AUDIO INTERFACE / INTERFACE AUDIO / INTERFAZ DE AUDIO
Owner’s Manual
Mode d'emploi
Manual de instrucciones

Rio3224-D3 Rio1608-D3 Owner’s Manual
2
FCC INFORMATION (U.S.A.)
1. IMPORTANT NOTICE: DO NOT MODIFY THIS UNIT!
This product, when installed as indicated in the instructions contained in this manual, meets FCC requirements. Modifications not
expressly approved by Yamaha may void your authority, granted by the FCC, to use the product.
2. IMPORTANT: When connecting this product to accessories and/or another product use only high quality shielded cables. Cable/s
supplied with this product MUST be used. Follow all installation instructions. Failure to follow instructions could void your FCC
authorization to use this product in the USA.
3. NOTE: This product has been tested and found to comply with the requirements listed in FCC Regulations, Part 15 for Class “B”
digital devices. Compliance with these requirements provides a reasonable level of assurance that your use of this product in a
residential environment will not result in harmful interference with other electronic devices. This equipment generates/uses radio
frequencies and, if not installed and used according to the instructions found in the users manual, may cause interference harmful to
the operation of other electronic devices. Compliance with FCC regulations does not guarantee that interference will not occur in all
installations. If this product is found to be the source of interference, which can be determined by turning the unit “OFF” and “ON”,
please try to eliminate the problem by using one of the following measures:
- Relocate either this product or the device that is being affected by the interference.
- Utilize power outlets that are on different branch (circuit breaker or fuse) circuits or install AC line filter/s.
- In the case of radio or TV interference, relocate/reorient the antenna. If the antenna lead-in is 300 ohm ribbon lead, change the
lead-in to co-axial type cable.
If these corrective measures do not produce satisfactory results, please contact the local retailer authorized to distribute this type of
product. If you cannot locate the appropriate retailer, please contact Yamaha Corporation of America, 6600 Orangethorpe Avenue,
Buena Park, CA 90620, U.S.A.
The above statements apply ONLY to those products distributed by Yamaha Corporation of America or its subsidiaries.
COMPLIANCE INFORMATION STATEMENT
(Supplierʼs declaration of conformity procedure)
Responsible Party: Yamaha Corporation of America
Address: 6600 Orangethorpe Avenue, Buena Park, CA. 90620, U.S.A.
Telephone: 714-522-9011
Type of Equipment: AUDIO INTERFACE
Model Name: Rio3224-D3, Rio1608-D3
This device complies with Part 15 of the FCC Rules.
Operation is subject to the following two conditions:
1) this device may not cause harmful interference, and
2) this device must accept any interference received, including interference that
may cause undesired operation.
(529-M02 FCC sdoc YCA 02)
(529-M04 FCC class B YCA 02)
Rio3224-D3 Rio1608-D3 Owner’s Manual
3
Contents
PRECAUTIONS................................... 4
Introduction 6
Intended User ....................................................6
Intended Usage..................................................6
Available Documentation...................................6
Firmware Updates..............................................6
Precautions for Rack Mounting ..........................7
Recessed Installation ..........................................7
Source Code Distribution ...................................7
Controls and Functions 8
Front Panel ........................................................8
Rear Panel........................................................10
Display Operations 12
Basic Operations ..............................................12
Main Screens ...................................................12
Mute on Startup 13
START UP Mode...............................................13
Initializing the Unit 13
Specifications 38
General Specifications......................................38
Dimensions......................................................39
Accessories (Make sure that all items
are included.)
• Power cord × 2
(Multiple AC power cords which have different kinds
of plug shapes may be included depending on the
region.)
• Open-Source Software License (English only)
(Separate literature: Refer to this literature for more
information on the open-source software license.)
• Owner’s Manual (This book)
Rio3224-D3 Rio1608-D3 Owner’s Manual
4
PRECAUTIONS
PLEASE READ CAREFULLY
BEFORE PROCEEDING
Please keep this manual in a safe place for
future reference.
WARNING
Always follow the basic precautions listed below to avoid
the possibility of serious injury or even death from
electrical shock, short-circuiting, damages, fire or other
hazards. These precautions include, but are not limited
to, the following:
If you notice any abnormality
• If any of the following problems occur, immediately turn off the
power switch and disconnect the electric plug from the outlet.
- The power cord or plug becomes frayed or damaged.
- Unusual smells or smoke are emitted.
- Some object, or water has been dropped into the product.
- There is a sudden loss of sound during use of the product.
- Cracks or other visible damage appear on the product.
Then have the product inspected or repaired by qualified
Yamaha service personnel.
Power supply
• Do not place the power cord near heat sources such as
heaters or radiators, and do not excessively bend or otherwise
damage the cord, place heavy objects on it, or place it in a
position where anyone could walk on, trip over, or roll anything
over it.
• Only use the voltage specified as correct for the product. The
required voltage is printed on the name plate of the product.
• Use the supplied power cord/plug only.
If you intend to use the product in an area other than in the
one you purchased, the included power cord may not be
compatible. Please check with your Yamaha dealer.
• Do not use the supplied cord/plug for other products.
• Check the electric plug periodically and remove any dirt or
dust which may have accumulated on it.
• Make sure to fully insert the electric plug to prevent electric
shocks or fire.
• This product receives power from multi sources. When setting
up the product, make sure that the AC outlet you
are using is easily accessible. If some trouble or
malfunction occurs, immediately turn off the power
switch and disconnect all plugs from the outlet.
Even when the power switch is turned off, as long
as the power cord is not unplugged from the wall
AC outlet, the product will not be disconnected
from the power source.
• Remove the electric plug from the outlet when the product is
not to be used for extended periods of time.
• Do not touch the product or the electric plug during an
electrical storm.
• Be sure to connect to an appropriate outlet with a protective
grounding connection. Improper grounding can result in
electrical shock, fire, or damage.
Do not open
• This product contains no user-serviceable parts. Do not
attempt to disassemble the internal parts or modify them in
any way.
Water warning
• Do not expose the product to rain, use it near water or in
damp or wet conditions, or place on it any containers (such as
vases, bottles or glasses) containing liquids which might spill
into any openings.
• Never insert or remove an electric plug with wet hands.
Fire warning
• Do not place any burning items or open flames near the
product, since they may cause a fire.
Hearing loss
• Before connecting the product to other devices, turn off the
power for all devices. Also, before turning the power of all
devices on or off, make sure that all volume levels are set to
the minimum. Failing to do so may result in hearing loss,
electric shock, or device damage.
• When turning on the AC power in your audio system, always
turn on the power amplifier LAST, to avoid hearing loss and
speaker damage. When turning the power off, the power
amplifier should be turned off FIRST for the same reason.
• Do not use headphones for a long period of time at a high or
uncomfortable volume level, since this can cause permanent
hearing loss. If you experience any hearing loss or ringing in
the ears, consult a physician.
CAUTION
Always follow the basic precautions listed below to avoid
the possibility of physical injury to you or others. These
precautions include, but are not limited to, the following:
Power supply
• When removing the electric plug from the product or an outlet,
always hold the plug itself and not the cord. Pulling by the
cord can damage it.
Location and connection
• Do not place the product in an unstable position or a location
with excessive vibration, where it might accidentally fall over
and cause injury.
• Keep this product out of reach of children. This product is not
suitable for use in locations where children are likely to be
present.
• Do not block the vents. This product has ventilation holes at
the front/rear to prevent the internal temperature from
becoming too high. In particular, do not place the product on
its side or upside down. Inadequate ventilation can result in
overheating, possibly causing damage to the product(s), or
even fire.
• To ensure proper heat dissipation of the product, when
installing it:
- Do not cover it with any cloth.
- Do not install it on a carpet or rug.
PA_en_14 1/2
Rio3224-D3 Rio1608-D3 Owner’s Manual
5
- Make sure the top surface faces up; do not install on its
sides or upside down.
- Do not use the product in a confined, poorly-ventilated
location.
Inadequate ventilation can result in overheating, possibly
causing damage to the product(s), or even fire.
• If the product is mounted in an EIA standard rack, carefully
read the section “Precautions for Rack Mounting” on page 7.
Inadequate ventilation can result in overheating, possibly
causing damage to the product(s), malfunction, or even fire.
If this product is to be used in a small space other than an
EIA-standard rack, make sure that there is adequate space
around the product: at least 1 cm above, 1 cm at the sides
and 5 cm behind.
• Do not place the product in a location where it may come into
contact with corrosive gases or salt air. Doing so may result in
malfunction.
• Before moving the product, remove all connected cables.
Maintenance
• Remove the power plug from the AC outlet when cleaning the
product.
Handling caution
• Do not insert your fingers or hands in any gaps or openings in
the vents of the product.
• Do not rest your weight on the product or place heavy objects
on it.
NOTICE
To avoid the possibility of malfunction/damage to the
product, damage to data, or damage to other property,
follow the notices below.
Handling and maintenance
• Do not connect this product to public Wi-Fi and/or Internet
directly. Only connect this product to the Internet through a
router with strong password-protections. Consult your router
manufacturer for information on security best practices.
• Do not use the product in the vicinity of a TV, radio, or other
electric products. Otherwise, the product, TV, or radio may
generate noise.
• Do not expose the product to excessive dust or vibration, or
extreme cold or heat, in order to prevent the possibility of
panel disfiguration, unstable operation, or damage to the
internal components.
• Do not install in locations where temperature changes are
severe. Otherwise, condensation may form on the inside or
the surface of the product, causing it to break.
• If there is reason to believe that condensation might have
occurred, leave the product for several hours without turning
on the power until the condensation has completely dried out,
in order to prevent possible damage.
• Do not place vinyl, plastic or rubber objects on the product,
since this might cause alteration or discoloration of the panel.
• Clean the product with a dry and soft cloth. Do not wipe
product surfaces with sodium hypochlorite, alcohol, benzene,
paint thinners, cleaning fluids, or a chemical-impregnated
wiping cloth, which could cause discoloration or change
surface characteristics.
Information
About copyrights
• Copying of the software or reproduction of this manual in
whole or in part by any means is expressly forbidden without
the written consent of the manufacturer.
Protection of copyright
• Do not use this product for any purpose that may infringe
upon the rights of any third party including copyrights, as
established by law in each country or region.
• Yamaha bears no responsibility for any infringement upon
third party rights that may occur as a result of using this
product.
About functions/data bundled with the product
• This product uses a Dante module provided by Audinate Pty.
Ltd. You can use Dante Controller to display information about
the Dante module used in this product.
Visit the Audinate website for more information on the open-
source software license applicable to each Dante module.
https://www.audinate.com/software-licensing
• XLR-type connectors are wired as follows (IEC60268 standard):
pin 1: ground, pin 2: hot (+), and pin 3: cold (−).
About this manual
• The illustrations and screens as shown in this manual are for
instructional purposes only.
• Yamaha Corporation makes no representations or warranties
with regard to the use of the software and documentation and
cannot be held responsible for the results of the use of this
manual and the software.
• The company names and product names in this manual are
the trademarks or registered trademarks of their respective
companies.
• Software may be revised and updated without prior notice.
About disposal
• This product contains recyclable components.
When disposing of this product, please contact the
appropriate local authorities.
Yamaha cannot be held responsible for damage caused by
improper use or modifications to the product, or data that is
lost or destroyed.
PA_en_14 2/2

Introduction
Rio3224-D3 Rio1608-D3 Owner’s Manual
6
Introduction
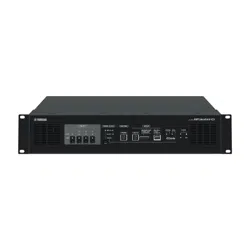
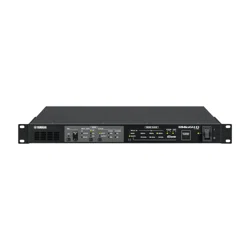
Thank you for purchasing the Yamaha Rio3224-D3 or
Rio1608-D3. This product is a Dante-compatible I/O rack
for use in an audio mixing system.
To take full advantage of the product’s functionality, please
read this manual before you begin using the product.
Afterwards, please keep this manual in a safe place.
NOTE
• Where specifications for the Rio3224-D3 differ from the
Rio1608-D3, this manual places specifications that
apply only to the Rio1608-D3 in curly brackets { }
(e.g., [INPUT] 1-32 {1-16}).
• Unless otherwise noted, illustrations for the Rio3224-D3
are used in this manual.
• If certain specifications are common to both the
Rio3224-D3 and Rio1608-D3, both units are collectively
called “Rio-D3.”
• In this manual, digital mixers, R Remote devices, and
other devices that can control the head amp of the
Rio-D3 are collectively called “supported devices.”
Intended User
This product is intended for people who can set up audio
mixing systems, such as mixing engineers and operators.
Intended Usage
This product is used in audio mixing systems for halls,
events, and broadcast production.
Available Documentation
Owner’s Manual (this book)
This book primarily explains panel controls and functions.
Reference Manual for Rio3224-D3 and
Rio1608-D3
This manual provides detailed explanations of the
functions and step-by-step procedures required to operate
the product. This manual can be downloaded from the
Yamaha Pro Audio website.
https://www.yamahaproaudio.com/
Status/Message list
This list explains the meaning of lit or blinking [SYSTEM]
and [SYNC] indicators, and the messages displayed on
screen.
https://manual.yamaha.com/pa/dante/status/
All of these manuals can be downloaded from the Yamaha
website. If necessary, you can view updated manual
information, which is always posted on the Yamaha
website.
https://download.yamaha.com/
Firmware Updates
You can update the unit firmware to improve the operation,
add functions, and correct possible malfunctions.
Information on updating the firmware can be found on the
following website:
https://www.yamahaproaudio.com/
For information on updating and setting up the unit, please
refer to the firmware update guide available on the website.
Introduction
Rio3224-D3 Rio1608-D3 Owner’s Manual
7
Precautions for Rack Mounting
Operation of this device is guaranteed within a
temperature range of 0 to 40°C. If you mount this unit
along with other Rio-D3 unit(s) or other device(s) in an
EIA standard rack, the heat from each device will raise the
temperature inside the rack, which may prevent the unit
from achieving full performance. When rack mounting the
unit, always observe the following requirements to avoid
heat buildup:
• If three or more Rio-D3 units are mounted without
space in the same rack, set the fan speeds to HIGH.
• If multiple units are mounted in the same rack with
their fan speeds set to LOW, leave 1U space between
every two units. In addition, ensure sufficient
ventilation by installing a ventilation panel in these
spaces, or simply leave the open spaces uncovered.
• When mounting the unit in a rack with devices such as
power amplifiers that tend to generate a significant
amount of heat, leave 1U or more space between this
unit and other equipment. In addition, ensure
sufficient ventilation by installing a ventilation panel
in these spaces, or simply leave the open spaces
uncovered.
• To ensure sufficient airflow, leave the rear of the rack
open and position it at least 10 cm from walls, ceilings
or other surfaces. If the rear of the rack cannot be left
open, install a commercially-available fan kit or similar
forced ventilation system to secure sufficient airflow. If
you have installed a fan kit, there may be cases in
which closing the rear of the rack will produce a
greater cooling effect. For more information, refer to
the instruction manuals for the rack and fan kit.
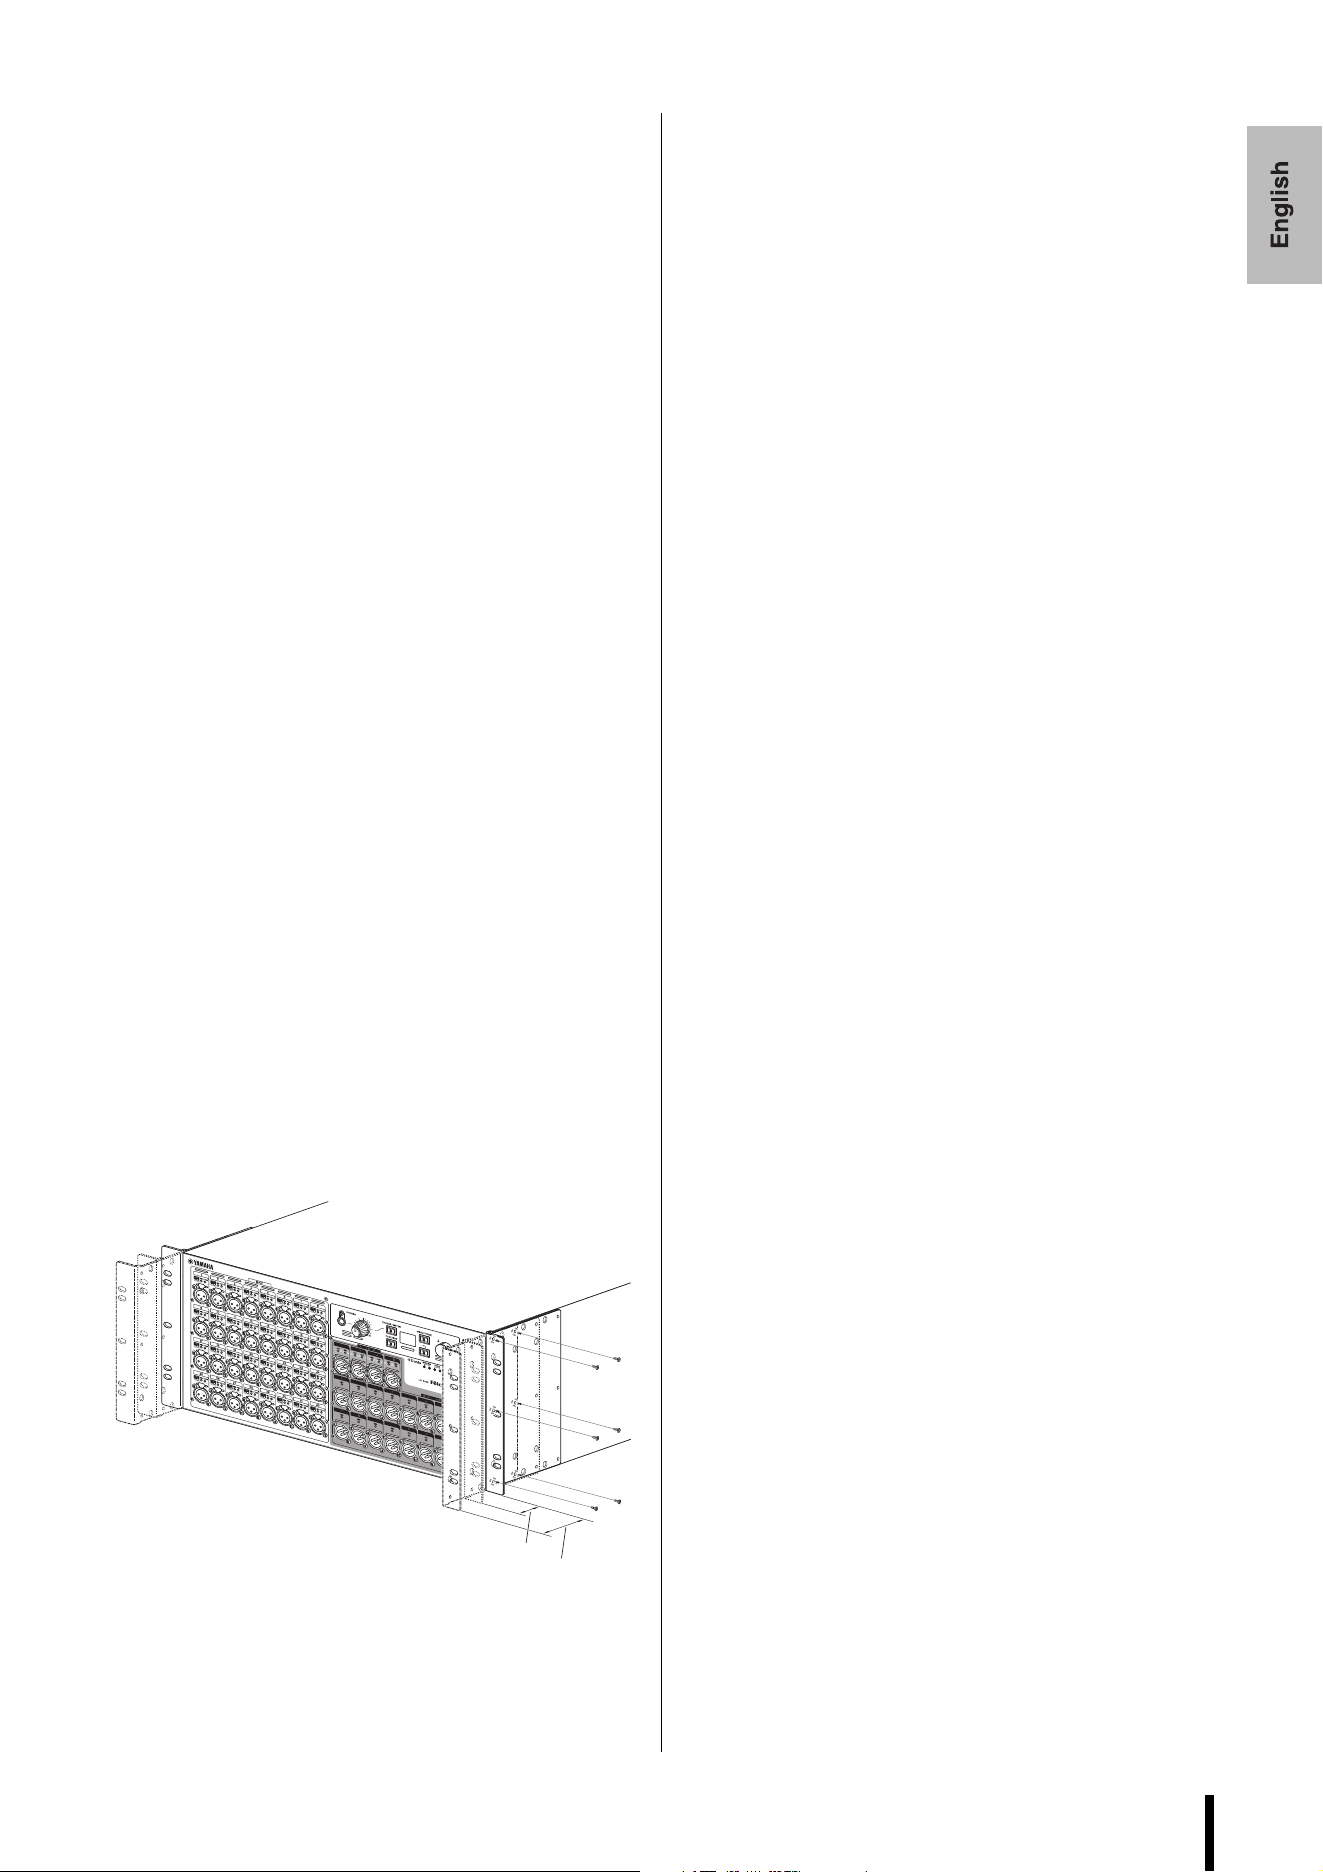
Recessed Installation
If you want to recess the front panel surface of the device
from the front edge of the rack, you can adjust the position
of the rack mount brackets to recess the device by 50 mm
or 100 mm, as shown in the illustration below.
In the same way, rack mount hardware can also be attached
to the rear panel surface.
NOTE
When you install the brackets, use the same screws that
you just removed.
Source Code Distribution
For three years after the final factory shipment, you may
request from Yamaha the source code for any portions of
the product which are licensed under the GNU General
Public License / GNU Lesser General Public License /
RealNetworks Public Source License by writing to the
following address:
10-1 Nakazawa-cho, Chuo-ku, Hamamatsu,
430-8650, JAPAN
Global Marketing & Sales Department,
Professional Solutions Division,
Musical Instruments & Audio Products Business
Unit, Yamaha Corporation
The source code will be provided at no charge; however, we
may require you to reimburse Yamaha for the cost of
delivering the source code to you. The source code can be
downloaded by visiting the following URL:
https://www.yamahaproaudio.com/
• Note that we shall bear no responsibility whatsoever for
any damage arising from changes (additions/deletions)
made to the software for this product by a third party
other than Yamaha (or party authorized by Yamaha).
• Note that re-use of source code released to the public
domain by Yamaha is not guaranteed. Yamaha shall not
bear any responsibility whatsoever for the source code.
50 mm
100 mm
Controls and Functions
Rio3224-D3 Rio1608-D3 Owner’s Manual
8
Controls and Functions
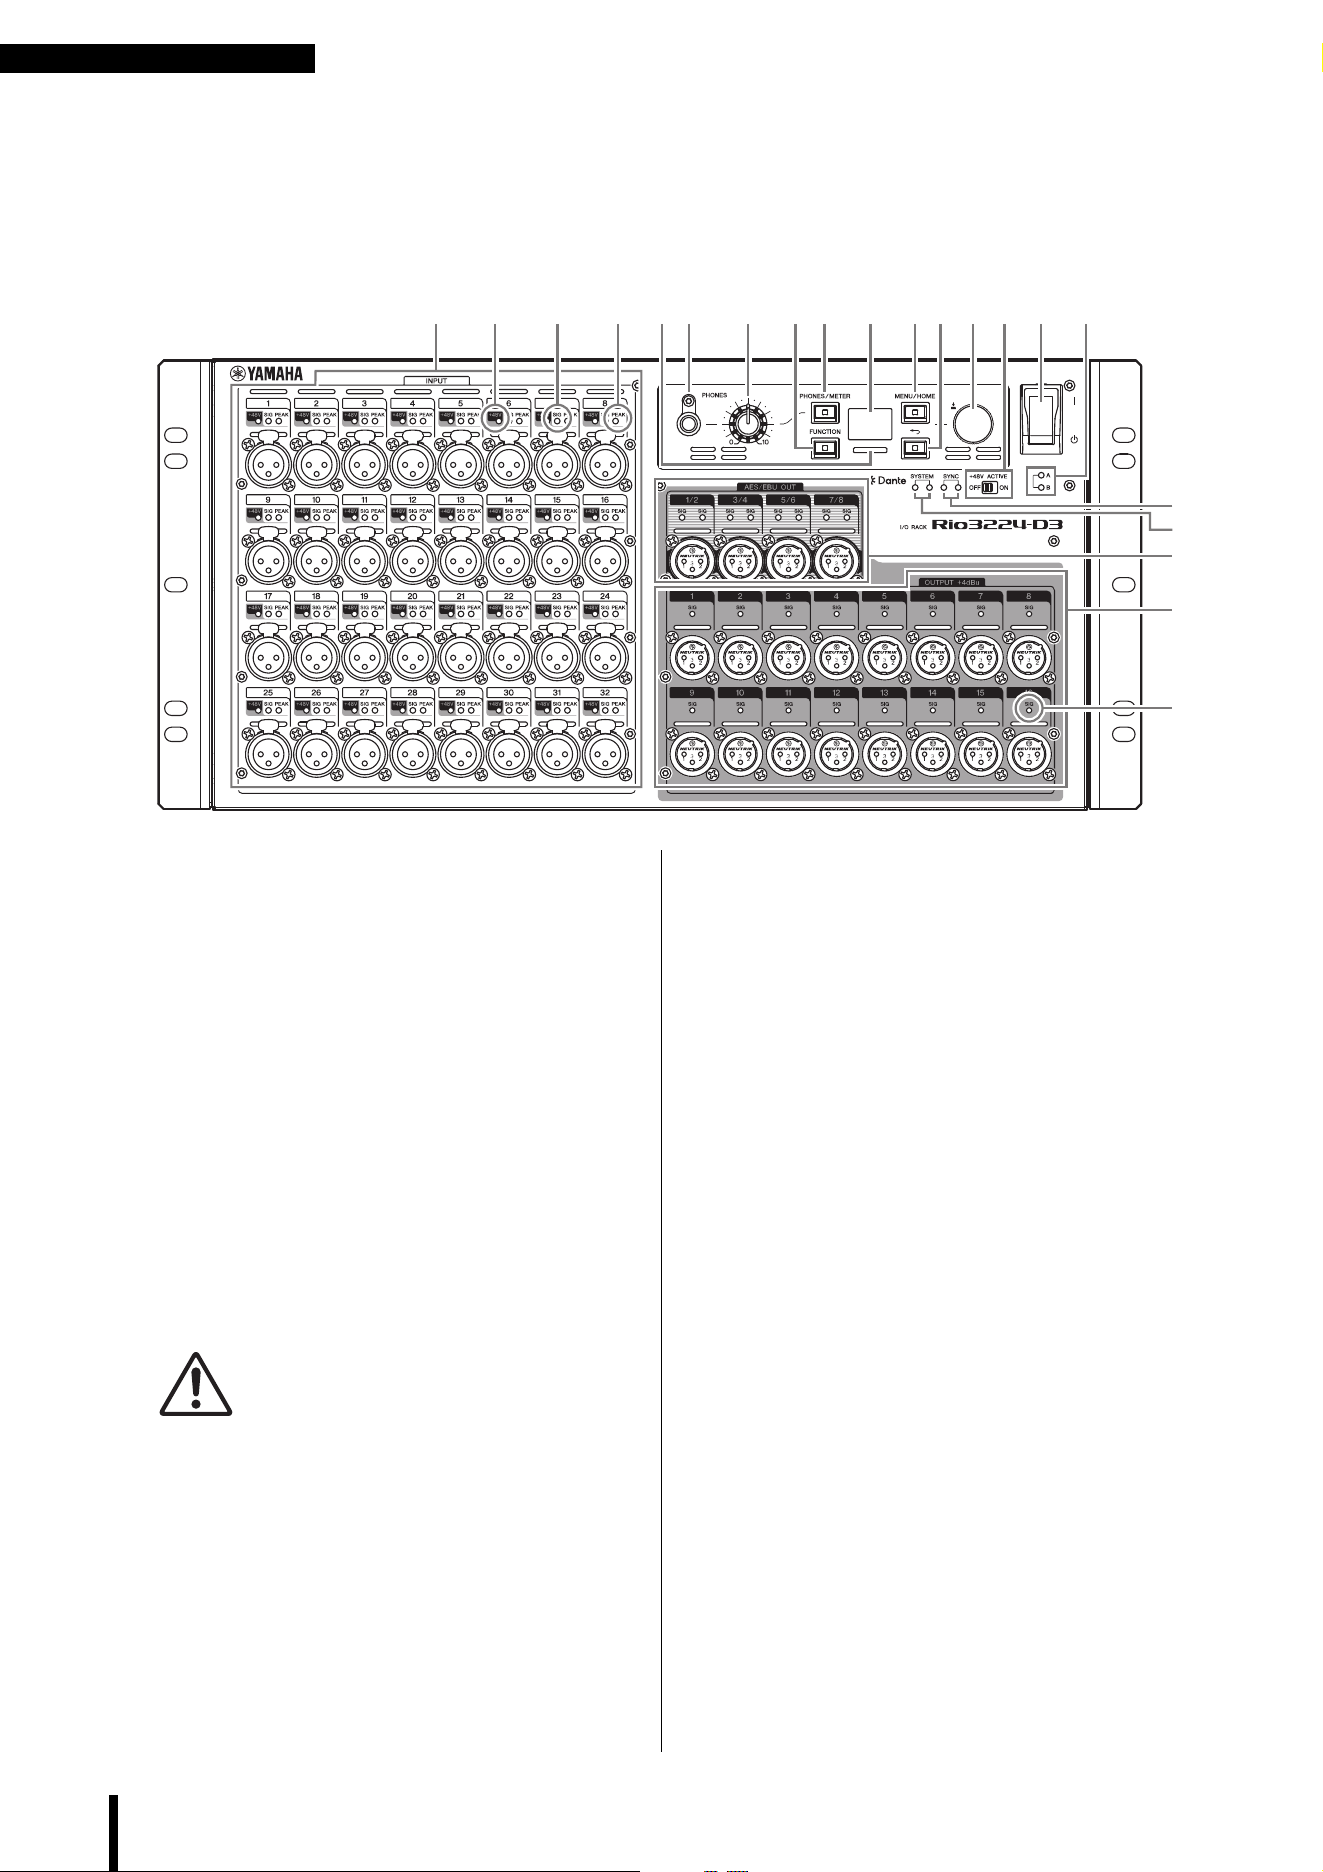
Front Panel
1 [INPUT] 1–32 {1–16}
These are balanced XLR 3-hole chassis input
connectors that enable you to input analog signals to
each channel. The rated input level range is from
–62 dBu to +10 dBu. Phantom power of +48 V can be
supplied to devices that require it via the input
connectors.
2 [+48V]
These indicators light when +48 V phantom power is
turned ON for the corresponding input channels.
On/off switching is controlled from this unit's front
panel display, or from a supported device. No
phantom power will be supplied, however, if the
[+48V ACTIVE] switch is OFF, even if phantom
power to individual channels is turned ON (the
[+48V] indicators will flash). If a serious error occurs
on the unit, these indicators will light or flash on all
channels.
WARNING
To prevent possible damage to speakers, make sure that
power amplifiers and/or powered speakers are turned OFF
when switching phantom power ON or OFF. In addition,
make sure that all output controls on the digital mixing
console are set to minimum when turning phantom power
ON or OFF. Sudden high level peaks caused by the
switching operation can damage equipment as well as the
hearing of those present.
NOTICE
• If phantom power is not required, you must turn OFF the
[+48V ACTIVE] switch or the phantom power setting.
• When turning phantom power ON, make sure that no
equipment other than phantom-powered devices such
as condenser microphones are connected to the
corresponding [INPUT] connectors. Applying phantom
power to a device that does not require phantom power
can damage the connected device.
• Do not connect or disconnect a device to an [INPUT]
connector while phantom power is applied. Doing so can
damage the connected device and/or the unit itself.
3 [SIG] (Signal)
These indicators light green when the input or output
signal applied to the corresponding channel reaches
or exceeds –40 dBFS.
If a serious error occurs on the unit, these indicators
will light or flash on all channels.
4 [PEAK]
These indicators light red when the signal level of the
corresponding input channel reaches or exceeds
‒3 dBFS.
If a serious error occurs on the unit, these indicators
will light or flash on all channels.
5 [PHONES] socket
This is a headphone socket that outputs assigned
audio signals (INPUT/OUTPUT). You can view the
signal assignments and parameter values on the
PHONES screen.
6 [PHONES] level knob
This knob adjusts the level of the signal output from
the [PHONES] socket.
1 5 6 7 A
9
G
I
D
E
J
2 3 4
C F80 B H
3
Controls and Functions
Rio3224-D3 Rio1608-D3 Owner’s Manual
9
7 [PHONES/METER]
Press this key repeatedly to display the PHONES
screen or one of the METER screens. The screen
changes each time you press the key.
Press and hold to clear PEAK HOLD.
8 [FUNCTION]
Press this key to recall the registered function screen.
9 Display
This shows information such as the parameter values
of each channel's head amp, or error and status
indications.
0 Color bar indicator
Indicates the status of the unit. You can change the
color and lighting/off settings that indicate a normal
status. You can also change the lighting/flashing/off
settings that indicate an error or warning.
For more information, refer to the Reference Manual.
A [MENU/HOME]
While the home screen is displayed, press this key to
display the MENU TOP screen that enables you to
select a menu. While a screen other than the home
screen is displayed, press this key to display the home
screen.
B [ ] (Back)
Press this key to display the previous screen.
Press and hold to display a popup screen that enables
you to set the display contrast and brightness. It also
enables you to set the color bar indicator brightness.
C Encoder with switch
By turning the encoder, you can select a menu or
parameter, or edit a parameter value shown on the
display. By pressing the encoder, you can confirm a
selection or switch the display.
D [SYSTEM]
These indicators show the operating status of the unit.
If the green indicator lights steadily and the red
indicator turns off, the unit is operating normally.
If the power to the unit is turned on but the green
indicator remains off, or if the red indicator lights or
flashes, the unit is not functioning properly.
For more information, refer to the Reference Manual
or Status/Message list*.
E [SYNC]
These indicators show the operating status of the
Dante module built into the unit.
A solid green indicator indicates that the device is a
clock follower and that the clocks are synchronized.
A flashing green indicator indicates that the device is
the clock leader.
If the power to the unit is turned on but the green
indicator remains off, the unit is not functioning
properly.
For more information on the orange indicator and
other details, refer to the Reference Manual or
Status/Message list*.
F [+48V ACTIVE]
Turns +48 V phantom power on or off. If the
[+48V ACTIVE] switch is off, no phantom power will
be supplied to the unit’s input connectors even if the
individual input phantom power settings are ON. In
this case, the [+48V] indicators will flash on channels
for which phantom power is turned ON. The switch is
set to off when the unit is shipped from the factory.
G Power switch [
l
]/[ ]
Toggles between power on (
I
) and off ( ).
NOTICE
Turning the unit on and off in rapid succession can cause
it to malfunction. After turning the unit off, wait at least six
seconds before turning it on again.
H Power indicator [A]/[B]
Lights when the power to the unit is ON.
I [AES/EBU OUT] 1/2–7/8
(Rio3224-D3 only)
These balanced XLR 3-pin chassis output connectors
deliver AES/EBU format digital audio signals from
the unit’s corresponding output channels. Each
connector outputs 2-channel digital audio.
J [OUTPUT +4dBu] 1–16 {1–8}
These are balanced XLR 3-pin chassis output
connectors that enable you to output analog signals
from each channel. The rated output level is +4 dBu.
* Status/Message list
This list explains the meaning of lit or blinking
[SYSTEM] and [SYNC] indicators, and the messages
displayed on screen.
https://manual.yamaha.com/pa/dante/status/
Controls and Functions
Rio3224-D3 Rio1608-D3 Owner’s Manual
10
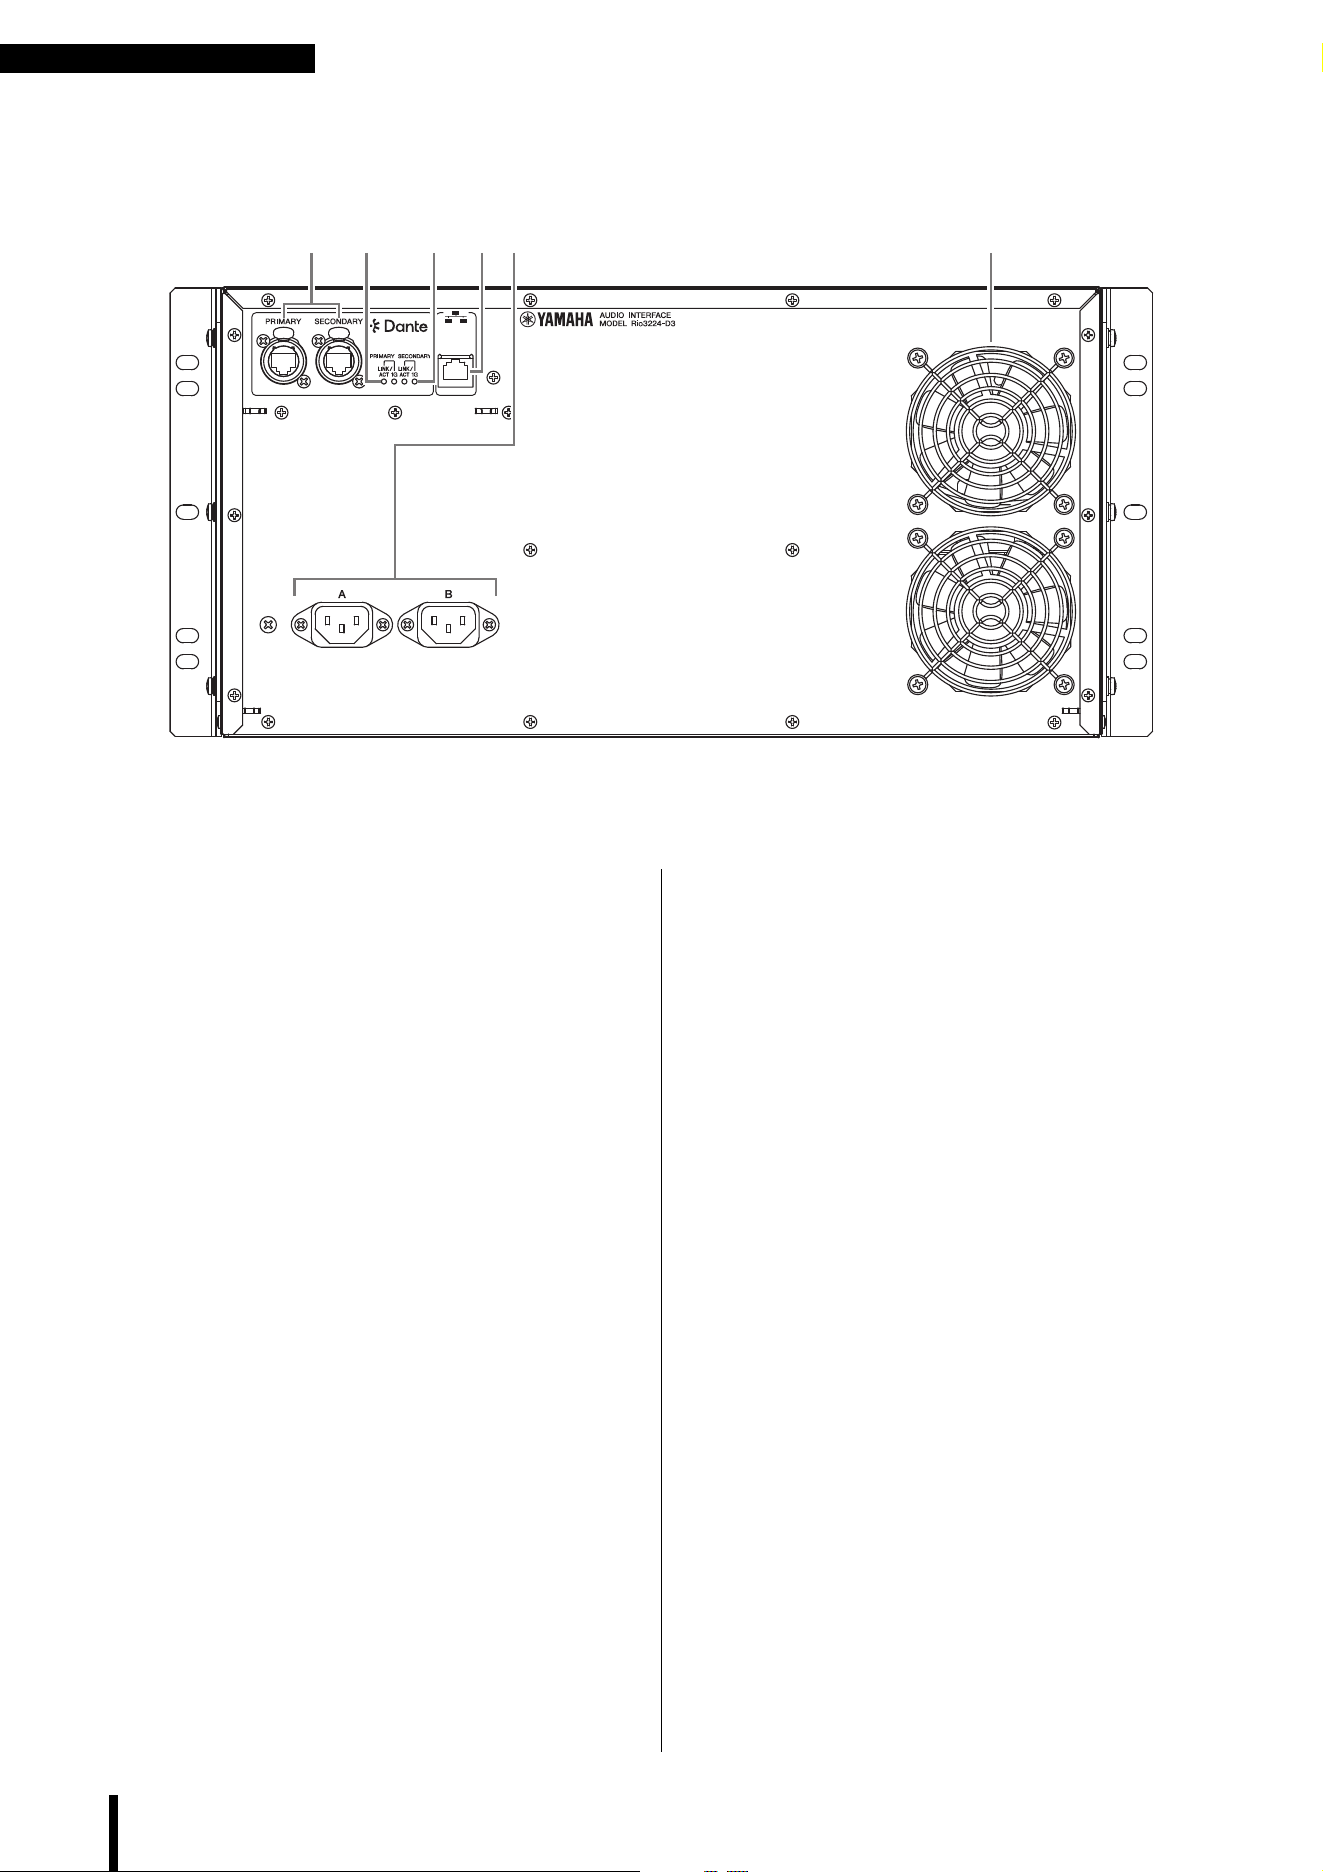
Rear Panel
K Dante [PRIMARY]/[SECONDARY]
These etherCON (RJ-45) connectors can be
connected to other Dante devices such as a RIVAGE
PM, DM7, DM3, CL, or QL series unit using Ethernet
cables (CAT5e or better recommended).
If SECONDARY port* is set to DAISY CHAIN, the
signal that is input from one connector is transmitted
to the other connector.
If SECONDARY port* is set to REDUNDANT, the
[PRIMARY] connector is used for the primary
connection and the [SECONDARY] connector is
used for the secondary (backup) connection. If the
unit is unable to transmit signals through the
[PRIMARY] connector for some reason (e.g., due to
damage or accidental removal of the cable, or a failed
network switch), the [SECONDARY] connector will
automatically take over the connection.
(* To display the SECONDARY port setting screen,
first, display the MENU TOP screen, select SETUP,
and then confirm your selection. Next, select
SEC.PORT (SECONDARY PORT) from the SETUP
menu, and then confirm your selection.)
For more information, refer to the Reference Manual.
NOTICE
Use an STP (Shielded Twisted Pair) cable to prevent
electromagnetic interference. Make sure that the metal
parts of the plugs are electrically connected to the STP
cable shield by conductive tape or comparable means.
NOTE
• We recommend using RJ-45 plugs that are compatible
with Neutrik etherCON CAT5e connectors. Standard
RJ-45 plugs can also be used.
• Connect only Dante-compatible devices or Giga-bit
Ethernet (GbE)-compatible devices (including a
computer).
• Do not use the EEE function of network switches in a
Dante network. The EEE function may cause poor
synchronization performance, resulting in occasional
dropouts. For more information, refer to the Reference
Manual.
L [LINK/ACT]
These indicators show the communication status of
the [PRIMARY] and [SECONDARY] connectors
respectively. They flash fast if the Ethernet cables are
connected properly.
M [1G]
These indicators light when the Dante network is
functioning as Giga-bit Ethernet.
N Network connector
This RJ-45 connector allows the unit to be connected
to a computer via an Ethernet cable (CAT5 or higher
recommended).
NOTICE
Use an STP (Shielded Twisted Pair) cable to prevent
electromagnetic interference.
LK PM N O

Controls and Functions
Rio3224-D3 Rio1608-D3 Owner’s Manual
11
O AC IN connectors [A]/[B]
Use these sockets to connect the supplied power
cords. First connect each AC power cord to this unit,
and then insert the power cord plug into an AC outlet.
CAUTION
Be sure to turn off the power to the unit before connecting
or disconnecting each power cord.
Insert each cord plug all the way until it locks in place
securely. The supplied AC power cords feature a
V-lock mechanism via a latch, which prevents the
power cords from disconnecting accidentally.
To disconnect each power
cord, remove it while
pressing the latch on the
plug.
P Cooling vent
This product is equipped with a cooling fan. This vent
lets warm air escape from the unit. Do not block the
vent with any object.
CAUTION
Do not block the ventilation ports on this product. This
product has ventilation ports at the front and rear to prevent
the internal temperature from becoming too high. If the
ventilation ports are blocked, heat will get trapped inside
the product, which may cause malfunction or fire.
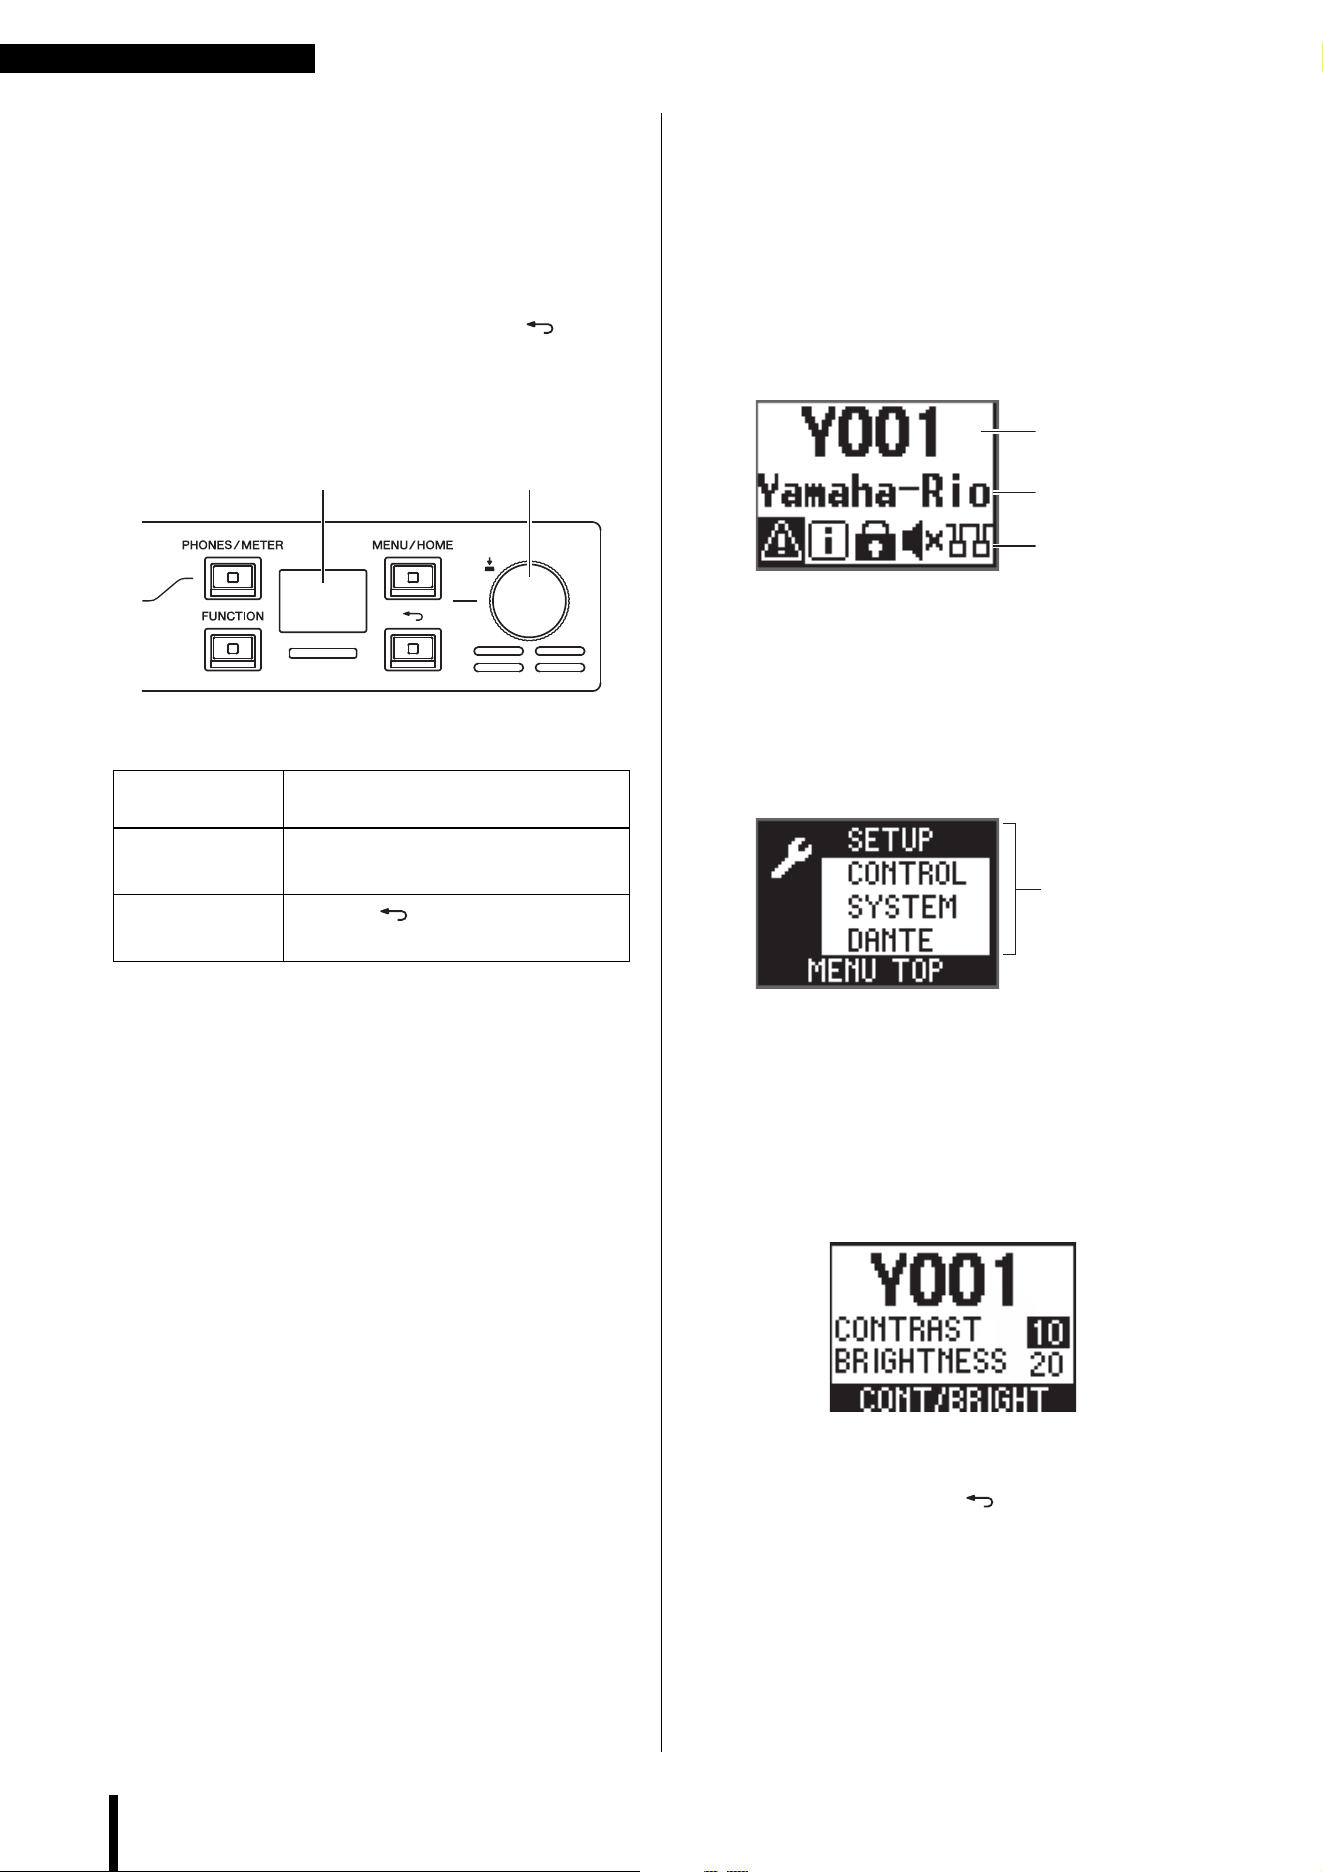
Display Operations
Rio3224-D3 Rio1608-D3 Owner’s Manual
12
Display Operations
Basic Operations
You can use the front panel display, [PHONES/METER]
key, [FUNCTION] key, [MENU/HOME] key, [ ] (Back)
key, and the encoder with switch to set the various
parameters.
Main Screens
The screens shown here are examples.
NOTE
For more information on these and other screens, refer to the
Reference Manual. The Reference Manual can be downloaded
from the Yamaha Pro Audio website.
https://www.yamahaproaudio.com/
Home screen
This is the screen that appears when you turn on the power
switch. The upper row displays the UNIT ID. The initial
value is Y001. The middle row displays part of the device
label. The bottom row displays the status bar, which uses
icons to indicate the status of the unit.
MENU TOP screen
This screen enables you to select a menu. To display it,
press the [MENU/HOME] key while the home screen is
displayed. When you select a menu and confirm the
selection, the corresponding menu screen appears.
Contrast / Brightness Adjustment
popup screen
This screen enables you to set the display contrast and
brightness. It also enables you to set the color bar indicator
brightness. Press and hold the [ ] (Back) key to display it.
Selecting an item
Turn the encoder with switch.
(The selected parameter is highlighted.)
Confirming the
setting
Press the encoder with switch.
Displaying the
previous screen
Press the [ ] (Back) key.
Display
Encoder with
switch
UNIT ID
Device label
Status bar
Menu

Mute on Startup
Rio3224-D3 Rio1608-D3 Owner’s Manual
13
Mute on Startup
When you first start up and use this product after
purchasing it, the inputs and outputs will be muted until
the unit receives HA parameter settings. This is because
START UP mode is set to REFRESH with MUTE by
default.
START UP Mode
Select the HA parameter settings at start-up from
REFRESH with MUTE, RESUME w/o MUTE, or
REFRESH w/o MUTE.
To display the START UP mode setting screen, first, display
the MENU TOP screen, select SETUP, and then confirm
your selection. Next, select START UP in the SETUP menu,
and then confirm your selection.
This setting is applied the next time the unit starts up.
REFRESH with MUTE (Initial Setting)
Initializes a portion of the internal memory when starting
up. The inputs and outputs will be muted until the unit
receives HA parameter settings from the supported device.
NOTE
To control the HA parameters from the supported device,
select this option to prevent inadvertently outputting
unmuted audio until the settings are received.
RESUME w/o MUTE
Starts up in the state prior to the most recent power-off.
The inputs and outputs will not be muted.
REFRESH w/o MUTE
Initializes a portion of the internal memory when starting
up. The initial values are the same as for REFRESH with
MUTE. However, the inputs and outputs will not be muted.
Initializing the
Unit
If an error occurs in the unit’s internal memory and you
become unable to operate the unit, follow the steps below
to initialize the unit (to restore the factory settings).
1. Turns off the power to the unit.
2. Turn the power ON while pressing and
holding down the [FUNCTION],
[MENU/HOME], and [ ] (Back) keys
simultaneously.
The system reverts to factory settings.
NOTE
Alternatively, you can operate the screens as follows to
reset the unit to factory settings.
(1) Display the MENU TOP screen, select SETUP, and
then confirm your selection.
(2) Select INITIALIZE from the SETUP menu, and then
confirm your selection.
(3) The INITIALIZE setup screen appears. Select
FACTORY PRESET, and then confirm the selection.
For more information, refer to the Reference Manual.
Specifications/Spécifications
Rio3224-D3 Rio1608-D3 Owner’s Manual
38
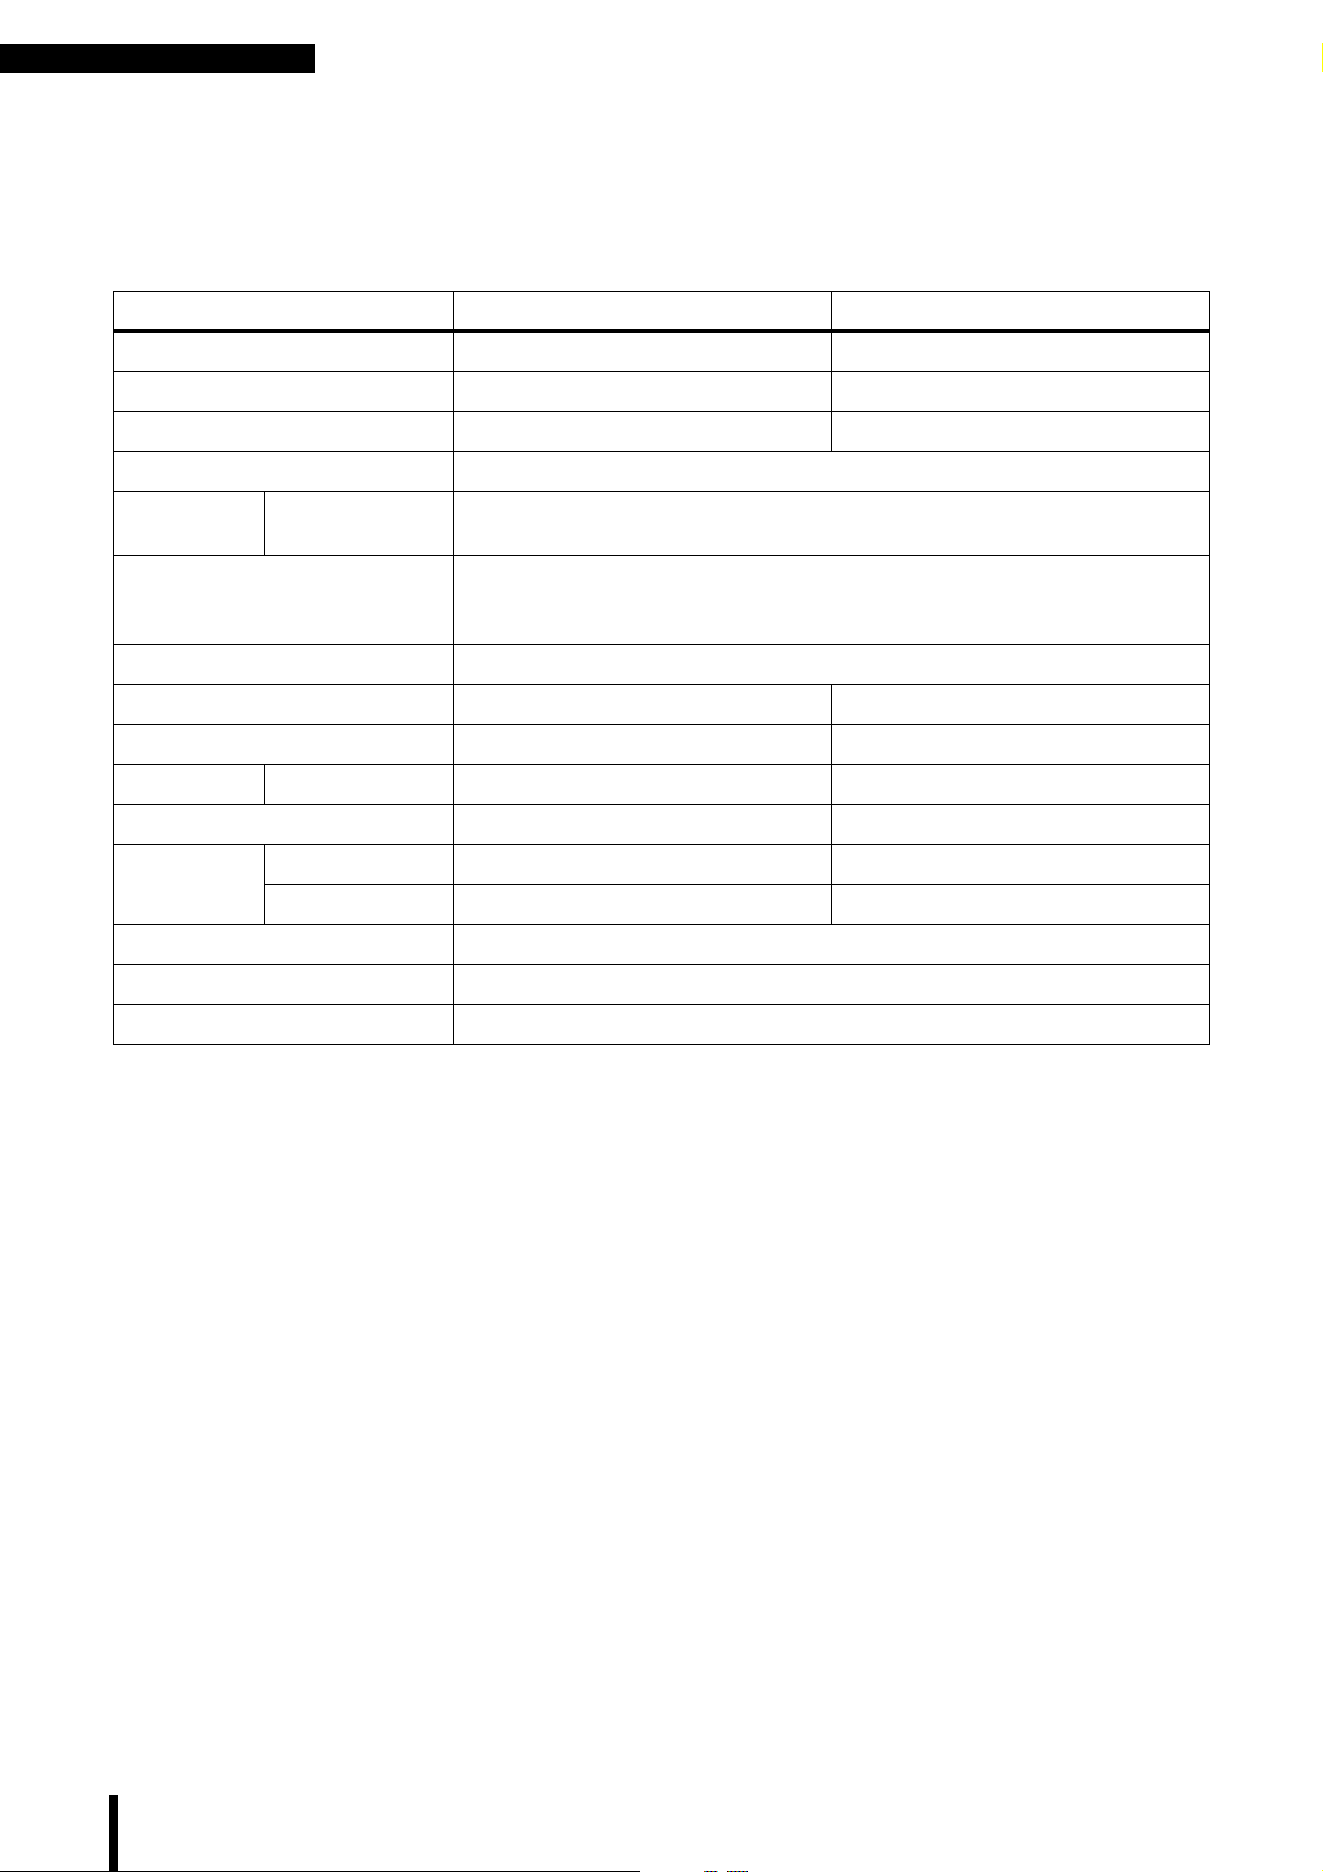
Specifications/Spécifications
General Specifications
- The contents of this manual apply to the latest specifications as of the publishing date. To obtain the latest manual, access
the Yamaha website then download the manual file.
- Le contenu de ce mode d’emploi s’applique aux dernières caractéristiques techniques connues à la date de publication du
manuel. Pour obtenir la version la plus récente du manuel, accédez au site Web de Yamaha puis téléchargez le fichier du
manuel concerné.
- El contenido de este manual se aplica a las últimas especificaciones según la fecha de publicación. Para obtener el último
manual, acceda al sitio web de Yamaha y descargue el archivo del manual.
Rio3224-D3 Rio1608-D3
Number of Analog Inputs 32 16
Number of Analog Outputs 16 8
AES/EBU 8-out 0
PHONES 1
Sampling
Frequency
External
44.1 kHz / 48 kHz / 88.2 kHz / 96 kHz ±200 ppm
+4.1667%, +0.1%, −0.1%, −4.0% ±200 ppm
Signal Delay
Less than 1.7 ms
Rio-D3 INPUT to Rio-D3 OUTPUT connect with DM7 using Dante, Fs=96 kHz.
Dante Receive Latency set to 0.25 msec
Power Requirements 100-240 V, 50/60 Hz
Power Consumption 100 W 60 W
Heat Dissipation 86 kcal/h 52 kcal/h
Dimensions W × H × D 480 × 220 × 370 mm 480 × 132 × 370 mm
Weight 13.2 kg 9.4 kg
NC Value
*1
*1. Measurement position: 1 m from the front of the unit
Fan Speed LOW 20 15
Fan Speed HIGH 30 25
Operating Temperature Range Min: 0°C, Max: 40°C
Storage Temperature Range Min: −20°C, Max: 60°C
Accessories Owner’s Manual, Power cord × 2, Open-Source Software License (English only)
Specifications/Spécifications
Rio3224-D3 Rio1608-D3 Owner’s Manual
39
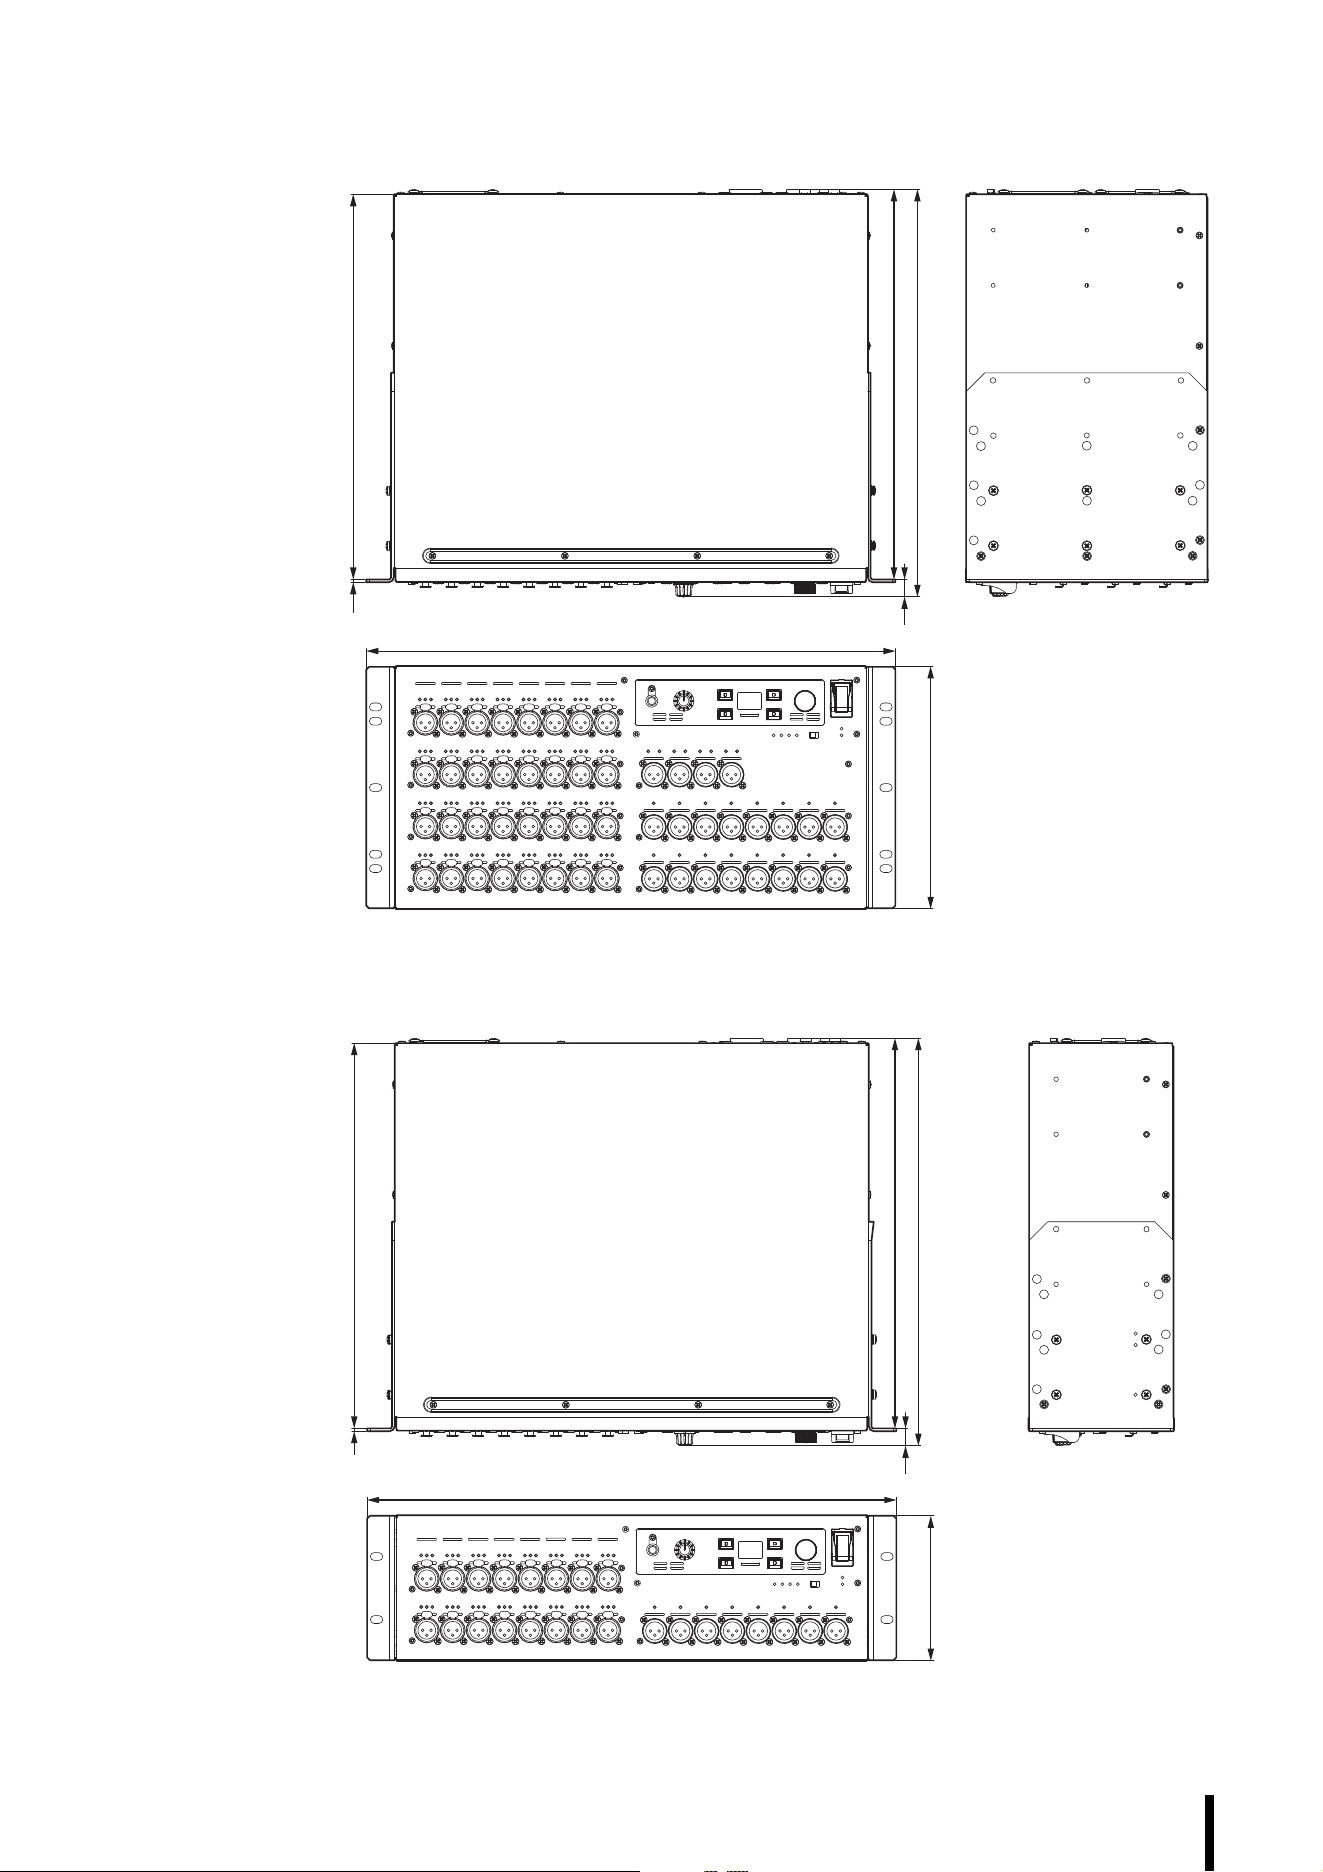
Dimensions
16
354
(370)
2.5 350
220
480
Unit: mm
Rio3224-D3
Approximate Munsell value of exterior color: N5
Rio1608-D3
132
480
16
354
(370)
2.5 350
Unit: mmApproximate Munsell value of exterior color: N5
Rio3224-D3 Rio1608-D3 Owner’s Manual
40
(58-M02 WEEE en 01)
(58-M02 WEEE fr 01)
(58-M02 WEEE es 01)
Information for users on collection and disposal of old equipment:
This symbol on the products, packaging, and/or accompanying documents means that used electrical and electronic
products should not be mixed with general household waste.
For proper treatment, recovery and recycling of old products, please take them to applicable collection points, in
accordance with your national legislation.
By disposing of these products correctly, you will help to save valuable resources and prevent any potential negative
effects on human health and the environment which could otherwise arise from inappropriate waste handling.
For more information about collection and recycling of old products, please contact your local municipality, your waste
disposal service or the point of sale where you purchased the items.
For business users in the European Union:
If you wish to discard electrical and electronic equipment, please contact your dealer or supplier for further information.
Information on Disposal in other Countries outside the European Union:
This symbol is only valid in the European Union. If you wish to discard these items, please contact your local authorities or
dealer and ask for the correct method of disposal.
Informations concernant la collecte et le traitement des déchets d'équipements électriques et électroniques
Le symbole sur les produits, l'emballage et/ou les documents joints signifie que les produits électriques ou électroniques
usagés ne doivent pas être mélangés avec les déchets domestiques habituels.
Pour un traitement, une récupération et un recyclage appropriés des déchets d'équipements électriques et électroniques,
veuillez les déposer aux points de collecte prévus à cet effet, conformément à la réglementation nationale.
En vous débarrassant correctement des déchets d'équipements électriques et électroniques, vous contribuerez à la
sauvegarde de précieuses ressources et à la prévention de potentiels effets négatifs sur la santé humaine qui pourraient
advenir lors d'un traitement inapproprié des déchets.
Pour plus d'informations à propos de la collecte et du recyclage des déchets d'équipements électriques et électroniques,
veuillez contacter votre municipalité, votre service de traitement des déchets ou le point de vente où vous avez acheté les
produits.
Pour les professionnels dans l'Union européenne :
Si vous souhaitez vous débarrasser des déchets d'équipements électriques et électroniques, veuillez contacter votre
vendeur ou fournisseur pour plus d'informations.
Informations sur la mise au rebut dans d'autres pays en dehors de l'Union européenne :
Ce symbole est seulement valable dans l'Union européenne. Si vous souhaitez vous débarrasser de déchets
d'équipements électriques et électroniques, veuillez contacter les autorités locales ou votre fournisseur et demander la
méthode de traitement appropriée.
Información para usuarios sobre la recogida y eliminación de los equipos antiguos
Este símbolo en los productos, embalajes y documentos anexos significa que los productos eléctricos y electrónicos no
deben mezclarse con los desperdicios domésticos normales.
Para el tratamiento, recuperación y reciclaje apropiados de los productos antiguos, llévelos a puntos de reciclaje
correspondientes, de acuerdo con la legislación nacional.
Al deshacerse de estos productos de forma correcta, ayudará a ahorrar recursos valiosos y a impedir los posibles efectos
desfavorables en la salud humana y en el entorno que de otro modo se producirían si se trataran los desperdicios de
modo inapropiado.
Para obtener más información acerca de la recogida y el reciclaje de los productos antiguos, póngase en contacto con las
autoridades locales, con el servicio de eliminación de basuras o con el punto de venta donde adquirió los artículos.
Para los usuarios empresariales de la Unión Europea:
Si desea desechar equipos eléctricos y electrónicos, póngase en contacto con su vendedor o proveedor para obtener
más información.
Información sobre la eliminación en otros países fuera de la Unión Europea:
Este símbolo solo es válido en la Unión Europea. Si desea desechar estos artículos, póngase en contacto con las
autoridades locales o con el vendedor y pregúnteles el método correcto.
Rio3224-D3 Rio1608-D3 Owner’s Manual
43
Yamaha Worldwide Representative Offices
For details on the product(s), contact your nearest Yamaha representative or the authorized distribu-
tor, found by accessing the 2D barcode below.
English
Wenden Sie sich für nähere Informationen zu Produkten an eine Yamaha-Vertretung oder einen
autorisierten Händler in Ihrer Nähe. Diese finden Sie mithilfe des unten abgebildeten 2D-Strichodes.
Deutsch
Pour obtenir des informations sur le ou les produits, contactez votre représentant ou revendeur agréé
Yamaha le plus proche. Vous le trouverez à l'aide du code-barres 2D ci-dessous.
Français
Para ver información detallada sobre el producto, contacte con su representante o distribuidor
autorizado Yamaha más cercano. Lo encontrará escaneando el siguiente código de barras 2D.
Español
Per dettagli sui prodotti, contattare il rappresentante Yamaha o il distributore autorizzato più vicino,
che è possibile trovare tramite il codice a barre 2D in basso.
Italiano
Para mais informações sobre o(s) produto(s), fale com seu representante da Yamaha mais próximo
ou com o distribuidor autorizado acessando o código de barras 2D abaixo.
Português
ɑɬɨɛɵɭɡɧɚɬɶɩɨɞɪɨɛɧɟɟɨɩɪɨɞɭɤɬɟɩɪɨɞɭɤɬɚɯɫɜɹɠɢɬɟɫɶɫɛɥɢɠɚɣɲɢɦɩɪɟɞɫɬɚɜɢɬɟɥɟɦɢɥɢ
ɚɜɬɨɪɢɡɨɜɚɧɧɵɦɞɢɫɬɪɢɛɶɸɬɨɪɨɦ<DPDKDɜɨɫɩɨɥɶɡɨɜɚɜɲɢɫɶɞɜɭɯɦɟɪɧɵɦɲɬɪɢɯɤɨɞɨɦɧɢɠɟ
Ɋɭɫɫɤɢɣ
㥵剣Ⱒ❡ㅷ涸霫絈⥌䜂霼翫禹騄䝠剒鵛涸:BNBIB➿邍䧴䱇勉絑Ꝉ㉁〳鸑鵂霄♴倰
涸%勵䕎瀦䪪ⵌ鵯❈➿邍䧴絑Ꝉ㉁涸⥌䜂կ
皍⡤⚥俒
㞞ꧏ榣⿁氳鎌碸鞴銻鑃绤礙艃䖼ꦗ鲥氳:BNBIBꊸす♏辑䡝䪧垷祺ꊸり䖼⺎♓䬟┖亡氳◅禵
半澰刨洇注绤礙鞴乣
竵냉╈乄
헪펞샎핞켆헣쫂쁢팒앦%짢슪펞펟켆큲펺많밚풂:BNBIB샂샇잲헞쏞쁢뫃킫샎읺헞펞
줆픦킻킪폲
묻펂
Head Oce/Manufacturer: Yamaha Corporation 10-1, Nakazawa-cho, Chuo-ku, Hamamatsu, 430-8650, Japan
Importer (European Union): Yamaha Music Europe GmbH Siemensstrasse 22-34, 25462 Rellingen, Germany
Importer (United Kingdom): Yamaha Music Europe GmbH (UK) Sherbourne Drive, Tilbrook, Milton Keynes, MK7 8BL, United Kingdom
AP01
https://manual.yamaha.com/audio/address_list/

© 2024 Yamaha Corporation
Published 10/2024
IPES-A0
Yamaha Downloads
https://download.yamaha.com/
Yamaha Pro Audio global website
https://www.yamahaproaudio.com/
V
H
G
1550