
What's in the Box
At a Glance
Before Mounting
1. Download the eufy App
2. Add HomeBase Mini (Optional)
3. Add the Camera
4. Expand the Storage (Optional)
5. Decorate the Camera with Stickers (Optional)
Mounting the Camera
Option 1: On the Table or Shelf
Option 2: On the Wall / Ceiling
Aer Mounting
1
.
Connect to Power
2. Adjust the Camera Field of View
3. Adjust the Antenna
Find Out More
Compatible Devices
Recommended microSD Card Brands
Core Camera Functions and Settings
Other Information
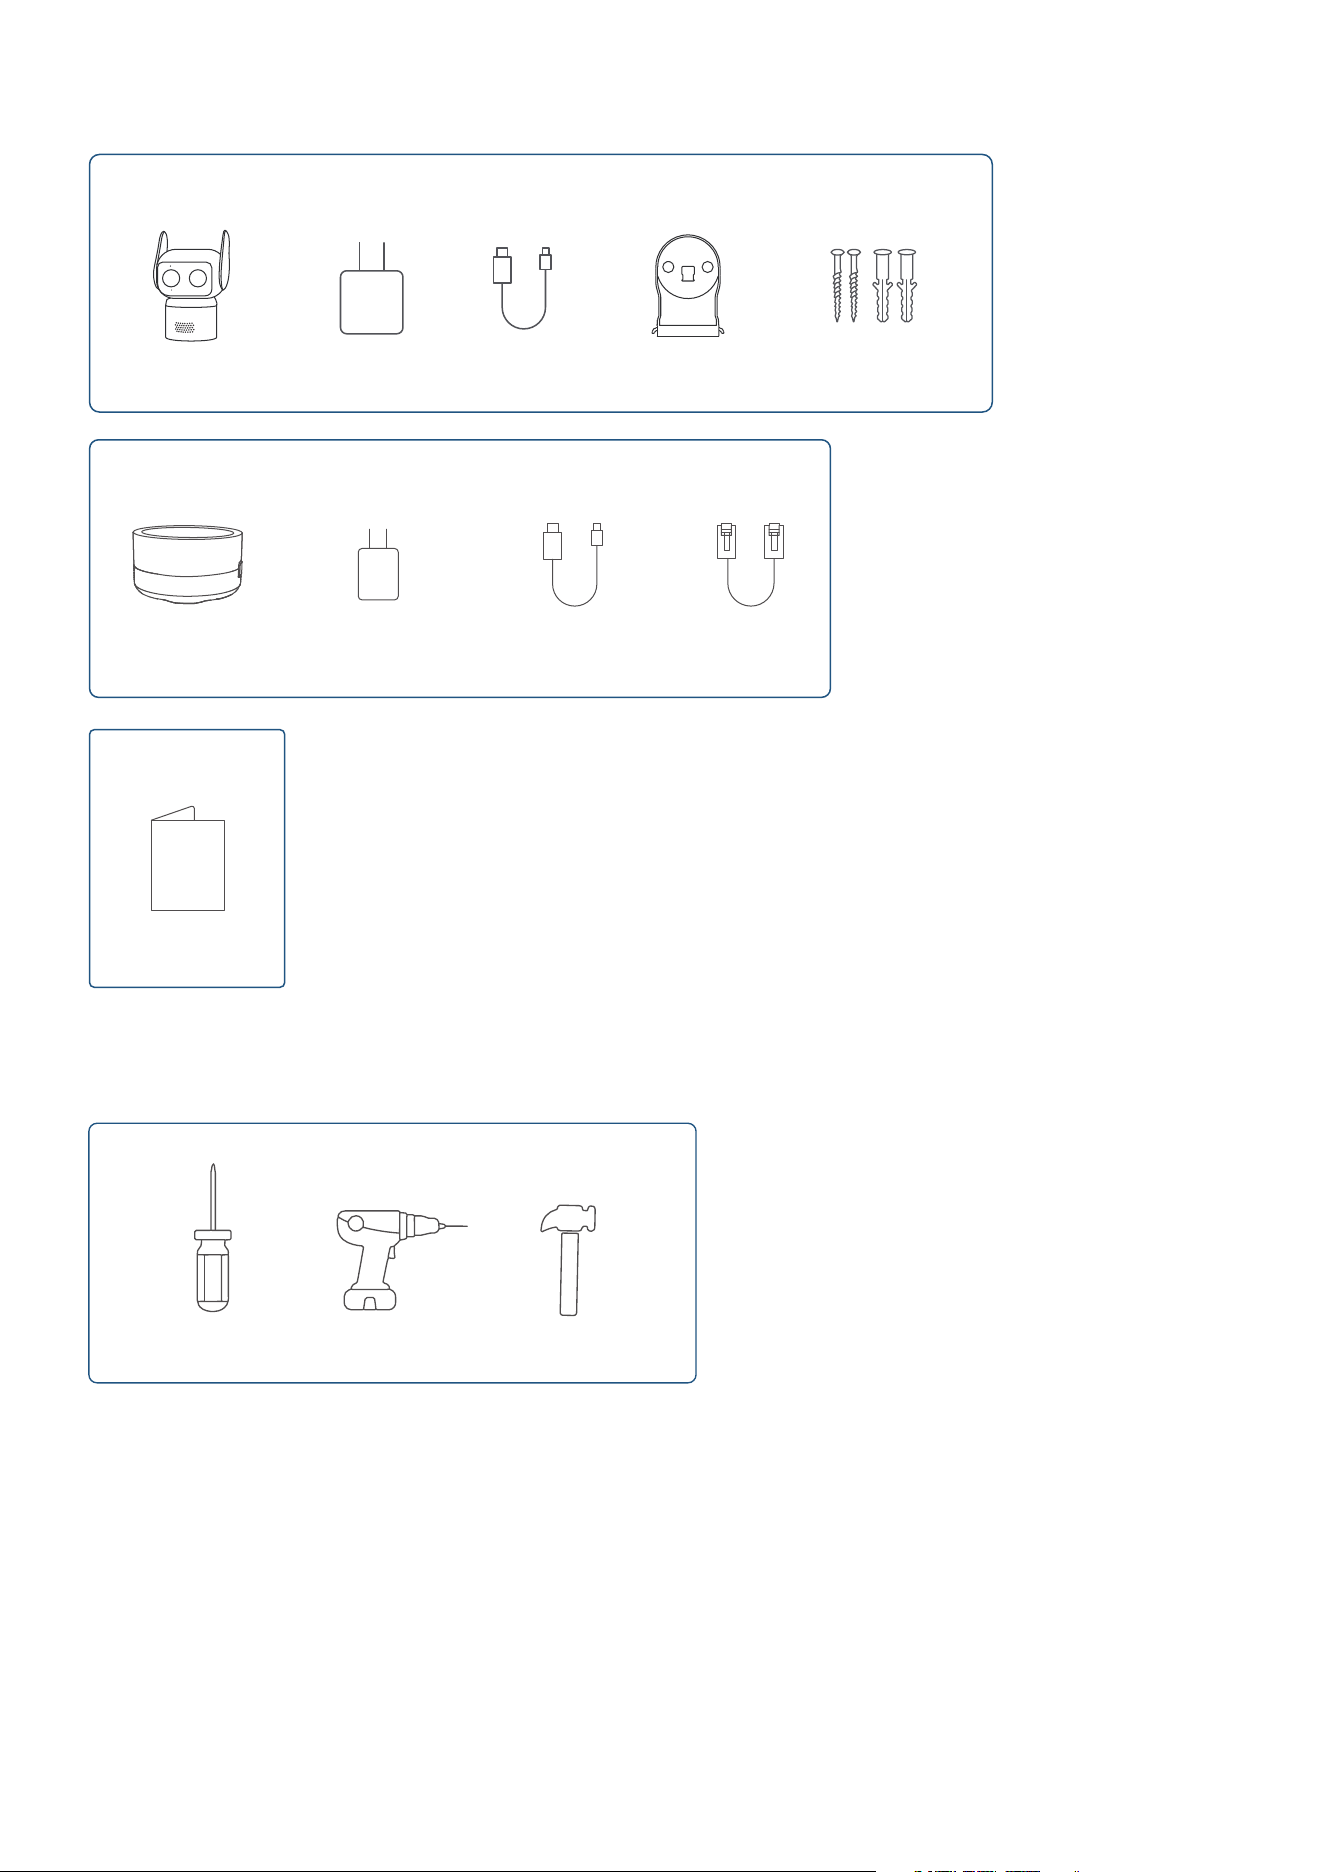
What's in the Box
For Camera Installation
Camera
HomeBase
Mini
Quick Start
Guide
5V/1A USB Adapter
5V/2A Power
Adapter
2m USB-C Cable
2m Power
Cable
Screw Pack
1.2m Ethernet
Cable
Mounting
Bracket
For HomeBase Setup
Other
Tools You will Need
Phillips
Screwdriver
Power Drill
(6 mm)
Hammer
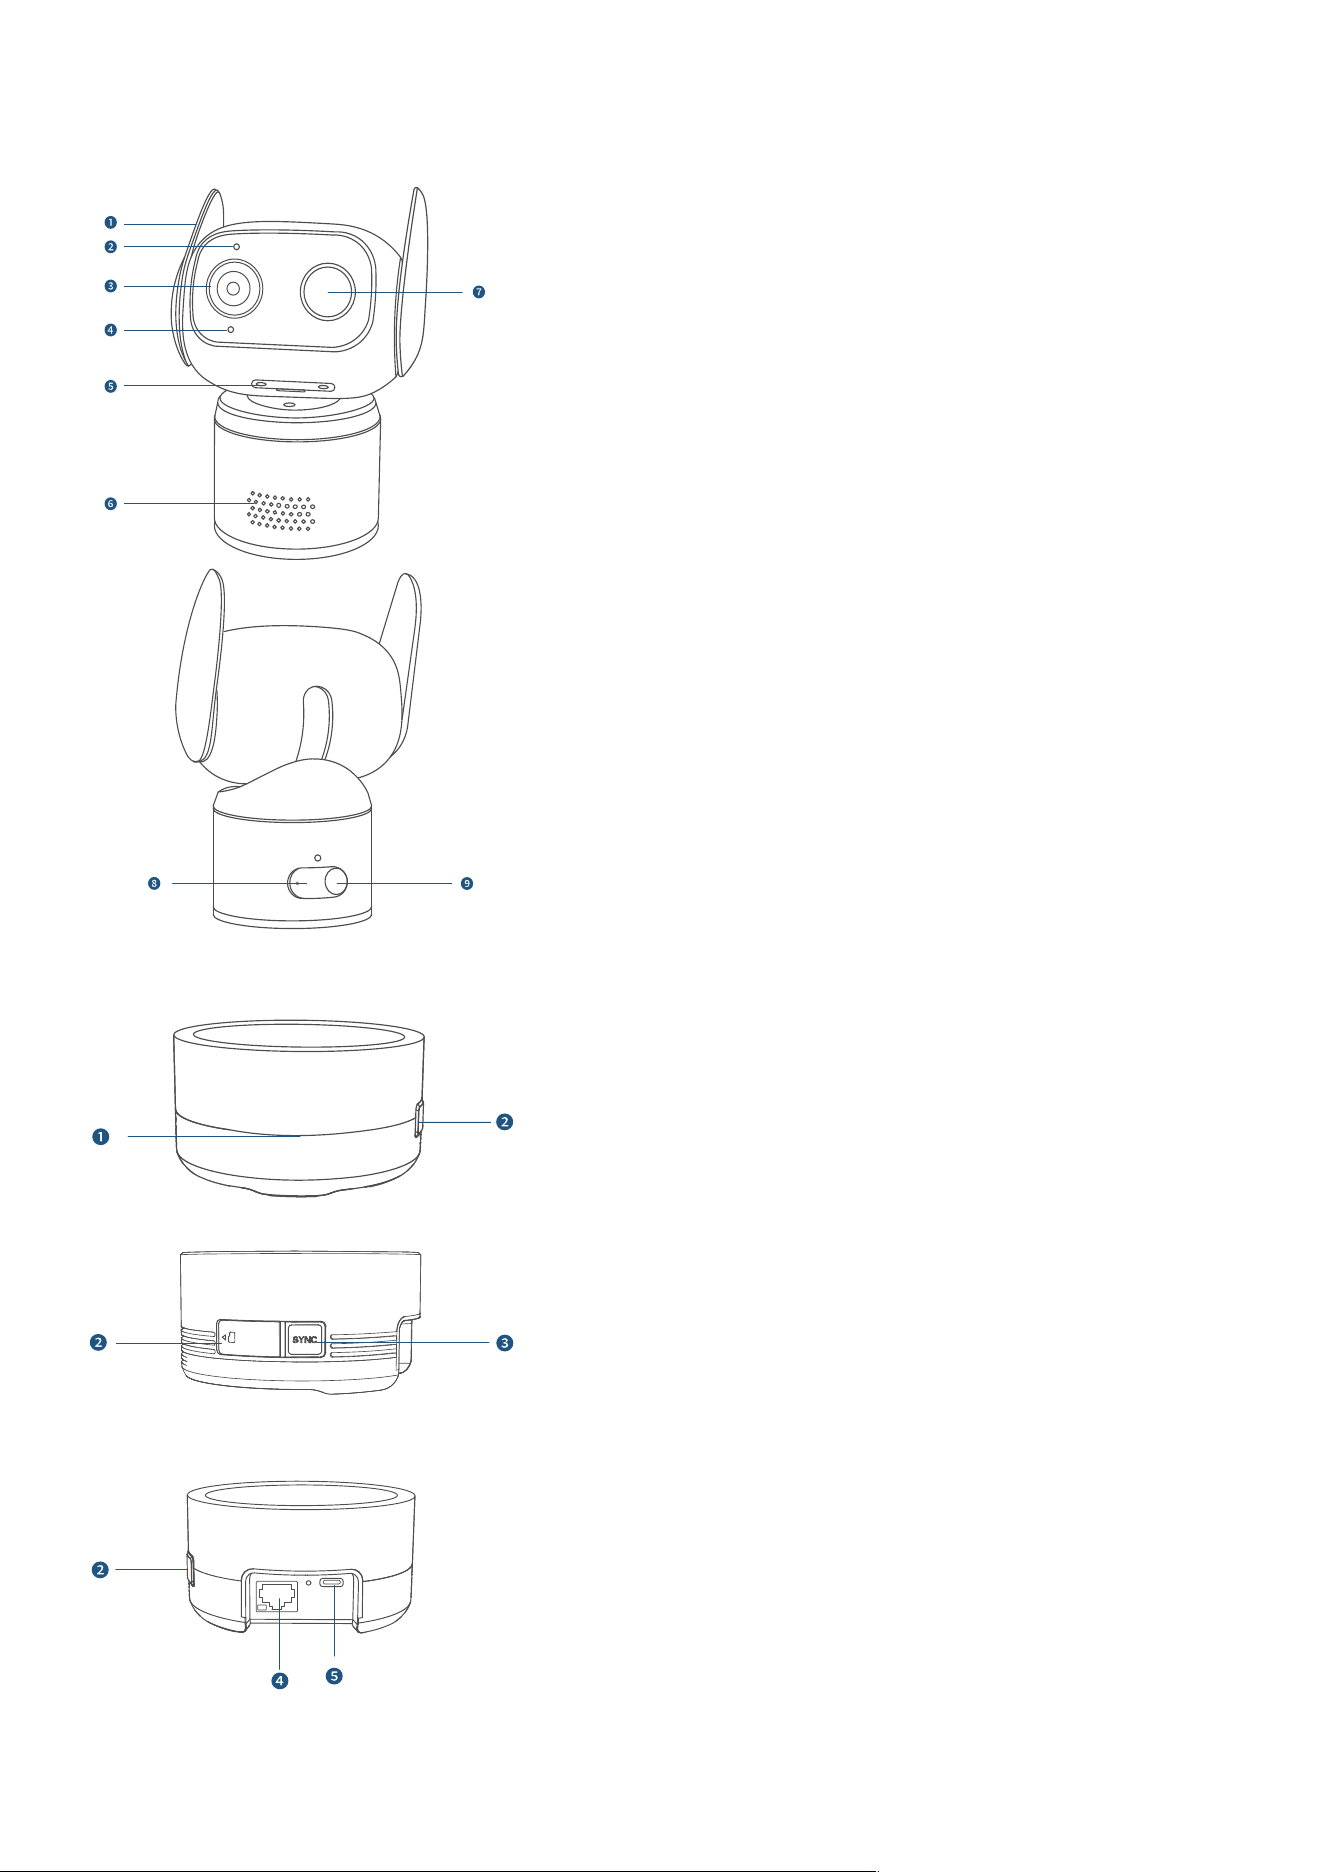
At a Glance
Type C
SYNC
❶
Antenna
❷
Microphone
❸
Camera Lens
❹
LED Indicator
❺
microSD Card Slot
❻
Speaker
❼
Spotlight
❽
Type-C Port
❾
Sync Button
❶
LED Indicator
❷
microSD Card Slot
❸
SYNC Button
❹
Ethernet Port
❺
USB-C Port
Before Mounting
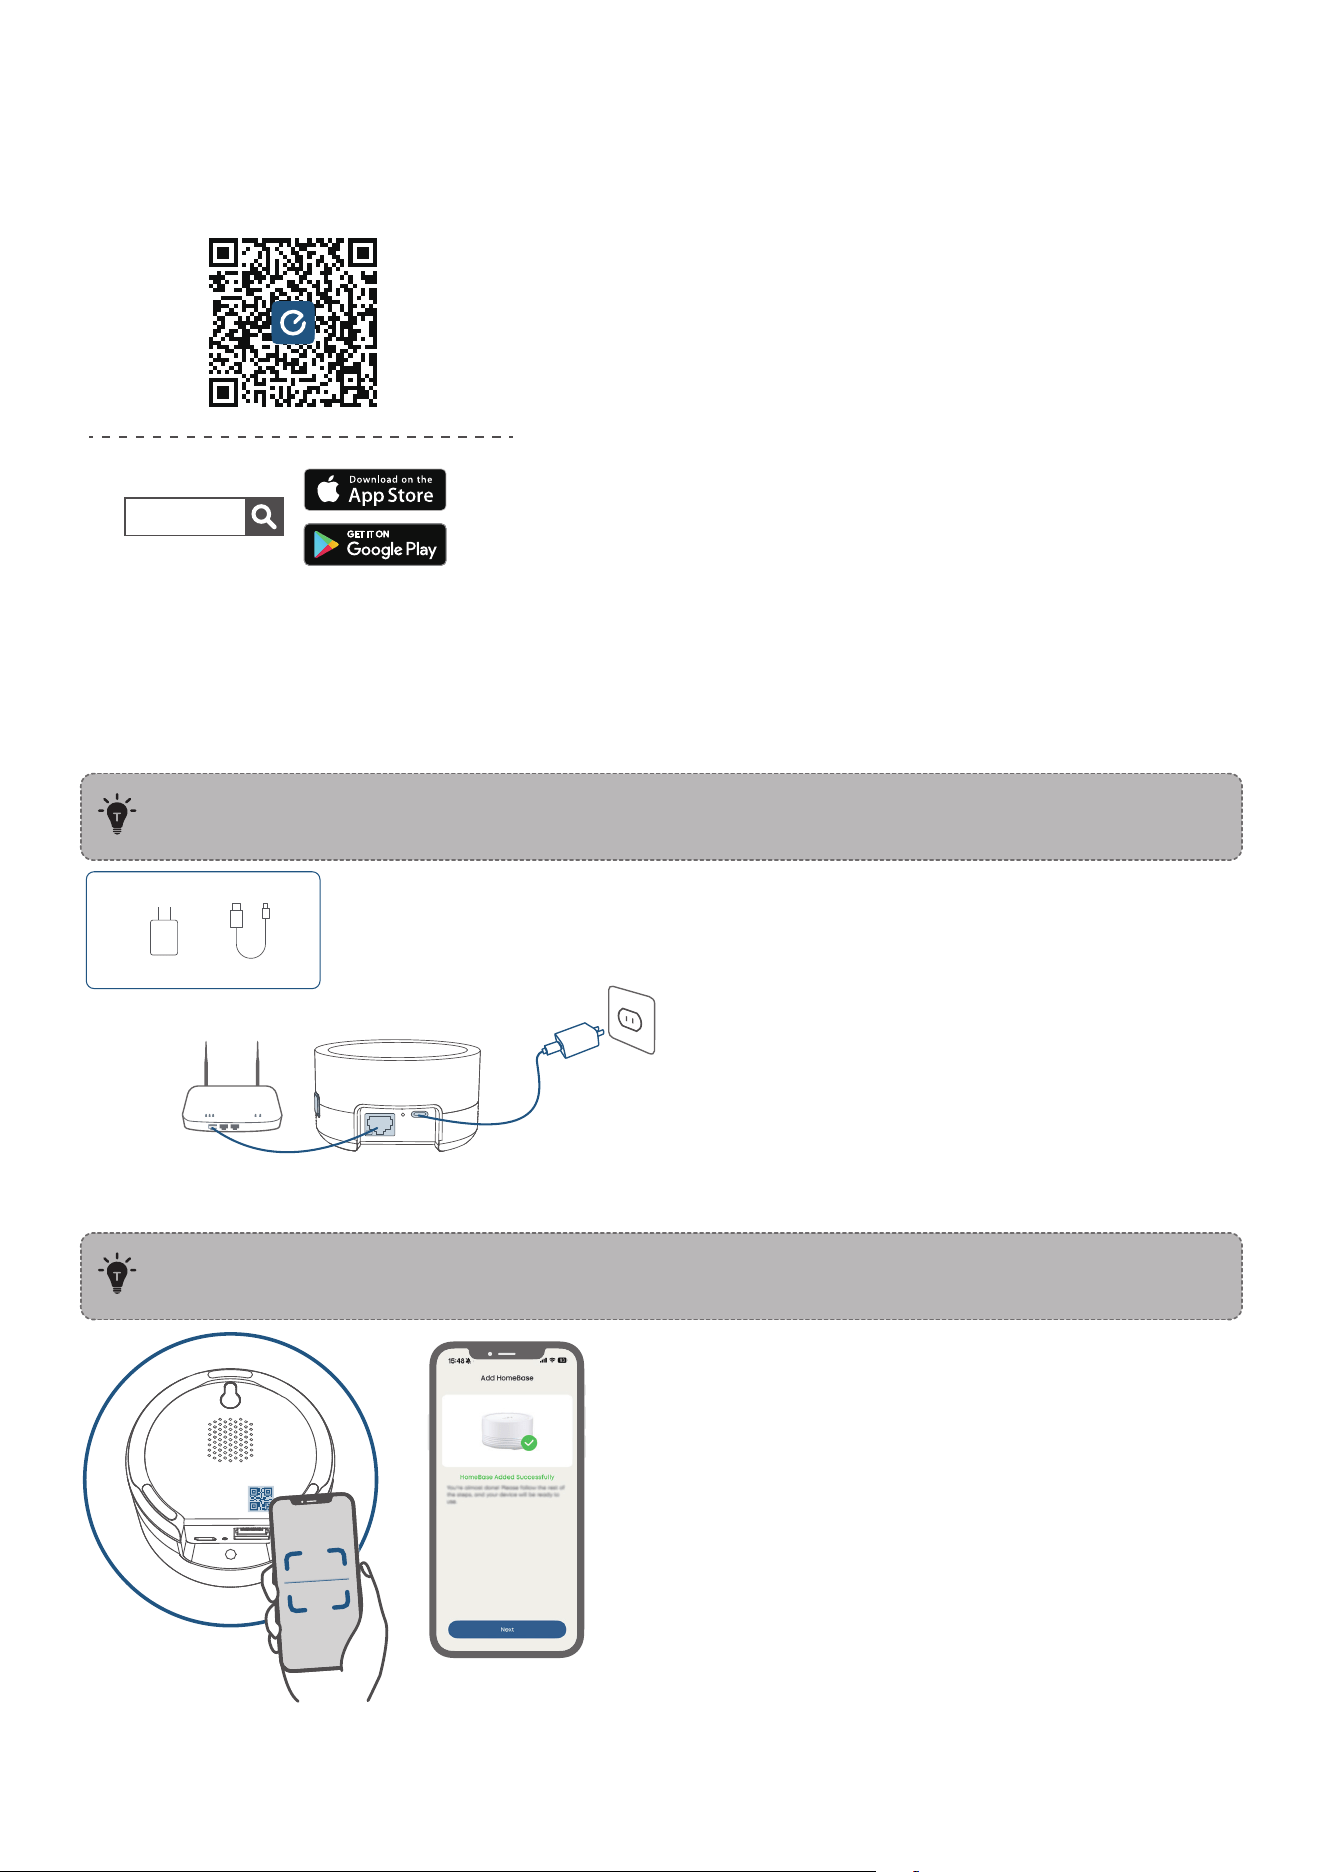
1. Download the eufy App
①
Download the latest version of eufy app.
②
Log in or create a new account.
eufy
2. Add HomeBase Mini (Optional)
*To use the eufy Wired Cam C31 with a HomeBase, add the HomeBase first, then add the camera.
①
Power the HomeBase Mini with the included 5V/2A power adapter and then connect it to your router.
Wait about one minute for the blue light to blink slowly.
To ensure proper operation, use only the included original power adapter. If a non-original
adapter must be used, it must be rated at 5V/2A or higher to avoid insuicient power supply.
②
Open the eufy app, scan the QR code on the HomeBase Mini. Then follow the in-app instructions to
add the device.
During this process, ensure the network is stable and the HomeBase is powered on. A solid
blue light indicates a successful binding.
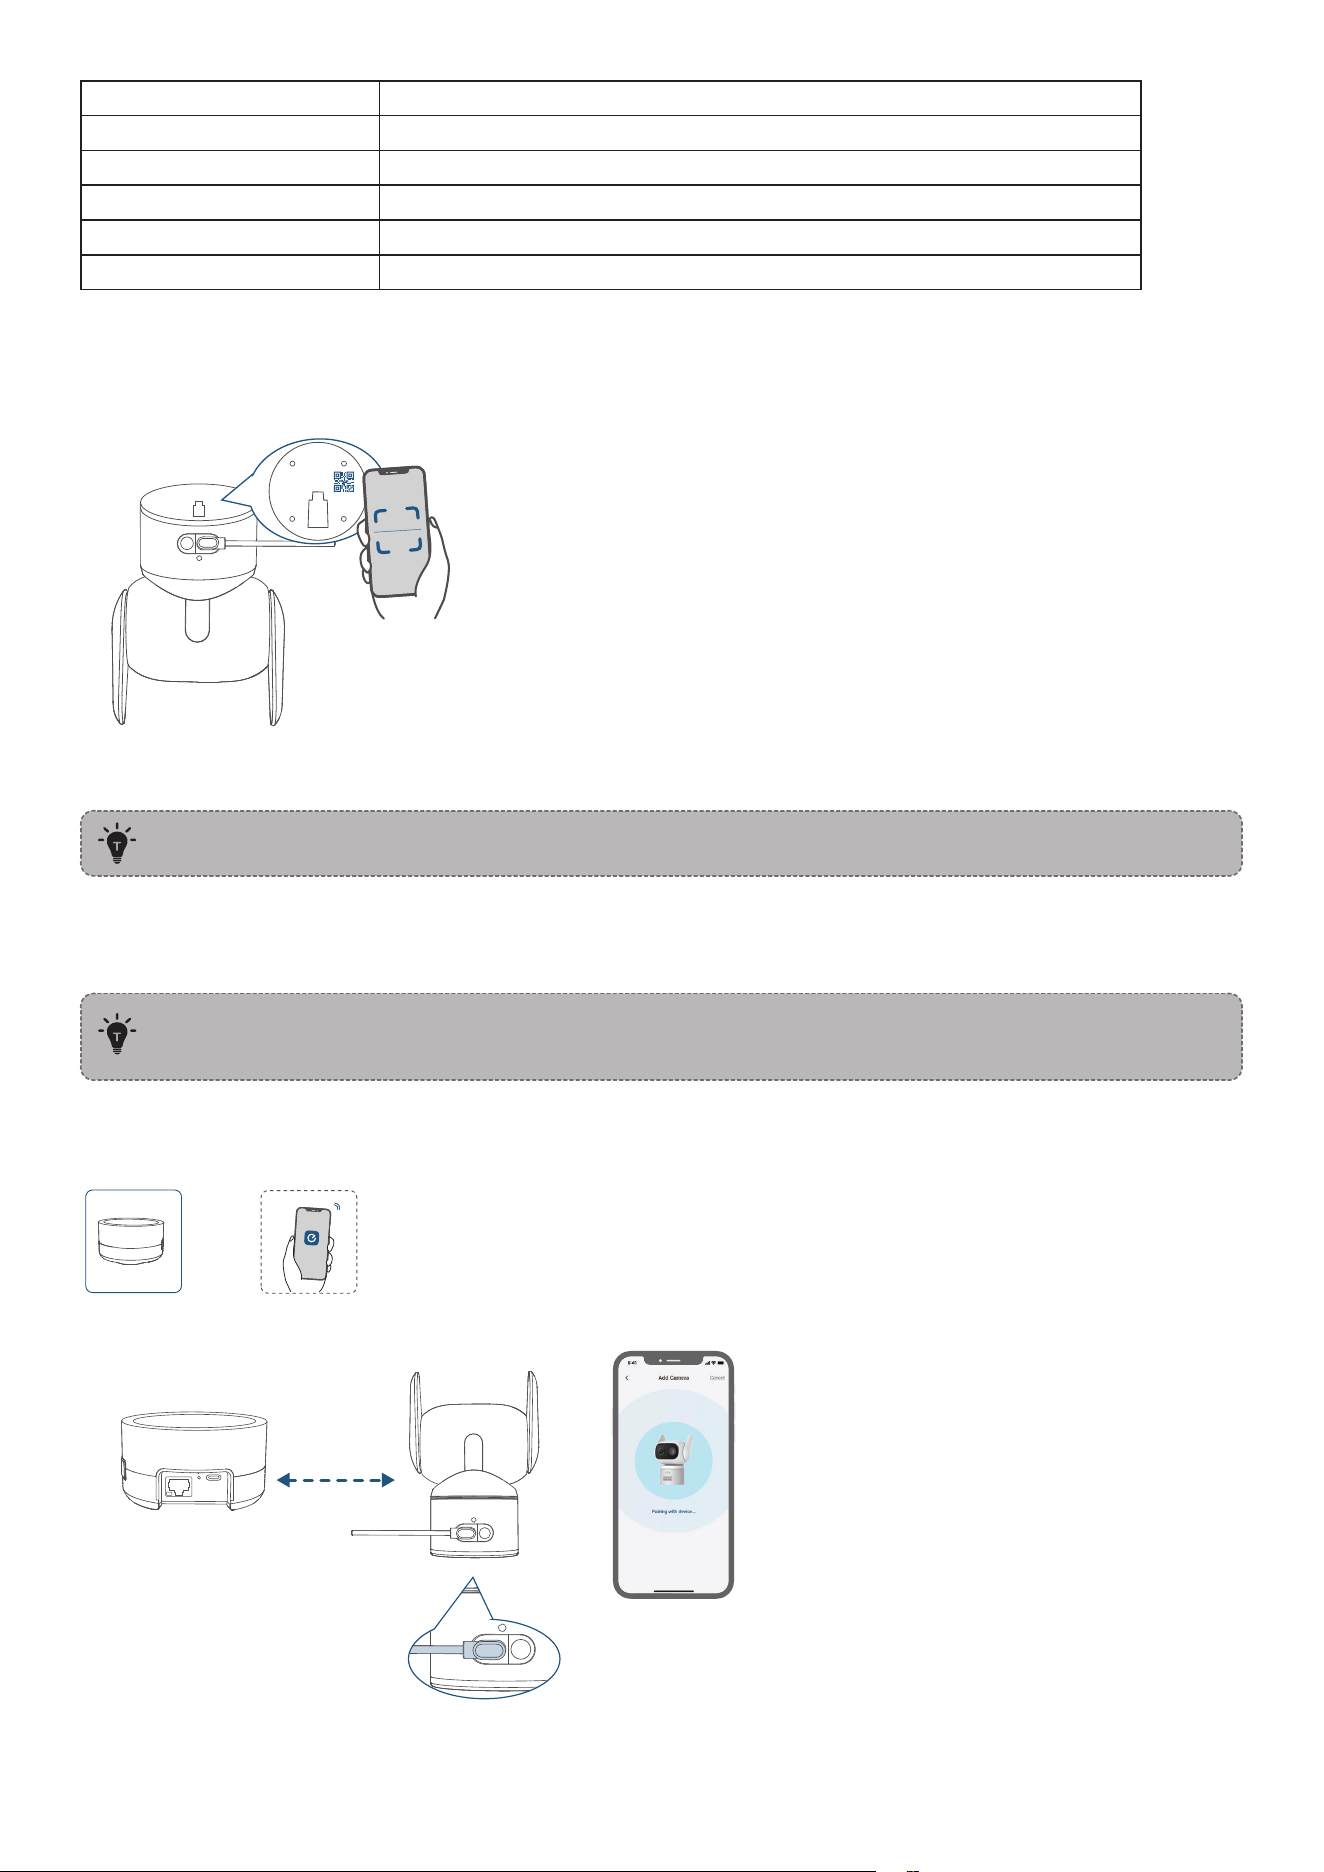
LED Indicator Description
Red Light Blinks Slowly Powered on, not connected to network
Solid Blue light Connected to the network successfully
Blue Light Blinks Slowly Connected to the network successfully but has not been set up
Solid Blue light Successfully bound
Solid Red light HomeBase Mini oline / network disconnected
3. Add the Camera
Open the eufy app, scan the QR code on the camera. Then follow the in-app instructions to add the
device.
Option 1: Connect to your Router (Without HomeBase Mini)
The device only supports 2.4GHz Wi-Fi networks.
①
Tap Connect to Router and then follow the in-app instructions.
Option 2: Connect to HomeBase
Some features, e.g., local bionic self-learning facial recognition, storage management, and
cross-camera tacking, require your eufyCam to be connected to the HomeBase.
①
Tap Connect to HomeBase.
②
Press and hold the camera's SYNC button for about 2 seconds until the blue light blinks slowly with a
beep. Then follow the in-app instructions to complete pairing.
< 3.3 (1 m)
4. Expand the Storage (Optional)
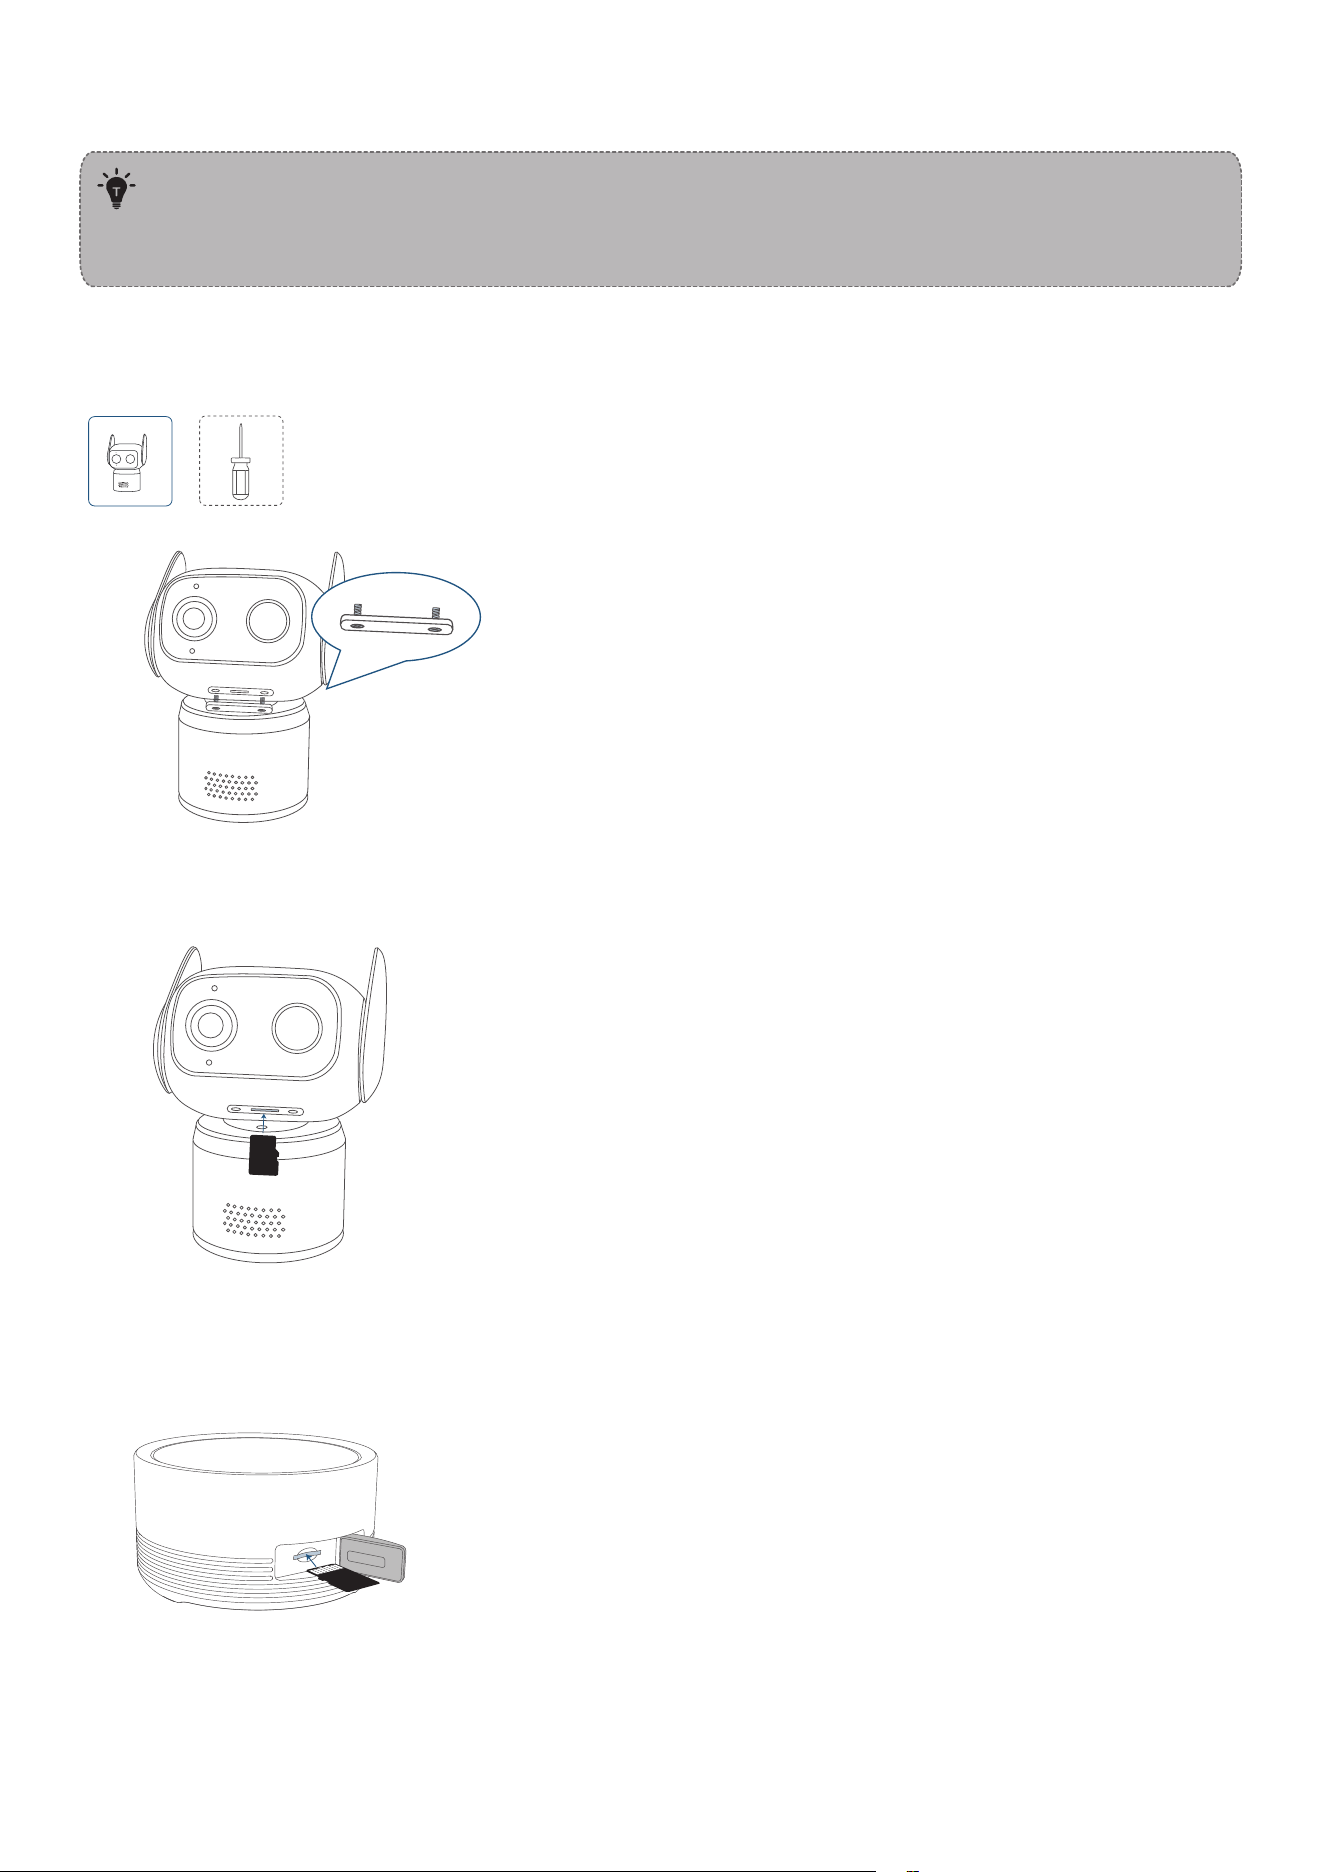
4.1 Insert the microSD Card
• Once inserted, the microSD card will serve as the primary storage medium, prioritizing the
storage of system-generated data (such as logs and configuration files) and video recordings
from the cameras.
• Do not insert or remove the microSD card when the device is powered on.
• Without HomeBase Mini: Insert the microSD card (up to 256GB) into the camera.
①
Unscrew and remove the microSD card slot cover. (A PH0 Phillips screwdriver is needed.)
Note: The captive screws remain attached to the slot cover. Simply loosen them to remove the cover.
②
Insert the microSD card with its pins facing down. Press the card into the slot until it clicks into
position.
• With HomeBase Mini: Insert the microSD card (up to 1TB) into HomeBase
①
Open the silicone cover of the microSD card slot.
②
Insert the microSD card with its pins facing up. Press the card into the slot until it clicks into position.
4.2 Remove the microSD Card
To remove the microSD card, press it inward until it springs loose, then pull it out from the slot.
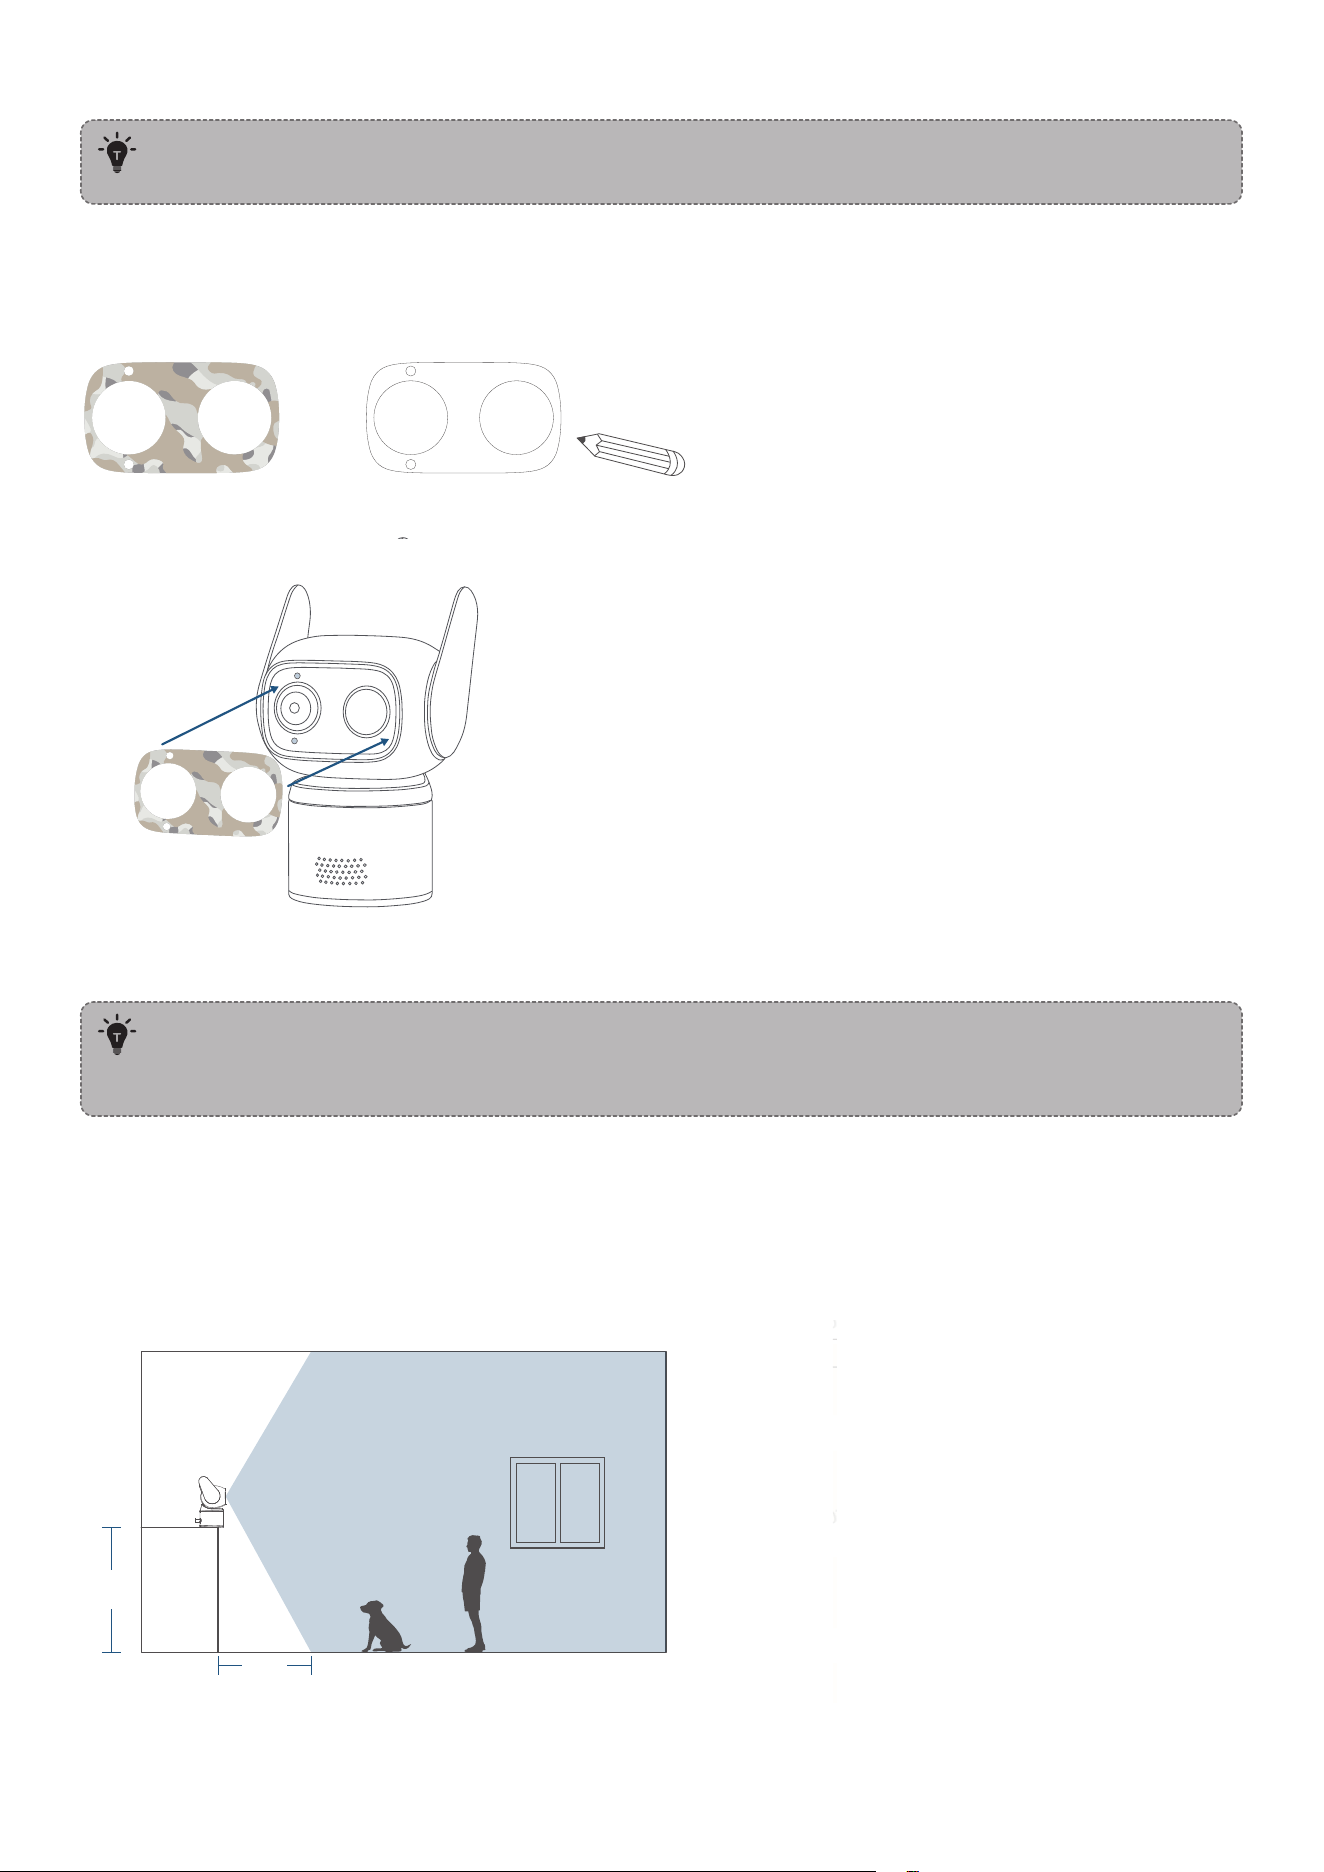
5. Decorate the Camera with Stickers (Optional)
Outdoor use may cause the sticker's edges to li over time. This is normal and can be gently
pressed back into place.
①
Clean and dry the application suace.
②
Choose from
• Patterned waterproof stickers
• White stickers for your own designs
③
When applying the sticker, ensure the microphone and LED indicator remain uncovered.
Mounting the Camera
To prevent network inteerence, maintain a minimum distance of 1 m between the camera,
HomeBase, and router.
! Disconnect the camera from the power outlet before mounting.
Option 1: On the Table or Shelf
1. Choose a Location
Recommended Location:
• Height of less than 0.8 m (2
.
6 )
• 0
.
6 m (2 ) field of view
• Strong Wi-Fi signal
0.6m
(2)
0.8m
(2.6)
2. Place the Camera
Place the camera on the table or shelf.
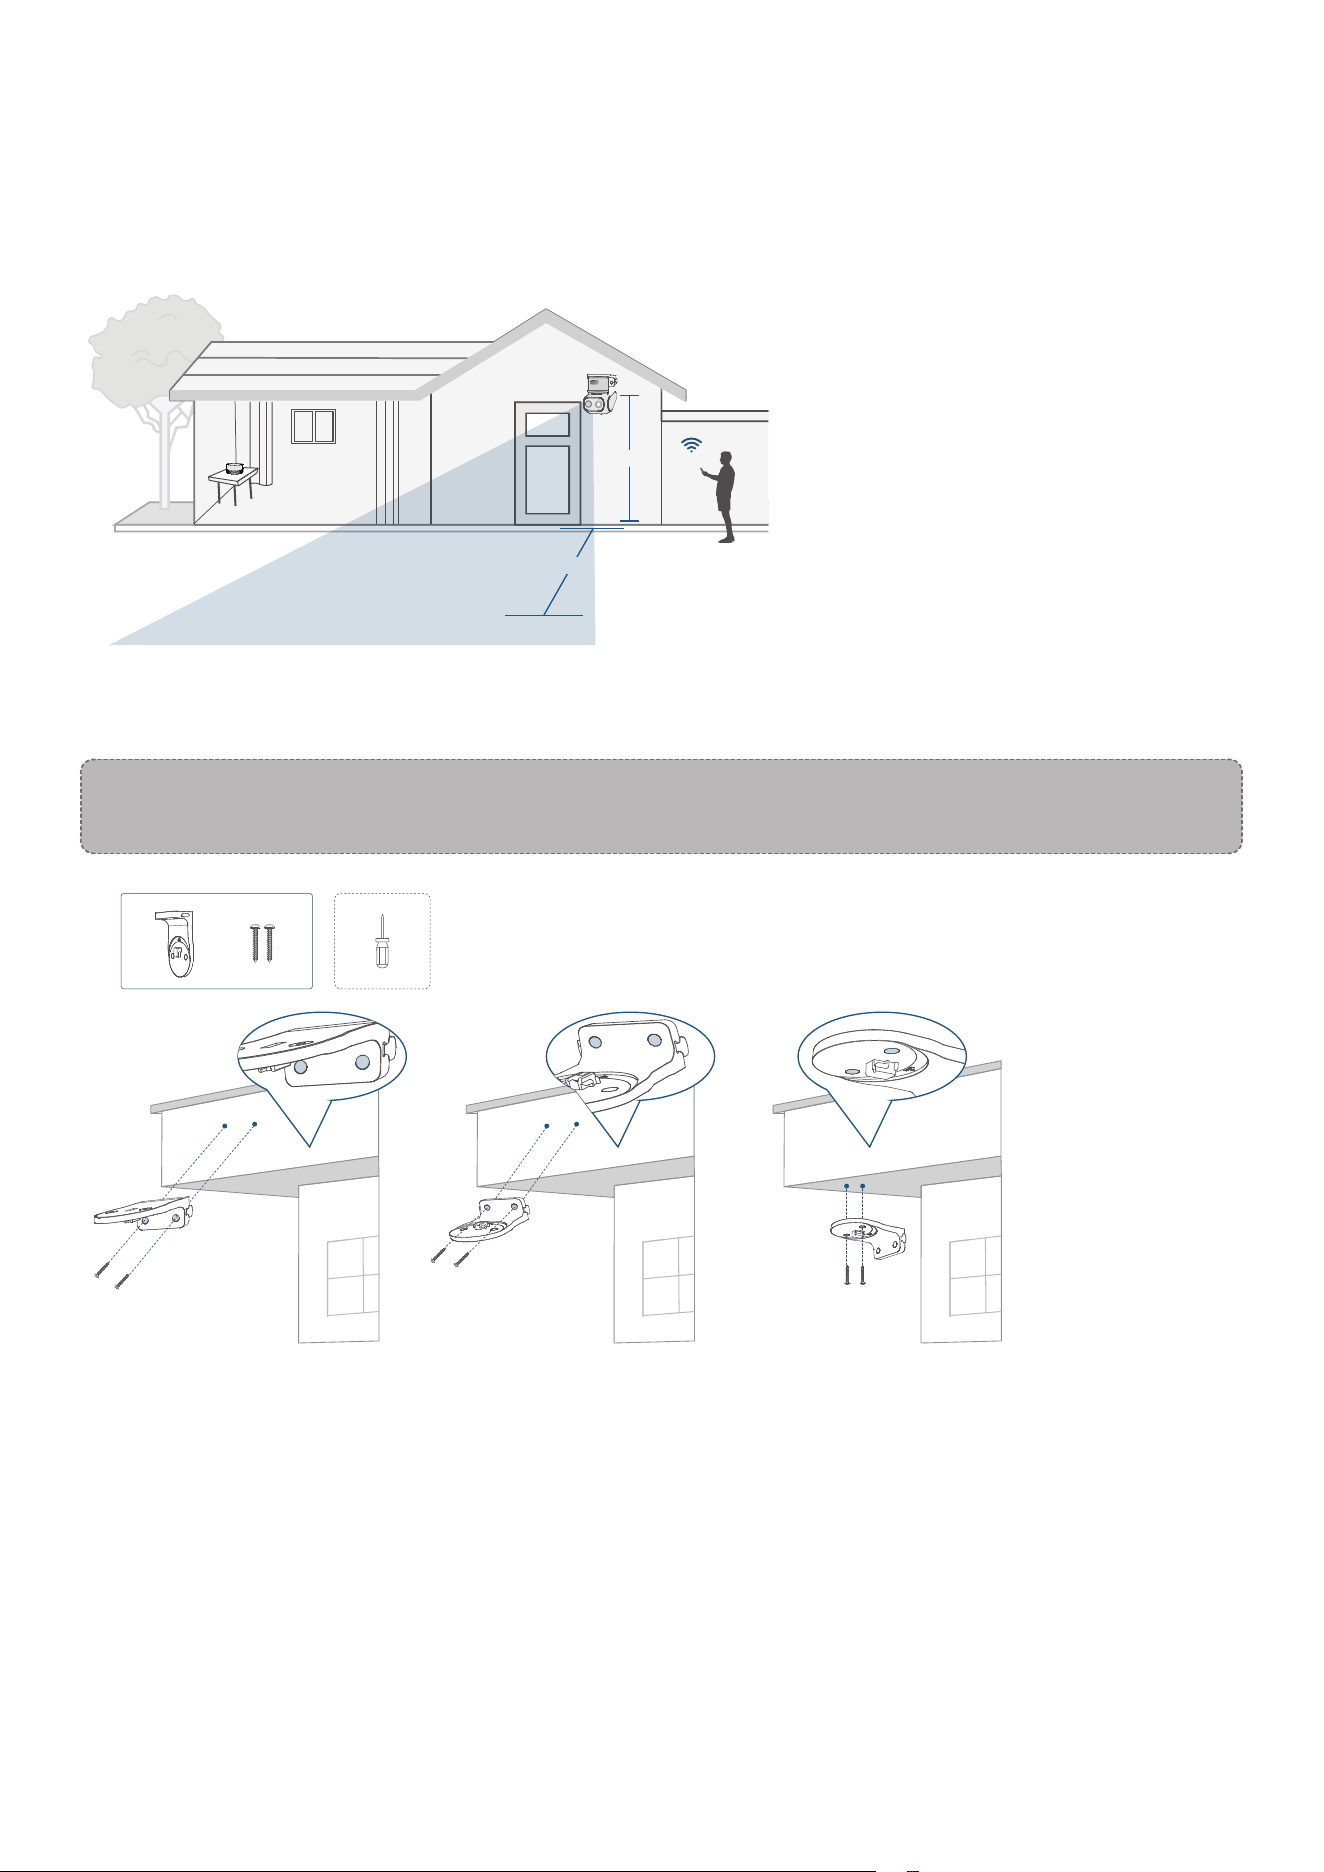
Option 2: On the Wall / Ceiling
1. Choose a Location
Recommended Location:
• Height of less than 2 m (7 )
• 7 m (23 ) field of view
• Strong Wi-Fi signal
2m (7 ft)
7m (23 ft)
2. Install the Mounting Bracket
This bracket can be installed either way —just attach the side with 2 holes to the wall or ceiling.
! Do not install the bracket in any manner other than as described in the manual. Improper
installation may result in the camera falling.
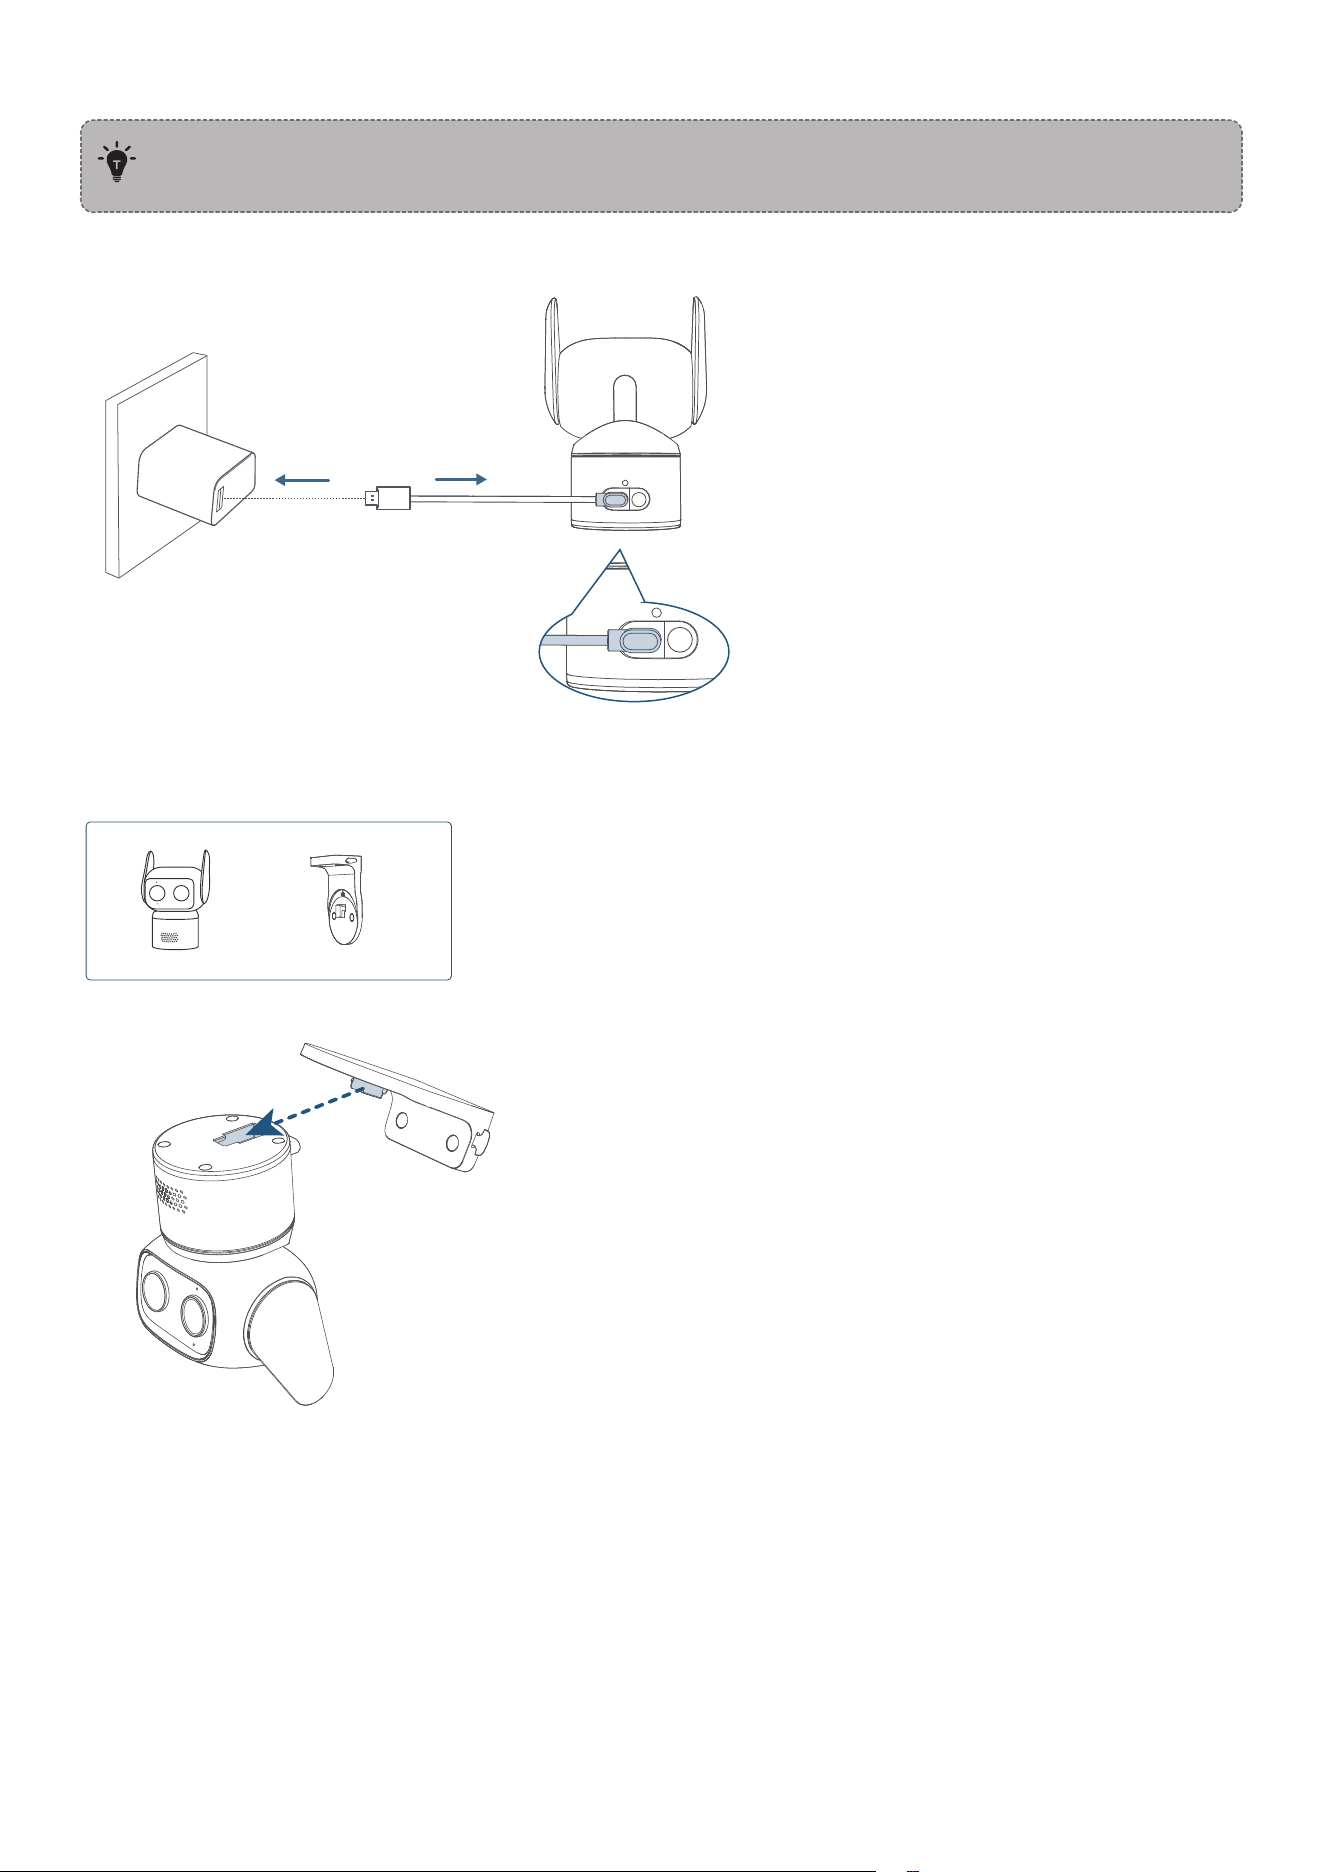
3. Mount the Camera
The opening on the back of the camera is a drainage vent which is safe by design. Do not insert
objects into it.
①
Connect the USB-C Cable to the USB-C Port
②
Attach the Camera to the Mounting Bracket
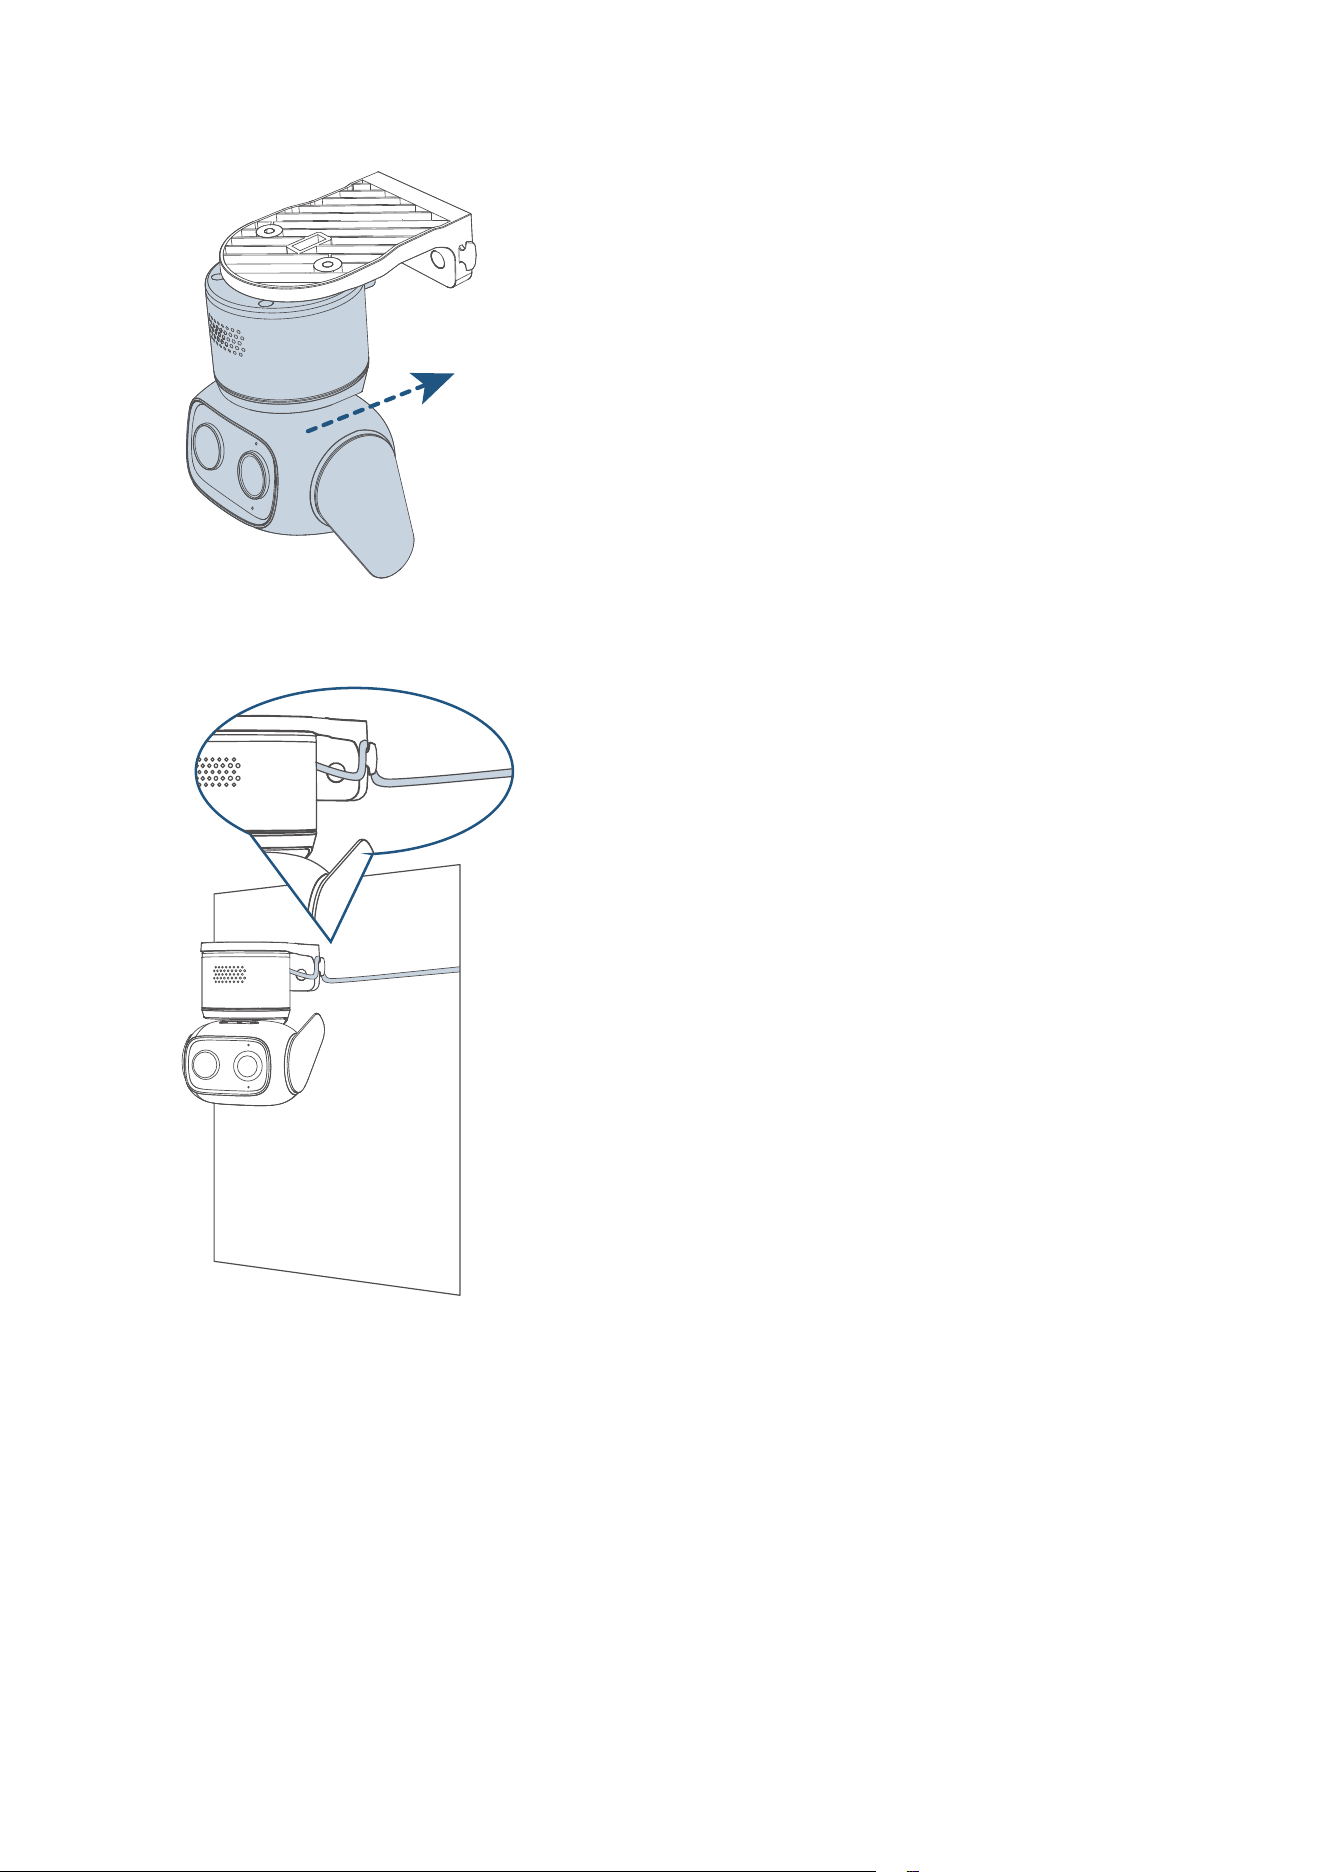
③
Slide to Lock the Camera
④
Fix the Cable
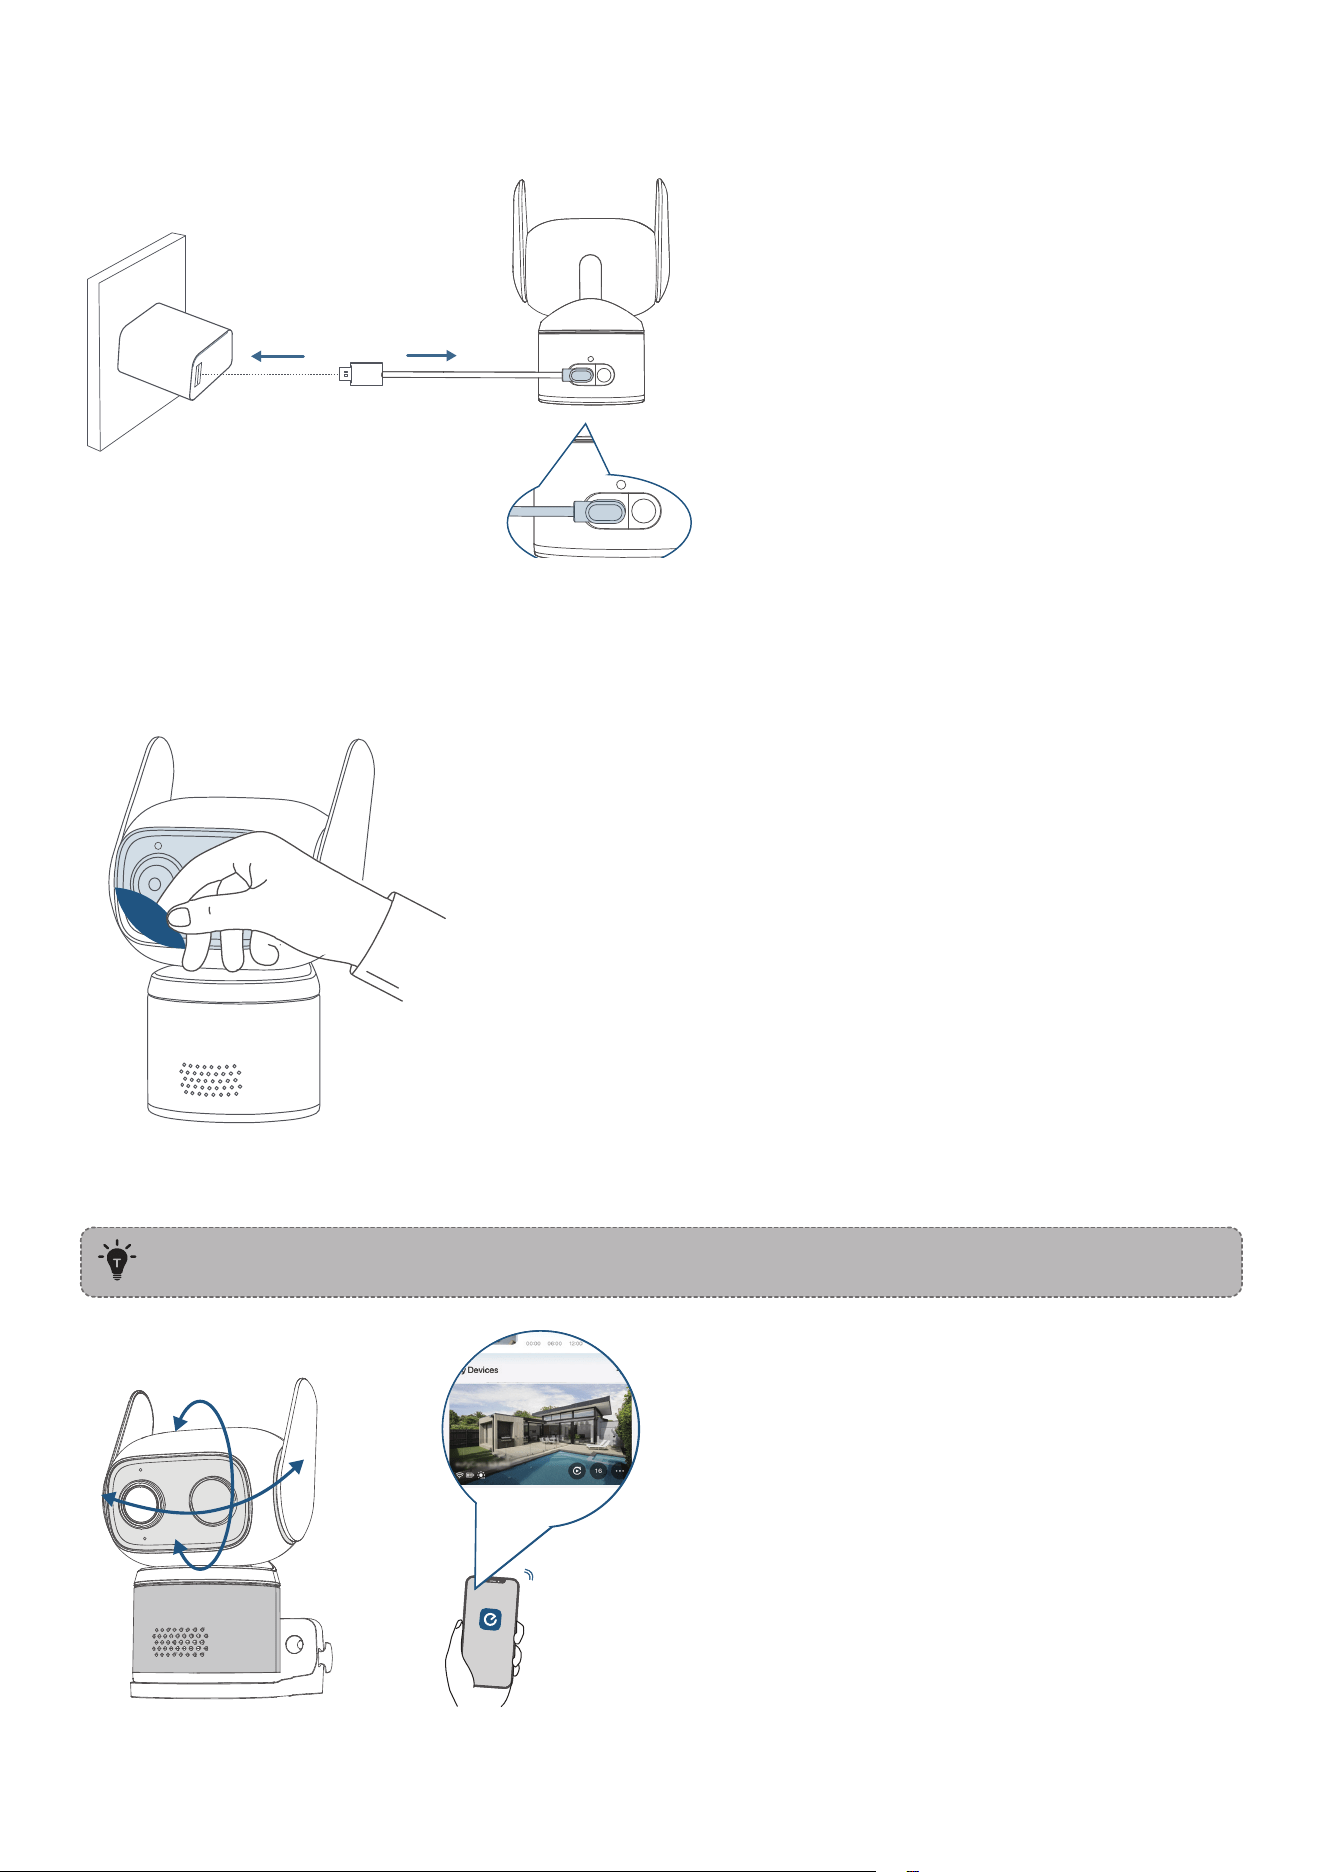
Aer Mounting
1
.
Connect to Power
2. Adjust the Camera Field of View
①
Remove Protective Film
②
Rotate the Camera via eufy App to Get the Optimal Angle
The opening on the back of the camera is a drainage vent which is safe by design. Do not insert
objects into it.
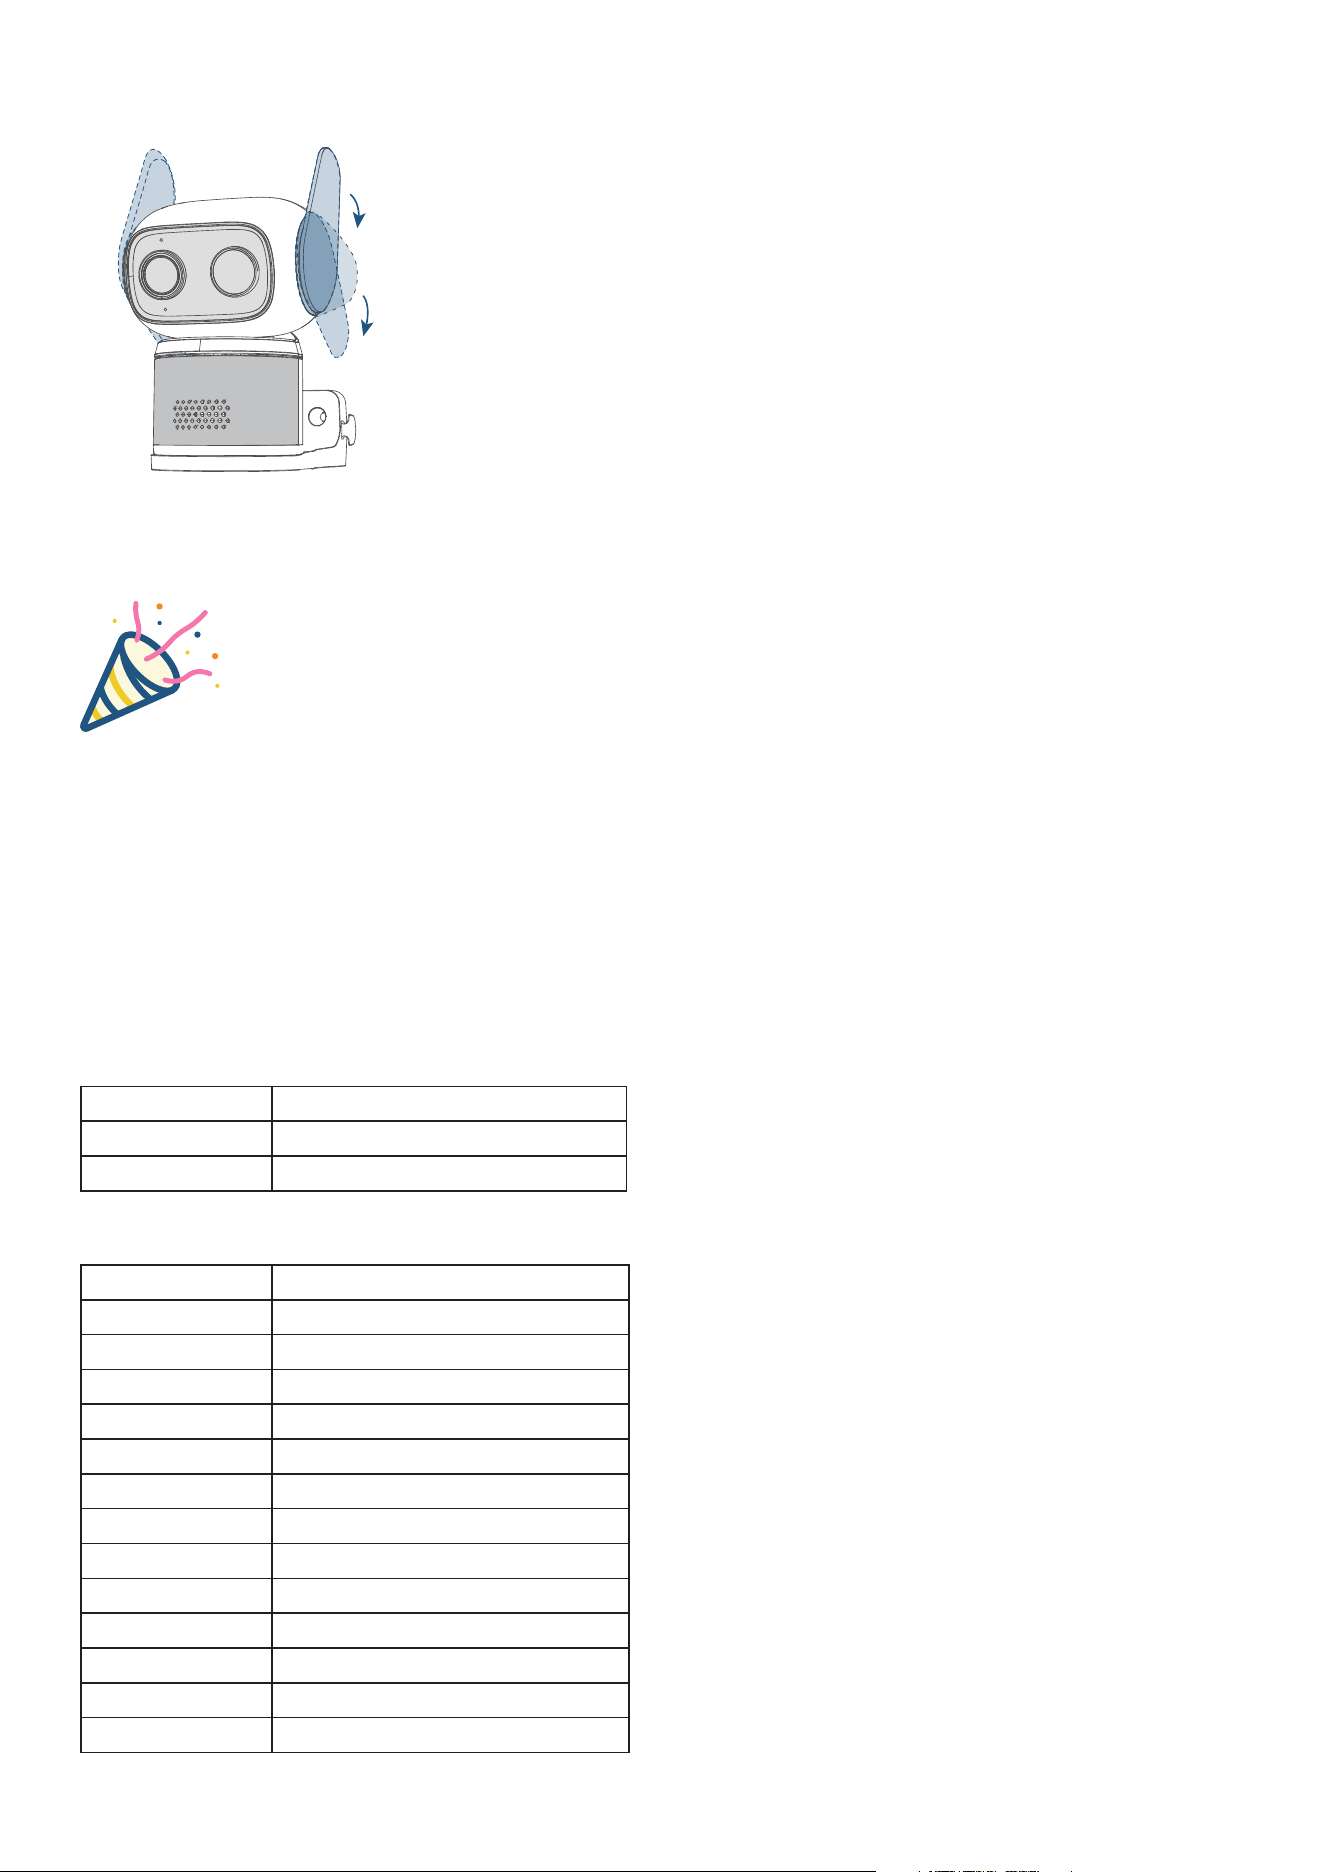
3. Adjust the Antenna
Congratulations!
Now you're all set to use your eufy Wired Cam C31!
Please explore more in the eufy app.
Find Out More
Compatible Devices
Finding the Part Number: The Part Number (PN) of any eufy device can be located on the product or
within the eufy app.
(Device Settings > General > About Device > The first five characters of the Serial Number)
1. HomeBase models compatible with eufy Wired Cam C31 (T817L)
Part Number Product Name
T8025 HomeBase Mini
T8030 HomeBase 3 (HomeBase S380)
2. eufy Devices compatible with HomeBase Mini (T8025)
Part Number Product Name
T817L Wired Cam C31
T8110 eufyCam C35
T8134 SoloCam S220
T8224 Video Doorbell C30
T8170 SoloCam S340
T8416 Indoor Cam S350
T8417 Indoor cam E30
T8425 Floodlight Cam E340
T8426 Floodlight Cam E30
T8214 Video Doorbell E340
T8223 Video Doorbell C31
T8910 Motion Sensor
T8900 Entry Sensor

Recommended microSD Card Brands
Brand Speed Class
SAMSUNG Class 10
SanDisk Class 10
Kingston Class 10
Toshiba Class 10
PNY Class 10
Longsys Class 10
Core Camera Functions and Settings
1. Night Vision Mode
The camera automatically activates night vision mode when low-light conditions are detected. Three
night vision modes are available: PureColor (Default), Spotlights, and Infrared.
Set it via:
Settings
>
Video Settings
>
Night Vision
2. Motion Detection
eufyCam C31 supports human (enabled by default), vehicle, and pet detection. When connected to
HomeBase, it also enables facial recognition.
3. Security Mode
①
Edit the Mode
You can edit the security mode of the camera to enable/disable video recording, notifications, and
alarms.
Set it via: Tap
Smart
(at the bottom)> Tap
Modes
> Select the corresponding device > Choose a mode >
Check or uncheck the options
②
Schedule Settings
You can enable/disable security mode based on your preset schedule.
Set it via: Tap
Smart
(at the bottom)> Tap
Modes
> Select the corresponding device > Tap
Schedule
>
Tap "+" to add a schedule
4. Download Recordings
Video recordings can be saved to your phone’s gallery.
Set it via: Tap
Events
(at the bottom) > Play the video to download > Tap
Download
Other Information
eufy Wired Cam C31:
Default Open Port 1: Wi-Fi (2.4GHz)
Port Description:
1. When powered on for the first time or aer a reset, if there is no configured Wi-Fi information, it may
enter network pairing mode (such as AP/BLE pairing);
2. In normal working mode, it will automatically connect to the router and save the SSID and password;
3. If you need to switch Wi-Fi configuration, you can use the App or follow the instructions in the manual
to reconfigure the network.
4. When connected to HomeBase, the device listens on UDP port 10200 to receive audio and video data
for downstream intercom functionality.
5. In Solo mode, the device listens on UDP port 32108 to receive app device discovery, LAN device
discovery, and establish P2P connections.
6. In Solo Mode, the device dynamically listens on random UDP ports between 10000 and 30000 for P2P
communication, including command transmission/reception and data transfer.
Default Open Port 2: BLE (Bluetooth Low Energy)
Port Description:
1. Bluetooth remains inactive during normal device operation. It automatically enables broadcast and
communication functions during the binding process to provide network configuration services. Aer
the network configuration is completed, BLE pairing will automatically be disabled.

2. When connecting the phone and camera directly, Bluetooth will automatically turn on and provide
communication services. When this feature is disabled, Bluetooth will automatically turn o.
HomeBase Mini:
Default Open Port: Wi-Fi (2.4GHz)
Port Description:
1. HomeBase will activate a Wi-Fi hotspot upon power-up to establish connection with cameras;
2. HomeBase connects to your home router using standard Wi-Fi (2.4GHz/5GHz) for data upload, remote
management, and cloud interaction. Encryption uses WPA2 or higher.
Default Open Port 2: Ethernet Port
1. Aer initial power-on or reset, HomeBase typically obtains an IP address via DHCP;
2. Check and confirm the Ethernet connection status in the device management inteace or app. To
use a wired connection, simply insert the Ethernet cable and ensure your router or switch is functioning
properly.

