PRECAUTIONS - 6391477C139/A
e
PRECAUTIONS 63
General safety instructions 63
For this appliance 66
Appliance purpose 67
This user manual 67
Manufacturer’s liability 67
Identification plate 68
Disposal 68
Information for European Control Bodies 68
Energy efficiency technical data 68
To save energy 68
Information on power consumption in off/stand-
by mode 68
Light sources 69
How to read the user manual 69
DESCRIPTION 69
General description 69
Control panel 69
Other parts 70
Accessories 70
Optional accessories (can be purchased
separately) 71
Advantages of humidified and steam cooking 71
USE 72
Preliminary operations 72
Using the accessories 72
Display 73
First use 74
Using the oven 75
Using the temperature probe (on some models
only) 79
Cooking advice 88
Smart Cooking 92
Multistep cooking 93
History 93
Mini guide to accessories 94
Discover the recipes 94
Information for Supervisory Bodies 94
My recipes 94
Other functions 95
In the event of a blackout 101
Settings 102
CLEANING AND MAINTENANCE 106
Cleaning the appliance 106
Cleaning the door 106
Cleaning the oven cavity 108
Vapor Clean (on some models only) 110
Descaling 111
Cleaning the reservoir and the water circuit
manually 112
Reservoir calibration 114
Extraordinary maintenance 115
INSTALLATION 115
Electrical connection 115
Positioning 116
We advise you to read this manual carefully, which contains all the instructions for
maintaining the appliance’s aesthetic and functional qualities. For further information on the
product: www.smeg.com
PRECAUTIONS
General safety instructions
Risk of personal injury
•ATTENTION: during use,
the appliance and its
accessible parts become
very hot. Children must be
kept away from the
appliance.
•ATTENTION: during use,
the appliance and its
accessible parts become
very hot. Never touch the
heating elements during
use.
• Protect your hands by
wearing oven gloves when
moving food inside the
oven.
• Never try to put out a fire or
flames with water: turn off
the appliance and smother
the flames with a fire
blanket or other appropriate
cover.
• This appliance may be used
by children aged at least 8
and by people of reduced

64 - PRECAUTIONS 91477C139/A
physical, sensory or mental
capacity, or lacking in
experience in the use of
electrical appliances,
provided that they are
supervised or instructed by
adults who are responsible
for their safety.
• Children must not play with
the appliance.
• Keep children under the age
of 8 at a safe distance
unless they are constantly
supervised.
• Keep children under the age
of 8 away from the
appliance when it is in use.
• Cleaning and maintenance
must not be carried out by
unsupervised children.
• The cooking process must
always be monitored. A
short cooking process must
be continuously surveyed.
• Never leave the appliance
unattended during cooking
operations where fats or
oils could be released, as
these could then heat up
and catch fire. Be very
careful.
• Do not pour water directly
onto very hot trays.
• Keep the oven door closed
during cooking.
• If you need to move food or
at the end of cooking, open
the door 5 cm for a few
seconds, let the steam
come out, then open it fully.
• Do not insert pointed metal
objects (cutlery or utensils)
into the slots in the
appliance.
• Switch off the appliance
immediately after use.
• DO NOT USE OR STORE
FLAMMABLE MATERIALS
NEAR THE APPLIANCE.
•DO NOT USE AEROSOLS
IN THE VICINITY OF THIS
APPLIANCE WHILST IT IS
IN USE.
• DO NOT MODIFY THIS
APPLIANCE.
• Installation and servicing
should be carried out by
qualified personnel in
accordance with current
standards.
• Do not try to repair the
appliance yourself or
without the assistance of a
qualified technician.
• Do not pull the cable to
unplug the appliance.
Risk of damaging the appliance
• Do not use abrasive or
corrosive detergents (e.g.
scouring powders, stain
removers and metallic
sponges), rough or abrasive
materials or sharp metal
scrapers on glass parts as
this could cause scratch the
surface and break the
glass. Use wooden or
plastic utensils.
• Do not sit on the appliance.
• Do not use cleaning
products containing
chlorine, ammonia or
bleach on parts made of
PRECAUTIONS - 6591477C139/A
e
steel or that have metallic
surface finishes (e.g.
anodizing, nickel- or
chromium-plating).
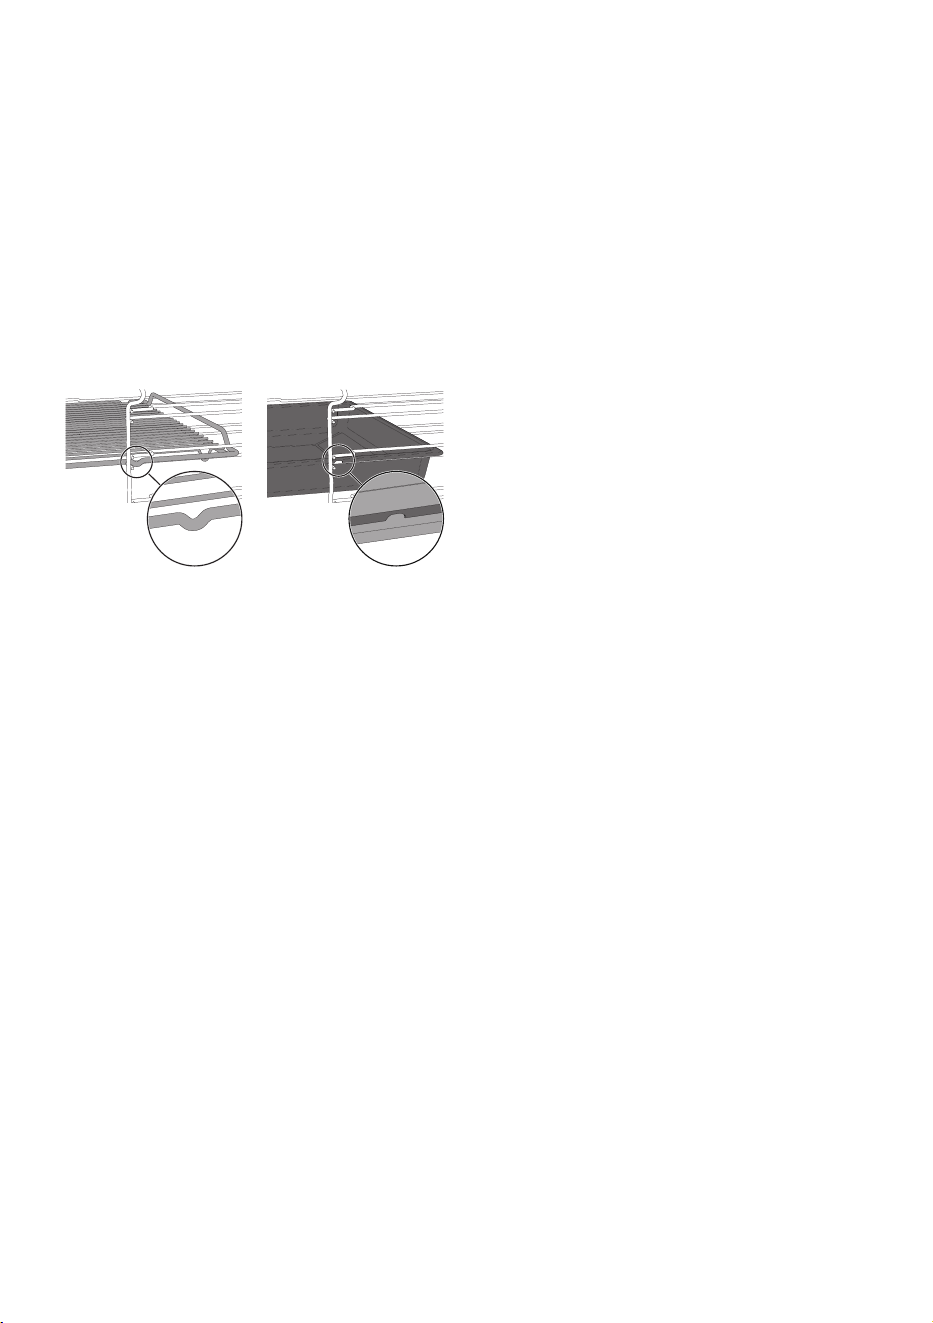
• Racks and trays should be
inserted as far as they will
go into the side guides. The
mechanical safety locks
that prevent them from
being removed must face
downwards and towards
the back of the oven cavity.
• Do not use steam jets to
clean the appliance.
• Do not spray any spray
product near the appliance.
• Do not obstruct ventilation
openings and heat
dispersal slots.
• Fire hazard: never leave
objects in the oven cavity.
• DO NOT FOR ANY
REASON USE THE
APPLIANCE AS A SPACE
HEATER.
• Do not use plastic
cookware or containers
when cooking food.
• Do not place sealed tins or
containers in the oven
cavity.
• Remove all trays and racks
which are not required
during cooking.
• Do not cover the bottom of
the oven cavity with
aluminium or tin foil sheets.
• Do not place pans or trays
directly on the bottom of the
oven cavity.
• If necessary, you can use
the tray rack (supplied or
sold separately, depending
on the model) by placing it
on the bottom as a support
for cooking.
• If you wish to use
greaseproof paper, place it
so that it will not interfere
with the hot air circulation
inside the oven cavity.
• Do not use the open door to
rest pans or trays on the
internal glass pane.
• Never use the oven door to
lever the appliance into
place when fitting.
• Avoid exerting too much
pressure on the door when
open.
• Do not use the handle to lift
or move this appliance.
Installation and maintenance
• THIS APPLIANCE MUST
NOT BE INSTALLED IN A
BOAT OR CARAVAN.
• The appliance must not be
installed on a pedestal.
• Position the appliance into
the cabinet cut-out with the
help of a second person.
• To prevent any possible
overheating, the appliance
should not be installed
behind a decoration door or
a panel.

66 - PRECAUTIONS 91477C139/A
• Installation and servicing
should be carried out by
qualified personnel in
accordance with current
standards.
• Have the electrical
connection performed by
authorised technical
personnel.
• The appliance must be
connected to earth in
compliance with electrical
system safety standards.
• Use cables withstanding a
temperature of at least
90 °C.
• The tightening torque of the
screws of the terminal
supply wires must be 1.5 -
2 Nm.
• If the power cable becomes
damaged, contact technical
support immediately to
arrange for it to be replaced
in order to avoid possible
hazards.
• WARNING: while
positioning the appliance,
make sure that the power
supply cable is not caught
or damaged.
• Always use any necessary/
required personal
protective equipment (PPE)
before performing any work
on the appliance
(installation, maintenance,
positioning or movement).
• Before performing any work
on the appliance, switch off
the power supply.
• Allow the appliance to be
disconnected after
installation, via an
accessible plug or a switch
in the case of a fixed
connection.
• Fit the power line with an
all-pole circuit breaker with
a contact separation
distance sufficient to
provide complete
disconnection in category III
overvoltage conditions,
pursuant to installation
regulations.
•WARNING: Make sure that
the appliance has been
switched off and
disconnected from the
mains power supply or that
the mains power has been
switched off before
replacing the interior
lighting bulbs.
•The bulbs used in this
appliance are specific for
household appliances; do
not use them for home
lighting.
• This appliance can be used
up to a maximum altitude of
4,000 metres above sea
level.
For this appliance
• Do not rest any weight or
sit on the open door of the
appliance.
• Take care that no objects
are stuck in the doors.
• Do not install/use the
appliance outdoors.
• Only use the temperature

PRECAUTIONS - 6791477C139/A
e
probe provided or
recommended by the
manufacturer (on some
models only).
Temperature probe (if present)
• Do not touch the rod or the
tip of the temperature
probe after use.
• Wear oven gloves when
handling the temperature
probe.
• Take care not to scratch or
damage enamelled or
chrome-plated surfaces
with the tip or the plug of
the temperature probe.
• Do not insert the
temperature probe into
openings and slots on the
appliance.
• When the temperature
probe is not in use, make
sure that the protective
metal cap is properly
closed.
• Do not pull the cable to
remove the temperature
probe from the socket or
from the food.
• Make sure that the
temperature probe or its
cable do not get caught in
the door.
• Make sure that the
temperature probe or its
cable do not come into
contact with heating
elements inside the oven.
• No part of the temperature
probe should be allowed to
come into contact with the
walls of the oven cavity, the
heating elements, the racks
or the trays when they are
still hot.
• The probe should not be
kept inside the appliance.
• Do not use the temperature
probe during the pyrolytic
cycle.
Appliance purpose
This appliance is intended for
cooking food in the home
environment. Every other use
is considered improper. It
must also not be used:
• In kitchen areas provided
for employees in shops,
offices and other work
environments.
• in farms/farmhouses.
• By guests in hotels, motels
and other types of
residential environments.
• In bed and breakfasts.
This user manual
• This user manual is an integral part of
the appliance and must therefore be
kept in its entirety and within the user's
reach for the whole working life of the
appliance.
• Read this user manual carefully before
using the appliance.
• The explanations in this manual include
images, which describe all that regularly
appears on the display. However, it
should be kept in mind that the
appliance may be equipped with an
updated version of the system, and as
such, all that appears on the display
may differ from those in the manual.
Manufacturer’s liability
The manufacturer declines all liability for
This appliance may only
be installed and used
indoors.
68 - PRECAUTIONS 91477C139/A
damage to persons or property caused by:
• use of the appliance other than that
specified;
• failure to comply with the instructions in
the user manual;
• tampering with any part of the
appliance;
• use of non-original spare parts.
Identification plate
The identification plate bears the technical
data, serial number and brand name of the
appliance. Do not remove the identification
plate for any reason.
Disposal
This appliance conforms to the WEEE
European directive (2012/19/EU) and
must be disposed of separately from
other waste at the end of its service life.
The appliance does not contain substances
in quantities sufficient to be considered
hazardous to health and the environment,
in accordance with current European
directives.
To dispose of the appliance:
• Cut the power cable and remove it.
• Deliver the appliance to the appropriate
recycling centre for electrical and
electronic equipment waste, or return it
to the retailer when purchasing an
equivalent product, on a one for one
basis.
Our appliances are packaged in non-
polluting and recyclable materials.
• Deliver the packing materials to the
appropriate recycling centre.
Information for European Control
Bodies
Fan forced mode
the ECO function used to define the energy
efficiency class complies with the
specifications of European standard EN
60350-1.
Conventional heating mode
To run the STATIC function, the preheating
phase must be skipped (see section
"Preheating phase" in the USE chapter).
Energy efficiency technical data
Information in accordance with the
European energy labelling and ecodesign
regulations is contained in a separate
document accompanying the product
instructions.
These data are present in the "Product
information sheet" that can be downloaded
from the website at the page dedicated to
the product in question.
To s ave energy
• Only preheat the appliance if the recipe
requires you to do so. The preheating
stage can be disabled for all functions
(see chapter “Preheating”) apart from
the PIZZA (preheating cannot be
disabled) and ECO functions (no
preheating stage).
• When using the functions (including the
ECO function), avoid opening the door
during cooking.
• Unless otherwise indicated on the
package, defrost frozen foods before
placing them in the oven.
• When cooking several types of food it is
recommended to cook the foods one
after the other to make the best use of
the already hot oven.
• Use dark metal moulds: They help to
absorb the heat better.
• Remove all trays and racks which are
not required during cooking.
• Stop cooking a few minutes before the
time normally used. Cooking will
continue for the remaining minutes with
the heat which has accumulated inside
the oven.
• Reduce any opening of the door to a
minimum to avoid heat dispersal.
• Keep the inside of the oven clean at all
times.
Information on power
consumption in off/stand-by
mode
Technical data on the appliance's power
consumption in off/stand-by mode can be
found at www.smeg.com under the page
corresponding to the product in question.
Power voltage
Danger of electrocution
• Disconnect the mains power supply.
• Unplug the appliance.
Plastic packaging
Danger of suffocation
• Do not leave the packaging or any part
of it unattended.
• Do not let children play with the plastic
bags.
DESCRIPTION - 6991477C139/A
e
Light sources
• This appliance contains user-
replaceable light sources.
• The light sources contained in the
appliance are declared suitable for
operation at ambient temperature
≥300°C and intended for use in high
temperature applications such as ovens.
• This appliance contains light sources of
efficiency class "G".
How to read the user manual
This user manual uses the following reading
conventions:
DESCRIPTION
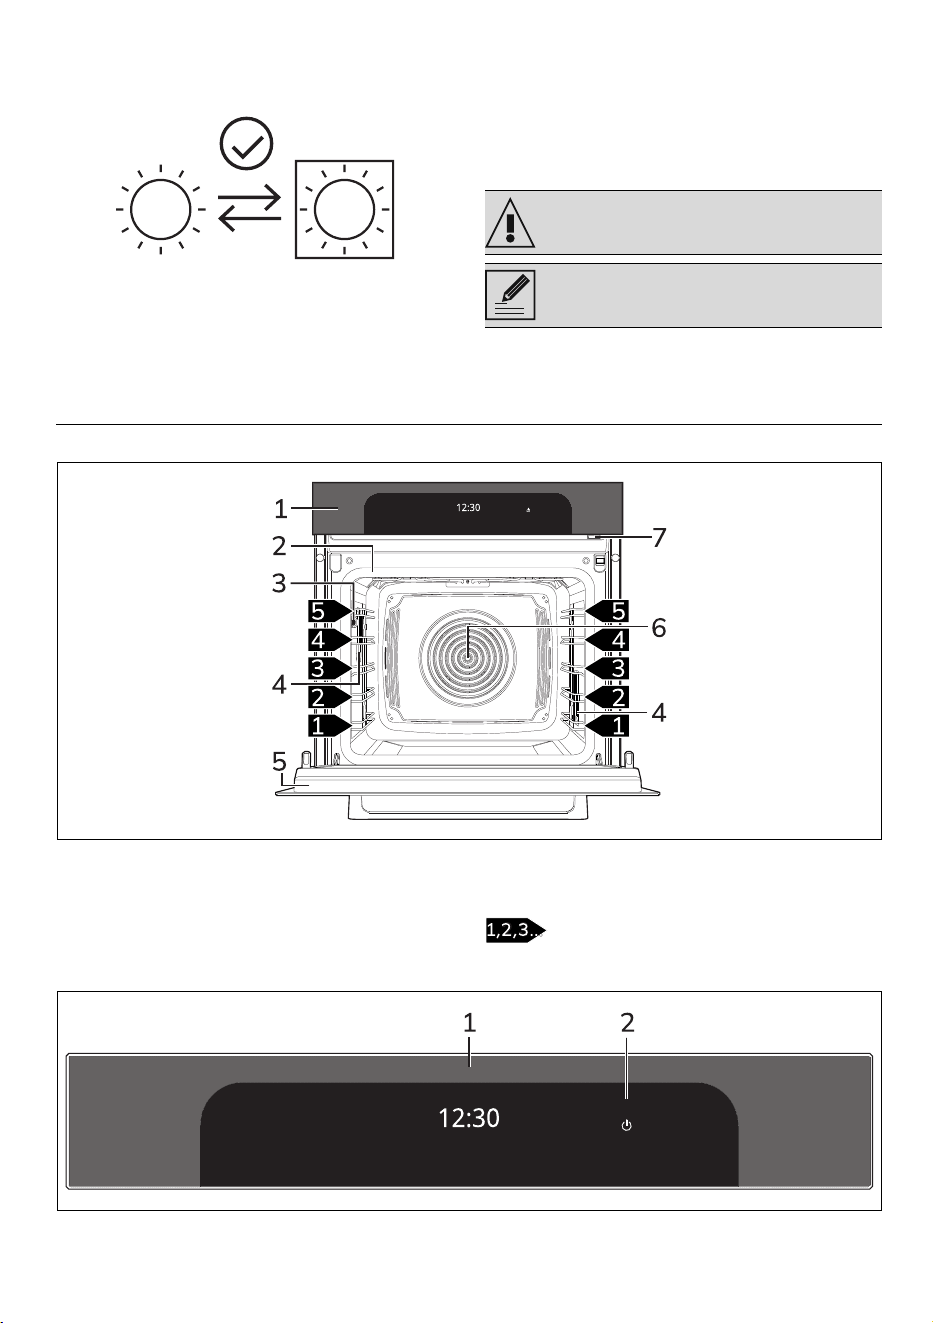
General description
1 Control panel
2 Gasket
3 Temperature probe socket (selected
models only)
4 Light
5 Door
6 Fan
7 Loading nozzle
Frame shelf
Control panel
1 Display The touch-screen display allows you to
interact with the appliance. Touch the icons
Warning/Caution
Information/Advice
70 - DESCRIPTION 91477C139/A
to access the various functions. All the
operating parameters will be shown on the
display.
2 ON/OFF button
The ON/OFF button turns the appliance on
or off.
Other parts
Shelves
The appliance features shelves to position
trays and racks at different heights. The
insertion heights are indicated from the
bottom upwards.
Cooling fan
The fan cools the appliance and comes into
operation during cooking.
The fan causes a steady outflow of air from
above the door which may continue for a
short period of time even after the
appliance has been turned off.
Oven cavity lighting
The appliance’s interior lighting comes on:
• when the door is opened;
• during one function, touch the light
symbol to manually activate or
deactivate the oven cavity light, apart
from the and functions.
Accessories
• Not all accessories are available on
some models.
• The accessories intended to come into
contact with food are made of materials
that comply with the provisions of
current legislation.
• Original supplied and optional
accessories can be requested to
Authorised Assistance Centres. Use only
original accessories supplied by the
manufacturer.
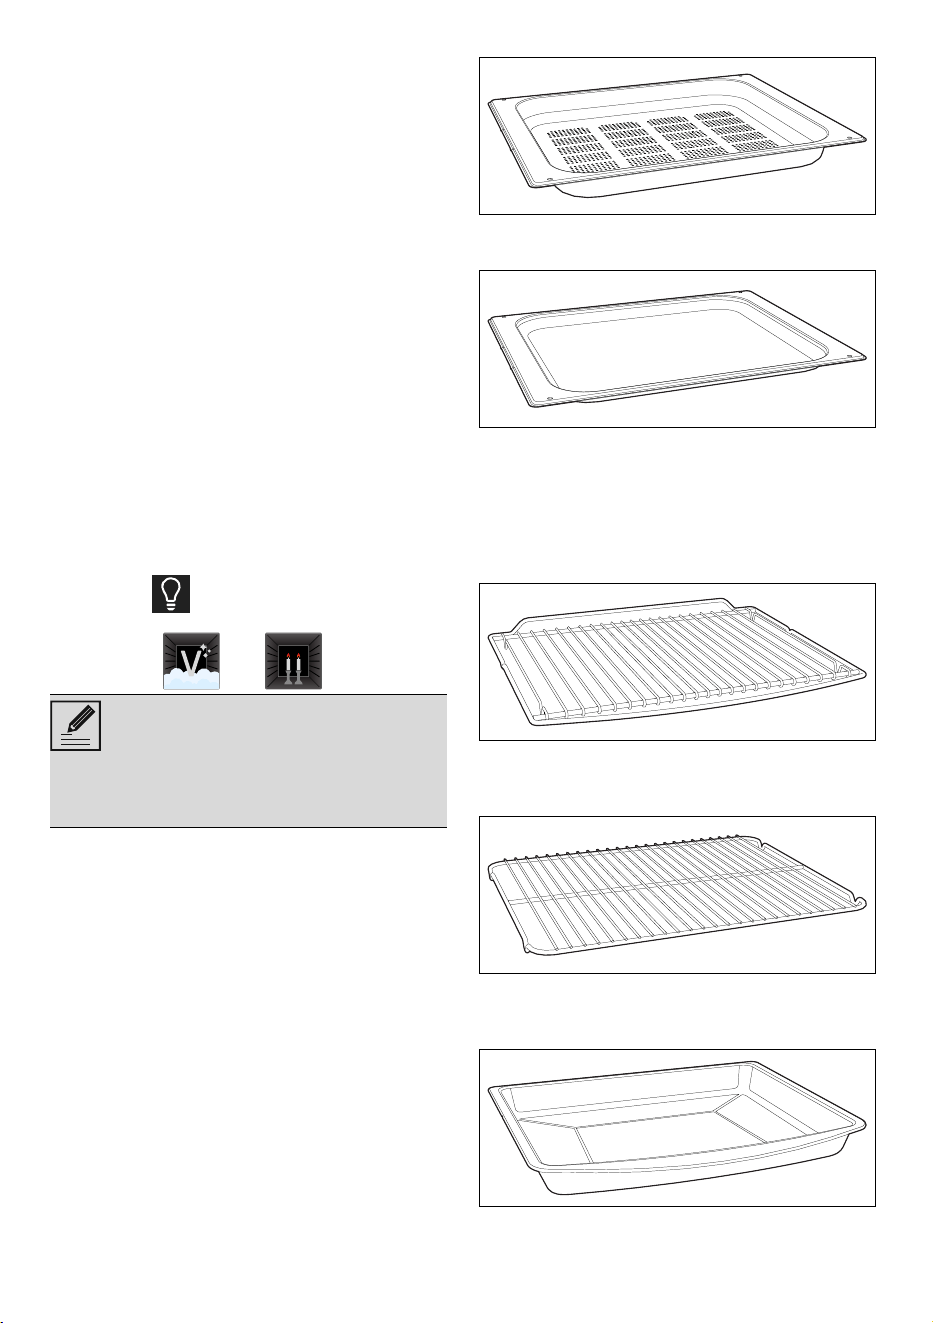
Perforated tray
Useful for steaming fish and vegetables.
Steel baking tray
Useful when cooking cakes (with cooking
times of less than 25 minutes or without
steam), rice, beans and cereals. It is also
essential for collecting liquids produced by
steaming or defrosting foods contained in
the perforated tray above.
Rack
Used for supporting containers with food
during cooking.
Tray rack
To be placed over the top of the tray; for
cooking foods which may drip.
Deep tray
Useful for collecting fat from foods placed
on the rack above and for cooking pies,
In order to save energy, the light
turns off after about one minute
from the start of cooking or
whenever the door is opened (this
function can be disabled via the
secondary menu).
DESCRIPTION - 7191477C139/A
e
pizzas, baked desserts, biscuits, etc.
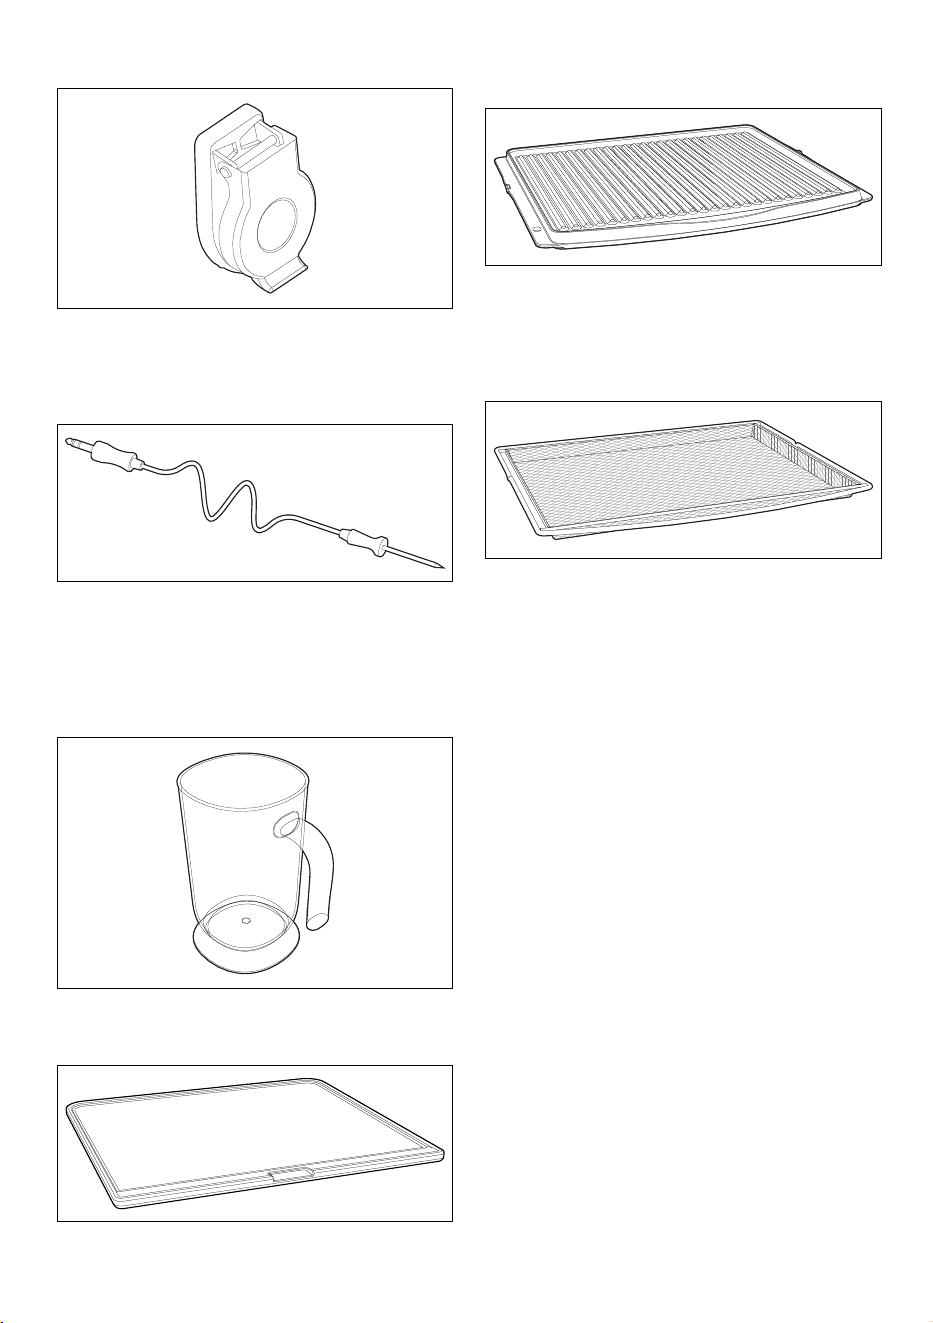
Protective cover (on some models only)
Used to cover and protect the temperature
probe socket when the temperature probe
is not in use.
Temperature probe (on some models
only)
With the temperature probe, you can cook
according to the temperature measured at
the centre the food.
Optional accessories (can be
purchased separately)
Jug
Useful for containing liquids during filling
and emptying of the reservoir.
PPR2 or STONE(refractory stone)
Ideal accessory for baking bread (pizza,
bread, focaccia...), but you can also use it for
more delicate preparations such as biscuits.
BBQ (teflon-coated barbecue grill pan)
Double-use accessory: the striped side is
recommended for grilling meat (fillets,
hamburgers...), while the smooth surface
can be used for cooking vegetables, fruit,
fish...
AIRFRY (oil-free frying grill)
Recommended accessory for air-frying
previously breaded, precooked and/or
frozen food (chips, potato or meat
croquettes, small mozzarella bites...).
Advantages of humidified and
steam cooking
The steam cooking system cooks any type
of food much smoother and faster and finds
its main applications for:
• Braising and stewing
•Cooking sauces
• Cooking au gratin
•Roasting
• Low temperature cooking
• Regenerating
• Multi-mode cooking
Variations in temperature and steam levels
allow the wished gastronomic result to be
achieved.
The addition of steam allows the use of less
fat in favour of a healthier and more
genuine cuisine. It also minimizes the loss of
weight and volume in food while cooking.
Steam cooking is particularly suitable for
cooking meat: in addition to making it very
soft, it maintains it bright and makes it more
succulent.
Also recommended for baking leavened
and bread dough. The humidity in fact lets
the dough grow and develop while cooking
before creating the outer crust. The result is
a lighter and more digestible dough,
72 - USE 91477C139/A
recognizable by thicker pockets.
(Valid for steam cooking only)
It is also ideal for defrosting food rapidly, for
heating up foods without hardening or
drying them out, and for naturally removing
salt from foodstuffs preserved with salt.
It is not recommended for short cooking
times or for foods that may produce a large
amount of moisture during cooking.
Cooking containers
• You may also use your own containers
for cooking, as long as they are resistant
to high temperatures.
• For steam cooking, the use of metal
containers is recommended. Metal
facilitates better distribution of heat to
the foods.
• It is normal for metal containers to
deform somewhat during high-
temperature cooking, but they will return
to their original shape when they cool
down.
• Thick ceramic plates may require more
heat than normal. Longer cooking times
may be necessary.
USE
Preliminary operations
• Remove any protective film from the
outside or inside of the appliance,
including accessories.
• Remove any labels (apart from the
technical data plate) from the
accessories and shelves.
• Remove and wash all the appliance
accessories (see chapter "CLEANING
AND MAINTENANCE").
First heating
1. Set a cooking time of at least one hour
(see paragraph "Using the oven").
2. Heat the empty oven compartment at
the maximum temperature to burn off
any residues left by the manufacturing
process.
When heating the appliance
• air the room;
•don't stay.
Using the accessories
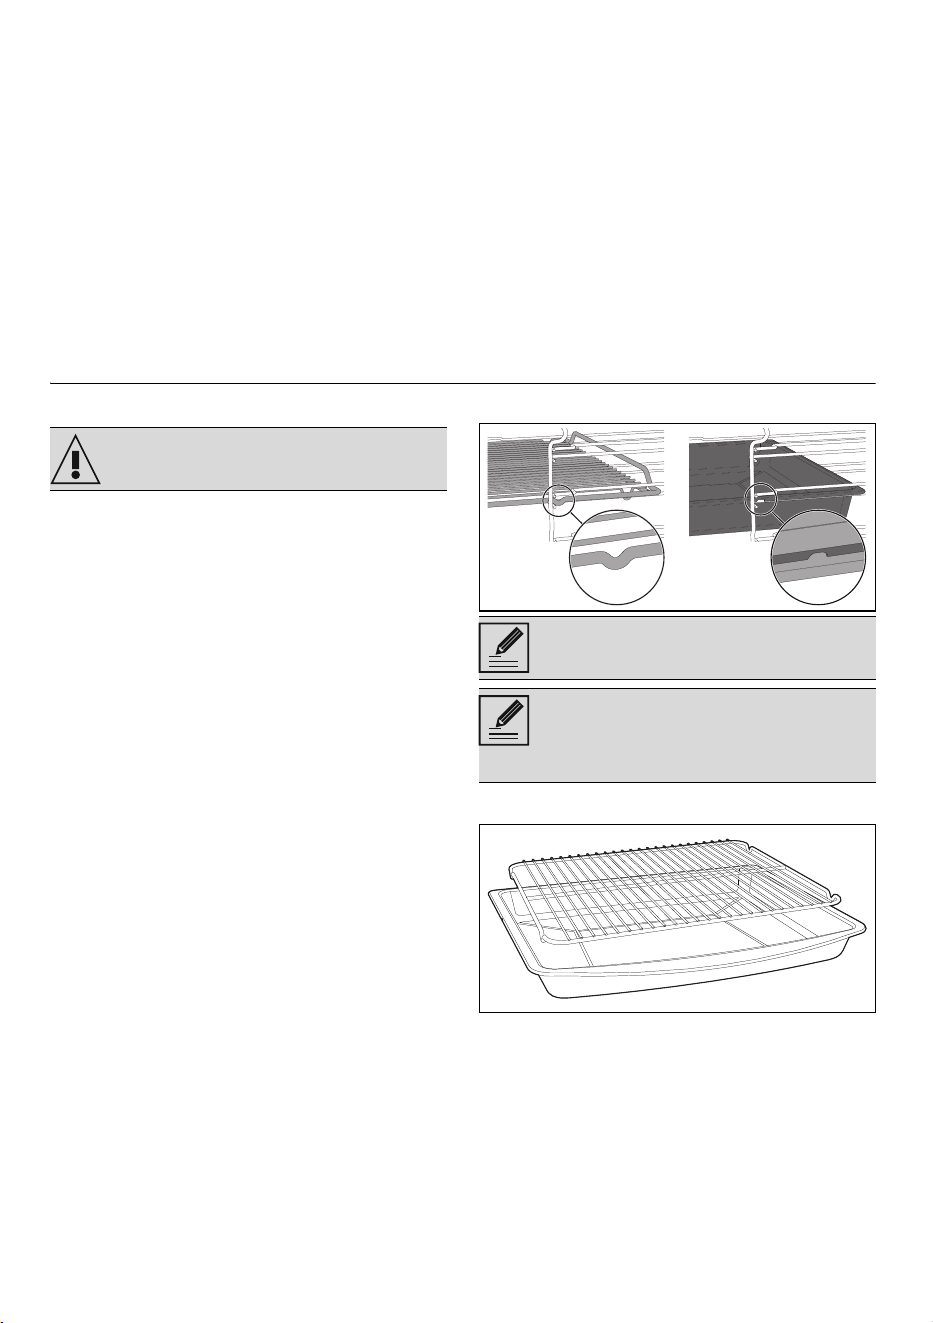
Racks and trays
Racks and trays have to be inserted into the
side guides until they come to a complete
stop.
• The mechanical safety locks that
prevent the rack from being removed
accidentally must face downwards and
towards the back of the oven cavity.
Tray rack
The tray rack has to be inserted into the
tray. In this way fat can be collected
separately from the food which is being
cooked.
See General safety instructions.
Gently insert racks and trays into the
oven until they come to a stop.
Clean the trays before using them
for the first time to remove any
residues left by the manufacturing
process.
USE - 7391477C139/A
e
Configuration for steam cooking
If you intend to use the perforated baking
tray for steam cooking, it must be placed on
the desired shelf taking care to place the
steel baking tray on the shelf below. This
allows liquids to be collected separately
from the food which is being cooked.
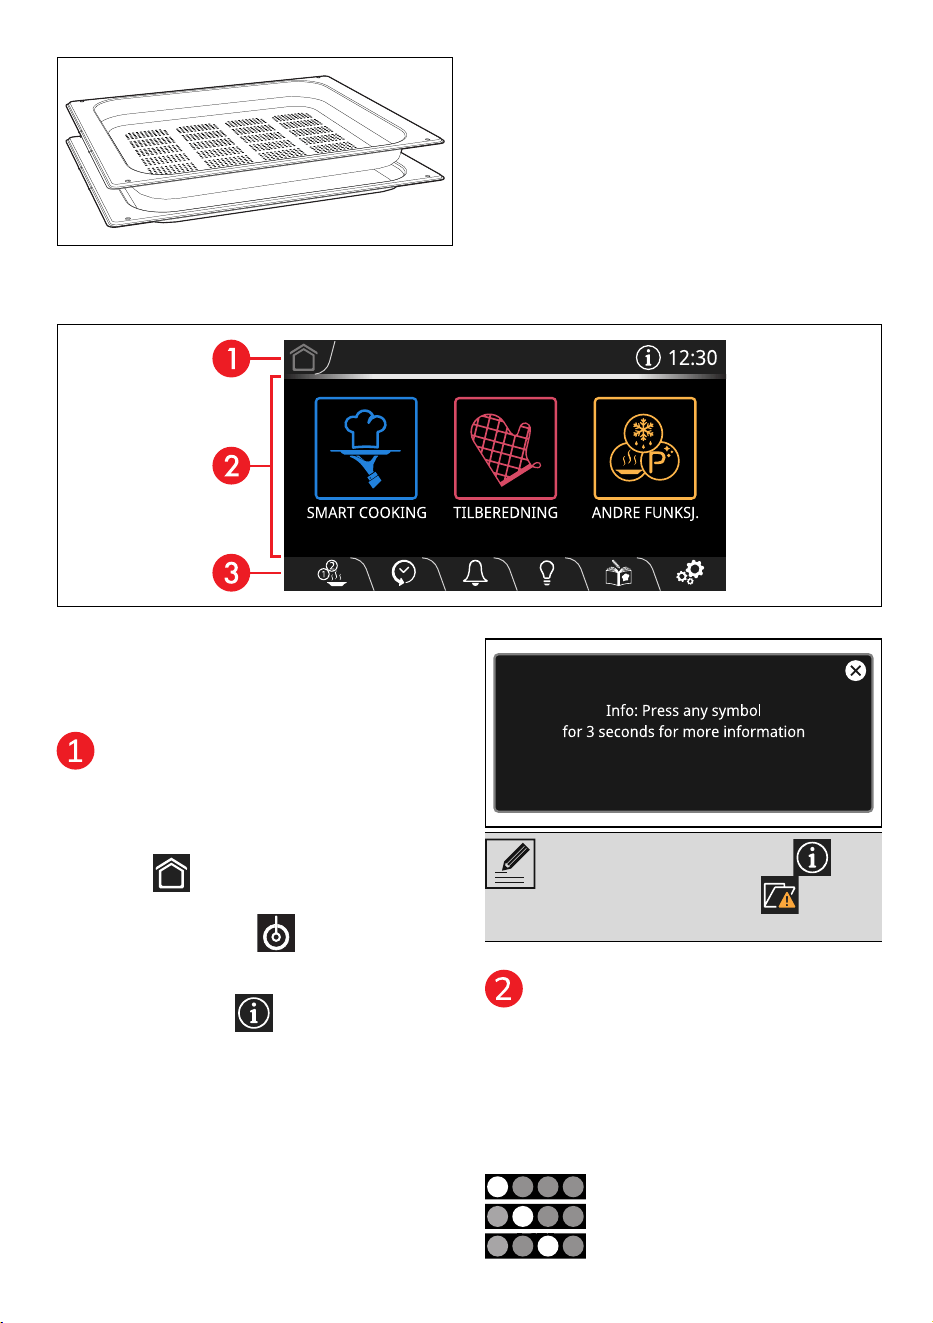
Display
The parameters and values for the currently
selected function will be indicated on the
display. To use it, simply touch the "virtual"
keys and/or scroll through the values
indicated (the image shows the main menu
screen).
Information area
Information regarding the menus and
submenus of the functions in progress in the
main area are indicated in this area.
The following are also present in this area:
• HOME button: touch this button to
return to the main menu;
• The QUICK MODE button (models
with knobs only): touch this button to
enter Quick Mode.
• INFORMATION button: touch this
button to display the following screen:
•current time display.
Main area
The various functions of the appliance can
be set in this area. Touch the buttons and
values to set the required function.
In addition, depending on the screen, dots
may appear at the bottom of this area to
indicate that there are other function pages,
which can be reached by scrolling
horizontally.
first page,
second page,
etc...
The INFORMATION button is
replaced by the symbol to warn
that the door is open.
74 - USE 91477C139/A
Lower area
There are various shortcut function buttons
in this area, which vary according to the
functions set in the main area:
MULTISTEP
HISTORY
TIMER
LIGHT BULB
MY RECIPES
SETTINGS
According to the page that is displayed, the
following buttons may also be present:
BACK
CONFIRM
START
REPLAY
STOP
SAVE
DELETE
RAPID PRE-HEATING
PROBE (on some models only)
Connectivity (selected models only)
Connectivity requirements:
• Smartphone or PC tablet with IOS or
Android operating system. The
minimum versions of the operating
systems are available at the
following link:
www.smeg.com/smegconnect/
• Wi-Fi network (2.4 GHz band,
WPA2 protected) active and
available in the place where the
appliance is installed.
• Internet connection.
• Name and password of the home
Wi-Fi network or WPS (Wi-Fi
Protected Setup) mode available.
For further information, please refer to
the “Built-in oven connectivity” manual.
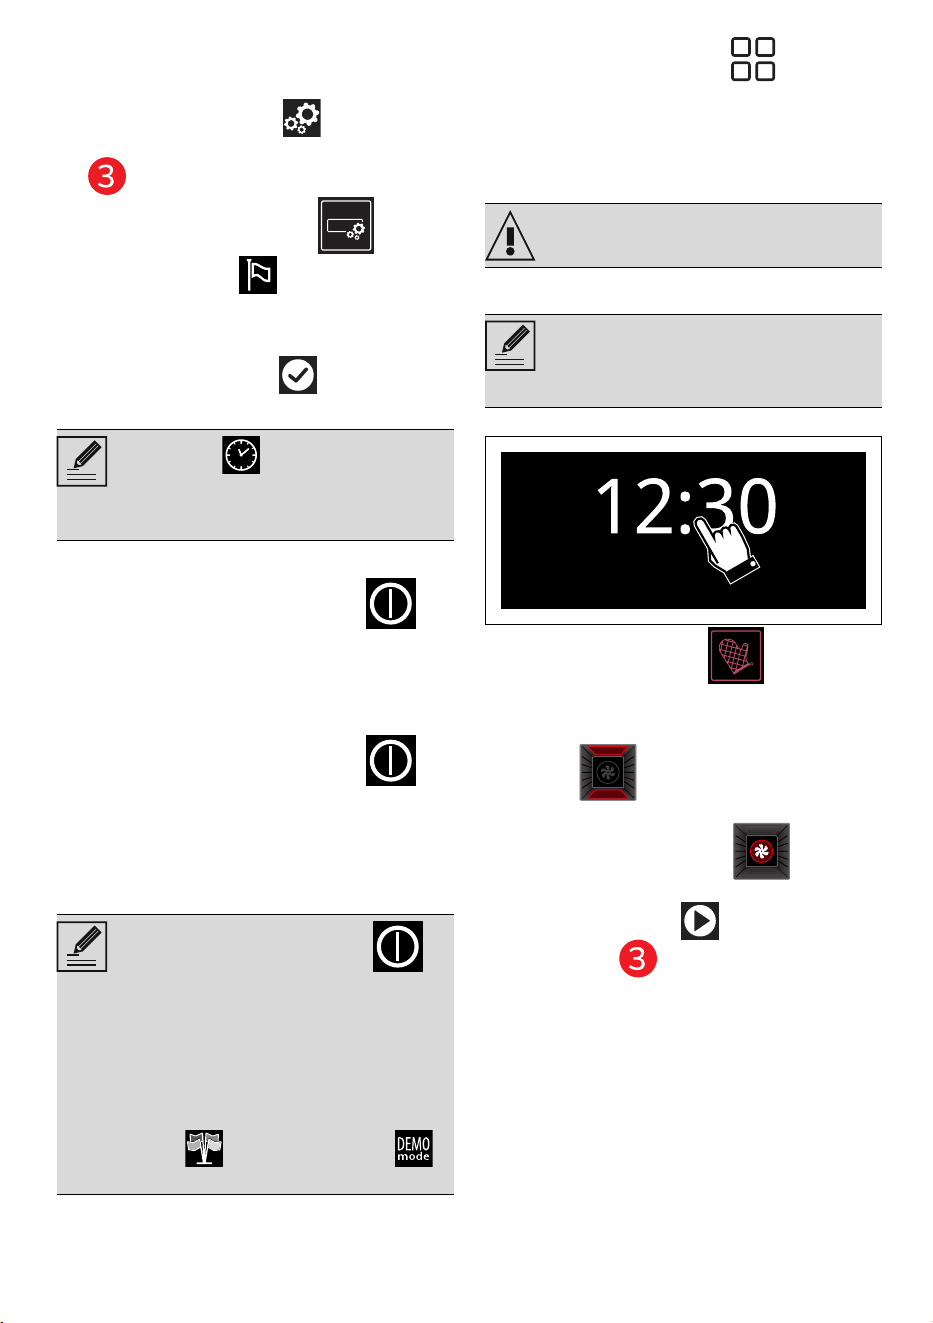
First use
To switch on the appliance:
1. Connect the appliance to the mains
power supply.
The manufacturer’s logo will display for a
few seconds.
The display then shows the current time
setting screen.
To be able to start any cooking function, the
current time must be set.
2. Scroll up and down through the hours
and minutes to set the current time.
3. Touch the CONFIRM button (at the
right in the lower area ) to set the
current time.
The first time you use the appliance, it may
Press and hold the HOME
button or the ON-OFF button
for a few seconds to stop cooking
immediately at any time and return
to the main menu.
The following instructions are also
valid in the case of a prolonged
power failure.
After the appliance is switched on,
you will need to wait a few seconds
before you can use it.
To change the current time (e.g. due
to daylight saving time) touch the
time shown on the display (in the
information area on the right).
When the current time is visible,
after 2 minutes from the last
operation by the user it is displayed
with low brightness.
USE - 7591477C139/A
e
be set to a language other than the one you
speak. It is recommended that you set the
required language at this point.
4. Touch the SETTINGS button on the
display (at the right in the lower area
).
5. Touch the display button .
6. In the Language option (on the left),
scroll through the available languages
(on the right) to select the required
language.
7. Touch the CONFIRM button.
Deactivating the display
To deactivate the display manually:
• Press and hold the ON-OFF
button for a few seconds until you
hear a sound.
Reactivating the display
To reactivate the display when it is off:
• Press and hold the ON-OFF
button for a few seconds until you
hear a series of sounds.
The display turns on after a few
seconds. The display shows the main
menu when it is switched on again.
Display reactivation for models with knobs
To reactivate the display when it is off:
• Turn the Function Knob one click
(to the right or left).
The display turns on after a few seconds.
The display shows the main menu when it
is switched on again.
Using the oven
Traditional cooking
1. Touch the time indicated on the display.
2. Touch the COOKING button on
the "main menu" (in the main area ).
3. Touch the TRADITIONAL COOKING
MENU button.
4. Select a combination function (for
example FAN-HEATED ) to enter
the relevant cooking screen.
5. Touch the START button (at the
lower right ) to start pre-heating.
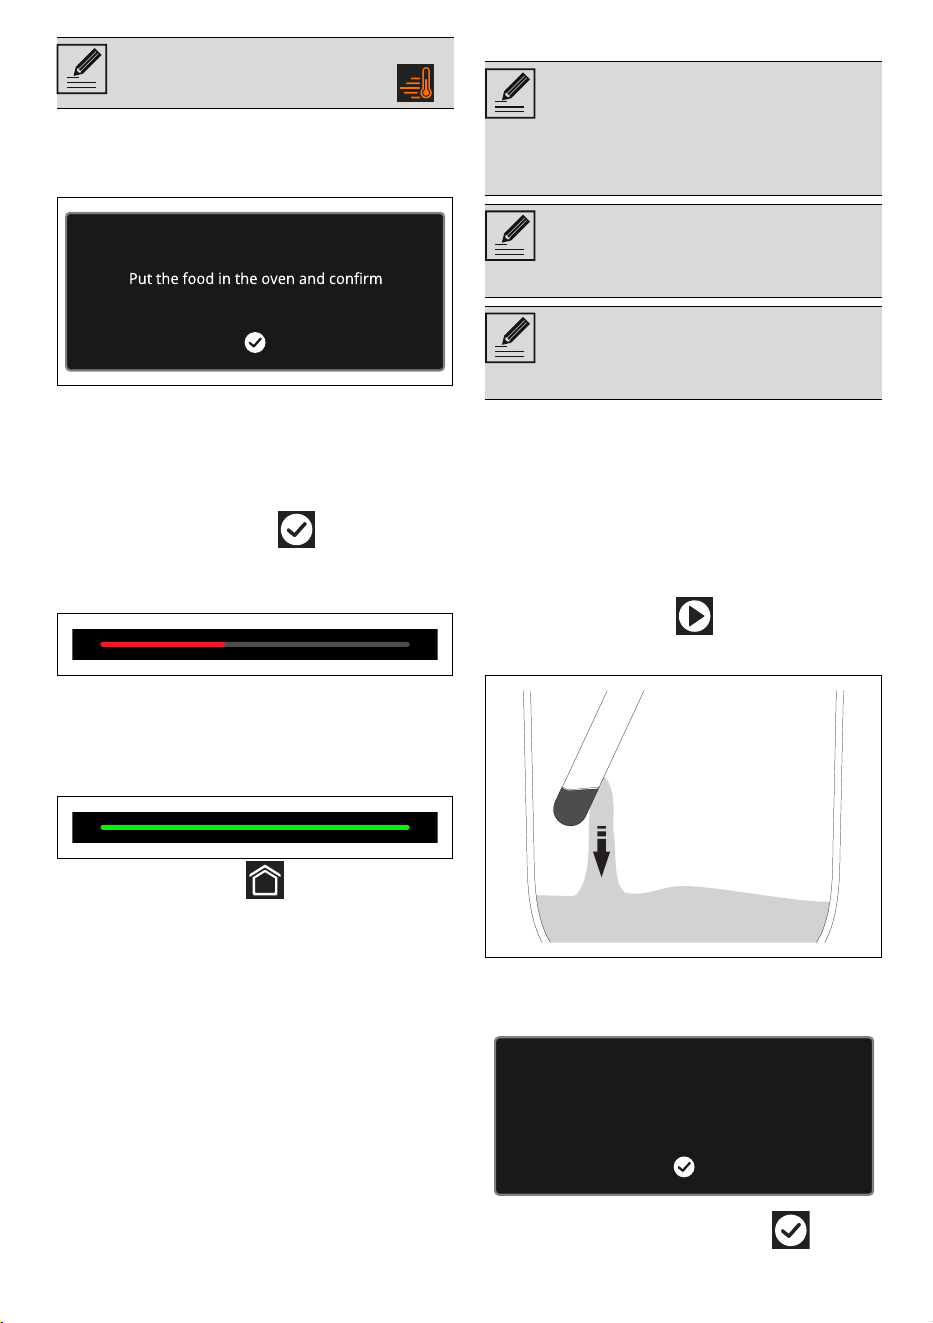
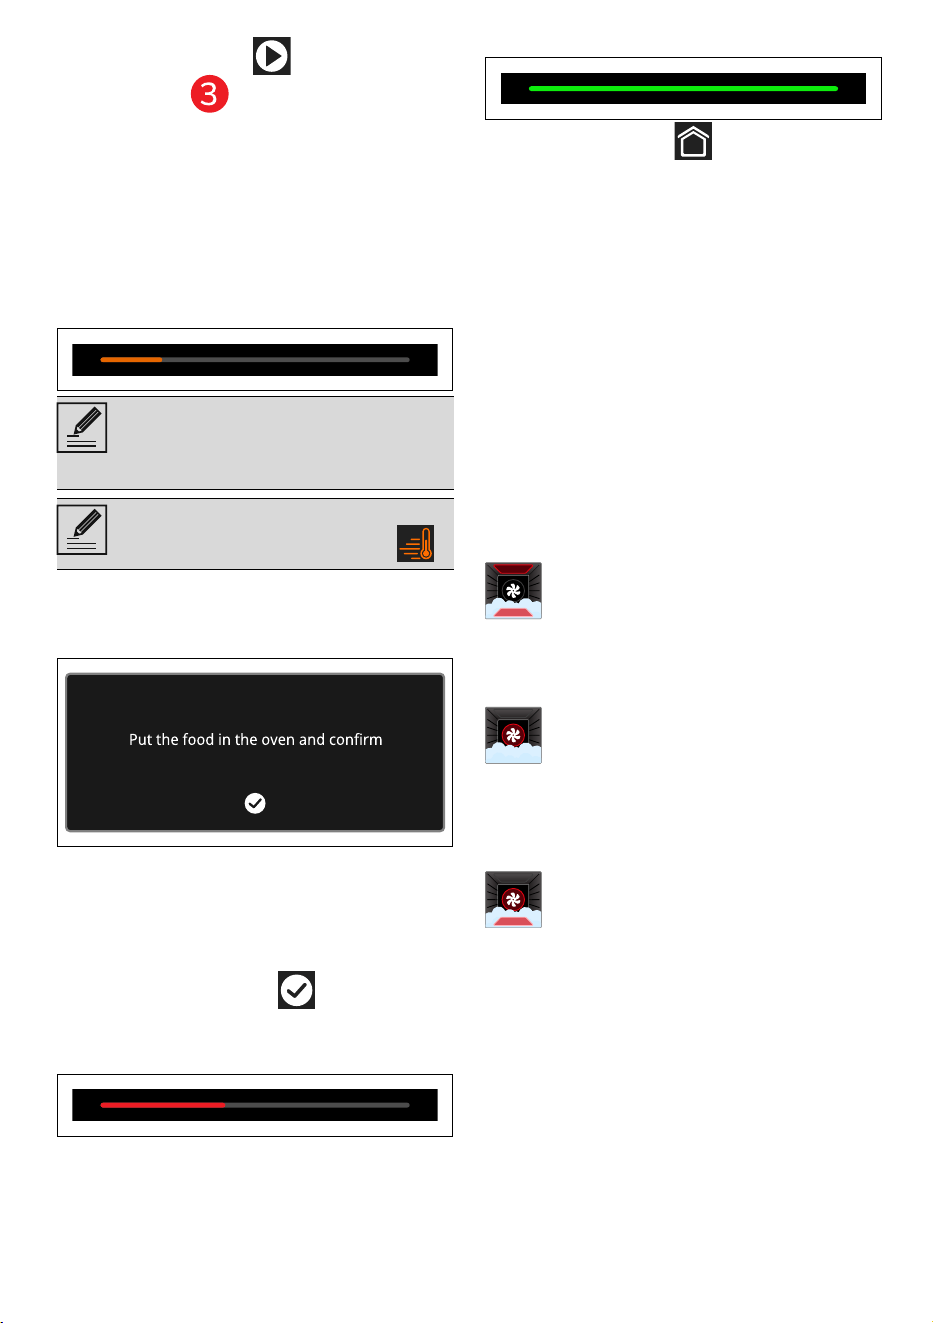
Preheating stage
Cooking itself is preceded by a preheating
stage, which allows the appliance to heat to
the cooking temperature more quickly.
This stage is indicated by a progressive
When the " Show the time"
mode is set to Off, if the time display
is shown, the display will switch off
automatically after 2 minutes.
In some cases, the ON-OFF
button does not deactivate the
display. For example, when:
• there is a cooking function in
progress (the button stops the
function);
• the door is open;
• a minute minder timer is active;
• the Showroom and/or
Demo modes are active.
See General safety instructions.
Each time the door is opened, the
function in progress will stop and
then automatically restart when the
door is closed again.
76 - USE 91477C139/A
increase in the temperature level reached.
After pre-heating, a buzzer will sound and a
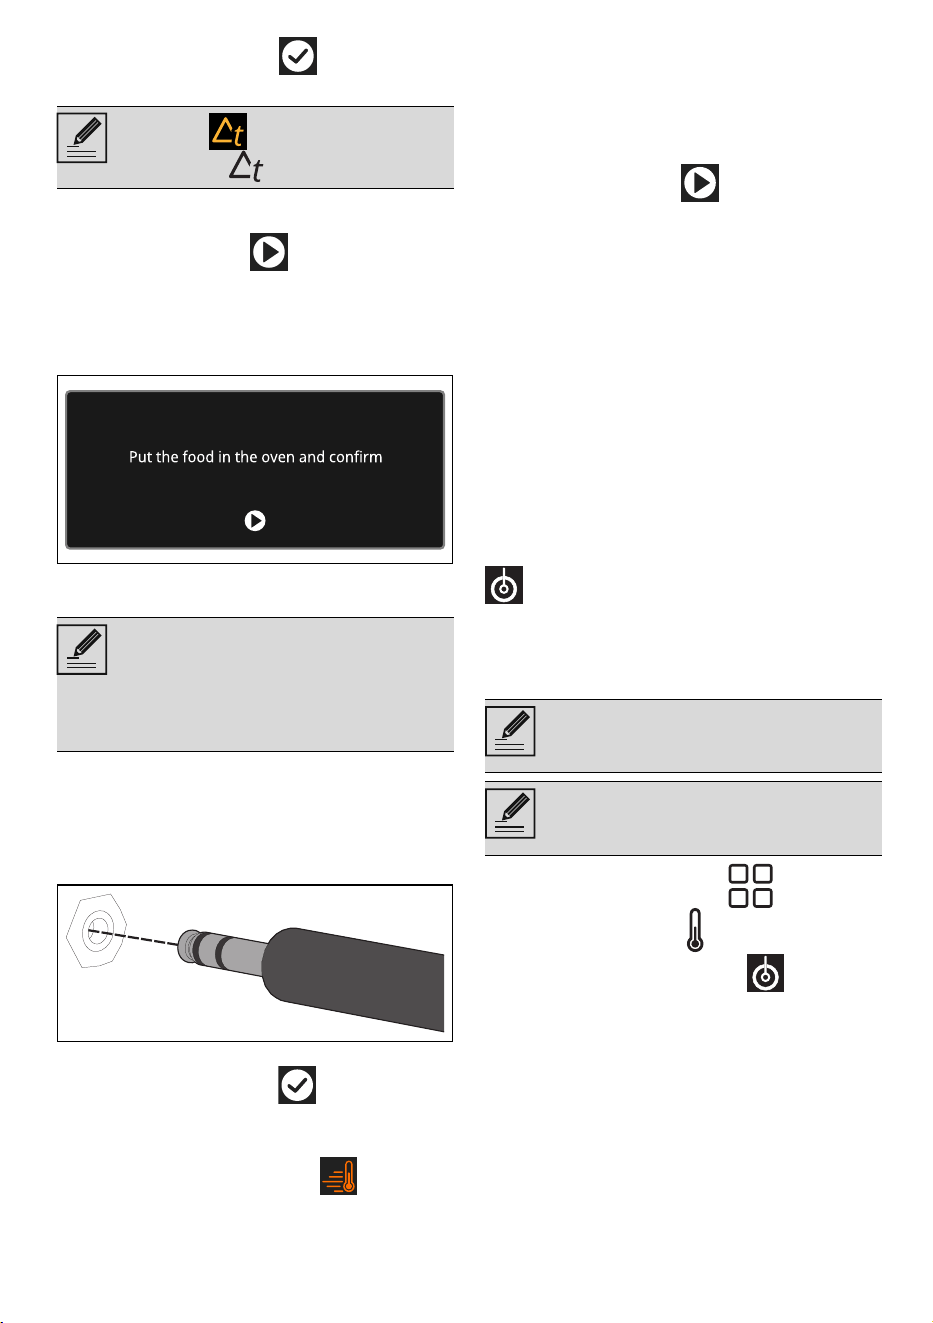
message will appear on the display to
indicate that the dish can be put in the oven
cavity.
Cooking phase
1. Open the door
2. Place the dish with the food to be
cooked into the oven cavity.
3. Close the door.
4. Touch the CONFIRM button to start
cooking.
This stage is indicated by a progressive
increase in cooking.
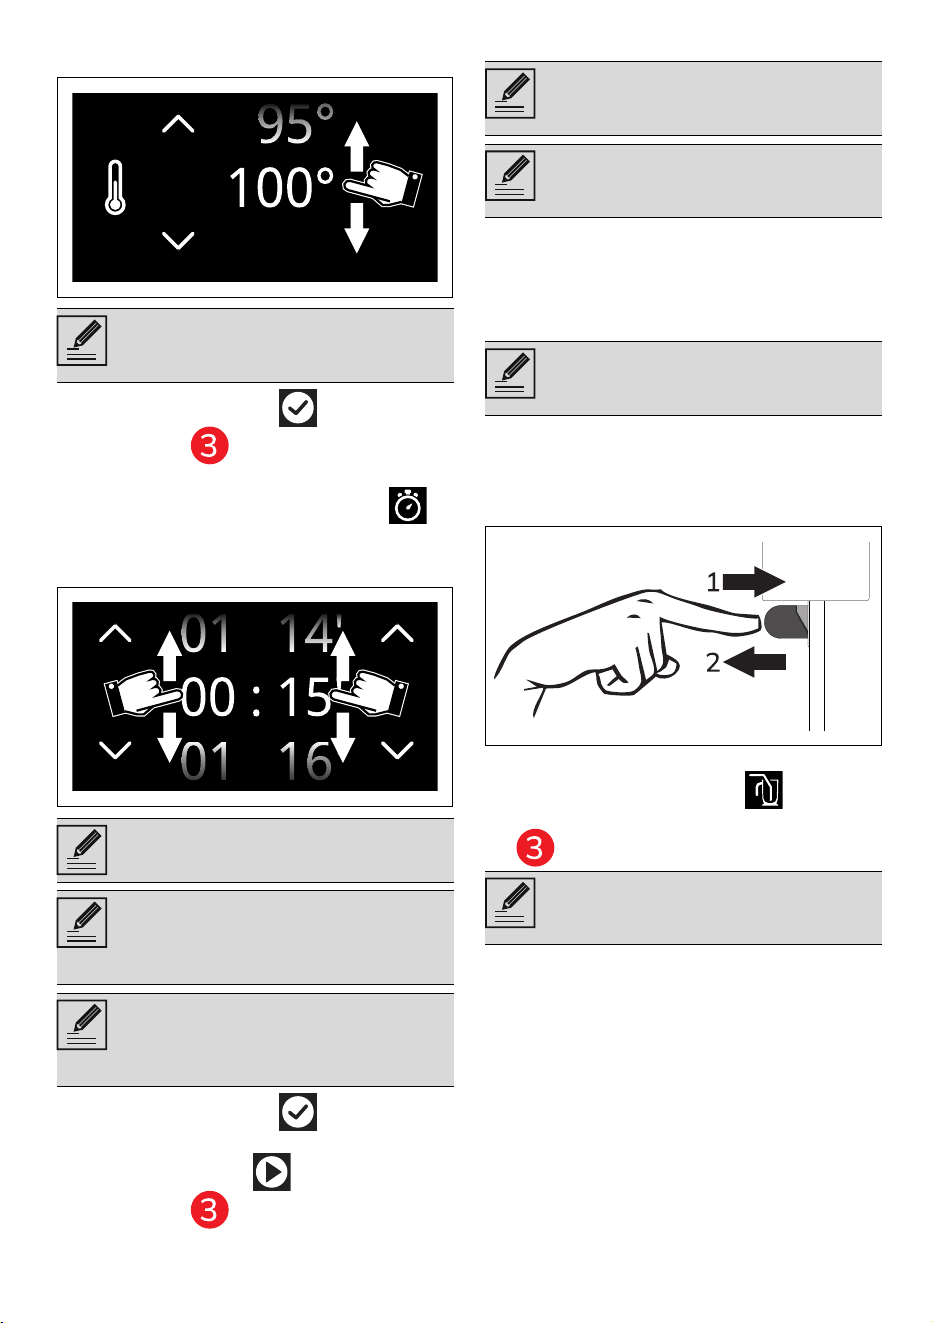
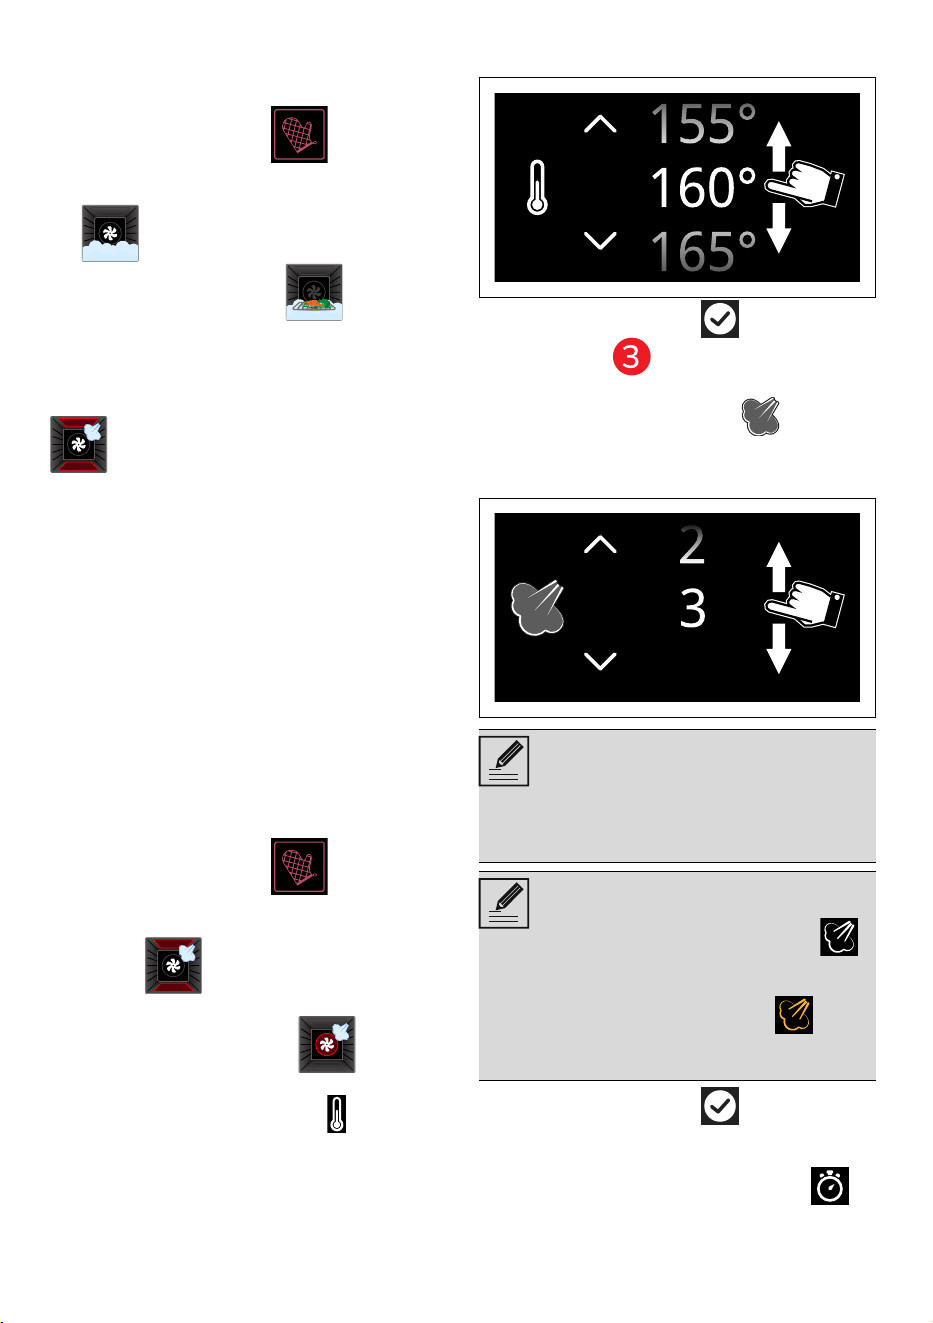
Modifying the cooking temperature
1. Touch the TEMPERATURE button or
the relevant value.
2. Scroll through the values and select the
required cooking temperature.
3. Touch the CONFIRM button (at the
lower right ) to confirm the cooking
temperature that has been selected.
End of cooking
To end cooking at any time:
1. touch the STOP button .
2. Touch the CONFIRM button.
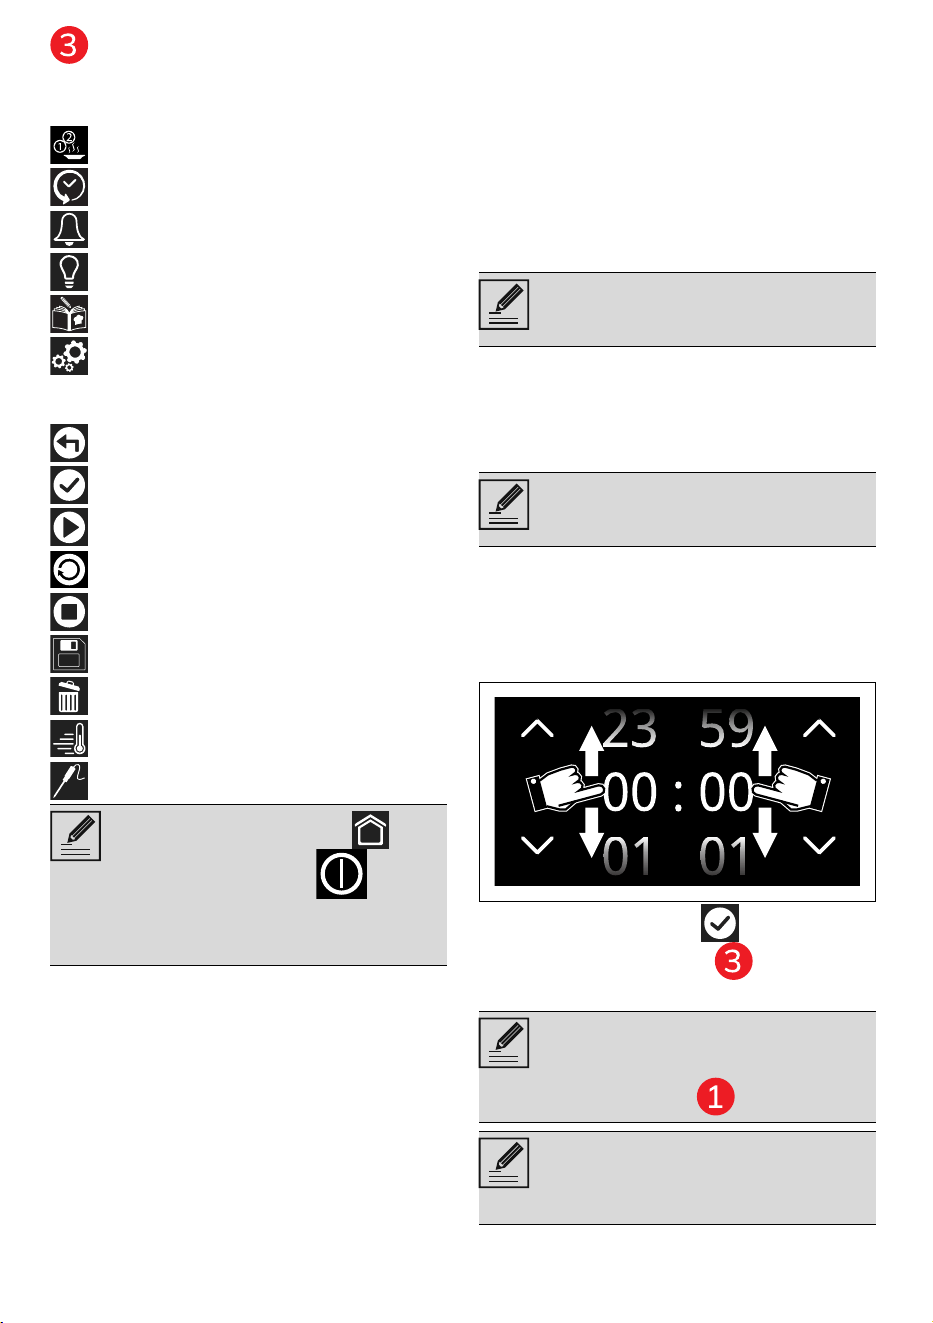
Timed cooking
1. After selecting a function, touch the
COOKING DURATION button or the
relative value.
2. Scroll through the values and select the
required duration.
3. Touch the CONFIRM button to
confirm the selected cooking duration.
Unless otherwise indicated in the
recipe, it is not recommended to
place food in the oven during the
preheating stage.
You can skip the pre-heating stage
touching the dedicated button .
The temperature can be modified at
any time during cooking.
Timed cooking is the function which
allows a cooking operation to be
started and then ended after a
specific length of time set by the
user.
The hours and minutes can be
selected separately.
USE - 7791477C139/A
e
The expected end of cooking time appears
under the duration.
4. Touch the START button to start
timed cooking.
End of cooking
At the end of cooking, "Function ended"
displays and a buzzer sounds briefly, which
can be deactivated by touching any point of
the display or by opening the door.
• Touch the HOME button to quit the
function.
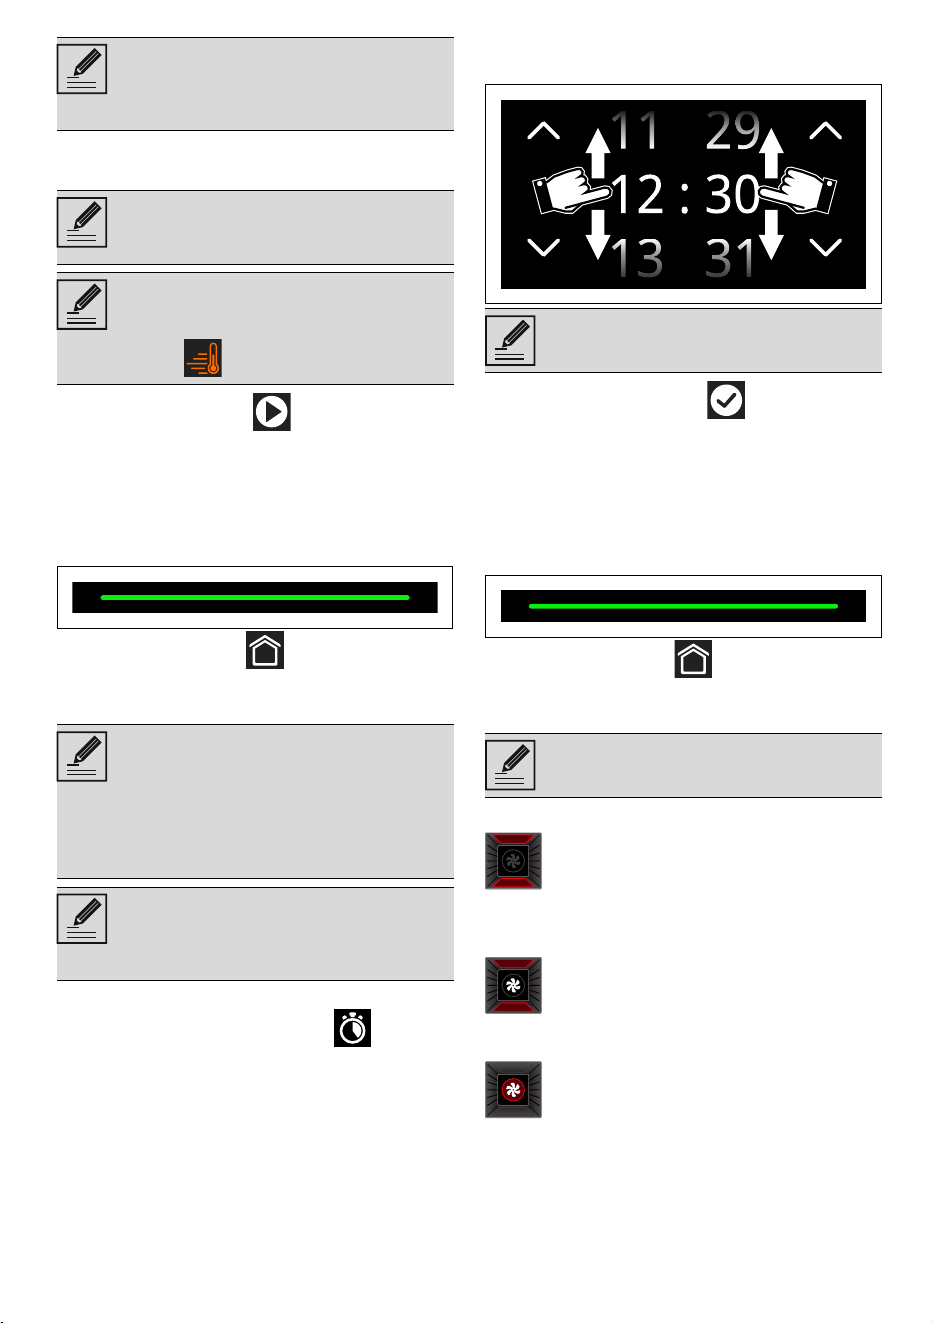
Programmed cooking
1. After setting timed cooking, touch
PROGRAMMED COOKING button
or the relevant value.
2. Scroll through the values and select the
required end-of-cooking time.
3. Touch the CONFIRM button to
confirm the selected end of cooking
time.
End of cooking
At the end of cooking, "Function ended"
displays and a buzzer sounds briefly, which
can be deactivated by touching any point of
the display or by opening the door.
• Touch the HOME button to quit the
function.
List of traditional cooking functions
STATIC
FAN-ASSISTED
THERMALLY-VENTILATED
The duration of the timed cooking
function can be from a minimum of 1
minute to a maximum of 12 hours
and 59 minutes.
The minutes required for pre-
heating are already included in the
end-of-cooking time.
The countdown starts after the pre-
heating has ended or if you wish to
avoid pre-heating (touch the relative
button ).
Programmed cooking is the function
which allows a time-controlled
cooking operation to be stopped at
an established time depending on
the time set by the user, after which
the appliance will switch off
automatically.
For safety reasons, it is not possible
to set the end of cooking time by
itself without setting the cooking
duration.
The hours and minutes can be
selected separately.
Not all functions are available on
some models.
Traditional cooking suitable for the
preparation of one dish at a time.
Ideal for cooking roasts, fatty meats,
bread, pies.
Intense and uniform cooking. Ideal
for biscuits, cakes and multilevel
cooking.
The heat is distributed quickly and
evenly. Suitable for all dishes, ideal
for cooking on several levels without
mixing odours and flavours.
78 - USE 91477C139/A
TURBO
GRILL
FAN-ASSISTED GRILL
BASE
THERMALLY-VENTILATED BASE
PIZZA
ECO
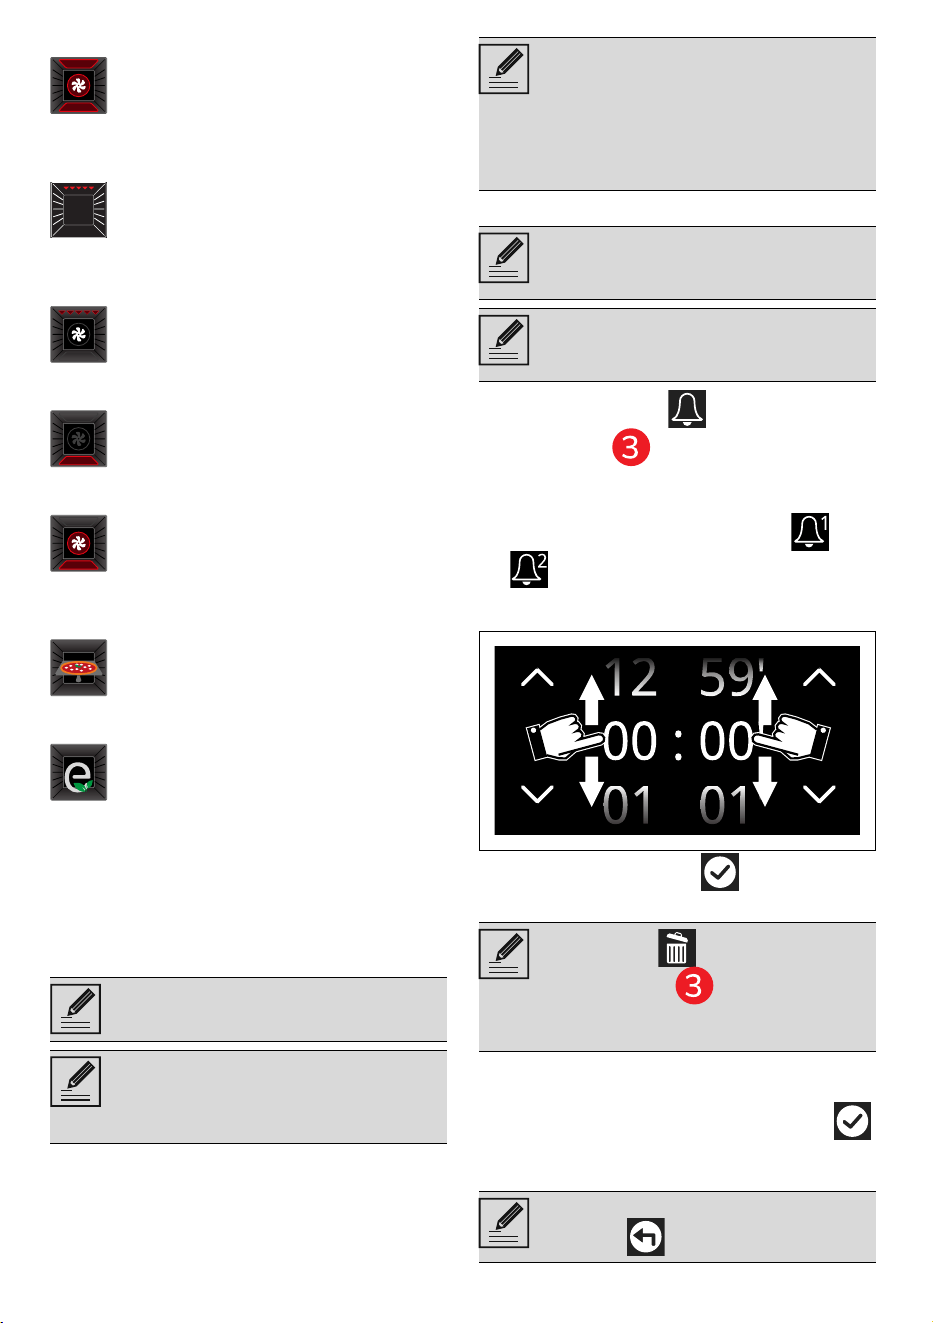
Minute minder timer
1. Touch the TIMER button (in the
lower area ) to access the Timer
menu.
Up to 2 minute minder Timers can be set:
2. Touch the button of the TIMER -
that you intend to use.
3. Scroll through the values and select the
required duration.
4. Touch the CONFIRM button to
confirm the selected duration.
5. Repeat the procedure for the other
Timers that you intend to use.
6. When finished, touch the CONFIRM
button again to confirm the selected
timers.
Allows quick cooking on multiple
shelves without mixing the aromas.
Perfect for large volumes that call
for intense cooking.
It allows to obtain excellent grilling
and grating results. Used at the end
of cooking, it gives a uniform
browning to the dishes.
Allows optimal grilling of even the
thickest meats. Perfect for large cuts
of meat.
The heat only comes from the
bottom of the cavity. Perfect for
cakes, pies, tarts and pizzas.
Allows you to quickly finish cooking
food already cooked on the surface
but not internally. Perfect for any
quiches and any type of food.
Function designed for cooking pizza.
Perfect not just for pizzas, but also
for biscuits and cakes.
This function is particularly suitable
for cooking on a single shelf with
low energy consumption.
It is recommended for all types of
food, excluding those that can
create a lot of humidity (such as
vegetables).
To obtain maximum energy savings
and reduce cooking times, it is
recommended to place food in the
oven without preheating.
When using the ECO function, avoid
opening the door during cooking.
In the ECO function cooking times
(and any preheating) are longer and
may depend on the amount of food
in the cooking compartment.
The ECO function is a delicate
cooking function and is
recommended for food withstanding
temperatures lower than 210°C; in
case of cooking at higher
temperatures, select another
function.
This function only activates the
buzzer, without stopping the
function in progress.
The Timer can be set from a
minimum of 1 minute to a maximum
of 12 hours and 59 minutes.
The DELETE button appears in
the lower area that can be used
to delete a timer if one has been
selected.
To cancel the operation, touch the
RETURN button.
USE - 7991477C139/A
e
In the following display, the lit TIMER
button indicates that one or more minute
minder timers have been activated.
7. Wait for the buzzer to indicate that the
time has finished.
Using the temperature probe (on
some models only)
The temperature probe enables you to cook
roasts, loin steaks and other cuts and sizes
of meat with great precision. The probe
ensures that the food is perfectly cooked by
monitoring the core temperature of the
food. The core temperature is measured by
a sensor inside the tip of the probe.
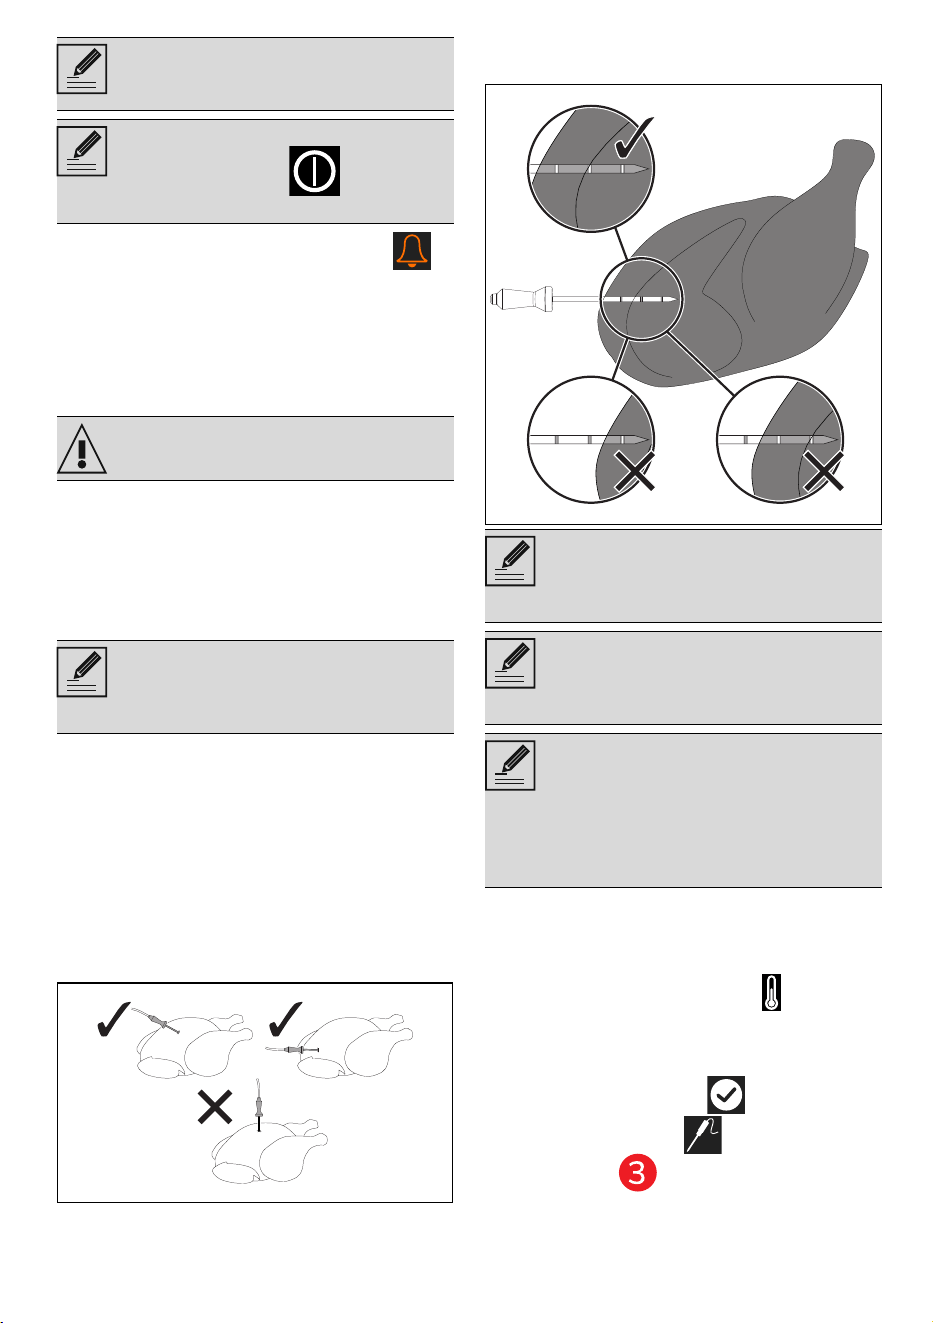
Positioning the probe
1. Place the food on a tray.
2. Insert the tip of the probe into the food
before you place it in the oven.
3. For best results, make sure that the
temperature probe is placed
transversely in the thickest part of the
food and for least 3/4 of its length. Make
sure that it does not touch the tray
underneath and that it does not
protrude from the food.
4. The 3 notches on the temperature probe
must be inserted into the food.
Setting cooking parameters when using
the temperature probe
1. Select a cooking function.
2. Touch the TEMPERATURE button or
the relevant value.
3. Scroll through the values and select the
required cooking temperature.
4. Touch the CONFIRM button.
5. Touch the PROBE button in the
lower area .
The counter must be set to zero in
order to remove the minute minder
timer.
The display cannot be switched off
using the ON-OFF button
when a timer is active.
See General safety instructions.
Do not install any telescopic guides
on the fourth shelf from the bottom,
as they would not allow access to
the temperature probe side socket.
In order for the probe to measure the
core temperature of the food
precisely, its tip must not be in
contact with bones or fat.
The recommended minimum
temperature for cooking with the
probe is 120°C, with the exception
of slow temperature cooking.
If the probe does not read the
temperature of the food correctly, 2
error messages will appear on the
display (to acknowledge), after
which, the appliance will
automatically carry out timed
cooking.

80 - USE 91477C139/A
6. Scroll through the target temperature
values and select the required
temperature.
7. Touch the CONFIRM button to
confirm the selected probe temperature.
A message appears on the display to
remind you to connect the probe to the
socket and to place it in the food.
8. Touch the CONFIRM button.
Cooking
This option automatically sets the ideal
temperature inside the oven cavity
according to the target temperature set by
the user.
1. After setting the desired target
temperature, press the button (at
the lower right ).
2. Select the temperature difference value.
slow
Sets the smallest difference between the
probe temperature and the temperature of
the oven cavity. This results in a longer
cooking time.
Medium
Sets a medium difference between the
probe temperature and oven cavity
temperature. This results in a medium
cooking time.
fast
Sets the largest difference between the
probe temperature and the temperature of
the oven cavity. This results in a shorter
cooking time.
The temperature range that can be
selected is from a minimum of 20°C
to a maximum of 90°C.
If the temperature of the oven is set
too low, the appliance automatically
sets the minimum temperature
necessary in order to reach the
selected target temperature.
For best results, it is recommended
to set a cooking temperature higher
than the target temperature.
The appliance automatically sets
the cavity temperature to a
predefined temperature (called )
which is higher than the core
temperature detected by the probe.
When the probe detects one degree
more at the core, the appliance
automatically increases its internal
temperature by one degree.
The appliance offers the possibility
to choose between three different
cooking modes (slow, medium and
fast) and to set any desired core
temperature.
A concentrate of technology that
produces tender, juicy, healthy
products of the highest quality.
USE - 8191477C139/A
e
3. Touch the CONFIRM button to
confirm the selected probe temperature.
With preheating:
1. Touch the START button to start
the pre-heating stage.
After pre-heating, a buzzer will sound and a
message will appear on the display to
indicate that the dish can be put in the oven
cavity.
2. Insert the tip of the temperature probe
into the food to be cooked.
3. Open the oven door.
4. Insert the tray on which the food has
been placed into the appropriate guides.
5. Insert the plug of the temperature probe
into the socket at the side, using the
probe to open the protective cover.
6. Close the door.
7. Touch the CONFIRM button to start
cooking using the temperature probe.
Without preheating:
1. Touch the PRE-HEATING button to
disable pre-heating.
2. Open the appliance door.
3. Insert the tray on which the food has
been placed into the appropriate guides.
4. Insert the plug of the temperature probe
into the socket at the side, using the
probe to open the protective cover.
5. Close the door.
6. Touch the START button to start
cooking using the temperature probe.
End of cooking parameters with the
temperature probe
Cooking ends when the instantaneous
temperature reaches the target
temperature set by the user.
The heating elements are switched off and
the appliance emits a series of beeps.
1. Open the door.
2. Remove the probe from the food and
unplug it from the socket.
3. Remove the food from the oven.
4. Make sure that the protective cover is
properly closed.
5. Close the door.
Quick Mode (models with knobs only)
1. Turn the Function knob and the
Temperature knob back to position 0.
2. Touch the QUICK MODE button in
the "main menu" (in the information area
at the top left).
It is now possible to use the knobs to
operate the appliance.
Press the button to eliminating
the cooking .
For best results, make sure that the
metal part of the temperature probe
is inserted almost completely into
the food at a right angle, but make
sure that it does not touch the tray
underneath.
This mode allows you to set a
traditional cooking function and its
temperature quickly using the
knobs.
It is also possible to quickly set the
probe cooking function.
The pre-heating function cannot be
disabled when Quick Mode is being
used.
Cooking can be interrupted at any
time by turning the function knob
and the temperature knob to 0.
82 - USE 91477C139/A
3. Turn the Functions knob to select
the required function.
Traditional cooking
1. Turn the Temperature knob to set the
desired cooking temperature.
The oven cavity starts to preheat a few
seconds after the last setting was made.
2. Use the Decrease and Increase
buttons (in the lower area ) to set a
cooking duration.
Cooking using the probe (on some models
only)
3. Touch the PROBE button in the
lower area .
4. Use the Decrease and Increase
keys to set the target temperature.
5. Touch the CONFIRM button to
confirm the target temperature.
6. Insert the tray on which the food has
been placed into the appropriate guides.
7. Insert the plug of the temperature probe
into the socket at the side, using the
probe to open the protective cover.
8. Close the door.
9. Turn the Temperature knob to set the
cooking temperature.
The oven cavity starts to preheat a few
seconds after the last setting was made.
End of cooking
At the end of cooking, End of cooking
displays and a buzzer sounds briefly, which
can be deactivated by touching any point of
the display or by opening the door.
1. Turn the Function knob and the
Temperature knob back to position 0.
2. Touch the TOUCH MODE button (in
the information area at the top left)
to return to the main menu.
Steam cooking
1. Touch the COOKING button on
the "main menu".
2. Touch the STEAM COOKING MENU
button.
3. Select the STEAM function to
enter the relevant cooking screen.
4. Touch the TEMPERATURE button or
the relevant value.
You can select all the traditional
functions apart from the
PIZZA
and
ECO functions.
If the Decrease and Increase
buttons are not used, the
display will show the cooking time
that has elapsed.
If cooking has just been performed
with temperatures greater than
100°C, you must wait for the oven to
cool in order to use the steam
function.
USE - 8391477C139/A
e
5. Scroll through the values and select the
required cooking temperature.
6. Touch the CONFIRM button (at the
lower right ) to confirm the cooking
temperature that has been selected.
7. Touch the COOKING DURATION
button or the relevant value.
8. Scroll through the values and select the
required duration.
9. Touch the CONFIRM button to
confirm the selected cooking duration.
10. Touch the START button (at the
lower right ) to start the reservoir
filling procedure.
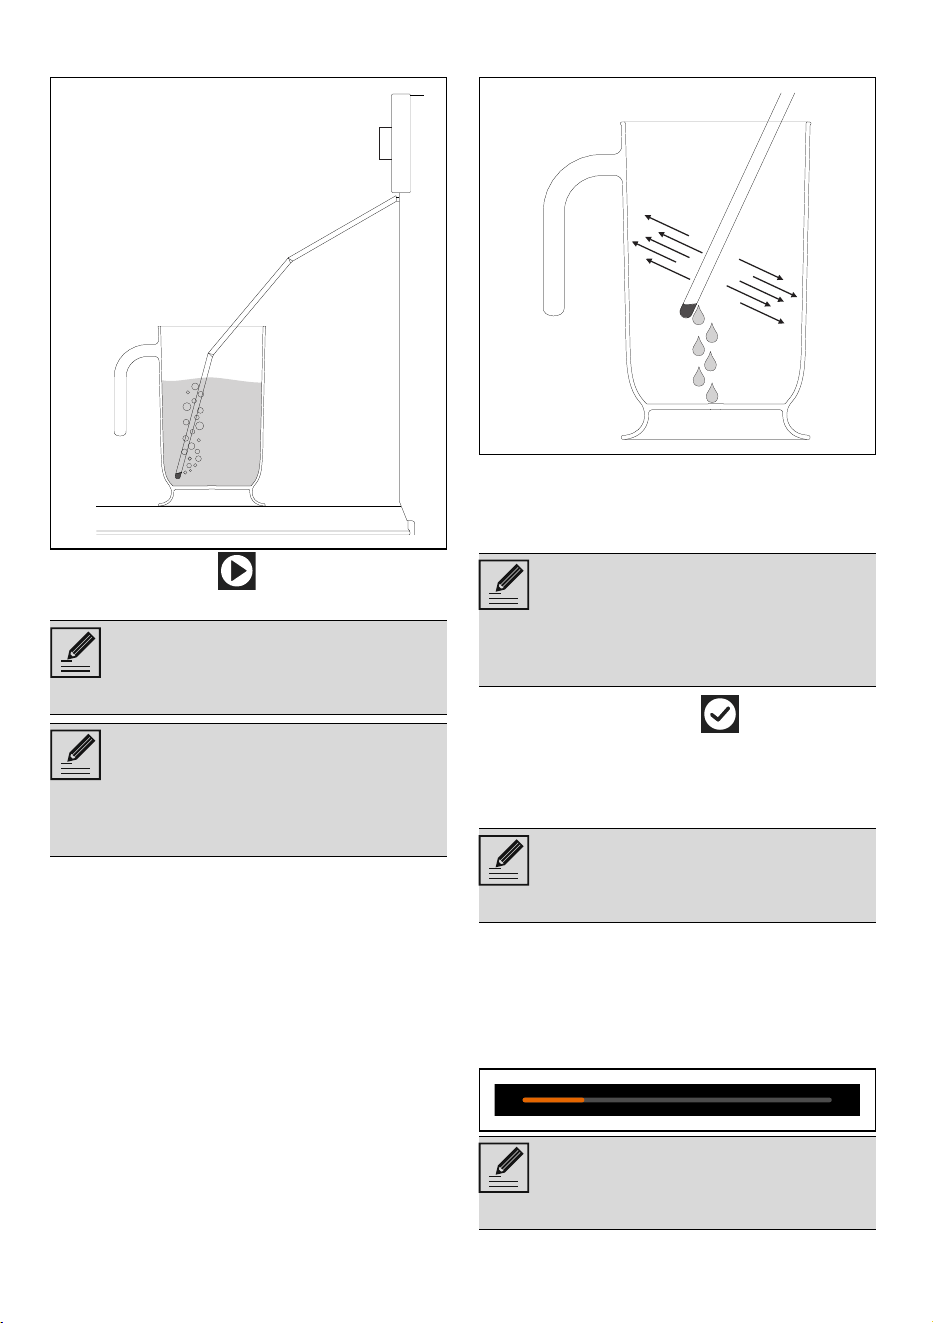
Reservoir filling
1. Fill a jug or a container with sufficient
water for the cooking duration.
2. Open the appliance door.
3. Place the jug (or container) on the open
door.
4. Remove the loading wand from its
holder.
• To remove the loading wand, press on
the front of the wand until the spring
contracts, then release.
or
• Touch the WAND button on the
display (positioned in the lower area
).
The steam cooking temperature can
be from a minimum of 30°C (90°F) to
a maximum of 100°C (210°F).
The minutes and seconds can be
selected separately.
The duration of the steam function
can be from a minimum of 1 minute
to a maximum of 1 hour and 59
minutes.
The expected time for the end of
cooking is shown under the
duration; the minutes needed for
preheating are already calculated.
Use cold tap water which is not too
hard, softened water or still mineral
water.
Do not use distilled water, tap water
with a high chloride content (> 40
mg/l), or other liquids.
The jug (or container) with the water
must have a gross weight lower
than 5 kg.
Pay attention to the distance to be
maintained so as not to be hit by the
wand projection.
84 - USE 91477C139/A
5. Place the end of the tube at the bottom
of the jug (or container).
6. Press the start button to start filling
the appliance reservoir with water.
7. When finished, shake the loading wand
to remove any water residue.
8. Place the loading wand back in its
holder.
9. Remove the jug (or container).
10. Close the door.
11. Touch the CONFIRM button to
confirm that you have finished filling the
reservoir.
The appliance starts the function using the
parameters set.
Preheating stage
Cooking itself is preceded by a preheating
stage, which allows the appliance to heat to
the cooking temperature more quickly.
This stage is indicated by a progressive
increase in the temperature level reached.
The appliance will automatically
draw the quantity of water
necessary for cooking on the basis
of the set duration.
In the event that the water runs out,
the appliance will automatically stop
the cooking process, a buzzer will
sound and the display will show a
request to fill the reservoir with
water.
When the door is closed, an
automatic system will automatically
draw in any residual water in the
loading wand to avoid drips. A
bubbling noise may be heard; this is
completely normal.
Each time the door is opened, the
function in progress will stop and
then automatically restart when the
door is closed again.
Unless otherwise indicated in the
recipe, it is not recommended to
place food in the oven during the
preheating stage.
USE - 8591477C139/A
e
After pre-heating, a buzzer will sound and a
message will appear on the display to
indicate that the dish can be put in the oven
cavity.
Cooking phase
1. Open the door
2. Place the dish with the food to be
cooked into the oven cavity.
3. Close the door.
4. Touch the CONFIRM button to start
cooking.
This stage is indicated by a progressive
increase in cooking.
End of cooking
At the end of cooking, "Function ended"
displays and a buzzer sounds briefly, which
can be deactivated by touching any point of
the display or by opening the door.
• Touch the HOME button to quit the
function.
Reservoir draining
1. Stand to the side of the appliance and
open the door ajar for a few seconds to
allow excess steam to escape.
2. Fully open the door when safe to do so
and cautiously remove the food from the
oven.
3. Place a jug or a container on the open
door.
4. Pull the loading nozzle out of its housing.
5. Press the START button to start
draining the water into the jug (or
container).
When complete, the display will indicate
that the residual water removal process is
complete.
6. Touch the CONFIRM button .
You can skip the pre-heating stage
touching the dedicated button .
Before draining the reservoir, wait
for the oven to cool down, leaving
the door open. To make sure that
the water remaining in the reservoir
is not too hot, wait at least 40
minutes.
It is recommended to drain at the
end of each cooking, to prevent any
residue of unused water from
remaining inside the reservoir.
After a long period of inactivity it is
recommended to make a reservoir
filling and draining cycle to rinse the
steam circuit.
Reservoir emptying ended
86 - USE 91477C139/A
7. Shake the loading nozzle to remove any
remaining water.
8. Place the loading nozzle place in its
housing.
9. Remove the jug (or container).
10. Remove condensation from the base
and walls of the oven cavity, the door
glass and drip tray and the front of the
appliance using a sponge.
Combination cooking with steam
1. Touch the COOKING button on
the "main menu".
2. Touch the STEAM COOKING MENU
button.
3. Select a combination function (for
example STEAM FAN-HEATED )
to enter the relevant cooking screen.
4. Touch the TEMPERATURE button or
the relevant value.
5. Scroll through the values and select the
required cooking temperature.
6. Touch the CONFIRM button (at the
lower right ) to confirm the cooking
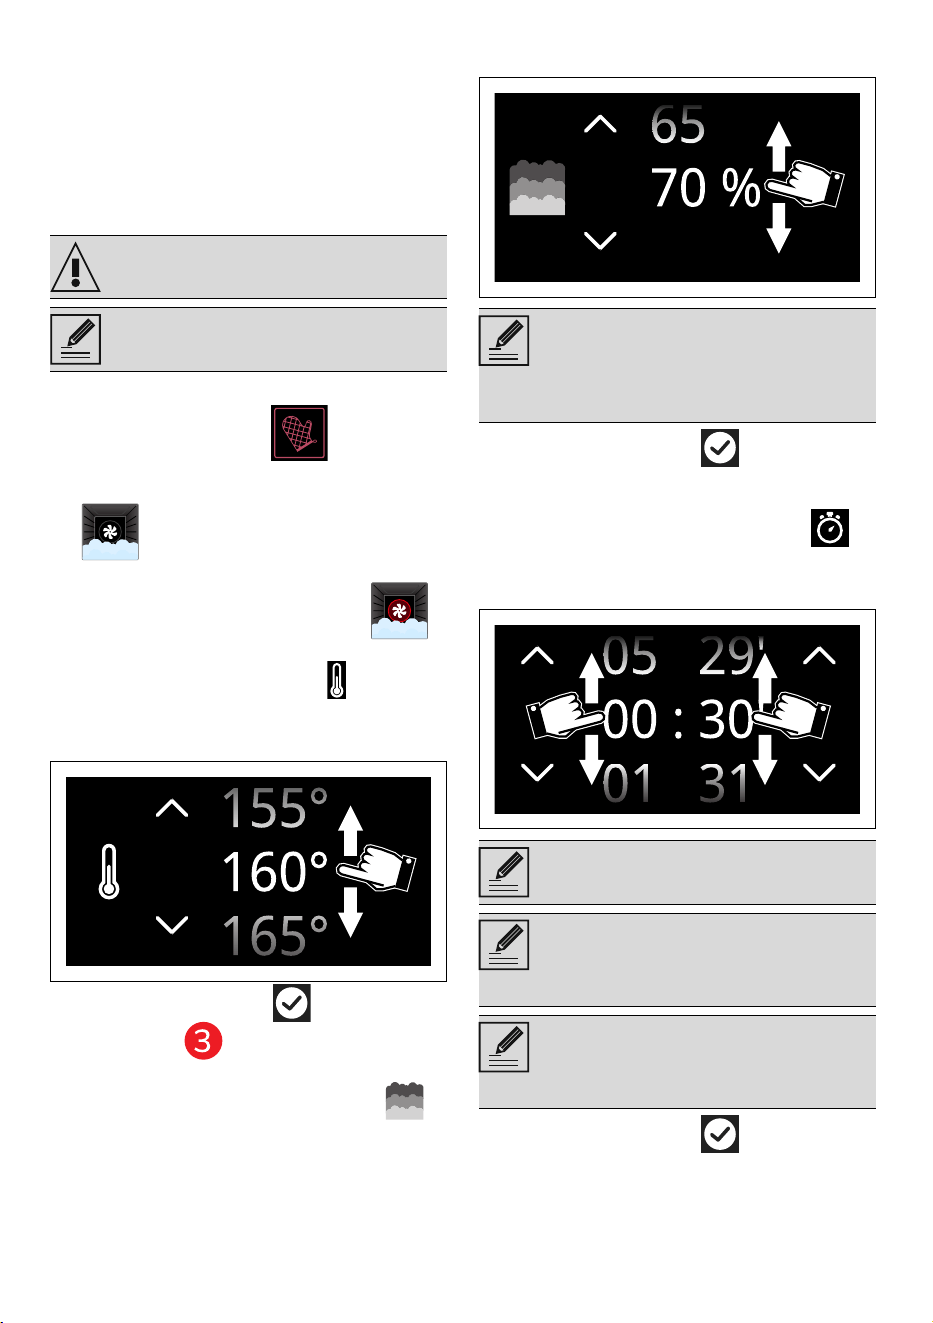
temperature that has been selected.
7. Touch the STEAM PERCENTAGE
button or the relevant value.
8. Scroll through the values and select the
required steam percentage.
9. Touch the CONFIRM button to
confirm the steam percentage that has
been selected.
10. Touch the COOKING DURATION
button or the relevant value.
11. Scroll through the values and select the
required duration.
12. Touch the CONFIRM button to
confirm the selected cooking duration.
Take care: the water may be very
hot.
The drained water cannot be used
for other cooking.
25% - Cakes and bread
30% - Duck
40% - Beef, veal and lamb
50% - Chicken
70% - Whole fish
The hours and minutes can be
selected separately.
The duration of the combined steam
function can be from a minimum of 1
minute to a maximum of 12 hours
and 59 minutes.
The expected time for the end of
cooking is shown under the
duration; the minutes needed for
preheating are already calculated.
USE - 8791477C139/A
e
13. Touch the START button (at the
lower right ) to start the reservoir
filling procedure.
14. Proceed with reservoir filling as
described above.
Preheating stage
Cooking itself is preceded by a preheating
stage, which allows the appliance to heat to
the cooking temperature more quickly.
This stage is indicated by a progressive
increase in the temperature level reached.
After pre-heating, a buzzer will sound and a
message will appear on the display to
indicate that the dish can be put in the oven
cavity.
Cooking phase
1. Open the door
2. Place the dish with the food to be
cooked into the oven cavity.
3. Close the door.
4. Touch the CONFIRM button to start
cooking.
This stage is indicated by a progressive
increase in cooking.
End of cooking
At the end of cooking, "Function ended"
displays and a buzzer sounds briefly, which
can be deactivated by touching any point of
the display or by opening the door.
• Touch the HOME button to quit the
function.
5. Proceed with draining the reservoir as
described above.
Drying after steam functions
Cooking with steam generates a lot of
moisture inside the appliance. This is a
normal phenomenon and does not affect
the appliance’s operation in any way.
Each time you finish cooking:
1. let the appliance cool down;
2. thoroughly dry the oven cavity and the
accessories used with a soft cloth or
paper towels;
3. leave the door open until the inside of
the appliance has dried completely.
List of combined steam cooking functions
FAN ASSISTED+STEAM
THERMALLY FAN-ASSISTED STEAM
STEAM WITH FAN-HEATED BASE
Advice for steam cooking
• Pasta and rice: upon reaching 100°C,
the cooking time will be the same as
with cooking on a hob. Place the pasta
or rice in a metal tray and cover with
around a centimetre of water. For best
results when cooking rice, place a lid on
the container or cover with aluminium
foil. This procedure allows the rice to
absorb all the water, and it can then be
served directly to the table.
• Eggs: these may be boiled, scrambled
or poached by using the steam function
at 100°C. To obtain perfect boiled eggs,
place them on the perforated tray and
Unless otherwise indicated in the
recipe, it is not recommended to
place food in the oven during the
preheating stage.
You can skip the pre-heating stage
touching the dedicated button .
Intense and uniform cooking. The
addition of steam allows better
preservation of the properties of the
food. Ideal for roast veal, roast duck
and cooking whole fish.
The addition of steam to thermally
fan-assisted cooking allows better
preservation of the properties of the
food. Ideal for preparing roasts,
chicken and baked goods like
leavened cakes and bread.
Allows you to quickly finish cooking
food that is already cooked on the
outside but not on the inside.

88 - USE 91477C139/A
cook for 4-6 minutes for soft boiled eggs
and 8-10 minutes for hard-boiled eggs.
For scrambled eggs, place the beaten
eggs in a metal tray together with milk,
butter and seasoning. Cover the tray
with aluminium foil. Mix every couple of
minutes using a fork. For poached eggs,
pour boiling water into the metal tray
with a drop of vinegar and steam cook
for around 4-5 minutes.
• Vegetables: steam cooking vegetables
gives excellent results. They maintain
their colour, flavour and nutritional
properties. For dense vegetables such
as potatoes, turnips and parsnips, cook
at 100°C for the same length of time you
would boil them on a hob. For broccoli
and carrots, cook for 6 minutes if you
want them to remain firm, or 10 minutes
if you want them to be softer.
• Fish: due to the delicate nature of fish,
steaming gives excellent results. For oily
fish such as salmon or trout, cook at
100°C for around 5 minutes. For white
fish such as cod or haddock, cook at
80°C for around 5 minutes. If you are
cooking different foods, all fish must be
cooked in the perforated tray which
must be placed on the bottom shelf of
the oven to avoid liquid from the fish
dripping onto other food products.
• Meat: casseroles and curries are ideal
for steam cooking. Prepare the
casserole as for normal oven cooking.
Place it in a metal tray, cover with a lid
or aluminium foil, and cook for between
45 minutes and 3 hours depending on
the cut of meat used.
• Thin soups: steam cooking allows
flavours to develop perfectly with
minimum effort, as the liquids will not
boil over. For vegetable soup with the
correct consistency, first steam the
vegetables, then add broth and steam
cook at 100°C. The steam function is
also ideal for preparing large quantities
for later use.
• Soups: Thicker soups are also easy and
quick to prepare. Place the soup in a
metal tray, cover with a lid or aluminium
foil and steam cook at 100°F for the
same time you would cook it in a
microwave oven. To obtain a creamy
texture stir halfway through cooking.
• Reheating: the steam cooking function
will not dry foods out and gives a
moister result. A previously prepared
home-cooked meal, covered with
aluminium foil, will take around 10-12
minutes to reheat. Ready meals will
require approximately double the time
indicated on the package.
• Defrosting: it is possible to use the
steam function to defrost foods. Times
vary, but defrosting with the steam
cooking function takes around half the
time necessary for covered foods left to
defrost at room temperature.
• Peeling peppers and tomatoes: this is
very easy to do when using the steam
function. Use a knife to cut a small cross
in the skin of the tomato, and steam
cook for 1 minute. Peppers have tougher
skin, and may require up to 4 minutes to
soften it sufficiently for peeling.
• Chocolate: this can be melted using the
steam cooking function. Place the
chocolate in a metal tray, cover with
aluminium foil and steam cook for 1
minute. Unlike other methods, chocolate
is unlikely to burn in the steam oven.
• Hot towels: ideal for facial treatments, a
close shave or for use after a meal,
these are easy to prepare using the
steam cooking function. Moisten a towel
with water, roll it up and steam it for 1
minute.
Cooking advice
General advice
• Use a fan assisted function to achieve
consistent cooking at several levels.
• It is not possible to shorten cooking
times by increasing the temperature (the
food could be overcooked on the outside
and undercooked on the inside).
Advice for cooking meat
• Cooking times vary according to the
thickness and quality of the food and to
consumer taste.
• Use a meat thermometer when roasting
meat, or simply press on the roast with a
spoon. If it is hard, it is ready; If not, it
needs another few minutes cooking.
Advice for cooking with the Grill and the
Fan with grill
• Meat can be grilled even when it is put
into the cold oven or into the preheated
oven if you wish to change the effect of
the cooking.
• When using the fan-assisted with grill
function, we recommend that you
preheat the oven before grilling.
• We recommend placing the food at the
centre of the rack.
• With the Grill function, we recommend
that you set the temperature to the
maximum value to optimise cooking.

USE - 8991477C139/A
e
Advice for cooking desserts/pastries and
biscuits
• Use dark metal moulds: They help to
absorb the heat better.
• The temperature and the cooking time
depend on the quality and consistency
of the dough.
• To check whether the dessert is cooked
right through: At the end of the cooking
time, put a toothpick into the highest
point of the dessert. If the dough does
not stick to the toothpick, the dessert is
cooked.
• If the dessert collapses when it comes
out of the oven, on the next occasion
reduce the set temperature by about
10°C, selecting a longer cooking time if
necessary.
Advice for defrosting and proving
• Place frozen foods without their
packaging in a lidless container on the
first shelf of the oven.
• Avoid overlapping the food.
• To defrost meat, use the rack placed on
the second level and a tray on the first
level. In this way, the liquid from the
defrosting food drains away from the
food.
• The most delicate parts can be covered
with aluminium foil.
• For successful proving, a container of
water should be placed in the bottom of
the oven.
To save energy
• Stop cooking a few minutes before the
time normally used. Cooking will
continue for the remaining minutes with
the heat which has accumulated inside
the oven.
• Reduce any opening of the door to a
minimum to avoid heat dispersal.
• Keep the inside of the appliance clean at
all times.
Sous Vide cooking
Sous vide cooking in a steam oven is the
best way to cook food without altering its
nutritional properties and quality. It is also
an extremely healthy and natural type of
cooking.
• The Sous vide technique allows the heat
to be transferred efficiently from the
steam to the food, preventing the loss of
flavour through the oxidation and
evaporation of nutrients and humidity
during cooking.
• Sous vide cooking also allows greater
control over the cooking compared to
traditional methods and ensures that
cooking is uniform.
• It also allows cooking to be carried out
at lower temperatures compared to
traditional cooking methods.
For Sous Vide cooking you need to:
• Have a chamber vacuum packing
machine that allows you to achieve a
better and safer vacuum for solid and
liquid foods.
• Make sure that the seal area of the bag
is clean and free from food residues.
• Hermetically seal the food in a special
food grade bag that can withstand the
cooking temperatures.
• Create a vacuum in the bag of at least
99.8% to prevent air bubbles forming
inside that could affect the cooking.
• If you have a Smeg vacuum drawer, use
the maximum vacuum level (level 3).
Once cooked, it is recommended to remove
the product from the bag and finish cooking
it in a pan or by grilling.
Tips:
• Preferably use fresh, high quality raw
materials well-preserved until cooked.
• To improve the cooking result, dressings
can be added inside the bag.
• Clean the food well from bones or
fishbones that could pierce the bag and
damage the cooking.
• Do not leave the food to be cooked for
too long at room temperature as the bag
may swell during cooking, losing all the
advantages of vacuum.
• The food to be vacuum-packed for Sous
Vide cooking or storage must be at a
refrigerator temperature (from 3°C to
7°C), never hot.
• Keep the products in a vacuum (cooked
and then blast chilled) at a constant
temperature not exceeding 3°C in the
refrigerator.
• For even cooking, do not overfill the
bags and place the food in the best
possible way on a single layer.
• If you are cooking multiple bags at the
same time, place the bags on the same
SOUS VIDE
Steam function for perfect cooking
inside a sealed bag. The food’s
flavours are enhanced and no
nutrients are lost.
The bag containing the food can be
placed on the perforated tray or on a
rack positioned on the first or
second shelf.
90 - USE 91477C139/A
shelf without overlapping them.
• Do not reuse the bags after cooking.
To select the Sous Vide cooking:
1. Touch the COOKING button on
the "main menu".
2. Touch the STEAM COOKING MENU
button.
1. Select the SOUS VIDE function.
2. For settings, see the procedure
described in the "Steam cooking"
paragraph.
Humidified cooking
1. Touch the COOKING button on
the "main menu".
2. Touch the HUMIDIFIED COOKING
MENU button.
3. Select a humidified function (for
example FAN-HEATED ) to enter
the relevant cooking screen.
4. Touch the TEMPERATURE button or
the relevant value.
5. Scroll through the values and select the
required cooking temperature.
6. Touch the CONFIRM button (at the
lower right ) to confirm the cooking
temperature that has been selected.
7. Touch the STEAM LEVEL button or
the relevant value.
8. Scroll through the values and select the
required steam level.
9. Touch the CONFIRM button to
confirm the steam level that has been
selected.
10. Touch the COOKING DURATION
button or the relevant value.
Level 1
comparable to cooking with a lid, it is
suitable for preparing pizzas, large
sausages, whole pork fillets, chicken
breasts, fish steaks, quiches, stewed
vegetables, bread...
Level 2
recommended for roast chicken,
turkey breast, pork loin, medium size
fish, roasted potatoes, low
temperature cooking of large lean
roasts, pasteurisation, egg pasta...
Level 3
comparable to cooking with a lid and
with the addition of wine. It is
recommended for braised meats,
stews, shoulder roasts, large fish,
casseroles, stewed potatoes, fish
and vegetables stews.....
The steam level that can be selected
depends on the set cooking
duration:
Level 1: always available;
Level 2: 30 minutes and upwards;
Level 3: 45 minutes and upwards.
With the MANUAL steam level
selection, injections of steam can be
introduced as wished with the
button during cooking.
Injections of steam are active as
long as the indicator light is
flashing (for a duration of approx. 8
minutes).
USE - 9191477C139/A
e
11. Scroll through the values and select the
required duration.
12. Touch the CONFIRM button to
confirm the selected cooking duration.
13. Touch the START button (at the
lower right ) to start the reservoir
filling procedure.
14. Proceed with reservoir filling as
described above.
Preheating stage
Cooking itself is preceded by a preheating
stage, which allows the appliance to heat to
the cooking temperature more quickly.
This stage is indicated by a progressive
increase in the temperature level reached.
After pre-heating, a buzzer will sound and a
message will appear on the display to
indicate that the dish can be put in the oven
cavity.
Cooking phase
1. Open the door
2. Place the dish with the food to be
cooked into the oven cavity.
3. Close the door.
4. Touch the CONFIRM button to start
cooking.
This stage is indicated by a progressive
increase in cooking.
End of cooking
At the end of cooking, "Function ended"
displays and a buzzer sounds briefly, which
can be deactivated by touching any point of
the display or by opening the door.
• Touch the HOME button to quit the
function.
5. Proceed with draining the reservoir as
described above.
List of humidified cooking functions
FAN-ASSISTED
FAN-HEATED
The hours and minutes can be
selected separately.
The duration of the combined steam
function can be from a minimum of 1
minute to a maximum of 12 hours
and 59 minutes.
The expected time for the end of
cooking is shown under the
duration; the minutes needed for
preheating are already calculated.
Unless otherwise indicated in the
recipe, it is not recommended to
place food in the oven during the
preheating stage.
You can skip the pre-heating stage
touching the dedicated button .
Intense heat is created by injections
of steam that speed up cooking but
allow the food to remain soft and
moist. Ideal for biscuits, cakes and
multilevel cooking.
Intense heat is created by injections
of steam that speed up cooking but
allow the food to remain soft and
moist. Ideal for biscuits, cakes and
cooking on more than one level
92 - USE 91477C139/A
TURBO
FAN-ASSISTED GRILL
FAN-HEATED BASE
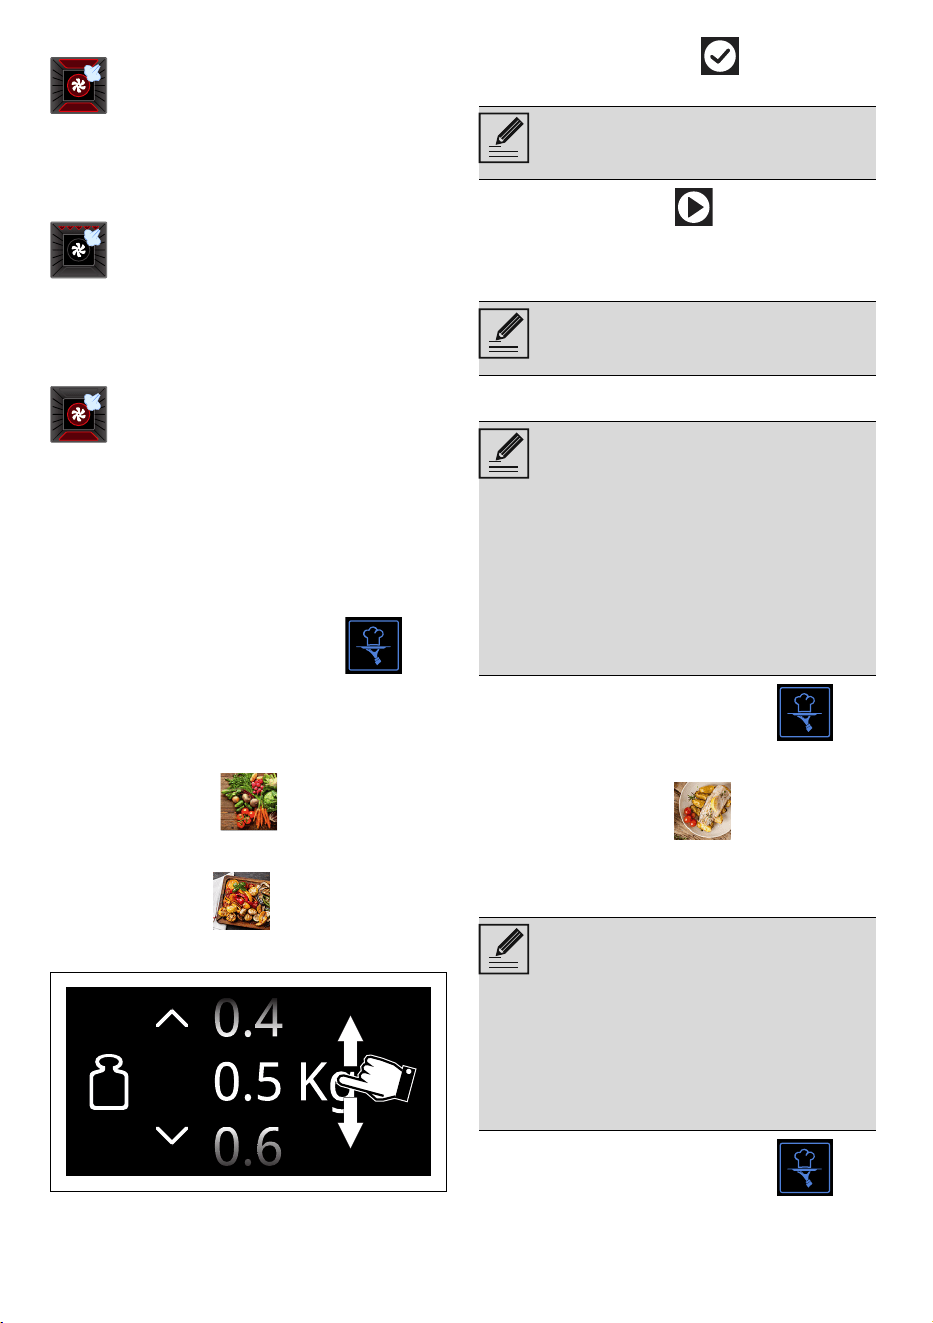
Smart Cooking
This mode allows you to select a previously
stored program for cooking food. The
appliance automatically calculates the
optimum cooking parameters based on the
weight selected.
1. Touch the SMART COOKING
button on the "main menu" (in the main
area ).
2. Select the type of dish required from the
SMART COOKING menu (for example
"VEGETABLES ").
3. Select the sub-category of dish to cook
(for example "MIXED GRILLED
VEGETABLES ").
4. Scroll through the values to set the
weight of the food to be cooked.
5. Touch the CONFIRM button to
confirm the settings.
6. Touch the START button to start
SMART COOKING.
Cooking will start with the settings specified
in the program.
Sametime
1. Touch the SMART COOKING
button on the "main menu".
2. Scroll through the functions until you
select SAMETIME .
3. Select the desired SAMETIME recipe and
follow the instructions on the display.
Quick recipes
1. Touch the SMART COOKING
button on the "main menu".
Allows quick cooking on multiple
shelves without mixing the aromas.
Perfect for large volumes that call
for intense cooking. The injection of
steam speeds up cooking without
drying out the food.
The intense heat from the grill is
distributed by the fan along with
injections of steam; this creates
optimal conditions for grilling even
thick slices of meat without drying
them out.
Intense heat is created by injections
of steam that speed up cooking, but
allow the food to remain soft and
moist. Ideal for pies.
It is now possible to save the
settings as a personal recipe (see
section “My recipes”).
The cooking temperature and
duration can be changed at any
time, even after cooking has started.
In this section you will find recipes
created by Smeg chefs for
SAMETIME cooking. This category
allows a complete preparation at
the same time. By choosing
available combinations and setting
the number of portions, the
appliance selects the most suitable
function, time and temperature. The
instructions on the display indicate
when to put the food in the oven
and on which shelf.
In this section you will find recipes
created by Smeg chefs for cooking
quick recipes. This category allows
you to prepare traditional recipes in
less time. By choosing the type and
weight of food, the appliance selects
the most suitable function, time and
temperature. The instructions on the
display indicate when to put the
food in the oven and on which shelf.
USE - 9391477C139/A
e
2. Scroll through the functions until you
select QUICK RECIPES .
3. Select the desired quick recipe and
follow the instructions on the display.
Multistep cooking
1. Touch the MULTISTEP button on
the "main menu" (at the left in the
lower area).
2. Touch the ADD STEP button.
3. Select the desired function for the first
step (traditional, microwave, steam...).
4. As described in the previous chapters,
touch the buttons of TEMPERATURE ,
COOKING DURATION , STEAM
PERCENTAGE (depending on the
selected function) to select the
parameters you want to change.
5. Scroll through the values and select the
required settings.
6. Touch the CONFIRM button (at the
right in the lower area) to confirm
the selected values.
7. Touch again the ADD STEP
button.
8. Select the required function for the
second step (traditional, microwave,
steam...).
9. Set the required parameters for the
second function.
10. Touch the CONFIRM button to
confirm the selected values.
11. Touch the START button (at the
right in the lower area) to start
Multistep cooking.
History
This menu is particularly useful for viewing
and reusing the last programmes or
personal recipes that were used.
1. Touch the HISTORY button on the
“main menu” (on the left in the
lower area).
2. Select the function you wish to reuse
and proceed with cooking as described
in the previous sections.
Deleting the history
If you wish to delete the history:
1. Touch the HISTORY button on the
"main menu".
2. Touch the BASKET button to delete
the history.
3. Touch the CONFIRM button to
confirm that you wish to delete the
history (or the CANCEL button to
cancel the operation).
Multistep cooking means the
possibility to start cooking with a
certain function, to proceed with the
cooking and finish it with different
functions set by the user.
It is not possible to add a further
step if no cooking time or probe
temperature (if present) has been
set.
It is not possible to start a cooking
process if a duration or probe
temperature (if present) of all steps
has not been set.
It is not possible to set a total
duration of more than 13 hours.

94 - USE 91477C139/A
Mini guide to accessories
Discover the recipes
To consult the recipes developed for various
categories of food and to get more
information on cooking suggestions, we
recommend visiting the dedicated page on
the www.smeg.com website, which can be
reached using the QR code on the leaflet
supplied with the product.
Information for Supervisory Bodies
Fan forced mode
The ECO function used to establish the
energy efficiency class is compliant with the
specifications of European standard EN
60350-1.
See the “To save energy ” section in the
INSTRUCTIONS chapter.
Conventional heating mode
To use the STATIC mode, you have to skip
the preheating stage (see the section
“Preheating stage” in the USE chapter.
See the “To save energy ” section in the
INSTRUCTIONS chapter.
My recipes
This menu allows you to enter a personal
program with the parameters you wish to
use. On first use, the appliance will only
offer you to add a new recipe. After storing
your personal recipes these will then be
available in the dedicated menu.
1. Touch the MY RECIPES button on
the "main menu" (at the left in the
lower area).
Adding a recipe
1. Touch the NEW RECIPE button.
2. Select the required function.
3. Touch the TEMPERATURE button or
the relevant value.
4. Scroll through the values and select the
required cooking temperature.
5. Touch the CONFIRM button to
confirm the cooking temperature that
has been selected.
6. Touch the COOKING DURATION
button or the relevant value.
Rack
We recommend the use of the grill as a support surface for baking moulds/casseroles.
In the absence of the baking tray grill, the grill can be used as a base for grilling with
the deep baking tray placed on a shelf below to collect the juices.
Perforated tray
Use the perforated baking tray with the steel pan placed on the level below.
It is suitable for steam and combination steam and cooking.
Tray rack
We recommend using the baking tray grill as a base for food to grill. The pan below
collects the juices from the grills.
Deep tray
We recommend the use of the deep baking tray for cooking on one level only.
Place the deep baking tray on the centre shelf when using the fan-assisted functions.
When using the STATIC function, place the deep baking tray on the required
shelf.
Place the baking tray on the last shelf with the baking tray grill to cook in GRILL mode
.
It is possible to store a limited
number of personal recipes.
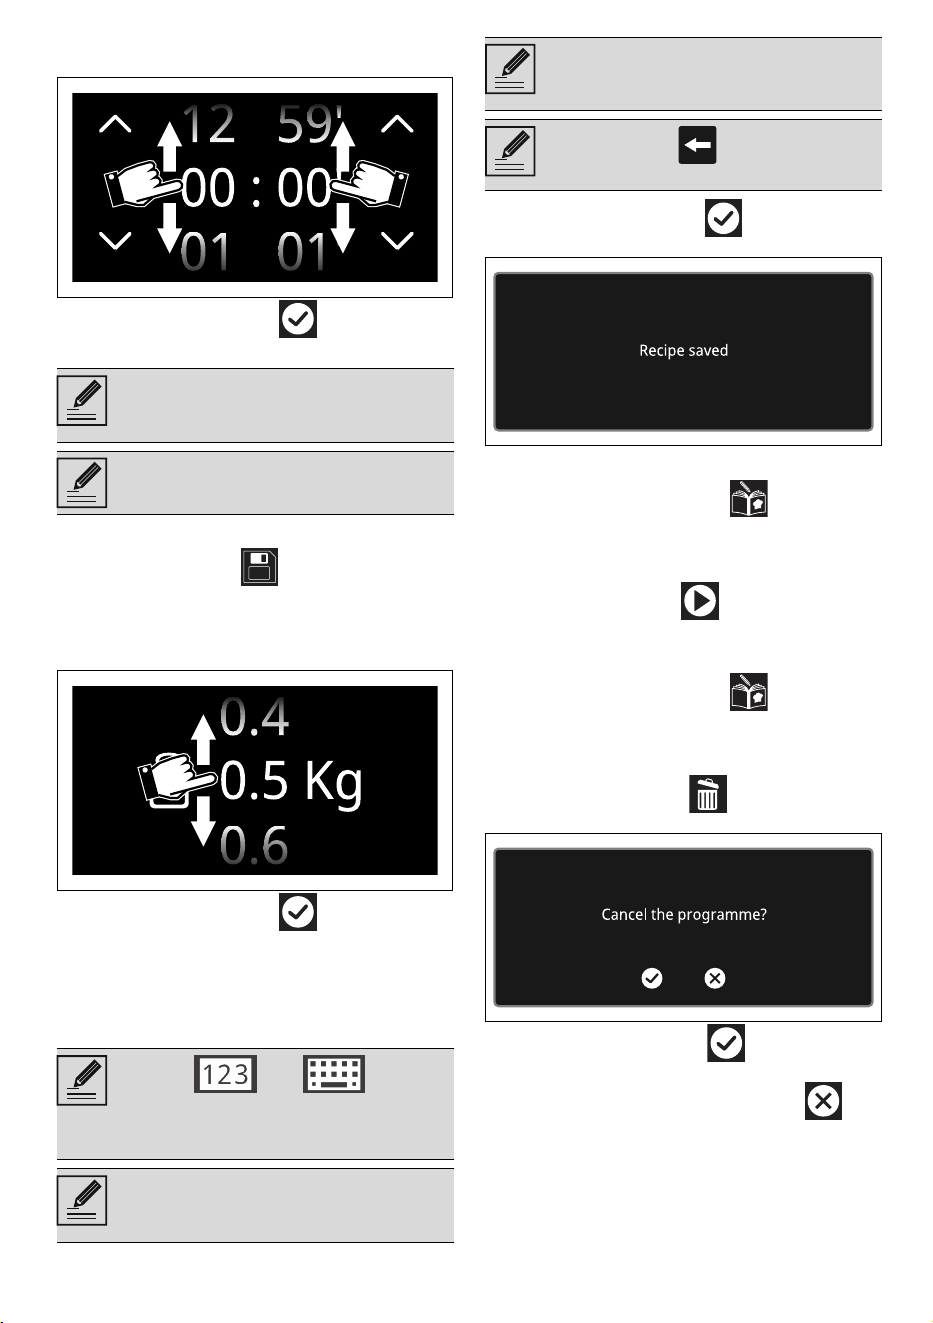
USE - 9591477C139/A
e
7. Scroll through the values and select the
required duration.
8. Touch the CONFIRM button to
confirm the selected cooking duration.
Saving a recipe
9. Touch the SAVE button.
10. Scroll through the values to set the
RACK.
11. Scroll through the values to set the
weight of the food to be cooked.
12. Touch the CONFIRM button to
confirm the settings.
At this point, a name for the recipe must be
entered.
13. Use the alphanumeric keypad to enter
the name of the recipe to be saved.
14. Touch the CONFIRM button to store
the program.
Starting a personal recipe
1. Touch the MY RECIPES button on
the "main menu".
2. Select the recipe that was saved
previously.
3. Touch the START button to start
cooking.
Deleting a recipe
1. Touch the MY RECIPES button on
the "main menu".
2. Select the recipe that was saved
previously.
3. Touch the DELETE button to delete
the recipe.
4. Touch the CONFIRM button to
confirm that you wish to delete the
selected recipe (or the CANCEL
button to cancel the operation).
Other functions
The special functions menu includes several
functions such as defrosting, proving or
cleaning...
The minutes required for preheating
are already included in the end-of-
cooking time.
Now it is possible to add
programmed cooking.
Use the and buttons
to switch from the alphabetic
keypad to the numerical keypad and
vice versa.
The recipe name can contain a
maximum 12 characters, including
spaces.
The name must contain at least one
character in order to store the
recipe.
The character deletes the
previous letter.
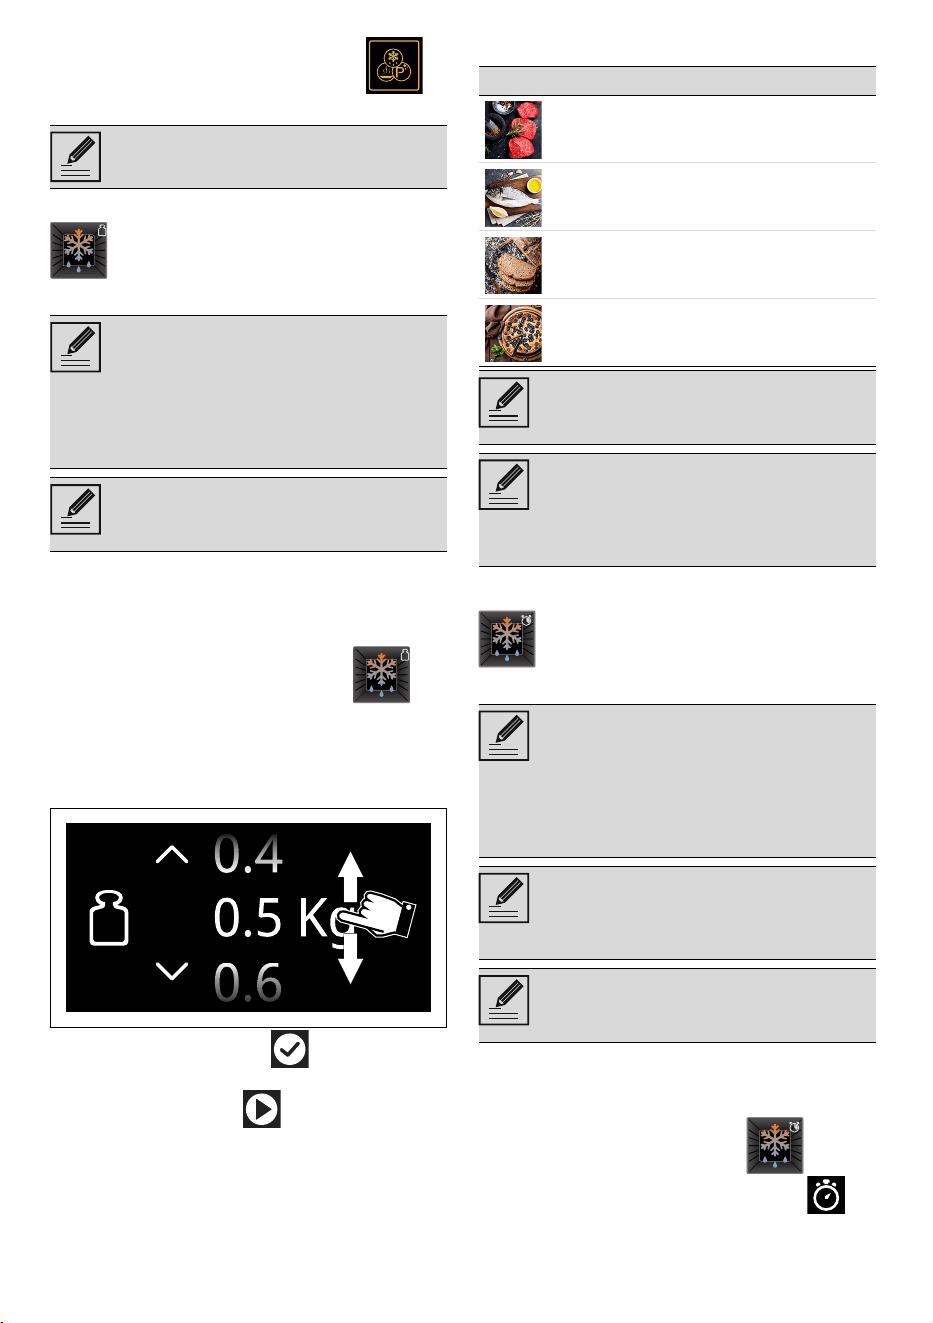
96 - USE 91477C139/A
• Touch the OTHER FUNCTIONS
button on the “main menu”.
DEFROST BY WEIGHT
1. Open the door.
2. After weighing the food, place it in the
oven cavity.
3. Close the door.
4. Select DEFROST BY WEIGHT .
5. Select the type of food to defrost from
the categories MEAT - FISH - BREAD -
DESSERTS
6. Scroll through the values to set the
weight of the food to be defrosted.
7. Touch the CONFIRM button to
confirm the settings.
8. Touch the START button to start
the defrost by weight function.
When finished, a buzzer sounds briefly,
which can be deactivated by touching any
point of the display or by opening the door.
Preset parameters:
DEFROST BY TIME
1. Open the door.
2. Place the dish into the oven cavity.
3. Close the door.
4. Select DEFROST BY TIME .
5. Touch the COOKING DURATION
button or the relevant value.
Certain functions are not available
on all models.
Automatic defrosting function.
Choose the dish, the oven calculates
the time necessary for proper
defrosting.
If the internal temperature is greater
than the one required, the function
will be stopped immediately and
"Internal temperature unsafe, please
wait until the oven is cool" will
display. Allow the appliance to cool
down before activating the function.
It is not possible to change the
default temperature for the Defrost
by weight function.
Type Weight (kg) Time
Meats 0.5 1h 45m
Fish 0.4 0h 40m
Bread 0.3 0h 20m
Desserts 1.0 0h 45m
Defrosting times may vary on the
basis of the shape and size of the
food to be defrosted.
When defrosting heavy and/or
irregularly shaped food (e.g. chicken,
fish, etc.), it is advisable to turn it
inside the oven cavity at least once
by 180°.
Manual defrosting function. Select
the length of time required for
defrosting, when the set time has
elapsed, the function will stop.
If the internal temperature is greater
than the one required, the function
will be stopped immediately and
"Internal temperature unsafe, please
wait until the oven is cool" will
display. Allow the appliance to cool
down before activating the function.
The duration of the Defrost by time
function can be from a minimum of 1
minute to a maximum of 12 hours
and 59 minutes.
It is not possible to change the
default temperature (30°C) for the
Defrost by time function.
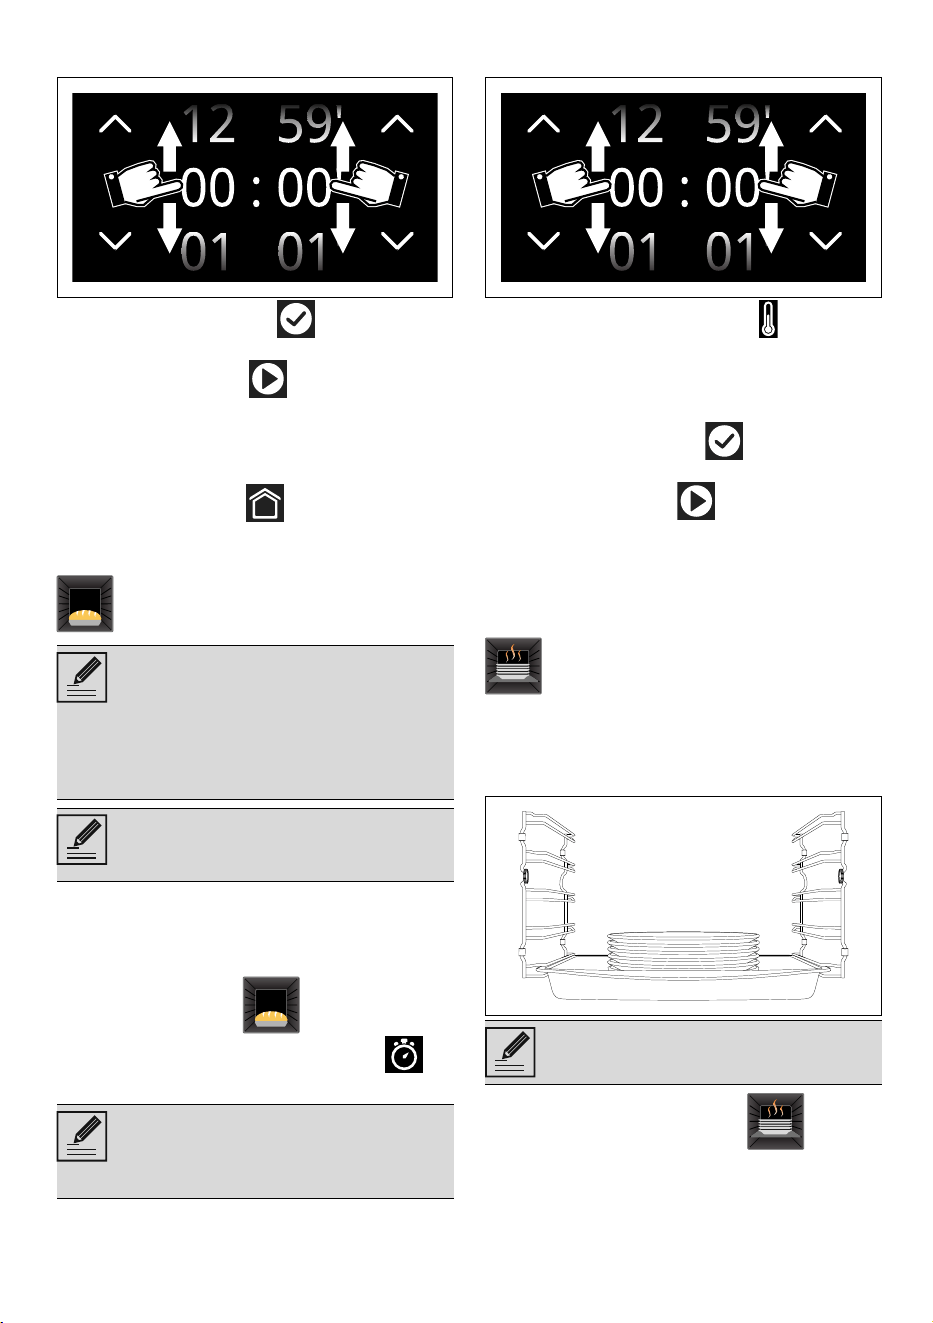
USE - 9791477C139/A
e
6. Scroll through the values and select the
required duration.
7. Touch the CONFIRM button to
confirm the settings.
8. Touch the START button to start
the Defrost by time function.
When finished, a buzzer sounds briefly,
which can be deactivated by touching any
point of the display or by opening the door.
9. Touch the HOME button to quit the
function.
PROVING
1. Open the door
2. Position the dough to prove on the
second level.
3. Close the door.
4. Select PROVING .
5. Touch the COOKING DURATION
button or the relevant value.
6. Scroll through the values and select the
required duration.
7. Touch the TEMPERATURE button or
the relevant value.
8. Scroll through the values and select the
required cooking temperature (from
25°C to 40°C).
9. Touch the CONFIRM button to
confirm the settings.
10. Touch the START button to start
the Proving cycle.
When finished, a buzzer sounds briefly,
which can be deactivated by touching any
point of the display or by opening the door.
PLATE WARMING
1. Position the tray on the first shelf and
place the plates to be warmed at the
centre of it.
2. Select PLATE WARMING .
This function is particularly suitable
for proving dough.
If the internal temperature is greater
than the one required, the function
will be stopped immediately and
"Internal temperature unsafe, please
wait until the oven is cool" will
display. Allow the appliance to cool
down before activating the function.
For successful proving, a container
of water should be placed in the
bottom of the oven.
The duration of the Proving function
can be from a minimum of 1 minute
to a maximum of 12 hours and 59
minutes.
Function that heats and keeps
plates warm. Position a baking tray
on the lowest shelf and put the
plates on it to warm.
Do not stack plates too high. Stack
plates a maximum of 5/6 high.
98 - USE 91477C139/A
3. Touch the START button to start
the Plate warming function.
The following can be set while the function
is in operation:
• the temperature (from 40°C to 80°C);
• the duration of the function ;
• one programmed function (only if a
duration different from the default one is
set).
When finished, a buzzer sounds briefly,
which can be deactivated by touching any
point of the display or by opening the door.
STEAM HEAT
1. Place the food to be heated in a
container.
2. Open the door.
3. Place the container on the rack in the
second shelf from the bottom.
4. Close the door.
5. Select STEAM HEAT .
6. Touch the COOKING DURATION
button or the relevant value.
7. Scroll through the values and select the
required cooking duration.
8. Touch the START button to start
the reservoir filling procedure.
9. Proceed with reservoir filling as
described above.
10. Touch the START button to start
the steam heat function.
End of steam heat
At the end, "Function ended" displays and a
buzzer sounds briefly, which can be
deactivated by touching any point of the
display or by opening the door.
11. Touch the HOME button to quit the
function.
12. Proceed with draining the reservoir as
described above.
KEEP WARM
1. Select KEEP WARM .
2. Touch the TEMPERATURE button or
the relevant value.
3. Scroll through the values and select the
required cooking temperature (from
60°C to 100°C).
4. Touch the START button to start
the Keep warm function.
When finished, a buzzer sounds briefly,
which can be deactivated by touching any
point of the display or by opening the door.
STONE
1. Open the door.
2. Insert the PPR2 or STONE accessory in
the oven cavity (refer to the specific
manual of the accessory).
3. Close the door.
4. Select STONE .
5. Scroll through the values and select the
required cooking temperature (from
50°C to 250°C).
6. Touch the START button to start
the Stone function.
7. After preheating, open the door and
place the food to be cooked on the
accessory.
Unless otherwise set, the Plate
warming function has a maximum
duration of 12 hours and 59
minutes.
The function steam-heats food that
has already been cooked and stored
in the fridge.
The temperature of the steam
heating cannot be changed by the
user.
This function allows you to keep
pre-cooked foods warm.
Useful for on stone cooking. For use
with the PPR2 or STONE accessory
sold separately.
Please refer to the instructions and
recommendations for use described
in the accessory documentation.
As with normal cooking functions,
you can skip pre-heating and set a
timed and programmed cooking.
USE - 9991477C139/A
e
8. Close the door.
When finished, a buzzer sounds briefly,
which can be deactivated by touching any
point of the display or by opening the door.
BBQ (Barbecue)
1. Open the door.
2. Insert the BBQ accessory into the oven
cavity.
3. Close the door.
4. Select BBQ .
5. Scroll through the values and select the
required cooking temperature (from
50°C to 250°C).
6. Touch the START button to start
the BBQ function.
7. After preheating, open the door and
place the food to be cooked on the
accessory.
8. Close the door.
When finished, a buzzer sounds briefly,
which can be deactivated by touching any
point of the display or by opening the door.
AIRFRY
1. Select AIRFRY .
2. Turn the temperature knob to select the
required temperature (from 50°C to
250°C).
3. Touch the START button to start
the Airfry function.
4. When preheating is complete, open the
door and insert the AIRFRY accessory
with the food to be cooked into the oven
cavity.
5. Close the door.
When finished, a buzzer sounds briefly,
which can be deactivated by touching any
point of the display or by opening the door.
SABBATH
This function results in the appliance
operating in a particular way:
• Cooking can proceed indefinitely, it is
not possible to set any cooking duration.
• No preheating will be performed.
• The cooking temperature that can be
selected ranges from 60°C to 150°C.
• Oven light disabled, any operation such
as opening the door or manual
activation will not activate the light.
• The internal fan remains turned off.
• Buzzers disabled.
1. Open the door.
2. Place the dish into the oven cavity.
3. Close the door.
4. Select SABBATH .
5. Touch the TEMPERATURE button or
the relevant value.
Useful for barbecue cooking. For use
with the BBQ accessory sold
separately.
Please refer to the instructions and
recommendations for use described
in the accessory documentation.
As with normal cooking functions,
you can skip pre-heating and set a
timed and programmed cooking.
Useful to obtain fried cooking
without oil. For use with the AIRFRY
accessory sold separately.
Please refer to the instructions and
recommendations for use described
in the accessory documentation.
As with normal cooking functions,
you can skip pre-heating and set a
timed and programmed cooking.
Function that allows you to cook
food whilst respecting the
provisions of the Jewish day of rest.
After activating the Sabbath mode
the settings cannot be altered. Any
action on the display buttons will
have no effect.
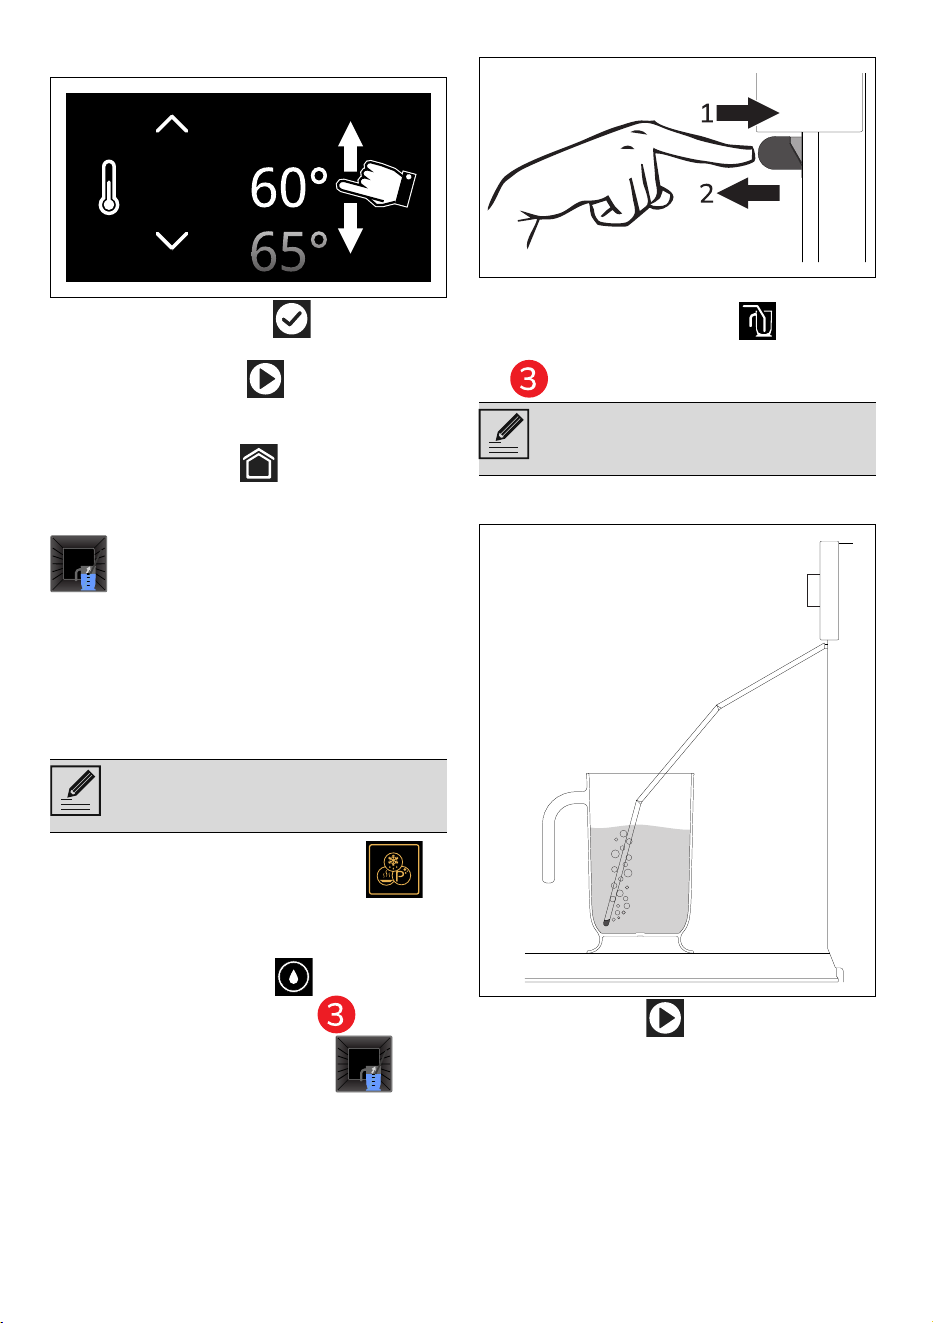
100 - USE 91477C139/A
6. Scroll through the values and select the
temperature (from 60°C to 150°C).
7. Touch the CONFIRM button to
confirm the selected temperature.
8. Touch the START button to start
the Sabbath function.
To stop the function:
• Touch the HOME button for
approximately 3 seconds.
Manual reservoir filling
1. Fill a jug supplied or a container with a
sufficient amount of water for the
duration of the functions that you wish
to use.
2. Open the appliance door.
3. Place the jug (or container) on the open
door.
4. Touch the OTHER FUNCTIONS
button on the "main menu" (in the main
area ).
5. Touch the sub-menu button
(located in the lower area ).
6. Touch the FILL RESERVOIR
button.
7. Remove the loading wand from its
holder.
• To remove the loading wand, press on
the front of the wand until the spring
contracts, then release.
or
• Touch the WAND button on the
display (positioned in the lower area
).
8. Place the end of the tube at the bottom
of the jug (or container).
9. Press the start button to start filling
the appliance reservoir with water.
Function for filling water (or other
liquids) into the reservoir.
The jug (or container) with the water
must have a gross weight lower
than 5 kg.
Pay attention to the distance to be
maintained so as not to be hit by the
wand projection.
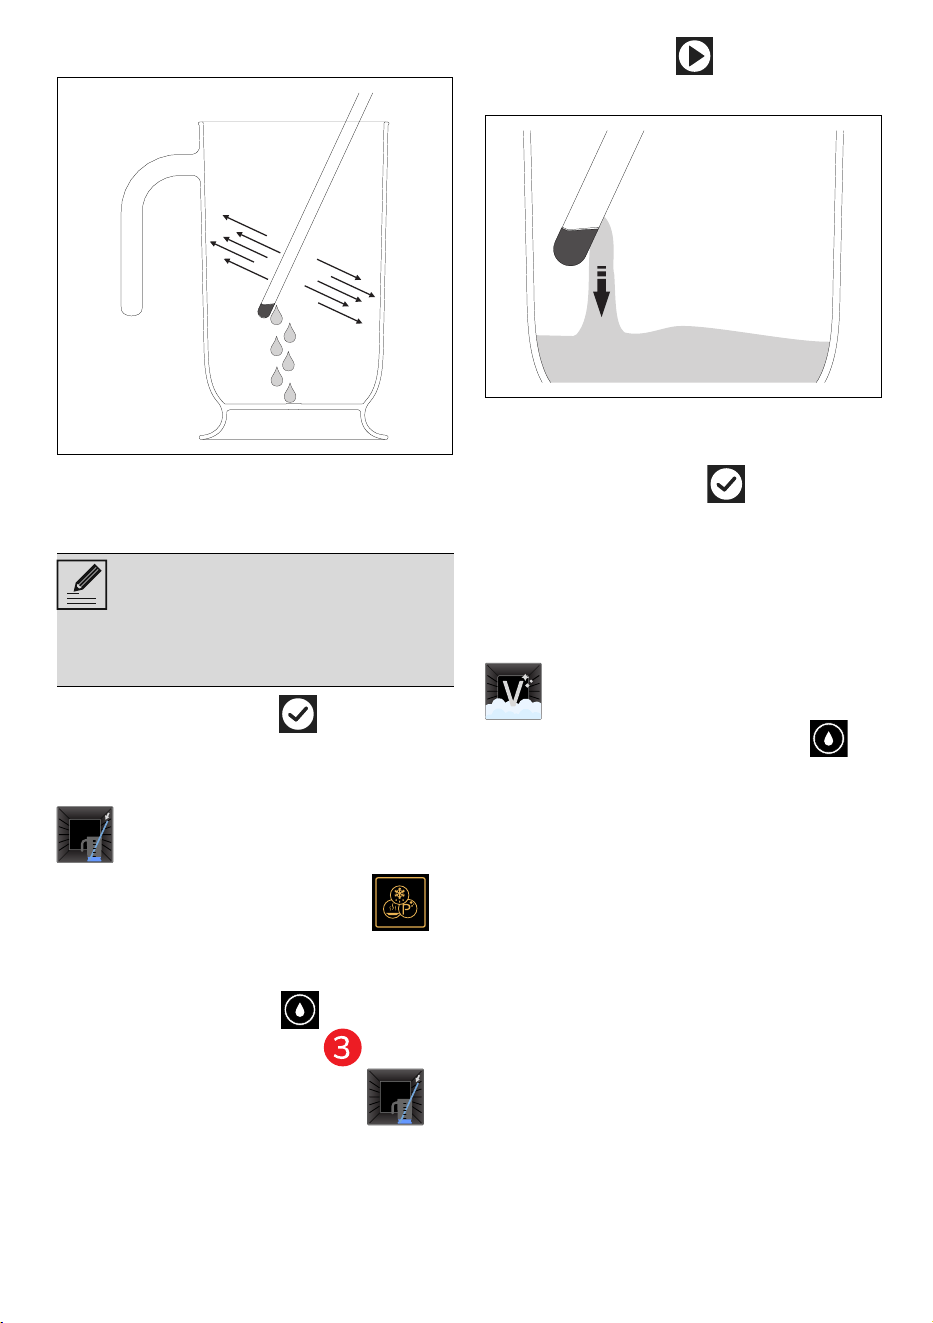
USE - 10191477C139/A
e
10. When finished, shake the loading wand
to remove any water residue.
11. Place the loading wand back in its
holder.
12. Remove the jug (or container).
13. Close the door.
14. Touch the CONFIRM button to
confirm that you have finished filling the
reservoir.
Manual reservoir draining
1. Touch the OTHER FUNCTIONS
button on the "main menu" (in the main
area ).
2. Touch the sub-menu button
(located in the lower area ).
3. Touch the RESERVOIR DRAIN
button.
4. Place a jug or container on the open
door.
5. Remove the loading wand from its
holder.
6. Press the START button to start
draining the water into the jug (or
container).
When complete, the display will indicate
that the residual water removal process is
complete.
7. Touch the CONFIRM button.
8. Shake the loading wand in order to
remove any remaining water.
9. Place the loading wand back in its
holder.
10. Remove the jug (or container).
11. Close the door.
For the cleaning function VAPOR CLEAN
(only on some models) and the
cleaning functions of the sub-menu ,
see the chapter CLEANING AND
MAINTENANCE.
In the event of a blackout
Following a power failure during a function,
the appliance automatically resumes the
function it was performing, maintaining all
the previous settings and discounting the
time already elapsed of the function only if:
• the duration of the power failure is less
than or equal to 60 seconds;
• the function does not include the use of
microwaves (depending on the model);
• the pyrolytic function is in progress
(depending on the model);
• the Sabbath function is in progress
(regardless of power failure time).
If the power failure occurs in a condition
other than those described above, the
appliance remains waiting for manual
consent to continue or not the function from
the user for a certain time.
If the function is reactivated, the cooking
settings remain as they were before the
When the door is closed, an
automatic system will automatically
draw in any residual water in the
loading wand to avoid drips. A
bubbling noise may be heard; this is
completely normal.
Function for draining water (or other
liquids) from the reservoir.
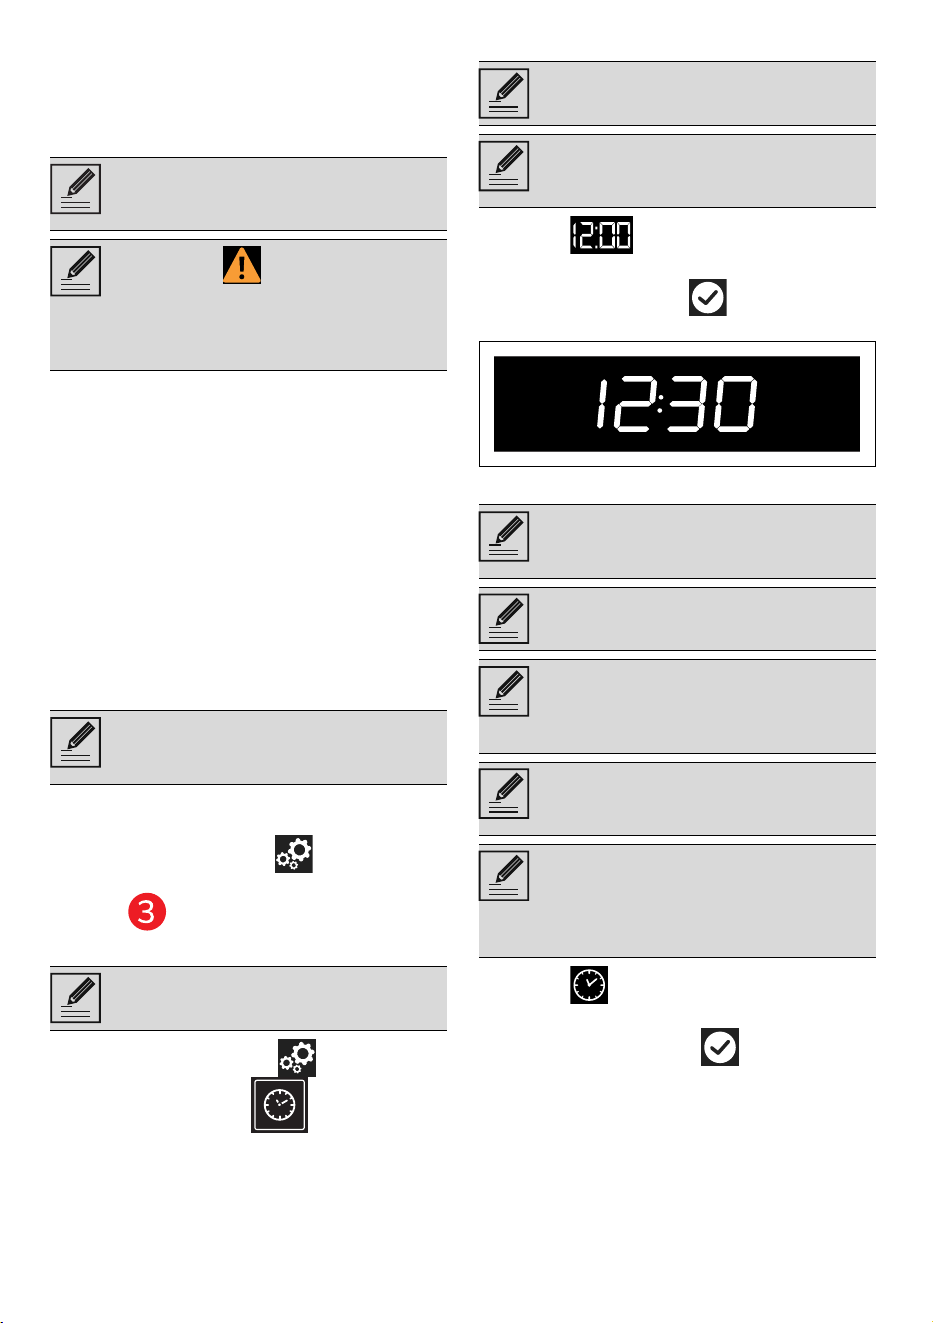
102 - USE 91477C139/A
blackout, taking into account the time
already elapsed.
If there is no intervention by the user, the
appliance cancels the function and the
display shows the current time again.
Blackout during a programmed function
If the power failure occurs while a
programmed cooking process is set:
• If the blackout is restored within the set
start time, the appliance remains in
standby mode updating the time until
start.
• If the blackout is restored after the set
start time, the device waits for the
function to start and, if after a certain
time there is no intervention by the user,
the appliance cancels the function and
the display shows again the current
time.
Settings
The product configuration can be set using
this menu.
• Touch the SETTINGS button on the
main menu (at the right in the lower
area ).
Clock settings
• In the "settings menu " touch the
CLOCK SETTINGS button.
Digital clock
1. Select Digital clock.
2. Select On.
Touch the CONFIRM button to
activate the Digital clock mode.
Time display
1. Select Show the time.
2. Select On.
3. Touch the CONFIRM button to
activate the time display.
(SmegConnect models only) A
notification also appears in the app
when you reconnect.
The symbol indicates that a
power failure has occurred and the
ongoing function could not be
automatically restored. Press the
symbol for more information.
In the event of a temporary power
cut, all personal settings will remain
stored.
Menu where you can set the time
and type of display.
Displays the current time in digital
format.
In the event of a temporary power
cut, the digital version will remain
selected.
Activates/deactivates the clock
display when the oven is switched
off.
The "Show the time" function is
factory set to Off.
If the "Show the time" function is set
to On, when the appliance is in
standby it displays the current time
at low brightness.
When the "Show the time" function
is set to On, the appliance consumes
more energy than in stand-by mode.
Only for SmegConnect models: if the
"Show the time" function is set to Off
the connectivity switches off
automatically when the clock goes
into stand-by.
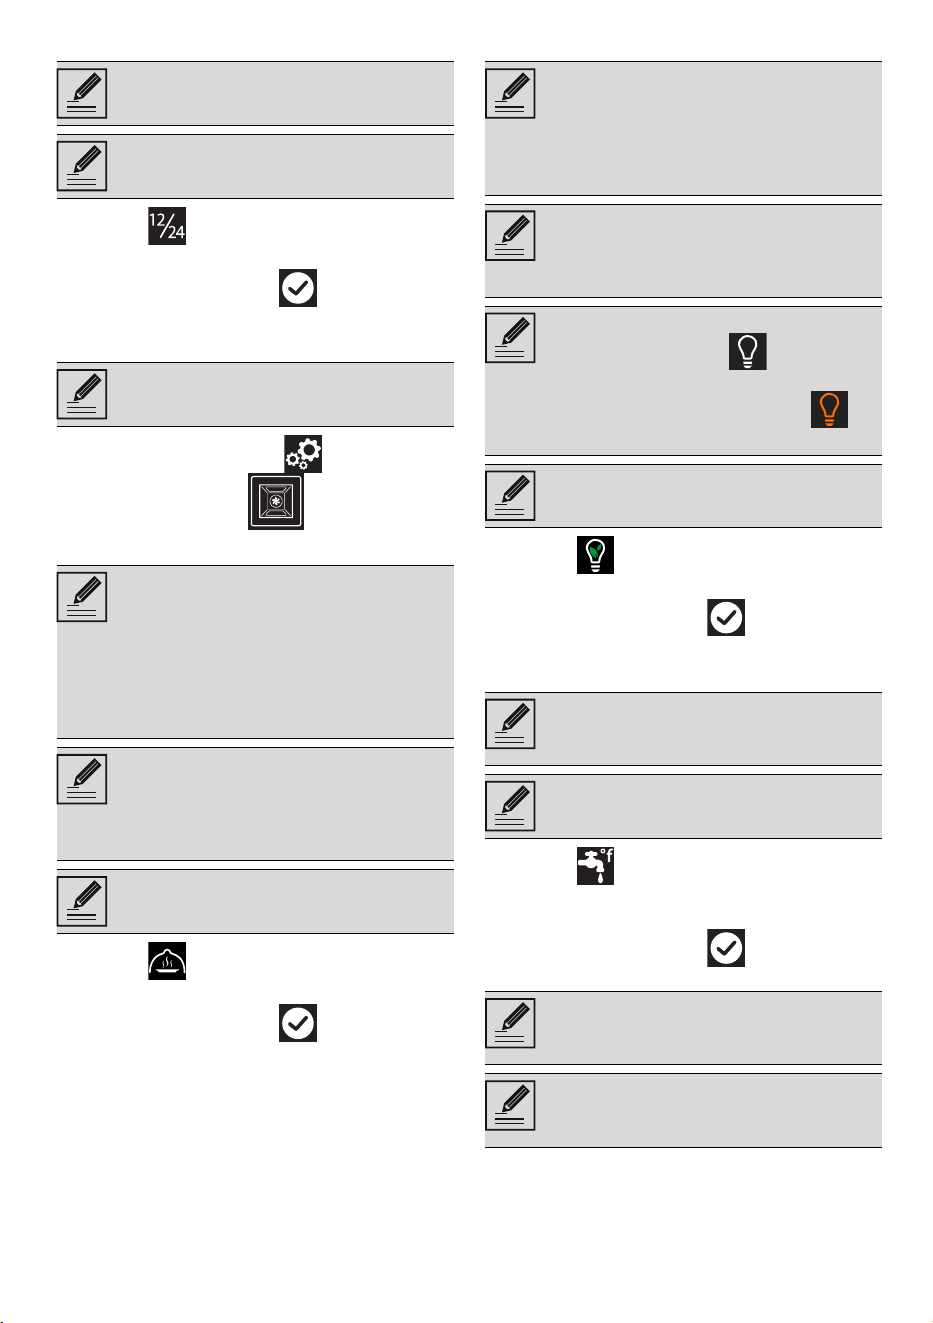
USE - 10391477C139/A
e
Clock format
1. Select Time format.
2. Select 12h or 24h.
3. Touch the CONFIRM button to
activate the required time format.
Oven settings
• In the "settings menu " touch the
OVEN SETTINGS button.
Keep warm
1. Select Keep warm.
2. Select On.
3. Touch the CONFIRM button to
activate the Keep warm mode.
Eco light
1. Select Eco light.
2. Select On.
3. Touch the CONFIRM button to
activate the Eco light mode.
Water hardness
1. Select Water hardness.
2. Scroll through the hardness levels and
select the one required (from 1 to 5).
3. Touch the CONFIRM button to
confirm.
Depending on the water hardness value
that has been set, after the steam function
has been used for a certain number of
hours, the display will prompt you to carry
out the descaling procedure.
Activates/deactivates the clock
display in the 12 or 24 hour format.
The Time format function is factory
set to 24h.
Dedicated menu for additional
product functions.
This mode allows the appliance to
keep cooked food warm (at low
temperatures) after cooking finishes
with a cooking cycle for which a
duration has been set (if this is not
manually interrupted), without
altering the taste and smell
obtained during cooking.
The keep warm function will be
activated 5 minutes after cooking
has finished; this is indicated by a
series of beeps (see cooking or
function ended).
The temperature of the keep warm
function is set to 80°C.
For greater energy savings, the
lights inside the oven cavity are
automatically deactivated
approximately one minute after the
start of cooking or after the door is
opened.
To stop the appliance from
automatically deactivating the light
after approximately one minute, set
this mode to Off.
The manual on/off control is always
available. Press the symbol,
when available, to manually
activate the oven light or the
symbol to deactivate it.
The Eco light function is factory set
to On.
This mode allows you to set the
water hardness value in order to
optimise the descaling process.
The appliance is factory set for
water of medium hardness (3).
If your mains water supply is too
hard, we recommend using a water
softener.
Request information on the
hardness of your water from your
local water board.
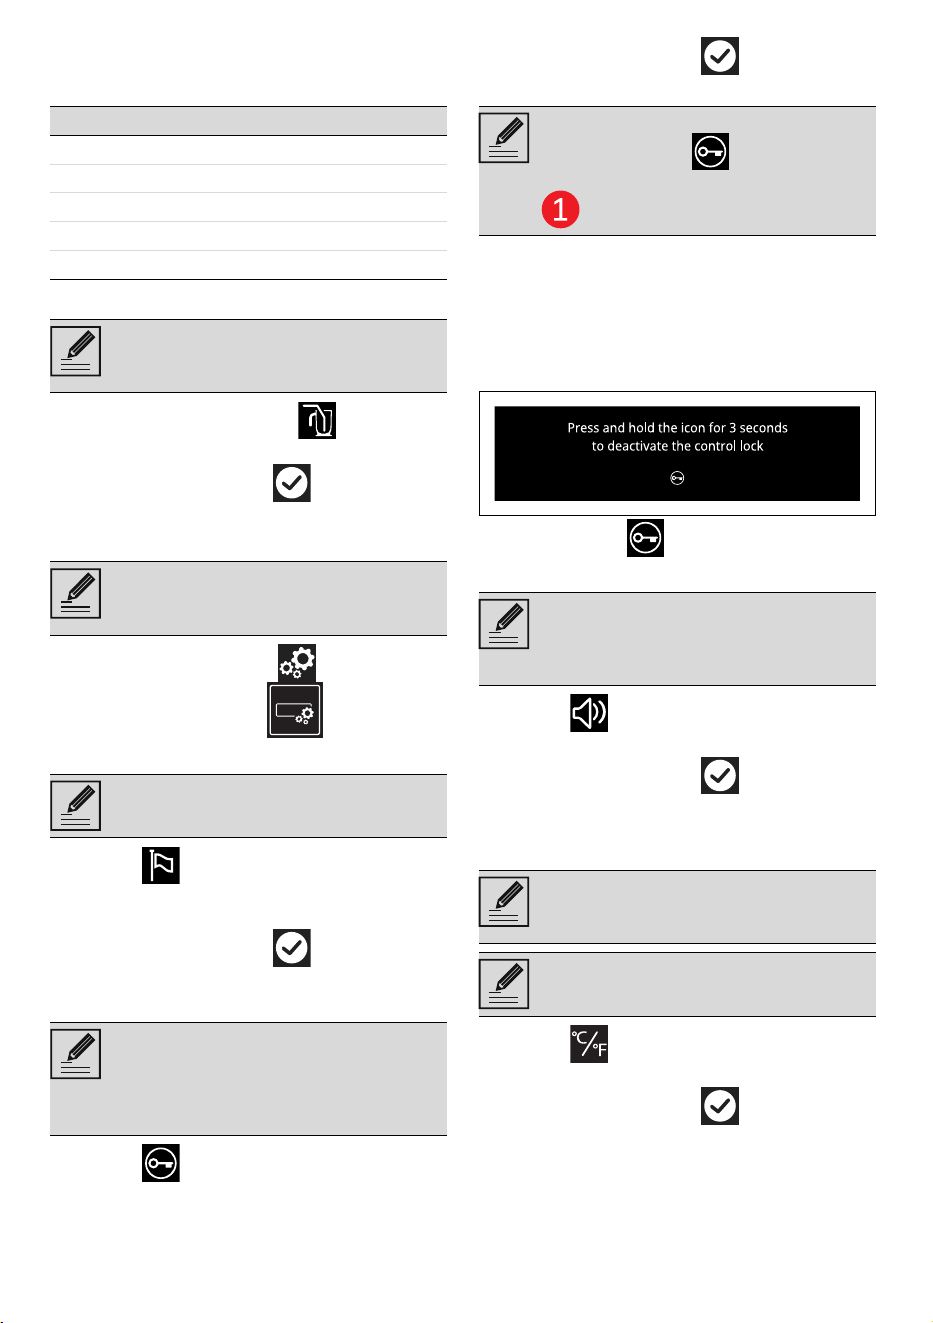
104 - USE 91477C139/A
According to the use of the appliance and
hardness of the water (°dH or °dF), the
approximate number of hours is as follows:
Automatic wand
1. Select Automatic wand .
2. Select On/Off.
3. Touch the CONFIRM button to
activate the wand automatic operation.
Display settings
• In the "settings menu " touch the
DISPLAY SETTINGS button.
Language
1. Select Language.
2. Scroll through the available languages
to select the required language.
3. Touch the CONFIRM button to
confirm the language.
Controls lock
1. Select Controls lock.
2. Select Yes.
3. Touch the CONFIRM button to
activate the Controls lock mode.
To temporarily disable the lock during
cooking:
4. Touch one of the values that you wish to
modify.
A message appears on the display that
indicates how to temporarily disable the
Controls lock mode.
5.
Touch the icon for 3 seconds.
Sound
1. Select Sound.
2. Select Off.
3. Touch the CONFIRM button to
disable the sound associated with the
touching of the symbols on the display.
Tempe r a t u re For m a t
1. Select Temperature format.
2. Select °C or °F.
3. Touch the CONFIRM button to
activate the required temperature
format.
Value °dH °dF Hours
1 0 ÷ 11 0 ÷ 20 8
2 12 ÷ 17 21 ÷ 30 7
3 18 ÷ 24 31 ÷ 42 6
4 25 ÷ 30 43 ÷ 53 5
5 31 ÷ 50 54 ÷ 90 4
Sets the automatic operation mode
of the reservoir filling and draining
wand.
Menu where you can change the
language and modify the display
settings of certain parameters.
Allows you to select the language of
the display.
Allows the appliance to
automatically lock the controls after
one minute of normal operation
without any intervention from the
user.
During normal operation, it is
indicated by the indicator light
turning on in the information area
.
Whenever one of the display
symbols is pressed, the appliance
beeps. This setting disables these
sounds.
Allows you to set the temperature
scale to degrees Celsius (°C) or
degrees Fahrenheit (°F).
The Temperature format function is
factory set to °C.

USE - 10591477C139/A
e
Display brightness
1. Select Display brightness.
2. Select from the options High - Medium -
Low.
3. Touch the CONFIRM button to
confirm the selection.
Weight type
1. Select Weight type .
2. Select kg or oz.
3. Touch the CONFIRM button to
activate the desired weight unit.
Connection setting (SmegConnect models
only)
• In the “settings menu ” touch the
CONNECTION SETTINGS button (at
the left in the lower area ).
System info
• In the “settings menu ” touch the
SYSTEM INFO button (at the right in
the lower area ).
Showrooms
• Touch the SHOWROOMS button
on the “settings menu ” (at the
centre of the lower area ).
Show Room (for showrooms only)
1. Select Show Room.
2. Select On.
3.
Touch the CONFIRM button
to activate the Show Room
mode.
Demo Mode (for showrooms only)
1. Select Demo Mode.
2. Select On.
3. Touch the CONFIRM button to
activate the demo mode.
This allows the display brightness
level to be selected.
The Display brightness function is
factory set to High.
Allows you to set the unit of
measurement to display the weight
value in kilograms (kg) or in ounces
(oz).
The Weight type function is factory
set to kg.
Menu where connectivity
parameters are displayed.
For CONNECTION settings
please refer to the "Built-in Oven
Connectivity" manual.
Menu displaying information about
serial number and software
versions.
Menu dedicated to showrooms.
This mode deactivates all the
appliance’s heating elements, while
keeping the control panel active.
During normal operation, it is
indicated by the indicator light
turning on in the information area
.
To use the appliance normally, set
this mode to Off.
The same as Show Room, when this
mode is activated, after a certain
period of inactivity, a demonstration
of the various screens that illustrate
the potential of the appliance is
shown on the display.
To use the appliance normally, set
this mode to Off.
106 - CLEANING AND MAINTENANCE 91477C139/A
Restore settings
• Touch the FACTORY RESET button
on the "settings menu " (at the
centre of the lower area ).
1. Touch the Yes button if you want to
restore the original factory operations.
or
2. Touch the No button to cancel the
operation.
CLEANING AND MAINTENANCE
Cleaning the appliance
Cleaning the surfaces
To keep the surfaces in good condition, they
should be cleaned regularly after use. Let
them cool first.
Ordinary daily cleaning
Always and only use specific products that
do not contain abrasives or chlorine-based
acids.
Pour the product onto a damp cloth and
wipe the surface, rinse thoroughly and dry
with a soft cloth or a microfibre cloth.
Food stains or residues
Do not use steel sponges and sharp
scrapers as they will damage the surface.
Use normal, non-abrasive products and a
wooden or plastic tool, if necessary. Rinse
thoroughly and dry with a soft cloth or a
microfibre cloth.
Do not allow residues of sugary foods (such
as jam) to set inside the oven. If left to set
for too long, they might damage the enamel
lining of the oven.
Cleaning the external glass
To clean the external glass, use a first dry
cloth and moisten it with the cleaning
product; then finish cleaning with a second
dry cloth, preferably microfibre, to remove
any residue and prevent streaks.
Cleaning the door
Door disassembly
For easier cleaning it is recommended to
remove the door and place it on a tea towel.
To remove the door proceed as follows:
1. Open the door completely and insert
two pins into the holes on the hinges
indicated in the figure.
2. Grasp the door on both sides with both
hands, lift it forming an angle of around
30° and remove it.
3. To reassemble the door, put the hinges
in the relevant slots in the oven, making
sure that grooved sections A are resting
completely in the slots.
This restores all settings to the
original factory settings.
The operation also deletes personal
recipes.
See General safety instructions.
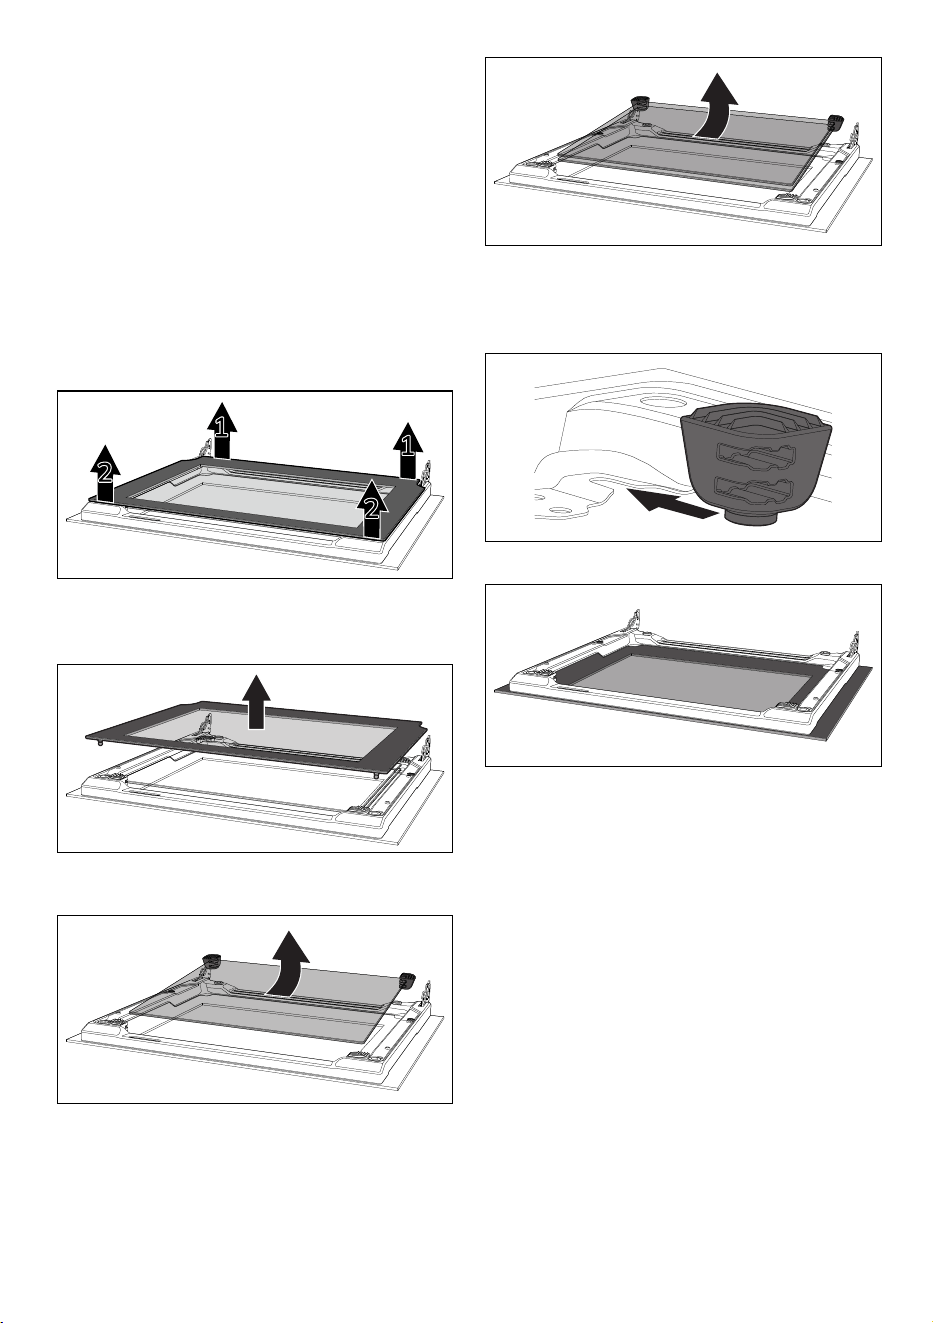
CLEANING AND MAINTENANCE - 10791477C139/A
e
4. Lower the door and once it is in place
remove the pins from the holes in the
hinges.
Cleaning the door glazing
The glass in the door should always be kept
thoroughly clean. Use absorbent kitchen
roll. In case of stubborn dirt, wash with a
damp sponge and an ordinary detergent.
Removing the internal glass panes
For easier cleaning the internal glass panes
of the door can be removed.
1. Lock the door with the appropriate pins.
2. Remove the internal glass pane by
pulling the rear part gently upwards,
following the movement indicated by
the arrows 1.
3. Release the front pins following the
movement indicated by the arrows 2
4. Then remove the inner glass pane from
the front profile.
5. Pull the intermediate glass unit
downwards from the door and then lift it
upwards.
Note: In some models, the intermediate
glass unit consists of two panes.
During this step, the upper grommets may
come out of their seats.
6. Insert the front grommets into their
seats. The feet of the grommets must be
facing the outer glass
7. Clean the external glass pane and the
panes removed previously.
8. Use absorbent kitchen roll. In case of
stubborn dirt, wash with a damp
sponge and neutral detergent.

108 - CLEANING AND MAINTENANCE 91477C139/A
9. Reinsert the intermediate glass unit and
reposition the inner glass.
10. Be sure to fit the 4 pins of the inner glass
well into their seats on the door.
Cleaning the oven cavity
In order to keep your oven in the best
possible condition, clean it regularly after
letting it cool down.
Avoid letting food residue dry inside the
oven cavity, as this could damage the
enamel.
Take out all removable parts before
cleaning.
For easier cleaning, it is recommended to
remove:
• the door;
• The rack/tray support frames.
Drying
Cooking food generates moisture inside the
appliance. This is a normal phenomenon
and does not affect the appliance’s
operation in any way.
Each time you finish cooking:
1. Let the appliance cool down.
2. Remove any dirt from inside the
appliance.
3. Dry the interior of the appliance with a
soft cloth.
4. Leave the door open until the inside of
the appliance has dried completely.
Removing rack/tray support frames
Removing the rack/tray support frames
enables the sides to be cleaned more easily.
A = front housing
B = rear pin
To remove the rack/tray support frames:
1. Unscrew the front fixing pin located on
the side wall near the opening of the
The intermediate glass pane must
be repositioned on the open door so
that the screen printing in the corner
can be read from left to right (the
rough part of the screen printing
must face the external glass pane of
the door).
In the event you are using specific
cleaning products, we recommend
running the oven at maximum
temperature for 15-20 minutes in
order to eliminate any residue.
In some models, the rear pin B
can be removed and re-
assembled in the same way as
the front housing A.
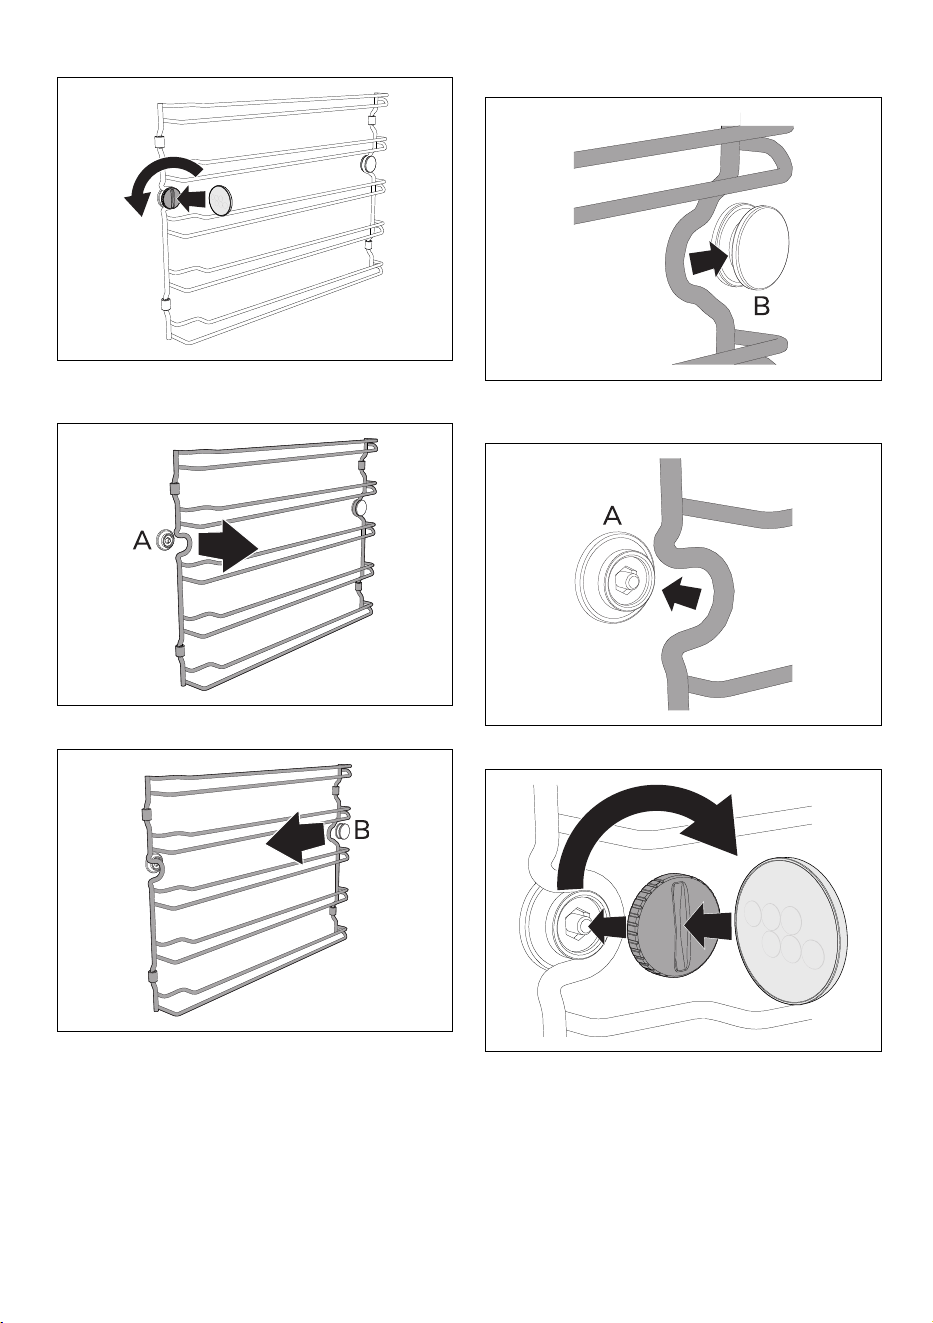
CLEANING AND MAINTENANCE - 10991477C139/A
e
oven cavity (you can help yourself with a
tool, e.g. a coin).
2. Carefully pull the frame towards the
inside of the oven cavity to unhook it
from front housing A.
3. Remove the frame from the rear pin B
located at the bottom of the side wall.
4. Repeat the operation for the frame
placed on the other side wall.
To refit the rack/tray support frames:
1. Slide the rear part of the frame into the
housing under the pin B located at the
bottom of the side wall.
2. Replace the front part of the frame in
housing A on the side wall near the
opening of the oven cavity.
3. Screw in the front fixing pin (you can
help yourself with a tool, e.g. a coin).
4. Repeat the operation for the frame
placed on the other side wall.
110 - CLEANING AND MAINTENANCE 91477C139/A
Vapor Clean (on some models
only)
Preliminary operations
Before starting the Vapor Clean function:
• Completely remove all accessories from
inside the oven.
• If present, remove the temperature
probe.
• If present, remove the self-cleaning
panels.
•Close the door.
• During the assisted cleaning cycle, wash
the self-cleaning panels (where fitted),
which were previously removed,
separately in warm water and a small
amount of detergent.
Vapor Clean cycle setting
1. Touch the OTHER FUNCTIONS
button on the "main menu" (in the main
area ).
2. Select VAPOR CLEAN .
3. Touch the START button to start
the reservoir filling procedure.
4. Proceed with reservoir filling as
described above.
Vapor Clean cleaning phase
5. Touch the START button to start
the Vapor Clean function.
This stage is indicated by a progressive
increase in the cooking level.
End of Vapor Clean
At the end of the Vapor Clean function,
"Function ended" displays and a buzzer
sounds briefly, which can be deactivated by
touching any point of the display or by
opening the door.
1. Touch the HOME button to quit the
function.
2. Proceed with draining the reservoir as
described above.
3. Open the door and wipe away the less
stubborn dirt with a microfibre cloth.
4. Use a non-scratch sponge with brass
filaments on tougher encrustations.
5. In case of grease residues use specific
oven cleaning products.
6. Remove any remaining water from the
oven cavity.
7. Where fitted, reposition the self-
cleaning panels and the rack/tray
support frames.
For greater hygiene and to avoid foods
taking on unpleasant odours:
• We recommend drying the inside of the
oven with a fan assisted function at
160°C for around 10 minutes.
•Where the self-cleaning panels are
fitted, we recommend drying the inside
of the oven with a simultaneous
catalysis cycle.
See General safety instructions.
The Vapor Clean function is an
assisted cleaning procedure which
facilitates the removal of dirt.
Thanks to this process, it is possible
to clean the inside of the oven very
easily. The dirt residues are softened
by the heat and water vapour for
easier removal afterwards.
If the internal temperature is higher
than expected, the function is not
activated.
Let the appliance cool down before
activating the function.
The duration and temperature of the
Vapor Clean function cannot be
changed by the user.
We recommend wearing rubber
gloves for these operations.
For easier manual cleaning of parts
that are difficult to reach, we
recommend removing the door.
CLEANING AND MAINTENANCE - 11191477C139/A
e
Descaling
Periodically the display will prompt you to
perform the boiler descaling procedure.
Preliminary operations
In case there is residual water inside the
reservoir:
1. Open the door.
2. Place a jug or a container on the open
door.
3. Pull the loading nozzle out of its housing.
4. Press the START button to start
draining the water into the jug (or
container).
Residual water begins to drain into the jug
(or container).
5. Wait for the end of the drain flow.
6. Empty the water in the jug (or
container).
7. Touch the CONFIRM button to
continue the function.
Reservoir filling
1. Mix 100 g of citric acid with 650 ml of
water in a jug.
2. Pull the loading nozzle out of its housing.
3. Place the end of the tube at the bottom
of the jug (or container).
4. Touch the START button to start
filling the reservoir of the appliance with
the descaling solution.
5. In the end, shake the loading nozzle to
remove any remaining water.
6. Place the loading nozzle place in its
housing.
7. Remove the jug (or container).
Boiler descaling function
1. Close the door
2. Descaling starts.
At the end of the descaling process the
display shows the request to drain the
water softener.
Reservoir draining
1. Open the door
2. Place a jug or a container on the open
door.
3. Pull the loading nozzle out of its housing.
4. Press the START button to start
draining the water softener into the jug
(or container).
The descaling solution begins to flow into
the jug.
5. Wait for the end of the drain flow.
6. Empty the descaling solution in the jug
(or container).
Cleaning the reservoir and hydraulic
circuit
Once the water softener has been drained,
the appliance starts the cleaning procedure
for the reservoir and the hydraulic circuit.
The display will show the request to fill the
reservoir with water.
1. Fill a jug or container with about 2 litres
of clean water.
2. Open the oven door.
The presence of scale due to lack of
descaling can compromise correct
operation of the appliance in the
long term.
Descaling is a long process (more
than one hour) that requires the user
to be present in front of the
appliance.
We recommend performing
descaling every time this is indicated
on the display in order to keep the
boiler in perfect operating condition.
Depending on conditions, the
system will show if the appliance
can perform standard functions or if
a descaling and cleaning process of
the hydraulic circuit is required.
From now on, it will no longer be
possible to cancel the descaling
process.
Do not use lactic acid or other
descaling agents.
Take care: the descaling solution
may be still hot.
Use cold tap water which is not too
hard, softened water or still mineral
water.
Do not use distilled water, tap water
with a high chloride content (> 40
mg/l), or other liquids.
112 - CLEANING AND MAINTENANCE 91477C139/A
3. Place the jug (or container) on the open
door.
4. Pull the loading nozzle out of its housing.
5. Place the end of the tube at the bottom
of the jug (or container).
6. Press the START button to start
filling the appliance reservoir with
water.
7. When you have finished filling water
into the reservoir, touch the CONFIRM
button to continue with the
function.
The appliance starts the function using the
parameters set.
• When cleaning the tank and the
hydraulic circuit, leave the jug on the
door open with the filling nozzle inside.
The appliance cyclically discharges
certain quantities of water used for
cleaning.
• During this process, the overflowing of
water inside the oven cavity is not
intended as a malfunction, rather it is
part of the rinsing procedure.
8. At the end of the cleaning process, the
display indicates the request to drain
water.
9. Clean and dry any residual water inside
the oven cavity.
10. Open the door
11. Place a jug or a container on the open
door.
12. Pull the loading nozzle out of its housing.
13. Press the START button to start
draining the water into the jug (or
container).
14. Wait for the end of the drain flow.
When complete, the display will indicate
that the residual water removal process is
complete.
Manual descaling
When you wish to perform descaling in
advance, you can run the function manually:
1. Touch the OTHER FUNCTIONS
button on the "main menu" (in the main
area ).
2. Touch the sub-menu button
(located in the lower area ).
3. Touch the DESCALING button .
4. Proceed with descaling as described in
the previous paragraphs.
Cleaning the reservoir and the
water circuit manually
1. Touch the OTHER FUNCTIONS
button on the "main menu" (in the main
area ).
2. Touch the sub-menu button
(located in the lower area ).
3. Touch the CLEAN RESERVOIR
button.
Preliminary operations
1. Fill a jug or a container with approx. 2
litres of water.
2. Open the appliance door.
3. Place the jug (or container) on the open
door.
4. Remove the loading wand from its
holder.
• To remove the loading wand, press on
the front of the wand until the spring
The overflowing of water inside the
oven cavity is not intended as a
malfunction, rather it is part of the
rinsing procedure.
Function that performs descaling of
boiler.
This function allows you to clean the
reservoir and the water circuit of the
appliance.
The jug (or container) with the water
must have a gross weight lower
than 5 kg.
CLEANING AND MAINTENANCE - 11391477C139/A
e
contracts, then release.
or
• Touch the WAND button on the
display (positioned in the lower area
).
5. Place the end of the tube at the bottom
of the jug (or container).
6. Press the start button to start filling
the appliance reservoir with water.
7. Touch the CONFIRM button to
confirm that you have finished filling the
reservoir.
The appliance starts the function using the
parameters set.
Cleaning the water circuit
• When cleaning the reservoir and the
hydraulic circuit, leave the jug on the
door open with the loading wand inside.
The appliance cyclically discharges
certain quantities of water used for
cleaning.
• During this process, the overflowing of
water inside the oven cavity is not
intended as a malfunction, rather it is
part of the rinsing procedure.
End of water circuit cleaning
8. After completion of the cleaning process
the request to drain the water is shown
on the display.
9. Clean and dry any residual water inside
the oven cavity.
Reservoir draining
10. Open the door
11. Place a jug or container on the open
door.
12. Remove the loading wand from its
holder.
13. Press the START button to start
draining the water into the jug (or
container).
14. Wait for the end of the drain flow.
When complete, the display will indicate
that the residual water removal process is
complete.
15. Touch the CONFIRM button.
16. Shake the loading wand in order to
remove any remaining water.
Pay attention to the distance to be
maintained so as not to be hit by the
wand projection.
It is recommended to carry out the
cleaning process of the reservoir
and the water circuit a couple of
times.
You can also use a cleaning solution
instead of water. In this case it is
advisable to carry out at least a
couple of water rinses afterwards,
following the instructions in this
chapter.
114 - CLEANING AND MAINTENANCE 91477C139/A
17. Place the loading wand back in its
holder.
18. Remove the jug (or container).
19. Drain the water from the jug.
20. Close the door.
Sanitization
Sanitization with steam allows to remove
the last residues of descaling from the
hydraulic circuit.
1. set a 70% combined steam function
lasting at least half an hour.
2. Fill the jug with clean water.
3. Open the appliance door.
4. Rest the jug on the open door.
5. Remove the loading wand from its
holder.
6. Place the end of the tube at the bottom
of the jug (or container).
7. Press the start button to start filling
the appliance reservoir with water.
8. When finished, shake the loading wand
to remove any water residue.
9. Place the loading wand back in its
holder.
10. Remove the jug (or container).
11. Close the door.
12. Touch the START button to start
the selected steam function.
13. Wait for the function to be executed
until the end.
14. At the end of the function, drain the
reservoir as described above.
15. Wait for the end of the drain flow.
16. Drain the water from the jug.
17. Open the door.
18. Wipe off any spillage of water in the
oven cavity with a cloth or sponge.
19. Close the door.
Reservoir calibration
Over time, the quantities of water in the
reservoir may not be read correctly by the
appliance sensor. In this case, the
functionality of the appliance sensor can be
restored to an optimal condition.
Preliminary operations
1. Touch the OTHER FUNCTIONS
button on the "main menu" (in the main
area ).
2. Touch the sub-menu button
(located in the lower area ).
3. Touch the RESERVOIR CALIBRATION
button (positioned in the lower area
).
Empty reservoir calibration
1. Open the appliance door.
2. Place an empty jug on the open door.
3. Touch the WAND button on the
display (positioned in the lower area
).
4. Pull out the wand and dip the end into
the bottom of the empty jug.
5. Press the START button to start
draining the water left in the jug.
6. Wait for the end of the drain flow.
7. Make sure that no more water comes
out of the wand, then touch the STOP
button .
8. Then touch the EMPTY RESERVOIR
CALIBRATION button to continue
calibration.
Take care: wait for the oven cavity
to cool down.
This function allows you to calibrate
the correct reading of the quantity of
water (or other liquid) inside the
reservoir.
Pay attention to the distance to be
maintained so as not to be hit by the
wand projection.
INSTALLATION - 11591477C139/A
e
Full reservoir calibration
1. Fill a jug with exactly 1 litre of water.
2. Place the jug with 1 litre of water on the
open door.
3. Immerse the end of it into the jug until it
reaches the bottom.
4. Press the START button to start
filling the appliance reservoir with
water.
5. Wait for the end of the reservoir filling.
6. Make sure that the appliance has
sucked up all the water contained in the
jug, then touch the STOP button .
7. Place the loading wand back in its
holder.
8. Remove the jug.
9. Close the door.
10. Touch the FULL RESERVOIR
CALIBRATION button to complete
calibration.
11. Wait for the end of calibration.
On completion, a warning on the display
indicates the end of the calibration
procedure.
12. Touch the CONFIRM button to end
the reservoir calibration procedure.
The display suggests to drain the water
from the reservoir. You can either use the
water for steam cooking or proceed as
described in the chapter for Reservoir
draining.
Extraordinary maintenance
Seal maintenance tips
The seal should be soft and elastic.
• To keep the seal clean, use a non-
abrasive sponge and wash with
lukewarm water.
INSTALLATION
Electrical connection
General information
Check the mains characteristics against the
data indicated on the plate.
The identification plate bearing the
technical data, serial number and brand
name is visibly positioned on the appliance.
Do not remove this plate for any reason.
The appliance must be connected to ground
using a wire that is at least 20 mm longer
than the other wires.
The appliance can work in the following
modes:
We recommend using a digital
kitchen scale and measuring 1000
grams of water.
When the door is closed, an
automatic system will automatically
draw in any residual water in the
loading wand to avoid drips. A
bubbling noise may be heard; this is
completely normal.
See General safety instructions.

116 - INSTALLATION 91477C139/A
• 220-240 V~
3 x 1.5 mm² three-core cable.
Fixed connection
Fit the power line with an all-pole circuit
breaker with a contact separation distance
sufficient to provide complete disconnection
in category III overvoltage conditions,
pursuant to installation regulations.
For the Australian/New Zealand market:
The circuit breaker incorporated in the fixed
connection must comply with AS/NZS 3000.
Connection with plug and socket
Make sure that the plug and socket are of
the same type.
Avoid using adapters, gang sockets or
shunts as these could cause overheating
and a risk of burns.
Cable replacement
1. Unscrew the rear casing screws and
remove the casing to access the
terminal board.
2. Replace the cable.
3. Make sure that the cables (for the oven
or any hob) follow the best route in order
to avoid any contact with the appliance.
Positioning
Position of the power cable
Front panel seal
Glue the supplied seal to the rear part of the
front panel to avoid water or other liquids
from leaking in.
Fastening bushings
1. Remove the bushing covers on the front
of the appliance.
2. Mount the appliance into the recess.
3. Secure the appliance to the cabinet
using screws.
4. Cover the bushings with the previously
removed covers.
The values indicated above refer to
the cross section of the internal lead.
The aforementioned power cables
are sized taking into account the
coincidence factor (in compliance
with standard EN 60335-2-6).
Power voltage
Danger of electrocution
• Disconnect the mains power supply.
See General safety instructions.
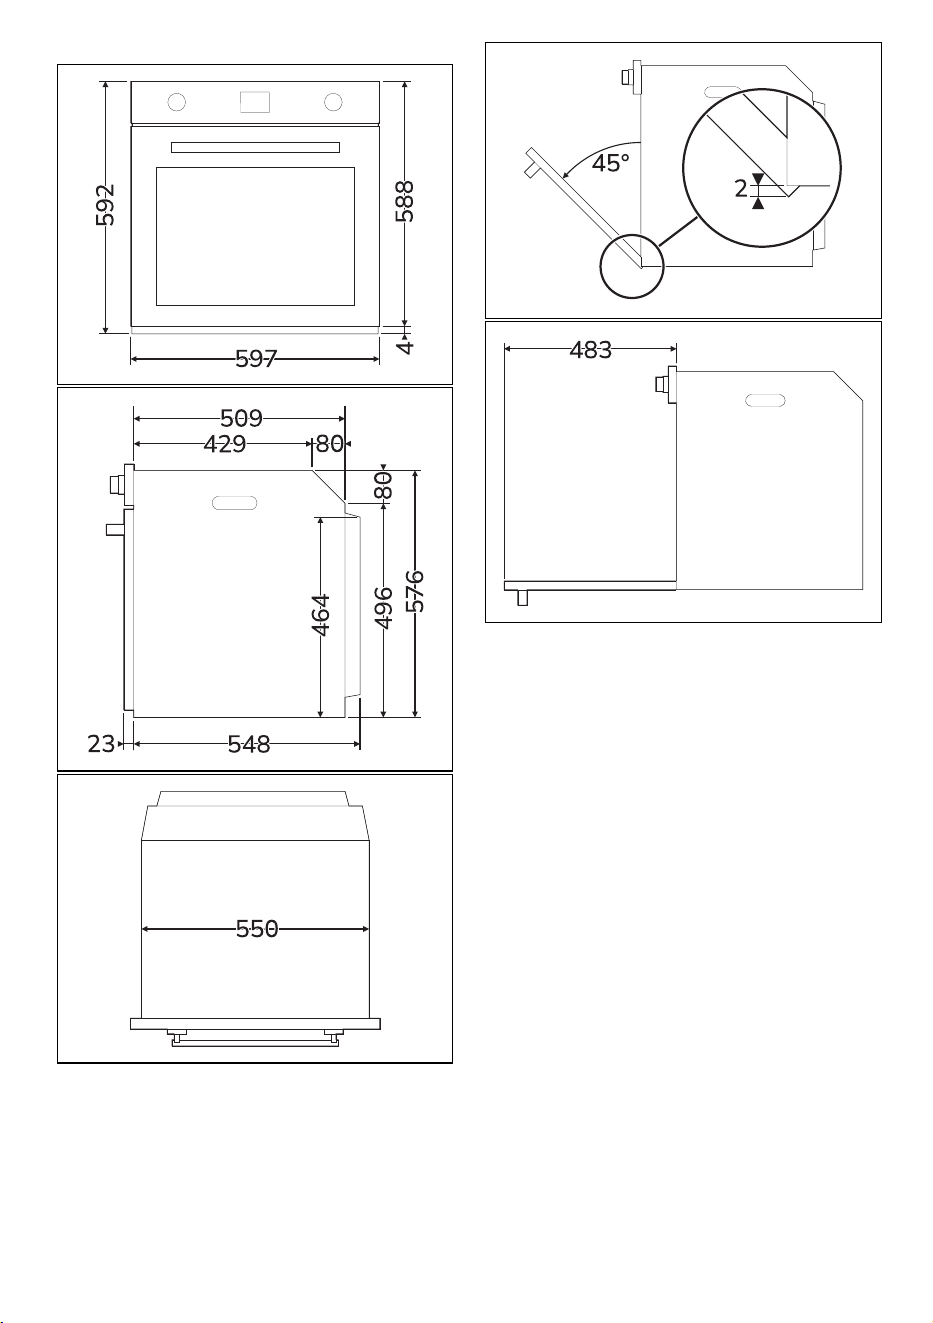
INSTALLATION - 11791477C139/A
e
Appliance overall dimensions (mm)
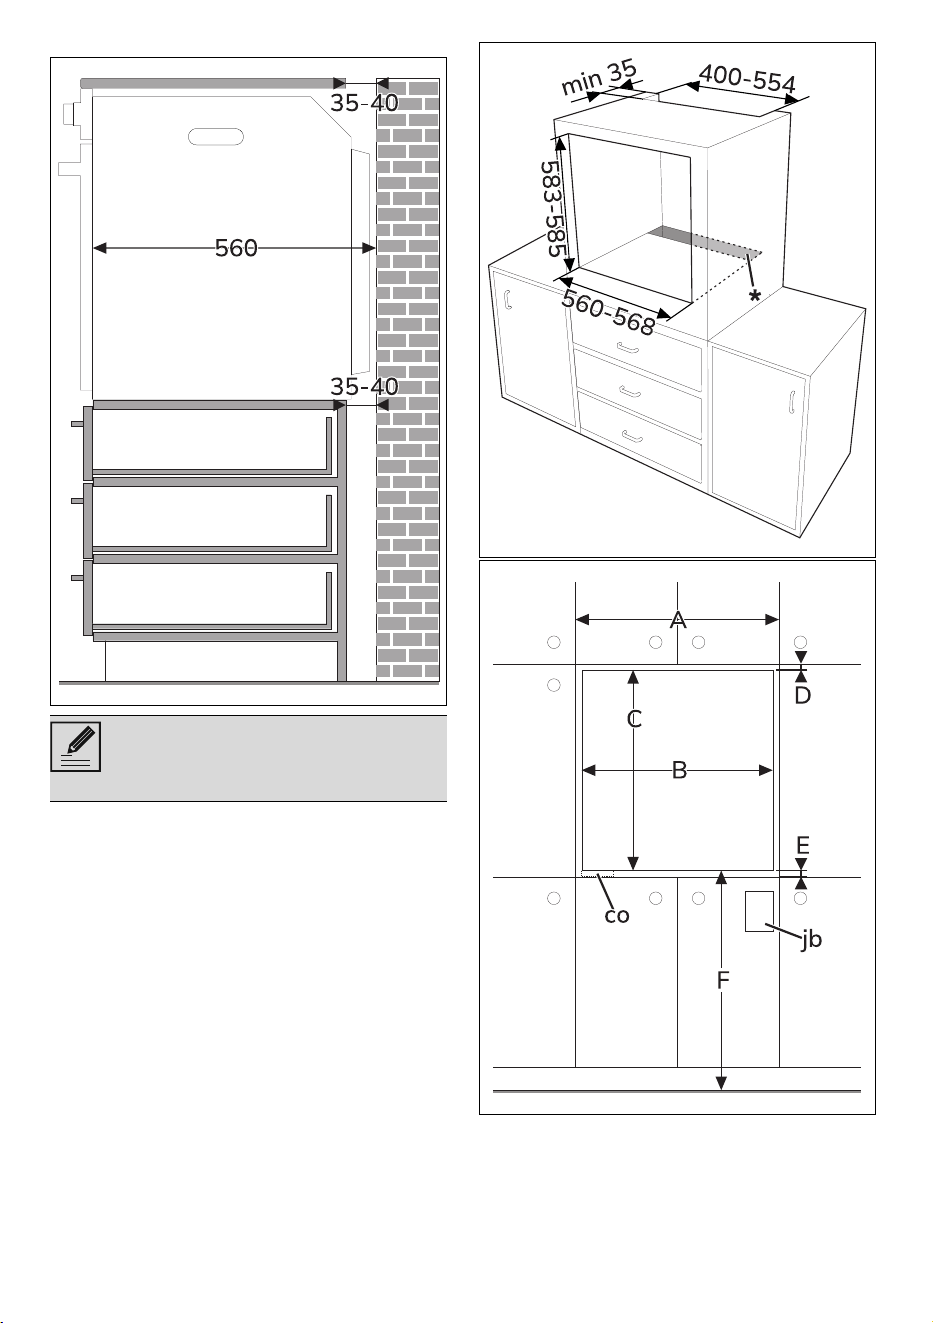
118 - INSTALLATION 91477C139/A
Mounting into a column (mm)
*Make sure that the cabinet top/
rear section has an opening approx.
35-40 mm deep.
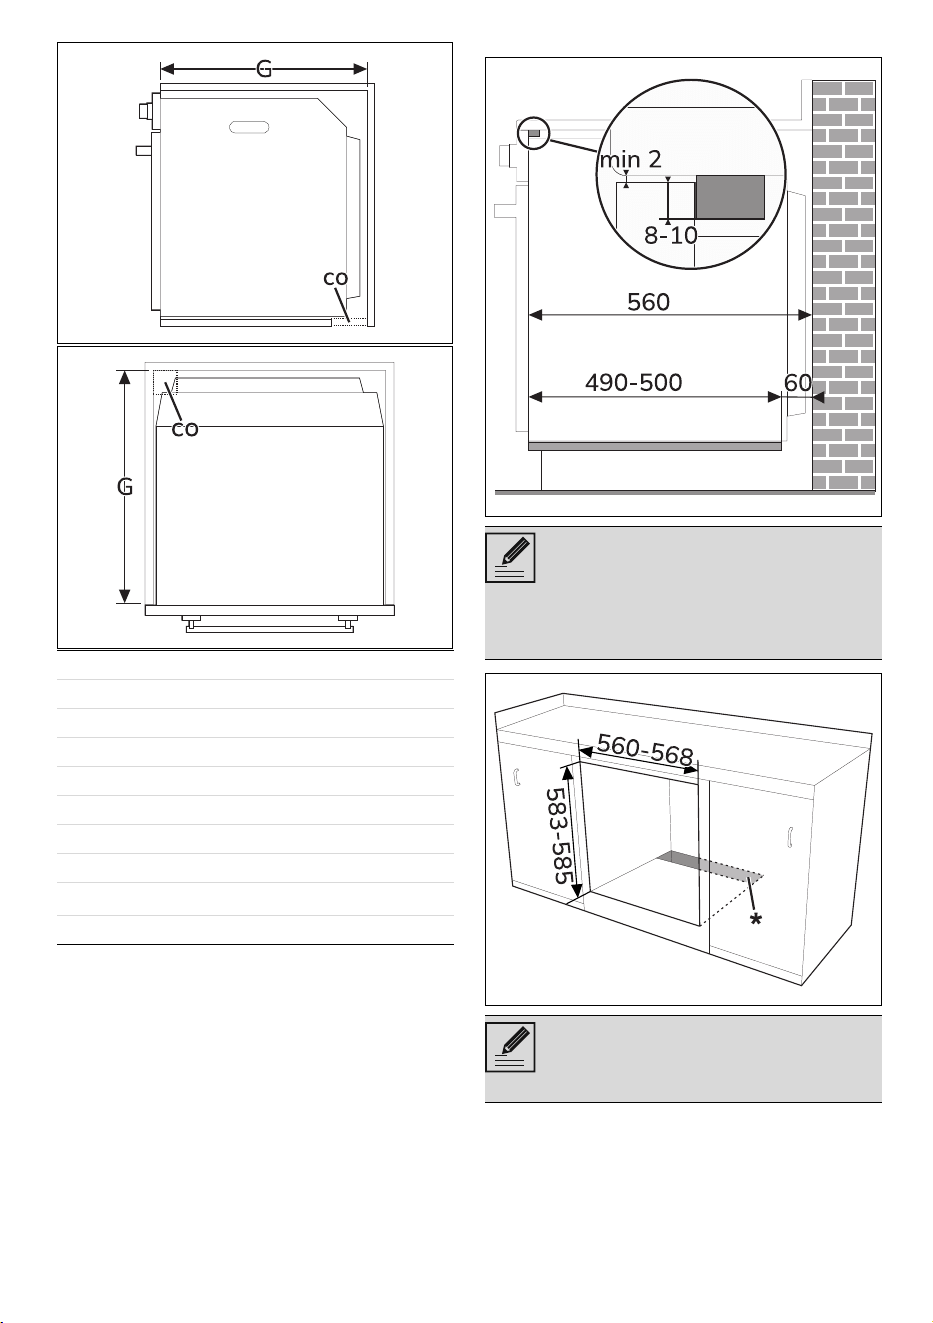
INSTALLATION - 11991477C139/A
e
Mounting under worktops (mm)
A min. 603 mm
B 560 - 568 mm
C 583 - 585 mm
D 9 - 11 mm
Emin. 5 mm
F 121 - 1105 mm
G min. 560 mm
H min. 594 mm
co
Cutout for power cord (min. 6 cm
2
)
jb Electrical connection box
If the appliance is to be built-in
under a worktop, a wooden bar has
to be installed order to use the seal
that is glued to the back of the front
panel to prevent water or other
liquids leaking in.
*Make sure that the piece of
furniture top/rear part has an
opening approx. 60 mm deep.
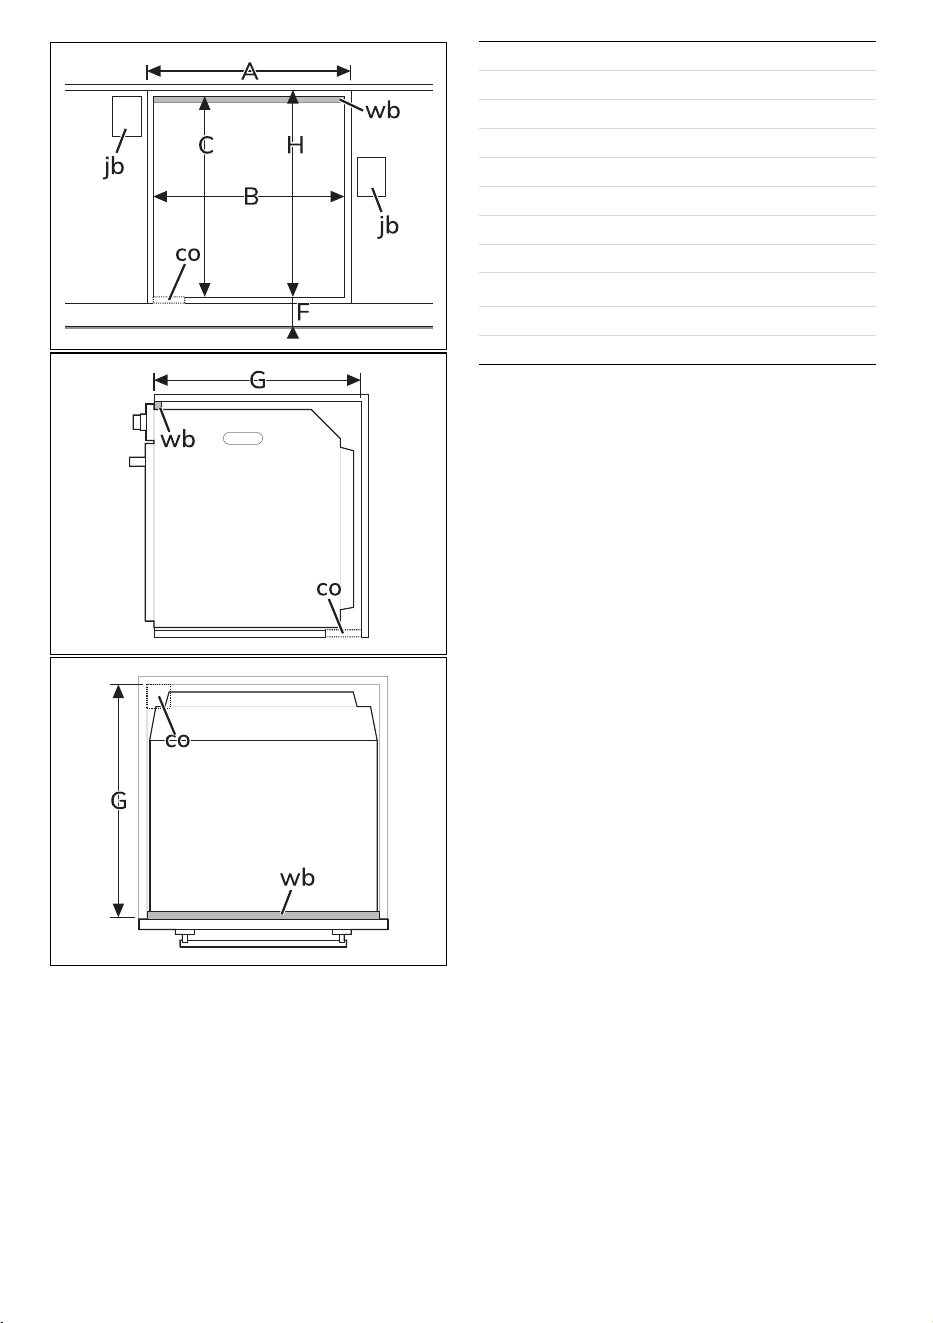
120 - INSTALLATION 91477C139/A
A min. 603 mm
B 560 - 568 mm
C 583 - 585 mm
D 9 - 11 mm
Emin. 5 mm
F 121 - 1105 mm
G min. 560 mm
H min. 594 mm
co
Cutout for power cord (min. 6 cm
2
)
jb Electrical connection box
wb Wooden bar (recommended)