OWNER'S MANUAL
FRIDGE & FREEZER
Before beginning installation, read these instructions
carefully. This will simplify installation and ensure that the
product is installed correctly and safely. Leave these
instructions near the product after installation for future
reference.
ENGLISH
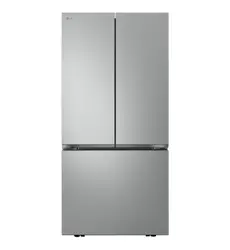
GF-B589PLE
MFL72152001
Rev.03_100125
www.lg.com
Copyright © 2024-2025 LG Electronics. All Rights Reserved
Scan the QR code to see the manual.

TABLE OF CONTENTS
This manual may contain images or
content that may be different from the
model you purchased.
This manual is subject to revision by the
manufacturer.
SAFETY INSTRUCTIONS
READ ALL INSTRUCTIONS BEFORE USE...........................................................3
WARNING............................................................................................................3
CAUTION .............................................................................................................9
INSTALLATION
Before Installation...........................................................................................11
Removing the Door and Drawer ....................................................................12
Levelling and Door Alignment........................................................................14
Turning on the Power......................................................................................16
Moving the Appliance for Relocation ............................................................16
OPERATION
Before Use........................................................................................................18
Product Features..............................................................................................20
Control Panel ....................................................................................................23
Drawer...............................................................................................................24
Glide‘N’Serve.....................................................................................................25
Shelf ...................................................................................................................26
Door Basket ......................................................................................................26
SMART FUNCTIONS
LG ThinQ Application.......................................................................................28
Smart Diagnosis ...............................................................................................29
MAINTENANCE
Cleaning............................................................................................................31
TROUBLESHOOTING
Before Calling for Service................................................................................33
3
SAFETY INSTRUCTIONS
ENGLISH
SAFETY INSTRUCTIONS
READ ALL INSTRUCTIONS BEFORE USE
The following safety guidelines are intended to prevent unforeseen
risks or damage from unsafe or incorrect operation of the appliance.
The guidelines are separated into
‘WARNING’
and
‘CAUTION’
as
described below.
Safety Messages
WARNING
WARNING
To reduce the risk of explosion, fire, death, electric shock, injury or
scalding to persons when using this product, follow basic precautions,
including the following:
Technical Safety
• This appliance is not intended for use by persons (including children)
with reduced physical, sensory or mental capabilities, or lack of
experience and knowledge, unless they have been given supervision
or instruction concerning use of the appliance by a person
This symbol is displayed to indicate matters and operations
that can cause risk. Read the part with this symbol carefully
and follow the instructions in order to avoid risk.
WARNING
This indicates that the failure to follow the instructions can
cause serious injury or death.
CAUTION
This indicates that the failure to follow the instructions can
cause the minor injury or damage to the product.

4
SAFETY INSTRUCTIONS
responsible for their safety. Children should be supervised to ensure
that they do not play with the appliance.
• Do not damage the refrigerant circuit.
• Do not use mechanical devices or other means to accelerate the
defrosting process.
• Keep ventilation openings, in the appliance enclosure or in the built-
in structure, clear of obstruction. This appliance is not for use in any
built-in or enclosed installations.
• Do not use electrical appliances inside the food storage
compartments of the appliance, unless they are of the type
recommended by the manufacturer.
• The refrigerant and insulation blowing gas used in the appliance
require special disposal procedures. Consult with service agent or a
similarly qualified person before disposing of them.
• This appliance is intended to be used in household and similar
applications only. It should not be used for commercial, or catering
purposes, or in any mobile application such as a caravan or boat.
• This appliance is not for use in portable or mobile installations, such
as marine or RV uses, where it will be in motion while operating.
• Do not store explosive substances such as aerosol cans with a
flammable propellant in this appliance.
•
• This appliance contains a small amount of isobutane refrigerant
(R600a), but it is also combustible. When transporting and installing
the appliance, care should be taken to ensure that no parts of the
refrigerating circuit are damaged.
• When positioning the appliance, ensure the supply cord is not
trapped or damaged.
• If the power cord is damaged or the hole of the outlet socket is loose,
it must be replaced. Do not use the power cord and contact an
authorized service centre in order to avoid a hazard.
This symbol alerts you to flammable materials that can
ignite and cause a fire if you do not take care.

5
SAFETY INSTRUCTIONS
ENGLISH
• Do not locate multiple portable socket-outlets or portable power
supplies at the rear of the appliance.
• Disconnect the power cord before cleaning the appliance interior or
exterior.
• Securely plug the power plug in the outlet socket after completely
removing any moisture and dust.
• Never unplug the appliance by pulling on the power cable. Always
grip the power plug firmly and pull straight out from the outlet
socket.
• Do not spray water or inflammable substances (toothpaste, alcohol,
thinner, benzene, flammable liquid, abrasive, etc.) over the interior or
exterior of the appliance to clean it.
• Do not clean the appliance with brushes, cloths or sponges with
rough surfaces or which are made of metallic material.
• Only qualified service personnel from LG Electronics service centre
should disassemble, repair, or modify the appliance. Contact an LG
Electronics customer information centre if you move and install the
appliance in a different location.
• Do not use a hair drier to dry the inside of the appliance or place a
candle inside to remove the odours.
• Do not tilt the appliance to pull or push it when transporting.
• Make sure not to get a body part such as a hand or foot stuck while
moving the appliance.
• Consult with a service agent or a similarly qualified person about the
recovery of refrigerant and recycling of components on disposal of
the refrigerating appliance.
Risk of Fire and Flammable Materials
• If a leak is detected, avoid any naked flames or potential sources of
ignition and air the room in which the appliance is standing for
several minutes. In order to avoid the creation of a flammable gas air
mixture if a leak in the refrigerating circuit occurs, the size of the
room in which the appliance is used should correspond to the

6
SAFETY INSTRUCTIONS
amount of refrigerant used. The room must be 1 m² in size for every
8 g of R600a refrigerant inside the appliance.
• Refrigerant leaking out of the pipes could ignite or cause an
explosion.
• The amount of refrigerant in your particular appliance is shown on
the identification plate inside the appliance.
Installation
• This appliance should only be transported by two or more people
holding the appliance securely.
• Install the appliance on a firm and level floor.
• Do not install the appliance in a damp and dusty place. Do not install
or store the appliance in any outdoor area, or any area that is subject
to weathering conditions such as direct sunlight, wind, rain, or
temperatures below freezing.
• Do not place the appliance in direct sunlight or expose it to the heat
from heating appliances such as stoves or heaters.
• Be careful not to expose the rear of the appliance when installing.
• Install the appliance in a place where it is easy to unplug the power
plug of the appliance.
• In the event that a door needs to be removed to pass the unit through
a doorway, be careful not to let the appliance door fall during
assembly or disassembly.
• Be careful not to pinch, crush, or damage the power cable during
assembly or disassembly of the appliance door.
• Be careful not to point the power plug up or let the appliance lean
against the power plug.
• Do not connect a plug adapter or other accessories to the power
plug.
• Do not modify or extend the power cable.
• Ensure that the outlet socket is properly grounded, and that the earth
pin on the power cord is not damaged or removed from the power

7
SAFETY INSTRUCTIONS
ENGLISH
plug. For more details on grounding, inquire at an LG Electronics
customer information centre.
• This appliance is equipped with a power cord having an equipment-
grounding conductor and a grounding power plug. The power plug
must be plugged into an appropriate outlet socket that is installed
and grounded in accordance with all local codes and ordinances.
• Never start up an appliance showing any signs of damage. If in doubt,
consult your dealer.
• Dispose of all packaging materials (such as plastic bags and
styrofoam) away from children. The packaging materials can cause
suffocation.
• Do not plug the appliance into multiple outlet sockets, power boards,
or an extension power cable.
• Do not use an extension cord or double adapter.
Operation
• Do not use the appliance for any purpose (storage of medical or
experimental materials or temperature strict medicines) other than
any domestic household food storage use.
• If water penetrates electrical parts of the appliance, disconnect
power plug and contact an LG Electronics customer information
centre.
• Unplug the power plug during a severe lightning or thunderstorm or
when not in use for a long period of time.
• Do not touch the power plug or the appliance controls with wet
hands.
• Do not bend the power cable excessively or place a heavy object on it.
• Immediately unplug the power plug and contact an LG Electronics
customer information centre if you detect a strange sound, odour, or
smoke coming from the appliance.
• Do not place hands or metallic objects inside the area emitting the
cold air, covers or heat releasing grille on the back.
• Do not apply excessive force or impact to the back cover of the
appliance.

8
SAFETY INSTRUCTIONS
• Be careful of nearby children when you open or close the appliance
door. The door may bump the child and cause injury.
• Avoid the danger of children getting trapped inside the appliance. A
child trapped inside the appliance can cause suffocation.
• Do not put animals, such as pets into the appliance.
• Do not place heavy or fragile objects, containers filled with liquid,
combustible substances, flammable objects (such as candles, lamps,
etc.), or heating devices (such as stoves, heaters, etc.) on the
appliance.
• Do not place any electronic appliance (such as heater and mobile
phone) inside the appliance.
• If there is a gas leakage (isobutane, propane, natural gas, etc.), do not
touch the appliance or power plug and ventilate the area
immediately. This appliance uses a refrigerant gas (isobutane,
R600a). Although it uses a small amount of the gas, it is still
combustible gas. Gas leakage during appliance transport, installation
or operation can cause fire, explosion or injury if sparks are caused.
• Do not use or store flammable or combustible substances (ether,
benzene, alcohol, chemical, LPG, combustible spray, insecticide, air
freshener, cosmetics, etc.) near the appliance.
• This appliance incorporates an earth connection for functional
purposes.
• Connect to potable water supply only (only for models with dispenser
function needing plumbed connection).
- If connected to a water supply, connect to a potable water supply
only.
• Fill with potable water only.
- If using an icemaker or water tank, make sure to fill it with potable
water only.
Disposal
• When discarding the appliance, remove the door gasket while leaving
the shelves and baskets in place and keep children away from the
appliance.
9
SAFETY INSTRUCTIONS
ENGLISH
CAUTION
CAUTION
To reduce the risk of minor injury to persons, malfunction, or damage
to the product or property when using this product, follow basic
precautions, including the following:
Installation
• After unpacking, check the appliance for any damage that may have
occurred during transit.
• Wait for at least 3 to 4 hours in order to ensure the refrigerant circuit
is fully efficient.
• Move the appliance carefully on sensitive floors to avoid damage to
the floor.
Operation
• This appliance must only be used with a town power supply. Solar
inverters and generator power supplies could cause disruption to
performance and potentially damage the electronics.
• Do not touch frozen food or the metal parts in the freezer
compartment with wet or damp hands. It may cause frostbite.
• Do not place glass containers, bottles or cans (especially those
containing carbonated drinks) in the freezer compartment, shelves or
ice bucket that will be exposed to temperatures below freezing.
• The tempered glass on the front side of the appliance door or the
shelves can be damaged by an impact. If it is broken, do not touch it
with hands.
• Do not hang from the appliance doors, door baskets, storage
compartments or shelves, or climb up into the appliance.
• Do not store an excessive amount of water bottles or containers in
the door baskets.
• Do not open or close the appliance door with excessive force.

10
SAFETY INSTRUCTIONS
• If the hinge of the appliance door is damaged or operates
improperly, stop using the appliance and contact an authorized
service centre.
• Prevent animals from nibbling on the power cable or water hose.
• Never eat frozen foods immediately after they have been taken out of
the freezer compartment.
• Make sure not to get a hand or foot stuck upon opening or closing the
appliance door or door in door.
Maintenance
• This appliance is equipped with maintenance-free LED interior light.
Do not remove cover or LED lamp in any attempt to repair or change
it. Contact an LG Electronics customer information centre.
• Do not clean glass shelves or covers with warm water when they are
cold. They may shatter if exposed to sudden temperature changes.
• Do not insert the shelves upside down. The shelves may fall.
• To remove frost from the appliance, contact an LG Electronics
customer information centre.
• Dispose of the ice inside the ice bucket in the freezer compartment
during an extended power outage.
11
INSTALLATION
ENGLISH
INSTALLATION
Before Installation
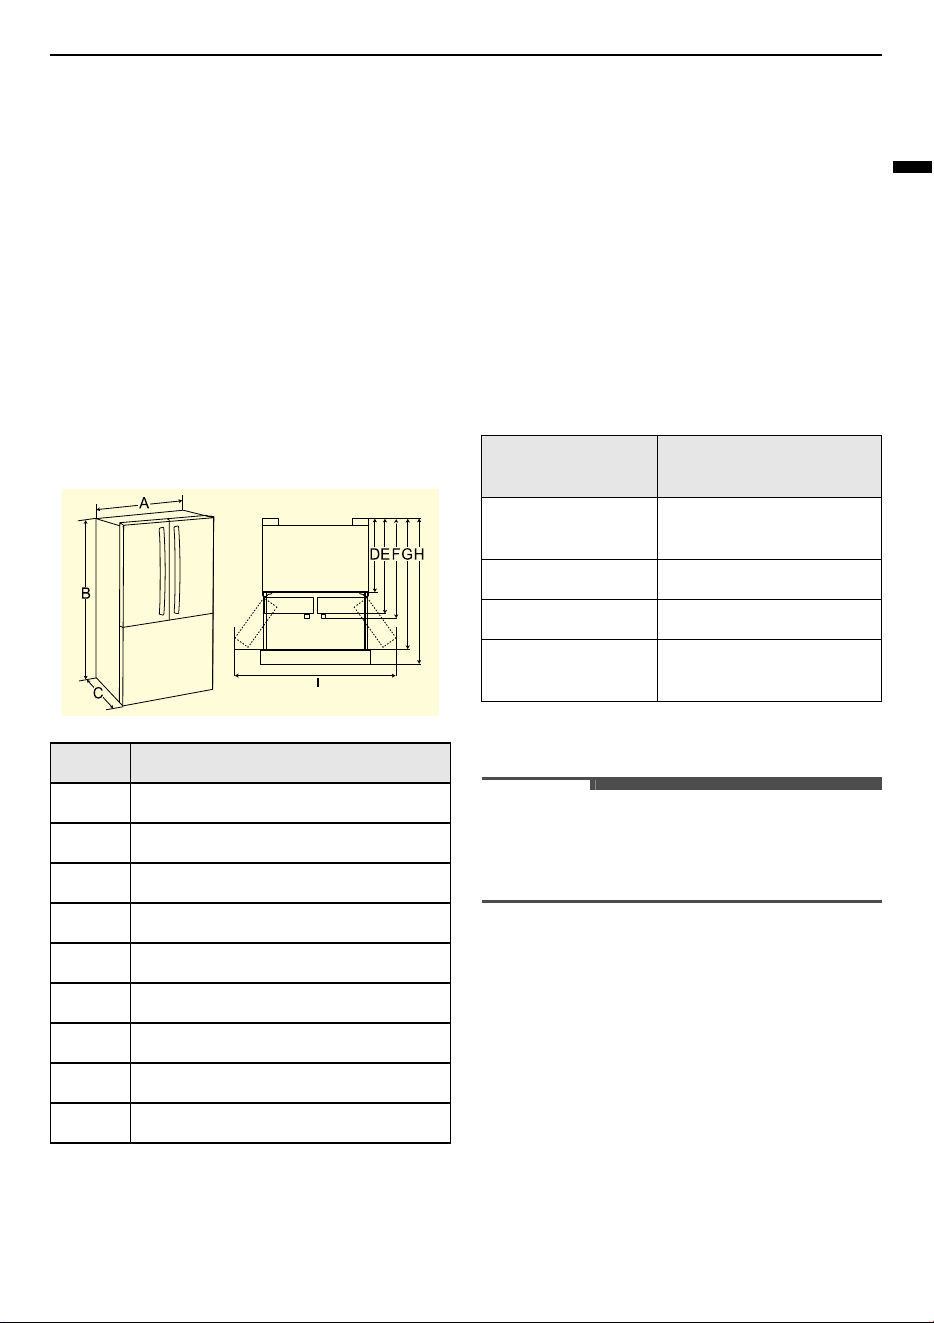
Dimensions and Clearances
Too small of a distance from adjacent items may
result in the degradation of freezing capability and
increased electricity costs. Allow over 50 mm of
clearance between the back of the appliance and
the wall when installing the appliance.
Do not install the appliance in an enclosed space,
such as inside a cabinet with closing doors or on an
elevated surface. Ensure that the installation allows
for proper air circulation around the appliance and
the surrounding walls.
Ambient Temperature
• The appliance is designed to operate within a
limited range of ambient temperatures,
depending on the climate zone.
• The internal temperatures could be affected by
the location of the appliance, the ambient
temperature, the frequency of door opening and
so on.
• The climate class can be found on the rating
label.
* Australia, India, Kenya
** Argentina
NOTE
• The appliances rated from SN to T are intended
to be used at an ambient temperature between
10 ºC and 43 ºC.
- Size (mm)
A836
B1776
C731
D630
E731
FN/A
G1058
H1165
I1290
Climate Class
Ambient Temperature
Range ºC
SN (Extended
Temperate)
+10 - +32
N (Temperate) +16 - +32
ST (Subtropical) +16 - +38 / +18 - +38**
T (Tropical) +10 - +43* / +16 - +43 /
+18 - +43**
12
INSTALLATION
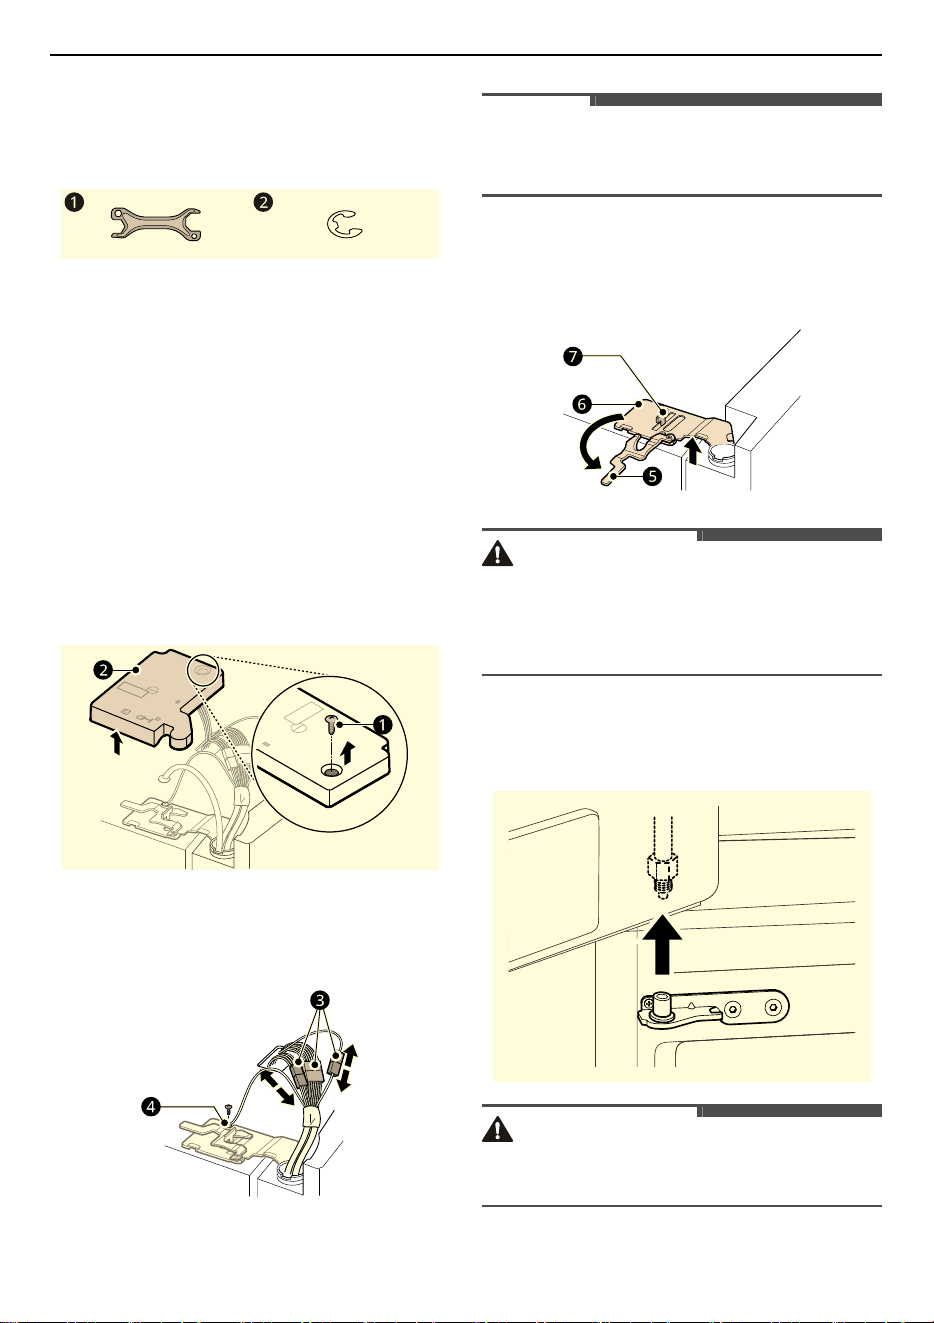
Accessories
*1 This feature is only available on some models.
a
Spanner
*1
b
C-Clip (Snap Ring)
*1
Removing the Door and
Drawer
Removing the Left Fridge Door
1
Remove the screw
a
from the hinge cover at
the top of the refrigerator. Lift the hook (not
visible), located at the bottom of the front side
of the cover
b
with a flat-head screwdriver.
2
Disconnect all wire harnesses
c
. Unscrew the
ground wire
d
.
NOTE
• The number of wire harnesses may vary
depending on the model.
3
Rotate the hinge lever
e
counterclockwise. Lift
the top hinge
f
free of the hinge lever latch
g
.
CAUTION
• When lifting the hinge free of the latch, be
careful that the door does not fall forward. It is
recommended that two or more people carry
out the door removal and refitting.
4
Lift the left fridge door until it is free of the
middle hinge assembly.
CAUTION
• Place the door on a non-scratching surface with
the inner side facing up.
13
INSTALLATION
ENGLISH
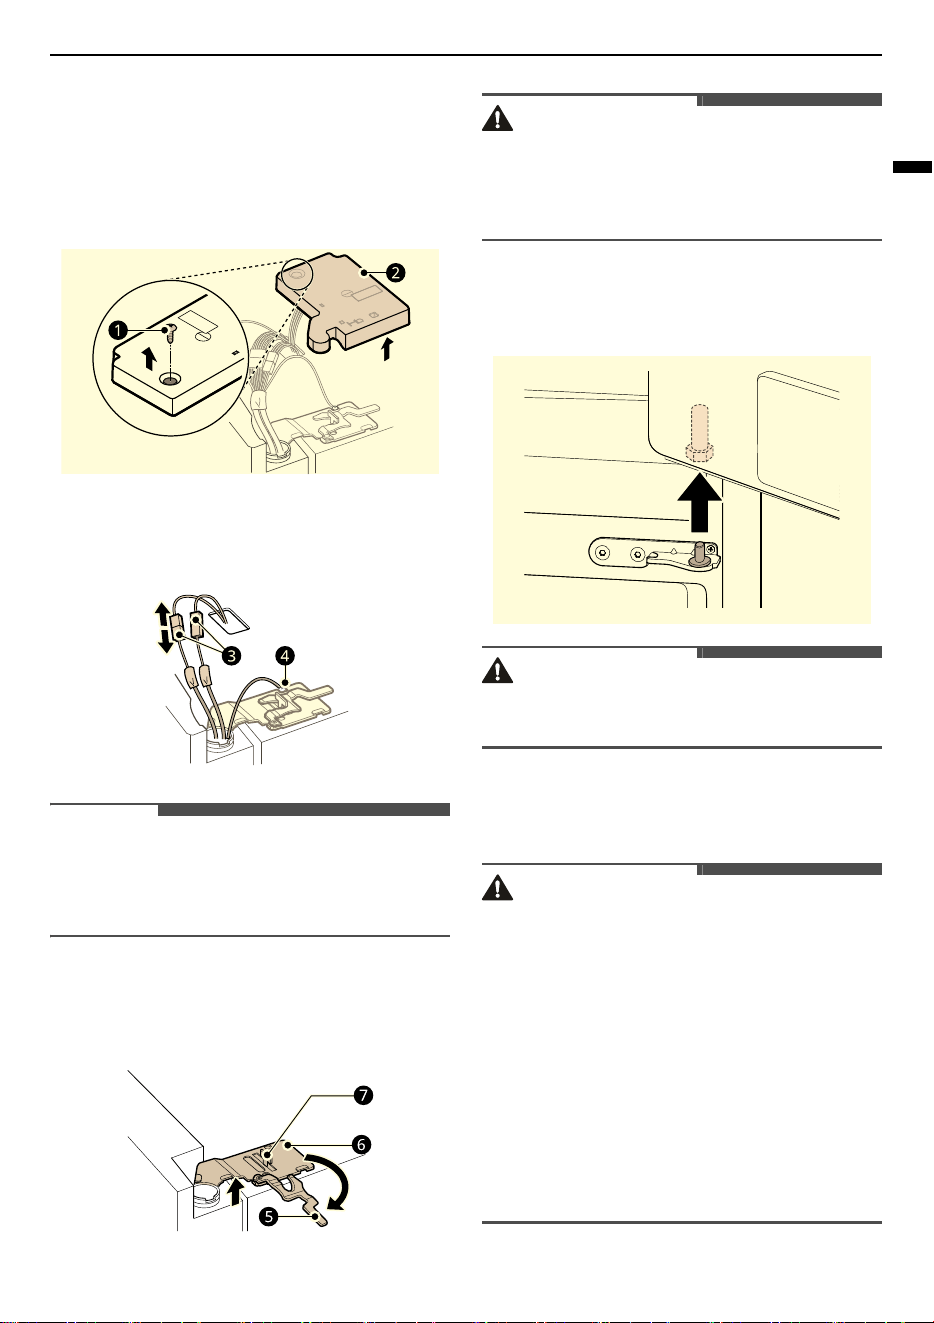
Removing the Right Fridge Door
1
Remove the screw
a
from the hinge cover at
the top of the refrigerator. Lift the hook (not
visible), located at the bottom of the front side
of the cover
b
with a flat-head screwdriver.
2
Disconnect all wire harnesses
c
. Unscrew the
ground wire
d
.
NOTE
• The number of wire harnesses may vary
depending on the model.
• Ground wire is only present on some model
3
Rotate the hinge lever
e
clockwise. Lift the top
hinge
f
free of the hinge lever latch
g
.
CAUTION
• When lifting the hinge free of the hinge lever
latch, be careful that the door does not fall
forward. It is recommended that two or more
people carry out the door removal and refitting.
4
Lift the right fridge door until it is free of the
middle hinge assembly.
CAUTION
• Place the door on a non-scratching surface with
the inner side facing up.
Removing the Freezer Drawer
WARNING
• Use two or more people to remove and install
the fridge doors and freezer drawer.
• Be careful of sharp hinges on both sides of the
drawer.
• When you lay the drawer down, be careful not to
damage the floor.
• Do not sit or stand on the freezer drawer.
• To prevent accidents, keep children and pets
away from the drawer. Do not leave the drawer
open. If the Durabase storage bin is removed
from the freezer drawer, there is sufficient space
for a small child or pet to crawl inside.
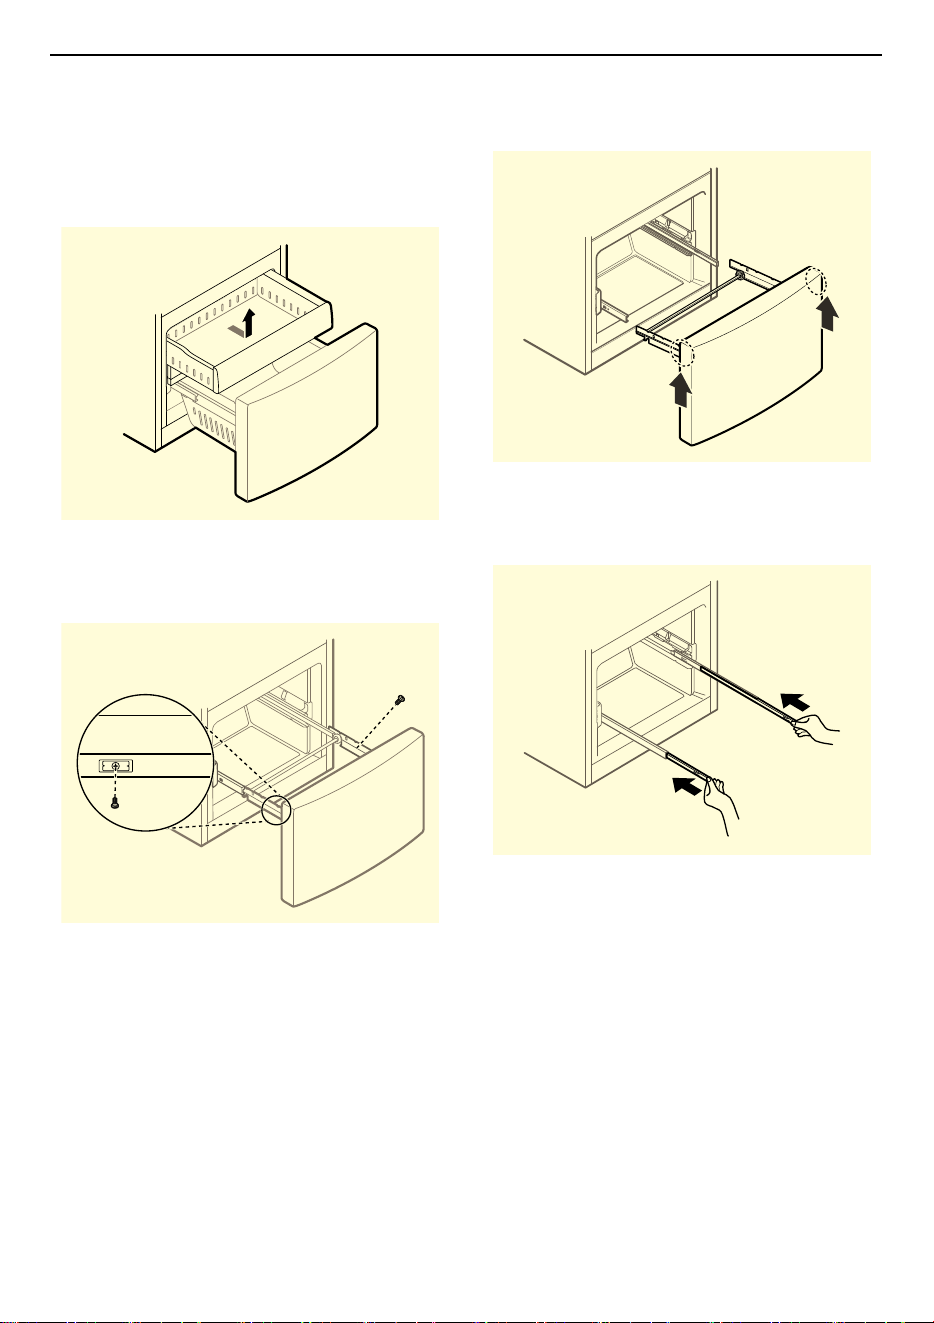
14
INSTALLATION
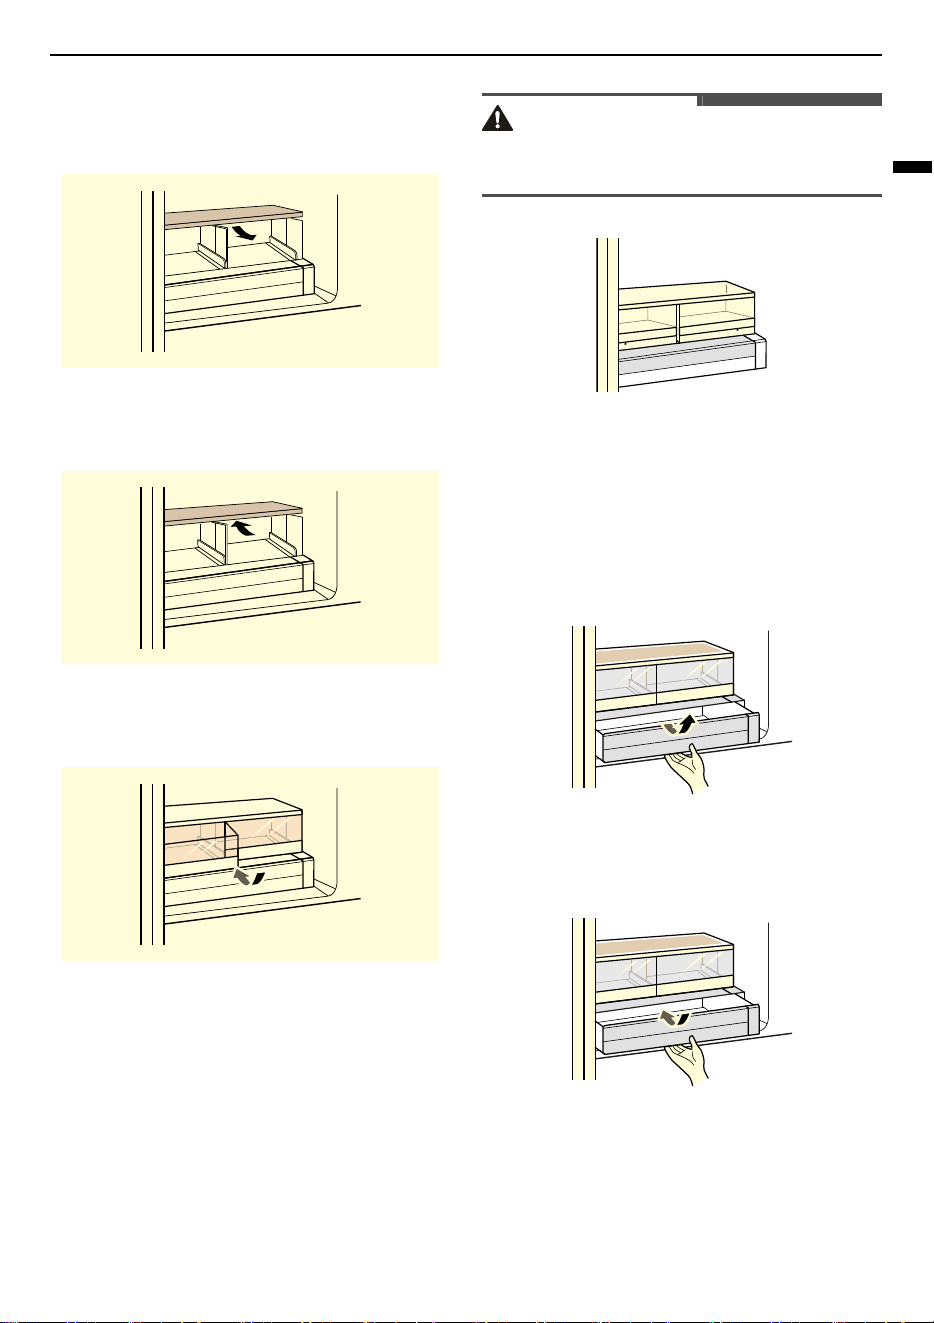
1
Pull the drawer open to full extension.
2
Lift the front of the drawer up, then pull it
straight out.
3
Remove the Durabase basket from the rails.
Remove the screws from the rails at both ends.
4
Grip both sides of the drawer and pull it up to
remove it from the rails.
5
Hold both rails and push them in
simultaneously.
Refitting the Door and Drawer
Refit the door and drawer in the reverse sequence
of their removal once the appliance has been
passed through all access doors.
Levelling and Door
Alignment
Levelling the Appliance
The appliance has two front levelling legs. Adjust
the legs to alter the tilt from front-to-back or side-
to-side. If the appliance seems unsteady, or the
15
INSTALLATION
ENGLISH
doors do not close easily, adjust the appliance’s tilt
using the instructions below:
1
Turn the levelling leg to the left to raise that
side of the appliance or to the right to lower it.
It may take several turns of the levelling leg to
adjust the tilt of the appliance.
NOTE
• A flare nut wrench works best, but an open-end
wrench will suffice. Do not over-tighten.
2
Open both doors and check to make sure that
they close easily. If the doors do not close
easily, tilt the appliance slightly more to the
rear by turning both levelling legs to the left. It
may take several more turns, and be sure to
turn both levelling legs the same amount.
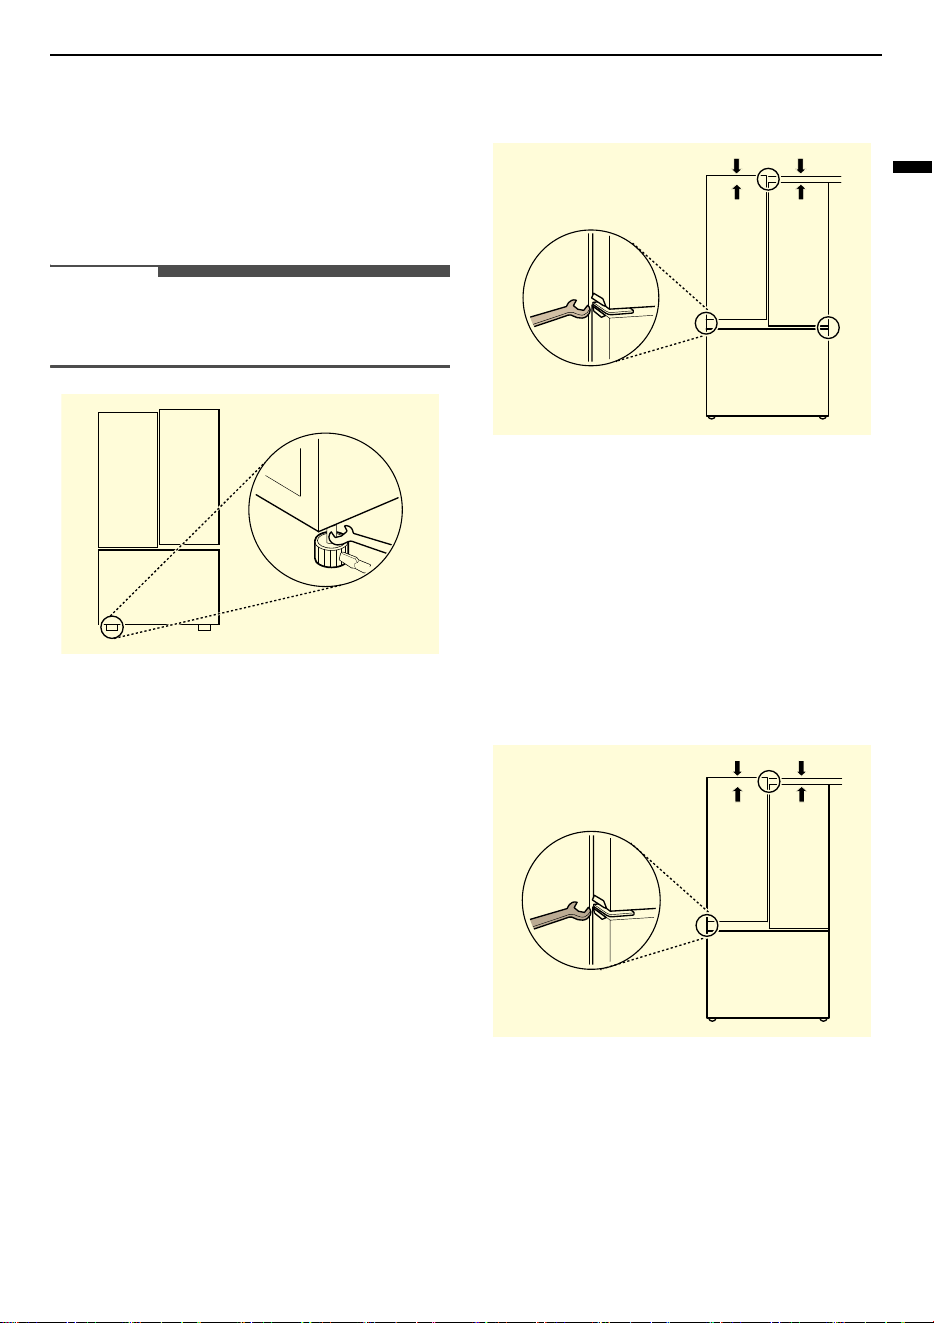
Door Alignment
The door alignment method may differ depending
on the model.
Appliance Type A
Both the left and right fridge doors have an
adjustable nut, located on the bottom hinge, to
raise and lower them to align properly.
If the space between the doors is uneven even
after the door bins are filled, follow the instructions
below to align the doors evenly:
Use the spanner (included with the owner's
manual) to turn the nut in the door hinge to adjust
the height. Turn the nut to the right to raise the
door or to the left to lower it.
Appliance Type B
Left Fridge Door
The left fridge door has an adjustable nut, located
on the bottom hinge, to raise and lower the door
for proper alignment.
If the space between the doors is uneven, follow
the instructions below to align the left door:
Use the spanner (included with the owner's
manual) to turn the nut in the door hinge to adjust
the height. Turn the nut to the right to raise the
door or to the left to lower it.
Right Fridge Door
The right fridge door does not have an adjustable
nut.
If the space between the doors is uneven, follow
the instructions below to align the right door:
1
Lift up both the inner and outer door sections
of the right door to raise them at the middle

16
INSTALLATION
hinge. (It may be easier to lift them with the
doors open.)
2
While the door is lifted, have an assistant insert
the C-Clip (snap ring) on the middle hinge. The
C-Clip may differ depending on the model.
• C-Clip type A
Use pliers to insert the C-Clip on the middle
hinge of the inner door section as shown.
Insert additional C-Clips until the right door
is aligned.
• C-Clip type B
Insert only one C-Clip on the middle hinge of
the inner door section as shown.
- If a C-Clip is already inserted on the middle
hinge, remove the C-Clip before inserting
a new C-Clip.
CAUTION
• The door is heavy. To avoid injury, use two or
more people to lift and align the fridge door.
• Small parts are a swallowing hazard for small
children. Keep C-Clips out of the reach of
children.
• Do not insert the C-Clip on the hinge of the outer
door section.
NOTE
• The number of freezer drawers may vary
depending on the model.
Turning on the Power
Connecting the Appliance
To turn on the appliance, connect the power plug
into the outlet socket. Do not double up with other
appliances on the same outlet.
NOTE
• After connecting the power supply cord (or plug)
to the outlet, wait enough time before you put
food into the appliance. If you add food before
the appliance has cooled completely, your food
may spoil. Make sure you have removed any
clear protective film where it has been applied to
the door.
• To turn off the appliance, disconnect the power
plug from the outlet socket.
Moving the Appliance for
Relocation
Moving the Appliance
1
Remove all food from inside the appliance.
2
Fix the power plug.
• Models with a power plug hook:
Pull the power plug out, insert and fix it into
the power plug hook at the rear or on top of
the appliance.
• Models without a power plug hook:
Pull the power plug out and fix the power
supply cable with a tape to the side of the
appliance where the power socket is located
at the installation site.
17
INSTALLATION
ENGLISH
3
Tape parts such as shelves and the door handle
to prevent from falling off while moving the
appliance.
4
Move the appliance with more than two people
carefully. When transporting the appliance
over a long distance, keep the appliance
upright.
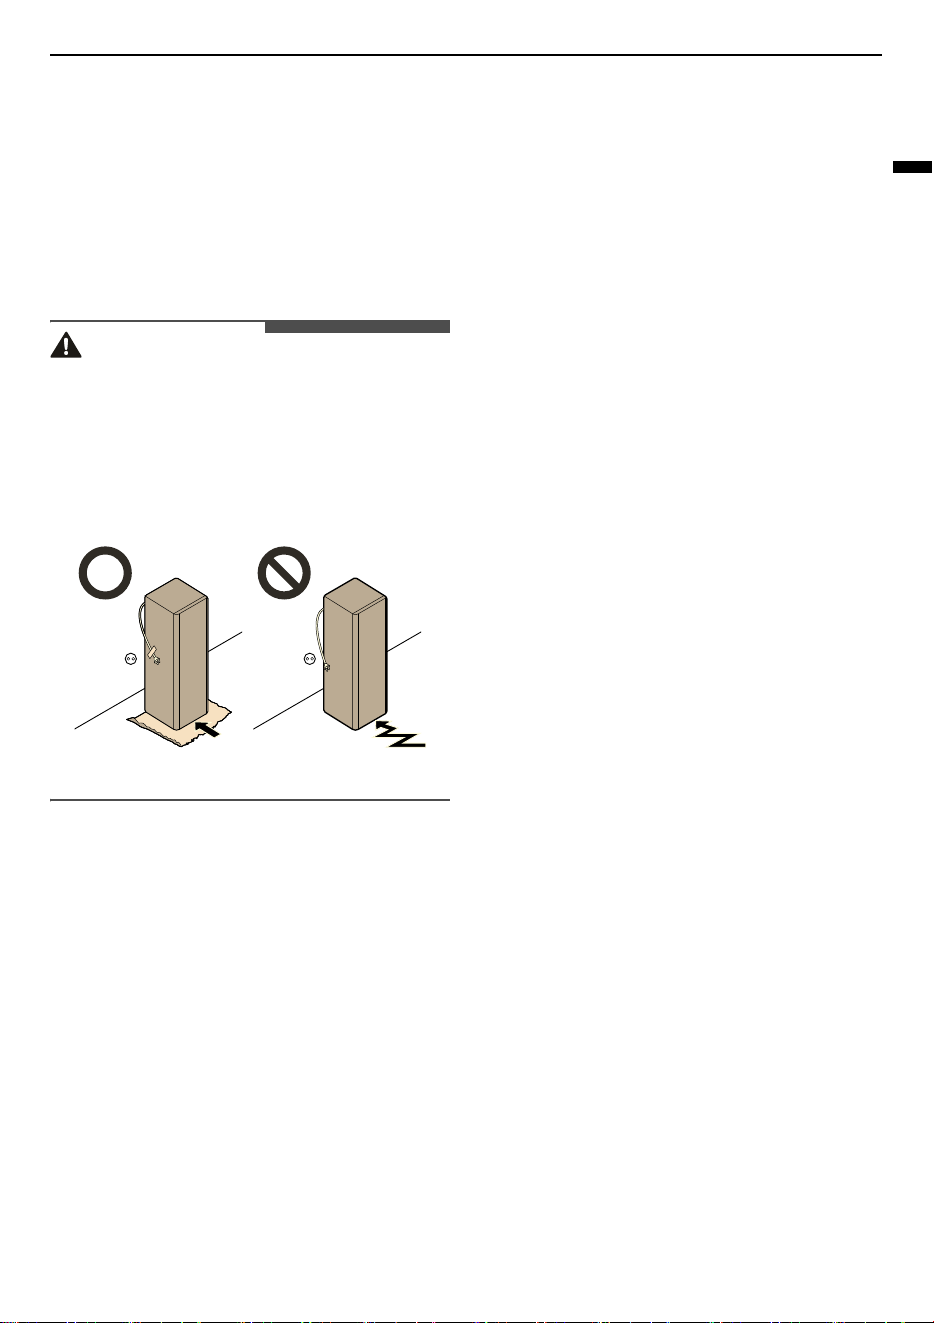
CAUTION
• Move the appliance carefully on sensitive floors
to avoid damage to the floor.
- Use cardboard, floor mat or carpet to prevent
scratches on the floor when installing or
moving the appliance.
- Do not move the appliance in zigzags.
5
After installing the appliance, connect the
power plug into a mains outlet socket and
switch it on.

18
OPERATION
OPERATION
Before Use
Notes for Operation
• Users should keep in mind that frost can form if
the door is not closed completely or if the
humidity is high during the summer.
• Ensure there is sufficient space between food
stored on the shelf or door basket to allow the
door to close completely.
• Opening the door for long periods can cause a
significant increase of the temperature in the
compartments of the appliance.
• If the refrigerating appliance is left empty for
long periods, switch off, defrost, clean, dry, and
leave the door open to prevent mould
developing within the appliance.
• Note that a temperature rise after defrosting has
a permissible range in the appliance
specifications. If you wish to minimise the impact
on the food storage due to a temperature rise,
seal or wrap the stored food in several layers.
Door Open Alarm
This feature is only available on some models.
The alarm sounds if the door is left open or not
completely closed.
NOTE
• Contact the LG Electronics customer information
centre if the alarm sound continues even after
closing all doors.
Failure Detection
The appliance can automatically detect problems
during the operation.
NOTE
• If a problem is detected, the appliance may not
operate and an error code is displayed even
when any button is pressed.
• If an error code is indicated on the display, do
not turn off the power. Immediately contact the
LG Electronics customer information centre and
report the error code. If you turn off the power,
the repair technician from the our information
centre may have difficulty finding the problem.
Suggestion for Energy Saving
• For the most efficient use of energy, keep all
inner parts (e.g. door baskets, drawers and
shelves) on their original location. Altering their
positions may result in less efficient energy
consumption or performance.
• Ensure there is sufficient space between stored
foods. This allows cold air to be circulated evenly
and lowers electricity bills.
• Store hot food only after it has cooled in order to
prevent dew or frost.
• When storing food in the freezer compartment,
set the freezer temperature lower than the
temperature indicated on the food.
• Do not set the temperature of the appliance
lower than needed.
• Do not put food near the temperature sensor of
the fridge compartment. Keep a distance of at
least 3 cm from the sensor.
Storing Foods Effectively
• Food may freeze or spoil if stored at the wrong
temperature. Set the refrigerator to the correct
temperature for the food being stored.
• Store frozen food or refrigerated food inside
sealed containers.
• Check the expiration date and label (storage
instructions) before storing food in the
appliance.
• Do not store food for a long period of time if it
spoils easily at a low temperature.
• Do not place unfrozen food in direct contact with
food that is already frozen. It could be necessary

19
OPERATION
ENGLISH
to reduce the quantity to be frozen if freezing
every day is anticipated.
• Place the refrigerated food or frozen food in
each fridge or freezer compartment
immediately after purchasing.
• Store raw meat and fish in suitable containers in
the refrigerator, so that it is not in contact with or
drip onto other food.
• Refrigerated foods and other food items can be
stored on top of the vegetable drawer.
• Avoid refreezing any food which has been
completely thawed. Freezing any food which has
been completely thawed again will lower its taste
and nutrition.
• Do not overfill the appliance. Cold air can not
circulate properly if the appliance is overfilled.
• Cool hot food before storing. If too much hot
food is placed inside, the internal temperature of
the appliance can increase and negatively affect
other foods stored in the appliance.
• If you set an excessively low temperature for
food, it may become frozen. Do not set a
temperature lower than the required
temperature for the food to be stored correctly.
• If there are chill compartments in the appliance,
do not store vegetables and fruits with higher
moisture content in the chill compartments as
they may freeze due to the lower temperature.
• In the event of a blackout, call the electricity
company and ask how long it is going to last.
- You should avoid door openings while the
power is off.
- When the power supply gets back to normal,
check the condition of the food.
Maximum Freezing Capacity
• For maximum freezing capacity, set the freezer
temperature to the coldest temperature setting.
•
Express Freeze
function will allow the freezer to
reach its maximum freezing capacity. This
generally takes up to 24 hours and automatically
switches off.
•
Express Freeze
must be switched on for 3 hours
before fresh products are placed in the freezer
compartment.
• To freeze food items quickly, store the food in
the center of pullout drawer. Food items will
freeze most quickly in the drawer.
• To get better air circulation, insert all inner parts
like baskets, drawers, and shelves.
21
OPERATION
ENGLISH
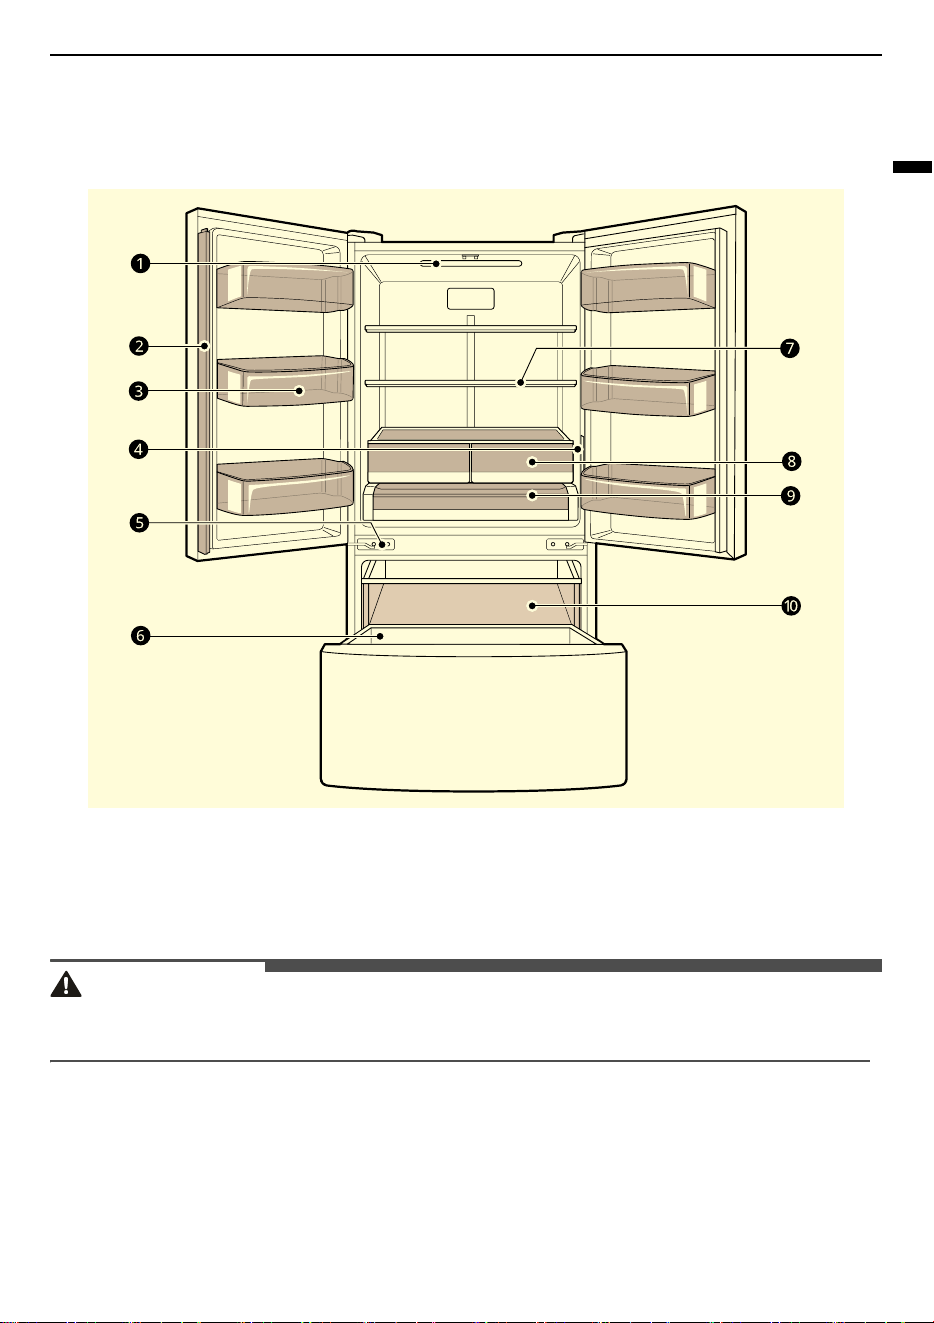
Interior
*1 This feature is only available on some models.
a
LED Interior Lighting
Lights up the inside of the fridge.
b
Door Mullion
Prevents the cold air of the fridge from leaking.
CAUTION
• To reduce the risk of scratching the door or breaking the center door mullion, make sure that the
refrigerator door mullion is always folded in.
c
Fixed Door Bin
Store chilled food or drinks.
d
Control Panel
Sets the fridge temperature and freezer temperature.
e
Auto Closing Hinge
*1

22
OPERATION
The fridge doors and freezer drawers close automatically when pushed slightly. (The door only closes
automatically when it is open at an angle of less than 30°.)
f
Durabase
Provides storage for large food items.
g
Adjustable Fridge Shelf
The fridge shelves are adjustable to meet individual storage needs.
h
Fridge Drawer
Keeps fruits and vegetables fresh.
i
Glide'N'Serve
Store food items at a different temperature than the regular fridge area.
j
Pullout Drawer
Provides extra storage within the freezer compartment.
23
OPERATION
ENGLISH
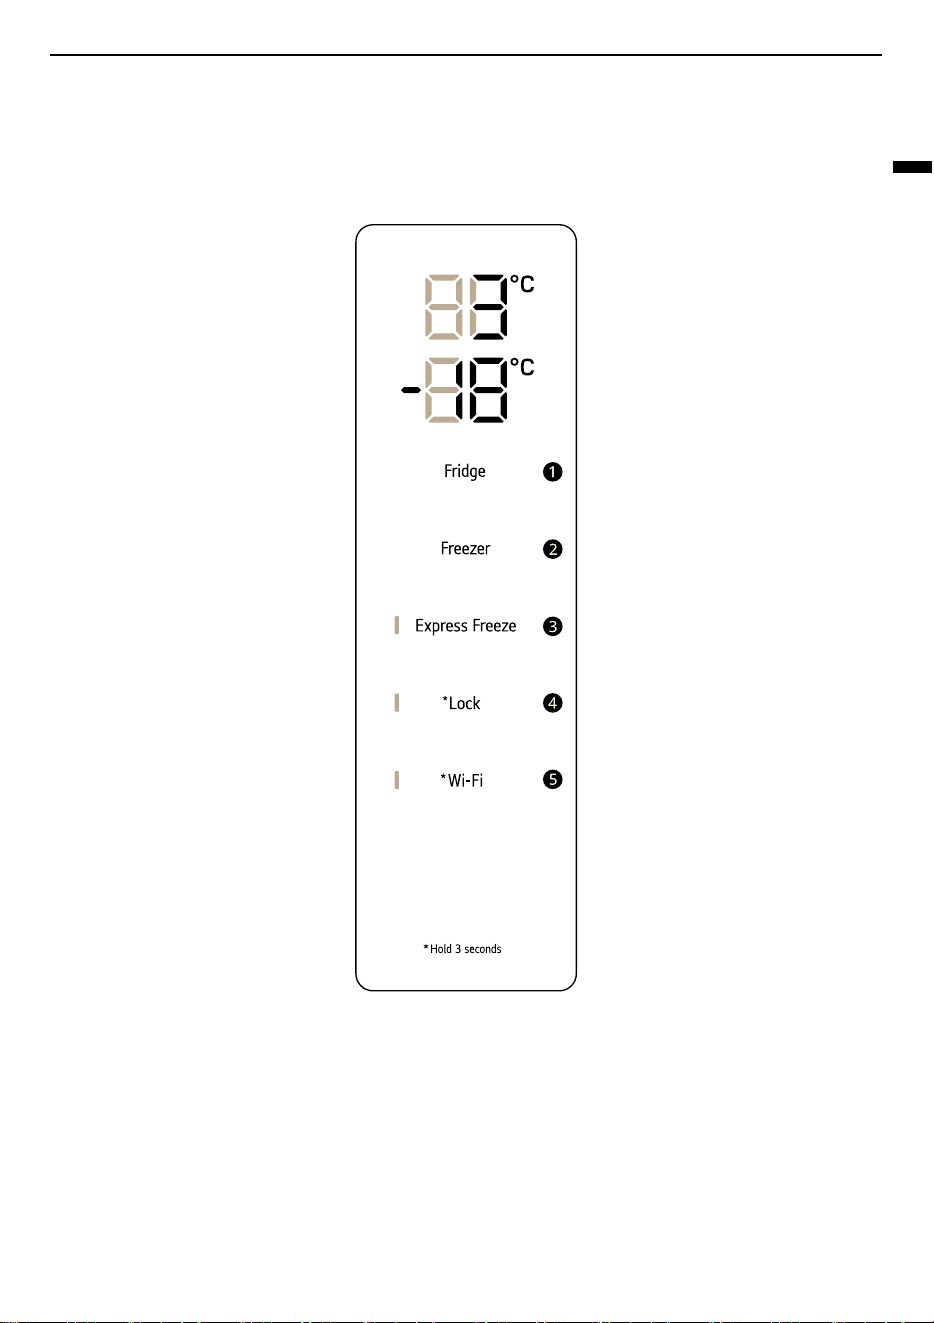
Control Panel
The actual control panel may differ from model to model.
Control Panel and Functions
a
Fridge
Press this button repeatedly to select a desired temperature between 1 °C and 7 °C.
• The default fridge temperature is 3 °C.
b
Freezer
Press this button repeatedly to select a desired temperature between -23 °C and -15 °C.
• The default freezer temperature is -18 °C.
c
Express Freeze
This function can quickly freeze a large amount of ice or frozen foods.
24
OPERATION
• This function is enabled and disabled in turn each time you press the button.
• This function automatically terminates after a specific period has passed.
d
Lock
The lock function disables every other button on the display.
• To lock the control panel buttons, press and hold the
Lock
button for 3 seconds until indicator light
turns on and the function is activated.
• To disable the function, press and hold the
Lock
button for 3 seconds until the indicator light turns
off and the function is deactivated.
e
Wi-Fi
This button allows the appliance to connect to a home Wi-Fi network. Refer to Smart Functions for
information on the initial setup of the
LG ThinQ
application.
NOTE
• For optimal food preservation, increasing or decreasing 1 °C from the default temperature is
recommended for each compartment.
• The displayed temperature is the target temperature, and not the actual temperature inside the
appliance.
• The actual temperature inside the appliance depends on the following factors: room temperature, the
amount of food and how often the doors are opened, where the appliance is. Set the temperatures by
considering these factors.
• If there is any finger or skin contacts to the control panel while cleaning it, the button function may
operate.
• This appliance incorporates an earth connection for functional purposes only.
Drawer
CAUTION
• Always empty the drawers before removing
them, and use both hands when removing and
refitting them.
• Make sure that the fridge doors are fully open
before removing and refitting the drawers.
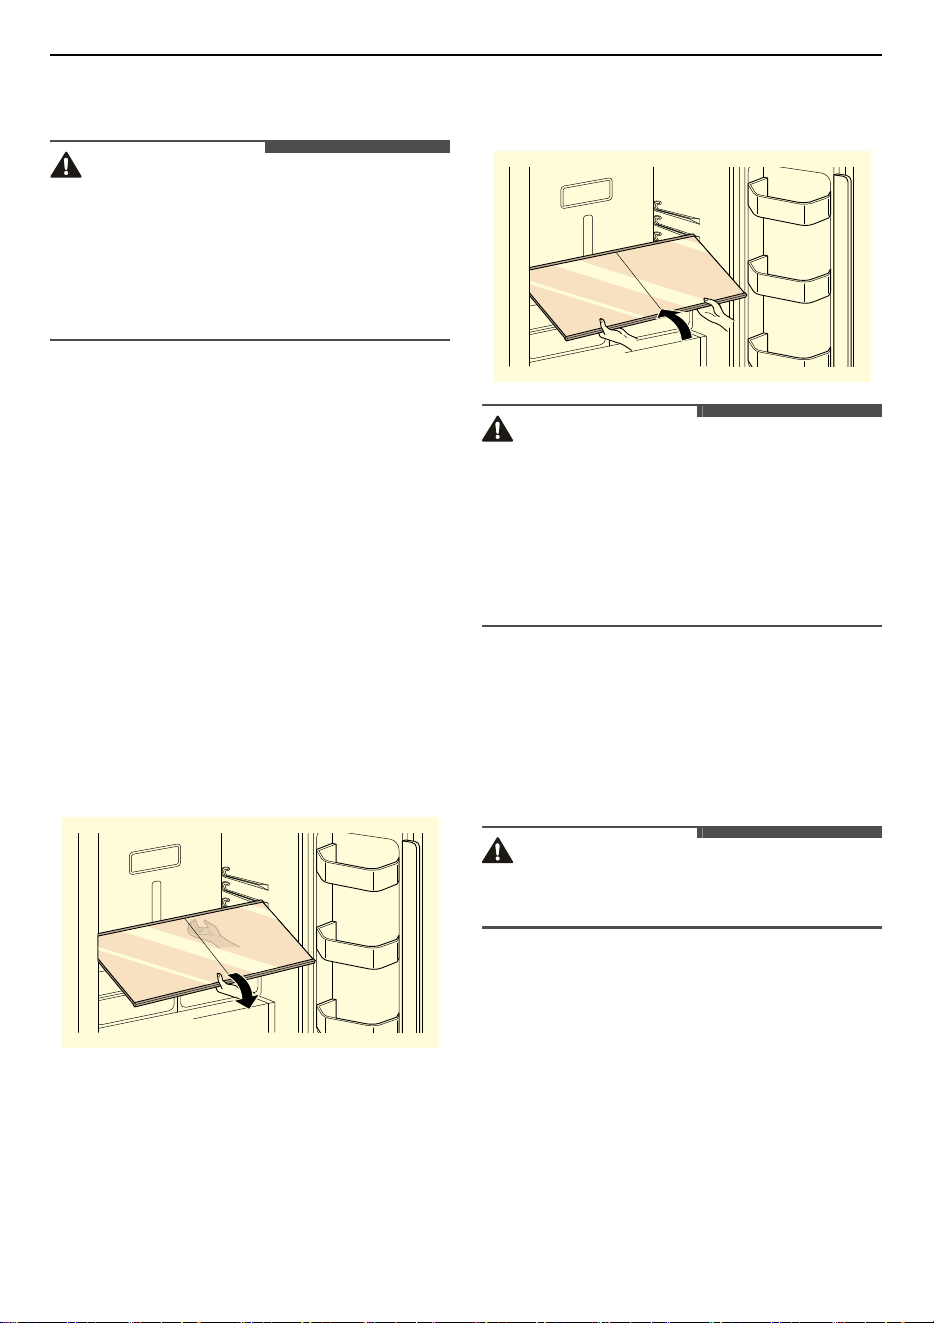
Removing/Refitting the Fridge
Drawer
1
Pull out the drawer to full extension, lift the
front up, and pull straight out.
25
OPERATION
ENGLISH
2
Lift the front of the cover up with both hands
until it detaches from the back wall of the
cabinet, then pull it out.
3
To refit, insert the cover into the refrigerator
with both hands and lower it onto the guides.
4
Slightly tilt up the front, insert the drawer into
the frame and push it back into place.
Glide‘N’Serve
This feature is only available on some models.
Using the Glide‘N’Serve
This drawer can be used for large party trays, deli
items and beverages. This drawer should not be
used to store vegetables that require high
humidity.
CAUTION
• Do not place any items on the Glide‘N’Serve
cover.
Removing/Refitting the
Glide‘N’Serve
1
To remove the Glide'N'Serve, pull out the
Glide'N'Serve to full extension, lift the front up,
and pull straight out.
2
To refit, slightly tilt up the front, insert the
Glide'N'Serve into the frame and push it back
into place.
26
OPERATION
Shelf
CAUTION
• Glass shelves are heavy. Use special care when
removing them.
• Do not clean glass shelves with warm water
while they are cold. Shelves may break if
exposed to sudden temperature changes or
impact.
Removing/Refitting the Shelf
The shelves in the fridge are adjustable to meet
individual storage needs. Adjusting the shelves to
fit items of different heights will make finding the
exact item you want easier.
1
Open the fridge doors completely.
2
If the Fresh Tray is inserted under the fridge
shelf, remove the Fresh Tray first.
3
Support the shelf from the bottom and tilt one
end up so the shelf is at an angle.
• If needed, lower one side of the shelf on the
bottom of the refrigerator interior.
4
Pull the shelf out.
5
Refit the shelf in the reverse order of the
removal process.
CAUTION
• Do not clean glass shelves with warm water
while they are cold. Shelves may break if
exposed to sudden temperature changes or
impact.
• Make sure that shelves are level from one side to
the other. Failure to do so may result in the shelf
falling or food spilling.
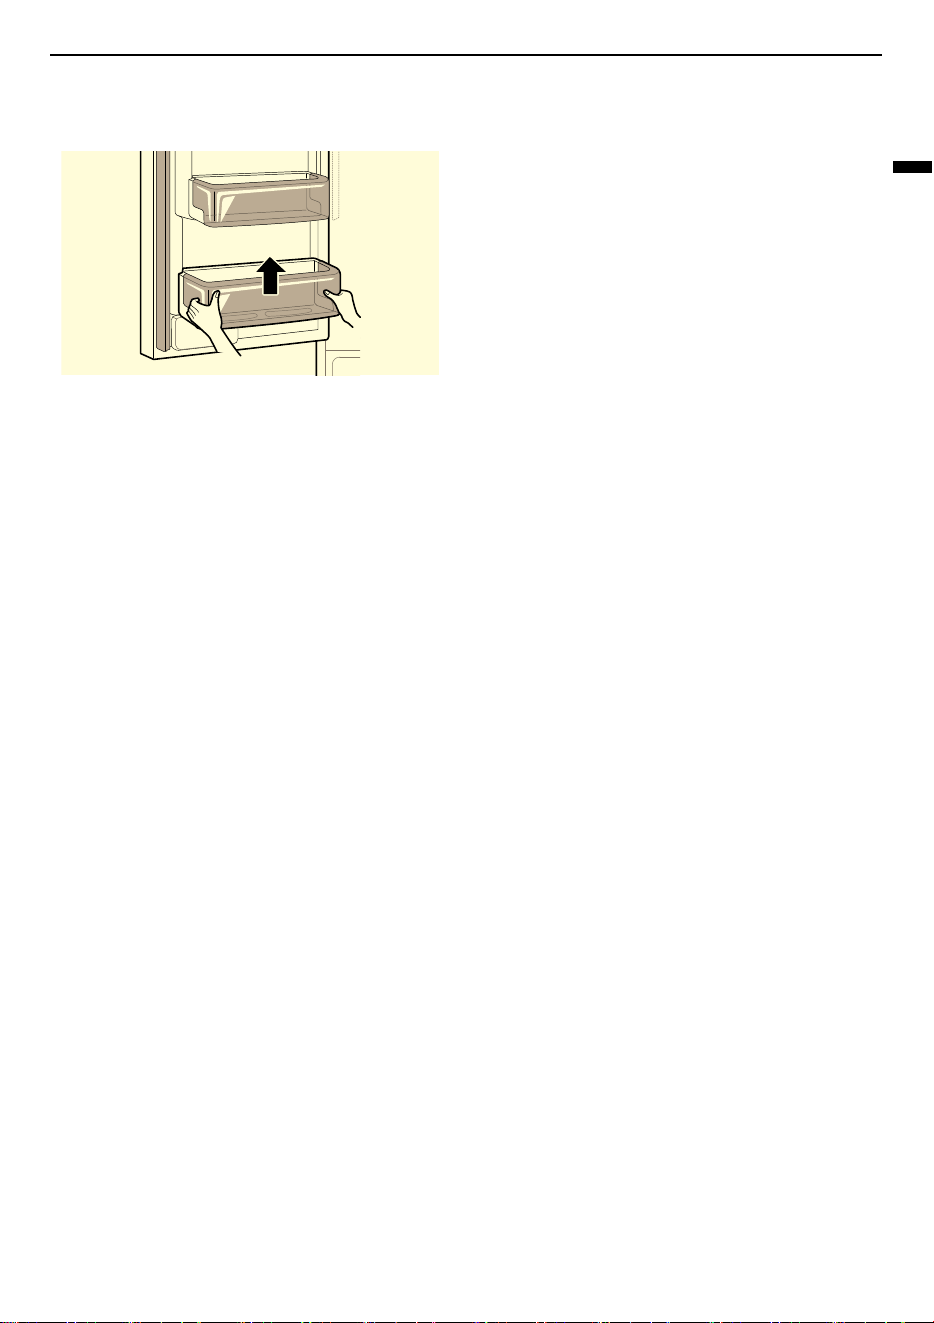
Door Basket
Removing/Refitting the Door
Basket
CAUTION
• Regularly detach and wash the door baskets;
they can become easily contaminated by food.
The door baskets are removable for easy cleaning
and adjustment.
27
OPERATION
ENGLISH
1
To remove the baskets, simply lift the basket
up and pull straight out.
2
To assemble the baskets, slide it in above the
desired support and push down until it snaps
into place.
28
SMART FUNCTIONS
SMART FUNCTIONS
LG ThinQ Application
This feature is only available on models with Wi-Fi.
The
LG ThinQ
application allows you to
communicate with the appliance using a
smartphone.
LG ThinQ Application Features
Communicate with the appliance from a
smartphone using the convenient smart features.
Smart Diagnosis
• If you experience a problem while using the
appliance, this smart diagnosis feature will help
you diagnose the problem.
Settings
• Allows you to set various options on the
appliance and in the application.
NOTE
• In the following cases, you must update the
network information for each appliance in the
LG ThinQ
application under
Device Cards
>
Settings
>
Change Network
.
- wireless router is changed
- wireless router password is changed
- Internet service provider is changed
• The application is subject to change for
appliance improvement purposes without notice
to users.
• Functions may vary by model.
Installing LG ThinQ Application
and Connecting an LG
Appliance
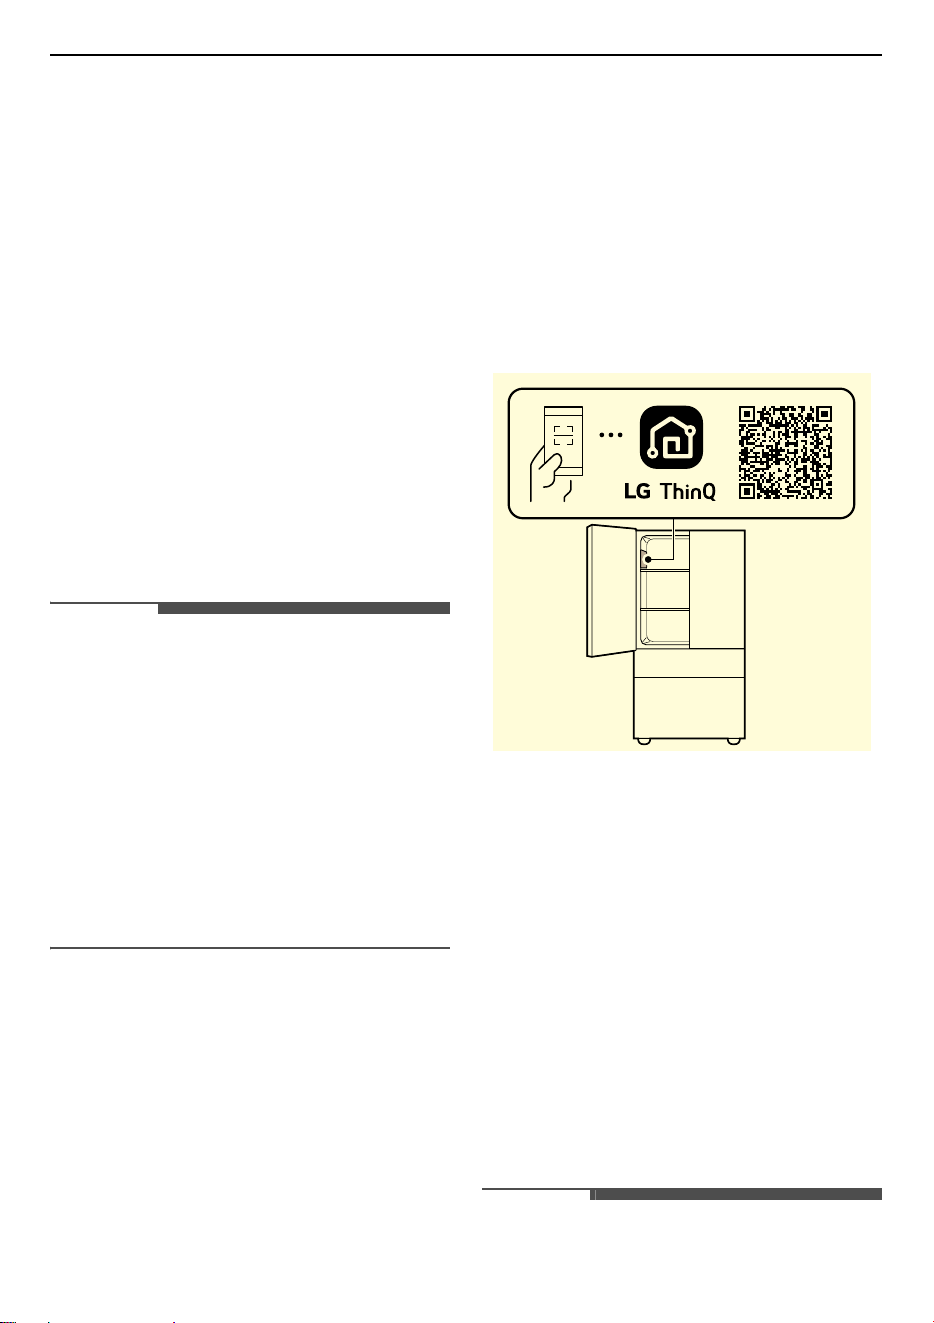
Models with QR Code
Scan the QR code attached to the product using the
camera or a QR code reader application on your
smartphone.
Models without QR Code
1
Search for and install the
LG ThinQ
application
from the Google Play Store or Apple App Store
on a smartphone.
2
Run the
LG ThinQ
application and sign in with
your existing account or create an LG account
to sign in.
3
Touch the add (
~
) button on the
LG ThinQ
application to connect your LG appliance.
Follow the instructions in the application to
complete the process.
NOTE
• To verify the Wi-Fi connection, check that the Wi-
Fi indicator on the control panel is lit.

29
SMART FUNCTIONS
ENGLISH
• The appliance supports 2.4 GHz Wi-Fi networks
only. To check your network frequency, contact
your Internet service provider or refer to your
wireless router manual.
•
LG ThinQ
is not responsible for any network
connection problems or any faults,
malfunctions, or errors caused by network
connection.
• The surrounding wireless environment can
make the wireless network service run slowly.
• If the distance between the appliance and the
wireless router is too far, the signal strength
becomes weak. It may take a long time to
connect or installation may fail.
• If the appliance is having trouble connecting to
the Wi-Fi network, it may be too far from the
router. Purchase a Wi-Fi repeater (range
extender) to improve the Wi-Fi signal strength.
• The network connection may not work properly
depending on the Internet service provider.
• The Wi-Fi connection may not connect or may be
interrupted because of the home network
environment.
• The appliance cannot be connected due to
problems with the wireless signal transmission.
Unplug the appliance and wait about a minute
before trying again.
• If the firewall on your wireless router is enabled,
disable the firewall or add an exception to it.
• The wireless network name (SSID) should be a
combination of English letters and numbers. (Do
not use special characters.)
• Smartphone user interface (UI) may vary
depending on the mobile operating system (OS)
and the manufacturer.
• If the security protocol of the router is set to
WEP
, you may fail to set up the network. Please
change it to other security protocols (
WPA2
is
recommended) and connect the product again.
• To disable the Wi-Fi function, press and hold the
Wi-Fi
button for 3 seconds. The Wi-Fi indicator
will be turned off.
• To reconnect the appliance or add another user,
press and hold the
Wi-Fi
button for 3 seconds to
temporarily turn it off. Run the
LG ThinQ
application and follow the instructions in the
application to connect the appliance.
RF Radiation Exposure
Statement
This equipment shall be installed and used at a
minimum distance of 20 cm from the human body.
Open Source Software Notice
Information
To obtain the source code that is contained in this
product, under GPL, LGPL, MPL, and other open
source licenses that have the obligation to disclose
source code, and to access all referred license
terms, copyright notices and other relevant
documents, please visit https://
opensource.lge.com.
LG Electronics will also provide open source code to
you on CD-ROM for a charge covering the cost of
performing such distribution (such as the cost of
media, shipping, and handling) upon email request
This offer is valid to anyone in receipt of this
information for a period of three years after our
last shipment of this product.
Smart Diagnosis
Use this feature to help you diagnose and solve
problems with your appliance.
NOTE
• For reasons not attributable to LGE’s negligence,
the service may not operate due to external
factors such as, but not limited to, Wi-Fi
unavailability, Wi-Fi disconnection, local app
store policy, or app unavailability.
• The feature may be subject to change without
prior notice and may have a different form
depending on where you are located.
Using LG ThinQ to Diagnose
Issues
If you experience a problem with your Wi-Fi
equipped appliance, it can transmit
troubleshooting data to a smartphone using the
LG ThinQ
application.
30
SMART FUNCTIONS
• Launch the
LG ThinQ
application and select the
Smart Diagnosis
feature in the menu. Follow
the instructions provided in the
LG ThinQ
application.
Using Audible Diagnosis to
Diagnose Issues
Follow the instructions below to use the audible
diagnosis method.
• Launch the
LG ThinQ
application and select the
Smart Diagnosis
feature in the menu. Follow
the instructions for audible diagnosis provided
in the
LG ThinQ
application.
1
Press the
Lock
button to activate the lock
function.
• If the display has been locked for over 5
minutes, you must deactivate the lock and
then reactivate it.
2
Open the fridge door and then hold the phone
on the upper right speaker hole.
3
Press and hold the
Freezer
button for three
seconds or longer while holding your phone to
the speaker until the data transfer is complete.
4
After the data transfer is complete, the
diagnosis will be displayed in the application.
NOTE
• For best results, do not move the phone while
the tones are being transmitted.

31
MAINTENANCE
ENGLISH
MAINTENANCE
Cleaning
General Cleaning Tips
• Performing manual defrosting, maintenance or
cleaning of the appliance while food is stored in
the freezer can raise the temperature of the food
and reduce its storage life.
• Regularly clean any surfaces that can come in
contact with food.
• When cleaning the inside or outside of the
appliance, do not wipe it with a rough brush,
toothpaste, or abrasive pads. Do not use any
chemical cleaners that contain or are blended
with solvents or flammable substances or
caustic based detergents. These include but are
not limited to:
- Flammable substances: alcohol (ethanol,
methanol, isopropyl alcohol, isobutyl alcohol,
etc.), thinner, bleach, benzene, flammable
liquid, abrasive, etc.
- This may cause discolouration or damage to
the appliance's internal parts and wall lining.
• After cleaning, check if the power cable is
damaged.
Cleaning the Exterior
• With models that have vents and rear covers
fitted, the outside air vents and rear lower cover
should be cleaned periodically to remove dust
buildup. Failure to do so could cause the
appliance to lose its cooling ability and cause the
compressor to overheat and malfunction,
resulting in food loss. We strongly recommend
this be done every 12 months or less, depending
on the environment.
• When cleaning the side vents and rear lower
cover by vacuuming, then the power cord must
be unplugged from the outlet to avoid any static
discharge that can damage the electronics or
cause an electric shock. Regular cleaning of the
rear and side ventilation covers is also necessary
to maintain reliable and economical operation of
the unit.
• Failure to keep the air vents on the exterior of
the appliance clean can also cause overheating,
appliance damage or property damage if the
defrosted water cannot evaporate from the rear
drain pan.
• For the appliance exterior, use a clean sponge or
soft cloth and a mild detergent in warm water.
Do not use abrasive or harsh cleaners. Dry
thoroughly with a soft dedicated cloth. Do not
use contaminated cloths when cleaning the
stainless steel doors. Always use a dedicated
cloth and wipe in the same direction as the grain.
This helps reduce surface staining and
tarnishing.
Cleaning the Interior
• Before removing a shelf or drawer from inside
the appliance, remove all stored foods from the
shelf or drawer to prevent injury or damage to
the appliance. Otherwise, injury may occur due
to the weight of stored foods.
• Detach the shelves and drawers and clean them
with water and a mild detergent, and then dry
them sufficiently, before replacing them.
• Regularly wipe the door gaskets and door seals
with water and a mild detergent. Never use
solvent or acidic based chemicals to clean the
interior. Doing so will alter its integrity.
• Door basket spills and stains should be cleaned
as they can compromise storage ability of the
basket and could even be damaged.
• Never clean the shelves, door baskets, or
containers in the dishwasher or in hot water. The
parts may become deformed, and glass may
shatter due to the heat.
• The automatic defrosting system in the
appliance ensures that the compartment
remains free of ice buildup under normal
operating conditions. Users do not need to
defrost it manually.

32
MAINTENANCE
Cleaning the Condenser Cover
Use a vacuum cleaner with a brush to clean the
condenser cover and vents. Do not remove the
panel covering the condenser coil area.
We strongly recommend that this be done every 12
months to maintain operating efficiency. Failing to
do so could cause loss of cooling, higher energy
usage and compressor overheating.
33
TROUBLESHOOTING
ENGLISH
TROUBLESHOOTING
Before Calling for Service
Cooling
Symptoms Possible Cause & Solution
There is no
refrigeration or
freezing.
Is there a power interruption?
• Check the power of other appliances.
Appliance is unplugged.
• Plug the power plug in the outlet properly.
A fuse in your home may be blown or the circuit breaker tripped. Or the
appliance is connected to a GFCI (Ground Fault Circuit Interrupter)
outlet, and the outlet's circuit breaker has tripped.
• Check the main electrical box and replace the fuse or reset the circuit
breaker. Do not increase fuse capacity. If the problem is a circuit overload,
have it corrected by a qualified electrician.
• Reset the circuit breaker on the GFCI. If the problem persists, contact an
electrician.
There is poor
refrigeration or
freezing.
Is the fridge or freezer temperature set to its warmest setting?
• Set the fridge or freezer temperature to a colder setting.
Is the appliance in direct sunlight, or is it near a heat generating object
such as cooking oven or heater?
• Check the installation area and reinstall it away from heat generating
objects.
Did you store hot food without cooling it first?
• Cool the hot food first before putting it in the fridge or freezer
compartment.
Did you put in too much food?
• Maintain an appropriate space between food.
Are the appliance doors completely closed?
• Completely close the door and make sure that stored food is not
obstructing in the door.
Is there enough space around the appliance?
• Adjust the installation position to make enough space around the
appliance.
The appliance contains
a bad smell.
Is the fridge or freezer temperature set to its warmest setting?
• Set the fridge or freezer temperature to a colder setting.
34
TROUBLESHOOTING
Condensation & Frost
The appliance contains
a bad smell.
Did you put in food with a strong smell?
• Store foods with strong smells in sealed containers.
Vegetables or fruit may have spoiled in the drawer.
• Throw away rotten vegetables and clean the vegetable drawer. Do not
store vegetables too long in the vegetable drawer.
Symptoms Possible Cause & Solution
There is condensation
inside the appliance or
on the bottom of the
vegetable drawer
cover.
Did you store hot food without cooling it first?
• Cool the hot food first before putting it inside the fridge or freezer.
Did you leave the appliance door open?
• Although the condensation will disappear soon after you close the
appliance door, you can wipe it with a dry cloth.
Do you open and close the appliance door too frequently?
• Condensation can form due to the temperature difference from the
outside. Wipe out the dampness with a dry cloth.
Did you put warm or moist food inside without sealing it in a container?
• Store food in a covered or sealed container.
Frost has formed in the
freezer compartment.
Doors may not be closed properly.
• Check if the food item inside the appliance is blocking the door and make
sure that the door is tightly closed.
Did you store hot food without cooling it first?
• Cool the hot food first before putting it in the fridge or freezer
compartment.
Is the air entry or exit of the freezer compartment blocked?
• Make sure that air entry or exit is not blocked so that the air can circulate
inside.
Is the freezer compartment overfilled?
• Maintain an appropriate space between items.
Frost or condensation
has formed inside or
outside the appliance.
Did you open and close the appliance door frequently or is the appliance
door improperly closed?
• Frosts or condensation can form if the outside air penetrates inside the
appliance.
Symptoms Possible Cause & Solution
35
TROUBLESHOOTING
ENGLISH
Parts & Features
Frost or condensation
has formed inside or
outside the appliance.
Is the installation environment humid?
• Condensation can appear on the exterior of the appliance if the installation
area is too humid or on a humid day such as a rainy day. Wipe off any
moisture with a dry cloth.
The side or front of the
appliance is warm.
There are anti condensation pipes fitted to these areas of the appliance
to reduce condensation forming from around the door area.
• The heat releasing pipe to prevent condensation is installed on the front
and side of the appliance. You may feel it particularly hot right after the
appliance is installed or during the summer. You can be assured that this
is not a problem and is quite normal.
There is water inside or
outside of the
appliance.
Is there water leakage around the appliance?
• Check if the water has leaked from a sink or another place.
Is there water on the bottom of the appliance?
• Check if the water is from the thawed frozen food or a broken or dropped
container.
Symptoms Possible Cause & Solution
The appliance door is
not closed tightly.
Is the appliance leaning forward?
• Adjust the front feet to raise the front side slightly.
Were the shelves properly assembled?
• Refit the shelves if needed.
Did you close the door with excessive force?
• If you apply too much force or speed when closing the door, it may remain
briefly open before closing. Make sure that you do not slam the door
closed. Close the door gently.
It is difficult to open
the appliance door.
Did you open the door right after you closed it?
• If you try to open the appliance door within one minute after you closed it,
you may have difficulties because of the pressure inside the appliance. Try
to open the appliance door again in a few minutes so that the internal
pressure stabilizes.
Door mullion does not
fold in and out
properly.
Are front levelling legs extended, the appliance level, and doors aligned?
• Once the door baskets are filled, the doors may become misaligned,
preventing the door mullion or the Auto Open Door function from working
properly. Extend both front levelling legs fully so they are in firm contact
with the floor. Follow the instruction in the Door Alignment section to raise
the left fridge door until the door mullion is once again working properly.
Adjust the right fridge door so it aligns with the left fridge door.
Symptoms Possible Cause & Solution
36
TROUBLESHOOTING
Noises
The inside lamp in the
appliance does not
turn on.
Lamp failure
• Close the door and re-open. If the lamp does not turn on, please contact
the LG Electronics customer information centre. Do not attempt removal
of the lamp.
Symptoms Possible Cause & Solution
The appliance is noisy
and generates
abnormal sounds.
Is the appliance installed on a weak floor or improperly levelled?
• Install the appliance on a solid and flat area.
Does the rear of the appliance touch the wall?
• Adjust the installation position to allow enough clearance around the
appliance.
Are objects scattered behind the appliance?
• Remove the scattered objects from behind the appliance.
Is there an object on top of the appliance?
• Remove the object on top of the appliance.
Clicking noises The defrost control will click when the automatic defrost cycle begins
and ends. The thermostat control (or appliance control on some models)
will also click when cycling on and off.
• Normal Operation
Rattling noises Rattling noises may come from the flow of appliance, the water line on
the back of the unit (for plumbed models only), or items stored around
the appliance.
• Normal Operation
Appliance is not resting evenly on the floor.
• Floor is weak or uneven or levelling legs need to be adjusted. See the Door
Alignment section.
Appliance with a compressor was moved while operating.
• Normal operation. If the compressor does not stop rattling after three
minutes, turn the power to the appliance off and then on again.
Whooshing noises Evaporator fan motor is circulating air through the fridge and freezer
compartments.
• Normal Operation
Air is being forced over the condenser by the condenser fan.
• Normal Operation
Symptoms Possible Cause & Solution
37
TROUBLESHOOTING
ENGLISH
Wi-Fi
Gurgling noises Appliance flowing through the cooling system.
• Normal Operation
Popping noises Contraction and expansion of the inside walls due to changes in
temperature.
• Normal Operation
Vibrating If the side or back of the appliance is touching a cabinet or wall, some of
the normal vibrations may make an audible sound.
• To eliminate the noise, make sure that the sides and back do not make any
contact with any wall or cabinet.
Buzzing sound from
the water tank. (Non
plumbed models only)
You may hear valve a buzzing sound from the water tank if the icemaker
is on and the water tank is empty.
• Fill the water tank or turn the icemaker off.
Symptoms Possible Cause & Solution
Your home appliance
and smartphone are
not connected to the
Wi-Fi network.
The password for the Wi-Fi that you are trying to connect to is incorrect.
• Find the Wi-Fi network connected to your smartphone and remove it, then
register your appliance on
LG ThinQ
.
Mobile data for your smartphone is turned on.
• Turn off the
Mobile data
of your smartphone and register the appliance
using the Wi-Fi network.
The wireless network name (SSID) is set incorrectly.
• The wireless network name (SSID) should be a combination of English
letters and numbers. (Do not use special characters.)
The router frequency is not 2.4 GHz.
• Only a 2.4 GHz router frequency is supported. Set the wireless router to 2.4
GHz and connect the appliance to the wireless router. To check the router
frequency, check with your Internet service provider or the router
manufacturer.
The distance between the appliance and the router is too far.
• If the distance between the appliance and the router is too far, the signal
may be weak and the connection may not be configured correctly. Move
the location of the router so that it is closer to the appliance.
Symptoms Possible Cause & Solution

Memo

Memo