OWNER’S MANUAL
BOTTOM FREEZER
FRIDGE
Please read this owner’s manual thoroughly before
operating and keep it handy for reference at all times.
GF-D725BML
www.lg.com
Copyright © 2017 - 2018 LG Electronics Inc. All Rights Reserved.
MFL68302753_Rev.02

2
TABLE OF CONTENTS
TABLE OF CONTENTS
3 PRODUCT FEATURES
4 IMPORTANT SAFETY
INSTRUCTIONS
7 COMPONENTS
7 Fridge Exterior
8 Fridge Interior
9 INSTALLATION
9 Installation Overview
10 Unpacking Your Fridge
10 Choosing the Proper Location
10 - Flooring
11 - Dimensions and Clearances
11 - Ambient Temperature
11 Turning On the Power
11 How to Remove the Fridge Door
12 How to Remove the Freezer Door
12 Height Adjustment
12 - Fridge Door Height Adjustment
13 - When the Freezer Door is Lower
14 HOW TO USE
14 Before Use
15 Control Panel
15 - Control Panel Features
17 Storing Food
17 - Food Preservation Location
19 - Food Storage Tips
19 - Storing Frozen Food
20 Adjusting the Fridge Shelves
20 - Detaching the Shelf
20 - Refitting the Shelf
21 - Using the Folding Shelf
21 - When Closing the Door
22 Big Fresh Zone
22 - Removal of the Big Fresh Zone drawer
22 - Refitting the Big Fresh Zone drawer
23 How to disassemble and assemble the
vegetable box
24 Extra Space
24 Tilting Fresh Basket
25 - Tilting Fresh Basket Disassembly
25 Dairy Corner
25 Door-In-Door
26 - Door-In-Door Shelf Disassembly
27 Adjustable Moving Basket
27 Ice Maker
28 Freezer Drawer
28 - Freezer Drawer Removal
29 - Refitting the Freezer Drawer
29 Freezer/Fridge Basket
30 SMART FUNCTIONS
30 Using LG SmartThinQ Application
32 Using Smart Diagnosis™
33 MAINTENANCE
33 Cleaning
34 Replacing the Pure N Fresh filter
35 TROUBLESHOOTING
3
PRODUCT FEATURES
PRODUCT FEATURES
* Depending on the model, some of the following functions may not be available.
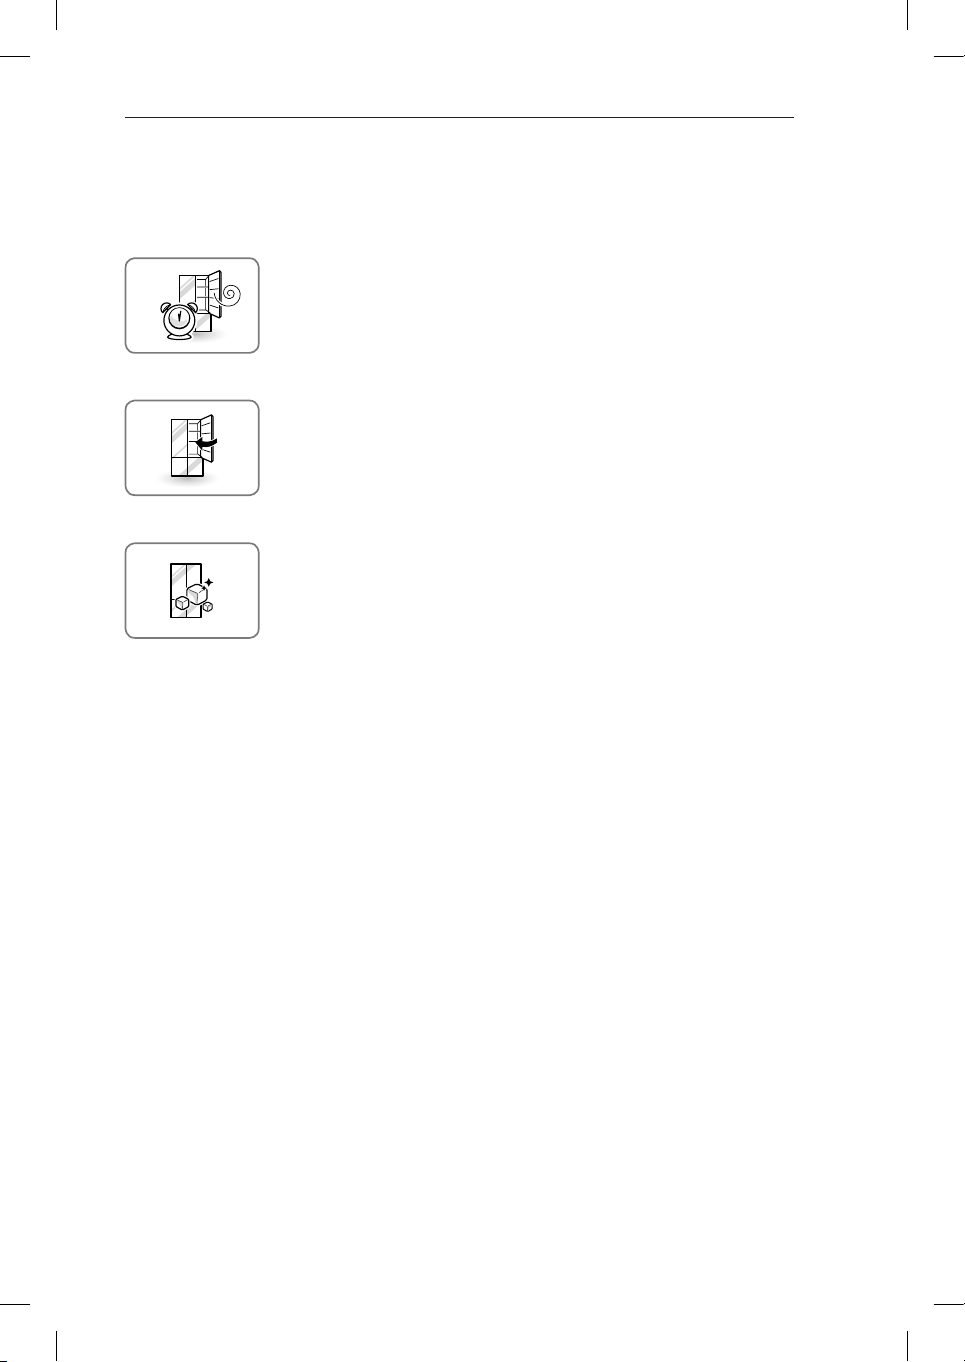
DOOR ALARM
The Door Alarm function is designed to prevent fridge malfunctioning that
could occur if a fridge door or freezer door remains open. If a fridge door or
freezer door is left open for more than 60 seconds, a warning alarm sounds
in 30 second intervals until it is closed.
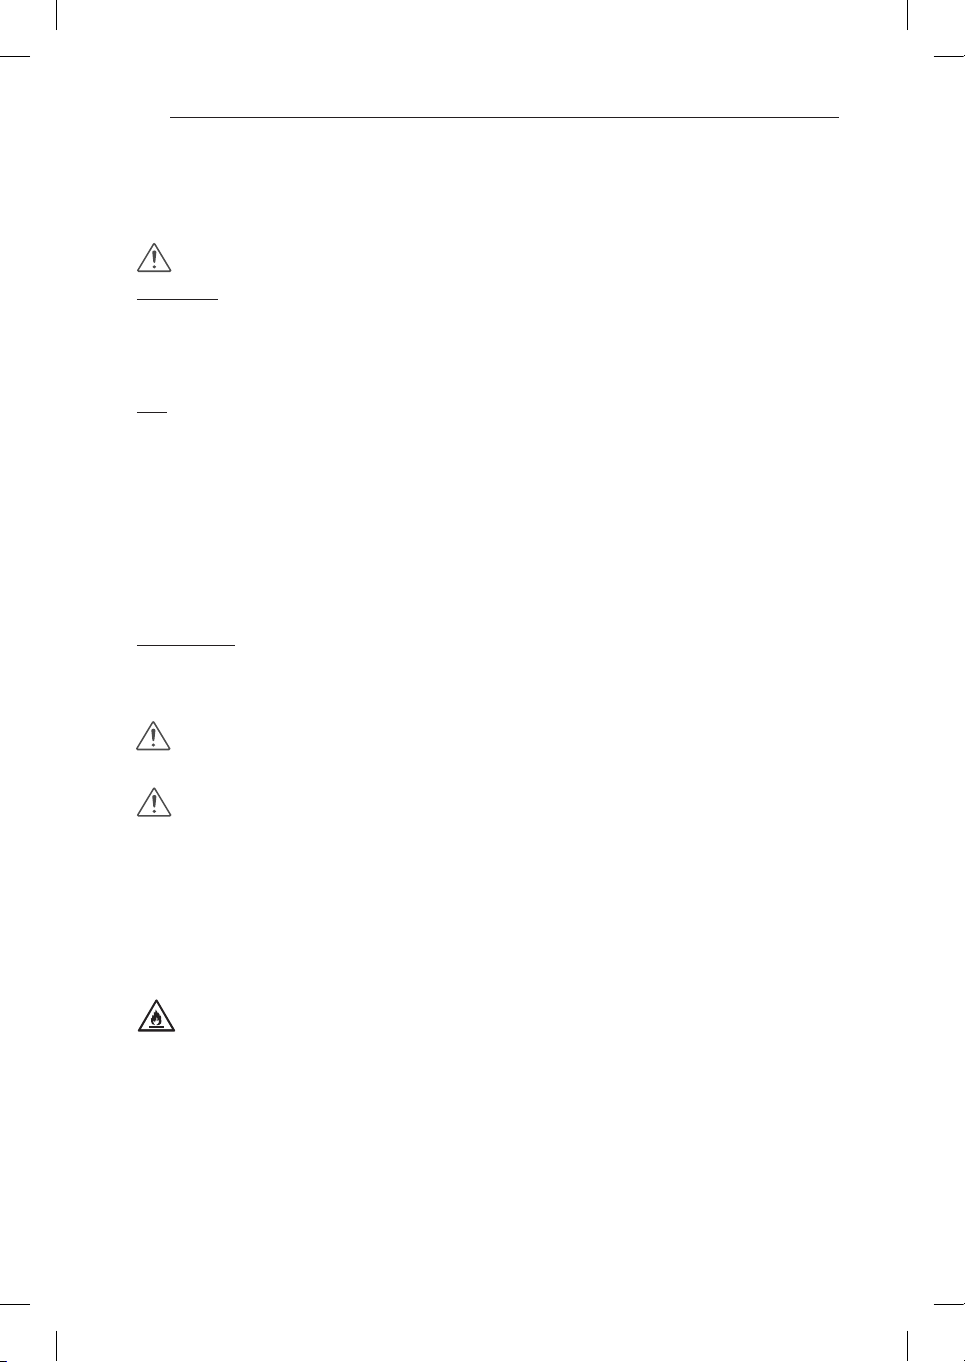
EXPRESS FREEZE
The freezer section is maintained at the coldest temperature for a 24-hour
period before automatically resuming normal operation. The freezer display
temperature will not change when Express Freeze is engaged. It will also
enhance ice production whilst it is on.
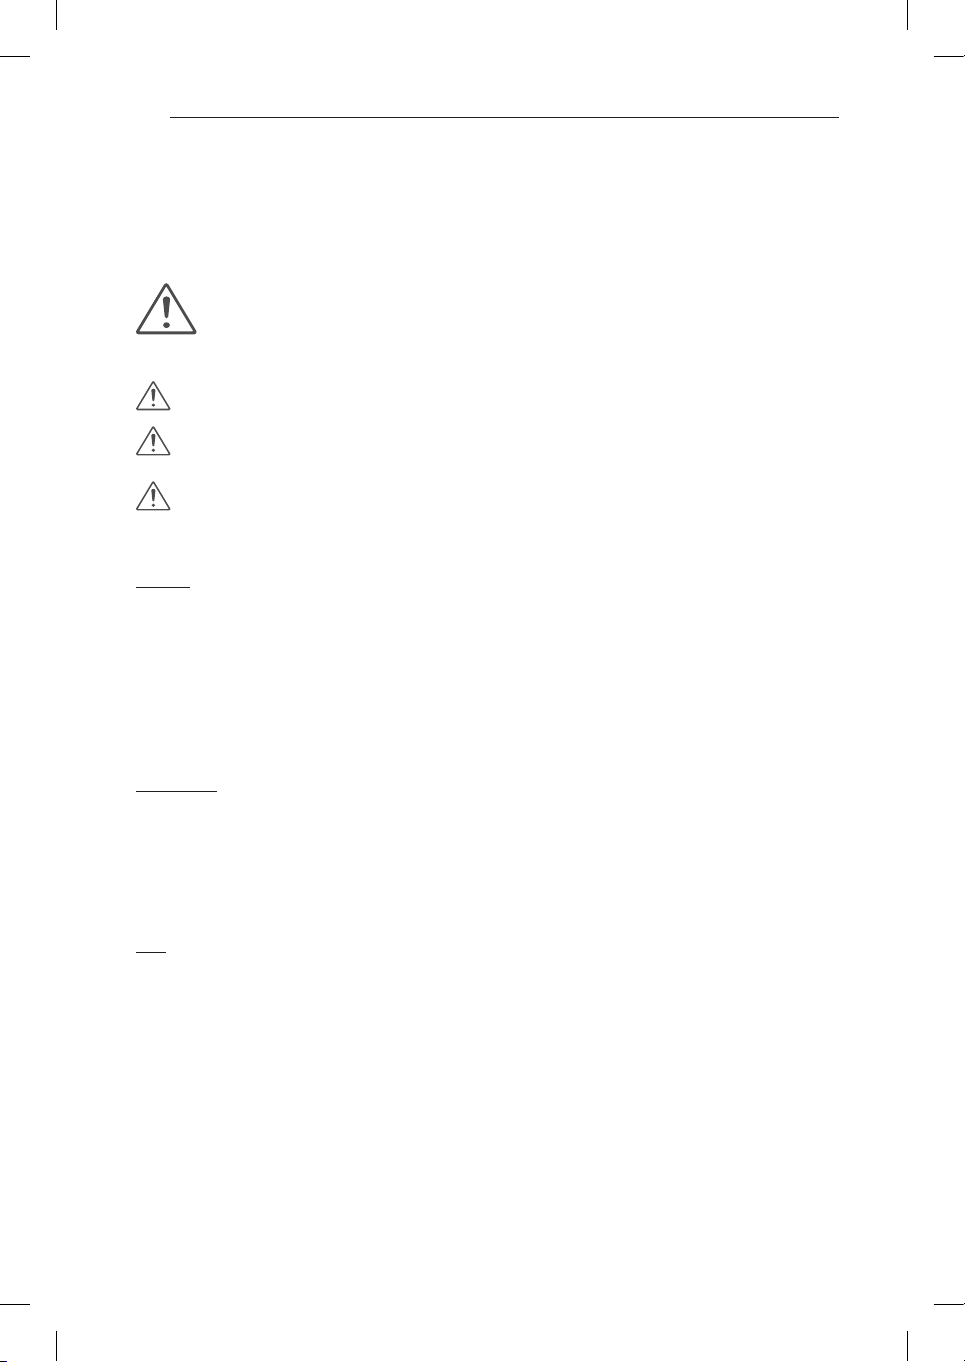
AUTO CLOSING HINGE
The fridge doors close automatically with a slight push. (The door only
closes automatically when it is open at an angle less than 30°.)
4
IMPORTANT SAFETY INSTRUCTIONS
IMPORTANT SAFETY INSTRUCTIONS
READ ALL INSTRUCTIONS BEFORE USING THE APPLIANCE.
This guide contains many important safety messages. Always
read and obey
all safety messages.
WARNING
You can be killed or seriously injured if you do not follow instructions.
CAUTION
Indicates an imminently hazardous situation which, if not avoided, may result
in minor or moderate injury, or product damage.
WARNING
To reduce the risk of fire, electric shock, or personal injury when using your product, basic safety
precautions should be followed, including the following.
Power
•
NEVER unplug your fridge by pulling on the power cord. Always grip the plug firmly and pull it straight
out from the outlet.
•
If the supply cord is damaged, it must be replaced by the manufacturer or its service agent or a similarly
qualified person in order to avoid a hazard. Do not use a cord that shows cracks or abrasion damage
along its length or at either the plug or connector end.
•
Do not use an uncertified power outlet.
•
Unplug the power plug immediately in the event of a blackout or thunderstorm.
•
Plug in the power plug with the power cord facing downward.
Installation
•
Contact an authorized service center when you install or relocate the fridge.
•
When moving your fridge away from the wall, be careful not to roll over or damage the power cord.
•
Connect this product to a dedicated grounded electric outlet conforming with the rating prior to use. It is
the user’s responsibility to replace a standard 2-prong wall outlet with a standard 3-prong wall outlet.
•
Do not install the fridge where there may be a danger of it falling. Installation on a non sturdy timber floor
may cause difficulty in door alignment and cause the cabinet to deform.
Use
•
DO NOT allow children to climb, stand, or hang on the fridge doors or shelves in the fridge. They could
damage the fridge and seriously injure themselves.
•
Where fitted, do not place heavy objects on the dispenser of the fridge or hang onto it.
•
Do not place heavy or dangerous objects (bottles or vases with liquid) on the fridge.
•
Do not put live animals inside of the fridge.
•
Do not allow children to climb into the product when it is in or out of use.
•
In the event of a gas leak (propane/LPG), ventilate sufficiently and contact an authorized service center
before use. Do not touch or disassemble the electric outlet of the fridge.
•
In the event of a refrigerant leak, move flammable objects away from the fridge. Ventilate sufficiently
and contact an authorized service center.
•
Do not use or place flammable substances (chemicals, medicine, cosmetics, etc) near the fridge or store
them inside the fridge. Do not place the fridge in the vicinity of flammable gas.
•
The tempered glass on door can be broken by impact. Do not touch the broken parts. You may be
injured.
This is the safety alert symbol. It alerts you to safety messages that inform you of
hazards that can kill or hurt you or others, or cause damage to the product.
All safety messages will be preceded by the safety alert symbol and the hazard
signal word WARNING or CAUTION. These words mean:

5
IMPORTANT SAFETY INSTRUCTIONS
•
This appliance is intended to be used in household and similar applications such as
- staff kitchen areas, offices and other working environments;
- farm houses and by clients in hotels, motels and other residential type environments;
- bed and breakfast type environments.
•
Do not use this product for special purposes or mobile applications (storage of medicine or test materials
or on ships, etc).
•
Unplug the power plug before cleaning or repairing the fridge.
•
If the fridge is fitted with light bulbs and require replacing, unplug the fridge or turn off the power before
doing so.
•
Do not modify or extend the power cord.
•
Do not use a hair dryer to dry the interior. Do not light a candle to remove any interior odor.
•
For your safety, this appliance must be properly grounded. Have the wall outlet and the circuit checked
by a qualified electrician to make sure the outlet is properly grounded.
•
Do not use an outlet that can be turned off via a remote switch. Do not use an extension cord. It is the
user’s responsibility to replace a standard 2-prong wall outlet with a standard 3-prong wall outlet.
•
Do not, under any circumstances, cut or remove the third (ground) prong from the power cord.
•
Do not use an adapter plug and plug the power plug into a multi-outlet extension cord.
•
Disconnect the power cord immediately if you hear a noise, smell a strange odor or detect smoke.
•
Turn the power off if dust or water from above or below penetrates into the fridge. Call a service agent.
•
Do not disassemble or modify the fridge.
•
Do not put hands, feet, or metal objects below or behind the fridge.
•
Do not operate the fridge or touch the power cord with wet hands.
•
In fridges with automatic icemakers, avoid contact with the moving parts of the ejector mechanism or
with the heating element that releases the cubes. Do not place fingers or hands on the automatic ice-
making mechanism while the fridge is plugged in.
•
When dispensing ice from the dispenser, do not use crystal ceramics.
•
Do not touch the cold surfaces in the freezer compartment with wet or damp hands, when your fridge is
in operation.
•
Do not put glass containers, glass bottles or beverage cans in the freezer.
•
Do not store explosive substances such as aerosol cans with a flammable propellant in this appliance.
•
This appliance is not intended for use by persons (including children) with reduced physical, sensory or
mental capabilities, or lack of experience and knowledge, unless they have been given supervision or
instruction concerning the use of the appliance by a person responsible for their safety.
•
If the appliance is equipped with a lock (some countries only), keep the key out of reach of children.
•
Do not refreeze frozen foods that have thawed completely. It may result in serious health issues.
•
If you are throwing away your old fridge, make sure the CFC coolant is removed for proper disposal by
a qualified servicer. If you release CFC coolant, you may be fined or imprisoned in accordance with the
relevant environmental law.
•
Disposed or abandoned fridges are dangerous, even if they are sitting for only a few days. When
disposing the fridge, remove the packing materials from the door or take off the doors but leave the
shelves in place so that children may not easily climb inside.
•
If the refrigerant gas has leaked, do not touch the fridge or the power outlet and ventilate the room
immediately. A spark could trigger an explosion causing a fire or burns. Because this fridge uses
natural gas (isobutene, R600a) as the environment-friendly refrigerant, even a small amount (50~60g) is
combustible. If gas leaks from severe damage during delivering, installing or using the fridge, any spark
may cause fire or burns.
READ ALL INSTRUCTIONS BEFORE USING THE APPLIANCE.
To reduce the risk of fire, electric shock, or personal injury when using your product, basic safety
precautions should be followed, including the following.
6
IMPORTANT SAFETY INSTRUCTIONS
CAUTION
Installation
•
The fridge must be properly installed in accordance with the Installer Instructions that were taped to
the front of the fridge.
•
Be careful when you unpack and install the fridge. Immediately dispose of packing materials (plastic)
out of reach of children.
Use
•
Close the doors carefully when children are around.
•
Keep fingers out of pinch point areas; clearances between the doors and cabinets are necessarily
small. Be careful closing doors when children are in the area.
•
If food is stacked or stored poorly on the shelves, it may fall and cause injury when the door is opened.
•
Do not move fridge while the fridge is operating. A Compressor rattling noise may occur as a result
and will only stop when the compressor cycles off, or when the power to the unit is turned off and
back on again. (This is normal and will not impact on the performance or the life of the compressor.
The rattling will stop after the compressor comes to a rest.)
•
Do not place glass containers, bottles or cans (especially those containing carbonated drinks) in the
freezer compartment, shelves or ice bin that will be exposed to temperatures below freezing.
Maintenance
•
Do not use strong detergents like wax or thinners for cleaning. Clean with a soft fabric.
•
Wipe foreign objects (dust, water, etc) off the prongs of the power plug and contact areas before
connecting.
READ ALL INSTRUCTIONS BEFORE USING THE APPLIANCE.
To reduce the risk of fire, electric shock, or personal injury when using your product, basic safety
precautions should be followed, including the following.
SAVE THESE INSTRUCTIONS
This appliance contains a small amount of isobutane refrigerant (R600a), natural gas with high
environmental compatibility, but it is also combustible. When transporting and installing the appliance,
care should be taken to ensure that no parts of the refrigerating circuit are damaged. Refrigerant
squirting out of the pipes could ignite or cause an eye injury. If a leak is detected, avoid any naked
flames or potential sources of ignition and air the room in which the appliance is standing for several
minutes.
In order to avoid the creation of a flammable gas air mixture if a leak in the refrigerating circuit occurs,
the size of the room in which the appliance may be sited depends on the amount of refrigerant used.
The room must be 1m
2
in size for every 8g of R600a refrigerant inside the appliance. The amount of
refrigerant in your particular appliance is shown on the identification plate inside the appliance. Never
start up an appliance showing any signs of damage. If in doubt, consult your dealer.
WARNING
•
Keep ventilation openings, in the appliance enclosure or in the built-in structure, clear of obstruction.
•
Do not use mechanical devices or other means to accelerate the defrosting process, other than those
recommended by the manufacturer.
•
Do not damage the refrigerant circuit.
•
Do not use electrical appliances inside the food storage compartments of the appliance, unless they
are of the type recommended by the manufacturer.
•
The refrigerant and insulation blowing gas used in the appliance require special disposal procedures.
When disposal, please consult with service agent or a similarly qualified person.
WARNING
•
Use drinkable water for ice making.
7
COMPONENTS
COMPONENTS
Use this page to become more familiar with the parts and features of your fridge.
Page references are included for your convenience.
*The appearance and specifications of the actual product may differ depending on the model.
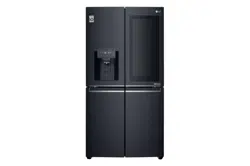
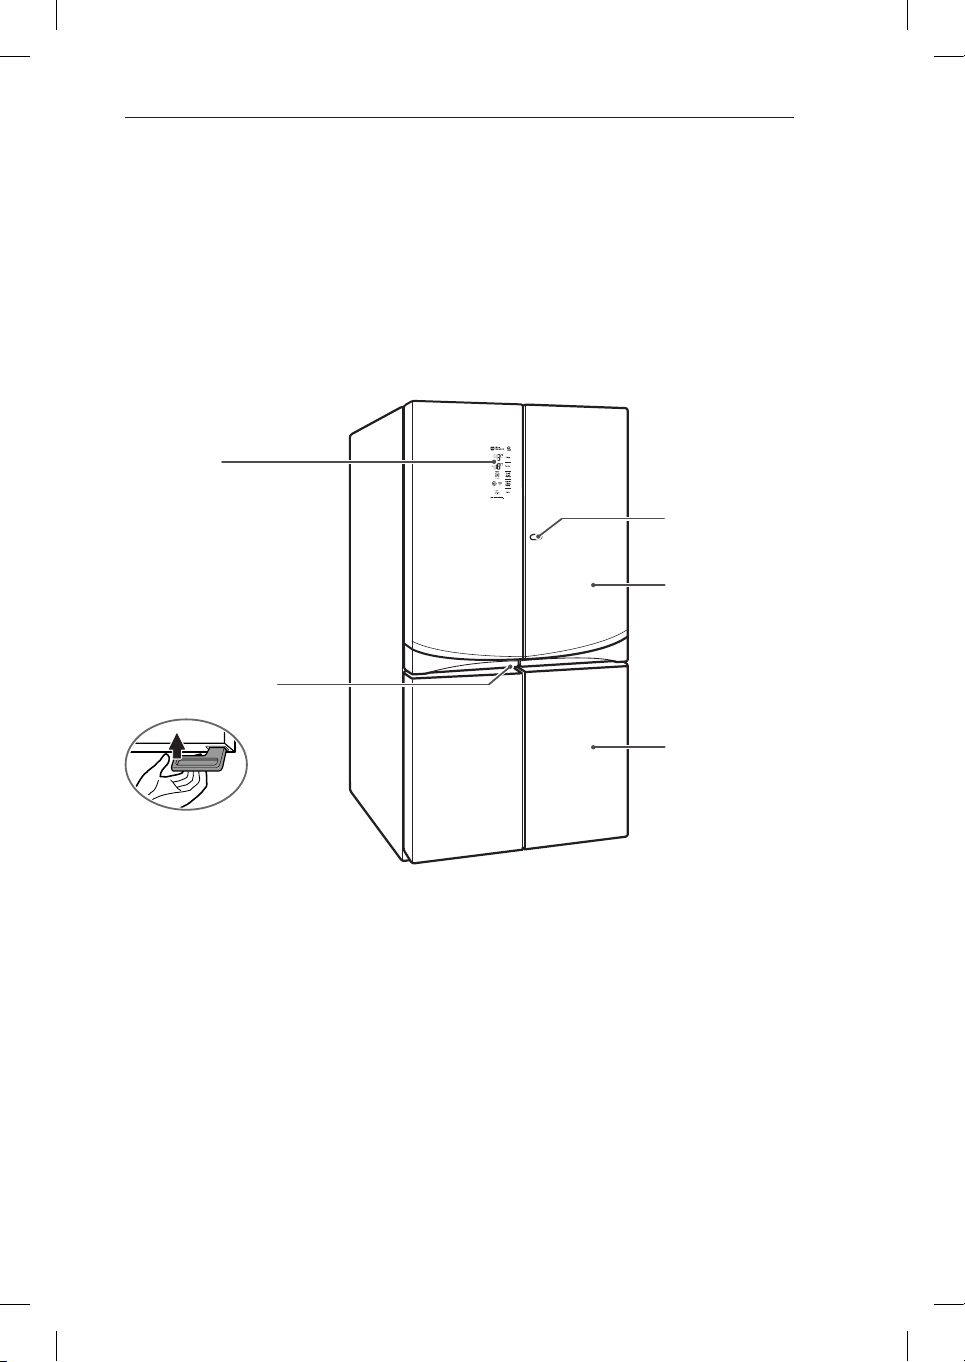
Fridge Exterior (Applicable to some models only)
LED Display
Displays the fridge and freezer’s
target temperature, the water
filter condition and the dispenser
status.
Door in Door release
Button
Fridge
Freezer
Door in Door release
Button
8
COMPONENTS
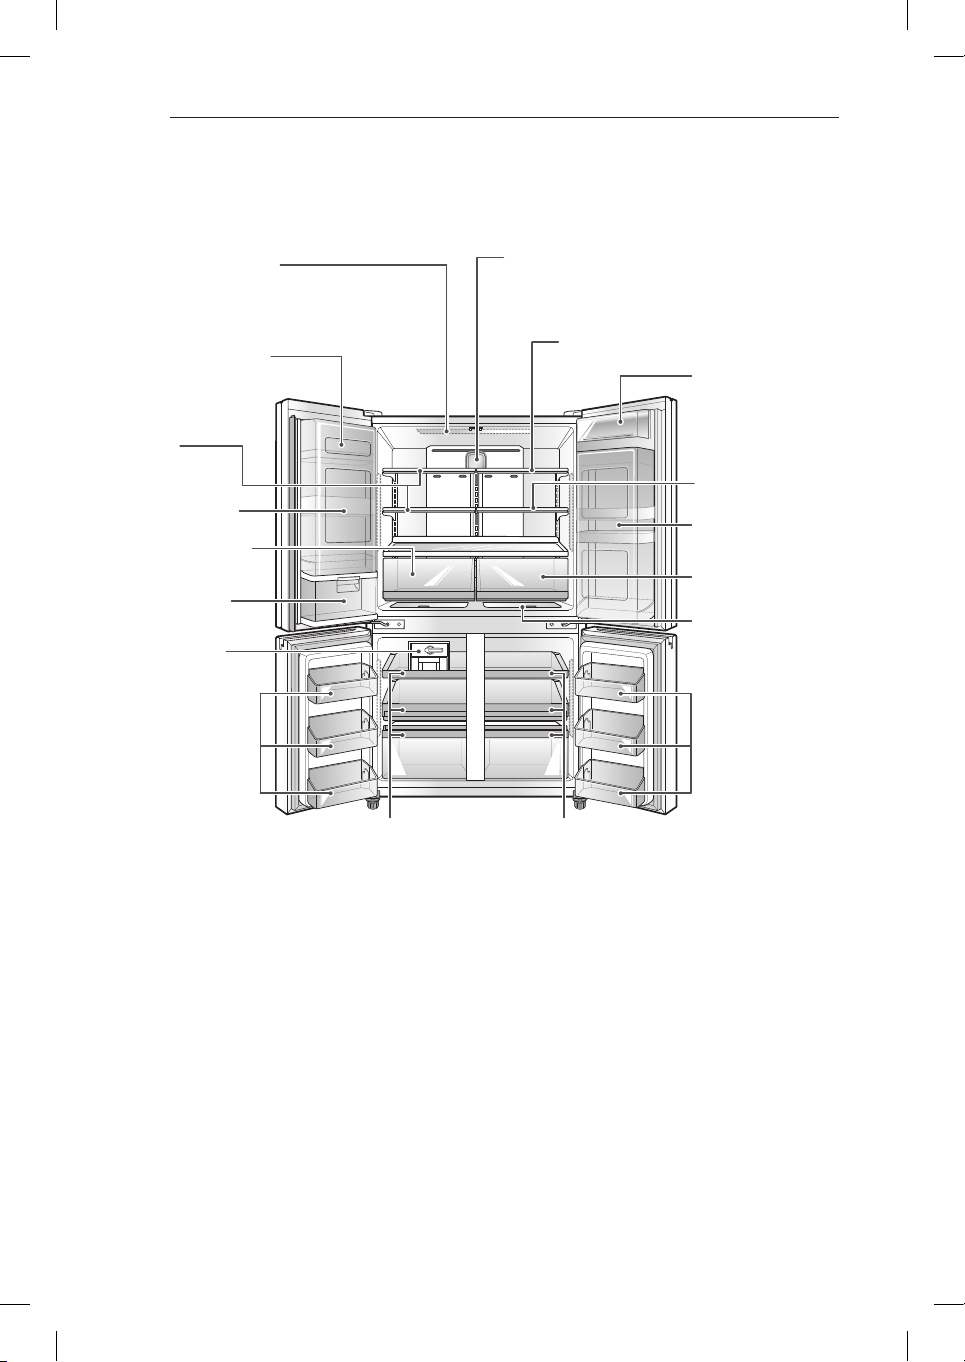
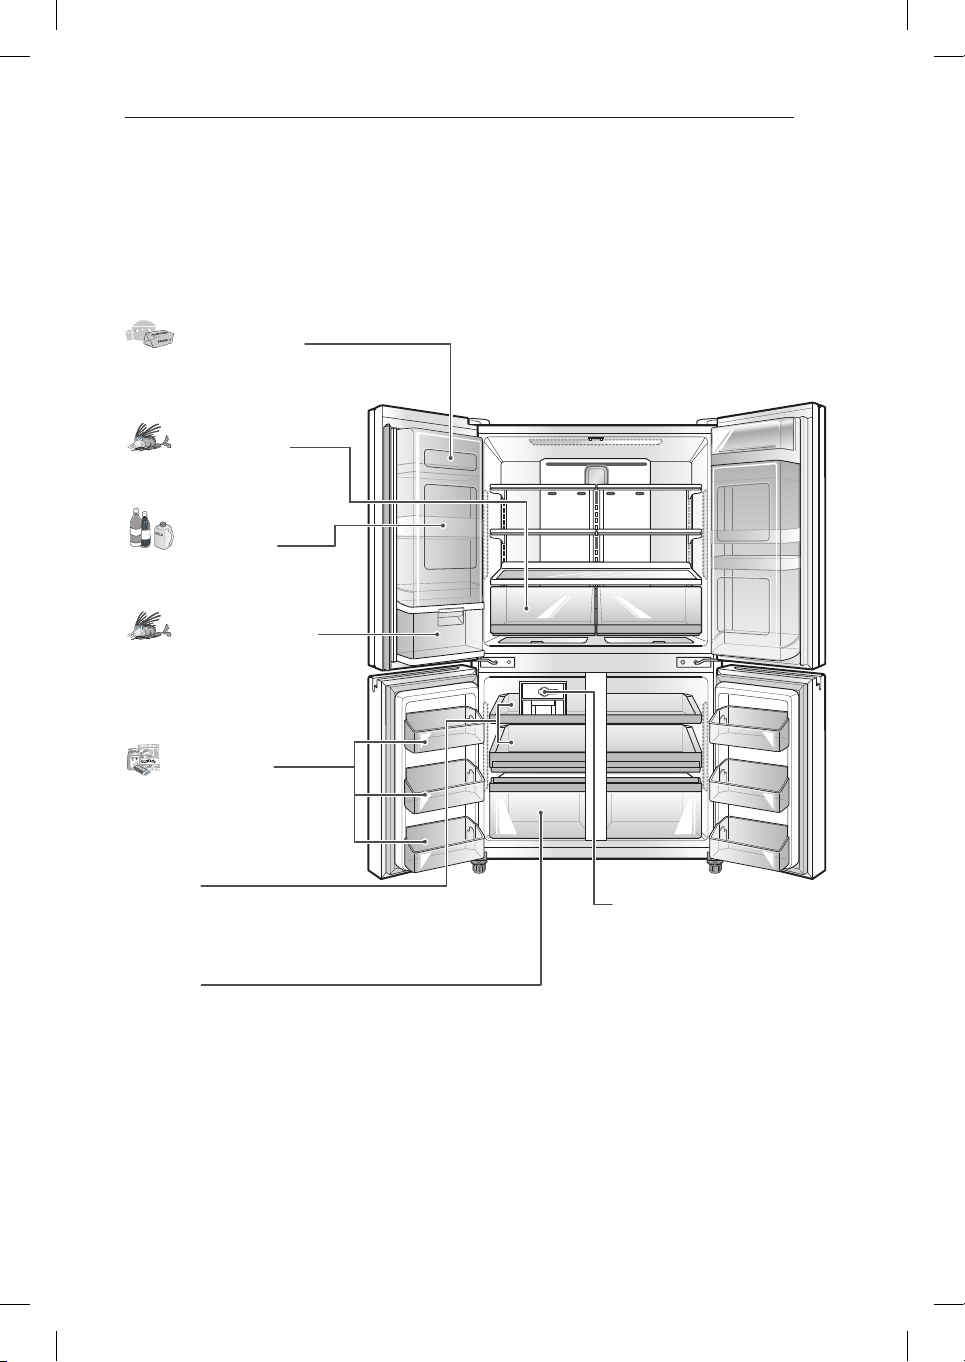
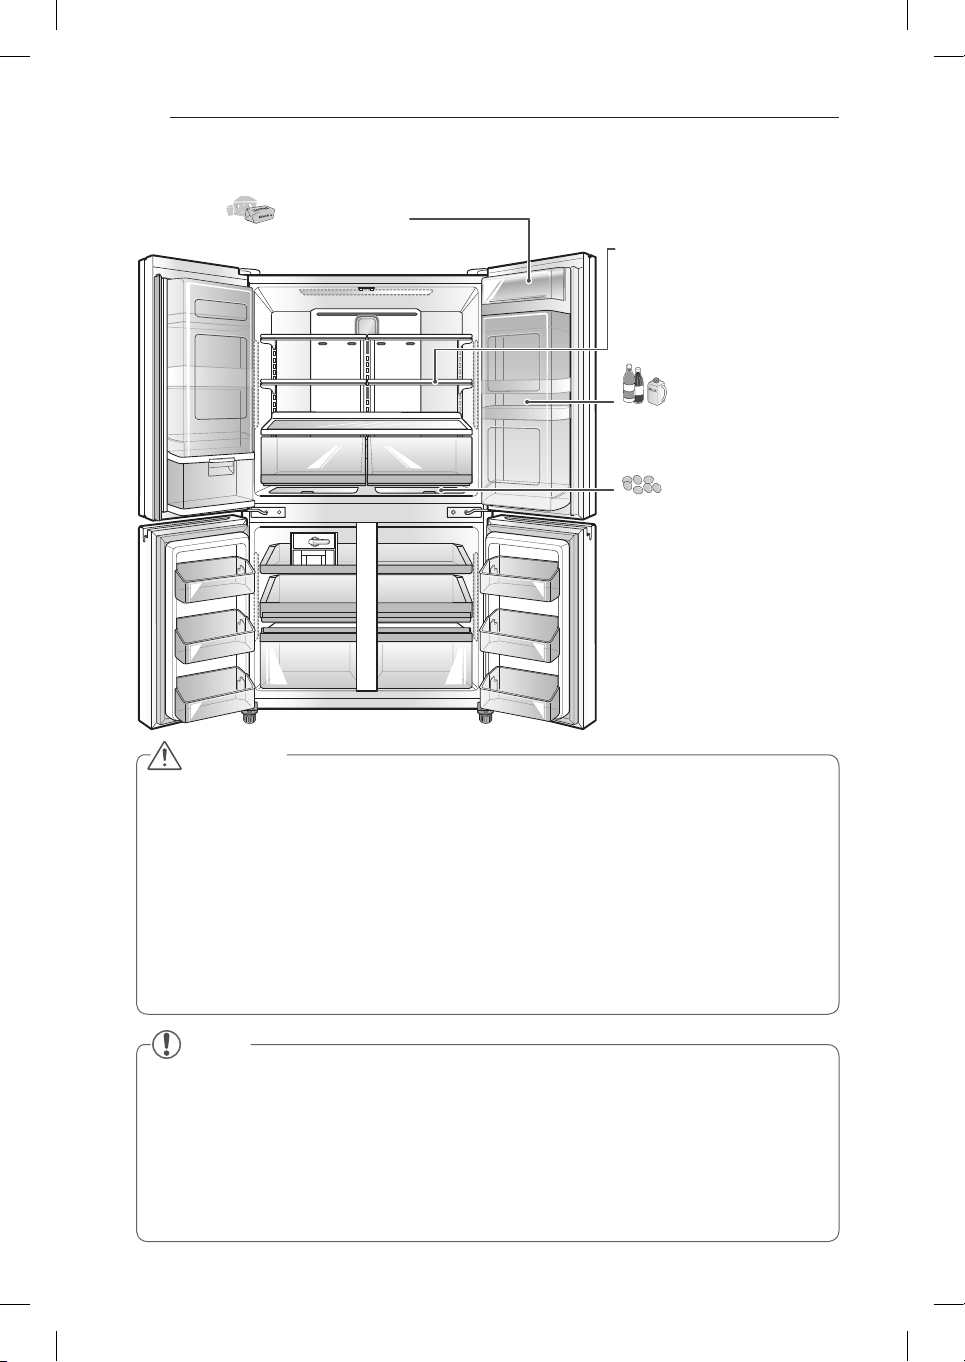
Fridge Interior (Applicable to some models only)
Dairy Product Bin
Used to preserve dairy
products.
Freezer Basket
Ice Maker
Door-In-Door
Folding Shelf
Big Fresh Zone
Freezer Basket
Extra Space
DrawerDrawer
LED interior lamps
The interior lamps light up the inside of
the fridge.
Dairy Product Bin
Used to preserve dairy
products.
Shelf
Big Fresh Zone
Door-In-Door
Tilting Fresh
Basket
Shelf
Pure N Fresh Filter
9
INSTALLATION
INSTALLATION
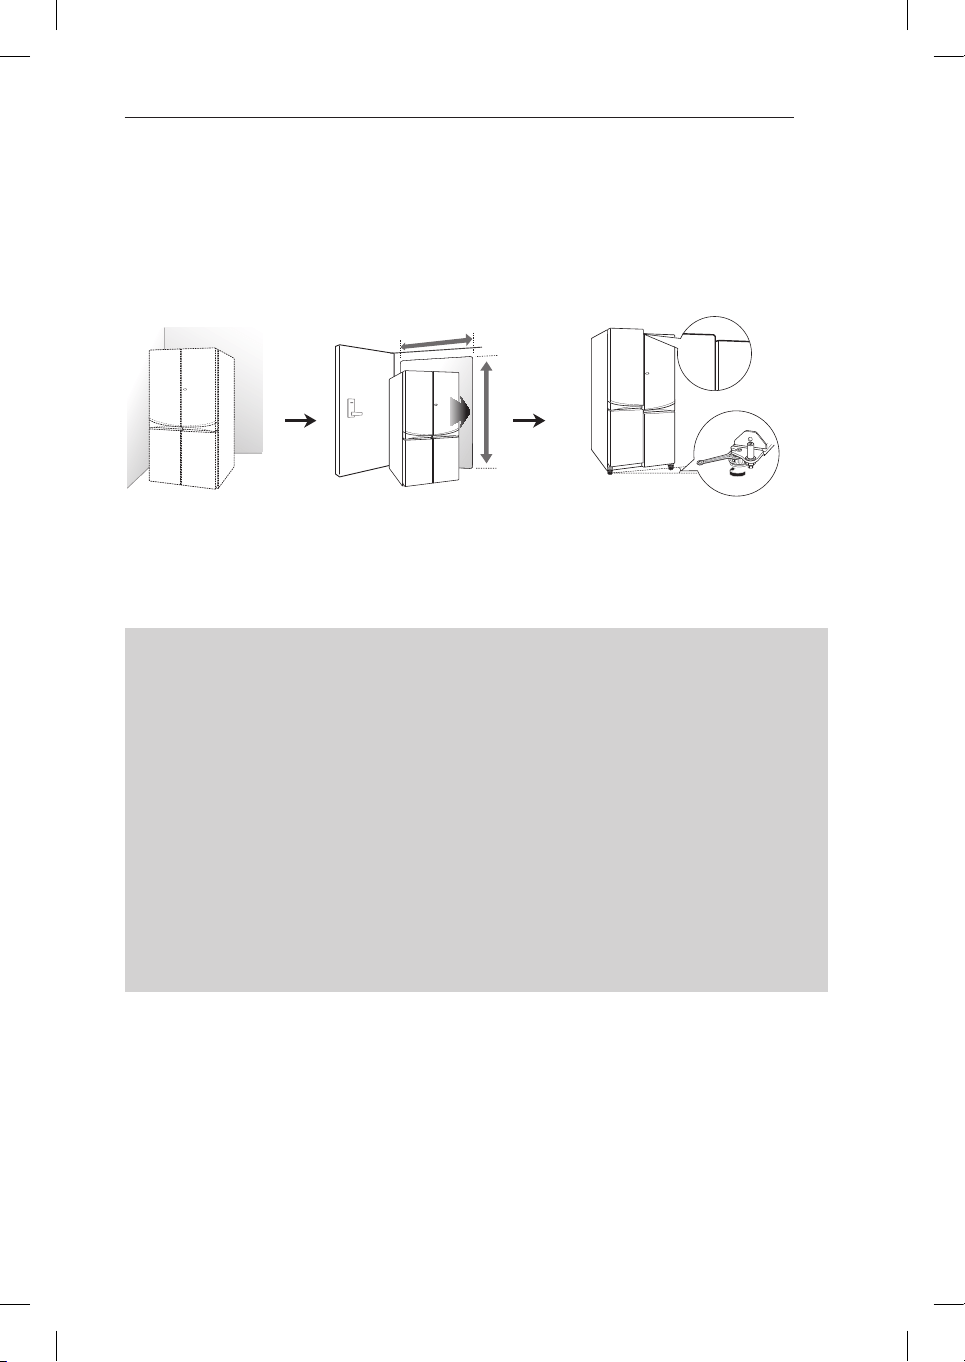
Installation Overview
Please read the following installation instructions first after purchasing this product or transporting
it to another location.
1 Unpacking your
fridge
2 Choosing the proper
location
3 Leveling and Door
Alignment
SUGGESTION FOR ENERGY SAVING
•
Please do not keep the door open for a long time, close door in the shortest time.
•
Too much food are not advised to be put in. Enough space should be kept for cool air circulating
freely.
•
Do not set the temperature of fridge lower than needed. Do not put the food near the temperature
sensor.
•
Allow hot food to cool prior to storing. Placing hot food in the fridge-freezer could spoil other food,
and lead to higher electric bills.
•
Do not block air vents with food. Smooth circulation of cold air keeps fridge-freezer temperature
even.
•
Do not open the door frequently. Opening the door lets warm air enter the fridge-freezer, and
cause temperature to rise.
•
The automatic defrosting system in the appliance ensures that the compartment remains free of
ice buildup under normal operating conditions.
10
INSTALLATION
Choosing the Proper Location
•
The fridge should always be plugged
into its own individual properly grounded
electrical outlet rated for 240 Volts, 50 Hz,
AC only, and fused at 15 or 20 amperes.
This provides the best performance and
also prevents overloading house wiring
circuits which could cause a fire hazard from
overheated wires. It is recommended that a
separate circuit serving only this appliance
be provided.
•
After installing the appliance, connect the
power plug into a socket outlet. Before
moving and discarding the appliance,
disconnect the plug from the socket outlet.
Unpacking Your Fridge
WARNING
•
Use two or more people to move and install
the fridge. Failure to do so can result in back
or other injury.
•
Your fridge is heavy. When moving the fridge
for cleaning or service, be sure to protect
the floor. Always pull the fridge straight
out when moving it. Do not wiggle or walk
the fridge when trying to move it, as floor
damage could occur. Wind the leveling feet
up first so that the unit is on its rollers.
•
Keep flammable materials and vapors, such
as gasoline, away from the fridge. Failure to
do so can result in fire, explosion, or death.
Remove tape and any temporary labels from your
fridge before using. Do not remove any warning-
type labels, the model and serial number label, or
the Tech Sheet that is located under the front of
the fridge.
To remove any remaining tape or glue, rub the
area briskly with your thumb. Tape or glue residue
can also be easily removed by rubbing a small
amount of liquid dish soap over the adhesive with
your fingers. Wipe with warm water and dry.
Do not use sharp instruments, rubbing alcohol,
flammable fluids, or abrasive cleaners to remove
tape or glue. These products can damage the
surface of your fridge.
Fridge shelves are installed in the shipping
position. Please reinstall shelves according to
your individual storage needs.
Flooring
To avoid noise and vibration, the unit must be
leveled and installed on a solidly constructed
floor. If required, adjust the leveling legs to
compensate for unevenness of the floor. The
front should be slightly higher than the rear to
aid in door closing. Leveling legs can be turned
easily by tipping the cabinet slightly. Turn the
leveling legs to the left to raise the unit or to
the right to lower it. Poorly constructed timber
flooring can cause a limit in door adjustment
and the cabinet to become out of shape. (See
Leveling and door AlIgnment.)
NOTE
Installing on carpeting, soft tile surfaces,
a platform or weakly supported structure
is not recommended.
WARNING
To reduce the risk of electric shock, do not
install the fridge in a wet or damp area.
do not install in any outdoor or sheltered
outdoor location or direct sunlight.
11
INSTALLATION
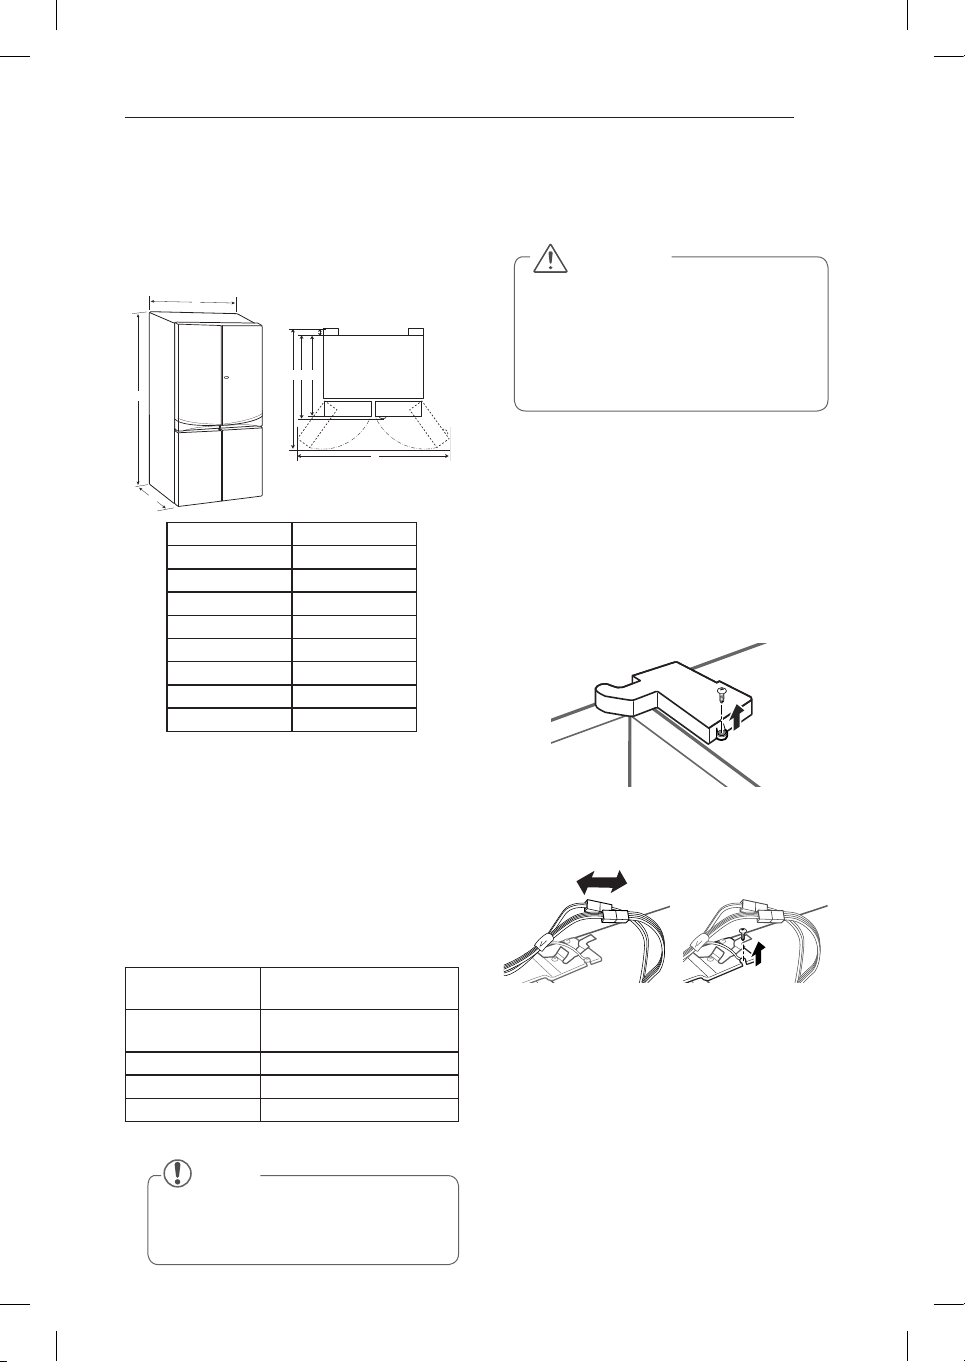
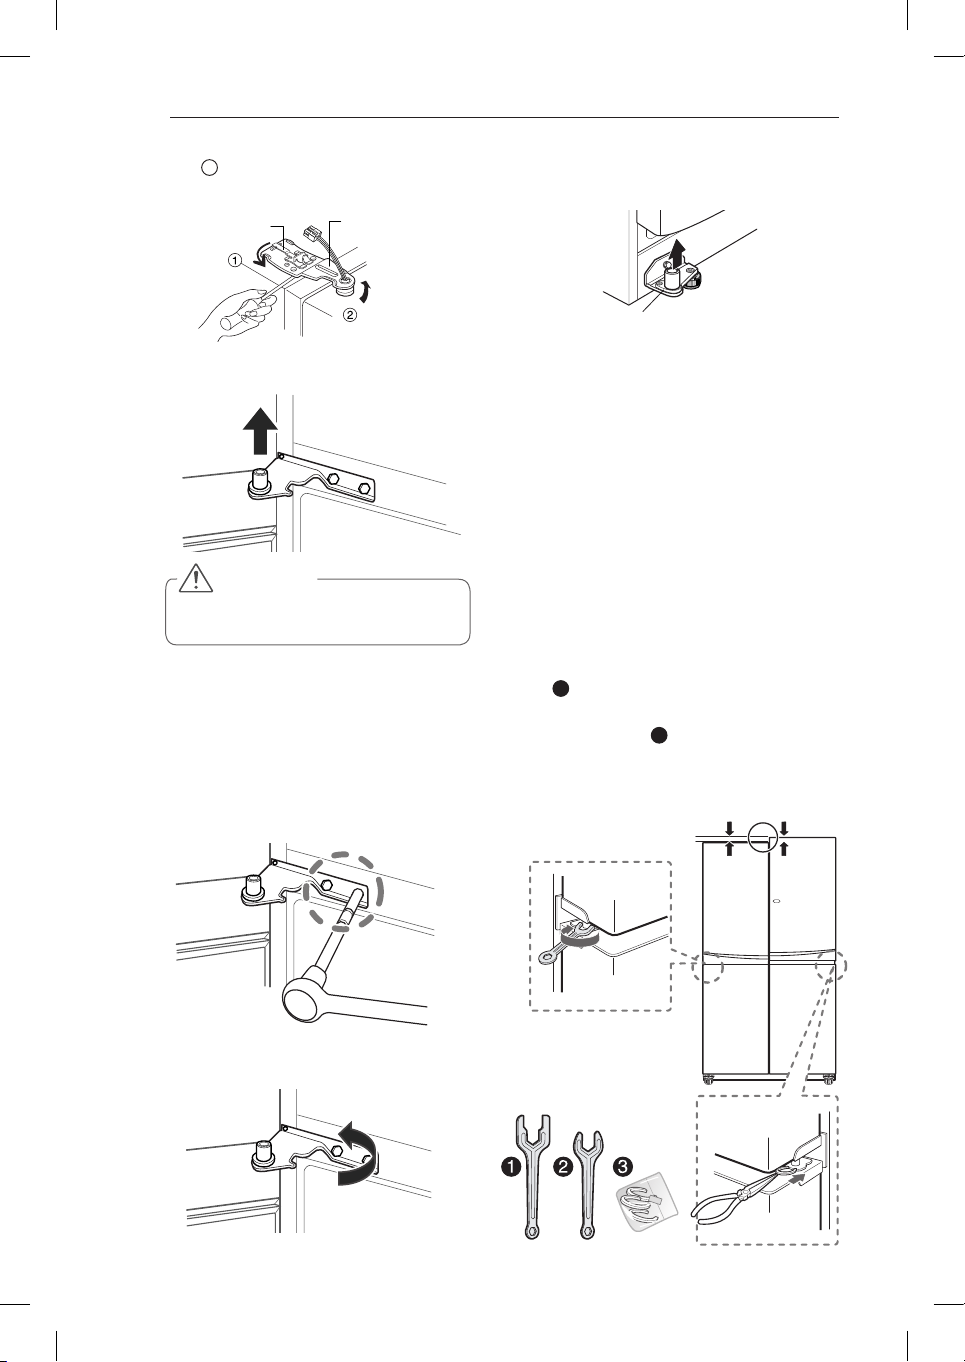
How to Remove the Fridge
Door (TURN OFF THE MAIN
POWER. Same procedure for
left and right doors)
1
Remove the fridge door hinge cover. (left
side)
2
Disassemble connection plugs and ground
wires.
Turning On The Power
Plug in the fridge.
CAUTION
•
Connect to a rated power outlet.
•
Have a certified electrician check
the wall outlet and wiring for proper
grounding.
•
Do not damage or cut off the ground
terminal of the power plug.
Dimensions and Clearances
Too small of a distance from adjacent items may
result in degradation of freezing capability and
increased electricity costs. Allow over 50mm
clearance from each adjacent wall when installing
the appliance.
A
C
E
H
FG
B
D
- Size
A 912 mm
B 1797 mm
C 758 mm
D 20 mm
E 733 mm
F 738 mm
G 996 mm
H 1637 mm
Ambient Temperature
The appliance is designed to operate within a
limited range of ambient temperatures, depending
on the climate zone. Do not use the appliance at
a temperature exceeding the limit. The internal
temperatures could be affected by the location
of the appliance, the ambient temperature, the
frequency of door opening and so on.
The climate class can be found on the rating label.
Climate Class
Ambient Temperature
Range °C
SN (Extended
Temperate)
+10 - +32
N (Temperate)
+16 - +32
ST (Subtropical)
+16 - +38
T (Tropical)
+16 - +43 / +10 - +43*
*Australia, India, Kenya
NOTE
•
The appliances rated from SN to T are
intended to be used at an ambient
temperature between 10 °C and 43 °C.
12
INSTALLATION
Height Adjustment
Leveling the doors may not be possible when
the floor is not leveled, or is of weak or poor
construction. The fridge is heavy and should
be installed on a rigid and solid surface. Some
Timber flooring may cause levelling difficulties
if it flexes excesively.
Fridge Door Height Adjustment
•
If the left door is lower, lift the door and screw
a door hinge bolt using a spanner as illustrated
in the figure.
•
Use
1
spanner in fridge.
•
If the right door is lower, lift the right door and
insert an additional
3
snap ring using a long
nose plier until both doors are level.
3
Remove the door by raising it from the
lower hinge.
How to Remove the Freezer
Door (TURN OFF THE MAIN
POWER. Same procedure for
left and right doors)
1
Remove the inner hinge bolt.
2
Twist the hinge to raise the pivoting end
so that the door can be lifted off.
3
Turn
1
around to release lock and raise
hinge up.
4
Disassemble Door, raising it from Hinge
Center.
Upper hinge
Keeper
CAUTION
Remove it after you open Door to 90
degrees.
Lower hinge
Fridge door
Height difference
Freezer door
Fridge door
Freezer door
13
INSTALLATION
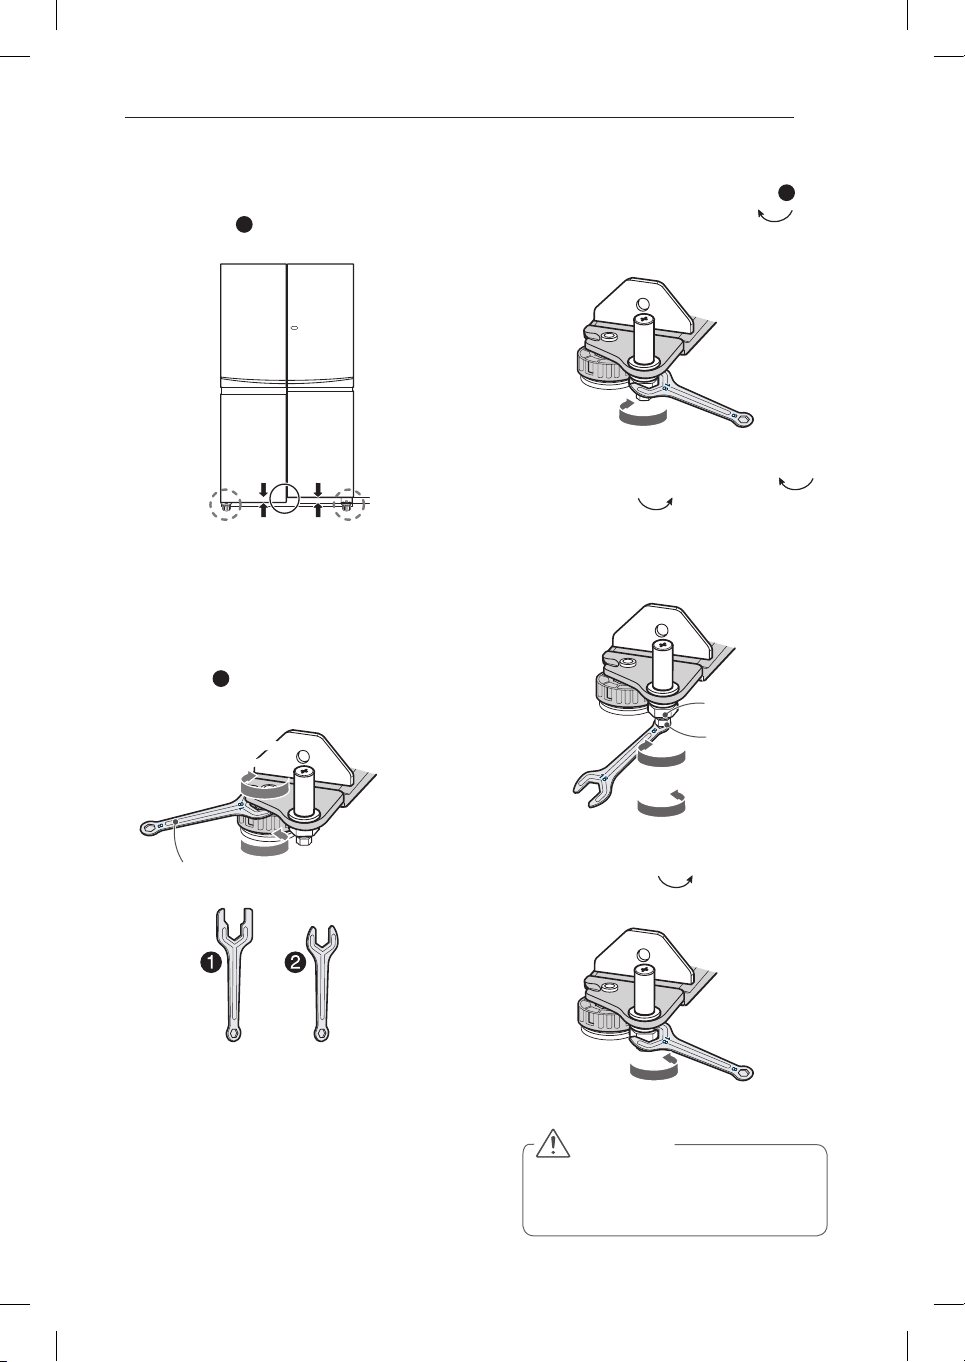
When the Freezer Door is Lower
•
Method 1 is recommended.
•
Use spanner
2
for freezer door adjustment.
1
(Method 1 recommended.)
Open the door and adjust the level by
using the nut on the adjustable round foot
of the lower side first by using the supplied
number
2
spanner as per the below
diagram.
2
(
Method 2)
(1) Using the large side of the number
2
spanner, rotate the locking nut (
)
clockwise to unlock it before adjusting the
Adjust-Hinge pin.
(2) Rotate the Adjust-hinge pin either (
)
clockwise or ( ) counter-clockwise
using the narrow side of the spanner
spanner to adjust the level difference
between the fridge door and freezer door
(this method provides limited adjustment).
(3) After adjusting door height, firmly tighten
the Locking nut (
) counter-clockwise
until secured.
CAUTION
Do not adjust the hinge pin height level
too much. The hinge pin can fall out.
(Range of height adjustment : Max. 3mm)
Height difference
Spanner
Release Locking
Nut
Adjust Hinge Pin
Lower Door Down
Raising Door Up
Nut Releasing
Nut Tightening
Lower Door
Down
Raising
Door Up
Raising
Door Up
14
HOW TO USE
HOW TO USE
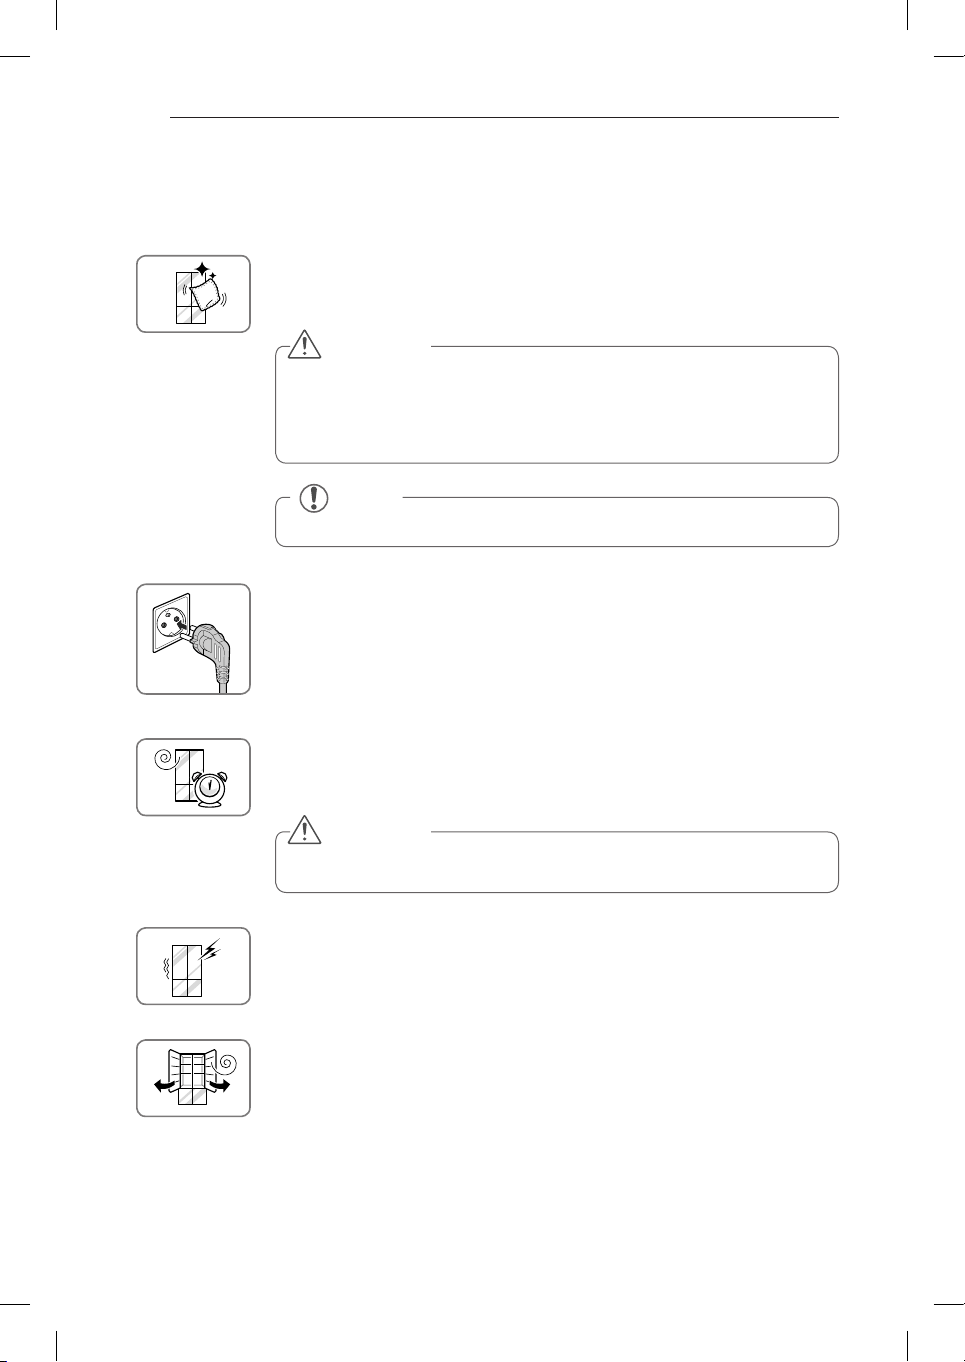
Before use
Clean the fridge.
Clean your fridge thoroughly and wipe off all dust that may have accumulated
during shipping.
NOTE
Remove adhesive residue by wiping it off with your thumb or dishwashing detergent.
CAUTION
•
Do not scratch the fridge with a sharp object or use a detergent that
contains alcohol, a flammable liquid or an abrasive when removing any tape
or adhesive from the fridge,.
•
Do not peel off the model or serial number label or the technical information
on the rear surface of the fridge.
Connect the power supply.
Check if the power supply is connected before use.
Read the “Turning On The Power” section. (Your plug type might be different from
the picture.)
CAUTION
Putting food in the fridge before it has cooled could cause the food to
spoil, or a bad odor could remain inside the fridge.
Wait for the fridge to cool.
Allow your fridge to run for at least three to four hours before putting food in it.
Check the flow of cold air in the freezer compartment to ensure proper cooling.
The fridge makes a loud noise after initial operation.
This is normal. The loudness will decrease as the temperature lowers.
Before Plugging in, open the fridge doors to ventilate the interior.
The inside of the fridge may smell like plastic at first. Remove any adhesive tape
from inside the fridge and open the fridge doors for ventilation until any odors have
subsided.
15
HOW TO USE
NOTE
The displayed temperature is the target
temperature, and not the actual temperature
of the refrigerator. The actual refrigerator
temperature depends on the food inside the
refrigerator as well as ambient temperatures and
how often the doors are opened and closed.
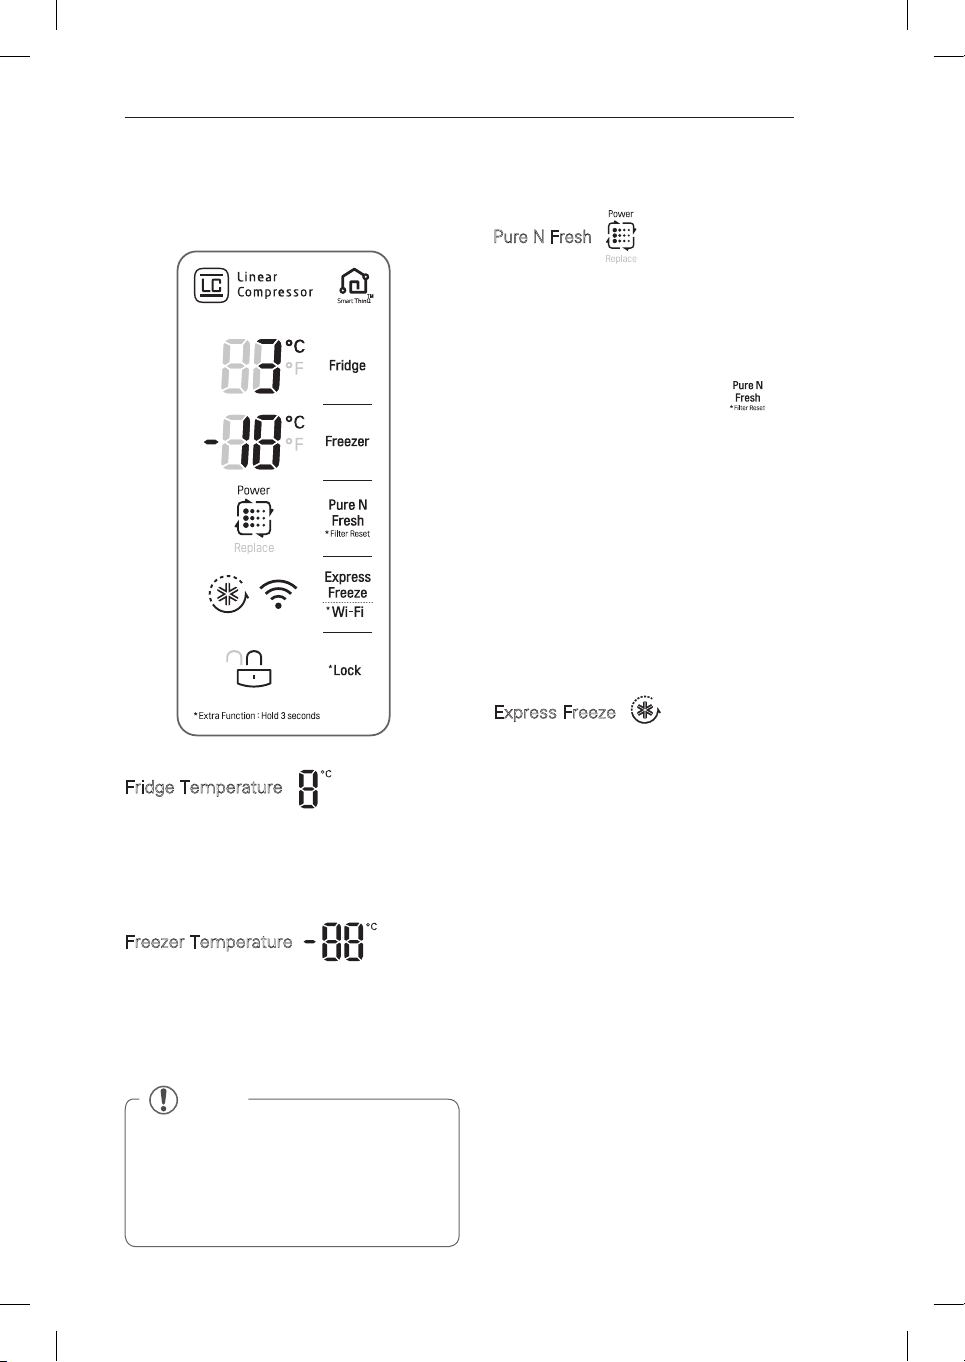
Control Panel (Applicable to some models only)
Control Panel Features
Fridge Temperature
Indicates the set target temperature of the
refrigerator compartment in Celsius (°C).
The recommended Fridge set temperature in
normal ambient conditions and loads is 3°C ~ 4°C.
Freezer Temperature
Indicates the set target temperature of the
freezer compartment in Celsius (°C).
The recommended Freezer set temperature
in normal ambient conditions and loads is
-17°C ~ -19 °C.
Express Freeze
This function increases both ice making and
freezing capabilities.
•
When you touch the
Express Freeze
button,
the graphic will illuminate in the display and
will continue for 3 hours. The function will
automatically disable itself after 3 hours.
•
You can stop this function manually by
touching the button one more time.
Pure N Fresh
When the Replace lamp is on, replace the Pure N
Fresh filter.
•
When the “Replace” lamp is turned on,
replace the filter to maintain the performance
of the Pure N Fresh Filter function.
•
To replace the filter, press the
button
on the touch control panel to the OFF mode
so that the filter icon is not illuminated and
the blue Pure N Fresh LED inside the fridge
remains off. The Pure N Fresh function
has three modes, Auto(when icon is lit
up), Power(when icon and Power are lit
up) and Off(when icon is not lit up). Power
mode can be engaged by pressing the
Pure N Fresh touch control respectively.
Auto>Power>Off>Auto….
Power mode will resume back to Auto mode
after 4 hours.
16
HOW TO USE
Control Panel Features (continued)
Wi-Fi
The
Wi-Fi
button, when used with the LG Smart
ThinQ application, allows the refrigerator to
connect to a home Wi-Fi network.
The
Wi-Fi
icon shows the status of the
refrigerator’s network connection. The icon
illuminates when the refrigerator is connected to
the Wi-Fi network.
Press and hold the
Wi-Fi
button for 3 seconds to
connect to the network. The icon blinks while the
connection is being made, then turns on once the
connection is successfully made.
Control Lock
The Control Lock function disables the button
functions only on the display.
•
When power is initially connected to the
refrigerator, the
Lock
function is off.
•
If you want to activate the
Lock
function to
lock other buttons, press and hold the
Lock
button for 3 seconds or more. The
Lock
icon
will display and the
Lock
function is now
enabled.
•
To disable the
Lock
function, press and hold
the
Lock
button for approximately
3 seconds.
17
HOW TO USE
Storing Food
Food Preservation Location (Applicable to some models only)
Each compartment inside the fridge is designed to store different types of food.
Store your food in the optimal space to enjoy the freshest taste.
Freezer Basket
Preserve small packaged frozen
food or frequently-taken out foods.
Ice Maker
If necessary, preserve ices made in
icemaker.
Drawer (1)
Preserve small packaged frozen
food or frequently-taken out foods.
Drawer(2)
Preserve frozen food to keep it long.
Tilting Fresh Basket
Preserve short term ready to eat
vegetables.
Door-In-Door
Preserve frequently-taken out foods
such as beverages, snacks, etc.
Big Fresh Zone
Preserve vegetables and fruits.
Dairy Product Bin
Store diary foods such as butter,
cheese, etc.
18
HOW TO USE
Food Preservation Location (Applicable to some models only) (continued)
CAUTION
•
Do not store food with high moisture content towards the top of the fridge. The moisture could
come in direct contact with the cold air and freeze.
•
Wash food before storing it in the fridge. Vegetables and fruit should be washed, and food
packaging should be wiped down to prevent adjacent foods from being contaminated.
•
If the fridge is kept in a hot and humid place, frequent opening of the door or storing a lot of
vegetables in the fridge may cause condensation to form. Wipe off the condensation with a clean
cloth or a paper towel.
•
If the fridge doors are opened or closed too often, warm air may penetrate the fridge and raise its
temperature. It can also increase the fridge’s electricity usage.
•
If there are chill compartments in the appliance, do not store vegetables and fruits with higher
moisture content in the chill compartments as they may freeze due to the lower temperature.
NOTE
•
If you are leaving home for a short period of time, like a short vacation, the fridge should be left
on. Refrigerated foods that are able to be frozen will stay preserved longer if stored in the freezer.
•
If you are leaving the appliance turned off for an extended period of time, remove all food and
unplug the power cord. Clean the interior, and leave the doors slightly ajar to prevent mold from
growing in the appliance.
•
In the event of a blackout, call the electricity company and ask how long it is going to last.
− You should avoid door openings while the power is off.
− When the power supply gets back to normal, check the condition of the food.
Dairy Product Bin
Store diary foods such as butter, cheese, etc.
Extra Space
Preserve small foods such as eggs,
ham, etc.
Door-In-Door
Preserve frequently-taken out foods
such as beverages, snacks, etc.
Folding Shelf
Fold a shelf to store large-sized
container or food.
19
HOW TO USE
Food Storage Tips
* The following tips may not be applicable
depending on the model.
Wrap or store food in the fridge in airtight and
moisture-proof material unless otherwise noted.
This prevents food odor and taste transfer
throughout the fridge. For dated products, check
use by dates to ensure freshness.
Food How to
Butter or
Margarine
Keep opened butter in a covered
dish or closed compartment.
When storing an extra supply,
wrap in freezer packaging and
freeze.
Cheese
Store in the original wrapping
until you are ready to use it.
Once opened, rewrap tightly in
plastic wrap or aluminum foil.
Milk Wipe milk cartons. For best
storage, place milk on interior
shelf, not on door shelf.
Eggs Store in original carton on
interior shelf, not on door shelf.
Fruit Do not wash or prepare fruit
until it is ready to be used. Sort
and keep fruit in its original
container, in a crisper, or store
in a completely closed paper
bag on a fridge shelf.
Leafy
Vegetables
Remove store wrapping and
trim or tear off bruised and
discolored areas. Wash in cold
water and drain. Place in plastic
bag or plastic container and
store in crisper.
Vegetables
with skins
(carrots,
peppers)
Place in plastic bags or plastic
container and store in crisper.
Fish Store fresh fish and shellfish
in the freezer section if they
are not being consumed the
same day of purchase. It is
recommended to consume
fresh fish and shellfish the
same day purchased.
Leftovers
Cover leftovers with plastic
wrap, aluminum foil, or plastic
containers with tight lids.
Storing Frozen Food
Freezing
Your freezer will not quick-freeze a large
quantity of food. Do not put more unfrozen
food into the freezer than will freeze within 24
hours (no more than 1 to 1.5kg. of food per
cubic foot of freezer space). Leave enough
space in the freezer for air to circulate around
packages. Be careful to leave enough room at
the front so the door can close tightly.
Storage times will vary according to the quality
and type of food, the type of packaging or wrap
used (how airtight and moisture-proof) and
the storage temperature. Ice crystals inside a
sealed package are normal. This simply means
that moisture in the food and air inside the
package have condensed, creating ice crystals.
NOTE
Check a freezer food guide or a reliable
cookbook for further information about preparing
food for freezing or food storage times.
NOTE
Allow hot foods to cool at room temperature
for 30 minutes, then package and freeze.
Cooling hot foods before freezing saves
energy.
NOTE
Never freeze beverage cans or bottles of any
kind as they can explode or shatter.
20
HOW TO USE
Storing Frozen Food (continued)
Packaging
Successful freezing depends on correct
packaging. When you close and seal the
package, it must not allow air or moisture in or
out. If it does, you could have food odor and
taste transfer throughout the fridge and could
also dry out frozen food.
Packaging recommendations:
•
Rigid plastic containers with tight-fitting
lids
•
Straight-sided canning/freezing jars
•
Heavy-duty aluminum foil
•
Plastic-coated paper
•
Non-permeable plastic wraps
•
Specified freezer-grade self-sealing plastic
bags
Follow package or container instructions for
proper freezing methods.
Do not use
•
Bread wrappers
•
Non-polyethylene plastic containers
•
Containers without tight lids
•
Wax paper or wax-coated freezer wrap
•
Thin, semi-permeable wrap
Adjusting the Fridge Shelves
The shelves in your fridge are adjustable to
meet your individual storage needs. Your
model may have either glass or wire shelves.
Adjusting the shelves to fit different heights
of items will make finding the exact item you
want easier. Doing so will also reduce the
amount of time the fridge door is open which
will save energy.
Detaching the Shelf
Tilt up the front of the shelf and lift it straight
up. Pull the shelf out.
Refitting the Shelf
Tilt the front of the shelf up and guide the
shelf hooks into the slots at the desired height.
Then, lower the front of the shelf so that the
hooks drop into the slots.
CAUTION
Make sure that shelves are level from
one side to the other. Failure to do so
may result in the shelf falling or spilling
food.
21
HOW TO USE
Using the Folding Shelf
You can store taller items, such as containers
or bottles, by simply pushing the front half of
the shelf underneath the back half of the shelf.
Pull the front of the shelf firmly toward you to
return to a full shelf.
When Closing the Door
CAUTION
•
Do not clean glass shelves with
warm water while they are cold.
Shelves may break if exposed to
sudden temperature changes or
impact.
•
Glass shelves are heavy. Use special
care when removing them.
CAUTION
•
To reduce the risk of door scratches
and breaking the door centre mullion,
please make sure that the fridge door
mullion is always folded in.
•
The door Alarm will sound if the door
remains open after 1 minute. Ensure
that the folding mullion is folded in
before closing the left hand door.
22
HOW TO USE
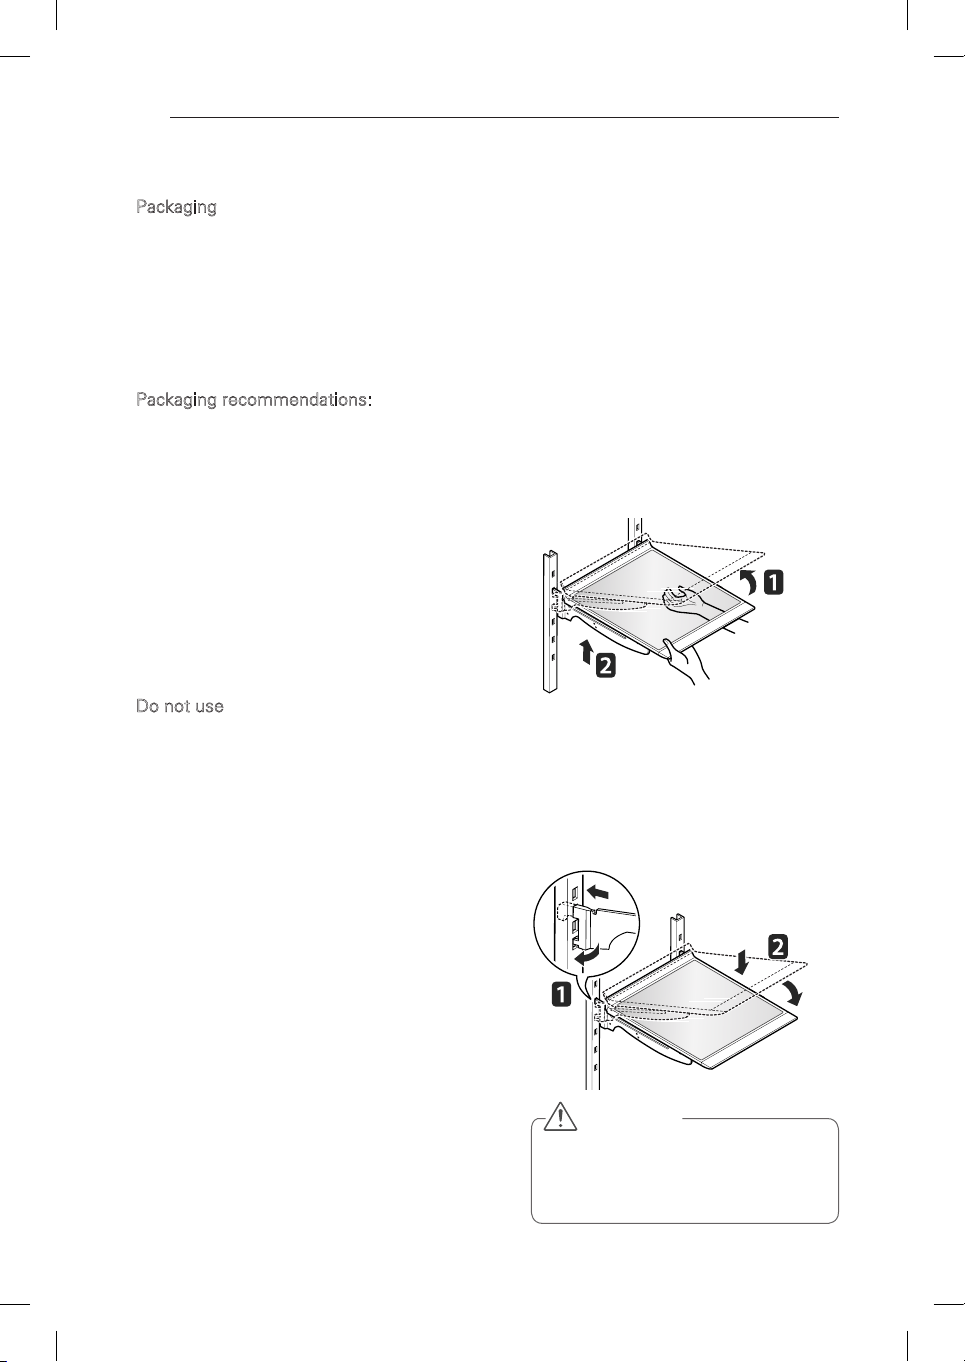
CAUTION
•
Always empty the draws before
removing them and use both hands
when removing and refitting.
•
Make sure that the fridge doors
are fully open before removing and
refitting the drawers.
Big Fresh Zone
Removal of the Big Fresh Zone drawer.
1
Pull the drawer back to the end of its
travel.
2
Lift the front of the draw up and remove it
from its guide.
Refitting the Big Fresh Zone drawer
1
Insert the left and right roller of the drawer
into the guides whilst the draw is slightly
lifted at the front. and push it in gently
while lowering it at the same time.
2
Push it in gently while lowering it at the
same time.
23
HOW TO USE
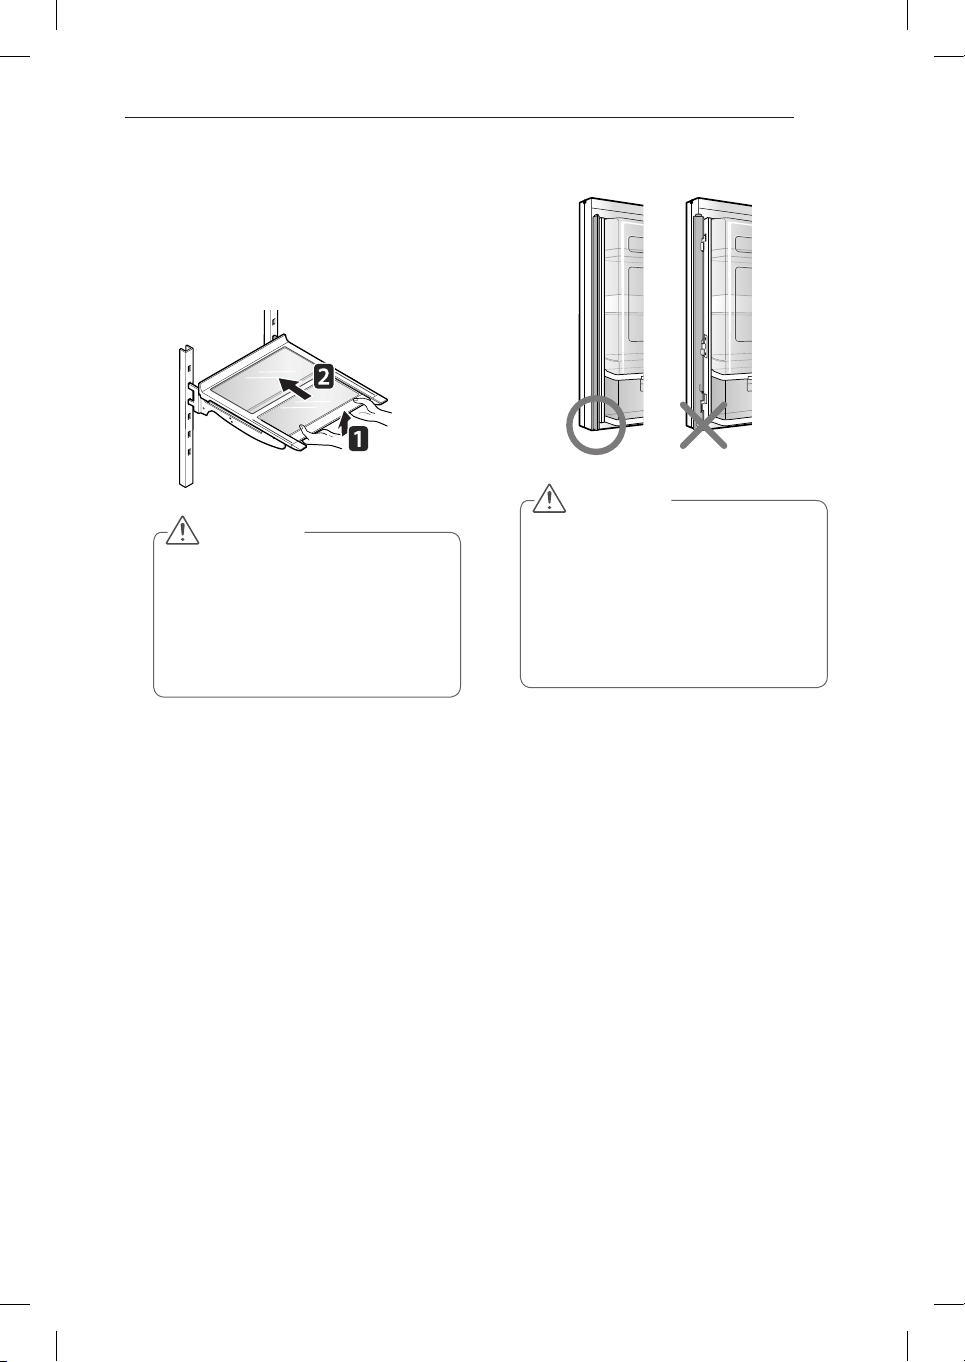
CAUTION
•
Make sure to disassemble with
both hands. Heavy food in storage
may cause injury.
•
When you disassemble or assemble
the vegetable box, make sure
to widely open the refrigeration
chamber door.
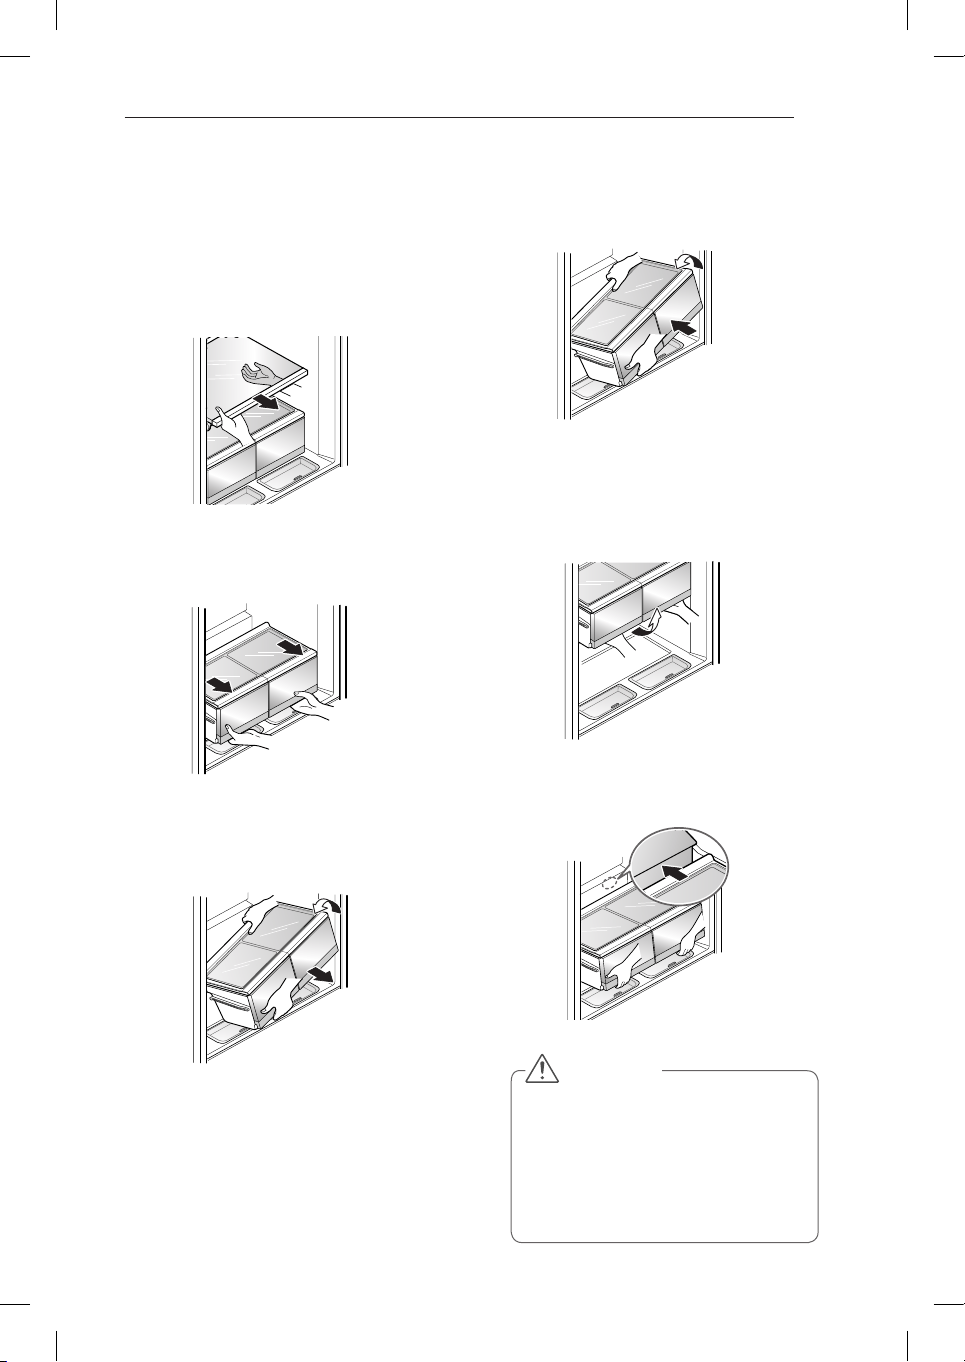
How to disassemble and
assemble the vegetable box
How to disassemble vegetable box
1
While the refrigeration chamber door is
wide open, take out all the shelves from
the refrigeration chamber.
2
Lift the vegetable box with both hands and
make space in the back by pulling it toward
you.
3
Grab the back side with one hand to lift the
vegetable box, and at this time, take it out
as tilted.
How to assemble vegetable box
1
Lift the vegetable box askew and push into
the refrigeration chamber.
2
Lift the vegetable box horizontally with the
height as high as the vegetable box in the
refrigeration chamber and put it down on
the floor. (It is to avoid contact with the
side of the refrigeration chamber.)
3
If there is a gap in the back side as in the
drawing, slightly lift the vegetable box and
push.
24
HOW TO USE
CAUTION
•
Be careful when handling and storing
larger eggs. They can be broken if the
cover is not completely closed and
the drawer is pushed in.
•
Observe the above diagrams when
removing and refitting the Multi-
Collection corner after cleaning.
•
Store all moist and easily-freezing
foods like soy bean curd, sesame leaf,
etc. on the front of the shelves.
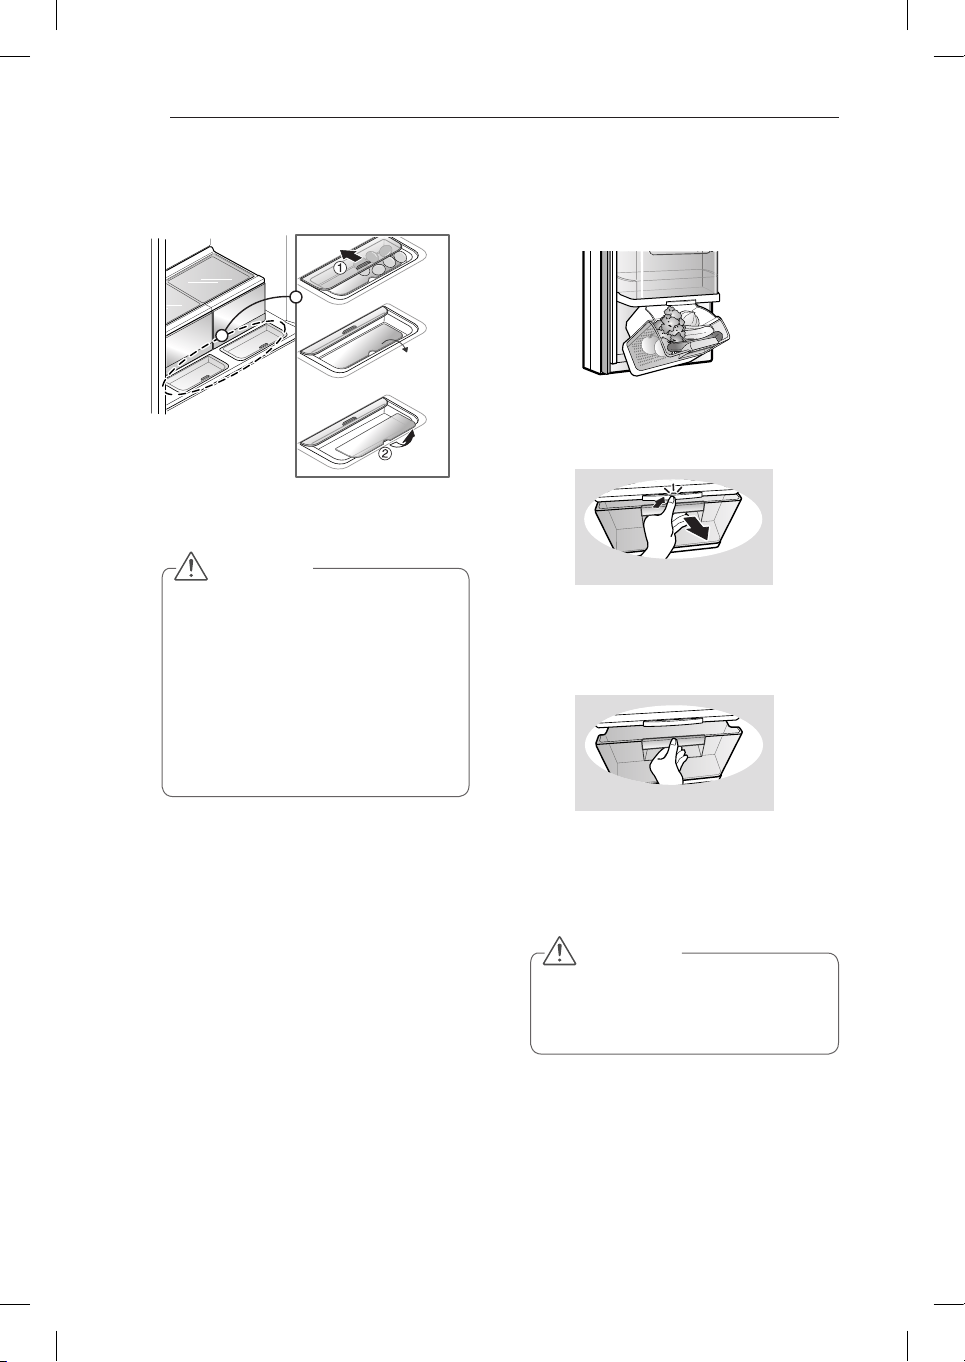
Extra Space
Store small foods like eggs, ham, cheese, etc.
•
Open and close pushing or pulling grips.
Multi-collection
corner supporter
CAUTION
•
Do not allow children to hang from
the basket when it is open or closed.
This will damage the basket and
could cause injury.
Tilting Fresh Basket
Ideal for storing vegetables soon to be eaten.
To open, lift the latch and gently pull the
basket back.
To close, push the basket in until a “click”
sound is heard.
•
To avoid damaging the drawer, do not
overload it or apply excessive force when
opening or closing.
< OPEN >
< CLOSE >
25
HOW TO USE
NOTE
The Cheese & Butter and Condiment
bins are not recommended for storing
items that spoil easily such as milk and
mayonnaise.
Door-In-Door (Applicable to
some models only)
The Door-In-Door compartment allows for easy
access of commonly used food items.
The inner Door-In-Door includes two door bins,
Cheese & Butter and Condiment bins, that
are specially designed for food that can be
stored at a warmer temperature. This makes
spreading butter and slicing cheese easier.
Press the the door button on the Home Bar
until you hear a click sound.
•
You can store more food in the larger Home
Bar.
•
With the larger storage room, you can
organize your foods better.
Press until
you hear
the “Click”
sound
When you turn the lever below the left door
upward, the door opens along with ‘click’ sound.
Door-In-Door (Left)
Door-In-Door (Right)
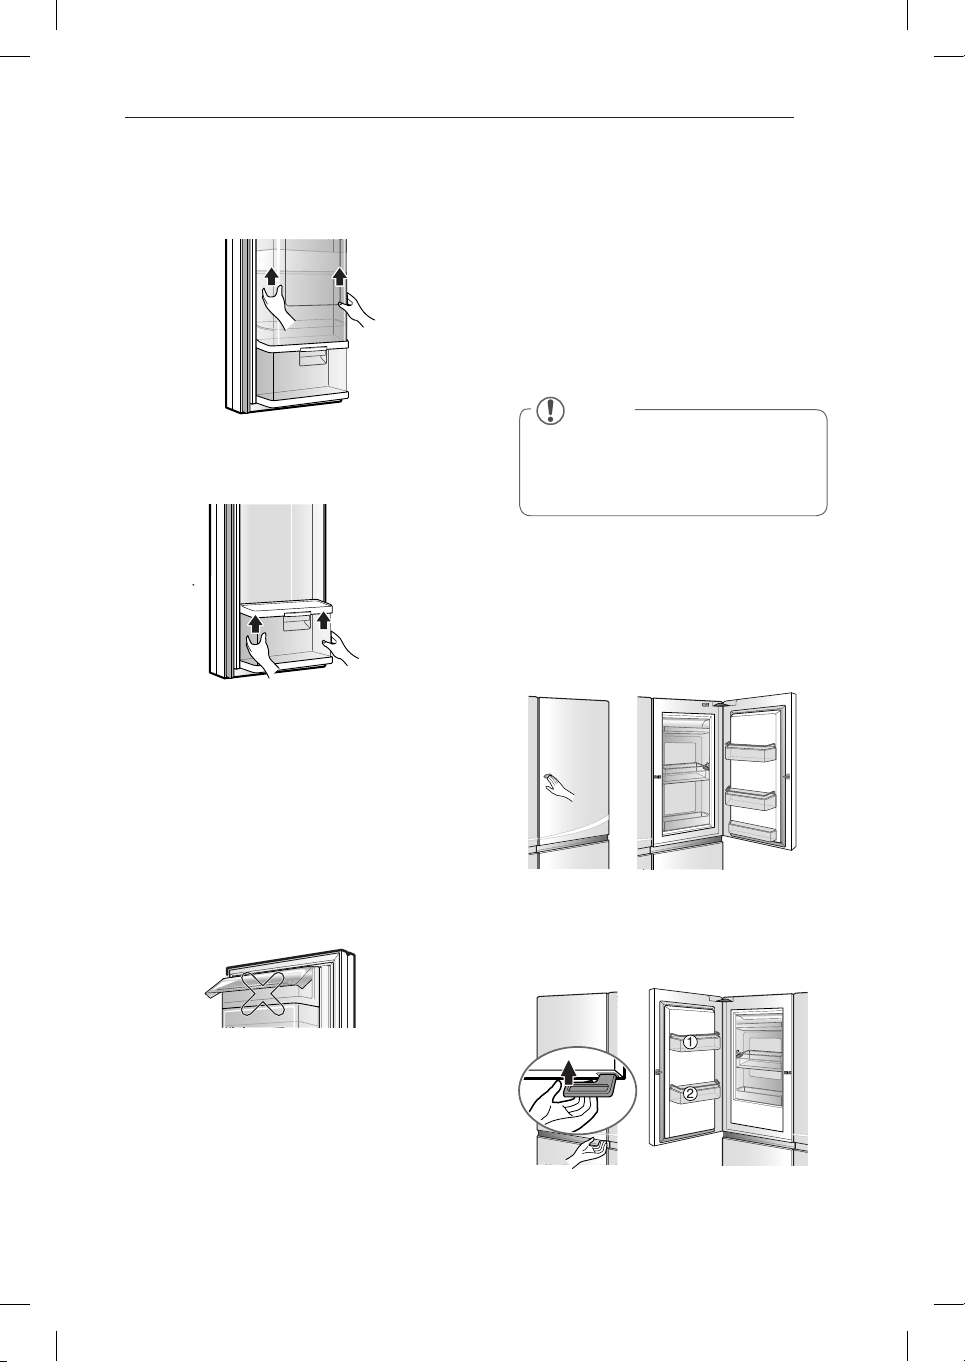
Tilting Fresh Basket Disassembly
1
Raise magicspace cover up and take it out.
2
Hold both ends of the tiling fresh basket and
lift up the front part of the tilting fresh basket.
Dairy Corner
You can store dairy products such as butter,
cheese etc.
If you close the fridge door with the dairy
corner left open, the fridge door may not close
properly. It could also result in damage to the
lid.

26
HOW TO USE
4
Remove screws on both sides of magic
space cover.
5
Hold the bottom of lower basket and raise
it up to take it out.
2
Hold the bottom of daily basket and raise it
up to take it out.
3
Move floating basket to the top
compartment from magic space cover
from which daily corner is removed.
Door-In-Door Shelf Disassembly
(Applicable to some models only)
1
Raise magicspace cover up and take it out.
Hold both ends of the basket and lift up the
front part of the basket.
•
Assemble in the same method as
disassembly.
Left : two separate
units type
Right : single unit
type

27
HOW TO USE
1
3
2
1
3
2
1
3
2
1
3
2
1
3
2
1
3
2
Adjustable Moving Basket
It can be moved up and down as necessary, and
used conveniently.
•
To move Adjustable Moving Basket up or
down, remove all items from the basket first.
•
Hold the center of basket gently with upward
pressure
•
Press the levers on both sides at the bottom of
the lower section upward, and then move it up
or down.
•
Adjusting the Moving Door Basket allows taller
food items to be stored more conveniently.
CAUTION
•
Remove all food items from basket before
moving it up or down. Not doing so could
cause damage to the basket or food items.
Ice Maker
•
To make ice cubes, fill the ice tray with
water and insert in its position.
•
To remove ice cubes, hold the lever of the
tray and pull turn gently. Then, ice cubes
drop in to the ice cube box.
NOTE
You can disassemble the Ice Maker to
secure space in the freezer.
WARNING
•
Do not use anything other than water.
•
Fill the water up to the marked line.
Ice Trays
Ice Cube Box
28
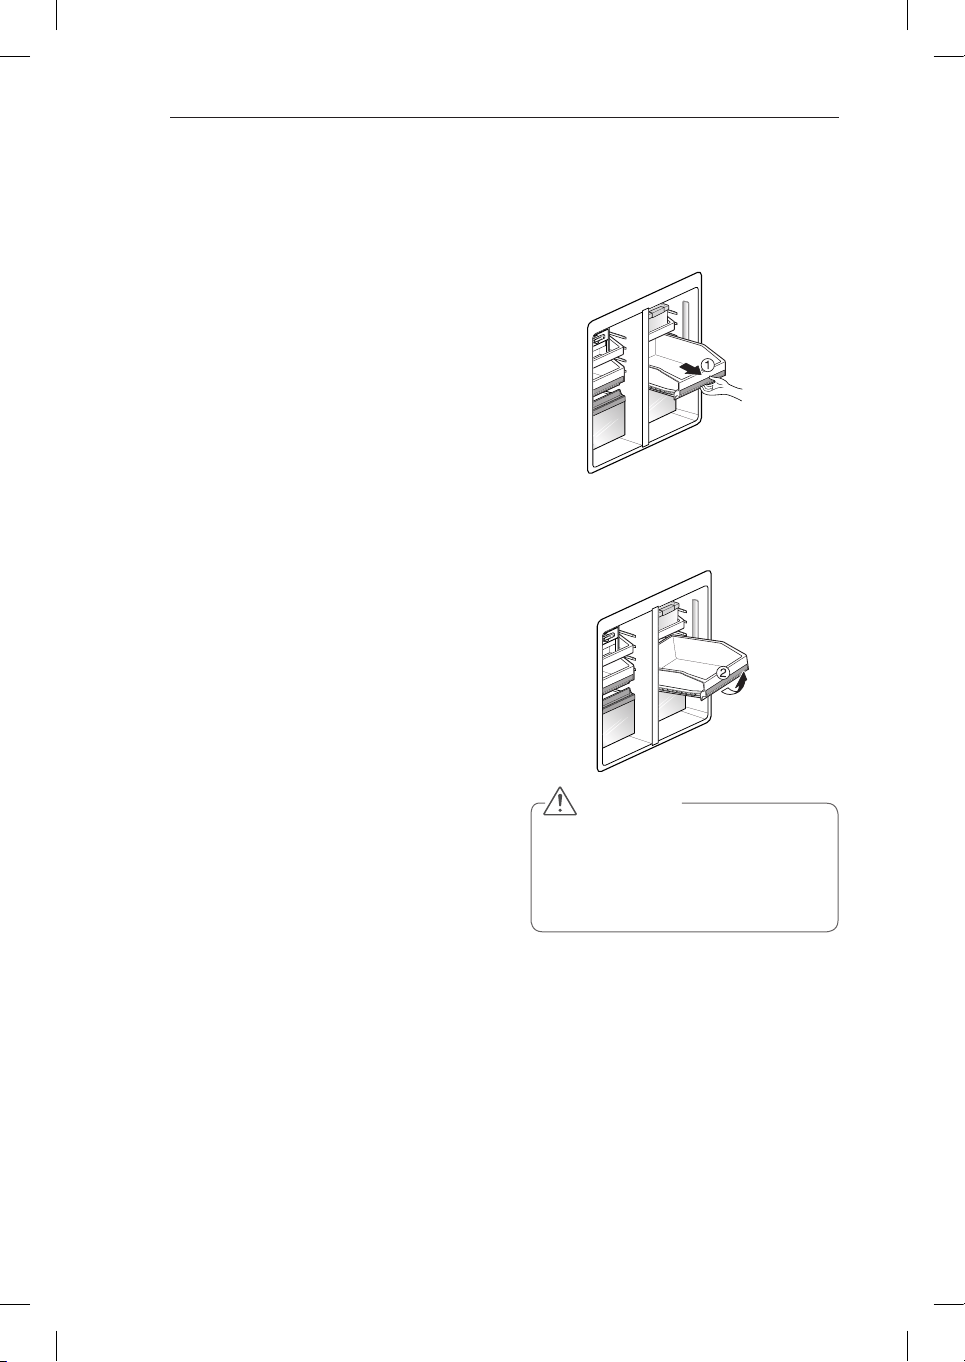
HOW TO USE
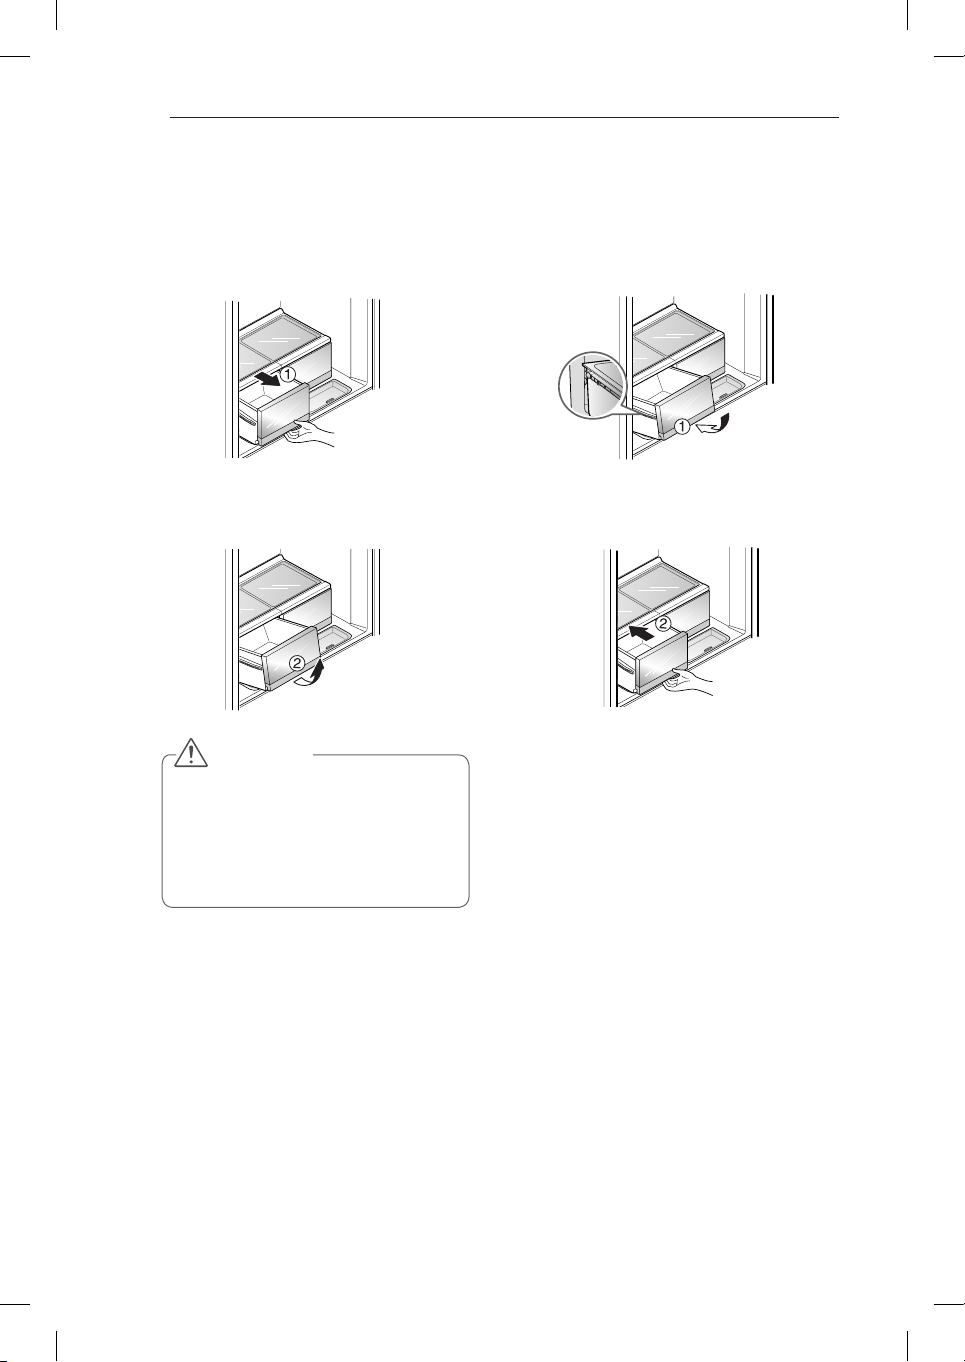
CAUTION
•
Always remove drawers with both
hands to avoid breakage or injury.
•
Always open the freezer doors all the
way before removing or refitting the
drawers.
Freezer Drawer
Use the compartment for packed frozen foods
and frequently-taken out foods.
You can have a wide space available by taking
out the ice maker or fresh zone from the top
compartment according to the purpose of use.
Use the bottom compartment for frozen foods.
(Dried fish & condiments)
•
The sliding freezer drawers allow easy
access and convenience of use.
Freezer Drawer Removal
1
Pull out the Freezer drawer to the end of
its travel (as per below fig)and remove all
of the contents.
2
When the drawer is fully extended, lift up
the front and continue to pull it out (as per
below fig).
29
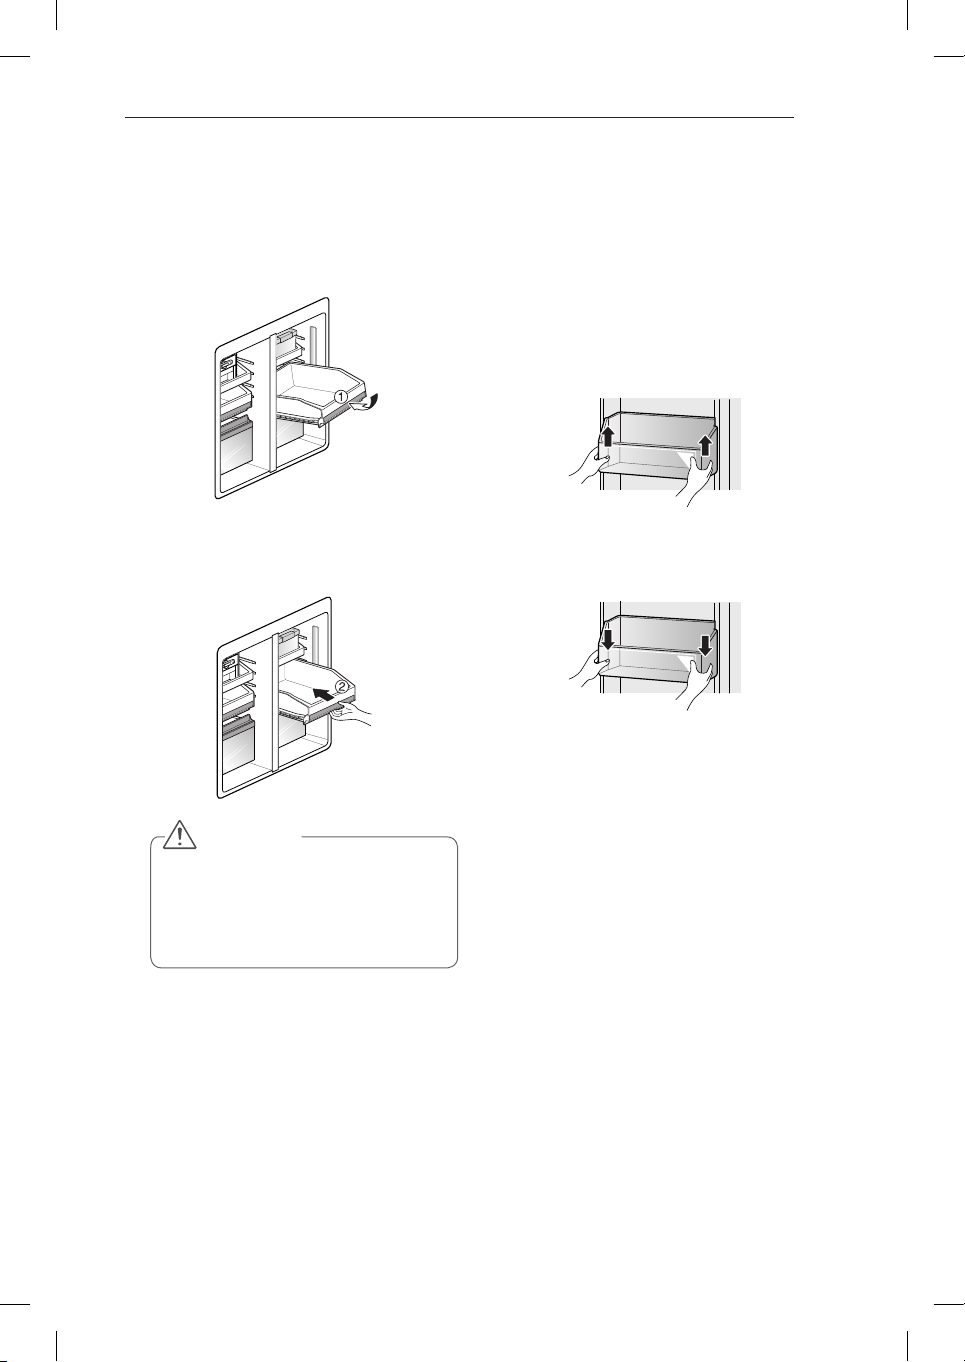
HOW TO USE
CAUTION
•
Always remove drawers with both
hands to avoid breakage or injury.
•
Always open the freezer doors all the
way before removing or refitting the
drawers.
Refitting the Freezer Drawer
1
Insert both rollers into the guides with
the front of the drawer slightly raised and
gently push in. while lowering the drawer
to the correct level.
2
Continue to push in the drawer all the way
while lowering the drawer to the correct
level.
Freezer/Fridge basket
You can store small packaged frozen food
(Freezer basket), small packaged refrigerated
food or beverages (Fridge basket) such as milk,
water, juice, beer etc.
Do Not store ice cream or foods intended for
long term storage in the Freezer Basket.
To remove the basket, hold the basket with
both hands and slightly lift up the front part to
pull it out.
To refit the basket, align both sides of the
basket with the guides and push it down until
secure.
30
SMART FUNCTIONS
SMART FUNCTIONS
Using LG SmartThinQ
Application
Things to check before using LG
SmartThinQ
•
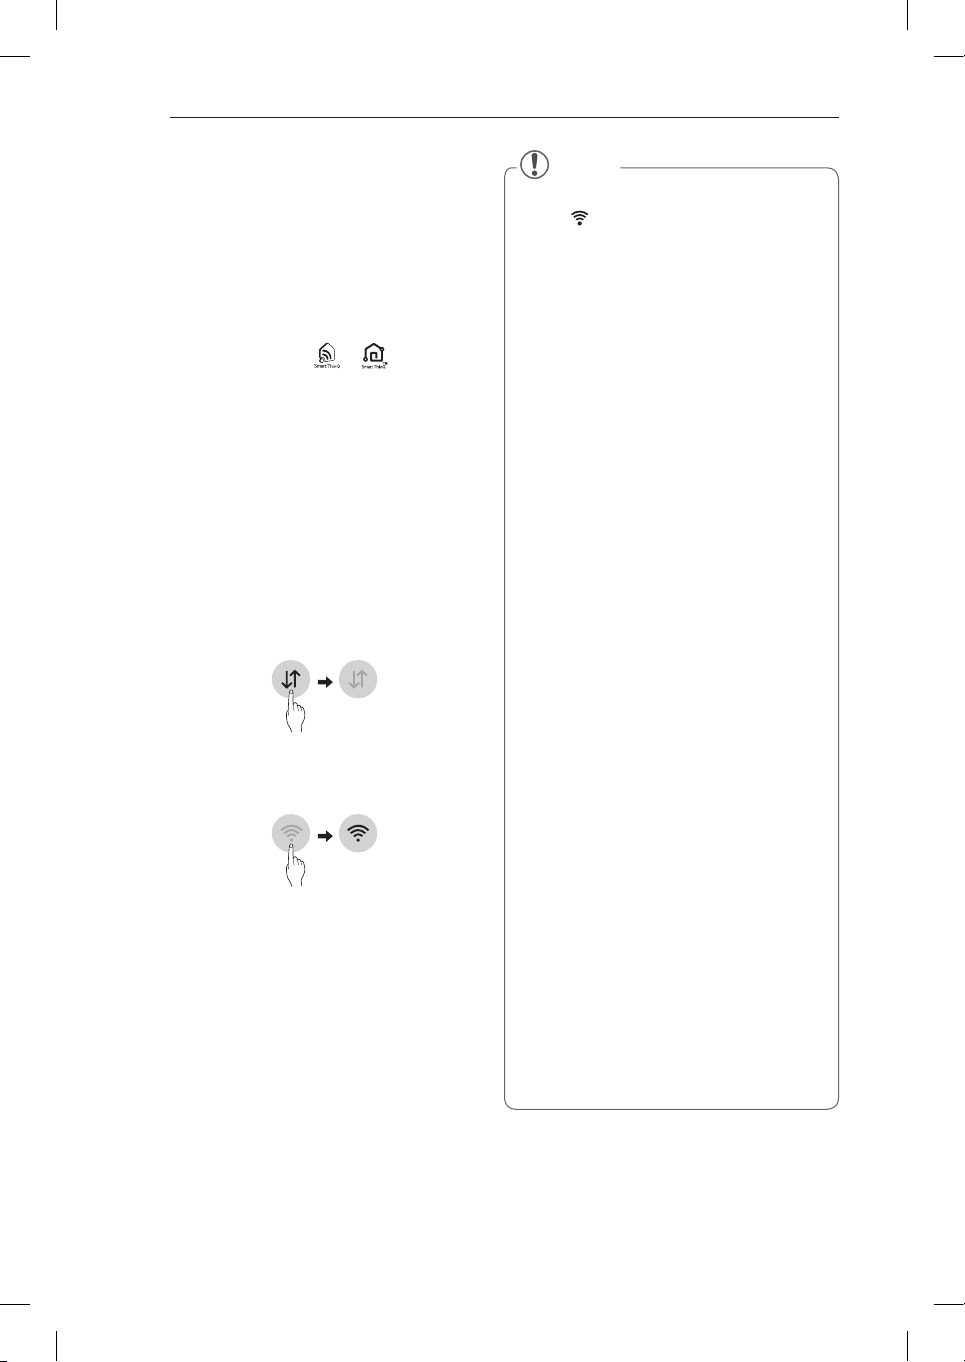
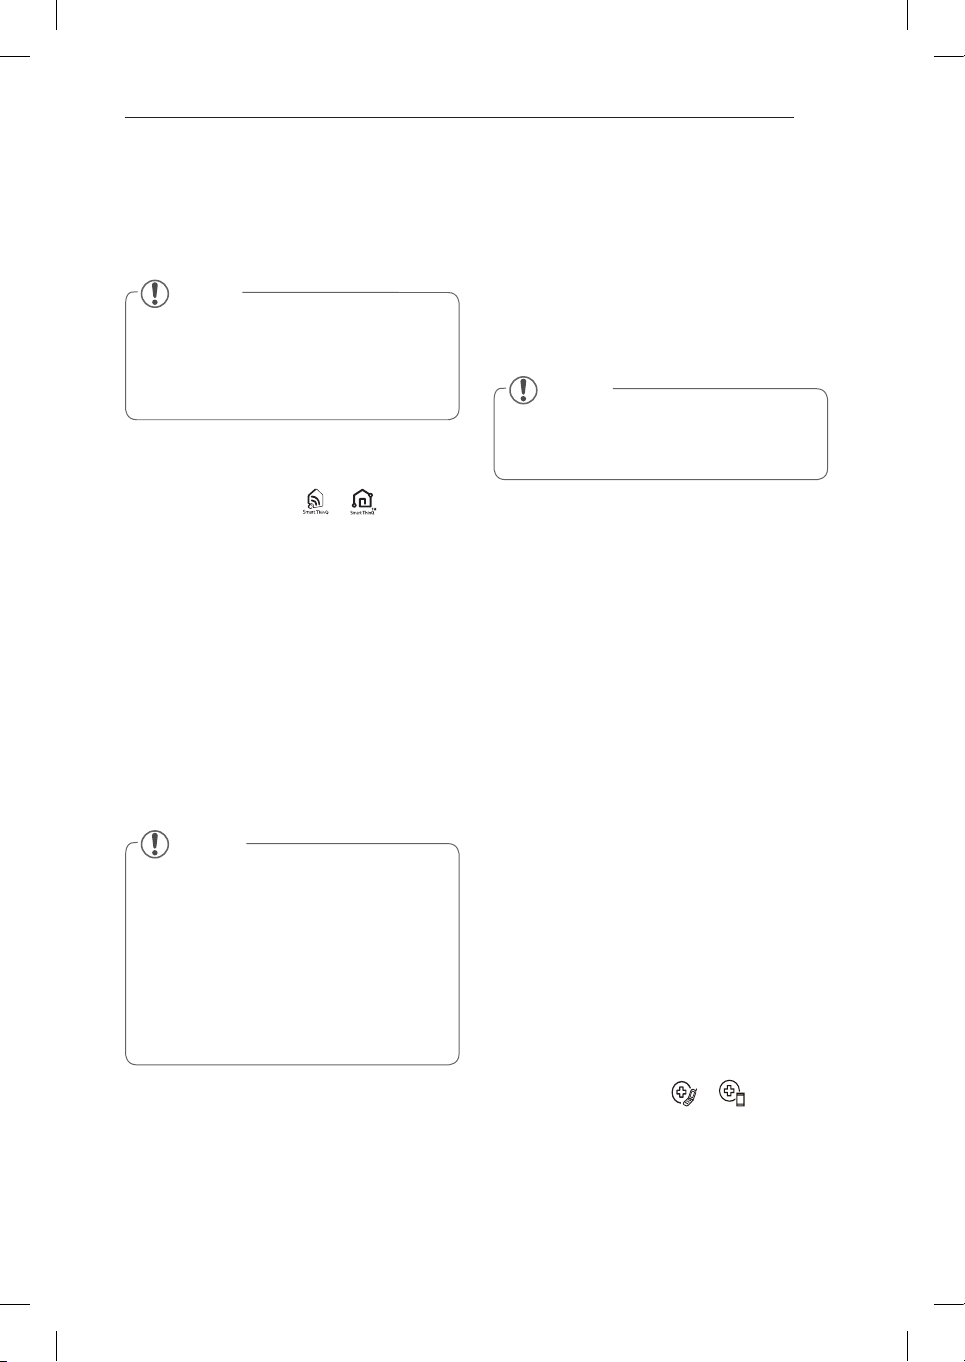
For appliances with the or logo
1
Check the distance between the appliance
and the wireless router (Wi-Fi network).
•
If the distance between the appliance and
the wireless router is too far, the signal
strength becomes weak.
It may take a long time to register or
installation may fail.
2
Turn off the
Mobile data
or
Cellular Data
on
your smartphone.
•
For iPhones, turn data off by going to
Settings
→
Cellular
→
Cellular Data
.
3
Connect your smartphone to the wireless
router.
NOTe
•
To verify the Wi-Fi connection, check that
Wi-Fi
icon on the control panel is lit.
•
The appliance supports 2.4 GHz Wi-Fi
networks only. To check your network
frequency, contact your Internet service
provider or refer to your wireless router
manual.
•
LG SmartThinQ is not responsible for any
network connection problems or any faults,
malfunctions, or errors caused by network
connection.
•
If the appliance is having trouble connecting
to the Wi-Fi network, it may be too far
from the router. Purchase a Wi-Fi repeater
(range extender) to improve the Wi-Fi signal
strength.
•
The Wi-Fi connection may not connect or
may be interrupted because of the home
network environment.
•
The network connection may not work
properly depending on the Internet service
provider.
•
The surrounding wireless environment can
make the wireless network service run
slowly.
•
The appliance cannot be registered due
to problems with the wireless signal
transmission. Unplug the appliance and wait
about a minute before trying again.
•
If the firewall on your wireless router is
enabled, disable the firewall or add an
exception to it.
•
The wireless network name (SSID) should
be a combination of English letters and
numbers.
(Do not use special characters.)
•
Smartphone user interface (UI) may vary
depending on the mobile operating system
(OS) and the manufacturer.
•
If the security protocol of the router is set
to
WEP
, you may fail to set up the network.
Please change it to other security protocols
(
WPA2
is recommended) and register the
product again.
31
SMART FUNCTIONS
Installing LG SmartThinQ
Search for the LG SmartThinQ application from
the Google Play Store or Apple App Store on a
smart phone. Follow instructions to download
and install the application.
NOTe
•
If you choose the simple login to access
the LG SmartThinQ application, you must
go through the appliance registration
process each time you change your
smartphone or reinstall the application.
Wi-Fi Function
•
For appliances with the or logo
Communicate with the appliance from a smart
phone using the convenient smart features.
Firmware Update
Keep the appliance performance updated.
Smart Diagnosis™
If you use the Smart Diagnosis function, you will
be provided with the useful information such as a
correct way of using the appliance based on the
pattern of use.
Settings
Allows you to set various options on the
refrigerator and in the application.
NOTe
•
If you change your wireless router, your
Internet service provider or your password
after registering the appliance, please
delete it from the LG SmartThinQ
Settings
→
Edit Product
and register again.
•
The application is subject to change for
appliance improvement purposes without
notice to users.
•
Functions may vary by model.
Connecting to Wi-Fi
The
Wi-Fi
button, when used with the LG
SmartThinQ application, allows the refrigerator to
connect to a home Wi-Fi network. The
Wi-Fi
icon
shows the status of the refrigerator’s network
connection. The icon illuminates when the
refrigerator is connected to the Wi-Fi network.
Initial Appliance Registration
Run the LG SmartThinQ application and follow
the instructions in the application to register the
appliance.
Re-registering the Appliance or Registering
Another User
Press and hold the Wi-Fi button for 3 seconds to
temporarily turn it off. Run the LG SmartThinQ
application and follow the instructions in the
application to register the appliance.
NOTe
•
To disable the Wi-Fi function, press and
hold the
Wi-Fi
button for 3 seconds. Wi-Fi
icon will be turned off.
RF Radiation Exposure Statement
This equipment shall be installed and used at
a minimum distance of 20 cm from the human
body.
Open Source Software Notice
Information
To obtain the source code under GPL, LGPL,
MPL, and other open source licenses, that is
contained in this product, please visit http://
opensource.lge.com.
In addition to the source code, all referred license
terms, warranty disclaimers and copyright notices
are available for download.
LG Electronics will also provide open source
code to you on CD-ROM for a charge covering
the cost of performing such distribution (such as
the cost of media, shipping, and handling) upon
email request to [email protected]. This offer
is valid for a period of three years after our last
shipment of this product. This offer is valid to
anyone in receipt of this information.
Smart Diagnosis™ Using a Smart
Phone
•
For appliances with the or logo
Use this function if you need an accurate diagnosis
by an LG Electronics customer information centre
when the appliance malfunctions or fails.
Smart Diagnosis™ can not be activated unless the
appliance is connected to power. If the appliance
is unable to turn on, then troubleshooting must be
done without using Smart Diagnosis™.
32
SMART FUNCTIONS
Using Smart Diagnosis™
Smart Diagnosis™ Through the
Customer Information Center
Use this function if you need an accurate
diagnosis by an LG Electronics customer
information center when the appliance
malfunctions or fails. Use this function only to
contact the service representative, not during
normal operation.
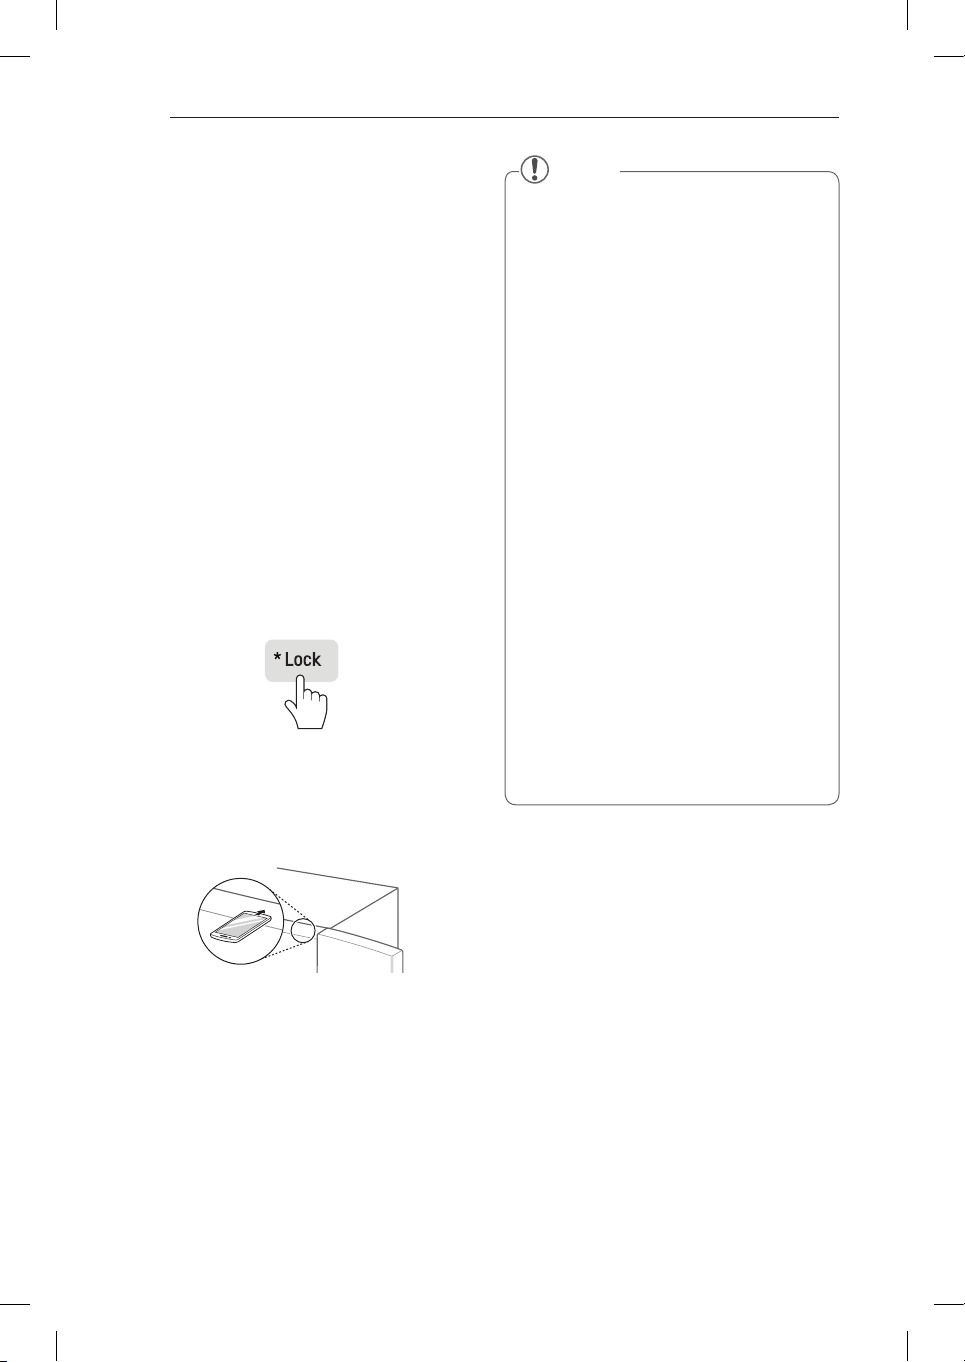
1
Press the Lock button to activate the lock
function.
• If the lock function has been activated
already, press the Lock button to deactivate
the lock function, and then press the Lock
button again to activate the lock function.
• Please note that the Smart Diagnosis
function will not operate until five minutes
has passed since the lock function was
activated.
2
Open the fridge door and then hold the phone
on the upper right speaker hole.
• Position the phone so that its microphone
is aligned with the speaker hole.
3
Press and hold the Freezer button for three
seconds or longer while continuing to hold
your phone to the speaker.
4
After the data transfer is complete, the
service agent will explain the result of the
Smart Diagnosis™.
NOTE
•
Position the phone so that its
microphone is aligned with the speaker
hole.
•
The Smart Diagnosis™ sound is
generated after around three seconds.
•
Do not take the phone off the speaker
hole while the data is transmitted.
•
Hold the phone to the upper right
speaker hole and wait while the data is
transmitted.
•
The data transfer sound may be harsh to
the ear while the Smart Diagnosis™ data
is being transmitted, but do not take the
phone off the speaker hole for accurate
diagnosis until the data transfer sound
has stopped.
•
When the data transfer is complete,
the transfer completion message is
displayed and the control panel is
automatically turned off and then on
again after a few seconds. After the
customer information centre explains
the diagnosis result.
•
The Smart Diagnosis™ function depends
on the local call quality.
•
The communication performance will
improve and you can transmit a better
signal if you use a land line home phone.
•
If the Smart Diagnosis™ data transfer
is poor due to poor call quality, you may
not receive the best Smart Diagnosis™
service.
33
MAINTENANCE
MAINTENANCE
Cleaning
•
Both the fridge and freezer sections defrost automatically; however, clean both sections
about once a month to prevent odors.
•
Wipe up spills immediately.
•
Always unplug the refrigeration before cleaning.
General Cleaning Tips
•
Unplug fridge or disconnect power.
•
Remove all removable parts, such as
shelves, crispers, etc.
•
Use a clean sponge or soft cloth and a
mild detergent in only warm water. Do
not use abrasive or harsh cleaners.
•
Hand wash, rinse and dry all surfaces
thoroughly.
Exterior
Waxing external painted metal surfaces helps
provide rust protection. Do not wax plastic
parts. Wax painted metal surfaces at least
twice a year using appliance wax (or auto paste
wax). Apply wax with a clean, soft cloth.
For products with a stainless steel exterior,
use a clean sponge or soft cloth and a mild
detergent in warm water. Do not use abrasive
or harsh cleaners. Dry thoroughly with a soft
cloth.
CAUTION
•
Do not use a rough cloth or sponge
when cleaning the interior and exterior
of the fridge.
•
Do not place your hand on the bottom
surface of the fridge when opening
and closing.
WARNING
Use non-flammable cleaner. Failure to do
so can result in fire, explosion, or death.
Always remove power cord from the
wall outlet prior to cleaning in the vicinity
of electrical parts (lamps, switches,
covers, controls, etc.).
Wipe up excess moisture with a sponge
or cloth to prevent water or Liquid
from getting into any electrical part and
causing an electric shock.
Never use metallic scouring pads,
brushes, coarse abrasive cleaners,
Strong alkaline solutions, industrial
detergent (bleach containing detergent)
Flammable or toxic cleaning liquids on
any surface. Do not use Hot water to
clean the interior or any interior parts of
the unit when they are cold.
34
MAINTENANCE
Inside Walls (allow freezer to warm
up so the cloth will not stick)
To help remove odors, you can wash the inside
of the fridge with a mixture of baking soda and
warm water. Mix 2 tablespoons of baking soda
to 1 litre of warm water. Be sure the baking
soda is completely dissolved so it does not
scratch the surfaces of the fridge.
Door Liners and Gaskets
Use a clean sponge or soft cloth and a mild
detergent in warm water. Do not use cleaning
waxes, concentrated detergents, bleaches, or
cleaners containing petroleum on plastic fridge
parts.
Plastic Parts (covers and panels)
Use a clean sponge or soft cloth and a mild
detergent in warm water. Do not use window
sprays, abrasive cleansers, or flammable fluids.
These can scratch or damage the material.
Condenser Coil Cover
Use a vacuum cleaner with an attachment to
clean the condenser cover and vents located
at the rear of the appliance. Do not remove the
panel covering the condenser coil area. Always
disconnect the main power before cleaning.
2
Installing a New Pure N Fresh filter.
Place the new filter inside of the cover
with the side that says “Front” facing
outward. Turn the filter cover to the right
to reattach it to the refrigerator wall.
After changing the filter, touch and hold
the Pure N Fresh filter button on the
front display for three seconds to reset
the filter sensor.
Replacing the Pure N Fresh
filter
It is recommended that you replace the Pure N
Fresh filter:
•
Approximately every 1~2 years.
•
When the Replace light turns on.
1 Remove the Old Filter
Turn the filter cover to the left to detach
from the refrigerator wall. The filter is
located on the inside of the filter cover.
Remove the filter from the cover and
replace it with a new filter.
35
TROUBLESHOOTING
TROUBLESHOOTING
Review the Troubleshooting section before calling for service; doing so will save you both time
and money.
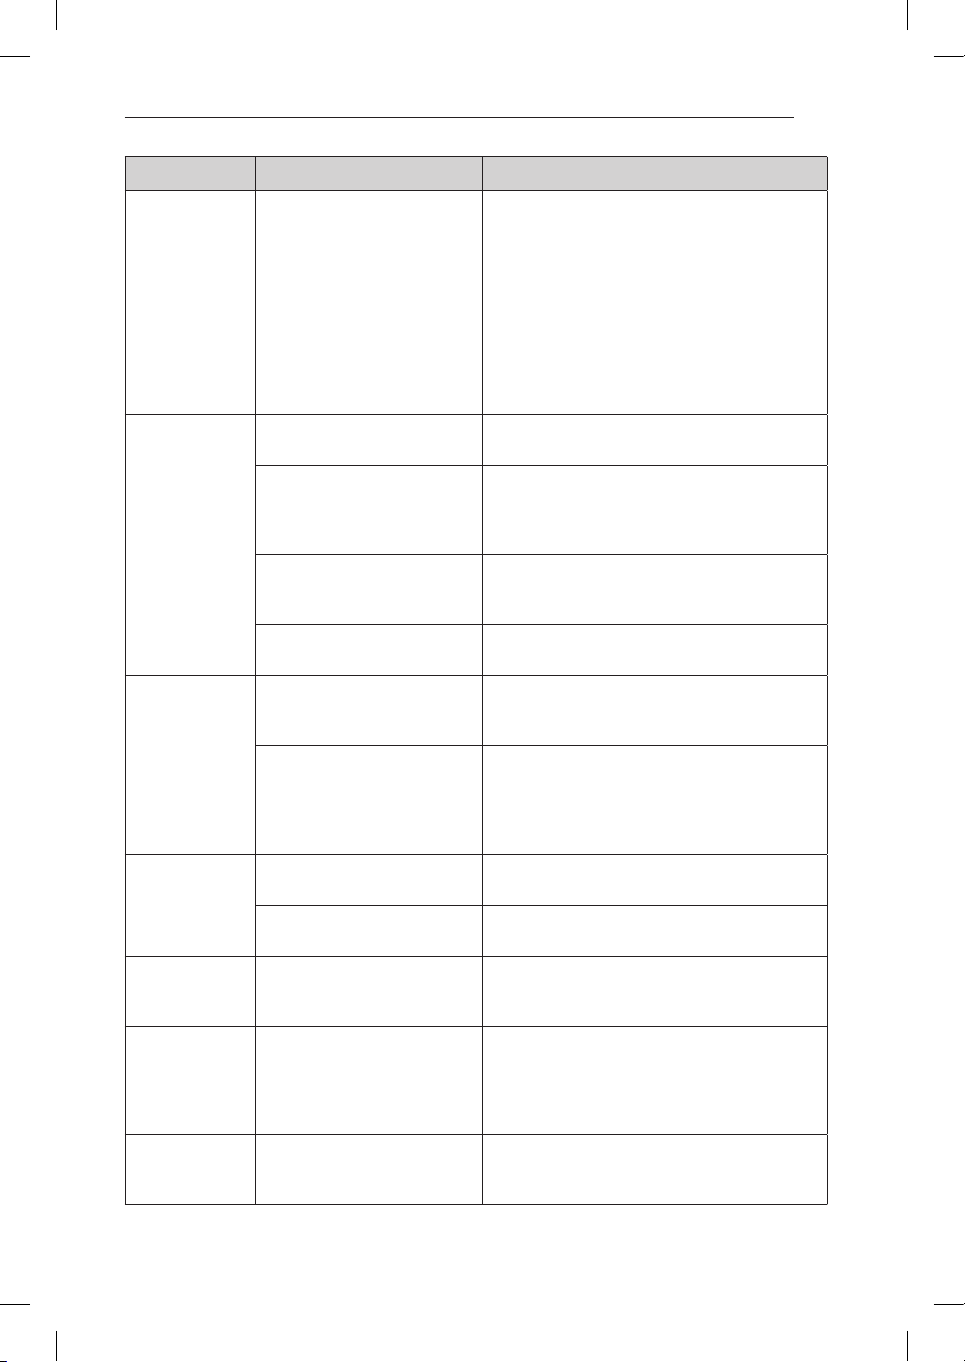
Problem Possible Causes Solutions
Fridge and
Freezer section
are not cooling.
The fridge display control is set
to OFF (some models).
Cancel the OFF mode so that the unit
commences operation. Refer to the Setting the
Controls section for proper temperature settings,
or call Customer Service if OFF remains on the
Display panel.
Fridge is in the defrost cycle. During the defrost cycle, the temperature of each
compartment may raise slightly. Wait 40 minutes
to confirm the proper temperature has been
restored once the defrost cycle has completed.
Fridge was recently installed. It may take up to 24 hours for each compartment
to reach the desired temperature.
Fridge was recently relocated. If the fridge was stored for a long period of time
or moved on its side, it is necessary for the fridge
to stand upright for 24 hours before connecting it
to power.
Cooling System
runs too much.
Fridge is replacing an older
model.
Modern fridges require more operating time but
use less energy due to more efficient technology.
Fridge was recently plugged in
or power restored.
The fridge will take up to 24 hours to cool
completely.
Door opened often or a large
amount of food / hot food was
added.
Adding food and opening the door warms the
fridge, requiring the compressor to run longer in
order to cool the fridge back down. In order to
conserve energy, try to get everything you need
out of the fridge at once, keep food organized so
it is easy to find, and close the door as soon as
the food is removed. (Refer to the Food Storage
Guide.)
Doors are not closed
completely.
Firmly push the doors shut. If they will not shut all
the way, see the Doors will not close completely
or pop open section in Parts & Features
Troubleshooting.
Fridge is installed in a hot
location.
The compressor will run longer under warm
conditions. At normal room temperatures
70°F(21°C) expect your compressor to run
about 40% to 80% of the time. Under warmer
conditions, expect it to run even more often. The
fridge should not be operated above 110°F(43°C).
Condenser / back cover is
clogged.
Use a vacuum cleaner with an attachment to
clean the condenser cover and vents. Do not
remove the panel covering the condenser coil
area. Disconnect the mains before cleaning.
36
TROUBLESHOOTING
Problem Possible Causes Solutions
Fridge or Freezer
section is too
warm.
Fridge was recently installed. It may take up to 24 hours for each compartment
to reach the desired temperature.
Air vents are blocked. Rearrange items to allow air to flow throughout
the compartment. Refer to the Airflow diagram in
the Using Your Fridge section.
Doors are opened often or for
long periods of time.
When the doors are opened often or for long
periods of time, warm, humid air enters the
compartment. This raises the temperature and
moisture level within the compartment. To lessen
the effect, reduce the frequency and duration of
door openings.
Unit is installed in a hot location. The fridge should not be operated in
temperatures above 110°F(43°C).
A large amount of food or
hot food was added to either
compartment.
Adding food warms the compartment requiring
the cooling system to run. Allowing hot food to
cool to room temperature before putting it in the
fridge will reduce this effect.
Doors not closed correctly. See the Doors will not close correctly or pop open
section in Parts & Features Troubleshooting.
Temperature control is not set
correctly.
If the temperature is too warm, adjust the
control one increment at a time and wait for the
temperature to stabilize. Refer to the Setting the
Controls section for more information.
Defrost cycle has recently
completed.
During the defrost cycle, the temperature of each
compartment may raise slightly and condensation
may form on the back wall. Wait 40 minutes
and confirm the proper temperature has been
restored once the defrost cycle has completed.
37
TROUBLESHOOTING
Problem Possible Causes Solutions
Interior moisture
buildup.
Doors are opened often or for
long periods of time.
When the doors are opened often or for long
periods of time, warm, humid air enters the
compartment. This raises the temperature and
moisture level within the compartment. To
lessen the effect, reduce the frequency and
duration of door openings.
Doors not closed correctly. See the Doors will not close correctly section in
the Troubleshooting section.
Weather is humid. Humid weather allows additional moisture
to enter the compartments when the doors
are opened leading to condensation or frost.
Maintaining a reasonable level of humidity in the
home will help to control the amount of moisture
that can enter the compartments.
Defrost cycle recently
completed.
During the defrost cycle, the temperature
of each compartment may be raised slightly
and condensation may form on the back wall.
Wait 40 minutes and confirm that the proper
temperature has been restored once the defrost
cycle has completed.
Food is not packaged correctly. Food stored uncovered or unwrapped, and damp
containers can lead to moisture accumulation
within each compartment. Wipe all containers
dry and store food in sealed packaging to prevent
condensation and frost.
Food is freezing
in the fridge
compartment.
Food with high water content
was placed near an air vent.
Rearrange items with high water content away
from air vents.
Fridge temperature control is
set incorrectly.
If the temperature is too cold, adjust the control
one increment at a time and wait for the
temperature to stabilize. Refer to the Setting the
Controls section for more information.
Fridge is installed in a cold
location.
When the fridge is operated in temperatures
below 41°F (5°C), food can freeze in the fridge
compartment. The fridge should not be operated
in temperature below 55°F (13°C).
Frost or ice
crystals form
on frozen food
(outside of
package).
Door is opened frequently or for
long periods of time.
When the doors are opened often or for long
periods of time, warm, humid air enters the
compartment. This raises the temperature and
moisture level within the compartment. Increased
moisture will lead to frost and condensation.
To lessen the effect, reduce the frequency and
duration of door openings.
Door is not closing properly. Refer to the Doors will not close correctly or pop
open section in the Troubleshooting section.
Fridge or Freezer
section is too
cold.
Incorrect temperature control
settings.
If the temperature is too cold, adjust the control
one increment at a time and wait for the
temperature to stabilize. Refer to the Setting the
Controls section for more information.

38
TROUBLESHOOTING
Problem Possible Causes Solutions
Frost or ice
crystals on frozen
food (inside of
sealed package).
Condensation from food with a
high water content has frozen
inside of the food package.
This is normal for food items with a high water
content.
Food has been left in the freezer
for a long period of time.
Do not store food items with high water content
in the freezer for a long period of time.
Clicking The defrost control will click
when the automatic defrost
cycle begins and ends. The
thermostat control (or fridge
control on some models) will
also click when cycling on and
off.
Normal Operation
Rattling Rattling noises may come from
the flow of refrigerant, the
water line on the back of the
unit, or items stored on top of
or around the fridge.
Normal Operation
Fridge is not resting solidly on
the floor.
Floor is weak or uneven or leveling legs need to
be adjusted. See the Door Alignment section.
Fridge with linear compressor
was jarred while running.
Normal Operation
Whooshing Evaporator fan motor is
circulating air through the fridge
and freezer compartments.
Normal Operation
Air is being forced over the
condenser by the condenser
fan.
Normal Operation
Gurgling Refrigerant flowing through the
cooling system.
Normal Operation
Popping Contraction and expansion of
the inside walls due to changes
in temperature.
Normal Operation
Sizzling Water dripping on the defrost
heater during a defrost cycle.
Normal Operation
Vibrating If the side or back of the fridge
is touching a cabinet or wall,
some of the normal vibrations
may make an audible sound.
To eliminate the noise, make sure that the sides
and back cannot vibrate against any wall or
cabinet.
Dripping Water running into the drain pan
during the defrost cycle.
Normal Operation
39
TROUBLESHOOTING
Problem Possible Causes Solutions
Pulsating or
High-Pitched
Sound
Your fridge is designed to
run more efficiently to keep
your food items at the desired
temperature. The high efficiency
compressor may cause your
new fridge to run longer than
your old one, but it is still more
energy efficient than previous
models. While the fridge is
running, it is normal to hear a
pulsating or high-pitched sound.
Normal Operation
Doors will not
close correctly or
pop open.
Food packages are blocking the
door open.
Rearrange food containers to clear the door and
door shelves.
Ice bin, crisper cover, pans,
shelves, door bins, or baskets
are out of position.
Push bins all the way in and put crisper cover,
pans, shelves and baskets into their correct
positions. See the Using Your Fridge section for
more information.
The doors were removed during
product installation and not
properly replaced.
Remove and replace the doors according to the
Removing and Replacing Fridge Handles and
Doors section.
Fridge is not leveled properly. See Door Alignment in the Height adjustment
section to level fridge.
Doors are difficult
to open.
The gaskets are dirty or sticky. Clean the gaskets and the surfaces that they
touch. Rub a thin coat of appliance polish or
kitchen wax on the gaskets after cleaning.
Door was recently closed. When you open the door, warmer air enters
the fridge. As the warm air cools, it can create
a vacuum. If the door is hard to open, wait one
minute to allow the air pressure to equalize, then
see if it opens more easily.
Fridge wobbles or
seems unstable.
Leveling legs are not adjusted
properly.
Refer to the Leveling and Door Alignment section.
Floor is not level. It may be necessary to add shims under the
leveling legs or rollers to complete installation.
Lights do not
work.
LED interior lighting failure. The fridge compartment lamp is LED interior
lighting, and service should be performed by a
qualified technician.
Fridge has an
unusual odor.
The Pure N Fresh filter may
need to be set to the POWER
setting or replaced.
Set the Pure N Fresh filter to the POWER setting.
If the odor does not go away within 24 hours, the
filter may need to be replaced. See the Replacing
the Pure N Fresh filter section for replacement
instructions.
The interior of the
fridge is covered
with dust or soot.
The fridge is located near a fire
source, such as a fireplace,
chimney or candle.
Make sure that the fridge is not located near a fire
source, such as a fireplace, chimney, heater or
candle.
40
TROUBLESHOOTING
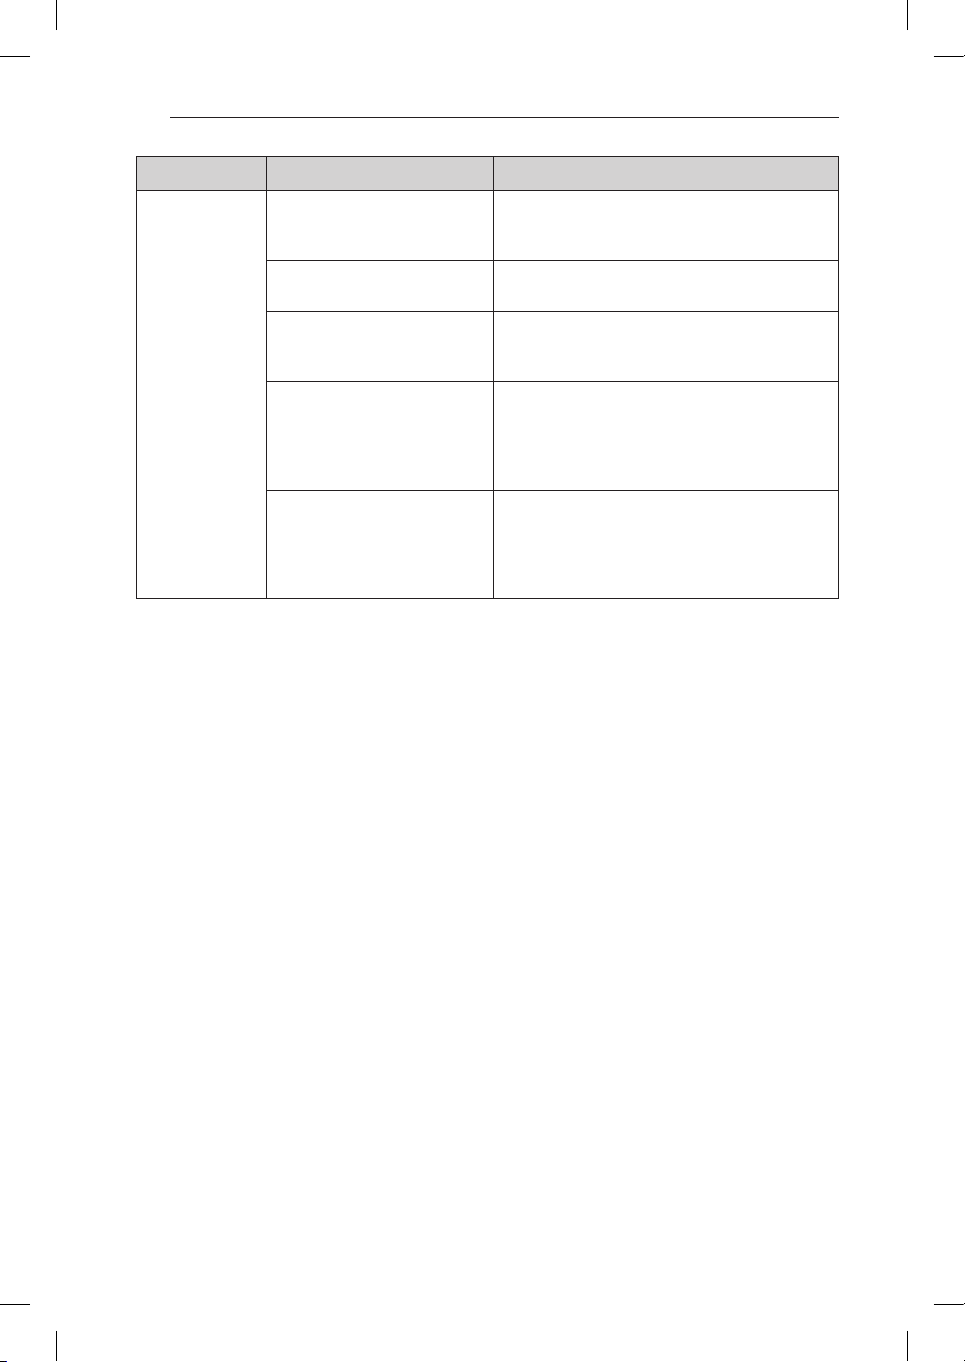
Problem Possible Causes Solutions
Your home
appliance and
smartphone is not
connected to the
Wi-Fi network.
The password for the Wi-Fi that
you are trying to connect to is
incorrect.
Find the Wi-Fi network connected to your
smartphone and remove it, then register your
appliance on LG SmartThinQ.
Mobile data for your smartphone
is turned on.
Turn off the
Mobile data
of your smartphone and
register the appliance using the Wi-Fi network.
The wireless network name
(SSID) is set incorrectly.
The wireless network name (SSID) should be a
combination of English letters and numbers. (Do
not use special characters.)
The router frequency is not 2.4
GHz.
Only a 2.4 GHz router frequency is supported.
Set the wireless router to 2.4 GHz and connect
the appliance to the wireless router. To check the
router frequency, check with your Internet service
provider or the router manufacturer.
The distance between the
appliance and the router is too
far.
If the distance between the appliance and the
router is too far, the signal may be weak and
the connection may not be configured correctly.
Move the location of the router so that it is closer
to the appliance.