4
Wireless Extension
Upstream
Wi-Fi Name
Tenda_XXXXXX
Upstream
Wi-Fi
Password
Please enter
Cancel
Next
Wi-Fi
Wi-Fi
Tenda_EXT Connected
1
Start Now
Thanks for Choosing Tenda
WiFi Range Extender
Faster, Safer, Smoother, Smarter
2
• Ensure that the router has a WPS button and is using WPA2-PSK, WPA/WPA2-PSK, or WPA3-SAE/
WPA2-PSK encryption.
• The WPS design may differ with different manufacturers. If this method fails, use another method to configure.
• The extender can form a Mesh network with Tenda Wi-Fi+ Mesh or EasyMesh-compatible routers.
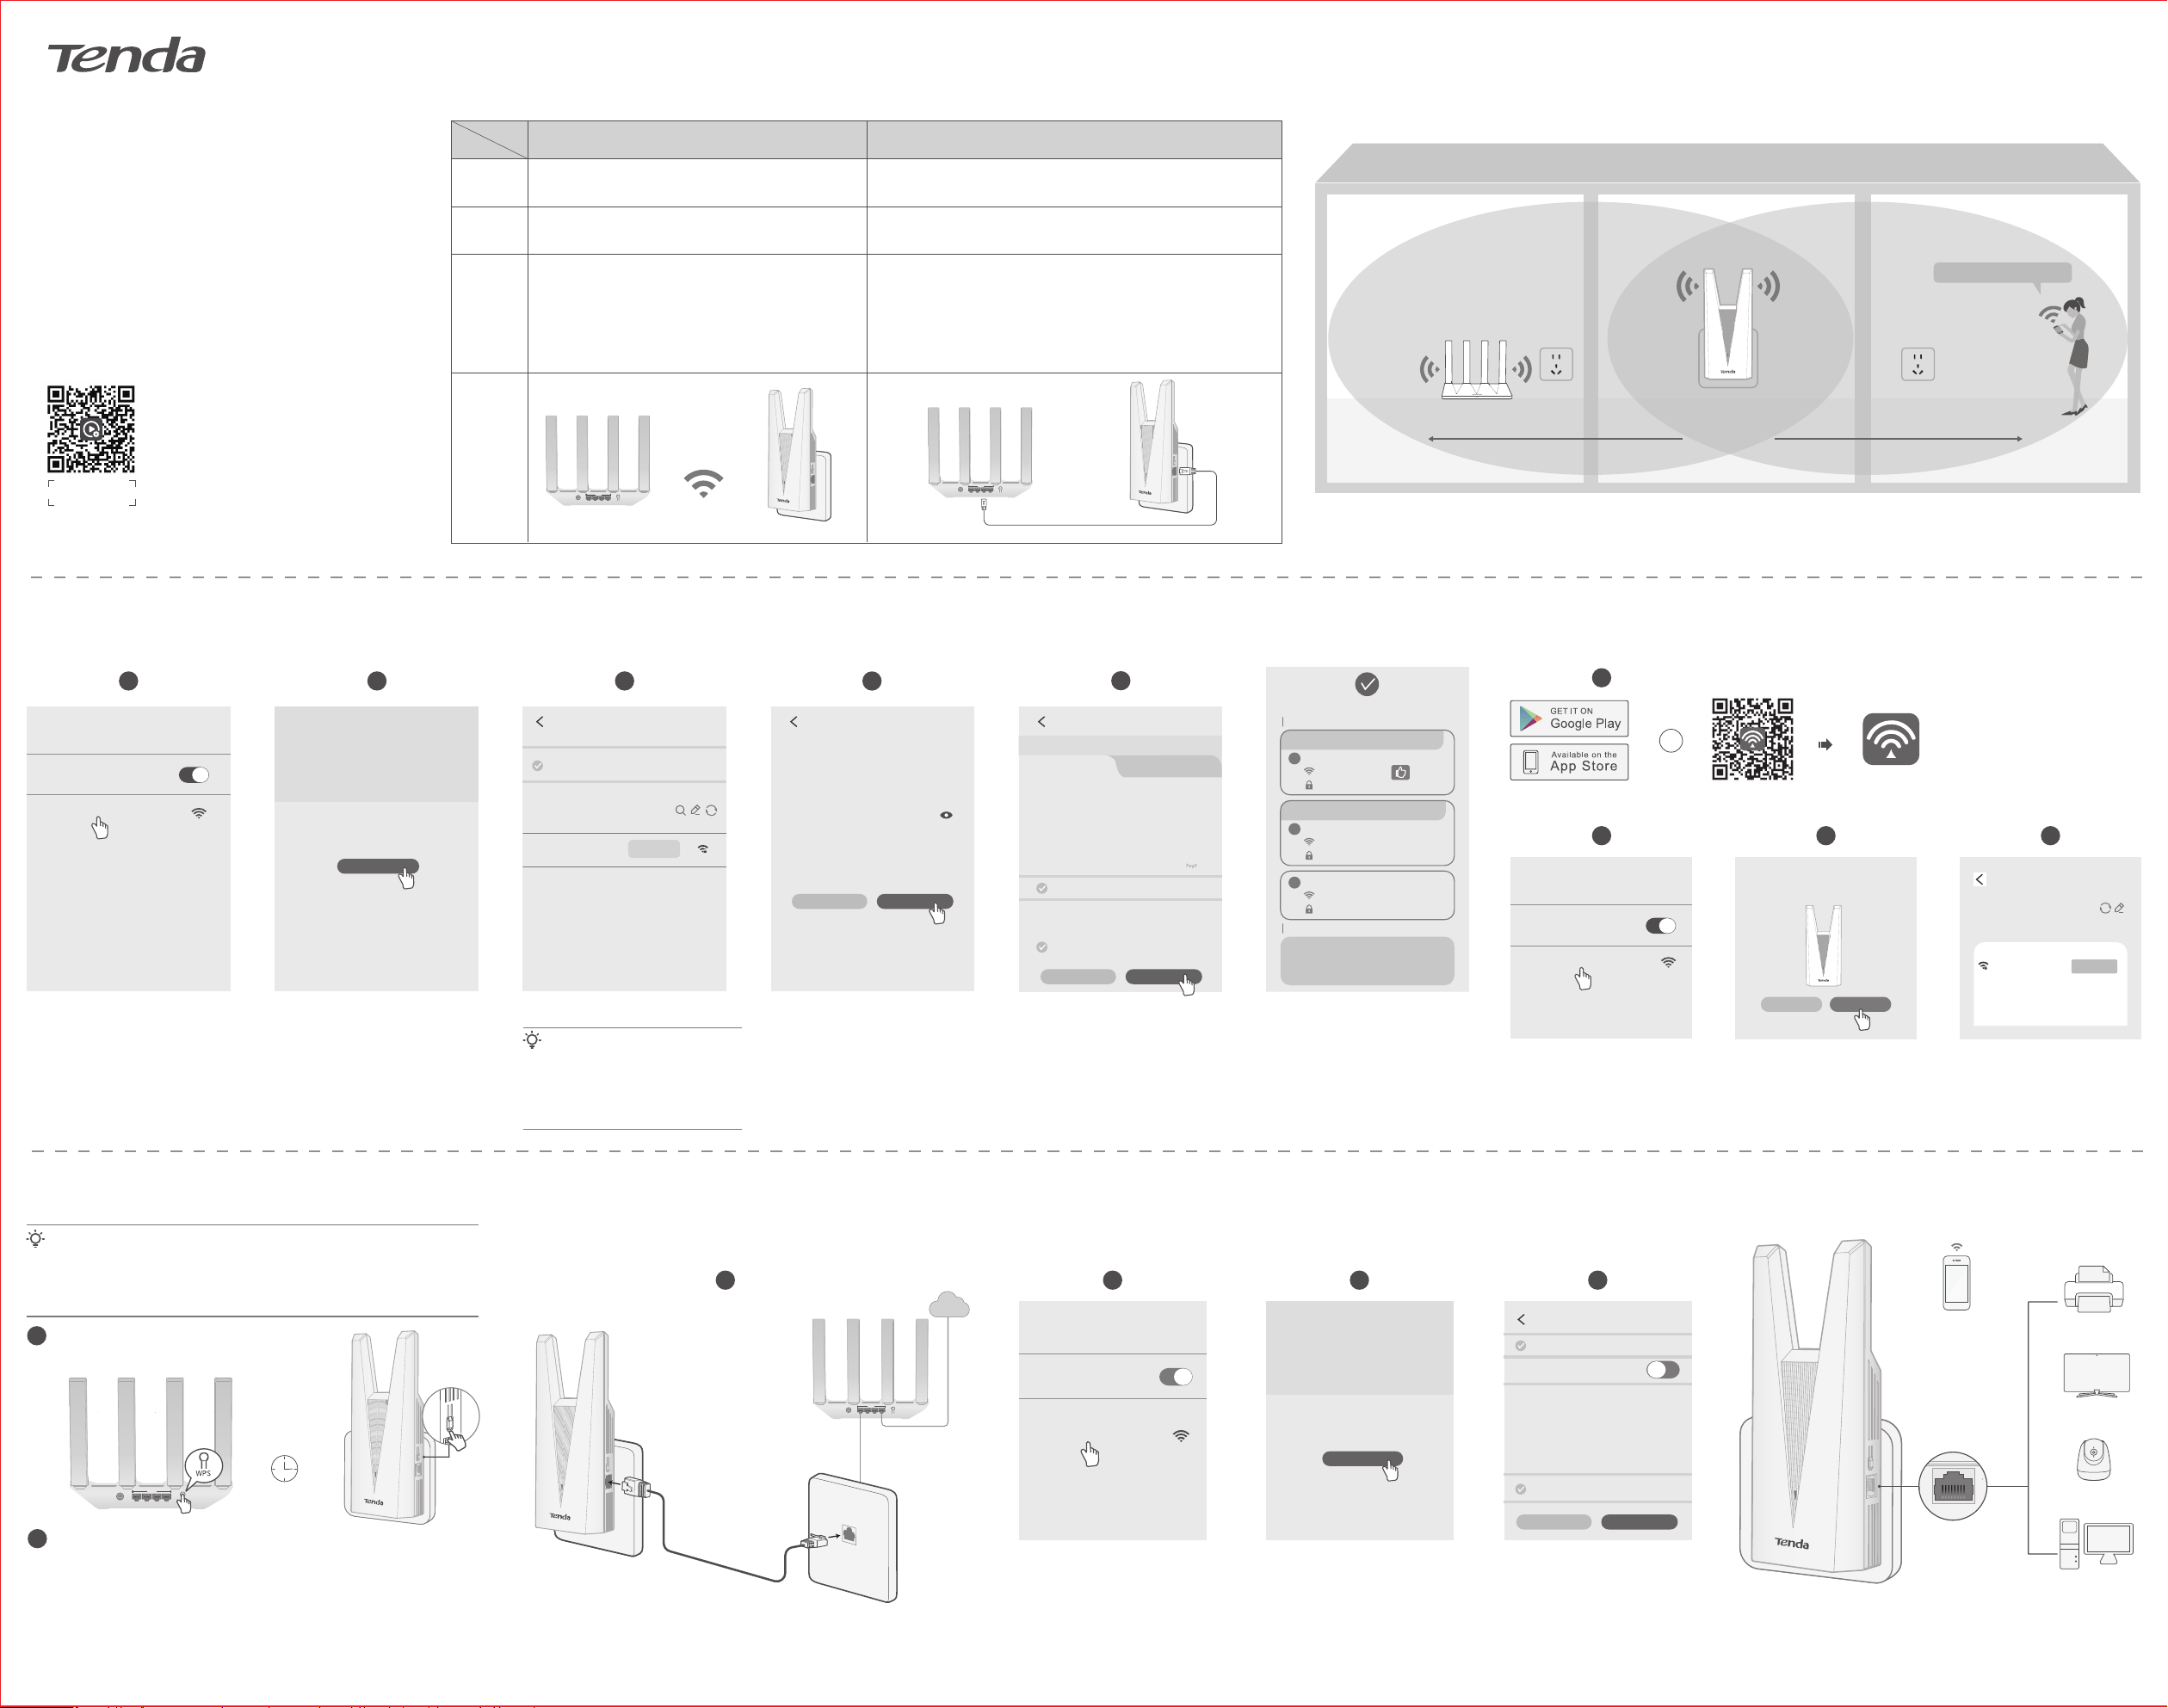
Method 1: Via Smartphone Web Browser (Recommended)
2. Set Up the Extender
Method 2: Via Tenda WiFi App
Method 3: Via WPS Button
Within 2 minutes
Wireless Extension
Your working mode has been detected
as: Wireless Extension
Select the Wi-Fi to be extended
Recommended to select 5GHz Wi-Fi
Switch
Tenda_XXXXXX 5G/2.4G
3
Connect your phone to the extender's
default Wi-Fi: Tenda_EXT
*If The WLAN is not connected to the Internet
appears, select Use Without Internet to continue.
*Ignore Unsecured Network prompt.
The welcome page appears
automatically. If not, disable cellular
data and visit re.tenda.cn in your
browser.
1
Connect the extender's Ethernet port to a wall Ethernet jack (with internet access)
using an Ethernet cable. When the indicator turns from blinking green to solid green,
the connection is established.
3
Start Now
Thanks for Choosing Tenda
WiFi Range Extender
Faster, Safer, Smoother, Smarter
4
Wired Extension
Set Wi-Fi password to the management
password
Extender 2.4 GHz
Wi-Fi Name
Tenda_EXT
Extender 5 GHz
Wi-Fi Name
Tenda_5G_EXT
Extender Wi-Fi
Password
Please enter
Previous Next
Unify 2.4 GHz & 5 GHz
Your working mode has been detected
as: Wired Extension
Switch
2
Wi-Fi
Wi-Fi
Tenda_EXT Connected
Set the Wi-Fi name, Wi-Fi password
and management password of the
extender. Tap Next.
Internet
WAN/LAN
POWER 1 2 3 4 WPS/ RESET
Connect your phone to the extender's
default Wi-Fi: Tenda_EXT
*If The WLAN is not connected to the Internet
appears, select Use Without Internet to continue.
*Ignore Unsecured Network prompt.
*If you don’t see Tenda_EXT, the extender may
already be connected in a Mesh network. In this
case, it uses the same Wi-Fi name and password
as your router.
The welcome page appears
automatically. If not, disable cellular
data and visit re.tenda.cn in your
browser.
Tips
Dual-band extension is supported: If the main router
provides dual-band Wi-Fi, you can select either band
to extend (5 GHz is recommended). The extender will
automatically use the same Wi-Fi password to
extend the other band.
Tips
Select the router's Wi-Fi to extend. Enter the Wi-Fi password of the router,
and tap Next.
Set the Wi-Fi name, Wi-Fi password and
management password of the extender
as required. If nothing changes, tap Next.
When the indicator is solid on, the setup is successful.
A: Upstream router without Mesh support
- Extender Wi-Fi name: Upstream router Wi-Fi name_EXT (or _5G_EXT), same as
the upstream router (only for 5 GHz Wi-Fi)
- Extender Wi-Fi password: Same as the upstream router
B: Upstream router with Mesh support
- Extender Wi-Fi name/password: Same as the upstream router
2
Within 2 minutes, press the WPS button on the extender for about 1 to
3 seconds, and its indicator blinks green fast.
1
Or
Download Tenda WiFi app, then register and log in.
2 3 4
Wireless Extension… Working Mode
Select the Wi-Fi to be extended
Recommended to select 5 GHz Wi-Fi
Tenda_XXXXXX 5G/2.4G
Wi-Fi
Wi-Fi
Tenda_EXT Connected
Connect your phone to the extender's default Wi-Fi: Tenda_EXT
*If The WLAN is not connected to the Internet appears, select Use Without
Internet to continue.
*Ignore Unsecured Network prompt.
Select the Wi-Fi to extend, then follow the
setup wizard to configure the extender
(refer to steps ~ in Method 1).
*Bind the extender to enable remote
management.
Not Now Configure
Signal Extender is found unconfigured.
Configure it now?
Connect Extender to the Internet
Wired clients
(Connected only via wireless extension. For wired extension, connect via Wi-Fi.)
Wireless clients
(such as a smartphone)
Printer
Smart TV
Camera
Computer
WAN/LAN
POWER 1 2 3 4 WPS/ RESET
5
*Extender network settings. If nothing changes, tap Next.
Extender 2.4 GHz Wi-Fi Name
Tenda_XXXXXX_EXT
Add New Wi-Fi
Use upstream Wi-Fi
name/password
Set Wi-Fi password to the management password
Broadcasts the same 5 GHz Wi-Fi name and
password as the upstream router for smoother
roaming.
Extender 5 GHz Wi-Fi Name
Tenda_XXXXXX_5G_EXT
Extender Wi-Fi Password
• • • • • • • •
5GHz Enhanced Roaming
Tenda_XXXXXX
Wireless Extension
Previous
Next
➌ ➎
WPS/RESET
Recommended: Place the extender midway between the router and the Wi-Fi dead zone.
*Ensure your phone can connect to the router's 5 GHz Wi-Fi and access the internet.
WPS/RESET
WPS/RESET
A solid LED indicates successful extension.
If the indicator is yellow or red, move the
extender closer to the router until it turns
solid green. Using 5 GHz Wi-Fi is
recommended.
*If the indicator remains solid yellow when placed
near the router, see FAQ > Q8.
1. Select the extender location
Place the extender midway between the router and the Wi-Fi dead zone to ensure stable signal reception and effective area coverage.
Wireless Extension
Ensure Ethernet cables are installed in areas where Wi-Fi coverage is needed and
internet access is available. For in-wall wiring, use the included Ethernet cable.
Wired Extension
Ethernet cable
WPS/RESET
WAN/LAN
POWER 1 2 3 4 WPS/ RESET
WAN/LAN
POWER 1 2 3 4 WPS/ RESET
Product Introduction
The extender supports both wireless and wired extension. If you have Ethernet cables deployed in your home, it is recommended to use the AP Mode.
Otherwise, opt for the Wireless Extension. Choose the extension type as required, and refer to the following section for configuration.
Wireless Extension
The extender connects to the upstream router through
Wi-Fi and extends the router's Wi-Fi coverage.
The extender connects to the upstream router through an Ethernet cable
and converts the router's wired network to Wi-Fi.
AP Mode
Extension
Type
1. It is recommended to select 5 GHz Wi-Fi for extension,
achieving better experience.
2. After successful wireless extension, the dead zone will
be covered by Wi-Fi, and the Ethernet port can be
used to provide wired network access for devices such
as set-top boxes, computers, and TVs.
After successful wired extension, high-speed and stable Wi-Fi
network access can be provided for smartphones, tablets, and smart
devices.
Features
Diagram
Rooms requiring Wi-Fi coverage without Ethernet cables
deployed.
Rooms requiring Wi-Fi coverage with Ethernet cables deployed.Scenario
AP Mode
Wireless Extension
WPS/RESET
WPS/RESET
Router
Extender
Midway position
Good signal, high speed
Quick Installation Guide
Dual-Band Gigabit Wi-Fi Range Extender
A33
Scan the QR code or visit www.tendacn.com for
installation videos, technical specifications, user
guides, Symbols on Products and Materials and
more information.
You can see the product name and model on the
product label. The label can be found on the
back of the device.
Video and More Info
1
Press the WPS button of the router for about 1 to 3
seconds to enable WPS function.
Extended Successfully
• Management Address
re.tenda.cn
• Management Password
XXXXXXXX
Smoother roaming for Wi-Fi 6 and newer devices
5G Enhanced Roaming Wi-Fi
1
Tenda_XXXXXX
XXXXXXXX
Extended 5 GHz Wi-Fi
2
Tenda_XXXXXX_5G_EXT
XXXXXXXX
Extended 2.4 GHz Wi-Fi
3
Tenda_XXXXXX_EXT
XXXXXXXX
Management Information
Wi-Fi Information
Easier signal switching for Wi-Fi 5 and older devices
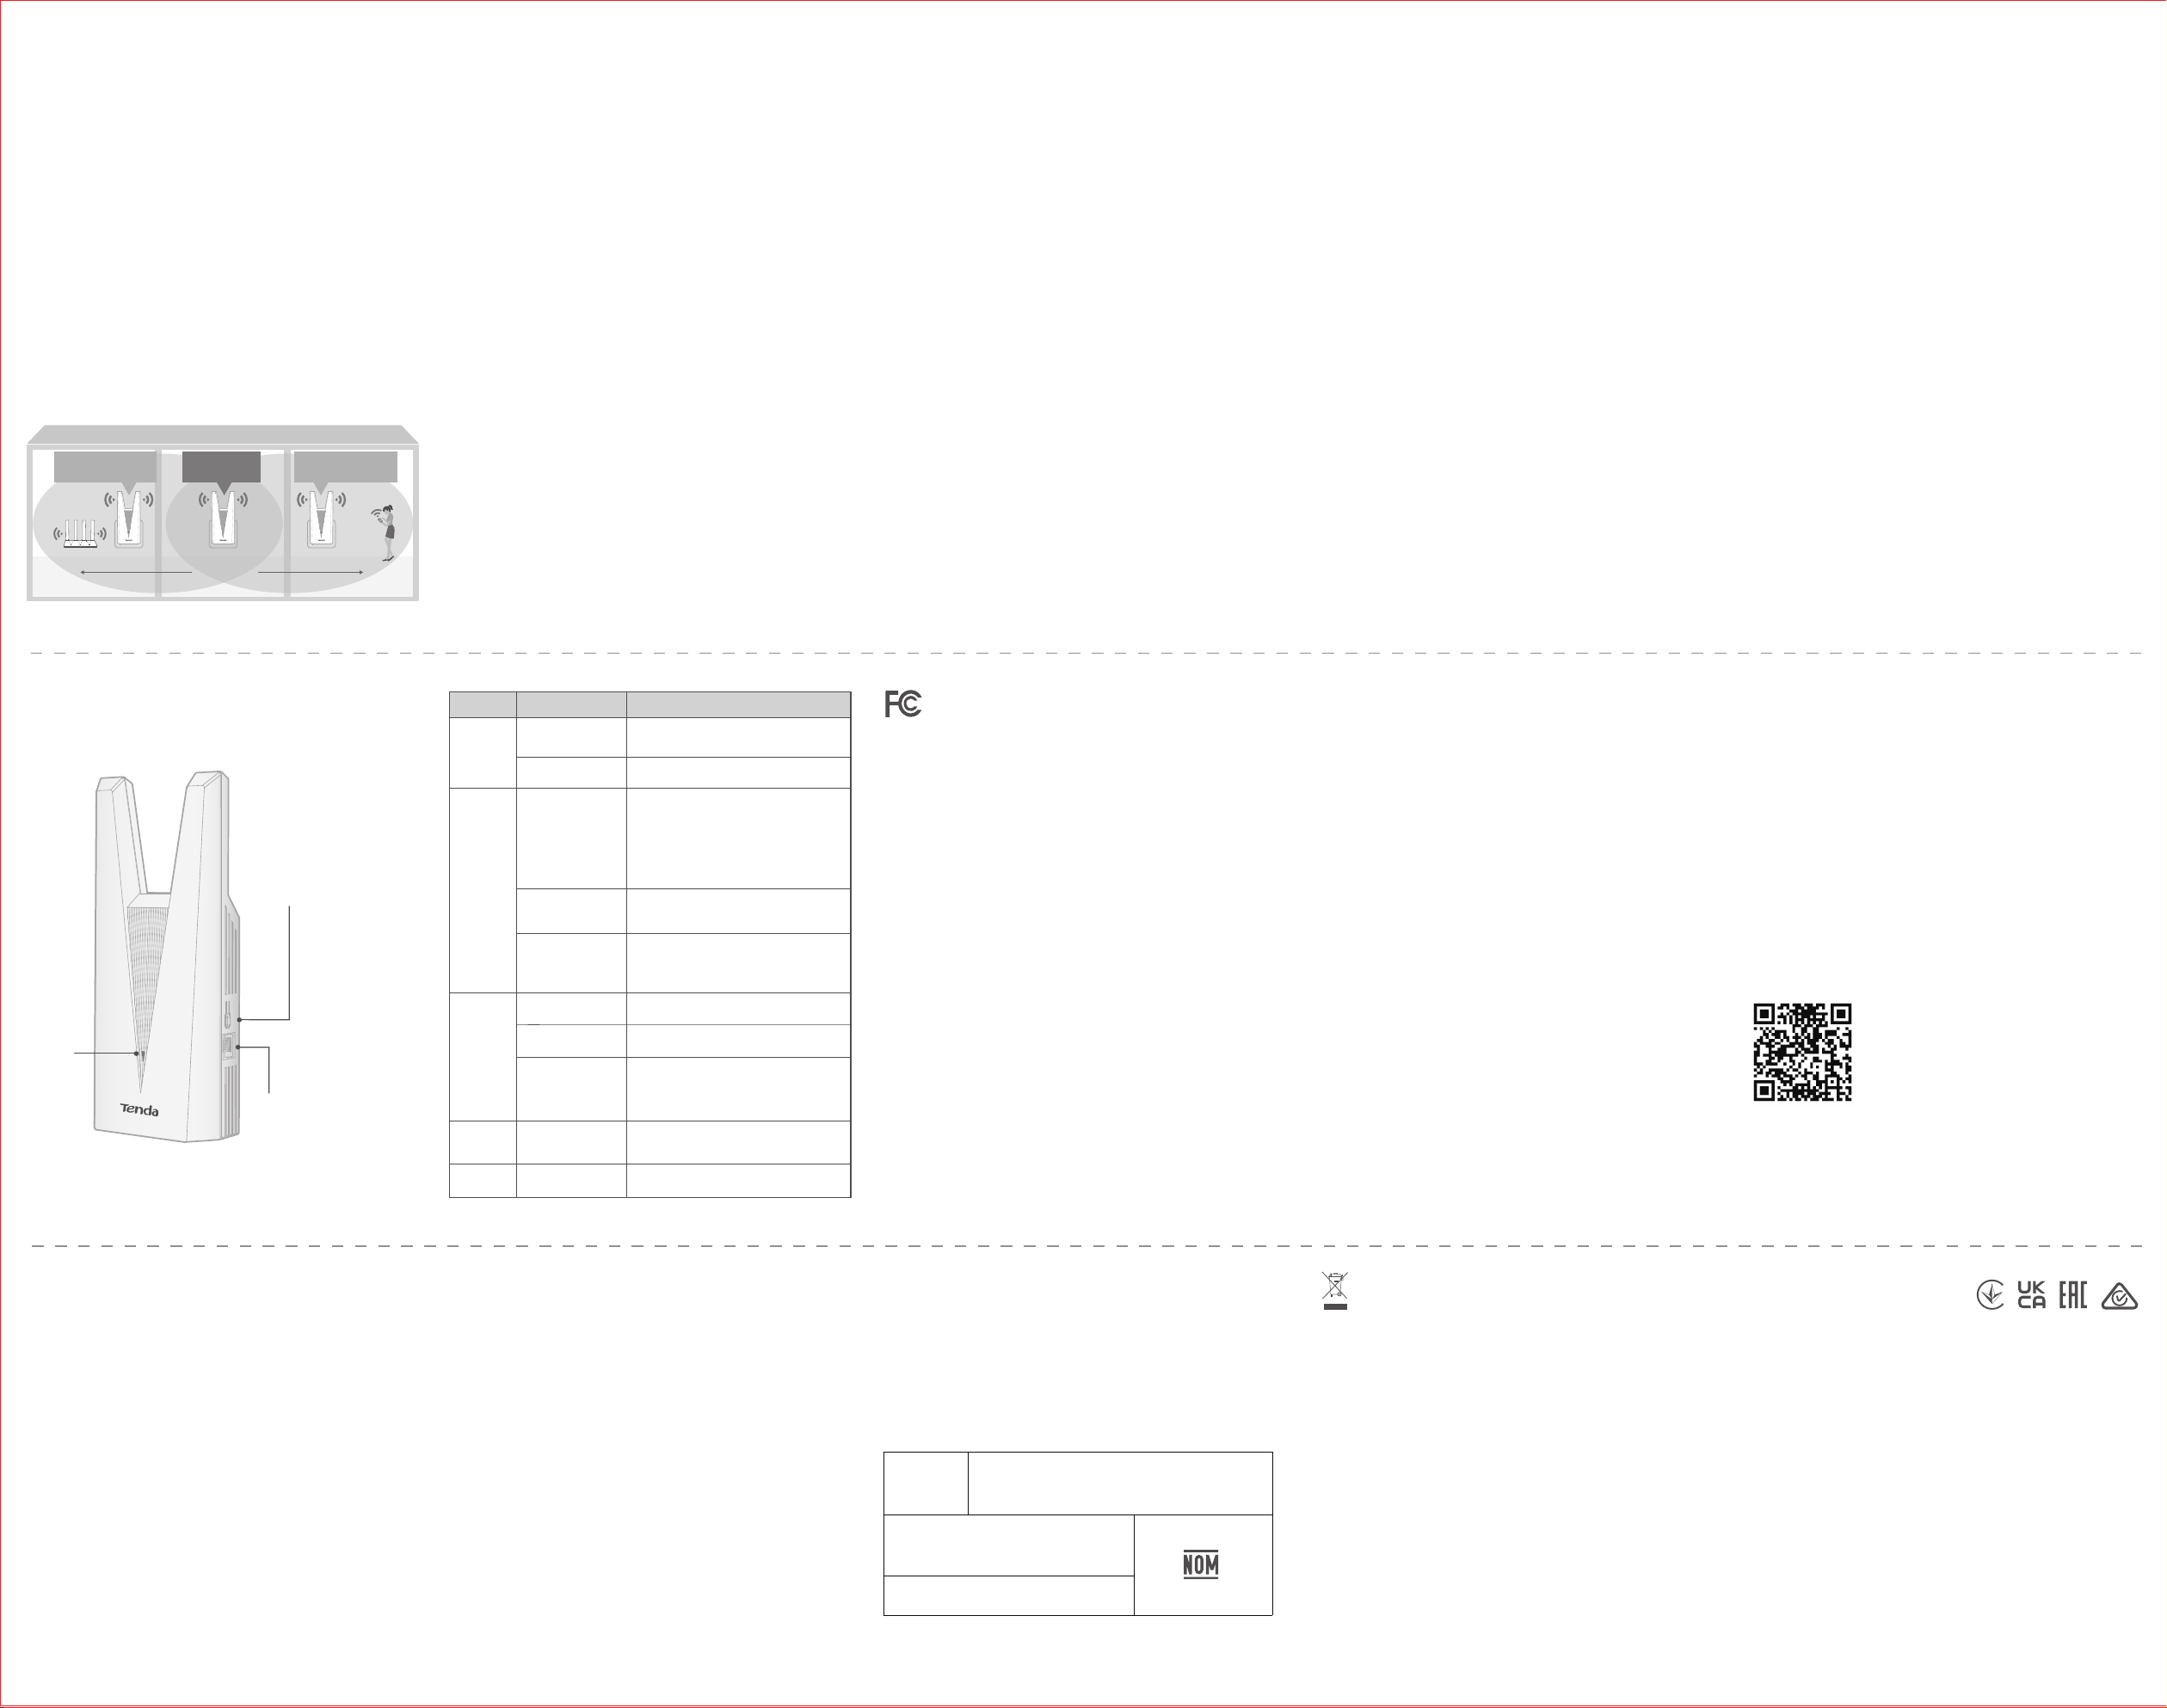
Appearance
FAQ
Q1. Unable to find the Wi-Fi name of the extender Tenda_EXT
Before extension:
The extender's default Wi-Fi name is Tenda_EXT.
After extension:
A: Wireless extension: After extension, the extender may use the
same Wi-Fi name as the upstream router, or Router Wi-Fi
Name_EXT (or _5G_EXT).
B: Mesh Networking: After a successful Mesh setup, the extender
uses the same Wi-Fi name as the upstream router.
*The extender can form a Mesh network with Tenda Wi-Fi+ Mesh or
EasyMesh-compatible routers, automatically syncing the Wi-Fi
name and password.
Q2. Slow speeds when using the extender's Wi-Fi
−
The extender may be improperly positioned.
•
If placed too far from the dead zone, the extender's Wi-Fi cannot
cover the area, leaving no signal in the dead zone.
•
If placed too far from the router, the extender cannot receive a
stable Wi-Fi signal to extend.
−
Reposition the extender midway between the router and the dead
zone for optimal performance.
Q3. Unable to log in to the web UI of the extender
Start with the following solutions:
−
Visit http://re.tenda.cn in your browser.
− If you are using a smartphone, ensure that mobile data is disabled.
− Clear browser cache.
If the problem persists, try the following solutions:
Before extension:
−
If you are using a wireless device, such as a smartphone, ensure that
your smartphone is connected to the Wi-Fi of the extender:
Tenda_EXT.
−
If you are using a wired device, such as a computer, ensure that your
computer is set to Obtain an IP address automatically and Obtain
DNS server address automatically.
−
Reset the extender and log in again.
After extension:
−
If you are using a wireless device, ensure that your device is
connected to the Wi-Fi of the extender. If the Wi-Fi name of the
extender is the same as the upstream router, stand near the extender
and connect to its Wi-Fi (the extender should not be too close to the
router, or temporarily power off the router).
−
If you are using a wired device, such as a computer, ensure that your
computer is set to Obtain an IP address automatically and Obtain
DNS server address automatically.
Q4. How to switch modes after Mesh networking
Restore the extender to factory settings first, then set it up again.
*If an Ethernet cable is connected, unplug it before resetting the
extender to factory settings.
Q5. After wireless extension (the indicator is solid on), speeds
through the extender may be lower than when connected directly
to the router
Some speed loss is normal due to signal attenuation and does not
affect normal use. To maximize the extension effect, ensure that the
extender indicator stays solid green, and reduce obstacles between the
extender and the router. If your home has Ethernet wiring, switch to
wired extension by connecting the extender to the router using an
Ethernet cable.
Q6. Mesh networking failed
−
For wireless setup, place the extender closer to the router (within 5
meters and no thick walls in between), then try again.
−
The extender supports networking with EasyMesh-compatible
routers across different brands. If networking fails, the upstream
device may not fully support the standard EasyMesh protocol.
A: If you can access the internet through the extender Wi-Fi
(Tenda_EXT), connect to it and access the extender management
page. Then follow the setup wizard to change the Wi-Fi name and
password.
B: If the internet connection is unavailable, restore the extender to
factory settings and access the management page. Then set up
wireless extension mode again as described in Method 1.
Q7. How to orient the extender
−
For large single-floor homes: Install the extender into a wall outlet
and keep it upright to the floor.
−
For multi-floor homes: Install the extender into a horizontally placed
power strip and keep it parallel to the floor.
Q8. After wireless extension, the extender indicator stays solid
yellow
−
When extending 5 GHz Wi-Fi, move the extender closer to the router
until the indicator turns solid green.
−
When extending only 2.4 GHz Wi-Fi, the indicator may stay solid
yellow even near the router. This is expected.
Q9. Unable to find the 5 GHz enhanced roaming Wi-Fi
If your phone cannot find the extended 5 GHz Wi-Fi after setup, it may
be because you are too far from the extender or there are too many
walls in between. Try moving the extender closer to the area with weak
Wi-Fi signal and ensure the indicator stays solid green. If the extender
cannot be moved, use the extender’s 2.4 GHz Wi-Fi for internet
access instead.
Q10. How to reset the extender
When the extender completes startup, press the RESET button for about 8
seconds.
When the indicator blinks red fast, the extender is restored to factory
settings.
Safety Precautions
Before operating, read and follow these precautions to prevent accidents.
− Do not use the device in a place where wireless devices are not allowed.
− Clean only with dry cloth.
− Do not block any ventilation openings, such as newspapers, table-cloth,
curtains.
− To avoid electrical shocks, do not insert any object into the ventilation
openings.
− Unplug this device during lightning storms or when unused for long periods
of time.
− The mains plug is used as the disconnect device, which shall remain readily
operable.
− The power socket shall be installed near the device and easily accessible.
− Operating environment: Temperature: 0℃ - 40℃ (32℉ - 104℉);
Humidity: (10% - 90%) RH, non-condensing; Storage environment:
Temperature: -40℃ - 70℃ (-40℉ - 158℉); Humidity: (5% - 90%) RH,
non-condensing.
− If such phenomena as smoke, abnormal sound or smell appear when you
use the device, immediately stop using it and disconnect its power supply,
and contact the after-sales service personnel.
− Warning: To reduce the risk of electric shock, do not remove cover as there
are no user-serviceable parts inside. Refer servicing to qualified personnel.
− Refer all servicing to qualified service personnel.
− Disconnect the power source during servicing.
− Keep this device out of reach of children to prevent children from using it as
a toy and causing personal injury.
− Keep the device away from water, fire, high electric field, high magnetic
field, and inflammable and explosive items.
For the latest safety precautions, see Safety and Regulatory Information
on www.tendacn.com.
Caution:
Any changes or modifications not expressly approved by the party
responsible for compliance could void the user's authority to operate
this equipment.
Operating frequency: 2412-2462MHz, 5150-5350 MHz,
5725-5850 MHz
The device is for indoor usage only.
NOTE: (1) The manufacturer is not responsible for any radio or TV
interference caused by unauthorized modifications to this equipment.
(2) To avoid unnecessary radiation interference, it is recommended to
use a shielded RJ45 cable.
This equipment has been tested and found to comply with the limits for a
Class B digital device, pursuant to Part 15 of the FCC Rules. These limits
are designed to provide reasonable protection against harmful
interference in a residential installation. This equipment generates, uses
and can radiate radio frequency energy and, if not installed and used in
accordance with the instructions, may cause harmful interference to
radio communications. However, there is no guarantee that interference
will not occur in a particular installation. If this equipment does cause
harmful interference to radio or television reception, which can be
determined by turning the equipment off and on, the user is encouraged
to try to correct the interference by one or more of the following
measures:
— Reorient or relocate the receiving antenna.
— Increase the separation between the equipment and receiver.
— Connect the equipment into an outlet on a circuit different from that to
which the receiver is connected.
— Consult the dealer or an experienced radio/TV technician for help.
Operation is subject to the following two conditions: (1) this device may
not cause harmful interference, and (2) this device must accept any
interference received, including interference that may cause undesired
operation.
Radiation Exposure Statement
This device complies with FCC radiation exposure limits set forth for an
uncontrolled environment and it also complies with Part 15 of the FCC RF
Rules.
This transmitter must not be co-located or operating in conjunction with
any other antenna or transmitter.
This equipment should be installed and operated with minimum distance
20cm between the device and your body.
FCC Statement
CAN ICES-3 (B) / NMB-3 (B)
Canadian Compliance Statement
This device contains licence-exempt transmitter(s)/receiver(s) that comply
with Innovation, Science and Economic Development Canada’s licence-ex-
empt RSS(s). Operation is subject to the following two conditions:
(1) This device may not cause interference.
(2) This device must accept any interference, including interference that may
cause undesired operation of the device.
L’émetteur/récepteur exempt de licence contenu dans le present appareil est
conforme aux CNR d’Innovation, Sciences et Développement économique
Canada applicables aux appareils radio exempts de licence. L’exploitation est
autorisée aux deux conditions suivantes:
(1) L’appareil ne doit pas produire de brouillage;
(2) L’appareil doit accepter tout brouillage radioélectrique subi, même si le
brouillage est susceptible d’en compromettre le fonctionnement.
Any changes or modifications not expressly approved by the party
responsible for compliance could void the user’s authority to operate the
equipment.
Tous les changements ou modifications non expressément approuvée par le
responsible de la conformité pourrait vider l’utilisateur est habilité à exploiter
l’équipement.
ISEDC Radiation Exposure Statement:
The equipment complies with ISEDC RF radiation exposure limits set forth for
an uncontrolled environment.
Cet appareil est conforme aux limitesd’exposition de rayonnement RF ISEDC
établiespour un environnement non contrôlé.
This transmitter must not be co-located or operating in conjunction with any
other antenna or transmitter. This equipment should be installed and operated
with a minimum distance of 20cm between the radiator and your body.
Cet émetteur ne doit pas être co-implanté oufonctionner en onjunction avec
toute autreantenne ou transmetteur. La distance entre le radiateur et le corps
doit être d'au moins 20 cm lors de l'installation et du fonctionnement de
l'appareil.
The device for operation in the bands 5150–5250 MHz and 5250–5350
MHz is only for indoor use to reduce the potential for harmful interference to
co-channel mobile satellite systems.
le dispositif utilisé dans la bandes 5150-5250 MHz et de 5250–5350 MHz
est réservé à une utilisation en intérieur afin de réduire le risque de brouillage
préjudiciable aux systèmes mobiles par satellite dans le même canal.
ISED Canada Compliance Statement
Australia Cyber Security SoC is available at the following internet
address:https://www.tendacn.com/au/page/CyberSecuritySoC
Australia Cyber Security SoC
Australia Cyber Security SoC
RECYCLING
This product bears the selective sorting symbol for Waste Electrical and
Electronic Equipment (WEEE). This means that this product must be
handled pursuant to European directive 2012/19/EU in order to be recycled
or dismantled to minimize its impact on the environment.
User has the choice to give his product to a competent recycling
organization or to the retailer when he buys a new electrical or electronic
equipment.
LA OPERACIóN DE ESTE DISPOSITIVO ESTA SUJETA A LAS SIGUIENTES
CONDICIONES:
a) Es posible que este equipo o dispositivo no cause interferencia perjudicial.
b) Este equipo o dispositivo debe aceptar cualquier tipo de interferencia,
incluyendo la que pueda causar su operación no deseada.
Estimado usuario: Antes de utilizar este producto lo invitamos a leer el
siguiente manual para que conozca todas sus funciones y caracteristicas.
NOM
Producto
NOMBRE DEL PRODUCTO: Extensor de alcance Wi-Fi
Gigabit de doble banda
MODELO: A33
Alimentador de Energía:
Alimentación: 100V - 240V ca 50Hz/60Hz, 0.4A
Salida: 12V cc 1A
PAIS DE ORIGEN: CHINA
Technical Support
Shenzhen Tenda Technology Co., Ltd.
Floors 6-8, Tower E3, No.1001, Zhongshanyuan Road, Nanshan
District, Shenzhen, China. 518052
Website: www.tendacn.com
E-mail: support@tenda.cn
support.usa@tenda.cn (North America)
support.uk@tenda.cn (United Kingdom)
support.au@tenda.cn (Australia)
support.mx@tenda.cn (Mexico)
Copyright © 2026 Shenzhen Tenda Technology Co., Ltd. All
rights reserved.
Tenda is a registered trademark legally held by Shenzhen Tenda
Technology Co., Ltd. Other brand and product names mentioned
herein are trademarks or registered trademarks of their respective
holders. Specifications are subject to change without notice.
V1.0 Keep for future reference
WPS/RESET
Scenario Status
Solid green for 30
seconds
Solid on
Blinking green fast
Blinking red slowly
Power on and starting up
Blinking green slowly Startup complete
Connected to the internet
Not set up or not connected to the internet
Device connected to or disconnected from
the Ethernet port
WPS connection or Mesh networking in
progress (valid for 2 minutes)
Failed to extend or connect to a network
*Check that both ends of the Ethernet cable are securely
connected to the extender.
Extension success
− Green: Proper position.
− Yellow: Fair position. Move the extender
closer to the router (see Q8 for details).
− Red: Too far from the router.
Blinking yellow slowly
Blinking green fast
for 3 seconds
Failed to connect to the internet
*Check that the upstream router can access the
internet normally.
Description
Start up
Network
extension
Internet
connection
Cable
connection
Restoring the extender to factory settingsBlinking red fastReset
Solid green
Blinking green slowly
Indicator
Reset button and WPS button
• Press 1-3s for bridging or MESH
networking
• Press 8s for reset
Ethernet port
Used to connect to such devices
as routers, computers, game
consoles, TV, set-top boxes, and
printers
Midway position
Extender Extender
Extender
Too far from the dead zone
(Not recommended)
Too far from the router
(Not recommended)
Midway
(Recommended)
Router