Operation guide(PuduBot2)
Download
To download the PDF version of this document, please click here:
PuduBot2_Operation_Guide_V12.2-231117.pdf
Quick Start Guide
Power on
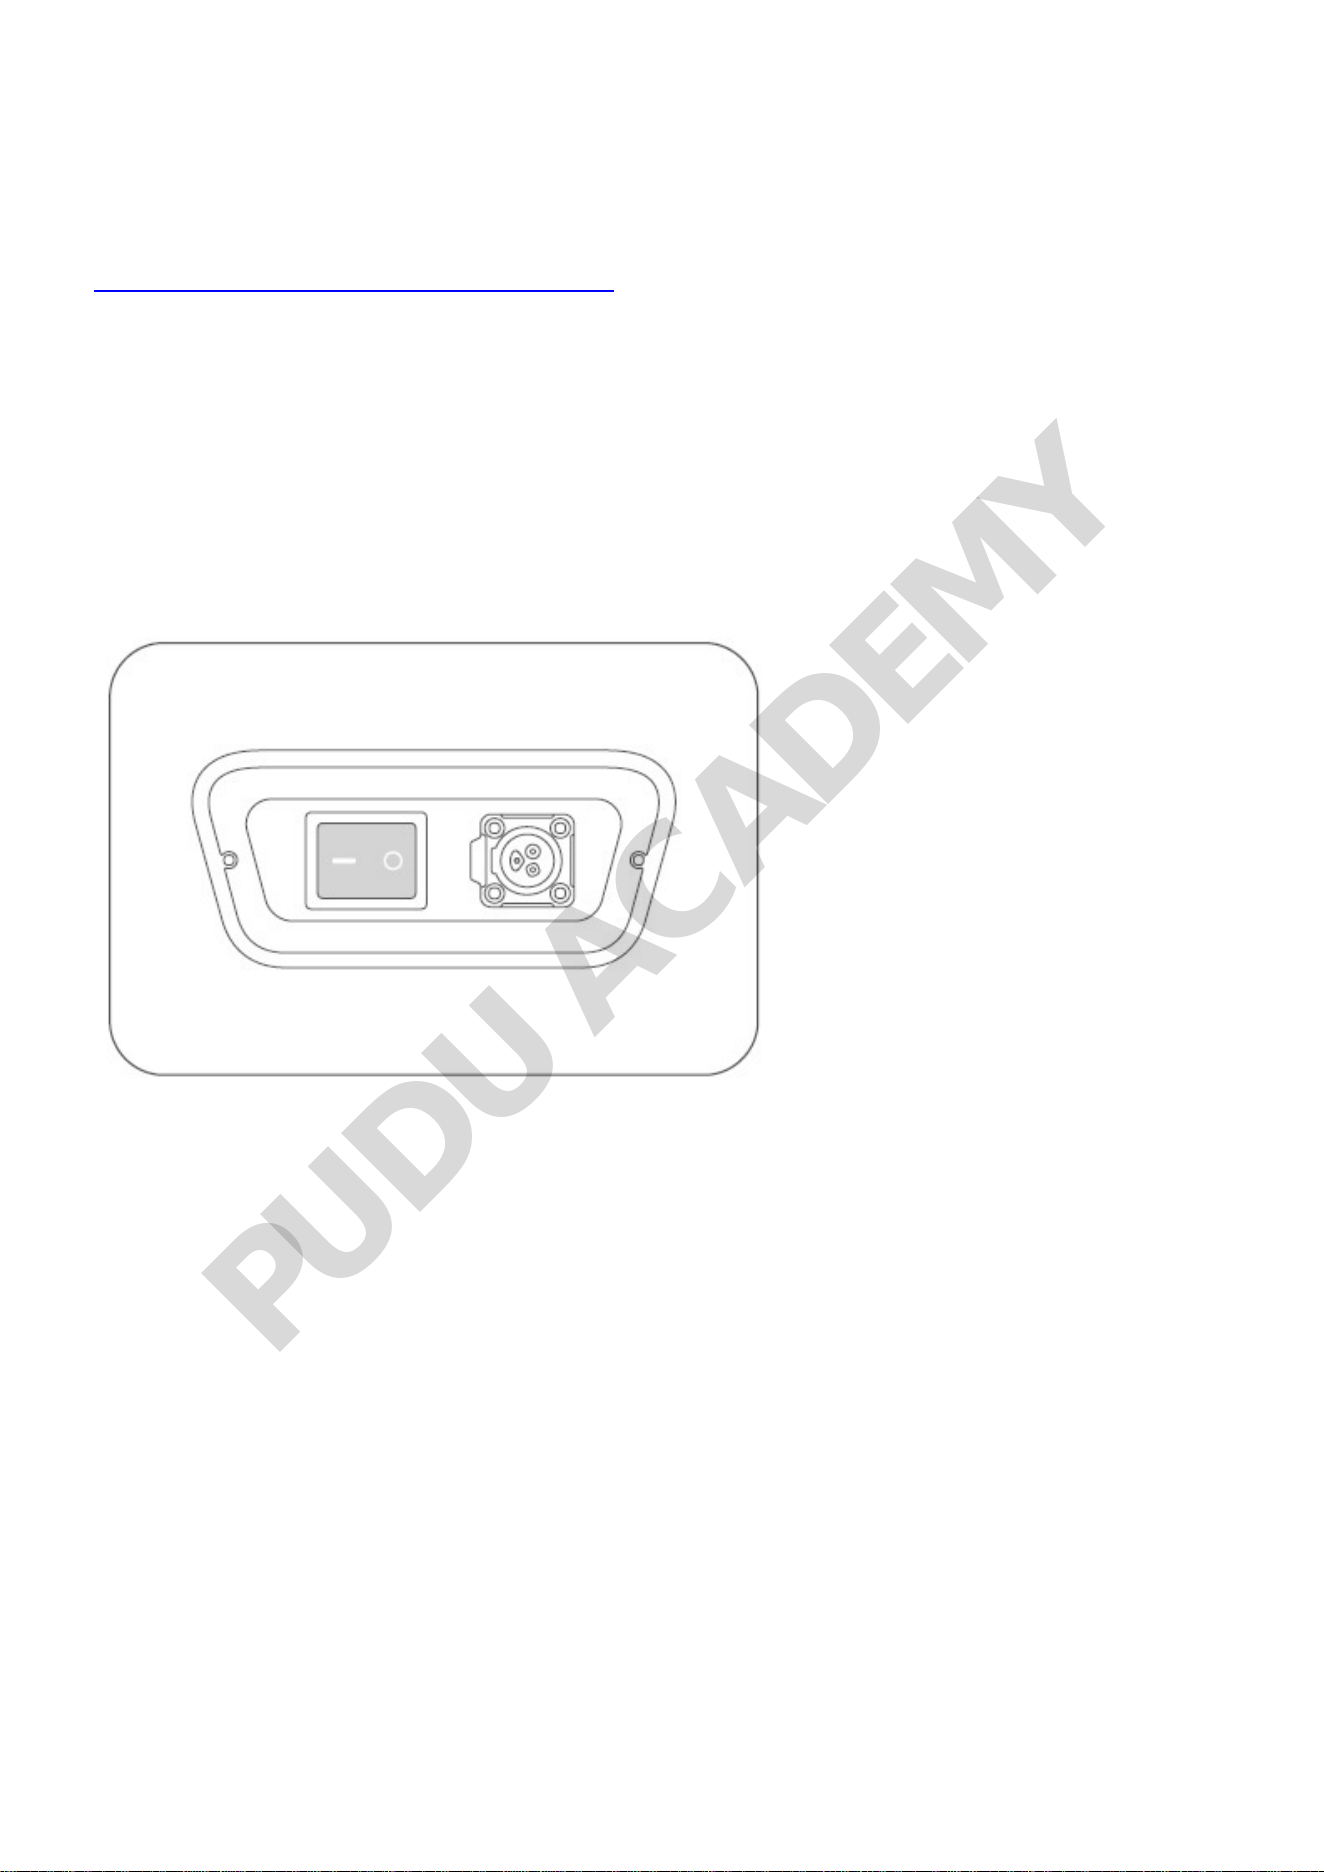
Step 1 Make sure that the master switch has been turned to the "➖" position before starting up the
robot.
Step 2 Move the robot to the startup location. Press and hold the power switch for 1 second, and the
light strip on the top of the robot will turn blue, indicating that the robot has been successfully
powered on.
PUDU ACADEMY
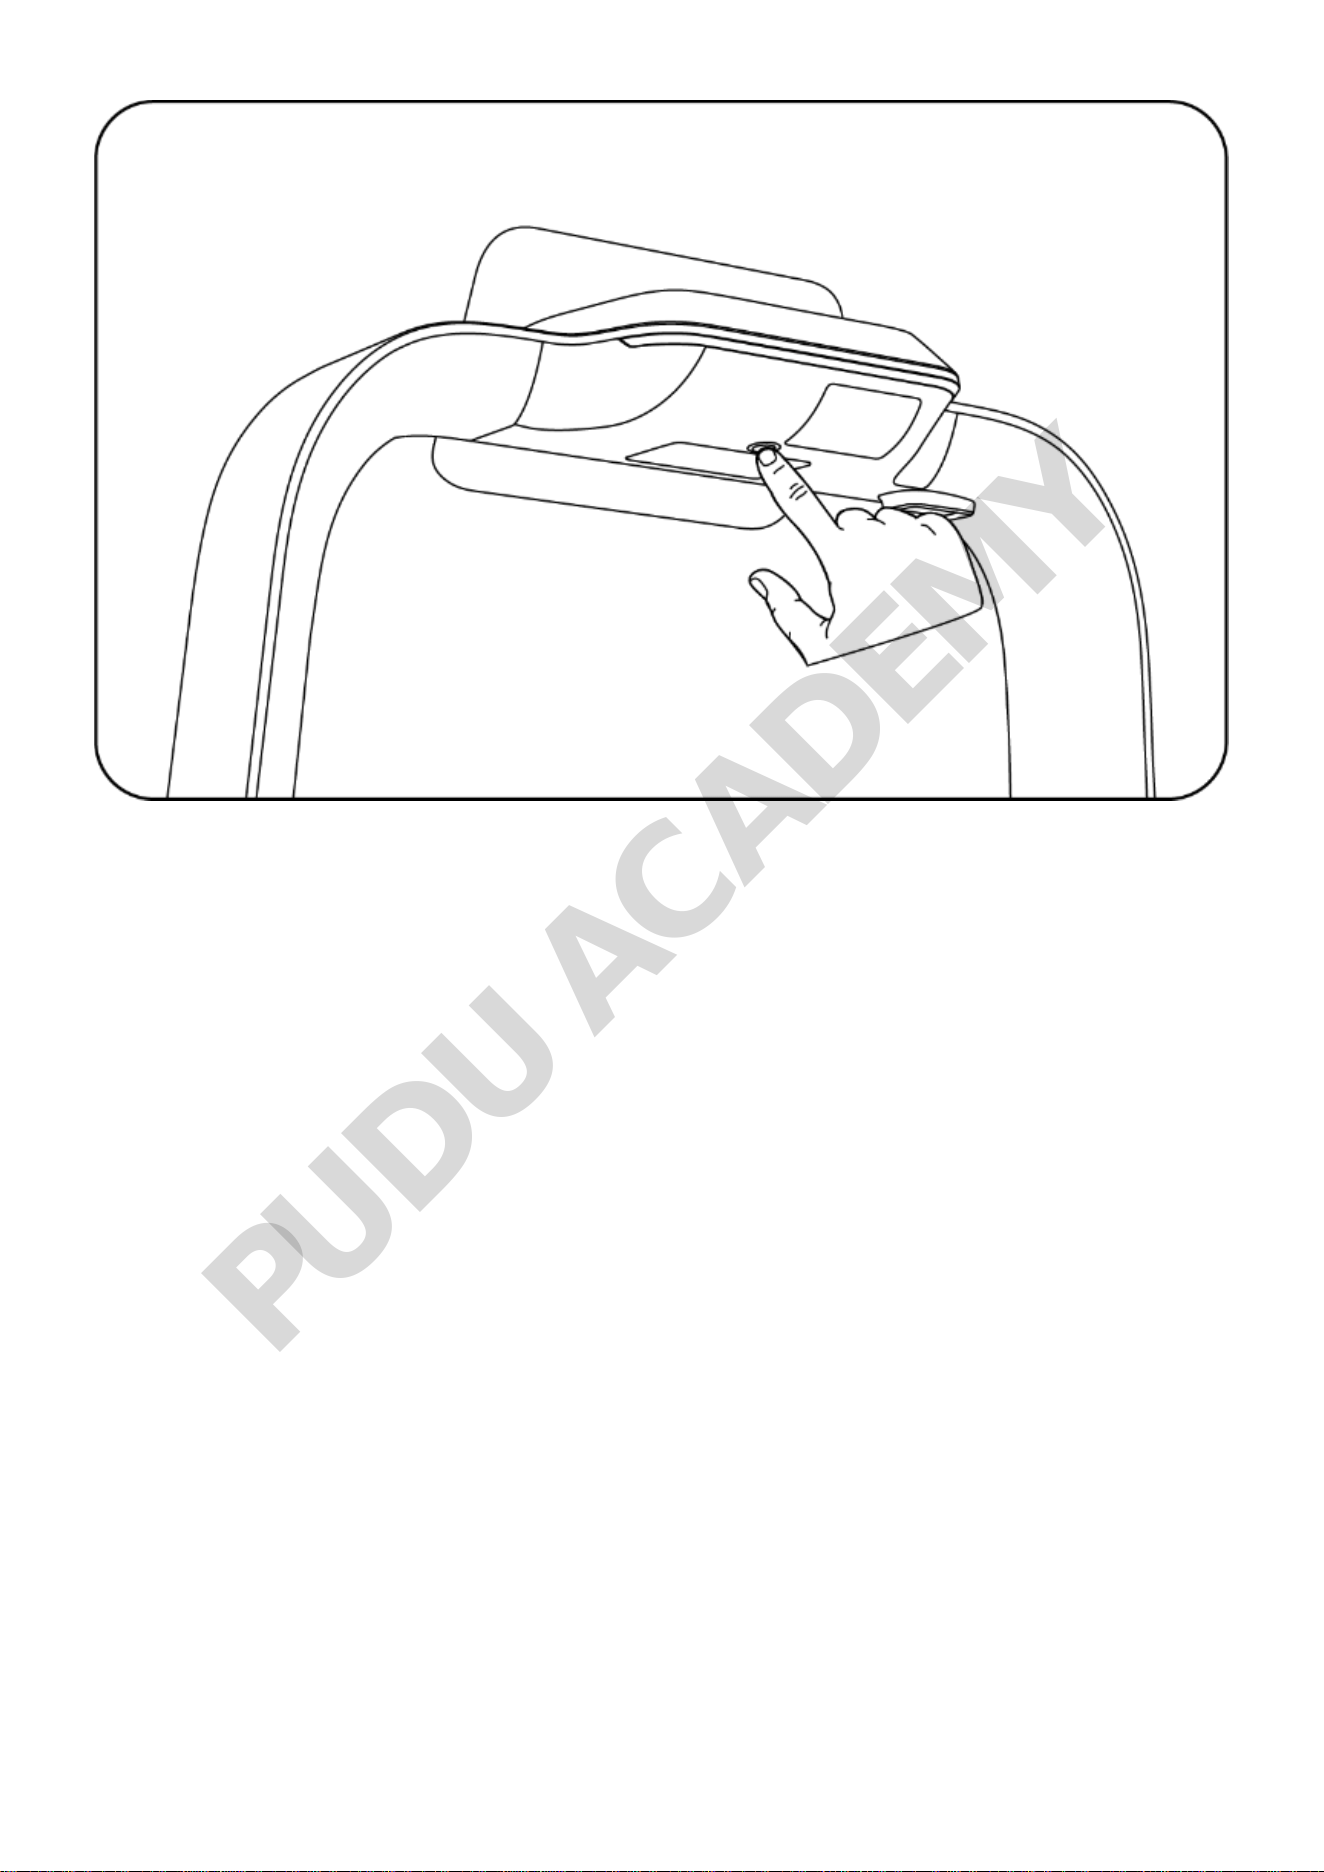
Note
The system will automatically start Pudu APP by default after powering on. If not, tap the "Desktop"
icon on the system desktop to start it.
Step 3 The robot is powered on, let's try it out!
Power off
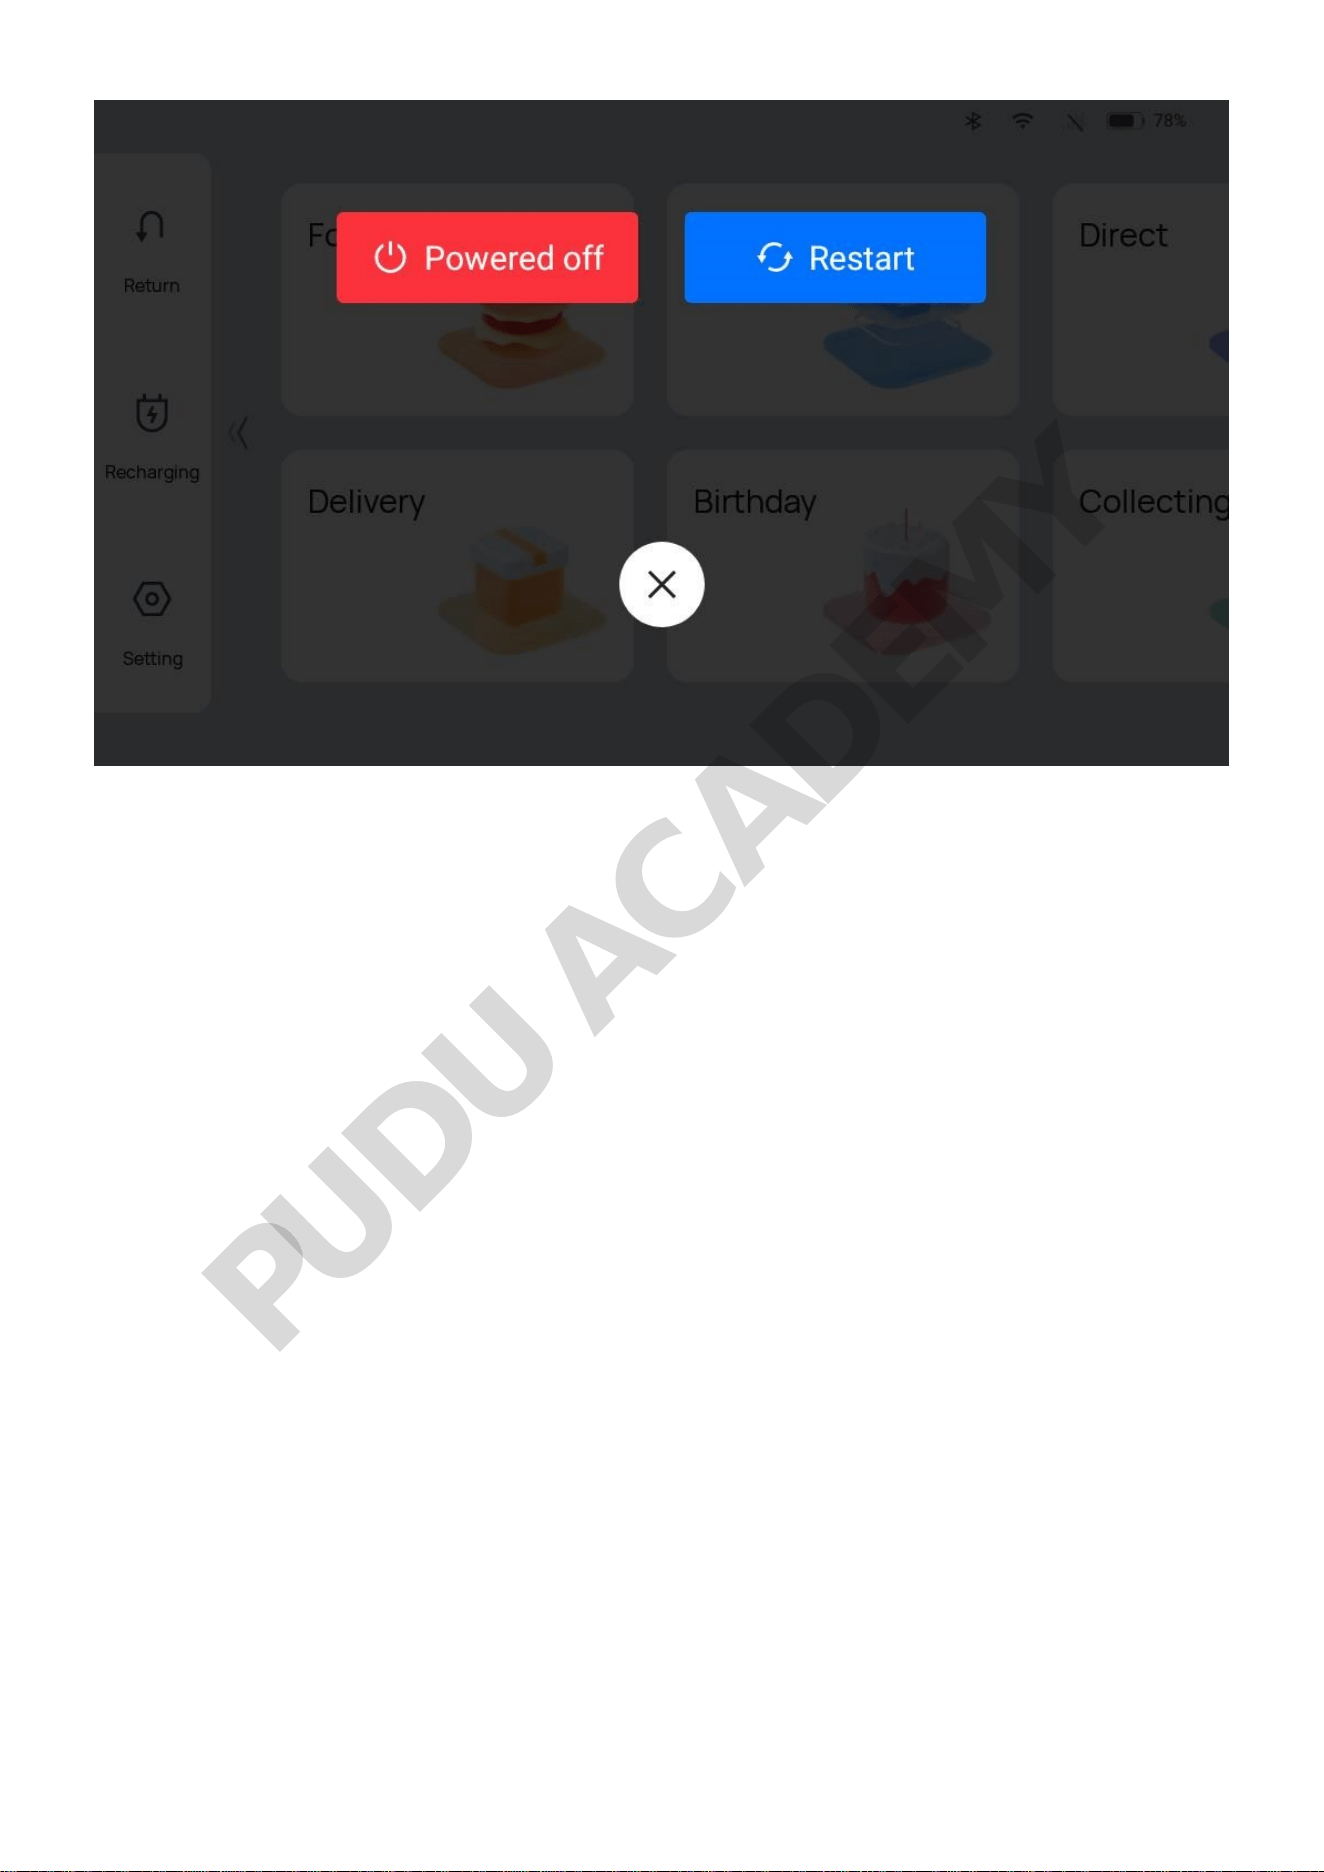
Press and hold the power switch for 3 seconds, and a shutdown prompt will pop up. Click "Confirm"
and the light strip on the top of the robot and the screen will turn off, indicating that the robot has
been successfully powered off.
PUDU ACADEMY
Pause
While the robot is moving, the current task can be paused by tapping the screen. Tapping the screen
again will resume the current task.
Emergency stop
In n case of an emergency while the robot is moving, press the emergency stop switch to stop the
robot. Turn the emergency stop switch clockwise and follow the on-screen prompts to resume the
robot's operation.
Task Scenarios
Product Features
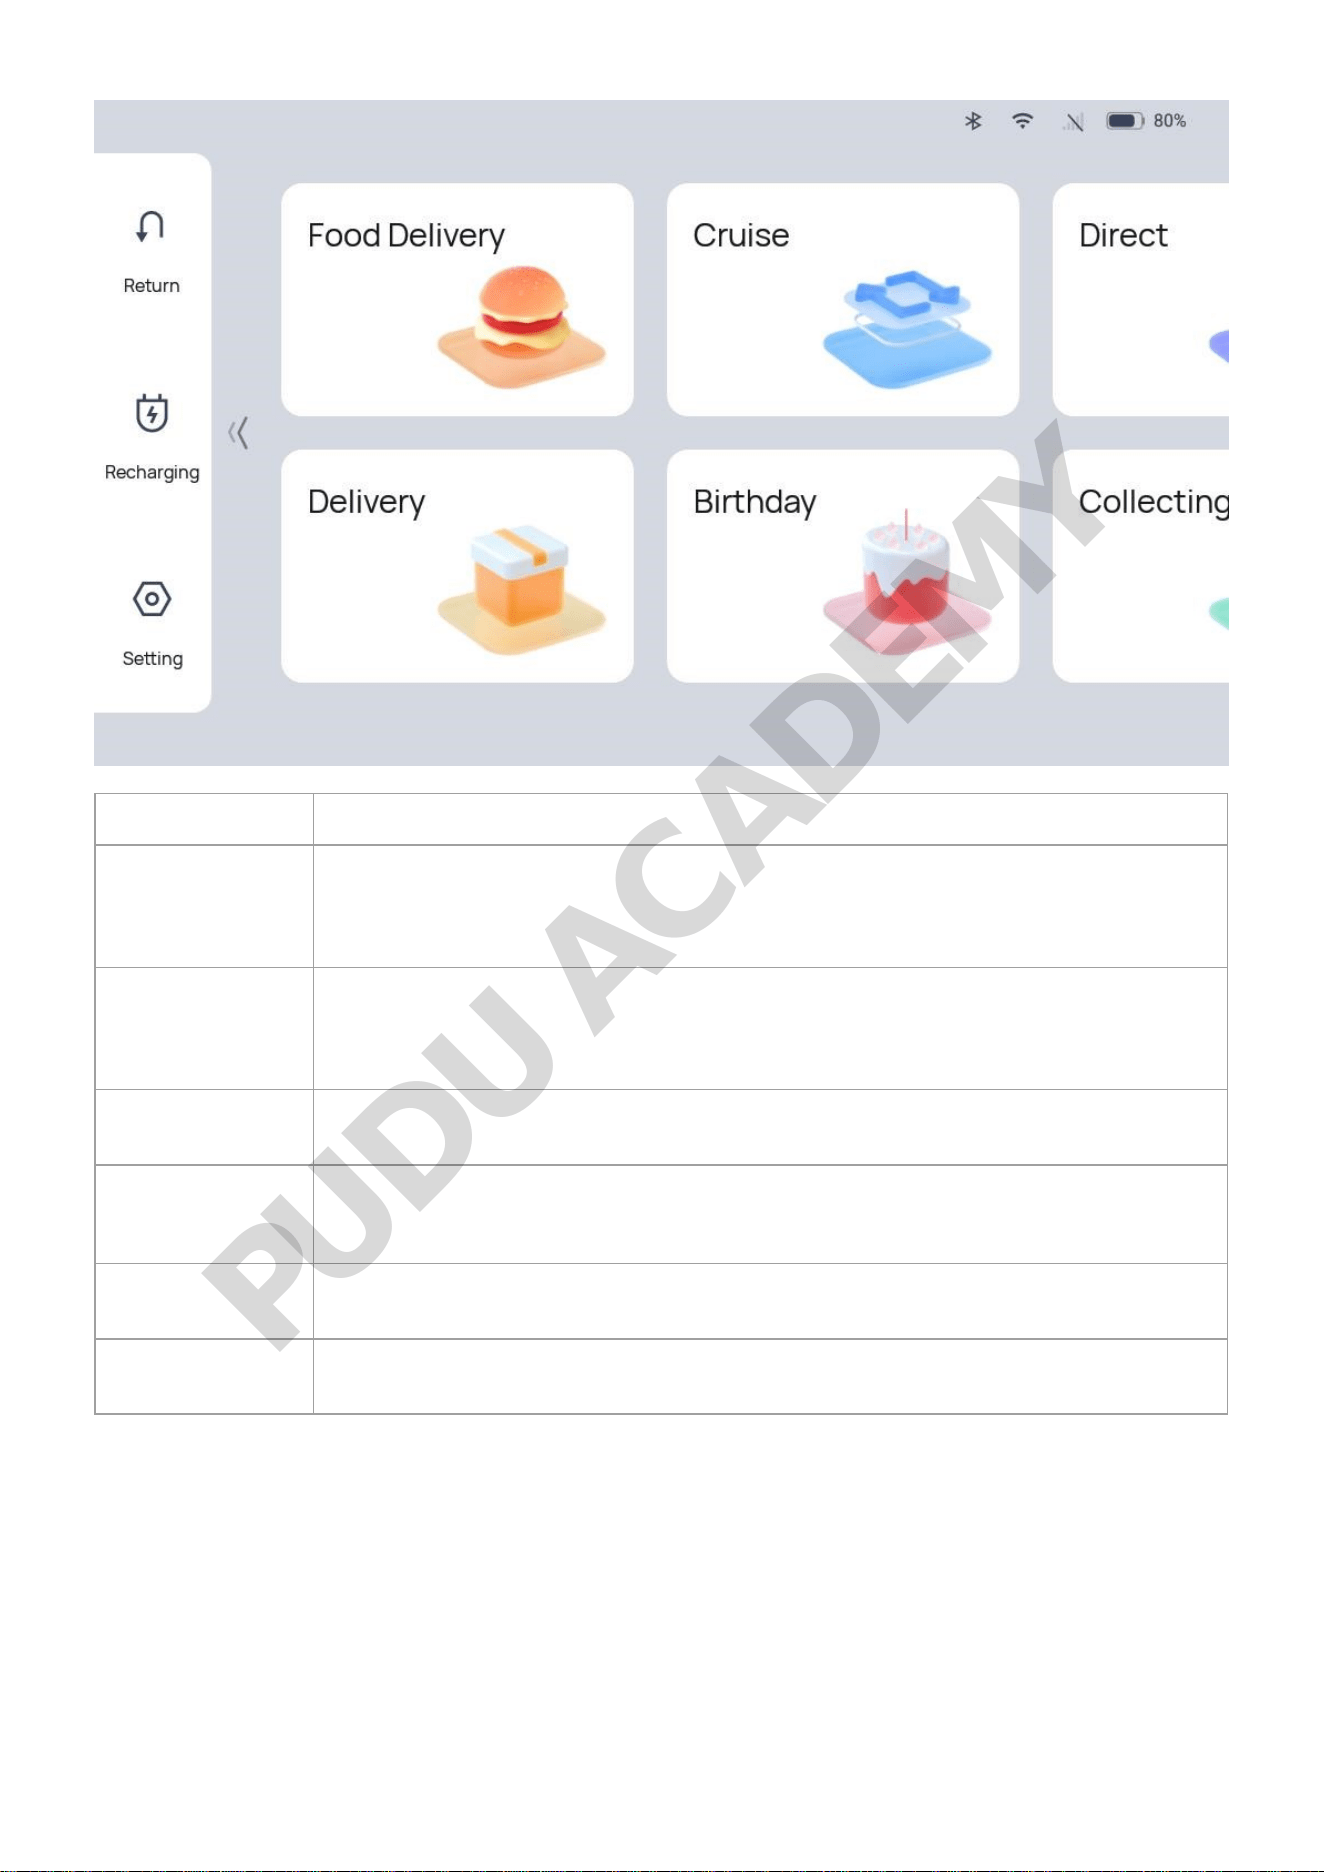
The robot comes with various modes, including Food delivery mode, Delivery mode, Cruise mode,
Direct Delivery mode, Birthday mode, and Collection mode, to cater to the needs of different
scenarios. After powering on the robot, you can select the mode as needed in the screen.
PUDU ACADEMY
Mode Description
Food delivery
mode
The robot delivers food to multiple tables at the same time. After the dishes
ordered by different customers are placed on the trays and the table numbers are
entered, the robot automatically plans the best routes for delivery. After that, the
robot automatically returns to the standby position.
Delivery mode
The robot delivers things to multiple tables at the same time. After the thingss
ordered by different customers are placed on the trays and the destinations are
entered, the robot automatically plans the best routes for delivery. After that, the
robot automatically returns to the standby position.
Cruise mode
The robot circulates along a predetermined path with self-service drinks, desserts
or napkins, and recommends them to customers by voice.
Direct Delivery
mode
You can set a table with a certain number or the dish-washing room as the
destination. After performing one-way delivery, the robot exits from the current
task instead of returning to the pick-up position.
Birthday mode
The robot delivers birthday cakes or gifts to customers, accompanied by
customized background music.
Collecting mode
In Collecting mode, the robot collects the things to be cleaned and delivers them
to the collecting point or the transit point.
Note
To ensure a stable and safe operation of the robot, it is recommended that the delivery speed be
lower than 0.9m/s (2.95 ft/s), and the cruise speed at 0.1m/s (0.33 ft/s) or 0.6m/s (1.97 ft/s).
Delivery Mode
In Delivery Mode, an item is delivered to a specified destination, with automatic return to the
docking location after completing delivery to the final destination
PUDU ACADEMY
How to Use the Main Processes in Delivery Mode
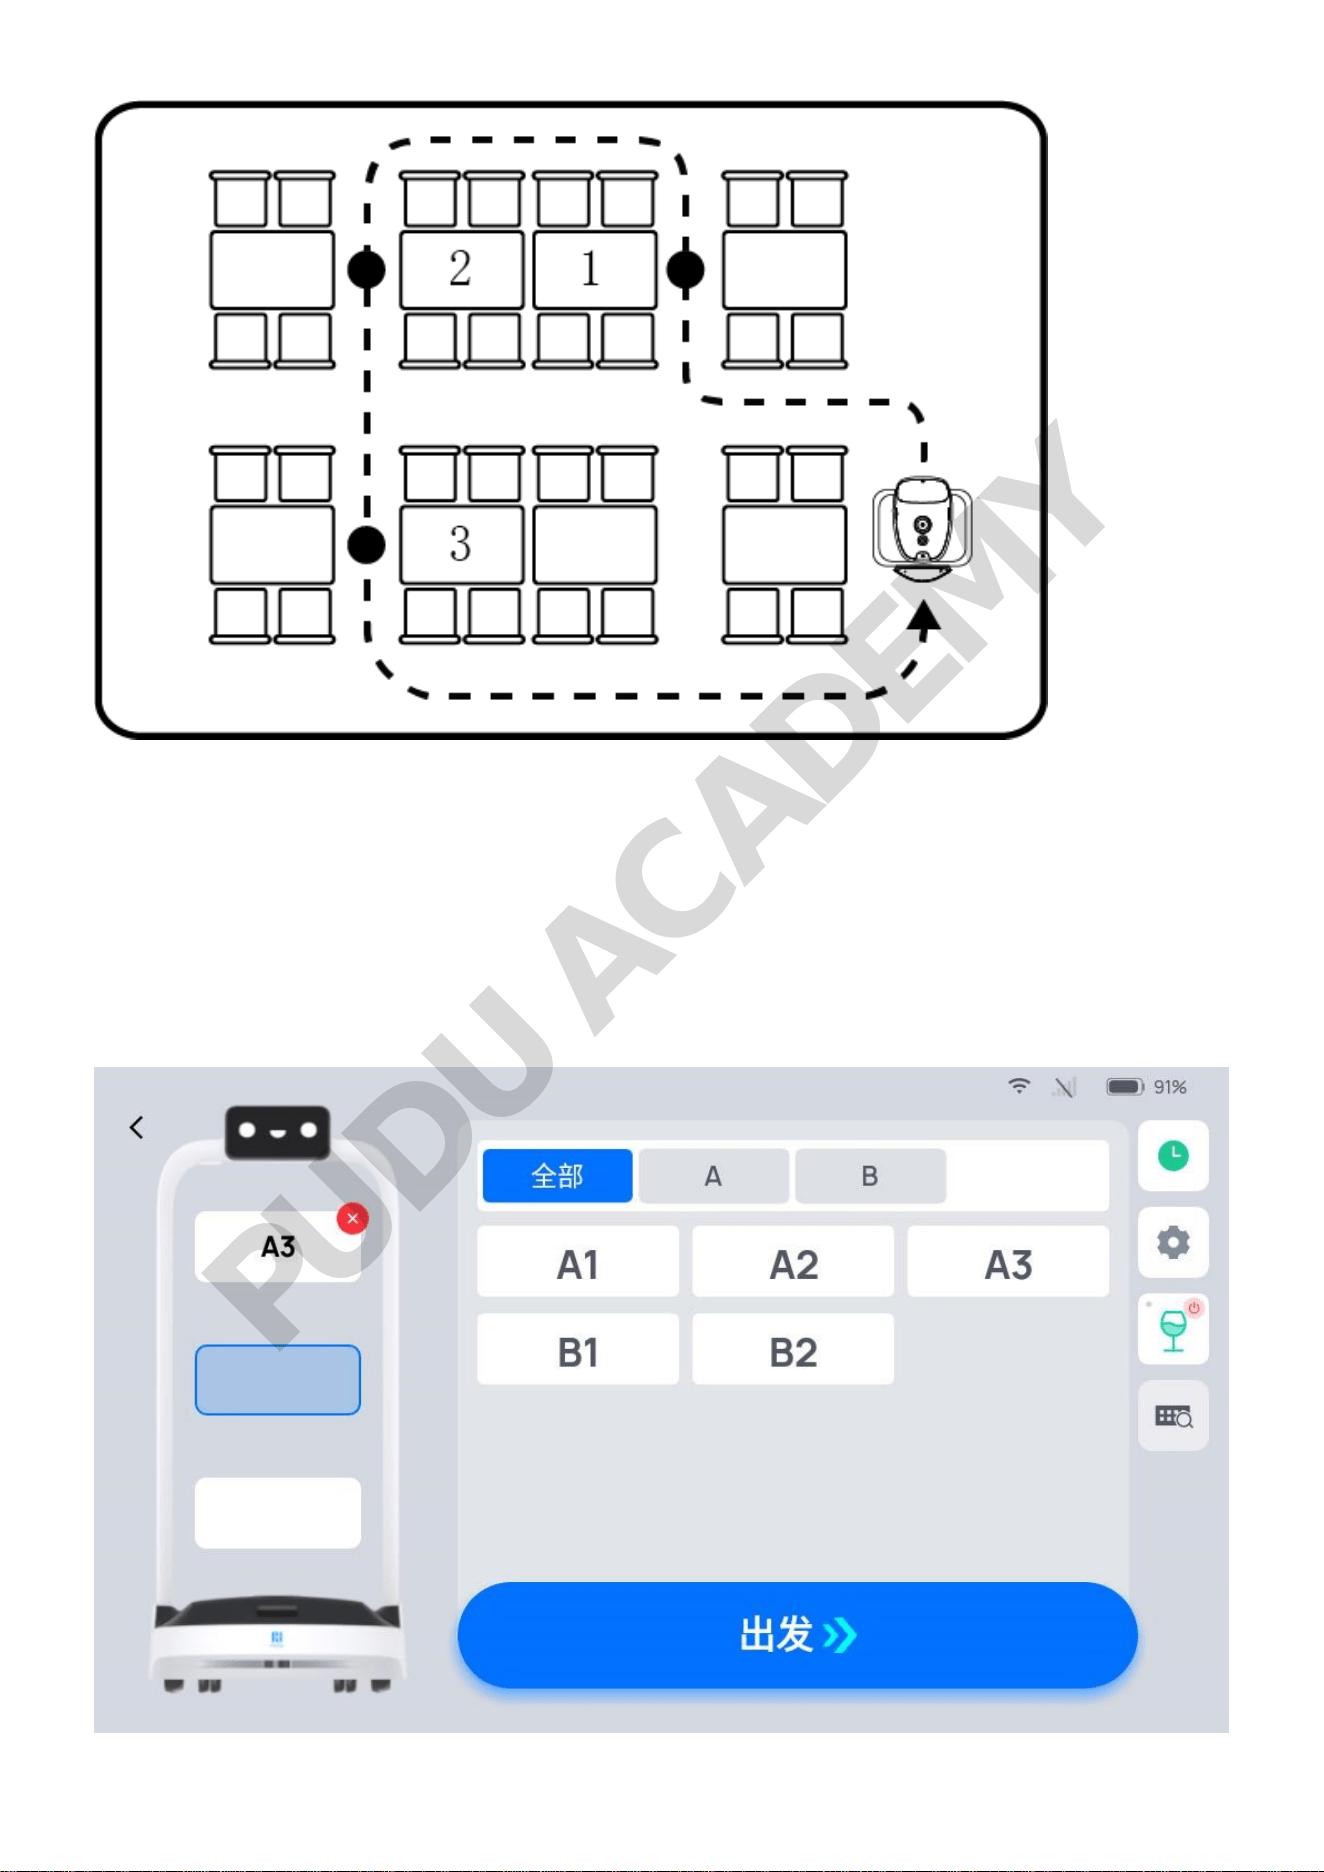
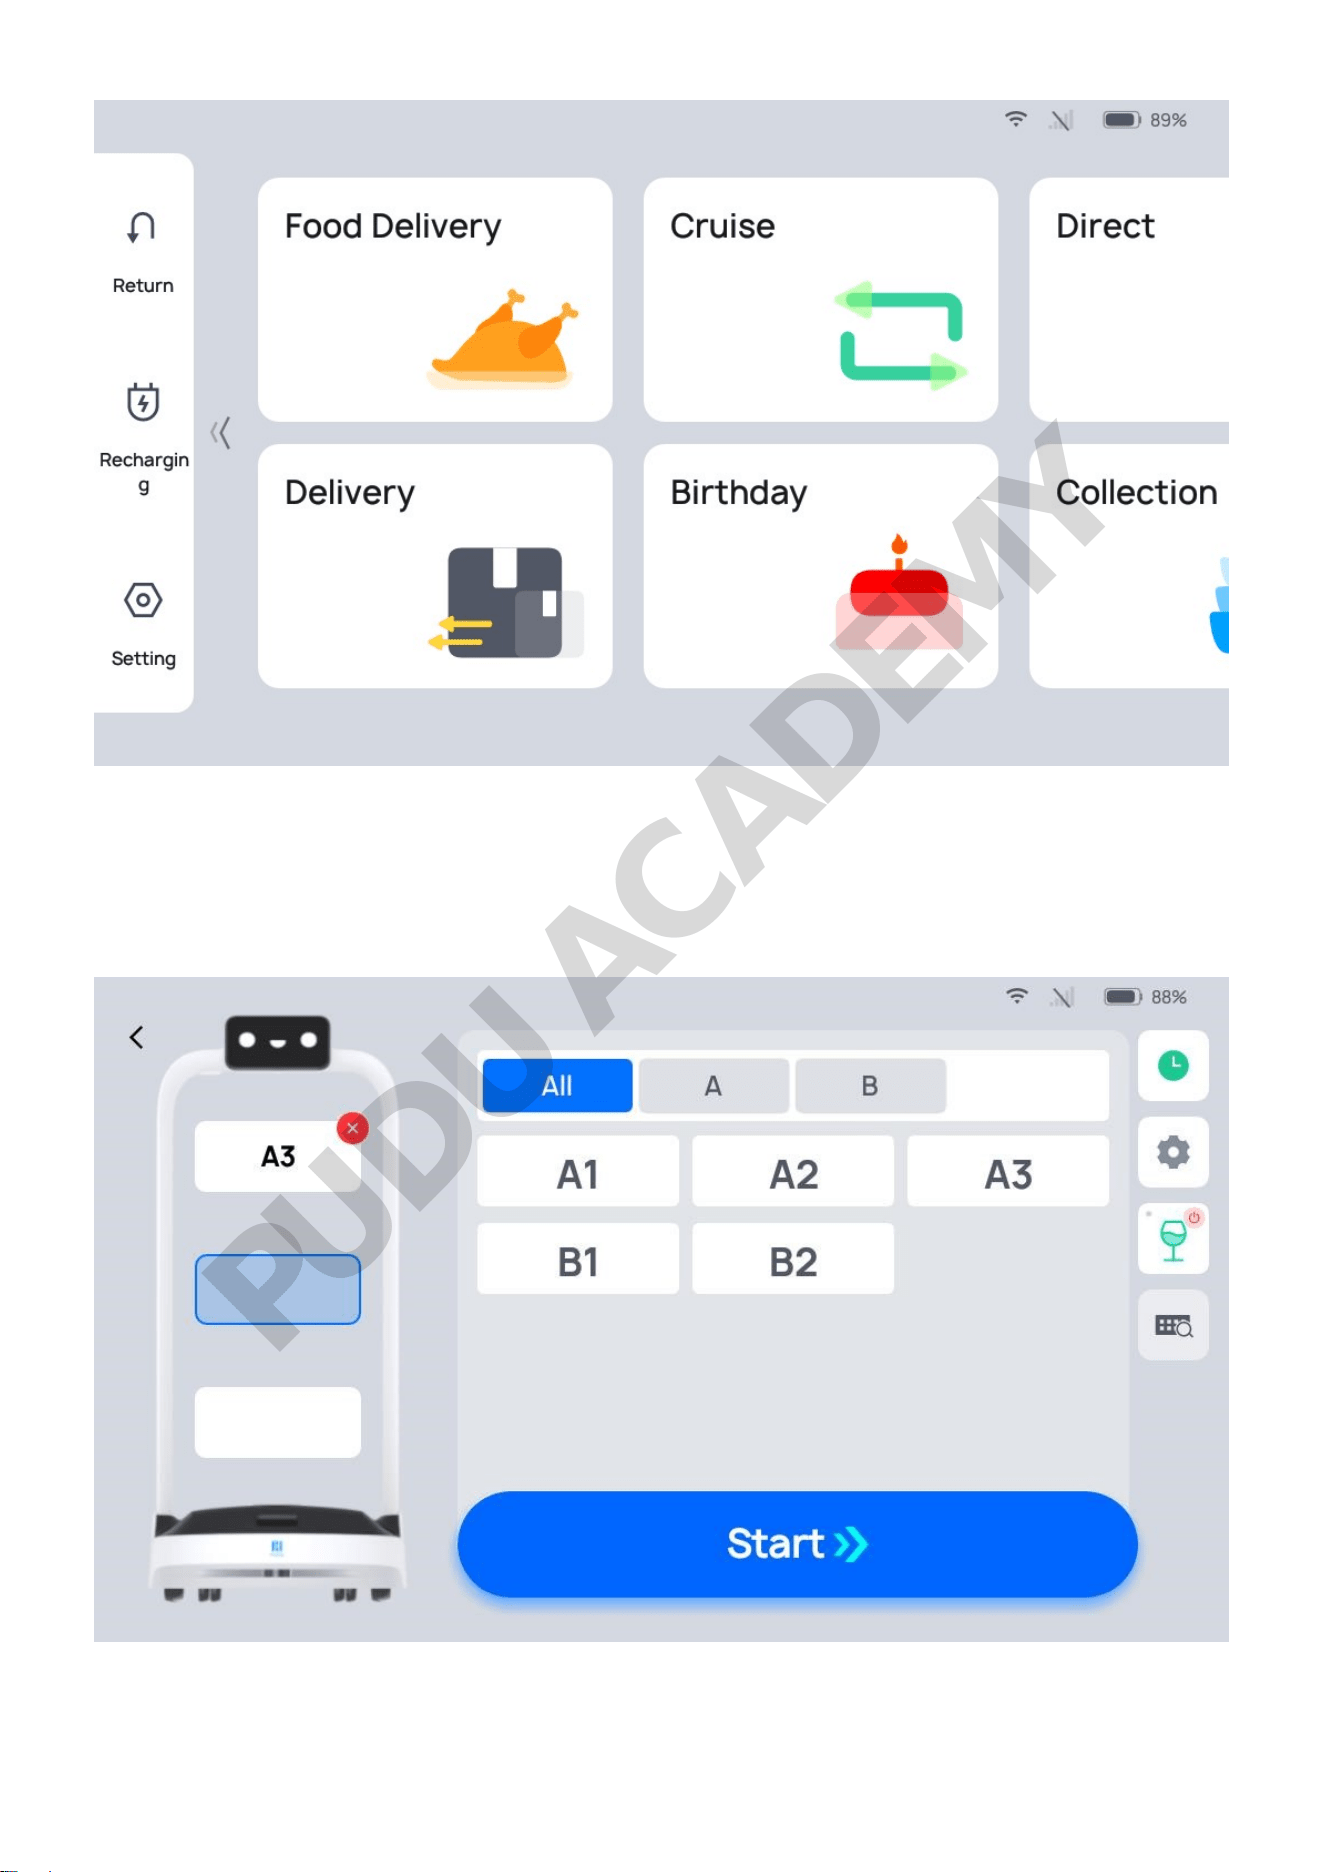
Step 1 On the robot's home page, select "Delivery" to access the main interface for delivery mode.
Step 2 Place the item on the corresponding tray.
Step 3 Tap on the tray bearing the item on the left side of the interface, then select the destination
on the right side. The corresponding tray will immediately display the destination name.
PUDU ACADEMY
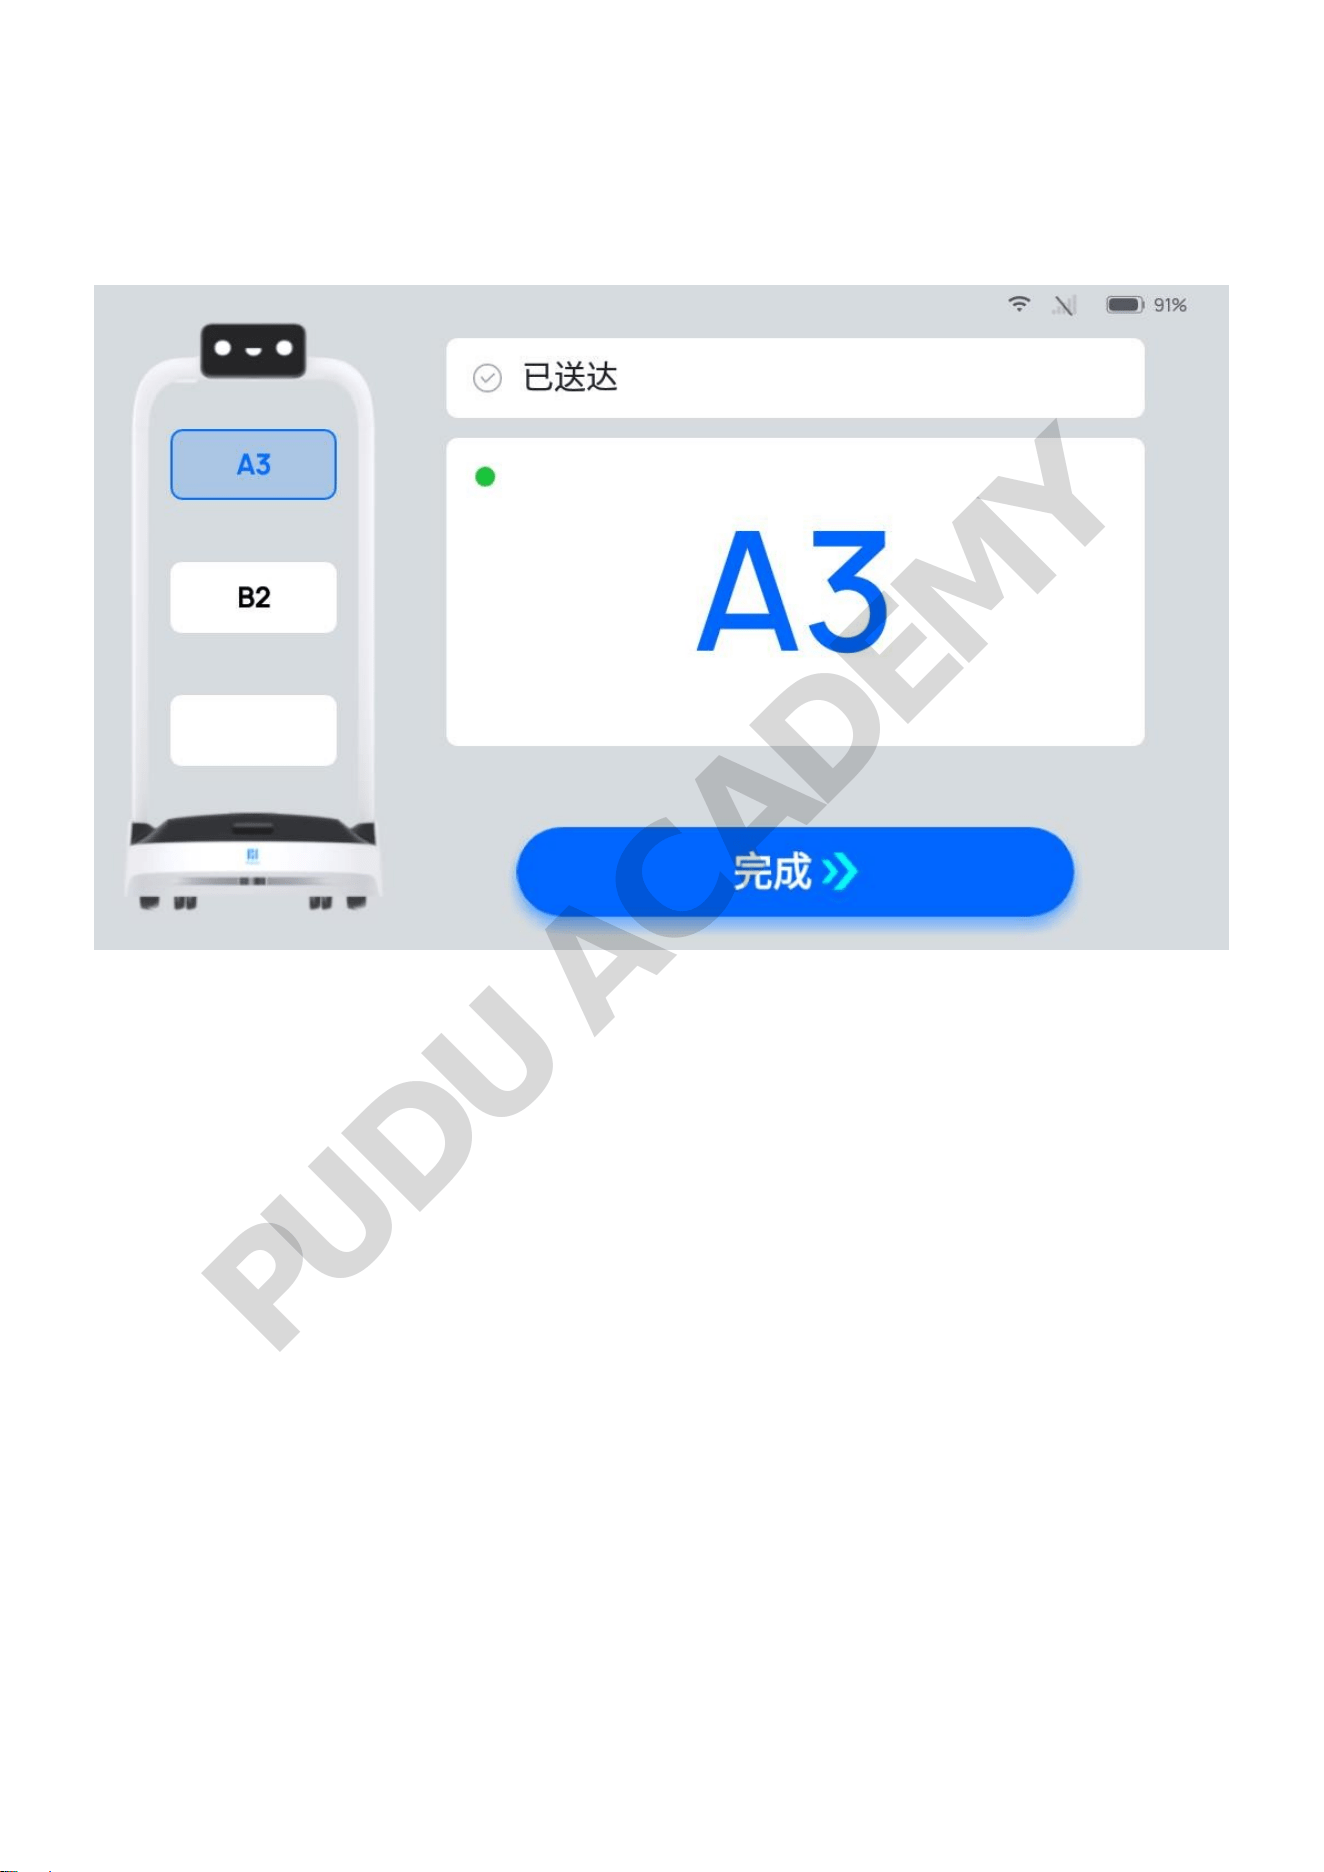
Step 4 Once you have finished entering the destination, tap "Start". The robot will proceed to the
corresponding destination.
Step 5 Once it reaches its destination, the robot will give a voice prompt. The operator will remove
the item in accordance with the on-screen and voice prompts.
Step 6 Once the operator removes the item, tap "Done", and the robot will then begin executing its
next task. If the robot has completed all tasks, it will return to the docking location.
During the delivery process, if it is necessary to edit a task, remove a meal in advance, cancel
all tasks, or return, you can tap on the robot’s screen to pause the robot before proceeding with
the operation. If there are no operations during the countdown period, the robot will continue
running.
PUDU ACADEMY
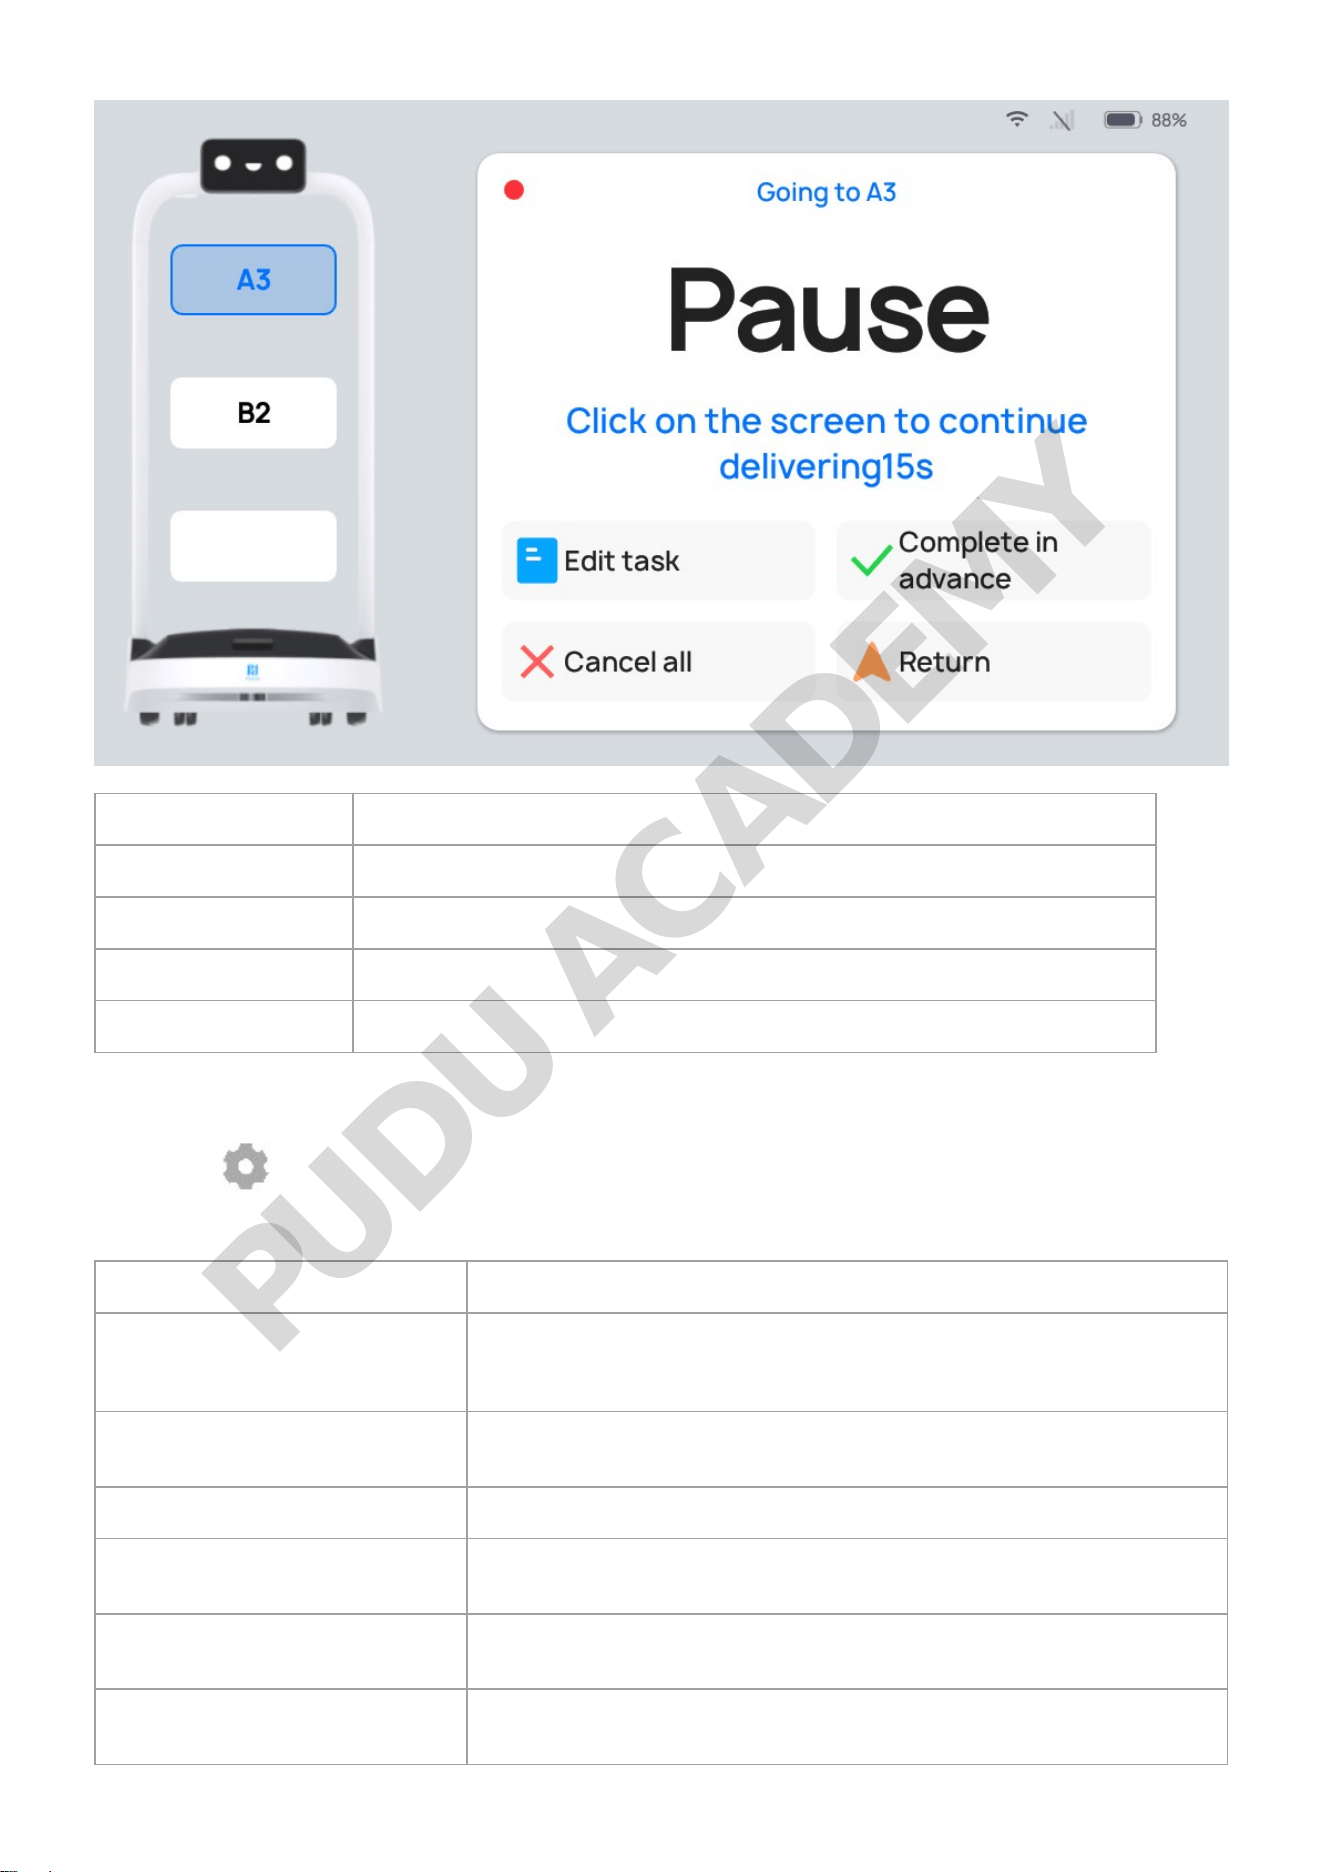
Button Description
Edit task Tap to modify the destination.
Complete in advance Tap to Complete in advance and move on to the next task.
Cancel all Tap to cancel all delivery tasks and not return to the docking location.
Return Tap to return to the docking location.
Description of Delivery Mode Settings
There is a " " button on the right side of the Delivery Mode interface. Tap it to configure the
delivery mode settings. The following settings can be configured:
Settings Description
Delivery arrival voice message
When this function is enabled, a customized voice message will play
on arrival of a delivery task. If multiple voice messages are
selected, one will play at random for each arrival.
Delivery arrival music
When this function is enabled, the robot will play music on arrival
of a delivery task.
Music during delivery task When this function is enabled, music will play during delivery task.
Multiple-location delivery with
one tray
When this function is enabled, a single tray can be delivered to
multiple corresponding locations.
Delivering speed
The robot can be configured to travel at a predetermined speed to a
destination.
Return speed
The robot can be configured to travel at a predetermined speed
when returning to the docking location.
PUDU ACADEMY
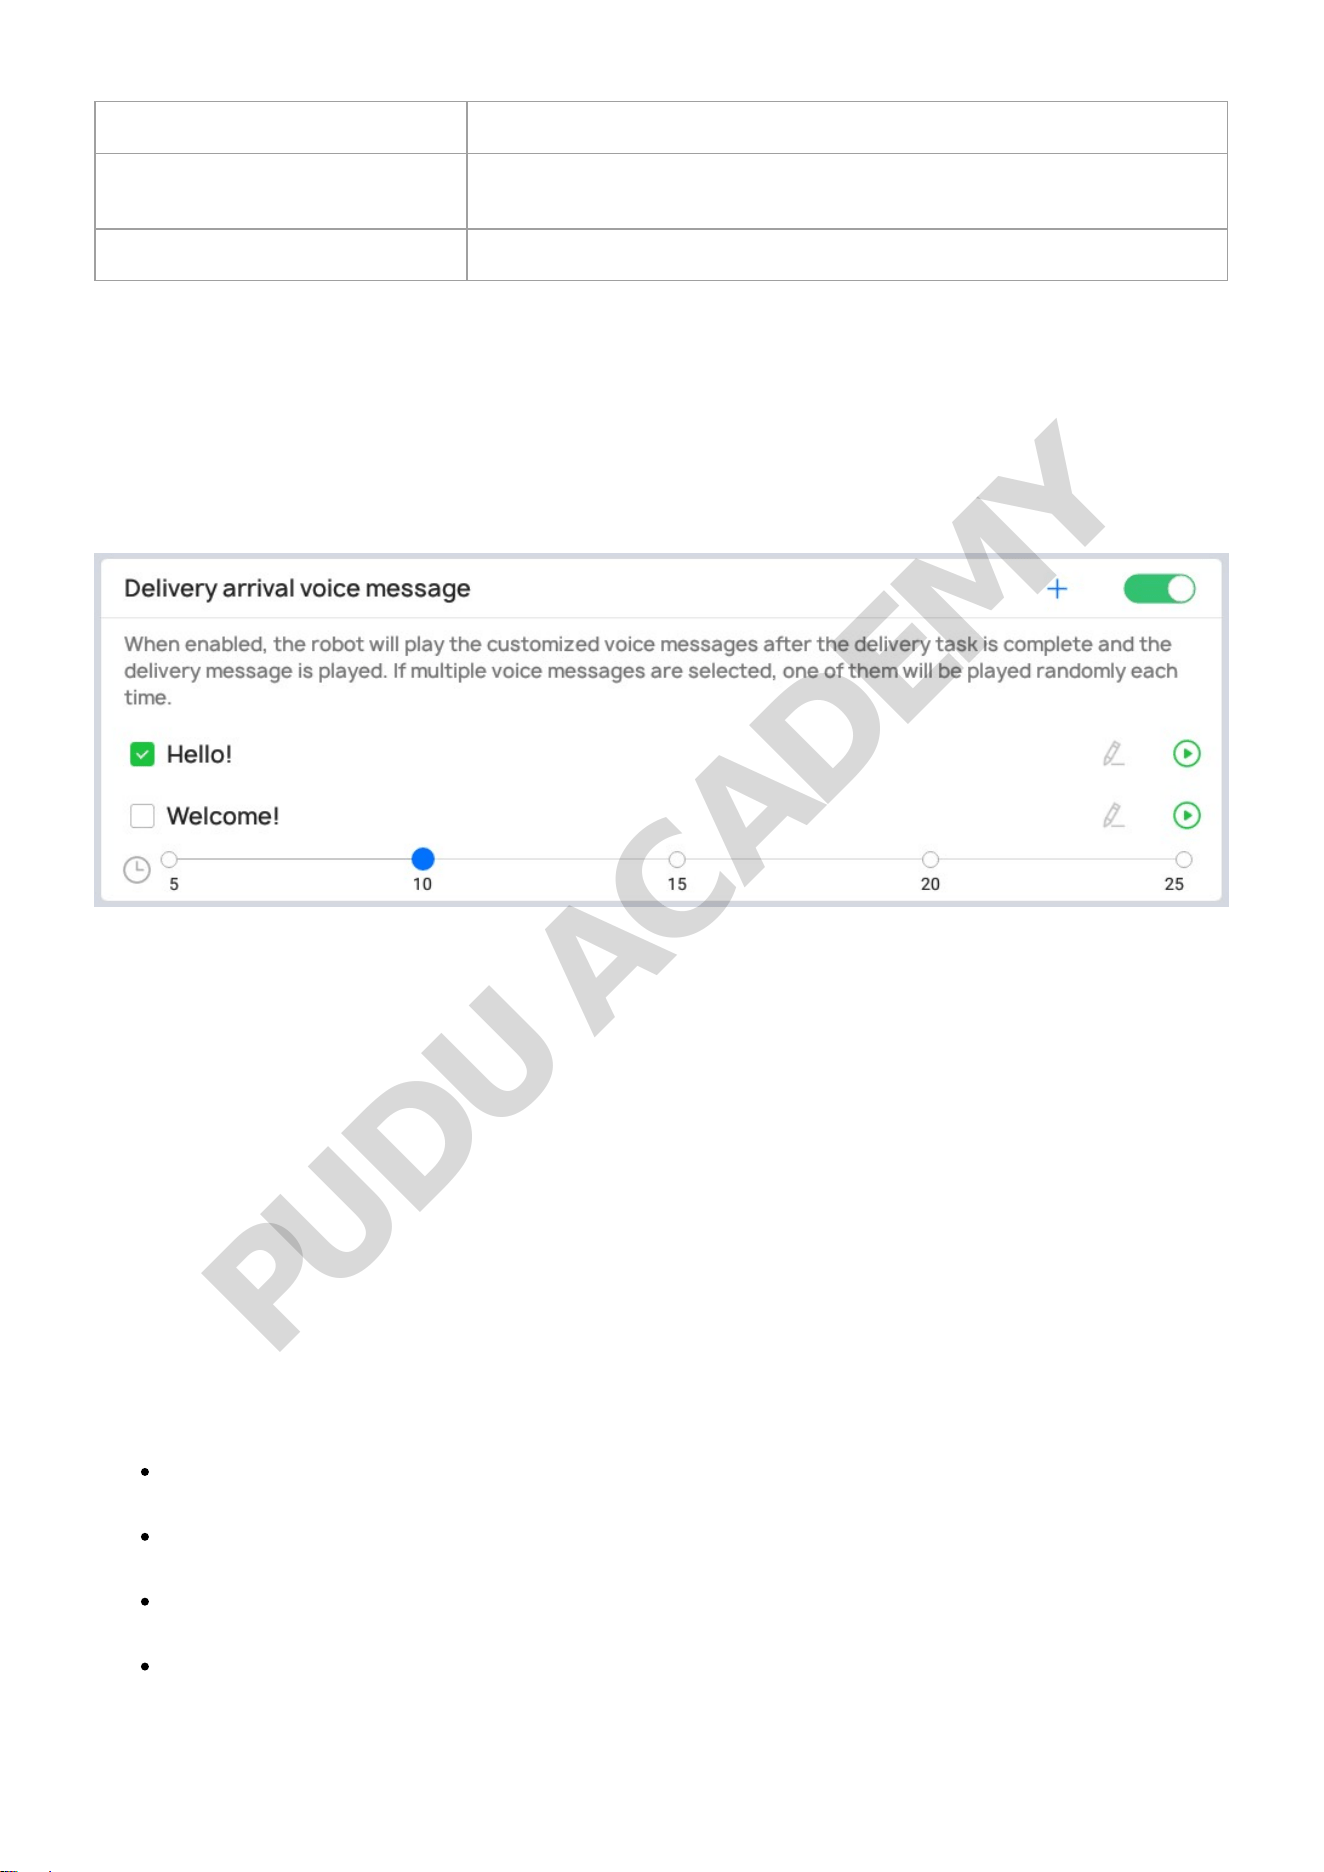
Settings Description
Task sequence
The criteria for determining the order of execution of robot delivery
tasks can be adjusted.
Select docking location Select the default docking location to which the robot will return.
Detailed Description:
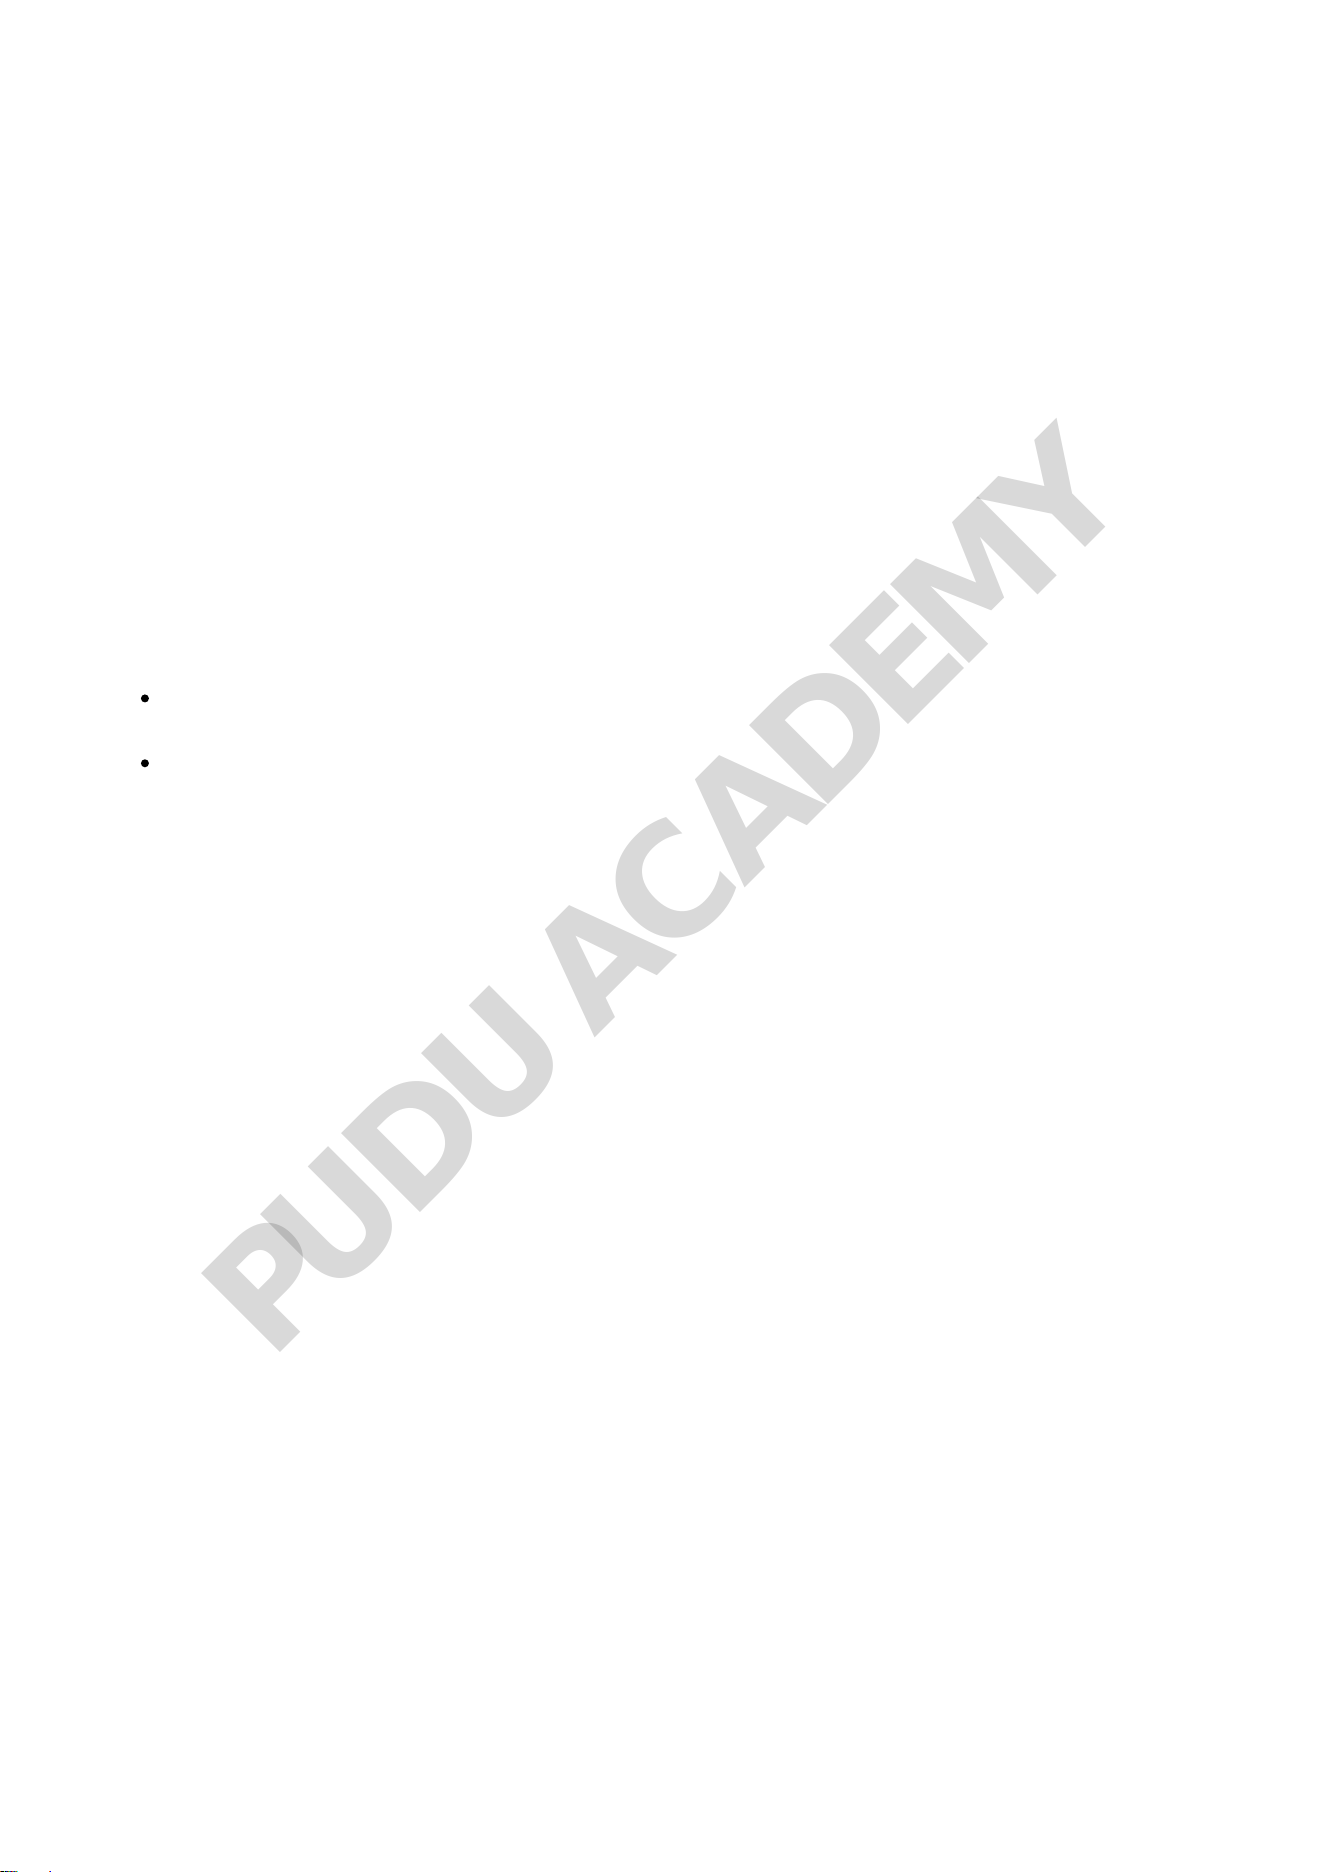
(1) Delivery arrival voice message
Users can customize the content played for the delivery arrival voice message; after choosing to play
content for a customized voice message, the robot will no longer play the default voice message
upon arriving at its destination.
Steps for Adding a Customized Voice Message:
Step 1 Go to "Delivery arrival voice message" in the Delivery Mode "Settings" interface and enable
the switch.
Step 2 In the "Delivery arrival voice message" field, enable Cruising Voice Messages and tap on the
"+" for the pop-up Voice Message Text Editing window.
Step 3 In the Voice Message Text Editing window, enter the content you want to be played, and tap
"Add/Save" to create a customized voice message. Before creating the voice message, you can tap on
the "Test Play" button to test the voice message.
Step 4 Select the voice message you created, and it will play when a delivery arrives. If multiple
voice messages are selected, the robot will randomly select one voice message to play upon arrival.
Note:
Up to 20 voice messages can be added, and up to 200 English characters per voice message
are supported.
Multiple voice messages can be selected, and the robot will randomly select one voice message
to play upon arrival of a delivery.
If you need to delete a customized voice message, long press the corresponding voice message
and tap "Delete".
The playback interval can be set within the range of 5s-25s; the default is 5s. The playback
interval can be manually changed. After making changes, save the settings.
PUDU ACADEMY
(2)Music during delivery task
The user can select the music that the robot plays in the process of traveling from the docking
location to the destination in delivery mode. Steps for adding music during delivery tasks:
Step 1 In the home page interface, enter "Settings" - "Music Library," tap "Import Music" in the top
right corner of the interface, and import the music by scanning the code with your phone.
Step 2 Go to "Music during delivery task" in the Delivery Mode "Settings" interface and enable the
switch.
Step 3 By checking the box to select music, you can select the music that the robot plays upon
arrival. If multiple voice messages are selected, the robot will randomly select one voice message to
play upon arrival.
Note:
Added music can be automatically synced with the Delivery Mode music and played once selected:
Up to 20 music files can be added to the music library, and the added music can be
automatically displayed in the "Music during delivery task" list.
Multiple music files can be selected, and the robot will randomly select one music file to play
during the delivery process.
Music files cannot be deleted from the list during delivery tasks. If you need to delete a music file,
you will need to go to "Settings" - "Music Library" to delete it.
(3)Delivery arrival music
Users can select music to be played by the robot when it arrives at its destination in delivery mode;
once the robot arrives at its destination, it will play the voice message, and then play the music.
Steps for Adding Delivery Arrival Music:
Step 1 In the home page interface, enter "Settings" - "Music Library," tap "Import Music" in the top
right corner of the interface, and import the music by scanning the code with your phone.
Step 2 Go to "Delivery arrival music" in the Delivery Mode "Settings" interface and enable the
switch.
Step 3 By checking the box to select music, you can select the music that the robot plays
upon arrival. If multiple voice messages are selected, the robot will randomly select one voice
message to play upon arrival.
Note:
Added music can beautomatically synced with the Delivery Mode music and played once selected:
• Up to 20 music files can be added to the Music Library, and the added music can be automatically
displayed in the "Delivery arrival music" list.
• Multiple music files can be selected, and the robot will randomly select one music file to play upon
arrival of a delivery task.
PUDU ACADEMY
• Music cannot be deleted from the Delivery Arrival Music list; if you need to delete a music file, you
will need to go to "Settings" -"Music Library" to delete it.
(4)Delivering speed
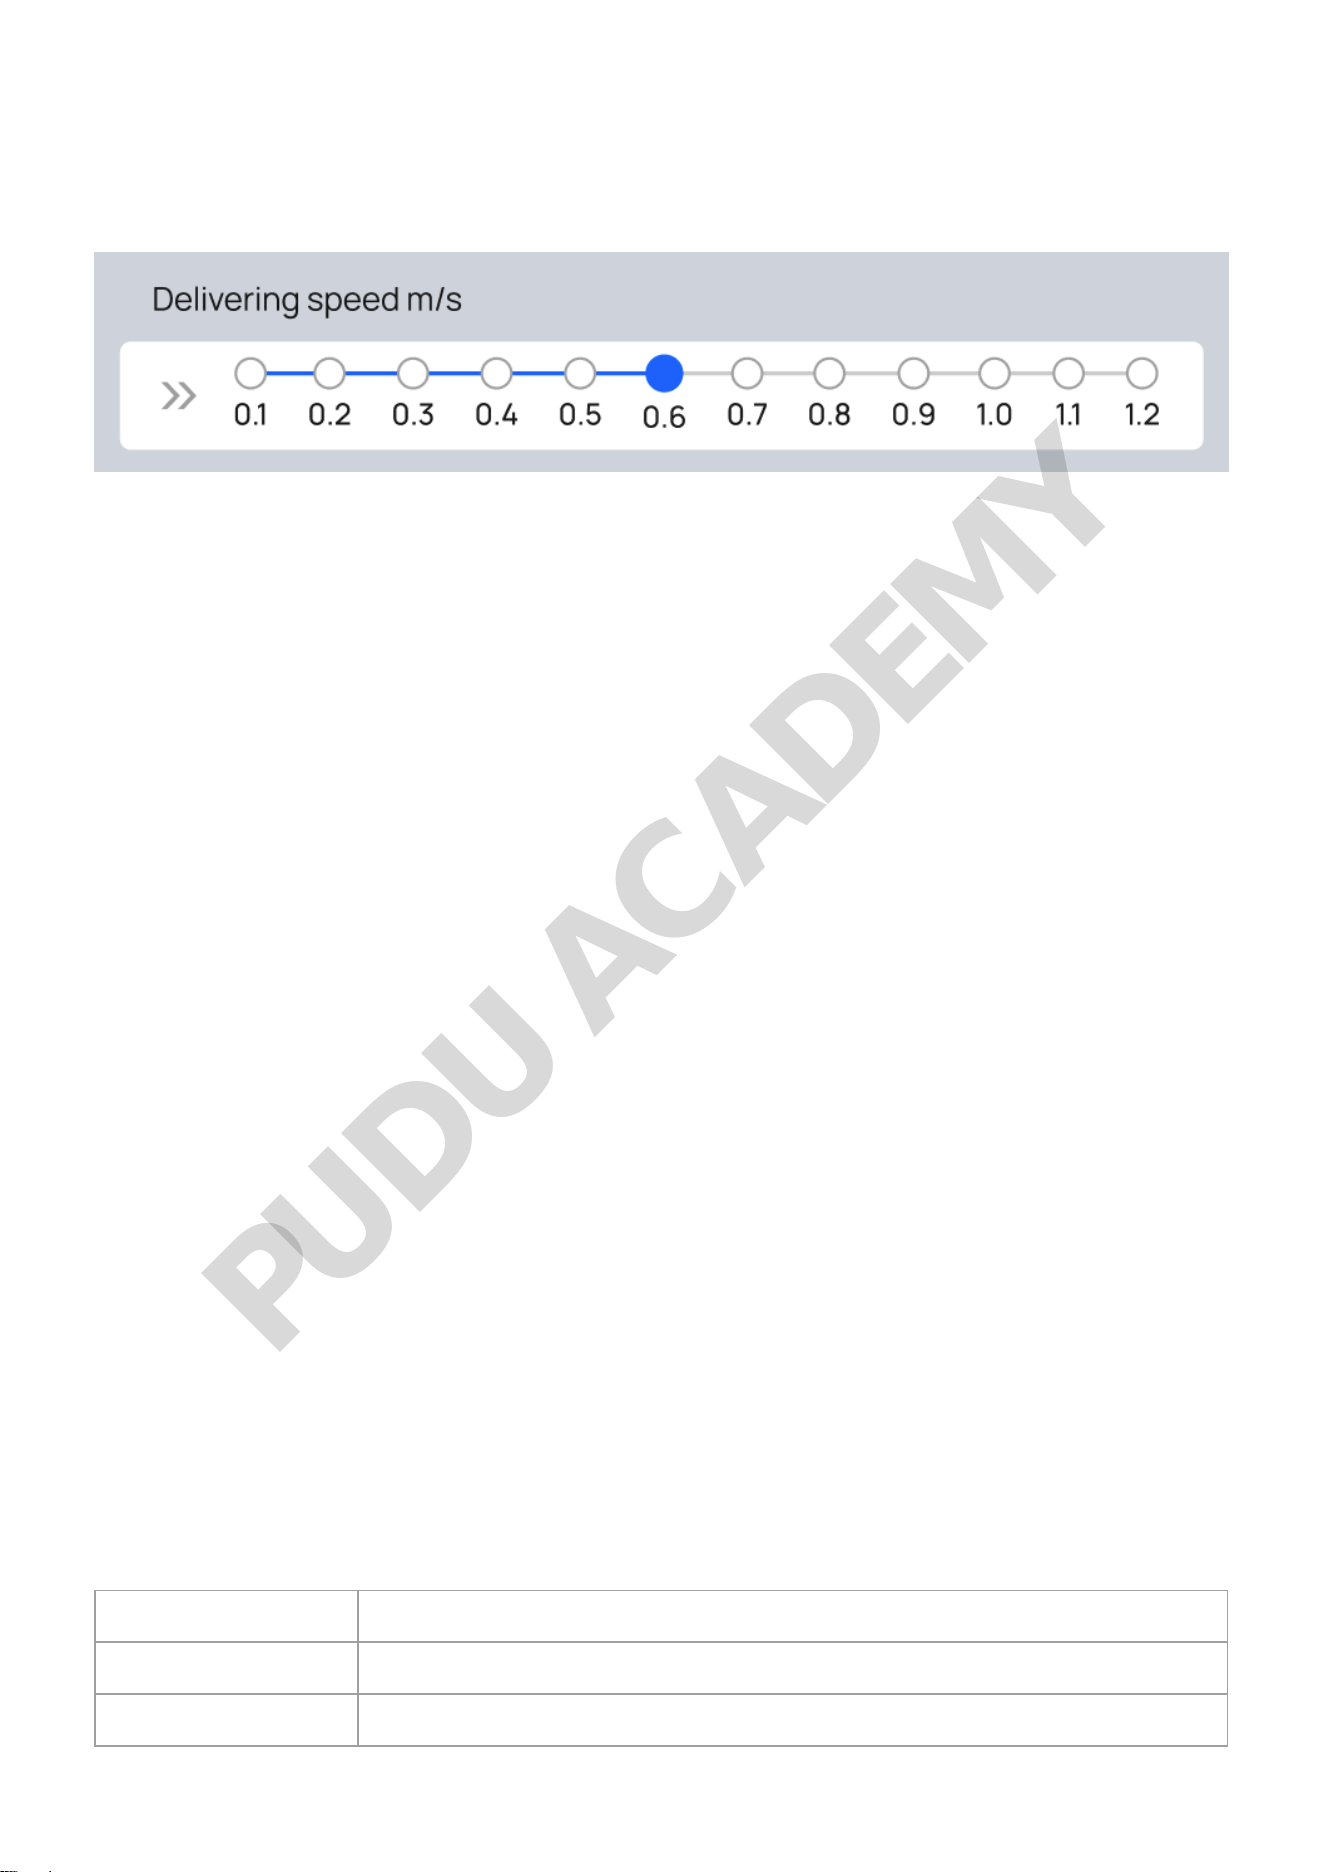
The robot can be configured to travel at a predetermined speed to a destination. The default speed is
0.8m/s (2.62 ft/s), and this can be adjusted by dragging the cursor within the range of
0.1m/s(0.33ft/s) to 1.2m/s(3.93ft/s).
Note:
If you need to enable higher speeds, you can go to "Settings" -"Advanced" and enable the "High-Gear
Traveling Speeds" switch.
(5) Return speed
The robot can be configured to return to its docking locationat a predetermined speed. The default
speed is 0.8m/s (2.62 ft/s), and this can be adjusted by dragging the cursor within the range of
0.1m/s (0.33ft/s)to 1.2m/s (3.93ft/s),.
Note:
If you need to enable higher speeds, you can go to "Settings" -"Advanced Settings" and enable the
"High-Gear Traveling Speeds" switch.
(6) Task sequence
You can choose between Prioritized Delivery by Distance and First Come First Served:
• Prioritized Delivery by Distance: Before executing a task, the robot will choose the table that is
currently at the closest distance and prioritize it in completing delivery.
• First Come First Served: Delivery is completed in the order in which tables are entered.
(7) Select docking location
Select the default docking location to which the robot will return.
More About Delivery Mode
Settings Description
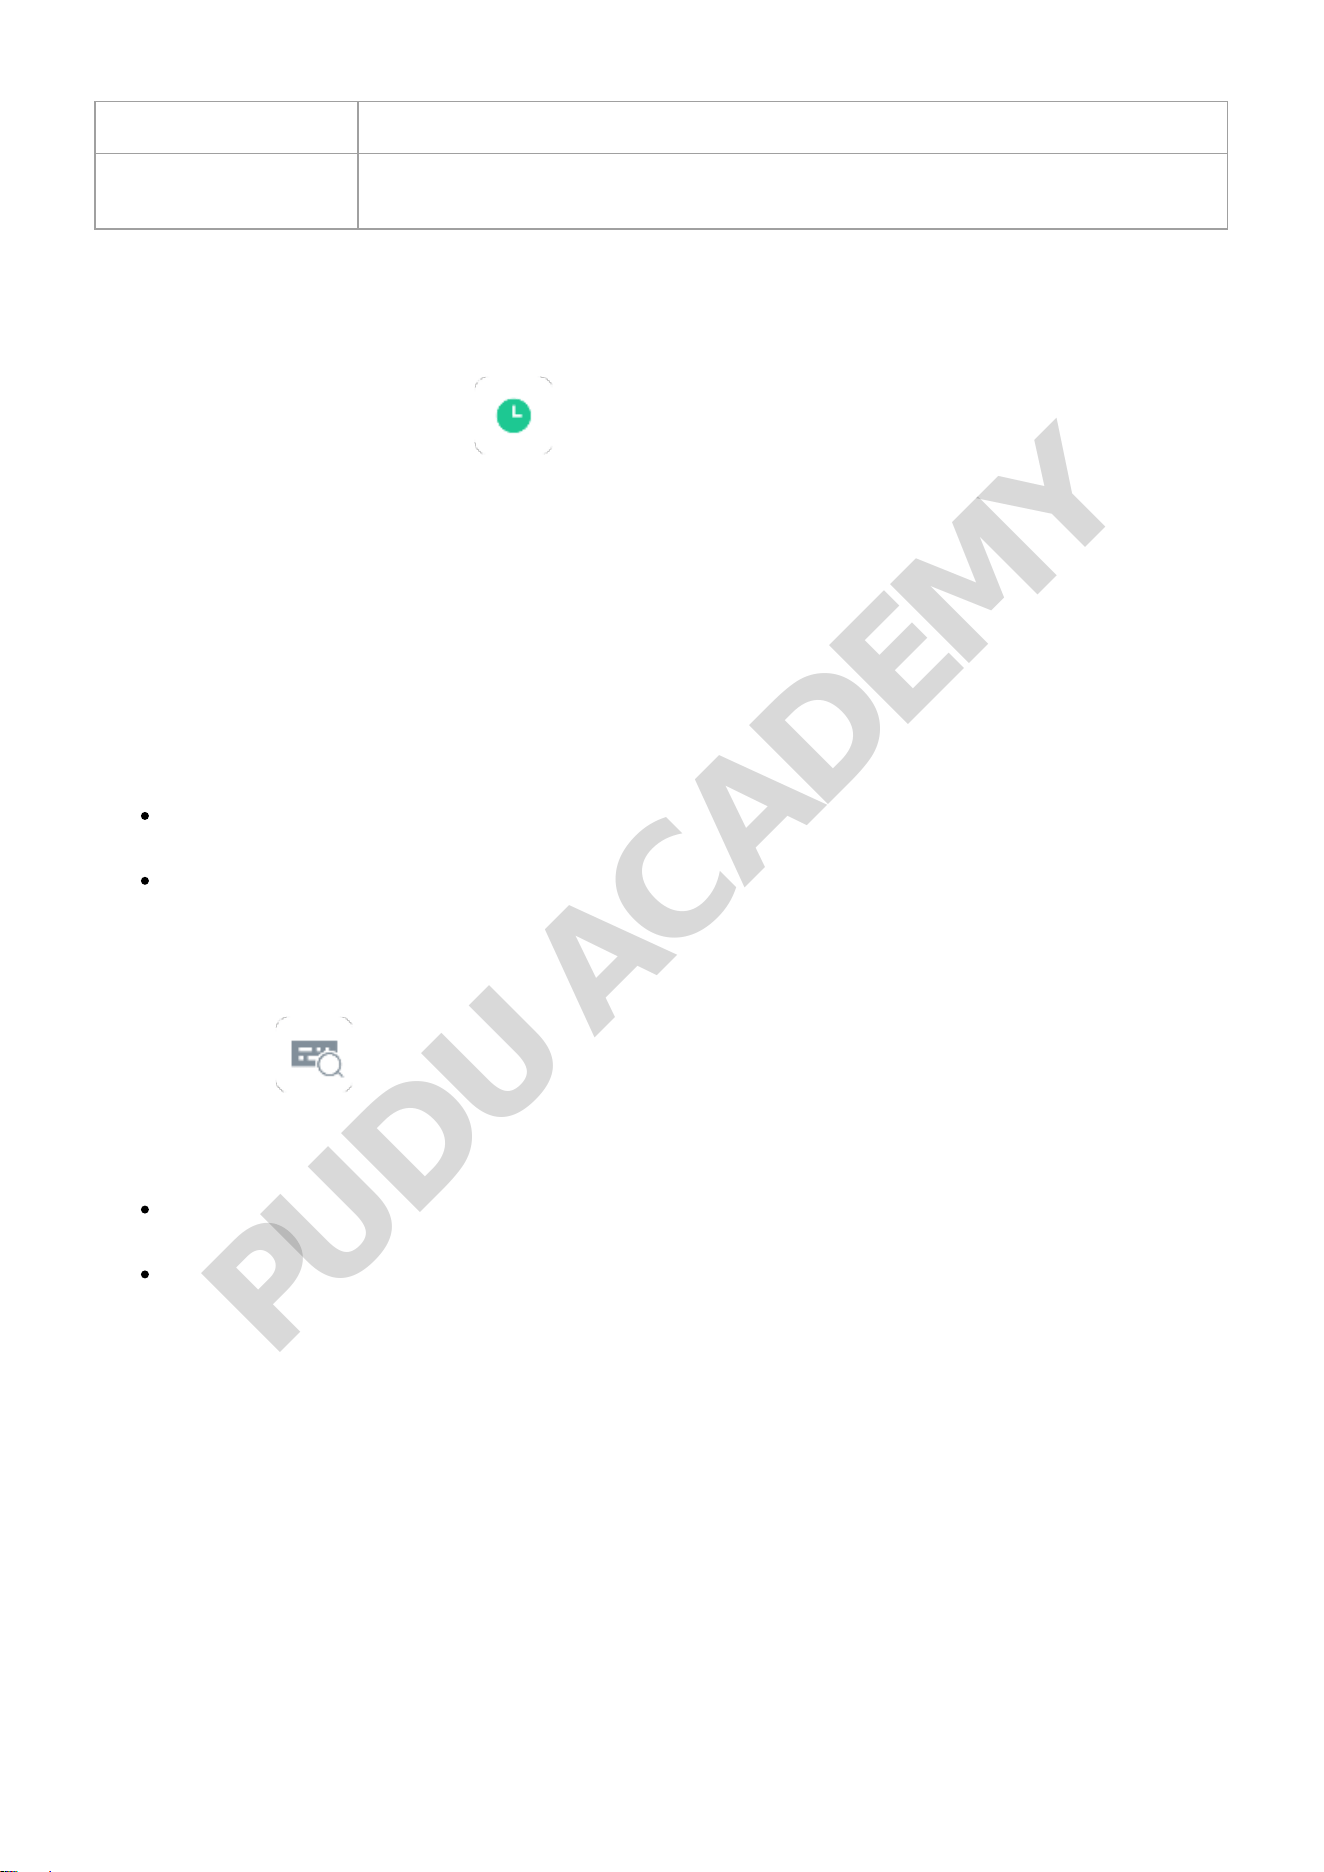
Task history You can view the previous task executed in the current mode
Steady mode When this function is enabled, the robot can travel smoothly at a low speed
PUDU ACADEMY
Settings Description
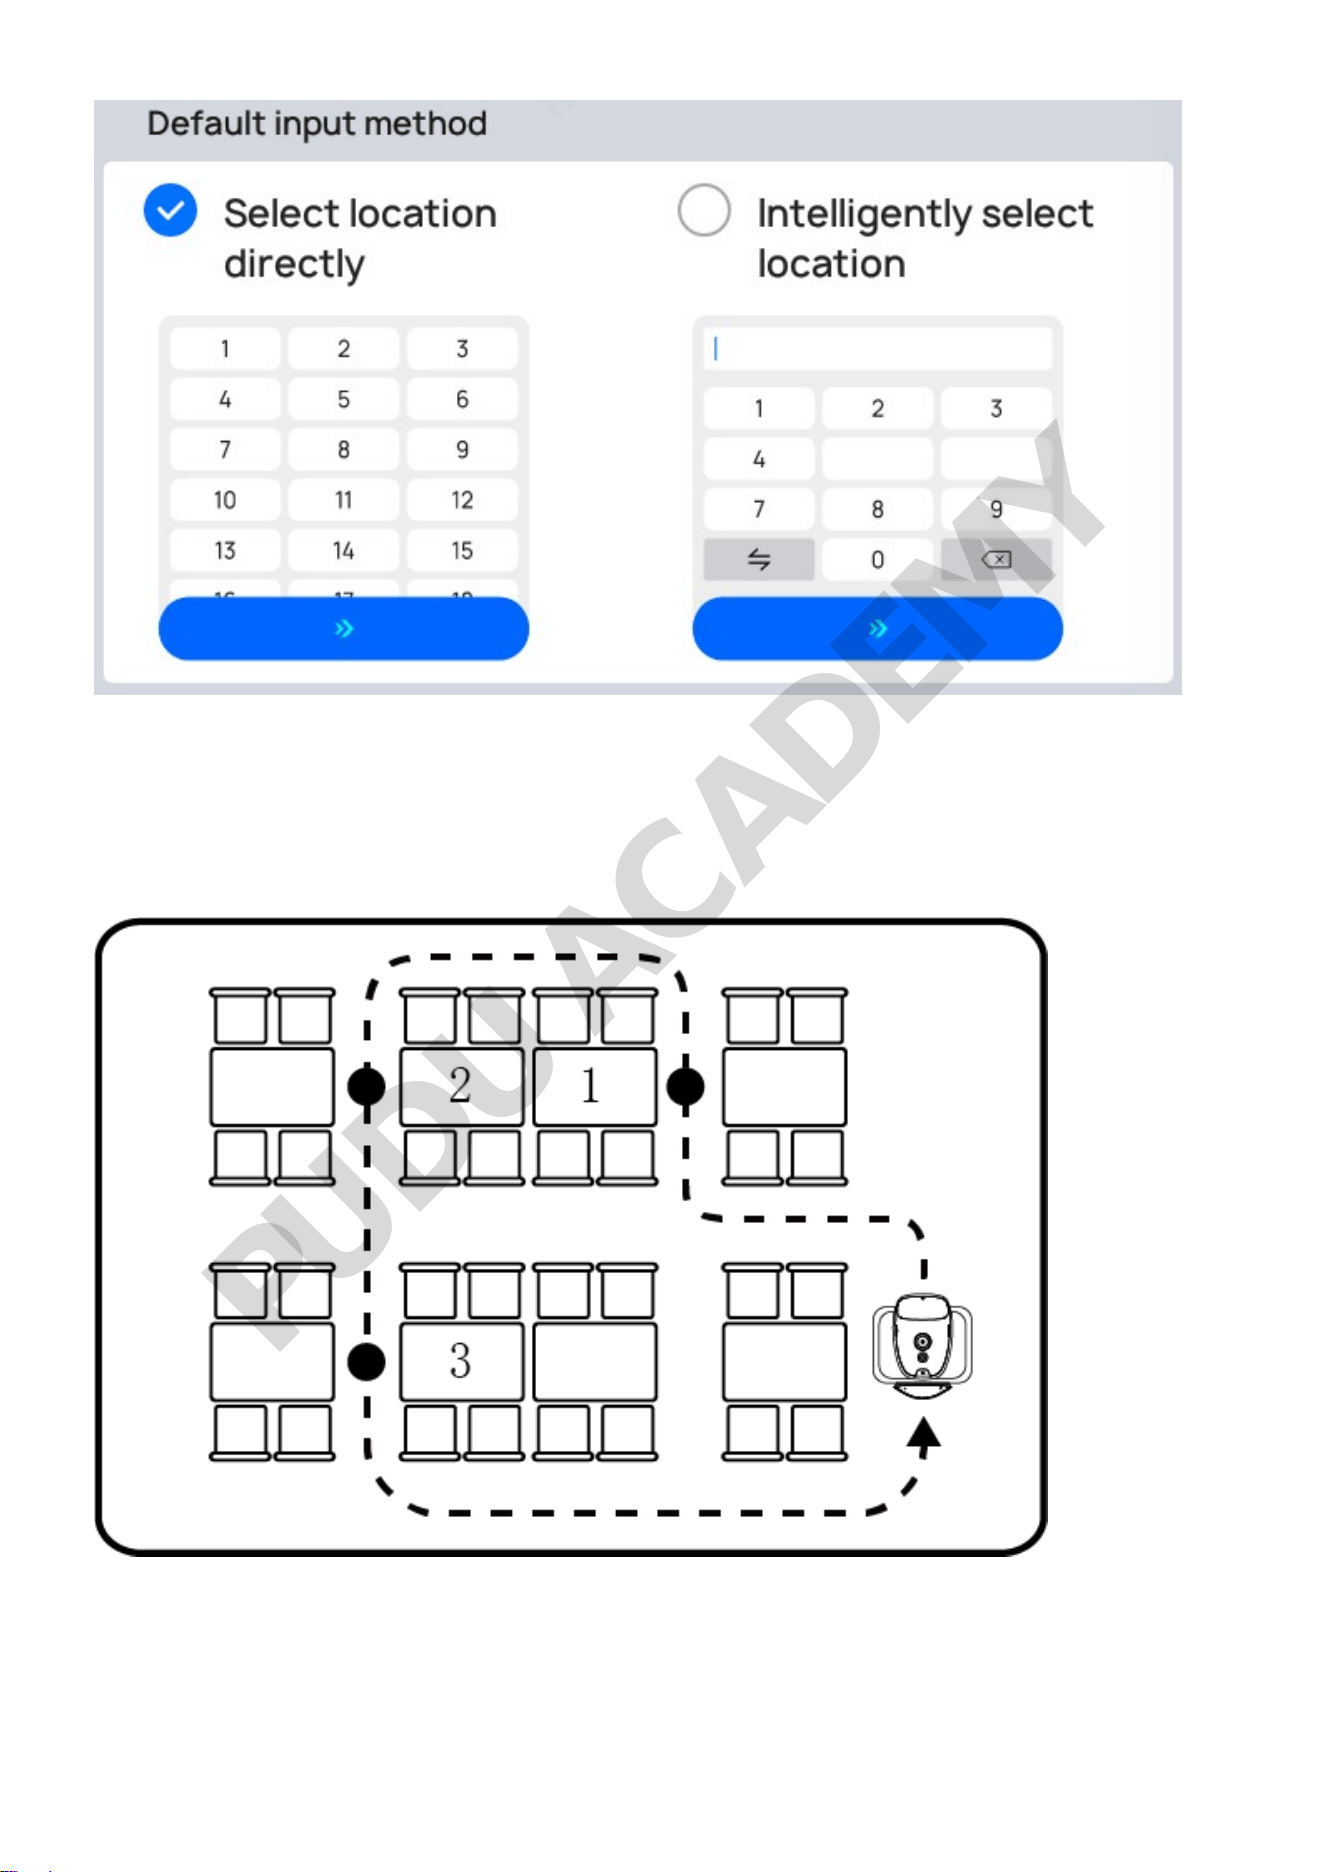
Default input method
You can modify the destination search method: Direct location selection/smart
location search
Detailed Description:
Task history1.
In the delivery interface, tap the " " button to view the delivery status of the robot’s previous
task.
Steady mode2.
You can choose whether or not the robot will use steady mode in the process of traveling. In steady
mode, the robot will travel at a lower speed, and start and brake more smoothly. The method of use
is as follows:
In the "Settings" - "Speed" interface, once the Steady Mode switch is enabled, the symbol "" will be
displayed on the Delivery Mode home page:
Tap the "" icon on the right side of the Delivery interface, and the icon will change to "",
indicating that Steady Mode is enabled.
Tap the "" icon on the right side of the Delivery screen, and the icon will change to "",
indicating that Steady Mode is disabled.
(3) Default input method
By tapping the " " button on the right side of the Delivery Mode home page, you can modify
the input method for selection of a delivery destination in the Delivery interface. There are two input
methods:
Direct destination selection: The destination list is in a tiled display in the window on the right
side of the interface, and you manually and directly find and select the table number.
Smart destination search: The robot automatically extracts the first character of all destination
names for display, and gradually filters out the destinations by screening the characters as you
proceed.
On the "Settings" - "Advanced Settings" page, under "Default Input Method," you can select the
default input method.
PUDU ACADEMY
Food Delivery Mode
In Food Delivery Mode, food is delivered to a specified destination, with automatic return to the
docking location after completing delivery to the final destination.
How to Use the Main Processes in Food Delivery Mode
Step 1 On the robot's home page, select "Food Delivery" to access the main interface for Food
Delivery Mode.
PUDU ACADEMY
Step 2 Place the dishes on the corresponding tray.
Step 3 On the left side of the interface, tap on the tray the dish was placed on, and select the
destination on the right side. The corresponding destination name will be displayed above the tray
on the left side of the interface.
Step 4 Once you have finished entering the destination, tap "Start" The robot will proceed to the
corresponding destination.
PUDU ACADEMY
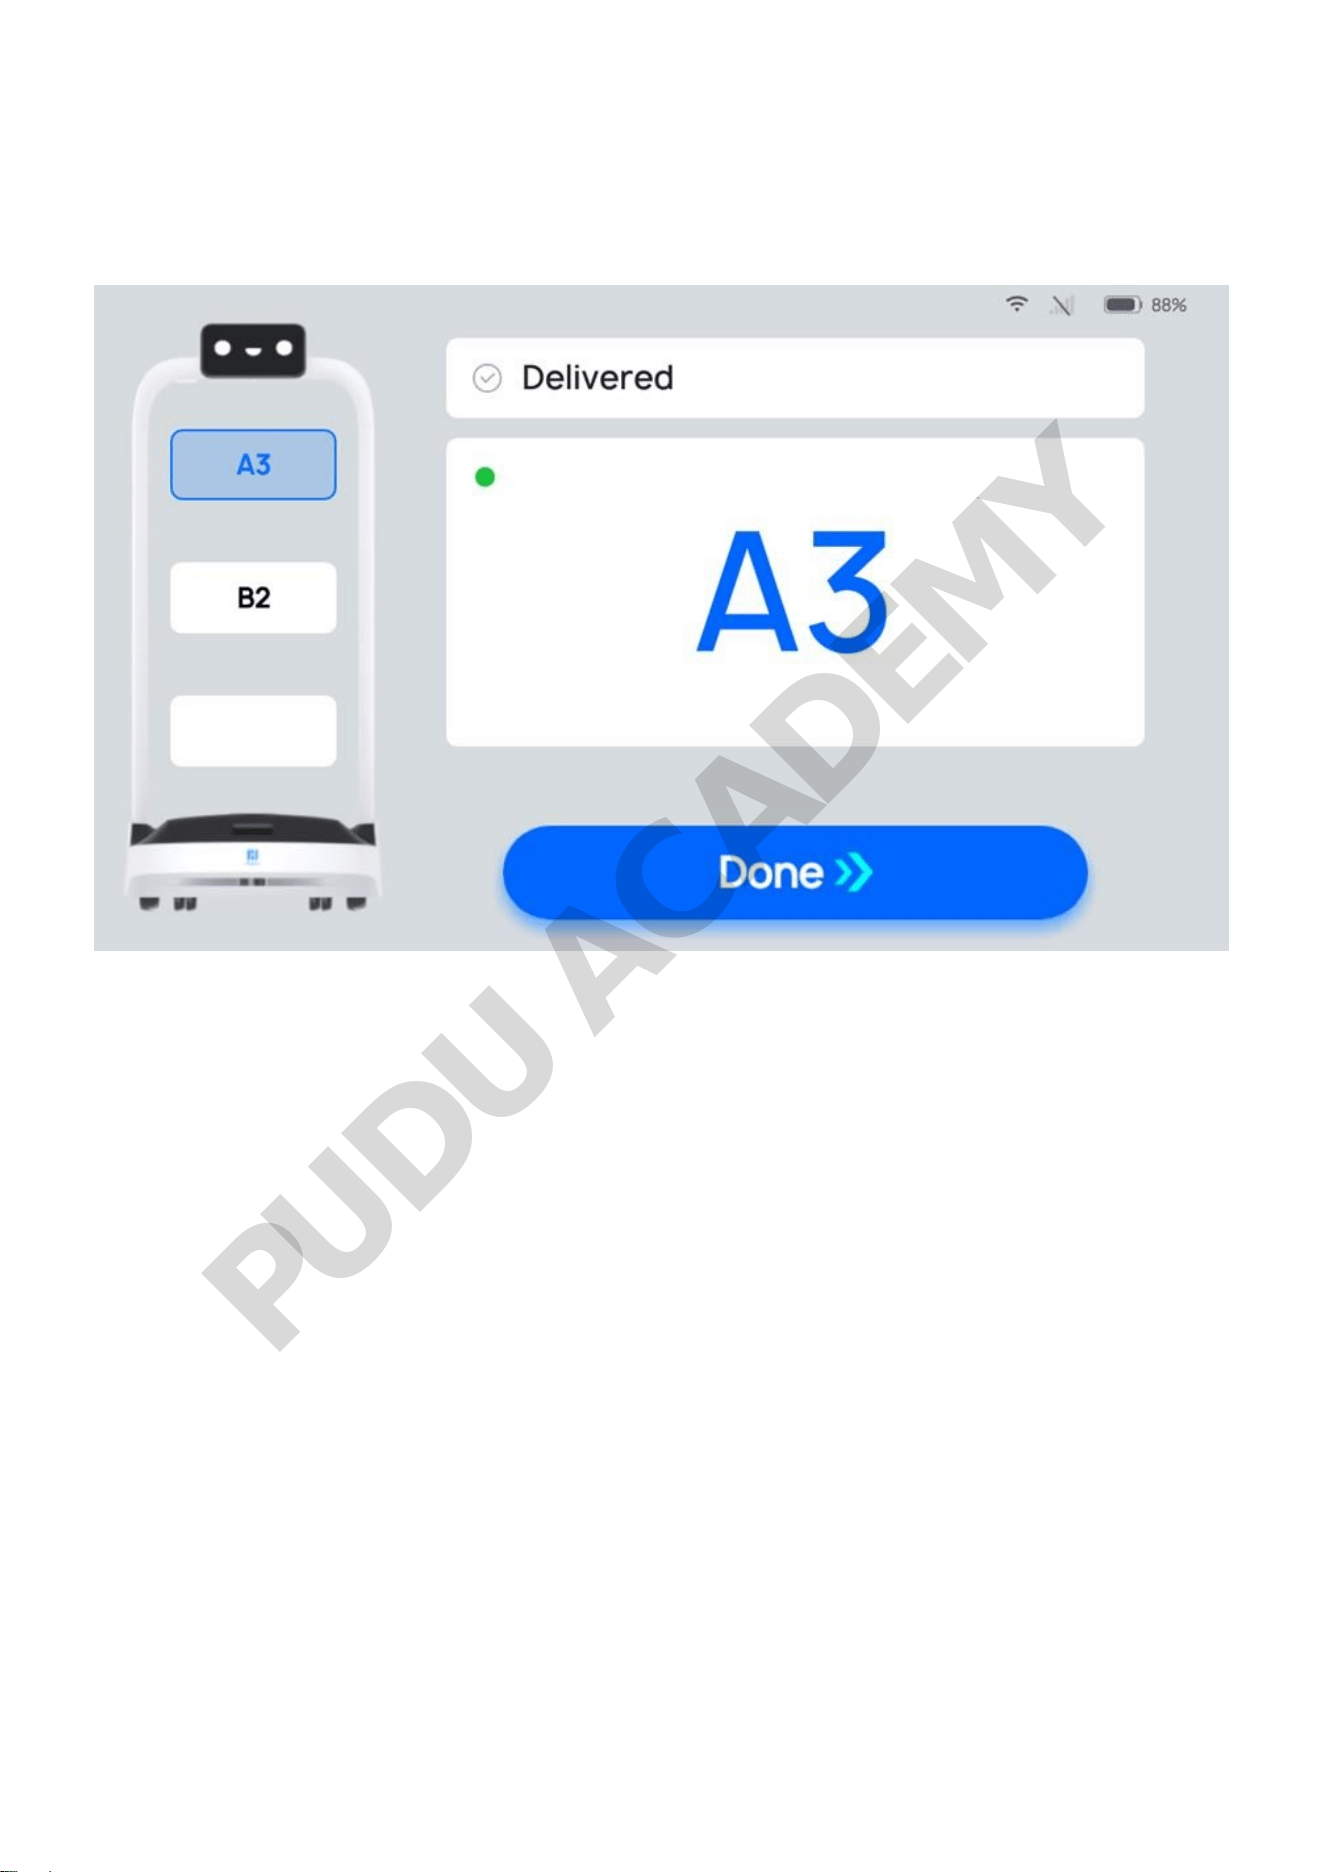
Step 5 Once it reaches its destination, the robot will give a voice prompt. The server will remove the
dishes in accordance with the on-screen and voice prompts.
Step 6 Once the server removes the item, they will tap "Done", and the robot will begin executing its
next task. If the robot has completed all tasks, it will return to the docking location.
During the food delivery process, if it is necessary to edit a task, Complete in advance, cancel
all tasks, or return, you can tap on the robot’s screen to pause the robot before proceeding with
the operation. If there are no operations during the countdown period, the robot will continue
running.
PUDU ACADEMY
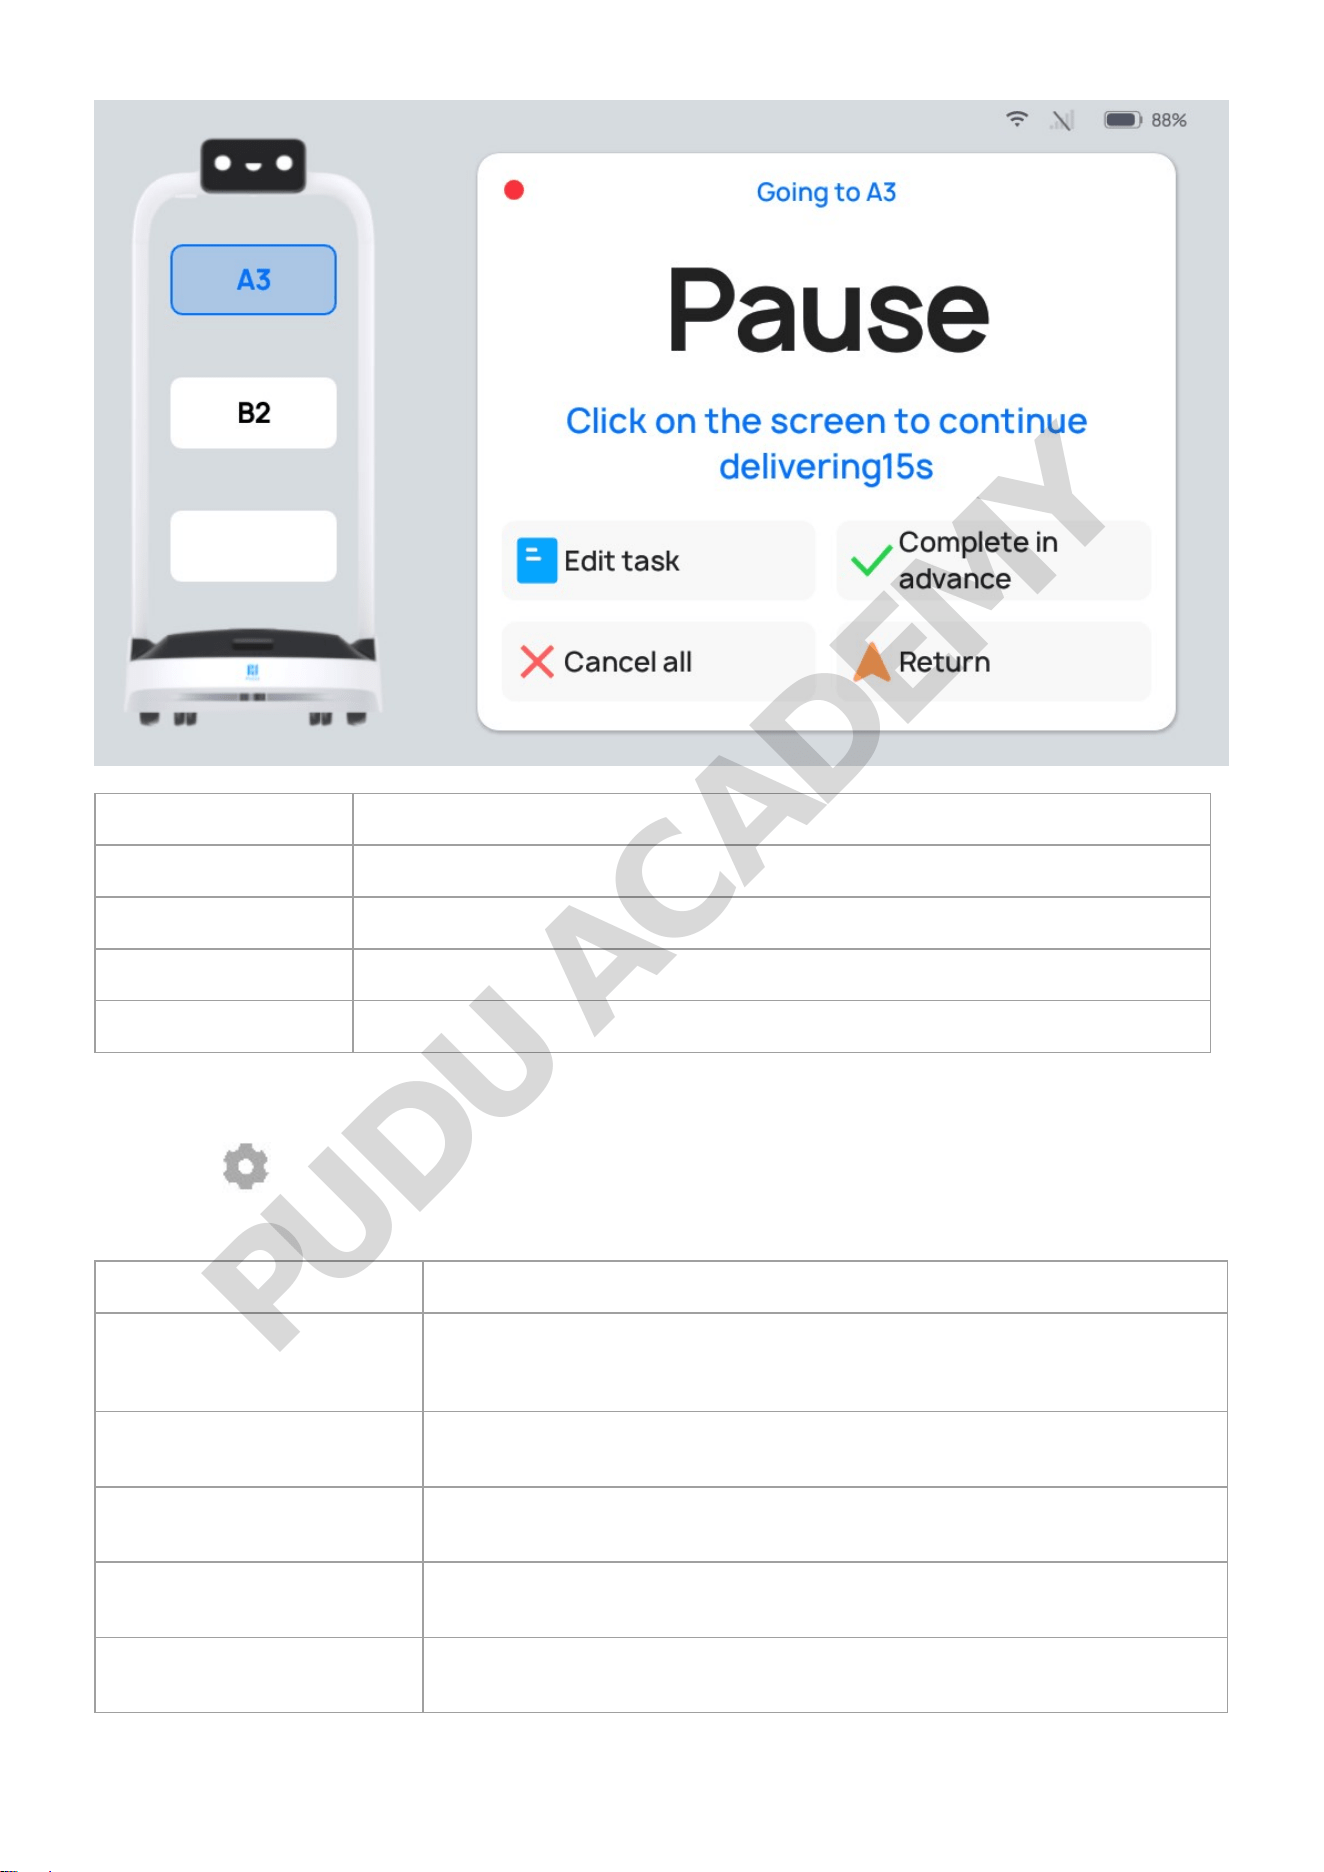
Button Description
Edit task Tap to modify the table number for food delivery task.
Complete in advance Tap to Complete in advance and move on to the next task.
Cancel all Tap to cancel all food delivery tasks and not return to the docking location.
Return Tap to return to the docking location.
Description of Food Delivery Mode Settings
There is a " " button on the right side of the Food Delivery Mode interface. Tap it to configure the
delivery mode settings. The following settings can be configured:
Settings Description
Food delivery arrival voice
message
When this function is enabled, a customized voice message will play on
arrival of a delivery. If multiple voice messages are selected, one will
play at random for each arrival.
Food delivery arrival music
When this function is enabled, the robot will play music when it arrives
on a food delivery task.
Play music during food
delivery
When this function is enabled, music will be played while en route for
food delivery.
Delivery to multiple
locations with a single tray
When this function is enabled, a single tray can be delivered to multiple
corresponding locations.
Delivering speed
The robot can be configured to travel at a predetermined speed to a
destination.
PUDU ACADEMY
Settings Description
Returns speed
The robot can be configured to travel at a predetermined speed when
returning to the docking location.
Task sequence
The criteria for determining the order of execution of robot food
delivery tasks can be adjusted.
Selection docking location Select the default docking location to which the robot will return.
The detailed method of operation for the specific settings is identical to the delivery mode settings.
For details, see "2.2.2 Description of Delivery Mode Settings.".
More About Food Delivery Mode
Other functions available in the Food Delivery Mode interface include:
Settings Description
Task history You can view the previous task executed in the current mode
Steady mode When this function is enabled, the robot can travel smoothly at a low speed
Default input method
You can modify the destination search method: Direct location selection/smart
location search
The specific, detailed method of operation is identical to the Delivery Mode settings. For details, see
"2.2.3 More About Delivery Mode".
Cruise Mode
Cruise mode is for cruising around in a specific environment on a patrol. In the process of cruising,
the robot can play certain voice messages and play music.
PUDU ACADEMY
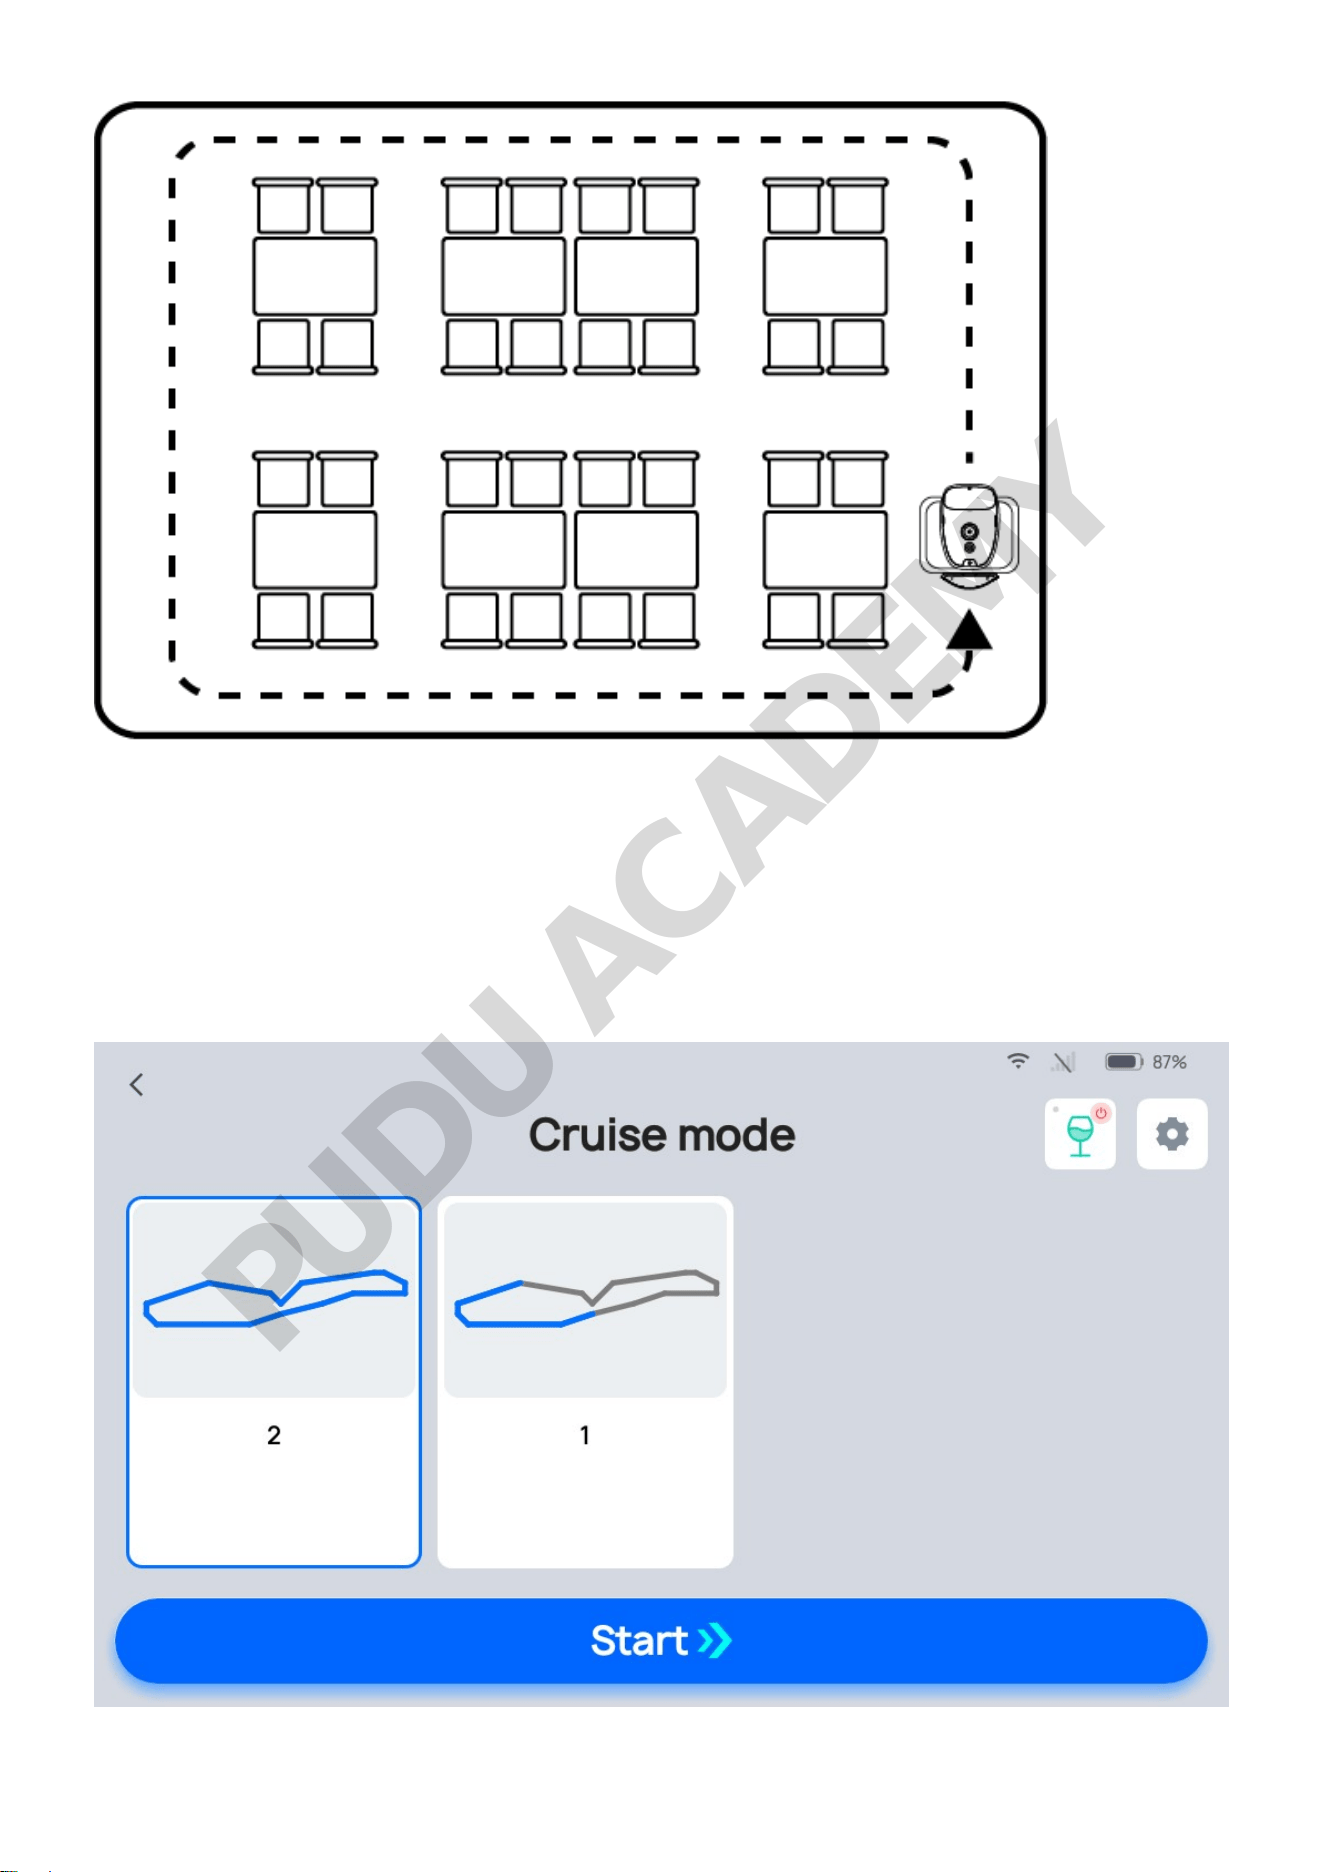
How to Use the Main Processes for Cruise Mode
Step 1 Select "Cruise" on the home page. After accessing the Cruise Mode interface, the cruising
routes will be displayed.
Step 2 Select the cruising route you want to use and tap "Start". The robot will begin to cruise along
the cruising route.
If you want the robot to pause, tap pause on the robot's screen. Once the pause countdown has
PUDU ACADEMY
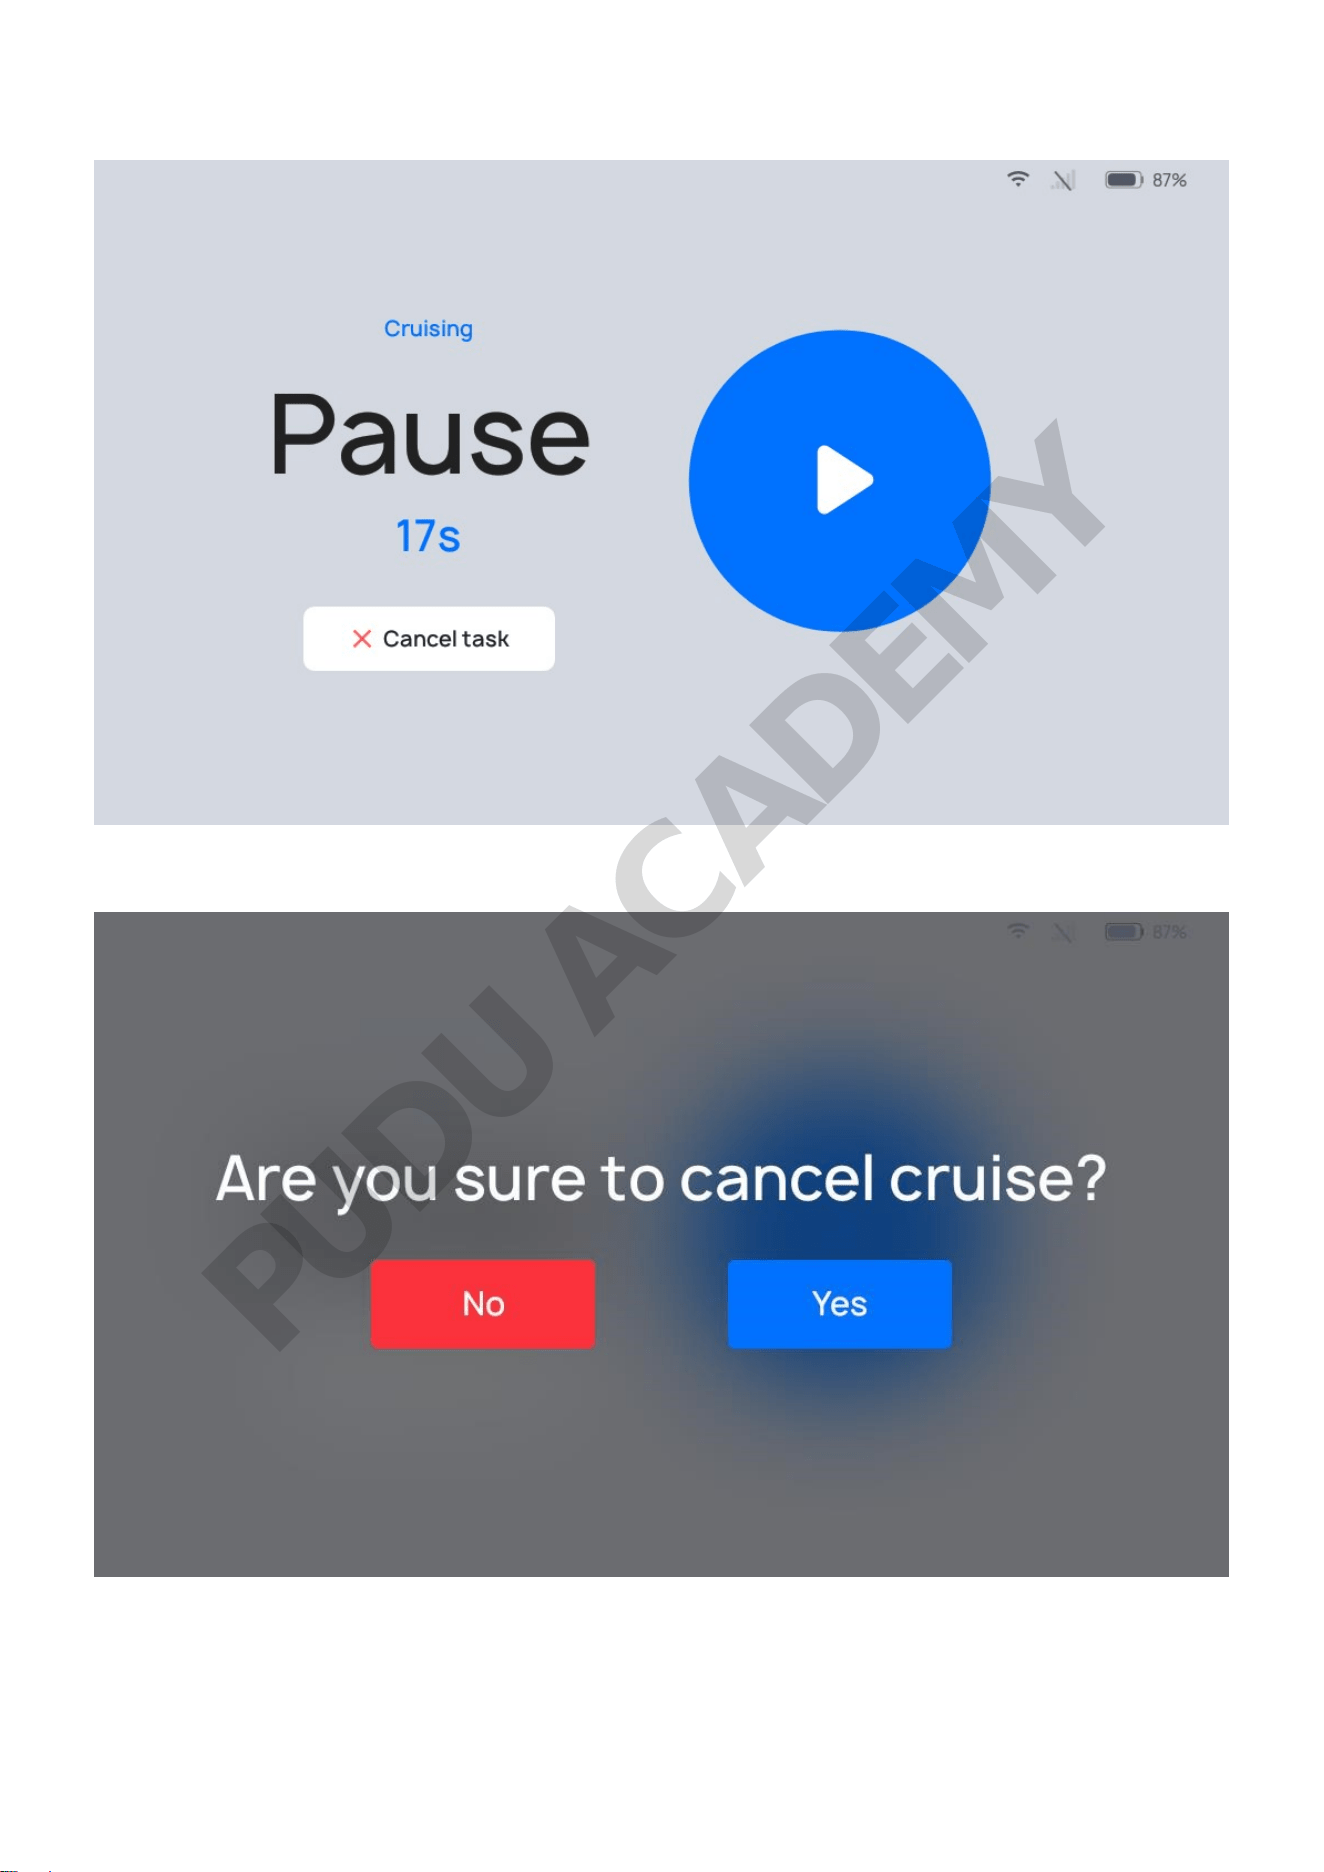
ended, the robot will continue moving.
While paused, tap "Cancel task" to end the cruising task.
If a rest point is set on the cruising route, the robot will travel to the rest point and stop. You will
need to manually tap on the screen for the robot to proceed to the next point on its route.
PUDU ACADEMY
Description of Cruise Mode Settings
There is a " " button at the top of the Cruise Mode interface. Tap it to configure the Cruise mode
settings. The following settings can be configured:
Settings Description
Cruising voice
When this function is enabled, a voice message will be played while
cruising.
Voice message for stays
along the cruise route
When this function is enabled, a voice message will play upon arrival at
rests while cruising.
Cruise music When this function is enabled, music will play while cruising.
Waiting time at cruise
locations
When this function is enabled, the robot will pause upon arriving at a
rest point, and proceed to the next location once the countdown ends.
Cruising speed
The robot’s traveling speed while cruising can be adjusted.
Detailed Description:
(1) Cruising voice
Users can customize the content played for cruising voice messages; once customized voice message
content is selected to be played, the robot will play the voice message at certain intervals while
cruising. Steps for Adding Voice Messages:
Step 1 Go to "Cruising voice" in the "Settings" interface for Cruise mode and enable the switch.
Step 2 In the "Cruising voice" field, enable Cruising Voice Messages and tap on the "+" to open the
Edit Voice Message Text window.
Step 3 In the Voice Message Text Editing window, enter the content you want to be played, and tap
"Add/Save" to create a customized voice message. Before creating the voice message, you can tap on
the "Test Play" button to test the voice message.
Step 4 Select the voice message you created, and it will play when a delivery arrives. If multiple
voice messages are selected, the robot will randomly select one voice message to play upon arrival.
Note:
Up to 20 voice messages can be added, and up to 100 Chinese characters per voice message
are supported.
Multiple voice messages can be selected, and one voice message will be randomly selected to
play while cruising.
If you need to delete a customized voice message, long press the corresponding voice message
and tap "Delete".
The playback interval can be set within the range of 5s-25s; the default is 5s. The playback
interval can be manually changed. After making changes, save the settings
(2) Voice message for stays along the cruise route
Users can choose for the robot to play a voice message at rest points while in Cruise mode. Steps for
PUDU ACADEMY
Adding a Cruising Rest Point:
Step 1 Go to "Voice message for stays along the cruise route" in the "Settings" interface for Cruise
mode and enable the switch.
Step 2 In the "Voice message for stays along the cruise route" field, enable Cruising Voice
Messages and tap on the "+" to open the Edit Voice Message Text window.
Step 3 Select the voice message you created, and it will play when the robot arrives at a rest point.
If multiple voice messages are selected, the robot will randomly select one voice message to play
upon arrival.
Note:
Up to 20 voice messages can be added, and up to 200 English characters per voice message
are supported.
Multiple voice messages can be selected, and one voice message will be randomly selected to
play while cruising.
If you need to delete a customized voice message, long press the corresponding voice message
and tap "Delete".
The playback interval can be set within the range of 5s-25s; the default is 5s. The playback interval
can be manually changed. After making changes, save the settings.
(3)Cruise Music
The user can choose for the robot to play music while in Cruise mode. The robot will travel and play
voice messages while cruising. Steps for Adding Cruising Music:
Step 1 In the home page interface, enter "Settings" - "Music Library," tap "Import Music" in the top
right corner of the interface, and import the music by scanning the code with your phone.
Step 2 Go to "Cruise Music" in the Cruise mode "Settings" interface and enable the switch.
Step 3 By checking the box to select music, you can select the music that the robot plays upon
arrival. If multiple music files are selected, the robot will randomly select the music to play while
cruising
Note:
Music added to the Music Library can be automatically synced to the Cruise mode music and can be
played once selected:
Up to 20 music files can be added to the Music Library, and the added music can be
automatically displayed in the "Cruising Music" list.
Multiple music files can be selected, and music will be randomly selected to play while
cruising.
Music cannot be deleted from the Cruising Music list. If you need to delete a music file, you
will need to go to "Settings" - "Music Library" to delete it.
Waiting time at cruise locations4.
The robot’s stoppage time at rest points can be set, and the robot will count down at the rest point
PUDU ACADEMY
based on a predetermined period of time. The steps for settings are as follows:
Step 1 Go to "Waiting time at cruise locations" in the Cruise mode "Settings" interface and enable
the switch;
Step 2 In the text box, enter the stoppage time at rest points (input range of 1s-600s). Once the
robot’s countdown for the rest time ends, it will proceed to the next rest point.
(5) Cruising Speed
The robot can be configured to adjust the travelling speed at cruising. The default speed is 0.8m/s
(2.62ft/s), and this can be adjusted by dragging the cursor within the range of 0.1m/s (0.33ft/s) to
1.2m/s (3.93ft/s).
Note:
If you need to enable higher speeds, you can go to "Settings" - "Advanced Settings" and enable the
"High-Gear Traveling Speeds" switch.
More About Cruise mode
Other functions available in the Cruise mode interface include:
Content Description
Steady mode When this function is enabled, the robot can travel smoothly at a low speed
The specific, detailed method of operation is identical to the Delivery Mode settings. For
details, see "32.2.3 More About Delivery Mode."
Direct Mode
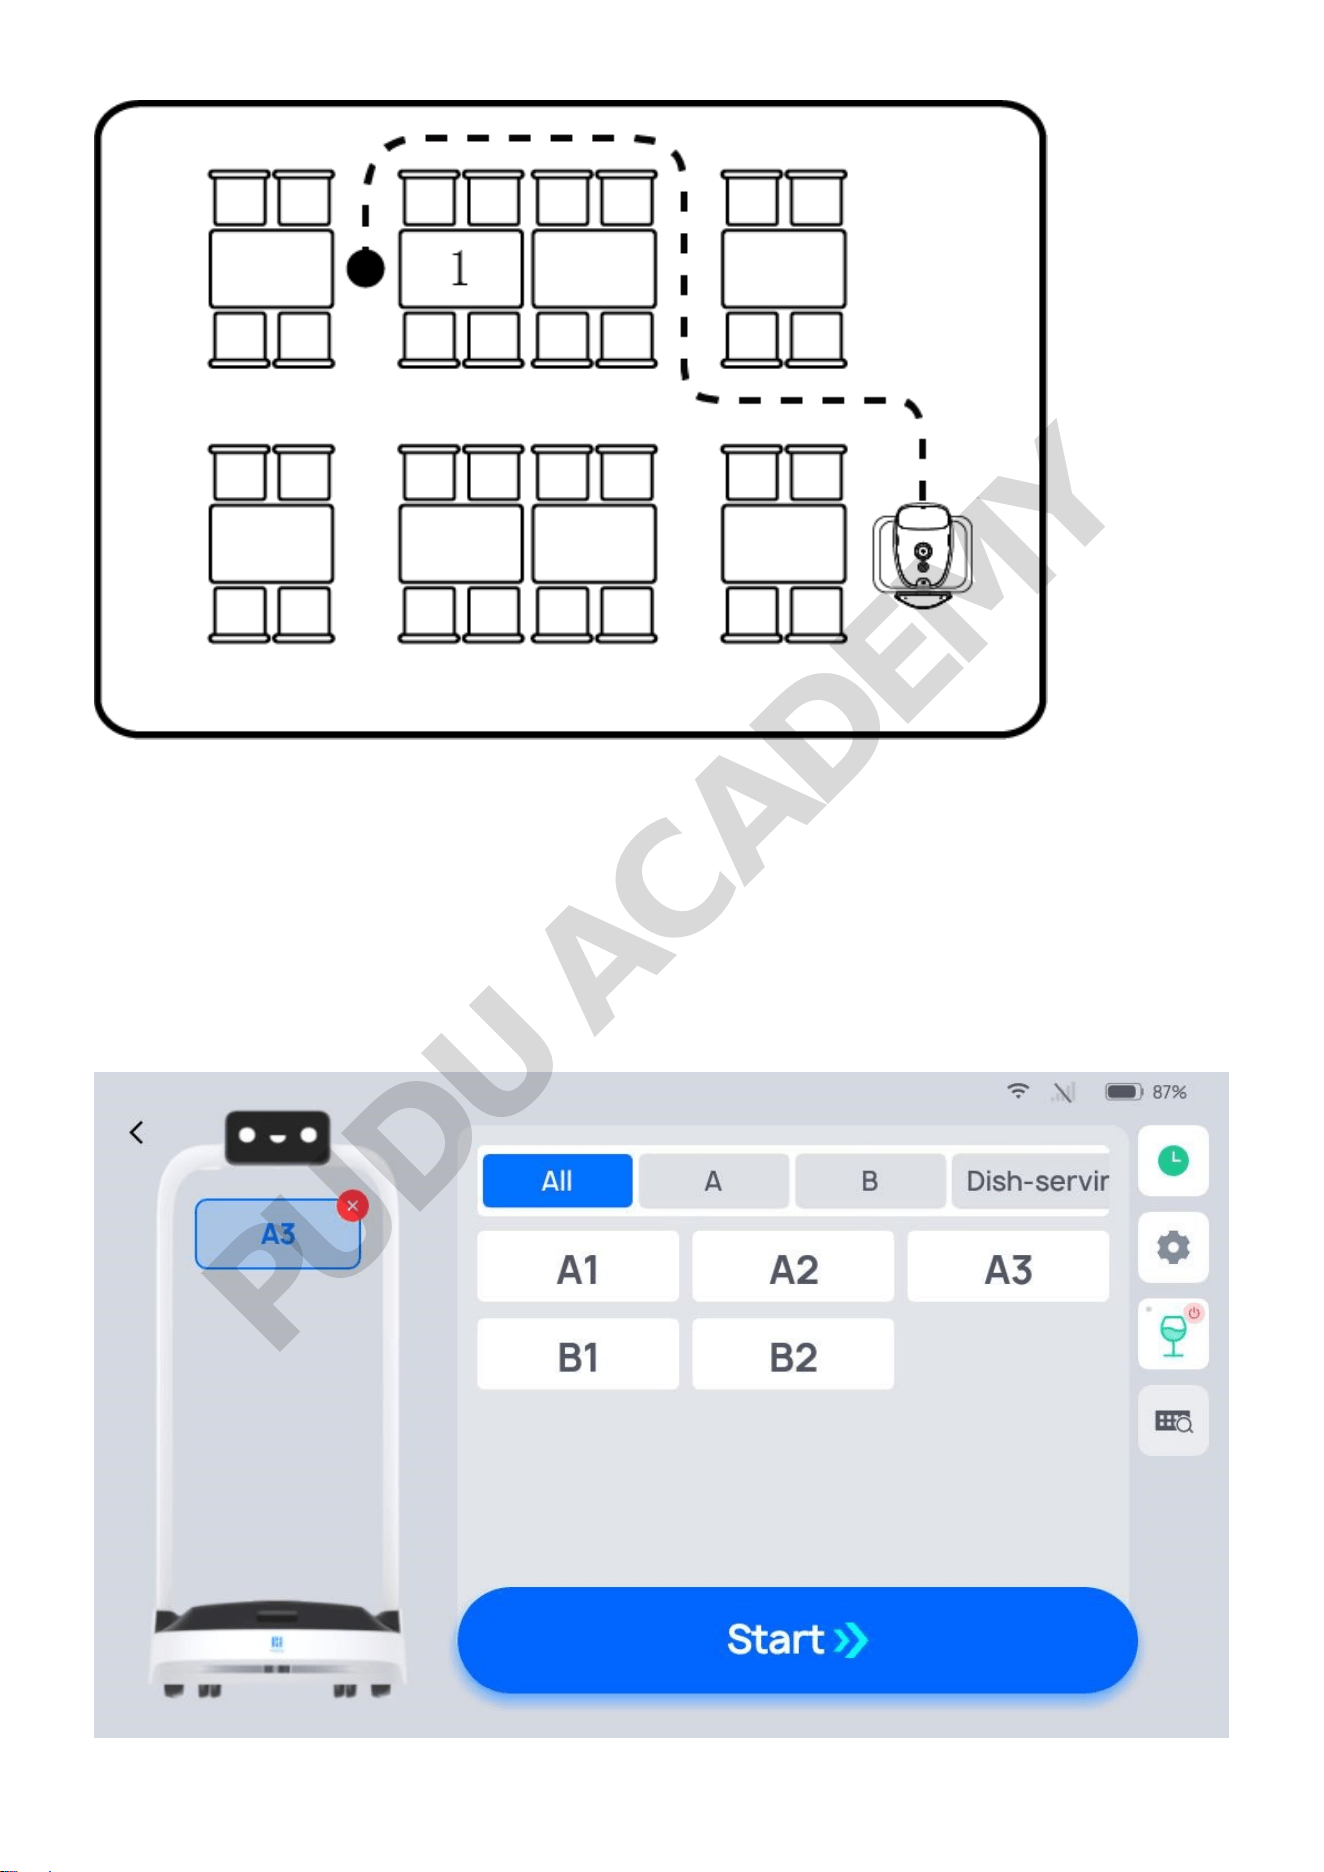
In Direct Mode, the robot can execute a one-way transport operation and remain at the delivery
point upon delivery, for use by personnel at the delivery point.
PUDU ACADEMY
How to Use the Main Processes for Direct Mode
The operating steps are as described below.
Step 1 On the robot’s home page, select "Direct".
Step 2 In the Direct Mode interface, tap the button to select the destination name; after tapping, the
destination name will be displayed on the tray. Once you tap the "Start", the robot will start direct
task.
PUDU ACADEMY
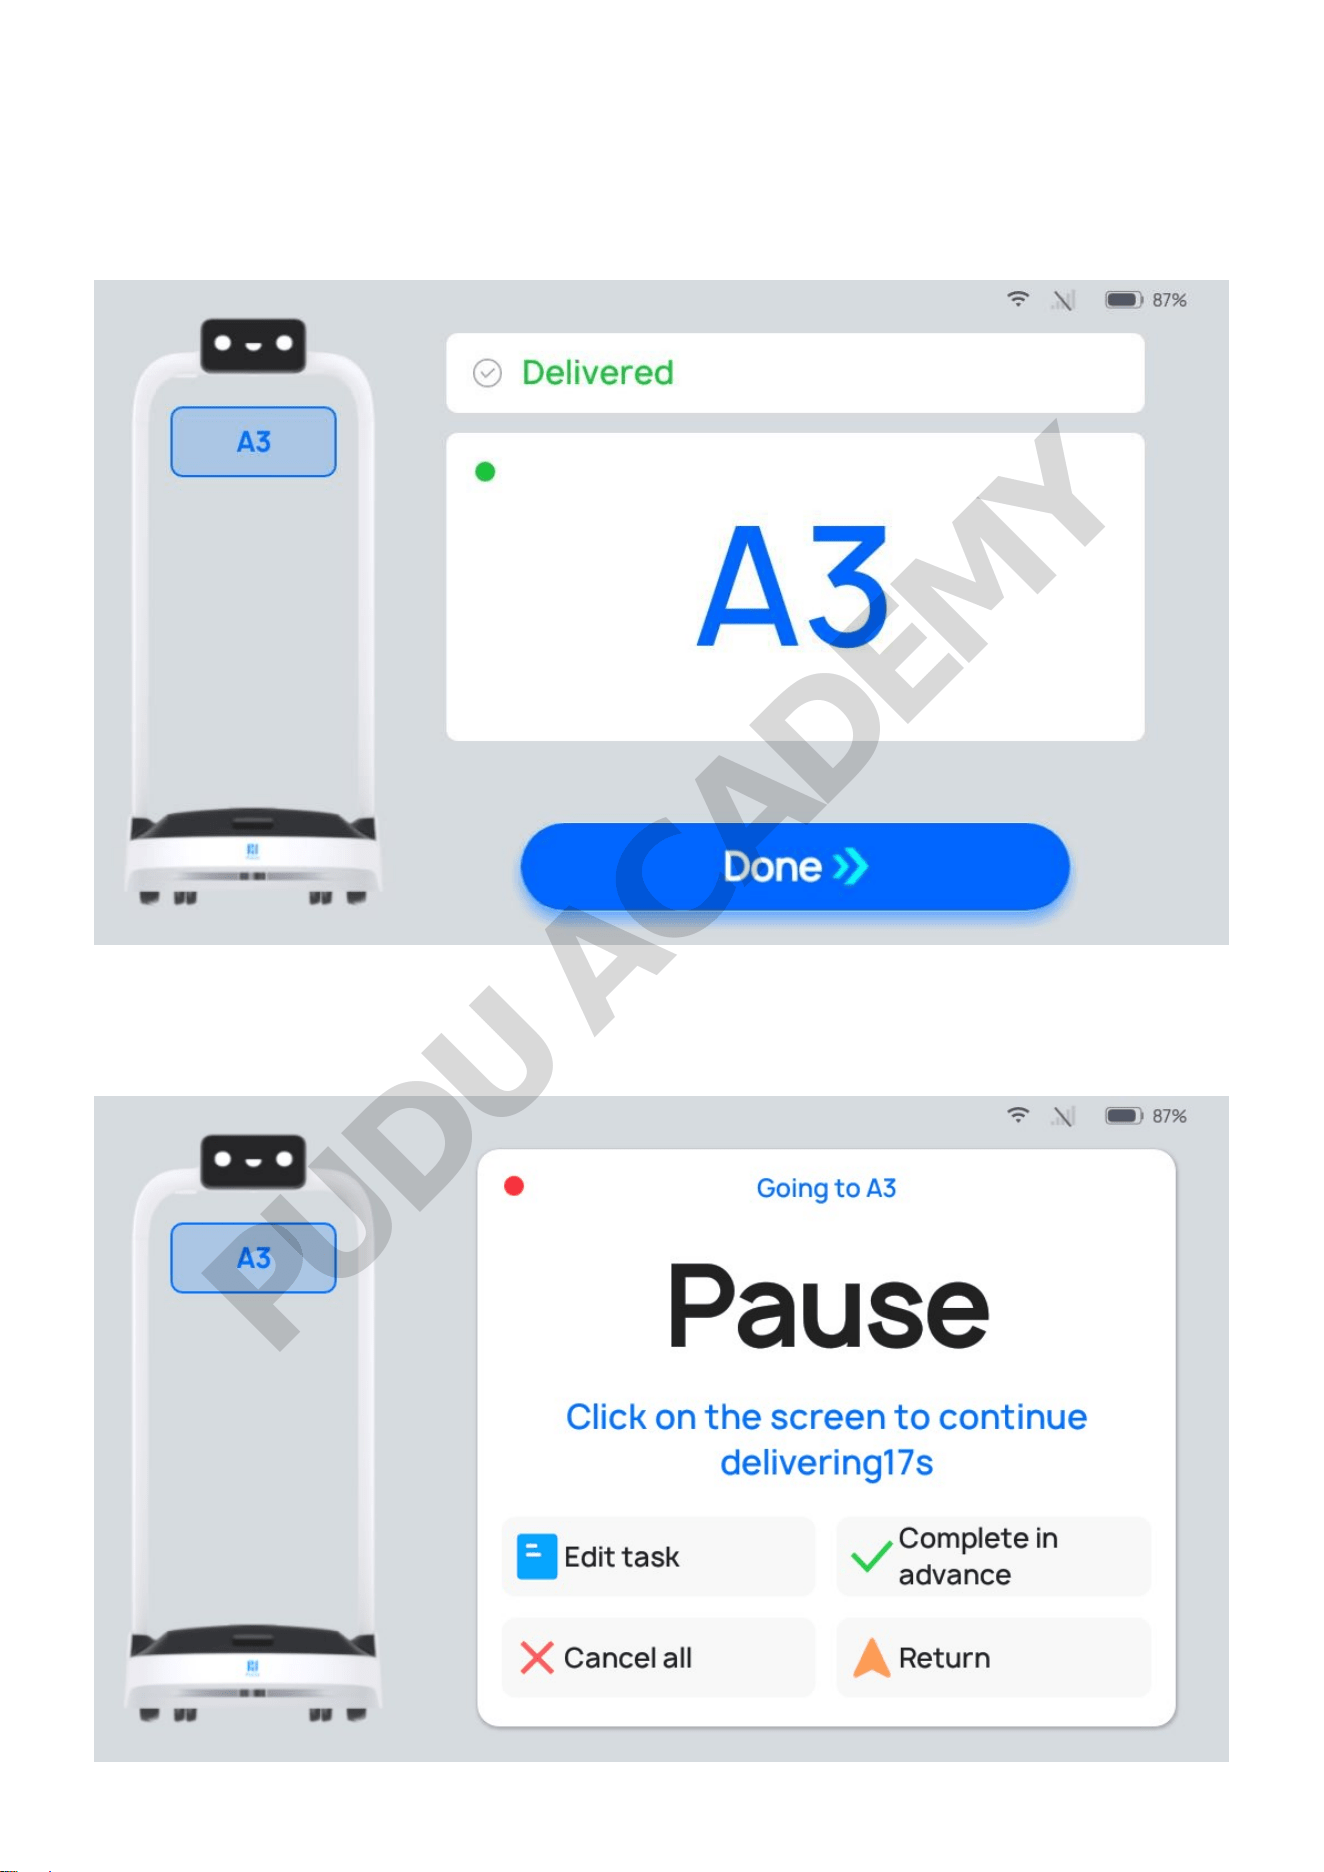
Description
In Direct Mode, only one destination can be selected.
Step 3 Upon reaching the destination, tap "Done" button, and the task will be completed.
During the process of Direct, if you need to edit a task, Complete in advance, cancel all tasks, or
return, you can tap the robot’s screen to pause the robot before proceeding with the operation. If
there are no operations during the countdown period, the robot will continue running.
PUDU ACADEMY
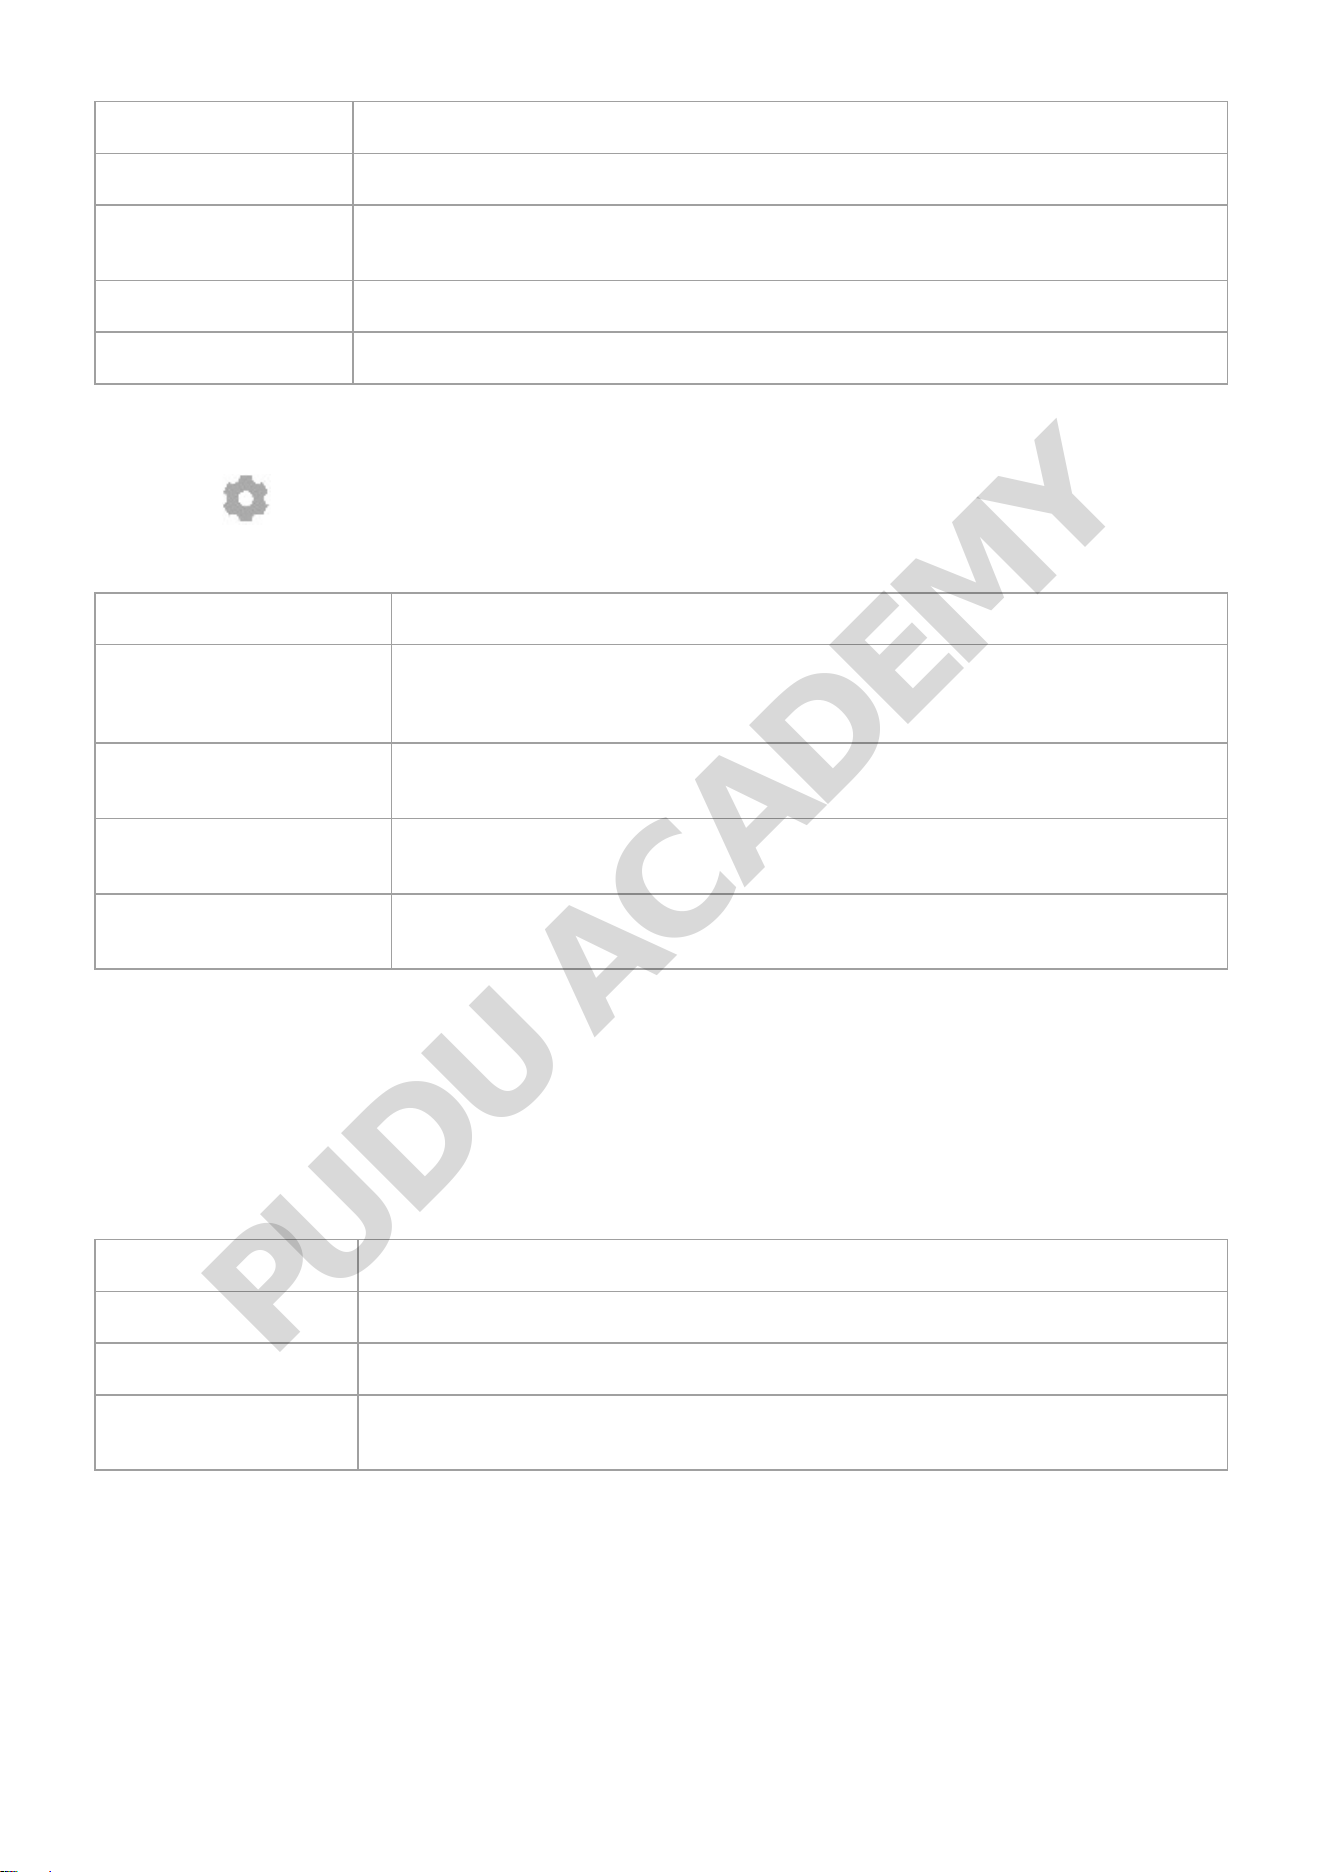
Button Description
Edit task Tap to modify the destination.
Complete in advance
Tap this button to force Complete the task, and the interface will return to the
Direct Mode interface.
Cancel all Tap to cancel all tasks and not return to the docking location.
Return Tap to return to the docking location
Description of Direct Mode Settings
There is a " " button on the right side of the Direct Mode screen. Tap it to configure the Direct
Mode settings. The following settings can be configured:
Settings Description
Direct arrival voice
message
When this function is enabled, a customized voice message will play upon
arrival on a Direct task. If multiple voice messages are selected, one will
randomly play upon each arrival.
Direct arrival
Music
When this function is enabled, the robot will play music upon arrival on a
Direct task.
Music during direct task
When this function is enabled, music will play while the route for Direct
tasks.
Delivering speed
The robot can be configured to travel at a predetermined speed to a
destination.
The detailed method of operation for the specific settings is identical to the Delivery Mode settings.
For details, see "3.2.2.2 Description of Delivery Mode Settings".
More About Direct Mode
Other functions available in the Direct Mode interface include:
Settings Description
Task history You can view the previous task executed in the current mode
Steady mode When this function is enabled, the robot can travel smoothly at a low speed
Default input method
You can modify the destination search method: Direct location selection/smart
location search
The detailed method of operation for the specific settings is identical to the Delivery Mode settings.
For details, see "3.2.2.2 Description of Delivery Mode Settings"
Birthday Mode
Birthday Mode is chiefly used in the settings of sending gifts and playing birthday songs to celebrate
a birthday. Tap the menu bar at the docking location and select "Birthday".
PUDU ACADEMY
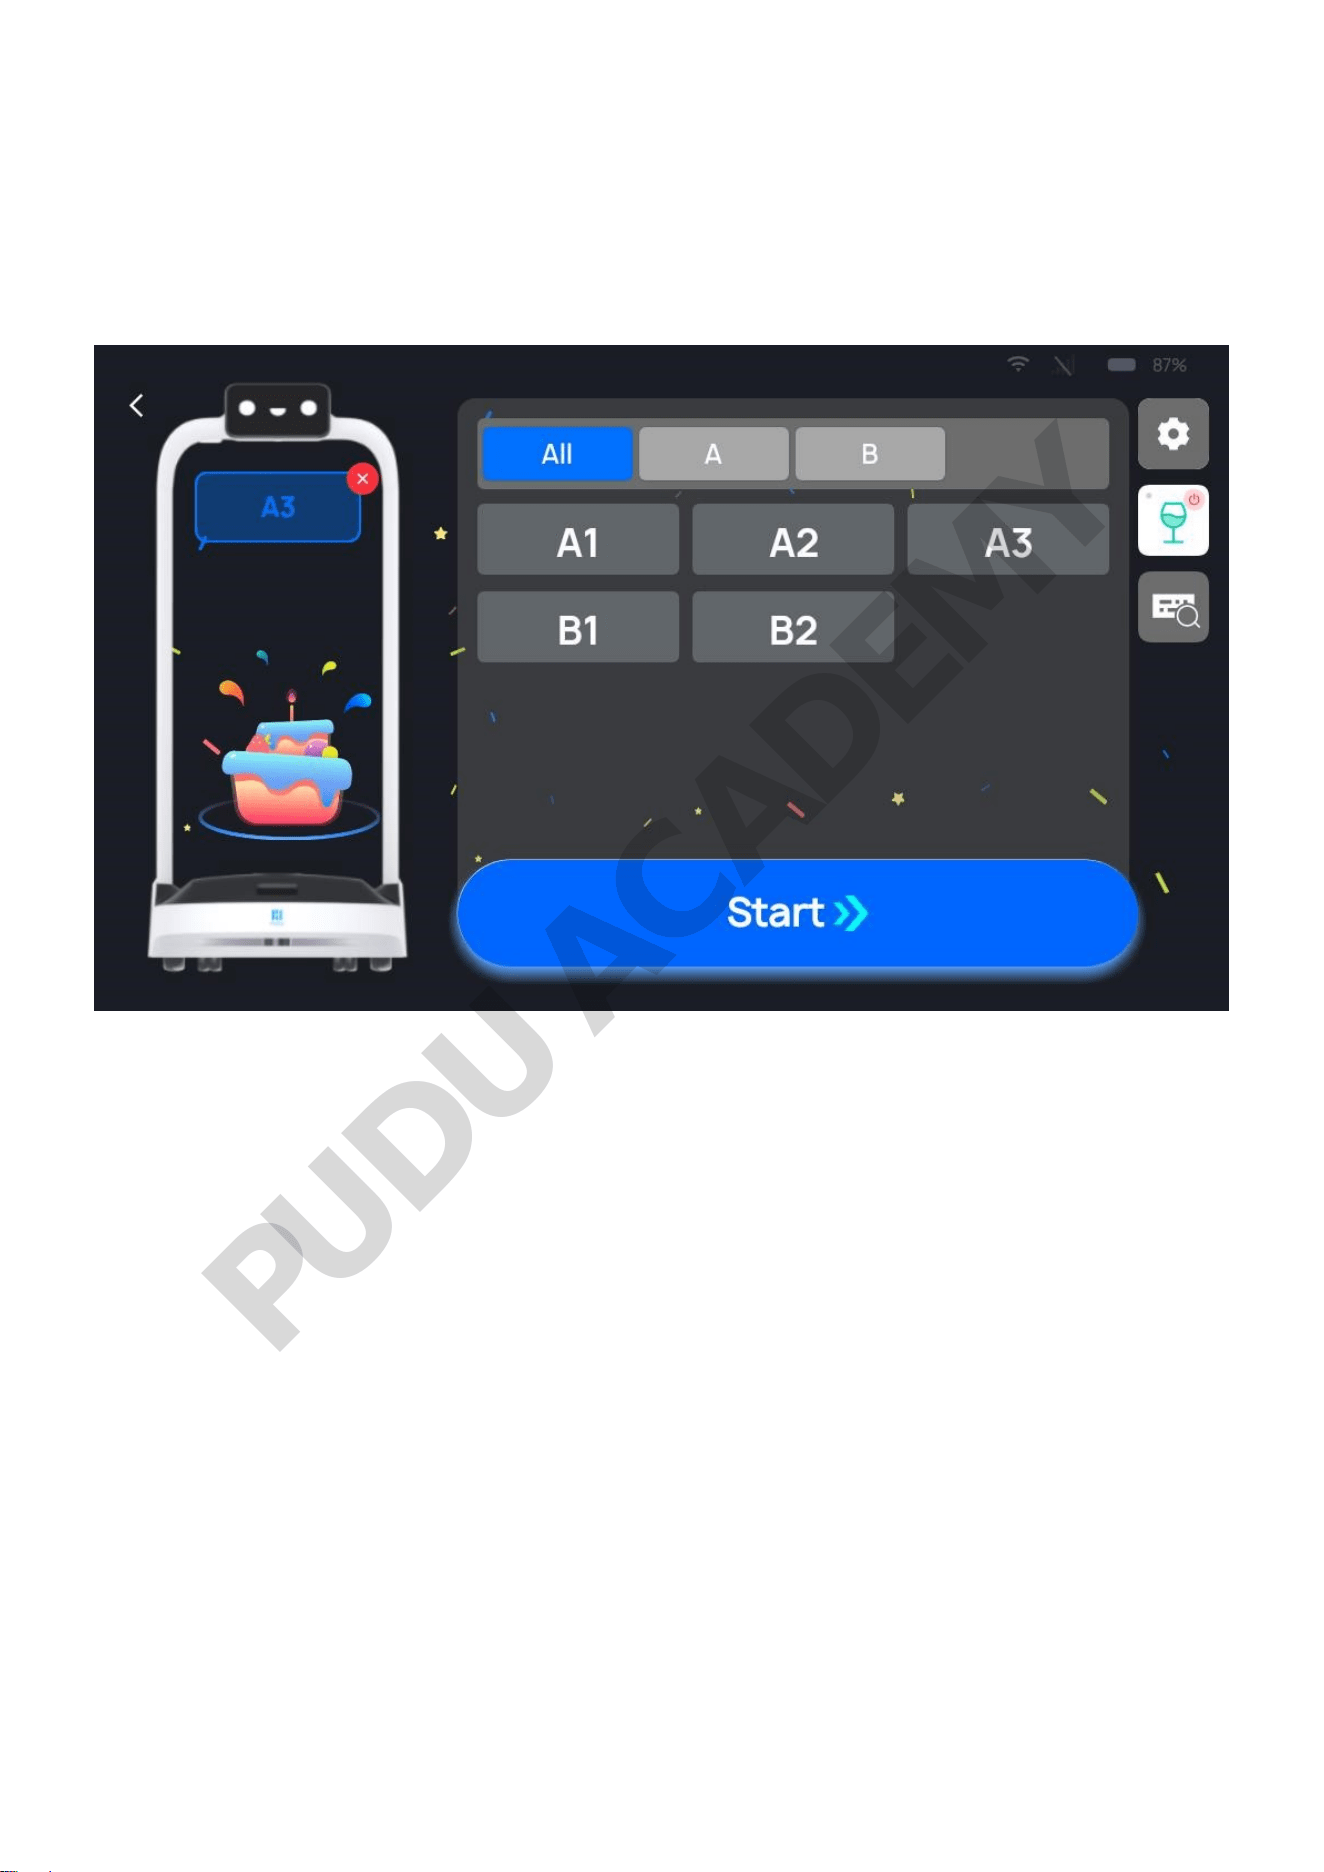
How to Use the Main Processes in Birthday Mode
Step 1 On the home page, select "Birthday" to access the main page for Birthday Mode.
Step 2 In Birthday Mode, tap the table number button on the right side to select the target
table number; after tapping, the selected table number will be displayed on the robot’s tray.
Description
Only one table can be selected in Birthday Mode.
---Tap "Start", and the robot will follow the set route to reach the destination and play the relevant
voice message and music in Birthday Mode.
Step 3 When the task is finished, tap "Done", and the robot will return to the docking location.
During the process of delivering birthday gifts, if it is necessary to edit a task, Complete in advance,
cancel all tasks, or return, you can tap on the robot’s screen to pause the robot before proceeding
with the operation. If there are no operations during the countdown period, the robot will continue
running.
PUDU ACADEMY
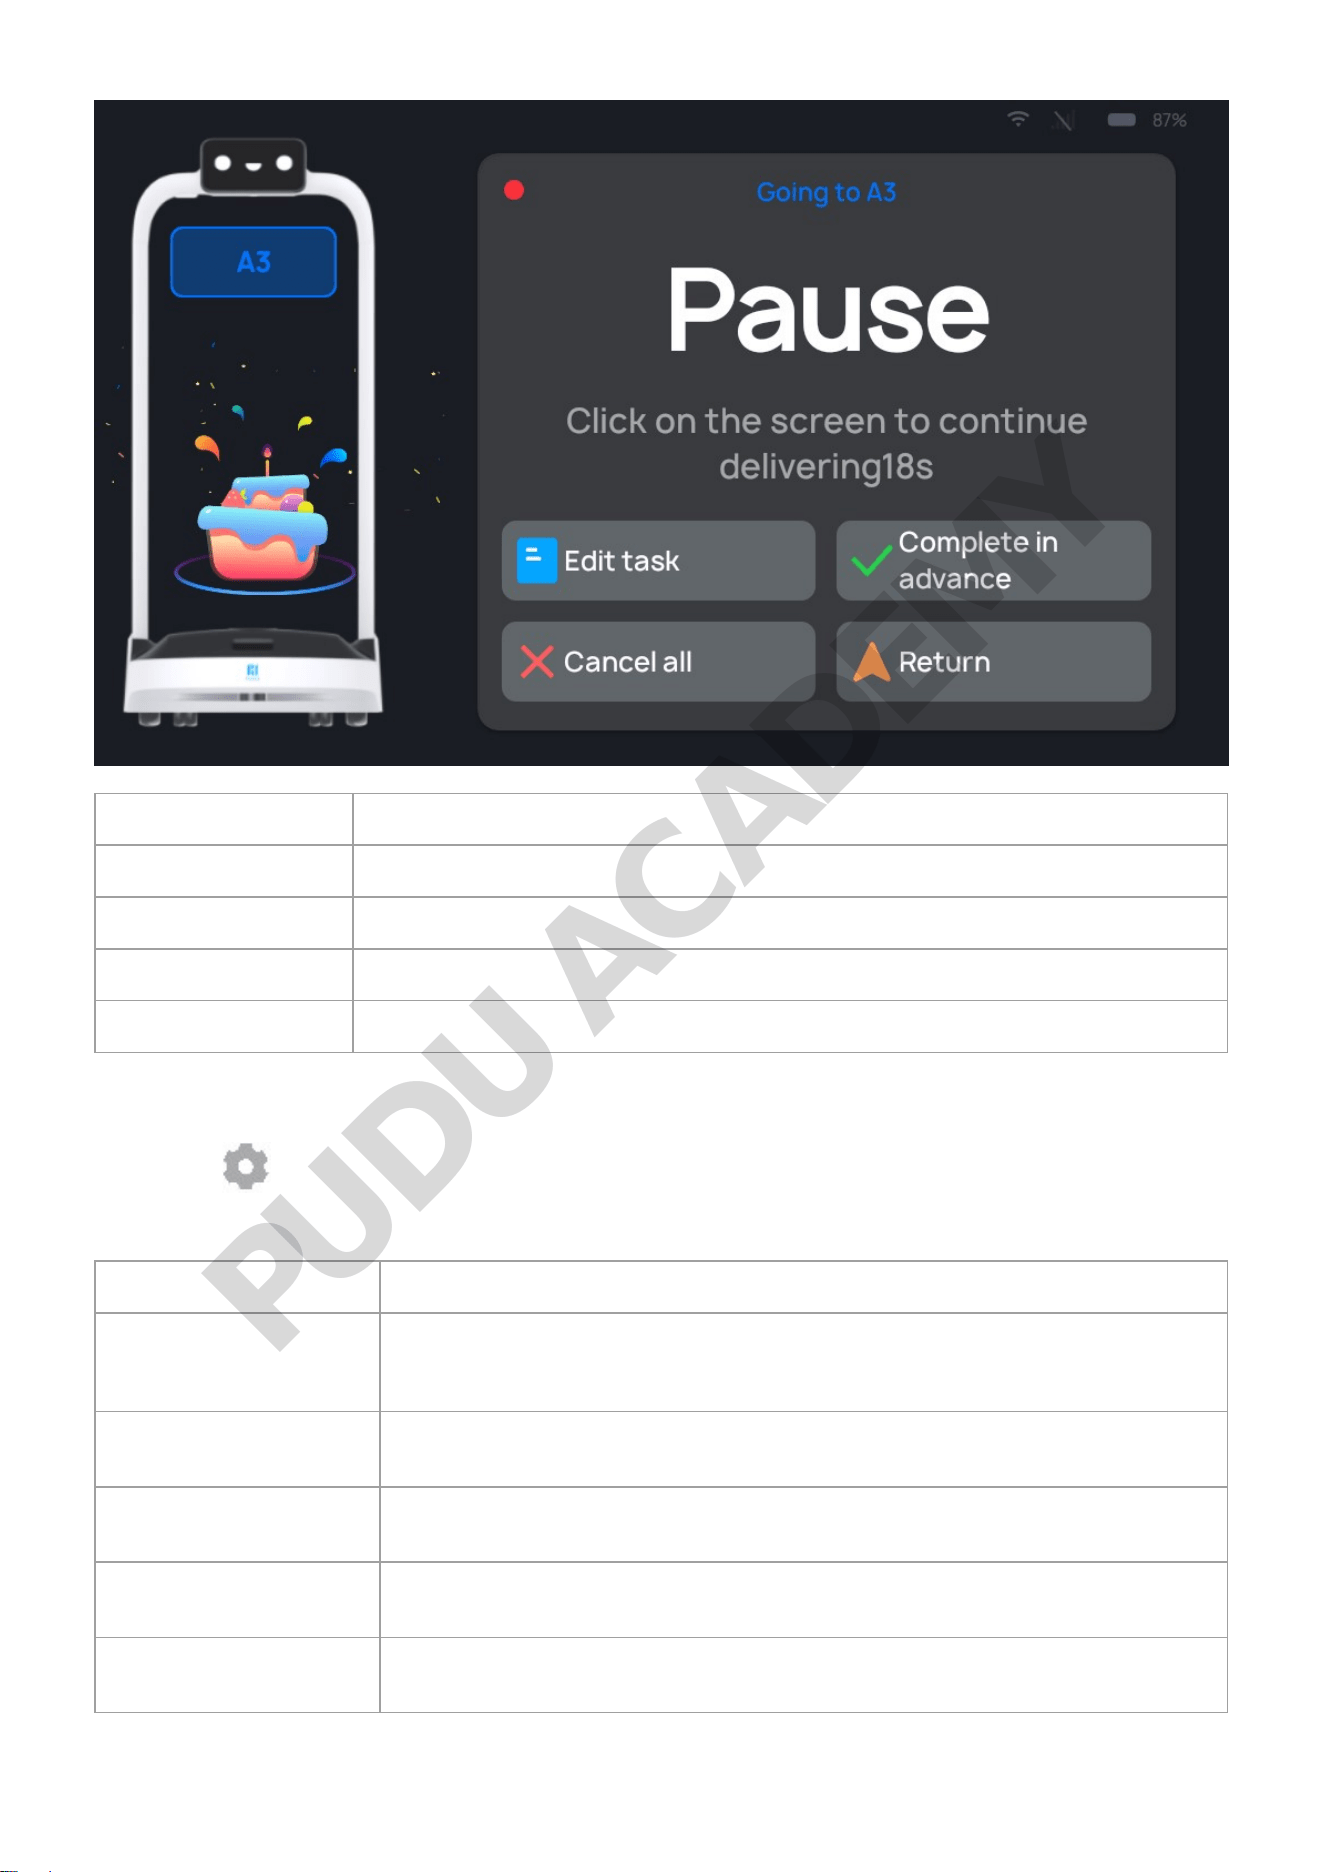
Button Description
Edit task Tap to modify the birthday celebration destination.
Complete in advance Tap this button to force complete the task and return to the docking location.
Cancel all Tap to cancel all tasks and not return to the docking location.
Return Tap to return to the docking location.
Description of Birthday Mode Settings
There is a " " button on the right side of the Birthday Mode screen. Tap it to configure the
Birthday Mode settings. The following settings can be configured:
Settings Description
Birthday arrival voice
Message
When this function is enabled, a customized voice message will play upon
arrival for a Birthday Mode task. If multiple voice messages are selected,
one will play at random upon each arrival.
Birthday arrival
Music
When this function is enabled, the robot will play music upon arrival for a
Birthday Mode task.
Music during birthday
task
When this function is enabled, music will play while the route for birthday
tasks.
Delivering
Speed
The robot can be configured to travel at a predetermined speed to a
destination.
Return Speed
The robot can be configured to travel at a predetermined speed when
returning to the docking location.
PUDU ACADEMY
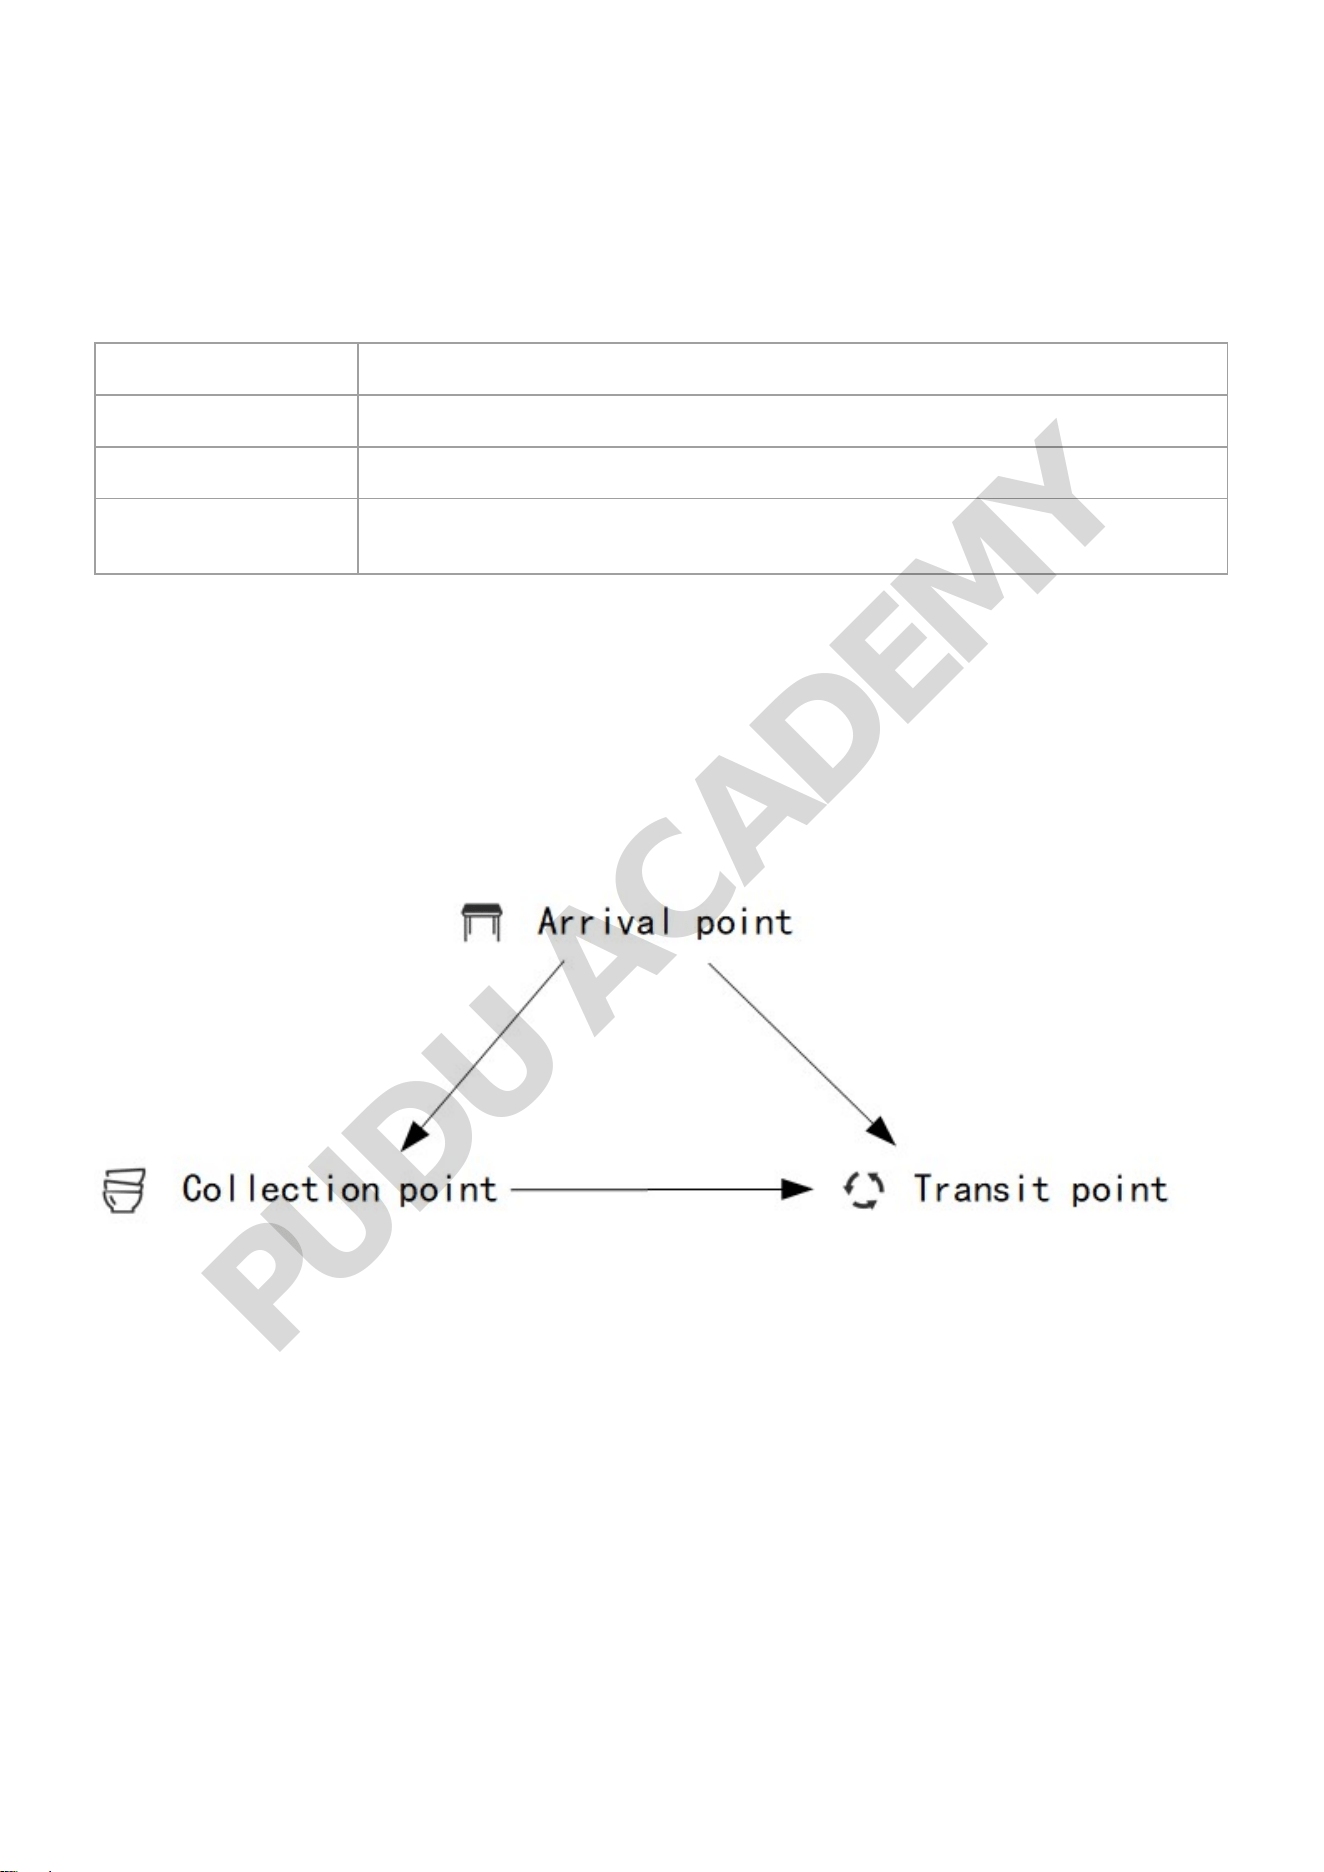
The other settings in Birthday Mode are identical to the Delivery Mode settings. For details, see
"2.2.2 Description of Delivery Mode Settings."
More About Birthday Mode
Other functions available in the Birthday Mode interface include:
Settings Description
Task history The previous task executed in the current mode can be viewed.
Steady mode When this function is enabled, the robot can travel smoothly at a low speed.
Default input method
You can modify the destination search method: Direct location selection/smart
location search.
The specific method of operation is identical to the Delivery Mode settings. For details, see "2.2.3
More About Delivery Mode"
Collection Mode
Collection mode is used for the task of Collecting items such as plates, parts. The robot can deliver
the collecting items from the designated point to the transit location or collection location
How to Use the Main Processes in Collection mode
Step 1 On the robot's home page, select "Collection" to access the main interface for collection
mode.
Step 2 Select the destination on the right side. Once you have finished entering the destination, tap
"Start". The robot will proceed to the corresponding destination.
PUDU ACADEMY
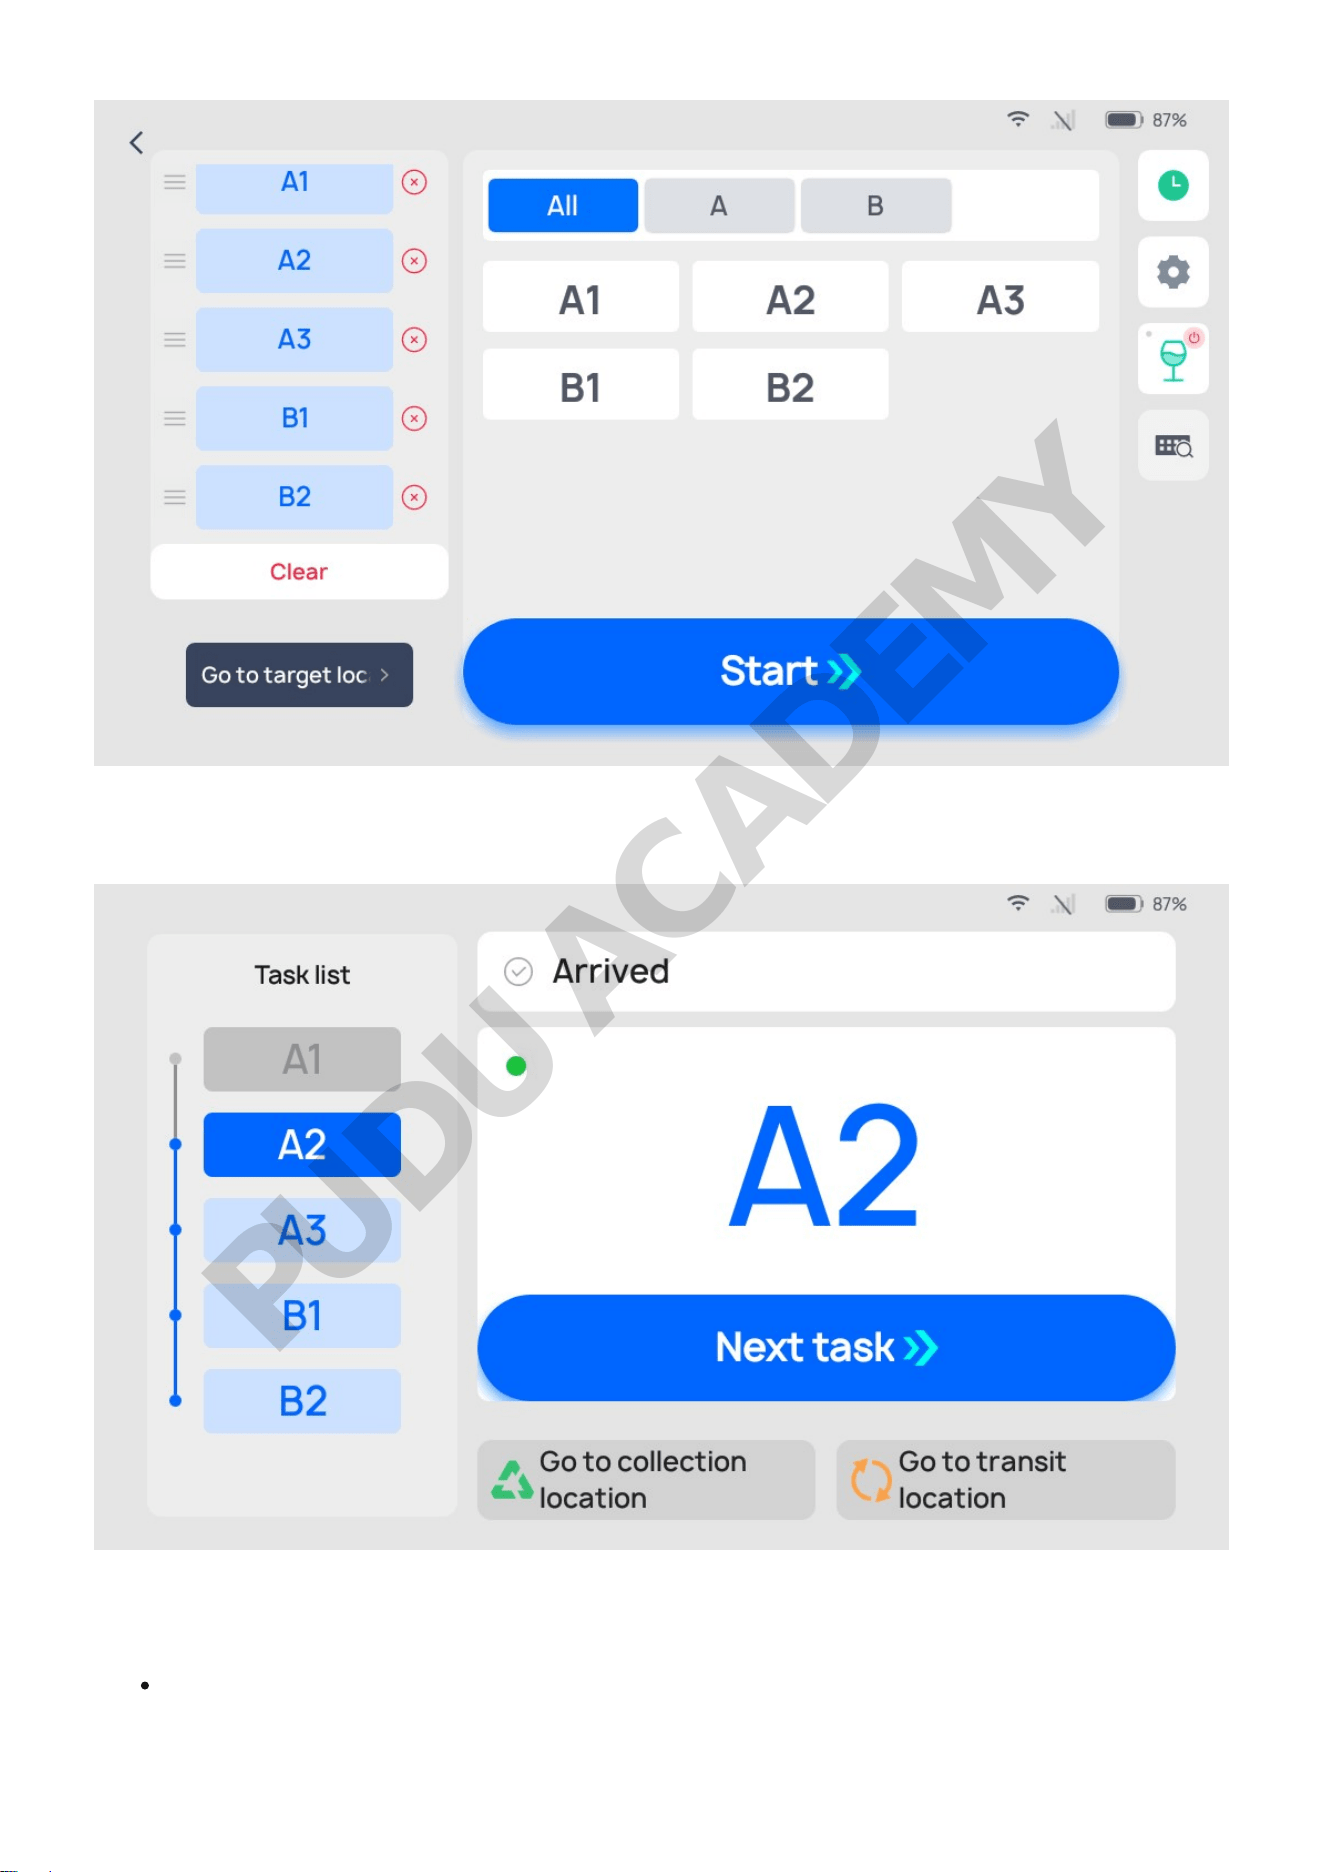
Step 3 When robot reaches its destination, the operator can put items on robot’s trays and tap
"Next task". And then, the robot will then begin executing its destination.
Step 4 After the robot reaches all the destinations, click "Next task" and the robot will execute
action according to whether the " transit location" is set in the map:
When there is a transit location in the map, the robot will go to the transit location. And the
robot will stay at transit location.
PUDU ACADEMY
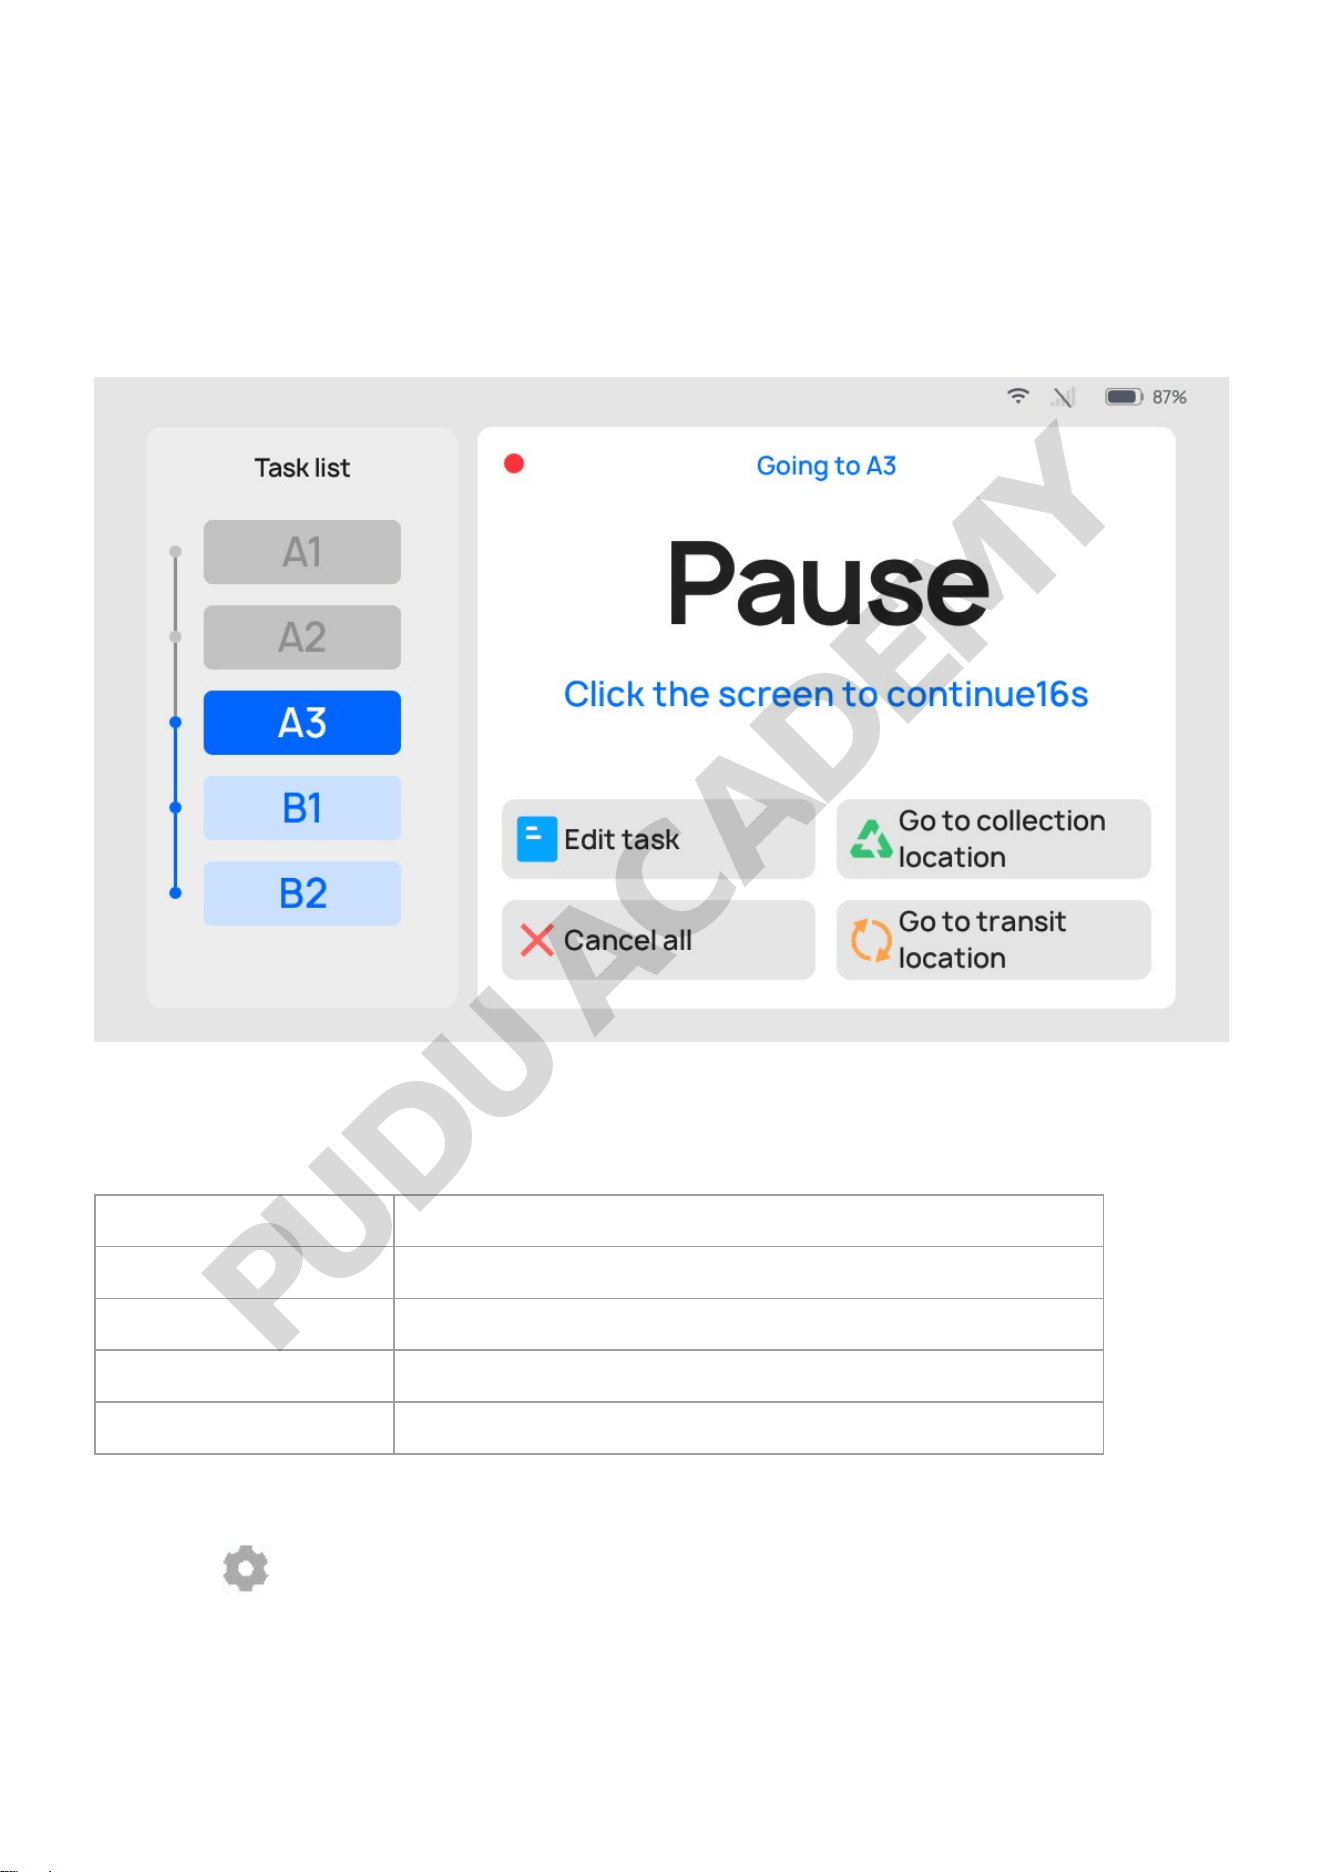
When there is no transit location in the map, the robot will go directly to the collection location. And
it will go to docking location, after you click "Done".
Note:
When there is no transit location in the map, the "Go to the transit location " button in the Collection
mode will be automatically replaced with "Return ". After clicking, the robot will go directly to the
docking location. Other pages are same for it.
During the Collecting process, if it is necessary to edit a task, go to collection location, cancel all, or
return, you can tap on the robot’s screen to pause the robot before proceeding with the operation.
If there are no operations during the countdown period, the robot will continue running.
Button Description
Edit Task Tap to modify the destination.
Go to collection location Tap to force robot to go to collection location
Cancel all Tap to cancel all tasks and not return to the docking location.
Return Tap to return to the docking location.
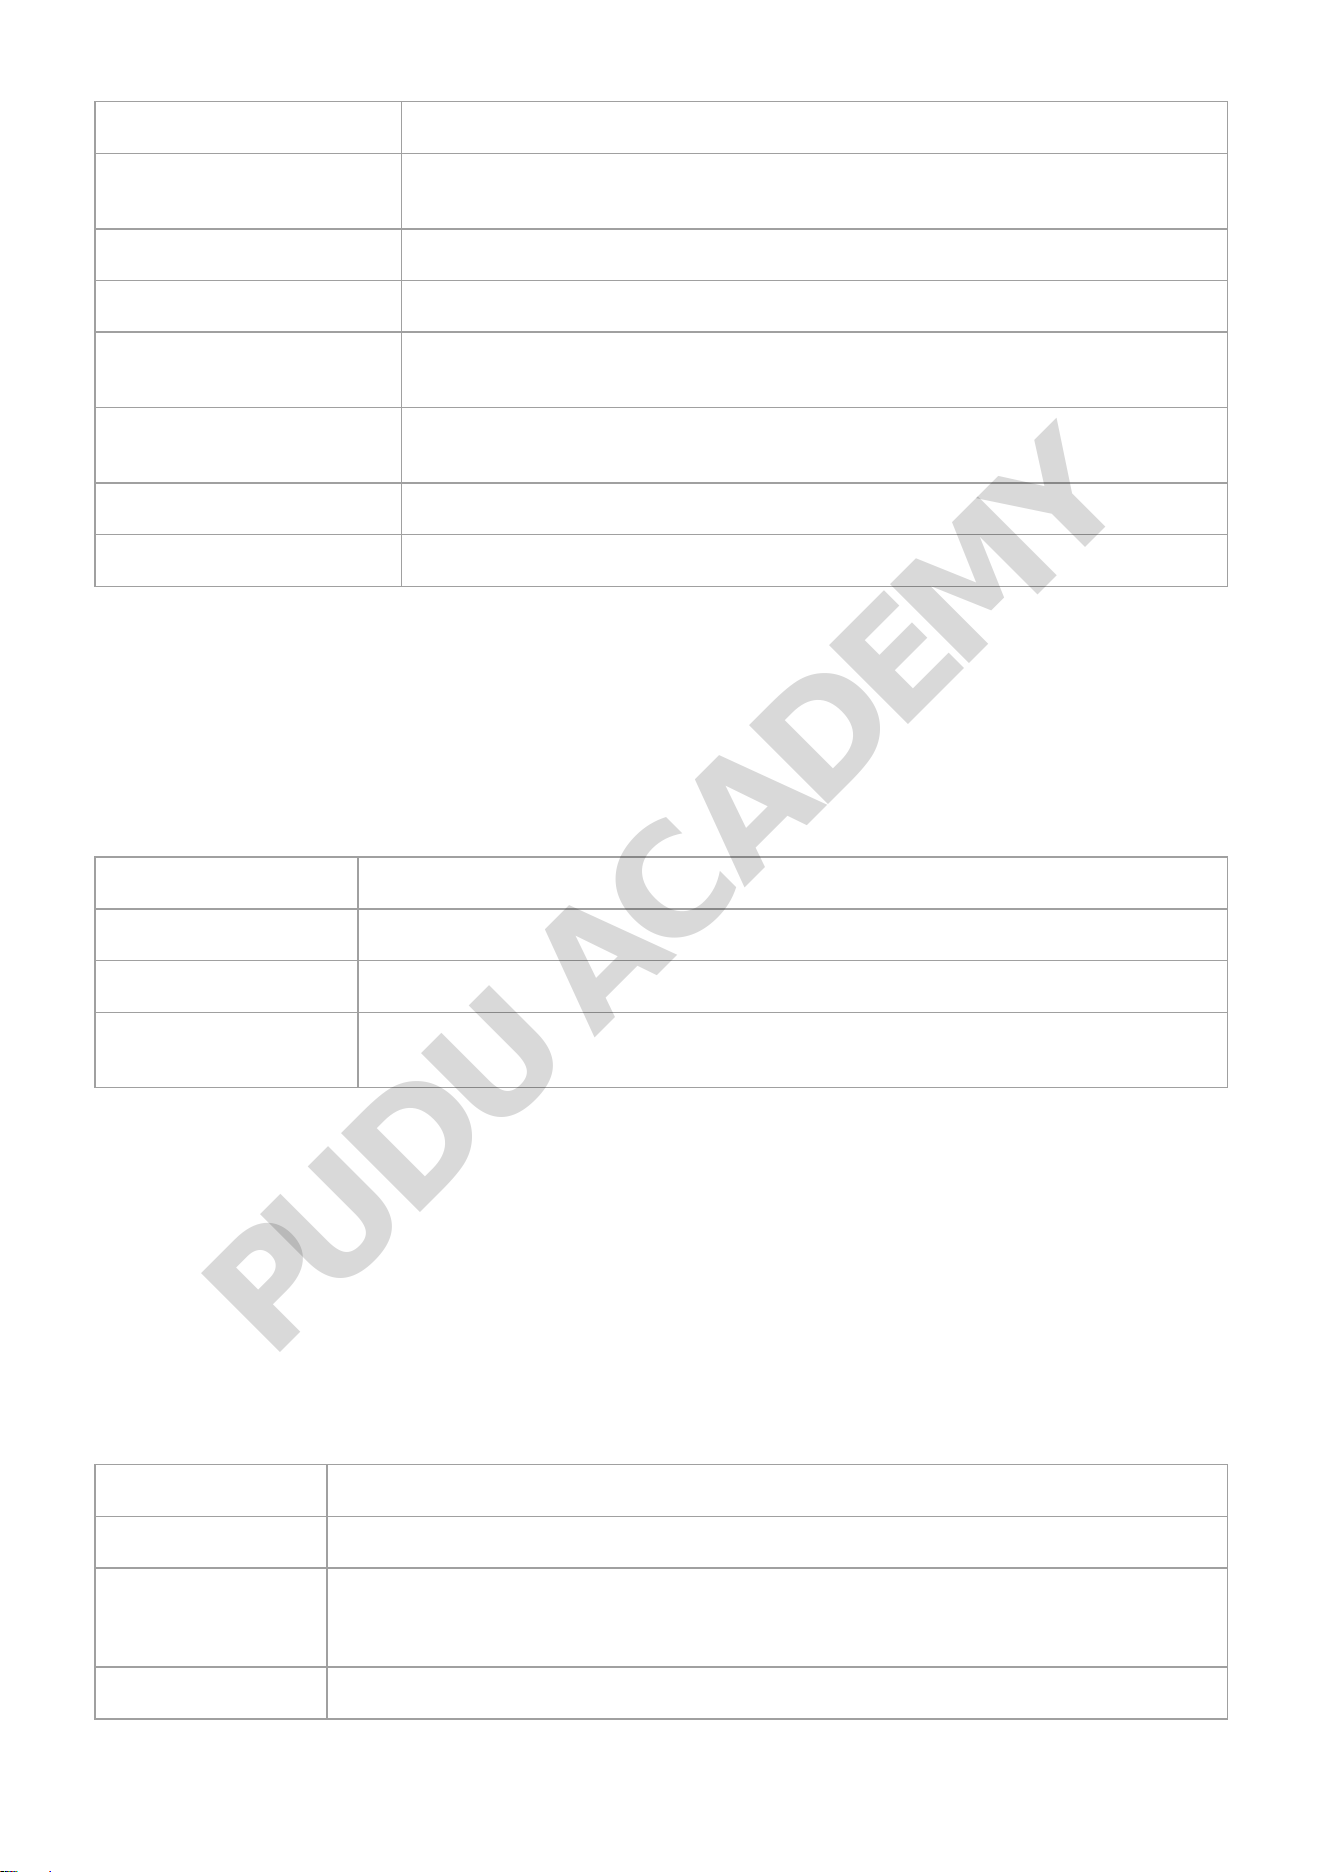
Description of Collection Mode Settings
There is a " " button on the right side of the Collection Mode interface. Tap it to configure the
collection mode settings. The following settings can be configured:
PUDU ACADEMY
Settings Description
Collection arrival music
When this function is enabled, the robot will play music when it arrives on
a collection task.
Music during When this function is enabled, music will be played while the route
collection task for collection task.
Delivering Speed
The robot can be configured to travel at a predetermined speed to a
destination.
Return Speed
The robot can be configured to travel at a predetermined speed when
returning to the docking location.
Select transit location Select the default transit location that robot goes to.
Select collection location Select the default collection location that robot goes to.
The detailed method of operation for the specific settings is identical to the delivery mode settings.
For details, see "2.2.2 Description of Delivery Mode Settings."
More About Collection mode
Other functions available in the Collection modeinterface include:
Settings Description
Task history The previous task executed in the current mode can be viewed.
Steady mode When this function is enabled, the robot can travel smoothly at a low speed.
Default input method
You can modify the destination search method: Direct location selection/smart
location search.
The specific method of operation is identical to the Delivery Mode settings. For details, see
"2.2.3 More About Delivery Mode".
Settings
Swipe the tab at the left-hand side of the robot’s homepage to access the "Settings" button. Tap to
access the general setup screen for the robot. The setup interface allows you to configure the robot's
operational settings.
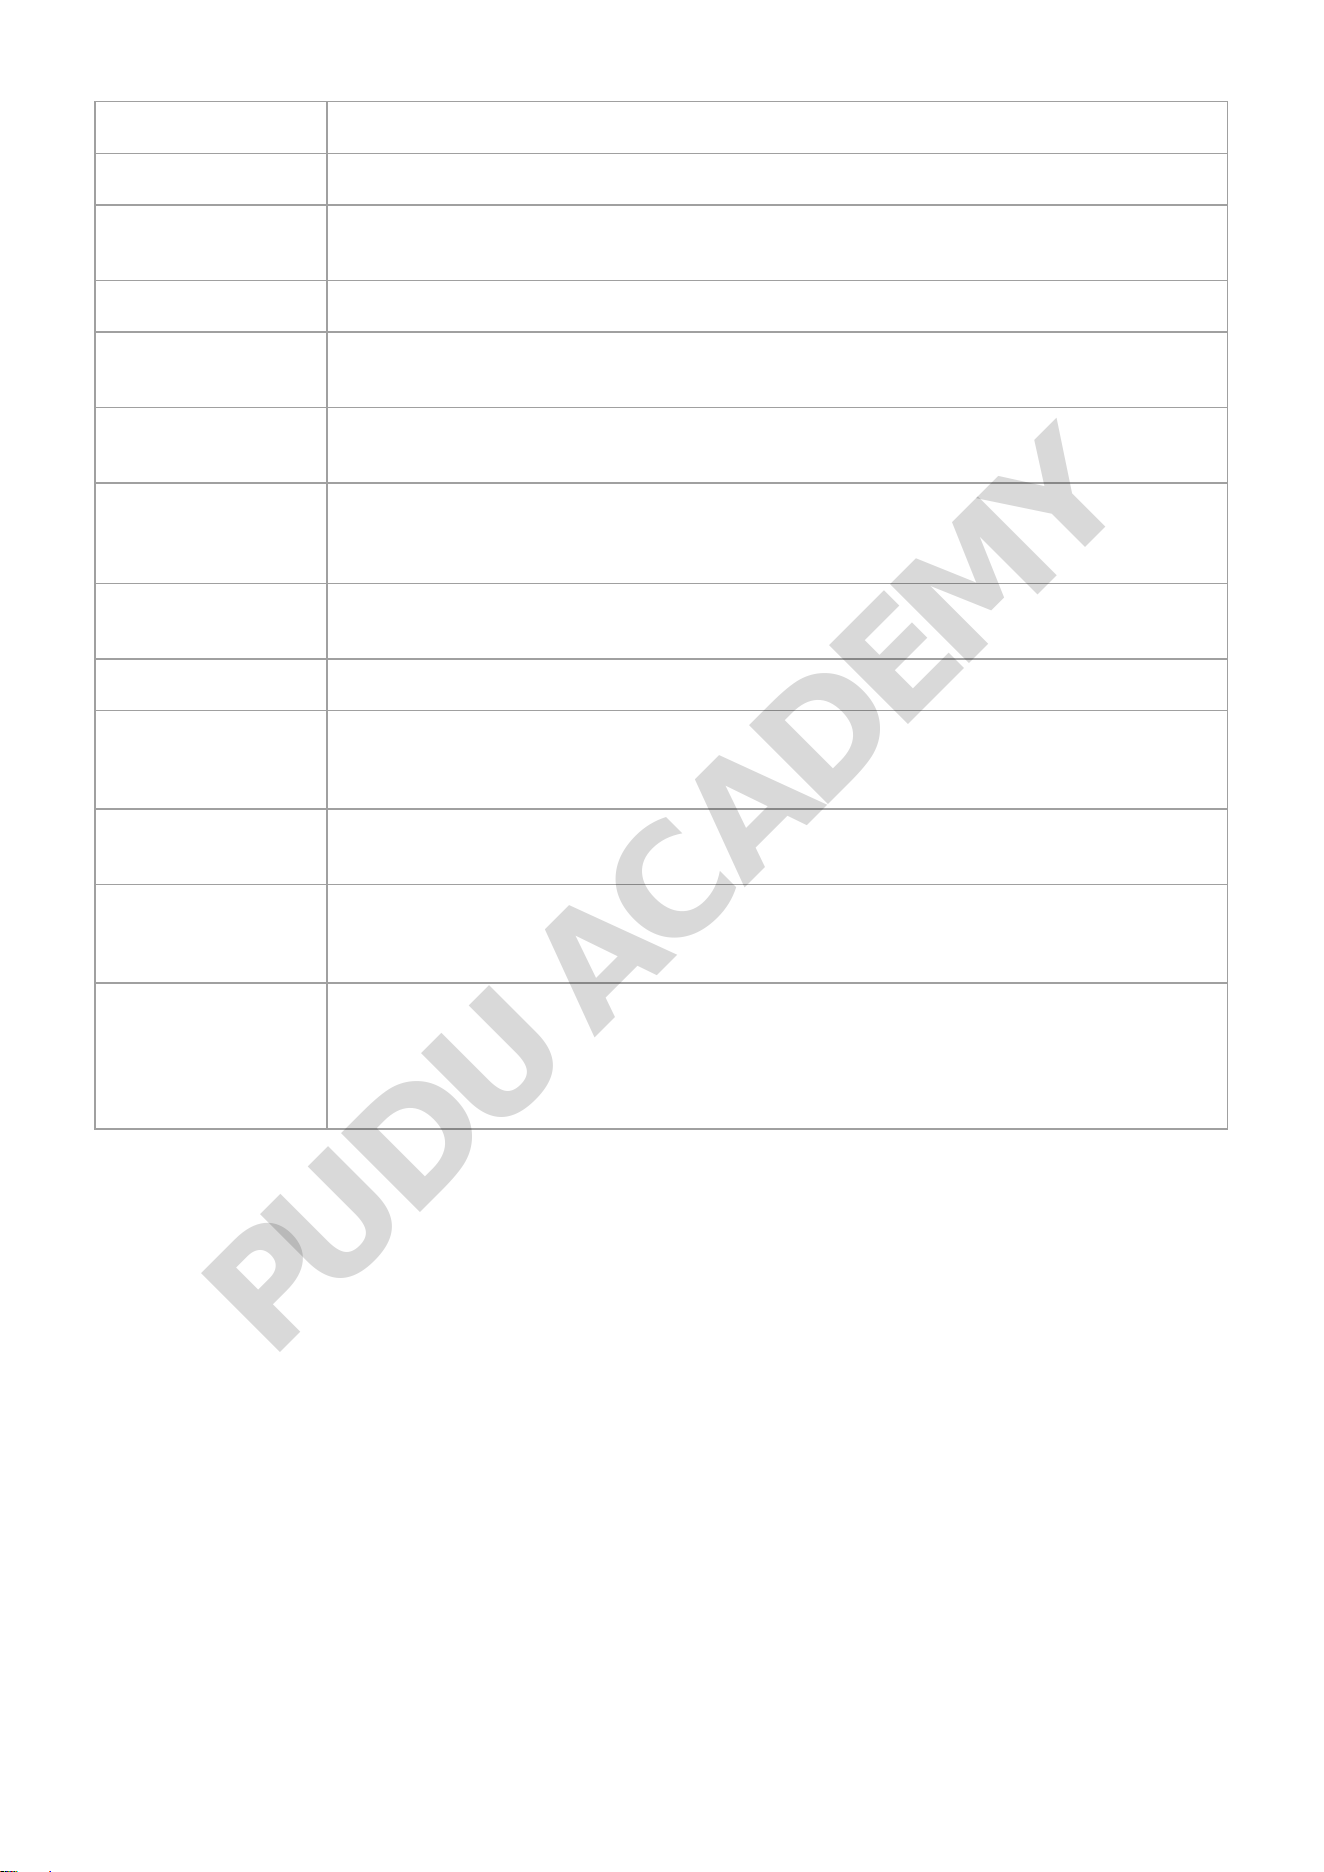
Settings Description
Basic Settings Set screen brightness and language.
Network
Can be set as wireless LAN or 4G network.
If the robot is not connected to a network, then the robot will not be able to
perform version updates and other operations.
Bluetooth You can set up a Bluetooth connection
PUDU ACADEMY
Settings Description
Settings Description
Map
Management module for the robot's operating maps. You can switch between
operating maps, select the return point, and configure other settings.
Volume Adjust song volume, voice message volume, and key press volume.
Music library
Import music and manage the music on the device. Up to 20 music files can be
imported onto the device.
Voice
Download the voice package configured on the cloud platform and select the
voice package..
Speed
Sets the robot's traveling speed in different modes, including the individual’s
traveling speed, return speed, and cruising speed, and turns off the robot’s
Steady Mode.
Charging setting
Sets the automatic charging configuration. It needs to be used with the PUDU
charging pile.
Calling function Set calling settings, including PUDU beeper, Pudu 4G watch, Pudu Pager, etc.
Version update
If it is not the latest version, you can download the latest version and update it.
Before updating, please ensure that the robot has at least 20% battery
remaining, otherwise the update may fail.
About
Displays manufacturer service information, such as the official website
information, robot operations guide, etc.
Debug
Debugs the robot parameters, for technical support engineers only.
The Company will not bear any liability for issues arising from unauthorized
operations.
Advanced Settings
Enable multiple trays for a single table, set delivery parameters, and other
functions.
Advanced settings are Advanced Robot Operations; please contact a technical
support engineer to get the method of operation. The Company will not bear any
liability for issues arising from unauthorized operations.
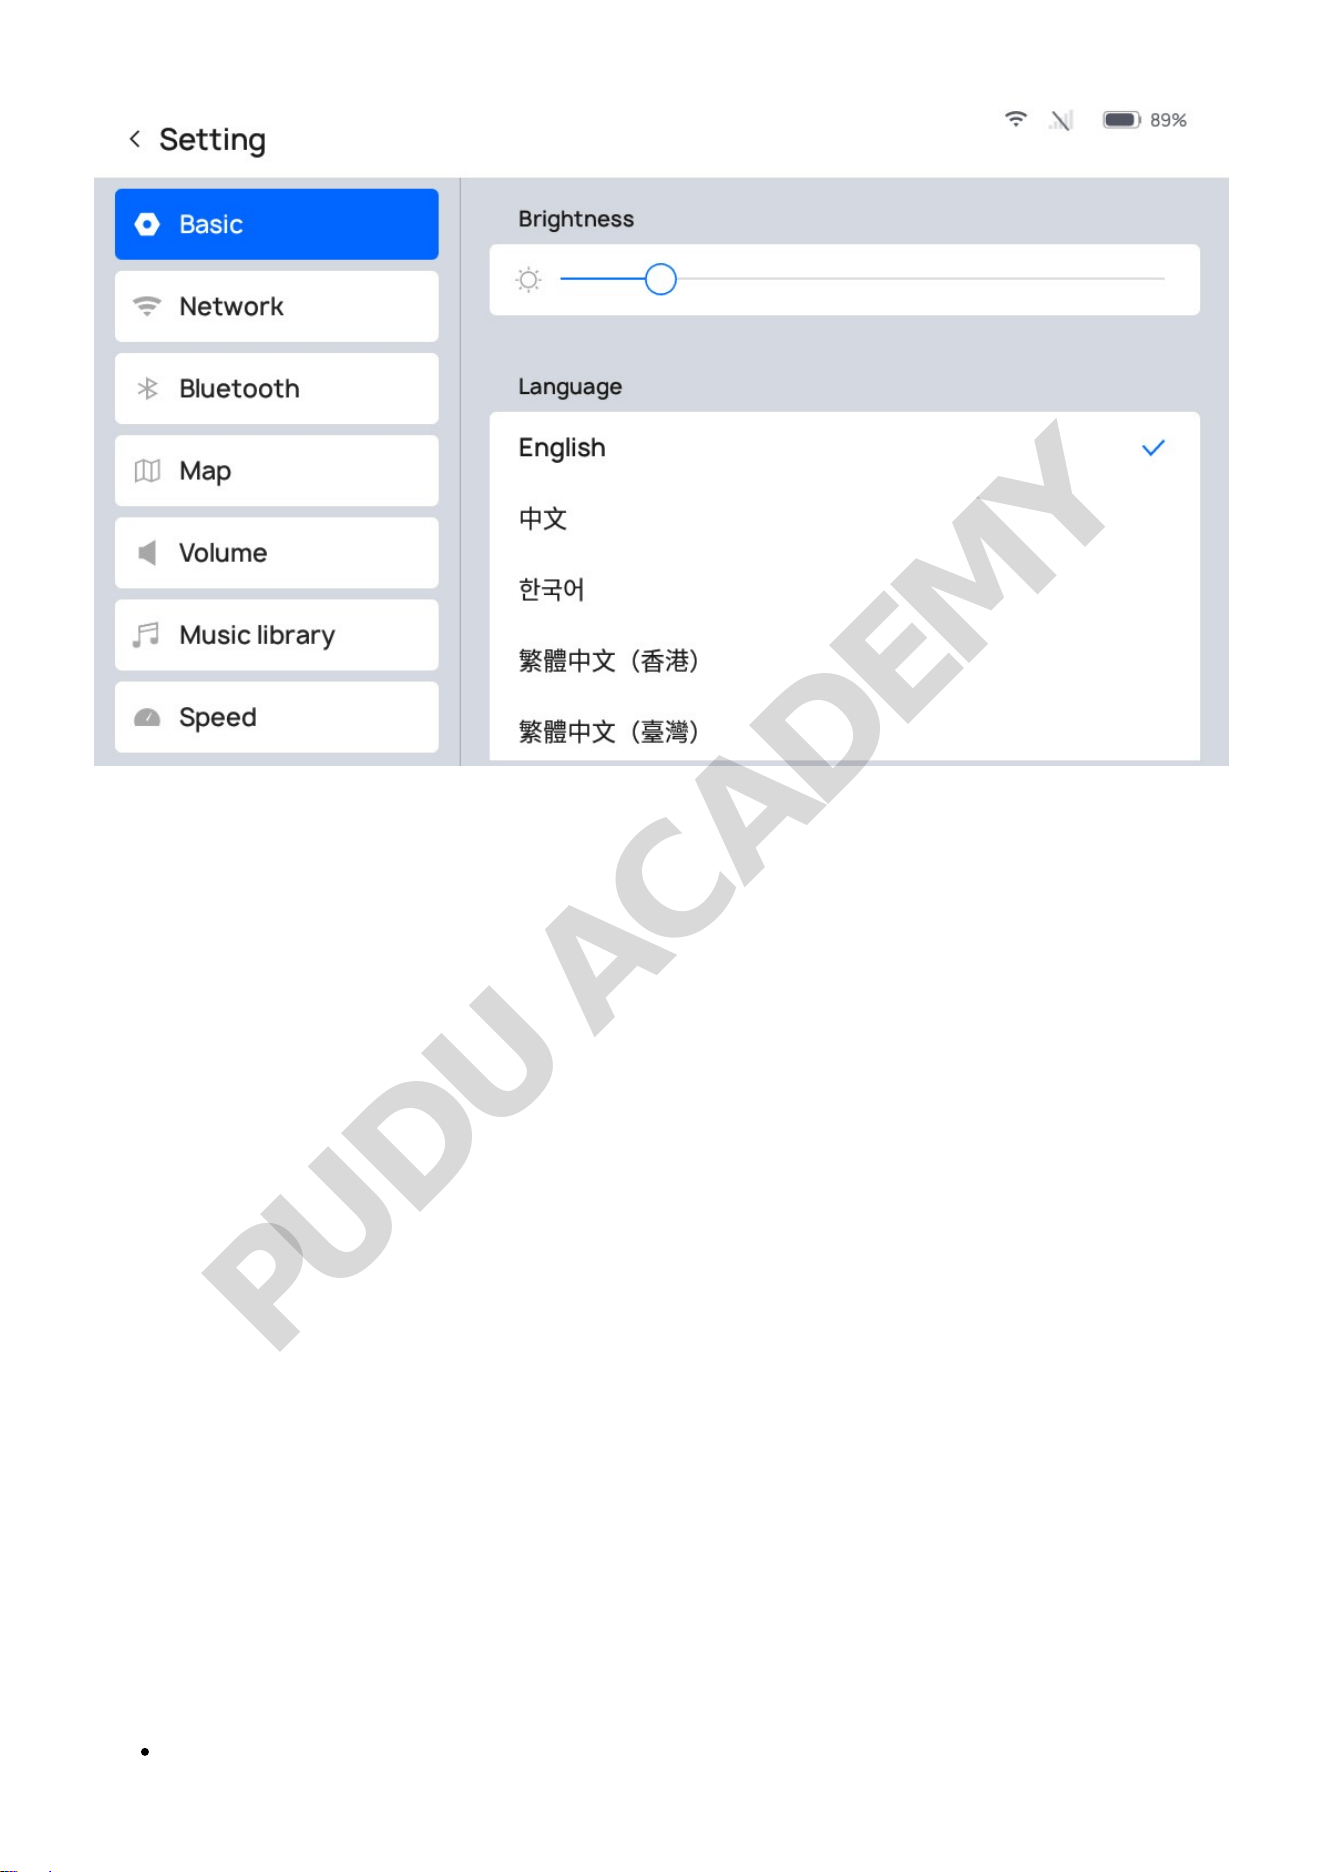
Basic settings
In Basic Settings, you can adjust the screen brightness and select the device language.
PUDU ACADEMY
Network
In Network Settings, the device can be configured for a 4G network or wireless LAN. A device
without a network connection cannot perform version updates.
Bluetooth
The device’s Bluetooth module can be enabled or turned off.
Map
The robot can support the configuration of multiple maps, for use when the usage scenario changes
or when the scenario route changes. When you switch maps, the Happy Delivery robot will
automatically synchronize the destination information, docking location, and other configured
information in the maps. Users can select a map and select a robot docking location based on the
actual scenario.
Tap on the map management screen to access the robot Mapping tool software interface and create
maps, edit maps, and more.
Volume
In Volume Settings, you can adjust the robot's song volume, voice message volume, and key press
volume. The specific meaning for each type of volume is as follows:
Song volume: The volume of the songs and music played by the robot;
PUDU ACADEMY
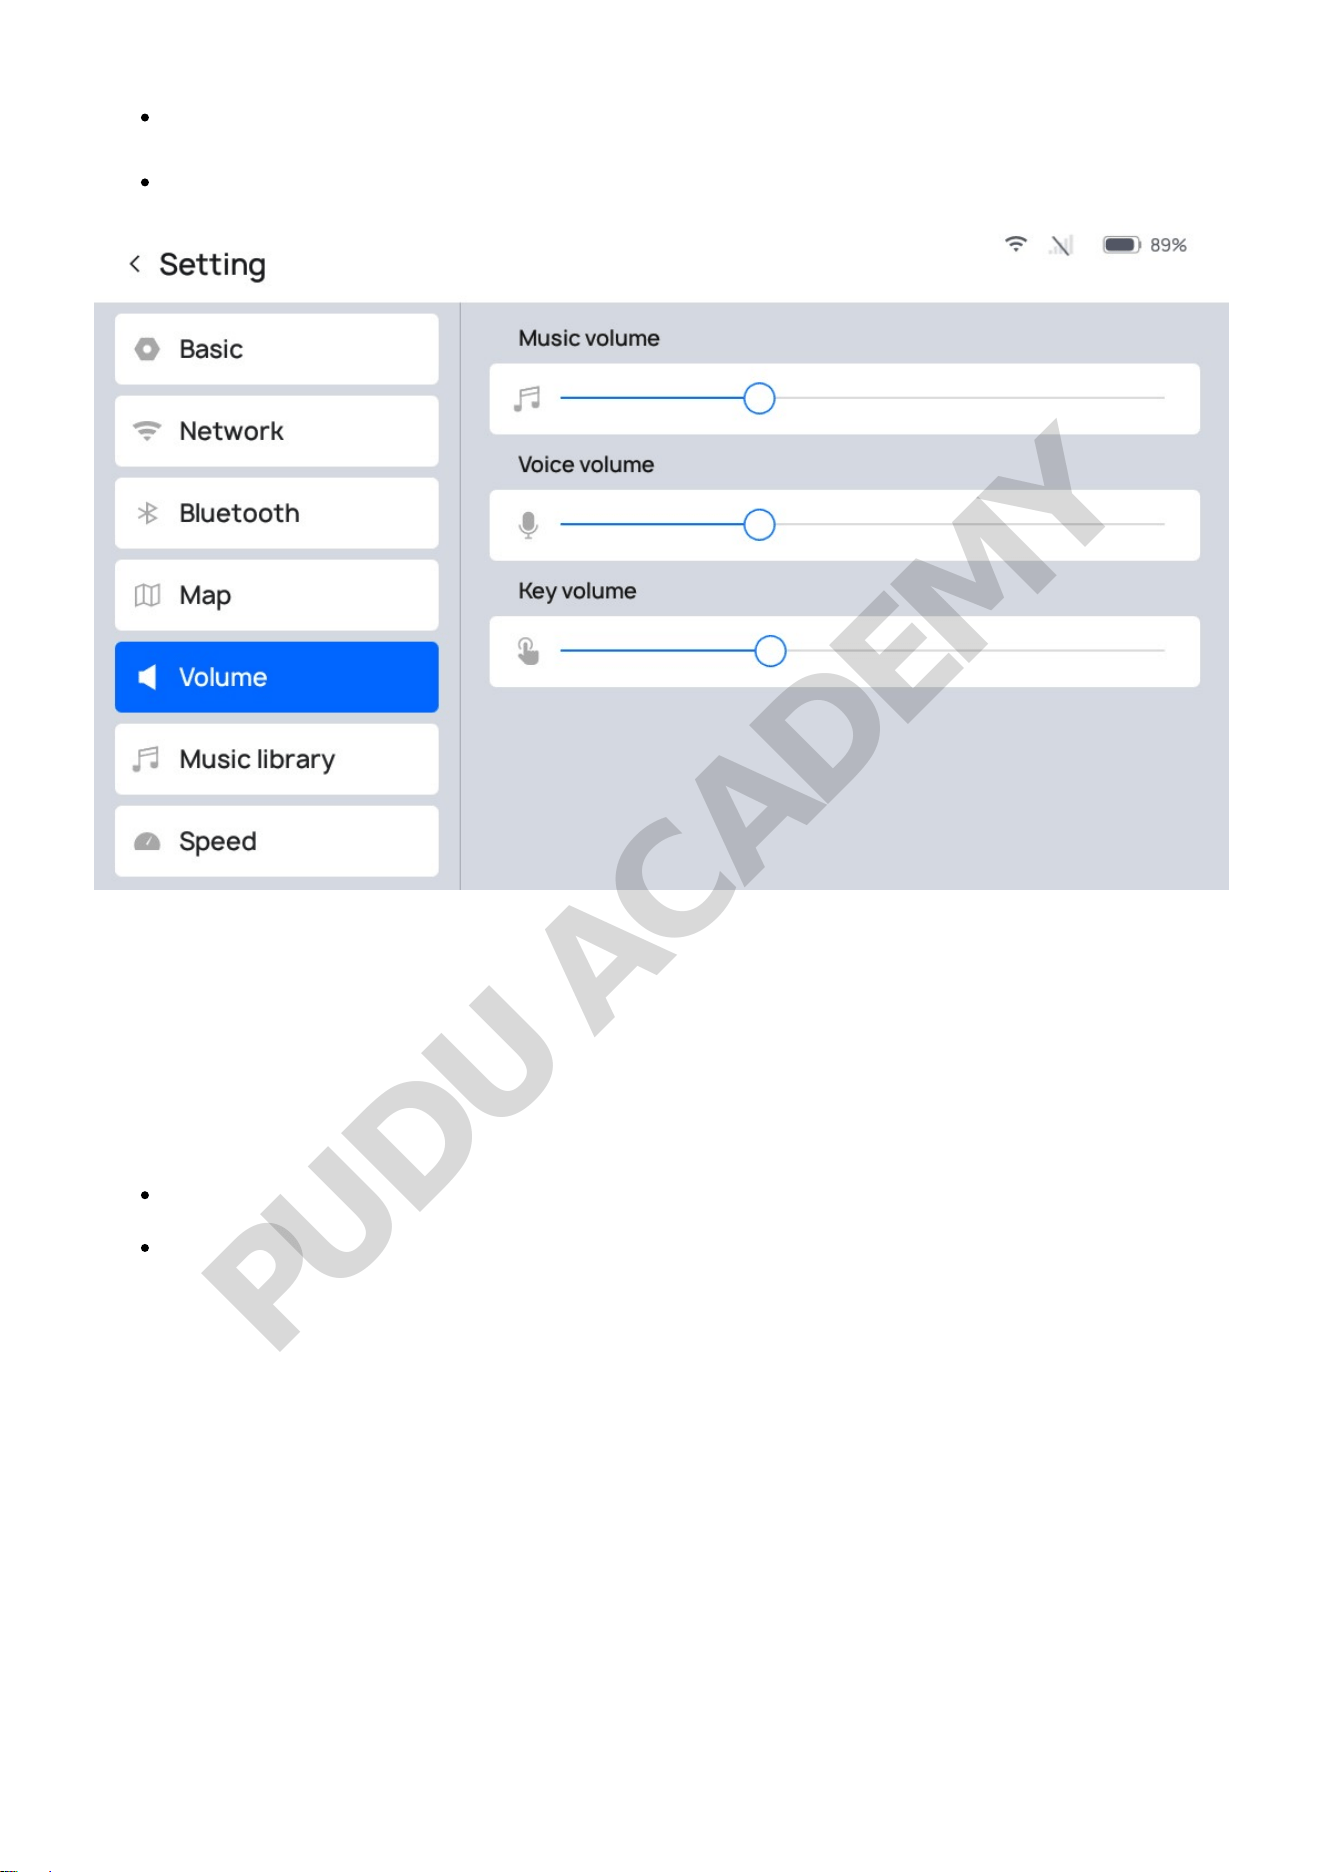
Voice message volume: The volume of the voice messages played by the robot, including
default voice messages and customized voice messages;
Key press volume: The volume of the key press sound when operating the robot.
Music Library
In the Music Library module, users can import music for the robot by connecting the robot to the
same Wi-Fi as their phone and scanning the QR code in the "Import Music" module. Imported music
files will be displayed in the "List of All Music." The robot can store up to 20 music files. Supported
music file formats: MP3, WAV, FLAC, AAC, PCM, WMA, APE.
You can test music by tapping the " " button to the right of the music file;
By long pressing a song, the "Delete" button will pop up. Tap the button to delete music.
Voice
In the voice module, you can download the voice package configured on the cloud platform or select
a locally stored voice package.
• Select Voice Package: You can select a locally downloaded voice package, and once selected, the
machine will play the chosen voice package.
• Download List: You can select the voice package whichisauthorized by the cloud platform for the
robot.
PUDU ACADEMY
Speed
The robot's traveling speed, return speed, and cruising speed can be adjusted on the basis of the
actual needs for use. The traveling speed, return speed, and cruising speed are defined as follows:
• Traveling speed: The speed at which the robot travels to the destination;
• Return speed: The speed at which the robot returns from any point to the docking location;
• Cruising speed: The speed at which the robot travels when acting as a patroller;
Range of speeds: 0.1m/s (0.33ft/s)~ 1.2m/s (3.93ft/s)
In addition, in order to ensure the smooth delivery of items, you can enable the "Steady
Mode" switch in the Speed Settings. Once the switch is enabled, a " " icon will appear on the
screen in all modes. Tap this icon to enable Steady Mode. In Steady Mode, the robot runs more
smoothly.
Charging settings
In this section, you can set automatic charging configuration on your need.
(1)The switch of automatic self-charging
If there is a charging pile set in the robot map, this switch will be turned on by default. When
enabled, the low battery threshold of the robot can be set (the setting range is 5%~50%). When the
battery is lower than this threshold, the robot will automatically go to the charging pile for
charging..
(2)Customize time slot for automatic recharging
The automatic charging time period of the robot can be customized, and the robot will only perform
the recharging task in the set time period. There will be a time period of "00:00~23:59" in the
machine by default. You can also click the "+" symbol to add the time period, and you can open/close
each time period through the switch.
When multiple time periods are opened at the same time, the robot will perform automatic recharge
if the current moment belongs to any of the open periods.
(3)Select charging pile
If multiple charging pile points are set in the map, you can select the charging pile that the robot
automatically charging here.
Calling function
You can set calling settings, including PUDU beeper, Pudu 4G watch, Pudu Pager, etc.
PUDU ACADEMY
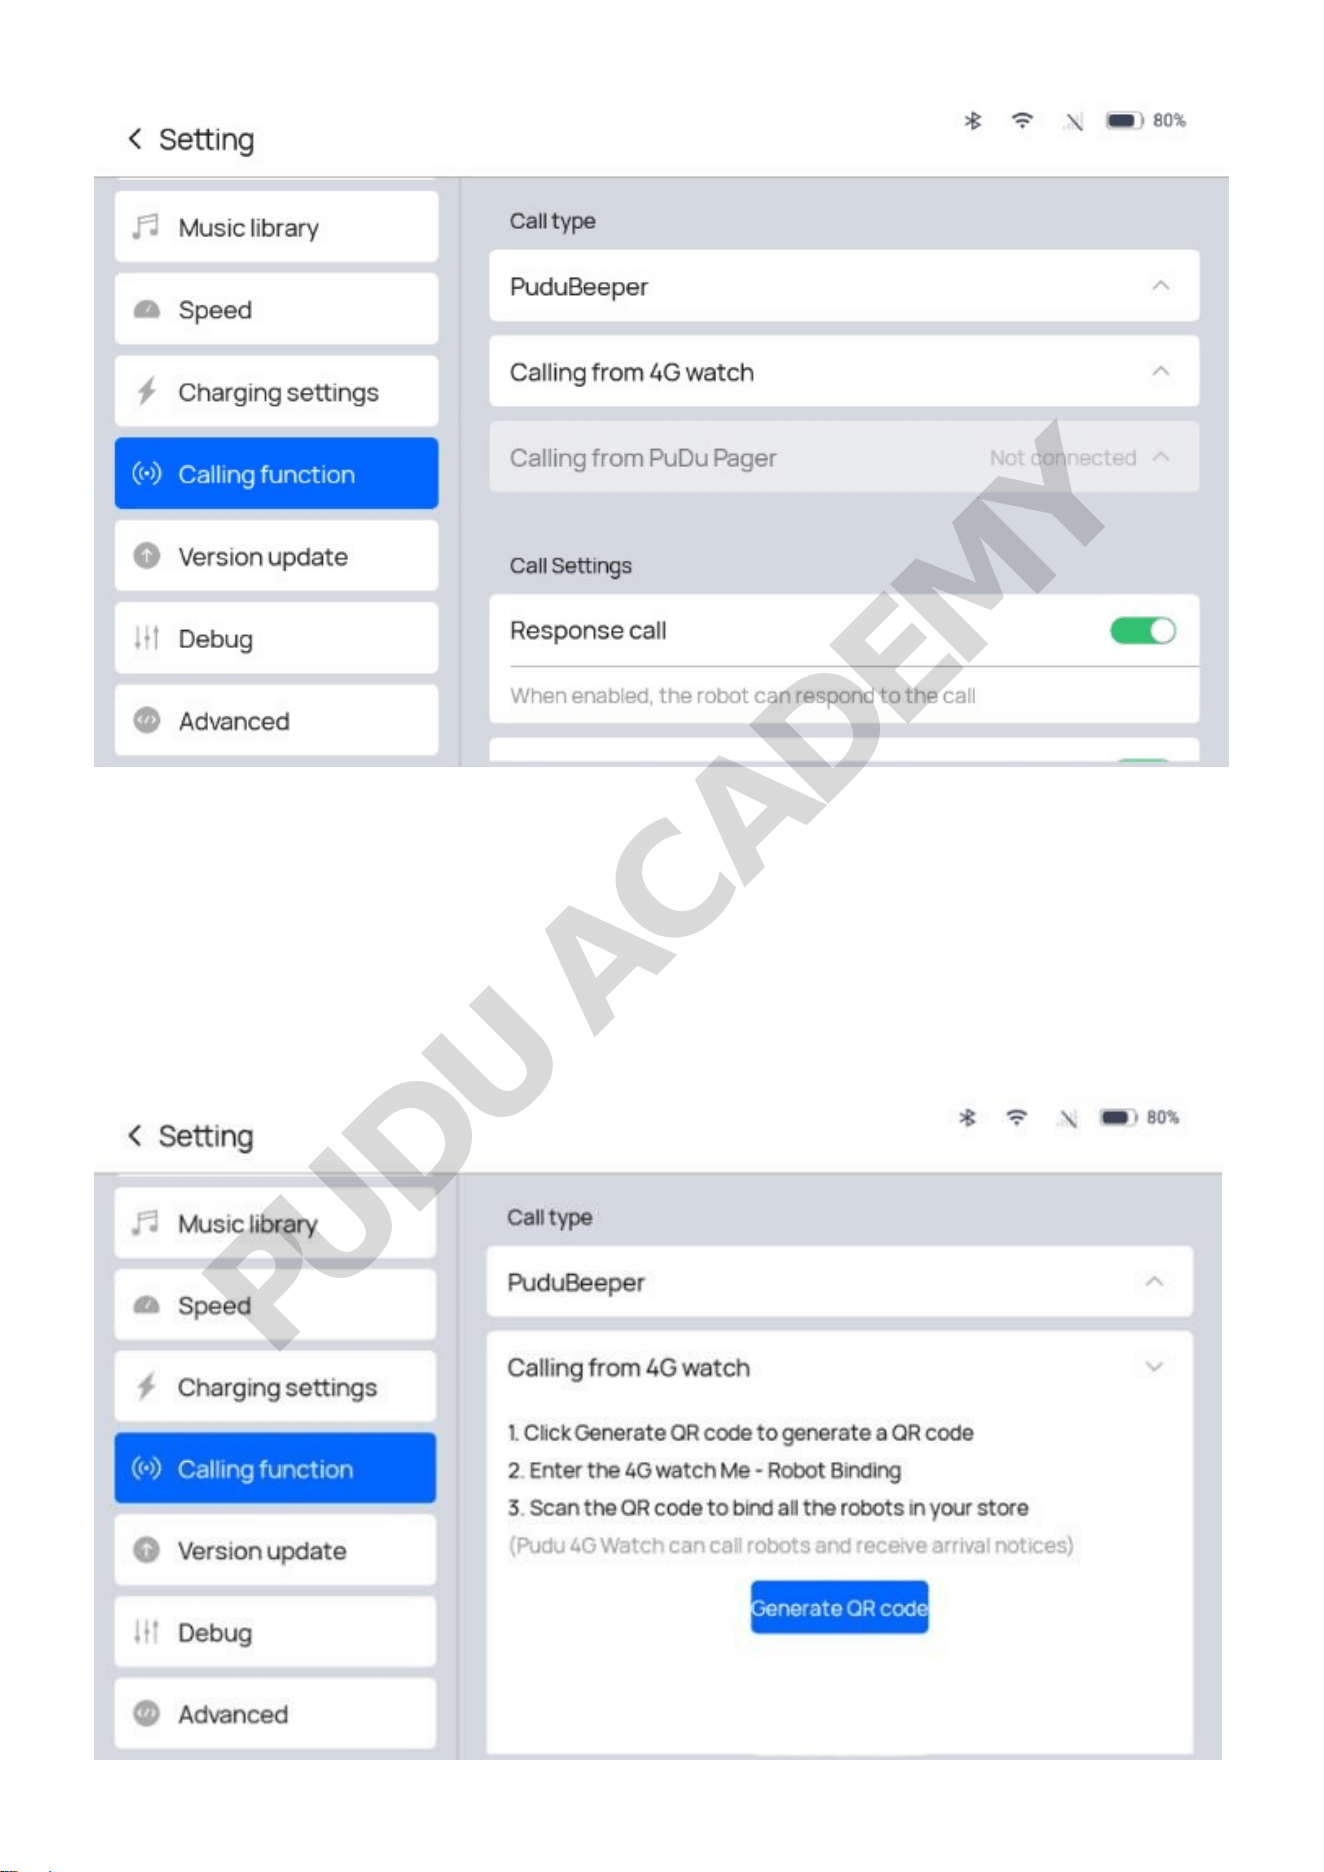
PuduBeeper1.
Pudu Beeper can be downloaded here. Click "Generate QR Code" and use PuduBeeper to scan the
QR code to call the robot.
Calling from 4G watch2.
4G watch can be bound here. Click "Generate QR Code" and use Pudu 4G watch to scan the
generated QR code to call the robot on the 4G watch.
PUDU ACADEMY
Calling from Pudu Pagar3.
Pudu Pager can be configured here. For specific deployment methods, please contact technical
support.
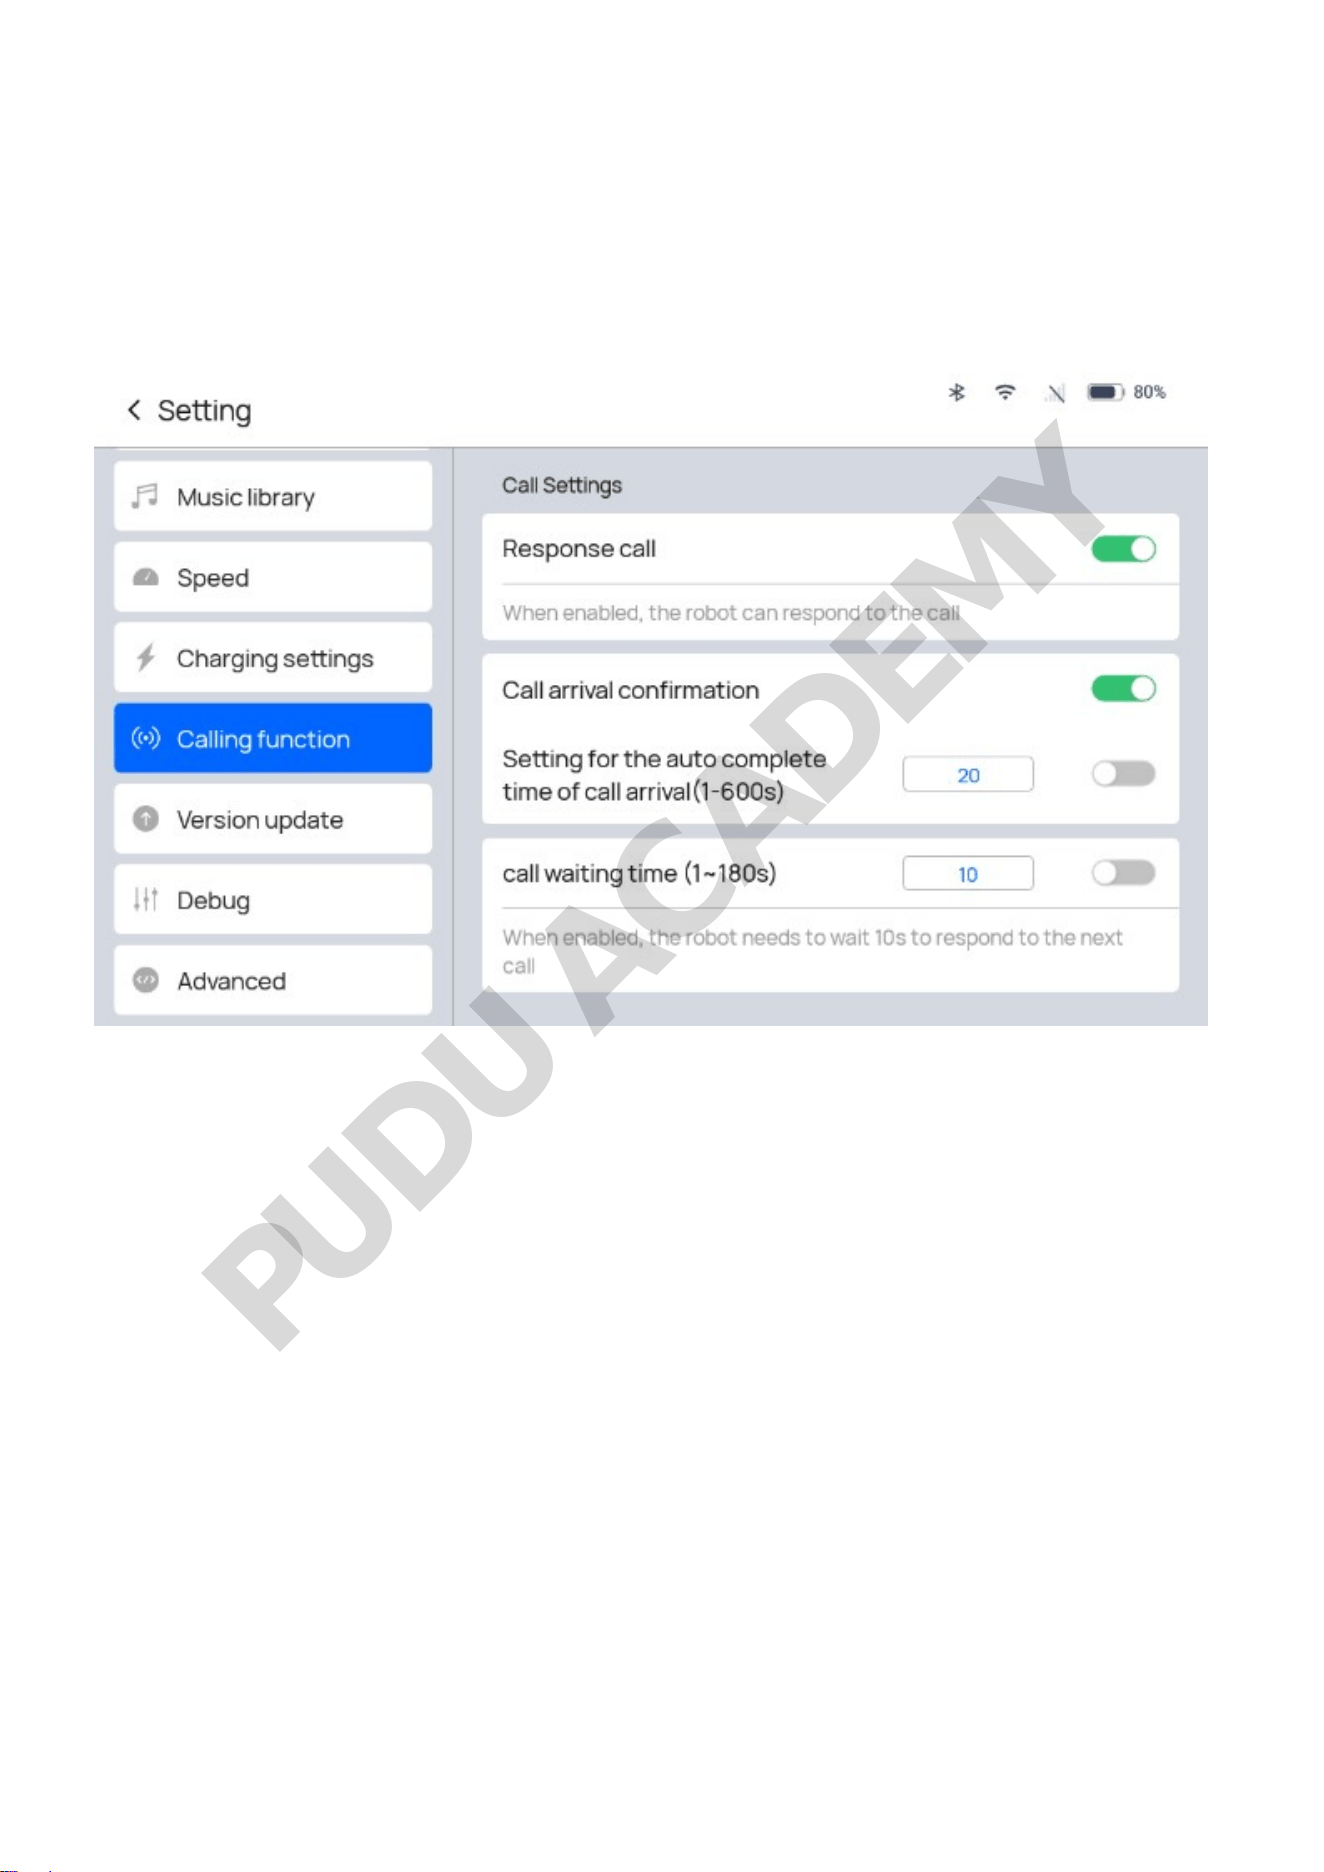
Call Settings4.
There are other settings on Calling Fuction:
Response call:When enabled, the robot can respond to calls from Pudu Beeper and 4G Watch.
Call arrival confirmation:When enabled, you need to click robot manually to let it return home
page, after the robot reaches it call point.
Setting for the auto complete time of call arrival:When enabled, After the robot reaches the point,
it will start counting down based on the set time. After the countdown ends, the robot returns to the
original page. In addition, if Call arrival confirmation is on,the robots will still remain on the call
arrival page after the countdown ends.
Call waiting time:When enabled, the robot will start counting down based on the set time, and will
only execute the call task after the countdown ends, after receiving a call task.
Version Updates
When the robot is connected to the network, it can check whether there are version updates. If a
new version of the robot software is available, there will be a red dot prompt next to "Version
Update" as a reminder to perform the update.
PUDU ACADEMY
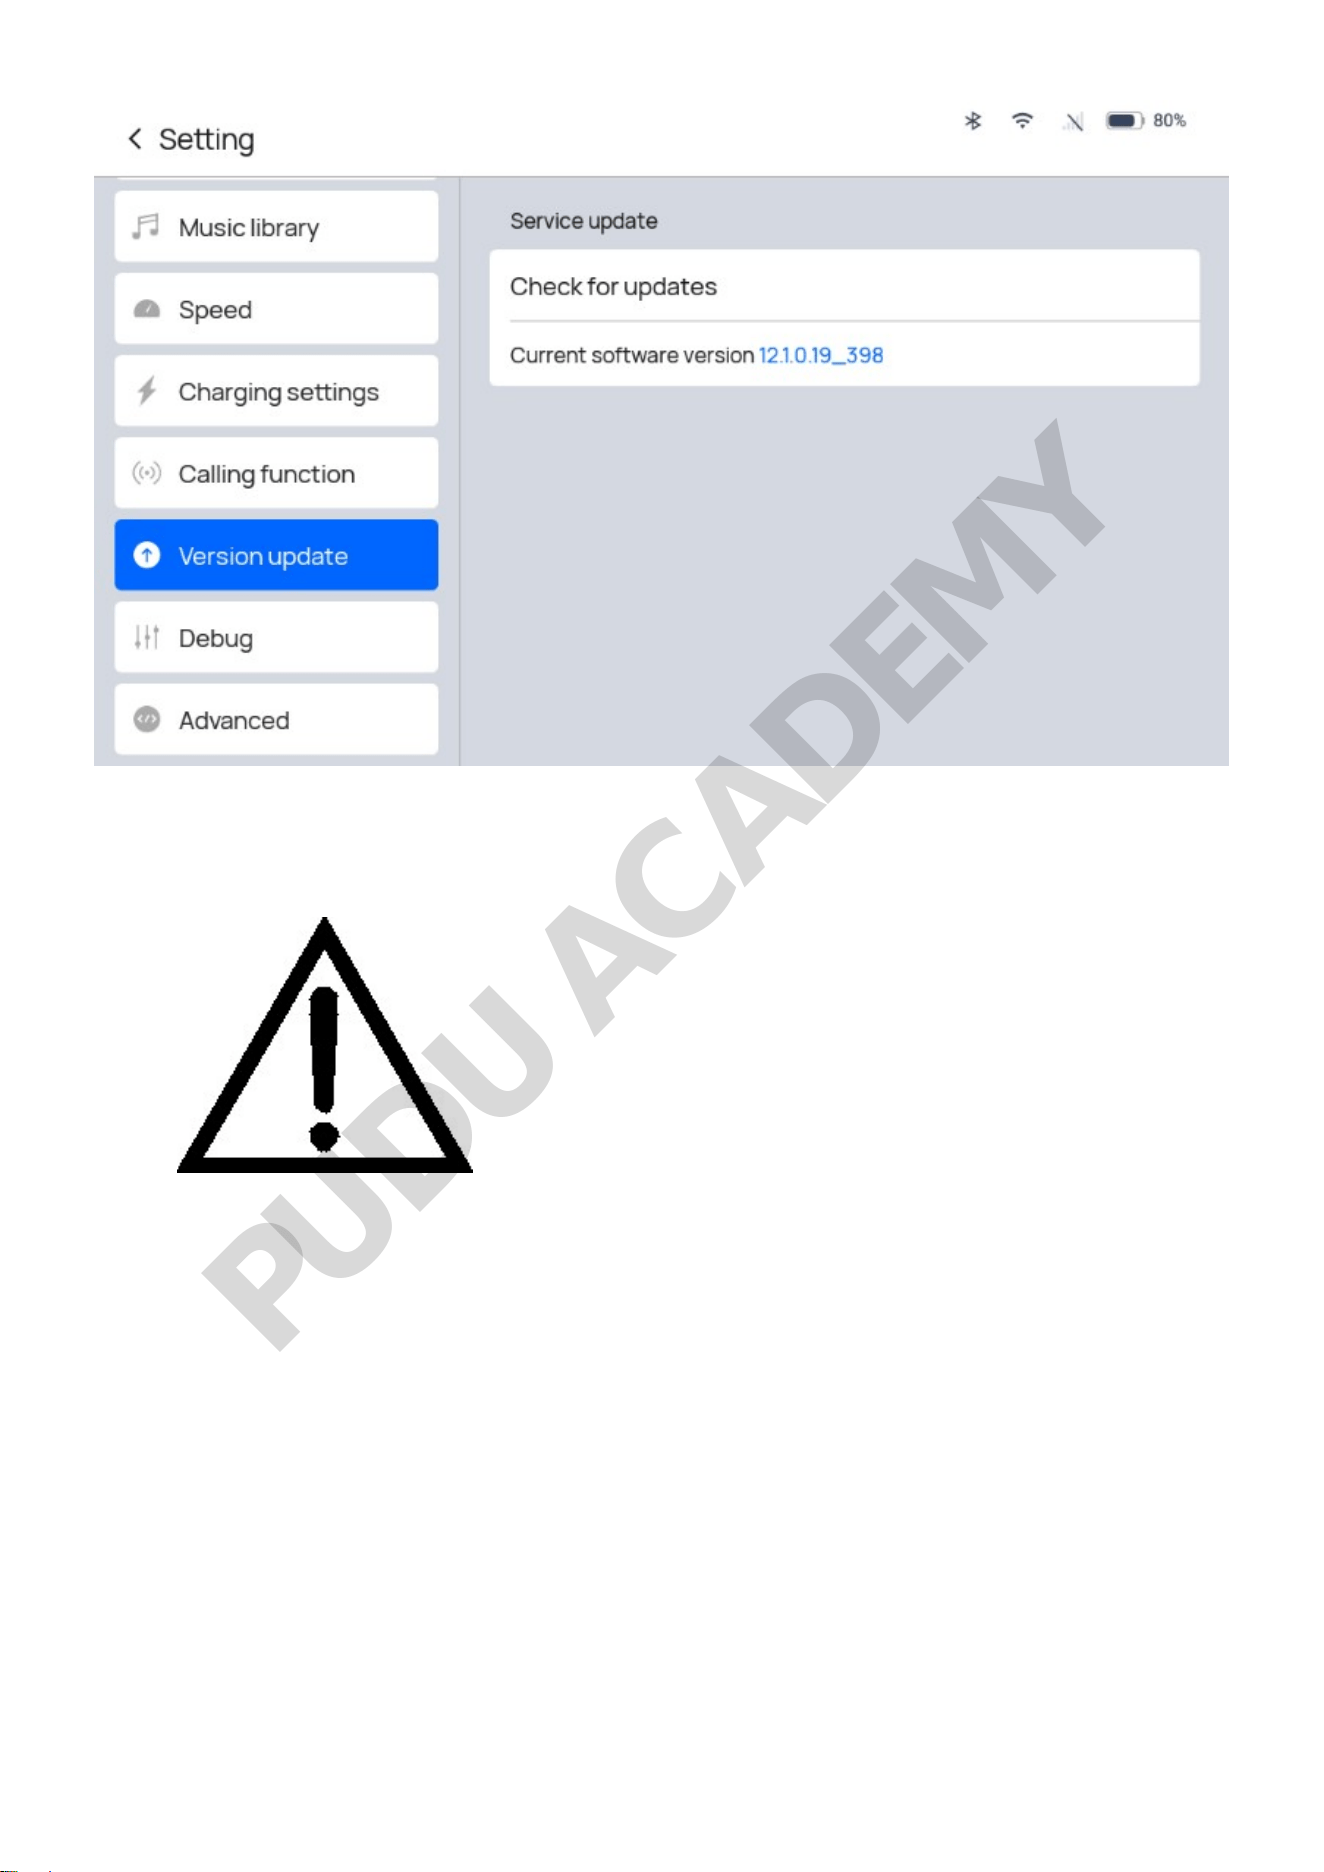
After tapping Update, the robot will download the installation package and a prompt for the
download percentage prompt will appear. Once the download is complete for the installation
package, the robot will automatically restart.
caution
When performing version updates, please ensure that the robot has at least 20% battery remaining.
Please do not manually turn off the robot while performing a version update..
About
The About interface displays information such as the manufacturer's service hotline, name, official
accounts, etc.
Debug
The Debugging interface is provided for use by technical support to debug the device. Please do not
use the Debugging interface yourself.
PUDU ACADEMY
Advanced Settings
The Advanced Settings are used to adjust the robot's advanced configurations, and a password must
be entered for access.
Settings Description
Task Parameter
Settings
Set common parameters for each operating mode, including
Automatic Return Time and Automatic Resume Time on Pause.
Settings Description
Show emoji during delivery Controls whether or not the robot displays emojis while executing tasks
High operating speed Enables higher traveling speeds
Default input method
The default method for inputting robot destinations in all modes,
including direct selection of locations and smart selection of locations
Select tray quantity
The number of trays in the robot schematic diagram on the left will be
changed accordingly on the home page of each mode.
Path blocking settings The behavior of robot can be configured, when it encounters obstacles.
Detailed Description:
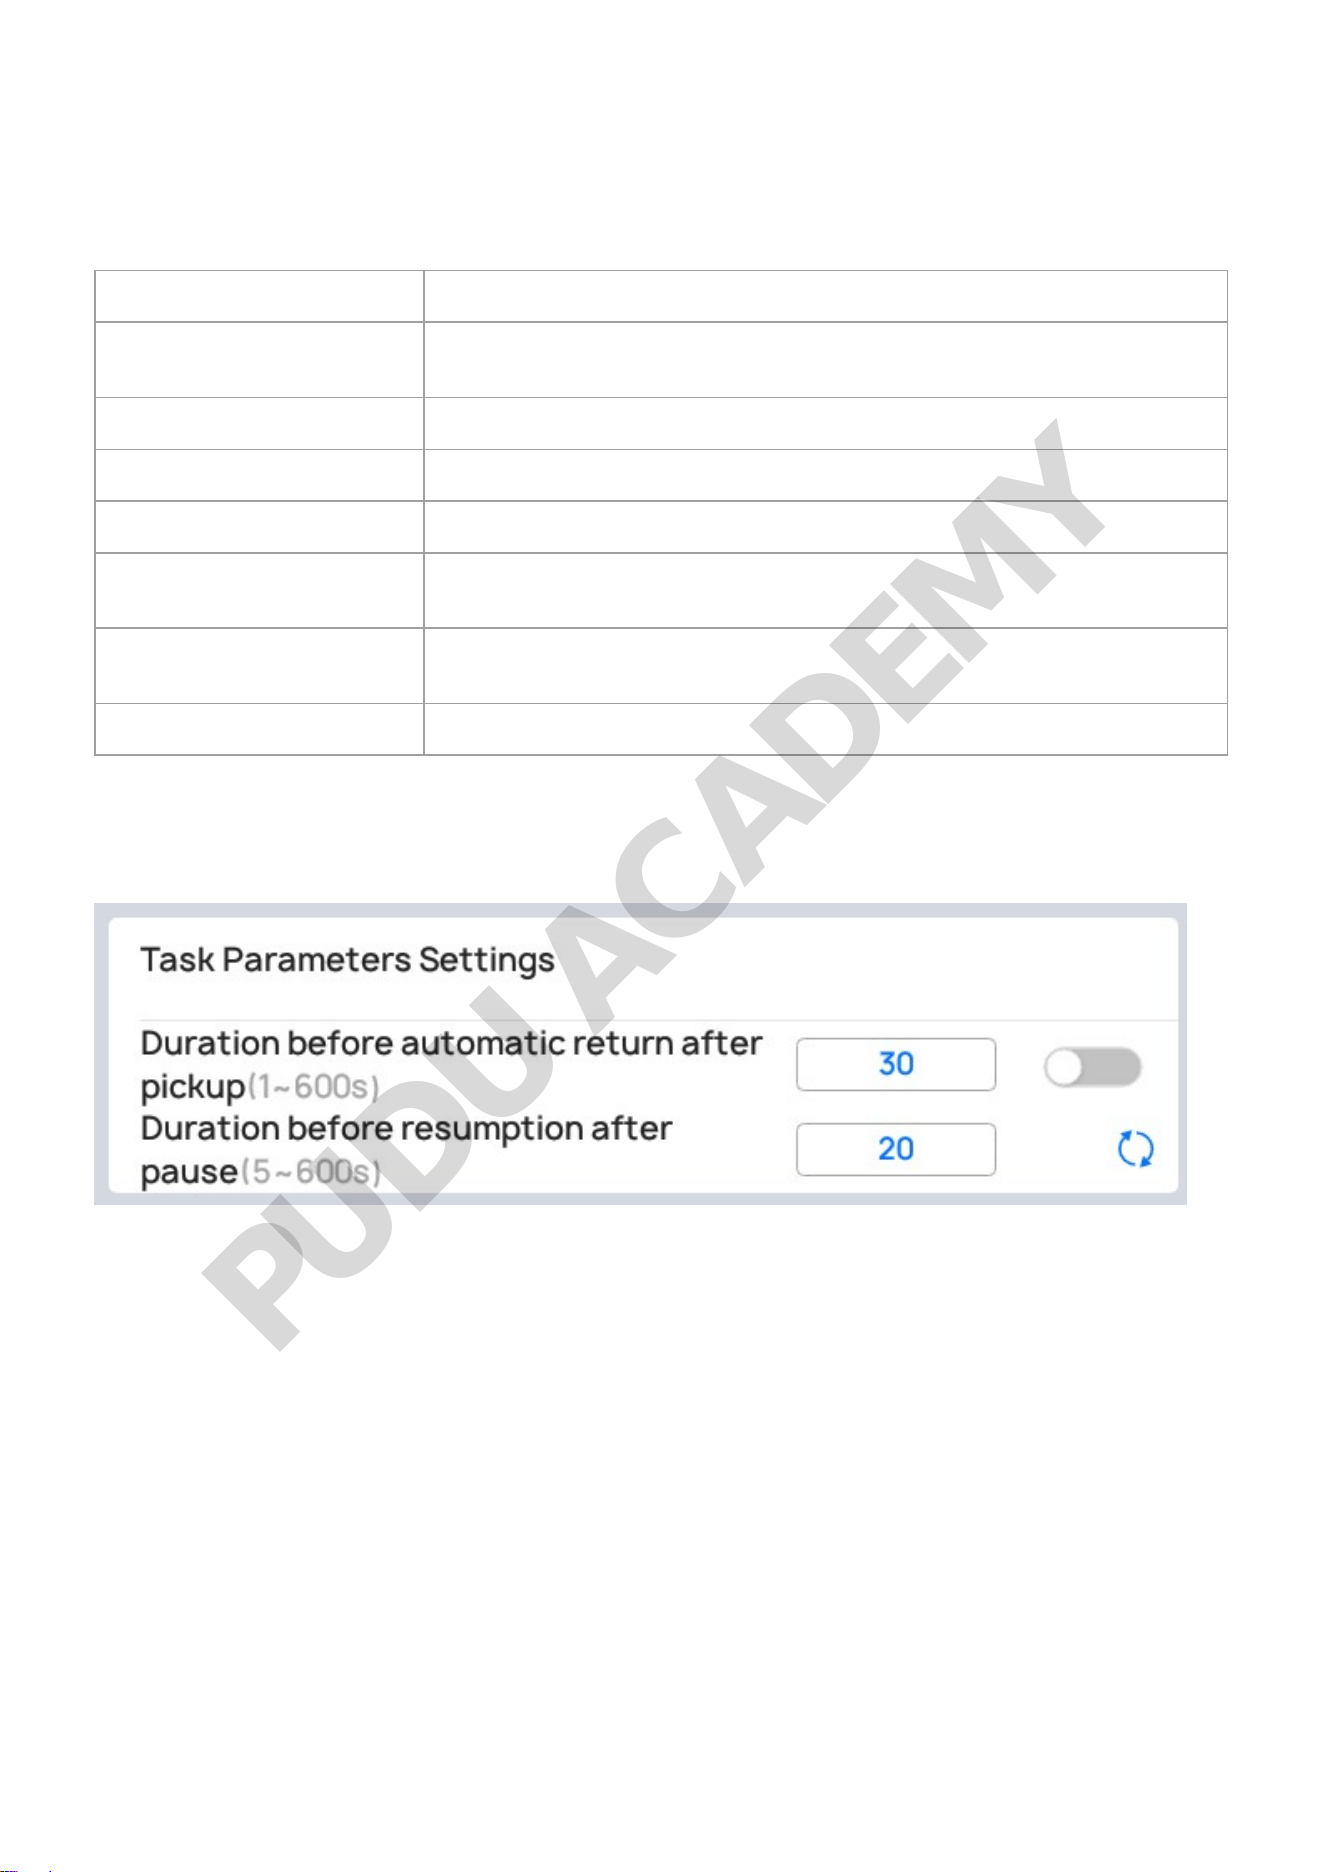
Task Parameter Settings1.
There are two items under the Task Parameter Settings:
Enable the right-most switch for "Automatic Return Time after Removing Items" and enter a number
in the text box (input range of 1-600, default of "30," units: seconds) so that, after arriving at a
destination, the robot will wait for the period of time input; once the time period ends, it will
automatically complete the task.
For "Automatic Resume Time on Pause," enter a number in the right-hand text box (input range of
5-600, default is "20," units: seconds) so that the robot will switch to the pause interface if the
screen is tapped while the robot is running. The device will then perform a countdown based on the
duration set here, and once the countdown ends, it will automatically execute the next task.
Display emojis during delivery2.
PUDU ACADEMY
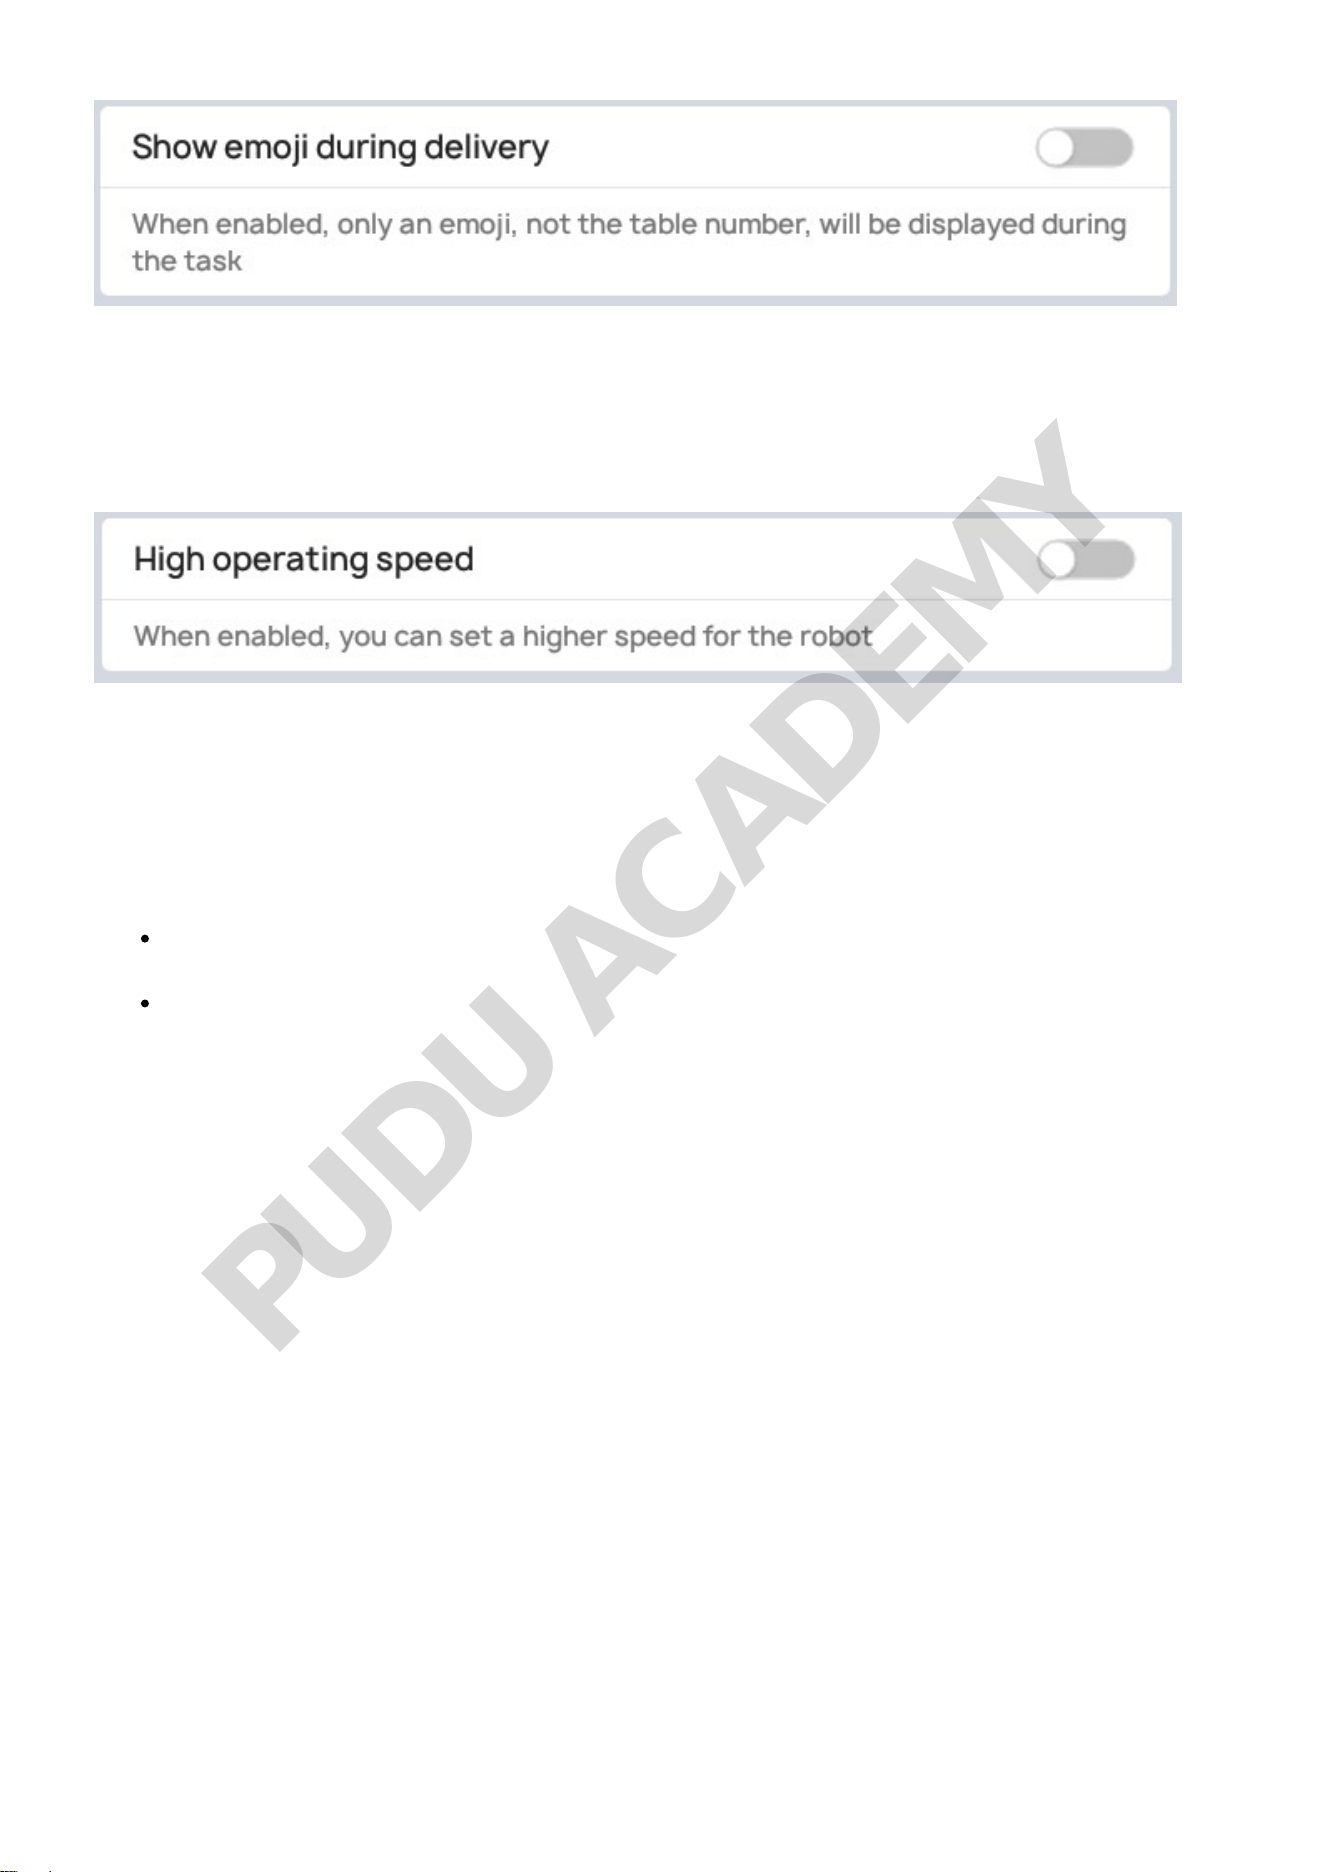
When this function is turned on, only emojis are displayed on the delivery map, and the
specific destination name is not displayed.
High operating speed3.
When this function is enabled, adjustable speeds within the range of 1.0 m/s~1.2 m/s (0.33 ft/s–3.93
ft/s) are displayed in the Speed Settings.
Default input method4.
The default destination input method can be selected for each mode. There are two input methods:
Direct Destination Selection: The destination list is in a tiled display in the window on the right
side of the interface, and you manually and directly find and select the table number.
Smart Destination Search: The robot automatically extracts the first character of all
destination names for display, and gradually filters out the destinations by screening the
characters as you proceed.
On the "Settings" - "Advanced Settings" page, under "Default Input Method," you can select the
default input method.
PUDU ACADEMY
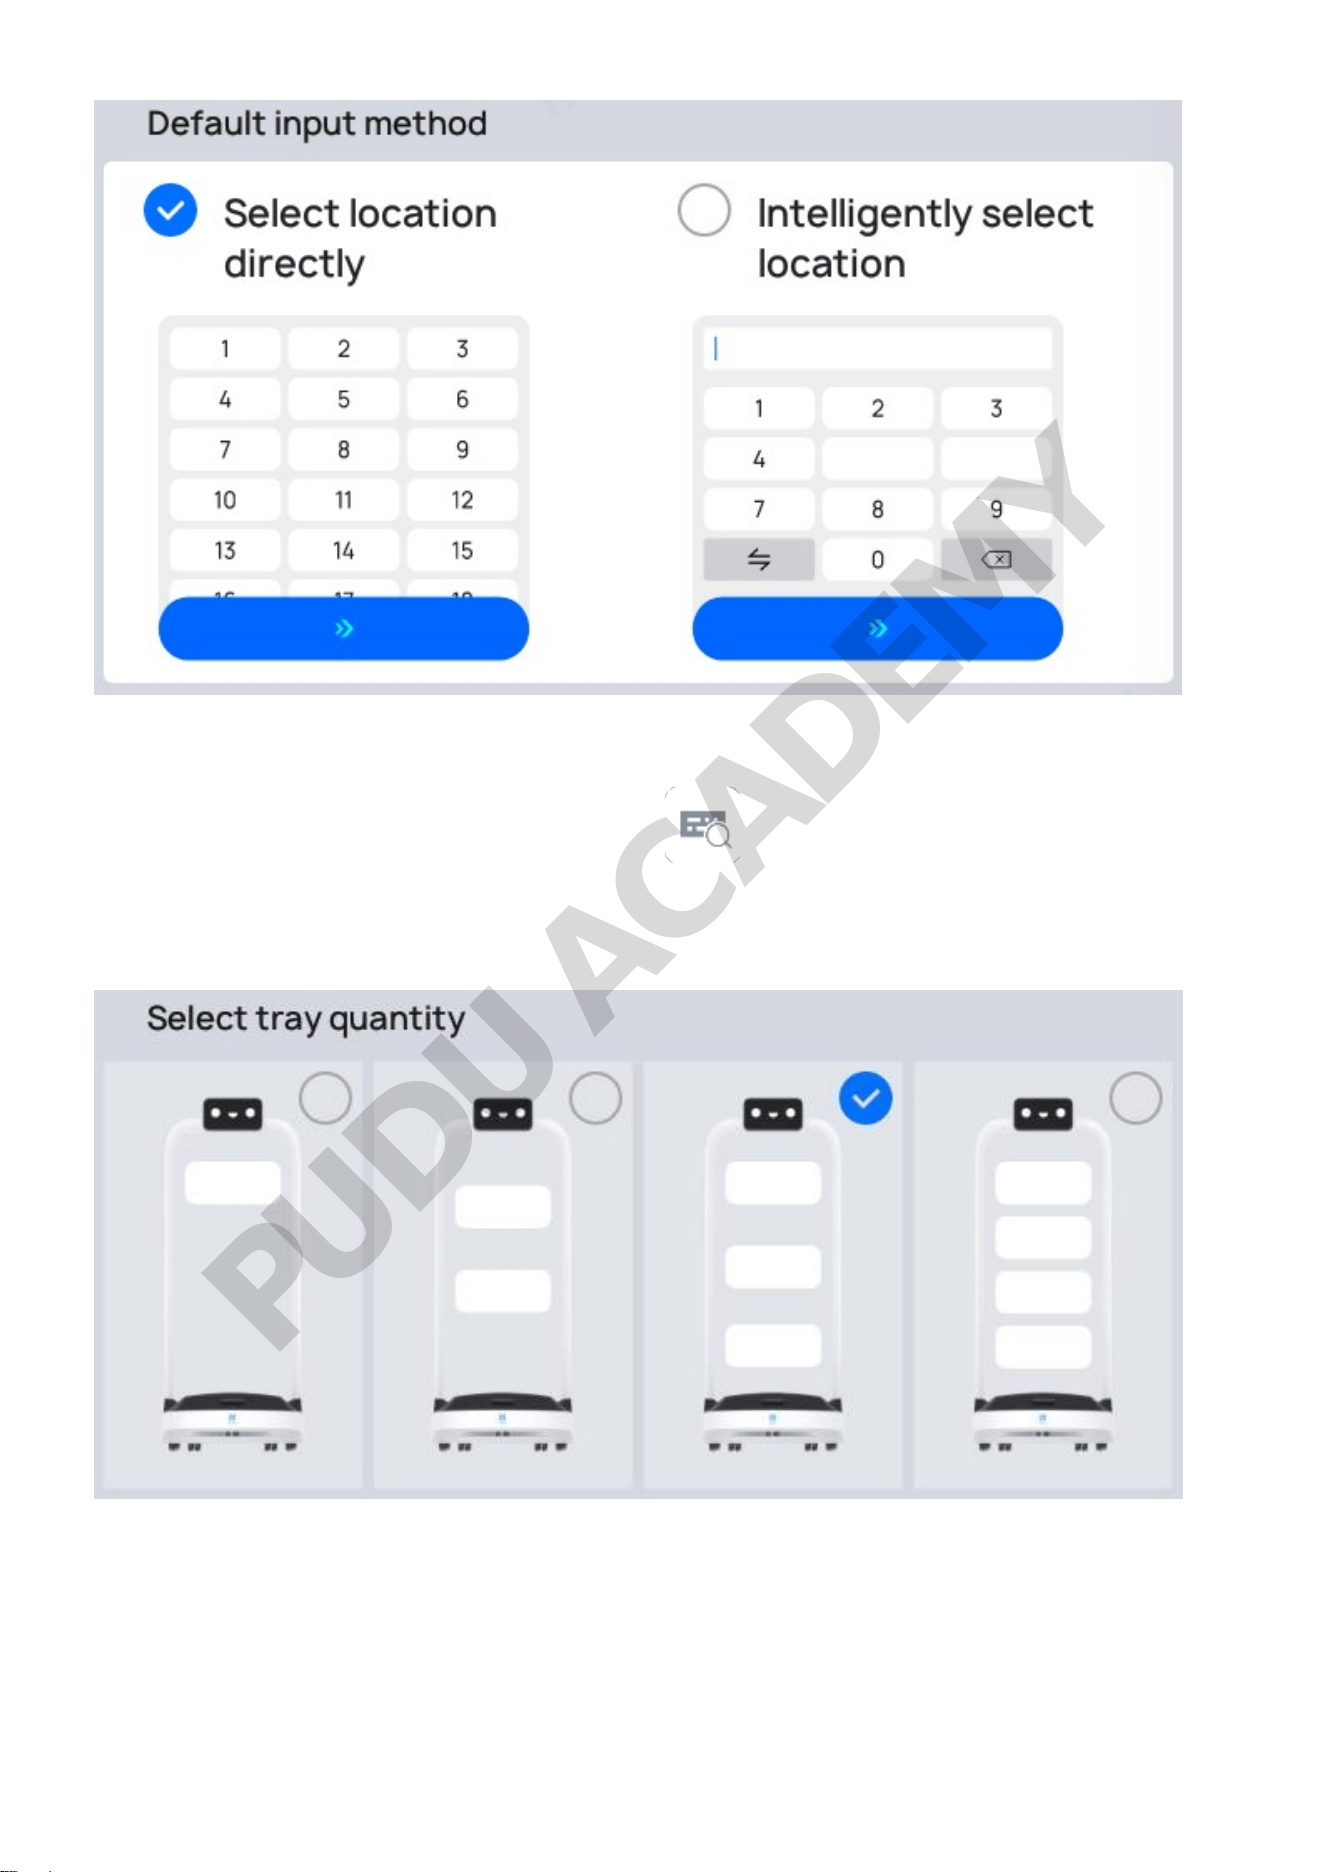
Each time you access the main page for each mode, the destination input method defaults to the
input method selected in the Advanced Settings. Of course, you can modify the input method for
selecting a delivery destination by tapping on the " " button on the right side of the Delivery
Mode home page.
Select tray quantity5.
The number of trays can be selected according to the actual number of pallets actually assembled by
the current robot. The selection range is 1 to 4. After modification, the number of trays in the robot
schematic diagram on the left will be changed accordingly on the home page of each mode.
Path blocking Settings6.
When "Path Blocking Setting" is enabled, if the robot encounters continuous obstruction during the
PUDU ACADEMY
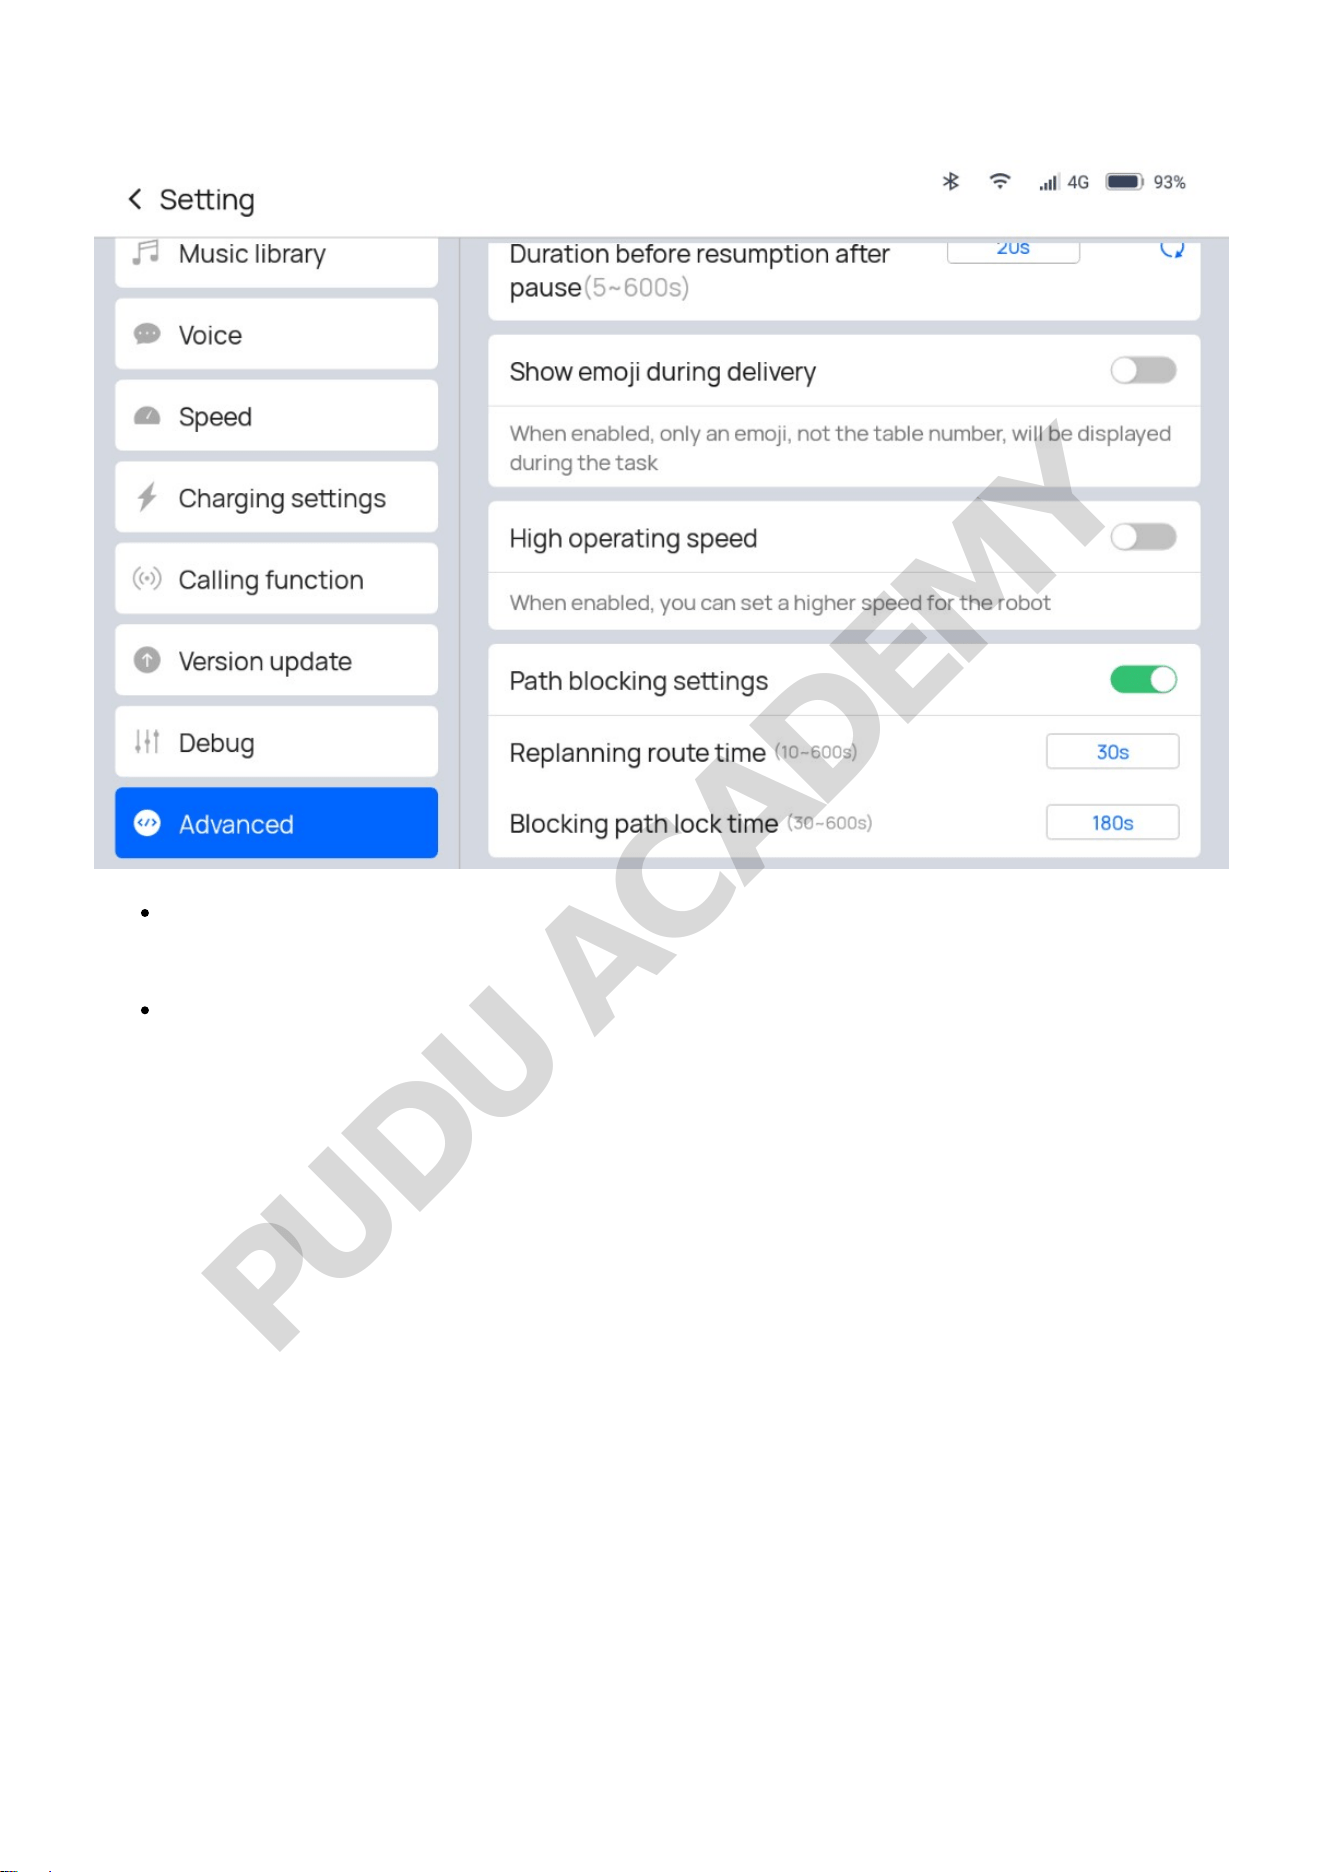
task, it will trigger path replanning.
Replanning route time: When the robot continues to avoid obstacles for the set time, path re-
planning is triggered, and other paths on the map are selected to attempt to reach the target
point. The time setting range is 10~600 seconds.
Blocked Path Locking Time: When the robot triggers path re-planning, the current blocked
road will be marked as "unavailable". After the set time in this parameter, it will automatically
be restored to "available". The time setting range is 30~600 seconds.
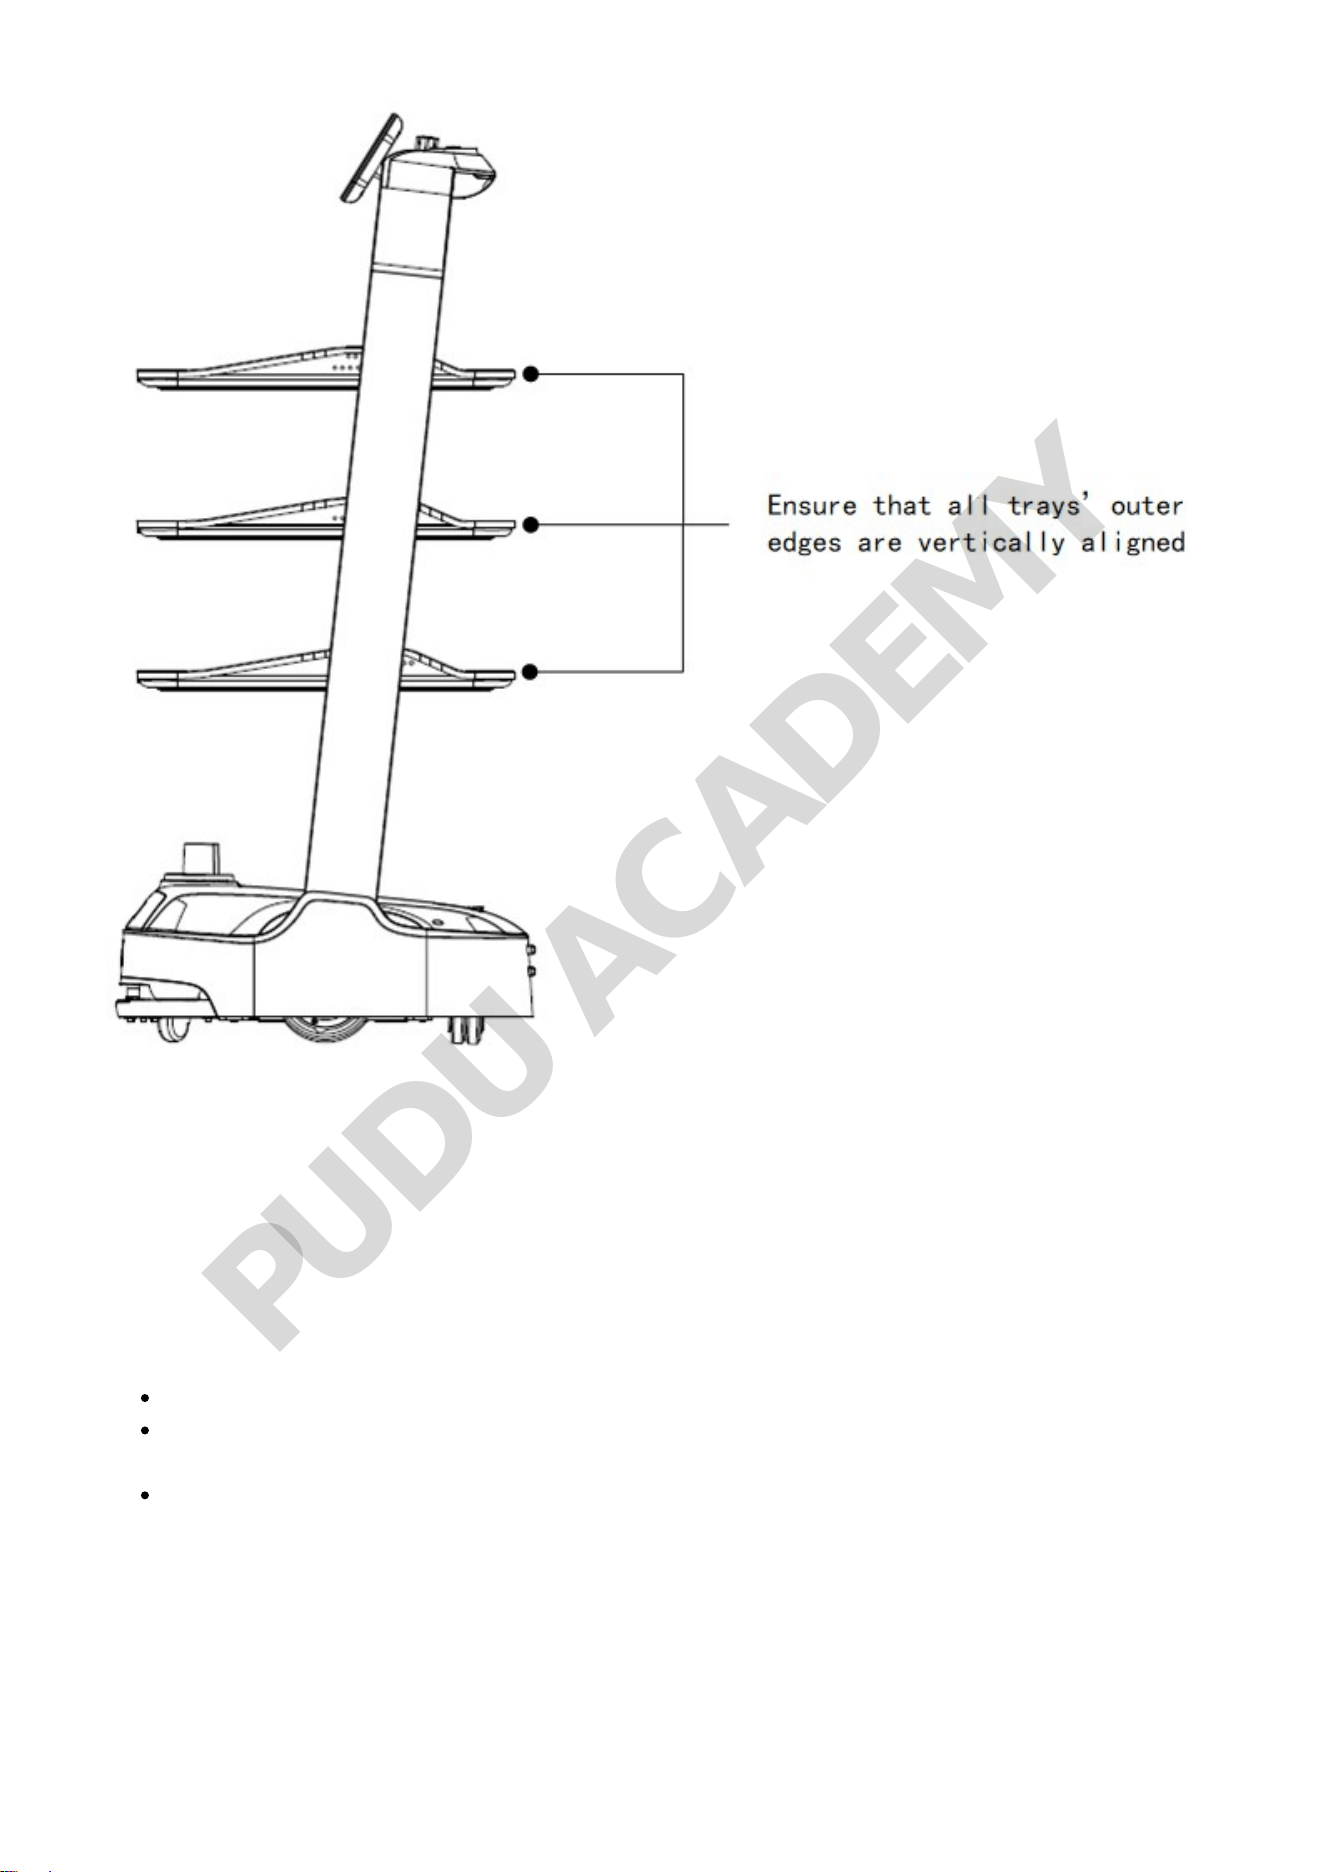
Tray Adjustment
The position of PuduBot 2’s trays can be adjusted according to the actual situation, with a total of 7
optional positions: During tray adjustment, the screen printing numbers (from back to front) on the
tray's fixture should be the same as those on the robot (from top to bottom) so that all trays' outer
edges are vertically aligned.
PUDU ACADEMY
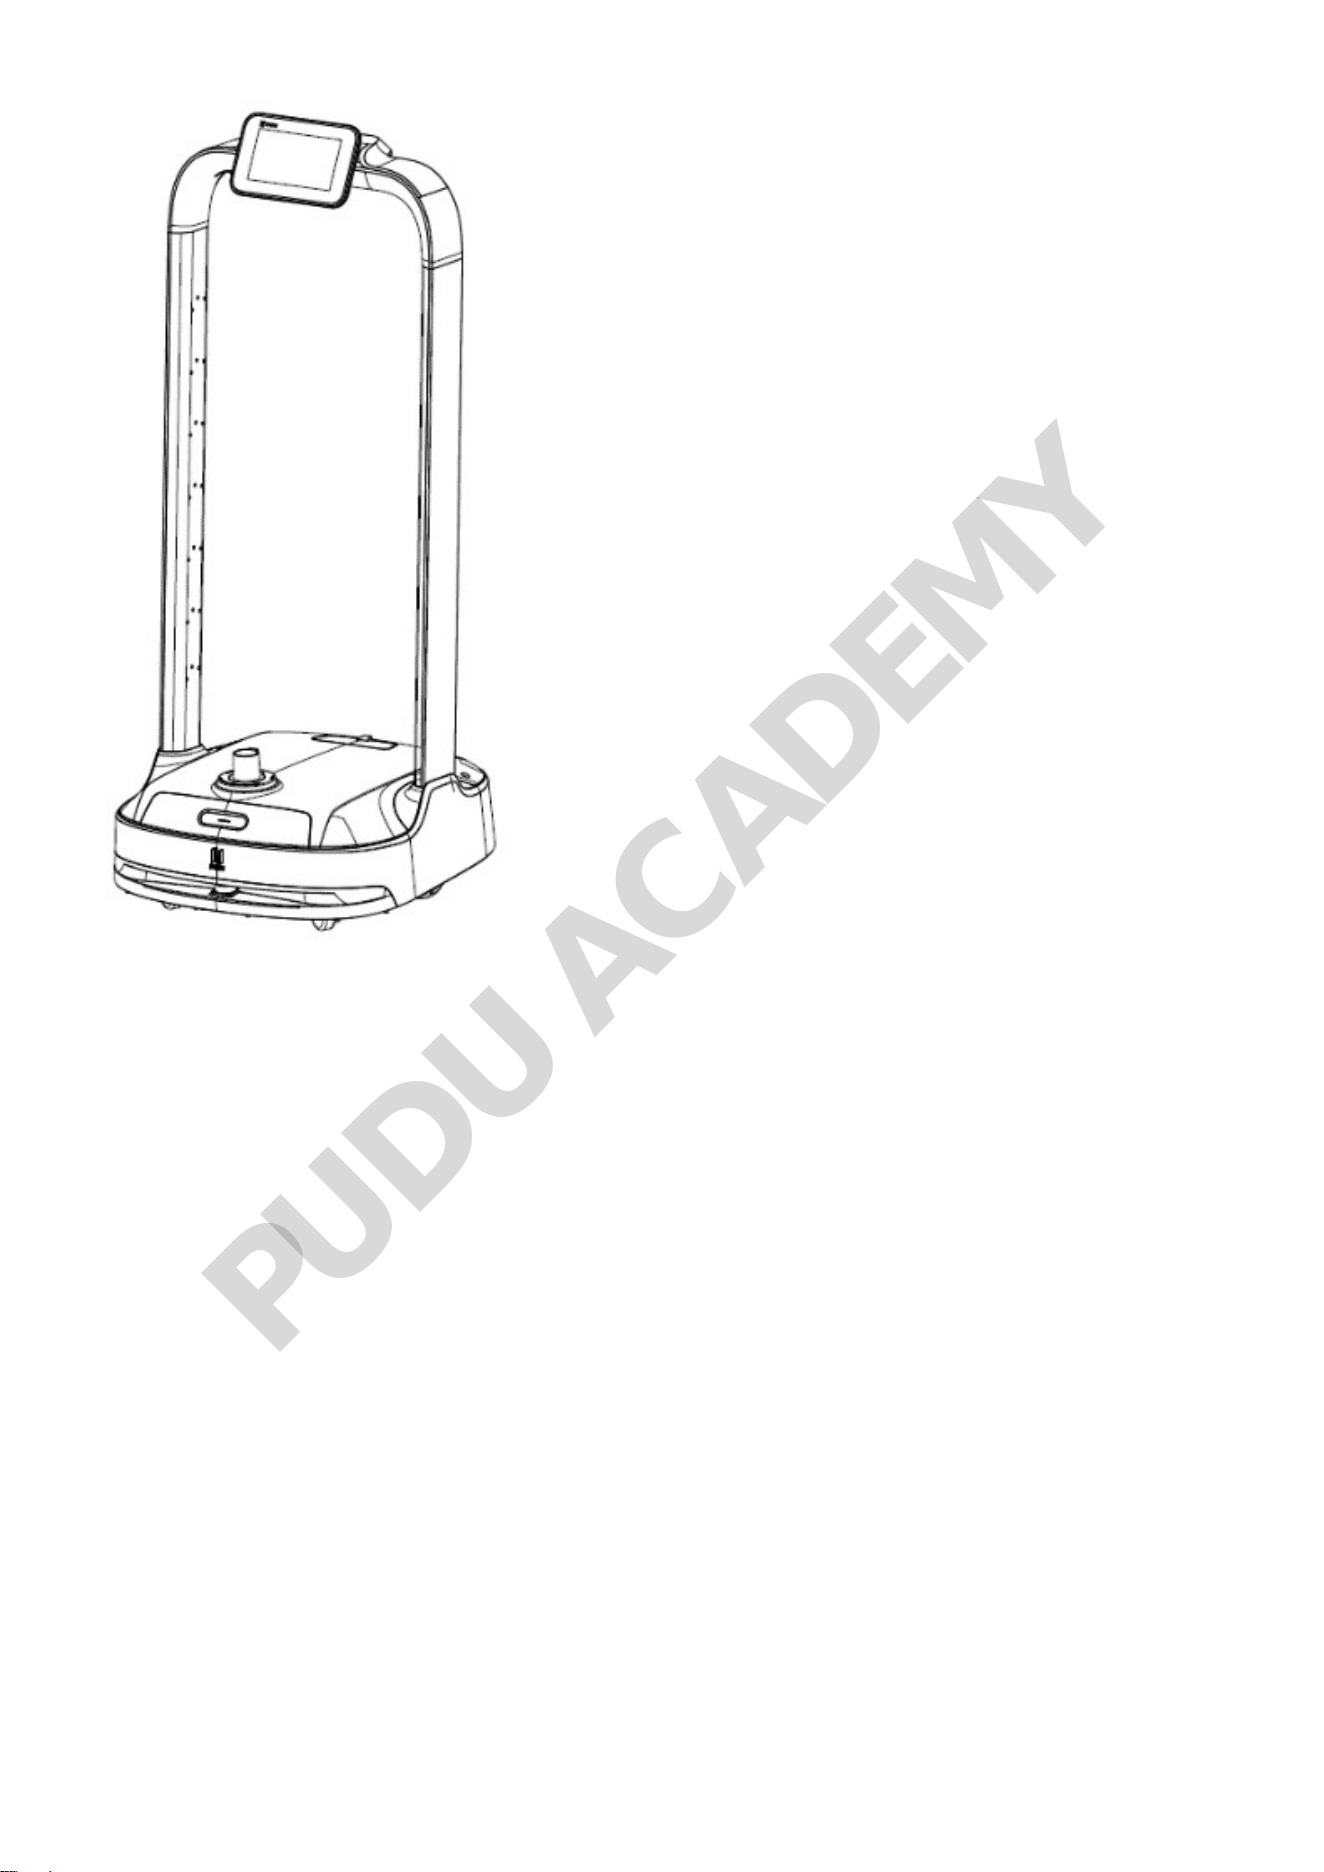
PUDU ACADEMY
Docking Instructions
PuduBot 2 supports three docking modes. In actual scenarios where multiple robots cooperate, users
can select any docking mode during mapping. This section only covers the description of the three
docking modes. For details about mapping, please contact our technical engineers.
Three docking modes:
One-to-one Docking mode: Each robot has its fixed pickup location (docking location).
Free Docking mode: Set multiple pickup locations (docking locations) for the robot to dock by
priority, i.e., the robot chooses the nearest pickup location for docking.
Waiting mode: Set temporary docking location. When the robot has no task and there's no
vacancy at the pickup locations (docking locations), the robot docks at the temporary docking
location. Once a vacancy appears at a pickup location (docking location), the robot
automatically goes there for docking.
PUDU ACADEMY