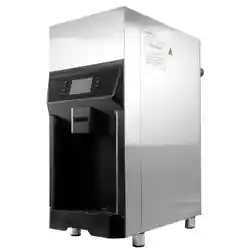
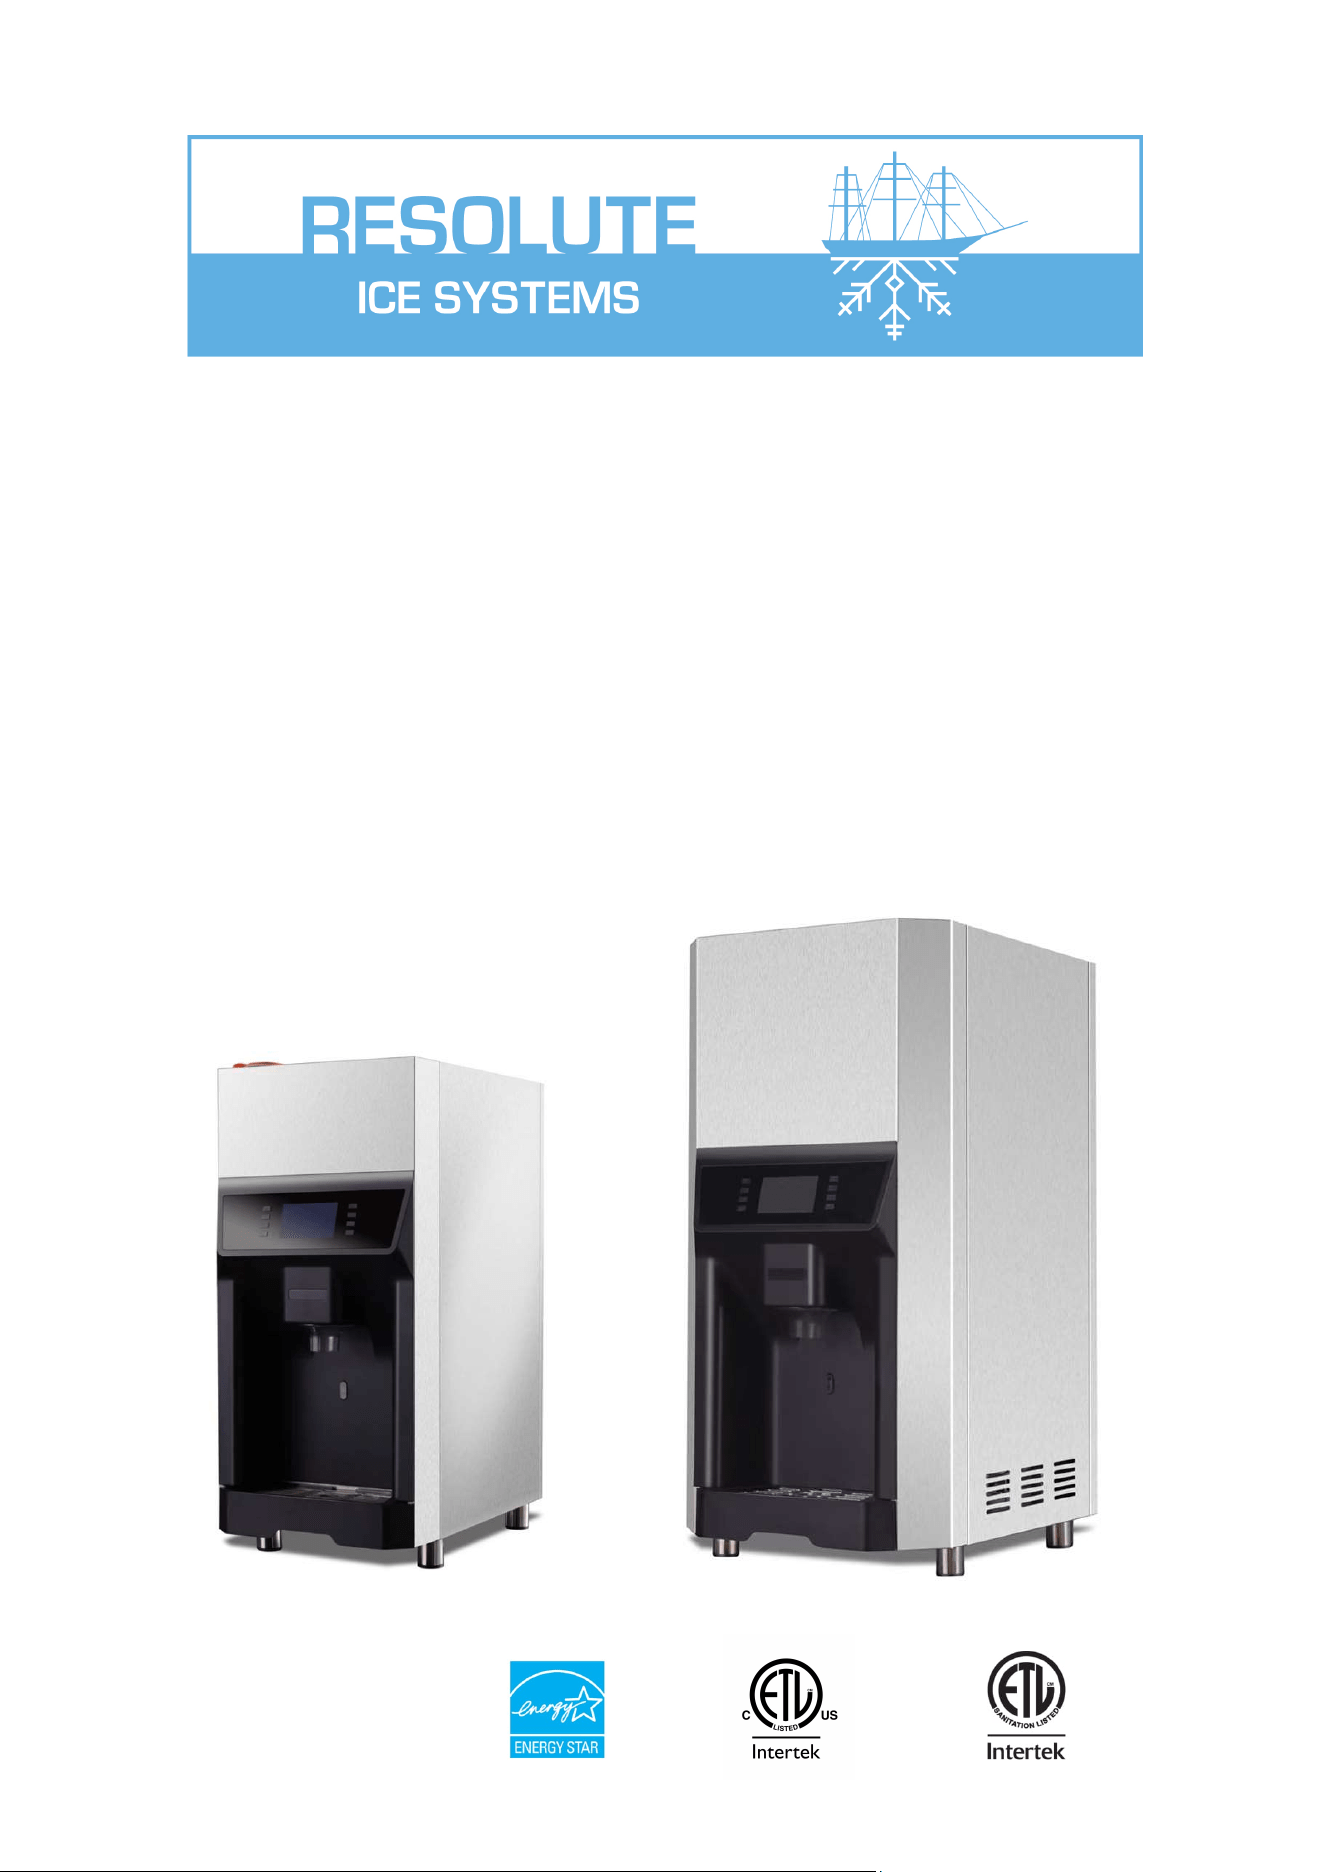
Commercial Ice and
Water Dispenser
V.08.04.2025
User Manual for Installation and
Maintenance
DOE

US: 334 Cornelia St. Suite #272, Plattsburgh, NY. 12901.
CAN: 120 rue de la Barre, Boucherville, QC. J4B 2X7.
1 888 956 6866
www.eurodib.com

Table of Contents
Important Information ................................................................................................................................................1
Warnings and safety instructions ..............................................................................................................................3
Overview ....................................................................................................................................................................3
Installation ..................................................................................................................................................................4
Requirements on installation location ................................................................................................................3
Typical installation diagram ................................................................................................................................4
Installation steps .................................................................................................................................................6
Start-up and operation .......................................................................................................................................7
Operating instructions for the ice machine ................................................................................................................7
Instructions for ice machine control panel .................................................................................................................8
Maintenance and service ..........................................................................................................................................9
Automatic cleaning steps ........................................................................................................................................10
Call for service ......................................................................................................................................................... 11
Common faults and possible causes ......................................................................................................................12
Warranty terms ........................................................................................................................................................13
Notes: Always keep this manual in a place accessible to the user at any time.
2
Important Information
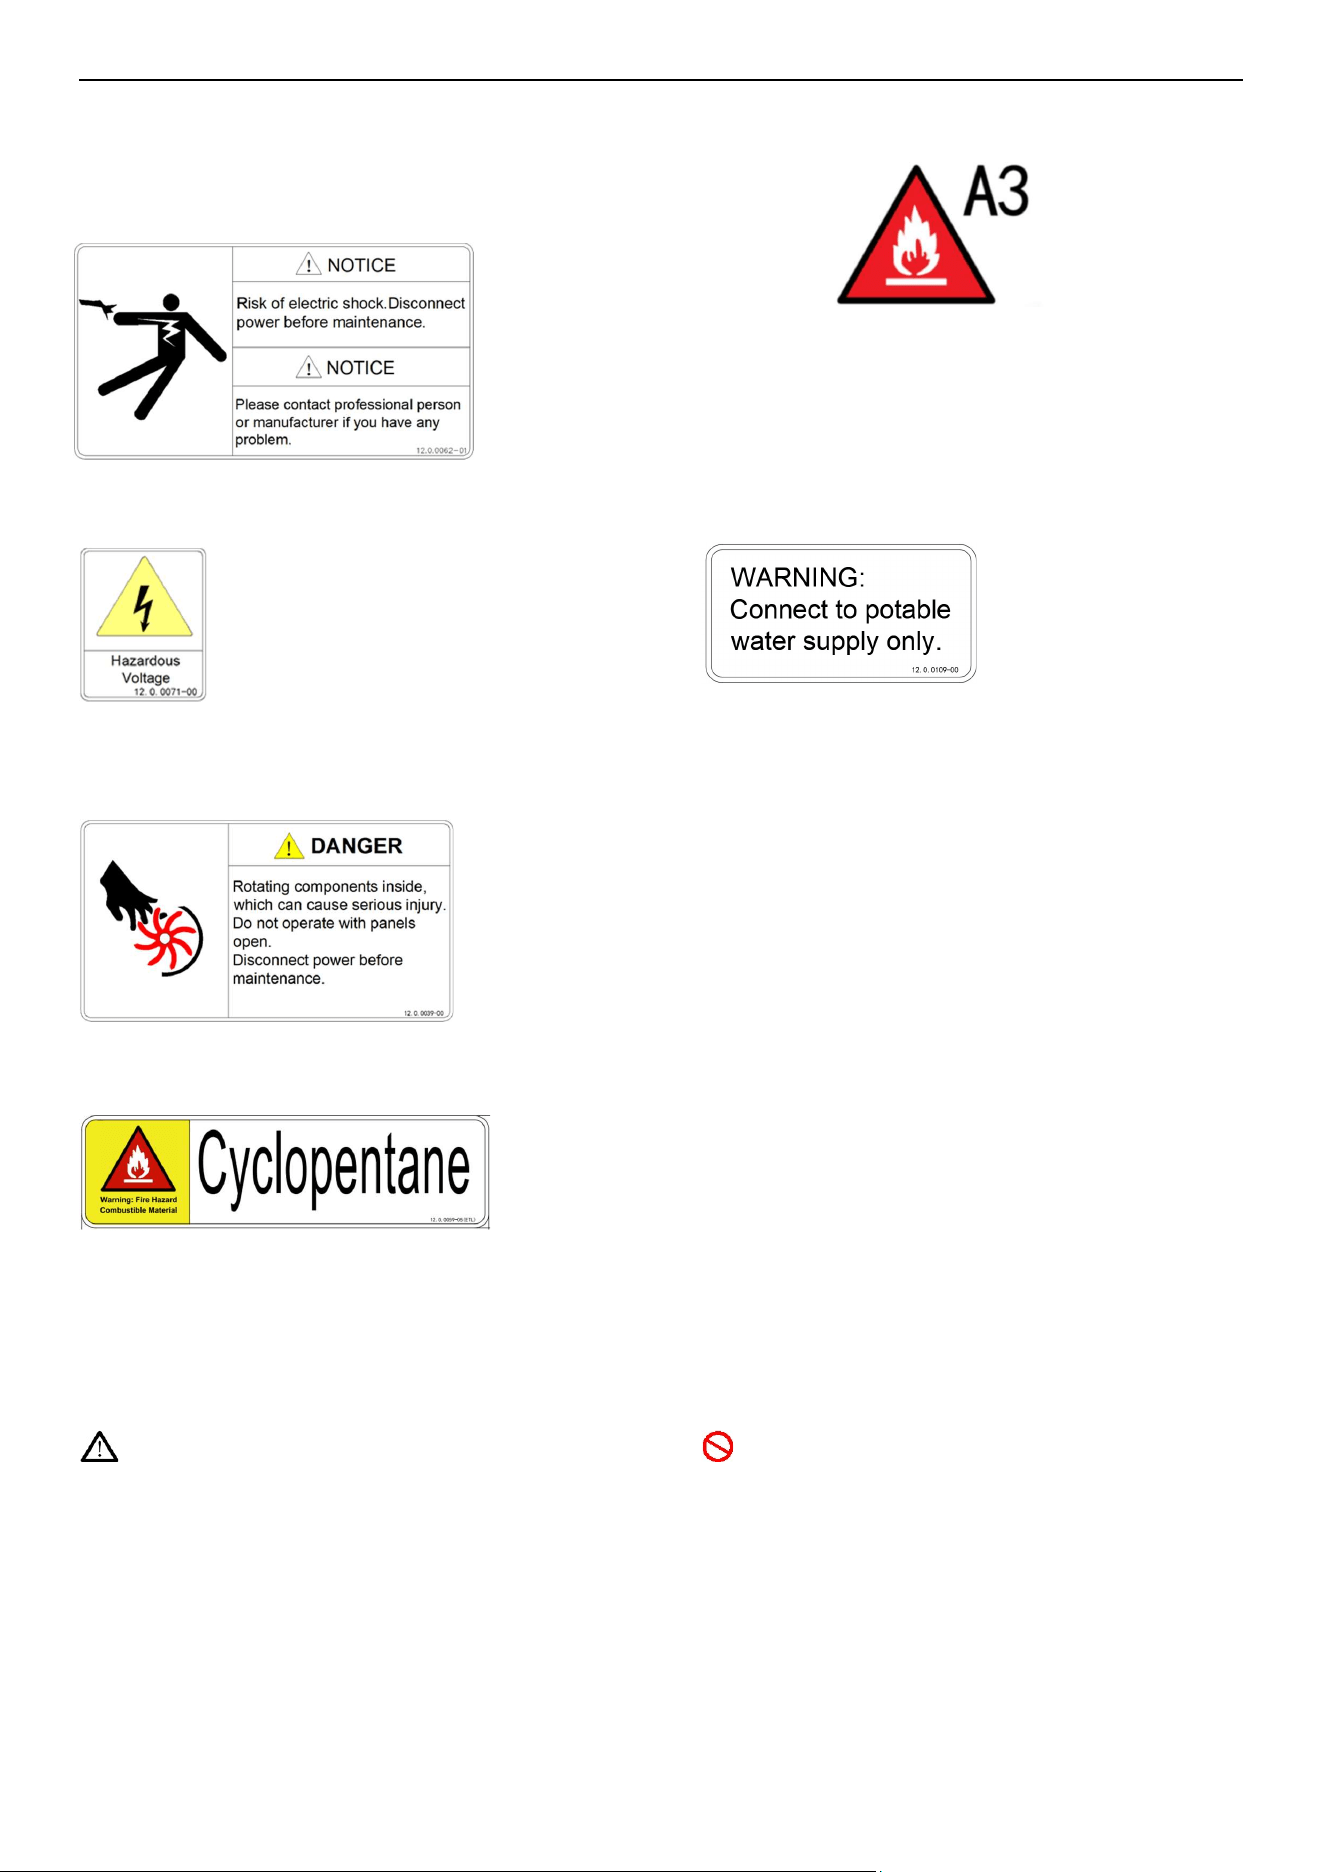
Please pay attention to the following warning labels
on the ice maker.
Warning of dangerous voltage that leads to risks of
electric shocks.
Warning of rotating parts that lead to mechanical
injury.
Warning of rotating parts that lead to mechanical
injury.
Warning that flammable foaming agent cyclopentane
is employed for the insulation material inside the
machine, and caution should be taken for risks of fire.
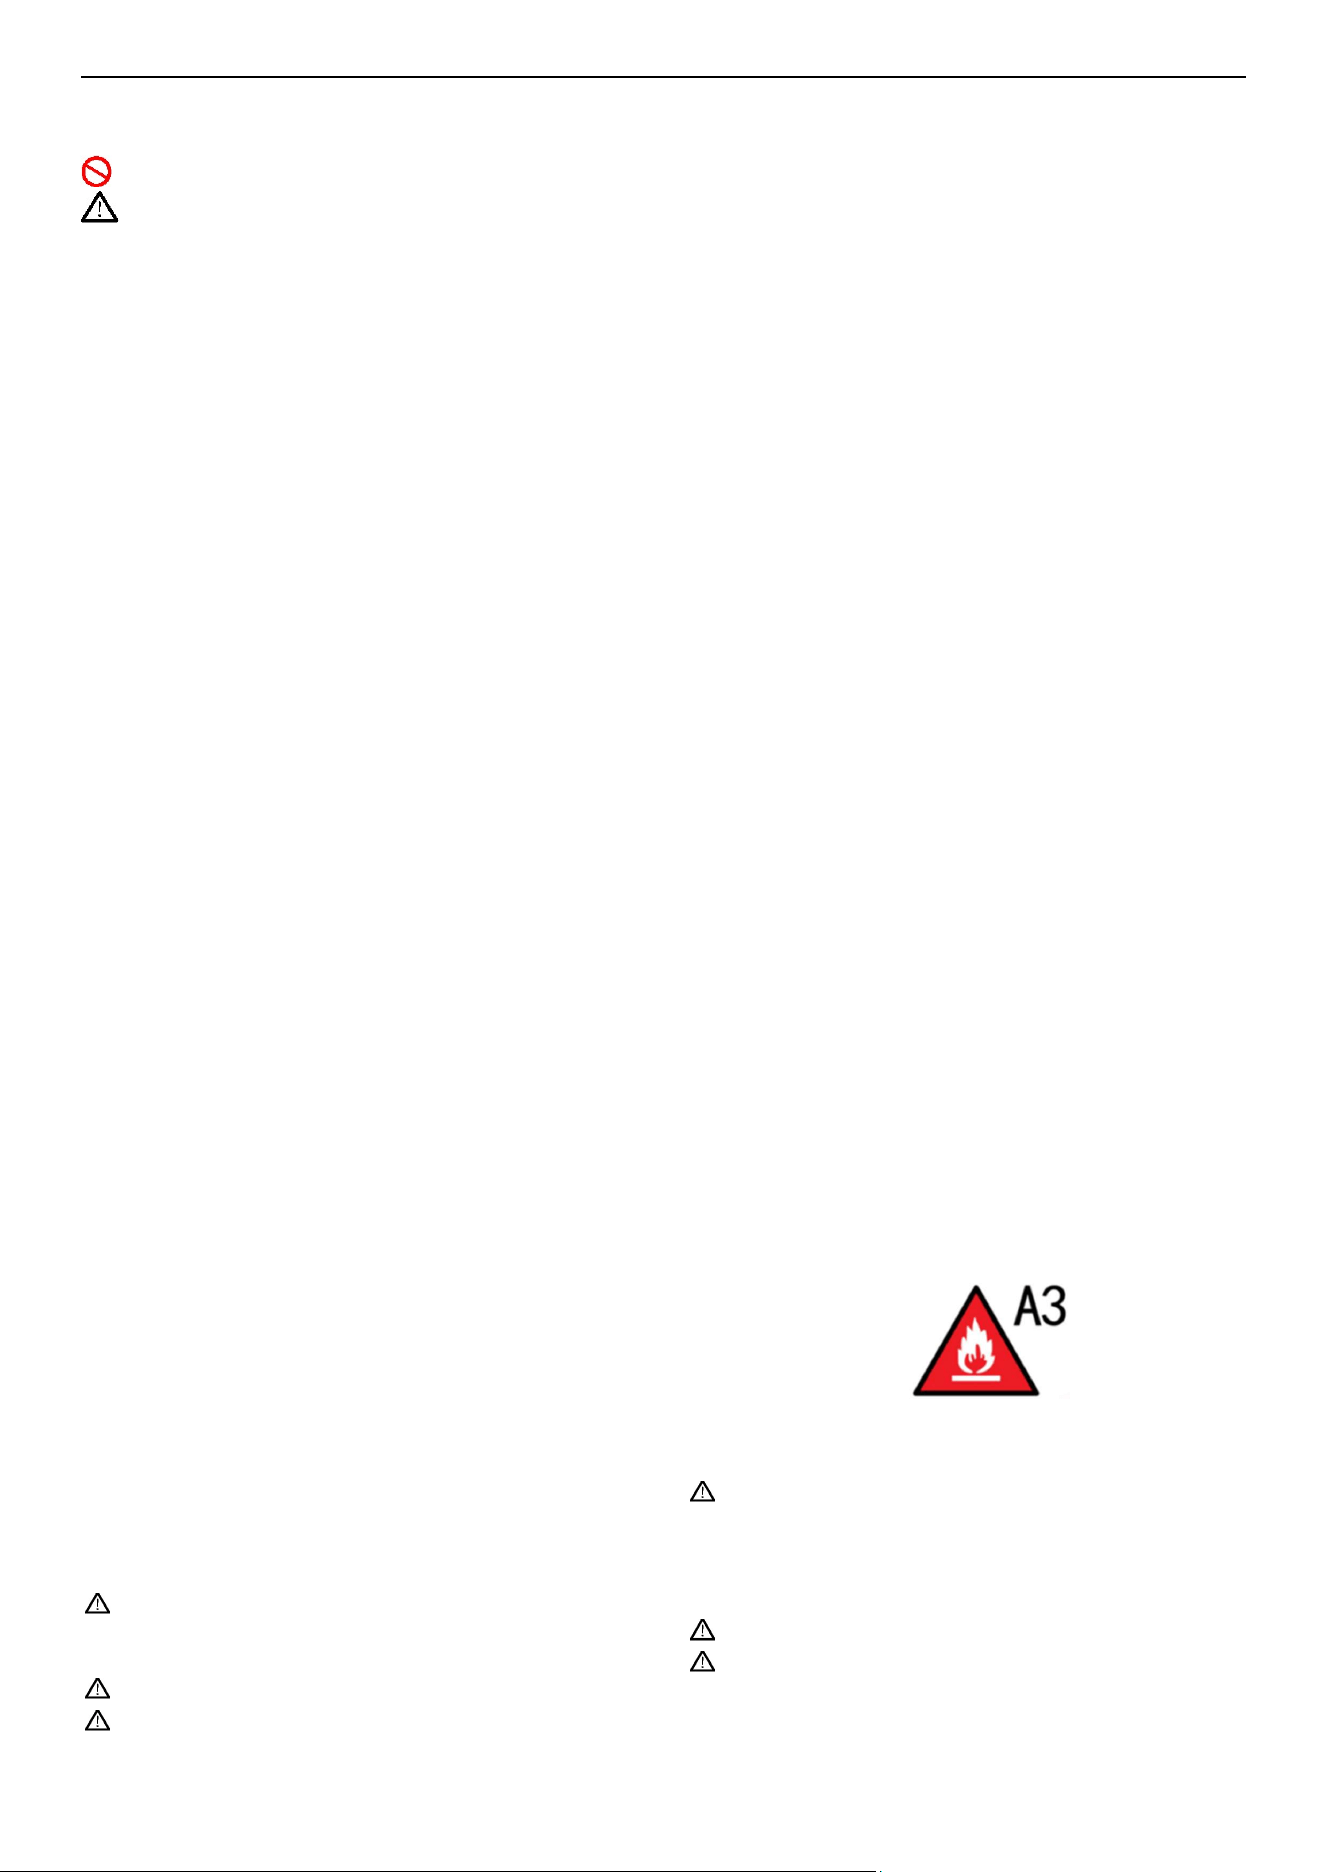
WARNING: Risk of fire/flammable materials
Warning that the machine is filled with flammable
refrigerant R290, and caution should be taken for
risks of fire.
Warning that the inlet of the water for ice making to
the ice maker can only be connected to drinking
water, instead of groundwater or other non-potable
water sources.
Illustrations in this manual
Warning mark, indicating that special caution
should be taken
Warning mark, indicating special caution should
be taken that the operation is prohibited.
3
Warnings and safety instructions
This product cannot be used outdoors.
This ice machine is not intended for use by
children, or those with physical weakness, slow
response, or mental disorders.
The installation, repair, or maintenance of this ice
maker must be carried out by professional and
qualified personnel. Unqualified personnel
performing such work may result in electric shocks,
fire, or personal injury.
After the ice maker is delivered, please keep the
machine upright and leave it to stand for more
than 24 hours to allow full settlement of the
lubricating oil in the compressor before starting,
otherwise the compressor might be damaged.
If the power cord is damaged, it must be replaced
by a professional from the manufacturer, its
service department, or a similar department to
avoid any hazards.
This ice maker must use the water pipe
components from the accessory box of the
machine. To ensure food hygiene and safety, do
not use water pipe components removed from old
machines.
During handling, try to keep the box upright. The
maximum tilt should not exceed 45 degrees. Do
not place it upside down or lay it down horizontally.
This ice maker should not be placed in places that
are damp or susceptible to water splashes.
The grounding of this ice maker should not be
connected to gas pipes, water pipes, telephone
lines, or lightning rods.
The ice maker contains rotating parts in it. Do not
insert slender objects into the vents or exhaust
outlets, as this may cause mechanical injury.
Volatile or flammable substances should not be
stored inside the ice maker, or it may result in
explosion or fire.
Do not store any unrelated objects, or even freeze
or refrigerate any food in the ice bin of this ice
maker. Keep the ice chute clean.
This ice maker must be placed on a countertop
that can adequately support its weight. An
unstable countertop may cause the equipment to
tip over, resulting in injury.
Sufficient ventilation space should be provided
around the ice maker to ensure smooth airflow.
Only the power supply specified on the machine
nameplate should be employed for the ice maker.
The ice maker should not be connected to hot
water.
The ice maker must be grounded reliably and
provided with a socket with Earth-leakage
protection.
Before manual cleaning, maintenance, or
servicing, the power supply to the ice maker must
be cut off.
Before cleaning, maintenance, or servicing, any
remaining ice in the ice bin should be removed to
prevent ice contamination during these processes.
Never directly splash water on the surface of the
ice maker for washing purpose, as this may cause
short circuits, electric leakage, or other faults.
The insulation material of this ice maker employs
a flammable foaming agent, and hence the its
discarding should be handled by qualified
personnel and institutions for disposal and
recycling.
The ice maker should be managed appropriately
to prevent access by children.
In case of a malfunction, the power supply should
be cut off, and a professional personnel member
should be contacted for repair.
This product is filled with either R404a or R290
refrigerants.
WARNING: Risk of fire/flammable materials
For machines filled with the flammable refrigerant
R290, please pay special attention:
Warning: Keep clear of obstruction all ventilation
openings in the appliance enclosure or in the structure
for
building-in.
Warning: Do not use mechanical devices or other
means to accelerate the defrosting process, other than
those recommended by the manufacturer.
Warning: Do not damage the refrigeration circuit.
Warning: Only use electrical appliances in the food
storage compartment that are recommended by the
manufacturer.
Warning: Connect to potable water supply only.
Warning: Do not store explosive substances such
as aerosol cans with a flammable propellant in this
appliance.
4
Warning: When the appliance is put in place,
ensure that the power cord is not trapped or damaged.
Warning: Do not place a portable power strip or
multiple outlets at the back of the appliance.
Warning: Do not use electrical appliances inside the
food/ice storage compartments unless they are of the
type recommended by the manufacturer.
Warning: In order to reduce flammability hazards
the installation of this appliance must only be carried
out by a suitably qualified person.
Overview
This ice machine is fully automatic. With proper
installation and connection to potable water and power
source, the ice making will start properly. When the ice
bin is full of ice, the machine shuts down automatically.
This ice machine is generally intended for the following
and similar scenarios:
Kitchen areas in shops, offices, or other
workplaces;
Farm, hotel, car hotel and restaurant;
The catering industry and similar non-retail
settings;
This ice machine is not intended for home use.
Installation
Requirements on installation location
The installation location of this ice machine should
meet the followings:
Indoors, at an altitude no greater than 2,000
meters;
Ambient temperature: 7.2 - 40°C;
Power supply: Rated voltage as indicated on the
machine nameplate ±6%;
Water source: potable water, with water pressure
from 130kPa to 550kPa; water temperature: 5-
35°C;
The ice machine should be kept away from heat
sources, and should be strictly forbidden to use at
extremely high temperature or low temperature
environment, and should avoid direct sunlight.
Sufficient ventilation space should be provided
around the ice maker to ensure smooth airflow.
The clearance should be at least 30 cm in the front,
4 cm at the back, and 30 cm at the top;
Warning:No obstructions around the appliance
or in the embedded structure to ensure smooth
ventilation;
Warning : Connect only to drinking water
source;
The ice machine must be placed on a countertop
that can adequately support its weight;
The ice machine must be grounded reliably and
provided with a socket with Earth-leakage
protection.
Proper floor drainage must be provided near the
installation location of the ice machine.
4
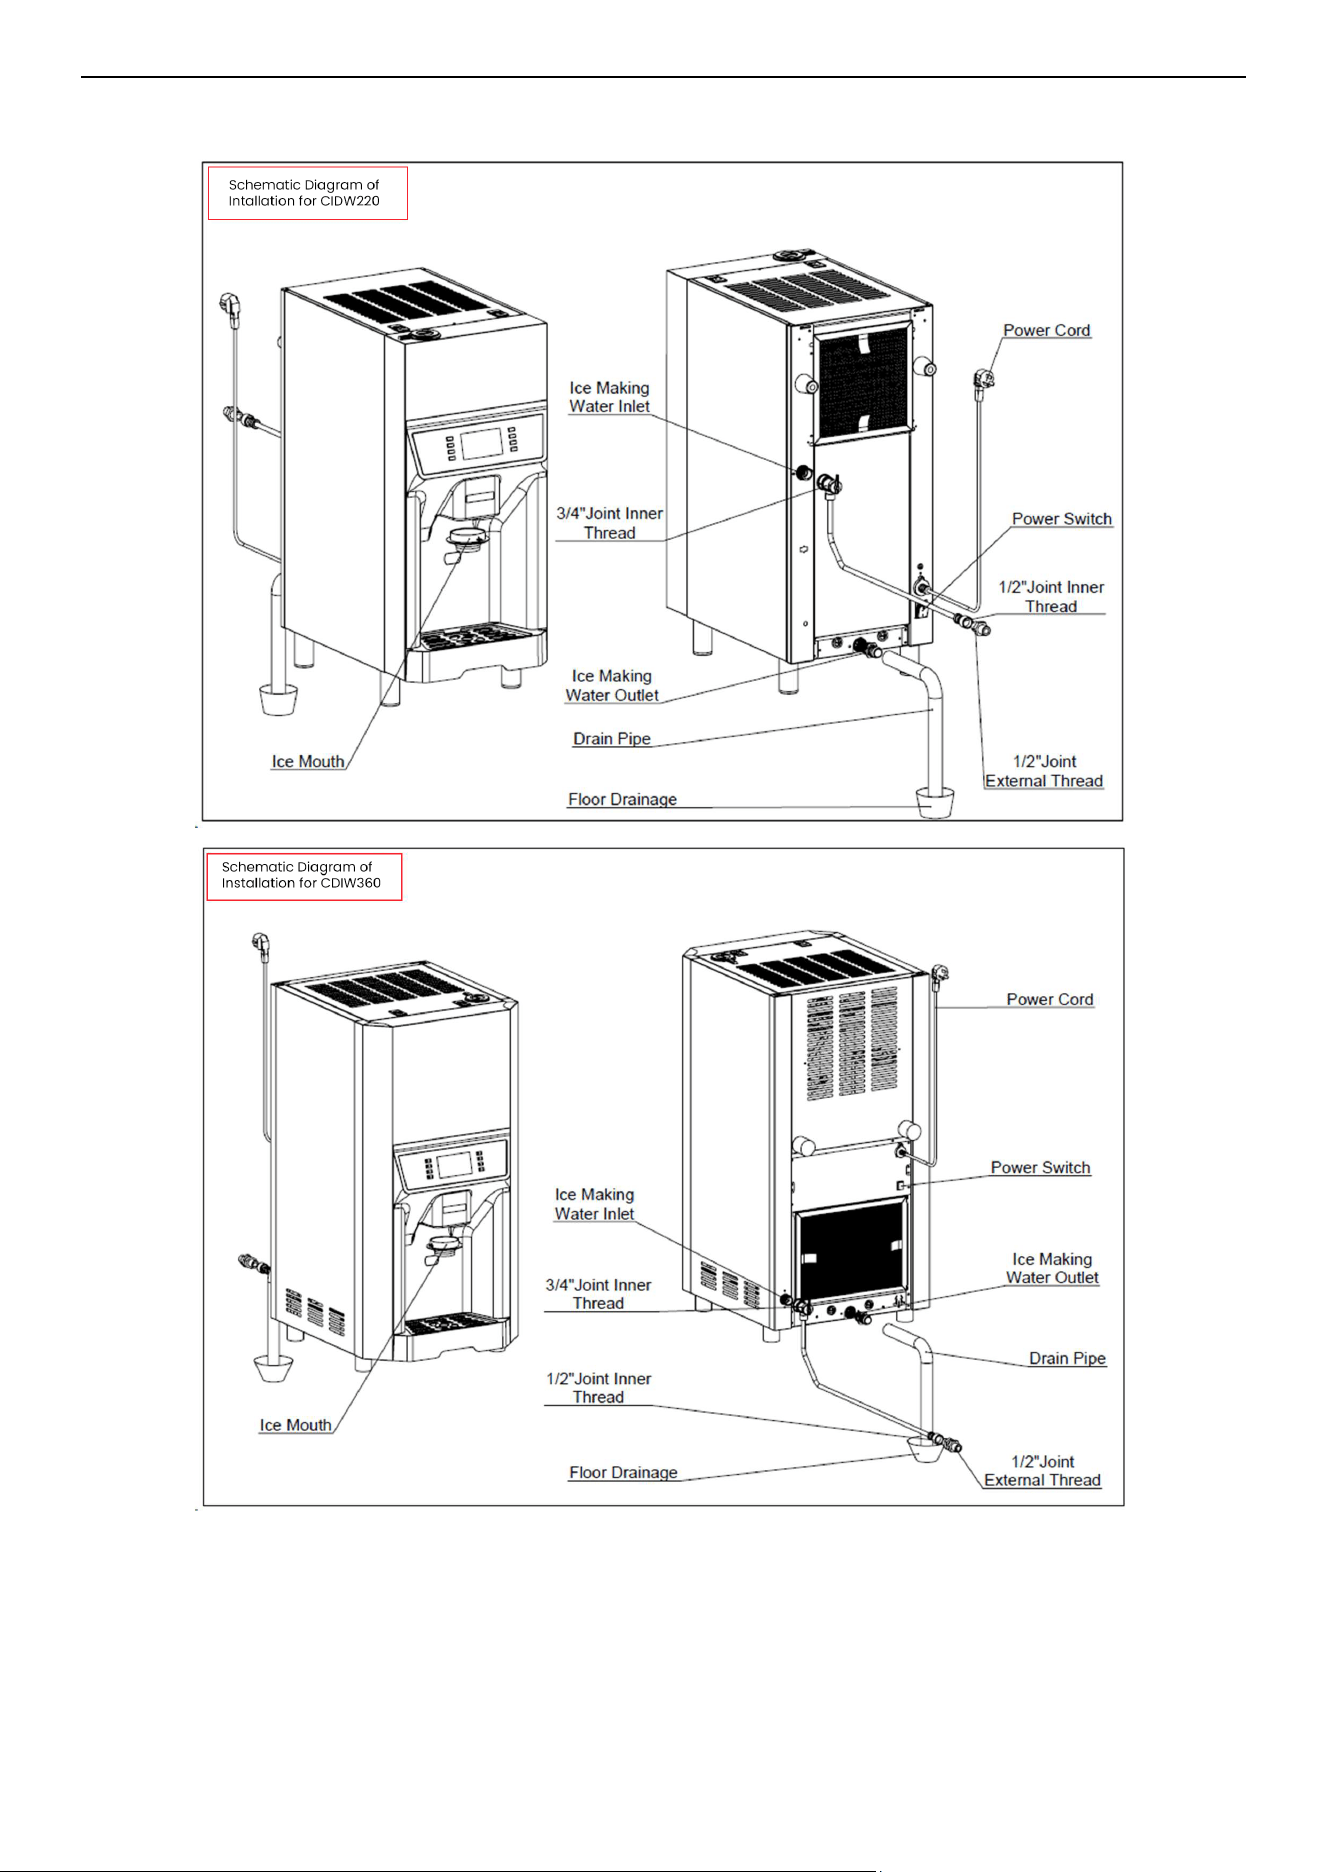
Typical installation diagram
6
Installation steps
1. Check if the ice machine is in good conditions
and if the accessories are complete; and verify
the machine model and check the machine
nameplate.
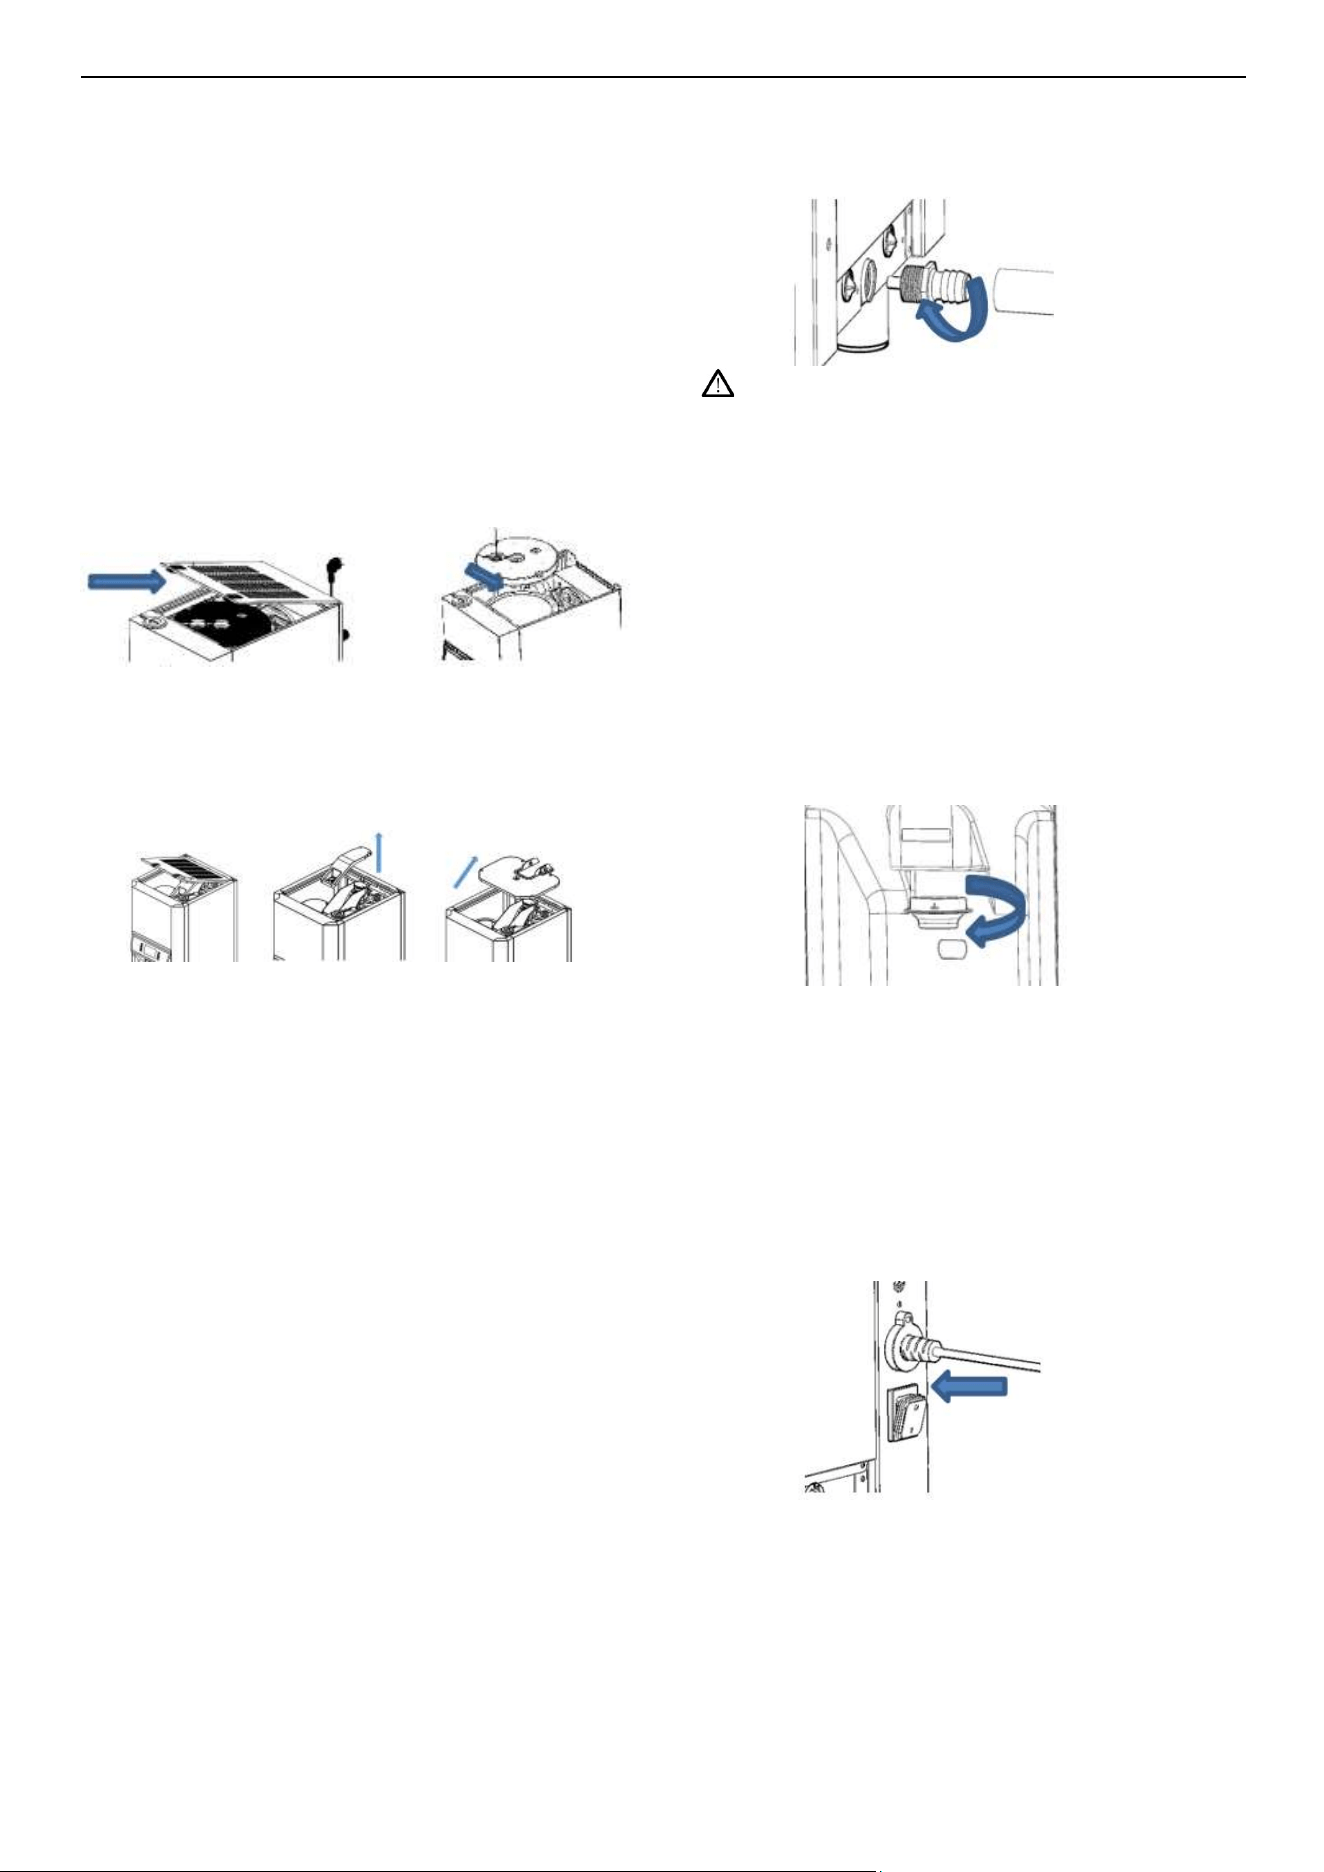
2. Remove the screws securing the top cover of the
machine.
3. Removal and installation of the top cover of the
ice bin:
Removal and installation of 220D top cover:
a. Press the plastic lock tab on top and lift
the cover upwards;
b. Pull apart the stainless steel tabs on
both sides and take out the ice bin cover.
Removal and installation of 360D top cover:
a. Open and remove the top cover panel;
b. Unscrew and remove the sliding ice rack
cover as indicated by the arrows;
c. Unscrew and remove the ice bin cover
as indicated by the arrows.
4. Use a sponge soaked in warm water and baking
soda to clean the ice bin and the interior of the
machine, and then rinse it with clean water and
dry it.
5. Place the ice machine in the operation area and
ensure the machine is level.
6. Air-cooled ice machine need good ventilation to
ensure excellent performance. Therefore, at
least 30 cm of ventilation space must be
maintained above the machine.
7. The bottom of the ice machine is equipped with
adjustable legs for easy leveling and countertop
cleaning.
8. The ice machine needs to be connected to
drinking water (this machine does not come with
a filter).
9. Connect the machine to the water supply pipeline
with the supplied 3/4 inlet water pipe. It is
recommended to install a water valve (not a
standard accessory of this product) in a
convenient location on the water supply pipeline.
10. Installation instructions for drainage connection.
Notes: The O-ring seal should be in place at the
connection.
11. Connect the supplied drain pipe to the drainage
connection. For easier drainage, it is
recommended that the drainage pipe is provided
with a drop of over 3 cm per meter. Make sure
that the drain pipe is not blocked as well. It is
recommended to have the drainage pipe lead to
an open drain.
12. No point in the drainage pipeline should ever be
higher than the drainage outlet of the machine or
the previous point.
13. Installation instructions for the ice chute.
Install the ice chute to the designated position,
then rotate it 90 degrees clockwise or
counterclockwise.
14. Confirm the power supply requirements specified
on the machine nameplate, and ensure the
power supply meets the requirements.
15. A circuit breaker or switch should be installed on
the power supply line of the machine, and an
Earth-leakage protection device must be
installed and properly grounded.
16. Turn off the switch on the power supply line, and
connect the machine to the power supply.
17. Turn on the power switch of the machine.
7
Start-up and operation
18. Pre-startup confirmation
Accessories or items inside the ice machine
have been removed;
The ice machine has been leveled;
The water pipes have been connected, and
the water valve opened;
The plug has been connected to the power
supply, and the power switch is off;
Confirm that the ambient temperature, water
temperature, and pressure of water supplied
to the ice machine are within the required
ranges.
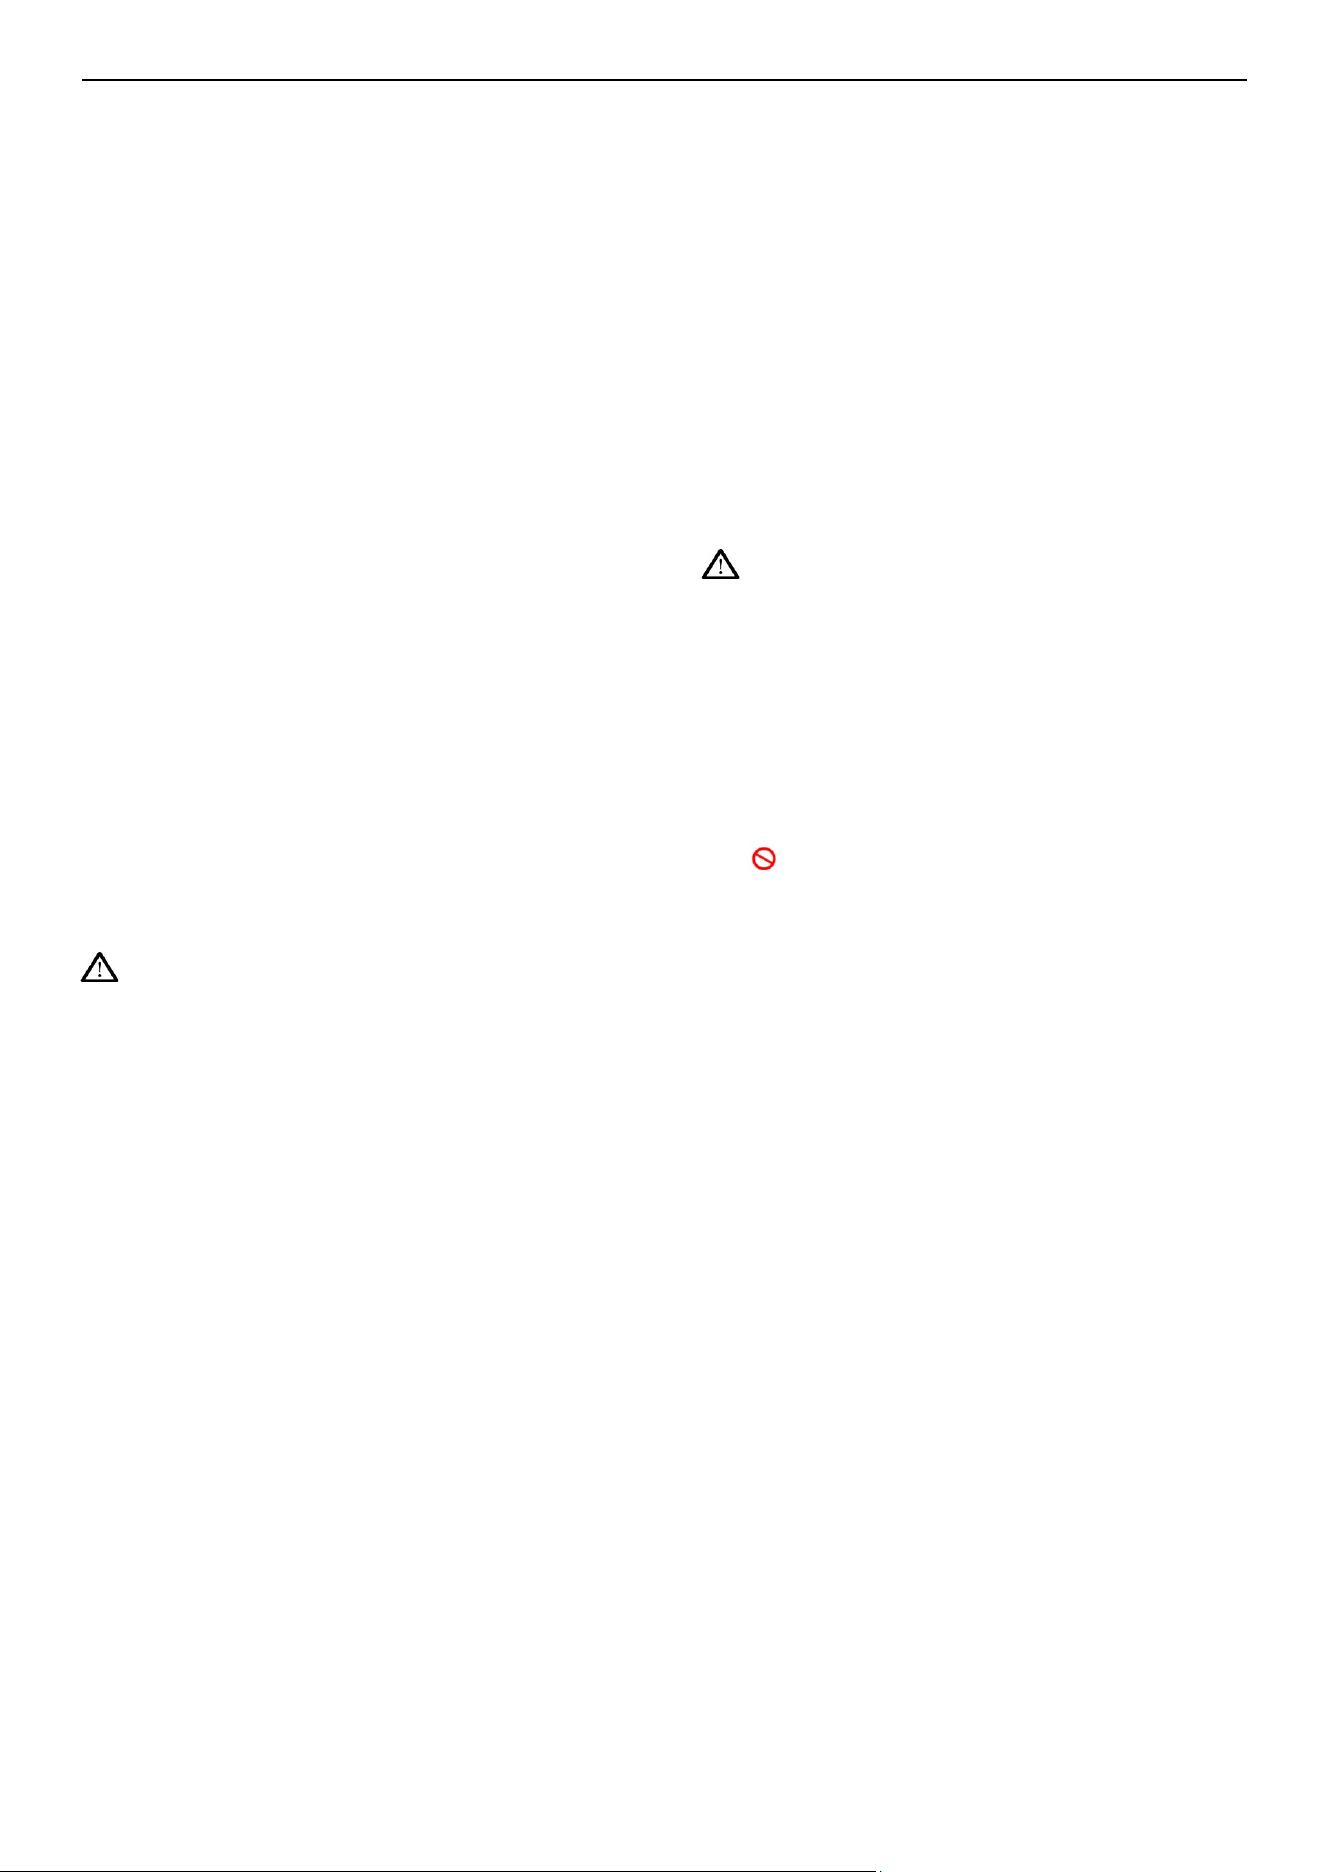
19. Start-up and operation: Turn on the power
switch of the power supply line. After powering on,
press and hold the "Set" button on the LCD for 3
seconds, and the machine will enter fully
automatic ice-making mode.
20. Normal operation confirmation
Confirm that the touch screen and buttons
function normally.
Confirm that the compressor is operating
normally.
For air-cooled ice machine, confirm that the fan
runs normally and that there is stable airflow at
the air inlet and outlet.
Check if there is no abnormal noise from the ice
machine;
Check if there is no abnormal vibration from the
ice machine.
Check if ice, water and ice water can be got
properly after 10 minutes of starting the machine;
Warning: Discard the 30 minutes of ice
production.
Operating instructions
Start-up: Once correctly installed and powered
on, the machine operates automatically
throughout the entire process and does not
require constant supervision. For the first startup,
please confirm that the machine operates
normally.
Notes: If there is a thunderstorm or the
machine will not be used for an extended period,
please cut off the power and water supplies!
Self-check: After the ice maker is powered on,
the internal controller performs a basic check of
all parts of the machine. During this period,
normal operations such as dispensing ice, water,
or ice water is functional.
Drainage before ice making: After the
water supply is connected, the machine will start
to fill with water; press and hold the "Set" button
on the LCD screen for 3 seconds, the machine
will automatically drain for 20 seconds to clean
the water tank. After cleaning, the drainage valve
will automatically close, and once the water level
reaches the set position, the ice-making cycle
will begin.
Ice making: Continuous water flow is stored
on the inner wall of the evaporator, where it
freezes. The ice so made is then cut by the ice
drill driven by the reducer and brought out of the
evaporator by the spiral ice blade.
Warning: Do not insert your hand into the
ventilation holes or open the machine’s
metal panels during the ice-making process
to avoid mechanical injury!
Water shortage restart: When the water
supply is insufficient to meet the needs of normal
ice-making, the LCD displays E05, and the
machine will restart after 10 minutes.
Shutdown: While the machine is running,
press and hold the "Set" button on the LCD
screen for 3 seconds. The compressor will stop
immediately, and the reducer and fan will shut
off; it’ll take three minutes.
Automatic shutdown when ice bin is
full: While the machine is running, as the ice
builds up in the ice storage bin, the LCD screen
will display “100%”, and the machine will enter
standby mode.
Resuming ice making: When the ice in the
bin is removed and the ice level drops below
80%, the machine will return to the normal ice-
making state.
8
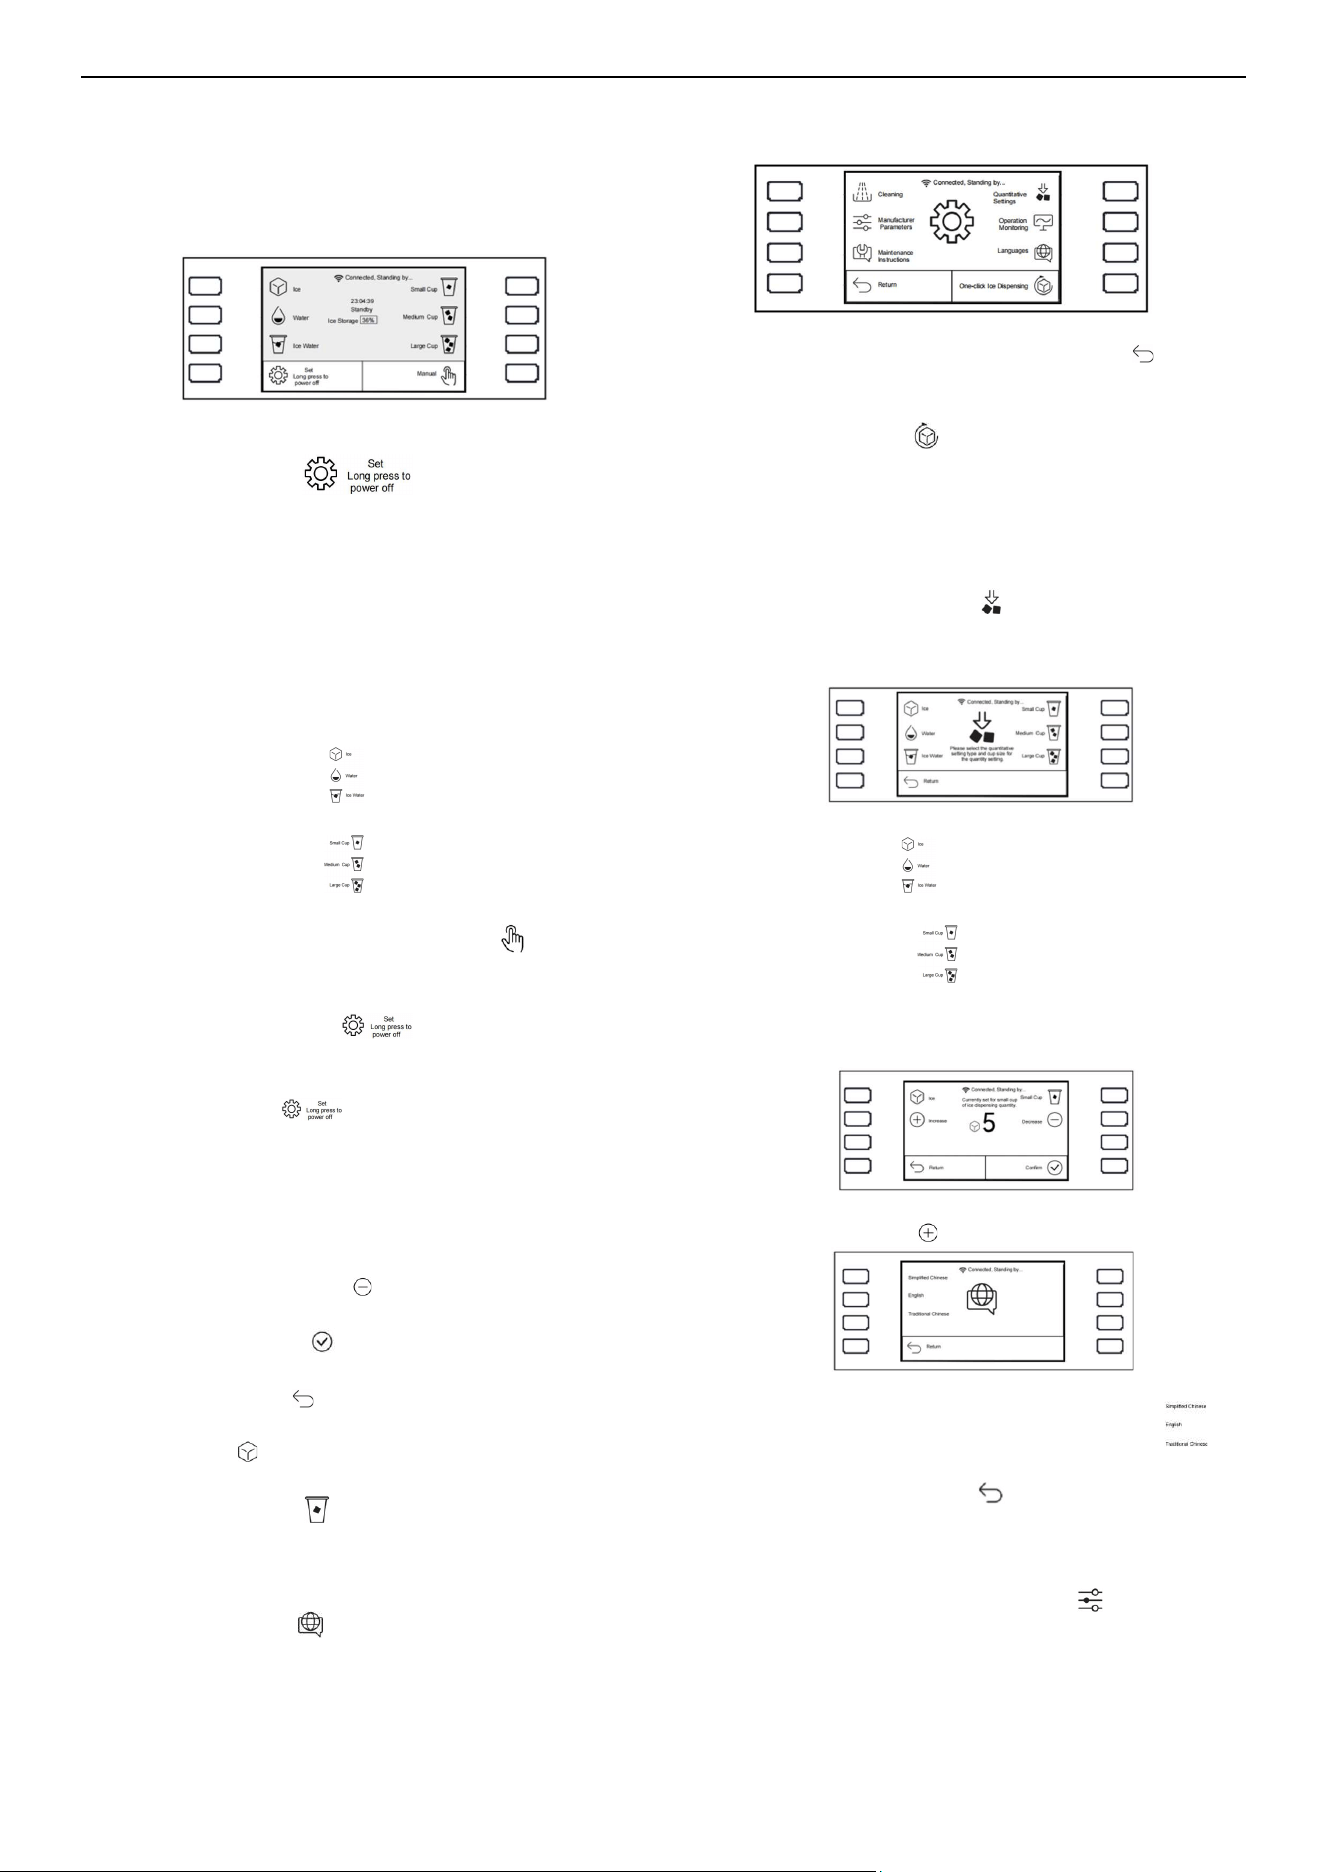
Instructions of the control panel
1. LCD main screen displays:
Ice machine status, ice storage percentage,
operation time, and ice retrieval operation button.
↑ LCD main screen (ice retrieval screen)
Press and hold the Set button at the lower left for
three seconds to activate the ice-making mode
from the standby mode;
a. Preparation cycle: 3 minutes;
b. Ice making cycle: the main screen displays ice
making process.
c. Full ice bin cycle: the main screen shows a full
bin when the ice storage reaches 100%.
• Press the left-side buttons to select between
ice, water, or ice water.
• Press the right-side buttons for small, medium,
or large cups to select ice quantity.
• The manual button on the lower right allows you
to dispense ice by touching it and stop by releasing
it.
• Press and hold the Set button at the lower left
for three seconds to activate the ice-making mode
from the standby mode.
• Press the Set button on the lower left to
enter the interface of machine settings.
2. Displays of machine settings:
Cleaning, manufacturer parameters, maintenance
instructions, operation monitoring, languages
↑ Displays of machine settings
• Click the Return button on the lower left to return
to the main interface.
• To enable one-click ice dispensing, click the One-
click Ice Dispensing button on the lower right. The
machine will continuously dispense ice until the ice
bin is emptied (to click the button again to cancel the
dispensing).
3. Displays of Quantitative Settings:
In the displays of machine settings, click the
"Quantitative Settings" button to enter the
displays of quantitative settings, where you can
modify the amount of ice dispensed per cup.
↑ Displays of Quantitative Settings:
• Press the left-side buttons to select between ice,
water, or ice water.
• Press the right-side buttons for small, medium,
or large cups to select ice quantity.
• Enter the settings displays of ice dispensing
quantity:
↑ Settings displays of ice dispensing quantity
• Click the "Increase" button on the left to
• increase the amount of ice dispensed.
• Click the "Decrease" button on the right to
decrease the amount of ice dispensed.
• Click the "Confirm" button on the lower right to
save the new ice quantity settings
• Click the "Return" button on the lower left to return
to the previous displays.
• Click the Ice icon on the top left to switch between
ice, water, and ice water.
• Click the Cup Size icon on the top right to switch
between small cup, medium cup, and large cup
4. Displays of languages:
Click the "Language" button in the machine settings
displays to enter the language settings.
↑ Displays of languages:
• Click the Languages button on the left to
select the desired language;
• After clicking the "Return" button on the lower left,
you will return to the machine settings displays,
where the selected language will be displayed.
5. Displays of manufacturer parameters
Click the "Manufacturer Parameters" button in the
machine settings displays to enter the manufacturer
parameters displays.
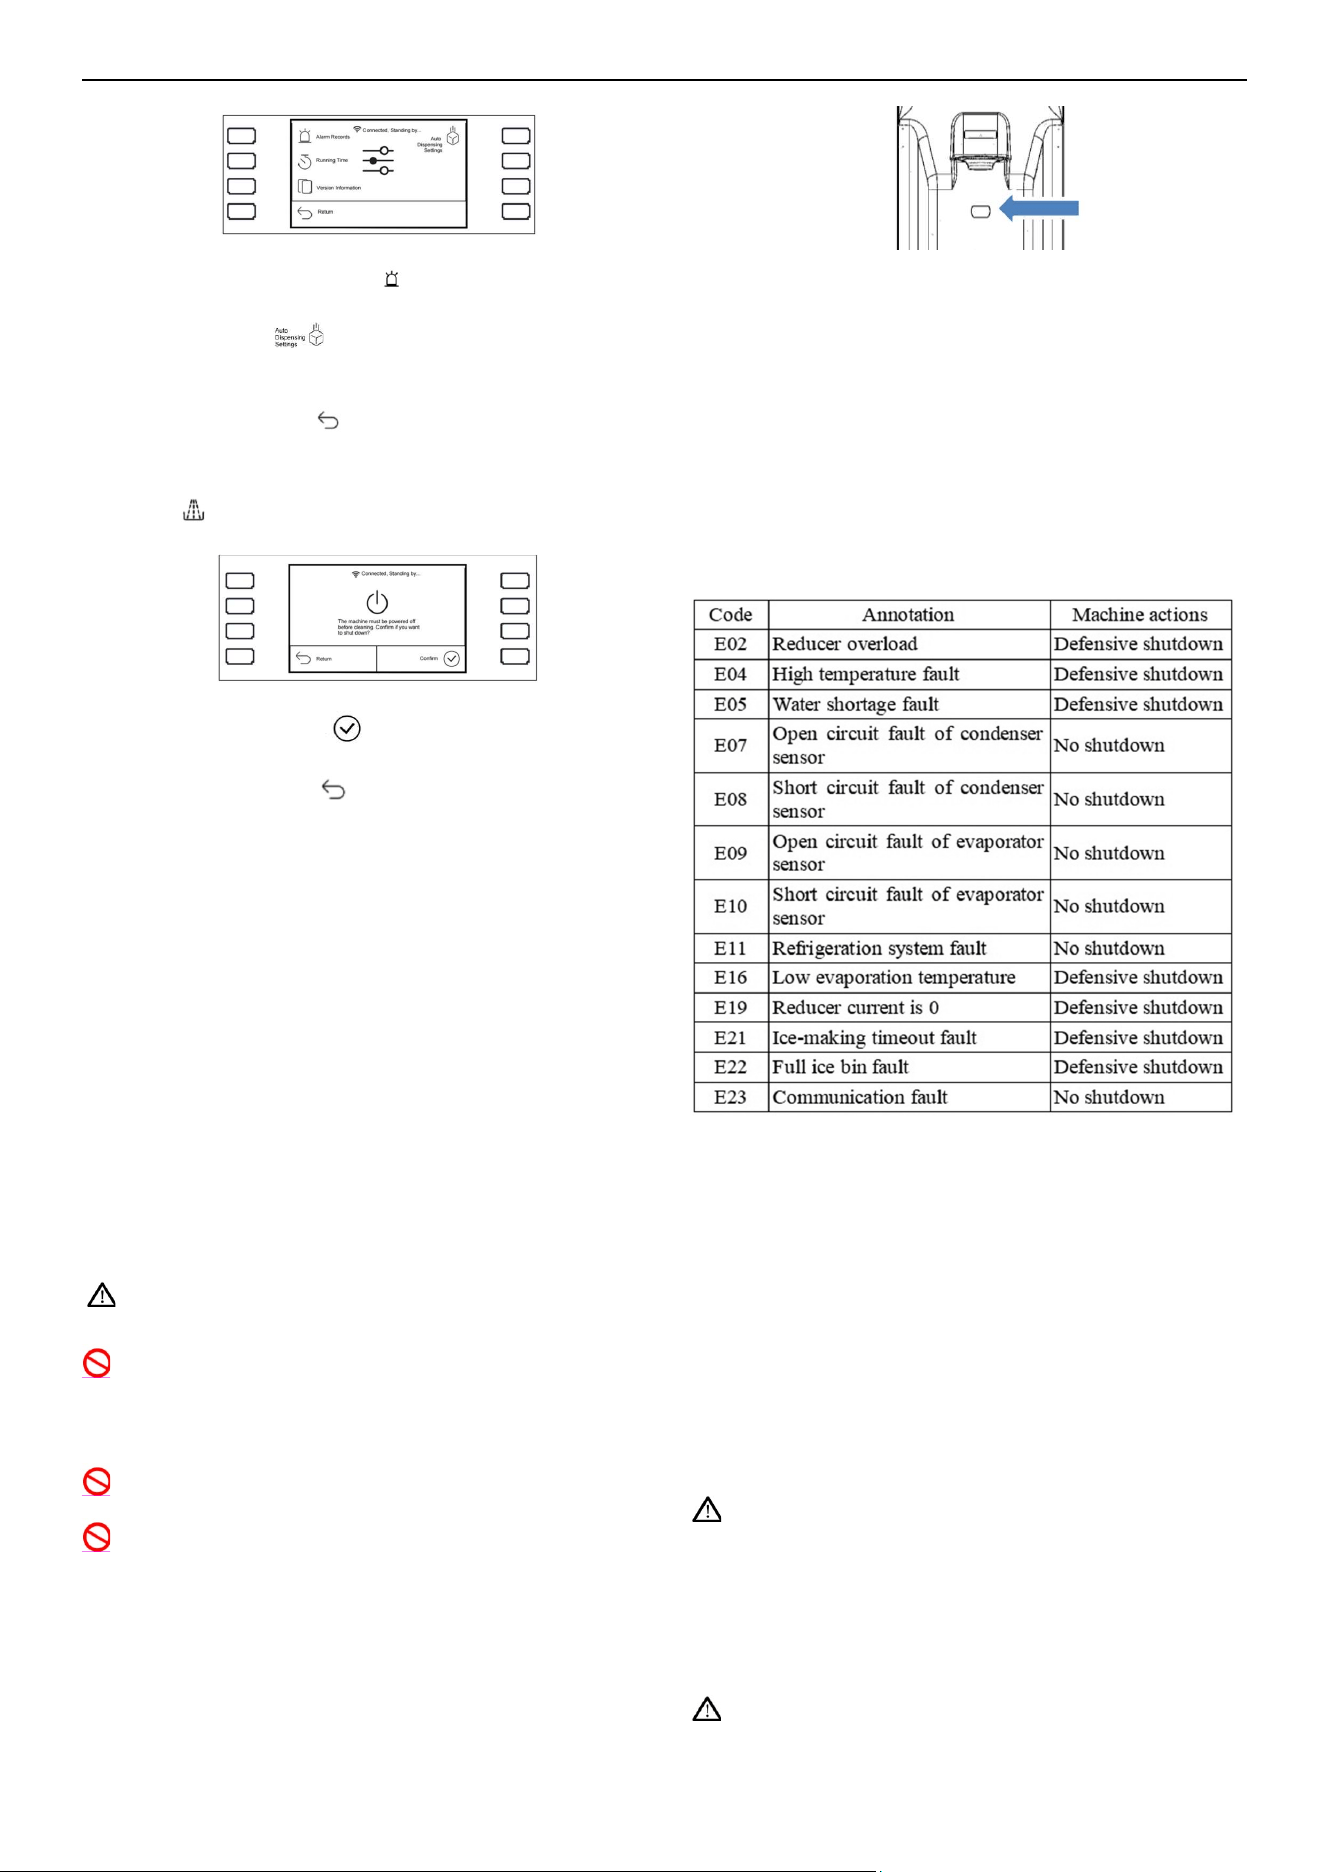
9
↑ Displays of manufacturer parameters
• Click the "Alarm Records" button on the top left
to view historical fault records.
• Click the button on the top right to activate the
infrared auto ice dispensing feature (optional
component).
• Click the "Return" button on the lower left to
return to the machine settings displays.
6. Displays of Cleaning:
Click the "Cleaning" button in the machine settings
displays to enter the automatic cleaning process.
↑ Displays of Cleaning:
• Click the "Confirm" button at the lower-right
corner to begin the cleaning process.
• Click the "Return" button on the lower left to
return to the machine settings displays.
7. Infrared ice dispensing (optional): Place the cup
near the position indicated by the arrow in the
image below to automatically dispense ice. The
ice dispensing will stop automatically when the
cup is removed.
8. Switch: While the machine is powered, press and
hold the "Set" button for 3 seconds to toggle the
produce between shutdown and running.
9. If the ice machine is to be left unused for an
extended period after use, it should be powered
on and run for 2 - 4 hours every 2 months.
Other special protection shutdowns
● The ice machine will shut down for protection if the
ambient temperature detected is too high.
● The ice machine will shut down for protection if an
anomaly is detected in the water supply.
● When a malfunction occurs, a fault code will be
displayed, whose explanation is as follows:
Maintenance and service
Notes: Maintenance and service must be
performed by qualified professionals.
Warning: Before maintenance and manual
cleaning, always be sure to cut off the water and
power supplies and unplug the machine. Live-line
working is prohibited.
Warning: Do not damage the refrigeration circuit.
Warning: Do not use mechanical devices or any
other methods to accelerate the defrosting
process, other than those recommended by the
manufacturer.
Appearance cleaning
• Regularly clean the area around the ice machine to
keep it clean, and do not block the vent.
• The enclosure can be cleaned with neutral
detergent, followed by wiping with a soft cloth. If
necessary, a commercial stainless steel cleaner
and polisher can be used.
Notes: Without proper maintenance, stainless
steel can also rust.
Display panel
• The LCD panel and buttons should be wiped once
a week using a towel soaked in alcohol.
Notes: The sponge or towel must be wrung out.
Do not rinse directly with water!
10
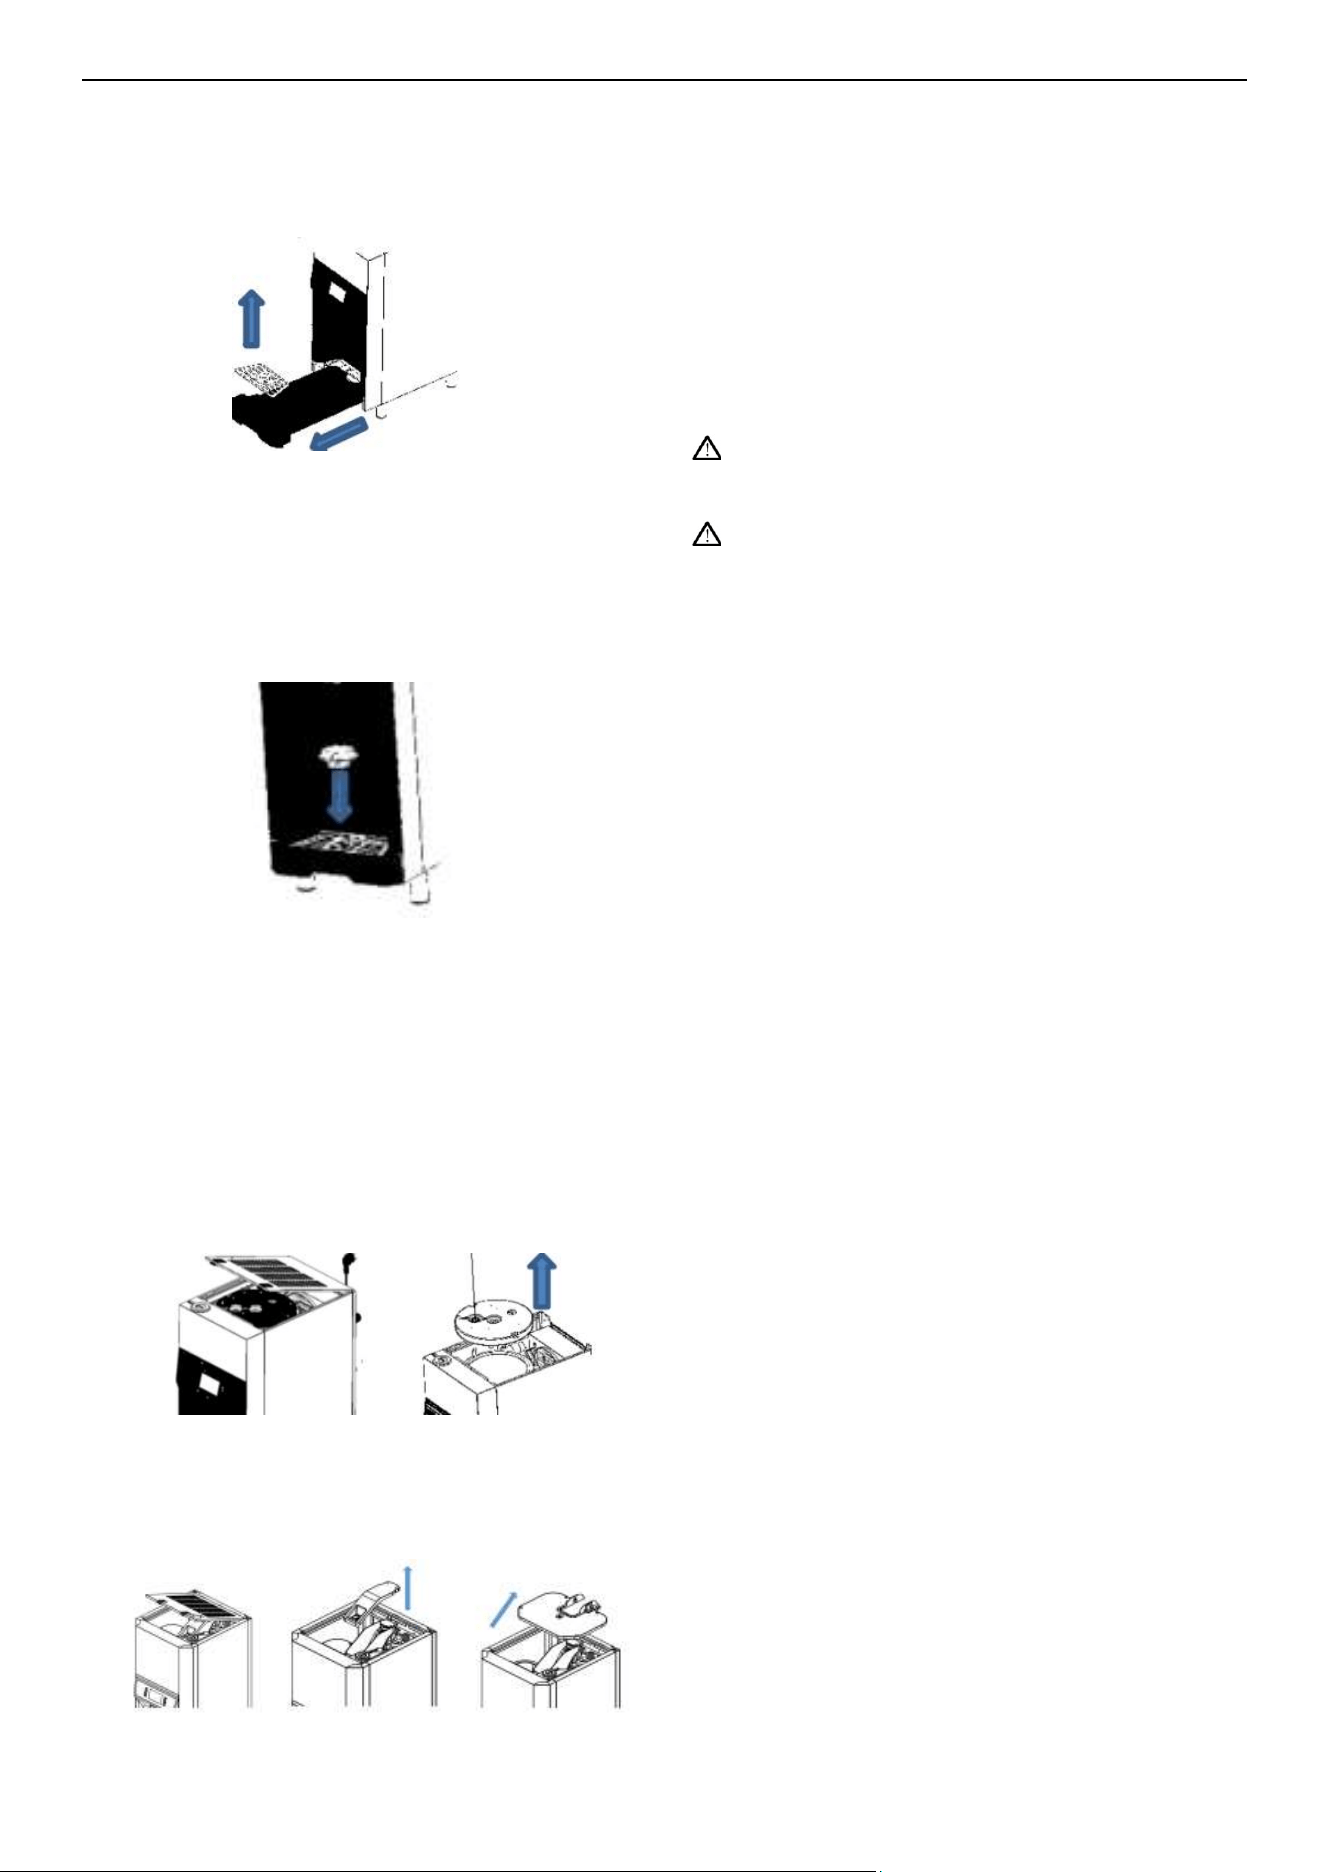
Cleaning the waste water box:
• Remove the stainless steel water tray, clean it with a
neutral detergent, and then wipe it dry with a soft
cloth.
• Pull out the waste water box. It is recommended to
clean and wipe it weekly with warm water and
baking soda.
Cleaning the ice dispensing chute:
• Rotate the nozzle 90 degrees and remove it vertically.
It is recommended to clean and wipe it weekly with
warm water and baking soda.
Water inlet filter
• The filter cartridge should be checked regularly.
Assembly and Disassembly of Ice Bin Top
Cover:
• Open and remove the top cover plate.
• Pull apart the stainless steel tabs on both sides and
take out the ice bin cover.
• Unscrew and remove the sliding ice rack cover as
indicated by the arrows.
• Unscrew and remove the ice bin cover as indicated
by the arrows.
Ice full switch
• It’s recommended to wipe the mirror surface of the
ice full switch every 1 to 3 months.
Interior cleaning of ice bin
• When cleaning the interior of the ice bin, use a
sponge soaked in warm water and baking soda to
clean the ice bin and the interior of the machine,
and then rinse it with clean water and dry it.
Notes: Never use a water hose to rinse, and never
rinse parts other than the ice bin directly to avoid
wetting electrical components.
Notes: The edges of the air-cooling condenser fins
are sharp. Please be careful when cleaning!
Water system
• To ensure food hygiene, the water system and
water components of the ice maker should be
regularly cleaned, descaled, and disinfected.
11
Condenser
• For air-cooled ice machines, the condenser
should be cleaned every three weeks. To do this,
use a soft brush or a vacuum cleaner with a brush
and do the cleaning along the direction of the fins
to avoid damaging the fins and affecting the
cooling effect.
• The filter screen should be cleaned every two
weeks.
• Diagram of air filter removal:
Remove the air filter by pulling it upwards from the filter
bracket at the back of the machine.
In Winter
• Cut off the water and power supplies, and drain
the residual water from the water tank and inlet
pipe of the ice machine.
The maintenance and service of the ice
machine are not covered under the
manufacturer's warranty!
Automatic cleaning steps
Notes: Before automatic cleaning and sterilization,
remove the ice from the bin to avoid contamination.
Notes: Please manually clean and disinfect the ice
bin, and rinse it thoroughly.
Cleaning process:
1. Preparation of descaling solution: Dissolve one
package of disinfectant powder (2 ounce) in 1000
ml of water to prepare the descaling solution.
2. Preparation of disinfection solution: Dissolve one
package of disinfectant powder (1 ounce) in 1000
ml of water to prepare the disinfecting solution.
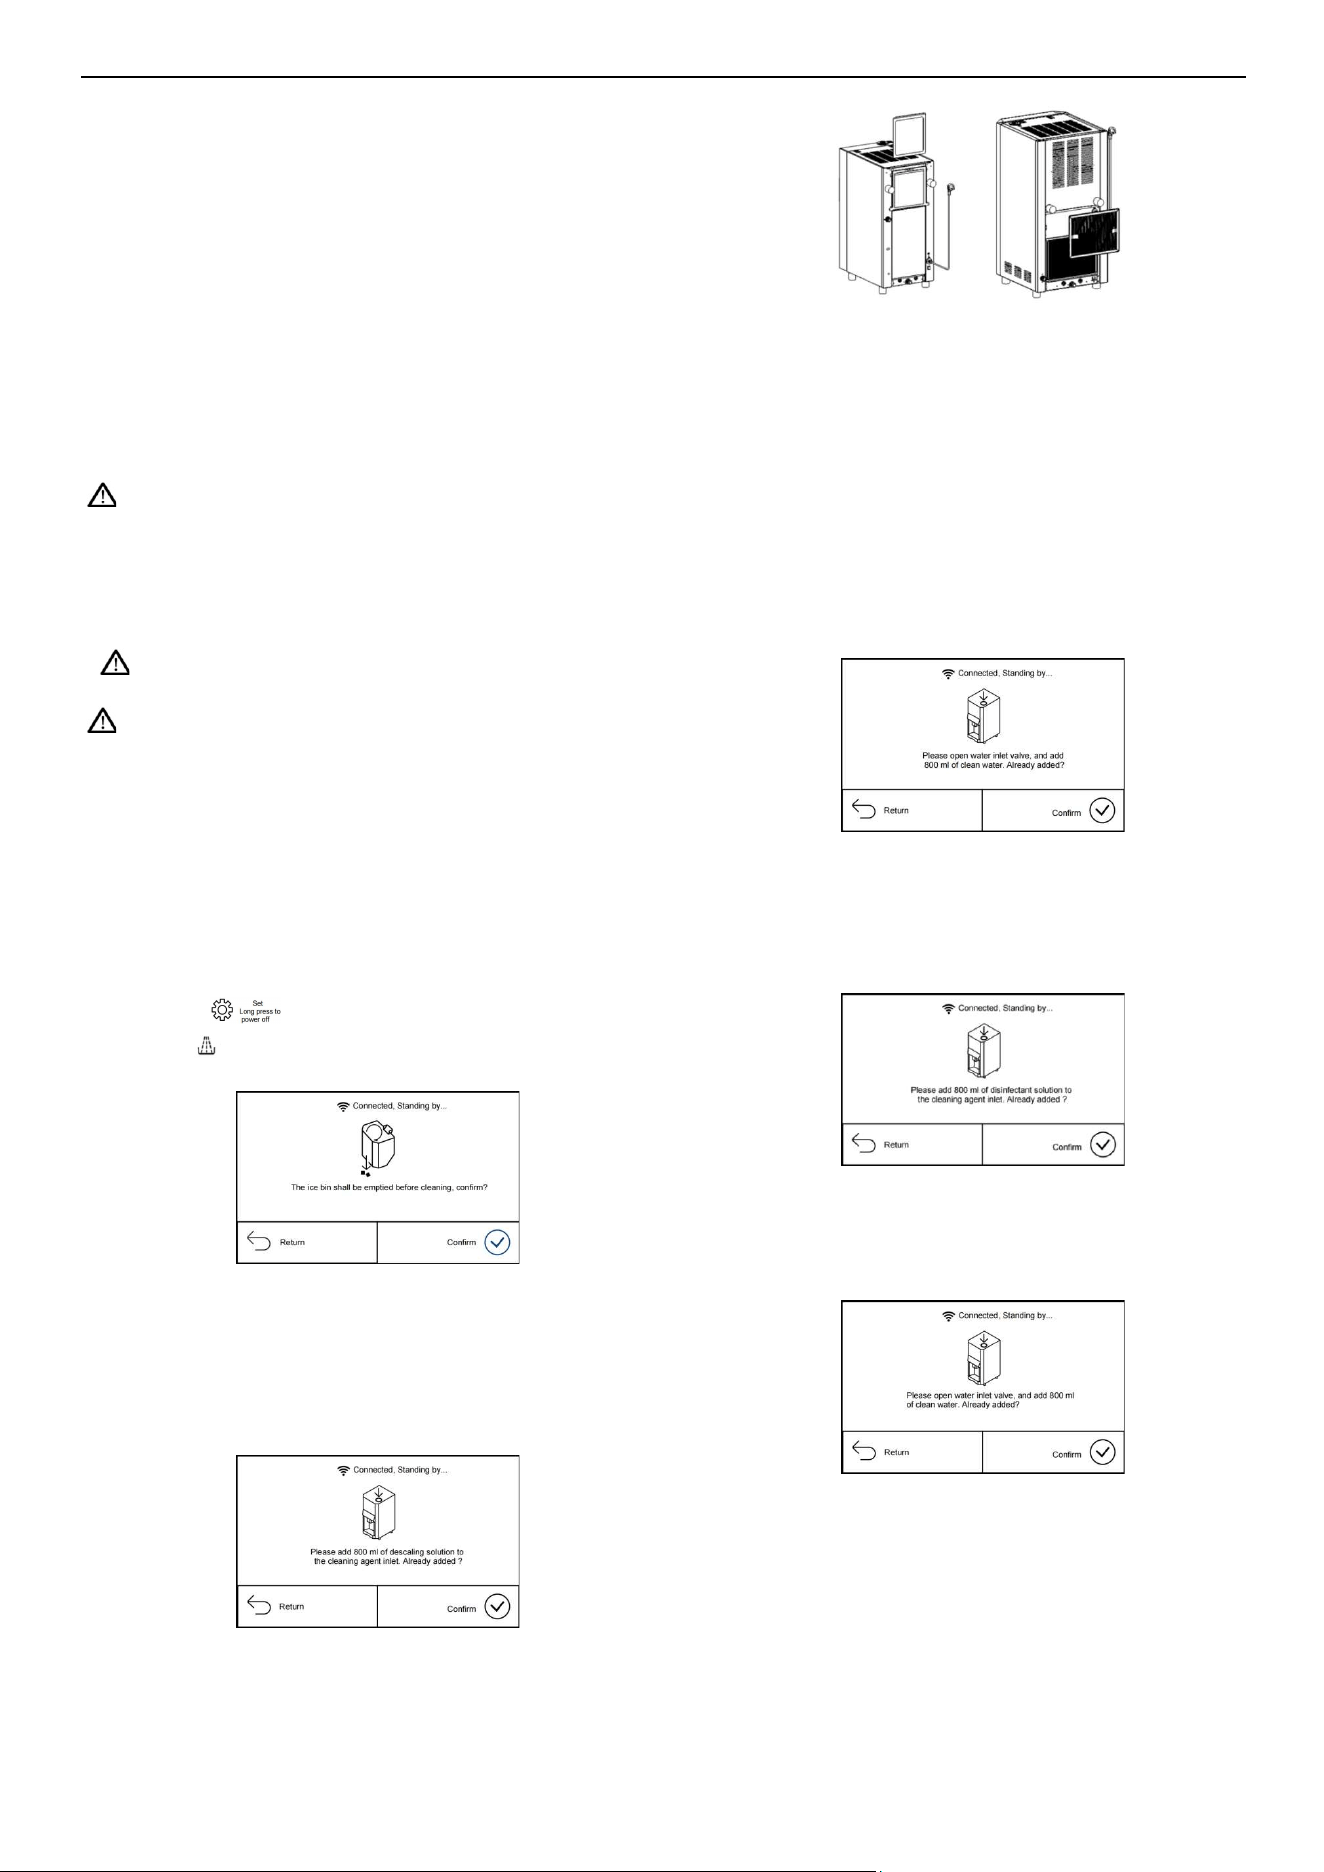
3. Entering the automatic cleaning steps:
a. Press the "Set" button.
Press "Cleaning" on the screen. The system
will ask if you wish to power off the machine.
Click "Confirm" to proceed with the shutdown process;
A prompt pops up to ask if you would like to empty the
ice bin, click "Yes";
b. After the cleaning is complete, the machine will
prompt you to manually close the water inlet valve.
Then, click "Confirm" to drain the machine for 30
seconds;
c. The machine will prompt you to add 800 ml of
descaling solution, and then begin the automatic
cleaning process for 60 minutes after you click the
"Confirm";
d. After 60 minutes, the machine will open the drain
valve for 20 seconds.
Add 800 ml of clean water to the cleaning agent inlet,
and then open water inlet valve. The machine will start
the rinse cycle (total of five rinses);
e. Follow the screen prompts to manually close the
water inlet valve and click "Confirm". The machine
will drain for 30 seconds;
f. Add 800 ml of disinfectant solution, and then click
"Confirm" to start the automatic disinfection process
for 60 minutes.
g. After 60 minutes, the machine will open the drain
valve for 20 seconds.
Add 800 ml of clean water to the cleaning agent
inlet, and then open water inlet valve. The machine
will start the rinse cycle (total of five rinses);
h. After cleaning (or disinfection), the ice maker will
enter standby mode.
i. Press the "Stop" button to forcibly exit the cleaning
process and shut down the machine.
12
4. Turn off the machine power after the automatic
disinfection is complete. Open the ice bin top cover
and use a spray bottle filled with 100 ml of
disinfectant solution to spray and clean the ice
dispensing area and the interior walls of the ice bin;
5. Use a spray bottle filled with clean water to rinse the
ice dispensing area and the interior walls of the ice
bin, and wipe with a clean towel to remove any
residual disinfectant solution;
6. Remove the plastic parts of the ice dispensing area,
clean them thoroughly with disinfectant solution,
and rinse with clean water.
7. Use a brush soaked in disinfectant solution to clean
and disinfect the interior of the ice dispensing area.
Then, use a clean water-soaked brush to rinse off
any remaining disinfectant solution.
8. After the cleaning, turn on the machine power again
to restart the machine. Ice produced from the first
30 minutes of operation shall be discarded.
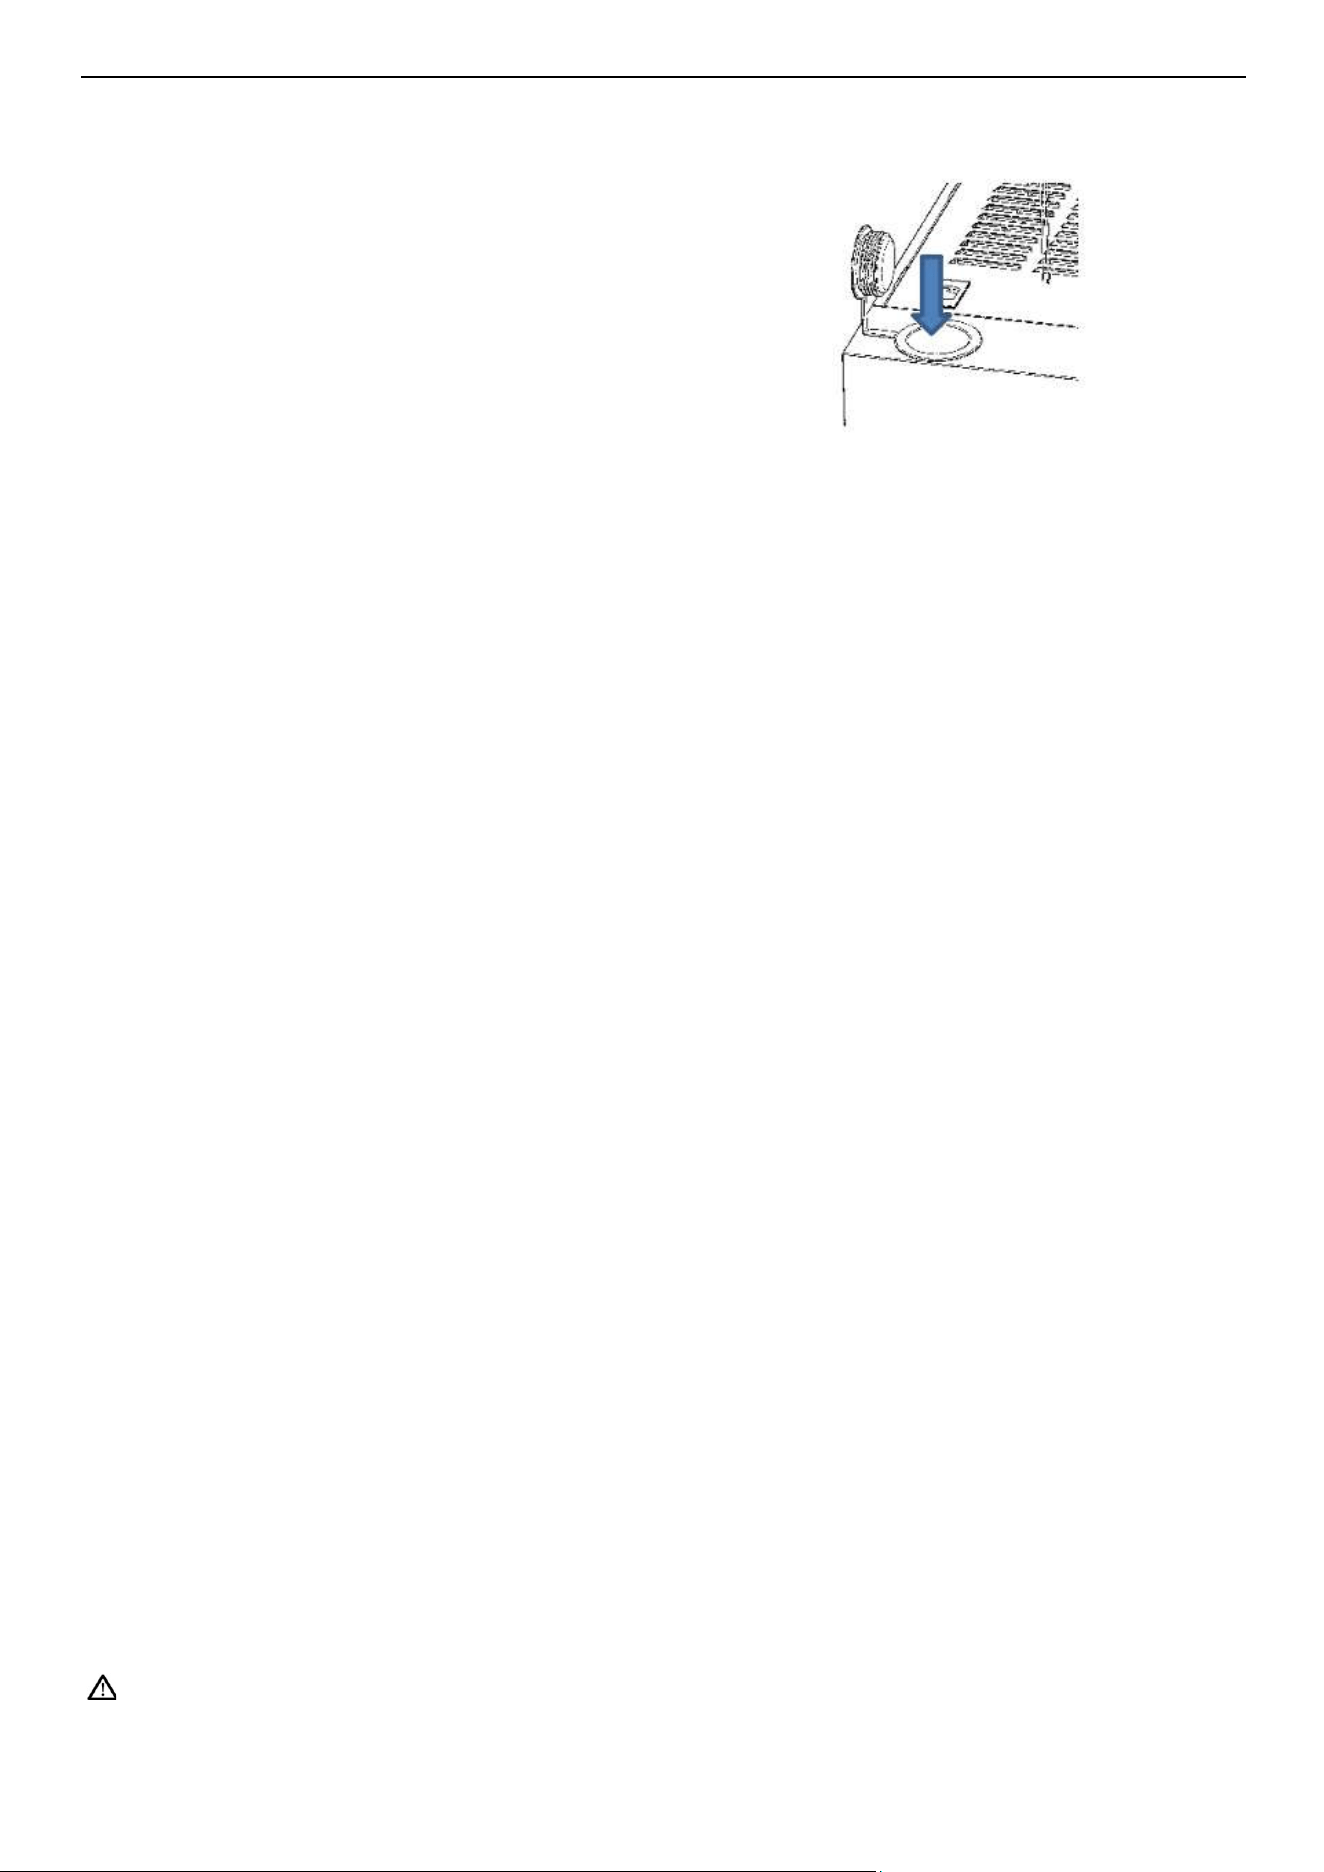
Diagram of Cleaning Solution Inlet.
Call for service
If the ice machine incurs an anomaly, please confirm
the following before making a call:
1. Confirm if the water supply is normal.
Check if the LCD displays any faults;
Ensure that the water pressure entering the ice
maker is no less than 130 kPa and no more than
550 kPa. The water temperature shall be between
5°C and 35°C.
Ensure the water valve is open;
Ensure there are no leaks.
2. Check if the power is on.
Check if the LCD is lit;
Ensure the LCD does not indicate standby mode;
If the LCD is not lit, check if the plug and socket of
the power supply line are working properly, and
the power switch at the back of the machine is on.
3. Check the nameplate and machine number
Check the nameplate on the side of the ice
machine, and record its model and number.
Notes: On-site service will result in a service fee if the faults are caused by the user instead
of the product itself, e.g. no water, no electricity, environmental factors, etc.
13
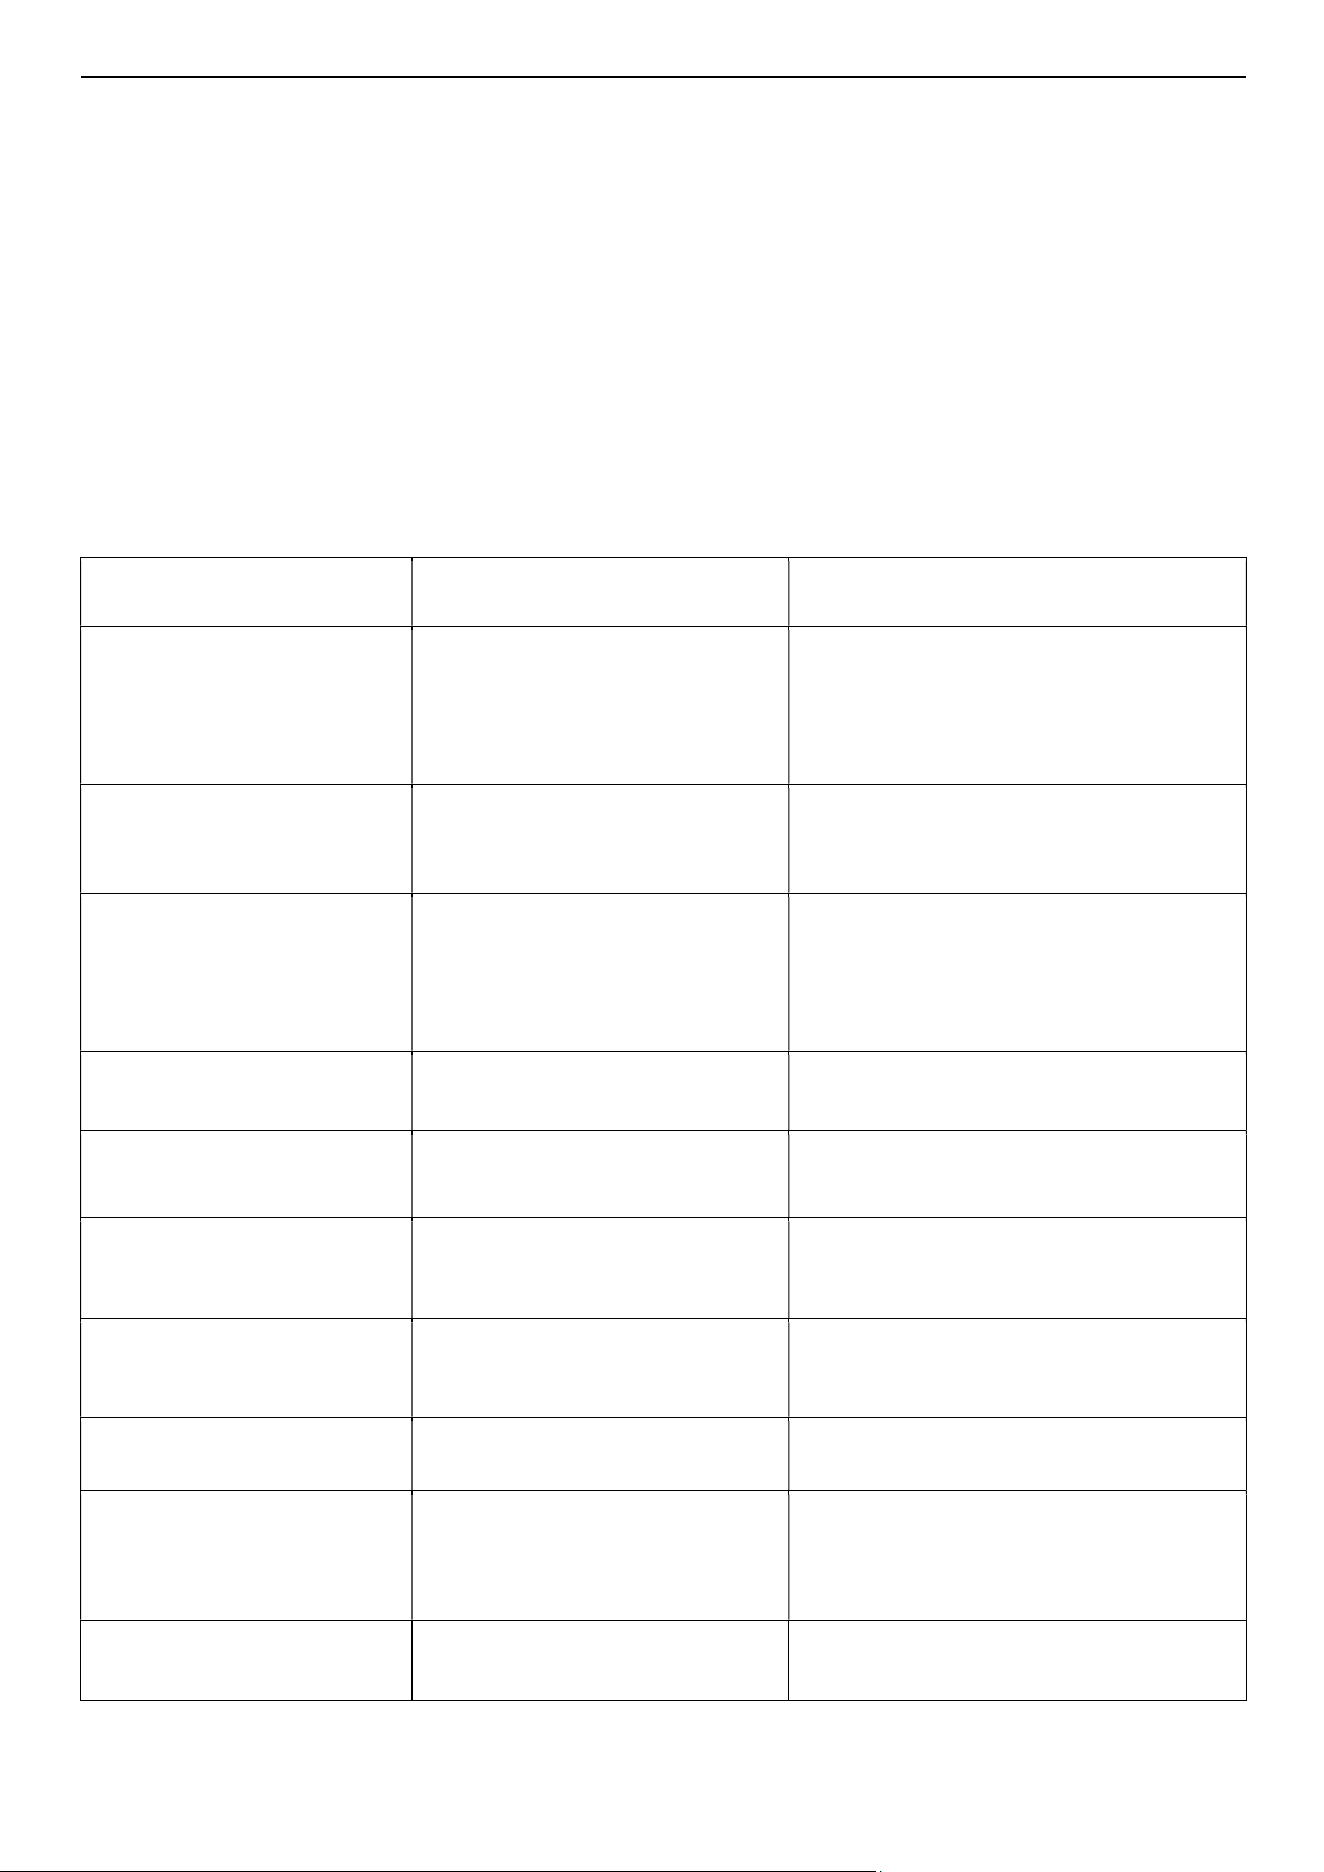
Troubleshooting
Before contacting the CustomerService,please confirm thefollowings:
The water source is functioning normally.
The LCD screen displays a fault.
The water pressure and the water temperature is
within the specified range.
The water inlet valve is open.
There are no signs of water leakage.
The power supply is switched on.
The LCD screen is illuminated.
If the LCD screen does not light up:
Check if the power plug and outlet are functioning
properly.
Ensurethe switch in the power supply circuit and
the power switch on the back of the machine are
turned on.
Faults and phenomena
Possible causes
Inspection and troubleshooting
LCD screen not lit ●Power supply circuit switch not
turned on
● Power switch on theback of the
machine not turned on
●Loose plug
● Turn on the power circuit switch
●Turn on the machine's power switch
●Check the plug and outlet
High temperature (E04) ●High ambient temperature
●Dirty or blocked condenser
● Fan failure
●Ensure ambient temperature is 41-104°F
●Clean the condenser
●Check and fix the fan
Ice making malfunction ●Low ambient temperature
●Dirty condenser or filter
●High ambient temperature
● Poor ventilation
● High water temperature
●Maintain ambient temperature between
41-104F
●Clean the condenser and filter
●Check ventilation
●Ensure water temperature is 41-95°F
Excessive noise ●Unstable machine placement
●Suspended outriggers
●Place the machine on a stable surface
Water shortage (E05) ●Inlet valve not opened
●Blocked water inlet filter
●Open the valve
● Replace the water purifier filter element
Reducer motor overload
(E02)
●High reducer current
●Ambient temperature too low
(<41°F)
● Inspect for abnormal operation
● Improve the working environment
Condensation and
evaporation temperature
sensor faults(E07 to E10)
●Loose or damaged sensor
connectors
●Check and secure or replace the
connectors
Refrigeration faults (E11) ●Low refrigerant
●Abnormal compressor
●Check refrigerant levels and compressor
function
Low evaporation
temperature (E16)
●Ice jamming
●Water shortage
●Power interruptions
● Inspect the reducer
●Ensure water inlet valve is open
●Wait at least 1 hour after a sudden power-
off
Reducer current issues (E19) ●Loose connections
●Check reducer and transformer
connections
13
Warranty terms
The following situations are not covered by the warranty of the ice machine:
Regular cleaning, maintenance, adjustment,
and servicing;
Unauthorized modifications to the ice
machine or use of non-original parts;
Damage caused by improper power supply,
water supply, or drainage;
Damage due to installation, cleaning, or
maintenance of the ice machine not in
accordance with the manual requirements;
Damage caused by water scale arising from
the water source;
Act-of-man damage.
Notes: Warranty service should be performed by agents or service organizations approved.

Note: In case of any technical changes, the actual product shall prevail, and no separate notice will
be provided.We appreciate your understanding!