Product Name:VOXiLink
Last Modify Date:
2024/12/24
Document Name:MP87X Controlled Part of Manual
Originator:JunJie Lu
Doc No.:CER90312
Rev. No.:1
Page 1 of 9
⚫ Never operate the monitor when the cover is removed.
⚫ Use only mPower replaceable battery pack P/N:025-3003-X00
⚫ This instrument has not been tested in an explosive gas/air atmosphere having an
oxygen concentration greater than 21%.
⚫ Substitution of components may impair suitability for intrinsic safety.
⚫ Substitution of components may void warranty.
⚫ This device complies with part 15 of the FCC Rules. Operation is subject to the following
two conditions: (1) This device may not cause harmful interference, and (2) this device
must accept any interference received, including interference that may cause undesired
operation.
⚫ CAUTION: Changes or modifications to this unit not expressly approved by the party
responsible for compliance could void the user's authority to operate the equipment.
⚫ NOTE: This equipment has been tested and found to comply with the limits for a Class
B digital device, pursuant to part 15 of the FCC Rules. These limits are designed to
provide reasonable protection against harmful interference in a residential installation.
This equipment generates, uses and can radiate radio frequency energy and, if not
installed and used in accordance with the instructions, may cause harmful interference
to radio communications. However, there is no guarantee that interference will not occur
in a particular installation. If this equipment does cause harmful interference to radio or
television reception, which can be determined by turning the equipment off and on, the
user is encouraged to try to correct the interference by one or more of the following
measures:
⚫ Reorient or relocate the receiving antenna.
⚫ Increase the separation between the equipment and receiver.
⚫ Connect the equipment into an outlet on a circuit different from that to which the receiver
is connected.
⚫ Consult the dealer or an experienced radio/TV technician for help.
⚫ This device complies with FCC radiation exposure limits set forth for an uncontrolled
environment. This equipment should be installed and operated with a minimum
distance of 20 cm between the radiator and your body. This transmitter must not be
co-located or operating in conjunction with any other antenna or transmitter.
Read Before Operating
This manual must be carefully read by all individuals who have or will have the
responsibility of using, maintaining, or servicing this product. The product will perform as
designed only if it is used, maintained, and serviced in accordance with the
manufacturer’s instructions. The user should understand how to set the correct
parameters and interpret the obtained results.
Warning
Product Name:VOXiLink
Last Modify Date:
2024/12/24
Document Name:MP87X Controlled Part of Manual
Originator:JunJie Lu
Doc No.:CER90312
Rev. No.:1
Page 2 of 9
WARNINGS:
CAUTION: UNDERSTAND MANUAL FIRST BEFORE
OPERATING!
ATTENTION: COMPRENDRE LE MANUEL AVANT D’UTILISER
CE PRODUIT!
Product Name:MP87X
Last Modify Date:
2024/12/24
Document Name:MP87X Controlled Part of Manual
Originator:JunJie Lu
Doc No.:CER90312
Rev. No.:1
Page 3 of 9
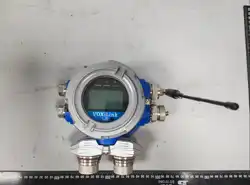
MP87X Multi Gas Detector Marking
MP87X Multi Gas Detector is certified by IECEx.
The MP87X Multi Gas Detector contains the following marking:
⚫ Ex Mark
⚫ Ex ibⅡC T4 Gb /Ex ib ia op is ⅡC T4 Gb
⚫ Multi Gas Detector
⚫ MP87X
⚫ VOXILink
⚫ Battery: 3.6V
⚫ Warnings:
Use only mPower replaceable battery pack
P/N:025-3003-X00
.
UNDERSTAND MANUAL FIRST BEFORE OPERATING.
⚫ Serial No
⚫ -40℃≤Tamb≤60℃
⚫ Manufacture name and logo
CAUTION: SUBSTITUTION OF COMPONENTS MAY IMPAIR
INTRINSIC SAFETY.
ATTENTION: LA SUBSTITUTION DE COMPOSANTS PEUT
ENDOMMAGER LA SÉCURITÉ INTRINSEQUE.
Product Name:MP87X
Last Modify Date:
2024/12/24
Document Name:MP87X Controlled Part of Manual
Originator:JunJie Lu
Doc No.:CER90312
Rev. No.:1
Page 4 of 9
CAUTION:
FOR SAFETY REASONS THIS EQUIPMENT MUST BE
OPERATED AND SERVICED BY QUALIFIED PERSONNEL ONLY.
READ AND UNDERSTAND INSTRUCTION MANUAL
COMPLETELY BEFORE OPERATING OR SERVICING.
ATTENTION:
POUR DES RAISONS DE SÉCURITÉ, CET ÉQUIPEMENT DOIT
Caution
⚫ Battery replacement can only be done by mPower
Electronics or authorized service department, to avoid any
damage to PCB.
⚫ Use only mPower replaceable battery pack P/N:M025-3003-X00.
Product Name:MP87X
Last Modify Date:
2024/12/24
Document Name:MP87X Controlled Part of Manual
Originator:JunJie Lu
Doc No.:CER90312
Rev. No.:1
Page 5 of 9
Year of manufacturing
To identify the year of manufacturing, please refer to the serial number of the instrument.
The fifth to sixth digit in the serial number indicates the year of manufacturing. 00~99
indicates the manufacturing year of 2000~2099.
*The following operation instruction may changes
according to firmware development.
1. Setup:
a) Connection:
i. Connect red (V+) & black (GND) wire to an DC supply for testing purpose. Set DC supply to
3.6V. For actual operation, a primary battery pack will be placed inside the enclosure and
connected to the two power supply wires.
b) Power consumption:
i. LCD ON: 15 mA – jump to 21 mA briefly once a second LCD OFF: 0 mA –
jump to 12 mA briefly once a second
2. Operation:
a) Turn On Power:
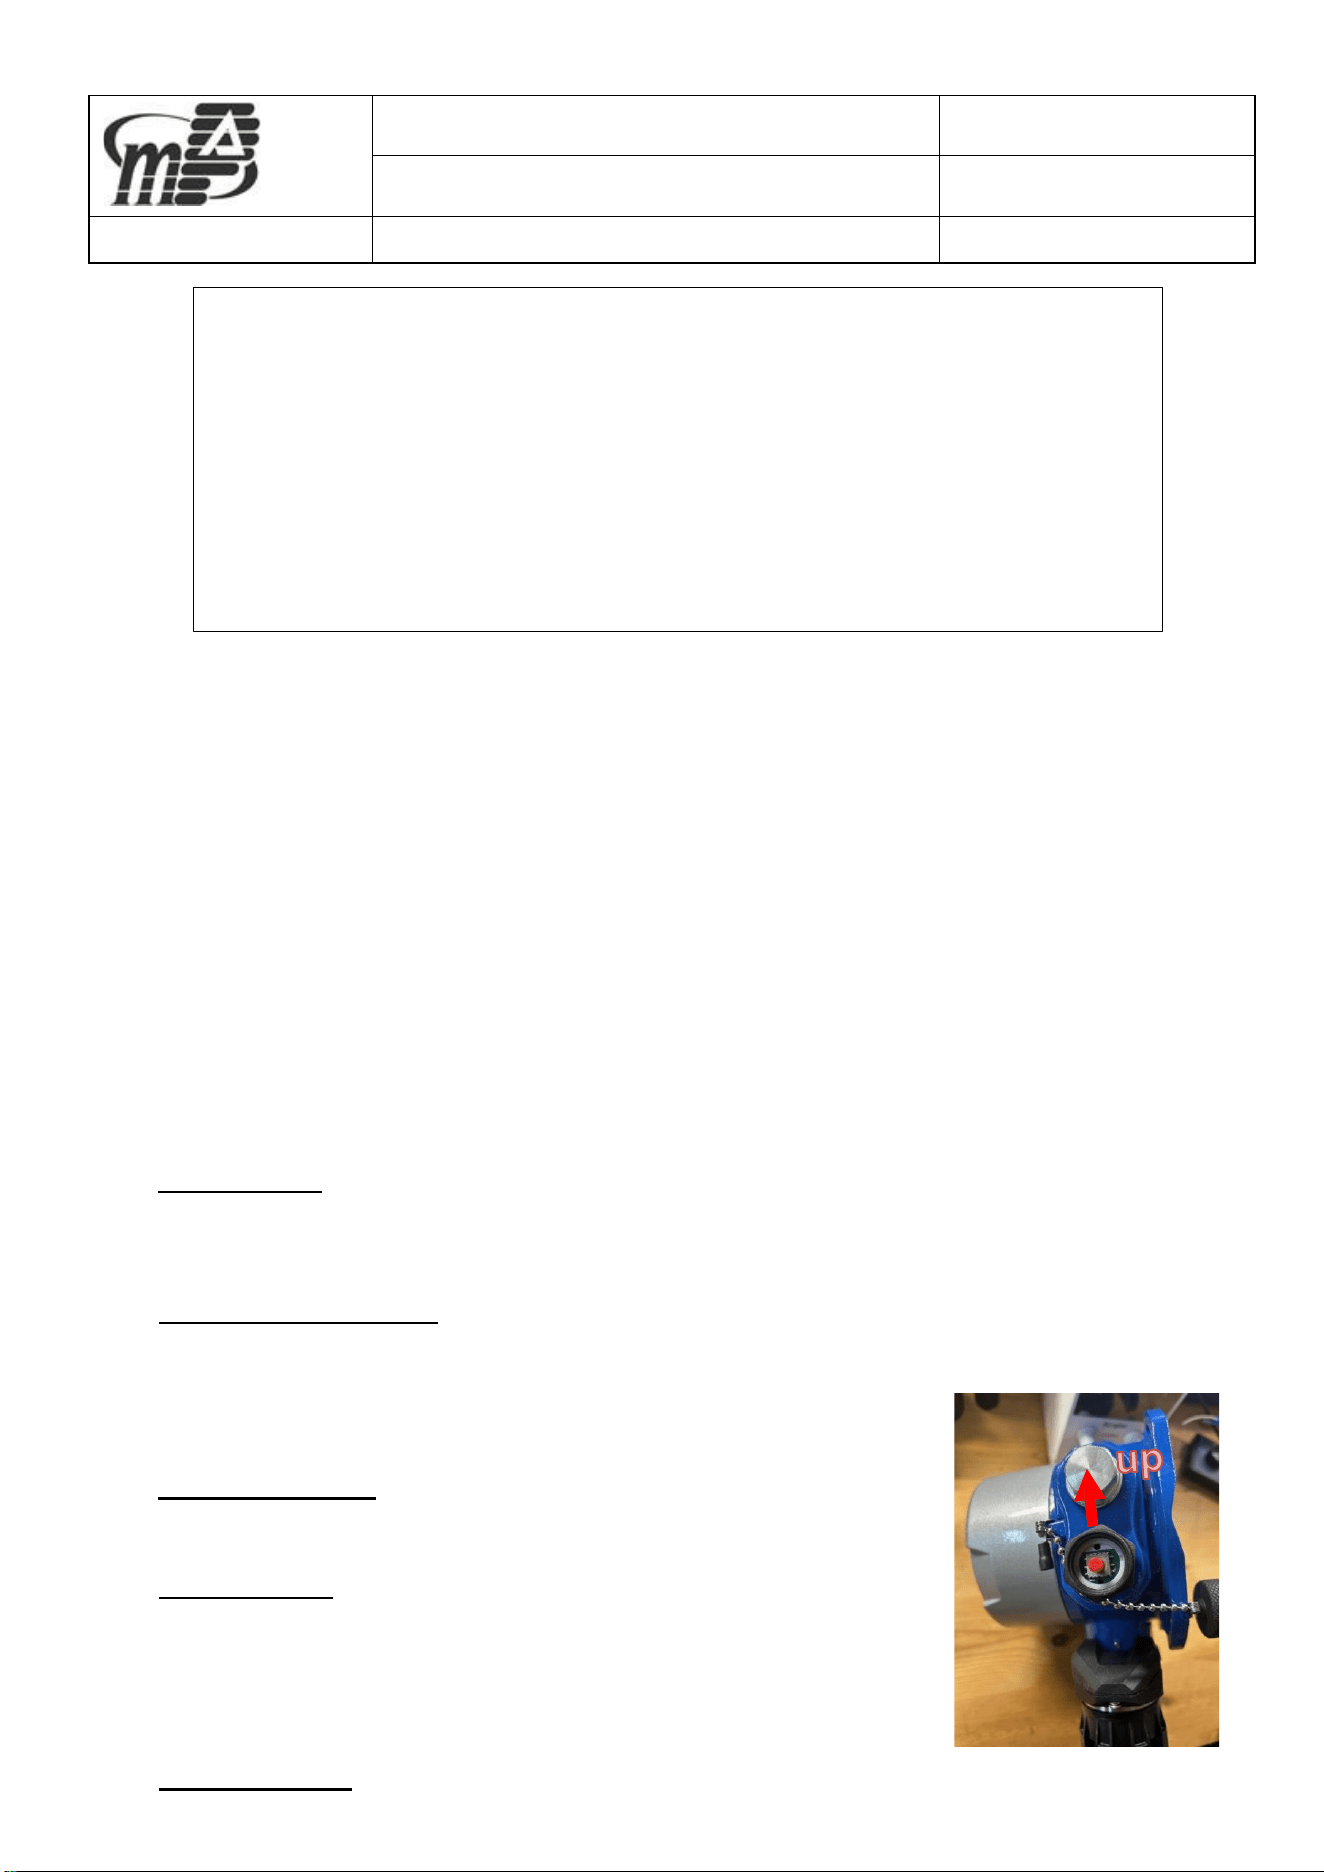
i. Open the programming port, press the red button for 3
seconds. The LCD display and LED should turn on
b) LCD display:
i. The LCD display shows the sensor name (H2S, LEL, etc.),
measurement unit
ii. (ppm, %LEL, etc.) and sensor readings. After 3 minutes,
the LCD display will turn off. The LED remains on. Press
once red button, the LCD display will turn on again.
c) Normal mode:
i. Press [↓] key, the Site ID will be displayed. After 2 seconds, it returns to
ÊTRE UTILISÉ ET ENTRETÉ PAR DU PERSONNEL QUALIFIÉ
UNIQUEMENT. LIRE ET COMPRENDRE LE MANUEL
D'INSTRUCTIONS COMPLÈTEMENT AVANT D'UTILISER OU
D'ENTRETIEN.
Product Name:MP87X
Last Modify Date:
2024/12/24
Document Name:MP87X Controlled Part of Manual
Originator:JunJie Lu
Doc No.:CER90312
Rev. No.:1
Page 6 of 9
normal display automatically.
d) Basic Menu mode:
i. Long press 3 sec [↑] key to enter the Basic menu mode.
1. Password screen (Default basic menu mode password is 0000)
ii. Press [↑] or [↓] key to adjust digit, Press [←] or [→] key to move cursor,
press once red button to confirm basic password
iii. Press [←] or [→] key to select [calibration], [measurement] or [alarm setting]
function, press once red button to confirm and enter the function menu
iv. Press twice red button to return to previous menu
v. Refer to MP87x Firmware QSG for the detailed basic menu mode
operation
e) Advanced Menu mode:
i. Long press 3 sec [↑] key to enter the Advanced menu mode.
1. Password screen (Default advanced menu password is 8888)
ii. Refer to the MP87x Firmware QSG for the rest of the advanced menu mode
operation
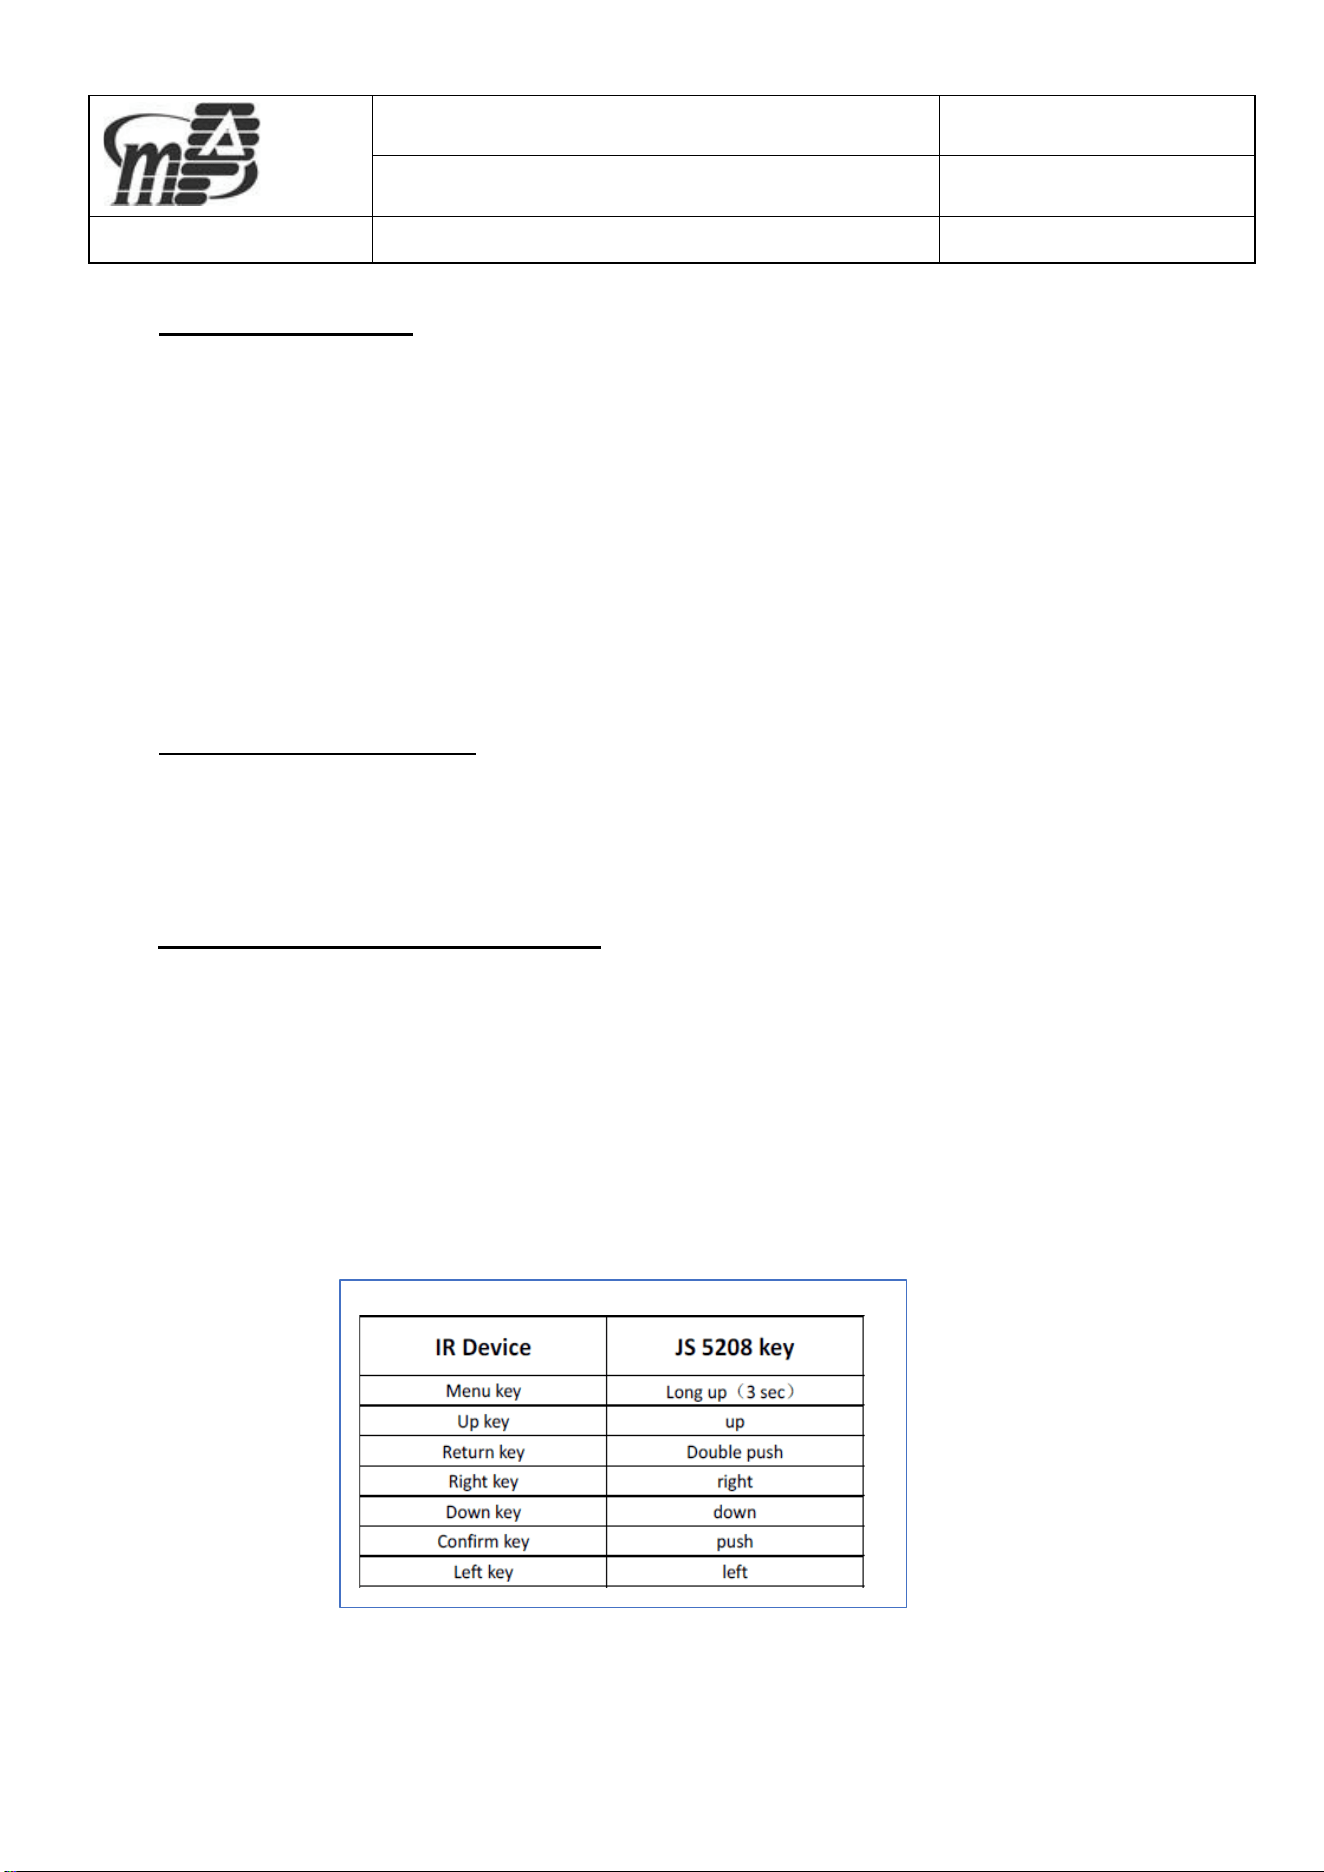
f) IR Remote Controller Operation:
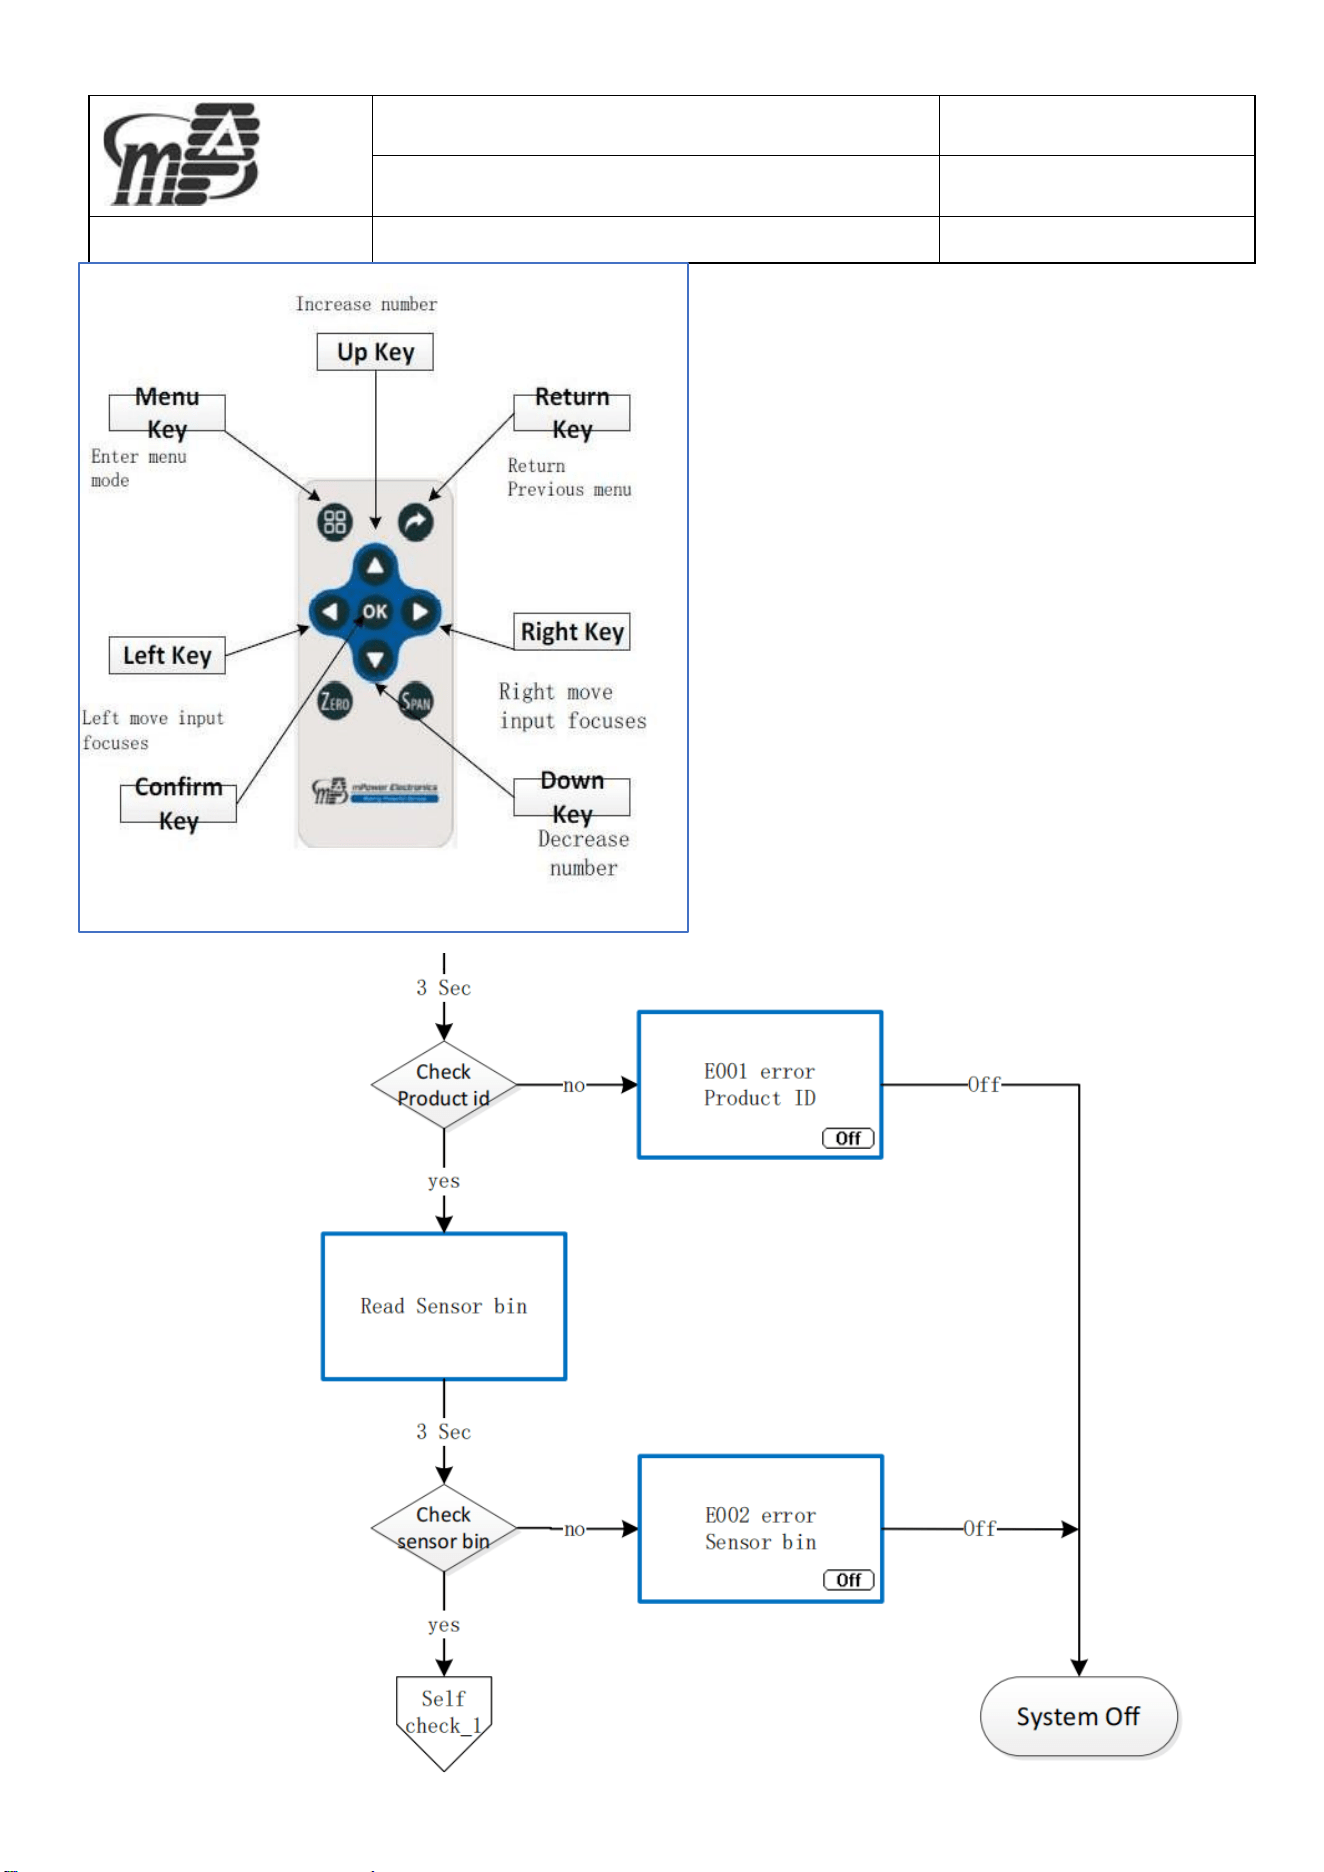
i. The IR remote controller MP220 can be used to control the display and
operation of MP87X transmitter.
ii. First, turn on MP87x unit following step 2a).
iii. If the LCD display is turned off, press [OK] button on the remote
controller to turn on the LCD display
iv. Operate the display using the buttons on the remote controller. The
operation is very similar to that of the programming switch.
Product Name:MP87X
Last Modify Date:
2024/12/24
Document Name:MP87X Controlled Part of Manual
Originator:JunJie Lu
Doc No.:CER90312
Rev. No.:1
Page 7 of 9
Product Name:MP87X
Last Modify Date:
2024/12/24
Document Name:MP87X Controlled Part of Manual
Originator:JunJie Lu
Doc No.:CER90312
Rev. No.:1
Page 8 of 9
3 Maintenance and repair
Please maintain the instrument regularly and check the working condition of the instrument;
Check the air inlet of the sensor to ensure that it is not stained or blocked by impurities;
Calibrate the instrument according to relevant laws and regulations.
If need to replace the instrument sensor, please contact the service agency for repair.
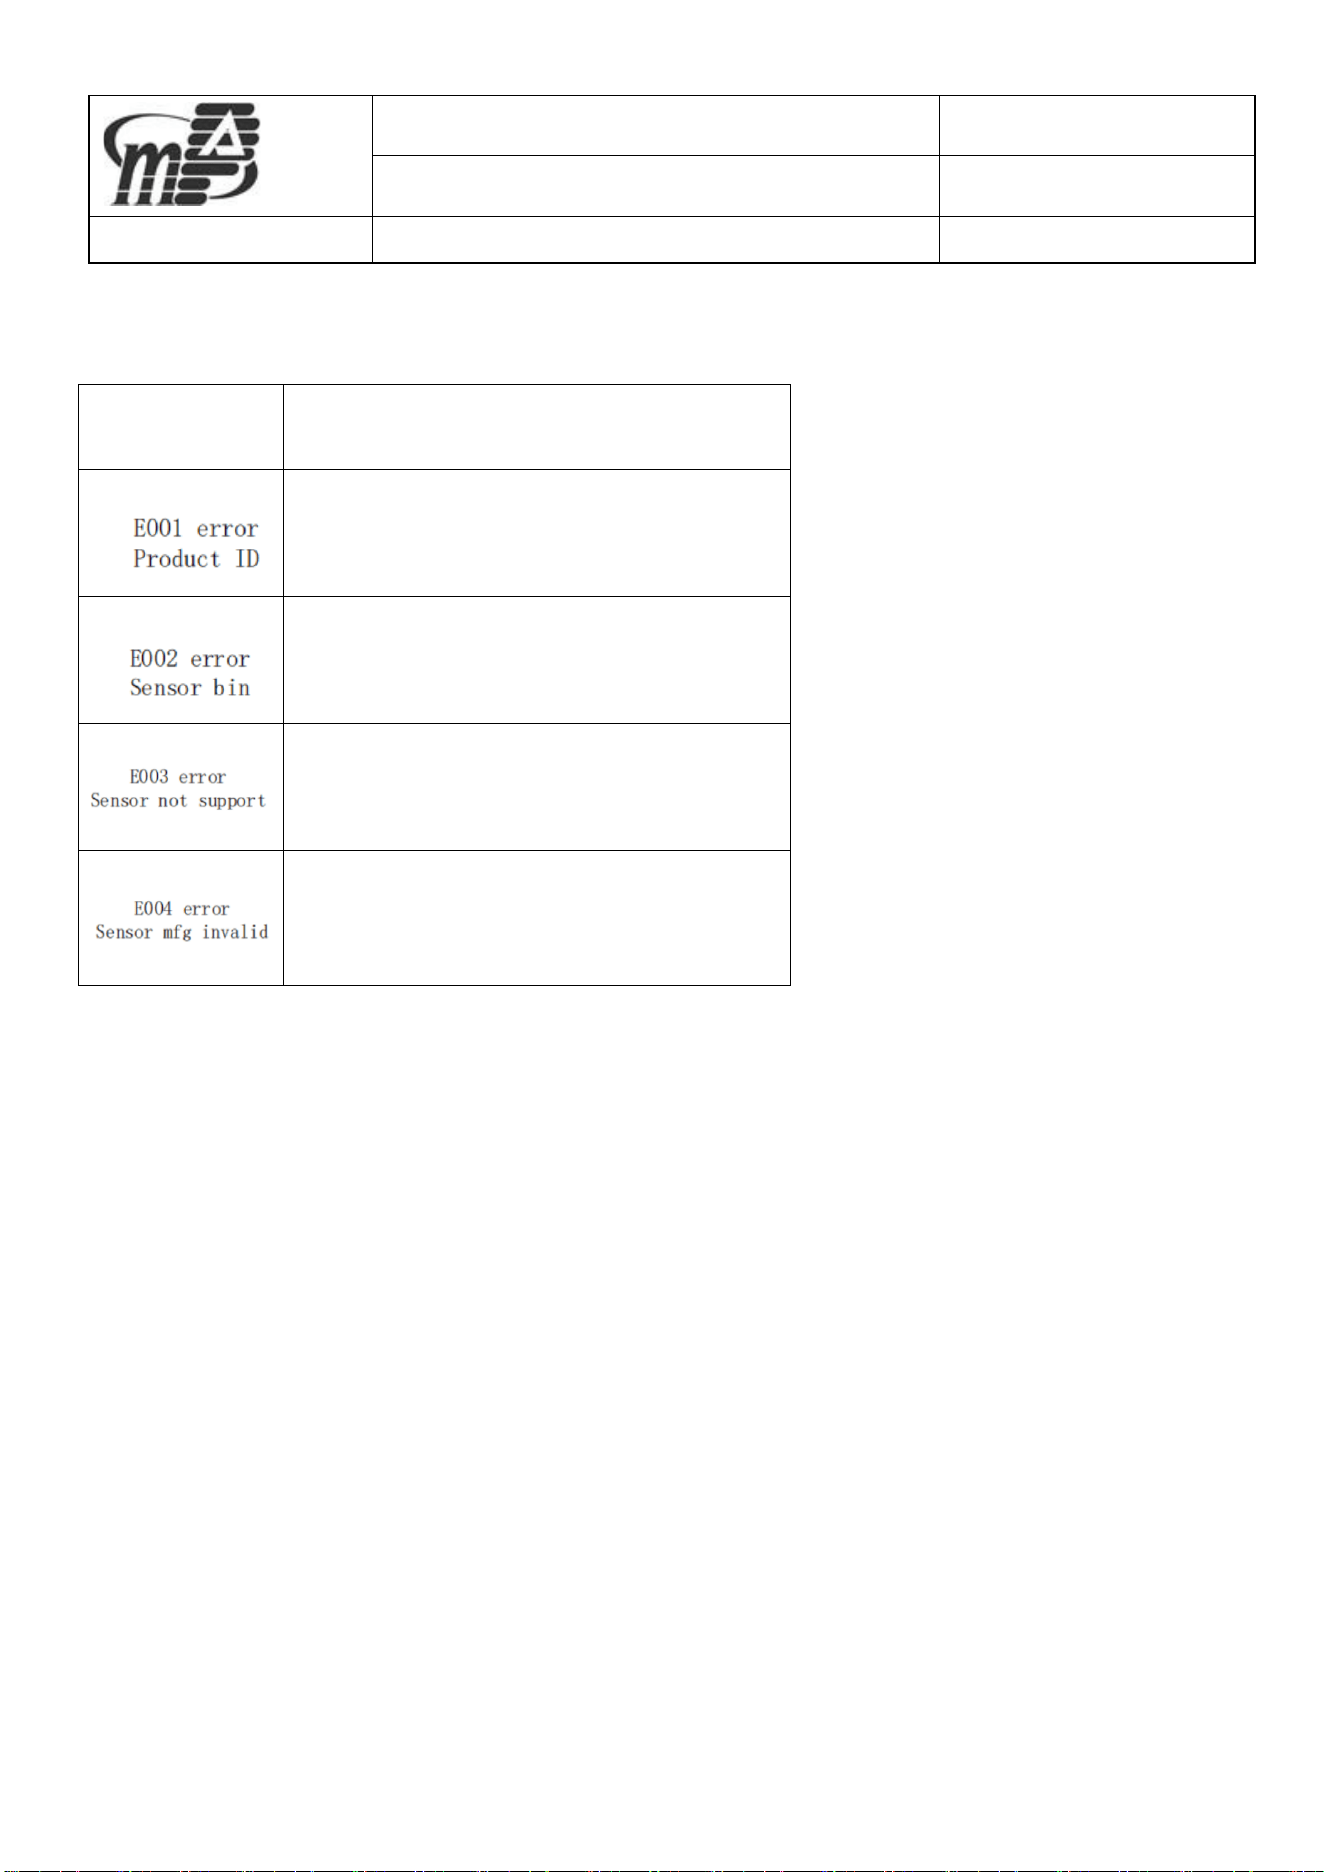
4 Troubleshooting
Product Name:MP87X
Last Modify Date:
2024/12/24
Document Name:MP87X Controlled Part of Manual
Originator:JunJie Lu
Doc No.:CER90312
Rev. No.:1
Page 9 of 9
Note: Before searching the instrument problem, please make zero and span gas calibration
on the instrument.
LCD fault
message
Reason and solutions
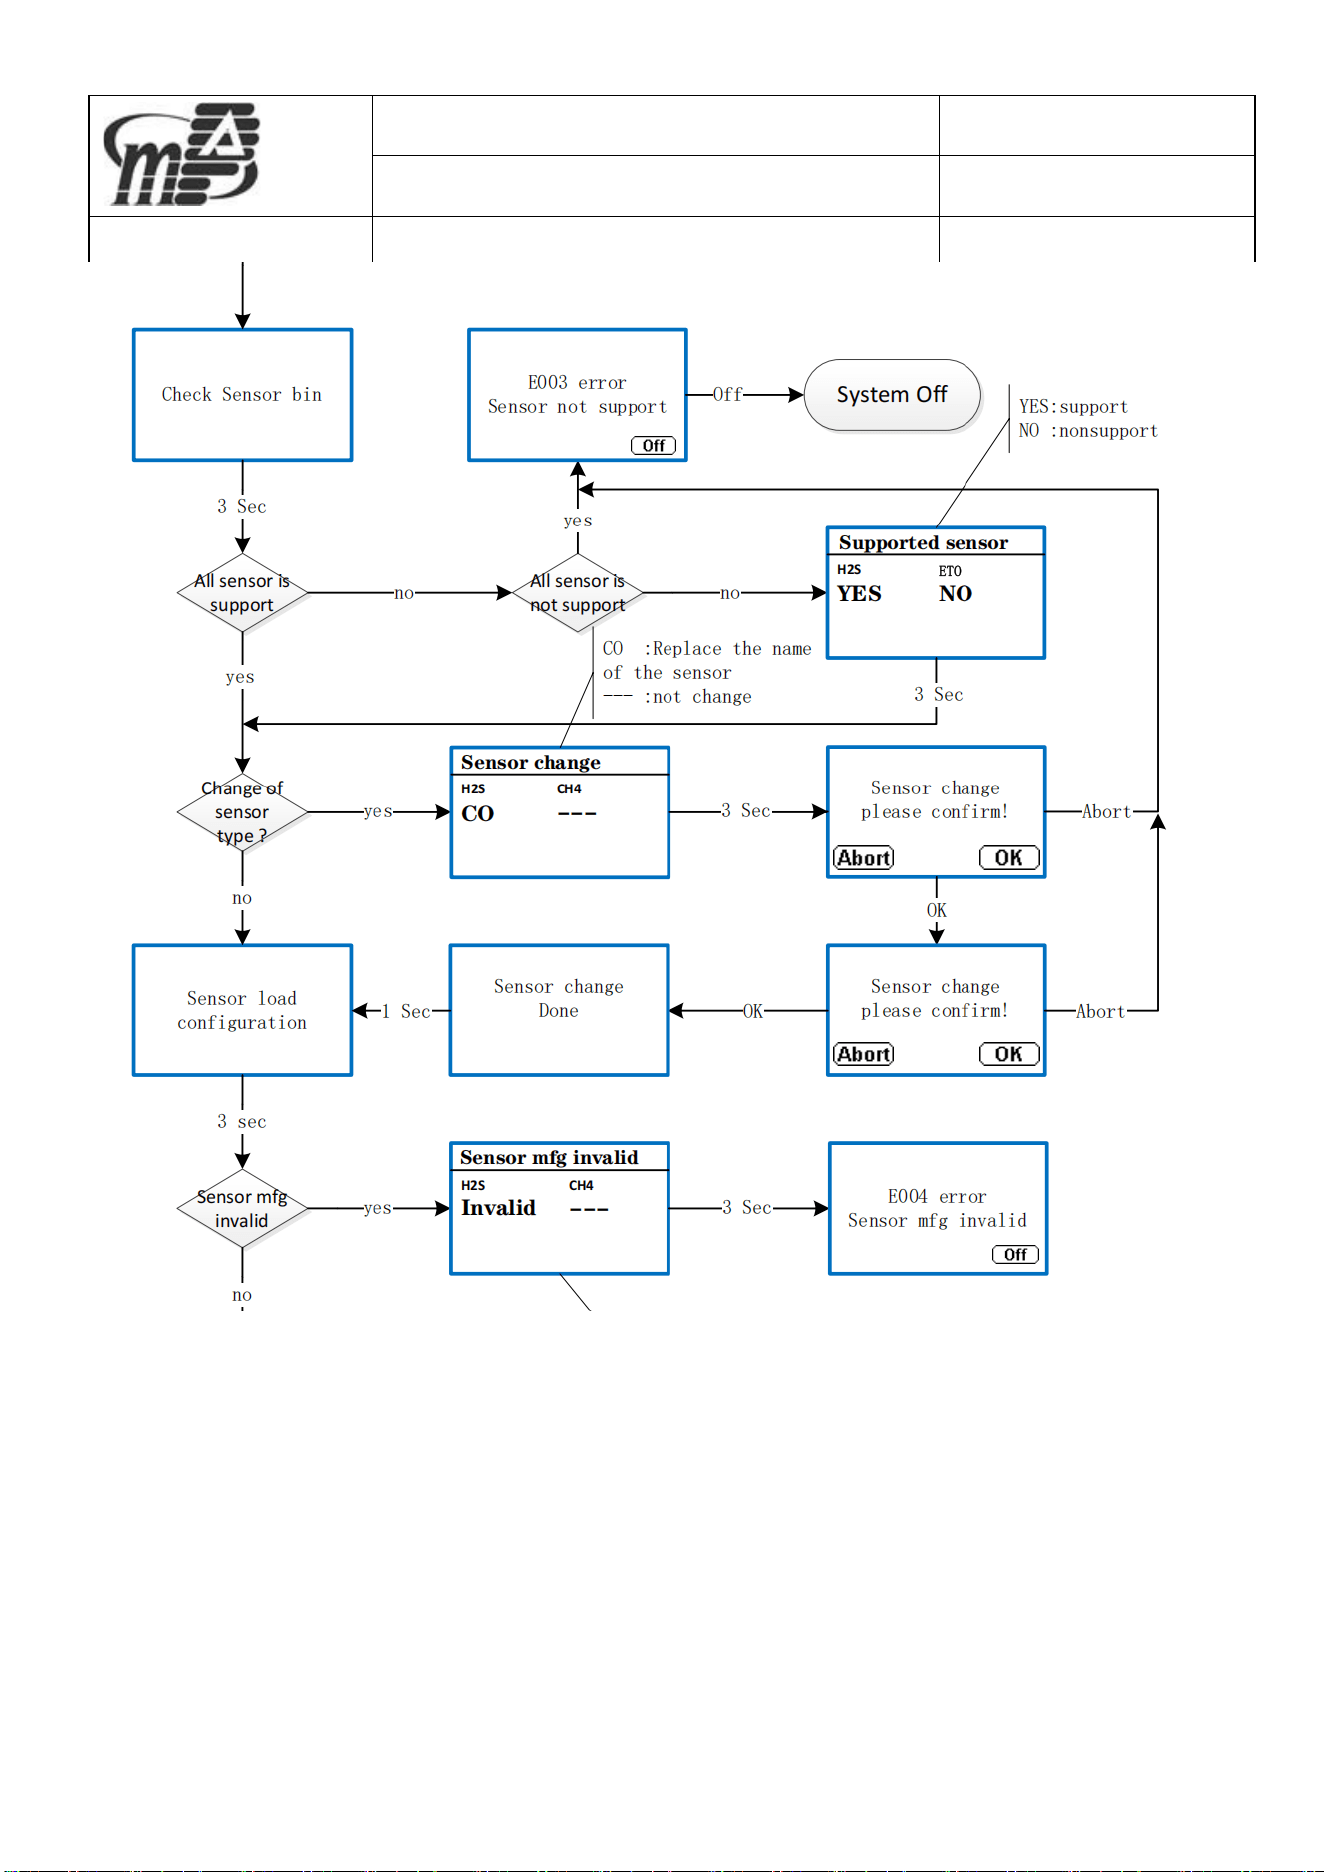
Reason: product id error
Solution: Check the product or set the id
again
Reason: sensor id error
Solution: Check the sensor or replace the
sensor
Reason: Unsupported sensor
Solution: Check the sensor or replace the
correct sensor
Reason: sensor mfg invalid
Solution: Make zero and span gas
calibration on the instrument