
manual
of buona cucina italiana
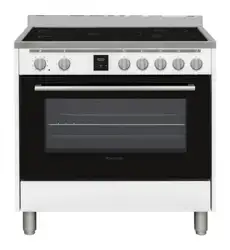
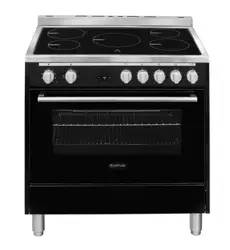
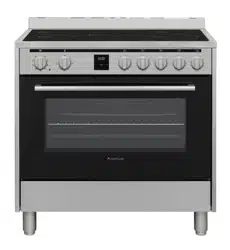
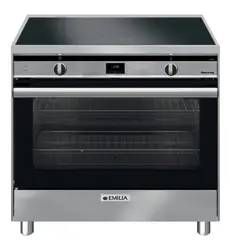
Freestanding Cooker with
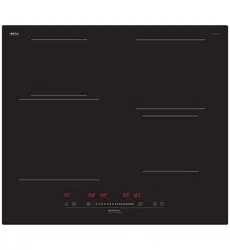
Induction Cooktop
90cm and 80cm models
INSTRUCTION MANUAL
PLEASE READ THE INSTRUCTION MANUAL CAREFULLY BEFORE USING THE COOKER.
Don’t install the cooker if it is damaged. Call 1300 307 917 for assistance
Iss 1P
Leave a review with details of your new cooker and receive a free gift.
Go to www.glemgas.com.au for details

D
ear Customer,
Thank you for purchasing our product. This manual
has been written to assist you and instruct you in the
operation of this appliance. It will help you get the
best performance and make full use of the appliance’s
features. The safety precautions and warnings are listed
for your safety and the safety of others when operating
this appliance. Please keep this manual in a safe place
for future reference.
This appliance has been designed for use in cooking
domestic (household) food. Any form of usage
other than cooking food is considered dangerous
and inappropriate. The manufacturer accepts no
responsibility in the event of problems caused by
improper use, incorrect use or faulty installation. Only an
authorised and licensed installer can install this cooker.
DO NOT ATTEMPT TO INSTALL THIS COOKER
YOURSELF
A signed installation certificate indicating the installer’s
license number and details is required for warranty
service.
Glem Gas Australasia Pty Ltd
IMPORTANT
This cooker is for domestic applications.
It is NOT suitable for commercial applications of any
kind. Do not install the cooker if there is any doubt.
Contact Glem Gas Australasia if you require clarification.
Note - Check with an electrician whether the
domestic wiring system in your home is suitable
without alterations. Any alterations must only be
made by a qualified electrician.
This cooker must be installed by a qualified & licensed
installer in accordance with these instructions.
If you do not retain proof of correct installation your
warranty will be voided. If your cooker is found to be
incorrectly installed, you will be liable for all service
costs.
If a warranty call is made and the cooker is found to be
incorrectly installed, you will be charged for the service
call even if the cooker is not repaired.
We will not service an incorrectly installed cooker.
IF THE APPLIANCE IS DAMAGED DO NOT INSTALL.
CALL 1300 307 917 FOR ASSISTANCE
“We know that the warnings in this manual are strongly
worded but we want you to have a great experience
with your new cooker. Too many service calls are due to
incorrect installation or incorrect use of the cooker.
These cookers are carefully designed for use in
Australian kitchens. When they are used for any other
purpose the chance of there being a problem with
performance increases.”

ENERGY SAVING
Glem Gas and Emilia induction cookers use an Energy
Saving system to reduce the total amount of electricity
consumed when all zones and the oven are being used.
We balance the load between the cooktop and the oven
so when the oven is operating one cooking zone shuts
off and another zone drops its maximum power from
level 14 to level 13. These zones are marked as energy
saving zones. Otherwise the overall performance of the
cooktop remains unaffected.
The Energy Saving system allows the cooker to be
installed into homes that may not otherwise have
enough electrical supply for an induction cooker.
RATED POWER INPUT FOR EACH MODEL:
Glem Gas cooker models
GLIND86FS 7500W = 32A
GLIND96FS 7500W = 32A
GLIND86MB 7500W = 32A
GLIND96MB 7500W = 32A
Emilia cooker models
EMIND86FS 7500W = 32A
EMIND96FS 7500W = 32A
EMIND86MB 7500W = 32A
EMIND96MB 7500W = 32A
TABLE OF CONTENTS
Important safety instructions & first time use 4
Installing the cooker - 6
How an induction cooktop works - 8
Using the induction cooktop - 10
Induction cooktop care and cleaning - 14
Induction cooktop error codes - 15
Using the electric oven - 15
Using the oven timer - 16
Suggested shelf positions - 17
Electric grilling - 19
Cooker cleaning and maintenance - 19
Installation instructions - 20
Electrical connection - 21
Product warranty - 22
3
IMPORTANT
This appliance is designed and intended for use in
domestic household applications.
It is not suitable for any non-domestic application.
IT SHOULD NOT BE USED IN A COMMERCIAL
ENVIRONMENT.
The appliance guarantee will be void if the appliance is
used within a non-domestic environment. This includes
semi commercial, commercial or communal applications
such as clubs and schools.
Model number location
Model number details are on the data plate fixed to the
inside of the flap under oven. The flap is hinged at the
bottom so just pull down on the top edge.
Serial number location
The serial number is shown on the data plate fixed to
the flap under the oven. You need the serial number
when requesting a service call.
Glem Gas & Emilia cookers are manufactured in the
Glem Gas factory in Modena, Italy. They have been
designed and constructed to meet the following
standards:
AS/NZS 60335-1 General Requirements for Domestic
electrical appliances
AS/NZS 60335-2-6 Particular Requirements for Domestic
electrical cooking appliances
AS/NZS 1044 Electromagnetic Compatibility
Requirements.
Surface Temperatures
Surface temperatures for all components comply with
the standards. Certain parts of a stainless steel cooker
can become very hot during and after use. On all models
a cooling fan operates during the cooking cycle and
continues to operate afterwards until the cooker cools.
SURROUNDING SURFACES -
If there is a concern
regarding the surrounding surfaces you must install
an insulating material such as fibre sheet between the
cupboards and the cooker.
FIRST TIME USE
IMPORTANT
Remove all packing material and literature from the
upright cooker before connecting the
electrical supply. A protective plastic film is coated on
the stainless steel both inside and on the outside of the
cooker. It must be removed before use. Make sure all
plastic has been removed.
Some models have trays with a protective coating; make
sure the plastic coating has been removed. To make the
plastic film easier to remove we suggest using a Stanley
knife to trim along joints and edges before peeling back
the film.
Follow the guidelines for first use as shown in this
manual.
WARNING: If the surface is cracked, switch off the
appliance to avoid the possibility of an electric shock.
WARNING: Metallic objects such as knives, forks, spoons
and lids should not be placed on the hotplate since they
can get hot
• DO NOT spray aerosols in the vicinity of this upright
cooker while it is in operation.
• DO NOT allow young children to use the cooker
• DO NOT touch surfaces when they are hot
• DO NOT store flammable materials in or under the
cooker
• DO keep the cooker clean to avoid fires
Location of model number and serial number
Record the number here for easy access.
MODEL NUMBER ______________________________
SERIAL NUMBER _____________________________
4
NOTE: If the upright cooker fails to operate correctly,
call Glem Gas Australasia Pty Ltd or their appointed
agent for service.
DO NOT ATTEMPT REPAIRS YOURSELF.
DO NOT MODIFY THIS APPLIANCE
DO NOT INSTALL IF THE COOKER IS DAMAGED
THIS APPLIANCE IS NOT FOR USE IN MARINE CRAFT,
CARAVANS OR MOBILE HOMES.
WARNING - THIS COOKER IS NOT TO BE USED AS A
SPACE HEATER.
The appliance is not intended for use by persons
(including children) with reduced physical, sensory
or mental capabilities, or lack of experience and
knowledge, unless they have been given supervised
or instruction concerning use of the appliance by a
responsible person for their safely.
Young children should be supervised to ensure that they
do not play with the appliance. During use the appliance
becomes hot. Care should be taken to avoid touching
heating elements inside the oven.
WARNING: Ensure the appliance is switched off before
replacing the lamp to avoid the possibility of electric
shock.
WARNING - Accessible parts will become hot when in
use. To avoid burns young children should be kept away.
This appliance is not intended to be operated by means
of external timer or separate remote control system
DO NOT use a steam cleaner to clean this appliance
DO NOT use harsh abrasive cleaners or sharp metal
scrapers to clean the oven glass door since they can
scratch the surface, which may result in shattering of the
glass
• If this appliance is installed on a base, measures
must be taken to prevent the appliance from
slipping from the base
• If the electrical supply is restricted, means of all-pole
disconnection must be accessible and incorporated
in the fixed wiring in accordance with the wiring
rules.
• This appliance must not be installed behind a
decorative door
• Danger of fire do not store items on the cooking
surface
CAUTION – The cooking process must be supervised.
A short term cooking process must be supervised
continuously.
WARNING - Unattended cooking with fat or oil can be
dangerous and may result in a fire.
WARNING - Do not cover the floor of the oven with,
for example, foil or baking tray as this can lead to
overheating and damage the enamel
PRODUCT DESCRIPTION
Free standing cooker with electric induction cooktop
and multifunction electric oven
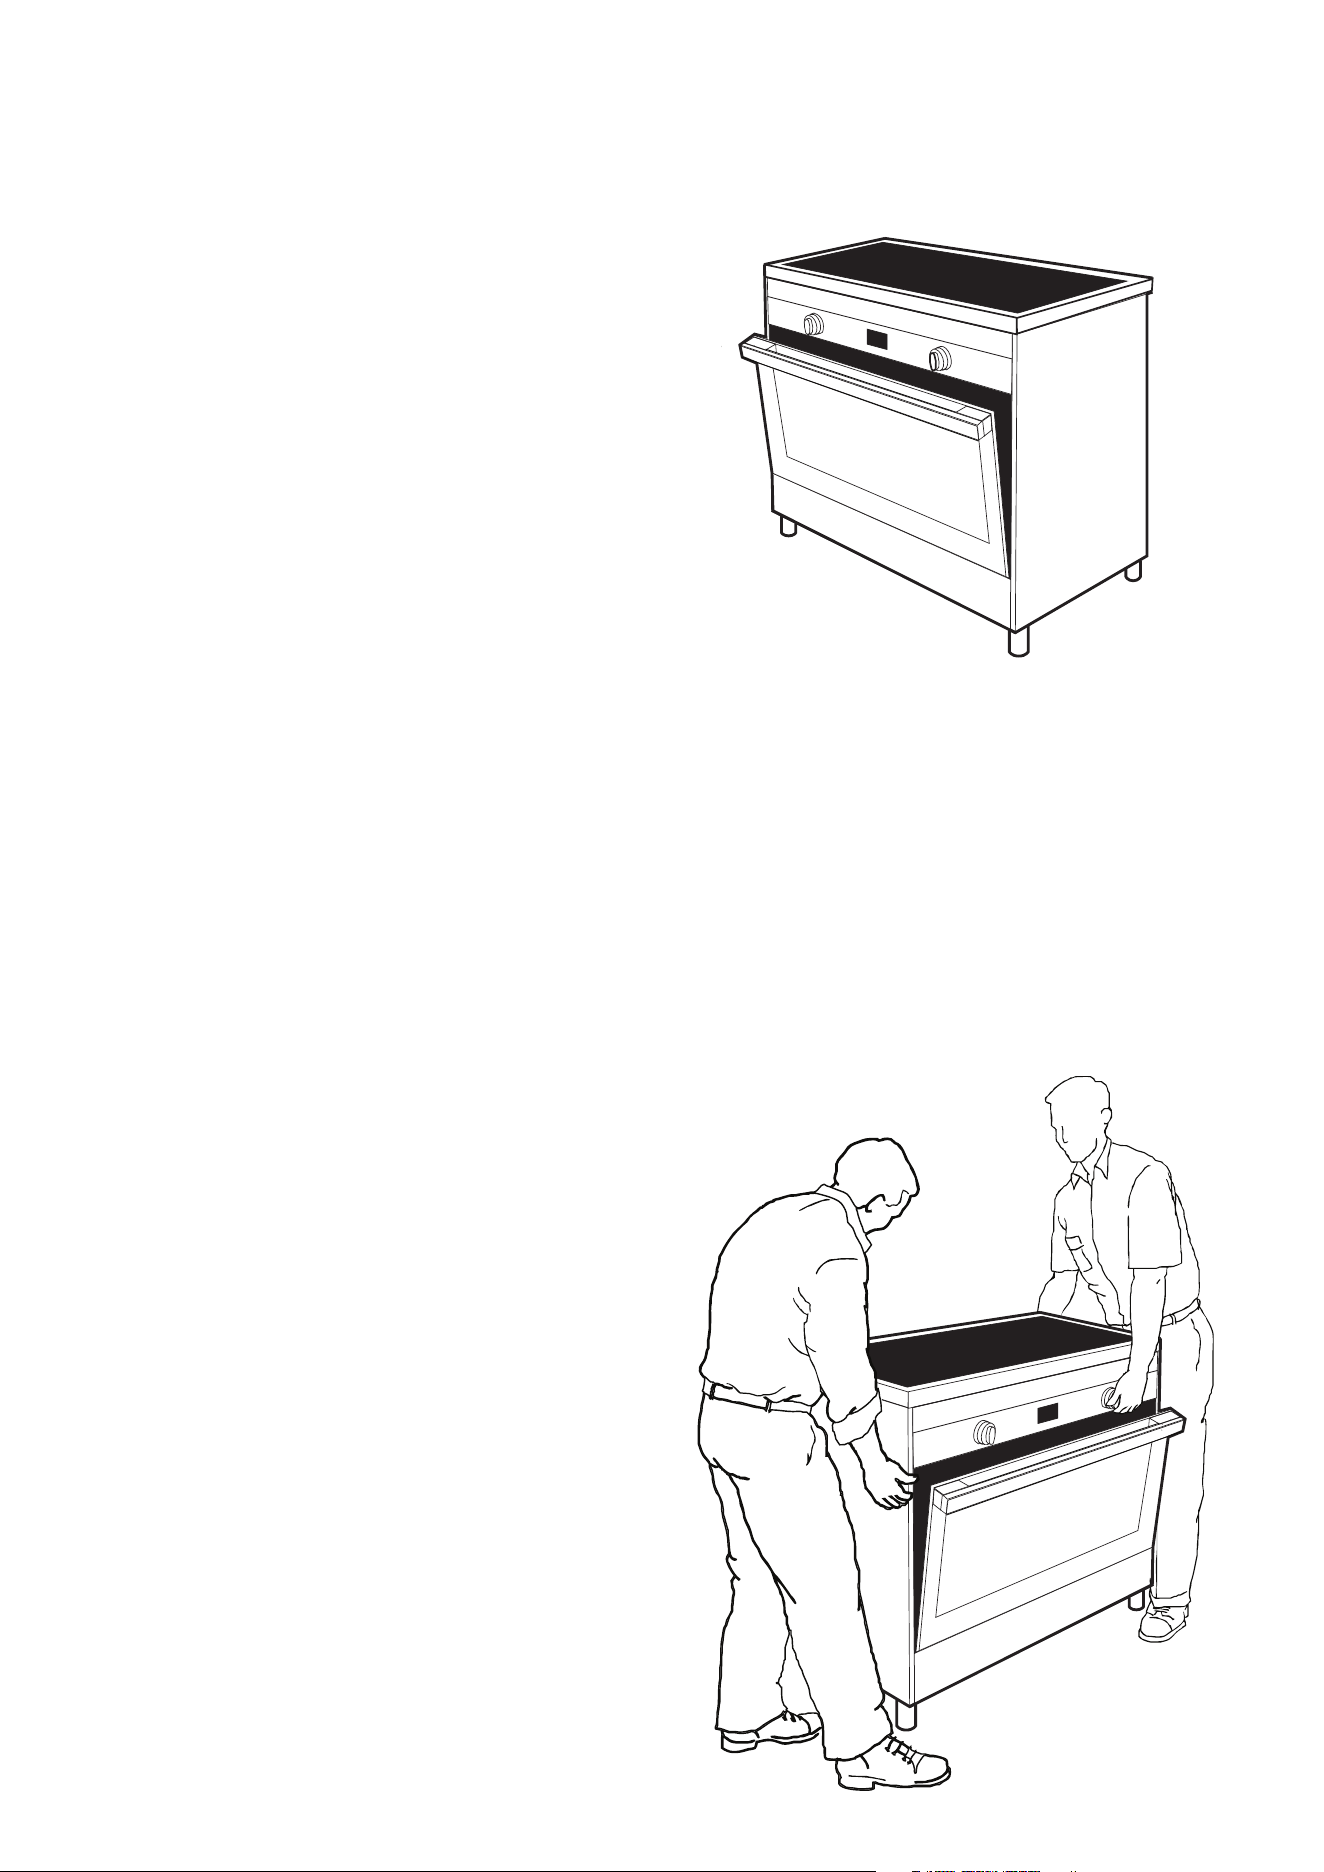
MOVING THE COOKER
When moving the cooker always use two people.
When it is installed correctly this cooker complies with all
safety requirements. However, it is manufactured from
sheet metal stainless steel and care must be taken when
moving the cooker as some sharp edges and corners
that are not normally intended to be touched could
cause injury.
DO NOT LIFT USING THE HANDLE
Lifting by using the handle could break the door so we
strongly recommend opening the door and hold inside
the top of the oven cavity.
Just be careful to make sure that the door does not
close hard onto your hand.
5
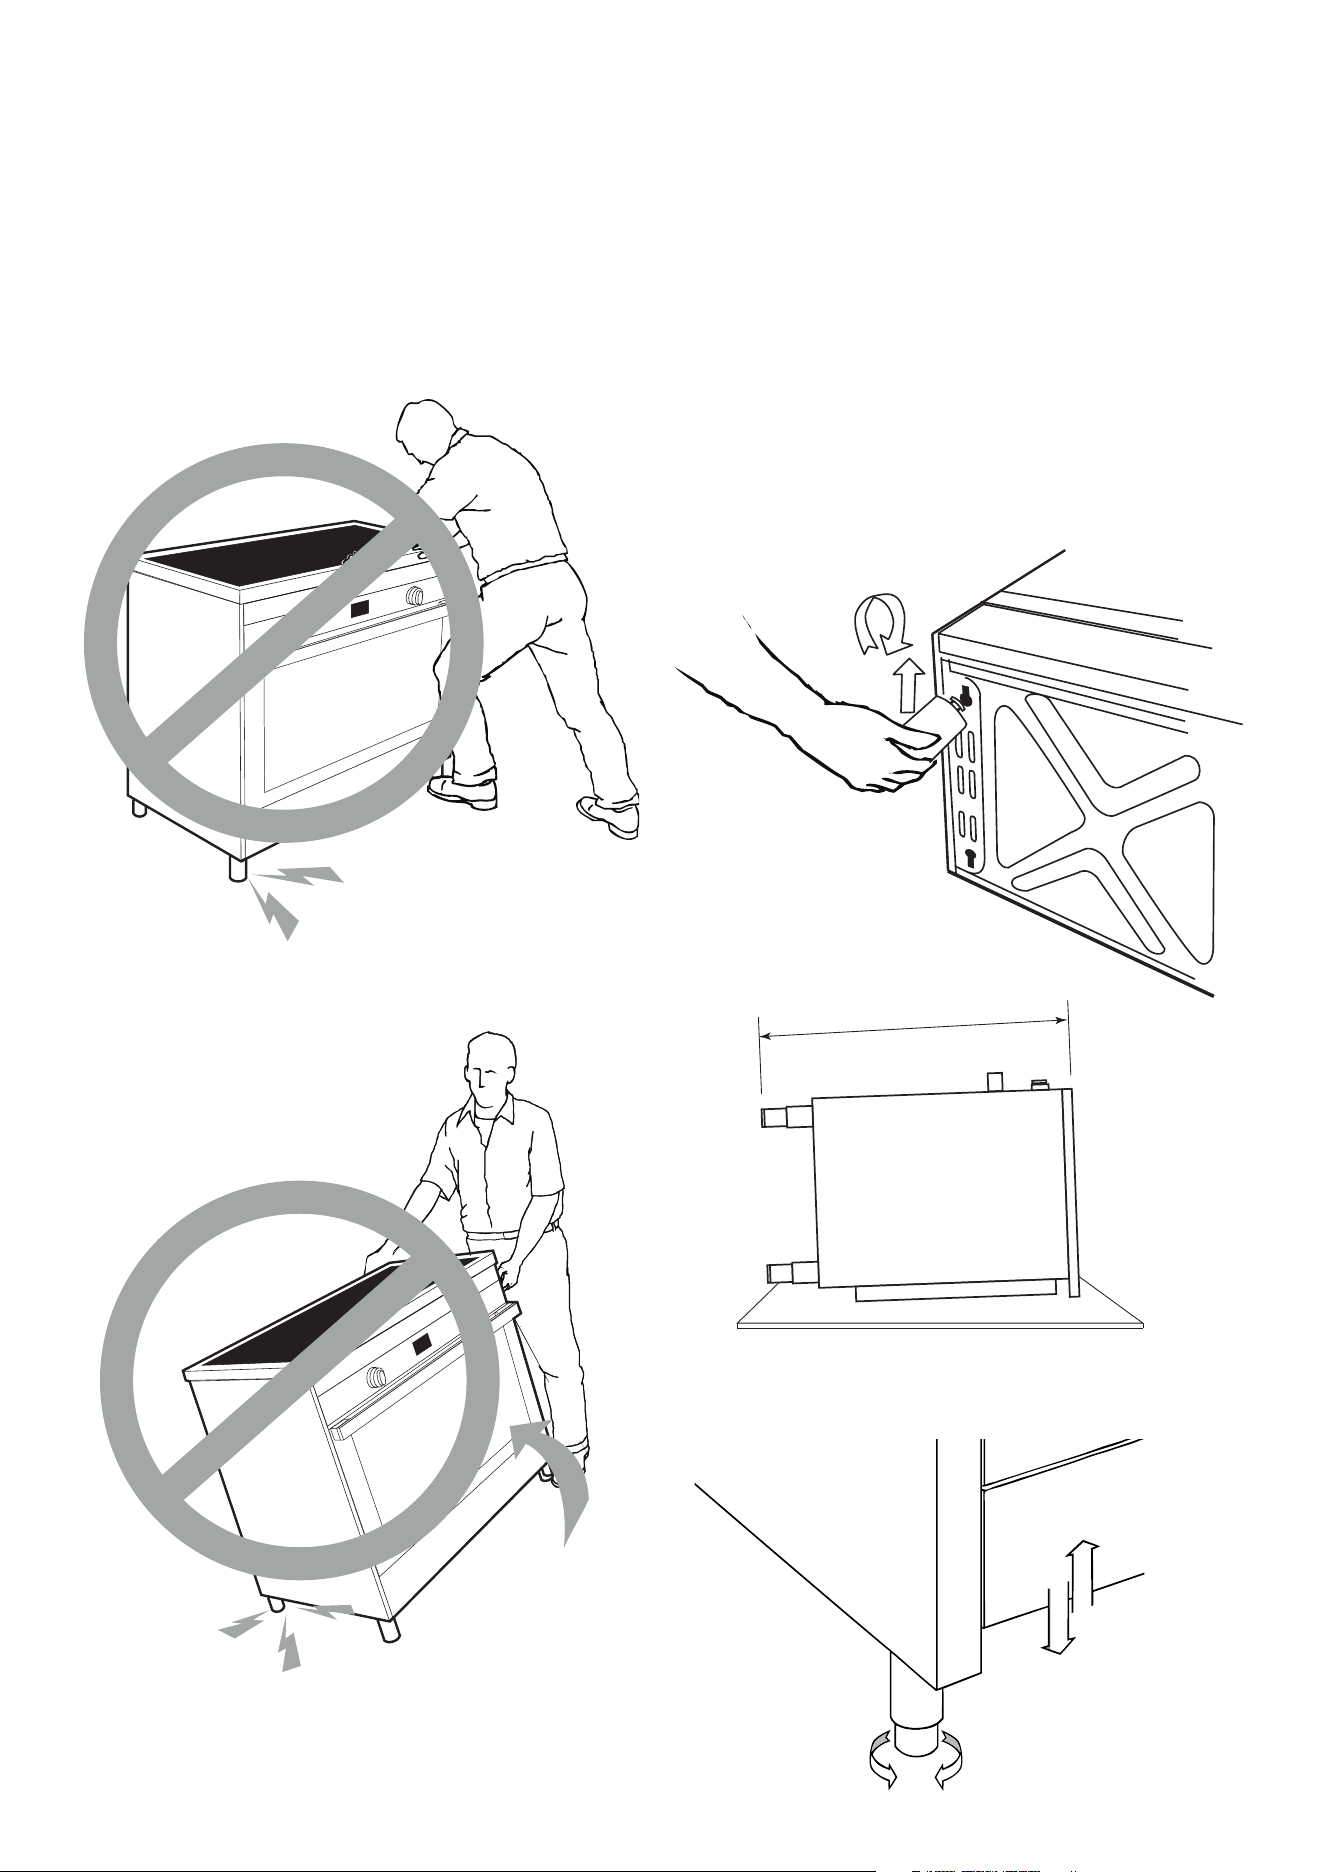
DO NOT DRAG OR SLIDE THE COOKER
Tilting or dragging the cooker may distort the legs.
The cooker may become uneven or off balance if the
legs are damaged by improper relocation or lifting.
Please take care not to slide the cooker
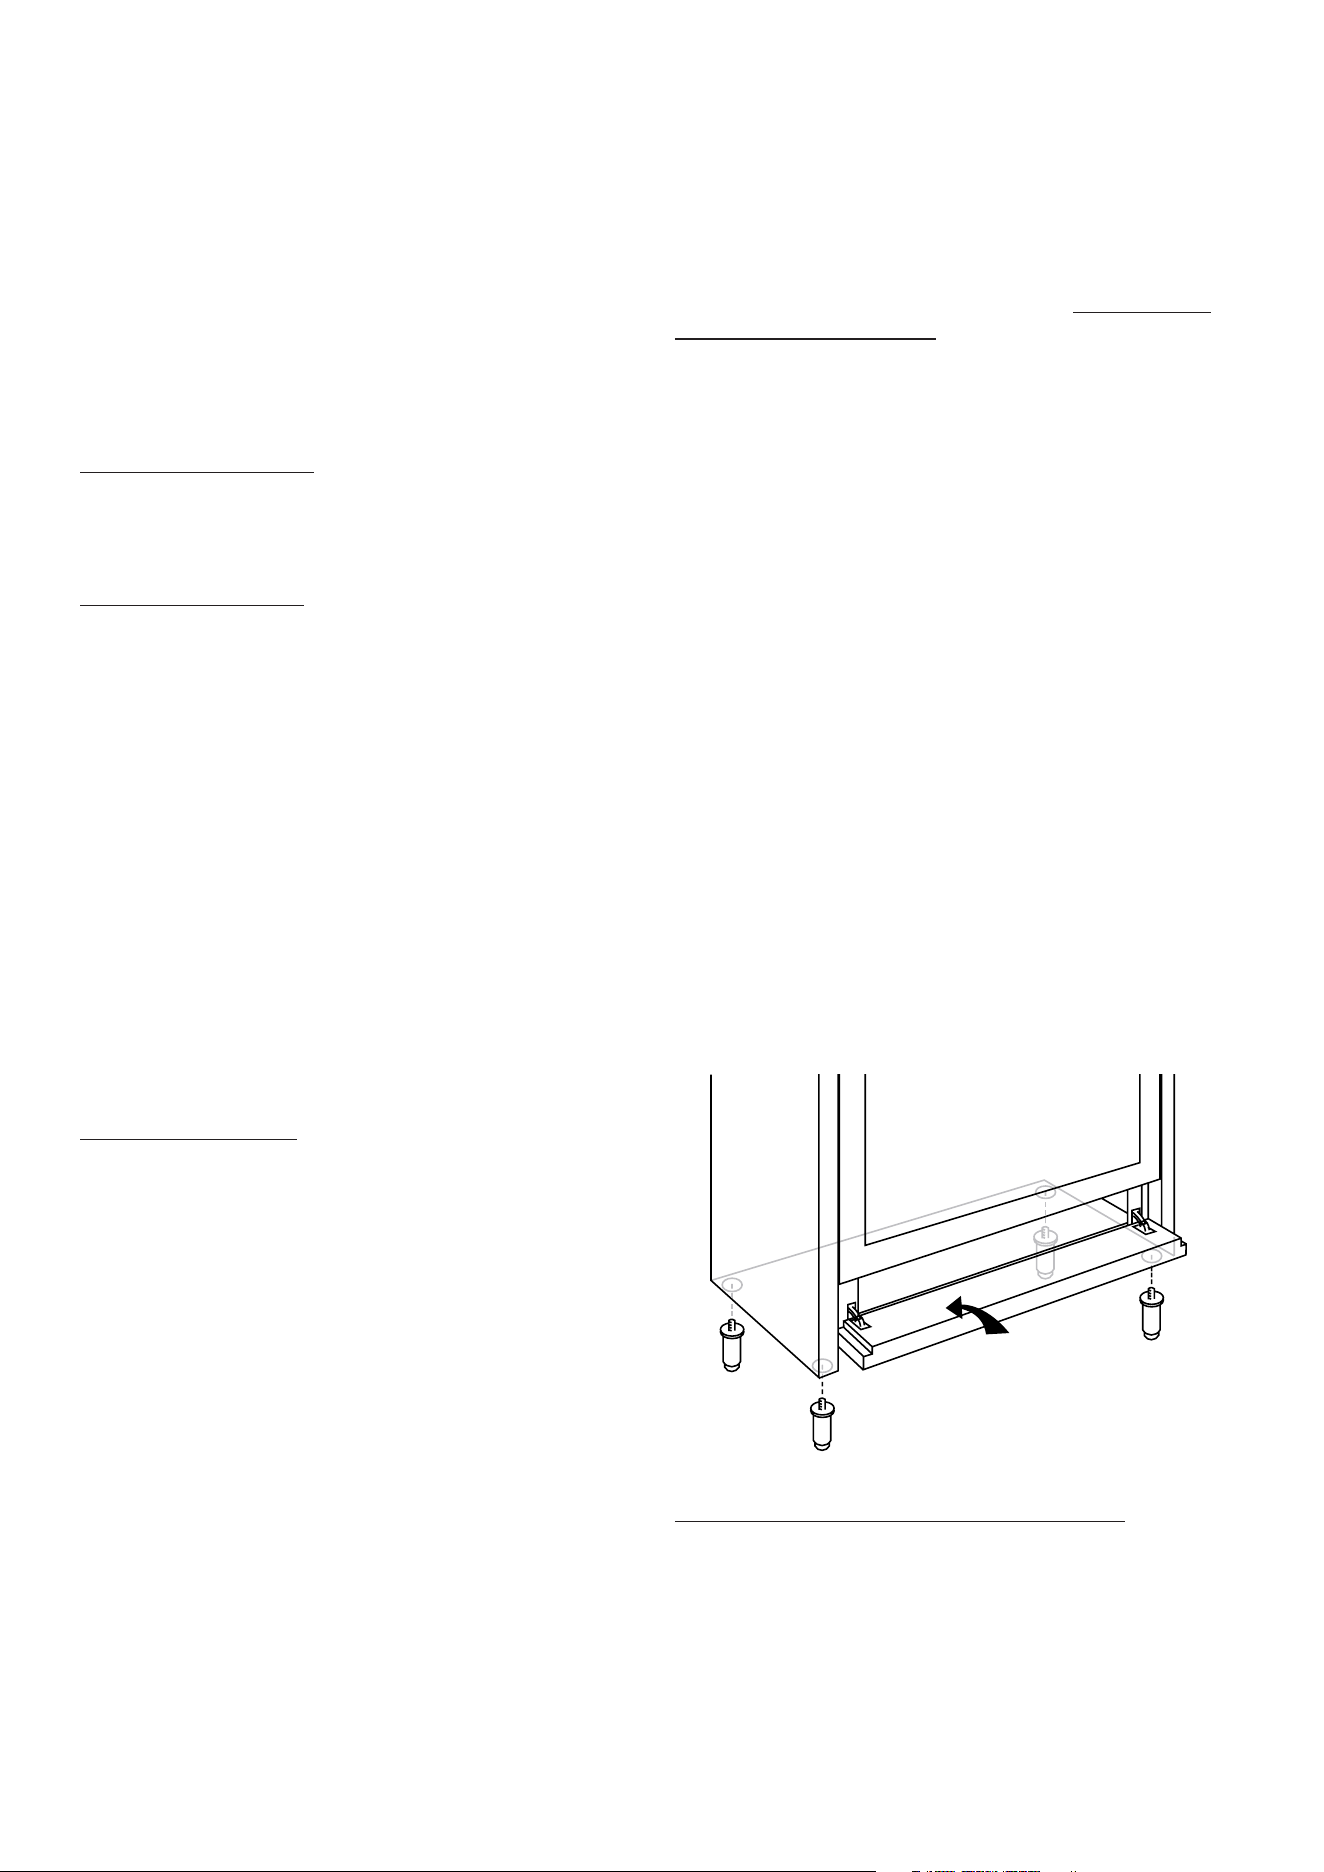
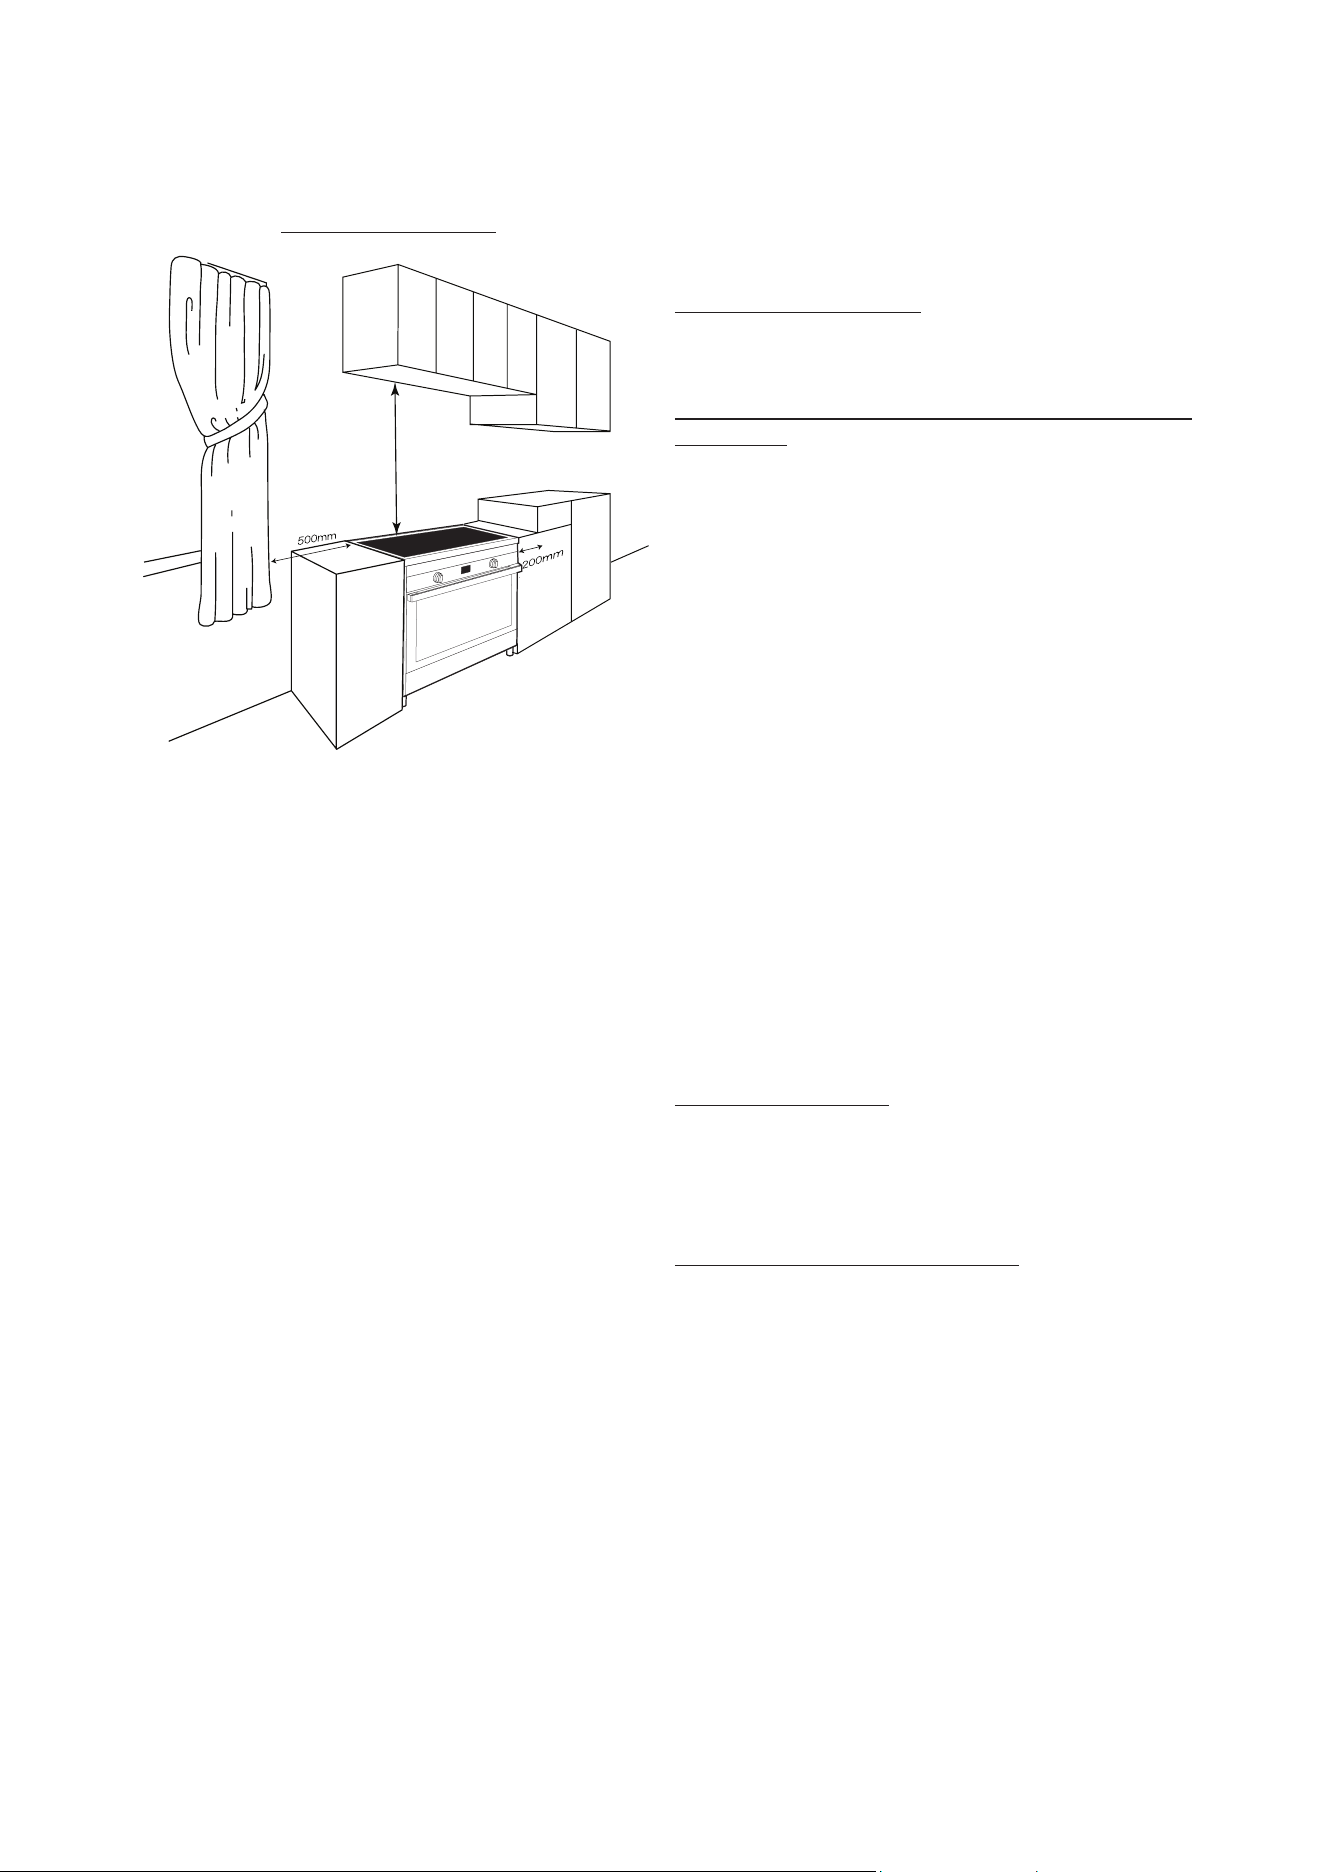
INSTALLING THE ADJUSTABLE LEGS
The cookers are delivered with adjustable height legs
that need to be fitted prior to the cooker installation. On
some models the legs easily screw into the underside of
the cooker. On other models the legs have a new keying
system where the screw on the top of the leg is inserted
and then slid up the slot so it can be tightened securely.
See FIG. 1. You may need to hand tighten the screw into
the top of the legs first.
TIP:
Measure the height of the benchtop and the cooker
itself and then pre adjust the leg height so when they
are installed the cooker will be 10 mm above the height
of the bench.
FIG. 1.
M = bench height + 10mm including legs
Laying the cooker carefully on its back onto the
packaging makes the operation of installing the legs
very easy.
FIG. 2.
M
6
INSTALLING THE ANTI TILT BRACKETS
Install the legs to the cooker and adjust the height to
the desired level. Make sure that this height is precisely
correct to what you require.
1. On the rear of the cooker there is a covering panel.
Accurately measure the distance from the top of this
panel to the floor Height H.
2. Mark the same height on the wall against which the
cooker is to be installed.
3. Mark the centre of the cooker at the same height on
the wall.
4. At a distance of 150mm either side of the centre at
the measured height mount the two anti tilt brackets
supplied onto the wall.
5. Slide the cooker into position after connecting
the chain. The brackets prevent any chance of the
cooker tilting forward.
Rear view showing the anti
tilt brackets fixed to the wall.
300
Brackets mount onto the wall at
height H so the rear panel on the
cooker slides under the brackets
H
Side view showing the anti-tilt brackets
attached to the wall.
Gently slide the cooker
under the
wall brackets.
INSTALLING A COOKER ONTO A RAISED PLATFORM
e cooker can be installed without legs onto a platform. e
height H is 760mm. e platform must be at a height that aligns
the cooker at least level with the bench height. Not below.
The adjacent cabinet material must be capable of
withstanding 85 degrees celcius. We recommend a gap
of 5 mm per side for ease of fitting the cooker and to
provide an insulating air space.
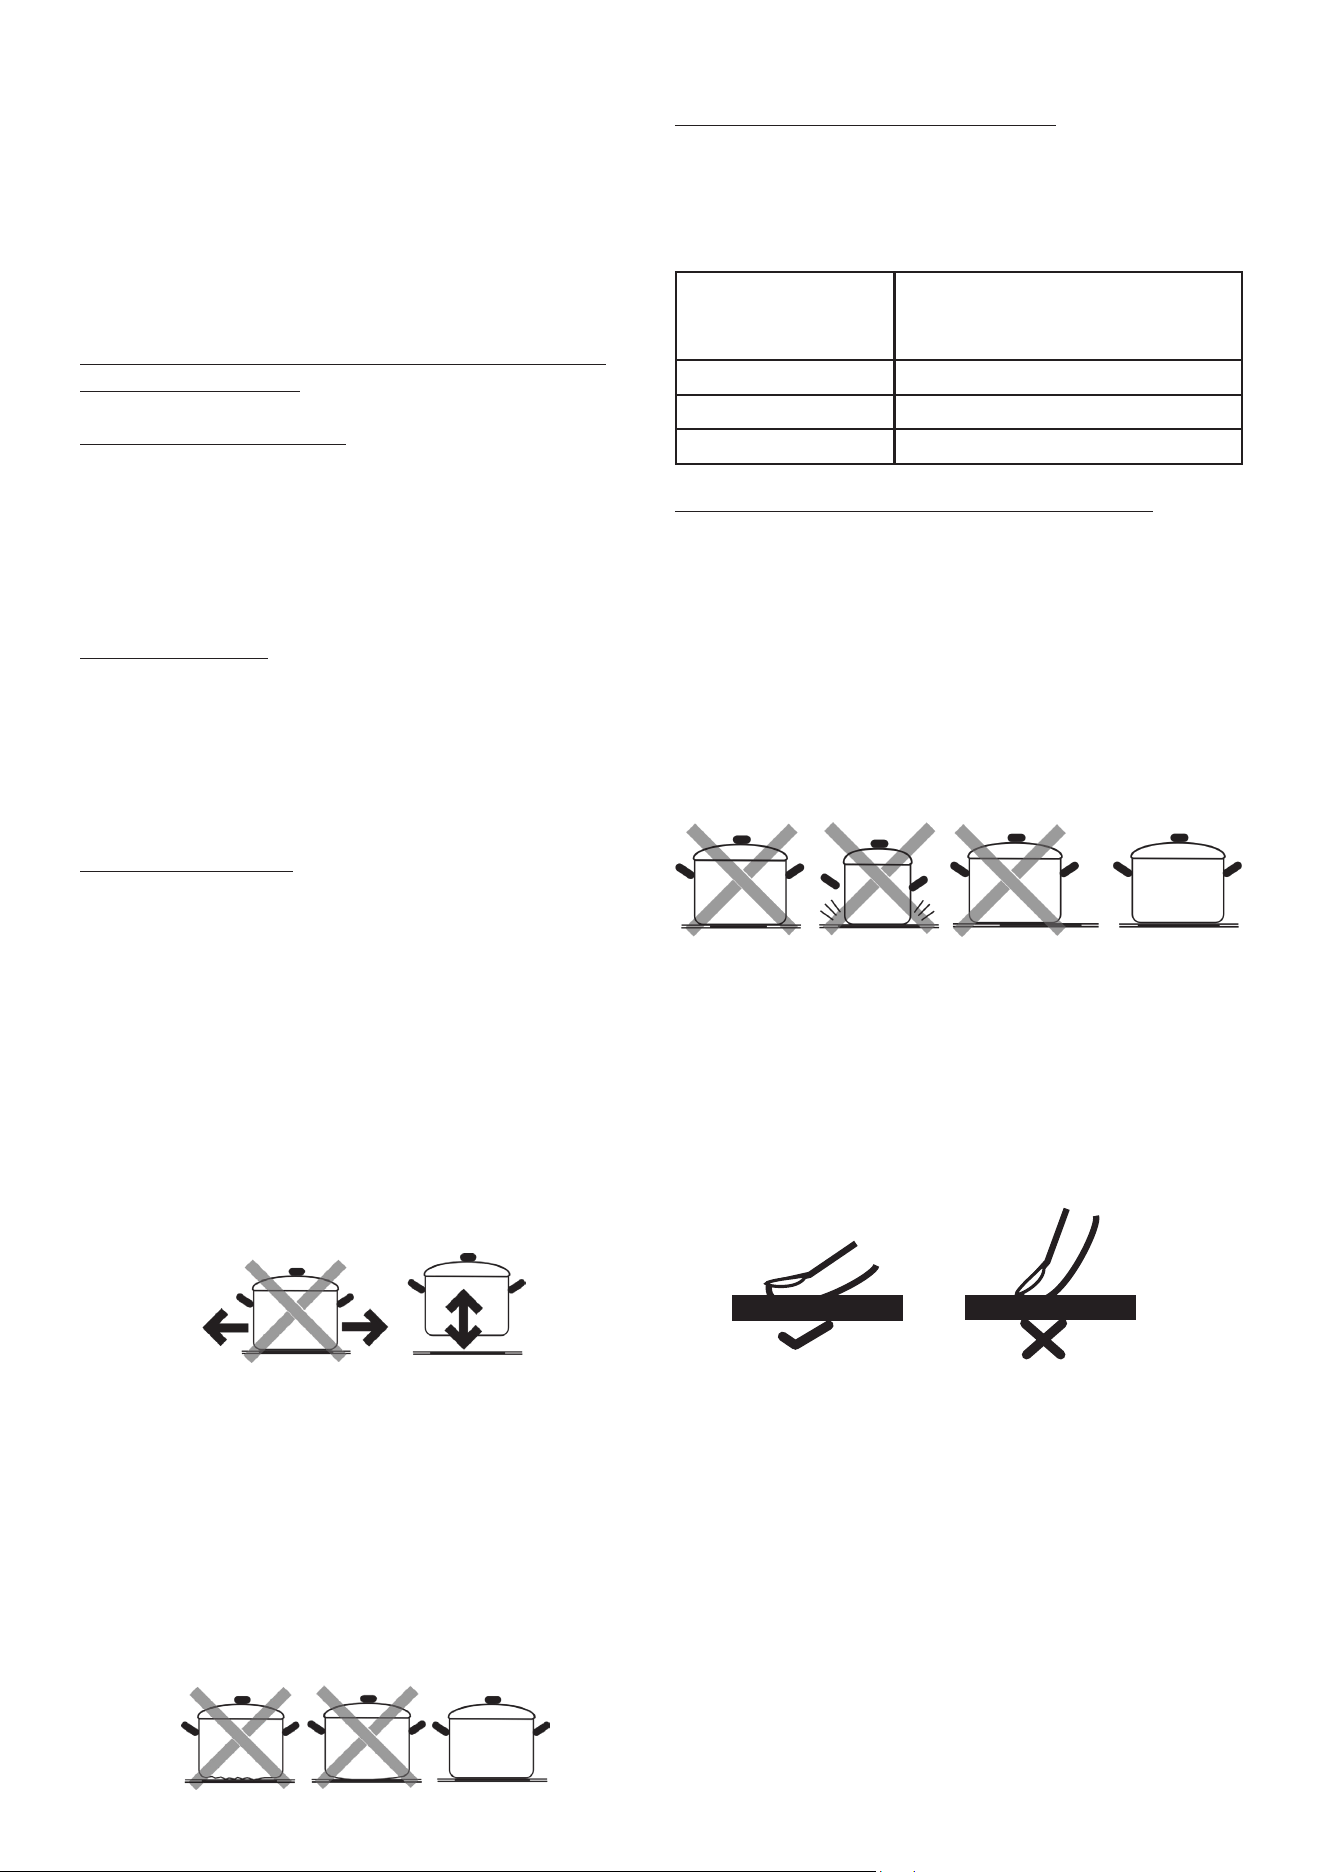
FOR SAFE USE OF THE COOKER
Oven door: Keep children away from the glass oven
door while cooking is in progress.
• DON’T let children sit on or play with the oven door.
DON’T use the drop down door as a stool to reach
above cabinets.
• DON’T put any weight on an open oven door.
• DON’T line the oven walls or floor with aluminium
foil
• DON’T place oven trays or anything onto the floor
of the oven when cooking.
• DON’T place inflammable material or plastics in the
storage compartment under the oven.
• DO Grill with the door closed.
• DO always turn pan handles to the side or to the
back of the cooktop where they can’t be knocked or
reached by children.
• DO Use the right sized pan: Using the right sized
pan makes sense as it saves energy and avoids burnt
handles or damage to pots and the hob.
• DO Use of pot holder gloves: Make sure that
burners and oven trays are cool before touching
them unless you are wearing oven gloves.
CLEANING
This cooker is stainless steel, but harsh detergents and
acids can cause rust spots. This is not covered under
warranty. Please use only approved stainless steel
cleaners. We suggest warm water on a cloth is sufficient
to keep the outside of the cooker clean.
Call 1300 307 917 if you are unsure.
Glem Gas Australasia Pty. Ltd. does not accept any
responsibility for any damage caused by inappropriate,
incorrect or irrational use. For more detailed information
refer to the warranty details at the end of this manual.
Contact Glem Gas Australasia Pty. Ltd. on 1 300 307 917
for all service enquiries.
Allow 5mm clearance
per side
600mm
H
7
H
BEFORE USING FOR THE FIRST TIME
Remove all packing material, plastic film and literature
from the oven before connecting the electricity supply.
Make sure all plastic has been removed before use.
Some models have trays with a protective coating; make
sure that plastic coating has also been removed. Clean
the interior of the oven and all accessories with soap and
water and dry them carefully.
Switch the empty oven on to maximum to eliminate
grease residues from manufacturing. There may be a
slight odour at this time. Run the oven on maximum for
a period of 1 hour and open the kitchen windows to
ventilate the room. The odor will completely dissipate
after a few uses.
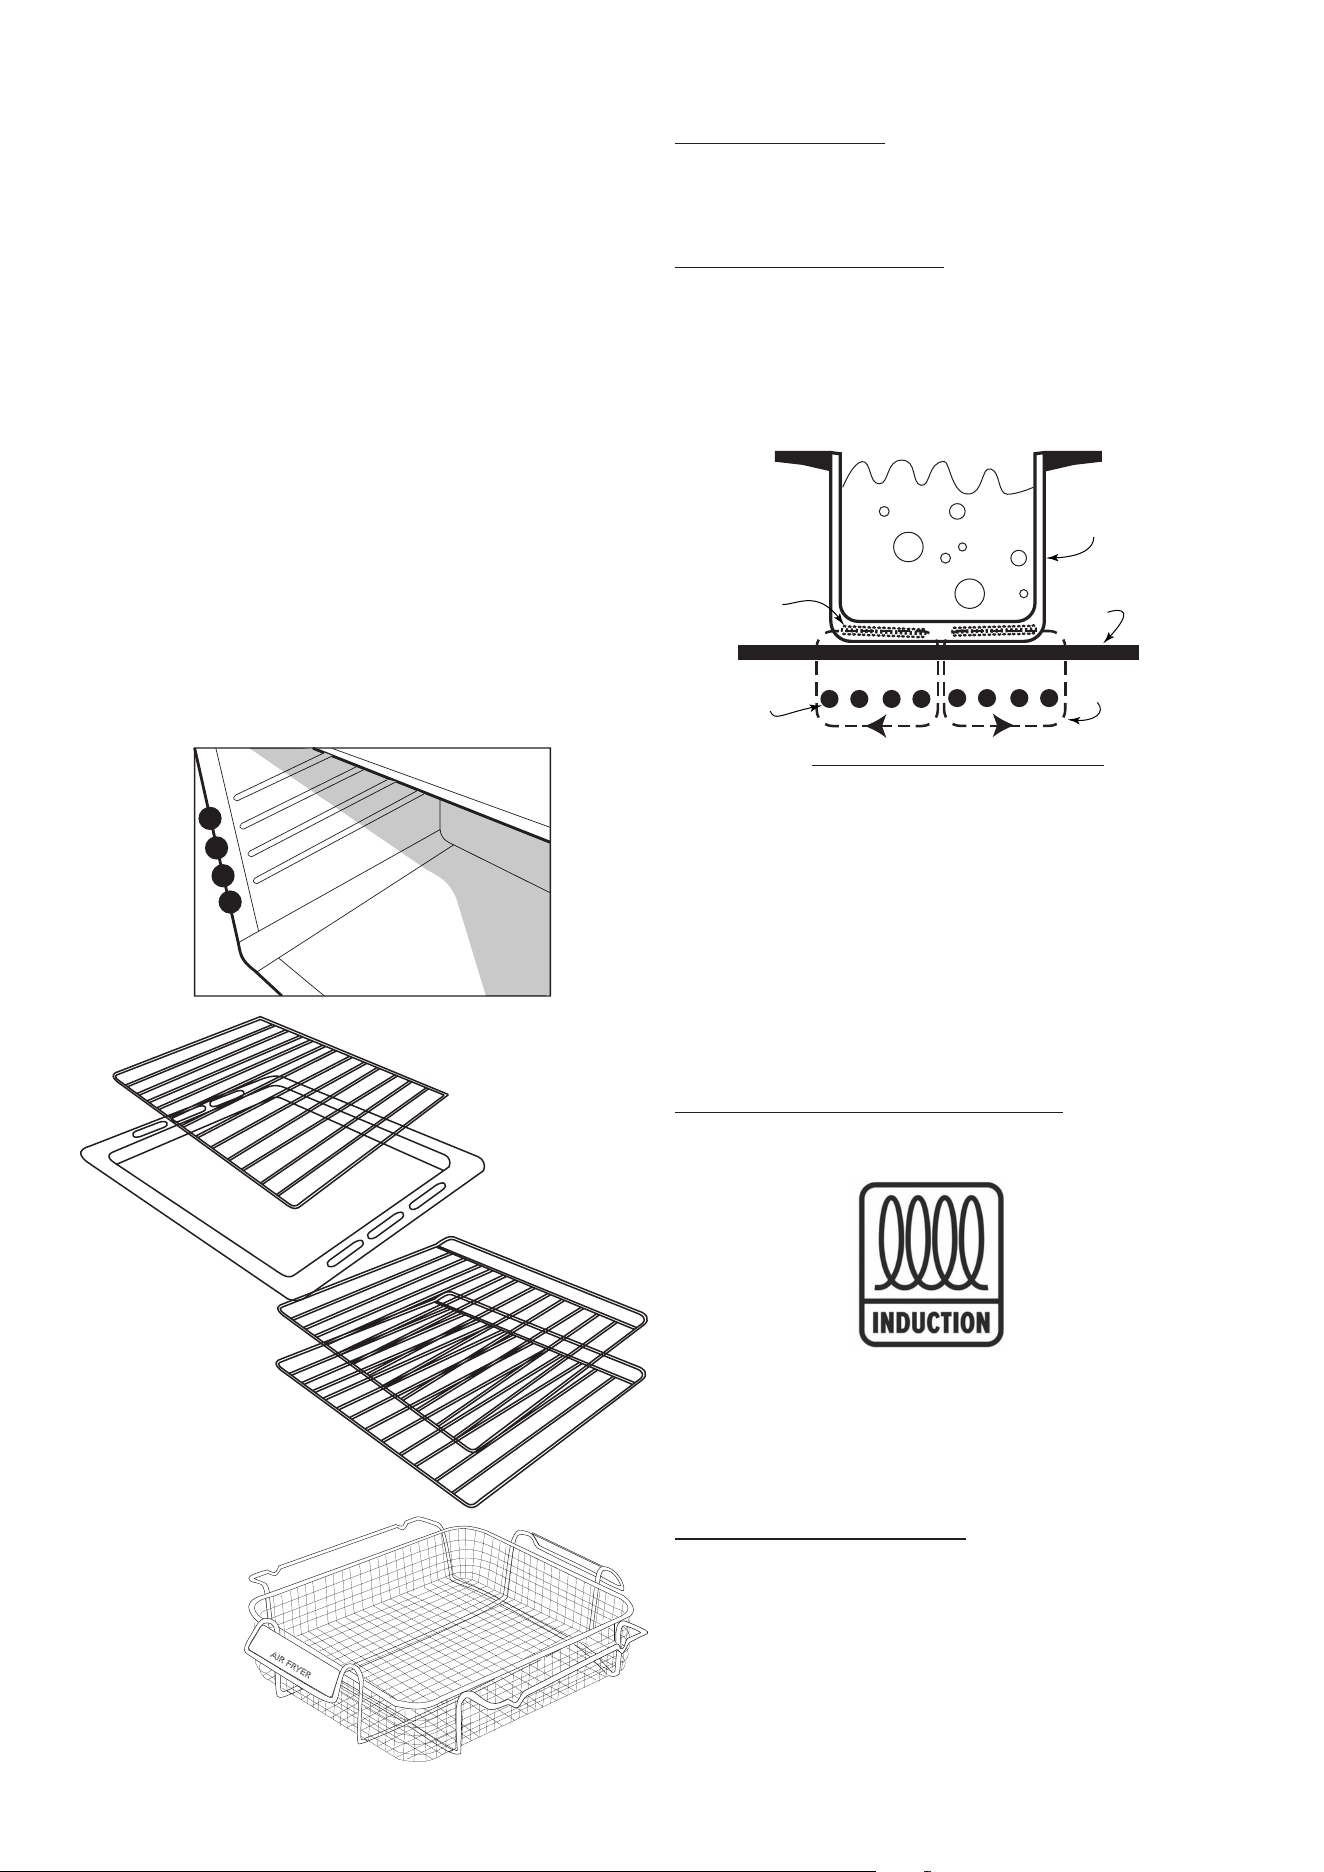
The oven is fitted with 3 or 4 guides for positioning
trays and racks at different heights. On some models a
telescopic runner is fitted to the middle level.
Included with all cookers are two oven shelves, a grill
tray and a rack insert for the grill tray.
1
2
3
4
AIR FRYER
Some models include an
Air Fryer basket feature.
FUNCTIONS OF AN INDUCTION COOKTOP
Cooktop Preparation - Remove and discard any
protective film or labels that may be attached to the
surface of your cooktop. Wipe the cooktop down with a
damp cloth to remove any builder’s debris or marks.
What is induction cooking?
Induction cooking is a safe, advanced, and efficient
cooking technology. It works by electromagnetic
vibrations generating heat directly into the pan, rather
than indirectly through heating the glass surface. The
glass becomes hot only because the pan eventually
warms it up.
Diagram of induction heating
A - Magnetic conductive cooking vessel
B - Ceramic cooktop surface provides insulation and the
cooking surface.
C - Magnetic coil
D - Coil
E - Vortex. Relying on an electromagnetic eddy current
the internal molecules of the pot are vigorously
rubbed together creating heat.
Choosing the right cooking containers Use pots bearing
the symbol:
Tip
You can use a magnet to check whether your pans
are suitable. A pan is suitable if the base of the pan is
attracted by the magnet.
Benefits of induction cooking
• Safer: lower temperature on the glass surface.
• Faster: shorter food heating times.
• More accurate: the cooktop immediately reacts to
your commands
• More efficient: 90% of the absorbed energy is
transformed into heat and once the pot is removed
from the cooktop the heat transmission immediately
stops.
A
B
D
C
E
8
BEST USE OF AN INDUCTION COOKTOP
Important: to avoid permanent damage to the glass
surface, do not use:
• containers with less than perfectly flat bottoms.
• metal containers with enamelled bottoms.
• containers with a rough base, (to avoid scratching
the glass surface).
Never place hot pots and pans on the surface of the
cooktop control panel
IMPORTANT WARNINGS:
If the cooktop surface is cracked, switch off the
appliance to avoid the possibility of an electric shock.
Metallic objects such as knives, forks, spoons and lids
should not be placed on the cooktop since they can
get hot.
Suitable Cookware
• Iron cookware
• Enameled iron cookware
• Steel or enameled cast iron pots/pans
• Cast iron pots/pans
• Cookware made of 18/0 stainless steel & aluminium
if marked as suitable for induction
Unsuitable Cookware
• Containers with bulged bottoms
• Aluminium, brass, copper cookware unless they are
clearly indicated as suitable for induction.
• Pots/pans with a diameter below 12 cm
• Cookware with feet
• Ceramic cookware
• Glass cookware
NOTE:
• Do not use the cooktop as a work surface.
• Grains of grit may cause scratches which cannot be
removed.
• Only use pans with a clean base and always pick
pans up to move them - don’t slide the pans on the
glass.
• Be careful with enameled sheet-steel pans:
- the enamel may come loose from the steel at high
settings when the pan is too dry; - high power level
settings may cause the base of the pan to warp.
• Never use pans with a misshapen base. A hollow or
rounded base can interfere with the operation of the
cooktop, causing the appliance to become too hot.
This may lead to the glass top cracking and the pan
base melting.
• Damage caused by using unsuitable pans or allowing
pots to boil dry is excluded from the product
warranty.
Recommended pan bottom diameters
IMPORTANT: if the pots are not correctly sized, the
cooking zones may not switch on.
For details of the minimum pot diameter that needs to
be used on each zone, see below:
Diameter of
cooking zone (mm)
Recommended minimum pot
diameter
(mm)
160 145
180 145
210 180
Energy saving recommendations for best results
• Use pots and pans with a bottom diameter equal to
that of the cooking zone.
• Use only pots and pans with flat bottoms.
• Where possible, keep the lid on pots and pans
during cooking
• Cook vegetables, potatoes, etc. with a small amount
of water to reduce cooking time.
• Use a pressure cooker, it further reduces the energy
consumption and cooking time
• Place pots in the centre cooking zone
USING THE TOUCH CONTROL PANEL
To select the commands, simply touch (press) the
symbols representing them. The controls respond to
touch, so you don’t need to apply any pressure.
Use the ball of your finger, not its tip (see figure below).
You will hear a beep each time a touch is registered.
Make sure the control panel is always clean, dry, and
that there is no object (e.g., a utensil or a cloth) covering
them. Even a thin film of water may make the controls
difficult to operate.
9
INDUCTION CONTROL PANEL
Key Function
1 Timer
2 Lock
3 Keep warm function
4 Slide touch control
5 Boost function
6 Pause/Restart
7 ON/OFF
USING THE COOKTOP
Switching the cooktop ON
Touch the ON/OFF key (7) for one second.
Aer power on, the buzzer beeps once and all displays show
“__” indicating that the cooktop is on standby mode.
Place a suitable pan on the cooking zone
that you wish to use. Make sure the bottom
of the pan and the surface of the cooking
zone are clean and dry.
Touching the Indicator A.B.C.D.E. to choose the cooking zone,
and the indicator you chose will ash.
Touch the slider to the level you want to set.
Note : if you don’t choose a heat setting within 1 minute, the
cooktop will automatically switch o.
While cooking, the power level can be changed at any time.
B
A
C
D
B
E
1 2 3 4 5 6 7
Zone selection key and power level display
Switching a zone OFF
To switch a zone off when you have finished cooking.
Touch the Indicator A.B.C.D.E to choose the cooking
zone that you wish to switch off and touch the slider
control to zero.
To turn the whole cooktop off touch the ON/OFF
symbol.
Residual heat indicator (warning of a hot surface)
When the cooktop has been operating for some time,
there will be some residual heat. The indicator will
appear to warn you to keep away from that zone.
It will disappear when the surface has cooled down to a
safe temperature.
Boost Function
The Boost function provides intensive heating for up to
5 minutes, ideal when boiling water for pasta.
Touch the Indicator A.B.C.D.E. to choose the cooking
zone that you want to cook on.
Touch the boost control (5) and the power level indicator
will read “P”.
To cancel the Boost function, select the zone under
Boost mode and touch the slide control to cancel Boost.
NOTE: the Boost function only lasts for 5 minutes after
which time the zone will revert to level 14 automatically.
Child Lock Function
You can lock the controls to prevent unintended use for
example children accidentally turning the cooking zones
on. When the controls are locked all controls except the
ON/OFF are disabled.
To lock the controls - touch the lock symbol (2)
until the indicator shows ‘Lo’
To unlock the controls - touch and hold the the lock
symbol for 5 SECONDS.
You can now use the cooktop.
NOTE: you can always switch the cooktop off with the
ON/OFF touch in an emergency.
Auto Shutdown
An additional safety feature of the cooktop is the auto
shutdown. This occurs when you forget to switch off a
cooking zone. The default cooking shut down times are
shown in the table below:
Power
level
1-6 7-10 11-14
Default
working
time (hour)
8 4 2
10
BB
A B C D E

USING THE TIMER
There is a timer built into the cooktop. This timer does
not control the oven. There are two ways to use the
timer:
1. You can use it as a minute minder - the timer does not
switch off any cooking zone when the time is up.
2. You can use it as a cut off timer to turn one or more
cooking zones off when the time is up.
You can set the timer up tp 99 minutes.
Using the timer as a minute minder
Make sure the hob is turned on, and no cooking zone
has been activated.
NOTE: you can set the minute minder while the cooking
zone is on as long as the power level indicator is not
flashing.
Touch the timer key (1) and “05” will show in the timer
display and single digit “5” flashes.
Set the desired minutes by touching the slide control.
Touch the timer key again and then the number to
represent tens digit will flash. Set the desired tens of
minutes by touching the slide control.
When the time is set it will commence counting down
immediately. The display will show the remaining time.
A signal will beep for 10 seconds and the timer indicator
will show “_ _ “ when the set time is finished.
Setting the timer to turn off one or more cooking zones
1. If the timer is set on one zone:
Touch the indicator to choose the cooking zone that you
want to set the off timer for.
Touch the timer key (1) and “05” will show in the timer
display and single digit “5” flashes.
Set the desired minutes by touching the slide control.
Touch the timer key again and then the number to
represent tens digit will flash. Set the desired tens of
minutes by touching the slide control.
NOTE: The red dot will appear next to the power level
indicator of the zone that is in timer mode.
When the set time expires the selected zone will switch
off automatically. Other zones will continue to operate if
they were turned on previously.
2. If the timer is set on more than one zone
When you set the time for multiple cooking zones a dot
shows against the zones under timer control. The minute
displays the remaining time of the zone where the dot is
flashing on and off.
Once the time expires the corresponding zone will
switch off. Then it will show the remaining time on the
other zone and dot will flash against that zone.
Cancelling the timer
Select the zone where you want to cancel the timer.
Touch the timer key (1) and the indicator will flash. Set
the timer to “00” and the timer will be switched off.
PAUSE FUNCTION
The pause function is to stop all heating but to keep all
the settings you have set in case you have to interrupt
your cooking. You can easily revert all settings using the
pause function.
To use the Pause Function
Touch the pause function key (6) and all the heating
zones will stop working and all zone displays show II
To cancel the Pause Function
Touch the pause function key (6) and all heating zones
will revert to their previous setting.
NOTE: The pause function is available when one or more
zones are working. If you don’t stop the Pause function
then after 30 minutes the cooktop will automatically
switch off.
KEEP WARM FUNCTION
The warming function is used to keep cooked food
warm. It can also be used as a melting or simmer
function.
To enter the keep warm mode touch the cooking zone
indicator you want to use and press key (3) to start the
keep warm function.
Wait for a moment and the display will show an indicator
that the zone is under keep warm mode.
To exit the keep warm mode touch the zone indicator to
choose the zone you wish to cancel and then press key
(3) to cancel the keep warm function.
11
Timer up
Timer down
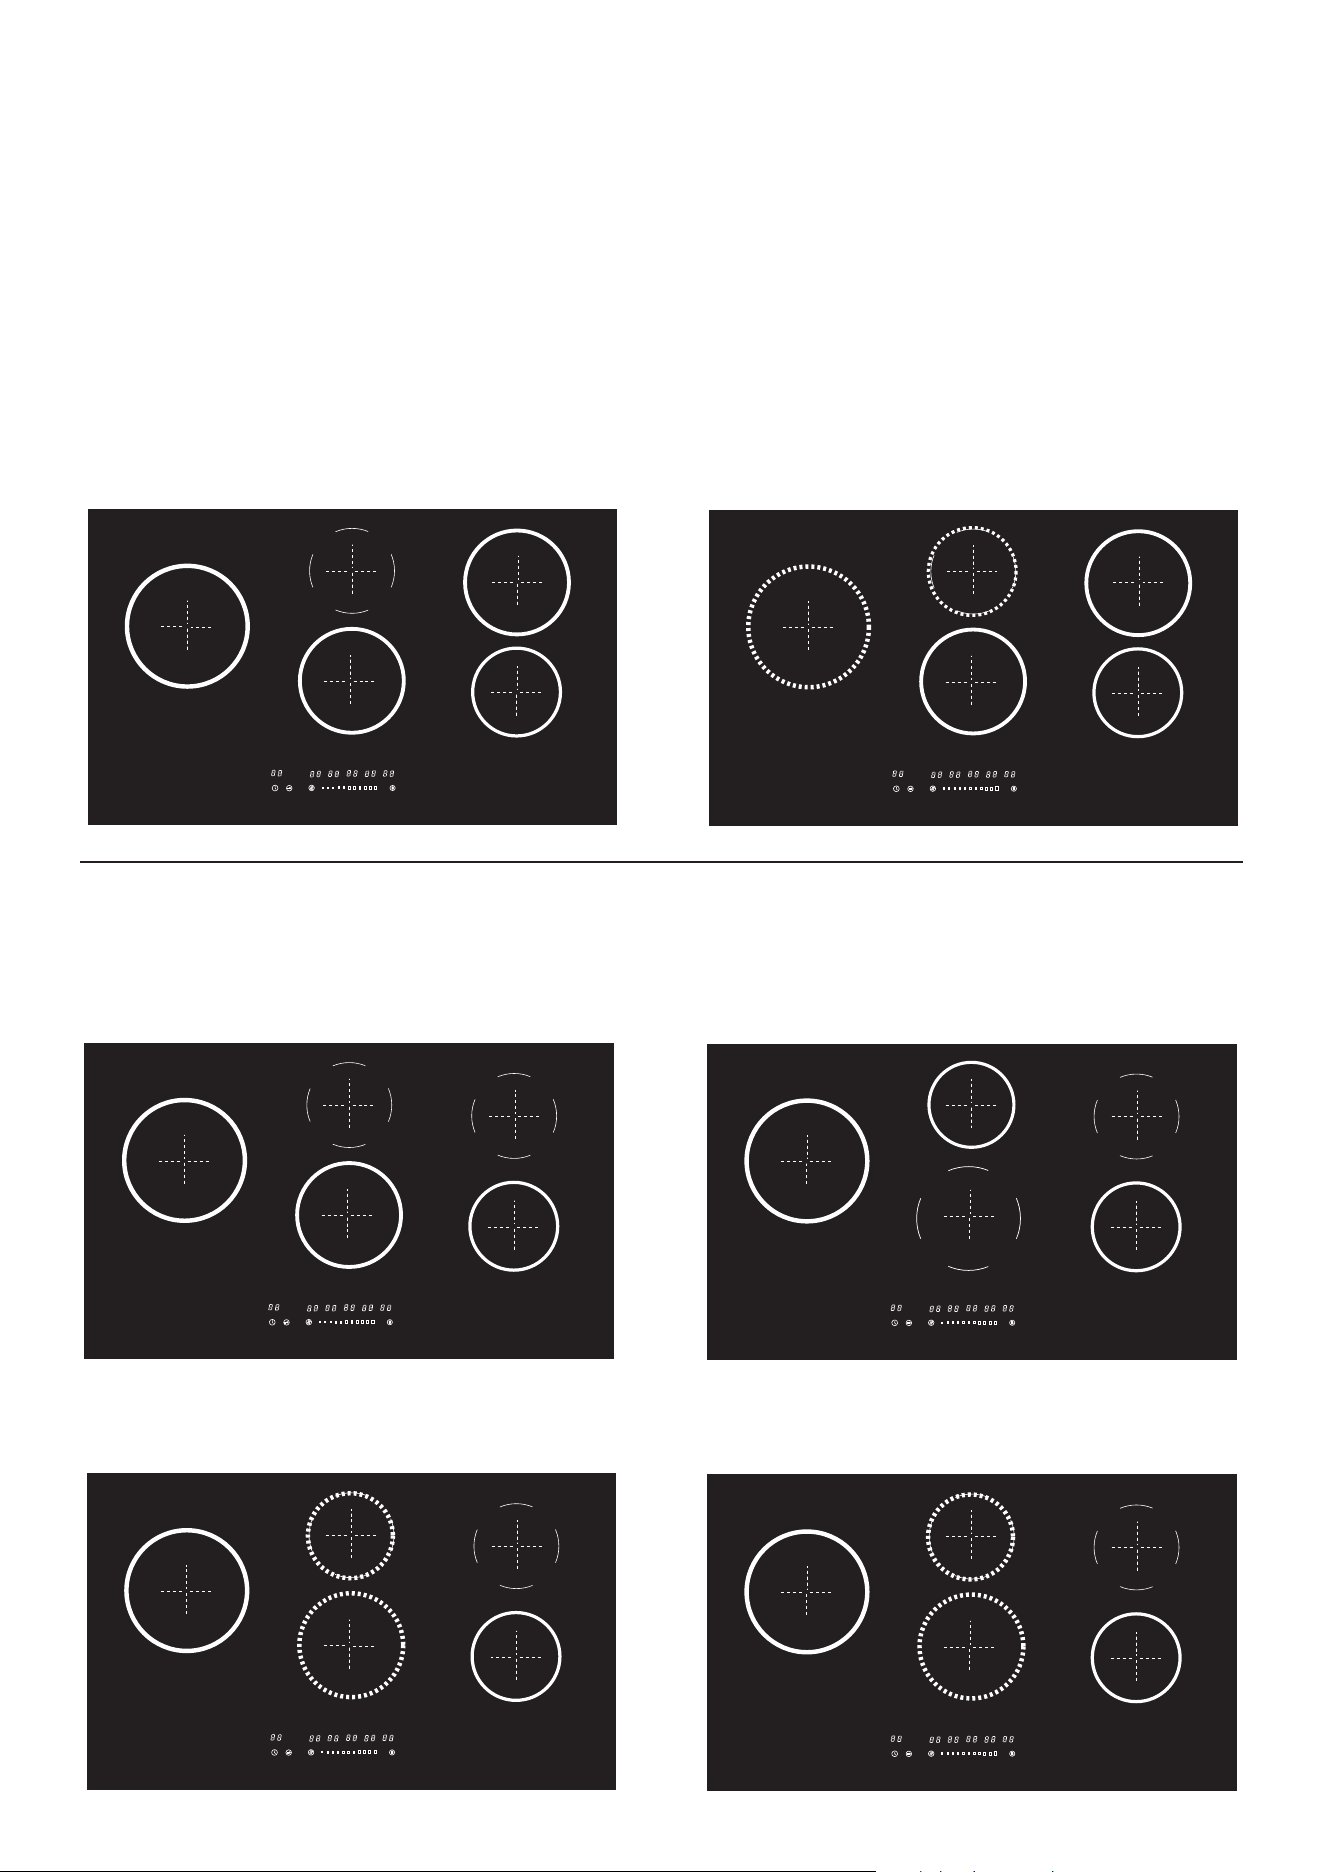
GETTING THE MOST OUT OF YOUR INDUCTION COOKTOP
80cm and 90cm wide cookers - running the induction zones on maximum level - level 14
When the oven is off, upto four cooktop zones can run at maximum power (L14).
When the oven is on, up to three zones can operate at maximum power.
Refer to the guide below on how your induction cooktop balances the power
• Dashed lines indicate zones with medium power availability. (L7-10) - similar power to a medium gas burner.
• The ECO OFF zone is always off when the oven is in use
• ECO MAX indicates a zone where maximum power sets at L13 when the oven is on
Induction Maximum Cooking Power when the oven is OFF
4 cooking zones can run on MAX (L14) 5 cooking zones - 3 zones can run on max and
2 zones can run on medium power (L7-10)
Induction Maximum Cooking Power when the oven is ON - ECO OFF zone always switches off when
the oven is in use.
3 cooking zones
2 cooking zones can run on MAX (L14) and the ECO max zone can run at (L13)
4 cooking zones
1 cooking zone can run on MAX (L14) - ECO max zone can run at L13 - 2 zones can run on medium (L7-10)
B
B
B
ECO
OFF
ECO
max
ECO
OFF
ECO
MAX
B
ECO
OFF
ECO
max
B
ECO
OFF
ECO
max
B
ECO
OFF
ECO
max
12
UNDERSTANDING THE POWER LEVELS
Power Level Cooking type
Best purpose for each power level
Max power
Boost
Heat quickly
Ideal to quickly increase the temperature of food up
to fast boiling in the case of water or quickly heat cooking liquids
13-14 Fry - boil
Ideal for browning, starting to cook, frying frozen products,
boiling rapidly
High power
11-12 Brown - fry - boil - grill
Ideal for frying, keeping the boil, cooking and grilling (for short
times, 5-10 minutes)
9-10 Brown - cook - stew - fry - grill
Ideal for frying, maintaining a simmer, cooking and grilling (for
average times, 10-20 minutes), preheating accessories
Medium
power
7-8 Cook - stew - fry - grill
Ideal for stewing, maintaining a light boil, cooking (for longer
times). Stir pasta
5-6 Cook - simmer - thicken - stir
Ideal for slow cooking (rice, sauces, roasts, fish) in the
presence of liquid (e.g. water, wine, broth, milk), stirring
3-4 Cook - simmer - thicken - stir
Ideal for slow cooking (volume less than one litre: rice,
sauces, roasts, fish) in the presence of liquid (e.g.
Lower power
1-2 Melt - thaw - keep warm - stir
Ideal for softening butter, gently melting chocolate, thawing small
quantities
1 Melt - thaw - keep warm - stir
Ideal for keeping small portions of freshly cooked food
warm or keeping the temperature of serving dishes and
No power Zero Support surface
Hob in stand-by or off (possible presence of residual heat from
the end of cooking, signalled by H)
SUGGESTED COOKING TASKS FOR POWER LEVEL
Category of food
Dishes or type
of cooking
Power level and cookig pattern
First stage Power Second stage Power
Pasta, rice
Fresh pasta
Heating water
Booster-14
Cooking pasta and
maintaining the boil
7-8
Boiled rice Heating water
Booster-14
Cooking pasta and
maintaining the boil
7-8
Risotto Frying and roasting 7- 8
Cooking
5-6
Vegetables,
legumes
Boiled
Heating water
9 Boiling
6-7
Fried
Heating oil 7- 8
Frying
8-9
Sauté
Heating accessory 7- 8
Cooking
6-7
Stewed
Heating accessory 7- 8
Cooking
3-4
Fried
Heating accessory 7- 8
Browning fried
7-8
Meats
Roast
Browning with oil
(if with butter, power 6)
7- 8
Cooking
3-4
Grilled Pre-heating pan 7- 8
Grilling on both sides
7-8
Browning
Browning with oil
(if with butter, power 6)
7- 8
Cooking
4-5
Stew
Browning with oil
(if with butter, power 6)
7- 8
Cooking
3-4
Fish
Grilled Pre-heating pan 7- 8
Cooking
7-8
Stew
Browning with oil
(if with butter, power 6)
7- 8
Cooking
3-4
Fried Heating oil or fat 8- 9
Frying
7-8
Eggs
Omelettes
Heating pan with butter
or fat
6 Cooking
6-7
Soft boiled /
boiled
Heating water
Booster-14 Cooking
5-6
Pancakes
Heating pan with butter
6 Cooking
6-7
Sauces
Tomato
Browning with oil
(if with butter, power 6)
6-7
Cooking
3-4
Meat sauce
Browning with oil
(if with butter, power 6)
6-7
Cooking
3-4
Béchamel
Preparing the base
(melt butter and flour)
5-6 Bring to simmering point 3-4
Desserts,
creams
Custard Boil the milk 4-5
Keep simmering
4-5
Puddings Boil the milk 4-5
Keep simmering
2-3
Rice pudding Heat the milk 5-6
Keep simmering
2-3
13

INDUCTION COOKTOP CARE AND CLEANING
What? How?
Dirty stuff on glass
(fingerprints, marks, residual
stains, or non-sugary spill
overs onto the glass).
1. Switch off the power to the hob.
2. Apply a hob cleaner while the glass is still warm (but not hot!)
3. Rinse and wipe dry with a clean cloth or paper towel.
4. Switch the power to the hob back on.
Boil overs, melts, and hot
sugary spills on the glass
Remove these immediately with a razor blade scraper suitable for ceramic glass
hobs but beware of hot cooking zone surfaces.
1. Switch the power to the hob off at the wall.
2. Hold the blade at a 30° angle and scrape the spill to a cool area of the cooktop.
3. Clean the spill up with a dish cloth or paper towel.
Spill overs on the touch
controls
1. Switch off the power to the hob.
2. Remove the spill overs
3. Wipe the touch control area with a clean damp sponge or cloth, then dry with a
paper towel.
4. Switch the power to the hob back on.
Important!
• When the hob is switched off, there will be no ‘hot surface’ indication, but the cooking zone may
still be hot! Take extreme care!
• Heavy-duty scourers, some nylon scourers and harsh/abrasive cleaning agents may scratch the
glass. Read the label to check that your cleaner or scourer is suitable. If in doubt don’t use it.
• Never leave cleaning residue on the hob or the glass may become stained.
INDUCTION COOKTOP Questions and quick check reference
Problem Possible causes and What to do
The cooktop wont turn
on.
No power.
1. Check the connection to the power supply and make sure it is switched on.
2. Check whether there is a power outage in your home or area.
3. If you’ve checked everything and the problem persists, call a qualified technician.
The touch controls are
unresponsive.
The control panel is locked by the child lock function.
Unlock the controls. See section ‘Using your cooktop’ for instructions.
The touch controls are
difficult to operate.
There may be a slight film of water over the controls, or you may be using the tip of
your finger when touching the controls.
Make sure the touch control area is dry and use the ball of your finger when touching
the controls.
The glass is being
scratched.
Rough-edged cookware. Unsuitable, abrasive scourer or cleaning products being used.
Use cookware with flat and smooth bases. See ‘Choosing the right cookware’.
See ‘Care and cleaning’.
Some pans make crack-
ling or clicking noises.
This may be caused by the material of your cookware (layers of different metals
vibrating differently).
This is normal for cookware and does not indicate a fault.
The induction hob makes
a low humming noise
at some certain power
setting.
This is caused by the technology of induction cooking.
This is normal, but the noise may quiet down or disappear completely when you
change the power level setting.
Fan noise coming from
the induction hob.
A cooling fan is built in your induction hob which prevents the electronics from
overheating. It may continue to run even after you’ve turned the induction hob off.
This is normal and needs no action. Do not switch the power to the induction hob off
at the wall while the fan is running.
Pans do not become
hot and appears in the
display.
The induction hob cannot detect the pan. Check the pan base size, if it is too small
for the cooking zone or not properly centred. Use cookware suitable for induction
cooking. See section ‘Choosing the right cookware’. Centre the pan and make sure
that its base matches the size of the cooking zone.
The cooktop or a
zone turns itself off
unexpectedly. A tone
sounds and error code is
displayed.
Technical fault.
Please note down the error code (typically alternating with one or two digits in the
cooking timer display), switch the power to the induction hob off at the wall, and
contact a qualified technician.
14
USING THE ELECTRIC OVEN
Your cooker is equipped with a multifunction electric
oven. To obtain the full benefit of this oven follow these
procedures when baking.
1. Remove the grill tray.
2. Choose a function using the selector knob for
oven functions. Turn the knob to the symbol of the
cooking function you wish to use in your cooking.
3. Rotate the thermostat knob to the desired
temperature.
4. Wait for the oven to preheat. The thermostat
indicator light goes off to indicate that the oven has
reached temperature, and you can introduce the
food to be cooked.
Selecting the best oven function
All ovens operate differently and trial and error is part
of gaining full familiarity with any new oven. Fan forced
is great heat up function and very good when cooking
on multiple shelves. The classic bake which applies heat
from the top and bottom of the oven works well when
cooking on a single level.
Oven Light
The oven light illuminates the oven cavity
enabling the user to visually monitor the
cooking process.
Fan Forced
The air is forced through the circular element
for rapid heat up. In some cooking tasks the
food may need to be rotated.
Classic Baking
Uses a top element and a bottom element. It is
good function for pizza and cooking on a single
shelf. No air movement in the oven.
Bottom Heat
Heat from the bottom element and distributed by a
fan. Too slow for initial heat up. Good for brown-
ing the bases of pies and pastries.
Double grill with fan
e grill element radiates heat to the top of the
food & a fan distributes the heat. Ideal for thicker
cuts of meat. Preheat for 3 minutes.
Double grill
Traditional grilling of sausages, chops, cheese
toasties. Grilling is done with the door closed for
maximum eciency.
Grill
e single grill element produces radiant heat over
a smaller area. Smaller amounts of food can be
grilled without wasting energy.
Defrost
e oven fan operates moving the air in the oven
cavity. is reduces the amount of time it takes to
defrost food.
Cooktop Error Codes
If an abnormality comes up, the hob will automatically
enter a protective state and display corresponding
protective codes:
Error Codes for Induction Cooktop
Problem Possible causes What to do
E1 Signal lost (PCB
failure)
Please contact after
sales service.
E2/E3 Abnormal high/
Low input voltage
Stop cooking and wait
until input voltage back
to normal. If not, please
contact service centre.
E4/E5/
E6
Thermistor fail-
ure.
Please contact service
centre to repair.
E7 Abnormal high
temperature (dry
burning)
Cut off power, wait for
30min and switch on.
If still not working,
please contact service.
E8/E9 Failure of IGBT
sensor
Please contact service
centre to repair.
E0 IGBT Overheat Check if the fan is still
working. If not, please
contact service centre
to repair.
EE Display PCB
failure.
Please contact service
centre.
The above are the judgment and inspection of
common failures.
ATTENTION!
To avoid danger, please do not disassemble the
unit by yourself!
NEW COOKER SMELLS
Before cooking in a new cooker, it is important to
remove the protective oils that are used during
manufacture.
Make sure the room is well ventilated, open a window
and run the grill for 20 minutes and operate the oven on
180C for an hour.
15

USING THE OVEN cont.
Thermostat Indicator light
The thermostat indicator light switches on and off during
cooking to show that the heating cycles are taking place
properly. For static and fan forced mode, the oven must
always be preheated.
Try to open the oven door as little as possible as
opening the door lowers the temperature and affects
the thermostat cycles. When cooking on different
shelves simultaneously, put all containers in the centre of
the shelves.
USING THE OVEN TIMER
The oven on your cooker is equipped with a touch
programmer which has the capability of operating as:
Minute minder - once the desired time is set the timer
will start counting down until the time is up and a tone
will sound.
Automatic End Cooking - when the time is up the oven
will switch off and a tone will sound.
Delayed start - by setting the cooking time and the
switch off time the oven will start and stop automatically.
Touch Pad Lock
The timer control touch pad automatically locks after
7 seconds of inactivity. To unlock, press any key for 2
seconds.
Setting the time of day
Press the + and - keys at the same time until the central
cursor between the hours and minutes starts flashing.
Then press either the + or the - to set the time of day.
Once you set the time do not press anything and after a
few seconds a beep with confirm the set time.
Setting the countdown timer (Minute Minder)
The minute minder operates independently from the
oven and can be used on all oven functions. Press the
Menu key until the screen changes. Release the key
and adjust the time (minutes) by using the + and - keys.
Once you reach the required time, release the key and
wait for the confirmation beep.
A bell icon will appear on the screen. At the end of the
set time, the bell will ring. Press any key to turn it off. To
remove the “A” icon from the screen, press the “Menu”
key.
To check the remaining amount of time (before it
expires), hold the “Menu” key down.
To delete the set amount of time, press the “Menu” key
until the screen changes, and then press the + and - keys
at the same time. The set amount of time will thus be
deleted.
Setting Auto Power Off
Turn the oven on by adjusting features and
temperatures. Hold the “Menu” key down until the
screen changes, then press it again. The letters “DUR”
(for ‘duration’) will appear on the screen. Press the
+ and - keys to adjust the cooking time. Wait for the
confirmation beep without touching any keys. When the
set amount of time is over, the oven will switch off and a
beeping sound will be heard. Press any key to turn it off.
To remove the “A” icon from the screen, press the
“Menu” key. To check the remaining amount of time
(before it is over) hold the “Menu” key down.
To delete the set amount of time, press the “Menu” key
until the screen changes, and then press the + and - keys
at the same time. Accordingly, the set amount of times
will be deleted. At the end of cooking, remember to
place the knob back to the “0” position.
Setting delayed start
Hold the “Menu” key down until the screen changes,
then press it again. The letters ‘’DUR’’ (for ‘duration’) will
appear on the screen. Press the + and - keys to adjust
the cooking time. Then press the “Menu” key once and
the letters END will appear on the screen, indicating the
menu to set the switch-off time. Press the + and - keys
to adjust the switch-off time. Then select the cooking
feature and required temperature. Obviously, the oven
will not start up immediately. Once the set amount of
time has passed, the oven will switch off and the beep
sound will start. Press any key to turn it off. To remove
the “A”icon from the screen, press the “Menu” key.
Setting the volume of the beep
Press + and - at the same time, followed by “Menu”,
to enter the tone setting mode and press the – key
repeatedly to change the tone of the alarm. Once you
have selected the tone, the timer will memorize your
selection until you wish to change it again.
Practical tips when using the programmer: please
consider the amount of time for pre heating the oven
when the cooking time is being set. Please switch the
oven off at the end of the cooking cycle.
16
SUGGESTED SHELF POSITIONS - TEMPERATURES & COOKING TIMES
17
Dish
Shelf Position
(1 = Top)
Temperature
Degrees C
Cooking Time
Minutes
Cakes Static Fan oven Static Fan oven
Chocolate Cake 2 2 3 180 - 190 180 35 - 40
Cream Caramel 3 2 3 130 - 150 130 30 - 35
Cup Cakes 1 1 2 190 - 200 180 - 190 18 - 20 (35 cakes)
Fruit Cake 3 2 3 175 - 190 165 - 180 35 - 45
Jam Tarts 2 2 3 185 - 200 185 - 200 40 - 50
Nut Cake 3 2 3 190 - 200 180 - 190 40 - 45
Scones 1 1 2 190 - 230 180 - 190 17 (35 scones)
Sponge Cake 2 2 3 195 - 210 185 35 - 45
Swiss Roll 2 2 3 195 - 200 185 - 200 35 - 45
Pastries
Brioches 3 2 3 190 - 200 180 - 190 25 - 30
Cookies 2 2 180 165 20
Pastry 3 2 3 220 - 240 190 - 220 18
Puff Pastry 3 2 3 230 - 250 200 - 230 10 - 15
Pizza and Bread
Bread 3 3 235 - 250 215 - 230 40 - 50
Muffins 3 2 205 - 220 185 - 200 25 - 35
Pizza 2 2 215 - 230 195 - 210 20 - 30
Baked Pasta
Lasagne 2 2 3 185 - 200 165 - 180 30 - 40
Macaroni 2 2 3 225 - 240 205 - 200 35 - 45
Pasta Bake 2 2 3 225 - 240 205 - 200 35 - 45
Vegetable Bake 2 2 3 185 - 200 165 - 180 30 - 40
Baked in foil 2 1 2 3 215 - 230 195 - 210 20 - 25
Fillets or Steak 2 1 2 3 175 - 190 155 - 170 15 - 20
Roast 2 1 2 3 195 - 210 175 - 190 25 - 30
Stewed Fish 2 1 2 3 180 - 190 165 - 180 15 - 20
Roast Meats
Beef 1kg 3 2 3 4 220 - 250 200 - 220 50 - 60
Lamb 1kg 3 2 3 4 190 - 220 180 - 200 50 - 60
Pork 1kg 3 2 3 4 190 - 220 180 - 200 60 - 80
Veal 1kg 3 2 3 4 190 - 220 180 - 200 60 - 80
Roast Poultry
Chicken 3 2 3 4 205 - 215 195 - 210 40
Duck 3 2 3 4 210 - 220 195 - 210 120 - 180
Goose 3 2 3 4 210 - 220 195 - 210 120
Turkey 3 2 3 4 215 - 230 195 - 210 220
Roast Game
Rabbit 3 2 3 4 215 - 235 200 - 220 40
Deer 3 2 3 4 90 - 220 180 - 200 50 - 60
Pheasant 3 2 3 4 205 - 215 195 - 210 40 - 50

OVEN OPERATION NOTES
The cooking information provided is intended purely as a guideline. Modify them to suit your experience, eating
habits and personal taste.
The times indicated in the table do not include the preheating of the oven, which is always recommended. The
times and temperature indicated refer to average quantities of food - meats = 1/1.5kg; dough for confectionary,
pizza, bread = 0.5/0.8kg.
Information in brackets with regards to shelves indicates the shelf to use when cooking several dishes together. All
ovens are different, and experimentation and use of the various cooking functions will determine the most effective
way to use the oven to suit your cooking style. When cooking on different shelves simultaneously put all containers
in the centre of the shelves.
Baking trouble shooting
Problem Cause Solution
Cooking Unevenly
Burning on Top
Burning on Bottom
Meat and potatoes not
browning
Cakes have a hard split
crust and seem over
cooked
Cakes sunk in middle and
seem under cooked
Wrong location in oven
Wrong size tray
Heat variations in oven
Oven not preheated
Oversized baking tins
Food too close to the top of the oven
Temperature is set too high
Baking tins to large or dark in colour
Food too low in the oven
Oven door being opened too often.
Poor heat distribution on the food
Temperature set too high
Food position too high in the oven
Cake tin is too deep
Cake tin is dark in colour
Temperature set too low
Baking time too short
Door was opened too early
Place food in the centre of the oven.
Try alternatives
Rotate food during cooking
Wait for oven to reach temperature first
Use correct sized tins
Place in the centre of the oven
Reduce the temperature setting
Use correct sized silver colour tins
Place the food onto a wire rack in the pan
to allow for heat to surround the food
Reduce the cooking temperature
Cook on a lower shelf height
Change to a correct size tin
Change to a silver colour tin
Increase the temperature
Increase the cooking time
Do not open the door until late in the cycle
A standard inclusion with some 90cm models is a stainless steel air fryer basket. The basket uses the movement of
hot air in the oven to distribute even heat around the food being cooked.
Select the fan forced function on the electric oven
AIR FRYER BASKET
The air fryer basket cooks any frozen food such as oven fries or fish fillets
perfectly. Cook following the normal directions on the packet.
Rather than turning the food while cooking just give the basket a shake part
way through the cycle. Use the middle shelf and place the grill tray on the shelf
below to catch crumbs. Use oven mits to handle the basket as it becomes hot.
Experiment with other foods such as fresh vegetables and try
filling the grill tray with water to add steam.
18

ELECTRIC GRILLING
Your cooker has an electric grill within the oven
compartment.
The oven door must be closed during grill operation. If
the oven has been on, always wait a few minutes before
switching on the grill. The grill element is an infrared
type, which provides an even controlled heat. When the
grill is on an indicator light will come on.
TIP: Using an oven shelf with a drip tray below filled
with some water will avoid smoke build-up coming from
burnt fat and at the same time assist to keep the food
moist.
The grill function is selected on the oven function
selector knob.
Select the temperature of the grill using the temperature
selection control knob. Preheat the grill for 3 minutes
prior to introducing the food.
Never leave the kitchen when grilling as the cooking
is fast and needs to be monitored. There is an overide
sensor that shuts the grill off in the event of a flare up
during cooking.
Selecting the right baking dish
Black baking dishes transfer heat differently to silver
baking dishes. If you are burning the under side of cakes
and biscuits try changing the colour of baking tray to
silver.
COOKER CLEANING AND MAINTENANCE
Do not use strong detergents to clean your cooker.
Many detergents or cleaning products will mark stainless
steel. The oven and hob must be kept clean, as a
buildup of fat constitutes a fire risk. A really great tip is
to wipe the oven down with something like a baby wipe
each time you cook, and the oven will rarely need a
major clean.
Every 3 to 4 years your cooker should be thoroughly
checked by an authorised service technician.
1.Cleaning of Stainless Steel:
In order that your cooker retains its new appearance,
care should be taken to protect the stainless steel
finish. Never use gritty or abrasive sponges. We
recommend stainless steel cleaners. Stubborn residues
can be removed by soaking in hot water. Stains can
be prevented by using a clean cloth soaked in warm
water before a spillage becomes cold or dries up. Acid
materials like milks, vinegar, citrus juice can damage
the most resistant surfaces. If a spill occurs wipe it up
immediately.
2. Oven Cleaning:
Oven spills should be cleaned straight away. Leaving
spills can also cause permanent damage to the enamel
and make it extremely hard to remove later. A non-
caustic oven cleaner is recommended such as non-
caustic “Mr. Muscle” to clean the the oven only. Do not
use abrasive scourers, sponges or cleaning products.
Wipe the oven out regularly while the oven is still warm
using hot soapy water and a soft cloth or even a baby
wipe. The removal of side shelves supports makes
cleaning easier.
3. Knobs and Control Panel:
All knobs are removable. Clean behind the knobs and
the control panel to prevent grease and grime build up
that can cause jamming of the knobs/gas taps etc. The
stainless steel panel should be cleaned with a damp
cloth, do not use anything abrasive.
4. Cleaning the Oven Door:
The outer glass should be cleaned with a specific glass
and mirror cleaner. Soapy water will work to remove
stains but may leave streaks. Do not use abrasive
or aggressive cleaners on aluminium door frame
components, if in doubt contact Glem Gas for advice.
5. Removal of Side Shelf Supports - All models:
The sides racks are removed by simply flexing the
bottom rail off the support and unhooking at the top. To
replace just reverse the procedure.
6.Grill Element/Top Element -
This element must never be sprayed with any
detergents. A damp cloth and a bottle brush can be
used to clean the roof of the oven and the element itself.
Never soak the element and always dry it after cleaning
as not doing so can lead to deterioration. It is important
to clean this area regularly as fats spit up and stick to the
ceiling and element while grilling and they may burn,
smoke and give out unpleasant odors.
19
RANGEHOODS
Rangehoods and overhead exhaust fans must be
installed according to manufacturers’ instructions.
Rangehoods should be installed not lower than 550mm
above the cooktop. Minimum Clearances
When the upright cooker is installed abutting a side or
rear wall, the wall must be of non-combustible material,
eg ceramic tiles. The following minimum clearances to
combustible materials must be observed:
MINIMUM CLEARANCE FROM COOKTOP TO SIDE
WALL MUST BE 200mm
INSTALLATION INSTRUCTIONS -
Licensed qualified installers only
These instructions are for the use of a qualified installer
only! It is the owner’s responsibility to ensure that the
installer is correctly licensed to complete installation.
Faulty installations will not be serviced, and you may
be subject to a call out fee if the cooker is found to be
incorrectly installed.
Statutory regulations
This appliance is to be installed in accordance with
the manufacturer’s installation instructions, applicable
building codes and electrical wiring regulations. Consult
SAA wiring rules as appropriate.
Safety Warnings About Installation
• The cooker must be installed and serviced by a
qualified technician.
• A certificate of compliance must be supplied by the
installer and kept by the customer.
• All packaging materials including protective plastic
film must be removed before the cooker is installed.
• The anti-tilt brackets must be fitted.
• The cooker must not be lifted or pulled using the
oven handle.
• The cooker must be serviced and checked at
least every 3 to 4 years depending on usage and
condition.
KITCHEN CABINET WARNING
IF THE INCORRECT CABINET MATERIAL IS USED, OR
THE DESCRIBED CLEARANCES NOT COMPLIED WITH
DURING INSTALLATION THEN THE CABINETS MAY
BE DAMAGED DUE TO HEAT TRANSFER FROM THE
COOKER.
THE COOKERS ARE MADE TO MEET AUSTRALIAN
STANDARDS FOR HEAT TRANSFER AND SURFACE
TEMPERATURES.
ALL ADJACENT SURFACES TO THE COOKER MUST
BE ABLE TO WITHSTAND NORMAL HEAT TRANSFER
FROM THE COOKER, AND THE HEAT RELEASED
FROM THE OVEN DOOR WHEN OPENED.
GLEMGAS ACCEPTS NO RESPONSIBILITY FOR
CABINET DAMAGE FOR DAMAGE TO KITCHEN
CUPBOARDS AND DRAWERS DUE TO INCORRECT
INSTALLATION.
IF IN DOUBT INSTALL A HEAT SHIELD SUCH AS A
THIN SHEET OF FIBROUS CEMENT BETWEEN THE
COOKER AND THE CUPBOARDS.
550 minimum
20
OVERALL DIMENSIONS OF THE COOKER
Depth over cabinet 600 mm - all models
Height over cooktop is either 760 mm or 750 mm (check
model)
Height over splashback is either 810 mm or 820 mm
(check model)
Width of cooker models:
86 series width 798 mm
96 series width 898 mm
Height of legs must be added to the overall cooker
dimensions
Height adjustable legs add up to 160 mm on 60, 70, 80
and 90 cm cookers.
REFER TO RELEVANT PAGE IN THIS MANUAL FOR
INSTALLATION OF ANTI TILT BRACKETS
NOTE: Glem Gas Australasia Pty Ltd and their appointed
agents decline any responsibility in the case of an
installation not according to these instructions.
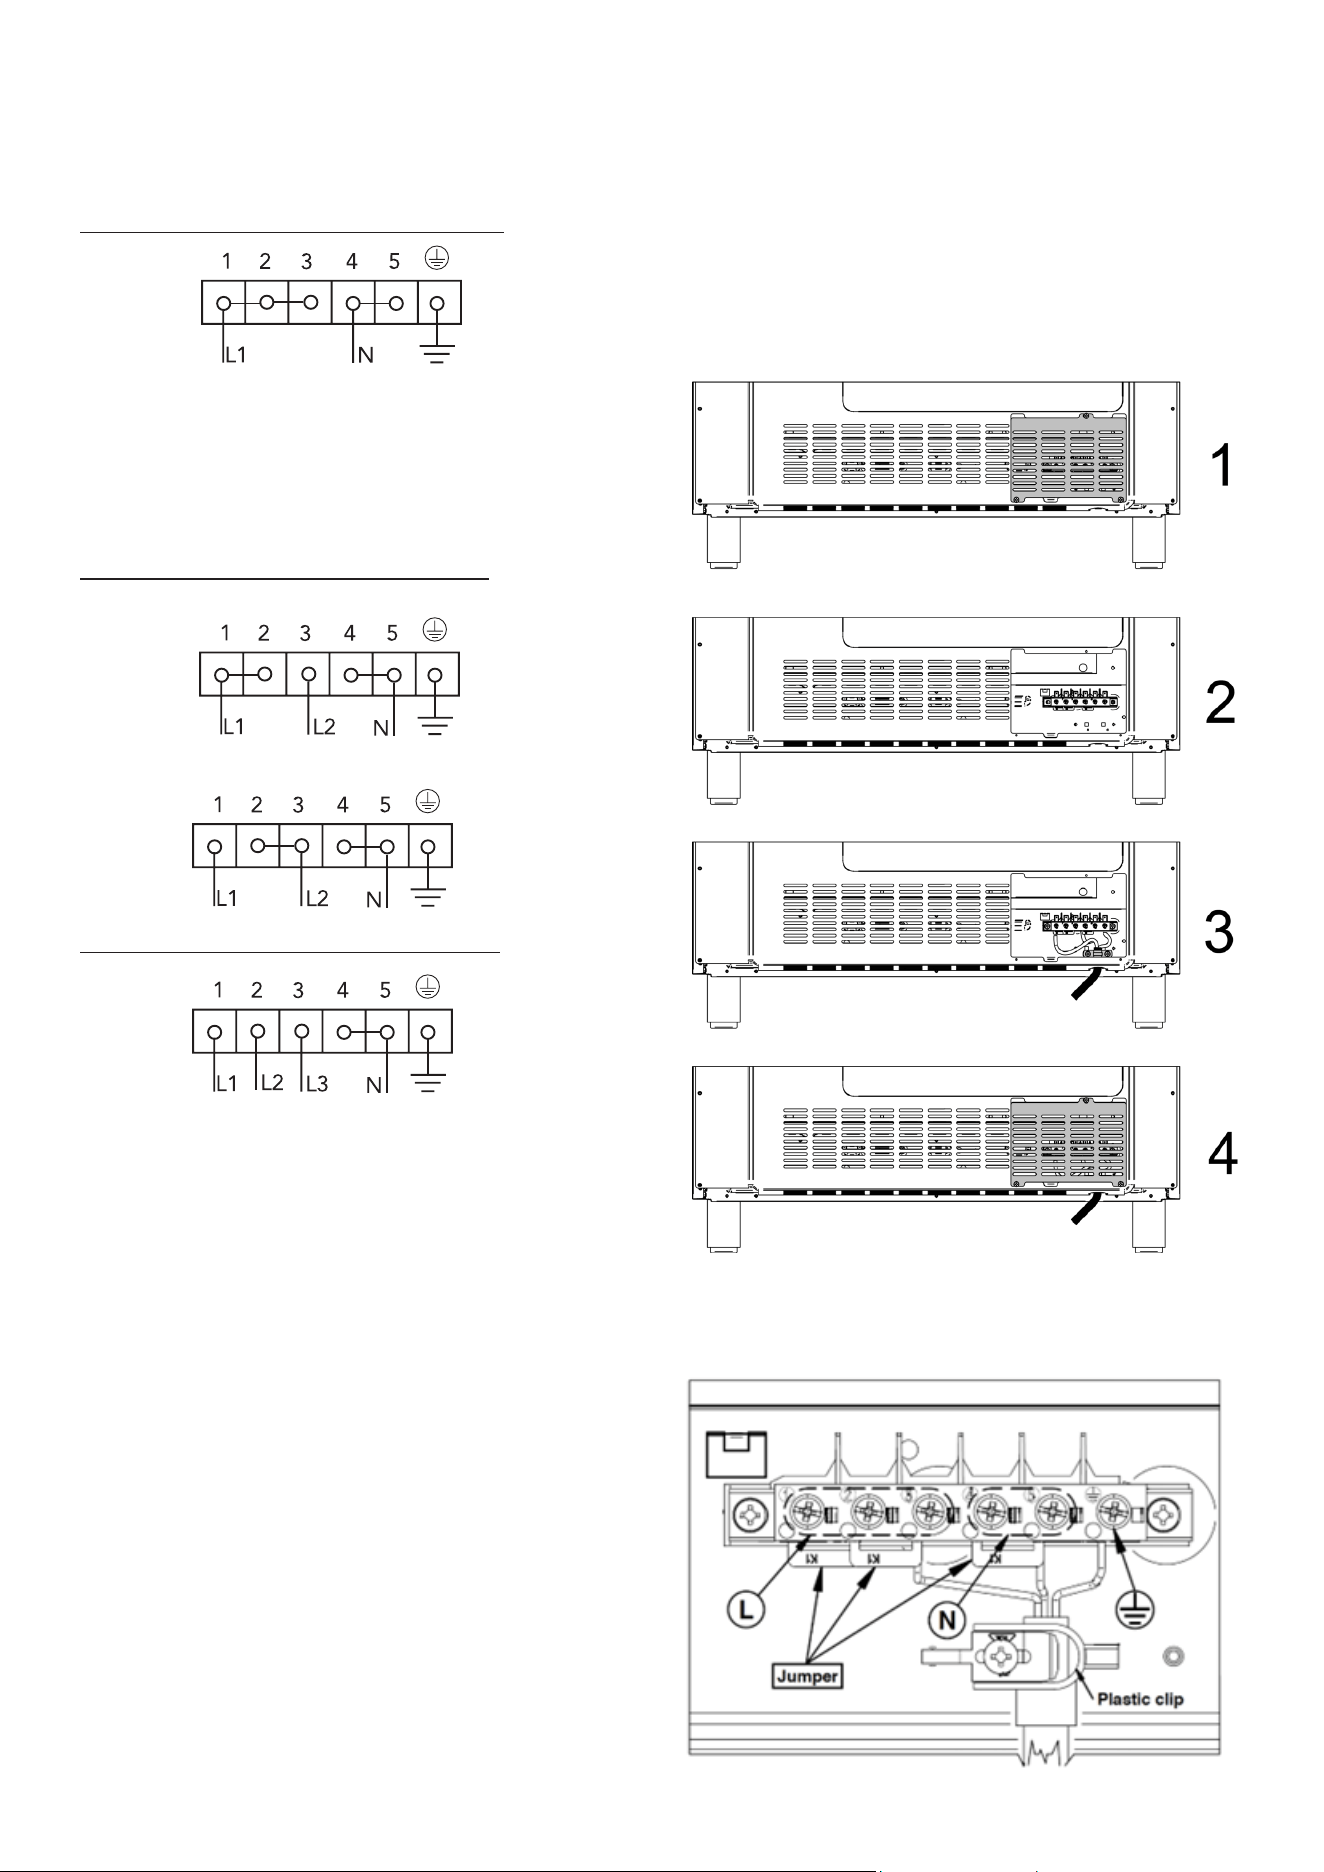
ELECTRICAL CONNECTION
The power supply should be connected in compliance
with the relevant standard, or a single-pole circuit
breaker. The appliance can work in the following modes:
1. Single phase connection 220-240V 1N
Three core cable requirements:
80cm & 90cm cookers power cable size: 3 x 6 sq mm
60cm & 70cm cookers power cable size: 3 x 10 sq mm
Note: These power cables are sized taking into account
the coincidence factor (in compliance with standard EN
60335-2-6).
2. Two phase connection 380-415V 2N
(a) Power cables size: 4 x 4 sq mm (four-core cable)
(b) Power cables size: 4 x 4 sq mm (four-core cable)
3. Three phase connection 380-415V 3N
Power cables size: 5 x 2.5 sq mm (five-core cable)
Connecting to services and commissioning
This appliance must be installed to the mains power
supply only by a qualified electrician who is familiar
with and adheres to the local requirements and
supplementary regulations of your electricity supplier.
Do not carry out the installation yourself.
RISK OF ELECTRIC SHOCK.
This appliance must be installed according to all codes
and regulations of:
• Electrical supply authorities;
• Building regulations;
• Local government and council authorities;
• AS/NZS 3000.
Before connecting the hob to the mains power supply,
check that:
• The domestic wiring system is suitable for the power
drawn by the hob.
• The voltage corresponds to the value given in the
rating plate
• The power supply cable sections can withstand the
load specified on the rating plate.
21
Hard wiring detail
1. Remove the terminal black access panel at the rear
of the cooker.
2. Make connections to terminals, using K1 jumpers to
configure the right connections (see below).
3. Engage wires into retaining clip. Secure the retaining
clip with the screw.
4. Replace the rear access panel.

PRODUCT WARRANTY
Thank you for choosing a Glem Gas or Emilia Appliance.
The purchase of this appliance is an important invest-
ment in your home and so to protect your investment
we urge you to complete the registration card attached,
please return it immediately.
The benefits conferred by this warranty are in addition
to all other conditions and warranties in respect of this
product which the consumer may have under the Trade
Practices Act 1874 of the Commonwealth of Australia
and/or similar State or Territory Laws.
Our goods come with guarantees that cannot be ex-
cluded under the Australian Consumer Law. You are
entitled to a replacement or refund for a major failure if
the goods fail to be of acceptable quality. You are also
entitled to have the goods repaired or replaced if the
goods fail to be of acceptable quality and failure does
not amount to a major failure.
Glem Gas Australasia Pty Ltd warrants, this appliance to
be free from defects in workmanship and materials for a
period of:
a) Where the appliance is intended to be used and is
used for DOMESTIC USE - 24 MONTHS FROM DATE OF
DELIVERY TO THE ORIGINAL PURCHASER.
b) Where the appliance is intended to be used and is
used for COMMERCIAL USE - NO WARRANTY APPLIES.
THIS IS A DOMESTIC APPLIANCE ONLY.
Glem Gas Australasia Pty Ltd, during the period of
warranty, will at its option, and subject to the terms and
conditions stated below, repair or replace free of charge
this appliance or any component part, which upon exam-
ination by Glem Gas Australasia Pty Ltd. is found to be
defective.
22
To connect the product to the mains power supply, do
not use adapters, reducers, or branching devices, as
they can cause overheating and fire.
The power supply cable must not touch any hot parts
and must be positioned so that its temperature will not
exceed 75˚C at any point.
Note - Check with an electrician whether the
domestic wiring system is suitable without
alterations. Any alterations must only be made by a
qualified electrician.
1. If the appliance is being connected directly to the
mains supply, an omni-polar circuit breaker must be
installed with a minimum gap of 3mm between the
contacts.
2. The installer must ensure that the correct electrical
connection has been made and that it complies with
safety regulations.
3. Your household power supply must meet the power
consumption of the appliance.
4. When the socket is not accessible for the user or a
fixed electrical connection of the appliance is required,
an all-pole disconnecting device must be incorporated
during installation. Disconnecting devices are switches
with a contact opening distance of at least 3 mm.
These include LS-switches, fuses and protectors (EN
30335). Read the information on the nameplate and the
connection diagram before connecting the appliance to
the mains. The electricity supply must be performed via
a 16A automatic cut-out. If in doubt, always contact the
local building authorities and consult the relevant legal
provisions.

This Warranty shall not apply:
a) If the rating plate has been removed or the serial
number or other details on it have been removed or
rendered illegible.
b) If the appliance has been subjected to misuse, abuse
accident or want of care.
c) If the appliance has been installed, operated or main-
tained contrary to the instructions supplied by Glem Gas
Australasia Pty Ltd.
d) If any defect or failure is due to connection to an inad-
equate or faulty power supply.
e) If damage is caused by foreign objects in or on the
appliance or by reason of its use for purposes other than
that for which it was delivered.
f) If a repair has been made or attempted by the
purchaser.
g) If you live more than 80 kilometres outside the service
area of the Glem Gas Australasia service agents, this
warranty does not cover the cost of transport of the
appliance for service or the service agent’s travelling
time.
Light Globes
This warranty does not cover any glass damage or
replacement of light bulbs.
Glass doors
This warranty does not cover oven door breakage.
Induction cooktop breakage
This warranty does not cover breakage, cracking or
damage of the induction cooktop.
Consquential Damage or Economic Loss
Glem Gas Australasia Pty Ltd accepts no liability
pursuant to this Warranty for any cost or consequential
damage or economic loss whether direct or indirect,
to any person or property, arising from breakdown or
failure of this appliance or any part thereof, and no
responsibility is to be implied or accepted over and
above the replacement value of the product.
Replacement Parts
Parts covered under warranty that need replacing i.e.
seals, knobs and burner caps.
These can be posted to the customer to put on at their
discretion.
This Warranty is given by Glem Gas Australasia Pty Ltd
and no other person or organisation is authorised to vary
its provisions and conditions.
Complete this section and keep for your own record.
Appliance Type _______________________________
Model No ____________________________________
Serial No______________________________________
Purchased From _______________________________
Date of purchase ______________________________
Please complete the section below and return to:
Glem Gas Australasia Pty Ltd, P.O. Box 63 Blaxcell PO
South Granville NSW 2142
or Scan/Photograph and email to [email protected]m.au
Cooker Model number ________________________
Serial number ________________________________
Retailer name and address and date of purchase
_______________________________________________
_______________________________________________
Customer’s Details
Name and address
______________________________________________
_______________________________________________
Postcode ___________________
Email address _________________________________
Tel. number ___________________________________
Installer’s Details
Installer’s name _______________________________
Installer’s signature ___________________________
Installer’s License number ______________________
Installer’s compliance number __________________
Installer’s telephone __________________________
23

GLEM GAS AUSTRALASIA PTY. LTD.
P.O.Box 63 Blaxcell PO South Granville NSW 2142
Phone: 1 300 307 917
Email [email protected] for service
www.glemgas.com.au