THANK YOU
USE AND CARE GUIDE
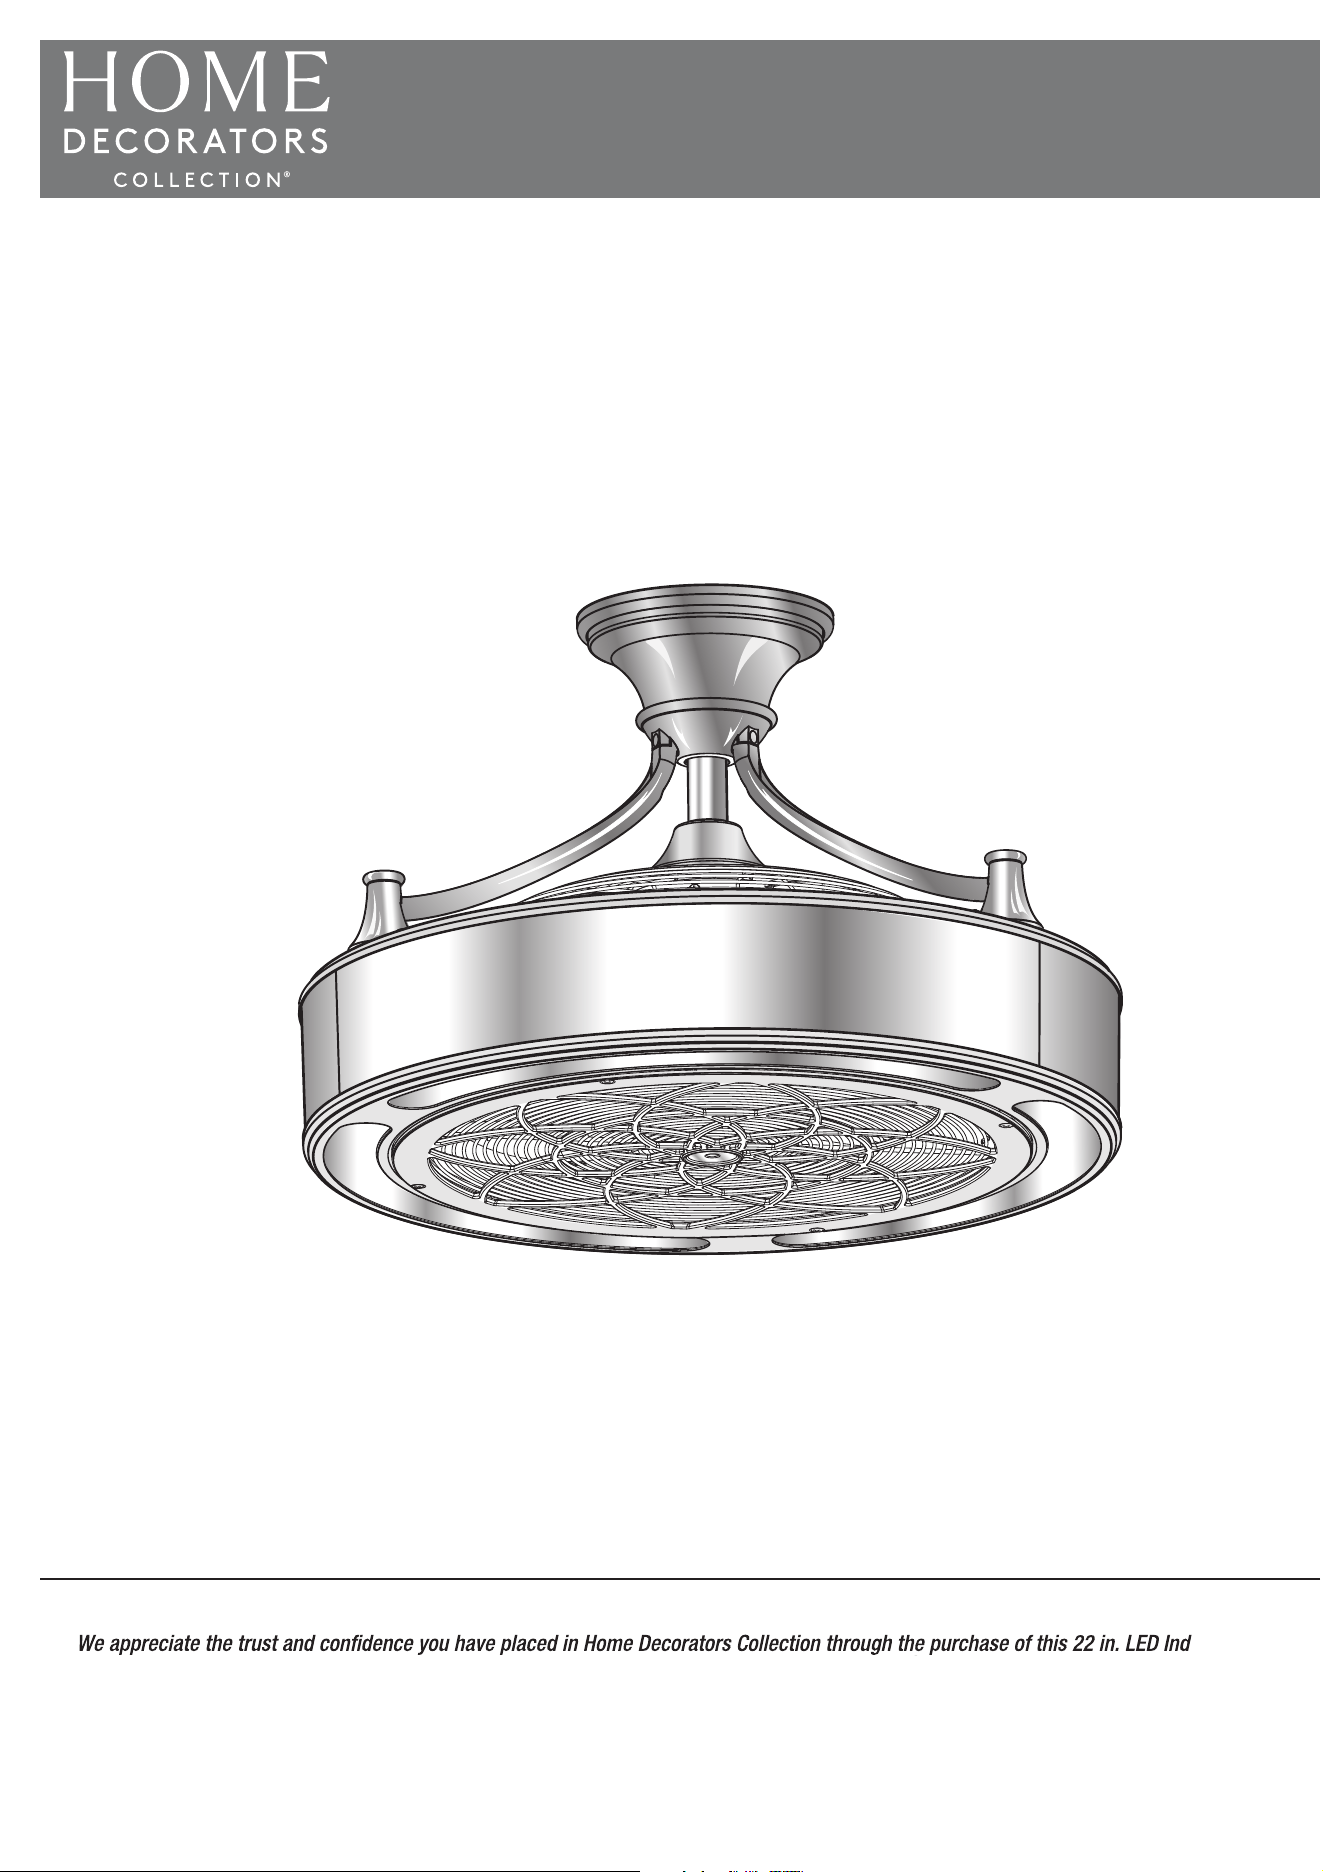
22 in. LED Indoor/Outdoor Ceiling Fan with Remote Control
Questions, problems, missing parts? Before returning to the store,
call Home Decorators Collection Customer Service
8 a.m. - 7 p.m. , EST, Monday - Friday, 9 a.m.- 6 p.m. , EST, Saturday
1-800-986-3460
HOMEDEPOT.COM/HOMEDECORATORS
Item # 000-000
Model # SFL-550L1, SFL-550L2, SFL-550L3, SFL-550L4
120V 60Hz 0.61A Weight of the fan with light kit: approx. 20.86lbs
Ceiling Fan with Remote Control . We strive to continually create quality products designed to enhance your home. Visit us online to see our
full line of products available for your home improvement needs. Thank you for choosing Home Decorators Collection!
,
dor/Outdoor
2
Table of Contents
Table of Contents . . . . . . . . . . . . . . . . . . . . . . . . . . . . . . . . . . .2
Safety Information . . . . . . . . . . . . . . . . . . . . . . . . . . . . . . . . . .2
What is cover . . .
What is not covered
.
W arranty . . . . . . . . . . . . . . . . . . . . . . . . . . . . . . . . . . . . . . . . . .3
Pre-Installation
. . . . . . . . . . . . . . . . . . . . . . . . . . . . . . . . . .
. . .
Package Contends
. . . . . . . . . . . . . . . . . . . . . . . . . . . .
. . .
Maintenance
Safety Information
Read all safety warnings and all instructions.
WARNING:
READ AND SAVE THESE INSTRUCTIONS
Use this unit only in the manner intended by the manufacturer. If you have questions, contact the manufacturer.
Before beginning installation, read and understand all instructions and safety information. Thoroughly review all
assembly information and drawings and be sure you understand the assembly requirements.
Before installing, servicing, or cleaning unit, switch power off at service panel and lock the service disconnecting means
to prevent power from being switched on accidentally.When the service disconnecting means cannot be locked, securely
fasten a prominent warning device, such as a tag, to the service panel.
Installation and wiring must be in accordance with the National Electrical Code, ANSI/NFPA 70 and all local codes.
If you are unfamiliar with or unable to comply with these requirements, have ceiling fan installed by a licensed
electrician.
When cutting or drilling into wall or ceiling, do not damage electrical wiring and other hidden utilities.
If this unit is to be installed over a tub or shower, it must be marked as appropriate for the application and be
to a GFCI (Ground Fault Circuit Interrupter) —protected branch circuit.
Do not bend the blade brackets when cleaning the fan. Do not insert foreign objects in between rotating fan blades.
Mount ceiling fan directly to a structural framing member or to a metal outlet box marked “Acceptable for Fan Support
of 35 lbs. or less. For outlet box mounting, use mounting screws provided with the outlet box.
When using an existing outlet box, make sure it is securely attached to the building structure and can support the full
support and would therefore need to be replaced. Do not use a plastic outlet box. Failure to follow this instruction
can result in serious injury or death.
Ensure power is off before beginning installation. After making the wire connections, wires should be spread apart
with the grounded conductor and the equipment grounding conductor on one side of the outlet box and the
ungrounded conductor on the other side of the outlet box. Splices should be turned upward and pushed carefully
up into the outlet box.
Always turn fan off and allow to come to a complete stop before reversing blade direction.
When installation is complete, make sure all connections are secure to prevent ceiling fan from falling.
All set screws must be checked, and retightened where necessary, before installation.
After making the wire connections, the wires should be spread apart with the grounded conductor and the
equipment-grounding conductor on one side of the outlet box and the ungrounded conductor on the other side
of the outlet box.
The splices after being made should be turned upward and pushed carefully up into the outlet box.
Save these instructions. Refer to them frequently and use them to instruct others who may use this product. If you
loan someone this product, loan them these instructions also.
. . . . . . . . . . . . . . . . . . . . . . . . . . . . . . .
. . . . . . . . . . . . . . . . . . . . . . . . . . . . . . .
4
Tools Required
Hardware Included . . . . . . . . . . . . . . . . . . . . . . . . . . . . . . .
. . . . . . . . . . . . . . . . . . . . . . . . . . . . . . . . . . . .
. . . . . . . . . . . . . . . . . . . . . . . . . . . . . . . . .
5
5
Installation 6-14
Operation . . . . . . . . . . . . . . . . . . . . . . . . . . . . . . . . . . . . .
15-16
. . . . . . . . . . . . . . . . . . . . . . . . . . . . . . . . . . . . . .
17
Trouble Shooting . . . . . . . . . . . . . . . . . . . . . . . . . . . . . . . . . . . 18
3
3
3
3 HOMEDEPOT.COM/HOMEDECORATORS
Please contact 1-800-986-3460 for further assistance.
Warranty
1-YEAR LIMITED WARRANTY
WHAT IS COVERED
The manufacturer warrants this product to be free from manufact uring defects in the material and workmanship under
norchaser.mal use for a period of one year after the date of purchase by the original purchaser.
WHAT IS NOT COVERED
Contact the Customer Service Team at 1-800-986-3460 or visit www.HOMEDEPOT.com/HOMEDECORATORS.
This warranty does not cover transit damages. This warranty does not apply to damages from accident, misuse, alteration of
any kind to the fan or where the connected voltage is more than above the nameplate voltage. This warranty does not apply
to the finish on any portion of the product. Serving performed by unauthorized persons shall render the warranty invalid.
This warranty is not responsible for damages or any kind, including accident and consequential damages. Some states do not
allow the exclusion or limitation of the incidental or consequential damages, so the above exclusion or limitation my not
apply to you. This warranty gives you specific legal rights, and you may also have other rights which vary from state to state
Pre-Installation
WARNING: Items in this section are not assembled to the product by the manufacturer and require installation. Use of a
product that may have been improperly assembled could result in serious personal injury.
Remove all parts from the package, and verify that everything listed in this Package Contents section are present.
Inspect the product carefully to make sure no breakage or damage occurred during shipping.
Do not discard the packing material until you have carefully inspected and satisfactorily operated the product.
WARNING: s, unplug or disconnect the appliance from the power
supply before the fan installation, cleaning, or servicing.
WARNING: To reduce the risk of personal injury, do not bend the blade brackets when installing the brackets, balancing the
blades, or cleaning the fan. Do not insert foreign objects in between rotating fan blades.
WARNING: an with any solid-state speed control device.
WARNING: If any parts are damaged or missing, do not operate this product until the parts are replaced. Use of this product with
damaged or missing parts could result in serious personal injur y.
WARNING: Do not attempt to modify this product or create accessories not recommended for use with his product. Any such a
dous condition leading to possible serious personal injury.
4
Pre-Installation (continued)
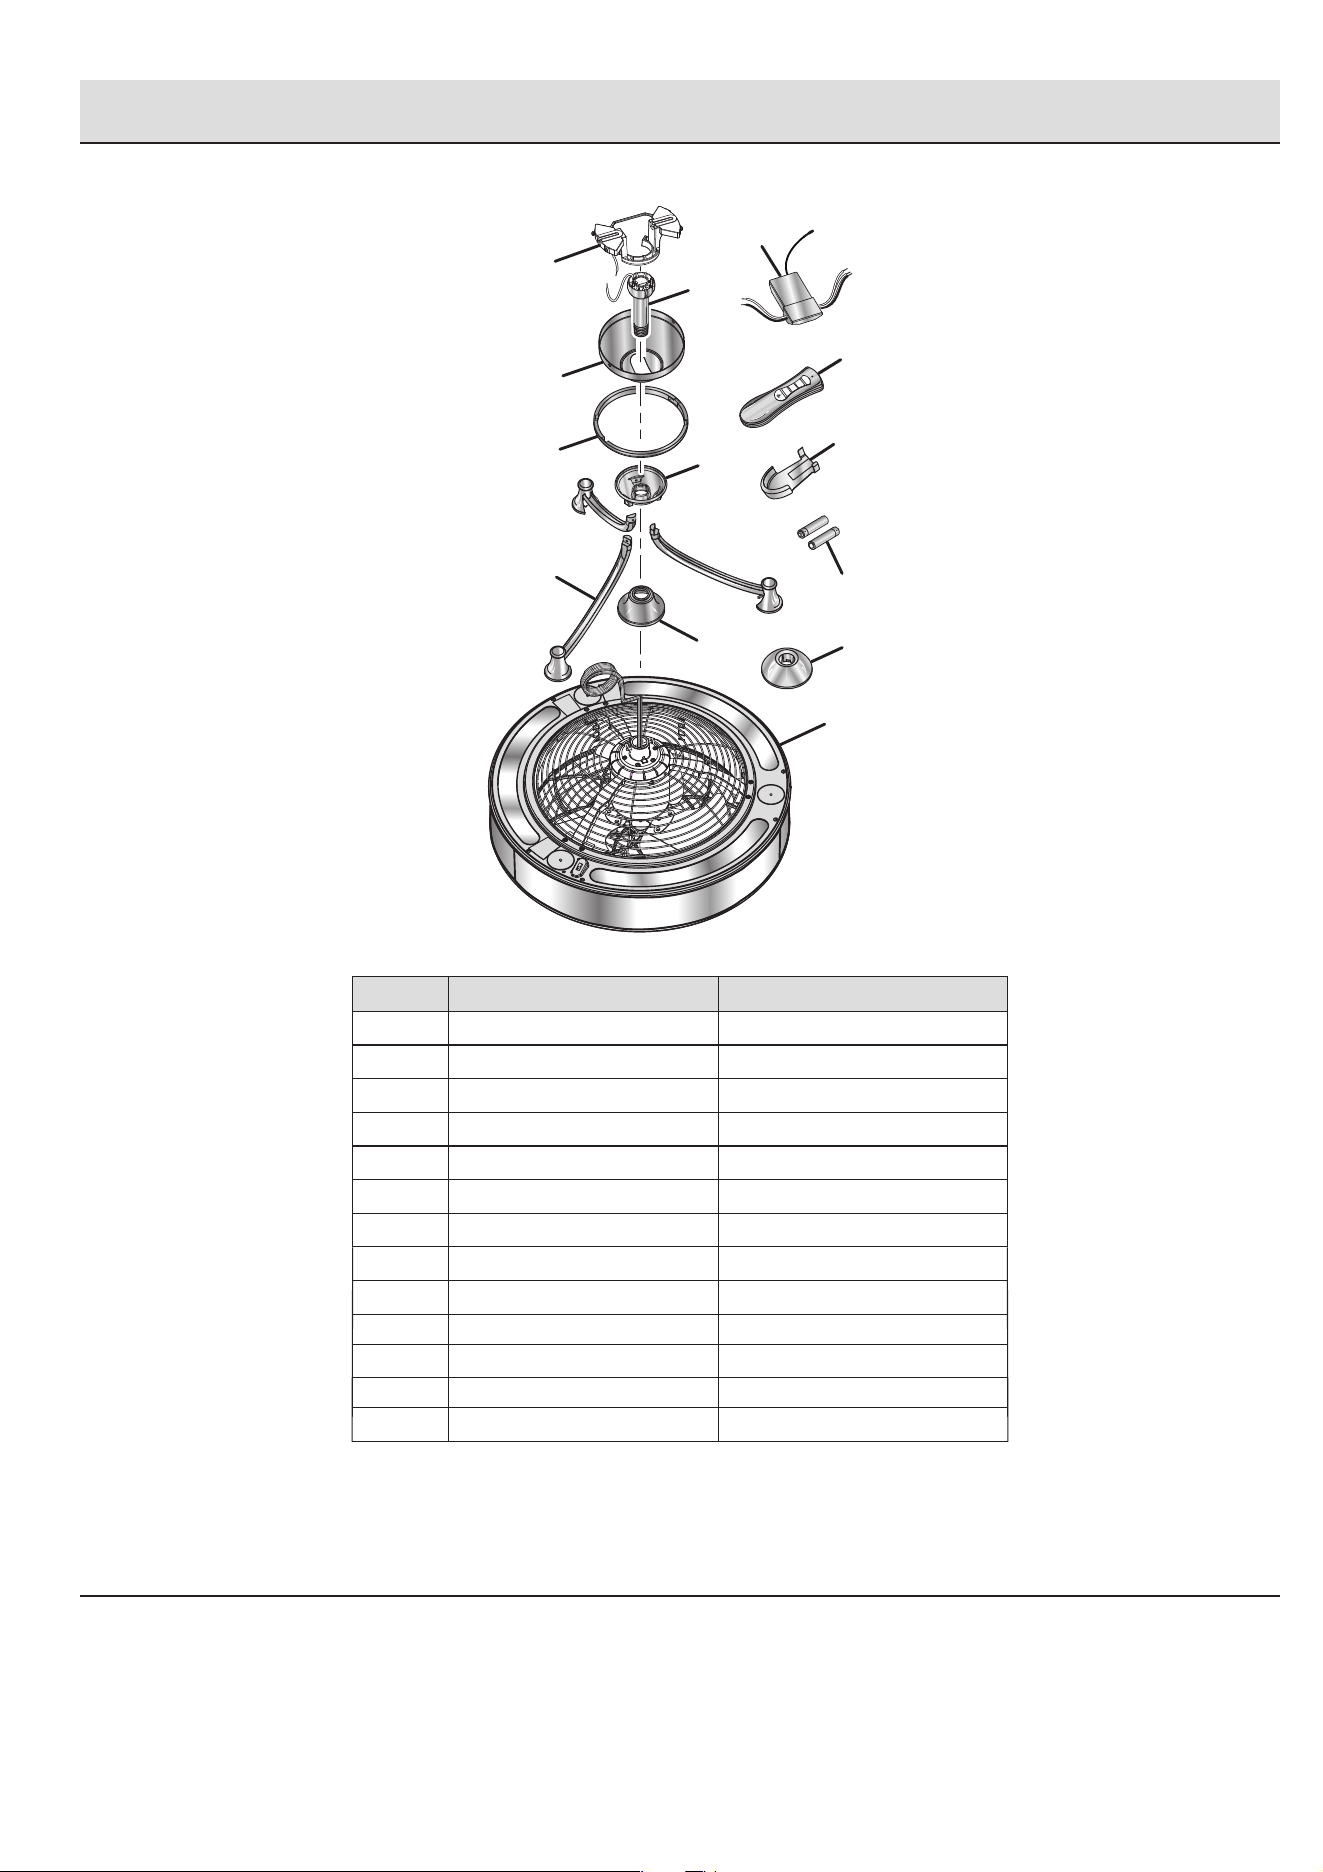
PACKAGE CONTENTS
Part Description Quantity
A
Mounting bracket assembly*
1
B 1
C 1
D 1
E 1
F 3
G 1
H 1
HI
MED
LOW
OFF
A
B
C
J
I
F
M
H
G
E
K
D
L
I
1
J
K
L
M
1
1
2
1
Pivot ball/downrod assembly
Canopy*
Canopy screw cover ring*
Center arm support
Decorative legs
Motor housing cap
Fan assembly
Remote receiver
Remote control
Remote control wall mount
Remote control AAA batteries
Center arm support cover**
*For packing purposes, the mounting bracket assembly, canopy, and caopy screw cover ring are assembled together.
**This part is used only if ceiling fan using an extended-length downrod longer than one provided in this package.
HOMEDEPOT.COM/HOMEDECORATORS
Please contact 1-800-986-3460 for further assistance.
5
Pre-Installation (continued)
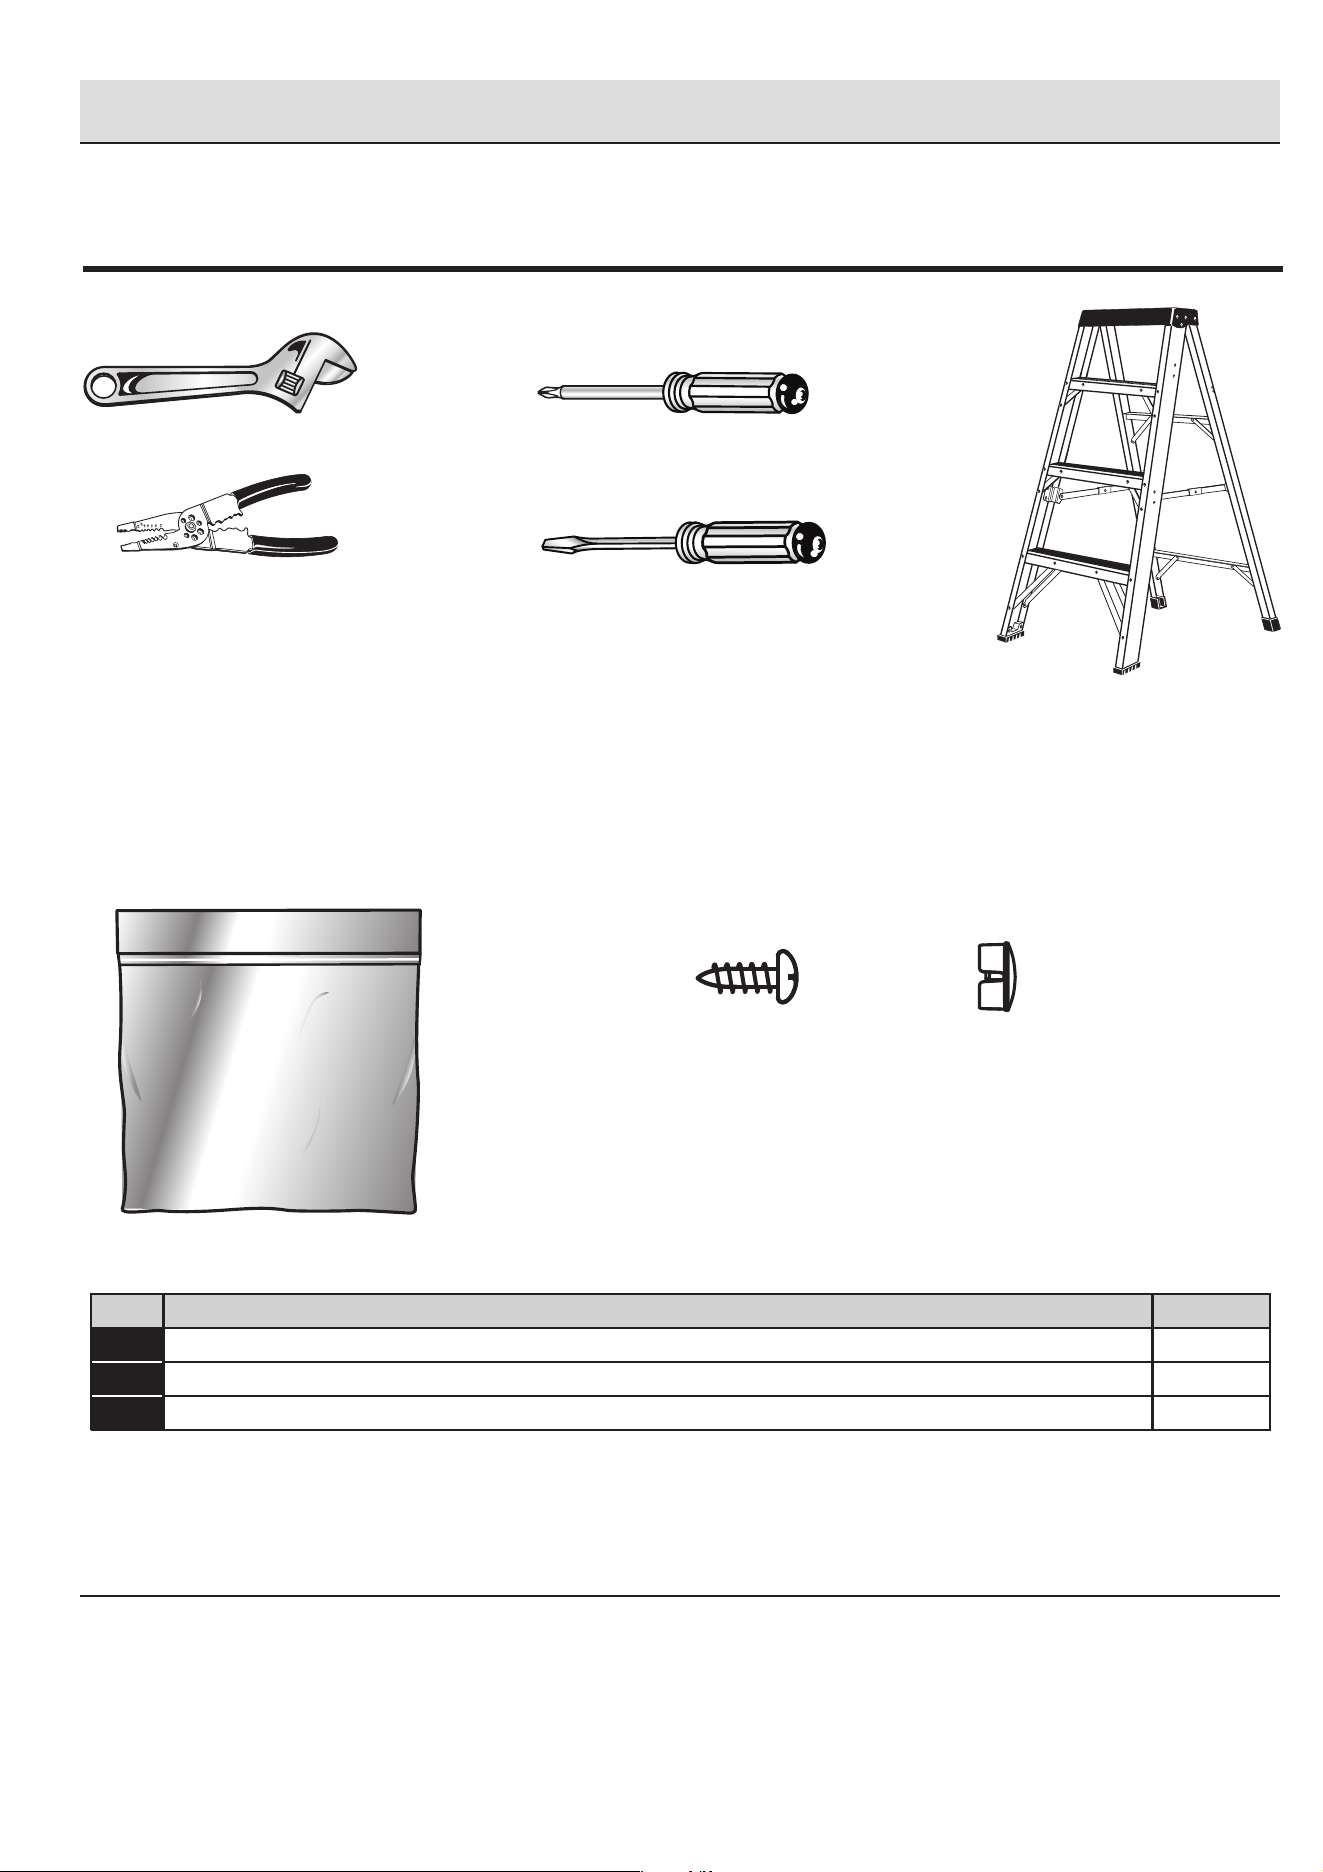
Part Description of Enclosed Installation Hardware Quantity
A Canada installation hardware bag 1
B 4
C
Phillips cap screws
4Phillips cap screw covers
A
BC
TOOLS NEEDED
Step ladder
Wire cutters/Strippers
LOOP
STRIP
WIREGAGE
PLERS
22
20
18
16
14
12
10
Phillips screwdriver
Adjustable wrench
Flat head screwdriver
HARDWARE INCLUDED
HOMEDEPOT.COM/HOMEDECOR
Please contact 1-800-986-3460 for further assistanc
6 HOMEDEPOT.COM/HOMEDECOR ATORS
Please contact 1-800-986-3460 for further assistance.
Installation
1
INSTALLING THE CEILING FAN
MOUNTING BRACKET ASSEMBLY
shock, or personal injury, turn off power to room
and wall switch by removing fuses or turning off
circuit breakers as needed before beginning
installation.
WARNING: Mount fan only to a metal outlet box
marked acceptable for fan support and use only
the mounting screws provided with the outlet
box. Plastic outlet boxes and outlet boxes
commonly used for the support of lighting
and may need to be replaced. If you are unsure
whether your outlet box is appropriate or
uncertain about the proper method for mounting
Ƒ If your installation site does not have an existing
UL-listed metal outlet box, one must be installed
before proceeding.Make sure box is mounted directly
to the building structure using ceiling joist screws
provided with the box.
Once installed, there must be at least 7 ft. clearance
between the bottom of the ceiling fan and the floor.
Ceilings taller than 8 ft. may benefit from an extended
length downrod (not included) to achieve the best
results.
NOTE: Extended-length downrods longer than 48 in.
will also require a downrod wire extension kit (not
included, available from the retailer where you
purchased your fan).
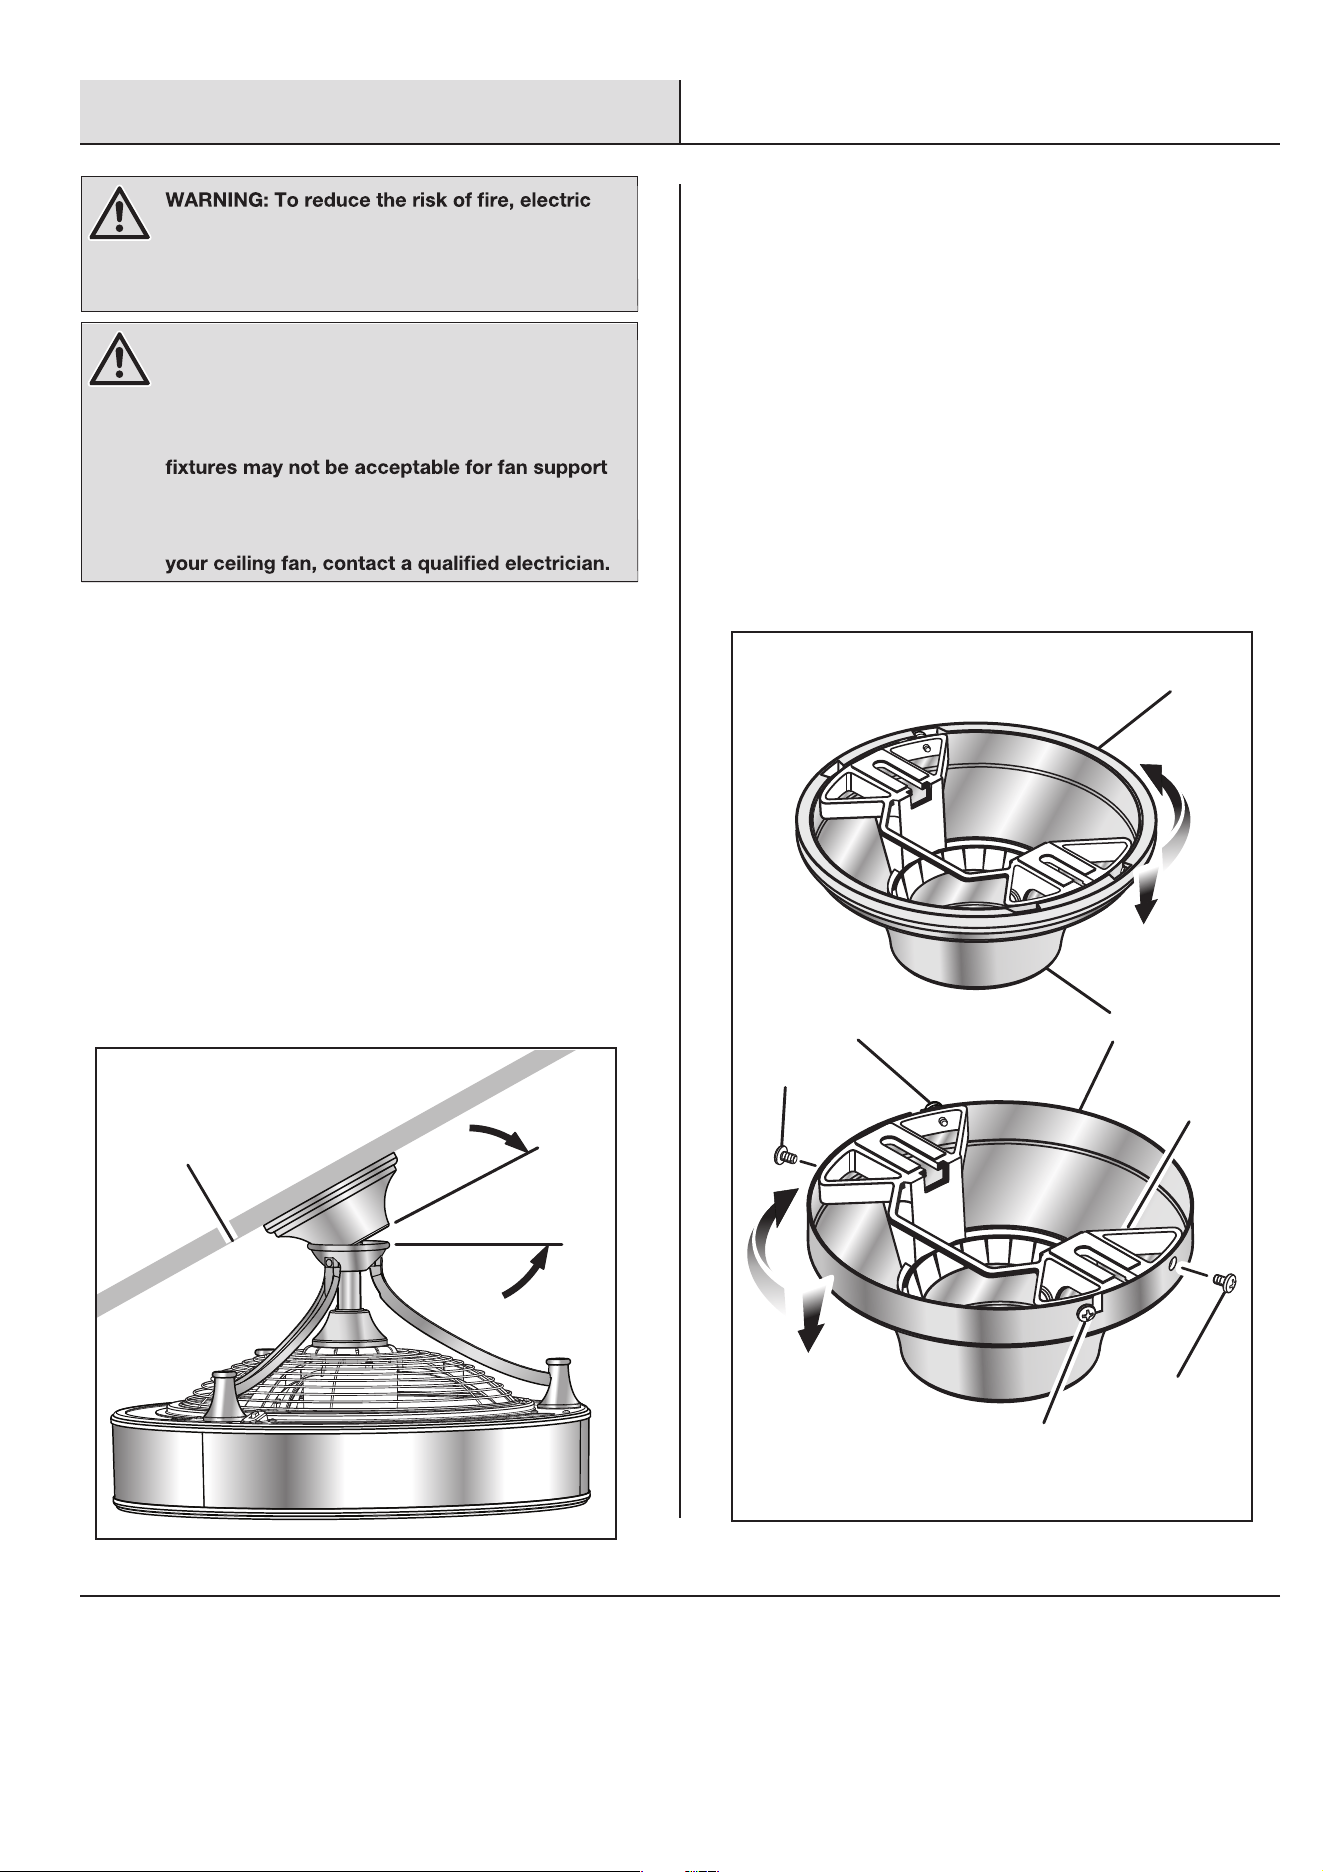
Angled ceilings must not be steeper than 30 °from
thehorizontal canopy.
Ƒ
Ƒ
30° max.
CEILING
Ƒ
The mounting bracket assembly, canopy, and the canopy
screw cover ring are assembled together for shipping
purposes. If you haven’t already done so, separate these
pieces now.
· Twist the canopy screw cover ring counterclockwise to
release.
· Loosen the two screws over the slots in the canopy.
· Remove the two screws securing the canopy to the
mounting bracket assembly, then twist the canopy
counterclockwise to release from the other two screws.
CANOPY SCREW
COVER RING
CANOPY
MOUNTING
BRACKET
SCREW
SCREW
SCREW OVER
CANOPY SLOT
SCREW OVER
CANOPY SLOT
7
Installation (continued)
2
PREPARING YOUR CEILING FAN
FOR MOUNTING
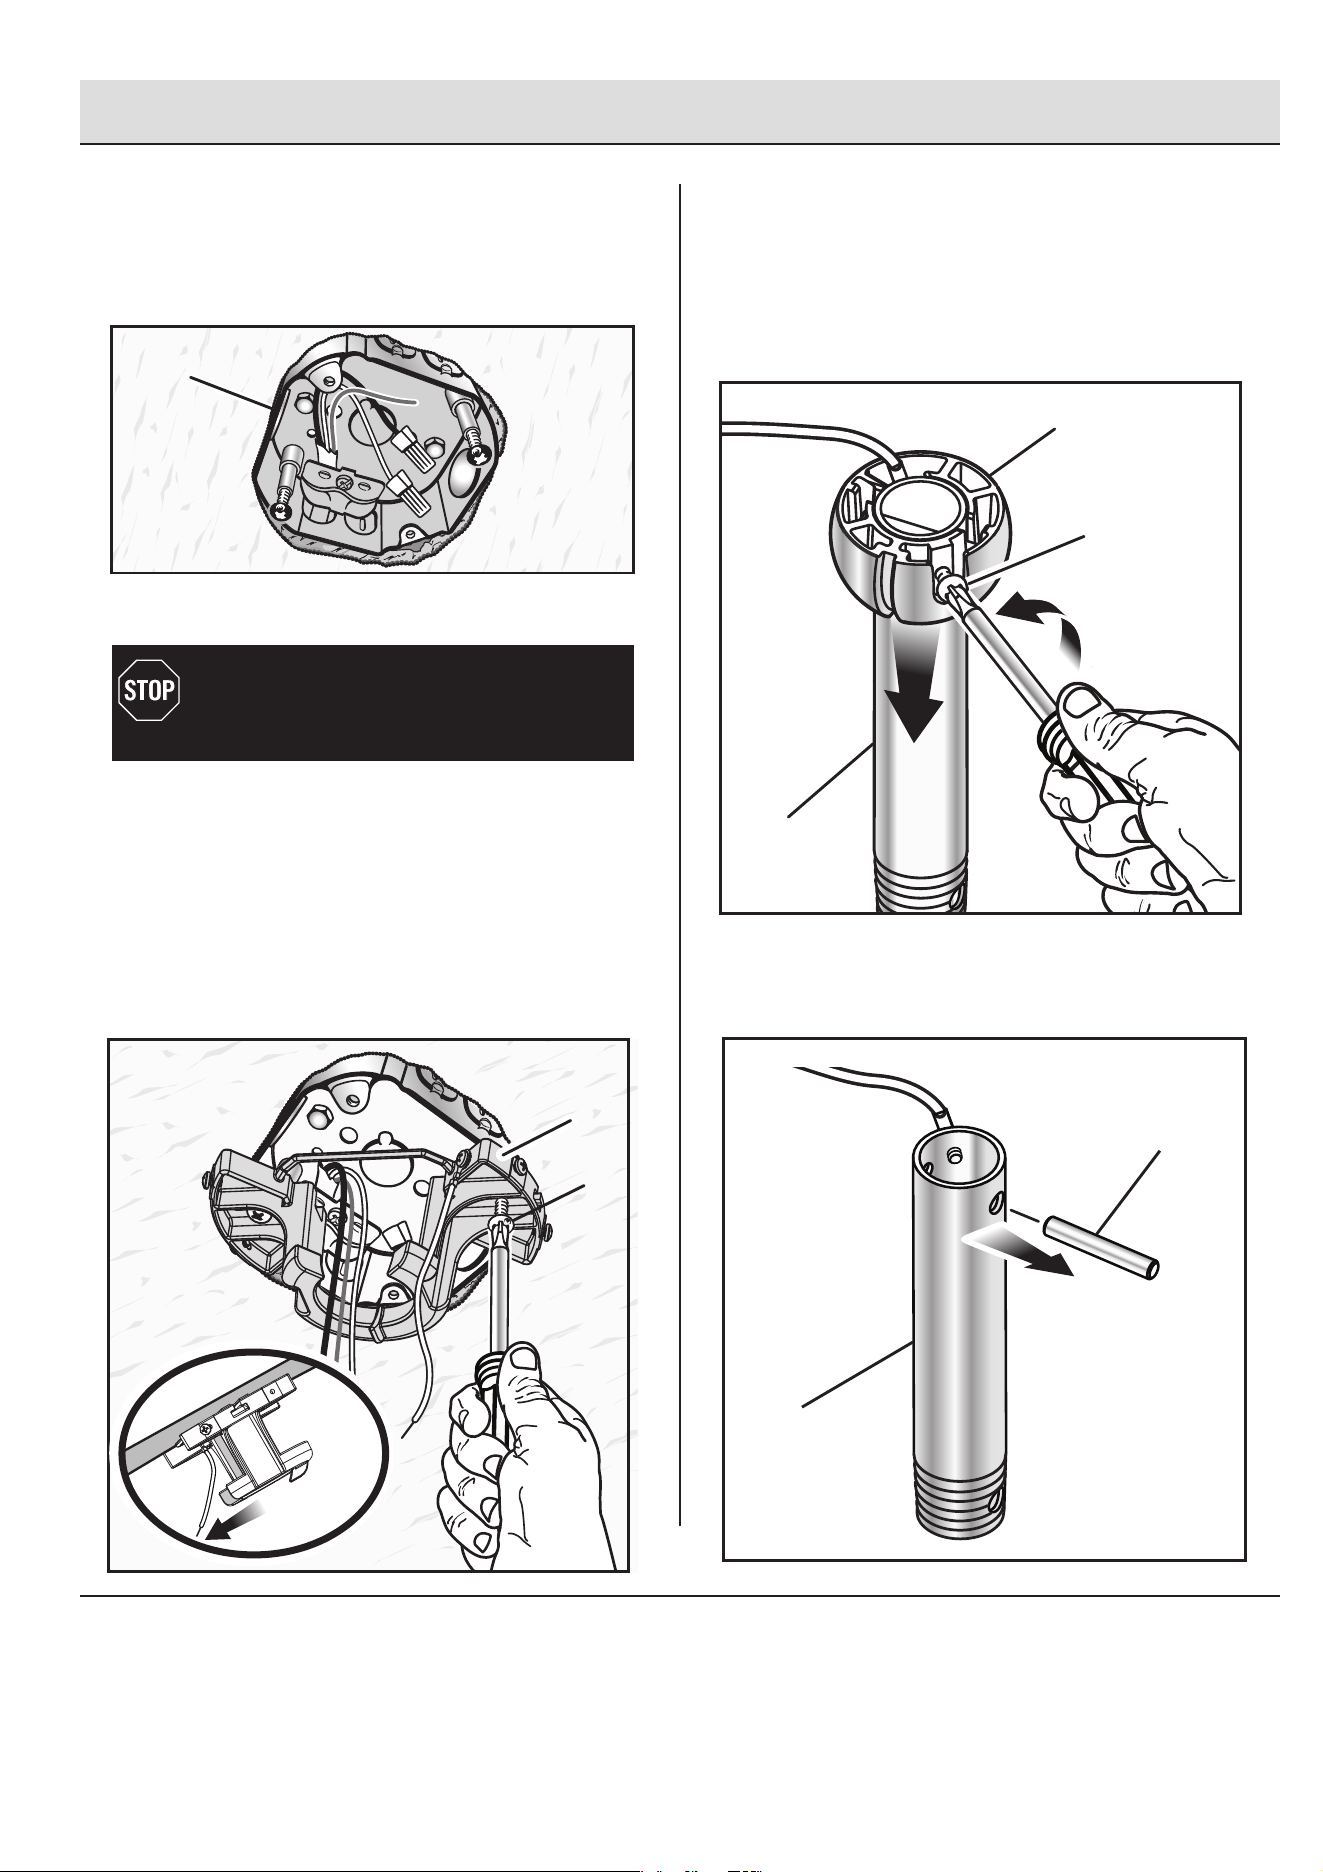
Ƒ Remove any existing ceiling fan or light where you
intend to install this ceiling fan. Verify the existing
outlet box is marked acceptable for fan support up to
35 lbs. and that it is securely fastened to the ceiling
joists.
OUTLET
BOX
For Canada installations, refer to the Canada
Installation Addendum located in the Canada
Installation Hardware Bag and install the eye
bolt or anchor assembly now.
Ƒ Using the screws provided with the outlet box, attach
the ceiling mounting bracket assembly to the electrical
box, passing the 120V electrical supply wires through
the hole in the center of the mounting bracket assembly.
NOTE: If you are installing the mounting bracket
assembly for an angled orientation, make sure the
open end of the bracket is installed facing the lower
point of the ceiling.
SCREW
CEILING
MOUNTING
BRACKET
ANGLED CEILING
OPEN END
F
ACING DOWN
ANGLED CEILING
Ƒ Loosen the screw securing the pivot ball to the downrod.
Slide the pivot ball down and off the downrod and set
aside.
PIVOT BALL
DOWNROD
SCREW
Ƒ
RETAINER PIN
DOWNROD
HOMEDEPOT.COM/HOMEDECORATORS
Please contact 1-800-986-3460 for further assistance.
Remove the retainer pin from the downrod.
8
Installation (continued)
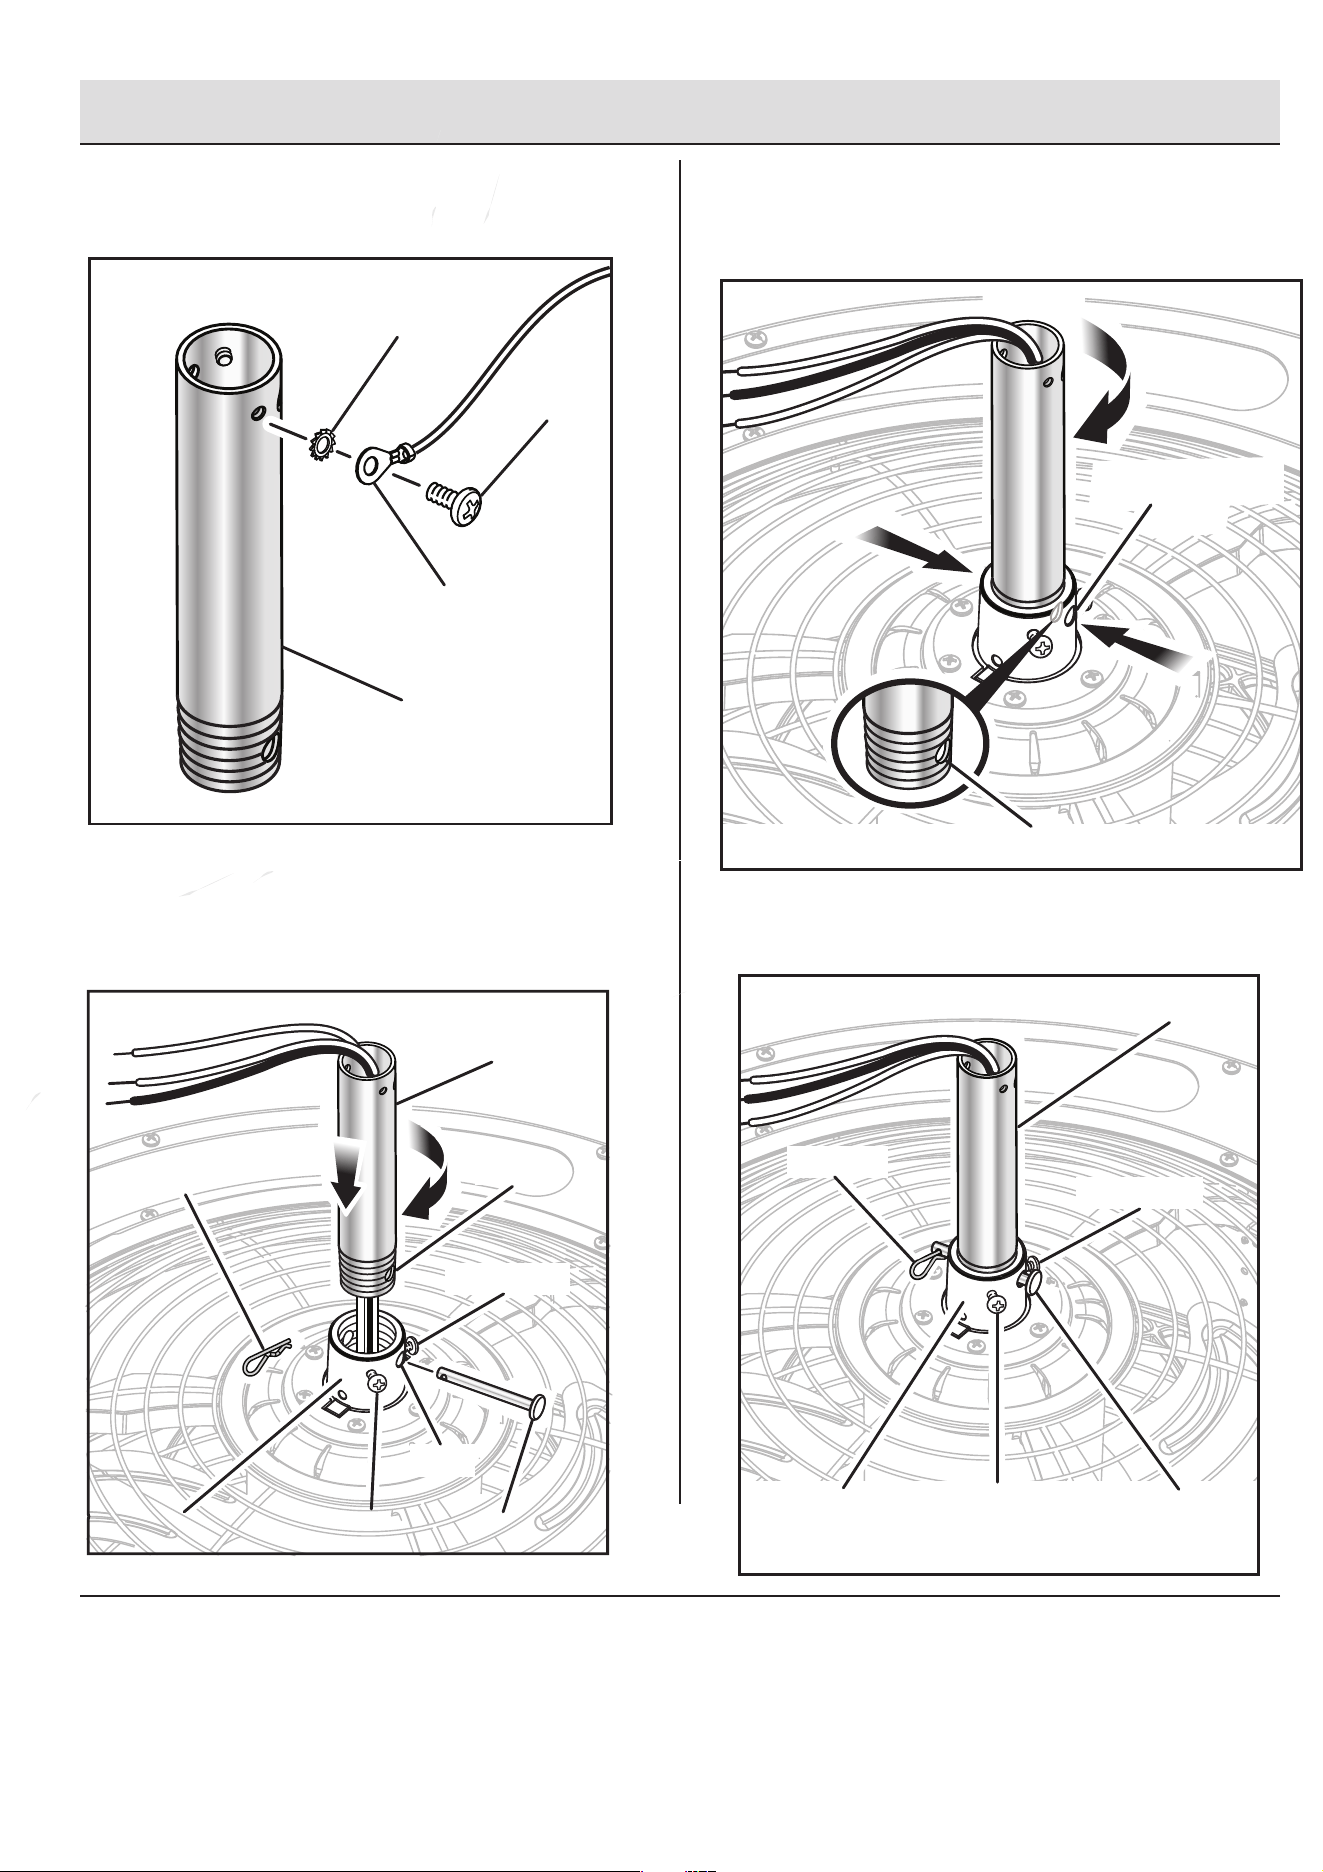
Ƒ Remove the screw and star washer securing the ground
wire terminal to the downrod. Remove the wire and set
aside.
Ƒ
Loosen (but do not remove) the lock screws securing the
downrod to the mounting collar on the fan assembly,
then remove the hitch pin and the clevis pin from the
mounting collar. Carefully feed the fan’s electrical
wiring up through the threaded end of the downrod.
Ƒ Thread the downrod into the motor housing until it bottoms
out, then back it out until the hole in the downrod aligns
with the hole in the motor housing. Be careful not to twist
the electrical wiring when tightening.
Ƒ
DOWNROD
STAR WASHER
SCREW
GROUND WIRE
TERMINAL
CLEVIS PIN
MOUNTING COLLAR
DOWNROD
HITCH PIN
LOCK SCREW
HOLE
HOLE
LOCK SCREW
DOWNROD HOLE
MOTOR HOUSING
HOLE
LOCK SCREW
DOWNROD
HITCH PIN
MOTOR HOUSING
CLEVIS PIN
LOCK SCREW
HOMEDEPOT.COM/HOMEDECORATORS
Please contact 1-800-986-3460 for further assistance.
Install the clevis pin through the holes in the motor housing and the
downrod, then reinsert hitch pin. Retighten the lock screws to
secure.
9
Installation (continued)
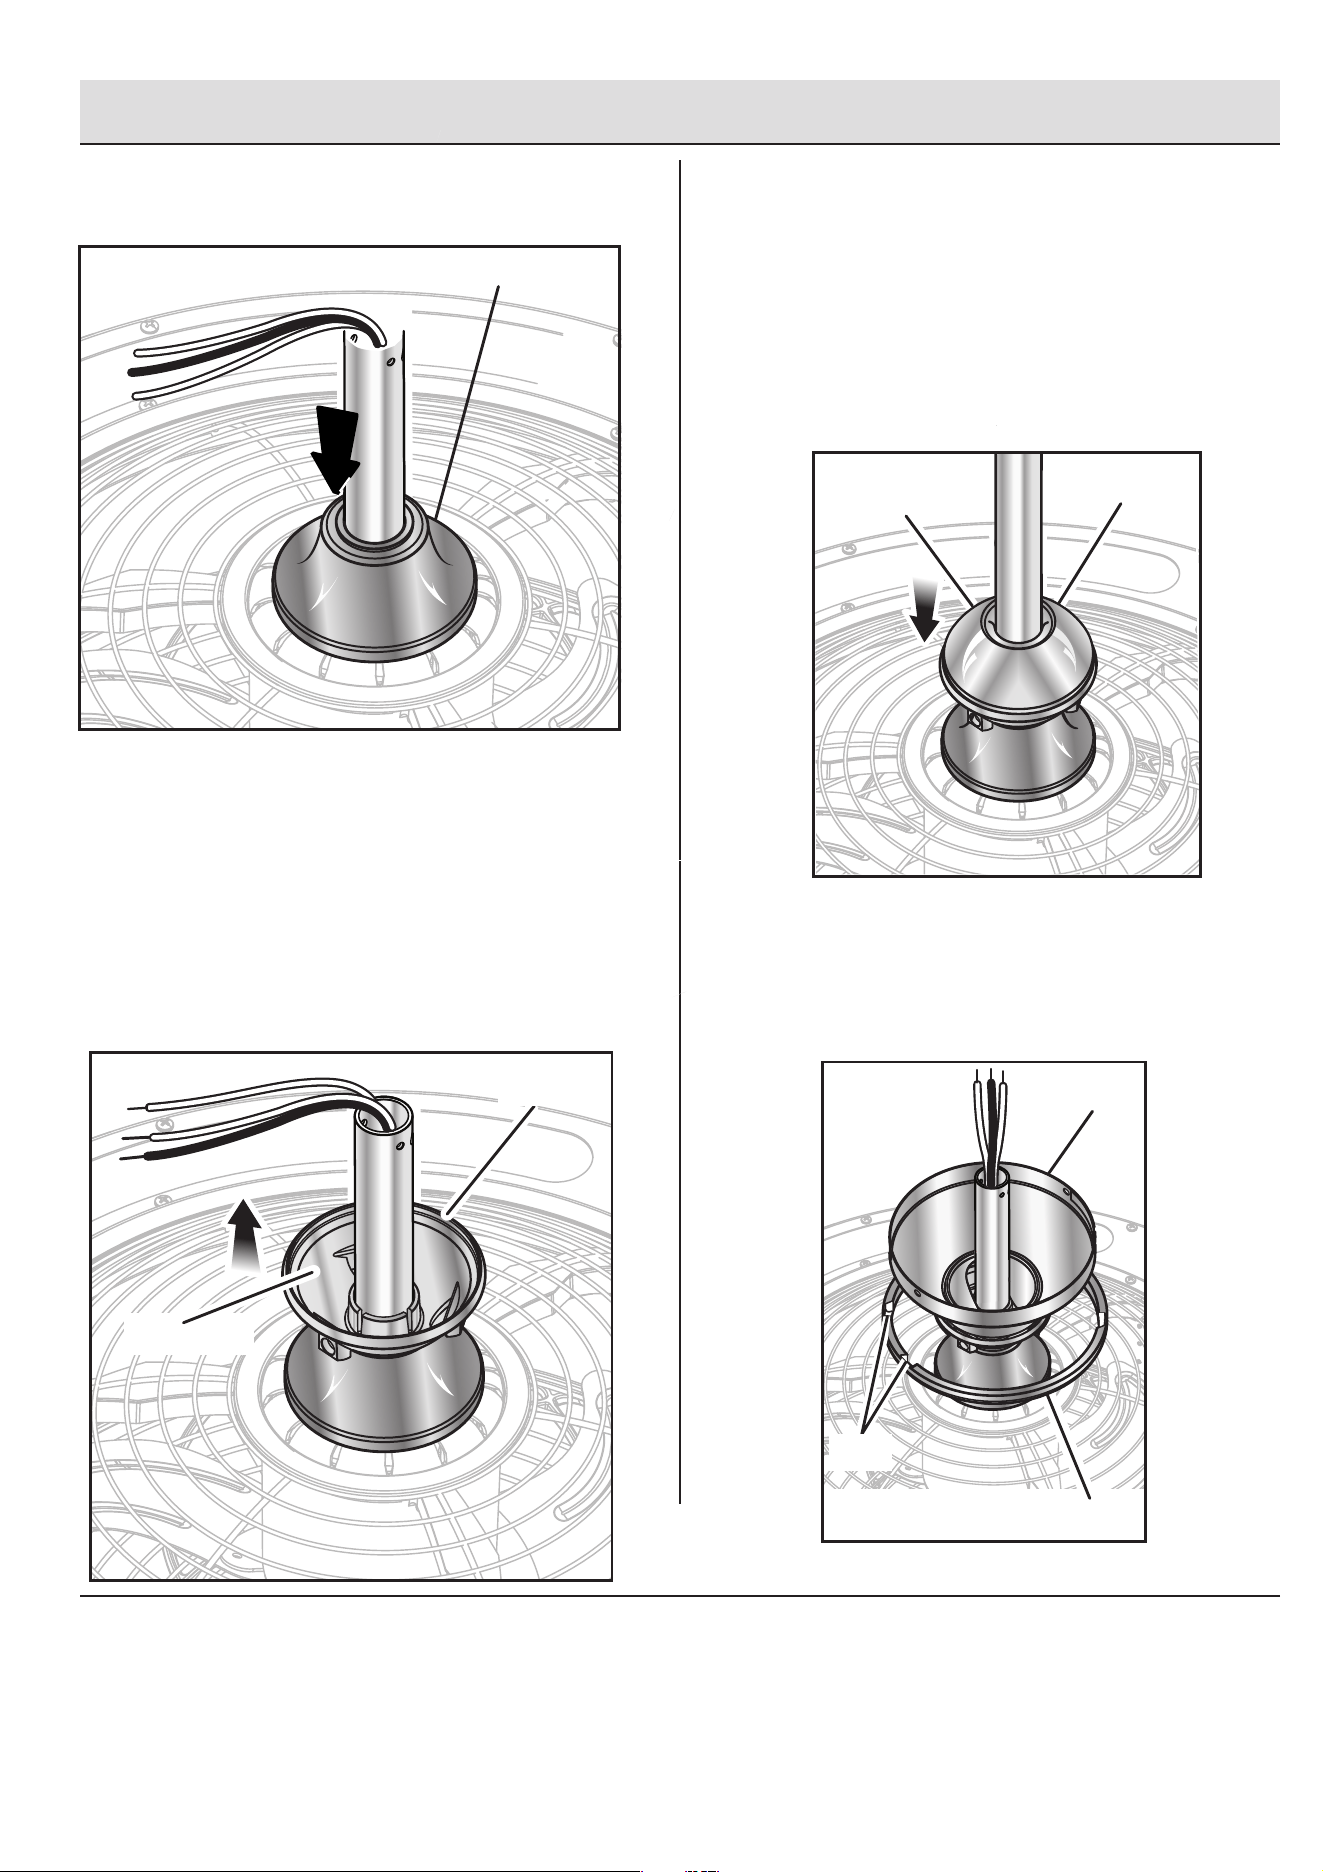
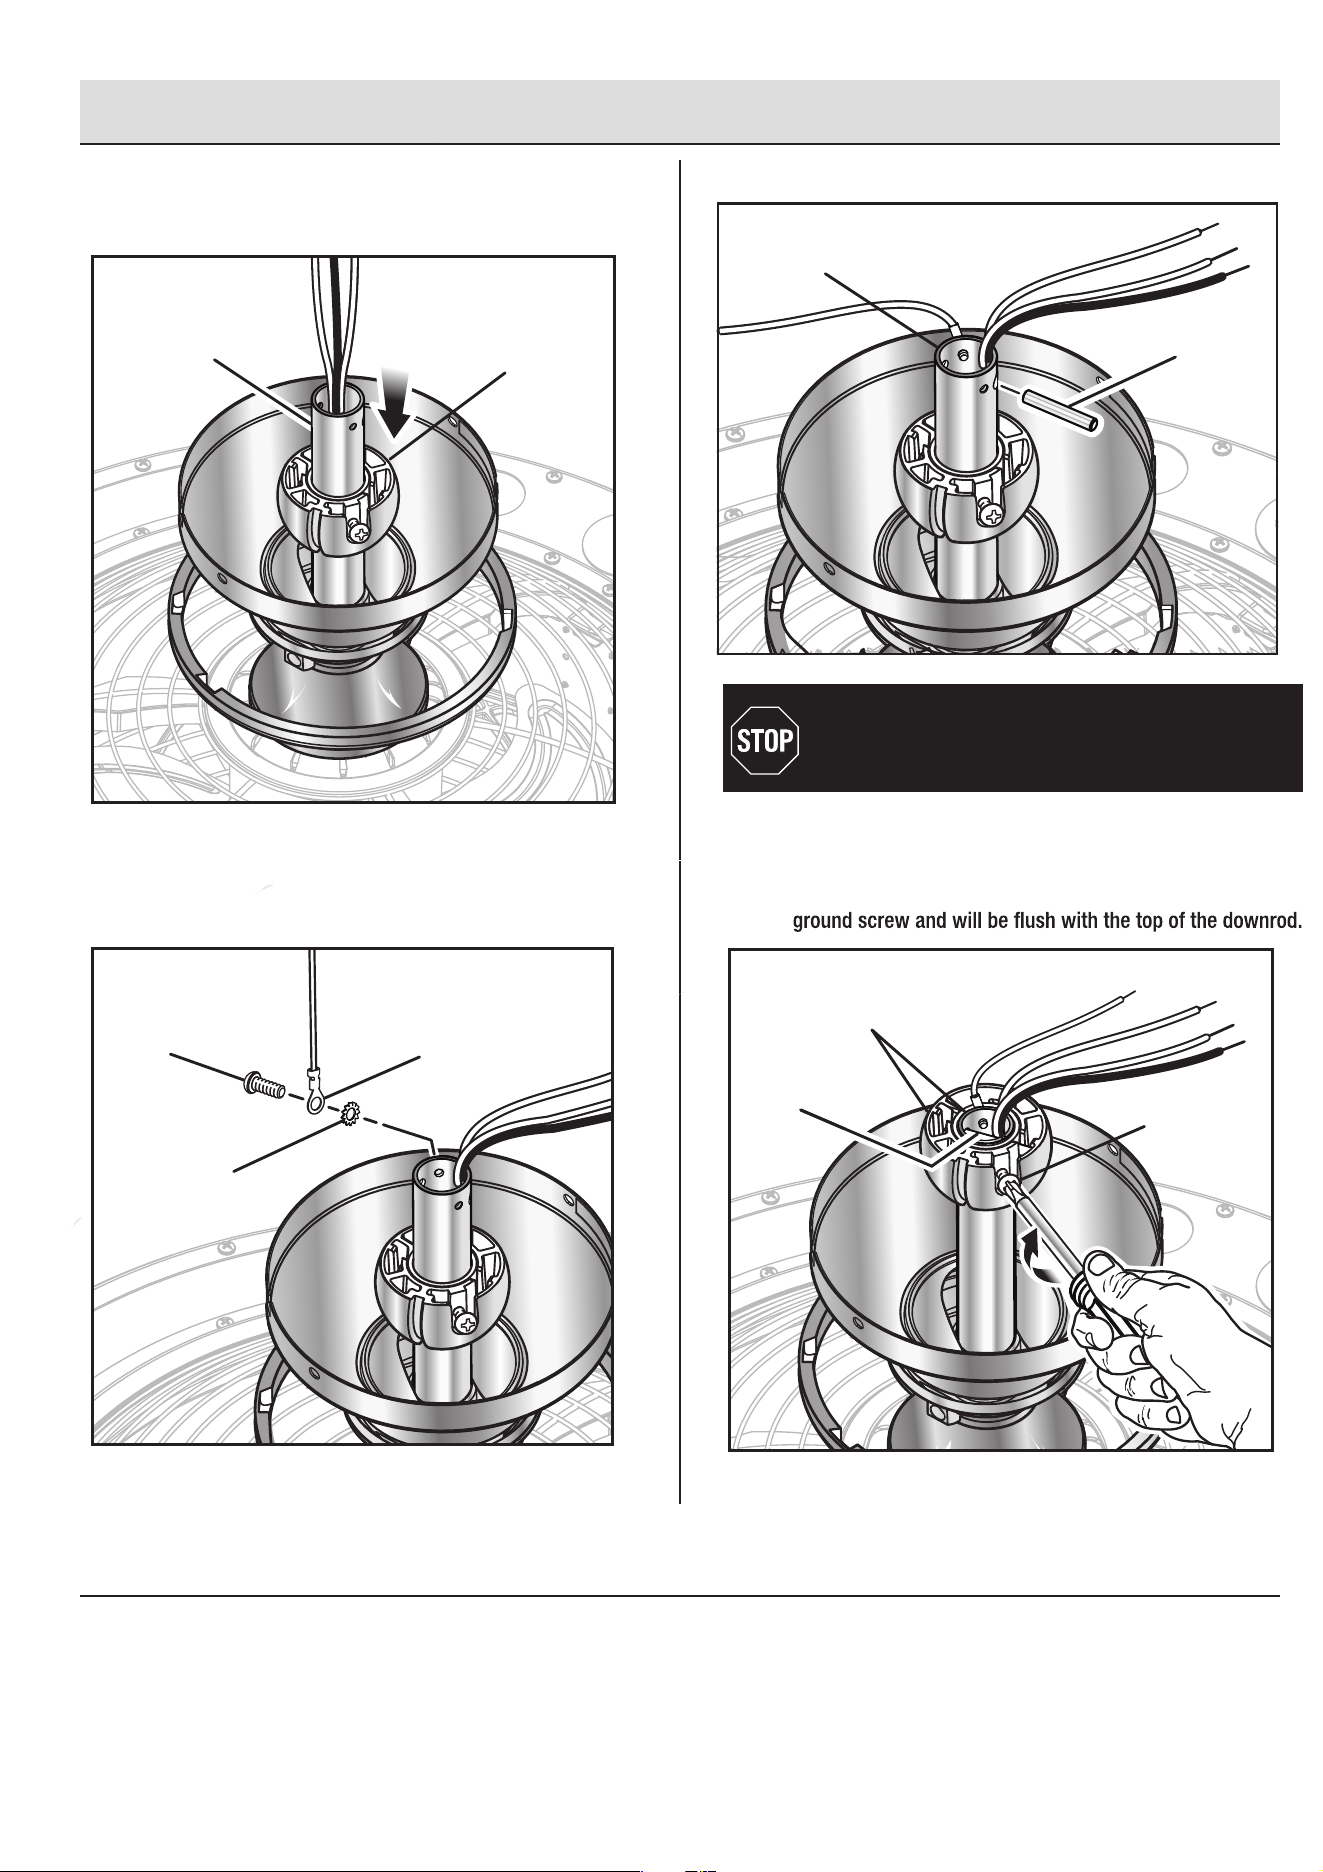
Ƒ Carefully feed the fan’s electrical wiring through the
motor housing cap, then install the cap as shown.
Ƒ Carefully feed the fan’s electrical wiring through the
center arm support, then install the support with the
cupped side facing up.
NOTE: If you do not intend to use the decorative arms
supplied with this ceiling fan, you can skip this step
because the center arm support will not be needed.
However, if you are installing using an extended-leng
the downrod (not provided), you may still wish to use
the center arm support and the cover discussed in the
next step for a more finished appearance, even when
not using the decorative arms.
Ƒ This step is needed only if you are installing your ceiling fan
using an extended-length downrod (not provided) and have
installed the center arm support from the previous step.
If you are using the downrod provided in this package, or if
you are using an extended-length downrod but chose not to
install the center arm support, skip this step and proceed
directly to installing the canopy screw cover ring and canopy.
Ƒ
Ƒ
CUP SIDE UP
CENTER ARM
SUPP
CUP SIDE DOWN
CENTER ARM
SUPPORT COVER
CANOPY
CANOPY SCREW
COVER RING
NOTCHED
OPENINGS
Carefully feed the fan’s electrical wiring through the canopy screw
cover ring and canopy, then install the cover ring and canopy on the
downrod as shown.
Note: Make sure the notched openings on the rim of the canopy screw
cover ring are facing up.
Carefully feed the fan’s electrical wiring through the center arm
support cover, then install the support with the cupped side
facing down.
HOMEDEPOT.COM/HOMEDECORATORS
Please contact 1-800-986-3460 for further assistance.
10
Installation (continued)
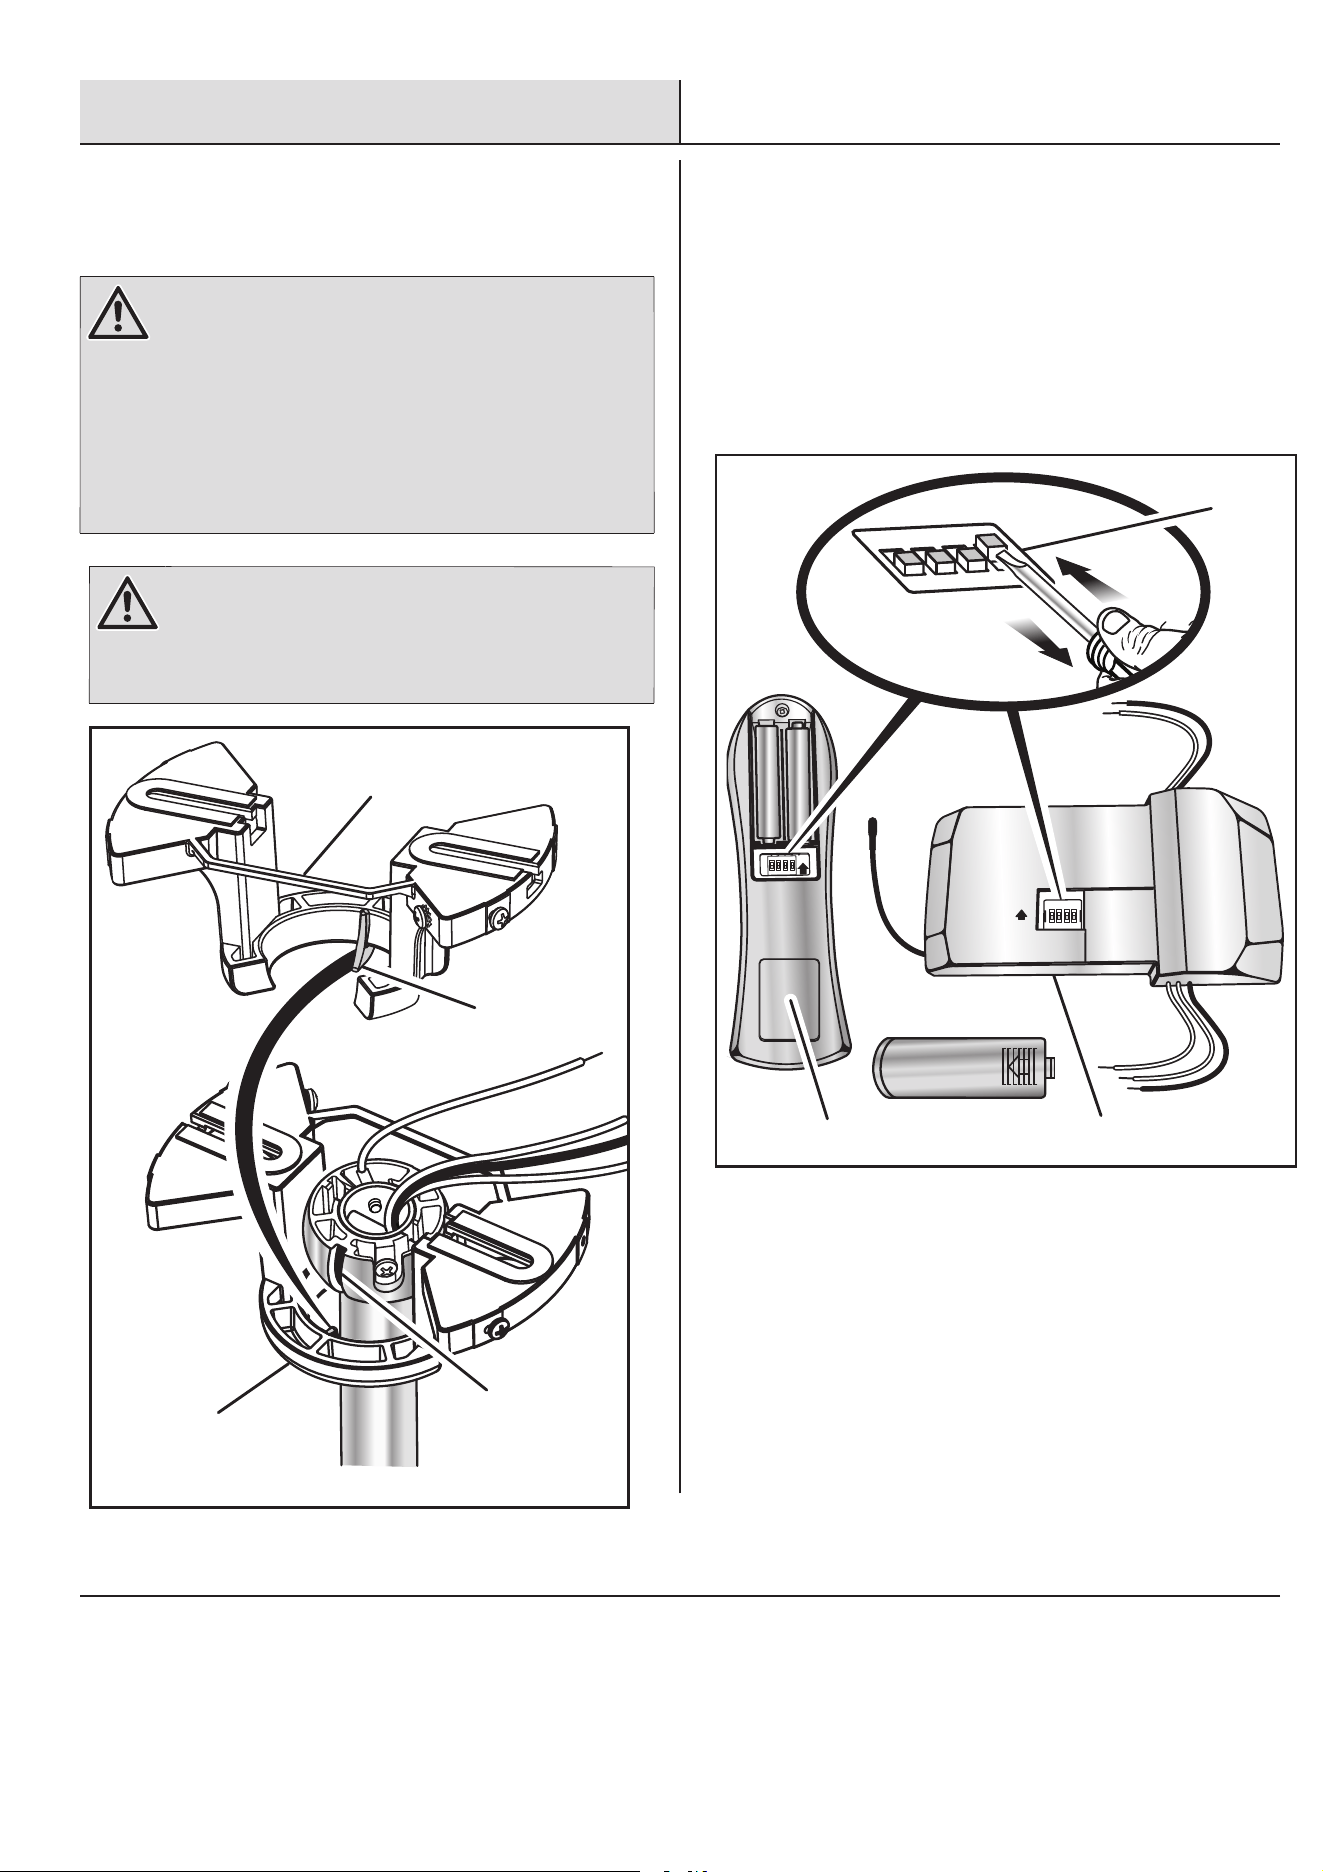
Ƒ Carefully feed the fan’s electrical wiring through the
pivot ball, then reinstall the pivot ball on the downrod
with the flat side facing the ceiling.
Ƒ Reinstall the ground wire with the wire facing up to
ensure proper grounding, make sure the star washer
is reinstalled in the location shown below.
Ƒ Reinstall the retainer pin in the downrod.
Ƒ
NOTE:
For Canada installations, refer to the Canada
Installation Addendum and install the support
cable on the retainer pin now.
PIVOT BALL
FLAT SIDE UP
DOWNROD
DOWNROD
RETAINER PIN
PIVOT BALL FLUSH WITH
TOP OF DOWNROD
RETAINER PIN
SCREW
GROUND
SCREW
GROUND WIRE
STAR WASHER
Lift the pivot ball back to the top of the downrod until the retainer pin
is captured. Tighten the screw to secure.
When the pivot ball is oriented correctly, it will also cover the
HOMEDEPOT.COM/HOMEDECORATORS
Please contact 1-800-986-3460 for further assistance.
11 HOMEDEPOT.COM/HOMEDECORATORS
Please contact 1-800-986-3460 for further assistance .
Installation (continued)
3
HANGING THE CEILING FAN
WARNING
Once you begin the process of hanging the ceiling
fan, do not leave the fan unattended until the
installation process is complete. A falling fan
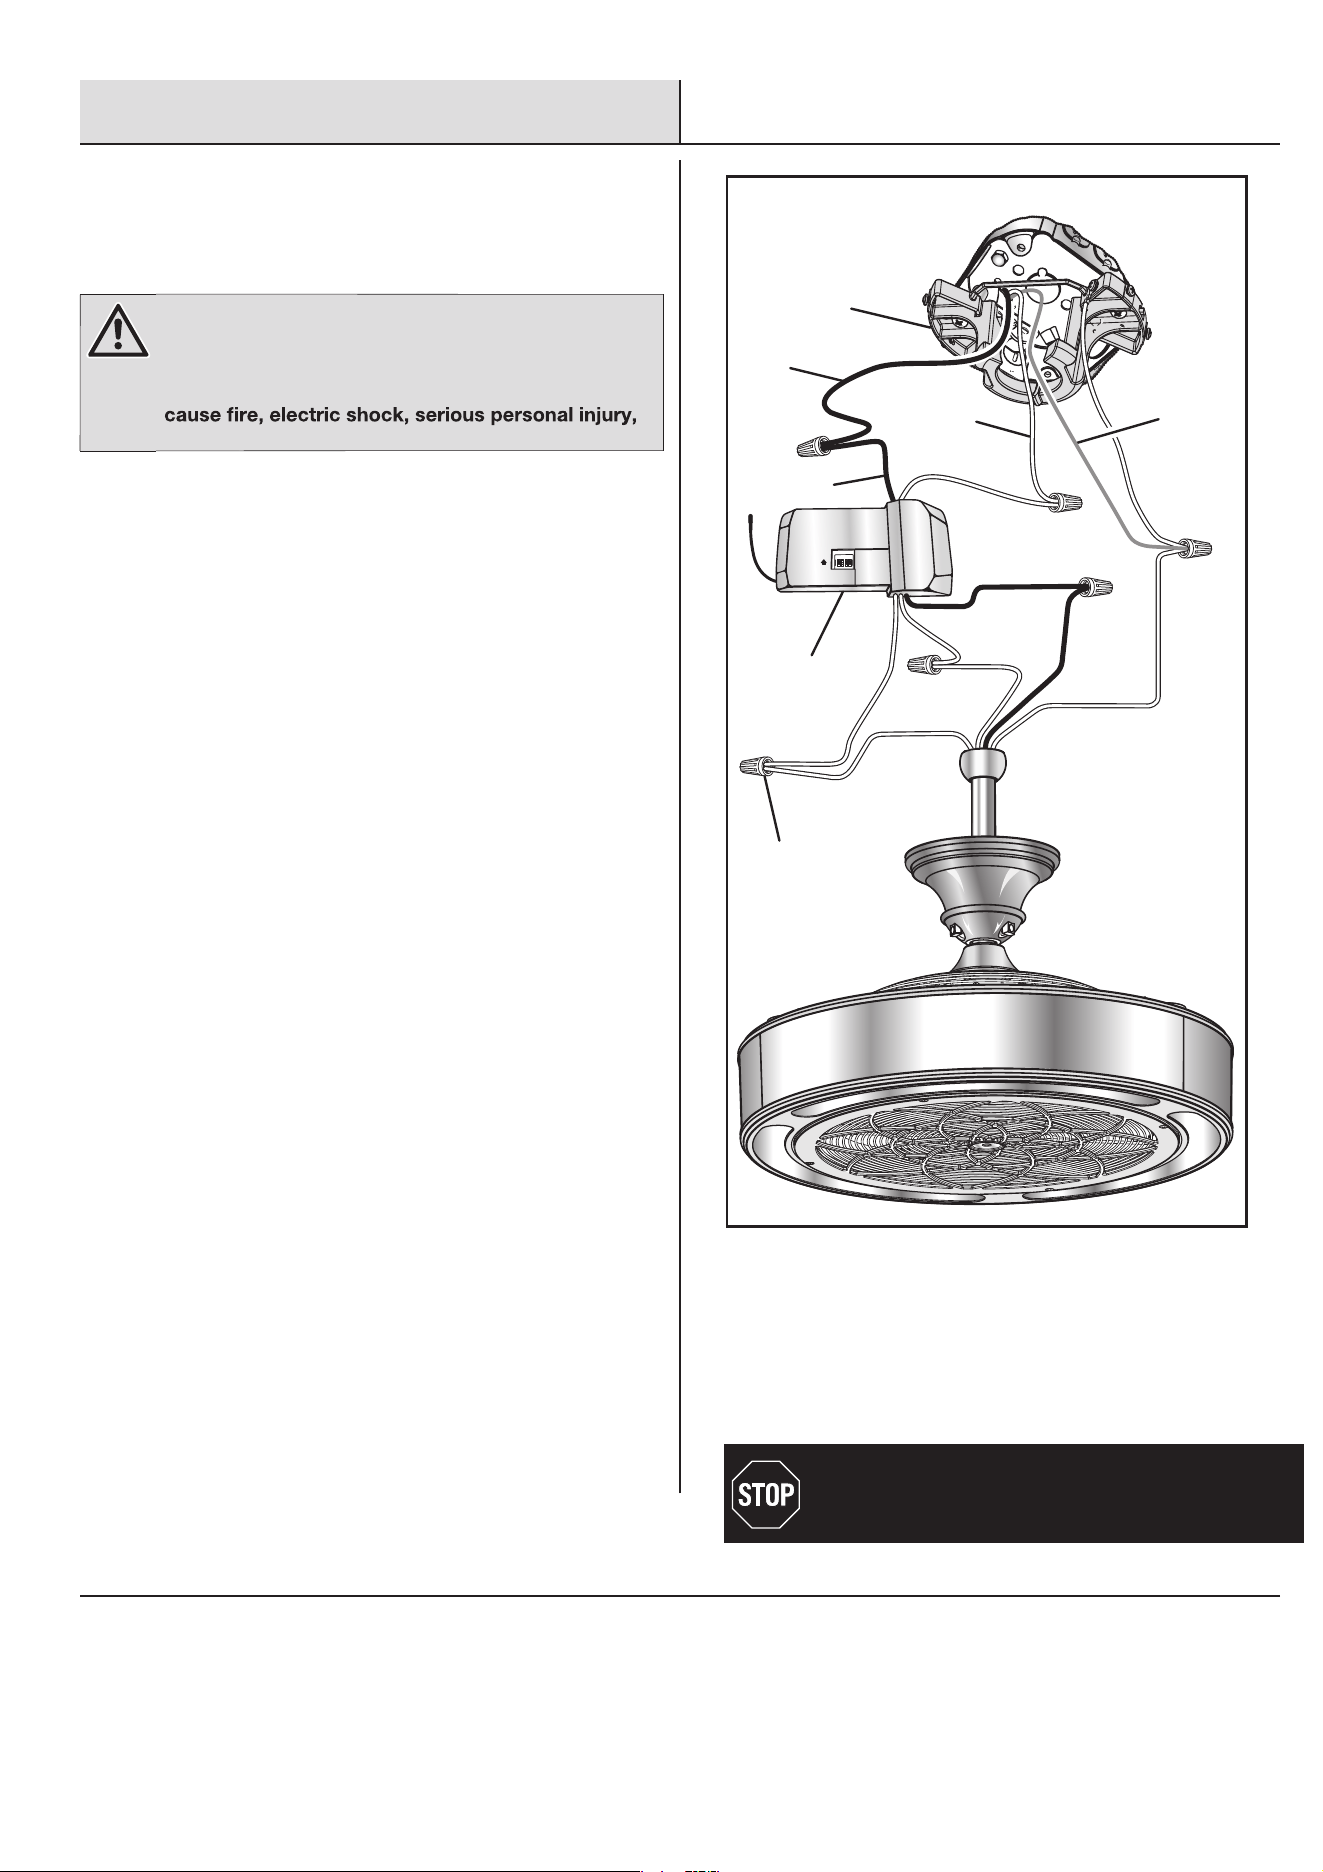
Ƒ Carefully lift the assembled fan up to the mounting
bracket assembly and seat the pivot ball in the
mounting bracket socket. Rotate the fan as needed so
the tab on the mounting bracket socket seats in the
groove in the pivot ball.
BACK SIDE OF
MOUNTING BRACKET
FRONT SIDE OF
MOUNTING BRACKET
PIVOT BALL
GROOVE
MOUNTING
BRACKET TAB
WARNING
Failure to engage the fan’s tab into the groove on
the mounting bracket could allow the fan to wobble
and/or fall. A falling fan could cause serious
personal injury or death.
Ƒ Verify the DIP switches on the receiver and the remote control
are both in the same configuration.
NOTE: The switches can be adjusted as needed to avoid
possible interference with other remote units in your home,
but always make sure that the same configuration
is set on both the remote and the receiver.
1
2
3
4
ON
DIP
DIP SWITCH
ON
ON
DIP
12
3
4
ON
ON
E
12
3
4
C
E
REMOTE CONTROL
RECEIVER
12 HOMEDEPO T.COM/HOMEDECORATORS
Please contact 1-800-986-3460 for further assistance.
Installation (continued)
4
MAKING THE ELECTRICAL
CONNECTIONS
WARNING
Verify the power has been disconnected to both the
room and the wall switch before making the
electrical connections. Failure to do so could
or death.
NOTICE:
When shipped, the electrical wires from the ceiling fan
offer enough length to accommodate extendedlength
downrods up to 48 in. (not included). For shorter
downrods, including the one provided with this fan, this
excess length is not needed and should be cut off before
making the electrical connections in order to allow
enough room for everything to fit inside the mounting
bracket. Trim the electrical wires so that only 12 in. of
electrical wires extend from the top of the downrod.
Failure to trim the electrical wires as noted may make it
impossible to fit the receiver into the mounting bracket
as described in these instructions.
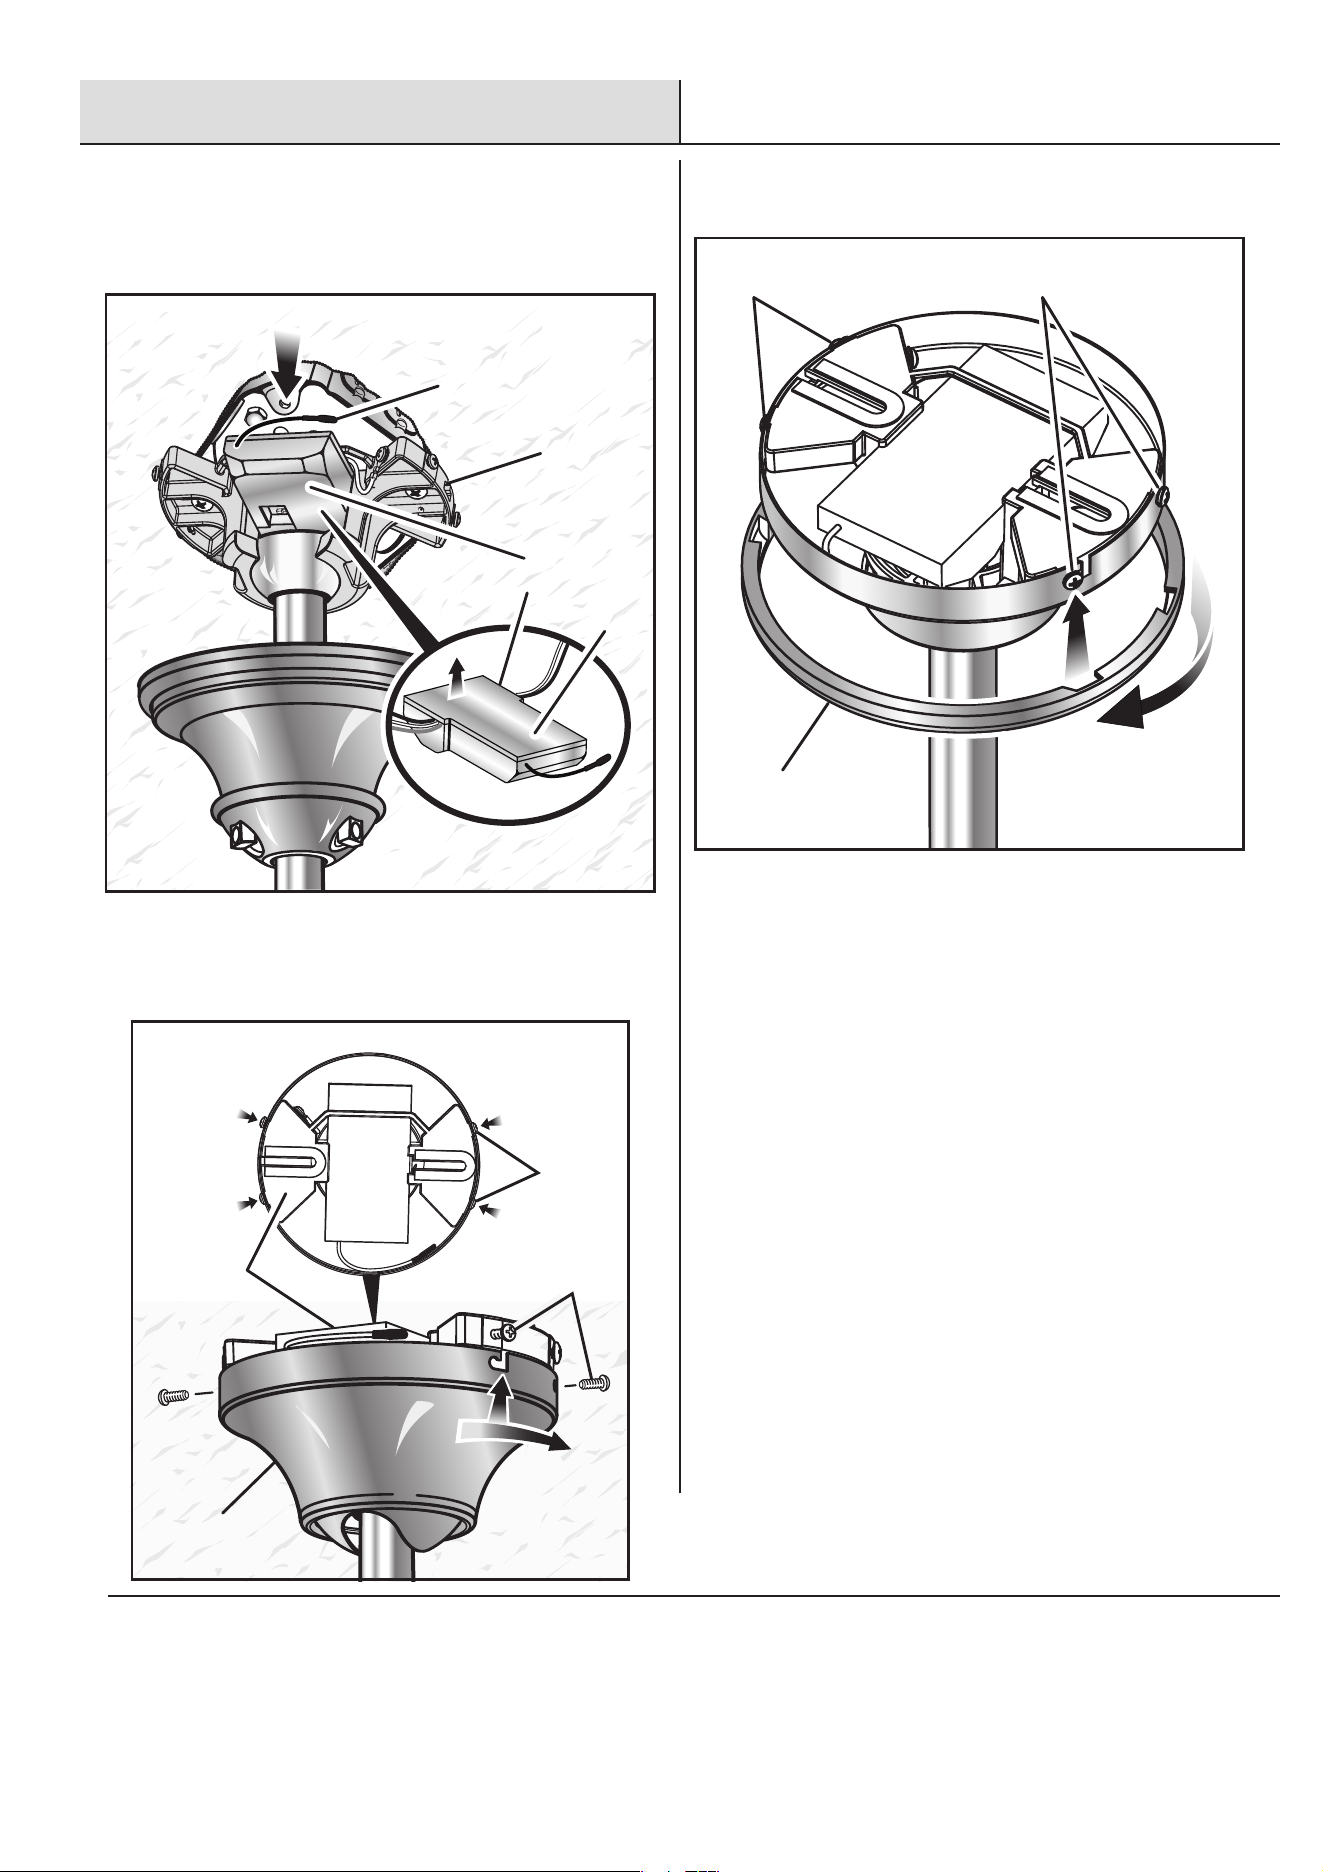
Ƒ
Connect the ceiling fan to the receiver:
Connect the ceiling fan black wire to the black wire on
the receiver marked TO MOTOR L.
Ƒ
Connect the ceiling fan white wire to the white wire on
the receiver marked TO MOTOR N.
Ƒ Connect the ceiling fan blue wire to the blue wire on
the receiver marked FOR LIGHT.
Connect the receiver to the 120V electrical supply wires:
If your outlet box has a ground wire (green or bare
copper), connect it to the ground wire on the ceiling
fan’s pivot ball. If there is no ground wire in your outlet
box, connect the ground wire on the pivot ball to the
ground wire on the mounting bracket assembly.
Connect the white (neutral) supply wire to the white
wire on the receiver marked AC in N.
Connect the black (hot) supply wire to the black wire
on the receiver marked AC in L.
NOTE: If your electrical box has both red and black hot
wires, only one of these will be needed. Choose the
supply wire that matches the wall switch you want to
use for your ceiling fan. Use a wire cap and electrical
tape to seal off the other wire and tuck it back up into
the box and out of the way.
Install a plastic wire nut over each connection to secure.
Reinforce with electrical tape as needed to make sure
no bare wire is visible at the wire nuts (except for a bare
ground wire, if present).
Ƒ
Ƒ
Ƒ
Ƒ
ON
ON
DIP
12
3
4
MOUNTING
BRACKET
GROUND
CONDUCTOR
BLACK
BLACK
WHITE
GREEN/
YELLOW
GREEN/
YELLOW
WHITE
BLACK
BLACK
WHITE
WHITE
BLUE
BLUE
RECEIVER
WIRE
NUT
Spread the wires apart so the green/yellow and white wires
go to one side and the black and blue go to the other, then
carefully tuck all the wire connections up into the outlet box.
NOTE: Orient the wires so the wire nuts are facing up and
are not touching each other. This will help minimize
potential noise once the installation is complete.
Ƒ
For Canada installations, refer to the Canada
Installation Addendum and connect the support
cable to the eye bolt or anchor assembly now.
13 HOMEDEPOT.COM/HOMEDECORATORS
Please contact 1-800-986-3460 for further assistance.
Installation (continued)
Ƒ Place the receiver into the top of the mounting bracket
with the flat side facing the ceiling. Tuck the receiver
antenna and all wiring up into the mounting bracket,
making sure the wires don’t become pinched.
Ƒ Slide the canopy up into place and rotate clockwise to
lock to mounting bracket assembly. Reinstall the two s
crews (M4 x 6 mm) removed previously and tighten
securely.
Ƒ Lift the screw cover ring up over the screws and twist
counterclockwise to secure in place.
4
CANOPY
SCREW
COVER RING
SCREWSSCREWS
CANOPY
SCREWS
CANOPY
SCREWS
MOUNTING
BRACKET
TOP VIEW
MOUNTING
BRACKET
RECEIVER
ANTENNA
TOP
SLIDES IN FROM THIS DIRECTION
14 HOMEDEPOT.COM/HOMEDECORATORS
Please contact 1-800-986-3460 for further assistance.
Installation (continued)
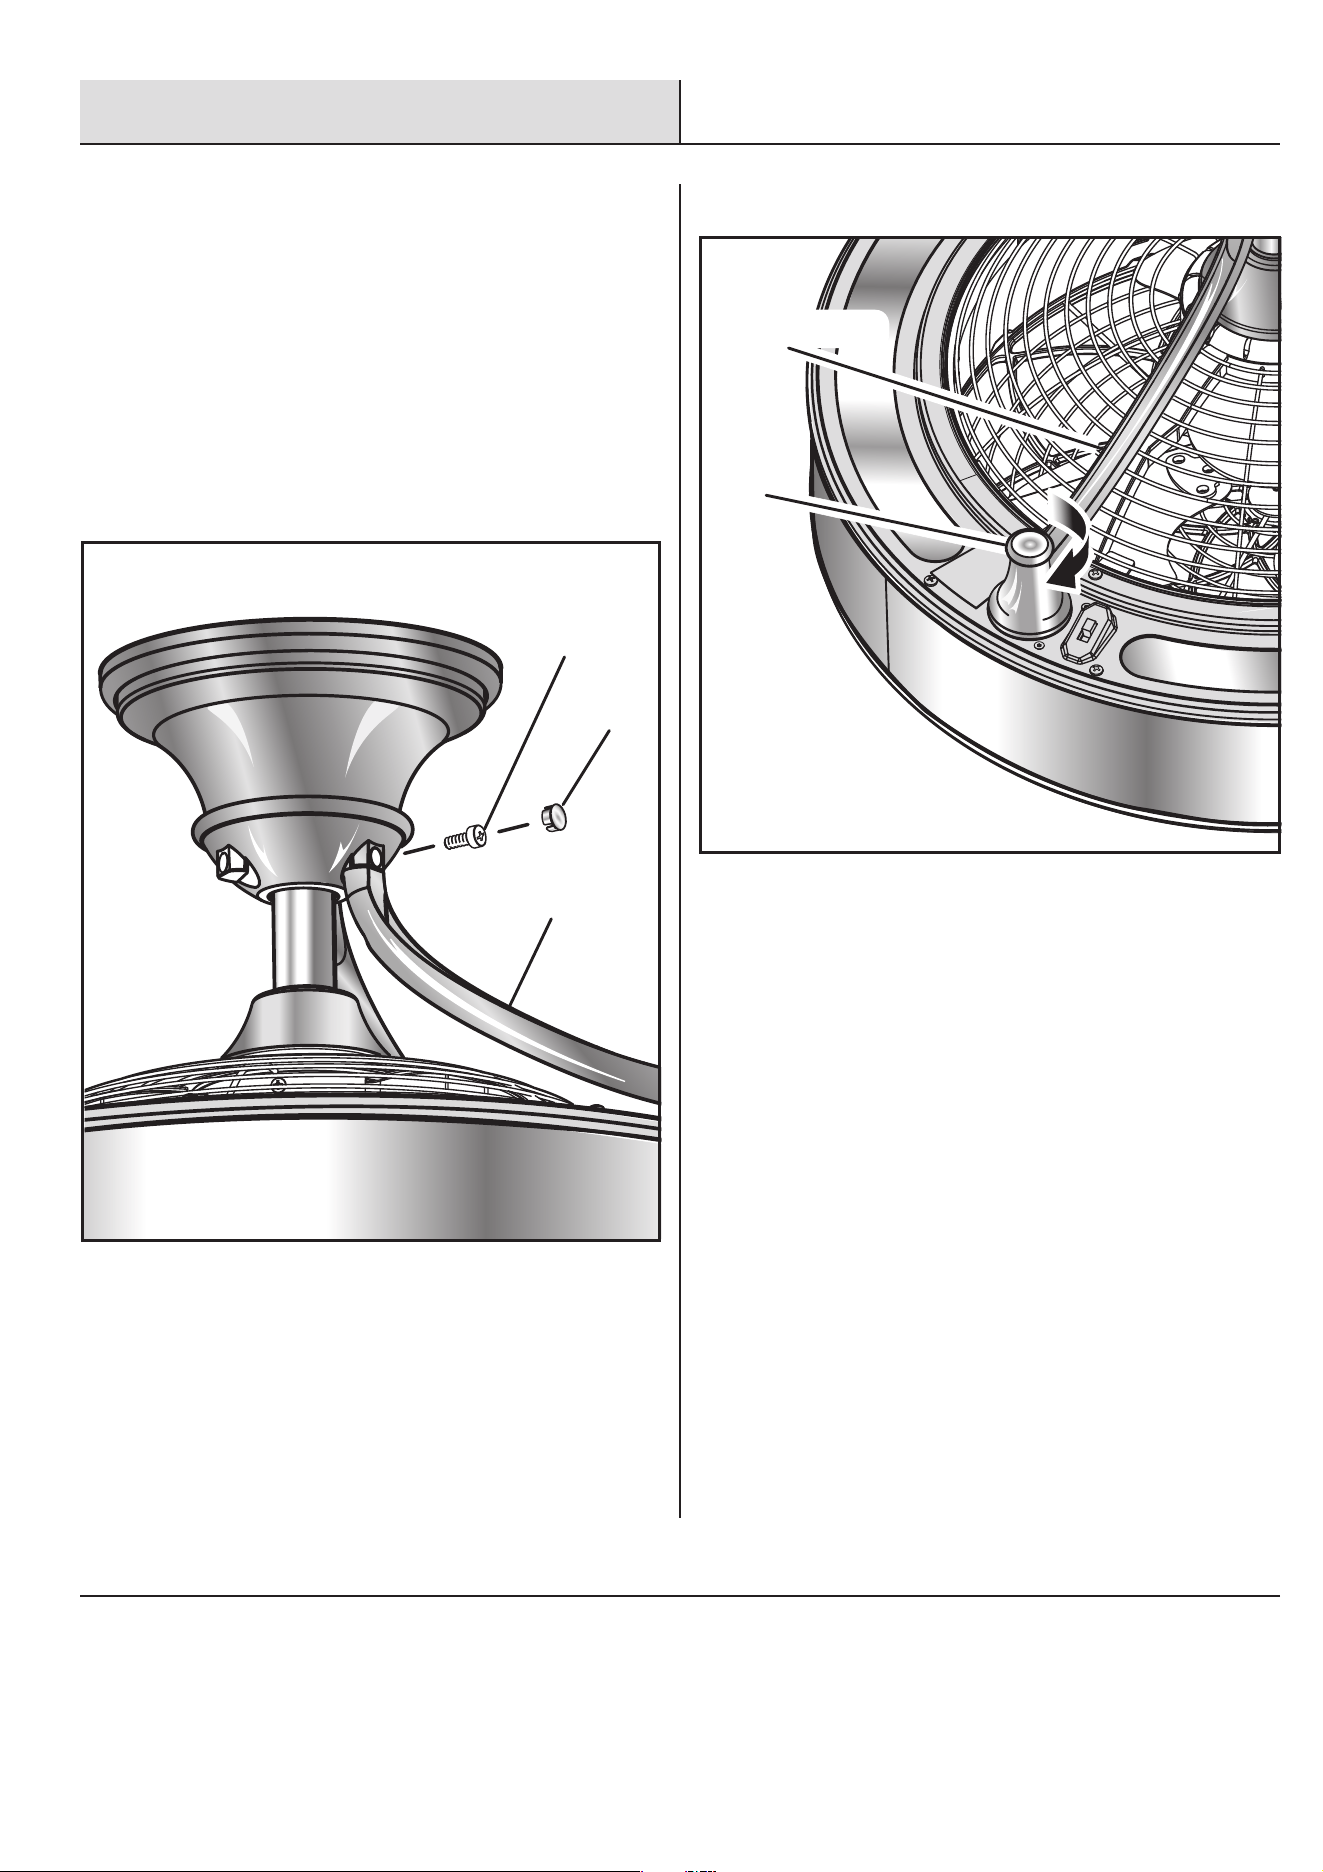
Ƒ NOTICE:
The decorative arms in the next two steps are not
required for fan operation. You may skip these two
steps if you do not wish to install the decorative arms.
Install the decorative arms using a Phillips head
screwdriver. Attach one side of each arm to the center
arm support using the Phillips cap screws and screw
covers as shown.
NOTE: For easier assembly, insert each screw and
partially tighten, then go back and fully tighten
each screw.
Ƒ
Finish the assembly by screwing the finial screw on each arm
into the threaded holes in the top lens cover.
Ƒ
Restore power to the room and wall switch. Turn on the wall
switch, then refer to the remote control operating
instructions in the next section to test the fan’s operation.
Ƒ
DECORATIVE ARM
SCREW
COVERS
CAP
SCREWS
FINIAL
SCREW
DECORATIVE ARM
15 HOMEDEPOT.COM/HOMEDECORATORS
Please contact 1-800-986-3460 for further assistance.
Operation
1
USING THE REMOTE CONTROL
NOTE: If you have not already done so, restore
power to the room and wall switch, then make
sure the wall switch controlling the fan is turned
on. The remote control will have no effect on the
fan if the switch is turned off.
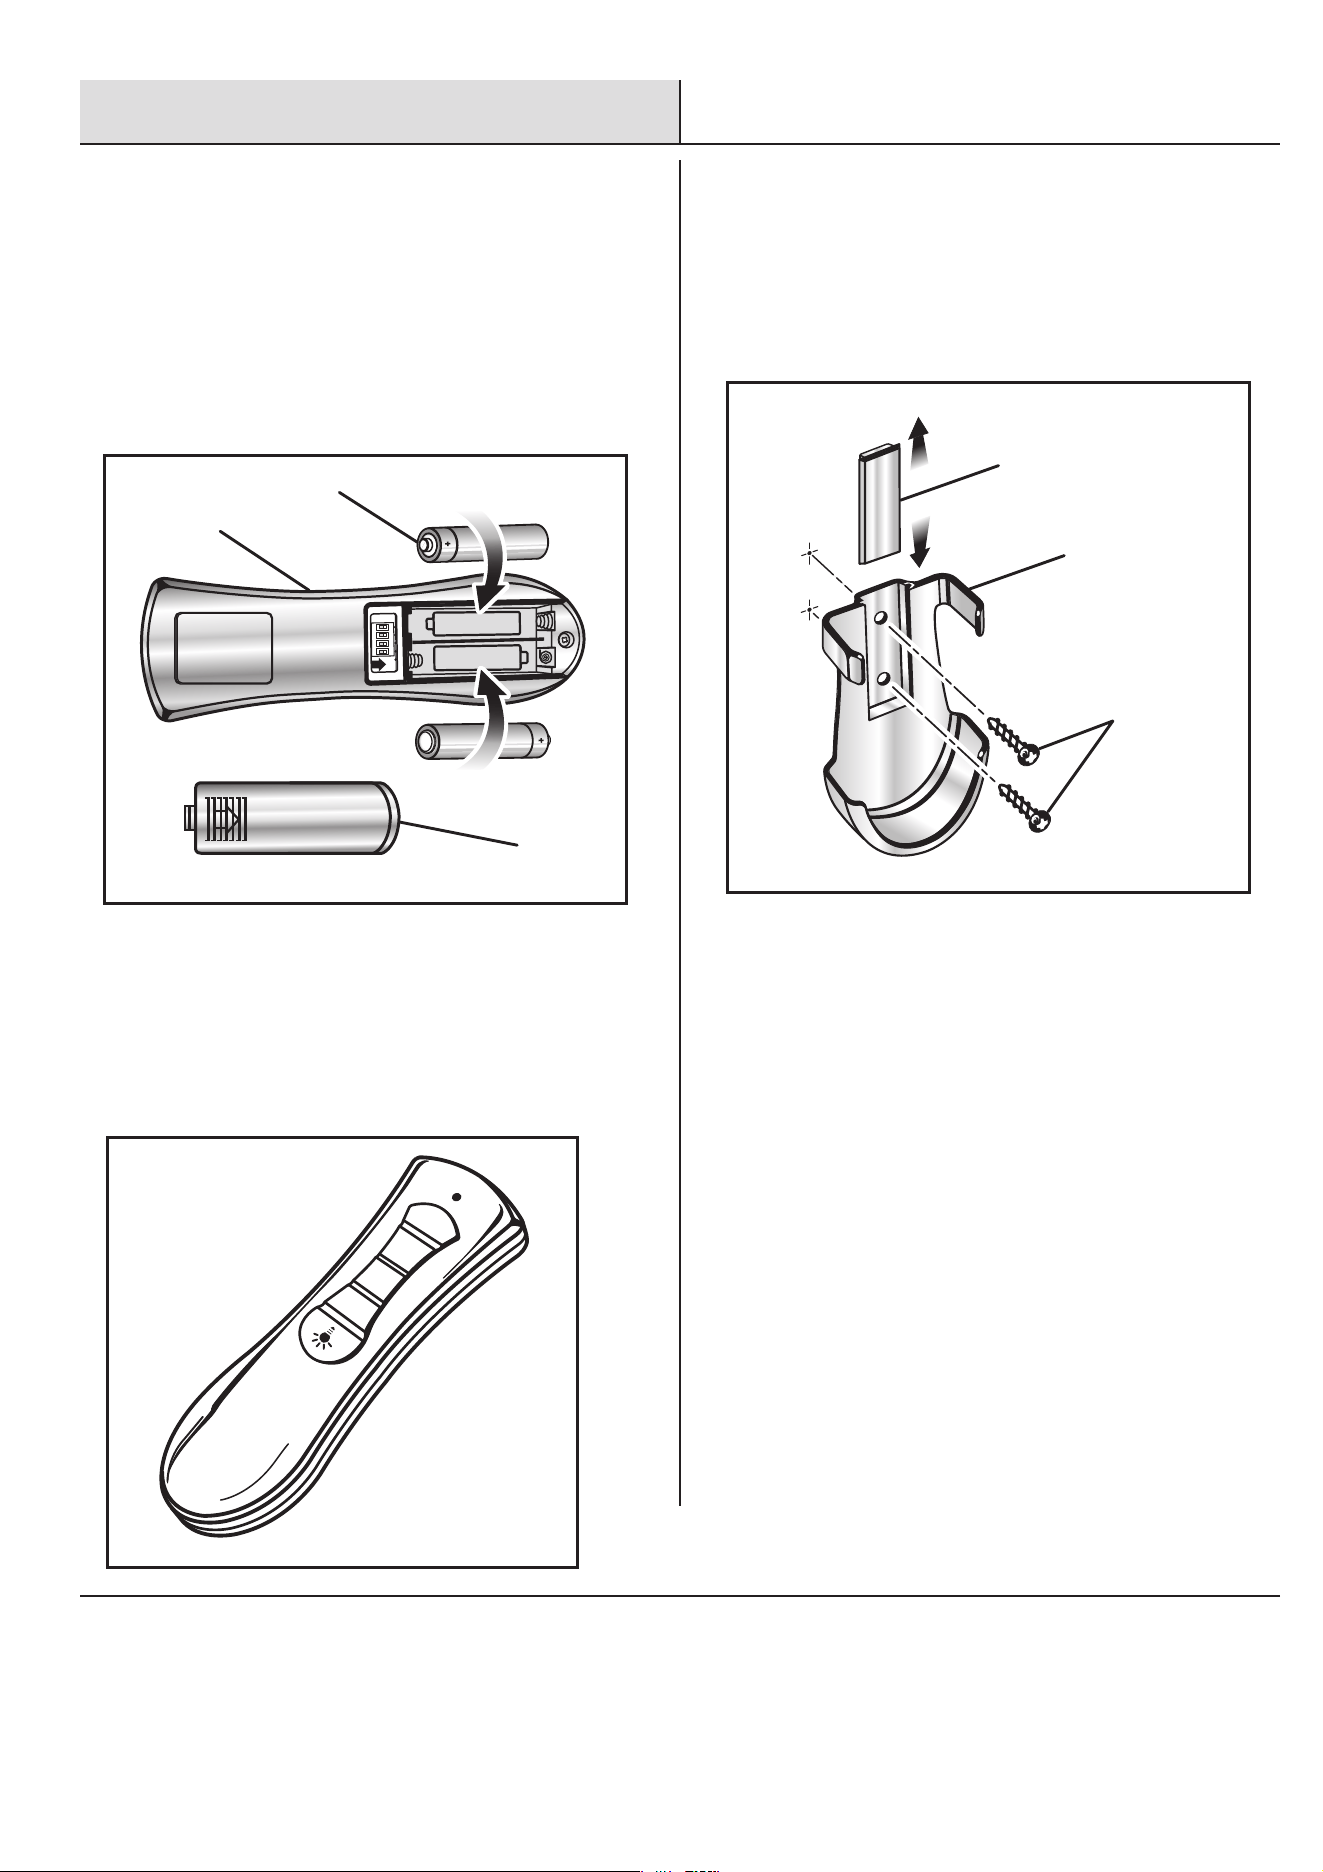
Ƒ
Install the two AAA batteries provided into the remote
control.
Ƒ
To turn the light on and off, press and release the
button . Press and hold the button to control the
brightness of the light.
NOTE: The brightness of the fan light can only be
controlled by the remote control. A wall-mounted
dimmer switch will not change the light’s brightness.
Ƒ
To set the fan speed, press the desired speed button.
To turn the fan OFF, press the OFF button.
Ƒ
ON
ON
E
1
2
3
4
C
E
+ AAA 1.5V
AAA 1.5V +
AAA BATTERY
+
+
REMOTE CONTROL
REMOTE CONTROL
BATTERY COVER
HI
MED
LOW
OFF
To mount the remote control holder:
Ƒ Remove the screw cover from the remote control holder.
Install the remote control holder in the desired location
using the two mounting screws provided.
Replace the screw cover to cover the screw heads.
Ƒ
Ƒ
MODEL NO: UC7216T
FCC ID: CHQ7216T
This device complies with Part 15 of the FCC Rules.
Operation is subject to the following two conditions:
(1) this device may not cause harmful interference, and
(2) this device must accept any interference received,
including interference that may cause undesired
operation.
SCREWS
REMOTE CONTROL
HOLDER
SCREW COVER
16
Operation (continued)
2
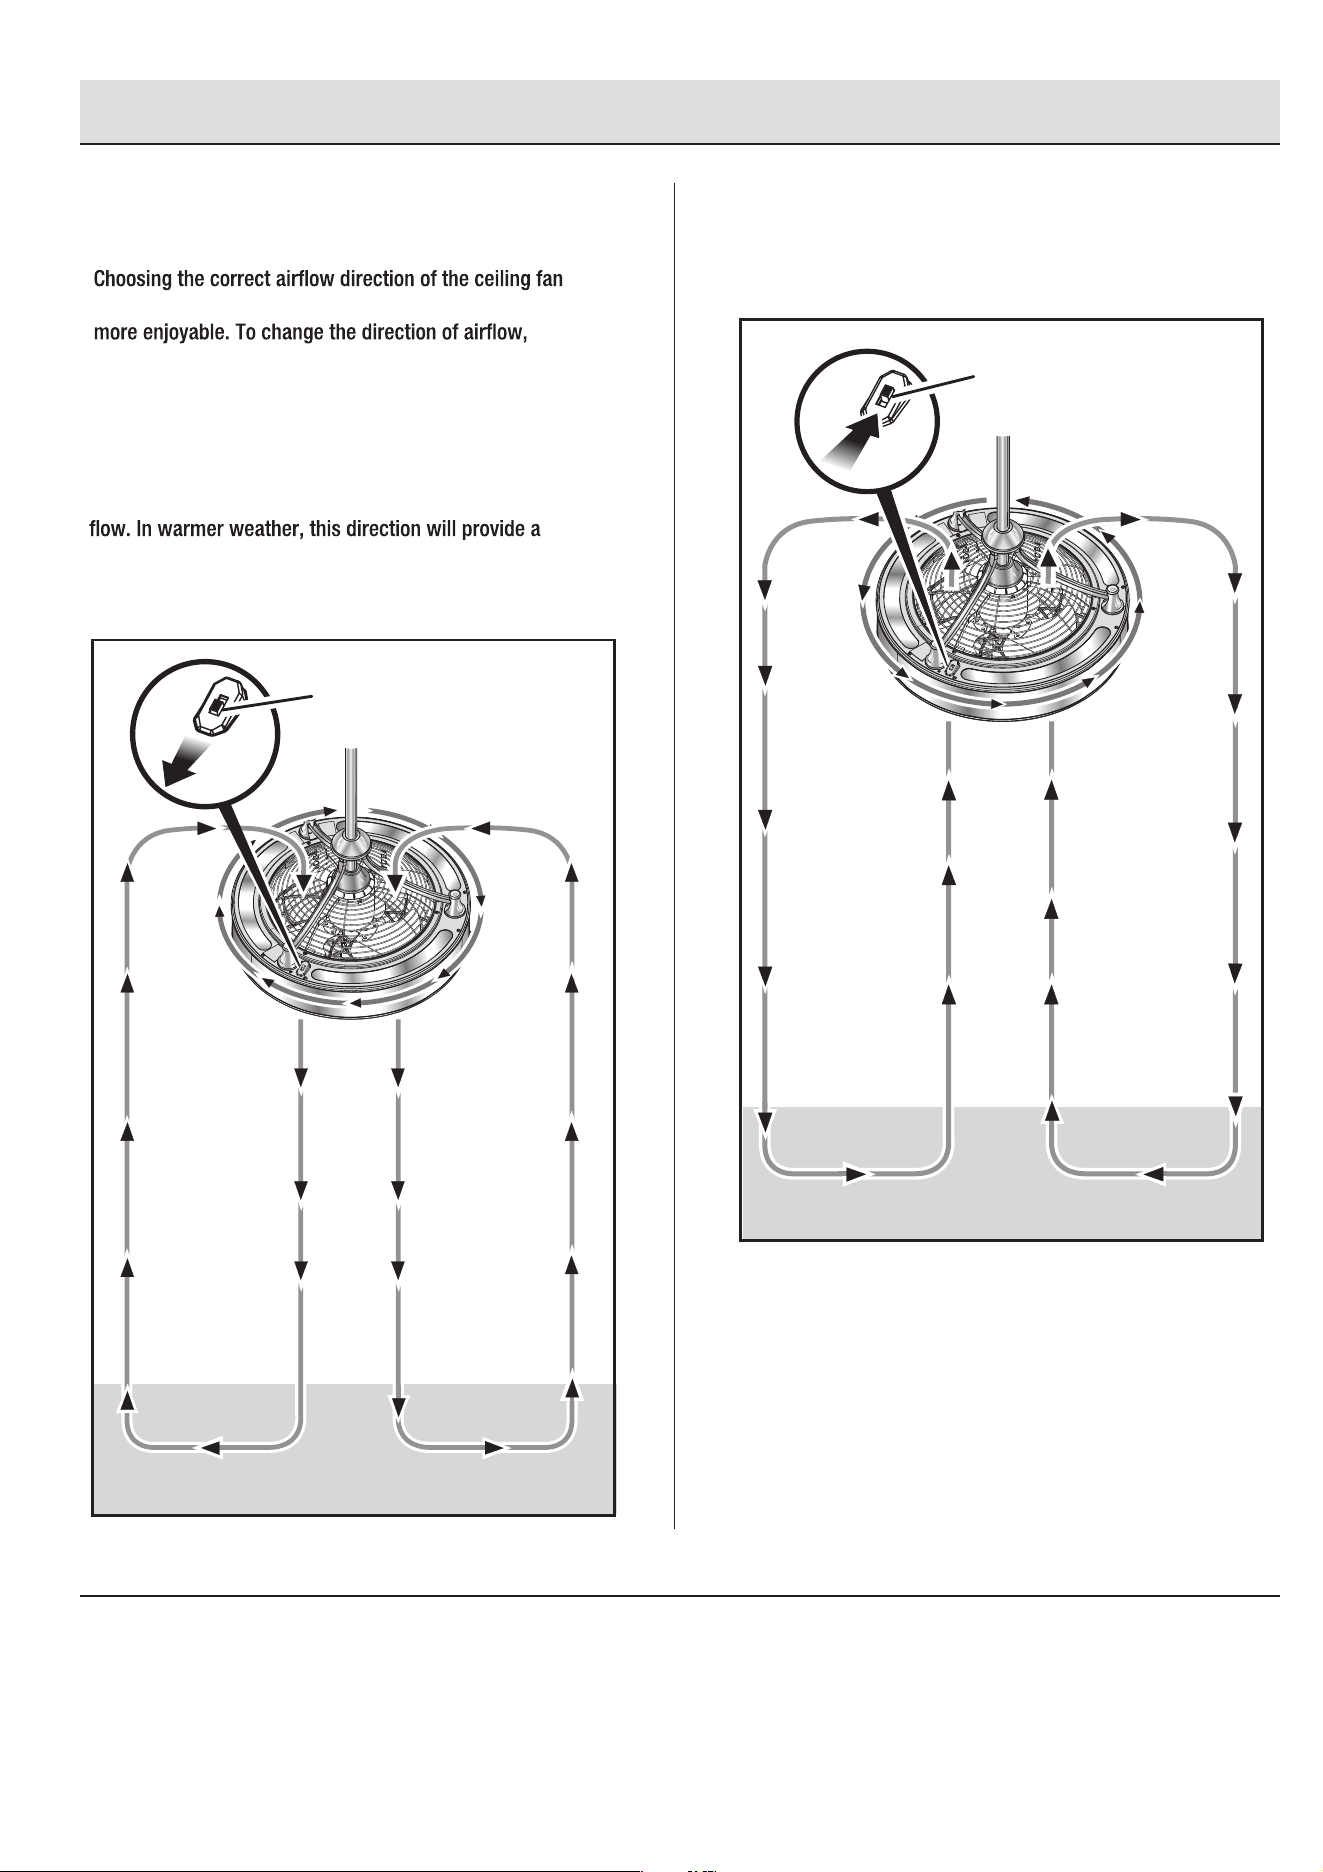
SETTING THE AIRFLOW
DIRECTION
Ƒ
will enhance the fan’s performance and make its use
use the direction switch on top of the ceiling fan’s
housing.
NOTICE:
Always allow the ceiling fan to come to a complete stop
before changing the fan’s direction.
Ƒ
Choose the DOWN position to provide a downward air
constant breeze, creating a wind chill effect for the
room’s occupants.
In cooler weather, choose the UP position to provide an
upward direction of air travel. This will help circulate
warm air off the ceiling and back down into the room.
DIRECTION SWITCH
IN DOWN POSITION
Ƒ
DIRECTION SWITCH
IN UP POSITION
17
Maintenance
Ƒ
GENERAL CARE AND CLEANING
Due to the natural movement of a ceiling fan, connections
can become loose over time. Check all the ceiling fan’s
connections (not including the electrical connections) at
least twice a year.
The fan has permanently lubricated sealed bearings, t
herefore no further lubrication is required.
Clean your fan periodically to help maintain its new
appearance over time. Use only a soft brush or lint-free
cloth to avoid scratching the finish. The plating is sealed
with a lacquer to minimize discoloration or tarnishing. Do
not use water when cleaning, as this could damage the
motor or cause an electrical shock.
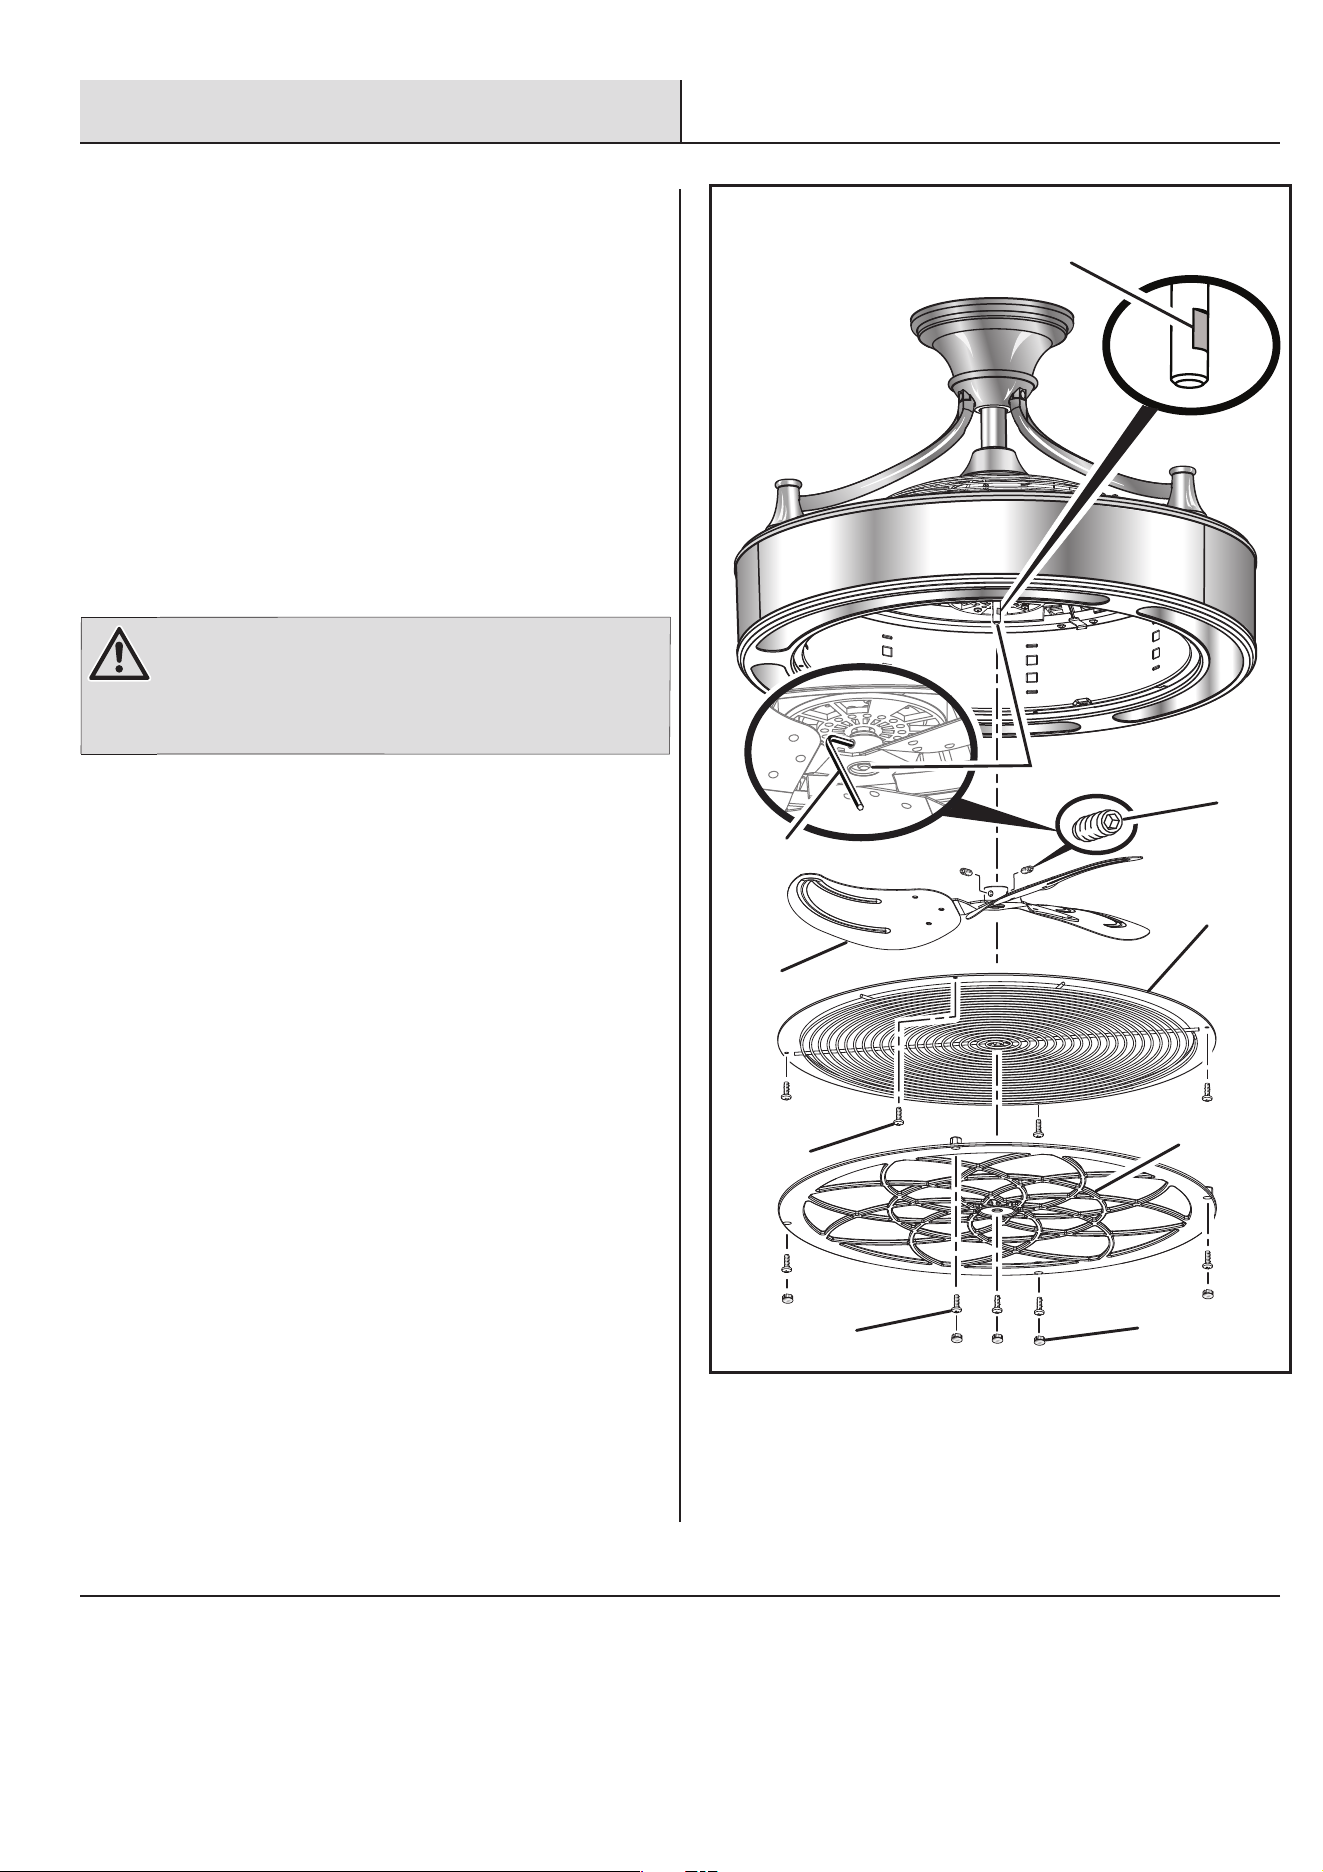
When shipped, the blade and guard on the ceiling fan
are preassembled. To diassemble for cleaning purposes:
Ƒ
Ƒ
WARNING
Turn off power to room and wall switch by removing
fuses or turning off circuit breakers as needed
before disassembling the ceiling fan.
Failure to do so can cause serious personal injury.
Remove the screws securing the decorative grill, then
remove the decorative grill.
Remove the guard screws, then remove the blade guard.
Remove the set screws at the top of the blade head
using a 3 mm hex wrench (not provided).
Remove the blade from the motor shaft.
To reassemble the fan:
Reinstall the blade on the motor shaft so the shaft
opening on the blade straddles the recessed area on
the blade shaft.
Reinstall the set screws and tighten securely.
Reinstall the blade guard and guard screws; tighten
securely.
Reinstall the decorative grill and screws; tighten securely.
Ƒ
Ƒ
Ƒ
Ƒ
Ƒ
Ƒ
Ƒ
Ƒ
SCREW
COVERS
SCREWS
SCREWS
DECORATIVE
GRILL
BLADE GUARD
FAN
BLADE
SET
SCREWS
RECESSED AREA
ON MOTOR SHAFT
MOTOR SHAFT
HEX
WRENCH
HOMEDEPOT.COM/HOMEDECORATORS
Please contact 1-800-986-3460 for further assistance.

18
FCC Statement
This equipment has been tested and found to comply with the limits for a Class B digital device, pursuant to Part 15 of
the FCC Rules. These limits are designed to provide reasonable protection against harmful interference in a residential
installation. This equipment generated uses and can radiate radio frequency energy and, if not installed and used in
accordance with the instructions, may cause harmful interference to radio communications. However, there is no
guarantee that interference will not occur in a particular installation. If this equipment does cause harmful interference to
radio or television reception, which can be determined by turning the equipment off and on, the user is encouraged to try
to correct the interference by one or more of the following measures:
t3FPSJFOUPSSFMPDBUFUIFSFDFJWJOHBOUFOOB
t*ODSFBTFUIFTFQBSBUJPOCFUXFFOUIFFRVJQNFOUBOESFDFJWFS
t$POOFDUUIFFRVJQNFOUJOUPBOPVUMFUPOBDJSDVJUEJGGFSFOUGSPNUIBUUPXIJDIUIFSFDFJWFSJTDPOOFDUFE
t$POTVMUUIFEFBMFSPSBOFYQFSJFODFESBEJP57UFDIOJDJBOGPSIFMQ
"OZDIBOHFTPSNPEJýDBUJPOTOPUFYQSFTTMZBQQSPWFECZUIFHSBOUFFPGUIJTEFWJDFDPVMEWPJEUIFVTFSTBVUIPSJUZUP
operate the equipment.
This device complies with Part 15 of the FCC Rules. Operation is subject to the following two conditions:
(1) This device may not cause harmful interference, and
(2) this device must accept any interference received, including interference that may cause undesired operation.
The following responsible party designated in FCC §2.909 is responsible for this declaration:
Model Number: SFL-550L1, SFL-550L2, SFL-550L3, SFL-550L4
Company Name: CM Development Inc.
$PNQBOZ"EESFTT10#PY$"64"
5FMFQIPOF/VNCFS
CAUTION:
19 HOMEDEPOT.COM/HOMEDECORATORS
Please contact 1-800-986-3460 for further assistance.
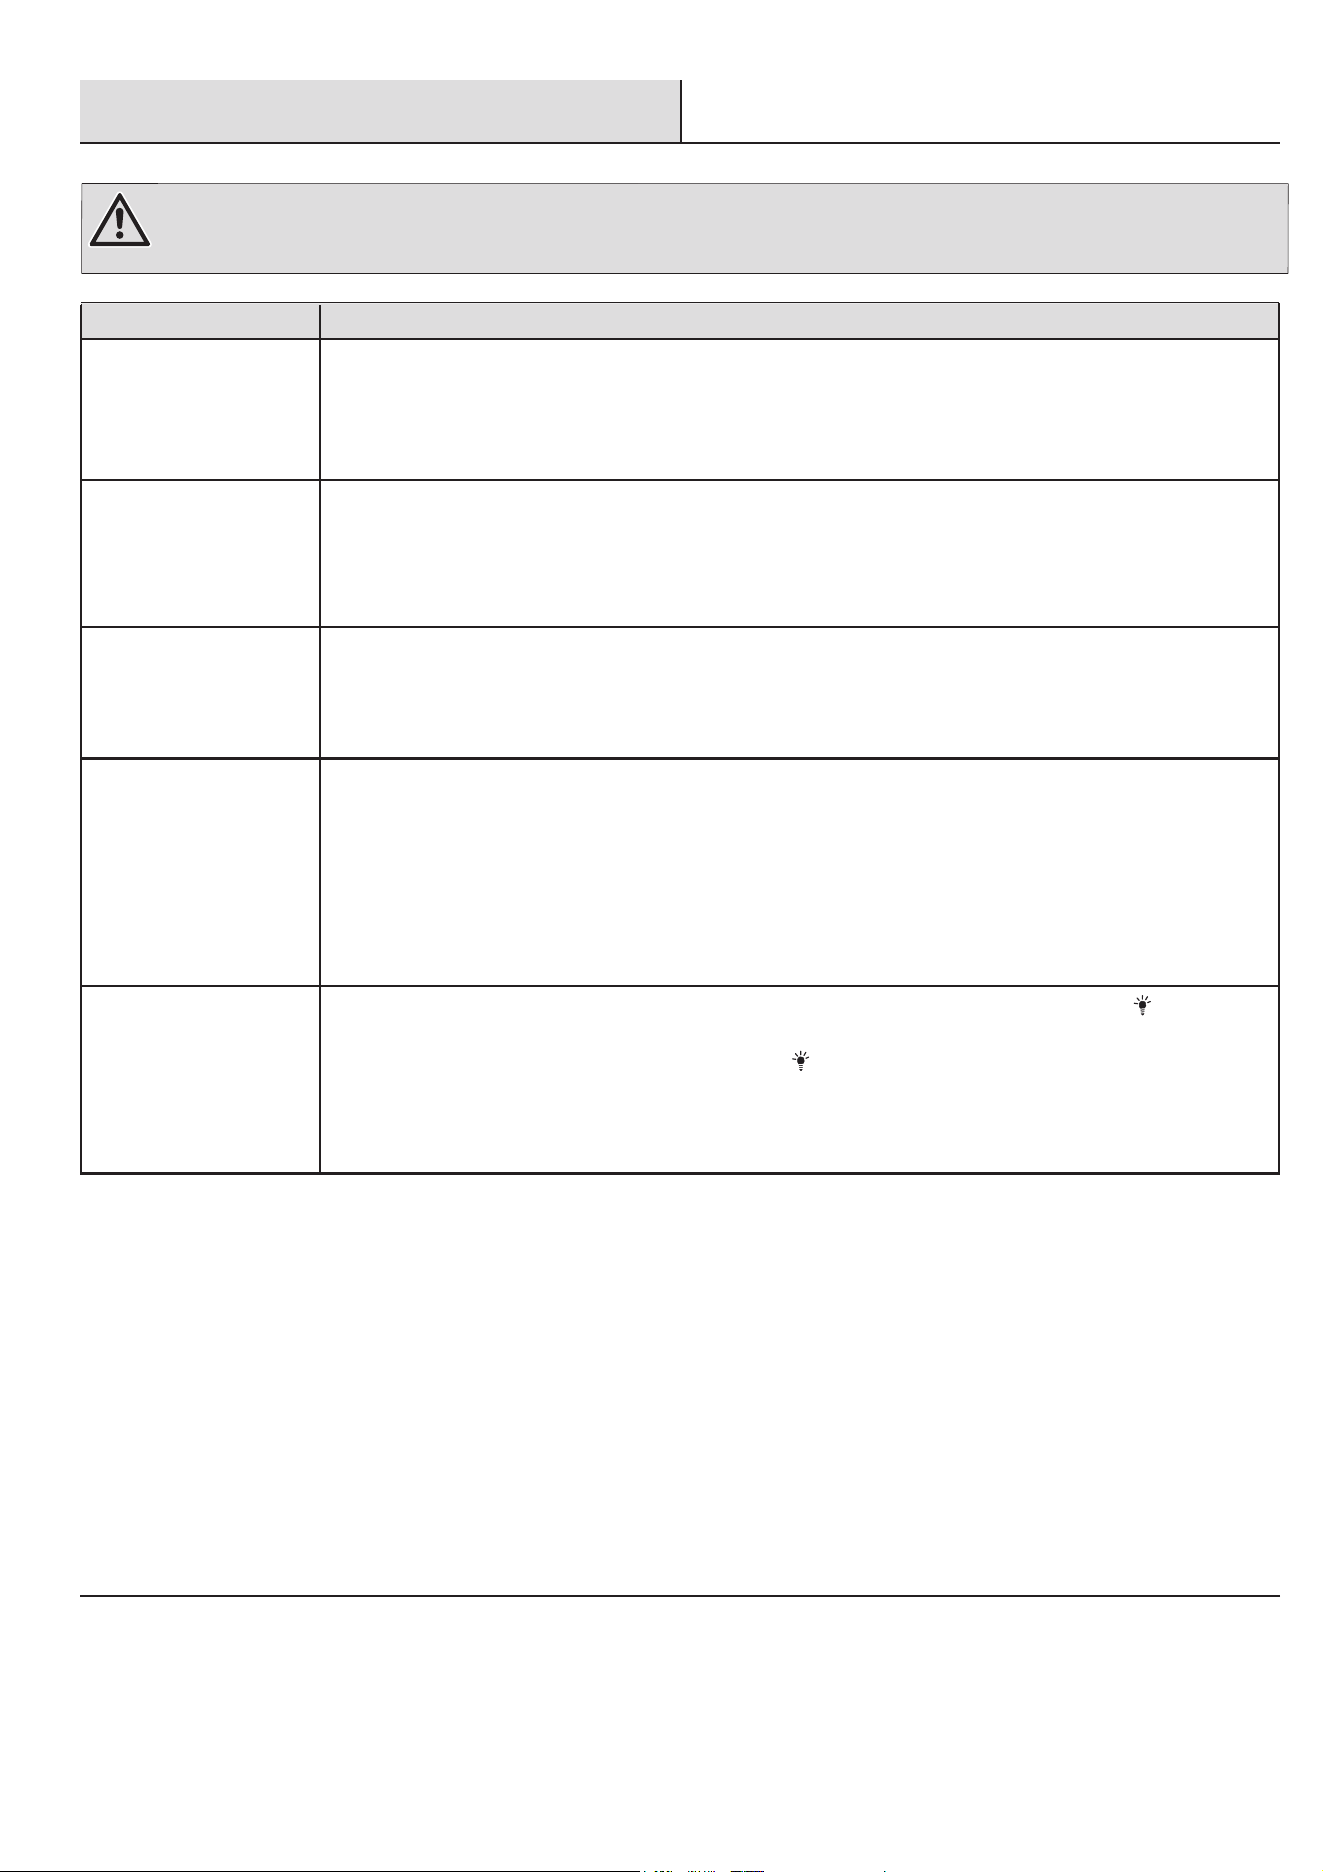
Troubleshooting
Problem
Solution
Ƒ
Ƒ
Ƒ
Fan will not start.
Wall switch is turned off. Turn wall switch on.
Circuit breaker is tripped or fuse is blown. Reset circuit breaker or replace fuse.
Ceiling fan wiring is incorrect. Check the ceiling fan’ s electrical connections. If you are
unable to detect the p roblem, consult a qualified electrician.
Fan is noisy. Some noise is natural during the break-in period of the fan. Allow a minimum 24
hours break-in period. Most noises associated with a new fan will be resolved during this
time.
Ceiling fan housing screws are loose. Make sure all housing screws are snugly tightened.
Blade set screw is loose. Retighten the blade set screw.
Fan wobbles. Pivot ball is not captured in slot on fan mounting bracket. Refer to the instructions
under Hanging the Ceiling Fan on page 11 to be sure the ceiling fan is hung cor rectly.
Outlet box is not securely fastened to the ceiling joists. Tighten the outlet box screws or
use longer screws, if needed, to fasten securely.
Remote control is not
working.
Wall switch is turned off. Turn wall switch on.
Remote batteries are dead. Replace the batteries in the remote cont rol.
Wall switch has solid-state speed controls. Do not use a wall switch that has variable
speed control (i.e. a dimmer switch).
DIP switches on the wall remote and the receiver do not match. Reset DIP switches
so that the configuration is the same on both the remote and the receiver.
Remote control and
fan are working, but
lights don ’ t work.
Verify the indicator light on the remote control lights up when you press the
button. This
light indicates a signal is being sent from the remote control to the ceiling fan. If the
indicator light does not illuminate when the
button is pressed, the remote control may be
damaged and need to be replaced. Contact a customer service representative.
If the light on the remote illuminates, but the lights on the fan still don’ t work, contact a
service representative.
Ƒ
Ƒ
Ƒ
Ƒ
Ƒ
Ƒ
Ƒ
Ƒ
Ƒ
Ƒ
WARNING
Turn off power to room and wall switch by removing fuses or turning off circuit breakers as needed before attempting
any repairs to the ceiling fan or the electrical connections. Failure to do so can cause serious personal injury.