User Manual
Wall Button and Pendant
safely-you.com | 415-579-3630 | 36 Clyde St, San Francisco, CA Rev 1.1 12/25
Overview
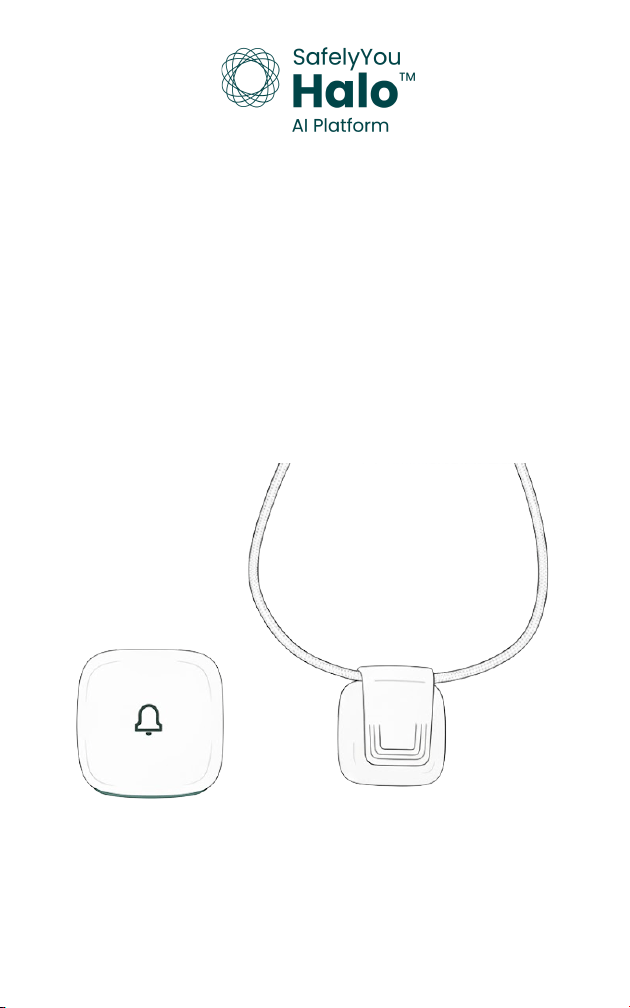
The SafelyYou Halo™ Wall Button and Pendant are devices that are
used by facility residents to request assistance from facility staff
members. Users simply need to push and release the white area of
the Wall Button or press and release the ribbed area of the clip on
the Pendant to activate either device and transmit a request. Both
of these devices are installed and activated by SafelyYou trained
technicians.
In the Box
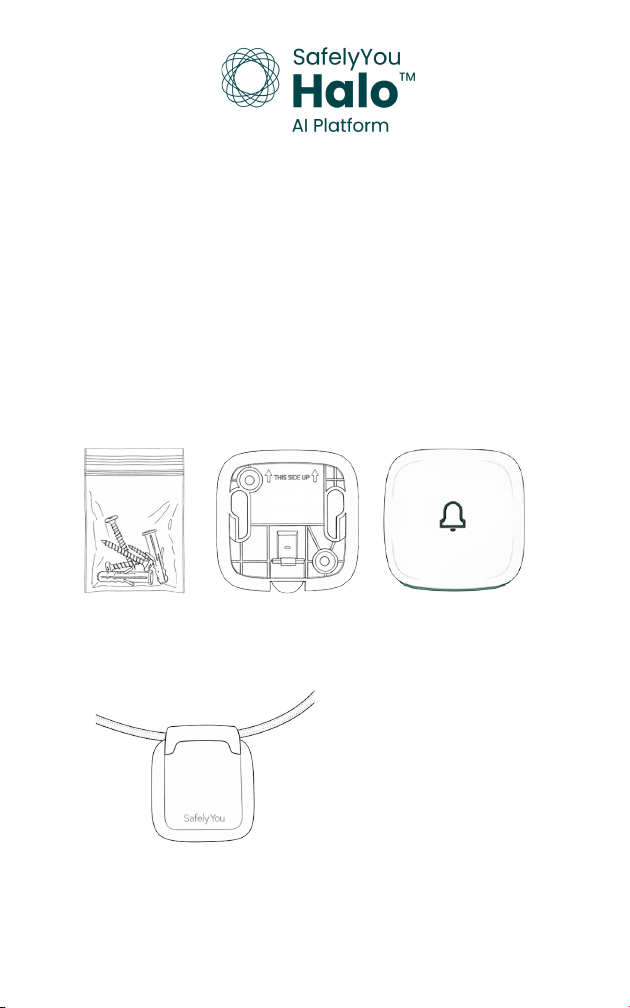
SafelyYou Halo™ Wall Button
Wall Button Wall Plate
Wall Plate Mounting Tape and Anchors with Screws
SafelyYou Halo™ Pendant
Pendant Lanyard
Batteries are shipped separately and furnished by SafelyYou.
A CR2450 coin cell battery is required for device operation.
safely-you.com | 415-579-3630 | 36 Clyde St, San Francisco, CA Rev 1.1 12/25
Installation
An installed and activated SafelyYou Halo™ Gateway is required prior
to activation and installation of a SafelyYou Halo™ Wall Button or
Pendant. Installation of all items should be performed by a SafelyYou
trained technician.
What You Will Need
Activated Halo Gateway
Drill with 15/64” bit
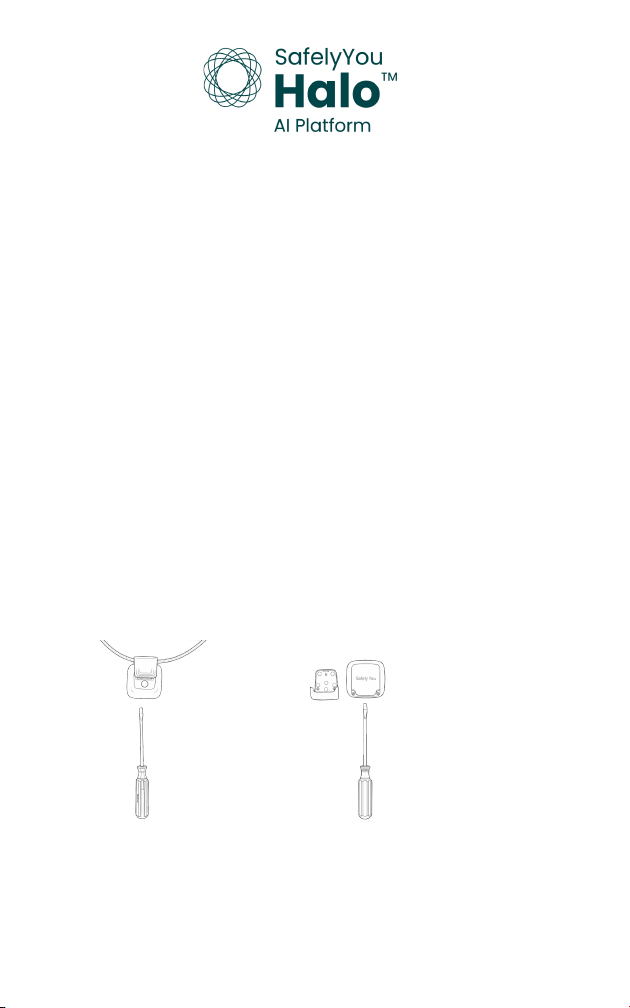
Mini Phillips head screwdriver
Mini slot head screwdriver
Small Spirit Level
SafelyYou Installation App
Access to site network
safely-you.com | 415-579-3630 | 36 Clyde St, San Francisco, CA Rev 1.1 12/25
Finding the appropriate installation location: It’s important to
determine the best location for installation of the Wall Button. Locations
will vary based on different area configurations. Ideal mounting locations
include on walls at light switch or lower heights or as required by local
standards in different regions. When installing the Wall Plate on drywall,
mounting anchors and screws (included) are recommended while ensuring
that there are no hidden obstructions behind the drywall. Installations on
fiberglass, tile, similar surfaces or furniture are best suited for mounting
tape (included). In all cases, please observe the correct direction of the
Wall Plate using the arrows in the Wall Plate and ensure that the Wall Plate
is installed level.
Preparation: The SafelyYou authorized installer will use the installation
App to activate these devices after Wall Plate installation and battery
insertion.
Battery Installation: Once the Wall Plate for the Wall Button is installed,
the next steps of battery installation and activation with the installation
app should follow. The Pendant battery should be installed prior to
attaching the included clip and lanyard to the Pendant, followed by
activation by the SafelyYou authorized installer with the installation app.
See the following diagrams for battery installation in both devices. Battery
removal and installation should only be performed by authorized
representatives.
Use a small slot head screwdriver in the provided slot under the clip to
loosen the clip. Remove the clip and set it to one side.
Using the same screwdriver from the prior step, use the slot provided
under the battery door to carefully remove the battery door.
safely-you.com | 415-579-3630 | 36 Clyde St, San Francisco, CA Rev 1.1 12/25
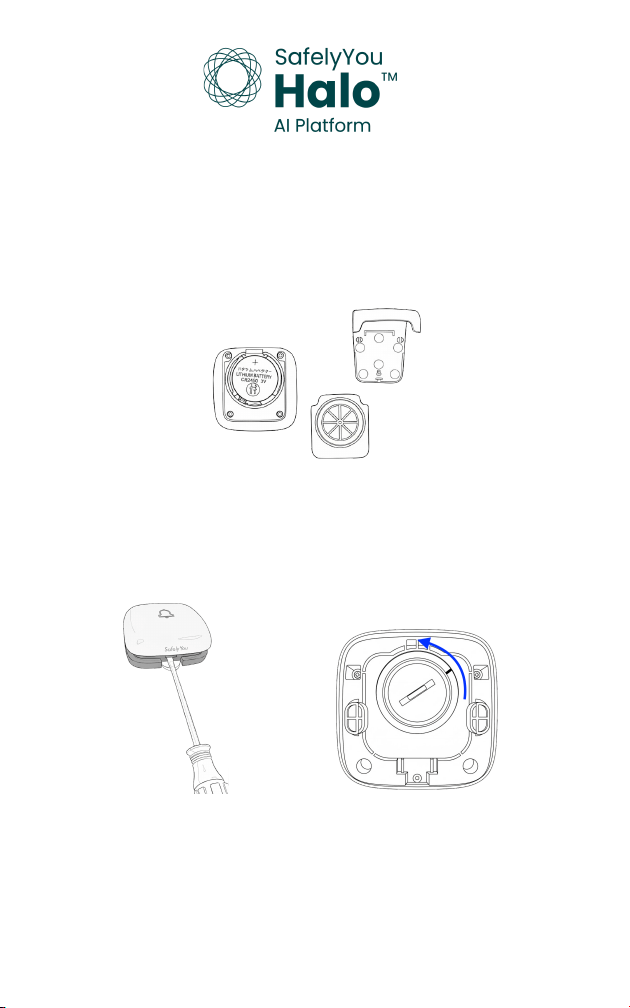
Install or replace the battery, placing it so that the positive side (marked
with a +) is facing you. Replace the battery cover and the clip with lanyard.
Wait up to one minute and verify that the LED illuminates blue. If the
device has not yet been activated, follow the steps outlined in the next
section. If the device has already been activated, resume normal use.
________________________________________________________________________________
Use a small slot head screwdriver in the provided slot under the Wall
Button to remove it from the Wall Plate. Using the same screwdriver from
the prior step or a properly-sized coin, use the slot provided in the round
battery cover to carefully turn the cover counter-clockwise and then
remove it.
safely-you.com | 415-579-3630 | 36 Clyde St, San Francisco, CA Rev 1.1 12/25
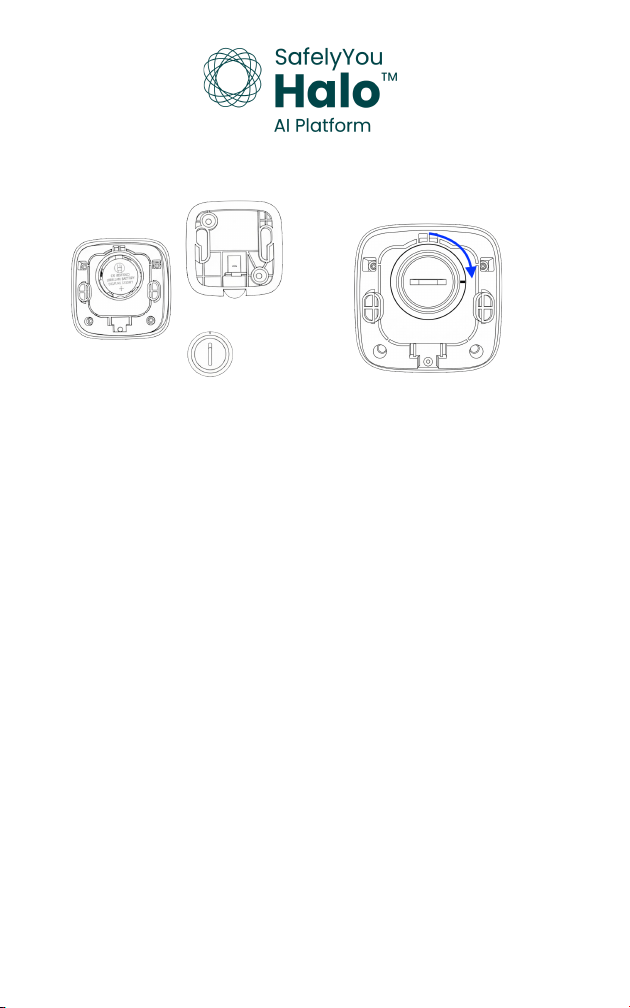
Install or replace the battery, placing it so that the positive side (marked
with a +) is facing you. Note the mark on the battery cover, lining it up with
the upper mark on the rear of the Wall Button. Using the same screwdriver
from the prior step, use the slot provided in the round battery cover to
carefully turn the cover clockwise until the mark on it and the lower one on
the rear of the button are aligned. Wait up to one minute and verify that
the LED illuminates blue. If the device has not yet been activated, follow
the steps outlined in the next section. If the device has already been
activated, resume normal use.
Initial Activation: Once the device has had a battery correctly installed,
activation will be performed as follows.
Up to one minute after battery installation, the device blue LED will start to
blink once every two seconds. This indicates that the device is ready for
the installer to begin system activation using a Bluetooth connection via
the installation App. Once the App has connected to the device, the blue
LED will switch to blinking twice every two seconds.
Using the App, the installer will verify the ID and type (Wall Button or
Pendant) of the device being activated. The QR code on the device will be
scanned by the installer as an additional verification step to match the
device to the one connected to the App.
Once the prior steps are completed, the installer will assign the device to a
user. For the Wall Button, the location of that device will then be selected.
safely-you.com | 415-579-3630 | 36 Clyde St, San Francisco, CA Rev 1.1 12/25
As a final confirmation step of successful device activation, the device LED
will blink green three times to verify successful connection to the Gateway.
Note: If the device is unable to successfully connect to the Gateway, the device
LED will blink red three times to indicate that the connection was unable to be
established. The device will automatically retry to establish a connection to the
Gateway. When that is successful, the device LED will blink green three times.
Questions: Please contact your SafelyYou representative with any
questions that you may have or call 415-579-3630.
safely-you.com | 415-579-3630 | 36 Clyde St, San Francisco, CA Rev 1.1 12/25
Resident Use
One or more Wall Buttons are installed in your living space and assigned
to you. A Pendant that is to be worn following Care Staff
recommendations has also been provided to you. You are to use these
to alert the Care Staff that you need something from a member of the
Care Staff team. Pressing any of your devices, Wall Buttons or Pendant,
will send an alert to the Care Staff team to come see you. Simply use
whatever device is most convenient to you when you want to send a
request.
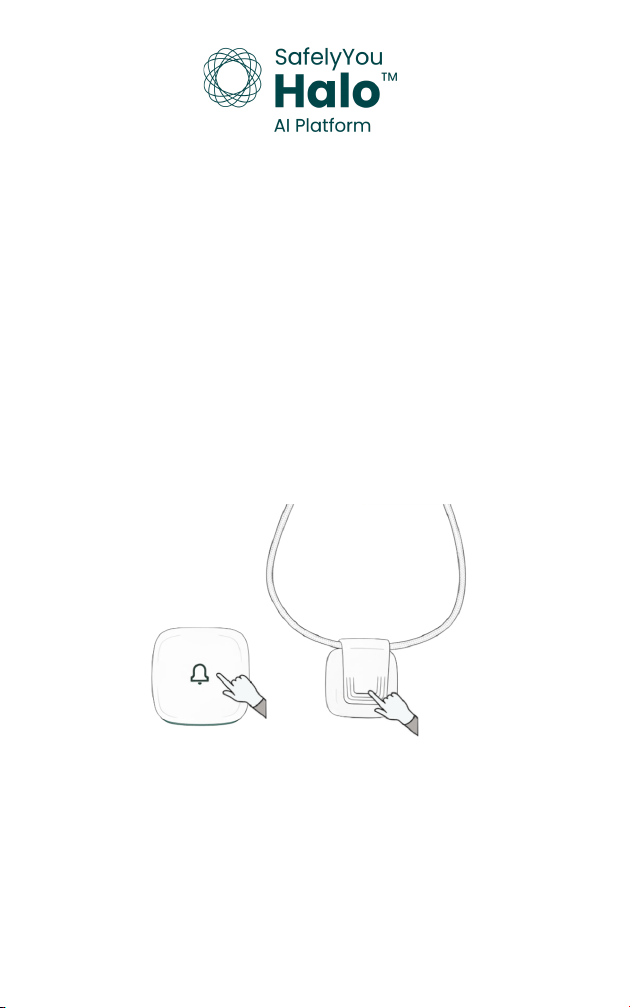
To press the Wall Button, simply press and release the white front area
of the button. For the Pendant, just press and release the ribbed area of
the clip. A successful press will show a light in the lower area of the Wall
Button or Pendant for a brief time. One press and release followed by a
brief light of either device is all you need to do to send a message to the
Care Staff team.
Questions: Please contact your Care Staff Team.
safely-you.com | 415-579-3630 | 36 Clyde St, San Francisco, CA Rev 1.1 12/25
Care Staff Use
Residents will use the SafelyYou Halo™ System to request assistance
from Care Staff.
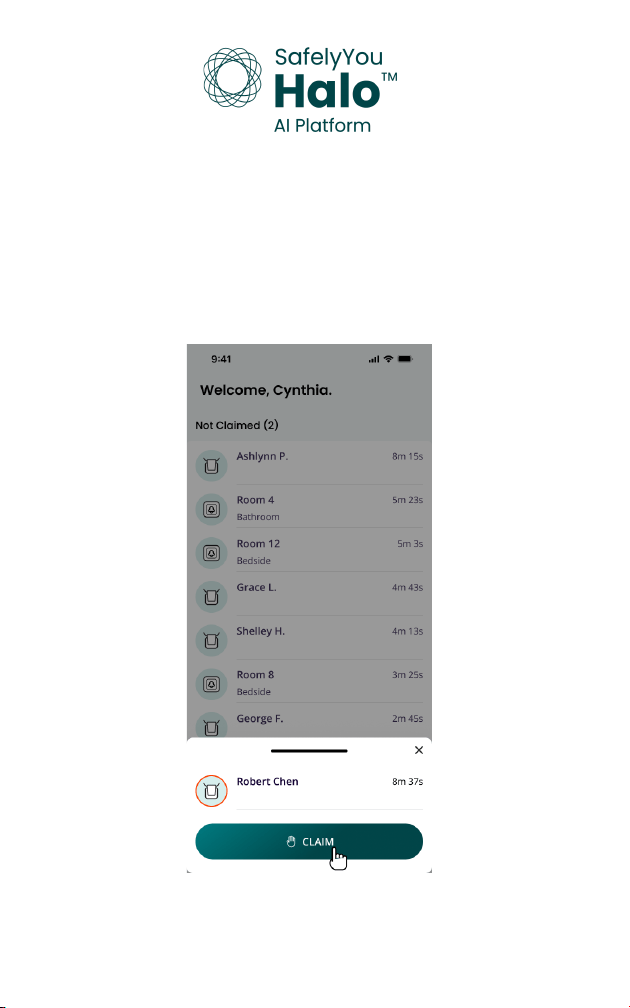
Notification of a request is delivered to the Care Staff via the SafelyYou
App. Any member of the Care Staff that is available may view the list of
current alerts that are not claimed and claim one from this list and then
check on that Resident.
safely-you.com | 415-579-3630 | 36 Clyde St, San Francisco, CA Rev 1.1 12/25
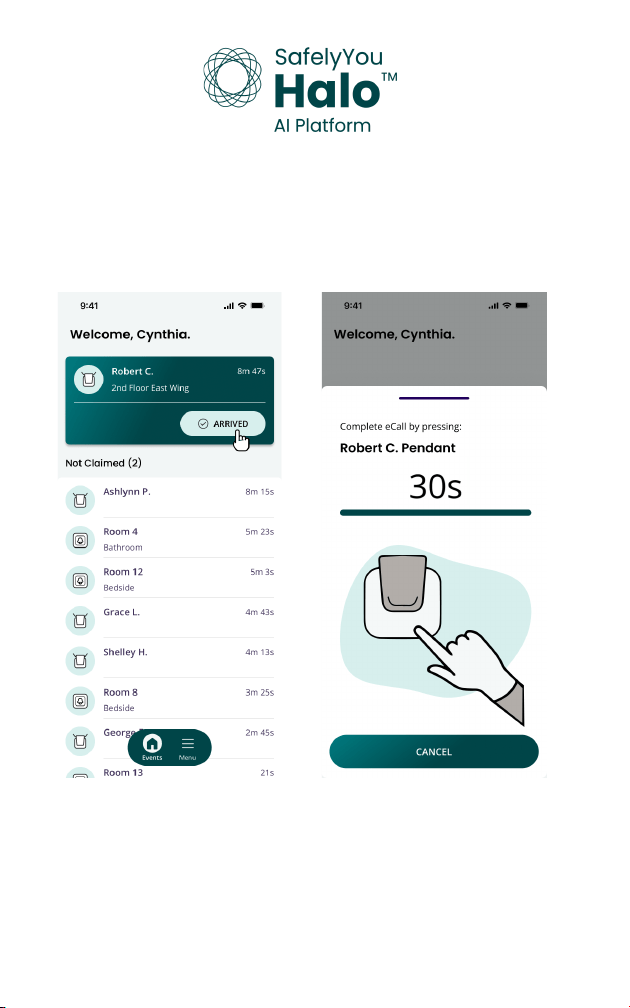
After claiming an alert and responding to a request, the Staff Member
simply selects Arrived to the Resident in the App. Once Arrived has
been selected, clearing the call must be completed by the Care Team
member within the time shown by pressing the button on the
Residents’ device shown in the App.
Questions: Please contact your SafelyYou representative with any
questions that you may have or call 415-579-3630.
safely-you.com | 415-579-3630 | 36 Clyde St, San Francisco, CA Rev 1.1 12/25
Compliance statements
Federal Communications Commission (FCC) statement
This equipment has been tested and found to comply with the limits
for a Class B digital device, pursuant to part 15 of the FCC Rules. These
limits are designed to provide reasonable protection against harmful
interference in a residential installation. This equipment generates,
uses and can radiate radio frequency energy and, if not installed and
used in accordance with the instructions, may cause harmful
interference to radio communications. However, there is no guarantee
that interference will not occur in a particular installation. If this
equipment does cause harmful interference to radio or television
reception, which can be determined by turning the equipment off and
on, the user is encouraged to try to correct the interference by one or
more of the following measures:
1. Reorient or relocate the receiving antenna.
2. Increase the separation between the equipment and receiver.
3. Connect the equipment into an outlet on a circuit different from that
to which the receiver is connected.
4. Consult the dealer or experienced radio TV technician for help.
This device complies with part 15 of the FCC Rules. Operation is
subject to the following two conditions:
1. This device may not cause harmful interference, and
2. This device must accept any interference received, including
interference that may cause undesired operation.
CAUTION:
Any changes or modifications not expressly approved by the grantee
of this device could void the user's authority to operate the
equipment.
safely-you.com | 415-579-3630 | 36 Clyde St, San Francisco, CA Rev 1.1 12/25