
SHS 9200RS
EN
AUTOROTATION HAIR STYLER
Translation of the original manual
SHS 9200RS
A
1
2
3
4
5
8
9
10
6
7

B
1 2 3 4 5
6 7 8 9
10
D
D1 D2
C
C1 C2
- 1 -
12/2025
2025, .
EN
Autorotation Hair Styler
User Manual
IMPORTANT SAFETY INSTRUCTIONS
READ CAREFULLY AND STORE FOR FUTURE USE.
• This appliance may be only used by children aged 8
years and older and by persons with physical, sensory or
mental impairments or lack of experience and knowledge,
if they are supervised or have been instructed on the safe
use of the appliance and understand the potential hazards.
• Children must not play with the appliance.
• Cleaning and maintenance must not be performed by
children without supervision.
• If the power cord is damaged, have it replaced in
aprofessional service centre in order to prevent
adangerous situation. Never use the appliance if the
power cord is damaged.
Warning:
Do not use this appliance near water.
Warning:
Do not use this appliance in bath, shower or near
containers containing water.
Warning:
Do not use this appliance near baths, showers,
washbasins or other containers containing water.
• If the appliance is used in the bathroom, unplug it from
the socket after use by removing the plug from the socket,
AUTOROTATION HAIR STYLER
- 2 -
12/2025
2025, .
as the presence of water poses danger, even when the
appliance is turned off.
• To insure additional safety, it is recommended to install
aResidual Current Device (RCD) into the electric circuit to
the bathroom with amaximum current rating of 30 mA.
Ask the electrician for advice.
• The temperature of accessible surfaces may be higher if the
appliance is in operation. Such surfaces can become hot during
use. Do not touch the hot surface. This could cause skin burns.
. . . . . . . . . . . . . . . . . . . . . . . . . . . . . . . . . . . . . . . . . . . . . . . . . . . . . . . . . . . . . . . . . . . . . . . . . . . . . . . . . . . . . . . . . . . . . . . . . . . . . . . . . . . . . . . . . . . . . . . . . . . . . . . . . . . . . . . . . . . .
Additional Important Safety Instructions forUse of the Appliance
• Carefully unpack the product and take care not to throw away any part of the packaging until all the product parts have been identified.
• Before connecting this appliance to apower socket, make sure the voltage stated on the label of the appliance corresponds to the voltage in your
power socket.
• Never use accessories which have not been supplied with this appliance or which are not designed for this appliance.
• Make sure that the power cord and plug cannot come into contact with water or dampness.
• Do not spray the product with water or any other liquid. Do not submerge this appliance and any of its components in water or any other liquids.
• This product is designed for household use. Do not use it in industrial environment or outdoors!
• Do not use sprays in the vicinity of the appliance.
• If you will not be using the appliance, disconnect it from the electrical grid. Before cleaning or moving the appliance, proceed in the same manner.
• Make sure the appliance is fully cold before storing.
• Do not expose sensitive people or animals to hot air.
• Do not place the appliance on or near an electrical or gas stove. Do not place the device within near heat producing devices such as fireplaces etc.
• Do not use attachments other than those supplied or specified by the manufacturer.
• Do not use the appliance if it has adamaged power cord or power plug.
• In no case should you attempt to repair the appliance yourself; do not make any modifications to it – danger of electric shock! Entrust all repairs and
adjustments of this device to aspecialised company/service. Failure to do so will expose you to the risk of voiding the warranty policy.
• Do not place the power cord of the appliance near hot surfaces or over sharp objects. Do not place heavy objects on the power cord, position the
cord so that it is not stepped on or tripped over. Make sure the power cord does not hang over the edge of atable and that it is not touching ahot
surface.
• Do not disconnect the appliance from the power socket by pulling the power cord – it may damage the power cord / power socket. Disconnect the
cable from the power socket by gently pulling the plug of the power cord.
• Do not use the product for any other purposes than those intended.
• Ensure that when turning on the product, that the air inflow or outflow grill is not covered.
• Ensure that no hair or threads remain in any of the openings of the curling iron.
• The manufacturer is not responsible for damages caused by the incorrect use of this product or its accessories (food spoilage, injuries, burns,
scalding, fire, etc.).
. . . . . . . . . . . . . . . . . . . . . . . . . . . . . . . . . . . . . . . . . . . . . . . . . . . . . . . . . . . . . . . . . . . . . . . . . . . . . . . . . . . . . . . . . . . . . . . . . . . . . . . . . . . . . . . . . . . . . . . . . . . . . . . . . . . . . . . . . . . .
EXPLANATION OF SYMBOLS PLACED ON THE PRODUCT OR INTHE ACCOMPANYING DOCUMENTATION
The product meets all the basic requirements of the applicable EU directives.
This symbol on products or accompanying documents means that used electric or electronic products must not be added to ordinary
municipal waste.
Product with protection class II
Electric shock protection is provided by double or heavy-duty insulation.
. . . . . . . . . . . . . . . . . . . . . . . . . . . . . . . . . . . . . . . . . . . . . . . . . . . . . . . . . . . . . . . . . . . . . . . . . . . . . . . . . . . . . . . . . . . . . . . . . . . . . . . . . . . . . . . . . . . . . . . . . . . . . . . . . . . . . . . . . . . .
- 3 -
12/2025
2025, .
• Thank you for purchasing our SENCOR product; we hope it will serve
to your satisfaction.
• Prior to using this appliance, please read the user manual thoroughly,
even in cases when you are already familiar with the use of similar
types of appliances. Use the appliance only as described in this
user manual. Keep the manual for future reference. If you pass the
appliance on to another person, ensure that this user manual is
included.
• Carefully unpack the appliance and make sure not to discard any part
of the packaging material until you have removed all its components.
It is recommended that you keep the original packaging, packing
material, receipt and confirmation of the extent of the seller'sliability
or warranty certificate at least for the duration of the legal right to
file adefect claim or the quality warranty. When transporting the
appliance, we recommend repackaging it in the original box provided
by the manufacturer.
. . . . . . . . . . . . . . . . . . . . . . . . . . . . . . . . . . . . . . . . . . . . . . . . . . . . . . . . . . . . . . . . . . . .
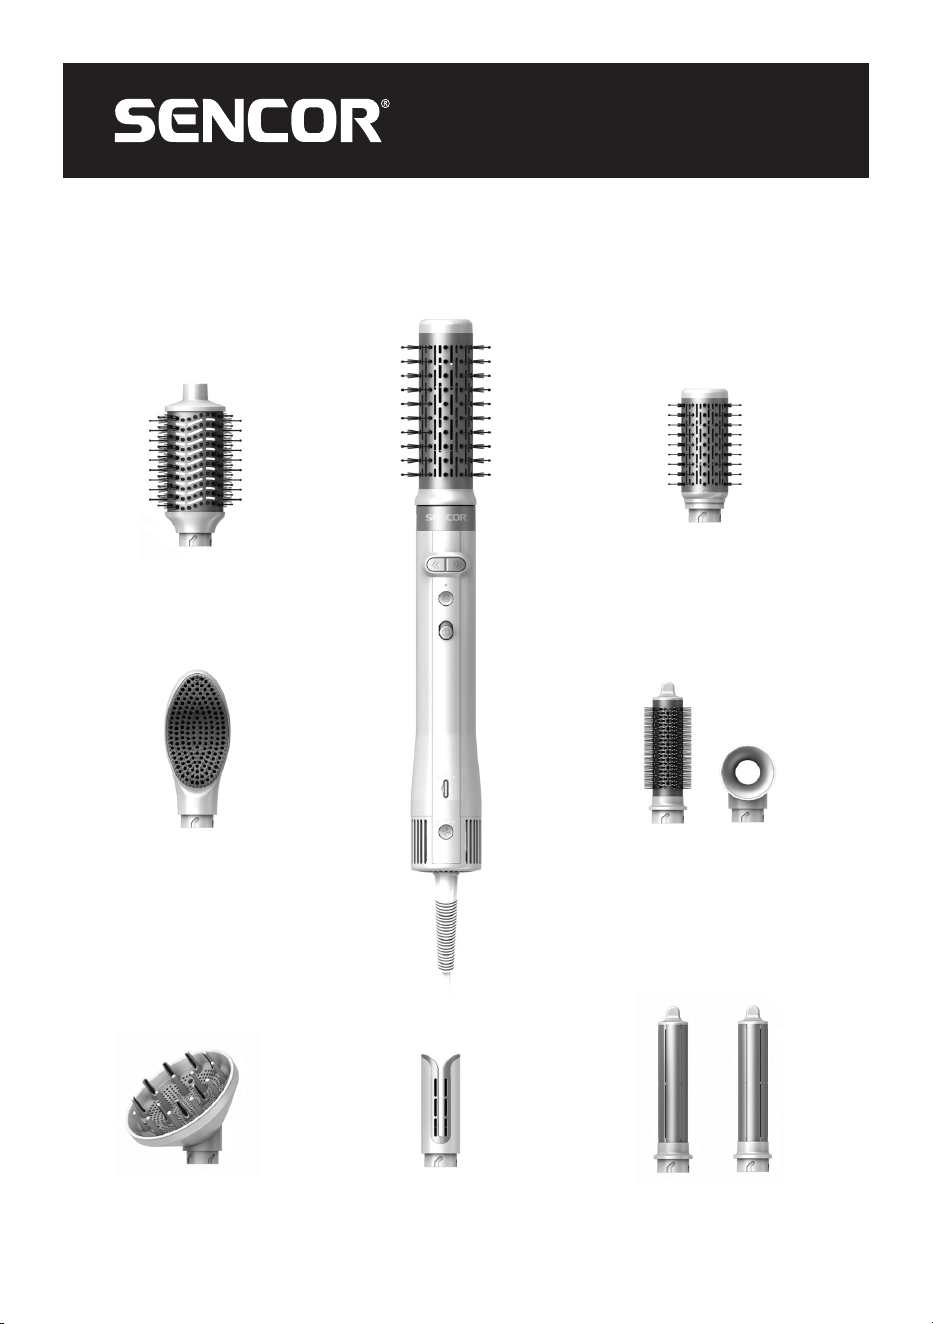
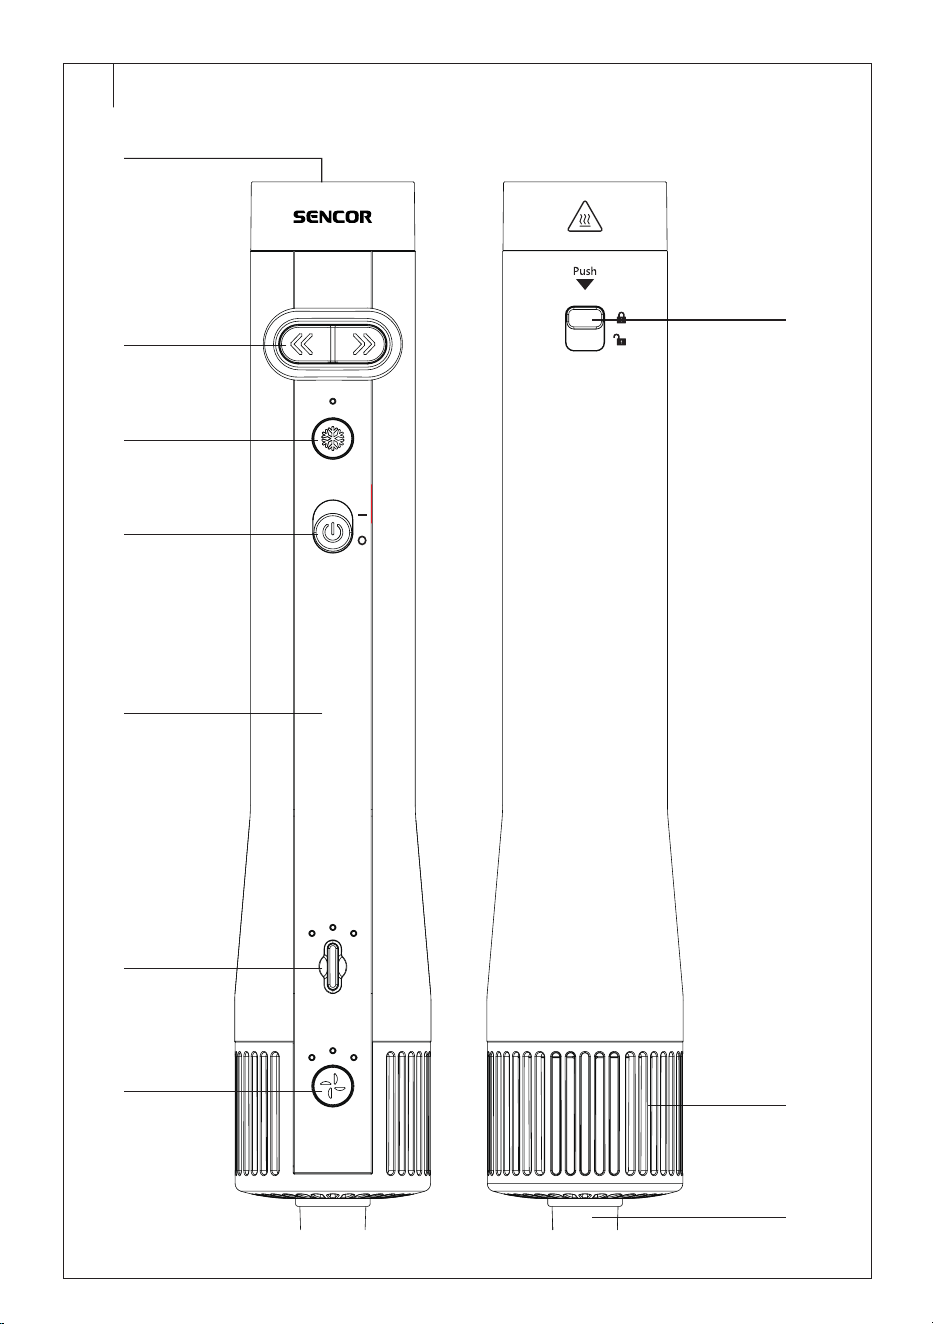
CURLING IRON DESCRIPTION
A1 Attachment connection
ending
A2 Rotation direction buttons
A3
Cold air button
A4 On/off switch
A5 Handle
A6 Temperature button
A7 Speed button
A8 Attachment release lock
A9 Filter protection grid
A10 Power cord
. . . . . . . . . . . . . . . . . . . . . . . . . . . . . . . . . . . . . . . . . . . . . . . . . . . . . . . . . . . . . . . . . . . .
DESCRIPTION OF ATTACHMENTS
B1 Drying head
B2 Air straight head
B3 Round rotary brush head
38 mm
B4 Round rotary brush head
50 mm
B5 Oval brush
B6 Diffuser
B7 Hair comb
B8 Curling attachments (left
andright)
B9 Round brush
B10 Case forstoring attachments
. . . . . . . . . . . . . . . . . . . . . . . . . . . . . . . . . . . . . . . . . . . . . . . . . . . . . . . . . . . . . . . . . . . .
BEFORE FIRST USE
• Before first use, remove the curling iron and its accessories from the
packaging and detach all promotional labels and stickers. Make sure
that it is not damaged.
• Make sure to remove all accessories from the package material.
. . . . . . . . . . . . . . . . . . . . . . . . . . . . . . . . . . . . . . . . . . . . . . . . . . . . . . . . . . . . . . . . . . . .
INTENDED USE
• The Sencor SHS 9200RS Automatic Rotating Curling Iron is designed
for drying hair and for styling and curling dry hair.
. . . . . . . . . . . . . . . . . . . . . . . . . . . . . . . . . . . . . . . . . . . . . . . . . . . . . . . . . . . . . . . . . . . .
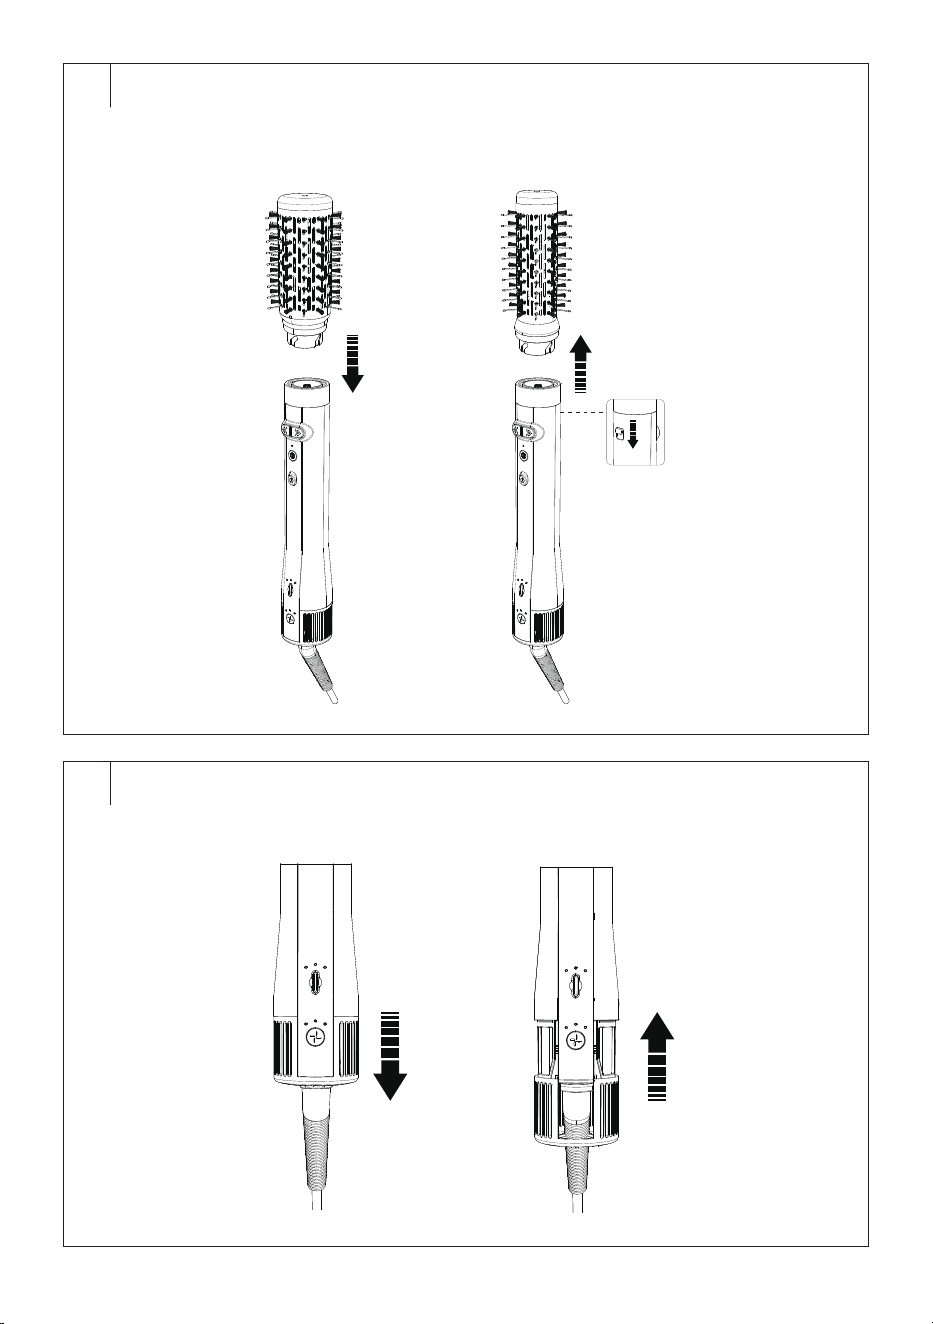
ASSEMBLING/REPLACING ATTACHMENTS
Caution:
Before assembling or replacing the attachments,
always make sure that the curling iron is switched off
and the power plug is disconnected from the mains
socket.
• Attach the attachment you want to use to the connection ending of
the curling iron andinsert it into the connection ending until you hear
aclick – see figure C1. The protrusions inside the ending must fit into
the grooves in the bottom part of the attachment.
• If you need to remove the attachment, press therelease button down
towardsthe symbol andpull the attachment upwards – see
figure C2.
Caution:
Before removing the attachment, please make sure
that it’scool. There is arisk of serious burns.
. . . . . . . . . . . . . . . . . . . . . . . . . . . . . . . . . . . . . . . . . . . . . . . . . . . . . . . . . . . . . . . . . . . .
USING THE CURLING IRON
• Comb your hair thoroughly andassemble the curling iron withthe
desired attachment.
• Plug the power cord into the mains socket.
• Move the power switch to position I(on).
• Press the temperature button repeatedly to set the desired
temperature: low temperature (50 °C, blue indicator light) – medium
temperature (70 °C, yellow indicator light) – high temperature (90 °C,
red indicator light).
• Press the speed button repeatedly to set the desired speed: low speed
– medium speed – high speed. Each time it is pressed, the respective
indicator light will be lit.
• Forrotary attachments, select the rotation direction using the
buttons.
• Dry your hair gradually or style it.
• When you have finished using it, move the switch to the 0 (off)
position. Allow appliance to cool down on aheat-resistant mat before
cleaning andstoring.
Cold air styling
• Turn the switch to the position so that you can shape your hair
with cold air.
• Press the speed button repeatedly to set the desired speed: low speed
– medium speed – high speed. Each time it is pressed, the respective
indicator light will be lit.
• When you have finished using it, move the switch to the 0 (off)
position. Allow appliance to cool down on aheat-resistant mat before
cleaning andstoring.
. . . . . . . . . . . . . . . . . . . . . . . . . . . . . . . . . . . . . . . . . . . . . . . . . . . . . . . . . . . . . . . . . . . .
ATTACHMENTS ANDTHEIR USE
Drying head
• The drying head is used todry the hair before shaping andfinal
styling.
Air straight head
• The air straight head is used for drying andstraightening hair
andbasic styling.
• Carefully comb your hair anddivide it into equally thick strands. Place
the air straight head as close to the roots as possible. Be careful not
to burn yourself.
• Insert the hair strand in between the arms of the air straight head.
Slowly and gently pull the curling iron through the entire length of the
hair from roots to ends. Repeat the procedure if needed.
• Repeat with theother strands that you wish to straighten.
Round rotary brush heads (38 mm / 50 mm)
• The round rotary brush head is used toquickly andcomfortably
shape the hair while drying.
• Use the buttons to select the direction of rotation (clockwise
or anticlockwise). Thanks to the rotation of the brush, the hair
automatically winds and smooths, making it easier to create volume
from the roots, fine waves or asmooth hairstyle without frizz.
EN
Autorotation Hair Styler
User Manual
- 4 -
12/2025
2025, .
• The warm air from thecurling iron combined with the airflow helps to
fix the hairstyle, while the bristles of the brush gently comb the hair
andgive it shine.
• This attachment is ideal for everyday styling because it saves time
andsimplifies working with acurling iron andahair dryer inone step.
Oval brush / round brush
• The oval/round brush is designed tomanually shape hair as it dries.
The hair curls around the brush by hand, and the heat from the curling
iron helps it get the shape it wants – from soft waves to asmooth,
voluminous hairstyle.
• The firm bristles of the brush smoothen, detangle andshine the hair
while the shape of the brush makes it easier to lift the strands away
from the roots.
Diffuser
• The diffuser is suitable fordrying andstyling curly andwavy hair.
Brush forcombing hair
• The brush forcombing the hair is designed to make it easier to comb
the hair andprevent tangling.
• The fine but firm bristles separate the individual strands, so the warm
air from thecurling iron spreads evenly and the styling is faster
andgentler.
• This attachment is ideal for smoothing hair before curling or when
creating loose waves, as it ensures smooth slippage of the strands
andminimizes pulling. At the same time, it helps to preserve the
natural shine of the hair andgives the hairstyle atidy, professional
look.
Curling attachments
• The curling iron is supplied with two curling attachments – right and
left for the right and left side of the head. For easy distinction, there is
agraphic mark on each attachment that distinguishes the sides.
• Carefully comb your hair anddivide it into equally thick strands.
• Put the end of the strand to the curling attachment andstart winding
it. Slowly pull the curling iron towards thehead, but not in close
proximity. There is no need to turn the curling iron.
• Hold the curling iron inthis position for 10 to 15 seconds, or until the
hair is dry.
• Then press the button to fix the curl shape with cold air for 5 to
10 seconds.
• Turn off the curling iron andcarefully release the strand fromthe
crimping attachment. When releasing, you can use your finger to wrap
the curl around it, andthen apply hair spray tofirmly fix the curl.
• To change the direction of rotation of the curls, swap the curling
attachments between themselves.
. . . . . . . . . . . . . . . . . . . . . . . . . . . . . . . . . . . . . . . . . . . . . . . . . . . . . . . . . . . . . . . . . . . .
CLEANING AND MAINTENANCE
• Before cleaning, turn off the curling iron andallow it to cool down
completely.
Caution:
To avoid the risk of electric shock, do not immerse
the curling iron, attachments or power cord in water or
any other liquid.
Caution:
Do not use abrasive cleaning agents, solvents, etc.
to clean any parts of the appliance, as these could
damage the surface.
Cleaning the curling iron and attachments
• Wipe the curling iron and attachments with aclean, dry cloth.
Cleaning the filter andprotective grille
• Regularly remove dust, dirt andhair from theprotective grid andfilter.
Automatic cleaning
• When the curling iron is switched off, press andhold the temperature
button for 3 seconds.
• The automatic cleaning process will begin. Let it finish the whole
process.
Manual cleaning
• Carefully turn the protective grid clockwise and pull it carefully
downwards from the filter – see figure D1.
• Remove any dirt. Use asoft anddry cloth or abrush withfine bristles
for cleaning.
• After cleaning, put the protective grid back on andturn it anticlockwise
– see figure D2.
Caution:
Do not clean the filter or the protective grille with
water. This may lead to aserious appliance damage.
Storage
Place the attachments in the supplied case.
Store the curling iron in adry, clean, and well-ventilated place away from
extreme temperatures and out of the reach of children or pets.
. . . . . . . . . . . . . . . . . . . . . . . . . . . . . . . . . . . . . . . . . . . . . . . . . . . . . . . . . . . . . . . . . . . .
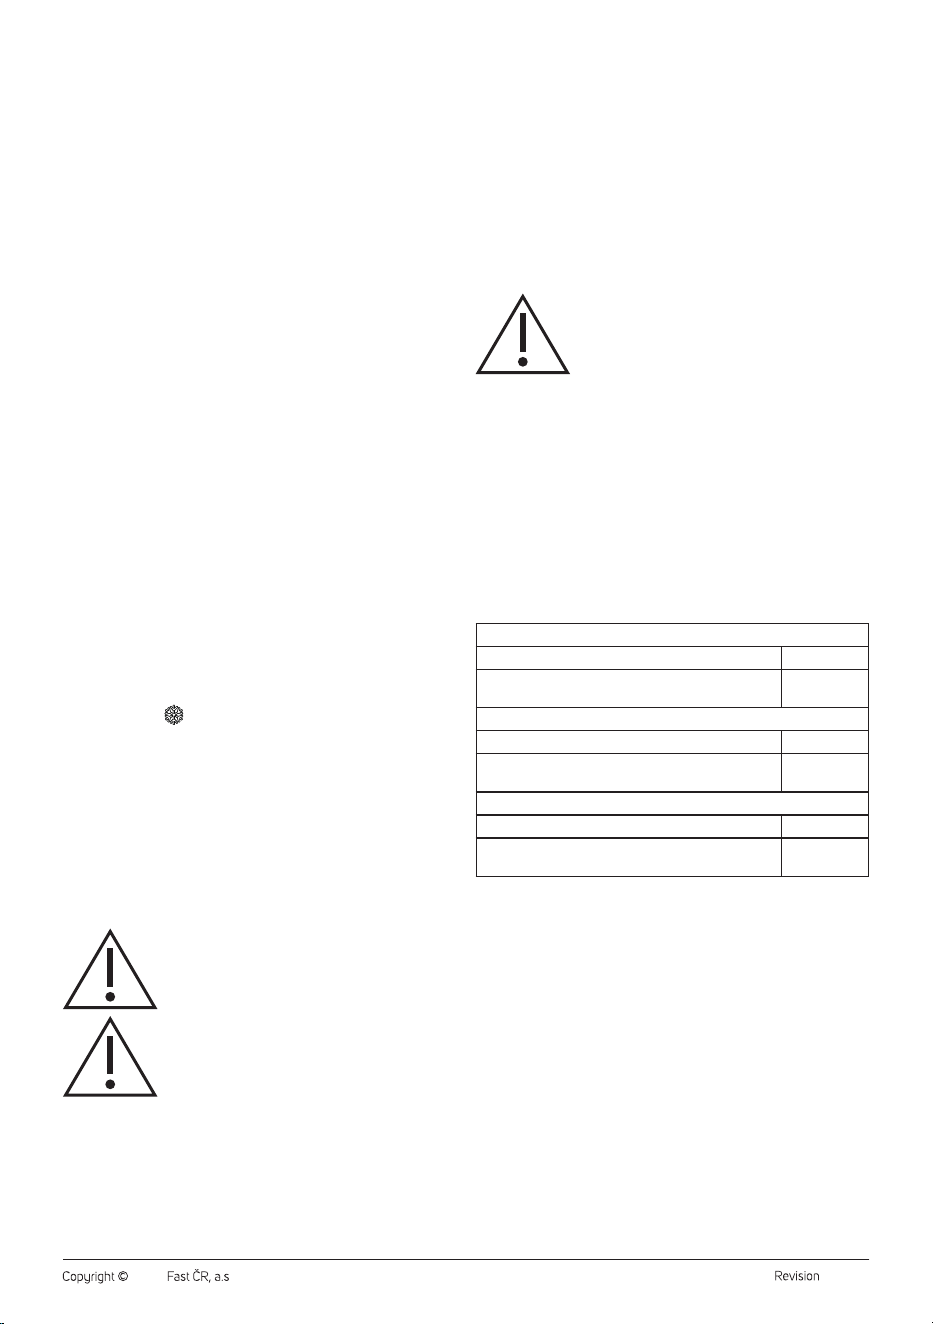
TECHNICAL SPECIFICATIONS
Rated voltage...........................................................................................220–240 V~
Rated frequency ...........................................................................................50/60 Hz
Rated input power .............................................................................................1500W
Values provided according to Commission Regulation EU
2023/826
Off mode
Power consumption in off mode 0.5 W
Time needed for the equipment to automatically reach
off mode
0 min
Standby mode
Power consumption in Standby mode -
Time needed for the equipment to automatically reach
standby mode
-
Networked standby mode (Wi-Fi)
Power consumption in networked standby -
Time needed for the equipment to automatically reach
networked standby mode
-
. . . . . . . . . . . . . . . . . . . . . . . . . . . . . . . . . . . . . . . . . . . . . . . . . . . . . . . . . . . . . . . . . . . .
INSTRUCTIONS AND INFORMATION ON DISPOSAL
OF USED PACKAGING MATERIAL
Dispose of used packaging material at the designated municipal waste
disposal site.
. . . . . . . . . . . . . . . . . . . . . . . . . . . . . . . . . . . . . . . . . . . . . . . . . . . . . . . . . . . . . . . . . . . .
DISPOSAL OF USED ELECTRICAL AND ELECTRONIC
EQUIPMENT
Used electrical andelectronic products must not be disposed of in
ordinary municipal waste. To enable the proper disposal, renewal and
recycling of these products, deliver them to the designated collection
points. Alternatively, in some European Union states or other European
countries the products can be returned to the local retailer when buying
an equivalent new product. By disposing of this product correctly, you
help to conserve valuable natural resources and prevent any potential
adverse impact on the environment and human health that could result
from improper waste disposal. For more details, contact your local
authority or nearest collection point. Fines may be imposed for the
improper disposal of this type of waste as per national regulations.

- 5 -
12/2025
2025, .
For business entities in European Union States
If you wish to dispose of electrical and electronic equipment, please
request the necessary information from your retailer or supplier.
Disposal in other countries outside the European Union
To dispose of this product elsewhere, request the necessary information
on the correct disposal method from local authorities or your retailer.
. . . . . . . . . . . . . . . . . . . . . . . . . . . . . . . . . . . . . . . . . . . . . . . . . . . . . . . . . . . . . . . . . . . .
Changes to text and technical parameters are reserved.