www.klarstein.com
EISZEIT
Eiswürfelmaschine
Ice Cube Maker
Máquina de hielo
Machine à glaçons
Macchina per cubetti di ghiaccio
10033478...10046160


3
DE
Sehr geehrter Kunde,
wir gratulieren Ihnen zum Erwerb Ihres Gerätes. Lesen Sie
die folgenden Hinweise sorgfältig durch und befolgen Sie
diese, um möglichen Schäden vorzubeugen. Für Schäden,
die durch Missachtung der Hinweise und unsachgemäßen
Gebrauch entstehen, übernehmen wir keine Haftung.
Scannen Sie den folgenden QR-Code, um Zugriff auf die
aktuellste Bedienungsanleitung und weitere Informationen
rund um das Produkt zu erhalten.
INHALTSVERZEICHNIS
Sicherheitshinweise 4
Geräteübersicht 5
Einzelteile 6
Bedienfeld und Anzeigen 7
Inbetriebnahme und Bedienung 8
Reinigung und Pege 10
Fehlersuche und Fehlerbehebung 10
Spezielle Entsorgungshinweise für Verbraucher in Deutschland 12
Hinweise zur Entsorgung 14
Hersteller & Importeur (UK) 14
TECHNISCHE DATEN
Artikelnummer 10033478, 10046160
Stromversorgung 220-240 V ~ 50/60 Hz
Wassertankkapazität 1,8 l
Eiswürfelmenge 10-15 kg / 24 h
English 15
Français 25
Español 35
Italiano 45

4
DE
SICHERHEITSHINWEISE
• Schließen Sie das Gerät nur an geerdete Steckdosen an, die der Spannung des
Geräts entsprechen.
• Wenn Sie das Gerät bewegen benutzen Sie die Griffe.
• Stellen Sie das Gerät auf einen ebenen Untergrund.
• Benutzen Sie das Gerät nur in Innenräumen.
• Benutzen Sie das Gerät nicht in der Nähe einer Badewanne oder eines
Swimmingpools.
• Ziehen Sie den Stecker aus der Steckdose wenn Sie das Gerät nicht benutzen.
• Tauchen Sie das Netzkabel und den Stecker niemals in Wasser oder andere
Flüssigkeiten.
• Benutzen Sie nur Zubehör, das vom Hersteller ausdrücklich für dieses Gerät
empfohlen wird.
• Stellen Sie das Gerät nicht direkt unter einer Steckdose auf.
• Lassen Sie das Netzkabel nicht von der Arbeitsäche hängen, damit Kinder
nicht daran ziehen können.
• Überfüllen Sie das Gerät nicht, andernfalls kann es zu Kurzschlüssen und
Stromschlägen kommen.
• Achten Sie darauf, dass der Deckel während des Betriebs immer geschlossen
ist.
• Ziehen sie den Stecker nicht am Kabel aus der Steckdose, sondern halten Sie
ihn beim Abziehen mit der Hand fest.
• Für Schäden, die durch Missachtung der Hinweise und unsachgemäßen
Gebrauch entstehen, übernehmen wir keine Haftung.
• Benutzen Sie das Gerät nur im Haushalt.
• Schließen Sie das Gerät nicht an eine Zeitschaltuhr oder ferngesteuerte
Steckdose an.
• Tauchen Sie das Gerät nicht in Wasser.
• Falls das Netzkabel oder der Stecker beschädigt sind, müssen sie vom
Hersteller, einem autorisierten Fachbetrieb oder einer ähnlich qualizierten
Person ersetzt werden.
• Halten Sie sich bei der Entsorgung an die örtlichen Vorschriften zur
Entsorgung von Geräten mit entzündlichem Gas.
• Bewahren Sie keine leichtentzündlichen oder explosiven Stoffe im Gerät auf.
• Befüllen Sie das Gerät nur mit Wasser.
• Kinder ab 8 Jahren, physisch und körperlich eingeschränkte Menschen
sollten das Gerät nur benutzen, wenn sie vorher von einer Aufsichtsperson
ausführlich mit den Funktionen und den Sicherheitsvorkehrungen vertraut
gemacht wurden.
Dieses Gerät enthält das Kältemittel Isobutan (R600a), ein Naturgas mit hoher
Umweltverträglichkeit, aber brennbar. Obwohl es brennbar ist, schädigt es
nicht die Ozonschicht und verstärkt nicht den Treibhauseffekt. Die Verwendung
dieses Kältemittels führt zu einer etwas höheren Geräuschentwicklung des
Gerätes. Zusätzlich zum Kompressorgeräusch können Sie den Fluss des
Kältemittels hören. Dies ist unvermeidlich und hat keine negative Wirkung auf
die Leistung des Gerätes. Seien Sie während des Transports vorsichtig, so dass
der Kältemittelkreislauf nicht beschädigt wird. Kältemittellecks können die
Augen reizen.

5
DE
Besondere Hinweise
• Achten Sie bei der Positionierung des Gerätes darauf, dass das Netzkabel
nicht eingeklemmt oder beschädigt ist.
• Achten Sie darauf, dass sich keine Mehrfachsteckdosen oder Netzteile auf der
Rückseite des Geräts benden.
WARNUNG
Achten Sie bei Gebrauch, Wartung und Entsorgung des Gerätes auf
das linke Symbol, das sich auf der Rückseite oder am Kompressor
des Gerätes bendet. Dieses Symbol warnt vor möglichen
Bränden. In den Kältemittelleitungen und im Kompressor benden
sich brennbare Stoffe. Halten Sie das Gerät bei Gebrauch, Wartung
und Entsorgung von Feuerquellen fern.
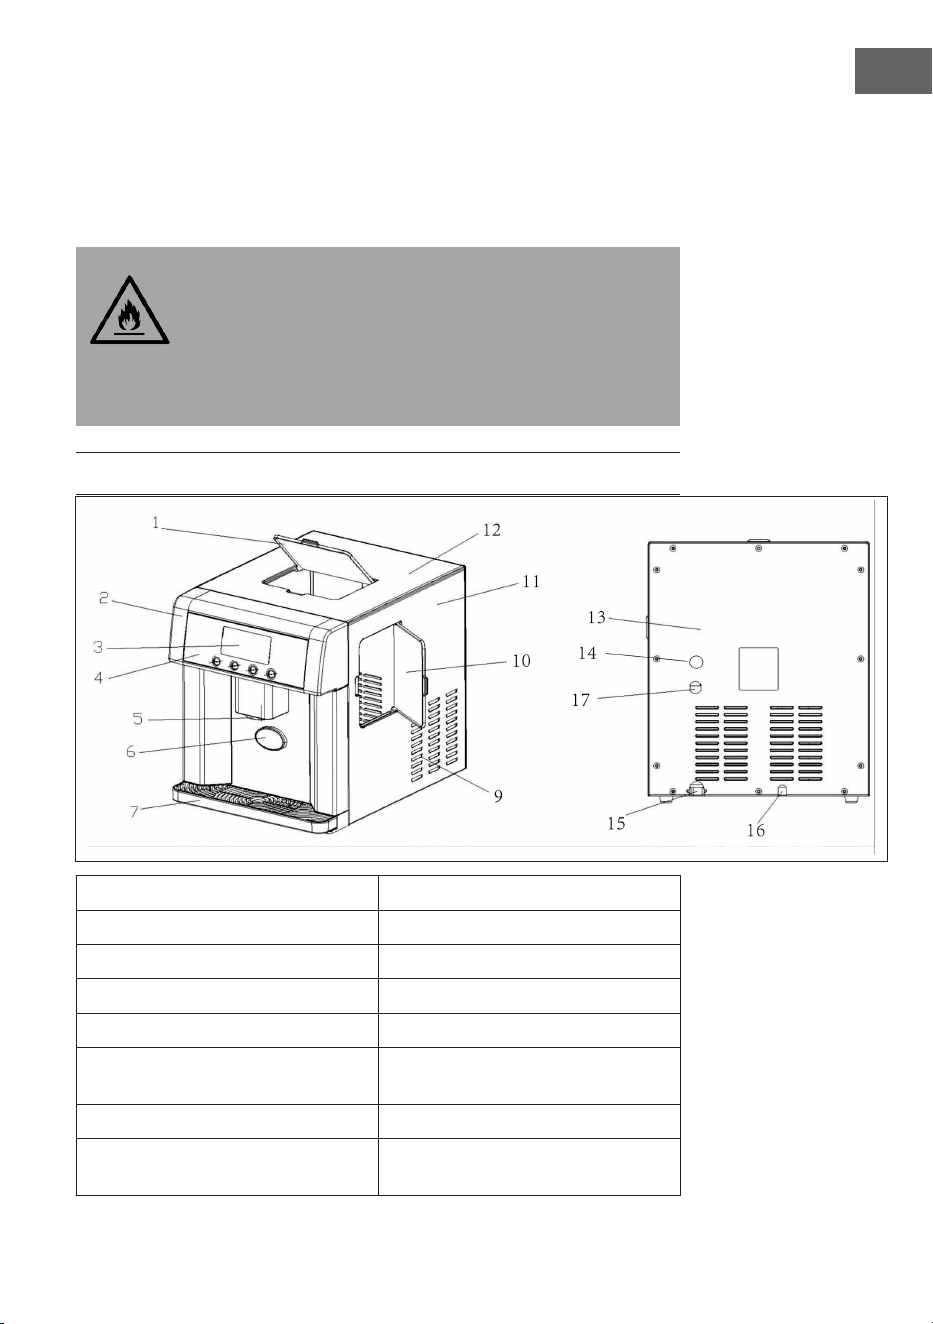
GERÄTEÜBERSICHT
1 Sichtfenster 10 Zugang zum Wassertank
2 vordere Abdeckung 11 seitliche Abdeckung
3 LCD-Bildschirm 12 obere Abdeckung
4 Bedienfeld 13 hintere Abdeckung
5 Eiswürfelausgabe 14 Wassereinlassloch
6 Knopf zur Eiswürfelausgabe 15 Netzstromkabel
7 Abtropfschale 16 Wasserablassleitung
9 Ventilatorabdeckung 17 Ablassleitung bei Überfüllung

6
DE
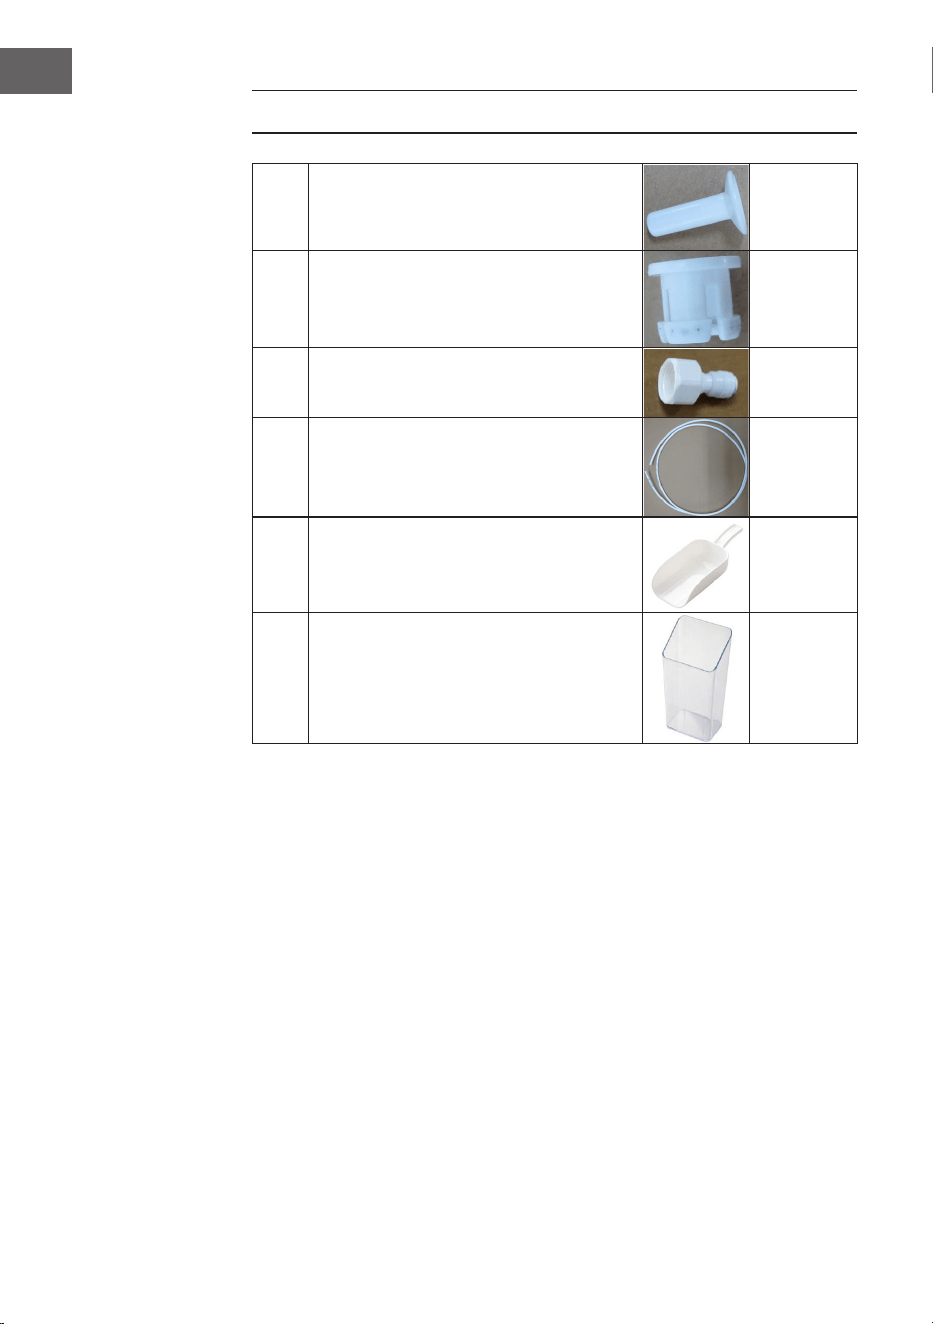
EINZELTEILE
1
Ablauf-Stopfen 1x
2
Verschluss 2x
3
Adapter 1x
4
Füllwasserrohr 2x
5
Eisschöpfer 1x
6
Messbecher 1x
7
DE
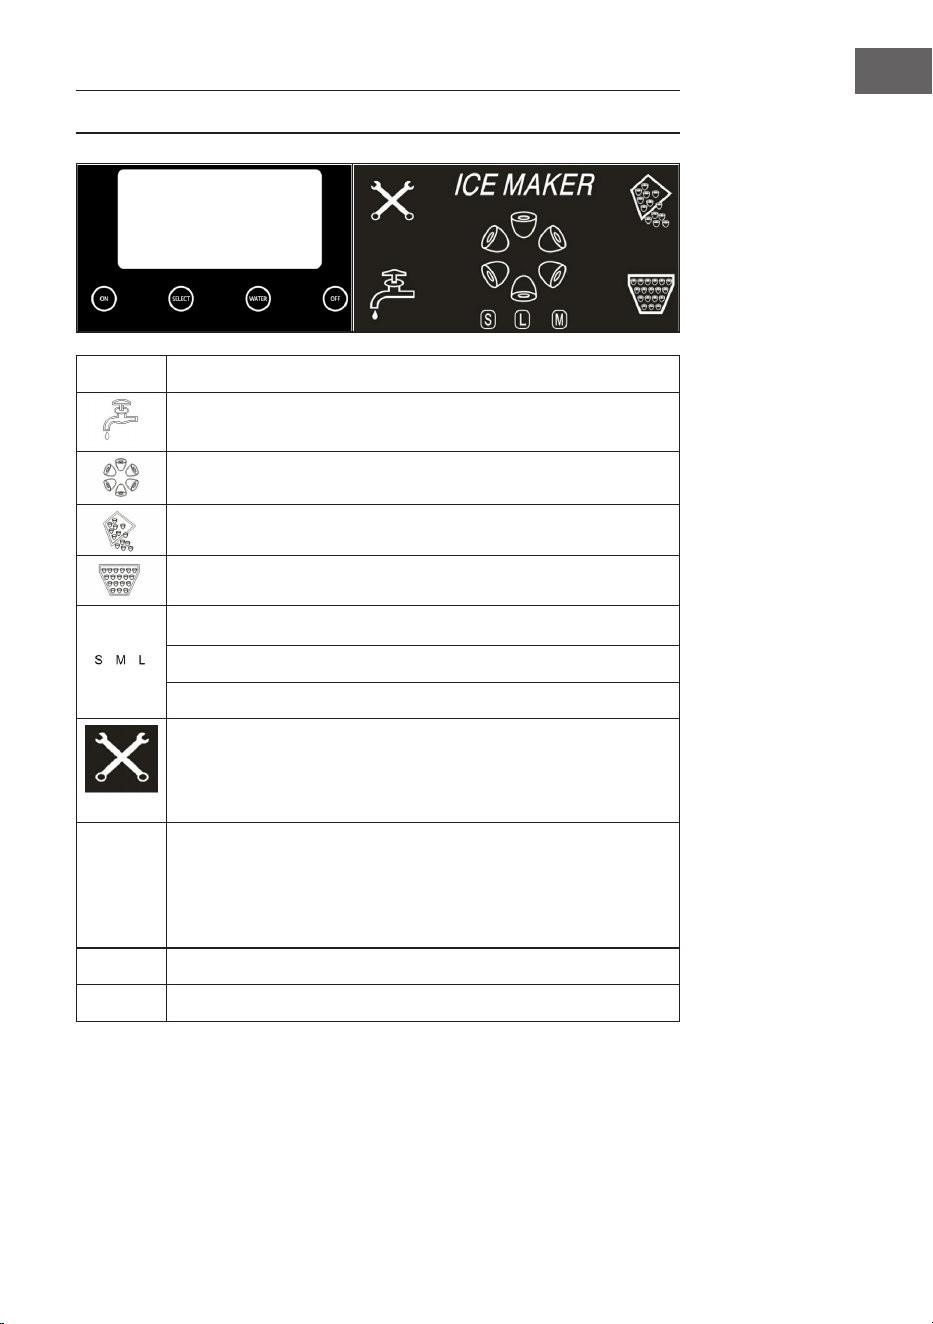
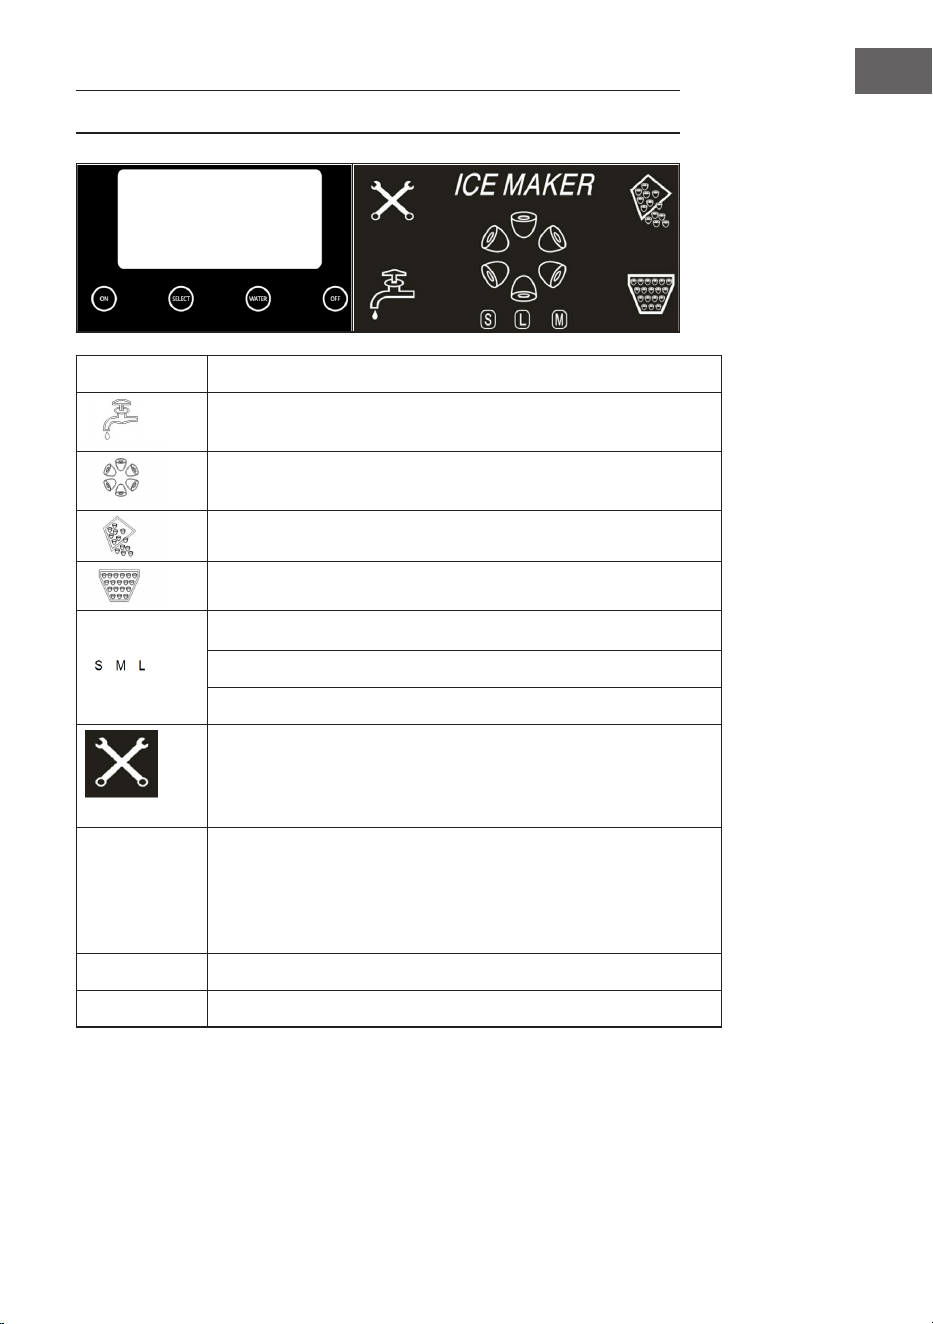
BEDIENFELD UND ANZEIGEN
Anzeige Beschreibung
Es bendet sich nicht genug Wasser im Wassertank, fügen
Sie Wasser hinzu.
Das Gerät bendet sich im Eiswürfelherstellungsprozess.
Die Eiswürfel werden gerade entnommen.
Der Eiswürfelbehälter ist voll.
S bedeutet kleine Eiswürfel.
M bedeutet mittlere Eiswürfel.
L bedeutet große Eiswürfel.
Das Gerät hat ein Problem. Schalten Sie Gerät aus, ziehen
Sie den Netzstecker aus der Steckdose und starten
Sie das Gerät anschließend neu. Kontaktieren Sie den
Kundendienst, falls das Problem erneut auftritt.
SELECT Drücken Sie diese Taste zum Bestätigen. Wenn kleine
Eiswürfel ausgewählt wurden, zeigt der Bildschirm „S“
an. Wenn mittlere Eiswürfel ausgewählt wurden, zeigt
der Bildschirm „M“ an. Wenn große Eiswürfel ausgewählt
wurden, zeigt der Bildschirm „L“ an.
WATER Nur dann drücken, wenn Sie Wasser haben möchten.
ON/OFF Drücken, um das Gerät ein- und auszuschalten.

8
DE
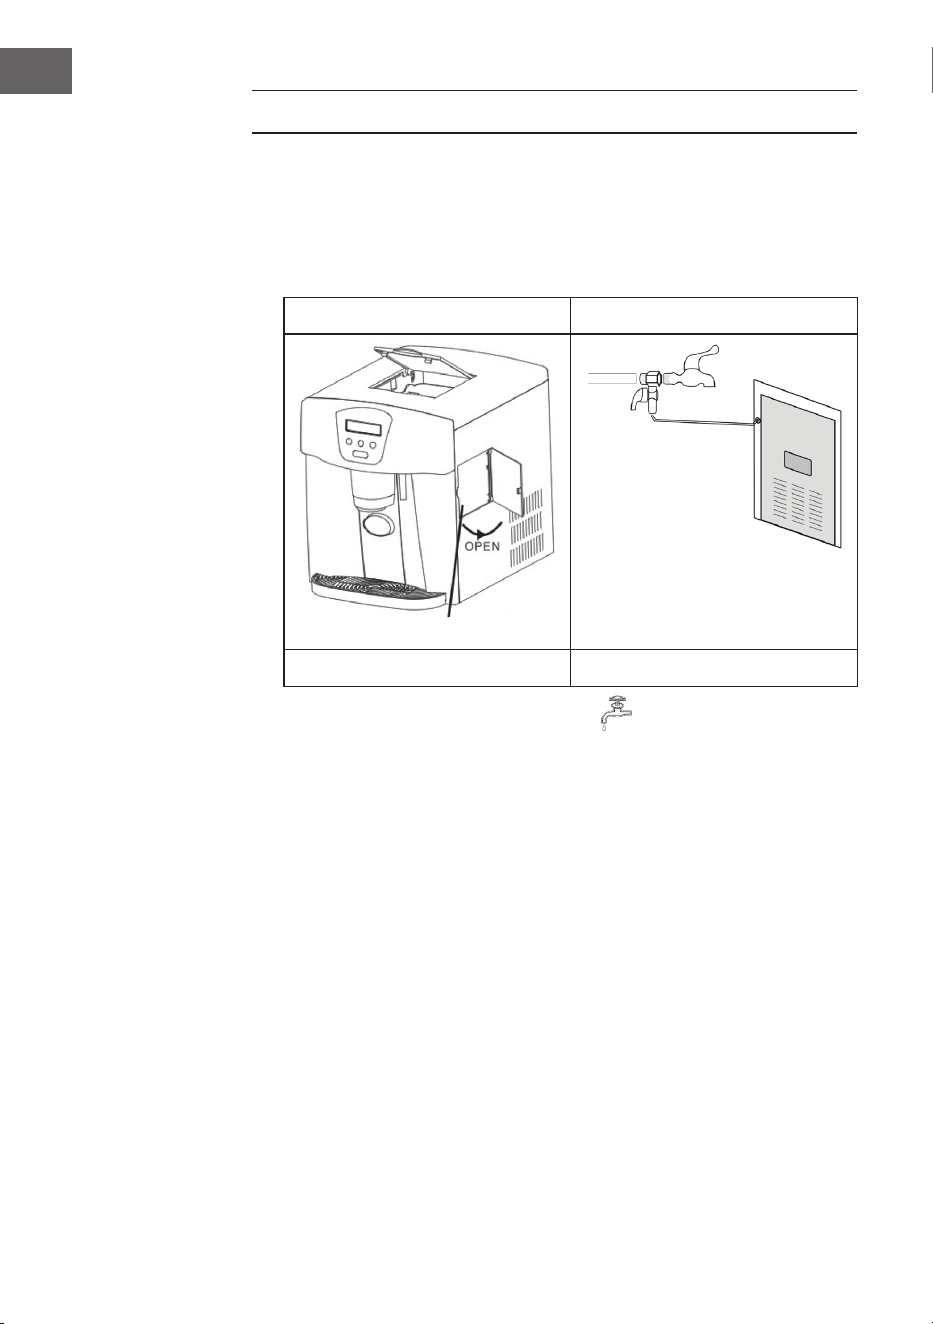
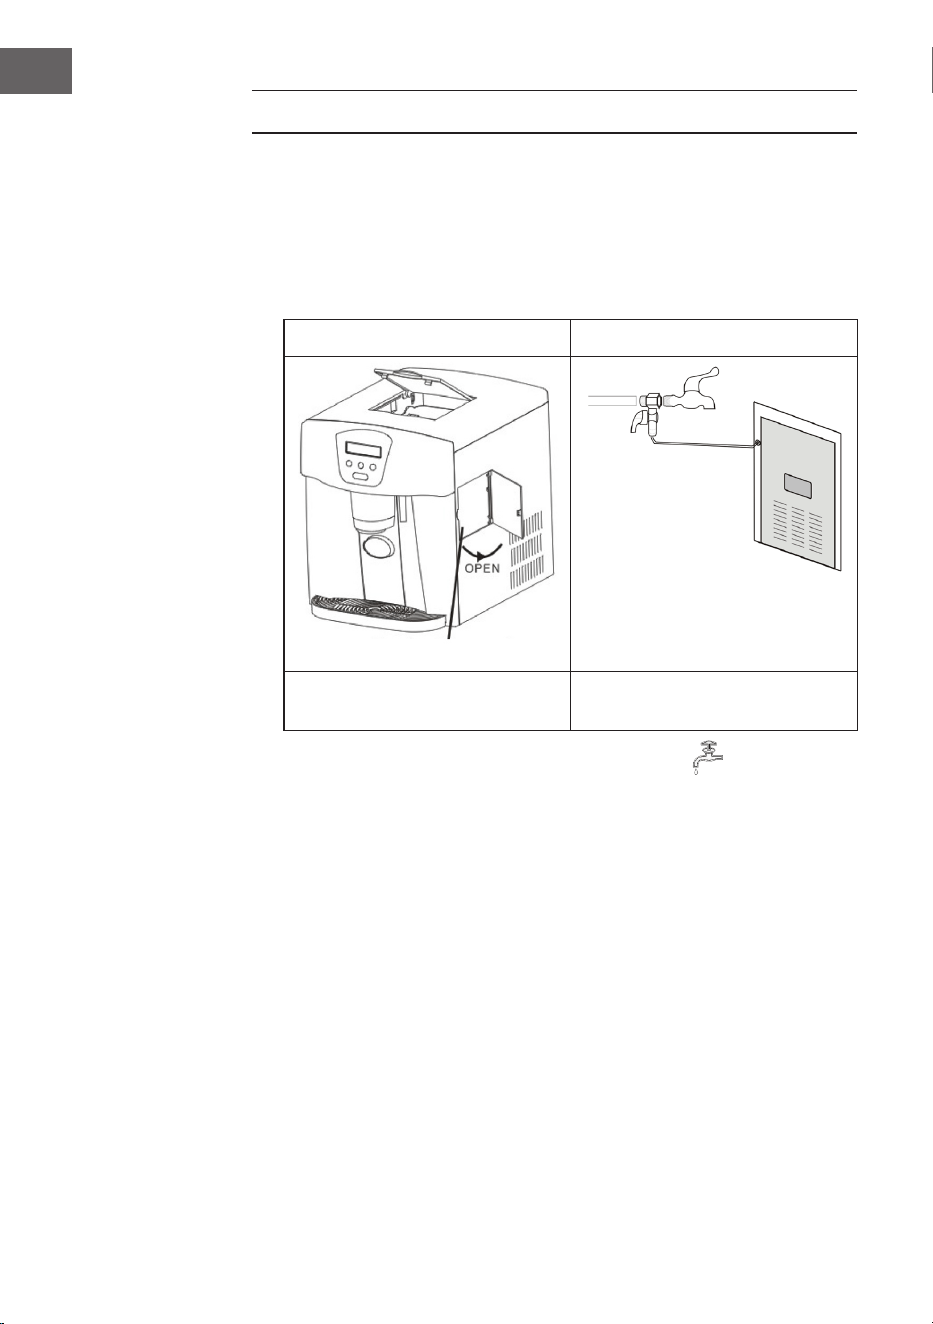
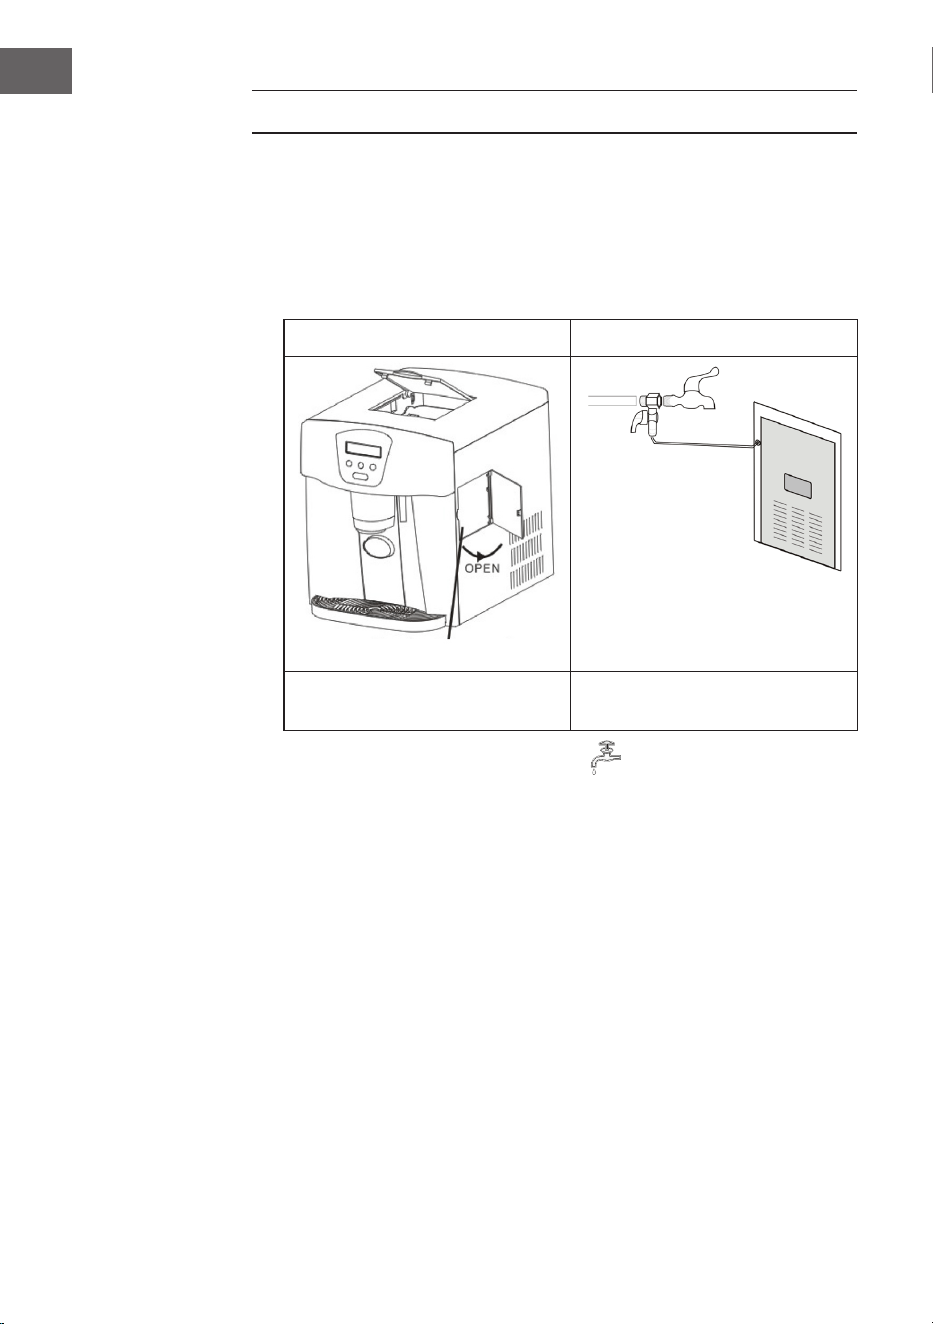
INBETRIEBNAHME UND BEDIENUNG
1. Schließen Sie den Wasserablaufschlauch an der Rückseite des Geräts an
(Nummer 17 in der Illustrationsskizze, unter dem Füllrohr), da die Feuchtigkeit
in der Luft zu Wasser gefrieren kann, wenn das Gerät weiterläuft, aber kein Eis
aus dem Gerät entnommen wird
2. Stecken Sie den Stecker des Gerätes in die Steckdose. Füllen Sie Wasser
gemäß Skizze A oder B ein.
Abbildung A Abbildung B
Fügen Sie Wasser manuell hinzu Schließen das Gerät an den
Wasserhahn an
Hinweis: Wenn das Gerät das Symbol anzeigt und Sie mehr Eiswürfel
herstellen möchten, fügen Sie Wasser hinzu. Entnehmen Sie vor dem
hinzufügen des Wasser die Eiswürfel und fügen Sie eine Tasse Wasser
hinzu, um ein Überlaufen des Wassertanks durch ein Schmelzen von Eis zu
verhindern.
3. Drücken Sie die Taste ON/OFF, um das Gerät zu starten.
4. Das Wasser wird aus dem Wassertank automatisch in den Wasserbehälter
gepumpt, was ungefähr 30 Sekunden in Anspruch nimmt.
Hinweis: Falls innerhalb von zwei Eisherstellungszyklen kein Wasser in den
Wasserbehälter gepumpt wird, öffnen Sie die Abusssicherung und lassen
Sie einige Tropfen Wasser herauslaufen. Drücken Sie anschließend erneut die
Taste ON/OFF, um das Gerät neu zu starten.
5. Drücken Sie zur Auswahl der Eiswürfelgröße die Taste SELECT.
Hinweis: Wenn die Raumtemperatur weniger als 15 Grad beträgt, empfehlen
wir die Auswahl von Eiswürfeln der Größe S. Wenn die Raumtemperatur mehr
als 30 Grad beträgt, empfehlen wir die Auswahl von Eiswürfeln der Größe L.
Wasser manuell einfüllen
A zur
Wasserleitung
B zum
Wasserhahn
C zum Gerät
9
DE
6. Sobald der Eiswürfelherstellungszyklus beginnt, wird das Eis auf den
Verdampferngern gefroren.
Hinweis: Während des Eiswüfelherstellungszyklus darf manuell kein Wasser
hinzugefügt werden. Die Dauer der Eiswürfelherstellung hängt von der
Raumtemperatur ab.
7. Sobald der Eiswürfelherstellungsprozess beendet ist, neigt sich der
Wasserbehälter, das übrig gebliebene Wasser ießt zurück in den Wassertank
und die Eiswürfel fallen von den Verdampferngern ab.
8. Nach ungefähr 15 – 35 Sekunden neigt sich der Wasserbehälter nach hinten
und die Eiswürfel, welche im vorherigen Zyklus produziert wurden werden
direkt in den Eiswürfelbehälter gedrückt. Das Gerät durchläuft nun erneut die
Schritte 3 – 6.
9. Drücken Sie den Knopf zur Eiswürfelausgabe, um Eiswürfel zu erhalten. Die
Anzeige wird auf dem LCD-Bildschirm angezeigt.
Hinweis: Stellen Sie das Gefäß bei der Eiswürfelausgabe direkt unter
die Ausgabestelle. Sollte sich das Eis für einen längeren Zeitraum im
Eiswürfelbehälter befunden haben, kann es vorkommen, dass die Eiswürfel
zusammenkleben. In diesem Fall fallen auch dann keine Eiswürfel heraus,
wenn der Behälter voll ist. Trennen Sie die Eiswürfel zunächst mit der im
Lieferumfang enthaltenen Eiswürfelschaufel und drücken Sie anschließend
auf den Knopf.
10. Drücken Sie zum Stoppen des Geräts die Taste ON/OFF.
11. Wenn Sie die Taste WATER drücken, können Sie Wasser erhalten.
Hinweis: Wenn Sie kaltes Wasser aus dem Gerät erhalten möchten, solle
zumindest die Eiswürfelherstellungsfunktion aktiviert sein. Stellen Sie sicher,
dass das Gefäß unterhalb des Wasserauslasses platziert wird, damit das
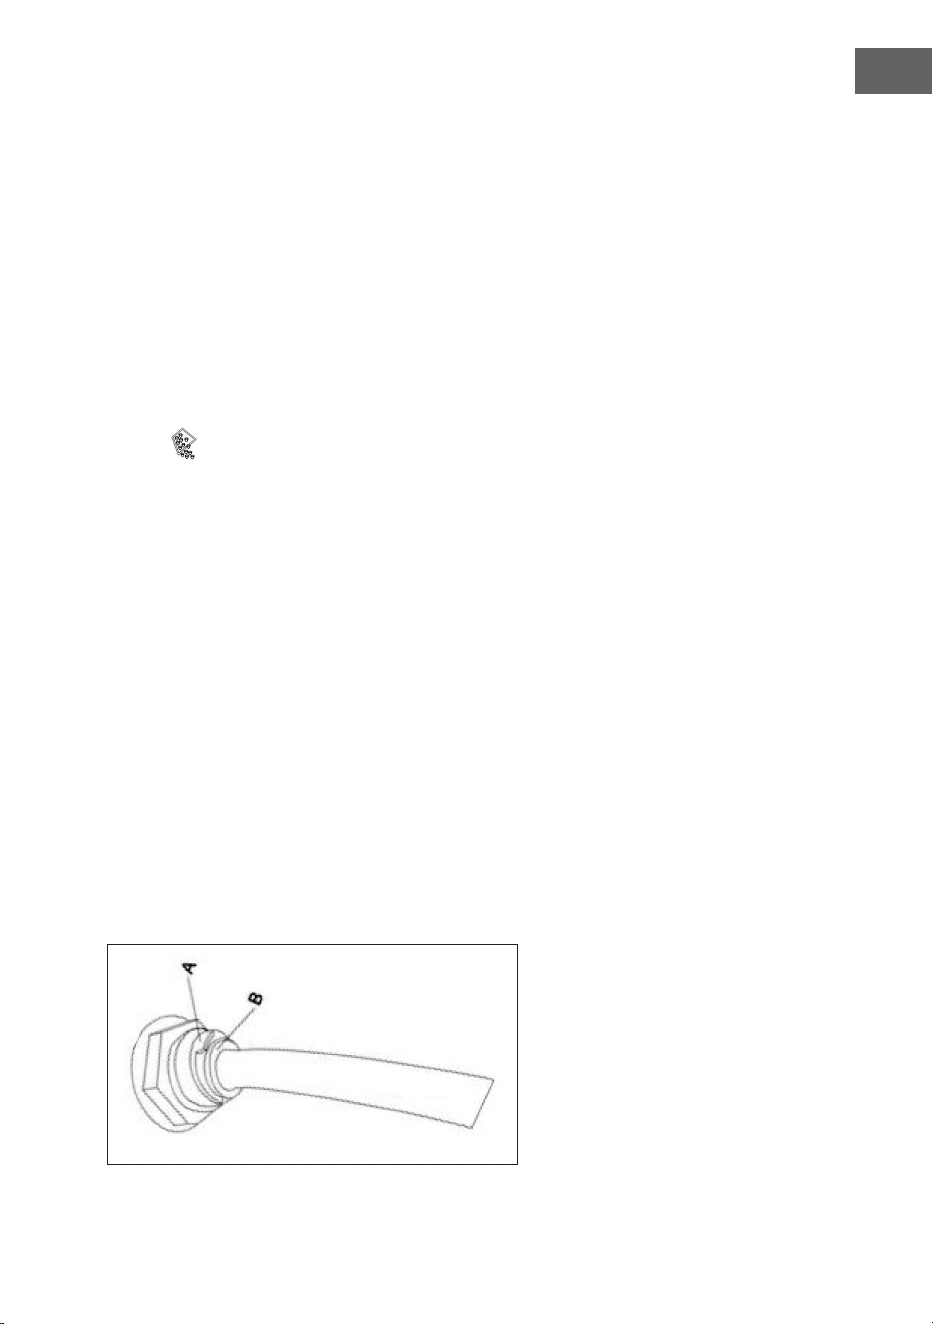
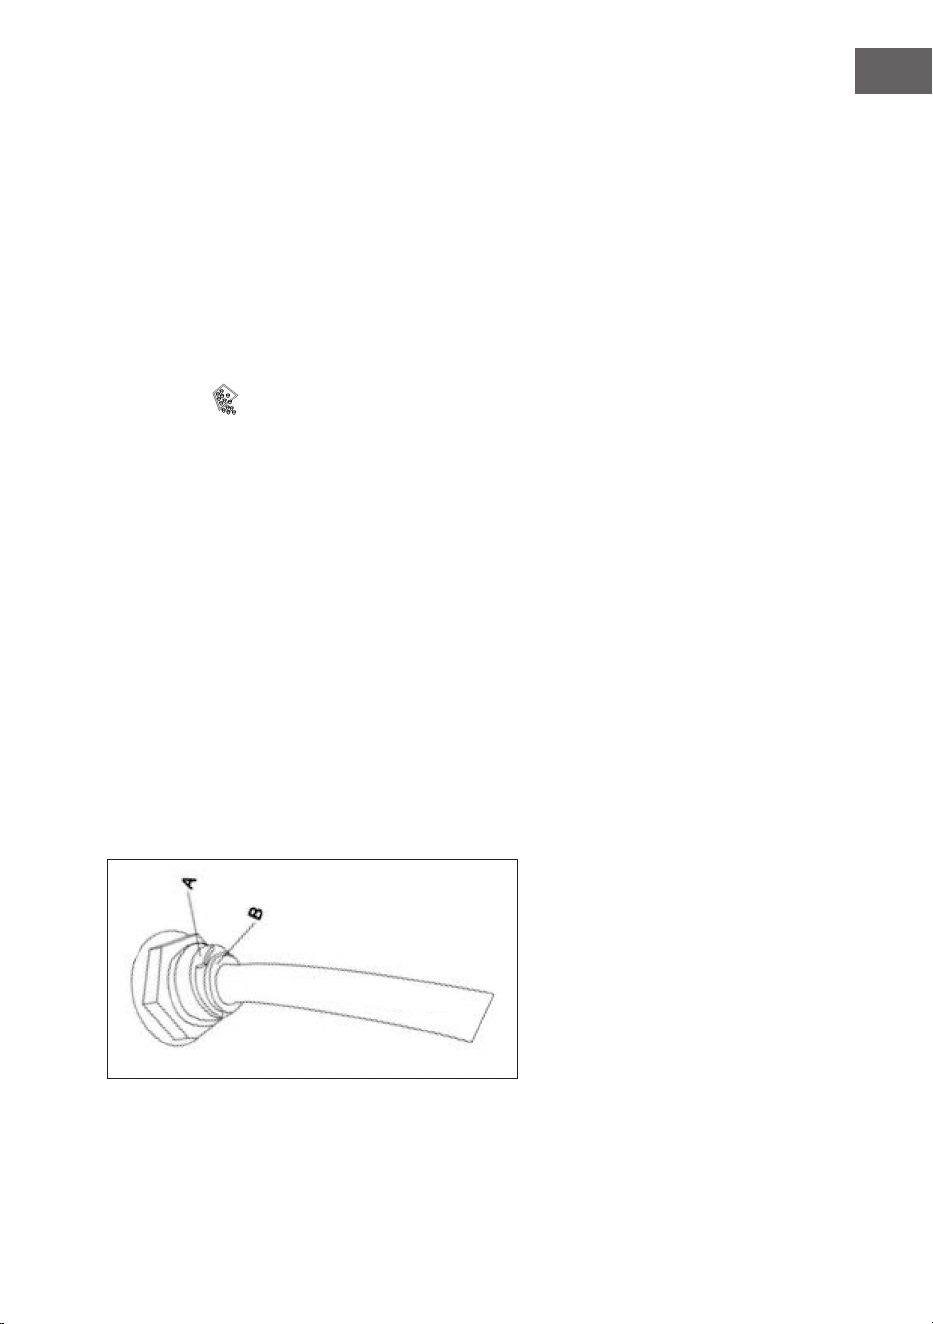
Wasser nicht überall hinlaufen kann.
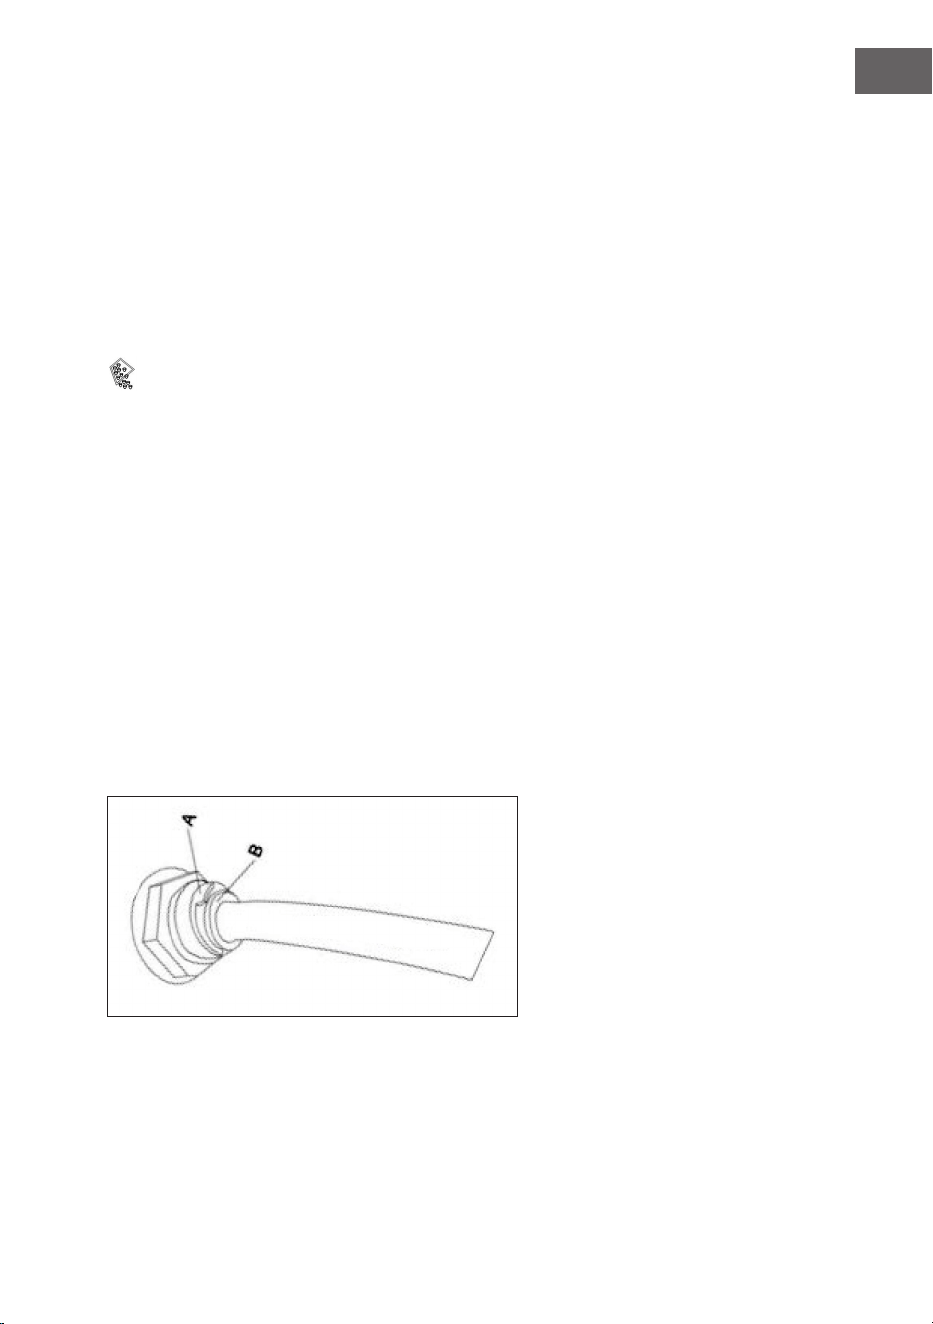
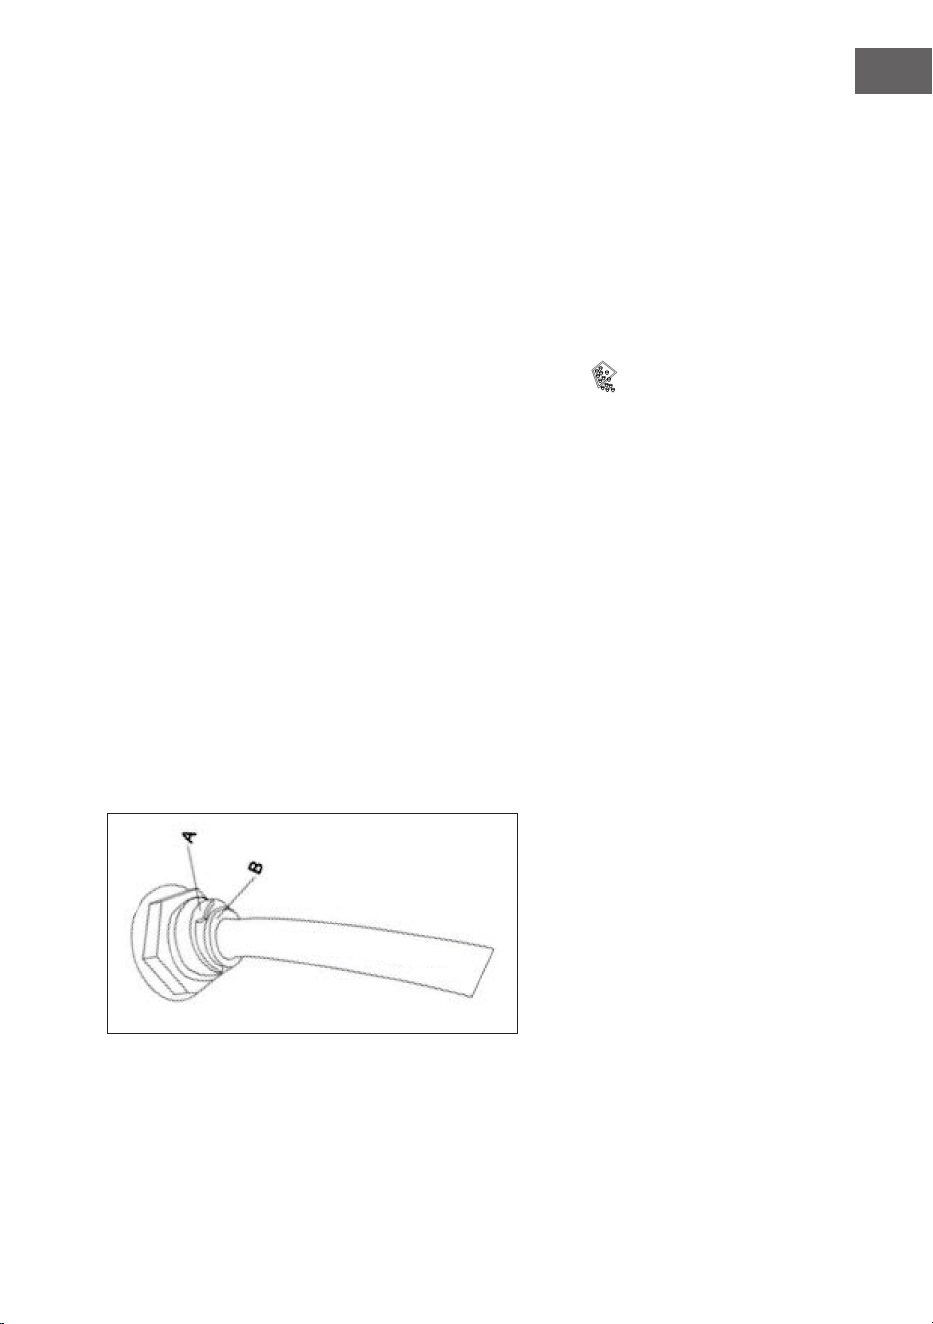
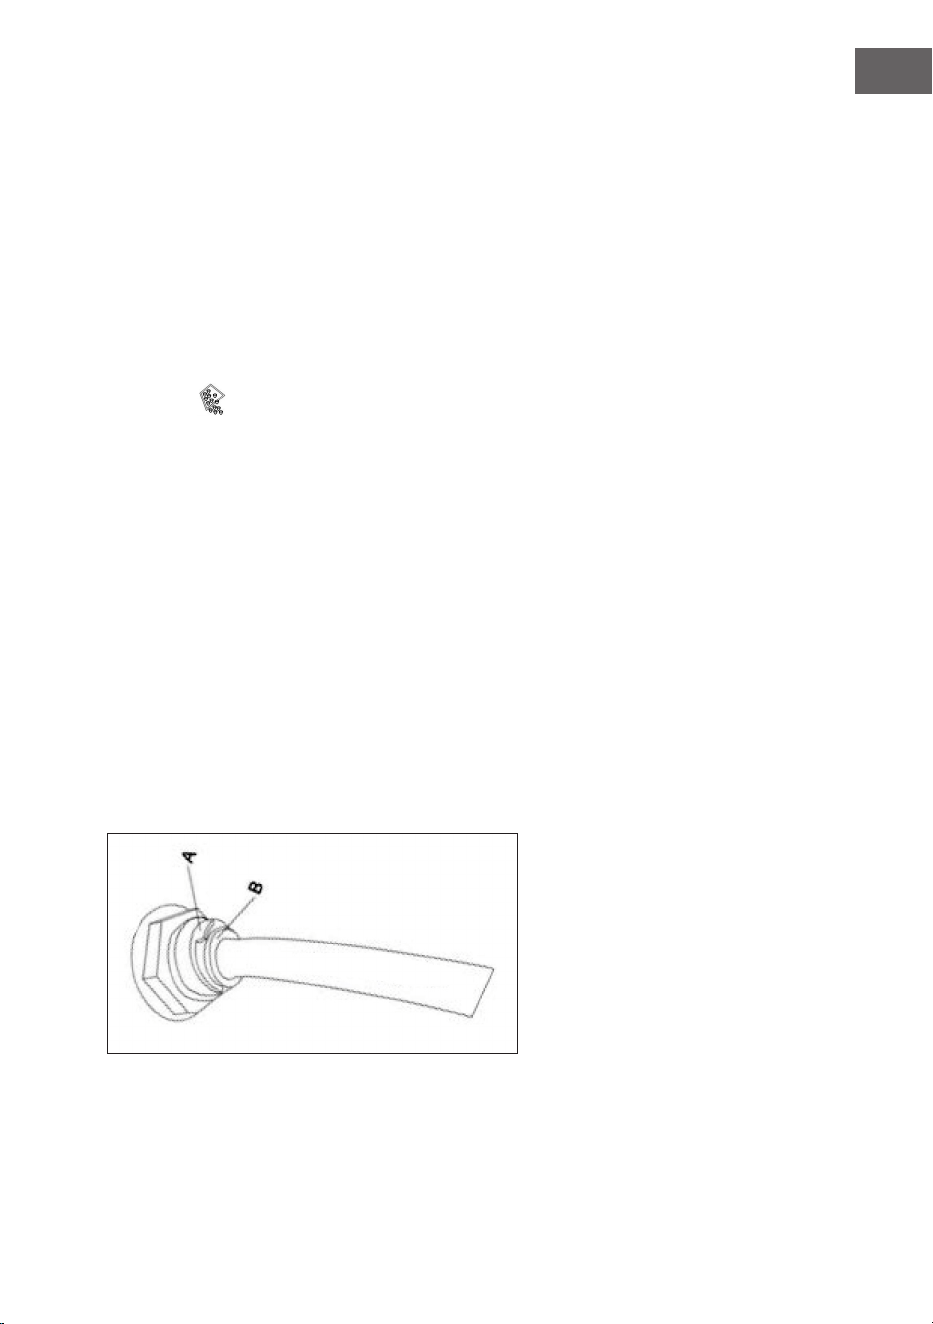
12. Wenn Sie die Leitung herausnehmen, ersetzen oder die Ablaufsicherung
hineinstecken möchten, gehen Sie folgendermaßen vor: Nehmen Sie zunächst
den blauen Ring (A) ab und drücken Sie anschließend den weißen Ring (B) an
der Außenseite. Entnehmen Sie anschließend die Leitung.
10
DE
REINIGUNG UND PFLEGE
• Reinigen Sie die Innenauskleidung, die Eisauffangschale, den Wasserkasten,
die Eisschaufel und den Verdampfer regelmäßig. Ziehen Sie beim Reinigen
den Netzstecker und entfernen Sie die Eiswürfel. Verwenden Sie eine
verdünnte Lösung aus Wasser und Essig, um das Innere und die Außenäche
der Eiswürfelmaschine zu reinigen. Besprühen Sie die Eiswürfelmaschine nicht
mit Chemikalien, Säuren, Benzin oder Öl. Wischen sie mit klaren Wasser und
einem sauberen Lappen nach.
• Halten Sie die Lüftungsöffnungen im Gerätegehäuse frei von Hindernissen.
Verwenden Sie keine mechanischen Vorrichtungen oder andere Mittel zur
Beschleunigung des Abtauprozesses.
• Verwenden Sie immer frisches Wasser, bevor Sie mit der Eisproduktion
beginnen. Das gilt sowohl für die Erstinstallation als auch nach einer längeren
Stillstandszeit.
FEHLERSUCHE UND FEHLERBEHEBUNG
• Beachten Sie, dass sich bei einem Stromausfall, durch Ziehen des
Netzstromkabels oder wenn der Stromschalter während eines
Eiswürfelherstellungszyklus ausgeschaltet wurde, kleine Eisspäne bilden
können, die sich in der automatischen Schaufel ablagern und diese blockieren
können. Ziehen Sie zum Entfernen der Eisspäne zunächst das Netzstromkabel
aus der Steckdose und schieben Sie die Schaufel vorsichtig in Richtung der
Gehäuserückseite. Die Eisspäne können dann entnommen werden.
• Starten Sie das Gerät neu, indem Sie auf Stop und dann auf Start drücken.
Wenn die Eisschaufel die Eiswürfel nicht in den Eissammler drückt, nachdem
die gebildeten Eiswürfel vom Verdampfernger fallen und gleichzeitig die
M-Leuchte leuchtet, überprüfen Sie, ob der Wasserbehälter horizontal oder
ausgewuchtet ist. Sollte dies nicht der Fall sein, stellen Sie die Einstellung
durch leichtes Drücken der Eisschaufel mit dem Finger neu ein. Starten Sie die
Eiswürfelmaschine anschließend neu.
Problem Mögliche Ursache Lösungsansatz
Der Kompressor
funktioniert
nicht richtig und
macht summende
Geräusche.
Die Stromspannung
ist niedriger als
empfohlen.
Stoppen Sie das Gerät
und schließen Sie es
an eine Steckdose
mit ausreichender
Stromspannung an.
11
DE
Problem Mögliche Ursache Lösungsansatz
Die Anzeige für
zu wenig Wasser
leuchtet auf.
Es bendet sich
kein Wasser im
Wassertank.
Befüllen Sie den
Wassertank mit
Wasser. Warten
Sie mindestens 3
Minuten und drücken
Sie anschließend zum
Starten die Taste ON/
OFF.
Die Pumpe ist voller
Luft.
Öffnen Sie die
Verschlusskappe der
Wasserablassleitung
und lassen Sie einige
Tropfen Wasser
herauslaufen.
Auswahl der
Eiswürfelgröße.
Die Eiswürfel kleben
zusammen.
Es wird empfohlen,
im Winter Eiswürfel
der Größe S und im
Sommer Eiswürfel
der Größe L
herzustellen.
Die Bedingungen
für die
Eiswürfelherstellung
sind gut aber es
werden keine
Eiswürfel hergestellt.
Gefriermittel
läuft aus/ Das
geschlossene System
ist blockiert.
Kontaktieren Sie den
Kundendienst.
Die Anzeige
leuchtet auf dem
Bildschirm auf.
Blockade durch
Eiswürfel.
Entfernen Sie die
Eiswürfel und starten
Sie das Gerät durch
Drücken der Taste
ON/OFF neu.
Der Motor ist kaputt. Kontaktieren Sie den
Kundendienst.
Das Sichtfenster
ist bei starkem
Lichteinfall geöffnet
Stellen Sie sicher,
dass das Sichtfenster
während der
Eiswürfelherstellung
geschlossen ist

12
DE
SPEZIELLE ENTSORGUNGSHINWEISE FÜR
VERBRAUCHER IN DEUTSCHLAND
Entsorgen Sie Ihre Altgeräte fachgerecht. Dadurch wird gewährleistet, dass die
Altgeräte umweltgerecht verwertet und negative Auswirkungen auf die Umwelt
und menschliche Gesundheit vermieden werden. Bei der Entsorgung sind
folgende Regeln zu beachten:
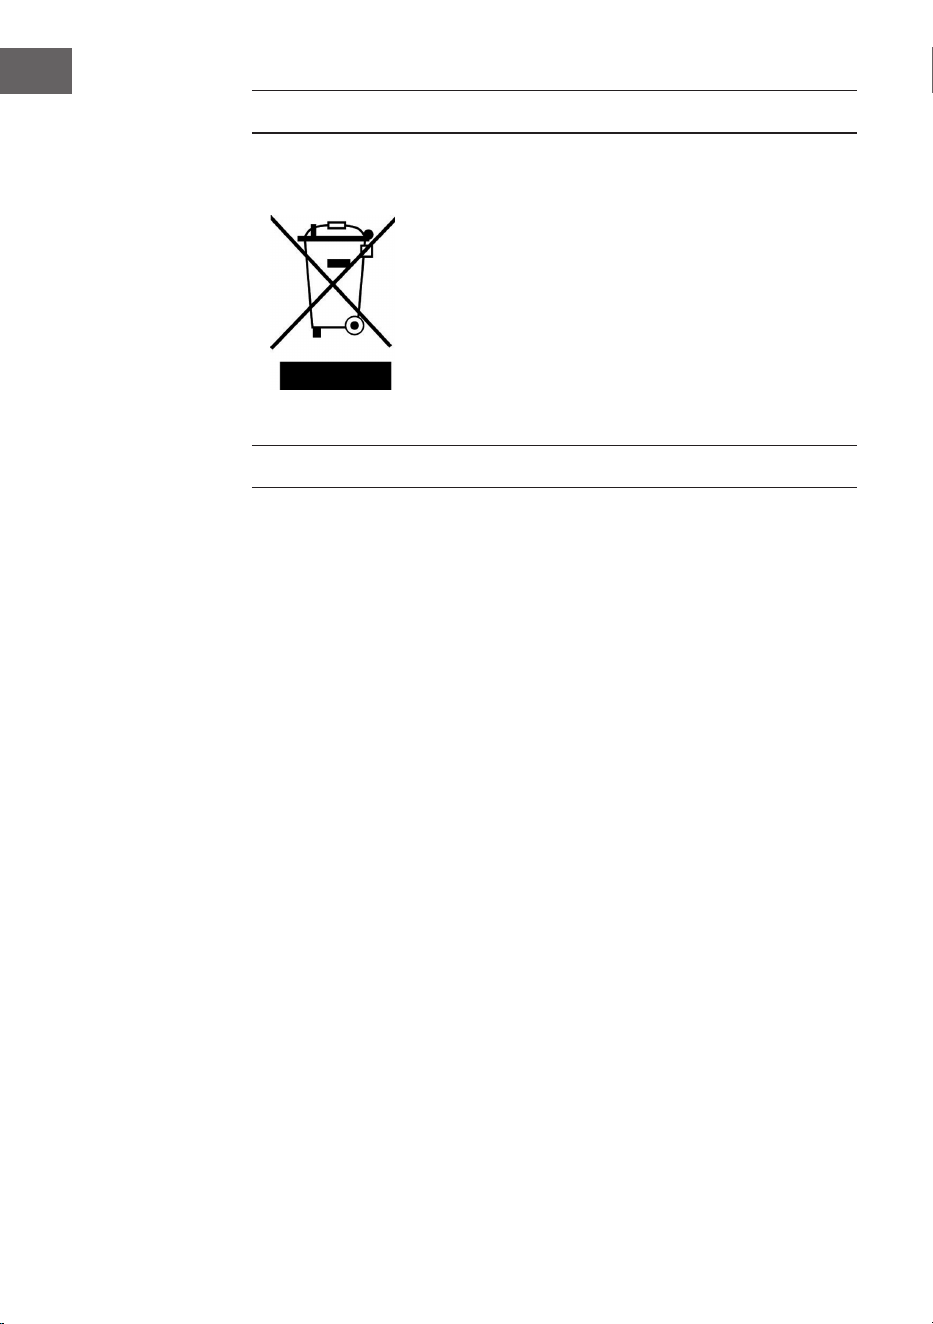
• Jeder Verbraucher ist gesetzlich verpichtet, Elektro- und Elek-
tronikaltgeräte (Altgeräte) sowie Batterien und Akkus getrennt
vom Hausmüll zu entsorgen. Sie erkennen die entsprechenden
Altgeräte durch folgendes Symbol der durchgestrichene Müll-
tonne (WEEE Symbol).
• Sie haben Altbatterien und Altakkumulatoren, die nicht vom Altgerät
umschlossen sind, sowie Lampen, die zerstörungsfrei aus dem Altgerät
entnommen werden können, vor der Abgabe an einer Entsorgungsstelle vom
Altgerät zerstörungsfrei zu trennen.
• Bestimmte Lampen und Leuchtmittel fallen ebenso unter das Elektro- und
Elektronikgesetz und sind dementsprechend wie Altgeräte zu behandeln.
Ausgenommen sind Glühbirnen und Halogenlampen. Entsorgen Sie
Glühbirnen und Halogenlampen bitte über den Hausmüll, sofern Sie nicht das
WEEE Symbol tragen.
• Jeder Verbraucher ist für das Löschen von personenbezogenen Daten auf dem
Elektro- bzw. Elektronikgerät selbst verantwortlich.
Rücknahmepicht der Vertreiber
Vertreiber mit einer Verkaufsäche für Elektro- und Elektronikgeräte von
mindestens 400 Quadratmetern sowie Vertreiber von Lebensmitteln mit einer
Gesamtverkauäche von mindestens 800 Quadratmetern, die mehrmals im
Kalenderjahr oder dauerhaft Elektro- und Elektronikgeräte anbieten und auf dem
Markt bereitstellen, sind verpichtet,
1 bei der Abgabe eines neuen Elektro- oder Elektronikgerätes an einen Endnutzer
ein Altgerät des Endnutzers der gleichen Geräteart, das im Wesentlichen die
gleichen Funktionen wie das neue Gerät erfüllt, am Ort der Abgabe oder in
unmittelbarer Nähe hierzu unentgeltlich zurückzunehmen und
2 auf Verlangen des Endnutzers Altgeräte, die in keiner äußeren Abmessung
größer als 25 Zentimeter sind, im Einzelhandelsgeschäft oder in unmittelbarer
Nähe hierzu unentgeltlich zurückzunehmen; die Rücknahme darf nicht an den
Kauf eines Elektro- oder Elektronikgerätes geknüpft werden und ist auf drei
Altgeräte pro Geräteart beschränkt.

13
DE
• Bei einem Vertrieb unter Verwendung von Fernkommunikationsmitteln
ist die unentgeltliche Abholung am Ort der Abgabe auf Elektro- und
Elektronikgeräte der Kategorien 1, 2 und 4 gemäß § 2 Abs. 1 ElektroG, nämlich
„Wärmeüberträger“, „Bildschirmgeräte“ (Oberäche von mehr als 100 cm²)
oder „Großgeräte“ (letztere mit mindestens einer äußeren Abmessung
über 50 Zentimeter) beschränkt. Für andere Elektro- und Elektronikgeräte
(Kategorien 3, 5, 6) ist eine Rückgabemöglichkeit in zumutbarer Entfernung
zum jeweiligen Endnutzer zu gewährleisten.
• Altgeräte dürfen kostenlos auf dem lokalen Wertstoffhof oder in folgenden
Sammelstellen in Ihrer Nähe abgegeben werden: www.take-e-back.de
• Für Elektro- und Elektronikgeräte der Kategorien 1, 2 und 4 an bieten wir auch
die Möglichkeit einer unentgeltlichen Abholung am Ort der Abgabe. Beim
Kauf eines Neugeräts haben sie die Möglichkeit eine Altgerätabholung über
die Webseite auszuwählen.
• Batterien können überall dort kostenfrei zurückgegeben werden, wo sie
verkauft werden (z. B. Super-, Bau-, Drogeriemarkt). Auch Wertstoff- und
Recyclinghöfe nehmen Batterien zurück. Sie können Batterien auch per Post
an uns zurücksenden. Altbatterien in haushaltsüblichen Mengen können Sie
direkt bei uns von Montag bis Freitag zwischen 08:00 und 16:00 Uhr unter der
folgenden Adresse unentgeltlich zurückgeben:
Chal-Tec Fulllment GmbH
Norddeutschlandstr. 3
47475 Kamp-Lintfort
Deutschland
• Wichtig zu beachten ist, dass Lithiumbatterien aus Sicherheitsgründen vor der
Rückgabe gegen Kurzschluss gesichert werden müssen (z. B. durch Abkleben
der Pole).
• Finden sich unter der durchgestrichenen Mülltonne auf der Batterie zusätzlich
die Zeichen Cd, Hg oder Pb ist das ein Hinweis darauf, dass die Batterie
gefährliche Schadstoffe enthält. (»Cd« steht für Cadmium, »Pb« für Blei und
»Hg« für Quecksilber).
Hinweis zur Abfallvermeidung
Indem Sie die Lebensdauer Ihrer Altgeräte verlängern, tragen Sie dazu bei,
Ressourcen ezient zu nutzen und zusätzlichen Müll zu vermeiden. Die
Lebensdauer Ihrer Altgeräte können Sie verlängern indem Sie defekte Altgeräte
reparieren lassen. Wenn sich Ihr Altgerät in gutem Zustand bendet, könnten Sie
es spenden, verschenken oder verkaufen.
14
DE
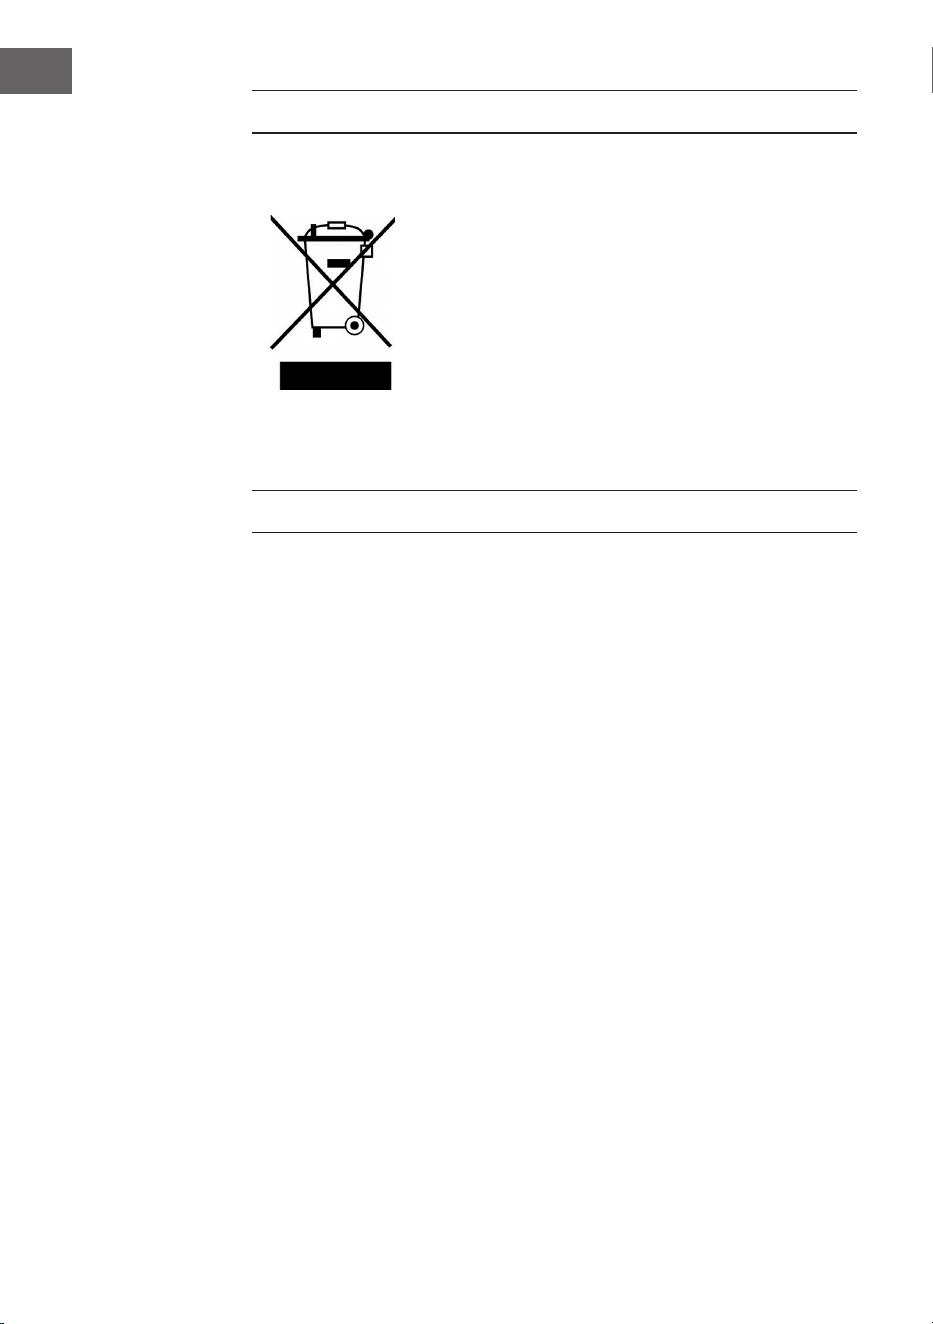
HINWEISE ZUR ENTSORGUNG
Wenn es in Ihrem Land eine gesetzliche Regelung
zur Entsorgung von elektrischen und elektronischen
Geräten gibt, weist dieses Symbol auf dem Produkt oder
auf der Verpackung darauf hin, dass dieses Produkt
nicht im Hausmüll entsorgt werden darf. Stattdessen
muss es zu einer Sammelstelle für das Recycling von
elektrischen und elektronischen Geräten gebracht
werden. Durch regelkonforme Entsorgung schützen
Sie die Umwelt und die Gesundheit Ihrer Mitmenschen
vor negativen Konsequenzen. Informationen zum
Recycling und zur Entsorgung dieses Produkts,
erhalten Sie von Ihrer örtlichen Verwaltung oder Ihrem
Hausmüllentsorgungsdienst.
HERSTELLER & IMPORTEUR (UK)
Hersteller:
Chal-Tec GmbH, Wallstraße 16, 10179 Berlin, Deutschland.
Importeur für Großbritannien:
Berlin Brands Group UK Limited
PO Box 42
272 Kensington High Street
London, W8 6ND
United Kingdom
15
EN
Dear Customer,
Congratulations on purchasing this equipment. Please
read this manual carefully and take care of the following
hints to avoid damages. Any failure caused by ignoring the
items and cautions mentioned in the instruction manual is
not covered by our warranty and any liability. Scan the QR
code to get access to the latest user mannual and other
information about the product
CONTENT
Safety Instructions 16
product Overview 17
Individual Parts 18
Control Panel and Indicators 19
Operation 20
Cleaning and Care 22
Troubleshooting 22
Disposal Considerations 24
Manufacturer & Importer (UK) 24
TECHNICAL DATA
Item number 10033478, 10046160
Power supply 220-240 V ~ 50/60 Hz
Water tank capacity 1.8 L
Daily Ice Output 10-15 kg / 24 h

16
EN
SAFETY INSTRUCTIONS
• Check that the mains voltage corresponds to the rating of the appliance
before operating.
• Use handles or knobs when moving. Place on a at stable surface for use. Do
not use outdoors.
• Do not use near or in the immediate vicinity of a bath or swimming pool or
any source of liquid.
• Unplug from socket outlet when not in use.
• To protect against electric shock, do not immerse cord or plug in water or any other
liquid.
• The use of accessory attachments not recommended by the appliance
manufacturer, may cause injury.
• Do not locate this appliance immediately below a socket outlet.
• Do not allow cord to overhang the counter top where it can be easily pulled by
children.
• Do not use this appliance for anything else other than its intended use.
• Do not overll as this may cause a hazard. Ensure lid is closed when in
operation
• To remove plug from outlet, do not pull on supply cord. Grasp plug rmly and
pull to remove.
• No liability can be accepted for any damage caused by non compliance with
these instructions or any other improper use or mishandling. This appliance
is for household use only
• This appliance is not intended to be operated by means of an external timer or
separate remote control system.
• This appliance is not intended to be immersed in water.
• If the supply cord is damaged, it must be replaced by the manufacturer or its
service agent or a similarly qualied person in order to avoid a hazard.
• Please according to local regulations regarding disposal of the appliance for
its ammable blowing gas.
• Do not store explosive substances such as aerosol cans with a ammable
propellant in this appliance.
• Fill with potable water only.
• This appliance is not intended for use by persons (including children) with
reduced physical, sensory or mental capabilities, or lack of experience and
knowledge, unless they have been given supervision or instruction concerning
use of the appliance by a person responsible for their safety. Children should
be supervised to ensure that they do not play with the appliance.
This appliance contains the coolant isobutane (R600a),a natural gas which is
environmentally friendly. Although it is ammable, it does not damage the
ozone layer and does not increase the greenhouse effect. The use of this
coolant has,however,led to a slight increase in the noise level of the appliance.
In addition to the noise of the compressor,you might be able to hear the
coolant owing around the system. This is unavoidable,and does not have any
adverse effect on the performance of the appliance. Care must be taken during
the transportation and setting up of the appliance that no parts of the cooling
system are damaged. Leaking coolant can damage the eyes.

17
EN
Special Notes
• When positioning the unit, make sure that the power cord is not pinched or
damaged.
• Make sure that there are no multiple sockets or power supplies on the back of
the unit.
WARNING
When using, servicing and disposing of the unit, pay attention to
the left symbol on the rear of the unit or on the compressor. This
symbol warns of possible res. There are ammable substances in
the refrigerant lines and in the compressor. Keep the appliance
away from sources of re during use, maintenance and disposal.
PRODUCT OVERVIEW
1 Viewing window 10 Water reservoir access door
2 Front Cover 11 Side shell
3 LCD Display 12 Top cover
4 Control Panel 13 Back cover
5 Ice cube dispenser shoot 14 Water inlet hole
6 Ice cube dispenser puncher 15 Power cord
7 Water drip tray 16 Drain pipe
9 Fan Cover 17 Overll drain pipe

18
EN
INDIVIDUAL PARTS
1
Drain plug 1x
2
Closure 2x
3
Adapter 1x
4
Filling water pipe 2x
5
Ice cream scoop 1x
6
Measuring cup 1x

19
EN
CONTROL PANEL AND INDICATORS
Display Description
Water is not enough in water reservoir, need to add
water.
Ice on making.
Unit is on ice dropping process.
Ice is full.
S means small ice size is selected.
M means middle ice size is selected.
L means large ice size is selected.
The unit has problem,need to take off the plug,and restart
it. If it appears again,then ask for service.
SELECT Press it to select size ice,if small size is selected,then S
will be shown on the screen.If middle or large size is
selected,then M or L will be shown on the screen too.
WATER Press it to release water only.
ON/OFF Press it to turn on or off the unit.
20
EN
OPERATION
1. Connect the water drain hose to the back of the unit (number 17 in the
illustration sketch, under the lling tube), as the moisture in the air may freeze
into water if the unit continues to run but no ice is removed from the unit.
2. Insert the plug of the unit into the socket. Fill with water according to sketch A
or B.
Sketch A Sketch B
Add water by manual. Connect unit to water faucet.
Note: If the unit is on ice making,indicator is on,but want to make more
ice,then add water to the water reservoir,but please take out the ice rst, then
add one full cup of water so as to avoid overow of water when the ice melt.
3. Press ON/OFF button to start the machine.
4. Water will be pumped into the water tray from the water reservoir
automatically,this takes about 30 seconds
Note: If no water is pumped to the water tray over two cycles but the water
in reservoir is enough, then please open the drain cap, and let several drops
water runs out. Then press ON/OFF button again to restart the unit.
5. Press the SELECT key to select the ice cube size.
Note: when temperature lower than 15 degrees, SMALL is
recommended,when temperature over 30 degrees, LARGE ice is
recommended.
Add water manual
A to
water pipe
B to
water faucet
21
EN
6. Ice making cycle begins,ice will be frozen onto the evaporator ngers.
Note: Do not add water manually during the ice cube making cycle. The ice
making time depends on the ambient temperature
7. Once ice making cycle is nished,the water tray will tilt forward; the remaining
water ows back to the water reservoir and the ice cubes will drop from the
ngers.
8. In about 15-35 seconds, the water tray will tilt backward,ice in produced in
previous cycle will be pushed to ice reservoir directly,unit back to work from
step 4 to step 6 again
9. Push the ice cube dispenser puncher button(sketch 6) to get ice, the indicator
will be on.
Note: Please put your cup below the ice cube dispenser shoot directly.
If the ice is stored in the unit for long time,the ice may freeze and stick
together,then no ice will be dispensed even the ice is full,if so,please kindly
use scoop included in the unit to break the ice rst,then push the puncher
button.
10. Press ON/OFF button to stop the unit.
11. When you push the WATER button, you can get water.
Note: if you need to get cold water,at least the ice making function should be
turn on. Please make sure your cup is below the cold water outlet,or water will
be splashed everywhere.
12. If you need to take off the pipe,replace it or insert the anti drain plug,please
do as follows: Firstly take off the blue ring named as A,then press the white
ring(lock) at the outer side named as B. At last take out the pipe.
22
EN
CLEANING AND CARE
• Clean the inner liner, ice collection tray, water box, ice scoop and evaporator
regularly. When cleaning, disconnect the power plug and remove the ice
cubes. Use a diluted solution of water and vinegar to clean the inside and
outside surface of the ice maker. Do not spray the ice maker with chemicals,
acids, gasoline or oil. Wipe it with clear water and a clean cloth.
• Keep the ventilation openings in the unit housing clear of obstructions. Do not
use mechanical devices or other means to speed up the defrosting process.
• Always use fresh water before starting ice production. This applies both to the
initial installation and after an extended period of downtime.
TROUBLESHOOTING
• Please note, if a power failure occurs due to disconnection of the power cord,
or the off power button has been pushed off during an ice making cycle, small
ice chips may formed and lodge in the automatic shovel causing it to jam. If
this occurs, the ice chips may be removed by disconnecting the power cord
and gently pushing the shovel to the rear of the cabinet and removing the ice
chips, then restarting.
• Please restart the ice maker by pressing Stop and then Start. If the Ice shovel
does not push the Ice into the Ice collector after the formed Ice drops from
the evaporator nger while at the same time the M light is on, check to see if
the water tray is horizontal or balanced. If not then adjust by pressing the Ice
shovel lightly with your nger. Then re-start the Ice maker.
Problem Possible Cause Suggested Solution
The compressor
works abnormally
with a Buzzing noise.
The voltage is lower
than
recommended.
Stop the Ice maker
and do not restart
until the voltage is
normal.

23
EN
Problem Possible Cause Suggested Solution
Water shortage
indicator
light is on.
There is no water Fill with water, wait
3 minutes and press
the “ON/OFF’ button
to restart.
The pump is full of air Open the drain cap,
and let several drops
water runs out.
Ice size choose. Ice stick together. We suggest that
choose S mode in
winter and L mode in
summer.
Conditions for Ice
making
Cycle are right but no
ice is made.
Refrigerant leaks./
Sealed system is
blocked.
Call for service.
illuminates.
Ice block. Clear the ice under
the ice making
tray,restart the unit
by push the button
ON/OFF
The motor is broken. Call for service
The viewing window
is open while the light
is strong.
Please always keep
the viewing window
close when ice
making.
24
EN
DISPOSAL CONSIDERATIONS
If there is a legal regulation for the disposal of electrical
and electronic devices in your country, this symbol on the
product or on the packaging indicates that this product
must not be disposed of with household waste. Instead,
it must be taken to a collection point for the recycling
of electrical and electronic equipment. By disposing of
it in accordance with the rules, you are protecting the
environment and the health of your fellow human beings
from negative consequences. For information about the
recycling and disposal of this product, please contact your
local authority or your household waste disposal service.
MANUFACTURER & IMPORTER (UK)
Manufacturer:
Chal-Tec GmbH, Wallstrasse 16, 10179 Berlin, Germany.
Importer for Great Britain:
Berlin Brands Group UK Limited
PO Box 42
272 Kensington High Street
London, W8 6ND
United Kingdom

25
ES
Estimado cliente,
Le felicitamos por la adquisición de este producto. Lea
atentamente el siguiente manual y siga cuidadosamente
las instrucciones de uso con el n de evitar posibles daños.
La empresa no se responsabiliza de los daños ocasionados
por un uso indebido del producto o por haber desatendido
las indicaciones de seguridad. Escanee el siguiente código
QR para tener acceso al manual de instrucciones más
actualizado y a información adicional sobre el producto.
ÍNDICE
Indicaciones de seguridad 26
Visión general del aparato 27
Piezas individuales 28
Panel de control e indicadores 29
Puesta en marcha y uso 30
Limpieza y cuidado 32
Detección y resolución de problemas 32
Indicaciones sobre la retirada del aparato 34
Fabricante e importador (Reino Unido) 34
DATOS TÉCNICOS
Número de artículo 10033478, 10046160
Suministro eléctrico 220-240 V ~ 50/60 Hz
Capacidad del depósito de agua 1,8 l
Cantidad de cubitos de hielo 10-15 kg / 24 h

26
ES
INDICACIONES DE SEGURIDAD
• Conecte el aparato solamente a tomas de corriente con toma de tierra que se
adecuen a la tensión del mismo.
• Si desea desplazar el aparato, utilice las asas.
• Coloque el aparato en una supercie plana y estable.
• Utilice este aparato solamente en espacios interiores.
• No utilice el aparato cerca de bañeras ni piscinas.
• Desconecte el enchufe de la toma de corriente cuando no utilice el aparato.
• No sumerja el cable de alimentación ni el enchufe en agua ni en ningún otro
líquido.
• Utilice exclusivamente los accesorios recomendados por el fabricante.
• No coloque el aparato justo bajo una toma de corriente.
• No deje que el cable de alimentación quede colgando de la supercie de
trabajo para evitar que los niños puedan tirar de él.
• No sobrecargue el aparato; de lo contrario, pueden producirse cortocircuitos y
descargas eléctricas.
• Asegúrese de que la tapa esté cerrada durante el funcionamiento.
• Para desconectar el aparato no tire del cable, sino del cuerpo del enchufe.
• La empresa no se responsabiliza de los daños ocasionados por un uso
indebido del producto o por haber desatendido las indicaciones de seguridad.
• Utilice el aparato solamente en entornos domésticos.
• No conecte el aparato a tomas de corriente manejadas por control remoto ni
con temporizador.
• No sumerja el aparato en agua.
• Si el cable de alimentación o el enchufe están dañados, deberán ser
sustituidos por el fabricante, un servicio técnico autorizado o una persona
igualmente cualicada.
• Cuando deseche el aparato, siga las disposiciones vigentes de reciclaje de
dispositivos con gases inamables.
• No almacene sustancias altamente explosivas dentro del aparato.
• Llene el aparato solamente con agua.
• Los niños mayores de 8 años y las personas con discapacidades físicas o
psíquicas solamente podrán utilizar el aparato si han sido previamente
instruidas sobre su uso y conocen las indicaciones de seguridad.
Este aparato contiene refrigerante isobutano (R600a), un gas natural
que no es nocivo para el medioambiente pero sí inamable. Aunque
sea inamable, no es perjudicial para la capa de ozono ni aumenta
el efecto invernadero. La utilización de este refrigerante provoca
un aumento de ruido del aparato. Además del ruido del compresor,
podrá escuchar también el ujo del refrigerante. Este hecho es
inevitable y no produce ningún efecto negativo en el rendimiento
del aparato. Durante el transporte, tenga cuidado para evitar dañar
el circuito de refrigeración. Las fugas de líquido refrigerante pueden
irritar los ojos.
27
ES
Notas especiales
• Cuando coloque la unidad, asegúrese de que el cable de alimentación no esté
pellizcado ni dañado.
• Asegúrese de que no haya varias tomas o fuentes de alimentación en la parte
posterior de la unidad.
ADVERTENCIA
Cuando utilice, repare y elimine la unidad, preste atención al
símbolo izquierdo en la parte posterior de la unidad o en el
compresor. Este símbolo advierte de posibles incendios. Hay
sustancias inamables en las líneas de refrigerante y en el
compresor. Mantenga el aparato alejado de fuentes de
fuego durante su uso, mantenimiento y eliminación.
VISIÓN GENERAL DEL APARATO
1 Ventana de visión 10 Acceso al depósito de agua
2 Cubierta delantera 11 Cubierta lateral
3 Monitor LCD 12 Cubierta superior
4 Panel de control 13 Cubierta trasera
5 Salida de los cubitos de hielo 14 Oricio de entrada de agua
6 Botón para la salida de cubitos de
hielo
15 Cable de alimentación
7 Bandeja antigoteo 16 Conducto de desagüe
9 Cubierta del ventilador 17 Conducto de desagüe en caso de
rebosamiento

28
ES
PIEZAS INDIVIDUALES
1
Tapón de drenaje 1x
2
Tapón 2x
3
Adaptador 1x
4
Llenado de la tubería de agua 2x
5
Cuchara de hielo 1x
6
Taza de medir 1x
29
ES
PANEL DE CONTROL E INDICADORES
Indicador Descripción
No existe suciente agua en el depósito, añada agua.
El aparato se encuentra en proceso de fabricación de hielo.
Se acaban de retirar los cubitos de hielo.
El recipiente de cubitos de hielo está lleno.
S se reere a cubitos pequeños.
M se reere a cubitos medianos.
L se reere a cubitos grandes.
El aparato tiene un problema. Apague el aparato y
desconecte el enchufe de la toma de corriente y vuelva a
reiniciarlo. Contacte con el servicio de atención al cliente si
el problema surge de nuevo.
SELECT Pulse esta tecla para conrmar. Si se han seleccionado
cubitos pequeños, el display muestra "S". Si se han
seleccionado cubitos medianos, el display muestra "M". Si
se han seleccionado cubitos grandes, el display muestra
"L".
WATER Pulsar si desea liberar el agua.
ON/OFF Pulse para encender y apagar el aparato.

30
ES
PUESTA EN MARCHA Y USO
1. Conecte la manguera de drenaje de agua a la parte trasera de la unidad
(número 17 en el croquis de la ilustración, debajo del tubo de llenado), ya que
la humedad del aire puede congelarse en agua si la unidad sigue funcionando
pero no se elimina el hielo de la unidad.
2. Inserte el enchufe del aparato en la toma de corriente. Llene con agua como
se muestra en el diagrama A o B.
Ilustración A Ilustración B
Añada el agua manualmente. Conecte el aparato a una toma
de agua.
Nota: Si el aparato muestra el símbolo y desea fabricar más cubitos
de hielo, añada más agua. Antes de añadir el agua, retire los cubitos y añada
posteriormente una taza de agua para evitar que el depósito rebose al
derretirse el hielo.
3. Pulse el botón ON/OFF para iniciar el aparato.
4. El agua se bombea al recipiente de agua automáticamente desde el depósito,
lo cual requiere aproximadamente 30 segundos.
Nota: Si en el transcurso de dos ciclos de fabricación de hielo no se bombea
más agua al recipiente, quite el tapón de drenaje y deje correr algunas gotas
de agua. Pulse a continuación el botón ON/OFF para reiniciar el aparato.
5. Pulse el botón SELECT para seleccionar el tamaño de los cubitos de hielo.
Nota: Si la temperatura ambiente es inferior a 15 grados, recomendamos la
selección de cubitos del tamaño S. Si la temperatura ambiente es superior a
30 grados, recomendamos los cubitos del tamaño L.
Añadir agua manualmente
A al tubo de
agua
B al grifo
C al aparato
31
ES
6. En cuanto comience el ciclo de fabricación de hielo, este se congelará en el
mecanismo de evaporación.
Nota: Durante el ciclo de fabricación de hielo, no añada agua manualmente. La duración de
la fabricación del hielo depende de la temperatura ambiente.
7. En cuanto nalice el proceso de fabricación de hielo, el recipiente de agua se
inclina, el agua restante regresa al depósito de agua y los cubitos caen del
mecanismo de evaporación.
8. Tras aproximadamente 15-35 segundos, el recipiente de agua se inclina hacia
atrás y los cubitos de hielo que se han producido en el ciclo anterior se envían
al recipiente de los cubitos. El aparato realiza ahora los pasos 3-6 de nuevo.
9. Pulse el botón para expulsar los cubitos y obtenerlos. El indicador se
muestra en la pantalla LCD.
Nota: Coloque el recipiente bajo el lugar de extracción durante la expulsión de los cubitos. Si
el hielo se almacena durante mucho tiempo en el recipiente de los cubitos, puede ocurrir que
estos se peguen. En este caso tampoco caerán cubitos aunque el recipiente esté lleno. Separe
los cubitos con la pala para el hielo incluida en el envío y a continuación presione el botón.
10. Pulse el botón ON/OFF para detener el aparato.
11. Si pulsa el botón WATER se suministrará agua.
Nota: Si desea obtener agua del aparato, debe estar activada al menos la función de
fabricación de hielo. Asegúrese de que el recipiente se sitúe bajo la salida de agua para que
el agua no se vierta.
12. Si extrae el conducto o necesita sustituirlo o colocar el tapón de drenaje,
proceda del siguiente modo: Primero desmonte la anilla azul (A) y presione la
anilla blanca (B) por la parte exterior. Finalmente, retire el conducto.
32
ES
LIMPIEZA Y CUIDADO
• Limpie regularmente el revestimiento interior, la bandeja de recogida de
hielo, el depósito de agua, la pala de hielo y el evaporador. Para la limpieza,
desenchufe el aparato y retire los cubitos de hielo. Utilice una solución diluida
de agua y vinagre para limpiar el interior y el exterior de la máquina de hielo.
No rocíe la máquina de hielo con productos químicos, ácidos, gasolina o
aceite. Límpialo con agua clara y un trapo limpio.
• Mantenga las aberturas de ventilación de la carcasa del aparato libres de
obstrucciones. No utilice dispositivos mecánicos u otros medios para acelerar
el proceso de descongelación.
• Utilice siempre agua fresca antes de empezar a producir hielo. Esto se aplica
tanto a la instalación inicial como después de un periodo prolongado de
inactividad.
DETECCIÓN Y RESOLUCIÓN DE PROBLEMAS
• Tenga en cuenta que, en caso de un corte eléctrico, al desconectar el cable
de alimentación o si se apaga el interruptor eléctrico durante un ciclo de
fabricación de hielo, se pueden formar virutas de hielo que se almacenan
en la pala automática y pueden bloquearla. Para retirar las virutas de hielo,
desconecte el cable de alimentación de la toma de corriente y desplace la
pala con cuidado en dirección a la parte trasera de la carcasa. Ahora podrán
retirarse las virutas de hielo.
• Reinicie el aparato presionando de nuevo el botón Stop y luego Start. Si la pala
del hielo no empuja los cubitos de hielo a su recipiente después de que estos
hayan caído del mecanismo de vaporización y al mismo tiempo se ilumina
la luz M, compruebe si el recipiente del agua está en posición horizontal o
equilibrado. Si no es el caso, reposicione el depósito presionando ligeramente
la pala de hielo con los dedos. Reinicie la máquina.
Problema Posible causa Solución propuesta
El compresor
no funciona
correctamente y hace
ruidos de vibración.
La tensión es
demasiado baja.
Detenga el aparato y
conéctelo a una toma
de corriente que se
adecue a la tensión
indicada.

33
ES
Problema Posible causa Solución propuesta
El indicador de
agua insuciente se
ilumina.
No hay agua en el
depósito.
Remplissez le
réservoir avec de
l'eau. Espere por lo
menos 3 minutos
y luego presione el
botón ON / OFF para
comenzar.
La bomba está llena
de aire.
Abra la tapa de la
tubería de desagüe y
deje salir unas gotas
de agua.
Seleccionar el tamaño
de los cubitos.
Los cubitos se
quedan pegados.
Se recomienda
fabricar en invierno
cubitos de hielo
del tamaño S y en
verano, del tamaño L.
Las condiciones de la
fabricación de hielo
son buenas pero no
se fabrican cubitos.
Fuga de líquido
congelante/el
sistema cerrado está
bloqueado.
Contacte con el
servicio de atención
al cliente.
El indicador
se muestra en la
pantalla.
Bloqueo de cubitos
de hielo.
Retire los cubitos de
hielo y reinicie del
aparato pulsando el
botón ON/OFF.
El motor está
averiado.
Contacte con el
servicio de atención
al cliente.
La ventana de visión
está abierta con una
gran incidencia del
sol.
Asegúrese de que
la ventana de visión
esté cerrada durante
la fabricación de
hielo.
34
ES
INDICACIONES SOBRE LA RETIRADA DEL
APARATO
Si en su país existe una disposición legal relativa a la
eliminación de aparatos eléctricos y electrónicos, este
símbolo estampado en el producto o en el embalaje
advierte que no debe eliminarse como residuo doméstico.
En lugar de ello, debe depositarse en un punto de
recogida de reciclaje de aparatos eléctricos y electrónicos.
Una gestión adecuada de estos residuos previene
consecuencias potencialmente negativas para el medio
ambiente y la salud de las personas. Puede consultar más
información sobre el reciclaje y la eliminación de este
producto contactando con su administración local o con
su servicio de recogida de residuos.
FABRICANTE E IMPORTADOR (REINO UNIDO)
Fabricante:
Chal-Tec GmbH, Wallstraße 16, 10179 Berlín, Alemania.
Importador para Gran Bretaña:
Berlin Brands Group UK Limited
PO Box 42
272 Kensington High Street
London, W8 6ND
United Kingdom

35
FR
Chère cliente, cher client,
Toutes nos félicitations pour l’acquisition de ce nouvel
appareil. Veuillez lire attentivement et respecter les
instructions de ce mode d’emploi an d’éviter d’éventuels
dommages. Nous ne saurions être tenus pour responsables
des dommages dus au non-respect des consignes et à
la mauvaise utilisation de l’appareil. Scannez le QR-Code
pour obtenir la dernière version du mode d‘emploi et des
informations supplémentaires concernant le produit.
SOMMAIRE
Consignes de sécurité 36
Aperçu de l‘appareil 37
Pièces détachées 38
Panneau de commande et indicateurs 39
Mise en marche et utilisation 40
Nettoyage et entretien 42
Identication et résolution des problèmes 42
Informations sur le recyclage 44
Fabricant et importateur (UK) 44
FICHE TECHNIQUE
Numéro d'article 10033478, 10046160
Alimentation 220-240 V ~ 50/60 Hz
Capacité du réservoir d'eau 1,8 l
Quantité de glaçons 10-15 kg / 24 h

36
FR
CONSIGNES DE SÉCURITÉ
• Ne branchez cet appareil que sur des prises de courant mises à la terre et
dont la tension correspond à celle de l‘appareil.
• Utilisez les poignées lorsque vous déplacez l‘appareil.
• Installez l‘appareil sur un support plane.
• Utilisez l‘appareil en intérieur uniquement.
• N‘utilisez pas l‘appareil à proximité d‘une baignoire ou d‘une piscine.
• Débranchez la che de la prise lorsque vous n‘utilisez pas l‘appareil.
• Ne plongez jamais le cordon d’alimentation et ne branchez pas d’eau ou
d’autres liquides.
• Utilisez uniquement les accessoires recommandés par le fabricant pour cet
appareil.
• Ne placez pas l‘appareil directement sous une prise de courant.
• Ne laissez pas le cordon d‘alimentation suspendu à la surface de travail pour
empêcher les enfants de le tirer.
• Ne surchargez pas l‘appareil, vous risqueriez des courts-circuits et des chocs
électriques.
• Assurez-vous que le couvercle est toujours fermé pendant le fonctionnement.
• Ne retirez pas la che en tirant sur le câble, mais tenez-la avec la main tout en
la tirant.
• Nous déclinons toute responsabilité pour les dommages résultant du non-
respect des instructions et d‘une utilisation non conforme.
• Utilisez l‘appareil uniquement à domicile.
• Ne connectez pas l‘appareil à une minuterie ou à une prise d‘alimentation
télécommandée.
• Ne plongez pas l‘appareil dans l‘eau.
• Si le cordon d‘alimentation ou la che sont endommagés, ils doivent être
remplacés par le fabricant, par un spécialiste agréé ou par une personne de
même qualication.
• Respectez les réglementations locales pour le recyclage des appareils
contenant des gaz inammables.
• Ne stockez pas de substances inammables ou explosives dans l‘appareil.
• Remplissez l‘appareil uniquement avec de l‘eau.
• Les enfants de 8 ans et plus, les personnes physiquement handicapées ne
doivent utiliser l‘appareil que s‘ils ont été correctement informés par un
superviseur de ses fonctions et des mesures de sécurité.
Cet appareil contient du liquide réfrigérant Isobutane (R600a), un gaz naturel
très respectueux de l’environnement mais inammable. Bien qu’il soit
inammable, il ne détruit pas la couche d’ozone et ne renforce pas l’effet
de serre. L’utilisation de ce liquide réfrigérant provoque toutefois un niveau
sonore de l’appareil légèrement plus élevé. Outre les bruits du compresseur,
vous pouvez percevoir le ux du liquide réfrigérant. Cela est inévitable et
n’a aucune inuence négative sur la puissance de l’appareil. Faites attention
pendant le transport an de ne pas endommager le circuit réfrigérant. Les
fuites de liquide réfrigérant peuvent irriter les yeux.

37
FR
Remarques particulières
• Lors du positionnement de l‘appareil, assurez-vous que le cordon
d‘alimentation n‘est pas pincé ou endommagé.
• Assurez-vous qu‘il n‘y a pas de prises multiples ou d‘alimentations multiples à
l‘arrière de l‘appareil.
AVERTISSEMENT
Lors de l‘utilisation, de l‘entretien et de la mise au rebut de
l‘appareil, faites attention au symbole de gauche à l‘arrière de
l‘appareil ou sur le compresseur. Ce symbole avertit d‘un éventuel
incendie. Il y a des substances inammables dans les conduites de
uide frigorigène et dans le compresseur. Tenez l‘appareil à l‘écart
de toute source d‘incendie pendant son utilisation, son entretien et
son élimination.
APERÇU DE L‘APPAREIL
1 fenêtre de contrôle 10 accès au réservoir d'eau
2 cache avant 11 cache latéral
3 écran LCD 12 cache supérieur
4 panneau de commande 13 cache arrière
5 sortie des glaçons 14 ouverture d'admission d'eau
6 bouton de commande de sortie de
glaçons
15 câble d'alimentation
7 bac d'égouttage 16 conduite d'évacuation d'eau
9 cache du ventilateur 17 conduite d'évacuation en cas de
trop plein
38
FR
PIÈCES DÉTACHÉES
1
Bouchon de vidange 1x
2
Fermeture 2x
3
Adaptateur 1x
4
Remplissage de la conduite d'eau 2x
5
Cuillère à glace 1x
6
Tasse à mesurer 1x

39
FR
PANNEAU DE COMMANDE ET INDICATEURS
Indicateur Description
Il n'y a pas assez d'eau dans le réservoir, rajoutez de l'eau.
L'appareil est en processus de fabrication de glaçons.
Les glaçons sont en train d'être récupérés.
Le bac à glaçons est plein.
S signie petits glaçons.
M signie glaçons moyens.
L signie gros glaçons.
L'appareil a un problème. Éteignez-le, débranchez le cordon
d'alimentation de la prise, puis redémarrez l'appareil. Contactez le
service client si le problème se reproduit.
SELECT Appuyez sur cette touche pour conrmer. Si vous avez choisi de petits
glaçons, l'écran afche "S". Si vous avez choisi des glaçons moyens,
l'écran afche "M". Si vous avez choisi de gros glaçons, l’écran afche
"L".
WATER Appuyez seulement lorsque vous désirez de l'eau.
ON/OFF Appuyez pour allumer ou éteindre l'appareil.
40
FR
MISE EN MARCHE ET UTILISATION
1. Raccordez le tuyau d‘évacuation de l‘eau à l‘arrière de l‘appareil (numéro 17
dans le croquis de l‘illustration, sous le tube de remplissage), car l‘humidité
présente dans l‘air peut se transformer en eau par congélation si l‘appareil
continue de fonctionner mais que la glace n‘est pas retirée de l‘appareil.
2. Insérez la che de l‘appareil dans la prise. Remplissez d‘eau comme indiqué
sur le schéma A ou B.
Figure A Figure B
Ajoutez manuellement de l'eau Branchez l'appareil sur le
robinet d'eau
Remarque: lorsque l‘appareil ache le symbole et que vous
souhaitez encore fabriquer des glaçons, rajoutez de l‘eau. Avant de rajouter
de l‘eau, retirez les glaçons et ajoutez une tasse d‘eau pour éviter de faire
déborder le réservoir d‘eau en faisant fondre la glace.
3. Appuyez sur la touche ON / OFF pour démarrer l’appareil.
4. L‘eau est automatiquement pompée du réservoir d‘eau vers le récipient
d‘eau, ce qui prend environ 30 secondes.
Remarque : si l‘eau n‘est pas pompée dans le réservoir d‘eau pendant deux
cycles de fabrication de glace, ouvrez le dispositif fuite et faites couler un peu
d‘eau. Appuyez à nouveau sur la touche ON/OFF pour redémarrer l‘appareil.
5. Appuyez sur le bouton SELECT pour sélectionner la taille des glaçons.
Remarque: Si la température ambiante est inférieure à 15 degrés, nous
recommandons de choisir des glaçons de taille S. Si la température ambiante
est supérieure à 30 degrés, nous vous recommandons de choisir des glaçons de
taille L.
A à la conduite
d‘eau
B au robinet
C à l‘appareil
41
FR
6. Une fois que le cycle de fabrication des glaçons a commencé, la glace est
fabriquée au contact des doigts du vaporisateur.
Remarque : Ne jamais ajouter d‘eau manuellement pendant le cycle de fabrication de
glace. La durée de production des glaçons dépend de la température ambiante.
7. Une fois le processus de fabrication des glaçons terminé, le réservoir d‘eau
bascule, le reste de l‘eau retourne dans le réservoir d‘eau et les glaçons
tombent des doigts de l‘évaporateur.
8. Au bout de 15 à 35 secondes environ, le réservoir d‘eau bascule vers l‘arrière
et les glaçons du cycle précédent sont poussés directement dans le bac à
glaçons. L‘appareil effectue à nouveau les étapes 3 à 6.
9. Appuyez sur le bouton du distributeur de glaçons pour obtenir des glaçons.
L‘indicateur s‘ache sur l‘écran LCD.
Remarque: Lorsque vous récupérez les glaçons, placez le récipient directement sous le point
de distribution. Si la glace se trouve dans le bac à glaçons depuis longtemps, il est possible
que les glaçons se collent les uns aux autres. Dans ce cas, aucun glaçon ne tombe, même si le
récipient est plein. Commencez par séparer les glaçons avec la pelle à glaçons incluse, puis
appuyez sur le bouton.
10. Appuyez sur la touche ON / OFF pour arrêter l‘appareil.
11. En appuyant sur la touche WATER, vous pouvez obtenir de l‘eau.
Remarque: Si vous souhaitez obtenir de l‘eau froide de l‘appareil, vous devez au moins
activer la machine à glaçons. Assurez-vous que le récipient est placé sous la sortie d’eau an
que l’eau ne puisse pas couler partout.
12. Si vous souhaitez retirer ou remplacer la conduite ou insérer le dispositif anti
fuite, procédez comme suit : commencez par retirer la bague bleue (A), puis
appuyez sur la bague blanche (B) à l‘extérieur. Retirez ensuite la conduite.
42
FR
NETTOYAGE ET ENTRETIEN
• Nettoyez régulièrement le revêtement intérieur, le bac à glace, le bac à eau,
la pelle à glace et l‘évaporateur. Lors du nettoyage, débranchez l‘appareil
et retirez les glaçons. Utilisez une solution diluée d‘eau et de vinaigre pour
nettoyer l‘intérieur et l‘extérieur de la machine à glaçons. Ne pas asperger
la machine à glaçons de produits chimiques, d‘acides, d‘essence ou d‘huile.
Essuyez-le avec de l‘eau claire et un chiffon propre.
• Veillez à ce que les ouvertures de ventilation du boîtier de l‘appareil ne soient
pas obstruées. N‘utilisez pas de dispositifs mécaniques ou d‘autres moyens
pour accélérer le processus de dégivrage.
• Utilisez toujours de l‘eau fraîche avant de commencer la production de glace.
Cela s‘applique aussi bien à l‘installation initiale qu‘après une période d‘arrêt
prolongée.
IDENTIFICATION ET RÉSOLUTION DES
PROBLÈMES
• Notez qu’en cas de panne de courant, de cordon d’alimentation débranché
ou de mise hors tension pendant un cycle de fabrication de glaçons, de petits
copeaux de glace peuvent s‘accumuler et bloquer la pelle automatique. Pour
retirer les copeaux de glace, débranchez d’abord le cordon d’alimentation
de la prise et faites glisser délicatement la pelle vers l’arrière du boîtier. Vous
pouvez ensuite retirer les copeaux de glace.
• Redémarrez l‘appareil en appuyant sur Arrêter, puis sur Démarrer. Si la pelle à
glaçons ne pousse pas les glaçons dans le collecteur une fois que ceux-ci sont
tombés du doigt de l‘évaporateur alors que le témoin M est allumé, vériez
que le réservoir d‘eau est horizontal ou équilibré. Si ce n‘est pas le cas, ajustez
le réglage en appuyant doucement sur la pelle à glace avec votre doigt. Puis
redémarrez la machine à glaçons.
Problème Cause possible Solution
Le compresseur
ne fonctionne pas
bien et fait des
bourdonnements.
La tension électrique
est insusante.
Arrêtez l'appareil et
branchez-le sur une
autre prise avec une
tension électrique
susante.

43
FR
Problème Cause possible Solution
Le témoin de manque
d'eau est allumé.
Le réservoir d'eau est
vide.
Remplissez le
réservoir avec de
l'eau. Attendez au
moins 3 minutes
puis appuyez sur la
touche ON / OFF pour
démarrer.
La pompe est pleine
d‘air.
Ouvrez le bouchon de
l‘évacuation d‘eau et
faites couler quelques
gouttes d‘eau.
Choix de la taille des
glaçons.
Les glaçons collent
entre eux.
Il est recommandé de
fabriquer des glaçons
de taille S en hiver et
des glaçons de taille L
en été..
Les conditions
sont bonnes pour
la fabrication de
glaçons mais aucun
glaçon n'est fabriqué.
Fuite de frigorigène /
Le système fermé est
bloqué.
Contactez le service
client.
Le témoin est
allumé à l‘écran.
Blocage dû aux
glaçons.
Retirez les glaçons et
redémarrez l'appareil
en appuyant sur la
touche ON/OFF.
Le moteur est
endommagé.
Contactez le service
client.
La fenêtre de contrôle
est ouverte par forte
luminosité.
Vériez que la fenêtre
de contrôle reste
fermée pendant
la fabrication des
glaçons.

44
FR
INFORMATIONS SUR LE RECYCLAGE
S‘il existe une réglementation pour l‘élimination ou le
recyclage des appareils électriques et électroniques dans
votre pays, ce symbole sur le produit ou sur l‘emballage
indique que cet appareil ne doit pas être jeté avec les
ordures ménagères. Vous devez le déposer dans un point
de collecte pour le recyclage des équipements électriques
et électroniques. La mise au rebut conforme aux règles
protège l‘environnement et la santé de vos semblables
des conséquences négatives. Pour plus d‘informations
sur le recyclage et l‘élimination de ce produit, veuillez
contacter votre autorité locale ou votre service de
recyclage des déchets ménagers.
FABRICANT ET IMPORTATEUR (UK)
Fabricant :
Chal-Tec GmbH, Wallstraße 16, 10179 Berlin, Allemagne.
Importateur pour la Grande Bretagne :
Berlin Brands Group UK Limited
PO Box 42
272 Kensington High Street
London, W8 6ND
United Kingdom

45
IT
Gentile Cliente,
La ringraziamo per aver acquistato il dispositivo. La
preghiamo di leggere attentamente le seguenti istruzioni
per l’uso e di seguirle per evitare possibili danni tecnici. Non
ci assumiamo alcuna responsabilità per danni scaturiti da
una mancata osservazione delle avvertenze di sicurezza e
da un uso improprio del dispositivo. Scansionare il codice
QR seguente, per accedere al manuale d’uso più attuale e
per ricevere informazioni sul prodotto.
INDICE
Avvertenze di sicurezza 46
Descrizione del dispositivo 47
Parti singole 48
Pannello di controllo e indicazioni 49
Messa in funzione e utilizzo 50
Pulizia e manutenzione 52
Ricerca e correzione degli errori 52
Avviso di smaltimento 54
Produttore e importatore (UK) 54
DATI TECNICI
Numero articolo 10033478, 10046160
Alimentazione 220-240 V ~ 50/60 Hz
Capacità del serbatoio 1,8 l
Quantità di cubetti di ghiaccio 10-15 kg / 24 h

46
IT
AVVERTENZE DI SICUREZZA
• Collegare il dispositivo solo a prese elettriche con messa a terra e con tensione
corrispondente a quella del dispositivo.
• Utilizzare le impugnature quando si sposta il dispositivo.
• Posizionare il dispositivo su un fondo piano.
• Utilizzare il dispositivo solo in locali chiusi.
• Non utilizzare il dispositivo vicino a vasche o piscine.
• Staccare la spina quando non si utilizza il dispositivo.
• Non immergere mai il cavo o la spina in acqua o altri liquidi.
• Utilizzare solo accessori consigliati dal produttore espressamente per questo
dispositivo.
• Non lasciar penzolare il cavo dal piano di lavoro, in modo che i bambini non
possano tirarlo.
• Non riempire eccessivamente il dispositivo, altrimenti possono risultare
cortocircuiti e folgorazioni.
• Assicurarsi che il coperchio sia sempre chiuso durante il funzionamento.
• Per staccare la spina dalla presa elettrica, non tirare dal cavo, ma impugnare
saldamente la spina stessa.
• Non ci assumiamo alcuna responsabilità per danni dovuti a un utilizzo
improprio del dispositivo e al mancato rispetto delle avvertenze.
• Utilizzare il dispositivo solo in ambienti casalinghi.
• Non collegare il dispositivo a timer o a prese elettriche con comando a
distanza.
• Non immergere il dispositivo in acqua.
• Se il cavo o la spina sono danneggiati, devono essere sostituiti dal produttore,
da un’azienda tecnica autorizzata o da una persona con qualica equivalente.
• Quando si smaltisce il dispositivo, rispettare le norme locali relative allo
smaltimento di dispositivi con gas inammabili.
• Non conservare nel dispositivo sostanze inammabili o esplosive.
• Riempire il dispositivo solo con acqua.
• Bambini a partire da 8 anni e persone con limitate capacità siche e psichiche
possono utilizzare il dispositivo solo se sono stati istruiti in modo esaustivo da
una persona responsabile del loro controllo sulle funzioni e sulle procedure di
sicurezza.
Questo dispositivo contiene il refrigerante isobutano (R600a), un gas
naturale con maggiore sostenibilità ecologica, ma inammabile. Sebbene sia
inammabile, non danneggia lo strato di ozono e non incrementa l’effetto
serra. L’utilizzo di questo refrigerante comporta una rumorosità del dispositivo
leggermente maggiore. Oltre al rumore del compressore, è possibile udire
anche il usso del refrigerante. Questo è inevitabile e non ha effetti negativi
sulla performance del dispositivo. Prestare attenzione durante il trasporto, in
modo da non danneggiare il circuito del refrigerante. Perdite di refrigerante
possono causare irritazioni agli occhi.

47
IT
Note speciali
• Quando si posiziona l‘unità, assicurarsi che il cavo di alimentazione non sia
schiacciato o danneggiato.
• Assicurarsi che non vi siano prese multiple o alimentatori sul retro dell‘unità.
ATTENZIONE
Durante l‘uso, la manutenzione e lo smaltimento dell‘unità,
prestare attenzione al simbolo a sinistra sul retro dell‘unità o sul
compressore. Questo simbolo avverte di possibili incendi. Ci sono
sostanze inammabili nelle linee frigorifere e nel compressore.
Tenere l‘apparecchio lontano da fonti di incendio durante l‘uso, la
manutenzione e lo smaltimento.
DESCRIZIONE DEL DISPOSITIVO
1 Finestrella 10 Accesso al serbatoio dell’acqua
2 Copertura anteriore 11 Copertura laterale
3 Schermo LCD 12 Copertura superiore
4 Pannello di controllo 13 Copertura posteriore
5 Erogazione cubetti di ghiaccio 14 Foro di ausso dell’acqua
6 Tasto per l’erogazione dei cubetti 15 Cavo di alimentazione
7 Vaschetta di gocciolamento 16 Condotto di scarico dell’acqua
9 Copertura della ventola 17 Condotto di scarico in caso di
eccessivo riempimento

48
IT
PARTI SINGOLE
1
Tappo di scarico 1x
2
Tappo 2x
3
Adattatore 1x
4
Riempimento del tubo dell'acqua 2x
5
Paletta per il ghiaccio 1x
6
Tazza di misurazione 1x
49
IT
PANNELLO DI CONTROLLO E INDICAZIONI
Indicazione Descrizione
Non c’è acqua a sucienza nel serbatoio. Aggiungere
acqua.
Il dispositivo si trova nel processo di produzione di cubetti
di ghiaccio.
I cubetti di ghiaccio vengono rimossi.
Il contenitore dei cubetti è pieno.
S signica cubetti di piccole dimensioni.
M signica cubetti di medie dimensioni.
L signica cubetti di grandi dimensioni.
Il dispositivo presenta un problema. Spegnere il
dispositivo, staccare la spina dalla presa elettrica e
riavviarlo. Se il problema persiste, contattare il servizio di
assistenza ai clienti.
SELECT Premere questo tasto per confermare. Se sono stati
selezionati i cubetti piccoli, lo schermo mostra “S”. Se sono
stati selezionati i cubetti medi, lo schermo mostra “M”. Se
sono stati selezionati i cubetti grandi, lo schermo mostra
“L”.
WATER Premere solo quando si desidera avere acqua.
ON/OFF Premere per accendere e spegnere il dispositivo.
50
IT
MESSA IN FUNZIONE E UTILIZZO
1. Collegare il tubo di scarico dell‘acqua alla parte posteriore dell‘unità
(numero 17 nello schizzo dell‘illustrazione, sotto il tubo di riempimento),
poiché l‘umidità nell‘aria può congelare in acqua se l‘unità continua a
funzionare ma non viene rimosso il ghiaccio dall‘unità.
2. Inserire la spina dell‘apparecchio nella presa. Riempire con acqua come
mostrato nel diagramma A o B.
Immagine A Immagine B
Aggiungere acqua
manualmente.
Collegare il dispositivo al
rubinetto dell’acqua.
Nota: se il dispositivo mostra il simbolo e si desidera produrre più
cubetti di ghiaccio, aggiungere acqua. Prima di aggiungere l’acqua, togliere i
cubetti di ghiaccio e aggiungere una tazza d’acqua, per evitare che il serbatoio
trabocchi a causa dello scioglimento dei cubetti.
3. Premere ON/OFF per avviare il dispositivo.
4. L’acqua viene pompata automaticamente dal serbatoio al contenitore
dell’acqua. Questo richiede circa 30 secondi.
Nota: se nel corso di due cicli di produzione di cubetti non viene pompata
acqua nel contenitore, aprire la sicura di scarico e lasciar uscire qualche goccia
d’acqua. Premere nuovamente ON/OFF per riavviare il dispositivo.
5. Premere il pulsante SELECT per selezionare la dimensione dei cubetti di
ghiaccio.
Nota: se la temperatura ambiente è inferiore a 15 gradi, consigliamo di
selezionare la dimensione S. Se la temperatura ambiente è superiore a 30
gradi, consigliamo di selezionare la dimensione L.
Aggiungere acqua manualmente
A al condotto
dell’acqua
B al rubinetto
dell’acqua
C al
dispositivo
51
IT
6. Quando inizia il processo di produzione dei cubetti, il ghiaccio viene formato
sull’evaporatore a peduncoli.
Nota: Durante el ciclo de fabricación de hielo, no añada agua manualmente.
La duración de la fabricación del hielo depende de la temperatura ambiente.
7. Quando è nito il processo di produzione, il contenitore dell’acqua si
inclina, l’acqua residua scorre di nuovo nel serbatoio e i cubetti cadono
dall’evaporatore a peduncoli.
8. Dopo circa 15-35 secondi il contenitore dell’acqua si inclina all’indietro
e i cubetti prodotti nel ciclo precedente vengono spinti direttamente nel
contenitore dei cubetti di ghiaccio. Il dispositivo ripete ora i passaggi 3-6.
9. Premere il tasto per l’erogazione per ricevere i cubetti di ghiaccio.
L’indicazione viene mostrata sullo schermo LCD.
Nota: quando vengono erogati i cubetti, posizionare il contenitore
esattamente sotto il punto di erogazione. Se il ghiaccio è rimasto nel
contenitore per un tempo prolungato, può capitare che i cubetti siano
attaccati uno all’altro. In tal caso non verranno erogati cubetti anche se il
contenitore del ghiaccio è pieno. Separare i cubetti con la paletta inclusa in
consegna e procedere a premere il tasto.
10. Premere ON/OFF per arrestare il dispositivo.
11. Quando si preme il tasto WATER viene erogata acqua.
Nota: se si desidera ricevere acqua fredda dal dispositivo, deve essere
attiva almeno la funzione di produzione dei cubetti di ghiaccio. Assicurarsi di
posizionare il contenitore proprio sotto al punto di erogazione dell’acqua, in
modo che non nisca dappertutto.
12. Quando si tira fuori il tubo, lo si sostituisce o si desidera inserire la sicura di
scarico, procedere in questo modo: per prima cosa, togliere l’anello blu (A) e
premere poi l’anello bianco (B) sul lato esterno. Procedere a togliere il tubo.
52
IT
PULIZIA E MANUTENZIONE
• Pulire regolarmente il rivestimento interno, la vaschetta di raccolta del
ghiaccio, il contenitore dell‘acqua, la paletta del ghiaccio e l‘evaporatore. Per
la pulizia, scollegare l‘apparecchio e rimuovere i cubetti di ghiaccio. Usare
una soluzione diluita di acqua e aceto per pulire l‘interno e l‘esterno del
fabbricatore di ghiaccio. Non spruzzare il fabbricatore di ghiaccio con prodotti
chimici, acidi, benzina o olio. Pulire con acqua pulita e uno straccio pulito.
• Mantenere le aperture di ventilazione nell‘alloggiamento dell‘apparecchio
libere da ostruzioni. Non usare dispositivi meccanici o altri mezzi per
accelerare il processo di sbrinamento.
• Usare sempre acqua fresca prima di iniziare la produzione di ghiaccio. Questo
vale sia per l‘installazione iniziale che dopo un lungo periodo di inattività.
RICERCA E CORREZIONE DEGLI ERRORI
• Considerare che in caso di blackout, se viene scollegato il cavo di
alimentazione o se si spegne l’interruttore durante il processo di produzione,
possono formarsi piccoli trucioli di ghiaccio che si depositano sulla paletta
automatica e la potrebbero bloccare. Per rimuovere i trucioli di ghiaccio,
staccare la spina dalla presa elettrica e spingere la pala in direzione del retro
dell’alloggiamento facendo attenzione. Ora è possibile rimuovere i trucioli di
ghiaccio.
• Riavviare il dispositivo premendo Stop e poi Start. Se la pala non spinge
i cubetti nel contenitore di raccolta del ghiaccio dopo essere caduti
dall’evaporatore e contemporaneamente si illumina l’indicazione M,
controllare se il contenitore dell’acqua è in orizzontale o se è in bilanciato.
Se non è così, regolare l’impostazione premendo leggermente la pala verso
l’interno con le dita. Procedere a riavviare la macchina del ghiaccio.
Problema Causa possibile Soluzione proposta
Il compressore
non funziona
correttamente ed
emette un ronzio.
La tensione è
inferiore al valore
consigliato.
Arrestare il
dispositivo e
collegarlo a una
presa elettrica con
tensione suciente.
53
IT
Problema Causa possibile Soluzione proposta
L’indicazione di
acqua insuciente si
accende.
Non c’è acqua nel
serbatoio.
Riempire il serbatoio
con acqua. Attendere
almeno 3 minuti e
premere ON/OFF per
avviare il dispositivo.
La pompa è piena
d´aria.
Aprire il tappo di
chiusura del condotto
di scarico dell’aria e
lasciar uscire qualche
goccia d’acqua.
Selezionare la
dimensione dei
cubetti.
I cubetti sono
attaccati uno all’altro.
In inverno si consiglia
di selezionare la
dimensione S e in
estate la dimensione
L.
Le condizioni per
la produzione di
ghiaccio sono buone
ma non vengono
prodotti cubetti.
Perdita di
refrigerante/il
sistema chiuso è
bloccato.
Contattare il servizio
di assistenza ai clienti.
La spia si
accende sullo
schermo.
Blocco causato dai
cubetti di ghiaccio.
Togliere i cubetti e
riavviare il dispositivo
con ON/OFF.
Motore guasto. Contattare il servizio
di assistenza ai clienti.
La nestrella è aperta
in una condizione di
luce è intensa.
Assicurarsi che
la nestrella sia
chiusa durante la
produzione del
ghiaccio.

54
IT
AVVISO DI SMALTIMENTO
Se nel proprio paese si applicano le regolamentazioni
inerenti lo smaltimento di dispositivi elettrici ed
elettronici, questo simbolo sul prodotto o sulla confezione
segnala che questi prodotti non possono essere
smaltiti con i riuti normali e devono essere portati a
un punto di raccolta di dispositivi elettrici ed elettronici.
Grazie al corretto smaltimento dei vecchi dispositivi si
tutela il pianeta e la salute delle persone da possibili
conseguenze negative. Informazioni riguardanti il riciclo
e lo smaltimento di questi prodotti si ottengono presso
l’amministrazione locale oppure il servizio di gestione dei
riuti domestici.
PRODUTTORE E IMPORTATORE (UK)
Produttore:
Chal-Tec GmbH, Wallstraße 16, 10179 Berlino, Germania.
Importatore per la Gran Bretagna:
Berlin Brands Group UK Limited
PO Box 42
272 Kensington High Street
London, W8 6ND
United Kingdom