
MADE IN CHINA
Rev_ 1.1
Video Baby
Monitor
USER GUIDE
2.8"/ 3.2" LCD
EN/ DE/ FR/ ES/ IT/ DA/ CS/ PL/
NL/ SV/ EL/ HU/ RU

CONTENTS
SAFETY INSTRUCTIONS
CAUTION
PACKAGE CONTENTS
PRODUCT DIAGRAM
GETTING STARTED
1. Charging & Powering Monitor
2. Powering Camera
3. Placing the Camera
FUNCTIONS & OPERATIONS
Top Status Indications
Notification Icons
Bottom Menu Brief
1. Brightness & Volume Adjustment
2. Pan-n-Tilt
3. Night Vision
4. Talk back
5. VOX Mode
6. Add Camera
7. Camera Night Light Adjustment
8. Lullabies
9. Alarm Clock
10. Temperature
11. Alarm Volume
12. System Version
TROUBLESHOOTING
WARRANTY & CUSTOMER SERVICE
FCC COMPLIANCE
WEEE COMPLIANCE
01
01
02
03
09
09
09
09
10
10
10
11
11
12
12
13
13
14
16
17
17
18
19
19
20
21
21
22
ENGLISH
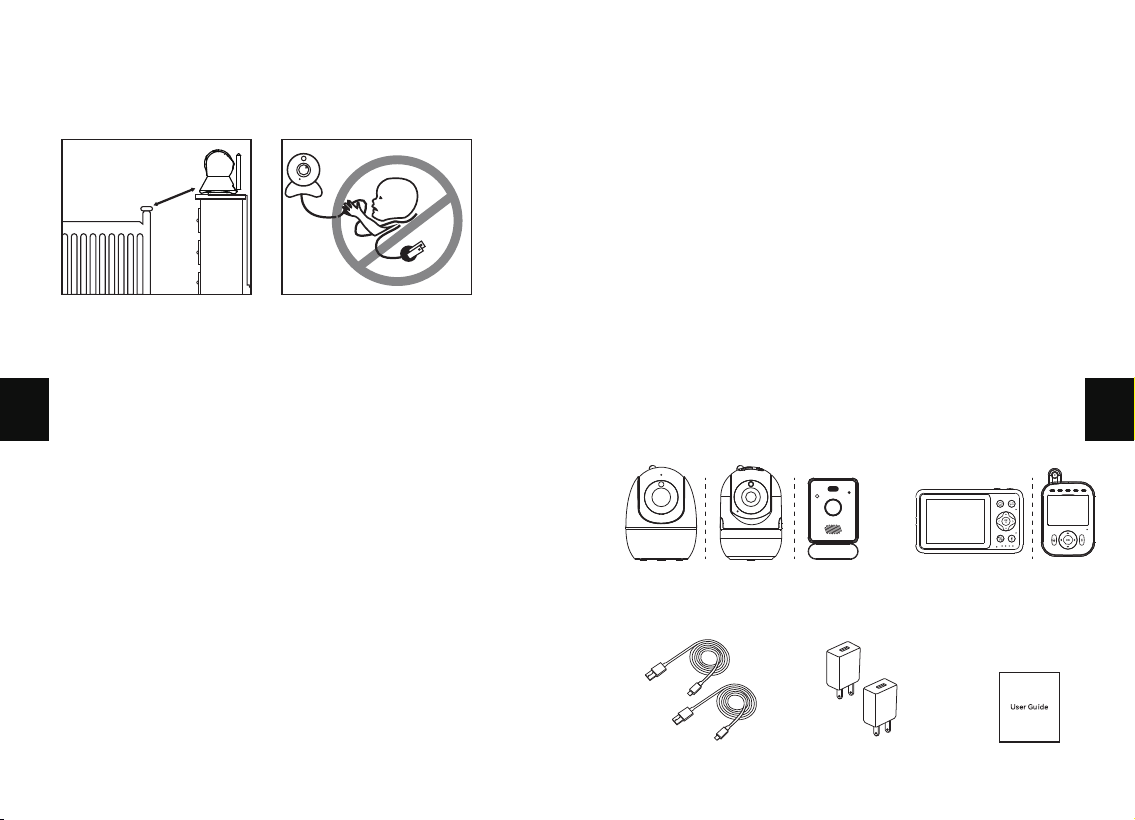
SAFETY INSTRUCTIONS
· Keep cord out of the reach of children (more than 3ft (0.9m)
away) in case of STRANGULATION.
· NEVER place the camera or cord in or near the crib or playpen.
· NEVER mount the camera directly above the crib or playpen
to avoid the risk of injury.
· Only use the AC adapters provided.
· Never use the unit near water, including near a bathtub, sink,
laundry machine tube, wet basement, etc.
· Do not install near any heat sources such as radiators, heat
registers, stoves, or other devices that produce heat.
· Only use attachments and accessories specified by the
manufacturer.
· Unplug this device when unused for long periods of time.
CAUTION
· NOT toys. Do not allow children to play with them.
· This product is NOT intended to replace the proper
supervision of children. You MUST check your child’s activity
regularly.
· This product is not intended for use as a medical camera and
its use should not replace adult supervision.
· Unplug the product during lightning storms.
1m
· Please check the operating range and condition of the camera
carefully at the initial installation, and on a regular basis after that.
· Check the reception regularly. Test the camera before use and
after changing the camera’s location.
· For indoor use only.
· Clean the camera with a dry cloth only.
· Do not block any ventilation openings.
· Microphone feedback might occur when the monitor is too
close to the camera. Please keep them at least 1.5m /4.9ft apart.
PACKAGE CONTENTS
Camera*1
Monitor*1
Power Cable*2 Adapter*2(Optional)
User Guide*1
01 02
EN
EN
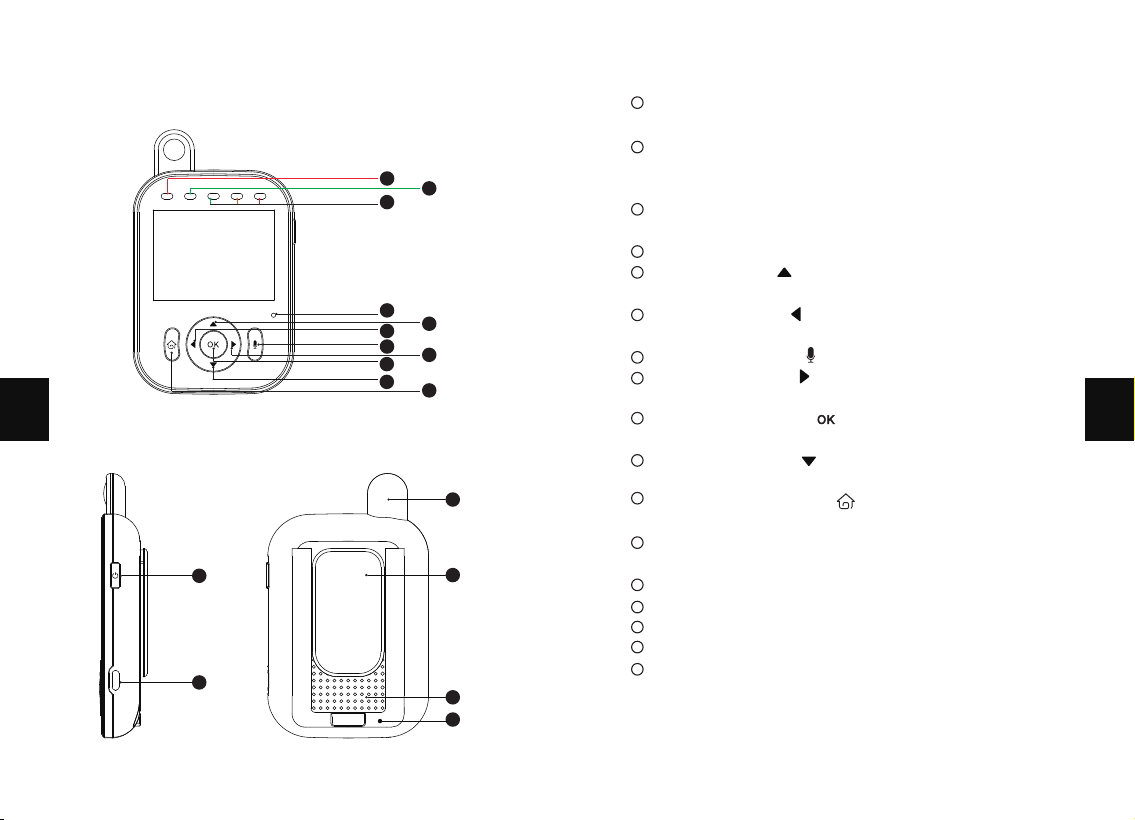
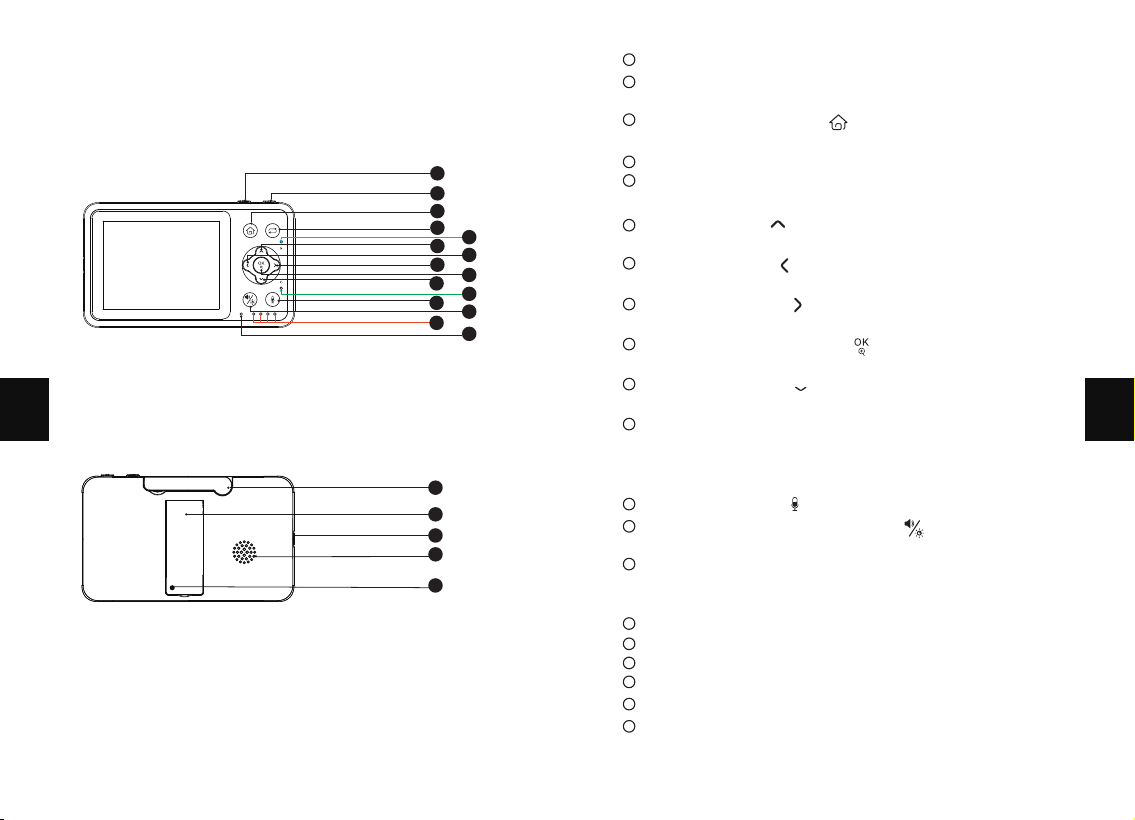
PRODUCT DIAGRAM
2.8 LCD Baby Monitor
1
3
4
6
7
9
10
5
8
2
11
12
13
15
14
16
17
1
2
3
4
5
6
7
8
9
10
11
12
13
14
15
16
17
Charging indicator light: blue when charging, green when fully
charged.
Status/Low battery indicator light: When the monitor is
turned on, it stays on in green; When the battery level is too
low, green flashes.
Sound Level LED: Low/high level shows low/high sound
detected by the camera.
Microphone
Up Button: Press to increase the volume or to change
your selection upward.
Left Button: Press to dim the brightness or to change
your selection leftward.
Two Way talk: Press and hold to talk with your baby.
Right Button: Press to increase the brightness or to
change your selection rightward.
Confirm Button: Press to Zoom in/out or to confirm
your selection.
Down Button: Press to decrease the volume or to
change your selection downward.
Menu/Back Button: Press to enter menu page or press
as a back key.
Monitor & Screen On/Off: Long press to turn on/off the
monitor; short press to turn on/off the screen.
Power Input
Antenna
Stand
Speaker
Reset
03 04
EN
EN
3.2 LCD Baby Monitor
1
2
3
4
6
8
10
12
11
13
15
5
7
9
14
16
19
18
17
20
1
2
3
4
5
6
7
8
9
10
11
12
13
14
15
16
17
18
19
20
VOX shortcut: Turn on or off the sound detection function.
Monitor & Screen On/Off: Long press to turn on/off the
monitor; short press to turn on/off the screen.
Menu/Back Button: Press to enter menu page or press as
a back key.
Camera switching: switch or cycle multiple cameras.
Charging indicator light: blue when charging, green when fully
charged.
Up Button: Press to tilt the camera upward or to change
your selection upward.
Left Button: Press to pan the camera leftward or to
change your selection leftward.
Right Button: Press to pan the camera rightward or to
change your selection rightward.
Confirm/Zoom Button: Press to Zoom in/out or to confirm
your selection.
Down Button: Press to tilt the camera downward or to
change your selection downward.
Monitoring Status Indicator: Green. When the camera is
Status/Low battery indicator light: When the monitor is turned
on, it stays on in green; When the battery level is too low, green
flashes.
Two way talk:Press and hold to talk with your baby.
Volume/Brightness shortcut: Press to adjust the
brightness and volume.
Sound Level LED: Low/high level shows low/high sound
detected. When there is alarm, 4 LEDs all blink together
every four seconds.
Microphone
Antenna
Stand
Power Input
Speaker
Reset
05 06
EN
EN
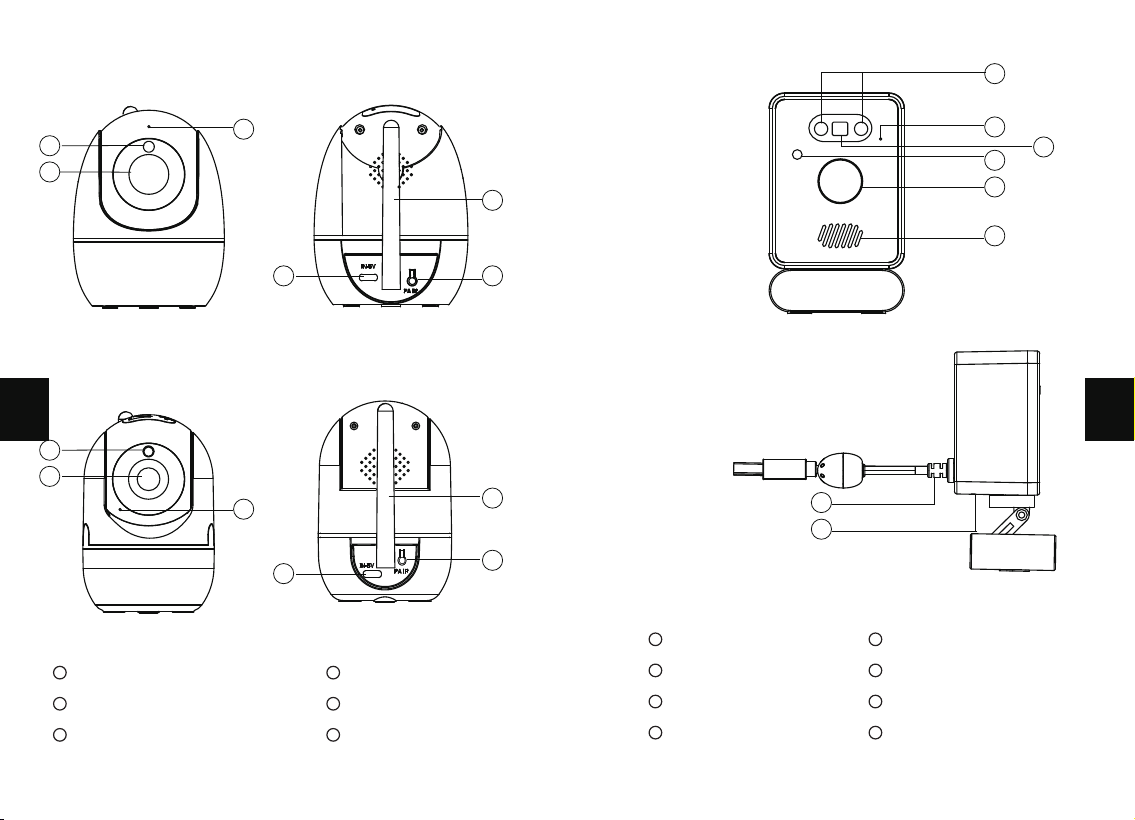
Camera
1
Camera Lens
2
Night Vision Sensor
3
Microphone
4
Power Input
5
Antenna/Temperature Sensor
6
Pair Button
1
Infrared LEDS
2
Microphone
3
Colorful Night Light
4
Night Vision Sensor
5
Camera Lens
6
Speaker
7
Temperature Sensor &
Power Input
8
Pair Button
01
02
03
04
05
01
02
03
04
05
06
07
08
06
01
02
03
04
05
06
07 08
EN
EN
GETTING STARTED
1. Charging & Powering Monitor
1) Connect the monitor to a power source via the type-C cable and
power adapter.
2) Unplug the unit when its power indicator turns off, indicating
a full charge. Of course, if it stays plugged in, it will not affect
the use, but it may affect the battery life.
3) Press the power button on the monitor to turn on the device.
See green power indicator lighting.
2. Powering Camera
1) Connect the camera to a power source via the type-C cable and
power adapter.
• Only use the power adapters included in the package.
• Do not place the camera and power cord within the reach
of your baby.
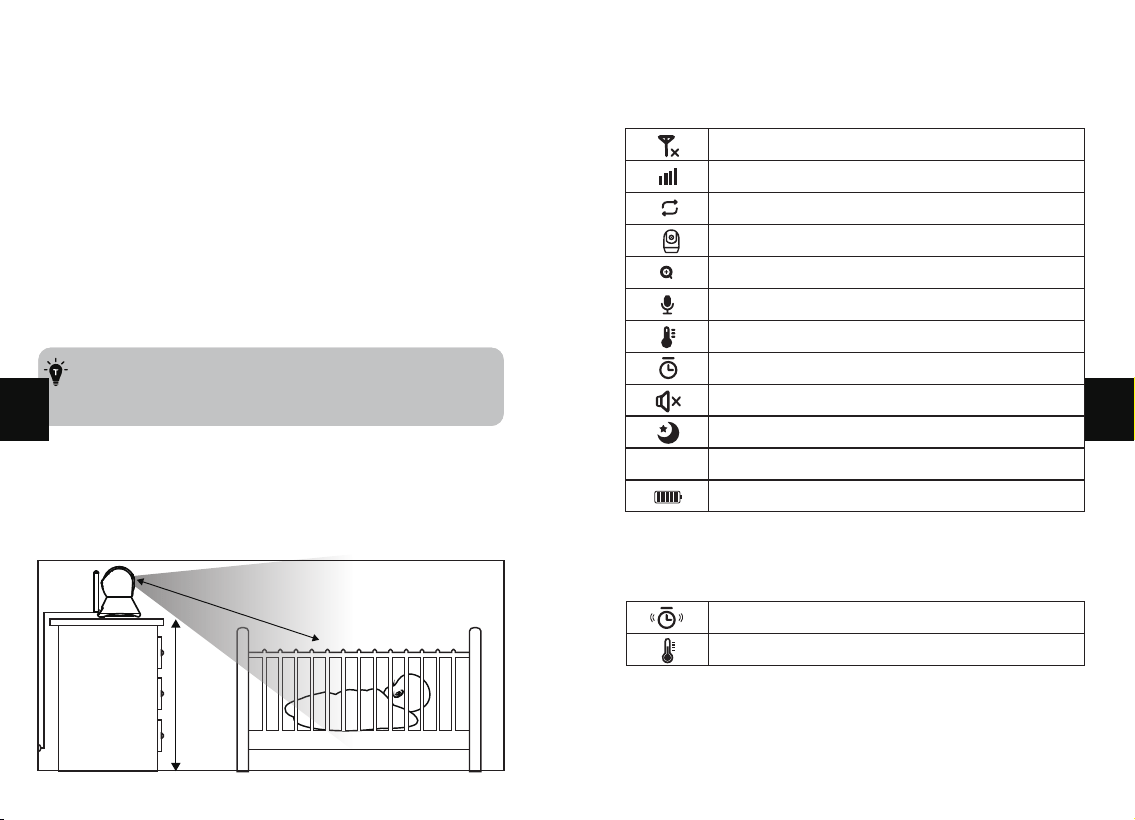
For safety reasons and better vision in night vision mode, place
the camera on a 0.75m table top and ensure the distance from
the baby is at least 1.5m.
3. Placing the Camera
0.75m
1.5m
°C / °F
No Signal Connection
Signal Strength
Cycle Camera Enabled (Switch every 15 seconds)
Camera
Zoom x2
Talk-back
Temperature Alarm Enabled
Feeding Reminder Enabled
Screen Mute
Night Vision Mode
Current Room Temperature
Battery Level
FUNCTIONS & OPERATIONS
Top Status Indications
Notification Icons
Feeding Reminder
High / Low Temperature Alarm
2
09 10
EN
EN
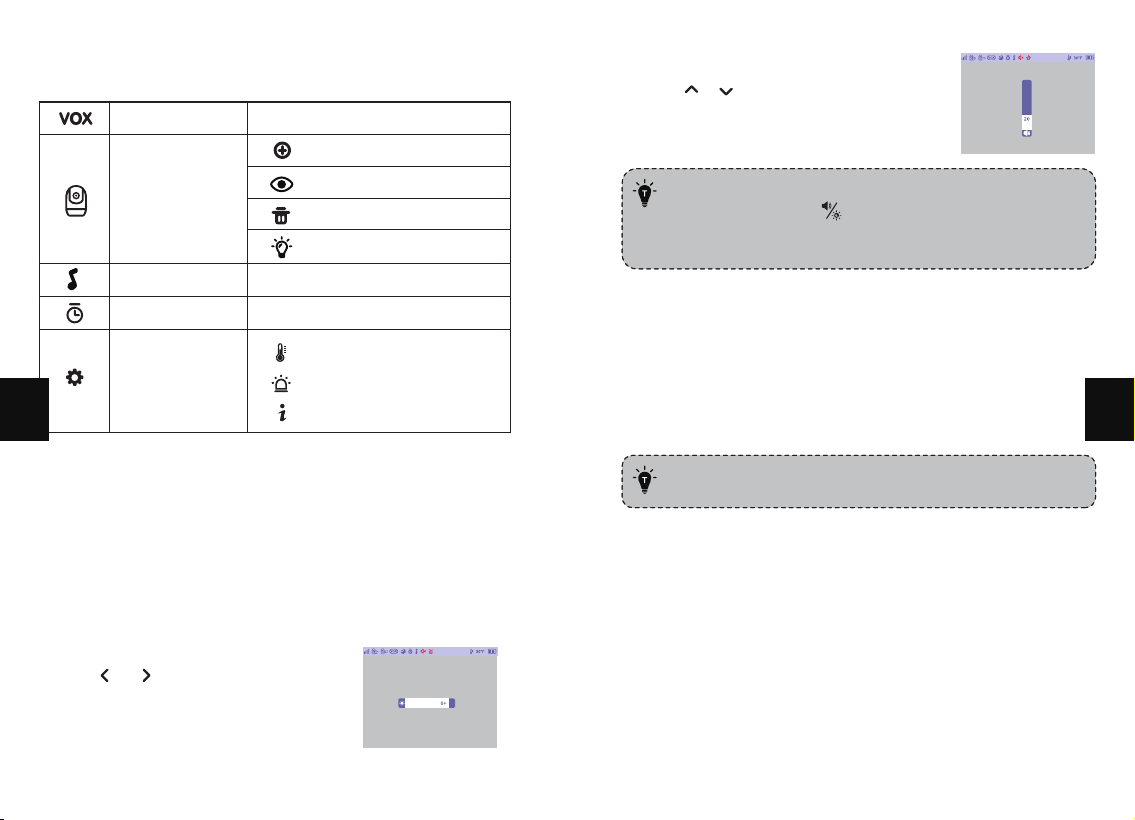
• 3.2 inch Volume & Brightness adjustment:
Press shortcut key , then Volume Brightness icons
appear, Press Left and Right to adjust the brightness,
press up and down to adjust the volume.
• Only for 3.2 inch.
Bottom Menu Brief
Add camera
Camera up & down
Delete camera
Night Light
(Only for 2.8 inch)
Camera
VOX
Voice Activated Transmission
Feeding regularly
Can play 6 soothing songs
Settings
Feeding Alarm
Lullabies
Temperature scale
Alarm volume
System Version
1. Brightness & Volume Adjustment
2. Pan-n-Tilt
Use Shortcut Button:
1. Press & buttons to
decrease/ increase the
Brightness, and press OK
Button to save your settings.
When viewing the camera, press Left / Right / Up / Down
Button to view at different angles.
3. Night Vision
The night vision is automatically activated in a dim environ-
ment.
The camera has high- intensity infrared LEDs for picking up
clear images in the dark. Black and white images can be
captured within 5m distance.
2. Press & buttons to quickly
adjust the volume, and press OK
button to save your settings.
11 12
EN
EN
4. Talk back
Press and hold the Talk button to communicate with the baby,
release to exit.
· When you enter the talking mode, the icon will be
shown on the monitor.
· When it’s mute or the speaker volume is too low, you
may not be able to hear the baby.
· When you’re pressing the Talk Button, the camera will
not transfer the sound to the monitor. Please release
the button to listen to your baby.
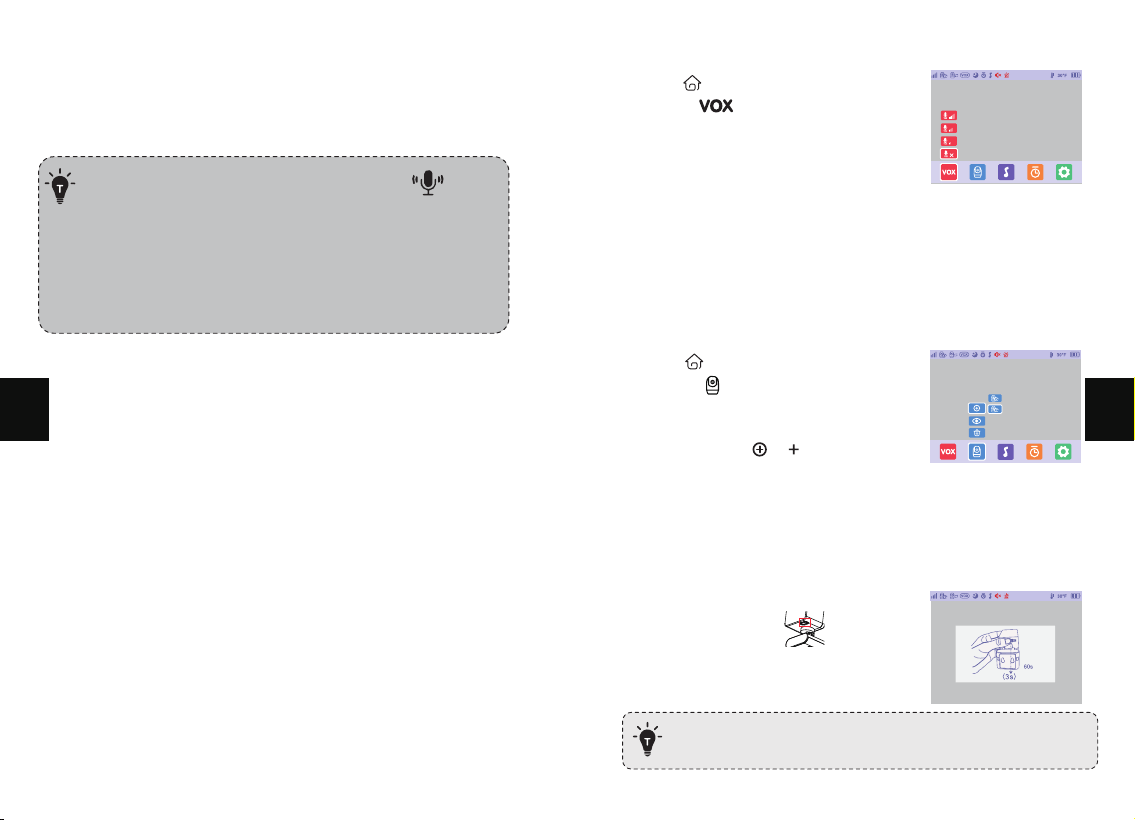
5. VOX Mode
Explanation:
·With VOX on, if the sound level from the baby camera room
does not reach the set sensitivity within 30 seconds, the
screen will automatically turn off. If it reaches the set sound
sensitivity, the screen will remain on. When screen is off, if
the sound reaches the set sensitivity, the screen will turn on.
If it does not reach the set sensitivity, the screen will remain
off.
·There are three options of sound detection, LOW(75dB),
MEDIUM(65dB) and HIGH(60dB). LOW(sensitivity) means
the sound can be detected if it reached 75dB, and so on for
MEDIUM and HIGH.
Step 1:
1. Press to enter menu page.
2. Choose -> OK button.
Step 2:
1. Select the option you want.
Press OK button.
6. Add Camera
Step 1:
1. Press to enter menu page.
2. Choose -> OK button.
Step 2:
1. Select through -> ->OK button.
Step 3:
1. Press and hold the PAIR
button on the camera for 3 seconds.
2.8 inch
· One camera at most can be connected to one monitor.
13 14
EN
EN
3.2 inch
· Two cameras at most can be connected to one monitor.
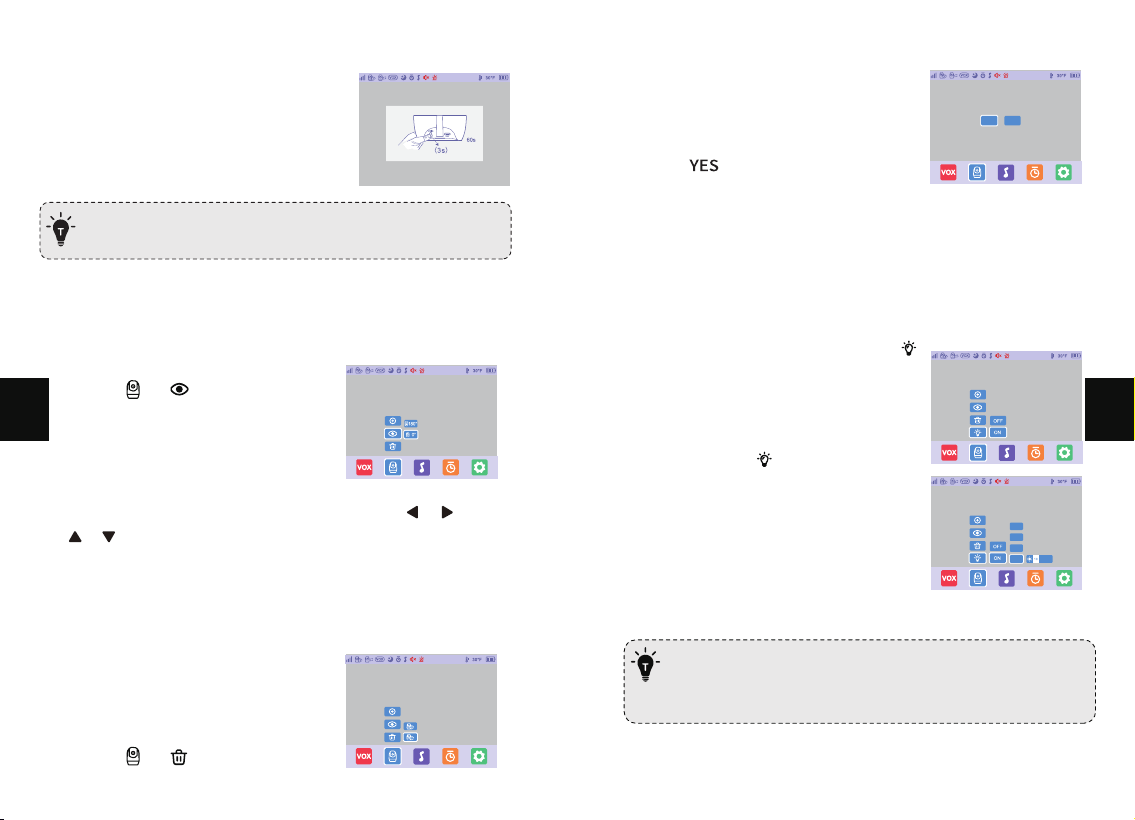
2) Press and hold the Pair Button on
the camera for 3 seconds.
View Camera
1) Press the Menu button, select
through -> -> OK Button.
1) Press the Menu button, select
through -> -> OK Button.
2) You can choose a 0° view or
a 180° rotated view.
3) When the 180° rotation view is selected, both / and
/ movements will be reversed.
Delete a Camera
Step 2:
1. Select the camera you want to
delete and press OK button.
Step 3:
1. Select . The camera is deleted
successfully.
Yes
No
7. Camera Night Light Adjustment
1) Press Menu button, select through
Press ON / OFF to turn on/off
the night light of the camera.
2) Select through -> ON-> OK
Button. Press the color you want ->
Left/Right button to adjust the
brightness of the night night.
3) Cycle will cycle between each colour.
Cycle
Blue
White
Yellow
· The night light function is only available when the camera
is equipped with a night light, and other cameras do not
have a night light function.
15 16
EN
EN
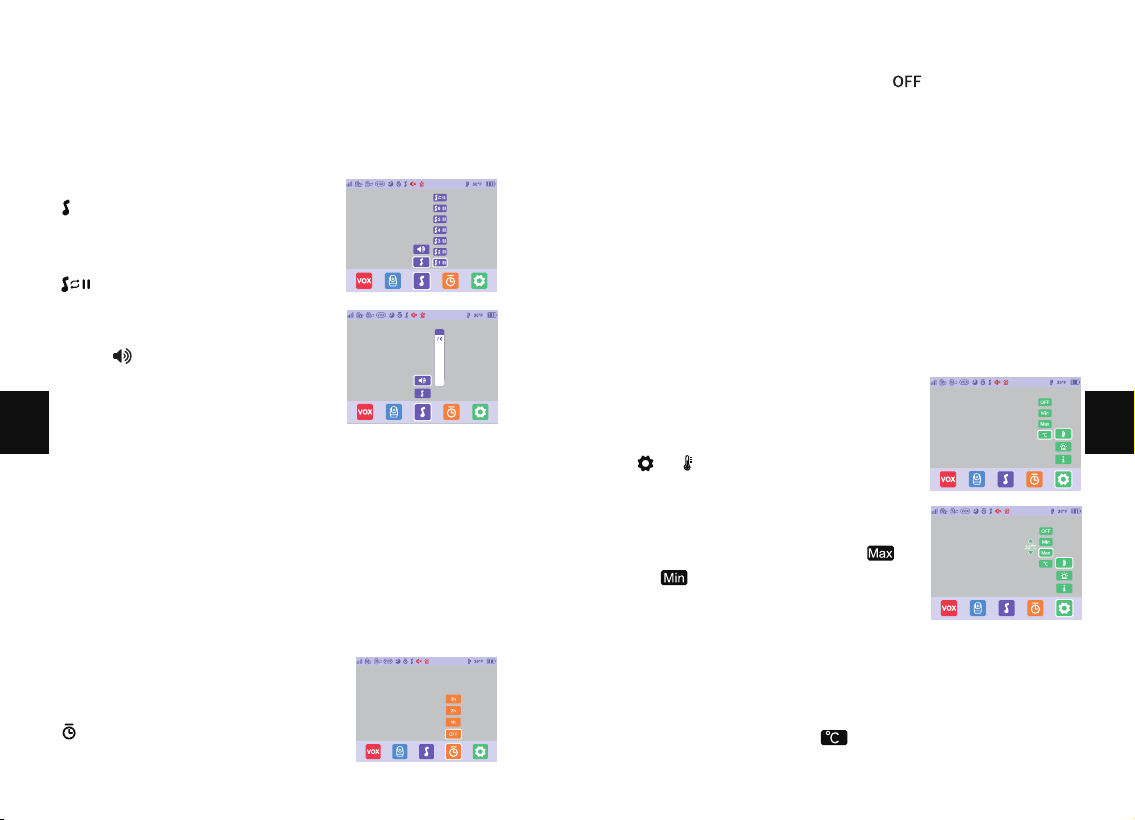
8. Lullabies
Explanation:
This function is to comfort baby with soothing lullabies.
9. Alarm Clock
Explanation:
This function is to remind you of feeding your baby.
OFF means you shut down the function; 2 hour means it
reminds you 2 hours later and so on for the other options.
Step 1:
1. Press Menu button, Choose
-> OK Button.
Step 2:
1. Select the lullaby you want. Select
to play the lullabies in a loop.
Step 1:
1. Press Menu button, Choose
-> OK Button.
Step 1:
1. Press Menu button, Choose
-> -> OK Button.
Step 3:
1. Press UP/DOWN key to adjust alarm setting, press OK and save.
Step 4:
1. Select temperature unit , press OK to switch between ℉
and ℃.
Step 2:
2. Select OFF, press OK to turn on the
temperature alarm, Press high /
low temperature -> press
OK Button.
Step 3:
1. Choose -> OK button.
2. Choose the volume level you want.
Step 2:
1. Select the time you want. Select to turn off the feeding
reminder.
10. Temperature
Explanation:
You can set the maximum/minimum temperature and turn on
the temperature alert, so that the baby monitor beeps whenever
the room temperature falls outside the desired temperature
range. You can also choose to display the temperature in
Fahrenheit (°F) or Celsius (°C) on your monitor.
17 18
EN
EN
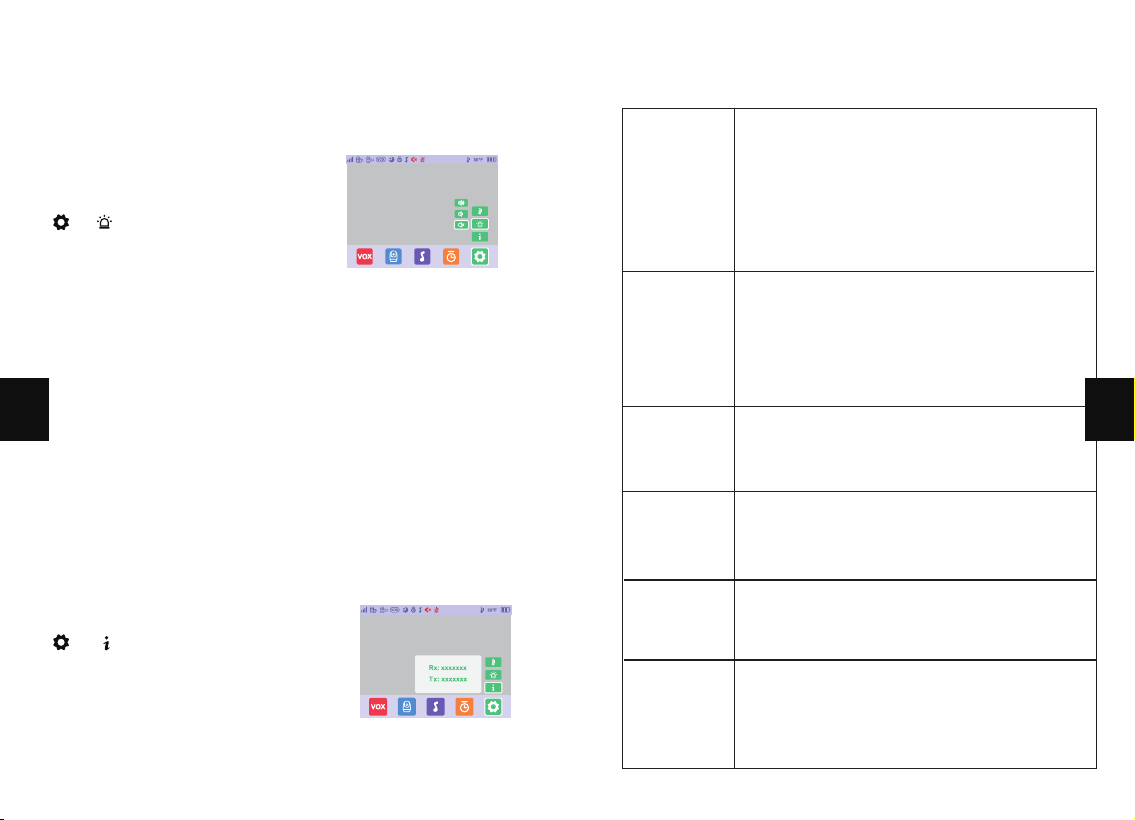
12. System Version
11. Alarm Volume
Explanation:
This function is used to adjust the sound of alarms.
Step 1:
1. Press Menu button, Choose
-> -> OK Button.
Step 1:
1. Press Menu button, Choose
-> -> OK Button.
Step 2:
1. Select the preferred alarm sound level. Press OK button.
2) View display screen and camera
version information.
TROUBLESHOOTING
· Check that the camera and monitor are
turned on.
· Check the camera and make sure it is well
plugged into the outlet.
· Check that the monitor has enough battery
(when the battery level icon flashes red slowly
on the display, it will automatically turn off in
about 10 minutes).
· Check all connections to the camera (power
cable plugging and pairing).
· Check whether the screen is in sleep mode.
Press any button to awake it.
· Check whether the camera is within range of
the monitor.
Product not
turning on?
Nothing
shown
when
viewing a
camera?
· Check whether the system sound volume is
set to “0”. It’ll be mute if set so.
No sound
from the
monitor?
· Night vision LED may be ON. Please turn on
room lights to force it out of the night
vision mode.
Black and
white
pictures?
· Check whether the camera is near the
monitor and that there’re no obstacles
between them.
Choppy
videos?
· Volume may be set too high. Press Menu Button
-> OK Button -> Left Button to volume down.
· The camera and monitor may be put too close;
keep them at least 1.5m / 4.9ft apart
Too much
noise?
19 20
EN
EN

WARRANTY & CUSTOMER SERVICE
12 months quality guarantee and life time customer service.
FCC REQUIREMENT
Any changes or modifications not expressly approved by the
party responsible for compliance could void the user’s
authority to operate the equipment.
This device complies with Part 15 of the FCC Rules. Operation
is subject to the following two conditions:
(1) this device may not cause harmful interference, and
(2) this device must accept any interference received, including
interference that may cause undesired operation.
Note:
This equipment has been tested and found to comply
with the limits for a Class B digital device, pursuant to Part 15
of the FCC Rules. These limits are designed to provide
reasonable protection against harmful interference in a
residential installation. This equipment generates, uses, and
can radiate radio frequency energy, and if not installed and
used in accordance with the instructions, may cause harmful
interference to radio communications. However, there is no
guarantee that interference will not occur in a particular
installation. If this equipment does cause harmful interference
to radio or television reception, which can be determined by
turning the equipment off and on, the user is encouraged to try
to correct the interference by one or more of the following
measures:
– Reorient or relocate the receiving antenna.
– Increase the separation between the equipment and receiver.
– Connect the equipment into an outlet on a circuit different
from that to which the receiver is connected.
– Consult the dealer or an experienced radio/TV technician
for help.
This equipment complies with FCC radiation exposure limits set
forth for an uncontrolled environment. This equipment should be
installed and operated with a minimum distance of 2Ocm
between the radiator & your body. This transmitter must not
be co-located or operating in conjunction with any other
antenna or transmitter.
WEEE COMPLIANCE
DISPOSE OF USED BATTERIES ACCORDING TO THE INSTRUCTIONS
“ ”The symbol indicates DC voltage
This product bears the selective sorting symbol for Waste
electrical and electronic equipment (WEEE). This means that
this product must be handled pursuant to European directive
2012/19/EU
in order to be recycled or dismantled to minimize its
impact on the environment. User has the choice to give his
product to a competent recycling organization or to the retailer
when he buys a new electrical or electronic equipment.
21 22
EN
EN
Camera
Video Baby monitor
This equipment complies with FCC radiation exposure limits set
forth for an uncontrolled environment.