7睟睞
Quick Start Guide
Plese review the entire before using the product.
ˀˢ˗˘˟ʭˍʤʙˍʤ˃˥ˢ

Scan the QR code to view detailed guides, including the user manual,
maintenance instructions, and troubleshooting.
㚇㟧⋄勳䰅嶵䬐忚勅㜟➈瑅ⶤ⎷䤭㙧◃ѵ勳㛀㧐䃧ѵ㥝檋㞪㯹佊Ѷ
wiki.makera.com
makerables.com
Scan the QR code to visit Makerables, our CNC content community. Discover
and share CNC projects, and use AI tools to turn ideas into reality quickly.
㚇㟧⋄勳䰅徳槞.BLFSBCMFT瑅㘭⌤䪉$/$▼䵀❬Ѷ⠀䞷㊓☺⋣$/$㸴⮳㱜⏃瑅㊓⎷䤭"*
㈅盷㐇搐〨㔏䃧⠇㘬䞷⿀Ѷ
makera.com/support
If you encounter any issues with your Carvera Air, scan the QR code for
solutions or contact us directly.
ⶤ㮰㓄搸♤⌳⎍▫⋆$BSWFSB"JS䪉槞沃瑅⠝㚇㟧⋄勳䰅㯹忖巗◩㧐㱜㘲䫹㞽呓僺㘭⌤Ѷ
1. Read Before Use---------------------03
2. Unboxing---------------------------03
3. Machine Overview-------------------03
4. What’s Included---------------------04
5. Common Tools---------------------05
6. Setting Up the Machine--------------05
7. Your First Job-----------------------05
8. Next Steps--------------------------05
CONTENTS
1 2
1. Read Before Use
⎷䤭⚁槵忯
Before using your Makera Z1(ˍʤʙˍʤ˃˥ˢ), make sure to read thoroughly
and understand the Safety Guidelines. Failure to follow the safety
instructions may result in personal injury, inferior results, or damage to
the product.
⎷䤭Makera Z1(Z1&Z1Pro)⚁瑅快䱱␕⎘㈒⌌勅槵忯㊓䠋巗Ѿ⾫■汦䯩ѿ≥䪉▼Ѷ
㬾㜡⾫■㜟㌲㣥⎔〨⠝哺〞嗰⋲抚⍜⿕ѵ♪⎔㘬⣯愙旀⎆≃瑅㘲〛⋟⣯搑㘬㝷⭷Ѷ
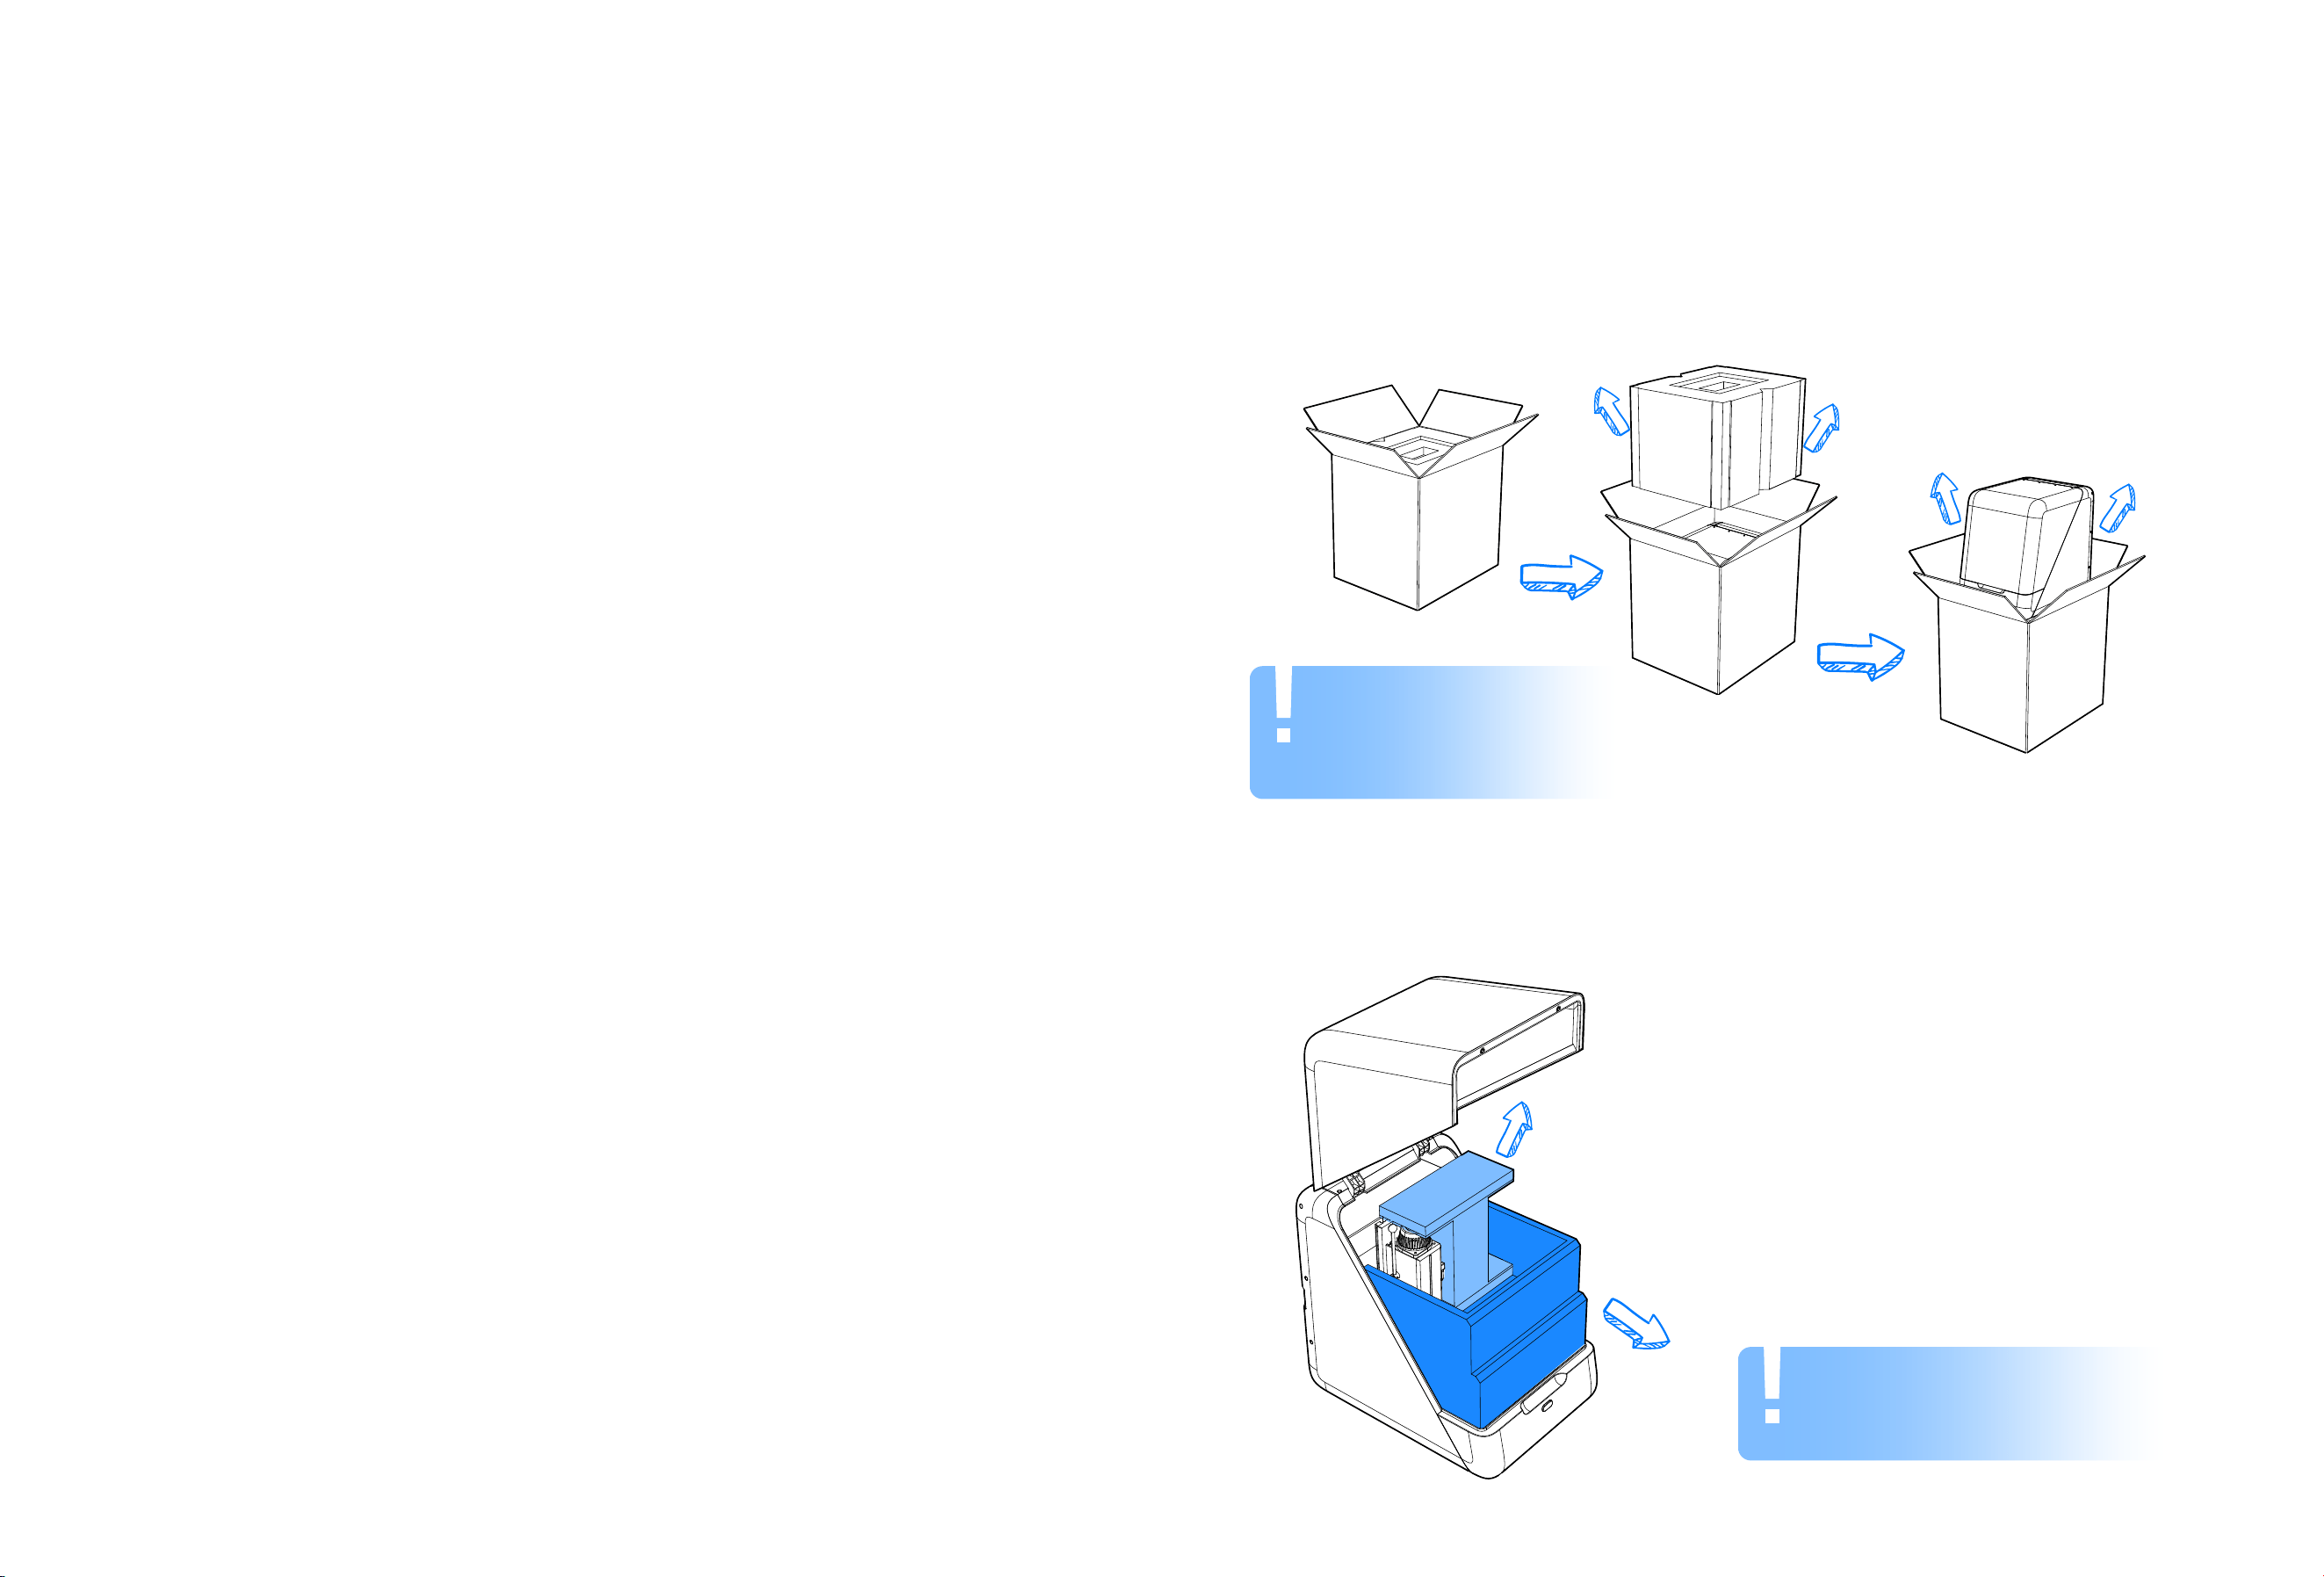
2. Unboxing
㌝侲
Remove the protective foam from the top and sides, then carefully lift the
machine out of the box with assistance from another person.
⠅≃侲▼污擙⢺⏟歐䪉␕㛀眍䂽瑅䔿⠼⭐⌎⋲➁⛝≃瑅〱㏠⭘〨㭎珪⌆侲≥㛈☯Ѷ
Note: Please keep the carton,
foam, and plastic packaging
bag for future use.
Carefully open the machine’s top cover as shown in the illustration below, then
gently remove the internal foam and accessories from inside the machine.
快㜡䕰≃㧐䴼㔫⬦㙜䴼瑅〱㏠㙯㌝㭎珪污擙䫛㮓瑅䔿⠼捪捪⠅☯㭎珪▼擙䪉␕㛀眍䂽⢺放⌮Ѷ
Note: When opening the top
cover, follow the illustrated
steps to avoid damage.
3 4
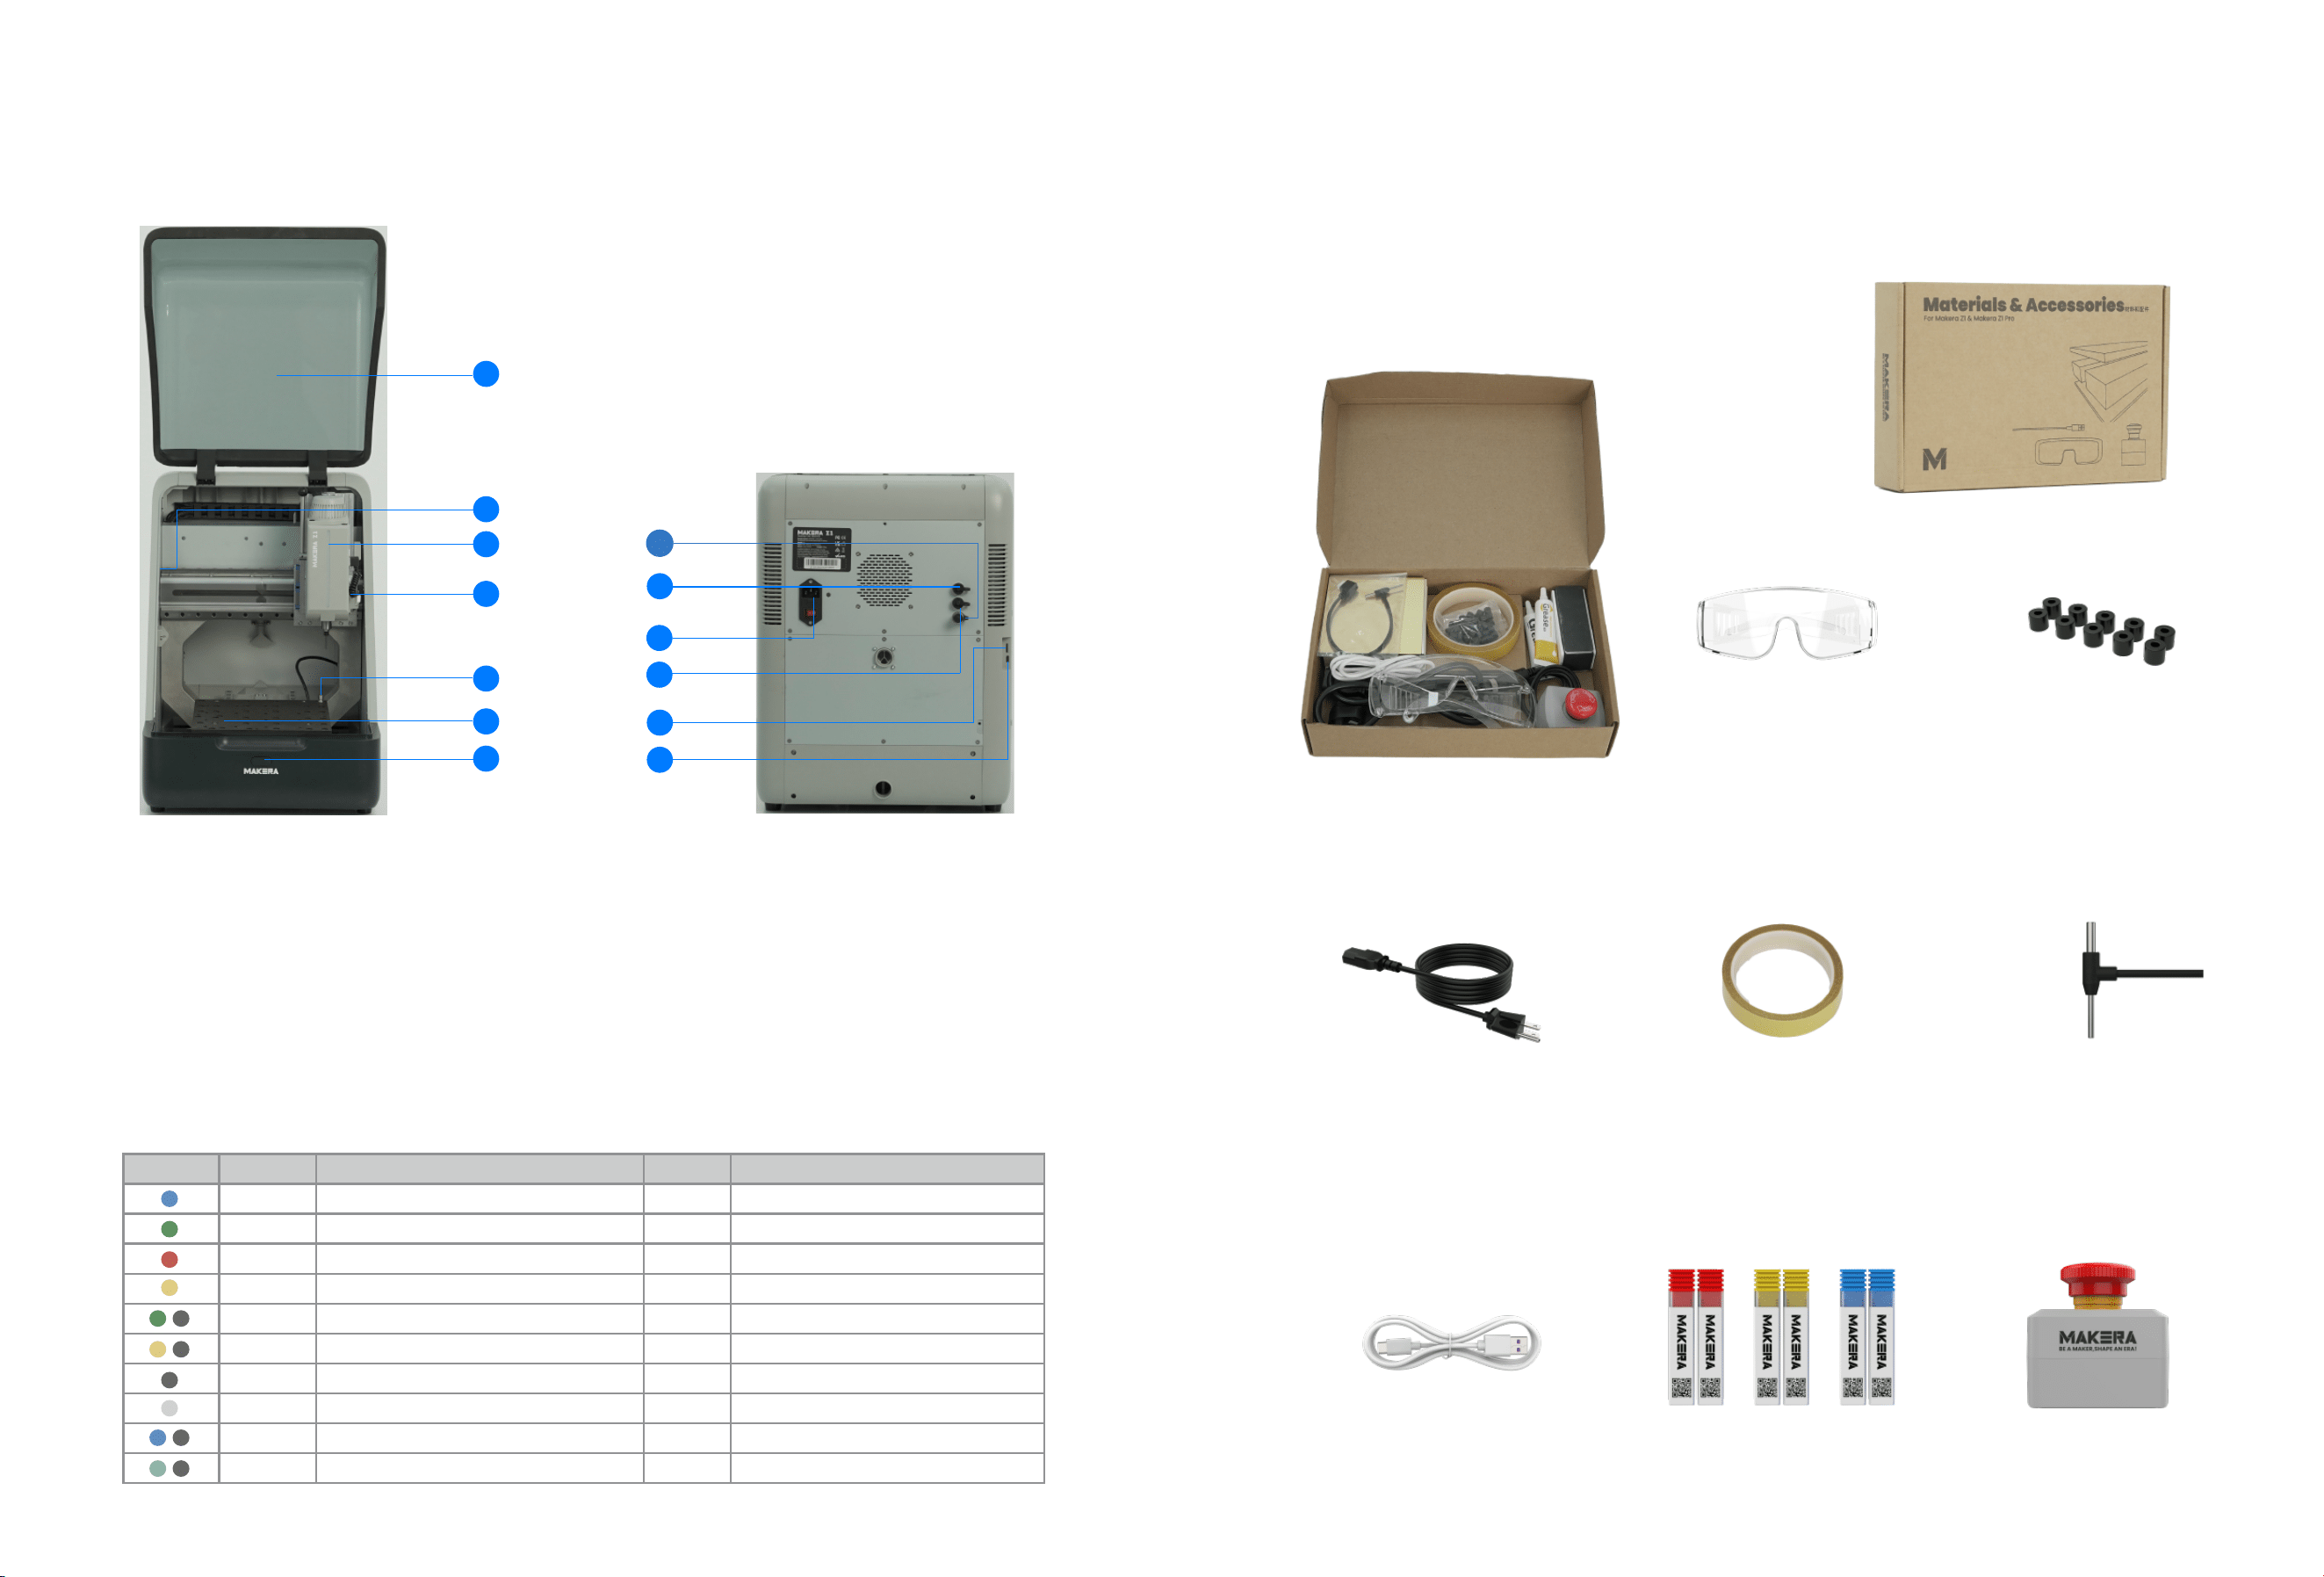
3. Machine Overview
㭎珪㶕嶻
3.1 Basic
Information
5.Auto Tool Setter
8.Emergency Stop
12.Data(type-C)
9.Power input
11.SD card
10.External Control
1.Machine Cover
6.Machine Bed
2.Illumination Lights 4.Wired Probe
3.Indicator Light
7.Main Button
1
7
3
2
4
5
6
8
9
10
11
12
4. What’s Included
✷⡙▼
x 1Emergency stop x 63.175mm Milling Bits
4.1 Accessories & Materials
3.2 Status Indicator
鍘〄勵⟝鍒ꤑ倰䒭
StatusColour
䖉劼
鵘遤
险䫣
䔱ꨪ
⥂䭯
瘝䖉
犜欽
⠅溭
兽⨢
䊨Ⱘ䖉劼
劼㐼㢅✵瑟ꢀ朐䙖
劼㐼姻㖈鵘遤
霃㢊䒗䌢鍒ꝉ䛪㢕
劼㐼㗂叻禹䔱ꨪꅾ縨
挿ⴁ兽⨢䭽꛵ⱄ妃挿ⴁ㔐㢕
劼㐼綕Ȿ餴俱幡ꤑ⚥
劢鵶䱹霃㢊
馄傞劢乼⡲ꅾ劼㐼䛪㢕
挿ⴁ兽⨢䭽꛵ⱄ妃挿ⴁ䛪㢕
瘝䖉刿䰃䊨Ⱘ
朐䙖
Idle
Run
Alarm
Home
Hold
Wait
Disable
Sleep
Pause
Tool/Wait
Machine is idle
How It Is Trigger/How To Quit
Machine is working
Machine has an alarm/Unlock it to restore
Machine is resetting the coordinate
Click the hold button/Click again to resume
Machine is emptying the buffer
No device has been connected
Timeout/Reboot machine to restore
Click the hold button/Click again to resume
Waiting for tool changing
x 10Spare 1/8" bit collar
x 1Safety goggles
x 1Power cable
x 1USB cable
x 13D Probe Rod
x 1Double-Side tape
5 6
13
13 Factory test interface
13.Factory test port
1
4
3
2
5
6
8
7
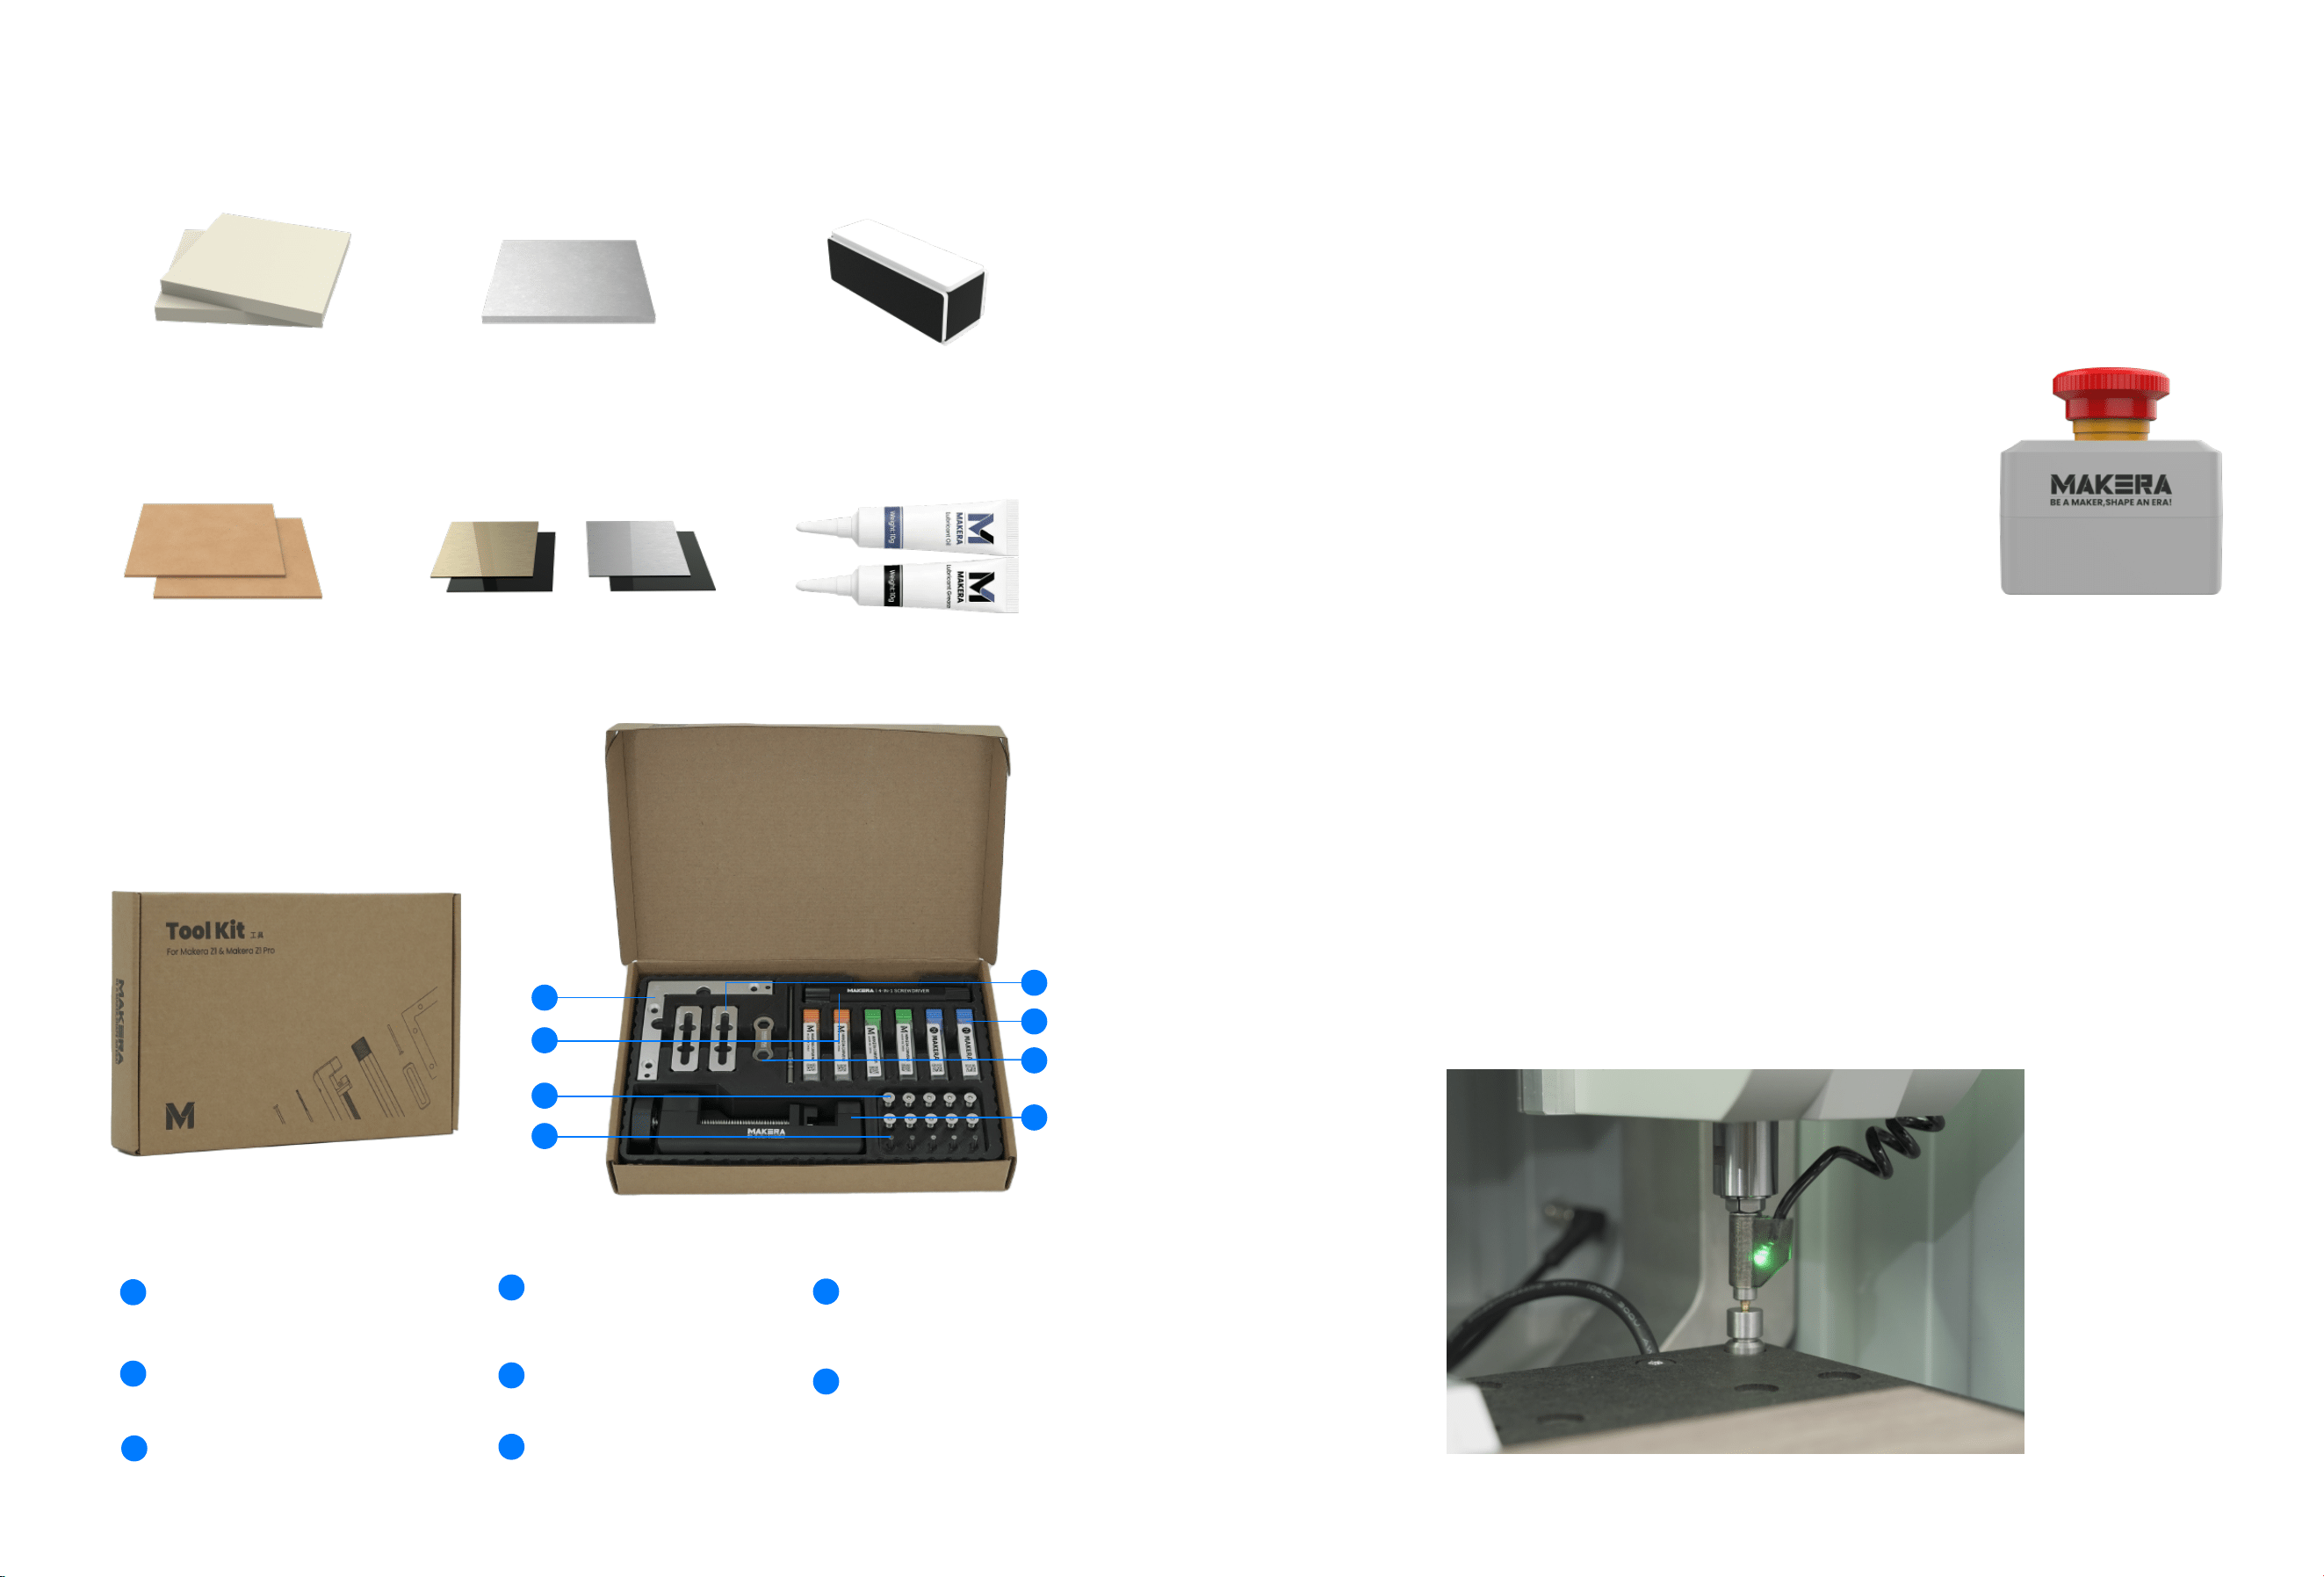
x 1
4 in 1 Screwdriver
x 1L bracket
x 1
x 6
Milling bit
x 2Top clamp
Bit collar installer
x 1Spindle collet installer
x 10M5 Screws
x 54mm Dowel pin
4.2 Tool Kits
1
2
3
4
5
6
7
8
x 2
Epoxy Tooling board
x2MDF Board
x 1Aluminum plate
x 2Bicolor Stock
x 2grease
x 1Stand Block
5. Common Tools
㉖䤭㈅盷
5.1 Emergency Stop Button
Plug the emergency stop cable into the rear port. Press it
to stop the machine immediately in an emergency. The
E-stop is self-locking; turn it clockwise to release before
powering on.
〨㑁⒓㌝▫劾㟪▝㭎珪⠼擙㞽⠑Ѷ儦㑁㨍㜡≃⠝仌➢⒓㽳㭎珪Ѷ㑁
⒓≲嗦棲㌬瑅㌝㭎⚁快汥㨍桹㧢捛嗯巗棲䚾㐝Ѷ
5.2 Wired Probe
The wired probe supports automatic Z-axis probing. When prompted, install it
like a milling bit. It includes a laser indicator that turns on automatically during
boundary scanning, or can be activated by double-tapping the probe.
㬞劾㞺桹㥇㜙嗦⛜;捣㞺䅜Ѷ捞⌮㟨䴼㨍瑅┆㬊㝺☵盷∸㱋岶▝㞺桹➢⠝Ѷ㞺桹㉅䏋▁㜟䴼瑅
㚇㟧措㱚㨍嗦⛜⋦慨瑅⊗⠝⟻☰㞺ⵗ㙧⛜㌝⡝Ѷ
7 8
wiki.makera.com
Makera APP
Makera Studio
makera.com/software
Scan the QR code to download Makera Studio and the Makera App. Design
and generate toolpaths on your computer, then control the machine from
your computer or mobile device.
㚇㟧⋄勳䰅≃捬.BLFSB4UVEJP⢺.BLFSB"11瑅㓄⠝⌝⭐䤺唎≂徲徕㊓䤤㘬☵懞㦞⌮
瑅㊓⭐䤺唎㘲䷼⛜徲≂㞿♪㭎珪揁尽Ѷ
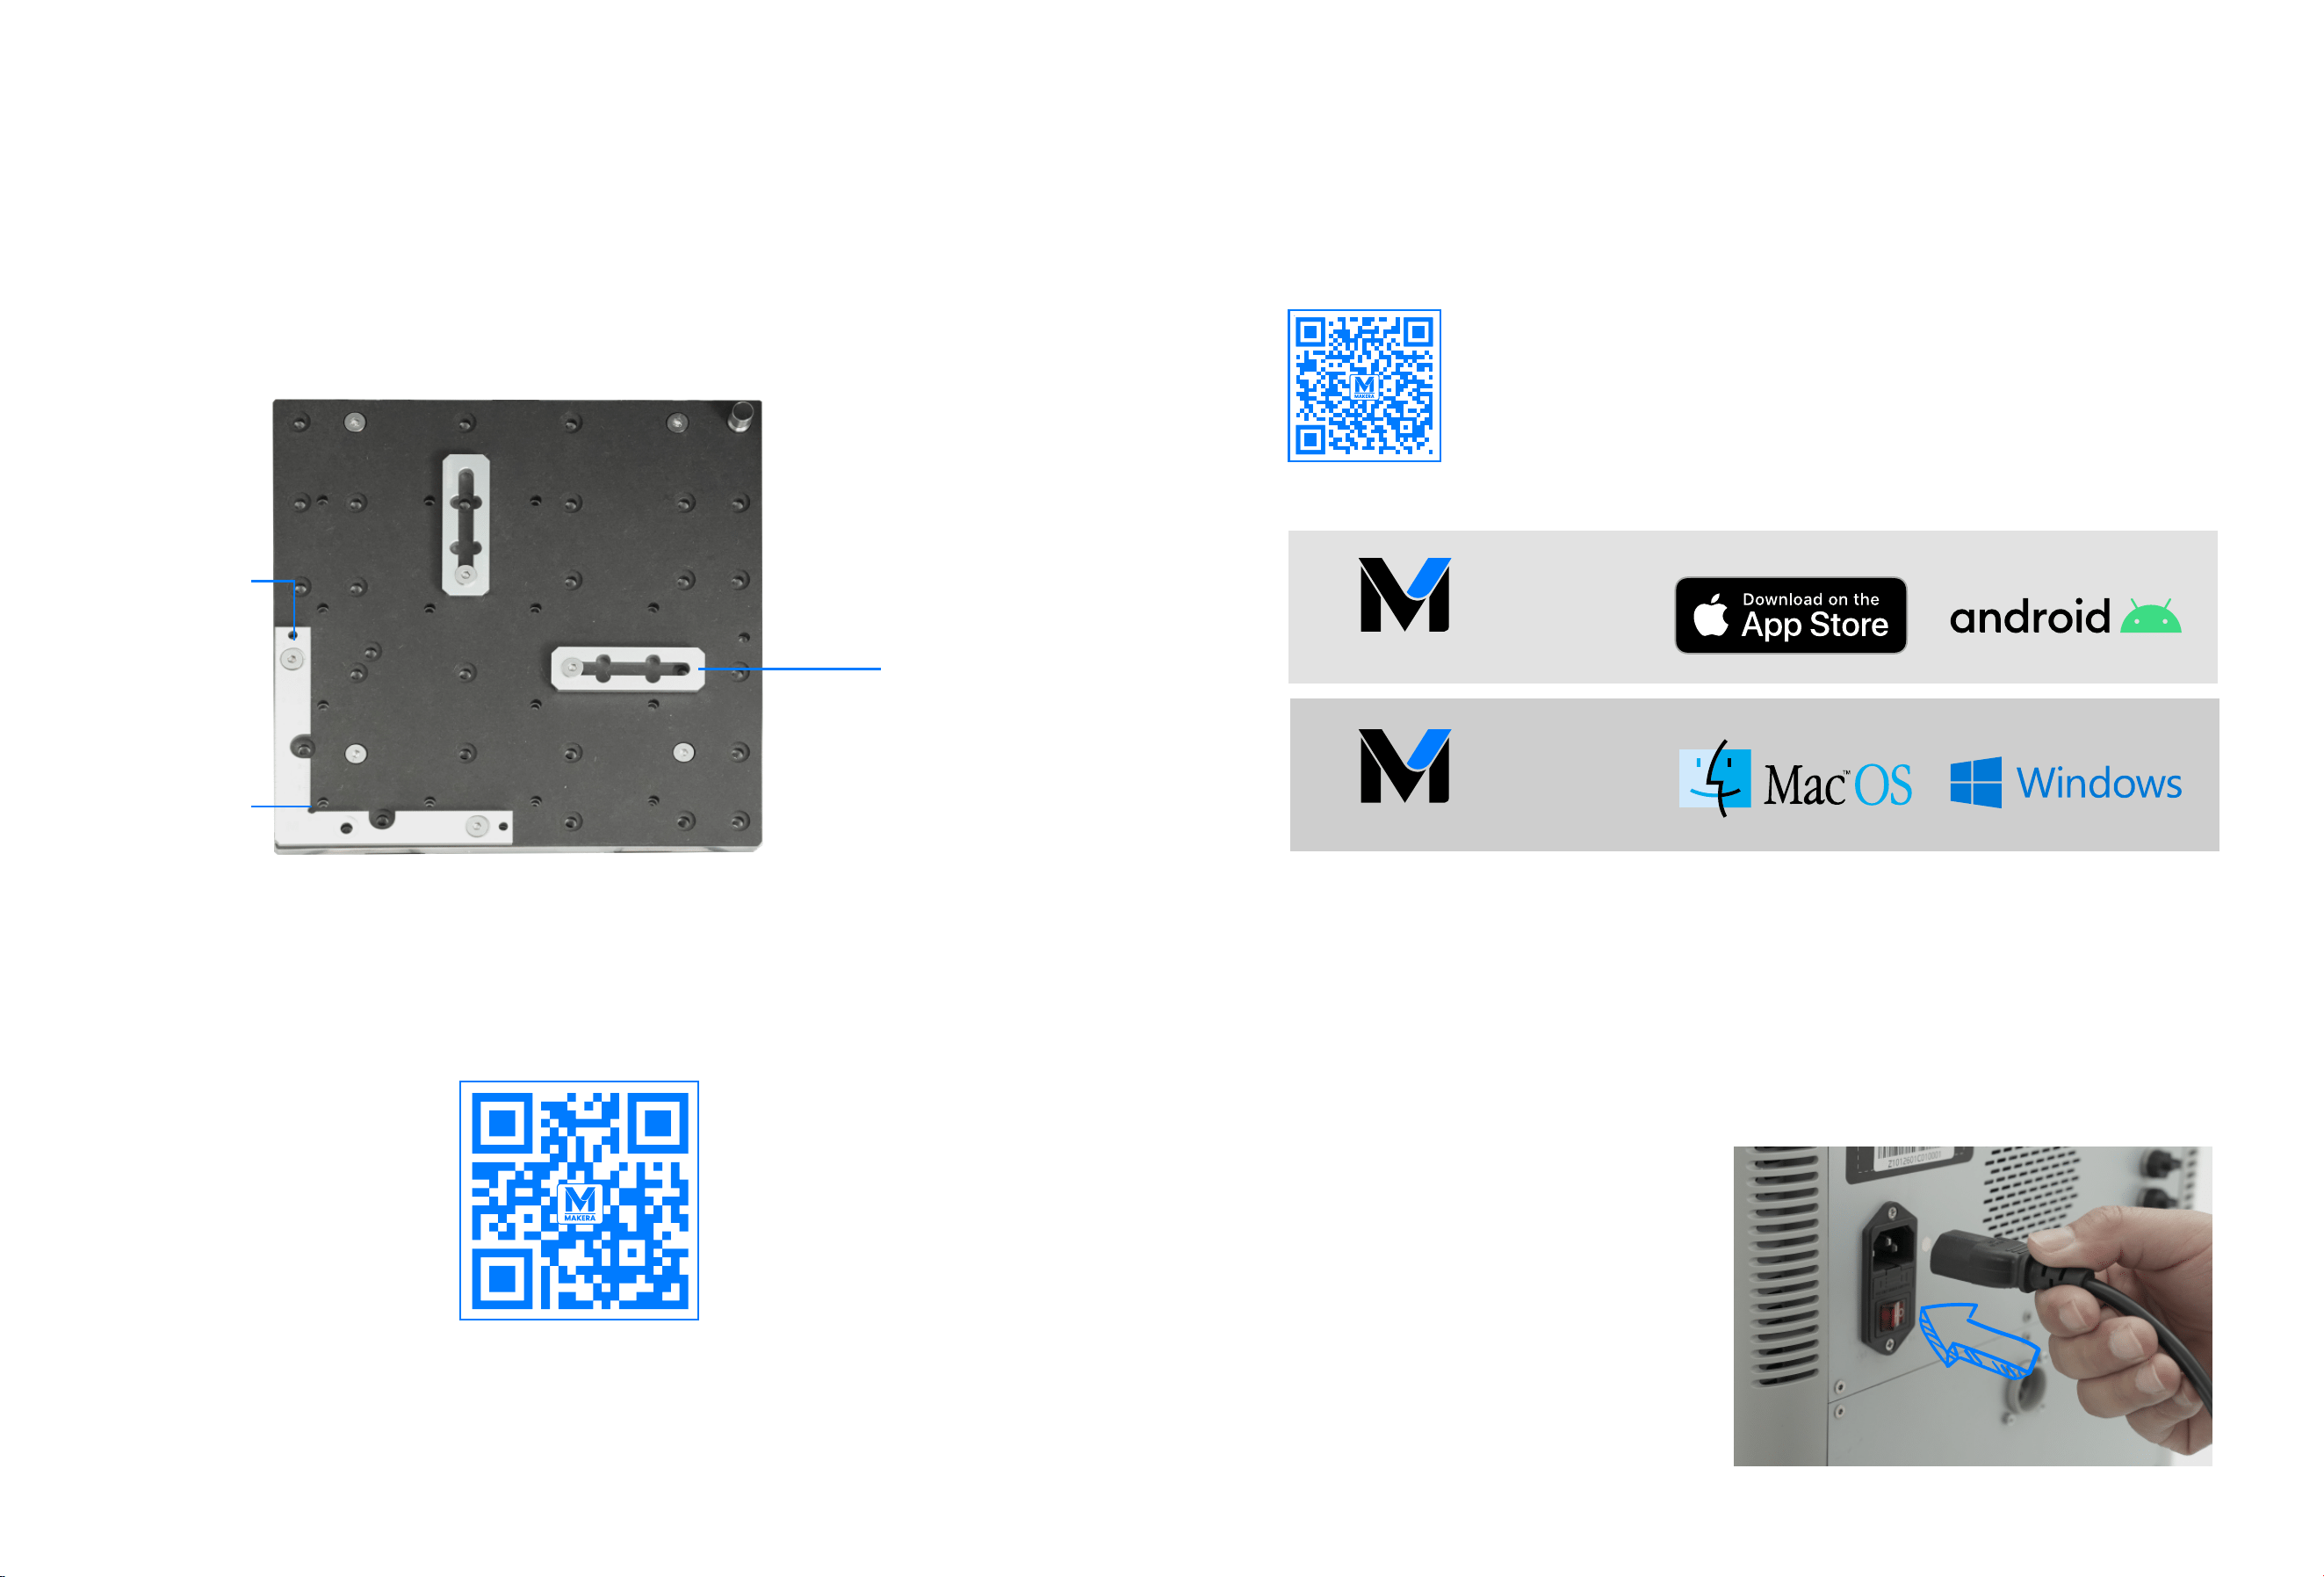
5.3 Workholding Tools
Install and secure the L-Bracket using two dowel pins and three M5×20
screws. The default position serves as the anchor point for X/Y alignment.
Threaded holes on the inner side allow clamping with Top Clamps.
⎷䤭睟≢⾼⎅棱⢺睠沂.睢睟睝宭≕⾫岶㊓⬢⾼-⮳歎ゑѶ犾徘⎅卮≲椋䓂瑅⏷⋆
9:捣⾼⎅Ѷ▼⏟㉅宭劸⽶瑅⠝放⠶≂➺㮓⬢⾼㈅⌮Ѷ
Anchor 1
L-Bracket
Top Clamp
6. Setting Up the Machine
㭎珪徲卮
6.1 Install Software
5.4 More
Scan the QR code to view a more detailed accessory guide.
㚇㟧⋄勳䰅㯹䬐㬊忚勅䪉放⌮⎷䤭㜟➈Ѷ
Plug in the power cable and turn on the switch. Makera Z1瑁Makera Z1Pro瑂 will home all axes
automatically, and the illumination light will stay blue (idle).
㟪≂䤺䊝劾㊓㙯㌝䤺䊝㌝▫Ѷ.BLFSB;睞瑁.BLFSB;睞1SP瑂〨嗦⛜⬇櫥㙜㬞捣瑅㜟䴼䑸␕㜙壖噮瑁乻槢䚾㐝瑂Ѷ
6.2 Power On
9 10

6.3 WiFi Configuration
You can configure the network for ˀ˔˞˘˥˔ˍʤʛˍʤʙˍʤ˃˥ˢʜ using the
Makera APP (connected to the machine’s AP) or Makera Studio
(connected to the machine’s AP or via USB). Add the device in the
software and follow the setup wizard to complete the WiFi
configuration. Visit wiki.makera.com for the detailed software user
guide.
㓄⠝⎷䤭.BLFSB"11瑁描㞽㭎珪"1瑂㘲.BLFSB4UVEJP瑁描㞽㭎珪"1㘲搋掸
64#㬞劾描㞽瑂≲.BLFSB;;;1SP放卐Ѷ⭐捞⌮≥眎⛔徲㊓㜡⠿〞⾮
㘬卐勛徲卮Ѷ⚁㎝XJLJNBLFSBDPN㯹䬐捞⌮忚勅㣥⎔㜟➈Ѷ
For more detailed instructions, please visit our official Wiki and select Makera Z1ʛˍʤʙˍʤ˃˥ˢʜ
㬊忚勅㣥⎔忨㨥瑅快徳槞㘭⌤䪉⾺㧐8JLJ㊓揺㜁.BLFSB;睞瑁;;1SP瑂Ѷ
wiki.makera.com
The latest this guide is available on our website. If you encounter any issues, feel free to contact us.
㬕㧇䪉㭀㜟➈⠝⭐⾺卐垳⠅Ѷⶤ⭐⎷䤭掸丌≥搸♤⌳⎍槞沃瑅㼳掿橾㨍呓僺㘭⌤Ѷ
www.makera.com/support
7. Your First Job
涁㼲⛔㈅
Your ˀ˔˞˘˥˔ˍʤʛˍʤʙˍʤ˃˥ˢʜ is ready—time for your first job!
Scan the QR code below or visit makerables.com/OfficialTutorials to choose an official tutorial project.
Follow the specified tools, materials, workholding method, and machine settings (all required tools
and materials are included with your machine).
Happy Milling!
㓄䪉.BLFSB;;;1SP㈒◼こ勩瑅㌝ⷭ涁㼲⛔㈅⡕睗
㚇㟧≃㧐⋄勳䰅㘲徳槞NBLFSBCMFTDPN0珴DJBM5VUPSJBMT瑅揺㜁⧉㼳䪉⾺㧐㥱丌汤䫳瑅㊓㜡忨㨥≥䪉☵盷ѵ㭤㦰ѵ岶
ⵜ㧐㌬⢺⟱㦇揌尽⛔㈅瑁㙜櫯☵盷⢺㭤㦰⭯㈒橾㭎珪樴慑瑂Ѷ
8. Next Steps
≃∸㽶
11 12