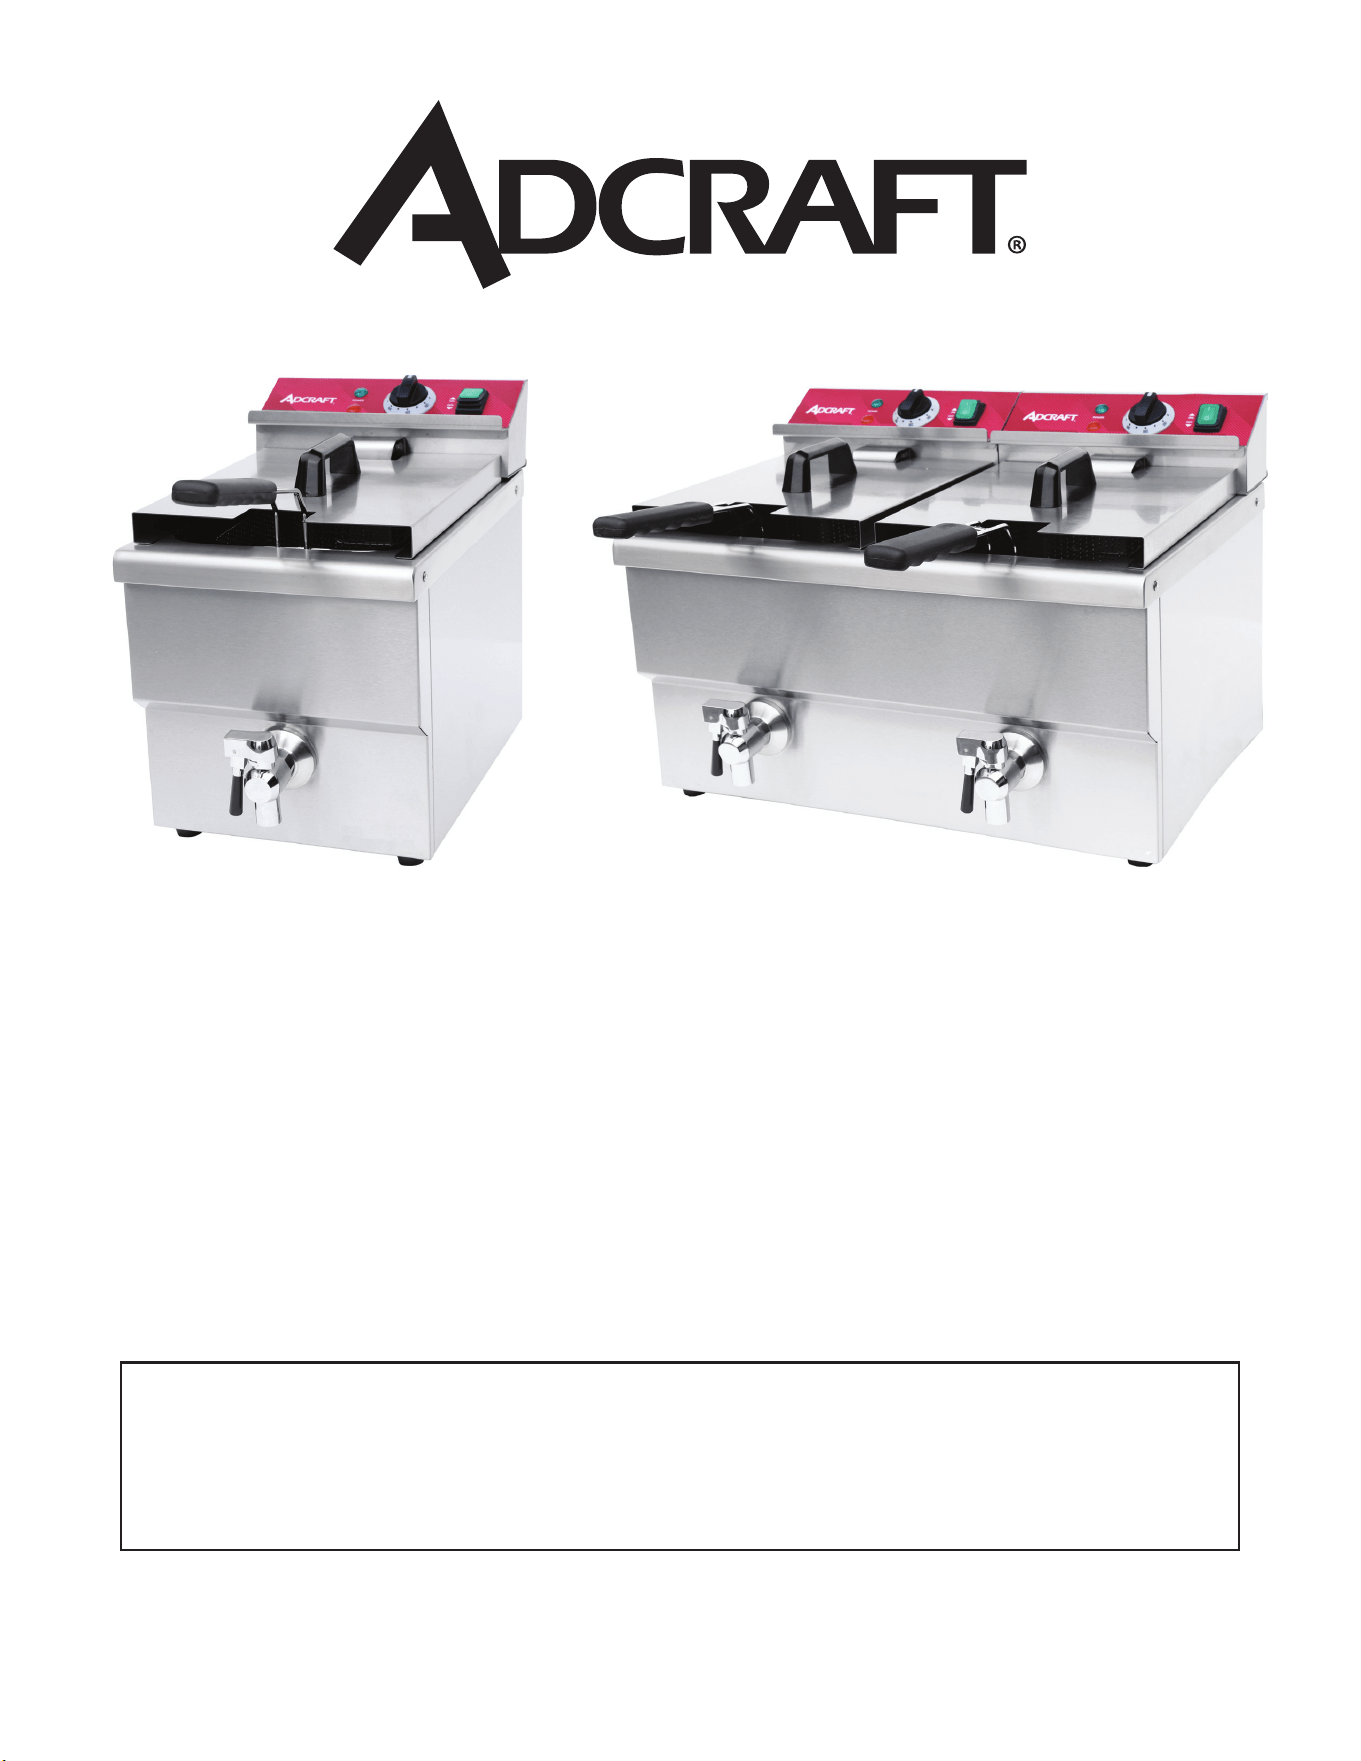
Electric Deep Fryers with Faucet
Instruction Manual
This manual contains important information regarding your Adcraft unit.
Please read this manual thoroughly prior to equipment set-up, operation, and
maintenance. Failure to comply with regular maintenance guidelines outlined in
this manual may void the warranty.
DF12LS
Single 8L Tank Deep Fryer
with Faucet
DF12L2S
Double 8L Tank Deep Fryer
with Faucet
®Admiral Craft Equipment Corporation © 2024 | All Rights Reserved.
3355 Enterprise Avenue - Suite 160 - Ft. Lauderdale, FL 33331 | Tel: 1.877.672.7740 | www.admiralcraft.com

IMPORTANT SAFEGUARDS
DF12LS model supplied with one power supply cord, DF12L2S model supplied with two separate power
supply cords, please plug in two power supply cords for model DF12L2S when operating and must unplug
two power supply cords for model DF12L2S during movement, testing, or repair of the product.
• Do not touch any hot surfaces
• Do not immerse unit, cord or plug in liquid at any time
• It is recommended that the fryer not be moved when it contains hot oil or any other hot liquid
• Do not use this unit for anything other than intended use
• Do not use outdoors
• Always cook on a rm, dry and level surface
• High temperature will cause scalding. Do not stand over fryer when operating and do not touch
any part of machine while in operation, other than handle of basket and power controls
• Do not use unit with a damaged cord or plug, in the event the appliance malfunctions, or has been
damaged in any manner
• Keep children and animals away from fryer
• Any incorrect installation, alterations, adjustments, and/or improper maintenance can lead to
property loss and injury. All repairs should be done by authorized professionals only.
• Keep all ammable and combustible materials away from this unit
• This machine must be placed on a level surface
• Volume of food should be limited to avoid overowing
• Foods that do not absorb oil easily should be limited to avoid overow
• Use caution when placing large foods in fryer
• When transporting the unit, the machine should be handled carefully, and held by the side
handles.
FEATURES
1. These fryers are available in 2 different models. One is a 1-tank fryer (DF12LS); another is a 2-tank
fryer (DF12L2S). The 2-tank fryer is able fry two different kinds of foods at the same time.
2. The oil temperature is regulated by the temperature regulator and includes a yellow (hot light)
which cycles on and off to indicate when the desired temperature has been reached.
3. The automatic shut off feature cuts power to the unit when the oil has reached 446°F / 230°C (the
maximum allowable temperature).
4. There is an automatic micro-switch on the bottom of the unit head. This will cut power to the unit if
the head has been separated from the base of the unit without the power switch turned off or the
power cord unplugged.
5. The stainless steel tank has a convenient spot for draining oil easily.
6. The heating coils are protected by a stainless steel panel base at the bottom of the unit.
2 Electric Deep Fryers with Faucet

TO USE
For model DF12L2S, individual branch circuits are to be employed to supply the product.
1. Make sure the power supply you are using is adequate for continual fryer use and voltage is
adequate. The use of a surge protector or circuit breaker is advisable.
2. Make sure that the temperature regulator knob is set to the off position.
3. Remove basket from the machine.
4. Fill oil receptacle with vegetable oil somewhere between the minimum and maximum levels,
allowing room for food volume.
5. Plug the machine in.
Note: DF12LS model supplied with one power supply cord, DF12L2S model supplier with two
separate power supply cords, please plug in two power supply cords for model DF12L2S
when operating.
6. A green “Power Light” will come on. Rotate the temperature regulator knob clockwise to the
desired temperature. When the desired temperature has been reached, the yellow “Hot Light” will
turn off and cycle, and the temperature controller will maintain the temperature automatically.
7. Load food into basket, and carefully place loaded basket into machine to avoid splash.
8. Gently shake off excess oil from food when removing from tank after frying.
9. The enclosed frying basket is intended to hold small foods such as French fries and onion rings.
Large food can be placed directly into the basket or oil tank.
CLEANING – NOTE:
• After fryer usage, turn power controller counterclockwise to the “OFF” position and remove plug
from power supply.
• Please note DF12LS model supplied with one power supply cord, DF12L2S model supplier with
two separate power supply cords, please unplug two power supply cords for model DF12L2S when
cleaning.
• Wait for oil to fully cool down before removing tank from outer case.
The procedure is as follows:
1. Carefully remove unit head from box and place in a safe dry place.
2. Lift out the tank and carefully dispose of oil
3. Gently wash oil tank with soap and water. Dry completely and place back on machine
• For best results, cover the fryer when oil is cool and not in use. This will keep unwanted debris from
falling into the oil.
• For best results, always use fresh vegetable oil with each use. It is recommended that you inspect
the unit before each use to check that the power cord is not frayed or damaged in any way.
3Instruction Manual
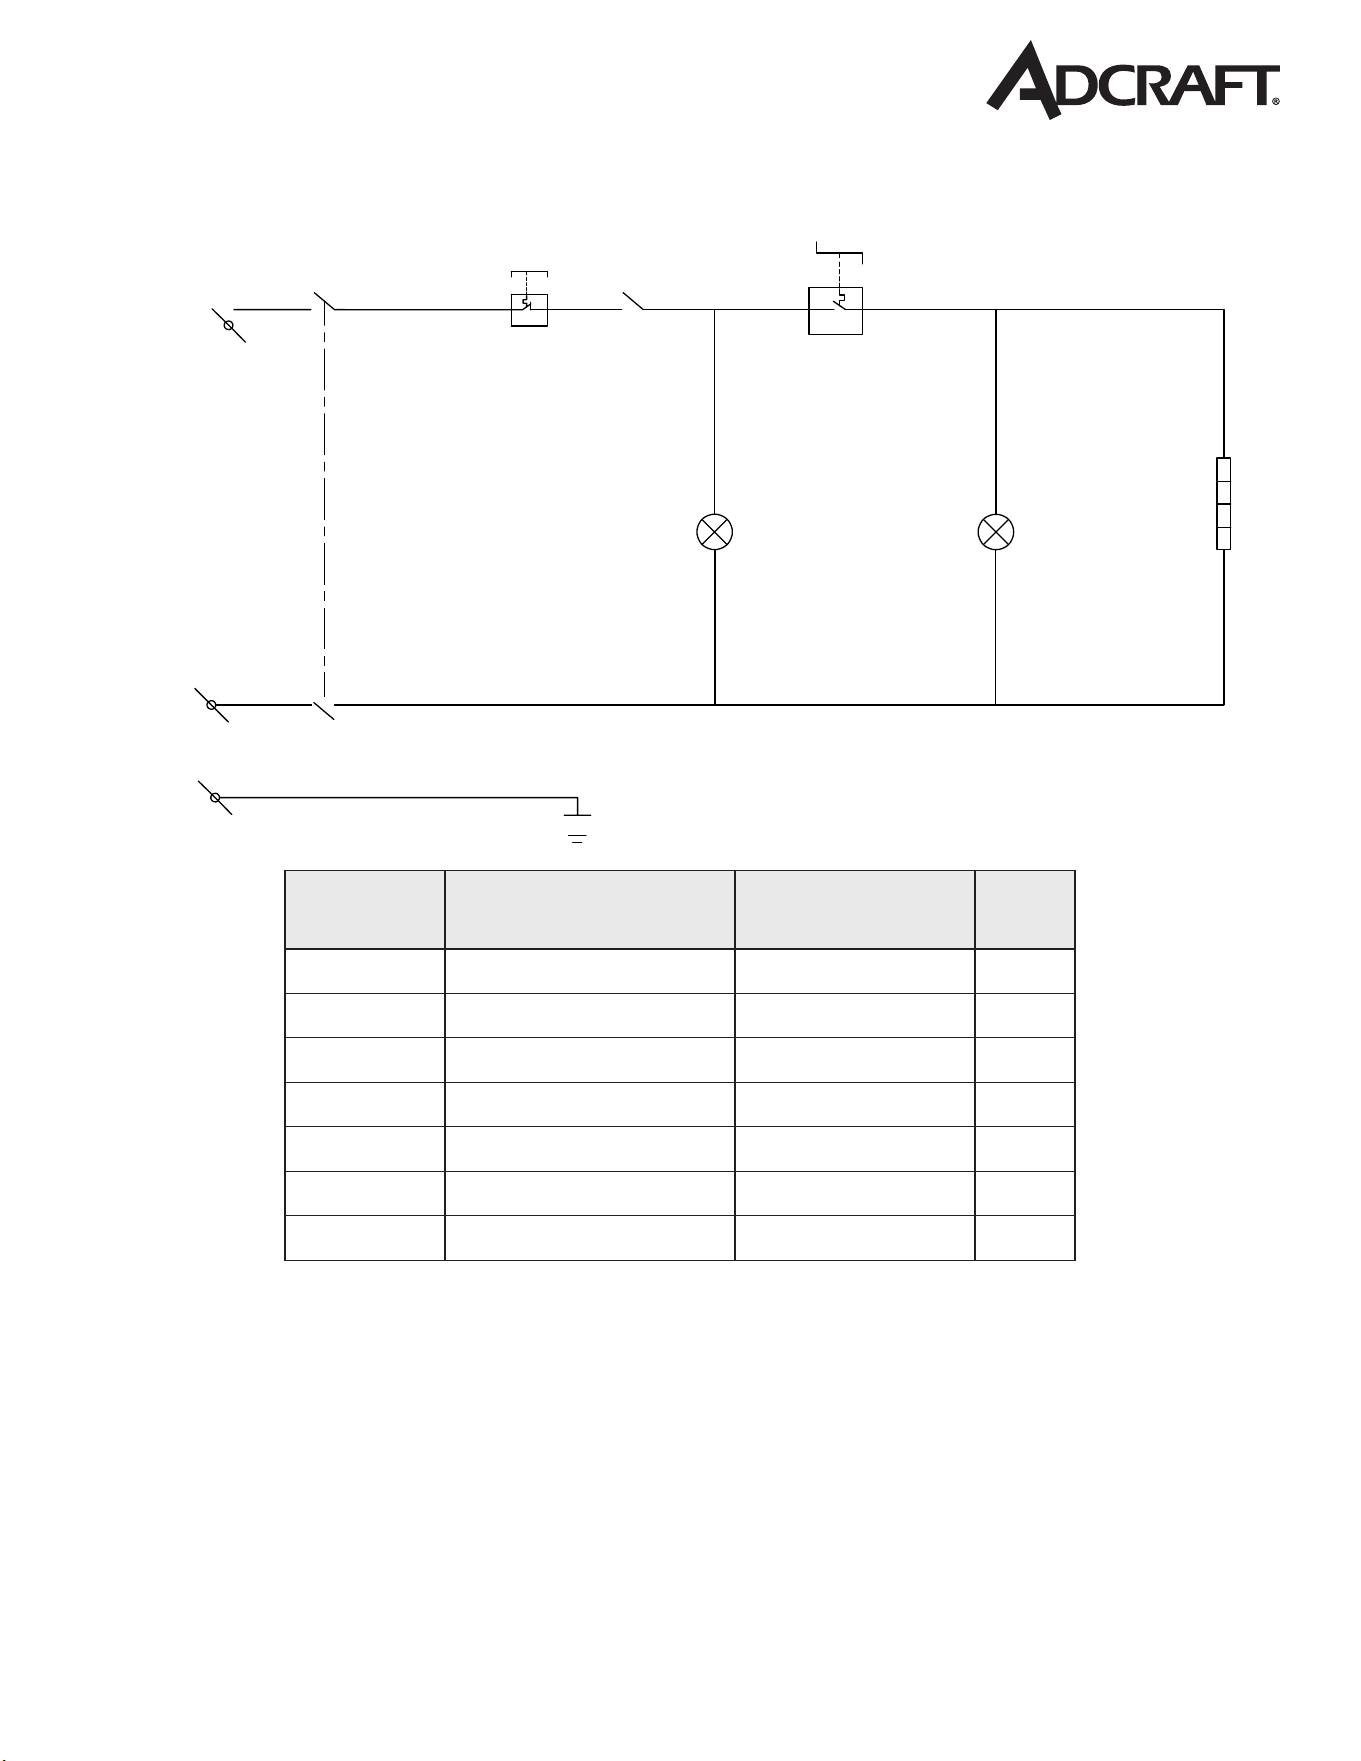
CIRCUIT DIAGRAM
ST
QS
HL1 HL2
EH
S1
S2
L
E
L
240V 60Hz
SYMBOL PART DESCRIPTION
MODEL &
SPECIFICATION
QTY
ST Thermostat 1
HL1 Power Indicator 1
EH Heating Element 1
QS High-Limit 446°F / 230°C 1
HL2 Heating Indicator 1
S1 Power Switch 1
S2 Micro Switch 1
Note: the circuits of the two fryers are identical. The difference is that the two-tank fryer has two separate
electrical unit boxes and receptacles.
4 Electric Deep Fryers with Faucet
TROUBLESHOOTING
Troubles listed are for reference. If any fault occurs, please discontinue use. Do not attempt to repair
yourself. This will void the warranty.
PROBLEM CAUSE SOLUTION
Not working as
well as expected
Unit is not on a
dedicated circuit
Unplug unit, plug into a dedicated line and retry
Basket is overloaded Too much product will bring down the temperature
of the oil bringing it to a boil rather than a frying
temperature. Use less product.
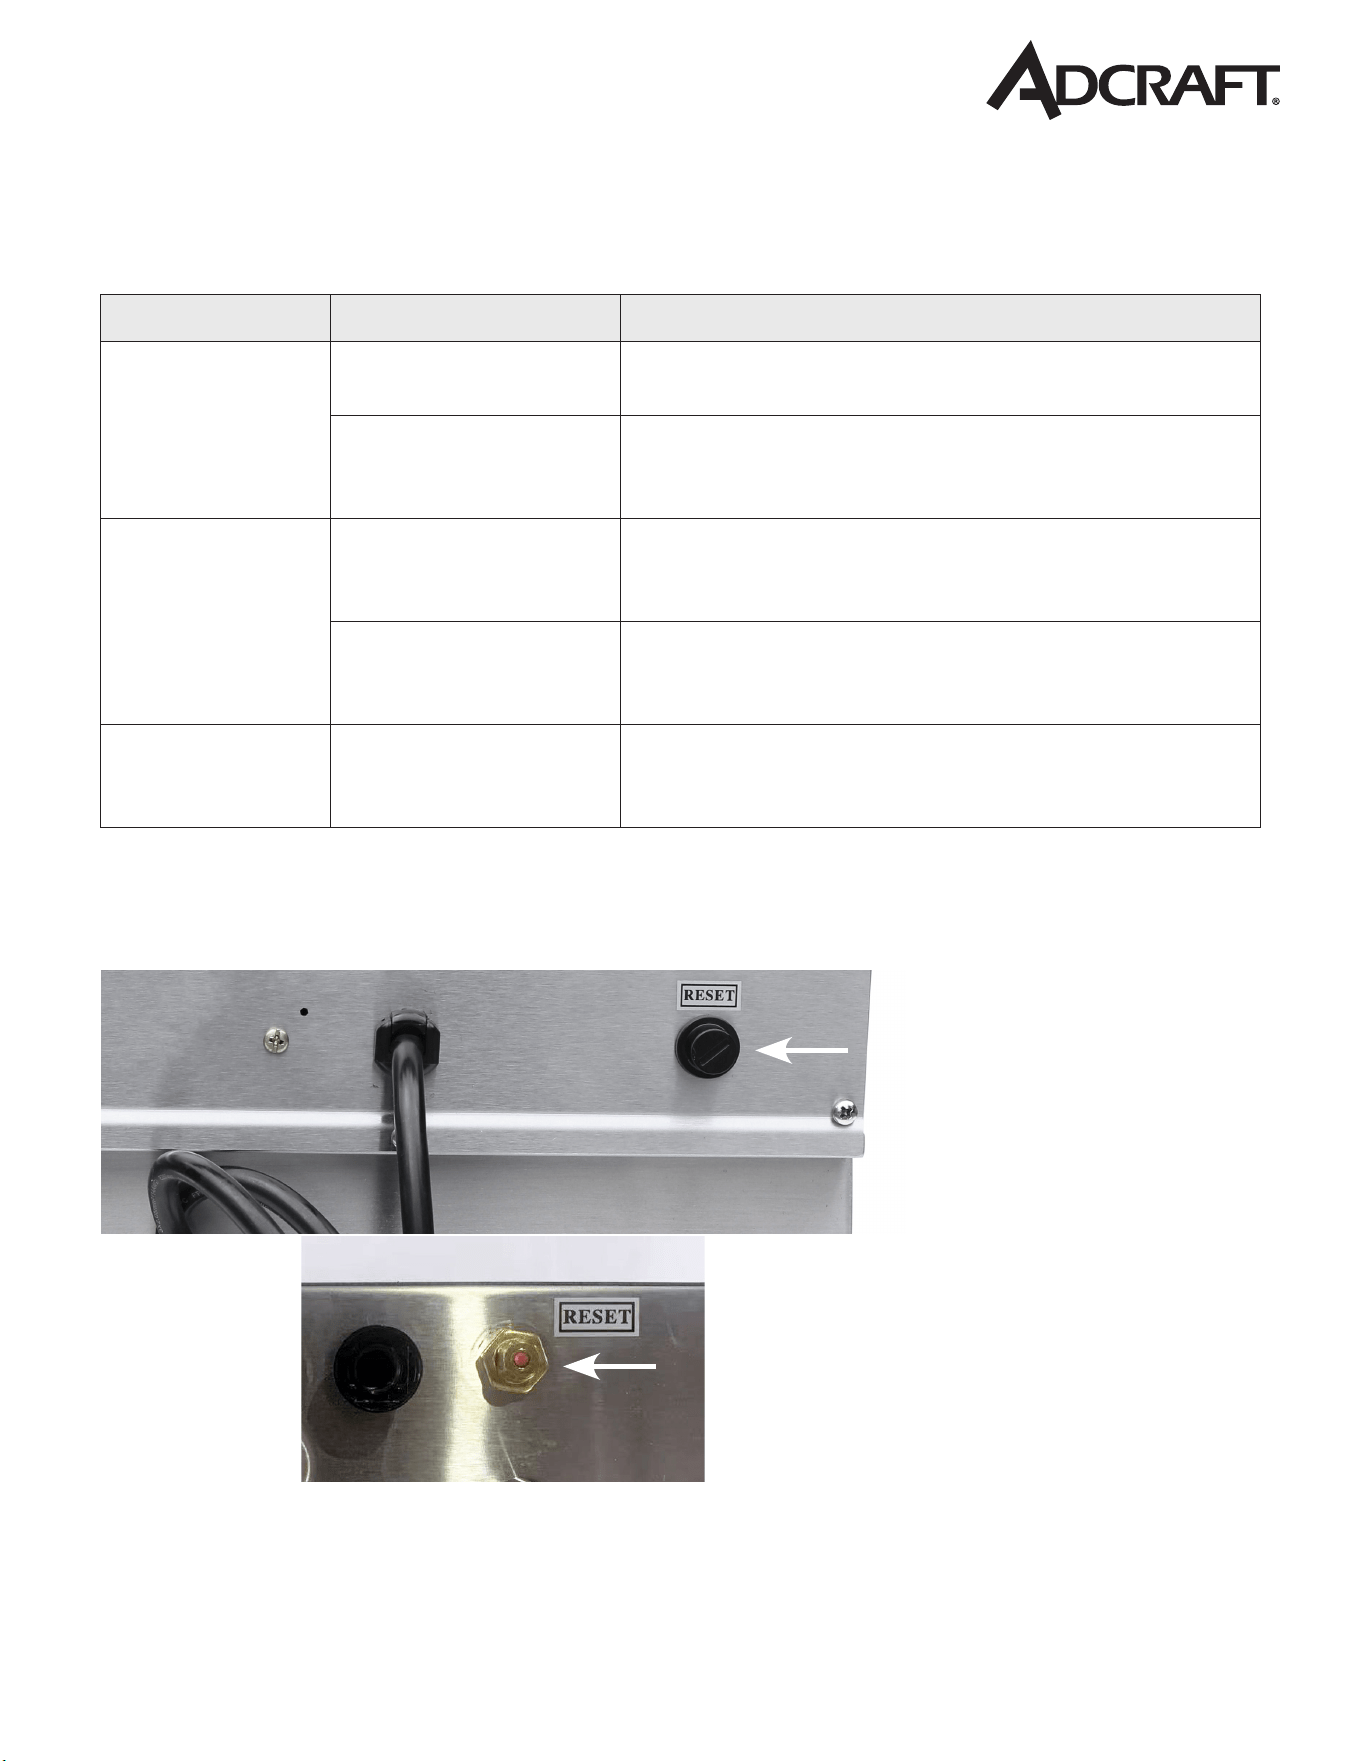
Stopped working Reset button was
tripped
There is a reset button located on the back of the head.
Unscrew the cap and push the button to reset. (Be sure
to replace black cap)
Micro/safety switch is
not making contact
Make sure that the unit is on a level surface and that
switch is sitting ush making contact with the metal on
the back of the body
Indicator light
won’t turn on and
unit will not heat
Plug not properly
inserted into outlet
Reinsert the plug
TO RESET
Located on the bottom of the fryer head, it will read “Reset”
With the unit
unplugged and fully
cooled off, unscrew
the knob to expose
red button
Press red button in
to reset
5Instruction Manual
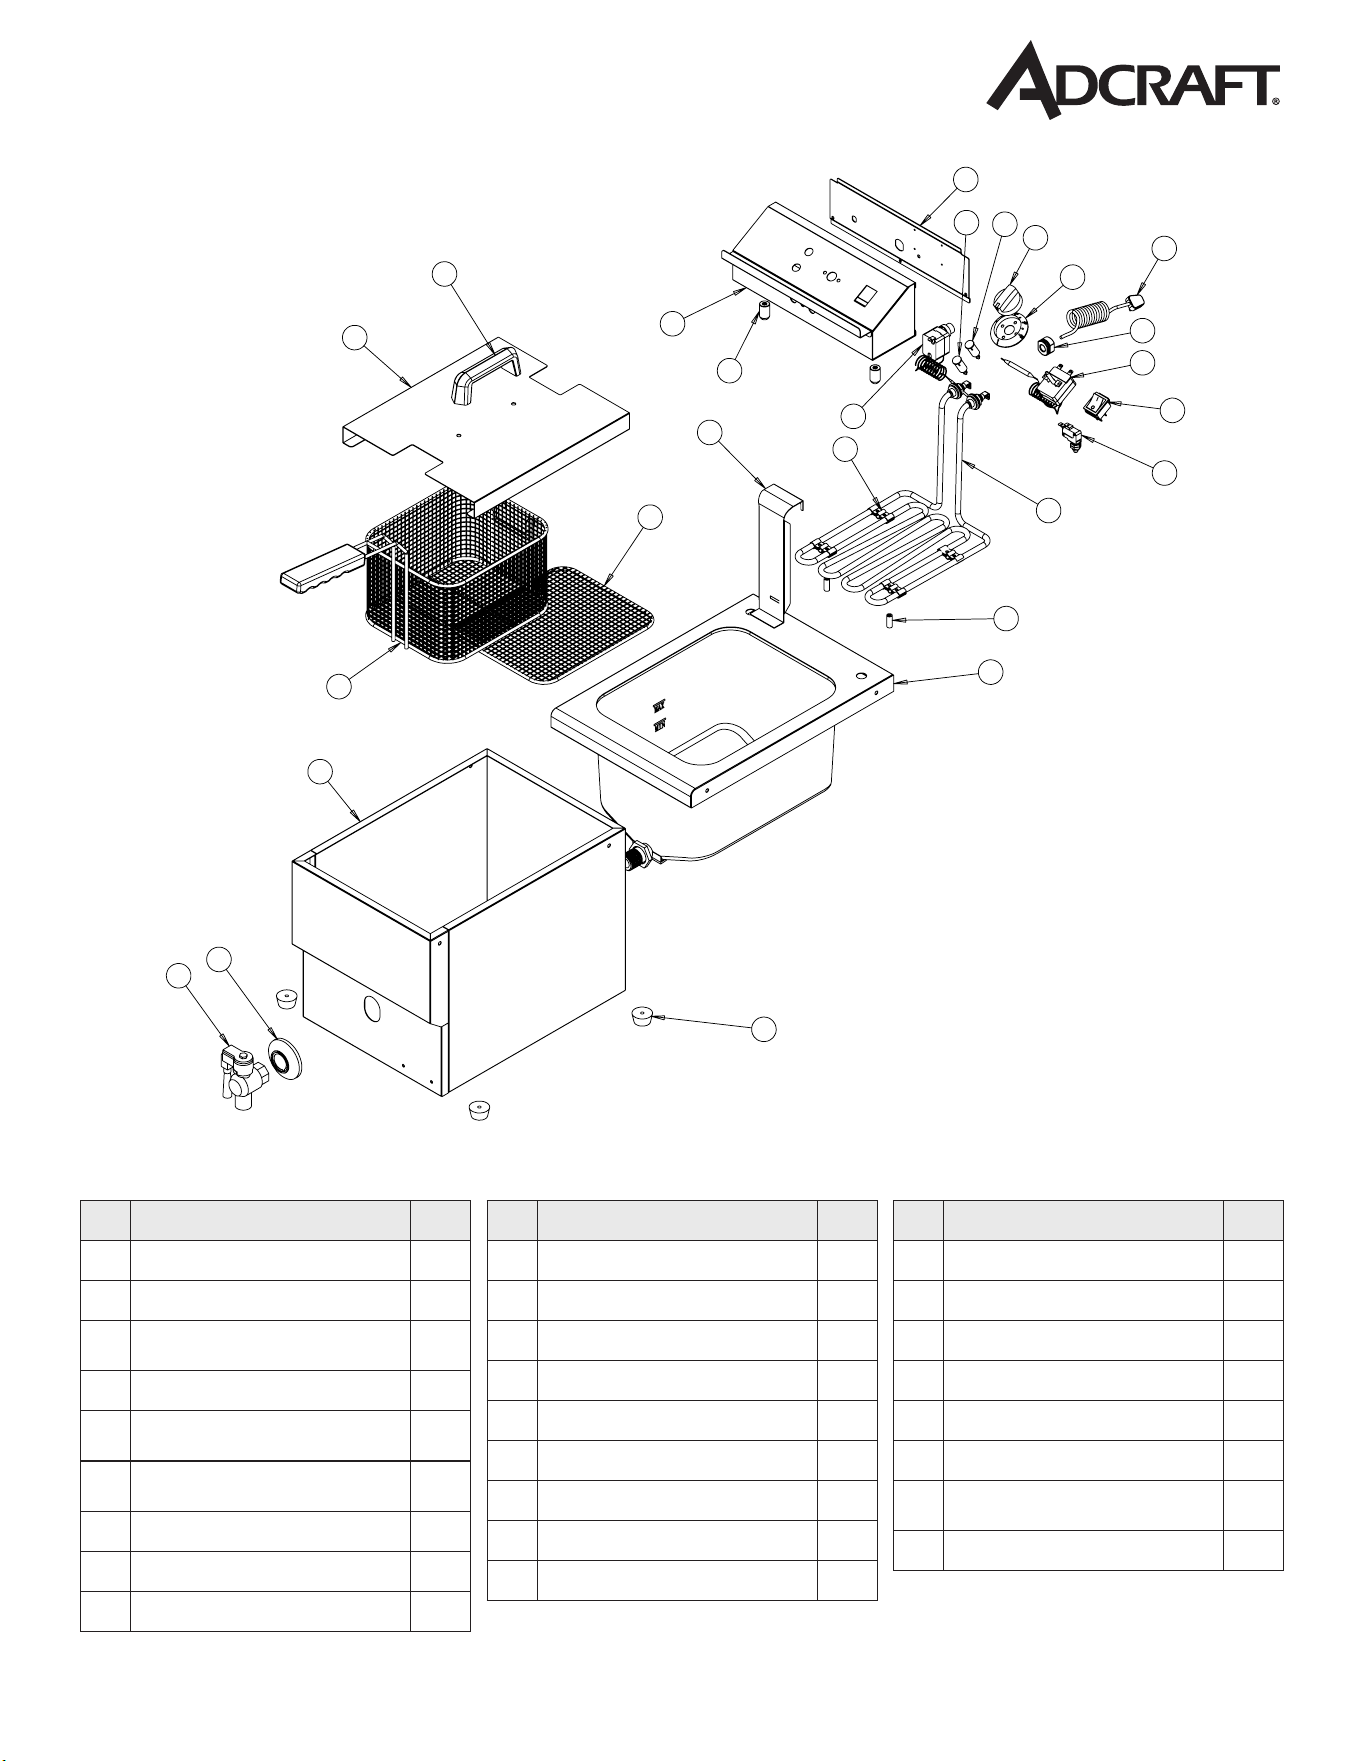
DF12LS EXPLODED DRAWING
1
2
3
4
5
6
7
8
9
10
11
12
13
14
15
16
17
18
19
20
21
22
23
24
25
26
DF12LS PART LIST
NO. DESCRIPTION QTY.
1 Electrical Box Assembly 1
2 Shell assembly 1
3
Rear cover board of
Electrical Box
1
4 Oil Tank Cover 1
5
Heating element protective
plate
1
6
Heating element probe xing
clamp
8
7 Heating element 1
8 Oil tank 1
9 Rack 1
NO. DESCRIPTION QTY.
10 Basket 1
11 Handle 1
12 EGO thermostat 374°F / 190°C 1
13 High Limit 446°F / 230°C 1
14 Knob Base (Fahrenheit 0-370) 1
15 Knob 1
16 Micro Switch 1
17 Green Switch 1
18 US Plug 1
NO. DESCRIPTION QTY.
19 Power cord buckle card 1
20 Green indicator 1
21 Yellow indicator 1
22 Drainage Valve 1
23 Decoration cover 1
24 Electrical box positioning pin 2
25
Heating Element supporting
post
2
26 Rubber feet 4
6 Electric Deep Fryers with Faucet
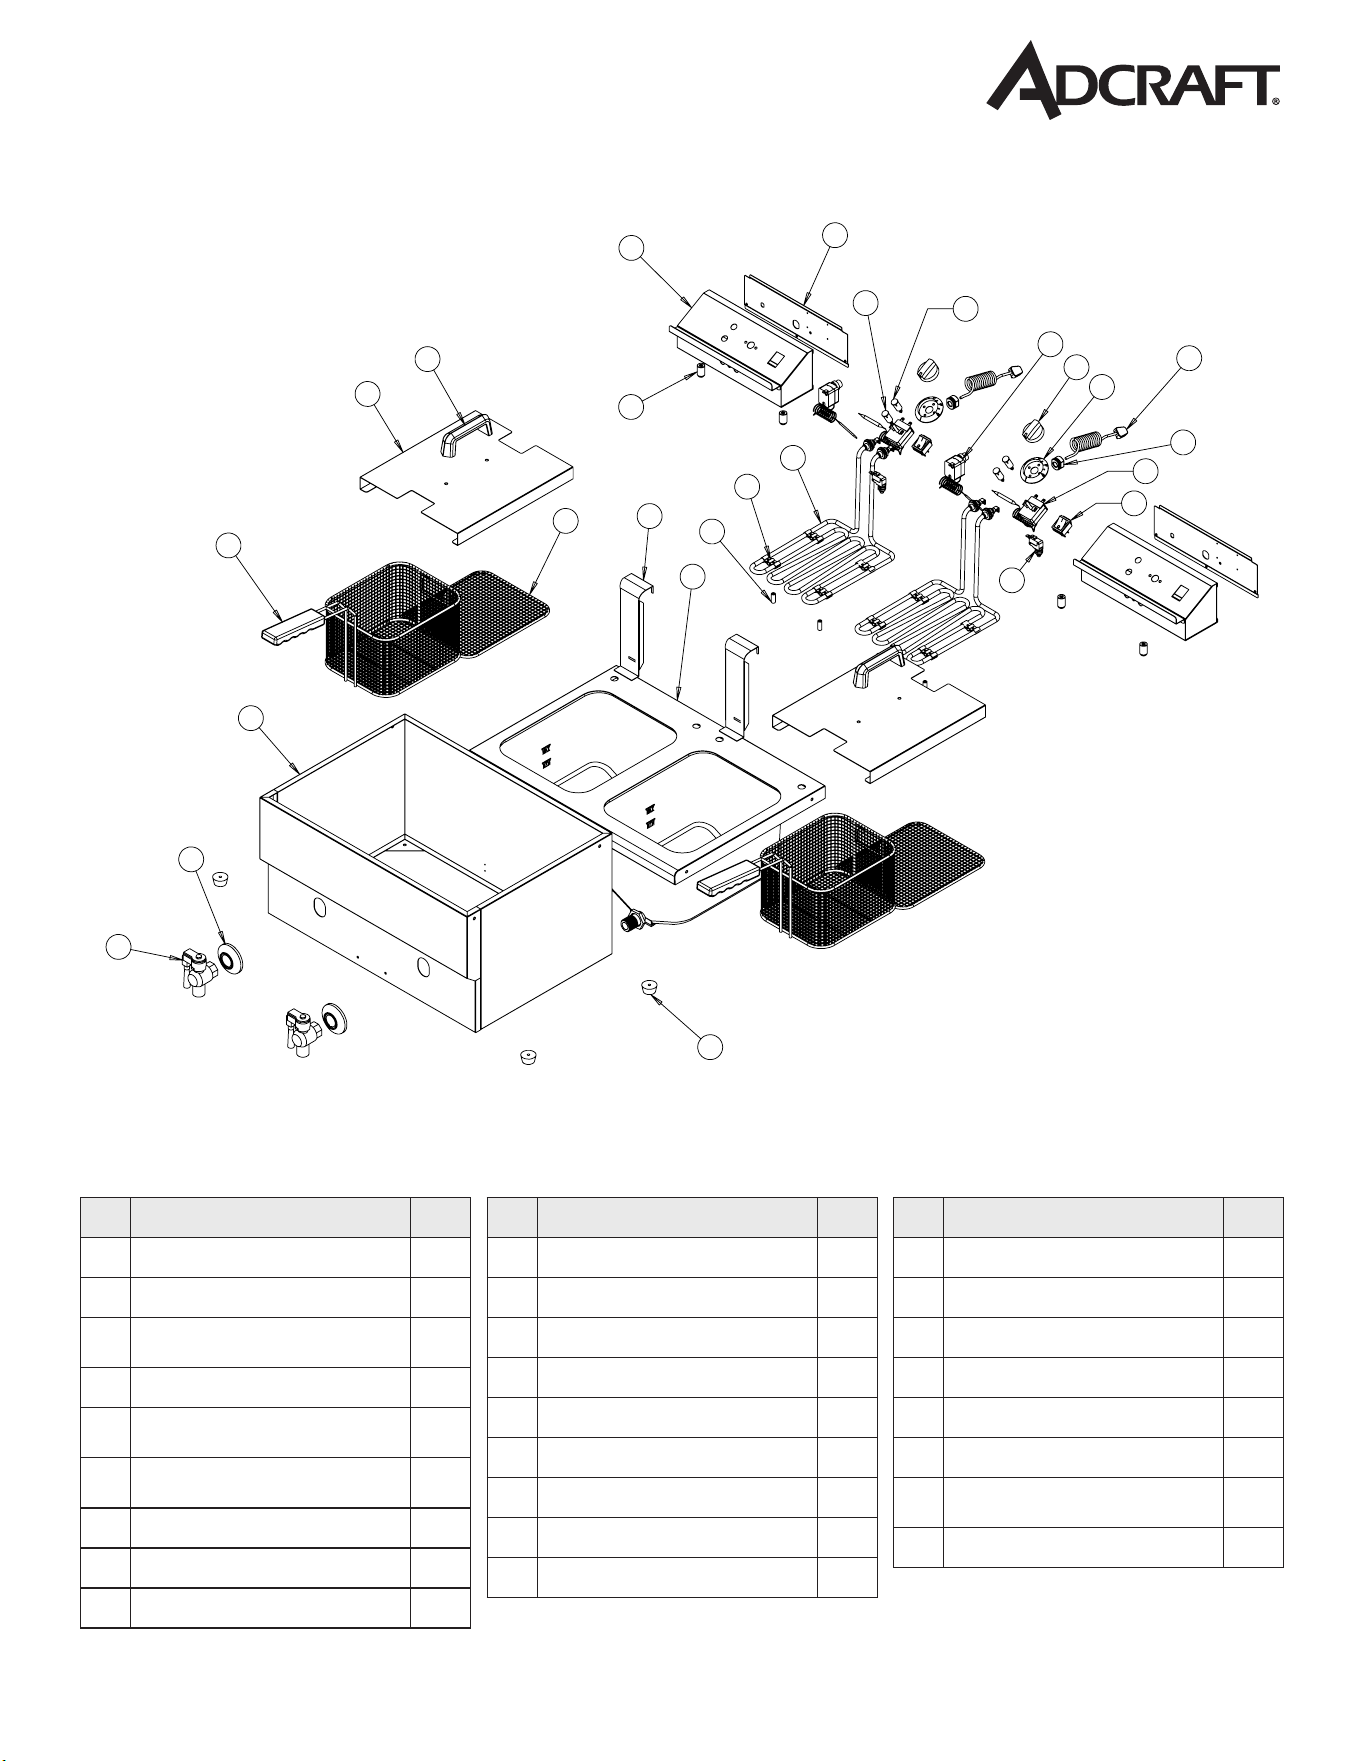
DF12L2S EXPLODED DRAWING
1
2
3
4
5
7
8
9
10
11
12
13
14
15
16
17
19
20
18
21
22
23
24
25
6
26
DF12L2S PART LIST
NO. DESCRIPTION QTY.
1 Electrical Box Assembly 2
2 Shell assembly 1
3
Rear cover board of Electrical
Box
2
4 Oil Tank Cover 2
5
Heating element protective
plate
2
6
Heating element probe xing
clamp
16
7 Heating element 2
8 Oil tank 1
9 Rack 2
NO. DESCRIPTION QTY.
10 Basket 2
11 Handle 2
12 EGO thermostat 374°F / 190°C 2
13 High Limit 446°F / 230°C 2
14 Knob Base (Fahrenheit 0-370) 2
15 Knob 2
16 Micro Switch 2
17 Green Switch 2
18 US Plug 2
NO. DESCRIPTION QTY.
19 Power cord buckle card 2
20 Green indicator 2
21 Yellow indicator 2
22 Drainage Valve 2
23 Decoration cover 2
24 Electrical box positioning pin 4
25
Heating Element supporting
post
4
26 Rubber feet 4
7Instruction Manual

1-YEAR LIMITED WARRANTY
Admiral Craft Equipment Corp. (the “Company”) warrants this product (the “Product”) will be free
from failures in material and workmanship for one (1) year from the date of original purchase with
proof of purchase, provided that the Product is operated and maintained in conformity with the
Owner’s Manual. This Limited Warranty is non-transferable. During this period, your exclusive remedy
is repair or replacement without charge of the Product or any component found to be defective at the
Company’s discretion. If the Product or any component is no longer available, the Company will replace
it with a similar one of equal or greater value. This Limited Warranty is void if the Product is used with
voltage other than 120 Volts. THIS WARRANTY IS IN LIEU OF ALL IMPLIED WARRANTIES,
INCLUDING WARRANTIES OF MERCHANTABILITY, FITNESS FOR A PARTICULAR
PURPOSE, PERFORMANCE, OR OTHERWISE, WHICH ARE HEREBY EXCLUDED. IN NO
EVENT SHALL THE COMPANY BE LIABLE FOR ANY DAMAGES, WHETHER DIRECT,
INDIRECT, INCIDENTAL, FORSEEABLE, CONSEQUENTIAL, OR SPECIAL ARISING OUT OF
OR IN CONNECTION WITH THIS PRODUCT INCLUDING DAMAGES ARISING FOR FOOD
OR BEVERAGE SPOILAGE CLAIMS.
You may have other legal rights depending upon where you live. Some States or Provinces do not allow
limitations on warranties so the foregoing may not apply to you.
WARRANTY EXCLUSIONS
IMPROPER ELECTRICAL CONNECTIONS:
The Company is not responsible for the repair or replacement of failed or damaged components resulting
from electrical power failure, the use of extension cords, low voltage, or voltage spikes to the Product.
IMPROPER USAGE:
This Limited Warranty does not cover failure or other damages to the Product resulting from (i) improper
usage or installation or failure to clean and/or maintain the Product as set forth in the Owner’s Manual; or
(ii) accident, misuse, abuse, negligence, or modication or alteration of the Product.
CONSUMABLES:
This Limited Warranty does not include consumables or wear-and-tear items such as legs, feet, plastic
component parts, splash shields, lters, gaskets, and non-stick cooking surfaces.
ADJUSTMENTS & CALIBRATIONS:
Leveling, tightening of fasteners, or utility connections normally associated with the original installation
are the responsibility of the dealer, installer, or the end user and not the responsibility of the Company and
will not be considered warranty issues.
If you think the Product has failed, or requires service, within its warranty period, please contact the
Company’s Customer Care Department through our website at: www.admiralcraft.com
“Service” --> “Technical Support Request”. A receipt proving the original purchase date will be required
for all warranty claims, handwritten receipts are not accepted. You may also be required to return the
Product for inspection and evaluation. Return shipping costs are not refundable. The Company is not
responsible for returns lost in transit.
This Limited Warranty is Valid only in the USA and Canada.
®Admiral Craft Equipment Corporation © 2024 | All Rights Reserved.
3355 Enterprise Avenue - Suite 160 - Ft. Lauderdale, FL 33331 | Tel: 1.877.672.7740 | www.admiralcraft.com
8
10.08.24