
10034492 10040031 10040088 10040089 10040090 10040092
Companion
Fahrradanhänger
Bicycle Trailer
Remorque de vélo
Remolque de bicicletas
Rimorchio da bici

3
DE
English 9
Français 15
Español 21
Italiano 27
Sehr geehrter Kunde,
wir gratulieren Ihnen zum Erwerb Ihres Gerätes. Lesen
Sie die folgenden Hinweise sorgfältig durch und befolgen
Sie diese, um möglichen Schäden vorzubeugen. Für
Schäden, die durch Missachtung der Hinweise und
unsachgemäßen Gebrauch entstehen, übernehmen wir
keine Haftung. Scannen Sie den folgenden QR-Code,
um Zugriff auf die aktuellste Bedienungsanleitung und
weitere Informationen rund um das Produkt zu erhalten.
INHALTSVERZEICHNIS
Sicherheitshinweise 4
Geräteübersicht 4
Lieferumfang 5
Zusammenbau 6
Befestigung am Rad 7
Wichtige Hinweise zur Befestigung und Benutzung 8
Hersteller & Importeur (UK) 8
TECHNISCHE DATEN
Artikelnummer 10034492, 10040031, 10040088,
10040089, 10040090, 10040092
Abmessungen (zusammengebaut) 127 x 62 x 40 cm
Abmessungen Anhänger 63 x 42 cm
Gewicht Anhänger 9.4 kg
Maximales Beladungsgewicht 40 kg
Maximaler Reifendruck 1.70 - 2.00 Bar (25 - 30 PSI)
Optionales Zubehör Zusätzlich zum mitgelieferten
Zubehör kann eine weitere passende
Tasche unter der Artikelnummer
10034495 erworben werden.
4
DE
SICHERHEITSHINWEISE
• Der Anhänger sollte nicht mit mehr als 40 kg beladen werden.
• Der Anhänger darf nicht benutzt werden, um Personen damit zu
befördern.
• FührenSiekeinetechnischenModikationenamGerätdurch.Dieskann
zu Gefahren im Straßenverkehr führen und die Herstellergarantie erlischt.
• Nutzen Sie den Anhänger nicht auf steinigem, unebenem Gelände und in
gefährlichen Verkehrssituationen.
• Das ziehende Fahrrad muss in einwandfreiem Zustand sein. Die Bremsen
sollten perfekt funktionieren. Mit Anhänger (und Beladung) verlängert
sich Ihr Bremsweg.
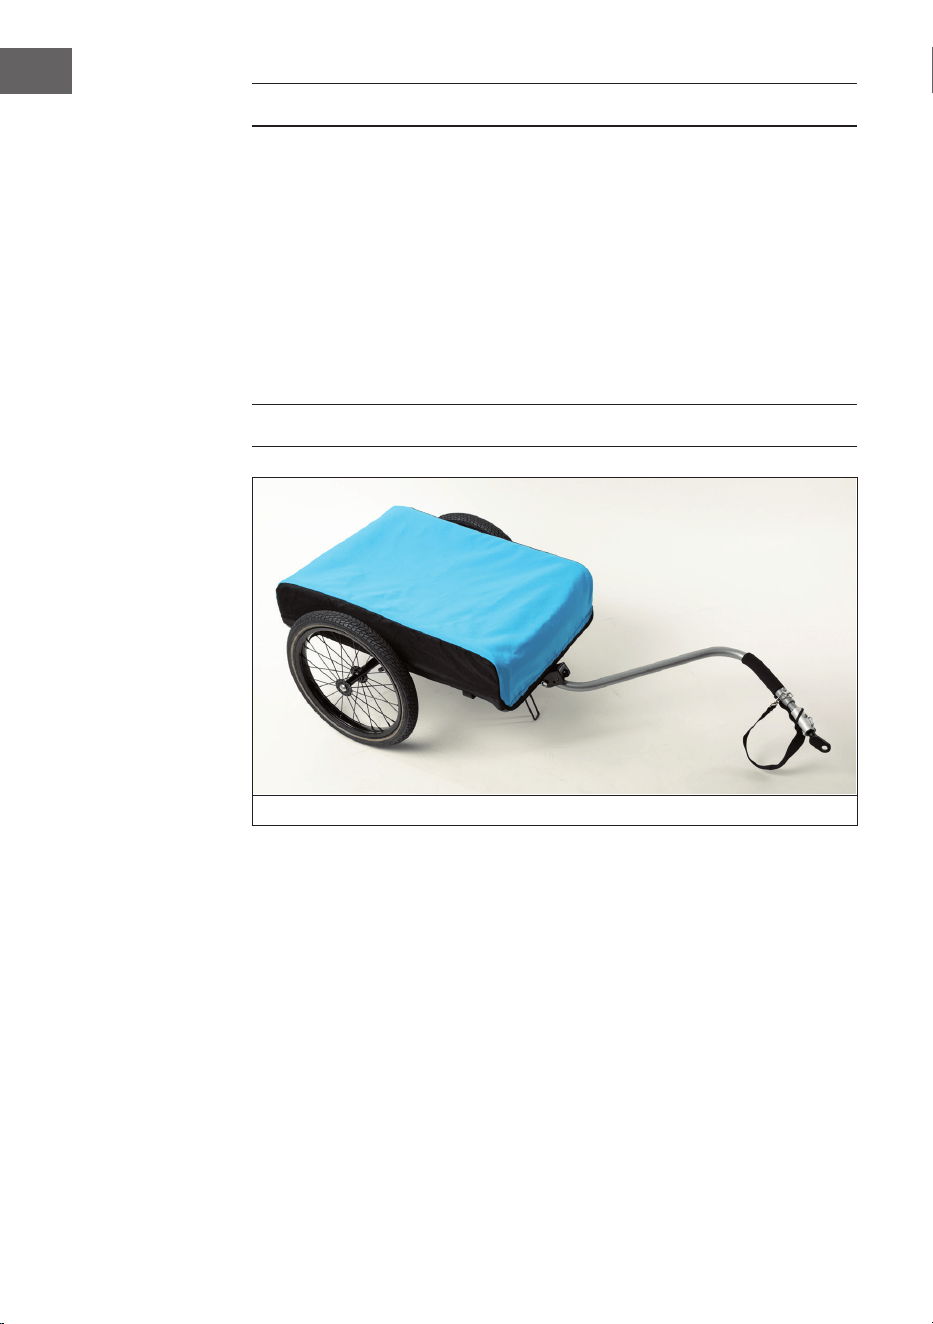
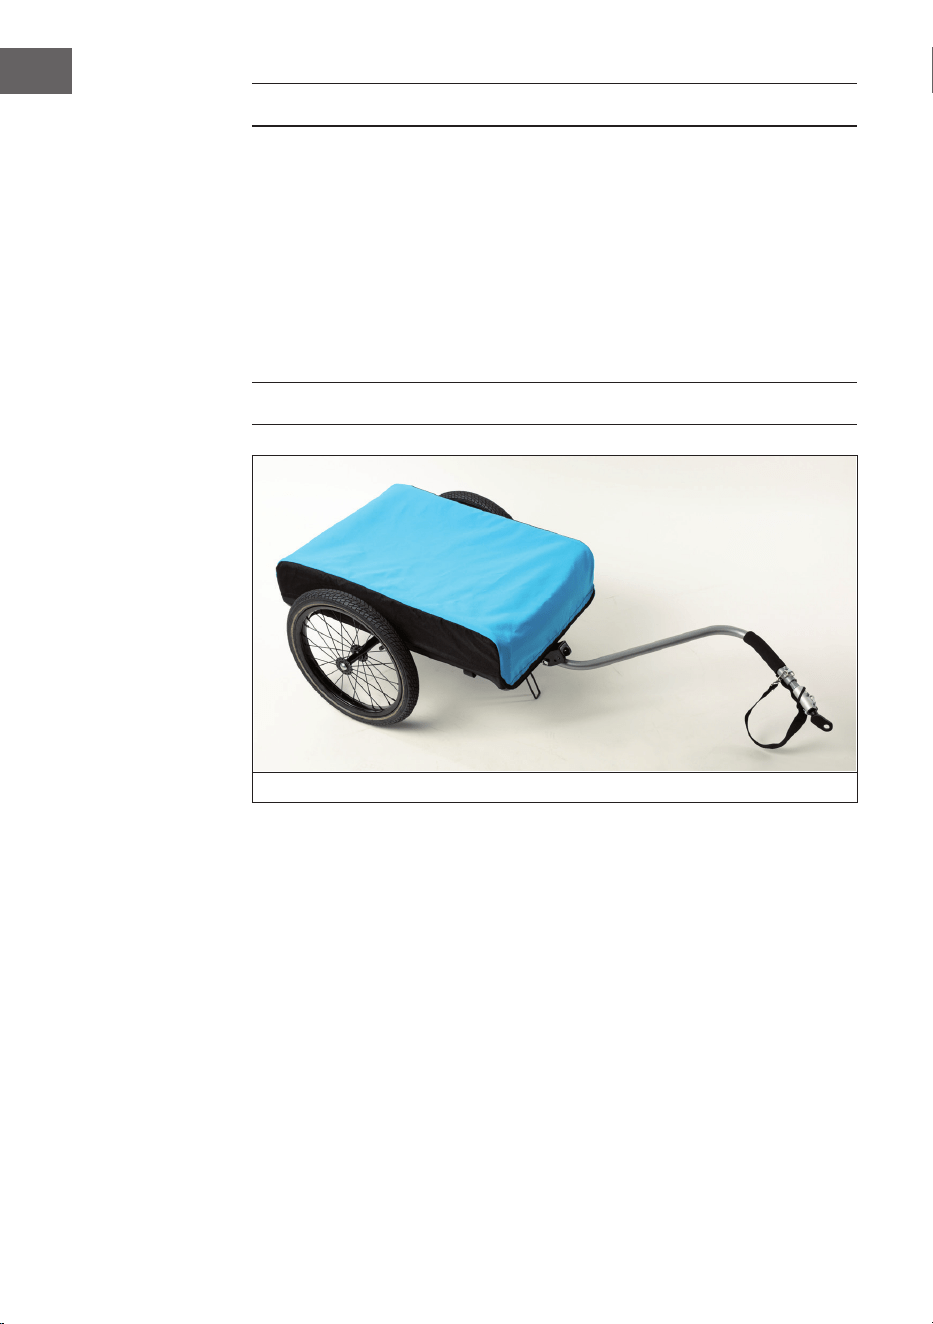
GERÄTEÜBERSICHT
Zusammengebauter Anhänger mit Einlage und Regenschutz

5
DE
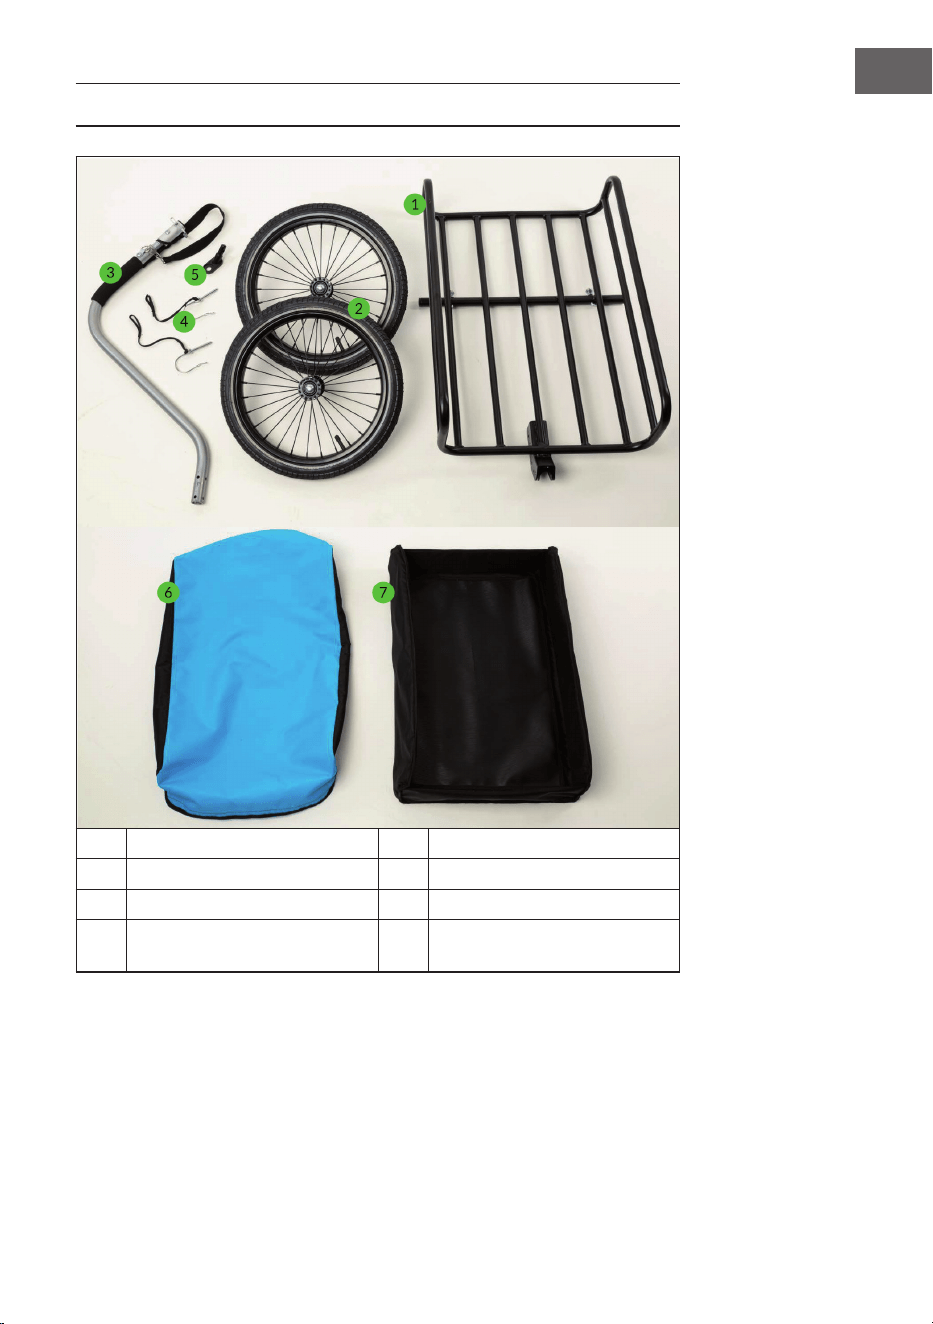
LIEFERUMFANG
1 Fahrgestell (1x) 5 Fahrradkupplung (1x)
2 Räder (2x) 6 Regenschutz (1x)
3 Deichsel (1x) 7 Einlage (1x)
4 Stifte (2x) 8
2roteund2weißeReektoren
(nicht auf dem Bild dargestellt)

6
DE
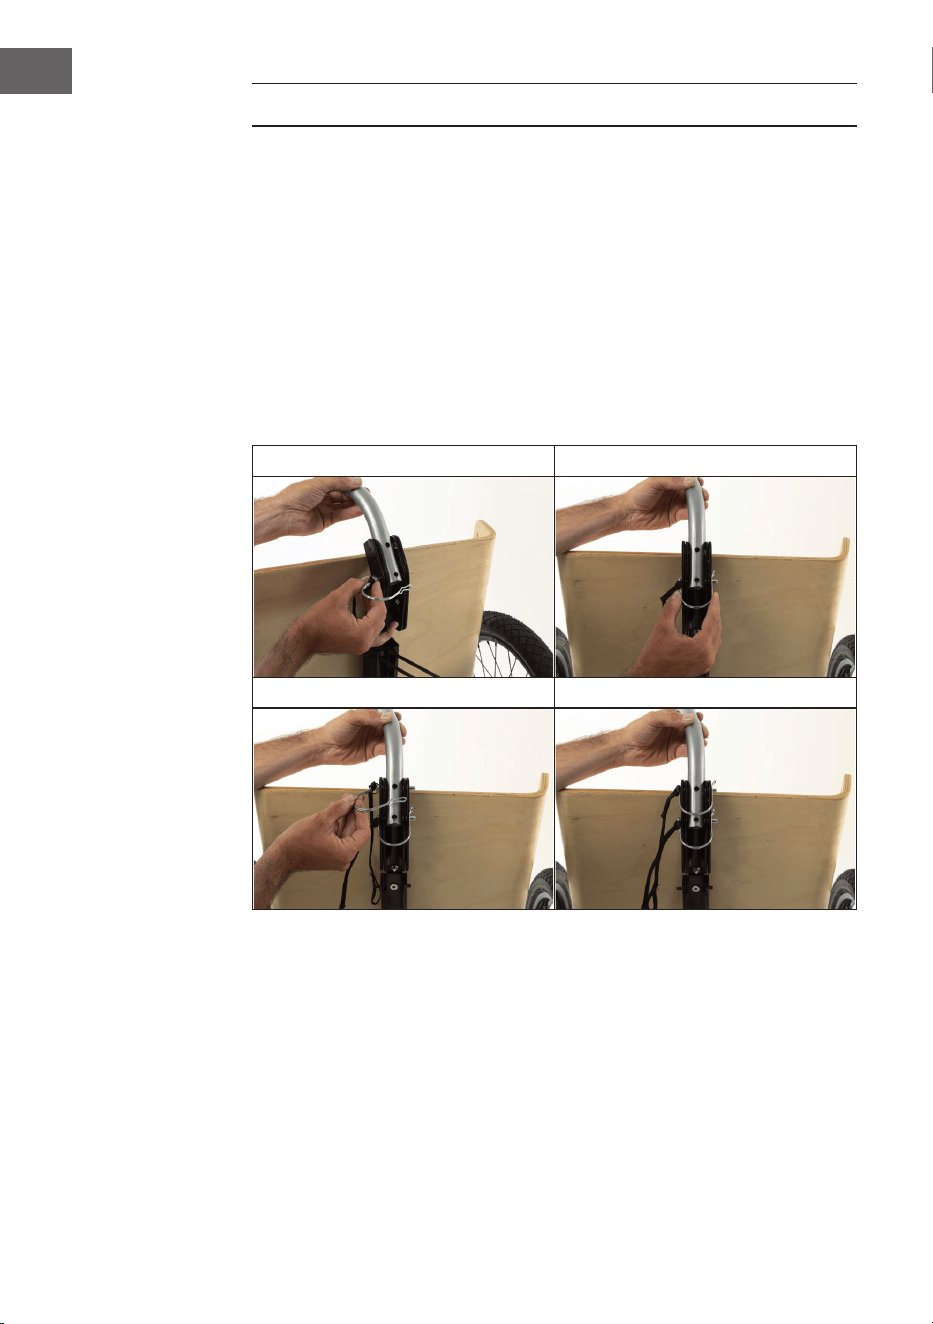
ZUSAMMENBAU
(a) Entfernen Sie die Schutzkappen an den Achsenden.
(b) Schieben Sie die Räder auf die Achsen. Sie hören ein Schnappgeräusch.
(c) Stecken Sie die Deichsel in die Halterung am Fahrgestell und drehen Sie
sie in die gewünschten Position:
• Handwagen-Modus: die Deichsel zeigt im 90°-Winkel nach oben.
• Fahrradanhänger-Modus: Die Deichsel zeigt im 45°-Winkel schräg zur
Seite.
(d) Stecken Sie die beiden Sicherungsstifte durch die Löcher, um die Deichsel
am Fahrgestell zu befestigen. Verwenden Sie Federklammern, um die
Verbindung zu sichern.
1 2
3 4
7
DE
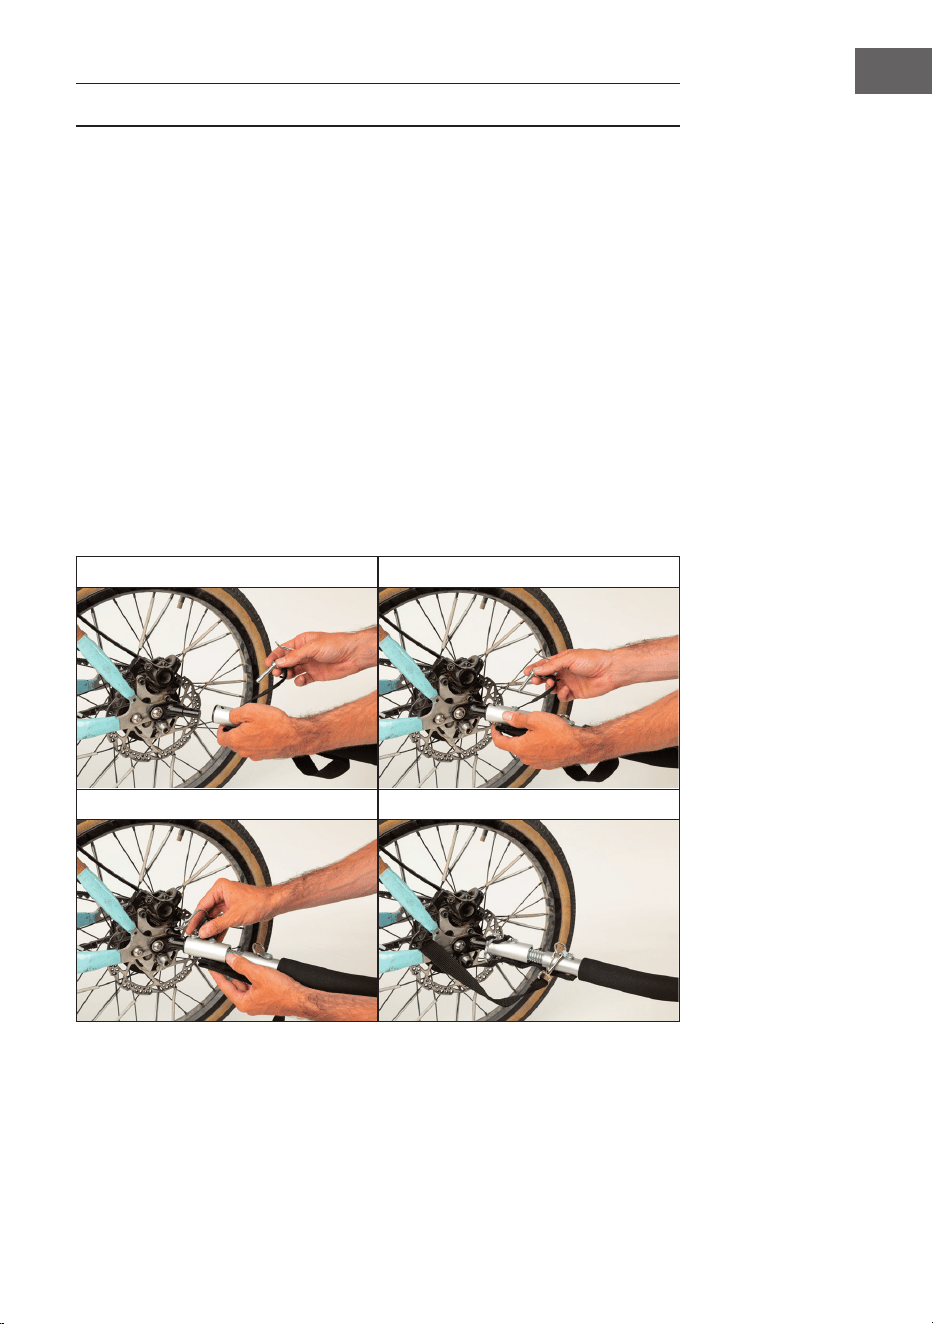
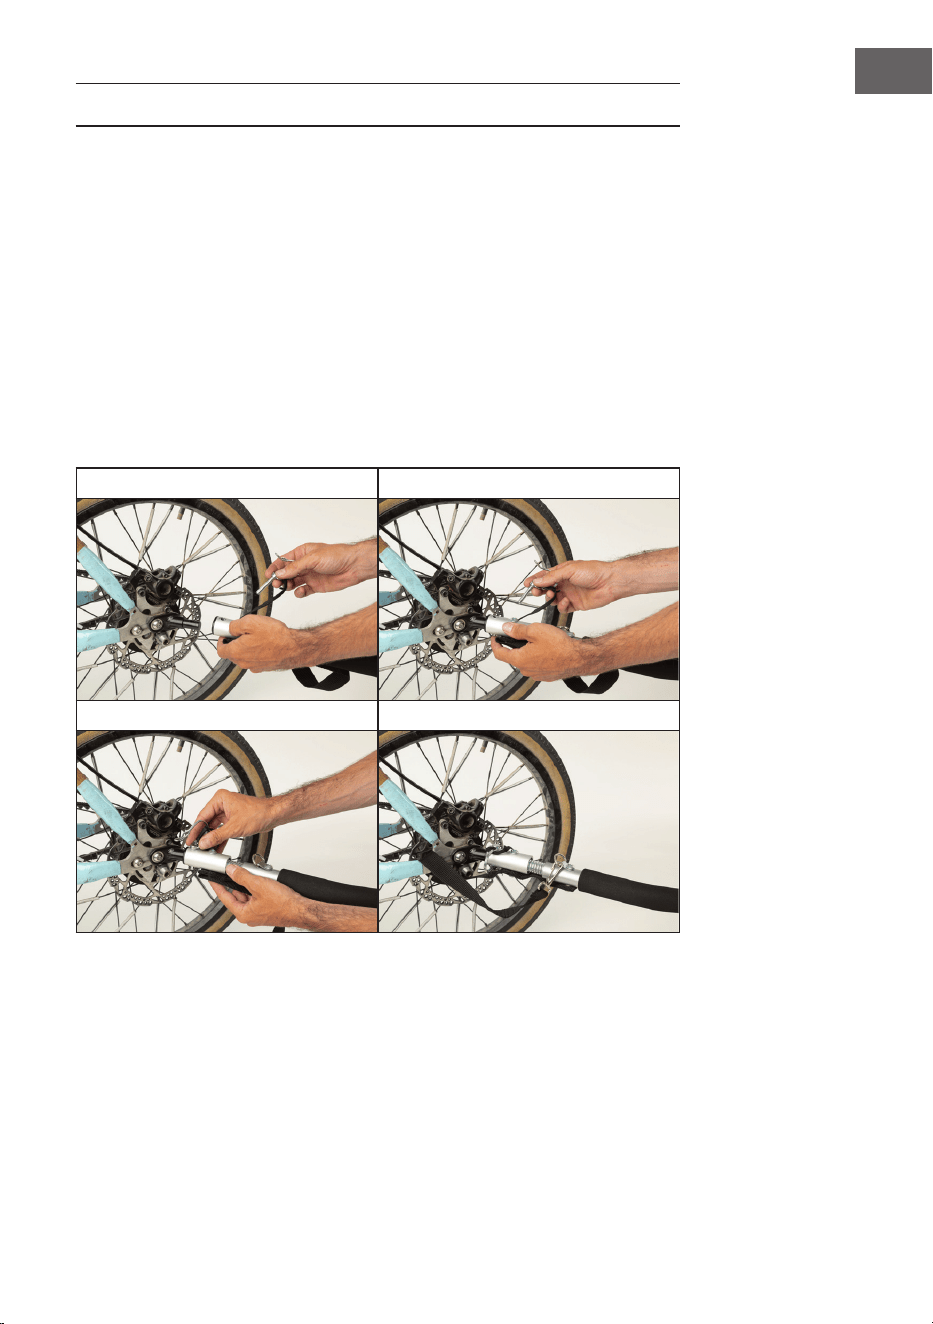
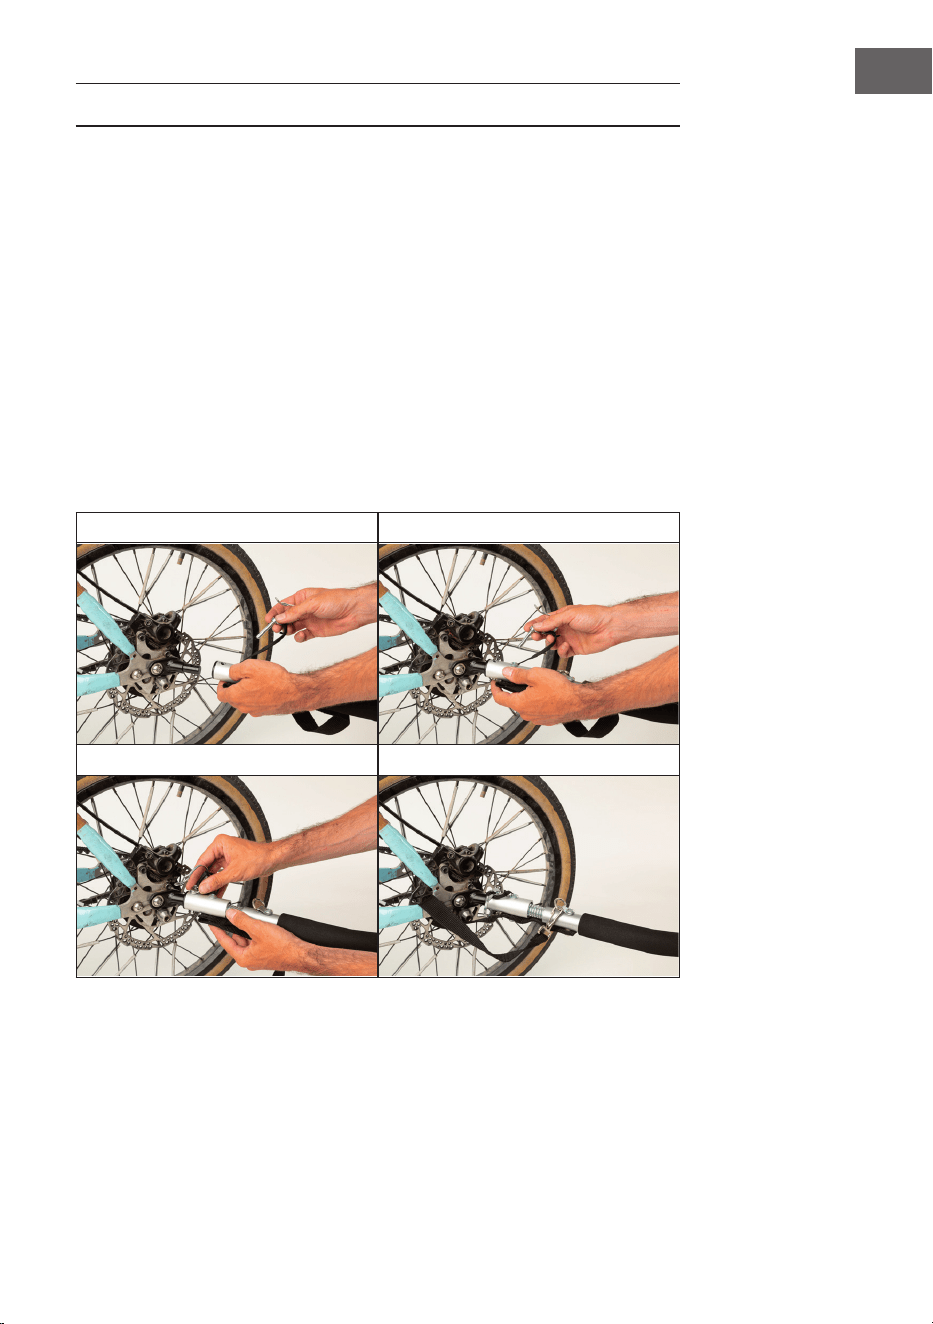
BEFESTIGUNG AM RAD
(a) Ziehen Sie die Anhängerkupplung aus der Deichsel und montieren Sie sie
auf der Hinterachse des Fahrrads:
• Bei Achsen mit Schnellspanner: Nehmen Sie die gesamte Achse
heraus, schieben Sie die Achse durch die Anhängerkupplung und
befestigen Sie die Achse wieder mit dem Schnellspanner.
• Bei Achsen, die mit Muttern befestigt sind: Schrauben Sie die Mutter
und die Unterlegscheibe ab. Schieben Sie die Anhängerkupplung auf
die Achse und ziehen Sie die Unterlegscheibe und die Mutter wieder
fest.
(b) Befestigen Sie die Deichsel an der Anhängerkupplung und sichern Sie die
Deichsel mit dem Sicherungsstift.
(c) Sobald die Deichsel befestigt ist, ziehen Sie den Sicherheitsgurt durch die
hintere Kettenstrebe am Fahrrad und haken Sie ihn in die Halterung an
der Deichsel ein.
1 2
3 4

8
DE
WICHTIGE HINWEISE ZUR BEFESTIGUNG UND
BENUTZUNG
Hinweis: Die Verbindung zwischen Fahrrad und Anhänger ist der
wichtigste Schritt im Montageprozess. Vergewissern Sie sich, dass
der Anhänger sicher mit dem Fahrrad verbunden ist. Wenn sich die
Anhängerkupplung nicht sicher an Ihrem Fahrrad befestigen oder anziehen
lässt, verwenden Sie sie nicht. Wenden Sie sich an Ihren Fahrradhändler,
um Hilfe bei der korrekten Installation zu erhalten.
• Überprüfen Sie den Zustand von Fahrrad und Anhänger vor jedem
Gebrauch.
• Fahren Sie immer defensiv. Während der Nutzung müssen Sie die örtlichen
Verkehrsvorschriften beachten.
• Mit Anhänger benötigen Sie einen zusätzlichen Bremsweg.
• Üben Sie mit Ihrem Anhänger vor dem Gebrauch, bis Sie mit ihm vertraut
sind.
• Stellen Sie sicher, dass Ihre Ladung vor der Fahrt gesichert ist.
Überschreiten Sie nicht das maximale Beladungsgewicht.
• Achten Sie darauf, dass Sie ein geeignetes Fahrrad verwenden. Fragen Sie
im Zweifelsfall Ihren lokalen Fahrradhändler oder Ihren Hersteller.
• Überprüfen Sie nach dem Zusammenbau und vor der Fahrt, ob die
Anhängevorrichtung vollständig eingerastet ist.
• Überprüfen Sie regelmäßig den Reifendruck. Achten Sie darauf, dass der
Reifendruck immer zwischen 1.70 - 2.00 Bar (25 - 30 PSI) liegt.
• Verwenden Sie den Anhänger nach Möglichkeit nur auf glatten Straßen.
Vermeiden Sie Bordsteine, Schlaglöcher oder unebenen Untergrund.
• Wenn Sie bergab oder um eine Kurve fahren, müssen Sie langsamer
fahren.
HERSTELLER & IMPORTEUR (UK)
Hersteller:
Chal-Tec GmbH, Wallstraße 16, 10179 Berlin, Deutschland.
Importeur für Großbritannien:
Berlin Brands Group UK Limited
PO Box 42
272 Kensington High Street
London, W8 6ND
United Kingdom

9
EN
Dear Customer,
Congratulations on purchasing this device. Please read
the following instructions carefully and follow them to
prevent possible damages. We assume no liability for
damage caused by disregard of the instructions and
improper use. Scan the QR code to get access to the
latest user manual and more product information.
CONTENT
Safety Instructions 10
Product Overview 10
Scope of Delivery 11
Assembly 12
Bike Attachment 13
Important Notes on Fastening and Use 14
Manufacturer & Importer (UK) 14
TECHNICAL DATA
Item number 10034492, 10040031, 10040088,
10040089, 10040090, 10040092
Dimensions (assembled) 127 x 62 x 40 cm
Dimensions trailer 63 x 42 cm
Weight trailer 9.4 kg
Maximum loading weight 40 kg
Maximum tire pressure 1.70 - 2.00 Bar (25 - 30 PSI)
Optional accessories In addition to the supplied
accessories, a further matching
bag can be purchased under article
number 10034495.
10
EN
SAFETY INSTRUCTIONS
• The trailer should not be loaded with more than 40 kg.
• The trailer must not be used to carry persons.
• Donotmakeanytechnicalmodicationstotheequipment.Thismayresult
in road hazards and void the manufacturer‘s warranty.
• Donotusethetraileronstony,uneventerrainorindangeroustrafc
situations.
• The towing bicycle must be in perfect condition. The brakes should work
perfectly. A trailer (and load) will increase your braking distance.
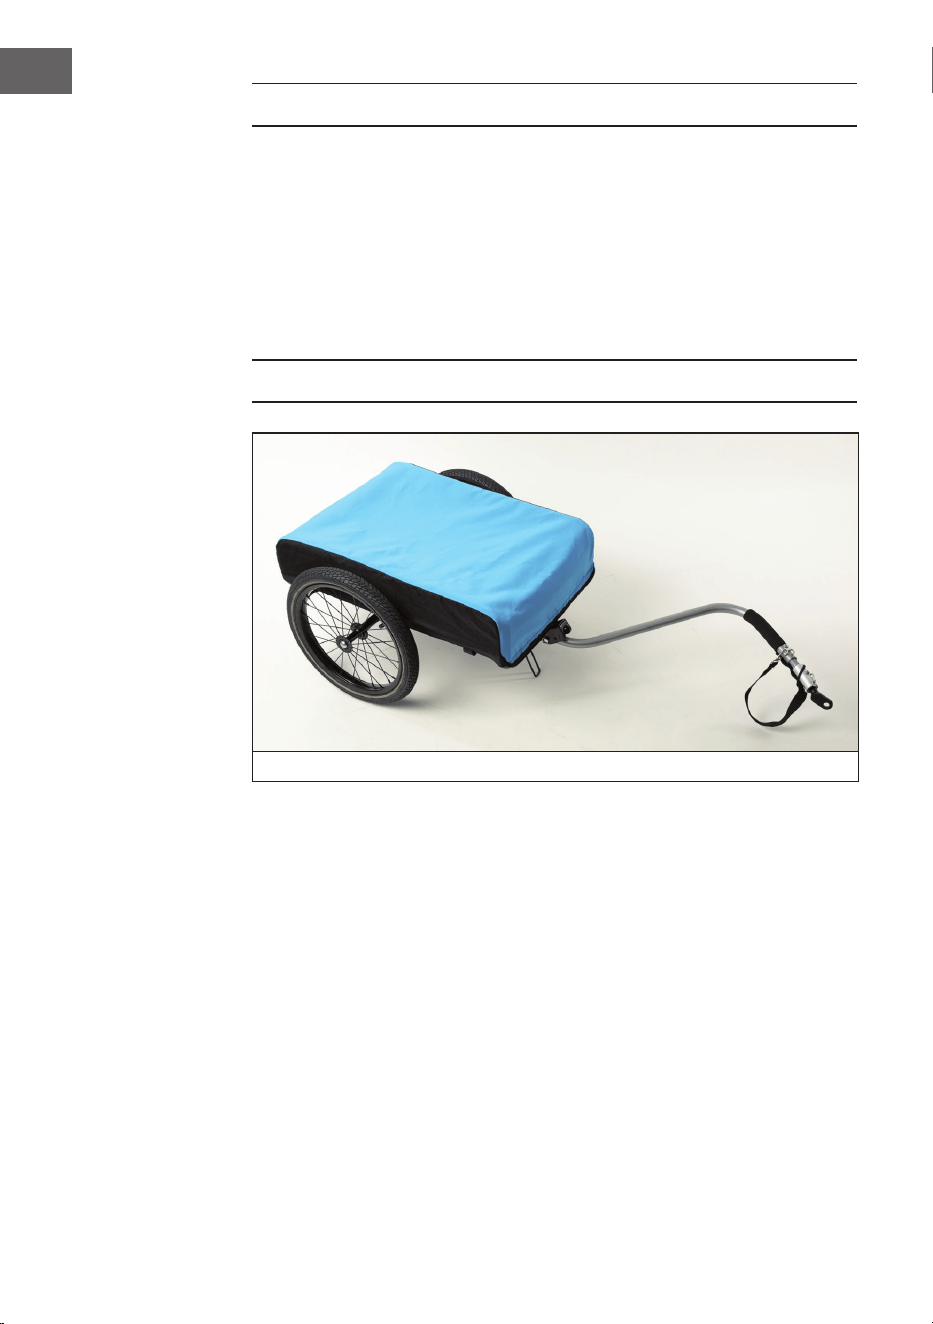
PRODUCT OVERVIEW
Assembled trailer with insert and rain cover

11
EN
SCOPE OF DELIVERY
1 Chassis (1x) 5 Trailer hitch (1x)
2 Wheels (2x) 6 Rain cover (1x)
3 Drawbar (1x) 7 Inlet (1x)
4 Pins (2x) 8
2redand2whitereectors(not
shown in the picture)
12
EN
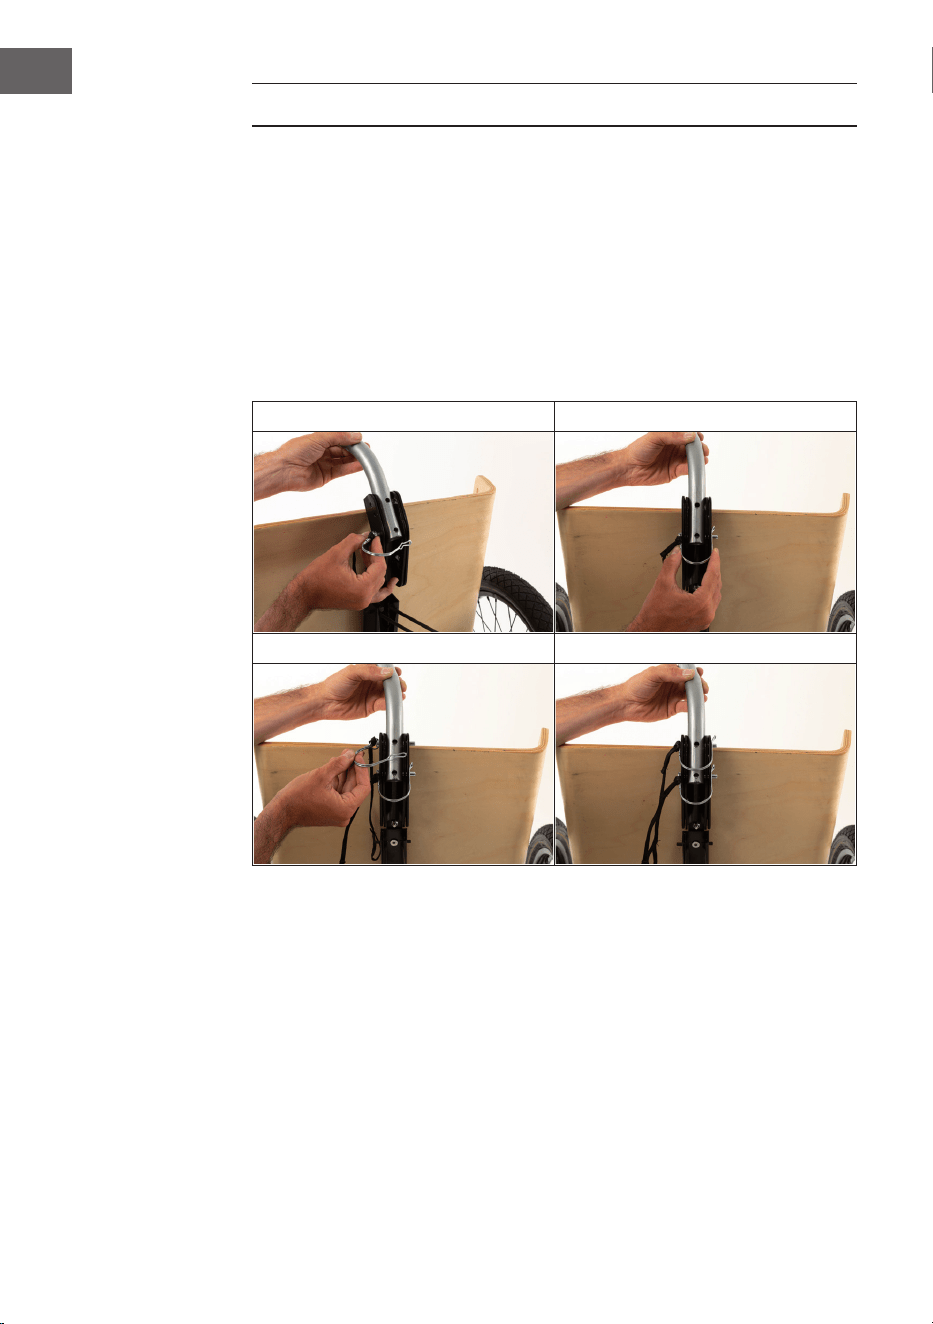
ASSEMBLY
(a) Remove the protective caps from the axle ends.
(b) Slide the wheels onto the axles. You will hear a snap sound.
(c) Insert the drawbar into the connector on the chassis and rotate it to the
desired position:
• Hand trolley mode: the drawbar points upwards at 90°.
• Bicycle trailer mode: The drawbar points at an angle of 45° to the side.
(d) Insert the two locking pins through the holes to secure the drawbar to the
chassis. Use spring clips to secure the connection.
1 2
3 4
13
EN
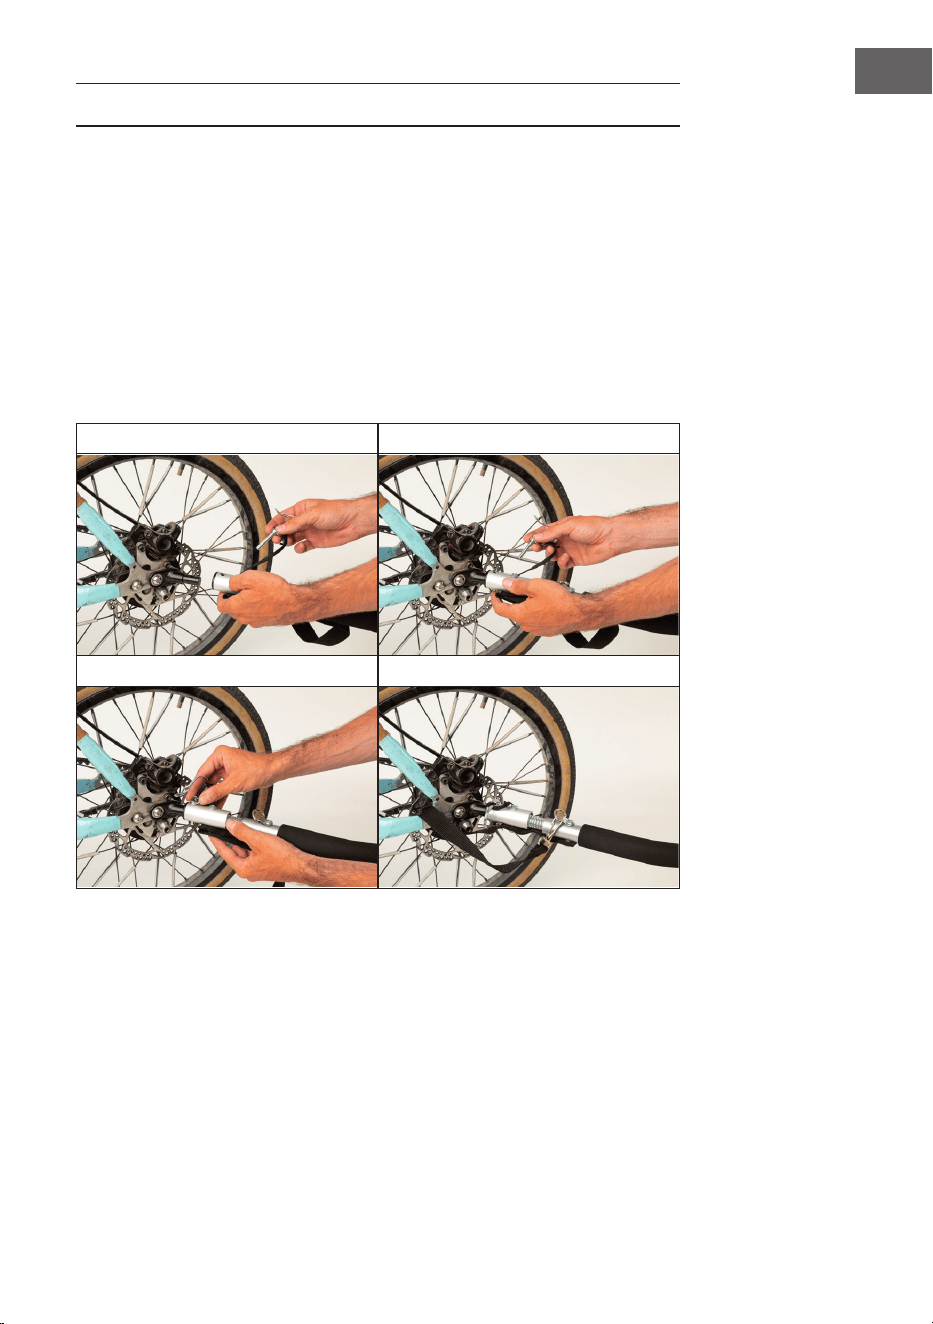
BIKE ATTACHMENT
(a) Pull the trailer hitch out of the drawbar and mount it on the rear axle of
the bicycle:
• For axles with quick release: Remove the entire axle, push the axle through
the trailer hitch and reattach the axle with the quick release.
• For axles that are fastened with nuts: Unscrew the nut and washer. Slide
the trailer hitch onto the axle and retighten the washer and nut.
(b) Attach the drawbar to the trailer hitch and secure the drawbar with the
locking pin.
(c) Once the drawbar is attached, pull safety belt through the rear end chain
stay on the bicycle and hook it into the bracket on the drawbar.
1 2
3 4

14
EN
IMPORTANT NOTES ON FASTENING AND USE
Note: The connection between bicycle and trailer is the most important
step in the assembly process. Make sure that the trailer is securely
attached to the bicycle. If the trailer hitch cannot be securely attached or
tightened to your bicycle, do not use it. Contact your bicycle dealer for help
with correct installation.
• Check the condition of the bicycle and trailer before each use.
• Alwaysridedefensively.Duringuse,observelocaltrafcregulations.
• If you have a trailer, you will need additional stopping distance.
• Practice your trailer before use until you are familiar with it.
• Make sure that your load is secured before driving. Do not exceed the
maximum load weight.
• Make sure that you use a suitable bicycle. If in doubt, consult your local
bicycle dealer or manufacturer.
• After assembly and before riding, check that the hitch is fully engaged.
• Check the tyre pressure regularly. Make sure that the tyre pressure is
always between 1.70 - 2.00 bar (25 - 30 PSI).
• If possible, use the trailer only on slippery roads. Avoid kerbs, potholes or
uneven surfaces.
• If you drive downhill or around a bend, you must drive slower.
MANUFACTURER & IMPORTER (UK)
Manufacturer:
Chal-Tec GmbH, Wallstrasse 16, 10179 Berlin, Germany.
Importer for Great Britain:
Berlin Brands Group UK Limited
PO Box 42
272 Kensington High Street
London, W8 6ND
United Kingdom

15
FR
Chère cliente, cher client,
Toutes nos félicitations pour l’acquisition de ce nouvel
appareil. Veuillez lire attentivement et respecter
les instructions de ce mode d’emploi an d’éviter
d’éventuels dommages. Nous ne saurions être tenus
pour responsables des dommages dus au non-respect
des consignes et à la mauvaise utilisation de l’appareil.
Scannez le QR-Code pour obtenir la dernière version
du mode d‘emploi et des informations supplémentaires
concernant le produit.
SOMMAIRE
Consignes de sécurité 16
Aperçu de l‘appareil 16
Contenu de l‘emballage 17
Assemblage 18
Fixation à la roue 19
Remarques importantes pour le montage et l’utilisation 20
Fabricant et importateur (UK) 20
FICHE TECHNIQUE
Numéro d'article 10034492, 10040031, 10040088,
10040089, 10040090, 10040092
Dimensions (assemblé) 127 x 62 x 40 cm
Dimensions de la remorque 63 x 42 cm
Poids de la remorque 9.4 kg
Charge maximale autorisée 40 kg
Pression maximale des pneus 1.70 - 2.00 Bar (25 - 30 PSI)
Accessoires en option Outre les accessoires fournis, vous
pouvez acheter un autre sac assorti
sous le numéro d‘article 10034495.

16
FR
CONSIGNES DE SÉCURITÉ
• La remorque ne doit porter plus de 40 kg.
• La remorque ne doit pas être utilisée pour transporter des personnes.
• N‘effectuezaucunemodicationtechniquesurl‘appareil.Celapeut
entraîner des risques dans la circulation et annule la garantie du fabricant.
• Ne pas utiliser la remorque sur un terrain pierreux, accidenté ou dans des
situations dangereuses de circulation.
• Le vélo de remorquage doit être en parfait état. Les freins doivent
fonctionner parfaitement. Avec la remorque (et son chargement), votre
distance de freinage est rallongée.
APERÇU DE L‘APPAREIL
Remorque assemblée avec fond et protection contre la pluie

17
FR
CONTENU DE L‘EMBALLAGE
1 Châssis (1x) 5 Attelage vélo (1x)
2 Roues (2x) 6 Protection contre la pluie (1x)
3 Timon 7 Fond (1x)
4 Goupilles (2x) 8
2réecteursrougeset2blancs
(non représentés sur les photos)
18
FR
ASSEMBLAGE
(a) Retirez les capuchons de protection aux extrémités des essieux.
(b) Poussez les roues sur les essieux. Vous entendez un clic.
(c) Insérez la barre de traction dans le support du châssis et tournez-la dans la
position souhaitée :
• Mode panier : la barre de remorquage pointe à 90° vers le haut.
• Mode remorque de vélo : le timon tire à un angle de 45° sur le côté.
(d) Insérezlesdeuxgoupillesdeverrouillagedanslestrouspourxerletimon
au châssis. Utilisez des pinces à ressort pour sécuriser la connexion.
1 2
3 4

19
FR
FIXATION À LA ROUE
(a) Sortez l’attelage du timon et montez-le sur l’essieu arrière du vélo :
• Pour les axes à blocage rapide : sortez l‘axe complet, poussez l‘axe dans
l‘attelagederemorqueetxezl‘axeàl‘aidedublocagerapide.
• Pourlesaxesquisontxésavecdesécrous:dévissezl‘écrouetla
rondelle. Faites glisser l‘attelage sur l‘axe et resserrez la rondelle et
l‘écrou.
(b) Fixezletimonàl’attelageetxezletimonaveclagoupilledeverrouillage.
(c) Unefoisqueletimonestxé,passezlasangledesécuritéàtraverslabase
arrière du vélo et accrochez-la à l‘attache sur le timon.
1 2
3 4

20
FR
REMARQUES IMPORTANTES POUR LE
MONTAGE ET L’UTILISATION
Remarque : La connexion entre le vélo et la remorque est l’étape la plus
importante du processus de montage. Assurez-vous que la remorque est
correctement attachée au vélo. Si l’attelage n‘est pas serré fermement
sur votre vélo, ne l’utilisez pas. Contactez votre revendeur de vélos pour
obtenir de l‘aide pour une installation correcte.
• Vériezl‘étatduvéloetdelaremorqueavantchaqueutilisation.
• Roulez toujours prudemment. Lors de l‘utilisation, vous devez vous
conformer aux règles de circulation locales.
• Avec la remorque, votre distance de freinage est rallongée.
• Entraînez-vous avec votre remorque avant de l‘utiliser jusqu‘à ce que vous
la connaissiez bien.
• Assurez-vous que votre cargaison est sécurisée avant de rouler. Ne
dépassez pas le poids maximum autorisé.
• Utilisez un vélo adapté. En cas de doute, demandez conseil à votre
revendeur de vélo ou au fabricant.
• Aprèslemontageetavantderouler,vériezquel‘attelageest
complètement enclenché.
• Vériezrégulièrementlapressiondespneus.Assurez-vousquelapression
des pneus est toujours comprise entre 1,70 et 2,00 bar (25 à 30 psi).
• Si possible, utilisez uniquement la remorque sur des routes lisses. Évitez
les bordures, les nids-de-poule ou les sols inégaux.
• Ralentissez en descente et dans les virages.
FABRICANT ET IMPORTATEUR (UK)
Fabricant :
Chal-Tec GmbH, Wallstraße 16, 10179 Berlin, Allemagne.
Importateur pour la Grande Bretagne :
Berlin Brands Group UK Limited
PO Box 42
272 Kensington High Street
London, W8 6ND
United Kingdom
21
ES
Estimado cliente,
Lefelicitamospor laadquisición deeste producto. Lea
atentamente las siguientes instrucciones y sígalas
para evitar posibles daños. No asumimos ninguna
responsabilidad por los daños causados por el
incumplimiento de las instrucciones y el uso inadecuado.
Escanee el siguiente código QR para obtener acceso a
la última guía del usuario y más información sobre el
producto.
ÍNDICE
Instrucciones de seguridad 22
Vista general del aparato 22
Volumen de suministro 23
Montaje 24
Montaje en las ruedas 25
Notasimportantessobrelajaciónyeluso26
Fabricante e importador (Reino Unido) 26
DATOS TÉCNICOS
Número de artículo 10034492, 10040031, 10040088,
10040089, 10040090, 10040092
Dimensiones (ensamblado) 127 x 62 x 40 cm
Dimensiones del remolque 63 x 42 cm
Peso del remolque 9.4 kg
Peso máximo de carga 40 kg
Presión máxima de los neumáticos 1.70 - 2.00 Bar (25 - 30 PSI)
Accesorios opcionales Además de los accesorios
suministrados, se pueden adquirir
bolsas adecuadas con los números
de artículo 10034495.

22
ES
INSTRUCCIONES DE SEGURIDAD
• El remolque no debe estar cargado con más de 40 kg.
• El remolque no debe utilizarse para el transporte de personas.
• Norealiceningunamodicacióntécnicaenelequipo.Estopuederesultar
en peligros en la carretera y anular la garantía del fabricante.
• No utilice el remolque en terrenos pedregosos, desiguales o en situaciones
detrácopeligrosas.
• La bicicleta de remolque debe estar en perfecto estado. Los frenos deben
funcionar perfectamente. Con un remolque (y carga) su distancia de
frenado aumentará.
VISTA GENERAL DEL APARATO
Remolque montado con inserción y cubierta para la lluvia

23
ES
VOLUMEN DE SUMINISTRO
1 Chasis (1x) 5 Embrague de bicicleta (1x)
2 Ruedas (2 x) 6 Protector de lluvia (1x)
3 Enganche de remolque (1x) 7 Inserción (1x)
4 Pasadores (2x) 8
2reectoresrojosy2blancos(no
se muestran en la imagen)

24
ES
MONTAJE
a) Retire las tapas protectoras de los extremos del eje.
b) Deslice las ruedas sobre los ejes. Oirás un chasquido.
c) Inserte el enganche de remolque en el soporte del chasis y gírela a la
posición deseada:
• Modo de carro de mano: la lanza apunta hacia arriba en un ángulo de
90°.
• Modo de remolque de bicicleta: La barra de tiro apunta diagonalmente
hacia el lado con un ángulo de 45°.
(d) Introduzcalosdospasadoresdebloqueoatravésdelosoriciosparajar
la lanza al chasis. Utilice abrazaderas de resorte para asegurar la conexión.
1 2
3 4
25
ES
MONTAJE EN LAS RUEDAS
(a) Extraiga el enganche del remolque de la lanza y móntelo en el eje trasero
de la bicicleta:
• Para ejes con cierre rápido: Retire todo el eje, empuje el eje a través
delacoplamientodelremolqueyvuelvaajarelejeconelcierre
rápido.
• Paraejesquesejancontuercas:Desenrosquelatuercaylaarandela.
Deslice el enganche del remolque sobre el eje y vuelva a apretar la
arandela y la tuerca.
b) Sujete el enganche de remolque al acoplamiento del remolque y asegure la
barra de tiro con el pasador de seguridad.
c) Una vez que la barra de tiro esté asegurada, tire del cinturón de seguridad
a través del soporte de la cadena trasera de la bicicleta y colóquelo en el
enganche de remolque de la barra de tiro.
1 2
3 4

26
ES
NOTAS IMPORTANTES SOBRE LA FIJACIÓN Y EL
USO
Nota: La conexión entre la bicicleta y el remolque es el paso más
importante en el proceso de montaje. Asegúrese de que el remolque esté
biensujetoalabicicleta.Sielenganchedelremolquenosepuedejaro
apretarrmementeasubicicleta,noloutilice.Póngaseencontactoconsu
distribuidor de bicicletas para obtener ayuda con la instalación correcta.
• Compruebe el estado de la bicicleta y del remolque antes de cada uso.
• Siempre maneje a la defensiva. Durante el uso, observe las normas de
trácolocales.
• Si tiene un remolque, necesitará una distancia de frenado adicional.
• Practique su remolque antes de usarlo hasta que se familiarice con él.
• Asegúrese de que su carga esté asegurada antes de conducir. No exceda el
peso máximo de la carga.
• Asegúrese de utilizar una bicicleta adecuada. En caso de duda, consulte a
su distribuidor o fabricante de bicicletas local.
• Después del montaje y antes de montar, compruebe que el enganche está
completamente enganchado.
• Compruebe regularmente la presión de los neumáticos. Asegúrese de que
la presión de los neumáticos esté siempre entre 1,70 - 2,00 bar (25 - 30
PSI).
• Si es posible, utilice el remolque sólo en carreteras resbaladizas. Evite los
bordillos,bachesosuperciesirregulares.
• Si conduce cuesta abajo o en una curva, tendrá que disminuir la velocidad.
en la unidad de disco duro.
FABRICANTE E IMPORTADOR (REINO UNIDO)
Fabricante:
Chal-Tec GmbH, Wallstraße 16, 10179 Berlín, Alemania.
Importador para Gran Bretaña:
Berlin Brands Group UK Limited
PO Box 42
272 Kensington High Street
London, W8 6ND
United Kingdom

27
IT
Gentile Cliente,
La ringraziamo per aver acquistato il dispositivo. La
preghiamo di leggere attentamente le seguenti istruzioni
per l’uso e di seguirle per evitare possibili danni. Non ci
assumiamo alcuna responsabilità per danni scaturiti da
una mancata osservazione delle avvertenze di sicurezza
e da un uso improprio del dispositivo. Scansionare il
codice QR seguente, per accedere al manuale d’uso più
attuale e per ricevere informazioni sul prodotto.
INDICE
Avvertenze di sicurezza 28
Descrizione del dispositivo 28
Volume di consegna 29
Assemblaggio 30
Fissaggio alla ruota 31
Avvertenzeimportantisussaggioeutilizzo32
Produttore e importatore (UK) 32
DATI TECNICI
Numero articolo 10034492, 10040031, 10040088,
10040089, 10040090, 10040092
Dimensioni (montato) 127 x 62 x 40 cm
Dimensioni rimorchio 63 x 42 cm
Peso rimorchio 9.4 kg
Carico massimo 40 kg
Pressione massima pneumatici 1.70 - 2.00 Bar (25 - 30 PSI)
Accessori opzionali Possibilità di acquistare, in aggiunta
agli accessori inclusi, una borsa
abbinata al numero articolo
10034495.
28
IT
AVVERTENZE DI SICUREZZA
• Il rimorchio è adatto a un carico massimo di 40 kg.
• Il rimorchio non deve essere utilizzato per trasportare persone.
• Nonapportaremodichetecnichealdispositivo.Questopuòcomportare
pericolineltrafcostradaleelaperditadivaliditàdellagaranzia.
• Non utilizzare il rimorchio su fondi pietrosi, accidentati o in condizioni di
trafcopericolose.
• La bicicletta che traina deve essere in perfetto stato. I freni devono
funzionare perfettamente. Lo spazio di frenata aumenta con il rimorchio
(e il carico).
DESCRIZIONE DEL DISPOSITIVO
Rimorchio montato con fondo e protezione antipioggia.
29
IT
VOLUME DI CONSEGNA
1 Telaio (1x) 5 Giunto per bici (1x)
2 Ruote (2x) 6 Protezione antipioggia (1x)
3 Timone (1x) 7 Fondo (1x)
4 Perni (2x) 8
2riettoribianchie2rossi(non
presenti in immagine)

30
IT
ASSEMBLAGGIO
a) Rimuovere i tappi protettivi sulle estremità dell’asse.
b) Inserire le ruote sull’asse. Si sentirà un clic.
c) Inserire il timone nel supporto del telaio e ruotarlo nella posizione
desiderata:
• Modalità carrello: il timone è girato a 90° verso l’alto.
• Modalità rimorchio: il timone è girato lateralmente di 45°.
(d) Inserireiduepernidisicurezzaattraversoifori,inmododassareil
timonealtelaio.Utilizzaremorsettiamollaperssareilcollegamento.
1 2
3 4
31
IT
FISSAGGIO ALLA RUOTA
(a) Tirare il giunto del rimorchio fuori dal timone montarlo sull’asse posteriore
della bicicletta:
• Per assi con tensionatore rapido: togliere l’intero asse, far passare
l’assenelgiuntoessaredinuovol’asseconiltensionatorerapido.
• Perassissaticondadi:svitaredadierondelle.Inserireilgiunto
sull’asse e stringere nuovamente dadi e rondelle.
b) Fissare il timone al giunto e bloccarlo con il perno di sicurezza.
c) Unavoltassatoiltimone,farpassarelacinghiaattraversoiltubo
posteriore della catena della bici e agganciarlo al supporto sul timone.
1 2
3 4

32
IT
AVVERTENZE IMPORTANTI SU FISSAGGIO E
UTILIZZO
Nota: il collegamento tra bici e rimorchio è il passaggio più importante
del processo di montaggio. Assicurarsi che il rimorchio sia ben collegato
allabici.Seilgiuntononsilasciassareostringeresaldamenteallabici,
non utilizzarlo. Rivolgersi al rivenditore di biciclette per farsi aiutare con
l’installazione.
• Controllare lo stato di bici e rimorchio prima di ogni utilizzo.
• Viaggiare sempre con la massima attenzione. Rispettare le norme locali del
trafco.
• Con il rimorchio è necessario uno spazio di frenata maggiore.
• Primadiutilizzareilrimorchioneltrafco,esercitarsinoadavere
sufcientecondenza.
• Assicurarsicheilcaricosiabenssatoprimadipartire.
• Non superare il carico massimo indicato.
• Assicurarsi di utilizzare una bici adeguata. In caso di dubbi, chiedere al
rivenditore di biciclette locale o al produttore.
• Prima del montaggio e dell’utilizzo, controllare che i dispositivi del
rimorchiosianobenssati.
• Controllare regolarmente la pressione degli pneumatici. Assicurarsi che la
pressione sia sempre tra 1.70 - 2.00 Bar (25 - 30 PSI).
• Se possibile, utilizzare il rimorchio solo su strade lisce. Evitare ciottolato,
buche e fondi irregolari.
• Se si viaggia in discesa o in curva è necessario rallentare.
PRODUTTORE E IMPORTATORE (UK)
Produttore:
Chal-Tec GmbH, Wallstraße 16, 10179 Berlino, Germania.
Importatore per la Gran Bretagna:
Berlin Brands Group UK Limited
PO Box 42
272 Kensington High Street
London, W8 6ND
United Kingdom