USER MANUAL
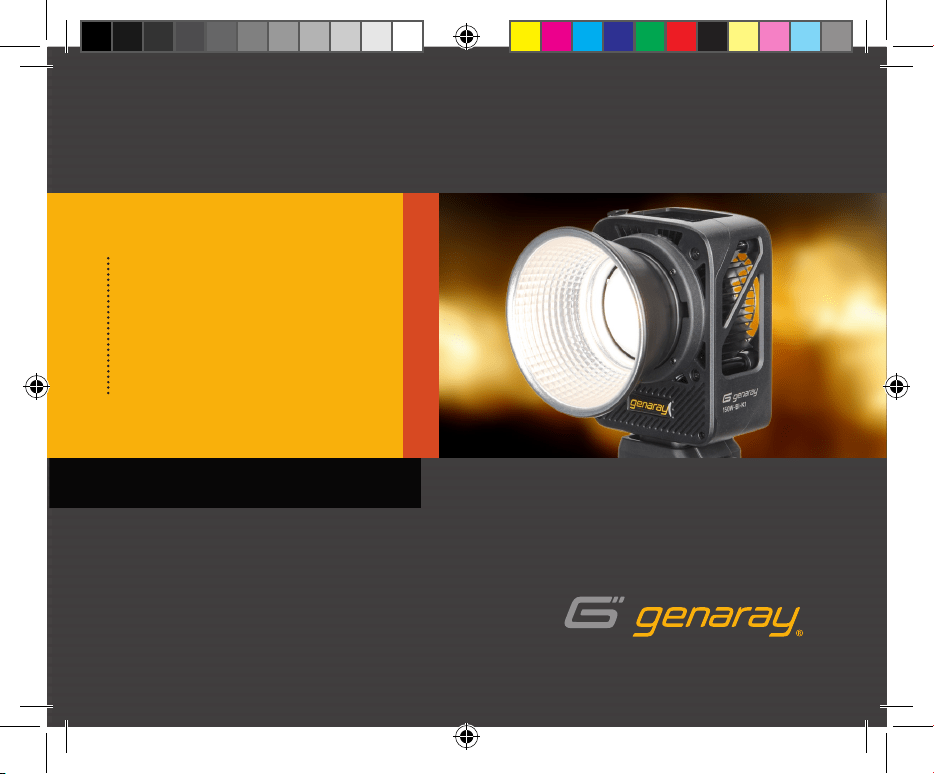
Compact 150 Watt
LED MONOLIGHT
150W-BI-K1 / 150W-RGB-K1
150W-xxx-K1_Manual.indd 1150W-xxx-K1_Manual.indd 1 5/7/26 5:05PM5/7/26 5:05PM
Compact 150 Watt LED Monolight - USER MANUAL
2
Compact 150 Watt LED Monolight - USER MANUAL
3
THANK YOU FOR CHOOSING GENARAY
The Genaray 150-watt Monolight Kit features a compact
and powerful LED light that has enough power output to
light subjects from a distance without interfering with
the picture frame. Ideal for image makers on the go, its
compact form factor and included rechargeable battery
handle make it road ready and dependable whenever you
need to light subjects or scenes. Onboard and wireless
control via the LEDLYD app make the 150W-BI-K1 and
150W-RGB-K1 great choices as stand-alone lights in the
field or in a multi-light setup.
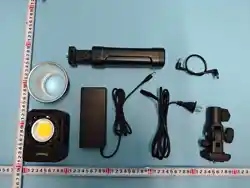
The monolight kit includes all the tools needed for lighting
vlogs, interviews, and a host of other uses. The handle
features a 77 Wh rechargeable battery that has enough
power to light quick news videos out in the field. For longer
photo and video sessions, the light can be powered directly
via the included AC adapter. The kit includes a textured
silver reflector for directing your light while preventing
light spill and amplifying the beam.
· Please read and follow these
instructions and keep this manual in a
safe place.
· Clean the unit with only a soft, dry
cloth.
· Use only parts provided by the
manufacturer.
· Make sure that this product is intact
and that there are no missing parts.
· Keep this unit away from water and
any flammable gases or liquids.
· Use only the correct, recommended
voltage.
· Do not attempt to disassemble or
repair the equipment—doing so will
void the warranty, and Genaray will not
be responsible for any damage.
· The high-intensity LEDs emit a bright
light. Never stare directly into the
light.
· Disconnect all cables prior to
transport.
· All images are for illustrative purposes
only.
PRECAUTIONS
Precautions
Compact 150 Watt
LED Monolight
INTRODUCTION
150W-xxx-K1_Manual.indd 2-3150W-xxx-K1_Manual.indd 2-3 5/7/26 5:05PM5/7/26 5:05PM
Compact 150 Watt LED Monolight - USER MANUAL
4
Compact 150 Watt LED Monolight - USER MANUAL
5
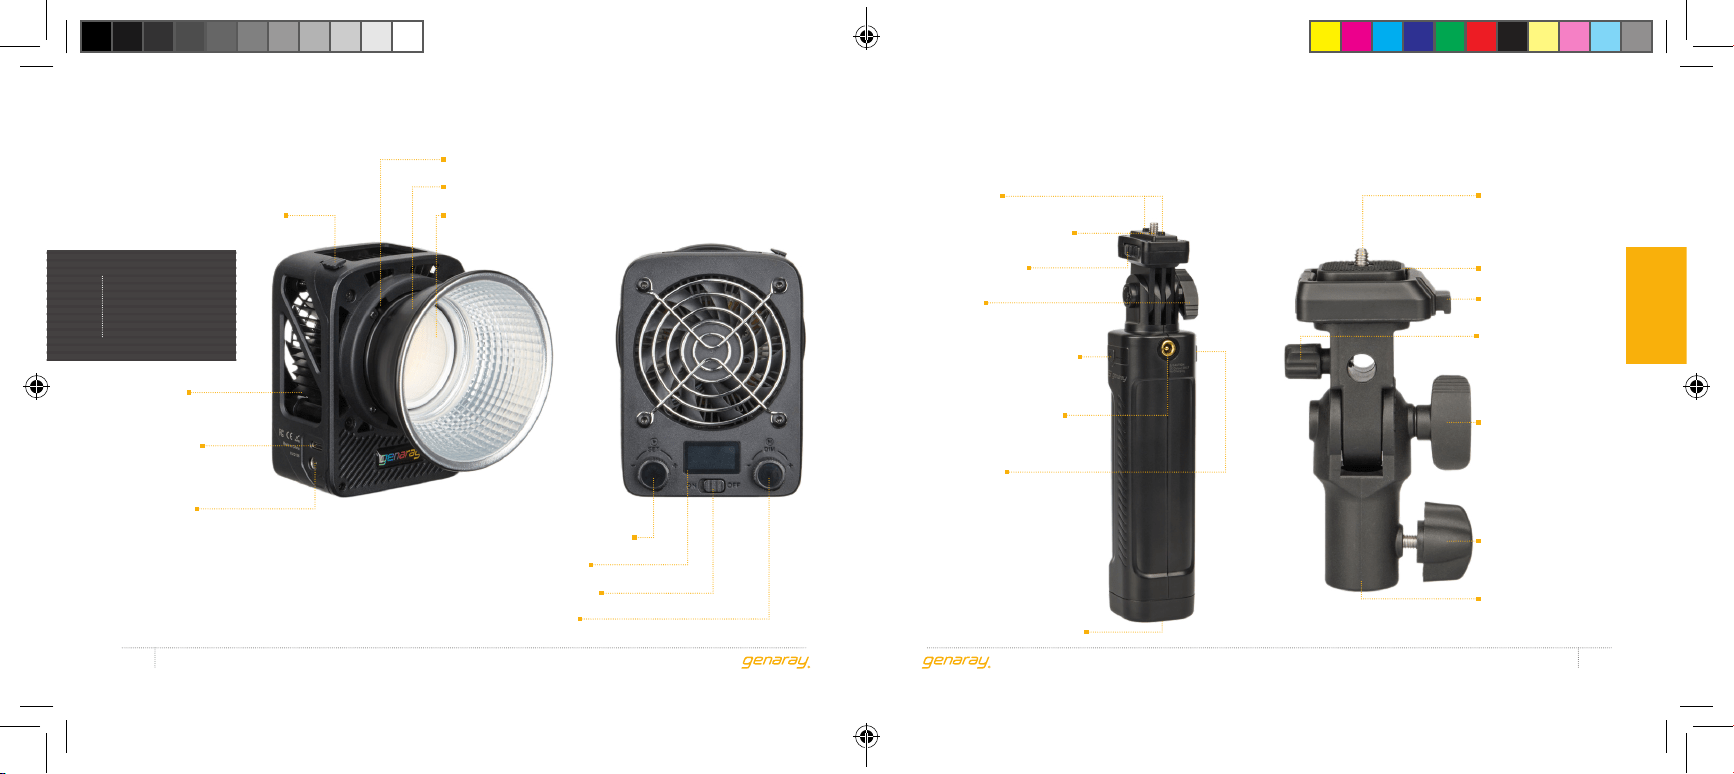
Product overview
PRODUCT
OVERVIEW
Front Battery Handle Tilt AdapterBack
Diffuser (RGB light only)
Reflector
Mini Bowens mount
DC 12.24 V
barrel connector
USB-C port
Heat sink
Reflector release button
DIM knob
LCD screen
Power switch
SET knob / Cursor
1/4-20 mounting stud
Guide pins
Locking wheel
Tilt lock
USB-C port
(input and output)
DC barrel connector
(output only)
Battery indicator LEDs
and battery check button
1/4-20 mounting socket
1/4-20
mounting screw
Quick release plate
Quick release lock
Umbrella lock
Tilt lock
Locking knob
5/8 in.
baby receiver
150W-xxx-K1_Manual.indd 4-5150W-xxx-K1_Manual.indd 4-5 5/7/26 5:05PM5/7/26 5:05PM
Compact 150 Watt LED Monolight - USER MANUAL
6
Compact 150 Watt LED Monolight - USER MANUAL
7
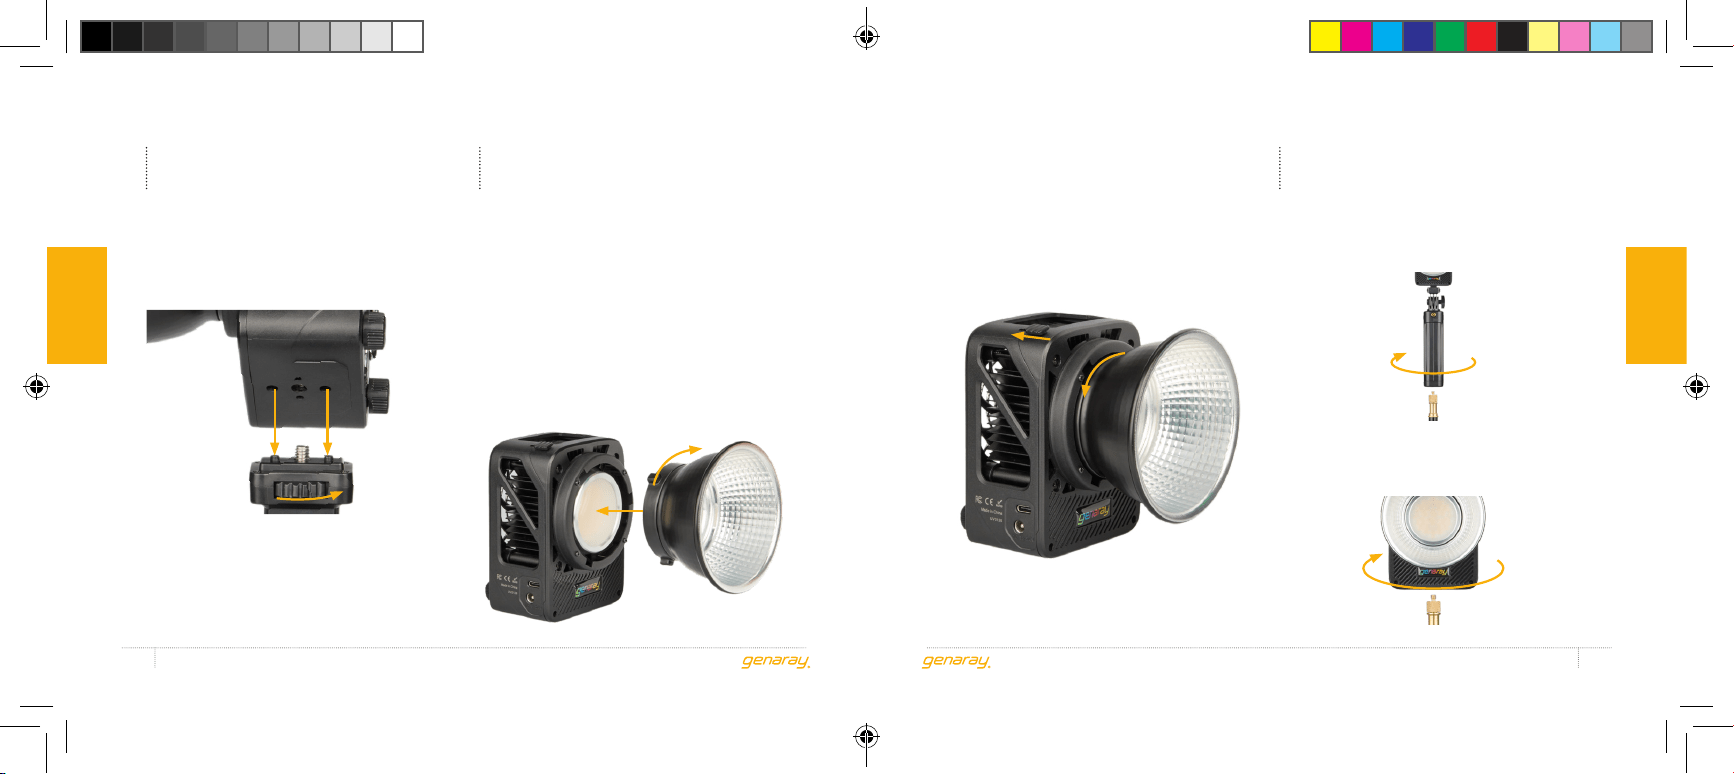
ATTACHING THE
HANDLE
Align the handle’s guide pins with
the light’s guide holes. Attach the
light by turning the locking wheel
counterclockwise until secure.
For mounting lights that don’t have
guide pins, place the included rubber
spacer over the mounting plate. This
forms a flat surface for mounting a
light with a 1/4-20 mounting socket.
The light includes an integrated
mini Bowens mount reflector
with a textured silver interior that
directs and amplifies the beam.
To attach the included reflector:
1. Insert the reflector’s mounting
pegs into the accessory slots
on the front of the light.
2. Turn the reflector clockwise until it clicks.
ATTACHING THE
REFLECTOR
To remove the reflector, slide the
reflector release button backward,
turn the reflector counterclockwise,
and remove it from the mount.
MOUNTING THE
LIGHT
Screw the handle onto a tripod’s or light
stand’s 1/4-20 mounting stud until secure.
The light can also be mounted directly onto
a tripod or stud with a 1/4-20 top stud.
instructions
instructions
150W-xxx-K1_Manual.indd 6-7150W-xxx-K1_Manual.indd 6-7 5/7/26 5:05PM5/7/26 5:05PM
Compact 150 Watt LED Monolight - USER MANUAL
8
Compact 150 Watt LED Monolight - USER MANUAL
9
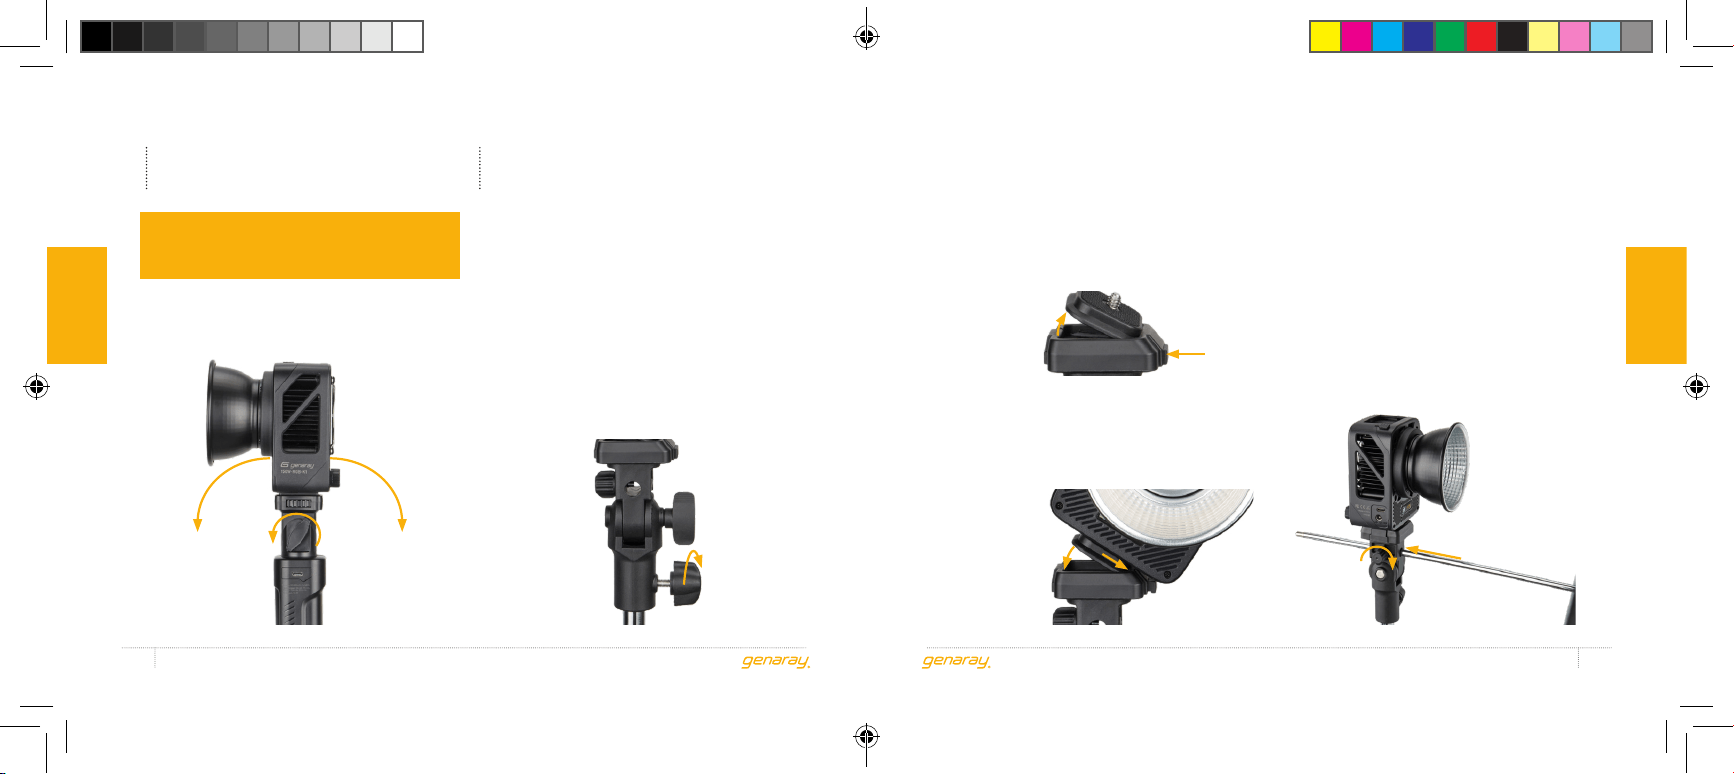
ADJUSTING THE TILT
USING THE TILT
ADAPTER
Important!
Always hold the light with one hand
when adjusting the tilt angle.
Turn the tilt lock counterclockwise to
loosen the tilt adapter. Adjust the tilt
angle and retighten the tilt lock.
The tilt adapter is compatible with any light
stand or wall mount with a 5/8-inch baby
pin stud. Attach the light to the tilt adapter
for light stand mounting. Without the
handle, the light must run on AC power.
To mount the light to the tilt adapter:
1. Loosen the locking knob and place
the receiver onto the mounting stud
until it’s completely inserted. Tighten
the locking knob until secure.
2. Press the quick release lock to remove
the quick release plate from the adapter
and attach it to the base of the light.
3. Angle the quick-release plate into
lock side of the clamp and press
down on the opposite side until
the plate snaps into place.
The tilt adapter has a +90° to -90° range
and is secured by a rosette joint that
won’t slip once the light angle is set.
Loosen the tilt lock, adjust the angle,
and retighten the tilt lock until secure.
Use an umbrella to soften and diffuse
the light and eliminate hot spots. Slide
the handle into the umbrella mount and
tighten the umbrella lock until secure.
instructions
instructions
150W-xxx-K1_Manual.indd 8-9150W-xxx-K1_Manual.indd 8-9 5/7/26 5:05PM5/7/26 5:05PM
Compact 150 Watt LED Monolight - USER MANUAL
10
Compact 150 Watt LED Monolight - USER MANUAL
11
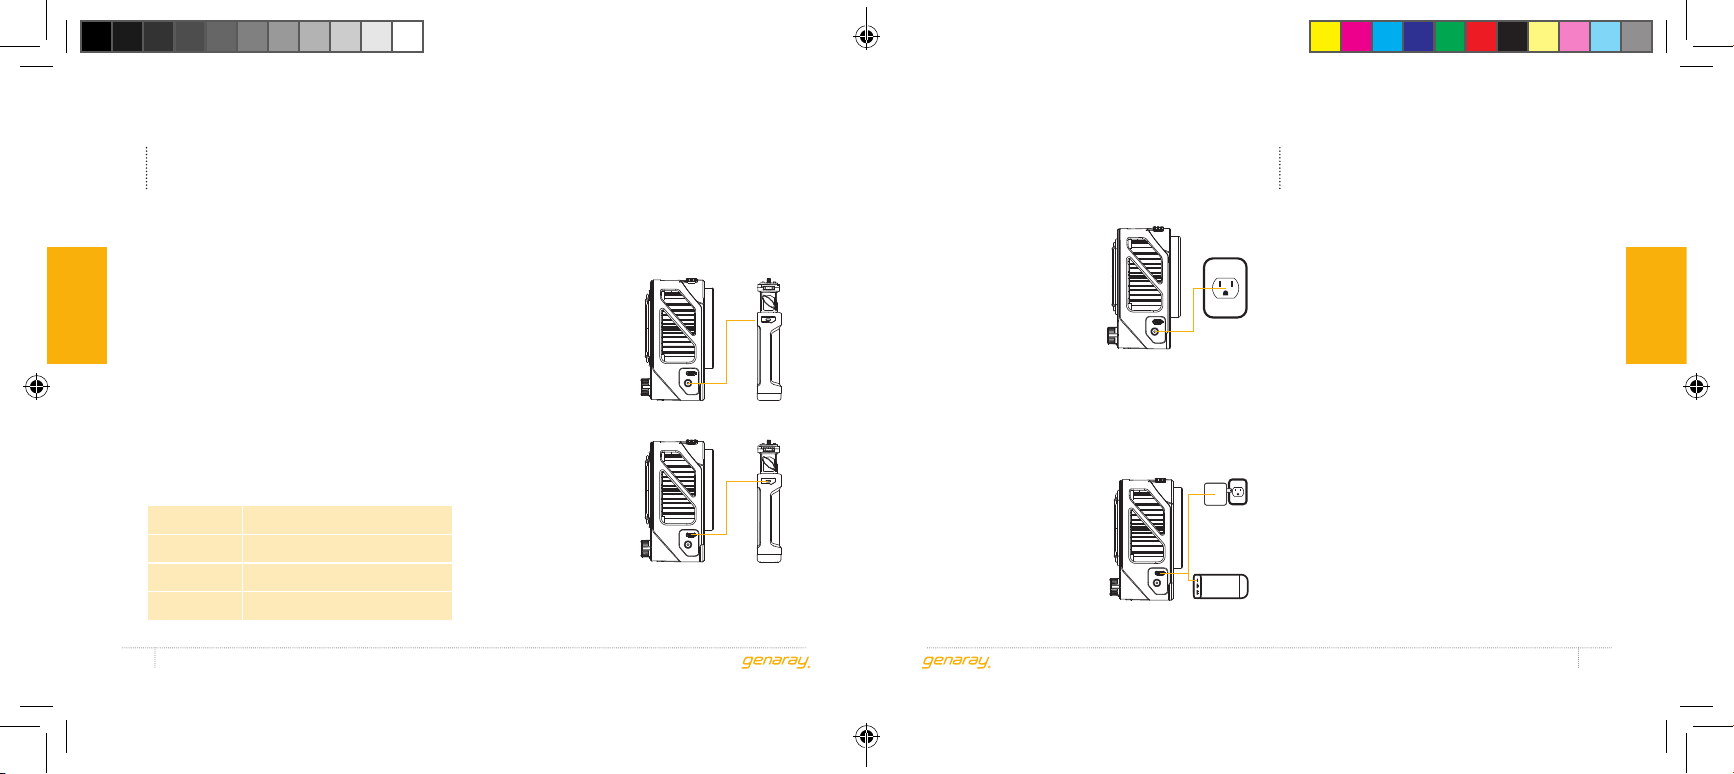
CONNECTING THE LIGHT
TO A POWER SOURCE
Option 1:
Connect the light
to the handle
with the included
barrel connector
power cord.
Option 2:
Connect the light
to the handle with
the included USB-C
cable. Press the
battery check
button and then
turn on the light.
CHARGING THE HANDLE
The handle houses a Li-ion battery that
can be recharged via the USB-C port
with a wall charger or power bank.
Press the battery check button to
see the handle’s remaining charge.
Each LED indicator represents
25% of the battery’s power.
When only one indicator light is illuminated,
the battery has 25% or less of its charge
remaining. Turn off the light and recharge
the battery or connect the light to an
alternative power source to continue use.
POWERING THE LIGHT
•••• 100% to 75%
•••
75% to 50%
•• 50% to 25%
• 25% to 0%
Option 3:
Plug the AC power
adapter into an
outlet and plug the
barrel connector
directly into the light’s
DC barrel port.
This option allows you to mount the light
directly onto a tripod or light stand without
the handle. The combined length of the
power cords allows you to move the light
up to 14 feet away from the power source.
Option 4:
Connect the light
to a USB wall
charger, battery,
or power bank
with the included
USB-C cable.
LIGHT OPERATION
In all operating modes:
· Turn the DIM button to adjust
the brightness from 1% to
100% in 1% increments.
· Turn the SET button to adjust the
parameter indicated by the cursor.
· Press the DIM button to change
the operating mode.
· Press the SET button to move the
cursor to the next editable parameter.
instructions
instructions
150W-xxx-K1_Manual.indd 10-11150W-xxx-K1_Manual.indd 10-11 5/7/26 5:06PM5/7/26 5:06PM
Compact 150 Watt LED Monolight - USER MANUAL
12
Compact 150 Watt LED Monolight - USER MANUAL
13
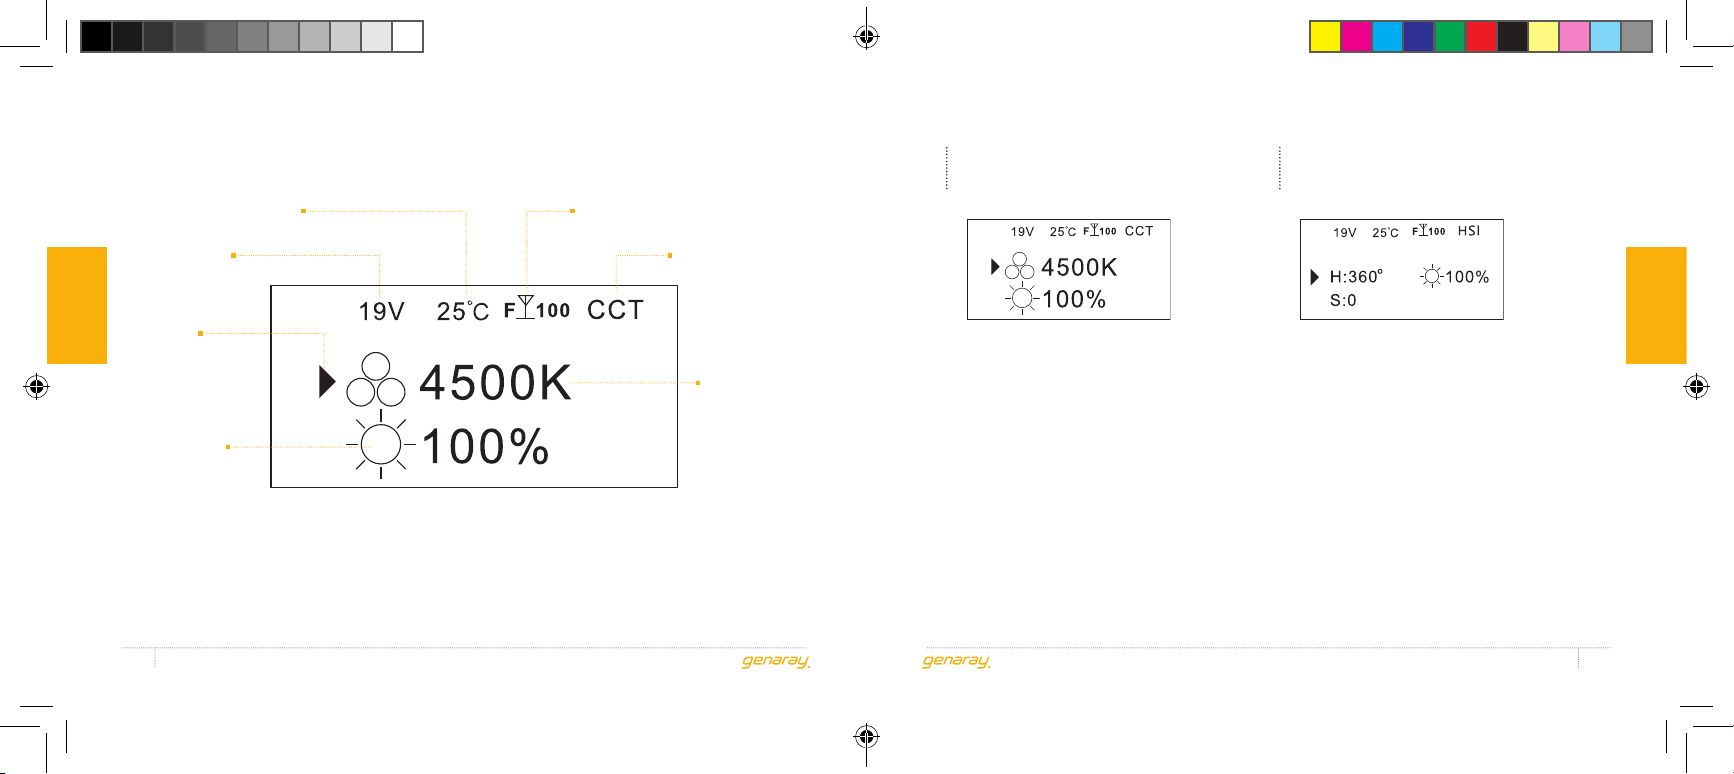
CCT (correlated color temperature)
mode allows you to adjust the color
temperature from 2700 to 6500 K.
Use CCT mode to match the color
temperature of ambient lighting or other
light fixtures in a multi-light setup.
· Press the DIM button repeatedly
until CCT appears at the top
right of the screen.
· Turn the SET button to adjust the color
temperature from 2700 to 6500 K.
· Turn the DIM button to
adjust the brightness.
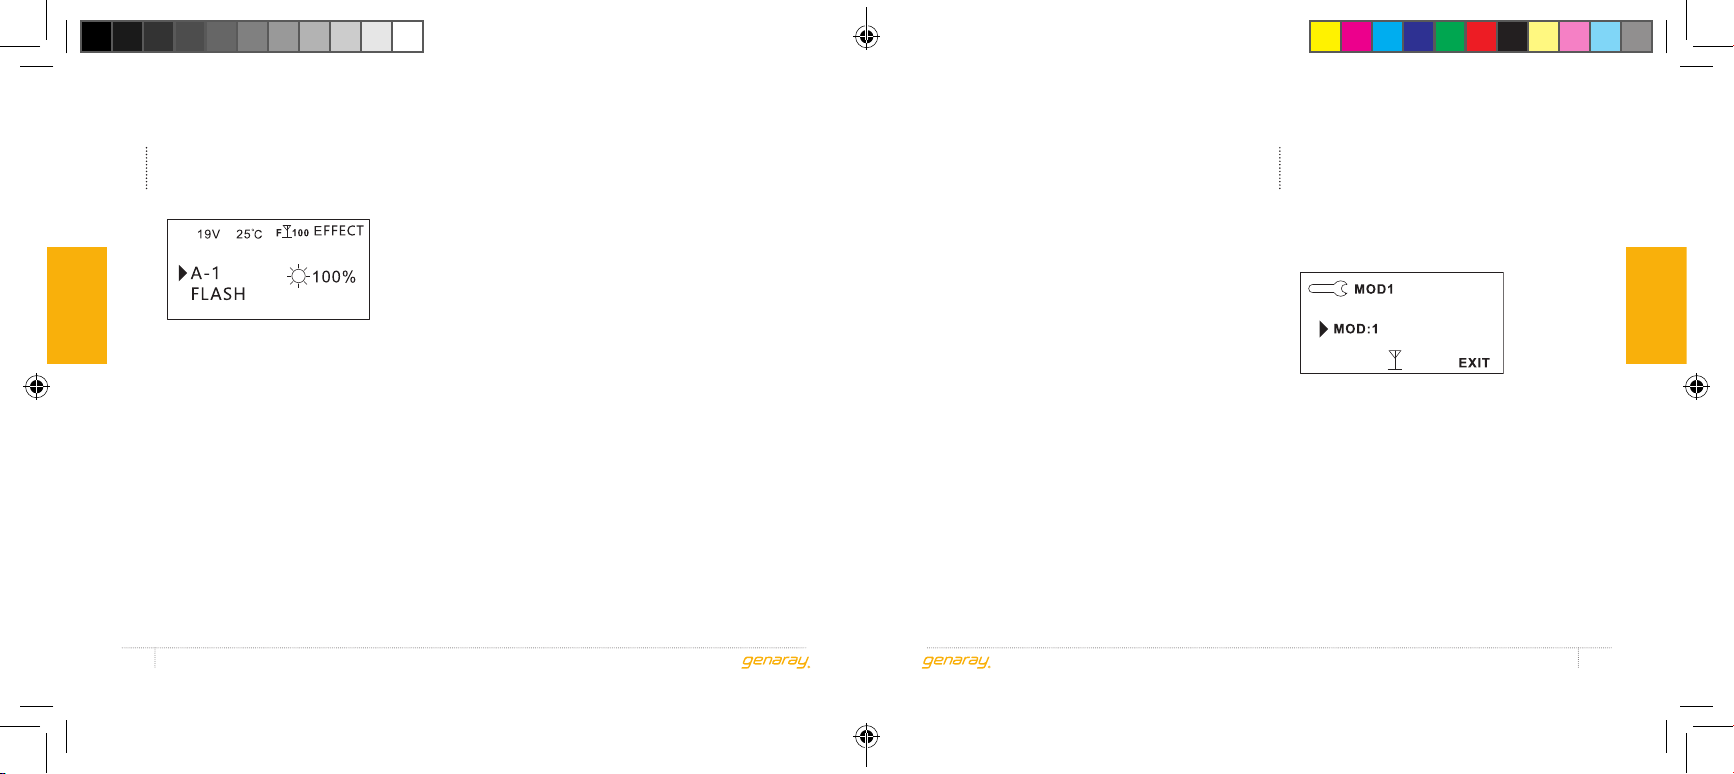
HSI MODE
(150W-RGB-K1 ONLY)
HSI (hue, saturation, intensity) mode allows
you to scroll through the entire 360° color
wheel and adjust the saturation level.
· Press the DIM button repeatedly until HSI
appears at the top right of the screen.
· When the cursor is pointed to Hue,
turn the SET button to adjust the
hue to a specific value on the color
wheel in 1° increments, or until the
hue looks like the desired color.
· Press the SET button to move the
cursor to saturation, and adjust
the hue’s saturation from 100%
(full color) to 0% (white).
CCT MODE
instructions
instructions
Input power
Cursor
Operating mode
indicator
Main display
Brightness /
Wireless
indicator
LCD Screen
Operating temperature Mode/Group/Channel indicator
150W-xxx-K1_Manual.indd 12-13150W-xxx-K1_Manual.indd 12-13 5/7/26 5:06PM5/7/26 5:06PM
Compact 150 Watt LED Monolight - USER MANUAL
14
Compact 150 Watt LED Monolight - USER MANUAL
15
150W-RGB-K1 LIST OF EFFECTS
A-1 Flash
A-2 Fast Flash
A-3 TV Screen
B-1 Candle
B-2 Flame 1
B-3 Flame 2
C-1 Police
C-2 Ambulance
C-3 Fire Truck
D-1 Strobe Light 1
D-2 Strobe Light 2
D-3 Strobe Light 3
E-1 Chase Slow
E-2 Chase Mid
E-3 Chase Fast
F-1 Firework 1
F-2 Firework 2
F-3 Firework 3
G-1 Club 1
G-2 Club 2
G-3 Romantic
H-1 Music
H-2 Wave 1
H-3 Wave 2
Press and hold the SET button for two
seconds. The Control screen will appear.
After 15 seconds of inactivity, the
control screen automatically closes,
implements the changes, and returns
to the most recently used screen.
CONTROL MENU SETTINGSEFFECTS MODE
The 150W-RGB-K1 is preset with 24
animated lighting effects. The 150W-BI-K1
is preset with six animated effects.
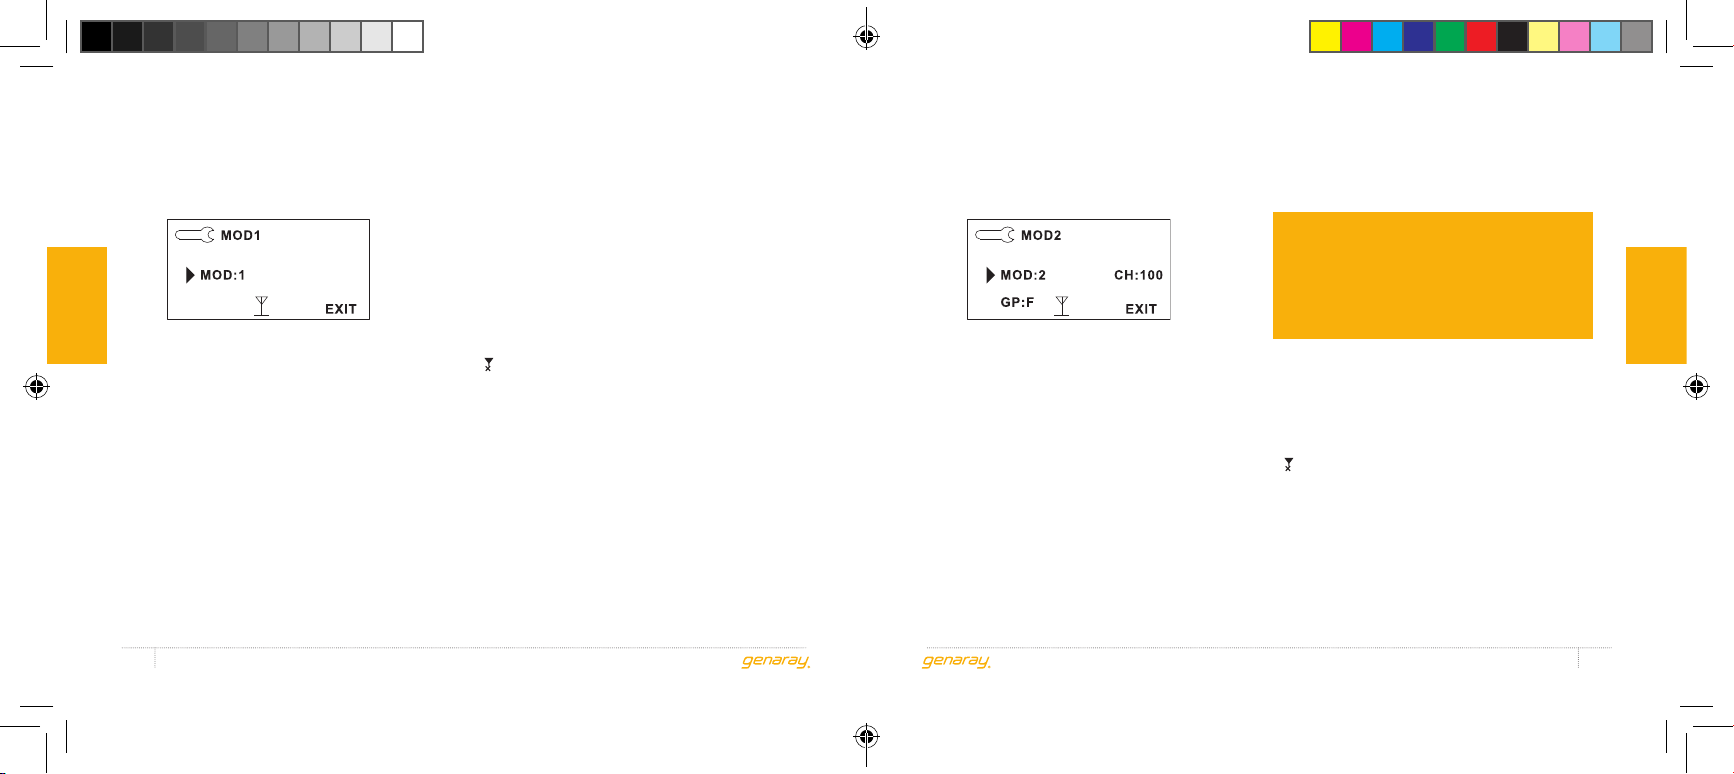
· Press the DIM button repeatedly until EFF
appears at the top right of the screen.
· Turn the SET button to select
an effect. The effect begins to
play when it’s selected.
· Turn the DIM button to
adjust the brightness.
The effects can be selected from
the back control panel on the light
and via the LEDLYD app.
For instructions for controlling the
effects via the LEDLYD app, download
the app’s user manual at Genaray.com.
150W-BI-K1 LIST OF EFFECTS
A-1 Flash
A-2 Flash Fast
A-3 TV Screen
D-1 Strobe Light 1
D-2 Strobe Light 2
D-3 Strobe Light 3
instructions
instructions
150W-xxx-K1_Manual.indd 14-15150W-xxx-K1_Manual.indd 14-15 5/7/26 5:06PM5/7/26 5:06PM
Compact 150 Watt LED Monolight - USER MANUAL
16
Compact 150 Watt LED Monolight - USER MANUAL
17
MOD 2
Activates channel and group selection so the
light can be used in a multi-light setup and
controlled wirelessly from the LEDLYD app.
Press the SET button to move the cursor to
select a parameter. When the parameter is
selected, turn the SET button to adjust it.
MOD: Selects Mod 1 or Mod 2.
CH: Selects channel 1-100.
GP: Select group A-F.
The selected channel and group
will be displayed on the main
screen in all operating modes.
Important!
For wireless control of the light when
operating in Mod 2, make sure the
LEDLYD app is set to the same channel
and group as the light. See Connecting
the Light to the LEDLYD App below.
Wireless: Turns wireless connectivity on
and off. The antenna icon indicates the
light can accept a wireless signal and
connect to the LEDLYD app. Turn the
SET button to disconnect from LEDLYD
app. An “x” will appear on the antenna
( ), indicating that the light can only be
controlled via the onboard controls.
Exit: Select Exit and turn the SET
button to accept the changes made on
this screen. The light will reset with
the implemented changes and return
to the most recently used screen.
MOD 1
The light operates as a standalone unit. It
can be controlled from the light’s onboard
controls or wirelessly from the LEDLYD app.
Press the SET button to move the cursor to
select a parameter. When the parameter is
selected, turn the SET button to adjust it.
MOD: Selects Mod 1 or Mod 2.
Wireless: Turns wireless connectivity on
and off. The antenna icon indicates the
light can accept a wireless signal and
connect to the LEDLYD app. Turn the SET
button to disconnect from the LEDLYD
app. An “x” will appear on the antenna
( ), indicating that the light can only be
controlled via the onboard controls.
Exit: Select Exit and turn the SET
button to accept the changes made on
this screen. The light will reset with
the implemented changes and return
to the most recently used screen.
instructions
instructions
150W-xxx-K1_Manual.indd 16-17150W-xxx-K1_Manual.indd 16-17 5/7/26 5:06PM5/7/26 5:06PM
Compact 150 Watt LED Monolight - USER MANUAL
18
Compact 150 Watt LED Monolight - USER MANUAL
19
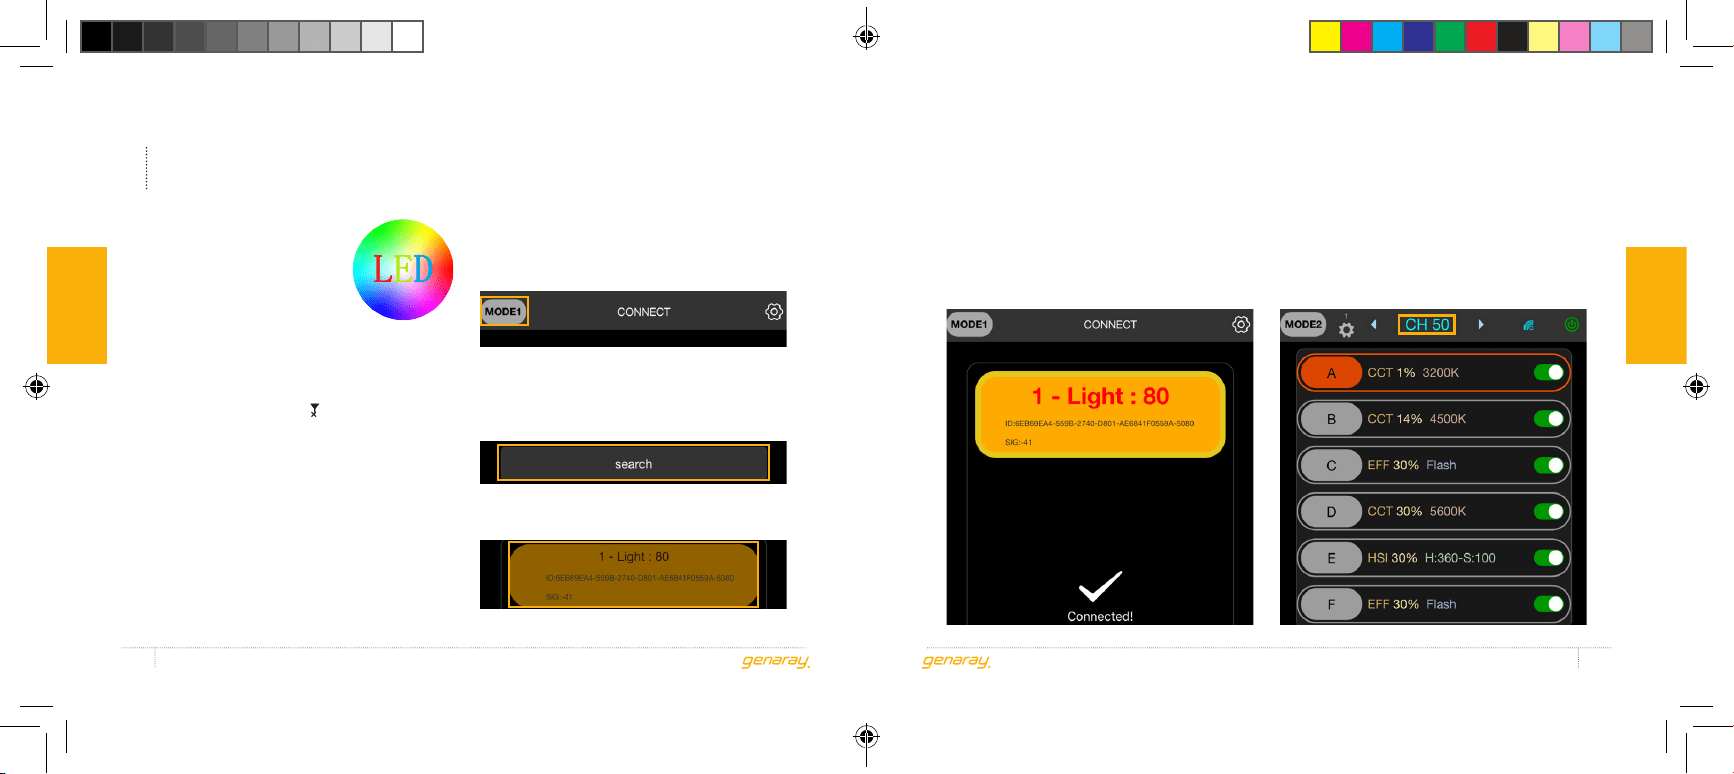
When the connection is successful, the
connected icon will appear with a check
mark and the app’s operating interface
will open.
In MOD 2: Select the light’s channel
number at the top of the page
by tapping on the arrows and
tap the light’s group letter.
CONNECTING TO THE
LEDLYD APP
1. Download the LEDLYD
app from App Store
or Google Play.
2. Download the LEDLYD
app user manual
from the product page
on Genaray.com
3. In the light’s control menu, set the
wireless icon to active. If the wireless
icon has an “x” on it ( ), go to the
Control
Menu Settings
section above to activate
the light’s wireless capabilities.
4. Turn on Bluetooth in your
mobile device’s settings.
5. Turn on the light.
6. In the light’s Control Menu Settings,
select MOD 1 or MOD 2. In MOD 2
set the light’s channel and group.
7. Open the LEDLYD app.
8. The app opens to a search page. Tap
the top button to select MOD 1 or MOD
2 to match the light’s MOD setting.
9. In MOD 1: If the app doesn’t search for
the light automatically, tap the Search
button.
Tap on the light when it appears.
instructions
instructions
150W-xxx-K1_Manual.indd 18-19150W-xxx-K1_Manual.indd 18-19 5/7/26 5:06PM5/7/26 5:06PM
Compact 150 Watt LED Monolight - USER MANUAL
20
Compact 150 Watt LED Monolight - USER MANUAL
21
PRODUCT
SPECIFICATIONS
LIGHT FIXTURE
LED Chip Type: BI: COB
RGB: RGB Light Engine
Beam Angle: 45° with reflector and 120° without
Color Temperature: 2700 to 6500 K
Color Accuracy Standard:
Bi-color: CRI: 97.5 / TLCI: 99
RGB: CRI: 97.8 / TLCI: 99
Cooling System: Active, fan
Dimming: Yes, 1 - 100%
Display: LDC
Housing Material: ABS plastic
Light Intensity @1 m: Bi-color: 16,800 lx
RGB: 8,480 lx
Expected Lamp Life: 30,000 to 50,000 hr.
Dimensions :
Light (H ×W × D): 4.3 × 3.1 × 2.8 in. (11 × 8 × 7.1 cm)
Reflector (
× D): 3.7 × 2.1 in. (9.3 × 5.4 cm)
Weight (with Reflector):1.2 lb. (562 g)
CONNECTORS
Battery Plate: No
Power Input Connector: Barrel, USB-C
DMX Connector: No
Service Connector: No
MOUNTING
Fixture Mount: 1/4-20 female
Battery Handle: Top mount: 1/4-20 male
Base: 1/4-20 female
Tilt Adapter: Top mount: 1/4-20 male
Base: baby receiver
REMOTE OPERATION
Remote Control Type: Wireless
Wireless Range : 35 ft. (10.7 m)
POWER AND I/O
Power Source: AC to DC adapter (included)
Battery handle
Inputs / Outputs: 100 to 240 V, 50/60 Hz, 2.7 A
24 V, 6.25 A (150 W)
Battery : 77 Wh
Input Power: 12 to 24.0 V DC
Included Adapter / Cable: USB Type-C to
USB Type-C, Barrel to barrel
Max Power Consumption: USB-C: 100 W
DC: 150 W
Power Pass-Thru: No
Inline Switch: No
BATTERY HANDLE
Output: USB-C: 5V/3A, 9V/3A, 12V/3A, 15V/3A,
20V/5A (Max 100 W)
DC: 16.8 (Output only)
Battery : 77 Wh
Battery Chemistry: Li-ion
Material of Construction: ABS plastic
Color: Black
Dimensions: 9.3 × 1.9 × 1.9 in. (23.6 × 4.8 × 4.8 cm)
sPecifications
sPecifications
150W-xxx-K1_Manual.indd 20-21150W-xxx-K1_Manual.indd 20-21 5/7/26 5:06PM5/7/26 5:06PM
ONE-YEAR LIMITED WARRANTY
This Genaray product is warranted to the original purchaser to be free from defects in materials and
workmanship under normal consumer use for a period of one (1) year from the original purchase date
or thirty (30) days after replacement, whichever occurs later. Genaray’s responsibility with respect
to this limited warranty shall be limited solely to repair or replacement, at Genaray’s discretion, of
any product that fails during normal use of this product in its intended manner and in its intended
environment. Inoperability of the product or part(s) shall be determined by Genaray. If the product
has been discontinued, Genaray reserves the right to replace it with a model of equivalent quality and
function.
This warranty does not cover damage or defect caused by misuse, neglect, accident, alteration, abuse,
improper installation or maintenance. EXCEPT AS PROVIDED HEREIN, GENARAY MAKES NEITHER
ANY EXPRESS WARRANTIES NOR ANY IMPLIED WARRANTIES, INCLUDING BUT NOT LIMITED TO
ANY IMPLIED WARRANTY OF MERCHANTABILITY OR FITNESS FOR A PARTICULAR PURPOSE. This
warranty provides you with specific legal rights, and you may also have additional rights that vary from
state to state.
To obtain warranty coverage, contact the Genaray Customer Service Department to obtain a return
merchandise authorization (“RMA”) number, and return the defective product to Genaray along with the
RMA number and proof of purchase. Shipment of the defective product is at the purchaser’s own risk
and expense.
For more information, or to arrange service, visit www.genaray.com or contact us at info@genaray.com.
© 2026 Genaray. All Rights Reserved.
150W-xxx-K1_Manual.indd 22-23150W-xxx-K1_Manual.indd 22-23 5/7/26 5:06PM5/7/26 5:06PM
GG1
150W-xxx-K1_Manual.indd 24150W-xxx-K1_Manual.indd 24 5/7/26 5:06PM5/7/26 5:06PM

FCC Warning
This device complies with part 15 of the FCC Rules. Operation is subject to the following two conditions:
(1) This device may not cause harmful interference, and (2) this device must accept any interference
received, including interference that may cause undesired operation.
Any Changes or modifications not expressly approved by the party responsible for compliance could
void the user's authority to operate the equipment.
Note: This equipment has been tested and found to comply with the limits for a Class B digital device,
pursuant to part 15 of the FCC Rules. These limits are designed to provide reasonable protection
against harmful interference in a residential installation. This equipment generates uses and can radiate
radio frequency energy and, if not installed and used in accordance with the instructions, may cause
harmful interference to radio communications. However, there is no guarantee that interference will not
occur in a particular installation. If this equipment does cause harmful interference to radio or television
reception, which can be determined by turning the equipment off and on, the user is encouraged to try to
correct the interference by one or more of the following measures:
-Reorient or relocate the receiving antenna.
-Increase the separation between the equipment and receiver.
-Connect the equipment into an outlet on a circuit different from that to which the receiver is
connected.
-Consult the dealer or an experienced radio/TV technician for help.
This equipment complies with FCC radiation exposure limits set forth for an uncontrolled environment.
This equipment should be installed and operated with minimum distance 20cm between the radiator &
your body.