1
OWNERS MANUAL
INSTALLATION, OPERATION, & MAINTENANCE INSTRUCTIONS
®
1128 Sherborn Street ▪ Corona, CA 92879-2089 ▪ (951) 281-1830 ▪ (951) 281-1879
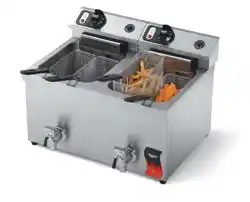
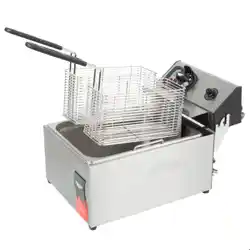
ELECTRIC FRYERS
PLEASE RETAIN THIS MANUAL FOR FUTURE REFERENCE
IMPORTANT
Electrical wiring from the electric meter, main control box or service outlet to appliance must be
electrically grounded in accordance with local codes, or in the absence of service of local codes, with the National
Electrical Code ANSI/NFPA 70-(latest edition). Canada, conform with Canadian Electrical Code CSA-C22.2.
IMPORTANT
Installing, Operating and Service Personnel:
Installation of the equipment should be performed by qualified, certified, licensed and/or authorized
personnel who are familiar with and experienced in state/local installation codes. Operation of the equipment should
be performed by qualified or authorized personnel who have read this manual and are familiar with the function of
the equipment. Service of the equipment should be performed by qualified personnel who are knowledgeable with
Imperial Ranges.
WARNING: Improper installation, adjustment,
alteration, service or maintenance can cause property
damage, injury or death. Read the installation,
operating and maintenance instructions thoroughly
before installing or servicing this equipment.
FOR YOUR SAFETY
DO NOT STORE OR USE GASOLINE OR OTHER
FLAMMABLE VAPORS OR LIQUIDS IN THE
VICINITY OF THIS OR ANY OTHER
APPLIANCE.
SHIPPING DAMAGE CLAIM PROCEDURE
The equipment is inspected & crated carefully by skilled personnel before leaving factory. The transportation company assumes
full responsibility for safe delivery upon acceptance of this equipment. If shipment arrives damaged:
1. Visible loss or damage: Note on freight bill or express delivery and have signed by person making delivery.
2. File claim for damages immediately: Regardless of extent of damages.
Concealed loss or damage: If damage is noticed after unpacking, notify transportation company immediately and file “Concealed
Damage” claim with them. This should be done within fifteen (15) days from date delivery is made to you. Retain container for
inspection
2
INSTALLATION INSTRUCTIONS:
DO NOT install the fryer next to any open flame section of a broiler, range or any other appliance. The
fryer should be placed in an area which is accessible for proper operation and servicing. The area around the fryer
must be kept clear of combustible materials.
CLEARANCE COMBUSTIBLE NON-COMBUSTIBLE
Sides 6” 0”
Rear 6” 0”
Floor 6” 6”
Installation on non-combustible floor only shall be with factory supplied legs or casters.
ELECTRICAL CONNECTIONS
A terminal block is provided on the back of the appliance for connecting to the power supply. Follow the
electrical schematic diagram located on the rear panel of the appliance when making connections to the supply lines.
VENTILATION:
Proper ventilation is very important for the proper function of your fryer as well as to remove unwanted
vapors and products of combustion. To keep your warranty in force, a proper ventilation system must be employed.
LEVELING:
After setting in position, level the fryer front to back and left to right. If it is not leveled, the fryer may not
function properly.
SET UP:
1. Ensure power switch is in the “OFF” position and thermostat is “OFF” prior to filling the vessel.
2. Fill the frypot with oil to the bottom OIL LEVEL line located on the rear of the frypot. This will allow
for oil expansion as heat is applied. Do not fill with cold oil any higher than the bottom line; overflow
may occur as heat expands the oil.
3. All fryers must be hardwired using flexible conduit to the terminal block located on the rear of the
fryer. These fryers should be wired to NEC specifications. Hardwired units must include installation
of restraint devices.
4. Ensure that the POWER SWITCH is turned “ON”.
5. Ensure that the oil level is at the top OIL LEVEL line when the oil is at its cooking temperature. It
May be necessary to add oil or shortening to bring the level up to the proper mark, after it has reached
cooking temperature.
.
WARNING
ELECTRICAL AND GROUNDING CONNECTIONS MUST COMPLY WITH THE APPLICABLE PORTIONS
OF THE NATIONAL ELECTRICAL CODE ANSI/NFPA 70(LATEST EDITION) AND/OR OTHER LOCAL
CODES.
WARNING
DISCONNECT ELECTRICAL POWER SUPPLY AND PLACE A TAG AT THE DISCONNECT SWITCH TO
INDICATE THAT YOU ARE WORKING ON THE CIRCUIT.
3
OPERATION INSTRUCTIONS:
PREPARATION FOR USE: New units have a coating of oil on the interior of the vessel. Remove this coating
with hot soapy water, washing soda, or any other grease dissolving liquid. Rinse thoroughly and drain until all
residues are removed. Wipe dry. Clean the baskets, crumb screen and clean-out rod.
DAILY SHUT-DOWN:
At the end of the day turn the thermostat to “OFF” position and the power switch to “OFF” position. Filter
the oil in all fryers.
CLEANING:
For continued performance efficiency and longevity of your fryer it is essential to carry out a good
maintenance program.
DAILY
1. Remove and wash thoroughly all “loose” parts (basket hanger, baskets, crumb screens, etc.)
2. Wipe clean all exterior and interior accessible surfaces and parts.
3. Filter the liquid oil/shortening at the end of the day, replace if necessary. If fryer is under heavy use, filter
more often during the day.
WEEKLY
1. Shut down the fryer
2. Drain the fryer in a filter pan or steel container. Flush out sediments at the bottom of the vessel with liquid
oil.
3. Close the drain valve and fill the vessel with a mixture of boil-out solution and water.
4. Turn on the elements.
5. When the solution starts to boil, turn off the thermostat and let the vessel soak to soften deposits and/or
carbon spots. (Approximately 1 hour)
6. Drain off solution, scrub the insides with brush and rinse thoroughly.
7. Repeat the cleaning procedure, if necessary.
8. Wipe dry with soft towels and refill with clean oil/shortening.
CAUTION
Elements shall not be “ON” when the vessel is empty. During testing, fill the vessel with liquid (oil or water) till above the
elements.
WARNINGS
Hot oil and hot surfaces can cause severe burns. Use caution when operating the fryer. Do not attempt to move the
fryer filled with hot oil or shortening. Severe burns may be caused. Drain hot oil in metal containers, do not use
plastic buckets or glass containers.
WARNING
All water must be removed before adding oil or shortening. Not doing so can result in splattering of hot oil.
4
STAINLESS STEEL:
All stainless steel body parts should be wiped regularly with hot soapy water during the day and with a
liquid cleaner designed for this material at the end of each day. DO NOT USE steel wool. Abrasive cloths, cleansers
or powders to clean stainless surface. If it is necessary to scrape stainless steel to remove encrusted materials, soak
in hot water to loosen the material, then use a wood or nylon scraper. DO NOT USE a metal knife, spatula, or any
other metal tool to scrape stainless steel. Scratches are almost impossible to remove.
PREVENTIVE MAINTENANCE:
Periodically have a qualified service personnel check and adjust all the control components.
CHECKING AND CALIBRATING THERMOSTAT:
CHECKING:
1. Fill the vessel with liquid oil/shortening up to the “oil level” marking.
2. Turn the thermostat and set @ 325°F.
3. Set a thermometer in the oil and let the fryer cycle few times before reading the thermometer.
4. If the temperature differential between the thermostat and the thermometer is more that 5°F, recalibrate the
thermostat.
CALIBRATING:
1. Pull the thermostat knob out. Use a screw driver to turn the trim screw inside the thermostat stem.
2. Turn counterclockwise to increase and clockwise to decrease the temperature. (Do not turn the stem while
turning the screw). Re-install the knob and check to see if the thermostat setting and the thermometer
reading are the same.
REMOVAL AND REPLACEMENT OF PARTS
Parts replacement should be done be certified or factory trained personnel only. If service is needed please
contact the local authorized service provider.
FOR SERVICE OR ORDERING PARTS:
Have the following information ready before contacting for service or ordering.
1. Model number and serial number of the fryer
2. Part name and the corresponding part number. Contact the factory service at (951)281-1830 or FAX
(951)281-1879 or any factory authorized service agency and/or parts distributors
WARNING
Shut-off before servicing this equipment.