model number 054-5757-2 | contact us: 1.866.523.5218
IMPORTANT:
Read and follow all safety rules and operating
instructions before using this product.
Instruction
Manual
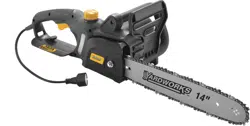
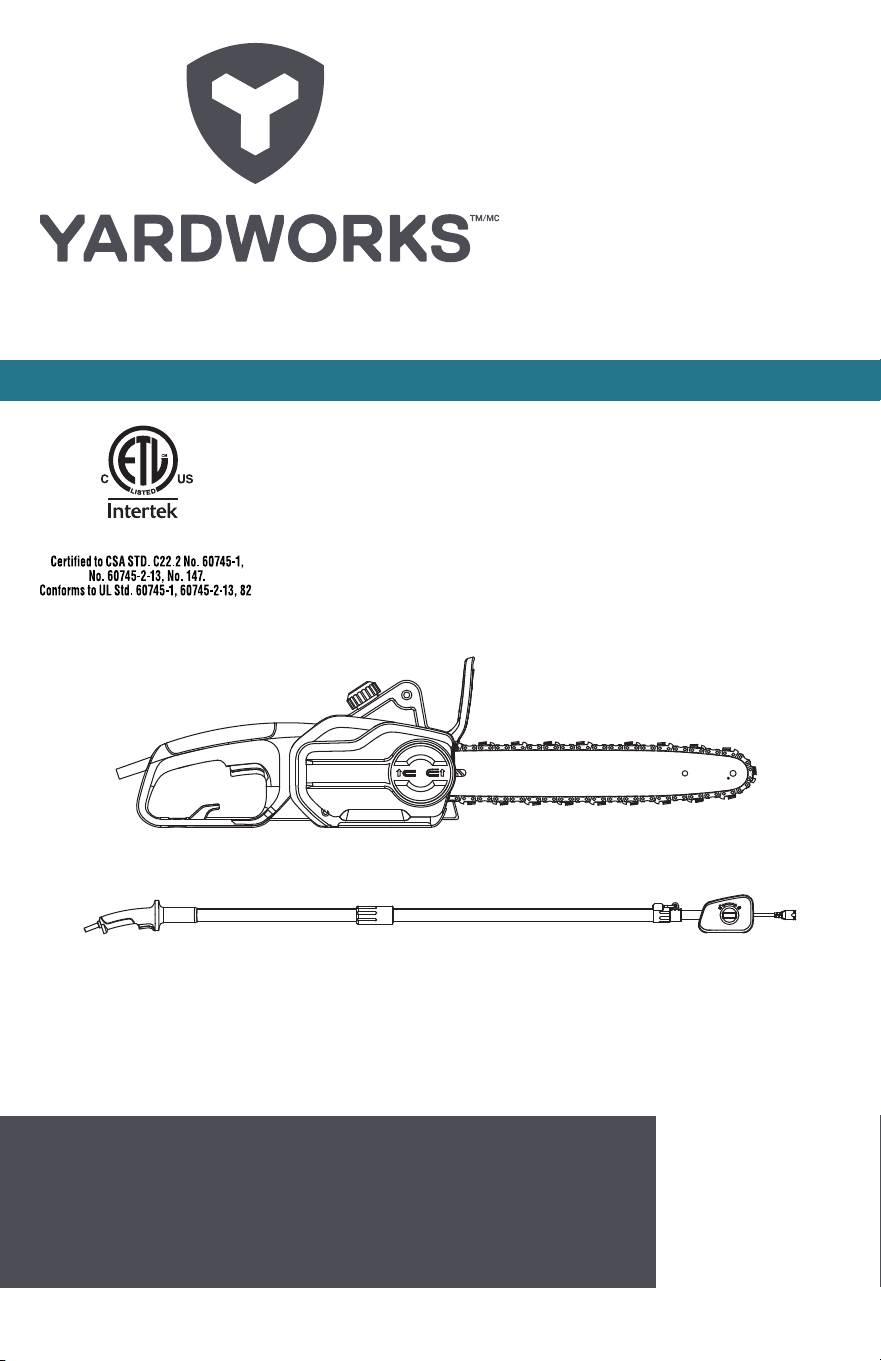
2-in-1 Pole Saw/Chainsaw
3025736

model number 054-5757-2 | contact us: 1.866.523.5218
2
Table of Contents
Technical Specications
TECHNICAL SPECIFICATIONS
Voltage 120 V~ 60 Hz
Rated Power 9 A
Bar Length 10” (254 mm)
Chain Speed 8.5 m/s
Oil Tank Capacity 120 mL
Chain Pitch 3/8” (9.53 mm)
Chain Gauge 0.05” (1.27 mm)
Drive Links 40
Bar Model 10” (25.4 cm) (ES 100SDEA041) (E&S)
Chain Model 10” (25.4 cm) (ES 91VG40E) (E&S)
Replacement Chain 054-5677-2
Weight 10 lb 4 oz (4.65kg)
Protection Class II
Technical Specications 2
General Safety Rules 3
Know Your Chainsaw 13
Accessories 14
Exploded View 15
Parts List 16
Assembly 18
Troubleshooting 33
Symbols 35
Warranty 37
model number 054-5757-2 | contact us: 1.866.523.5218 model number 054-5757-2 | contact us: 1.866.523.5218
3
General Safety Rules
WARNING: Some dust created by power
sanding, sawing, grinding, drilling and
other construction activities contains
chemicals known to cause cancer, birth
defects or other reproductive harm. Some
examples of these chemicals are:
• Lead from lead-based paints;
• Crystalline silica from bricks and
cement and other masonry products;
and
• Arsenic and chromium from
chemically-treated lumber.
Your risk from these exposures varies,
depending on how often you do this type
of work. To reduce your exposure to
these chemicals: work in a well-ventilated
area, and work with approved safety
equipment, such as those dust masks
that are specially designed to lter out
microscopic particles.
GENERAL POWER TOOL SAFETY
WARNINGS
!
WARNING: Read all safety warnings
and instructions. Failure to follow the
warnings and instructions may result in
electric shock, re and/or serious injury.
Save all warnings and instructions for
future reference.
The term power tool in the warnings refer to
your electric (corded) power tool or battery-
operated (cordless) power tool.
1) Work area safety
a) Keep work area clean and well lit.
Cluttered or dark areas invite accidents.
b) Do not operate power tools in
explosive atmospheres, such as in the
presence of ammable liquids, gases
or dust. Power tools create sparks which
may ignite the dust or fumes.
c) Keep children and bystanders
away while operating a power tool.
Distractions can cause you to lose
control.
2) Electrical safety
a) Power tool plugs must match the
outlet. Never modify the plug in any
way. Do not use any adaptor plugs
!
WARNING: This product can expose you to chemicals including lead,
phthalate or bisphenol A which are known to cause cancer, birth defects or
other reproductive harm. Wash your hands after use.
!
WARNING: Read all instructions.
!
WARNING: When using electric gardening appliances, basic safety precautions
should always be followed to reduce the risk of re, electric shock, and personal
injury.
model number 054-5757-2 | contact us: 1.866.523.5218
4
General Safety Rules
with grounded power tools. Unmodied
plugs and matching outlets will reduce
risk of electric shock.
b) Avoid body contact with grounded
surfaces such as pipes, radiators,
ranges and refrigerators. There is an
increased risk of electric shock if your
body is grounded.
c) Do not expose power tools to rain or
wet conditions. Water entering a power
tool will increase the risk of electric shock.
d) Do not abuse the cord. Never use
the cord for carrying, pulling or
unplugging the power tool. Keep cord
away from heat, oil, sharp edges or
moving parts. Damaged or entangled
cords increase the risk of electric shock.
e) When operating a power tool outdoors,
use an extension cord suitable for
outdoor use. Use of a cord suitable for
outdoor use reduces the risk of electric
shock.
f) If operating a power tool in a damp
location is unavoidable, use a
ground fault circuit interrupter (GFCI)
protected supply. Use of an GFCI
reduces the risk of electric shock.
3) Personal safety
a) Stay alert, watch what you are
doing and use common sense when
operating a power tool. Do not use
a power tool while you are tired or
under the inuence of drugs, alcohol
or medication. A moment of inattention
while operating power tools may result in
serious personal injury.
b) Use personal protective equipment.
Always wear eye protection. Protective
equipment such as dust mask, non-
skid safety shoes, hard hat, or hearing
protection used for appropriate conditions
will reduce personal injuries.
c) Prevent unintentional starting. Ensure
the switch is in the off-position before
connecting to power source and/or
battery pack, picking up or carrying
the tool. Carrying power tools with your
nger on the switch or energizing power
tools that have the switch on invites
accidents.
d) Remove any adjusting key or wrench
before turning the power tool on. A
wrench or a key left attached to a rotating
part of the power tool may result in
personal injury.
e) Do not overreach. Keep proper
footing and balance at all times. This
enables better control of the power tool in
unexpected situations.
f) Dress properly. Do not wear loose
clothing or jewellery. Keep your hair,
clothing and gloves away from moving
parts. Loose clothes, jewellery or long
hair can be caught in moving parts.
g) If devices are provided for the
connection of dust extraction and
collection facilities, ensure these are
connected and properly used. Use of
dust collection can reduce dust-related
hazards.
4) Power tool use and care
a) Do not force the power tool. Use the
!
WARNING: Read all safety warnings and instructions. Failure to follow
the warnings and instructions may result in electric shock, re and/or
serious injury.
model number 054-5757-2 | contact us: 1.866.523.5218 model number 054-5757-2 | contact us: 1.866.523.5218
5
General Safety Rules
correct power tool for your application.
The correct power tool will do the job
better and safer at the rate for which it
was designed.
b) Do not use the power tool if the switch
does not turn it on and off. Any power
tool that cannot be controlled with
the switch is dangerous and must be
repaired.
c) Disconnect the plug from the power
source and/or the battery pack from
the power tool before making any
adjustments, changing accessories, or
storing the power tool. Such preventive
safety measures reduce the risk of
starting the power tool accidentally.
d) Store idle power tools out of the reach
of children and do not allow persons
unfamiliar with the power tool or these
instructions to operate the power tool.
Power tools are dangerous in the hands
of untrained users.
e) Maintain power tools. Check for
misalignment or binding of moving
parts, breakage of parts and any other
condition that may affect the power
tool’s operation. If damaged, have
the power tool repaired before use.
Many accidents are caused by poorly
maintained power tools.
f) Keep cutting tools sharp and clean.
Properly maintained cutting tools with
sharp cutting edges are less likely to bind
and are easier to control.
g) Use the power tool, accessories and
tool bits etc., in accordance with
these instructions and in the manner
intended for the particular type of
power tool, taking into account the
working conditions and the work to
be performed. Use of the power tool for
operations different from those intended
could result in a hazardous situation.
5) Service
a) Have your power tool serviced by a
qualied repair person using only
identical replacement parts. This will
ensure that the safety of the power tool is
maintained.
CHAINSAW SAFETY WARNINGS
1. Keep all parts of the body away from
the saw chain when the chainsaw
is operating. Before you start the
chainsaw, make sure the saw chain
is not contacting anything. A moment
of inattention while operating chainsaws
may cause entanglement of your clothing
or body with the saw chain.
2. Always hold the chainsaw with your
right hand on the rear handle and
your left hand on the front handle.
Holding the chainsaw with a reversed
hand conguration increases the risk of
personal injury and should never be done.
3. Hold the power tool by insulated
gripping surfaces only, because the
saw chain may contact hidden wiring
or its own cord. Saw chains contacting a
live wire may make exposed metal parts
of the power tool live and could give the
operator an electric shock.
4. Wear safety glasses and hearing
protection. Further protective
SAVE THESE INSTRUCTIONS!
model number 054-5757-2 | contact us: 1.866.523.5218
6
equipment for head, hands, legs
and feet is recommended. Adequate
protective clothing will reduce personal
injury by ying debris or accidental
contact with the saw chain.
5. Do not operate a chainsaw in a tree.
Operation of a chainsaw while up in a
tree may result in personal injury.
6. Always keep proper footing and
operate the chainsaw only when
standing on xed, secure and level
surface. Slippery or unstable surfaces
such as ladders may cause a loss of
balance or control of the chainsaw.
7. When cutting a limb that is under
tension be alert for spring back. When
the tension in the wood bres is released,
the spring-loaded limb may strike the
operator and/or throw the chainsaw out of
control.
8. Use extreme caution when cutting
brush and saplings. The slender
material may catch the saw chain and
be whipped toward you or pull you off
balance.
9. Carry the chainsaw by the front
handle with the chainsaw switched
off and away from your body. When
transporting or storing the chainsaw
always apply the guide bar cover.
Proper handling of the chainsaw will
reduce the likelihood of accidental
contact with the moving saw chain.
10. Follow instructions for lubricating,
chain tensioning and changing
accessories. Improperly tensioned or
lubricated chain may either break or
increase the chance for kickback.
11. Keep handles dry, clean, and free from
oil and grease. Greasy, oily handles
are slippery and may cause loss of
control.
12. Cut wood only. Do not use chainsaw
for purposes not intended. For
example: do not use chainsaw for
cutting plastic, masonry or non-wood
building materials. Use of the chainsaw
for operations different than intended
could result in a hazardous situation.
13. The use of a residual current device with
a tripping current of 30 mA or less is
recommended.
CAUSES AND OPERATOR PREVENTION
OF KICKBACK
Kickback may occur when the nose or tip of
the guide bar touches an object, or when the
wood closes in and pinches the saw chain in
the cut.
Tip contact in some cases may cause a
sudden reverse reaction, kicking the guide
bar up and back towards the operator.
Pinching the saw chain along the top of the
guide bar may push the guide bar rapidly
back towards the operator.
Either of these reactions may cause you to
lose control of the saw which could result
in serious personal injury. Do not rely
exclusively upon the safety devices built into
your saw. As a chainsaw user, you should
take several steps to keep your cutting jobs
free from accident or injury.
Kickback is the result of tool misuse and/or
incorrect operating procedures or conditions
and can be avoided by taking proper
precautions as given below:
- Maintain a rm grip: thumbs and
ngers encircling the chainsaw
handles, both hands on the saw, and
position your body and arm to allow
you to resist kickback forces. Kickback
General Safety Rules
model number 054-5757-2 | contact us: 1.866.523.5218 model number 054-5757-2 | contact us: 1.866.523.5218
7
forces can be controlled by the operator
if proper precautions are taken. Do not let
go of the chainsaw.
- Do not overreach and do not cut
above shoulder height. This helps
prevent unintended tip contact and
enables better control of the chainsaw in
unexpected situations.
- Only use replacement bars and
chains specied by the manufacturer.
Incorrect replacement bars and chains
may cause chain breakage and/or
kickback.
- Follow the manufacturer’s sharpening
and maintenance instructions for the
saw chain. Decreasing the depth gauge
height can lead to increased kickback.
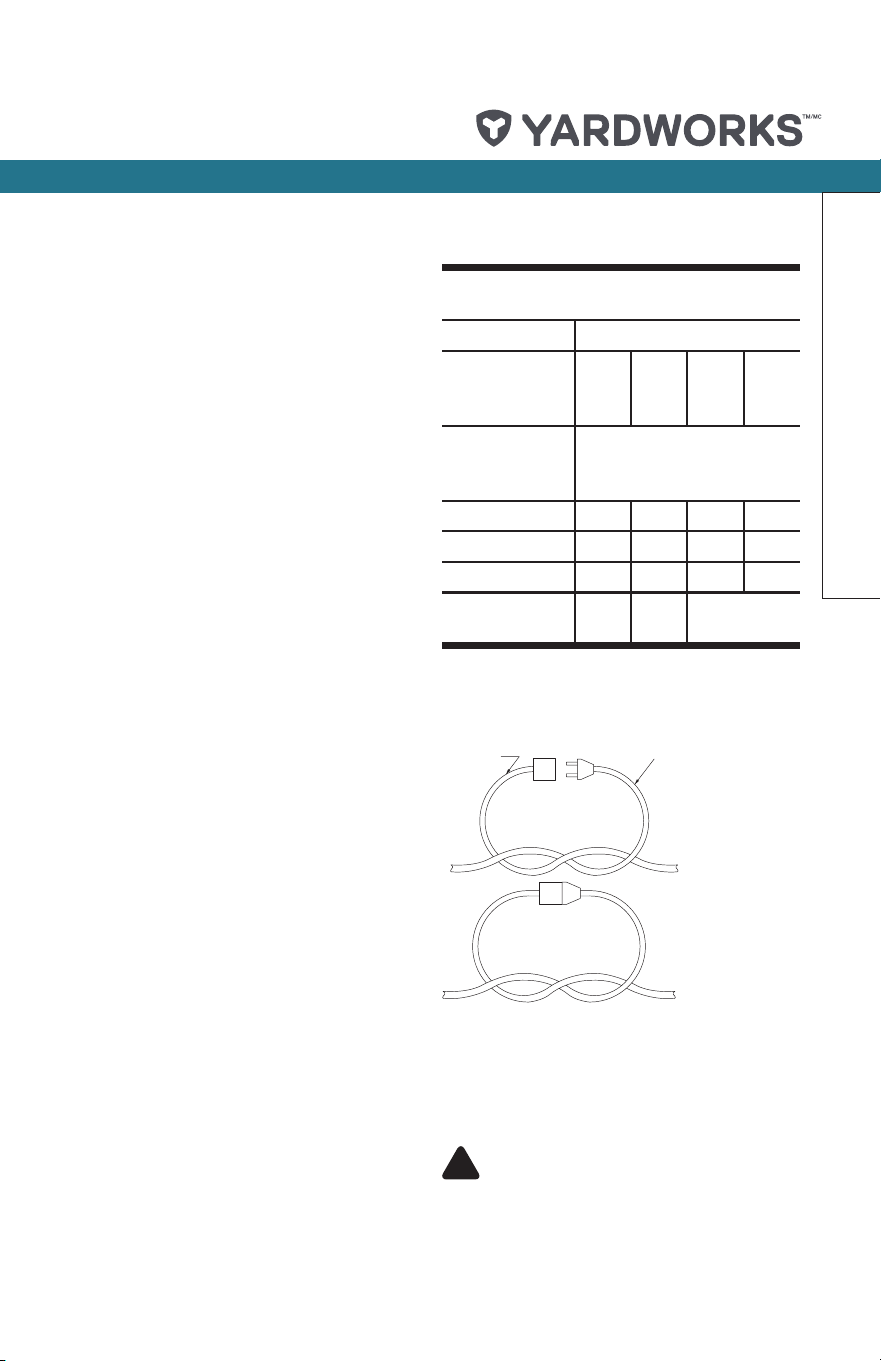
SAFETY RULES FOR EXTENSION CORD
Make sure your extension cord is in good
condition. When using an extension cord,
be sure to use one heavy enough to carry
the current your product will draw. An
undersized extension cord will cause a drop
in line voltage resulting in loss of power
and overheating. Table 1 shows the correct
size to use depending on cord length and
nameplate ampere rating. If in doubt, use the
next heavier gauge. The smaller the gauge
number, the heavier the cord. To reduce the
risk of disconnection of appliance cord from
the extension cord during operation:
I) Make a knot as shown in Figure 1; or
II) Use one of the plug-receptacle retaining
straps or connectors described in this
manual.
Table 1
Minimum gauge for extension cords
Volts Total length of cord
120 V
25’
(7.6 m)
50’
(15.2
m)
100’
(30.5
m)
150’
(45.7
m)
Ampere rating
more than not
more than
AWG
0-6 18 16 16 14
6-10 18 16 14 12
10-12 16 16 14 12
12-16 14 12
Not
recommended
Figure 1
Method of securing extension cord
CORD SET
APPLIANCE CORD
(A) TIE CORD AS
SHOWN
(B) CONNECT PLUG
AND RECEPTACLE
SAFETY WARNINGS FOR CHAINSAW
WITH THE EXTENDED POLE
IMPORTANT SAFETY INSTRUCTIONS
!
WARNING: When using electric
gardening appliances, basic safety
precautions should always be followed to
reduce the risk of re, electric shock, and
personal injury, including the following:
General Safety Rules
model number 054-5757-2 | contact us: 1.866.523.5218
8
!
WARNING: Read all instructions
FOR ALL APPLIANCES
1) Avoid dangerous environment. Don’t
use appliances in damp or wet locations.
2) Don’t use in rain.
3) Keep children away. All visitors should
be kept at a distance from work area.
4) Dress properly. Do not wear loose
clothing or jewellery. They can be caught
in moving parts. Use of gloves and
substantial footwear is recommended
when working outdoors. Wear protective
hair covering to contain long hair.
5) Use safety glasses. Always use eye
protection plus a dust mask if operation is
dusty.
6) Use right appliance. Do not use
appliance for any job except that for
which it is intended.
7) Ground Fault Circuit Interrupter (GFCI)
protection should be provided on the
circuit(s) or outlet(s) to be used for the
gardening appliance. Receptacles are
available having built-in GFCI protection
and may be used for this measure of
safety.
8)
!
WARNING! To reduce the risk of
electric shock, use only with an extension
cord intended for outdoor use, such as an
extension cord of cord type SW-A,
SOW-A, STW-A, STOW-A, SJW-A,
SJOW-A, SJTW-A. or SJTOW-A.
9) Extension Cord — Make sure your
extension cord is in good condition.
When using an extension cord, be
sure to use one heavy enough to carry
the current your product will draw. An
undersized extension cord will cause a
drop in line voltage resulting in loss of
power and overheating. Table 1 shows
the correct size to use depending on cord
length and nameplate ampere rating.
If in doubt, use the next heavier gauge.
The smaller the gauge number, the
heavier the cord. To reduce the risk of
disconnection of appliance cord from the
extension cord during operating:
i) Make a knot as shown in Figure 1; or
ii) Use one of the plug-receptacle retaining
straps or connectors described in this
manual.
10) Avoid Unintentional Starting — Don’t
carry plugged-in appliance with nger
on switch. Be sure switch is off when
plugging in.
11) Don’t Abuse Cord — Never carry
appliance by cord or yank it to
disconnect from receptacle.
Keep cord from heat, oil, and sharp
edges.
12) Don’t grasp the exposed cutting blades or
cutting edges when picking up or holding
the appliance.
13) Don’t Force Appliance. It will do the
job better and with less likelihood of a
risk of injury at the rate for which it was
designed.
14) Don’t Overreach. Keep proper footing
and balance at all times.
15) Stay Alert — Watch what you are
doing. Use common sense. Do not
operate appliance when you are tired.
16) Disconnect Appliance. Disconnect the
appliance from the power supply when
not in use, before servicing, and when
changing accessories such as blades,
and the like.
17) Store Idle Appliances Indoors. When
General Safety Rules
model number 054-5757-2 | contact us: 1.866.523.5218 model number 054-5757-2 | contact us: 1.866.523.5218
9
not in use, appliances should be stored
indoors in
dry, and high or locked-up place out of
reach of children.
18) Maintain Appliance With Care — Keep
cutting edge sharp and clean for
best performance and to reduce the
risk of injury. Follow instructions for
lubricating and changing accessories.
Inspect appliance cord periodically,
and if damaged, have it repaired by
an authorized service facility. Inspect
extension cords periodically and replace
if damaged. Keep handles dry, clean, and
free from oil and grease.
19) Check Damaged Parts — Before
further use of the appliance, a guard
or other part that is damaged should
be carefully checked to determine that
it will operate properly and perform its
intended function. Check for alignment
of moving parts, binding of moving parts,
breakage of parts, mounting, and any
other condition that may affect operation.
A guard or other part that is damaged
should be properly repaired or replaced
by an authorized service centre unless
indicated elsewhere in this manual.
SAVE THESE INSTRUCTIONS
FOR ALL DOUBLE-INSULATED
APPLIANCES
1) Replacement Parts.
When servicing use only identical
replacement parts.
2) Polarized Appliance Connections.
To reduce the risk of electric shock, this
appliance has a polarized plug (one blade is
wider than the other) and will require the use
of a polarized extension cord. The appliance
plug will t into a polarized extension cord
only one way. If the plug does not t fully
into the extension cord, reverse the plug.
If the plug still does not t, obtain a correct
polarized extension cord. A polarized
extension cord will require the use of a
polarized wall outlet. This plug will t into the
polarized wall outlet only one way. If the plug
does not t fully into the wall outlet, reverse
the plug. If the plug still does not t, contact a
qualied electrician to install the proper wall
outlet. Do not change the equipment plug,
extension cord receptacle, or extension cord
plug in any way.
Keep the pole chainsaw a sufcient distance
away from electrical power lines.
WARNING – Do not operate near electrical
power lines. The unit has not been designed
to provide protection from electric shock in
the event of contact with overhead electric
lines. Consult local regulations for safe
distances from overhead electric power lines
and ensure that the operating position is safe
and secure before operating the sawchain
pole pruner.
a) Keep all parts of the body away from the
saw chain. Make sure the switch is off
when clearing jammed material. Saw
chain continues to move after the switch
is turned off. A moment of inattention
while operating the pole pruner may
result in serious personal injury.
b) Carry the pole pruner by the handle
with the saw chain stopped. When
transporting or storing the pole pruner,
always t the saw chain device cover.
Proper handling of the pole pruner will
reduce possible personal injury from the
saw chain.
General Safety Rules
model number 054-5757-2 | contact us: 1.866.523.5218
10
c) Hold the pole pruner by insulated
gripping surfaces only, because the saw
chain may contact hidden wiring or its
own cord. A saw chain contacting a “live”
wire may make exposed metal parts of
the pole pruner “live” and could give the
operator an electric shock.
d) Keep cable away from cutting area.
During operation the cable may be hidden
in shrubs and can be accidentally cut by
the saw chain.
e) Do not use the pole pruner in bad
weather conditions, especially when
there is a risk of lightning. This decreases
the risk of being struck by lightning.
f) To reduce the risk of electrocution, never
use near any electrical power lines.
Contact with or use near power lines may
cause serious injury or electric shock
resulting in death.
g) Always use two hands when operating
the pole pruner. Hold the pole pruner with
both hands to avoid loss of control.
h) Always use head protection when
operating the pole pruner overhead.
Falling debris can result in serious
personal injury.
SAVE THESE INSTRUCTIONS
Instructions concerning the proper
techniques for basic felling, limbing, and
cross-cutting.
1. Felling a tree
When bucking and felling operations are
being performed by two or more persons at
the same time, the felling operations should
be separated from the bucking operation by
a distance of at least twice the height of the
tree being felled. Trees should not be felled
in a manner that would endanger any person,
strike any utility line or cause any property
damage. If the tree does make contact
with any utility line, the company should be
notied immediately.
The chainsaw operator should keep on the
uphill side of the terrain as the tree is likely to
roll or slide downhill after it is felled.
An escape path should be planned and
cleared as necessary before cuts are started.
The escape path should extend back and
diagonally to the rear of the expected line of
fall as illustrated in Figure 2.
Before felling is started, consider the natural
lean of the tree, the location of larger
branches and the wind direction to judge
which way the tree will fall.
Remove dirt, stones, loose bark, nails,
staples and wire from the tree.
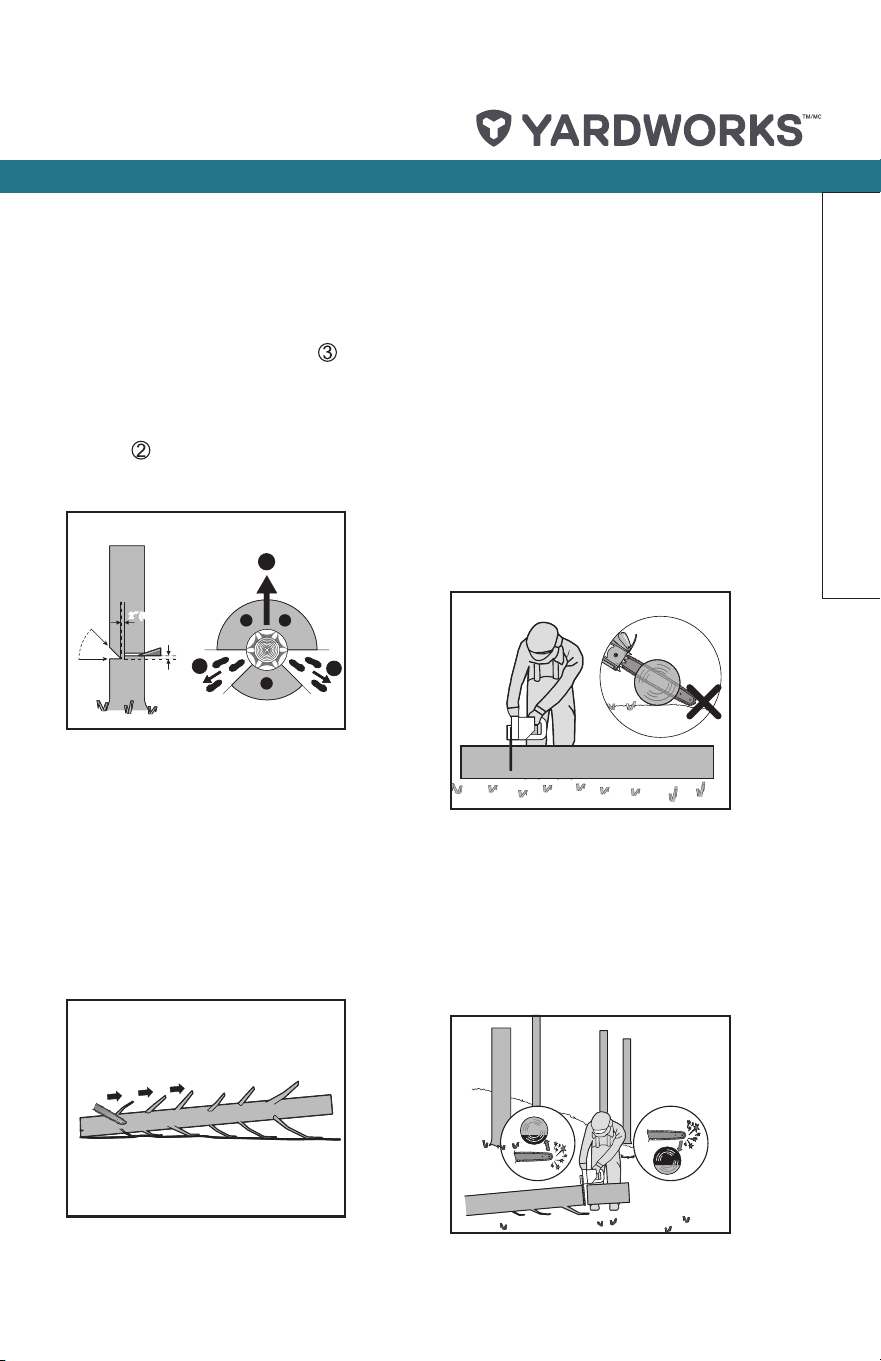
2. Notching undercut
Make the notch 1/3 the diameter of the
tree, perpendicular to the direction of fall
as illustrated in Figure 2. Make the lower
horizontal notching cut (W) rst. This will help
to avoid pinching either the saw chain or the
guide bar when the second notch (X) is being
made.
3. Felling back cut
Make the felling back cut (Y) at least 2” (5
cm) higher than the horizontal notching cut as
illustrated in Figure 2. Keep the felling back
cut parallel to the horizontal notching cut.
Make the felling back cut so enough wood is
left to act as a hinge. The hinge wood keeps
the tree from twisting and falling in the wrong
direction. Do not cut through the hinge.
As the felling gets close to the hinge, the tree
should begin to fall. If there is any chance
that the tree may not fall in desired direction
or it may rock back and bind the saw chain,
General Safety Rules
model number 054-5757-2 | contact us: 1.866.523.5218 model number 054-5757-2 | contact us: 1.866.523.5218
11
stop cutting before the felling back cut is
complete and use wedges of wood, plastic or
aluminium (Z) to open the cut and drop the
tree along the desired line of fall ( ).
When the tree begins to fall, remove the
chainsaw from the cut, stop the motor, put
the chainsaw down, then use the retreat path
planned ( ). Be alert for overhead limbs
falling and watch your footing.
3
2
2
W
Y
Z
X
2˝ (5 cm)
1
1
1
2˝ (5 cm) 2˝ (5 cm)
2
2/3
1
1/3
1
2
2/3
1/3
Figure 7
Figure 5
Figure 6
Figure 2
Figure 3
Figure 4
4. Limbing a tree
Limbing is removing the branches from
a fallen tree. When limbing, leave larger
lower limbs to support the log off the
ground. Remove the small limbs in one cut
as illustrated in Figure 3. Branches under
tension should be cut from the bottom up to
avoid binding the chainsaw.
3
2
2
W
Y
Z
X
2˝ (5 cm)
1
1
1
2˝ (5 cm) 2˝ (5 cm)
2
2/3
1
1/3
1
2
2/3
1/3
Figure 7
Figure 5
Figure 6
Figure 2
Figure 3
Figure 4
5. Bucking a log
Bucking is cutting a log into lengths. It is
important to make sure your footing is rm
and your weight is evenly distributed on both
feet. When possible, the log should be raised
and supported by the use of limbs, logs or
chocks. Follow the simple directions for easy
cutting.
When the log is supported along its entire
length as illustrated in Figure 4, it is cut
from the top (overbuck) , avoid contacting
ground as this will greatly reduce the chain
sharpness.
3
2
2
W
Y
Z
X
2˝ (5 cm)
1
1
1
2˝ (5 cm) 2˝ (5 cm)
2
2/3
1
1/3
1
2
2/3
1/3
Figure 7
Figure 5
Figure 6
Figure 2
Figure 3
Figure 4
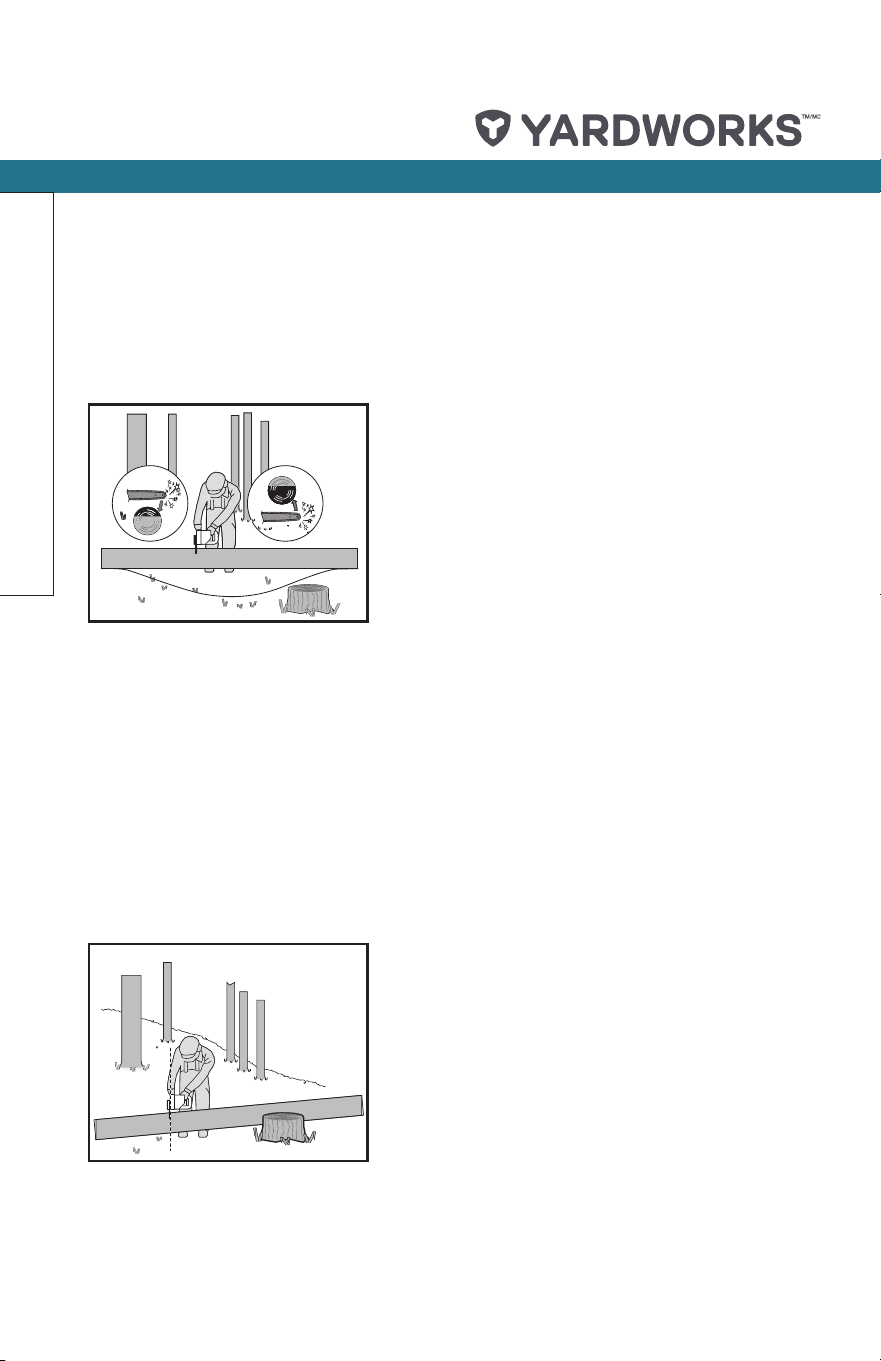
When the log is supported on one end, as
illustrated in Figure 5, cut 1/3 the diameter
from the underside (underbuck) (1). Then
make the nished cut by overbucking (2) to
meet the rst cut.
3
2
2
W
Y
Z
X
2˝ (5 cm)
1
1
1
2˝ (5 cm) 2˝ (5 cm)
2
2/3
1
1/3
1
2
2/3
1/3
Figure 7
Figure 5
Figure 6
Figure 2
Figure 3
Figure 4
General Safety Rules
model number 054-5757-2 | contact us: 1.866.523.5218
12
When the log is supported on both ends, as
illustrated in Figure 6, cut 1/3 the diameter
from the top (overbuck) (1). Then make the
nished cut by underbucking (2) the lower 2/3
to meet the rst cut.
3
2
2
W
Y
Z
X
2˝ (5 cm)
1
1
1
2˝ (5 cm) 2˝ (5 cm)
2
2/3
1
1/3
1
2
2/3
1/3
Figure 7
Figure 5
Figure 6
Figure 2
Figure 3
Figure 4
When bucking on a slope always stand on the
uphill side of the log, as illustrated in Figure 7.
When “cutting through”, to maintain complete
control release the cutting pressure near the
end of the cut without relaxing your grip on
the chainsaw handles. Don’t let the chain
contact the ground. After completing the cut,
wait for the saw chain to stop before you
move the chainsaw. Always stop the motor
before moving from tree to tree.
3
2
2
W
Y
Z
X
2˝ (5 cm)
1
1
1
2˝ (5 cm) 2˝ (5 cm)
2
2/3
1
1/3
1
2
2/3
1/3
Figure 7
Figure 5
Figure 6
Figure 2
Figure 3
Figure 4
General Safety Rules
model number 054-5757-2 | contact us: 1.866.523.5218 model number 054-5757-2 | contact us: 1.866.523.5218
13
22
Chain Rotation
1
5
10
21
23
24
25 26 27 2928
11
12
13
14
3
22
4
7
8
9
6
1615
20 19
17
18
2
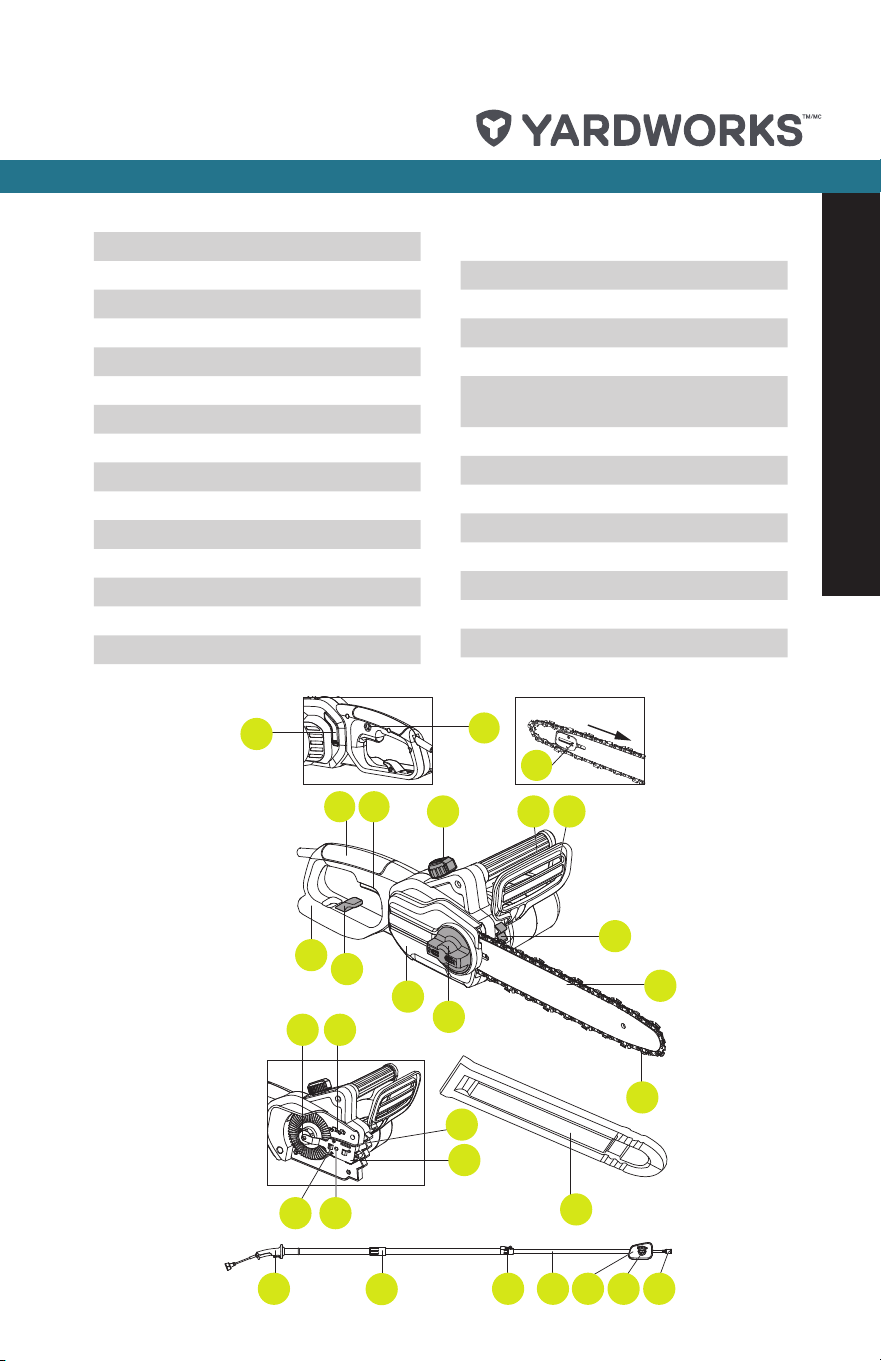
1. Rear Handle
2. On/Off Switch
3. Lock-off Button
4. Oil Level Window
5. Oil Filler Cap
6. Front Handle
7.
Hand Guard
8. Bumper Spike
9. Guide Bar
10. Chain
11.
Chain Tensioning Knob
12. Chain Cover
13. Extension Cord Holder
14. Rear Hand Guard
15. Drive Sprocket
16. Chain Direction Symbol
17. Oil Outlet
18. Bar Clamp
19. Fastening Bar Bolt
20. Bar Locating Tabs
21.
Bar And Chain Storage/
Transportation Cover
22. Bar Tensioning Plate
23. Extension Pole Handle
24. Locking Collar
25. Clamping Lever
26. Inner Pole
27. Handle Bracket
28. Knob
29. Receptacle Cord
Know Your Chainsaw

model number 054-5757-2 | contact us: 1.866.523.5218
14
Extend pole 1
Blade protection cover 1
Bar: 10” (25.4 cm) 1
Chain: 40 pitch 1
Accessories
We recommend that you purchase your accessories from the same store that
sold you the tool. Refer to the accessory packaging for further details. Store
personnel can assist you and offer advice.
model number 054-5757-2 | contact us: 1.866.523.5218 model number 054-5757-2 | contact us: 1.866.523.5218
15
Exploded View
36
37
39
40
32
33
31
30
9
62
58
12
11
15
16
22
2
61
57
39
Y
Y
X
X
Y
X
V
V
U
U
29
28
26
54
83
79
80
81
82
108
141
202
204
201
203
102
103
109
104
65
73
76
75
69
70
67
140
2(5)
2(2)
2(5)
2(2)
5(2)
2(4)
59(2)
79(2)
34(3)
60(2)
57
67
66
3
53
8
7
6
101
142
9
1
71
72
74
77
78
80
84
39
23
24
5152
20
35
15
122
123
124
125
126
127
128
129
42
43
44
45
46
56
47
48
49
50
130
S
S
T
T
N
N
M
M

model number 054-5757-2 | contact us: 1.866.523.5218
16
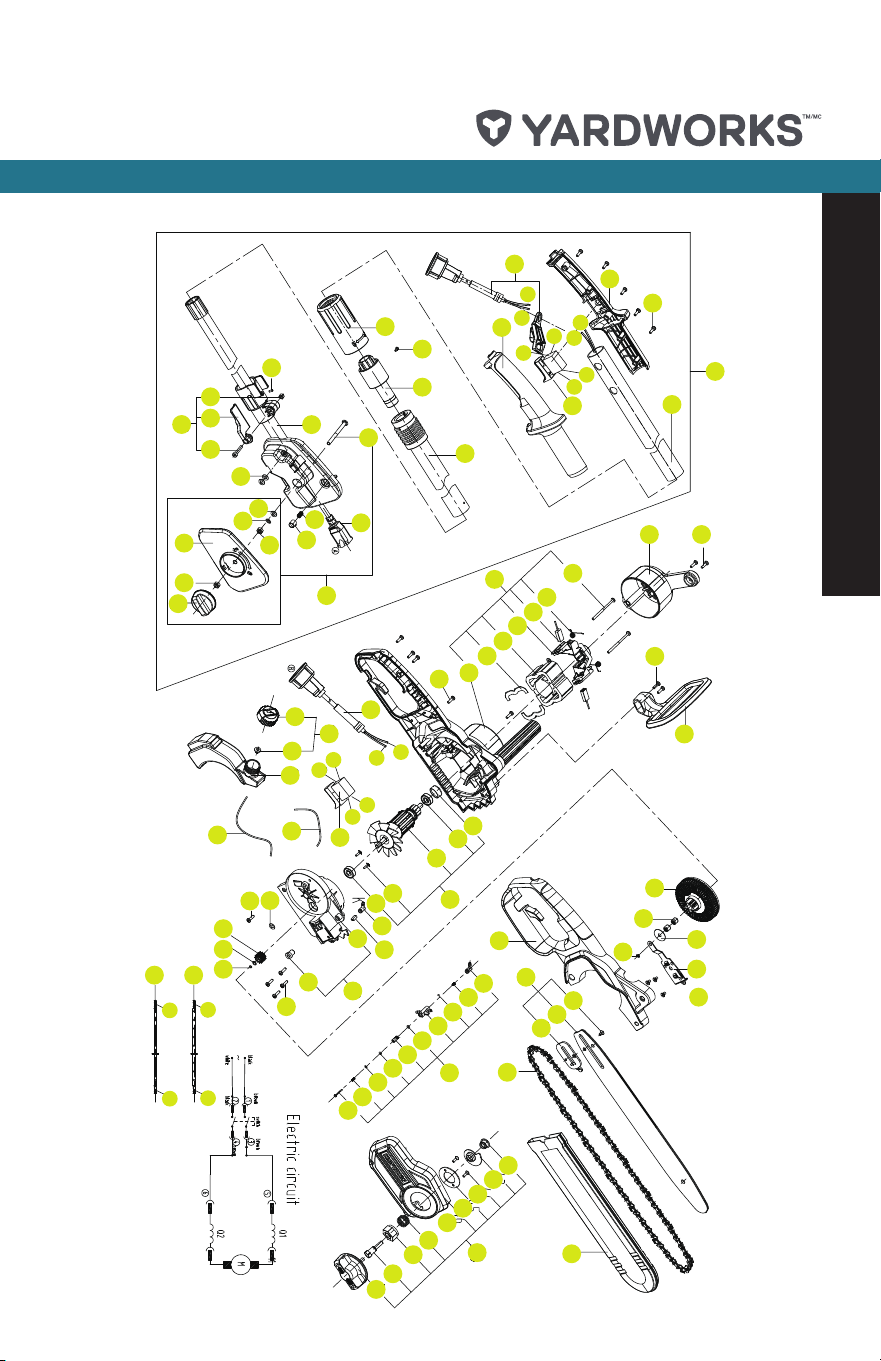
Parts List
Item Description QTY.
1 Protect Plate 1
2 Self-tapping Screw 19
3 Motor Cover 1
5 Torsional Spring 2
6 Carbon Brush (Pair) 1
7 Rear Bracket 1
8 Stator 1
9 Left/Right Housing 1
11 Bearing 1
12 Rotor 1
15 Oil Exit 2
16 Front Bracket 1
20 Tighten Bolt 1
22 Pinion 1
23 Washer 1
24 Retaining Ring 1
26 Oil Bottle Cap 1
28 Duck Bill 1
29 Oil Bottle 1
30 Big Gear 1
31 Bearing 2
32 Washer 1
33 Bar Spacer 1
34 Self-tapping Screw 3
35 E-Ring 1
36 Self-tapping Screw 1
37 Guide Bar 1
39 Press Block 1
40 Saw Chain 1
42 Bush 1
Item Description QTY.
43 Cam 1
44 Self-tapping Screw 2
45 Flange 1
46 Chain Guard 1
47 Compression Spring 1
48 Tension Wheel 1
49 Bolt 1
50 Knob Body 1
51 Inner Wire 1
52 Inner Wire 1
53 Micro Piece 2
54 Cord and Plug 1
56 Blade Sheath 1
57 Switch 2
58 Bearing Sleeve 1
59
Screw And Washer
Assembly
2
60 Self-tapping Screw 2
61 Washer 1
62 Bearing 1
65 Spring Wire 1
66 Telescope Tube I 1
67
Left/Right Pole
Handle
1
69 Thread Sleeve 1
70 Screw 1
71 Safety Helmet B 1
72 Tube Assembly II 1
73 Nut 1
74 Nut 1
75 Spring Pin 1
model number 054-5757-2 | contact us: 1.866.523.5218 model number 054-5757-2 | contact us: 1.866.523.5218
17
Item Description QTY.
76 Tube Assembly Iii 1
77 Lock Knob 1
78 Screw 1
79 Washer 3
80 Nut 2
81 Compression Spring 1
82 Button 1
83 Handle Cover 1
84 Knob Body 1
101
Left/Right Housing
Assembly
1
102 Rotor Set 1
103
Front Bracket
Assembly
1
104 Pump Set 1
108 Spring Washer 1
109 Felt Seal 1
120 Oil Tube I 1
121 Oil Tube II 1
122 Compression Spring 1
123 Steel Ball 1
124 Pump Housing 1
125 O-Ring 1
126 Pump 1
127 O-Ring 1
128 Washer 1
129 Compression Spring 1
130 Pump Rod 1
140 Power Cord 1
141 Pole Handle Body 1
142 Lock Knob Kit 1
Item Description QTY.
201 Guide Bar 1
202 Oil Bottle Cap Set 1
203
Clutch Cover
Assembly
1
204 Extension Support 1
Parts List
model number 054-5757-2 | contact us: 1.866.523.5218
18
ASSEMBLY AND ADJUSTMENTS
INTENDED USE
The pole saw/chainsaw is intended for wood: sawing of trees, trees trucks, branches, wooden
beams, planks, etc. Cuts can be sawed with or across the grain.
This product is not suitable for sawing mineral materials, plastics or non-wood building
materials.
!
WARNING! Do not connect the chainsaw to the power supply before it is completely
assembled. Always use gloves when handling the chain.
CHAIN AND GUIDE BAR ASSEMBLY/REPLACEMENT (See Fig. A1—A6)
1. Unpack all parts carefully.
NOTE: Bar and Chain oil is not included. Before using this chainsaw, do not forget to
purchase Bar and Chain oil, SEA30.
!
WARNING! If any part of the chainsaw is missing or damaged, do not connect the
chainsaw to the power source until the damaged part is repaired or replaced.
2. Place the chainsaw on any suitable at surface.
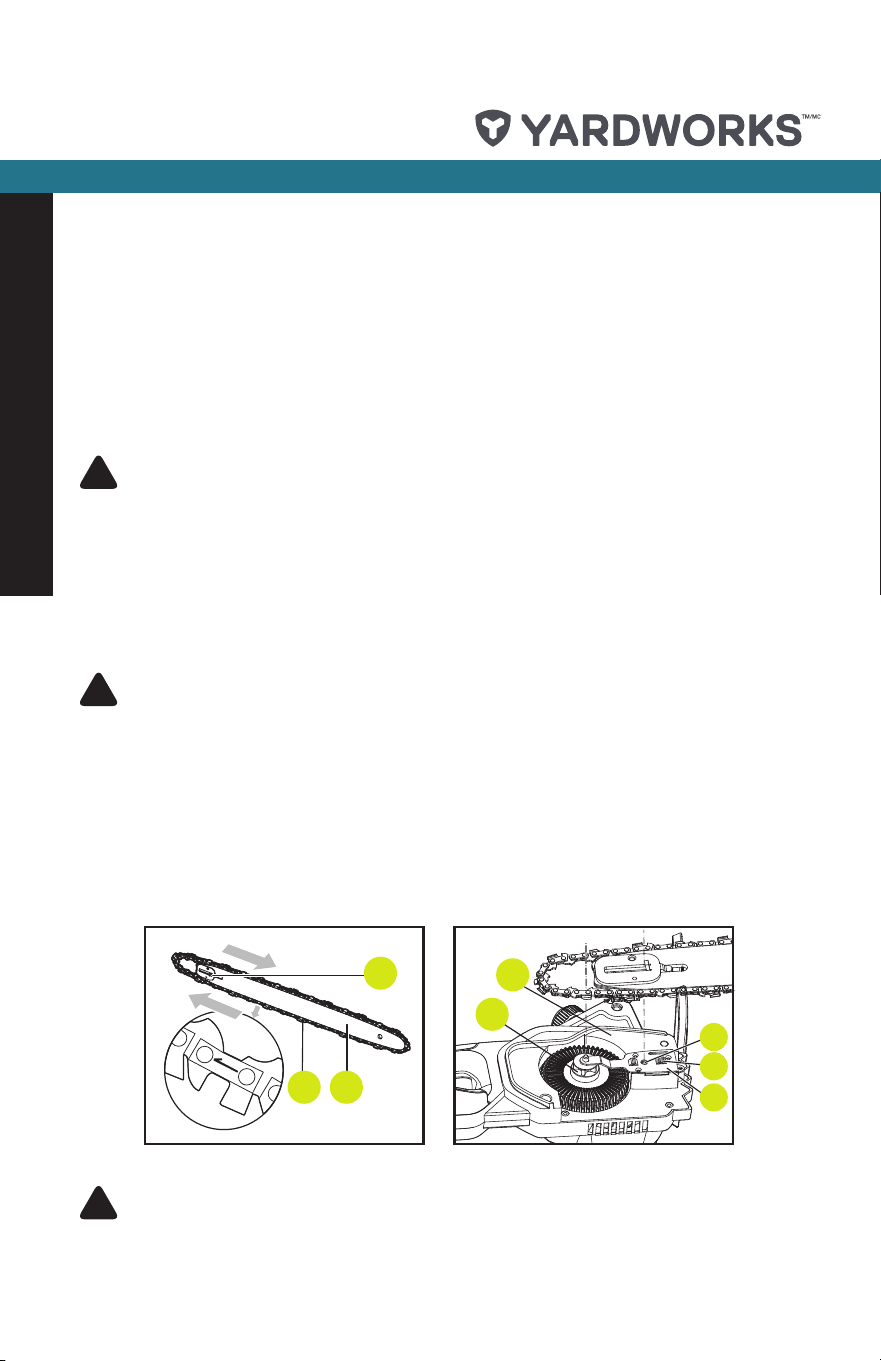
3. Slide the Chain (10) in the slot around the Guide Bar (9). Ensure the Chain is in correct
running direction by comparing it to the Chain Direction Symbol (16) found on the saw
body. Ensure the Bar Tensioning Plate (22) is facing outward. (See Fig. A1)
4. Fit the Chain onto the Drive Sprocket (15), so that the Fastening Bar Bolt (19) and the two
Bar Locating Tabs (20) on the Bar Clamp (18) t into the keyway of the opening on the
Guide Bar (9). (See Fig. A2)
!
WARNING: The chain is not yet tensioned. Tensioning the chain is described under
“TENSIONING CHAIN”. The chain now needs to be inspected to make sure it is properly
tensioned.
15
20
18
19
11 10
Bar
0.12-0.24"
(3-6 mm)
10
9
22
Oil Filler Cap
Oil Reservoir
22
15
1112
15
19
18
20
10 9
A1
A2
A3
A4
A5 A6
B
C1
C2
D1 D2
Assembly
model number 054-5757-2 | contact us: 1.866.523.5218 model number 054-5757-2 | contact us: 1.866.523.5218
19
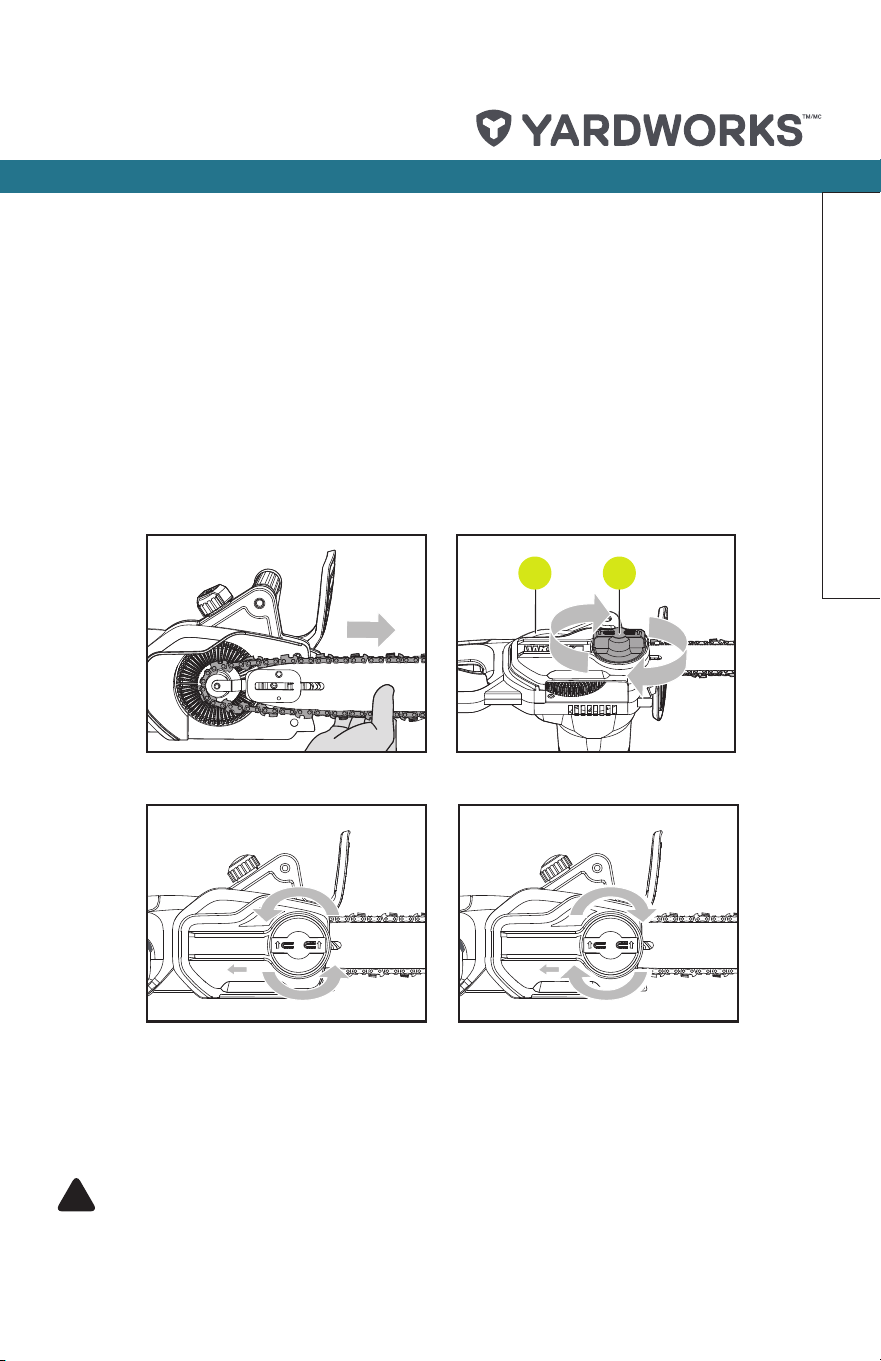
5. Check to make sure all parts are seated properly and hold chain and guide bar in a level
position. (See Fig. A3)
6. Fit the Chain Cover (12) and tighten the Chain Cover by turning the Chain Tensioning Knob
(11) clockwise until it is tight.(See Fig. A4)
NOTE: The new Chain (10) will stretch while cutting and lose proper tension. When the chain
becomes loose, completely unscrew the Chain Tensioning Knob (11) or turn the knob around
three (3) full turns in a counter-clockwise direction (See Fig. A5), then retighten the Chain
Tensioning Knob (11) (See Fig. A6) to properly reset the chain tension by repeating Steps 5
and 6 listed above.
TENSIONING CHAIN/LOCKING KNOB
Always check the chain tension before use, after the rst cuts and regularly during use. Upon
initial operation, new chains can lengthen considerably.
!
WARNING:
• Unplug chainsaw from power source before adjusting saw chain tension.
• Cutting edges on chain are sharp. Use protective gloves when handling chain.
15
20
18
19
11 10
Bar
0.12-0.24"
(3-6 mm)
10
9
22
Oil Filler Cap
Oil Reservoir
22
15
1112
15
19
18
20
10 9
A1
A2
A3
A4
A5 A6
B
C1
C2
D1 D2
Assembly
model number 054-5757-2 | contact us: 1.866.523.5218
20
• Maintain proper chain tension always. A loose chain will increase the risk of
kickback. A loose chain may jump out of guide bar groove. This may injure operator
and damage chain. A loose chain will cause chain, bar, and sprocket to wear
rapidly. The chain life of the saw chain mainly depends upon sufcient lubrication
and correct tensioning. Avoid tensioning the chain if it is hot, as this will cause the
chain to become over tensioned when it cools down.
1. Place the chainsaw on any suitable at surface.
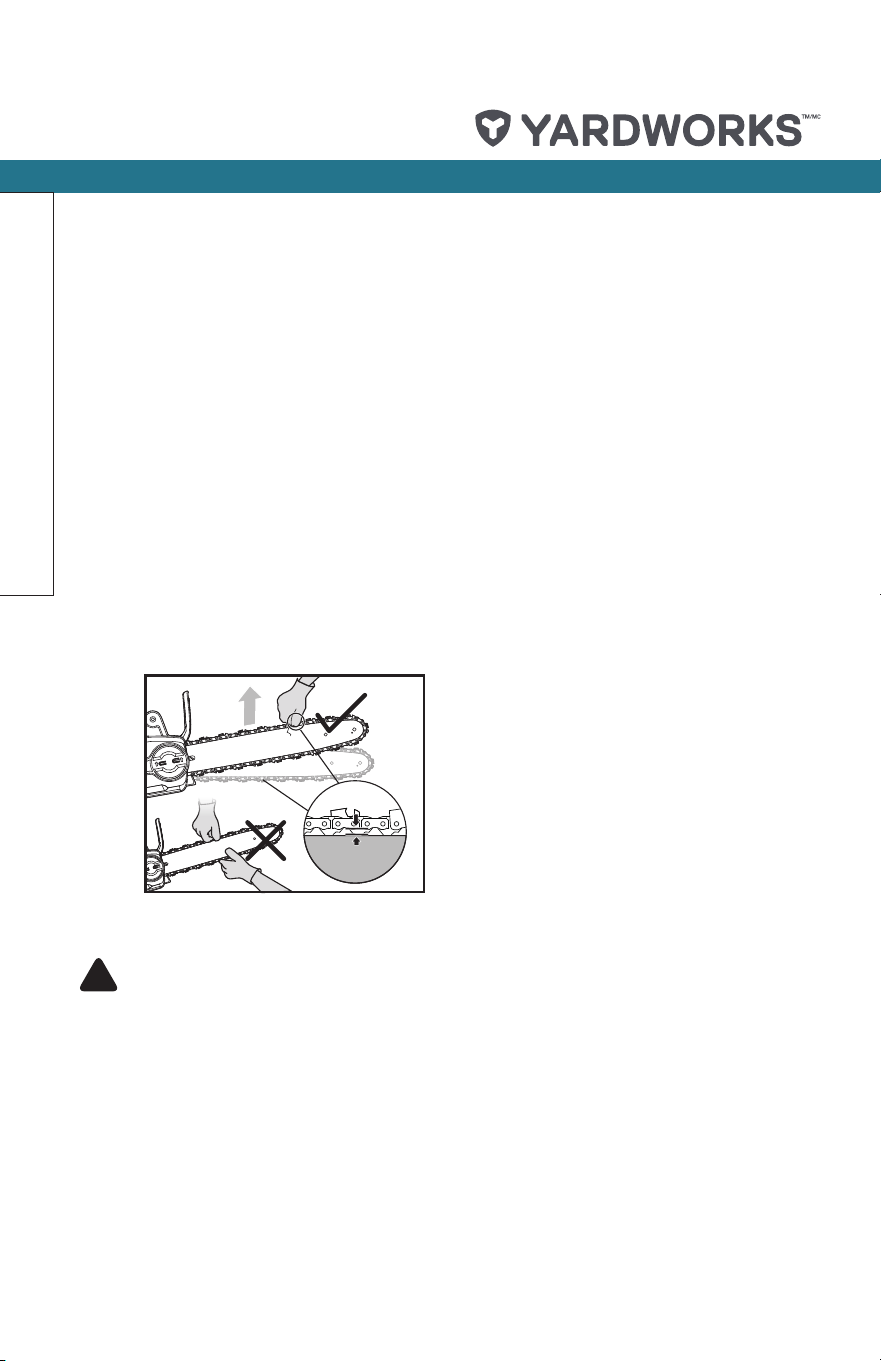
2. Turn the Chain Tensioning Knob (11) clockwise until it is hand tight. The tension is
automatically set while the Chain Tensioning knob is being tightened.
3. Double check the tension set by the automatic Chain Tensioning Knob. The correct chain
tension is reached when the Chain (10) can be raised approximately 0.12 – 0.24” (3 – 6
mm) from the Guider Bar (9) in the centre. This should be done by using one hand to raise
the chain against the weight of the machine. (See Fig. B)
4. The chain will stretch from use and lose proper tension. To retension the chain, turn knob
counter-clockwise (3x), secure the chain cover, and repeat steps 1 – 3 listed above.
LUBRICATION
!
Important: The chainsaw is not supplied lled with oil. It is essential to ll with oil
before use. Never operate the chainsaw without chain oil or at an empty oil tank level as
this will result in extensive damage to the product. Chain life and cutting capacity
depend on optimum lubrication. Therefore, the chain is automatically oiled during
operation via oil outlet.
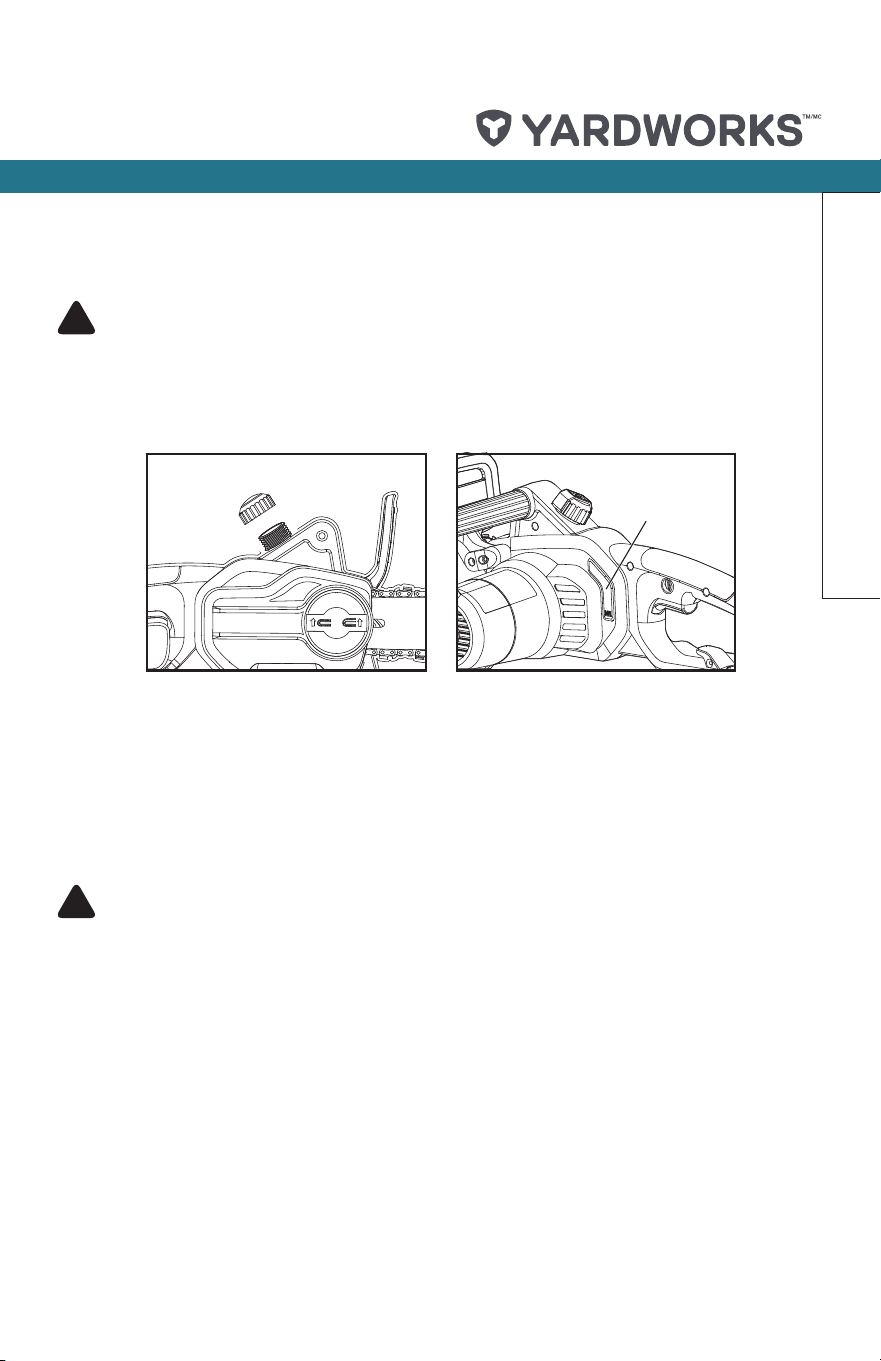
FILLING OIL TANK: (See Fig. C1 and C2)
1. Set chainsaw on any suitable surface with Oil Filler Cap (5) facing upward.
2. Clean area around the Oil Filler Cap (5) with cloth and unscrew the cap by turning it
counter-clockwise.
3. Add bar and chain oil SAE30 until reservoir is full.
15
20
18
19
11 10
Bar
0.12-0.24"
(3-6 mm)
10
9
22
Oil Filler Cap
Oil Reservoir
22
15
1112
15
19
18
20
10 9
A1
A2
A3
A4
A5 A6
B
C1
C2
D1 D2
Assembly
model number 054-5757-2 | contact us: 1.866.523.5218 model number 054-5757-2 | contact us: 1.866.523.5218
21
4. Avoid dirt or debris entering oil tank, re-screw Oil Filler Cap (5) and tighten.
!
CAUTION: To allow venting of the oil reservoir, small breather channels are
provided between the Oil Filler Cap and the strainer. To prevent leakage, ensure machine
is left in a horizontal position (Oil Filler Cap uppermost) when not in use.
It is important to use only the recommended chain oil to avoid damage to the chainsaw.
Never use recycled/old oil. Use of non-approved oil will void the warranty.
CHECKING THE AUTOMATIC OILER
Proper functioning of the automatic oiler can be checked by running the chainsaw and pointing
the tip of the chain Guide Bar (9) towards a piece of cardboard or paper on the ground. If an
increasing oil pattern develops on the cardboard, the automatic oiler is operating ne. If there
is no oil pattern, despite a full oil reservoir, contact customer service agent or approved service
agent.
!
Caution: Do not touch the ground with the chain. Ensure safety clearance of 12” (30 cm).
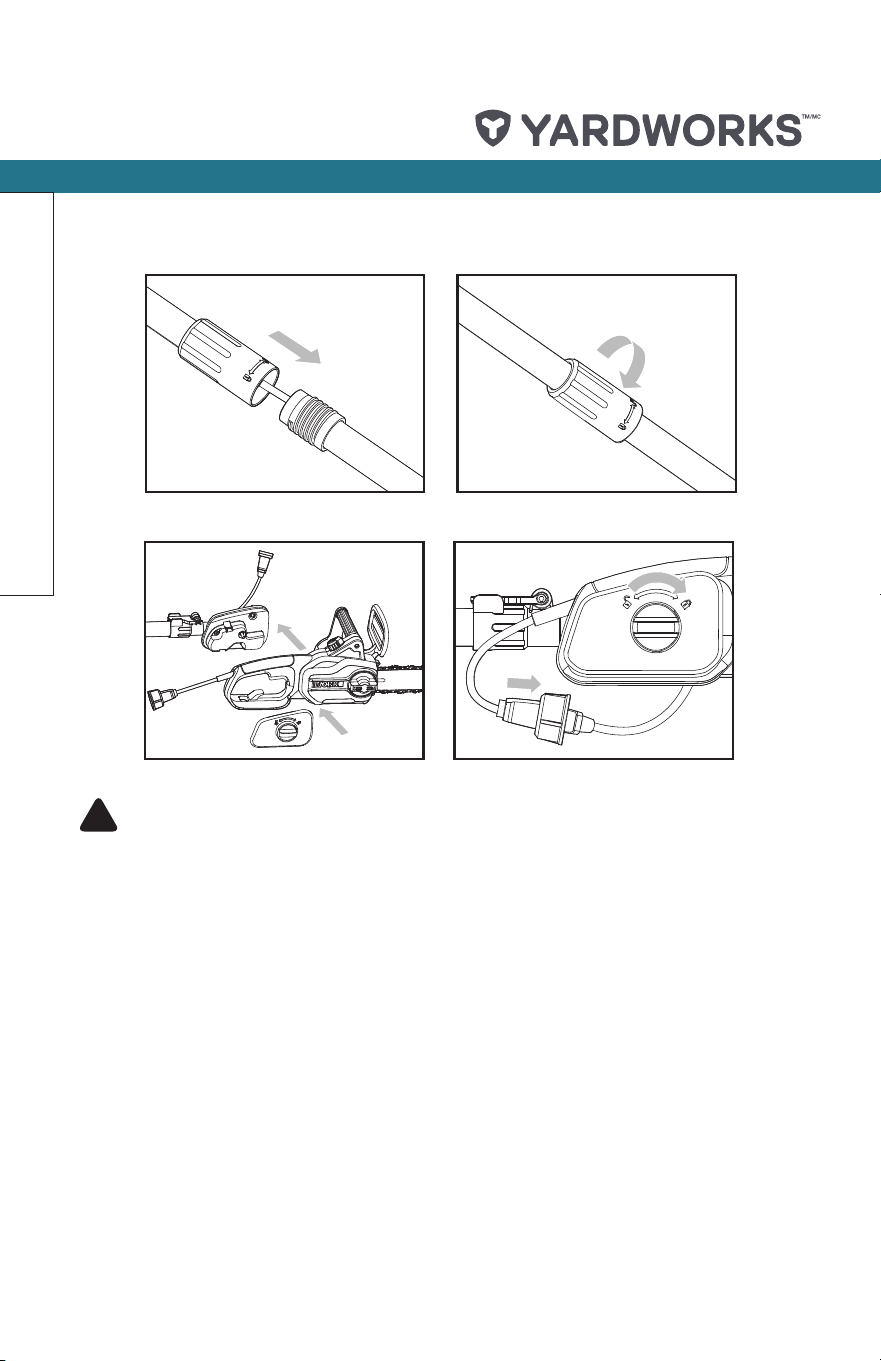
ASSEMBLING THE EXTENSION POLE
Align and insert the handle of extension pole into the shaft. Rotate the locking collar clockwise
to lock. (See Fig. D1, D2)
NOTE: Make sure that the shaft is rmly locked in place.
ATTACHING THE EXTENSION POLE TO THE MACHINE
1. Insert the pole bracket into the saw. (See Fig. E1)
NOTE: Pole bracket holds trigger in “ON” position.
2. Slide the handle bracket onto clamping bolt.
3. Screw the knob tightly.
4. Plug saw power cord into receptacle cord at end of inner pole. (See Fig. E2)
15
20
18
19
11 10
Bar
0.12-0.24"
(3-6 mm)
10
9
22
Oil Filler Cap
Oil Reservoir
22
15
1112
15
19
18
20
10 9
A1
A2
A3
A4
A5 A6
B
C1
C2
D1 D2
Assembly
model number 054-5757-2 | contact us: 1.866.523.5218
22
!
WARNING!
• Before attaching the power cord of the machine to the power cord of the extension
pole, make sure that the tool is switched off and unplugged from the power supply.
• When using this machine with the extension pole, make sure to rst attach the
power cord of the machine to the power cord of the extension pole, and then attach
the power cord of the extension pole to power supply.
• ELECTROCUTION HAZARD:
Never use the saw or extension pole in an area with overhead power lines or where
the branch being cut can come into contact with overhead power lines.
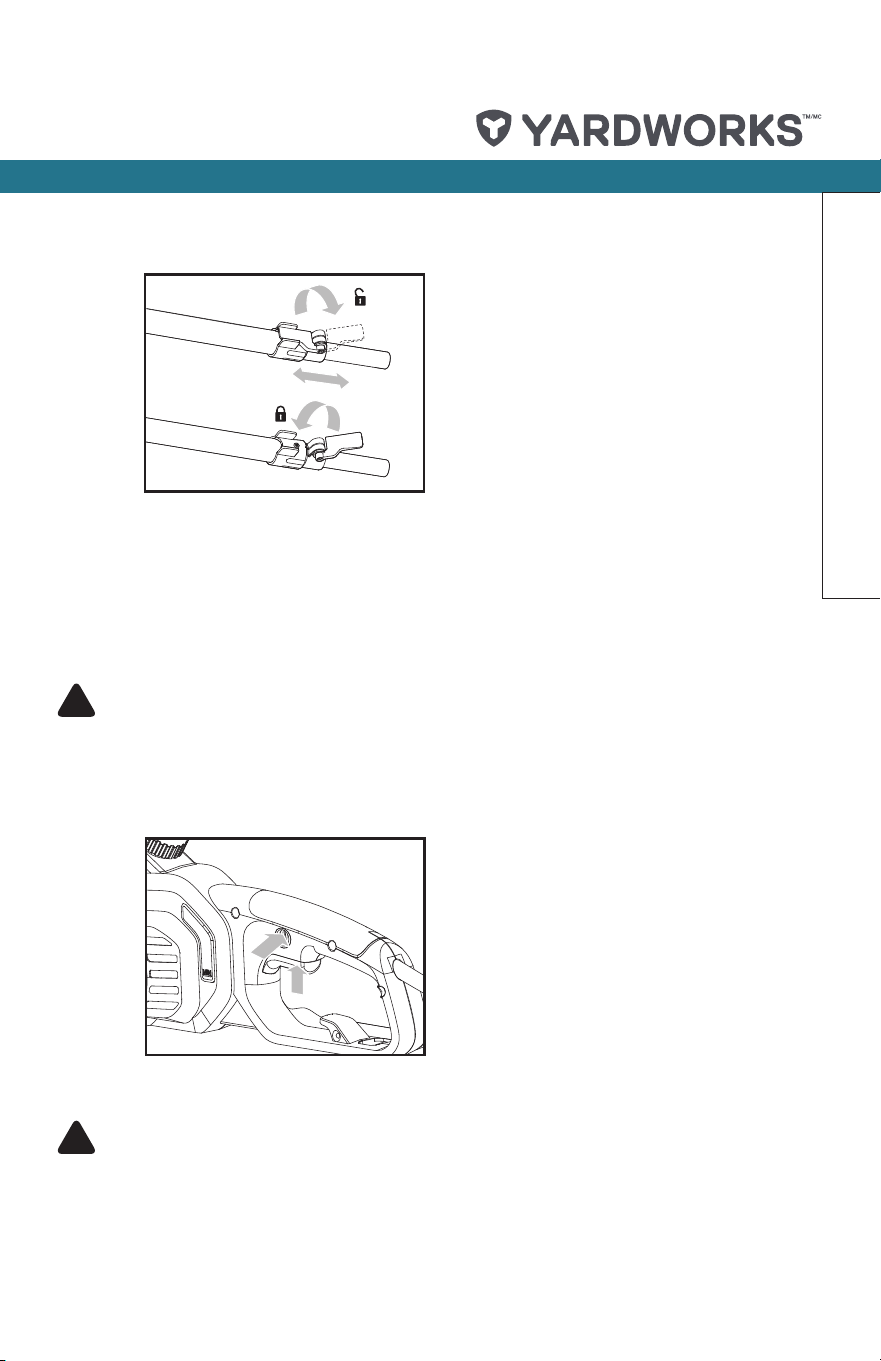
ADJUSTING POLE LENGTH
The pole saw has a telescoping pole assembly that will extend from 89 11/16” (227.8 cm) (fully
retracted) to 119 3/8” (303.3 cm) (fully extended).
A
cam-levered collet is used to hold the pole in position at any extended length.
1. To extend the pole, loosen the clamping lever as shown in Fig
.
F. Pole will slide freely.
2. Pull inner pole section out to desired length of extension. Note: only extend pole to
minimum length required to reach limb that is being cut.
3. To lock pole in position, tighten clamping lever as shown in Fig. F.
15
20
18
19
11 10
Bar
0.12-0.24"
(3-6 mm)
10
9
22
Oil Filler Cap
Oil Reservoir
22
15
1112
15
19
18
20
10 9
A1
A2
A3
A4
A5 A6
B
C1
C2
D1 D2
1
2
2
1
1
2
3
1
2
Z
Y
kg
Z
Y
Elbow
Locked
oil reservoir
WARNING:
!
NEVER
REVERSE
HAND
POSITIONS
8
E1
E2
F
G
H I
J K
L
M
N
Assembly
model number 054-5757-2 | contact us: 1.866.523.5218 model number 054-5757-2 | contact us: 1.866.523.5218
23
OPERATION
POWER ON/OFF
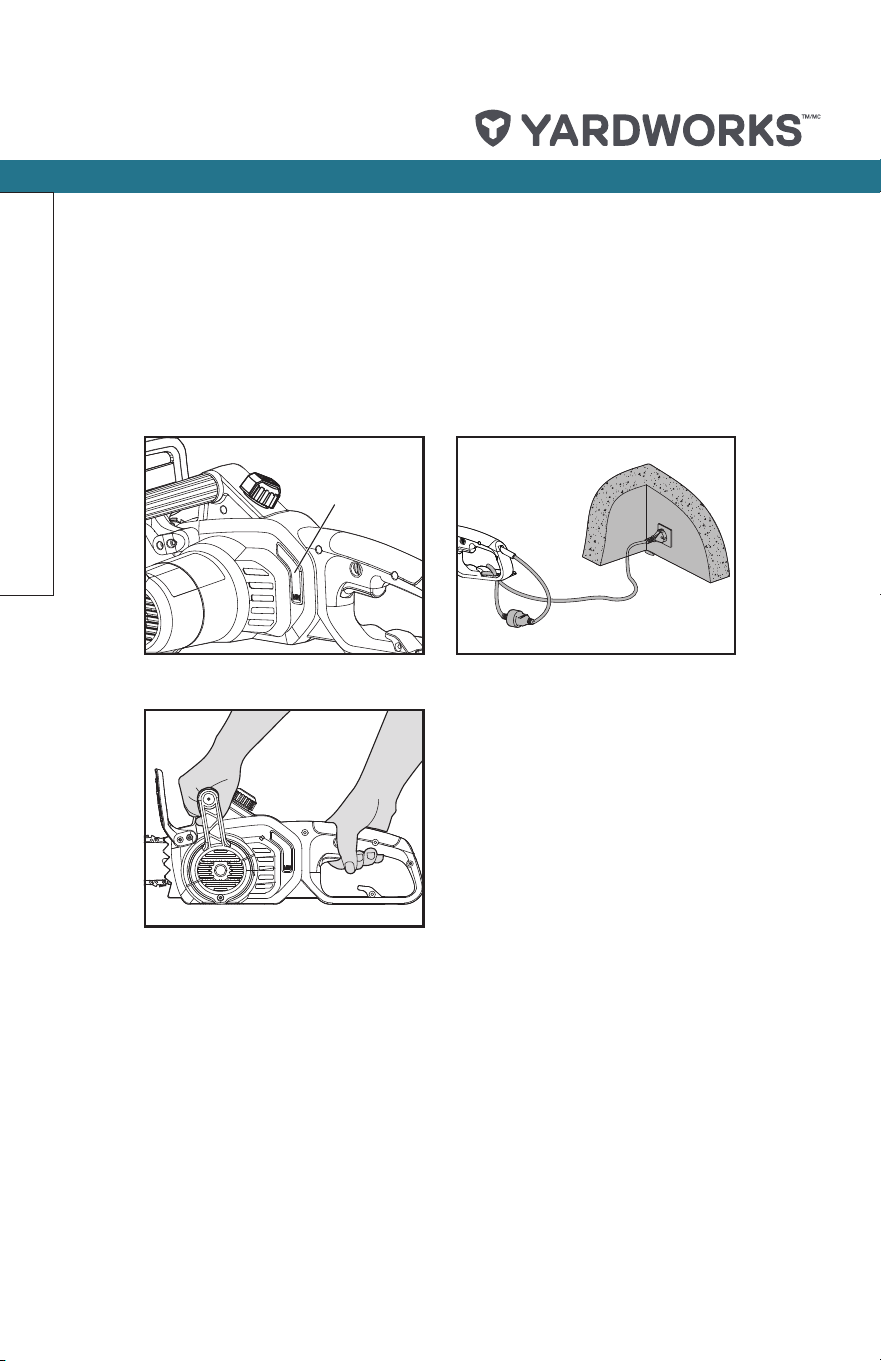
1. SWITCHING ON AND OFF (See Fig. G)
!
ATTENTION: Check the voltage and current supply: The voltage and current supply
must comply with the ratings on the product plate.
For switching on the tool, press the Lock-off Button (3), then fully press the On/Off Switch (2)
and hold in this position. The Lock-off Button can now be released.
For switching off, release the On/Off Switch.
2. CUTTING WITH CHAINSAW
!
Important: Is the oil reservoir lled? Check the Oil Level Window (4) (See Fig. H)
prior to starting and regularly during operation. Rell oil when oil level is low. A full oil
tank will last approximately 12 minutes of cutting depending on sawing intensity and
stops.
Check recently replaced chain tension about every 10 minutes during operation.
(1) Connect saw to extension cord. Connect extension cord to power supply. (See Fig. I)
1
2
2
1
1
2
3
1
2
Z
Y
kg
Z
Y
Elbow
Locked
oil reservoir
WARNING:
!
NEVER
REVERSE
HAND
POSITIONS
8
E1
E2
F
G
H I
J K
L
M
N
1
2
2
1
1
2
3
1
2
Z
Y
kg
Z
Y
Elbow
Locked
oil reservoir
WARNING:
!
NEVER
REVERSE
HAND
POSITIONS
8
E1
E2
F
G
H I
J K
L
M
N
Assembly
model number 054-5757-2 | contact us: 1.866.523.5218
24
(2) Make sure section of log to be cut is not laying on the ground. This will keep the chain from
touching the ground as it cuts through the log.
Touching the ground while the chain is moving is dangerous and will dull the chain.
(3) Use both hands to grip saw. Always use left hand to grip Front Handle (6) and right hand to
grip Rear Handle (1). Use a rm grip. Thumbs and ngers must wrap around saw handles.
(See Fig. J)
(4) Make sure your footing is rm. Keep feet shoulder-width apart. Distribute your weight evenly
on both feet.
(5) When ready to make a cut, push the Lock-off Button (3) completely in with the right thumb
and squeeze the trigger. This will turn saw on. Releasing the trigger will turn the saw off.
Make sure the saw is running at full speed before starting a cut.
(6) When starting a cut, slowly place moving chain against the wood. Hold saw rmly in place
to avoid possible bouncing or skating (sideways movement) of saw.
(7) Guide the saw using light pressure and do not put excessive force on the saw, or the motor
will overload and can burn out. It will do the job better and safer at the rate for which it was
intended.
(8) Remove the saw from a cut with the saw running at full speed. Stop the saw by releasing
the On/off Switch (2). Make sure the chain has stopped before setting the saw down.
1
2
2
1
1
2
3
1
2
Z
Y
kg
Z
Y
Elbow
Locked
oil reservoir
WARNING:
!
NEVER
REVERSE
HAND
POSITIONS
8
E1
E2
F
G
H I
J
K
L
M
N
1
2
2
1
1
2
3
1
2
Z
Y
kg
Z
Y
Elbow
Locked
oil reservoir
WARNING:
!
NEVER
REVERSE
HAND
POSITIONS
8
E1
E2
F
G
H I
J K
L
M
N
Assembly
model number 054-5757-2 | contact us: 1.866.523.5218 model number 054-5757-2 | contact us: 1.866.523.5218
25
(9) Keep practicing on scrap logs in a secure working area until you get the hang of it and can
saw with ease, using a uid motion and a steady cutting rate.
KICKBACK SAFETY DEVICES ON THIS SAW
This saw has a low-kickback chain and reduced kickback Guide Bar (9). Both items reduce the
chance of kickback. However, kickback can still occur with this saw.
The following steps will reduce the risk of kickback.
• Use both hands to grip saw while saw is running. Use rm grip. Thumbs and ngers must
wrap around saw handles.
• Keep all safety items in place on saw. Make sure they work properly.
• Do not overreach or cut above shoulder height.
• Keep solid footing and balance at all times.
• Stand slightly to left side of saw. This keeps your body from being in direct line with chain.
• Do not let guide bar nose touch anything when chain is moving.
• Never try cutting through two logs at same time. Only cut one log at a time.
• Do not bury the guide bar nose or try plunge cut (boring into wood using guide bar nose).
• Watch for shifting of wood or other forces that may pinch chain.
• Use extreme caution when reentering a previous cut.
• Use only the low-kickback chain and Guide Bar (9) that were supplied with this chainsaw.
• Never use a dull or loose chain. Keep chain sharp with proper tension.
HOW TO USE SAW SAFELY
1. Use the chainsaw only with secure footing.
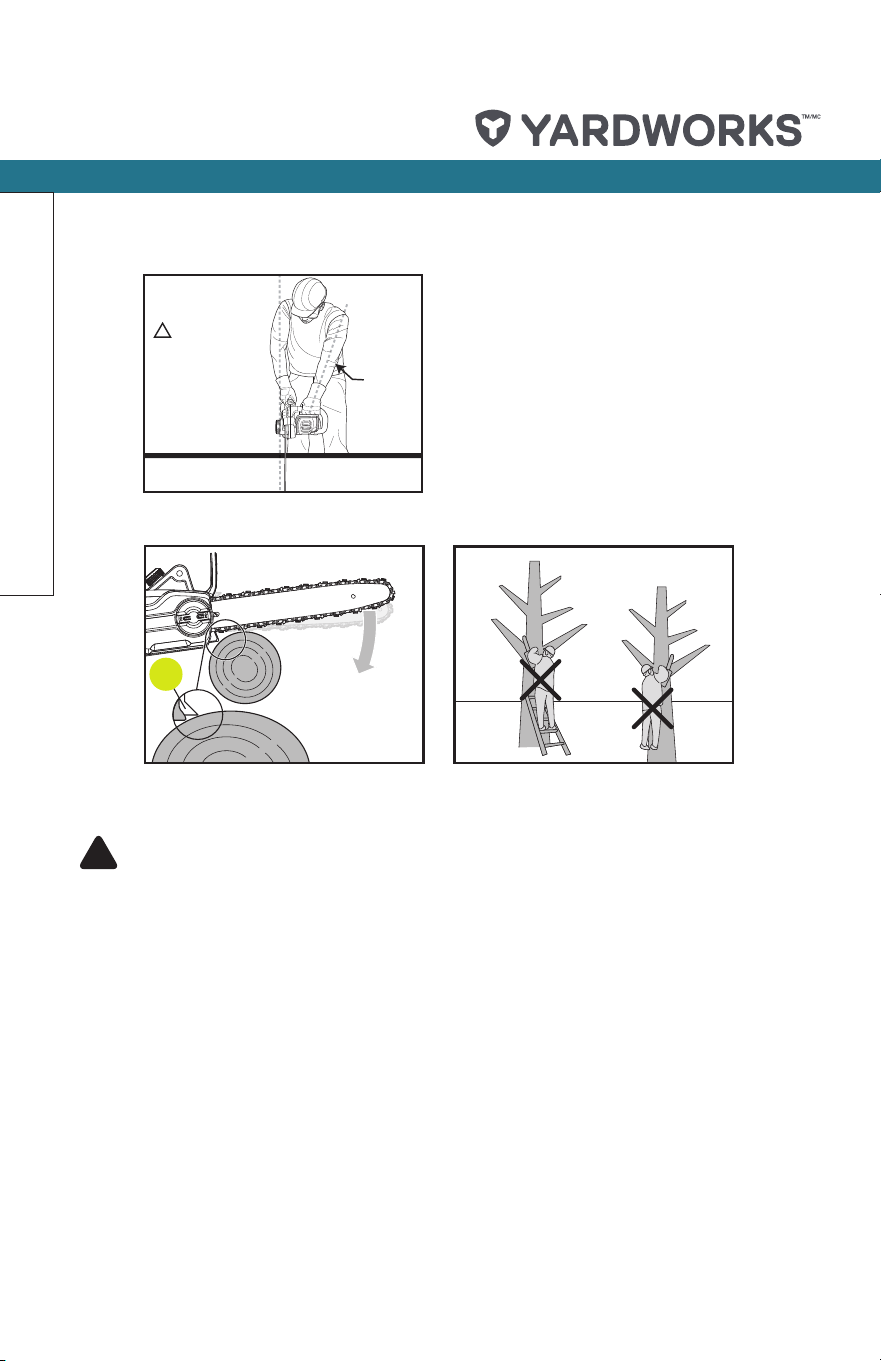
2. Hold the chainsaw at the right-hand side of your body. (See Fig. K)
3. The chain must be running at full speed before it makes contact with the wood.
4. Use the Bumper Spikes (8) to secure the saw onto the wood before starting to cut.
5. Use the bumper spikes as a leverage point while cutting. (See Fig. L)
6. Do not operate the chainsaw with arms fully extended, attempt to saw areas which are
difcult to reach, or stand on a ladder while sawing. (See Fig. M)
NOTE: Never use the chainsaw above shoulder height.
Assembly
model number 054-5757-2 | contact us: 1.866.523.5218
26
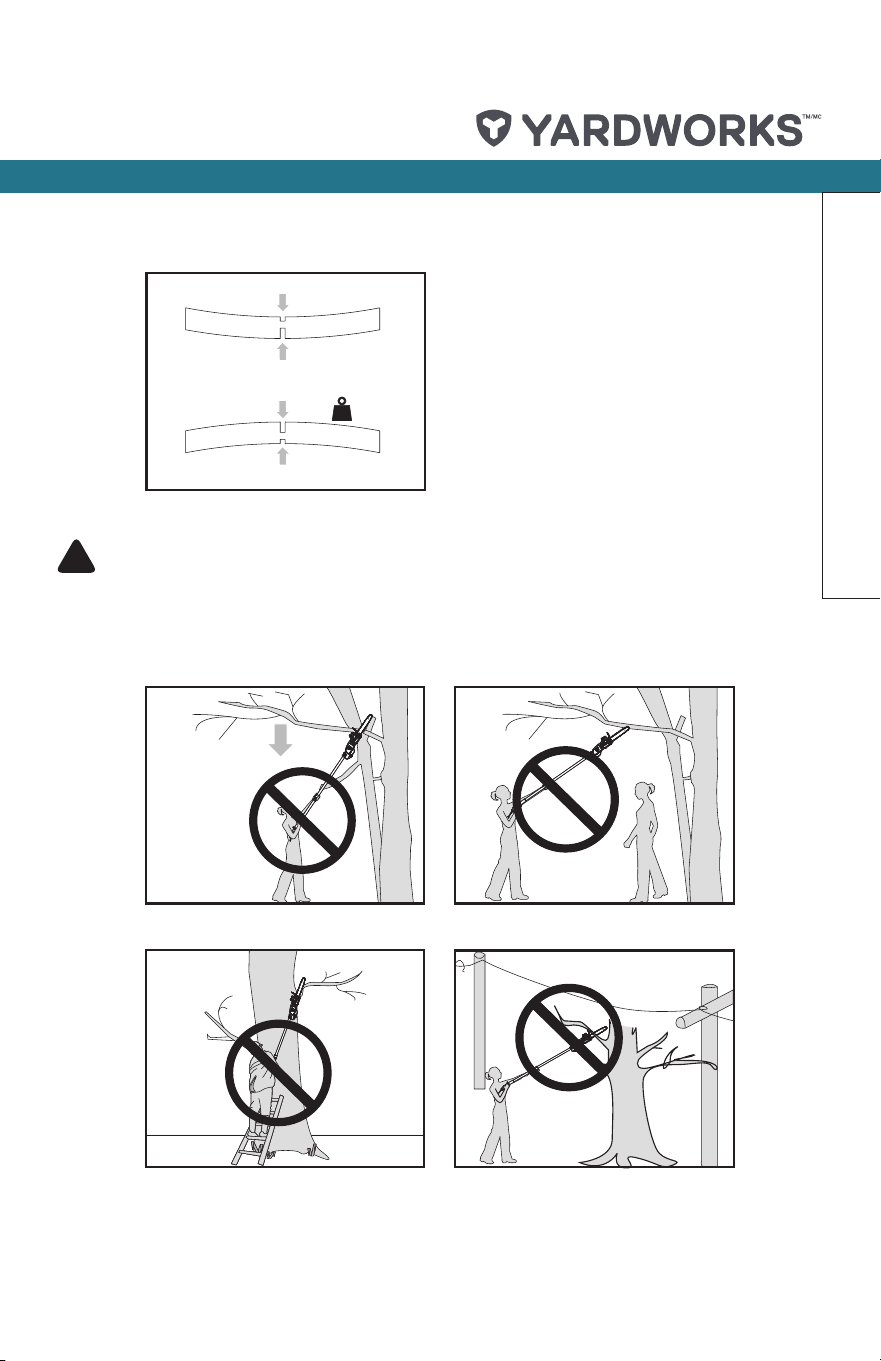
CUTTING WOOD UNDER TENSION (See Fig. N)
!
WARNING: When cutting a limb that is under tension, use extreme caution. Be alert
for wood springing back. When wood tension is released, limb could spring back and
strike operator causing severe injury or death.
When sawing logs supported on both ends, start the cut from above (Y) about 1/3 of the
diameter into the log and then nish the cut (Z) from below, in order to avoid contact of the
chainsaw with the ground. When sawing logs supported on only one end, start the cut from
below (Y) about 1/3 of the diameter into the log and nish the cut from above (Z) in order to
avoid log splitting or jamming of the chainsaw.
POLE SAW OPERATION
CUTTING WITH EXTENSION POLE
1. Connect saw to extension cord. Connect extension cord to power supply.
Before cutting a high branch, consider all the same points detailed in the previous section
but pay particular attention to the likely path of the falling branch.
1
2
2
1
1
2
3
1
2
Z
Y
kg
Z
Y
Elbow
Locked
oil reservoir
WARNING:
!
NEVER
REVERSE
HAND
POSITIONS
8
E1
E2
F
G
H I
J K
L
M
N
1
2
2
1
1
2
3
1
2
Z
Y
kg
Z
Y
Elbow
Locked
oil reservoir
WARNING:
!
NEVER
REVERSE
HAND
POSITIONS
8
E1
E2
F
G
H I
J
K
L
M
N
Assembly
model number 054-5757-2 | contact us: 1.866.523.5218 model number 054-5757-2 | contact us: 1.866.523.5218
27
!
WARNING: Do not stand directly below a branch being cut. Keep bystanders far
away. Do not stand on a ladder or other type of unstable support while using the tool.
Do not use the tool near cable, electrical power or telephone lines. Keep 10’ (3 m) away
from all power lines. (See Fig. O1 – O4)
1
2
2
1
1
2
3
1
2
Z
Y
kg
Z
Y
Elbow
Locked
oil reservoir
WARNING:
!
NEVER
REVERSE
HAND
POSITIONS
8
E1
E2
F
G
H I
J K
L
M
N
1
2
2" to 4"
(5 to 10 cm)
6"
(15 cm)
W
Y
Z
X
Y
1/3
a
Injecting grease to lubricate
When rail top is uneven, use a flat file to restore
square edges and sides.
Worn Groove Correct Groove
File Rail Edges
and Sides
O1
O2
O3
O4
P Q
R S
T
U
V
Assembly
model number 054-5757-2 | contact us: 1.866.523.5218
28
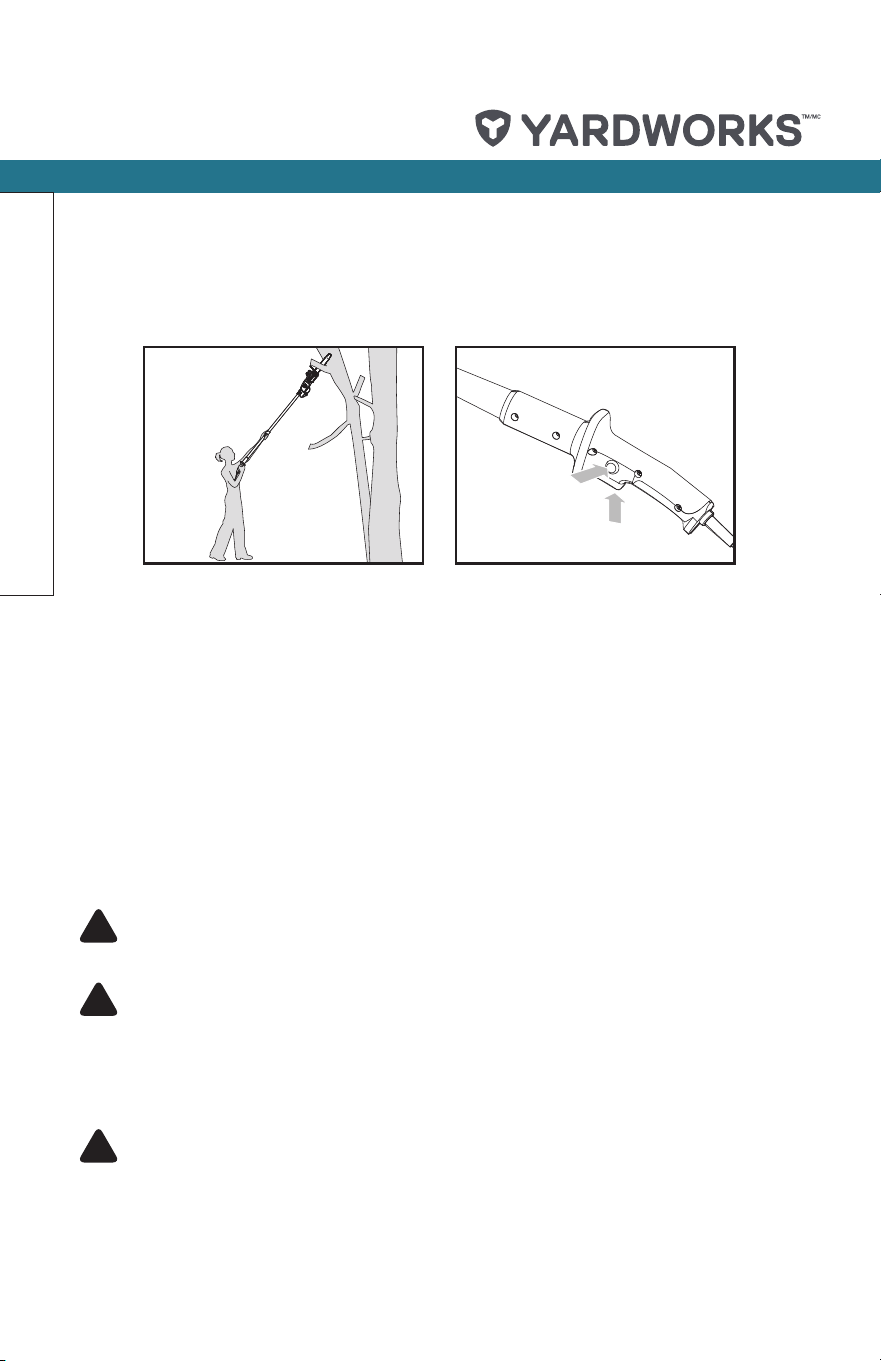
2. Use both hands to grip pole saw. Use only designated grip areas when operating pole saw
(See Fig.
P). Use rm grip. Thumbs and ngers must wrap around pole saw handle and
pole.
3.
Make sure your footing is rm. Keep feet apart. Divide your weight evenly on both feet.
4. When ready to make a cut, press the Lock-off Button, then fully press the On/Off Switch
(See Fig. Q). This will turn pole saw on. Releasing On/off Switch will turn pole saw off. Make
sure saw is running at full speed before starting a cut.
5. When starting a cut, place moving chain against wood. Hold pole saw rmly in place to
avoid possible bouncing or skating (sideways movement) of saw.
6.
Guide
pole saw
using light pressure. Do not force pole saw. The motor will overload and can
burn out. It will do the job better and safer at the rate for which it was intended.
7. Remove pole saw from a cut with saw running at full speed. Stop pole saw by releasing
trigger. Make sure chain has stopped before setting pole saw down.
TRIMMING A TREE (PRUNING)
!
WARNING: Avoid kickback. Kickback can result in severe injury or death.
See Kickback section to avoid risk of kickback.
!
WARNING: Do not operate pole saw while
• in a tree
.
• on a ladder or any other unstable surface
.
• in any awkward position
.
You may lose control of pole saw causing severe injury.
!
WARNING: Do not extend arms above shoulders when using pole saw.
CAUTION: Seek professional help if facing conditions beyond your ability.
Trimming a tree is the process of cutting limbs from a living tree. Make sure your footing is rm.
Keep feet apart. Divide your weight evenly on both feet.
Follow directions below to trim a tree.
1
2
2" to 4"
(5 to 10 cm)
6"
(15 cm)
W
Y
Z
X
Y
1/3
a
Injecting grease to lubricate
When rail top is uneven, use a flat file to restore
square edges and sides.
Worn Groove Correct Groove
File Rail Edges
and Sides
O1
O2
O3
O4
P Q
R S
T
U
V
Assembly
model number 054-5757-2 | contact us: 1.866.523.5218 model number 054-5757-2 | contact us: 1.866.523.5218
29
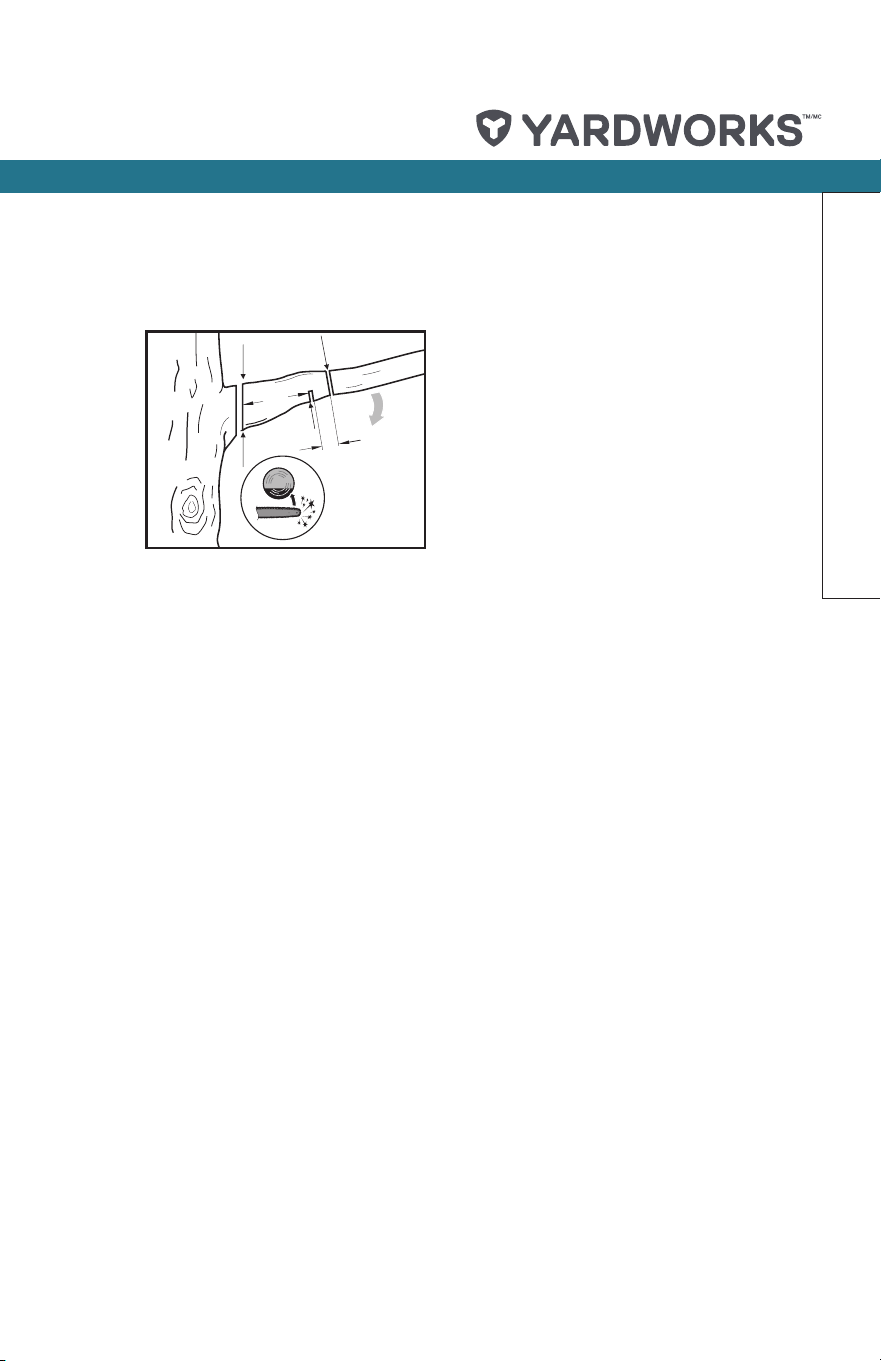
1. Make rst cut 6” (15 cm) from tree trunk on underside of limb. Use top of guide bar to make
this cut. Cut 1/3 through diameter of limb. (See Fig. R)
2. Move 2 to 4” (5 to 10 cm) farther out on limb. Make second cut from above limb. Continue
cut until you cut limb off.
3. Make third cut as close to tree trunk as possible on underside of limb stub. Use top of guide
bar to make this cut. Cut 1/3 through diameter of stub.
4. Make fourth cut directly above third cut. Cut down to meet third cut. This will remove limb
stub.
SAW MAINTENANCE
Follow maintenance instructions in this manual. Proper cleaning of saw and chain and guide
bar maintenance can reduce chances of kickback. Inspect and maintain saw after each use.
This will increase the service life of your saw.
NOTE: Even with proper sharpening, risk of kickback can increase with each sharpening.
MAINTENANCE AND STORAGE OF CHAINSAW
If the replacement of the supply cord is necessary, this has to be done by the manufacturer or
his agent in order to avoid a safety hazard.
1. Unplug chainsaw from power source:
• When not in use.
• Before moving from one place to another.
• Before servicing.
• Before changing accessories or attachments, such as saw chain and guard.
2. Inspect chainsaw before and after each use. Check saw closely if guard or other part has
been damaged. Check for any damage that may affect operator safety or operation of saw.
Check for alignment or binding of moving parts. Check for broken or damaged parts. Do not
use chainsaw if damage affects safety or operation. Have damage repaired by authorized
service centre.
1
2
2" to 4"
(5 to 10 cm)
6"
(15 cm)
W
Y
Z
X
Y
1/3
a
Injecting grease to lubricate
When rail top is uneven, use a flat file to restore
square edges and sides.
Worn Groove Correct Groove
File Rail Edges
and Sides
O1
O2
O3
O4
P Q
R
S
T
U
V
Assembly
model number 054-5757-2 | contact us: 1.866.523.5218
30
3. Maintain chainsaw with care.
• Never expose saw to rain or direct moisture.
• Keep chain sharp, clean, and lubricated for better and safer performance.
• Follow steps outlined in this manual to sharpen chain.
• Keep handles dry, clean, and free of oil and grease.
• Keep all screws and nuts tight.
• Inspect power cord often. If damaged, have repaired by authorized service centre.
• Never carry chainsaw by power cord.
• Never yank power cord to unplug it.
• Keep power cord from heat, oil, and sharp edges.
• Inspect extension cords often and replace if damaged.
4. When servicing, use only identical replacement parts.
5. When not in use, always store chainsaw:
• in a high or locked place, out of children’s reach.
• in a dry place.
BAR MAINTENANCE
To maximize bar life, the following bar maintenance is recommended.
1. The bar rails that carry the chain should be cleaned before storing the tool or if the bar or
chain appear to be dirty.
2. The rails should be cleaned every time the chain is removed.
3. Turn the bar over, top rail becoming bottom and bottom rail becoming top, every 5
hours of use.
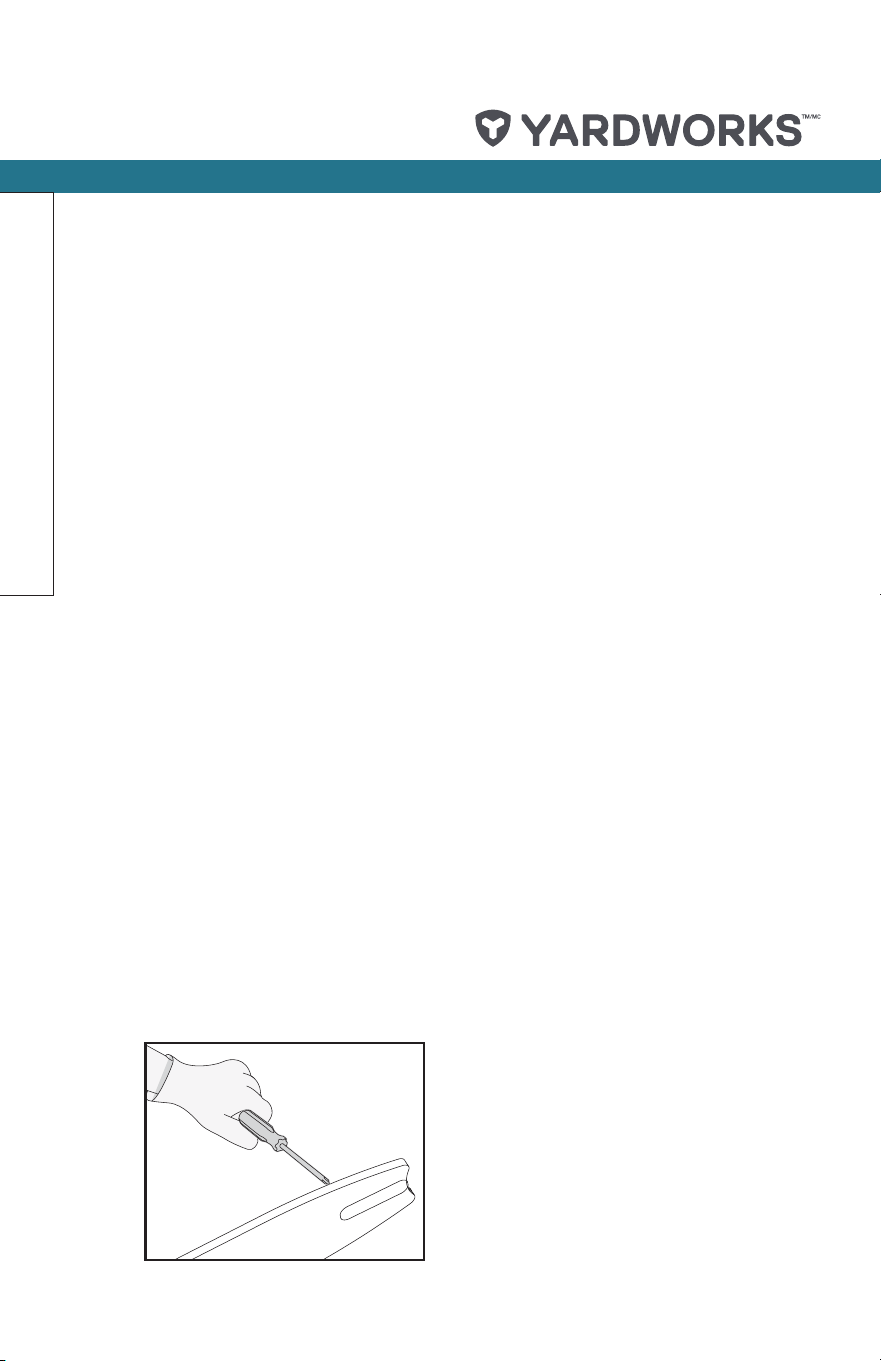
CLEANING THE BAR RAILS
1. Remove chain cover and bar and chain. (see section ASSEMBLY)
2. Using a wire brush, screwdriver or similar tool, clear the residue from the inner groove of the
bar. (See Fig. S)
3. Make sure to clean oil passages thoroughly.
1
2
2" to 4"
(5 to 10 cm)
6"
(15 cm)
W
Y
Z
X
Y
1/3
a
Injecting grease to lubricate
When rail top is uneven, use a flat file to restore
square edges and sides.
Worn Groove Correct Groove
File Rail Edges
and Sides
O1
O2
O3
O4
P Q
R
S
T
U
V
Assembly
model number 054-5757-2 | contact us: 1.866.523.5218 model number 054-5757-2 | contact us: 1.866.523.5218
31
CONDITIONS WHICH REQUIRE CHAIN BAR MAINTENANCE:
• Saw cuts to one side or at an angle.
• Saw has to be forced through the cut.
• Inadequate supply of oil to the bar and chain.
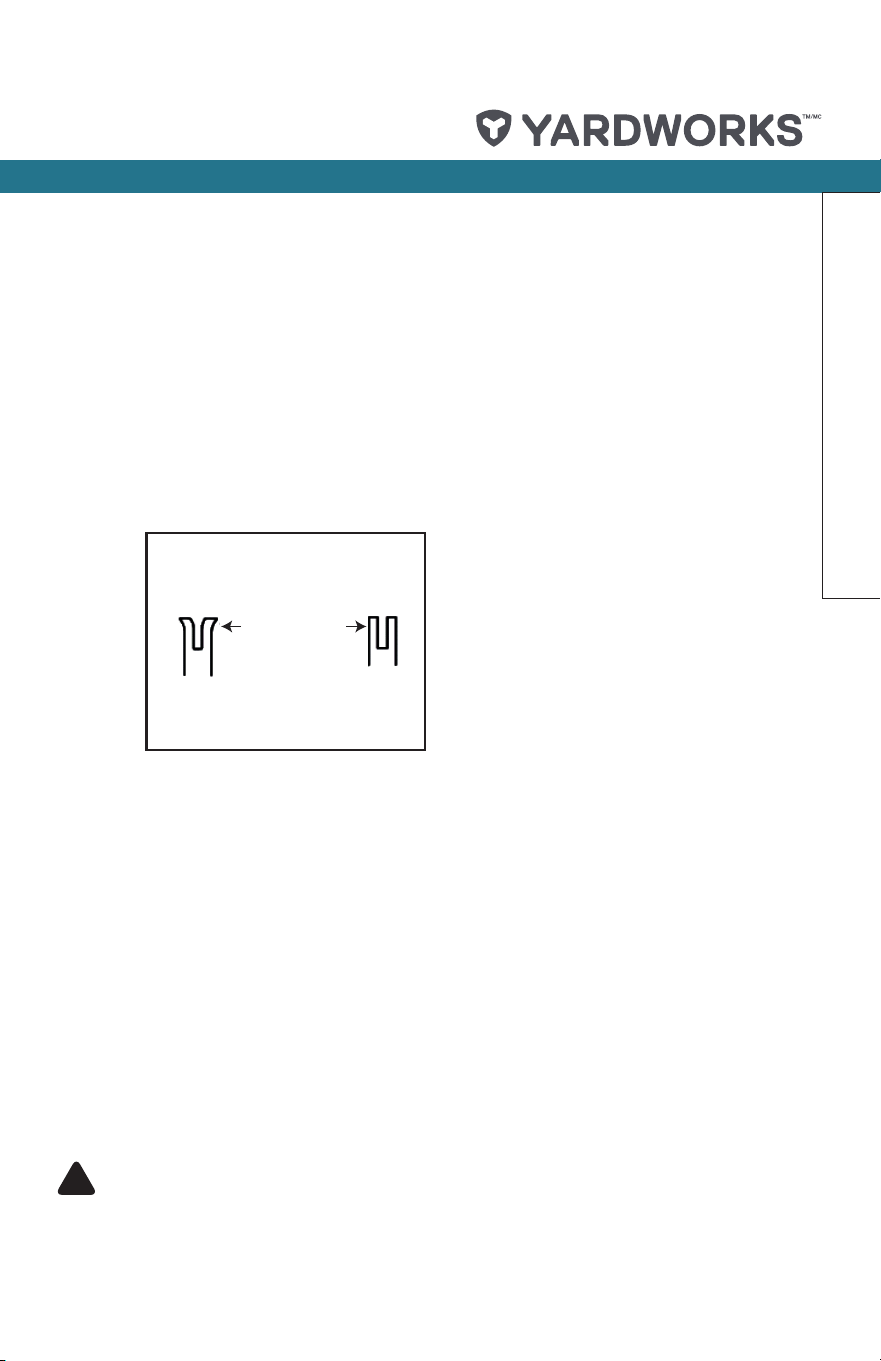
Check the condition of the guide bar each time the chain is sharpened. A worn guide bar will
damage the chain and make cutting difcult.
After each use, with unit disconnected from power source, clean all sawdust from the guide bar
and sprocket hole.
When rail top is uneven, use a at le to restore square edges and sides. (See Fig. T)
Replace the guide bar when the groove is worn, the guide bar is bent or cracked, or when
excess heating or burring of the rails occurs. If replacement is necessary, use only the guide
bar specied for your saw in the repair parts list or on the decal located on the chainsaw.
REPLACING BAR AND CHAIN
Replace chain when cutters are too worn to sharpen or when chain stops. Only use
replacement chain noted in this manual.
Always include a new drive sprocket when replacing chain to maintain proper driving of chain.
Inspect guide bar before sharpening chain. A worn or damaged guide bar is unsafe. A worn or
damaged guide bar will damage the chain and will make cutting harder.
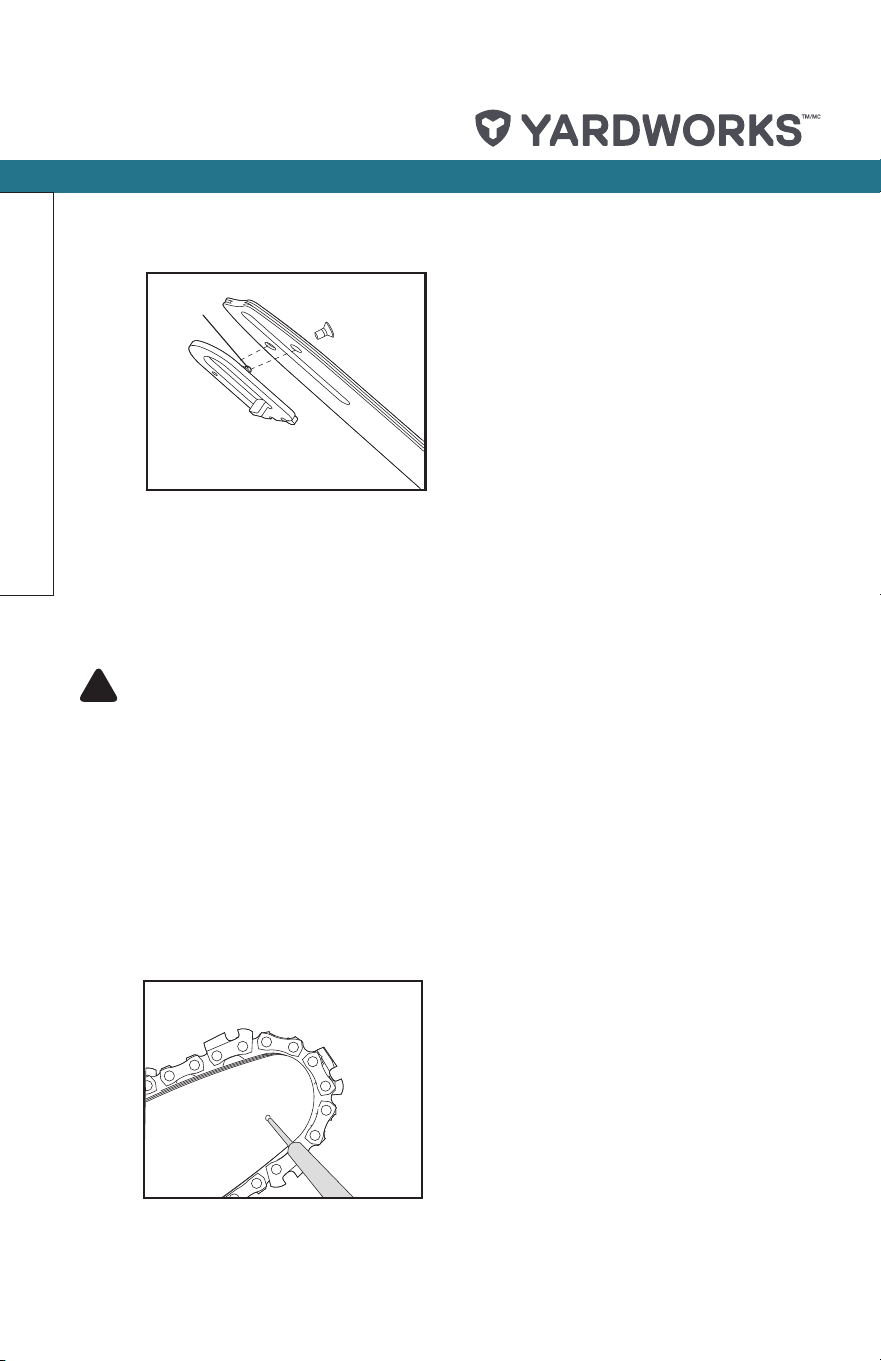
Fit the Bar Tensioning Plate tab (22) into the new bar by tightening the screw clockwise. The
catch protrusion (a) must be tted into the bar hole. (See Fig. U)
SHARPENING SAW CHAIN
!
WARNING:
Unplug chainsaw from power source before servicing. Severe injury or death could
occur from electric shock or body contact with moving chain.
Cutting edges on chain are sharp. Use protective gloves when handling chain.
1
2
2" to 4"
(5 to 10 cm)
6"
(15 cm)
W
Y
Z
X
Y
1/3
a
Injecting grease to lubricate
When rail top is uneven, use a flat file to restore
square edges and sides.
Worn Groove Correct Groove
File Rail Edges
and Sides
O1
O2
O3
O4
P Q
R S
T
U
V
Assembly
model number 054-5757-2 | contact us: 1.866.523.5218
32
Keep chain sharp. Your saw will cut faster and more safely. A dull chain will cause undue
sprocket, guide bar, chain, and motor wear. If you must force chain into wood and cutting
creates only sawdust with few large chips, chain is dull.
LUBRICATING SPROCKET
!
WARNING
Wear heavy-duty gloves when performing any maintenance or service to this tool.
Always unplug the tool before performing any service or maintenance on this tool.
NOTE:
It is not necessary to remove the chain or bar when lubricating the guide bar sprocket.
1. Clean the bar and sprocket.
2. Using a grease gun, insert the tip of the gun into the lubrication hole and inject grease until it
appears at the outside edge of the sprocket tip. (See Fig. V)
3. To rotate the sprocket pull the chain by hand until the ungreased side of the sprocket is in
line with the grease hole. Repeat the lubrication procedure.
1
2
2" to 4"
(5 to 10 cm)
6"
(15 cm)
W
Y
Z
X
Y
1/3
a
Injecting grease to lubricate
When rail top is uneven, use a flat file to restore
square edges and sides.
Worn Groove Correct Groove
File Rail Edges
and Sides
O1
O2
O3
O4
P Q
R S
T
U
V
1
2
2" to 4"
(5 to 10 cm)
6"
(15 cm)
W
Y
Z
X
Y
1/3
a
Injecting grease to lubricate
When rail top is uneven, use a flat file to restore
square edges and sides.
Worn Groove Correct Groove
File Rail Edges
and Sides
O1
O2
O3
O4
P Q
R S
T
U
V
Assembly

model number 054-5757-2 | contact us: 1.866.523.5218 model number 054-5757-2 | contact us: 1.866.523.5218
33
TROUBLESHOOTING TABLE
The following table gives checks and actions that you can perform if your machine does not
operate correctly. If these do not identify/remedy the problem, contact your service agent.
WARNING: Switch off and remove plug from power source before investigating fault.
SYMPTOM POSSIBLE CAUSE REMEDY
Chainsaw fails to operate
No power
Mains socket faulty
Extension cord damaged
Check power
Use another socket
Check cord; replace
Chainsaw operates
intermittently
Extension cord damaged
Loose connection
Internal wiring defective
On/Off defective
Check cord; replace
Contact service agent
Contact service agent
Contact service agent
Dry chain
No oil in reservoir
Vent in oil ller cap clogged
Oil passage clogged
Rell oil
Clean cap
Clean oil passage outlet
Chain/chain bar
overheats
No oil in reservoir
Vent in oil lter clogged
Oil passage clogged
Chain is over tensioned
Dull chain
Rell oil
Clean cap
Clean oil passage outlet
Adjust locking knob
Sharpen chain or replace
Chainsaw rips,
vibrates, does not saw
properly
Chain tension too loose
Dull chain
Chain worn out
Chain teeth are facing in the
wrong direction
Adjust locking knob
Sharpen chain or replace
Replace chain
Reassemble with chain in
correct direction
Troubleshooting
model number 054-5757-2 | contact us: 1.866.523.5218
34
Symbols
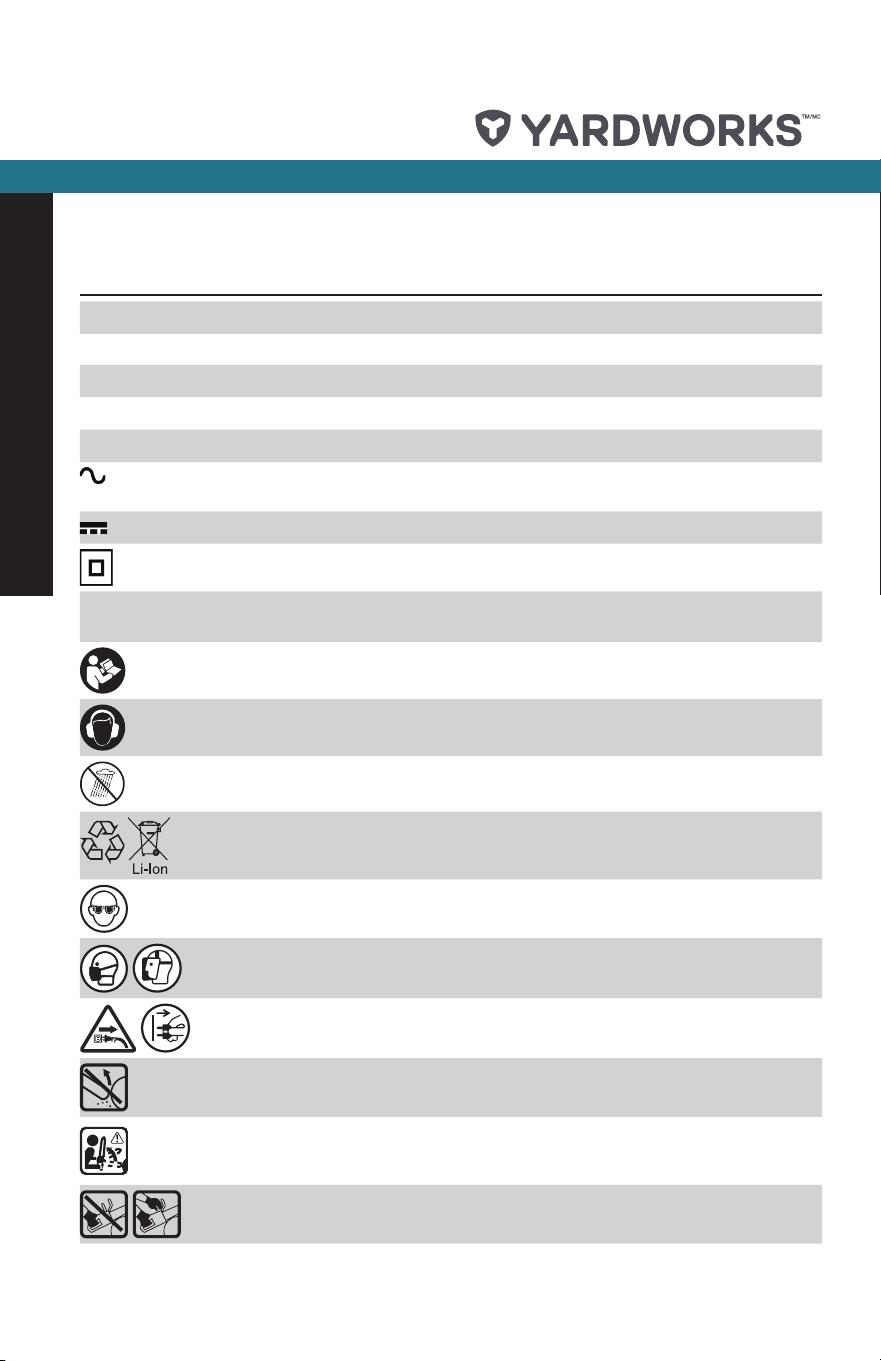
Symbol Name Designation/Explanation
V Volts Voltage
A Amperes Current
Hz Hertz Frequency (cycles per second)
W Watts Power
min Minutes Time
Alternating Current Type of current
Direct Current Type of current
Class II Construction Double-insulated construction
/min Per Minute
Revolutions, strokes, surface speed, orbits etc., per
minute.
Read The Operator’s
Manual
To reduce the risk of injury, user must read
instruction manual.
Ear Protection Wear ear protection.
Operation condition Do not expose to rain.
Li-ion Battery
Lithium-ion. Separate collection: battery must be
recycled.
Wear eye protection.
Wear dust mask.
Remove plug from the mains immediately if the
cable is damaged or cut.
Contact of the guide bar tip with any object should
be avoided.
Tip contact can cause the guide bar to move
suddenly upward and backward, which can cause
serious injury.
Always use two hands when operating the
chainsaw.
model number 054-5757-2 | contact us: 1.866.523.5218 model number 054-5757-2 | contact us: 1.866.523.5218
35
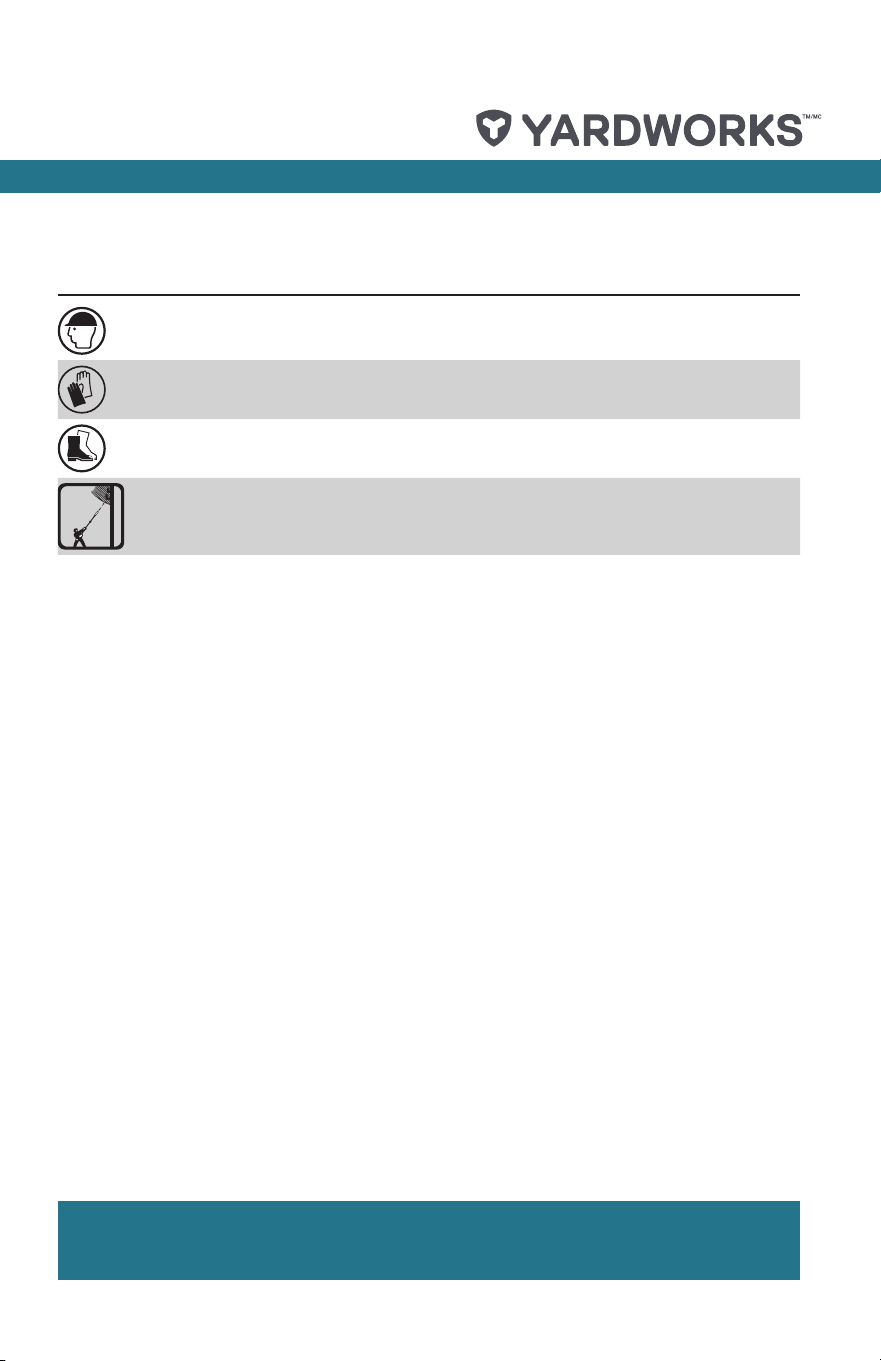
Symbol Name Designation/Explanation
Wear head protection.
Wear protective gloves.
Wear protective footwear.
1
0
m
Warning of danger from overhead electric-power
lines.
SAVE THESE INSTRUCTIONS!

model number 054-5757-2 | contact us: 1.866.523.5218

model number 054-5757-2 | contact us: 1.866.523.5218 model number 054-5757-2 | contact us: 1.866.523.5218
37
Warranty
TWO-YEAR LIMITED WARRANTY
For Two (2) Years from the date of purchase
within Canada, YARDWORKS CANADA
will, at its option, repair or replace for the
original purchaser, free of charge, any part
or parts found to be defective in material or
workmanship.
THIS WARRANTY DOES NOT COVER
1. Any part that has become inoperative
due to misuse, commercial use,
abuse, neglect, accident, improper
maintenance, or alteration;
2. The unit, if it has not been operated and/
or maintained in accordance with the
owner’s manual;
3. Normal wear, except as noted below;
4. Routine maintenance items such as
lubricants, blade sharpening; or
5. Normal deterioration of the exterior nish
due to use or exposure.
FULL ONE HUNDRED TWENTY (120)DAYS
WARRANTY ON NORMAL WEAR PARTS
Normal wear parts are dened as blade
adaptors, blades, grass bags and tires.
These parts are warranted to the original
purchaser to be free from defects in material
and workmanship for a period of one
hundred twenty (120) days from the date of
retail purchase.
HOW TO OBTAIN SERVICE
Warranty service is available by calling
the toll-free helpline, at 1.866.523.5218.
The factory will not accept the return of a
complete unit unless prior written permission
has been extended by YARDWORKS
CANADA.
TRANSPORTATION CHARGES
Transportation charges for the movement of
any power equipment unit or attachment are
the responsibility of the purchaser.
The purchaser must pay transportation
charges for any part submitted for
replacement under this warranty unless
such return is requested in writing by
YARDWORKS CANADA.
OTHER WARRANTIES
All other warranties, express or implied,
including any implied warranty of
merchantability is limited in its duration to
that set forth in this express limited warranty.
The provisions as set forth in this warranty
provide the sole and exclusive remedy of
YARDWORKS CANADA obligations arising
from the sale of its products.

Made in China. Imported by Yardworks Canada
Toronto, Canada M4S 2B8