Version: 1.0
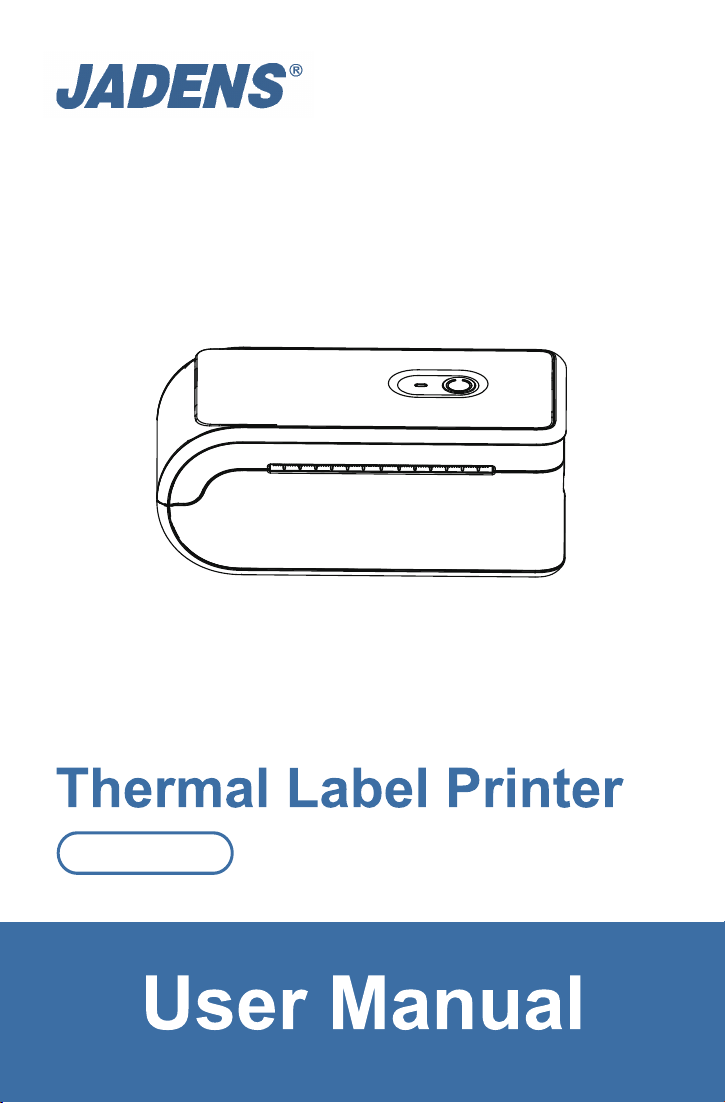
JD-568P

1.English
2.Deutsch
3.Français
P1 - P29
P30 - P58
P59 - P87
----------------------------------------------------------------
---------------------------------------------------------------
---------------------------------------------------------------
Manual Language Options
How can we help you today?
Enter your questions here
1-833-470-2950
support.jadens.com
Scan or upload this QR code
using the WhatsApp camera
to add us
Available Time:
Mon -Fri: EST 10am-10pm
Sat -Sun: EST 1pm-9pm
Scan the below QR code to talk with us.
1. This warranty only applies to hardware components of the product that are not subject to accident,
misuse, neglect, fire or damage from other external causes, al teration, repair or commercial use.
Defects that are the result of normal wear and tear will not be conside red manufacturing defects
under this warranty.
2. This warranty does not cover damage resulting from any unaut horized attempts to repair or from
any use not in accordance with the instruction manual.
4. Please read the Instruction Manual carefully before setting up or using this product. If you believe
this product to be suffering from a manufacturing fault, or if you have inquiries about this product,
please contact Customer Support:
ATTN: Customer Support
Email: [email protected]
Model:
Jadens
Date of purchase:
Purchased from:
Order Number:
3. This warranty applies only to the original purchaser of this product from the original date of
purchase. This warranty applies only if the unit is purchased new from an authorized retailer and is
non-transferable from the original purchaser of the item. Any warranties accompanied with this
product is only valid in the country of purchase.
Warranty Information

1.Product Sketch
2.What’s in the Box
3.LED Indicator
4.Compatible Label Size
5.How to Feed Label
6.Smartphone APP Printing
7.Driver Installation and Printer Setting for Windows System
8.USB and Bluetooth Connection Methods for MacOS Systems
9.Extension Installation and Printer Setting for ChromeOS System
10.Important Tips: How to Print Label of Multiple Size
Using "Take a Snapshot"
11.Frequently Asked Question
12.Trouble Shooting
13.Printer Driver Deletion
14.Maintenance
15.Safety Tips
16.Specifications
1
2
2
4
5
6
6
11
20
24
26
27
27
28
29
29
---------------------------------------------------------------
------------------------------------------------------------
-----------------------------------------------------------------
-------------------------------------------------------
-----------------------------------------------------------
---------------------------------------------------
---------------
-----------------
--------
---------------------------------------------------
------------------------------------------------
------------------------------------------------------------
------------------------------------------------------
----------------------------------------------------------------
------------------------------------------------------------------
---------------------------------------------------------------
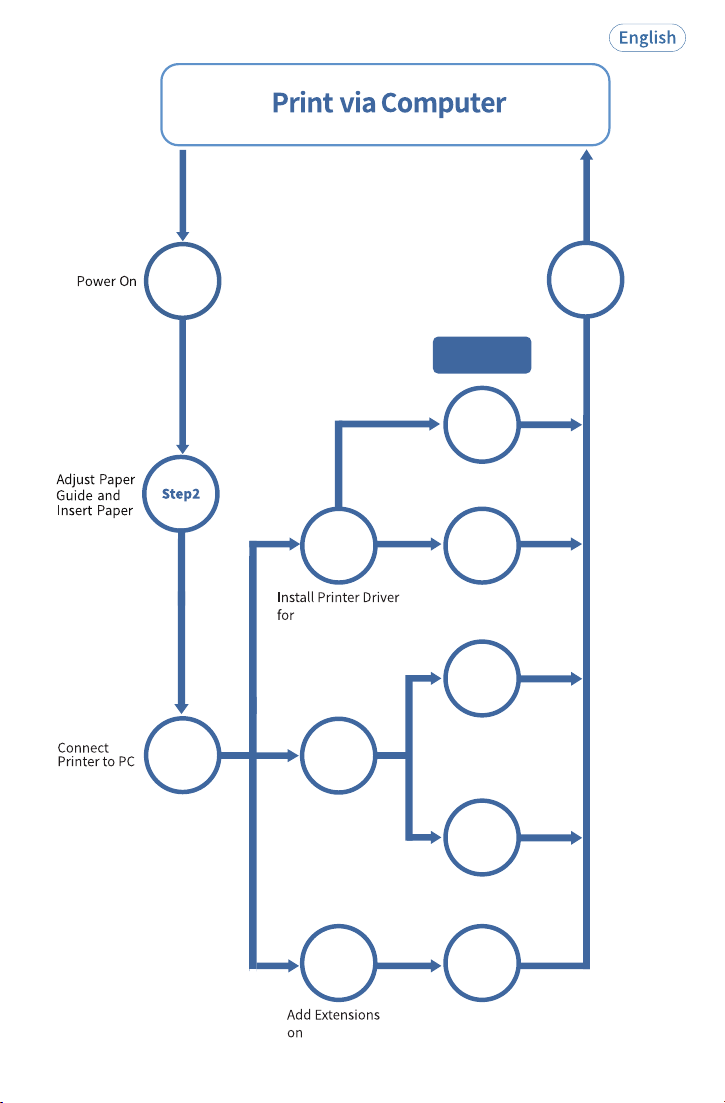
Chromebook
Step
4.1.2
Step
4.1.1
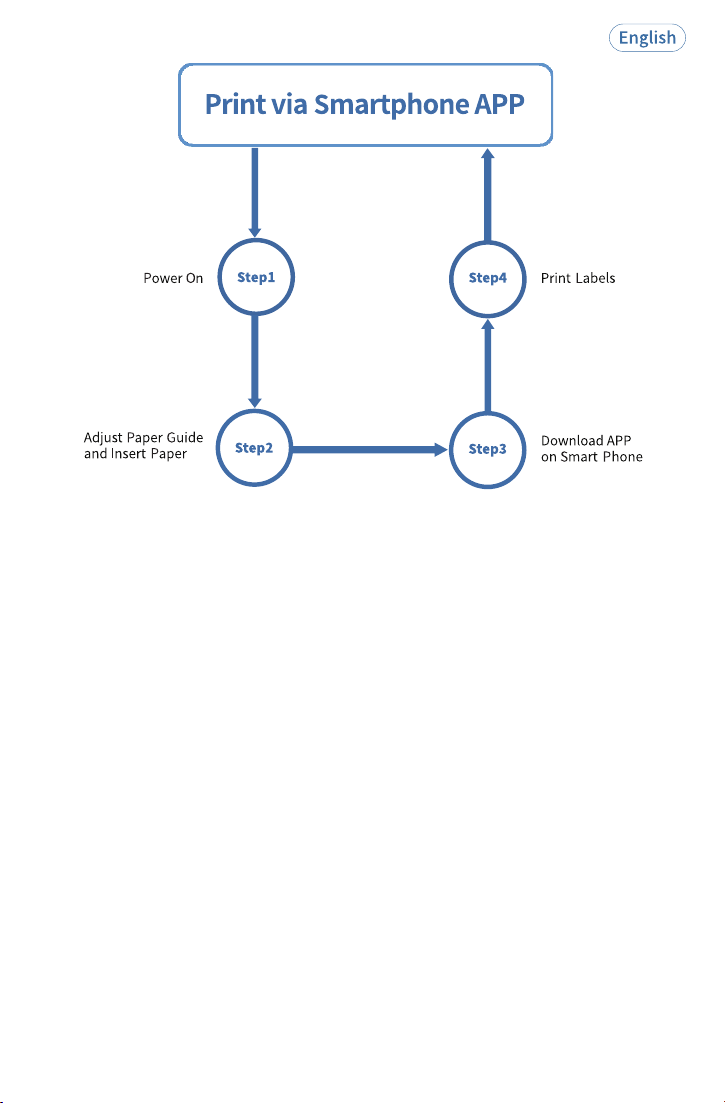
Step5
Step1
Step
4.2.1
Step4.2
Step3
Step4.1
Step
4.3.1
Step4.3
Windows
Wireless Connection
by Bluetooth
Print Labels
Download [Jadens
Printer] APP in App
Store for Bluetooth
Connection
Step
4.2.2
Install Printer Driver
for USB Connection
Macbook
Wired Connection
by USB Cable
Wired Connection
by USB Cable
Different
Connection
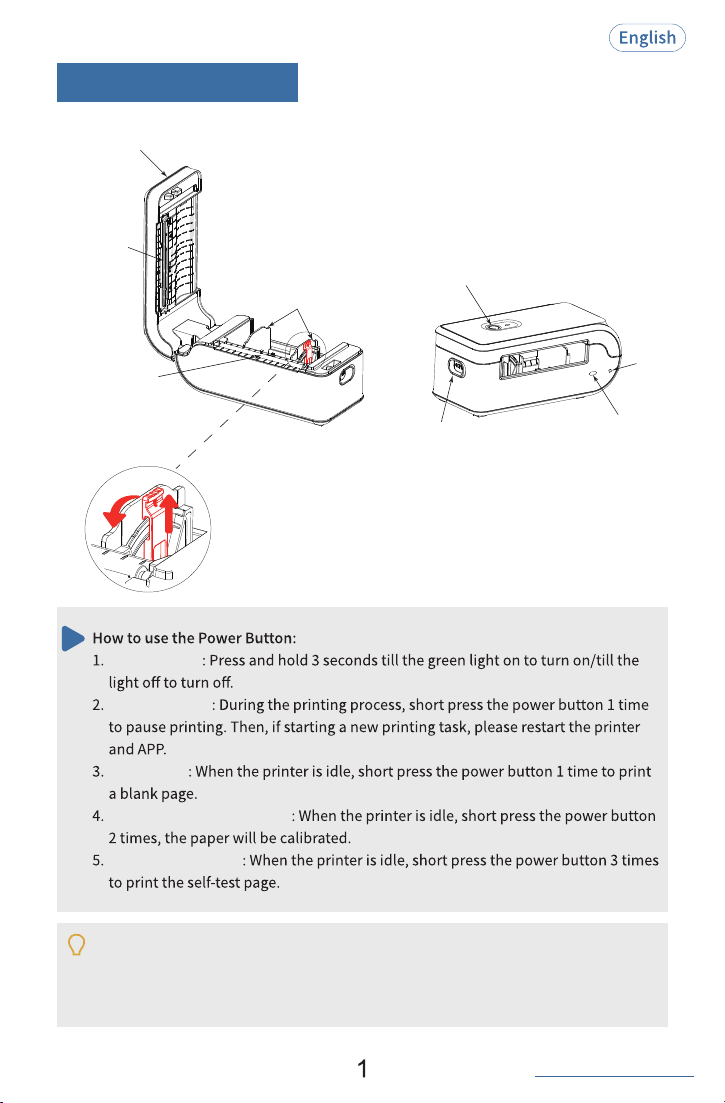
1.Product Sketch
See FAQ at support.jadens.com
Power on/off
Reset
key
Feed button/Power button
USB port
Release latch
Rubber roller
lock-in
release
Print head
Upper cover
Paper guide
Pause printing
Feed paper
Automatic paper learning
Print self-test page
Reset Key: When forced shutdown is required, use a pin to press the reset key.
Please reboot the printer after resetting.
Paper guide switch: The width of the paper guide can be
adjusted when the paper guide switch is flipped to the front,
and when the paper guide switch is flipped to the center, the
paper guide will lock up.
Data reset: When printer is idle, short press the power button 4 times to restore
to basic factory parameters. Please perform paper learning after data reset.
2
See FAQ at support.jadens.com
Long press for 2s
Idle Status:
Power on/off
To detect label gapQuickly press 1 time
Quickly press 2 times
Automatic paper learning
Print self-test page
Date reset
(After resetting,
please perform paper learning.)
Quickly press 3 times
Quickly press 4 times
In Print:
Quickly press 1 time
Printing paused
Instruction for Power Button
Printer status indicator
Bluetooth status indicator
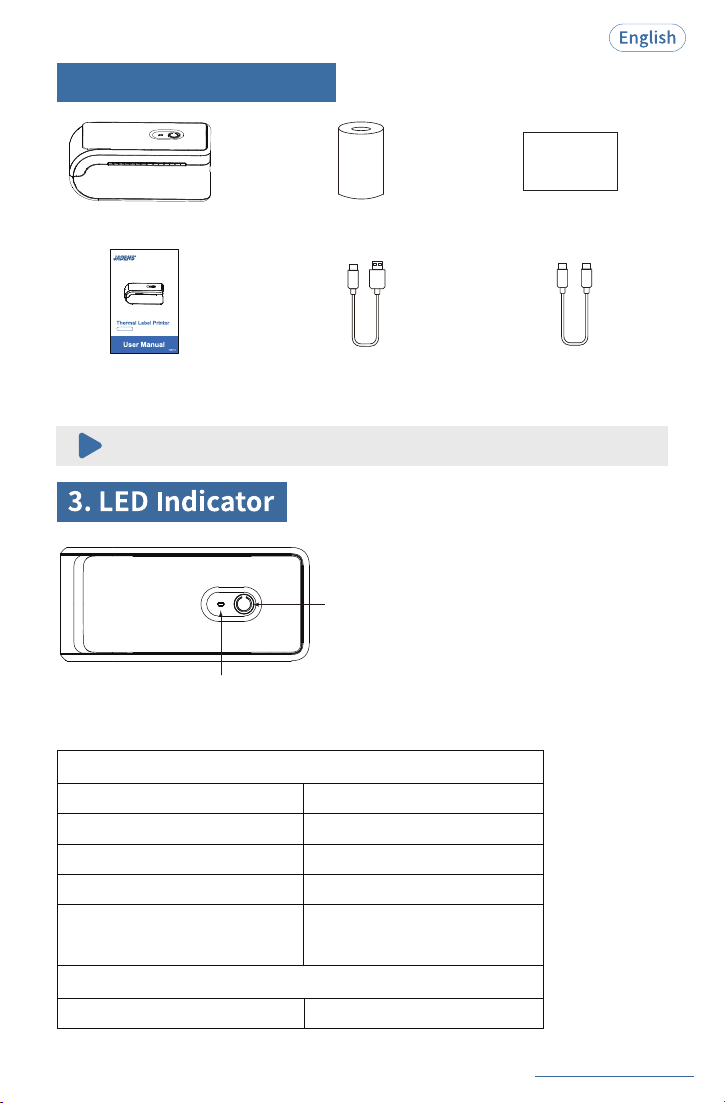
PrinterRoll Label
User Manual
2. What’ s in the Box
Cable
USB-A to USB-C
for WIN
USB-C to USB-C
Cable
for MAC
APP Guide Card
APP Guide Card
If any accessories are missing, please contact us for support.
JD-568P
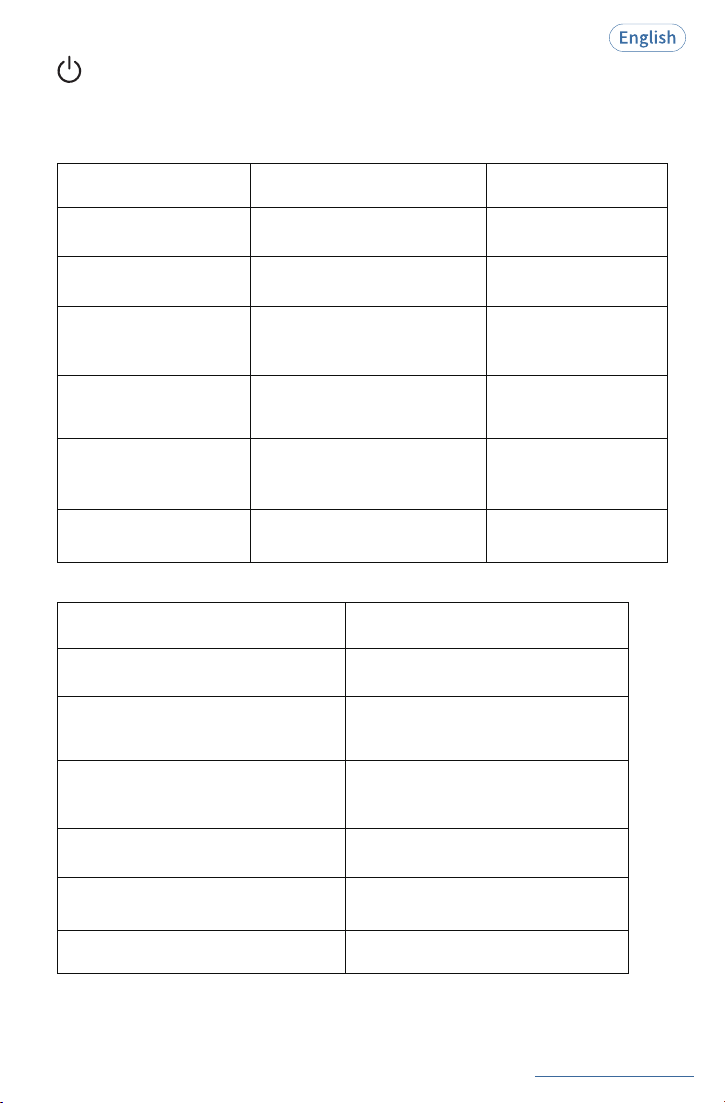
See FAQ at support.jadens.com
3
Full charged
Battery Status
Printer Status Indicater
Green light on
Green light on
Yellow light flash slowly
Yellow light on
Alternating yellow and green
flashing
Normal
(Battery power ≥20 %)
Low battery
(Battery power<20 %)
Charging normally
(Printer is on)
Charging normally
(Printer is off)
Yellow light flash quickly
Charging anomaly
Printer Status Indicater
Printer StatusPrinter Status Indicater
Troubleshoot
Power on
Green light on
/
Power off
Light off
Over-heat
Red light on
Wait for printer cooling
down, and it will continue
working automatically.
Printing paused
Green light flash slowly
Press feed button once to
resume printing.
Cover opened
Red light flash slowly
Check that cover is closed
completely.
Cover closed
Green light on
/
/
Note: Upgrading > Charging > Low Battery > Other status
See FAQ at support.jadens.com
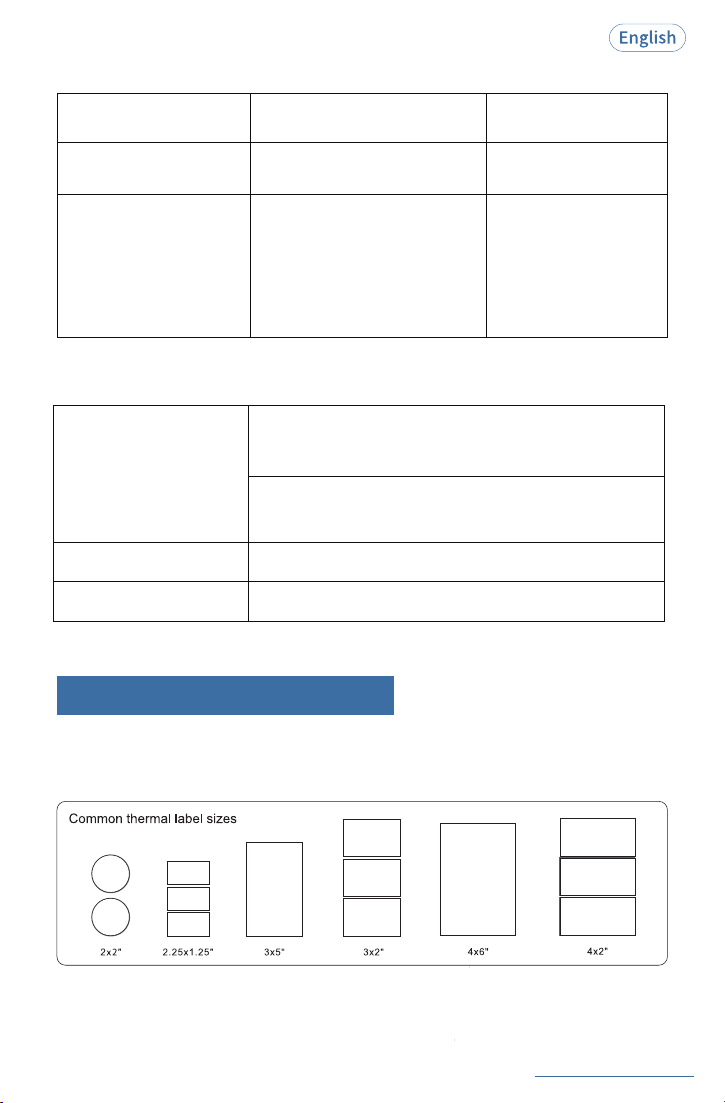
4.Compatible Label Size
The printer works with any Direct Thermal Label, and compatible with
a width range from 1" to 4.3" and length over 0.79".
4
Bluetooth disconnected
Bluetooth connected
For Smartphone wireless printing:
Blue light on
For Windows wireless printing:
Blue light turns on a few seconds then goes off
Blue light flash slowly
Blue light flash quickly
Bluetooth abnormal
Bluetooth Status Indicator
Normal
Green light on
No paper detected
Green light flash quickly
① Open the cover and clear
any jammed paper. lf rubber
roller is dirty, use alcohol pad
to clean and wait 2-5 minutes
before printer power on.
② Make sure the printer loads
the paper correctly.
/
Consumable Status
Printer Status Indicater
Troubleshoot
See FAQ at support.jadens.com
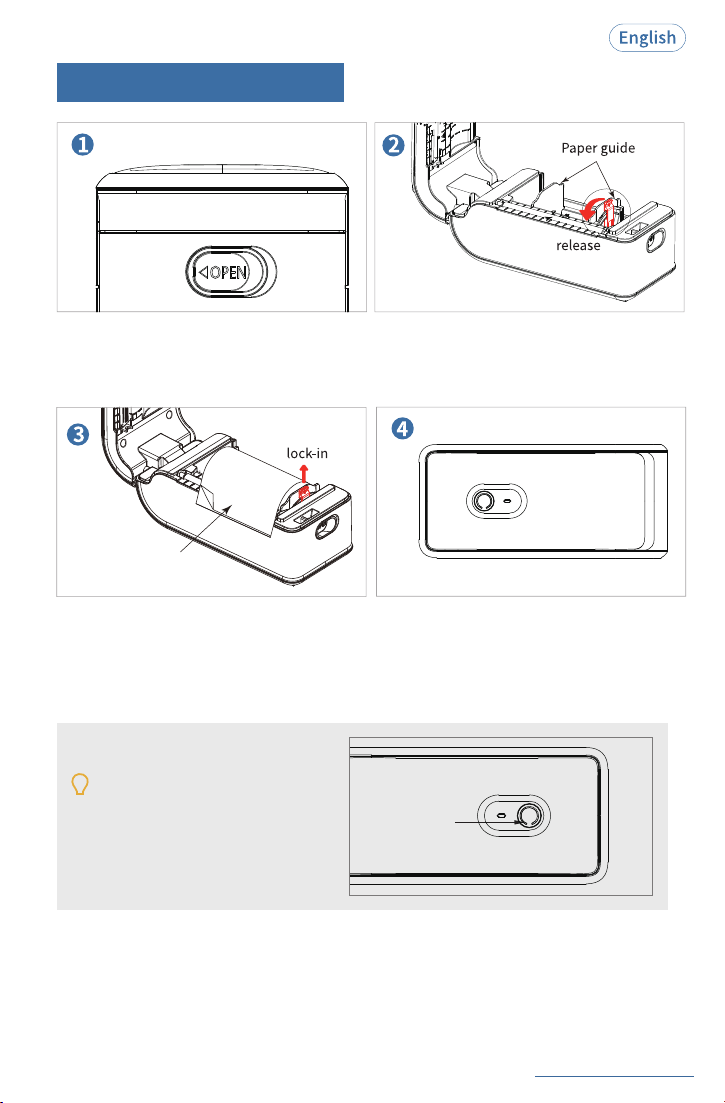
5.How to Feed Label
Tips:
Power button
Printing Side
Printing side should be face up.
Pull the release latch to open the cover.
Load the label and adjust the paper guide to
fit the width of paper, and lock up the guide.
Carefully close the cover. Label will be
automatically positioned at the tear-off point.
Printer is ready to print.
Pull the paper guide switch to the front to release
the paper guide , then, adjust the paper guide to
fit the width of paper you are going to put in.
Anytime you change your label, run the
automatic label identification: short press
the power button 2 times, the paper will
be calibrated.
5
See FAQ at support.jadens.com
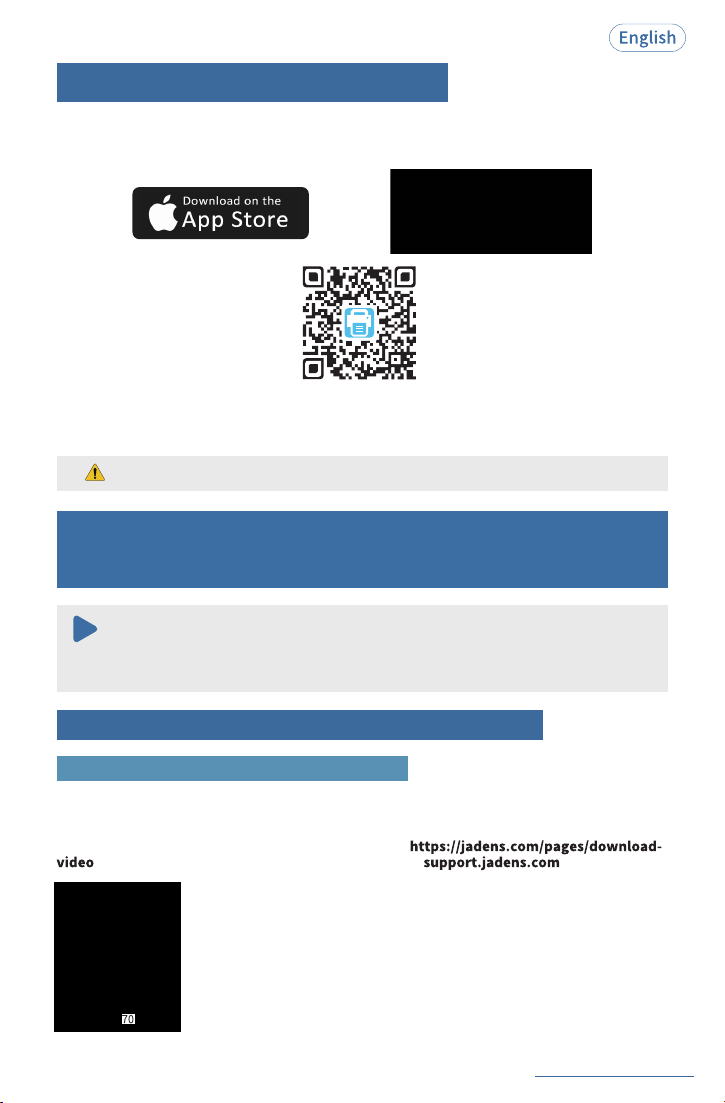
6.Smartphone APP Printing
APP download:Search for [Jadens Printer] on Google Play or App Store and download the app
for free. Please refer to the“APP Printing Quick Start Guide”for specific operating
instructions.
APP Store is a trademark of Apple Inc., registered in the U.S. and other countries.
Google Play and Google Play logo are trademarks of Google LLC.
7.Driver Installation and Printer Setting for
Windows System
It is recommended to close security software before installation to prevent any issues,
and you can reopen it after the installation is complete.
Note:
Tip: If asked for a PIN during pairing, try 0000 or 1234.
Option 1: Wireless Connection by Bluetooth
Step1: Install Printer Driver(Bluetooth or USB Cable)
1. Connect the power cable and turn on the printer(It is not necessary to connect USB cable).
2. Download the driver:
Download the driver (JADENS_Printer_Driver.exe) from
. Driver version may be updated. See the latest info at .
6
See FAQ at support.jadens.com
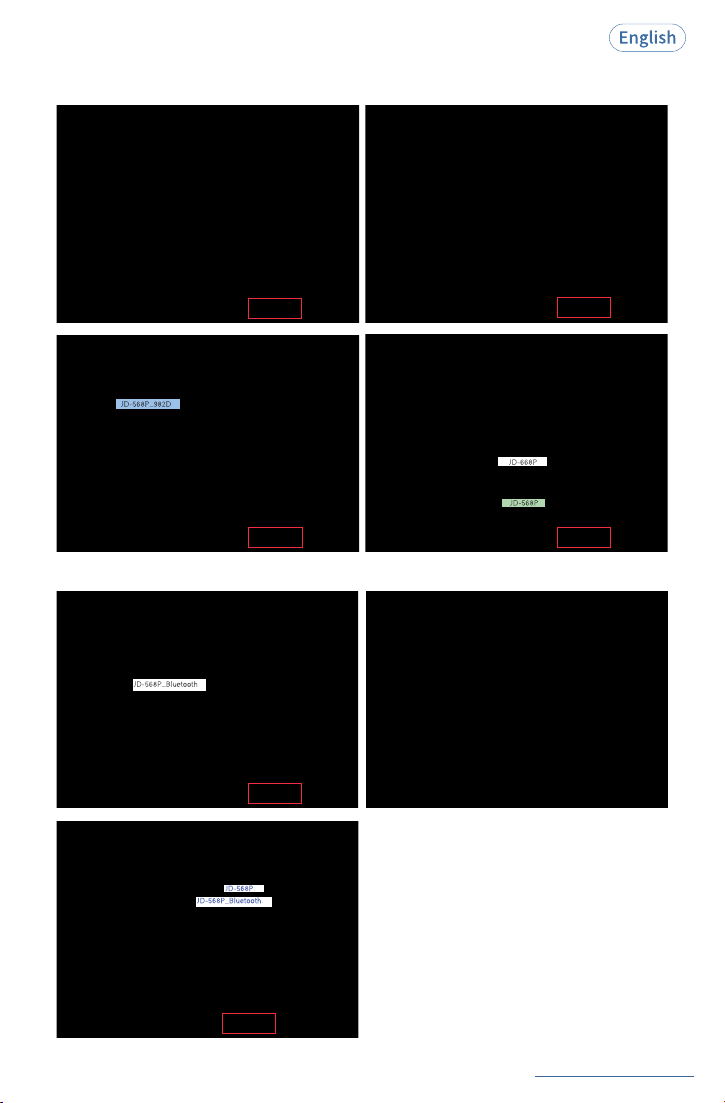
3. Install the driver:
Copy the printer driver to your computer desktop, double click to open and install it as below:
The search process will take about 40 seconds. Please kindly wait.
_
7
_
.
_.
1. Connect the power cable and turn on the printer (Please skip this step if you have already done it).
2. Connect the USB cable to your computer (Please skip this step if you have already done it).
3. Download the driver:
Download the driver (JADENS_Printer_Driver.exe) from
. Driver version may be updated. See the latest info at
.
See FAQ at support.jadens.com
If you can't print successfully, please restart your computer and printer, then install driver again.
Repeat installation will create duplicate copies of the printer in your operating system such as
“JD-568P(copy 1, 2...)”.
Note:
4. Print test page:
After successfully installing the printer driver, please click“print test page”to ensure the printer is
working correctly.
Option 2: Wired Connection by USB Cable
8
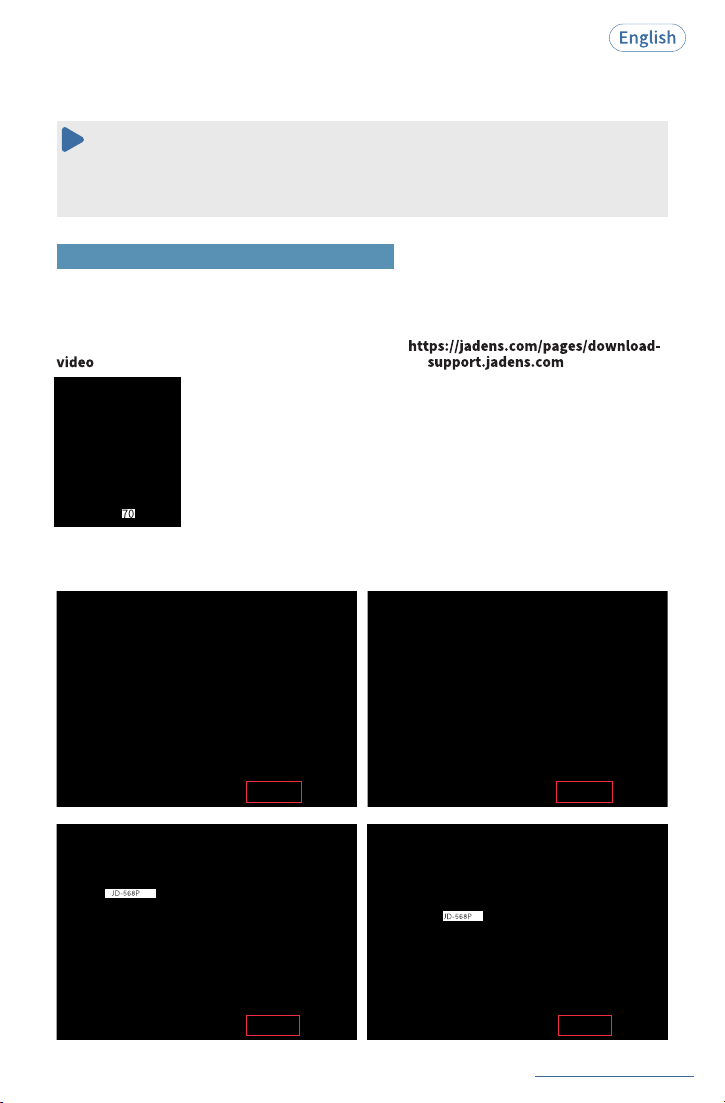
4. Install the driver:
Copy the printer driver to your computer desktop, double click to open and install it as below:
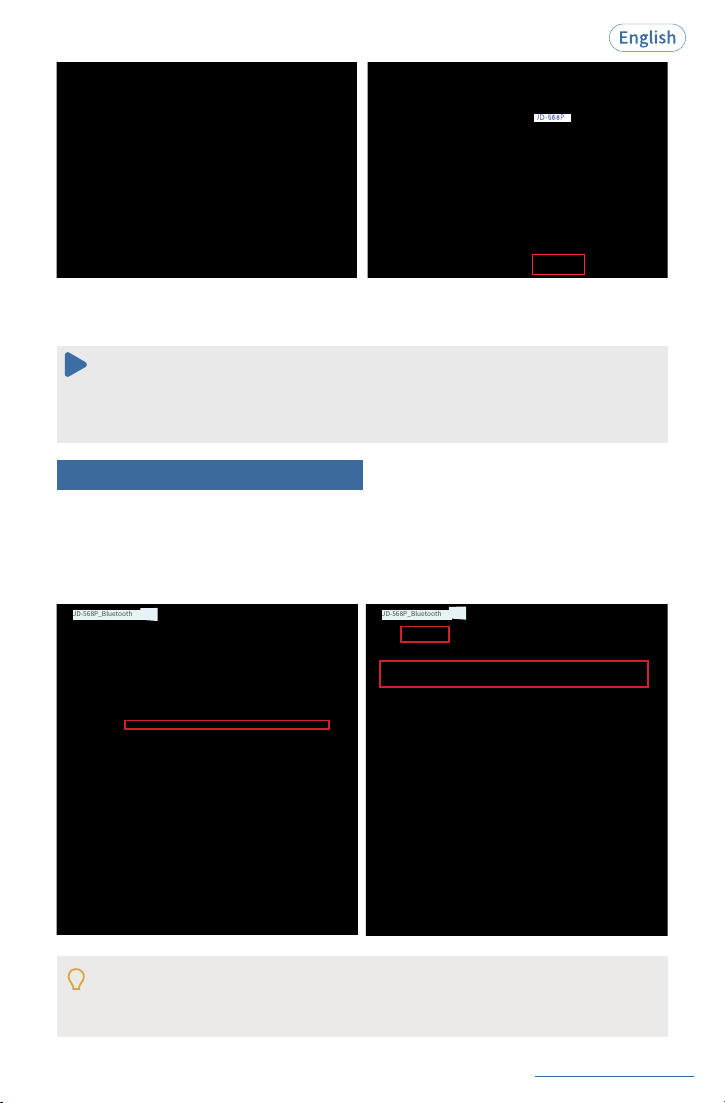
If you can't print successfully, please restart your computer and printer, then install driver again.
Repeat installation will create duplicate copies of the printer in your operating system such as
“JD-568P(copy 1, 2...)”.
Note:
5.Print test page:
After successfully installing the printer driver, please click“print test page”to ensure the printer is
working correctly.
See FAQ at support.jadens.com
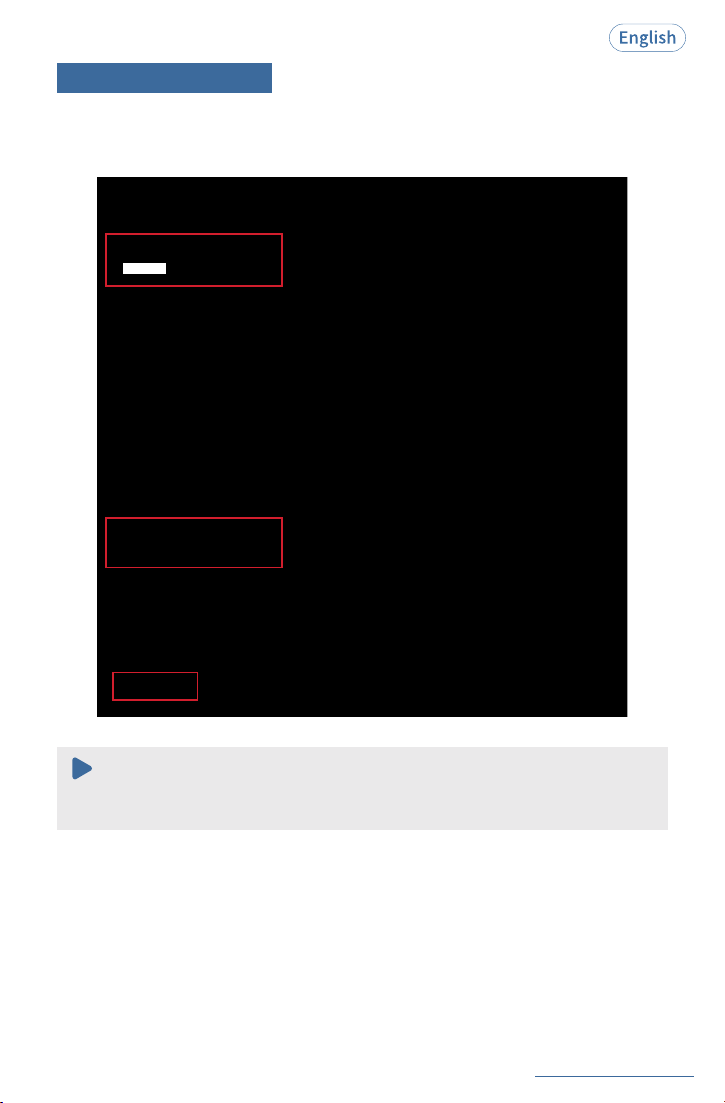
ln this part, you can set the default print page size, print speed and density.
Especially for density, if the labels print out light or not clear, you can change the density.
For Windows system please set the density at 8-12.
For Mac system please set the density at 8-12.
JD-568P_Bluetooth
JD-568P_Bluetooth
Step2: Printer Preference Setting
1
2
9
Go to the“Setting”> click“Device”> click“Printer &Scanners”> find the printer“JD-568P/
JD-568P_Bluetooth”> click“Manage”> click“Printer Preference”. Then set default page
size, printing speed and printing density.
See FAQ at support.jadens.com
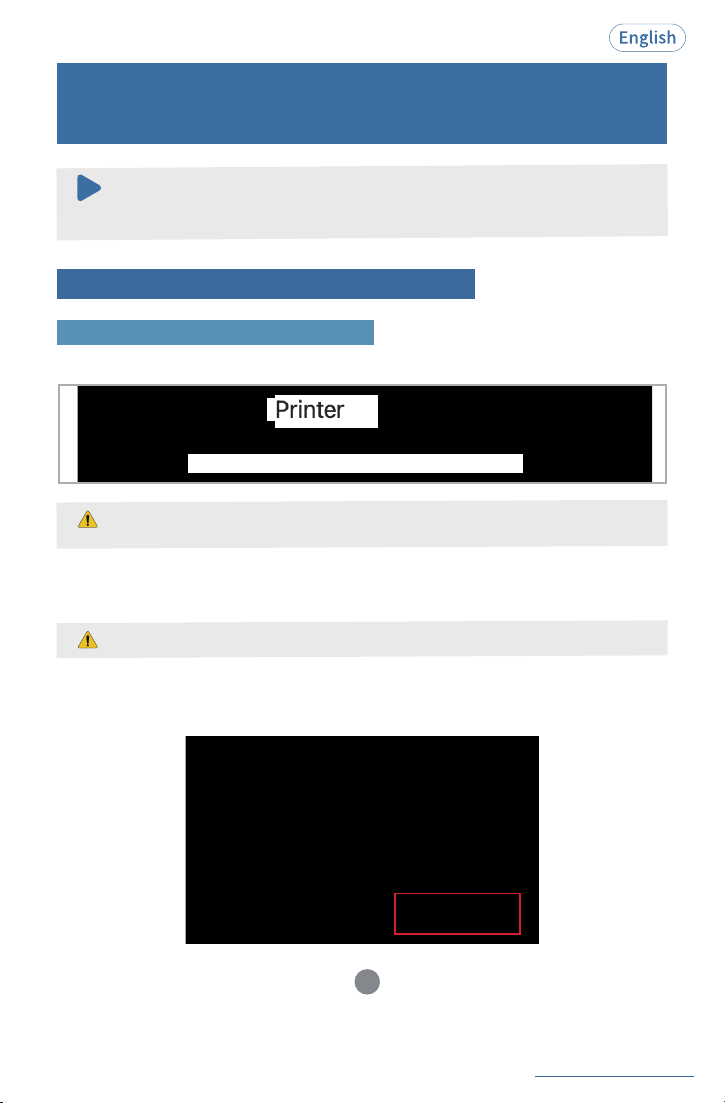
Step3: Printing a Label
(Take 4x6 inch shipping label as an example)
1.Open the Label File, and Click ‘Print’ icon.
2.Choose the right printer and paper size> Click ‘Print’.
Before printing, please make sure the size of thermal labels you load, and the size settings
on devices are same.
Note:
10
JD-568P
See FAQ at support.jadens.com
11
It is recommended to close security software before installatio
Compatible with macOS 11.0 or later and a Mac with Apple M1 chip or later.
For other systems, please use the USB driver instead.
n to prevent any issues,
and you can reopen it after the installation is complete.
Note:
8. USB and Bluetooth Connection Methods
for MacOS Systems
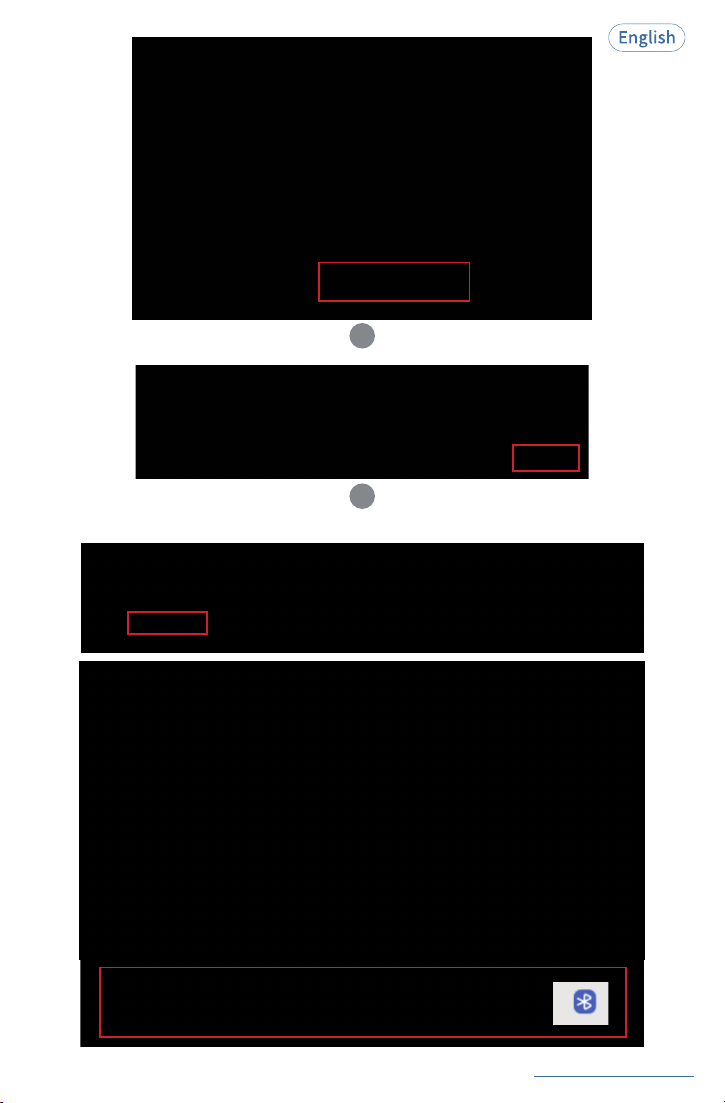
1. Search for "[Jadens Printer]" on the App Store and download the app for free.
2. Long-press the power button for 2 seconds to turn on the printer.
When the printer is connected to a power source (such as a computer or power adapter), it will enter
charging mode, indicated by a steady yellow power light. The printer can still be used while charging.
Step1: Free Download of [Jadens Printer] App
Wireless Connection via Bluetooth
If the light flashes yellow/green, the printer is off while charging — please turn it on first.
3. Open the [Jadens Printer] app and enable Bluetooth in System Settings, and allow access when
prompted.
1
See FAQ at support.jadens.com
12
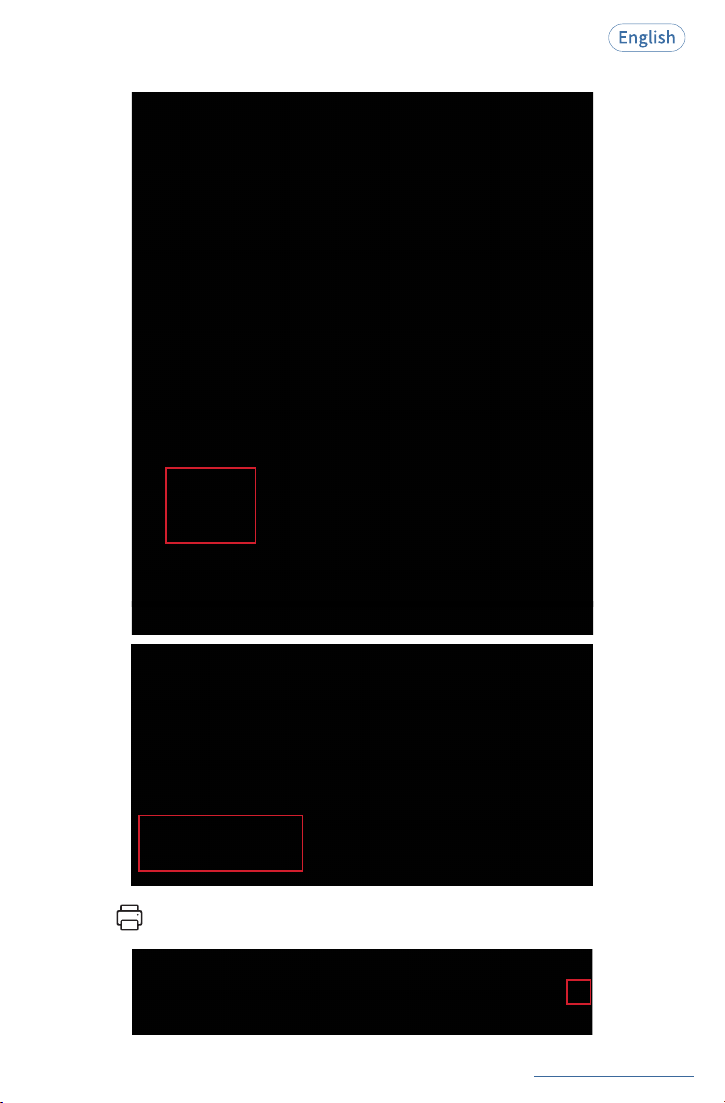
4. Tap "Go to Connect" > Search for devices > Tap "Connect".
2
3
See FAQ at support.jadens.com
13
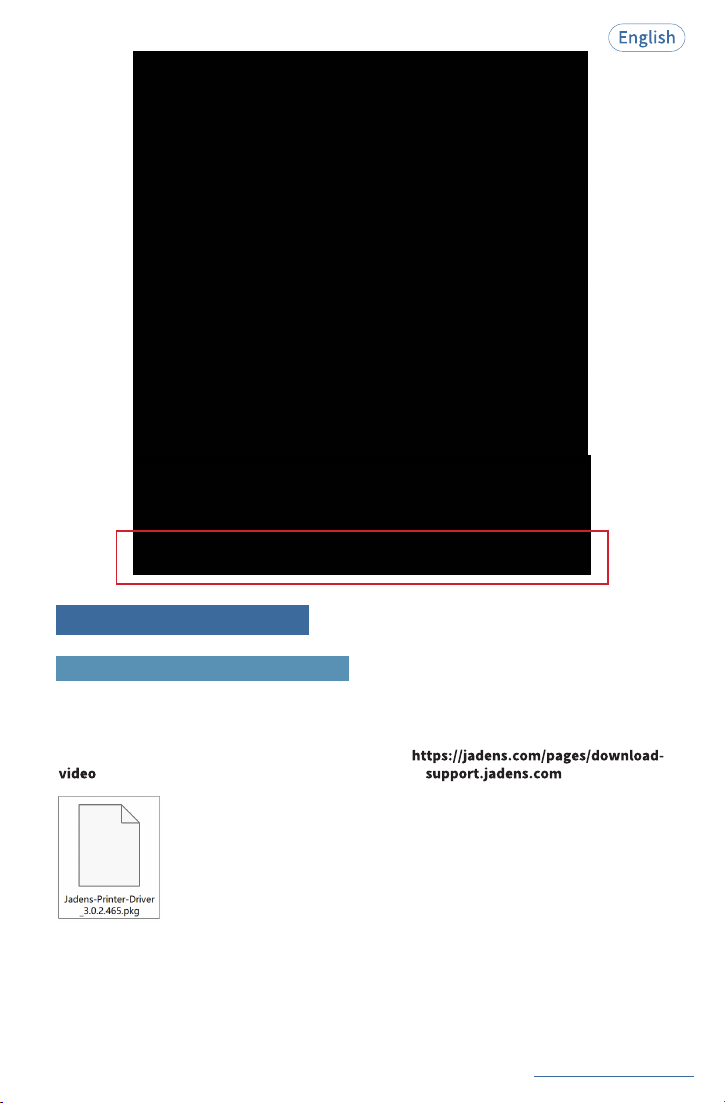
5. Tap "File" to import documents — such as PDFs or images — from local storage or other social
platforms.
6. Click " " to print.
See FAQ at support.jadens.com
14
Step2: Install Printer Driver
Wired Connection by USB Cable
1. Connect the power cable and turn on the printer (Please skip this step if you have already done it).
2. Connect the USB cable to your computer (Please skip this step if you have already done it).
3. Download the driver:
Download the driver (JADENS_Printer_Driver.exe) from
. Driver version may be updated. See the latest info at
4. Install the driver:
Copy the printer driver to your computer desktop, double click to open and install it as below:
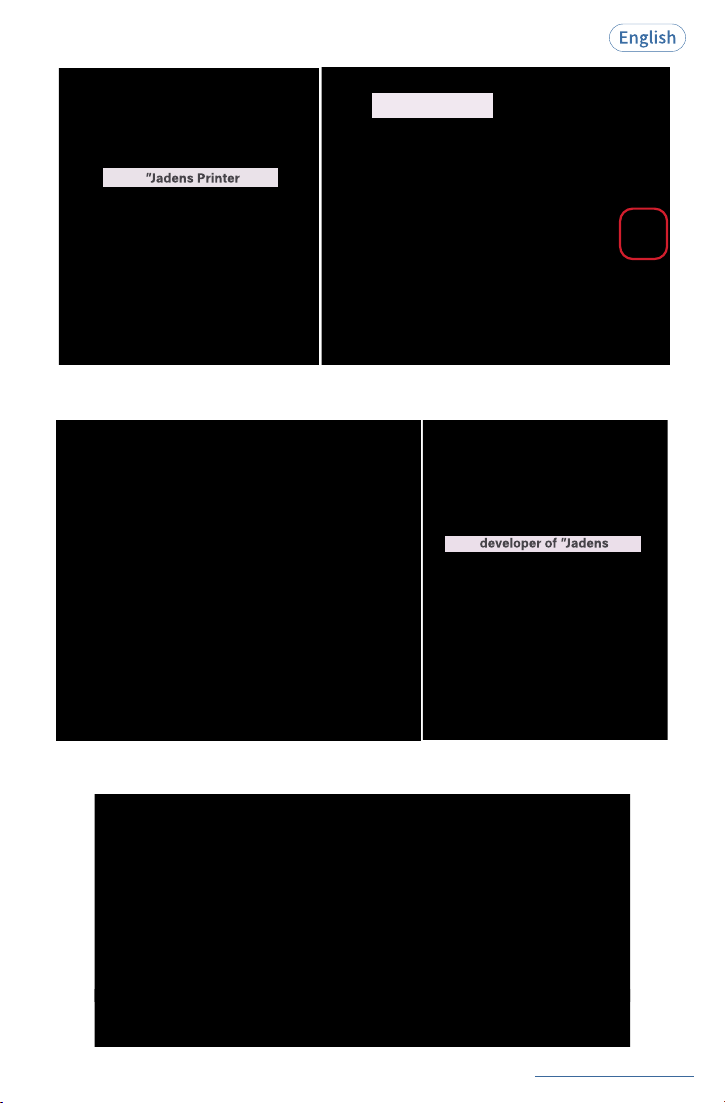
5. Click“OK”and open“System Preferences”, and click on“Security & Privacy”. (If you don't
see the warning, you can skip this step)
See FAQ at support.jadens.com
15
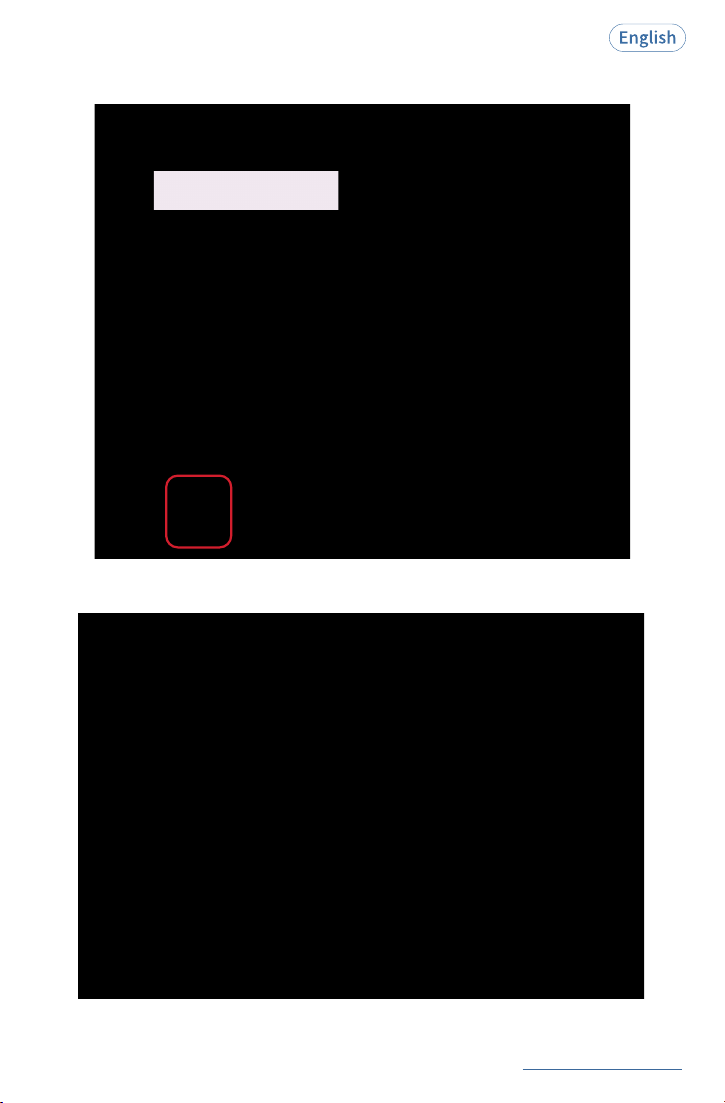
6. Click on“Open Anyway”button. Click on“open” and continue to install the printer.
7. Follow the installation steps until you see“The installation was successful”window.
See FAQ at support.jadens.com
16
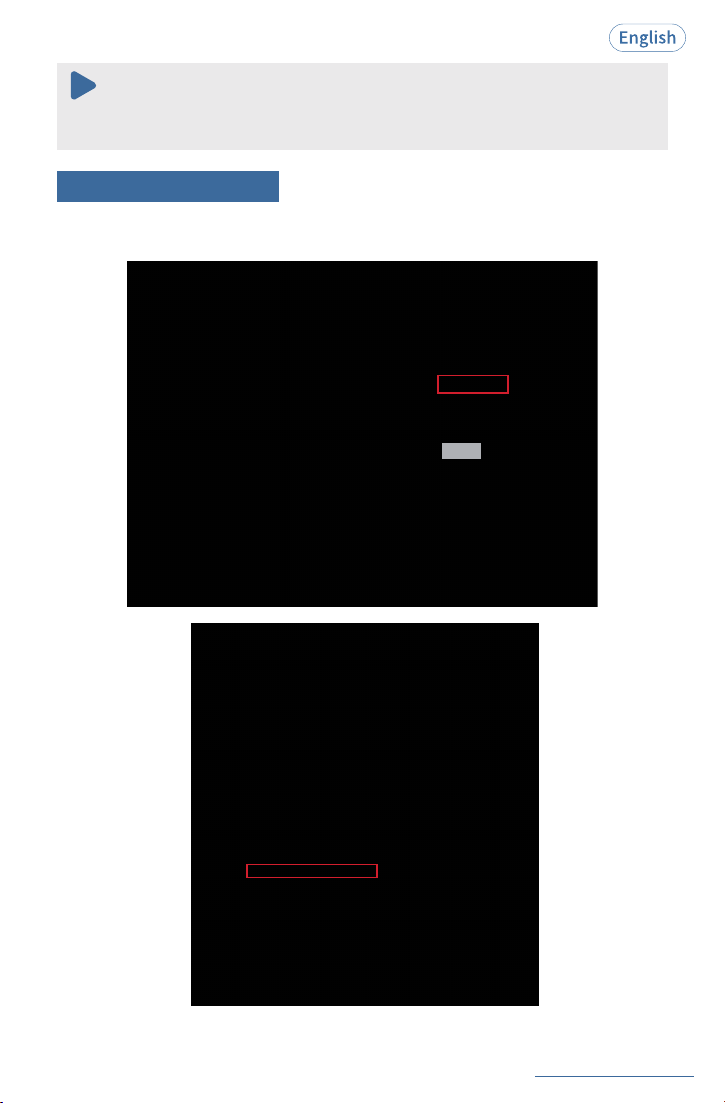
8. Open“System Preferences”> click“Printer and Scanners”.
9. Click“+”to add a new printer.

See FAQ at support.jadens.com
17
JADENS JD
568P
10. Click“JADENS JD-568P”.
11. Click“Add” , now the printer has been installed in your Mac Book successfully.
Air
MacBook
jadens
568P
JADENS JD
568P
JADENS JD
JADENS JD
568P
18
See FAQ at support.jadens.com
(Take 4x6 inch shipping labels as example)
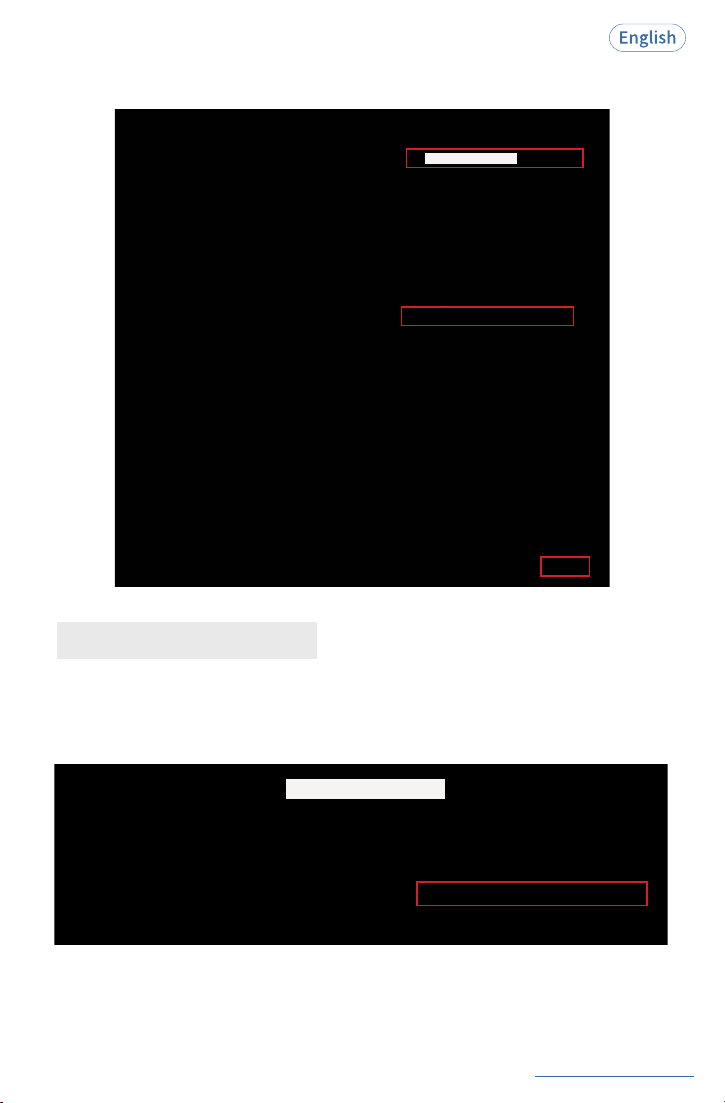
1.Open Label file with ‘Preview’> Click ‘File’ > Click ‘Print’.
Note:
Now you can print directly, If you can't print successfully, please restart your computer
and install driver again.
Step2: Printing a Label
See FAQ at support.jadens.com
19
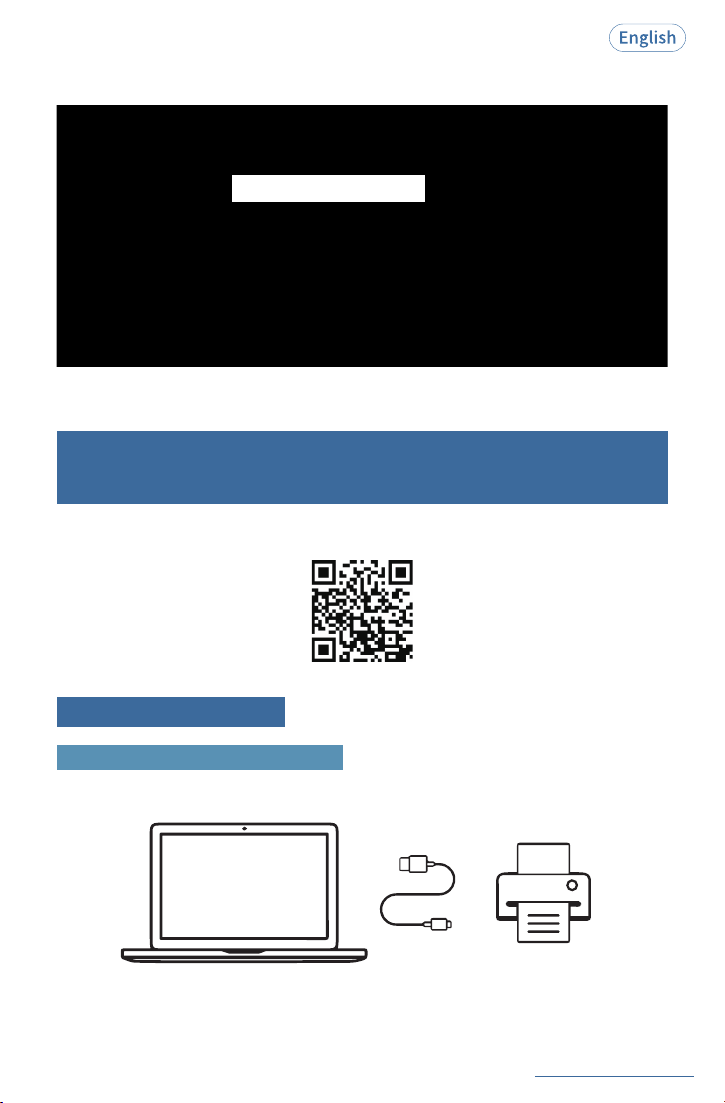
2.Choose the right printer and printing label size > Click ‘Print’.
JADENS JD-568P
1.Choose the commonly used paper size, density and speed in Printer Setting.
Pro Tips for Preset Setting:
2.Click ‘Default Settings’> ‘Set Current Settings as Preset’.
JADENS JD-568P
See FAQ at support.jadens.com
20
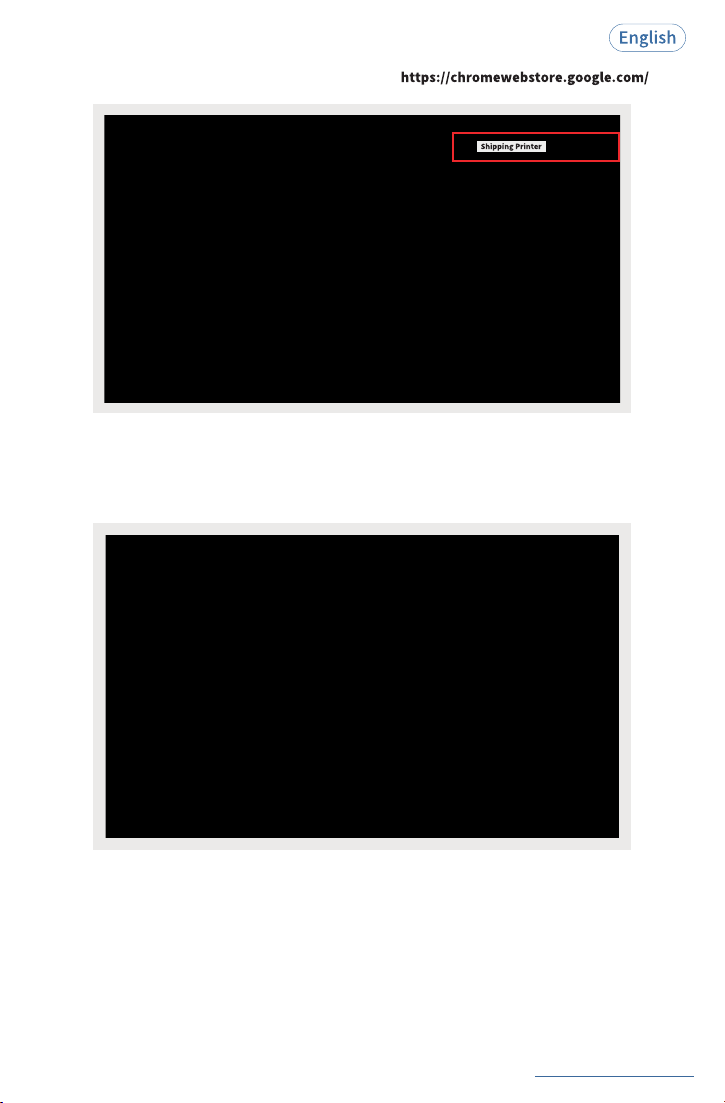
3.Input preset name and choose preset application range.
JADENS JD-568P
Scan the QR code below to view the guide video.
9. Extension Installation and Printer Setting for
ChromeOS System
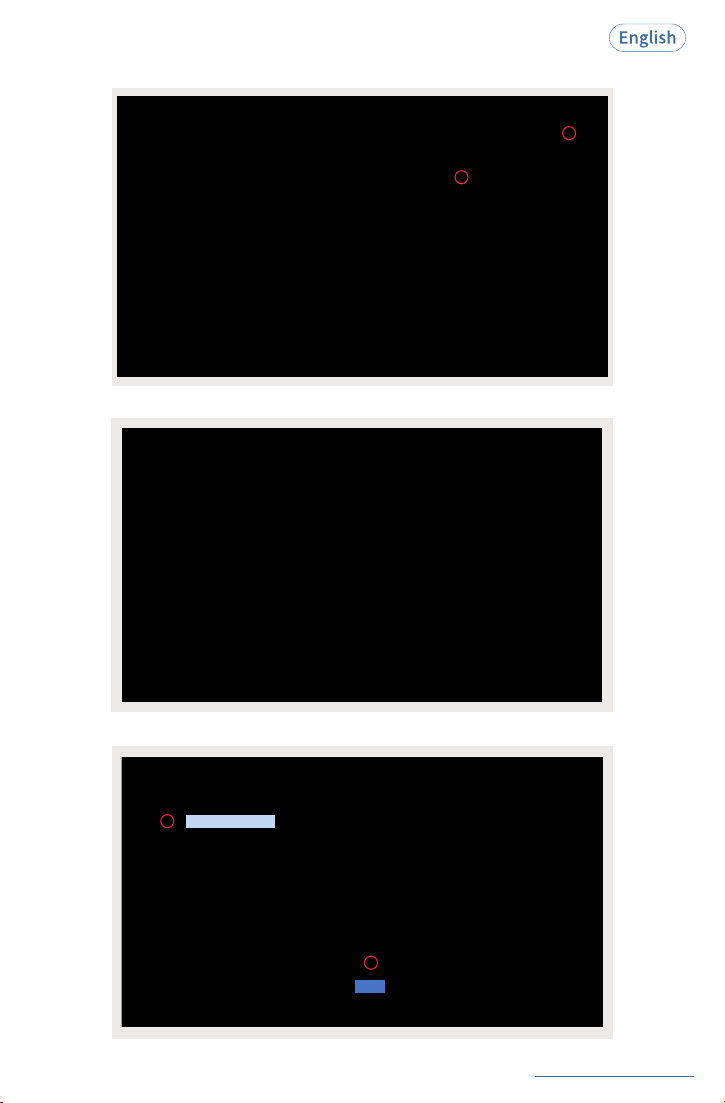
Step1: Install Extensions
①
Connect the printer with your Chromebook with provided USB cable and turn on the printer.
Wired Connection by USB Cable
Next time you can directly select“Default Setting”to switch and supply the preset settings!
See FAQ at support.jadens.com
21
Search“Shipping Printer”on Chrome Web Store: .
③
②
Download“Shipping Printer”extension to your Chrome.
See FAQ at support.jadens.com
22
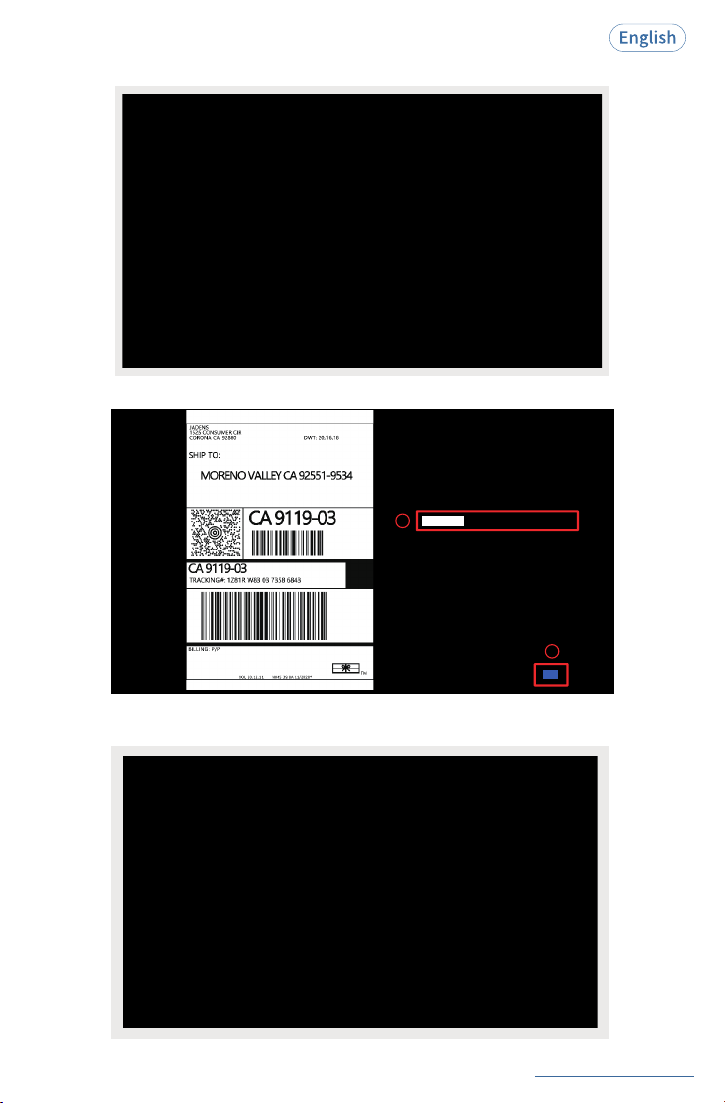
Click extension icon to select“Shipping Printer”.
2
1
④
Click“connection”icon.
⑥
⑤
Choose your printer to connect.
1
2
Printer-Paired
Connect
See FAQ at support.jadens.com
23
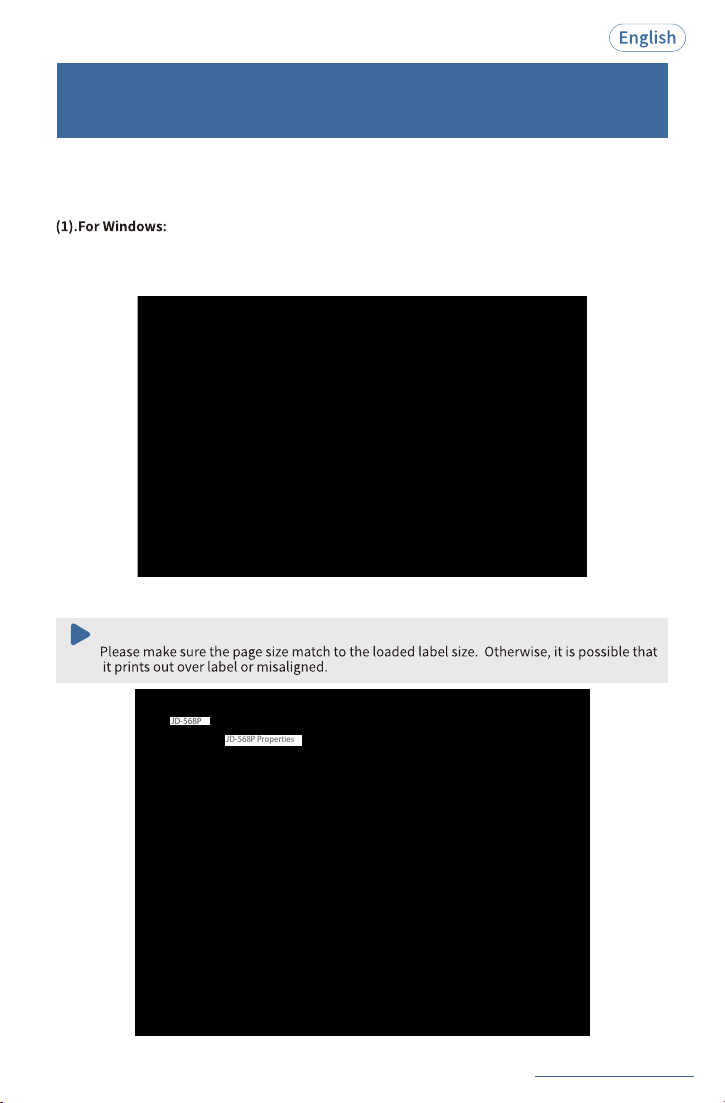
Open the file you need to print and click the the print icon.
⑦
1
2
More settings
Print
Turn back to the“Shipping label”extension setting page.
The printer will then print the label.
Click“More settings”to select the paper size and copies as you need, then click“Print”.
⑧
⑨
See FAQ at support.jadens.com
24
10.Important Tips: How to Print Label of
Multiple Size Using"Take a Snapshot"
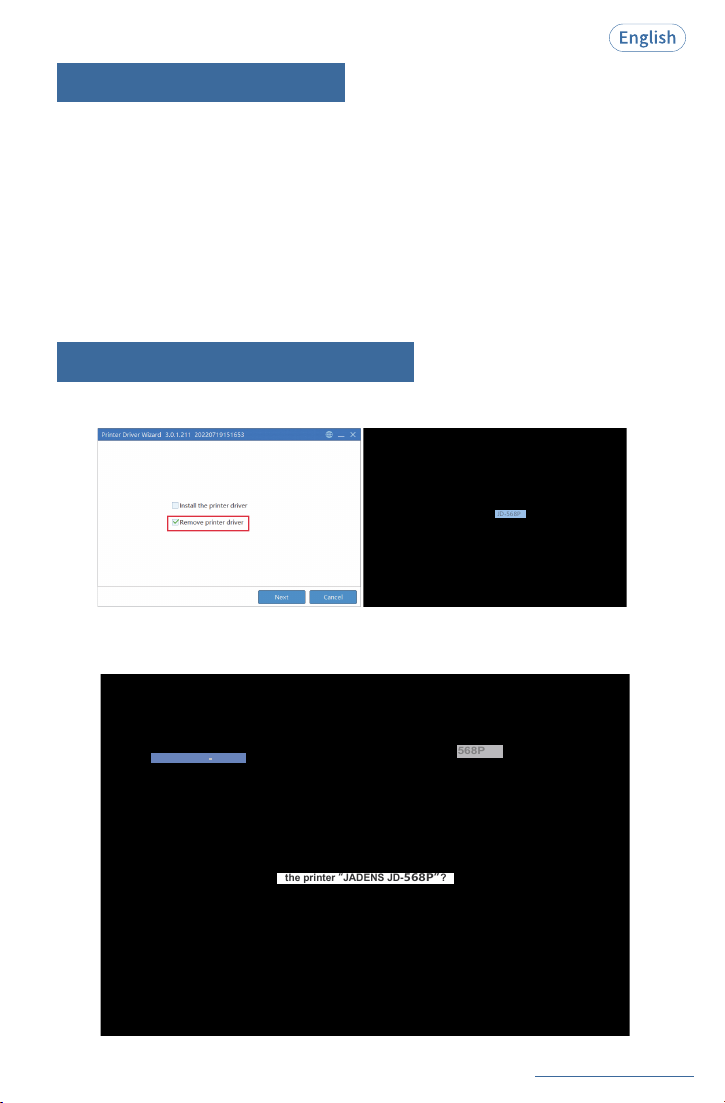
If the printed PDF/file is unusual size such as A4 which can't
situations, you have to use the function of“take a snapsh
be found the same size label. In this
ot”to print.
Here are the steps to operate.
b. From the top panel, select“Edit”>“Take a Snapshot”. choose the area you want to print.
a. Open the PDF in Adobe Reader.
c. Click“Print”, set up the page size same as the labels you load, then print.
Note:
JD-568P
JD-568P Properties

See FAQ at support.jadens.com
25
a. Find the“File”in the top left corner of you desktop > Click“Open”>Click“Desktop”>Choose
PDF file (or you can open the file with Adobe)
b. From the top panel, select“View”>“Rotate View”>“Clockwise”so that the labels are side by
side.(If the labels has laid vertically, please skip this step)

See FAQ at
support.jadens.com
26
11.Frequently Asked Question
Scan QR Code to support.jadens.com to see FAQ
C. Next, from the top panel, select‘Edit’>‘Take a Snapshot’. Then click and drag over one of the
labels that you need, so that you can print a specific range of label.
If you want to print the label that include barcode, please make sure print out the barcode
vertically in case the high temperature lead to the barcode print out blocks and can't be scanned.
See FAQ at support.jadens.com
27
13.Printer Driver Deletion
Open the driver again and follow below steps to uninstall the driver.
Click“System Preferences”>“Printer & Scanners”, click“JADENS JD-568P”>“-”
>“Delete Pinter”.
568P
JD
the printer “JADENS JD-
568P”
?
568P
568P
JADENS JD
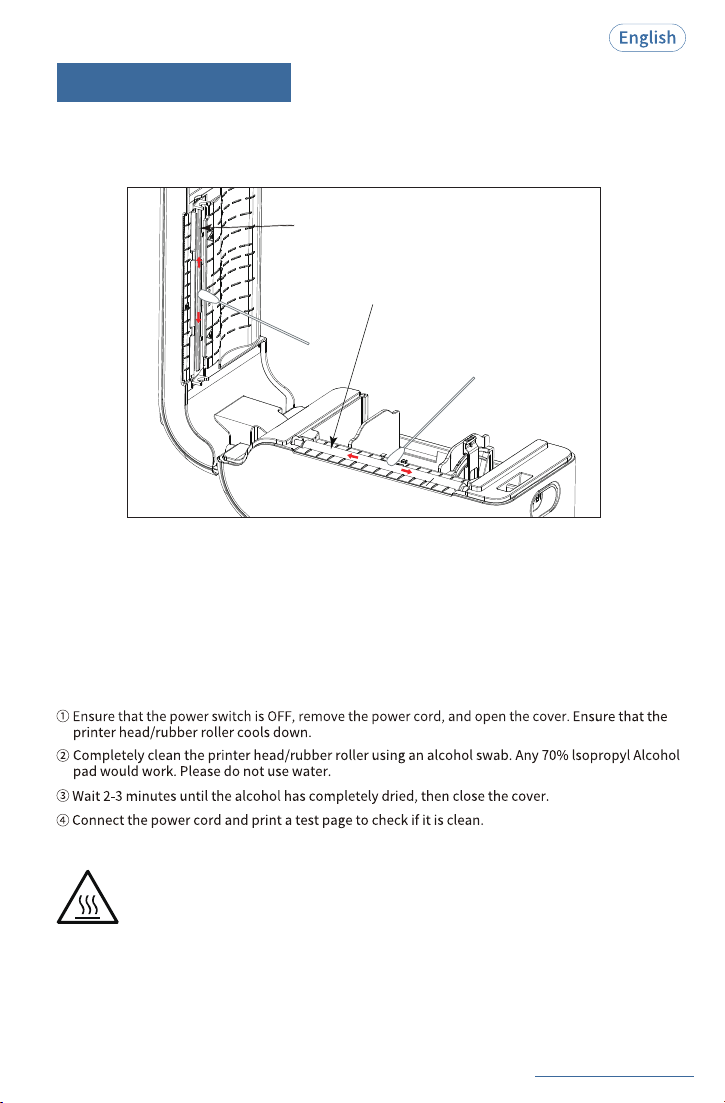
If paper is jammed, turn off the printer, and allow the printer head to cool down. Open the cover
and clear any jammed paper. lf rubber roller is dirty, use alcohol pad to clean. Allow the area to dry
off before turning the printer on.
1. How to deal with paper jammed?
Anytime you change your label, run the automatic label identification to ensure print centrally;
short press the power button 2 times, the paper will be calibrated.
2. Printer is not printing centrally.
(1) Dust or adhesive on the printer head.Please try to clean the printer head with a clean cloth with
alcohol. Details please refer to 15. Maintenance .
(2) The printhead and roller needs to be cleaned after a period of use as part of routine maintenance.
3. Printer prints not clear/ blurry.
12.Trouble Shooting
For Windows:
For Mac:
See FAQ at support.jadens.com
28
14.Maintenance
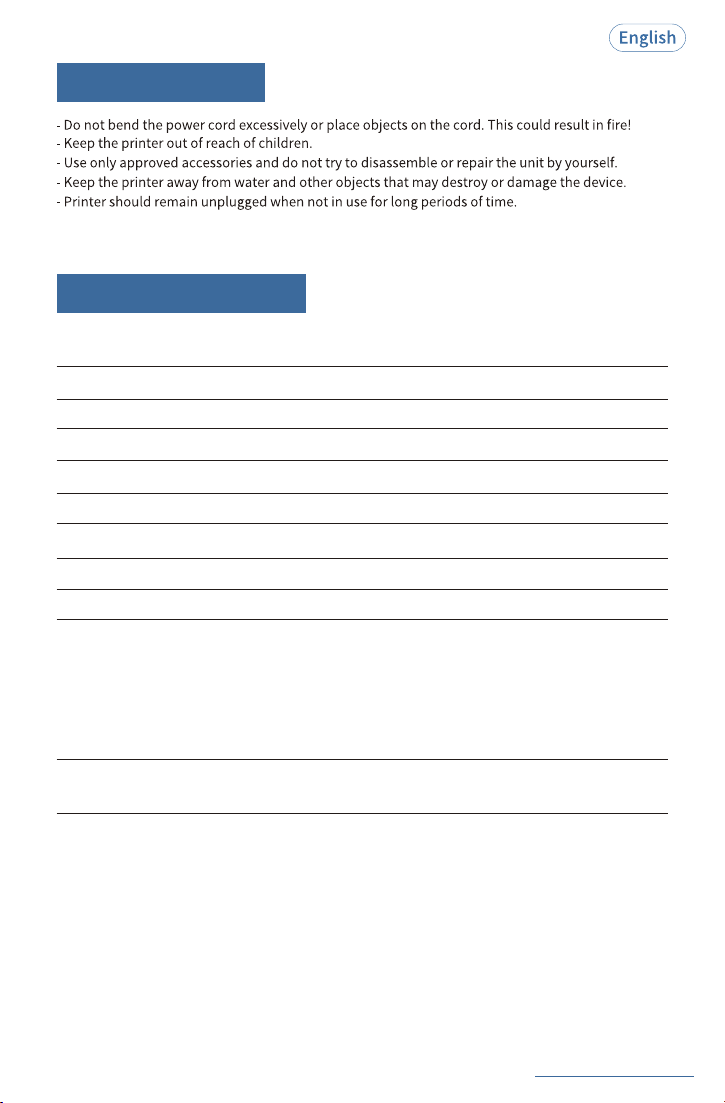
The print head is a sensitive part of the printer and can be found on the upper part of the printer
when open.
Caution: Print Head Can be Hot When Printer is Running!
Burrned fingers when handling the print head.
Wait 2-5 minutes to cool it down after switching off before handling print head.
1. Avoid using poor quality thermal label as they will affect the life
of print head.
2. CLEANING THE PRINT HEAD/RUBBER ROLLER
Rubber roller helps move paper smoothly through the printing mechanism. Over time, printer
rollers can accumulate dust and residue from the paper.
Print head
Rubber roller
See FAQ at support.jadens.com
29
16.Specifications
15.Safety Tips
Printing MethodThermal
Resolution203 DPI
Max Printing Speed50 mm/s
Label Width1"- 4.3"(25.4-109 mm)
Label Thickness0.08-0.2 mm
Connection USB + Bluetooth
Input Voltage5 V / 2 A
Battery Capacity2600mAh
Supported PaperDirect Thermal Labels / Paper
Suppoted Operating Systems
Printing Life
4"x6": ~328,000 labels
2"x1": ~1,968,000 labels
Label Minimum Length
Bluetooth Connection:
iOS, iPadOs, Android, Windows 7
or later
USB Connection:
MacOs V10.9 or later, ChromeOs,
Windows 7 or later
0.39"(10 mm)
Wie können wir lhnen heute helfen?
Geben Sie hier lhre Fragen ein
1-833-470-2950 (Nur English)
Kundenservice
support.jadens.com
Scannen oder laden Sie diesen OR-Code hoch,
indem Sie die WhatsApp-Kamera verwenden,
um uns hinzuzufügen
Kundendienst
Vielen Dank, dass Sie sich füir uns
entschieden haben!
Verfugbare Zelt:
MO-Fr: EST 10:00-22-00 Uhr
Sa-So: EST 13.00-21:00 Uhr
Bitte kontaktieren Sie uns gerne, wenn Sie Probleme oder
Fragen bei der Installation und Verwendung haben.
Scannen Sie den untenstehenden QR-Code,
um mit uns zu sprechen.

1. Diese Garantie gilt nur fur Hardwarekomponenten des Produkts, die nicht durch Unfall, Missbrauch,
Vernachlässigung, Feuer oder Schäden durch andere äulere Einfliisse, Anderungen, Reparaturen oder
kommerzielle Nutzung beeintrachtigt wurden, Mangel, die auf normalen Verschleil zuruckzufuhren sind,
gelten nicht als Herstellungsfehler im Rahmen dieser Garantie.
2. Diese Garantie deckt keine Schaden ab, die durch unbefugte Reparaturversuche oder durch
unsachgemaBe Verwendung gemäß der Bedienungsanleitung entstehen.
4. 4. Lesen Sie bitte das Handbuch sorgfaltig durch, bevor Sie dieses Produkt aufstellen oder verwenden.
Wenn Sie glauben, dass dieses Produkt unter einem Herstellungsfehler leidet, oder wenn Sie Anfragen
zu diesem Produkt haben, kontaktieren Sie bitte den Kundensupport:
Zu Händen: Kundensupport
Email: [email protected]
Modell:
Kaufdatum:
Gekauft von:
Bestellnummer:
3. Diese Garantie gilt nur fur den Originalkaufer dieses Produkts ab dem ursprüinglichen Kaufdatum. Sie
gilt nur, wenn das Gerat neu von einem autorisierten Handler erworben wurde, und ist nicht ubertragbar
vom ursprüinglichen Kaufer des Artikels. Etwaige mit diesem Produkt mitgelieferte Garantien sind nur
im Land des Kaufs gultig.
Gewahrleistungsinformationen
1-JAHRIGE BESCHRÄNKTE GARANTIE - REGISTRIEREN UND AKTIVIEREN SIE DIE GARANTIE ÜBE
RDIE SMARTPHONE-ANWENDUNG 'Jadens Printer'.
Alle Garantieanfragen müssen durch einen Kaufnachweis begleitet werden, Wenn Sie uns bezüglich
der Garantie kontaktieren, halten Sie bitte die unten stehenden Informationen bereit.
Diese 1-jahrige beschrankte Garantie gilt fur Reparatur oder Ersatz, wenn das Produkt nach Wahl
von Jadens als fehlerhaft in Material oder Verarbeitung erkannt wird.

1.Produktskizze
2.Lieferumfang
3.LED-Anzeige
4.Kompatible Etikettengrößen
5.Etikettenzufuhr
6.Drucken per Smartphone-App
7.Treiberinstallation und Druckereinstellungen für Windows Systems
8.USB- und Bluetooth-Verbindungsmethoden für MacOS-Systeme
9.Erweiterungsinstallation und Druckereinstellungen
für ChromeOS Systems
10.Wichtige Tipps: Drucken von Etiketten in verschiedenen Größen
mit "Screenshot aufnehmen"
11.Häufig gestellte Fragen
12.Fehlerbehebung
13.Druckertreiber löschen
14.Wartung
15.Sicherheitshinweise
16.Spezifikationen
30
31
31
33
34
35
35
40
49
53
55
56
56
57
58
58
-----------------------------------------------------------------
------------------------------------------------------------------
------------------------------------------------------------------
--------------------------------------------------
----------------------------------------------------------------
-----------------------------------------------
------
--------
----------------------------------------------------
-----------------------------------------------
-----------------------------------------------------
-------------------------------------------------------------
------------------------------------------------------
----------------------------------------------------------------------
---------------------------------------------------------
--------------------------------------------------------------
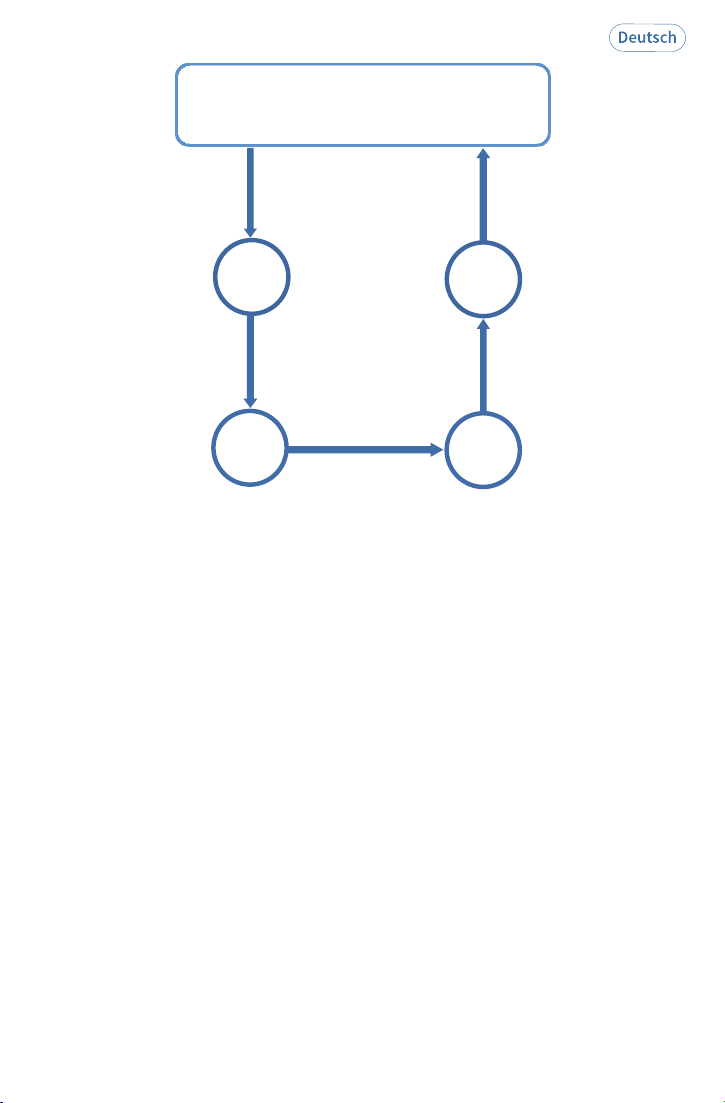
Drucken über die
Smartphone-App
Schritt 1Schritt 4
Schritt 2Schritt 3
Papierführung
einstellenund
Papier einlepen
Einschalten
App auf dem
Smartphone
herunteraden
Etiketten drucken
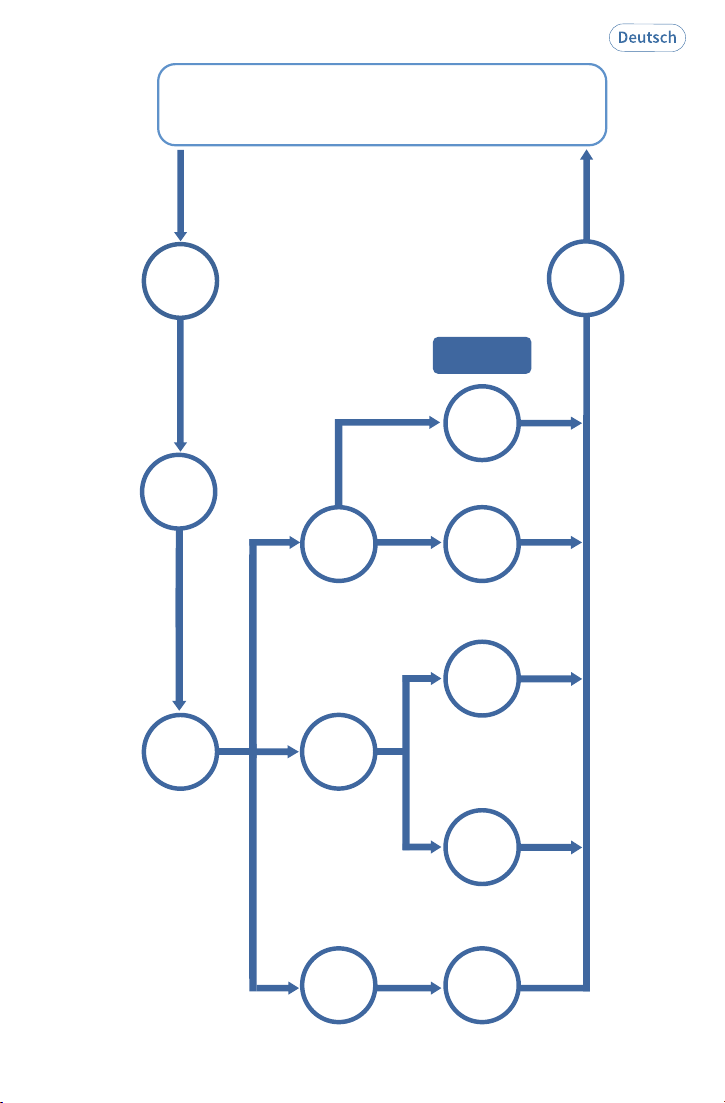
Drucken über den Computer
Andere
Verbindung
Schritt 5
Schritt 1
Schritt 2
Schritt 3
Schritt
4.1
Schritt
4.1.1
Schritt
4.1.2
Schritt
4.2
Schritt
4.3
Einschalten
Papierführung
anpassen
und Papier
einlegen
Drucker an den
PC anschließen
Druckertreiber für
Windows installieren
Kabellose Verbindung
per Bluetooth
Etiketten
drucken
Kabelgebundene
Verbindung per
USB-Kabel
Laden Sie die Jadens
Printer App im App
Store herunter, um
eine Bluetooth
Verbindung herzustellen
Kabelgebundene
Verbindung
per USB-Kabel
Macbook
Erweiterungen auf
dem Chromebook
hinzufügen
Schritt
4.2.1
Druckertreiber für
die USB-Verbindung
installieren
Schritt
4.2.2
Schritt
4.3.1
See FAQ at support.jadens.com
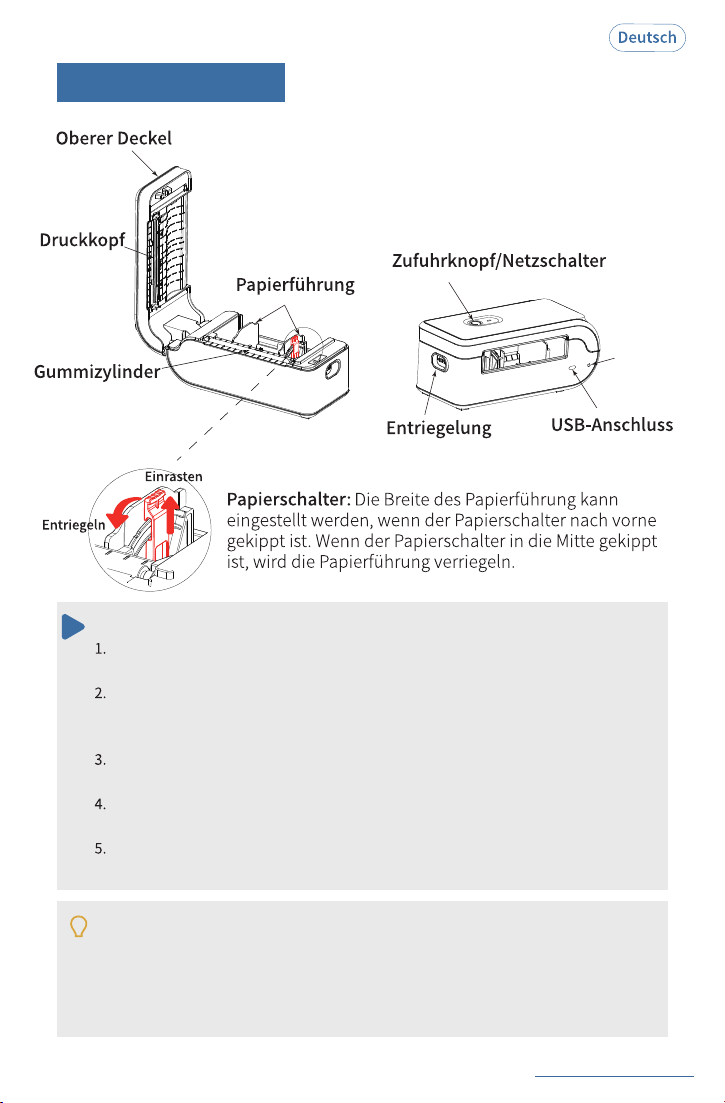
Ein-/Ausschalten: 3 Sekunden lang gedrückt halten, bis die grüne Leuchte
leuchtet.
So verwenden Sie den Ein-/Ausschalter:
Druckvorgang pausieren: Drücken Sie während des Druckvorgangs einmal kurz
die Ein-/Aus-Taste, um den Druckvorgang zu pausieren. Starten Sie anschließend
den Drucker und die App neu, wenn Sie einen neuen Druckvorgang starten.
Papierzufuhr: Drücken Sie im Ruhezustand die Ein-/Aus-Taste einmal kurz, um
eine leere Seite auszudrucken.
Automatische Papiererkennung: Drücken Sie im Ruhezustand die Ein-/Aus-Taste
zweimal kurz, um das Papier zu kalibrieren.
Selbsttestseite drucken: Drücken Sie im Ruhezustand die Ein-/Aus-Taste dreimal
kurz, um die Selbsttestseite auszudrucken.
Reset
-Taste
Reset-Taste: Wenn ein erzwungenes Herunterfahren erforderlich ist, drücken Sie die
Reset-Taste mit einer Nadel. Starten Sie den Drucker nach dem Zurücksetzen neu.
Datenreset: Drücken Sie im Leerlauf die Einschalttaste viermal kurz, um die
Werkseinstellungen wiederherzustellen. Führen Sie nach dem Datenreset einen
Papierlernvorgang durch.
1.Produktskizze
30
31
See FAQ at support.jadens.com
2 Sekunden lang drücken
Leerlaufstatus:
Ein-/Ausschalten
Erkennung von Etikettenlücken1 Mal schnell drücken
2 Mal schnell drücken
Automatisches Papierlernen
Selbsttestseite drucken3 Mal schnell drücken
4 Mal schnell drücken
Daten zurücksetzen
(Führen Sie nach dem Zurücksetzen
bitte das Papierlernen durch.)
Im Druck:
1 Mal schnell drücken
Drucken angehalten
Anleitung für den Netzschalter
Druckerstatusanzeige
Bluetooth-Statusanzeige
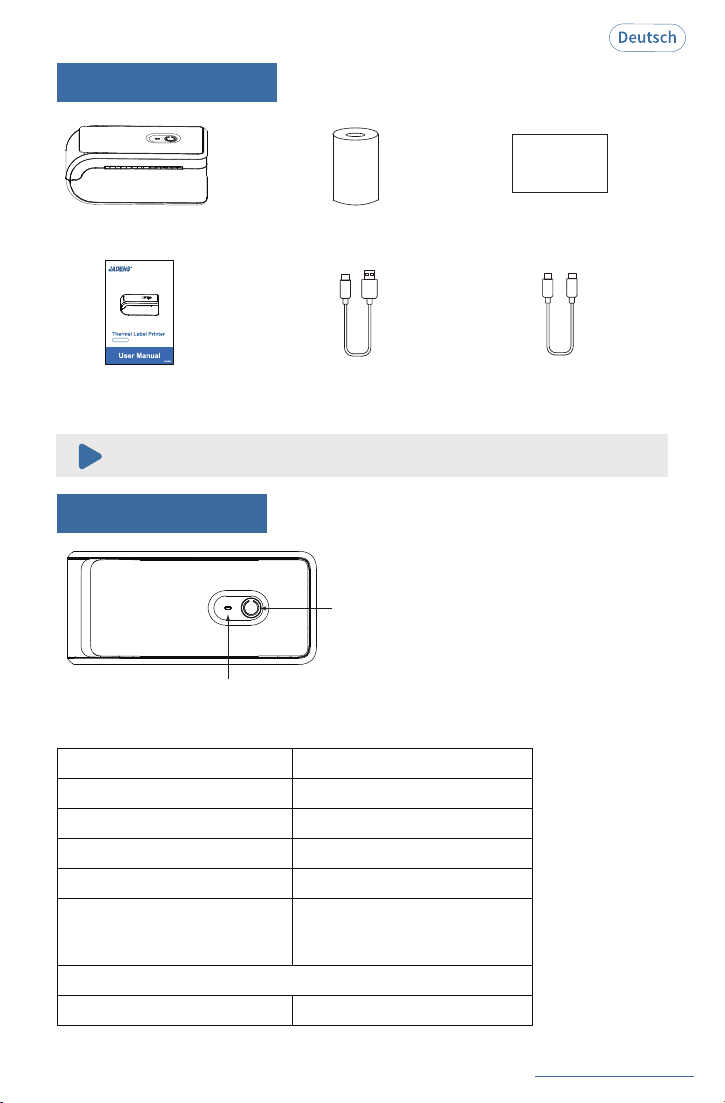
DruckerRollenetikett
Benutzerhandbuch
2.Lieferumfang
3.LED-Anzeige
USB-A-auf-USB-C
-Kabel für
Windows
USB-C-auf-USB-C
-Kabel für
Mac
APP-Anleitung
APP Guide Card
Sollte Zubehör fehlen, kontaktieren Sie uns bitte.
JD-568P
See FAQ at support.jadens.com
32
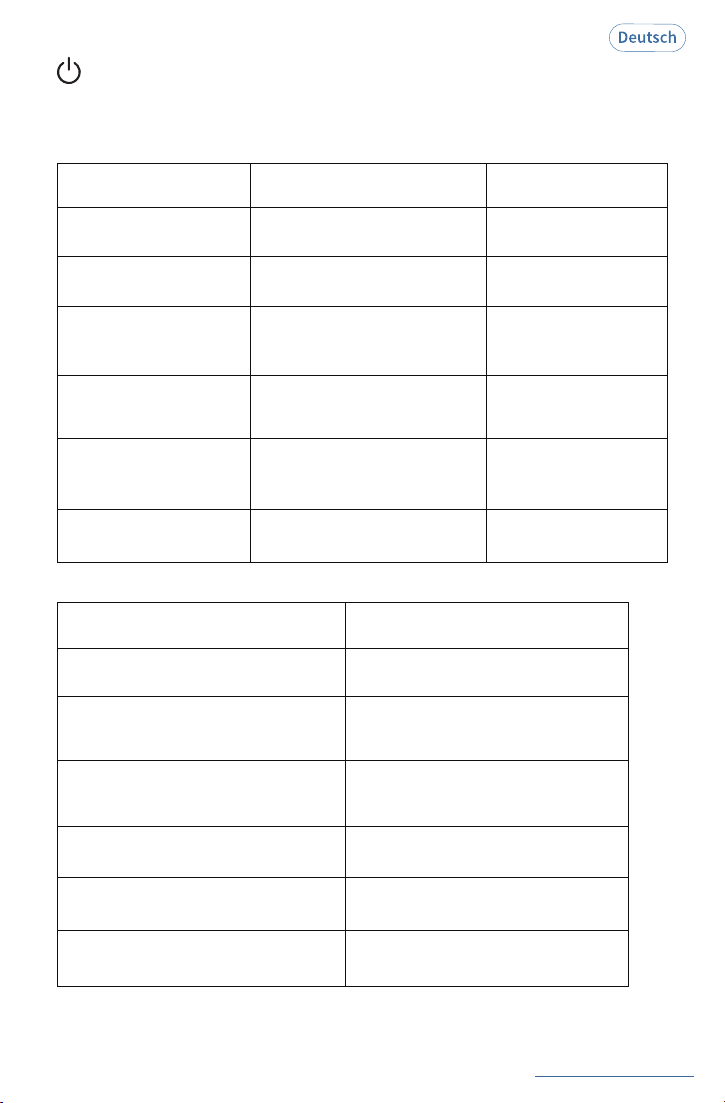
Vollständig geladen
Batteriestatus
Druckerstatusanzeige
Grünes Licht an
Grünes Licht an
Gelbes Licht blinkt langsam
Gelbe Leuchte leuchtet
Abwechselnd gelbes und grünes Blinken
Normal
(Akkuleistung ≥ 20 %)
Niedriger Akkustand
(Akkuleistung < 20 %)
Lädt normal
(Drucker ist eingeschaltet)
Lädt normal
(Drucker ist ausgeschaltet)
Gelbes Licht blinkt schnell
Ladeanomalie
Druckerstatusanzeige
Druckerstatus
Druckerstatusanzeige
Fehlerbehebung
Strom einschalten
Grünes Licht an
/
Strom aus
Licht aus
Überhitzen
Rotes Licht an
Warten Sie, bis der Drucker
abgekühlt ist, dann arbeitet
er automatisch weiter.
Druckvorgang angehalten
Grünes Licht blinkt langsam
Drücken Sie die Vorschubtaste
einmal, um den Druckvorgang
fortzusetzen.
Deckel offen
Rotes Licht blinkt langsam
Vergewissern Sie sich, dass
der Deckel vollständig
geschlossen ist.
Deckel geschlossen
Grünes Licht an
/
/
Hinweis: Aktualisierung > Laden > Niedriger Akkustand > Sonstiger Status
See FAQ at support.jadens.com
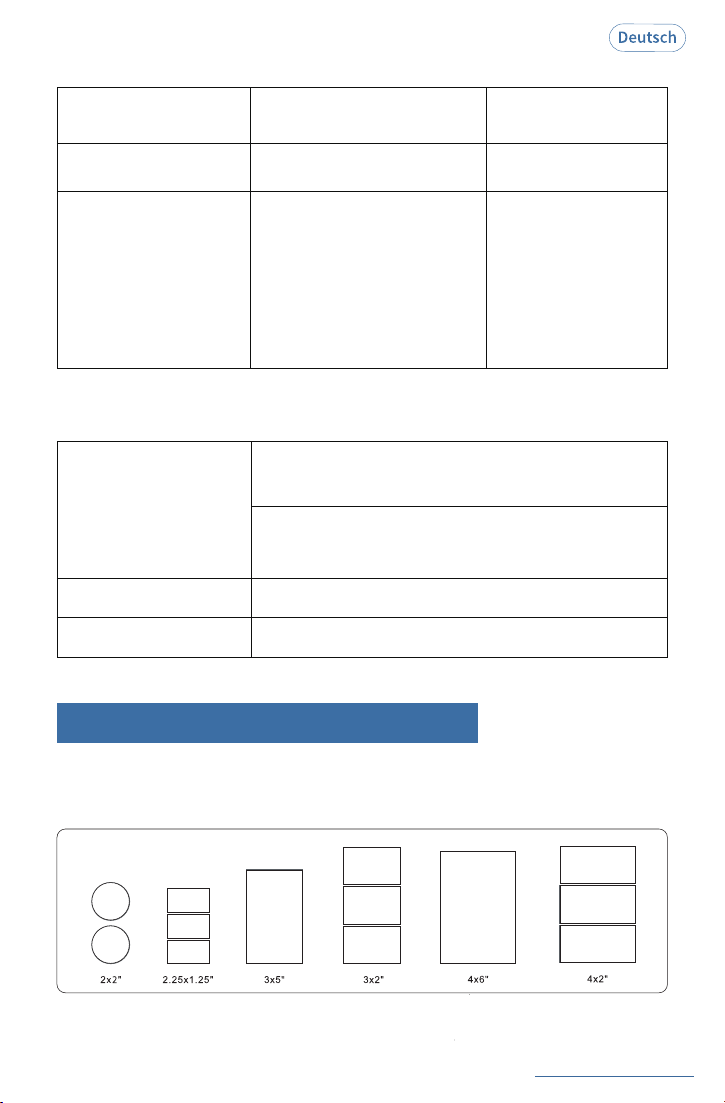
4.Kompatible Etikettengrößen
Der Drucker ist mit allen Thermodirekt-Etiketten kompatibel und bietet eine
Breite von 1" bis 4.3" und eine Länge von über 0.79".
Gängige Thermoetikettengrößen
33
Bluetooth getrennt
Bluetooth-verbunden
Für drahtloses Drucken mit dem Smartphone:
Blaues Licht an
Beim drahtlosen Drucken unter Windows leuchtet
die blaue LED einige Sekunden lang auf und
erlischt dann.
Blaues Licht blinkt langsam
Blaues Licht blinkt schnell
Bluetooth-Anormalität
Bluetooth-Statusanzeige
NormalGrünes Licht an
Kein Papier erkanntGrünes Licht blinkt schnell
① Öffnen Sie die Abdeckung
und entfernen Sie eventuell
eingeklemmtes Papier. Falls
die Gummiwalze verschmutzt
ist, reinigen Sie sie mit einem
Alkoholtupfer und warten Sie
2‒5 Minuten, bevor Sie den
Drucker einschalten.
② Stellen Sie sicher, dass der
Drucker das Papier korrekt
einlegt.
/
Verbrauchsmaterialsta
tus
Druckerstatusanzeige
Fehlerbehebung
See FAQ at support.jadens.com
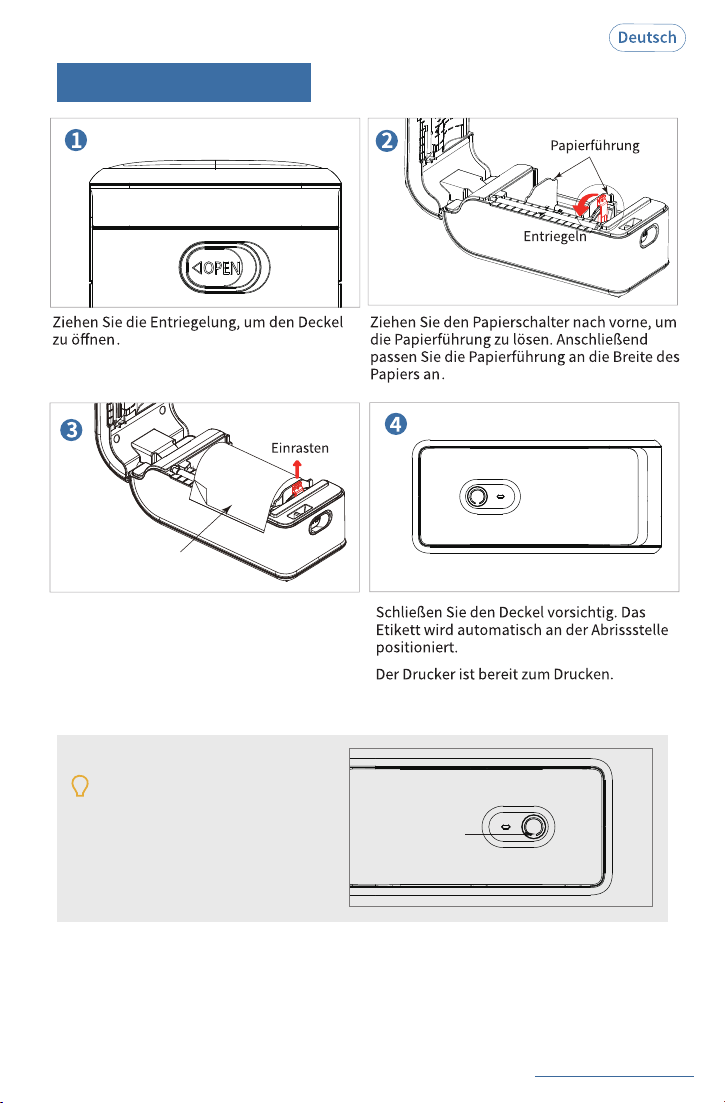
5.Etikettenzufuhr
34
Tipps:
Wenn Sie Ihr Etikett wechseln, führen
Sie die automatische Etikettenerkennung
durch: Drücken Sie zweimal kurz die
Einschalttaste, um das Papier zu
kalibrieren.
Einzugstaste
Druckseite
Die Druckseite sollte nach oben zeigen.
Legen Sie das Etikett ein, passen Sie die
Papierführung an die Breite des Papiers
an .
See FAQ at support.jadens.com
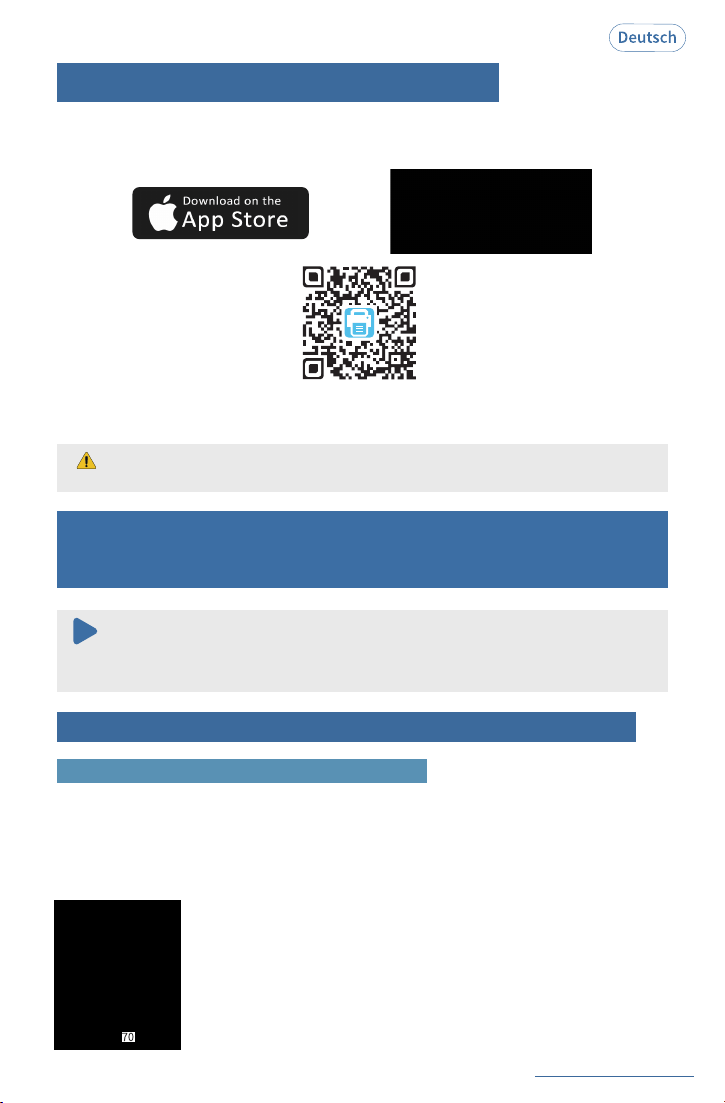
6.Drucken per Smartphone-App
App-Download: Suchen Sie im Google Play Store oder App Store nach [Jadens Printer] und laden
Sie die App kostenlos herunter. Genaue Bedienungsanleitungen finden Sie in der
Kurzanleitung zum Drucken per App.
7.Treiberinstallation und
Druckereinstellungen für Windows-Systems
Es wird empfohlen, die Sicherheitssoftware vor der Installation zu schließen, um Probleme
zu vermeiden. Nach Abschluss der Installation können Sie sie er
Tipp: Falls Sie während der Kopplung nach einer PIN gefragt werden, versuchen Sie es
mit 0000 oder 1234.
neut öffnen.
Hinweis:
Option 1: Kabellose Verbindung per Bluetooth
Schritt 1: Druckertreiber installieren (Bluetooth oder USB-Kabel)
1. Schließen Sie das Netzkabel an und schalten Sie den Drucker ein
(ein USB-Kabel ist nicht erforderlich).
2. Treiber herunterladen:
Laden Sie den Treiber (JADENS Printer Driver.exe) von https://jadens.com/pages/download-
video herunter. Die Treiberversion kann aktualisiert werden. Aktuelle Informationen finden Sie unter
support.jadens.com.
35
App Store ist eine Marke von Apple Inc., eingetragen in den USA und anderen Ländern.
Google Play und das Google Play-Logo sind Marken von Google LLC.
See FAQ at support.jadens.com
Der Suchvorgang dauert ca. 40 Sekunden. Bitte warten Sie.
_
36
_
.
_.
3. Treiber installieren:
Kopieren Sie den Druckertreiber auf Ihren Desktop, doppelklicken Sie darauf und installieren Sie ihn
wie folgt:
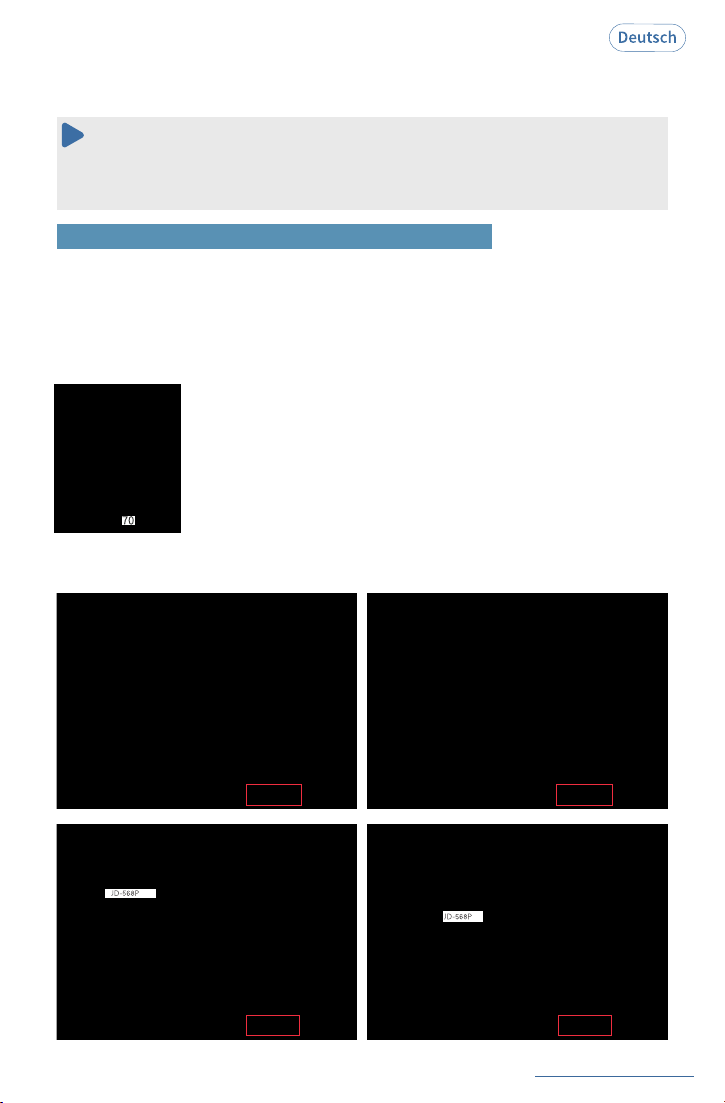
1.Schließen Sie das Netzkabel an und schalten Sie den Drucker ein (überspringen Sie diesen Schritt,
falls Sie ihn bereits durchgeführt haben).
2. Schließen Sie das USB-Kabel an Ihren Computer an (überspringen Sie diesen Schritt, falls Sie ihn
bereits durchgeführt haben).
3. Treiber herunterladen:
Laden Sie den Treiber (JADENS Printer Driver.exe) von https://jadens.com/pages/download.video.
Die Treiberversion kann aktualisiert sein. Aktuelle Informationen finden Sie unter support.jadens.com.
See FAQ at support.jadens.com
Sollten Sie nicht drucken können, starten Sie Ihren Computer und Drucker neu und installieren
Sie den Treiber erneut. Bei einer erneuten Installation werden Kopien des Druckers in Ihrem
Betriebssystem erstellt, z. B. "JD-568P (Kopie 1, 2...)".
Hinweis:
4.Testseite drucken:
Klicken Sie nach erfolgreicher Installation des Druckertreibers auf "Testseite drucken", um
sicherzustellen, dass der Drucker ordnungsgemäß funktioniert.
37
4. Treiber installieren:
Kopieren Sie den Druckertreiber auf Ihren Desktop, doppelklicken Sie darauf und installieren Sie ihn
wie folgt:
Option 2: Kabelgebundene Verbindung per USB-Kabel
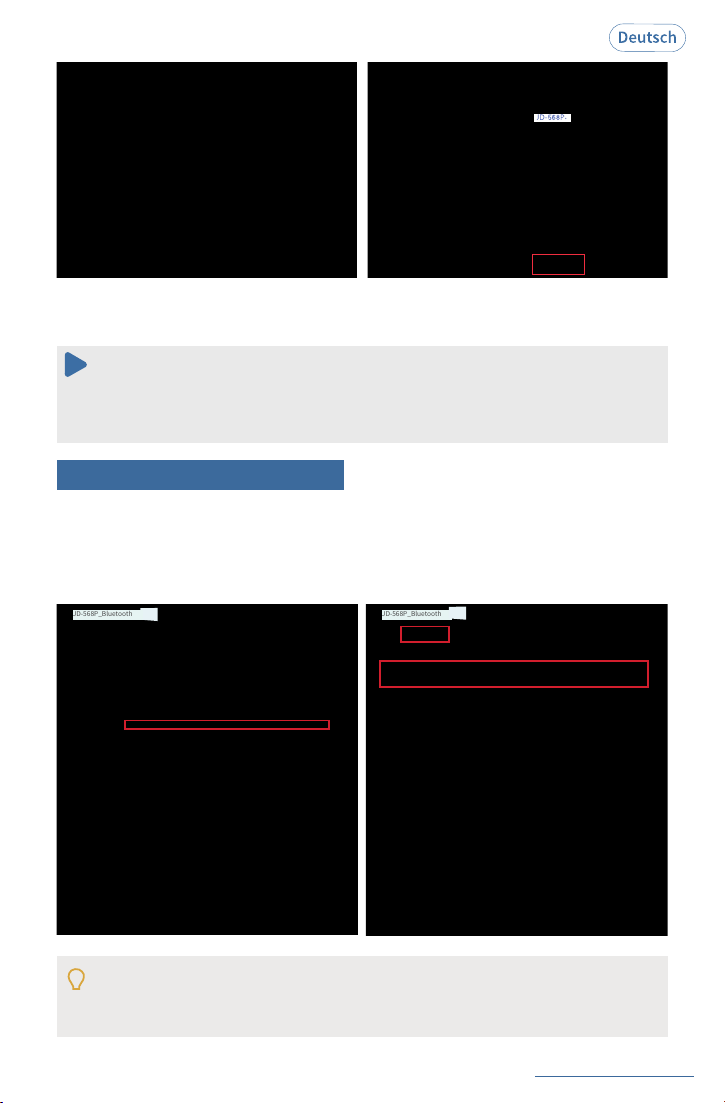
Sollten Sie nicht drucken können, starten Sie Ihren Computer und Drucker neu und installieren
Sie den Treiber erneut. Bei einer erneuten Installation werden in Ihrem Betriebssystem
Duplikate des Druckers erstellt, z. B. "JD-568P (Kopie 1, 2...)".
Hinweis:
5.Testseite drucken:
Nach erfolgreicher Installation des Druckertreibers klicken Sie auf "Testseite drucken", um
sicherzustellen, dass der Drucker ordnungsgemäß funktioniert.
See FAQ at support.jadens.com
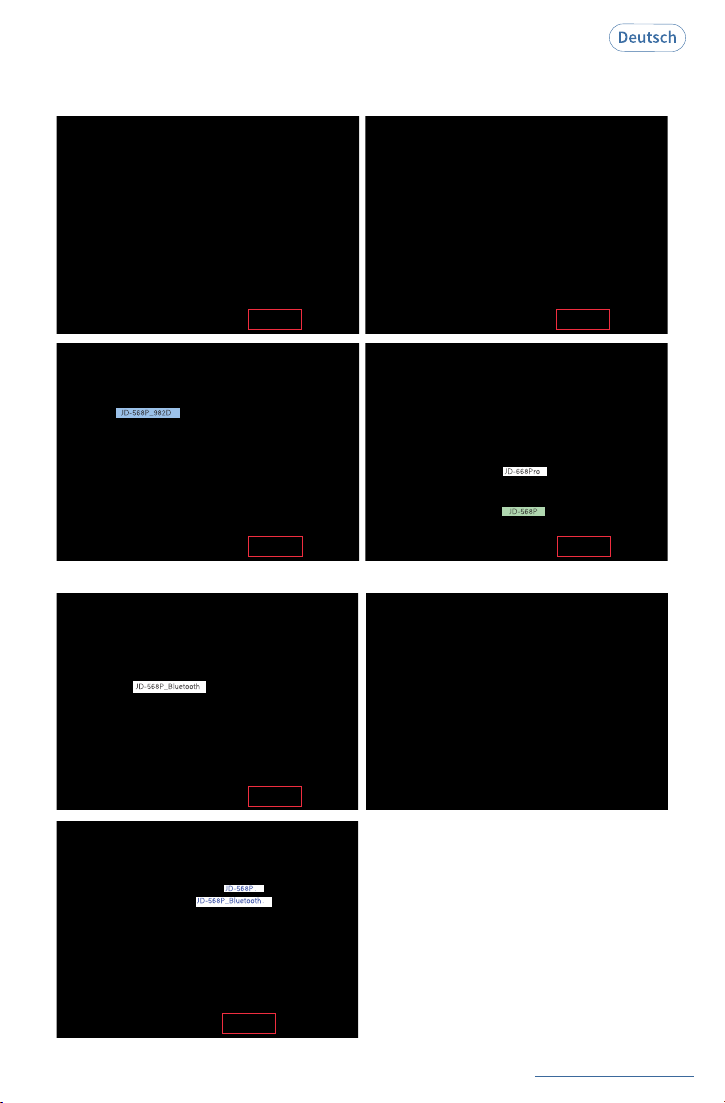
Gehen Sie zu "Einstellungen" > "Gerät" > "Drucker & Scanner" > suchen Sie den Drucker "JD-568P/
JD-568P Bluetooth" > klicken Sie auf "Verwalten" > "Druckereinstellungen". Stellen Sie
anschließend die Standard-Druckseitengröße, Druckgeschwindigkeit und Druckdichte ein.
Hier können Sie die Standard-Druckseitengröße, Druckgeschwindigkeit und Druckdichte einstellen.
Sollten die Etiketten hell oder unscharf ausgedruckt werden, können Sie die Dichte anpassen.
Unter Windows stellen Sie die Dichte auf 8‒12 ein.
Unter Mac OS stellen Sie die Dichte auf 8‒12 ein.
JD-568P_Bluetooth
JD-568P_Bluetooth
Schritt 2: Druckereinstellungen
.
1
2
38
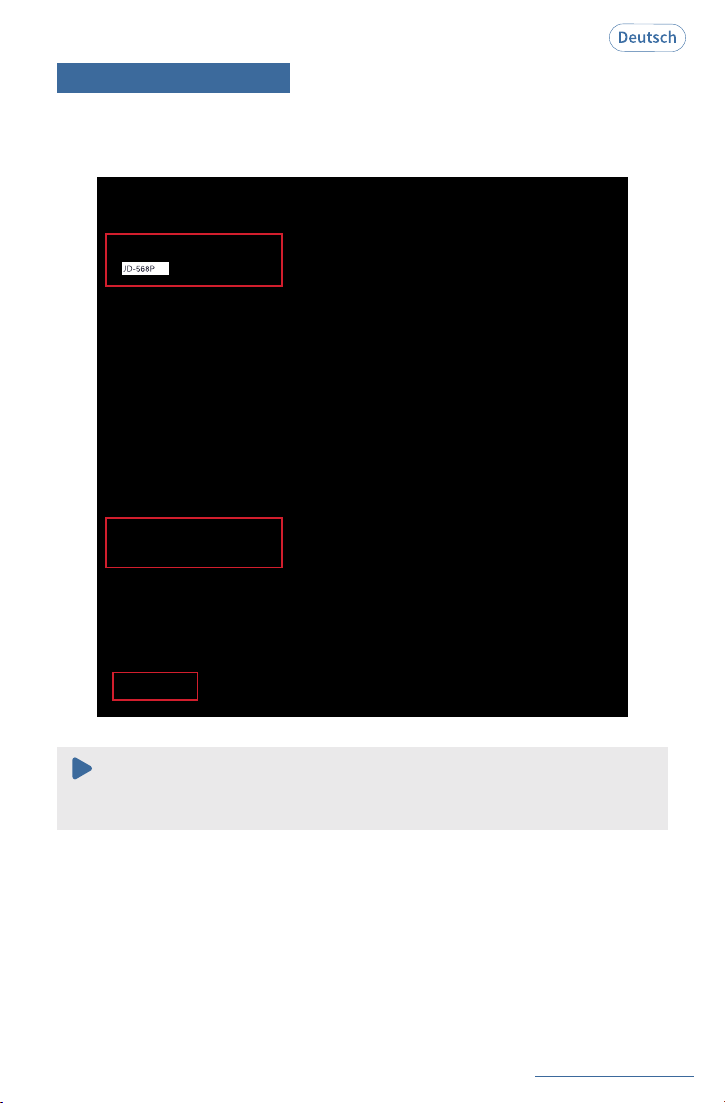
See FAQ at support.jadens.com
Schritt 3: Etikett drucken
(Beispiel: Versandetikett im Format 4x6 inch)
1. Öffnen Sie die Etikettendatei und klicken Sie auf "Drucken".
2. Wählen Sie den richtigen Drucker und das richtige Papierformat aus und klicken Sie auf "Drucken".
Stellen Sie vor dem Drucken sicher, dass die Größe der eingelegten Thermoetiketten mit
den Größeneinstellungen der Geräte übereinstimmt.
Hinweis:
39
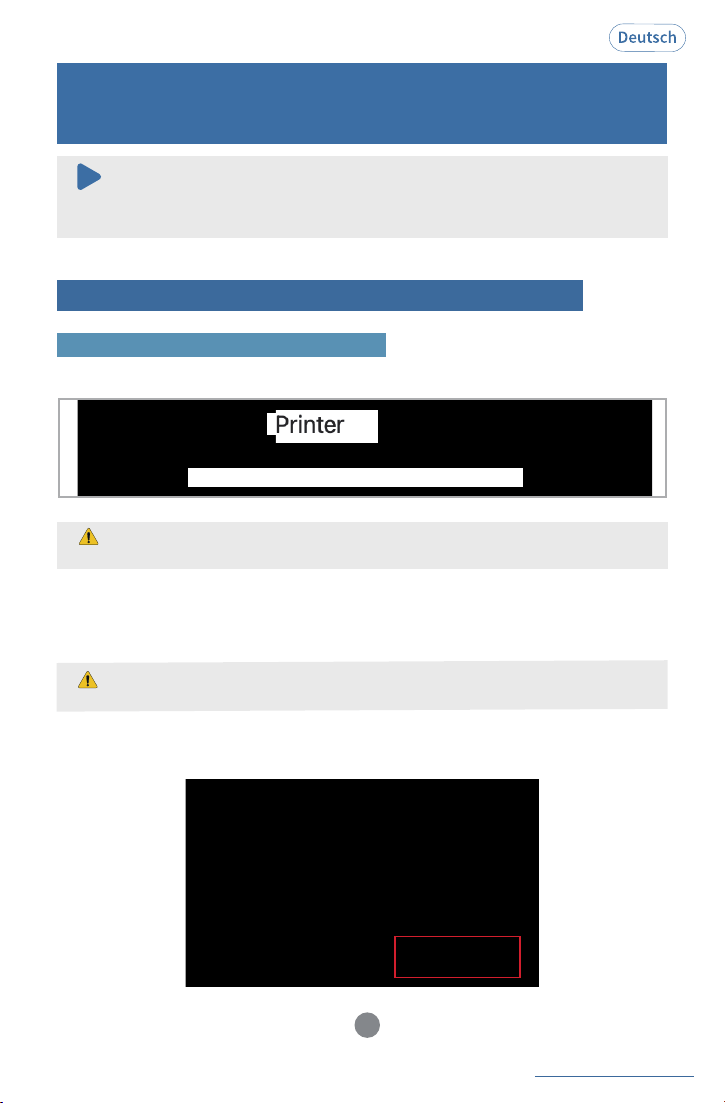
See FAQ at support.jadens.com
40
Es wird empfohlen, die Sicherheitssoftware vor der Installation zu schließen, um
Probleme zu vermeiden. Nach Abschluss der Installation können Sie sie erneut öffnen.
Hinweis:
8. USB- und Bluetooth-
Verbindungsmethoden für MacOS-Systeme
.
Schritt 1: Kostenloser Download der [Jadens Printer]-App
1. Suchen Sie im App Store nach "[Jadens Printer]" und laden Sie die App kostenlos herunter.
Drahtlose Verbindung via Bluetooth
Kompatibel mit macOS 11.0 oder neuer und Macs mit Apple M1 Chip oder neuer.
Für andere Systeme verwenden Sie bitte stattdessen den USB-Treiber.
2. Halten Sie den Netzschalter 2 Sekunden lang gedrückt, um den Drucker einzuschalten.
Sobald der Drucker an eine Stromquelle (z. B. einen Computer oder ein Netzteil) angeschlossen ist,
wechselt er in den Lademodus. Dies wird durch eine dauerhaft leuchtende gelbe Betriebsanzeige
signalisiert. Der Drucker kann während des Ladevorgangs weiterhin verwendet werden.
Wenn die Anzeige gelb/grün blinkt, ist der Drucker während des Ladevorgangs
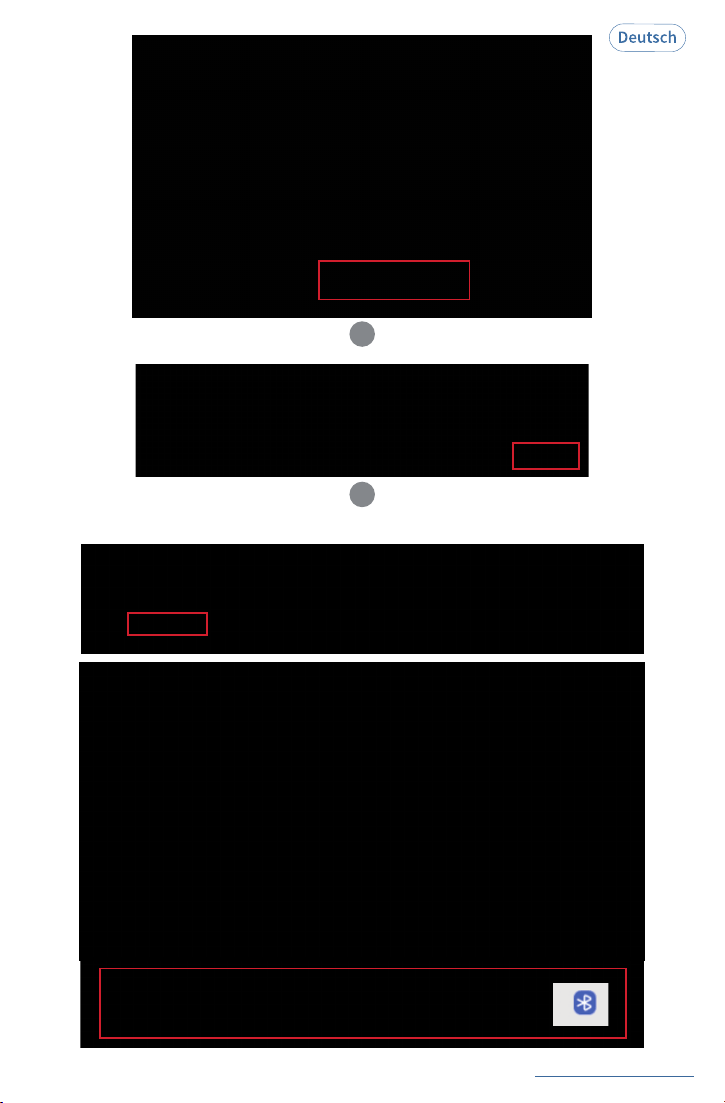
ausgeschaltet ‒ schalten Sie ihn bitte zuerst ein.
3. Öffnen Sie die [Jadens Printer]-App und aktivieren Sie Bluetooth in den Systemeinstellungen.
Erlauben Sie den Zugriff, wenn Sie dazu aufgefordert werden.
1
See FAQ at support.jadens.com
41
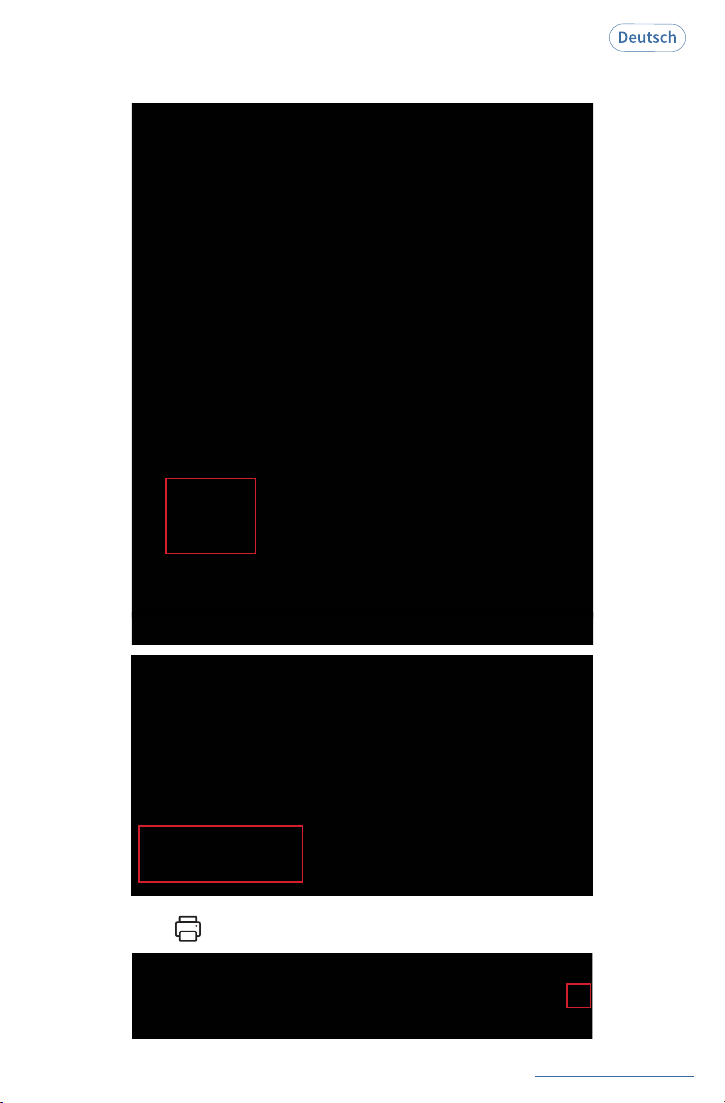
4. Tippen Sie auf "Gehe zu Connect" > Suchen Sie nach Geräten > Tippen Sie auf "Verbinden".
2
3
See FAQ at support.jadens.com
42
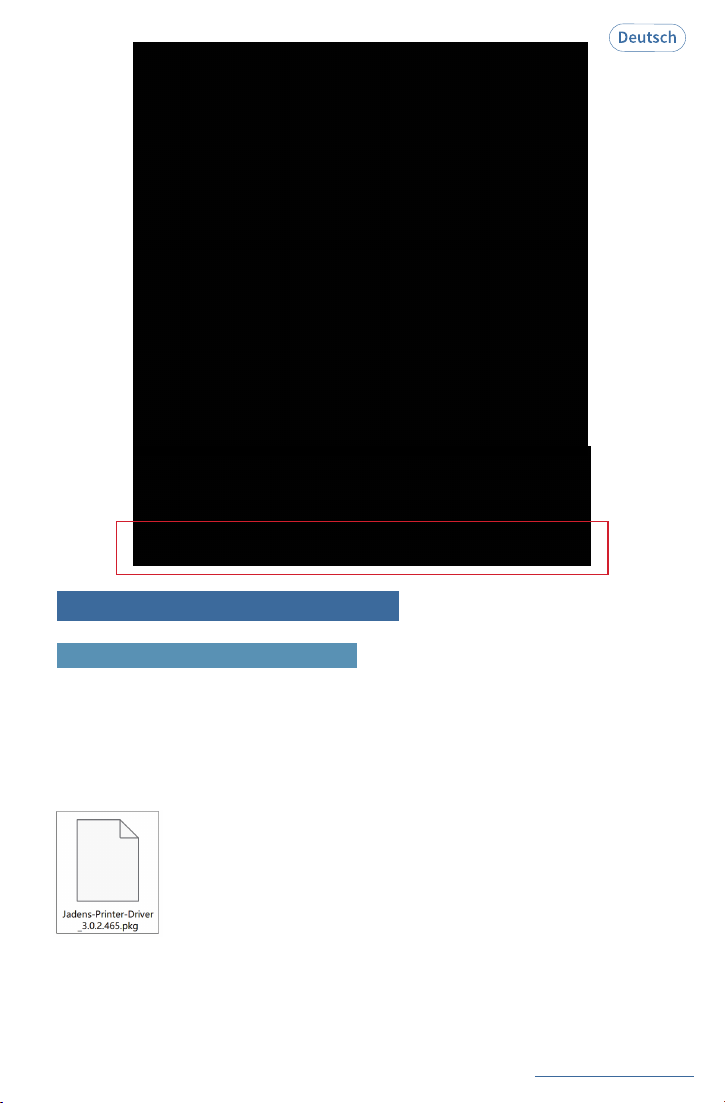
5. Tippen Sie auf "Datei", um Dokumente ‒ wie PDFs oder Bilder ‒ aus dem lokalen Speicher oder von
anderen sozialen Plattformen zu importieren.
6. Klicken Sie auf " " zum Drucken.
See FAQ at support.jadens.com
43
.
Schritt 2: Druckertreiber installieren
1. Schließen Sie das Netzkabel an und schalten Sie den Drucker ein (überspringen Sie diesen Schritt,
falls Sie ihn bereits durchgeführt haben).
2. Schließen Sie das USB-Kabel an Ihren Computer an (überspringen Sie diesen Schritt, falls Sie ihn
bereits durchgeführt haben).
3. Laden Sie den Treiber (JADENS Printer_Driver.pkg) von https://jadens.com/pages/download-
video herunter. Die Treiberversion ist möglicherweise aktualisiert. Aktuelle Informationen finden Sie
unter support.jadens.com.
Kabelverbindung per USB-Kabel
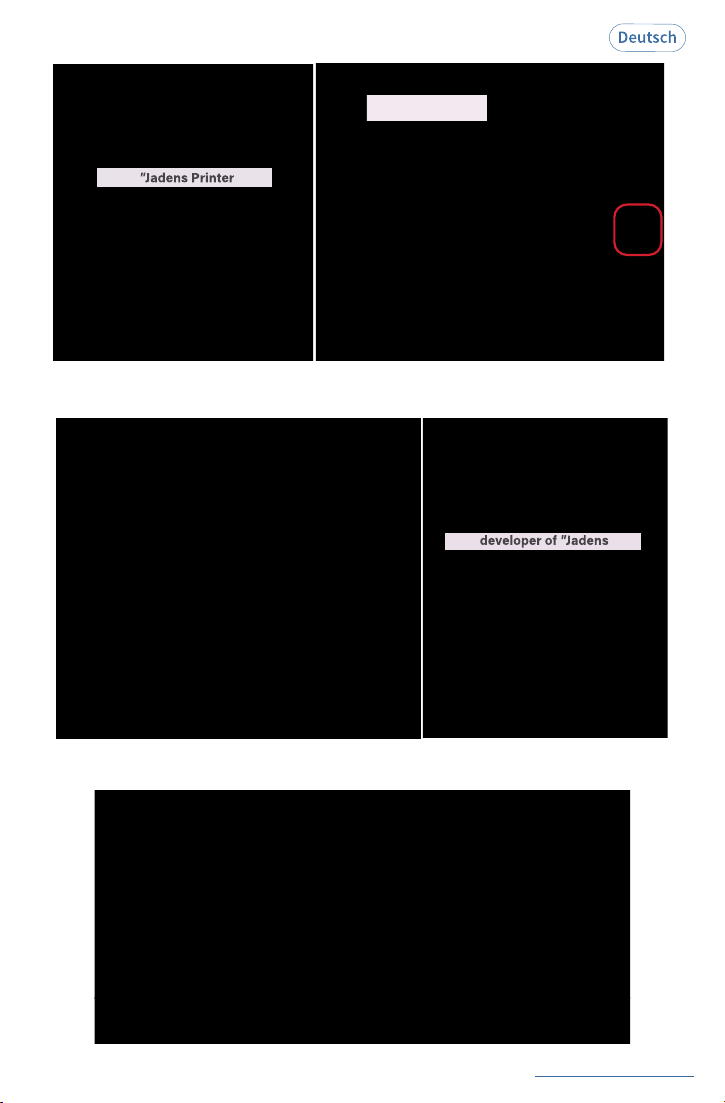
4. Treiber installieren:
Kopieren Sie den Druckertreiber auf Ihren Desktop, doppelklicken Sie darauf und installieren Sie ihn
wie folgt:
5. Klicken Sie auf "OK", öffnen Sie die "Systemeinstellungen" und klicken Sie auf "Sicherheit &
Datenschutz". (Wenn die Warnung nicht angezeigt wird, können Sie diesen Schritt überspringen.)
See FAQ at support.jadens.com
44
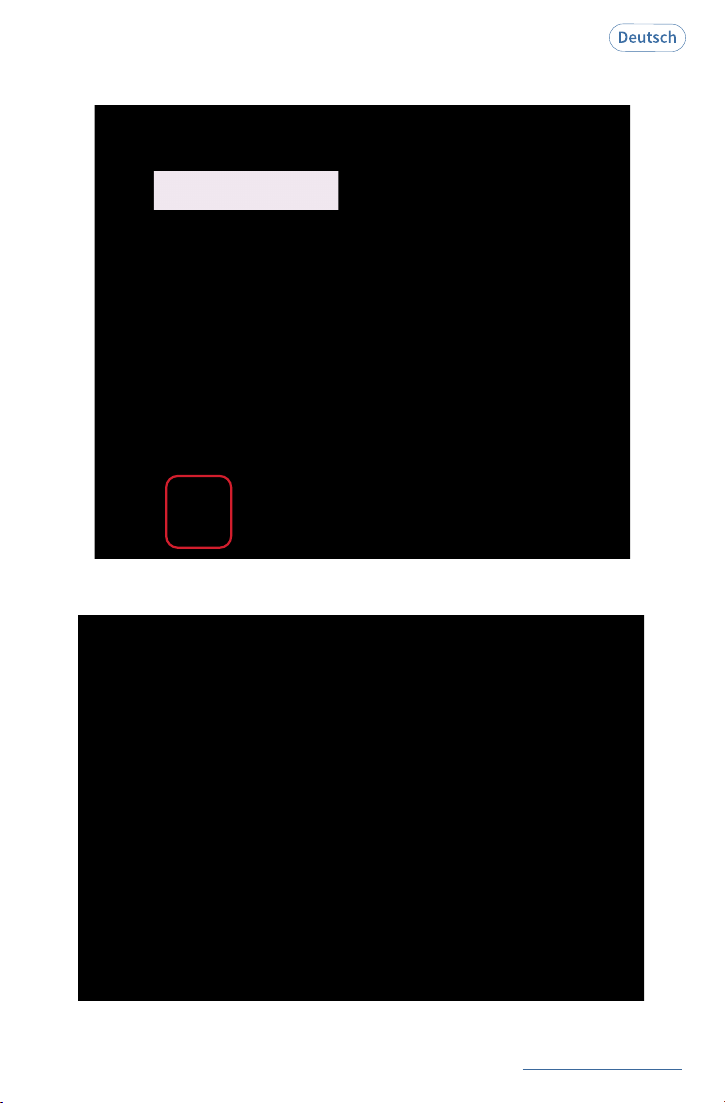
6. Klicken Sie auf "Trotzdem öffnen". Klicken Sie auf "Öffnen" und fahren Sie mit der
Druckerinstallation fort.
7. Folgen Sie den Installationsschritten, bis das Fenster "Die Installation war erfolgreich" angezeigt
wird.
See FAQ at support.jadens.com
45
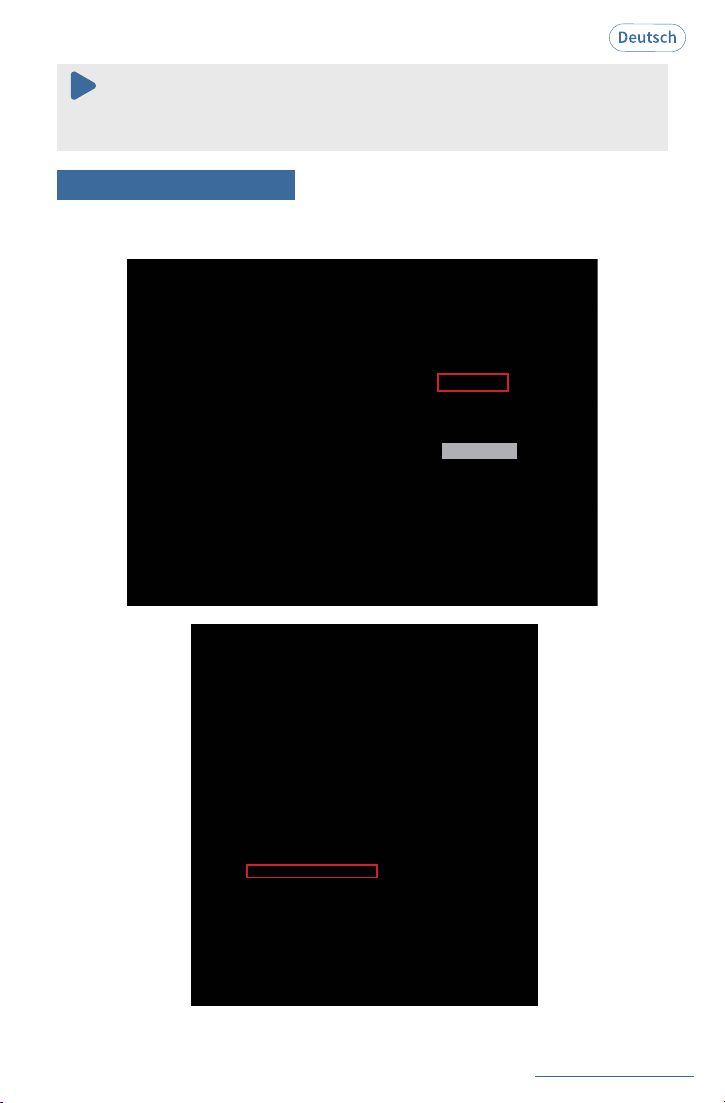
8. Öffnen Sie "Systemeinstellungen" und klicken Sie auf "Drucker und Scanner".
9. Klicken Sie auf "+ " um einen neuen Drucker hinzuzufügen.

See FAQ at support.jadens.com
46
JADENS JD
568P
10. Klicken Sie auf "JADENS JD-568P".
Air
MacBook
jadens
568P
JADENS JD
568P
JADENS JD
JADENS JD
568P
11. Klicken Sie auf "Hinzufügen". Der Drucker wurde nun erfolgreich auf Ihrem MacBook installiert.
47
See FAQ at support.jadens.com
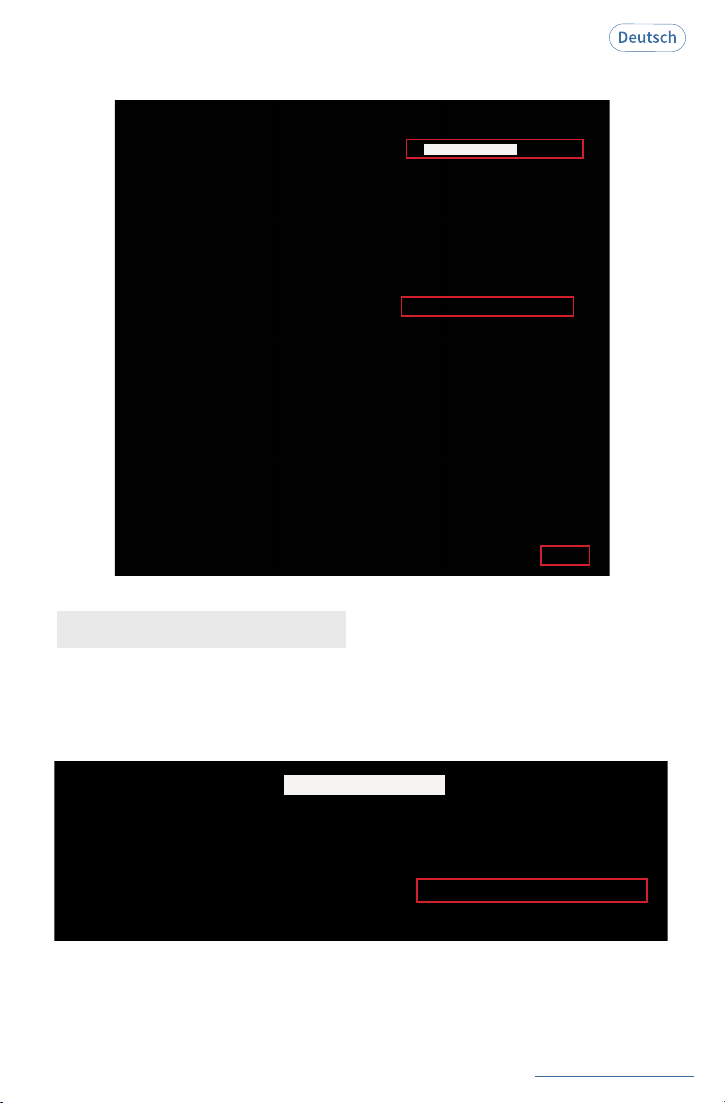
(Beispiel: Versandetiketten im Format 4x6 inch)
1. Etikettendatei mit "Vorschau" öffnen > "Datei" > "Drucken".
Hinweis:
Sie können jetzt direkt drucken. Sollte dies nicht funktionieren, starten Sie Ihren
Computer neu und installieren Sie den Treiber erneut.
Schritt 2: Etikett drucken
See FAQ at support.jadens.com
48
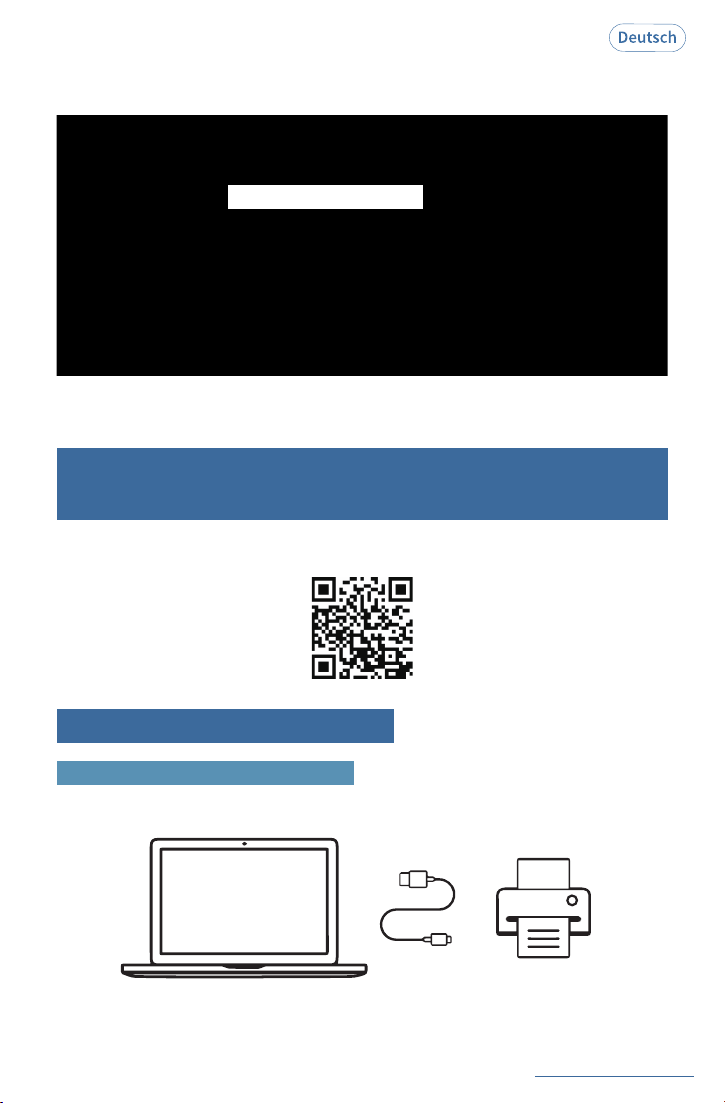
2.Wählen Sie den richtigen Drucker und die richtige Etikettengröße.
JADENS JD-568P
1. Wählen Sie in den Druckereinstellungen das gängigste Papierformat, die Dichte und die
Geschwindigkeit.
Profi-Tipps zur Voreinstellung:
2.Klicken Sie auf 'Standardeinstellungen' > 'Aktuelle Einstellungen als Voreinstellung festlegen' .
JADENS JD-568P
See FAQ at support.jadens.com
49
3.Geben Sie den Namen der Voreinstellung ein und wählen Sie den Anwendungsbereich der
Voreinstellung.
Sie können beim nächsten Mal direkt "Standardeinstellung" auswählen, um die Voreinstellungen
zu ändern und zu übernehmen.
JADENS JD-568P
Scannen Sie den untenstehenden QR-Code, um das Anleitungsvideo anzusehen.
9. Erweiterungsinstallation und
Druckereinstellungen für ChromeOS Systems
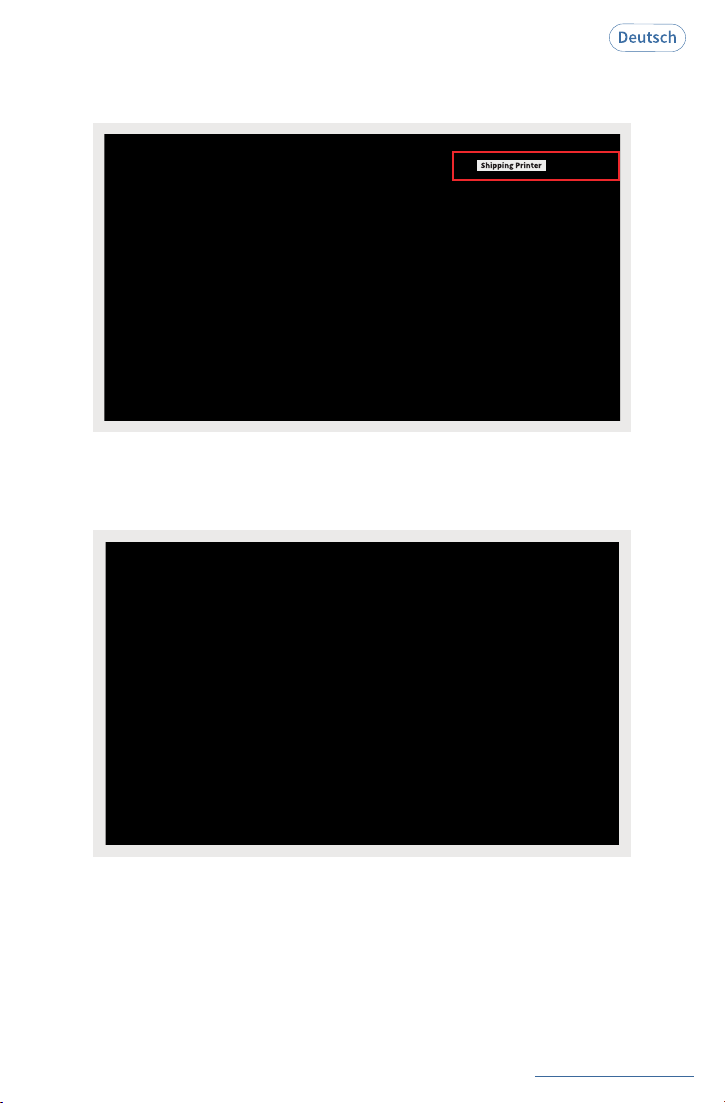
Schritt 1: Erweiterungen installieren
①
Verbinden Sie den Drucker über das mitgelieferte USB-Kabel mit Ihrem Chromebook und
schalten Sie ihn ein.
Kabelverbindung per USB-Kabel
See FAQ at support.jadens.com
50
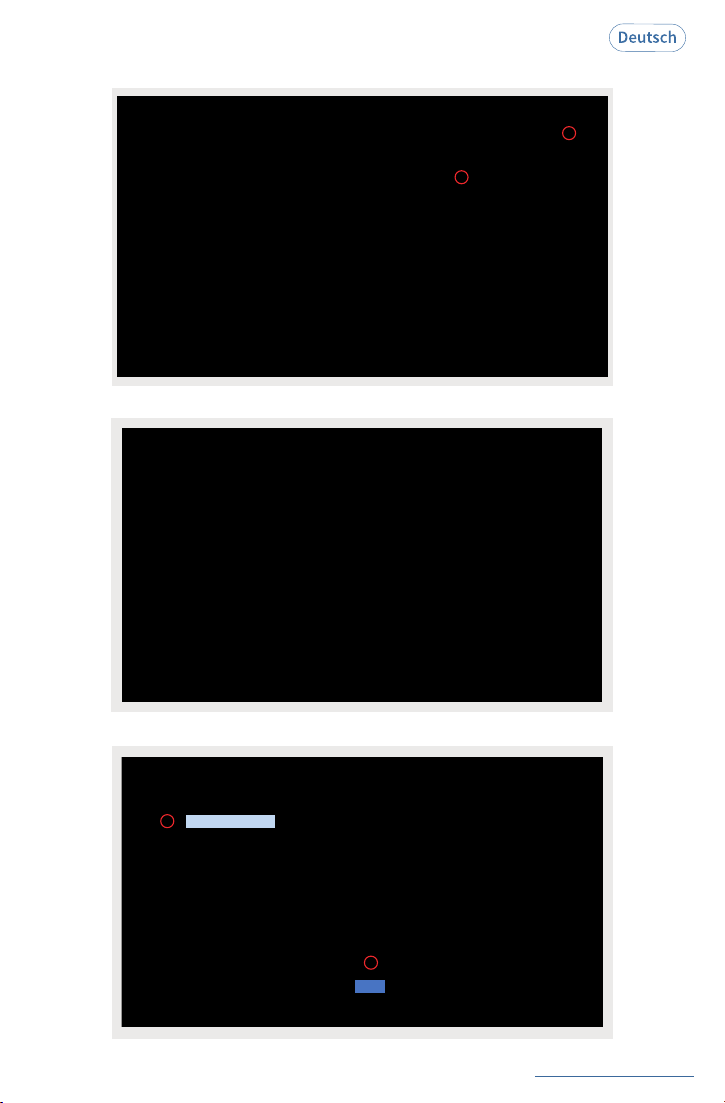
Suchen Sie im Chrome Web Store nach "Shipping Printer": https://chromewebstore.google.
com/.
②
Laden Sie die Erweiterung "Shipping Printer" für Ihren Chrome-Browser herunter.
③
See FAQ at support.jadens.com
51
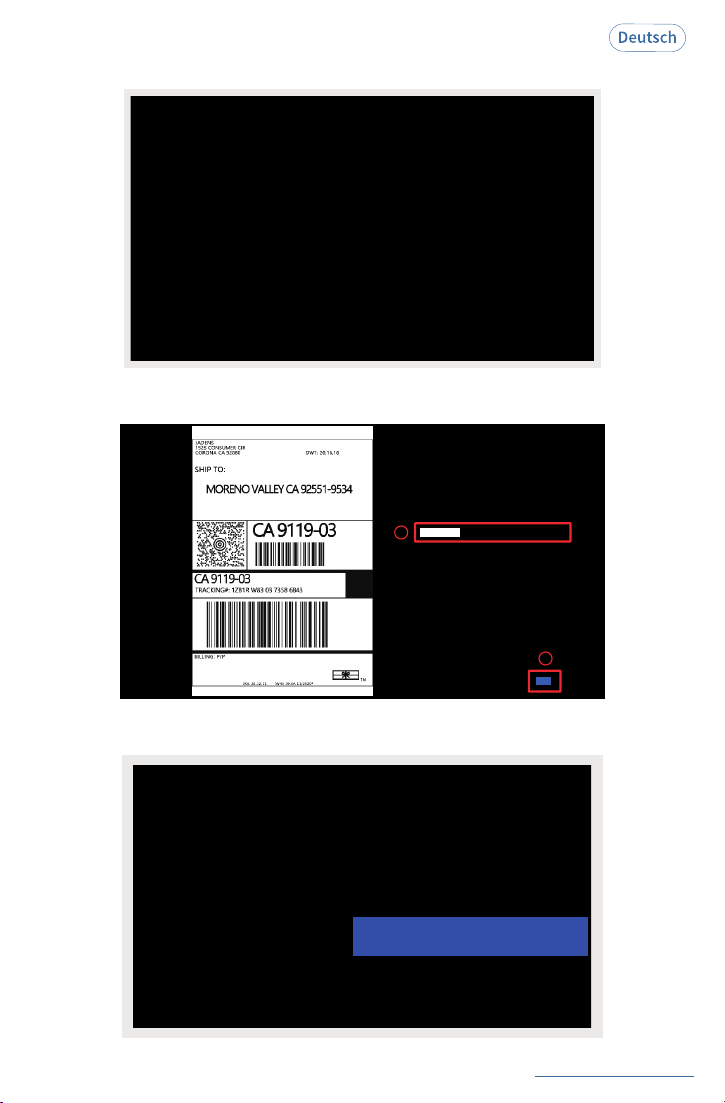
Klicken Sie auf das Erweiterungssymbol, um "Shipping Printer" auszuwählen.
2
1
④
Klicken Sie auf das Symbol "Verbindung".
⑤
Wählen Sie den Drucker aus, den Sie verbinden möchten.
1
2
Printer-Paired
Connect
⑥
See FAQ at support.jadens.com
52
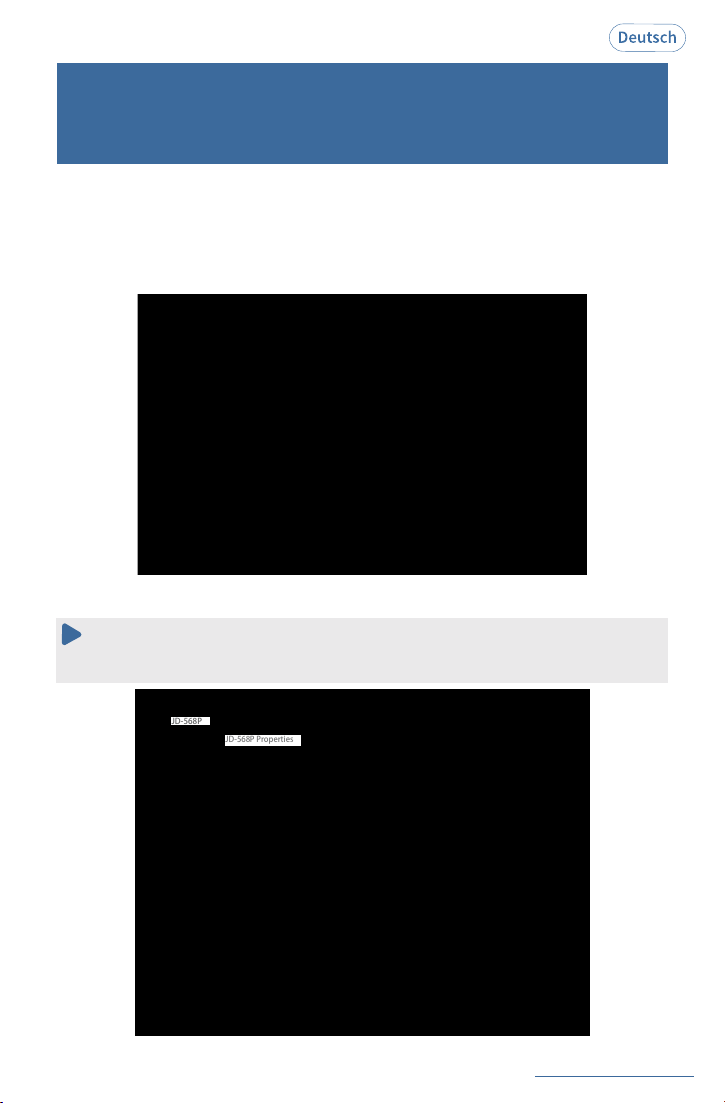
Öffnen Sie die zu druckende Datei und klicken Sie auf das Drucksymbol.
⑦
1
2
More settings
Print
⑧
Klicken Sie auf "Drucken", um zur
Einstellungsseite zurückzukehren.
Der Drucker druckt das Etikett.
Klicken Sie auf "Weitere Einstellungen", um das gewünschte Papierformat und die Anzahl
der Kopien auszuwählen. Klicken Sie anschließend auf "Drucken".
Kehren Sie zur Einstellungsseite der Erweiterung " Versandetikett "zurück.
Der Drucker druckt das Etikett.
⑨
See FAQ at support.jadens.com
53
10.Wichtige Tipps: Drucken von Etiketten in
verschiedenen Größen mit "Screenshot
aufnehmen"
Wenn das gedruckte PDF-/Dateiformat eine ungewohnliche GroBe hat, wie z. B. A4, fur die
keinpassendes Etikettenfomm:n werden kann,müssen Sie die Funktion "Screenshot aufnehmen"
verwendier sind die Schritte zur Durchführung.
a. Öffnen Sie das PDF in Adobe Reader.
b. Vom oberen Menü wählen Sie "Bearbeiten" > "Screenshot aufnehmen". Wählen Sie den Bereich
aus, den Sie drucken möchten.
c.Klicken Sie auf "Drucken", stellen Sie die Seitengröße auf die gleiche Größe wie die Etiketten
ein, die Sie geladen haben, und klicken Sie dann auf "Drucken".
Bitte stellen Sie sicher, dass die Seitengröße mit der Größe des geladenen Etiketts
übereinstimmt.Andernfalls besteht die Möglichkeit, dass das Druckergebnis
über das Etikett hinausragt oder nicht korrekt ausgerichtet ist.
Hinweis:
(1).Fur Windows:
JD-568P
JD-568P Properties

See FAQ at support.jadens.com
54
b. Vom oberen Menü wählen Sie "Ansicht" > "Drehen" > "Im Uhrzeigersinn", damit die Etiketten
nebeneinander angeordnet sind. (Wenn die Etiketten bereits vertikal angeordnet sind,
überspringen Sie diesen Schritt bitte)
(2)Für MAC:
a. Suchen Sie in der oberen linken Ecke Ihres Desktops die Option "Datei" > Klicken Sie auf "Öffnen"
>Klicken Sie auf "Desktop" > Wählen Sie die PDF-Datei aus (oder öffnen Sie die Datei mit Adobe).

See FAQ at
support.jadens.com
55
11.Häufig gestellte Fragen
Die FAQ finden Sie unter support.jadens.com.
c. Als Nächstes wählen Sie im oberen Menü "Bearbeiten" > "Bildschirmaufnahme". Klicken und
ziehen Sie dann über eines der Etiketten, das Sie benötigen, um einen bestimmten Bereich des
Etiketts zu markieren, den Sie drucken möchten.bels
Wenn Sie das Etikett mit Barcode drucken möchten, stellen Sie bitte sicher, dass der Barcode
vertikalgedruckt wird, um zu verhindern, dass die hohe Temperatur dazu führt, dass der Barcode
blockiert wirdund nicht gescannt werden kann.
See FAQ at support.jadens.com
56
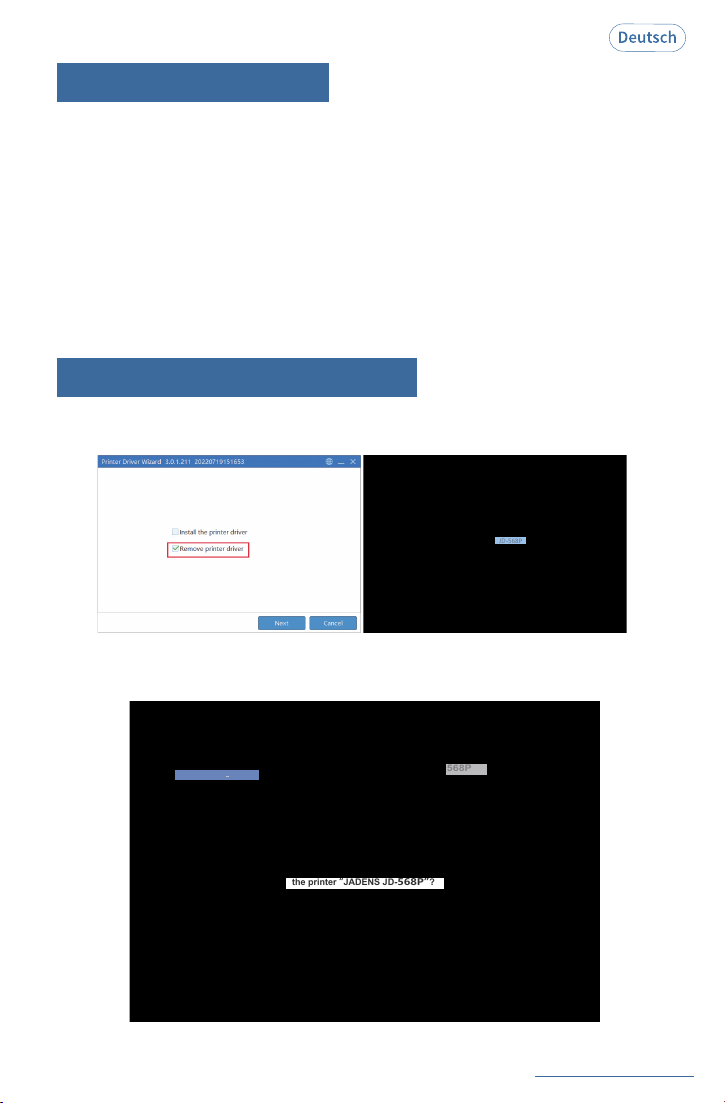
13.Druckertreiber löschen
Öffnen Sie den Treiber erneut und befolgen Sie die folgenden Schritte, um den Treiber zu
deinstallieren.
Klicken Sie auf "Systemeinstellungen" > "Drucker & Scanner", klicken Sie auf "JADENS JD-568P" >
"-", wählen Sie "Drucker löschen".
568P
JD
the printer “JADENS JD-
568P”
?
568P
568P
JADENS JD
Schalten Sie bei einem Papierstau den Drucker aus und lassen Sie den Druckkopf abkühlen.
Öffnen Sie die Abdeckung und entfernen Sie das gestaute Papier. Reinigen Sie die Gummiwalze bei
Verschmutzung mit einem Alkoholtupfer. Lassen Sie den Bereich trocknen, bevor Sie den Drucker
einschalten.
1. Wie gehe ich mit einem Papierstau um?
Führen Sie bei jedem Etikettenwechsel die automatische Etikettenerkennung durch, um einen
mittigen Druck sicherzustellen. Drücken Sie dazu zweimal kurz die Einschalttaste, um das Papier
zu kalibrieren.
2. Der Drucker druckt nicht mittig.
(1) Staub oder Klebstoff auf dem Druckkopf. Reinigen Sie den Druckkopf mit einem sauberen Tuch
und Alkohol. Weitere Informationen finden Sie unter 15. Wartung.
(2) Druckkopf und Walze müssen nach einer gewissen Nutzungsdauer im Rahmen der
routinemäßigen Wartung gereinigt werden.
3. Der Drucker druckt unscharf/unscharf.
Für Windows:
Für Mac:
12.Fehlerbehebung
See FAQ at support.jadens.com
57
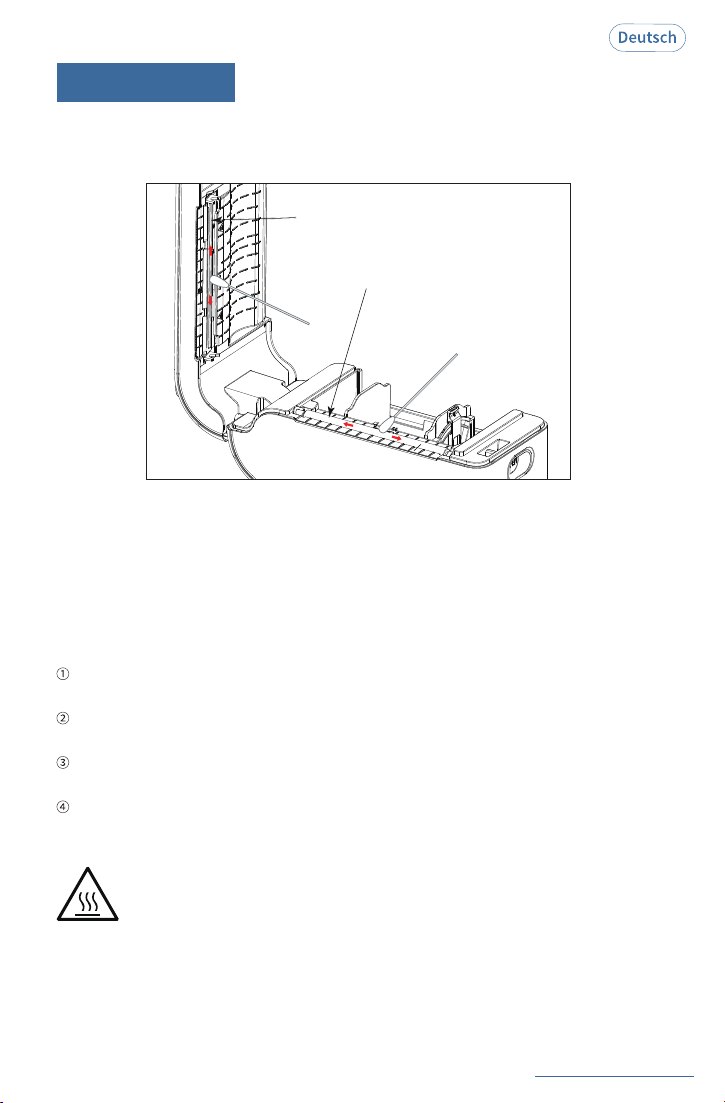
14.Wartung
Der Druckkopf ist ein empfindliches Bauteil des Druckers und befindet sich im geöffneten Zustand
oben.
Achtung: Der Druckkopf kann bei laufendem Drucker heiß sein!
Verbrennungen beim Umgang mit dem Druckkopf.
Warten Sie 2‒5 Minuten, bis der Druckkopf abgekühlt ist. Schalten Sie es nach dem
Ausschalten aus, bevor Sie den Druckkopf handhaben.
1. Vermeiden Sie die Verwendung minderwertiger Thermoetiketten,
da diese die Lebensdauer des Druckkopfes beeinträchtigen.
Die Gummiwalze sorgt für einen reibungslosen Papiertransport. Mit der Zeit können sich Staub und
Papierrückstände auf den Druckwalzen ansammeln.
Stellen Sie sicher, dass der Netzschalter ausgeschaltet ist, ziehen Sie das Netzkabel ab und
öffnen Sie die Abdeckung. Stellen Sie sicher, dass der Druckkopf/die Gummiwalze abkühlt.
Reinigen Sie den Druckkopf/die Gummiwalze gründlich mit einem Alkoholtupfer. Ein 70%iges
Isopropylalkohol-Tupfer ist geeignet. Bitte kein Wasser verwenden.
Warten Sie 2‒3 Minuten, bis der Alkohol vollständig getrocknet ist, und schließen Sie dann die
Abdeckung.
Schließen Sie das Netzkabel an und drucken Sie eine Testseite, um zu prüfen, ob der Druckkopf
sauber ist.
2. DRUCKKOPF REINIGEN/GUMMIWALZE
Druckkopf
Gummiwalze
See FAQ at support.jadens.com
58
- Biegen Sie das Netzkabel nicht übermäßig und stellen Sie keine Gegenstände darauf. Dies könnte
einen Brand verursachen!
- Bewahren Sie den Drucker außerhalb der Reichweite von Kindern auf.
- Verwenden Sie nur zugelassenes Zubehör und versuchen Sie nicht, das Gerät selbst zu zerlegen
oder zu reparieren.
- Halten Sie den Drucker von Wasser und anderen Gegenständen fern, die das Gerät zerstören oder
beschädigen könnten.
- Ziehen Sie den Netzstecker, wenn der Drucker längere Zeit nicht benutzt wird.
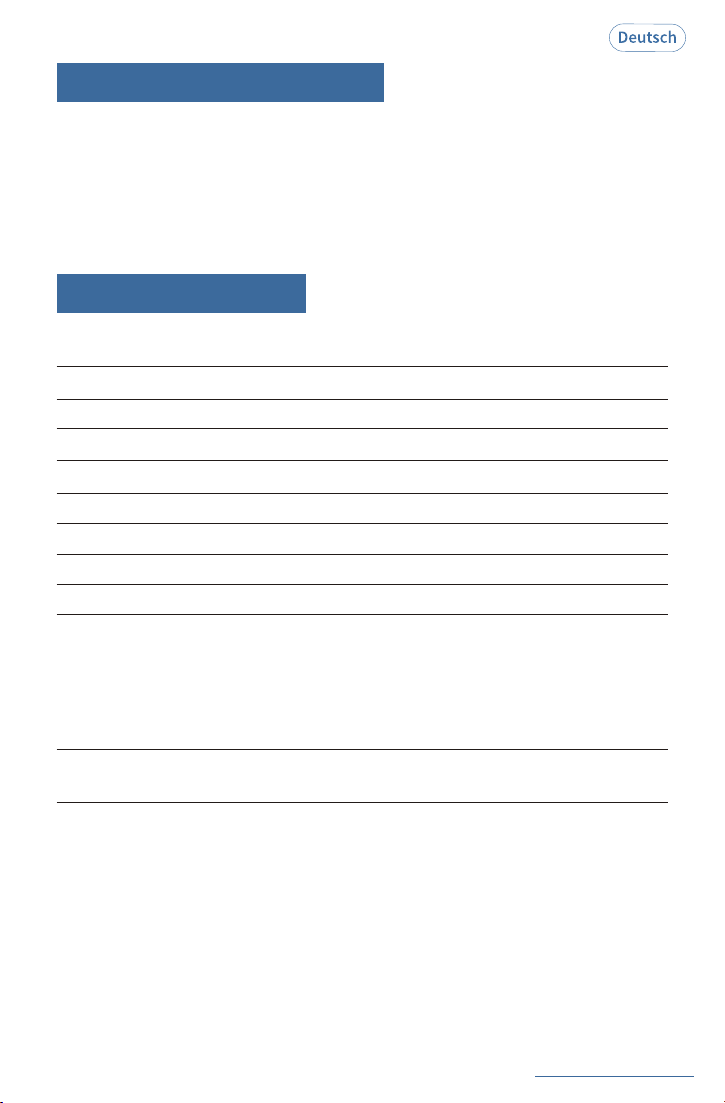
16.Specifications
15.Sicherheitshinweise
DruckverfahrenThermisch
Auflösung 203 DPI
Maximale Druckgeschwindigkeit50 mm/s
Etikettenbreite1"-4.3"(25.4-109 mm)
Druckverfahren0.08‒0.2 mm
Verbindung USB, Bluetooth
Eingangsspannung5 V / 2 A
Akkukapazität2600 mAh
Unterstützte PapierDirektthermoetiketten / Papier
Unterstützte Betriebssysteme
Drucklebensdauer
4"x6": ca. 328.000 Etiketten
2"x1": ca. 1.968.000 Etiketten
Minimale Etikettenlänge
Bluetooth-Verbindung:
iOS, iPadOS, Android, Windows 7
oder höher
USB-Verbindung:
MacOS 10.9 oder höher, ChromeOS,
Windows 7 oder höher
0.39" (10 mm)
Veuillez saisir vos questions ici.
Comment pouvons-nous vous aider aujourd'hui ?
support.jadens.com
N'hésitez pas à nous contacter en cas de problèmes ou de
questions concernant l'installation et l'utilisation.
Scannez le code QR ci-dessous pour parler avec nous.
Service client
Scannez ou téléchargez ce code QR en
utilisant l'appareil photo WhatsApp
pour nous ajouter.
Service clientèle
Merci de nous avoir choisi !
Temps disponible :
Lun- Ven: EST10h-22h
Sam- Dim: EST13h-21h

GARANTIE LIMITÉE D'UN AN - ENREGISTREZ ET ACTIVEZ VIA L'APPLICATION TÉLÉPHONIQUE
'Jadens Printer'.
Cette garantie limitée d'un an s'applique à la réparation ou au remplacement du produit, à la
discrétion de Jadens, s'il est jugé défectueux au niveau du matériau ou de la fabrication.
1. Cette garantie ne s'applique qu'aux composants matériels du produit qui ne sont pas sujets à un
accident, une mauvaise utilisation, négligence, incendie ou dommages résultant d'autres causes
externes, modification, réparation ou usage commercial. Les défauts résultant de l'usure normale ne
seront pas considérés comme des défauts de fabrication dans le cadre de cette garantie.
2. Cette garantie ne couvre pas les dommages résultant de toute tentative non autorisée de réparation
ou de toute utilisation non conforme au manuel d'instructions.
4. Veuillez lire attentivement le Manuel d'Instructions avant de configurer ou d'utiliser ce produit. Si
vous estimez que ce produit présente un défaut de fabrication, ou si vous avez des questions à ce
sujet, veuillez contacter le service client :
À l'attention du service client
E-mail : [email protected]
Modèle:
Date d'achat:
Achété chez:
Numéro de commande:
3. Cette garantie s'applique uniquement à l'acheteur original de ce produit à partir de la date d'achat
originale. Cette garantie s'applique uniquement si l'unité est achetée neuve auprès d'un revendeur
agréé et est non transférable de l'acheteur original de l'article. Toutes les garanties accompagnant ce
produit ne sont valables que dans le pays d'achat.
Toutes les demandes de garantie doivent être accompagnées d'une preuve d'achat. Lorsque vous
nous contactez pour une garantie, veuillez avoir les informations ci-dessous.
Informations sur la garantie

1.Schéma du produit
2.Contenu de la boîte
3.Voyant LED
4.Formats d'étiquettes compatibles
5.Comment charger l'étiquette
6.Impression via l'application smartphone
7.Installation du pilote et configuration de l'imprimante pour
Windows Systems
8.Méthodes de connexion USB et Bluetooth pour les systèmes macOS
9.Installation de l'extension et configuration de l'imprimante pour
ChromeOS Systems
10.Conseils importants : Comment imprimer des étiquettes de
plusieurs formats avec "Prendre un instantané"
11.Foire aux questions
12.Dépannage
13.Suppression du pilote d'imprimante
14.Maintenance
15.Conseils de sécurité
16.Spécifications
59
60
60
62
63
64
64
69
78
82
84
85
85
86
87
87
-----------------------------------------------------------
----------------------------------------------------------
-------------------------------------------------------------------
-------------------------------------------
------------------------------------------------
------------------------------------
-----------------------------------------------------------
---------------------------------------------------------
----------------------------
--------------------------------------------------------
-----------------------------------------------------------------
---------------------------------------
----------------------------------------------------------------
--------------------------------------------------------
--------------------------------------------------------------
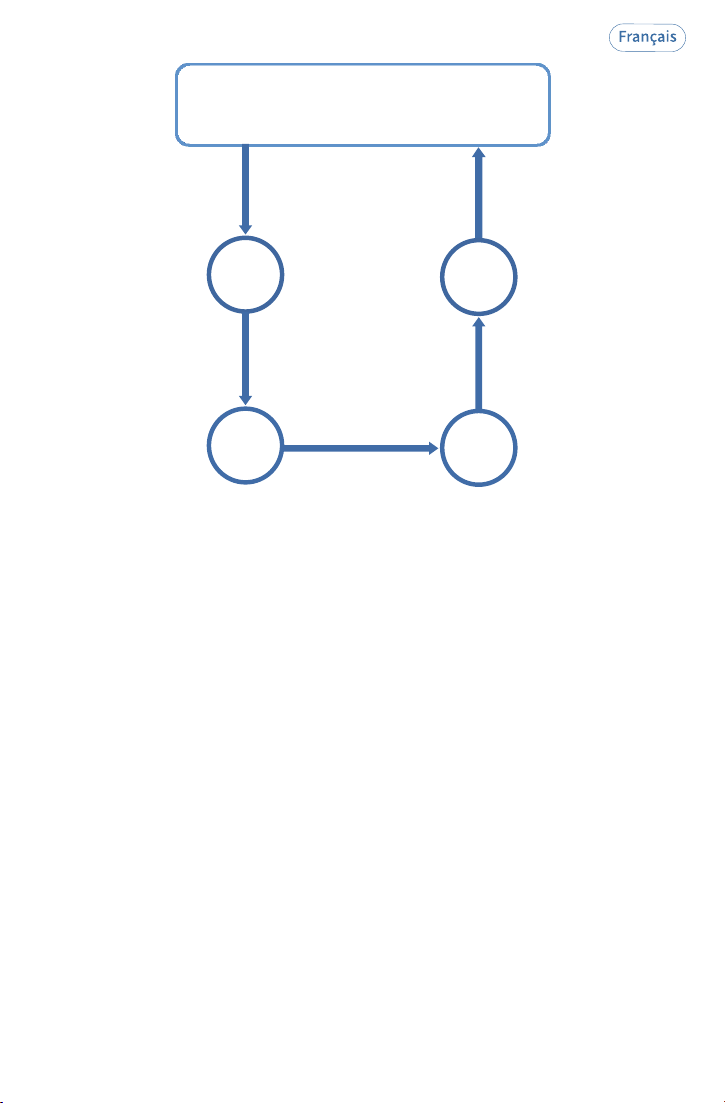
Ajustez le guide
papier et insérez
le papier
Imprimer via
l'application smartphone
Allumez l'appareil
Téléchargez
l'application sur
Étape 1
Imprimez
les étiquettes
Étape 2
Étape 4
Étape 3
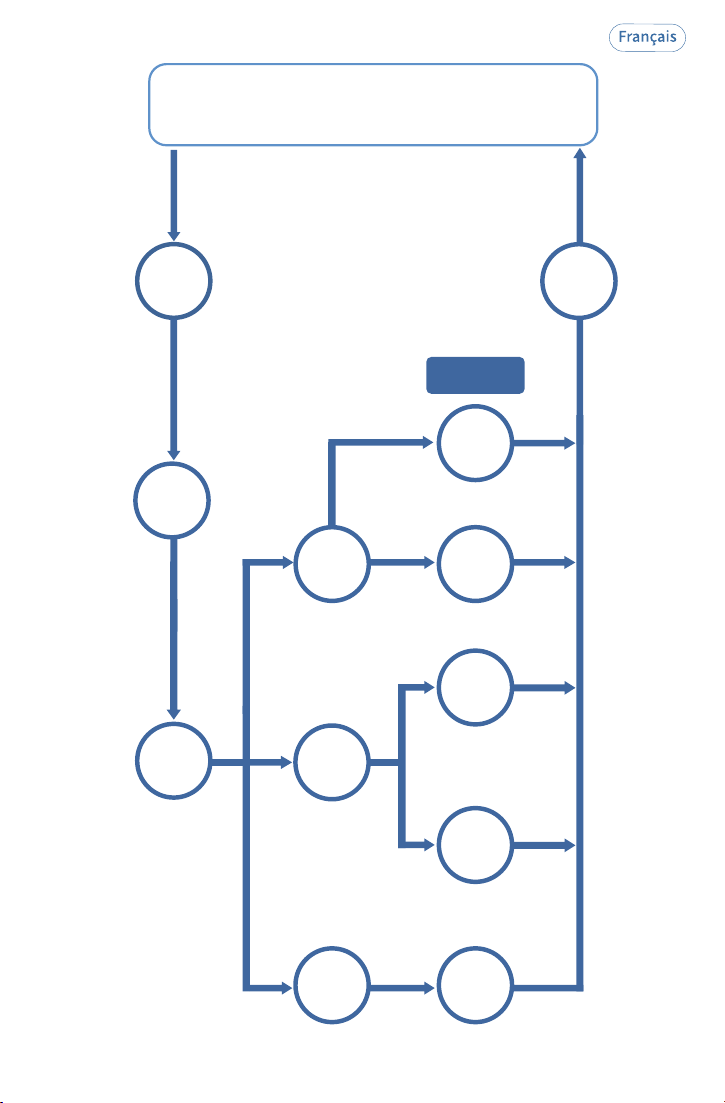
Imprimer via un ordinateur
Étape 5
Étape 1
Étape 2
Étape 3
Étape
4.1
Étape
4.1.1
Étape
4.1.2
Étape
4.3
Allumez
l'appareil
Ajustez le
guide-papier
et insérez le
papier
Connecter
l'imprimante
au PC
Installer le pilote
d'imprimante pour
Windows
Connexion sans fil
par Bluetooth
Imprimer
des
étiquettes
Connexion filaire
par câble USB
Téléchargez l'application
Jadens Printer sur l'App
Store pour la connexion
Bluetooth.
Connexion filaire
par câble USB
Ajouter des
extensions
sur Chromebook
Étape
4.2.1
Étape
4.2
Installation du pilote
d'imprimante pour la
connexion USB
Macbook
Étape
4.2.2
Étape
4.3.1
Andere
Verbindung
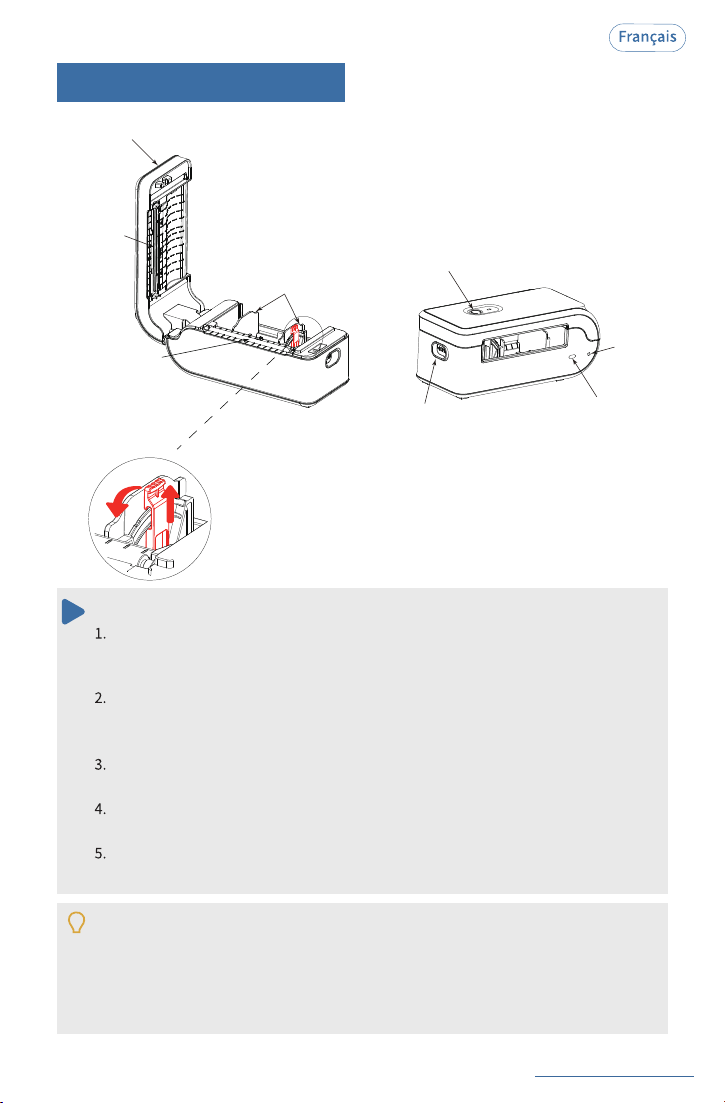
1.Croquis du produit
See FAQ at support.jadens.com
Bouton marche/arrêt
Bouton de
déverrouillage
clé de
réinitia-
lisation
Port d'
alimentation
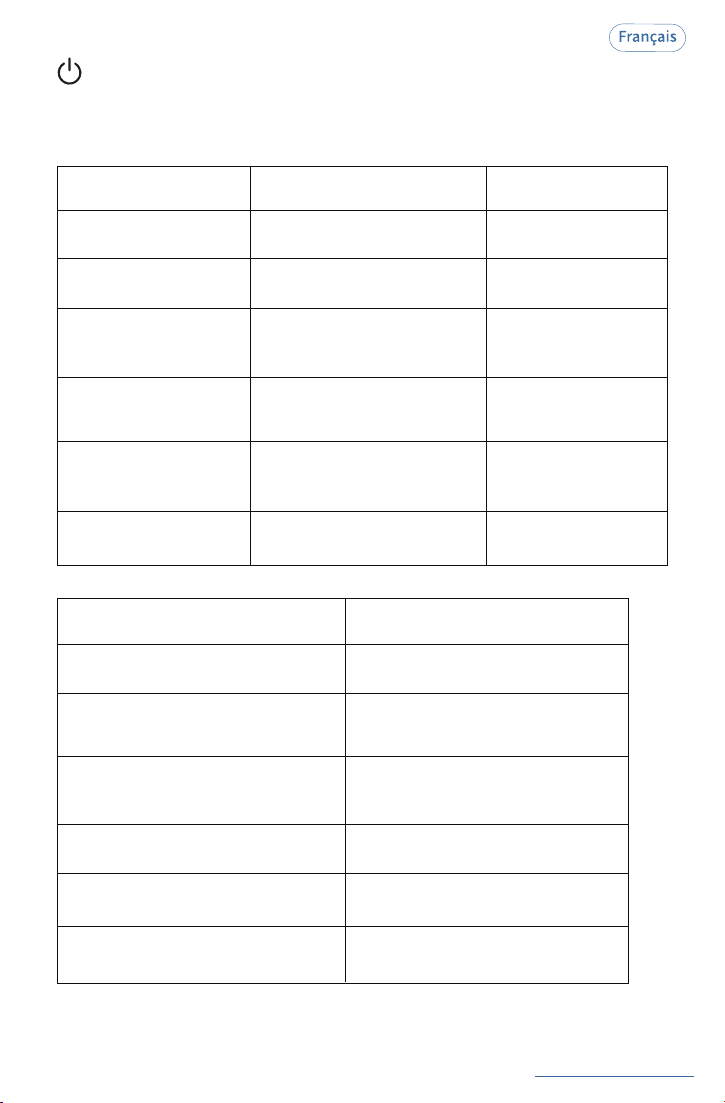
Marche/arrêt : Maintenez le bouton enfoncé pendant 3 secondes jusqu'à ce que
le voyant vert s'allume pour allumer l'imprimante ou jusqu'à ce qu'il s'éteigne
pour l'éteindre.
Commutateur du guide papier : La largeur du guide papier
peut être ajustée lorsque le commutateur du guide papier
est basculé vers l'avant, et lorsque le commutateur du guide
papier est basculé vers le centre, le guide papier se verrouille.
Utilisation du bouton marche/arrêt:
Pause d'impression : Pendant l'impression, appuyez brièvement une fois sur le
bouton marche/arrêt pour mettre l'impression en pause. Si vous lancez une
nouvelle impression, redémarrez l'imprimante et l'application.
Alimentation papier : Lorsque l'imprimante est inactive, appuyez brièvement
une fois sur le bouton marche/arrêt pour imprimer une page blanche.
Apprentissage automatique du papier : Lorsque l'imprimante est inactive,
appuyez brièvement deux fois sur le bouton marche/arrêt pour calibrer le papier.
Impression de la page d'autotest : Lorsque l'imprimante est inactive, appuyez
brièvement trois fois sur le bouton marche/arrêt pour imprimer la page d'autotest.
Touche de réinitialisation : En cas d'arrêt forcé, appuyez sur la touche de
réinitialisation à l'aide d'une épingle. Redémarrez l'imprimante après la
réinitialisation.
Réinitialisation des données : Lorsque l'imprimante est inactive, appuyez
brièvement quatre fois sur le bouton d'alimentation pour restaurer les paramètres
d'usine. Effectuez l'apprentissage du papier après la réinitialisation des données.
Rouleau en
caoutchouc
Verrouillage
Libérer
Guide papier
Capot supérieur
Tête d'
impression
59
60
See FAQ at support.jadens.com
Appui long de 2 s
État d'inactivité :
Mise sous/hors tension
Détection d'un espace entre les étiquettes
Appui rapide 1 fois
Appui rapide 2 fois
Apprentissage automatique du papier
Impression d'une page d'autotest
Réinitialisation des données
(Après la réinitialisation, veuillez
effectuer l'apprentissage sur papier.)
Appui rapide 3 fois
Appui rapide 4 fois
Imprimé :
Appui rapide 1 fois
Impression en pause
Instructions pour le bouton d'alimentation
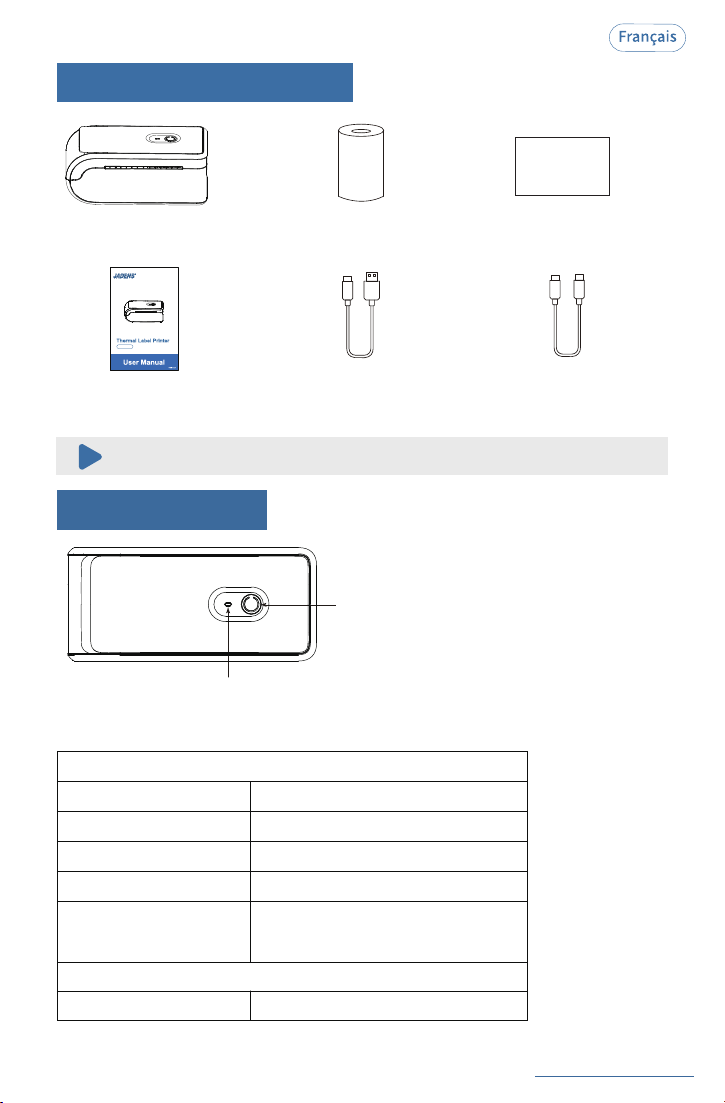
Indicateur d'état de l'imprimante
Indicateur d'état Bluetooth
Imprimante
Étiquette en
rouleau
Manuel
d'utilisation
2.Contenu de la boîte
3. Voyant LED
Câble USB-A
vers USB-C
pour Windows
Câble USB-C
vers USB-C
pour Mac
Guide de
l'application
APP Guide Card
Si des accessoires manquent, veuillez nous contacter pour obtenir de l'aide.
JD-568P
See FAQ at support.jadens.com
61
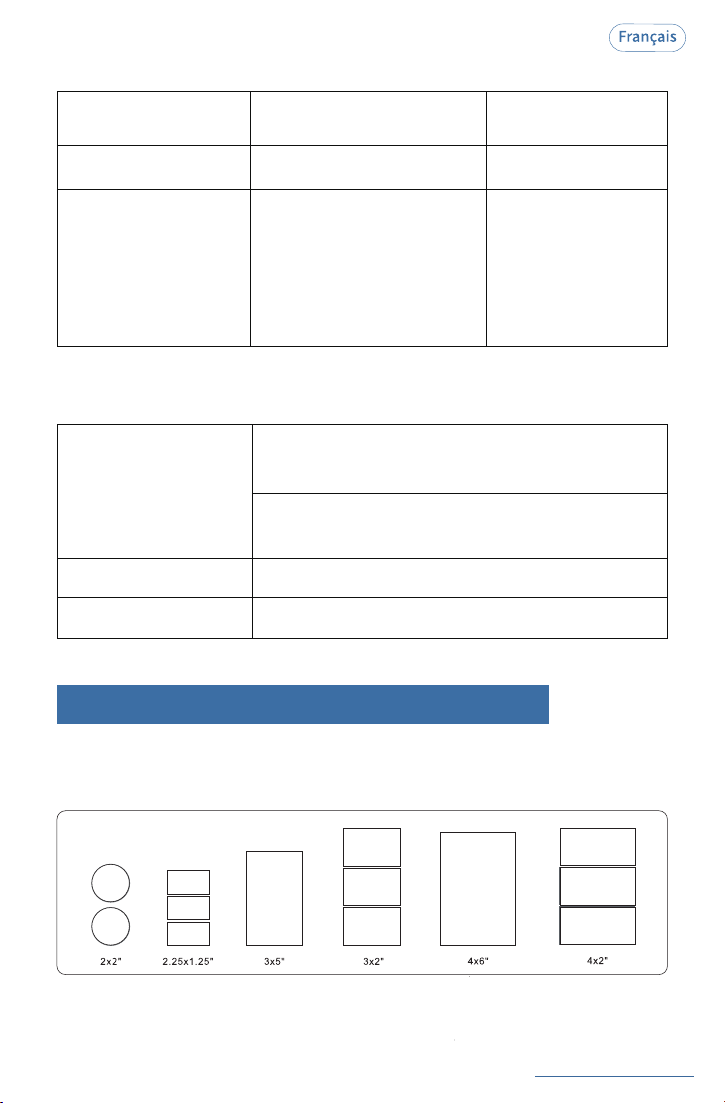
Charge complète
État de la batterie
Indicateur d'état de l'imprimante
Feu vert allumé
Feu vert allumé
Une lumière jaune clignote lentement.
Voyant jaune allumé
Clignotement alterné jaune et vert
Normal
(Niveau de batterie ≥ 20 %)
Batterie faible
(Niveau de batterie < 20 %)
Chargement normal
(imprimante allumée)
Chargement normal
(imprimante éteinte)
Une lumière jaune clignote rapidementAnomalie de charge
Indicateur d'état de l'imprimante
État de l'imprimante
Indicateur d'état de
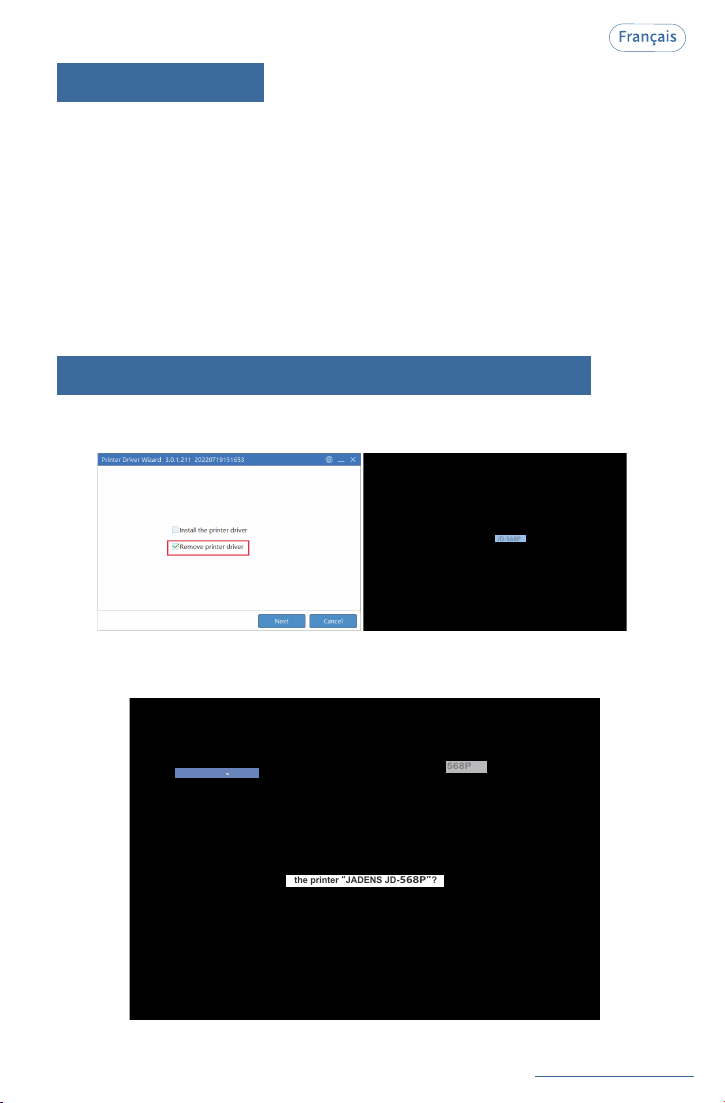
l'imprimante
Dépannage
Mise sous tension
Feu vert allumé/
Mise hors tension
Lumière éteinte
Surchauffer
Feu rouge allumé
Attendez que l'imprimante
refroidisse, et elle
continuera à fonctionner
automatiquement.
Impression interrompue
Le voyant vert clignote
lentement
Appuyez une fois sur le
bouton d'alimentation pour
reprendre l'impression.
Couvercle ouvert
Le voyant rouge
clignote lentement
Vérifiez que le couvercle est
bien fermé.
Couvercle fermé
Feu vert allumé
/
/
Remarque : Mise à niveau > Chargement > Batterie faible > Autre état
See FAQ at support.jadens.com
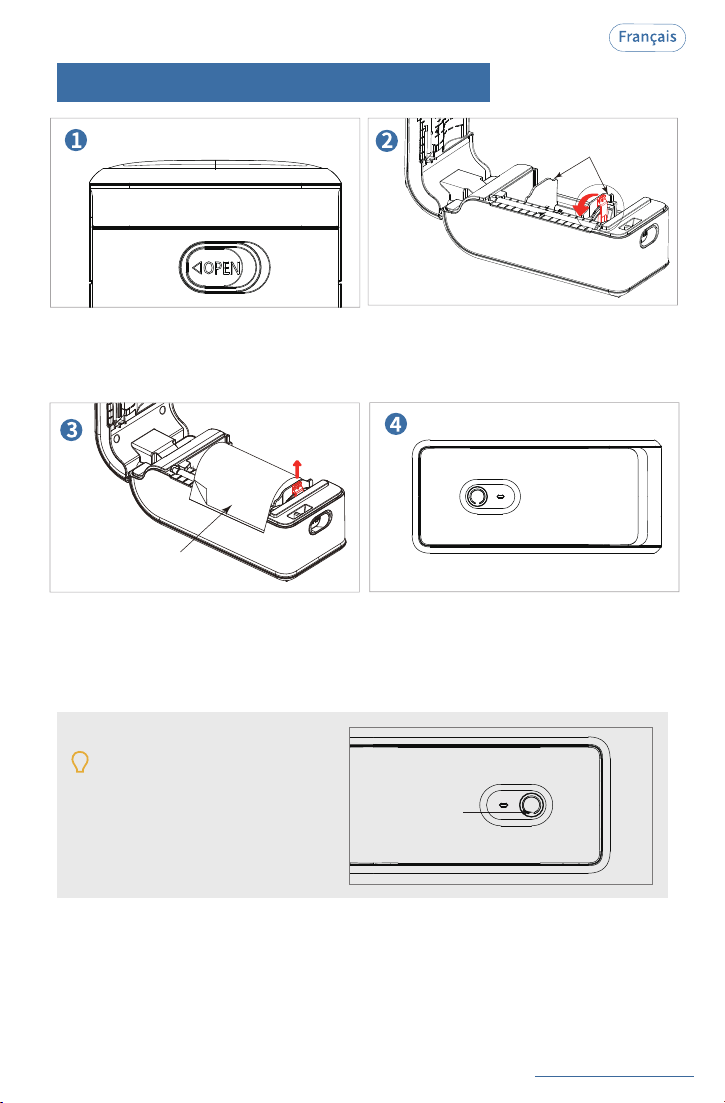
4.Formats d'étiquettes compatibles
L'imprimante est compatible avec toutes les étiquettes thermiques directes,
avec des largeurs de 1" à 4.3" et des longueurs supérieures à 0.79".
Formats d'étiquettes thermiques courants
62
Bluetooth déconnecté
Connexion Bluetooth
Pour l'impression sans fil sur Smartphone :
voyant bleu allumé
Pour l'impression sans fil sous Windows :
le voyant bleu s'allume quelques secondes puis s'éteint
Une lumière bleue clignote lentement
La lumière bleue clignote rapidement
Bluetooth anormal
Indicateur d'état Bluetooth
Normale
Feu vert allumé
Aucun papier détectéLe voyant vert clignote rapidement
① Ouvrez le capot et retirez
tout papier coincé. Si le
rouleau en caoutchouc est
sale, nettoyez-le avec une
lingette imbibée d'alcool et
attendez 2 à 5 minutes avant
de rallumer l'imprimante.
② Assurez-vous que le papier
est correctement chargé dans
l'imprimante.
/
État consommable
Indicateur d'état de
l'imprimante
Dépannage
See FAQ at support.jadens.com
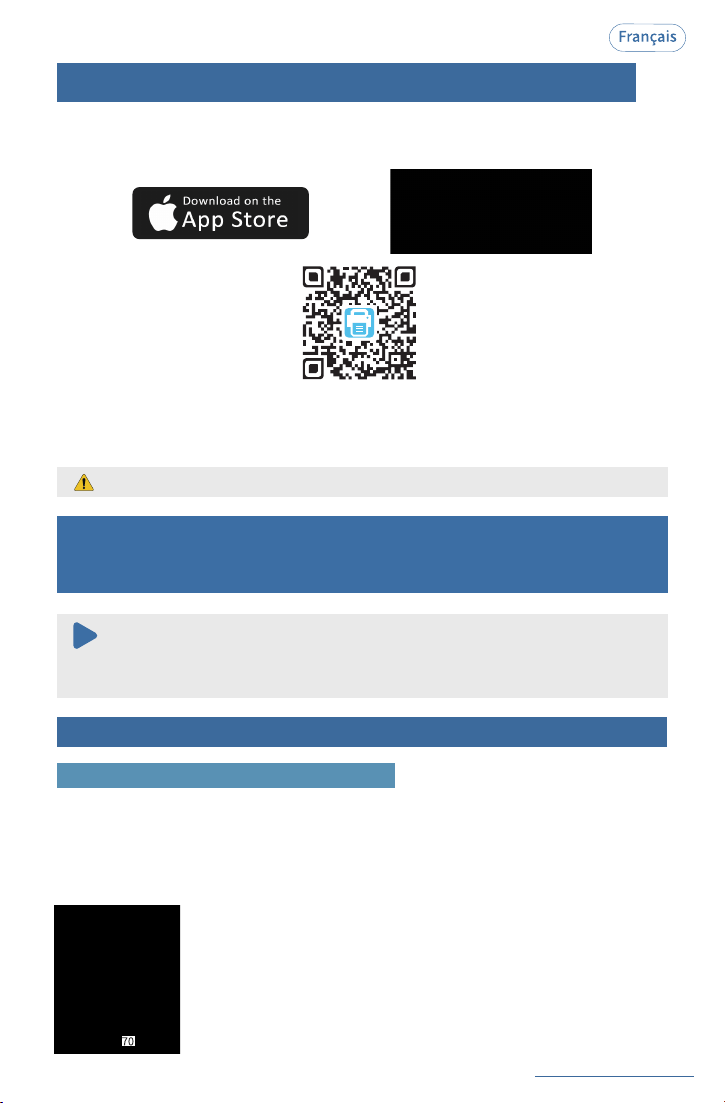
5. Comment charger l'étiquette
63
Bouton
d'alimentation
Conseils:
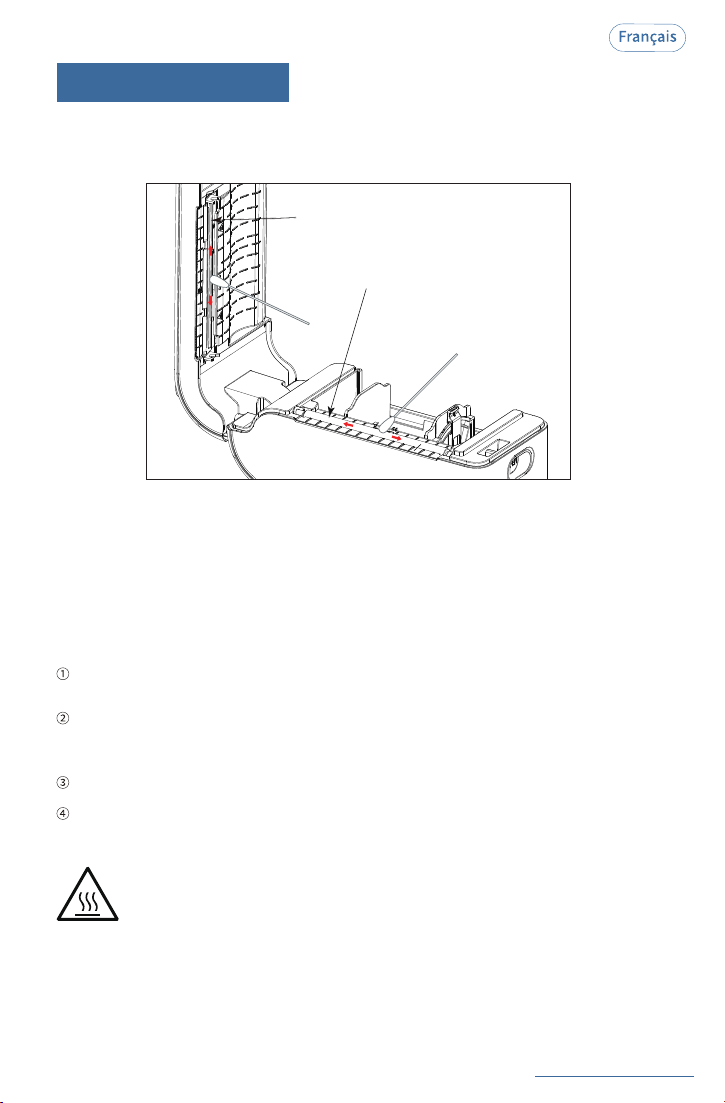
Tirez le loquet de déverrouillage pour ouvrir
le capot.
Tirez le commutateur du guide papier vers l'avant
pour le libérer, puis ajustez-le à la largeur du papier.
Guide papier
Déverrouillage
Verrouillage
Chargez l'étiquette, ajustez le guide papier à
la largeur du papier et verrouillez-le.
La face à imprimer doit être orientée vers
le bas.
Refermez soigneusement le capot. L'étiquette se
positionnera automatiquement au point de découpe.
L'imprimante est prête à imprimer.
À chaque changement d'étiquette, lancez
l'identification automatique : appuyez
brièvement 2 fois sur le bouton
d'alimentation pour calibrer le papier.
Côté d'impression
See FAQ at support.jadens.com
6.Impression via l'application smartphone
Téléchargement de l'application: Recherchez [ Jadens Printer ] sur Google Play ou l'App Store
et téléchargez l'application gratuitement. Veuillez consulter le“Guide de démarrage rapide de
l'impression via l'application”pour obtenir des instructions d'utilisation spécifiques.
7.Installation du pilote et configuration de
l'imprimante pour Windows Systems
Il est recommandé de fermer le logiciel de sécurité avant l'ins
Conseil : Si un code PIN vous est demandé lors du jumelage, essayez 0000 ou 1234.
tallation afin d'éviter tout
problème. Vous pourrez le rouvrir une fois l'installation terminée.
Remarque:
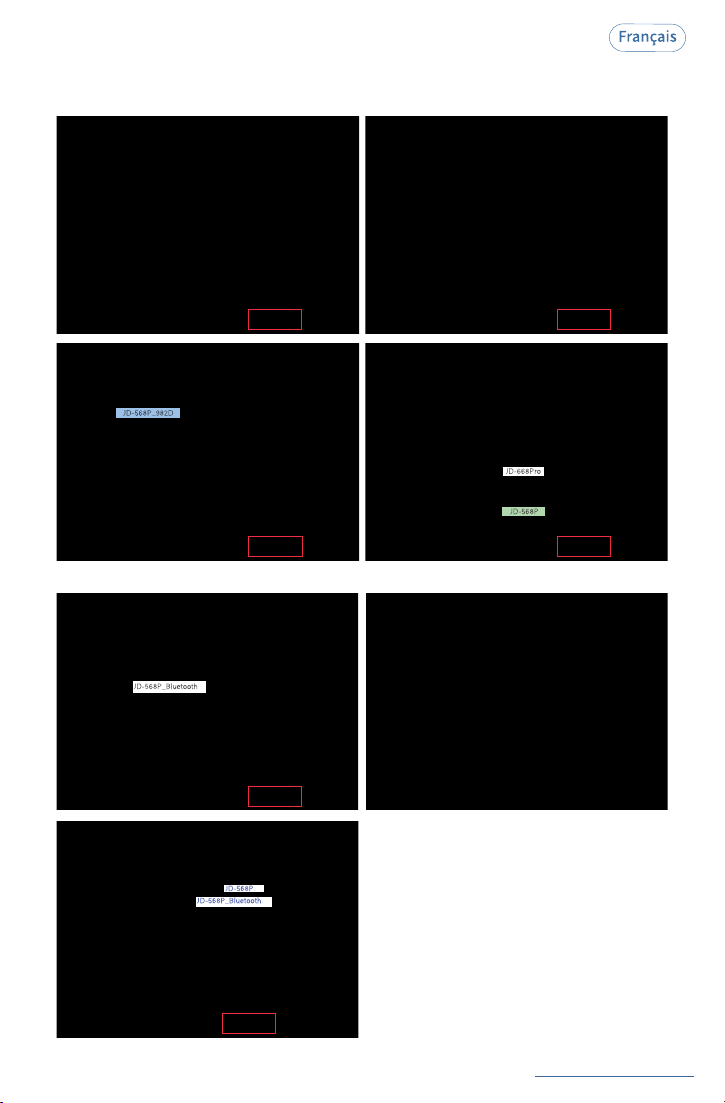
Option 1: Connexion sans fil par Bluetooth
Étape 1: Installation du pilote d'imprimante (Bluetooth ou câble USB)
1. Branchez le câble d'alimentation et allumez l'imprimante (le câble USB n'est pas nécessaire).
2. Téléchargement du pilote:
Téléchargement du pilote : Téléchargez le pilote (JADENS Printer Driver.exe) depuis https://
jadens.com/pages/download.video. La version du pilote peut être mise à jour. Consultez les
dernières informations sur support.jadens.com.
64
L'App Store est une marque déposée d'Apple Inc., déposée aux États-Unis et dans
d'autres pays.
Google Play et le logo Google Play sont des marques déposées de Google LLC.
See FAQ at support.jadens.com
La recherche prendra environ 40 secondes. Veuillez patienter.
_
65
_
.
_.
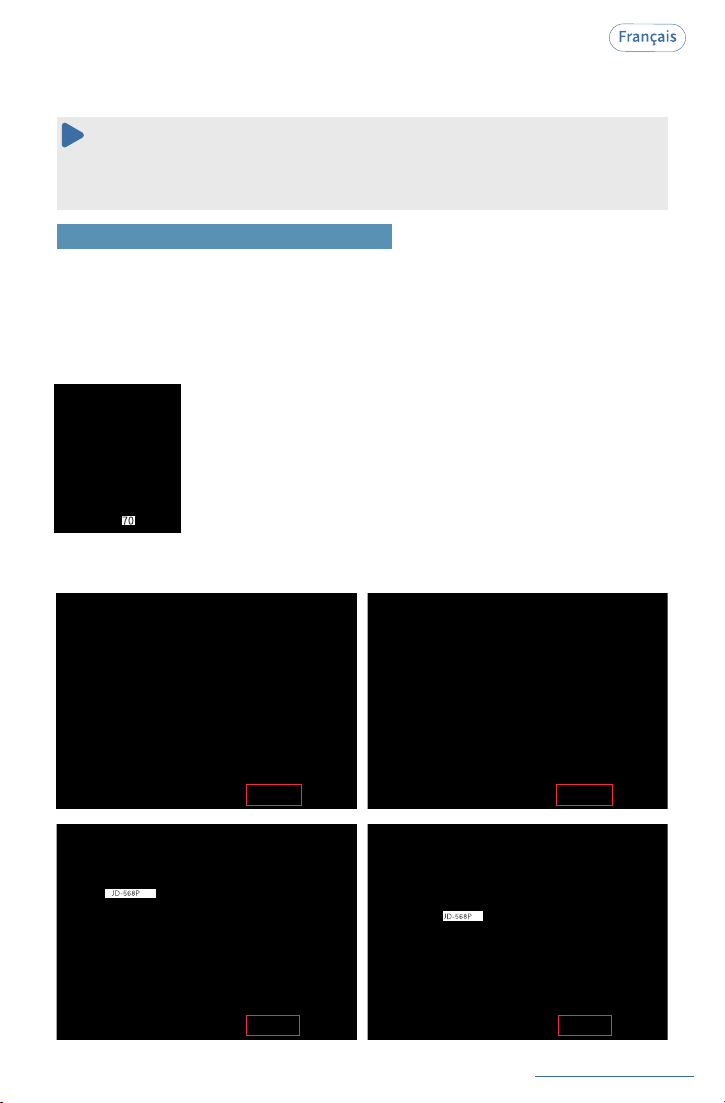
3. Installation du pilote:
Copiez le pilote d'imprimante sur le bureau de votre ordinateur, double-cliquez dessus pour l'ouvrir
et l'installer comme indiqué ci-dessous:
1.Branchez le câble d’alimentation et allumez l’imprimante (ignorez cette étape si vous l’avez
déjà effectuée).
2. Branchez le câble USB à votre ordinateur (ignorez cette étape si vous l’avez déjà effectuée).
3. Télécharger le pilote:
Téléchargez le pilote (JADENS Printer Driver.exe) depuis https://jadens.com/pages/download.
video. La version du pilote peut être mise à jour. Consultez les dernières informations sur
support.jadens.com.
See FAQ at support.jadens.com
Si vous ne parvenez pas à imprimer, redémarrez votre ordinateur et votre imprimante, puis
réinstallez le pilote. Une nouvelle installation créera des copies de l’imprimante dans votre
système d’exploitation, par exemple "JD-568P (copie 1, 2)".
Remarque:
4.Imprimer une page de test:
Après avoir installé le pilote d’imprimante, cliquez sur "Imprimer une page de test" pour vous
assurer que l’imprimante fonctionne correctement.
Option 2: Connexion filaire par câble USB
66
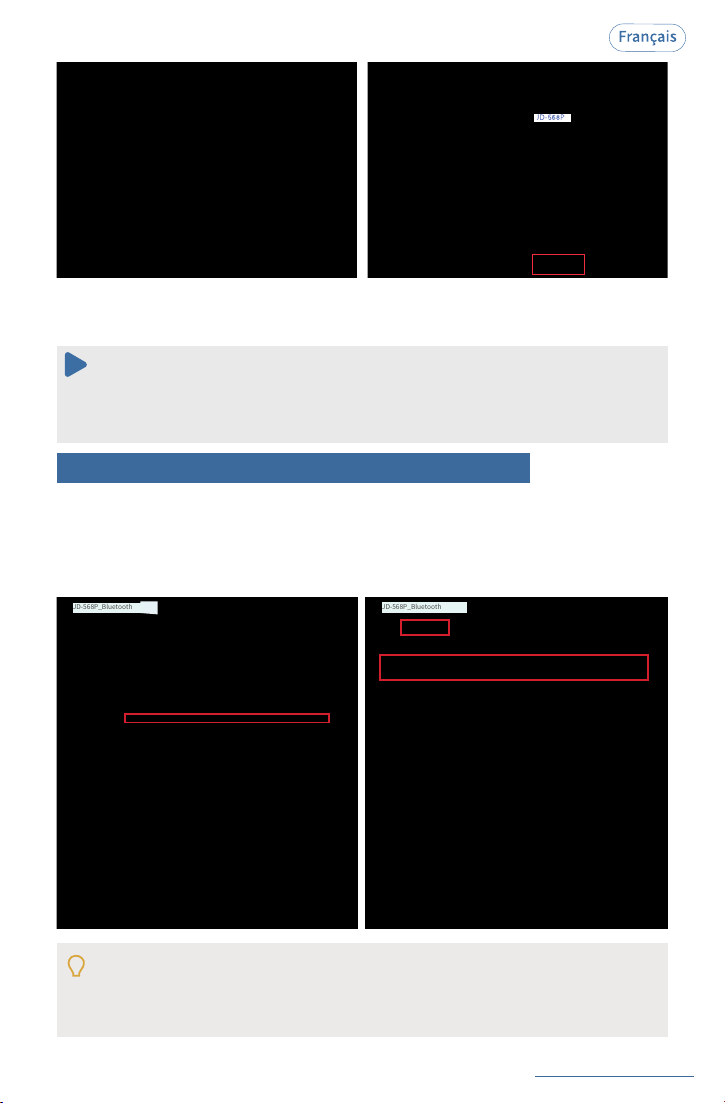
4. Installer le pilote:
Copiez le pilote d’imprimante sur le bureau de votre ordinateur, double-cliquez dessus pour l’
ouvrir et l’installer comme suit:
Si vous ne parvenez pas à imprimer, redémarrez votre ordinateur et votre imprimante, puis
réinstallez le pilote. Une nouvelle installation créera des copies de l'imprimante dans votre
système d'exploitation, par exemple "JD-568P (copie 1, 2...)".
Remarque:
5.Impression d'une page de test:
Après avoir installé le pilote d'imprimante, cliquez sur "Imprimer une page de test" pour vous
assurer que l'imprimante fonctionne correctement.
See FAQ at support.jadens.com
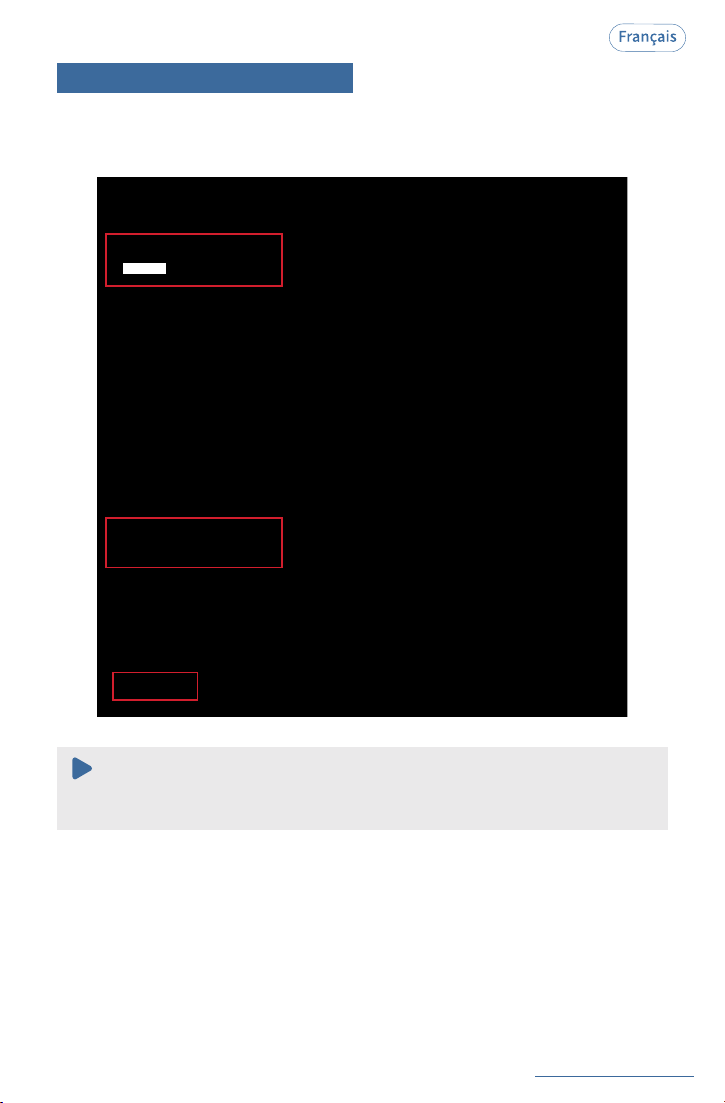
Accédez à "Paramètres" > "Périphérique" > "Imprimantes et scanners" > recherchez l'imprimante
"JD-568P/JD-568P Bluetooth" > cliquez sur "Gérer" > "Préférences d'impression". Définissez
ensuite le format de page, la vitesse et la densité d'impression par défaut.
Cette section vous permet de définir le format de page, la vitesse et la densité d'impression par
défaut.
En ce qui concerne la densité, si les étiquettes sont claires ou floues, vous pouvez modifier la
densité.
Sous Windows, définissez la densité entre 8 et 12.
Pour le système Mac, veuillez définir la densité sur 8-12.
JD-568P_Bluetooth
JD-568P_Bluetooth
Étape 2: Configuration des préférences d'impression
1
2
67
See FAQ at support.jadens.com
Étape 3: Imprimer une étiquette
(Prenons l'exemple d'une étiquette d'expédition de 4x6 inch)
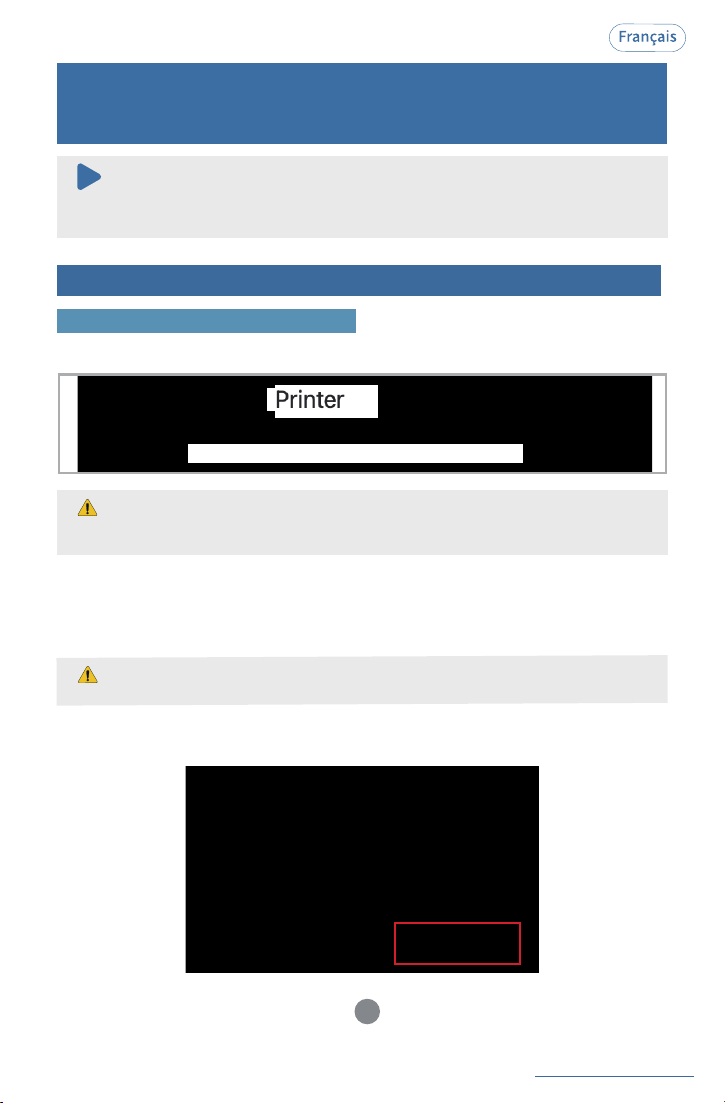
1. Ouvrez le fichier d'étiquette et cliquez sur l'icône "Imprimer".
2. Choisissez l'imprimante et le format de papier appropriés, puis cliquez sur "Imprimer".
Avant d'imprimer, assurez-vous que le format des étiquettes thermiques que vous chargez
correspond aux paramètres de format de vos appareils.
Remarque:
68
JD-568P
See FAQ at support.jadens.com
69
Il est recommandé de fermer le logiciel de sécurité avant l'installation afin d'éviter tout
problème. Vous pourrez le rouvrir une fois l'installation termi
Compatible avec macOS 11.0 ou version ultérieure et un Mac équipé d’une puce Apple
M1 ou ultérieure.
Pour les autres systèmes, veuillez utiliser le pilote USB.
née.
Remarque:
8. Méthodes de connexion USB et Bluetooth
pour les systèmes macOS
Étape 1: Téléchargement gratuit de l’application [Jadens Printer]
1. Recherchez [Jadens Printer] sur l’App Store et téléchargez l’application gratuitement.
Connexion sans fil via Bluetooth
2. Appuyez longuement sur le bouton d'alimentation pendant 2 secondes pour allumer l'imprimante.
Lorsque l'imprimante est connectée à une source d'alimentation (ordinateur ou adaptateur secteur),
elle passe en mode charge, indiqué par un voyant jaune fixe. L'imprimante reste utilisable pendant
la charge.
Si le voyant clignote en jaune/vert, l'imprimante est éteinte pendant la charge ; veuillez
l'allumer au préalable.
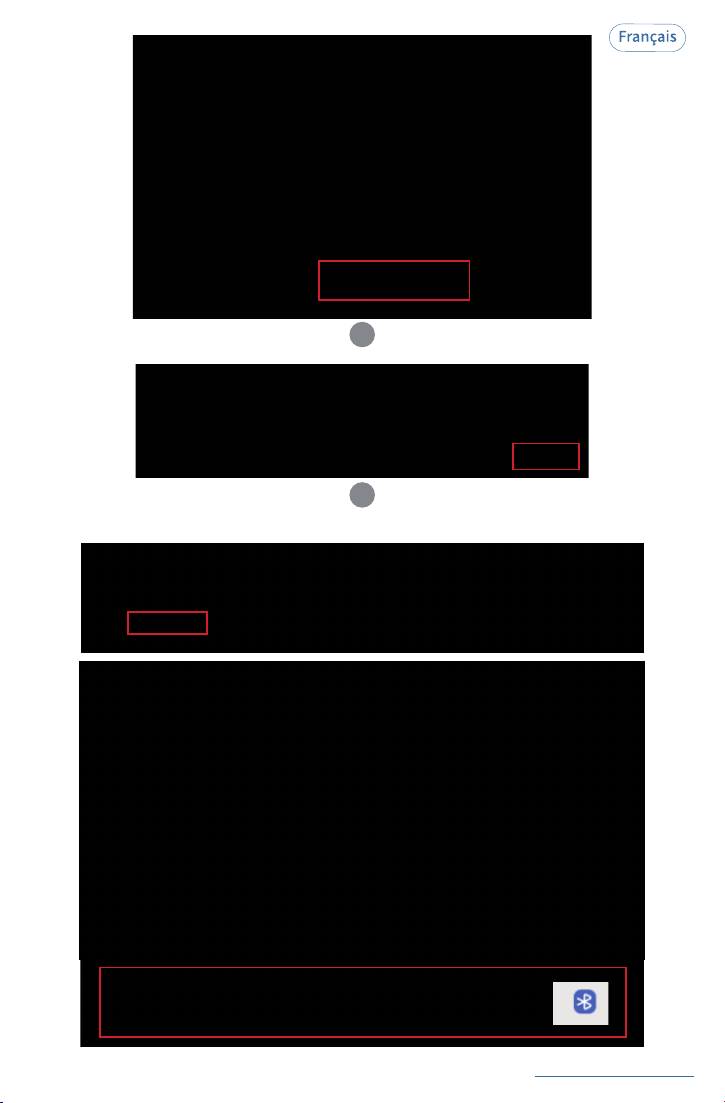
3. Ouvrez l'application [Jadens Printer] et activez le Bluetooth dans les paramètres système, puis
autorisez l'accès lorsque vous y êtes invité.
1
See FAQ at support.jadens.com
70
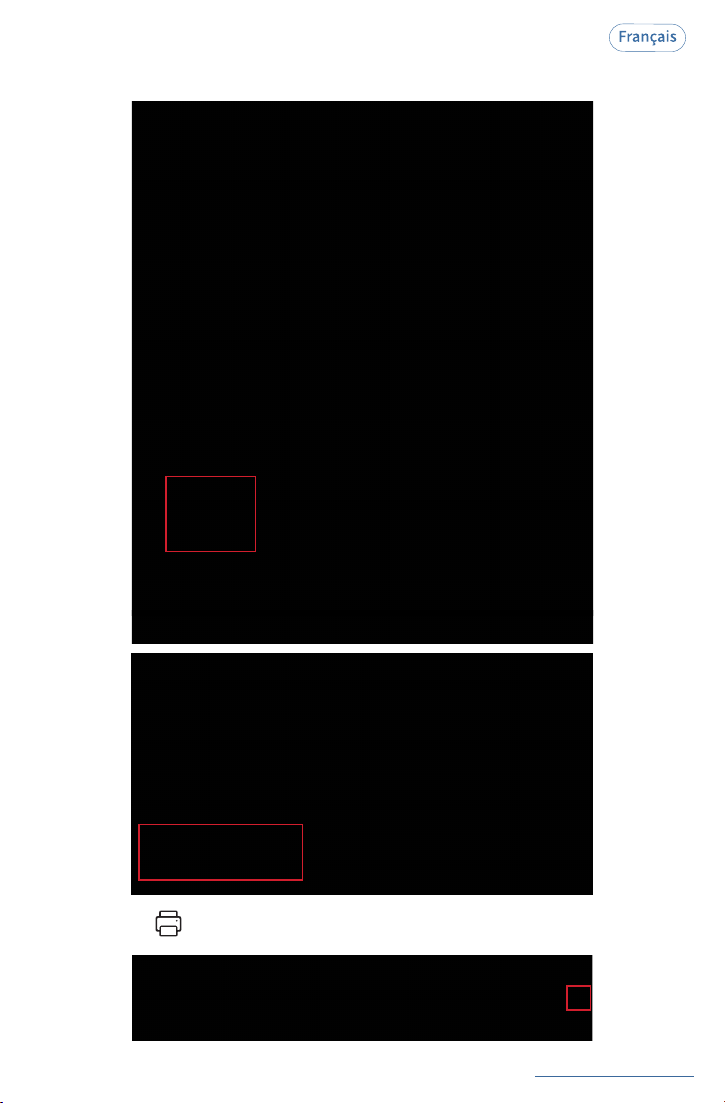
4. Appuyez sur " Accéder à la connexion " > Rechercher des appareils > Appuyez sur " Se connecter ".
2
3
See FAQ at support.jadens.com
71
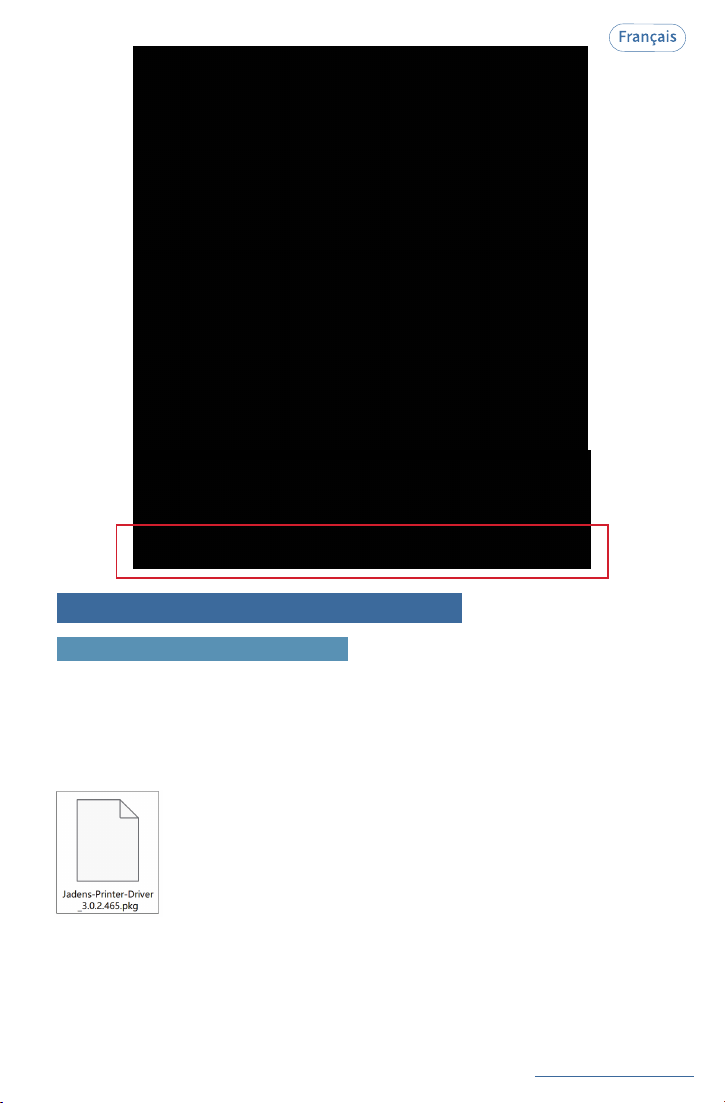
5. Appuyez sur " Fichier "pour importer des documents (PDF ou images) depuis votre stockage local
ou d'autres plateformes sociales.
6. Cliquez sur " " pour imprimer.
See FAQ at support.jadens.com
72
Étape 2: Installation du pilote d'imprimante
1. Branchez le câble d'alimentation et allumez l'imprimante (ignorez cette étape si vous l'avez déjà
effectuée).
2. Branchez le câble USB à votre ordinateur (ignorez cette étape si vous l'avez déjà effectuée).
3. Téléchargement du pilote : Téléchargez le pilote (JADENS Printer Driver.exe) depuis https://
jadens.com/pages/download.video. La version du pilote peut être mise à jour. Consultez les
dernières informations sur support.jadens.com.
Connexion filaire par câble USB
4. Installer le pilote:
Copiez le pilote d’imprimante sur le bureau de votre ordinateur, double-cliquez dessus pour l’
ouvrir et l’installer comme suit:
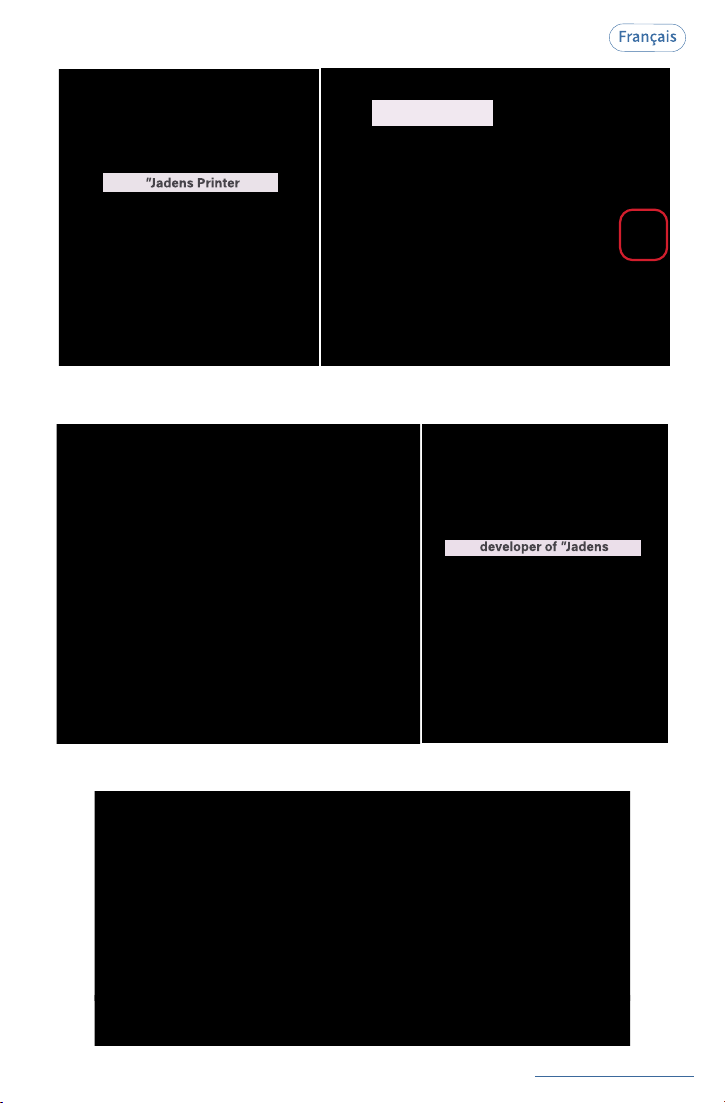
5. Cliquez sur "OK", ouvrez les "Préférences Système" et cliquez sur "Sécurité et confidentialité".
(Si l'avertissement ne s'affiche pas, vous pouvez ignorer cette étape.)
See FAQ at support.jadens.com
73
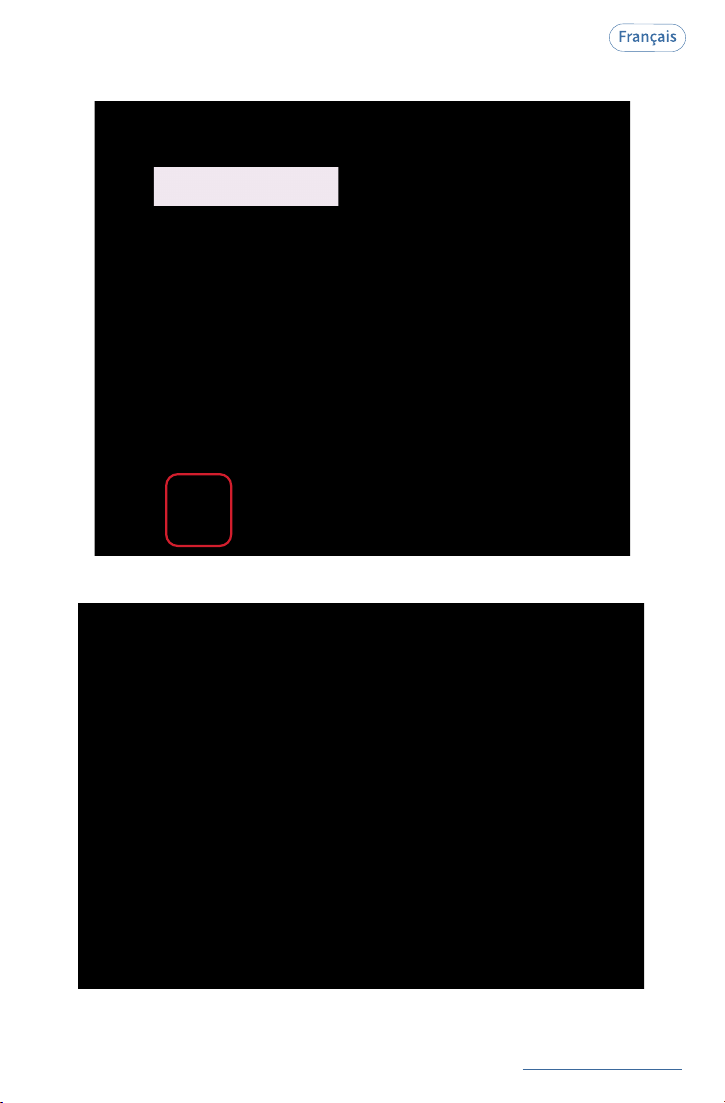
6. Cliquez sur le bouton "Ouvrir quand même". Cliquez ensuite sur "Ouvrir" et poursuivez l'installation
de l'imprimante.
7. Suivez les étapes d'installation jusqu'à ce que la fenêtre "Installation réussie" s'affiche.
See FAQ at support.jadens.com
74
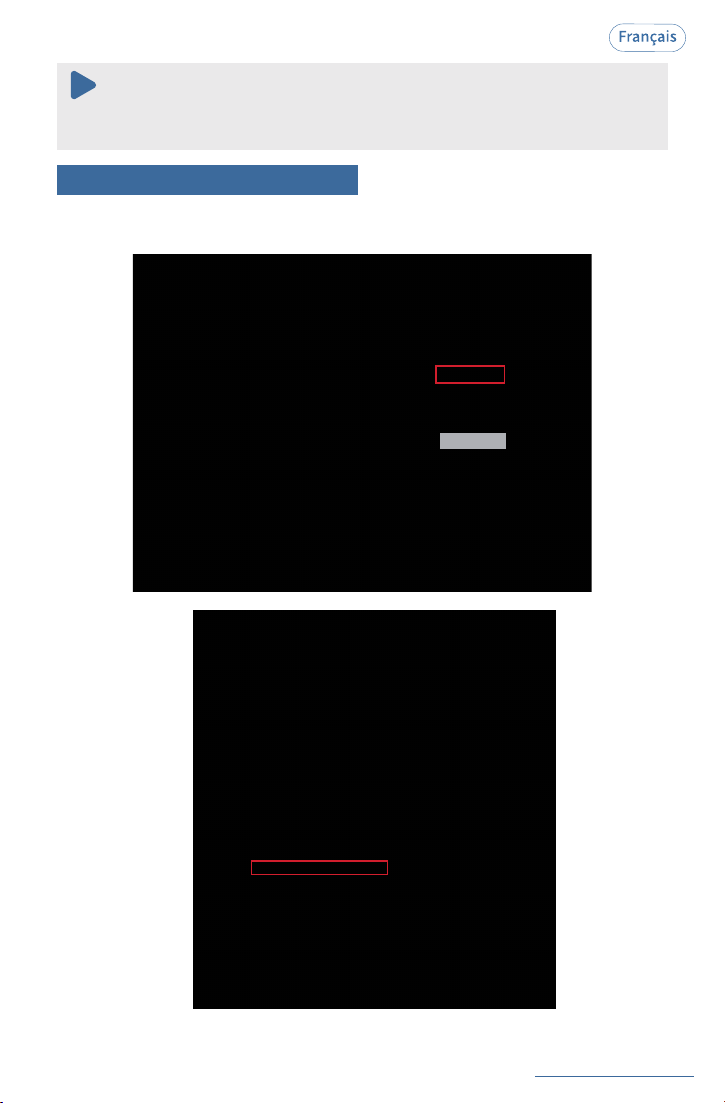
8. Ouvrez les "Préférences Système" et cliquez sur "Imprimantes et scanners".
9. Cliquez sur "+" pour ajouter une nouvelle imprimante.

See FAQ at support.jadens.com
75
JADENS JD
568P
10. Cliquez sur "JADENS JD-568P".
Air
MacBook
jadens
568P
JADENS JD
568P
JADENS JD
JADENS JD
568P
11. Cliquez sur "Ajouter". L'imprimante est maintenant installée sur votre MacBook.
76
See FAQ at support.jadens.com
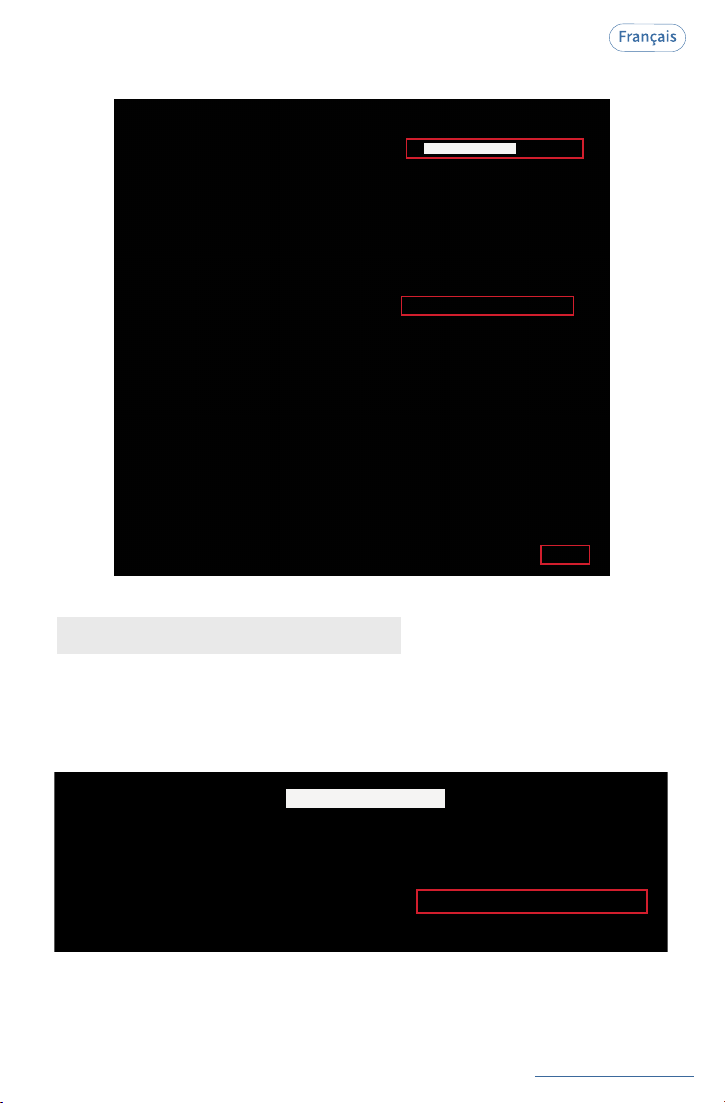
(Prenons l'exemple d'étiquettes d'expédition de 4x6 inch)
1. Ouvrez le fichier d'étiquette avec "Aperçu" > Cliquez sur "Fichier" > "Imprimer".
Remarque:
Vous pouvez maintenant imprimer directement. En cas d'échec, redémarrez votre
ordinateur et réinstallez le pilote.
Étape 2. Imprimer une étiquette
See FAQ at support.jadens.com
77
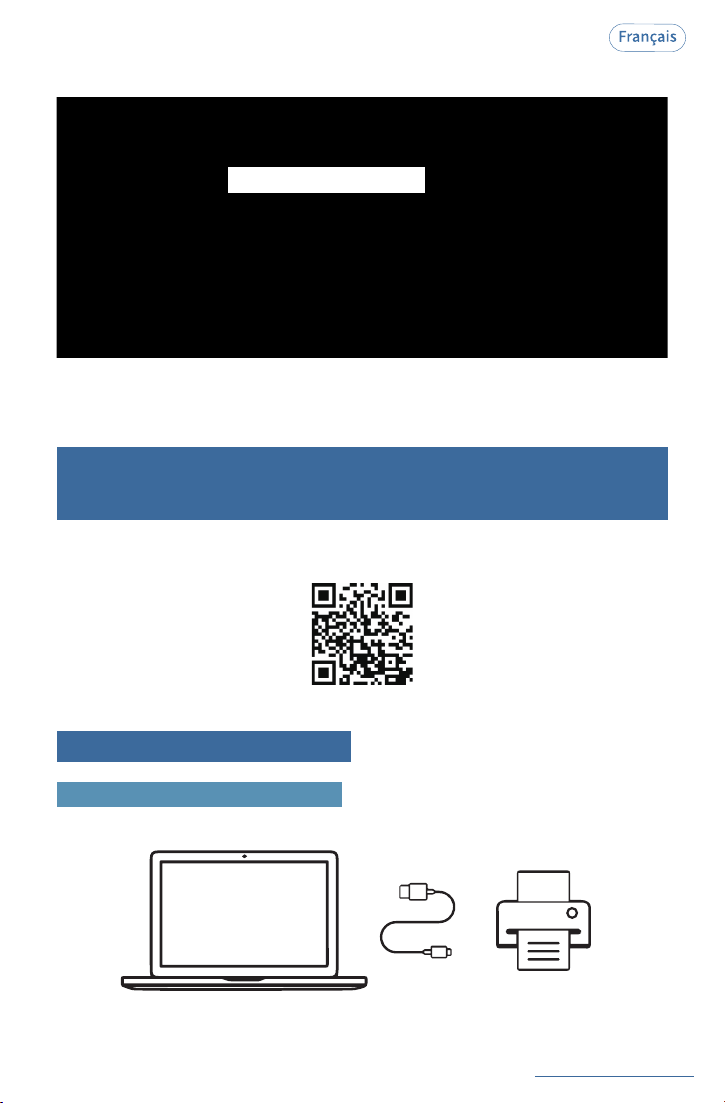
2. Choisissez la bonne imprimante et la bonne taille d'étiquette d'impression.
1. Choisissez le format de papier, la densité et la vitesse les plus courants dans les paramètres de
l'imprimante.
Conseils de pro pour les préréglages:
2. Cliquez sur ‘Paramètres par défaut' > ‘Définir les paramètres actuels comme préréglages’.
JADENS JD-568P
JADENS JD-568P
See FAQ at support.jadens.com
78
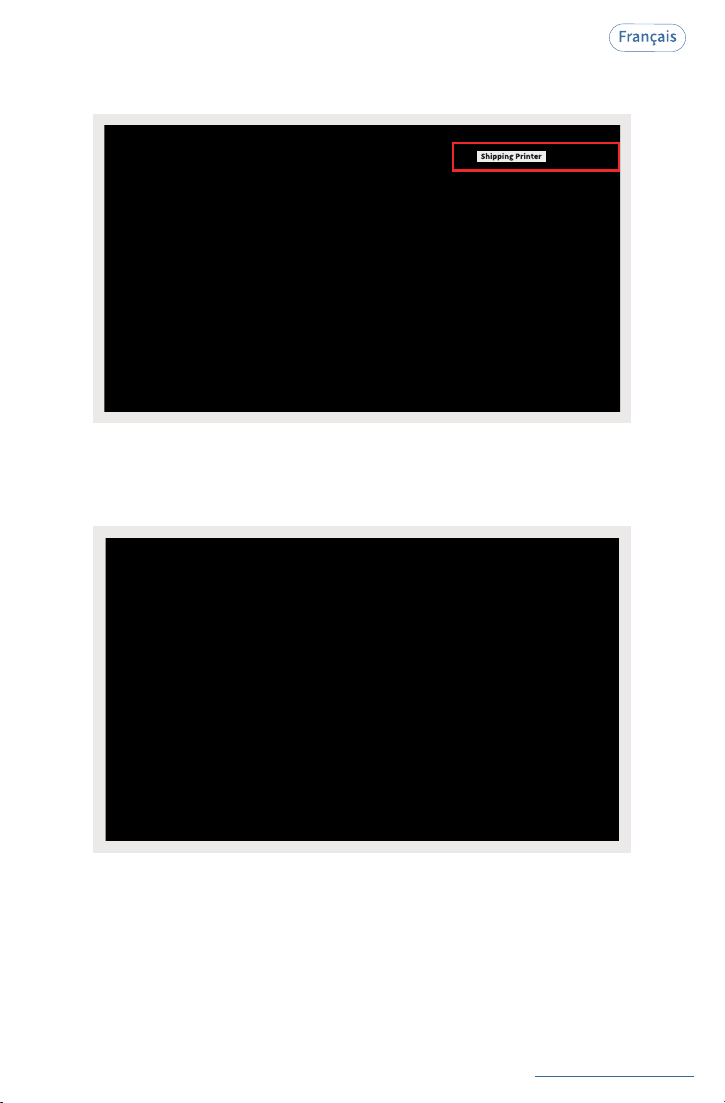
3.Saisissez le nom du préréglage et choisissez sa plage d'application.
La prochaine fois, vous pourrez sélectionner directement "Paramètre par défaut" pour activer les
préréglages.
Scannez le code QR ci-dessous pour visionner le guide vidéo.
9. Installation de l'extension et configuration
de l'imprimante pour ChromeOS Systems
Étape 1: Installer les extensions
①
Connectez l'imprimante à votre Chromebook à l'aide du câble USB fourni et allumez-la.
Connexion filaire par câble USB
JADENS JD-568P
See FAQ at support.jadens.com
79
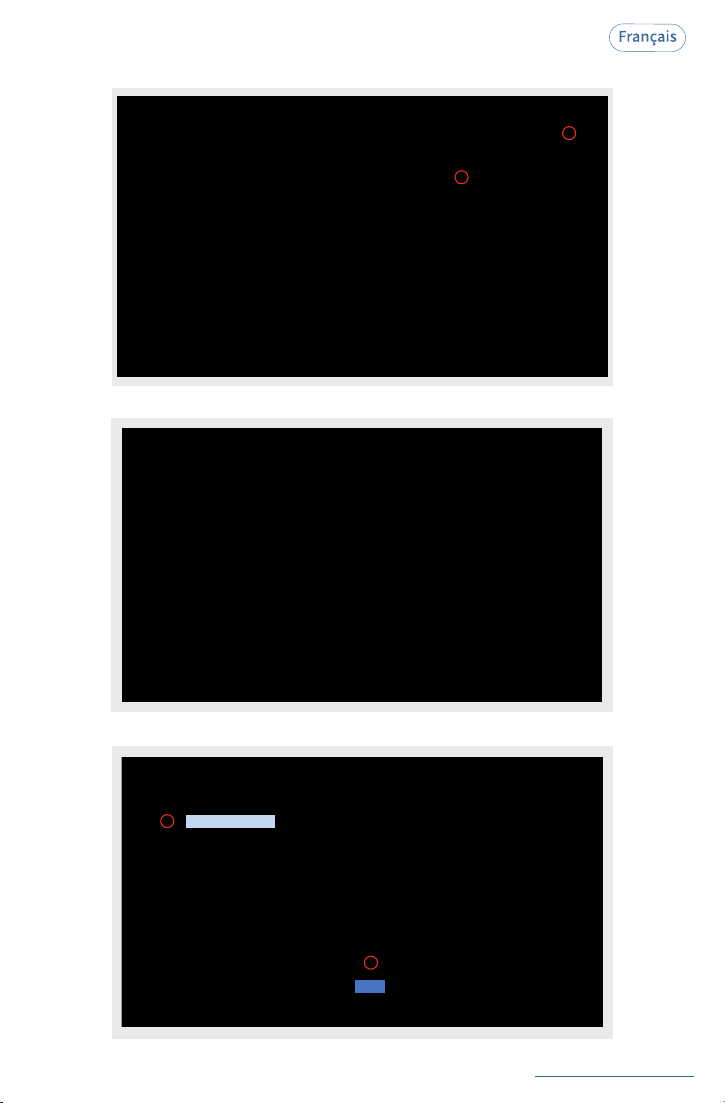
Recherchez "Shipping Printer" sur le Chrome Web Store : https://chromewebstore.google.
com/.
②
Téléchargez l'extension "Shipping Printer" sur votre Chrome.
③
See FAQ at support.jadens.com
80
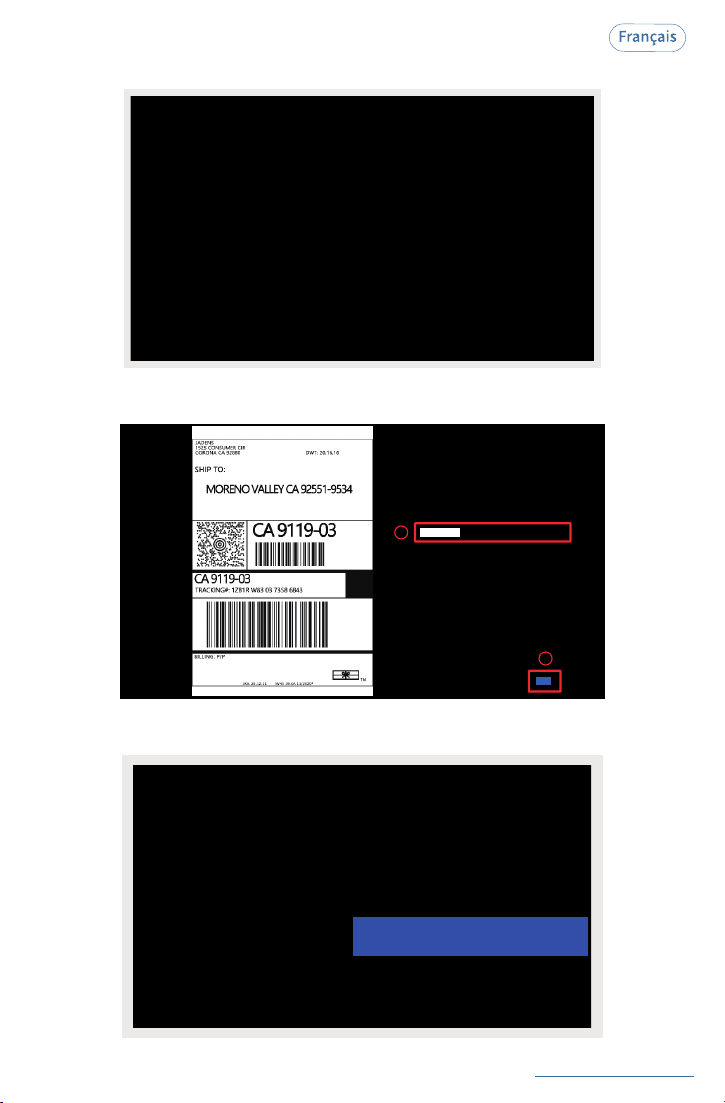
Cliquez sur l'icône d'extension pour sélectionner "Shipping Printer".
2
1
④
Cliquez sur l'icône "Connexion".
⑤
Choisissez l'imprimante à connecter.
1
2
Printer-Paired
Connect
⑥
See FAQ at support.jadens.com
81
Ouvrez le fichier à imprimer et cliquez sur l'icône d'impression.
⑦
1
2
More settings
Print
⑧
Retournez à la page de configuration de l'extension " Étiquette d'expédition".
L'imprimante imprimera alors l'étiquette.
Après avoir cliqué sur le bouton "Imprimer",
retournez à la page de configuration.
L'imprimante imprimera alors l'étiquette.
Cliquez sur "Plus de paramètres" pour sélectionner le format de papier et le nombre de
copies souhaités, puis cliquez sur "Imprimer".
⑨

See FAQ at support.jadens.com
82
10. Note importante : Pour imprimer des
étiquettes de tailles différentes, utilisez la
fonction "Capture d'écran"
Si le format PDF ou de fichier imprimé a une taille inhabituelle, telle que A4, pour laquelle aucun
format d'étiquette approprié n'est disponible, vous devrez utiliser la fonction "Capture d'écran"
pour imprimer.
a. Ouvrez le PDF dans Adobe Reader.
b. Dans le menu supérieur, sélectionnez "Édition" > "Capture d'écran". Choisissez la zone que
vous souhaitez imprimer.
Cliquez sur "Imprimer", réglez la taille de la page sur la même taille que celle des étiquettes que
vous avez chargées, puis cliquez sur "Imprimer".
Veuillez vous assurer que la taille de la page correspond à la taille de l'
étiquette chargée. Sinon, il existe un risque que le résultat d'impression
dépasse les dimensions de l'étiquette ou ne soit pas correctement aligné.
Hinweis:
(1).Pour Windows:
JD-568P Properties
JD-568P

See FAQ at support.jadens.com
83
b. Dans le menu supérieur, sélectionnez "Affichage" > "Rotation" > "Dans le sens des aiguilles d'
une montre" pour aligner les étiquettes côte à côte. (Si les étiquettes sont déjà alignées
verticalement, vous pouvez ignorer cette étape).
(2)Pour MAC:
a. Dans le coin supérieur gauche de votre bureau, recherchez l'option "Fichier" > Cliquez sur
"Ouvrir" > Cliquez sur "Bureau" > Sélectionnez le fichier PDF (ou ouvrez le fichier avec Adobe).
See FAQ at
support.jadens.com
84
11.Foire aux questions
Consultez la FAQ sur support.jadens.com.
c. Ensuite, dans le menu supérieur, sélectionnez "Édition" > "Capture d'écran". Cliquez et faites
glisser sur l'une des étiquettes que vous souhaitez pour sélectionner une zone spécifique de l'
étiquette que vous souhaitez imprimer.
Si vous souhaitez imprimer l'étiquette avec un code-barres, veuillez vous assurer que le code-
barres est imprimé verticalement pour éviter que la température élevée ne bloque le code-barres
et ne puisse pas être scannée.
See FAQ at support.jadens.com
85
13.Suppression du pilote d'imprimante
Ouvrez à nouveau le pilote et suivez les étapes suivantes pour désinstaller le pilote.
Cliquez sur "Préférences Système" > "Imprimantes et Scanners", cliquez sur "JADENS JD-568P" >
"-", puis sélectionnez "Supprimer l'imprimante".
568P
JD
the printer “JADENS JD-
568P”
?
568P
568P
JADENS JD
En cas de bourrage papier, éteignez l'imprimante et laissez refroidir la tête d'impression. Ouvrez le
capot et retirez le papier coincé. Si le rouleau en caoutchouc est sale, nettoyez-le avec un tampon
imbibé d'alcool. Laissez sécher la zone avant de rallumer l'imprimante.
1. Comment gérer un bourrage papier?
À chaque changement d'étiquette, lancez l'identification automatique des étiquettes pour garantir
une impression centralisée ; appuyez brièvement deux fois sur le bouton d'alimentation pour
calibrer le papier.
2. L'imprimante n'imprime pas de manière centralisée.
(1) Poussière ou adhésif sur la tête d'impression. Veuillez essayer de nettoyer la tête d'impression
avec un chiffon propre imbibé d'alcool. Pour plus de détails, reportez-vous à la section.
(2) La tête d'impression et le rouleau doivent être nettoyés après une période d'utilisation dans le
cadre de l'entretien de routine.
3. L'impression est floue ou floue.
Pour Windows:
Pour Mac:
12.Dépannage
See FAQ at support.jadens.com
86
14.Maintenance
La tête d'impression est une pièce sensible de l'imprimante et se trouve sur la partie supérieure de
l'imprimante lorsqu'elle est ouverte.
Attention : la tête d'impression peut être chaude lorsque l'imprimante est en marche!
Doigts brûlés lors de la manipulation de la tête d'impression.
Attendez 2 à 5 minutes. minutes pour le refroidir après l'avoir éteint avant de
manipuler la tête d'impression.
1. Évitez d'utiliser des étiquettes thermiques de mauvaise qualité, car
elles pourraient réduire la durée de vie de la tête d'impression.
Le rouleau en caoutchouc facilite le déplacement du papier dans le mécanisme d'impression. Avec
le temps, les rouleaux de l'imprimante peuvent accumuler de la poussière et des résidus de papier.
Assurez-vous que l'interrupteur est sur OFF, débranchez le cordon d'alimentation et ouvrez le
capot. Assurez-vous que la tête d'impression/le rouleau en caoutchouc refroidissent.
Nettoyez complètement la tête d'impression/le rouleau en caoutchouc à l'aide d'un tampon
imbibé d'alcool. N'importe quel tampon imbibé d'alcool isopropylique à 70 % fera l'affaire.
N'utilisez pas d'eau.
Attendez 2 à 3 minutes que l'alcool soit complètement sec, puis refermez le capot.
Branchez le cordon d'alimentation et imprimez une page de test pour vérifier la propreté.
2. NETTOYAGE DE LA TÊTE D'IMPRESSION/ROULEAU EN CAOUTCHOUC
Tête d'impression
Rouleau en caoutchouc
See FAQ at support.jadens.com
87
- Ne pliez pas excessivement le cordon d'alimentation et ne placez pas d'objets dessus. Cela
pourrait provoquer un incendie !
- Gardez l'imprimante hors de portée des enfants.
- Utilisez uniquement des accessoires approuvés et n'essayez pas de démonter ou de réparer
l'appareil vous-même.
- Tenez l'imprimante à l'écart de l'eau et de tout autre objet susceptible de la détruire ou de
l'endommager.
- L'imprimante doit rester débranchée en cas de non-utilisation prolongée.
16.Spécifications
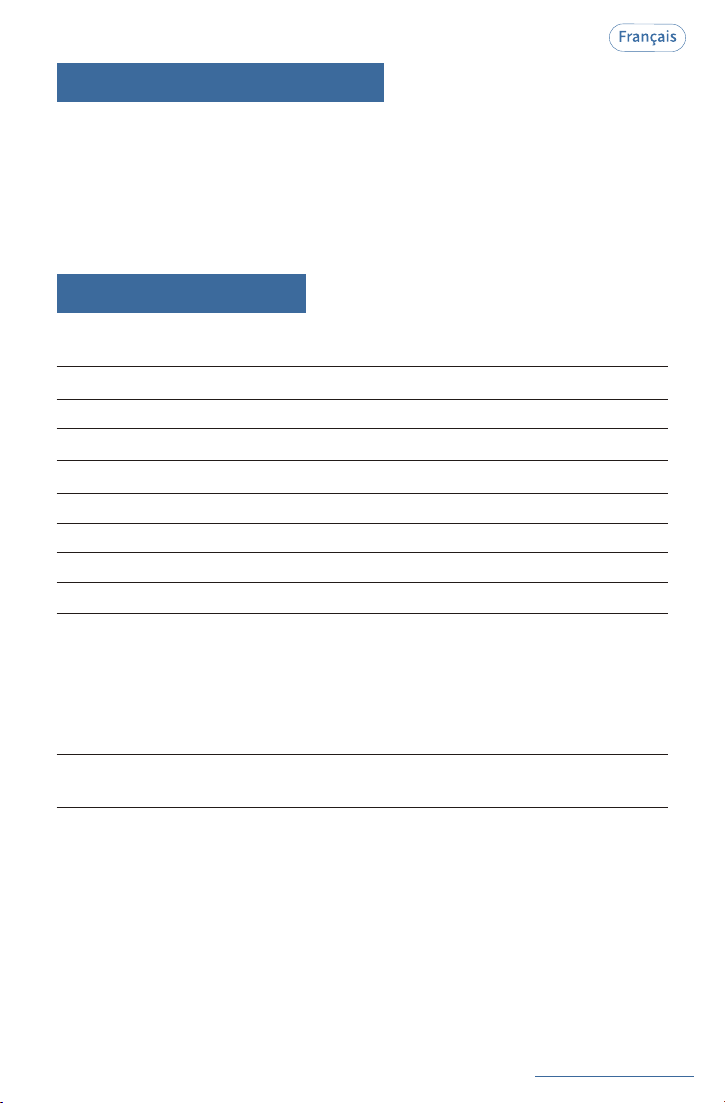
15.Conseils de sécurité
Méthode d'impressionThermique
Résolution 203 DPI
Vitesse d'impression maximale50 mm/s
Largeur de l'étiquette1"-4.3"(25.4-109 mm)
Épaisseur de l'étiquette0.08‒0.2 mm
Connexion USB, Bluetooth
Tension d'entrée5 V / 2 A
Capacité de la batterie2600 mAh
Étiquettes thermiquesÉtiquettes/papier thermiques directs
Systèmes d'exploitation compatibles
Durée d'impression
4"x6": environ 328 000 étiquettes
2"x1": environ 1 968 000 étiquettes
Nombre minimal d'étiquettes Longueur
Connexion Bluetooth :
iOS, iPadOS, Android, Windows 7
ou version ultérieure
Connexion USB :
MacOS V10.9 ou version ultérieure, ChromeOS,
Windows 7 ou version ultérieure
0.39" (10 mm)

FCC Caution:
FCC Radiation Exposure Statement:
Any Changes or modifications not expressly approved by the party responsible
for compliance could void the user's authority to operate the equipment.
This device complies with part 15 of the FCC Rules. Operation is subject to the
following two conditions: (1) This device may not cause harmful interference,
and (2) this device must accept any interference received, including interference
that may cause undesired operation.
IMPORTANT NOTE:
Note: This equipment has been tested and found to comply with the limits for a
Class B digital device, pursuant to part 15 of the FCC Rules. These limits are
designed to provide reasonable protection against harmful interference in a
residential installation. This equipment generates, uses and can radiate radio
frequency energy and, if not installed and used in accordance with the instructions,
may cause harmful interference to radio communications. However, there is no
guarantee that interference will not occur in a particular installation. If this
equipment does cause harmful interference to radio or television reception, which
can be determined by turning the equipment off and on, the user is encouraged to
try to correct the interference by one or more of the following measures:
—Reorient or relocate the receiving antenna.
—Increase the separation between the equipment and receiver.
—Connect the equipment into an outlet on a circuit different from that to which the
receiver is connected.
—Consult the dealer or an experienced radio/TV technician for help.
This equipment complies with FCC radiation exposure limits set forth for an
uncontrolled environment. This equipment should be installed and operated with
minimum distance 20cm between the radiator& your body.
ISED Warning
This device complies with Inovation, Science,and Economic Development
Canada licence-exempt RSS standard(s). Operation is subject to the following
two conditions:
(1) this device may not cause interference, and
(2) this device must accept any interference, including interference that may
cause undesired operation of the device.
Le présent appareil est conforme aux CNR d' Imnovation, Sciences et
Développement économique Canada applicables aux appareils radio exempts
de licence. L'exploitation est autorisée aux deux conditions suivantes:
(1)l'appareil nedoit pas produire de brouillage, et
(2)l'utilisateur de l'appareil doit accepter tout brouillage radioélectrique subi,
méme si le brouillage est susceptible d'en compromettre le fonctionnement.
The device is compliance with RF exposure guidelines, users can obtain Canadian
information on RF exposure and compliance.The minimum distance from body
to use the device is 20cm.
Le présent appareil est conforme Après examen de ce matériel aux conformité
ou aux limites d'intensité de champ RF, les utilisateurs peuvent sur l'exposition
aux radiofréquences et la conformité and compliance d'acquérir les informations
correspondantes. La distance minimale du corps à utiliser le dispositif est de 20cm.
FCC ID: 2BDL3-MC240
The crossed-out wheeled bin symbol indicates that the item should be disposed of
separately from household waste. This product complies with the 3R principles of the
EU WEEE Directive (recyclable, reused, recycled), The item should be handed in for
recycling in accordance with local environmental regulations for waste disposal. By separating
a marked item from household waste, you will help reduce the volume of waste sent to
incinerators or land-fill and minimize any potential negative impact on human health and the
environment. For more information, please contact us.
Das Symbol mit der durchgestrichenen Abfalltonne bedeutet, dass das Produkt getrennt
vom Haushaltsabfall entsorgt werden muss. Das Produkt muss gem. der örtlichen
Entsorgungsvorschriften der Wiederverwertung zugeführt werden. Durch separate
Entsorgung des Produkts trägst du zur Minderung des Verbrennungs- oder Deponieabfalls bei
und reduzierst eventuelle negative Einwirkungen auf die menschliche Gesundheit und die
Umwelt. Für weitere Informationen kontaktieren Sie uns bitte.
Le pictogramme de la poubelle barrée indique que le produit doit faire l'objet d'un tri.
Il doit être recyclé conformément à la réglementation environnementale locale en
matière de déchets. En triant les produits portant ce pictogramme, vous contribuez à
réduire le volume des déchets incinérés
ou enfouis, et à diminuer tout impact négatif sur la
santé humaine et l'environnement. Pour plus d'informations, veuillez nous contacter.