
X2 Smart Remote
Ⅰ Wake Up Your Remote
Ⅱ Getting Started with Your Sofabaton X2
Ⅲ Understanding Your IR Control Options
Ⅳ Positioning Guidelines for the X2-Hub
Ⅴ Support
Ⅵ Downloading the Sofabaton App
Ⅹ Manage Input Sources
Ⅺ Creating an Activity
Ⅻ Smart Ecosystem Compatible
XⅢ Specifications and Performance
Ⅱ Getting Started with Your Sofabaton X2
To ensure reliable IR control, choose the best placement for your
environment.
1. Hub Placement in an Open Location (Recommended)
This setup provides the best performance for the Hub's powerful,
multi-directional IR signals.
2. Hub Placement Inside an Enclosure
When placing the Hub inside a cabinet or other enclosure:
1. Access Video Tutorials
You can scan the QR code or visit our website directly to
watch video tutorials:
https://sofabaton.com/video_tutorial.html
3.
Contact Our Support Team
Ⅶ Setup New Hub
1. Prepare Your App
Login or create an account in the Sofabaton app
Select X Series --> Setup New Hub
Note: Your phone needs to have Bluetooth enabled and be
connected to a 2.4GHz Wi-Fi network (not 5GHz).
2. Hub Connecting
Connect the included power adapter to the Sofabaton Hub and
plug it into a power outlet.
Note: Use only the official 5V/2A power adapter to prevent
voltage mismatch.
a. Plug in the Power Cable
Entering Pairing Mode:
Press and hold the Hub's button for 3 seconds (the Blue LED
should blink).
b.
c.
App Connection & Network Setup
Select the detected Hub from the list in the app.
Choose the 2.4GHz Wi-Fi network (this must be the same network
your phone is currently connected to).
Enter the Wi-Fi password and confirm.
Note: The Wi-Fi verification process requires cloud access. If there is
no internet connection, verification may fail.
d. App Connects to Hub, Ready to Add Devices
If the Hub completes network setup, but the app cannot connect to
the Hub, please troubleshoot as follows:
Use the same 2.4GHz Wi-Fi – Ensure both the Hub and your
phone are connected to the same 2.4Ghz Wi-Fi network and
subnet.
Retry Hub Setup – Attempt to run the "Setup New Hub" process
within the app again.
Disable VPN – Active VPNs can block Hub detection. Turn off
VPN, then restart Wi-Fi and the app.
Ⅷ Adding Devices
Launch the Sofabaton app & go to the Devices page.
Tap the“+” icon to add new devices.
Select the control type of your device
1. Add IR Device
Standard Setup
Search by Brand & Model to load the correct IR codes. Navigate to:
App > Devices > Add > Infrared > Search in the database
a.
b. Alternative Methods (If device not found)
2. Add Bluetooth Device
Search by Brand and download the required Bluetooth control
profile
Confirm pairing on the device itself.Confirm pairing on the device itself.
Example (Apple TV):
Go to Apple TV Settings → Remotes and Devices →Bluetooth. Select
the device named “Sofabaton_XXX” from the list to complete
pairing.
3. Add WiFi Control Service
The app will automatically scan for compatible devices on the
same 2.4GHz Wi-Fi network.
Currently Supported Brands:
Roku, Sonos, Philips Hue (please check app for the latest list)
Firstly, configure the MQTT Broker information in the Hub
settings within the Sofabaton app. This enables communication
between the Hub and your Home Assistant system.
Than, add a virtual remote in the Sofabaton app for controlling
Home Assistant.
Finally, in Home Assistant, set up automations to listen for MQTT
commands from this virtual remote to trigger your desired
automation functions.
Directly add a virtual device in the Sofabaton app for IP control.
Each command requires individual setup of the URL and Request
Method (e.g., GET, POST).
4. Add RF433/RF315 Device
You can add RF433 or RF315 devices using the learning mode.
Note:
If you don't know your device's RF type, check the back of your
RF remote or inside the battery compartment for a label
indicating the operating frequency (e.g., "433 MHz" or "315
MHz").
Learning encrypted RF commands or a rolling code is not
supported.
Ⅸ Power On/Off Setup
1. Default Settings
For most devices, the default power commands work perfectly.
However, we highly recommend you use the "Test" button to
verify they control your device correctly. This is crucial for
reliable Activities later on
2. Custom Power Sequences
A long-press to turn on/off
If your device requires:
Multi-step commands (e.g., press "Power" then "OK")→
3. Startup Delays
For TVs or projectors with a slow startup:
a. Navigate to the device’s Turn On Settings.
b. Add a delay that is longer than the device’s boot time.
Why? This prevents missed commands (e.g., input switching) during
Activity startup.
Ⅹ Manage Input Sources
Note: Proper source configuration is essential for Activities to switch
inputs correctly (e.g., on your TV or AV Receiver).
1. Devices Requiring Setup
This settings is needed for equipment with multiple inputs (e.g.,
TV HDMI ports, AV Receiver inputs).
2. Select the Input Switching Mode:
Direct Input Switching Mode
If your device supports specific commands to go directly to each
input (e.g., a unique command for "HDMI 1," another for "HDMI
2"), the system will suggest using Direct Input Switching Mode
Note: If Direct Input Switching Mode is suggested, it's generally
the fastest and most reliable option. We recommend choosing it.
Alternative Switching Modes
If your remote doesn't have dedicated buttons for each input
(like 'HDMI 1'), you will need to set up how the Hub controls
your input menu.
This usually involves one of two methods:
Menu Navigation: Teach the Hub how to open the on-screen
menu ( Bring Up the Navigation Menu), then use arrow, number,
or input keys to select a source.
Input Cycling: Teaching the Hub which single button (e.g.,'Source')
to press repeatedly to cycle through inputs.
3. Source List / Input Menu Configuration
This is a critical step for accurate input switching, especially when
switching input by Bring Up the Navigation Menu or Input
Toggling / Cycling.
Match the Device's Menu Order: The list of input sources you
create in the Sofabaton app must exactly match the order they
appear on your actual device's input selection screen (the menu
you see when you press the "Input" or "Source" button on your
original remote).
Example: If your TV's input menu show
HDMI 1
HDMI 2
AV
DVD
You must enter them in this exact sequence in the Sofabaton app.
Note: An incorrect order or mismatched names will cause errors
when Activities try to switch inputs.
Ⅺ Creating an Activity
1.
Open the App
Launch the app and navigate to the Activities section.
2. Start a New Activity
Tap the "+" icon to create a new Activity.
3. Choose a Suggested Activity or Customize
The system will display recommended Activities with pre-config-
ured device combinations (e.g., "Watch Satellite TV" = TV +
Set-top Box).
Alternatively, manually choose the devices you want to use for a
custom setup (e.g., TV, Soundbar, Streaming Box, Philips Hue).
4.
Select Inputs
For devices with multiple inputs (e.g., TV HDMI ports, AV Receiver
inputs), select the correct input source (e.g., HDMI 1 for Satellite
TV).
5.
Select the Power Status of Each Device
The system will record the power status of each device to ensure
proper activation/deactivation during Activity switching, prevent-
ing operational conflicts.
6.
Assign Physical Remote Keys
Volume Keys:
Select which device will respond to the physical volume buttons
on your remote (e.g., control TV volume instead of Apple TV
Other Keys:
Select which device will respond to the other physical buttons
(e.g., Streaming Box for menu control).
Further Key Customization:
7.
Complete
Enter an Activity name (e.g., "Watch TV").
Choose an icon from the available options.
8. Modify Activity Startup Commands (Optional)
To customize the Activity further (e.g., automatically switch
to Channel 102 when starting satellite TV):
a.
Navigate to: Activities > [Your Activity Name] > Edit > Startup
Settings.
b.
Add the desired commands (e.g., 1, 0, 2 for Channel 102) after the
TV switches to the correct input.
c.
Add or adjust delays between commands if needed.
Ⅻ Smart Ecosystem Compatibility
1. Connect to Home Assistant (MQTT broker)
To integrate Sofabaton with Home Assistant using MQTT, you first
need to set up an MQTT Broker in your Home Assistant.
Add MQTT Broker to your Home Assistant system:
a. In Home Assistant, navigate to Settings > Add-ons > Add-on
Store.
b.
Install the Mosquitto broker add-on.
MQTT Broker Setup in Sofabaton app:
a. In the Sofabaton app, navigate to: Me > Connect to Home
Assistant (MQTT broker).
b. Use your Home Assistant account credentials to complete the
setup.
Add Sofabaton integration to Home Assistant:
a.
In Home Assistant, navigate to: Settings > Devices & Services.
b. Click "Add Integration," search for, and locate the "Sofabaton
Hub" service, then click to add it.
With this integration, you can control all Sofabaton Activities or
set up automations in Home Assistant to trigger them.
The Sofabaton X2 supports voice control through Amazon Alexa
and Google Assistant to turn your Activities on or off.
Prerequisites
a. A compatible smart speaker (e.g., Echo Dot, Nest Mini)
b. Created Activities in the Sofabaton app
Note: If you need voice control for a specific device function, you
can set it up as a separate Activity.
Setup Instructions
Amazon Alexa
Navigate to: Amazon Alexa app > More+ > Skill & Games >
Search for and enable the "SofaBaton" skill > Log in to your
Sofabaton account to sync Activities.
Google Assistant
Navigate to: Google Home app > Devices > Add Devices > Works
with Google > Search for and select the "Sofabaton" service > Log
in to your Sofabaton account to sync Activities.
Voice Commands
Say:
"Alexa, turn on [Activity Name]" or "Alexa, turn off [Activity Name]"
"Hey Google, turn on [Activity Name]" or "Hey Google, turn off
[Activity Name]"
XⅢ Specifications and Performance
Product name: X2 Smart Remote
Power Input: 5V/2A
Input Port: USB-C
Material: PC + Silicone
X2-Remote
Display: 2.4-inch Color Touchscreen
Battery Type: Li-Polymer
Battery Capacity: 1200mAh
Charging Port: USB-C
Charging Input: 5V/0.5A
Charging Time: Approx. 3 hours
Battery Life: Approx. 30 days
Material: Zinc Alloy, PC + Silicone
X2-Dock
Power Input: 5V/2A
Input Port: USB-C
Material: PC + Silicone
Main Devices
• 1 × X2-Remote
• 1 × X2-Hub
• 1 × Charging Dock
Power & Cables
• 2 × 5V/2A Power Adapters
• 2 × 1.2m USB-C to USB-A Cables
Others
• 1 × 2m 3.5mm IR Blaster (dual emitters)
• 1 × 3m 3.5mm IR Blaster (single emitter)
Off Button: Powers off all active Activities with a single press.
Return key: Returns to the previous menu on the X2-Remote
display (back navigation).
Favorites ( Star) key: Instantly activates Numpad (0-9) for direct
channel input or access to user-defined Favorite and Macro
Other keys: These keys have no default functions and need to be
defined on a device or within an Activity.
Find X2-Remote
Function
Activate Wi-Fi
Pairing Mode
Short press
Action
(on X2-Hub Button)
Press and hold for
3+ seconds
Hub’s Blue LED flashes
continuously for 120
seconds (indicating
pairing/search mode).
Indication(s)
The X2-Remote emits
an alert beep. Press any
key on the X2-Remote
to silence it.
2. LED Indications
WLAN Not Connected
Abnormal Status /
System Error
Status
Blue LED: Solid On
Red LED: Solid On
LED Indication (on X2-Hub)
Green LED: Solid On
Green LED: Briefly Flashes
Command Received
(from App or X2-Remote)
WLAN Connected
1. K
ey Definitions for X2-Hub
Learn from Original Remote –Point your original remote at the
Hub and follow in-app instructions.
Test & Match Codes –Manually test suggested command sets
on your device to find the correct IR code matc
3.
Work with Amazon Alexa & Google Assistant
Package contents:
X2-Hub
http://www.sofabaton.com/
2 3 4 5 6 7 8 10
1 (Cover)
2
9 11 1312
14 15 16
17 18 19 20 21 2322 24 25
26
Step 3: Add Your Devices
Step 4: Complete Required Device Setup
Welcome! This guide provides a quick overview of the main steps
to set up your Sofabaton X2. You will find detailed instructions for
each step in the chapters that follow.
Before you begin, we recommend reading the next two short
chapters to understand your new remote system.
Follow the app's instructions to add your entertainment devices,
like your TV and Cable Box.
After adding a device, you must complete its essential setup
before it can be used in an Activity.
Ⅲ Understanding Your IR Control Options
Step 5: Create Activities
Combine your devices into powerful one-touch Activities, like
"Watch Movie" or "Listen to Music", to control multiple devices at
once.
For detailed steps, please refer to the Guide or Video Tutorials.
Power On/Off Setup: Tell the app exactly how your original
remote turns the device on and off. This is vital for reliable
control.
Manage Input Sources: Set up your device's inputs (like HDMI
1, HDMI 2) for use in activities.
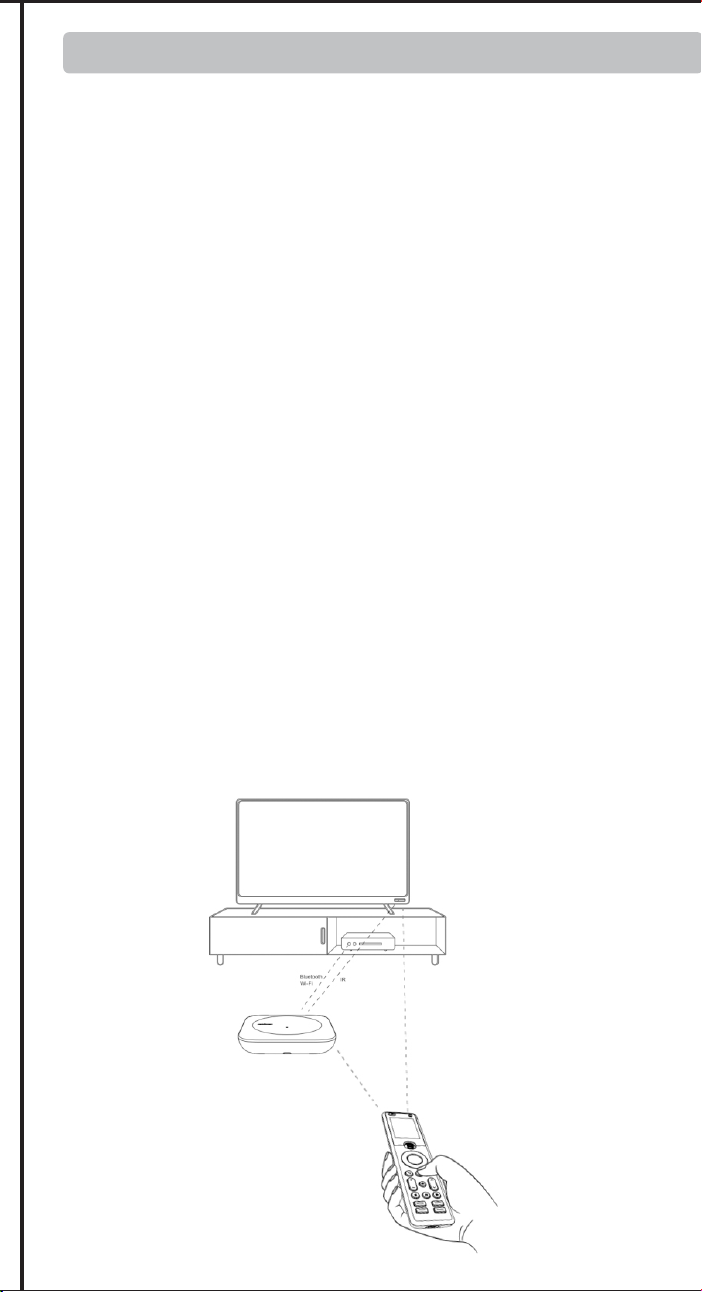
1. Default IR Signals from Hub:
The X2-Hub features powerful, multi-directional IR emitters. By
default, it directly controls devices in its vicinity without needing to
be aimed precisely. This is the recommended default method for
effortless control.
Important Tip: The Hub sends signals forwards and upwards in a
360° pattern, but not downwards. For best results, place the Hub
on an open shelf with a clear line of sight to your devices,
preferably not above them.
2.
Control from the Physical Remote
If the Hub's signal is obstructed or you prefer traditional aiming,
you can enable the IR emitter on the physical remote via the app.
This allows for direct, line-of-sight control.
3. Extending Range with an IR Repeater
For devices in other rooms or cabinets far from the Hub, you can
use an IR Repeater R1 (sold separately). This device amplifies and
relays the Hub's commands to hard-to-reach equipment.
Ⅳ Positioning Guidelines for the X2-Hub
Placement:
Position the X2-Hub on top of your cabinet or on a large, open
shelf, ensuring it is unobstructed.
Controlling Hidden Devices:
To control devices that are inside a cabinet, box, or behind a
door, connect the included wired IR blaster. Aim its emitter
head directly at each device's IR sensor.
For devices also inside the enclosure:
The Hub can typically control these directly with its own
powerful IR signal.
For devices outside the enclosure:
You must use the included IR blaster. Run the blaster's cable
outside and aim the emitter head at each external device (e.g.,
your TV, soundbar).
3. Advanced Solutions & Alternatives
Consider these options for difficult setups.
Using the Remote's Built-in IR:
If the Hub’s placement makes it ineffective for a specific
device (like a TV off to the side), you can enable the remote's
own IR emitter in the app settings. This allows for traditional,
direct line-of-sight control using the remote itself.
Extending Signal Range:
If the Hub's signal or the IR blaster's cable can't reach a device,
use an R1 IR Repeater (sold separately) to amplify and relay the
commands over a longer distance.
First, download the Sofabaton app and connect your X2-Hub.
(See Chapter Ⅵ & Ⅶ for details)
IR Control Options: Learn how your system sends commands.
Position Hub: Find the best location for your Hub to ensure a
strong signal.
Improve Hub Placement – Move the Hub closer to your Wi-Fi
router. If the Hub is placed inside a cabinet, take it out and move
Hub closer to the router to increase the network signal. Relaunch
the app to try again.
Avoid guest networks – Hub connection issues may occur if
linked to an isolated guest network.
Simplify Your Network – If you have Wi-Fi extenders or
secondary routers, temporarily power off the secondary ones,
leaving only the main router on. Move the Hub close to the main
router and retry the setup new hub process.
Try a Different Mobile Device – Install the app on a second
phone or tablet and attempt the setup. This can help identify if
the issue is with the original device.
3.1 Add WiFi Control Device
3.2 Add Home Assistant Remote
3.3 IP Control
Tip:
The X2 supports two Bluetooth modes: BLE (recommended) and BT.
We strongly recommend using BLE whenever possible. The X2 can
connect to three BLE devices simultaneously, offering instant
response times.
If your device cannot connect to "BLE-Sofabaton," try the BT mode
instead. Please note that the X2 can only connect to one BT device at
a time, and switching between BT devices may cause a slight delay
as it disconnects from one before connecting to the next.
2.
User Guide and FAQ
Ⅵ
Downloading the Sofabaton App
Download the Sofabaton app by scanning the QR code below
or by searching "Sofabaton" in your app store.
4. When to Configure "Idle Behavior"
"Idle Behavior" is an advanced setting that controls what a device
does when you switch from an activity that uses it to one that
doesn't.
For most devices, the default setting (Turn off when not in use)
works perfectly. However, you might need to change this for specific
devices to improve your experience.
Stay on when switching activities:Use for devices like HVAC
controllers or smart lighting that should only be turned off when you
shut down the whole system, not during simple activity changes.
Always On: Use this if you don't want the system to control this
device's power automatically.
For advanced key customization (e.g., assigning specific
commands to buttons), you can modify these settings later.
Navigate to: Activities > [Your Activity Name] > Edit >
Customize Remote Buttons
9. Advance Settings
Macro & Favorite Keys: If the physical keys on your remote aren't
enough, you can create macros and select favorite keys in the app.
These will appear as soft keys on your remote's screen.
To access these settings, navigate to: Activities > [Your Activity Name]
> Edit > Macro & Favorite Keys.
Once the activity is active, you can quickly access them by tapping
the Favorites key (Star icon ) at the bottom of the screen.
2.
Add a Home Assistant Remote
You can add a special "Home Assistant Remote" to your
Sofabaton app. This allows you to use any button on your X2
remote to directly trigger automations and control devices within
your Home Assistant system.
For example, you can assign a button on your X2 remote to run
your "Movie Night" scene in Home Assistant.
Step 1. In the Sofabaton App: Add the "Home Assistant Remote"
from the Wi-Fi Control Service list and create custom command
names (e.g., "toggle_lights").
Step 2. In Home Assistant: Create a new automation that uses an
MQTT message as a trigger.
Step 3. Link Them: In your HA automation, use the exact command
name you created in the Sofabaton app as the MQTT payload.
Setup Overview:
The setup process involves three main steps:
4.
Matter Fuction
FCC Warning
This device complies with Part 15 of the FCC Rules. Operation is
subject to the following two conditions:
(1) This device may not cause harmful interference, and (2) this
device must accept any interference received, including
interference that may cause undesired operation.
NOTE 1: This equipment has been tested and found to comply
with the limits for a Class B digital device, pursuant to part 15 of
the FCC Rules. These limits are designed to provide reasonable
protection against harmful interference in a residential
installation. This equipment generates, uses and can radiate radio
frequency energy and, if not installed and used in accordance
with the instructions, may cause harmful interference to radio
communications. However, there is no guarantee that interference
will not occur in a particular installation. If this equipment does
cause harmful interference to radio or television reception, which
can be determined by turning the equipment off and on, the user
is encouraged to try to correct the interference by one or more of
the following measures:
- Reorient or relocate the receiving antenna.
- Increase the separation between the equipment and receiver.
-Connect the equipment into an outlet on a circuit different from
that to which the receiver is connected.
-Consult the dealer or an experienced radio/TV technician for
help.
NOTE 2: Any changes or modifications to this unit not expressly
approved by the party responsible for compliance could void the
user's authority to operate the equipment.
The device has been evaluated to meet general RF exposure
requirement. The device can be used in portable exposure
condition without restriction.
IC Caution:
This device complies with Industry Canada’s license-exempt RSSs.
Operation is subject to the following two conditions:
(1) This device may not cause interference; and
(2) This device must accept any interference, including
interference that may cause undesired operation of the device.”
« Le présent appareil est conforme aux CNR d'Industrie Canada
applicables aux appareils radio exempts de licence.
L'exploitation est autorisée aux deux conditions suivantes : (1)
l'appareil ne doit pas produire de brouillage, et
(2) l'utilisateur de l'appareil doit accepter tout brouillage
radioelectrique subi, meme sile brouillage est susceptible
d'en compromettre le fonctionnement. »
The device has been evaluated to meet general RF exposure
requirement. The device can be used in portable exposure
condition without restriction.
L’appareil a été évalué pour répondre aux exigences générales en
matière d’exposition aux RF. L’appareil peut être utilisé en
condition d’exposition portable sans restriction.
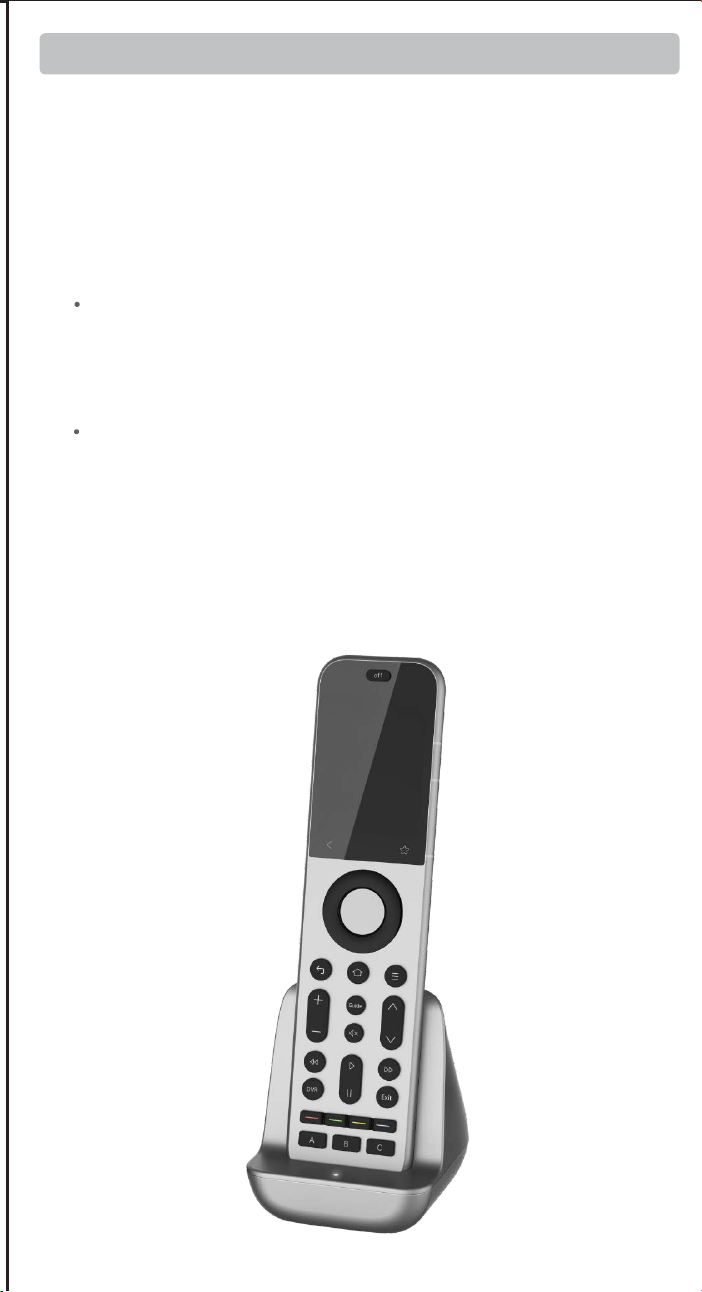
For safety during transport, your remote arrives in a low-power
"Shipping Mode". You must activate it before your first use.
To do this, simply connect the remote to a standard 5V USB power
source using one of the following methods:
Via Charging Dock:
Place the remote onto the charging dock. Make sure the dock
itself is connected to power.
Via USB-C Cable:
Plug the included USB-A to USB-C cable directly into the port
at the bottom of the remote.
⚠ Important:
USB-C to USB-C cables and chargers are not supported.
Ⅰ Wake Up Your Remote
Ⅴ Support
Ⅶ Setup New Hub
Ⅷ Adding Devices
Ⅸ Power On/Off Setup
1 × Reset pin
•
Reset port: Insert the included pin and press and hold for over 8
seconds to factory reset your remote.
Full Matter support for your X2 is coming via a free firmware update,
pending final compatibility approval from major smart home platforms.
Find step-by-step guides and answers on our website. We
refresh them often!
•
•
▲ (Temporary until Q2 2026)
Main Website: https://www.sofabaton.com/
X2 Resources: https://www.sofabatonx.com/
You have to change the default settings in the "Power On/Off
Setup" to modify the command action to press and hold, or add
adictional custom steps.
IR blaster
IR blaster
Step 1: Understand Your Hardware
Step 2: Connect Your Hub
X2 Smart Remote
Ⅰ Wake Up Your Remote
Ⅱ Getting Started with Your Sofabaton X2
Ⅲ Understanding Your IR Control Options
Ⅳ Positioning Guidelines for the X2-Hub
Ⅴ Support
Ⅵ Downloading the Sofabaton App
Ⅹ Manage Input Sources
Ⅺ Creating an Activity
Ⅻ Smart Ecosystem Compatible
XⅢ Specifications and Performance
Ⅱ Getting Started with Your Sofabaton X2
To ensure reliable IR control, choose the best placement for your
environment.
1. Hub Placement in an Open Location (Recommended)
This setup provides the best performance for the Hub's powerful,
multi-directional IR signals.
2. Hub Placement Inside an Enclosure
When placing the Hub inside a cabinet or other enclosure:
1. Access Video Tutorials
You can scan the QR code or visit our website directly to
watch video tutorials:
https://sofabaton.com/video_tutorial.html
3.
Contact Our Support Team
Ⅶ Setup New Hub
1. Prepare Your App
Login or create an account in the Sofabaton app
Select X Series --> Setup New Hub
Note: Your phone needs to have Bluetooth enabled and be
connected to a 2.4GHz Wi-Fi network (not 5GHz).
2. Hub Connecting
Connect the included power adapter to the Sofabaton Hub and
plug it into a power outlet.
Note: Use only the official 5V/2A power adapter to prevent
voltage mismatch.
a. Plug in the Power Cable
Entering Pairing Mode:
Press and hold the Hub's button for 3 seconds (the Blue LED
should blink).
b.
c.
App Connection & Network Setup
Select the detected Hub from the list in the app.
Choose the 2.4GHz Wi-Fi network (this must be the same network
your phone is currently connected to).
Enter the Wi-Fi password and confirm.
Note: The Wi-Fi verification process requires cloud access. If there is
no internet connection, verification may fail.
d. App Connects to Hub, Ready to Add Devices
If the Hub completes network setup, but the app cannot connect to
the Hub, please troubleshoot as follows:
Use the same 2.4GHz Wi-Fi – Ensure both the Hub and your
phone are connected to the same 2.4Ghz Wi-Fi network and
subnet.
Retry Hub Setup – Attempt to run the "Setup New Hub" process
within the app again.
Disable VPN – Active VPNs can block Hub detection. Turn off
VPN, then restart Wi-Fi and the app.
Ⅷ Adding Devices
Launch the Sofabaton app & go to the Devices page.
Tap the“+” icon to add new devices.
Select the control type of your device
1. Add IR Device
Standard Setup
Search by Brand & Model to load the correct IR codes. Navigate to:
App > Devices > Add > Infrared > Search in the database
a.
b. Alternative Methods (If device not found)
2. Add Bluetooth Device
Search by Brand and download the required Bluetooth control
profile
Confirm pairing on the device itself.Confirm pairing on the device itself.
Example (Apple TV):
Go to Apple TV Settings → Remotes and Devices →Bluetooth. Select
the device named “Sofabaton_XXX” from the list to complete
pairing.
3. Add WiFi Control Service
The app will automatically scan for compatible devices on the
same 2.4GHz Wi-Fi network.
Currently Supported Brands:
Roku, Sonos, Philips Hue (please check app for the latest list)
Firstly, configure the MQTT Broker information in the Hub
settings within the Sofabaton app. This enables communication
between the Hub and your Home Assistant system.
Than, add a virtual remote in the Sofabaton app for controlling
Home Assistant.
Finally, in Home Assistant, set up automations to listen for MQTT
commands from this virtual remote to trigger your desired
automation functions.
Directly add a virtual device in the Sofabaton app for IP control.
Each command requires individual setup of the URL and Request
Method (e.g., GET, POST).
4. Add RF433/RF315 Device
You can add RF433 or RF315 devices using the learning mode.
Note:
If you don't know your device's RF type, check the back of your
RF remote or inside the battery compartment for a label
indicating the operating frequency (e.g., "433 MHz" or "315
MHz").
Learning encrypted RF commands or a rolling code is not
supported.
Ⅸ Power On/Off Setup
1. Default Settings
For most devices, the default power commands work perfectly.
However, we highly recommend you use the "Test" button to
verify they control your device correctly. This is crucial for
reliable Activities later on
2. Custom Power Sequences
A long-press to turn on/off
If your device requires:
Multi-step commands (e.g., press "Power" then "OK")→
3. Startup Delays
For TVs or projectors with a slow startup:
a. Navigate to the device’s Turn On Settings.
b. Add a delay that is longer than the device’s boot time.
Why? This prevents missed commands (e.g., input switching) during
Activity startup.
Ⅹ Manage Input Sources
Note: Proper source configuration is essential for Activities to switch
inputs correctly (e.g., on your TV or AV Receiver).
1. Devices Requiring Setup
This settings is needed for equipment with multiple inputs (e.g.,
TV HDMI ports, AV Receiver inputs).
2. Select the Input Switching Mode:
Direct Input Switching Mode
If your device supports specific commands to go directly to each
input (e.g., a unique command for "HDMI 1," another for "HDMI
2"), the system will suggest using Direct Input Switching Mode
Note: If Direct Input Switching Mode is suggested, it's generally
the fastest and most reliable option. We recommend choosing it.
Alternative Switching Modes
If your remote doesn't have dedicated buttons for each input
(like 'HDMI 1'), you will need to set up how the Hub controls
your input menu.
This usually involves one of two methods:
Menu Navigation: Teach the Hub how to open the on-screen
menu ( Bring Up the Navigation Menu), then use arrow, number,
or input keys to select a source.
Input Cycling: Teaching the Hub which single button (e.g.,'Source')
to press repeatedly to cycle through inputs.
3. Source List / Input Menu Configuration
This is a critical step for accurate input switching, especially when
switching input by Bring Up the Navigation Menu or Input
Toggling / Cycling.
Match the Device's Menu Order: The list of input sources you
create in the Sofabaton app must exactly match the order they
appear on your actual device's input selection screen (the menu
you see when you press the "Input" or "Source" button on your
original remote).
Example: If your TV's input menu show
HDMI 1
HDMI 2
AV
DVD
You must enter them in this exact sequence in the Sofabaton app.
Note: An incorrect order or mismatched names will cause errors
when Activities try to switch inputs.
Ⅺ Creating an Activity
1.
Open the App
Launch the app and navigate to the Activities section.
2. Start a New Activity
Tap the "+" icon to create a new Activity.
3. Choose a Suggested Activity or Customize
The system will display recommended Activities with pre-config-
ured device combinations (e.g., "Watch Satellite TV" = TV +
Set-top Box).
Alternatively, manually choose the devices you want to use for a
custom setup (e.g., TV, Soundbar, Streaming Box, Philips Hue).
4.
Select Inputs
For devices with multiple inputs (e.g., TV HDMI ports, AV Receiver
inputs), select the correct input source (e.g., HDMI 1 for Satellite
TV).
5.
Select the Power Status of Each Device
The system will record the power status of each device to ensure
proper activation/deactivation during Activity switching, prevent-
ing operational conflicts.
6.
Assign Physical Remote Keys
Volume Keys:
Select which device will respond to the physical volume buttons
on your remote (e.g., control TV volume instead of Apple TV
Other Keys:
Select which device will respond to the other physical buttons
(e.g., Streaming Box for menu control).
Further Key Customization:
7.
Complete
Enter an Activity name (e.g., "Watch TV").
Choose an icon from the available options.
8. Modify Activity Startup Commands (Optional)
To customize the Activity further (e.g., automatically switch
to Channel 102 when starting satellite TV):
a.
Navigate to: Activities > [Your Activity Name] > Edit > Startup
Settings.
b.
Add the desired commands (e.g., 1, 0, 2 for Channel 102) after the
TV switches to the correct input.
c.
Add or adjust delays between commands if needed.
Ⅻ Smart Ecosystem Compatibility
1. Connect to Home Assistant (MQTT broker)
To integrate Sofabaton with Home Assistant using MQTT, you first
need to set up an MQTT Broker in your Home Assistant.
Add MQTT Broker to your Home Assistant system:
a. In Home Assistant, navigate to Settings > Add-ons > Add-on
Store.
b.
Install the Mosquitto broker add-on.
MQTT Broker Setup in Sofabaton app:
a. In the Sofabaton app, navigate to: Me > Connect to Home
Assistant (MQTT broker).
b. Use your Home Assistant account credentials to complete the
setup.
Add Sofabaton integration to Home Assistant:
a.
In Home Assistant, navigate to: Settings > Devices & Services.
b. Click "Add Integration," search for, and locate the "Sofabaton
Hub" service, then click to add it.
With this integration, you can control all Sofabaton Activities or
set up automations in Home Assistant to trigger them.
The Sofabaton X2 supports voice control through Amazon Alexa
and Google Assistant to turn your Activities on or off.
Prerequisites
a. A compatible smart speaker (e.g., Echo Dot, Nest Mini)
b. Created Activities in the Sofabaton app
Note: If you need voice control for a specific device function, you
can set it up as a separate Activity.
Setup Instructions
Amazon Alexa
Navigate to: Amazon Alexa app > More+ > Skill & Games >
Search for and enable the "SofaBaton" skill > Log in to your
Sofabaton account to sync Activities.
Google Assistant
Navigate to: Google Home app > Devices > Add Devices > Works
with Google > Search for and select the "Sofabaton" service > Log
in to your Sofabaton account to sync Activities.
Voice Commands
Say:
"Alexa, turn on [Activity Name]" or "Alexa, turn off [Activity Name]"
"Hey Google, turn on [Activity Name]" or "Hey Google, turn off
[Activity Name]"
XⅢ Specifications and Performance
Product name: X2 Smart Remote
Power Input: 5V/2A
Input Port: USB-C
Material: PC + Silicone
X2-Remote
Display: 2.4-inch Color Touchscreen
Battery Type: Li-Polymer
Battery Capacity: 1200mAh
Charging Port: USB-C
Charging Input: 5V/0.5A
Charging Time: Approx. 3 hours
Battery Life: Approx. 30 days
Material: Zinc Alloy, PC + Silicone
X2-Dock
Power Input: 5V/2A
Input Port: USB-C
Material: PC + Silicone
Main Devices
• 1 × X2-Remote
• 1 × X2-Hub
• 1 × Charging Dock
Power & Cables
• 2 × 5V/2A Power Adapters
• 2 × 1.2m USB-C to USB-A Cables
Others
• 1 × 2m 3.5mm IR Blaster (dual emitters)
• 1 × 3m 3.5mm IR Blaster (single emitter)
Off Button: Powers off all active Activities with a single press.
Return key: Returns to the previous menu on the X2-Remote
display (back navigation).
Favorites ( Star) key: Instantly activates Numpad (0-9) for direct
channel input or access to user-defined Favorite and Macro
Other keys: These keys have no default functions and need to be
defined on a device or within an Activity.
Find X2-Remote
Function
Activate Wi-Fi
Pairing Mode
Short press
Action
(on X2-Hub Button)
Press and hold for
3+ seconds
Hub’s Blue LED flashes
continuously for 120
seconds (indicating
pairing/search mode).
Indication(s)
The X2-Remote emits
an alert beep. Press any
key on the X2-Remote
to silence it.
2. LED Indications
WLAN Not Connected
Abnormal Status /
System Error
Status
Blue LED: Solid On
Red LED: Solid On
LED Indication (on X2-Hub)
Green LED: Solid On
Green LED: Briefly Flashes
Command Received
(from App or X2-Remote)
WLAN Connected
1. K
ey Definitions for X2-Hub
Learn from Original Remote –Point your original remote at the
Hub and follow in-app instructions.
Test & Match Codes –Manually test suggested command sets
on your device to find the correct IR code matc
3.
Work with Amazon Alexa & Google Assistant
Package contents:
X2-Hub
http://www.sofabaton.com/
2 3 4 5 6 7 8 10
1 (Cover)
2
9 11 1312
14 15 16
17 18 19 20 21 2322 24 25
26
Step 3: Add Your Devices
Step 4: Complete Required Device Setup
Welcome! This guide provides a quick overview of the main steps
to set up your Sofabaton X2. You will find detailed instructions for
each step in the chapters that follow.
Before you begin, we recommend reading the next two short
chapters to understand your new remote system.
Follow the app's instructions to add your entertainment devices,
like your TV and Cable Box.
After adding a device, you must complete its essential setup
before it can be used in an Activity.
Ⅲ Understanding Your IR Control Options
Step 5: Create Activities
Combine your devices into powerful one-touch Activities, like
"Watch Movie" or "Listen to Music", to control multiple devices at
once.
For detailed steps, please refer to the Guide or Video Tutorials.
Power On/Off Setup: Tell the app exactly how your original
remote turns the device on and off. This is vital for reliable
control.
Manage Input Sources: Set up your device's inputs (like HDMI
1, HDMI 2) for use in activities.
1. Default IR Signals from Hub:
The X2-Hub features powerful, multi-directional IR emitters. By
default, it directly controls devices in its vicinity without needing to
be aimed precisely. This is the recommended default method for
effortless control.
Important Tip: The Hub sends signals forwards and upwards in a
360° pattern, but not downwards. For best results, place the Hub
on an open shelf with a clear line of sight to your devices,
preferably not above them.
2.
Control from the Physical Remote
If the Hub's signal is obstructed or you prefer traditional aiming,
you can enable the IR emitter on the physical remote via the app.
This allows for direct, line-of-sight control.
3. Extending Range with an IR Repeater
For devices in other rooms or cabinets far from the Hub, you can
use an IR Repeater R1 (sold separately). This device amplifies and
relays the Hub's commands to hard-to-reach equipment.
Ⅳ Positioning Guidelines for the X2-Hub
Placement:
Position the X2-Hub on top of your cabinet or on a large, open
shelf, ensuring it is unobstructed.
Controlling Hidden Devices:
To control devices that are inside a cabinet, box, or behind a
door, connect the included wired IR blaster. Aim its emitter
head directly at each device's IR sensor.
For devices also inside the enclosure:
The Hub can typically control these directly with its own
powerful IR signal.
For devices outside the enclosure:
You must use the included IR blaster. Run the blaster's cable
outside and aim the emitter head at each external device (e.g.,
your TV, soundbar).
3. Advanced Solutions & Alternatives
Consider these options for difficult setups.
Using the Remote's Built-in IR:
If the Hub’s placement makes it ineffective for a specific
device (like a TV off to the side), you can enable the remote's
own IR emitter in the app settings. This allows for traditional,
direct line-of-sight control using the remote itself.
Extending Signal Range:
If the Hub's signal or the IR blaster's cable can't reach a device,
use an R1 IR Repeater (sold separately) to amplify and relay the
commands over a longer distance.
First, download the Sofabaton app and connect your X2-Hub.
(See Chapter Ⅵ & Ⅶ for details)
IR Control Options: Learn how your system sends commands.
Position Hub: Find the best location for your Hub to ensure a
strong signal.
Improve Hub Placement – Move the Hub closer to your Wi-Fi
router. If the Hub is placed inside a cabinet, take it out and move
Hub closer to the router to increase the network signal. Relaunch
the app to try again.
Avoid guest networks – Hub connection issues may occur if
linked to an isolated guest network.
Simplify Your Network – If you have Wi-Fi extenders or
secondary routers, temporarily power off the secondary ones,
leaving only the main router on. Move the Hub close to the main
router and retry the setup new hub process.
Try a Different Mobile Device – Install the app on a second
phone or tablet and attempt the setup. This can help identify if
the issue is with the original device.
3.1 Add WiFi Control Device
3.2 Add Home Assistant Remote
3.3 IP Control
Tip:
The X2 supports two Bluetooth modes: BLE (recommended) and BT.
We strongly recommend using BLE whenever possible. The X2 can
connect to three BLE devices simultaneously, offering instant
response times.
If your device cannot connect to "BLE-Sofabaton," try the BT mode
instead. Please note that the X2 can only connect to one BT device at
a time, and switching between BT devices may cause a slight delay
as it disconnects from one before connecting to the next.
2.
User Guide and FAQ
Ⅵ
Downloading the Sofabaton App
Download the Sofabaton app by scanning the QR code below
or by searching "Sofabaton" in your app store.
4. When to Configure "Idle Behavior"
"Idle Behavior" is an advanced setting that controls what a device
does when you switch from an activity that uses it to one that
doesn't.
For most devices, the default setting (Turn off when not in use)
works perfectly. However, you might need to change this for specific
devices to improve your experience.
Stay on when switching activities:Use for devices like HVAC
controllers or smart lighting that should only be turned off when you
shut down the whole system, not during simple activity changes.
Always On: Use this if you don't want the system to control this
device's power automatically.
For advanced key customization (e.g., assigning specific
commands to buttons), you can modify these settings later.
Navigate to: Activities > [Your Activity Name] > Edit >
Customize Remote Buttons
9. Advance Settings
Macro & Favorite Keys: If the physical keys on your remote aren't
enough, you can create macros and select favorite keys in the app.
These will appear as soft keys on your remote's screen.
To access these settings, navigate to: Activities > [Your Activity Name]
> Edit > Macro & Favorite Keys.
Once the activity is active, you can quickly access them by tapping
the Favorites key (Star icon ) at the bottom of the screen.
2.
Add a Home Assistant Remote
You can add a special "Home Assistant Remote" to your
Sofabaton app. This allows you to use any button on your X2
remote to directly trigger automations and control devices within
your Home Assistant system.
For example, you can assign a button on your X2 remote to run
your "Movie Night" scene in Home Assistant.
Step 1. In the Sofabaton App: Add the "Home Assistant Remote"
from the Wi-Fi Control Service list and create custom command
names (e.g., "toggle_lights").
Step 2. In Home Assistant: Create a new automation that uses an
MQTT message as a trigger.
Step 3. Link Them: In your HA automation, use the exact command
name you created in the Sofabaton app as the MQTT payload.
Setup Overview:
The setup process involves three main steps:
4.
Matter Fuction
FCC Warning
This device complies with Part 15 of the FCC Rules. Operation is
subject to the following two conditions:
(1) This device may not cause harmful interference, and (2) this
device must accept any interference received, including
interference that may cause undesired operation.
NOTE 1: This equipment has been tested and found to comply
with the limits for a Class B digital device, pursuant to part 15 of
the FCC Rules. These limits are designed to provide reasonable
protection against harmful interference in a residential
installation. This equipment generates, uses and can radiate radio
frequency energy and, if not installed and used in accordance
with the instructions, may cause harmful interference to radio
communications. However, there is no guarantee that interference
will not occur in a particular installation. If this equipment does
cause harmful interference to radio or television reception, which
can be determined by turning the equipment off and on, the user
is encouraged to try to correct the interference by one or more of
the following measures:
- Reorient or relocate the receiving antenna.
- Increase the separation between the equipment and receiver.
-Connect the equipment into an outlet on a circuit different from
that to which the receiver is connected.
-Consult the dealer or an experienced radio/TV technician for
help.
NOTE 2: Any changes or modifications to this unit not expressly
approved by the party responsible for compliance could void the
user's authority to operate the equipment.
The device has been evaluated to meet general RF exposure
requirement. The device can be used in portable exposure
condition without restriction.
IC Caution:
This device complies with Industry Canada’s license-exempt RSSs.
Operation is subject to the following two conditions:
(1) This device may not cause interference; and
(2) This device must accept any interference, including
interference that may cause undesired operation of the device.”
« Le présent appareil est conforme aux CNR d'Industrie Canada
applicables aux appareils radio exempts de licence.
L'exploitation est autorisée aux deux conditions suivantes : (1)
l'appareil ne doit pas produire de brouillage, et
(2) l'utilisateur de l'appareil doit accepter tout brouillage
radioelectrique subi, meme sile brouillage est susceptible
d'en compromettre le fonctionnement. »
The device has been evaluated to meet general RF exposure
requirement. The device can be used in portable exposure
condition without restriction.
L’appareil a été évalué pour répondre aux exigences générales en
matière d’exposition aux RF. L’appareil peut être utilisé en
condition d’exposition portable sans restriction.
For safety during transport, your remote arrives in a low-power
"Shipping Mode". You must activate it before your first use.
To do this, simply connect the remote to a standard 5V USB power
source using one of the following methods:
Via Charging Dock:
Place the remote onto the charging dock. Make sure the dock
itself is connected to power.
Via USB-C Cable:
Plug the included USB-A to USB-C cable directly into the port
at the bottom of the remote.
⚠ Important:
USB-C to USB-C cables and chargers are not supported.
Ⅰ Wake Up Your Remote
Ⅴ Support
Ⅶ Setup New Hub
Ⅷ Adding Devices
Ⅸ Power On/Off Setup
1 × Reset pin
•
Reset port: Insert the included pin and press and hold for over 8
seconds to factory reset your remote.
Full Matter support for your X2 is coming via a free firmware update,
pending final compatibility approval from major smart home platforms.
Find step-by-step guides and answers on our website. We
refresh them often!
•
•
▲ (Temporary until Q2 2026)
Main Website: https://www.sofabaton.com/
X2 Resources: https://www.sofabatonx.com/
You have to change the default settings in the "Power On/Off
Setup" to modify the command action to press and hold, or add
adictional custom steps.
IR blaster
IR blaster
Step 1: Understand Your Hardware
Step 2: Connect Your Hub
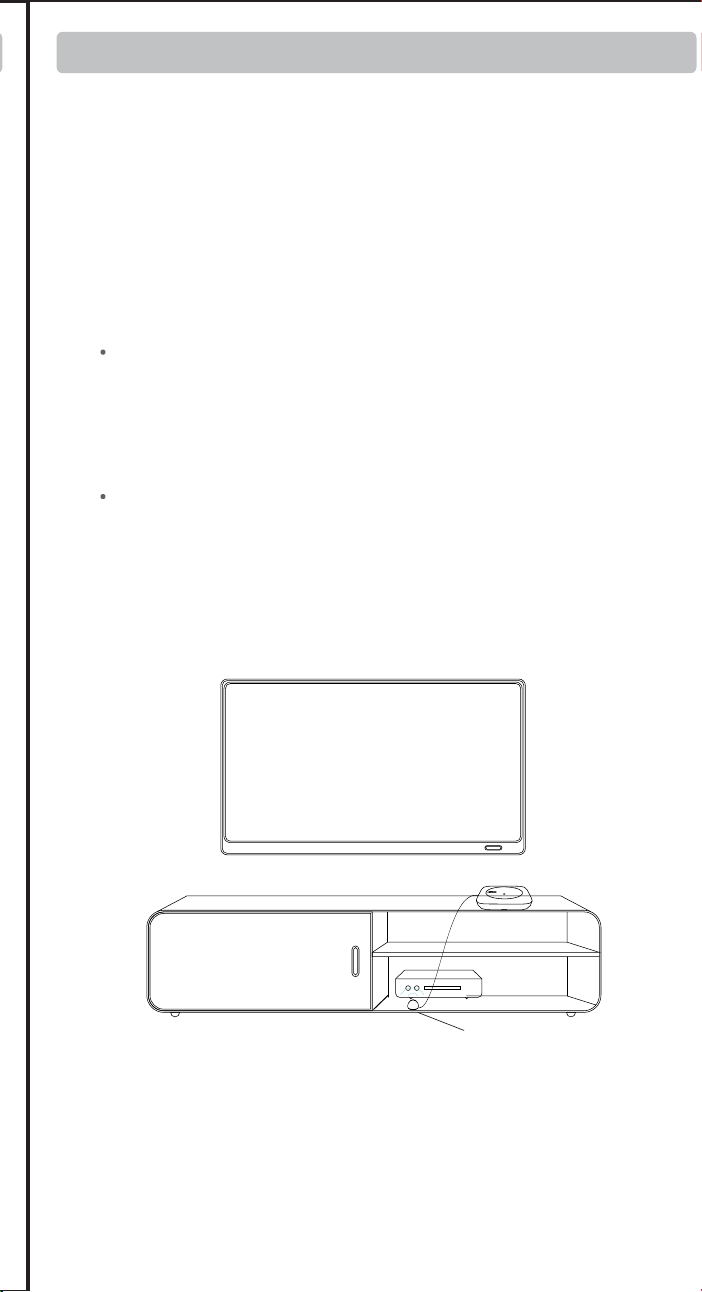
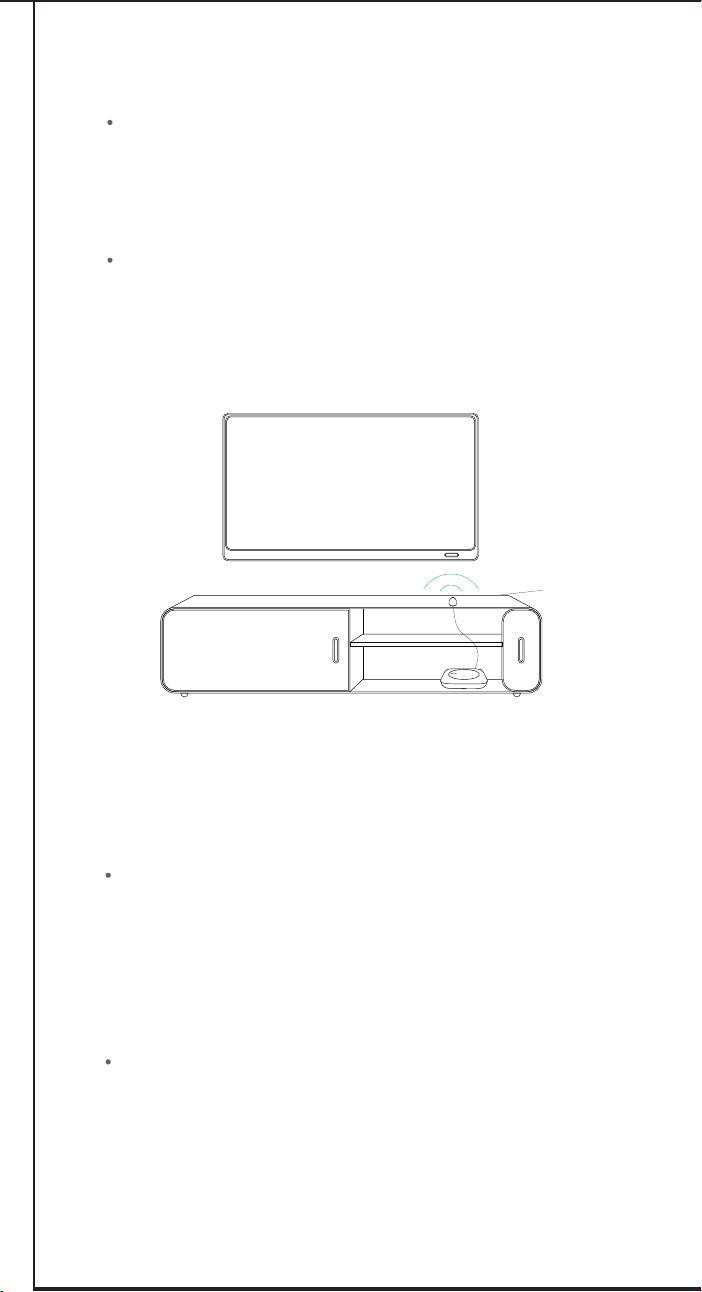
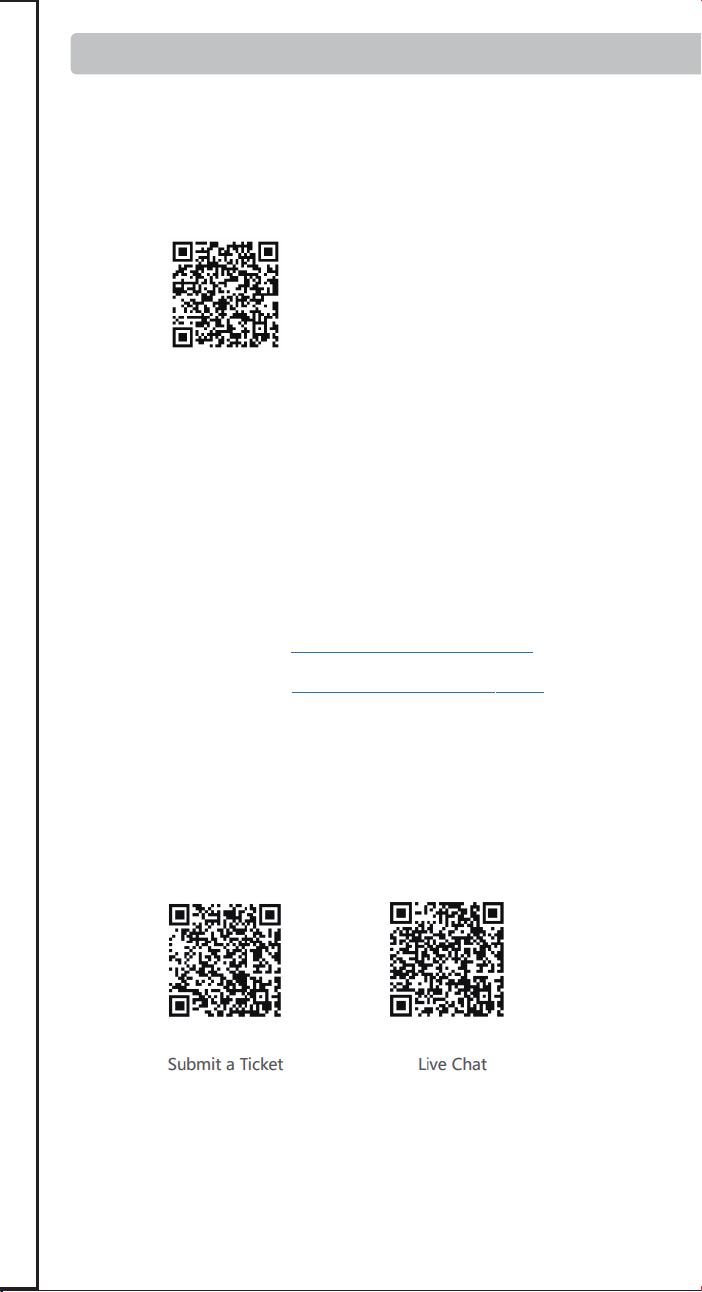
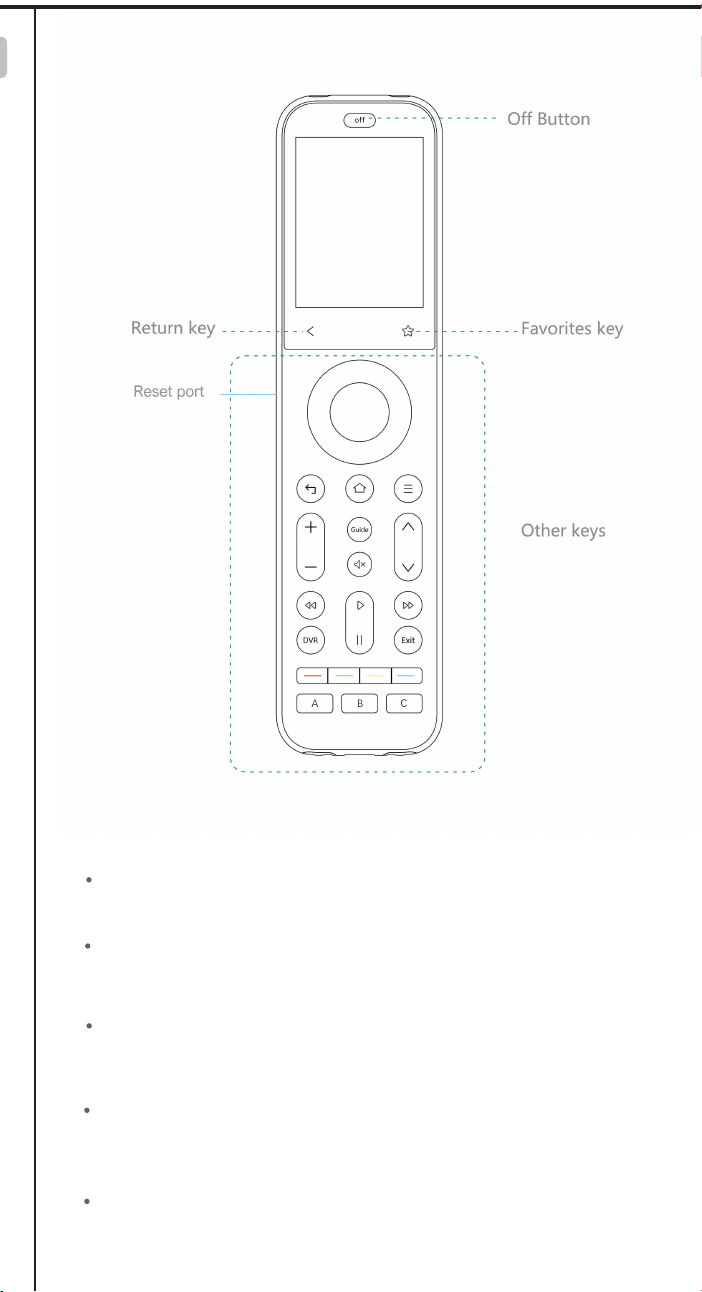