
POSHIJI ESL Management System
1
POSHIJI ESL Management System Operation
Manual
Document Version: V1.0
Release Date: March 2026
Applicable System: POSHIJI ESL Management System Web Admin Panel
Target Audience: System Administrator, Store Manager
contents
Document Description ................................................................................................................4
Purpose ............................................................................................................................... 4
Target Audience .................................................................................................................. 4
Terminology ........................................................................................................................ 4
Chapter 1: System Introduction ..................................................................................................5
1.1 Logging In ......................................................................................................................5
Chapter 2: Business Management ..............................................................................................6
2.1 Store Management .......................................................................................................6
2.2 Area Management ........................................................................................................8
2.3 Product Management ...................................................................................................9
Chapter 3: LCD ESL Management .............................................................................................10
3.1 ESL Management ........................................................................................................ 10
3.2 Screen On/Off Scheduling .......................................................................................... 11
3.3 Batch Re-push ............................................................................................................. 12
3.4 Push Log ......................................................................................................................13
3.5 Holiday Template Push & Template Push Schedule ...................................................14
3.6 Switch LCD Resources .................................................................................................15
Chapter 4: Epd ESL Management ............................................................................................. 16
4.1 Store Base Station .......................................................................................................16
4.2 Epd ESL Management .................................................................................................17
Chapter 5: Resource & Template Management .......................................................................17
5.1 Resource Management ...............................................................................................17
5.2 Template Management .............................................................................................. 18
Chapter 6: Advertising Campaign .............................................................................................19
6.1 Media Management ................................................................................................... 19
6.2 Advertising Campaign .................................................................................................19
Chapter 7: System Management .............................................................................................. 20
7.1 Role Management ...................................................................................................... 20
7.2 User Management ......................................................................................................21
7.3 Parameter Settings ..................................................................................................... 21
7.4 Operation Log ............................................................................................................. 22
7.5 Software Integration ...................................................................................................22
Appendix ................................................................................................................................... 23
Appendix A: Frequently Asked Questions and Solutions .................................................23

POSHIJI ESL Management System
2
POSHIJI ESL Management System App
Operation Manual
Document Version: V1.0
Release Date: March 2026
Applicable System: Android / iOS
Target Audience: Store Operator, Store Staff
Document Description ..............................................................................................................24
Purpose ............................................................................................................................. 24
Target Audience ................................................................................................................ 24
Terminology ...................................................................................................................... 24
Chapter 1: Download and Installation ......................................................................................25
1.1 Android Download ......................................................................................................25
1.2 iOS Download ............................................................................................................. 25
1.3 First Launch After Installation .....................................................................................26
Chapter 2: Registration and Login ............................................................................................ 26
2.1 Register Account .........................................................................................................26
2.2 Login with Password................................................................................................... 27
2.3 Forgot Password ......................................................................................................... 29
Chapter 3: Home Page ..............................................................................................................29
3.1 Home Page Overview ................................................................................................. 29
Chapter 4: Product Management .............................................................................................31
4.1 Product List................................................................................................................. 31
4.2 Bind/Unbind ESL ......................................................................................................... 32
4.3 Batch Price Change ..................................................................................................... 33
Chapter 5: LCD ESL Management .............................................................................................34
5.1 ESL List .........................................................................................................................34
5.2 Bind ESL .......................................................................................................................35
5.3 Unbind ESL .................................................................................................................. 36
5.4 Batch Bind ...................................................................................................................37
5.5 Switch Template ..........................................................................................................38
5.6 Multi-screen Sync ....................................................................................................... 38
5.7 Split-screen Sync .........................................................................................................39
Chapter 6: EPD ESL Management .............................................................................................39
6.1 Base Station Management ......................................................................................... 39
6.2 EPD ESL Management .................................................................................................40
Chapter 7: Resource Management ...........................................................................................41
7.1 LCD Resource Management ....................................................................................... 41
7.2 Switch LCD Resources .................................................................................................42

POSHIJI ESL Management System
3
Chapter 8: Configure ESL (WiFi Setup) ..................................................................................... 43
Chapter 9: Re-push ................................................................................................................... 44
Chapter 10: My ......................................................................................................................... 45
10.1 Settings ..................................................................................................................... 45
10.2 User Management ....................................................................................................45
10.3 Store Information ..................................................................................................... 45
10.4 About ........................................................................................................................ 45
10.5 Logout ....................................................................................................................... 46
Appendix ................................................................................................................................... 46
Appendix A: Frequently Asked Questions and Solutions .................................................46

POSHIJI ESL Management System
4
Document Description
Purpose
This manual is designed to guide users in correctly using the POSHIJI ESL Management System
Web Admin Panel, including basic data maintenance, ESL device management, template and
resource management, advertising campaigns, and system configuration, helping users efficiently
complete daily operations.
Target Audience
System Administrator: Responsible for overall system configuration, permission
assignment, and data integration.
Store Manager: Responsible for store information, product data, ESL binding, and daily
price change operations.
Terminology
Term
Description
LCD ESL
Electronic shelf label using a liquid crystal display, supporting rich media content such as
images and videos.
Epd / EPD
ESL
Electronic shelf label using electronic paper technology, featuring low power
consumption and a paper-like display.
base station
The communication hub for Epd ESLs, responsible for data transmission between the ESLs
and the server.
Template
Defines the layout of content displayed on the ESL, including the positions of product
name, price, barcode, and other elements.
Resource
Image, video, or other media files used for display on ESLs.
POSHIJI ESL Management System
5
Chapter 1: System Introduction
1.1 Logging In
Operation Path:Browser
→
Access System URL
→
Enter Credentials
→
Click "Login"
Steps:
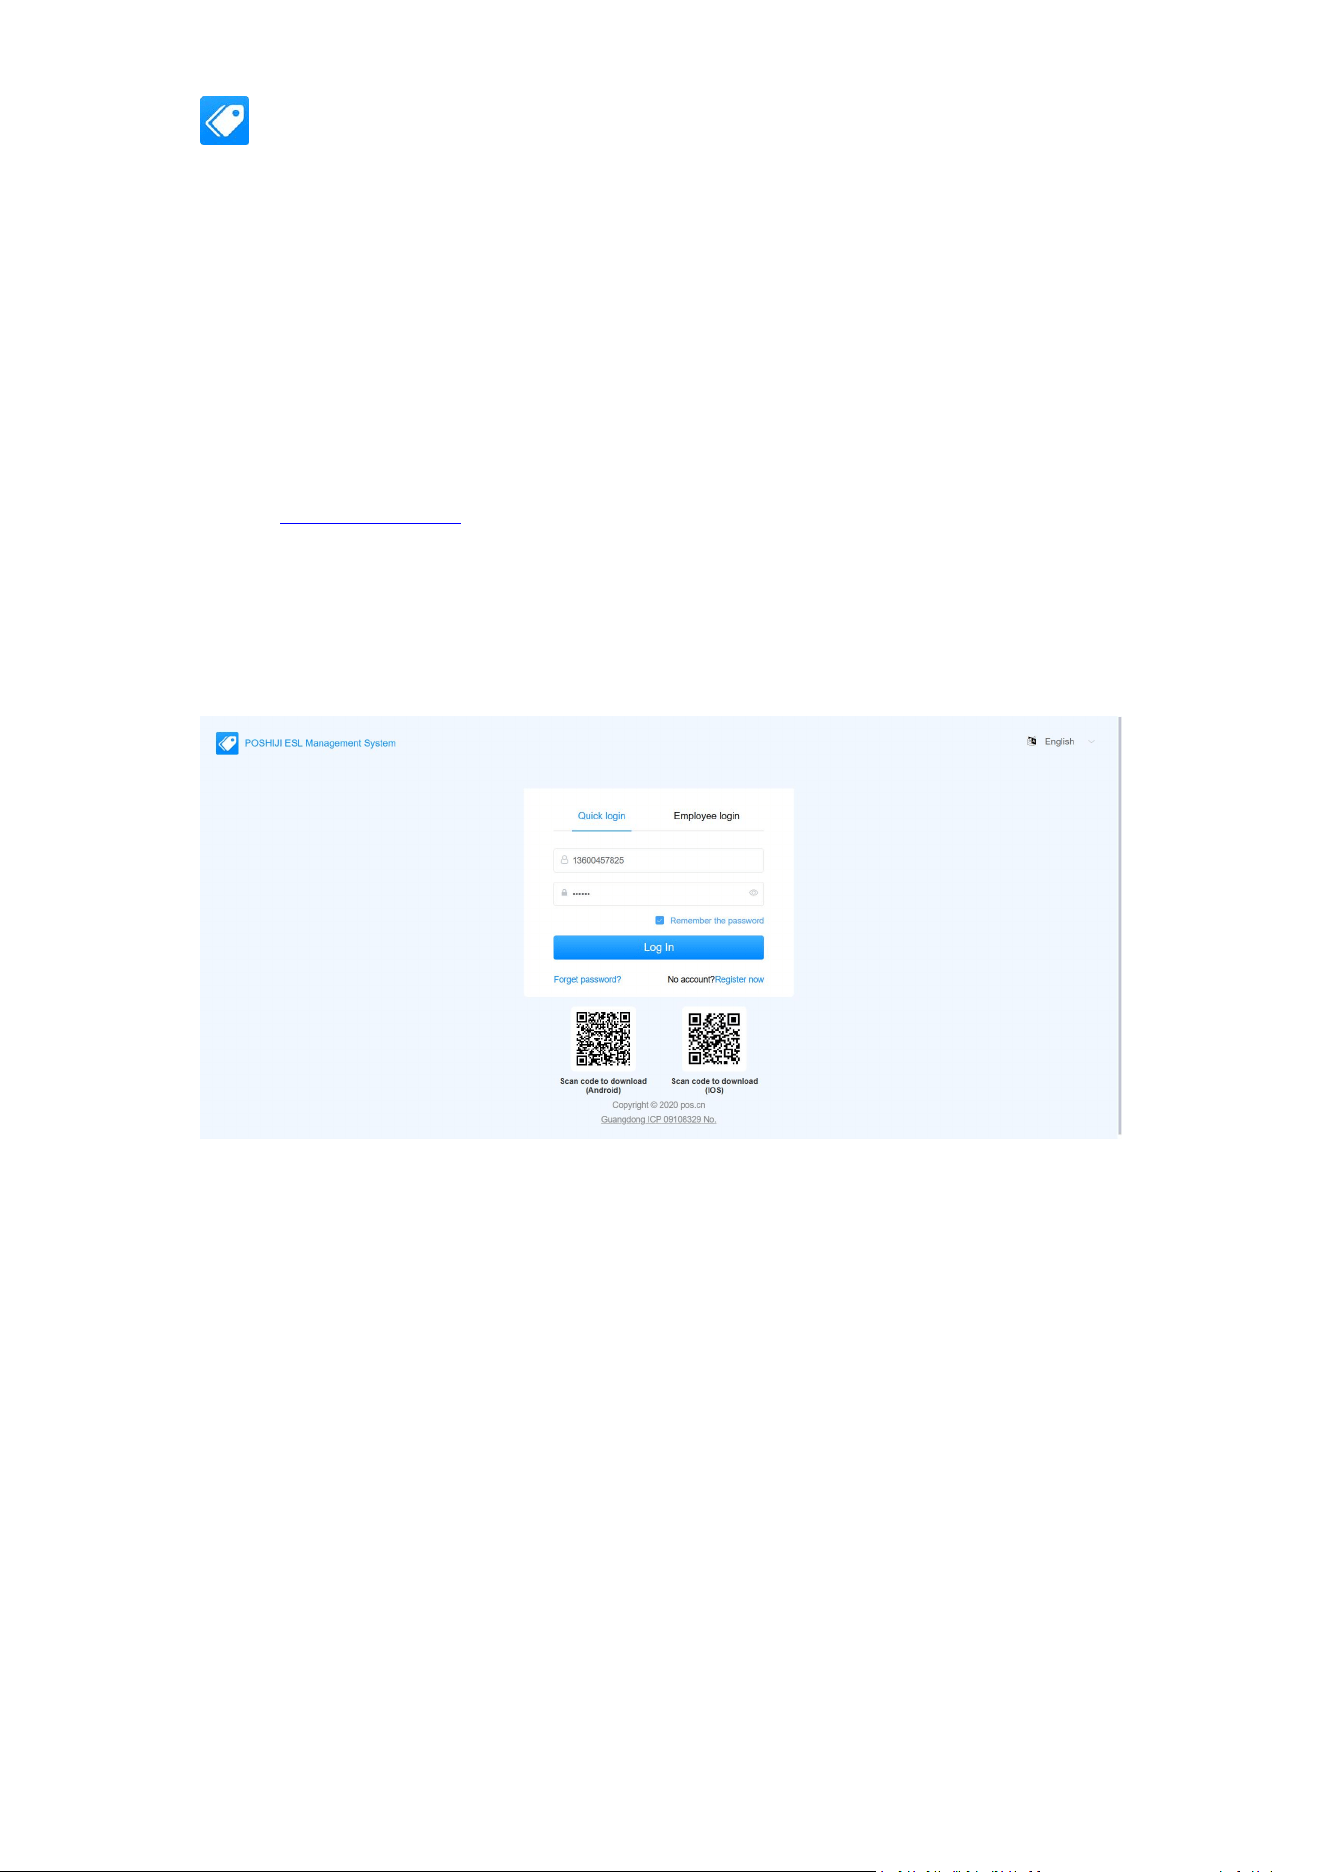
1. Open Chrome or Edge browser, enter the system access URL in the address bar:
https://esl.pos.cn/.
2. On the login page, enter the username and password assigned by the administrator.
3. Enter the verification code (if applicable), then click the 【Login】 button.
4. It is recommended to change the initial password upon first login to ensure account
security.
Interface Description:
1.2 Homepage Overview
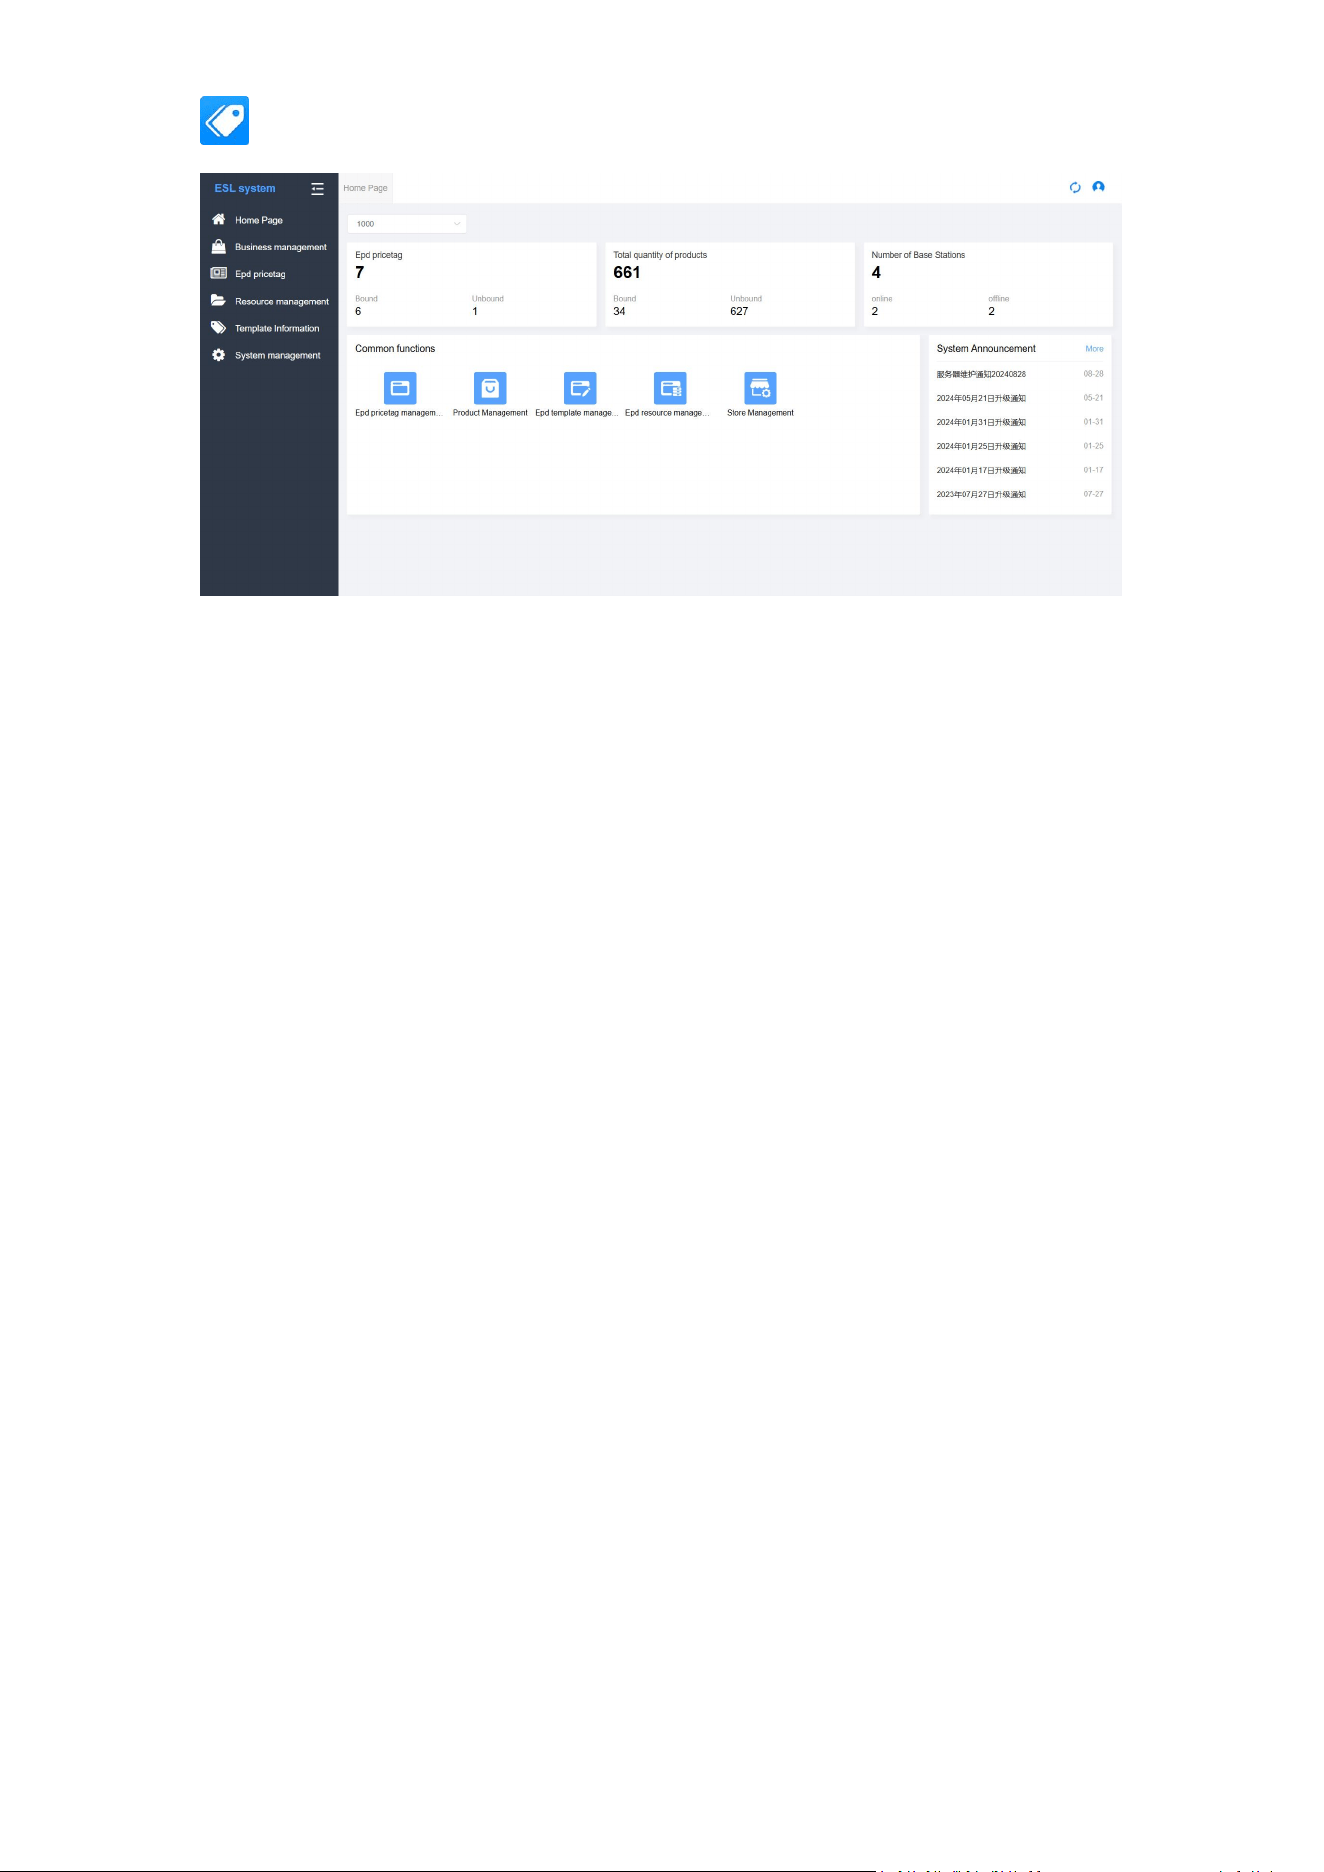
Function Description: After logging in, the homepage dashboard provides a quick overview of
the overall operational data of the current store and displays system announcements.
Page Components:
Data Dashboard: Displays the total number of LCD ESLs, Epd ESLs, products, and base
stations for the current store. Clicking on some data points will jump to the
corresponding management list.
Quick Access Shortcuts: Such as "Add Product", "Bind ESL", "Batch Price Change". Click
to navigate directly to the operation page.
System Announcements: Displays the latest notifications and maintenance reminders
issued by the administrator.
Instructions:
If the logged-in account is associated with multiple stores, you can switch stores at the
top, and the data dashboard will update accordingly.
Click the announcement title to view details.
POSHIJI ESL Management System
6
Chapter 2: Business Management
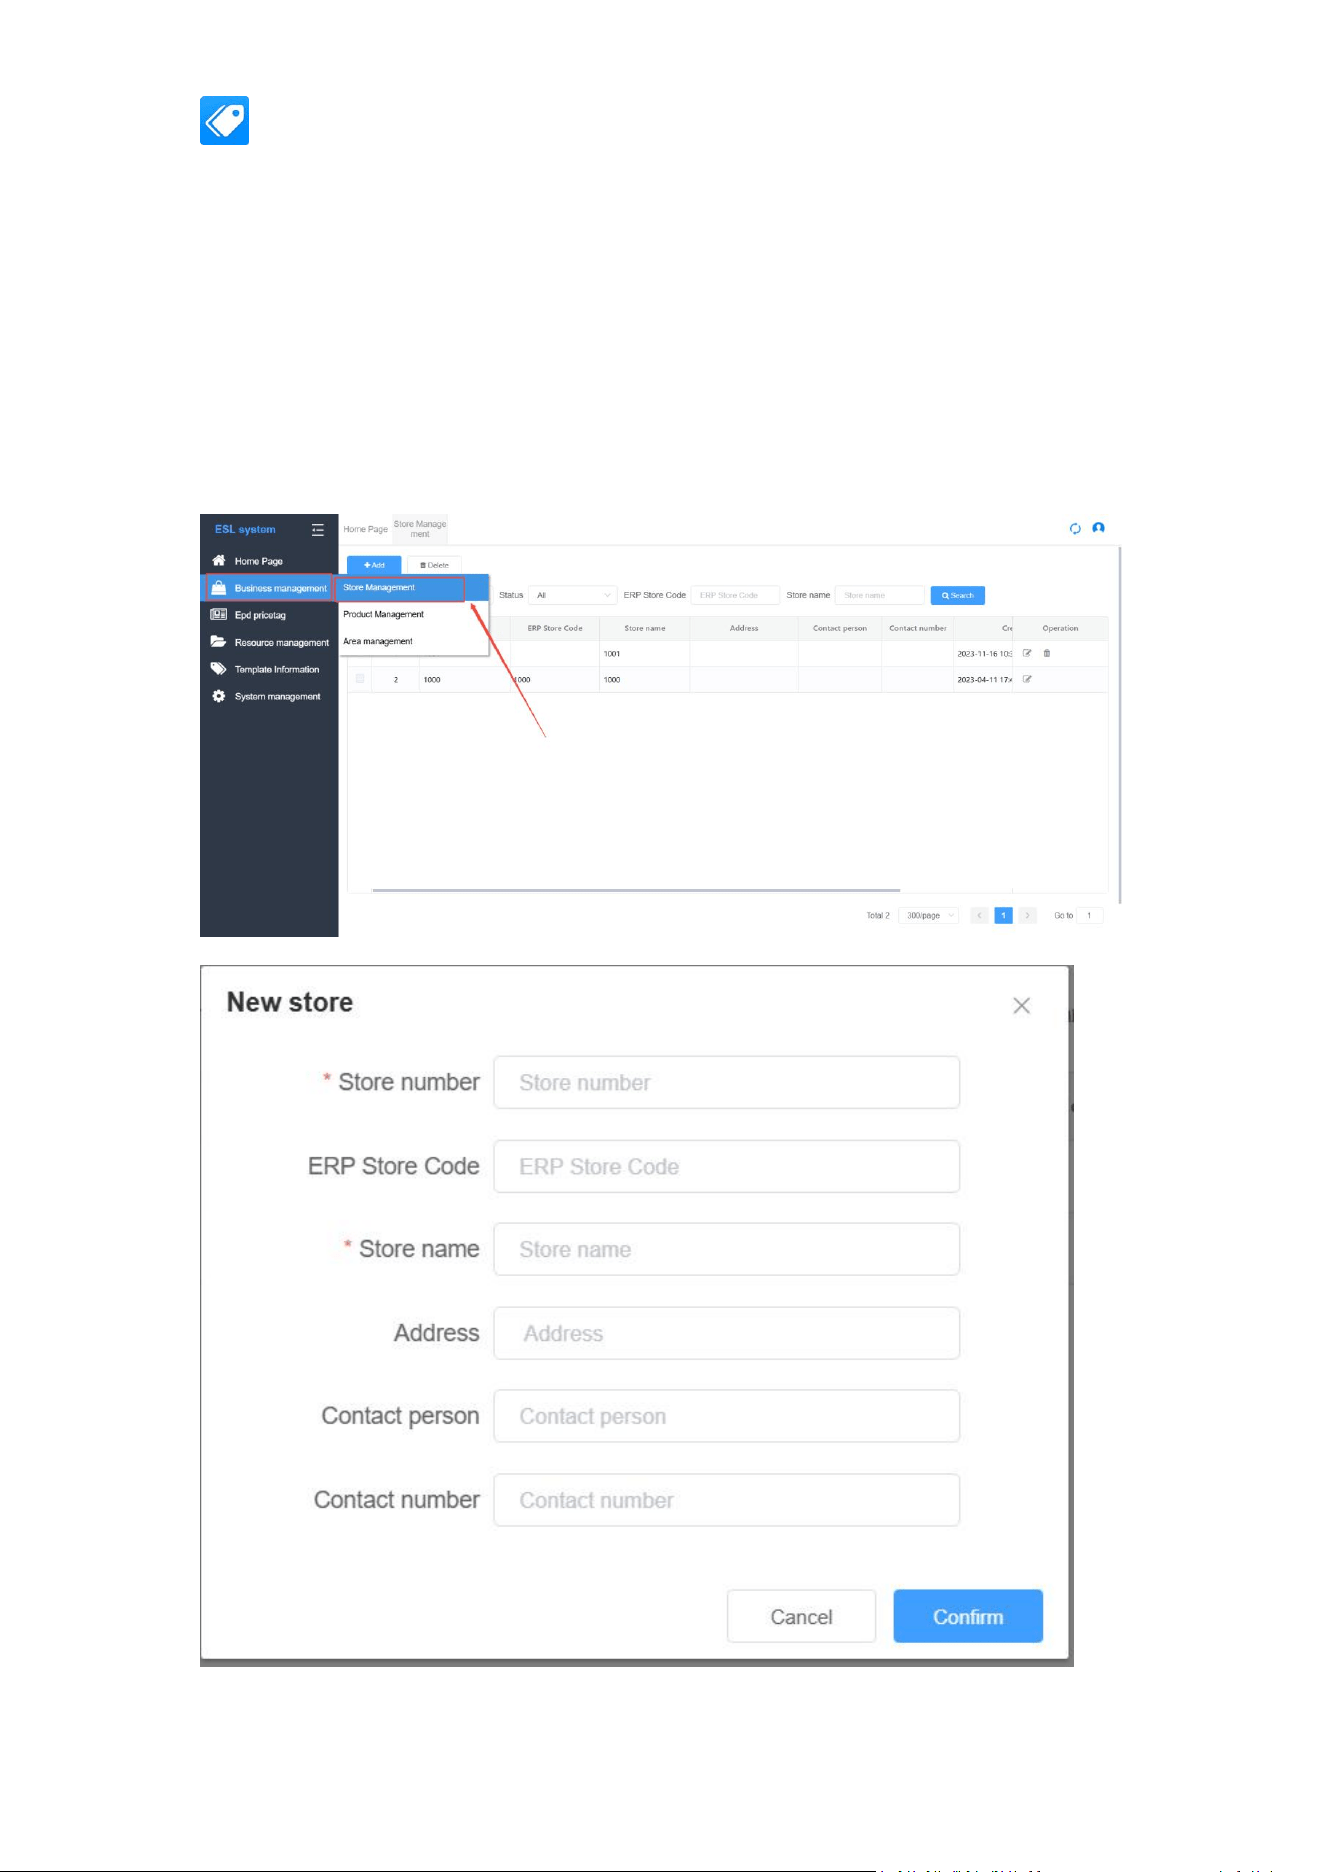
2.1 Store Management
Function Overview: Maintain information for all stores within the chain enterprise, including
adding, editing, and deleting stores.
Operation Path: Business Management → Store Management
2.1.1 Add Store
1. Click the
【
Add Store
】
button.
2. In the pop-up window, fill in:
o Store Code (unique)
o Store Name
o Region (Province/City)
o Detailed Address
o Contact Person, Contact Number
3. Click
【
Save
】
.
2.1.2 Edit Store
1. Find the target store in the store list and click
【
Edit
】
in the operation column.
2. Modify the information to be changed and click
【
Save
】
.
2.1.3 Delete Store
If the store has associated products or ESLs, the system will prompt that deletion is not
possible. Unbinding or data migration is required first.
After confirmation, click 【Delete】 and confirm again.
List Field Descriptions:
Field
Description
Store Code
Unique system identifier
POSHIJI ESL Management System
7
Field
Description
Store Name
Display name
Contact Person
Store contact person
Contact Number
Contact phone number
Status
Enabled / Disabled
POSHIJI ESL Management System
8
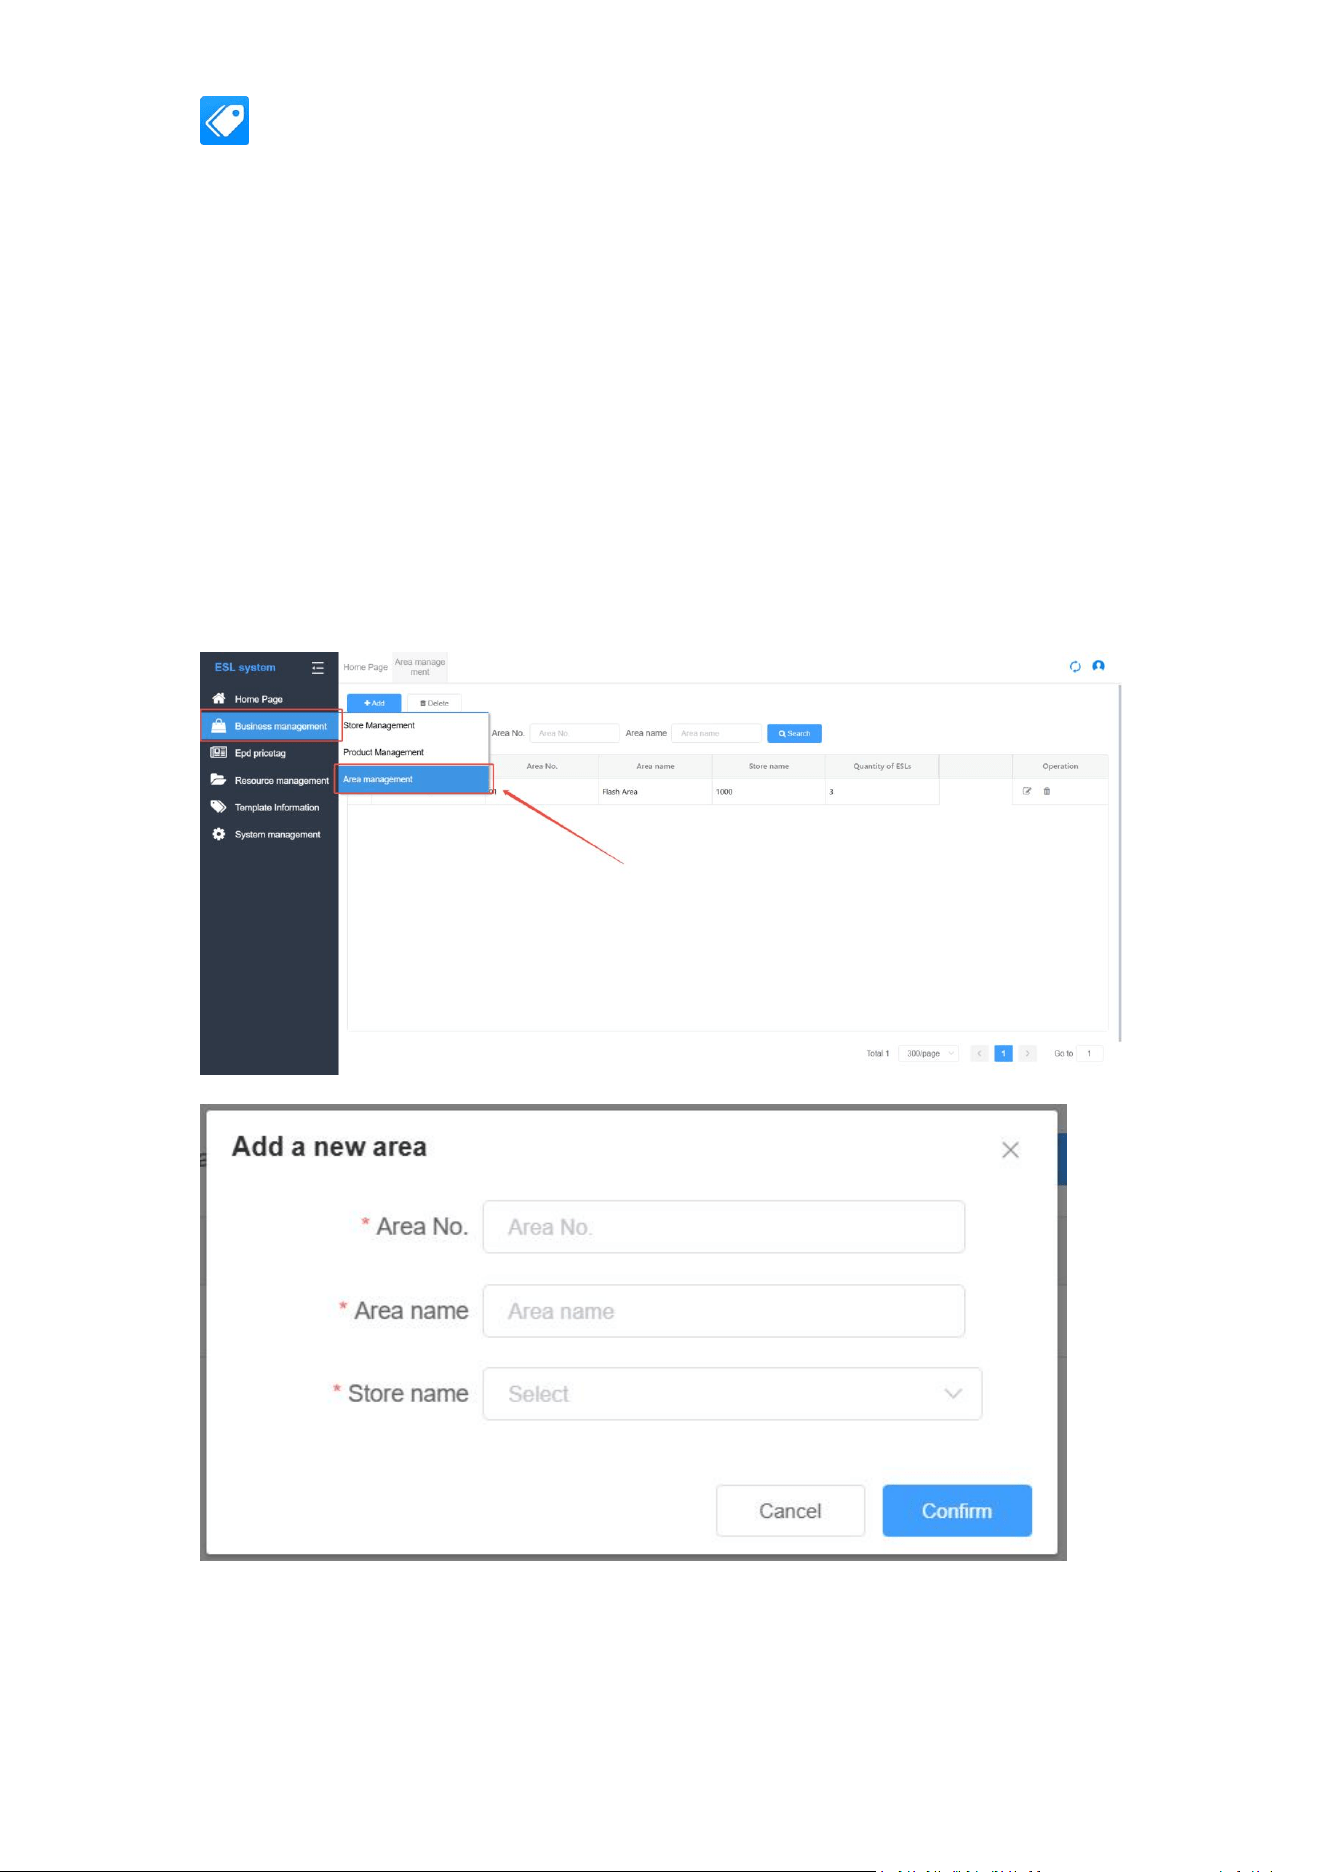
2.2 Area Management
Function Overview: Divide areas within a store (e.g., Fresh Food Section, Beverage Section) for
easier ESL and product management by Area.
2.2.1 Add Area
1. Select the store.
2. Click
【
Add Area
】
, enter the area name (e.g., "Dairy Section") and sort order.
3. After saving, the zone will appear in the store's area tree.
2.2.2 Edit/Delete Area
Supports modifying the Area name and adjusting the sort order.
If ESLs are already bound to the Area, they must be moved out of the Area before
deletion.

POSHIJI ESL Management System
9
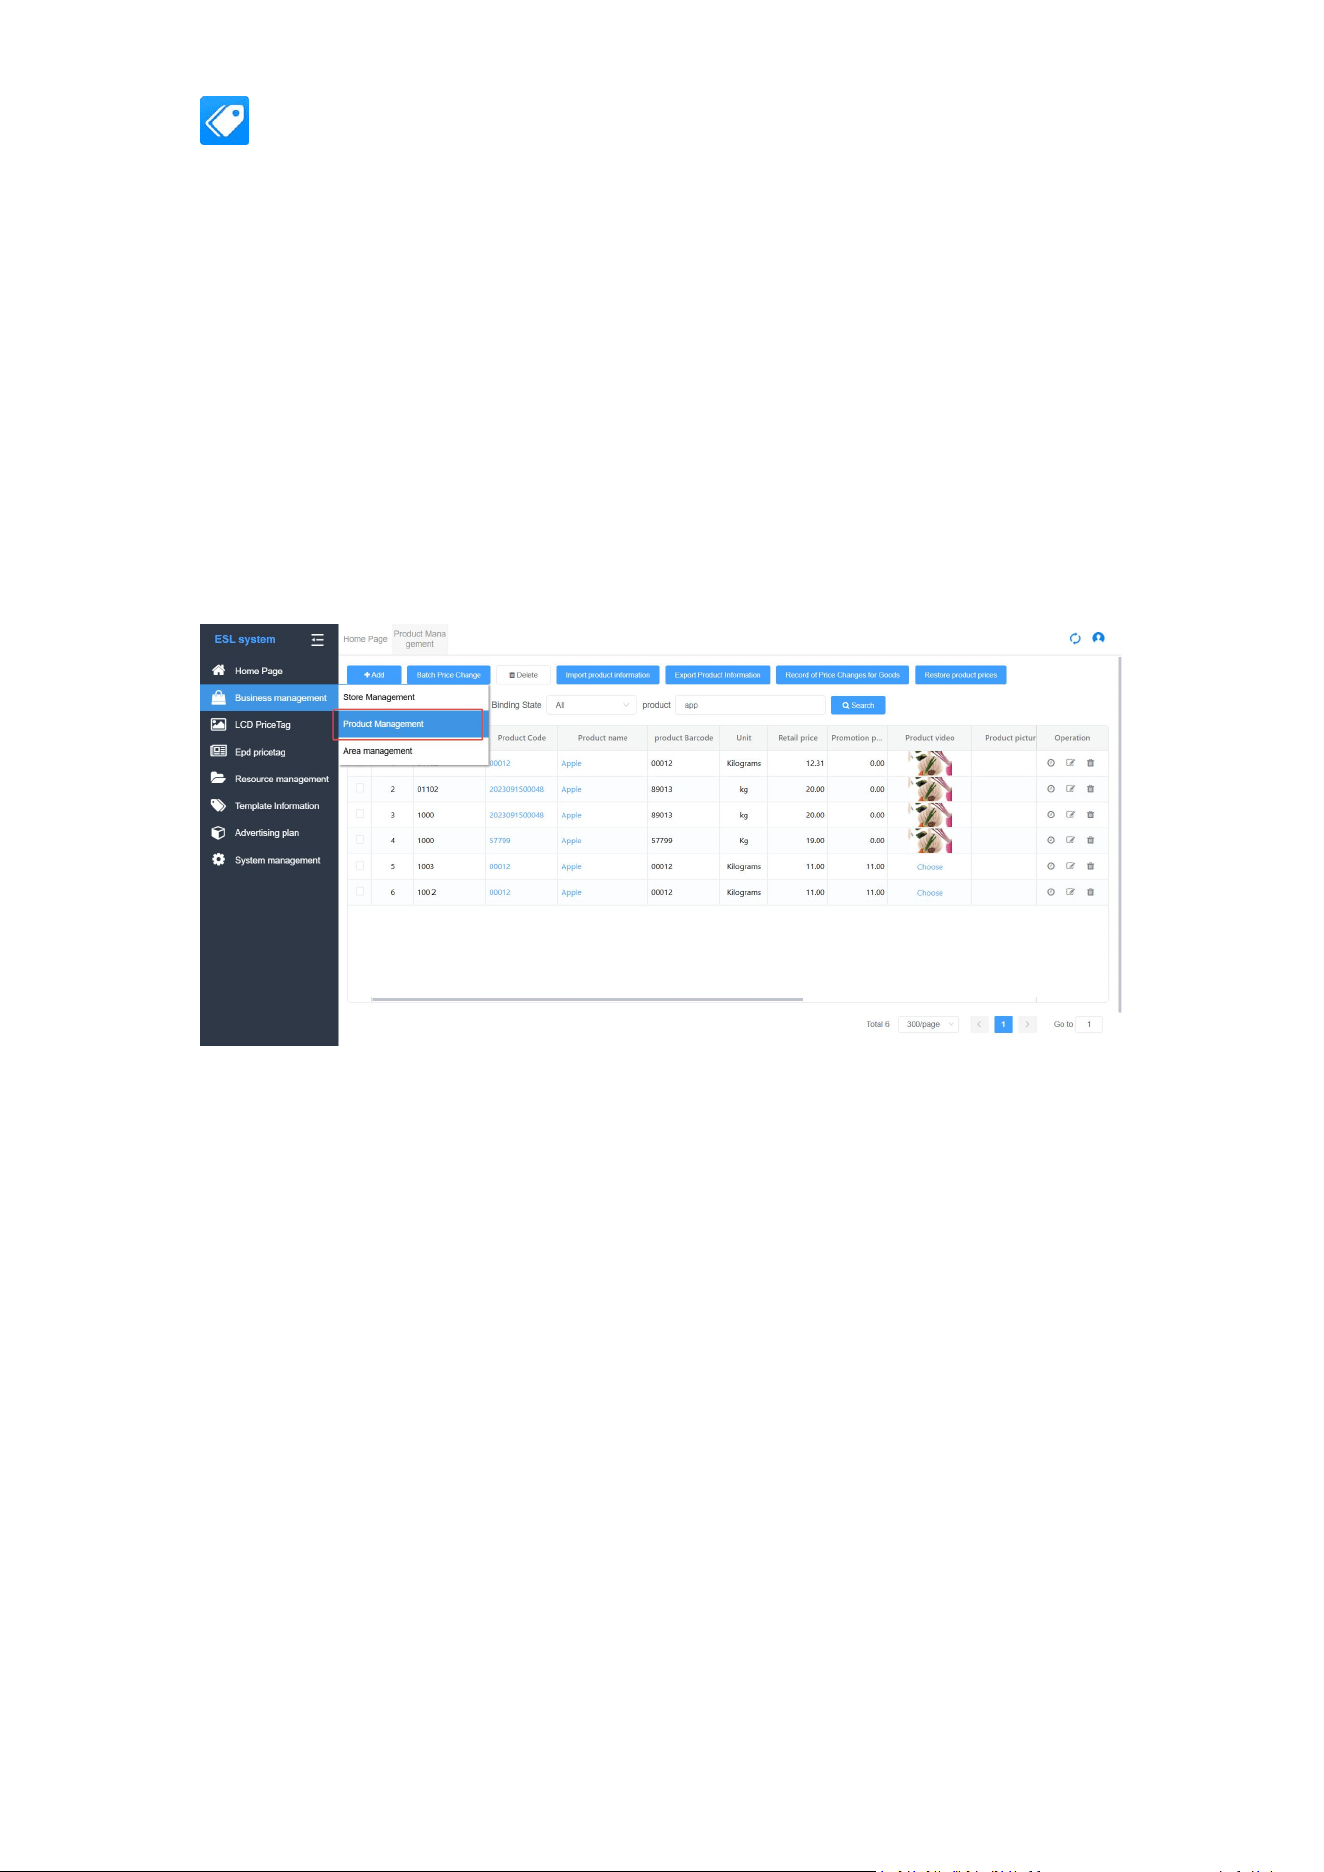
2.3 Product Management
Function Overview: Manage product profiles, supporting single operations and batch
import/export, batch price changes, viewing historical price change records, and price
restoration.
Operation Path: Business Management
→
Product Management
2.3.1 Add Product
1. Click
【
Add Product
】
.
2. Fill in the product information (fields marked with * are required):
o *Product Name
o *Product Code
o Product Barcode (SKU)
o Product Image
o Product Video
o Status
o Measurement Method
o Store
o *Retail Price
o Member Price
o Promotional Price
o Unit (e.g., piece, bottle, bag)
o Specification
o QR Code
o Brand
o Origin
o Shelf Life
o Grade
o Stock/Quantity
o Promotion Start Time, Promotion End Time
o Member Price Start Time, Member Price End Time
o Pricing Officer, Remarks
o Reserved Text Fields 1~6
3. Click
【
Save
】
.
2.3.2 Batch Import Products
1. Click
【
Import Product Information
】 →
Download the Excel template.
2. Fill in the product data according to the template (pay attention to field formats, e.g.,
prices should retain two decimal places).
3. Upload the file. The system will validate and display the import results (number of
successes, failed data, and reasons).
2.3.3 Batch Price Change
1. Check the products to be re-priced in the product list (can filter by store).
2. Click
【
Batch Price Change
】
.
POSHIJI ESL Management System
10
3. Confirm the operation; the system will record the price change in the price change
history.
2.3.4 Product History & Price Restoration
Product History: Click "History" for a product to view the change log of that product
profile.
Product Price Change Records: View all price change transactions, including operator,
operation time, original price, and new price.
Price Restoration: In the price change records within a specific period, click 【Restore
Price】 to revert the current price to a historical price.
2.3.5 Batch Export / Delete
Batch Export: Supports exporting the product list to Excel after filtering by conditions.
Batch Delete: Check products and click 【Batch Delete】 . Only products not bound to
any ESL can be deleted.
Chapter 3: LCD ESL Management
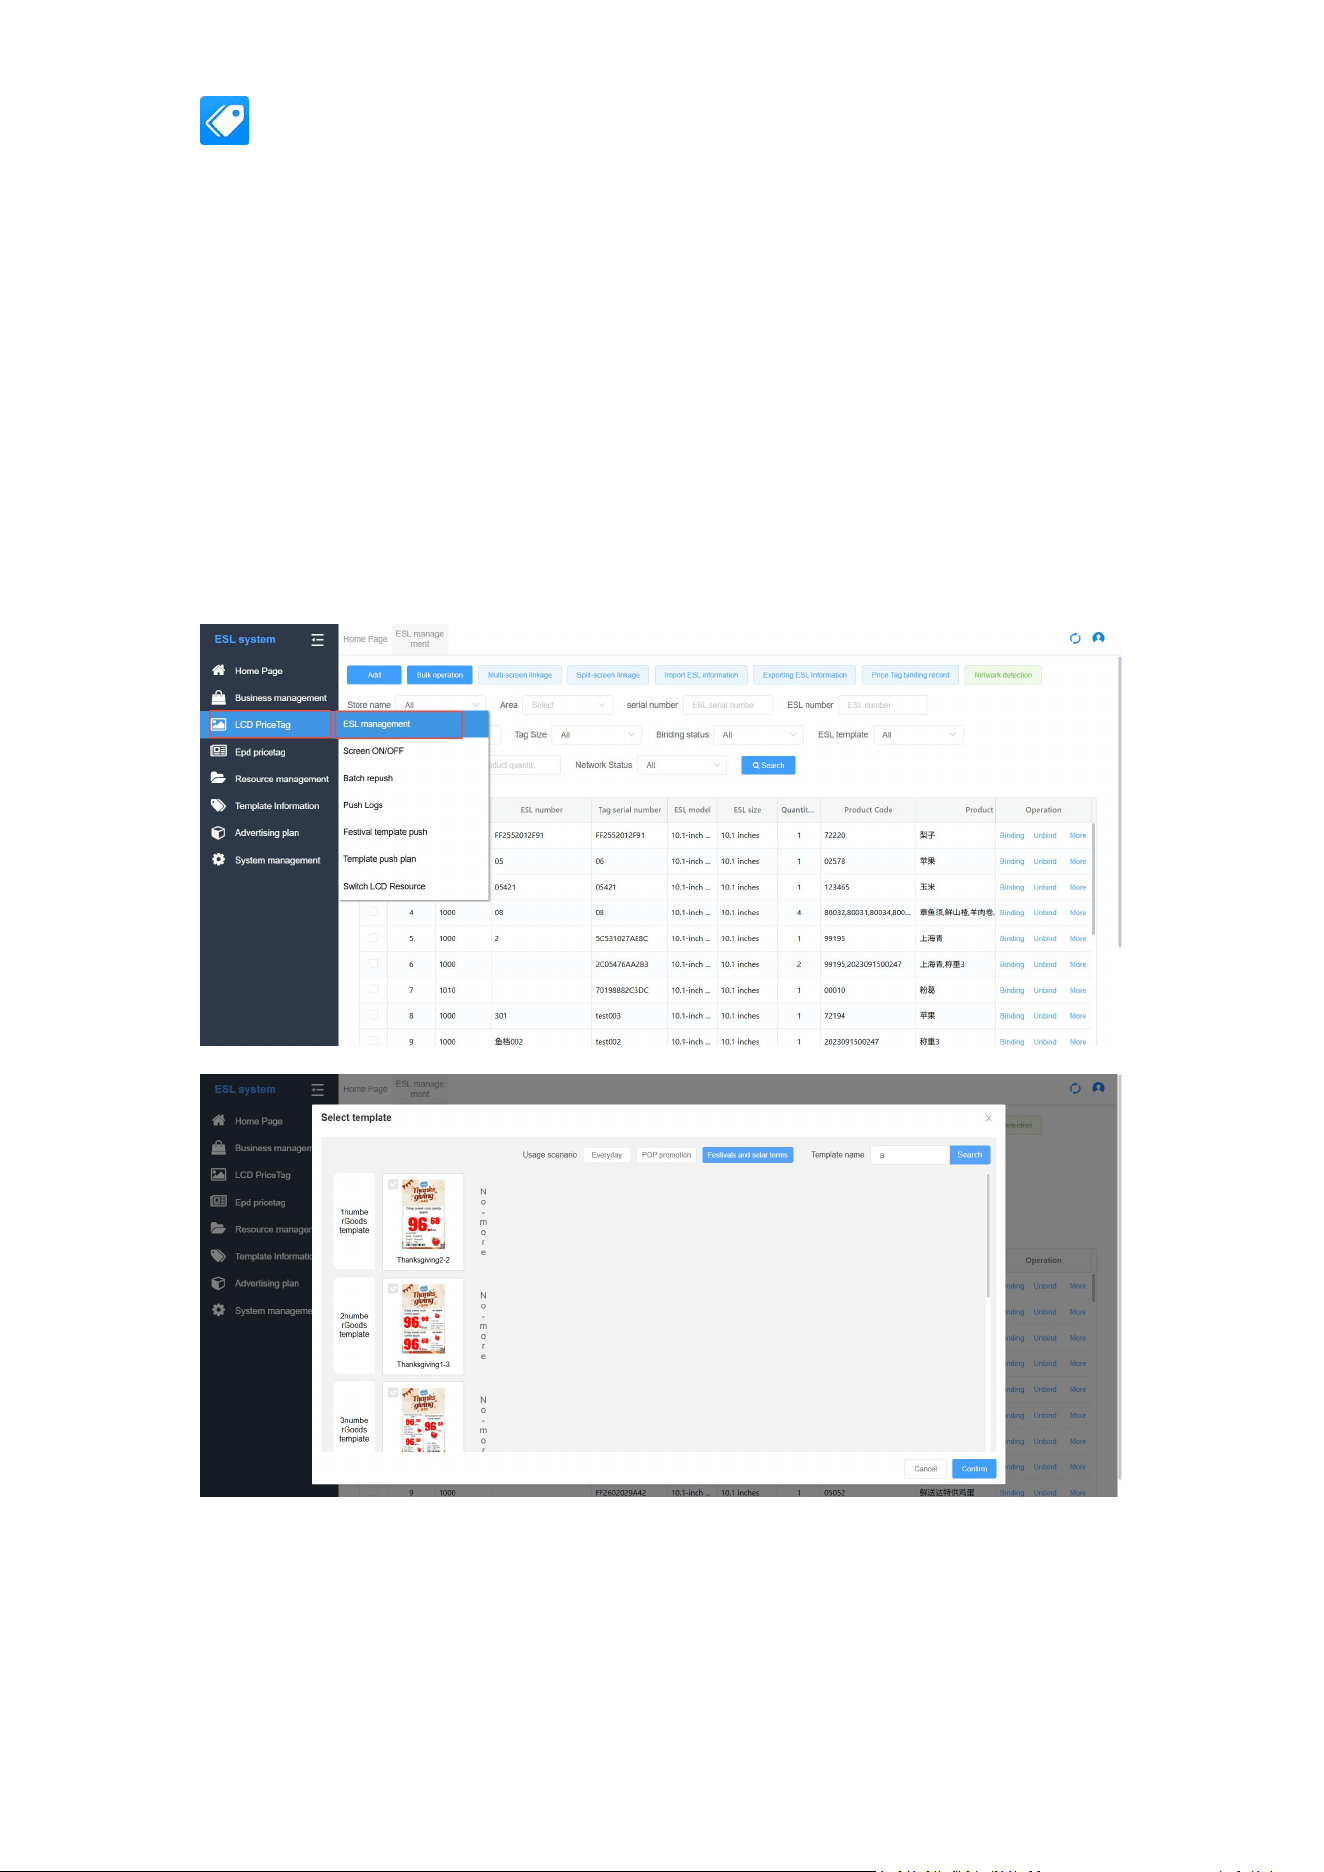
3.1 ESL Management
Function Overview: Manage LCD ESL devices, supporting single/batch binding, unbinding,
template switching, deletion, and other operations.
Operation Path: LCD ESL → ESL Management
3.1.1 ESL List
Displays all LCD ESLs. Supports filtering by store, zone, status
(Online/Offline/Bound/Unbound), ESL template, template product count, product,
binding status, and network status.
Key fields: ESL ID, Serial Number, Model, Bound Product, Template Name, Status,
Firmware Version, Last Online Time.
3.1.2 Single Bind/Unbind
1. Find the target ESL in the list and click
【
Bind
】
.
2. Select a template from the template interface.
POSHIJI ESL Management System
11
3. In the product selection pop-up, search for the product (by name/barcode) and confirm
to complete the binding.
4. After successful binding, the ESL status changes to "Bound", and the system
automatically pushes the product data to the ESL.
5. To unbind, click
【
Unbind
】
, confirm to remove the association with the product.
3.1.3 Batch Operations
Batch Bind: Check multiple ESLs → Click 【 Batch Bind 】 → Select a template →
Select products (multiple selections allowed). The system will match ESLs to products in
order or one-to-one.
Batch Unbind: Check bound ESLs → Click 【Batch Unbind】 .
Batch Switch Template: Check ESLs → Select the target template → Execute the
switch.
Batch Delete: Check ESLs → Delete (only allowed for ESLs that are unbound or offline).
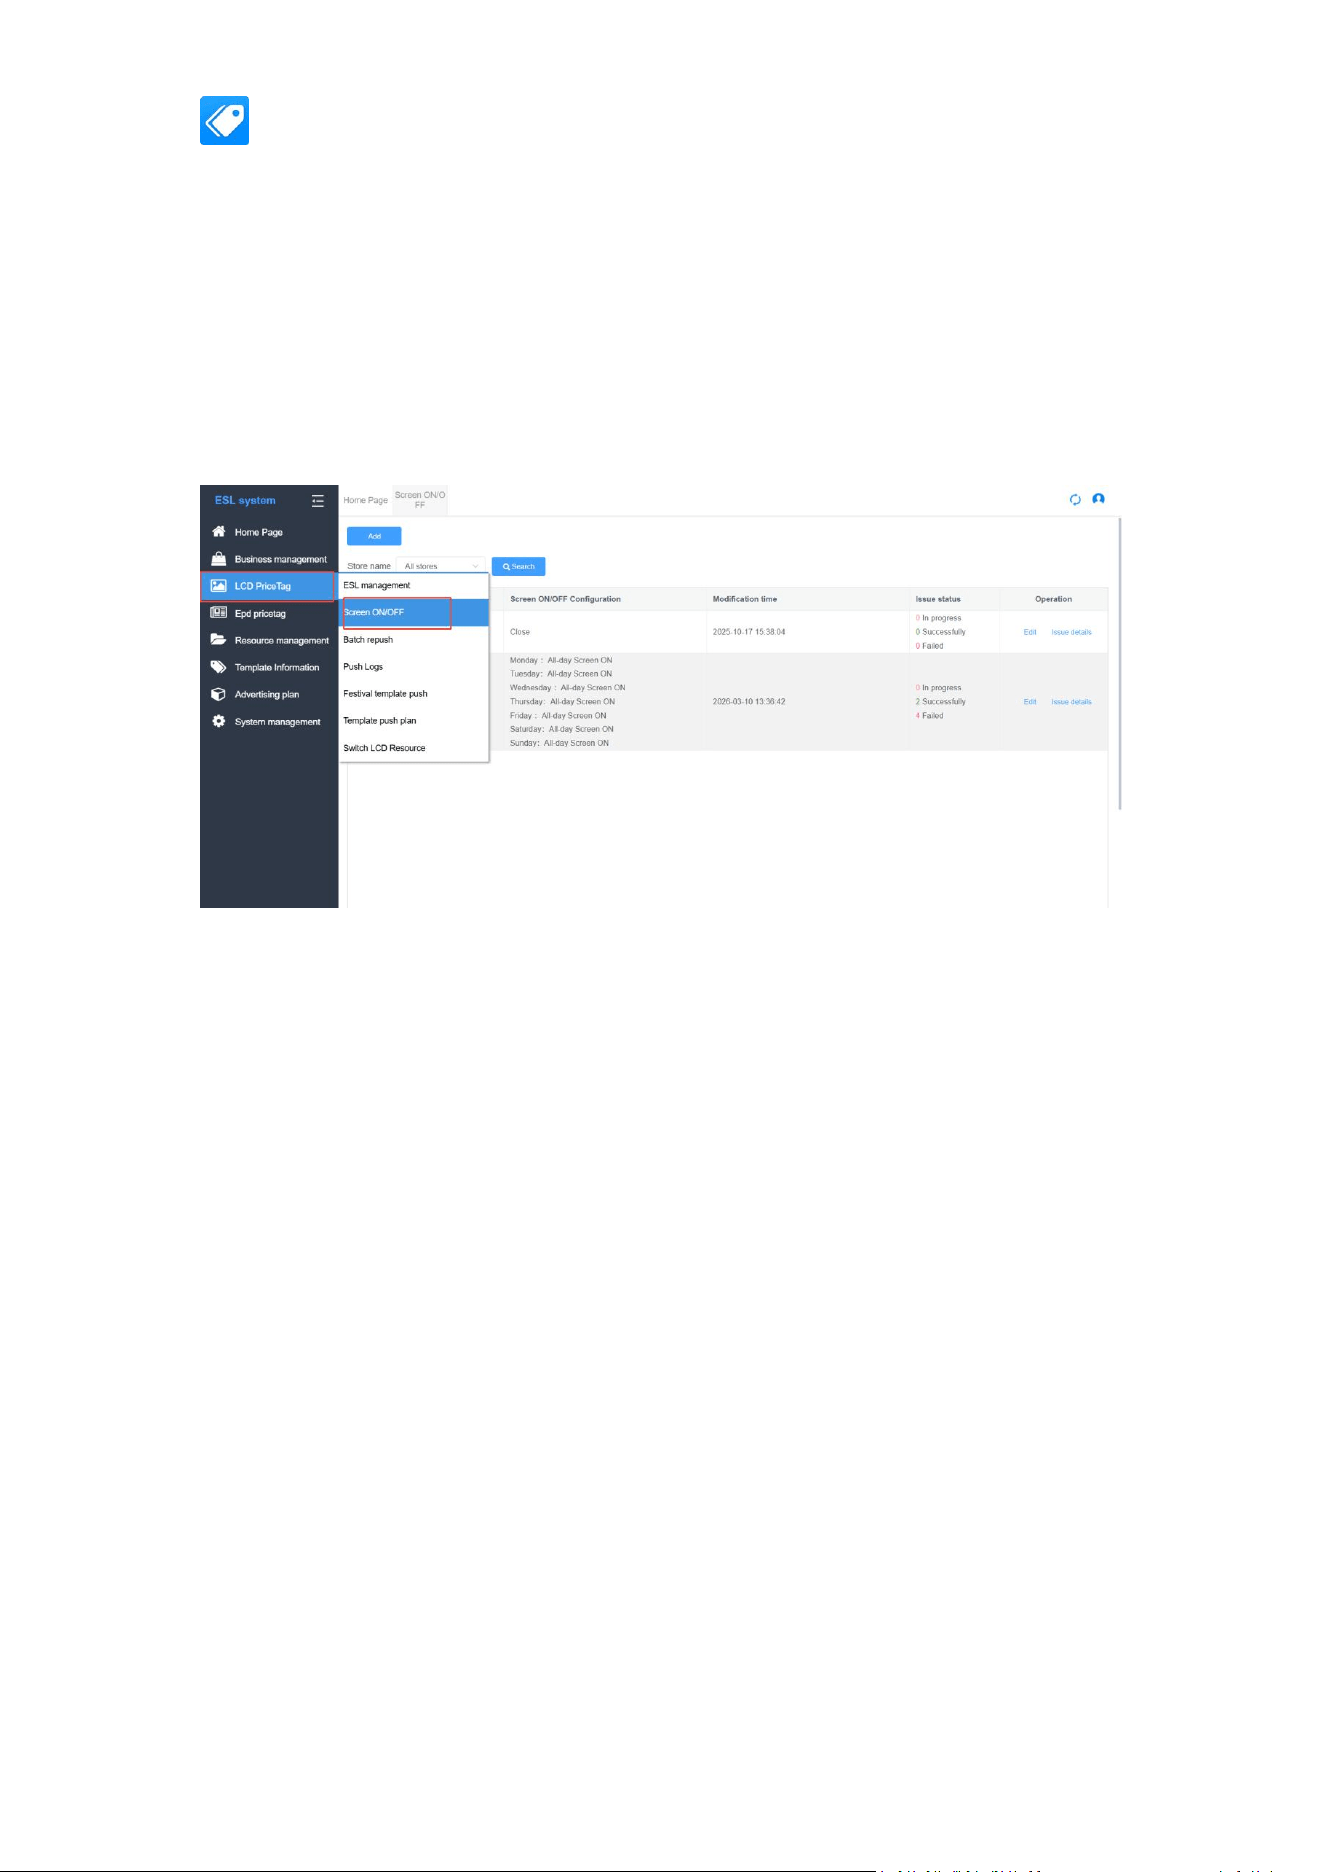
3.2 Screen On/Off Scheduling
Function Overview: Set timed screen on/off schedules for LCD ESLs, with temporary control
options.
POSHIJI ESL Management System
12
Operation Path: LCD ESL → Screen On/Off Scheduling
3.2.1 Scheduled Strategy
1. Click
【
Add Strategy
】
.
2. Select the applicable store (global or specific store).
3. Set the screen-on time (e.g., 08:00) and screen-off time (e.g., 22:00).
4. Select the repeat cycle (Daily, Weekdays, Weekends, etc.).
5. After saving, the system will issue commands on schedule.
3.2.2 Disable Control
Turn off the setting in the screen on/off configuration to execute immediately.
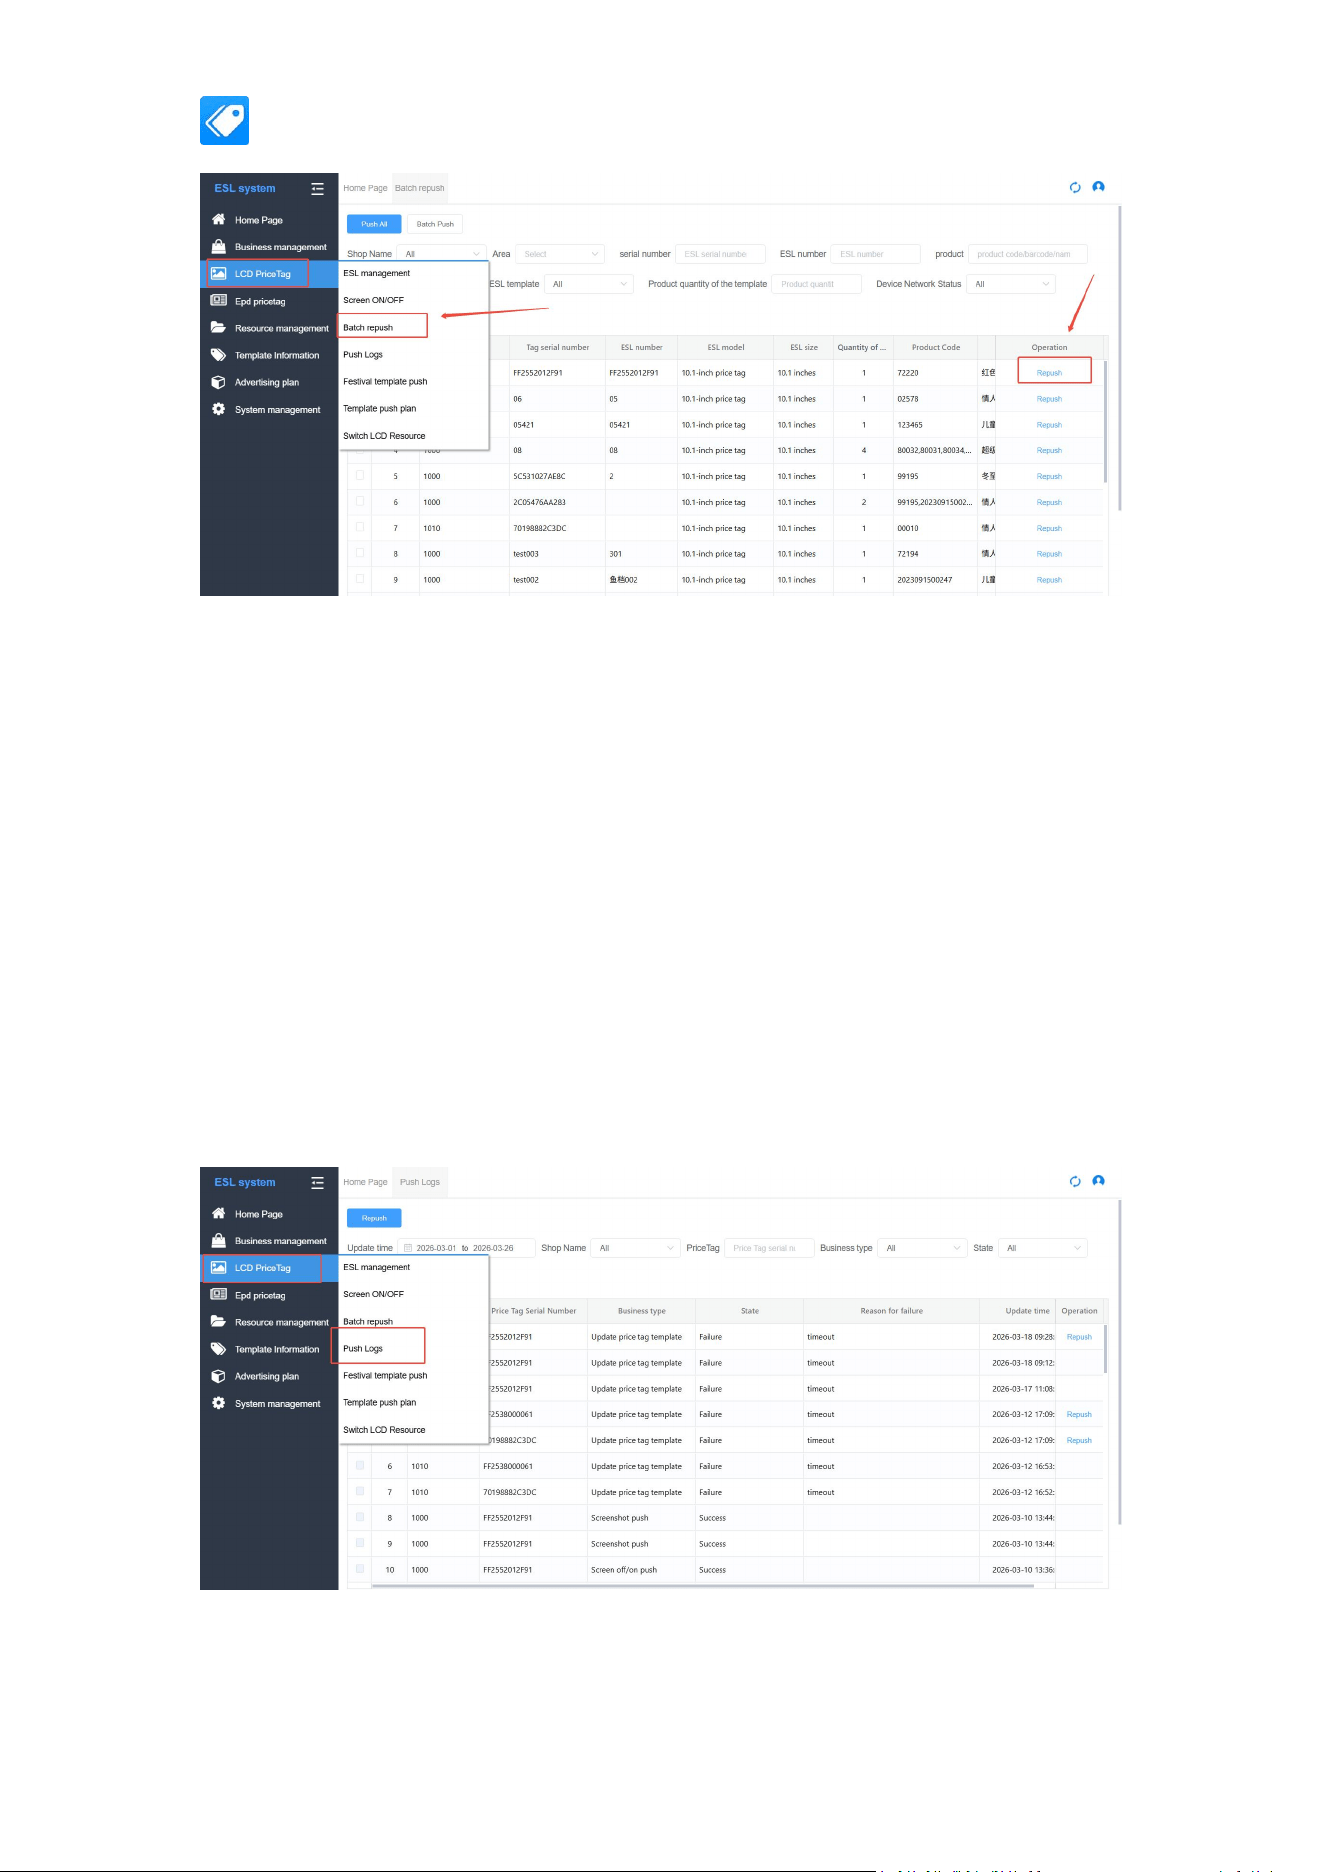
3.3 Batch Re-push
Function Overview: Manually re-push product information or templates in batches when some
ESL data fails to update correctly.
Operation Path: LCD ESL
→
Batch Re-push
Steps
:
1. Filter the ESLs that need re-pushing (supports filtering by store, area, binding status,
template, etc.).
2. Click 【Batch Re-push】 .
3. Confirm; the system will create a re-push task. The execution results can be viewed in
the "Push Log".
POSHIJI ESL Management System
13
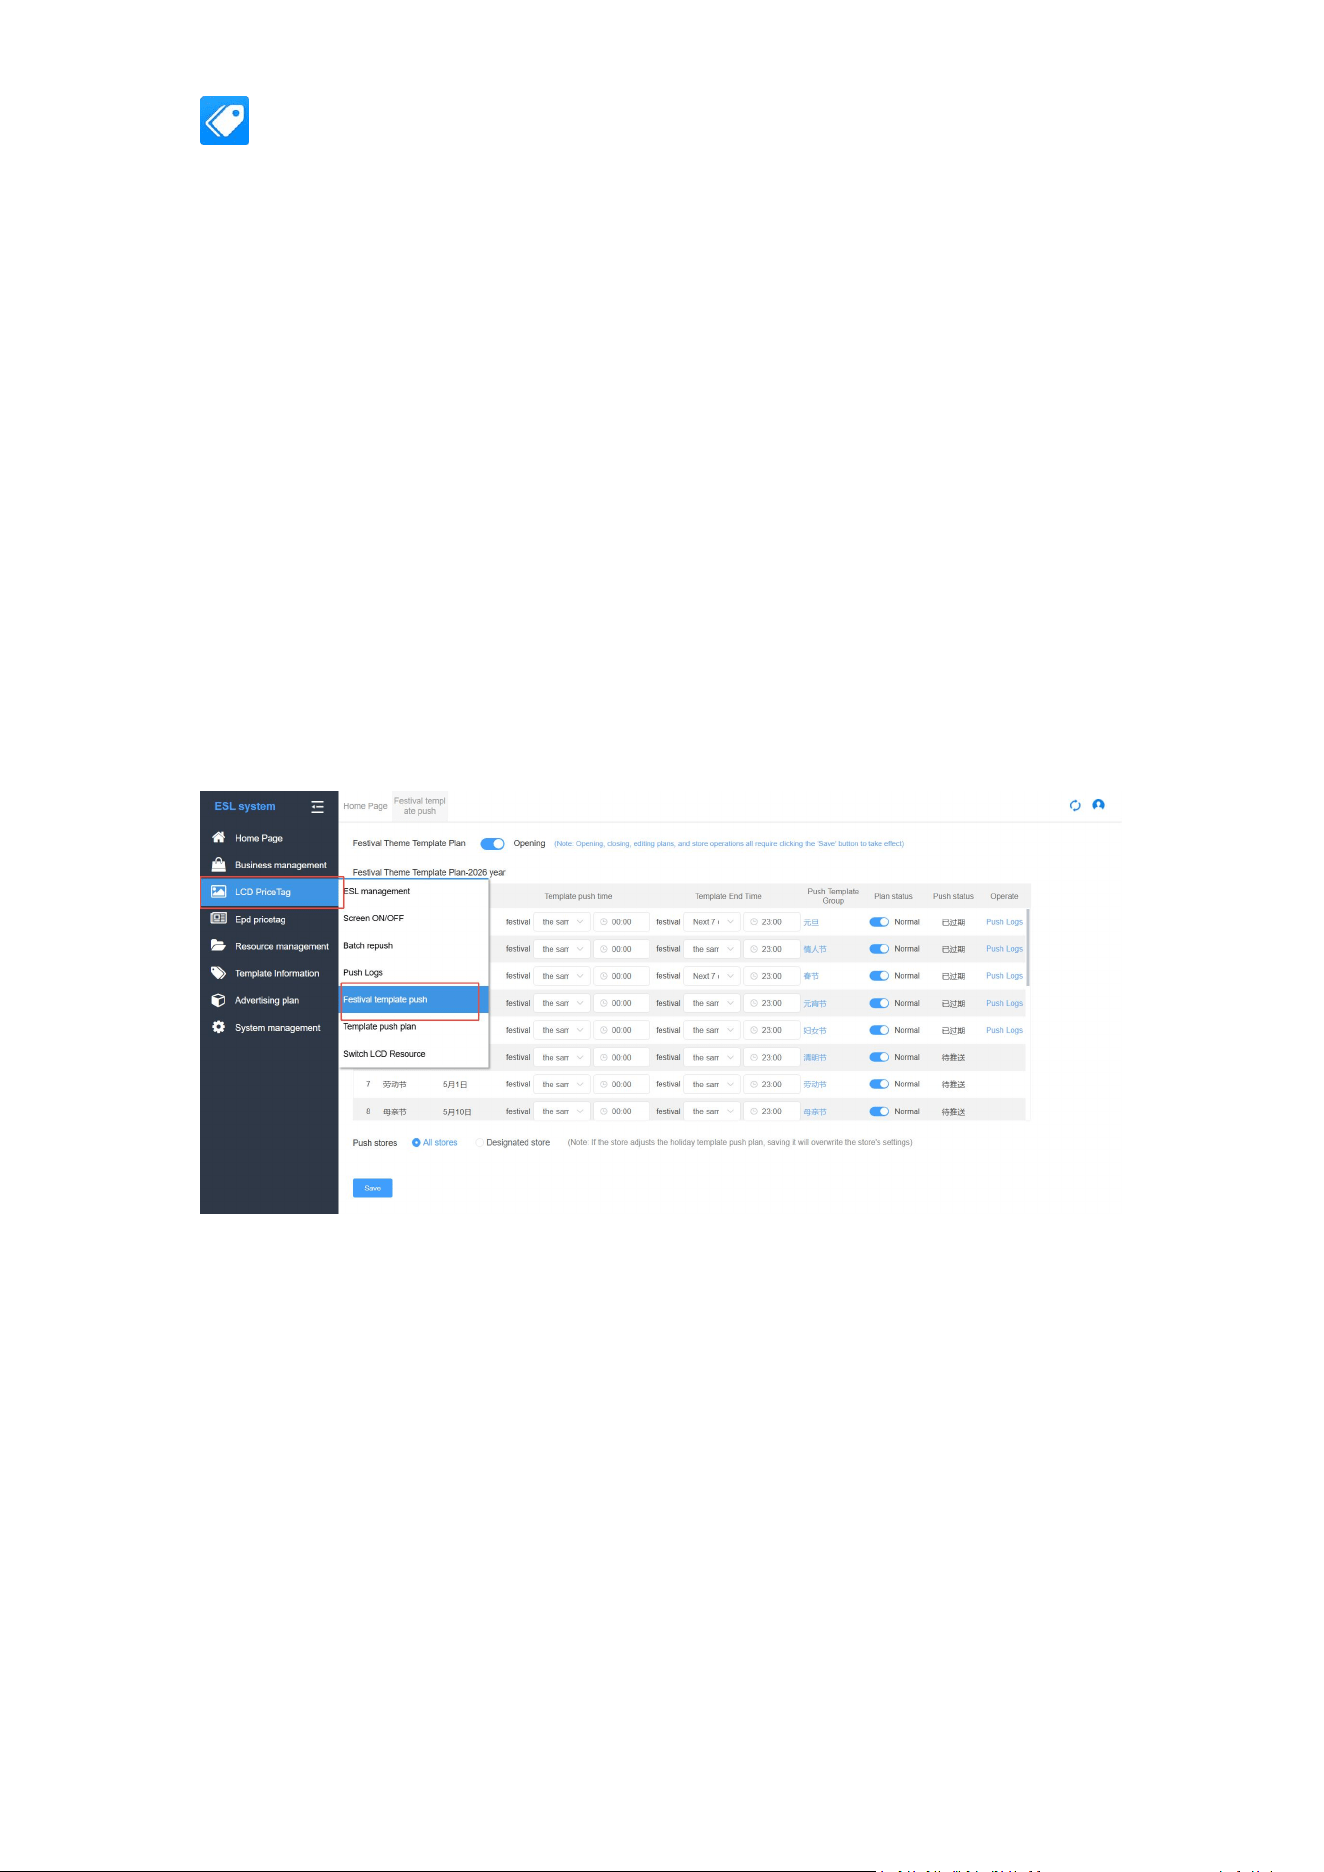
3.4 Push Log
Function Overview: Record all operations that push data to LCD ESLs for tracking and
troubleshooting.
Operation Path: LCD ESL
→
Push Log
Search Criteria:
Time Range
ESL Serial Number
Operation Type (Update ESL Template, Network Detection, Screenshot Push, Screen
On/Off Push)
Execution Status (In Progress / Success / Failed)
Log Details:
Store Name, ESL Serial Number, Push Time, Operator, Business Type, Failure Reason (e.g.,
ESL offline, timeout).
POSHIJI ESL Management System
14
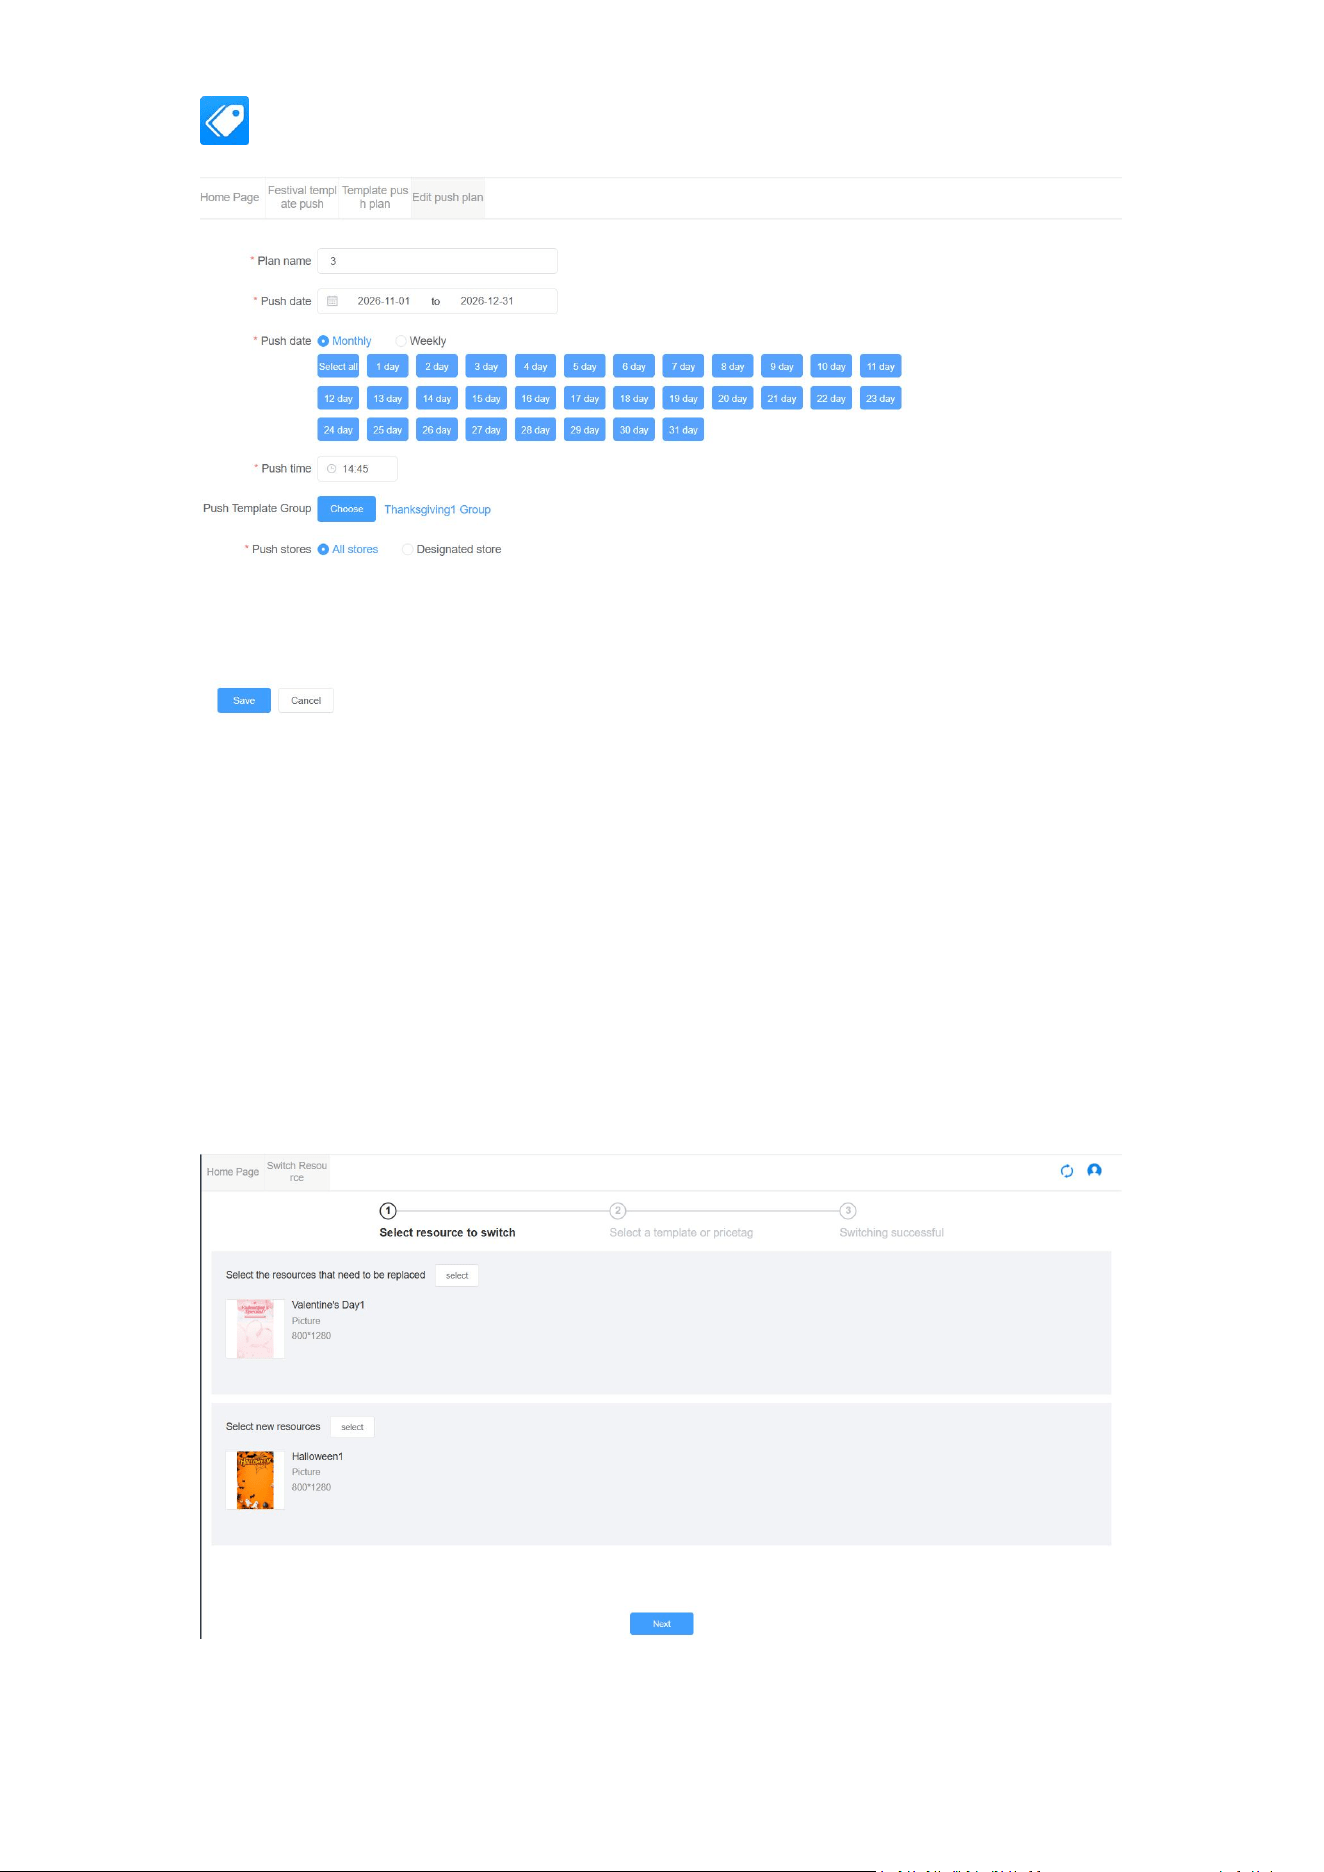
3.5 Holiday Template Push & Template Push Schedule
Function Overview: Automatically switch ESL templates on a schedule for holiday marketing or
daily segmented display.
Operation Path: LCD ESL
→
Holiday Template Push / Template Push Schedule
3.5.1 Holiday Template Push
1. Click
【
Add Holiday Plan
】
.
2. Fill in the plan name and select the holiday template (must be created in template
management in advance).
3. Set the effective time period (e.g., Jan 20, 2026
–
Feb 5, 2026).
4. Select the applicable store or ESL range.
5. After enabling, the system will automatically push the template during the specified
period and revert to the original template after the period ends.
3.5.2 Template Push Schedule
Supports more flexible scheduled tasks, such as "Push promotional template every
Friday at 18:00" or "Push daily template every day at 10:00".
The operation is similar to the holiday template push, with settable repeat cycles.
POSHIJI ESL Management System
15
3.6 Switch LCD Resources
Function Overview: Batch switch the images or videos displayed on LCD ESLs, suitable for
advertising content updates.
Operation Path: LCD ESL
→
Switch LCD Resources
Steps
:
1. Select the resource source (choose an uploaded image/video from the resource library).
2. Filter the target ESLs (supports filtering by store, zone, template group, etc.).
3. Click 【Preview】 to confirm the display effect of the resource on the ESL (simulation).
4. Execute the switch; the system pushes the resource to the ESLs.
POSHIJI ESL Management System
16
Chapter 4: Epd ESL Management
4.1 Store Base Station
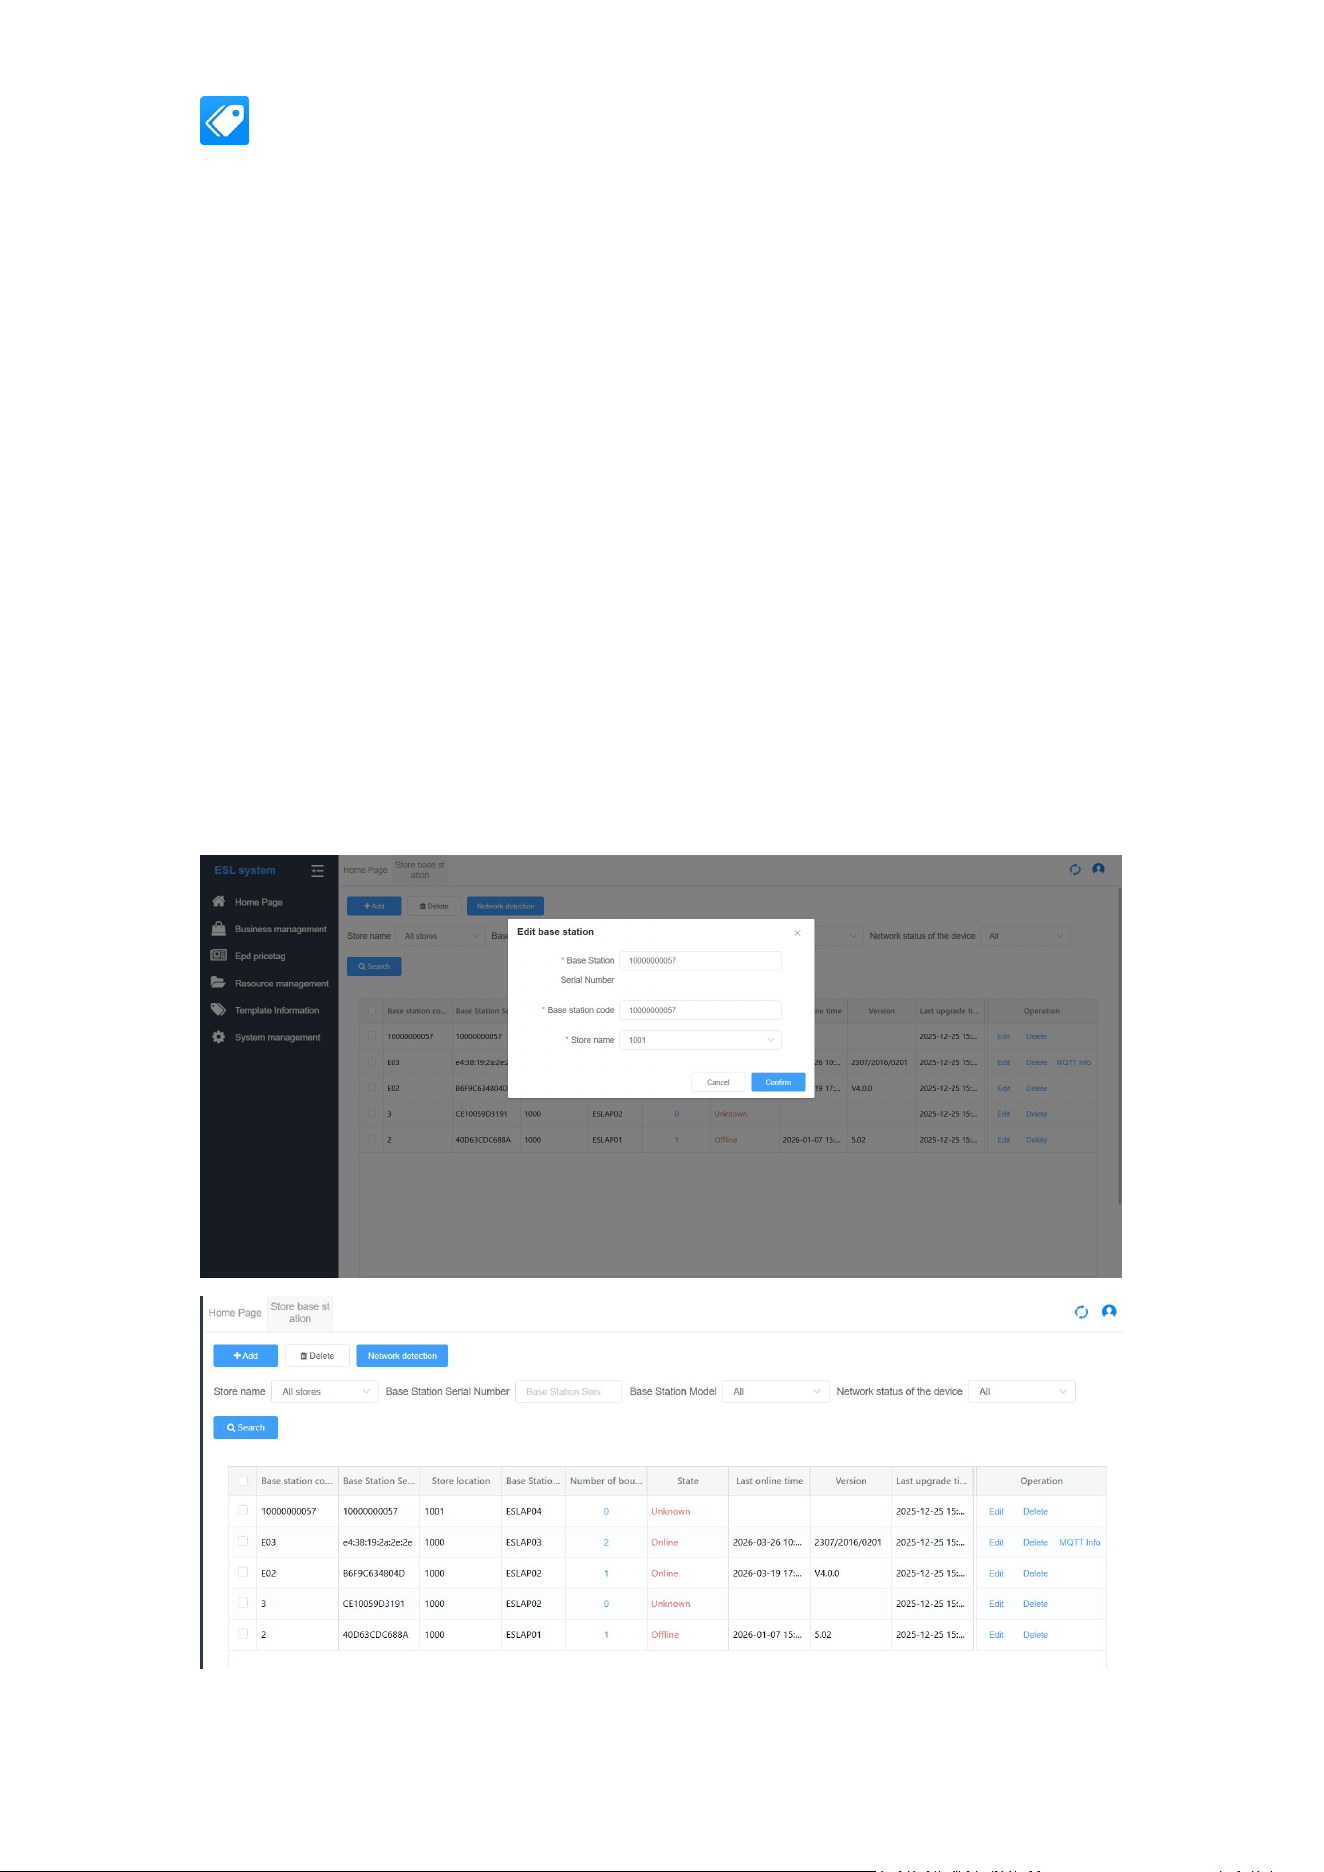
Function Overview: Manage the communication base stations for Epd ESLs, including base
station information maintenance and network status detection.
Operation Path: Epd ESL
→
Store base station
4.1.1 AddBase Station
1. Click 【Add】 .
2. Enter Base Station Code, Base Station MAC Address, and the store.
3. After saving, the Base Station will appear in the list with a status of "Offline" until the
first connection is made.
4.1.2 Edit/Delete Base Station
Supports modifying base station information. Ensure no ESLs are bound to the base
station before deletion.
4.1.3 Network Detection
The list displays Base Station status (Online/Offline) and signal strength (RSSI) in
real-time.
POSHIJI ESL Management System
17
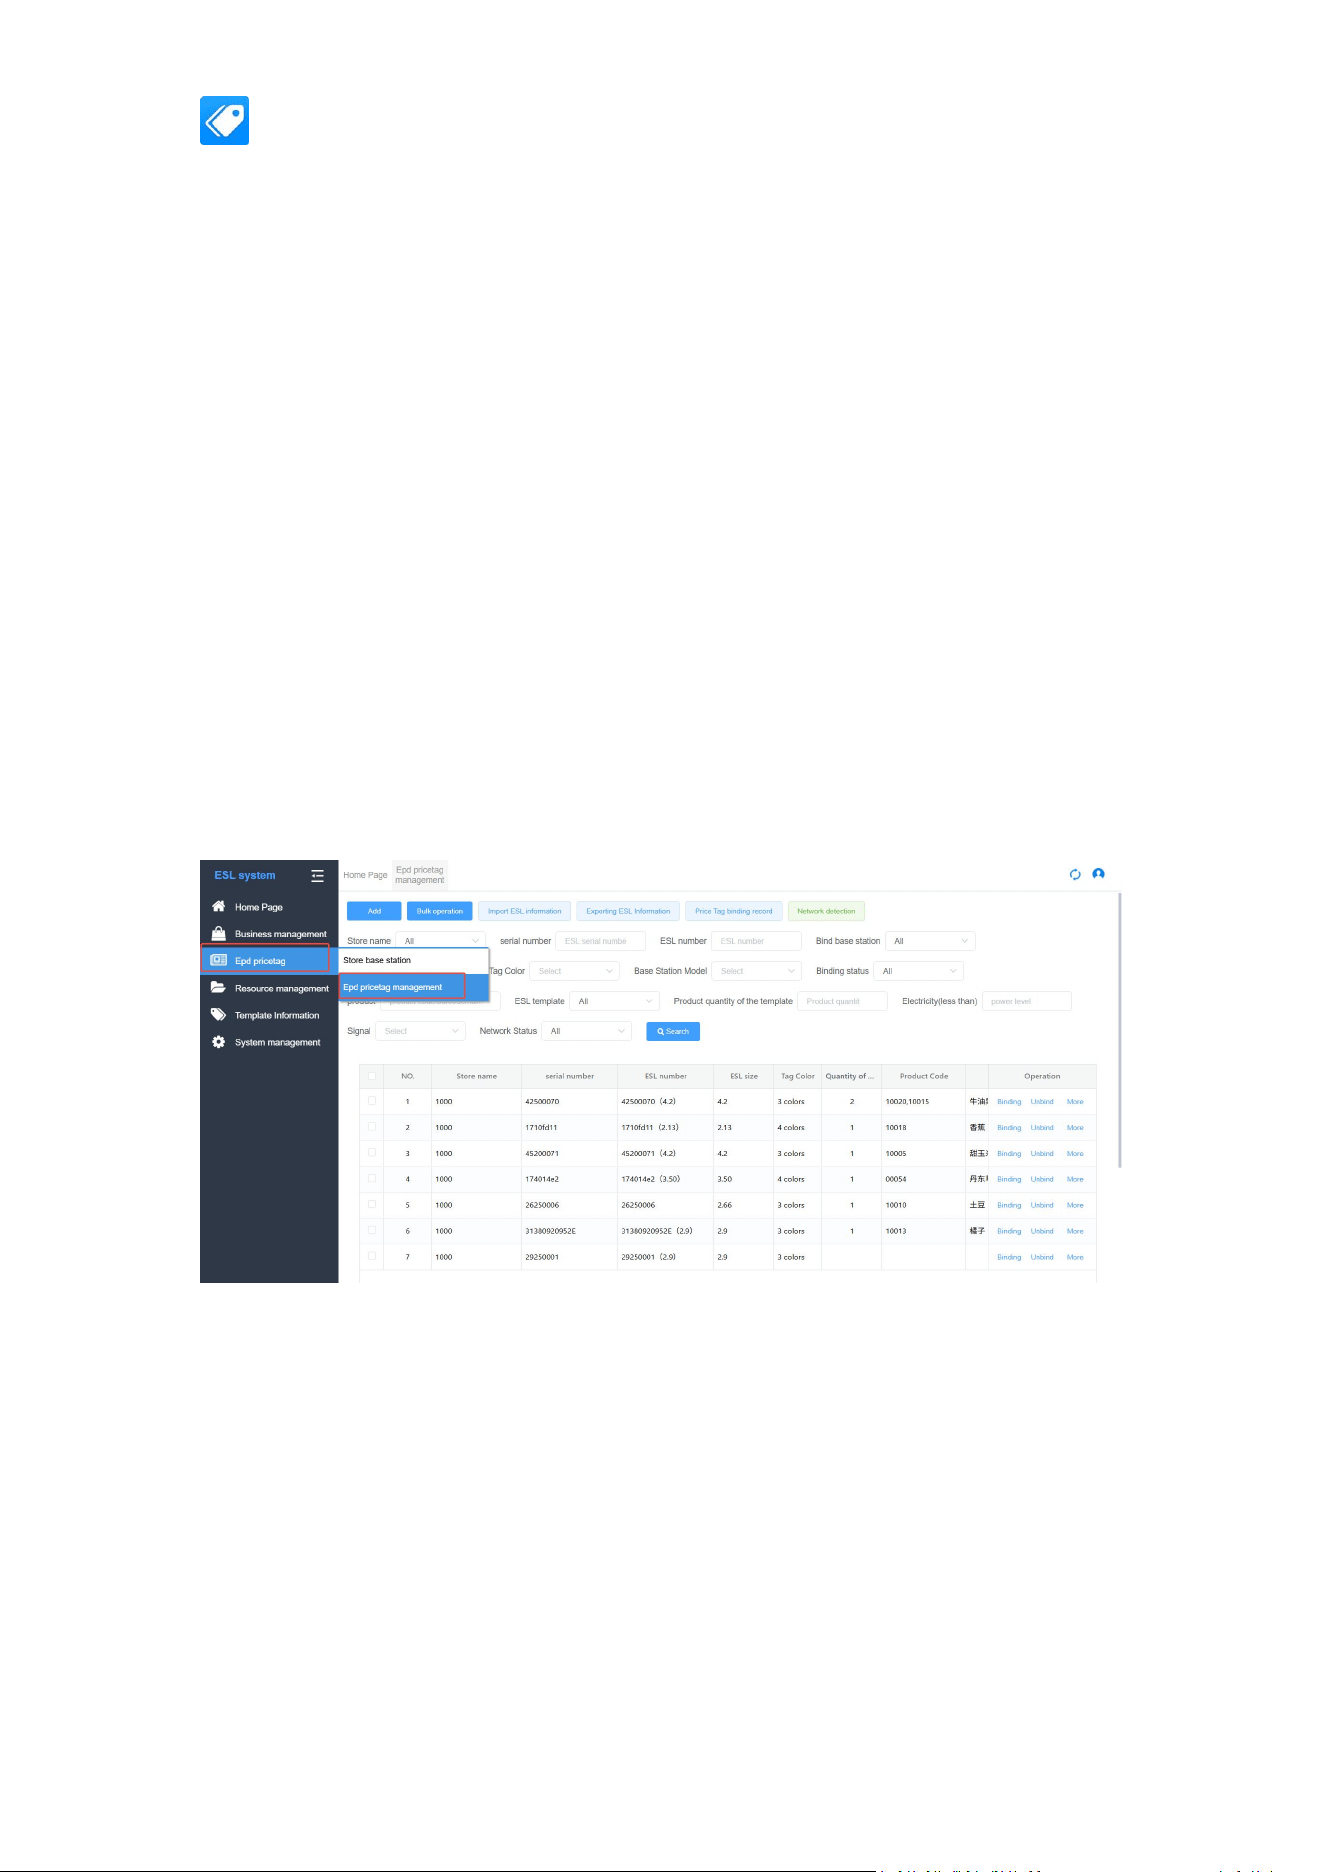
4.2 Epd ESL Management
Function Overview: Manage Epd ESLs, supporting product binding, Base Stationbinding, and
batch template switching.
Operation Path: Epd ESL
→
Epd ESL Management
4.2.1 ESL List
Displays all Epd ESLs. Supports filtering by store, zone, Base Station, and status.
Key fields: ESL ID, MAC, Name, Bound Product, Bound Base Station, Template, Battery
Level, Status.
4.2.2 Single Operations
Bind Product: Click
【
Bind
】
, select a product.
Bind base station: Click
【
Bind
】
, select the target Base Station to assign the ESL to its
coverage area.
Unbind: Remove the association with the product or Base Station.
4.2.3 Batch Operations
Batch Bind/Unbind Products: Check ESLs and execute, commonly used when putting a
batch of new products on shelves.
Batch Switch Template: Check ESLs
→
Select the Epd template
→
Execute.
Batch Bind/Unbind base station: Batch assign ESLs to a specified Base Station.
Chapter 5: Resource & Template Management
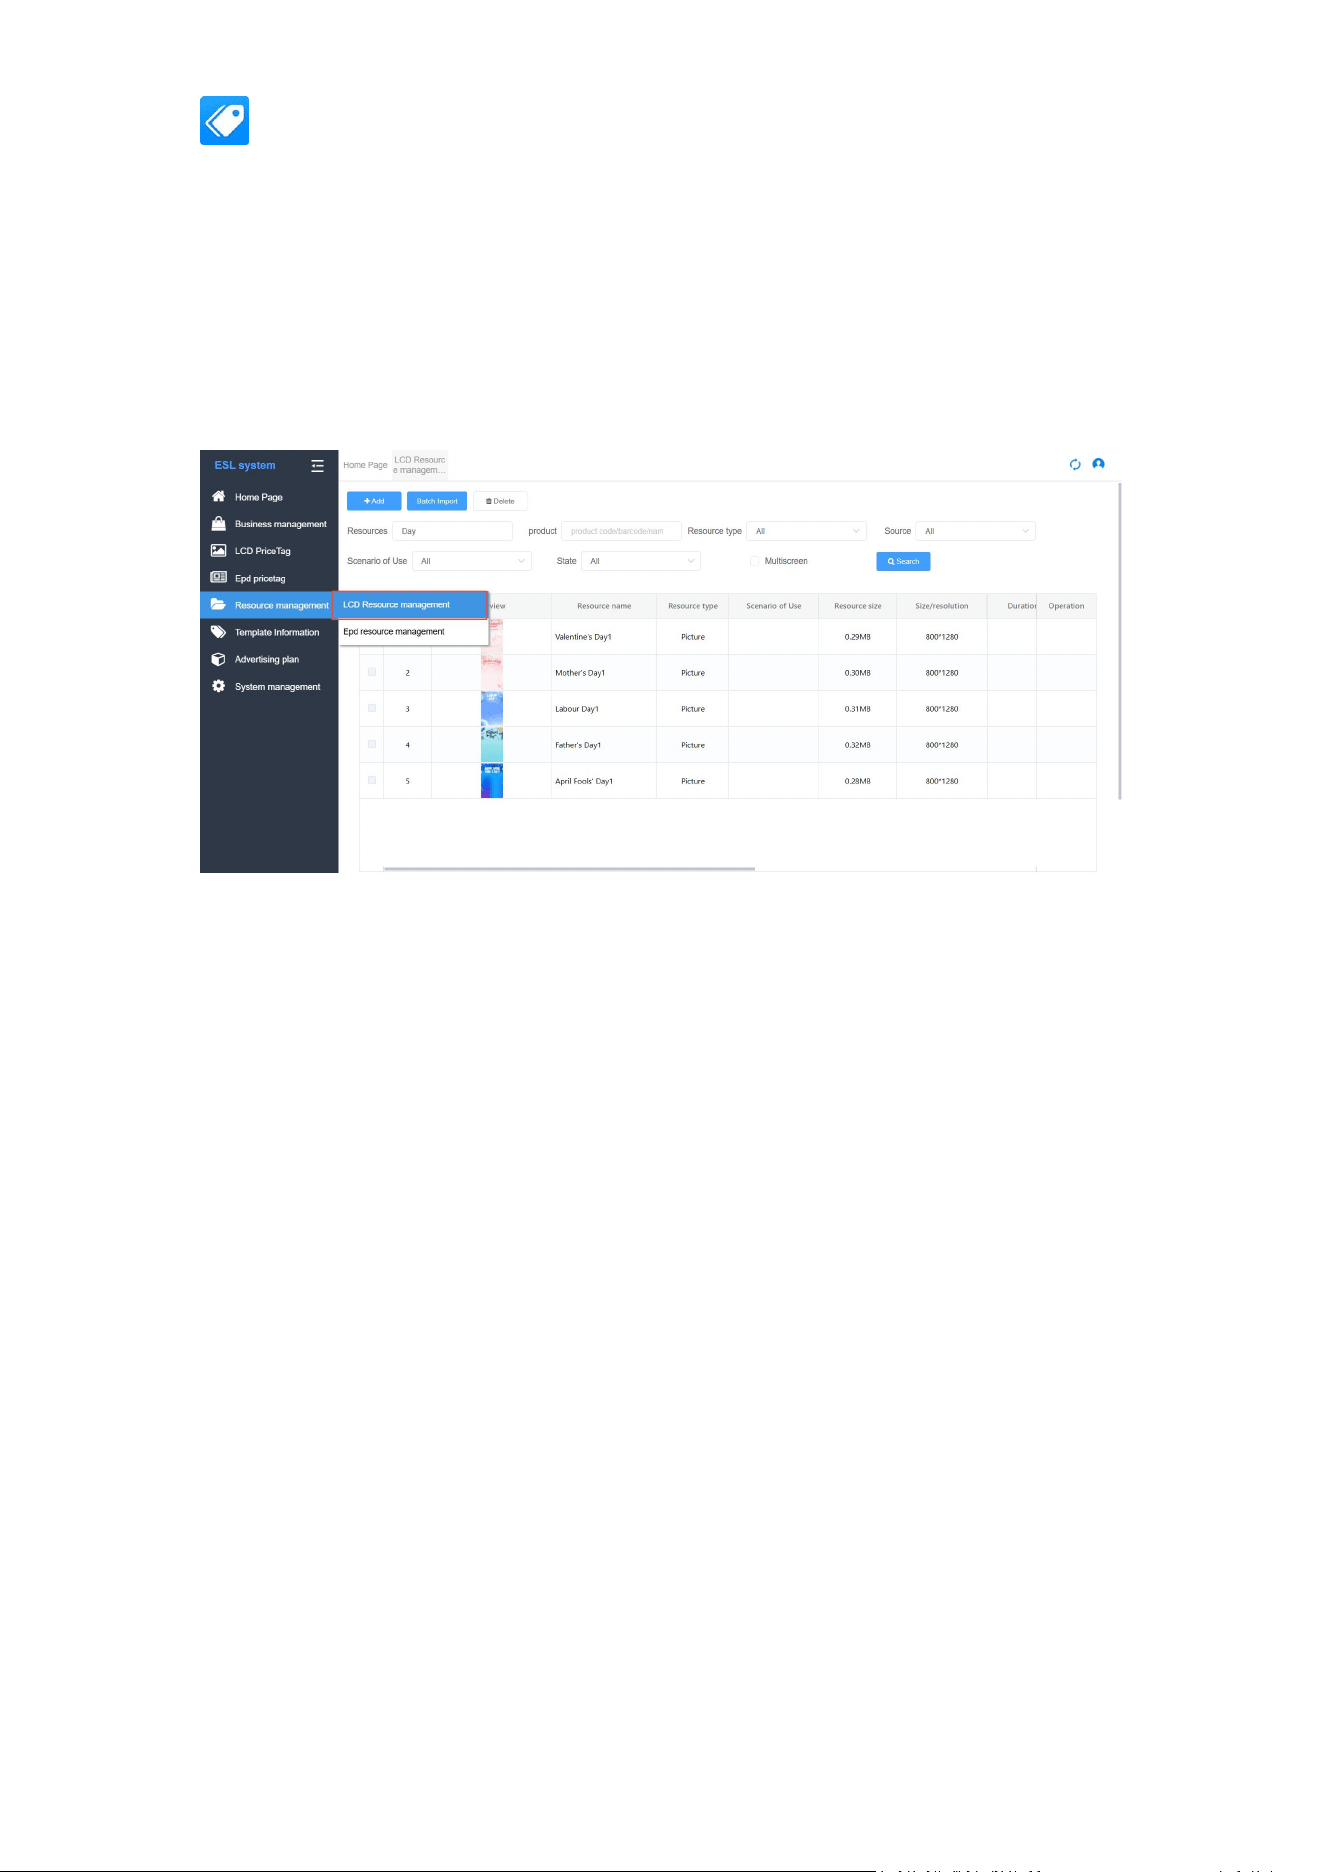
5.1 Resource Management
Function Overview: Upload and manage images, videos, and other media used for ESL display.
Operation Path: Resource Management
→
LCD Resource Management / Epd Resource
Management
5.1.1 Upload Resource
POSHIJI ESL Management System
18
1. Click
【
Upload
】
.
2. Select the file (LCD supports jpg/png/mp4; Epd supports images with specific
resolutions).
3. Fill in the resource name and category tags.
4. After successful upload, the resource can be previewed in the list.
5.1.2 Resource Management
Supports editing names, deletion, and filtering by category.
Can view which products are referencing the resource.
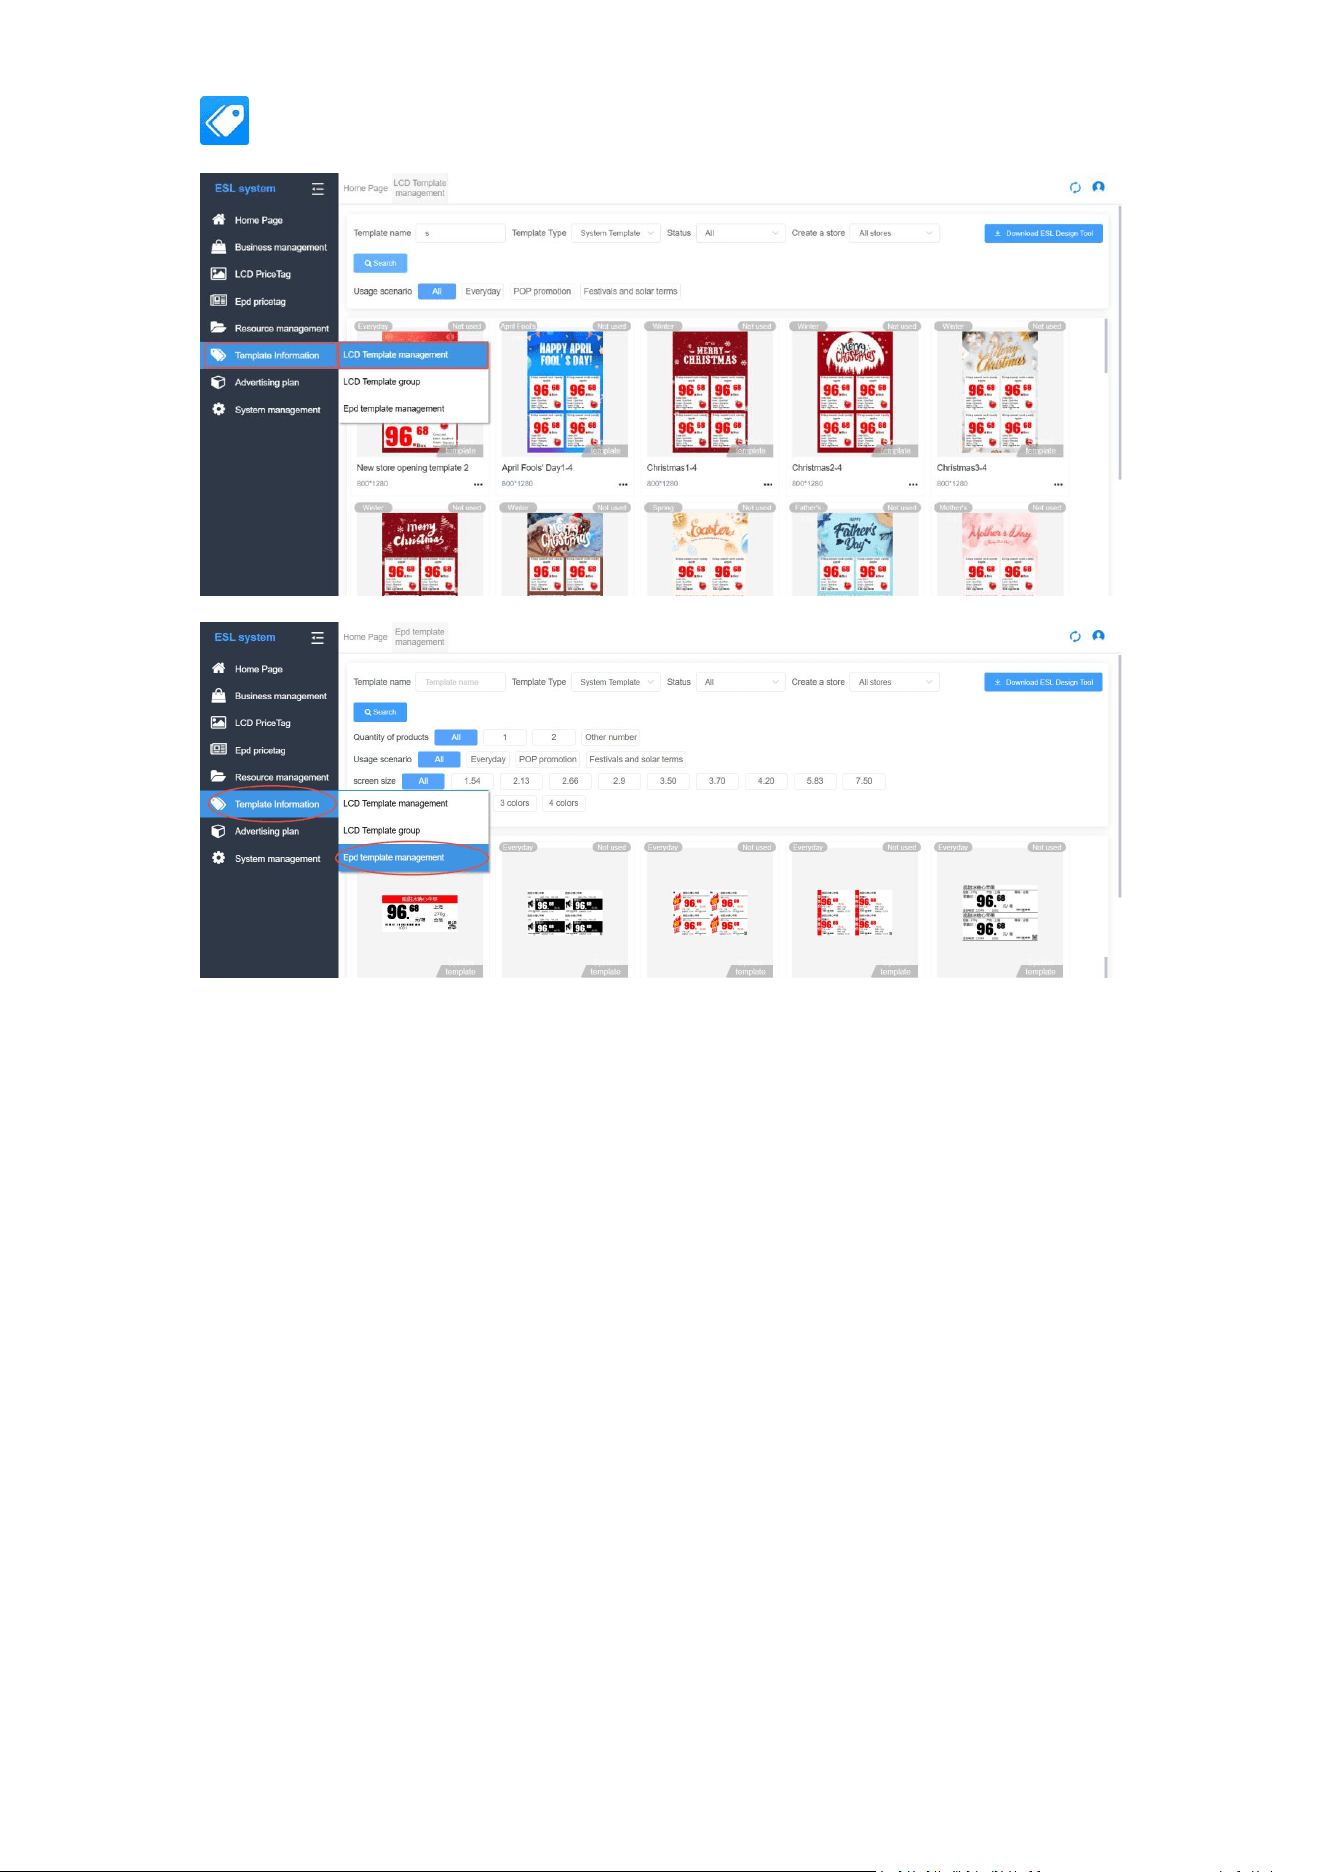
5.2 Template Management
Function Overview: Define the display layout of ESLs, including text positions, font sizes, and
resource references.
Operation Path: Template Information
→
LCD Template Management / LCD Template Group
Management / Epd Template Management
5.2.1 LCD Template Management
Add Template: Download “ESL Design tool”, Set the template name and resolution.
Design the layout using drag-and-drop (product name, price, barcode, image area, etc.).
Edit/Delete: Templates currently in use by ESLs cannot be deleted; switch to another
template first.
5.2.2 LCD Template Group Management
Bundle multiple templates into a group for batch switching to display different numbers
of product items (e.g., a template displaying 3 products).
5.2.3 Epd Template Management
Epd template design should consider the limitations of
black/white/three-color/four-color displays and support different Epd screen sizes, etc.
POSHIJI ESL Management System
19
Chapter 6: Advertising Campaign
6.1 Media Management
Function Overview: Centrally manage advertising materials, similar to Resource Management
but focused on marketing content.
Operation Path: Advertising Campaign → Media Management
Instructions:
Upload images, videos, and other advertising materials.
Supports tagging (e.g., "Summer Sale", "New Arrival") for easy recall in advertising
campaigns.
6.2 Advertising Campaign
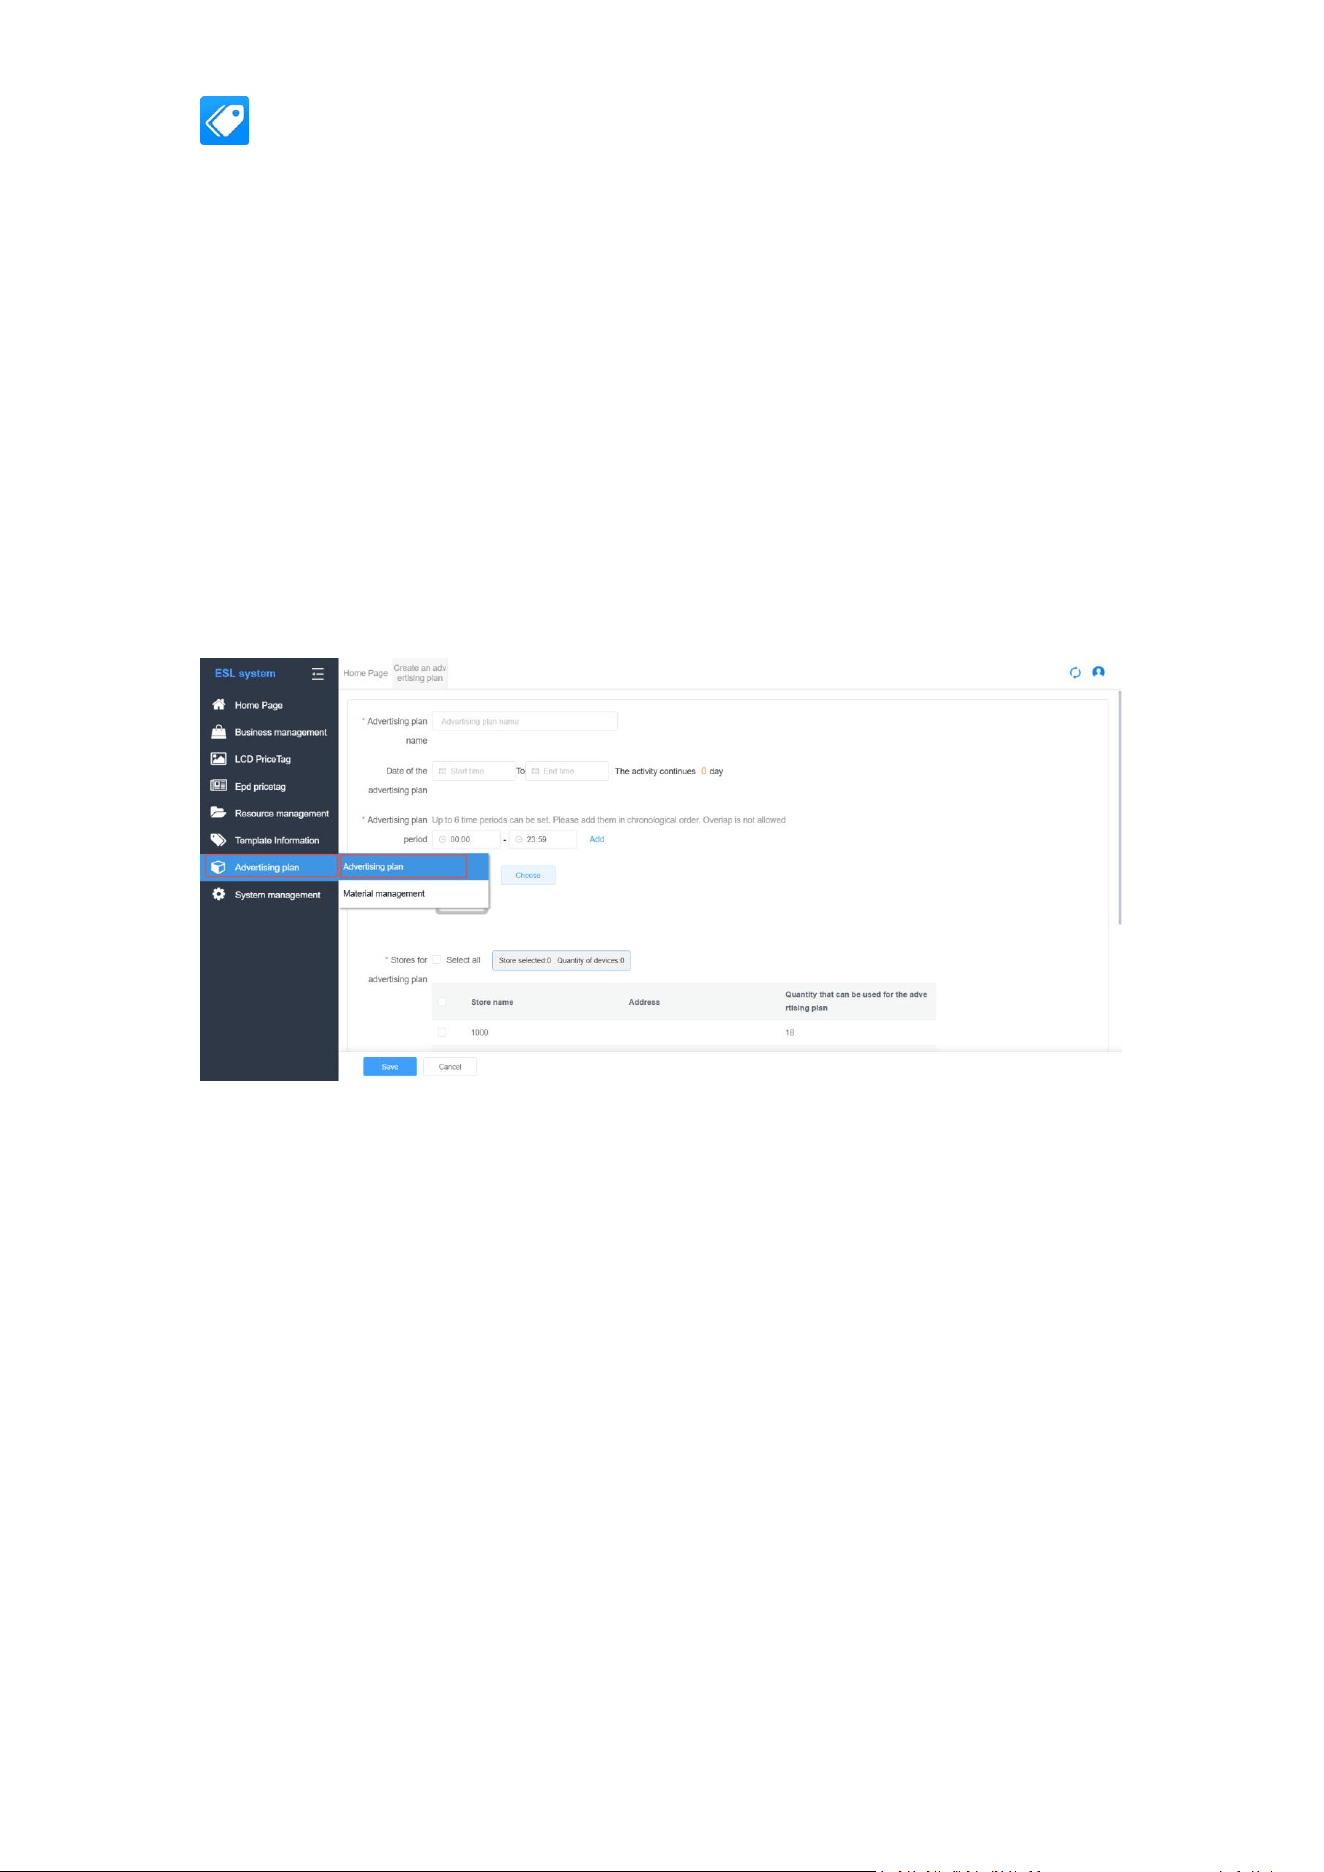
Function Overview: Create advertising plans, specifying the target devices, schedule, and
playback strategy.
Operation Path: Advertising Campaign
→
Advertising Campaign
POSHIJI ESL Management System
20
6.2.1 Create Campaign
1. Click
【
Add Advertising Campaign
】
.
2. Fill in the campaign name and select the device type (LCD ESL / Epd ESL).
3. Select the target range (by store, zone, or specific ESLs).
4. Select the media to display (supports multiple media in a loop).
5. Set the playback strategy:
o Playback Order (Sequential / Random)
o Duration per Media (seconds)
o Loop Count or Infinite Loop
6. Set the effective time period (Start Time ~ End Time).
7. Save and enable the campaign.
6.2.2 Campaign Management
Supports enabling/disabling, editing, and deleting.
Can view the campaign status and the number of devices targeted.
Chapter 7: System Management
7.1 Role Management
Function Overview: Create different roles and assign menu permissions and operation
permissions.
Operation Path: System Management → Role Management
Steps:
1. Click
【
Add Role
】
, enter the role name (e.g., "Store Staff").
2. In the permission tree, check the menus that this role is allowed to access (e.g., only
product management and ESL viewing, not system settings).
3. After saving, assign users to this role to control their permissions.
POSHIJI ESL Management System
21
7.2 User Management
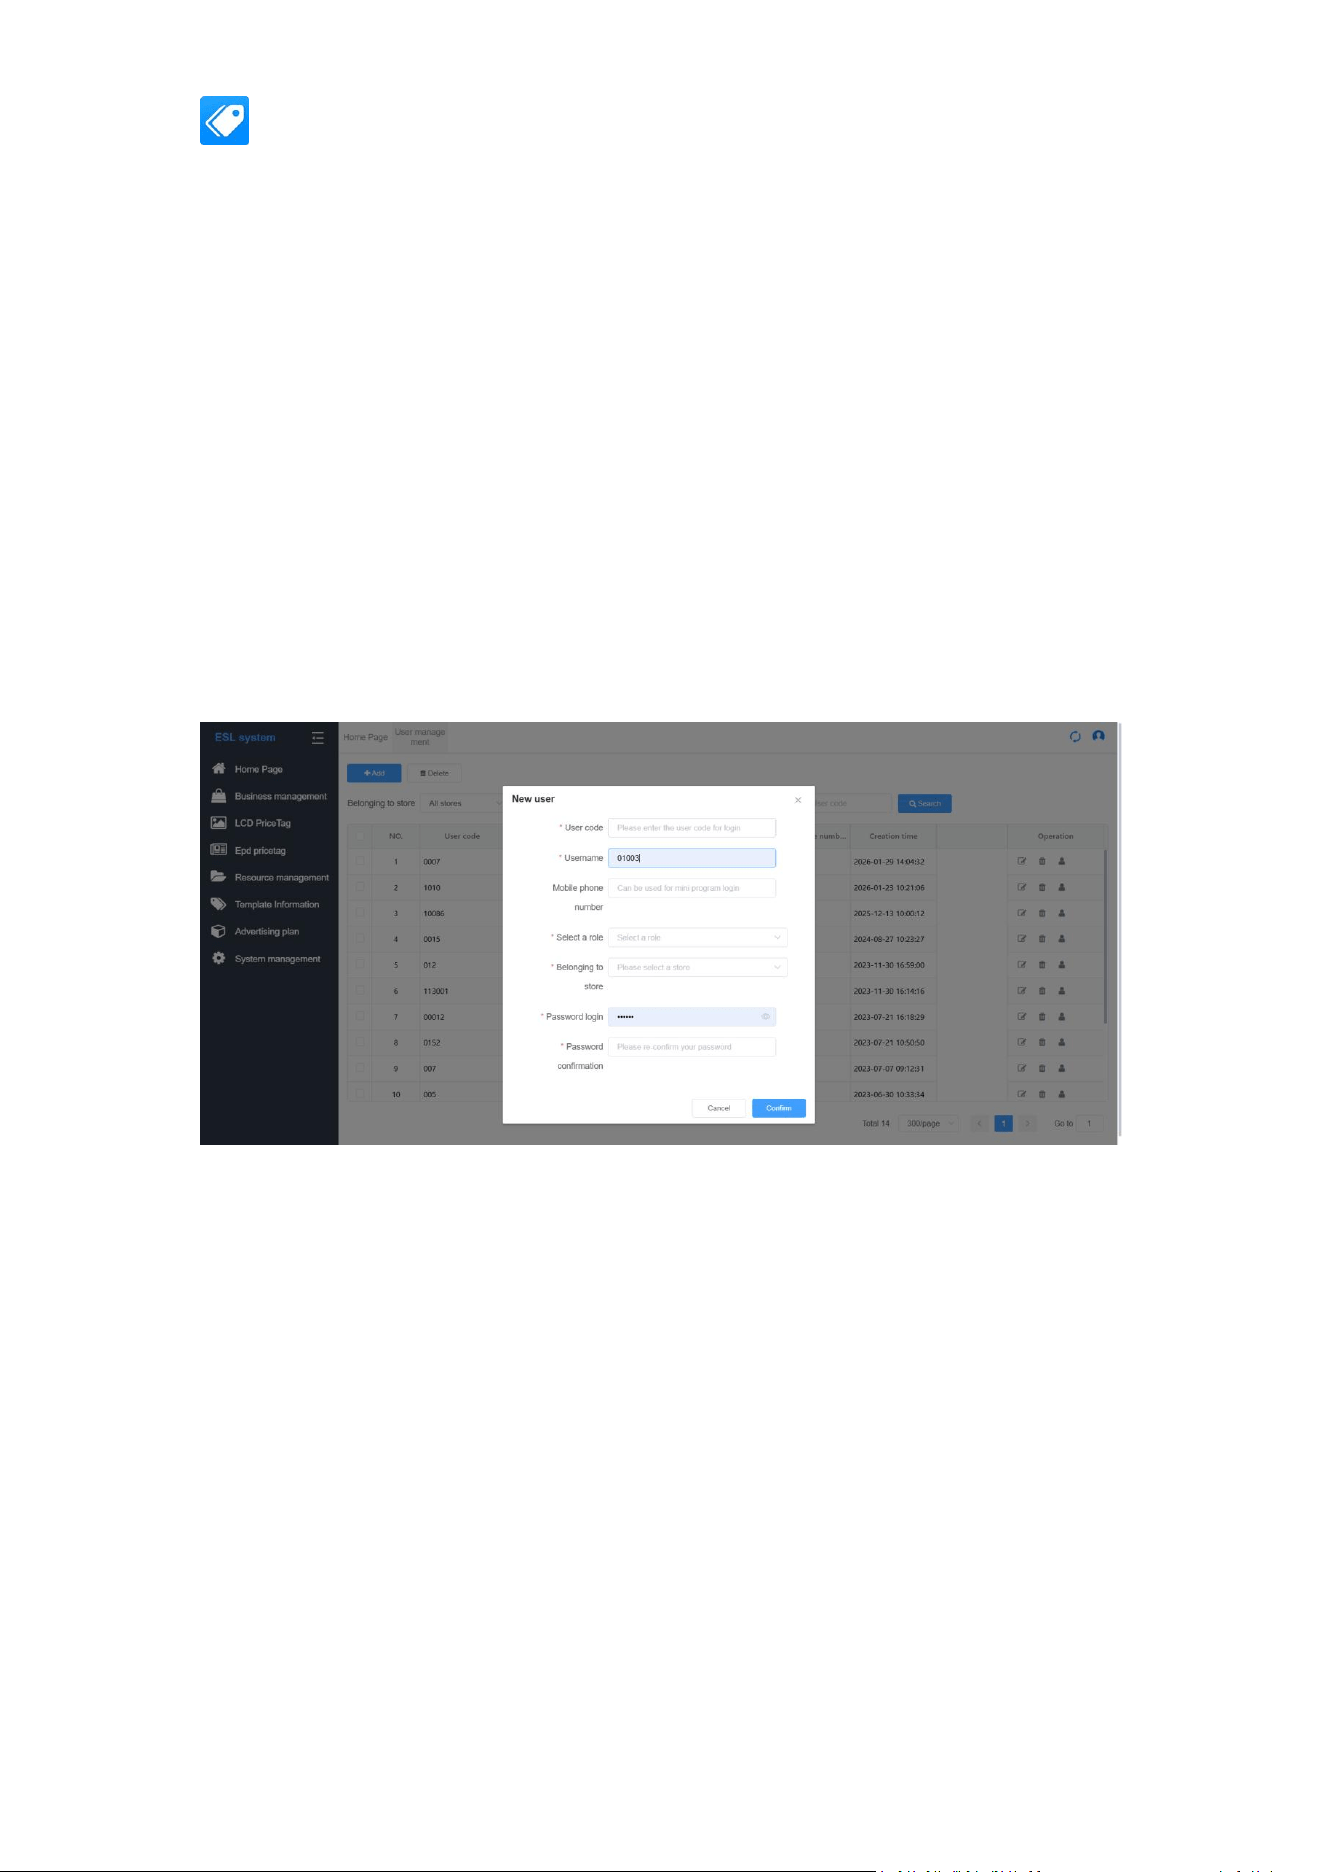
Function Overview: Manage system login accounts, assign associated stores and roles.
Operation Path: System Management
→
User Management
7.2.1 Add User
1. Click
【
Add User
】
.
2. Fill in the username, name, phone number, and password.
3. Select the associated store(s) (multiple stores allowed).
4. Assign a role (select from the role list).
5. Set the status (Enabled / Disabled).
6. After saving, the user can log in.
7.2.2 Edit/Disable User
Supports password reset, modifying information, and disabling accounts (disabled
accounts cannot log in).
7.3 Parameter Settings
Function Overview: Configure system global parameters, such as ESL data synchronization
frequency and default templates.
Operation Path: System Management → Parameter Settings
Common Parameters:
Parameter
Name
Description
ESL Type
10.1" LCD ESL / Epd ESL / Both

POSHIJI ESL Management System
22
Parameter
Name
Description
Product Unit
Product unit, e.g., KG (kilogram), Jin (500g)
ESL Display
Unit
Unit displayed on the ESL
Store
Parameters
Control whether the store syncs third-party prices and other product information (unit,
specification, shelf life, origin, grade, brand, QR code)
7.4 Operation Log
Function Overview: Record all user operations in the admin panel for auditing and traceability.
Operation Path: System Management
→
Operation Log
Query :
Can filter by operator, operation time, operation module (Product Management, ESL
Management, etc.), and operation type (Add, Edit, Delete, Batch, etc.).
Log Content Example:
Operation
Time
Operator
Module
Type
Details
Source
2026-03-26
10:15
admin
Product
Management
Batch Price
Change
50 products, 5%
price reduction
Admin
Panel
7.5 Software Integration
Function Overview: Integrate with the Kemai Yunfan backend to automatically sync product data.
Operation Path: System Management
→
Software Integration
Configuration Steps:
1. On the integration configuration page, fill in the API URL, AppKey, and Secret provided by
Kemai Yunfan.
2. Click
【
Test Connection
】
to verify network and authentication.
3. Set the sync strategy:
4. Automatic Sync: Pull product data at fixed intervals.
5. Manual Sync: Click
【
Sync Now
】
to trigger a one-time data sync.
6. View Sync Logs: Records the number of products synced each time, the number of
successes/failures, and the reasons for failures.

POSHIJI ESL Management System
23
Appendix
Appendix A: Frequently Asked Questions and Solutions
Issue
Possible Cause
Solution
ESL cannot be
bound
ESL not powered on, ESL not
connected to network, ESL not
registered, ESL already bound
elsewhere
Check ESL power, check ESL network. Verify
MAC address; unbind in the original system
or contact administrator.
Batch
operation
partially fails
Some ESLs are offline or have data
anomalies
Check failure details, retry for offline ESLs.
Epd ESL refresh
is slow
Weak base station signal or network
latency
Check base station status, ensure
communication between ESL and base
station is normal.

POSHIJI ESL Management System
24
POSHIJI ESL Management System App
Operation Manual
Document Version: V1.0
Release Date: March 2026
Applicable System: Android / iOS
Target Audience: Store Operator, Store Staff
Document Description
Purpose
This manual is designed to guide store operators in using the POSHIJIESL Management System
mobile App to perform daily operations such as product management, ESL binding/unbinding,
template switching, Base Station management, and WiFi configuration.
Target Audience
Store Staff:Responsible for on-site product shelving, ESL binding, and price changes.
Store Manager:Responsible for store device management, user management, and
system configuration.
Terminology
Term
Description
LCD ESL
Electronic shelf label using a liquid crystal
display, supporting images and video
playback.
EPD / EPD ESL
Electronic shelf label using electronic paper
technology, featuring low power consumption
and a paper-like display.
Base Station
The communication hub for EPD ESLs,
responsible for data transmission between
the ESLs and the server.
Template
Defines the layout of content displayed on the
ESL.
POSHIJI ESL Management System
25
Multi-screen Sync
Multiple ESLs spliced together to form a larger
screen, playing the same video
simultaneously.
Split-screen Sync
Multiple ESLs work together to display
different content, collectively forming a
complete visual.
MQTT
A lightweight messaging protocol used for
communication between ESLs and the
backend.
Chapter 1: Download and Installation
1.1 Android Download
Method 1: App Store Download
Open an app store on your phone (e.g., Huawei AppGallery, Xiaomi GetApps, Tencent
MyApp).
Search for "POSHIJIESL Management System" or "ESL Manager".
Locate the app and tap
【
Install
】
.
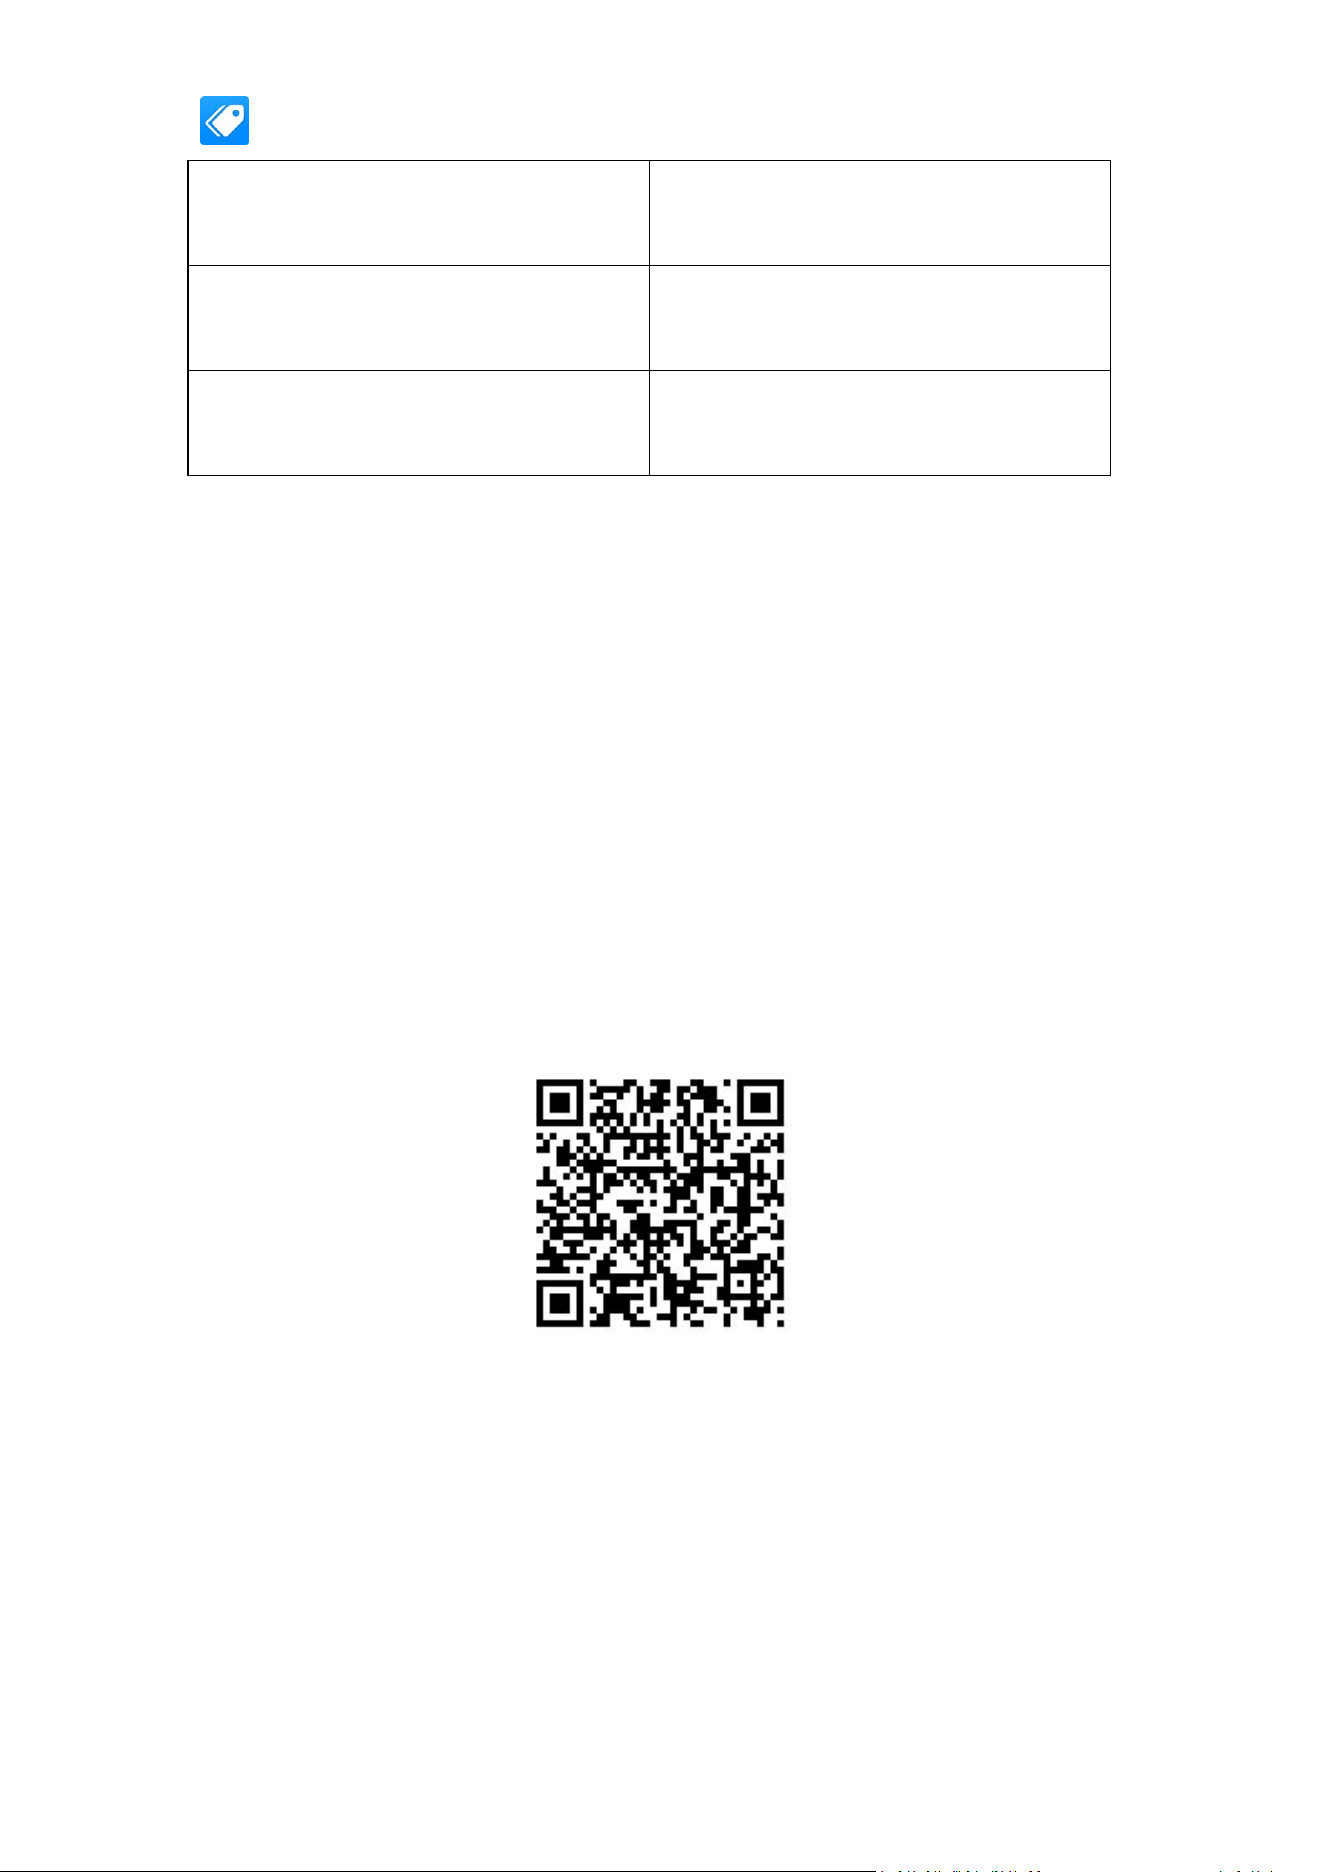
Method 2: Official Website QR Code Download
Use your phone’s browser to scan the QR code below to enter the download page.
Tap
【
Android Version Download
】
to download the APK installation package.
Once downloaded, open the APK file and follow the prompts to complete the
installation.
(Android)
1.2 iOS Download
Method 1: App Store Download
Open the App Store.
Search for "POSHIJIESL Management System" or "ESL Manager".
Locate the app and tap
【
Get
】
or
【
Download
】
, then follow the prompts to complete the
installation (Apple ID password or Face ID may be required).

POSHIJI ESL Management System
26
Method 2: QR Code Download
Use your phone’s camera or WeChat to scan the QR code below to go to the App Store
download page.
Tap【Get】to complete the installation.
(iOS)
1.3 First Launch After Installation
Permission Authorization
When you open the App for the first time, the system will request the following permissions.
Please allow them; otherwise, some functions may not work:
Bluetooth Permission:Used to search for nearby ESLs and configure WiFi.
Location Permission:Android requires location permission to scan Bluetooth devices
(recommended to select “While Using the App”).
Camera Permission:Used to scan ESL serial number QR codes for quick
binding/unbinding.
Notification Permission:Used to receive push task results (optional).
Important Notes
If you installed the APK from the official website on Android, the first launch may prompt
“Install from unknown source”. Please tap “Install anyway” or “Allow”.
Some Android phones may require manually enabling “Allow installation from unknown
sources” in Settings.
Chapter 2: Registration and Login
2.1 Register Account
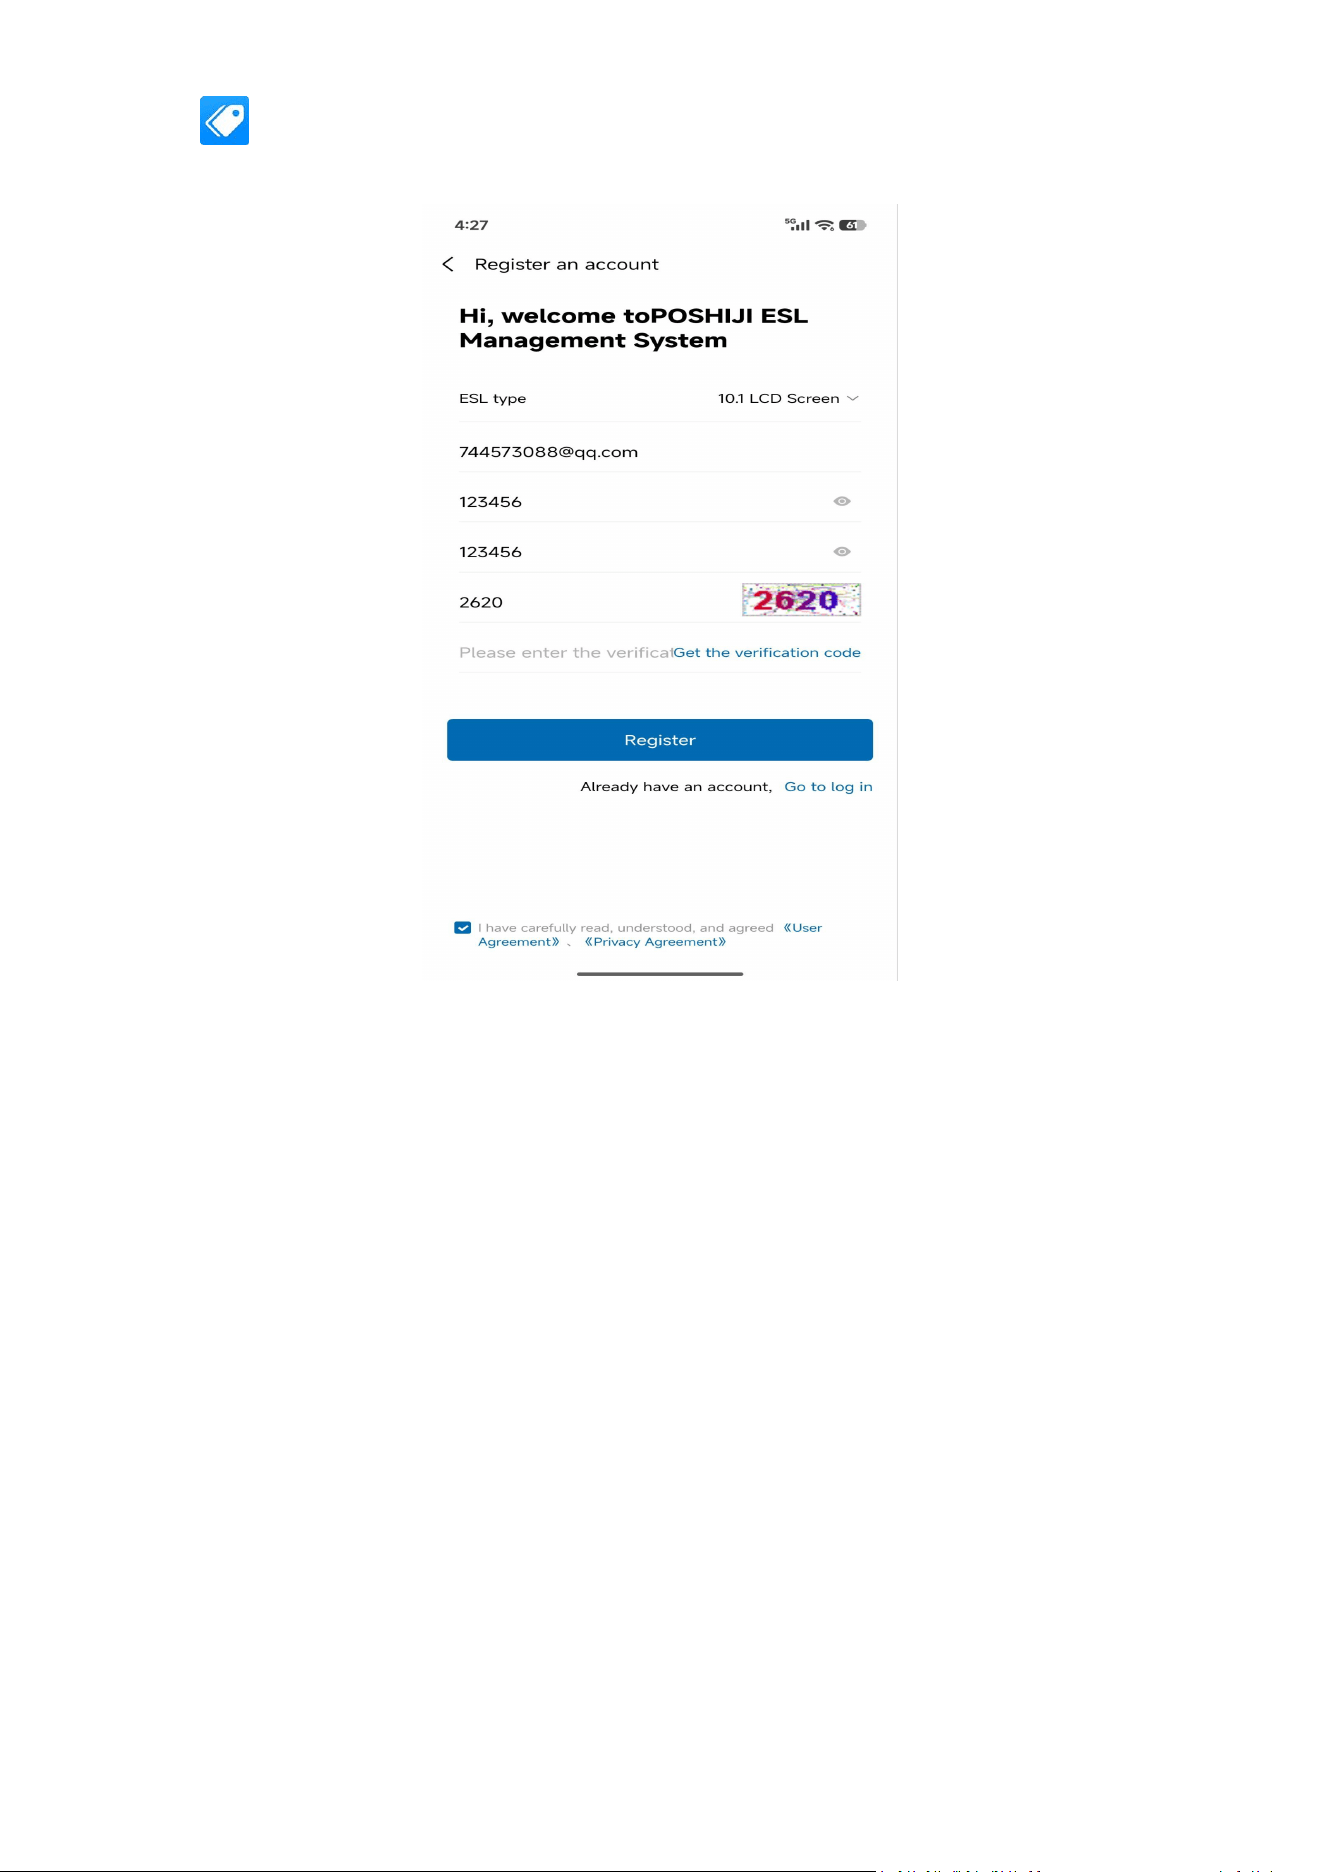
Operation Path:App Start Page → Register
Steps:
1. Open the App and tap the【Register】button.
2. Enter your mobile phone number / email address, then tap【Get Verification Code】.
3. Enter the SMS/email verification code you received.
4. Set a login password (recommended to contain letters and numbers, 6–20 characters).
POSHIJI ESL Management System
27
5. Confirm the password and tap
【
Register
】
to complete.
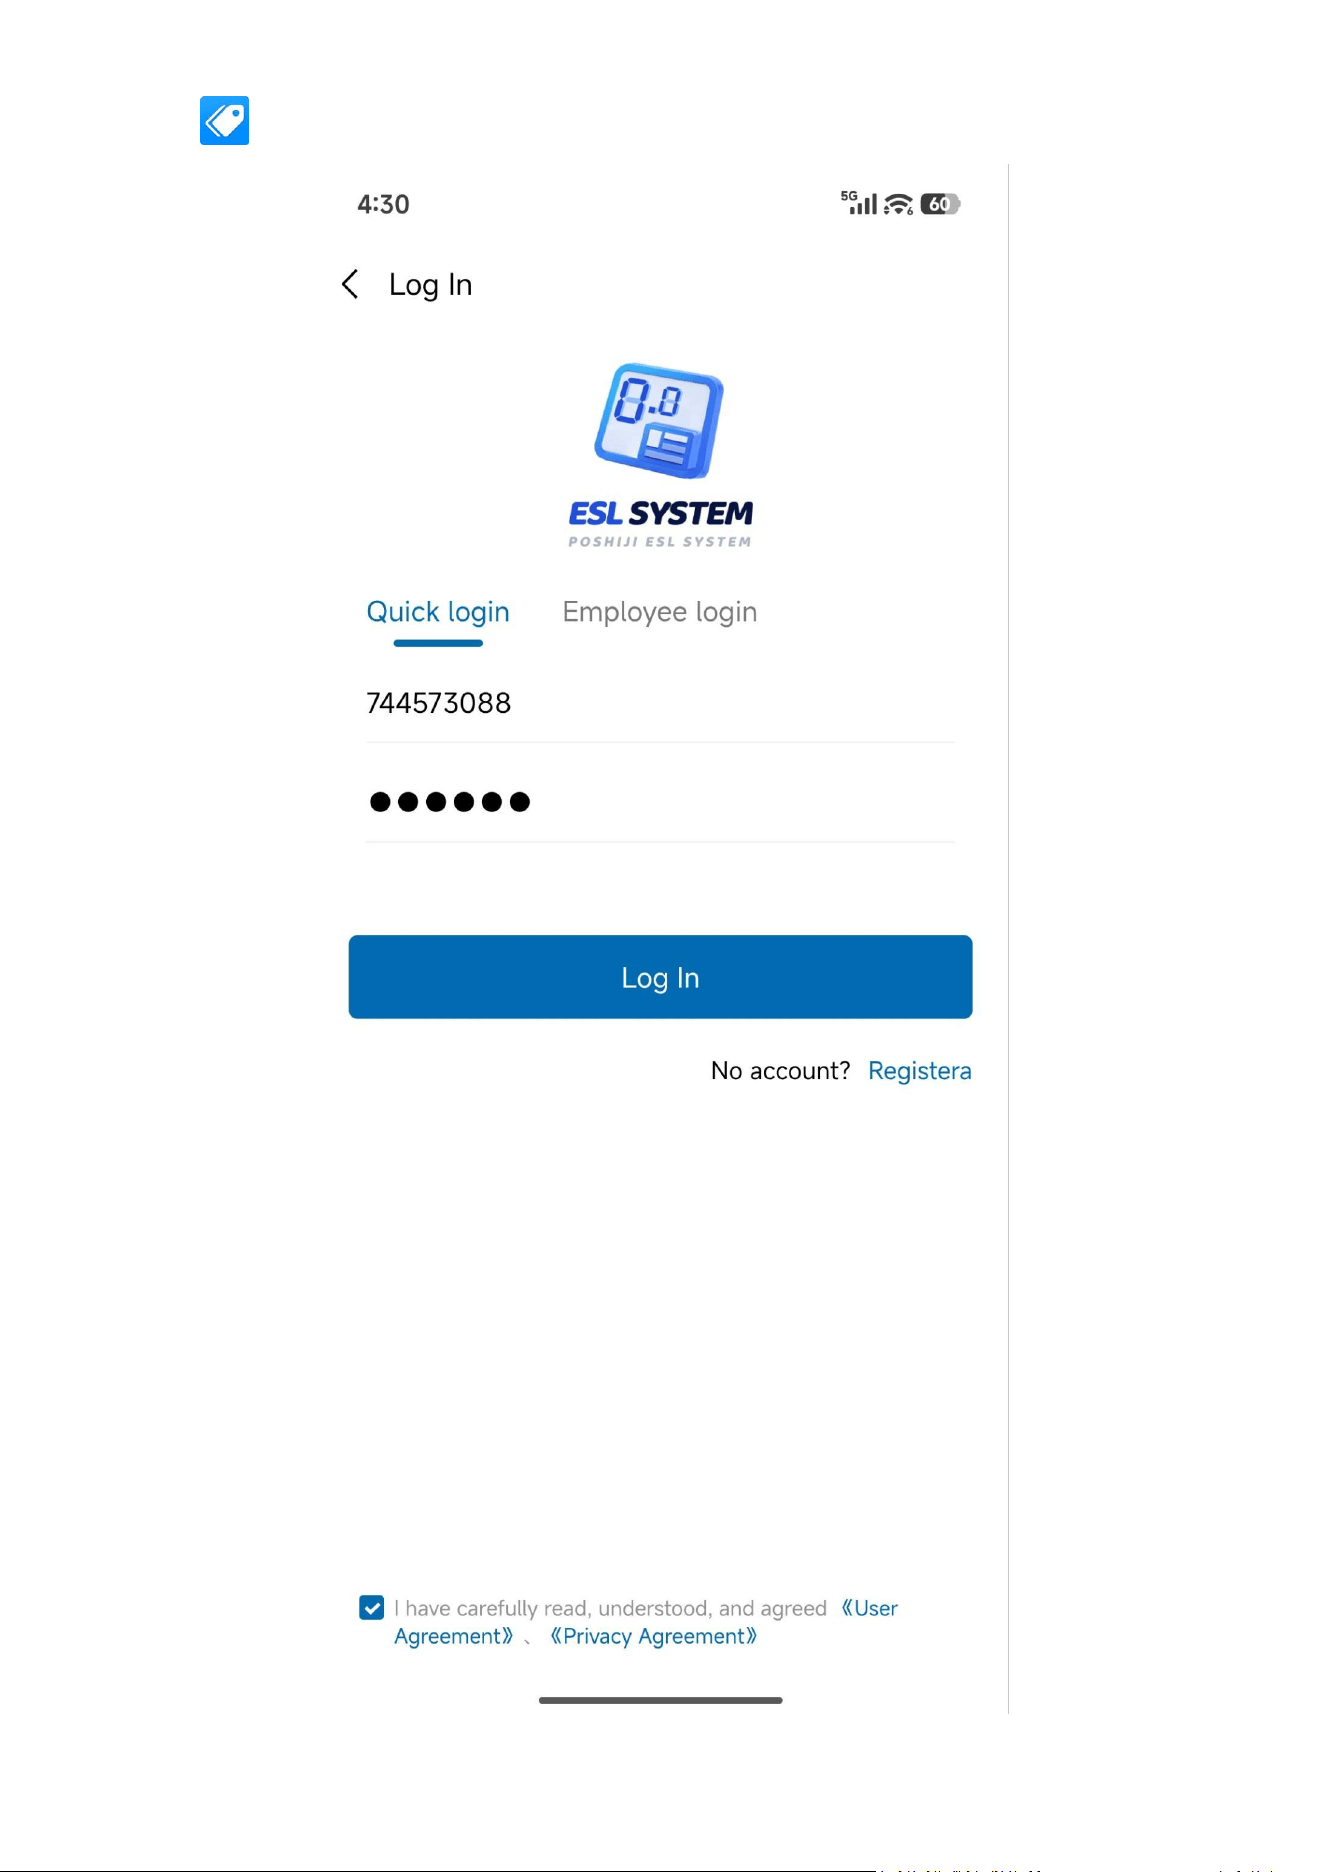
2.2 Login with Password
Operation Path:App Start Page → Enter credentials → Login
Steps:
1. Enter the registered mobile number/email or username.
2. Enter the password.
3. Tap the【Login】button.
POSHIJI ESL Management System
28

POSHIJI ESL Management System
29
2.3 Forgot Password
Operation Path:Login Page → Forgot Password
Steps:
1. Tap
【
Forgot Password
】
.
2. Enter the registered mobile number/email and request a verification code.
3. Enter the new password and confirm.
4. Tap
【
Confirm
】
. After completion, return to the login page and log in with the new
password.
Chapter 3: Home Page
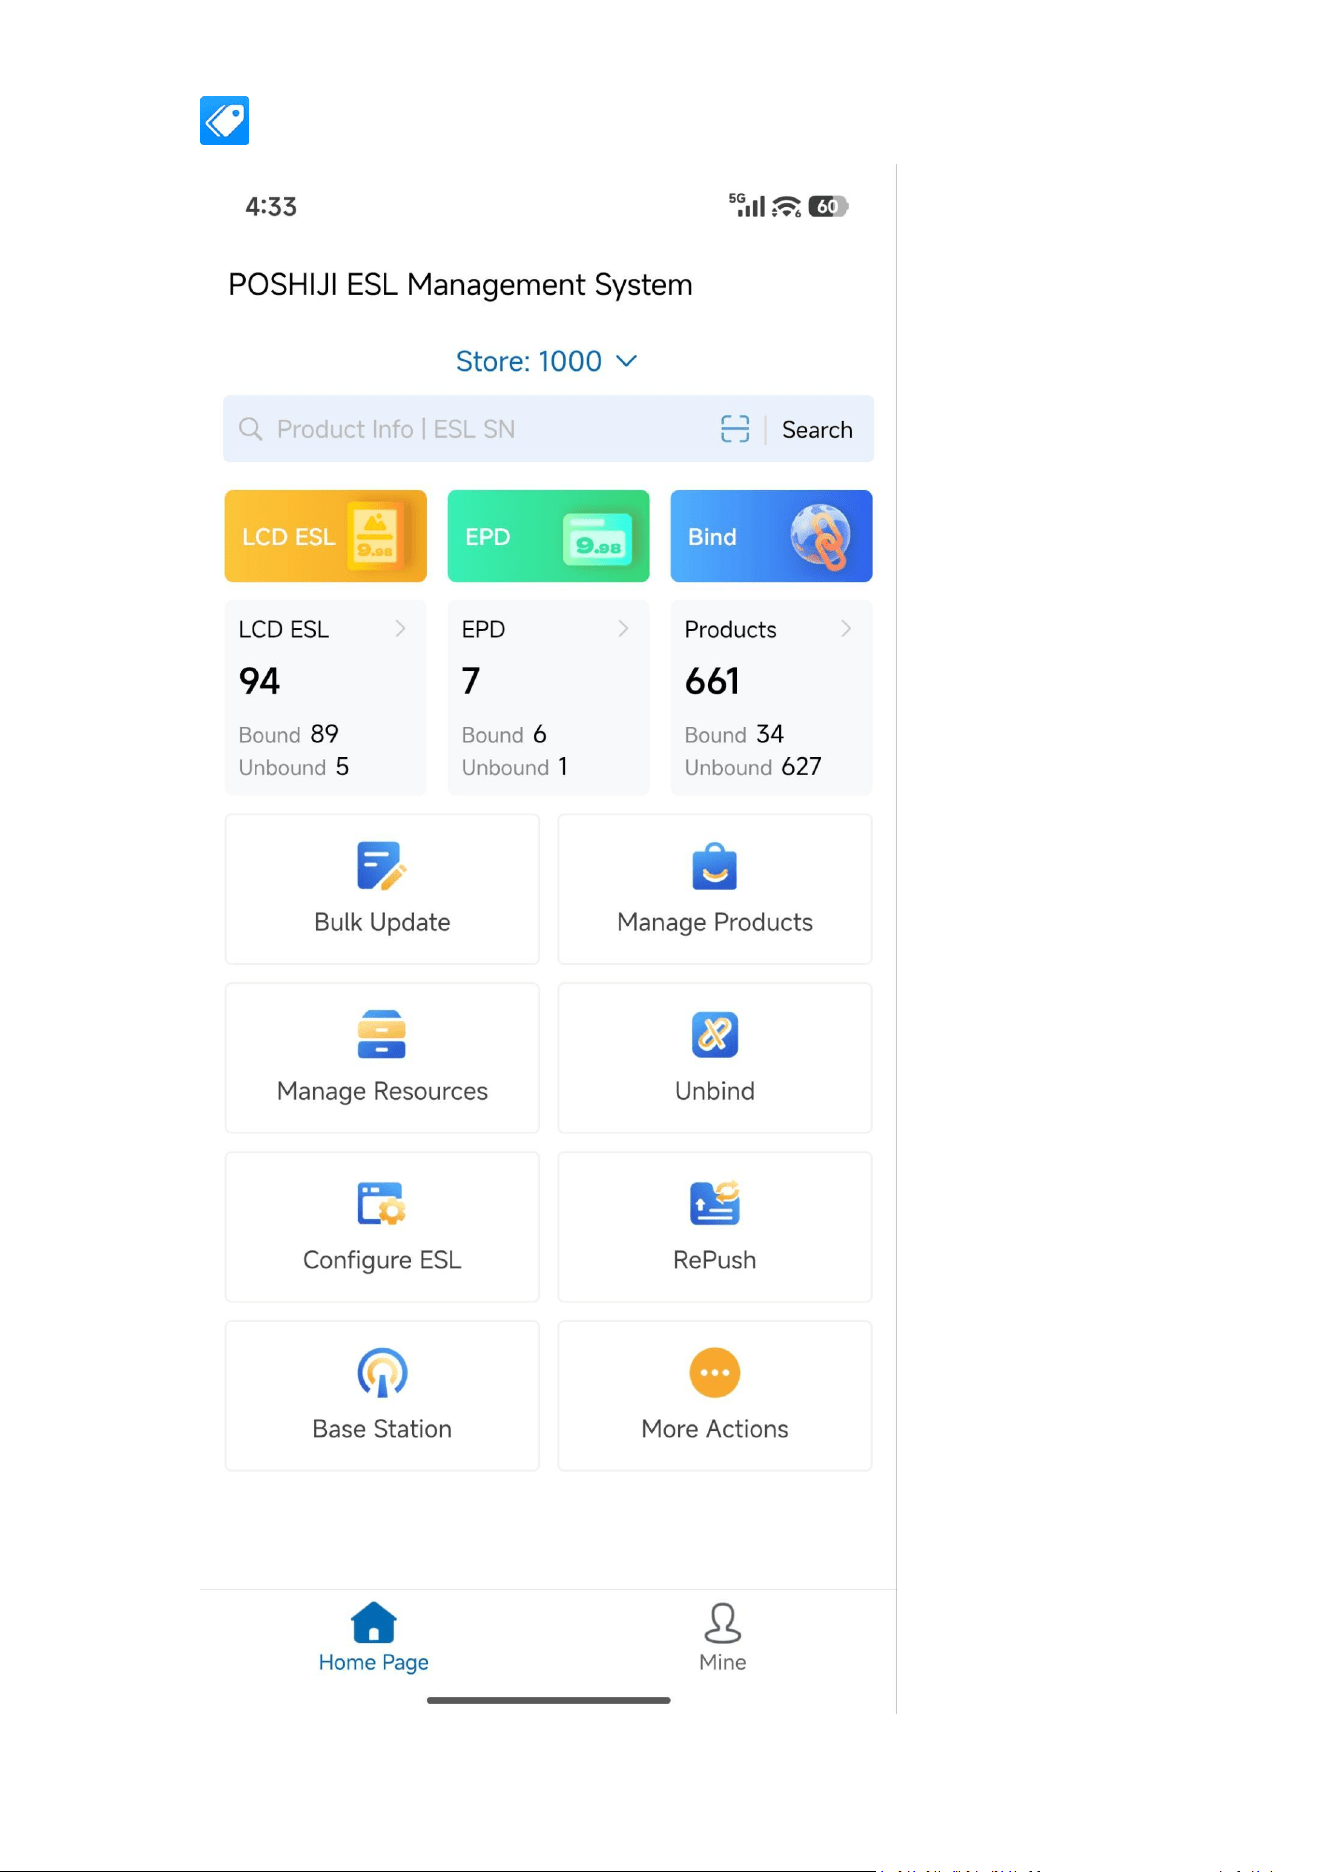
3.1 Home Page Overview
Function Description:After logging in, the home page displays key data statistics and quick access
shortcuts.
Page Components:
Main Search Box:Supports quick search by product name, product code, ESL serial
number, etc.
Data Cards:
o LCD ESL: Displays number bound / number unbound
o EPD ESL: Displays number bound / number unbound
o Product Management: Displays total products / bound / unbound
Quick Action Buttons:
o Bind
o Batch Price Change
o Resource Management
o Unbind
o Configure ESL
o Re-push
o Base Station Management
o More Functions (tap to expand other functions)
Instructions:
Tap a data card to jump to the corresponding management list.
Tap a quick action button to directly enter the corresponding operation page.
POSHIJI ESL Management System
30

POSHIJI ESL Management System
31
Chapter 4: Product Management
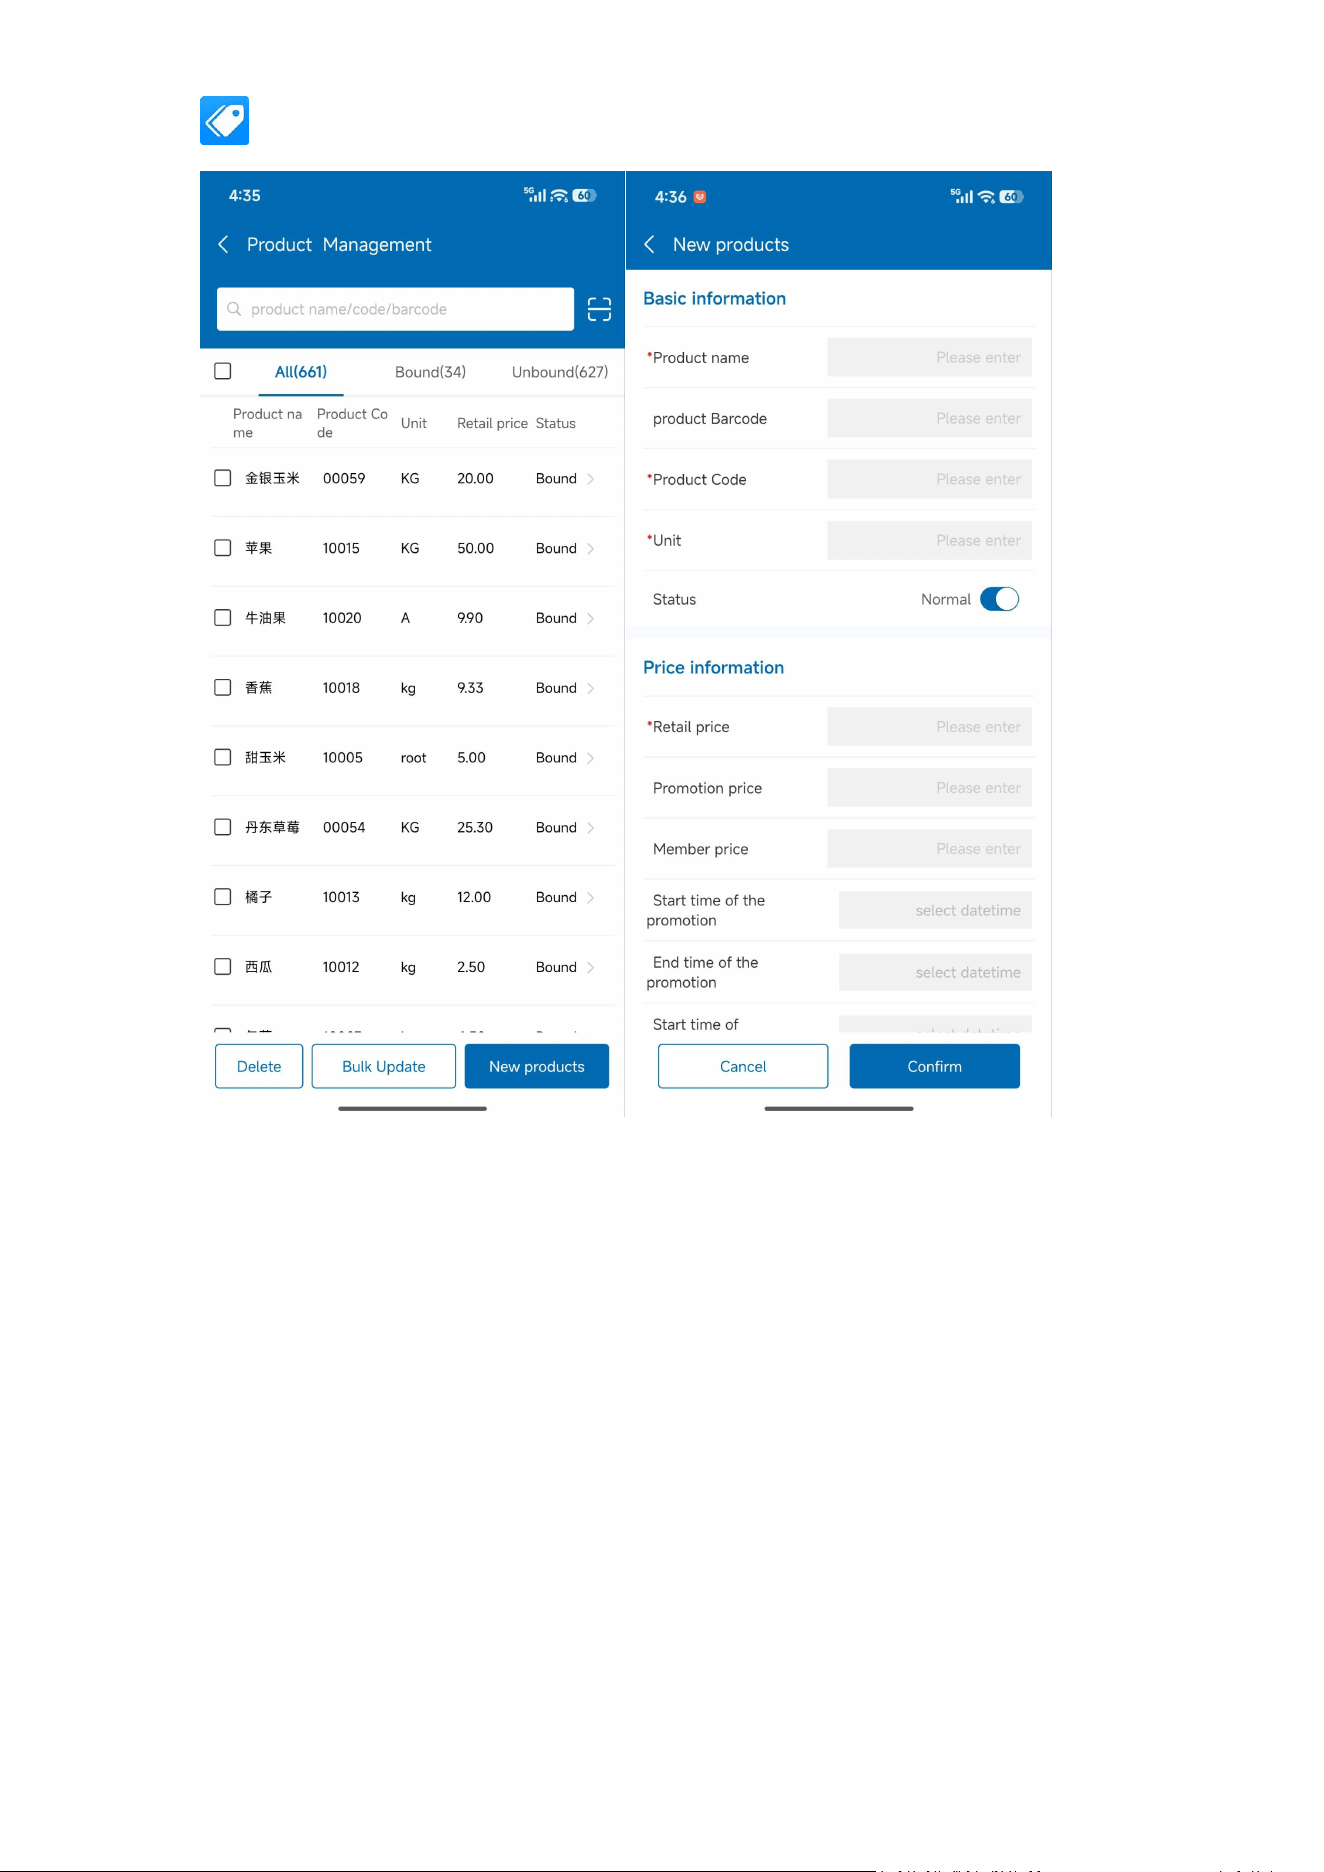
4.1 Product List
Operation Path:Home → Product Management → Products
Function Description:View all products in the current store; supports adding, searching, deleting,
and viewing details.
4.1.1 Search Products
Enter a product name or barcode in the search box at the top of the list, then tap search.
Supports scanning barcodes or QR codes with the phone.
4.1.2 Add Product
1. Tap the【Add Product】button.
2. Fill in product information:
o Product Name (required)
o Product Code / Barcode
o Measurement Method
o Retail Price (required)
o Member Price, Promotional Price (optional)
o Promotion Start/End Time
o Unit, Specification
o Product Image (optional)
o Product Video
o Shelf Life, Origin, Grade, Brand
o Reserved Text Fields 1–6
3. Tap【Save】to add the product.
4.1.3 View Product Details
Tap any product in the list to enter the details page.
The details page shows complete product information and the list of bound ESLs.
4.1.4 Delete Product
Select the product by checking the box on the left, then choose
【
Delete
】
.
Confirm deletion (only products not bound to any ESL can be deleted).
POSHIJI ESL Management System
32
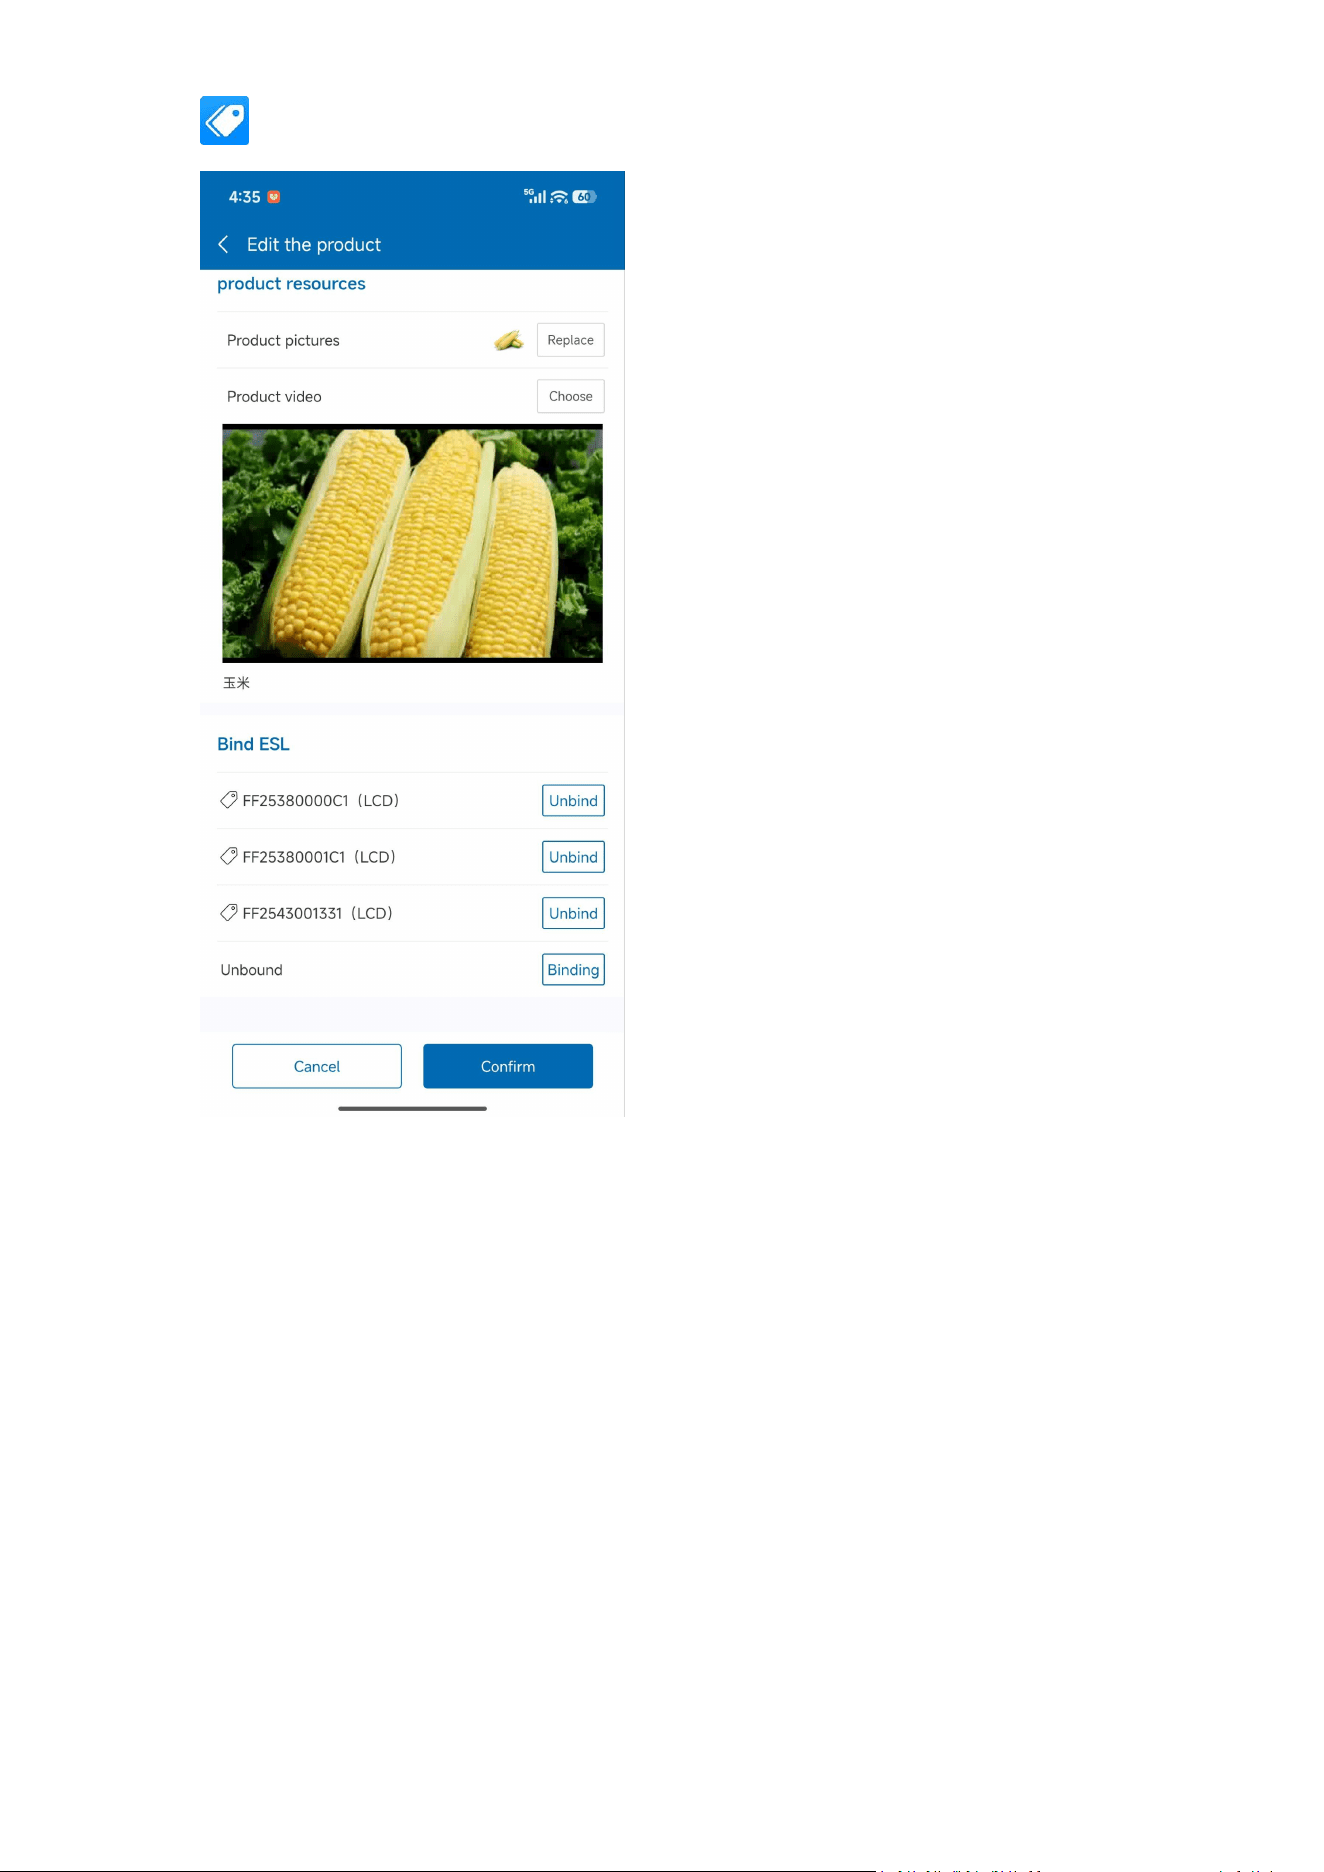
4.2 Bind/Unbind ESL
Operation Path:Product Details Page → Bind / Unbind
4.2.1 Bind ESL
1. On the product details page, tap【Bind ESL】and select LCD or EPD ESL.
2. On the bind ESL screen, you can:
o Scan to Bind:Scan the ESL QR code or barcode.
o Manual Selection:Manually enter the ESL ID or serial number.
3. Select a template (LCD or EPD templates are automatically filtered based on the ESL
type).
4. Tap【Confirm Bind】; the system pushes product data to the ESL.
4.2.2 Unbind ESL
1. On the product details page, in the “Bound ESLs” section, view the currently bound ESLs.
2. Tap the 【 Unbind 】 button, confirm to remove the association; the ESL returns to the
unbound state.
POSHIJI ESL Management System
33
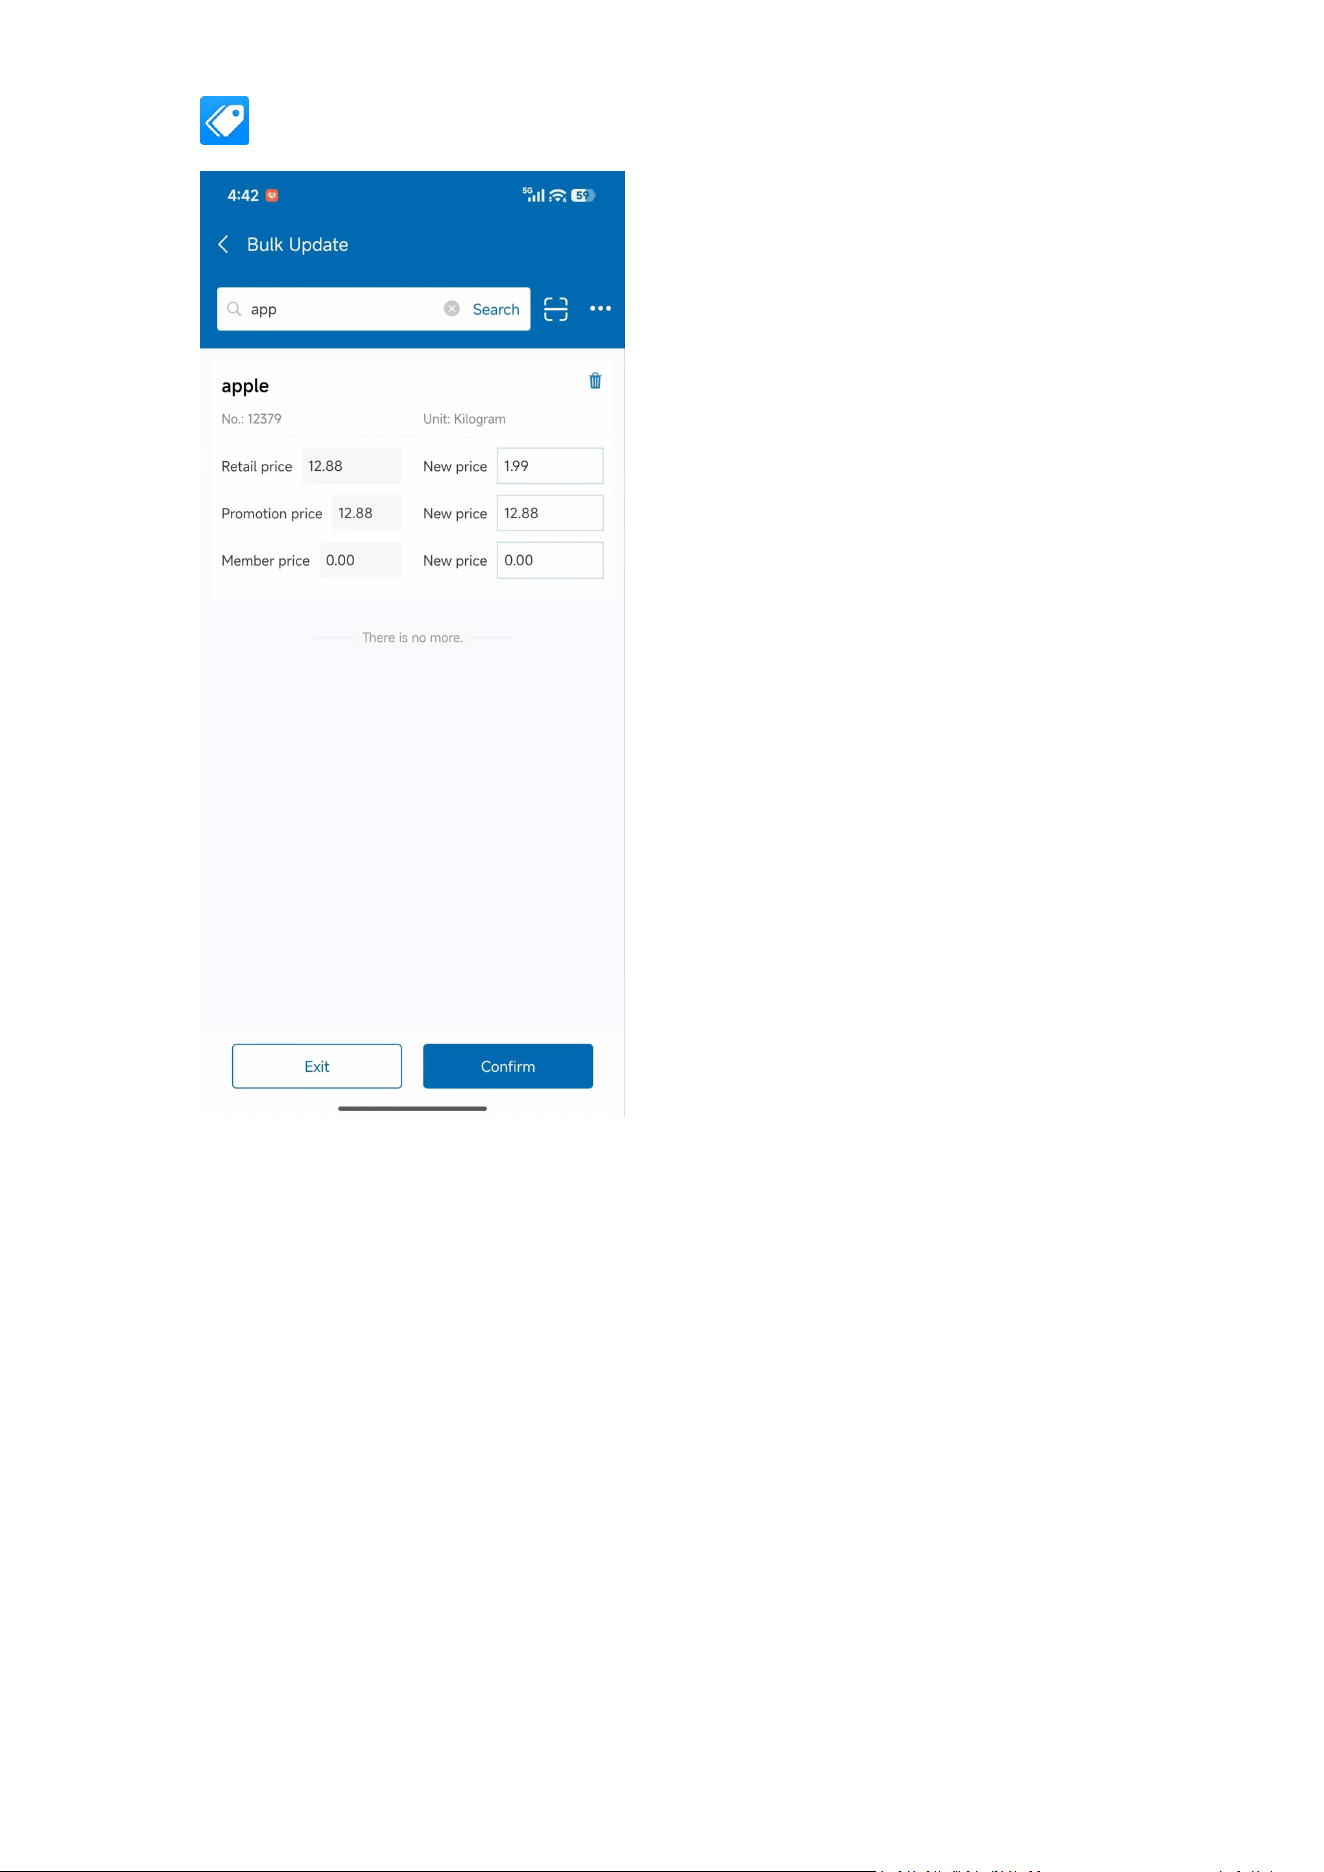
4.3 Batch Price Change
Operation Path:Home → Batch Price Change or Product Management → Batch Price Change
Function Description:Adjust prices for multiple products uniformly.
Steps:
1. Tap【Batch Price Change】.
2. On the “Add Products to Change Price” page, select the products to reprice (supports
search, checkboxes, and scanning).
3. Enter the new retail price, member price, or promotional price for the products.
4. After confirming the price change, the system automatically pushes the new prices to
the bound ESLs.
5. You can check the results in the “Push Log”.
POSHIJI ESL Management System
34
Chapter 5: LCD ESL Management
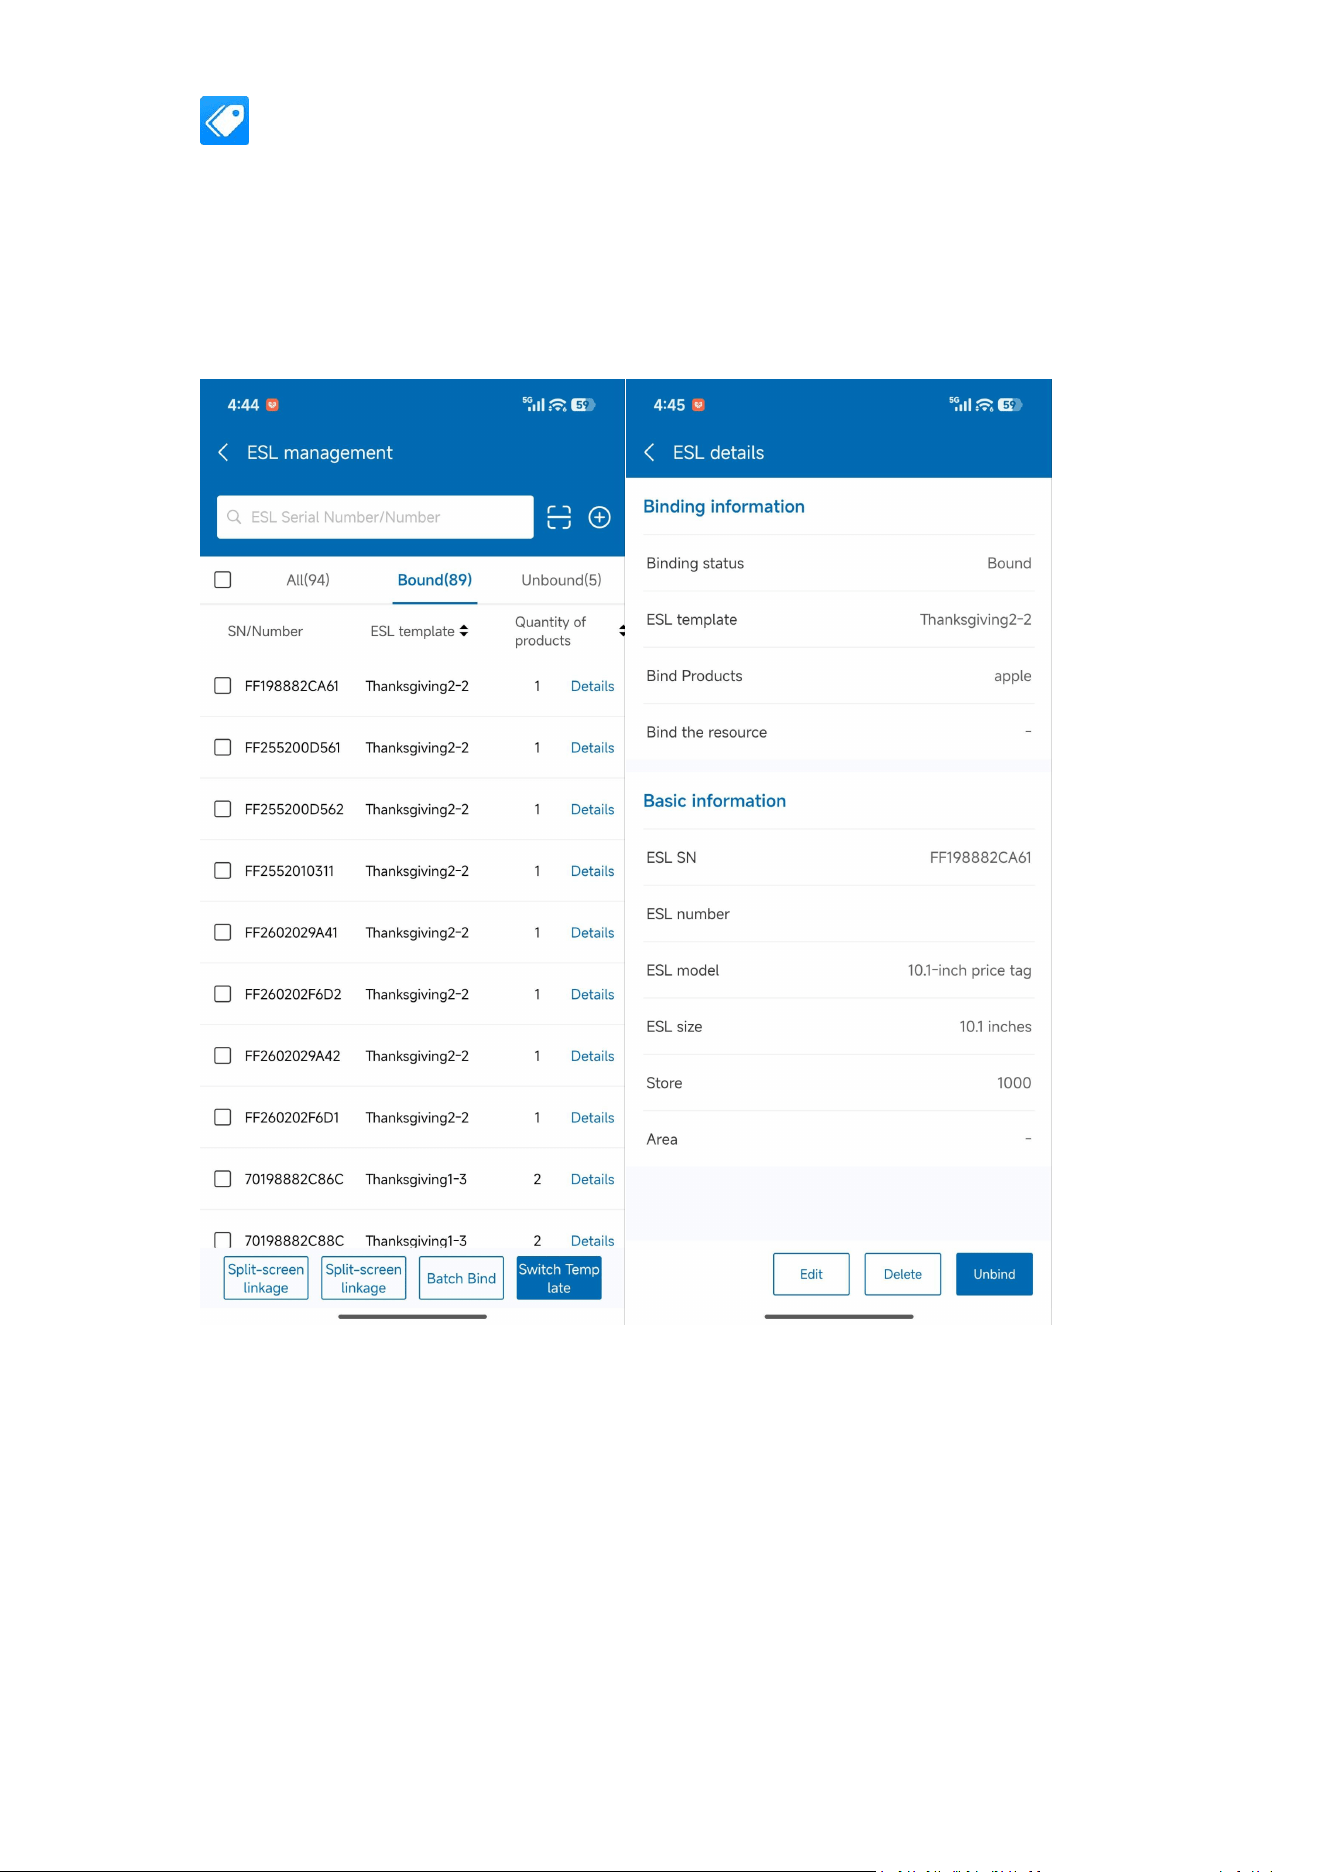
5.1 ESL List
Operation Path:Home → LCD ESL
Function Description:View all LCD ESLs; supports adding, searching, and viewing details.
5.1.1 Search ESLs
Enter the ESL serial number, name, or bound product name in the search box at the top
of the list.
Supports filtering by binding status.
5.1.2 Add ESL
1. Tap the
【
Add ESL
】
button.
2. Enter the ESL serial number (MAC address) and ID.
3. Select the store and zone.
POSHIJI ESL Management System
35
4. Select the default binding template.
5. Tap
【
Save
】
to add the ESL.
5.1.3 ESL Details
Tap an ESL to enter the details page, where you can view detailed information, bound
product, current template, last online time, etc.
Supports【Unbind】,【Switch Template】,【Re-push】operations on the details page.
5.2 Bind ESL
Operation Path:Home → Bind or LCD ESL List → Bind
Function Description:Bind an LCD ESL to a product and push data to the screen.
Steps:
1. Select the ESL to bind (supports scanning or manual selection).
2. Select a template (only LCD templates are displayed).
3. Select a product (supports searching by product name or barcode).
4. If the template includes a video resource, you may optionally select a video resource.
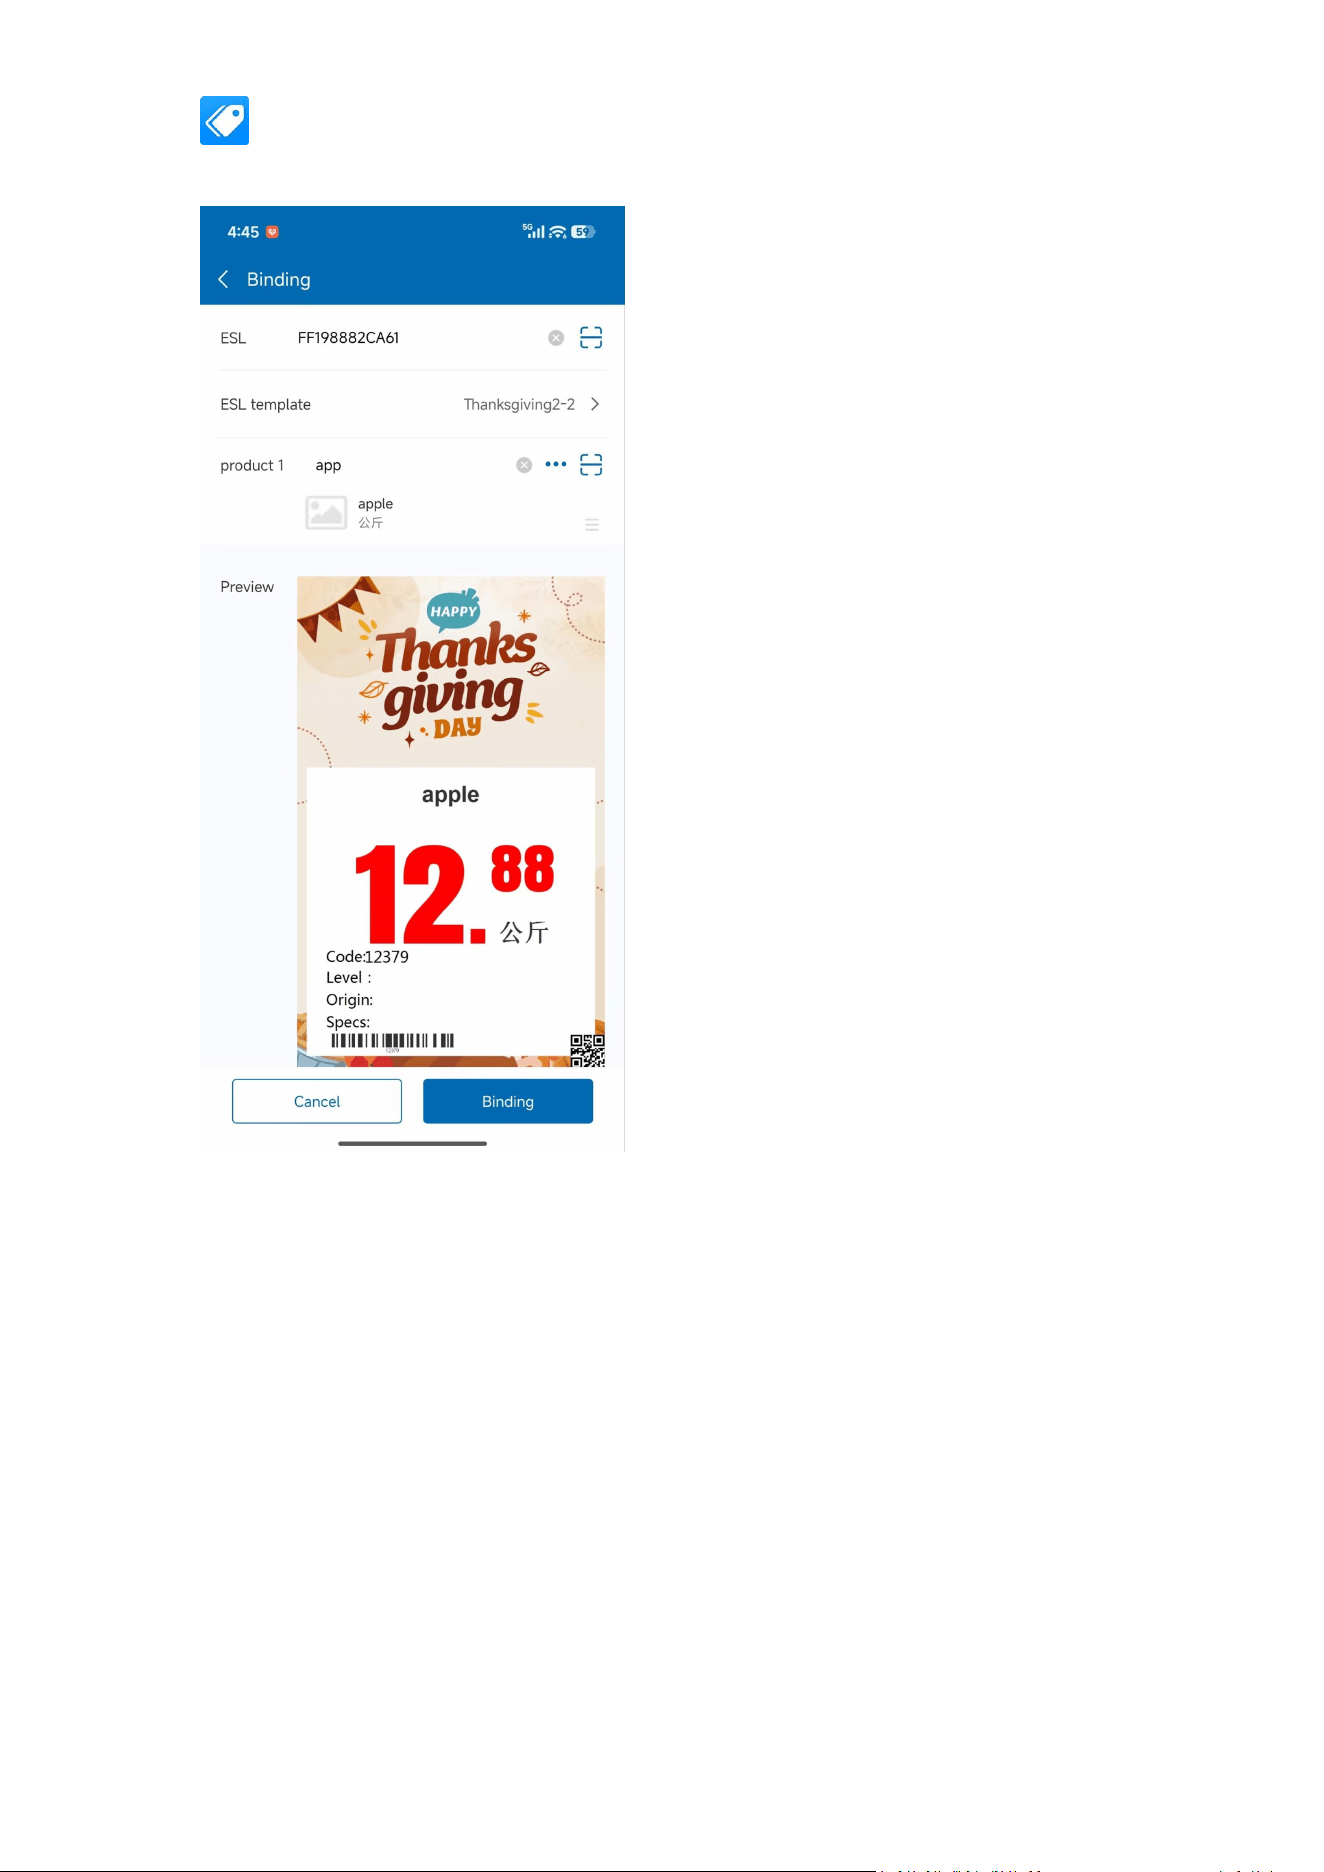
POSHIJI ESL Management System
36
5. Tap
【
Confirm Bind
】
; the system pushes data to the ESL screen.
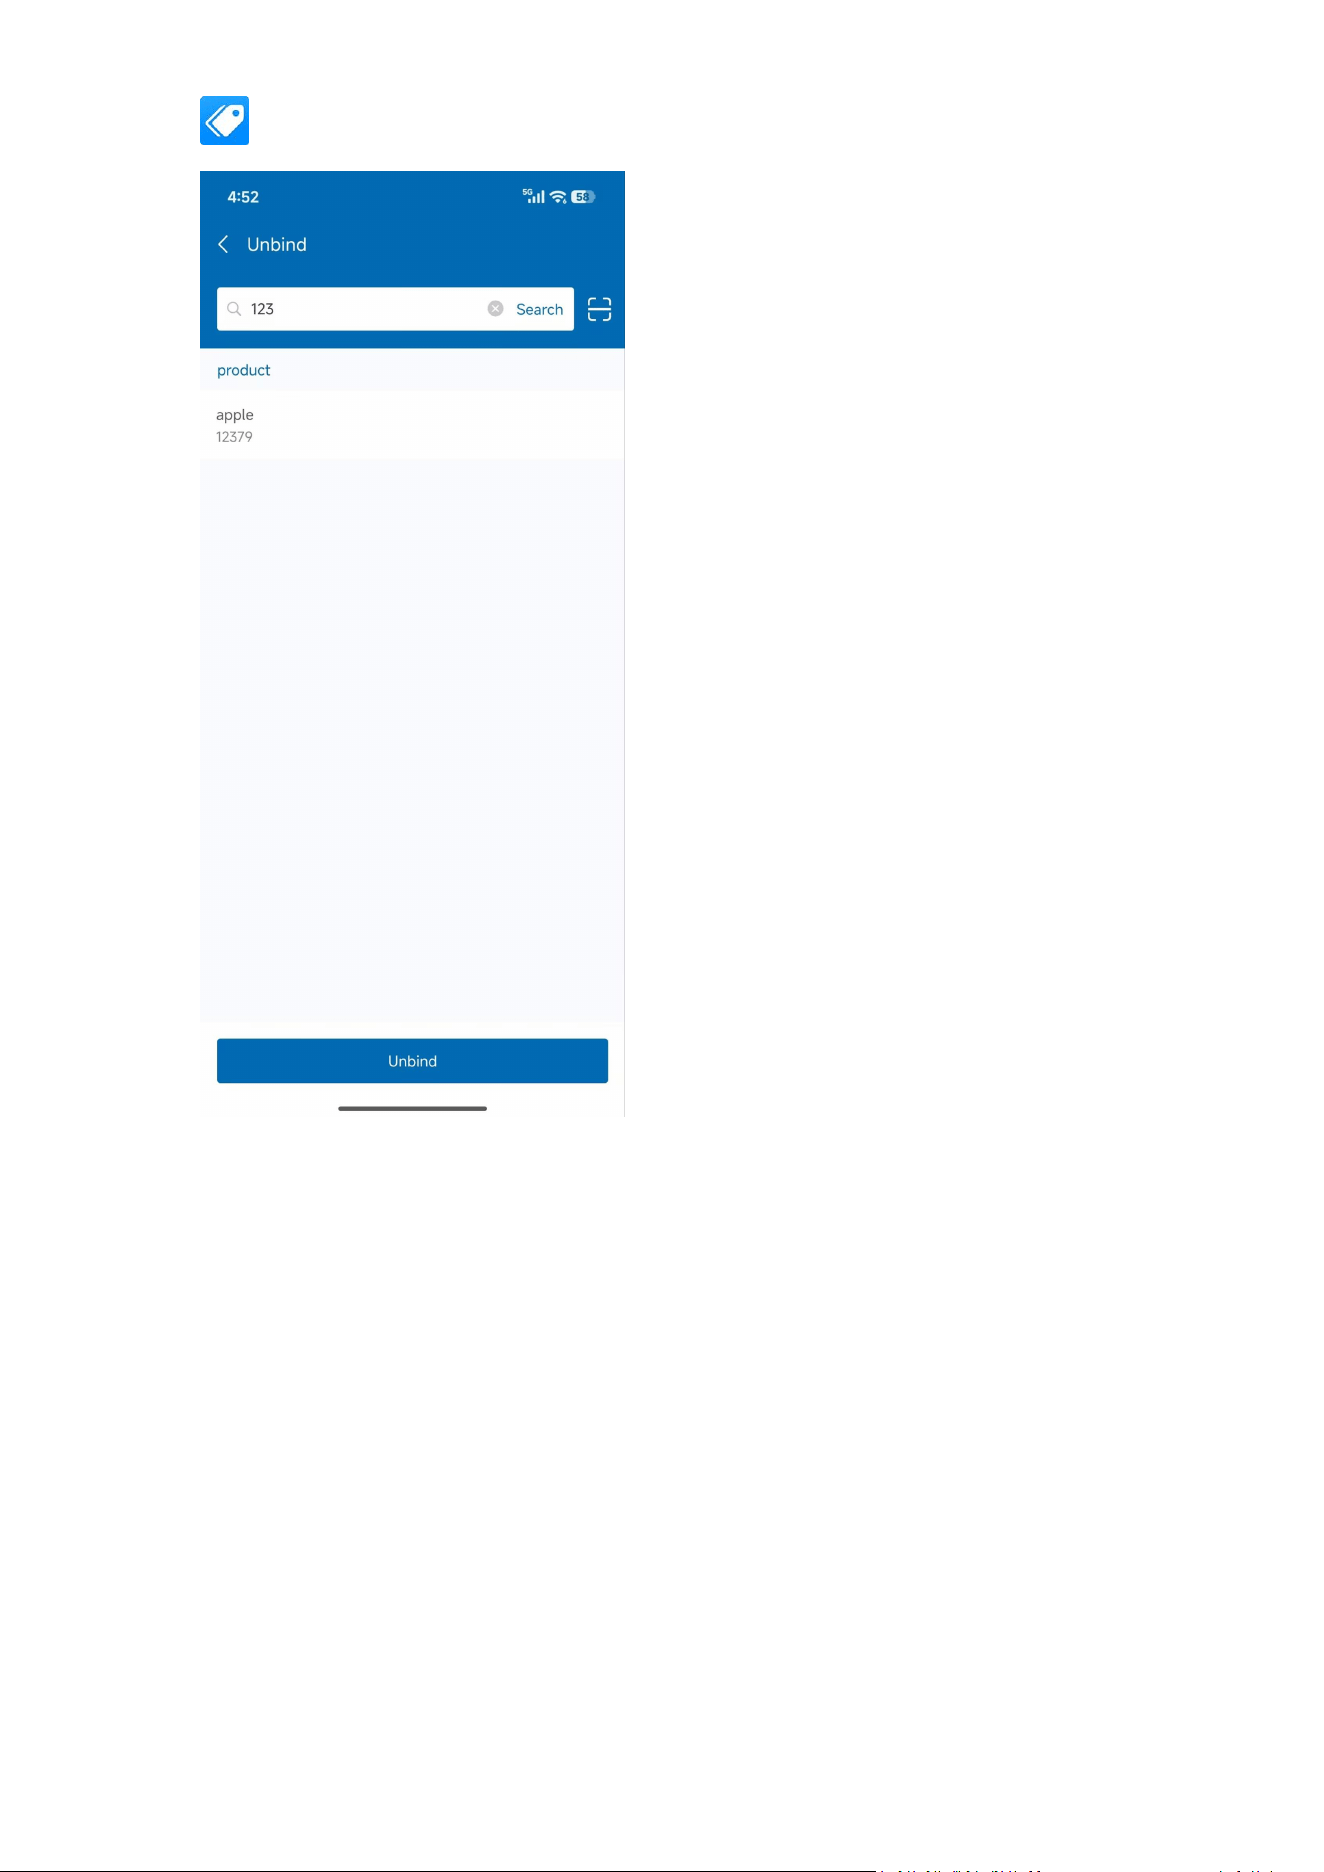
5.3 Unbind ESL
Operation Path:Home → Unbind or ESL Details Page → Unbind
Function Description:Remove the binding between an ESL and a product; the ESL returns to the
unbound state.
Steps:
1. Enter the unbind page.
2. Enter or scan the ESL serial number QR code to quickly locate the ESL.
3. Confirm and tap【Unbind】to remove the association.
POSHIJI ESL Management System
37
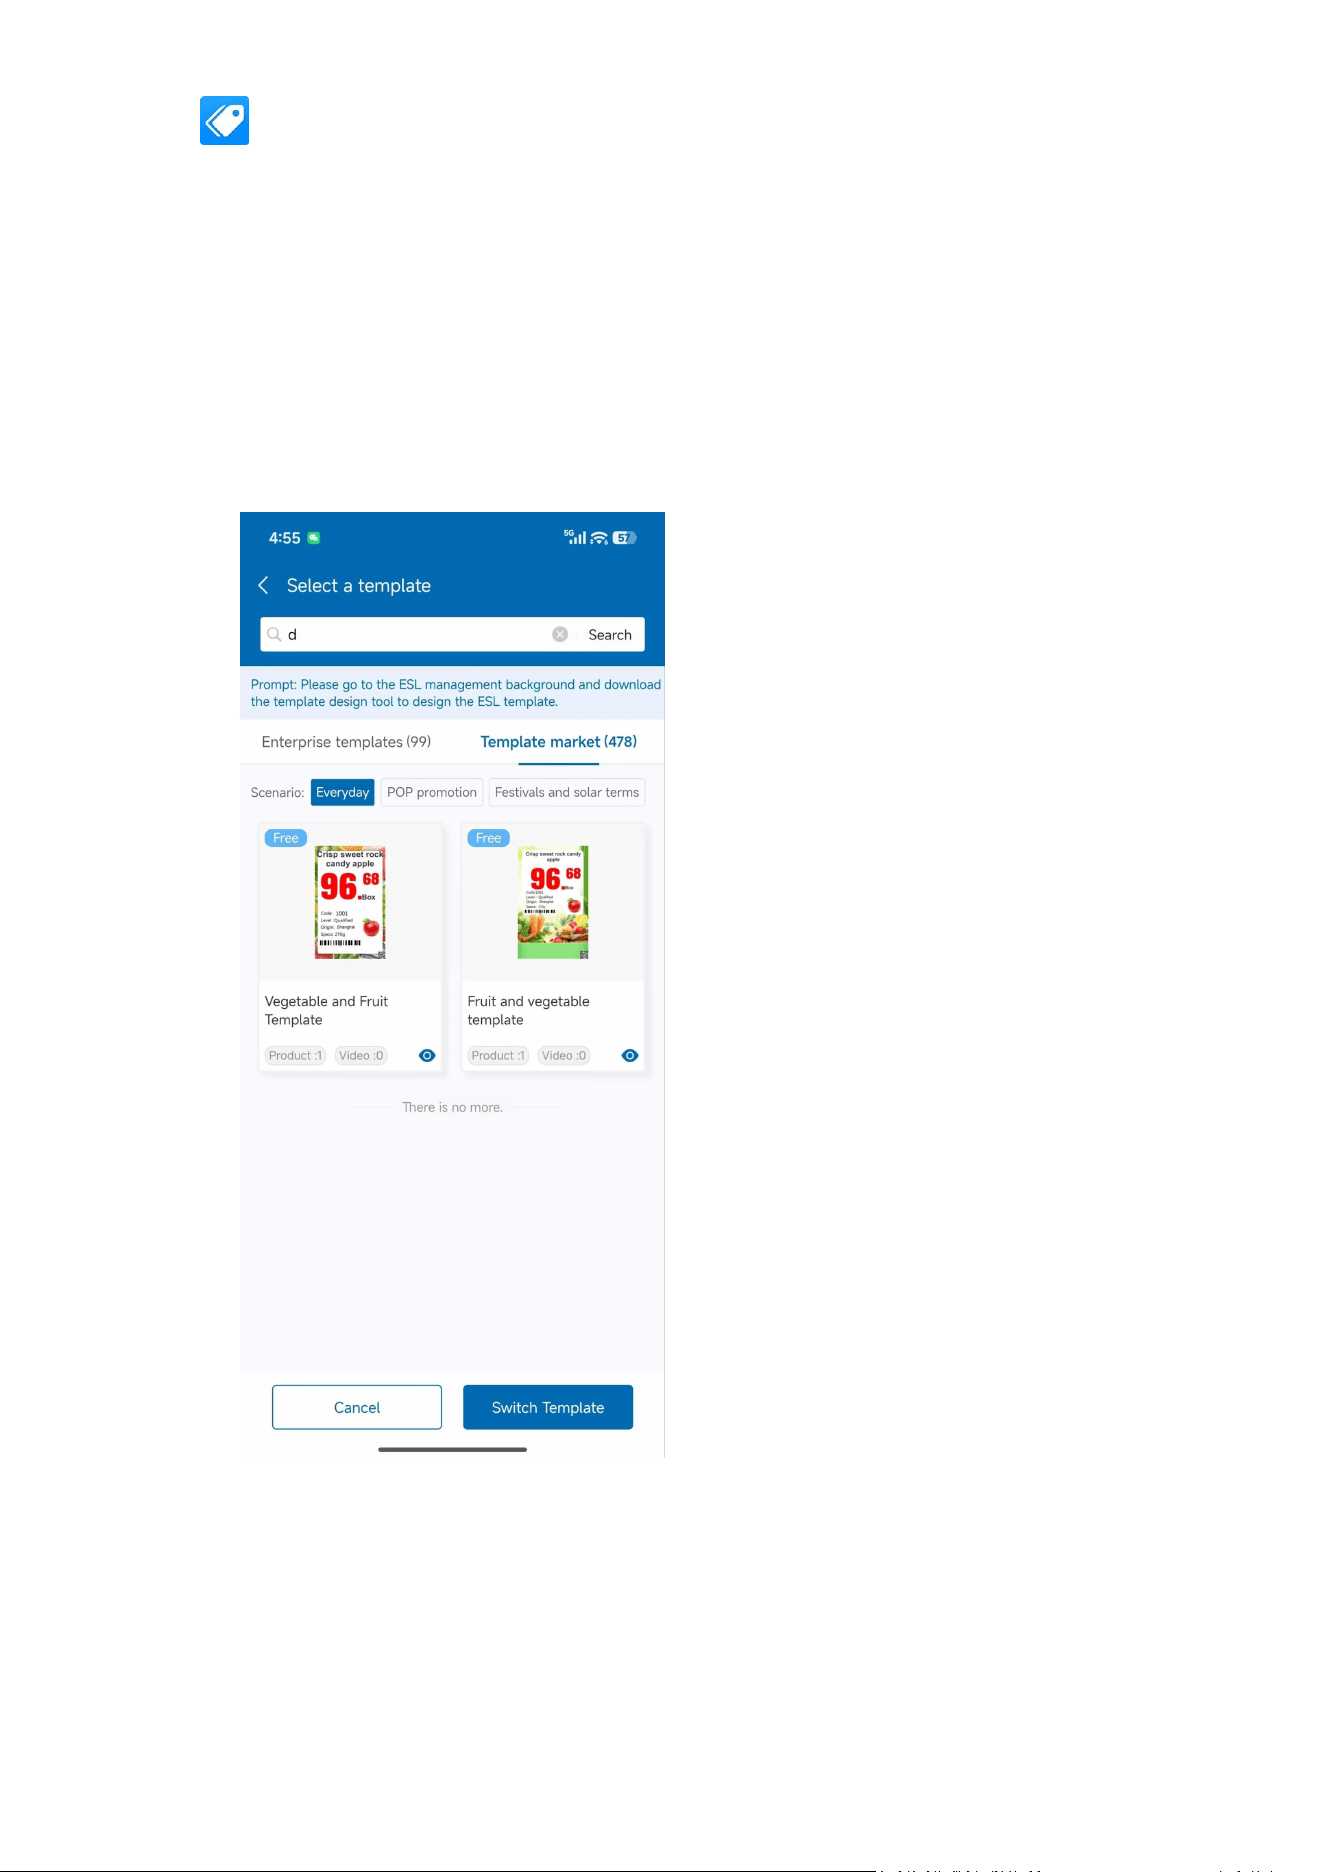
5.4 Batch Bind
Operation Path:LCD ESL List → Batch Bind
Function Description:Bind multiple LCD ESLs to multiple products in batches.
Steps:
1. Select the ESLs to bind (at least one).
2. Tap【Batch Bind】.
3. Select a template.
4. Select products (multiple selections allowed; the system matches in order or
one-to-one).
5. Confirm to execute the batch binding.
POSHIJI ESL Management System
38
5.5 Switch Template
Operation Path:LCD ESL List → Batch Switch Template or ESL Details Page → Switch Template
Function Description:Switch the display template for one or more LCD ESLs in batch.
Steps:
1. Select the ESLs for which you want to switch templates.
2. Tap
【
Switch Template
】
.
3. Select the target template.
4. Confirm; the system pushes the template to the ESLs.
5.6 Multi-screen Sync
Operation Path:LCD ESL → Multi-screen Sync
Function Description:Splicing multiple LCD ESLs together to form a large screen and play the
same video simultaneously.

POSHIJI ESL Management System
39
Prerequisites:
All participating ESLs must use the same template, and that template must include a
video resource.
Currently only supports horizontal arrangement in a single row.
Steps:
1. Select the ESLs to synchronize (in order of arrangement).
2. Select a template that contains a video.
3. Select a video resource.
4. Tap
【
Save
】
; the system splits the video and pushes it to the ESLs for combined playback.
5.7 Split-screen Sync
Operation Path:LCD ESL → Split-screen Sync
Function Description:Multiple ESLs work together to display different content, collectively
forming a complete visual. Suitable for displaying different angles of a single product or a single
video template.
Prerequisites:
Only one product or one single-video template can be selected.
Steps:
1. Select the ESLs to synchronize.
2. Select a product or a single-video template.
3. Tap【Start Sync】; the system distributes the content to the ESLs for display.
Chapter 6: EPD ESL Management
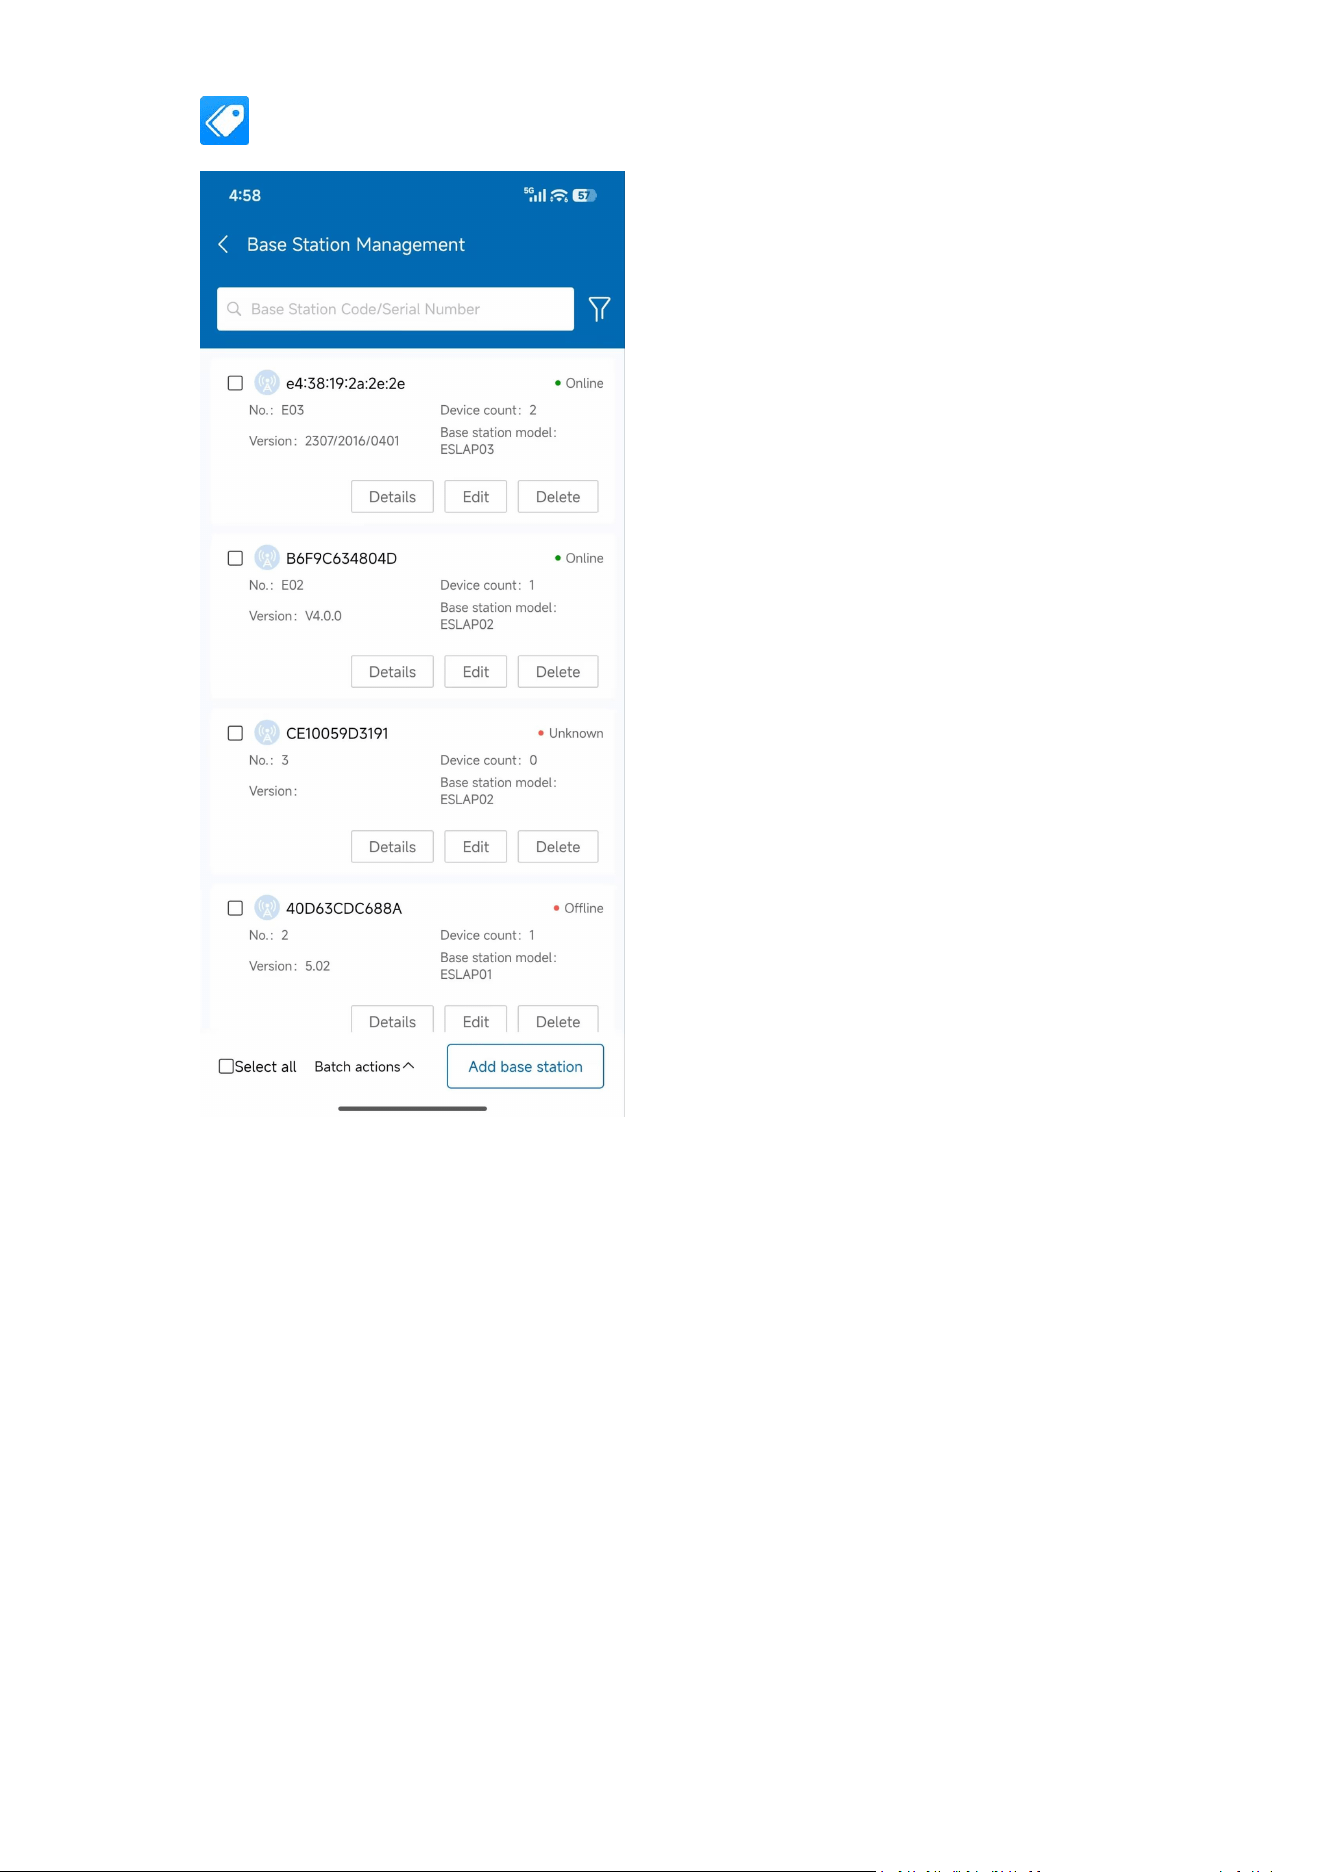
6.1 Base Station Management
Operation Path:Home → Base Station Management
Function Description:Manage the communication Base Stations for EPD ESLs.
6.1.1 Add Base Station
1. Tap【Add Base Station】.
2. Enter the Base Station ID, Base Station MAC address, and the store.
3. Tap【Save】.
6.1.2 Base Station List
Displays all Base Stations.
Shows Base Station status (Online/Offline) and signal strength.
Supports
【
Network Check
】
and
【
Delete
】
operations.
6.1.3 Batch Operations
Batch Network Check:Select multiple Base Stations and tap
【
Network Check
】
.
Batch Delete:Select multiple Base Stations and tap
【
Batch Delete
】
(ensure no ESLs are
bound to the Base Stations before deletion).
POSHIJI ESL Management System
40
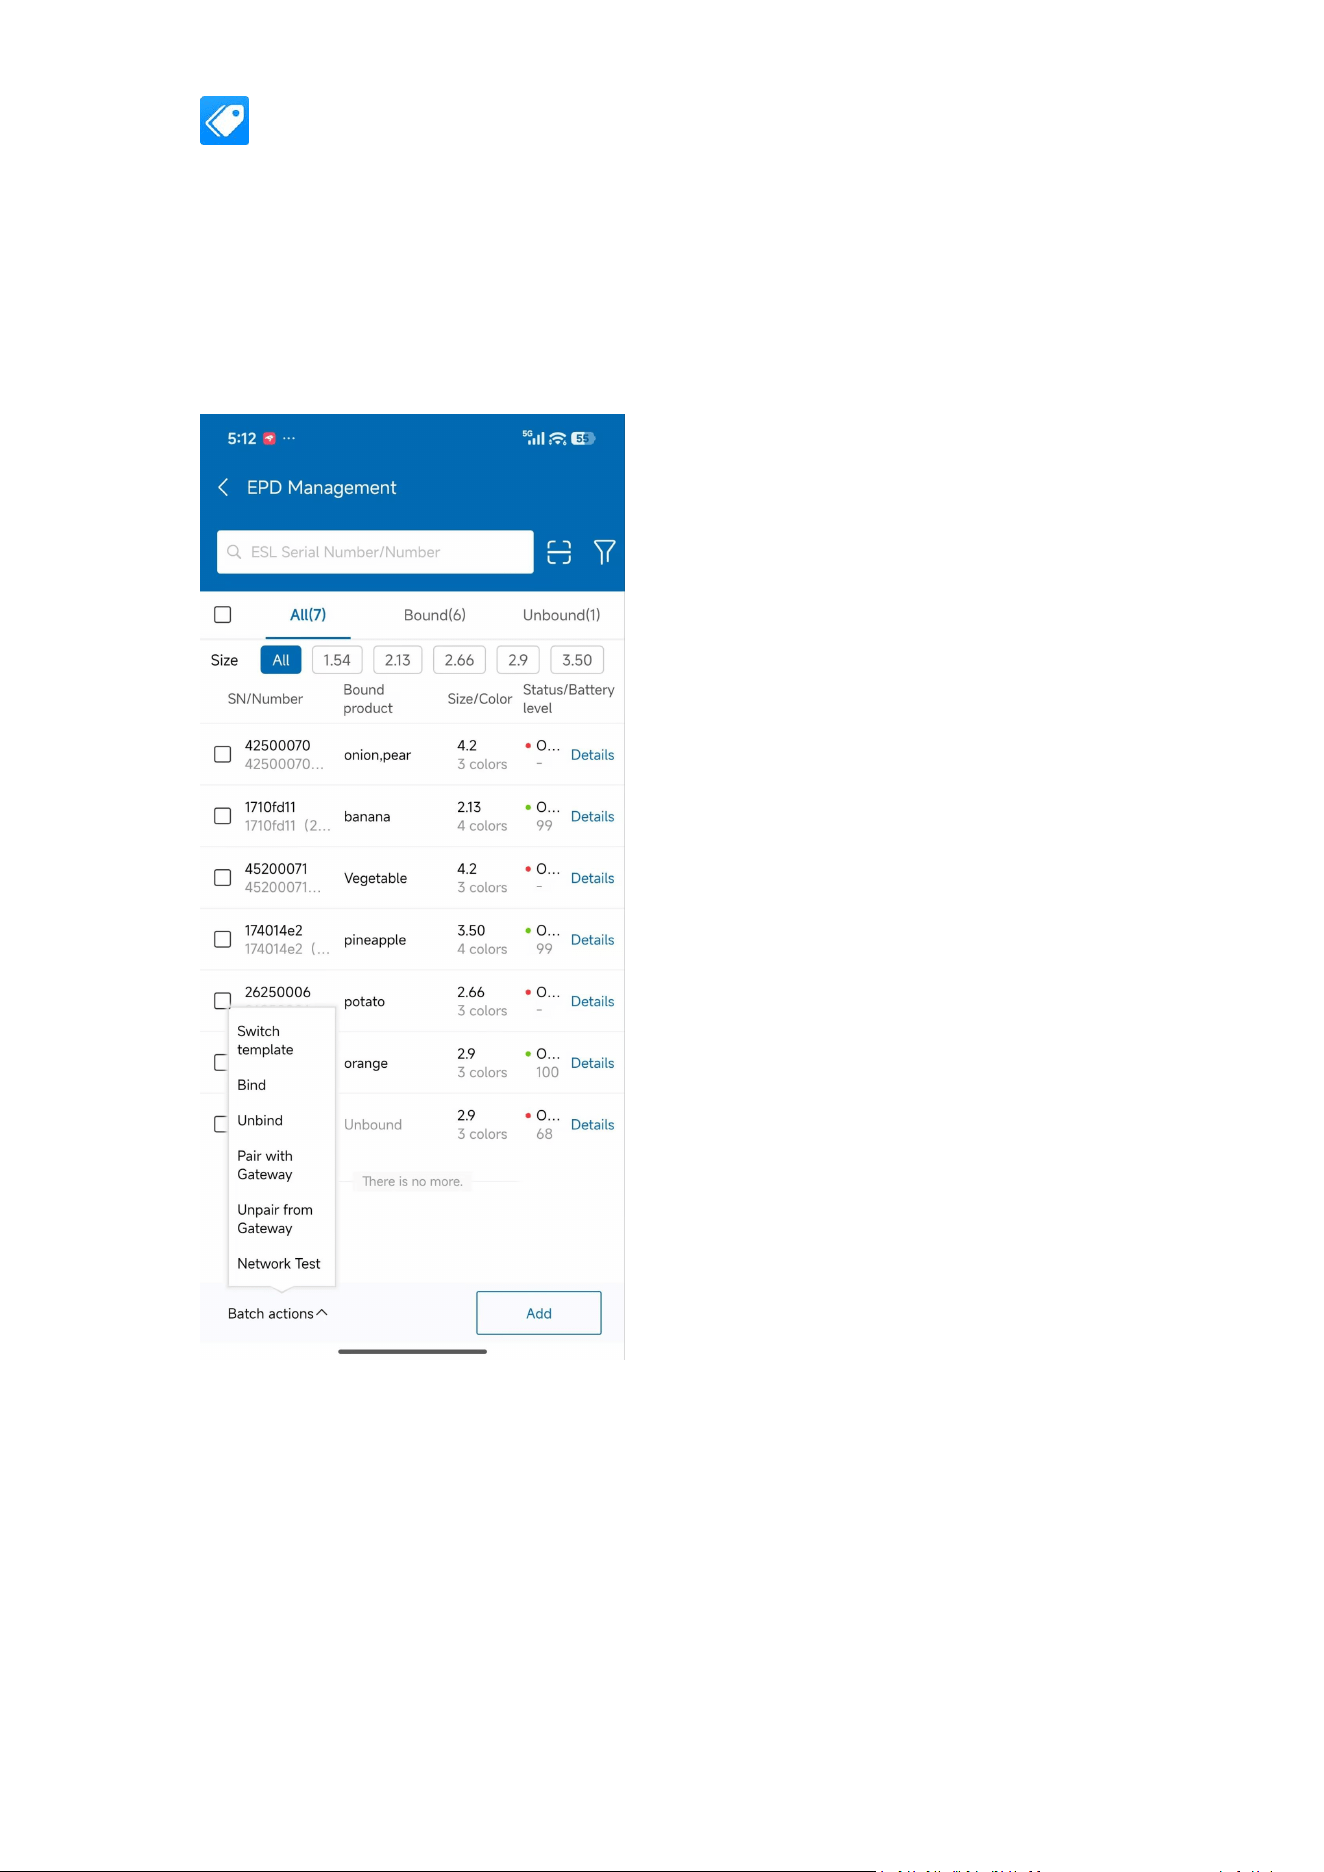
6.2 EPD ESL Management
Operation Path:Home → EPD ESL
Function Description:Manage EPD ESLs, supporting adding, editing, deleting, binding, unbinding,
and other operations.
6.2.1 Search ESLs
Supports multi-dimensional filtering:
o By Size (2.13", 2.9", 4.2", etc.)
o By Base Station
o By Bound Product
o By Bound Template
o By Color (Black & White, Black & White & Red, Black & White & Red & Yellow,
etc.)
o By Network Status (Online/Offline)
6.2.2 Batch Operations
POSHIJI ESL Management System
41
Batch Bind:Select ESLs → Select template → Select product → Execute binding.
Batch Unbind:Select ESLs → Tap【Batch Unbind】.
Batch Switch Template:Select ESLs → Select target template → Execute switching.
Batch Delete:Select ESLs → Delete (only allowed for ESLs that are unbound or offline).
Batch Bind Base Station:Select ESLs → Select target Base Station → Execute.
Batch Unbind Base Station:Select ESLs → Remove the association with the Base Station.
Network Check:Select ESLs → Check online status.
Chapter 7: Resource Management
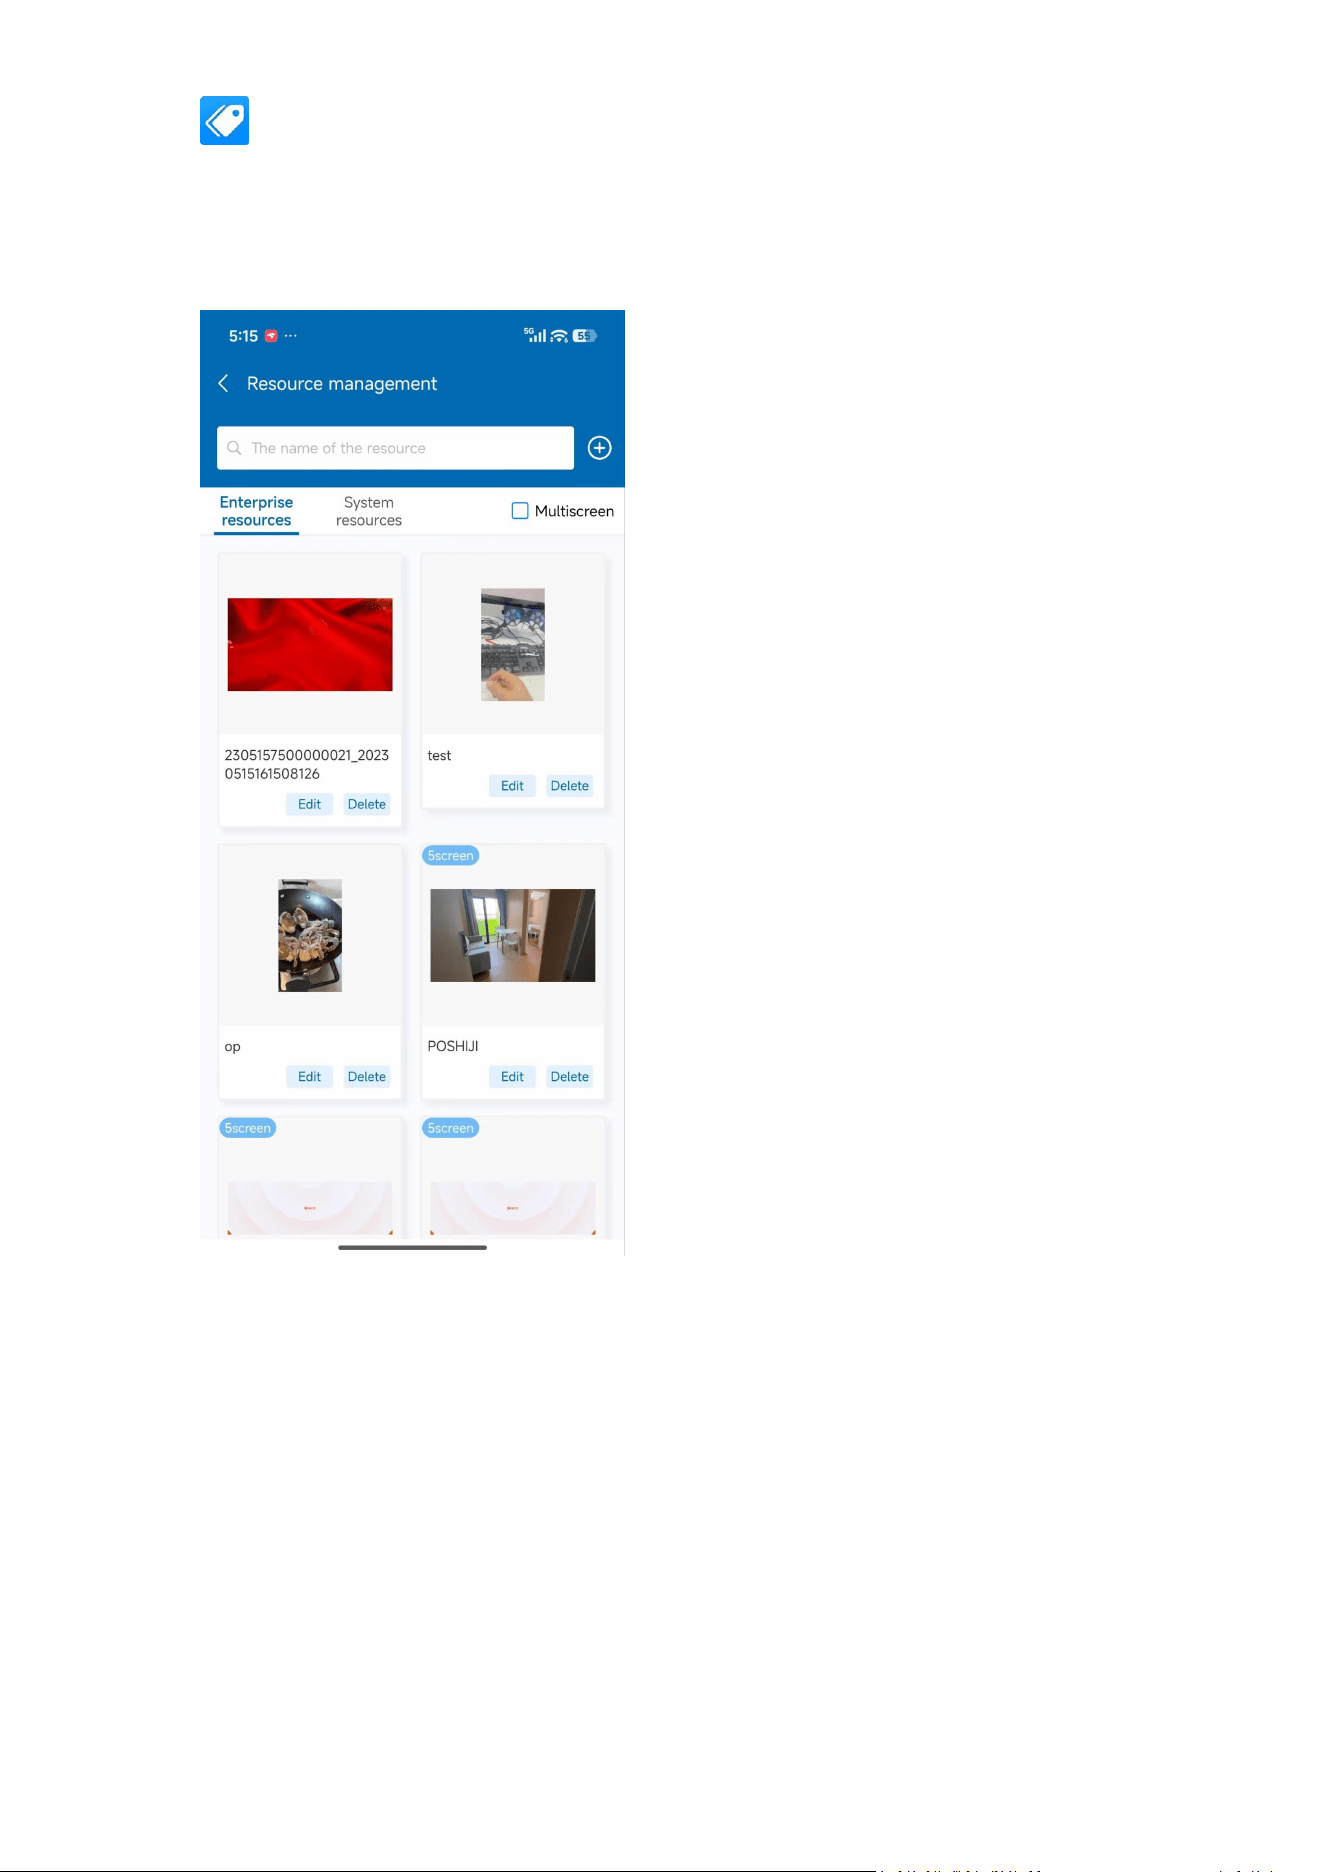
7.1 LCD Resource Management
Operation Path:Home → Resource Management → Resources
Function Description:Manage images and video resources used by LCD ESLs.
Operations:
POSHIJI ESL Management System
42
Upload Resource:Tap【Upload】, select a local image or video, enter a resource name,
and upload to the server.
Resource List:Displays uploaded resources, supports preview, editing name, and
deletion.
7.2 Switch LCD Resources
Operation Path:Home → Switch LCD Resources
Function Description:Batch switch the images or videos displayed on LCD ESLs.
Steps:
1. Select the target resource (choose from the resource library).
2. Filter the ESLs that need the resource change (supports filtering by store, zone, template,
etc.).
3. Preview the effect (optional).
4. Tap【Execute Switch】; the system pushes the resource to the ESLs.

POSHIJI ESL Management System
43
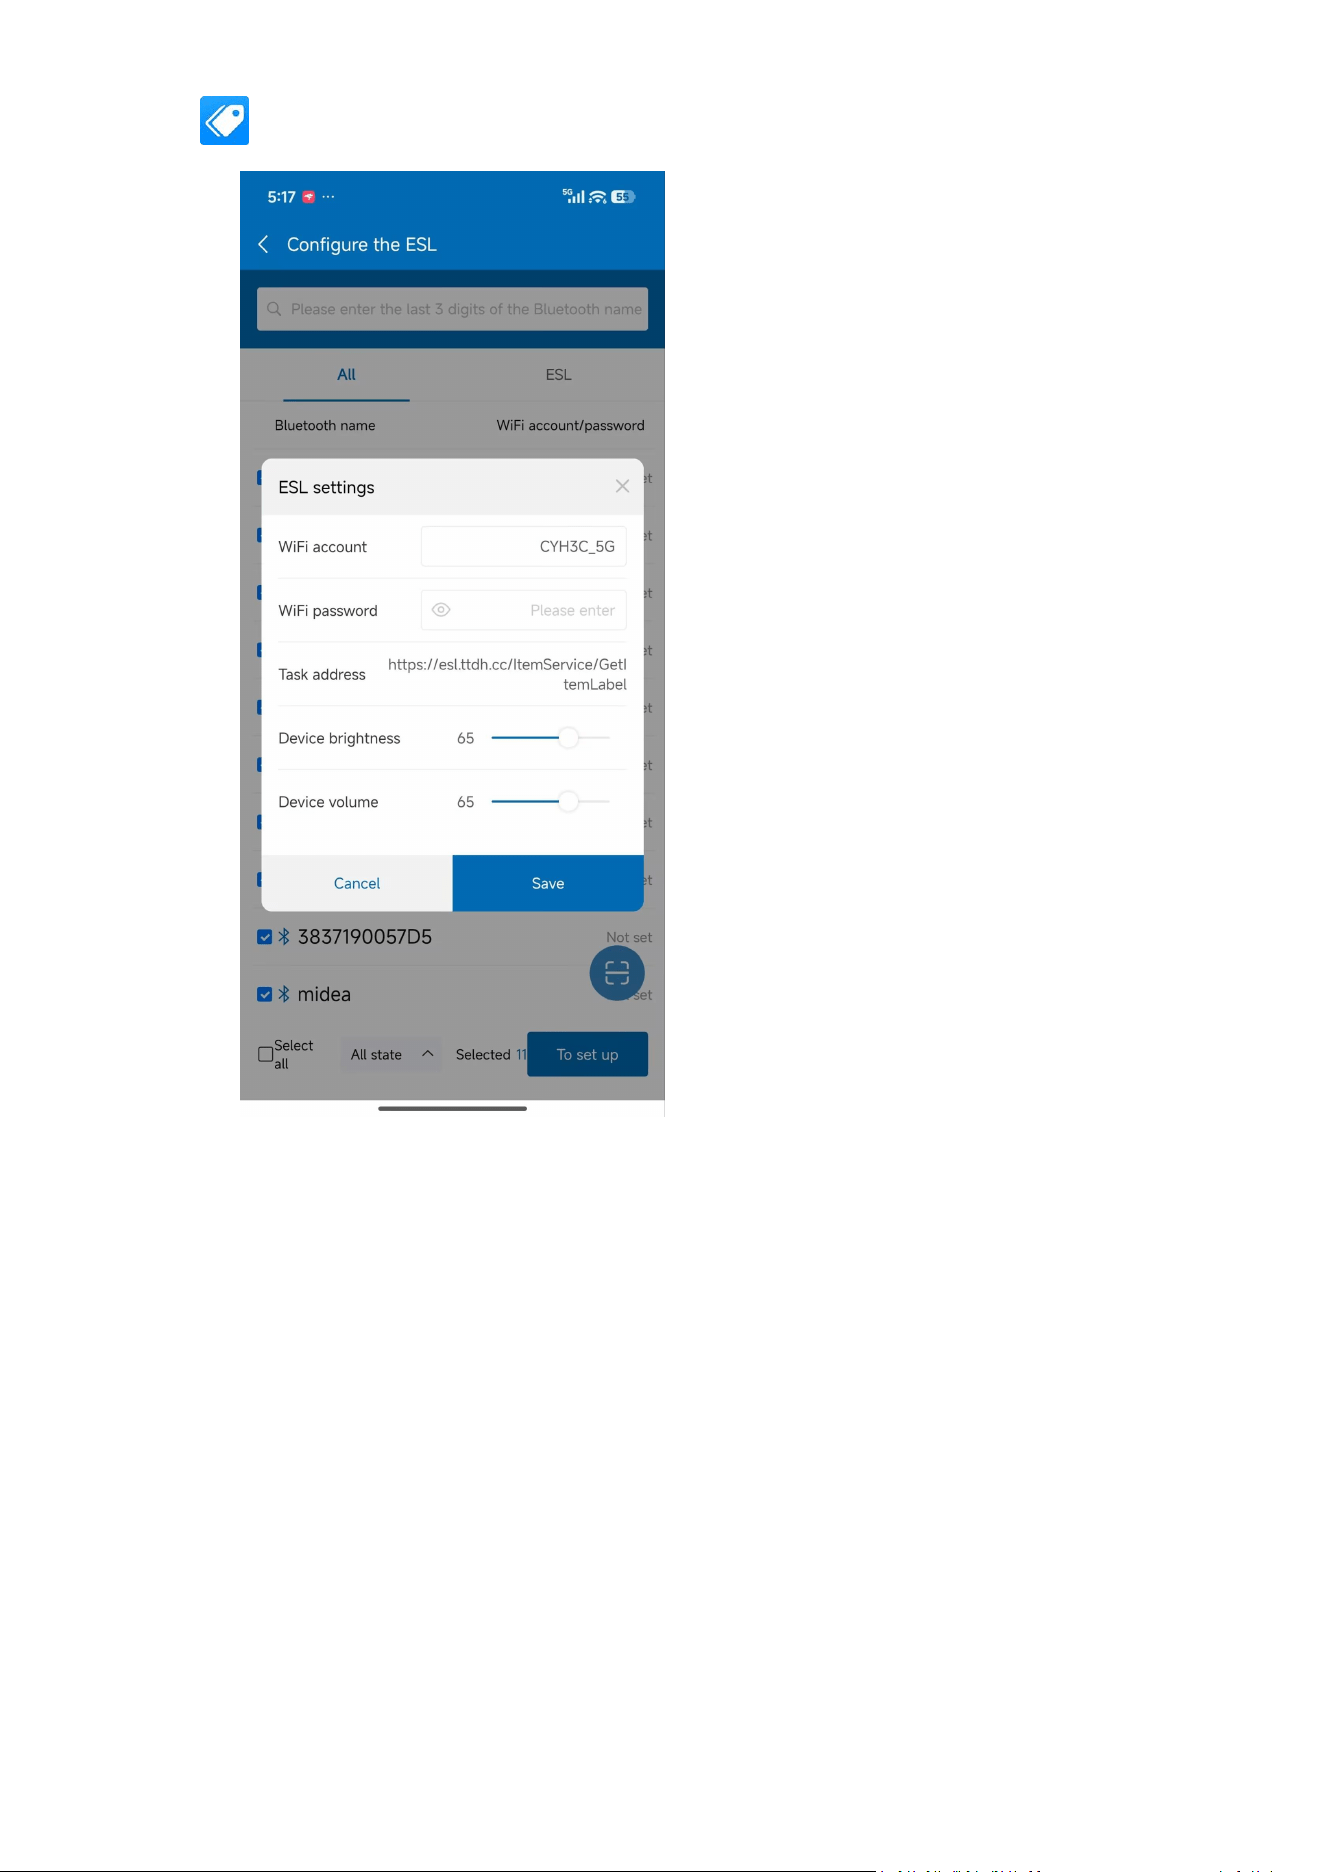
Chapter 8: Configure ESL (WiFi Setup)
Operation Path:Home → Configure ESL
Function Description:Use the phone’s Bluetooth to search for nearby LCD ESLs and configure
their WiFi network to connect them to the backend server.
Prerequisites:
Bluetooth and location permissions must be granted (required on Android).
The ESL must be in a network‑ to‑ be‑ configured state (typically powered on but not
yet connected to WiFi).
Steps:
1. Tap
【
Configure ESL
】
.
2. When prompted to “Allow Bluetooth”, tap
【
Allow
】
.
3. Tap
【
Start Scan
】
; the App will scan for nearby LCD ESLs.
4. Select the ESLs you want to configure from the search results (multiple selection
allowed).
5. Enter the WiFi name (SSID) and password.
6. Tap
【
Start Configuration
】
; the system sends the WiFi credentials to the ESLs via
Bluetooth.
7. Once the ESL successfully connects to WiFi, it automatically registers the MQTT
connection and communicates with the backend.
8. The configuration result can be viewed in the list (Success/Failure).
Batch Configuration:
Supports selecting multiple ESLs and configuring WiFi for them in batch.
POSHIJI ESL Management System
44
Chapter 9: Re-push
Operation Path:Home → Re-push
Function Description:Batch re-push data that timed out or failed to be pushed to ESLs.
Steps:
1. Filter the ESLs that need re-pushing (supports filtering by store, ESL type, push status,
etc.).
2. Tap【Re-push】.
3. The system creates a re-push task; you can view the results in the “Push Log”.

POSHIJI ESL Management System
45
Chapter 10: My
10.1 Settings
Operation Path:Bottom Navigation Bar → My → Settings
Function Description:Configure App personalization options.
Configurable Items:
ESL Type:Select the ESL type used in the current store (LCD ESL / EPD EPD ESL / Both),
which affects the data statistics and function display on the home page.
Language:Switch the App interface language (Chinese / English, etc.).
10.2 User Management
Operation Path:My → User Management
Function Description:Manage sub‑ users of the current store (visible only to admin accounts).
Operations:
Add Sub‑ user:Enter username, phone number, role, and set an initial password.
Edit User:Modify user information and role.
Delete User:Remove a sub‑ user account.
Reset Password:Reset a user’s password to the initial password.
10.3 Store Information
Operation Path:My → Store Information
Function Description:View details of the currently logged‑ in store.
Displayed Content:
Store Name
Store Code
Address
Contact Person, Contact Number
10.4 About
Operation Path:My → About
Function Description:View App version information and legal documents.
Content:
Update:Check for new App versions and upgrade.
User Agreement:View the user agreement.
Privacy Policy:View the privacy policy.

POSHIJI ESL Management System
46
10.5 Logout
Operation Path:My → Logout
Function Description:Log out of the current account and return to the login page.
Appendix
Appendix A: Frequently Asked Questions and Solutions
Issue
Possible Cause
Solution
Bluetooth cannot find ESL
Bluetooth not enabled,
location permission not
granted, ESL not in
configuration mode
Check Bluetooth, grant
location permission, confirm
ESL status
WiFi configuration fails
Incorrect password, weak
signal, ESL does not support
5G WiFi
Verify password, ensure ESL is
within WiFi coverage, use
2.4GHz WiFi
ESL does not refresh after
binding
ESL offline, network delay
Check ESL network status, tap
“Re‑ push”
Login error “Account does not
exist”
Account not registered or
entered incorrectly
Verify account details, or
contact administrator to
create account
Batch operation partially fails
Some ESLs are offline or have
data anomalies
Check failure details, retry for
offline ESLs individually

FCC Warnning:
This equipment has been tested and found to comply with the limits for a Class B digital device,
pursuant to part 15 of the FCC Rules. These limits are designed to provide
reasonable
protection against harmful interference in a residential installation. This equipment generates,
uses and can radiate radio
frequency
energy
and,
if
not
installed
and
used
in
accordance
with
the
instructions,
may cause
harmful
interference
to
radio
communications.
However,
there
is
no
guarantee
that interference
will
not
occur
in
a
particular
installation.
If
this
equipment
does
cause
harmful interference to radio or television reception, which can be
determined by turning the equipment off
and
on,
the
user
is
encouraged
to
try
to
correct
the interference
by
one
or
more
of
the following measures:
•
Reorient or relocate the receiving antenna.
•
Increase the separation between the equipment and receiver.
•
Connect the equipment into an outlet on a circuit different from that to which the receiver is
connected.
• Consult the dealer or an experienced radio/TV technician for help.
Caution:
Any
changes
or
modifications
to
this
device
not
explicitly
approved
by
manufacturer
could void your authority to operate this equipment.
This
device
complies
with
part
15
of
the
FCC
Rules.
Operation
is
subject
to
the
following
two
conditions:
(1)This
device
may
not
cause
harmful
interference,
and
(2)
this
device
must
accept
any
interference received, including interference that may cause undesired operation.
This
equipment
complies
with
FCC
radiation
exposure
limits
set
forth
for
an
uncontrolled
environment.
This
equipment
should
be
installed
and
operated
with
minimum
distance
0cm
between the radiator and your body.