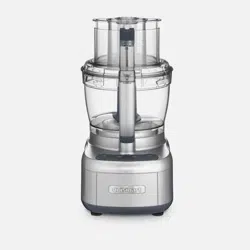
Cuisinart
®
Elemental
™
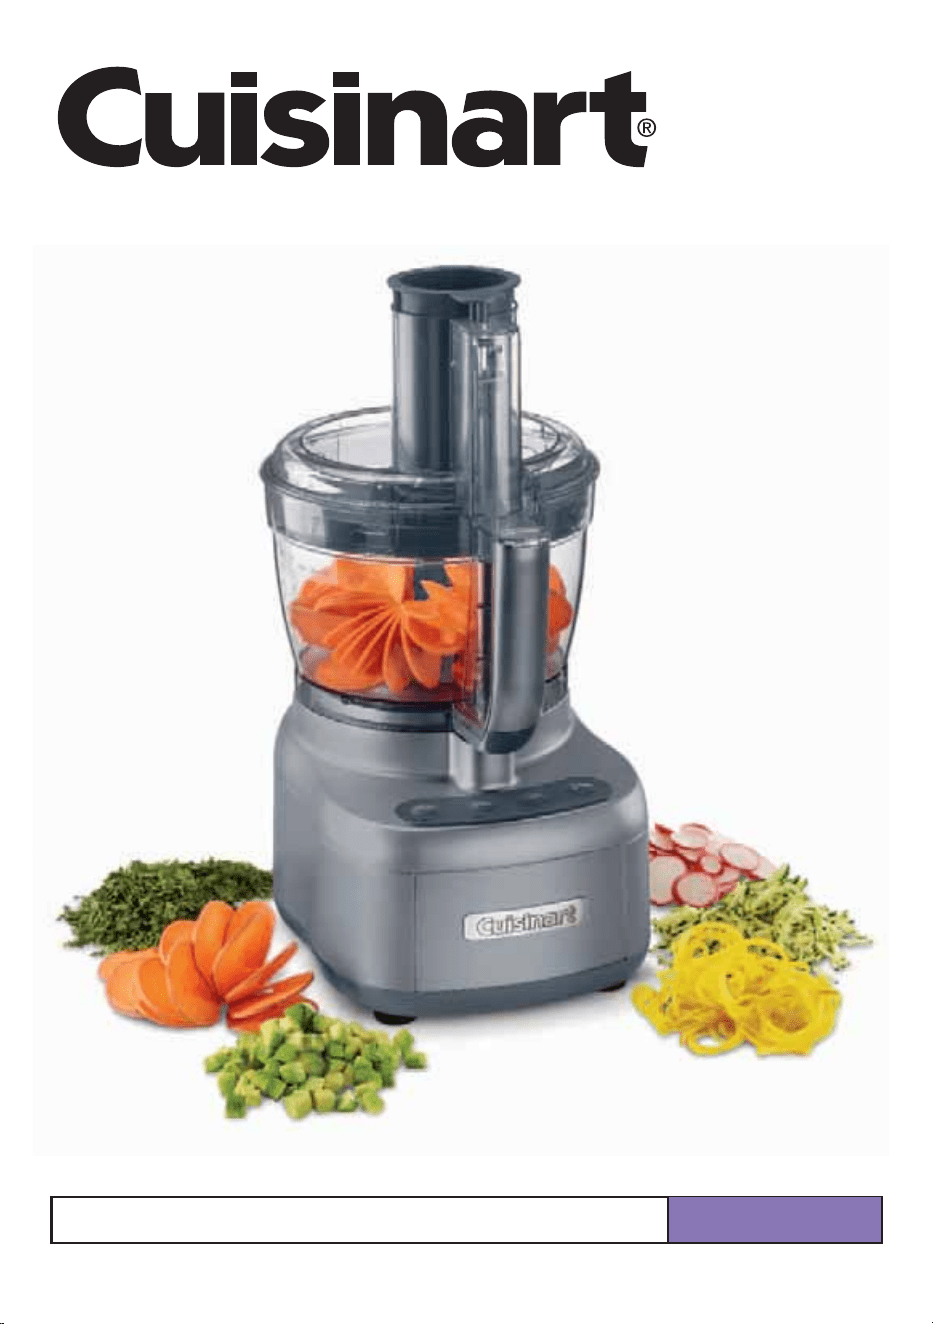
13-Cup Food Processor with Spiralizer & Dicer
FP-1300WS Series
For your safety and continued enjoyment of this product, always read the instruction book carefully before using.
INSTRUCTION
AND RECIPE
BOOKLET
2
FOOD CAPACITY
Sliced or shredded fruit, vegetable or cheese 13 cups
Dicing for vegetable and fruit 6 cups
Chopped fruit, vegetable or cheese 6 cups
Puréed fruit or vegetable 6 cups cooked
Chopped or puréed meat, fish or seafood 2 pounds
Thin liquid (e.g., dressings, soups, etc.)
8 cups
Cake batter 8-inch cheesecake batter; 1 box (15.25 ounce) cake mix
Cookie dough 5 dozen (based on average chocolate chip cookie recipe)
White bread/pizza dough 4 cups (all-purpose or bread flour)
Nuts for nut butter
4 cups
Spiralizer for fruit or vegetables
6 cups
RECOMMENDED MAXIMUM LARGE WORK BOWL CAPACITY
FOOD CAPACITY
Chopped fruit, vegetable or cheese 2 cups
Puréed fruit or vegetable 2 cups
Thin liquid (e.g., dressings, soups, etc.)
2 cups
Nuts for nut butter
1 cup
RECOMMENDED SMALL WORK BOWL CAPACITY
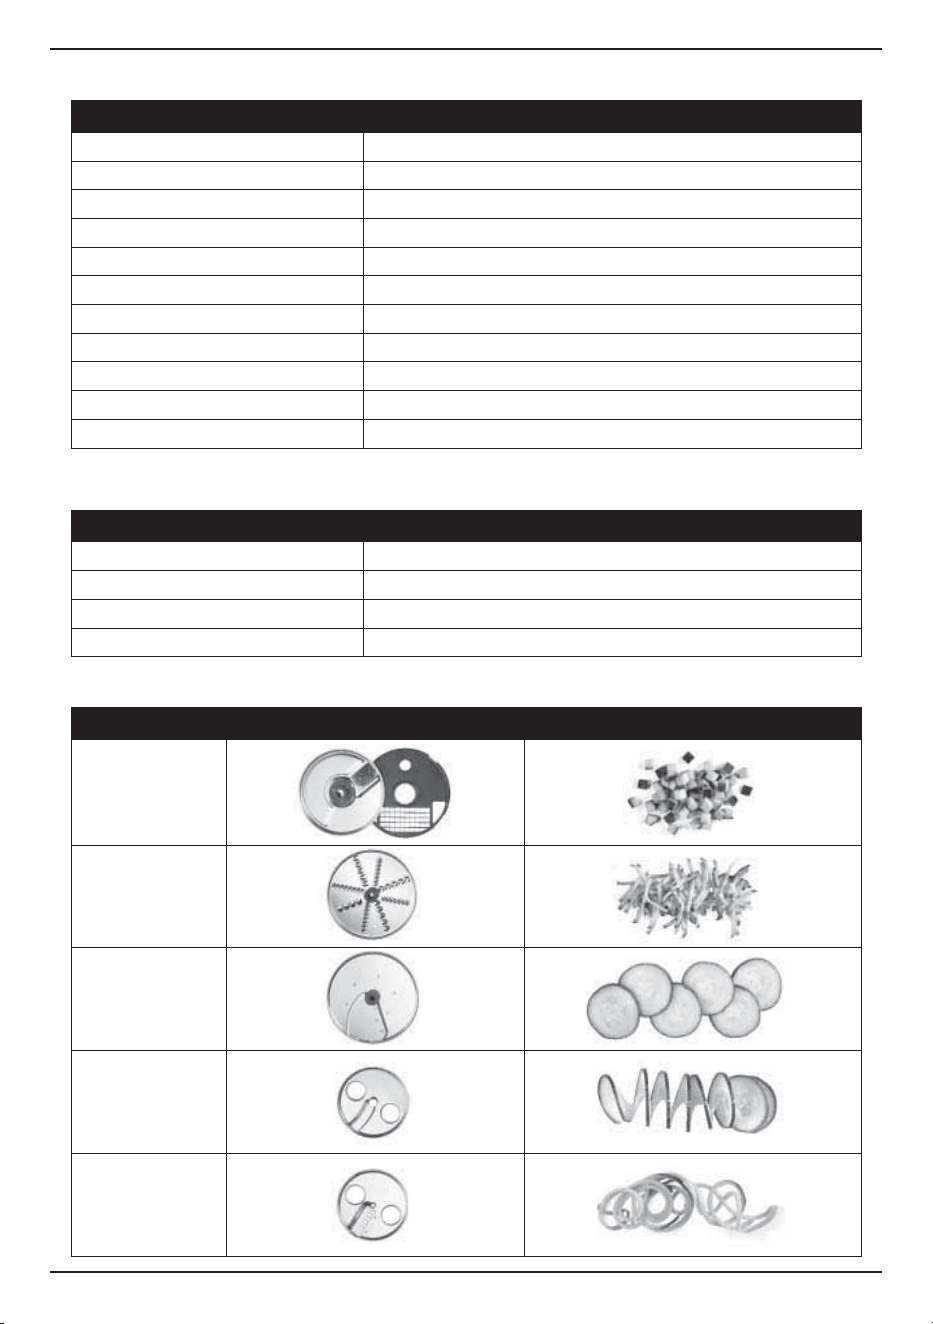
FUNCTION DISC RESULTS
Dice
Shred
Slice
Spiral (Ribbon)
Spiral (Spaghetti)
DISCS
3
IMPORTANT UNPACKING
INSTRUCTIONS
This package contains a Cuisinart®
Elemental™ 13-Cup Food Processor and
accessories:
large 13-cup work bowl, small 4.5-cup work
bowl, cover with multiple feed tubes and
interlock, at cover, spiralizer cover with
interlock, accessory storage case, dicing kit,
spiralizer pusher, ribbon and spaghetti discs,
and instruction/recipe book.
CAUTION: THE CUTTING TOOLS HAVE
VERY SHARP EDGES.
To avoid injury when unpacking the parts,
please follow these instructions.
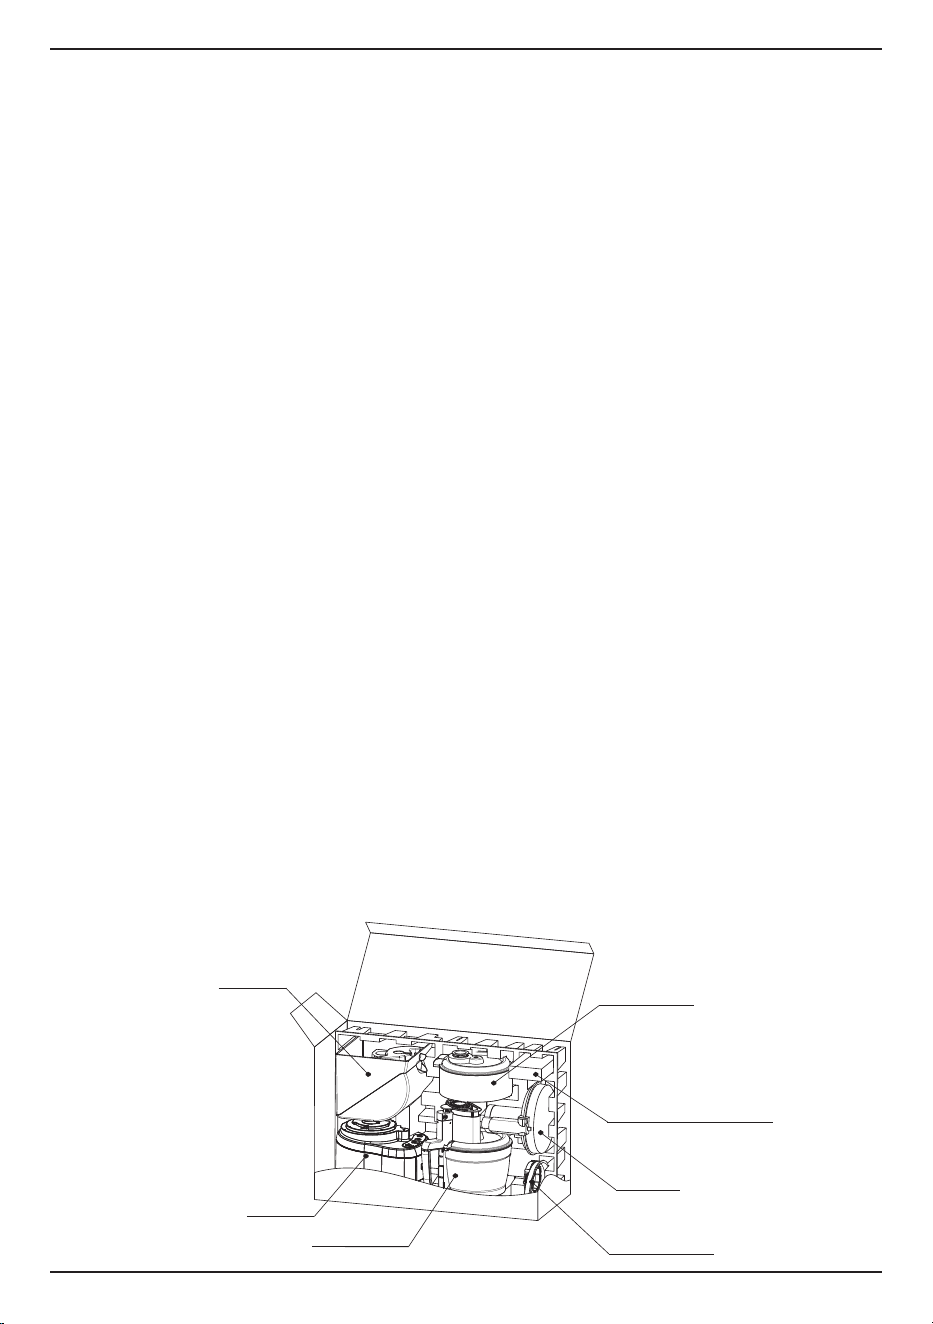
1. Place the box on a low table or on the
oor next to the kitchen counter where you
intend to keep the food processor. Be sure
the box is right side up.
2. Open top aps – there will be a rectangular
block of packing material that holds the
processor parts, each tted into a cavity.
3. Remove the instruction/recipe book and
spatula.
4. Lift out the packing material.
5. Remove the base, the 13- and 4.5-cup
work bowls, and place the base on the
counter or table. Assemble the work bowls
on the base by placing them over the shaft,
using the handle to turn the work bowl
clockwise to lock it.
6. Always read the Assembly Instructions
thoroughly before using your food
processor.
7. When ready to use your machine, unlock
the accessory storage case, lift the cover
and remove the clamshell to access the
small metal chopping/mixing blade, Dough
Blade, large metal chopping/mixing blade,
Stem Adapter, Adjustable Slicing Disc, and
Reversible Shredding Disc. Each is in a
cavity. CAREFULLY REMOVE THE METAL
CHOPPING/MIXING BLADE BY GRASPING
THE CENTER HUB AND LIFTING IT
STRAIGHT UP. NEVER TOUCH THE
BLADES, AS THEY ARE RAZOR SHARP.
CAREFULLY REMOVE THE ADJUSTABLE
SLICING DISC BY USING THE PLASTIC
HUB. DO NOT TOUCH THE BLADE; IT IS
VERY SHARP.
Remember to lock the parts in the storage
case when not in use.
8. To use the dicing kit, turn the at cover
counterclockwise to open, remove the
clamshell to access the dicing cutting
disc, Dicing Grid supporter and Cleaning
Tool. CAREFULLY REMOVE THE DICING
CUTTING DISC BY USING THE PLASTIC
HUB. DO NOT TOUCH THE BLADE; IT IS
VERY SHARP.
9. The spiralizer pusher, and ribbon and
spaghetti discs set are located at the
side. Remove the clamshell to access the
discs. We suggest you keep the clamshell
for better protection and storage of the
accessories. CAREFULLY REMOVE THE
RIBBON AND SPAGHETTI DISCS BY
GRASPING THE HOLES ON EACH DISC.
DO NOT TOUCH THE BLADE; THEY ARE
VERY SHARP.
10. Save the shipping cartons and cardboard
insert blocks. You will nd them very useful
if you need to repack the processor for
moving or other shipment. NOTE: We
recommend that you visit our website,
www.cuisinart.com for a fast, ef cient way
to complete your product registration.
Housing/Base
Work Bowl/Pushers
Spiral Lid
Dicing Storage Box
Storage Box
Gear Box
Spiral & Spaghetti Disc
Ribbon Cut & Spaghetti Cut Discs
Dicing Storage Box
Work Bowl/Pushers
Housing/Base
Storage Box
Spiralizer Lid
Spiralizer Disc Holder

4
IMPORTANT
SAFEGUARDS
Always follow these safety precautions when
using this appliance.
Getting Ready
1. Read all instructions.
2. Blades and discs are sharp. Handle them
carefully.
3. Always unplug from outlet when not
in use, before putting on or taking off parts,
before removing food and before cleaning.
To unplug, grasp plug and pull from electrical
outlet. Never pull cord.
4. Do not use outdoors.
5. Do not let cord hang over edge of table or
counter, or touch hot surfaces.
6. Do not operate any appliance with a damaged
cord or plug, or after appliance has been
dropped or damaged in any way. Return
appliance to the nearest authorized service
facility for examination, repair or electrical
or mechanical adjustment.
Operation
1. Keep hands as well as spatulas and other
utensils away from moving blades or discs
while processing food to prevent the possibility
of severe personal injury or damage to food
processor. A plastic spatula may be used,
but only when the food processor motor
is stopped.
2. Avoid coming into contact with moving parts.
Never push food down by hand when slicing
or shredding. Always use pusher.
3. Make sure motor has completely stopped
before removing cover. (If machine does not
stop within 4 seconds after being turned off,
call 1-800-762-0190 for assistance. Do not use
the machine.)
4. Never store any blade or disc on motor shaft.
To reduce the risk of injury, no blade or disc
should be placed on the shaft except when
the bowl is properly locked in place and the
processor is in use. Store blades and discs out
of reach of children.
5. Be sure cover and feed tube are securely locked
in place before operating food processor.
6. Never try to override or tamper with cover
interlock mechanism.
Cleaning
1. To protect against risk of electrical shock,
do not put base in water or other liquids.
General
1. This appliance should not be used by or near
children or individuals with certain disabilities.
2. Do not operate this, or any other motor-driven
appliance, while under the influence of alcohol
or other substances that affect your reaction
time or perception.
3.
This food processor is ETL listed for household
use. Use it only for food preparation as
described in the accompanying recipe and
instruction book. Do not use this appliance
for anything but its intended use.
4. The use of attachments not recommended
or sold by Cuisinart may cause fire, electrical
shock or personal injury, or damage to your
food processor.
5. To avoid possible malfunction of work bowl
switch, never store processor with cover
assembly in locked position.
6. Maximum rating of 550 watts is based on
Shredding Disc, which the draws greatest
current. Other recommended attachments
may draw significantly less current.
7. Do not operate your appliance in an appliance
garage or under a wall cabinet. When storing
in an appliance garage, always unplug the
unit from the electrical outlet. Not doing
so could create a risk of fire, especially if the
appliance touches the walls of the garage or
the door touches the unit as it closes.
NOTICE: This appliance has a plastic case,
it has a polarized plug (one blade is wider
than the other). As a safety feature, this plug
will fit in a polarized outlet only one way. If the
plug does not fit fully in the outlet, reverse the
plug. If it still does not fit, contact a qualified
electrician. Do not attempt to defeat this
safety feature.
SAVE THESE
INSTRUCTIONS
FOR HOUSEHOLD
USE ONLY
WARNING
RISK OF FIRE OR ELECTRIC SHOCK
DO NOT OPEN
WARNING: TO REDUCE THE RISK OF FIRE OR ELECTRIC SHOCK,
DO NOT REMOVE COVER (OR BACK)
NO USER-SERVICEABLE PARTS INSIDE
REPAIR SHOULD BE DONE BY AUTHORIZED SERVICE PERSONNEL ONLY
5
WARNING: RISK OF FIRE
OR ELECTRIC SHOCK
The lightning flash with arrowhead
symbol within an equilateral triangle
is intended to alert the user to the
presence of uninsulated, dangerous
voltage within the product’s enclosure
that may be of sufficient magnitude
to constitute a risk of fire or electric
shock to persons.
The exclamation point within an
equilateral triangle is intended
to alert the user to the presence
of important operating and
maintenance (servicing) instructions
in the literature accompanying
appliance.
CONTENTS
Important Unpacking Instructions ............... 3
Important Safeguards.................................. 4
Features and Benefits ............................. 6-7
Accessory Storage Cases ............................8
General Assembly Instructions ....................9
Chopping/Mixing Blades ............................10
Slicing/Shredding Discs ............................. 10
Dough Blade...............................................12
Dicing .........................................................13
Spiralizer .....................................................14
Cleaning, Storage and Maintenance ......... 15
For Your Safety .......................................... 15
Technical Data ............................................16
Troubleshooting ......................................... 16
Warranty Information ................................. 18
Recipes ................................................. 19–78

6
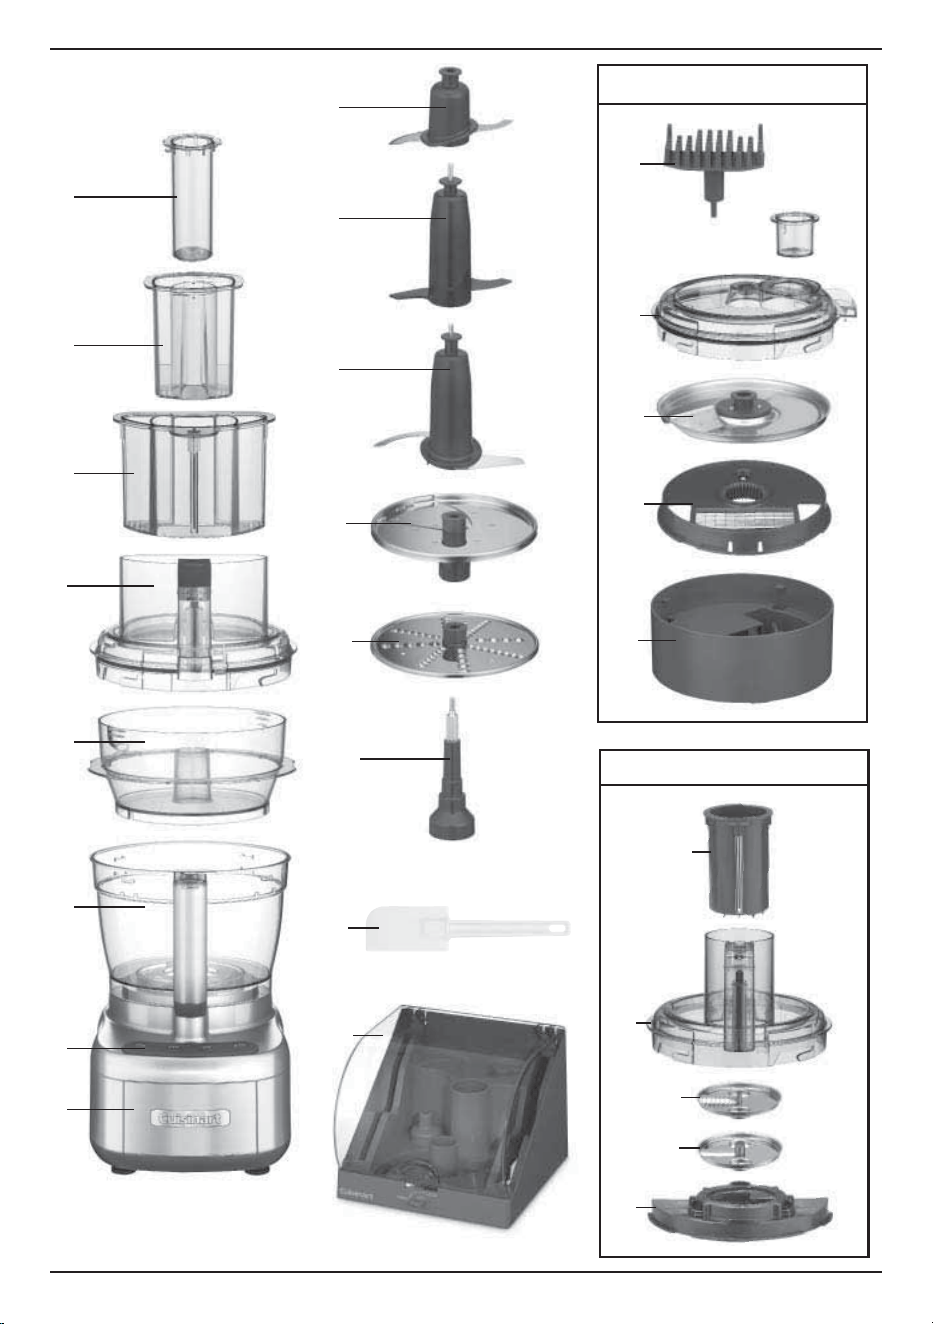
FEATURES AND BENEFITS
1
. 3-Part Pusher Assembly
A small pusher (1a) sits inside the medium
pusher (1b), which sits inside the large
pusher (1c), allowing you to accommodate
ingredients of all sizes. The Large Pusher
Lock can be pulled out to lock the
large pusher, and pushed in to unlock
it. This feature should be used when
processing heavy loads or dicing.
2. Work Bowl Cover with Supreme
®
Wide-Mouth Feed Tube
Cover includes the SealTight
TM
Advantage
feature, allowing maximum bowl
capacity during processing and pouring.
Exclusive feed tube accommodates larger
ingredients and saves time precutting.
3. Small 4.5-Cup (3a) and Large 13-Cup (3b)
Work Bowls
Designed for maximum versatility, select the
appropriate work bowl for the task.
4. Touchpad Control Panel
These easy-to-clean buttons feature High,
Low, Off and Pulse options for every food
processing function.
5. Housing Base and Motor
The heavy-duty base houses a powerful
550-watt motor and vertical motor shaft
that processes a variety of recipes without
slowing down.
6. Small Chopping/Mixing Blade
The small stainless steel blade chops or
mixes ingredients in your small work
bowl – features Cuisinart’s BladeLock System.
7. Dough Blade
Designed to gently knead through all types
of dough. Low speed is recommended
when kneading. NOTE: The Dough Blade
can only be used in the Large Work Bowl.
8. Large Chopping/Mixing Blade
This heavy-duty stainless steel blade will
process a variety of food in your Large
Work Bowl. The BladeLock System keeps
the blade in place to provide optimal ease
when pouring. NOTE: Large Work Bowl has
a sealed drive system that eliminates any
leaks.
9. Adjustable Slicing Disc
The versatile 7-in-1 disc allows for thin
to thick slices with 1mm to 7mm indicators.
This disc may be used only in the Large Work
Bowl.
10. Reversible Shredding Disc
Provides the option of either fine or medium
shredding for optimal results. This disc may
be used only in the Large Work Bowl.
11. Stem Adapter
This user-friendly tool easily attaches to
either disc, Small Chopping/Mixing Blade,
Spiral Disc Holder or Dicing Grid and Dicing
Disc to engage the motor shaft.
12. Spatula
Uniquely designed for use with either
work bowl.
13. Accessory Storage Case
This convenient storage case with safety
lock holds all of the blades, shredding and
slicing discs and Stem Adapter that are
included with your new food processor.
14. Dicing Kit
a. Cleaning Tool
Makes quick work of removing food
trapped in Dicing Grid.
b. Flat Work Bowl Cover with
Small Pusher
This dual-function work bowl cover is also
the lid of the Dicing Kit’s storage case.
NOTE: Not to be used WITH the
Dicing Kit.
c. Dicing Disc
Cuts food as it is pushed through Grid.
d. Dicing Grid
Designed to position food to be cut into
perfect squares.
e. Storage Case
Safely stores all the parts of the Dicing Kit.
15. Spiral Accessories
a. Spiralizer Pusher
b. Spiralizer Cover
c. Spaghetti Cut Disc
d. Ribbon Cut Disc
e. Spiralizer Disc Holder
7
5.
4.
2.
3b.
1c.
1b.
1a.
3a.
6.
7.
8.
9.
10.
11.
12.
13.
Spiral Accessories
14e.
14b.
14a.
Dicing Kit & Storage Case
14d.
14c.
15b
15a
15e
15c
15d
A
F
C
D
B
E
8
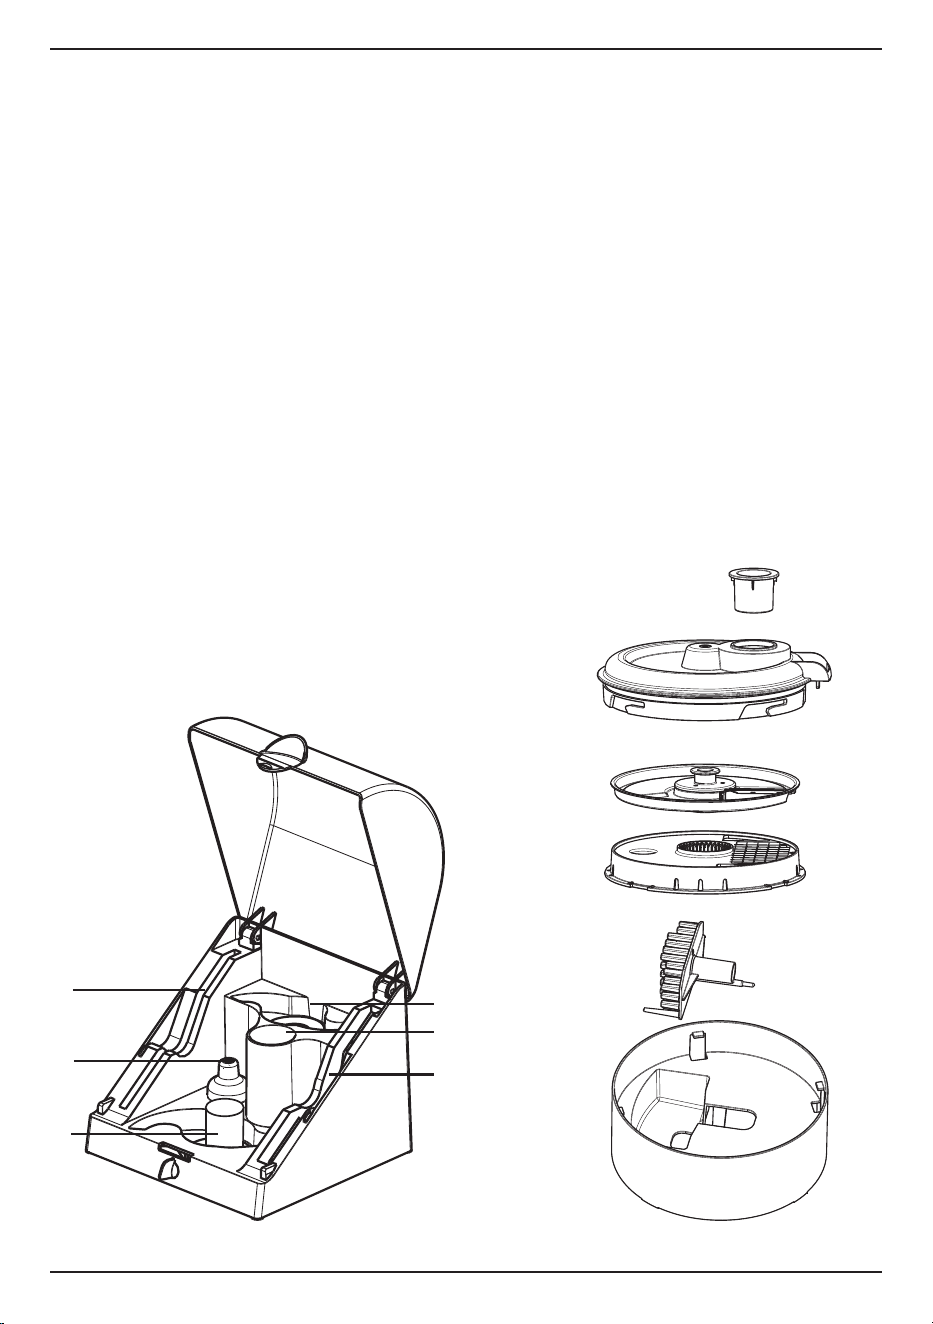
ACCESSORY
STORAGE CASE
Operating the Lock
To unlock, turn counterclockwise. Gently lift up
the transparent cover. Do not force the cover open
when the knob is in the locked position. To lock,
gently close the cover and turn the knob clockwise.
Inserting Accessories
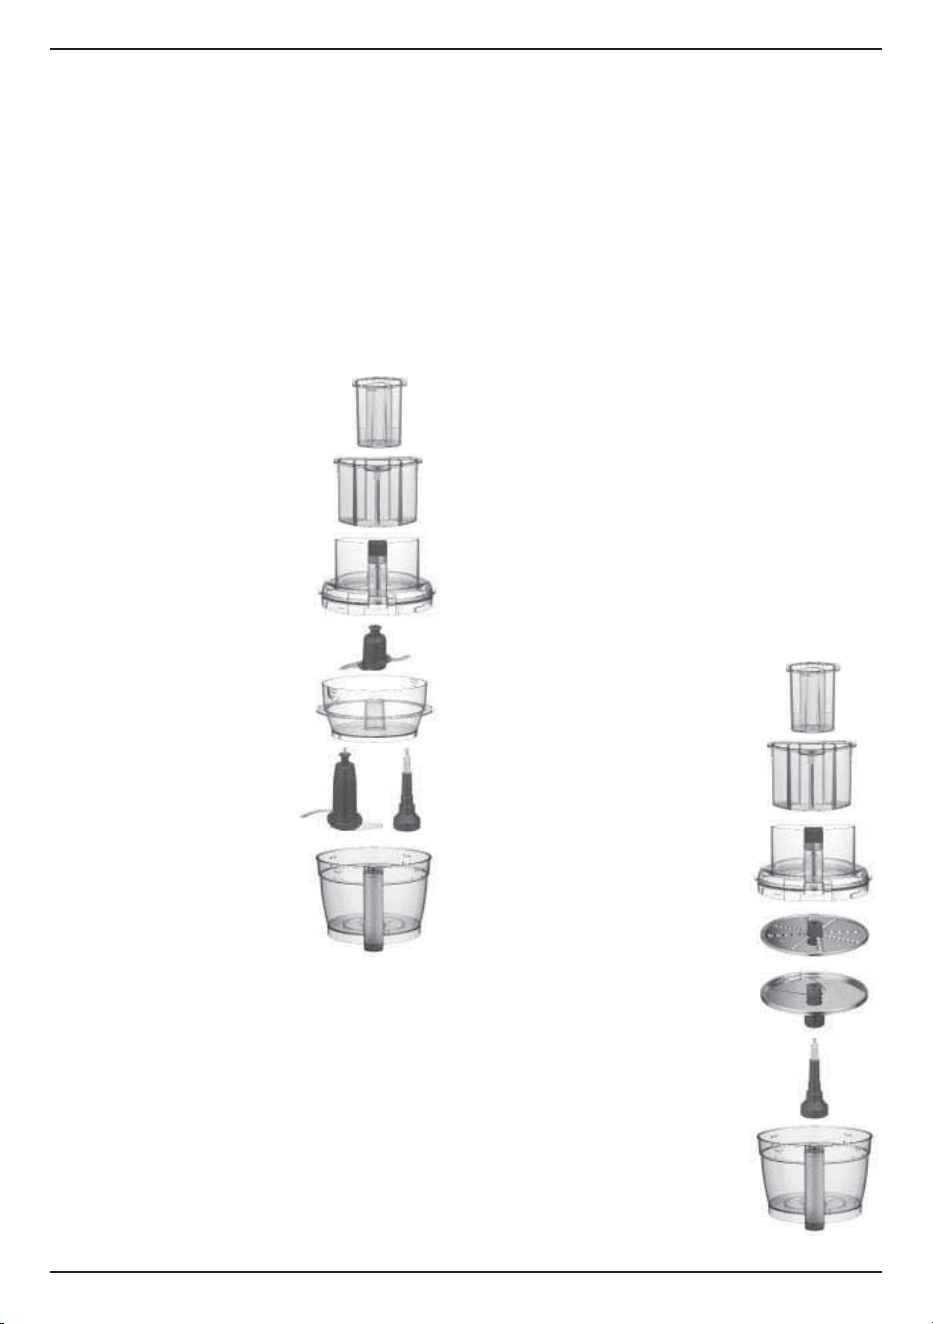
The Accessory Storage Case holds the Small
Chopping/Mixing Blade (A) on the peg in the back
of the case, the Dough Blade (B) on the middle
peg, the Stem Adapter (C) on the front peg,
the Large Chopping/Mixing Blade (D) in the front
cavity, the Adjustable Slicing Disc (E) in the slot
on the right, and the Reversible Shredding Disc
(F) in the left slot.
Carefully hold discs by center hub when inserting
into and removing from the Storage Case.
NOTE: DO NOT TOUCH METAL BLADES
OR CUTTING EDGES OF DISCS. ALL ARE
EXTREMELY SHARP AND CONTACT COULD
CAUSE INJURY.
DICING KIT
STORAGE CASE
Removing Parts
1. To open kit, turn the Flat Work Bowl Cover
with Small Pusher counterclockwise and lift
to remove.
2. Grasp center knob on Dicing Blade and
carefully lift out of Storage Case. Set aside
on a flat surface.
3. Using the openings in the top of the Dicing
Grid, grip and lift out to remove. See page 13
for assembly instructions.
4. The Cleaning Tool sits in a dedicated space
in the base of the Storage Case.
NOTE: When finished dicing, wash, thoroughly
dry and reverse order of directions above to
return parts to Storage Case.
9
GENERAL ASSEMBLY
INSTRUCTIONS
Before First Use
Before using your Cuisinart
®
Elemental
TM
13-Cup
Food Processor for the first time, wash all the
parts (see Cleaning, Storage and Maintenance
Instructions on page 15).
1. Place the food processor base on a dry,
level countertop with the controls facing
toward you. Do not plug the unit in until
it is fully assembled.
Note: To use the Small Bowl, it must be
nested in the Large Work Bowl with the
Stem Adapter in place for operation.
2. Place the Large Work Bowl on the base
and use the handle to turn the bowl
counterclockwise to lock it into place.
3. To use the Small Work Bowl, first attach the
Large Work Bowl to the base. Place the
Stem Adapter onto the shaft, then lower the
Small Work Bowl over the adapter and into
the Large Work Bowl. Place your fingers in the
recesses of the Small Work Bowl and turn
slightly to secure in place.
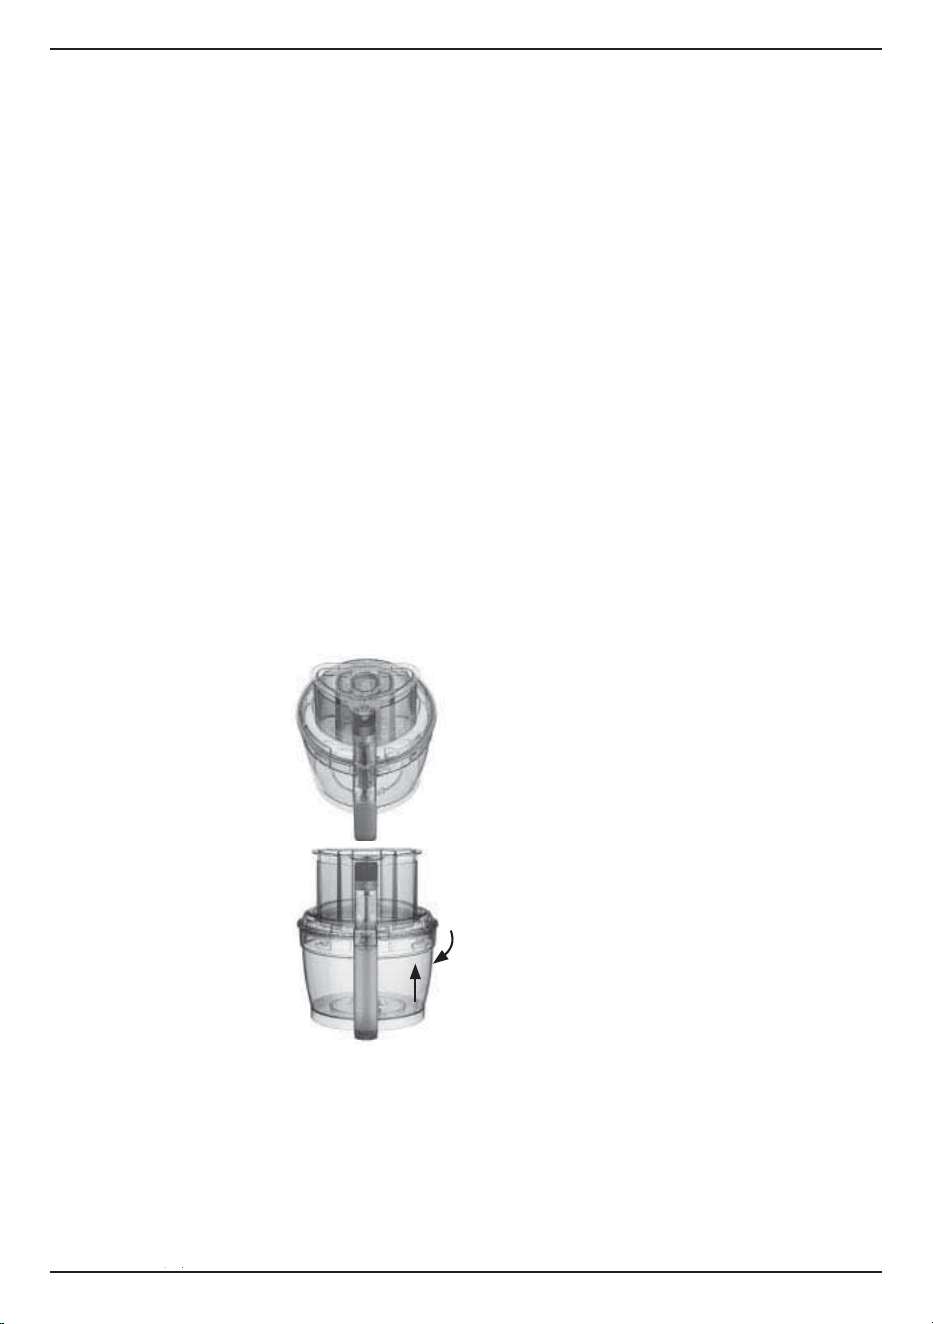
Main Work Bowl Cover
Operation
1. Place the cover over the
large work bowl with the
feed-tube assembly
shifted slightly to the
right of the handle.
2. Once the cover is fully
seated, rotate the cover
to the left (clockwise)
to engage the lid-locking
mechanism and interlock.
3. To remove the cover,
rotate the cover
approximately
1/
1
2
th of a turn to the
right to disengage the
interlock and locking
mechanism.
Flat Work Bowl Cover Operation
Use the Flat Cover for added convenience when
your recipe calls for chopping, mixing, puréeing
or kneading. It is particularly useful when you are
preparing baked goods such as cakes, cookies,
pies and breads.
To Assemble the Flat Cover
Begin with the work bowl and the metal blade
in place. Place the Flat Cover on the work
bowl so that the Cuisinart logo written on the
cover is face up and readable. Then turn cover
CLOCKWISE to lock into place.
Make sure the small cap is in place before using.
To Disassemble the Flat Cover
Place one hand near the Cuisinart logo and one
hand on opposite end of cover; turn cover
COUNTERCLOCKWISE. Lift cover up and off
work bowl. Do not use the Flat Cover with the
Slicing Disc, Shredding Disc, Dicing or Spiralizer
attachments. Use only with the metal blade or
Dough Blade.
Work Bowls
The two nested work bowls offer versatile food
processing options and save you time by
minimizing cleanup. Use only the Small Work
Bowl when processing smaller quantities.
Optimize efficiency when making recipes that
require multiple bowls by starting with the Smaller
Work Bowl. For example, prepare a crumb topping
before mixing batter for a cake in the Large Work
Bowl. Or emulsify dressing before shredding
vegetables for vegetable slaw.
Chopping certain foods may scratch or cloud the
work bowl; this will not affect the functionality of
your work bowl.
Machine Controls
High and Low Control Buttons
The High and Low controls are buttons that allow
the machine to run until Off is selected.
1. Properly assemble the machine.
2. Add ingredients to the work bowl, either
through the feed tube or directly into the bowl.
Lock cover into place.
3. Press the High or Low button. The motor
will start.
4. Press the Off button when finished.
Pulse Button
The Pulse control is a button that allows the machine
to run only while it is being pressed. This capability
provides more accurate control of the duration and
frequency of processing. Unless otherwise specified,
a pulse should be about two seconds.
With the machine properly assembled and
engaged, and ingredients in the work bowl,
press the Pulse button repeatedly as needed.
10
CHOPPING/
MIXING BLADES
Blade Operation
The BladeLock feature is designed to keep the
blade in place during processing, pouring, lifting,
and handling tasks — but is not permanently
attached. Handle with care. Always check to be
sure the blade is securely locked before turning
the bowl upside down.
Large Blade Operation
With your Large Work Bowl
assembled on the base, grasp
the Large Chopping/Mixing
Blade by its hub, align it over
the center of the bowl, place it
onto the shaft and push down
until it locks into place. Always
check to be sure the blade is
securely locked before turning
the bowl upside down. (To
remove, first take the bowl off
the base and put it on a flat
surface. Rest the heel of your
hand on the rim of the bowl
and pull up gently and
carefully.)
Small Blade Operation
With the Large Work Bowl in
place on the base, place the
Stem Adapter onto the hub in
the center of the bowl. Next,
put the Small Work Bowl into
the Large Work Bowl,
positioning it over the Adapter.
Grasp the Small Chopping/
Mixing Blade by its hub,
placing it on the Stem Adapter.
Push down firmly to lock. (To
remove, first take the bowl off
the base and put it on a flat surface. Rest the heel of
your hand on the rim of the bowl and pull up gently
and carefully.)
Chopping
(using the Chopping/Mixing Blade)
• For raw ingredients: Peel, core and/or remove
seeds and pits. Food should be cut into even,
½- to 1-inch pieces. Foods cut into same size
pieces produce the most even results.
• Pulse food in 1- to 2- second increments to
chop. For the finest chop, either hold the Pulse
button down or press High or Low to run the
machine continuously. Watch ingredients closely
to achieve desired consistency and scrape the
work bowl as necessary. High speed is
recommended for most chopping, processing
and slicing/shredding tasks.
Puréeing
(using the Chopping/Mixing Blade)
• To purée fresh fruits or cooked fruits/vegetables:
Ingredients should be cut into 1-inch pieces;
a smooth purée is best achieved when all the
pieces are equal in size. Pulse to initially chop
and then process on High or Low until food is
puréed; scrape the work bowl as necessary. Do
not use this method to purée cooked white
potatoes.
• To purée solids for a soup or sauce: Strain the
solids from the liquid and process the solids
alone. Add cooking liquid through the feed tube
and process as needed.
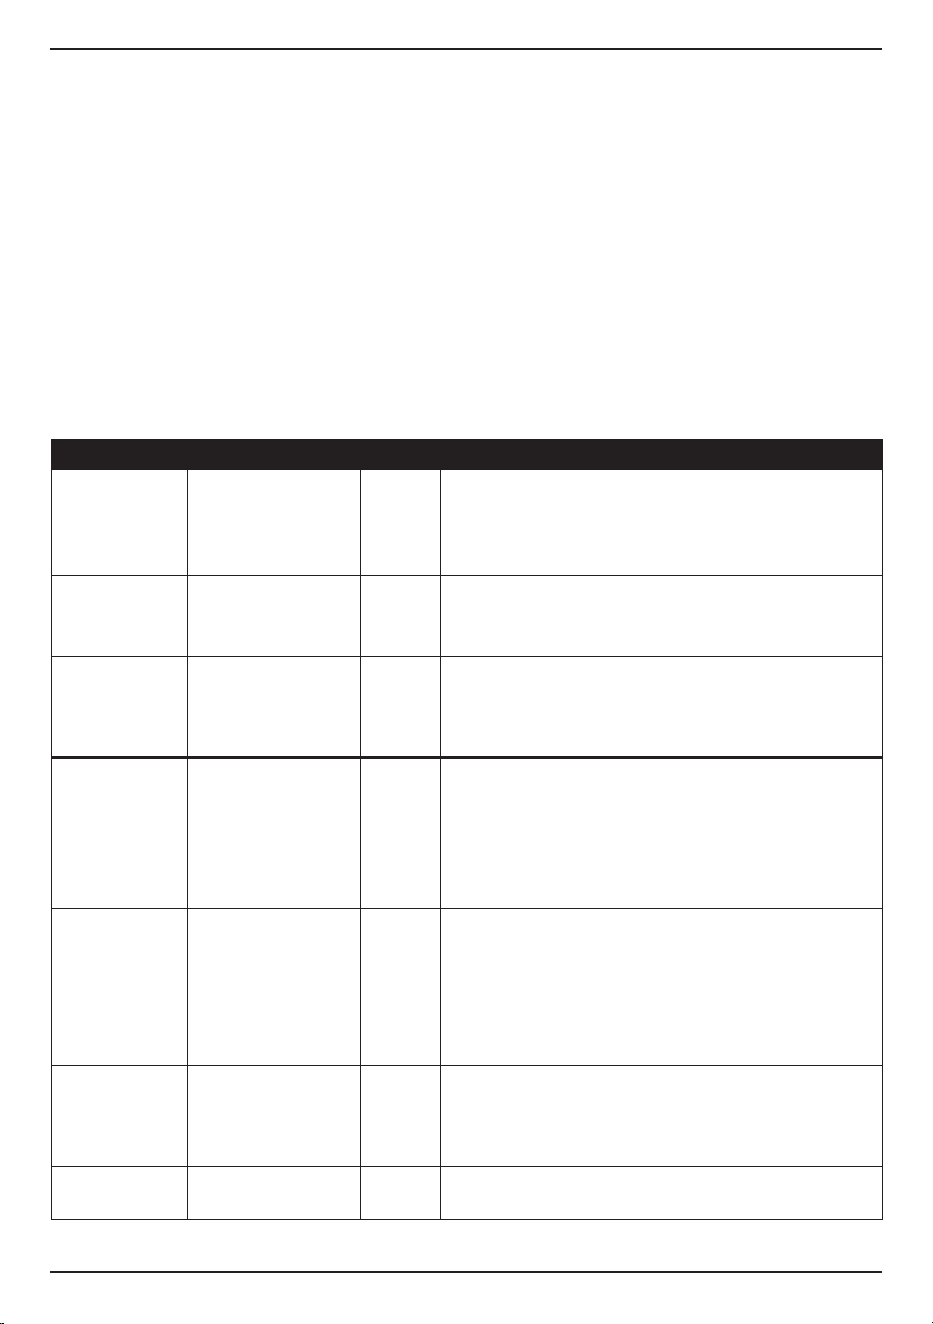
SLICING/SHREDDING DISCS
Disc Operation
When using the Large Work Bowl,
position the Stem Adapter onto
the shaft. If using the Adjustable
Slicing Disc, use the rotating hub
and indicator markings to select
slicing thickness. Using the
plastic hub, align and insert the
disc over the Stem Adapter.
If using the Reversible Shredding
Disc, determine whether the fine
or medium side will be used, and
use the plastic hub to twist into
position on the Stem Adapter.
The plastic hub may be used for
removal of this disc.
Using the Adjustable
Slicing and Reversible
Shredding Discs
• The Slicing Disc makes whole
slices. It slices fruits, vegetables
and cooked meat.
• The Shredding Disc shreds most
firm and hard cheeses. It also
shreds vegetables like
potatoes, carrots and zucchini.
• Always pack food in the feed
tube evenly for slicing and
shredding. The food will dictate
the amount of pressure: Use light pressure for
Small and Large
Work Bowls
& Accessories
Shredding & Slicing
Accessories
11
soft foods, medium pressure for medium foods
and firm pressure for harder foods. Always
process with even pressure.
• For round fruits or vegetables, slice a thick piece
off base so it sits upright in feed tube. Slice to fit
tube if necessary.
• For small ingredients like mushrooms, radishes
or strawberries: Trim the ends so the food sits
upright in the feed tube.
• When slicing or shredding cheese, be sure that
it is well chilled.
• To shred leafy vegetables like lettuce or spinach:
Roll leaves together and stand them up in feed
tube. Process with even pressure.
NOTE: Always use the pusher when slicing
or shredding. Never put your fi ngers in the
feed tube while unit is running.
You can slice, shred and chop a multitude of vegetables and fruits in the Cuisinart
®
Food Processor. What
you may not know is that the food processor is the perfect tool for a number of other tasks, such as soften-
ing butter, making breadcrumbs, making baby food, etc. Here is a guide that will help you in preparing just
about anything!
USER GUIDE
FOOD TOOL SPEED DIRECTIONS
Soft Cheeses
(ricotta, cream
cheese, cottage
cheese, etc.)
Chopping/Mixing Blade Low to
gently mix
or High to
whip
Have cheese at room temperature. When applicable, cut into 1-inch
pieces. Process until smooth, stopping to scrape down the sides of
the bowl as needed. Perfect for making cheesecakes, dips, pasta
fillings and more.
Firm Cheeses
(Cheddar, Swiss,
Edam, Gouda, etc.)
Slicing or Shredding Disc High Cheese should be well chilled before slicing/shredding.
Cut to fit feed tube. Use light to medium pressure when slicing/
shredding.
Hard Cheeses
(Parmesan,
Romano, etc.)
Chopping/Mixing Blade
Slicing or Shredding Disc
Pulse
and High
If using the Chopping Blade, cut into ½-inch pieces.
Pulse to break up and then process until finely grated.
This will produce a nice grated cheese. If slicing or shredding, cut to
fit feed tube. Use light to medium pressure when slicing/shredding.
Baby Food Chopping/Mixing Blade Pulse
and High
As for all fruit and vegetable purées, cut ingredients into
½ - to 1-inch pieces. Steam ingredients until completely soft.
Pulse to chop, then process until completely smooth
(add steaming liquid through the feed tube when processing if
necessary). Keeps frozen in ice cube trays for individual 1-ounce
portions.
Butter Chopping/Mixing Blade
Slicing or Shredding Disc
High For creaming: Have butter at room temperature. Cut into 1-inch
pieces. Process, scraping bowl as necessary. For compound
(flavored) butters, process flavoring ingredients, such as herbs, zest,
vegetables, etc., before adding butter. For shredding/slicing: Freeze
briefly. Use light to medium pressure to shred or slice. Shredded
butter is great for preparing certain pastry doughs. Sliced butter is
great for serving alongside corn on the cob or freshly made rolls.
Crumbs (Bread,
Cookie, Cracker,
Chip)
Chopping/Mixing Blade Pulse
and High
Break into pieces. Pulse to break up, and then process until desired
consistency. This will make perfect bread/cracker/chip crumbs for
coating meats and fish. Processed cookies make delicious pie and
cake crusts.
Fresh Herbs Chopping/Mixing Blade Pulse Wash and dry herbs thoroughly. Pulse to roughly chop. Continue
pulsing until desired consistency is achieved.
12
FOOD TOOL SPEED DIRECTIONS
Ground Meat Chopping/Mixing Blade Pulse Cut meat into 1-inch pieces. Pulse to chop, about 25 long pulses, or
until desired consistency is achieved. If a purée
is desired, continue to process. Never chop/purée more than
2 pounds at one time. Make sure to never process meat containing
bones.
“Ice Cream” Chopping/Mixing Blade Pulse
and High
Put frozen fruit cut into 1-inch pieces into the work bowl with liquid
(juice or milk), any desired sweeteners, such as sugar, honey, simple
syrup and other flavors. Pulse to break up. Process until smooth.
Milk Shakes/
Smoothies
Chopping/Mixing Blade Low For milk shakes, first add ice cream. While unit is running,
add milk through the feed tube until desired consistency is achieved.
For smoothies, add fruit first, then add the liquid through the feed
tube while unit is running.
Nuts Chopping/Mixing Blade Pulse and
High
Pulse to chop to desired consistency. To make a nut butter, pulse to
break up, and then process until smooth, stopping to scrape down as
needed.
Superfine Sugar Chopping/Mixing Blade High Process granulated sugar for about 1 minute until finely ground.
Excellent for using in meringues and other baked goods.
Whipped Cream Chopping/Mixing Blade Low Process well-chilled cream until cream begins to thicken.
Add sugar as desired; process continuously until cream reaches
desired consistency. This cream is dense and perfect as a whipped
topping for cake or ice cream.
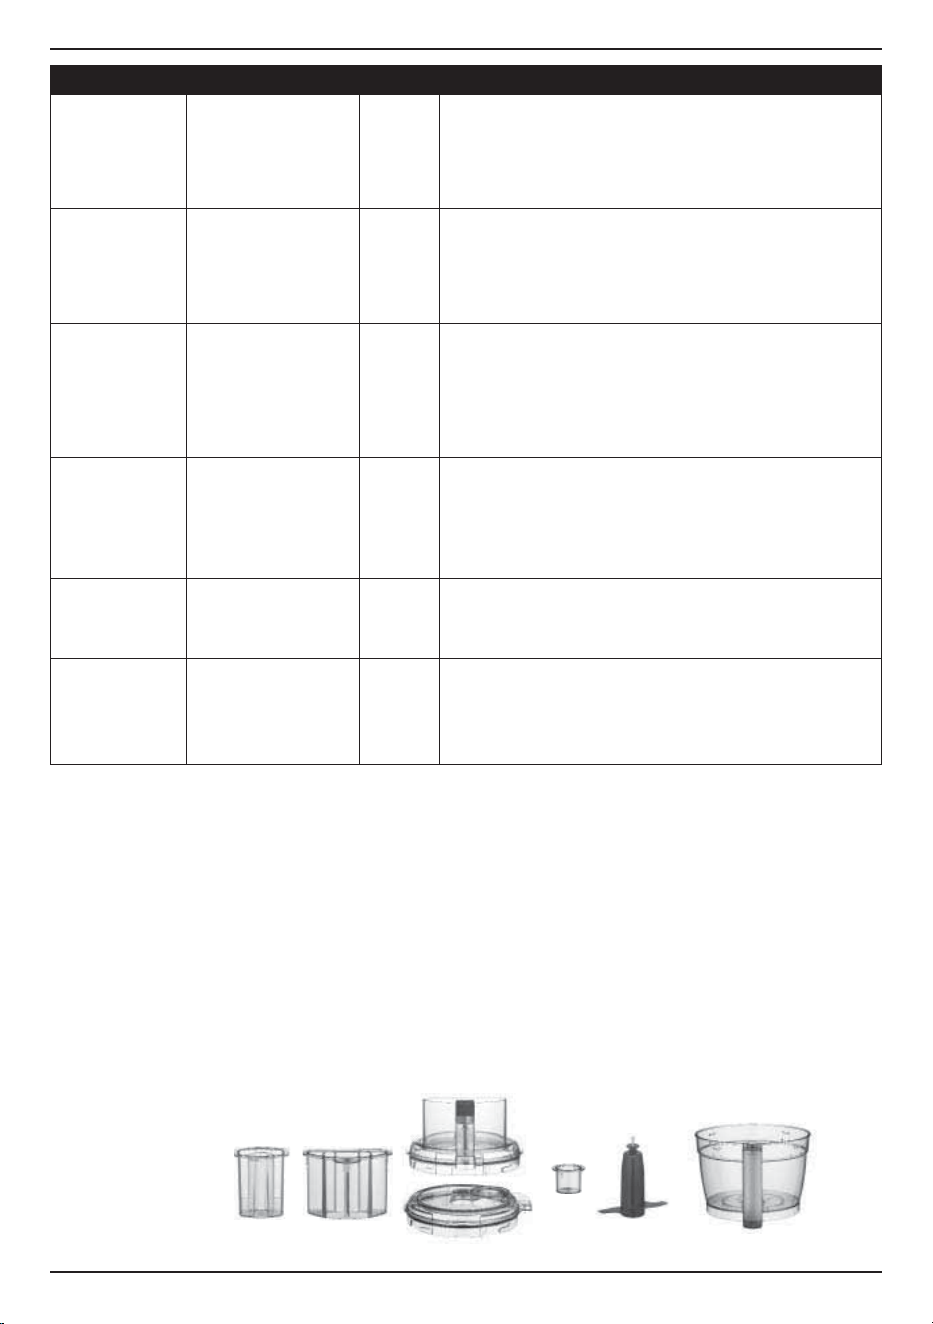
Dough Blade
Dough Blade Operation
For use with the Large Work Bowl. Carefully place
the Dough Blade on the shaft and push into place.
Kneading
(using the Dough Blade or the Chopping/
Mixing Blade with Low Speed)
• The Chopping Blade is ideal for pastry doughs,
while the Dough Blade is specifically designed
for kneading yeast doughs.
• The Large Pusher Lock is recommended to be in
the locked position when kneading dough to avoid
it
from moving around
—
some vibration is still
normal.
• Dough kneading should be done in the Large
Work Bowl only.
Large Work Bowl
& Accessories
13
DICING
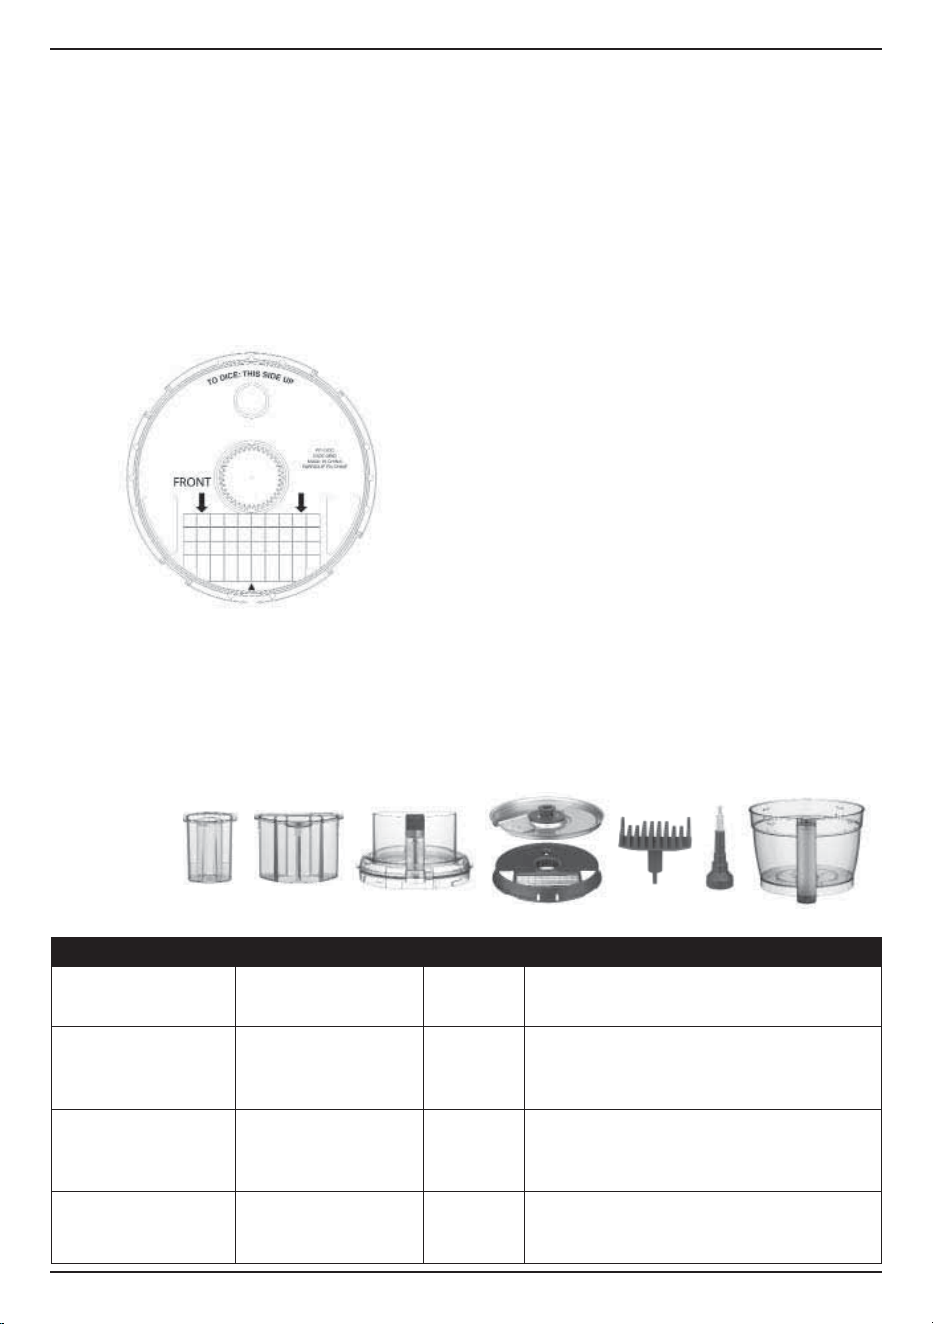
Assembling the Dicer in Work Bowl
1.
With Large Work Bowl on base, insert Stem
Adapter.
2. Carefully place Dicing Grid onto the Stem
Adapter with the Grid positioned closest to the
front of the food processor. Be sure “This Side
Up” shows on top. The triangle on front of the
Grid should be aligned with the center of the
work bowl handle. Dicer will not work if inserted
incorrectly.
3. Carefully place Dicing Disc on top of Grid.
Push down slightly to lock into place.
It should not move if positioned accurately.
NOTE: Always use caution when handling the
Dicing Disc; they are very sharp.
4. Follow instructions under Main Work Bowl
Cover Operation to lock cover onto work bowl.
Using Dicing Kit
• The Dicing Disc and Grid make cubed pieces of
fruit and vegetables. The recommended speed
for dicing most fruits and vegetables is High.
Use Low speed when dealing with very soft items
such as kiwi.
• When dicing, only use the medium or small feed
tube. Be sure to pack single items tightly, to the
left of the feed tube using consistent downward
pressure.
• Use the Cleaning Tool to clear the Grid. First
dislodge jammed particles using the long single
tooth on the handle. Then align the two long pins
along the right and left of the Grid. Guide the
cleaner into the correct position and press down
to clear the Grid of food residue.
• When processing items like carrots, squash
and potatoes, clean the Grid every 3 to 4 times
to prevent buildup.
• When large pieces of food remnants are lying
between the Grid and Disc, use caution when
cleaning off the remains by using the gaps featured
to the right and left of the Grid.
NOTE:
We do not recommend dicing frozen foods
and meats.
For dicing, use Medium or Small Pusher
only.
TIP:
Always process foods from soft (kiwi)
to hard (potato).
FOOD TOOL SPEED DIRECTIONS
Most Vegetables (e.g.,
Potato, Zucchini)
Dicing Kit High Peel vegetables if necessary, and trim to fit small or
medium feed tube before dicing.
Soft/Very Ripe Vegetables
(e.g., Ripe Tomatoes and
Avocados)
Dicing Kit Low Peel vegetables if necessary, and trim to fit small or
medium feed tube before dicing.
Most Fruits
(e.g., Apples, Bananas,
Strawberries)
Dicing Kit High Peel fruit if necessary, and trim to fit small or medium
feed tube before dicing.
Soft/Very Ripe Fruits (e.g.,
Kiwi, Ripe Pineapple, Very
Ripe Bananas)
Dicing Kit Low Peel fruit if necessary, and trim to fit small or medium
feed tube before dicing.
DICING GUIDE
Dicing Kit
& Accessories
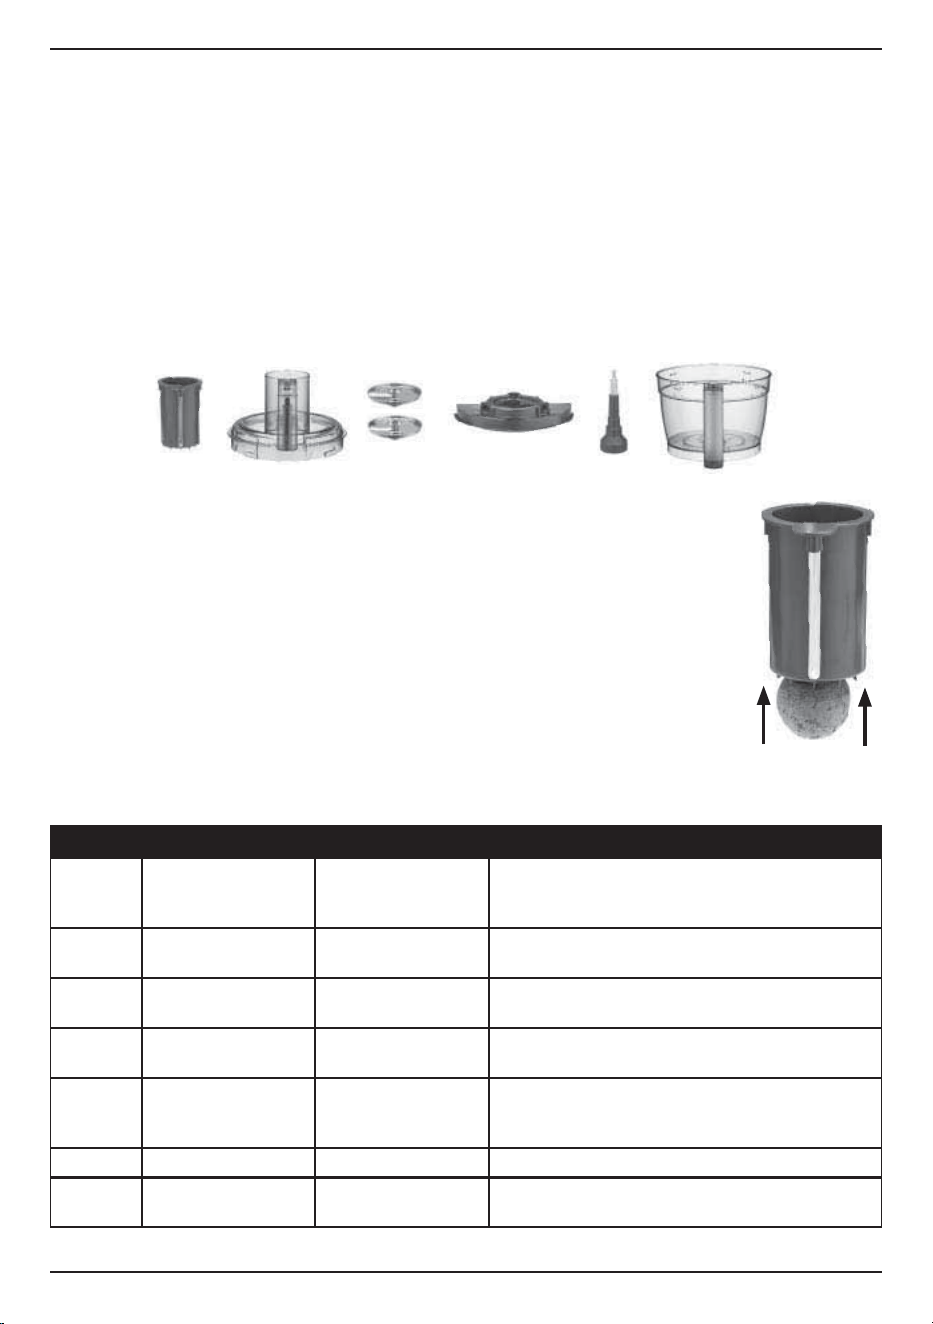
14
SPIRALIZER
Operating the Spiralizer
1. With Large Work Bowl on base, insert Stem
Adapter.
2. Place the Spiralizer Disc holder over the Stem
Adapter and secure into place.
3. Fit the desired disc onto the Spiralizer Disc
Holder. Insert your fingers into the finger holes
and turn disc clockwise to lock into place.
4. Lock the cover into place.
5. Trim the fruit or vegetable to fit the Feed Tube.
Trim the top and bottom to form a flat surface
on both sides. Put the item into the Feed Tube,
centering it onto the corer (middle pin).
6. Using the Pusher, push down item to secure
firmly onto the pusher’s teeth.
7. Select High or Low to spiralize item. Select Off
to stop spiralizing and remove lid. Remove
scraps remaining on cutting disc. Remove
scraps on Pusher. Replace lid and repeat with
next item.
SPIRALIZER GUIDE
Spiralizer Tips
• The Spiralizer attachment uses two discs – a
Spaghetti Cut Disc and a Ribbon Cut Disc—to
create garnishes or cut slices of vegetables and
fruits in wide or narrow spirals.
• Use the Spaghetti Cut Disc to cut long, thin
ribbon slices. Use the Ribbon Cut Disc for wider
slices.
• Once the desired amount of spiralized fruit or
vegetable accumulates in the work bowl, turn
the food processor off, remove the lid, and
remove the food.
• For best results, use firm fruits
and vegetables and process on
High speed (see chart for
suggestions).
• Be sure to clean the entire unit
after each usage. All pieces are
dishwasher safe
• Attach shorter foods such as
radishes by pressing the
Pusher's teeth onto the food,
then place into Feed Tube for a
more secure hold.
FRUIT BLADE PREPARATION RECIPE TIPS
Apple Spaghetti or Ribbon Cut Core (no need to peel!) Use spaghetti cut raw in salads (be sure to toss with lemon
juice to prevent oxidation). Bake in oven with cinnamon
sugar for dessert toppings, or bake into a tart or pie.
Pear Ribbon Cut Core; trim to fi t if pears
are large
Cut into smaller pieces and bake into chips. Sauté to
caramelize.
Potato Spaghetti or Ribbon Cut Trim to fi t feed tube Fry spaghetti cut in oil – toss with salt and pepper (and
vinegar for good tang!). Roast in the oven with olive oil.
Yam/Sweet
Potato
Spaghetti or Ribbon Cut Trim to fi t feed tube Steam or quick boil spaghetti cut for a “pasta”; roast.
Roast ribbon cut with olive oil and salt.
Beet Spaghetti or Ribbon Cut Peel; trim to fi t feed tube Use the spaghetti cut raw in a salad, or steam for a light
side dish. Roast the ribbon cut beets and serve with a good
olive oil.
Daikon Spaghetti or Ribbon Cut Peel Spaghetti cut for a fresh salad.
Cucumber Spaghetti or Ribbon Cut Trim to fi t feed tube Serve raw with desired dressing. Ribbon cut and make into
quick pickles.

15
CLEANING, STORAGE AND
MAINTENANCE
• Keep your Cuisinart
®
Elemental
TM
13-Cup Food
Processor ready to use on the kitchen counter.
When not in use, leave it unplugged.
• Keep the blades and discs out of reach
of children.
• All parts except the housing base are dishwasher
safe, and we recommend washing them in the
dishwasher on the top rack only. Due to intense
water heat, washing the work bowls, cover and
accessories on the bottom rack may cause
damage over time. Insert the cover with the
feed tube facing up to ensure proper cleaning.
Insert the work bowls and pusher upside down
for drainage. Remember to unload the dishwasher
carefully wherever you have placed sharp blades
and discs.
• To simplify cleaning, rinse the work bowls, cover,
pusher and blades or discs immediately after
use so food won’t dry on them. Be sure to
position the pusher upside down for drainage. If
food lodges in the pusher, remove it by running
water through it, or use a bottle brush.
• If you wash the blades, discs, dicing and spiral
accessories by hand, do it carefully. When
handling, use the plastic hubs. Avoid leaving
them in soapy water where they may disappear
from sight. To clean the blades, fill the work bowl
with soapy water, hold the blade by its plastic
center and move it rapidly up and down on the
center shaft of the bowl. Use of a spray
attachment is also effective. If necessary, use a
brush.
• The work bowls are made of SAN plastic with
metal components. They should not be placed in
a microwave oven.
• The housing base may be wiped clean with
a soapy, nonabrasive material. Be sure to dry
it thoroughly.
• If the feet leave spots on the counter,
spray them with a spot remover and wipe
with a damp sponge.
• If any trace of the spot remains, repeat the
procedure and wipe the area with a damp sponge
and nonabrasive cleaning powder.
IMPORTANT: Never store any blade or disc on the
motor shaft. No blade or disc should be placed on
the shaft except when the processor is about to
be used.
MAINTENANCE: Any other servicing should be
performed by an authorized service representative.
FOR YOUR SAFETY
• Like all powerful electrical appliances,
a food processor should be handled with care.
Follow these guidelines to protect yourself and
your family from misuse that could cause injury.
• Handle and store blades and discs carefully.
Their cutting edges are very sharp.
• Never put blades or discs on the motor shaft
until the work bowl is locked in place.
• Always be sure that the blade or disc is down
on the motor shaft as far as it will go.
• Always insert the blade in the work bowl before
putting ingredients in bowl.
• When slicing, shredding, dicing or spiralizing
Radish Spaghetti or Ribbon Cut Trim to fi t feed tube Ribbon cut to pickle, or to add a tangy bite to a fresh spring
salad.
Carrot Spaghetti or Ribbon Cut Peel Spaghetti or ribbon cut to use raw in salads.
Zucchini/
Summer
Squash
Spaghetti or Ribbon Cut Trim to fi t feed tube Spaghetti cut to use as “zoodles” with your favorite pasta
sauce. Ribbon cut can be sautéed in olive oil.
Butternut
Squash
Ribbon Cut Peel; trim to fi t feed tube.
Use only the neck (save
bottom for another use)
Roast or steam to add to soups, salads or as a light side
dish.
Turnip Ribbon Cut Peel; trim to fi t feed tube Prepare as you would the butternut squash – roasted or
steamed.
Kohlrabi Spaghetti or Ribbon Cut Peel; trim to fi t feed tube Spaghetti cut are best raw in salads or slaws. Roast the
ribbon cut with olive oil and salt.
Jicama Spaghetti Cut Peel; trim to fi t feed tube Add to raw salads for a nice crunch.
Parsnip Spaghetti or Ribbon Cut Peel; trim to fi t feed tube These are great when added to broth-based soups.
Rutabaga Ribbon Cut Peel; trim to fi t feed tube Roast up for a nice side dish!

16
food, always use the pusher. Never put your
fingers or spatula
into feed tube.
• Always wait for the blade or disc to stop spinning
before you remove the pusher assembly or cover
from the work bowl.
• Always unplug the unit before removing food,
cleaning or putting on or taking off parts.
• Always remove work bowl from base of machine
before you remove the blade.
• Be careful to prevent the chopping/mixing blade
from falling out of the work bowl when emptying
the bowl. Remove it before tilting the work bowl.
TECHNICAL DATA
The motor in your food processor operates on a
standard line operating current. The appropriate
voltage and frequency for your machine are shown
on a label on the bottom of the base.
An automatic, temperature-controlled circuit
breaker in the motor ensures complete protection
against motor burnout. If the processor runs for an
exceptionally long time when chopping, mixing or
kneading a thick or heavy mixture in successive
batches, the motor may overheat. If this happens,
the processor will stop. Turn it off and wait for the
motor to cool before proceeding. It will usually
cool within 10 minutes. In extreme cases, it could
take an hour.
Safety switches prevent the machine from
operating when the work bowl or the cover is not
locked into position. The motor stops within
seconds when the motor is turned off; and when
the pusher assembly is removed, a fast-stop circuit
also enables the motor to stop within seconds.
Cuisinart offers a Limited Three-Year Warranty on
the entire machine.
TROUBLESHOOTING
Food Processing
1. Problem: The food is unevenly processed
when chopping.
Solution:
• The ingredients should be cut evenly into
½ - to 1-inch pieces before processing.
• Process in batches to avoid overloading.
2. Problem: Slices are uneven or slanted.
Solution:
• Place evenly cut food, cut side down, into
the feed tube. Pack if possible. Always use
the smallest feed tube possible.
• Apply even pressure on the pusher.
3. Problem: Food falls over in feed tube.
Solution:
• Feed tube should be packed full for best
results.
4. Problem: Some food remains on top of the disc.
Solution:
• It is normal for small pieces to remain;
cut remaining bits by hand and add to
processed ingredients.
Spiralizer
1. Problem: No room for ribbon stacks to fall.
Solution:
• Turn the food processor Off, remove the lid,
and transfer the food to a separate bowl
before continuing.
2. Problem: Spaghetti cuts wrap around stem.
Solution:
• Turn the food processor Off, remove the lid,
and transfer the food to a separate bowl
before continuing.
3. Problem: Food is not spiralizing.
Solution:
• Remove food from Feed Tube, remove scraps
from Disc and Pusher and retrim edges of
food to form a new, flat surface.
4. Problem: Spaghetti cuts are not clean cut.
Solution:
• Rinse Disc and make sure it is free of any
scraps.
Dicing Kit
1. Problem: Food is stuck in the Grid.
Solution:
• First, unplug unit. Carefully remove Dicing
Disc.
• Use the long, single tooth on the Cleaning
Tool handle to push stubborn food
through Grid and large openings.
• Then, carefully reach into the large openings
on either side of Grid to remove large food
pieces.
• Do not use your fingers to clean the Grid.
ONLY USE THE CLEANING TOOL.
2. Problem: Pieces of food are not evenly cut.
Solution:
• Pack items closest to the left in medium
or small feed tube.
• Use the small feed tube for smaller items.
• Apply even pressure when using feed tube.
Dough Kneading

17
1. Problem: Motor slows down.
Solution:
• Amount of dough may exceed maximum
capacity of your food processor. Remove half
and process in two batches.
• Dough may be too wet (see number 8).
If motor speeds up, continue processing.
If not, add more flour, 1 tablespoon at a time,
until the motor speeds up. Process until
dough cleans the sides of the work bowl.
2. Problem: Blade doesn’t incorporate ingredients.
Solution:
• Always start the food processor before
adding liquid. Add liquid in a slow, steady
stream, or through the drizzle hole in the
pusher, allowing the dry ingredients time to
absorb it. If liquid is added too quickly,
wait until ingredients in the work bowl have
mixed, then add remaining liquid slowly
(do not turn off the machine). Pour liquid onto
dough as it passes under feed tube opening;
do not pour liquid directly onto bottom of
the work bowl.
3. Problem: Blade rises in work bowl.
Solution:
• Excessively sticky dough can cause blade to
rise. Carefully reinsert blade and immediately
add 2 tablespoons of flour through the feed
tube while the machine is running.
4. Problem: Dough doesn’t clean inside of the
work bowl.
Solution:
• Amount of dough may exceed maximum
capacity of your food processor. Remove half
and process in two batches.
• Dough may be too dry (see number 7).
• Dough may be too wet (see number 8).
5. Problem: Nub of dough forms on top of blade
and does not become uniformly kneaded.
Solution:
• Stop machine, carefully remove dough,
divide it into 3 pieces and redistribute them
evenly in the work bowl.
6. Problem: Dough feels tough after kneading.
Solution:
• Divide dough into 2 or 3 pieces and redistribute
evenly in bowl. Process 10 seconds or until
uniformly soft and pliable.
7. Problem: Dough is too dry.
Solution:
• While machine is running, add water,
1 tablespoon at a time, until dough cleans
the inside of the bowl.
8. Problem: Dough is too wet.
Solution:
• While machine is running, add flour,
1 tablespoon at a time, until dough cleans
the inside of the bowl.
Technical
1. Problem: The motor does not start.
Solution:
• There is a safety interlock to prevent the
motor
from starting if it is not properly assembled.
Make sure the work bowl and work bowl cover
are securely locked into position.
• If the motor still will not start, check the
power cord and outlet.
2. Problem: The food processor shuts off during
operation.
Solution:
• The cover may have become unlocked;
check to make sure it is securely in position.
• A safety protector in the motor prevents the
motor from overheating, which is caused by
excessive strain. Press the Off control button
and wait 10 minutes to allow the food processor
to cool off before resuming.
3. Problem: The motor slowed down during
operation.
Solution:
• This is normal as some heavier loads
(e.g., slicing/shredding cheese) may require
the motor to work harder. Simply reposition
the food in the feed tube and try again.
• The maximum load capacity may have been
exceeded. Remove some of the ingredients
and continue processing.
4. Problem: The food processor vibrated/moved
around the countertop during processing.
Solution:
• Make sure the rubber feet at the bottom of
the unit are clean and dry. Also make sure
that the maximum load capacity is not being
exceeded.
• This is normal as some heavier loads
(e.g., slicing/shredding cheese) may require
the motor to work harder.

18
LIMITED THREE-YEAR
WARRANTY
(U.S. AND CANADA ONLY)
This warranty is available to consumers only.
You are a consumer if you own a Cuisinart
®
Elemental
TM
13-Cup Food Processor that was purchased at retail for
personal, family or household use. Except as otherwise
required under applicable law, this warranty is not
available to retailers or other commercial purchasers or
owners.
We warrant that your Cuisinart
®
Elemental
TM
13-Cup
Food Processor will be free of defects in materials and
workmanship under normal home use for three years from
the date of original purchase.
We recommend that you visit our website, www.
cuisinart.com for a fast, efficient way to complete your
product registration. However, product registration does
not eliminate the need for the consumer to maintain the
original proof of purchase in order to obtain the warranty
benefits. In the event that you do not have proof of
purchase date, the purchase date for purposes
of this warranty will be the date of manufacture.
If your Cuisinart
®
Elemental
TM
13-Cup Food Processor
should prove to be defective within the warranty period,
we will repair it, or if we think necessary, replace it. To
obtain warranty service, simply call our toll-free number
1-800-726-0190 for additional information from our
Consumer Service Representatives, or send the defective
product to Consumer Service at Cuisinart, 7475 North
Glen Harbor Blvd., Glendale, AZ 85307.
To facilitate the speed and accuracy of your return, please
enclose $10.00 for shipping and handling of the product.
Please pay by check or money order made payable to
Cuisinart (California residents need only supply proof of
purchase and should call 1-800-726-0190 for shipping
instructions).
NOTE: For added protection and secure handling of any
Cuisinart product that is being returned, we recommend
you use a traceable, insured delivery service. Cuisinart
cannot be held responsible for in-transit damage or
for packages that are not delivered to us. Lost and/
or damaged products are not covered under warranty.
Please be sure to include your return address, daytime
phone number, description of the product defect, product
model number (located on bottom of product), original
date of purchase and any other information pertinent to
the product’s return.
Your Cuisinart
®
Elemental
TM
13-Cup Food Processor has
been manufactured to the strictest specifications and has
been designed for use only in 120 volt outlets and only
with authorized accessories and replacement parts. This
warranty expressly excludes any defects or damages
caused by attempted use of this unit with a converter, as
well as use with accessories, replacement parts or repair
service other than those authorized by Cuisinart. This
warranty does not cover any damage caused by accident,
misuse, shipment or other than ordinary household use.
This warranty excludes all incidental or consequential
damages. Some states do not allow the exclusion or
limitation of these damages, so these exclusions may not
apply to you.
You may also have other rights, which vary
from state to state.
CALIFORNIA RESIDENTS ONLY
California law provides that for In-Warranty Service,
California residents have the option of returning a
nonconforming product (A) to the store where it was
purchased or (B) to another retail store that sells Cuisinart
products of the same type.
The retail store shall then, at its discretion,
either repair the product, refer the consumer to an
independent repair facility, replace the product, or refund
the purchase price less the amount directly attributable to
the consumer’s prior usage of the product. If the above
options do not result in the appropriate relief to the
consumer, the consumer may then take the product to an
independent repair facility if service or repair
can be economically accomplished. Cuisinart
and not the consumer will be responsible
for the reasonable cost of such service, repair,
replacement, or refund for nonconforming products under
warranty.
California residents may also, according to
their preference, return nonconforming products directly
to Cuisinart for repair, or if necessary, replacement, by
calling our Consumer Service Center toll-free at 1-800-
726-0190.
Cuisinart will be responsible for the cost of the repair,
replacement, and shipping and handling for such
products under warranty.
BEFORE RETURNING YOUR
CUISINART PRODUCT
If you are experiencing problems with your Cuisinart
product, we suggest that you call our Consumer Service
Center at 1-800-726-0190 before returning the product to
be serviced.
If servicing is needed, a Representative can
confirm
whether the product is under warranty and direct you
to the nearest service location.
Important: If the nonconforming product is to be
serviced by someone other than Cuisinart’s Authorized
Service Center, please remind the servicer to call our
Consumer Service Center
at 1-800-726-0190 to
ensure that the problem is properly diagnosed, the
product is serviced with the correct parts, and the
product is still under warranty.

19
BASICS
RECIPES
To help your Cuisinart
®
Elemental
™
13-Cup Food Processor feel right at home in your kitchen, we’ve assembled a
variety of delicious recipes to get you started, from quick and easy to more complex gourmet dishes. Breakfast
and brunch through dinner and dessert, these easy-to-follow recipes make sure every meal is covered.
Look for the chef’s whisks above the ingredients for the degree of difficulty (1=easy, 2=medium, 3=challenging).
In addition, the detailed nutritional information lets you know exactly what you’re eating!
Bon appétit!
BASICS
Champagne Vinaigrette ..................................................................................................................................................21
Asian-Style Dressing ........................................................................................................................................................22
Radish Top Pesto..............................................................................................................................................................23
Breadcrumbs (Plain and Seasoned) ...............................................................................................................................24
Herb Butter .......................................................................................................................................................................25
Basil Pesto ........................................................................................................................................................................26
Simple Pizza and Tomato Sauce ....................................................................................................................................27
Peanut Butter ....................................................................................................................................................................28
Almond Butter ..................................................................................................................................................................29
Mayonnaise .......................................................................................................................................................................30
Basic Vinaigrette ..............................................................................................................................................................31
Caesar Dressing ...............................................................................................................................................................32
Baby Food ........................................................................................................................................................................33
BREAKFAST/BRUNCH
Blueberry Cream Cheese ................................................................................................................................................34
Morning Glory Muffins ....................................................................................................................................................35
Banana Nut Bread............................................................................................................................................................36
Zucchini Frittata with Manchego and Ham ...................................................................................................................37
Home Fries .......................................................................................................................................................................38
Rustic Potato and Fennel Tart ........................................................................................................................................39
APPETIZERS, SNACKS & DRINKS
Pear Chips .........................................................................................................................................................................40
Hummus ............................................................................................................................................................................41
Guacamole........................................................................................................................................................................42
Fire-Roasted Salsa ............................................................................................................................................................43
Crab Cakes .......................................................................................................................................................................44
Potato Nachos ..................................................................................................................................................................45
White Sangria ...................................................................................................................................................................46

20
BASICS
SOUPS & SALADS
Lemongrass Chicken Soup with Sweet Potato Noodles ............................................................................................47
Beet Salad with Roasted Walnuts and Ricotta Salata ..................................................................................................48
Cucumber Salad ...............................................................................................................................................................49
Peanut Thai Salad ............................................................................................................................................................50
Creamy White Bean Soup...............................................................................................................................................51
Spring Vegetable Minestrone with Pesto .....................................................................................................................52
Pear and Kale Salad .........................................................................................................................................................53
Celery Root Salad with Tarragon Dressing ...................................................................................................................54
Potato Salad .....................................................................................................................................................................55
MAIN COURSES & SIDES
Butternut Squash “Pappardelle” in a Wild Mushroom and Brown Butter Sauce ....................................................56
Fresh Summer “Spaghetti” ............................................................................................................................................57
Crispy Potatoes and Roots with Chipotle Dipping Sauce ..........................................................................................58
Quick Pickled Radishes ...................................................................................................................................................59
Latkes (Potato Pancakes) .................................................................................................................................................60
Falafel ................................................................................................................................................................................61
Chicken Burgers with Mango-Avocado Salsa ..............................................................................................................62
Meatballs ...........................................................................................................................................................................63
Pineapple Fried Rice........................................................................................................................................................64
Ratatouille .........................................................................................................................................................................65
Brussels Sprouts with Lardons ........................................................................................................................................66
Cauliflower-Crust Pizza ....................................................................................................................................................67
Sausage Rolls ....................................................................................................................................................................68
BREADS & DOUGHS
Classic White Bread .........................................................................................................................................................69
Buttery Dinner Rolls .........................................................................................................................................................70
Pizza Dough ......................................................................................................................................................................71
Flaky Pastry Dough (Pâte Briseé) ...................................................................................................................................72
DESSERTS
Quick Apple Tart ..............................................................................................................................................................73
Tropical Fruit Salad ..........................................................................................................................................................74
Apple Tart .........................................................................................................................................................................75
Double Chocolate Zucchini Bread .................................................................................................................................76
Pecan Shortbread Linzer Cookies ..................................................................................................................................77
Strawberry Frozen Yogurt ................................................................................................................................................78

21
BASICS
CHAMPAGNE VINAIGRETTE
This quick dressing will soon become a favorite.
Makes about 1 cup
Fit the food processor with the Small Work Bowl and
Small Chopping Blade. With the unit running on High,
drop the garlic and shallot through the feed tube to
chop. Scrape down and add the mustard, salt and
vinegar. While running on Low, slowly add the olive oil
through the feed tube. Continue to process until
emulsifi ed, about 1 minute.
Nutritional information per serving (1 tablespoon):
Calories 93 (90% from fat) | carb. 1g | pro. 0g | fat 11g | sat. fat
2g | chol. 0mg | sod. 57mg | calc. 1mg | fi ber 0
1 GARLIC CLOVE, PEELED
1 SMALL SHALLOT, PEELED AND
HALVED
1 TEASPOON DIJON MUSTARD
¼ TEASPOON KOSHER SALT
2½ TABLESPOONS CHAMPAGNE
VINEGAR
¾ CUP EXTRA VIRGIN OLIVE OIL

22
BASICS
ASIAN-STYLE DRESSING
This is a very versatile dressing that is perfect for our two salads,
but is also nice over a bed of mixed greens.
Makes about ¼ cup
Fit the food processor with the Small Work Bowl and
Small Chopping Blade. With the unit running on High,
drop the garlic and chile through the feed tube to chop.
Scrape down and add the remaining ingredients, except
for the vegetable oil. While running on Low, slowly add
the oil through the feed tube. Continue to process until
emulsifi ed, about 1 minute. Remove bowl and reserve.
Nutritional information per serving (2 tablespoons):
Calories 155 (91% from fat) | carb. 4g | pro. 0g | fat 16g | sat. fat
2g | chol. 0mg | sod. 583mg | calc. 4mg | fi ber 0g
1 GARLIC CLOVE, PEELED
½ THAI CHILE, TRIMMED AND SEEDED
1½ TEASPOONS FISH SAUCE
1 TEASPOON FRESH LIME JUICE
1 TEASPOON GRANULATED SUGAR
1 TEASPOON RICE VINEGAR
1 TEASPOON TOASTED SESAME OIL
¼ TEASPOON KOSHER SALT
2 TABLESPOONS VEGETABLE OIL

23
BASICS
RADISH TOP PESTO
A nice change of pace from the standard basil pesto as well as a quick way
to use those radish greens.
Makes ½ cup
1. Fit the Large Chopping Blade into the Large Work
Bowl. Add the walnuts and garlic to the bowl and
process on High until chopped. Scrape down the
sides of the bowl and add the radish tops, salt and
pepper. Process on Low to fi nely chop and then
drizzle in the oil through the feed tube. Process until
smooth, about 1 minute.
2. Taste and adjust seasoning as desired. Use as you
would use traditional basil pesto – on top of pasta, as
a topping for bruschetta or as a dip for crudités.
Nutritional information per serving (2 tablespoons):
Calories 177 (96% from fat) | carb. 1g | pro. 1g | fat 20g | sat. fat
3g | chol. 0mg | sod. 328mg | calc. 25mg | fi ber 1g
¼ CUP WALNUTS
1 GARLIC CLOVE, PEELED
RADISH TOPS FROM ½ POUND OF
RADISHES, ABOUT 2 CUPS
½ TEASPOON KOSHER SALT
PINCH FRESHLY GROUND BLACK
PEPPER
1
/
3
CUP OLIVE OIL

24
BASICS
BREADCRUMBS (PLAIN AND SEASONED)
There is no need to buy breadcrumbs when you can make them fresh
in your Cuisinart
®
Food Processor.
Makes about 2 cups
1. Preheat oven to 325ºF. Arrange the bread on a sheet
tray in a single layer. Bake until golden in color and
completely dried out, about 20 minutes.
2. When the bread is dried out, break into large pieces
and put into the Large Work Bowl fi tted with the
Large Chopping Blade. Pulse to break up, about 10
times. Process on High until fi ne and even in consis-
tency, about 1 minute. Store in an airtight container
until ready to use.
TIP: Making breadcrumbs is a great use for stale bread.
Just break up and process as instructed above without
baking fi rst.
Note: For seasoned breadcrumbs, add ¼ teaspoon
each dried oregano, dried basil, garlic powder
and ground onion fl akes to the work bowl with the
dried-out bread.
Nutritional information per serving (2 tablespoons):
Calories 60 (11% from fat) | carb. 11g | pro. 2g | fat 1g
sat. fat 0g | chol. 0mg | sod. 90mg | calc. 10mg | fi ber 1g
8 SLICES WHITE BREAD

25
BASICS
HERB BUTTER
Spruce up ordinary dishes with a dab of herb butter. It can be used in plain
pastas, on vegetables, or to fi nish simply cooked steaks, fi sh and chicken.
Makes 1 cup
1. Insert the Small Work Bowl and Small Chopping
Blade. With the food processor running on High,
drop the garlic through the small feed tube to fi nely
chop. Scrape down the sides and add the chives and
thyme leaves. Pulse to chop, about 5 to 6 times.
2. Add the butter and salt. Pulse to break up butter,
about 5 to 6 times. Process on High until all the
ingredients are fully combined, about 40 seconds.
3. Use herb butter immediately or transfer to a sheet of
wax paper, shape into a log about 4 to 5 inches long,
wrap and twist the ends in opposite directions
to seal. Store in the refrigerator until ready to use.
TIP: Use this recipe as a guide for making any type of
compound butter. Add a different assortment of herbs,
chopped vegetables, crumbled bacon, or sweet
ingredients like honey or cinnamon sugar.
Nutritional information per serving (1 tablespoon):
Calories 100 (99% from fat) | carb. 0g | pro. 0g | fat 11g
sat. fat 8g | chol. 30mg | sod. 67mg | calc. 1mg | fiber 0g
1 SMALL GARLIC CLOVE, PEELED
½ SMALL BUNCH CHIVES (ABOUT ¼
OUNCE), CUT INTO 1-INCH PIECES
2 SPRIGS FRESH THYME,
LEAVES ONLY
16 TABLESPOONS (2 STICKS)
UNSALTED BUTTER, CUT INTO
1-INCH PIECES AND SOFTENED
½ TEASPOON KOSHER SALT

26
BASICS
BASIL PESTO
For a spin on the traditional recipe, substitute the pine nuts in this recipe
with toasted hazelnuts, and the basil with 2½ ounces arugula and 1½ ounces
baby spinach leaves.
Makes about 1½ cups
1. Insert the Large Chopping Blade into the Large Work
Bowl. With the food processor running on High, drop
the Parmesan cubes and garlic through the small feed
tube to fi nely chop. Add the pine nuts and pulse to
chop, about 5 to 6 times. Add the basil and salt.
Pulse to chop, about 10 to 15 times. Scrape the sides
of the bowl.
2. With the machine running on High, add the olive oil
in a steady stream through the small feed tube.
Process until combined, about 1 minute.
3. Use immediately or store in an airtight container in
the refrigerator until ready to use.
Nutritional information per serving (2 tablespoons):
Calories 120 (90% from fat) | carb. 1g | pro. 2g | fat 13g
sat. fat 2g | chol. 3mg | sod. 121mg | calc. 74mg | fiber 0g
2 OUNCES PARMESAN CHEESE, CUT
INTO ½-INCH CUBES
1 GARLIC CLOVE, PEELED
¼ CUP PINE NUTS, LIGHTLY TOASTED
4 OUNCES FRESH BASIL LEAVES
(ABOUT 3 CUPS)
¼ TEASPOON KOSHER SALT
½–²∕
³
CUP EXTRA VIRGIN OLIVE OIL

27
BASICS
SIMPLE PIZZA AND TOMATO SAUCE
The difference between pizza sauce and tomato sauce is that pizza sauce
does not need to be cooked—it cooks on the pizza in the oven, while tomato
sauce simmers on the stove.
Makes 7 cups pizza sauce; about 5 cups tomato sauce
Pizza Sauce:
1. Put all of the ingredients, in the order listed, into the
Large Work Bowl fi tted with the Large Chopping
Blade. Process on High until smooth, 1 minute.
2. Use as is for pizza or other recipes that will cook
in the oven. Store remaining sauce in an airtight
container in the refrigerator.
Tomato Sauce:
1. Put tomatoes into the Large Work Bowl fi tted with the
Large Chopping Blade. Process on High until smooth,
about 1 minute. Reserve.
2. Put olive oil in a medium saucepan over medium
heat. When oil is hot, add garlic and cook until lightly
golden and fragrant, 2 to 3 minutes. Add puréed
tomatoes, cover and reduce heat to simmer, stirring
frequently, until sauce is reduced slightly until
thickened, about 15 minutes.
3. Tear up basil and add to sauce; cook for 2 minutes.
Add salt, taste and adjust seasoning as desired.
Remove garlic cloves before serving.
Nutritional information per serving (½ cup pizza sauce):
Calories 41 (61% from fat) | carb. 5g | pro. 1g | fat 2g
sat. fat 0g | chol. 0mg | sod. 398mg | calc. 36mg | fiber 1g
Nutritional information per serving (½ cup tomato sauce):
Calories 58 (43% from fat) | carb. 7g | pro. 1g | fat 3g
sat. fat 0g | chol. 0mg | sod. 557mg | calc. 28mg | fiber 1g
2 CANS (28 OUNCES EACH)
WHOLE, PEELED TOMATOES
2 TABLESPOONS EXTRA VIRGIN
OLIVE OIL
2 LARGE GARLIC CLOVES, PEELED
10–15 FRESH BASIL LEAVES
1 TEASPOON KOSHER SALT

28
BASICS
PEANUT BUTTER
Once you discover how easy it is to make peanut butter in the
Cuisinart
®
Food Processor, you’ll wonder how you ever bought it jarred.
Makes 2 cups
1. Put peanuts and salt, if using, into the Large Work
Bowl fi tted with the Large Chopping Blade. Pulse to
break up, about 5 to 6 times. Process on High until
desired consistency is achieved.
2. Taste and adjust seasoning as desired. Store in an
airtight container in the refrigerator.
TIP: For a spiced variation, add 2 teaspoons honey,
½ teaspoon ground cinnamon, ½ teaspoon kosher salt
(do not use if already added above), 1 teaspoon ground
allspice and 1 teaspoon ground nutmeg.
Nutritional information per serving (1 tablespoon, unsalted):
Calories 80 (61% from fat) | carb. 2g | pro. 4g | fat 7g
sat. fat 1g | chol. 0mg | sod. 3mg | calc. 36mg | fi ber 1g
1 POUND (ABOUT 4 CUPS) UNSALTED,
DRY-ROASTED PEANUTS
½ TEASPOON KOSHER SALT, OPTIONAL

29
BASICS
ALMOND BUTTER
Try a combination of your favorite nuts to make the ultimate nut butter.
Makes about 1¼ cups
1. Put almonds, oil and salt, if using, into the Large Work
Bowl fi tted with the Large Chopping Blade. Pulse to
break up, about 10 times, and then process on High
until desired consistency is achieved.
2. Taste and adjust seasoning as desired. Store in an
airtight container in the refrigerator.
Nutritional information per serving (1 tablespoon, unsalted):
Calories 94 (78% from fat) | carb. 3g | pro. 3g | fat 9g
sat. fat 1g | chol. 0mg | sod. 0mg | calc. 34mg | fi ber 2g
9 OUNCES (ABOUT 2 CUPS)
RAW, UNSALTED ALMONDS
3½ TABLESPOONS VEGETABLE OIL
½ TEASPOON KOSHER SALT,
OPTIONAL

30
BASICS
MAYONNAISE
Taste the difference in homemade mayonnaise.
Makes 1 cup
1. Put the egg yolks, salt, mustard, lemon juice and
water into the Large Work Bowl fi tted with the Large
Chopping Blade. Process on Low until smooth,
about 30 seconds.
2. With the food processor still running on Low, add the
oil through the hole in the small pusher until all the oil
is incorporated and the mayonnaise is emulsifi ed and
homogenous. Scrape down sides. Taste and adjust
seasoning as desired. Store remaining mayonnaise in
an airtight container in the refrigerator.
TIP: For fresh herb mayonnaise, process ¹⁄
³
cup fi rmly
packed fresh herbs (e.g., parsley, dill, tarragon, basil, etc.),
stems removed, with the yolks before adding the oil.
For a bolder-fl avored mayonnaise, increase the salt by
¼ teaspoon, the Dijon by ½ teaspoon and lemon juice
to 1 tablespoon.
Nutritional information per serving (1 tablespoon):
Calories 104 (97% from fat) | carb. 1g | pro. 1g | fat 12g
sat. fat 1g | chol. 46mg | sod. 113mg | calc. 6mg | fi ber 0g
4 LARGE EGG YOLKS
¾ TEASPOON KOSHER SALT
½ TEASPOON DIJON MUSTARD
1 TEASPOON FRESH LEMON JUICE
1 TABLESPOON WATER
¾ CUP VEGETABLE OIL

31
BASICS
BASIC VINAIGRETTE
Use this basic vinaigrette as a guide and change your vinegar/oil fl avors
to create exciting salads. You can add other fl avors such as crushed or
roasted garlic, chopped shallots, fresh or dried herbs, sun-dried tomatoes,
honey, lemon juice, or fl avored vinegars.
Makes about 1 cup
1. Put all of the ingredients into the Small Work
Bowl fi tted with the Small Chopping Blade.
Process on Low until combined, about 1 minute.
2. Taste and adjust seasoning as desired.
Serve immediately or store in an airtight
container in the refrigerator.
Nutritional information per serving (1 tablespoon):
Calories 91 (98% from fat) | carb. 0g | pro. 0g | fat 10g
sat. fat 1g | chol. 0mg | sod. 23mg | calc. 0mg | fi ber 0g
¼ CUP WINE VINEGAR
(RED OR WHITE)
1 TABLESPOON DIJON MUSTARD
¾ CUP EXTRA VIRGIN OLIVE OIL
KOSHER SALT AND FRESHLY
GROUND BLACK PEPPER TO TASTE

32
BASICS
CAESAR DRESSING
Makes about 1 cup
1. Insert the Large Chopping Blade into the Large Work
Bowl. With the food processor running on High, drop
the garlic through the small feed tube to fi nely chop.
Add the anchovies, egg yolks, mustard, lemon juice,
vinegar, Worcestershire sauce and pepper to the work
bowl. Process on High until well blended.
2. With the machine running on Low, slowly pour
the olive oil through the small feed tube in a steady
stream until the dressing is emulsifi ed, about 30
seconds to 1 minute.
3. Taste and adjust seasoning as desired. Serve immediately
or store in an airtight container in the refrigerator.
Raw Egg Warning: Caution is suggested in consuming
raw and lightly cooked eggs due to the slight risk of
salmonella or other food-borne illnesses. To reduce
this risk, we recommend you use only fresh, properly
refrigerated, clean, grade A or AA eggs with intact
shells. Avoid contact between the yolks or whites and
the shell.
Nutritional information per serving (1 tablespoon):
Calories 91 (95% from fat) | carb. 1g | pro. 1g | fat 10g
sat. fat 2g | chol. 24mg | sod. 68mg | calc. 4mg | fi ber 0g
2 SMALL GARLIC CLOVES, PEELED
6 ANCHOVY FILLETS
2 LARGE EGG YOLKS*
2 TEASPOONS DIJON MUSTARD
4 TEASPOONS FRESH LEMON JUICE
4 TEASPOONS RED WINE VINEGAR
2 TEASPOONS WORCESTERSHIRE
SAUCE
½ TEASPOON FRESHLY GROUND
BLACK PEPPER
²∕
³
CUP EXTRA VIRGIN OLIVE OIL
There are many versions of this recipe, but our take is pretty close to the
classic. If you prefer not to use raw egg yolks, try an egg substitute.
*

33
BASICS
BABY FOOD
Any fruit or vegetable can be substituted. Add more or less liquid based on
the consistency desired.
Makes 2 cups
1. Insert Dicing Grid and blade. Dice butternut squash.
Steam until very tender. Reserve steaming water.
2. Add the steamed butternut squash to the Large Work
Bowl fi tted with the Large Chopping Blade. Add 2
tablespoons of the reserved steaming water or plain
water. Process on High until desired consistency is
achieved, about 2 minutes for a very smooth and
creamy purée.
TIP: Store remaining baby food in covered ice cube
trays in the freezer until ready to use. Each "cube"
equals 1 ounce of food.
Nutritional information per serving (2 ounces):
Calories 44 (33% from fat) | carb. 7g | pro. 1g | fat 2g
sat. fat 1g | chol. 6mg | sod. 165mg | calc. 0mg | fi ber 2g
1 POUND BUTTERNUT SQUASH,
PEELED AND CUT TO FIT FEED TUBE
2 TABLESPOONS STEAMING LIQUID
OR WATER

34
BREAKFAST & BRUNCH
BLUEBERRY CREAM CHEESE
6 OUNCES (ABOUT 4¼ CUPS)
FRESH BLUEBERRIES
1 TEASPOON GRANULATED SUGAR
1 TEASPOON FRESH LEMON JUICE
1 PACKAGE (8 OUNCES) CREAM
CHEESE, CUT INTO 4 PIECES
AND SOFTENED
Flavored cream cheese options are endless.
This one’s versatile and not too sweet.
Makes 1½ cups
1. Put blueberries, sugar and lemon juice into a small
saucepan and cook over low heat until blueberries
are mostly broken down and mixture has thickened,
about 5 to 6 minutes. Remove from heat and allow to
cool to room temperature.
2. Put softened cream cheese pieces and cooled
blueberry mixture into the Small Work Bowl fi tted
with the Small Chopping Blade. Pulse to break up
cream cheese and mix in blueberry mixture, about
8 to 10 times.
3. Serve immediately or store in an airtight container in
the refrigerator.
Nutritional information per serving (2 tablespoons):
Calories 111 (77% from fat) | carb. 5g | pro. 2g | fat 10g
sat. fat 5g | chol. 31mg | sod. 92mg | calc. 29mg | fi ber 1g

35
BREAKFAST & BRUNCH
MORNING GLORY MUFFINS
NONSTICK COOKING SPRAY
¼ CUP UNBLEACHED, ALL-PURPOSE
FLOUR
¹∕
³
CUP WHOLE-WHEAT FLOUR
½ TEASPOON KOSHER SALT
¾ TEASPOON BAKING SODA
½ TEASPOON GROUND CINNAMON
¼ CUP ROLLED OATS (NOT INSTANT)
½ TEASPOON GRATED ORANGE ZEST
¹∕
³
CUP WALNUTS, LIGHTLY TOASTED
2 LARGE CARROTS, PEELED AND CUT
TO FIT FEED TUBE
¹∕
³
CUP PACKED, LIGHT BROWN SUGAR
2 LARGE EGGS, ROOM TEMPERATURE
¹∕
³
CUP VEGETABLE OIL
½ TEASPOON PURE VANILLA EXTRACT
¹∕
³
CUP SHREDDED, UNSWEETENED
COCONUT
2 TABLESPOONS SUNFLOWER SEEDS
Your kids will never guess that the secret ingredient in these muffi ns
is carrots—they add the perfect sweetness.
Makes 6 muffi ns
1. Preheat the oven to 350°F. Lightly coat a six-cup
muffi n pan with nonstick cooking spray. Reserve.
2. Put the fl ours, salt, baking soda, cinnamon, oats and
zest into the Large Work Bowl fi tted with the Large
Chopping Blade. Process on High to sift, 10 seconds.
Transfer ingredients to a medium-size mixing bowl;
reserve.
3. Add the walnuts and pulse to chop, about 5 times.
Leaving the nuts in the bowl, remove the Chopping
Blade and insert the Shredding Disc with the medium
setting facing up. Shred carrots. Add to the bowl with
the dry ingredients. Stir to combine. Reserve.
4. Reinsert the Large Chopping Blade and add the
brown sugar, eggs, oil and vanilla extract to the work
bowl and process until combined. Add the fl our and
carrot mixture and pulse to combine, about 3 times.
Scrape down the sides of the bowl and add the
coconut and sunfl ower seeds. Pulse to incorporate,
about 3 to 4 times.
5. Divide the batter evenly among the prepared muffi n
cups and bake until a cake tester inserted into the
center comes out clean, about 18 to 20 minutes.
Nutritional information per muffi n:
Calories 306 (60% from fat) | carb. 26g | pro. 6g | fat 21g
sat. fat 4g | chol. 62mg | sod. 372mg | calc. 27mg | fi ber 3g

36
BREAKFAST & BRUNCH
BANANA NUT BREAD
Slice up this bread for a tasty breakfast on the go
or for a sweet, afternoon snack.
NONSTICK COOKING SPRAY
2 CUPS UNBLEACHED, ALL-PURPOSE
FLOUR
²∕
³
CUP WALNUT HALVES, SHELLS
REMOVED
1 TEASPOON BAKING POWDER
1 TEASPOON BAKING SODA
½ TEASPOON KOSHER SALT
2 RIPE BANANAS, CUT INTO
1-INCH PIECES
2 LARGE EGGS
2 LARGE EGG WHITES
1 CUP GRANULATED SUGAR
½ CUP PLAIN, NONFAT YOGURT
4 TABLESPOONS UNSALTED BUTTER,
CUT INTO 1-INCH PIECES AND
ROOM TEMPERATURE
2 TEASPOONS PURE VANILLA
EXTRACT
Makes one, 9-inch loaf
1. Preheat oven to 350°F. Lightly coat a 9-inch loaf pan
with nonstick cooking spray. Reserve.
2. Put fl our, nuts, baking powder, baking soda and salt
into the Large Work Bowl fi tted with the Large
Chopping Blade. Pulse to combine, about 5 times.
Transfer to a medium-size bowl and reserve.
3. Process bananas on High until puréed, about 30
seconds. Scrape down the sides. Add eggs, egg
whites, sugar, yogurt, butter and vanilla extract.
Process on High until well combined, about 10 to 15
seconds. Add reserved dry ingredients. Pulse until
fl our is just mixed in, about 5 to 6 times.
4. Pour batter into prepared pan. Bake until golden
brown and a toothpick inserted into the center
comes out clean, about 50 minutes.
5. Cool in pan on a wire rack for 20 minutes.
Remove from pan and cool completely.
Nutritional information per serving (1 slice based on 12 servings):
Calories 227 (27% from fat) | carb. 37g | pro. 5g | fat 7g
sat. fat 3g | chol. 46mg | sod. 265mg | calc. 30mg | fi ber 1g

37
BREAKFAST & BRUNCH
ZUCCHINI FRITTATA WITH MANCHEGO AND HAM
This frittata is hearty enough to feed a crowd.
Makes 8 servings
1. Preheat oven to 350ºF. Insert Dicing Grid and Disc.
Dice leek and zucchini. Reserve in bowl.
2. Heat olive oil in a 10-inch nonstick skillet over
medium-high heat. Once hot, add the diced leek,
zucchini and ¼ teaspoon of the salt. Cook, stirring
frequently, until zucchini is just tender, about 5 minutes.
3. While leek and zucchini are cooking, dice ham and
add to bowl with the reserved eggs.
4. Remove Dicing Grid and Disc. Insert the Shredding
Disc with the fi ne setting facing up. Shred cheese.
Put ½ of the cheese into the bowl with the eggs and
ham. Add the remaining ¼ teaspoon salt and pepper.
Stir. Reserve.
5. Reduce heat to medium and add egg mixture to the
pan with the leek and zucchini. Stir constantly until
eggs start to set, about 2 minutes. Let cook on
stovetop until edges start to fi rm, about 5 minutes.
Add remaining cheese to top of egg mixture.
6. Transfer to oven and cook until fully set,
about 10 to 15 minutes.
7. Let cool slightly and serve warm.
Nutritional information per serving:
Calories 140 (67% from fat) | carb. 4g | pro. 8g | fat 10g
sat. fat 4g | chol. 200mg | sod. 477mg | calc. 83mg | fiber 1g
8 LARGE EGGS, LIGHTLY BEATEN AND
RESERVED IN A MEDIUM BOWL
1 SMALL LEEK, WASHED WELL,
HALVED LENGTHWISE, WHITE AND
LIGHT GREEN PARTS ONLY
1 SMALL ZUCCHINI, TRIMMED AND
CUT TO FIT FEED TUBE
1 TABLESPOON EXTRA VIRGIN
OLIVE OIL
½ TEASPOON KOSHER SALT, DIVIDED
4 OUNCES HAM SLAB
3 OUNCES MANCHEGO CHEESE
¼ TEASPOON FRESHLY GROUND
BLACK PEPPER

38
BREAKFAST & BRUNCH
The dicing attachment makes it easier than ever to dice a lot of potatoes
evenly
—
in this case, just in time for breakfast.
HOME FRIES
Makes about 4 cups
1. Insert the Dicing Grid and blade. Dice onion.
Use Cleaning Tool to clean Grid. Reserve in Large Work
Bowl. Dice pepper. Use Cleaning Tool to clean Grid.
Reserve with diced onion.
2. Heat olive oil in a large skillet over medium heat.
When oil is hot, add the diced onion and pepper.
Cook, stirring frequently, until soft and onion is
translucent, about 5 minutes.
3. While onions and peppers are cooking, dice potatoes.
Add to skillet with the salt, paprika, chili powder and
black pepper; stir. Cover and cook until potatoes are
fully cooked through, about 20 minutes.
4. Taste and adjust seasoning as desired.
Serve immediately.
Nutritional information per serving (½ cup):
Calories 72 (23% from fat) | carb. 12g | pro. 2g | fat 2g
sat. fat 0g | chol. 0mg | sod. 272mg | calc. 6mg | fi ber 1g
1 ONION, HALVED
1 LARGE GREEN BELL PEPPER, CUT
TO FIT MEDIUM FEED TUBE AND
SEEDED
2 TABLESPOONS EXTRA VIRGIN
OLIVE OIL
4 RUSSET POTATOES (ABOUT 1 TO
1½ POUNDS), SCRUBBED
1 TEASPOON KOSHER SALT
½ TEASPOON SMOKED PAPRIKA
¼ TEASPOON CHILI POWDER
¼ TEASPOON FRESHLY GROUND
BLACK PEPPER

39
BREAKFAST & BRUNCH
RUSTIC POTATO AND FENNEL TART
This recipe will quickly become a favorite when it comes to entertaining.
It is easy to prepare and, since it’s a free-form tart,
the presentation cannot be beat.
Makes one 9- to 10-inch tart
1. Have Flaky Pastry Dough prepared and ready to roll
out. Preheat oven to 350ºF. Line a baking sheet with
parchment paper. Reserve.
2. Adjust the Slicing Disc to setting 2. Insert the Slicing
Disc. Slice potato. Reserve in bowl.
3. Remove Slicing Disc and adjust to setting 4. Slice the
fennel. Remove the Slicing Disc and stem.
4. Add the speck, olive oil, salt and lemon zest to the
work bowl with the potato and fennel. Toss gently.
5. On a surface lightly dusted with fl our, roll Flaky Pastry
Dough into a 12-inch circle, about ¹∕
8-inch in thickness.
Pile potato, fennel and speck mixture into the center of
the dough. Top with dollops of goat cheese. Fold
dough over mixture, leaving the center exposed. Brush
dough with egg wash.
6. Bake until vegetables are tender and tart is golden
brown, about 45 minutes to 1 hour. Cool on tray at
least 10 to 15 minutes before cutting and serving.
Nutritional information per serving (based on 8 servings):
Calories 229 (62% from fat) | carb. 17g | pro. 5g | fat 16g
sat. fat 10g | chol. 64mg | sod. 402mg | calc. 20mg | fi ber 1g
½ RECIPE FLAKY PASTRY DOUGH,
PAGE 72
1 MEDIUM YUKON GOLD POTATO
(ABOUT 8 OUNCES), SCRUBBED
¼ FENNEL BULB
¼ CUP DICED SPECK (PANCETTA OR
BACON CAN BE USED)
1 TABLESPOON EXTRA VIRGIN
OLIVE OIL
¼ TEASPOON KOSHER SALT
¼ TEASPOON GRATED LEMON ZEST
UNBLEACHED ALL-PURPOSE
FLOUR, FOR DUSTING
2 OUNCES GOAT CHEESE
EGG WASH (1 LARGE EGG
WHISKED WITH 1 TABLESPOON
WATER)

40
BREAKFAST & BRUNCH
PEAR CHIPS
With just the right amount of sweetness, these pear chips
make the perfect snack.
Makes about 50 chips
1. Preheat oven to 300°F. Prepare 2 baking trays with
parchment paper. Combine cinnamon and sugars in a
small bowl. Set aside.
2. Cut pear to fi t feed tube. Fit the spiralizer with the
ribbon disc. Process pear on Low.
3. Break large pieces into single layer rounds and place
on prepared baking trays. Sprinkle pears evenly with
2 teaspoons of cinnamon-sugar mixture. Turn pears
over and sprinkle with remaining cinnamon sugar.
4. Bake for 45 minutes, rotating pans halfway through
baking. Remove from oven and let pears cool so they
become crunchy, at least 5 minutes.
Nutritional information per serving (10 chips):
Calories 56 (2% from fat) | carb. 14g | pro. 0g | fat 0g | sat. fat 0g
| chol. 0mg | sod. 1mg | calc. 8mg | fi ber 2g
2 TEASPOONS GROUND CINNAMON
1 TEASPOON LIGHT BROWN SUGAR
1 TEASPOON GRANULATED SUGAR
1 FIRM PEAR, CORED

41
APPETIZERS, SNACKS & DRINKS
HUMMUS
Serve with warm pita for a satisfying snack. See tip on page 71 to learn how
to make your own homemade pita using our Pizza Dough recipe.
Makes about 2½ cups
1. Put the parsley, salt, lemon zest and garlic into the
Large Work Bowl fi tted with the Large Chopping
Blade. Pulse to roughly chop, about 5 to 6 times.
Scrape down the sides of the bowl. Add remaining
ingredients and process on High until smooth, about
5 minutes.
2. Taste and adjust seasoning as desired. Serve, drizzled
with the extra tablespoon of olive oil and sprinkled
with paprika and za'atar, if using.
Nutritional information per serving (¼ cup):
Calories 173 (41% from fat) | carb. 21g | pro. 5g | fat 8g
sat. fat 1g | chol. 0mg | sod. 551mg | calc. 45mg | fi ber 4g
¼ CUP FRESH PARSLEY LEAVES
1¼ TEASPOONS KOSHER SALT
½ TEASPOON GRATED LEMON ZEST
1 GARLIC CLOVE, PEELED
2 CANS (15.5 OUNCES EACH)
CHICKPEAS, DRAINED AND RINSED
¼ CUP FRESH LEMON JUICE
¼ CUP WATER
¼ CUP EXTRA VIRGIN OLIVE OIL,
PLUS 1 TABLESPOON FOR SERVING
2 TABLESPOONS TAHINI
½ TEASPOON GROUND CUMIN
¹∕
8
TEASPOON PAPRIKA, OPTIONAL
PINCH ZA'ATAR, OPTIONAL

42
APPETIZERS, SNACKS & DRINKS
GUACAMOLE
A party favorite that can easily be tweaked to your preference.
Makes about 3 cups
1. Insert the Large Chopping Blade into the Large Work
Bowl. With the food processor running on High, drop
the garlic and jalapeño through the small feed tube
to fi nely chop. Add the onion and cilantro to the work
bowl. Pulse to roughly chop, about 5 times.
2. Add the avocados, lime juice and salt. Pulse until
desired consistency is achieved. Process on High if
very smooth consistency is desired.
3. Taste and adjust seasoning as desired. Serve
immediately or store in an airtight container in the
refrigerator.
TIP: Press a piece of plastic wrap directly onto the
surface of the fi nished guacamole to help prevent
browning before serving or while storing.
Nutritional information per serving (¼ cup):
Calories 137 (75% from fat) | carb. 8g | pro. 12g | fat 25g
sat. fat 2g | chol. 0mg | sod. 273mg | calc. 12mg | fi ber 6g
1 GARLIC CLOVE, PEELED
½–1 JALAPEÑO, SEEDED AND CUT INTO
1-INCH PIECES
½ SMALL ONION (RED OR WHITE)
¼ CUP PACKED CILANTRO LEAVES
5 RIPE AVOCADOS, PITTED AND
FLESH SCOOPED OUT
2 TABLESPOONS FRESH LIME JUICE
1½ TEASPOONS KOSHER SALT,
PLUS MORE IF DESIRED

43
APPETIZERS, SNACKS & DRINKS
FIRE-ROASTED SALSA
The deep fl avors of this restaurant-style salsa are addictive.
Makes about 1½ cups
1. Line a baking sheet with aluminum foil. Put all of the
ingredients onto the prepared baking sheet and toss.
Place rack in the middle position in the oven. Broil on
High until completely charred, about 40 to 50
minutes. Remove from oven and cool.
2. When vegetables are cool to touch, add all ingredients
to the Large Work Bowl of the food processor fi tted
with the Large Chopping Blade. Pulse until desired
consistency is achieved, about 8 to 10 times for
chunky.
3. Taste and adjust seasoning as desired. Serve with
tortilla chips or alongside grilled meats.
Nutritional information per serving (¼ cup):
Calories 80 (75% from fat) | carb. 4g | pro. 1g | fat 7g
sat. fat 1g | chol. 0mg | sod. 4mg | calc. 12mg | fi ber 1g
1 POUND RIPE TOMATOES,
QUARTERED
1 SMALL TO MEDIUM ONION,
QUARTERED
½–1 JALAPEÑO, HALVED AND SEEDED
2 LARGE GARLIC CLOVES, PEELED
3 TABLESPOONS EXTRA VIRGIN
OLIVE OIL
2 TEASPOONS KOSHER SALT

44
APPETIZERS, SNACKS & DRINKS
CRAB CAKES
Chopping all the mix-ins for crab cakes takes no time in the food processor.
Makes 8 crab cakes
1. Pick through crabmeat to make sure there are no
shells; reserve in refrigerator. Preheat oven to 400°F.
Line a baking sheet with aluminum foil. Spray with
nonstick cooking spray. Set aside.
2. Insert the Small Chopping Blade into Small Work
Bowl. With the food processor running on High, drop
the garlic through the small feed tube to fi nely chop.
Add the pepper, green onions and parsley and pulse
to coarsely chop, about 10 to 12 times.
3. Put the oil into a large skillet placed over medium
heat. Cook chopped vegetables with salt and pepper
until soft, about 5 to 7 minutes. Remove and reserve
in a large mixing bowl.
4. Once vegetables have cooled slightly, add the
reserved crab, eggs, breadcrumbs, mayonnaise,
Worcestershire, seafood seasoning, mustard and a
dash or two of the hot sauce, if using, to the mixing
bowl. Mix thoroughly but carefully by hand, so not to
break up the crabmeat too much.
5. Form crabmeat mixture into 8 round cakes. Place on
prepared baking sheet and bake until crab cakes are
evenly golden on each side, about 8 to 10 minutes
per side.
6. Serve immediately with prepared tartar sauce if
desired, and with a lemon wedge.
Nutritional information per crab cake:
Calories 186 (57% from fat) | carb. 12g | pro. 8g | fat 12g
sat. fat 2g | chol. 87mg | sod. 652mg | calc. 128mg | fi ber 0g
NONSTICK COOKING SPRAY
16 OUNCES LUMP CRABMEAT
1 GARLIC CLOVE, PEELED
1 RED BELL PEPPER, SEEDED AND
CUT INTO 2-INCH PIECES
3 GREEN ONIONS, CUT INTO 1-INCH
PIECES
½ CUP FRESH PARSLEY LEAVES,
LOOSELY PACKED
1 TEASPOON EXTRA VIRGIN OLIVE OIL
¼ TEASPOON KOSHER SALT
¼ TEASPOON FRESHLY GROUND
BLACK PEPPER
2 LARGE EGGS, LIGHTLY BEATEN
1 CUP PLAIN BREADCRUMBS, SEE
PAGE 24 FOR RECIPE
½ CUP MAYONNAISE
1 TEASPOON WORCESTERSHIRE
SAUCE
1½ TEASPOONS SEAFOOD SEASONING
2 TEASPOONS DIJON MUSTARD
HOT SAUCE, OPTIONAL
TARTAR SAUCE, FOR SERVING
LEMON WEDGES, FOR SERVING

45
APPETIZERS, SNACKS & DRINKS
POTATO NACHOS
Thinly sliced potatoes make a heartier, delicious base for nachos.
Makes 8 servings
1. Preheat oven to 425ºF. Line two baking sheets with
aluminum foil. Reserve.
2. Adjust the Slicing Disc to setting 3. Insert the Slicing
Disc. Slice potatoes. Remove Slicing Disc and stem.
Toss potatoes with olive oil and salt.
3. Spread potatoes onto the baking sheets in a
single layer. Bake until golden brown and crispy,
about 45 minutes.
4. While potatoes are baking, reinsert stem and Slicing
Disc (still at setting 3). Slice the green onions, jalapeño
and olives. Remove from bowl and reserve.
5. Insert Shredding Disc with the medium setting facing
up. Shred cheese. Reserve in bowl.
6. When potatoes are done baking, remove from oven
and let cool slightly. Pile half of the potatoes into the
center of one baking sheet. Sprinkle with half of the
green onions, jalapeño, olives and cheese. Pile the
remaining potatoes on top of the fi rst layer and
sprinkle with remaining ingredients. Bake until cheese
is melted and slightly browned, about 5 minutes.
7. Serve immediately with salsa, guacamole and sour
cream if desired.
Nutritional information per serving:
Calories 225 (83% from fat) | carb. 4g | pro. 6g | fat 21g
sat. fat 7g | chol. 30mg | sod. 883mg | calc. 202mg | fi ber 21g
2 POUNDS RUSSET POTATOES,
SCRUBBED
1 TABLESPOON EXTRA VIRGIN
OLIVE OIL
1 TEASPOON KOSHER SALT
1 BUNCH GREEN ONIONS, TRIMMED
½–1 JALAPEÑO, HALVED LENGTHWISE
AND SEEDED
1 CAN (15 OUNCES) WHOLE BLACK
PITTED OLIVES, DRAINED
8 OUNCES CHEESE, SUCH AS SHARP
CHEDDAR
SALSA, GUACAMOLE AND SOUR
CREAM, FOR SERVING

46
APPETIZERS, SNACKS & DRINKS
WHITE SANGRIA
The Cuisinart
®
dicing attachment cuts fruit into perfect bite-sized pieces for
sangria; best part is, the prep takes no time!
Makes about 5 servings
1. In a large pitcher or glass serving bowl, combine the
wine and orange-fl avored liqueur. Reserve.
2. Insert the Dicing Grid and blade. Dice the fruit. Add
to the wine mixture. If time allows, let sit overnight so
the fl avors can develop.
3. Serve cold.
Nutritional information per serving (about 5 ounces):
Calories 174 (11% from fat) | carb. 17g | pro. 1g | fat 0g
sat. fat 0g | chol. 0mg | sod. 27mg | calc. 11mg | fi ber 2g
1 BOTTLE (750 ML) DRY WHITE
WINE SUCH AS CHARDONNAY
¹∕
³
CUP ORANGE-FLAVORED LIQUEUR
1 CUP WHOLE STRAWBERRIES,
HULLED
1 SMALL PEACH, PITTED
½ MANGO, PEELED AND PITTED
1 SMALL APPLE, HALVED AND CORED

47
APPETIZERS, SNACKS & DRINKS
LEMONGRASS CHICKEN SOUP WITH SWEET
POTATO NOODLES
The base of this Thai-inspired soup can be made in advance and
refrigerated or frozen until ready to use.
Makes 8 cups
1. Put chicken, cilantro stems, celery, carrots,
lemongrass, ginger, garlic, star anise and peppercorns
into a large stockpot. Add the water.
2. Bring mixture to a boil, then reduce heat to maintain
a simmer; cook until chicken is very tender and falls
off the bone, about 2 hours. Strain into another large
pot, reserving both the strained stock and chicken. (If
making the base in advance, shred the chicken at this
point, add it to the stock and let cool before
refrigerating or freezing.)
3. Trim the sweet potato to fi t the feed tube. Fit the
spiralizer with the ribbon disc and process on Low;
reserve.
4. Add the bok choy, cilantro leaves, lime juice, salt,
jalapeño and fi sh sauce to the strained stock. Shred
the reserved chicken and add to the soup; reserve.
5. When ready to serve, put a handful of the spiralized
sweet potatoes into a bowl. Reheat the soup until it
just comes to a boil. Remove from heat and ladle the
hot soup over the sweet potato. Let sit until sweet
potato is just tender, about 5 minutes.
6. Serve with a lime wedge.
Nutritional information per serving (1 cup):
Calories 133 (24% from fat) | carb. 7g | pro. 18g | fat 4g | sat. fat
1g | chol. 71mg | sod. 417mg | calc. 86mg | fi ber 2g
1½ POUNDS SKINLESS CHICKEN THIGHS
½ CUP CILANTRO, STEMS AND LEAVES
DIVIDED (ROUGHLY CHOP THE
LEAVES)
4 SMALL CELERY STALKS, CUT INTO
3-INCH PIECES
2 CARROTS, CUT INTO 3-INCH PIECES
1 6-INCH PIECE LEMONGRASS,
CUT INTO 2-INCH PIECES AND
SMASHED
1 2-INCH PIECE GINGER, PEELED
1 GARLIC CLOVE, PEELED
1 STAR ANISE POD
¼ TEASPOON BLACK PEPPERCORNS
12 CUPS WATER
1 SWEET POTATO
2 BABY BOK CHOY, CUT INTO
QUARTERS
2 TABLESPOONS FRESH LIME JUICE
1 TEASPOON KOSHER SALT
½ JALAPEÑO, SLICED INTO DISCS
¼ TEASPOON FISH SAUCE
2 LIMES, QUARTERED FOR SERVING

48
APPETIZERS, SNACKS & DRINKS
BEET SALAD WITH ROASTED WALNUTS
AND RICOTTA SALATA
The saltiness of the cheese combines nicely with the sweetness of the beets
and walnuts in the eye-catching salad.
Makes about 6 cups
1. Preheat oven to 425°F. Line a baking sheet with foil
and drizzle with 1 tablespoon of olive oil.
2. Trim the beets so that both the tops and bottoms are
cut fl at. Fit the spiralizer with the ribbon disc. Process
beets on Low, stopping after each beet and clearing
the disc when necessary.
3. Spread the beets out on the prepared baking sheet.
Drizzle with the remaining oil and sprinkle with salt.
Bake for 20 minutes.
4. To serve, divide the arugula among four plates. Top
each with a beet, fanned across the arugula, and then
sprinkle with an even amount of walnuts and cheese,
and drizzle with Champagne Vinaigrette.
5. Serve immediately.
Nutritional information per serving (1 cup):
Calories 188 (74% from fat) | carb. 9g | pro. 4g | fat 16g | sat. fat
4g | chol. 10mg | sod. 183mg | calc. 98mg | fi ber 2g
2 TABLESPOONS OLIVE OIL, DIVIDED
1 BUNCH BEETS (ABOUT 1 POUND,
4 SMALL TO MEDIUM BEETS),
SCRUBBED, TRIMMED AND
PEELED
1 TO 2 PINCHES KOSHER SALT
4 CUPS BABY ARUGULA
½ CUP TOASTED WALNUT HALVES
2 OUNCES CRUMBLED RICOTTA
SALATA
¼–½ CUP CHAMPAGNE VINAIGRETTE
(SEE PAGE 21)

49
APPETIZERS, SNACKS & DRINKS
CUCUMBER SALAD
The spaghetti cut disc is perfect for preparing your favorite raw vegetables
to use in a delicate salad like this one.
Makes 3 cups
1. Trim vegetables to fi t into the feed tube. Fit the
spiralizer with the spaghetti cut disc. Process veg-
etables on Low, in the order listed. You may need to
stop to clear the disc between processing vegetables.
2. Put the dressing into a large serving bowl. Add the
vegetables and toss gently; sprinkle with salt before
serving.
Nutritional information per serving (1 cup):
Calories 139 (67% from fat) | carb. 11g | pro. 1g | fat 11g | sat.
fat 1g | chol. 0mg | sod. 426mg | calc. 36mg | fi ber 2g
1 LARGE SEEDLESS CUCUMBER
3 MEDIUM RADISHES
2 LARGE CARROTS (ONLY USE WIDE
END OF CARROTS)
1 PINCH OF KOSHER SALT, FOR
SERVING
RECIPE ASIAN-STYLE DRESSING
(SEE PAGE 22)

50
APPETIZERS, SNACKS & DRINKS
PEANUT THAI SALAD
This restaurant favorite is so simple to make at home. You will love the nice
balance of sweet and salt in this salad.
Makes 2 cups
1. Insert the spiralizer fi tted with the ribbon disc. Cut the
mango to fi t the feed tube and then process on Low.
Remove the ribbon disc and insert the spaghetti cut
disc. Process the daikon on Low.
2. Transfer vegetables to a serving bowl, along with the
cilantro. Add the dressing and toss to combine. Top
with the peanuts and serve immediately.
*The cilantro and peanuts can both be chopped in
the small bowl of the food processor prior to making
the dressing.
Nutritional information per serving (1 cup):
Calories 152 (70% from fat) | carb. 11g | pro. 1g | fat 12g | sat.
fat 1g | chol. 0mg | sod. 108mg | calc. 39mg | fi ber 2g
1 MANGO, PEELED AND PITTED
½ LARGE DAIKON
1
/
3
CUP FRESH CILANTRO, ROUGHLY
CHOPPED*
1 RECIPE ASIAN-STYLE DRESSING
(SEE PAGE 22)
2 TABLESPOONS PEANUTS, ROUGHLY
CHOPPED*

51
SOUPS/SALADS
CREAMY WHITE BEAN SOUP
This soup tastes even better the next day, when the fl avors are given more time to develop.
Makes about 8 cups
1. Put a large stockpot over medium heat. Once hot, add
pancetta and cook slowly, stirring frequently, to render
fat, about 5 minutes.
2. While pancetta is rendering, put carrots, celery and
onion into the Large Work Bowl fi tted with the Large
Chopping Blade. Pulse to roughly chop, about 10 times.
Add chopped carrots, celery and onion to the stockpot
with the pancetta, stir. Add thyme, garlic and black
pepper. Allow to cook to soften, about 3 minutes.
3. Add beans with the liquid to the pot, plus enough
liquid (water or low-sodium chicken broth) to just cover
beans, about 2½ cups. Bring soup to a boil, cover with
lid, reduce to a simmer and cook until the beans and
vegetables are very tender, about 25 to 30 minutes.
Remove from heat and let cool 5 minutes. Remove
thyme sprig.
4. Add soup to work bowl and process on High until
desired consistency is achieved, 30 seconds to 1 minute
30 seconds.
5. Taste and season with salt to taste, one pinch at a time.
TIP: Do not over season. Flavors will deepen as soup cools;
best enjoyed warm.
Nutritional information per serving (1 cup):
Calories 177 (24% from fat) | carb. 24g | pro. 10g | fat 5g
sat. fat 1g | chol. 11mg | sod. 264mg | calc. 62mg | fi ber 7g
3 OUNCES DICED PANCETTA
3 SMALL CARROTS, PEELED AND CUT
INTO 1-INCH PIECES
2 SMALL STALKS CELERY, CUT INTO
1-INCH PIECES
1 SMALL ONION, CUT INTO 1-INCH
PIECES
1 FRESH THYME SPRIG
1 GARLIC CLOVE, PEELED
¼ TEASPOON FRESHLY GROUND
BLACK PEPPER, PLUS MORE TO
TASTE
3 CANS (15.5 OUNCES EACH)
CANNELLINI BEANS,
WITH CANNING LIQUID
2–3 CUPS WATER, OR LOW-SODIUM
CHICKEN BROTH FOR RICHER TASTE
KOSHER SALT TO TASTE

52
SOUPS/SALADS
SPRING VEGETABLE MINESTRONE WITH PESTO
This recipe contains many ingredients and requires a lot of
preparation, but the dicing attachment makes it much easier than dicing
by hand
—
and we promise the fi nal result is worth it!
Makes about 14 cups
1. Prepare all ingredients before beginning recipe.
Using the Slicing Disc fi rst, slice the leek and celery
on setting 5. Reserve together. Adjust Slicing Disc to
setting 7. Slice green beans. Reserve.
2. Replace the disc with the Dicing Grid and Disc.
Dice zucchini and yellow squash. Reserve together.
Dice fennel and carrots. Reserve together. Have potatoes
ready to dice.
3. Put olive oil in a large stockpot over medium heat.
Once the oil is hot, add the reserved leek, celery, carrots,
fennel with the garlic, ¼ teaspoon of salt
and a pinch of the pepper. Sweat until vegetables are
slightly soft, about 10 minutes.
4. While the vegetables are sweating, dice the potatoes.
Stir into the pot along with the green beans and the
remaining salt and pepper. Stir well.
5. Add the broth and Parmesan rind. Increase the heat
and bring the liquid to a boil. Add the zucchini, squash,
chickpeas and beans. Reduce heat to maintain a simmer
until all the vegetables are tender, about 20 to 30
minutes. If using the ditalini, stir in during the last 5 to 10
minutes to heat through.
6. While soup is simmering, prepare the pesto in the Smalll
Work Bowl fi tted with the Small Chopping Blade: With
the food processor running on High, drop the garlic
through the small feed tube to fi nely chop. Scrape down
the bowl and add basil, salt and pepper. Pulse to roughly
chop, about 5 to 6 times. Run food processor on High
and drizzle in oil through the small feed tube. Process
until combined, about 1 minute.
7. Once the soup has simmered and all vegetables are
tender, taste and adjust seasoning as desired.
8. Serve in individual bowls topped with a dollop of pesto.
Pesto is best stirred into soup just before eating.
Nutritional information per serving (1 cup):
Calories 115 (18% from fat) | carb. 18g | pro. 6g | fat 2g
sat. fat 0g | chol. 0mg | sod. 568mg | calc. 62mg | fi ber 4g
1 SMALL LEEK, WASHED WELL AND
TRIMMED, WHITE AND LIGHT
GREEN PARTS ONLY
1 SMALL CELERY STALK, TRIMMED
AND CUT TO FIT FEED TUBE
6 OUNCES GREEN BEANS, TRIMMED
1 SMALL ZUCCHINI, TRIMMED AND
CUT TO FIT FEED TUBE
1 SMALL YELLOW SQUASH, TRIMMED
AND CUT TO FIT FEED TUBE
½ SMALL FENNEL BULB, TRIMMED,
CORED AND CUT TO FIT FEED TUBE
4 MEDIUM CARROTS, PEELED AND
TRIMMED TO FIT FEED TUBE
6 OUNCES RED POTATOES, SCRUBBED
1½ TEASPOONS EXTRA VIRGIN
OLIVE OIL
1 GARLIC CLOVE, SMASHED AND
PEELED
¾ TEASPOON KOSHER SALT, DIVIDED
½ TEASPOON FRESHLY GROUND
BLACK PEPPER, DIVIDED
6 CUPS CHICKEN OR VEGETABLE
BROTH
1 3- TO 4-INCH PARMESAN RIND
1 CAN (15 OUNCES) CHICKPEAS,
DRAINED AND RINSED
1 CAN (15 OUNCES) RED KIDNEY
BEANS, DRAINED AND RINSED
2 CUPS COOKED DITALINI PASTA,
OPTIONAL
PESTO:
MAKES ABOUT ¾ CUP
1 SMALL GARLIC CLOVE, PEELED
3 CUPS PACKED, FRESH BASIL LEAVES
1¼ TEASPOONS KOSHER SALT
¼ TEASPOON FRESHLY GROUND
BLACK PEPPER
½–²∕
³
CUP EXTRA VIRGIN OLIVE OIL

53
SOUPS/SALADS
PEAR AND KALE SALAD
This salad pairs well with our Basic Vinaigrette on page 31.
Makes 9 to 10 cups
1. Set Slicing Disc to setting 7. Insert Slicing Disc. Slice
kale. Reserve in bowl.
2. Adjust Slicing Disc to setting 2. Slice cabbage,
carrots, pear and cucumber. Transfer to a Large Work
Bowl. Add walnuts. Toss with desired dressing.
TIP: The dressing for this salad (and most others) can be
made in the Large Work Bowl with all the veggies sliced
right on top for the ultimate one-bowl cleanup.
The walnuts can be chopped in the Large Work Bowl
prior to prepping the rest of the salads.
Nutritional information per serving (1 cup, without dressing):
Calories 38 (24% from fat) | carb. 7g | pro. 1g | fat 1g
sat. fat 0g | chol. 0mg | sod. 77mg | calc. 38mg | fi ber 2g
1 BUNCH LACINATO KALE
¼ SMALL RED CABBAGE HEAD,
CORED AND CUT TO FIT FEED TUBE
2 CARROTS, PEELED AND CUT TO FIT
FEED TUBE
1 PEAR, CORED AND QUARTERED
½ ENGLISH CUCUMBER, QUARTERED
AND CUT TO FIT FEED TUBE
½ CUP WALNUTS, TOASTED AND
ROUGHLY CHOPPED
*

54
SOUPS/SALADS
CELERY ROOT SALAD WITH TARRAGON DRESSING
This salad gets better the longer you let it sit; the fl avors become bolder
and the celery root gets softer. Make up to a couple of days ahead to serve
at a party or make to eat all week.
1. To make dressing: Put the shallot and tarragon into
the Small Work Bowl fi tted with the Small Chopping
Blade. Pulse to roughly chop, about 2 to 3 times.
2. Add the vinegar, lemon juice, mustard, salt and
pepper to work bowl. Process on Low to fully blend,
about 20 seconds.
3. While food processor is running on Low, slowly pour
the olive oil through the drizzle hole in the pusher.
Continue to process on Low until emulsifi ed, about
40 seconds. Reserve or store in an airtight container
in the refrigerator.
4. To make salad: Put the pistachios into the Large Work
Bowl fi tted with the Large Chopping Blade. Pulse to
roughly chop, about 5 to 6 times. Reserve in bowl.
5. Remove the Large Chopping Blade and insert the
Shredding Disc with the medium side facing up. Prep
celery root by washing and peeling. Rub peeled celery
root with lemon half. Cut celery root into pieces so that
they will fi t into the feed tube. Rub each piece with
more lemon. Shred celery root on High. Transfer to a
large mixing bowl. Toss with 1 teaspoon lemon juice.
6. Prep apple by halving, coring and rubbing with
lemon half. Remove medium Shredding Disc and fl ip
so the fi ne side is facing up; shred apple on High.
Add to bowl with celery root. Toss mixture with
additional teaspoon of lemon juice.
7. Add raisins and Tarragon Dressing; toss to coat.
Sprinkle with chopped pistachios and more fresh
tarragon if desired.
Nutritional information for dressing per serving (2 tablespoons):
Calories 186 (97% from fat) | carb. 1g | pro. 0g | fat 21g
sat. fat 3g | chol. 0mg | sod. 222mg | calc. 6mg | fi ber 0g
Nutritional information for salad per serving (1 cup):
Calories 147 (40% from fat) | carb. 20g | pro. 4g | fat 7g
sat. fat 1g | chol. 0mg | sod. 45mg | calc. 44mg | fi ber 4g
DRESSING:
MAKES 1 CUP
1 SMALL SHALLOT, CUT INTO
½-INCH PIECES
¼ CUP PACKED FRESH TARRAGON
LEAVES
¼ CUP APPLE CIDER VINEGAR
1 TEASPOON FRESH LEMON JUICE
1 TEASPOON DIJON MUSTARD
¾ TEASPOON KOSHER SALT
¼ TEASPOON FRESHLY GROUND
BLACK PEPPER
¾ CUP EXTRA VIRGIN OLIVE OIL
SALAD:
MAKES ABOUT 8 CUPS
1 CUP RAW, UNSALTED PISTACHIOS,
SHELLED
2 SMALL HEADS OR 1 LARGE HEAD
(ABOUT 12 OUNCES) CELERY ROOT
½ LEMON (FOR RUBBING CELERY
ROOT AND APPLE)
2 TEASPOONS FRESH LEMON JUICE,
DIVIDED
1 GALA (OR SIMILAR) APPLE, CORED
½ CUP GOLDEN RAISINS
½ CUP TARRAGON DRESSING
(ABOVE)
CHOPPED TARRAGON,
FOR GARNISH

55
SOUPS/SALADS
POTATO SALAD
The dicing attachment creates the perfect sized pieces for potato salad.
Makes about 5 cups
1. Insert the Dicing Grid and Disc. Dice potatoes.
Put into a large stock pot. Add water to 1 inch above
the potatoes. Boil until tender. Drain, rinse with cold
water and drain again and let cool.
2. While potatoes are cooking, put parsley, onion and
celery into the Small Work Bowl fi tted with the Small
Chopping Blade. Pulse to roughly chop, about 3 to 4
times.
3. When potatoes are cooked and slightly cool,
transfer to a large bowl. Add chopped parsley, onion
and celery mixture to the bowl with the potatoes.
Add the remaining ingredients. Stir gently.
4. Taste and adjust seasoning as desired.
Nutritional information for salad per serving (½ cup):
Calories 92 (34% from fat) | carb. 13g | pro. 2g | fat 3g
sat. fat 0g | chol. 0mg | sod. 364mg | calc. 13mg | fi ber 2g
2 POUNDS RED POTATOES, SCRUBBED
¼ CUP FRESH PARSLEY LEAVES,
LOOSELY PACKED
½ SMALL RED ONION, CUT INTO
1-INCH PIECES
3 CELERY STALKS, CUT INTO
1-INCH PIECES
3 TABLESPOONS EXTRA VIRGIN
OLIVE OIL
2 TABLESPOONS WHOLE GRAIN
DIJON MUSTARD
1 TABLESPOON WHITE WINE VINEGAR
1½ – 2 TEASPOONS KOSHER SALT
¼ TEASPOON FRESHLY GROUND
BLACK PEPPER

56
SOUPS/SALADS
BUTTERNUT SQUASH “PAPPARDELLE” IN A WILD
MUSHROOM AND BROWN BUTTER SAUCE
Butternut squash never took so quickly to cook!
Makes 2 to 3 cups
1. Trim butternut squash to fi t into feed tube. Fit the
spiralizer with the ribbon disc. Process squash on Low.
Break apart extra-long strands into 2- to 3-inch
pieces; reserve.
2. In a large skillet, heat half of the butter over medium-
high heat until hot and foamy, about 4 minutes. Add
shallot. Cook until transparent, about 1 minute.
3. Add mushrooms, ½ teaspoon salt and the pepper.
Sauté until dark brown, about 8 minutes.
4. Add wine and deglaze pan by scraping up the brown
bits on the bottom of the pan. Cook mushrooms for
an additional minute.
5. Add remaining butter and cook until butter starts to
brown, about 5 to 6 minutes. Add squash, remaining
salt and sage leaves. Stir and cook until soft, but not
breaking apart, about 4 to 5 minutes.
6. Remove from heat and let sit 2 minutes.
7. Sprinkle with Parmesan cheese, if using. Taste and
adjust seasoning as desired and serve.
Nutritional information per serving (1 cup):
Calories 408 (72% from fat) | carb. 3g | pro. 2g | fat 33g | sat. fat
24g | chol. 90mg | sod. 867mg | calc. 80mg | fi ber 0g
1 SMALL BUTTERNUT SQUASH,
ABOUT 2 POUNDS, PEELED
AND SEEDED
6 TABLESPOONS UNSALTED BUTTER,
DIVIDED
1 SHALLOT, FINELY DICED
4 OUNCES MIXED WILD MUSHROOMS
SUCH AS OYSTER, CREMINI/BABY
BELLA
¾ TEASPOON KOSHER SALT, DIVIDED
¼ TEASPOON FRESHLY GROUND
BLACK PEPPER
2 TABLESPOONS WHITE WINE
8–10 SMALL SAGE LEAVES
GRATED PARMESAN CHEESE FOR
SERVING, OPTIONAL

57
SOUPS/SALADS
FRESH SUMMER "SPAGHETTI"
This light, stovetop dish is full of bright fl avors and couldn’t be
easier to make.
Makes 5 cups
1. Trim vegetables to fi t into feed tube. Fit the spiralizer
with the spaghetti cut disc. Process the zucchini and
carrot on Low; reserve.
2. In a large skillet, heat olive oil, garlic and crushed red
pepper over medium-high heat until hot and fragrant,
about 5 minutes.
3. Add tomatoes and ¼ teaspoon salt; cook until
blistered and just starting to pop, about 6 to 8
minutes.
4. Remove skillet from heat. Remove garlic cloves. Stir in
zucchini, carrot, basil and remaining salt. Taste and
adjust seasoning as desired.
5. Serve immediately.
Nutritional information per serving (1 cup):
Calories 81 (62% from fat) | carb. 7g | pro. 2g | fat 6g | sat. fat 1g
| chol. 0mg | sod. 338mg | calc. 29mg | fi ber 2g
2 MEDIUM ZUCCHINI, ABOUT 1
POUND TOTAL
1 LARGE CARROT (ONLY USE WIDE
END OF CARROT)
2 TABLESPOONS EXTRA VIRGIN OLIVE
OIL
2 GARLIC CLOVES, SMASHED
¼ TEASPOON CRUSHED RED PEPPER
FLAKES
1 PINT GRAPE TOMATOES, HALVED
¾ TEASPOON KOSHER SALT, DIVIDED
¼ CUP PACKED FRESH BASIL LEAVES,
SLICED VERY THIN

58
SOUPS/SALADS
CRISPY POTATOES AND ROOTS WITH CHIPOTLE
DIPPING SAUCE
This spiralizer isn’t just for the healthy—after all, doesn’t almost
everything taste better fried?
Serves 4 to 6 people
1. Trim the potatoes and beet to fi t feed tube.
2. Fit the spiralizer with the spaghetti cut disc. Process
vegetables on Low. You may need to stop to clear the
disc in between processing vegetables.
3. Put vegetable oil in a medium saucepan*. Heat until
oil reaches 375°F. Fry the vegetables, in small
batches, until golden brown, about 3 to 4 minutes
per batch. Adjust the heat as needed to maintain the
necessary temperature. Remove from oil and drain on
a plate lined with paper towels. Sprinkle with a pinch
of the salt.
4. Taste and adjust seasoning as desired. Serve immedi-
ately with dipping sauce, if desired. In place of the
dipping sauce, a spritz of malt or cider vinegar over
the fried vegetables is delicious.
*NOTE: When frying, oil should be a couple of inches
deep to prevent crowding.
Nutritional information per serving (based on 6 servings,
without dipping sauce):
Calories 333 (73% from fat) | carb. 22g | pro. 2g | fat 28g | sat.
fat 48g | chol. 0mg | sod. 327mg | calc. 29mg | fi ber 3g
1 RUSSET POTATO, SCRUBBED
1 SWEET POTATO, SCRUBBED
1 MEDIUM BEET, SCRUBBED
VEGETABLE OIL, FOR FRYING
¾ TEASPOON SALT, DIVIDED
CHIPOTLE DIPPING SAUCE (OPTIONAL)
½ CUP MAYONNAISE
½ CHIPOTLE IN ADOBE
PINCH KOSHER SALT

59
SOUPS/SALADS
QUICK PICKLED RADISHES
While these are ready after sitting in the refrigerator overnight, they have
even a better tang after a few days.
Makes 1 quart
1. Trim radishes so they are fl at on the tops and
bottoms.
2. Fit the spiralizer with the ribbon disc. Process
vegetables on Low. Transfer to a glass quart-sized jar.
Add the celery, peppercorns and garlic; reserve.
3. Put the water, vinegar, salt and sugar into a small
saucepan. Bring to a boil and then pour over the
mixture in the jar. Tightly screw on the lid and allow to
cool to room temperature. Refrigerate overnight.
4. Radishes will keep in the refrigerator for up to 1
month.
Nutritional information per serving (based on 8 servings):
Calories 8 (0% from fat) | carb. 2g | pro. 0g | fat 0g | sat. fat 0g
chol. 0mg | sod. 158mg | calc. 10mg | fi ber 1g
*Do not toss those radish tops, rather, make some pesto
(see recipe on page 23!
½ POUND RADISHES, TOPS TRIMMED
AND RESERVED*
1 CELERY STALK WITH LEAVES, CUT
INTO 3 PIECES
½ TEASPOON BLACK PEPPERCORNS
1 GARLIC CLOVE, HALVED AND
SMASHED
1 CUP WATER
1 CUP WHITE VINEGAR
1 TEASPOON KOSHER SALT
1 TEASPOON GRANULATED SUGAR

60
MAIN COURSES & SIDES
LATKES (POTATO PANCAKES)
This no-fail recipe is great for the holidays, or any time of the year.
Makes twelve, 3-inch pancakes
1. Insert the Small Chopping Blade with the Small Work
Bowl. add the parsley and process on High to chop.
Reserve.
2. Insert the Shredding Disc with the fi ne side facing up.
Shred the potato and the onion. Transfer to a clean
towel and gently wring to squeeze out all of the
excess liquid. Transfer to a large bowl. Add reserved
parsley, fl our, salt and pepper; toss to mix thoroughly.
Add egg and stir.
3. Divide the potato mixture evenly to make 12 pancakes.
Form into balls and then fl atten into pancakes.
4. Put 2 tablespoons of the oil into a large skillet and
heat over medium-high heat. Once hot, add 6 of the
pancakes and cook until golden brown, about 3 to 4
minutes. Flip and cook on the other sides until also
golden brown and cooked thoroughly, about 5 to 6
minutes, lowering the heat if necessary to cook
through and not burn.
5. Transfer to a plate lined with a paper towel to absorb
excess oil. Add the remaining 2 tablespoons
of oil to the pan and heat to cook second batch of
pancakes.
6. Serve immediately with applesauce or sour cream
if desired.
Nutritional information per latke:
Calories 83 (53% from fat) | carb. 8g | pro. 2g | fat 5g
sat. fat 1g | chol. 18mg | sod. 8mg | calc. 9mg | fi ber 1g
2 TABLESPOONS FRESH
PARSLEY LEAVES
1 POUND RUSSET POTATOES*,
PEELED AND CUT TO FIT FEED TUBE
½ SMALL ONION, TRIMMED
2 TABLESPOONS UNBLEACHED,
ALL-PURPOSE FLOUR (YOU MAY
USE MATZO MEAL)
1 TEASPOON KOSHER SALT
¼ TEASPOON FRESHLY GROUND
BLACK PEPPER
1 LARGE EGG, LIGHTLY BEATEN
4 TABLESPOONS EXTRA VIRGIN OLIVE
OIL, DIVIDED
½ POUND RUSSET, ½ POUND SWEET
POTATO MAY BE USED
*

61
MAIN COURSES & SIDES
FALAFEL
Serve with pita bread, hummus, chopped tomatoes, cucumbers and onions.
Makes 8 falafel
1. Drain the soaked garbanzo beans. Put the drained
beans into the Large Work Bowl fi tted with the Large
Chopping Blade. Pulse to break up and then process
on High until smooth, about 30 seconds. Add the
garlic, onion, salt, pepper, cumin and coriander to the
beans and process until the vegetables are fi nely
chopped. Pulse in the parsley.
2. Dissolve the baking soda in the water and reserve.
With the machine running on High, add the baking
soda and water and continue to process until the
falafel batter is smooth.
3. Form patties using a ¼-cup measuring cup.
4. Fry until deeply and evenly golden.
Serve immediately.
Nutritional information per falafel:
Calories 96 (15% from fat) | carb. 16g | pro. 5g | fat 2g
sat. fat 0g | chol. 0mg | sod. 314mg | calc. 34mg | fi ber 5g
1 CUP DRIED GARBANZO BEANS,
SOAKED IN COLD WATER OVERNIGHT
1 GARLIC CLOVE, PEELED
½ SMALL ONION, CUT INTO
1-INCH PIECES
1 TEASPOON KOSHER SALT
¼ TEASPOON FRESHLY GROUND
BLACK PEPPER
1 TEASPOON GROUND CUMIN
¾ TEASPOON GROUND CORIANDER
¼ CUP FRESH PARSLEY LEAVES,
LOOSELY PACKED
¼ TEASPOON BAKING SODA
1 TABLESPOON WATER
¼ CUP VEGETABLE OIL

62
MAIN COURSES & SIDES
CHICKEN BURGERS WITH MANGO-AVOCADO SALSA
Remaining salsa can be served with tortilla chips—you’re not going to want
one bite to go to waste.
Makes 6 burgers; 3 cups of salsa
1. Put cut chicken thigh pieces into the freezer for
30 minutes to slightly harden.
2. While thighs are in freezer, prepare salsa:
Insert the Large Chopping Blade into the Large Work
Bowl. With the food processor running on high, drop
the jalapeño through the small feed tube to fi nely
chop. Add the cilantro and pulse to roughly chop,
about 6 times. Remove the large blade and insert the
Dicing Grid and Disc. Dice the avocados, followed by
the mango. Remove the Dicing attachment. Add the
salt and lime juice to the mixture. Gently fold and
transfer to a medium bowl. Taste and adjust seasoning
as desired. Cover with plastic wrap and store in the
refrigerator until ready to use.
3. Wipe down the Large Work Bowl. Re-insert the Large
Chopping Blade and add the green onions to the
bowl. Pulse to roughly chop, about 6 times. Once 30
minutes have elapsed and the chicken pieces are
slightly fi rm but not hard, add the chicken thighs to
the bowl. Add the salt and pepper. Pulse until
medium fi ne, about 16 times. Form into 6 even
patties.
4. To cook chicken patties, preheat oven to 350°F.
Heat oil in a large nonstick pan. Once oil is hot, add 3
of the chicken patties, being careful not to crowd the
pan. Brown each side until a nice, golden brown crust
forms, then transfer to a baking sheet. Repeat with
remaining patties and fi nish cooking in the oven until
the internal temperature reaches 165ºF. Remove from
oven and let stand for 5 minutes.
5. Serve, topped with Mango-Avocado Salsa and a lime
wedge. May also be served on a soft bun like brioche
or potato.
Nutritional information per serving (1 burger with ½ cup salsa):
Calories 316 (45% from fat) | carb. 12g | pro. 32g | fat 16g
sat. fat 3g | chol. 125mg | sod. 1026mg | calc. 36mg | fi ber
CHICKEN BURGERS:
2 POUNDS BONELESS, SKINLESS
CHICKEN THIGHS, CUT INTO
1-INCH PIECES
1½ TEASPOONS KOSHER SALT
½ TEASPOON FRESHLY GROUND
BLACK PEPPER
3 GREEN ONIONS, TRIMMED AND
CUT INTO 1-INCH PIECES
1 TABLESPOON VEGETABLE OIL
SALSA:
½–1 JALAPENO, SEEDED AND CUT INTO
1-INCH PIECES
¼ CUP FRESH CILANTRO LEAVES,
LOOSELY PACKED
2 AVOCADOS, HALVED, PITTED
AND SCOOPED OUT
1 MANGO, PEELED, HALVED
AND PITTED
1 TEASPOON KOSHER SALT
1–2 TEASPOONS FRESH LIME JUICE

63
MAIN COURSES & SIDES
MEATBALLS
This recipe allows you to chop and mix all of the ingredients directly
in the Cuisinart
®
Food Processor.
Makes 18 meatballs
1. Put beef and pork pieces into the freezer for 30 minutes to
slightly harden. Preheat oven to 425º F. Line two baking
sheets with aluminum foil. Reserve.
2. While meat is in freezer, insert the Large Chopping Blade
into the Large Work Bowl. With the food processor
running on High, drop the garlic through the small feed
tube to fi nely chop. Add the parsley and onion to the
bowl and pulse to roughly chop, about 5 to 6 times.
Once the 30 minutes have elapsed and the meat is fi rm
but not hard, add the meat to the work bowl along with
the remaining ingredients. Pulse to chop meat and
combine ingredients until meat is medium fi ne,
about 35 times.
3. Using a ¼-cup measuring cup, form meat mixture into
balls. Bake until golden brown on all sides, about 25 to
30 minutes.
4. Serve plain or with tomato sauce.
Nutritional information per meatball:
Calories 119 (46% from fat) | carb. 3g | pro. 13g | fat 6g
sat. fat 2g | chol. 60mg | sod. 324mg | calc. 17mg | fi ber 0g
1½ POUNDS BEEF CHUCK, CUT INTO
1-INCH PIECES
½ POUND PORK SHOULDER,
TRIMMED OF ANY EXCESS FAT,
CUT INTO 1-INCH PIECES
2 GARLIC CLOVES, PEELED
½ CUP FRESH PARSLEY LEAVES,
LOOSELY PACKED
½ ONION, CUT INTO 1-INCH PIECES
½ CUP ITALIAN SEASONED
BREADCRUMBS (SEE PAGE 24)
1½ TEASPOONS KOSHER SALT
2 LARGE EGGS, LIGHTLY BEATEN

64
MAIN COURSES & SIDES
PINEAPPLE FRIED RICE
Try making this recipe with caulifl ower
—
yes, caulifl ower!
—
instead of rice.
See our tip below on how to prepare.
Makes 5½ cups
1. Insert the Large Chopping Blade into the Large Work
Bowl. With the food processor running on High, drop the
garlic and ginger through the small feed tube to fi nely
chop. Remove the Chopping Blade and insert the Dicing
Grid and Disc. Dice the onion and carrots. Remove and
reserve. Dice the pineapple. Remove and reserve
separately.
2. Put 2 tablespoons of the oil into a large nonstick skillet
set over medium heat. Once hot, add the garlic, ginger,
onion and carrots. Sauté until vegetables are softened,
about 5 minutes. Add the remaining oil and allow to
heat for about 1 minute.
3. Add the rice (or caulifl ower “rice” if using) and cashews.
Cook, allowing it to sit for 1 to 2 minutes between stirs,
until crisped and slightly browned, 6 to 8 minutes.
Add the pineapple, salt and turmeric; stir, scraping up
brown bits from bottom of pan.
4. Push mixture to one side of the pan. Add eggs and let cover
half of the pan, and cook, breaking up with a spatula
while cooking. Once eggs have cooked, mix with rice.
5. Reduce heat to low. Stir in soy sauce, fi sh sauce and
green onions. Taste, adding additional salt if desired.
Add the sake to deglaze the pan, scraping up brown bits
from bottom of the pan. Serve immediately.
TIP: The rice can be substituted with caulifl ower. Simply cut
into fl orets and put into the Large Work Bowl fi tted with the
Large Chopping Blade. Pulse to break up, then run on High
to fi nely and evenly chop. Caulifl ower will cook when added
to the pan in place of the rice.
Nutritional information per serving (based on 1 cup with rice):
Calories 618 (61% from fat) | carb. 101g | pro. 12g | fat 19g
sat. fat 3g | chol. 53mg | sod. 490mg | calc. 35mg | fi ber 2g
Nutritional information per serving (based on 1 cup with
caulifl ower “rice”):
Calories 787 (68% from fat) | carb. 128g | pro. 16g | fat 25g
sat. fat 4g | chol. 68mg | sod. 623mg | calc. 45mg | fi ber 3g
1 GARLIC CLOVE, PEELED
1 1-INCH PIECE FRESH GINGER,
PEELED AND HALVED
1 SMALL ONION, TRIMMED AND
HALVED
2 MEDIUM CARROTS, PEELED AND
CUT TO FIT FEED TUBE
½ PINEAPPLE, TRIMMED AND CORED
¼ CUP GRAPESEED OIL, DIVIDED
4 CUPS COOKED AND COOLED
JASMINE RICE OR 4 CUPS PULSED
CAULIFLOWER* (FROM ABOUT 1
POUND CAULIFLOWER)
1 CUP CASHEWS (TOASTED)
1 TEASPOON KOSHER SALT,
PLUS MORE TO TASTE
¼ TEASPOON GROUND TURMERIC
2 LARGE EGGS, LIGHTLY BEATEN
2 TABLESPOONS REDUCED-SODIUM
SOY SAUCE
1 TEASPOON FISH SAUCE
2 GREEN ONIONS, TRIMMED AND
THINLY SLICED (WHITE AND GREEN
PARTS)
1 TABLESPOON SAKE
(OR WHITE WINE)
*

65
MAIN COURSES & SIDES
Make this summer stew when vegetables are abundant in the garden.
2 MEDIUM ZUCCHINI,
ABOUT 1 POUND
1 EGGPLANT, ABOUT 1 POUND
1 ONION, TRIMMED AND HALVED
2 TABLESPOONS OLIVE OIL
1 GARLIC CLOVE, SMASHED
1½ POUNDS PLUM TOMATOES
2 TABLESPOONS TOMATO PASTE
1¼ TEASPOONS KOSHER SALT
¼ TEASPOON FRESHLY GROUND
BLACK PEPPER
½ TEASPOON DRIED OREGANO
1 SPRIG FRESH THYME
10 FRESH BASIL LEAVES, THINLY SLICED
RATATOUILLE
Makes about 6 cups
1. Insert the Dicing Grid and Disc. Dice zucchini,
eggplant and onion. Use Cleaning Tool to clean Grid.
Reserve in bowl.
2. Put the olive oil and garlic clove in a large saucepan
set over medium-high heat. Once the oil is hot,
add the reserved diced vegetables. Stir to coat and
allow to cook until slightly browned and tender, about
5 to 6 minutes.
3. While the zucchini, eggplant and onion are cooking,
dice plum tomatoes. Reserve in bowl.
4. Add tomato paste to the pan with the cooking
vegetables; stir and cook 1 to 2 minutes.
5. Add plum tomatoes, salt, pepper, oregano
and thyme sprig; stir. Cover and reduce heat to
medium and cook until tender, about 10 minutes.
Remove lid and cook until liquid is reduced and
slightly thickened, about 5 minutes. Remove from
heat, remove thyme sprig and stir in fresh basil. Taste
and adjust seasoning as desired. ratatuoille can be
served hot, at room temperature or cold.
Nutritional information per serving (1 cup):
Calories 176 (41% from fat) | carb. 14g | pro. 3g | fat 5g
sat. fat 1g | chol. 0mg | sod. 473mg | calc. 36mg | fi ber 6g

66
MAIN COURSES & SIDES
BRUSSELS SPROUTS WITH LARDONS
Makes 3 cups
1. Adjust the Slicing Disc to setting 5. Insert Slicing Disc.
Slice Brussels sprouts. Reserve in a bowl.
2. Put bacon lardons into a large nonstick skillet set
over medium heat. Cook until crispy, stirring often
to prevent sticking, about 6 minutes.
3. Use a slotted spoon to remove bacon and transfer
to a plate. Leaving the bacon fat in the pan, increase
the heat to medium-high. When hot, add reserved
Brussels sprouts and cook until brown on one side, 3
to 4 minutes. Stir and cook until tender, an additional
1 to 2 minutes. Add in lardons and vinegar; stir.
Remove from heat.
4. Taste and season with salt and pepper, if desired.
Nutritional information per serving (½ cup):
Calories 222 (65% from fat) | carb. 7g | pro. 13g | fat 16g
sat. fat 5g | chol. 41mg | sod. 802mg | calc. 32mg | fi ber 3g
1 POUND BRUSSELS SPROUTS,
CLEANED AND ROOT END TRIMMED
½ POUND SLAB BACON, CUT INTO
LARDONS (¼-INCH CUBES)
2 TABLESPOONS APPLE CIDER
VINEGAR
KOSHER SALT AND BLACK PEPPER
FOR SEASONING, IF DESIRED
Slicing the Brussels sprouts (and any other ingredient) in the food processor
ensures they will all cook evenly.

67
MAIN COURSES & SIDES
CAULIFLOWER-CRUST PIZZA
Makes 8 servings
1. Preheat oven to 450°F. Line a baking sheet with
parchment paper. Set aside.
2. Put caulifl ower fl orets into the Large Work Bowl fi tted
with the Large Chopping Blade. Pulse to break up, 5 to 6
times, and then process on High to fi nely chop, about
30 seconds. Add remaining crust ingredients to work
bowl and process on High again to combine, about 30
seconds. Transfer ingredients to the prepared baking
sheet. Form into a rectangle about ½ inch thick.
Bake until golden brown and slightly fi rm, about 40
minutes. Cool slightly.
3. While caulifl ower is cooling, adjust Slicing Disc to
setting 5. Insert Slicing Disc. Slice pepper, onion and
mushrooms. Transfer to a large bowl. Reserve.
4. Insert Shredding Disc with the medium setting facing up.
Shred the mozzarella. Reserve in a bowl.
5. Put the pizza sauce in the center of the cooled caulifl ower
crust and spread evenly, leaving a 1-inch border. Spread
vegetables evenly over sauce. Spread cheese evenly
over vegetables. Brush edges of crust with olive oil.
6. Bake until toppings are soft and cheese is melted and
bubbly, about 15 to 20 minutes.
Our Pizza Dough recipe on page 71 can also be used.
Unlike the caulifl ower crust, it does not need to be
prebaked fi rst. To make: On a lightly dusted surface,
roll out pizza dough into a 12-inch circle. Transfer pizza
dough to a pizza screen sprayed with nonstick cooking
spray or a baking sheet dusted very well with cornmeal.
Top with sauce and toppings, brush edges of crust with
olive oil and bake until crust is golden brown, toppings
are soft and cheese is melted and bubbly.
Nutritional information per serving:
Calories 210 (60% from fat) | carb. 8g | pro. 15g | fat 15g
sat. fat 7g | chol. 80mg | sod. 715mg | calc. 366mg | fi ber 2g
CRUST*:
1 HEAD (ABOUT 1 POUND)
CAULIFLOWER, FLORETS ONLY
2 LARGE EGGS
¾ CUP GRATED PARMESAN CHEESE
½ TEASPOON KOSHER SALT
¼ TEASPOON FRESHLY GROUND
BLACK PEPPER
¼ TEASPOON ONION POWDER
¼ TEASPOON GARLIC POWDER
TOPPING:
½ BELL PEPPER, SEEDED AND CUT
TO FIT FEED TUBE
½ ONION, TRIMMED
3 WHITE MUSHROOMS
½ POUND MOZZARELLA,
REFRIGERATED
¾ CUP PIZZA SAUCE, SEE RECIPE
PAGE 27
2 TABLESPOONS EXTRA VIRGIN
OLIVE OIL
Try this caulifl ower crust as a gluten-free alternative.
*

68
MAIN COURSES & SIDES
Makes four, 7-inch rolls
1. Put pork pieces into the freezer for 30 minutes to slightly
harden. While pork is in the freezer, toast fennel seeds in
a pan over medium heat. Reserve.
2. Insert the Large Chopping Blade into the Large Work
Bowl. With the food processor running on High, drop the
garlic through the small feed tube to fi nely chop. When
the pork shoulder cubes are suffi ciently cold, put them
into the Large Work Bowl with the chopped garlic. Add
the toasted fennel seeds, salt, pepper and sugar. Pulse
to coarsely chop, about 15 to 20 times.
3. In a large skillet set over medium-high heat, cook
chopped pork until completely browned. With a slotted
spoon, transfer to a plate lined with a paper towel to
drain and cool. Preheat oven to 425ºF.
4. While sausage is cooling and oven is heating, lightly dust
a work surface with fl our. Roll the prepared pizza dough
into an 18-inch circle. Divide into four equal pieces.
5. Take one piece of dough and place it in front of you
with the point facing away from you. Put ½ cup of the
shredded mozzarella into the center of each piece
of dough and arrange into a horizontal line. Distribute
the meat evenly on top of each cheese pile. Top each
with ¼ cup of pizza sauce.
6. Close roll by folding the long bottom part of the dough
loosely over the mixture, then fold the tip over the folded
dough and tuck under roll. The sides of the sausage roll
will be exposed. Repeat with each of the pieces of dough.
7. Put the rolls on a baking sheet lined with foil and bake in
the lower part of the oven until dough is golden brown,
about 20 to 25 minutes.
Nutritional information per serving (½ sausage roll):
Calories 472 (35% from fat) | carb. 49g | pro. 29g | fat 18g
sat. fat 7g | chol. 70mg | sod. 1275mg | calc. 228mg | fi ber 2g
SAUSAGE ROLLS
The taste of homemade sausage surpasses the taste of prepackaged and
is very easy to make in the Cuisinart
®
Food Processor. Cook it “loose” on
the stovetop to add to any pasta or sauce dish, or make New York City-style
sausage rolls using pizza dough and sauce like we do here.
1 POUND PORK SHOULDER, TRIMMED
OF ANY EXCESS FAT AND CUT INTO
1-INCH PIECES
1 TEASPOON FENNEL SEEDS
1 GARLIC CLOVE, PEELED
1½ TEASPOONS KOSHER SALT
½ TEASPOON FRESHLY GROUND
BLACK PEPPER
¼ TEASPOON GRANULATED SUGAR
UNBLEACHED ALL-PURPOSE
FLOUR, FOR DUSTING
1 RECIPE PIZZA DOUGH, PAGE 71
2 CUPS SHREDDED MOZZARELLA
CHEESE
1 CUP PREPARED PIZZA SAUCE
(OR USE RECIPE ON PAGE 27)

69
BREADS & DOUGHS
CLASSIC WHITE BREAD
Makes two, 1-pound loaves
1. In a 2-cup liquid measuring cup, dissolve yeast and
sugar in warm water. Let stand until foamy, about 5
minutes.
2. Put the fl our, butter and salt into the Large Work Bowl
fi tted with the Dough Blade. Process on Low to mix,
about 10 to 15 seconds.
3. Add cold water to yeast mixture. With the food
processor running on Low, add the liquid through the
small feed tube only as fast as fl our absorbs it. Once
dough cleans the sides of the work bowl and forms a
ball, continue processing to knead for 45 seconds.
4. Transfer dough to a large bowl lightly dusted with
fl our. Cover with plastic wrap and allow to rise in a
warm place until doubled, about 1 to 1½ hours.
5. After the dough has doubled in size, lightly coat
two, 9-inch loaf pans with nonstick cooking spray.
Reserve. Punch down dough and divide into two
equal pieces. Form into 2 loaves and transfer to the
prepared loaf pans. Cover with plastic wrap coated
with the nonstick cooking spray. Allow to rise until
dough is just above the tops of the pans, about 45
minutes to 1 hour.
6. Preheat oven to 400°F. Bake until tops are browned
and loaf sounds hollow when tapped, about 30 to 35
minutes. Remove from pans and cool on wire rack.
Cool completely before slicing.
Nutritional information per serving (based on 16 servings):
Calories 137 (17% from fat) | carb. 25g | pro. 3g | fat 3g
sat. fat 1g | chol. 6mg | sod. 221mg | calc. 80mg | fi ber 1g
2¼ TEASPOONS (1 PACKET)
ACTIVE DRY YEAST
2 TEASPOONS GRANULATED SUGAR
¹∕
³
CUP WARM WATER
(105°F TO 110°F)
4 CUPS UNBLEACHED,
ALL-PURPOSE FLOUR
3 TABLESPOONS UNSALTED BUTTER,
CUT INTO 1-INCH PIECES
1½ TEASPOONS KOSHER SALT
1 CUP COLD WATER
NONSTICK COOKING SPRAY
Fresh homemade bread is very simple to make with your
Cuisinart
®
Food Processor.

70
BREADS & DOUGHS
BUTTERY DINNER ROLLS
Fresh from the oven, warm rolls make any dinner extra special.
Makes 12 rolls
1. In a small saucepan, combine the milk, butter and
sugar. Warm over low heat until the butter is melted.
Remove from heat and reserve.
2. In a 2-cup measuring cup, dissolve the yeast in the
warm water. Let stand until foamy, about 5 minutes.
3. Put the fl our and salt into the Large Work Bowl fi tted
with the Dough Blade. Process on Low to sift, 10
seconds. Add the milk mixture and egg to the yeast
mixture. Gently stir to combine.
4. With the machine running on Low, slowly add the
liquid through the feed tube and process until a
dough ball forms. Continue processing to knead the
dough, 45 seconds. Shape the dough into a smooth
ball and transfer to a large bowl; cover with plastic
wrap. Allow to rise in a warm place until doubled in
size, about 45 to 60 minutes.
5. Preheat oven to 450°F. Lightly butter a 9-inch round
baking pan. Divide the dough into 12 equal pieces,
about 2 ounces each. Roll into smooth rounds and
arrange in the prepared pan. Cover with plastic wrap
and allow to rise until the rolls have doubled in size,
about 30 to 40 minutes.
6. Just before baking, gently brush the rolls with the
egg wash. Bake until golden brown or an internal
temperature of 200°F is reached, about 12 to 15
minutes.
7. Remove rolls from pan and cool on a rack for about
10 minutes before serving. For a softer roll, brush each
with melted butter just after removing from the oven.
Nutritional information per roll:
Calories 144 (28% from fat) | carb. 7g | pro. 4g | fat 2g
sat. fat 1g | chol. 22mg | sod. 157mg | calc. 17mg | fi ber 1g
¹∕
³
CUP WHOLE MILK
6 TABLESPOONS UNSALTED BUTTER,
PLUS MORE FOR PAN
3 TABLESPOONS GRANULATED SUGAR
1¾ TEASPOONS ACTIVE DRY YEAST
3 TABLESPOONS WARM WATER
(105°F TO 110°F)
3 CUPS BREAD FLOUR
¾ TEASPOON KOSHER SALT
1 LARGE EGG, LIGHTLY BEATEN
EGG WASH (1 LARGE EGG
WHISKED WITH 1 TABLESPOON
WATER)

71
BREADS & DOUGHS
PIZZA DOUGH
Need ideas for pizza toppings?
Visit Cuisinart.com for some delicious recipes.
Makes three, 12-inch pizzas
1. Put the yeast, warm water and sugar into a 2-cup
measuring cup. Let stand until foamy, about 5 minutes.
2. Put the fl our, salt and olive oil into the Large Work
Bowl fi tted with the Dough Blade. Process on Low to
mix.
3. Add the cold water to the yeast mixture. With the
food processer running on Low, slowly pour the liquid
yeast mixture through the feed tube. Process until
a dough ball forms. Continue processing to knead,
about 1 minute. Dough will be slightly sticky.
4. Transfer dough to a large bowl that is lightly dusted
with fl our. Cover with plastic wrap and let rise in a
warm place until doubled, about 45 minutes to 1 hour.
5. Punch down dough and divide into three portions.
Use immediately, or store remaining portions in
sealed, airtight plastic bags in the refrigerator for up
to 2 days or in the freezer up to 3 months.
6. Bake using the Pizza Sauce recipe on page 27 or use
dough to make focaccia. To make focaccia: Brush a
baking sheet with 3 tablespoons of extra virgin olive
oil. Stretch the dough onto the pan and cover to let
rise again, an additional 45 minutes to 1 hour. Use
your fi ngers to make indentations in the dough over
the entire surface. Drizzle with an additional 1 to 2
tablespoons of extra virgin olive oil and sprinkle with
kosher salt and fresh herbs if desired. Bake in an oven
set to 425ºF until golden brown and crispy, about 40
minutes.
TIP: Pizza dough can also be used to make pita bread:
Roll 2-ounce pieces into disks, about ¼ inch thick and
bake in a 450°F oven until puffed, about 3 minutes.
Nutritional information per serving (based on 8 servings):
Calories 73 (7% from fat) | carb. 15g | pro. 2g | fat 1g
sat. fat 0g | chol. 0mg | sod. 134mg | calc. 0mg | fi ber 0g
2¼ TEASPOONS (1 PACKET)
ACTIVE DRY YEAST
½ CUP WARM WATER
(105°F TO 110°F)
1 TEASPOON GRANULATED SUGAR
4 CUPS UNBLEACHED, ALL-PURPOSE
FLOUR, PLUS MORE FOR DUSTING
1½ TEASPOONS KOSHER SALT
1 TABLESPOON EXTRA VIRGIN
OLIVE OIL
1 CUP COLD WATER

72
BREADS & DOUGHS
FLAKY PASTRY DOUGH (PÂTE BRISEÉ)
This versatile dough can be used for sweet or savory treats.
Makes two, single-crust 9-inch tarts or one,
double-crust pie
1. Put the fl our and salt into the Large Work Bowl fi tted
with the Large Chopping Blade. Process on Low to
sift, 10 seconds.
2. Evenly disperse the butter on top of the fl our
mixture. Pulse until the mixture resembles coarse
crumbs, about 14 pulses. Pour in water, 1 tablespoon
at a time, and pulse until the mixture just forms a
dough
—
you may not need all of the water.
3. Divide the dough equally into 2 pieces and form
each into a fl at disk. Wrap each with plastic wrap and
refrigerate for at least 30 minutes or until ready to
use, up to 1 week. This dough also freezes well, up to
3 months.
TIP: For a sweet pastry dough, add 1½ tablespoons of
granulated sugar to the dry ingredients in the work bowl.
Nutritional information per serving (based on 16 servings):
Calories 150 (66% from fat) | carb. 11g | pro. 2g | fat 11g
sat. fat 8g | chol. 30mg | sod. 133mg | calc. 0mg | fi ber 0g
2 CUPS UNBLEACHED,
ALL-PURPOSE FLOUR
1 TEASPOON KOSHER SALT
16 TABLESPOONS (2 STICKS)
UNSALTED BUTTER, COLD AND
CUT INTO ½-INCH CUBES
¼ CUP ICE WATER

73
BREADS & DOUGHS
QUICK APPLE TART
This is more of a rustic-style tart that takes only minutes to prepare.
Makes 8 servings
1. Roll the fl aky pastry dough to fi t into a 9-inch tart pan.
Chill in the refrigerator for a minimum of 30 minutes.
Once chilled, prick the dough all over with the tines
of a fork, being sure not to pierce through the dough.
2. Preheat oven to 425°F with one rack in the bottom
third and one in the middle third of the oven.
3. Prepare the fi lling: Fit the spiralizer with the ribbon
disc. Process apples on Low, one at a time, to cut.
Transfer to the chilled tart dough, in a concentric
pattern. Drizzle with the lemon juice and then evenly
sprinkle the cinnamon sugar and salt over the apples.
Top with the butter.
4. Put the prepared tart on a baking sheet and put into
the preheated oven in the lower rack position. Bake
for 20 minutes. Carefully move tart to the middle
position for another 15 minutes, or until the apples
are nicely browned and caramelized.
5. Once tart is baked, remove from oven and carefully
brush with the warm jam to create a shiny coating.
Allow to cool 10 minutes before serving.
Nutritional information per serving (1 slice):
Calories 269 (46% from fat) | carb. 36g | pro. 2g | fat 14g | sat.
fat 9g | chol. 38mg | sod. 207mg | calc. 10mg | fi ber 2g
½ RECIPE FLAKY PASTRY DOUGH
(PAGE 72)
6 SMALL PINK LADY APPLES (NO
MORE THAN 2 INCHES IN DIAM-
ETER), CORED
1½ TEASPOONS FRESH LEMON JUICE
1
/
3
CUP CINNAMON SUGAR (
1
/
3
CUP
GRANULATED SUGAR AND 1½
TEASPOONS GROUND CINNAMON)
¼ TEASPOON KOSHER SALT
2 TABLESPOONS UNSALTED BUTTER,
COLD AND CUBED
2 TABLESPOONS APRICOT JAM,
WARMED

74
DESSERTS
TROPICAL FRUIT SALAD
Eat this fruit salad on its own or over waffl es or ice cream. It’s also a great base
for adult beverages mixed with club soda and rum.
3 KIWIS, PEELED
2 BANANAS, HALVED
1 SMALL PAPAYA, PEELED AND
SEEDED
1 PINEAPPLE, PEELED, QUARTERED
AND CORED
TOASTED COCONUT FLAKES,
OPTIONAL
Makes 5 cups
1. Insert the Dicing Grid and Disc. Dice the kiwis on Low.
Then, on High, dice the bananas, papaya and
pineapple. Stir together and serve, sprinkled with the
toasted coconut fl akes, if desired.
Nutritional information per serving (½ cup):
Calories 78 (4% from fat) | carb. 20g | pro. 1g | fat 0g
sat. fat 0g | chol. 0mg | sod. 3mg | calc. 19mg | fi ber 2g

75
DESSERTS
This classic French dessert is a sure way to impress guests.
This recipe is more advanced than our Quick Apple Tart on page 73, so
choose your comfort level.
APPLE TART
Makes one, 9-inch tart
1. Insert Dicing Grid and Disc. Dice 3 apples. Put apples
into a medium saucepan with the butter, sugar and
lemon juice. Gently simmer over low heat until very tender
and liquid, about 30 to 40 minutes. When apples are done
cooking, remove from heat, stir in vanilla extract and cool.
2. While apples are cooking, blind bake the pastry dough:
Preheat oven to 350°F. On a lightly dusted surface,
roll out the pastry dough into a circle about ¹∕
8 inch thick.
Transfer to a 9-inch tart pan (with removable bottom)
and gently press dough into the sides and bottom of
pan. Use the rolling pin to roll over the tart pan and trim
the edges of the dough. Gently prick the bottom of the
pan with the tines of a fork, being sure not to go all the
way through. Coat a piece of aluminum foil with nonstick
cooking spray. Place, sprayed side down, onto the top of
the dough in the tart pan. Fill with pie weights (dried
beans or rice can be used). Bake until bottom of crust is
no longer wet, about 20 minutes. Gently remove foil
with pie weights and continue baking until golden
brown,
an additional 10 to 12 minutes. Remove pan from oven
and cool slightly.
3. While apple mixture and tart shell are cooling, adjust the
Slicing Disc to setting 3. Insert the Slicing Disc and slice
remaining 2 apples. Toss with 1 teaspoon cinnamon.
Reserve in bowl.
4. Pour cooked and cooled apple mixture into the tart pan
and spread evenly. Arrange apple slices over the apple
mixture in concentric circles. Brush with 1 tablespoon
melted butter. Bake until apple slices are soft and lightly
golden, about 25 to 30 minutes.
5. Remove from oven and brush with the warm apricot jam.
Let cool slightly in pan and then carefully remove from pan.
Serve warm.
Nutritional information per serving (based on 8 servings):
Calories 287 (47% from fat) | carb. 37g | pro. 2g | fat 15g
sat. fat 11g | chol. 41mg | sod. 138mg | calc. 11mg | fi ber 3g
½ RECIPE FLAKY PASTRY DOUGH
(PAGE 72)
5 APPLES (ABOUT 2 POUNDS) OF
YOUR CHOICE, PEELED, HALVED
AND CORED, DIVIDED
2 TABLESPOONS UNSALTED BUTTER,
PLUS 1 TABLESPOON MELTED
¼ CUP GRANULATED SUGAR
1 TABLESPOON FRESH LEMON JUICE
1 TEASPOON PURE VANILLA EXTRACT
UNBLEACHED, ALL-PURPOSE
FLOUR, FOR ROLLING
NON-STICK COOKING SPRAY
¼ CUP APRICOT JAM, WARMED

76
DESSERTS
The zucchini keeps this quick bread very moist, without much added fat.
DOUBLE CHOCOLATE ZUCCHINI BREAD
Makes one, 9-inch loaf
1. Preheat oven to 325° F. Lightly coat a 9-inch loaf pan
with cooking spray. Reserve.
2. Combine the fl our, cocoa powder, espresso powder,
cinnamon, salt, baking powder, baking soda and
nutmeg in a medium bowl. Reserve.
3. Insert the Shredding Disc with the medium side
facing up. Shred zucchini. Add to the bowl with the
reserved dry ingredients.
4. Put the sugar, eggs and oil into the Large Work Bowl
fi tted with the Large Chopping Blade. Process on
High for 30 seconds. Add dry ingredients and pulse,
to just combine, about 8 to 10 times. Remove blade.
Fold in chocolate chips. Pour batter into prepared
loaf pan.
5. Bake until a cake tester inserted into the center
comes out clean, about 1 hour.
6. Let cool in pan and serve warm, if desired.
Nutritional information per serving (based on 12 servings):
Calories 272 ( 42% from fat) | carb. 38g | pro. 4g | fat 14g
sat. fat 4g | chol. 36mg | sod. 240mg | calc. 8mg | fi ber 2g
NONSTICK COOKING SPRAY
1¾ CUPS UNBLEACHED, ALL-PURPOSE
FLOUR
½ CUP COCOA POWDER
2 TEASPOONS INSTANT ESPRESSO
POWDER
1 TEASPOON GROUND CINNAMON
1 TEASPOON KOSHER SALT
1 TEASPOON BAKING POWDER
¼ TEASPOON BAKING SODA
PINCH NUTMEG
1 LARGE ZUCCHINI (ABOUT 12
OUNCES), TRIMMED AND CUT
TO FIT FEED TUBE
1 CUP PACKED, LIGHT BROWN SUGAR
2 LARGE EGGS
½ CUP VEGETABLE OIL
½ CUP CHOCOLATE CHIPS (SEMISWEET
OR MILK CHOCOLATE)

77
DESSERTS
PECAN SHORTBREAD LINZER COOKIES
These cookies can be cut into any shape, making them perfect
for any holiday.
Makes 45 cookie sandwiches
1. Put the pecans and sugar into the Large Work Bowl
fi tted with the Large Chopping Blade. Pulse until
the mixture resembles a coarse meal, remove and
reserve. Put the fl our, confectioners’ sugar and salt
into the work bowl. Pulse to mix dry ingredients
together, about 2 to 3 times. Add the pecan/sugar
mixture to dry ingredients.
2. Distribute the butter evenly over dry ingredients in
work bowl. Pulse to cut in the butter, 10 to 12 pulses.
Add the vanilla extract. Continue to pulse until the
mixture forms a dense dough. Remove dough and
divide into two equal disks, wrap in plastic wrap and
place in refrigerator for at least one hour.
3. Preheat oven to 350°F. Line two baking sheets with
parchment paper. Set aside.
4. Remove 1 dough disk from refrigerator. On a fl oured
surface, roll the dough into an even ¹∕
8
-inch thickness.
Using a 2-inch fl uted round cookie cutter, cut rounds
and place on parchment-lined baking sheet. Bake for
12 to 15 minutes, turning baking sheet halfway through
bake time, until the edges are golden. Remove from
oven and transfer cookies to a cooling rack.
5. Repeat rolling and baking with remaining dough, this
time using a ¾-inch round cutter to cut out centers of
the 2-inch fl uted rounds.
6. Once cookies are cooled, spread ½ tablespoon of the
warm jam over the surface of the uncut rounds. Top
with the cutout rounds and press gently together to
adhere. Dust the tops of the cookies with
confectioners’ sugar.
Nutritional information per cookie sandwich:
Calories 111 (46% from fat) | carb. 14g | pro. 1g | fat 6g
sat. fat 3g | chol. 13mg | sod. 25mg | calc. 2mg | fiber 0g
½ CUP TOASTED PECAN HALVES
¼ CUP GRANULATED SUGAR
3 CUPS UNBLEACHED, ALL-PURPOSE
FLOUR, PLUS MORE FOR ROLLING
1 CUP CONFECTIONERS’ SUGAR,
PLUS EXTRA FOR DUSTING
½ TEASPOON KOSHER SALT
20 TABLESPOONS (2½ STICKS)
UNSALTED BUTTER,
ROOM TEMPERATURE, CUT INTO
1-INCH PIECES
1 TEASPOON PURE VANILLA EXTRACT
¾ CUP RASPBERRY JAM, WARM

78
DESSERTS
STRAWBERRY FROZEN YOGURT
Substitute your favorite frozen fruit if desired; plus, top with fresh fruit
diced in your Cuisinart
®
Food Processor.
Makes 2 cups
1. Put the strawberries into the Large Work Bowl fi tted
with the Large Chopping Blade. Pulse to break up,
about 15 to 20 times. Add yogurt and agave, and
process on High until smooth, about 1 minute.
Nutritional information per serving (½ cup):
Calories 54 (7% from fat) | carb. 13g | pro. 2g | fat 1g
sat. fat 0g | chol. 0mg | sod. 23mg | calc. 48mg | fiber 1g
2 CUPS FROZEN STRAWBERRIES
½ CUP PLAIN YOGURT, FULL OR
LOWFAT
1 TABLESPOON AGAVE NECTAR

NOTES:
G IB-14328
©2016 Cuisinart
150 Milford Road
East Windsor, NJ 08520
Printed in China
16CE020755
Any other trademarks or service marks referred to herein are the
trademarks or service marks of their respective owners.
Juicers
Griddlers Cookware
Tools and
Gadgets
Cuisinart offers an extensive assortment of top quality products
to make life in the kitchen easier than ever. Try some of our other countertop
appliances, cookware, tools and gadgets.
www.cuisinart.com
Coffeemakers

Version No: FP1300WS Series IB-14328
Size: 148x210MM
Number of Page:80PP Saddle Stitiched
Materal: 105gsm gloss art paper for whole book
Coating: gloss varnishing in cover
Color(Cover): 4C(CMYK)+ 1C(black)
PDF version: FP1300WS Series IB-14328(0.0)
Hugo Code: CEM0583 IB-1-1 Operator:CW
Hugo Diecut: IRP:BBJ
Hot Stamping:
Remark: Quality Request(1)
Spot UV: Embossing:
(Inside): 1C(black) +1C(black)
Date: 18-JUNE-2016
Co-ordlinator:Astor You/Linda Ouyang
Hugo Description