24/9 Powells Road, Brookvale NSW Australia 2100 [email protected]
www.tecsunradios.com.au
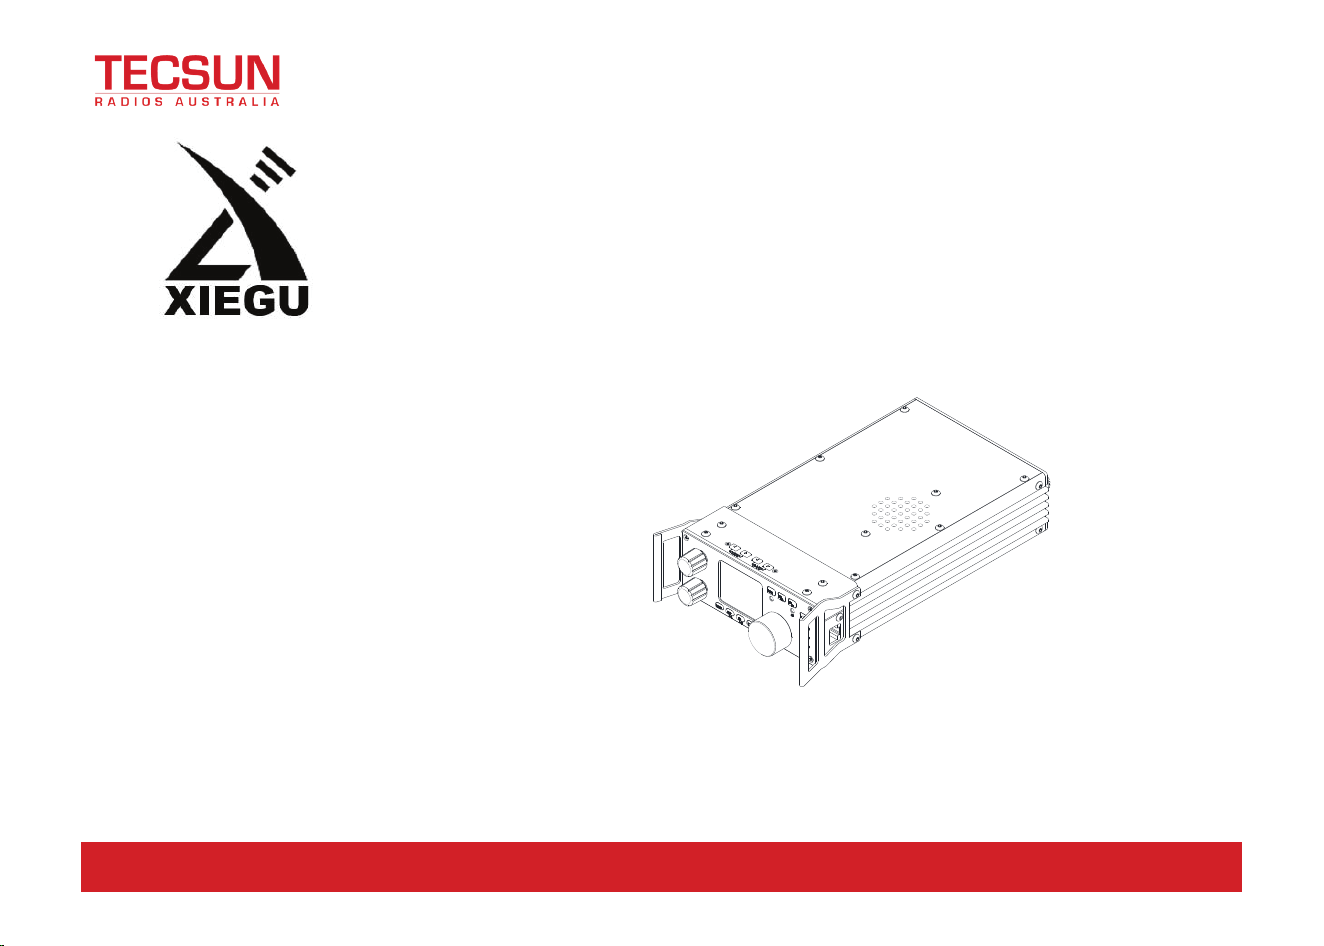
G90
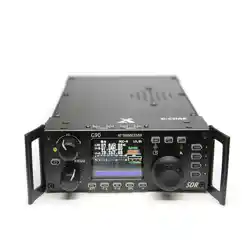
Portable SDR HF Transceiver
XIEGUTECH
Operation manual
V1.00.01
Built-in automatic antenna tuner ATU

24/9 Powells Road, Brookvale NSW Australia 2100 [email protected]
www.tecsunradios.com.au
Catalog
1
Basic Feature 2
Panel button 3
Front panel Interface 6
Tail interface 7
Interface definition 8
MIC button 9
External power connection method 10
Menu operation 1 2
Display interface 12
Power on/off 1 3
Operating frequency bands selection 14
Operating MODE selection 15
Volume adjustment 16
Multifunction adjustment knob 17
Adjusting transmit power Po 18
Setting operation frequency 19
ATU 2 0
Function buttons 21
Setting SPL and VFO 23
CW transmission 24
CW Auto pager 25
Standing wave scanner SWR 26
Digital filter 27
Line Input / Output selection 28
Channel Memory MW 29
Pre-channel naming TAG 30
Boot interface call sign setting CALL 31
Connect to a computer for data communication 32
System parameter setting 33
Computer control instruction 33
Bands voltage parameter 33
Performance parameter 34
Packing items 35
G90 and XPA125B connection diagram 36
CE-19 expansion card interface 37

24/9 Powells Road, Brookvale NSW Australia 2100 [email protected]
www.tecsunradios.com.au
Basic feature
2
G90 is a portable 20W HF amateur radio transceiver with an SDR architecture with built-in auto antenna
tuner. The display unit and the radio can be separated. It is a new member of the Xiegu product family and
the first model of the G series.
24-bit data size @48kHz sampling rate, it has excellent transmit performance and a highly
configurable function experience;。
High performance front end narrowband ESC preselector;
Covers the frequency range of 0.5~30MHz, SSB/CW/AM/ FM
*1
three working modes;
1.8 inch high brightness color TFT LCD screen;
±24k bandwidth spectrum display, waterfall display;
Software defined narrowband filter(CW mode: 50Hz);
detachable display unit;
Up to 20W of RF power;
Built-in wide range automatic antenna tuner;
Diversified interfaces, In particular, the baseband I/Q output allows it to interface with any external device that can handle
baseband I/Q, including sound card-based or PC-based applications such as XDT1.
In order to better experience this device, please read this manual carefully before use to fully understand
the operation method of G90.
*1: The FM mode can only be turned on when the GSOC controller is used together.
24/9 Powells Road, Brookvale NSW Australia 2100 [email protected]
www.tecsunradios.com.au
Panel button
3

24/9 Powells Road, Brookvale NSW Australia 2100 [email protected]
www.tecsunradios.com.au
Panel button
4
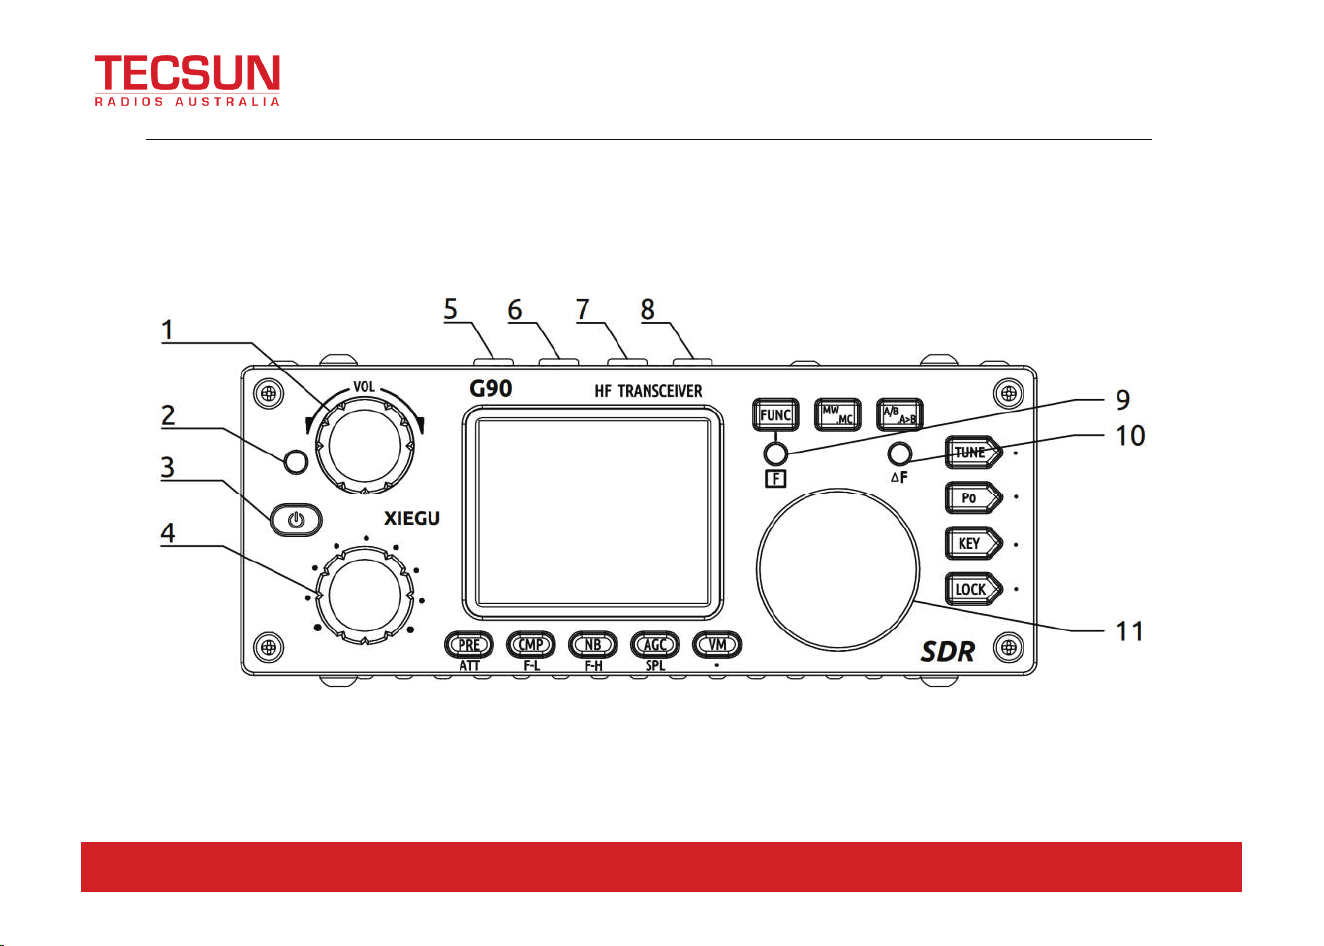
1 Volume knob
Turning,+ /– the volume.
Short press,Switch to headphone output mode.
2 Power/ Receive or transmitting status pilot
lamp.
Standby/receive status, showing yellow-green;
transmitting status,showing red;
3 Power switch
In the off state,press it to boot.
In the on state,hold press it to shut down。
4 Multifunction adjustment Knob
By default, turning this knob will stepping at 100
kHz.
Press and hold this knob to switch to the Select
Custom function.
5
~
6 Mode switching
Mode switching
7
~
8 BAND Switching
Band switching
9 FUNC pilot
This pilot will light when the second function of the
button is operated.
10 △
△
F Pilot
11 Main Knob
Operating this knob will change the current
frequency.
24/9 Powells Road, Brookvale NSW Australia 2100 [email protected]
www.tecsunradios.com.au
Panel button
5
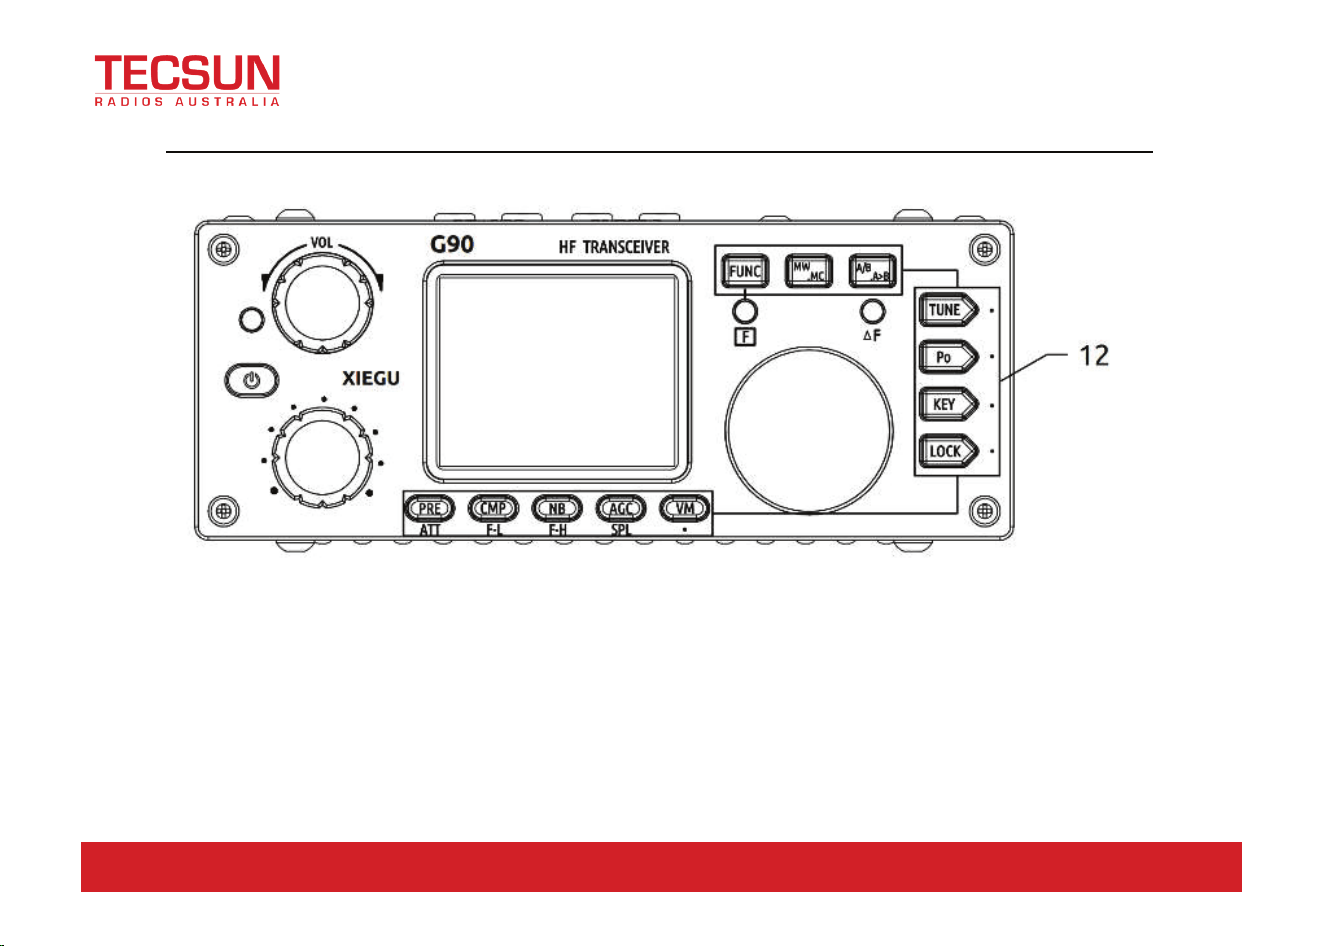
12 Function button
Button definitions and functions are detailed in the
operation section.
24/9 Powells Road, Brookvale NSW Australia 2100 [email protected]
www.tecsunradios.com.au
Machine-head interface
6
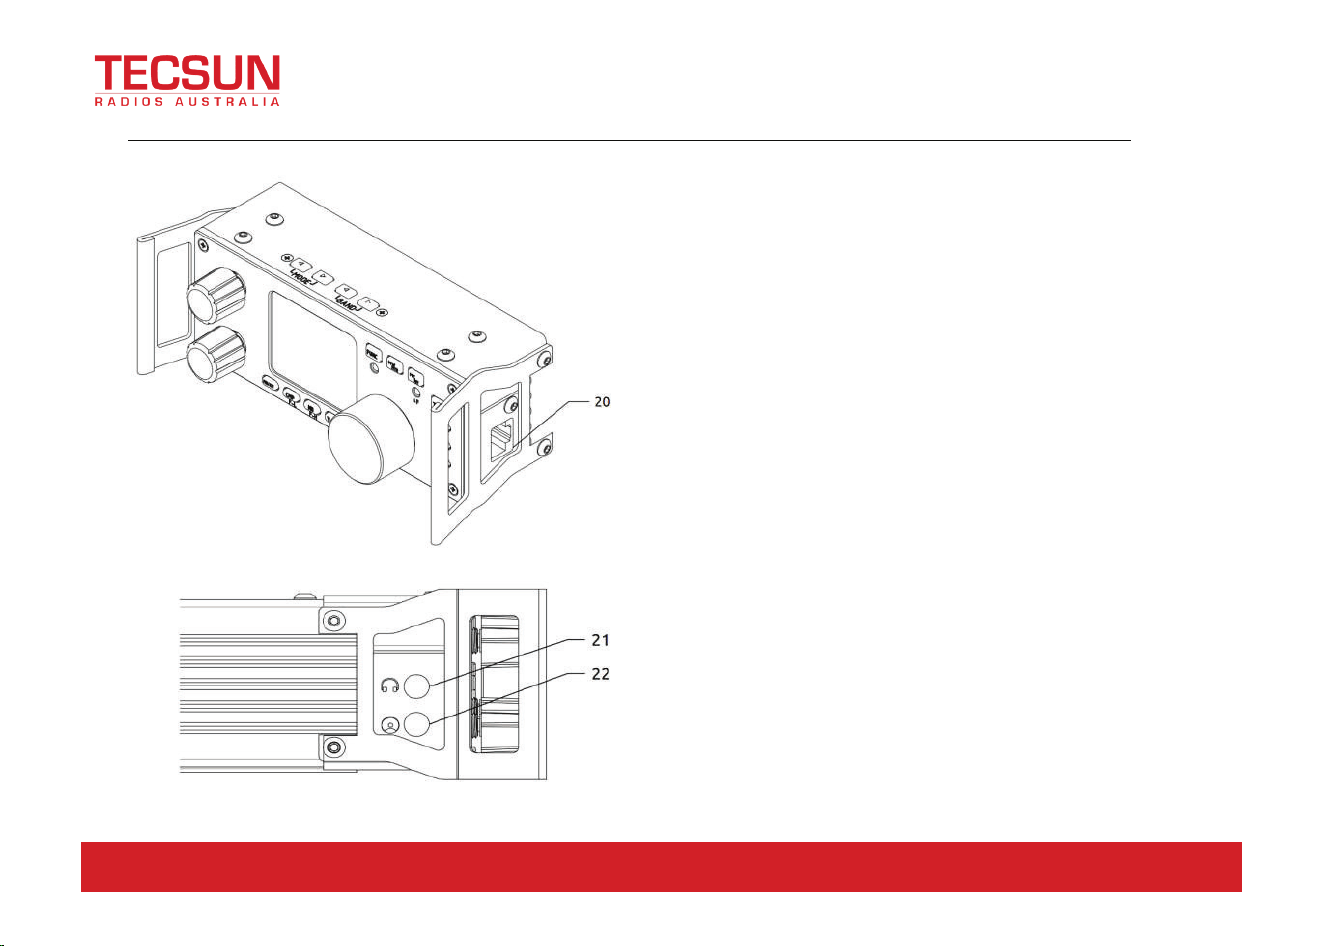
20 MIC Interface(
On the right side of the machine-head)
Connecting the multi-function MIC to this connector.
21 headphone interface(
On the left side of the machine-
head
)
This 3.5mm stereo jack (3-pin) for connecting headphones.
22 Self-defining(communication) interface (
On
the left side of the machine-head
)
Firmware update for the machine-head (Controller), or
other features.
24/9 Powells Road, Brookvale NSW Australia 2100 [email protected]
www.tecsunradios.com.au
Tail plate interface
7
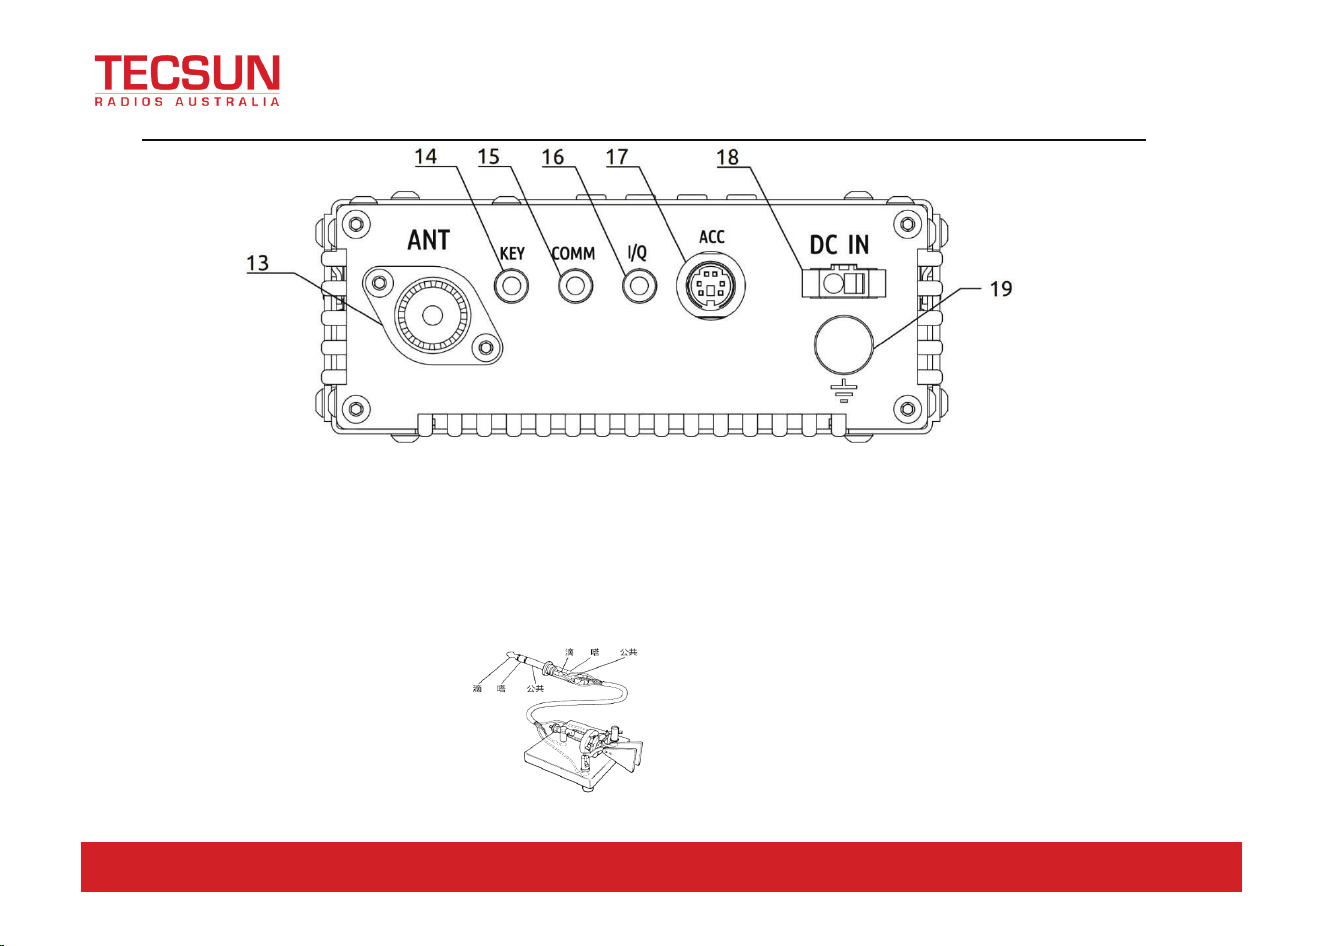
13 Antenna interface
SL16-K type,impedance 50Ω。
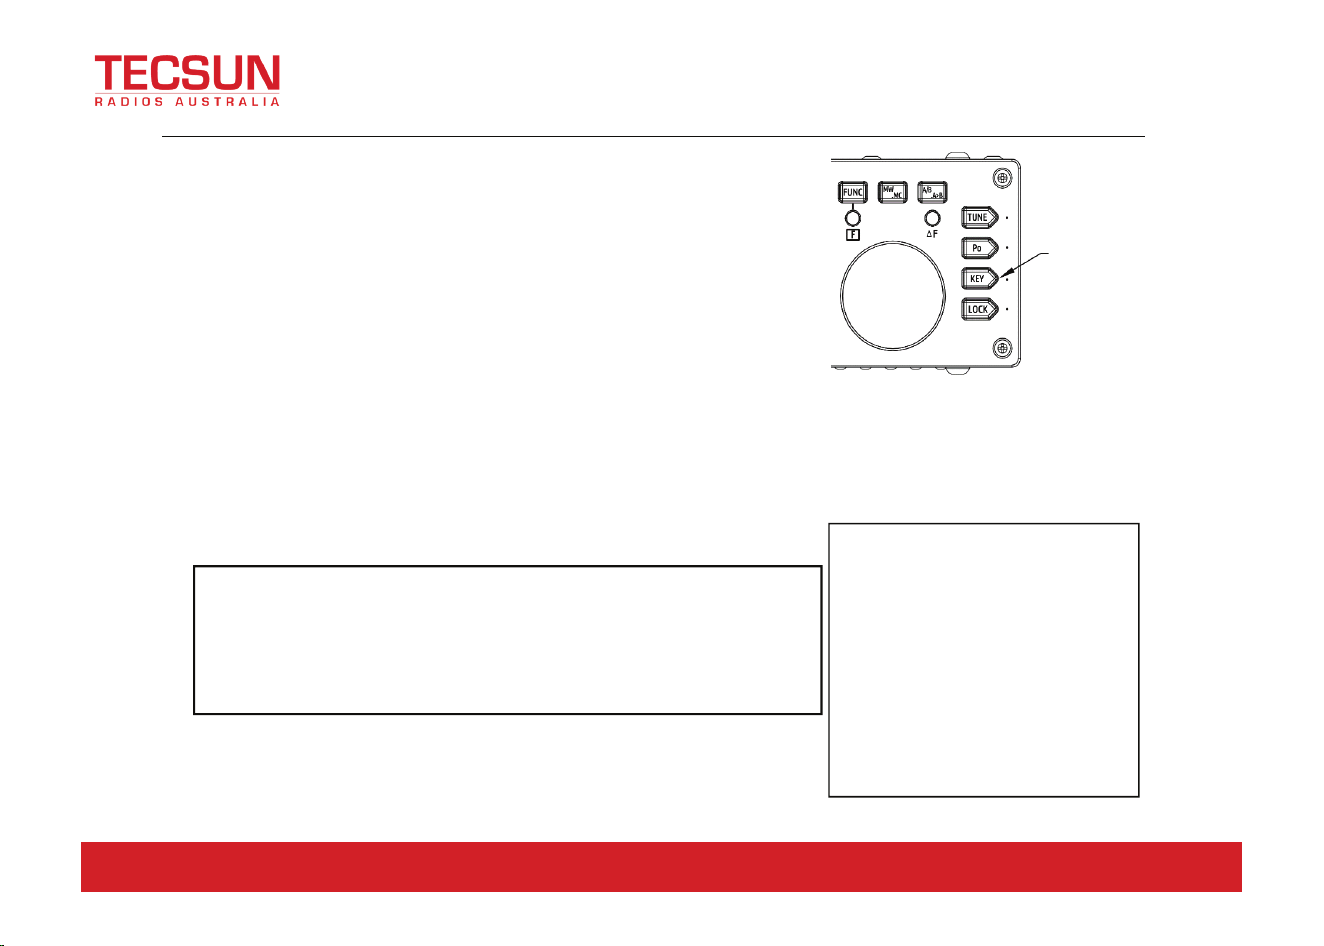
14 KEY interface
The interface is a 3.5mm stereo jack for connection to
manual/automatic telegraph keys.
Telegraph key connection diagram, as shown:
Manual telegraph keys,It is
Necessary to connect "di(滴)"
And "da(嗒)" together.
15 COMM interface
Using for the case firmware updates.。
16 I/Q Signal output
The interface is a 3.5mm stereo jack for “I/Q” signal
output.
17 ACC
The interface is an 8-pin mini DIN interface, as defined
in the interface definition.
18 DC power interface
External DC power input interface.
The round hole is "-", the square hole is "+".
19 Ground terminal
24/9 Powells Road, Brookvale NSW Australia 2100 [email protected]
www.tecsunradios.com.au
Interface definition
8
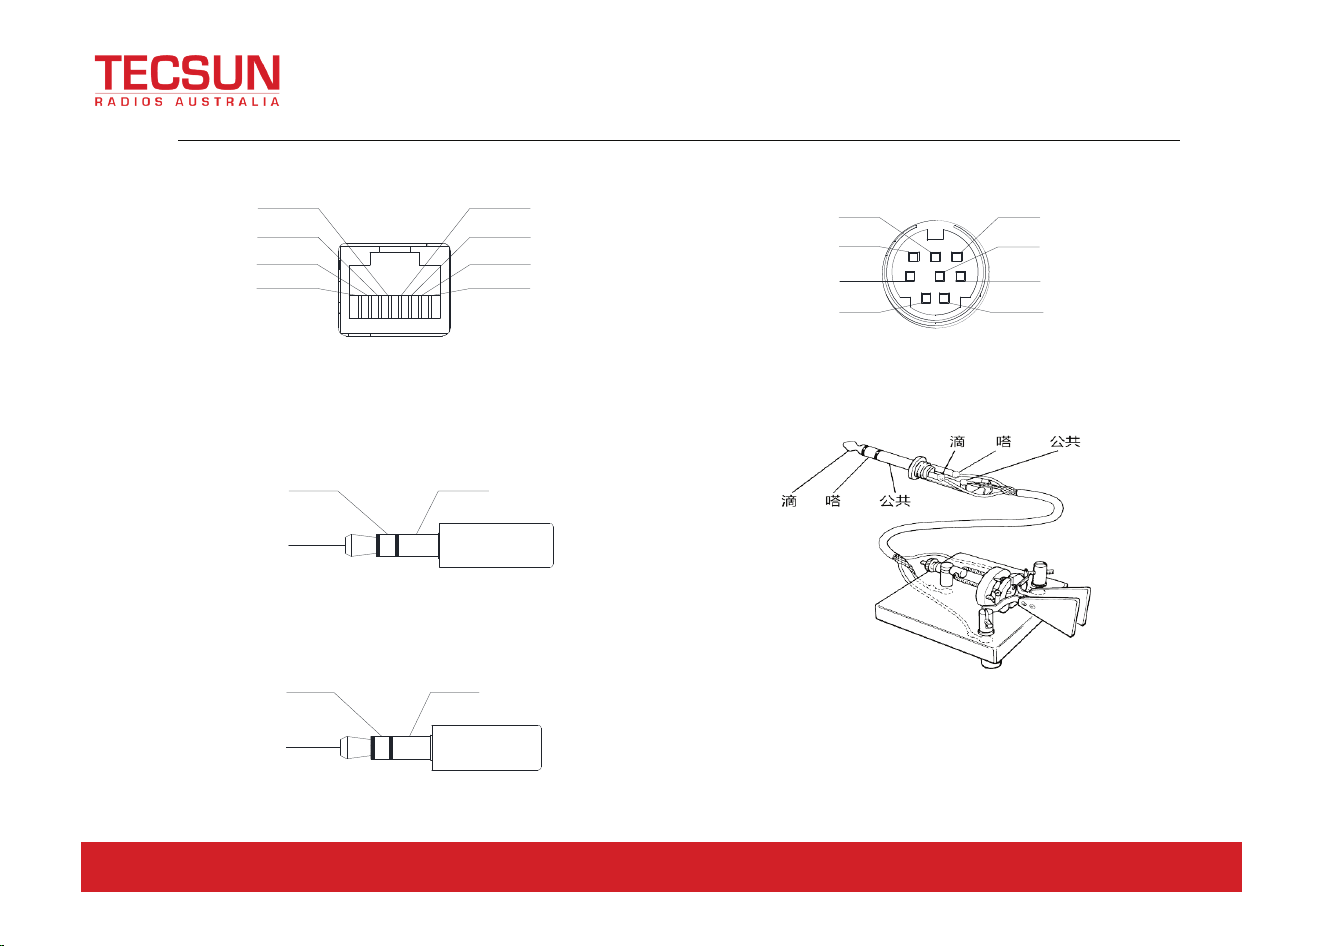
1、
、
MIC interface
2、
、
COMM Connector
3、
、
Headphone interface
Note: 信号(signal)
4、ACC interface
5、Telegraph key wiring diagram
Note:滴(di)嗒(da)公共(common)
MIC
MDATA
GND
MIC
MICE PTT
MSVSW
NC
+8V
TXD
RXD GND
信号
信号 GND
PTTBAND
AF_IN
AF_OUT
ALC
DATA
+8V
GND
24/9 Powells Road, Brookvale NSW Australia 2100 [email protected]
www.tecsunradios.com.au
Hand MIC
9
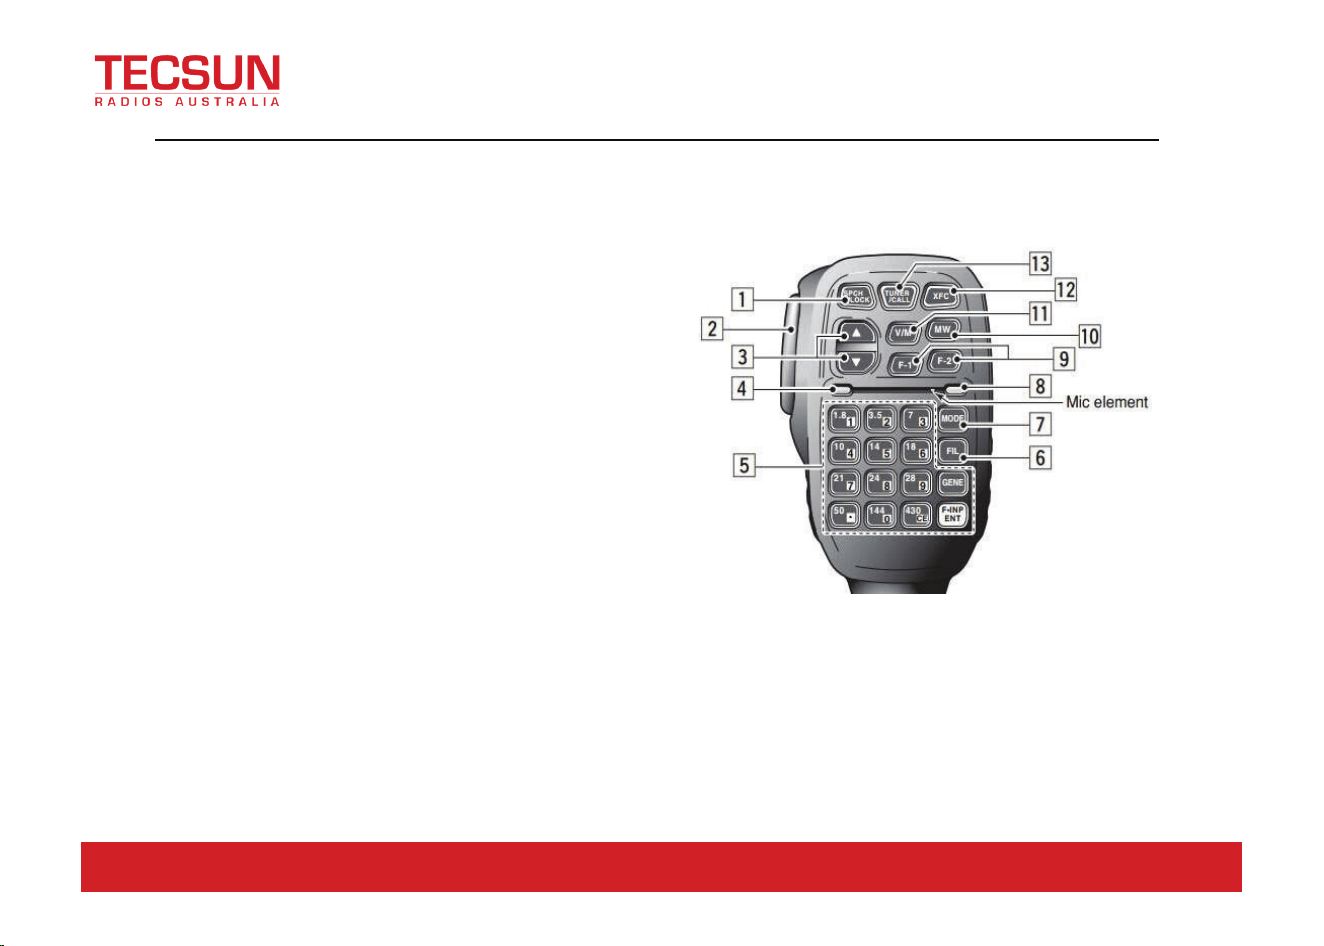
1、
、
LOCK
2、
、
PTT
3、
、
UP / DOWN
4、
、
Receive/transmit indicator
5、
、
Numeric keypad
6、
、
FIL
7、
、
MODE
8、
、
Function indicator
9、
、
Function button
10、
、
MW
11、
、
V/M
12、
、
XFC
13、
、
TUNER
Lock button
Transmit control button
Frequency "+" or "-" buttons
Hand Mic operation indicator
Numeric keypad area
Filter selection
Case operation mode
No
F1/F2 self-defining setting button
Storage operation
Frequency/channel switching
No
Hold press to turn on the built-in
automatic antenna tuner for tuning.
24/9 Powells Road, Brookvale NSW Australia 2100 [email protected]
www.tecsunradios.com.au
External power connection
10
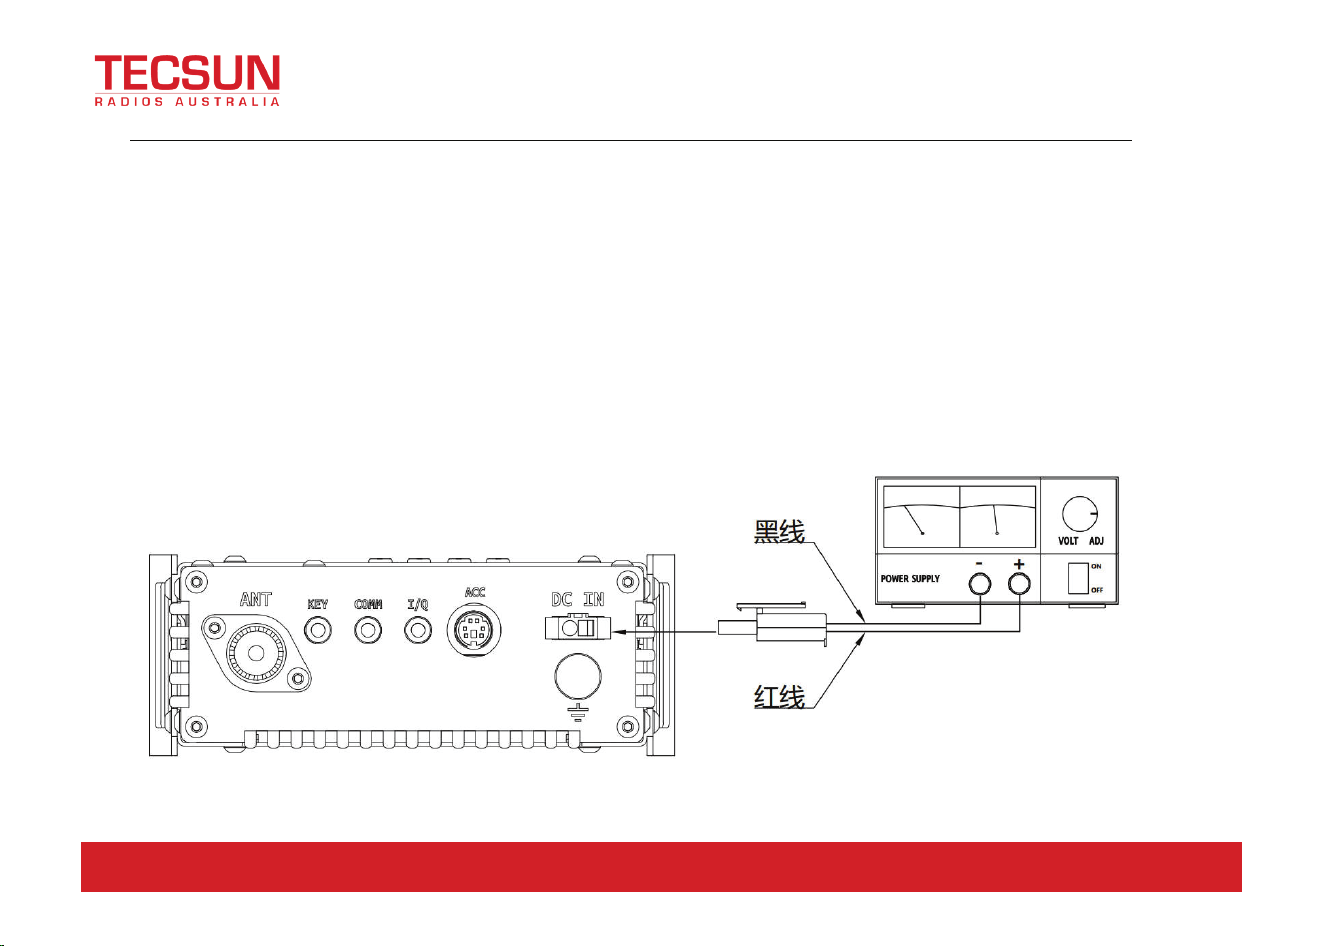
The G90 can use a 13.8V external DC power supply. The DC power supply has a current load capacity of at least 10A. The
supplied power cord can be used to connect radio and DC power.
When connecting the DC power supply, please carefully connect according to the following figure to avoid reverse
polarity of the power supply.
The red wire is connected to the positive pole of the power supply, and the black wire is connected to the negative pole
of the power supply
.
Note: 黑线(black wire)红线(red wire);
24/9 Powells Road, Brookvale NSW Australia 2100 [email protected]
www.tecsunradios.com.au
External power connection
11
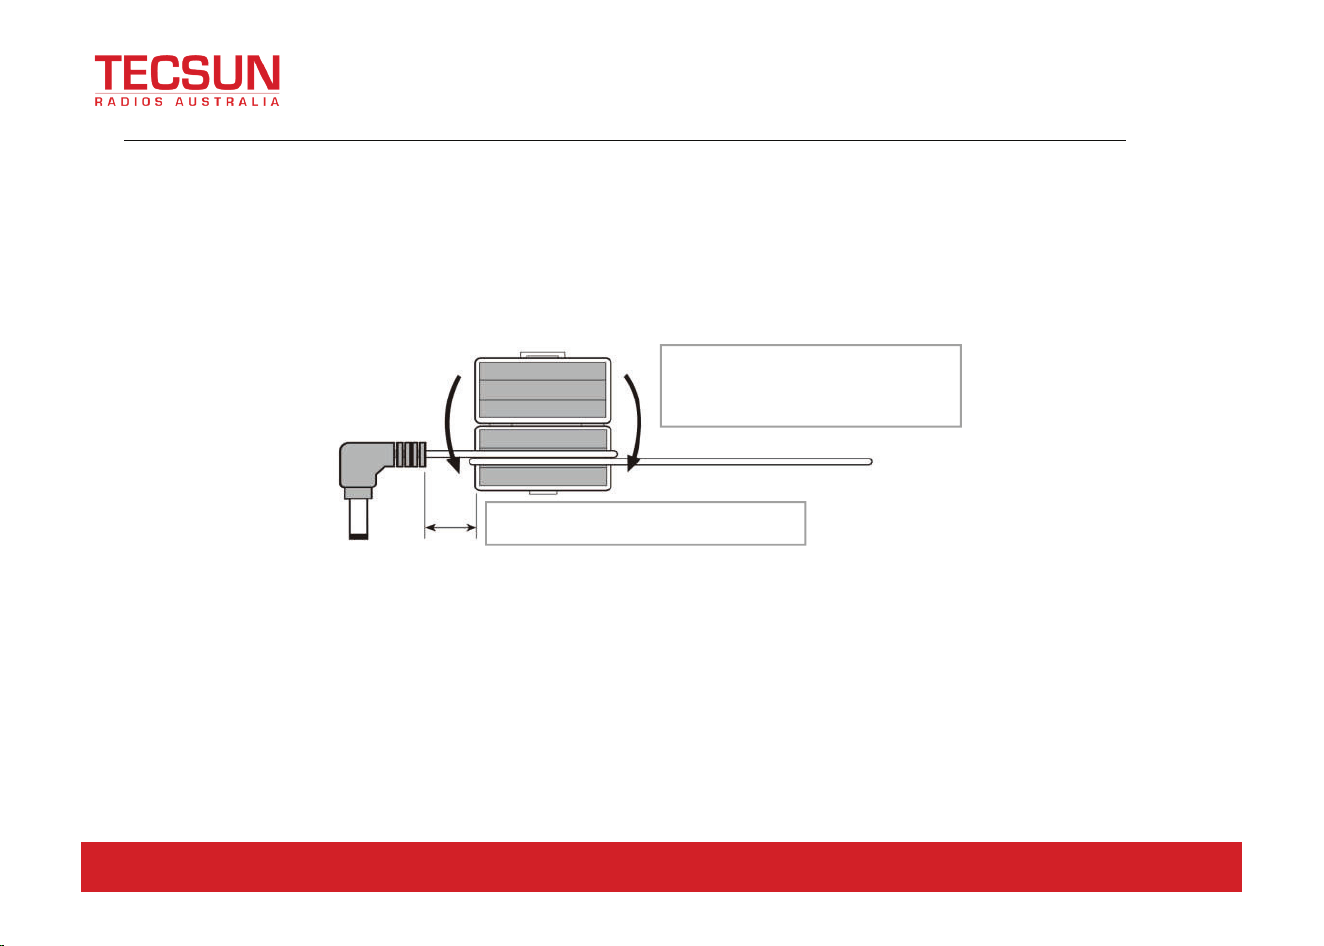
When the G90 uses an external power supply, in order to prevent external interference from entering the radio through
the power line or the radio frequency interference in the radio is radiated outside through the power line, we can put the EMC
magnetic ring on the power line. Install the magnetic ring as close as possible to the side of the power plug.
When using an external power supply, carefully check the polarity of the power cord and do not
reverse the polarity.
The limited warranty of this radio does not include damage caused by an external power
connection error or damage caused by improper power supply voltage.
As close as possible to the plug.
The power cord wraps around
the magnetic ring 2 turns.
24/9 Powells Road, Brookvale NSW Australia 2100 [email protected]
www.tecsunradios.com.au
Operating
12
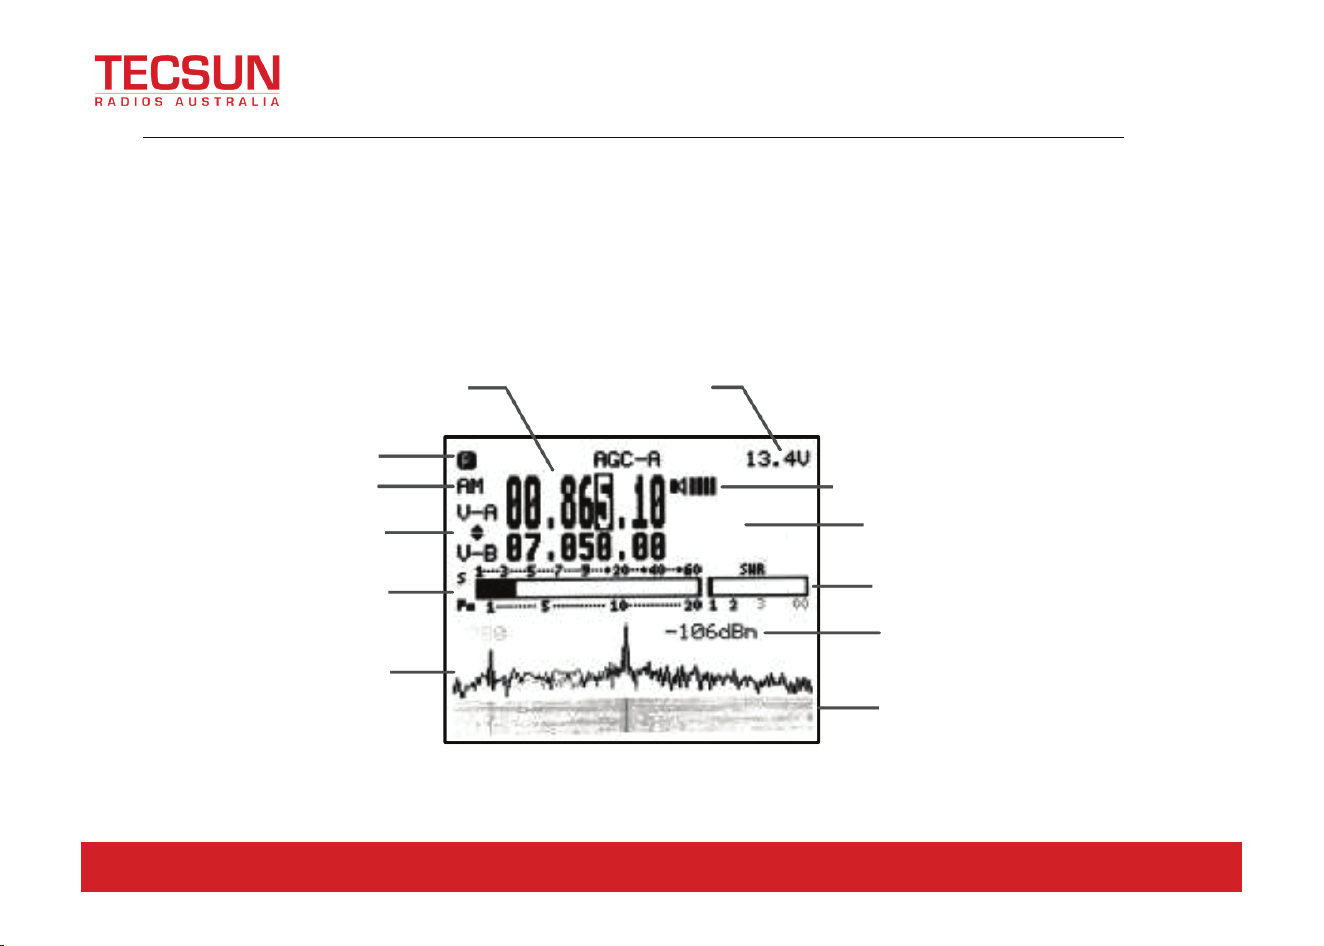
The G90 uses the Quick Mode button operation to use or turn off various functions. All functions are distributed on each
function button (or in the second function). All functions are turned on or off or adjusted and displayed or reminded in the
corresponding area on the screen.。
Interface display as follows:
Main frequency
Input voltage
Volume
Functions display
Standing wave
Signal level
Waterfall image display
Status Display
Mode
VOF status
S-table and power mete
Waterfall image display
24/9 Powells Road, Brookvale NSW Australia 2100 [email protected]
www.tecsunradios.com.au
Operating
13
Hi Dear friends.
In order to let you master the functions and proficiency of the G90 portable transceiver ASAP, please read the operation
guide of this manual to understand the powerful functions of the G90. Go ahead now!
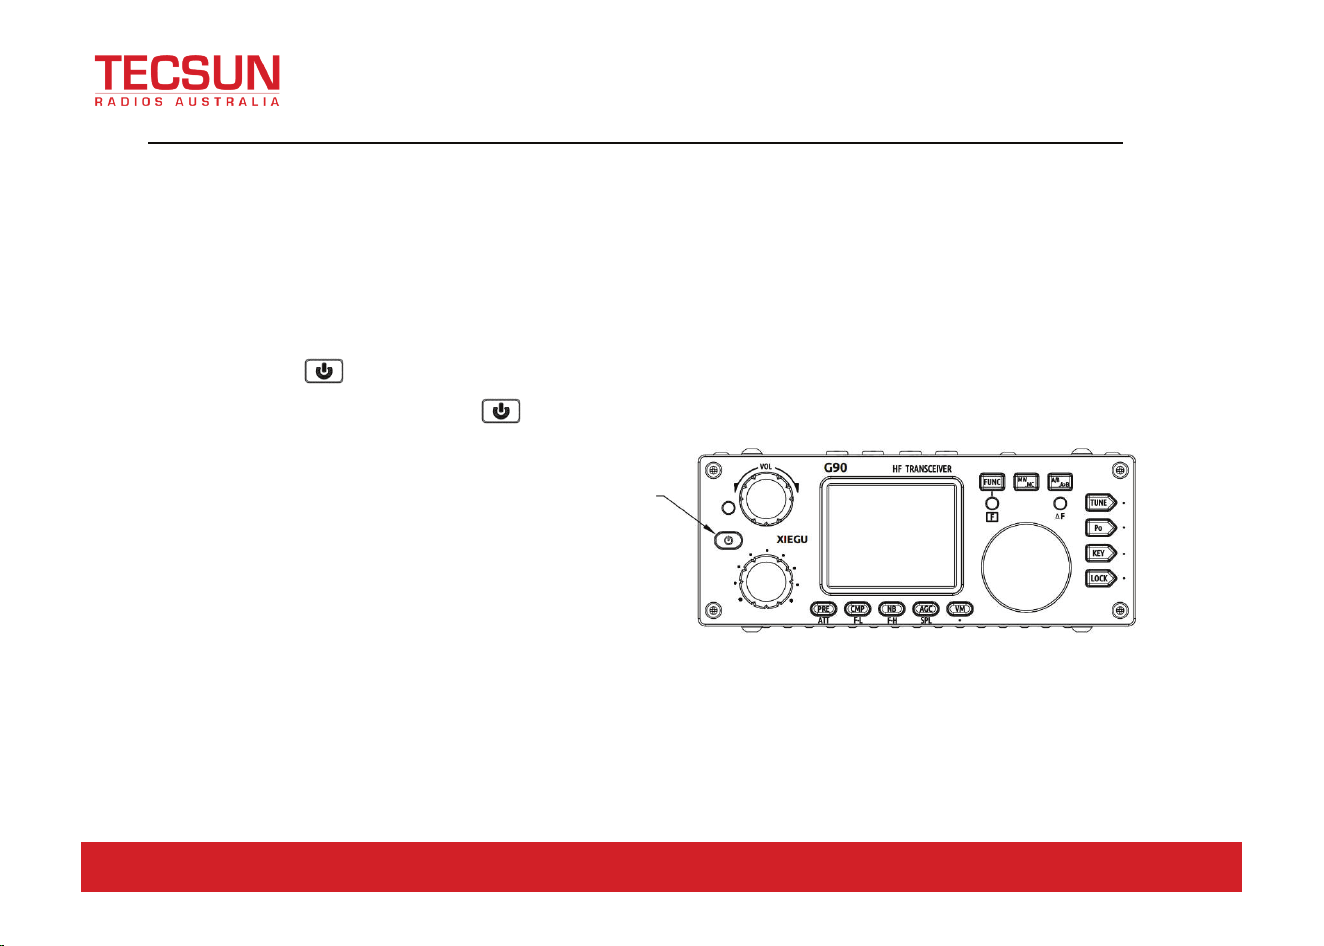
Turn on/off Transceiver
1、Turn on:press button.
2、Turn off:Power on state,Hold press button1 second。
Turn off screen operation:
In the power on state, tapping the switching
Button to turn off the screen display.
The other units are still working.
Pressing any button or turning the
Knob will wake up the screen display.
Power button
24/9 Powells Road, Brookvale NSW Australia 2100 [email protected]
www.tecsunradios.com.au
Operating
14
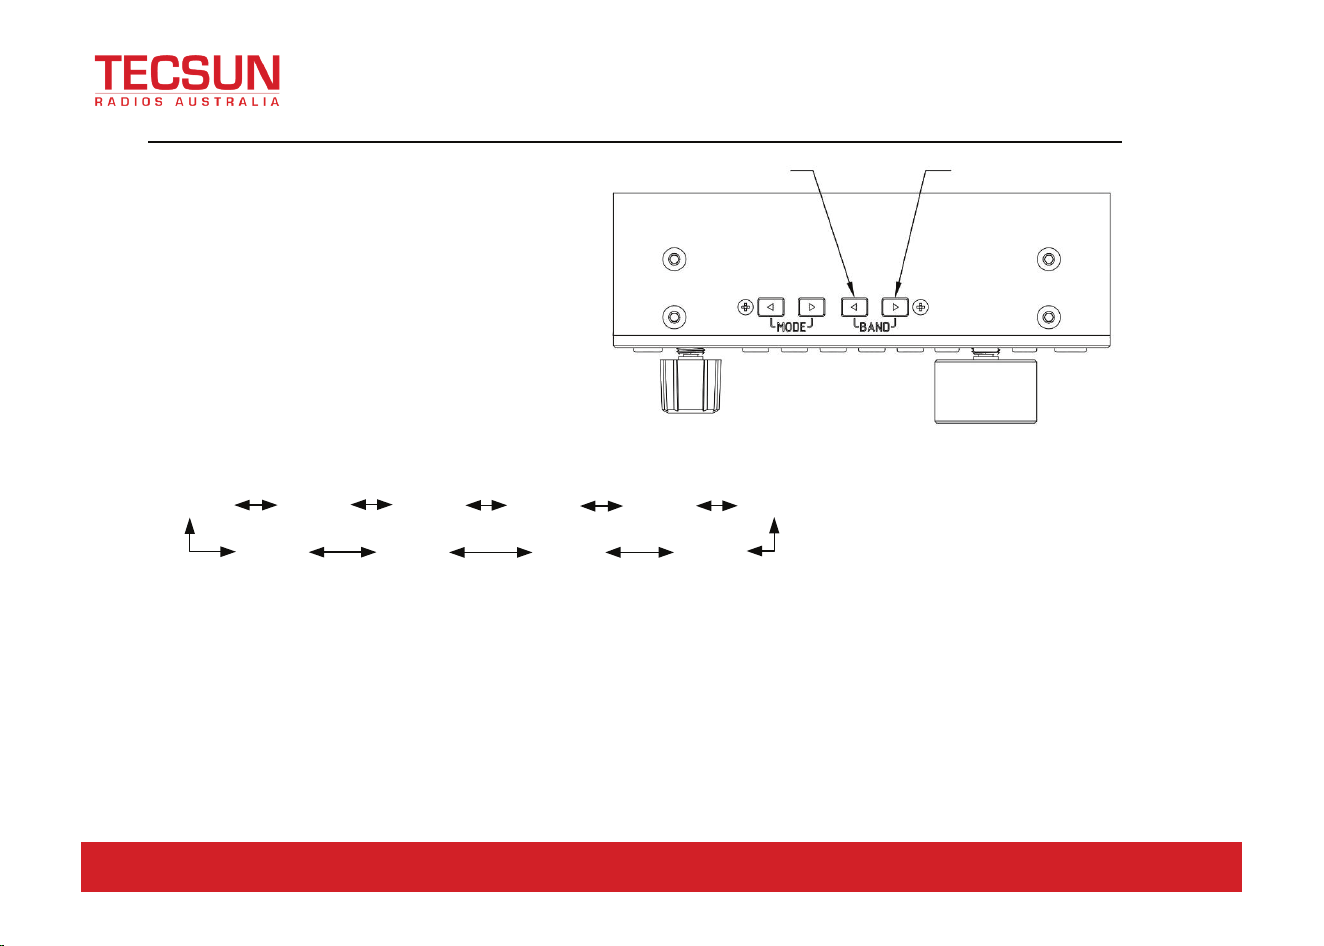
Operating frequency band selection
Operation method:
Press the BAND’s
<
or
>
button,Switch to the next or previous operating band separately.
3.5MHz
7.0MHz
10MHz
14MHz
18MHz
21MHz
24MHz
1.8MHz
28MHz
5.2MHz
Each amateur band has a user-defined frequency band that can be used temporarily, when the band is switched,
you will see this custom band.
Whether the 60-meter band is open, it depends on the different laws of different countries (or regions).
Different versions of the machine have different frequency divisions, depending on the laws of different countries
(or regions).。
VFO-A and VFO-B are two independent VFO modes that can be set to different operating states. Check [VFO
Settings] please.。
The G90's frequency range covers 0.5 to 30
MHz. Amateur frequencies within this range
are divided into multiple bands, and band
switching can be performed in a number of
different ways.
+
-
24/9 Powells Road, Brookvale NSW Australia 2100 [email protected]
www.tecsunradios.com.au
Operating
15
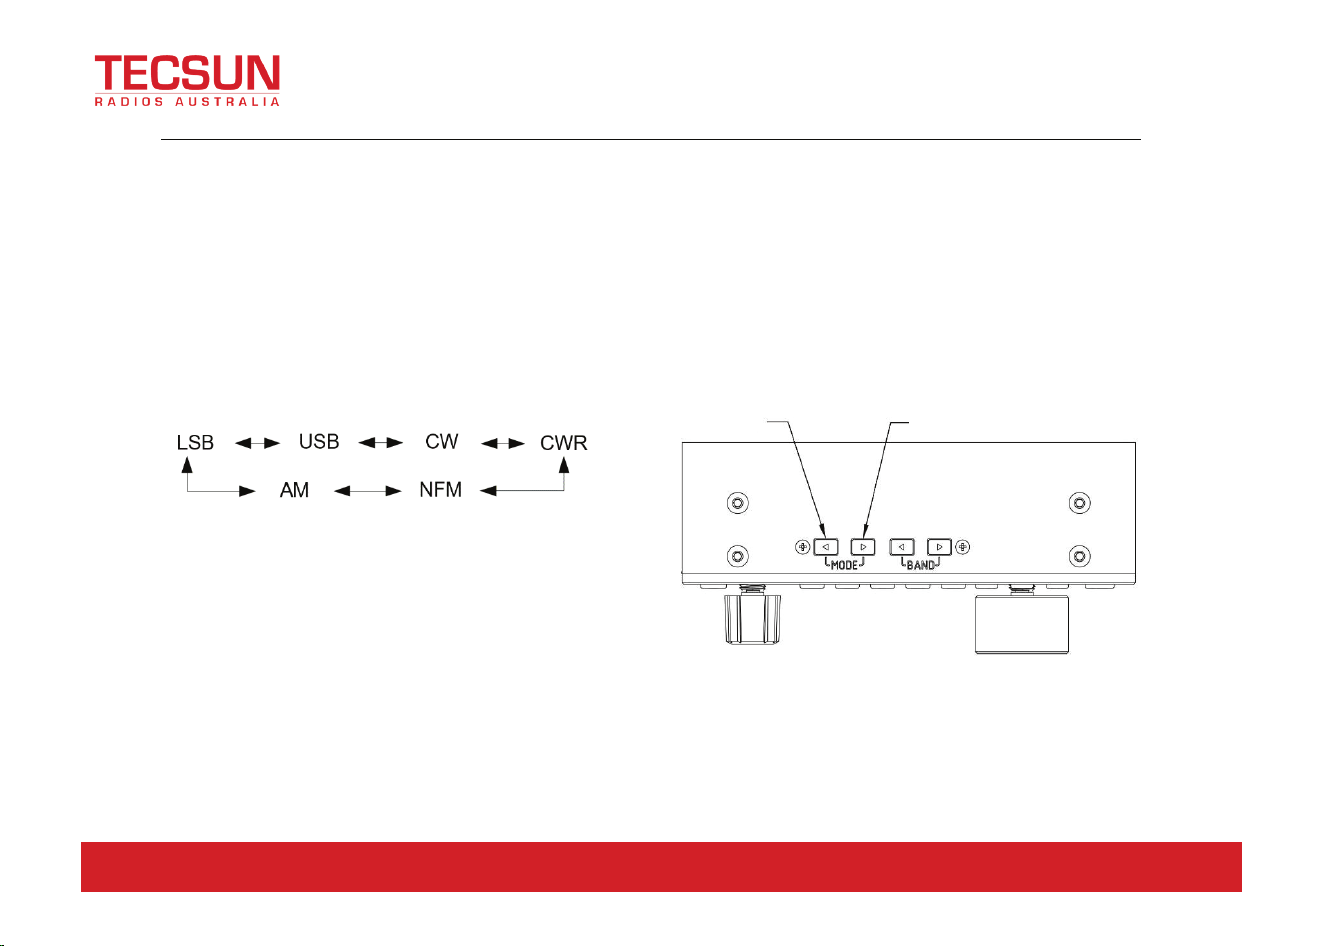
Operating mode select
The FM mode can only be turned on when used with the GSOC controller.
Press [
MODE ]
button,In all modes ,according to the following
fixed order switching
Mode left loop
Mode right loop
24/9 Powells Road, Brookvale NSW Australia 2100 [email protected]
www.tecsunradios.com.au
Operating
16
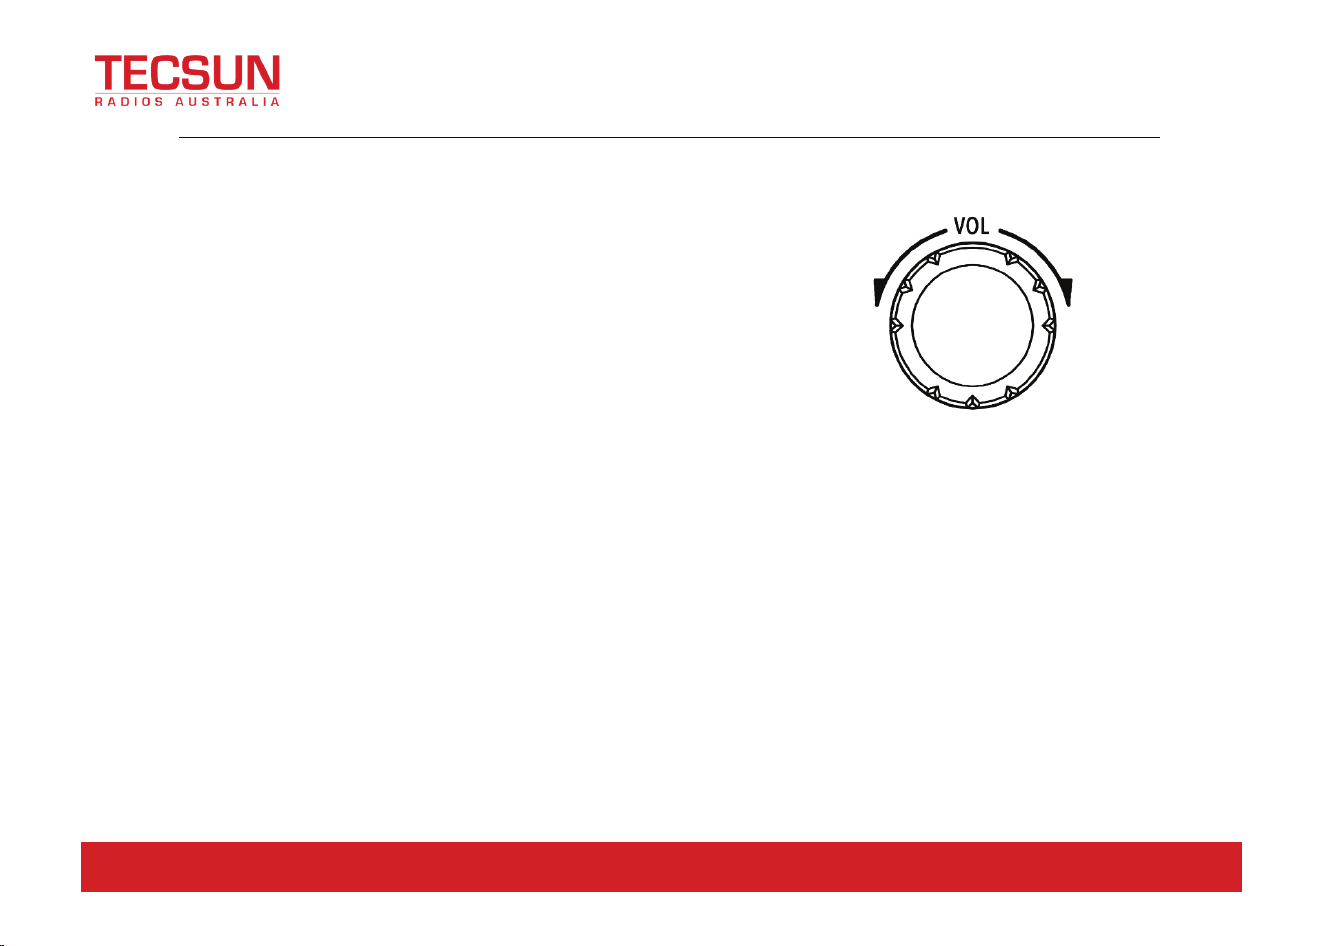
VOLUME CONTROL
Speaker mode:
Headphone mode:
VOX mode on / off:
Press and hold the volume knob for 3-second to turn the VOX feature on or off.
(This feature has not been activated yet.)
When using the AF in/out Port of the ACC interface, set the relevant volume size in the system menu.
Rotate the volume knob left or right to adjust
the size of the output volume.
Press the volume knob short to enter
headphone mode.
Rotate the volume knob left or right to
adjust the size of the headset volume.
24/9 Powells Road, Brookvale NSW Australia 2100 [email protected]
www.tecsunradios.com.au
Operating
17
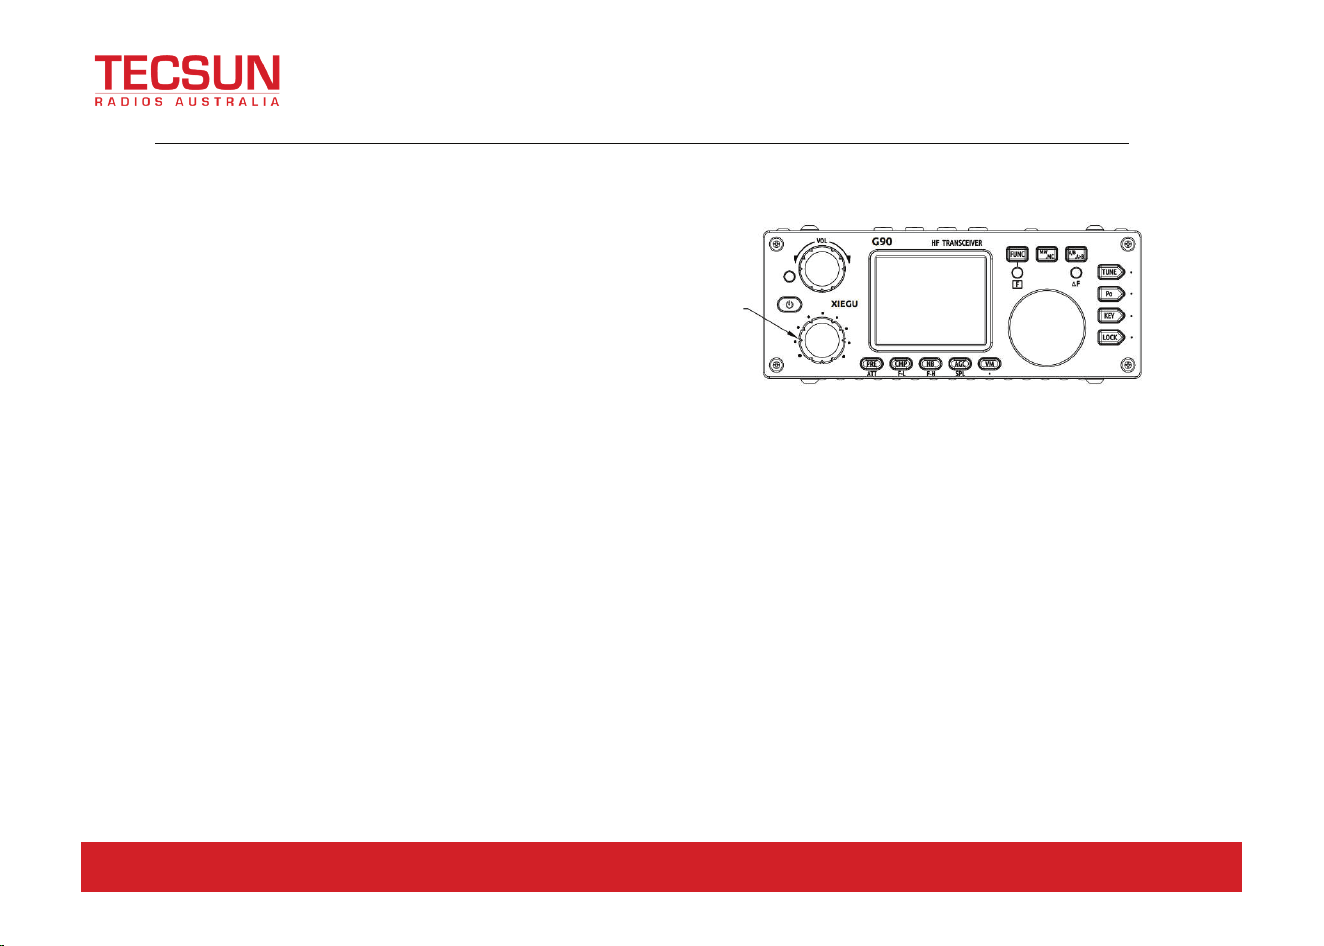
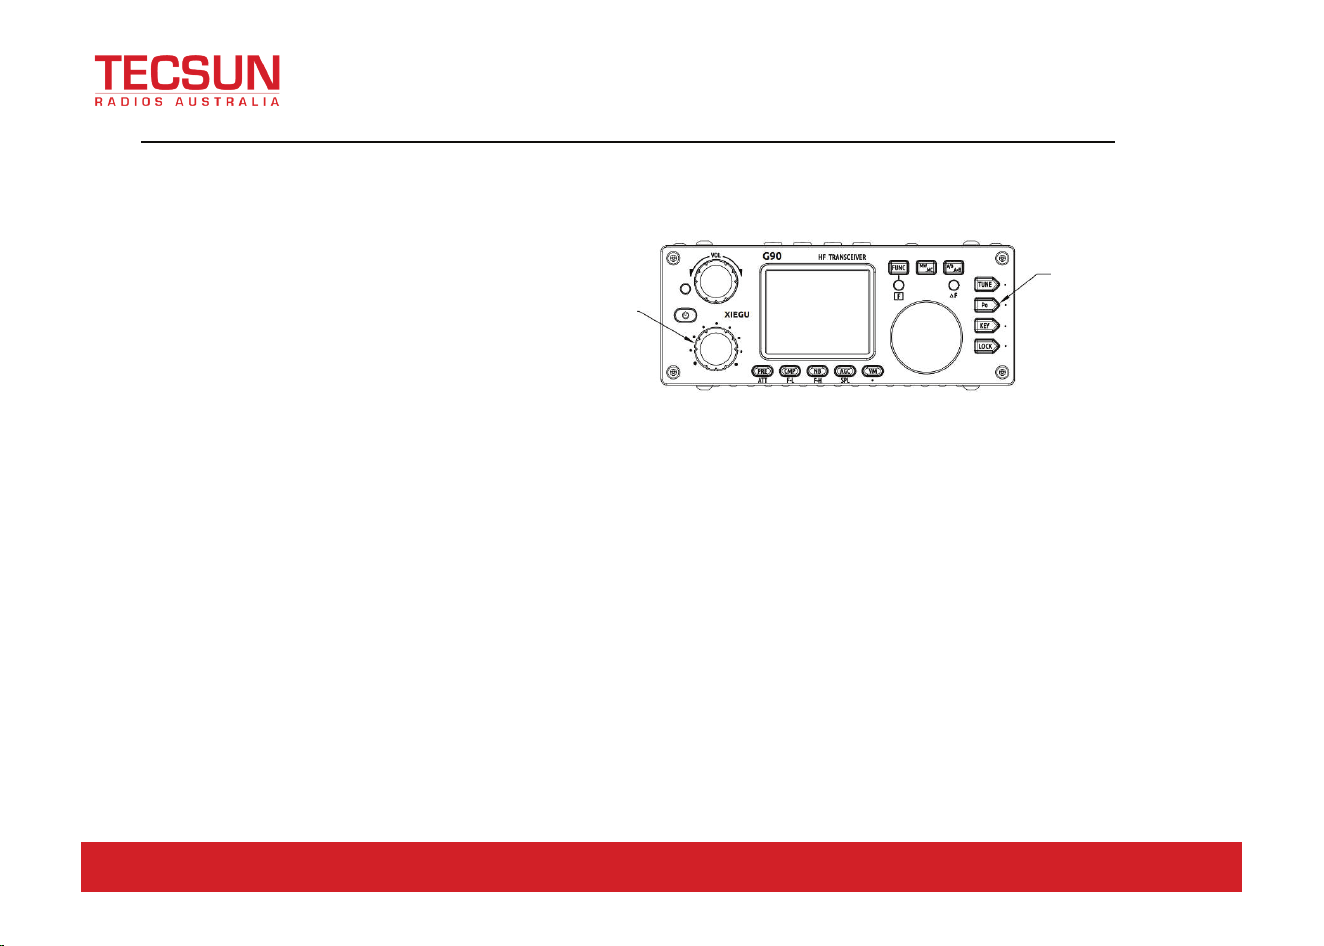
Multifunction adjustment knob
The multifunction knob provides several operation options and can customize features.
Operation method:
Default: Stepping of 100 kHz frequency bits.
Short press: Enter SQL item to adjust SQL noise depth.
Hold press:Go to the User Custom feature menu, rotate
The main knob to select the appropriate function, and short press the “SAVE” key to determine that the feature is selected.
At this point, the feature is projected onto the [multifunction adjustment knob].
The customizable features are as follows:
1) Frequency 100k, stepping 100k
2) SQL Level, squelch setting
3) Po Level, transmit power setting
4) Key Speed, automatic key rate setting
5) FFT Scale, spectrum reference level setting
Multi-function adjustment
24/9 Powells Road, Brookvale NSW Australia 2100 [email protected]
www.tecsunradios.com.au
Operating
18
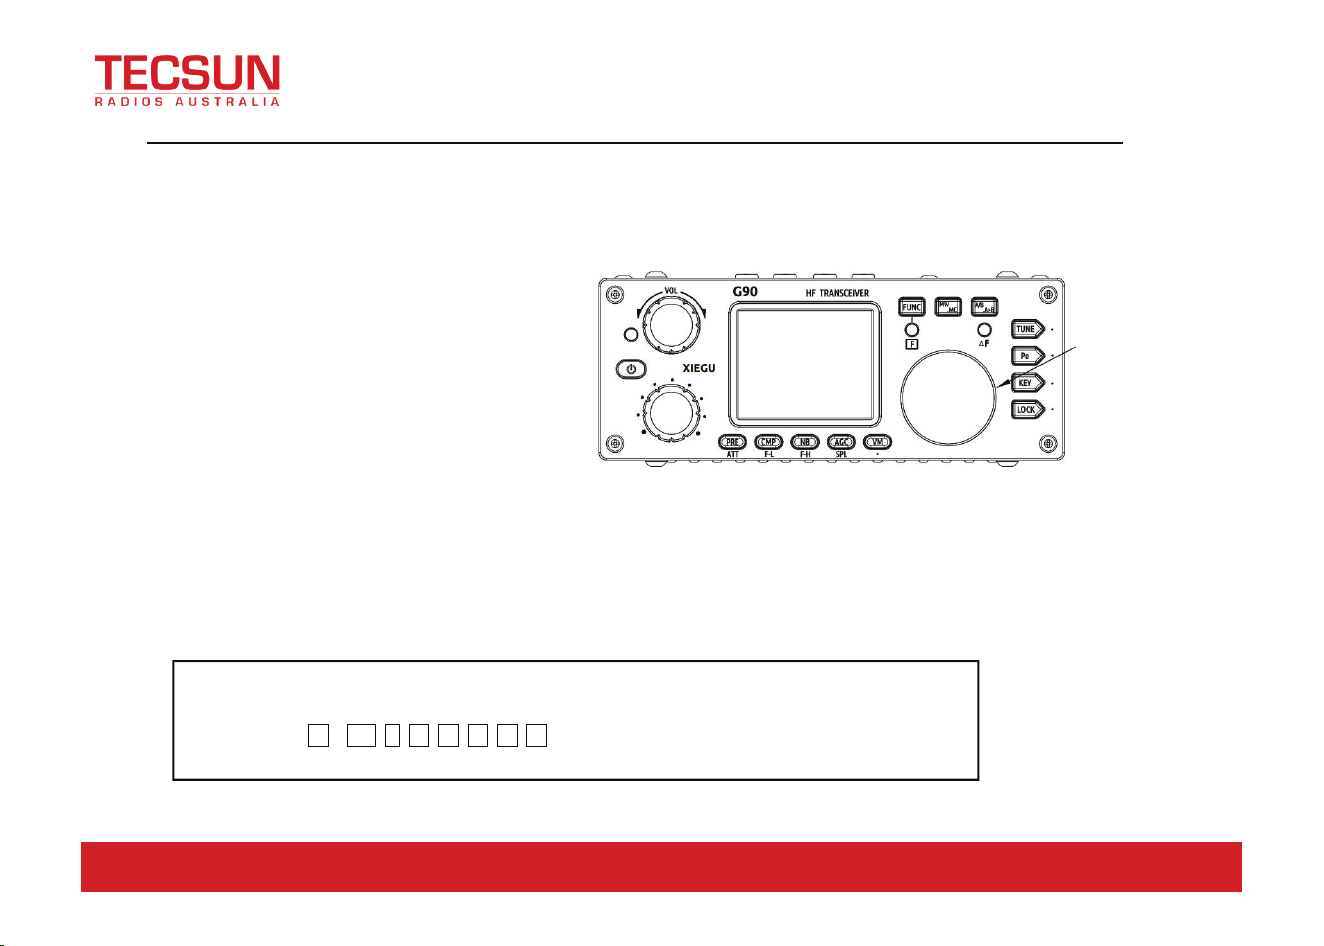
Adjustment transmitting Po
When using the G90 transceiver for the first time without understanding the current antenna state,
minimize the set transmit power value.
Operation method:
1、 Short press the [Po] button to enter the
power setting state, the right side of
the screen function display area will
display the power settings number.
2、 Rotate [multifunction adjustment
knob] for power setting with stepping
1W。
PO
Multi-function
Adjustment knob
24/9 Powells Road, Brookvale NSW Australia 2100 [email protected]
www.tecsunradios.com.au
Operating
19
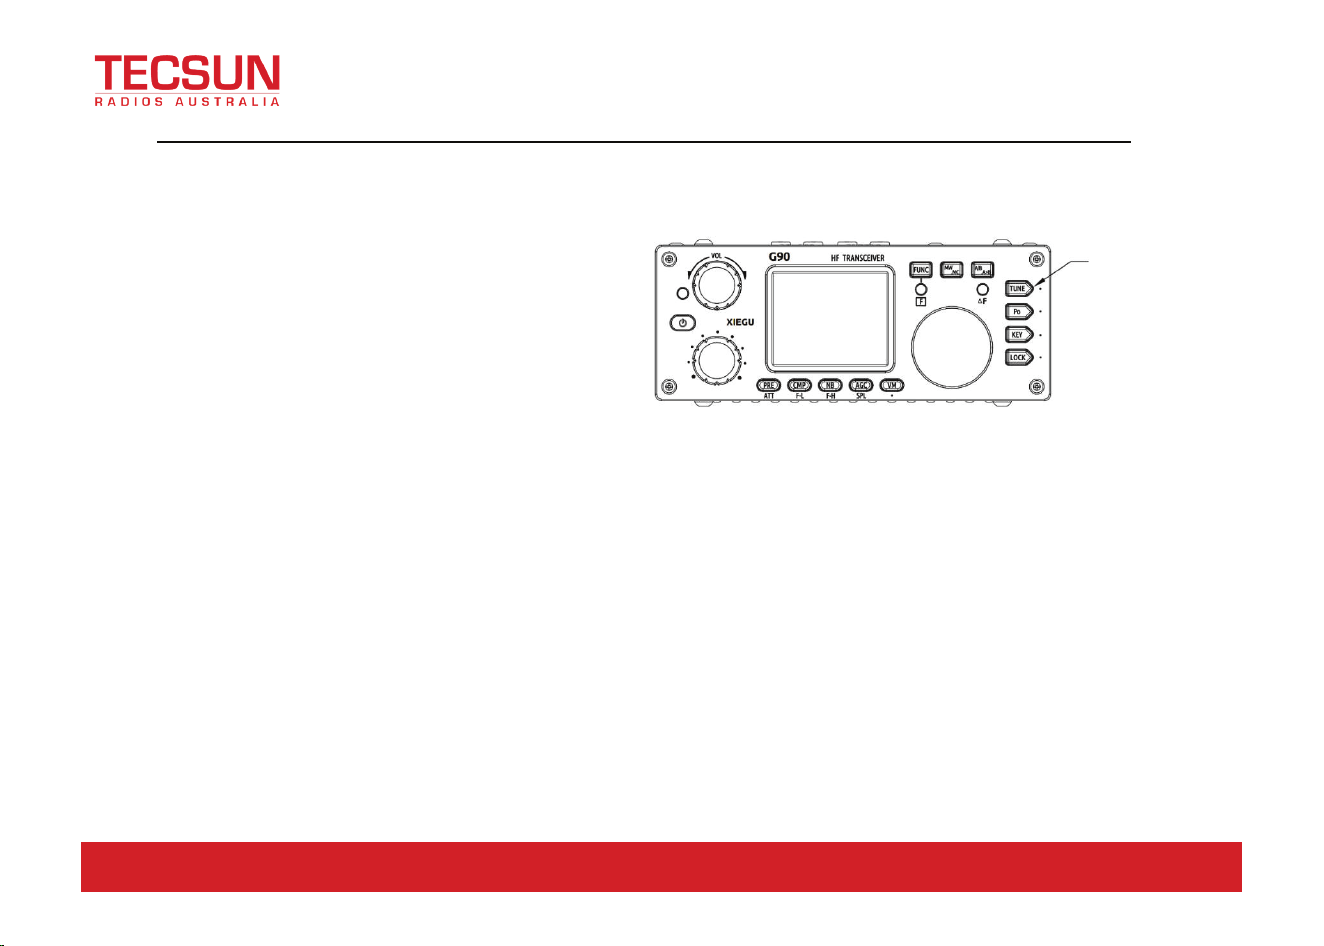
Set the operating frequency
2、Set the frequency using the multifunction handle
Press the [F-INP ENT] button on the handle, G90 enter the frequency setting state, the cursor will blink in the first
position on the left side of the frequency display bit;
Enter the frequency values you want to set, and then press the [F-INP ENT] button again to complete the
frequency setting.
For example, set the current frequency to 14.09000MHz, and the key order is as follows:
1. First press the [F-INP ENT] button;
2. Press the 1 4 . 0 9 0 0 0 number key in sequence;
3. Press the [F-INP ENT] button again, complete the setup.
There are two ways to set the G90 operating
frequency, which is to use the main knob and multi-
function handle to set the frequency.。
Operating method:
1、 Set the frequency using the main knob
Short press the main knob, select 100Hz,
1kHz, 10kHz Stepper.
Rotate the main knob to set the frequency
of the current step.
Main Knob
24/9 Powells Road, Brookvale NSW Australia 2100 [email protected]
www.tecsunradios.com.au
Operating
20
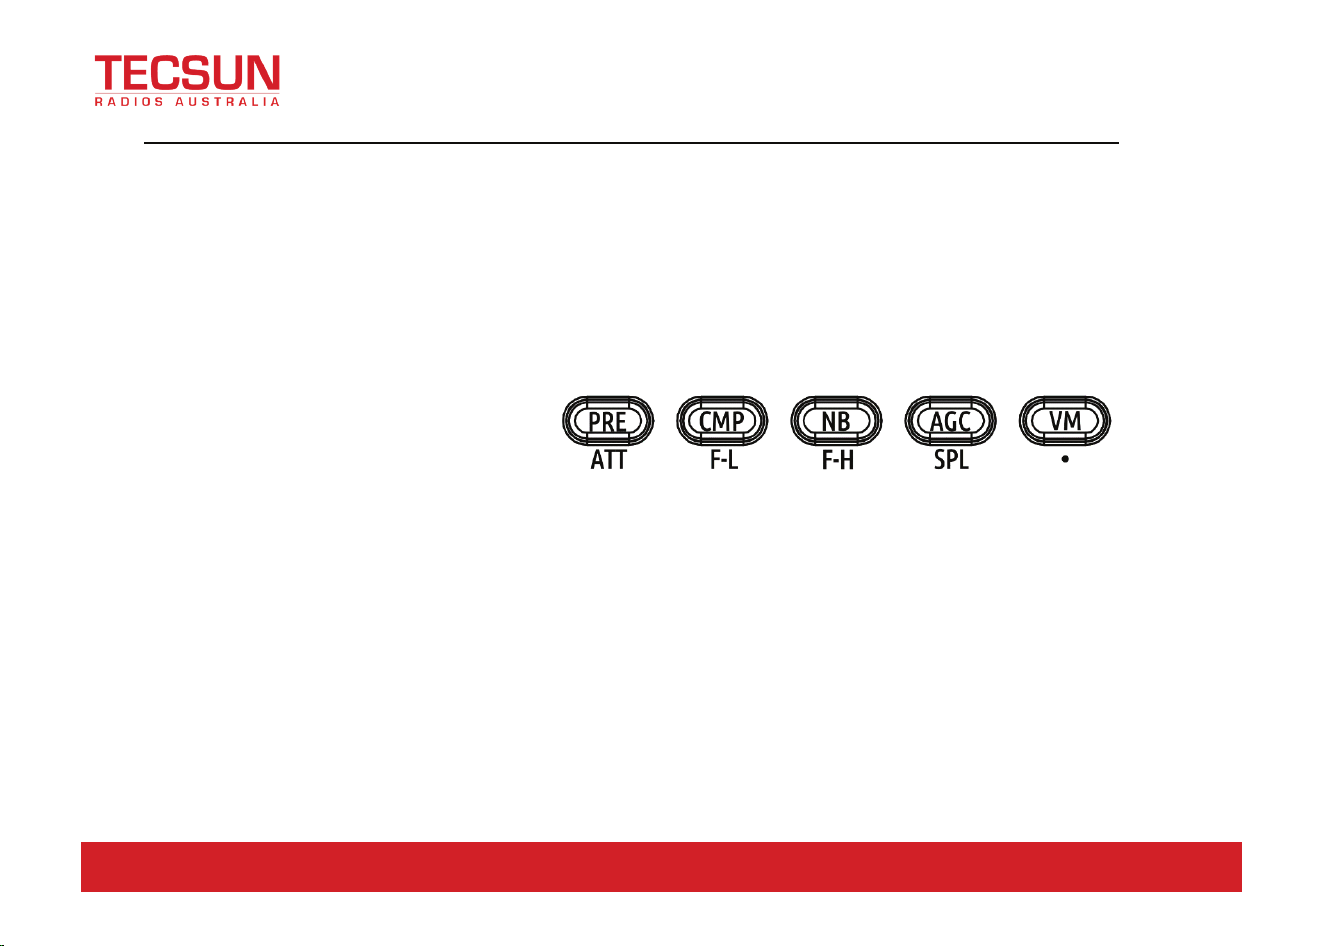
Automatic Antenna Tuner
Note:
:
1. Press the [TUNE] button and the antenna icon appears at the top of the screen to indicate that the automatic antenna
tuner function is turned on. Just open, the automatic Antenna tuner tuning has not been started.
2. To use the built-in automatic antenna tuner, you must tune once after you turn on the Automatic Antenna tuner feature.
3. If you start the transmission after tuning, the “SWR” icon will appear on the top of the screen and flash, which means
That the standing wave of the current antenna is still large and needs to be retuned.
4. When the antenna naturally resonates into the current band, be sure to turn off the Automatic Antenna tuner feature.
5. When using a whip antenna and turning on the built-in antenna tuner for tuning, it is possible to cause strong RF
interference to the native or electronic device.
This G90 is integrated with an efficient automatic antenna tuner that can
help you quickly set up and debug your antenna.
Short press the [TUNE] button, will be connected to the built-in antenna
tuner, the "TUNE" logo will be displayed at the top of the screen.
When connected to the automatic antenna regulator, press the [TUNE]
button for 1 seconds and the ATU auto-tuning function will be activated.
The receive status is automatically returned when tuning is complete.
Tuner
24/9 Powells Road, Brookvale NSW Australia 2100 [email protected]
www.tecsunradios.com.au
Operating
21
Function button
Its common functions are distributed on the various function keys. Some function keys have a second function.
When the function is selected, turn the main knob to adjust the value.
Operation of the second function:
Press the [FUNC] button at first, the “F” indicator will light, then press the corresponding function button.
Press the [FUNC] button again to exit the second function. At this time, the “F” indicator is off.
In any function (including the second function of FUNC), press the main knob to exit the function settings and return to
the main interface.
24/9 Powells Road, Brookvale NSW Australia 2100 [email protected]
www.tecsunradios.com.au
Operating
22
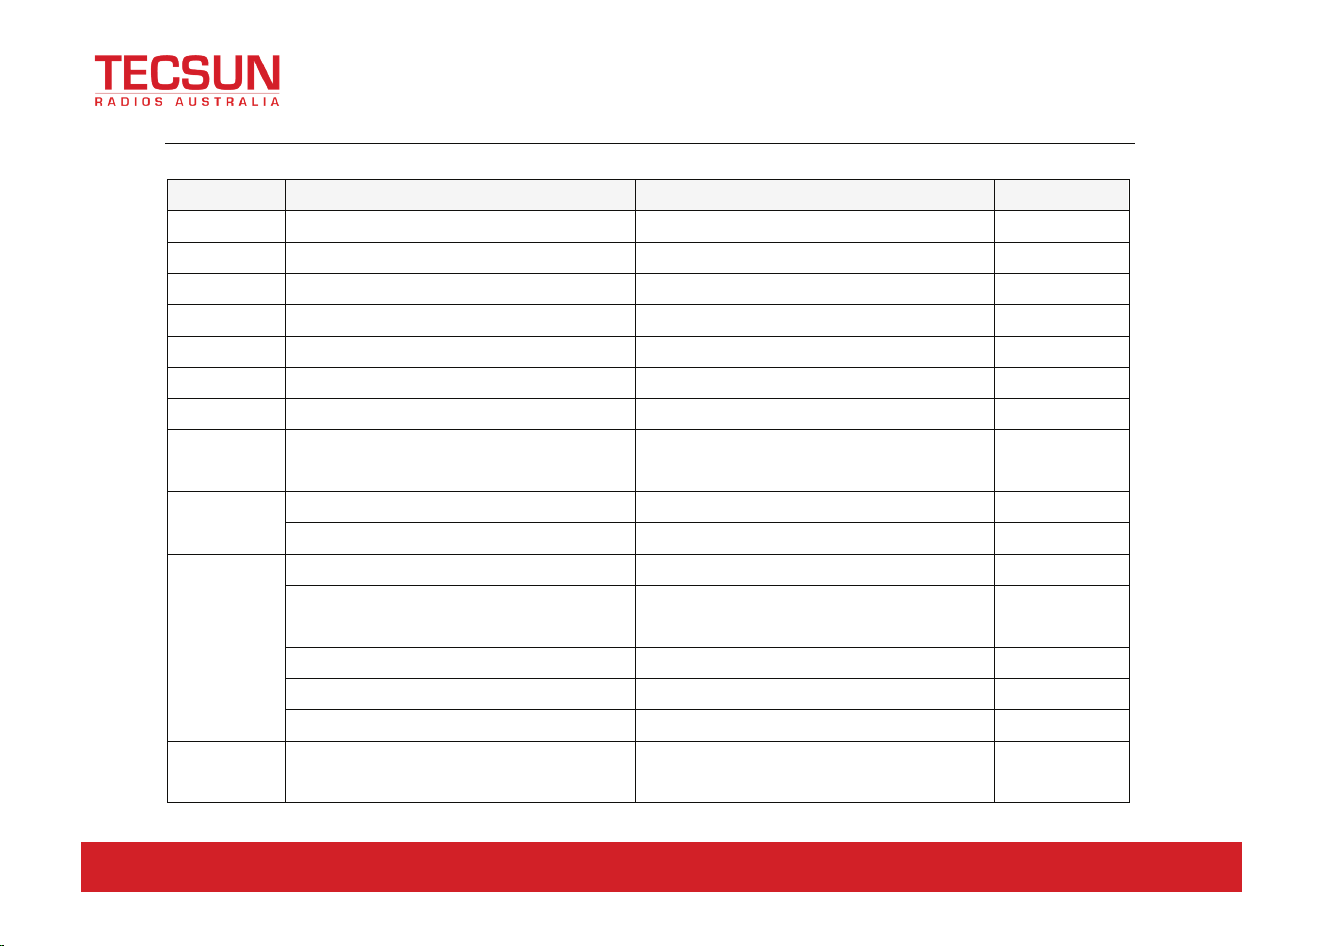
Button function table
Button
Func1 (press,
,
cycle)
)
Func2(
(
FUNC+)
Hold press
PRE/ATT PRE--ATT-- direct connection /
CMP/F-L Turn on transmit voice compression Digital filter F-L low-end frequency selection /
NB/F-H Turn on pulse interference canceller Digital filter F-H high-end frequency selection /
AGC/SPL
AGC--、AGC-S、AGC-F、AGC-A cycle
Turn on split frequency transceiver operation mode /
VM. Switch frequency mode or channel mode To be determined /
MW/MC Turn on channel storage Turn on channel clear mode /
A/B.A>B Switch between VFO-A and VFO-B Copy the current VFO to the background VFO /
TUNE Turn on/off the antenna tuning function /
Start antenna
tuner tuning
POW
POWER Transmit power setting MIC GAIN MIC gain setting /
SWR THR Standing wave protection threshold INPUT Voice input selection /
KEY
SPEED Automatic key rate setting CW Volume Side-tone volume setting /
M/L/R Manual/automatic left and right mode
switching
CW TONE Side-tone frequency setting /
MODE iambic A/B Mode switching / /
QSK Insert/not insert selection / /
QSK Time Insert time setting / /
LOCK 5-level screen backlight brightness setting SCALE Spectrum reference level setting
Lock button,
knob
24/9 Powells Road, Brookvale NSW Australia 2100 [email protected]
www.tecsunradios.com.au
Operating
23
Split frequency transceiving operation SPL and VFOA/B settings
Split frequency transceiver SPL operation method:
1、 Set the receiving frequency and mode (VFO-A) first;
2、 Then setting the transmit frequency and mode (VFO-B);
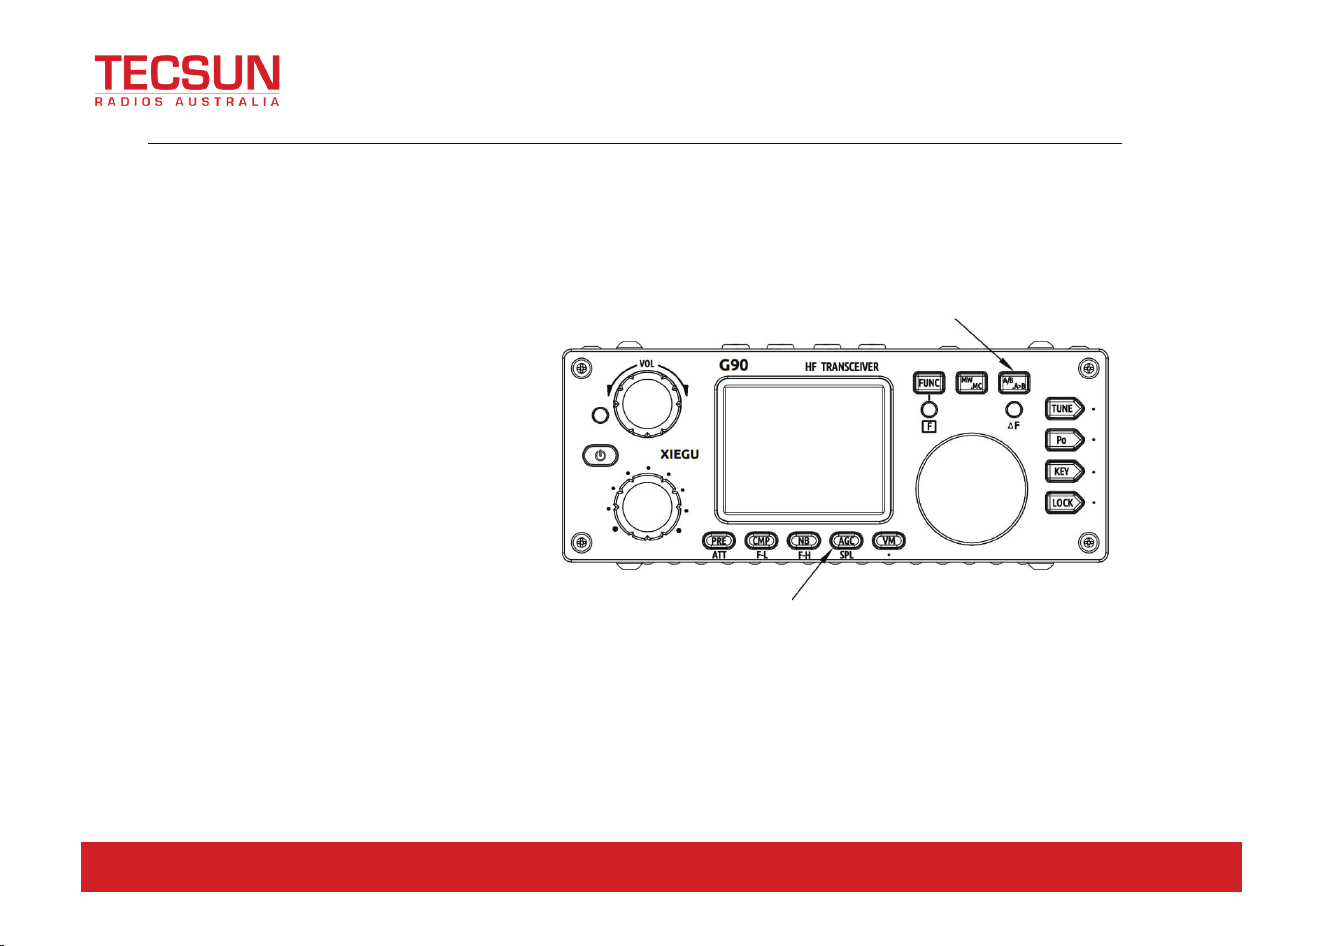
3、 Operate the second function of the [AGC/SPL] button,
4、 Turning on the SPL function to turns on the split transceiver mode.。
You can make full use of VFOA/B to set different frequencies or modes, and switch between two frequency points in real time.
There are two independent VFOs inside the G90
transceiver. We can set different frequencies and
modes separately. With the SPL function, it is
convenient to realize the split transceiving
operation.
VFO setting:
1、 Press the [A/B / A>B] button to switch
between VFO-A and VFO-B.
2、 When switching to a certain VFO state, you
can set the current VFO's operating
frequency, mode and other settings.
VFO operation
SPL operation
24/9 Powells Road, Brookvale NSW Australia 2100 [email protected]
www.tecsunradios.com.au
Operating
24
CW communication
Operate with a hand key or an external key controller device.
Operation method:
1、 Insert the key body (three-wire) plug into the KEY interface;
2、 Press the [MODE] button to switch the mode to CW (or CWR);
3、 Open the QSK function in the [KEY] button function and set the appropriate QSK time;;
4、 Press the CW button to perform CW communication.
Practice mode:
:
You can use the G90 as a CW code trainer.
The operation method is as follows: In the [KEY] button function, the QSK
function is turned off. In this state, when the button is pressed, the
transceiver has a CW side tone, but Does not emit signals externally.
The [KEY] button function contains adjustment
items that are commonly used when doing CW
communication::
SPEED
K-R/L
Iambic A/B
QSK
QSK
Key button

24/9 Powells Road, Brookvale NSW Australia 2100 [email protected]
www.tecsunradios.com.au
Operating
25
CW automatic caller MSG1~MSG3 (Not yet opened, need to be used with GSOC
controller)
The G90 host provides 4 sets of CW preset telegraph text storage for automatic call in CW mode.
Operation method:
To be determined

24/9 Powells Road, Brookvale NSW Australia 2100 [email protected]
www.tecsunradios.com.au
Operating
26
Standing wave scanner SWR (Not yet opened)
G90
host has an antenna standing wave scanning function, which can scan the standing wave parameters of the current
antenna, and is convenient for the user to adjust the antenna.。
Operation method :
1、 Operate the second function of the [Po] button to start the standing wave scan;
2、 After the scan is completed, the scanning process is automatically exited.
The scanning result of the standing wave scanner may have a certain error, for temporary use only. For accurate measurement
of antenna standing wave data, use a professional antenna analysis device for measurement.
。

24/9 Powells Road, Brookvale NSW Australia 2100 [email protected]
www.tecsunradios.com.au
Operating
27
Digital filter
The G90 has a built-in variable digital filter that implements a narrowband filter function to improve signal identification.
Operation method:
Operate the [CMP/F-L] button and the second function of the [NB/F-H] button;
Rotate the main knob to adjust the lower limit of the digital filter frequency and the upper limit of the frequency
respectively until the user experience is appropriate;
You can adjust the filter parameters according to your own listening preferences to get the best experience.

24/9 Powells Road, Brookvale NSW Australia 2100 [email protected]
www.tecsunradios.com.au
Operating
28
Line input/output
The G90 has an external line input interface. When communicating with a computer or an external modem for data
communication, the corresponding input/output items should be correctly selected.
Operating method:
In the system menu, using ACC port line input, select: AUX LINE IN. Set the appropriate input volume.
In the system menu, select: AUX AFOUT VOLUM to set the appropriate output volume。
When digital communication is in progress and audio input is made using the ACC port, make sure that the volume of the line
input is sufficient.

24/9 Powells Road, Brookvale NSW Australia 2100 [email protected]
www.tecsunradios.com.au
Operating
29
Channel storage MW, clear MC
Channel storage:
1. In the VFO mode, adjust the required frequency, mode, advanced function status and other parameters;
2. Press the [ MW/MC ] button to start the channel storage operation;
3. Rotate the main knob to select the channel number to be stored, and short press the main knob to complete the channel
storage;
4. If the current channel has stored information, using this channel number for storage again will clear the previous channel
information and save the current channel information.
Bring up the storage channel:
1、 If you press the [VM] button on the panel in VFO mode, you will enter channel mode;
2、 Rotate the main knob to switch the current channel.
Clearing channel storage:
1. In the channel mode, operate the second function of the [MW/MC] button to start the channel clear function;
2. At this point, the channel number starts to flash. Rotate the main knob to the corresponding channel number and press the
main knob to complete the channel clear.

24/9 Powells Road, Brookvale NSW Australia 2100 [email protected]
www.tecsunradios.com.au
Operating
30
Channel naming TAG (need to be used with GSOC large screen controller)
Stored channels can be named with "tags" consisting of letters and numbers.
Operating method:
To be determined.

24/9 Powells Road, Brookvale NSW Australia 2100 [email protected]
www.tecsunradios.com.au
Operating
31
Boot interface call sign setting CSN
The G90 can set the call sign information displayed on the boot interface.
Operating method:
1. Press and hold the [FUNC] button to go to the system setup menu and select the [CALL SIGN] function to go to the call sign
editor;
2. Under the editor, after editing the call sign, save the set text content and return to the normal operation state;
4. When you turn it on again, the boot interface will display the call sign you edited.

24/9 Powells Road, Brookvale NSW Australia 2100 [email protected]
www.tecsunradios.com.au
Operating
32
Connect to a computer for amateur radio data communication
The G90 transceiver can be connected to a computer to perform various data communication with the
corresponding computer software.
Operation connection method:
Connect the computer audio output/input to the G90 from the ACC port (MINI-DIN8).
Insert the data cable into the COMM port, connect the G90 to the computer, and ensure that the computer driver of
the data cable is installed correctly. The PC software can control the G90 transceiver;
Adjust the volume of G90 and the input/output volume of ACC port to the appropriate one. Observe the software
interface to avoid the Audio frequency amplitude being too large and unable to communicate.
Select the corresponding working mode to perform data communication.
In order to prevent interference, the radio and computer must be well grounded. Please install the EMC magnetic
ring for the data cable and audio cable, and install it as close as possible to the radio.
24/9 Powells Road, Brookvale NSW Australia 2100 [email protected]
www.tecsunradios.com.au
System parameter configuration
33
Computer control instruction
The G90 uses the standard CIV instruction set. You can use the standard instructions of this instruction set to remotely
control the transceiver. It can also be used to configure the control instructions of other software to control the G90.
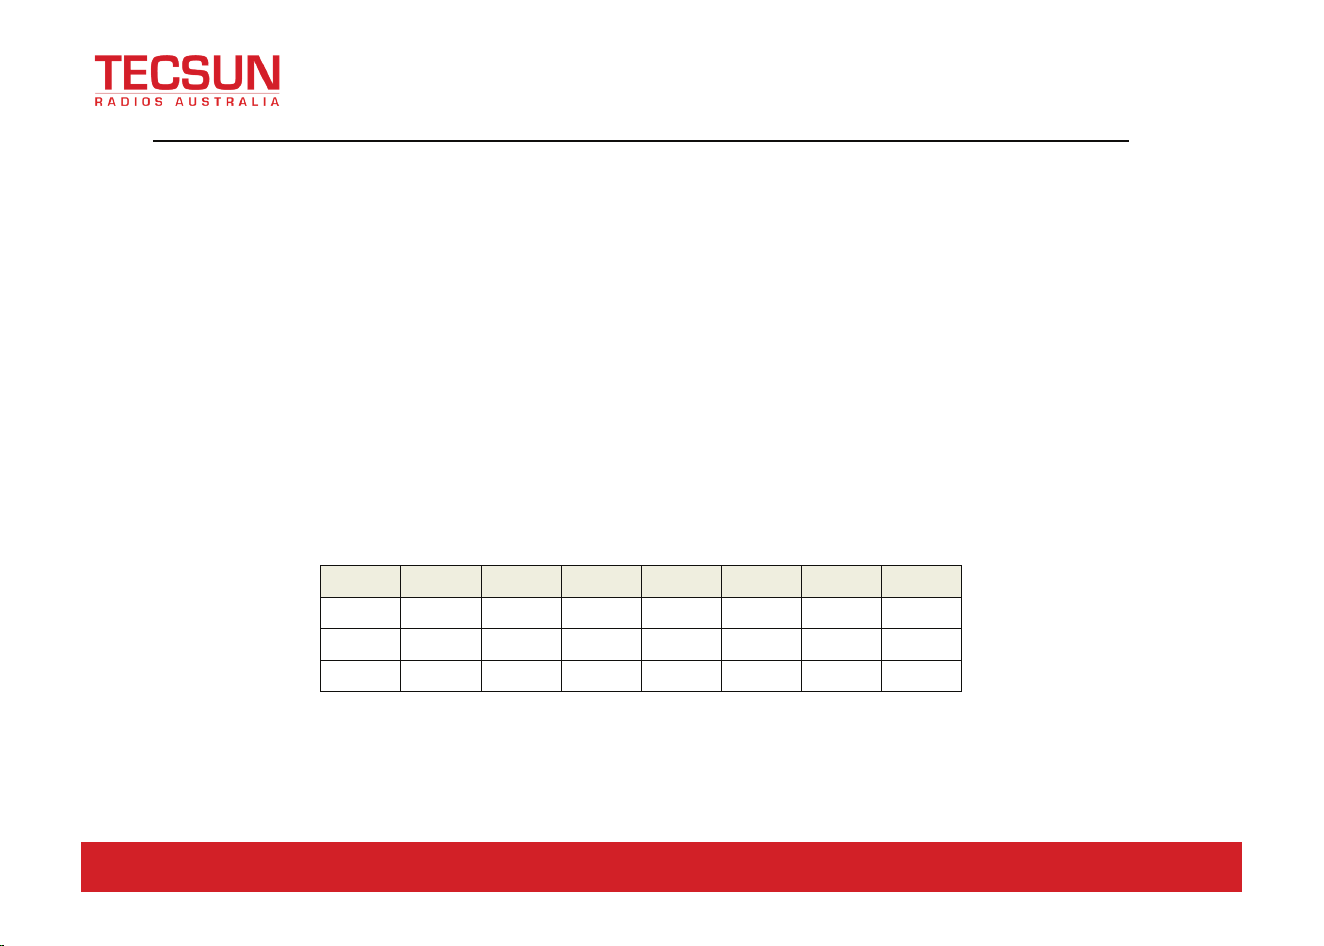
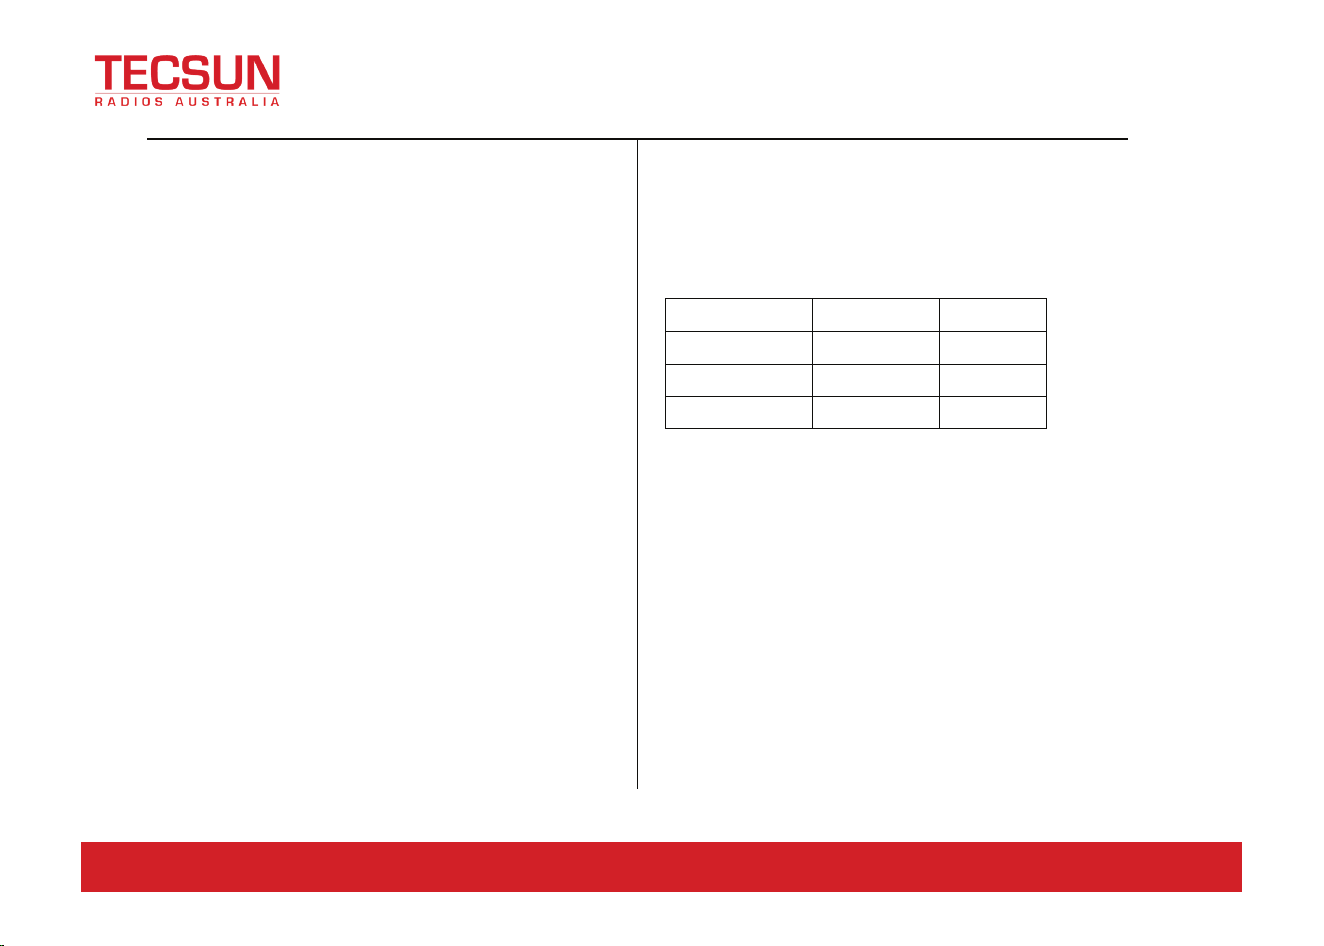
Band voltage data
The G90's ACC port provides band data for each band. The band data can control the peripheral to automatically switch the
band or share the band information with other devices.
Band Voltage Band Voltage Band Voltage Band Voltage
1.8MHz 230mV 7MHz 920mV 18MHz 1610mV 28MHz 2300mV
3.5MHz 460mV 10MHz 1150mV 21MHz 1840mV / /
5.0MHz 690mV 14MHz 1380mV 24MHz 2070mV / /
24/9 Powells Road, Brookvale NSW Australia 2100 [email protected]
www.tecsunradios.com.au
Performance parameter
34
General parameters
Frequency Range: receive:0.5MHz~30MHz
transmitting: 160M~10M(
Amateur
radio band only
)
transmitting mode:
A1A(CW),A3E(AM),J3E(USB/LSB),F3E(FM)
Mini step: 10Hz
Antenna impedance: 50Ω
Range of operating temperature: 0℃ ~ +50℃
Frequency stability:
±10 ppm for 10 to 60 min after power on
@25℃:1ppm/h
Voltage: 10.5~16.5V DC,Negative ground
Electric current: receive:500mA@ Max
transmitting:8A@ Max
Case size: 120*45*210mm(W * H * L)
(No protrusions)
Weight: about 1.63kg(only case)
Transmitter parameters
RF output power: 20W (SSB/CW/FM)
5W (AM Carrier) @13.8VDC
Modulation type: Digital modulation
Stray radiation suppression: ≥50dB
Carrier suppression: ≥40dB
Mic impedance: 200~10k(conventional 600Ω)
Receiver parameters
Circuit type: ZIF
Adjacent channel suppression: ≥60dB
Sideband suppression: ≥60dB
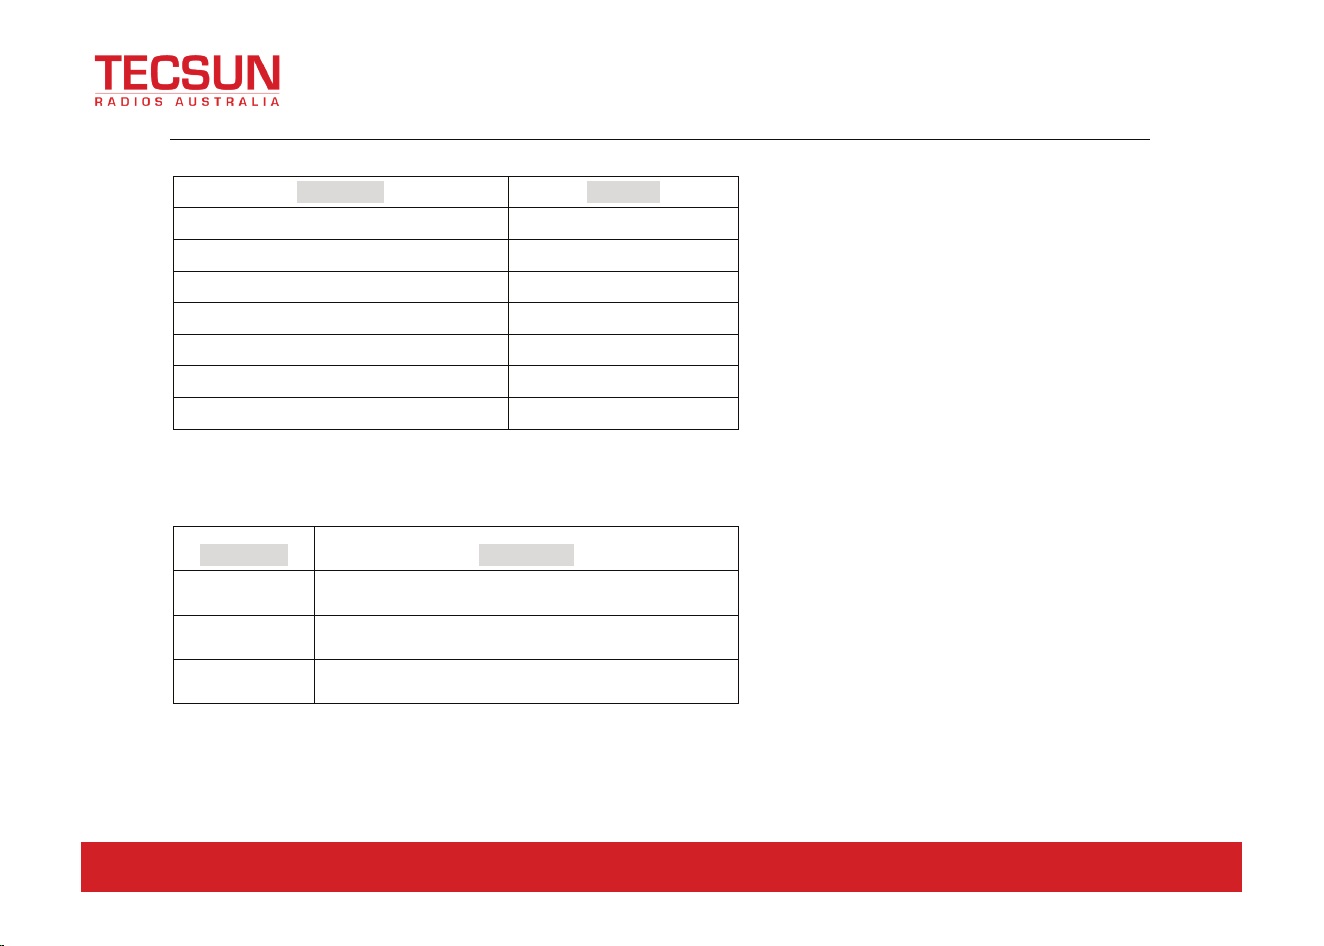
Sensitivity:
(PRE=on,ATT=off,NB=off,NR=off,SSB/CW/AM = 10dB S/N,FM = 12dB SINAD)
Image rejection : 70dB
IF suppression : 60dB
Audio output : 0.5W (8Ω,≤10% THD)
Audio output impedance: 4~16Ω
For the above parameters, we may make adjustments without
notice.。
The operating frequency range of the transceiver will vary with
the machine version, please consult your dealer.
SSB/CW/FM AM
1.0~1.79999MHz
/ 10uV
1.8~27.9999MHz
0.25uV 2uV
28~30MHz
0.25uV 2uV
24/9 Powells Road, Brookvale NSW Australia 2100 [email protected]
www.tecsunradios.com.au
Accessories and options
35
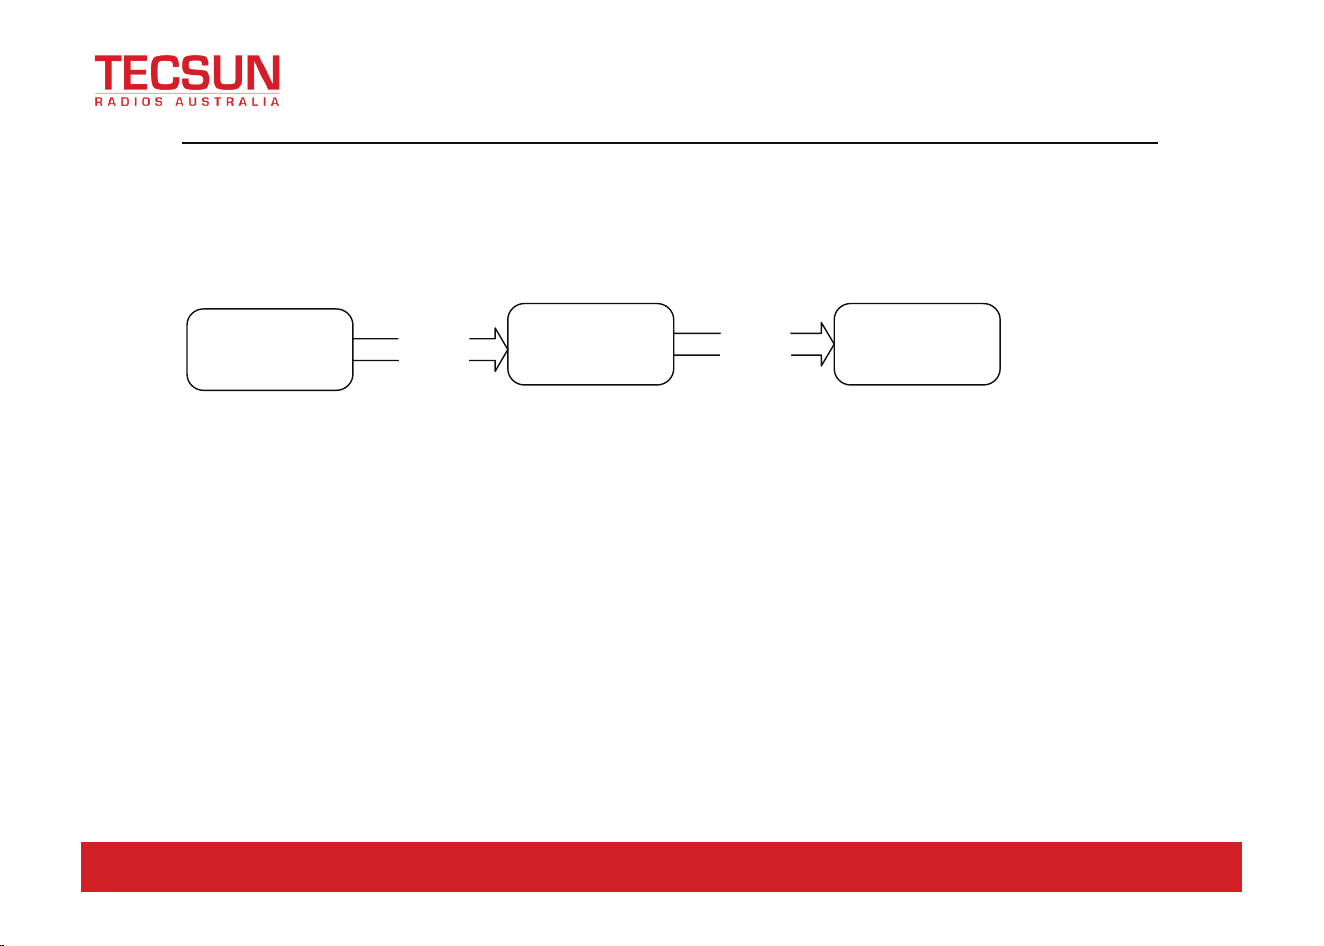
Packing List
Item name Quantity
G90 1pcs
Multi-function handle 1pcs
Data cable 1pcs
power cable 1pcs
Operation Manual 1pcs
Warranty Card 1pcs
Certificate 1pcs
* Optional accessories
Item name Description
CE-19 ACC expansion adapter
XPA125B
100W power amplifier (with built-in antenna adjuster)
GSOC
*1
G90 dedicated large screen controller
*1 The GSOC controller is expected to be available in 2019.
24/9 Powells Road, Brookvale NSW Australia 2100 [email protected]
www.tecsunradios.com.au
Copyright Notice
36
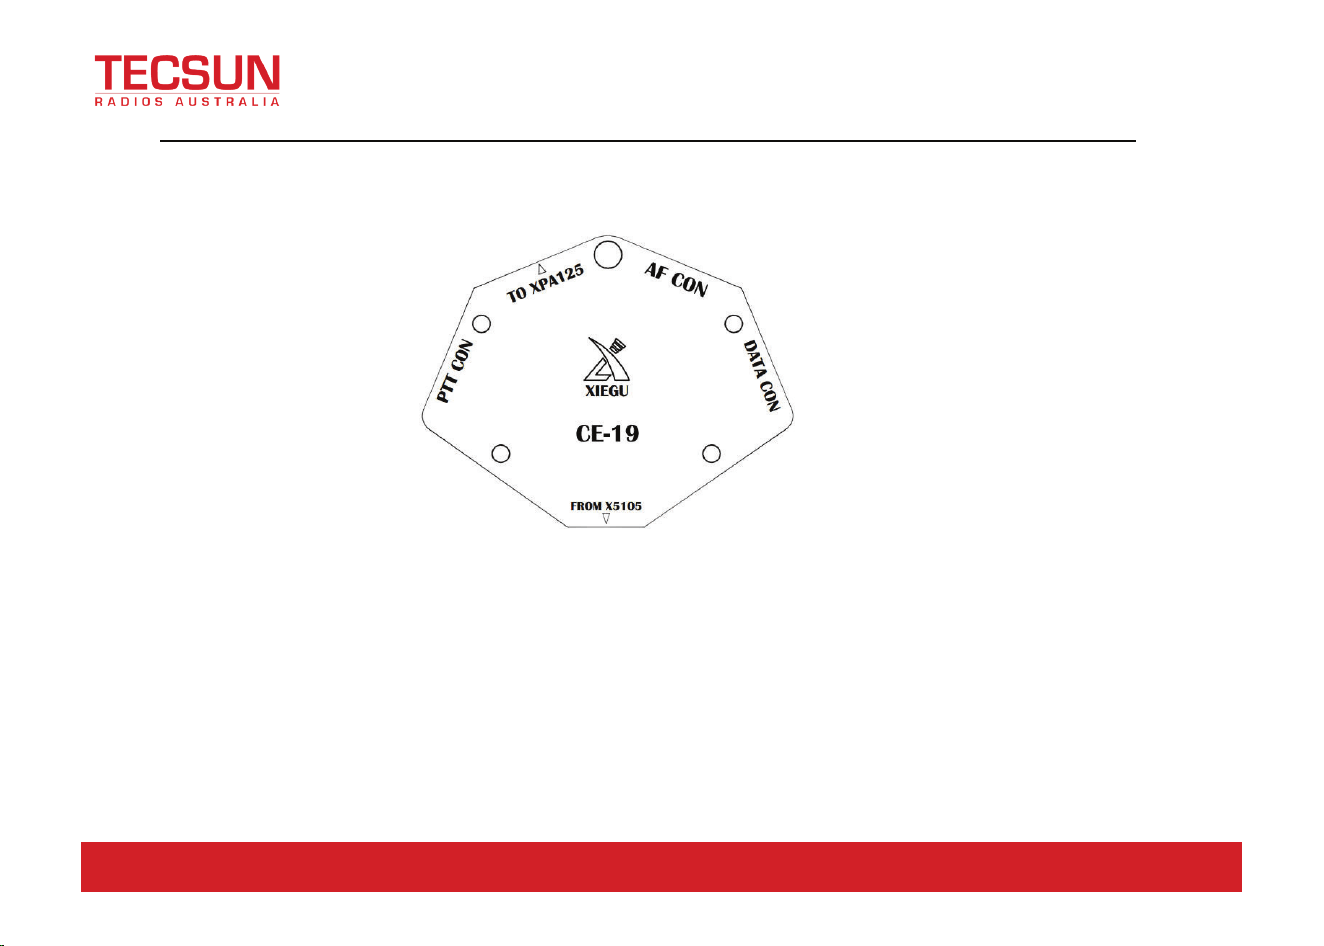
Connection diagram between G90 and XPA125B
G90
CE-19 XPA125B
8芯线
ACC口
6芯线
TO XPA125
*note:The 8-core ACC control line is delivered in the CE19 kit.
8 Pin
6 Pin
24/9 Powells Road, Brookvale NSW Australia 2100 [email protected]
www.tecsunradios.com.au
appendix 2
37
CE-19 expansion adapter interface diagram
PTT CON PTT signal / BAND signal output port. The PTT signal of this port is completely isolated from the host,
providing a "low level" trigger associated with the host.
TO XPA125B XPA12B dedicated interface.
AF CON Audio input/output port. The audio output from this port is directly output after demodulation, no
filter.
DATA CON Data output port in NFM mode. The two terminals of this port are in parallel relationship and both
output the same signal.

24/9 Powells Road, Brookvale NSW Australia 2100 [email protected]
www.tecsunradios.com.au
Copyright Notice
38
All rights reserved 2018
Chongqing Xiegu Technology Co., Ltd. reserves all rights to this manual, and reproduction of any part of this manual is
prohibited without permission.
------------------------------------------------------------------------------------------------
V1.0.01
1010160204-C