

en-us Table of contents
Table of contentsTable of contents
1 IMPORTANT SAFETY INSTRUCTIONS ................. 3
1.1 Safety definitions ........................................................ 4
1.2 General information ................................................... 4
1.3 Intended use ............................................................... 4
1.4 Restriction on user group ........................................ 4
1.5 Safe use ...................................................................... 4
1.6 Child safety ................................................................. 7
1.7 Gas safety ................................................................... 7
1.8 Food safety ................................................................. 8
1.9 Proper installation and maintenance ..................... 8
1.10 Conversion to Liquified Petroleum gas ........... 9
1.11 High altitude installation ................................... 9
1.12 State of California Proposition 65 Warnings ...... 9
2 Preventing material damage ................................ 10
2.1 Preventing oven cavity damage ............................ 10
2.2 Preventing cooktop damage ................................. 10
3 Environmental protection and energy-saving .... 10
3.1 Disposal of packaging ............................................ 10
3.2 Saving energy when using the oven .................... 10
3.3 Saving energy when using the cooktop .............. 11
4 Familiarizing yourself with your appliance ......... 11
4.1 Appliance .................................................................. 11
4.2 Oven features ........................................................... 12
4.3 Burner assembly ...................................................... 13
4.4 Control panels .......................................................... 14
5 Accessories ........................................................... 15
5.1 Other accessories ................................................... 15
5.2 Fitting the telescopic rail set .................................. 15
5.3 Inserting racks .......................................................... 15
6 Before using for the first time .............................. 16
6.1 Before using the oven for the first time ............... 16
6.2 Before using the cooktop for the first time ......... 17
7 Cooktop operation ................................................ 17
7.1 About the appliance ................................................ 17
7.2 To operate ................................................................. 17
7.3 In case of power failure .......................................... 17
7.4 Flame failure safety system ................................... 17
7.5 Normal operation - electronic ignition ................. 17
7.6 Getting the most out of your appliance ............... 18
7.7 Settings recommendations .................................... 18
7.8 Standard burner cooking table ............................. 18
7.9 Notes regarding cookware .................................... 20
8 Oven operation ...................................................... 21
8.1 Switching on the oven ............................................ 21
8.2 Switching off the oven ............................................ 21
8.3 Getting the most out of your appliance ............... 21
9 Cleaning and maintenance ................................... 24
9.1 Cleaning and maintenance - cooktop ................. 24
9.2 Cleaning and maintenance - oven ....................... 26
10 Cooking charts .................................................... 29
10.1 Baked goods/entrees ........................................... 29
10.2 Meats ....................................................................... 32
11 Troubleshooting .................................................. 34
11.1 Malfunctions ........................................................... 35
12 Disposal ............................................................... 36
12.1 Disposal of your old appliance ........................... 36
13 Customer Service ............................................... 36
13.1 Model number (E-Nr.) and production number
(FD) .......................................................................... 36
13.2 Rating plate location ............................................. 36
14 STATEMENT OF LIMITED PRODUCT
WARRANTY ......................................................... 36
14.1 What this warranty covers & Who it applies
to .............................................................................. 36
14.2 How long the warranty lasts ................................ 37
14.3 Repair/replace as your exclusive remedy ........ 37
14.4 Out of warranty product ....................................... 37
14.5 Warranty exclusions .............................................. 37
14.6 Obtaining warranty service .................................. 38
14.7 Product information .............................................. 38
Recursos y ayuda en línea en español ..................... 39
2
Read all of the instructions carefully before using the appliance. In order to reduce the risk of fire, electric shocks and
personal injuries when using the appliance, follow the basic safety precautions, including the following safety instruc-
tions.
en-us
IMPORTANT SAFETY INSTRUCTIONS
READ AND SAVE THESE INSTRUCTIONS
3

1.1 Safety definitions
Here you can find explanations of the safety signal
words used in this manual.
WARNING
This indicates that death or serious injuries may occur
as a result of non-observance of this warning.
CAUTION
This indicates that minor or moderate injuries may occur
as a result of non-observance of this warning.
NOTICE
This indicates that damage to the appliance or property
may occur as a result of non-compliance with this advi-
sory.
Note: This alerts you to important information.
1.2 General information
Read this manual carefully.
Do not connect the appliance if it has been damaged
in transit.
1.3 Intended use
Only use this appliance:
To prepare meals and drinks.
Under supervision. Never leave the appliance unat-
tended when cooking for short periods.
for normal household use and in enclosed spaces in
a residential environment.
Do not use the appliance:
On boats or in vehicles.
as a room heater.
This appliance is not intended for operation with an
external time switch or external remote control.
Call Customer Service if you want to convert your appli-
ance to a different type of gas.
1.4 Restriction on user group
This appliance is not intended for use by persons (in-
cluding children) with reduced physical, sensory or men-
tal capabilities, or lack of experience and knowledge,
unless they have been given supervision or instruction
concerning use of the appliance by a person responsi-
ble for their safety.
When children become old enough to use the appli-
ance, it is the responsibility of the parents or legal
guardians to ensure that they are instructed in safe
practices by qualified persons.
Children should be supervised to ensure that they do
not play with the appliance.
Do not let children play with the appliance.
1.5 Safe use
WARNING
When properly cared for, your new appliance has been
designed to be safe and reliable.
Read all instructions carefully before use. These pre-
cautions will reduce the risk of burns, electric shock,
fire, and injury to persons.
When using kitchen appliances, basic safety precau-
tions must be followed, including those in the follow-
ing pages.
WARNING
Cooking with gas can release small amounts of certain
by-products, such as carbon monoxide, benzene,
formaldehyde, nitrogen oxides (including nitrogen diox-
ide), and particulate matter / soot. To minimize expo-
sure to these substances:
Always ensure proper ventilation by using an appro-
priate ventilation fan or hood vented to the outside
and/or an open window.
Always operate the unit according to the instructions
in this manual.
If applicable, the burners should be verified by a certi-
fied installer or agency to ensure proper combustion.
WARNING
Overheated materials can cause fire or burns and may
produce potentially harmful smoke or fumes.
To prevent overheating, turn ventilation hood ON
when heating grease, fats or frying using medium to
high heat settings.
Avoid heating empty pots and pans.
Do not allow pans to boil dry.
Do not allow aluminum foil, plastic, paper, or cloth to
come in contact with a hot surface element, burner,
or grate.
WARNING
To avoid risk of fire, do not leave the cooktop unat-
tended while in use. Unattended cooking can lead to fire
hazards, property damage, and injury. Always supervise
cooking, especially when using high heat with oils and
fats. Boilovers may cause smoking and greasy
spillovers may ignite.
WARNING
Set the burner control so that the flame does not extend
beyond the bottom of the pan.
Take care that drafts like those from fans or forced air
vents do not push the flames so that they extend be-
yond the edges of the pan.
If materials inside an oven or warming drawer should ig-
nite, keep door closed.
Turn off the appliance and disconnect the circuit at
the circuit breaker box.
A fire could occur during cooking.
Always have a working smoke detector near the
kitchen.
Have an appropriate fire extinguisher available,
nearby, highly visible and easily accessible near the
appliance.
en-us
IMPORTANT SAFETY INSTRUCTIONS
READ AND SAVE THESE INSTRUCTIONS
4

NEVER cover any slots, holes or passages in the oven
bottom or cover an entire rack with materials such as
aluminum foil.
Doing so blocks air flow through the oven and may
cause carbon monoxide poisoning.
Aluminum foil linings may also trap heat, causing a
fire hazard.
If the cooktop is near a window, forced air vent or fan,
be certain that flammable materials such as window
coverings do not blow over or near the burners or heat-
ing elements. They could catch on fire.
Cooking fires can spread if extinguished incorrectly.
Never use water on cooking fires.
WARNING
TO REDUCE THE RISK OF A RANGE TOP GREASE
FIRE
Never Leave Surface Units Unattended at High Set-
tings - Boilovers cause smoking and greasy spillovers
that may ignite. Heat oils slowly on low or medium
settings.
Always turn hood ON when cooking at high heat or
when flambeing food (i.e. Crepes Suzette, Cherries
Jubilee, Peppercorn Beef Flambe’).
Clean ventilating fans frequently. Grease should not
be allowed to accumulate on fan or filter.
Use proper pan size. Always use cookware appropri-
ate for the size of the surface element.
WARNING
Flames can be drawn into the ventilation system.
Whenever possible, do not operate the ventilation
system during a cooktop fire. However, do not reach
through fire to turn it off.
Cookware Handles Should be Turned Inward and Not
Extend Over Adjacent Surface Units.
To reduce the risk of burns, ignition of flammable ma-
terials, and spillage due to unintentional contact with
the cookware, the handle of a cookware should be
positioned so that it is turned inward, and does not
extend over adjacent surface units.
Wear Proper Apparel.
Loose-fitting or hanging garments, such as ties, scarves,
jewelry, or dangling sleeves, should never be worn while
using the appliance.
Tie long hair so that it does not hang loose.
Secure all loose garments, etc. before beginning.
Use Proper Pan Size - This appliance is equipped with
one or more surface units of different sizes.
Select cookware having flat bottoms large enough to
cover the surface unit burner.
The use of undersized cookware will expose a portion
of the burner to direct contact and may result in igni-
tion of clothing. Proper relationship of cookware to
burner will also improve efficiency.
CAUTION
The cooking process has to be supervised. A short term
cooking process has to be supervised continuously.
WARNING
To avoid risk of fire do not store items on the cooking
surfaces.
In the event that personal clothing or hair catches fire,
drop and roll immediately to extinguish flames.
Do Not Use Water on Grease Fires.
Smother fire or flame or use dry chemical or foam-
type extinguisher.
Adjust burner flame size so that it does not extend be-
yond the edge of the cookware. Proper relationship of
cookware to burner flame reduces safety risks.
CAUTION
The oven vents are important for air circulation. Cover-
ing the oven vents will cause the oven to overheat.
Refer to the appliance overview for the location of the
oven vents.
Page11
Do not obstruct the front oven vent or rear vent trim.
WARNING
Use Only Dry Potholders - Moist or damp potholders on
hot surfaces may result in burns from steam.
Do not let potholders touch hot heating elements.
Do not use a towel or other bulky cloth.
Hot oil is capable of causing extreme burns and injury.
Use high heat settings on the cooktop only when nec-
essary.
To avoid bubbling and splattering, heat oil slowly on
no more than a low-medium setting.
Never move a pan of hot oil, especially a deep fat
fryer. Wait until it is cool.
Spills of hot food may cause burns.
Hold the handle of the pan when stirring or turning
food. This helps prevent spills and movement of the
pan.
DO NOT TOUCH SURFACE UNITS OR AREAS NEAR
UNITS. Surface units may be hot even though they are
dark in color. Areas near surface units may become hot
enough to cause burns.
During and after use, do not touch, or let clothing,
potholders, or other flammable materials contact sur-
face units or areas near units until they have had suffi-
cient time to cool. Among these areas are the cook-
top and areas facing the cooktop.
DO NOT TOUCH HEATING ELEMENTS OR INTERIOR
SURFACES OF OVEN - Heating elements may be hot
even though they are dark in color. Interior surfaces of
an oven become hot enough to cause burns.
During and after use, do not touch, or let clothing,
potholders, or other flammable materials contact
heating elements or interior surfaces of oven until
they have had sufficient time to cool. Other surfaces
of the appliance may become hot enough to cause
burns. Among these surfaces are oven vent open-
ings, surfaces near these openings and oven doors.
Exercise caution when opening the appliance.
Standing to the side, open the door (or drawer) slowly
and slightly to let hot air and/or steam escape.
Keep your face clear of the opening and make sure
there are no children or pets near the unit.
After the release of hot air and/or steam, proceed
with your cooking.
en-us
IMPORTANT SAFETY INSTRUCTIONS
READ AND SAVE THESE INSTRUCTIONS
5

Keep doors shut unless necessary for cooking or
cleaning purposes.
Do not leave open doors unattended.
Clean Cooktop With Caution.
If a wet sponge or cloth is used to wipe spills on a
hot cooking area, be careful to avoid steam burn.
Some cleaners can produce noxious fumes if applied
to a hot surface.
Do not clean the appliance while it is still hot.
After a spill or boilover, turn off the burner and allow the
cooktop to cool.
Clean around the burner and burner ports.
After cleaning, check for proper operation.
Inspect your cookware for damage or excessive wear
before using it.
CAUTION
Use caution when cooking foods with high alcohol con-
tent (e.g. rum, brandy, bourbon) in the oven. Alcohol
evaporates at high temperatures. There is a risk of burn-
ing as the alcohol vapors may catch fire in the oven.
Use only small quantities of alcohol in foods, and
open the oven door carefully.
The oven racks and the oven cavity surfaces become
very hot during cooking.
Place oven racks in the desired positions before turn-
ing oven on.
Always use oven mitts when the oven is warm.
If a rack must be moved while the oven is hot, do not
let oven mitts contact hot heating elements.
Use caution when removing oven racks from the low-
est rack position to avoid contact with the hot oven
door.
WARNING
Avoid reaching or leaning over the appliance.
Be aware that certain clothing and hair sprays may
contain flammable chemicals that could be ignited if
brought in to contact with hot surface units or heating
elements and may cause severe burns.
WARNING
Storage in or on Appliance - The use of corrosive chem-
icals in heating or cleaning will damage the appliance
and could result in injury.
Flammable materials, corrosive chemicals, vapors or
non-food products should not be stored or used in an
oven or on or near surface units.
The appliance is specifically designed for use when
heating or cooking food.
This appliance is intended for normal family household
use only. It is not approved for outdoor use. See the
Statement of Limited Product Warranty. If you have any
questions, contact the manufacturer.
WARNING
Using this appliance other than for its intended use can
cause fire or injury to persons.
Use this appliance only for its intended use as de-
scribed in this manual.
NEVER use your appliances as a space heater for
warming or heating the room. Doing so may result in
overheating the appliance.
Never use the appliance for storage.
WARNING
TO REDUCE THE RISK OF INJURY TO PERSONS IN
THE EVENT OF A RANGE TOP GREASE FIRE, OB-
SERVE THE FOLLOWING.
SMOTHER FLAMES with a close-fitting lid, cookie
sheet, or metal tray, then turn off the burner. BE
CAREFUL TO PREVENT BURNS. If the flames do not
go out immediately, EVACUATE AND CALL THE FIRE
DEPARTMENT.
NEVER PICK UP A FLAMING PAN – You may be
burned.
DO NOT USE WATER, including wet dishcloths or
towels – a violent steam explosion will result.
Use an extinguisher ONLY if:
- You know you have a Class ABC extinguisher, and
you already know how to operate it.
- The fire is small and contained in the area where it
started.
- The fire department is being called.
- You can fight the fire with your back to an exit.
WARNING
Do not heat or warm unopened food containers.
Build-up of pressure may cause the container to burst
and cause injury.
Failure to operate knobs properly may result in personal
injury and damage to the appliance.
Glazed Cooking Utensils - Only certain types of glass,
glass/ceramic, ceramic, earthenware, or other glazed
utensils are suitable for cooktop or range-top service
without breaking due to the sudden change in tempera-
ture.
Cooking or roasting bags might explode.
Follow the manufacturer’s directions when using
cooking or roasting bags.
CAUTION
To avoid possible injury or damage to the appliance, en-
sure oven rack is installed exactly per installation in-
structions and not backwards or upside down.
Do not place anything on the oven cavity bottom. Do not
cover it with aluminum foil. A build-up of heat could
damage the appliance or cause injury.
WARNING
Moisture intrusion may cause an electric shock.
Do not use any steam cleaners or high-pressure
cleaners to clean the appliance.
To avoid risk of injury from a damaged appliance or
power cord, observe the following.
Do not turn the power on if the appliance or the
power cord is damaged. Doing so may cause injury.
Never operate a damaged appliance.
Never pull on the power cord to unplug the appliance.
Always unplug the appliance at the power outlet.
If the appliance or the power cord is damaged, imme-
diately unplug the power cord or switch off the
breaker in the circuit breaker box and turn off the gas
supply.
Call Customer Service.
Page36
en-us
IMPORTANT SAFETY INSTRUCTIONS
READ AND SAVE THESE INSTRUCTIONS
6

Repairs to the appliance should only be performed by
an authorized service provider.
WARNING
Scratched glass in the appliance door may develop into
a crack.
Do not use any harsh or abrasive cleaners or sharp
metal scrapers to clean the glass on the oven door,
as they may scratch the surface.
WARNING
To avoid food contamination, fire, or personal injury:
Do not place food directly on the burner grates.
Use only cookware that is suitable for gas cooktops
and is stable on the grates.
Always monitor cooking to prevent boil-over, spillage,
or flame contact with food.
CAUTION
To reduce the risk of contamination and damage:
Always clean baking trays and wire racks before plac-
ing food on them.
Inspect accessories for surface damage prior to use.
1.6 Child safety
This appliance is not intended for use by persons (in-
cluding children) with reduced physical, sensory or men-
tal capabilities, or lack of experience and knowledge,
unless they have been given supervision or instruction
concerning use of the appliance by a person responsi-
ble for their safety.
When children become old enough to use the appli-
ance, it is the responsibility of the parents or legal
guardians to ensure that they are instructed in safe
practices by qualified persons.
WARNING
Do not allow children to use this appliance unless
closely supervised by an adult.
Children and pets should not be left alone or unat-
tended in the area where the appliance is in use.
They should never be allowed to play in its vicinity,
whether or not the appliance is in use.
Do not allow anyone to climb, stand, lean, sit, or hang
on any part of an appliance, especially a door, warming
drawer, or storage drawer.
This can damage the appliance, and the unit may tip
over, potentially causing severe injury.
Do not let children play with the appliance.
CAUTION
Do not store items of interest to children in cabinets
above a range or on the backguard of a range.
Children climbing on the range to reach items could be
seriously injured.
Do Not Leave Children Alone.
Children should not be left alone or unattended in the
area where the appliance is in use.
They should never be allowed to sit or stand on any
part of the appliance.
Always check inside the oven before turning it on.
WARNING
To avoid the risk of suffocation:
Do not allow children to play with packaging material.
Store small parts safely as they can be a choke haz-
ard.
1.7 Gas safety
WARNING
To prevent carbon monoxide build-up, do not block ap-
pliance air vents.
WARNING
Have the installer show you where the gas shut-off valve
is located.
If a burner goes out and gas escapes, open windows
and doors. Wait until gas dissipates before using the ap-
pliance.
If you smell gas, your installer has not done a proper
job of checking for leaks. If the connections are not per-
fectly tight, you can have a small leak and, therefore, a
faint smell. If you smell gas, immediately shut off the unit
and contact an authorized service provider to diagnose
the issue. Read the WARNING about gas smell.
Page3
WARNING
Keep the igniter ports clean for proper lighting perfor-
mance of the burners. It is necessary to clean these
when there is a boilover or when the burner does not
light even though the electronic igniters click.
For proper burner performance, keep igniters clean and
dry.
CAUTION
All igniters spark when any single burner is turned on.
Do not touch any of the burners when the cooktop is
in use.
WARNING
To prevent flare-ups all grates must be properly posi-
tioned on the cooktop whenever the cooktop is in use.
Each of the feet must be placed into the corresponding
dimples in the cooktop.
Do not use a grate if the rubber feet are missing or
damaged.
WARNING
Do not clean or touch any of the burners when an extra
low burner (if equipped) is in use.
When the extra low burner automatically reignites the ig-
nitor at the burner will spark.
WARNING
To prevent flare-ups do not use the cooktop without all
burner caps and all burner grates properly positioned.
WARNING
Use this appliance only for its intended use as de-
scribed in this manual.
NEVER use this appliance as a space heater to heat
or warm the room. Doing so may result in carbon
monoxide poisoning and overheating the appliance.
Never use the appliance for storage.
en-us
IMPORTANT SAFETY INSTRUCTIONS
READ AND SAVE THESE INSTRUCTIONS
7

1.8 Food safety
1.9 Proper installation and maintenance
WARNING
TIP OVER HAZARD!
A child or adult can tip the range over and be killed.
Install the anti-tip device to the structure and/or the
range.
Verify the anti-tip device has been properly installed
and engaged.
Engage the range to the anti-tip device. Ensure the
anti-tip device is re-engaged when the range is
moved.
Re-engage the anti-tip device if the range is moved.
Do not operate the range without the anti-tip device in
place and engaged.
See installation instructions for details.
Failure to follow the instructions in this manual can re-
sult in death or serious burns to children and adults.
Check for proper installation and use of the anti-tip
bracket. Carefully tip the range forward pulling from
the back to ensure that the anti-tip bracket engages
the range leg and prevents tip-over. The range should
not move more than 1" (2.5cm).
WARNING
In the event of a malfunction, it might become neces-
sary to turn off the power supply.
Have the installer show you the circuit breaker or
fuse. Mark it for easy reference.
To avoid electrical shock hazard, before servicing the
appliance, turn power off at the service panel and lock
the panel to prevent the power from being switched on
accidentally.
Proper Installation - Improper installation or grounding
can cause electric shock.
This appliance must be properly installed and
grounded by a qualified technician.
Connect only to properly grounded outlet.
Refer to installation instructions for details.
User Servicing - Do not repair or replace any part of the
appliance unless specifically recommended in this man-
ual.
All other servicing should be referred to an authorized
service provider.
Light socket is live when door is open if main power
supply is not turned off.
Turn off main power supply at the service panel be-
fore changing the light bulbs.
WARNING
Make sure the appliance and lights are cool and power
to the appliance has been turned off before replacing
the light bulb(s).
Failure to do so could result in electrical shock or burns.
The lenses must be in place when using the appli-
ance.
The lenses serve to protect the light bulb from break-
ing.
The lenses are made of glass. Handle carefully to
avoid breaking. Broken glass can cause an injury.
Failure to follow these instructions when removing the
oven door may lead to personal injury or product dam-
age.
Make sure oven is cool and power to the oven has
been turned off before removing the door. Failure to
do so could result in electrical shock or burns.
The oven door is heavy and parts of it are fragile. Use
both hands to remove the oven door.
The door front is glass. Handle it carefully to avoid
breakage.
Grasp only the side of the oven door. Do not grasp
the handle. It may swing in your hand and cause
damage or injury. Failure to grasp the oven door
firmly and properly could result in personal injury or
product damage.
To avoid injury from hinge bracket snapping closed,
be sure both levers are securely locked in place be-
fore removing the door.
Do not force the door open or closed to avoid dam-
aging the hinge and risking injury.
Do not place the removed door on sharp or pointed
surfaces or objects to avoid breaking the glass or
damaging the door. Lay on a flat, smooth surface
where it is securely positioned to prevent it from mov-
ing or falling.
WARNING
Grease and fat can ignite when heated.
Keep the oven free from grease build up.
CAUTION
In the event of an error the display flashes and beeps
continuously.
Disconnect appliance from the power supply and call
an authorized service provider.
WARNING
Malfunctions can cause injuries.
Do not operate this appliance if it is not working prop-
erly, or if it has been damaged. Contact an authorized
service provider.
en-us
IMPORTANT SAFETY INSTRUCTIONS
READ AND SAVE THESE INSTRUCTIONS
8
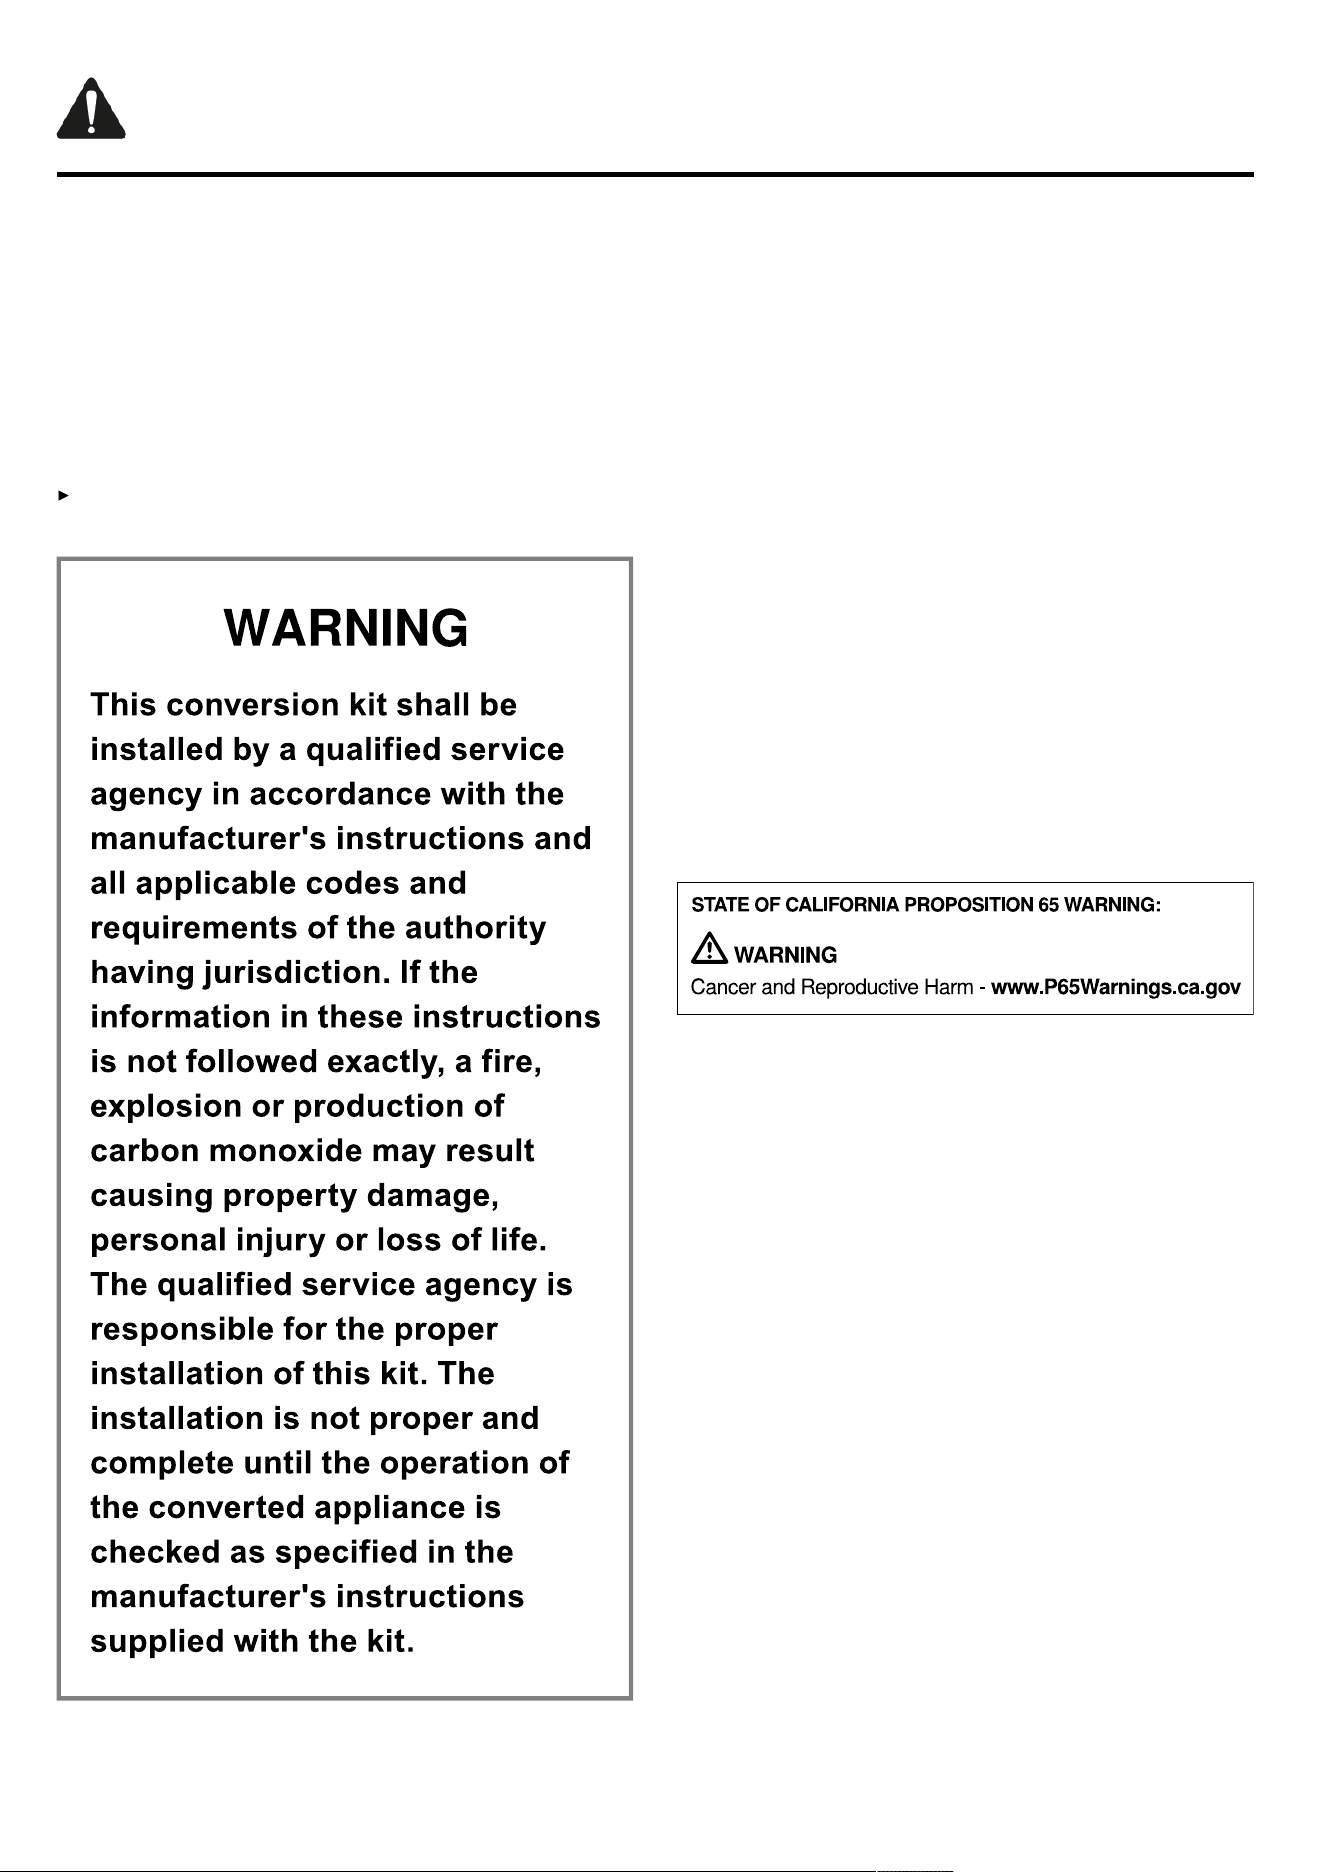
1.10 Conversion to Liquified Petroleum gas
WARNING
Personal injury or death from electrical shock may oc-
cur, if the range is not installed by a qualified installer or
electrician.
Any additions, changes, or conversions required in or-
der for this appliance to satisfactorily meet the applica-
tion needs must be made by a qualified technician.
Your gas range model is designed to allow for LP con-
version by a qualified service technician.
Before installing the kit, be sure to follow the LP In-
stallation Instructions carefully.
1.11 High altitude installation
This appliance has been tested for operation up to an
altitude of 10,000ft (3,048m) elevation above sea
level.
If desired, for altitudes above 2,000ft (610m) elevation
above sea level, adjustments may be made. Burners
should be checked at the lowest setting, if the flame is
not stable the simmer should be increased until the
flame is stable. This can be done by adjusting the by-
pass screw in the valve. If flame performance is satisfac-
tory, adjustment will not be required. It is required that a
Certified Professional make the high altitude adjust-
ments during installation. High altitude nozzle sets for
natural gas and propane gas are available for installa-
tions at 2,000-6,500ft (610-1,981m) or 6,501-10,000ft
(1,982-3,048m) if the adjustments using the bypass
screw don’t resolve performance issues.
1.12 State of California Proposition 65
Warnings
This product may contain a chemical known to the State
of California, which can cause cancer or reproductive
harm. Therefore, the packaging of your product may
bear the following label as required by California:
en-us
IMPORTANT SAFETY INSTRUCTIONS
READ AND SAVE THESE INSTRUCTIONS
9

en-us Preventing material damage
Preventing material damage2 Preventing material damage
2.1 Preventing oven cavity damage
NOTICE
The presence of objects on the oven cavity bottom will
cause heat to build up. The baking and roasting times
will no longer be correct and the enamel will be dam-
aged.
Do not cover the oven cavity bottom with any sort of
foil or greaseproof paper.
Do not place accessories on the oven cavity bottom.
Do not allow aluminum foil in the oven cavity to come
into contact with the door glass, it could cause perma-
nent discoloration.
Never pour water into the oven cavity when it is still hot.
Never place cookware containing water on the oven
cavity bottom.
The prolonged presence of moisture in the appliance
cavity leads to corrosion.
Allow the appliance cavity to dry after use.
Do not keep moist food in the appliance cavity for a
long time with the door closed.
Do not store food in the appliance cavity.
Leaving the appliance to cool down with the door open
will damage the front of neighboring kitchen units over
time.
Always allow the appliance cavity to cool down with
the door closed after cooking at high temperatures.
Only leave the appliance cavity to dry with the door
open if a lot of moisture was produced during opera-
tion.
Take care not to trap anything in the appliance door.
Fruit juice dripping from the baking tray leaves stains
that cannot be removed.
When baking very juicy fruit pies, do not pack too
much on the baking tray.
If the seal is very dirty, the appliance door will not close
properly when the appliance is in operation. This may
damage the front of adjacent kitchen units.
Keep the seal clean at all times.
Never operate the appliance if the seal is damaged or
missing.
Sitting or placing objects on the appliance door may
damage it.
Do not place or hang objects on the appliance door.
Do not place cookware or accessories on the appli-
ance door.
With certain models, accessories may scratch the door
glass when closing the appliance door.
Always push accessories fully into the appliance cav-
ity.
Carrying the appliance by the door handle could break
it. The door handle cannot support the weight of the ap-
pliance.
Do not carry or hold the appliance by the door han-
dle.
2.2 Preventing cooktop damage
NOTICE
OPERATIONAL FAULT.
Always turn the control knob to the off position when
the appliance is not being used.
Overheating can damage the cookware.
Do not heat empty pots or pans.
Aluminum foil and plastic melt on hot burners.
Do not let aluminum foil or plastic come into contact
with hot burners.
A build-up of heat may damage the appliance.
Never cover the cooktop, for example with aluminum
foil or oven protectors.
Do not place roasters, frying pans or grill stones on
more than one burner at a time.
Only use the accessories specified.
Acidic liquids such as lemon juice or vinegar may dam-
age the surface finish of the appliance.
Remove spilled liquids immediately. Use caution while
the burners are still hot.
Heat may cause damage to adjacent appliances or fur-
niture.
If the appliance is in operation for an extended period,
heat and moisture will be generated. Additional ventila-
tion is required.
Open the window or switch on an extractor hood that
discharges the extracted air and moisture outside the
building.
Environmental protection and energy-saving3 Environmental protection and energy-saving
3.1 Disposal of packaging
The packaging materials are environmentally compatible
and can be recycled.
Sort the individual components by type and dispose
of them separately.
3.2 Saving energy when using the oven
If you follow these tips, your appliance consumes less
energy.
Only preheat the appliance if the recipe or the recom-
mended settings tell you to do so.
Not preheating the appliance can reduce the energy
used.
Use dark-colored, black-coated or enameled baking
pans.
These types of baking pans absorb the heat particu-
larly well.
Open the appliance door as little as possible during op-
eration.
10

Familiarizing yourself with your appliance en-us
This will maintain the temperature in the appliance
cavity and eliminate the need for the appliance to re-
heat.
When baking multiple dishes, do so in succession or at
the same time.
The oven cavity is heated after baking the first dish.
This reduces the baking time for the second dish.
If the cooking time is relatively long, you can switch the
appliance off 10minutes before the cooking time ends.
There will be enough residual heat to finish cooking
the dish.
Remove any accessories that are not being used from
the oven cavity.
An extra pan without food affects the browning and
cooking.
Allow frozen food to defrost before cooking.
This will save the energy that would otherwise be re-
quired to defrost it.
3.3 Saving energy when using the cooktop
If you follow these tips, your appliance consumes less
energy.
Select a cookware diameter that matches the burner.
Center the cookware on the burner.
Tip: Cookware manufacturers usually state the top di-
ameter of the cookware. The diameter of the cookware
base is usually smaller.
The energy is targeted at the cookware.
If you use cookware that is too small, energy is
wasted. If the cookware is too large, much energy is
used to heat up the cookware.
Close cookware with a fitting lid.
Cooking without a lid consumes more energy.
Only lift the lid when necessary.
If you lift the lid, a lot of energy can escape.
Use a glass lid.
If you use a glass lid, you can look inside the cook-
ware without lifting the lid.
Use cookware with a solid flat bottom.
Curved cookware bases increase energy consump-
tion.
Use a cookware size that matches the amount of food
you want to cook.
Cookware with little content consumes a lot of en-
ergy.
Cook with a small amount of water.
More water requires more energy to heat it up.
Select a lower power level as soon as possible. Select a
suitable power level to continue cooking.
For ongoing cooking a lower power level is sufficient.
Familiarizing yourself with your appliance4 Familiarizing yourself with your appliance
This Use and Care Manual covers several models. Your
model may have some but not all of the features listed.
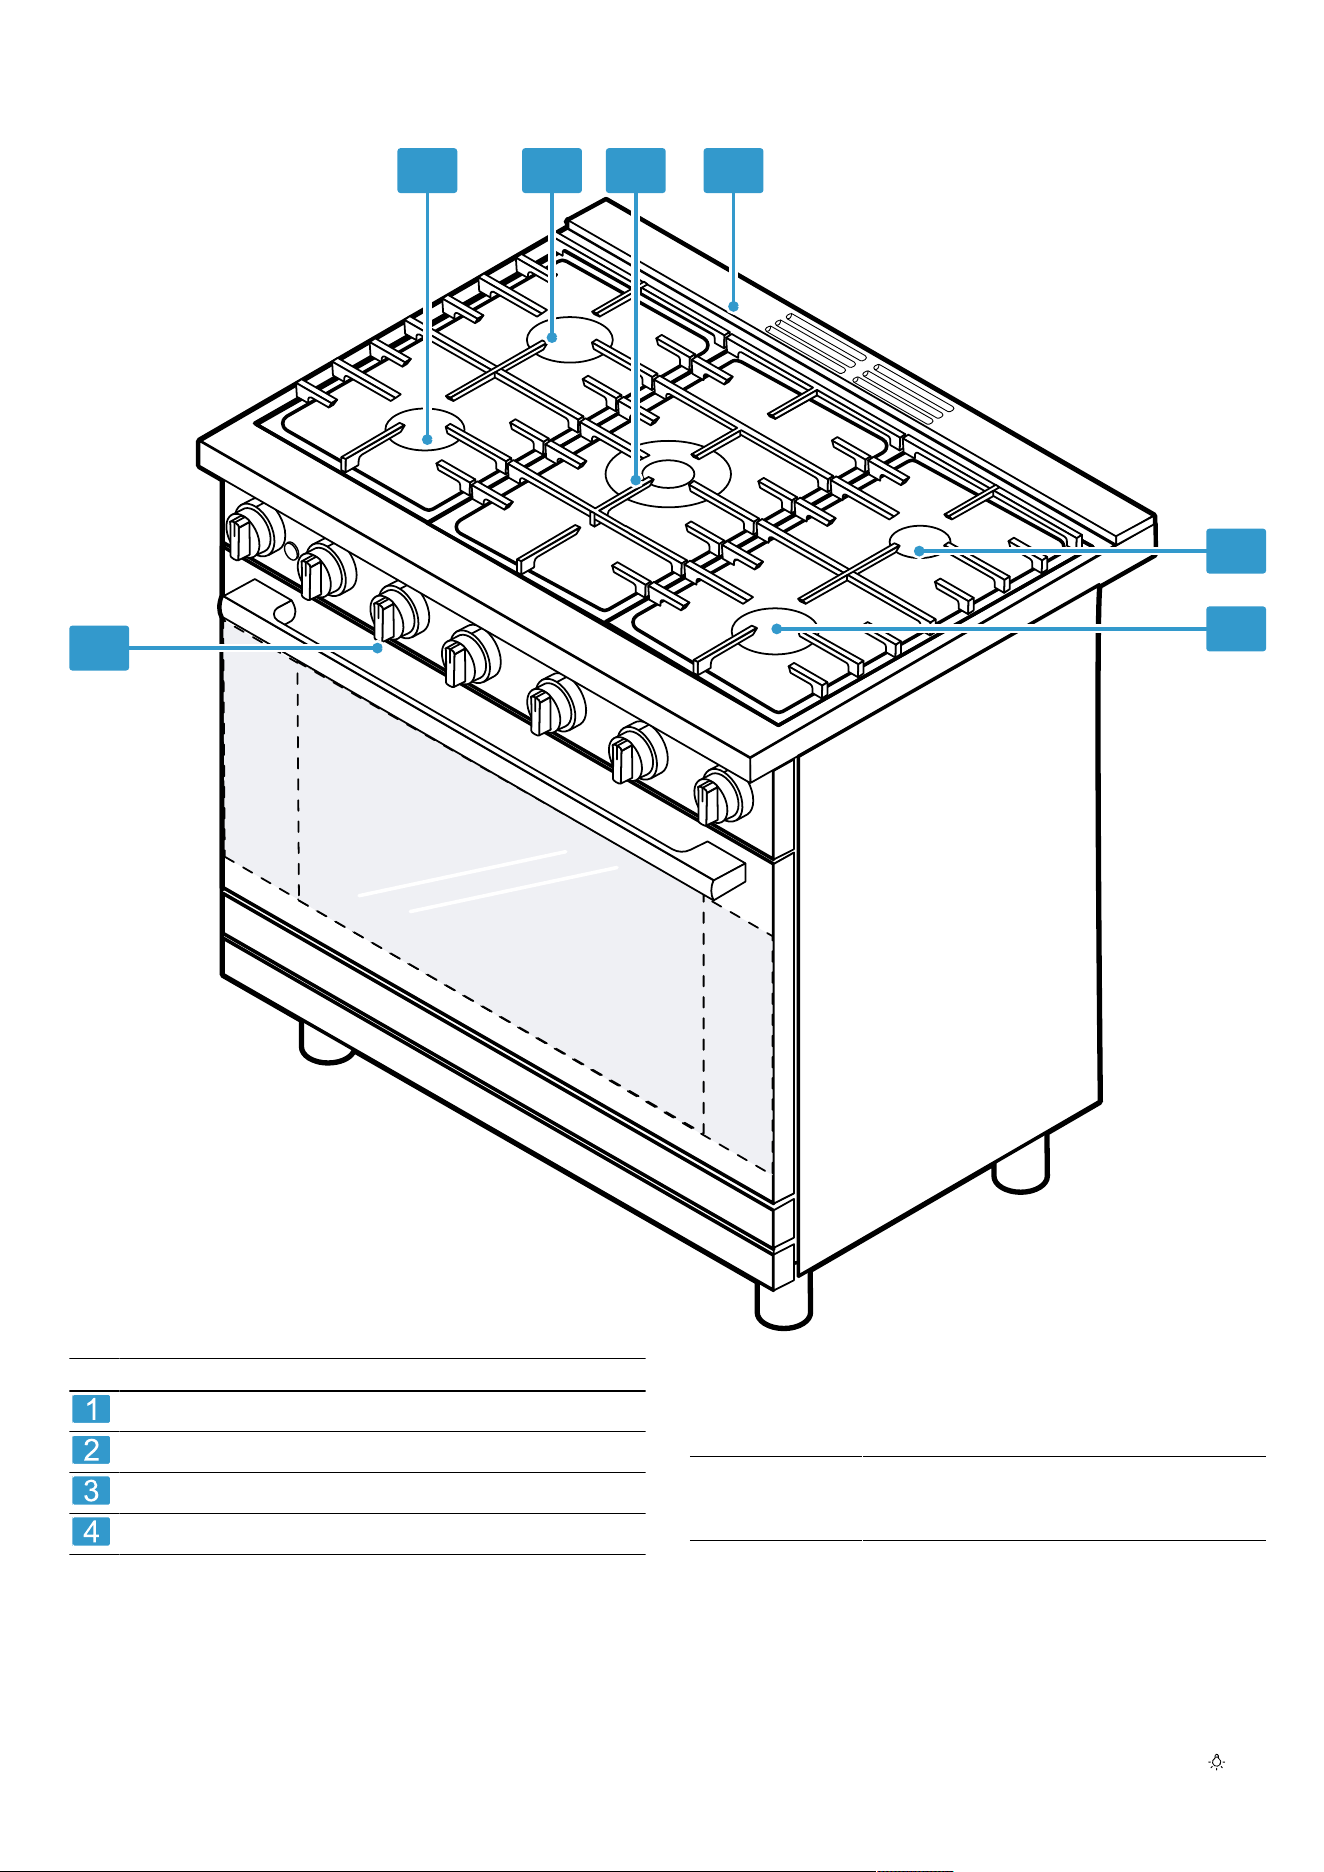
4.1 Appliance
Here you can find an overview of the parts of your appliance.
11
en-us Familiarizing yourself with your appliance
36" Range
1 4
4
2
23
3
No. Designation
Dual-flame burner (20,000BTU / 5.9kW)
Rapid burner (12,000BTU / 3.5kW)
Small burner (5,000BTU / 1.5kW)
Oven vent
4.2 Oven features
Cooling fan
The cooling fan runs during all cooking modes.
The fan can be heard when it is running, and warm air
may be felt as it is released from the appliance vent.
The fan may also run after the appliance is off.
Temperature indicator
The temperature indicator light shows when the set tem-
perature has been reached.
Temperature in-
dicator light
The indicator light is lit when the oven
is heating up. It goes out as soon as
the set temperature has been reached.
Indicator light
The indicator light is lit when the oven is heating up.
It goes out as soon as the set temperature has been
reached.
Oven light
Your appliance is equipped with an oven light.
You can turn the oven light on and off by pressing .
12
Familiarizing yourself with your appliance en-us
4.3 Burner assembly
Sealed burners
Your cooktop has sealed gas burners.
There are no burner parts under the cooktop to clean,
disassemble or adjust. Your cooktop has three different
burner sizes: small, large and dual-flame.
WARNING
To prevent flare-ups do not use the cooktop without all
burner caps and all burner grates properly positioned.
CAUTION
To prevent burns, do not touch burner caps or grates
while hot.
Turn the cooktop off and allow the burners to cool.
Notes
The burner caps must be properly placed for the
cooktop to function properly.
If the burner cap is not properly placed, one or more
of the following may occur:
– Burner flames are too high
– Flames shoot out of the burners
– Stainless steel discolorations
– Burners do not ignite
– Burner flames light unevenly
– Burner emits gas odor
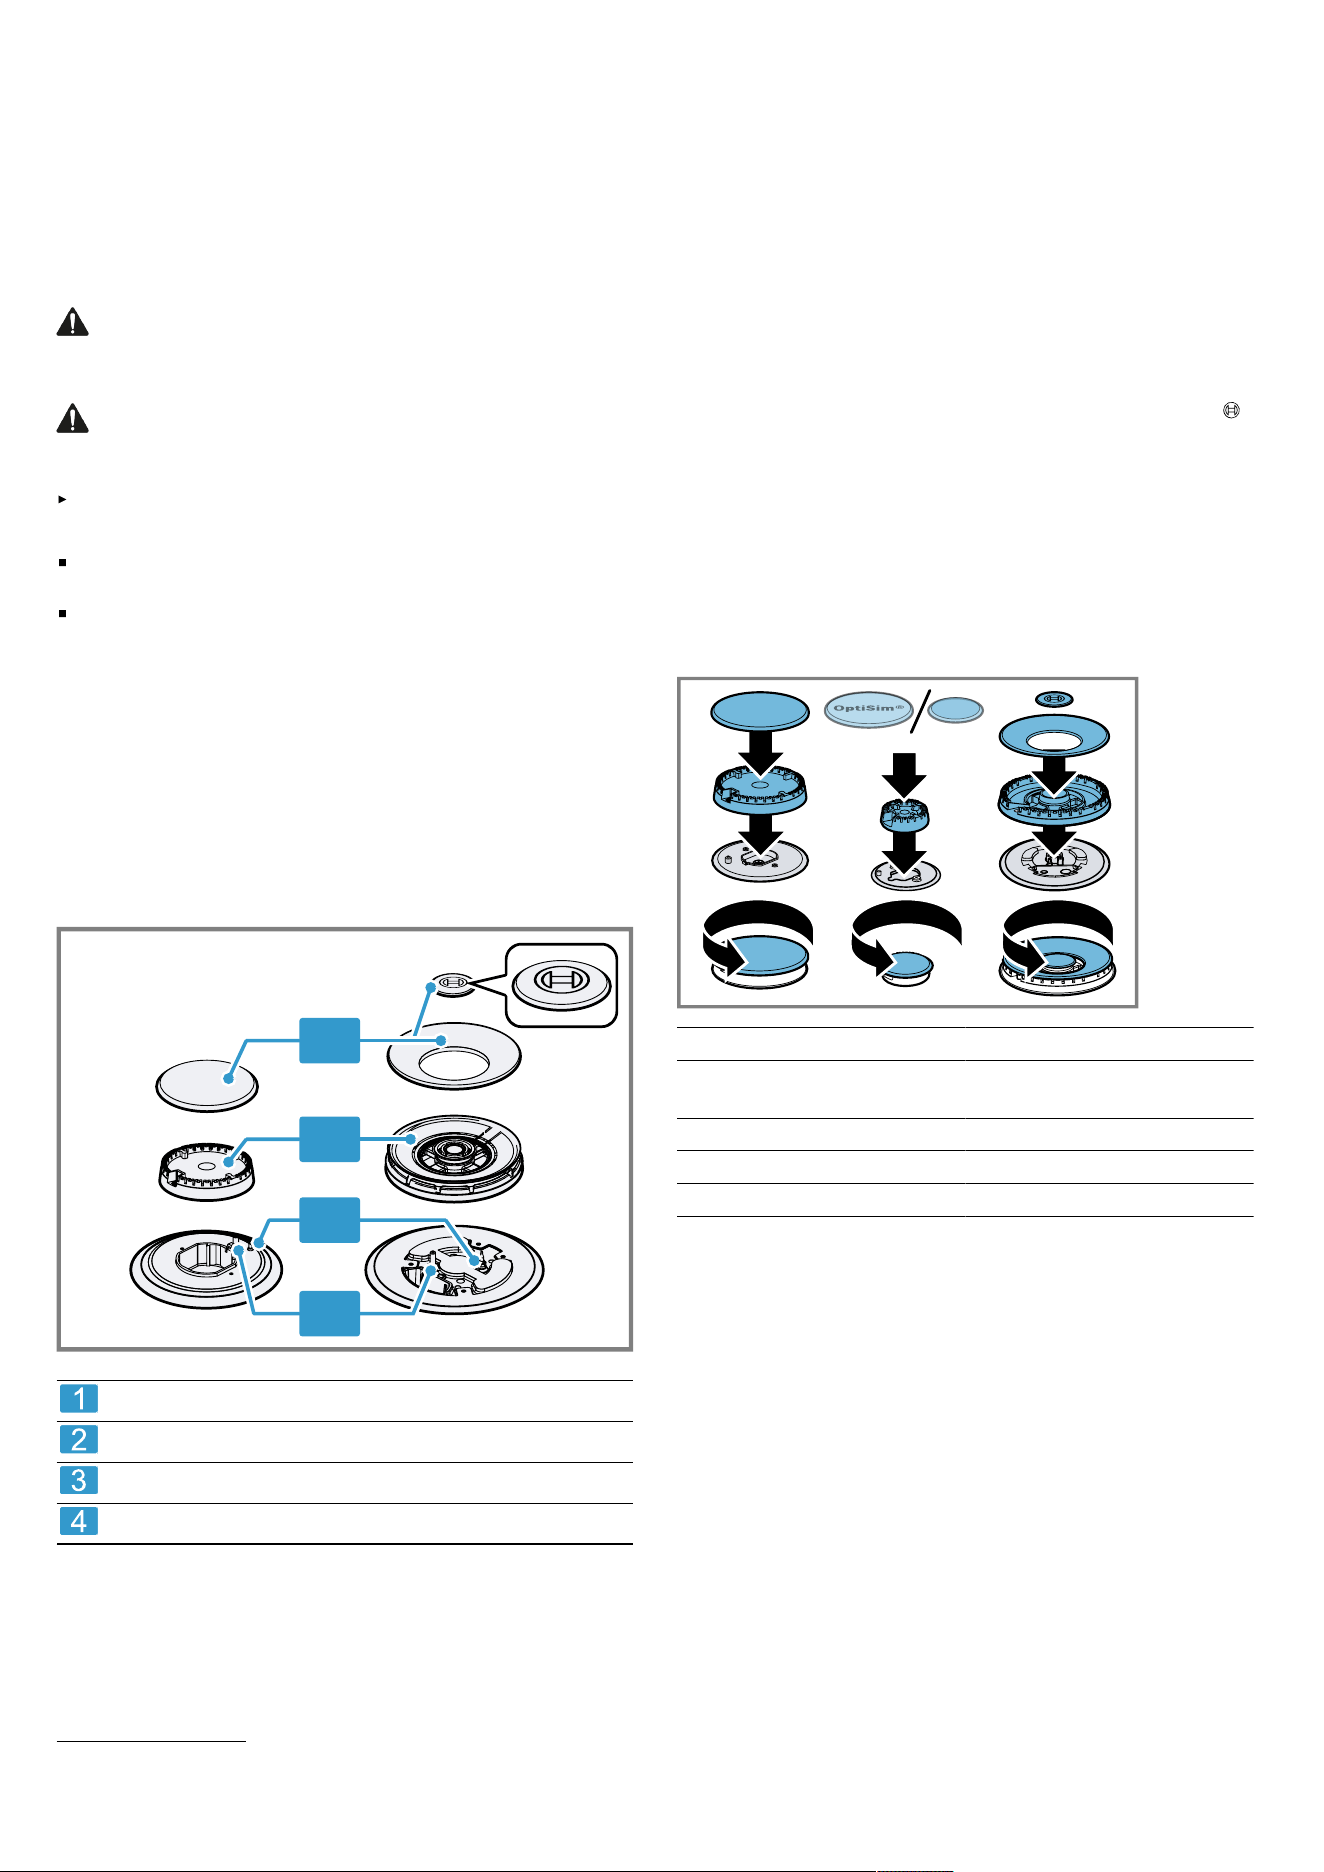
Burner parts
The burner caps must be properly placed for the cook-
top to function properly.
4
3
2
1
Burner cap
Burner base
Thermocouple
Igniter
Burner cap and burner base placement
After electrical connection is complete, place each
burner base on the corresponding location on the cook-
top.
One of the three bars on the burner base should line up
with the notch and prevent the base from rotating. The
small hole or cutout near the edge should also line up
with the igniter. Pay special attention to avoid damaging
the igniter during installation of the base. See Illustration
below.
Once each base is located and resting evenly, place
each burner cap on its correct burner base. See Illustra-
tion.
Note: Do not swap burner caps. These will affect the
stability of the flame and make the burner impossible or
difficult to light. The smallest burner cap marked with
is to be used exclusively on the Dual-flame burner. Do
not put it on the small burner.
Place burner cap gently on top of base so that the
prongs of the burner base fit snugly into the groove of
the burner cap.
If the maintop is removed by a certified installer (for ex-
ample to check electrical or gas connection) the pan-
head screws that were removed must be re-installed to
ensure proper functionality of burners.
Burner Burner cap dimensions
Dual-flame burner Inner dual: 1
3
/
4
" (45mm)
Ring: 5
5
/
16
" (135 mm)
Small burner
1
2
3
/
16
" (55mm)
OptiSim® burner
1
3
3
/
4
" (95mm)
Large burner 3
15
/
16
" (100mm)
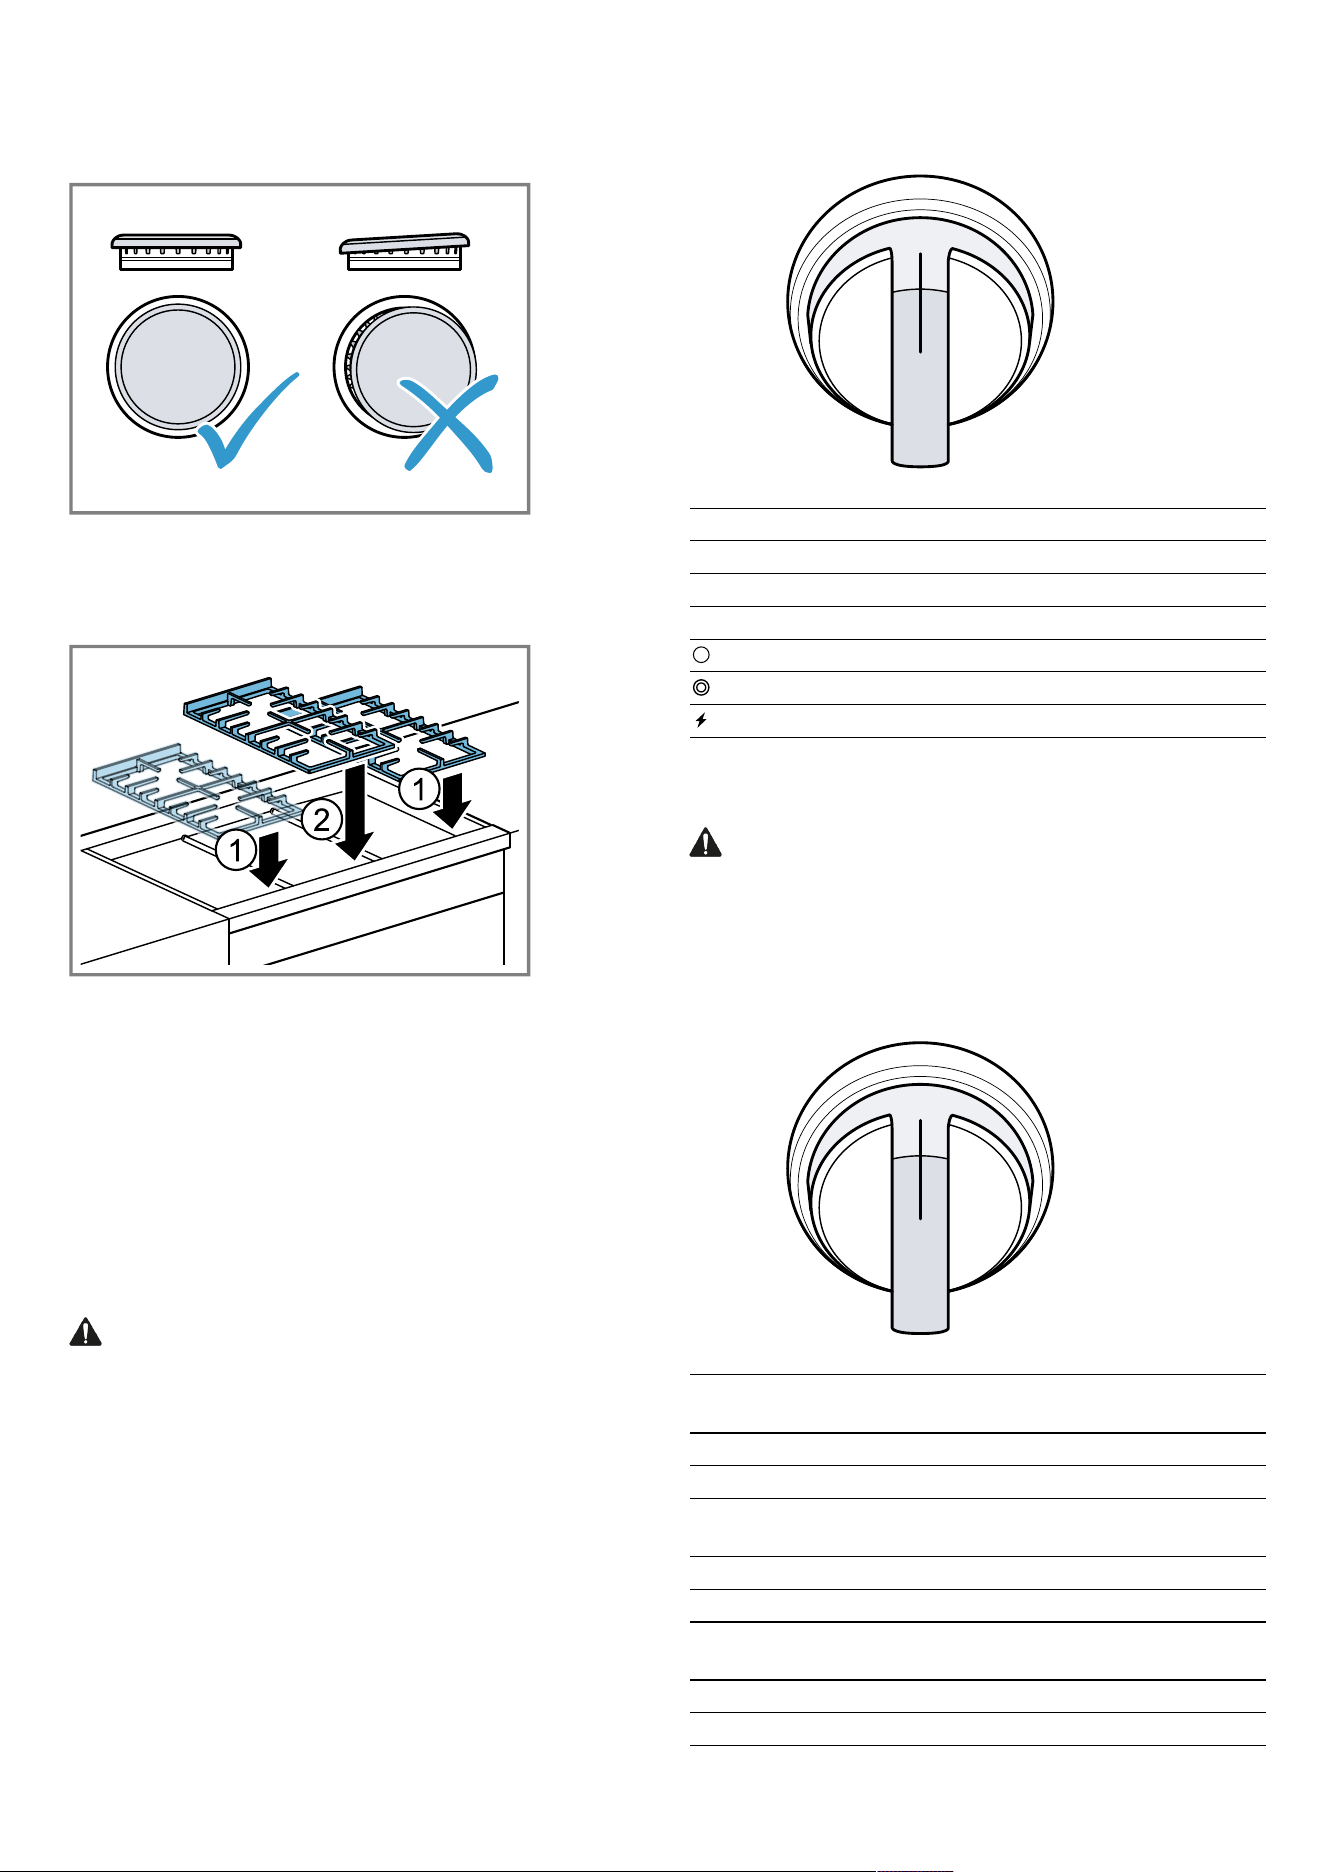
Checking burner cap placement
Check to make sure that there is no gap between the
burner cap and burner base.
See illustration for correct and incorrect placements of
the burner cap.
You may gently try to move the burner cap from side to
side to check if it is properly placed. If properly placed,
1
Depending on the appliance specifications
13
en-us Familiarizing yourself with your appliance
the cap will click from side to side as the prongs hit the
groove ridge.
Install grates
First position the outer grates, followed by the center
grate.
4.4 Control panels
You can use the control panel to configure all functions
of your appliance and to obtain information about the
operating status.
Cooktop control panel
The cooktop has one control knob for each burner.
Push in and turn to the left to light and set the desired
heat setting. Once the flame appears, keep the knob
pressed in fully for 2-3 seconds before releasing and
adjusting the flame.
WARNING
Failure to operate knobs properly may result in personal
injury and damage to the appliance.
The cooktop has standard burner controls.
Symbol Meaning
off Cooking zone switched off
min Minimum power
max Maximum power
Inner flame switched on
Inner and outer flame switched on
Recommended ignition position
Oven control panel
Control knobs
WARNING
Failure to operate knobs properly may result in personal
injury and damage to the appliance.
Oven
Set the required type of heating using the rotary selector
for the oven.
Knob po-
sition
Function
off Oven switched off
bake Switching on Bake
conv
bake
Switching on Convection Bake
broil Switching on Broiling
conv broil Switching on Convection Broil
conv
roast
Switching on Convection Roast
pizza Switching on Pizza mode
proof Switching on Proofing
14
Accessories en-us
Knob po-
sition
Function
multi rack Switching on Multi Rack mode
air fry Switching on Air Fry
steam
clean
Switching on Steam clean
Temperature selector
Use the temperature selector to set the temperature.
Accessories5 Accessories
Only use genuine accessories. These are designed es-
pecially for your appliance.
The accessories supplied may differ depending on the
appliance model.
Accessories Use
Wire rack Inserting cake pans, baking
dishes, cookware, meat
and frozen meals.
5.1 Other accessories
You can purchase other accessories from our Customer
Service, specialist retailers or online.
You will find a comprehensive range of products for
your appliance in our brochures and online:
www.bosch-home.com
Accessories are appliance-specific. When purchasing,
always check for compatibility with your appliance
model number (E-Nr).
You can find out which accessories are available for
your appliance in our online shop or from our Customer
Service.
Other accessories Use
Telescopic rail Pull wire rack out further
without tipping.
Order number: 12029918
Wire rack Inserting cake pans, baking
dishes, cookware, meat
and frozen meals.
Order number: 11068084
Toe kick plate Toe kick plate to conceal
the appliance feet.
Order number:
HEZ90T36UC
Metal range feet Set (4 pcs.) of premium
range feet.
Order number: HEZ9LMUC
Island installation kit Island installation kit com-
posed from rear Vent trim
extension and special back-
trim.
Order number:
HEZ90H36UC
Low back guard Cover for the wall behind
the cooktop.
Order numbers:
30": HEZ90K30UC
36": HEZ90K36UC
5.2 Fitting the telescopic rail set
Instructions on fitting the telescopic rail set are enclosed
with the set.
5.3 Inserting racks
The wire rack can be inserted into the oven cavity at
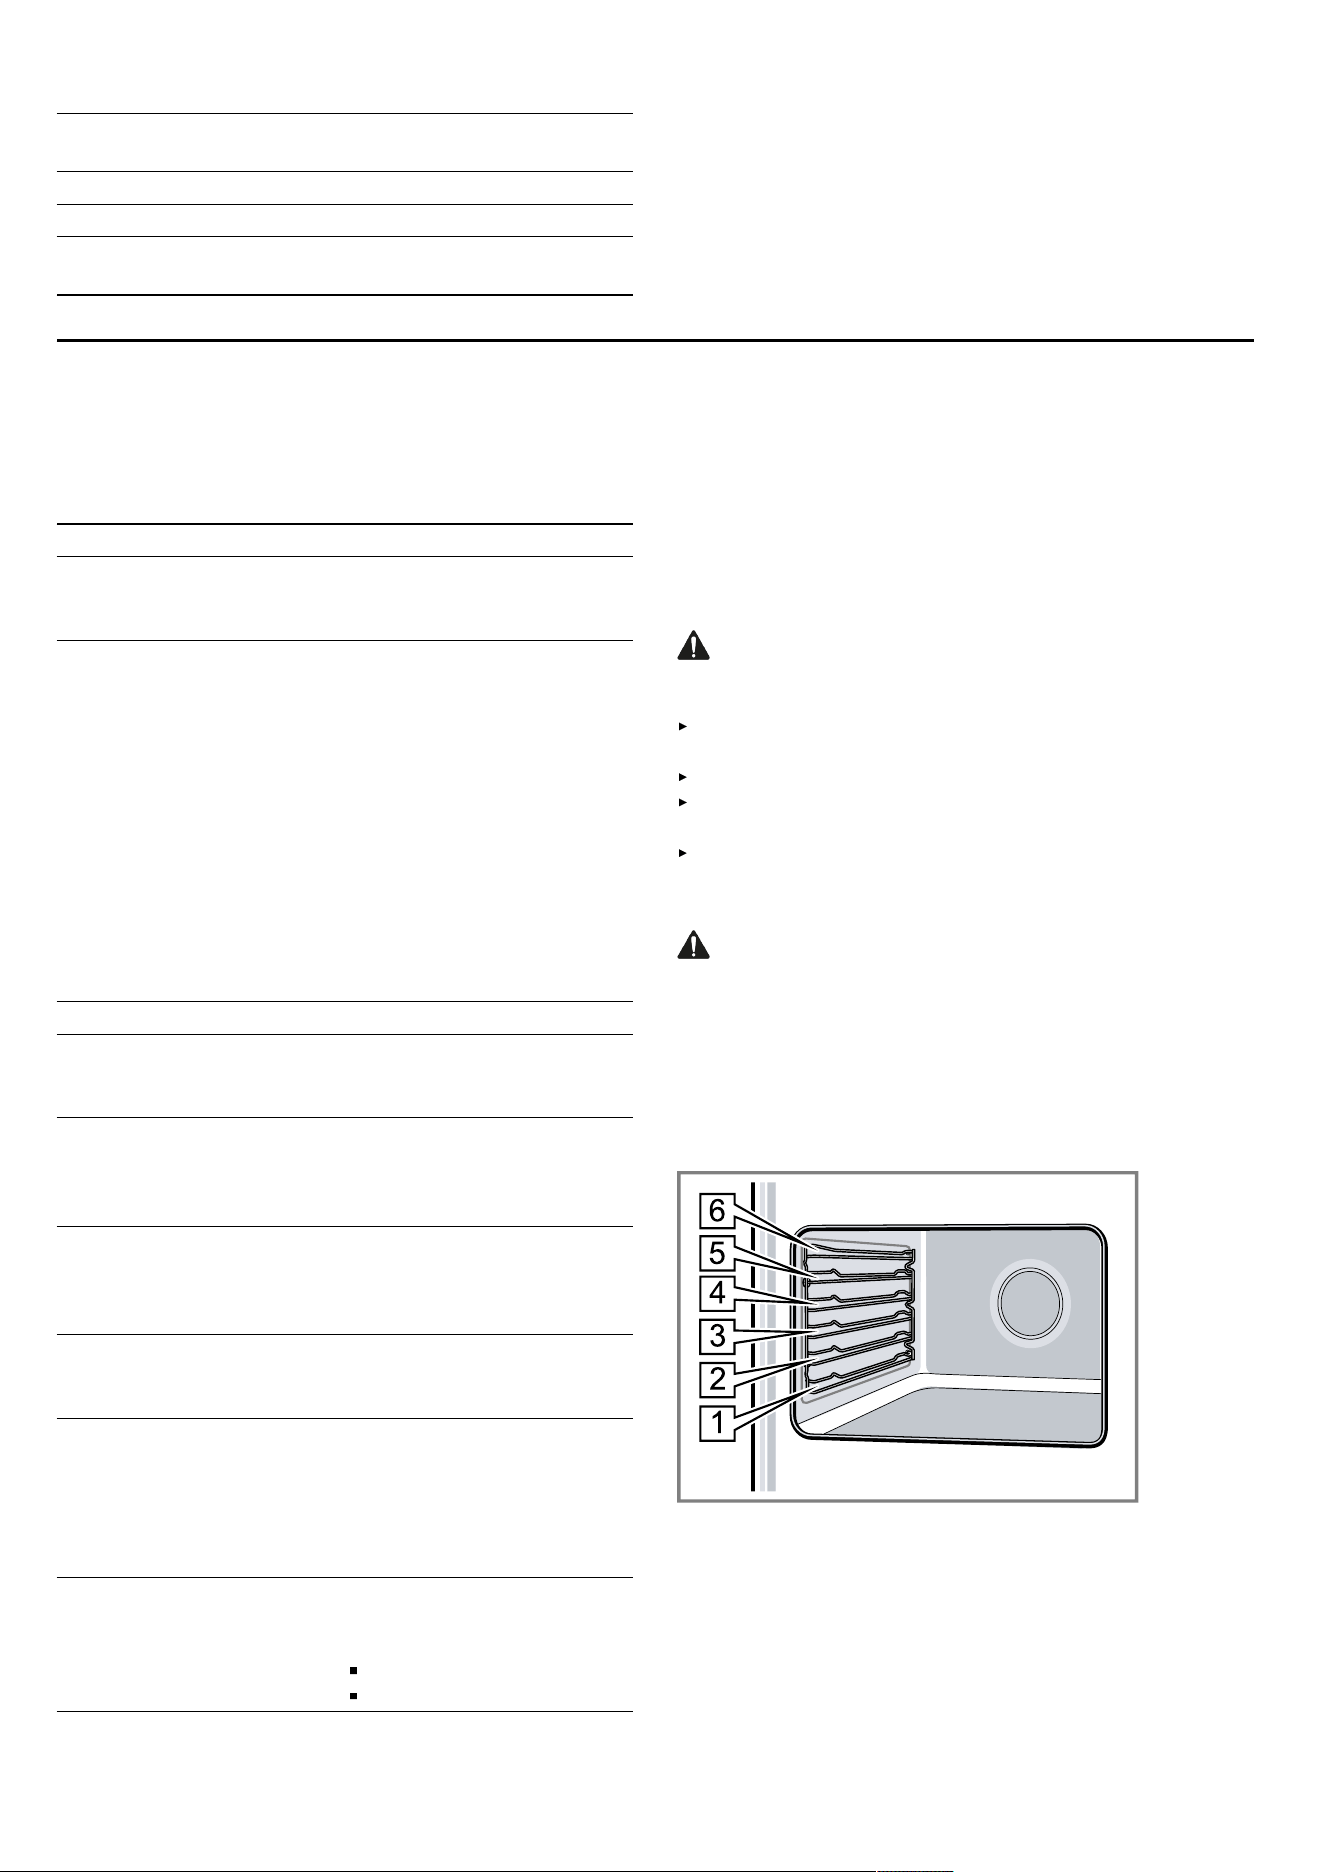
6different levels.
CAUTION
The oven racks and the oven cavity surfaces become
very hot during cooking.
Place oven racks in the desired positions before turn-
ing oven on.
Always use oven mitts when the oven is warm.
If a rack must be moved while the oven is hot, do not
let oven mitts contact hot heating elements.
Use caution when removing oven racks from the low-
est rack position to avoid contact with the hot oven
door.
CAUTION
To avoid possible injury or damage to the appliance, en-
sure oven rack is installed exactly per installation in-
structions and not backwards or upside down.
Always push racks in fully so that they do not touch the
door panel. Make sure that you always insert the racks
into the oven cavity the right way, and not backwards or
upside down.
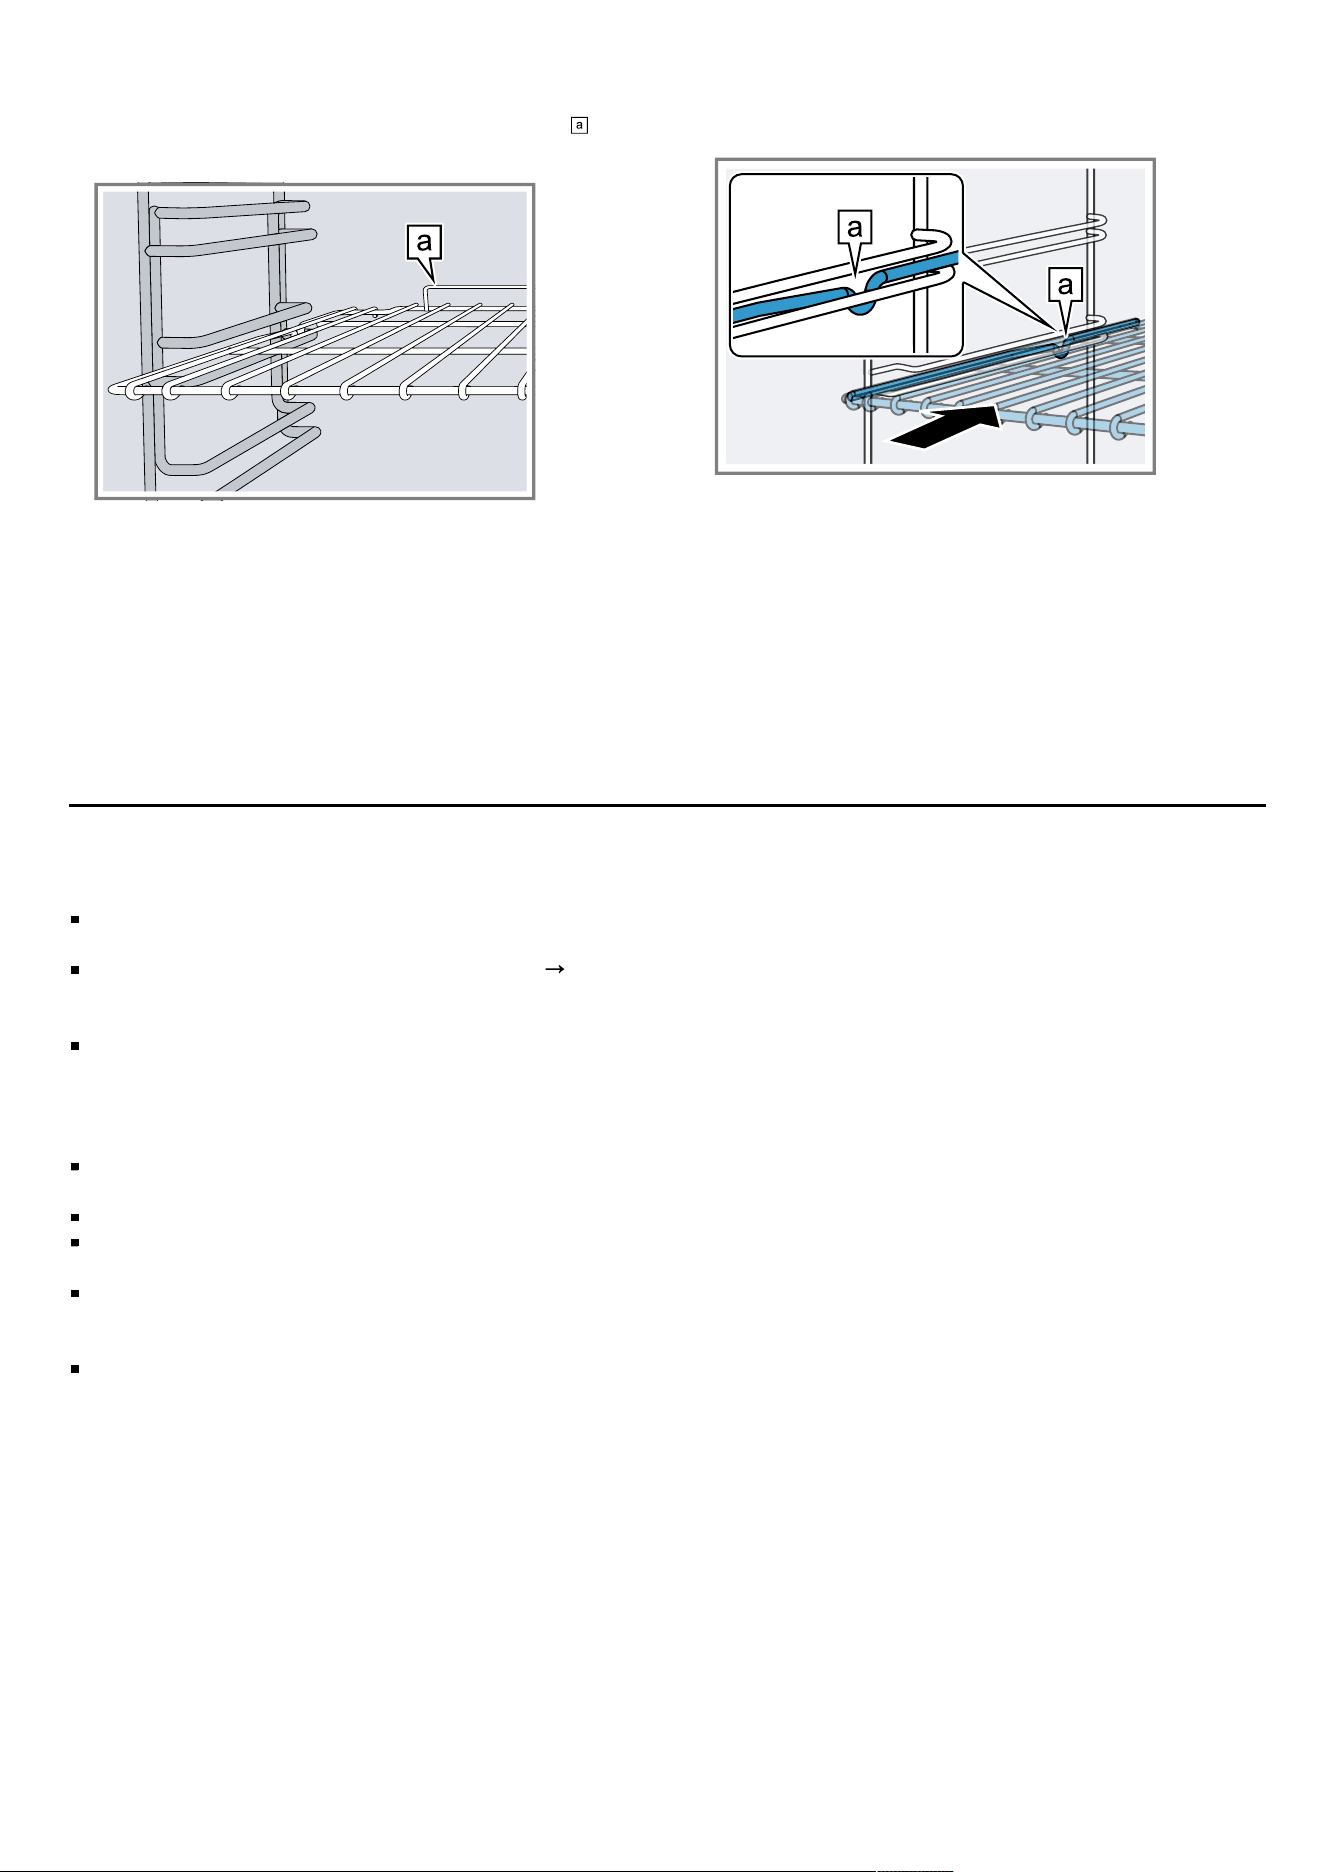
Flat rack
The rack is designed with a stop so it will stop before
coming completely out of the oven.
Inserting the wire rack into oven
1.
Grasp the rack firmly on both sides.
15
en-us Before using for the first time
2.
Do not insert the rack front and back inverted.
need to be in the back.
3.
Insert the rack.
4.
Tilt the rack up to allow the stop to slide onto the rack
guide.
5.
Bring the rack to a horizontal position and push it in
the rest of the way.
The rack should be straight and level.
Removing the flat rack from the oven
1.
Grasp the rack firmly on both sides and pull it toward
you.
2.
When the stop is reached, tilt the rack up and pull it
out fully.
Before using for the first time6 Before using for the first time
Carry out these steps before using your appliance.
The appliance must be properly installed by a quali-
fied service provider before use.
Read and understand all safety precautions
Page3
and information in the Use and Care Manual prior to
operating.
This Use and Care Manual covers several models.
Not all features are available on all models.
6.1 Before using the oven for the first time
Remove all packing materials and literature from the
cooktop surface.
Wipe with a clean, damp sponge and dry.
There may be a slight odor during the first several
uses. This is normal and will disappear.
Optimum cooking results depend on the proper cook-
ware being selected and used. See “Choosing Cook-
ware - Cookware Recommendations”.
Read and understand all safety precautions and infor-
mation in the Use and Care Manual prior to operat-
ing.
Prepping the oven
1.
Remove the accessories and the rack guides from
the oven cavity.
2.
Completely remove any leftover packaging, e.g. small
pieces of polystyrene, from the oven cavity.
3.
Remove protection film from parts.
4.
Clean the outside of the appliance with a soft, damp
cloth.
5.
Clean the oven cavity with hot soapy water.
Pre-cleaning the oven
1.
Remove the accessories and the hook-in rack guides
from the oven cavity.
2.
Completely remove any leftover packaging, e.g. small
pieces of polystyrene, from the oven cavity.
3.
Some parts are covered with a protective film. Re-
move this scratch protection film.
4.
Clean the outside of the appliance with a soft, damp
cloth.
5.
Clean the oven cavity with hot soapy water.
Initial start up
In order to prevent excess smoke and odor from manu-
facturing oils, heat up the oven for the first time when it
is empty and closed.
Note: Make sure that there is no leftover packaging,
such as polystyrene pellets, in the oven cavity. Before
heating the appliance, wipe the smooth surfaces in the
oven cavity with a soft, damp cloth. Keep the kitchen
ventilated while the appliance is heating.
1.
Turn the function selector to the desired operating
mode.
2.
Use the temperature selector to set the maximum
temperature.
3.
Switch the oven off after one hour.
4.
Once oven has cooled wipe out with hot soapy water
and replace rack guides.
Note: When the appliance is heating up for the first
time, you may hear crackling noises coming from the
oven.
Re-cleaning the oven
1.
Clean the oven cavity with hot soapy water.
16
Cooktop operation en-us
2.
Reinstall the rack guides.
3.
If necessary, clean the door panels.
Cleaning the accessories
Before using the accessories, clean them thoroughly
using a cloth and warm soapy water.
6.2 Before using the cooktop for the first
time
Remove all packing materials and literature from the
cooktop surface.
Wipe with a clean, damp sponge and dry.
There may be a slight odor during the first several
uses. This is normal and will disappear.
Optimum cooking results depend on the proper cook-
ware being selected and used.
"Cookware recommendations", Page21
Read and understand all safety precautions and infor-
mation in the Use and Care Manual prior to operat-
ing.
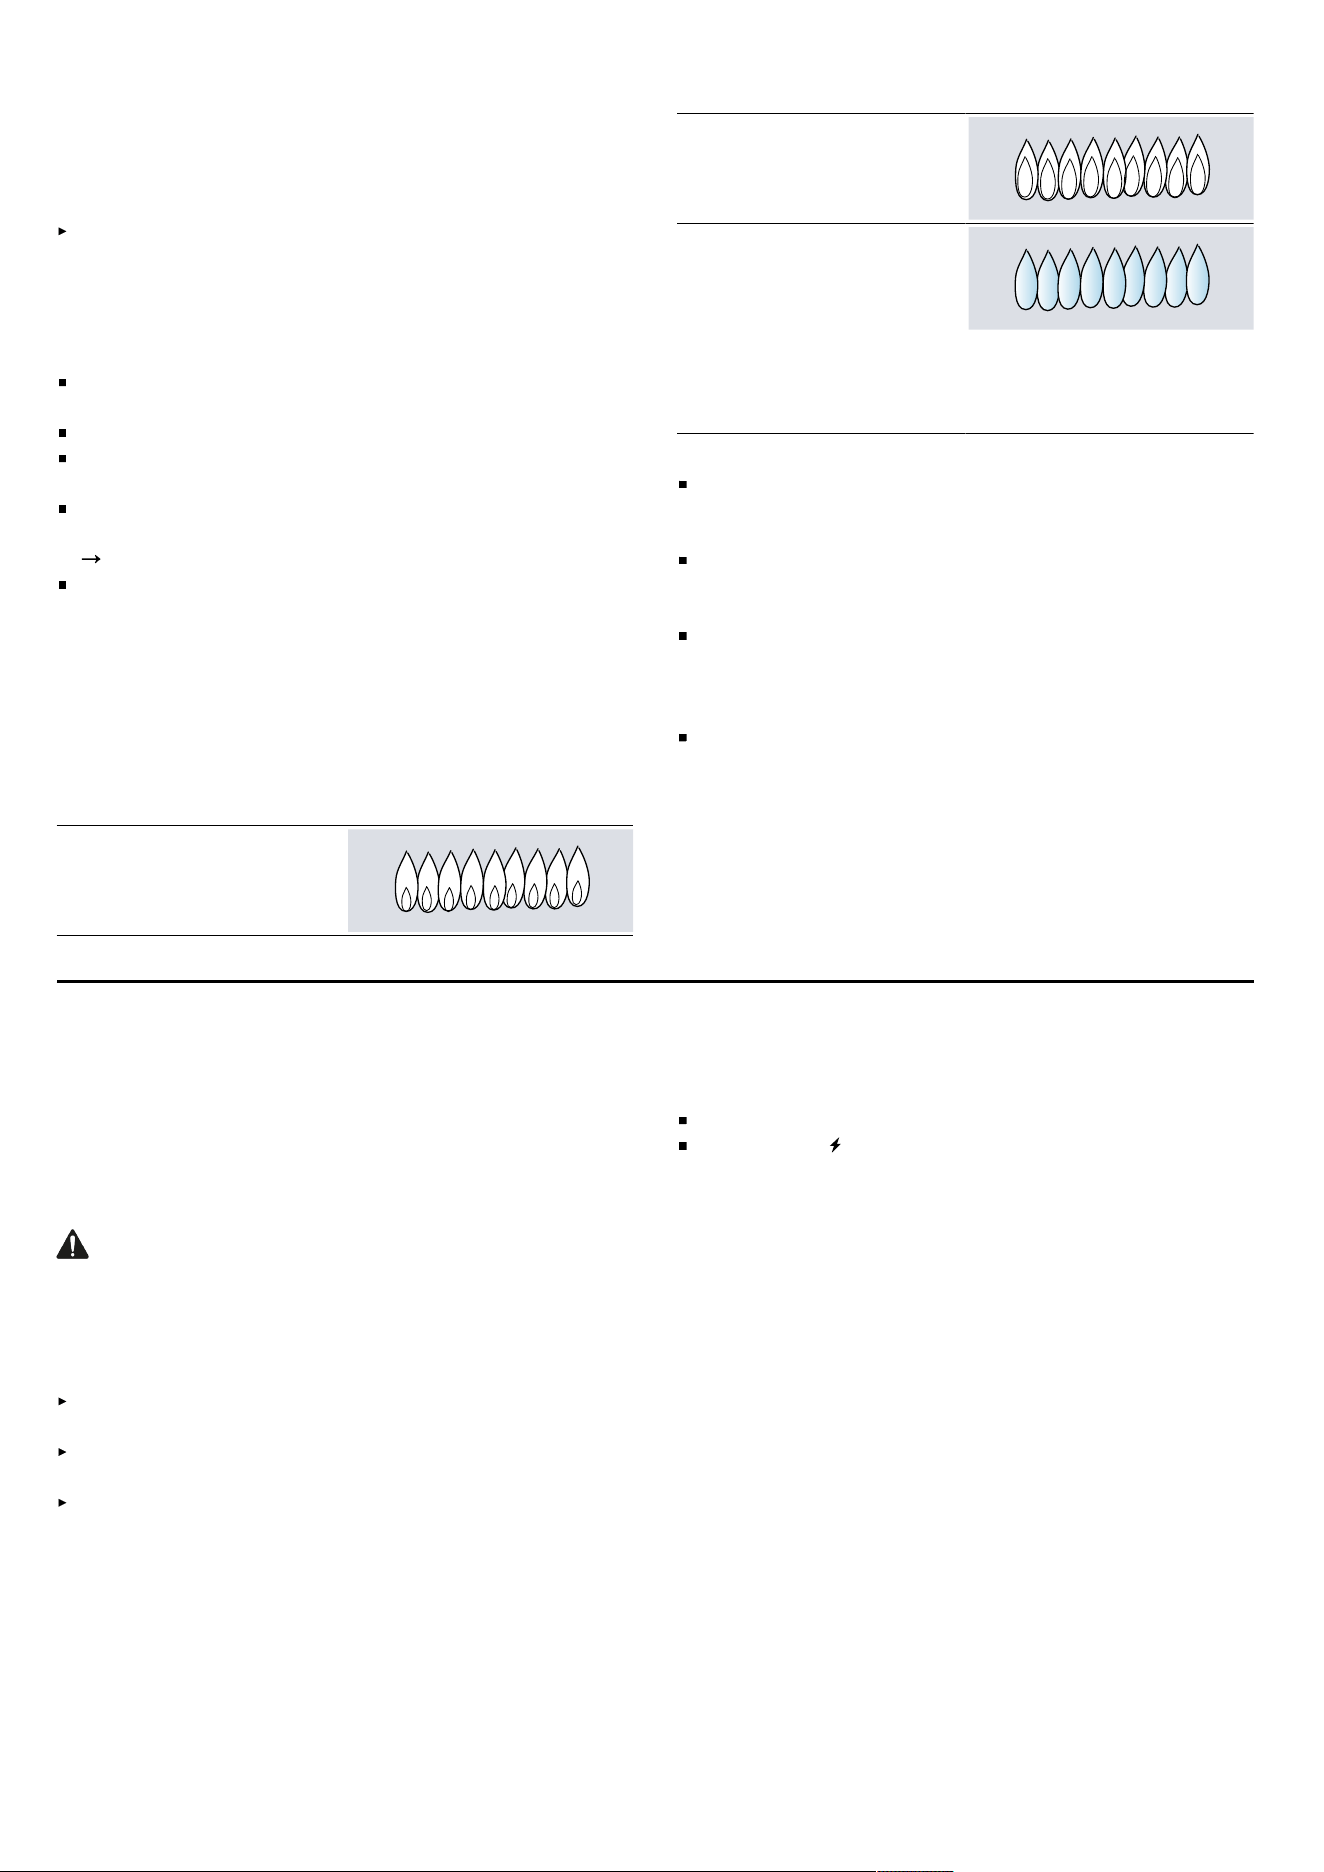
Typical flame characteristics
The burner flame should be blue in color and stable
with no yellow tips, excessive noise or fluttering. It
should burn completely around the burner cap.
Checking the flame characteristics:
Yellow flames:
Further adjustment is re-
quired.
Yellow tips on outer cones:
Normal for propane gas.
Soft blue flames:
Normal for natural gas.
Orange flames:
Can be normal if certain
types of humidifiers are
used in the home. Flames
should return to blue with-
out the humidifier running.
Note
If the flame is completely or mostly yellow, verify that
the regulator is set for the correct fuel. Retest after
adjustment.
Some yellow streaking is normal during the initial
startup. Allow the appliance to operate for 4–5min-
utes and reevaluate before making adjustments.
Foreign particles in the gas line may cause an orange
flame during initial use. This should disappear with
use. Check the burner to make sure that port holes
are not obstructed. If the ports are clogged.
An audible "pop" may be heard when the burner is
turned off manually. The "popping" may be louder
with propane gas than with natural gas. This is nor-
mal.
Cooktop operation7 Cooktop operation
Here you will find out everything you need to know
about operating your cooktop.
7.1 About the appliance
Use the cooktop for surface cooking applications such
as boiling, frying, simmering, steaming and sautéing.
WARNING
Cooking with gas can release small amounts of certain
byproducts, such as Carbon Monoxide, Benzene,
Formaldehyde, Nitrogen Oxides (including Nitrogen
Dioxide), and Particulate Matter / Soot. To minimize ex-
posure to these substances:
Always ensure proper ventilation by using an appro-
priate ventilation fan or hood and/or an open window.
Always operate the appliance according to the in-
structions in this manual.
The burners should be adjusted by a certified installer
or agency to ensure proper combustion.
7.2 To operate
Select the appropriate control knob, push in and turn
counterclockwise to the desired flame setting.
With this motion, burner sparking and gas flow will be
initiated. Keep the knob pressed and once the flame ap-
pears keep the knob pressed in fully for 2-3 seconds
before releasing and adjusting the flame.
Turn off by turning the control knob clockwise to off.
Notes
It is normal that sparks will appear at all burners.
The symbol on the control knobs indicates the po-
sition recommended for igniting the burner.
7.3 In case of power failure
In the event of a power failure, the burners may be lit by
an alternate flame source.
Hold a lit flame source next to the burner gas exit ports,
turn corresponding knob to max position, and remove
flame source immediately upon burner lighting.
7.4 Flame failure safety system
Your cooktop is equipped with a safety system that cuts
off the gas flow in case the flame extinguishes by acci-
dent, (i.e. because of a strong draft or high amount of
spillage), preventing an escape of unburned gas.
This system requires that the knob has to be pressed in
completely for 2-3seconds until the thermocouple is
heated up by the flame and keeps the gas flowing.
7.5 Normal operation - electronic ignition
The cooktop uses electronic igniters to light the burners.
There is no pilot light. Each burner has its own igniter.
All igniters are activated when a control knob is pushed.
17

en-us Cooktop operation
CAUTION
To avoid possible injury or damage to the appliance, en-
sure grates are installed exactly per installation instruc-
tions and not backwards or upside down.
The igniter should be clean and dry for proper opera-
tion.
Avoid getting water or food on the igniter.
If the igniter is wet or soiled, it may spark without ig-
niting the burner, or even spark continuously when a
flame is present.
Note: If the burner does not light within 4 seconds, turn
the burner off. Check to see that the burner cap is posi-
tioned correctly. Check that the igniter is clean and dry.
Wait at least 5minutes before igniting the burner again.
If a burner still fails to ignite, see “Before Calling for Ser-
vice”.
7.6 Getting the most out of your appliance
Cooking suggestions for best results
Boil water in covered pot on High using largest
burner for best results. If water boils over, turn to a
lower setting.
When melting chocolate or butter, use smallest
burner with a water bath for best results.
When simmering, bring food to a boil first. Stir well to
be sure all the food is boiling, then cover and reduce
the flame to the desired setting to simmer.
There should be steam and slight quivering of the liq-
uid’s surface while simmering.
Use a lid to keep a more constant cooking tempera-
ture and heat food faster.
Check the food occasionally to see if the control knob
should be turned to a lower or higher setting.
It is normal to stir food occasionally.
Center the pan over the burner before turning the
burner on.
Use proper cookware.
Refer to the settings recommendations in the follow-
ing chart for suggested settings.
7.7 Settings recommendations
Here you can find recommendations on cooking and an
overview of various dishes with suitable heat levels.
Uses Heat setting
Boiling (i.e. water, stock, etc.) High
Pan frying, sautéing, browning
meat, deep frying
Medium High
Shallow frying, eggs, pancakes, ba-
con
Medium
Steaming, braising Medium Low
Melting chocolate, melting butter,
simmering sauces, soups and
stews (i.e. tomato sauce, alfredo
sauce, beef stew, etc.)
Low
7.8 Standard burner cooking table
The table lists the optimal heating setting for various dishes.
The temperature and cooking time depend on the amount, composition and temperature of the food. Setting ranges
are indicated for this reason. Try using the lower values at first. During cooking heat may be increased.
Beverages
Food Burner Heat Level Start Cooking
(boil, melt, brown. fry, etc.)
Heat Level Continue Cook-
ing (simmer, braise, poach,
hold, etc.)
Mulled Cider Dual Flame
Large
High Medium Low
Hot Chocolate Dual Flame
Large
Medium High Low
Tea Small High Low
Breads
Food Burner Heat Level Start Cooking
(boil, melt, brown. fry, etc.)
Heat Level Continue Cook-
ing (simmer, braise, poach,
hold, etc.)
French toast Dual Flame
Large
Medium Medium-Medium Low
Pancakes Dual Flame
Large
Medium Medium-Medium Low
Grilled Sandwiches Dual Flame
Large
Medium Medium-Medium Low
18

Cooktop operation en-us
Cereals
Food Burner Heat Level Start Cooking
(boil, melt, brown. fry, etc.)
Heat Level Continue Cook-
ing (simmer, braise, poach,
hold, etc.)
Beans Dual Flame
Large
High Medium-Medium Low
Cornmeal/Polenta Large High Medium-Medium Low
Grits Large High Medium-Medium Low
Oatmeal Large High Medium-Medium Low
Deep Frying
Food Burner Heat Level Start Cooking
(boil, melt, brown. fry, etc.)
Heat Level Continue Cook-
ing (simmer, braise, poach,
hold, etc.)
French Fries Dual Flame Medium High Medium High
Donuts Dual Flame Medium High Medium High
Desserts
Food Burner Heat Level Start Cooking
(boil, melt, brown. fry, etc.)
Heat Level Continue Cook-
ing (simmer, braise, poach,
hold, etc.)
Pie Filling, Fruit Compote Small Medium Low Medium-Medium Low
Pudding Small Medium Low Medium-Medium Low
Poached Fruit Dual Flame
Large
High-Medium High Medium-Medium Low
Eggs
Food Burner Heat Level Start Cooking
(boil, melt, brown. fry, etc.)
Heat Level Continue Cook-
ing (simmer, braise, poach,
hold, etc.)
Fried Dual Flame
Large
Medium High Medium Low
Scrambled Dual Flame
Large
Medium High Medium Low-Low
Meat, Fish, Poultry
Food Burner Heat Level Start Cooking
(boil, melt, brown. fry, etc.)
Heat Level Continue Cook-
ing (simmer, braise, poach,
hold, etc.)
Bacon, Sausage Patties Dual Flame Medium High Medium-Medium Low
Braising: Swiss Steak, Pot
Roast, Stew Meat
Dual Flame Medium High Low
Shallow Frying: Chicken,
Fish
Dual Flame Medium Medium-Medium Low
Pan Frying: Lamb Chops,
Thin Steaks, Hamburgers,
Link Sausage
Dual Flame Medium High Medium
Simmering: Stewed
Chicken, Corned Beef,
Poaching Fish
Dual Flame High Medium Low
19

en-us Cooktop operation
Pasta
Food Burner Heat Level Start Cooking
(boil, melt, brown. fry, etc.)
Heat Level Continue Cook-
ing (simmer, braise, poach,
hold, etc.)
All types Dual Flame
Large
High High
Rice
Food Burner Heat Level Start Cooking
(boil, melt, brown. fry, etc.)
Heat Level Continue Cook-
ing (simmer, braise, poach,
hold, etc.)
White Rice Large High Low
Brown Rice Large High Low
Sauces
Food Burner Heat Level Start Cooking
(boil, melt, brown. fry, etc.)
Heat Level Continue Cook-
ing (simmer, braise, poach,
hold, etc.)
Tomato Sauce: Marinara,
Bolognese
Dual Flame High Low
Cream Sauce: Alfredo,
Queso
Dual Flame Medium Low
Butter Sauce: Bearnaise,
Hollandaise
Large
Small
Medium Low
Soups and Stocks
Food Burner Heat Level Start Cooking
(boil, melt, brown. fry, etc.)
Heat Level Continue Cook-
ing (simmer, braise, poach,
hold, etc.)
Cream Soup Dual Flame
Large
Medium Low
Broth Soup Dual Flame
Large
High Low
Stock: Beef, Chicken, Veg-
etable
Dual Flame
Large
High Low
Vegetables
Food Burner Heat Level Start Cooking
(boil, melt, brown. fry, etc.)
Heat Level Continue Cook-
ing (simmer, braise, poach,
hold, etc.)
Fresh Large
Small
High Medium
Frozen Large
Small
High Medium
7.9 Notes regarding cookware
The following information and tips have been provided
to help you save energy and avoid damaging your cook-
ware.
Suitable cookware
Burner Recommended pan base
diameter
Small burner 5" - 8" (127 - 203mm)
Large burner 7" - 9½" (178 - 240mm)
Burner Recommended pan base
diameter
Dual-flame burner 7" - 11" (178 - 280mm)
Pans with a diameter of less than 4.7" (120mm) or
more than 11.0" (280mm) should not be used. If you
do use larger pans, these should not protrude beyond
the edges of the appliance.
20
Oven operation en-us
Cookware recommendations
Note: When using certain pots or pans, a slight and
temporary deformation of the steel cooking surface may
occur. This is normal and does not affect the functional-
ity of the appliance.
Proper Cookware
Aluminum or copper bottomed pans conduct heat
evenly.
Steel pans, if not combined with other metals, may
cook unevenly.
Cast-iron cookware absorbs heat slowly and cooks
more evenly at low-to-medium settings.
Flat heavy bottom pans provide even heat and stabil-
ity.
DO NOT USE pans that are thin, warped, dented or
ridged as they heat unevenly.
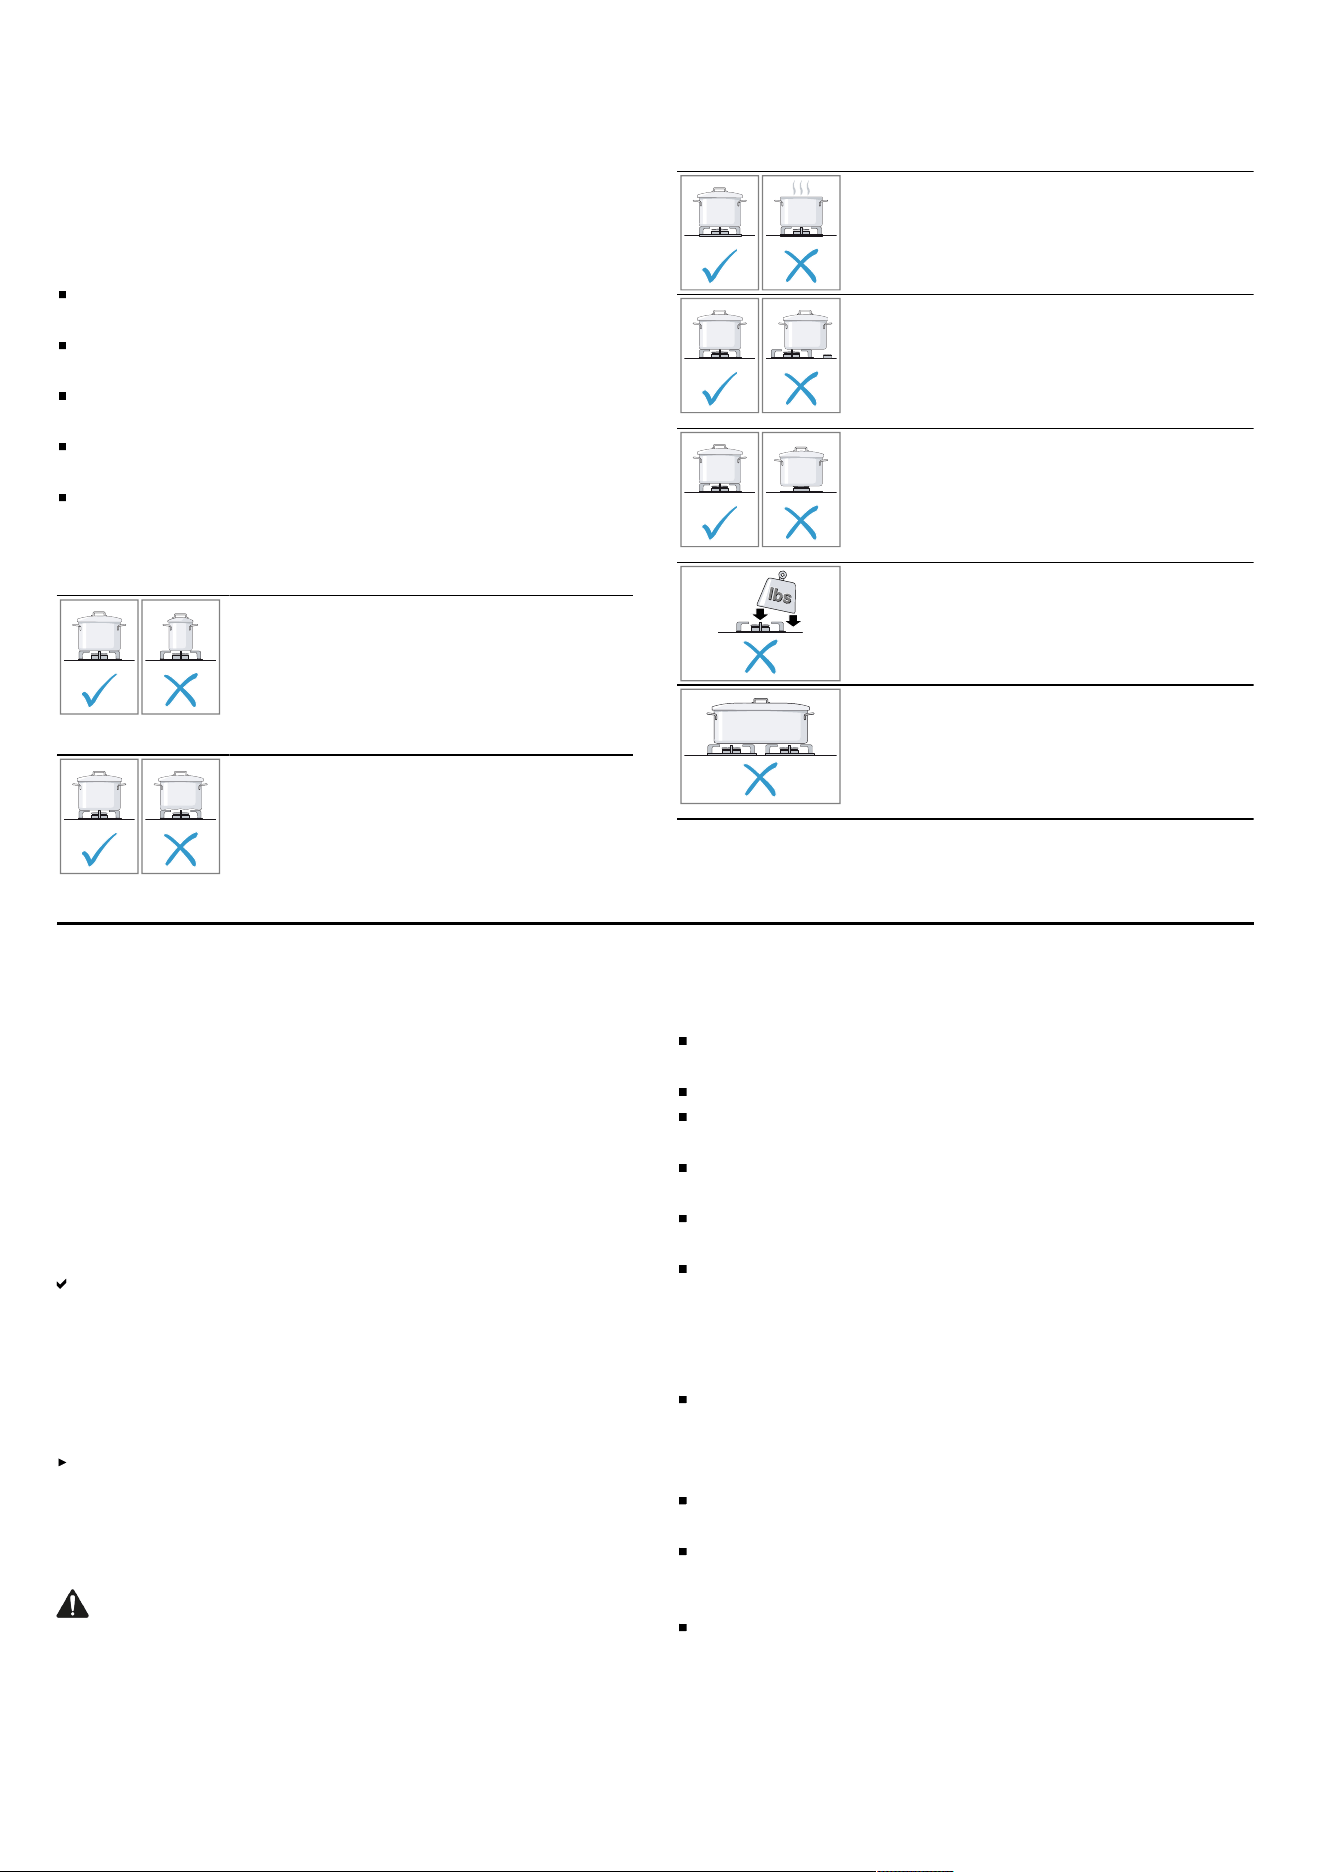
Information for use
Use cooking vessels of appropriate
size for the particular burner.
Don't use small cooking vessels on
large burners. The flame shouldn't
come in contact with the sides of the
cooking vessel.
Don't use any deformed cooking ves-
sels that don't stand solidly on the
cooktop. The vessels could tip over.
Only use cooking vessels with flat and
thick bottoms.
Don't cook without a lid or if the lid is
not on all the way. The majority of the
heat is lost.
Place the cooking vessel in the center
of the burner, otherwise it may tip over.
Don't place large pots on the burners
near the stove controls. They could
overheat and become damaged.
Place the pots on the pan supports,
never directly onto the burners.
Prior to use, ensure that the pan sup-
ports and lids of the gas burners are
positioned correctly.
Handle vessels carefully on the cook-
top.
Don't bang the cooktop and don't
place any heavy weight on it.
Never heat a cooking vessel (e.g.
roasting tin, pan, cooking stone) with
multiple burners, except for the griddle
plate. The resulting accumulation of
heat causes damage to the appliance.
Oven operation8 Oven operation
Here you will find out everything you need to know
about operating your oven.
8.1 Switching on the oven
Note: Always keep the appliance door closed when it is
in operation.
1.
Turn the function selector to the desired operating
mode.
2.
Use the temperature selector to set the desired tem-
perature or grill setting.
The oven switches on.
Note: The indicator light is lit when the oven is heating
up. It goes out as soon as the set temperature has been
reached.
8.2 Switching off the oven
Turn the function selector to "off".
8.3 Getting the most out of your appliance
Aluminum foil
WARNING
Do not use aluminum foil or protective liners to line any
part of the appliance, especially the oven bottom. In-
stalling these liners may result in risk of electric shock
or fire.
Preheating the oven
Place oven racks in the required position before heat-
ing the oven.
Always preheat the oven.
Allow the oven to preheat while preparing recipe in-
gredients or food items.
Increasing the oven temperature will require a longer
preheat time.
When the oven has preheated a beep indicator will
sound for 2 seconds.
Once the oven is preheated, place the food in the
oven as quickly as possible to minimize the loss of
heat and reduction of oven temperature.
Baking pans and dishes
Glass baking dishes absorb heat. Some cookware
manufacturers recommend reducing the temperature
by 25°F (14°C) when using this type of dish. Follow
the manufacturers’ recommendations.
Cookie sheets should have at least 1" clearance on
all sides.
Use pans that provide the desired level of browning.
For tender, light, golden brown crusts, use light, an-
odized or shiny metal bakeware.
Dark, rough or dull pans (nonstick or anodized) will
absorb heat and result in a browner, crisper crust.
Some manufacturers recommend reducing the tem-
perature by 25°F (14°C) when using this type of
pan. Follow the manufacturers’ recommendations.
21
en-us Oven operation
Insulated cookie sheets or bakeware may increase
the length of cooking time.
Do not place broil pans or any other heavy objects
down on the open oven door.
Do not store empty pans or pizza stones in the oven
during cooking as this changes the cooking perfor-
mance. Store pans outside of the oven.
Opening the oven door
Open and close the appliance door only by holding the
door handle.
To avoid risk of burns, do not touch any other parts of
the door. Open the door as briefly as possible to avoid
temperature reduction. Use the interior oven light to
view the food through the oven window rather than
opening the door frequently.
High altitude baking
When cooking at high altitudes, recipes and cooking
times will vary.
For accurate information, write the Extension Service,
Colorado State University, Fort Collins, Colorado 80521.
There may be a cost for the guides. Specify which high
altitude food preparation guide you prefer: general infor-
mation, cakes, cookies, breads, etc.
Condensation
It is normal for certain amount of moisture to evaporate
from the food during any cooking process.
The amount depends on the moisture content of the
food. The moisture may condense on any surface cooler
than the inside of the oven, such as the control panel.
Bake
Bake is cooking with dry, heated air.
Both the upper and lower elements cycle to maintain the
oven temperature. Bake mode can be used to prepare
a variety of food items, from pastries to casseroles. Re-
fer to recipe or package directions for oven temperature
and baking time.
Tip
Preheat the oven if the recipe recommends it.
Baking time will vary with the size, shape and finish of
the bakeware. Dark metal pans or nonstick coatings
will cook faster with darker results. Insulated bake-
ware will lengthen the cooking time for most foods.
For best results, bake food on a single rack with at
least 1–1½" space between pans or dishes and oven
walls.
Eliminate heat loss from the oven by using the win-
dow to periodically check food for doneness instead
of opening the door.
Convection bake
Convection Bake is similar to Bake.
Heat comes from the upper and lower heating elements.
The main difference in convection baking is that the
heat is circulated throughout the appliance by the con-
vection fan. Convection Bake mode is well suited for
cakes, bar cookies and breads to take advantage of the
bottom heat, yielding a better crust on baked items.
The benefits of Convection Bake include:
Slight decrease in cooking time.
Higher volume (yeast items rise higher).
Tip
Place food in shallow, uncovered pans, such as
cookie sheets without sides.
If baking more than one pan on a rack, allow at least
1–1½" of air space around the pan.
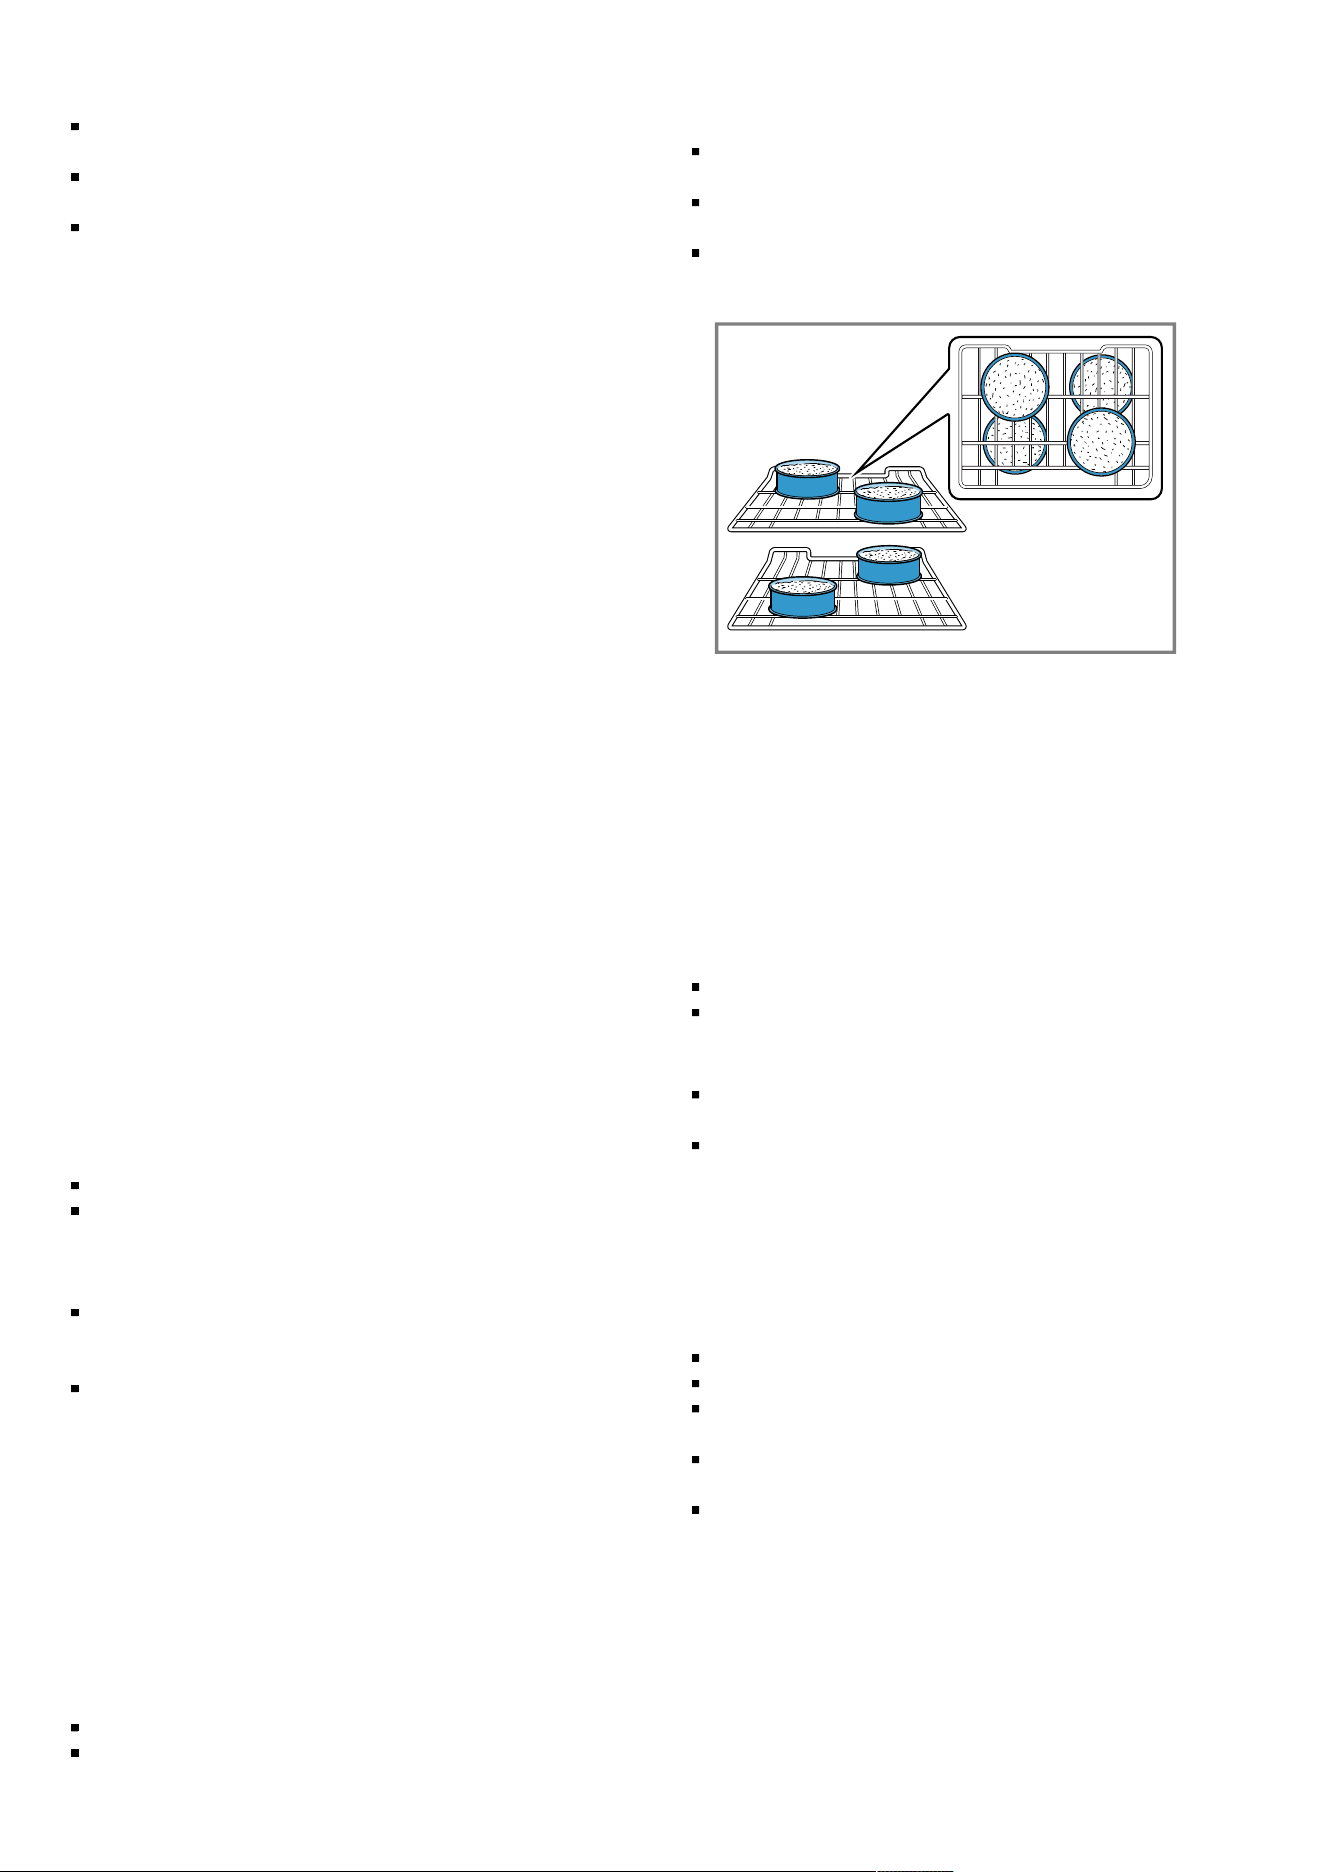
For cakes, use rack positions 2 and 5. Stagger pans
so that one is not directly above the other (see follow-
ing graphic).
Multi-Rack
Convection Multi-Rack cooks with heat from a third ele-
ment behind the back wall of the oven.
The heat is circulated throughout the oven by the con-
vection fan. Convection Multi-Rack is well suited for
cooking individual serving-sized foods such as cookies
and biscuits. It is also good for cooking on multiple
racks (2 or 3) at the same time. Baking cookies is pos-
sible on 5 racks simultaneously. In this case, the baking
time increases slightly.
The benefits of Convection Multi-Rack include:
Even browning.
Time savings as a result of using multiple racks at
one time.
Tip
Place food in low-sided, uncovered pans such as
cookie sheets without sides.
If baking more than one pan on a rack, allow at least
1" to 1½" of air space around the pan. Stagger pans
so that one is not directly above the other.
Proof
In Proof mode, the appliance uses the lower elements to
maintain a low temperature to proof bread or other
yeast doughs.
No preheating is necessary.
Proofing is the rising of yeast dough.
In Proof mode, the temperature is 85°F (30°C) to
125°F (50°C).
Loosely cover the bowl or pan and use any rack that
accommodates the size of the container.
Keep the door closed and use the oven light to check
the rising of the dough.
Pizza
In Pizza mode, heat from the upper and lower elements
is circulated throughout the oven by the convection fan.
Use Pizza mode for fresh or frozen pizza.
22

Oven operation en-us
Tip
When baking a frozen pizza: For a crispy crust, place
directly on the rack. For a softer crust, use a pizza
pan.
When proofing pizza dough, coat dough with olive oil
and cover it in a bowl tightly with plastic wrap to pre-
vent crust formation.
Sprinkle cornmeal on the pizza pan to prevent stick-
ing.
If using a pizza paddle, sprinkle the paddle liberally
with cornmeal for ease in transferring the dough to
the pan.
If par baking handmade pizza dough, prick the dough
with a fork before baking.
If using a pizza pan, choose a dark, perforated pan
for a more crisp crust and a non-perforated pan for a
softer crust.
Preheat baking stones following manufacturer’s rec-
ommendations while the oven is preheating.
Bake homemade pizzas on rack position 2 in the cen-
ter of the rack.
Follow manufacturer’s directions for frozen pizza.
Convection roast
Convection Roast uses heat from the lower elements as
well as heat circulated by the convection fan.
Convection Roast mode is well suited for preparing ten-
der cuts of meat and poultry. It is also suitable for roast-
ing vegetables.
The benefits of Convection Roast mode include:
As much as 25% faster cooking than non-convection
modes.
Rich, golden browning.
Tip
Preheating the oven is not necessary.
Use the same temperature as indicated in the recipe.
Check doneness early, since roasting time may de-
crease.
Do not cover meat or use cooking bags.
Use a broil pan with a rack and grid or a shallow, un-
covered pan with a rack for roasting.
Use a meat thermometer to determine the internal
temperature of the meat.
If the meat is browned to your liking, but is not yet
done, foil can be placed over the meat to prevent
overbrowning.
Let meat stand covered with foil for 10–15minutes af-
ter removing it from the oven.
Convection broil
Convection Broil is similar to Broil.
It combines intense heat from the upper element with
heat circulated by a convection fan. Convection Broil
mode is well suited for cooking thick, tender cuts of
meat, poultry and fish. Convection Broil is not recom-
mended for browning breads, casseroles and other
foods. Always use Convection Broil with the door
closed. In addition to the benefits of standard broiling,
convection broiling is faster.
Tip
Preheat oven for 3–4minutes. Do not preheat for
more than 5minutes.
Steaks and chops should be at least 1–1½" thick.
Use the broil pan and grid or a deep pan with a metal
rack for broiling.
Do not cover the broil grid with foil. It is designed to
drain fats and oils away from the cooking surface to
prevent smoking and spattering.
Turn meats (other than fish) once during the recom-
mended cooking time. Fish does not need to be
turned.
Never use heat-proof glass (Pyrex®); it cannot toler-
ate the high temperature.
Broil
Broil uses intense heat radiated from the upper element.
Broil mode is best suited for cooking thin, tender cuts of
meat (1" or less), poultry and fish. It can also be used to
brown breads and casseroles. Always broil with the
door closed.
The benefits of broiling include:
Fast and efficient cooking.
Cooking without the addition of fats or liquids.
Tip
Preheat oven for 3–4minutes. Do not preheat for
more than 5minutes.
Steaks and chops should be at least 3/4" thick.
Brush fish and poultry with butter or oil to prevent
sticking.
Use broiler pan with grid when broiling.
Do not cover the broil grid with foil. It is designed to
drain fats and oils away from the cooking surface to
prevent smoking and spattering.
Turn meats (other than fish) once during the recom-
mended cooking time. Fish does not need to be
turned.
When browning the top of casseroles, use only metal
or glass ceramic dishes.
Never use heat-proof glass; it cannot tolerate the high
temperature.
Air Fry
This mode uses hot air for crispy results without all the
oil. For packaged and convenience foods such as hot
wings or French fries.
Notes
Allow the oven to preheat for 5minutes before plac-
ing the food in the oven.
When using Air Fry, use dark bakeware with low or no
sides and place food on rack position 3 for best re-
sults for foods like chicken wings or vegetables.
Make sure there is no over-crowding of food on the
pan.
Air fry mode is not recommended for two rack cook-
ing.
Cook food items on rack position 4 for frozen foods,
unless directed otherwise by the product manufac-
turer.
Spritz food with olive oil for overall better crispiness of
foods.
Follow package instructions for time and temperature.
Keep warm
Use the keep warm to keep hot, cooked foods at serv-
ing temperature.
23
en-us Cleaning and maintenance
CAUTION
Food may spoil when kept warm for too long.
Do not use the warm mode to heat cold food.
Be sure to maintain proper food temperature. The
USDA recommends holding hot food at 140°F
(60°C) or warmer.
DO NOT warm food longer than one hour.
To keep warm foods, set bake mode to 140°F (60°C).
Tip
ALWAYS start with hot food. DO NOT use this mode
to heat cold food other than for crisping crackers,
chips, and dry cereal.
Serving dishes, plates, and cups may be kept warm
with this mode.
Foods that must be kept moist should be covered
with a lid or aluminum foil.
Aluminum foil may be used to cover food. Use only
heat-safe dishes.
DO NOT open the oven door unnecessarily. Opening
the door will reduce the temperature of the oven.
When keeping cooked food warm, allow time for the
oven to preheat before placing the item in the oven.
Slow cook
Gentle slow cooking for a particularly tender result.
To slow cook foods, set bake mode between 140°F
(60°C) and 200°F (95°C).
Tip
No preheating is necessary.
Foods that must be kept moist should be covered
with a lid or aluminum foil.
Do not open the oven door unnecessarily. Opening
the door will reduce the temperature of the oven.
Cleaning and maintenance9 Cleaning and maintenance
Note: The Statement of Limited Product Warranty covers
defects in materials and workmanship. Cleaning and
maintenance is not covered by the warranty and a
charge will apply. See the Statement of Limited Product
Warranty for more details.
9.1 Cleaning and maintenance - cooktop
The entire cooktop can be safely cleaned by wiping with
a soapy sponge, then rinsing and drying. If stubborn soil
remains, follow the recommended cleaning methods be-
low.
Cleaning recommendations:
Always keep the appliance area clear and free from
combustible materials, gasoline, and other flammable
vapors and liquids.
Always use the mildest cleaner that will do the job.
Use clean, soft cloths, sponges or paper towels.
Rub stainless steel finishes in the direction of the
grain. Wipe area dry to avoid water marks.
Before cleaning, be certain the burners are turned off
and the grates and burners are cool.
Do not clean removable cooktop parts in any self
cleaning oven or dishwasher.
Do not obstruct air flow around cooktop burners,
range backguard and door area.
After cleaning, place all parts in their proper positions
before using cooktop.
For proper burner performance, keep igniters clean
and dry.
Keep the igniter ports clean for proper lighting perfor-
mance of the burners. It is necessary to clean these
when there is a boilover or when the burner does not
light even though the electronic igniters click.
Do not use flammable cleansers such as lighter fluid.
Do not use chlorine based cleaners.
Always test cleaners on a small inconspicuous area
first.
CAUTION
All igniters spark when any single burner is turned on.
Do not touch any of the burners when the cooktop is
in use.
Cleaning guidelines
The cleaners recommended below and on the following page indicate a type and do not constitute an endorsement
of a particular brand. Use all products according to package directions.
WARNING
Be sure the entire appliance (including the light bulb) has cooled and grease has solidified before attempting to
clean any part of the appliance.
Do not clean the cooktop while it is in operation.
Cooktop part / material Suggested cleaners Recommendations
Burner base / aluminum alloy Detergent and hot water; rinse and
dry thoroughly.
Stiff nylon bristle tooth brush to
clean port openings.
Abrasive cleansers: Brillo®
1,
or
S.O.S.®
1
pads. Rinse and dry.
Do not scratch or gouge the port
openings.
Clean ports with a wire or straight-
ened paper clip.
Do not use a toothpick that may
break off.
Do not soak burner bases.
1
These marks are registered trademarks of their respective owners. All other trademarks are trademarks of BSH Hausgeräte
GmbH or its affiliated companies.
24

Cleaning and maintenance en-us
Cooktop part / material Suggested cleaners Recommendations
Burner cap / porcelain enamel Detergent and hot water; rinse and
dry thoroughly.
Nonabrasive Cleansers: Omit am-
monia, Fantastic®
1,
, Formula
409®
1
.
Mild Abrasive Cleansers: Bon
Ami®
1,
, Ajax®
1,
, Comet®
1
.
Liquid cleaners: Bar Keeper's
Friend®
1,
, Soft Scrub®
1
.
Bar Keeper's Friend Soft Cleanser
Liquid ®
1
.
Reassemble, make sure that the
cap is seated on the base.
Acidic and sugar-laden spills deteri-
orate the porcelain enamel.
Remove soil immediately after unit
has cooled enough to touch.
Do not use wet sponge or towel on
hot porcelain.
Do not soak burner caps.
Always apply minimal pressure with
abrasive cleaners.
Dry thoroughly after cleaning.
Control knobs and bezels Detergent and hot water; rinse and
dry thoroughly.
To remove knobs, pull outward.
Do not soak knobs.
Do not use abrasive scrubbers or
cleansers, such as Bon Ami®
1,
,
Ajax®
1,
, or Comet®
1
. They may per-
manently damage the finish or re-
move graphics.
Exterior finish / stainless steel Nonabrasive Cleaners: Hot water
and detergent, Fantastic®
1,
, For-
mula 409®
1
. Rinse and dry imme-
diately.
Bosch Stainless Steel Conditioner
(Order number: 00576696)
Cleaner Polish: Stainless Steel
Magic®
1
to protect the finish from
staining and pitting; enhances ap-
pearance.
Hard water spots: Household white
vinegar.
Mild Abrasive Cleaners: Bon
Ami®
1
.
Heat discoloration: Bar Keepers
Friend®
1
Do not use steel wool pads. They
will scratch the surface.
Stainless steel resists most food
stains and pit marks providing the
surface is kept clean and protected.
Never allow food stains or salt to re-
main on stainless steel for any
length of time.
Rub lightly in the direction of the
grain.
Chlorine or chlorine compounds in
some cleaners are corrosive to
stainless steel. Check ingredients
on label before using.
Grates and grate bridge / porcelain
enamel on cast iron
Nonabrasive cleaners: Hot water
and detergent, Fantastic®, Formula
409®
1
. Rinse and dry immediately.
Mild abrasive cleaners: Bon
Ami®
1,
and Soft Scrub®
1
.
Abrasive cleaners for stubborn
stains: soap-filled steel wool pad.
You may also clean the burner
grates in the dishwasher. Remove
any burnton food prior to placing
the burner grates in the
dishwasher. Place them on the low-
est rack of dishwasher and use the
dishwasher manufacturer's recom-
mended detergent.
The grates are heavy; use care
when lifting. Place on a protected
surface for cleaning.
Blisters/ crazing/ chips are com-
mon due to the extreme tempera-
tures on grate fingers and rapid
temperature changes.
Acidic and sugar-laden spills deteri-
orate the enamel. Remove soil im-
mediately after unit has cooled
enough to touch.
Abrasive cleaners, used too vigor-
ously or too often can eventually
mar the enamel.
Do not clean in a self-cleaning
oven.
Igniters / ceramic Carefully wipe with a cotton swab
dampened with water or Formula
409®
1
.
Gently scrape soil off with a tooth-
pick.
Avoid excess water on the igniter. A
damp igniter will prevent burner
from lighting.
Remove any lint that may remain af-
ter cleaning.
1
These marks are registered trademarks of their respective owners. All other trademarks are trademarks of BSH Hausgeräte
GmbH or its affiliated companies.
25

en-us Cleaning and maintenance
Cooktop part / material Suggested cleaners Recommendations
Griddle grease tray Remove the grease tray after the
grease has cooled.
Discard grease into a grease resis-
tant container for disposal.
Rinse and dry immediately.
Recommended cleaners:
Non-abrasive cleaners: Dish soap
and hot water
The grease tray is dishwasher-safe.
Important notes:
Clean the grease tray after each
use.
Do not let the grease tray fill up so
far that tipping it spills the grease.
Burnt-on dirt
For hard-to-remove, burnt-on dirt, you can order a clean-
ing gel from our online shop, from your specialist re-
tailer or our Customer Service (item number
00311859). It is suitable for pan supports and the stain-
less steel recess. If necessary, let the dirt soak
overnight. Follow the instructions on the cleaning agent.
NOTICE
DAMAGE TO THE SURFACE
Do not use the cleaning gel on the burner parts.
9.2 Cleaning and maintenance - oven
To avoid electrical shock hazard, before servicing the
appliance, switch power off at the service panel and
lock the panel to prevent the power from being switched
on accidentally.
Cleaning the oven
Avoid These Cleaners
Do not use commercial oven cleaners such as Easy
Off®. They may damage the oven finish or parts.
Chlorine or chlorine compounds in some cleansers are
corrosive to stainless steel. Check ingredients on label.
Never use scouring pads or abrasive cleaners.
Oven cleaning guide
The cleaners recommended below and on the following
page indicate a type and do not constitute an endorse-
ment of a particular brand. Use all products according
to package directions.
Part Recommendations
Flat rack Clean with soapy water. Rinse thor-
oughly and dry, or gently rub with
cleansing powder or soapfilled pads
as directed.
Telescopic rail Clean with soapy water. Rinse thor-
oughly and dry, or gently rub with
cleansing powder or soapfilled pads
as directed. Avoid getting cleansing
powder in the telescopic slides. Re-lu-
brication may become necessary. Use
only high-temperature food-grade lubri-
cants to re-lubricate slides.
Part Recommendations
Door seal The seal should be soft and elastic. To
keep the door seal clean, use a non-
abrasive sponge and wash with luke-
warm water.
Glass Clean with soapy water or glass
cleaner. Apply Fantastik®
1,
or Formula
409®
1
to a clean sponge or paper
towel and wipe clean. Avoid using
powder cleaning agents, steel wool
pads and oven cleaners.
Painted sur-
faces
Clean with soapy water or apply
Fantastik®
1,
or Formula 409®
1
to a
clean sponge or paper towel and wipe
clean. Avoid using powder cleaning
agents, steel wool pads and oven
cleaners.
Porcelain sur-
faces
Immediately wipe up acid spills like
fruit juice, milk and tomatoes with a dry
cloth when surface is cool enough to
touch. Do not use a moistened
sponge/cloth on hot porcelain. When
cool, clean with soapy water or apply
Bon-Ami®
1,
or Soft Scrub®
1
to a
damp sponge. Rinse and dry. For stub-
born stains, use soap-filled pads. It is
normal for porcelain to show fine lines
with age due to exposure to heat and
food soil.
Stainless steel
surfaces
Never allow food stains or salt to re-
main on stainless steel for any length
of time. Always wipe or rub in the di-
rection of the grain. Clean with a soapy
sponge, then rinse and dry, or wipe
with Fantastik®
1,
or Formula 409®
1,
sprayed onto a paper towel. Protect
and polish with Stainless Steel
Magic®
1,
and a soft cloth. Protect and
condition with the Bosch Stainless
Steel Conditioner (order no.
00576696) and a soft cloth. Do not
apply to logos and labeling. Remove
water spots with a cloth dampened
with white vinegar. Use Bar Keeper´s
1
These marks are registered trademarks of their respective owners. All other trademarks are trademarks of BSH Hausgeräte
GmbH or its affiliated companies.
26
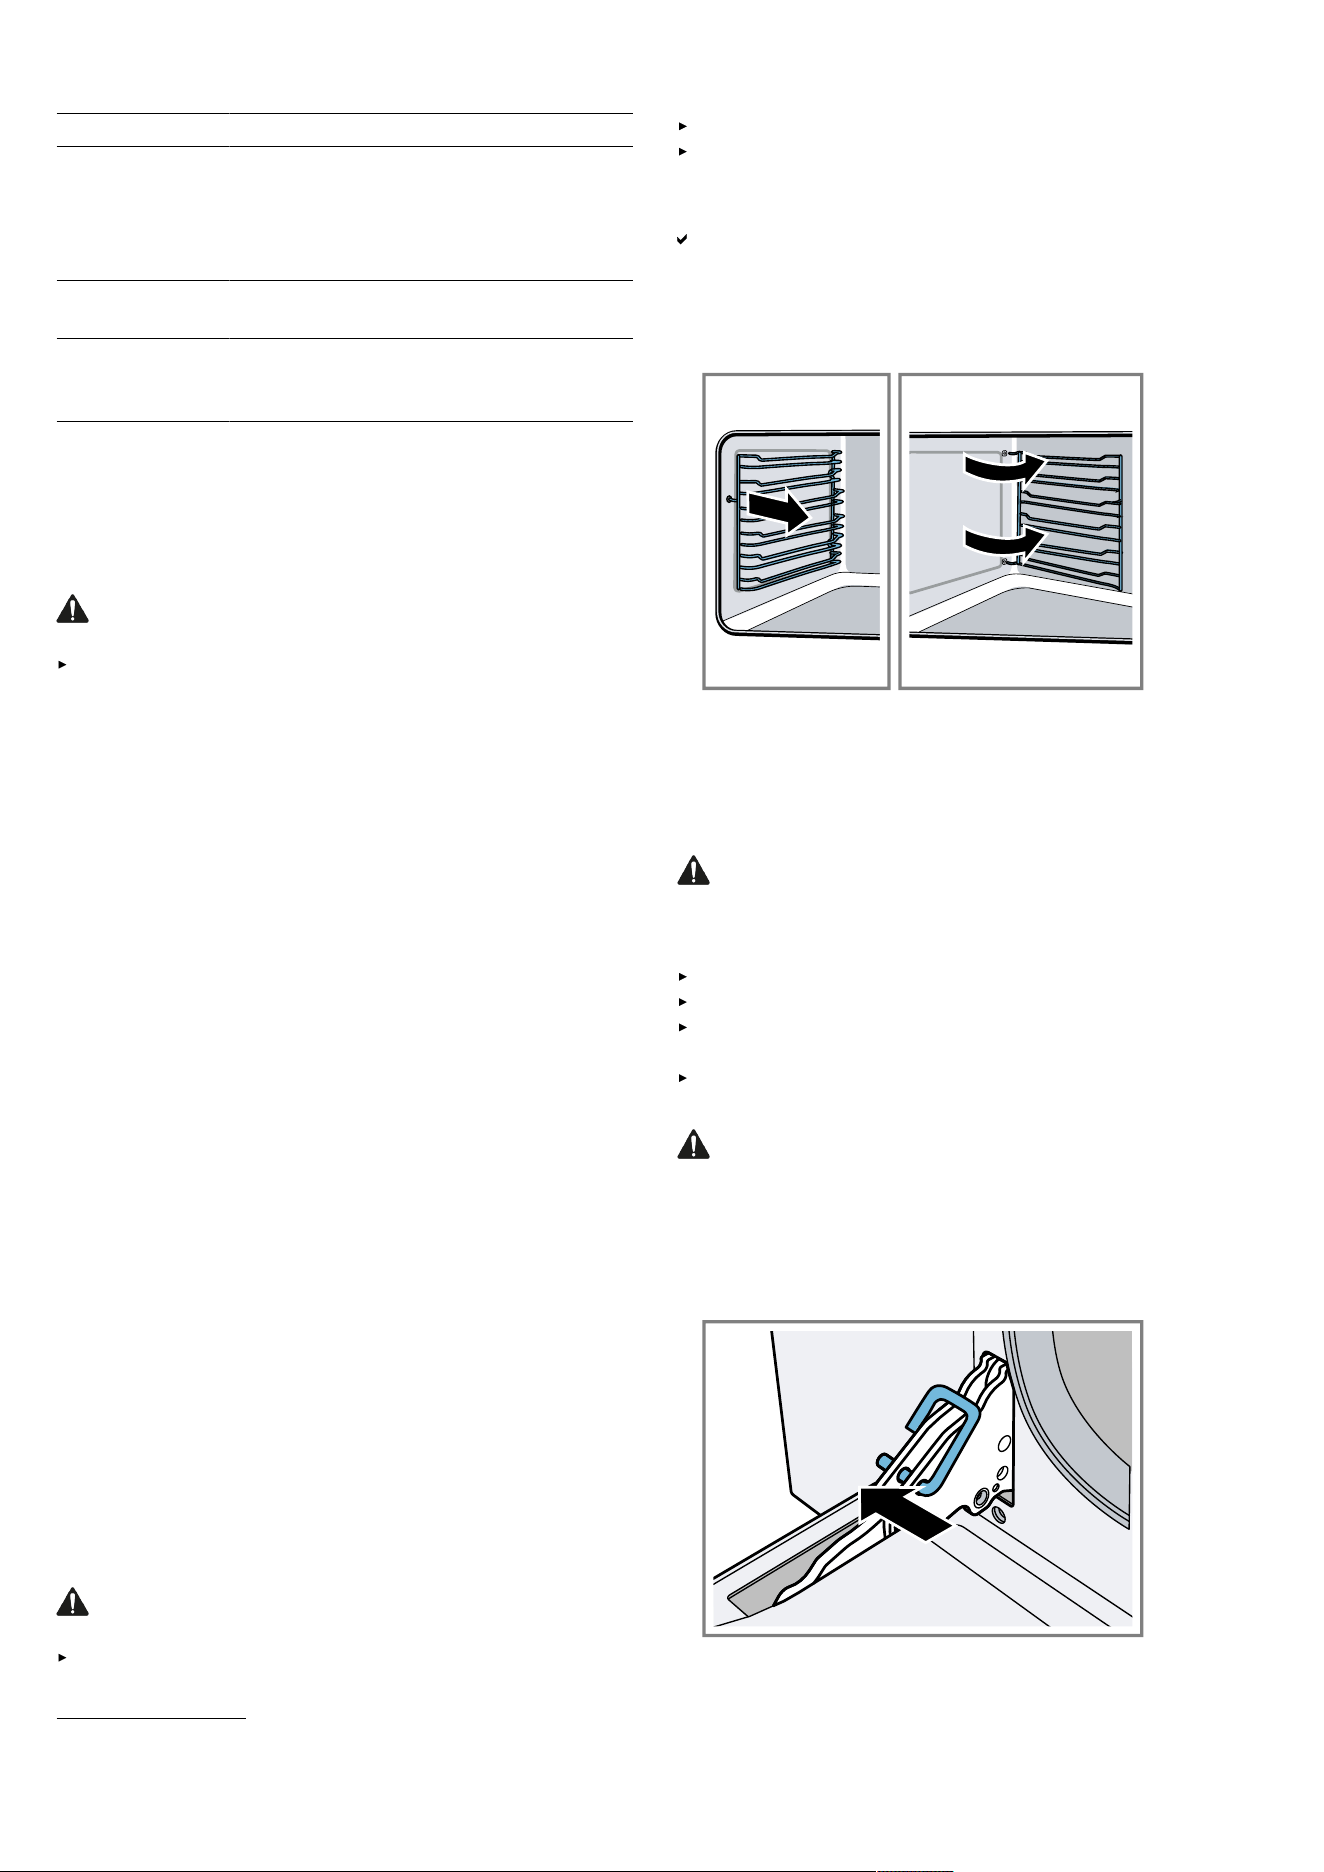
Cleaning and maintenance en-us
Part Recommendations
Friend®
1
to remove heat discoloration.
Chlorine or chlorine compounds in
some cleansers are corrosive to stain-
less steel. Check the ingredients on
the label.
Plastic & con-
trols
When cool, clean with soapy water,
rinse and dry.
Printed areas
(words & num-
bers)
Do not use abrasive cleaners or petro-
leum based solvents.
Steam clean
This function makes it easier to clean the bottom of the
oven cavity. Food and food spills are soaked and can
then be removed more easily.
Setting steam clean
CAUTION
Hot steam can arise due to water in the hot oven cavity.
Never pour water into the hot oven cavity.
Requirement: The oven cavity has cooled off.
1.
Remove any food residues or large spills from previ-
ous cooking operations from the inside of the oven.
2.
Completely remove all accessories from inside the
oven. The upper guard can be left inside the oven.
3.
Pour approximately 60 cc of water onto the bottom of
the oven. Make sure it does not overflow out of the
cavity.
4.
Spray a water and washing up liquid solution inside
the oven using a spray nozzle. Direct the spray to-
wards the side walls, upwards, downwards and to-
wards the deflector. We recommend spraying approx.
20 times at the most.
5.
Close the door.
6.
Turn the function knob to the steam clean position
and the temperature.
7.
Set a cooking time of 18minutes using the program-
mer clock.
8.
At the end of the cooking time, the timer will switch
the oven heating elements off and the buzzer will start
to sound.
End of steam clean
1.
Open the door and wipe away the less stubborn dirt
with a damp cloth.
2.
Use a non-scratch sponge with brass filaments to re-
move hard deposits.
3.
In case of grease residues, use specific oven clean-
ing products.
4.
Remove the water left inside the oven..
Maintenance
How to remove the rack guides
The rack guides are fixed to the side panels of the oven
cavity at three points.
WARNING
The rack guides get very hot.
Never touch the rack guides when they are hot.
Always allow the appliance to cool down.
Keep children at a safe distance.
1.
When the oven is cool, grip the front of the rack guide
and pull it round to the middle of the oven cavity.
The front hook of the rack guide will come out of the
hole.
2.
Swing the rack guide round further and pull it out of
the rear holes in the side panel.
3.
Remove the rack guides from the oven cavity.
4.
Replace the rack guides in the reverse order in which
they were removed.
How to remove the oven door glass
For easier cleaning the internal glass panes of the door
can be removed.
WARNING
The glass panels are big, heavy and parts are fragile.
Failure to grasp the glass firmly and properly could re-
sult in personal injury or product damage.
Use both hands to remove the glass.
Handle carefully to avoid breakage.
Do not place the glass on sharp or pointed objects
as this could break the glass.
Lay on a flat, smooth surface, positioned so that the
glass cannot fall over.
CAUTION
Wear gloves to avoid cutting fingers on broken glass.
1.
Open the oven door fully.
2.
Lock the two hinges on the left and right using the
locking pin. The locking pins must be fully inserted
into the holes in the hinges.
1
These marks are registered trademarks of their respective owners. All other trademarks are trademarks of BSH Hausgeräte
GmbH or its affiliated companies.
27
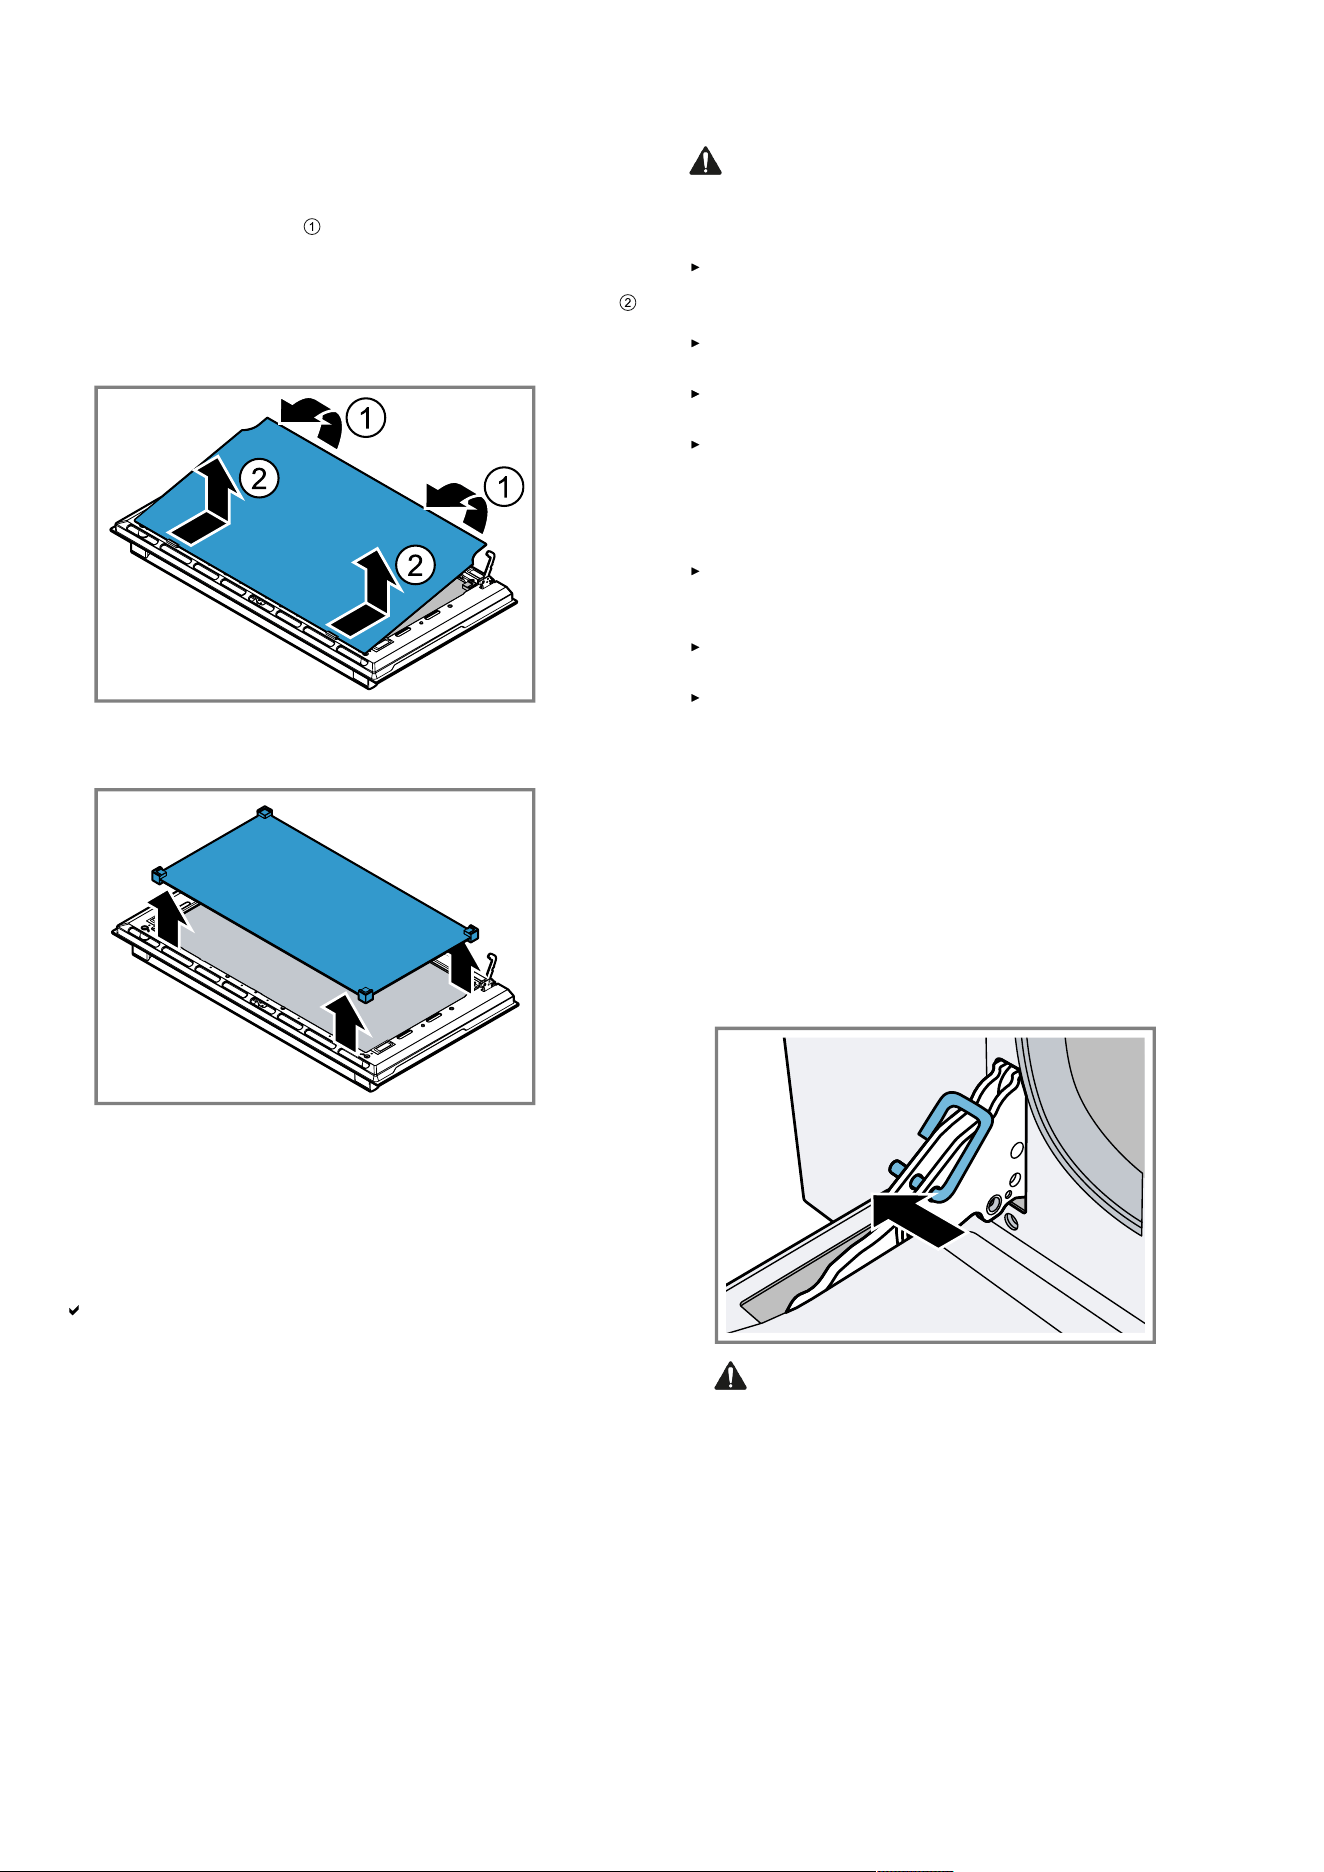
en-us Cleaning and maintenance
3.
NOTICE: Move the glass pane slowly to avoid dam-
age to the glass and the oven cavity frame.
Remove the internal glass pane by pulling the rear
part gently upwards, following the movement indi-
cated by the arrows . This way, the first 2 pins at-
tached to the rear of the glass detach from their
housings in the oven door. Then, push the glass pane
slightly towards the oven cavity and pull it upwards .
This way, the other 2 pins attached to the front of the
glass detach from their housings in the oven door.
4.
Remove the intermediate glass pane by lifting it up-
wards.
5.
Clean the external glass pane and the panes re-
moved previously.
Use absorbent kitchen roll. In case of stubborn dirt,
wash with a damp sponge and neutral detergent.
6.
Reinsert the middle panel.
Make sure that the panel is seated correctly. All rub-
ber mounts must lay flat against the outer panel.
If the Low-E symbol can be read, the middle panel is
inserted correctly.
7.
NOTICE: Do not use with intermediate glass pane not
correctly re-fitted.
Reposition the internal glass pane. First insert the
front part into the two clips and the 2 pins in the front
into their housings. Then insert the 2 pins in the rear
into their housings in the oven door by applying slight
pressure.
8.
Remove the locking pins and close the oven door.
How to remove the oven door
WARNING
Failure to follow these instructions when removing the
oven door may lead to personal injury or product dam-
age.
Make sure oven is cool and power to the oven has
been turned off before removing the door. Failure to
do so could result in electrical shock or burns.
The oven door is heavy and parts of it are fragile. Use
both hands to remove the oven door.
The door front is glass. Handle it carefully to avoid
breakage.
Grasp only the side of the oven door. Do not grasp
the handle. It may swing in your hand and cause
damage or injury. Failure to grasp the oven door
firmly and properly could result in personal injury or
product damage.
To avoid injury from hinge bracket snapping closed,
be sure both levers are securely locked in place be-
fore removing the door.
Do not force the door open or closed to avoid dam-
aging the hinge and risking injury.
Do not place the removed door on sharp or pointed
surfaces or objects to avoid breaking the glass or
damaging the door. Lay on a flat, smooth surface
where it is securely positioned to prevent it from mov-
ing or falling.
Note: To avoid injury or damage, make sure that you
read the above WARNING before attempting to remove
the oven door.
1.
Open the oven door to its fully open position.
2.
Lock the two hinges on the left and right using the
locking pin. The locking pins must be fully inserted
into the holes in the hinges.
3.
CAUTION
Closing the door by 8" (203mm) takes the pressure
off the spring. If this is not done, the door can still be
removed but the latch will now slam shut and may
pinch or cut your hand.
Close the oven door until it catches on the hinge stop
levers, locking the hinges at the correct angle for
door removal. The door can be removed when it is
pulled up from the open position by about 8 inches
(203mm). This takes the tension off the spring-
28
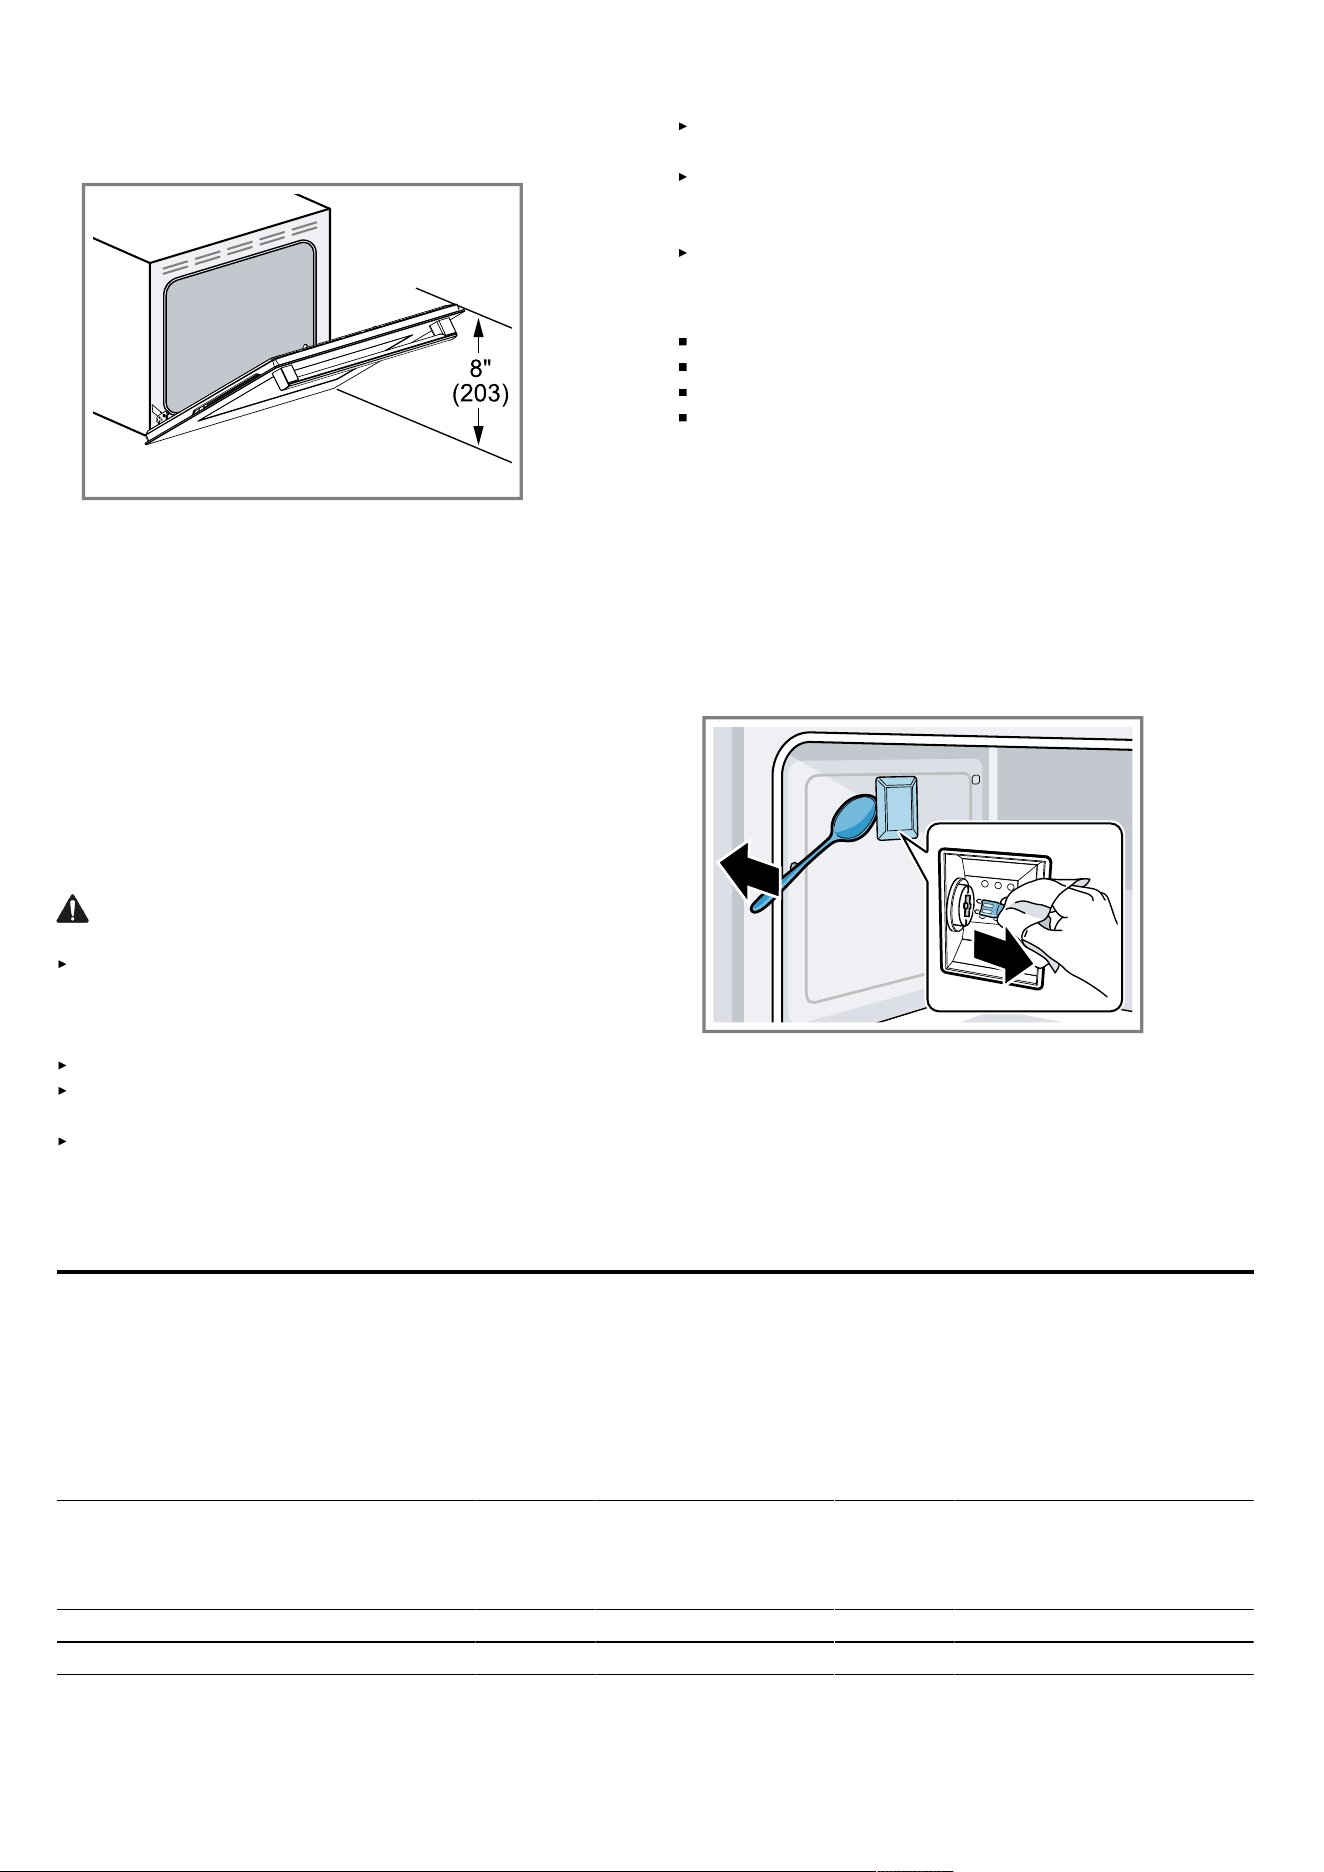
Cooking charts en-us
loaded hinges so that the door can be easily lifted
out.
4.
The door is heavy. Use both hands to firmly grip it by
the sides. Do not grip the door by the handle. Keep-
ing the angle of the door the same, lift the door
straight up approximately 3/4" (19mm) to unhook
the hinges from the slots. Pull the door out towards
you until the hinges are clear of the oven housing.
5.
Place the door in a convenient and stable location for
cleaning.
6.
Refit the door in the reverse order in which it was re-
moved.
Note: Do not throw away the locking pins. Keep them in
a safe place. They will be needed anytime the door is
removed from the appliance.
Replacing an oven light
WARNING
WHEN REPLACING AN OVEN LIGHT:
Make sure the appliance and lights are cool and that
the power to the appliance has been turned off before
replacing the light bulb(s). Failure to do so may result
in electrical shock or burns.
Wear gloves.
The lenses must be in place when using the appli-
ance.
The lenses serve to protect the light bulb from break-
ing.
The lenses are made of glass. Handle carefully to
avoid breaking. Broken glass may cause an injury.
The light socket is live when the door is open.
Light socket is live when door is open if main power
supply is not turned off.
Turn off main power supply at the service panel be-
fore changing the light bulbs.
Bulb specifications:
Voltage: 120 V
Power: 40 W
Fitting: G9
Temperature resistance: 575°F (300°C)
To change the bulb
1.
Allow the oven cavity to cool down.
2.
Open the appliance door.
3.
Place a cloth in the oven cavity to prevent damage.
4.
Remove the racks and rack guides.
5.
Remove the glass cover.
To do this, open the glass cover at the front with your
hand. Should you experience difficulties removing the
glass cover, use a spoon to help.
6.
Remove the oven light bulb.
7.
Replace the oven light bulb with a bulb of the same
type.
8.
Replace the glass cover for the oven light bulb.
9.
Replace rack guides and racks.
10.
Remove the cloth.
11.
Switch the circuit breaker back on.
12.
Check that the oven light is working again.
Cooking charts10 Cooking charts
The charts can be used as a guide. Follow the package
or recipe directions.
10.1 Baked goods/entrees
The charts can be used as a guide. Follow package or
recipe directions.
Cakes
Food Recommended
cooking mode
Oven
tempera-
ture in °F
(°C)
Preheat
oven
Number
of racks
Rack po-
sition
Time in
min.
Pan size and
type
Angel food bake 350 (175) Yes Single 2, 3 45-55 10" tube
Angel food conv bake 325 (160) Yes Single 2, 3 45-55 10" tube
29

en-us Cooking charts
Food Recommended
cooking mode
Oven
tempera-
ture in °F
(°C)
Preheat
oven
Number
of racks
Rack po-
sition
Time in
min.
Pan size and
type
Bundt®
1
bake 350 (175) Yes Single 2 55-65 12-cup Bundt®
1
Bundt®
1
conv bake 325 (160) Yes Single 2 55-65 12-cup Bundt®
1
White cake bake 350 (175) Yes Single 3 30-35 cake mold 8" x
2"
White cake layers bake 350 (175) Yes
2
Multiple 1 & 4 30-35 cake mold 8" x
2"
White cake layers multi rack 350 (175) Yes Multiple 1 & 4 30-35 cake mold 8" x
2"
Cupcakes bake 375 (190) Yes Single 3 15 12-cup muffin
pan
Cupcakes conv bake 350 (175) Yes Single 2 15 12-cup muffin
pan
Cupcakes multi rack 350 (175) Yes Multiple 1 & 4 17-20 12-cup muffin
pan
Round layers bake 350 (175) Yes Single 2, 3 25-35 8" or 9" round
4 Round layers multi rack 325 (160) Yes Multiple 2 & 4 25-35 8" or 9" round
Yellow flat cake bake 350 (175) Yes Single 2 35-40 12" x 17"
Apple Pie bake 375 (190) Yes Single 2, 3 50-55 9" pie dish
Cookies
Food Recommended
cooking mode
Oven
tempera-
ture in °F
(°C)
Preheat
oven
Number
of racks
Rack po-
sition
Time in
min.
Pan size and
type
Brownies bake 350 (175) Yes Single 2 35-40 Cake mold 13" x
9"
Chocolate chips bake
multi rack
350 (175)
350 (175)
Yes
Yes
Single
Single
3
2, 4
13-15
13-15
Cookie sheet
Chocolate chips multi rack 350 (175) Yes Multiple 2 & 4 13-15 Cookie sheet
Chocolate chips multi rack 350 (175) Yes Multiple 2, 4 & 6 15-17 Cookie sheet
Cookie bars conv bake 350 (175) Yes Single 2, 3 20-35 8" or 9" square
Sugar cookies bake
multi rack
375 (190)
350 (175)
Yes
Yes
Single
Single
2, 3
4
10-11
10-11
Cookie sheet
Sugar cookies multi rack
multi rack
350 (175)
350 (175)
Yes
Yes
Multiple
Multiple
2 & 4
2 & 4 & 6
9-11
10-12
Cookie sheet
Entrées
Food Recommended
cooking mode
Oven
tempera-
ture in °F
(°C)
Preheat
oven
Number
of racks
Rack po-
sition
Time in
min.
Pan size and
type
Casseroles bake recipe
temp.
Yes Single 2, 3 recipe
time
Casserole dish
Quiche bake 375 (190) Yes Single 2 35-40 Quiche dish
Soufflé bake 350 (175) Yes Single 2, 3 35-50 Soufflé dish
Vegetables conv bake recipe
temp.
No Single 2, 3 recipe
time
Casserole dish
1
These marks are registered trademarks of their respective owners. All other trademarks are trademarks of BSH Hausgeräte
GmbH or its affiliated companies.
2
Preheat for 20minutes
30

Cooking charts en-us
Pastries
Food Recommended
cooking mode
Oven
tempera-
ture in °F
(°C)
Preheat
oven
Number
of racks
Rack po-
sition
Time in
min.
Pan size and
type
Cream puffs multi rack 350 (175) Yes Single 2, 3 30-40 Cookie sheet
Cream puffs multi rack 350 (175) Yes Multiple 2 & 4 35-45 Cookie sheet
Puff pastry conv bake 375 (190) Yes Single 2, 3 15-25 Cookie sheet
Pies
Food Recommended
cooking mode
Oven
tempera-
ture in °F
(°C)
Preheat
oven
Number
of racks
Rack po-
sition
Time in
min.
Pan size and
type
1 Crust shell bake 450 (230) Yes Single 2, 3 10-20 9" pie pan
1 Crust shell conv bake 425 (220) Yes Single 2, 3 10-20 9" pie pan
2 Crust, fruit bake 375 (190) Yes Single 2, 3 45-60 9" pie pan
2 Crust, fruit conv bake 350 (175) Yes Single 2, 3 45-60 9" pie pan
Frozen bake 400 (205) Yes Single 2, 3 package
time
Package direc-
tions
Pecan bake 350 (175) Yes Single 2, 3 45-60 9" pie pan
Pumpkin bake 350 (175) Yes Single 2, 3 40-60 9" pie pan
Pizza
Food Recommended
cooking mode
Oven
tempera-
ture in °F
(°C)
Preheat
oven
Number
of racks
Rack po-
sition
Time in
min.
Pan size and
type
Baking stone bake
pizza
500 (260) Yes Single 2 recipe
time
Baking stone
Fresh pizza 425 (220)
500 (260)
Yes Single 1
2
8-10
6-8
Pizza pan
Thick crust, frozen pizza on pack-
age
Yes Single on pack-
age
recipe
time
Package direc-
tions
Thin crust, frozen pizza on pack-
age
Yes Single on pack-
age
recipe
time
Package direc-
tions
Quick breads
Food Recommended
cooking mode
Oven
tempera-
ture in °F
(°C)
Preheat
oven
Number
of racks
Rack po-
sition
Time in
min.
Pan size and
type
Biscuits bake 375 (190) Yes Single 2 15-20 Cookie sheet
Biscuits multi rack 325 (160) Yes Multiple 2 & 4 15-20 Cookie sheet
Loaf bake 375 (190) Yes Single 2, 3 50-60 8" x 4" loaf pan
Muffins bake 375 (190) Yes Single 2 18-22 12-cup muffin
pan
Muffins conv bake 350 (175) Yes Single 2, 3 18-30 12-cup muffin
pan
Muffins multi rack 350 (175) Yes Multiple 2 & 4 20-35 12-cup muffin
pan
31

en-us Cooking charts
Food Recommended
cooking mode
Oven
tempera-
ture in °F
(°C)
Preheat
oven
Number
of racks
Rack po-
sition
Time in
min.
Pan size and
type
Toast broil 500 (260) Yes
1
Single 3 1-5 Broil Pan & Grid
or Cookie Sheet
Yeast breads
Food Recommended
cooking mode
Oven
tempera-
ture in °F
(°C)
Preheat
oven
Number
of racks
Rack po-
sition
Time in
min.
Pan size and
type
Dinner rolls bake 350 (175) Yes Single 2, 3 15-30 Cookie sheet
Dinner rolls multi rack 325 (160) Yes Multiple 2 & 4 20-35 Cookie sheet
Loaf conv bake 400 (205) Yes Single 2, 3 25-40 9" x 5" loaf pan
Cornbread bake 350 (175) Yes Single 2 35 10" x 7" baking
tray
Sweet rolls conv bake 350 (175) Yes Single 2, 3 20-30 Cookie sheet
Crescent rolls bake 350 (175)
375 (190)
Yes
Yes
Single
Single
3
3
17-25
10-15
Cookie sheet
Focaccia bread bake 450 (230) Yes Single 2, 3 18-22 Cookie sheet
Frozen food
Food Recommended
cooking mode
Oven
tempera-
ture in °F
(°C)
Preheat
oven
Number
of racks
Rack po-
sition
Time in
min.
Pan size and
type
Lasagne bake 400 (205) Yes Single 1 package
time
Package direc-
tions
Frozen turnovers bake 400 (205) Yes Single 3 25-30 Package direc-
tions
10.2 Meats
The charts can be used as a guide. Follow package or
recipe directions.
Roasting times are approximate and may vary depend-
ing on the shape of the meat.
Note: Internal food temperatures are USDA recom-
mended temperatures as measured by a digital cooking
thermometer.
Beef
Food Recommended
cooking mode
Oven
tempera-
ture in °F
(°C)
Rack po-
sition
Done-
ness, in-
ternal
tempera-
ture in °F
(°C)
Time in
min.
Food cov-
ered
Stand time in
min.
Hamburgers, 0.3lbs
each
broil 500 (260) 5 Medium-
rare, 140
(60)
Side 1:
6-7;
Side2: 5
No none
Rib eye, boneless,
3-3.5lbs
conv roast 325
(160)
2
2, 3 Medium-
rare, 145
(63)
27-31
min/lb
No 10-15
Rib eye, boneless,
3-3.5lbs
conv roast 325
(160)
2
2, 3 Medium,
160 (71)
30-38
min/lb
No 10-15
1
Preheat for 5minutes
2
Preheat for 10minutes
32

Cooking charts en-us
Food Recommended
cooking mode
Oven
tempera-
ture in °F
(°C)
Rack po-
sition
Done-
ness, in-
ternal
tempera-
ture in °F
(°C)
Time in
min.
Food cov-
ered
Stand time in
min.
Rump, eye, sirloin,
boneless, 3-4lbs
conv roast 325 (160) 2, 3 Medium-
rare, 145
(63)
18-33
min/lb
No 10-15
Steak, 1" thick broil 500 (260) 5 Medium-
rare, 145
(63)
Side 1:
5-8;
Side2:
4-6
No none
Tenderloin, 3-4lbs conv roast 425 (220) 2, 3 Medium-
rare, 145
(63)
15-24
min/lb
No 10-15
Lamb
Food Recommended
cooking mode
Oven
tempera-
ture in °F
(°C)
Rack po-
sition
Done-
ness, in-
ternal
tempera-
ture in °F
(°C)
Time in
min.
Food cov-
ered
Stand time in
min.
Leg, boneless,
2-4.5lbs
conv roast 325
(160)
1
2, 3 Medium-
rare, 145
(63)
25-30
min/lb
No 10-15
Leg, boneless,
2-4.5lbs
conv roast 325
(160)
1
2, 3 Medium,
160 (71)
30-35
min/lb
No 10-15
Chops, 1" thick broil 500
(260)
1
5 Medium-
rare, 145
(63)
Side 1: 4;
Side2: 4
No none
Pork
Food Recommended
cooking mode
Oven
tempera-
ture in °F
(°C)
Rack po-
sition
Done-
ness, in-
ternal
tempera-
ture in °F
(°C)
Time in
min.
Food cov-
ered
Stand time in
min.
Loin roast, 2.2-6.5lbs conv roast 350
(175)
1
2 Medium,
160 (71)
16-25
min/lb
No none
Chops, 0.3-0.4lbs broil 500 (260) 5 160 (71) Side 1:
8-12;
Side2:
6-10
No none
Sausage, fresh broil 500 (260) 5 170 (75) Side 1:
5-7;
Side2:
4-6
No none
Tenderloin, 2-3lbs conv roast 425 (220) 2 Medium,
160 (71)
15-28
min/lb
No none
Poultry
Stuffed turkey requires additional roasting time. The minimum safe temperature for stuffing in poultry is 165°F
(75°C).
1
Preheat for 10minutes
33

en-us Troubleshooting
Food Recommended
cooking mode
Oven
tempera-
ture in °F
(°C)
Rack po-
sition
Done-
ness, in-
ternal
tempera-
ture in °F
(°C)
Time in
min.
Food cov-
ered
Stand time in
min.
Chicken breasts,
bone-in
broil 500 (260) 5 170 (75) Side 1:
20;
Side2: 15
No none
Chicken thighs, bone-
in
broil 500 (260) 4 180 (82) Side 1:
12-15;
Side2:
9-11
No none
Chicken, whole,
3-6.6lbs
conv roast 375 (190) 2 180 (82) 115 No none
Cornish game hens,
1-1½"lbs
conv roast 350 (175) 2 180 (82) 45-75min
total time
No none
Turkey breast, 4-8lbs conv roast 325
(160)
1
2, 3 180 (82) 17-25
min/lb
Foil to
prevent
over-
browning
none
Turkey, unstuffed,
12-19lbs
conv roast 325
(160)
1
2 180 (82) 7-15 min/
lb
Foil to
prevent
over-
browning
none
Turkey, unstuffed,
20-30lbs
conv roast 325
(160)
1
2 180 (82) 7-15 min/
lb
Foil to
prevent
over-
browning
none
Seafood
Food Recommended
cooking mode
Oven
tempera-
ture in °F
(°C)
Rack po-
sition
Done-
ness, in-
ternal
tempera-
ture in °F
(°C)
Time in
min.
Food cov-
ered
Stand time in
min.
Whole fish conv roast 400 (205) 2 145 (60) 30-40 No none
Whole salmon fillet
2.2lbs
broil 500 (260) 5 145 (60) Side 1:
13;
Side2:
9-11
No none
Troubleshooting11 Troubleshooting
You can eliminate minor issues on your appliance yourself. Please read the information on eliminating issues before
contacting Customer Service. This may avoid unnecessary repair costs.
WARNING
To avoid risk of injury from improper repairs, observe the following.
Only qualified technicians or authorized service providers should perform repairs.
Only genuine spare parts may be used to repair the appliance.
1
Preheat for 10minutes
34

Troubleshooting en-us
11.1 Malfunctions
Fault Cause and troubleshooting
Burner(s) do not light or igniters
do not spark.
The gas shut-off valve is not in the “ON” position or the gas supply to the house
is shut off.
Ensure that the gas shut-off valve is in the “ON” position and the gas supply to
the house is not shut off.
The burner caps, burner bases or burner ports are clogged.
1.
Ensure that the burner caps and burner bases and the burner ports are not
clogged.
2.
Clear ports with a wire or straightened paper clip if clogged.
The igniters are dirty or wet.
Make sure the igniters are clean and dry.
The power supply is not properly grounded or has the wrong polarity.
Check the power supply. It should be properly grounded with the correct polar-
ity.
The unit's power cord is not fully plugged into the power outlet or the circuit
breaker has tripped.
Ensure that the unit's power cord is fully plugged into the power outlet and the
circuit breaker has not tripped.
The burner flame goes out unex-
pectedly.
There is a draft in the room.
Ensure that there is no draft in the room.
Cooktop burner(s) does not start
correctly or flame extinguishes at
burner as soon as knob is re-
leased.
The pushing time was too short or the pushing was too soft.
1.
Use the recommended lighting position .
2.
Push the knob completely.
3.
Keep it fully pushed during the whole lighting procedure.
4.
Release the knob after min.3-5seconds.
The burner cap not well positioned.
Check the correct placement of the burner caps.
"Burner assembly", Page13
Dirt or moisture on burner, spark plug or thermocouple.
Clean and dry these parts.
Not enough gas in pipe.
Check main gas valves and pressure regulator and make sure that pipes are
purged from air.
The small burner or the dual-
flame burner does not light prop-
erly or is not stable or extin-
guishes.
The small burner caps are swapped.
Check the correct placement of the burner caps.
"Burner assembly", Page13
The burner cap with the smallest diameter must always be placed in the middle
of the dual-flame burner.
If one of your burner caps is marked with "DUAL", it has to be placed in the
middle of the dual-flame burner.
Sparks appear on the wrong
burner.
No fault: On starting one burner on all burners sparks will be generated.
The igniters spark even though
the knobs are in the off position.
The electrical power connection has been activated at the first power-up or recon-
nected after an outage.
The igniters may spark once or twice, even though all burner knobs are in the
“OFF” position. This is normal.
Cooking results are not as ex-
pected.
The cooktop burner is not properly levelled.
Check the level of the cooktop burner during installation.
The cookware does not fit on the surface being used.
Choose a different surface or a different piece of cookware.
The cookware is not the recommended type or size.
See "Notes regarding cookware" and "Baking pans and dishes".
The oven door feels hotter than
before, after the oven door glass
has been removed for cleaning.
The oven door glass is not inserted the right way round.
Check if the oven door glass is inserted the right way round (low-E symbol can
be read).
The oven door is not balanced. The inner door glass is missing or has not been inserted during reassembly.
Check if the inner door glass is present or has been inserted during reassem-
bly.
35
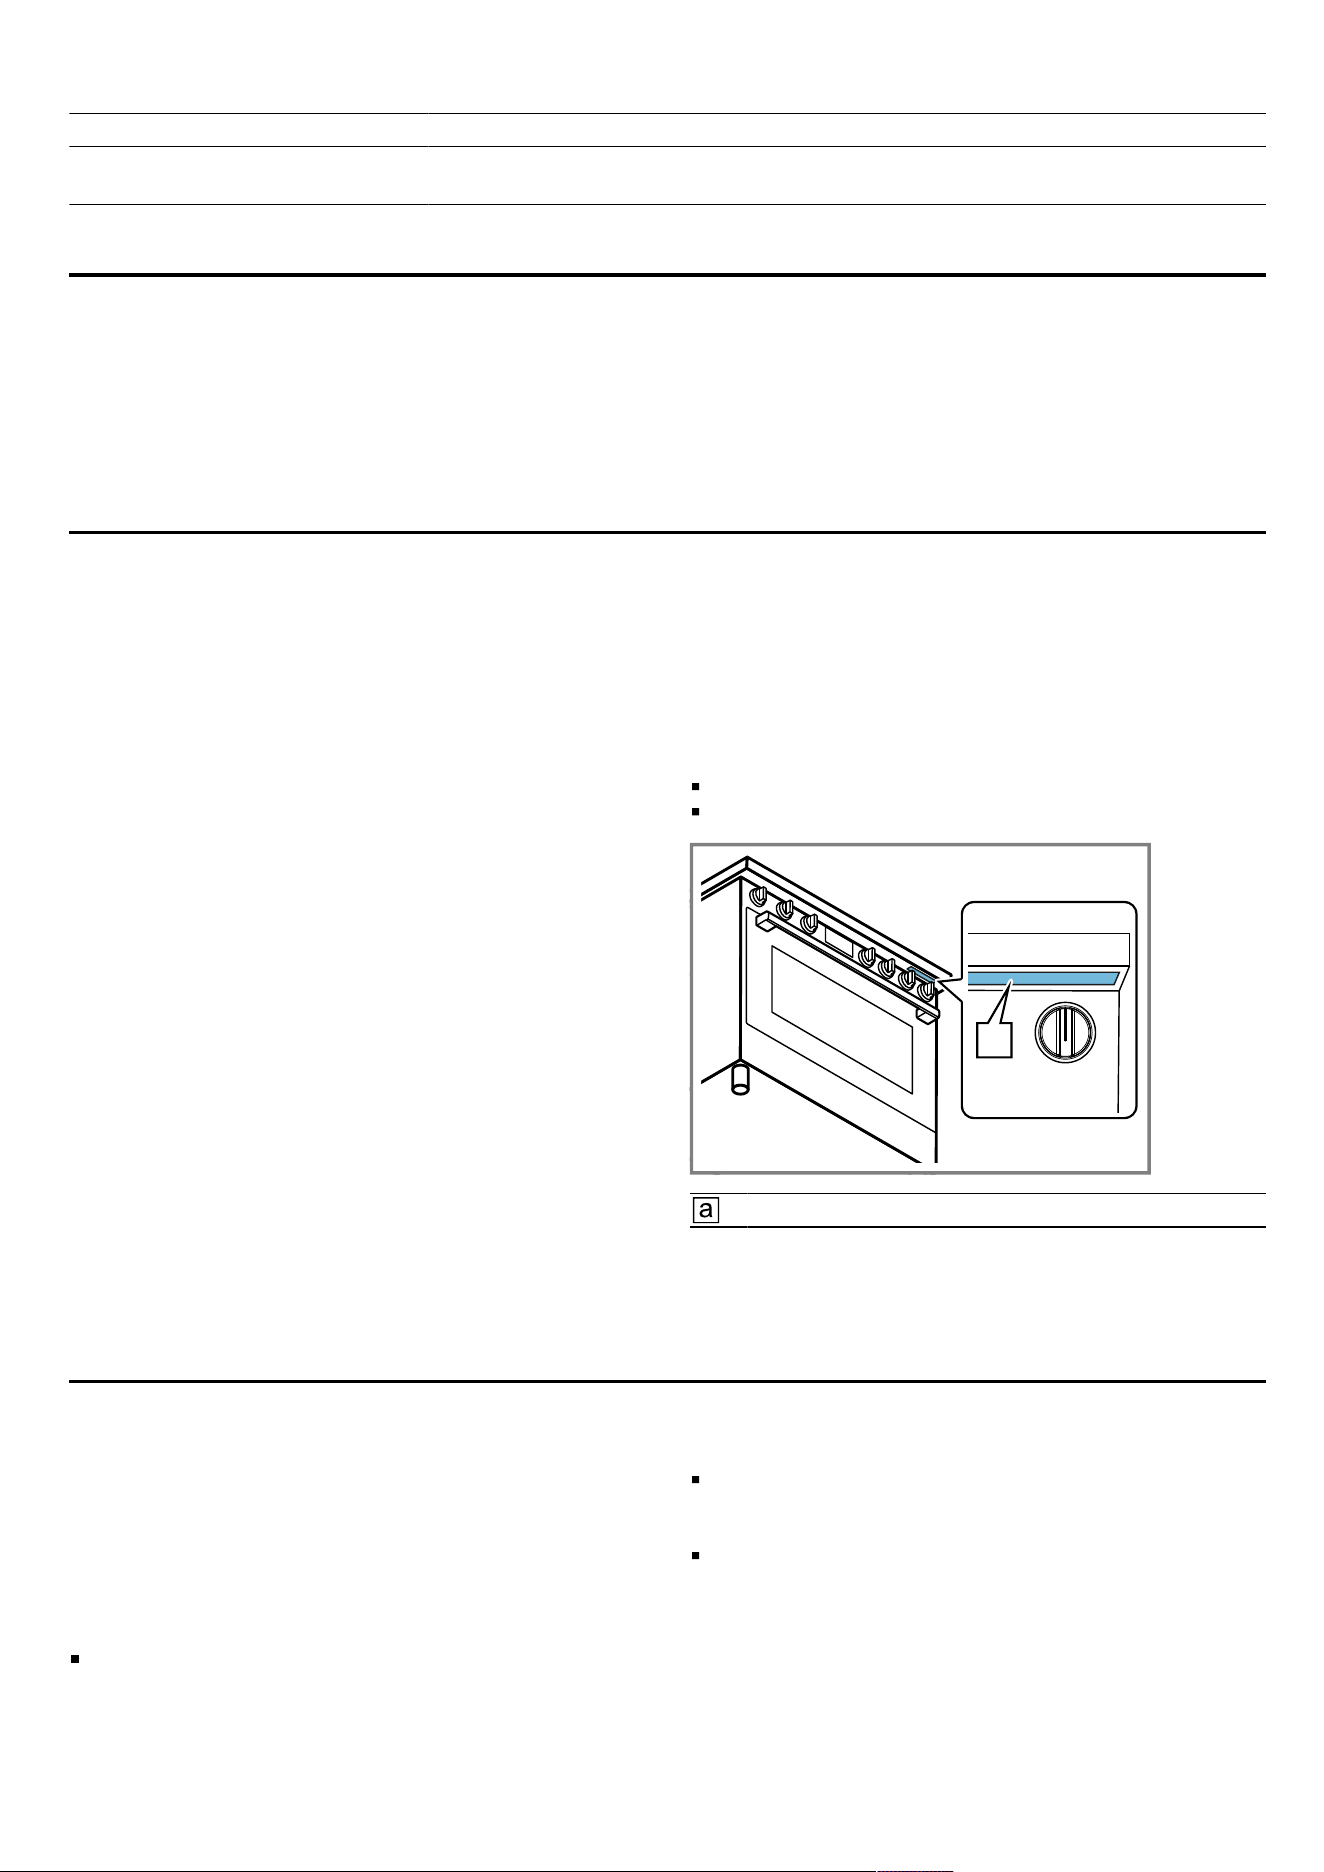
en-us Disposal
Fault Cause and troubleshooting
Cooling fan continues to run
when the oven is switched off.
No fault: The cooling fan will cool down until the oven temperature has reached
the temperature chosen in the settings.
Disposal12 Disposal
12.1 Disposal of your old appliance
Environmentally compatible disposal allows valuable
raw materials to be recycled.
1.
Unplug the appliance from the power supply.
2.
Cut through the power cord.
3.
Dispose of the appliance in an environmentally re-
sponsible manner.
Information about current disposal methods can be
obtained from your specialist dealer or local authority.
Customer Service13 Customer Service
With any warranty repair, we will make sure your appli-
ance is repaired by an authorized service provider using
genuine replacement parts. We use only genuine re-
placement parts for all repairs.
You can obtain function-relevant and storable genuine
spare parts from our Customer Service for up to
15years from the date on which your appliance was
placed on the market.
For more information, please contact our Customer Ser-
vice team.
Detailed information on the warranty period and terms of
warranty can be found in the Statement of Limited Prod-
uct Warranty, from your retailer, or on our website.
USA:
1-800-944-2904
www.bosch-home.com/us/owner-support/get-support
www.bosch-home.com/us/shop
CA:
1-800-944-2904
www.bosch-home.ca/en/service/get-support
www.bosch-home.ca/en/service/cleaners-and-
accessories
13.1 Model number (E-Nr.) and production
number (FD)
If you contact Customer Service, you will need the prod-
uct number (E-Nr.) and production number (FD), which
you can find on the appliance's rating label.
Making a note of your appliance's details and the Cus-
tomer Service telephone number will enable you to find
them again quickly.
13.2 Rating plate location
You can find the rating plate of your appliance:
on the underside of the projecting control panel.
on the rear of the appliance.
a
Rating plate
STATEMENT OF LIMITED PRODUCT WARRANTY14 STATEMENT OF LIMITED PRODUCT WARRANTY
14.1 What this warranty covers & Who it
applies to
The limited warranty provided by BSH Home Appliances
(“Bosch“) in this Statement of Limited Product Warranty
applies only to the Bosch appliance sold to you (“Prod-
uct“), provided that the Product was purchased:
For your normal, household (non-commercial) use,
and has in fact at all times only been used for normal
household purposes.
New at retail from a BSH authorized dealer or directly
from BSH (not a display, "as is", or previously re-
turned model), and not for resale, or commercial use.
Within the United States or Canada, and has at all
times remained within the country of original pur-
chase.
The warranties stated herein apply to the original pur-
chaser of the product warranted herein and to each suc-
ceeding owner of the product purchased for ordinary
home use during the term of the warranty.
36

STATEMENT OF LIMITED PRODUCT WARRANTY en-us
Please make sure to register your Product; while not
necessary to effectuate warranty coverage, it is the best
way for Bosch to notify you in the unlikely event of a
safety notice or product recall.
14.2 How long the warranty lasts
Bosch warrants that the Product is free from defects in
materials and workmanship for a period of three hun-
dred and sixty-five (365) days from the date of the origi-
nal delivery. The foregoing timeline begins to run upon
the date of the original delivery, and shall not be stalled,
tolled, extended, or suspended, for any reason whatso-
ever. This Product is also warranted to be free from
cosmetic defects in material and workmanship (such as
scratches of stainless steel, paint/porcelain blemishes,
chips, dents, or other damage to the finish) of the Prod-
uct, for a period of thirty (30) days from the date of de-
livery or closing date for new construction. This cos-
metic warranty excludes slight color variations due to in-
herent differences in painted and porcelain parts, as
well as differences caused by kitchen lighting, product
location, or other similar factors. This cosmetic warranty
specifically excludes any display, floor, “As Is”, or “B”
stock appliances.
14.3 Repair/replace as your exclusive
remedy
During this warranty period, Bosch or one of its autho-
rized service providers will repair your Product without
charge to you (subject to certain limitations stated
herein) if your Product proves to have been manufac-
tured with a defect in materials or workmanship. If rea-
sonable attempts to repair the Product have been made
without success, then Bosch will replace your Product
(upgraded models may be available to you, in Bosch’s
sole discretion, for an additional charge). Nothing in this
warranty requires damaged or defective parts to be re-
placed with parts of a different type or design than the
original part. All removed parts and components shall
become the property of Bosch at its sole option. All re-
placed and/or repaired parts shall assume the identity
of the original part for purposes of this warranty and this
warranty shall not be extended with respect to such
parts. Bosch's sole liability and responsibility hereunder
is to repair manufacturer-defective Product only, using a
Bosch authorized service provider during normal busi-
ness hours. For safety and property damage concerns,
Bosch highly recommends that you do not attempt to re-
pair the Product yourself, or use a non-authorized ser-
vice provider; Bosch will have no responsibility or liabil-
ity for damage resulting from repairs or work performed
by a non-authorized service provider. Authorized service
providers are those persons or companies that have
been specially trained on Bosch products, and who pos-
sess, in Bosch's opinion, a superior reputation for cus-
tomer service and technical ability (note that they are in-
dependent entities and are not agents, partners, affili-
ates or representatives of Bosch). Nevertheless, taking
your product to be serviced by a repair shop that is not
affiliated with or an authorized dealer of Bosch will not
void this warranty. Also, using third-party parts will not
void this warranty. Notwithstanding the foregoing, Bosch
will not incur any liability, or have responsibility, for the
Product if it is located in a remote area (more than 100
miles from an authorized service provider) or is reason-
ably inaccessible, hazardous, threatening, or treacher-
ous locale, surroundings, or environment; in any such
event, if you request, Bosch would still pay for labor and
parts and ship the parts to the nearest authorized ser-
vice provider, but you would still be fully liable and re-
sponsible for any travel time or other special charges by
the service company, assuming they agree to make the
service call. Further, to the extent you have installed the
Product in a difficult-to-access location or have other-
wise installed temporary or permanent fixtures that cre-
ate barriers to accessing or removing the Product,
Bosch will not incur any liability for, or have responsibil-
ity, for work or costs associated with moving the Prod-
uct or otherwise creating access to the Product in order
to repair or replace it. All such costs shall be your sole
responsibility.
14.4 Out of warranty product
Bosch is under no obligation, at law or otherwise, to
provide you with any concessions, including repairs,
prorates, or Product replacement, once this warranty
has expired.
14.5 Warranty exclusions
The warranty coverage described herein excludes all
defects or damage that are not the direct fault of Bosch,
including without limitation, one or more of the following:
Use of the Product in anything other than its normal,
customary and intended manner (including without
limitation, any form of commercial use, use or storage
of an indoor product outdoors, use of the Product in
conjunction with air or water-going vessels).
Any party's willful misconduct, negligence, misuse,
abuse, accidents, neglect, improper operation, failure
to maintain, improper or negligent installation, tamper-
ing, failure to follow operating instructions, mishan-
dling, unauthorized service (including selfperformed
"fixing" or exploration of the appliance's internal work-
ings).
Adjustment, alteration or modification of any kind.
A failure to comply with any applicable state, local,
city, or county electrical, plumbing and/or building
codes, regulations, or laws, including failure to install
the product in strict conformity with local fire and
building codes and regulations.
Ordinary wear and tear, spills of food, liquid, grease
accumulations, or other substances that accumulate
on, in, or around the Product.
Any external, elemental and/or environmental forces
and factors, including without limitation, rain, wind,
sand, floods, fires, mud slides, freezing temperatures,
excessive moisture or extended exposure to humidity,
lightning, power surges, structural failures surround-
ing the appliance, and acts of God.
Service calls to correct the installation of your Prod-
uct, to instruct you how to use your Product, to re-
place house fuses or correct house wiring or plumb-
ing.
Removal and replacement of trim or decorative pan-
els that interfere with servicing the Product.
37

en-us STATEMENT OF LIMITED PRODUCT WARRANTY
Damage or defects caused by labor or parts installed
by any non-authorized service provider, unless ap-
proved by Bosch before service is performed.
In no event shall Bosch have any liability or responsibil-
ity whatsoever for damage to surrounding property, in-
cluding cabinetry, floors, ceilings, and other structures
or objects around the Product. Also excluded from this
warranty are Products, on which the serial numbers
have been altered, defaced, or removed; service visits
to teach you how to use the Product, or visits where
there is nothing wrong with the Product; correction of in-
stallation problems (you are solely responsible for any
structure and setting for the Product, including all electri-
cal, plumbing or other connecting facilities, for proper
foundation/flooring, and for any alterations including
without limitation cabinetry, walls, floors, shelving, etc.);
and resetting of breakers or fuses.
TO THE EXTENT ALLOWED BY LAW, THIS WARRANTY
SETS OUT YOUR EXCLUSIVE REMEDIES WITH RE-
SPECT TO PRODUCT, WHETHER THE CLAIM ARISES
IN CONTRACT OR TORT (INCLUDING STRICT LIABIL-
ITY, OR NEGLIGENCE) OR OTHERWISE. THIS WAR-
RANTY IS IN LIEU OF ALL OTHER WARRANTIES,
WHETHER EXPRESS OR IMPLIED. ANY WARRANTY IM-
PLIED BY LAW, WHETHER FOR MERCHANTABILITY
OR FITNESS FOR A PARTICULAR PURPOSE, OR OTH-
ERWISE, SHALL BE EFFECTIVE ONLY FOR THE PE-
RIOD THAT THIS EXPRESS LIMITED WARRANTY IS EF-
FECTIVE. IN NO EVENT WILL THE MANUFACTURER BE
LIABLE FOR CONSEQUENTIAL, SPECIAL, INCIDENTAL,
INDIRECT, "BUSINESS LOSS", AND/OR PUNITIVE DAM-
AGES, LOSSES, OR EXPENSES, INCLUDING WITHOUT
LIMITATION TIME AWAY FROM WORK, HOTELS AND/
OR RESTAURANT MEALS, REMODELLING EXPENSES
IN EXCESS OF DIRECT DAMAGES WHICH ARE DEFINI-
TIVELY CAUSED EXCLUSIVELY BY BOSCH, OR OTH-
ERWISE. SOME STATES DO NOT ALLOW THE EXCLU-
SION OR LIMITATION OF INCIDENTAL OR CONSE-
QUENTIAL DAMAGES, AND SOME STATES DO NOT
ALLOW LIMITATIONS ON HOW LONG AN IMPLIED
WARRANTY LASTS, SO THE ABOVE EXCLUSIONS OR
LIMITATIONS MAY NOT APPLY TO YOU. THIS WAR-
RANTY GIVES YOU SPECIFIC LEGAL RIGHTS, AND
YOU MAY ALSO HAVE OTHER RIGHTS WHICH VARY
FROM STATE TO STATE.
No attempt to alter, modify or amend this warranty shall
be effective unless authorized in writing by an officer of
BSH.
14.6 Obtaining warranty service
To obtain warranty service for your product, you should
contact Bosch Customer Support at 1-800-944-2904 to
schedule a repair.
14.7 Product information
For handy reference, copy the information below from
the rating plate. Keep your invoice and/or delivery docu-
ments for warranty validation.
Model number (E-
Nr.)
Production number
(FD)
Date of delivery
38

Recursos y ayuda en línea en españolRecursos y ayuda en línea en español
Muchos manuales están disponibles en línea en inglés, francés y español.
Para acceder a manuales de modelos específicos y otros documentos en español:
Visite
www.bosch-home.com/us/owner-support/owner-manuals
o escanee el código QR.
Introduzca el número de producto (E-Nr.) que encontrará en la placa de características del aparato.
Seleccione o descargue el manual o documento que desee.
39

Register your appliance to
enjoy customized benefits.
Thank you for being a Bosch customer!
Simply create a MyBosch account, then register your appliance.
You'll find a variety of customized information in MyBosch such as:
• Discounts for filters, cleaners, accessories & parts
• Easy access to manuals & appliance specifications
• Easy access to part lists
• Customized offer for the Bosch Appliance Service Plan (sent by mail after appliance
registration)
Register here:
www.bosch-home.com/us/owner-support/mybosch
Looking for help?
You'll find it here.
No matter what, no matter when: Bosch is here to support you.
We're here to assist with usage instructions, cleaning tips, accessories & parts, troubleshooting, and
repairs.
Find online resources such as FAQs, how-to-videos, manuals, warranties and authorized Bosch servicers at:
www.bosch-home.com/us/owner-support/get-support
Contact us:
Please have your model Number (E-Nr) ready when contacting us.
1-800-944-2904
www.bosch-home.com/us/owner-support/contact-us
BSH Home Appliances Corporation
1901 Main Street, Suite 600
Irvine, CA 92614
USA
www.bosch-home.com
1-800-944-2904
© 2026 BSH Home Appliances Corporation
*9002046205*
9002046205 (060603)
en-us