ASSEMBLY INSTRUCTIONS
Enclosed Drawers for
Tables with Channel Frame
Drawers #501572, 502943, 502946, 502947, 502971 and 502972
eG9834 revised 10/12
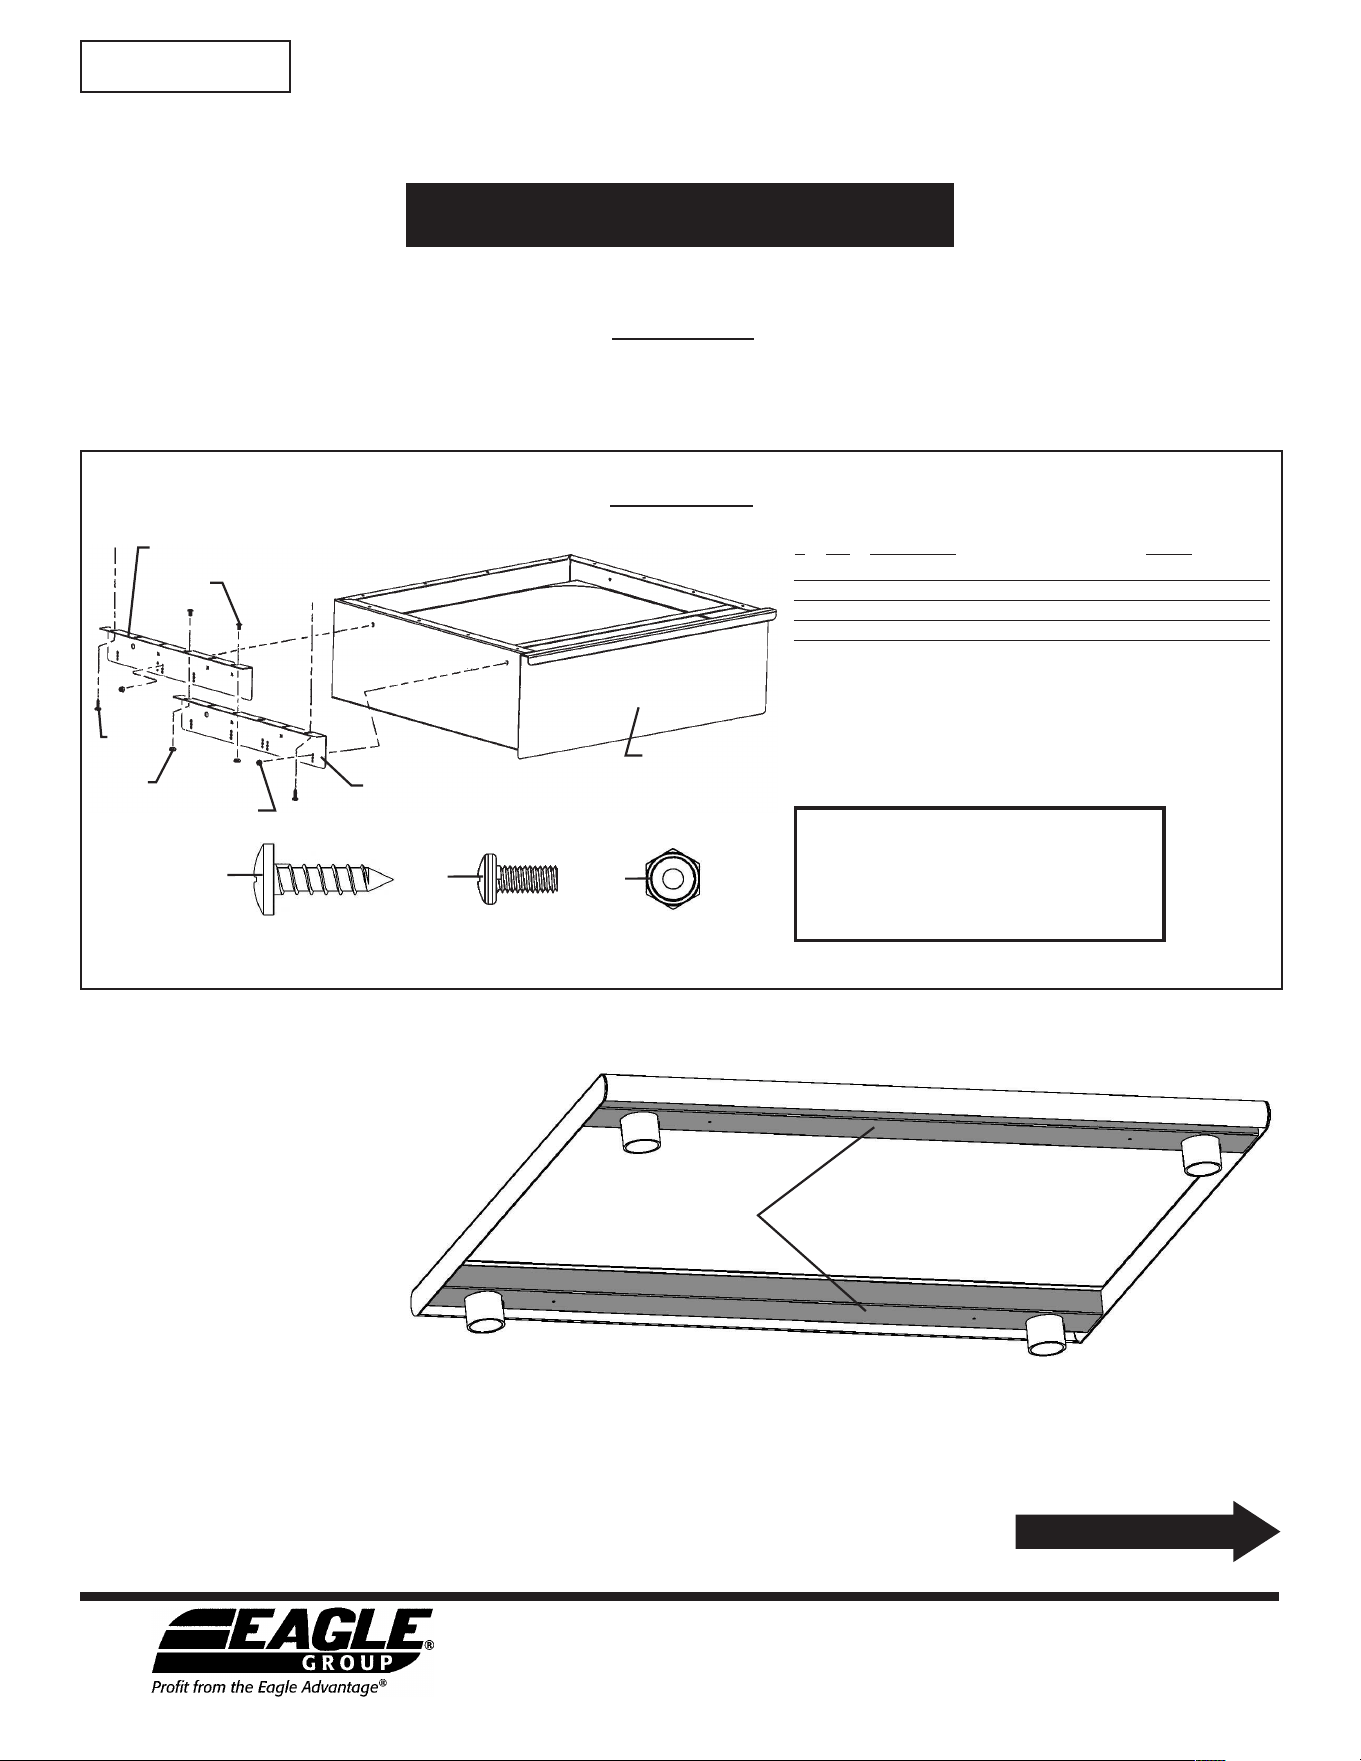
#1
eagle Foodservice equipment, eagle Mhc, specFAB
®
, and retail Display are divisions of eagle Group. ©2012 by the eagle Group
• 100 Industrial Boulevard, Clayton, Delaware 19938-8903 U.S.A. • www.eaglegrp.com
• Phone: 302/653-3000 • (Foodservice) 800/441-8440 • (MHC/Retail) 800/637-5100
• Fax: 302/653-2065
*
For 20˝ x 20˝ bowls: these screws are premounted to the table
c
hannel framing (underneath tabletop), and will be used to mount
drawer angles.
F
or 15˝ x 20˝ bowls: screws can be found in the hardware package
p
rovided with drawer.
Parts List
CAUTION
insPect contents iMMeDiAteLY AnD FiLe cLAiM With DeLiVerinG cArrier For AnY DAMAGe.
SAVE YOUR BOX AND ALL PACKING MATERIALS.
You Are resPonsiBLe For DAMAGe to Your unit iF returneD iMProPerLY PAcKeD.
(continued on Page 2)
#4
#2
(actual size of hardware)
#1
#3
#2
#4
#4
#5
#3
Tools needed:
• 11/32˝ or 9mm socket or wrench
• Phillips screwdriver
• Tape measure
“Channels,” indicated in illustration at right,
run left-to-right underneath tabletop.
How to determine if you have a “channel frame” table:
If your table framing does not resemble the framing above,
turn to page 5 for “Drawers for Tables with Angle Frames.”
channels
# qty description part #
#1 4 Drawer Mounting Bracket Angles 373770
#2 4 Drive screw, #12 x 3/4˝ 313630
#3 8 Machine screw, #8 x 3/8˝ 373748
#4 8 Lock nut, #8 313196
#5 1 Drawer Assembly varies per order
*
instruction sheet
#336672
left-hand
bracket assembly
right-hand
bracket assembly
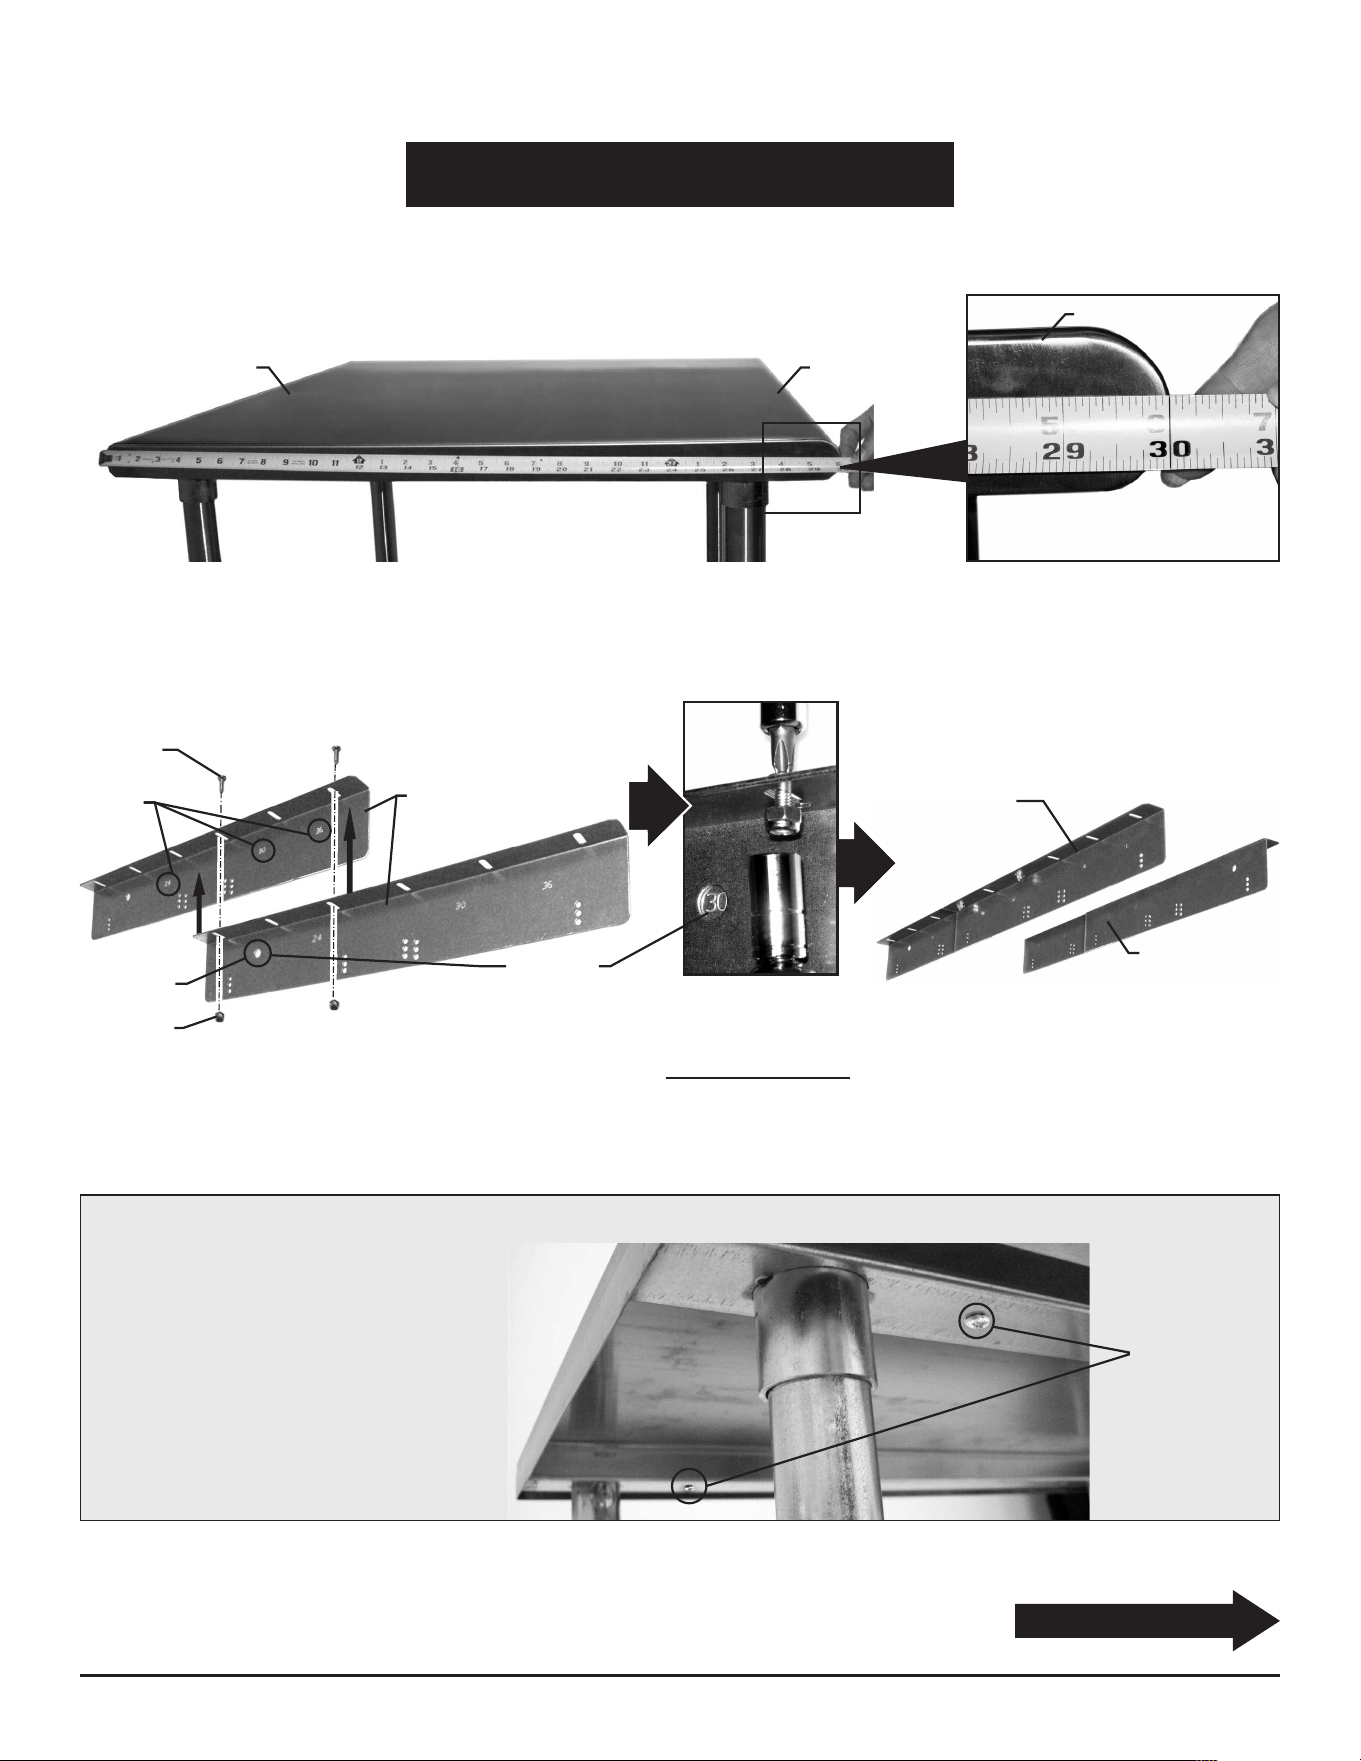
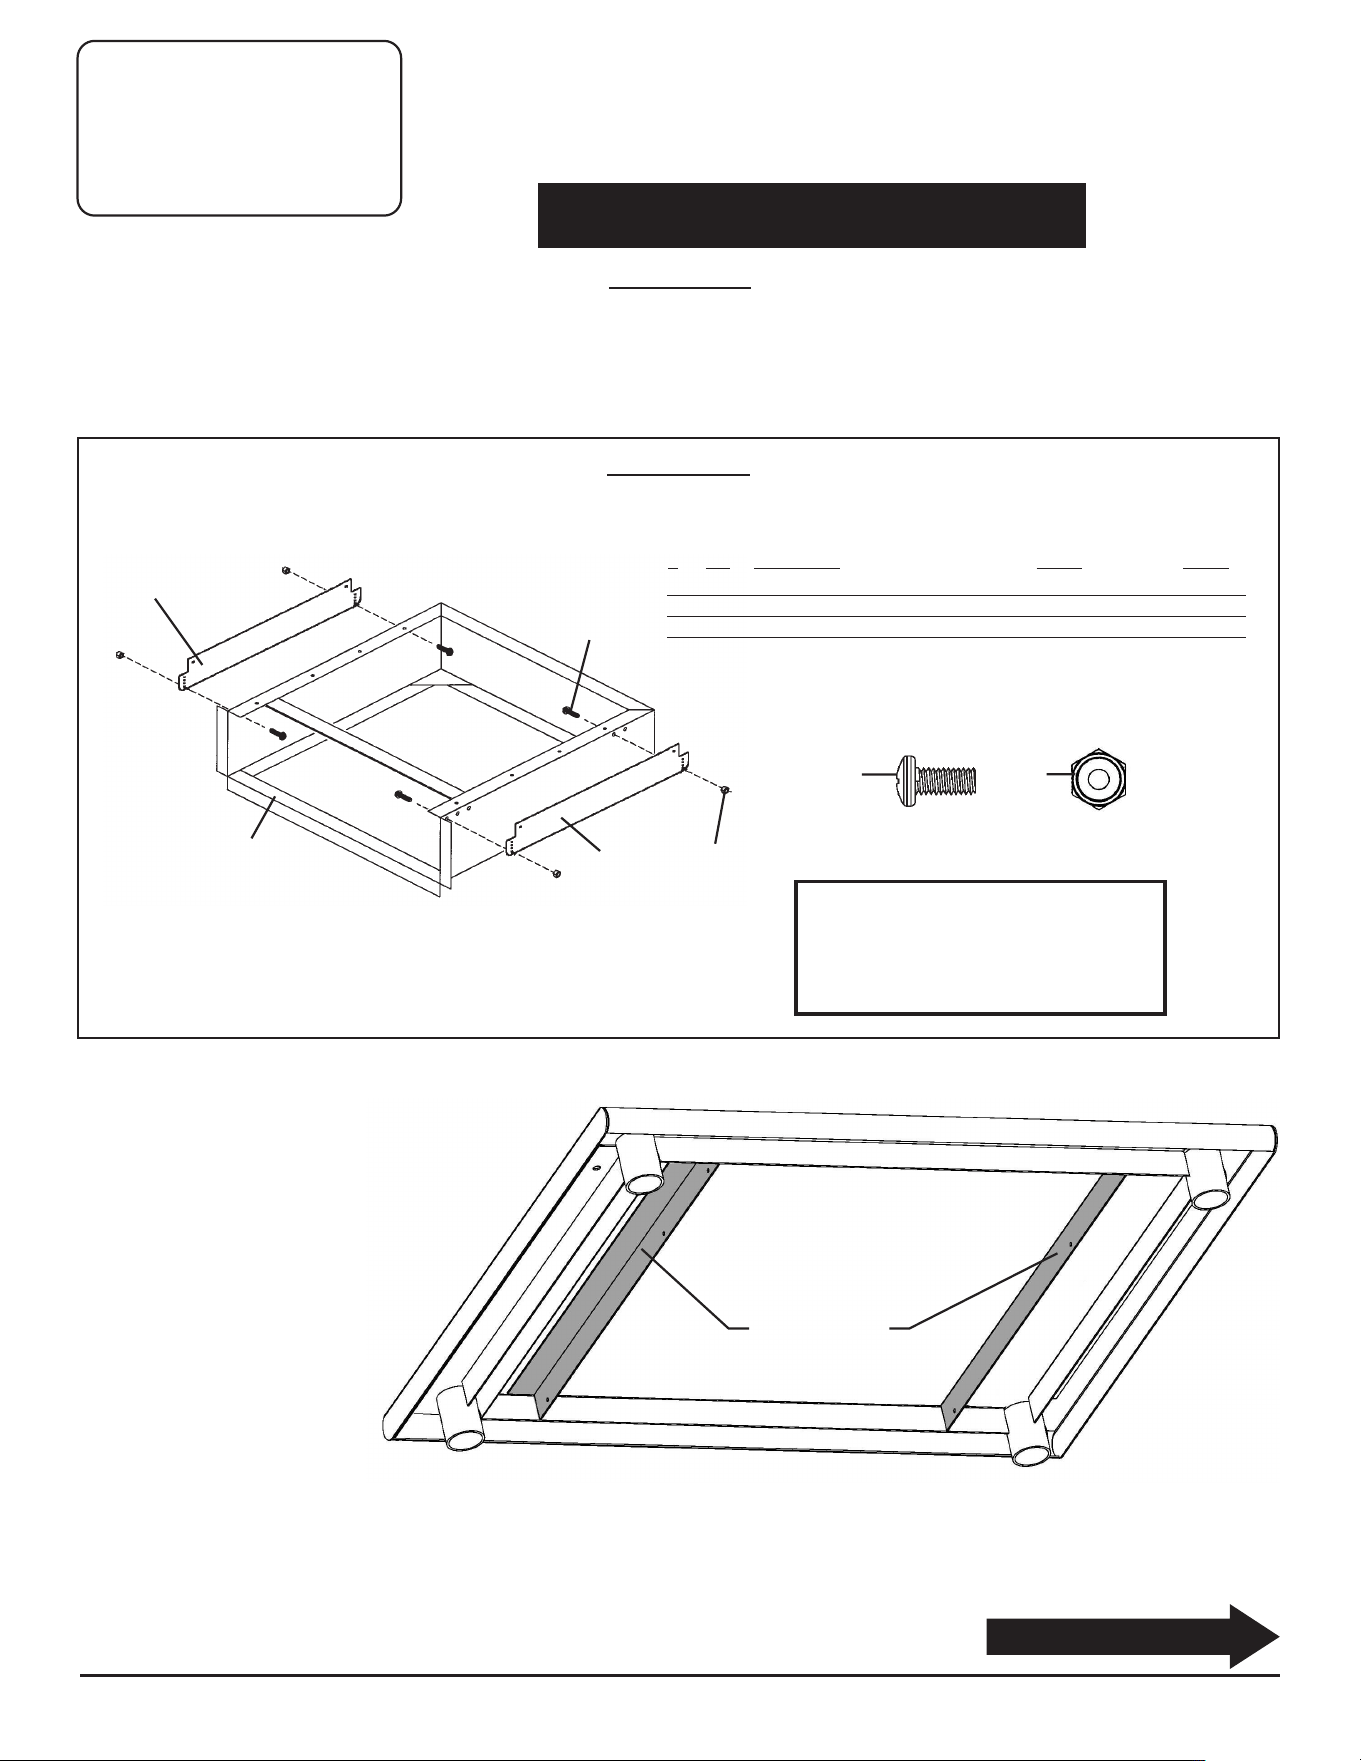
Step 2 - Assemble brackets, based on front-to-back dimension of tabletop (24˝, 30˝, or 36˝).
Each bracket assembly consists of two bracket angles. Align hole in the first bracket angle with applicable tabletop dimension number in
the second bracket angle, and assemble as shown.
PLEASE NOTE: As an example, assembly for a 30˝ tabletop is shown.
Item #1
bracket
angles
Item #3
#373748 screw
tabletop
dimension
numbers
Item #4
#313196 hex nut
When aligned
properly, the tabletop
dimension number
will appear through
this hole.
bracket
angle hole
Use screwdriver and
socket or wrench to
join bracket angles.
Do NOT fully tighten.
ASSEMBLY INSTRUCTIONS
Enclosed Drawers for Tables with Channel Frame
2
Step 1 - Measure front-to-back dimension of tabletop (24˝, 30˝, or 36˝).
This will determine how to assemble brackets in Step 2.
Front-to-back dimension
shown here is 30˝.
tabletop
front of tabletoprear of tabletop
(continued on Page 3)
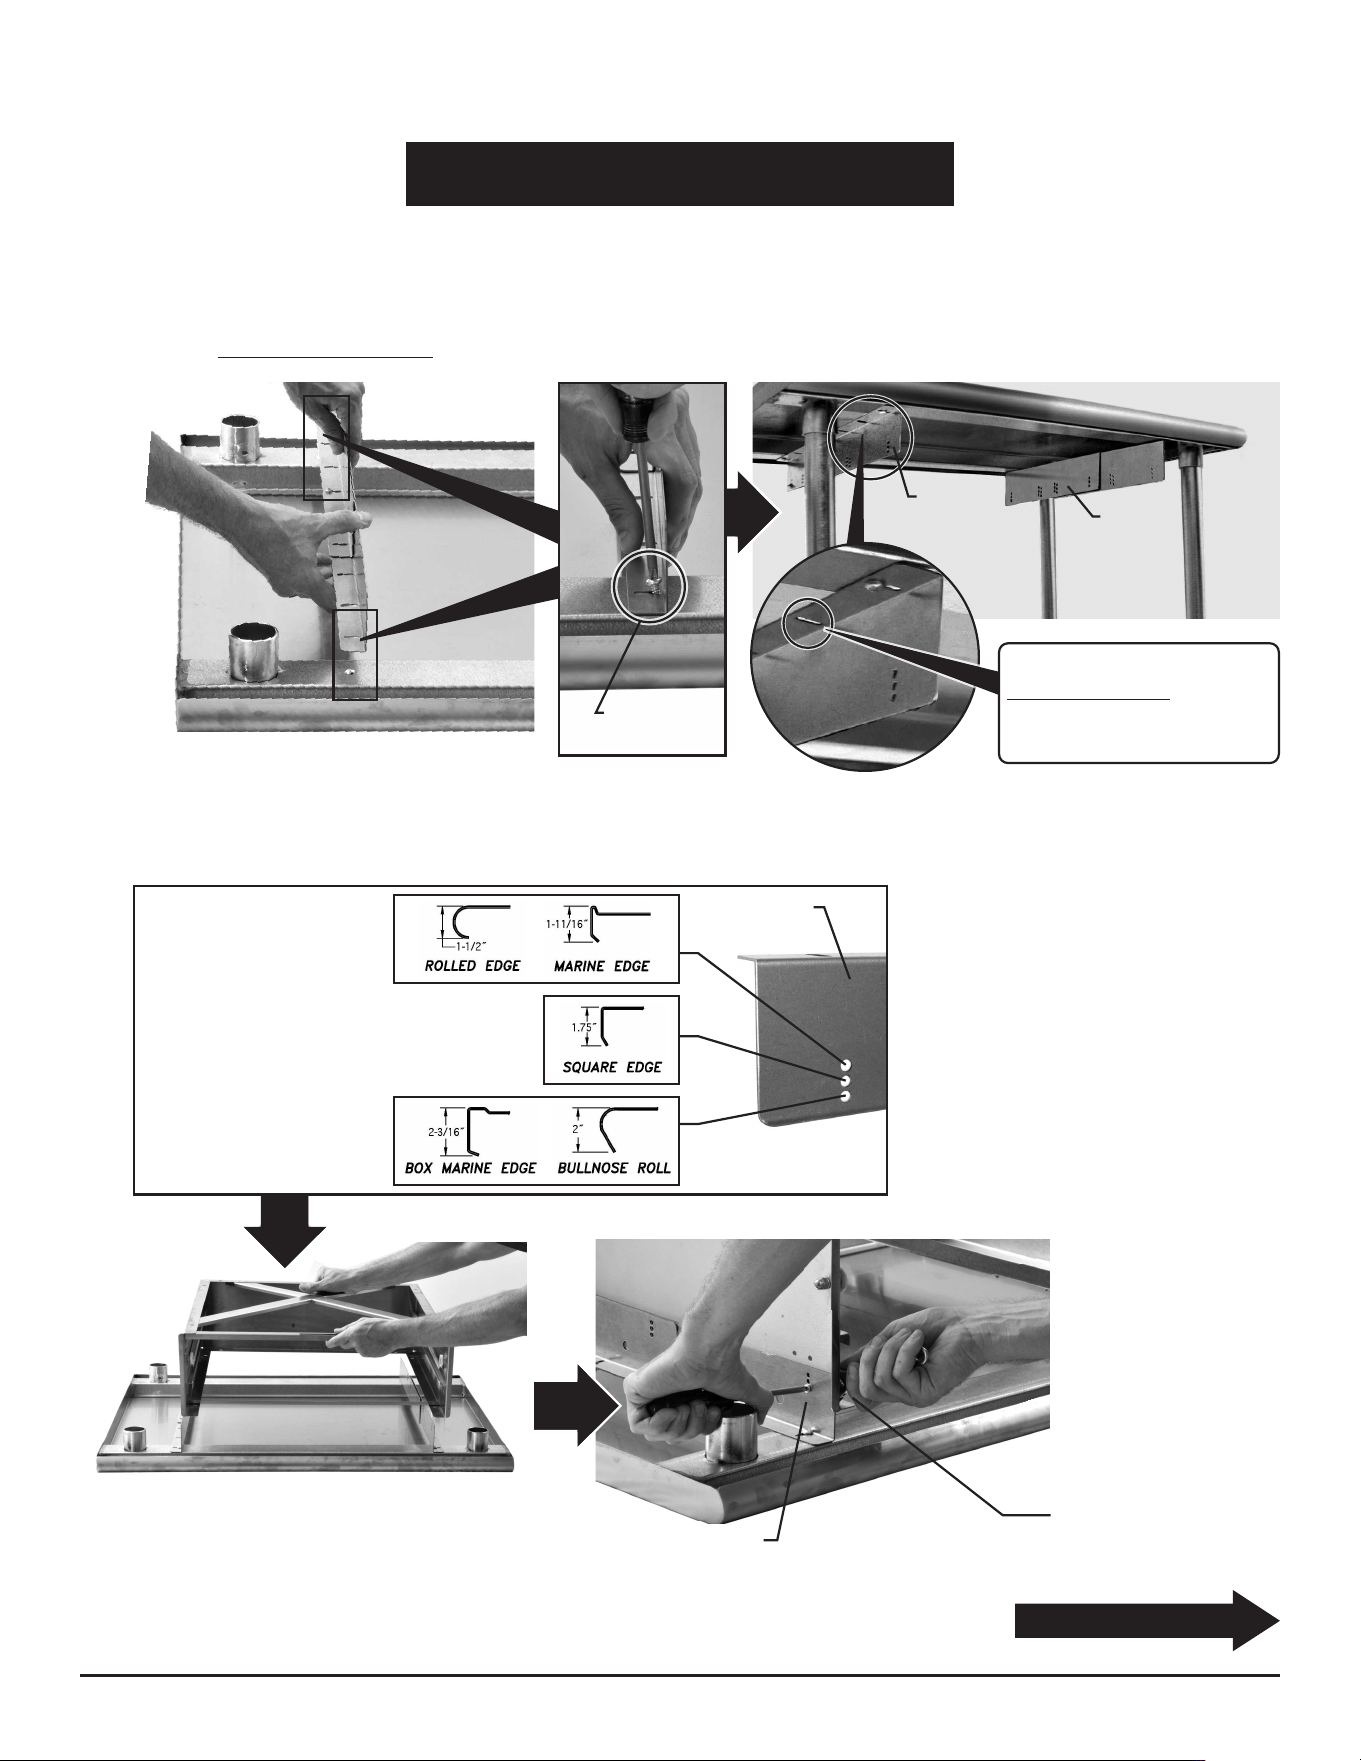
Before continuing, please read the following about tabletop channels (located underneath tabletop):
For 20˝ x 20˝ drawers
Tables with channels feature predrilled holes
with screws (see photo at right) for bracket
assemblies. Take the screws out and set
aside.
For 15˝ x 20˝ drawers:
Tables with channels require holes to be
drilled, using a 1/8˝ drill bit.
front and rear
predrilled holes and
screws (shown for
left-hand bracket
assembly)
D
rawers #501572, 502943, 502946, 502947, 502971 and 502972
3
Enclosed Drawers for Tables with Channel Frame
ASSEMBLY INSTRUCTIONS
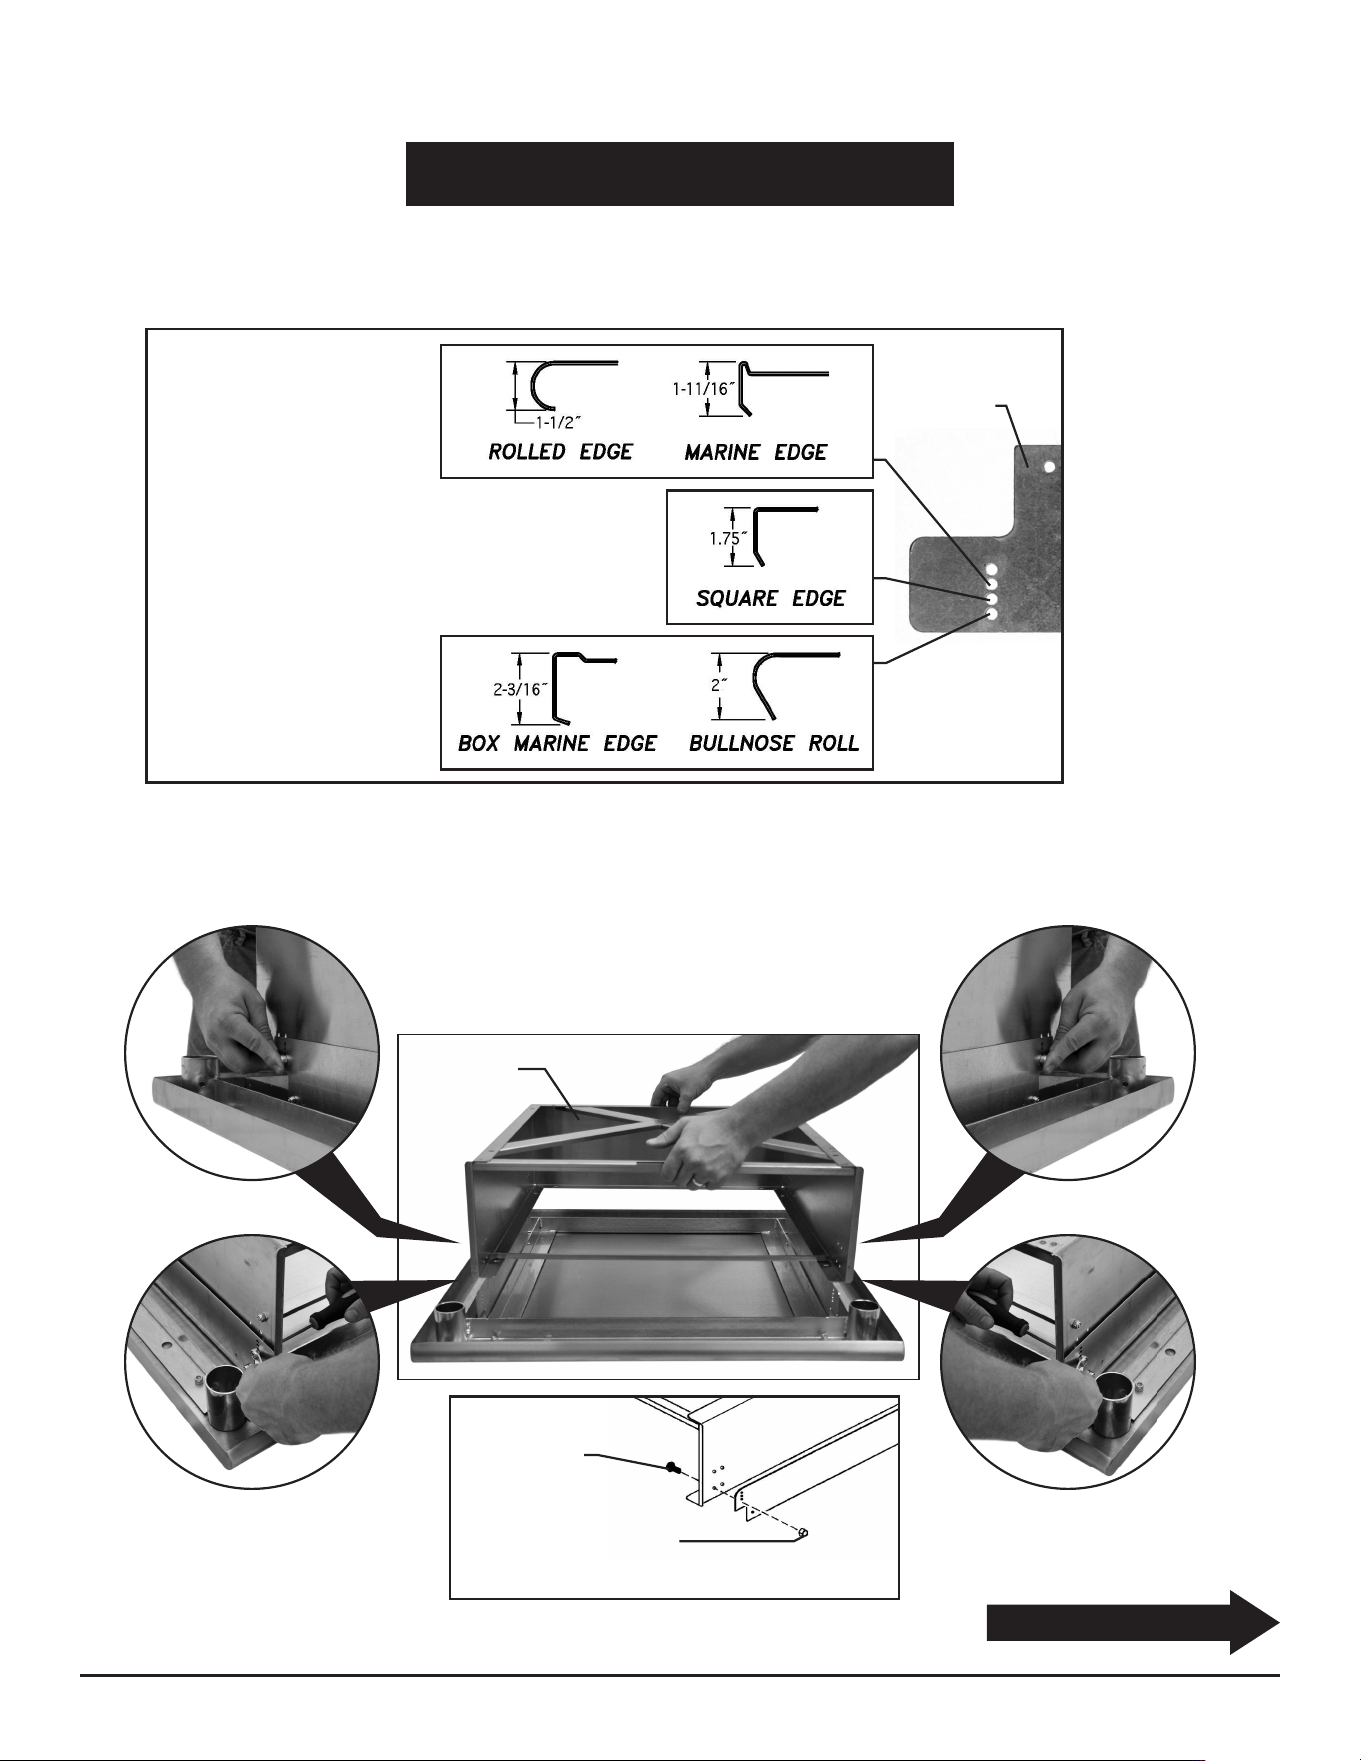
(continued on Page 4)
Which set of holes to
use on each bracket
assembly…
…depends on your
table’s edge. Match the
tabletop edge with the
relevant holes on bracket
assemblies.
bracket
assembly
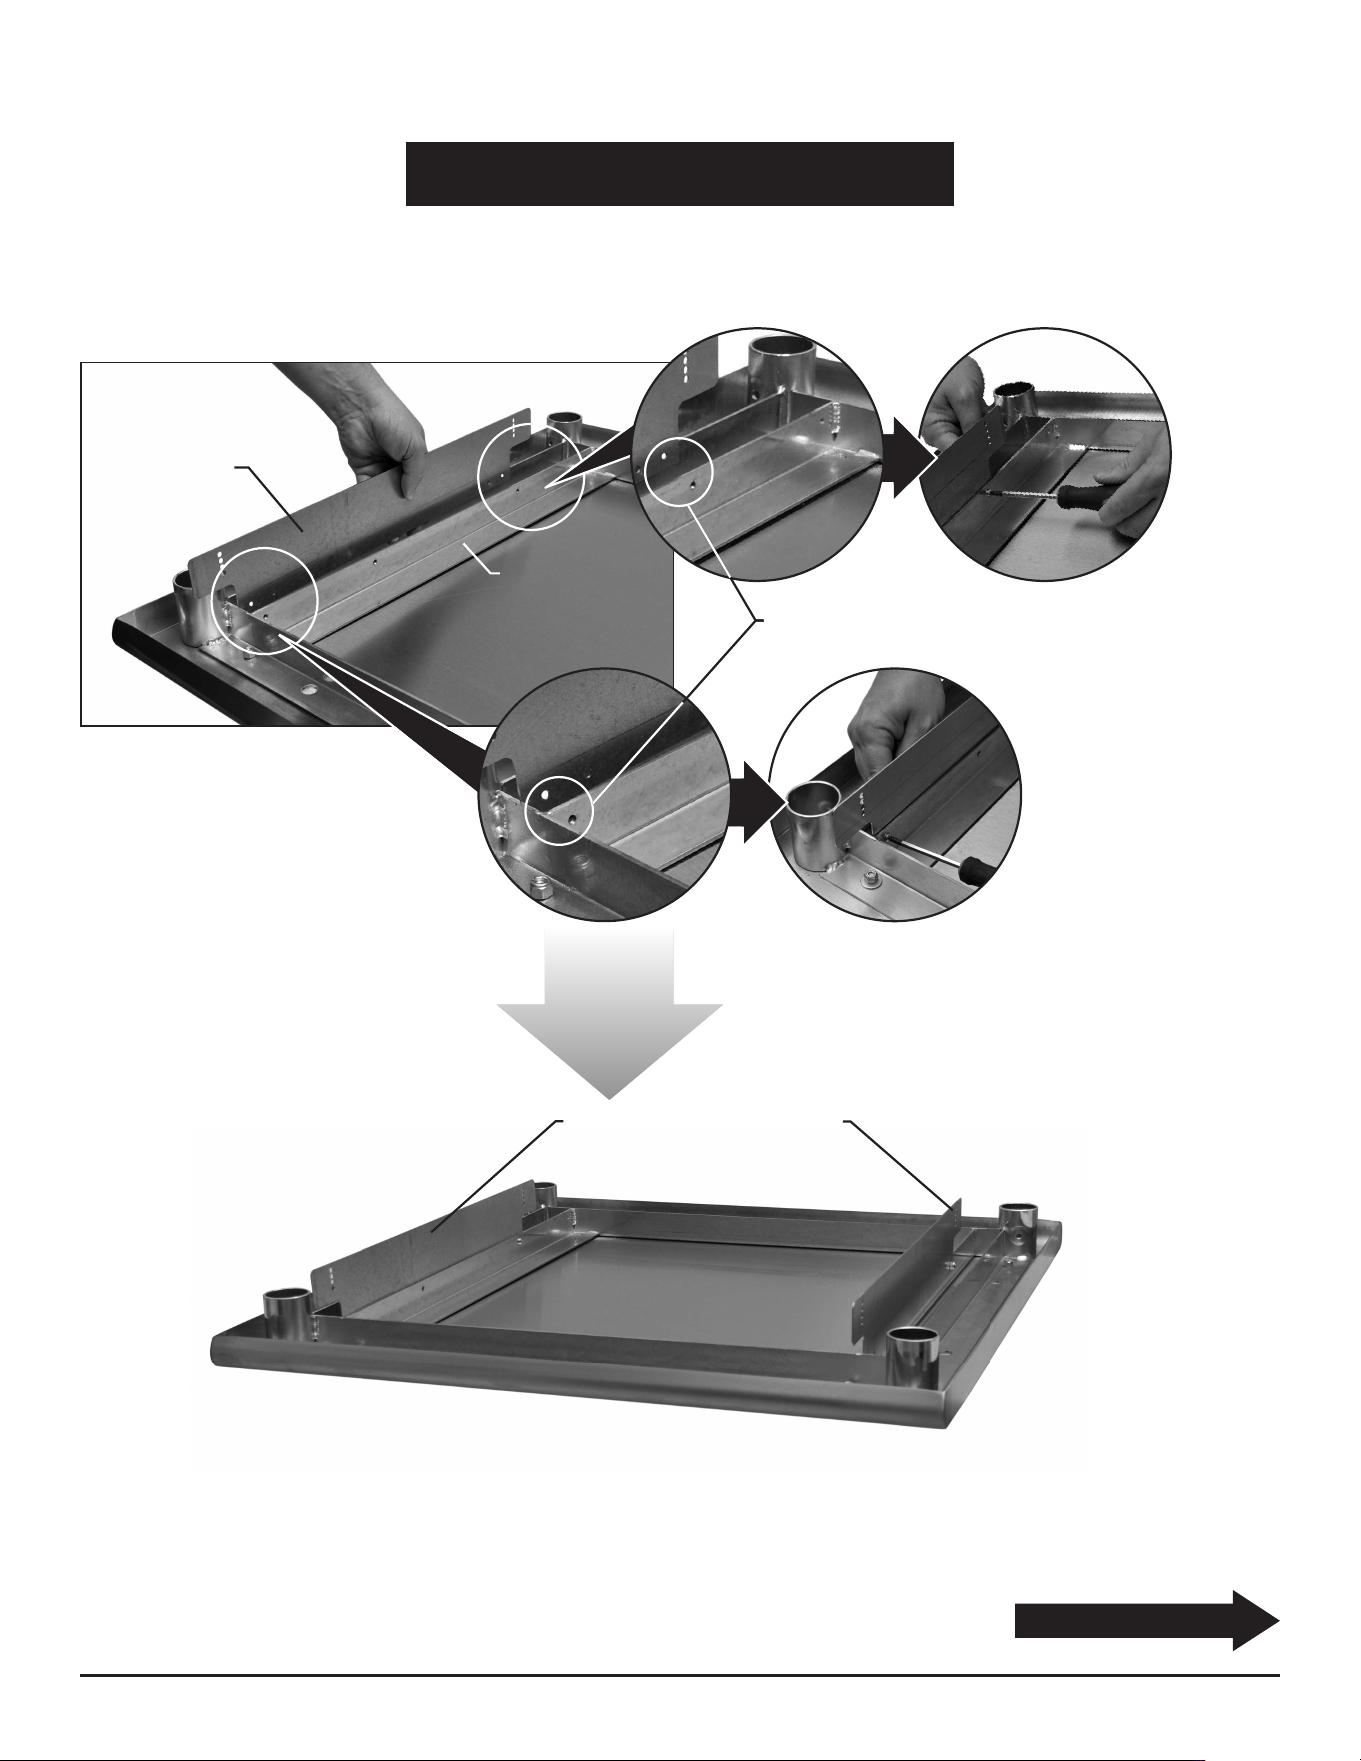
Step 3 - Attach bracket assemblies (created in Step 2) to table channels, using screwdriver.
PLEASE NOTE: Do NOT tighten screws.
Step 4 - Attach drawer enclosure to bracket assemblies.
left-hand side shown
left-hand
bracket/slide
assembly
right-hand
bracket/slide
assembly
NOTE: For 36˝ tables, use
2nd slot from front on bracket.
This will extend drawer to the
front of the table.
Drawers #501572, 502943, 502946, 502947, 502971 and 502972
Item #2 screw
Item #3 screw
(outside enclosure)
Item #4 hex nut
(inside enclosure)
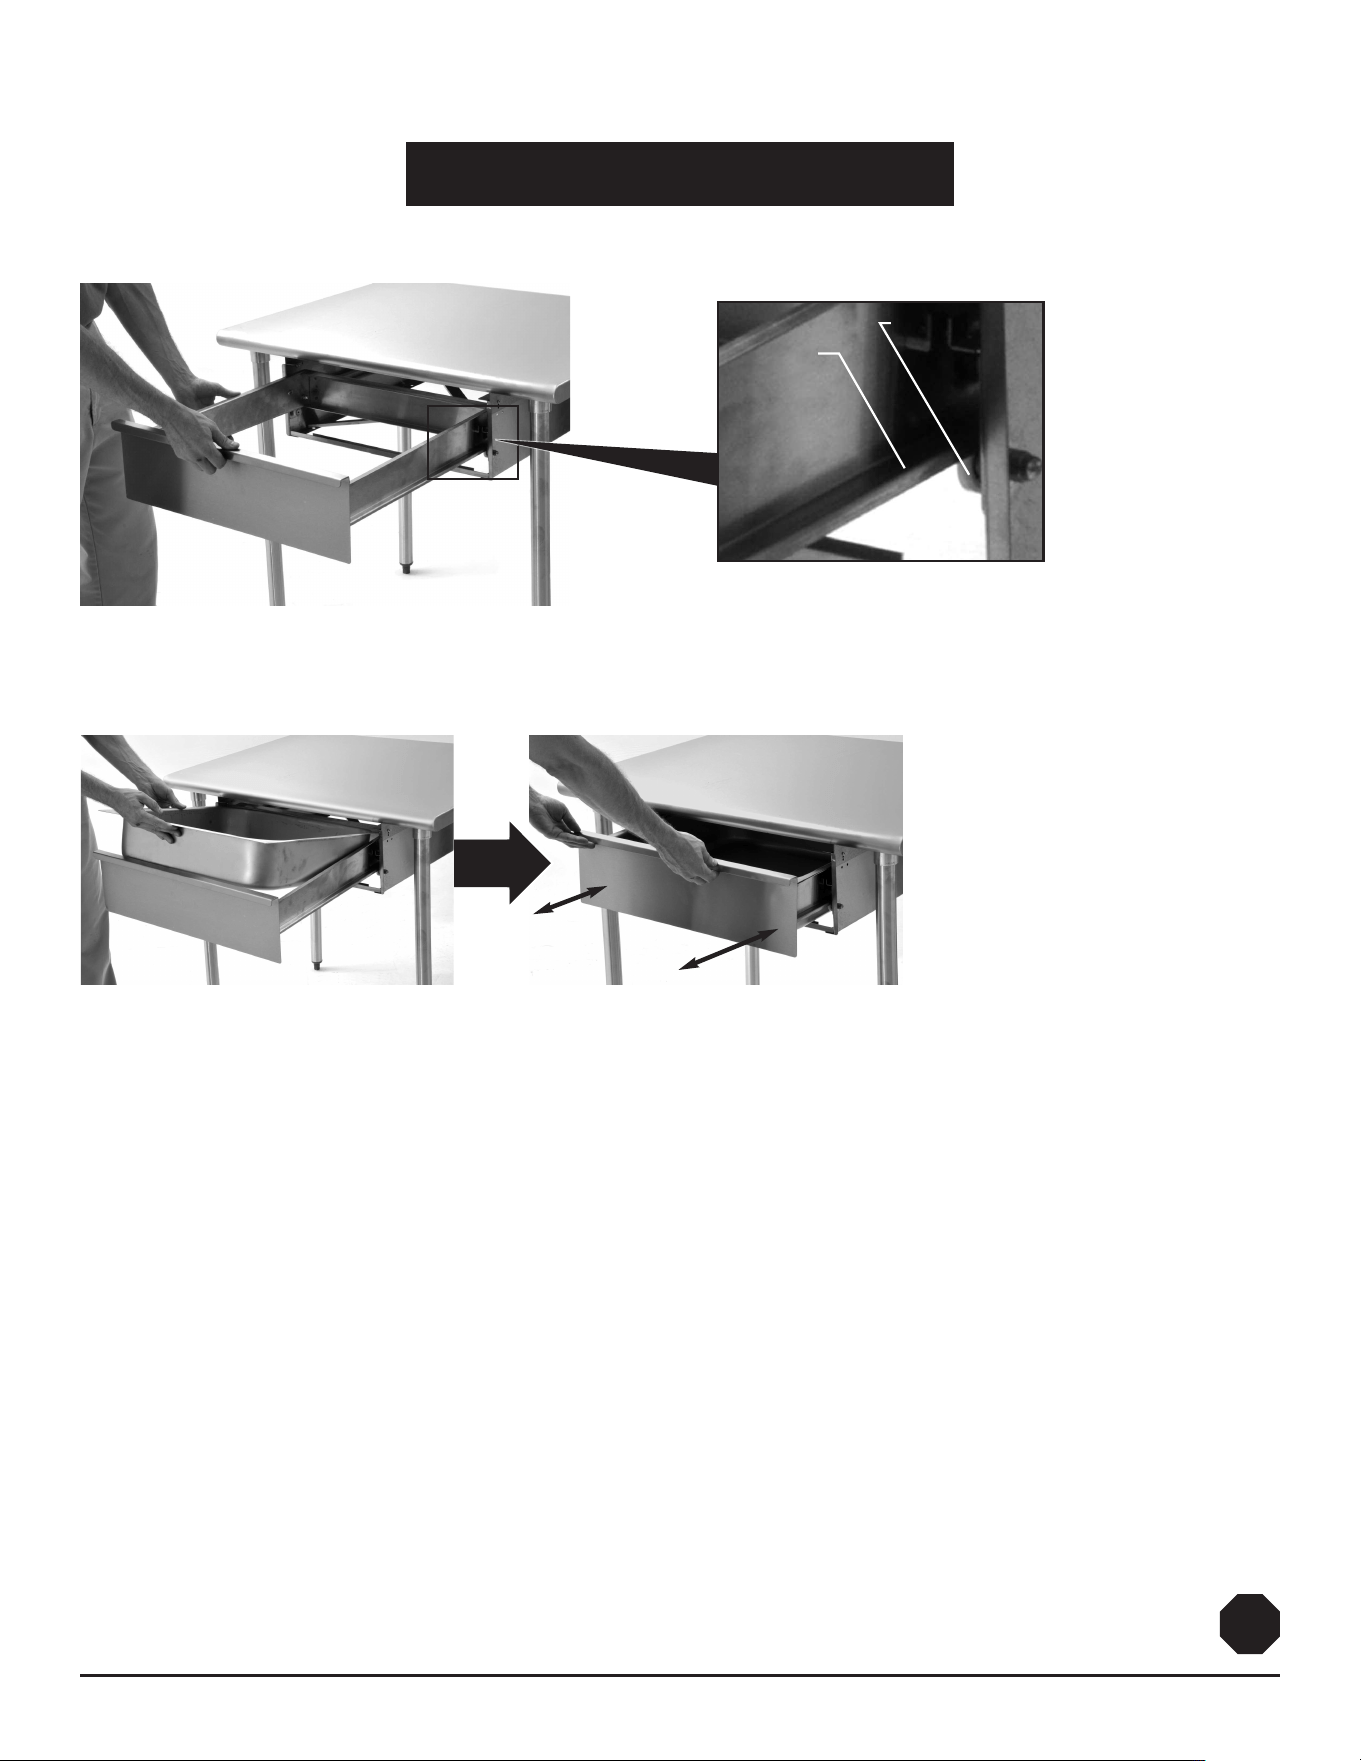
Drawer should operate smoothly after
o
pening and closing several times.
If not, check alignment of bracket angles.
4
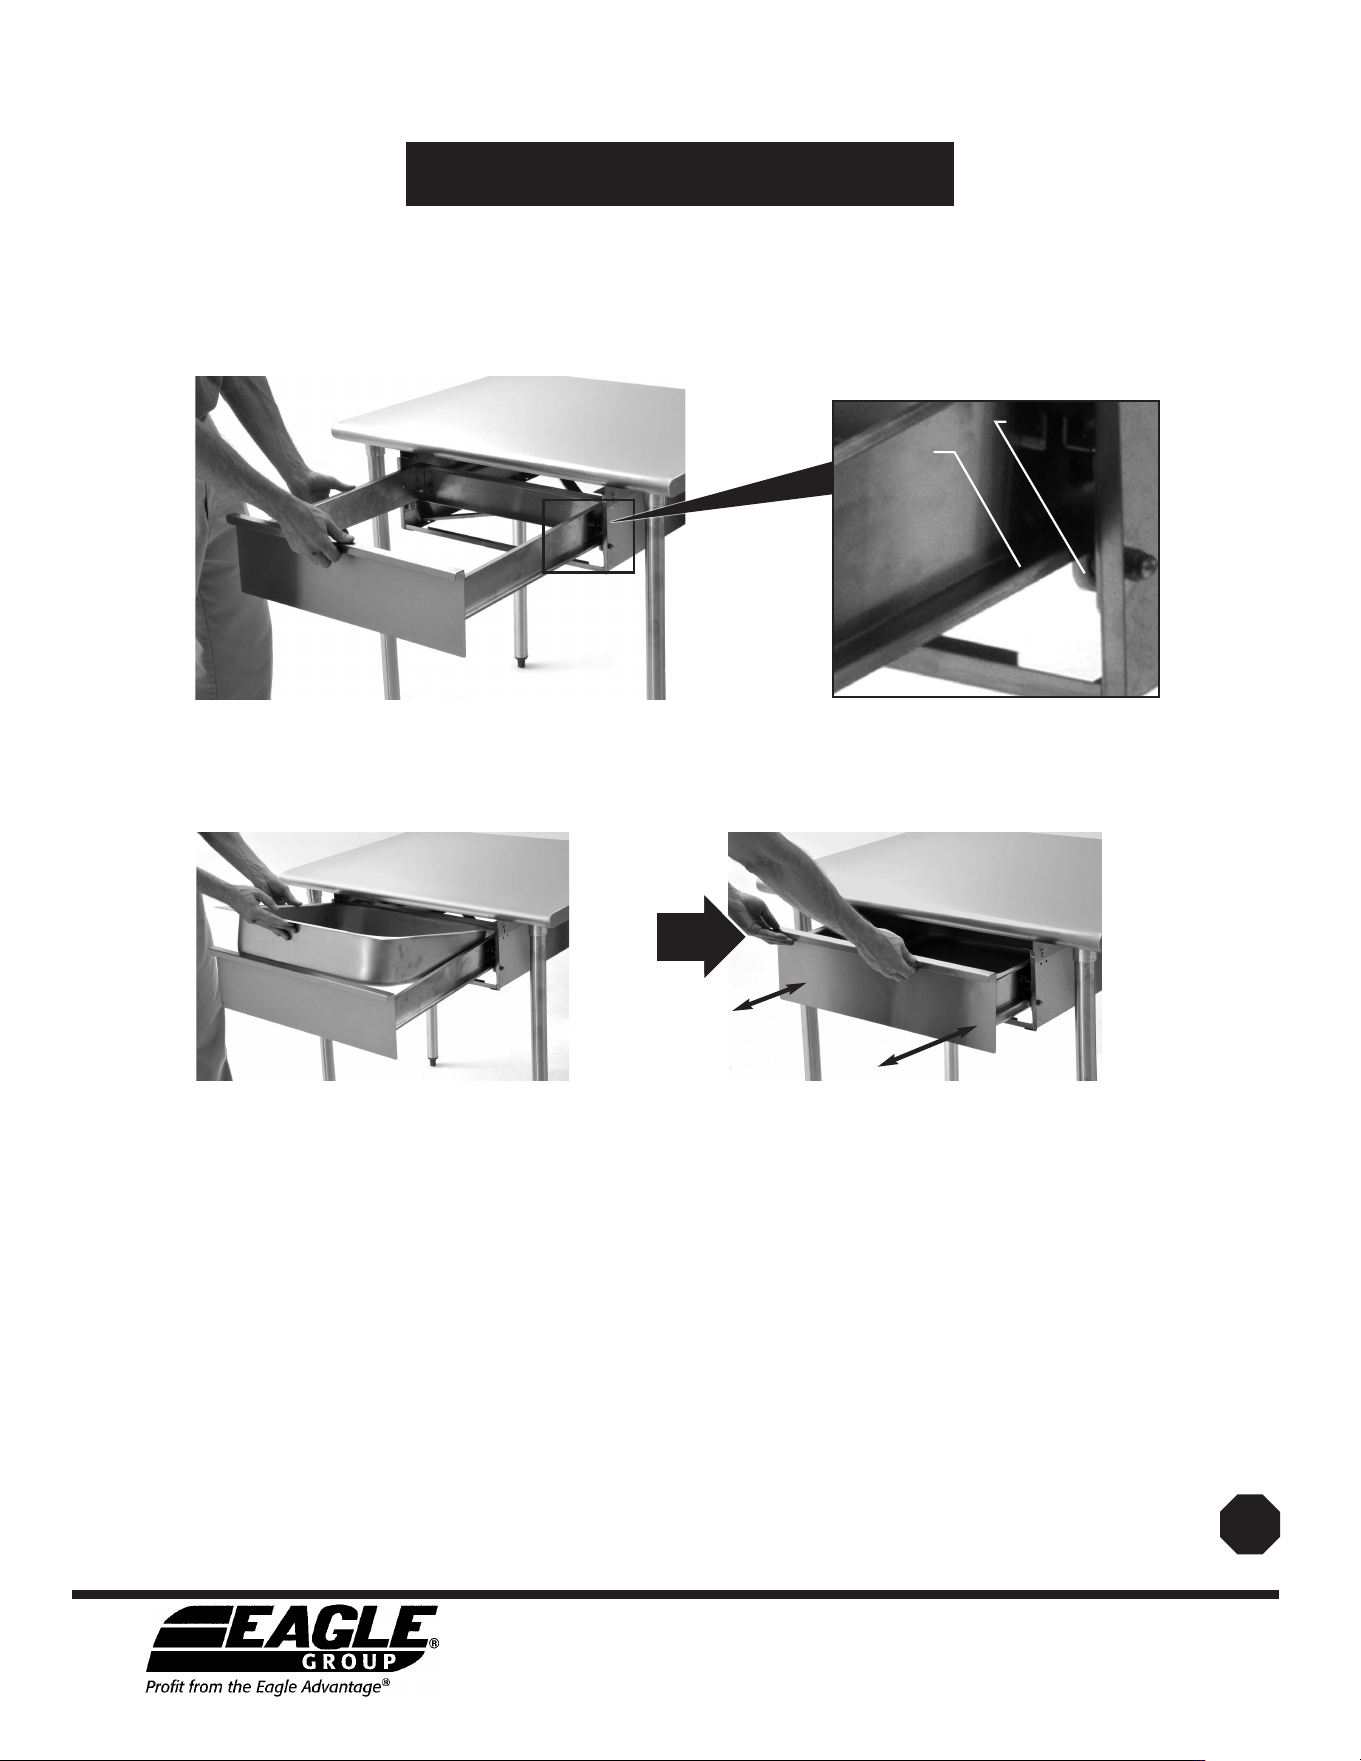
Carefully align drawer frame with enclosure (mounted to table), resting left- and right-side flanges of frame
onto rollers inside enclosure.
D
r
o
p
d
r
a
w
e
r
b
o
w
l
i
n
s
i
d
e
d
r
a
w
e
r
f
r
a
m
e
.
ASSEMBLY INSTRUCTIONS
Enclosed Drawers for Tables with Channel Frame
(End)
flange of
drawer frame
(right-hand side)
roller inside enclosure
Step 5 - Assemble drawer to drawer enclosure.
Drawers #501572, 502943, 502946, 502947, 502971 and 502972
Step 6 - Close drawer and secure all hardware.
Assembly is complete.
(drawer #502943 shown above)
Parts List
#1
#1
#2
#4
#3
#3
#2
(actual size of hardware)
PLEASE NOTE:
To mount drawers onto custom
equipment with angle frame construction,
one of the following kits is required:
• Kit #605499 for galvanized frame, or
• Kit #609700 for stainless steel frame
ASSEMBLY INSTRUCTIONS
Enclosed Drawers for
Tables with Angle Frame
CAUTION
insPect contents iMMeDiAteLY AnD FiLe cLAiM With DeLiVerinG cArrier For AnY DAMAGe.
SAVE YOUR BOX AND ALL PACKING MATERIALS.
You Are resPonsiBLe For DAMAGe to Your unit iF returneD iMProPerLY PAcKeD.
(continued on Page 6)
5
Tools needed:
• 11/32˝ or 9mm socket or wrench
• Phillips screwdriver
How to determine if you have an “angle frame” table:
If your table framing does not resemble the framing above, see channel frames on front page.
angle framing
“Angle framing,” indicated in illustration at right,
runs front-to-back underneath tabletop.
Drawers #501572, 502943, 502946, 502947, 502971 and 502972
for galvanized for stainless
frame steel frame
#
qty description part # part #
#1 2 Drawer Mounting Bracket 373779 373780
#2 8 #8 x 3/8˝ Machine screw 373748 377888
#3 8 #8 Lock nut 313196 375035
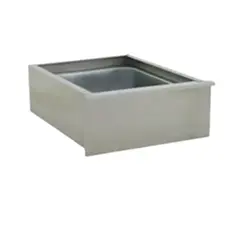
#4 1
Drawer enclosure
* varies per order *
(pan not shown)
6
ASSEMBLY INSTRUCTIONS
Enclosed Drawers for Tables with Angle Frame
(continued on Page 7)
Step 1 - Attach brackets to angle framing of table.
P
LEASE NOTE: Tighten all hardware.
brackets attached to angle framing of table
Drawers #501572, 502943, 502946, 502947, 502971 and 502972
angle framing of table
underneath tabletop
holes to be used with Item #2 screw and Item #3 lock nut
front of table
Item #1
bracket
7
ASSEMBLY INSTRUCTIONS
Enclosed Drawers for Tables with Angle Frame
(continued on back page)
D
rawers #501572, 502943, 502946, 502947, 502971 and 502972
Step 3 - Mount drawer enclosure to brackets.
Step 2 - Determine which set of holes to use for mounting drawer enclosure.
PLEASE NOTE: Bracket shown right-side up.
Which set of holes to
use on each bracket
assembly…
…depends on your
table’s edge. Match the
tabletop edge with the
relevant holes on bracket
assemblies.
bracket
drawer
enclosure
Item #2 screw
(inside enclosure)
Item #3 lock nut
(outside enclosure)
PLEASE NOTE:
eagle Foodservice equipment, eagle Mhc, specFAB
®
, and retail Display are divisions of eagle Group. ©2012 by the eagle Group
• 100 Industrial Boulevard, Clayton, Delaware 19938-8903 U.S.A. • www.eaglegrp.com
• Phone: 302/653-3000 • (Foodservice) 800/441-8440 • (MHC/Retail) 800/637-5100
• Fax: 302/653-2065
(End)
ASSEMBLY INSTRUCTIONS
Enclosed Drawers for Tables with Angle Frame
Drawers #501572, 502943, 502946, 502947, 502971 and 502972
Step 6 - Make sure all hardware is secure.
Assembly is complete.
Step 5 - Assemble drawer to drawer enclosure.
Carefully align drawer frame with enclosure (mounted to table), resting left- and right-side flanges of frame
onto rollers inside enclosure. Lift drawer stop pin over drawer stops.
Drawer should operate smoothly after
o
pening and closing several times.
If not, check alignment of bracket angles.
D
r
o
p
d
r
a
w
e
r
b
o
w
l
i
n
s
i
d
e
d
r
a
w
e
r
f
r
a
m
e
.
flange of
drawer frame
(right-hand side)
roller inside enclosure