INSTRUCTION MANUAL
Smart Heavy Duty™ HD9120 / 9125

For Household Sewing Machines and Overlock Machines
IMPORTANT SAFETY INSTRUCTIONS
Read all instructions before using this sewing machine.
When using an electrical appliance, basic safety precautions should always be followed, including the following:
Keep the instructions at a suitable place close to the machine. Make sure to hand them over if the machine is given to a
third party.
This appliance is intended for use by adults. The appliance can be used with adult supervision by (i) children aged from
8 to 12 years and (ii) persons with reduced physical, sensory or mental capabilities or lack of experience and knowledge
if they have been given instruction concerning use of the appliance in a safe way and understand the hazards involved.
Cleaning and user maintenance shall not be made by children without supervision. It is not allowed for anyone to play
with the machine. Children up to 8 years are not allowed to use the machine.
DANGER - TO REDUCE THE RISK OF ELECTRIC SHOCK:
• A sewing machine should never be left unattended when plugged in. The electrical socket, to which the machine is
plugged in should be easily accessible. Always unplug this sewing machine from the electric outlet immediately after
using and before cleaning, removing covers, lubricating or when making any other user servicing adjustments
mentioned in the instruction manual.
WARNING –TO REDUCE THE RISK OF BURNS, FIRE, ELECTRIC
SHOCK, OR INJURY TO PERSON:
• Do not allow to be used as a toy. Close attention is necessary when this sewing machine is used by or near children.
• Use this sewing machine only for its intended use as described in this manual. Use only attachments recommended
by the manufacturer as contained in this manual.
• Never operate this sewing machine if it has a damaged cord or plug, if it is not working properly, if it has been
dropped or damaged, or dropped into water. Return the sewing machine to the nearest authorized dealer or service
center for examination, repair, electrical or mechanical adjustment.
• Never operate the sewing machine with any air openings blocked. Keep ventilation openings of the sewing machine
and foot control free from the accumulation of lint, dust, and loose cloth.
• Keep fingers away from all moving parts. Special care is required around the sewing machine needle.
• Always use the proper needle plate. The wrong plate can cause the needle to break.
• Do not use bent needles.
• Do not pull or push fabric while stitching. It may deflect the needle causing it to break.
• Wear safety glasses.
• Switch the sewing machine off (“0”) when making any adjustment in the needle area, such as threading needle,
changing needle, threading bobbin, or changing presser foot, etc.
• Never drop or insert any object into any opening.
• Do not use outdoors.
• Do not operate where aerosol (spray) products are being used or where oxygen is being administrated.
• To disconnect, turn all controls to the off (“0”) position, then remove plug from outlet.
• Do not unplug by pulling on cord. To unplug, grasp the plug, not the cord.
• The foot control is used to operate the machine. Never place other objects on the foot control.
• Do not use the machine if it is wet.
• If the LED lamp is damaged or broken, it must be replaced by the manufacturer or its service agent or a similarly
qualified person, in order to avoid a hazard.
• If the cord connected with the foot control is damaged, it must be replaced by the manufacturer or its service agent
or a similarly qualified person, in order to avoid a hazard.
• Only use the external power supply (if applicable), the foot controller and cords supplied with your machine. No other
can be used. If damaged or lost, make sure to replace with identical parts. Replacement should be carried out by
the manufacturer, its service agent or a similarly qualified person, to ensure safety and avoid a hazard.
SAVE THESE INSTRUCTIONS

Federal Communication Commission Interference Statement
FFoorr tthhee UUSSAA aanndd CCaannaaddaa
Responsible party: Singer Sourcing Limited LLC
300 2nd Ave. S, Suite 300, Nashville, TN 37201, USA
Product name:
SINGER® Smart Heavy Duty™ HD9120 / 9125 household sewing machine
This device complies with Part 15 of the FCC Rules. Operation is subject to the following two conditions: (1) This device
may not cause harmful interference, and (2) this device must accept any interference received, including interference
that may cause undesired operation.
This device contains license-exempt transmitter(s)/receiver(s) that comply with Innovation, Science and Economic
Development Canada’s license-exempt RSS(s). Operation is subject to the following two conditions: (1) This device may
not cause interference, and (2) This device must accept any interference, including interference that may cause
undesired operation of the device.
To satisfy radio frequency exposure requirements, a separation distance of 8” (20 cm) or more should be maintained
between this device and persons during device operation. To ensure compliance, operations at closer than this
distance is not recommended. The built-in antenna used for this transmitter must not be co-located in conjunction with
any other antenna or transmitter.
This equipment has been tested and found to comply with the limits for a Class B digital device, pursuant to Part 15 of
the FCC Rules. These limits are designed to provide reasonable protection against harmful interference in a residential
installation. This equipment generates, uses and can radiate radio frequency energy and, if not installed and used in
accordance with the instructions, may cause harmful interference to radio communications. However, there is no
guarantee that interference will not occur in a particular installation. If this equipment does cause harmful interference
to radio or television reception, which can be determined by turning the equipment off and on, the user is encouraged
to try to correct the interference by one of the following measures:
• Reorient or relocate the receiving antenna.
• Increase the separation between the equipment and receiver.
• Connect the equipment into an outlet on a circuit different from that to which the receiver is connected.
• Consult the authorized SINGER® retailer or an experienced radio/TV technician for help.
The included interface cable should be used in order to ensure compliance with the limits for a Class B digital device.
Any changes or modifications not expressly approved by the party responsible for compliance could void the
user's authority to operate this equipment.

CE Declaration of Conformity
FFoorr WWiiFFii EEnnaabblleedd MMaacchhiinneess
VSM Group AB Soldattorpsgatan 3, SE-554 74 Jonkoping, Sweden declare that the product:
WiFi connected Household Sewing Machine SINGER® Smart Heavy Duty™ HD9120 / 9125 complies fully with the following
EU directives:
• 2014/53/EU RED Directive
• 2011/65/EU RoHS Directive
and that the relevant harmonized standards are applied as listed:
• EN 60335-1:2012, A13:2017, A1:2019, A2:2019, A14:2019, A15:2021, A16:2024
• EN 60335-2-28:2003, A1:2008, A11:2018
• EN 62233:2008
• EN 62311:2020
• EN 50564:2011
• EN 50014-1:2021
• EN 55014-2:2021
• EN 61000-3-2:2019, A1:2021
• EN 61000-3-3:2019, A1:2019
• EN 63000:2018
• EN 301 489–17 V3.24–2020
• EN 301 489-v2.1.1-2017
• EN 300 328 v2.2.2–2019
• EN 18031-1:2024
• EN 18031-2:2024
Jönköping, 01062025
Carsten Raunsgaard
Sr. Manager Regulatory Compliance

TABLE OF CONTENTS
CONNECT TO WIFI & CREATIVATE
SERVICES................................................................1
Download the CREATIVATE™ App . ... . . . . . .. .. .. .. .. . . . . . . . .. .. .. .. ..1
Connect to the CREATIVATE™ App . . . . . . . .. .. .. .. .. . . . . . .. .. .. . . . . . ..1
Firmware Update Using WiFi.. .. . . . . . .. .. .. .. .. .. . . . . . .. .. .. . . . . . .. .. ..1
INTRODUCTION ................................................... 2
Intended Use .. .. . . . . . . . .. .. .. .. .. . . . . . .. .. .. .. .. . . . . . . . .. .. . . . . . . . .. .. .. .. .2
Machine Overview — Front .. . . . . . .. .. .. .. .. . . . . . . . .. .. . . . . . . . .. .. .. .. .2
Needle Area Overview . . . . . . .. .. .. .. .. . . . . . . . .. .. .. .. .. . . . . . .. .. .. .. .. . .3
Top of Machine . .. .. .. . . . . . .. .. .. .. .. . . . . . .. .. .. .. .. .. . . . . . .. .. .. .. .. . . . . . .3
Overview Accessories. .. .. . . . . . .. .. .. .. .. . . . . . .. .. .. .. .. . . . . . . . .. .. .. . . .4
Included Accessories . .. .. .. .. . . . . . .. .. .. .. .. . . . . . . . .. .. . . . . . . . .. .. .. .. .4
Presser Feet .. . . . . . .. .. .. .. .. .. . . . . . .. .. .. .. .. . . . . . .. .. .. . . . . . .. .. .. .. .. .. . . .5
Function and Machine Operating Buttons . . .. .. .. .. .. . . . . . .. .. .6
Machine Status Indicators . .. . . . . . . . .. .. .. .. .. . . . . . .. .. .. .. .. . . . . . . . ..7
Connect Button LED. . . . . . .. .. .. .. .. . . . . . .. .. .. .. .. .. . . . . . .. .. .. . . . . . .. .. .7
Stitch Overview . . . . . . . . .. .. .. .. .. . . . . . .. .. .. .. .. . . . . . . . .. .. . . . . . . . .. .. .. .. .8
Utility Stitches . .. .. .. .. .. .. . . . . . .. .. .. . . . . . .. .. .. .. .. . . . . . .. .. .. .. .. .. . . .8
Stitch Menu Overview . . . .. .. .. . . . . . .. .. .. .. .. . . . . . . . .. .. .. .. .. . . . . . .. ..10
GET STARTED........................................................11
Unpack the Machine . . . . .. .. .. . . . . . .. .. .. .. .. . . . . . . . .. .. .. .. .. . . . . . .. .. .11
Connect to the Power Supply . . . . . . .. .. .. .. .. . . . . . .. .. .. .. .. . . . . . . . ..11
Pack Away After Sewing. . . .. .. .. .. .. . . . . . .. .. .. . . . . . .. .. .. .. .. . . . . . . . .12
Standby Mode .. .. .. .. .. .. . . . . . .. .. .. .. .. . . . . . . . .. .. .. . . . . . .. .. .. .. .. . . . . .12
Free Arm/Removable Accessory Tray . .. .. .. .. .. . . . . . .. .. .. .. .. .12
Presser Foot Lifter . . .. .. .. . . . . . .. .. .. .. .. . . . . . . . .. .. .. .. .. . . . . . .. .. .. . . . . .12
Thread Knife . . . . . .. .. .. . . . . . .. .. .. .. .. . . . . . .. .. .. .. .. .. . . . . . .. .. .. . . . . . .. ..12
Spool Pins. . . . . . .. .. .. . . . . . . . . . . . .. .. . . . . . . . .. .. .. .. .. . . . . . .. .. .. .. .. . . . . . . . .13
Spool Caps.. .. .. . . . . . .. .. .. .. .. . . . . . .. .. .. . . . . . . . .. .. .. .. .. . . . . . .. .. .. .. .. .13
Threads. .. .. . . . . . . . .. .. .. . . . . . .. .. .. .. .. . . . . . .. .. .. .. .. .. . . . . . .. .. .. .. .. . . . . .14
Threading Tips and Hints . . .. .. .. .. .. . . . . . . . .. .. .. . . . . . .. .. .. .. .. . . . . .15
If the Thread Spool is Pulled up on the Spool Pin. . . .. .. .. .15
If the Thread Slides Down on the Standing Thread
Spool . . .. .. .. .. .. . . . . . . . .. .. .. .. .. . . . . . .. .. .. . . . . . .. .. .. .. .. . . . . . . . .. .. .. ..15
Needles. . . . . .. .. .. .. .. . . . . . .. .. .. .. .. . . . . . . . .. .. .. . . . . . . . . . .. .. .. . . . . . .. .. .. .15
Important Needle Information. . .. .. .. . . . . . .. .. .. .. .. . . . . . .. .. .. .15
Selection Guide — Needle Size, Fabric, Thread. . . . . . .. .. .. .16
Change the Needle . . .. .. .. .. .. . . . . . .. .. .. .. .. . . . . . . . .. .. . . . . . . . .. .. .. ..16
Thread Tension . . . . . .. .. .. .. .. . . . . . .. .. .. .. .. .. . . . . . .. .. .. . . . . . .. .. .. .. .. .16
Sew without Feed Teeth. .. . . . . . .. .. .. .. .. .. . . . . . .. .. .. .. .. . . . . . .. .. .. . 17
Presser Foot Pressure... . . . . . .. .. .. . . . . . .. .. .. .. .. .. . . . . . .. .. .. .. .. . . . . . 17
Change the Presser Foot. .. .. .. .. . . . . . .. .. .. . . . . . . . .. .. .. .. .. . . . . . .. .. 17
Wind the Bobbin. .. .. .. . . . . . . . .. .. .. .. .. . . . . . .. .. .. . . . . . .. .. .. .. .. . . . . . . . .18
Insert the Bobbin.. .. .. . . . . . . . .. .. . . . . . . . .. .. .. .. .. . . . . . .. .. .. .. .. . . . . . . . .18
Thread the Machine . . . . . . . . .. .. .. .. .. . . . . . .. .. .. .. .. . . . . . .. .. .. . . . . . . . .19
Needle Threader . .. .. . . . . . .. .. .. .. .. . . . . . .. .. .. . . . . . . . .. .. .. .. .. . . . . . .. .20
Threading for Twin Needle .. . . . . . .. .. .. . . . . . .. .. .. .. .. . . . . . . . .. .. .. .. 21
SEWING................................................................22
Stitch Selector.. .. .. .. .. . . . . . . . .. .. .. .. .. . . . . . .. .. .. . . . . . .. .. .. .. .. . . . . . . . 22
Fabric Selection . . . . . . . .. .. .. .. .. . . . . . .. .. .. .. .. . . . . . . . .. .. . . . . . . . .. .. .. . 22
Woven or Stretch (Knit). .. .. . . . . . . . .. .. .. .. .. . . . . . .. .. .. . . . . . .. .. .. 22
Leather and Vinyl . .. .. . . . . . .. .. .. .. .. . . . . . . . .. .. .. . . . . . .. .. .. .. .. . . . . 23
Load a Stitch. . . . . .. .. .. .. .. . . . . . .. .. .. .. .. . . . . . . . .. .. .. . . . . . .. .. .. .. .. . . . . 23
Stitch Settings. . . .. .. .. .. .. . . . . . .. .. .. . . . . . .. .. .. .. .. .. . . . . . .. .. .. .. .. . . . . 23
Stitch Width . . . .. .. .. .. .. . . . . . .. .. .. .. .. . . . . . . . .. .. .. . . . . . .. .. .. .. .. . . . . 23
Stitch/Needle Positioning. . . . . . .. .. .. .. .. . . . . . . . .. .. .. .. .. . . . . . .. . 23
Stitch Length.. . . . . . . . .. .. .. . . . . . .. .. .. .. .. . . . . . .. .. .. .. .. . . . . . . . .. .. .. . 23
Mirroring. .. .. .. . . . . . .. .. .. .. .. . . . . . .. .. .. .. .. .. . . . . . .. .. .. . . . . . . . . . .. .. .. 23
Save Stitch .. .. .. . . . . . .. .. .. .. .. . . . . . .. .. .. . . . . . . . .. .. .. .. .. . . . . . .. .. .. .. .. 24
Sewing Techniques .. . . . . . . . .. .. .. .. .. . . . . . .. .. .. .. .. . . . . . .. .. .. . . . . . . . 24
One-Step Buttonhole. .. . . . . . .. .. .. .. .. . . . . . .. .. .. .. .. . . . . . . . .. .. .. .24
EMBROIDERY PREPARATIONS ........................25
Embroidery Unit Overview . .. .. .. . . . . . .. .. .. . . . . . .. .. .. .. .. . . . . . . . .. .25
Embroidery Hoop Overview.. . . . . . .. .. .. .. .. .. . . . . . .. .. .. .. .. . . . . . .. 25
Embroidery Foot.. .. . . . . . . . .. .. .. .. .. . . . . . .. .. .. . . . . . .. .. .. .. .. . . . . . . . .. .25
Attach Embroidery Foot . .. .. .. .. .. . . . . . . . .. .. .. . . . . . .. .. .. .. .. . . . . . ..26
Embroidery Designs . .. .. . . . . . .. .. .. . . . . . . . . . . . .. .. .. . . . . . .. .. .. .. .. . . .26
Attach the Embroidery Unit .. .. .. . . . . . . . .. .. .. .. .. . . . . . .. .. .. .. .. . . .26
Remove the Embroidery Unit. .. . . . . . .. .. .. .. .. . . . . . .. .. .. . . . . . . . .. .26
Stabilizers .. .. .. . . . . . . . .. .. .. .. .. . . . . . .. .. .. . . . . . .. .. .. .. .. . . . . . . . .. .. .. .. .. 27
Tear-Away Stabilizers . . . . .. .. .. . . . . . .. .. .. .. .. . . . . . .. .. .. .. .. .. . . . . 27
Iron-on Tear-Away. .. .. .. .. .. . . . . . .. .. .. . . . . . . . .. .. .. .. .. . . . . . .. .. .. 27
Cut-Away Stabilizer.. .. .. . . . . . .. .. .. . . . . . .. .. .. .. .. . . . . . . . .. .. .. .. .. 27
Water Soluble Stabilizer . . .. .. .. .. .. .. . . . . . .. .. .. .. .. . . . . . .. .. .. . . . 27
Heat Soluble Stabilizer .. .. .. . . . . . .. .. .. . . . . . . . .. .. .. .. .. . . . . . .. .. .. 27
Sticky Stabilizer . . . . . . .. .. .. .. .. . . . . . .. .. .. .. .. .. . . . . . .. .. .. . . . . . .. .. .. 27
To Hoop the Fabric . . . . .. .. .. .. .. . . . . . .. .. .. .. .. .. . . . . . .. .. .. . . . . . .. .. .. 28
Attach/Remove the Hoop . .. .. .. . . . . . .. .. .. .. .. . . . . . .. .. .. . . . . . . . .. .28
EMBROIDERY EDIT .............................................29
Select Hoop .. .. .. . . . . . .. .. .. .. .. . . . . . . . .. .. .. .. .. . . . . . .. .. .. . . . . . .. .. .. .. .29
Load a Design. .. .. .. . . . . . . . .. .. .. .. .. . . . . . .. .. .. .. .. . . . . . .. .. .. .. .. .. . . . . 29
Embroidery Text . .. . . . . . .. .. .. .. .. . . . . . .. .. .. .. .. .. . . . . . .. .. .. . . . . . .. .. .. 29
Position and Size .. . . . . . .. .. .. .. .. . . . . . .. .. .. .. .. .. . . . . . .. .. .. . . . . . .. .. .. 29
Cut/Copy and Paste. . . . . . .. .. .. .. .. . . . . . . . .. .. .. . . . . . .. .. .. .. .. . . . . . ..29
Delete .. .. .. .. .. . . . . . .. .. .. . . . . . .. .. .. .. .. . . . . . . . .. .. .. .. .. . . . . . .. .. .. .. .. . . .30
Duplicate . .. .. . . . . . .. .. .. .. .. . . . . . .. .. .. .. .. .. . . . . . .. .. .. . . . . . .. .. .. .. .. . . .30
Edit Colors . . .. .. .. .. .. . . . . . . . .. .. .. .. .. . . . . . .. .. .. . . . . . .. .. .. .. .. . . . . . . . .. .30
Scale. .. .. . . . . . .. .. .. . . . . . .. .. .. .. .. . . . . . . . .. .. .. .. .. . . . . . .. .. .. . . . . . . . .. .. .. .30
Mirror Side to Side . .. .. .. . . . . . .. .. .. . . . . . .. .. .. .. .. . . . . . .. .. .. .. .. .. . . . . 30
Send Design to Machine . . . . .. .. .. . . . . . . . .. .. .. .. .. . . . . . .. .. .. .. .. . . .30
Stitch-Out Setup and Adjustments . .. .. . . . . . .. .. .. . . . . . . . .. .. .. .30
Machine Setup for Embroidery .. .. . . . . . .. .. .. . . . . . .. .. .. .. .. .. . . . . 30
EMBROIDERY STITCH OUT ...............................31
Adjustments . . . . . . .. .. .. .. .. . . . . . .. .. .. . . . . . . . .. .. .. .. .. . . . . . .. .. .. .. .. . . . .31
Corner Check . . . . .. .. .. . . . . . .. .. .. .. .. . . . . . . . .. .. .. .. .. . . . . . .. .. .. . . . . . .. .31
Basting. . . .. .. .. .. .. . . . . . .. .. .. .. .. . . . . . . . .. .. .. . . . . . .. .. .. .. .. . . . . . .. .. .. .. ..31
Hoop Positions . . . . . . .. .. .. . . . . . .. .. .. .. .. . . . . . .. .. .. .. .. . . . . . . . .. .. .. .. .. .31
Current Stitch . .. .. .. .. .. .. . . . . . .. .. .. .. .. . . . . . .. .. .. . . . . . .. .. .. .. .. .. . . . . .31
Trim . .. . . . . . .. .. .. .. .. .. . . . . . .. .. .. .. .. . . . . . .. .. .. .. .. .. . . . . . .. .. .. . . . . . .. .. .. .31
Center... . . . . . .. .. .. . . . . . .. .. .. .. .. . . . . . . . .. .. .. .. .. . . . . . .. .. .. . . . . . .. .. .. .. ..31
Park . . . .. .. .. .. .. . . . . . .. .. .. .. .. . . . . . .. .. .. . . . . . . . .. .. .. .. .. . . . . . .. .. .. .. .. . . . .31
Color Blocks.. . . . . . .. .. .. . . . . . .. .. .. .. .. . . . . . . . .. .. .. .. .. . . . . . .. .. .. . . . . . .. 32
Load Next Thread . . . .. .. .. . . . . . .. .. .. .. .. .. . . . . . .. .. .. .. .. . . . . . .. .. .. .. . 32
Return To Embroidery Edit . . . . . . . .. .. .. .. .. . . . . . .. .. .. .. .. . . . . . . . .. . 32
Finishing and Removing the Embroidery . .. .. .. .. .. . . . . . .. .. .. 32
MAINTENANCE...................................................33
Cleaning the Bobbin Area. .. .. .. . . . . . .. .. .. . . . . . .. .. .. .. .. . . . . . . . .. . 33
Cleaning under the Bobbin Area . . .. .. .. . . . . . .. .. .. .. .. . . . . . . . .. . 33
Troubleshooting. .. .. .. . . . . . .. .. .. .. .. . . . . . . . .. .. .. .. .. . . . . . .. .. .. . . . . . ..34
Technical Specification . . . . .. .. .. .. .. . . . . . .. .. .. . . . . . .. .. .. .. .. .. . . . . 37


CONNECT TO WIFI & CREATIVATE SERVICES
Download the CREATIVATE™ App
The machine requires a connection to the CREATIVATE™
app to access all available functions. The connection is
established wirelessly through WiFi.
The CREATIVATE™ app is your all-in-one companion for
sewing, embroidery, quilting, and crafting.
Download the CREATIVATE™ app for free from the App
Store or Google Play. Follow the instructions in the app to
complete the connection process. When the machine is
successfully synced, the connection button indicator
lights blue. The machine will not operate fully until it is
connected and synced to the CREATIVATE™ app.
Connect to the CREATIVATE™ App
Once connected, the app unlocks the full range of your machine's features, including stitch selection and adjustment,
embroidery edit and stitch-out, and access to the CREATIVATE™ Design Catalog. The app also provides step-by-step
tutorials, fabric and needle recommendations, and other guidance.
Note: Without a connection to the CREATIVATE™ app, this machine will only sew a straight stitch. All other stitches,
embroidery functions, and settings require the machine to be connected and synced to the app. Make sure your
mobile device is charged and the app is installed before beginning any sewing session.
Firmware Update Using WiFi
To receive the latest firmware wirelessly, connect the
machine to a WiFi network. Once connected, the
machine will automatically check for available firmware
updates. If a newer firmware is detected, the app will
notify you and guide you through the steps to download
and install it. The firmware version can be checked in the
machine settings.
Connect to Wifi & CREATIVATE Services – 1
English
INTRODUCTION
Intended Use
Optimal use and maintenance are described in these instructions. This product is not intended for industrial use.
Additional assistance, by region, may be found on the web at www.singer.com.
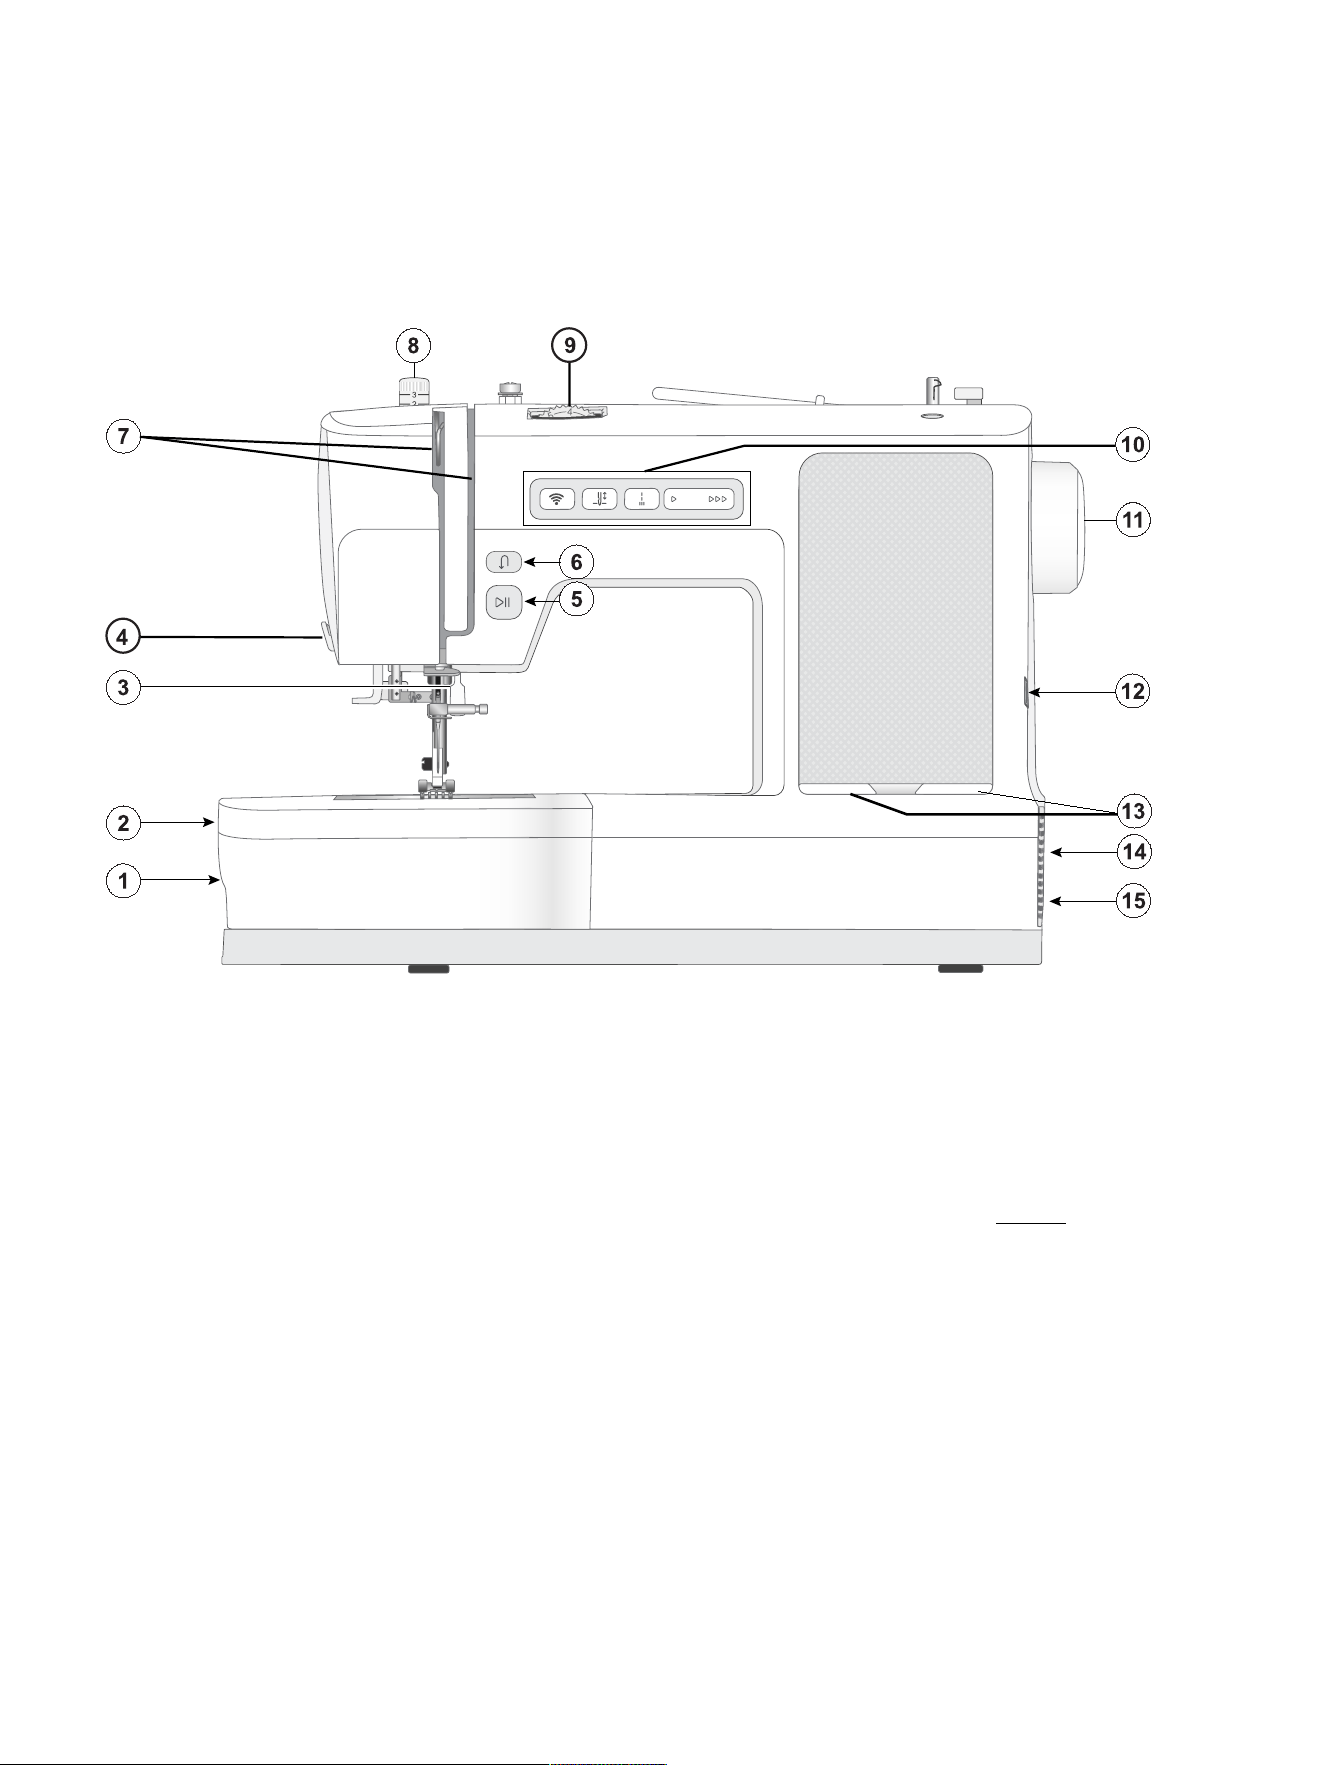
Machine Overview — Front
1. FFeeeedd TTeeeetthh LLeevveerr — move from side to side to
engage or disengage the feed teeth. Positioned at
the back of the free arm.
2. AAcccceessssoorryy TTrraayy // FFrreeee AArrmm — provides a flat surface
when sewing and allows storage for your accessories.
Remove the accessory tray to use the free arm which
makes it easier to sew, e.g., trouser hems and sleeves.
3. PPrreesssseerr FFoooott LLiifftteerr — used to raise and lower the
presser foot.
4. TThhrreeaadd KKnniiffee — conveniently located at the side of
the machine, used for trimming upper thread and
bobbin thread at the end of sewing. Ensures that
trimmed threads are left long enough so they don’t
come unthreaded when sewing is resumed.
5. SSttaarrtt//SSttoopp BBuuttttoonn — press to start and stop sewing
or embroidering without using the foot control. The
built-in LED indicator shows the current machine
status. See Machine Status Indicators for details.
6. RReevveerrssee BBuuttttoonn — press and hold to sew in reverse, e.
g., when securing the beginning or ending of a seam.
7. TThhrreeaaddiinngg SSlloottss — thread paths with tension discs
and take up lever.
8. PPrreesssseerr FFoooott PPrreessssuurree — controls the pressure the
presser foot exerts onto the fabric.
9. TThhrreeaadd TTeennssiioonn DDiiaall — set the right tension for your
stitch, thread and fabric.
10. FFuunnccttiioonn BBuuttttoonnss — functions used to make your
sewing more convenient (see page 6).
11. HHaanndd WWhheeeell — used to manually control the
movement of the needle and the thread take-up
lever.
12. BBuuiilltt--iinn UUSSBB--CC ppoorrtt —charges your device while
sewing. For charging purposes only.
13. MMoobbiillee DDeevviiccee HHoollddeerr — holds the device in place
and within view while sewing.
14. PPoowweerr SSwwiittcchh — Switch to turn on machine and LED-
light.
15. FFoooott CCoonnttrrooll aanndd PPoowweerr CCoorrdd SSoocckkeett — Used to
connect the foot control and power cord.
2 – Introduction
English
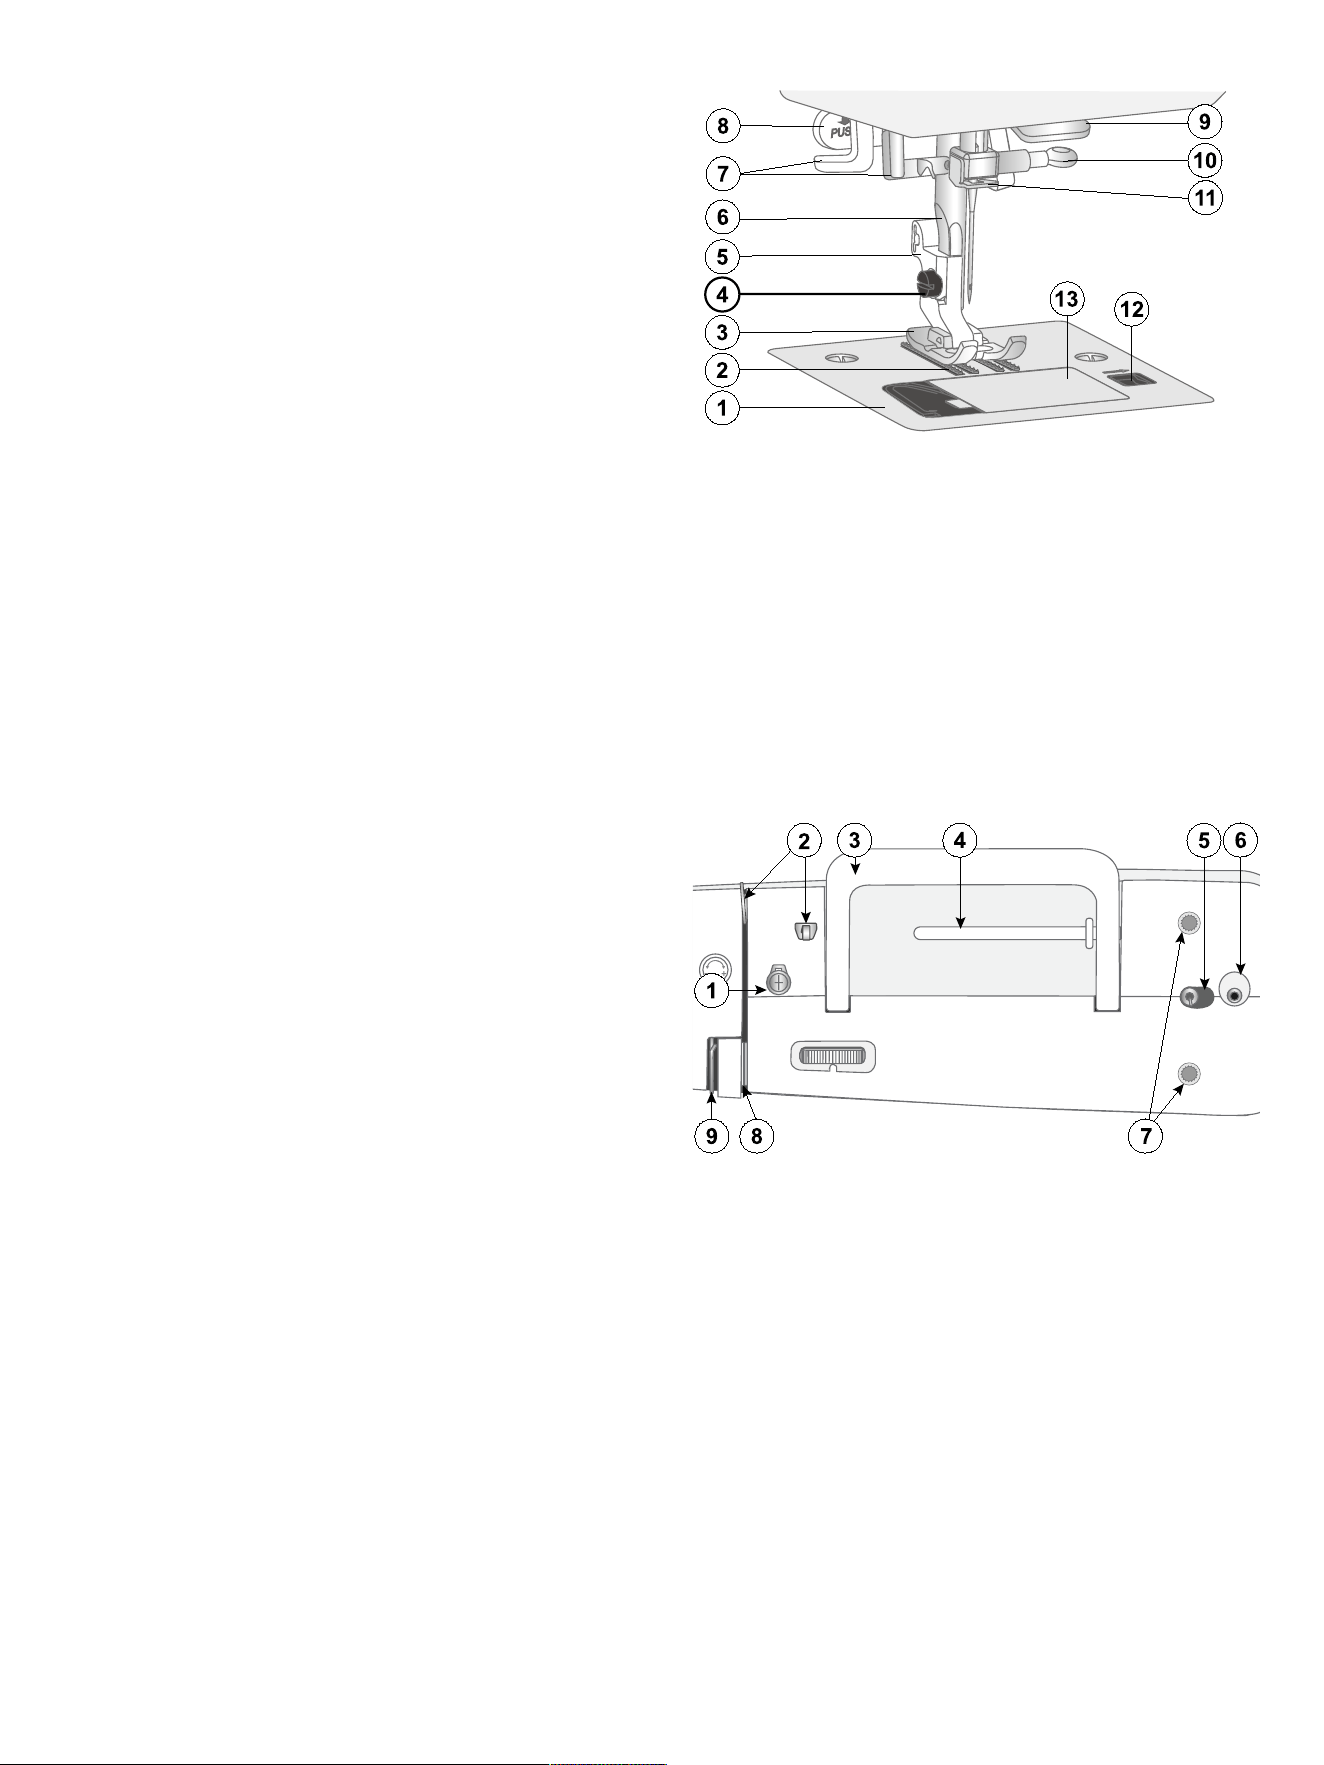
Needle Area Overview
1. NNeeeeddllee PPllaattee — provides a flat area around presser
foot for sewing. Guide lines make it easy to guide the
fabric straight when sewing.
2. FFeeeedd TTeeeetthh — feed the fabric under the presser foot
when sewing.
3. PPrreesssseerr FFoooott — holds fabric against feed teeth which
draws fabric under the presser foot as you sew.
4. PPrreesssseerr FFoooott HHoollddeerr SSccrreeww — loosen the screw to
remove the presser foot holder.
5. PPrreesssseerr FFoooott HHoollddeerr — holds the presser foot.
6. PPrreesssseerr FFoooott BBaarr — accommodates the presser foot
holder.
7. BBuuiilltt--iinn NNeeeeddllee TThhrreeaaddeerr — thread the needle
quickly and easily.
8. BBuuttttoonnhhoollee LLeevveerr — used for buttonhole sewing.
9. TThhrreeaadd GGuuiiddee — helps maintain thread flow when
sewing.
10. NNeeeeddllee CCllaammpp SSccrreeww — secures the needle.
11. NNeeeeddllee TThhrreeaadd GGuuiiddee — helps maintain thread flow
when sewing.
12. BBoobbbbiinn CCoovveerr RReelleeaassee BBuuttttoonn — push to open the
bobbin cover.
13. BBoobbbbiinn CCoovveerr — protects the bobbin while sewing.
Top of Machine
1. Bobbin winding tension disc
2. Thread guides
3. Handle
4. Spool pin
5. Bobbin winding spindle
6. Bobbin winding stopper
7. Holes for auxiliary spool pin
8. Thread tension discs
9. Thread take-up lever
Introduction – 3
English
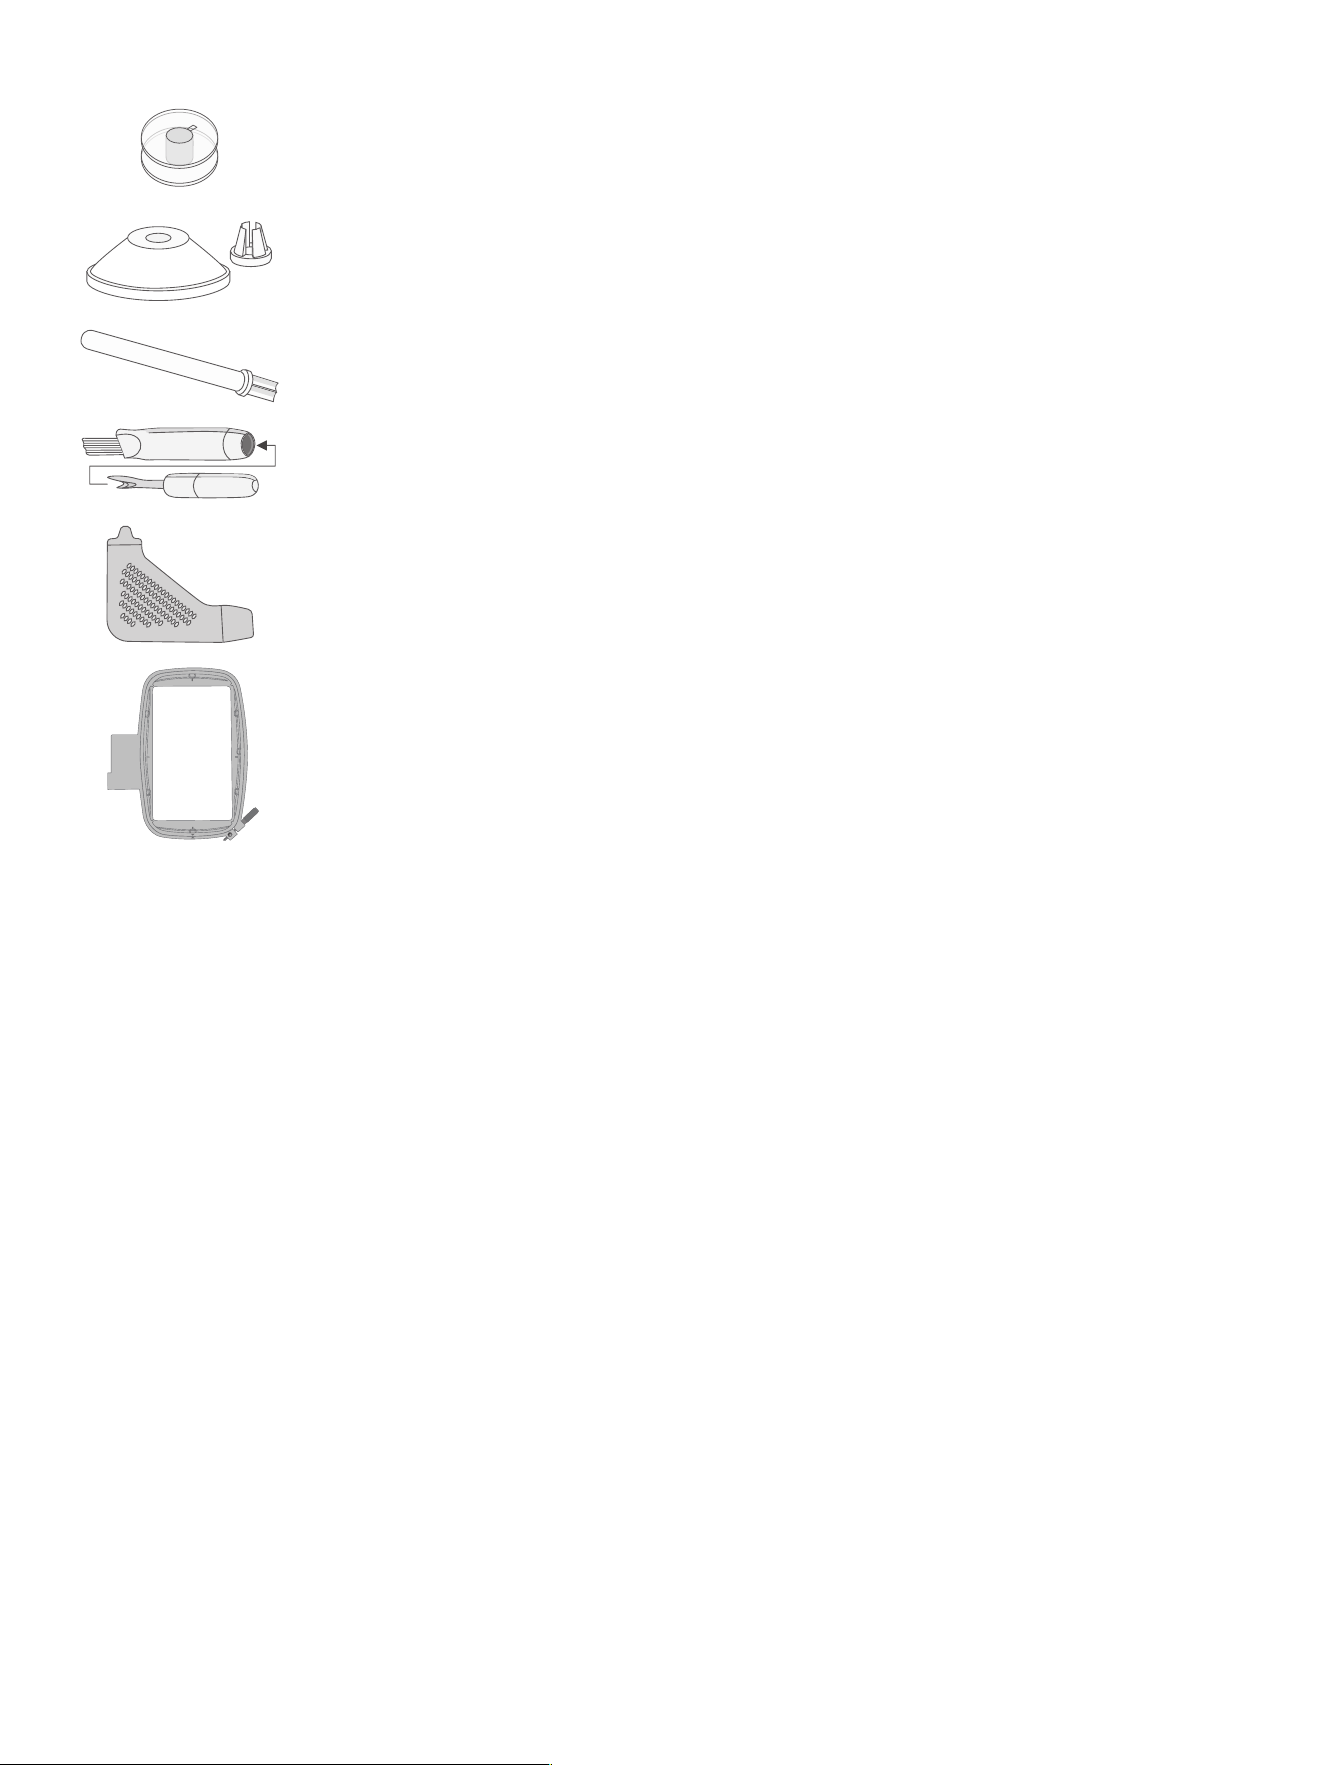
Overview Accessories
BBoobbbbiinn xx44 — only use the type of transparent bobbins delivered with your machine (SINGER®
Class 15 transparent bobbins). One of the bobbins is inserted in the machine upon delivery.
SSppooooll CCaapp — two sizes (medium and small) for various thread spool styles.
AAuuxxiilliiaarryy SSppooooll PPiinn — for sewing with large thread spools or when using specialty threads.
BBrruusshh aanndd SSeeaamm RRiippppeerr — used to remove stitches/brush off lint.
LL--SSccrreewwddrriivveerr — used to remove the needle plate, presser foot holder or needle screw.
Note: The Embroidery Hoop is included with the embroidery unit. If it is not included with your
machine, it is available for purchase separately.
EEmmbbrrooiiddeerryy HHoooopp ((117700xx110000)) —holds fabric secure during embroidery. The hoop size
indicates the maximum embroidery area.
Included Accessories
(Not Pictured)
• Needles
• Foot control
• AC- Plug
• Power cord
4 – Introduction
English
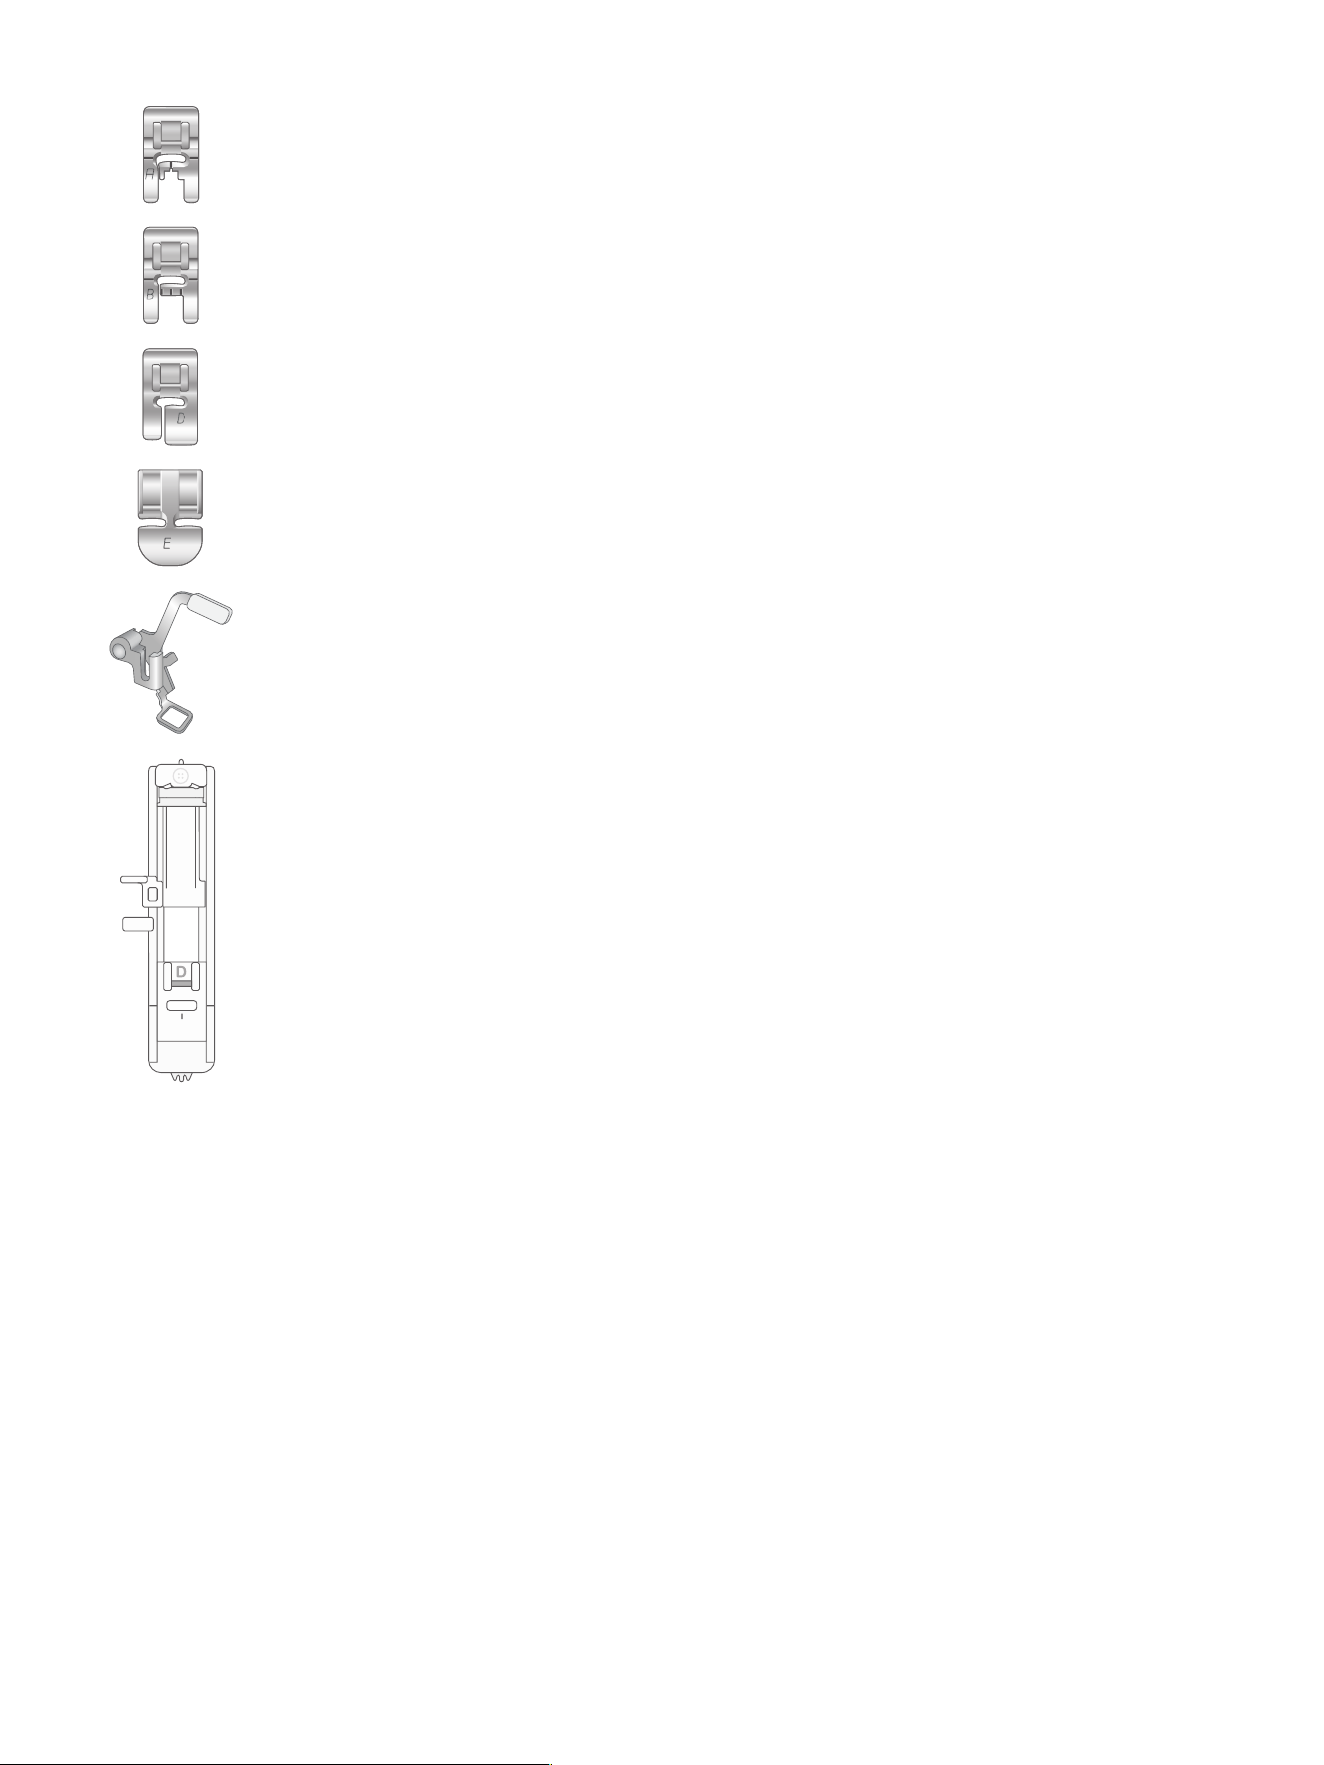
Presser Feet
All Purpose Foot A
(attached on the machine upon delivery)
This foot is used mainly for straight stitching and zigzag stitching with a stitch length longer than 1mm.
Decorative Stitch Foot B
For sewing close zigzag stitches (satin stitches) with less than 1.0mm stitch length, other utility stitches
or decorative stitches, use this foot. The tunnel on the underside of the foot is designed to feed
smoothly over the stitches.
Blind Hem Foot D
This foot is used for blind hem stitches. The inner edge of this foot guides the fabric. The right toe of
the foot is designed to ride along the hem edge.
Zipper Foot E
This foot can be snapped on either to the right or to the left of the needle.
This makes it easy to sew both sides of the zipper. Move needle position to right or left to sew closer to
zipper teeth or for covering large cording.
Embroidery Foot
Note: The Embroidery Foot is included with the embroidery unit. If it is not included with your machine,
it is available for purchase separately.
The Embroidery Foot is recommended for hoop embroidery.
One-Step Buttonhole Foot
This foot has a space in the back to set the size of the buttonhole. The machine will sew a buttonhole
to fit that button size.
Introduction – 5
English
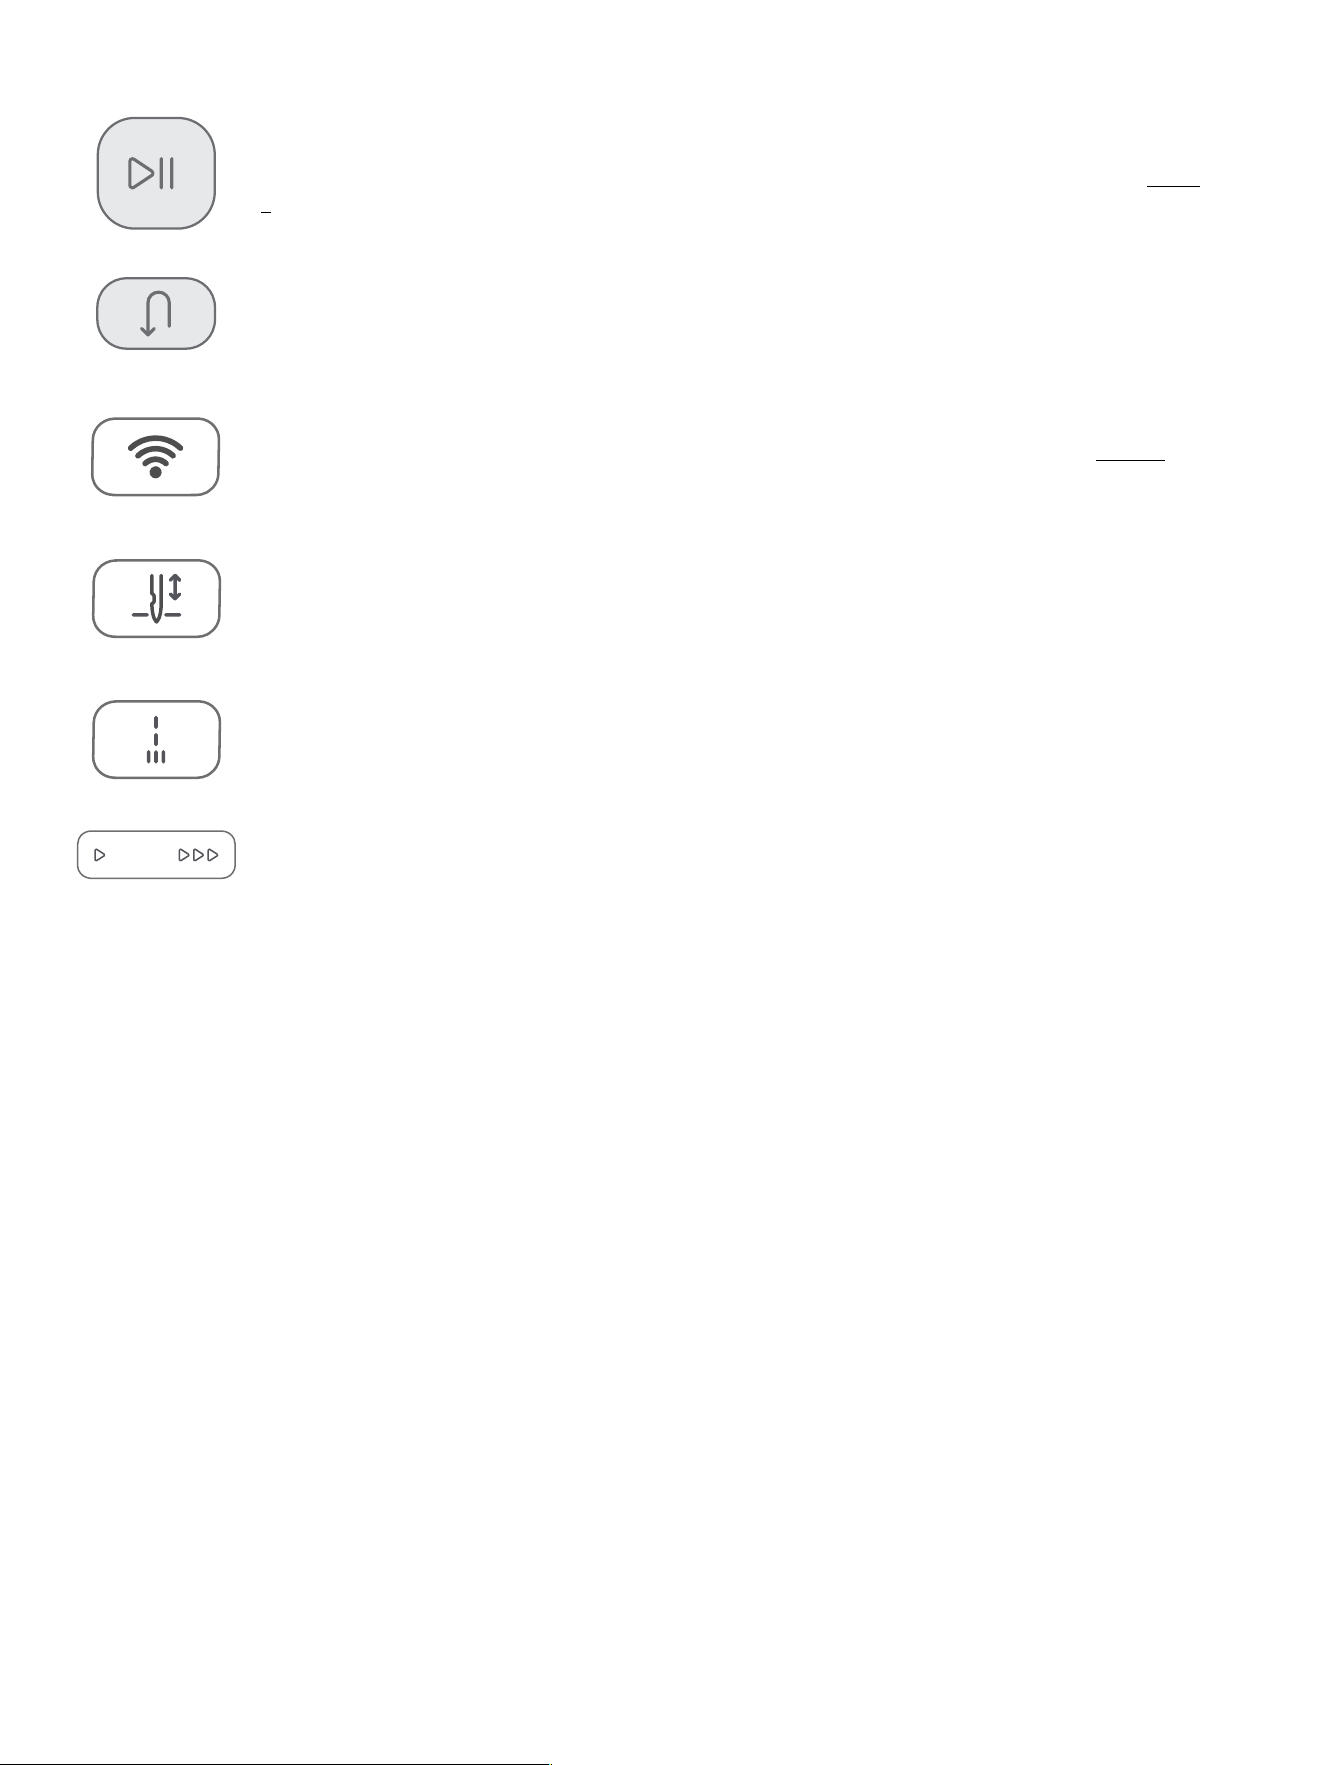
Function and Machine Operating Buttons
Start/Stop Button (Machine Status Indicator)
press to start and stop sewing or embroidering without using the foot control. The built-in LED
indicator shows the current machine status. See Machine Status Indicators for details (see page
7).
Reverse Button
Press and hold to sew in reverse, e.g., when securing the beginning or ending of a seam.
Connect Button
Press to connect the machine to your WiFi network and sync with the CREATIVATE™ app on your
mobile device. The button also indicates connection status through the LED light (see page 7).
Needle Up/Down
Press Needle Stop Up/Down to set the position of the needle when you stop sewing. The needle
will move up or down when you touch the button.
Note: Tip: You can also touch the foot control to raise or lower the needle once you stop sewing.
Tie-Off
When pressed the machine immediately sews three tie-off stitches and stops automatically.
Speed Control
You can adjust the speed using the speed control buttons.
Press the single arrow (left side) to decrease speed, or the triple arrow (right side) to increase
speed. You cannot select a higher speed than the default max speed for the selected stitch.
6 – Introduction
English
Machine Status Indicators
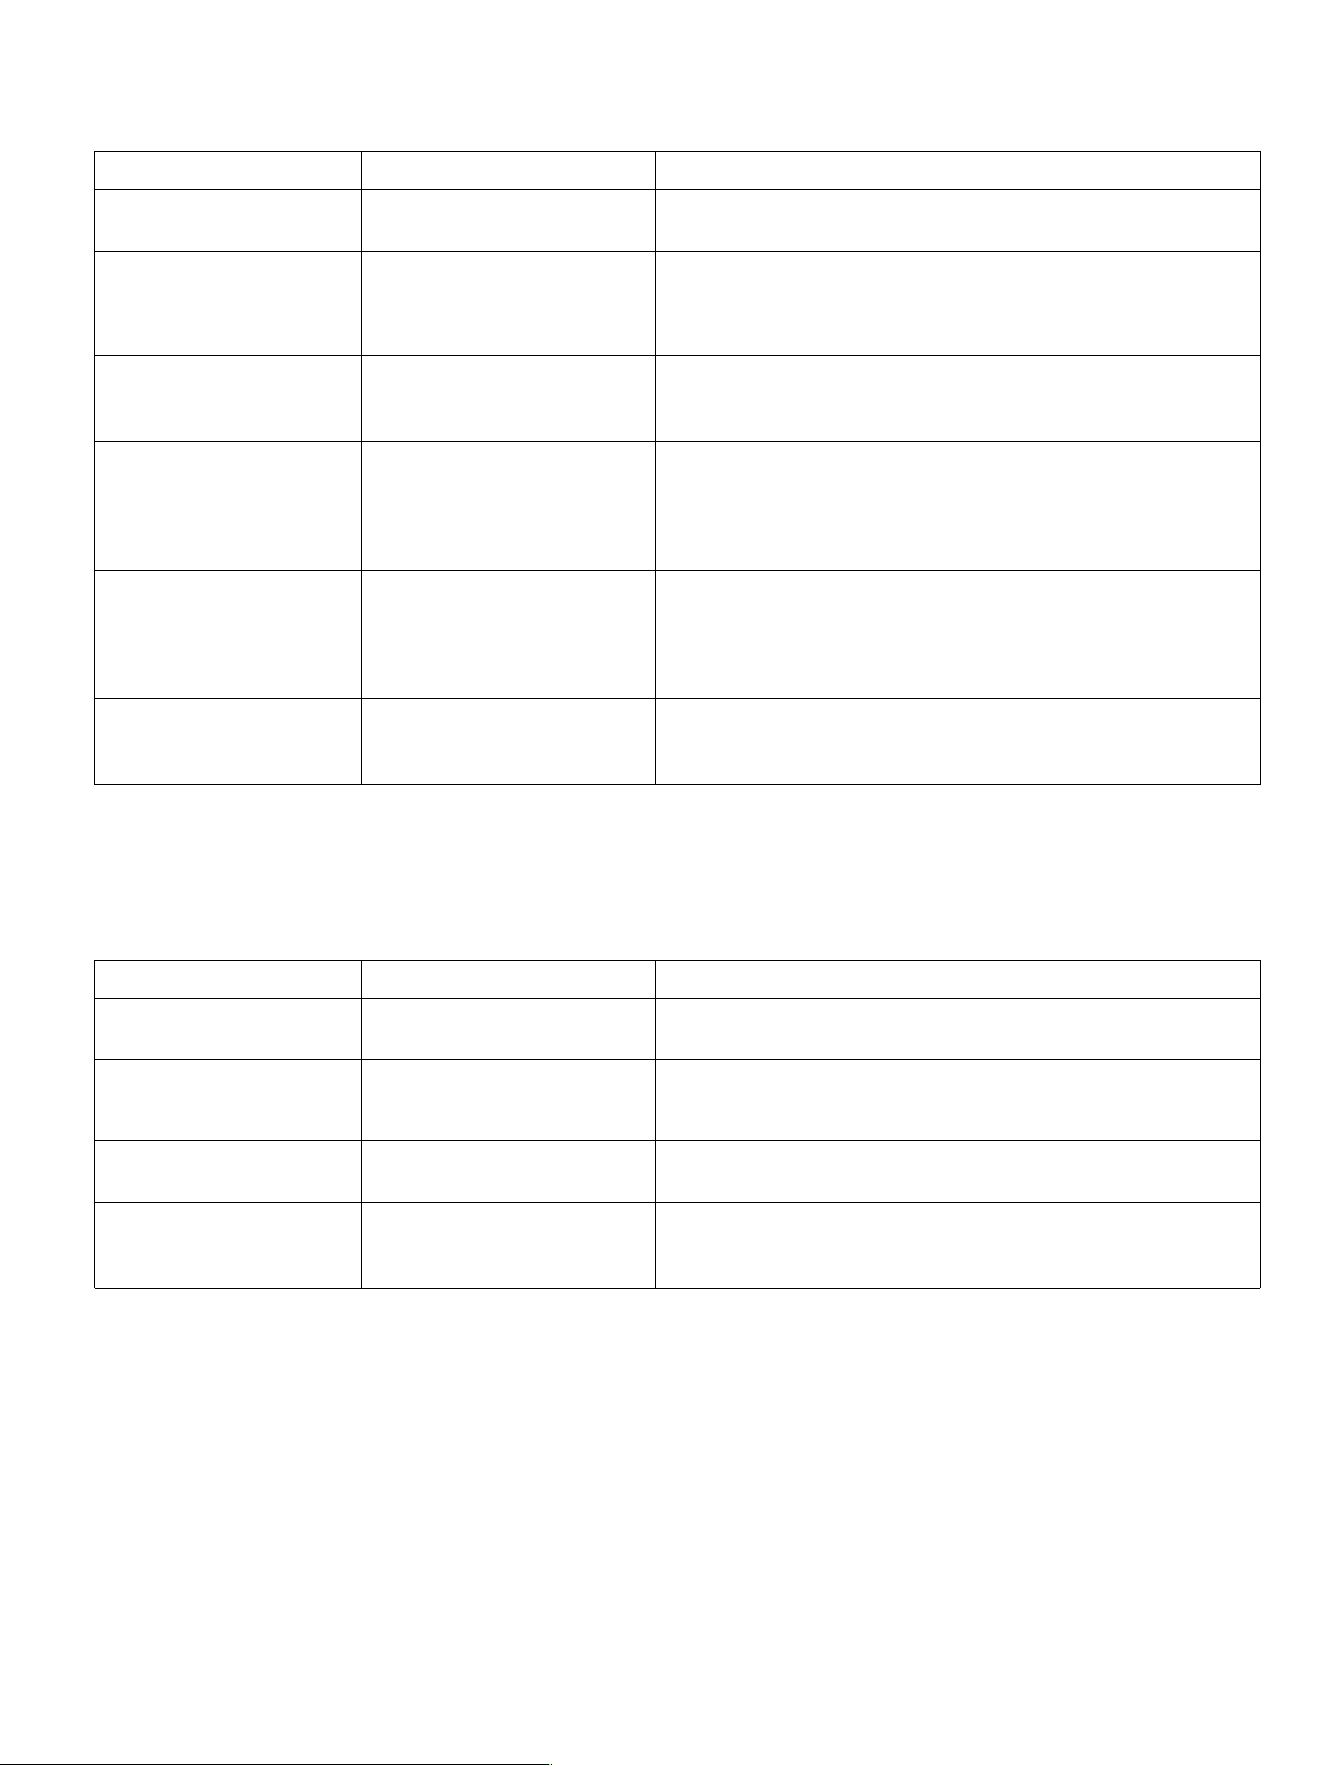
The LED indicator on the machine shows the current machine status. The color and behavior of the LED indicate
whether the machine is ready, busy, or requires attention. See the descriptions below for details.
LLEEDD SSttaattuuss
MMeeaanniinngg
Solid Green
Ready / Sewing
The machine is ready or sewing. Press Start or use the foot
control to begin sewing. Press again to pause.
Solid Orange Waiting The machine is processing a task such as calibration,
syncing settings, downloading firmware, or loading a
design. Wait until the LED turns green. Do not turn off the
machine.
Flashing Orange Attention! A warning is detected, but sewing can continue. Examples:
low bobbin or thread change required during embroidery.
Check the app for details or press Start to continue.
Flashing Red Action Needed The machine has paused and requires action before
continuing. Examples: upper thread break, hoop not
detected, or invalid design. Check the app for details,
correct the issue and press Start or confirm in the app to
resume.
Solid Red Blocked The machine has stopped for safety reasons. Start button
and foot control are disabled. Check the app for details,
then turn off the machine and resolve the issue before
restarting. If the problem persists, contact your authorized
SINGER® retailer.
Off
Idle
The machine is off, starting up, installing firmware, or no
design is loaded. Open the app to load a design or start a
new project.
Note: Solid red is followed by four beeps. Turn off the machine and contact your authorized SINGER® retailer if the issue
continues.
Connect Button LED
The LED on the Connect (WiFi) button shows the network connection status.
LLEEDD SSttaattuuss
MMeeaanniinngg
Fast Blinking Blue Pairing The machine is ready to receive WiFi credentials. Open the
app and follow the setup instructions.
Slow Blinking Blue Connecting The machine is connecting to your WiFi network and linking
to your CREATIVATE™ account. Wait until the connection is
established.
Solid Blue Connected
The machine is successfully connected to your
CREATIVATE™ account and ready to use.
Off
Not Connected
WiFi is disabled, not configured, or failed to connect. Hold
the WiFi button for 10 seconds to enter pairing mode. Two
short beeps confirm activation.
Introduction – 7
English
Stitch Overview
Utility Stitches
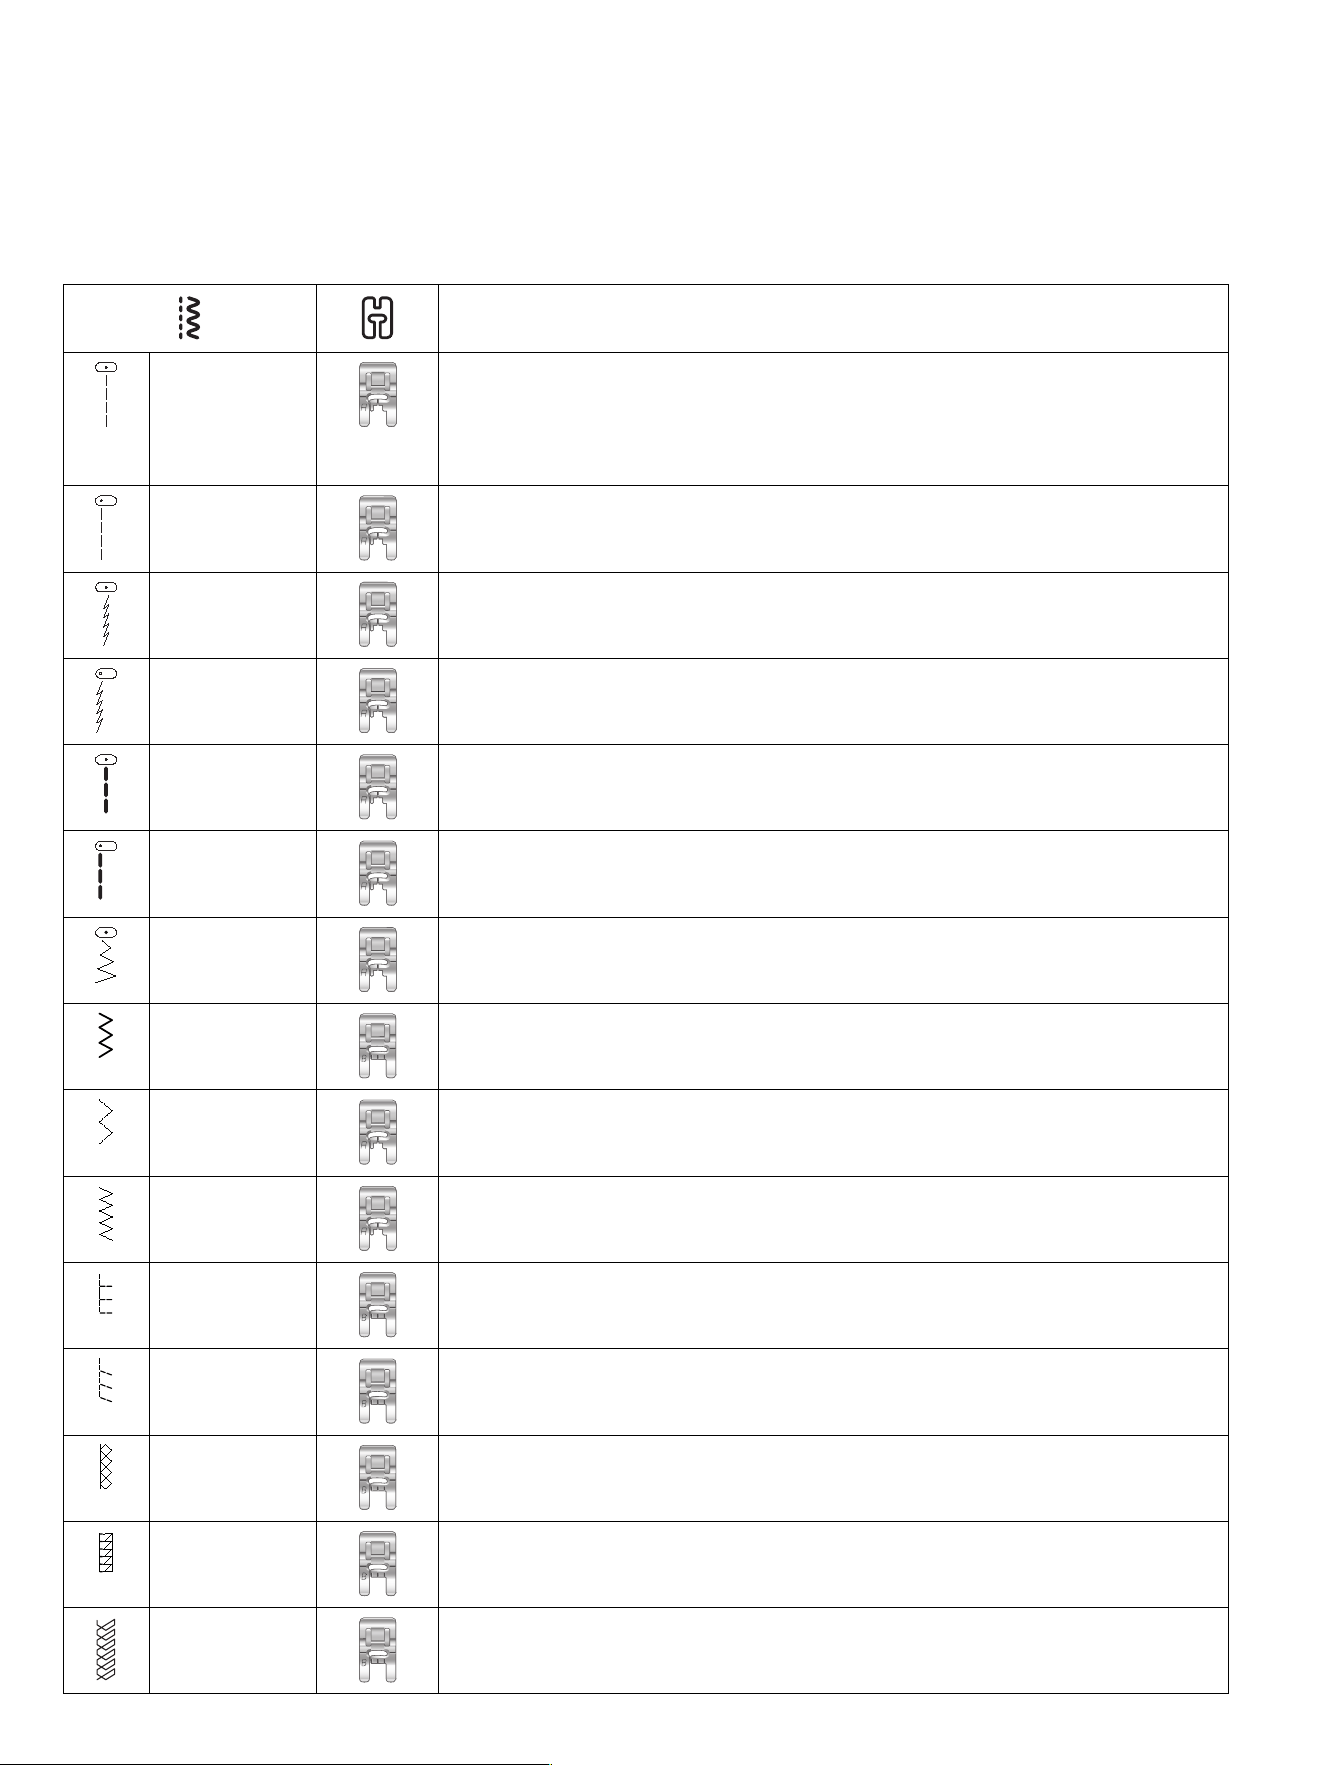
The stitches described in the below chart are utility stitches, used mainly for utility sewing.
Stretch stitches are marked with (*) in the stitch chart below.
When sewing, use a thread tension between 1–5. Always test sew on a piece of scrap fabric, and adjust the tension if
necessary.
AApppplliiccaattiioonn
Straight Stitch
Center
Position
Straight Stitch is the basic stitch that is used for sewing. The most common
use for a straight stitch is to sew two pieces of fabric together. The straight
stitch can also be sewn a few stitches in reverse to secure the beginning and
end of a seam. Choose from multiple straight stitch lengths depending on
your project and fabric.
Straight Stitch
Left Position
Use the straight stitch in the left needle position for sewing zippers or for top
stitching.
Stretch Stitch
Center
Position
For seams in tricot and stretch fabrics.
Stretch
Straight Stitch
Left Position
For seams in tricot and stretch fabrics.
Reinforced
Straight Stitch
Triple and elastic, for reinforced seams. For top stitch, increase the stitch
length.
Reinforced
Straight Stitch
Left Position
Triple and elastic, for reinforced seams. For top stitch, increase the stitch
length.
Multi-Step
Zigzag Stitch
For sewing on lace, trims and appliqués.
Reinforced
Zigzag Stitch
For joining fabric edge to edge or overlapping in leather. For decorative
sewing.
Three-step
Zigzag
For overcasting, mending, sewing on patches and elastic. Suitable for light
and medium weight fabrics.
Two-step
Zigzag
For joining two pieces of lace with finished edges, and for elastic shirring.
Seam/
overcast
Stitch
Seam and overcast in one step along the edge or trim later. For light stretch
and non-stretch fabrics.
Stretch Seam/
Overcast
Stitch
Seam and overcast in one step along the edge or trim later. For medium and
heavy stretch fabrics.
Double
Overlock
Stitch
Seam and overcast in one step along the edge or trim later. For heavy stretch
and heavy woven fabrics.
Overlock
Stitch
Seam and overcast in one step along the edge or trim later. For medium
stretch fabrics.
Overlock
Stitch
For patching and sewing in light stretch fabrics.
8 – Introduction
English
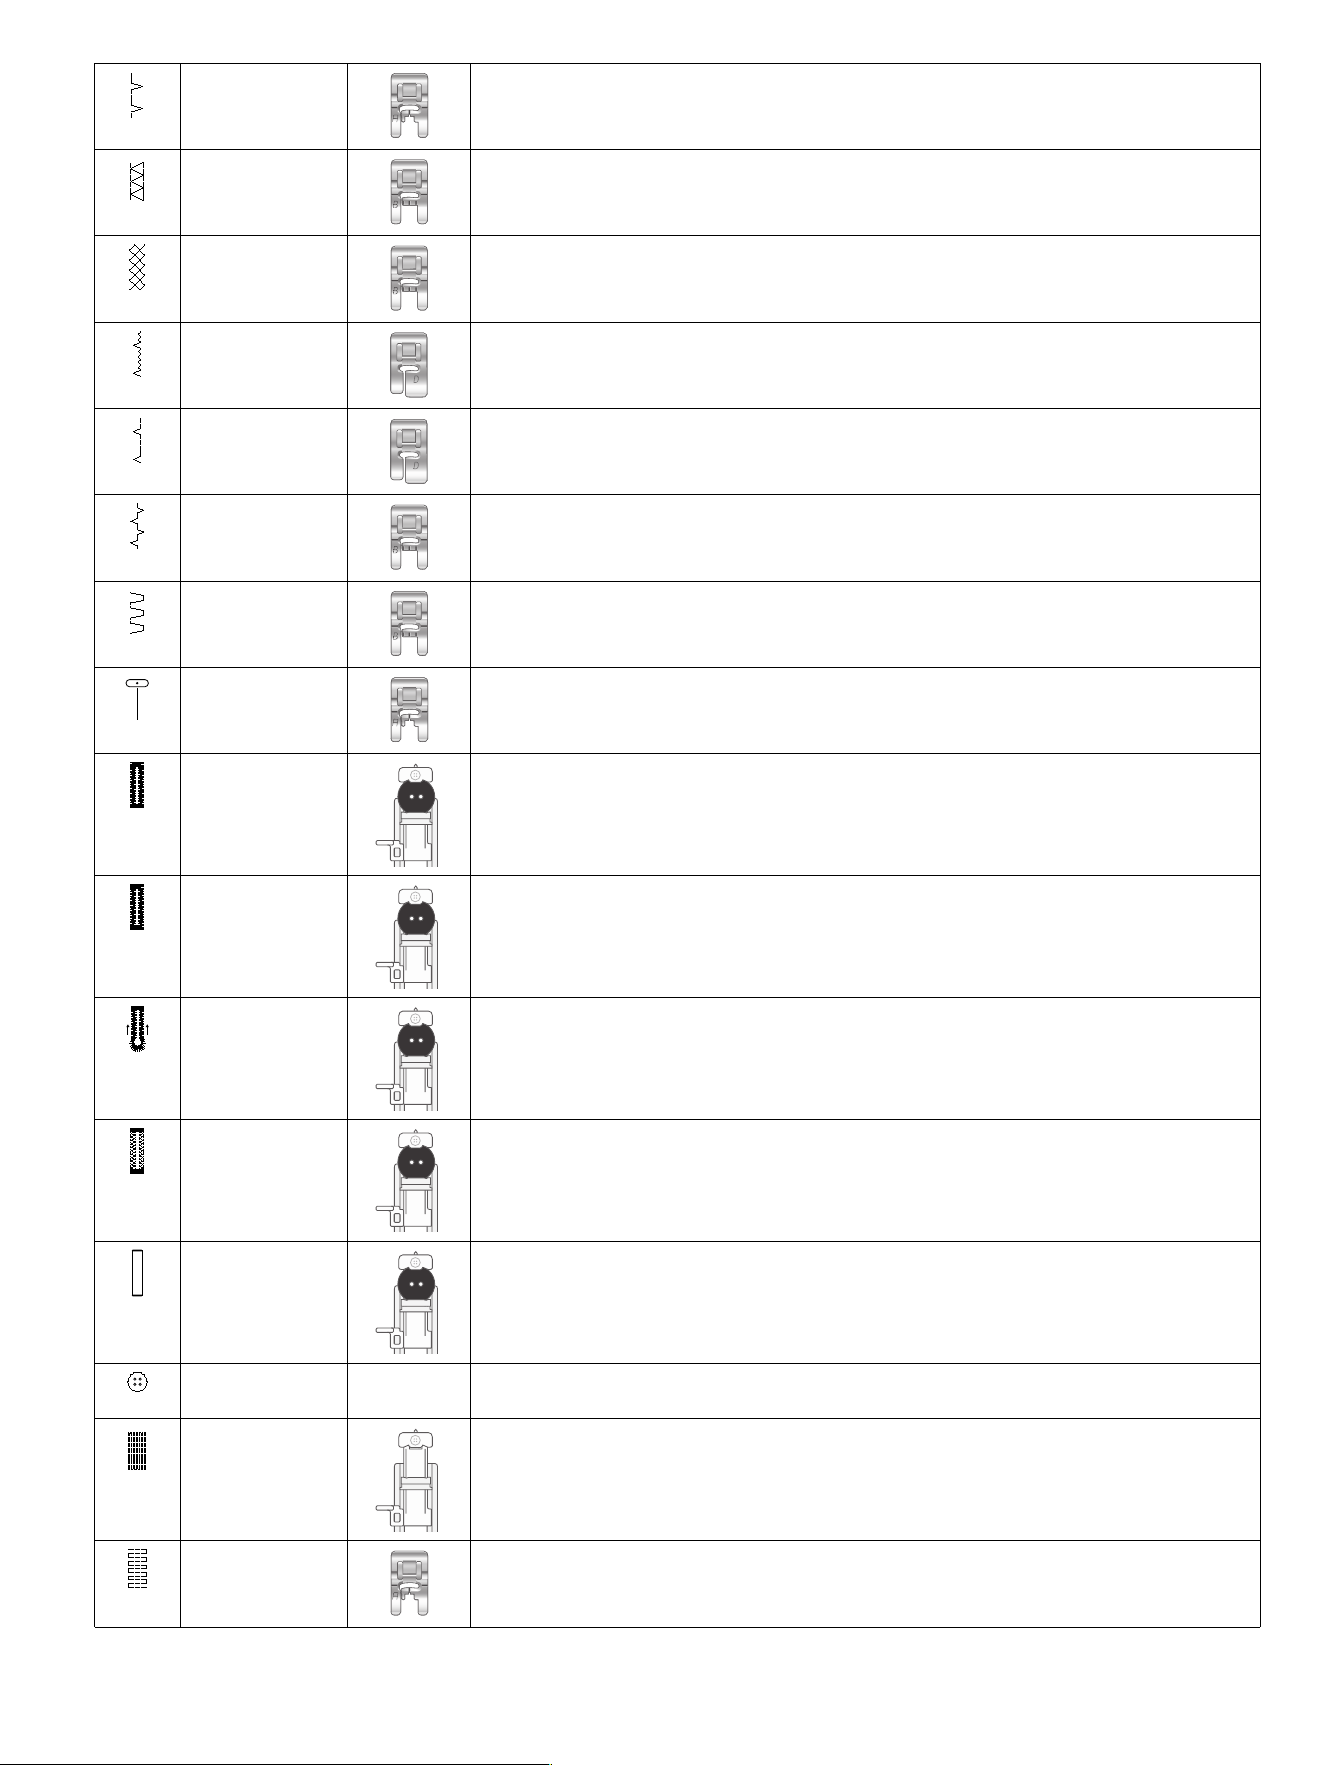
Shell Edge
Stitch
For edging, sewing over the edge on light woven fabrics. Sew woven fabrics on
bias.
Flatlock Stitch
Decorative hems and overlapped seams, belts and bands. For medium/heavy
stretch fabrics.
Elastic or
Smocking
Stitch
Sew over two rows of elastic thread for elastic shirring.
Stretch Blind
Hem Stitch
Blind hems in medium and heavy stretch fabrics.
Woven Blind
Hem Stitch
Blind hems in medium and heavy woven fabrics.
Bridging stitch
For joining two pieces of fabric with finished edges and for elastic shirring.
Elastic/casing
stitch
For overlapped seams in tricot. To sew casing over narrow elastic.
Basting stitch
For temporary seams. The long stitches make the seams easy to unravel.
Bartack
buttonhole
For most fabric weights.
Linen
buttonhole
For blouses and children’s garments.
Keyhole
Buttonhole
Square end for tailored jackets, coats, etc.
Medium
Reinforced
Buttonhole
For medium and heavy fabrics.
Leather
Buttonhole
(straight
stitch)
For leather and suede.
Sew on Button
Stitch
-
For sewing on buttons.
Darning Stitch
(forward and
backward)
Darn and mend small holes in work clothes, children's clothing, jeans, home
linens and more.
Darning Stitch
(side to side)
For mending small tears.
Introduction – 9
English
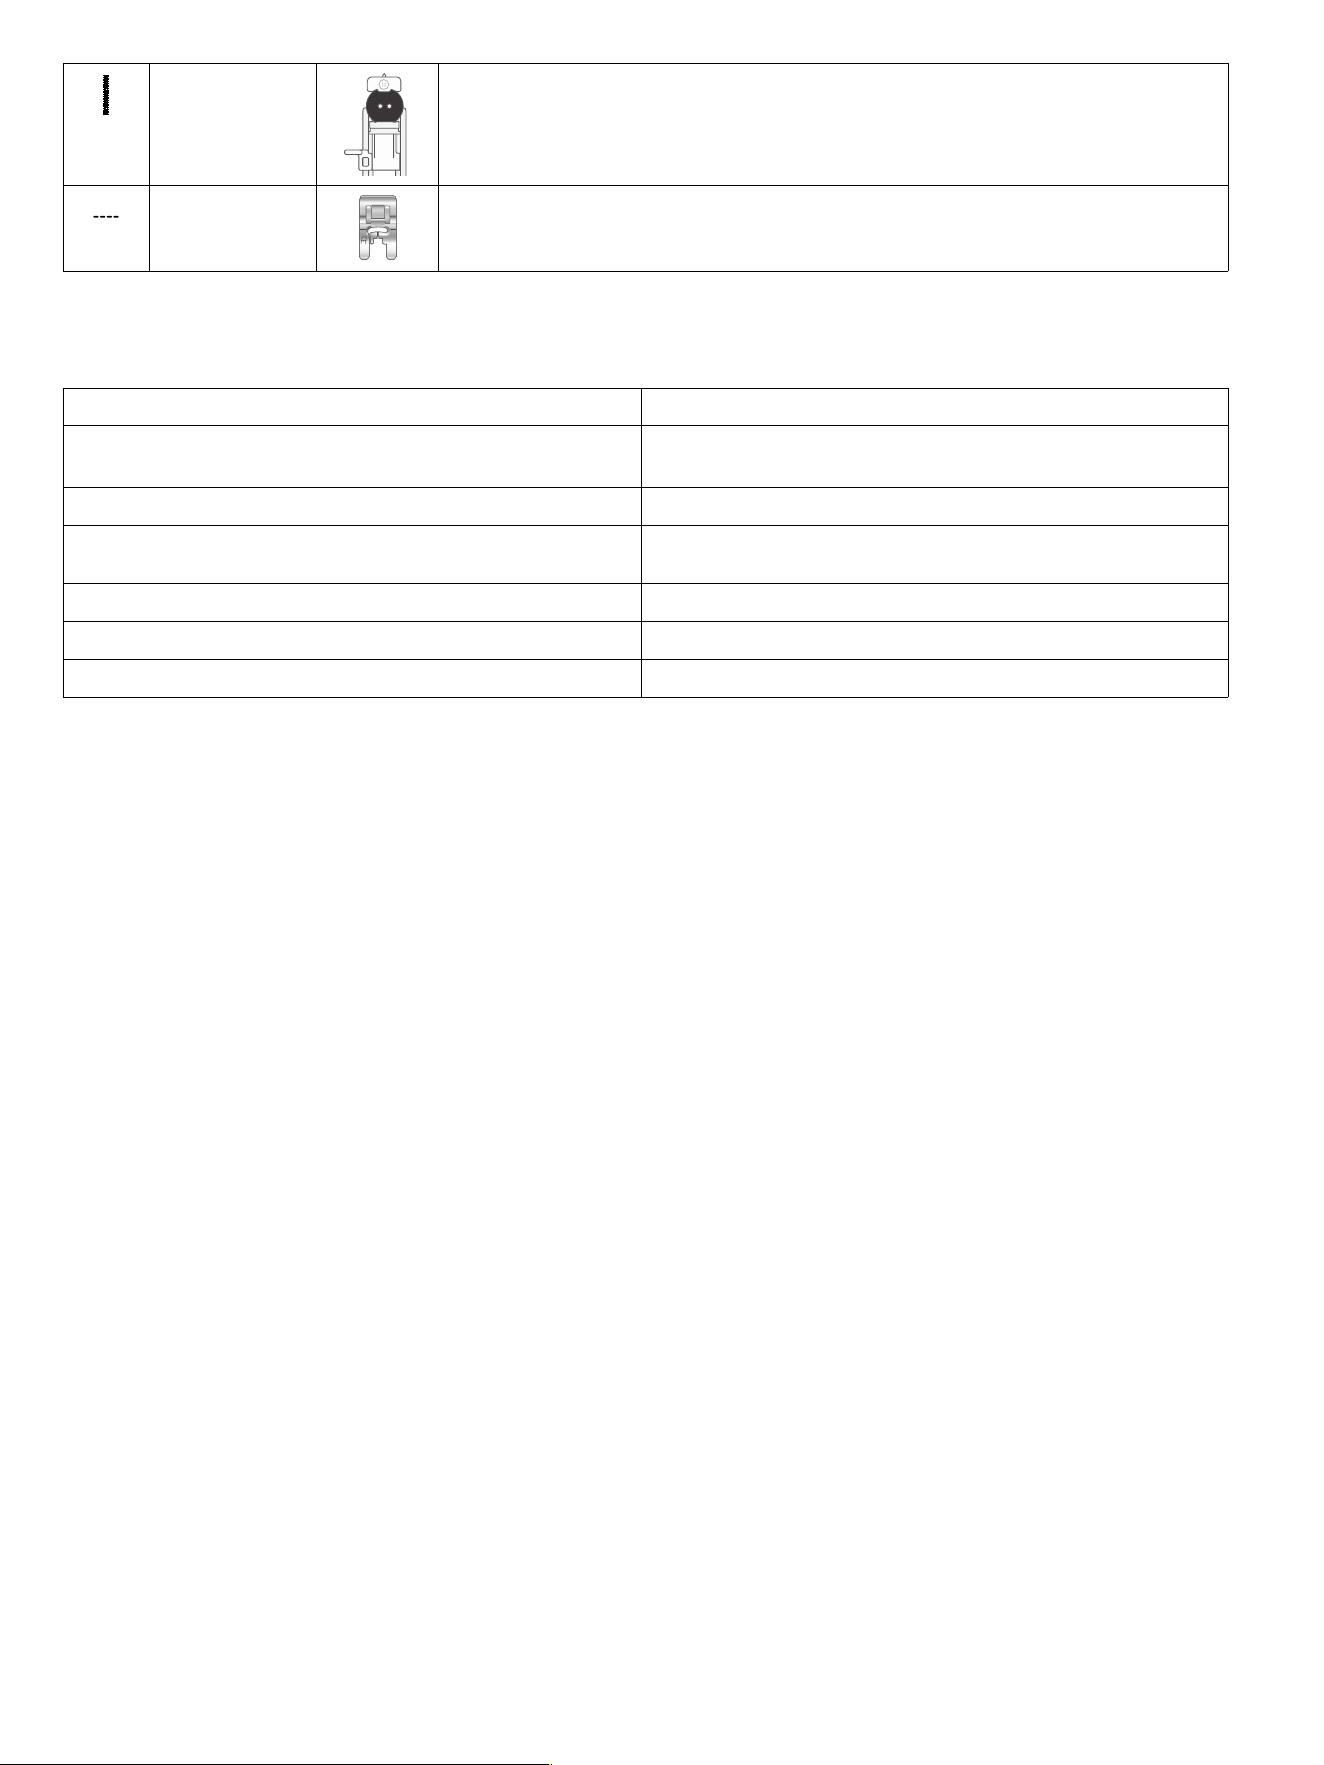
Bartack,
manual
Reinforce pockets, shirt openings, belt loops, as well as at lower end of a zipper.
Belt Loop
Stitch
For securing belt loops. Lower the feed teeth before using this stitch.
Stitch Menu Overview
There are several different stitch menus with stitches for all purposes.
SSttiittcchh MMeennuu NNaammee DDeessccrriippttiioonn
Favorites Access the stitches you have marked as favorites in one
place.
Utility Stitches Stitches for garment sewing and mending.
Buttonhole Stitches
Sew buttonholes on home decór, garments, crafts and
more.
Quilt Stitches Stitches designed for quilting and patchwork projects.
Decorative Stitches For decorative sewing.
My Sequence
Find your saved stitch sequences.
10 – Introduction
English
GET STARTED
Unpack the Machine
1. Place the box on a steady, flat surface. Lift the machine out of the box, and remove the packaging.
2. Remove all outer packing material and the plastic bag.
3. Wipe off the machine with a dry cloth to remove any lint and/or excess oil around the needle area.
Note: Your sewing machine is adjusted to provide the best stitch result at normal room temperature. Extreme hot and
cold temperatures can affect the sewn result.
Connect to the Power Supply
FFoorr tthhee UUSSAA aanndd CCaannaaddaa
This sewing machine has a polarized plug (one blade wider
than the other). To reduce the risk of electric shock, this plug is
intended to fit in a polarized outlet only one way. If the plug
does not fit fully in the outlet, reverse the plug. If it still does not
fit, contact a qualified electrician to install the proper outlet.
Do not modify the plug in any way.
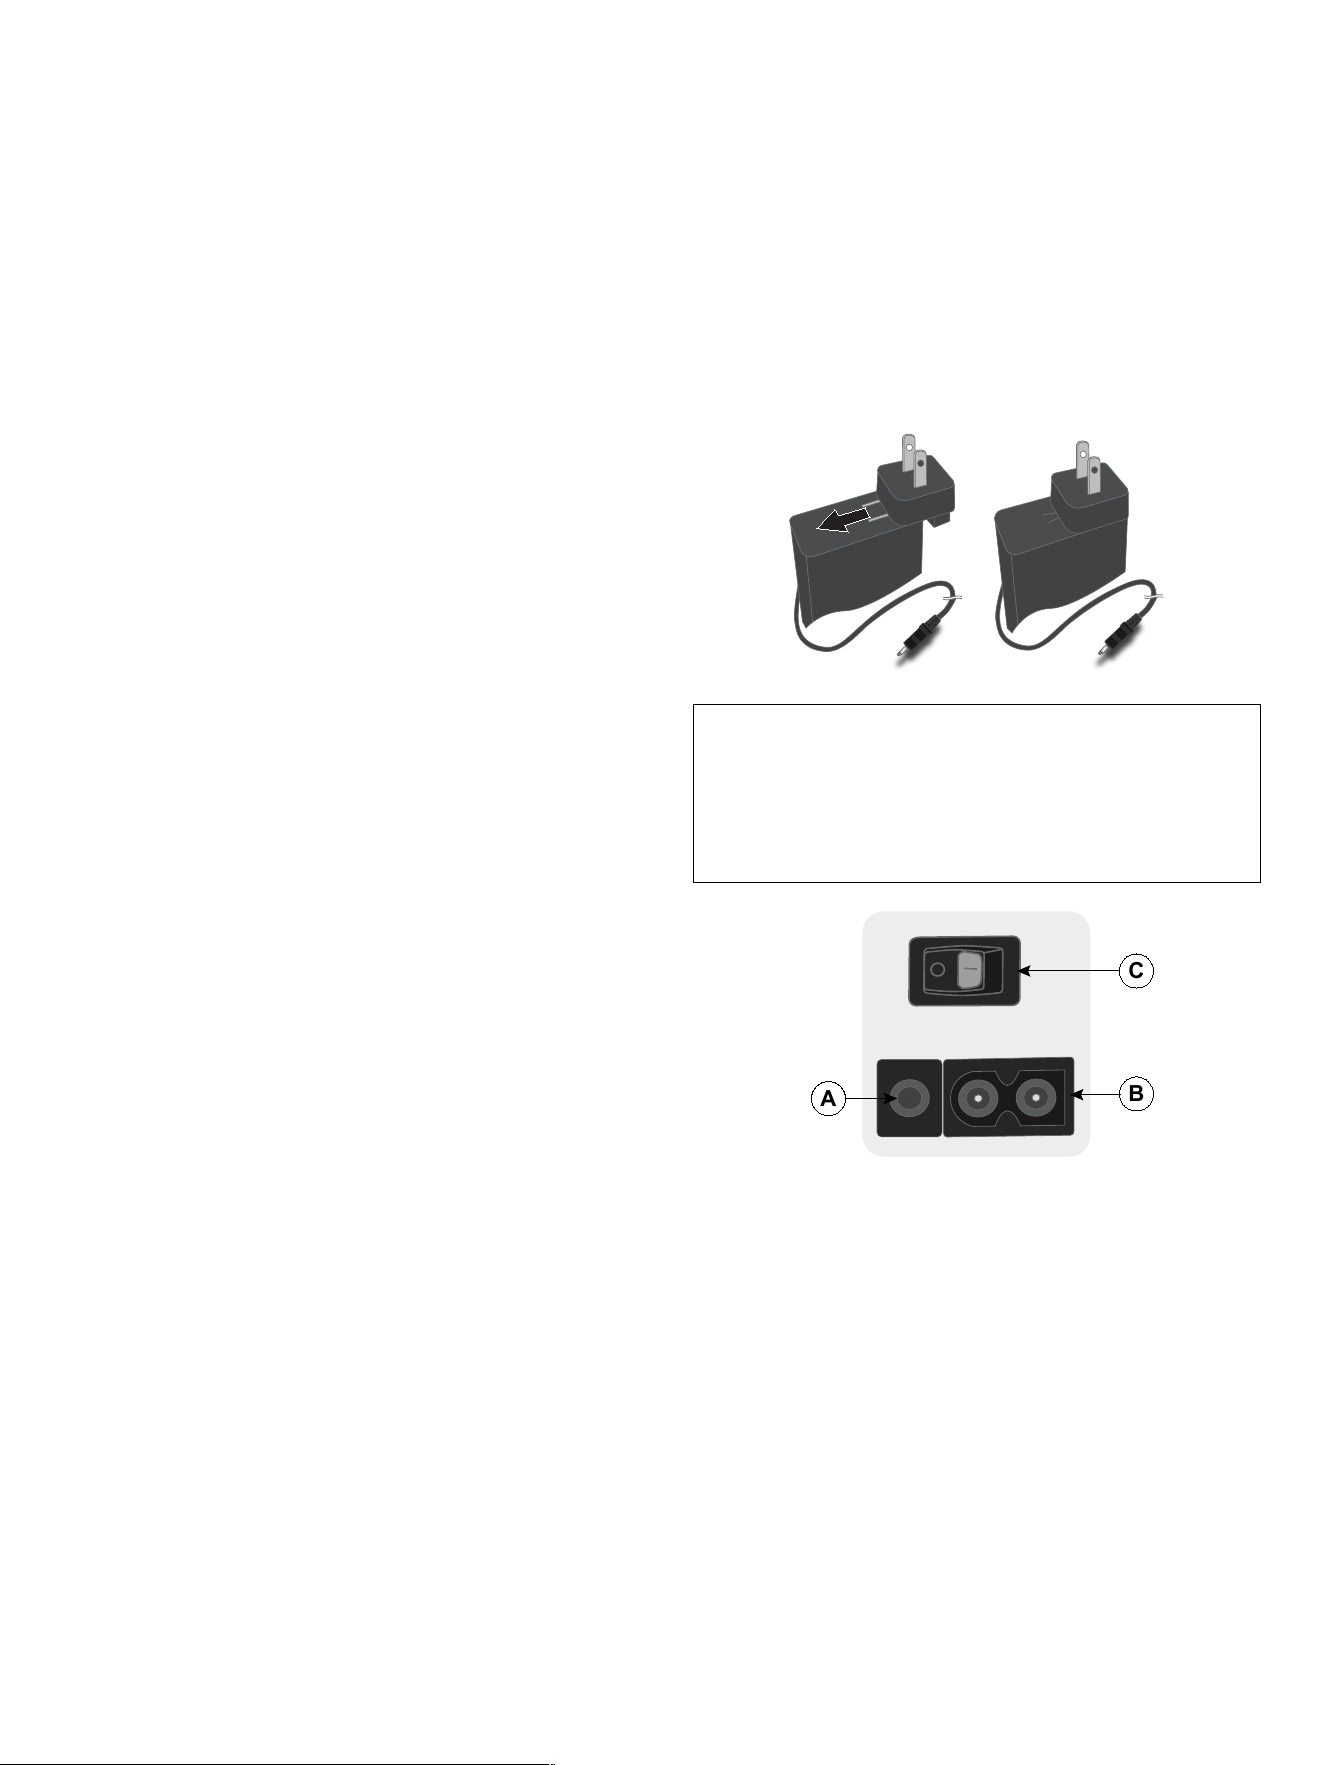
Among the accessories you will find the power cord and
the foot control.
Note: The AC plug used for your machine differs between
countries and may not match the illustration.
Before using the machine for the first time an AC-plug
must be mounted to the power supply unit in order to
plug it into an electrical outlet. Slide on the correct AC-
plug until it clicks in place. Make sure the plug is firmly
attached.
Note: Consult a qualified electrician if in doubt as how to
connect the machine to the power source. Unplug the
power cord when the machine is not in use.
Among the accessories you will find the power cord and
the foot control.
On the bottom right side of the sewing machine, you find
the connecting sockets and the ON/OFF button.
1. Connect the foot control cord to the front socket on
the bottom right side of the machine (A).
2. Connect the power cord to the rear socket on the
bottom right side of the machine (B). Plug the cord
into the wall socket.
3. Press the ON/OFF switch (C) to "I" to turn on power
and light.
The sewing speed is regulated by pressing the foot
control, or by using the Start/Stop Button and Speed
Control Buttons.
Note: After turning off the machine, residual power may
remain in the machine. This could cause the light to stay
on for a few seconds while the power is consumed. This
is normal for an energy efficient appliance.
B
C
A
Get Started – 11
English
Pack Away After Sewing
1. Switch the main switch off. After switching off, residual power may still remain in the machine. This may cause the
light to stay on for a few seconds while the power is consumed. This is normal behavior for an energy efficient
appliance.
2. Unplug the cord from the wall socket and then from the machine.
3. Wind the cord around the foot control for easy storage.
4. Place all accessories in the accessory tray. Slide the tray on to the machine around the free arm.
5. Place the foot control and cord in the space above the free arm.
Standby Mode
Your machine will automatically go into standby mode after a duration of time, due to inactivity.
The current state will be saved and possible to restore when the machine is activated again.
You will get a notification before the machine goes into standby mode.
You can change the duration of time or turn this off in settings. Be aware of that changing the standby time could
increase the energy consumption.
Press any of the buttons on the machine and the machine will be activated to be in normal mode again.
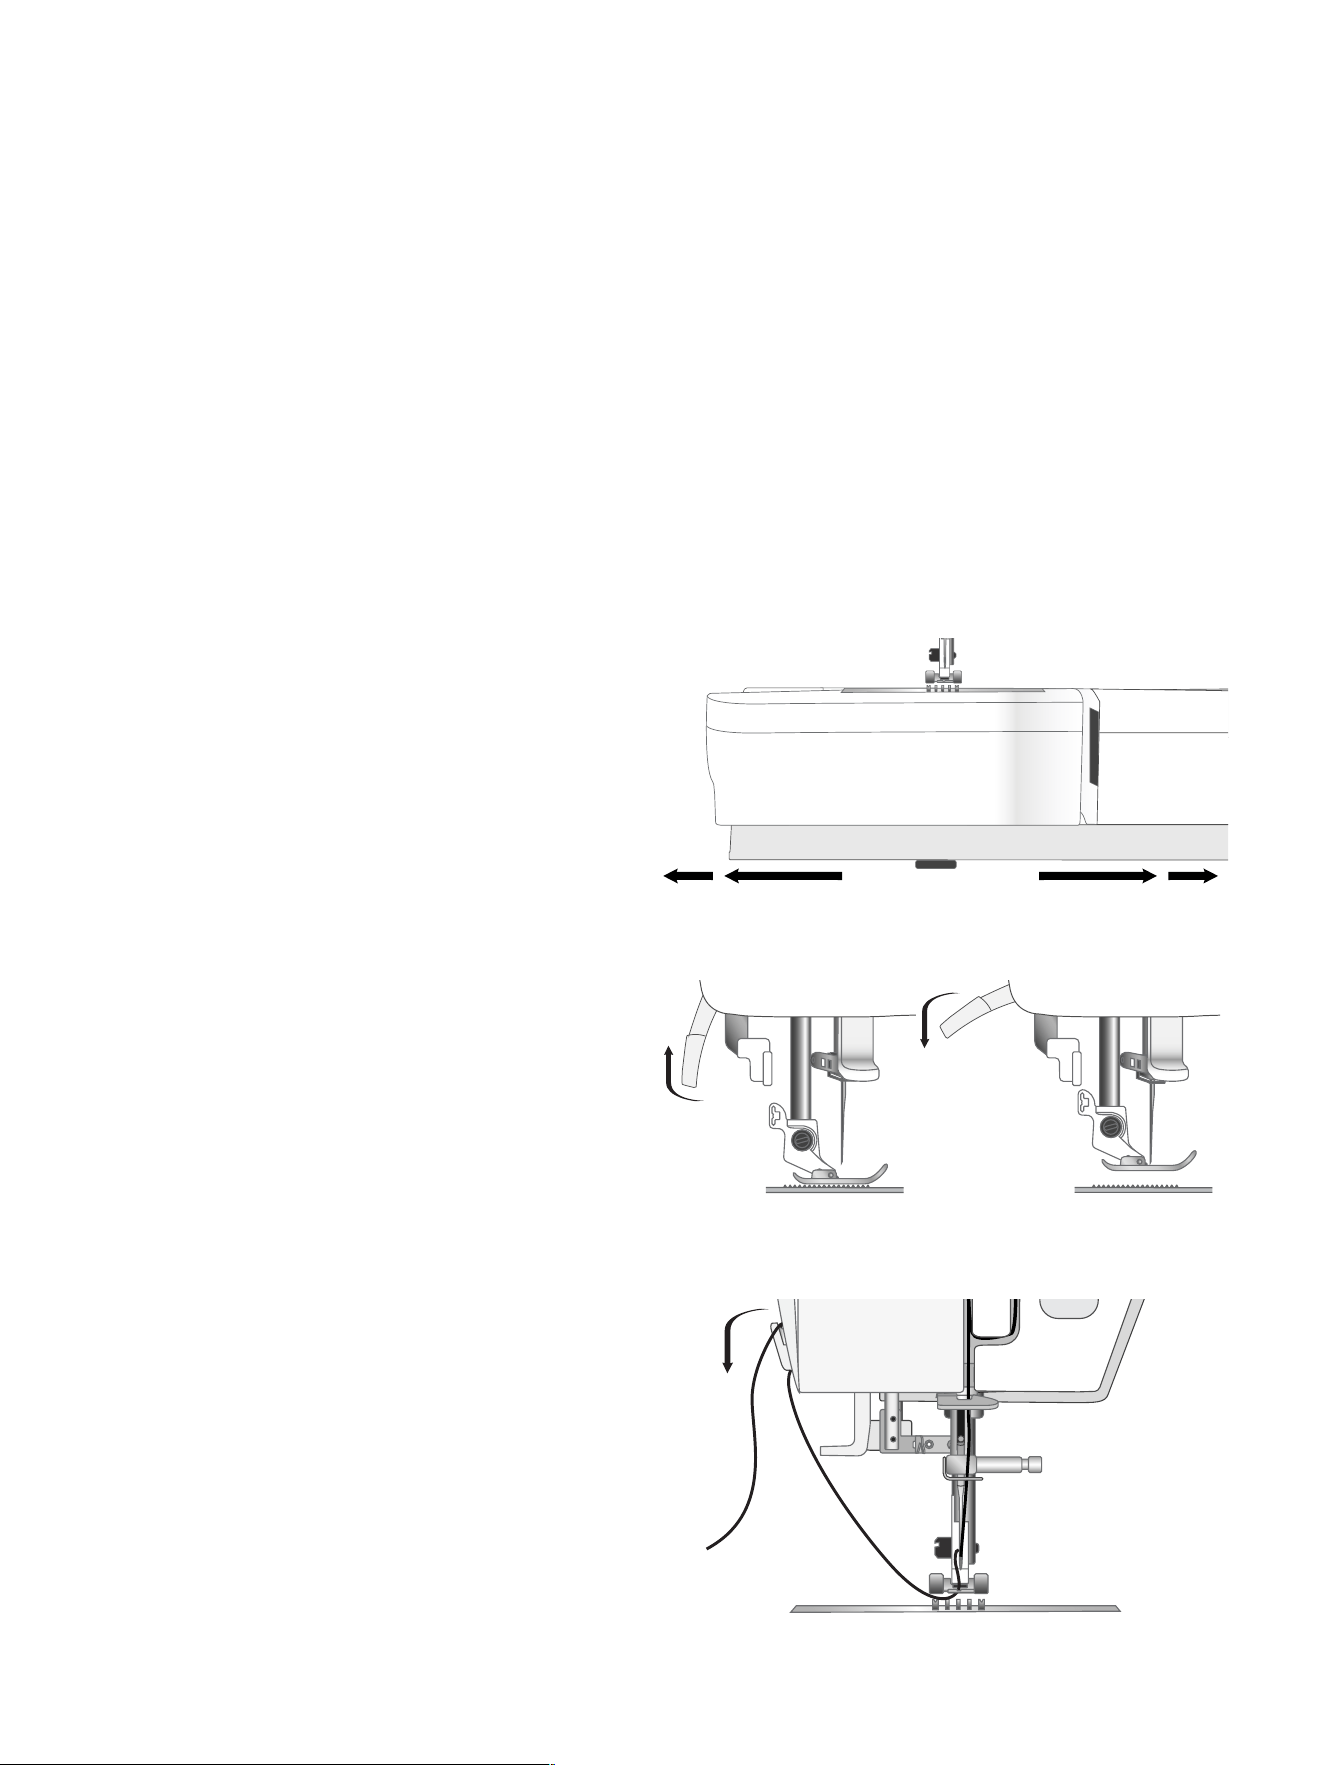
Free Arm/Removable Accessory Tray
Store presser feet, bobbins, needles and other
accessories in the accessory tray so that they are easily
accessible.
Keep the accessory tray on the machine to provide a
larger, flat work surface.
Use the free arm to facilitate sewing trouser legs and
sleeve hems. To use the free arm, slide off the accessory
tray. Remove the tray by sliding it to the left.
Presser Foot Lifter
The presser foot lifter is located at the back side of the
sewing machine head. The lever is used to raise and
lower the presser foot.
By raising the presser foot lever and then pressing it
farther upwards, the lift height of the presser foot is
increased to an extra height allowing you to place thick
fabric layers under the foot.
Thread Knife
To use the thread knife, pull the thread from back to front
as illustrated. Doing this will leave the thread ends long
enough so that the needle doesn't become unthreaded
when you start to sew again.
12 – Get Started
English
Spool Pins
Your machine has two spool pins, a main spool pin and an Auxiliary Spool Pin. The spool pins are designed for all types
of thread. The main spool pin is used in a horizontal position (the thread reels off the spool) and the Auxiliary Spool Pin
in a vertical position (the thread spool rotates). Use the horizontal position for normal threads and the vertical position
for large spools or specialty threads.
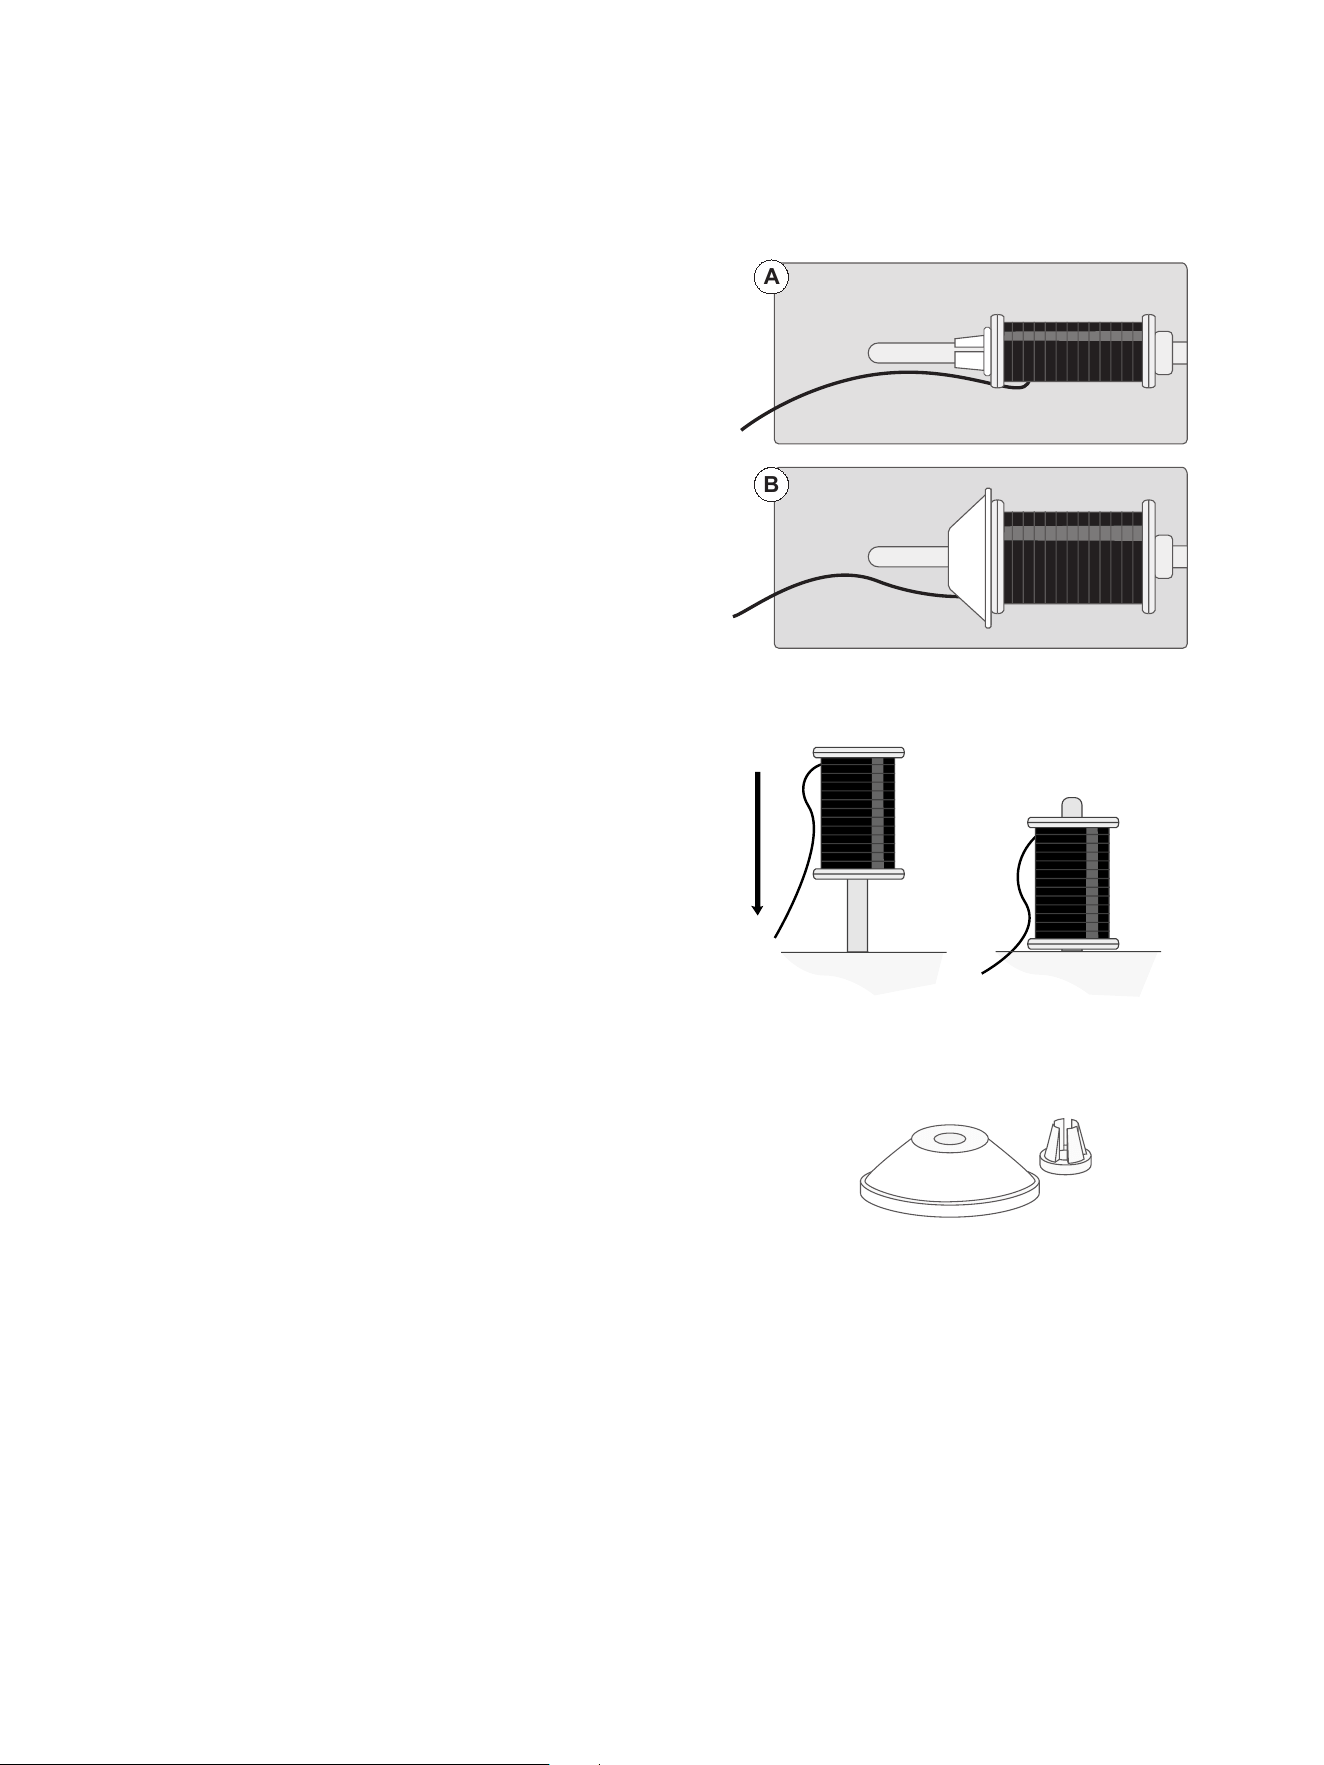
MMaaiinn SSppooooll PPiinn
A
B
Place the thread spool on the spool pin. Make sure that
the thread reels off the spool counter clockwise and slide
on a spool cap. Use a spool cap slightly larger than the
thread spool. For narrow thread spools (A), use a smaller
spool cap in front of the spool. For large thread spools (B),
use a larger spool cap in front of the spool. The flat side
of the spool cap should be pressed firmly against the
spool. There should be no space between the spool cap
and the thread spool.
Note: Not all thread spools are manufactured in the
same way. If you experience problems with the thread,
turn it in the opposite way or use the vertical position.
AAuuxxiilliiaarryy SSppooooll PPiinn
The Auxiliary Spool Pin is used when winding a bobbin
thread from a second spool of thread or when sewing
with a twin needle. Insert the Auxiliary Spool Pin into one
of the designated holes at the top of the machine.
Do not place a spool cap on top of the spool pin as that
would prevent the spool from rotating.
Spool Caps
Spool caps in two sizes are included with your machine. If
the thread is snagging on the top of the thread spool,
place a spool cap on top. Always use a spool cap slightly
larger than the thread spool to prevent the thread from
snagging. The flat side of the spool cap should be
pressed firmly against the spool.
Get Started – 13
English
Threads
There are many threads on the market today developed
for different purposes.
Your Smart Heavy Duty™ HD9120 / 9125 machine is
designed for many types of threads and spool sizes.
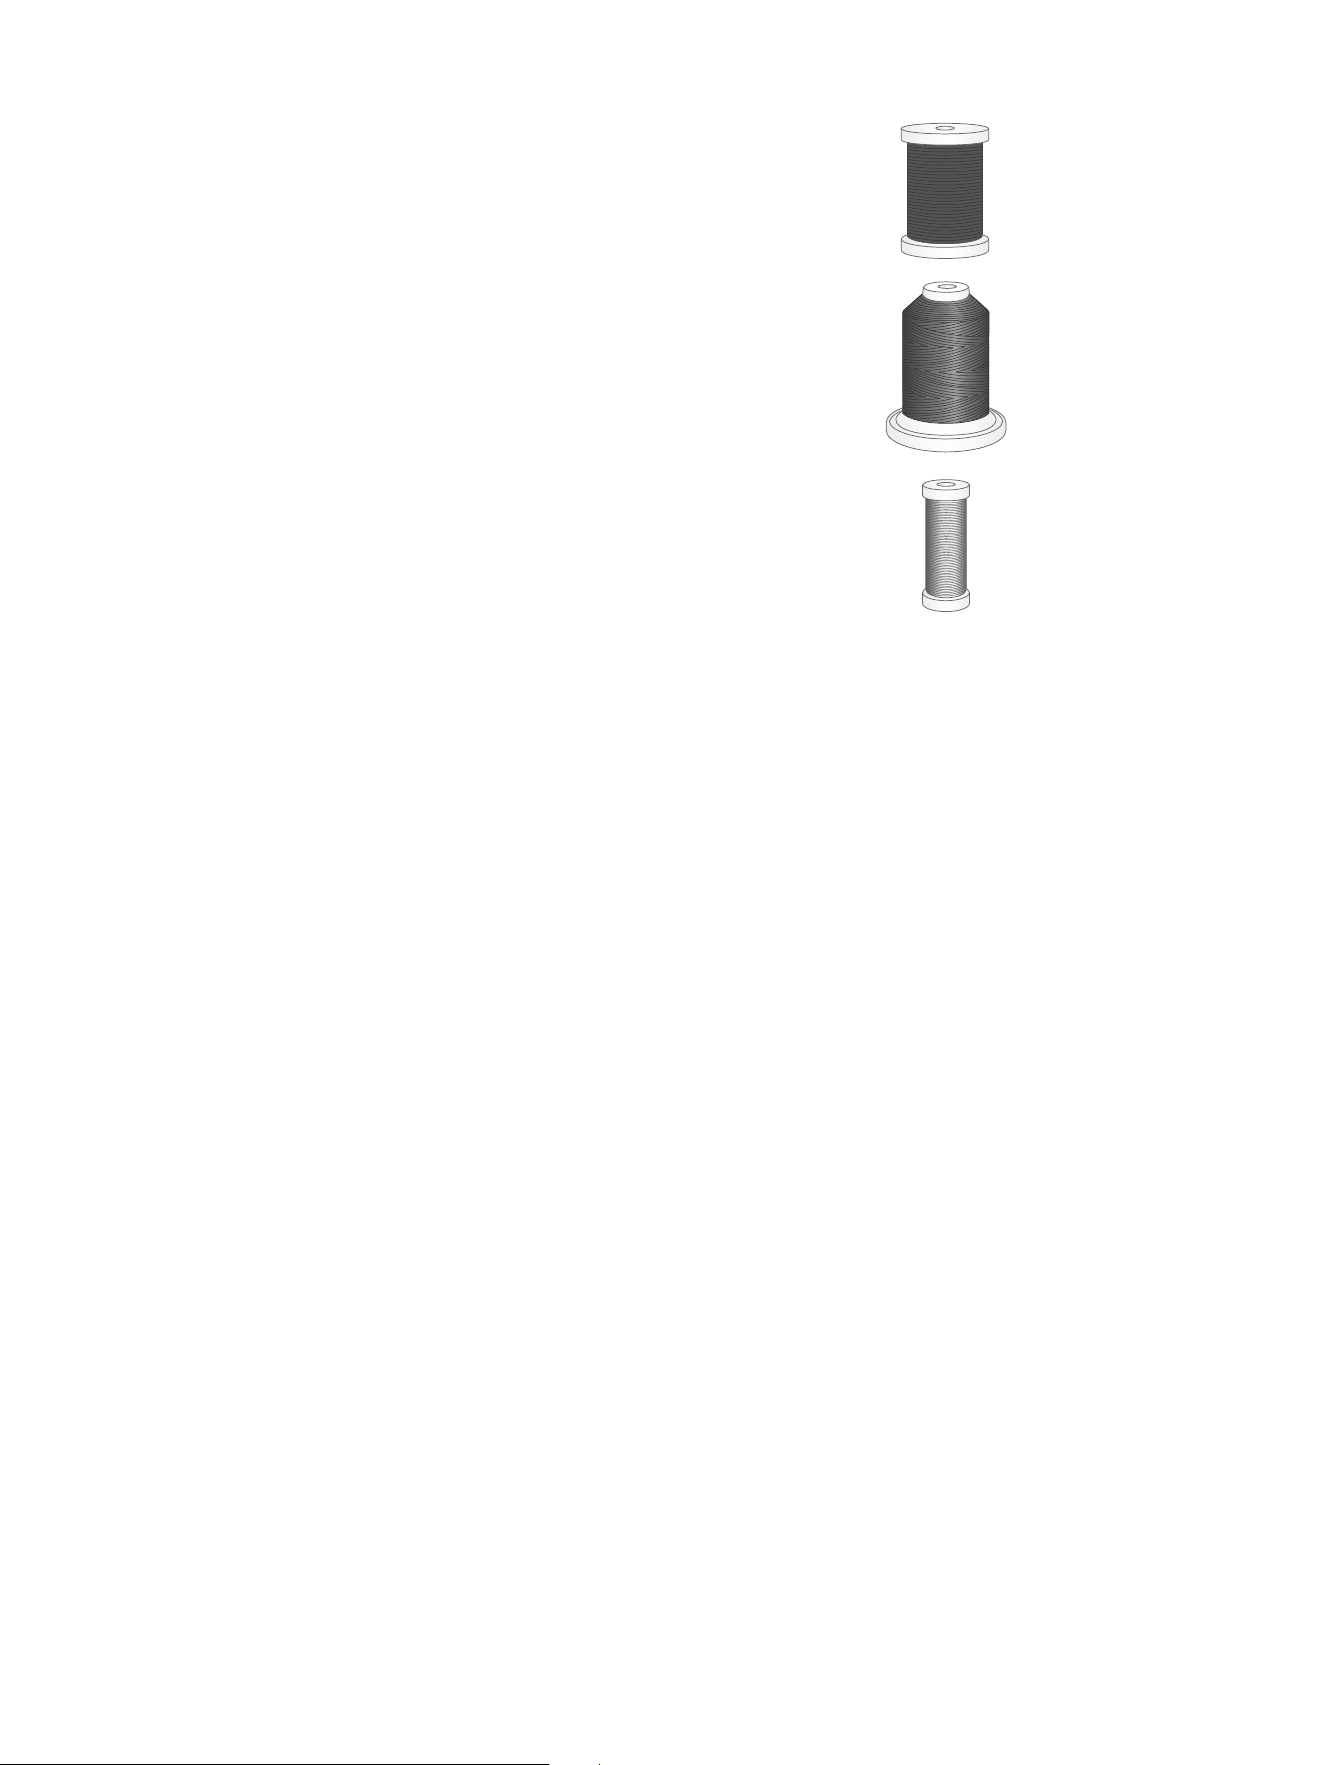
AAllll PPuurrppoossee SSeewwiinngg TThhrreeaadd
All purpose sewing thread is made of synthetic, cotton or
cotton covered polyester. This type of thread is used for
most sewing projects, including garments, home decor,
and quilting.
EEmmbbrrooiiddeerryy TThhrreeaadd
Embroidery thread is made from a variety of fibers: rayon,
polyester, acrylic or metallic. These threads create a
smooth glossy appearance for embroidery and other
decorative stitching.
Embroidery thread is not typically used in the bobbin
unless both sides of the project will be seen. A light
weight, embroidery bobbin thread is often used in the
bobbin instead. The lighter weight thread does not build
up under the embroidery.
Note: When using a metallic thread for embroidery, you
may need to use a needle with a larger eye and lower
the embroidery speed.
TTrraannssppaarreenntt TThhrreeaadd
Transparent thread, also called monofilament thread, is
a clear synthetic thread. It can be used for some quilting
and embellishment techniques. When winding a bobbin,
wind at half speed to help prevent the thread from
stretching, which can cause puckers in the fabric when
you sew. Fill the bobbin half full.
14 – Get Started
English
Threading Tips and Hints
There are many threads on the market today developed for different purposes. The quality and structure of the thread
as well as the shape and size of the thread spool can affect the behavior of the thread. Threads can also behave
differently if the spool is full or nearly empty.
If experiencing problems, try the tips and hints below.
Note: Always test sew on a scrap piece of fabric to check the sewing result.
If the Thread Spool is Pulled up on the Spool Pin
Always use a spool cap slightly larger than the thread spool to prevent the thread from snagging. The flat side of the
spool cap should be pressed firmly against the spool. There should be no space between the spool cap and the
thread spool.
If the Thread Slides Down on the Standing Thread Spool
If the thread is of a quality that unwinds easily and slides down on the standing thread spool it can get caught under
the thread spool around the spool pin and break.
Needles
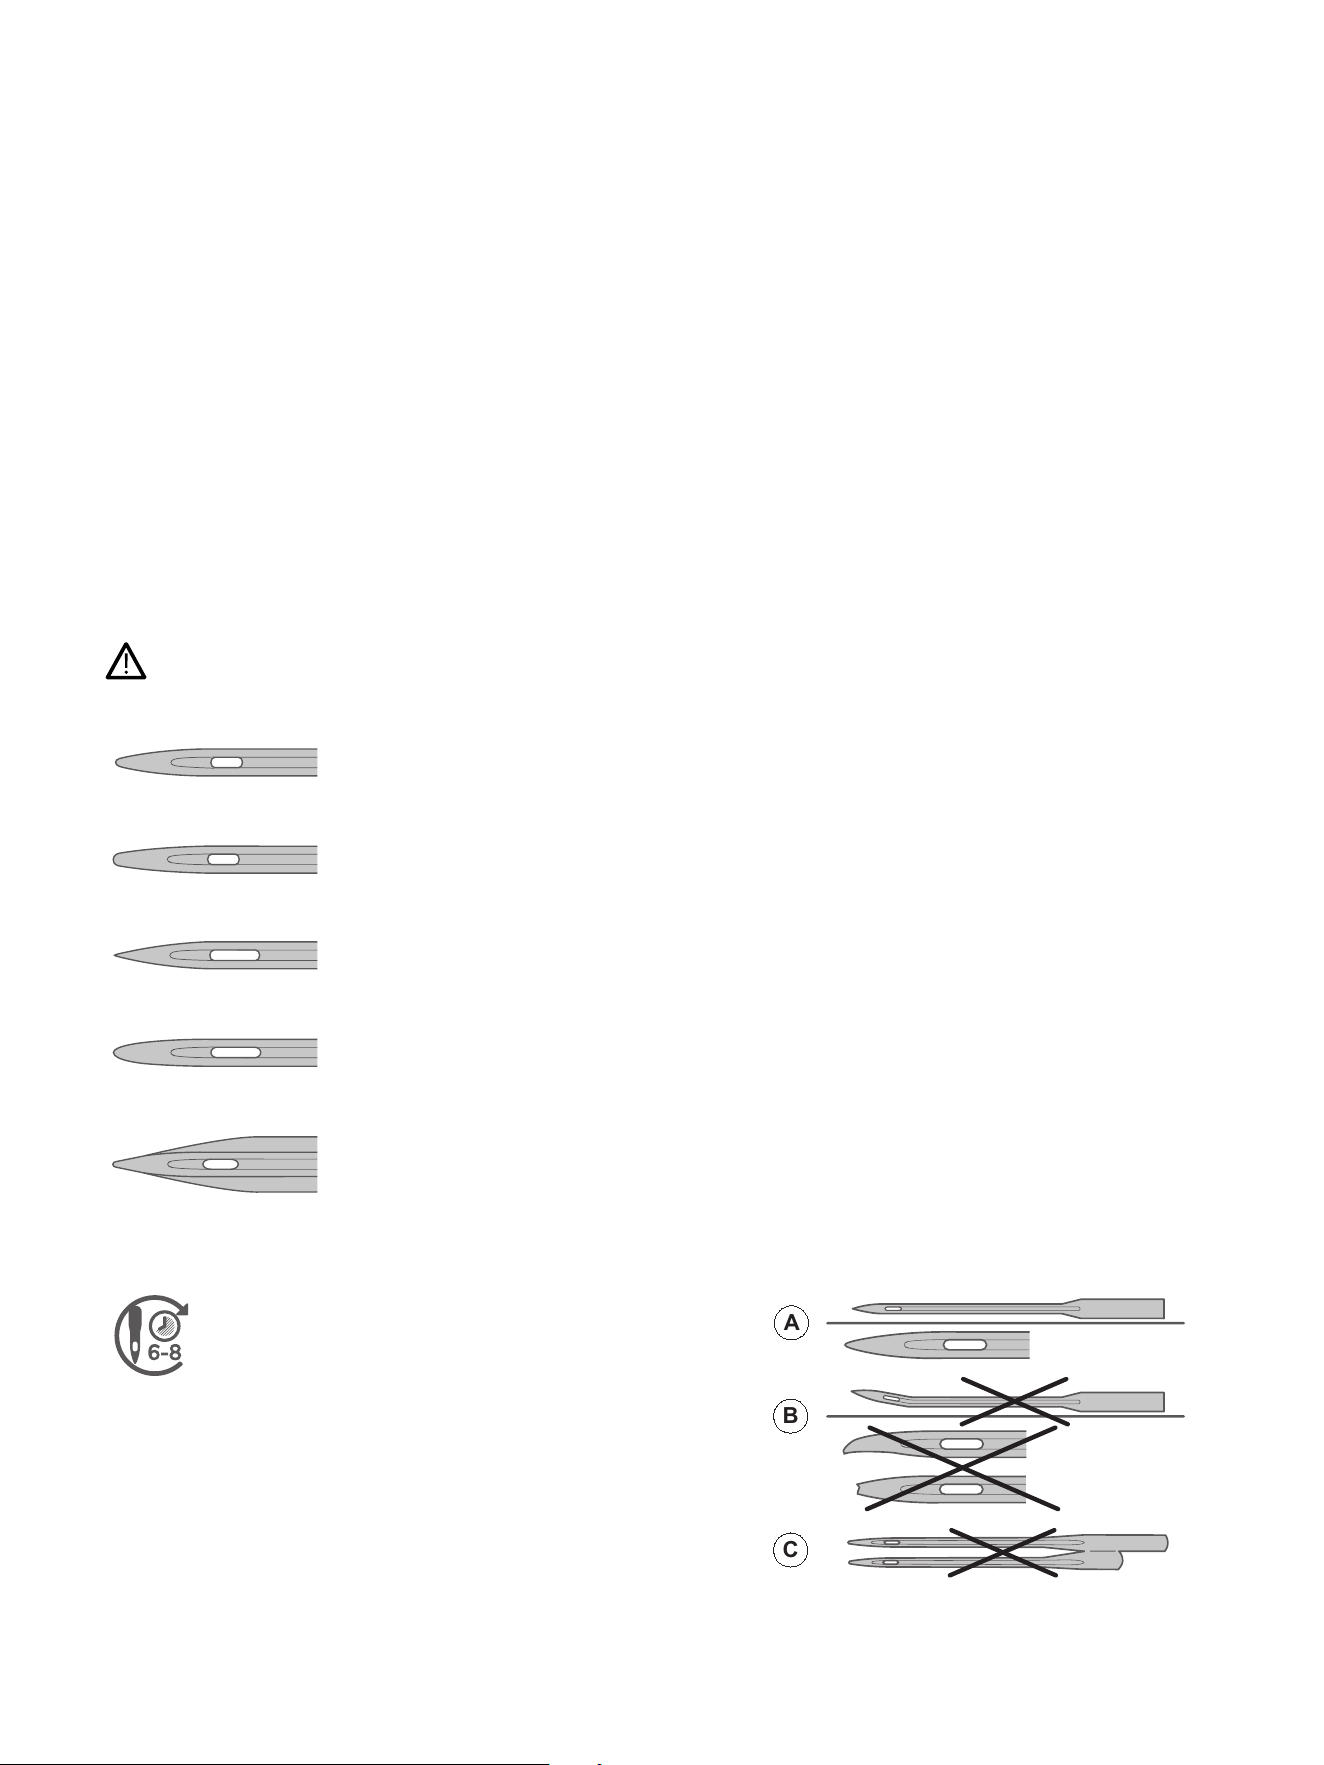
The sewing machine needle plays an important role in successful sewing. Use only quality needles. We recommend
needles of system 130/705H. The needle package included with your machine contains needles of the most frequently
used sizes.
Be sure to match the needle to the thread you are using. Heavier threads require a needle with a larger needle
eye. If the needle eye is too small for the thread the needle threader may not work properly.
Universal Needle
Universal needles have a slightly rounded point and come in a variety of sizes. For general
sewing in a variety of fabric types and weights.
Stretch Needle
Stretch needles have a ball point and a special scarf to eliminate skipped stitches when
there is a flex in the fabric. For knits, swimwear, fleece, synthetic suedes and leathers.
Denim Needle
Denim needles have a sharp point to penetrate tightly woven fabrics without deflecting the
needle. For canvas, denim, microfibers.
Embroidery Needle
Embroidery needles have a special scarf, a slightly rounded point and a slightly larger eye to
avoid damage to thread and materials. Use with metallic and other specialty threads for
embroidery and decorative sewing.
Wing Needle
Wing needles have wide extensions on each side of the needle to poke holes in the fabric
when sewing entredeux and other hemstitches on natural fiber fabrics.
Important Needle Information
A
B
C
Change the needle often. As a general rule,
needles should be changed every 6-8
hours of actual stitching time.
Always use a straight needle with a sharp point and
make sure the point is not bent or damaged (A).
A damaged needle (B) can cause skipped stitches,
breakage or snapping of the thread. It can also damage
the needle plate.
Do not use asymmetrical twin needles (C), they can
damage your sewing machine.
Get Started – 15
English
Selection Guide — Needle Size, Fabric, Thread
NNeeeeddllee SSiizzee FFaabbrriicc TThhrreeaadd
80 (11)
Lightweight fabrics: Fine cotton, voile, silk, muslin,
interlock, tricot, jersey, crepe, polyester, chiffon,
organza, organdy
Light duty all purpose thread
80-90 (12-14 )
Medium weight fabrics: Quilting cotton, satin, double
knit, lightweight wool, rayon, polyester, lightweight
linen
Use polyester threads on synthetic fabrics
and all-purpose or cotton thread on
natural fabrics for best results.
90 (14)
Medium weight fabrics: Firm woven, medium weight
linen, cotton/polyester blend, terrycloth, chambray,
double knit
100 (16)
Heavy weight fabrics: Canvas, wool, denim, home
decor, fleece, heavy knit
110 (18)
Heavy weight fabrics: Coat weight wool, upholstery
fabrics
Heavy duty thread for needle, with all-
purpose thread for the bobbin.
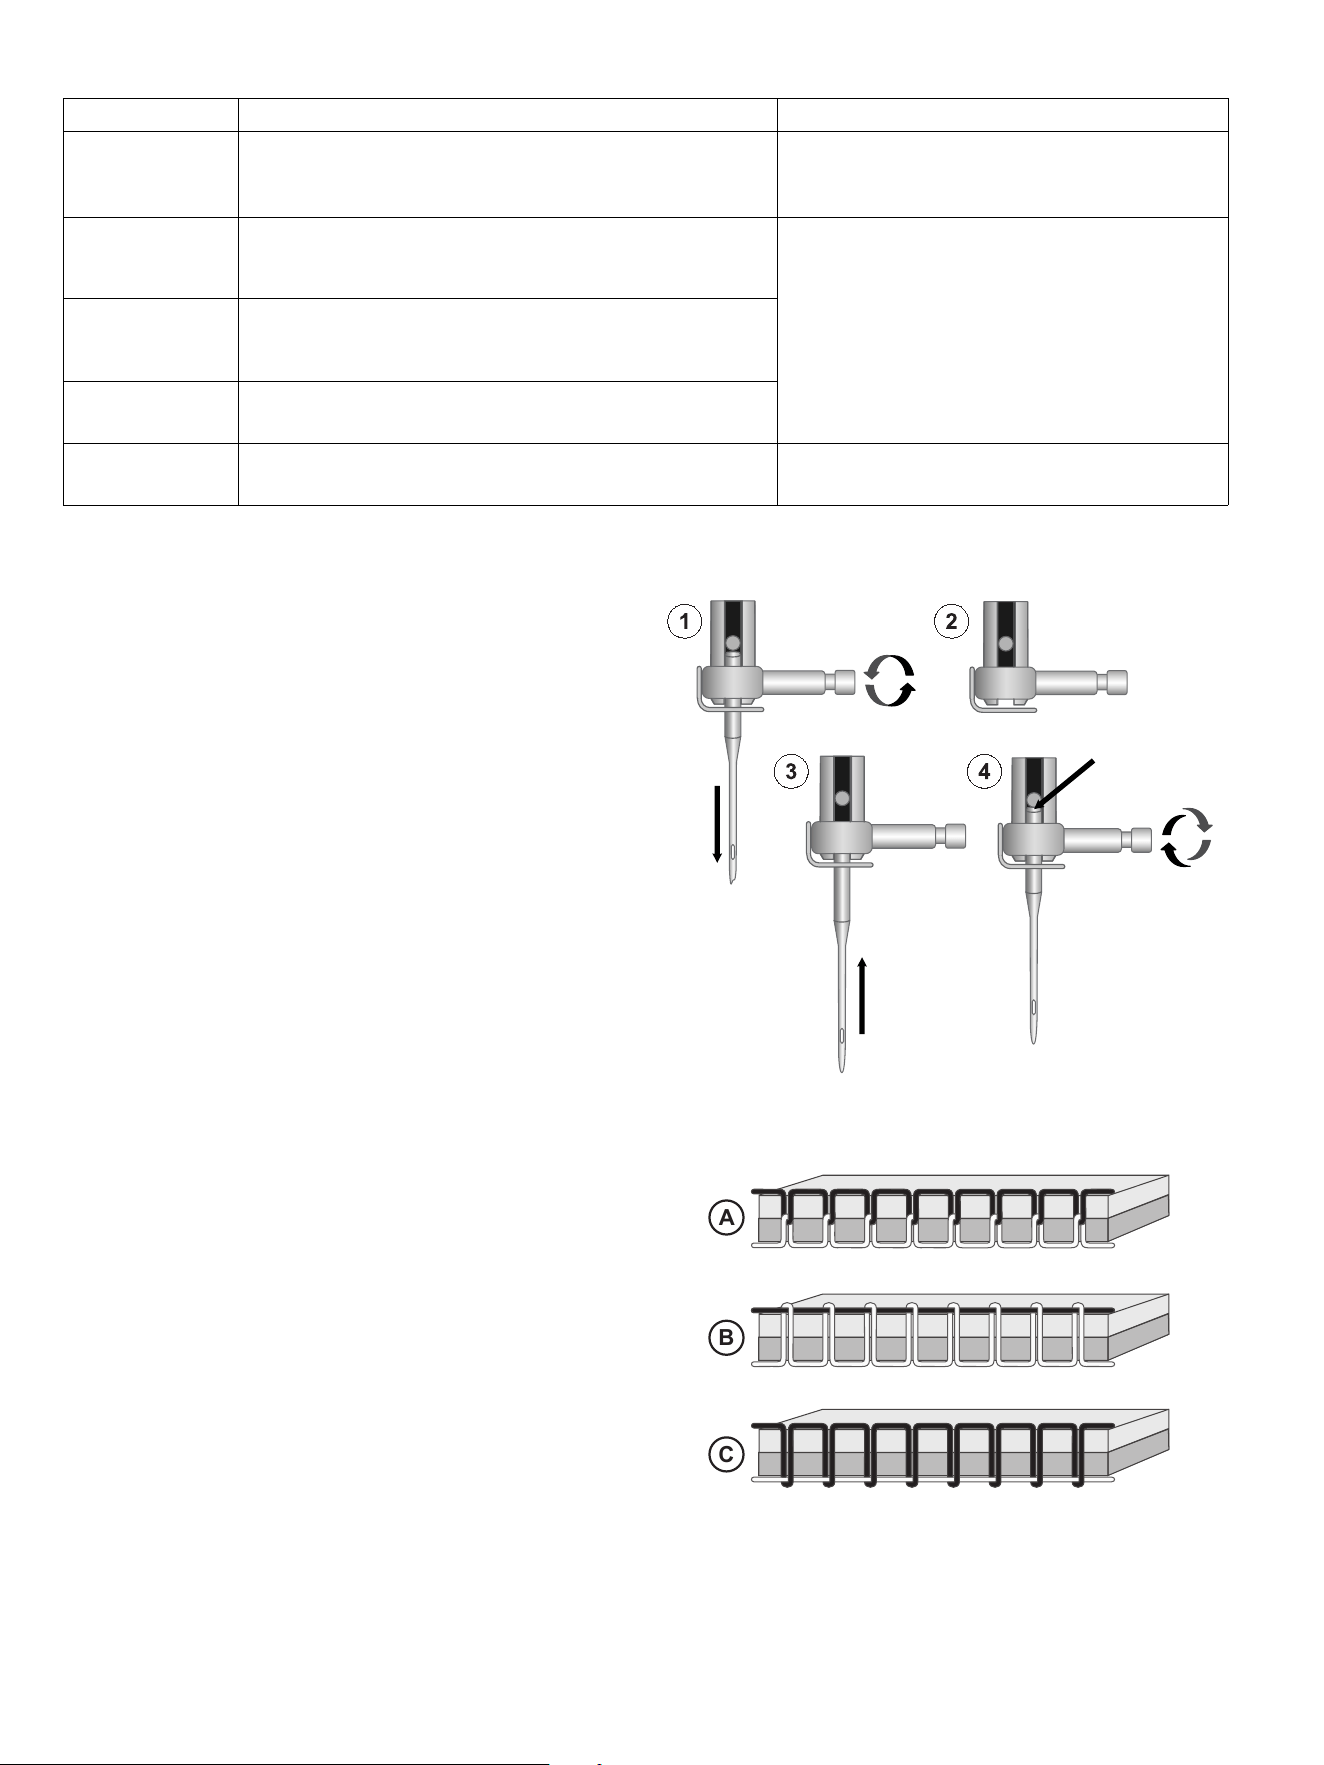
Change the Needle
Note: Before you begin changing the needle, it can be
helpful to place a small piece of paper or fabric
underneath the needle area, over the hole in the needle
plate, so that the needle doesn't accidentally fall down
into the machine.
1. Loosen the needle clamp screw. If it feels tight, use
the L-Screwdriver from your accessories to aid with
loosening the screw.
2. Remove the needle.
3. Push the new needle upwards into the needle clamp
with the flat side away from you.
4. When the needle will go up no further, tighten the
screw securely.
Thread Tension
A
B
C
To set the thread tension, turn the dial on top of the
machine. Depending on the fabric, thread, etc, the
tension may need to be adjusted. For the best stitch
appearance and durability, make sure the needle thread
tension is correctly adjusted. For general sewing, the
threads evenly meet between the two layers of fabric (A).
If the bobbin thread is visible on the top side of the fabric,
the needle thread tension is too tight (B). Reduce the
needle thread tension.
If top thread is visible on the underside of the fabric, the
needle thread tension is too loose (C). Increase the
needle thread tension.
For decorative stitches and buttonholes, the top thread
should be visible on the underside of the fabric.
Make a few tests on a scrap piece of the fabric you are
going to sew and check the tension.
16 – Get Started
English
Sew without Feed Teeth
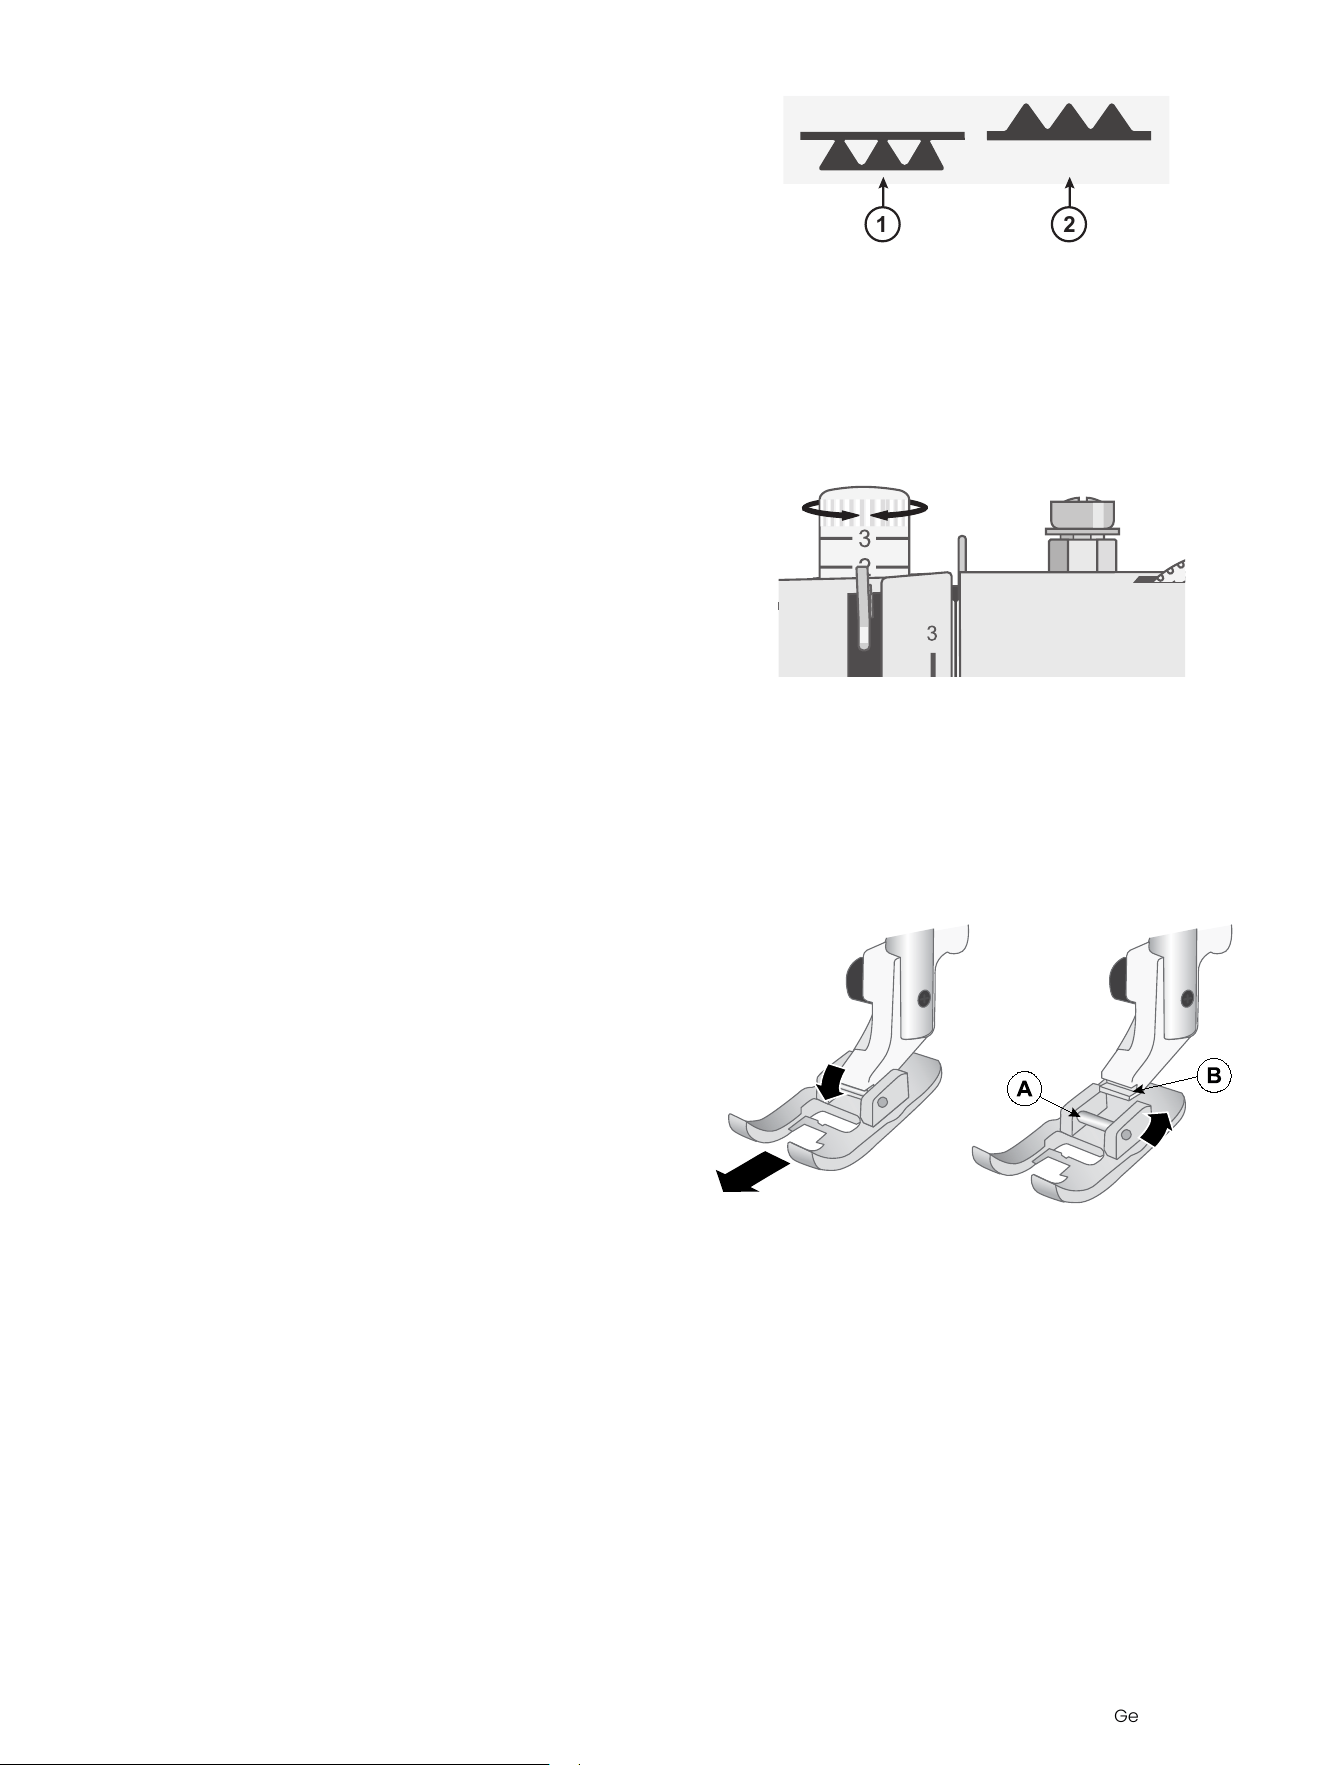
21
When sewing on buttons or doing other sewing
techniques where you don't want the fabric to feed, you
need to lower the feed teeth.
The feed teeth lever is found at the back of the free arm.
1. Lower the feed teeth by moving the lever to the “Feed
Teeth Down” position.
2. Raise the feed teeth by moving the lever to the “Feed
Teeth Up” position.
Note: The feed teeth will not raise immediately when the
lever is switched. Turn the hand wheel toward you one
full turn or start sewing to re-engage the feed teeth.
Presser Foot Pressure
3
The presser foot pressure is used to control the amount
of pressure that the presser foot exerts onto the fabric, to
ensure smooth feeding of the fabric while sewing. The
presser foot pressure has been pre-set to the standard
value "2". Though it needs no adjustment for most fabrics,
it can be adjusted for very thick or very thin fabric -
increase for heavy weight fabrics, decrease for
lightweight fabrics.
Note: If the dial is turned counterclockwise too much, it
could come off. If this happens, simply replace the dial
and turn it clockwise until it stays in place.
Note: If the dial is turned clockwise until it comes to a stop,
it has reached the maximum pressure available. Do not
try to turn the dial any further!
Change the Presser Foot
1. Make sure that the needle is in the highest position.
Pull the presser foot down and towards you.
2. Line up the cross pin (A) on the foot with the gap in
the presser foot holder. Push the foot into the gap
until the foot snaps into place (B).
A
B
Get Started – 17
English
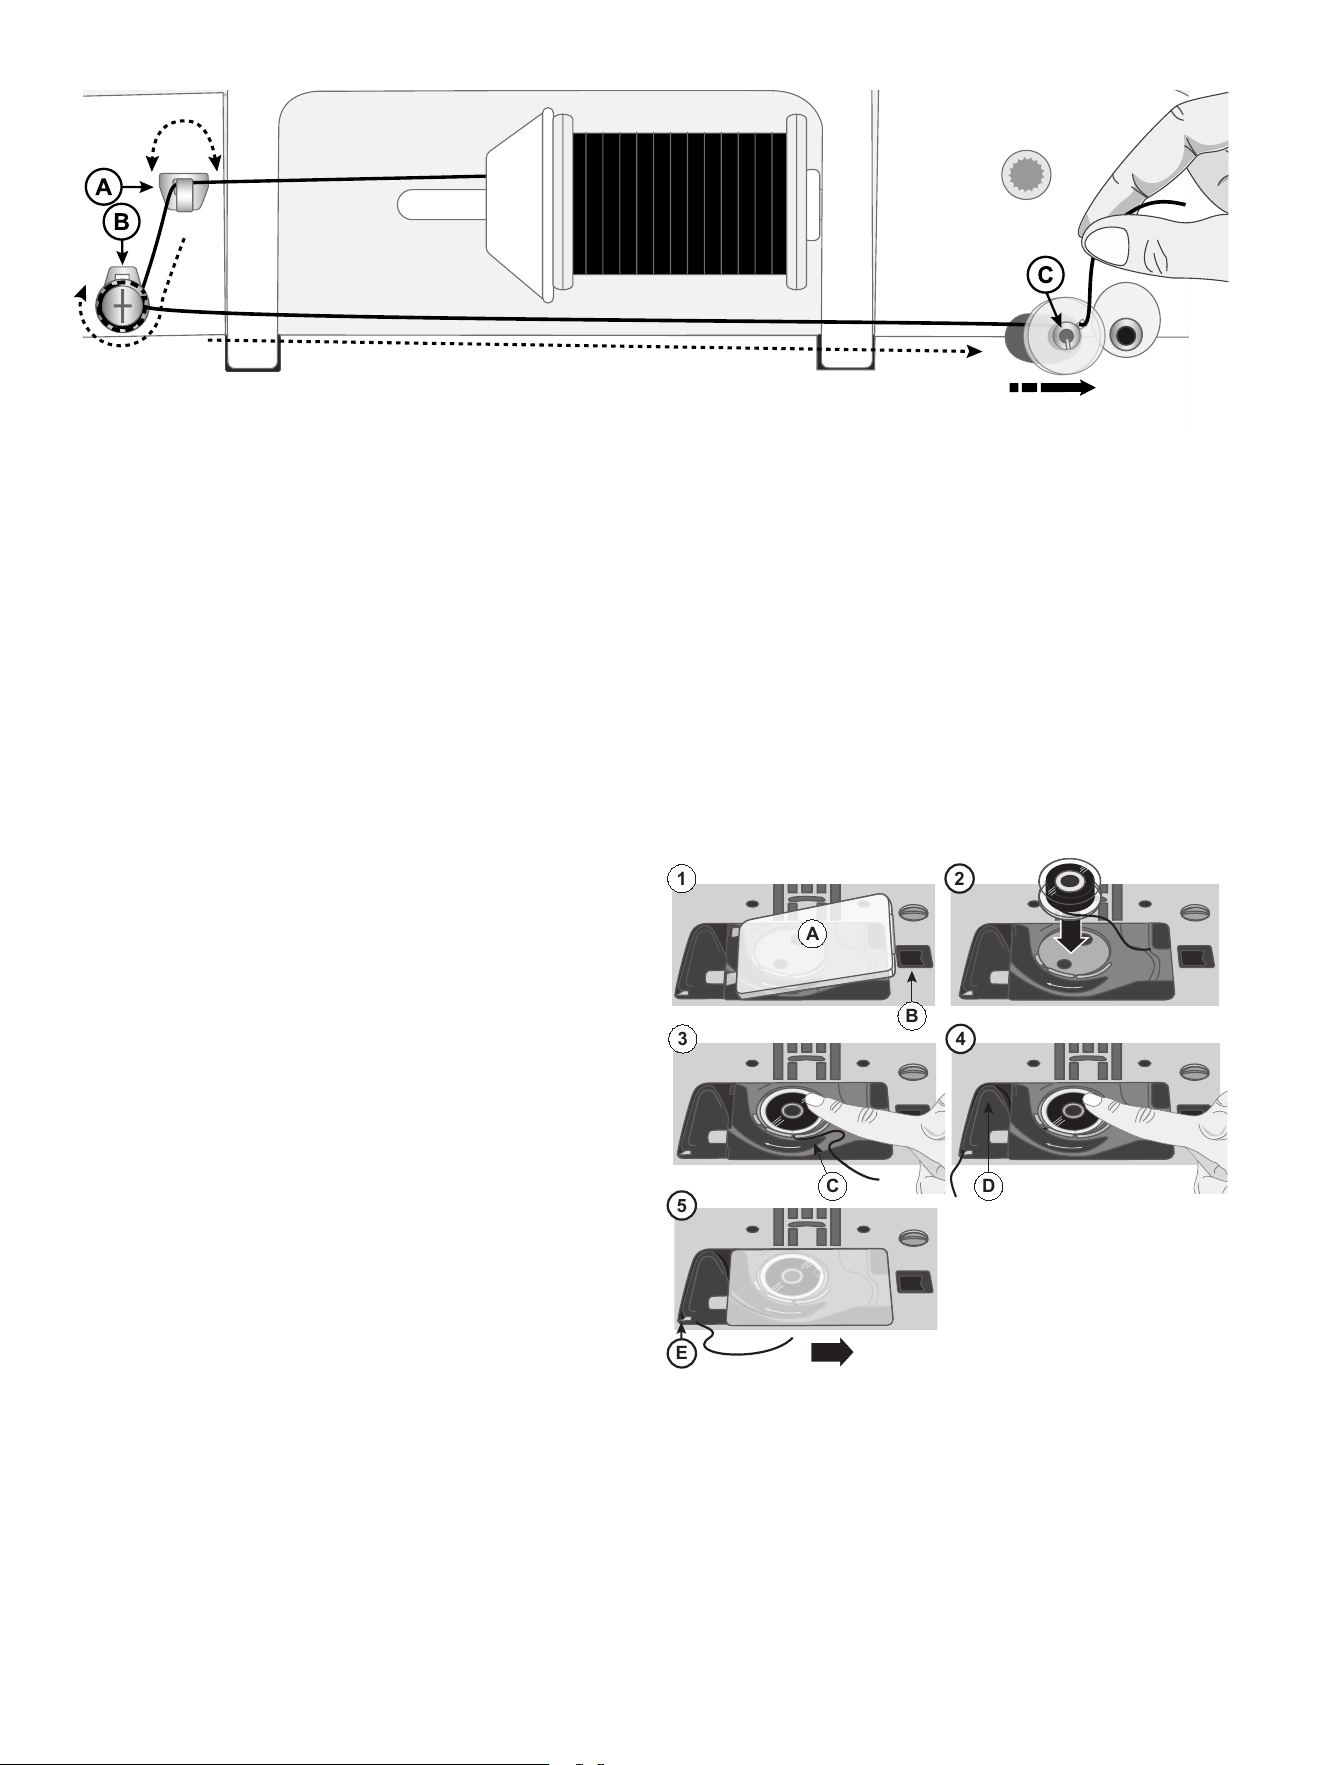
Wind the Bobbin
1. Place the thread spool on the spool pin. Slide a spool
cap firmly against the spool.
2. Place the thread into the thread guide (A) from the
back to the front. Bring the thread clockwise around
the bobbin winding tension disc (B), making sure that
the thread is pulled snuggly between the discs.
3. Thread through the hole in the bobbin (C) from the
inside to the outside.
4. Place the bobbin on the bobbin winding spindle.
Make sure the bobbin is pushed down firmly.
5. Push the bobbin winding spindle to the right. Hold the
thread end and press the foot control or Start/Stop to
start winding. After a few turns, take your foot off the
foot control or press Start/Stop to stop winding. Cut
the excess thread tail close to the bobbin. Step on the
foot control or press Start/Stop to resume winding.
When the bobbin is full, press Start/Stop or release the
foot control to stop.
6. Push the bobbin winding spindle to the left. Remove
the bobbin and cut the thread.
Note: When the bobbin winding spindle is pushed to the right, the machine will not sew. Make sure to push the bobbin
spindle back to the sewing position (left) before sewing.
Insert the Bobbin
A
B
1 2
3
C D
4
5
E
Note: Make sure that the needle is fully raised and the
machine is turned off before inserting or removing the
bobbin.
1. Remove the bobbin cover (A) by pushing the small
button to the right of the cover (B) towards the right.
2. Insert the bobbin in the bobbin case with the thread
running in a counterclockwise direction.
3. With the tip of your finger on the bobbin, pull the
thread slightly to the right and under the guide (C)
then towards the left.
4. Continue guiding the thread up toward the left and
around the curve (D).
5. Bring it down the channel toward the front and into
the bobbin thread knife (E).
Replace the bobbin cover and pull the thread to the
right to cut off the excess thread.
18 – Get Started
English
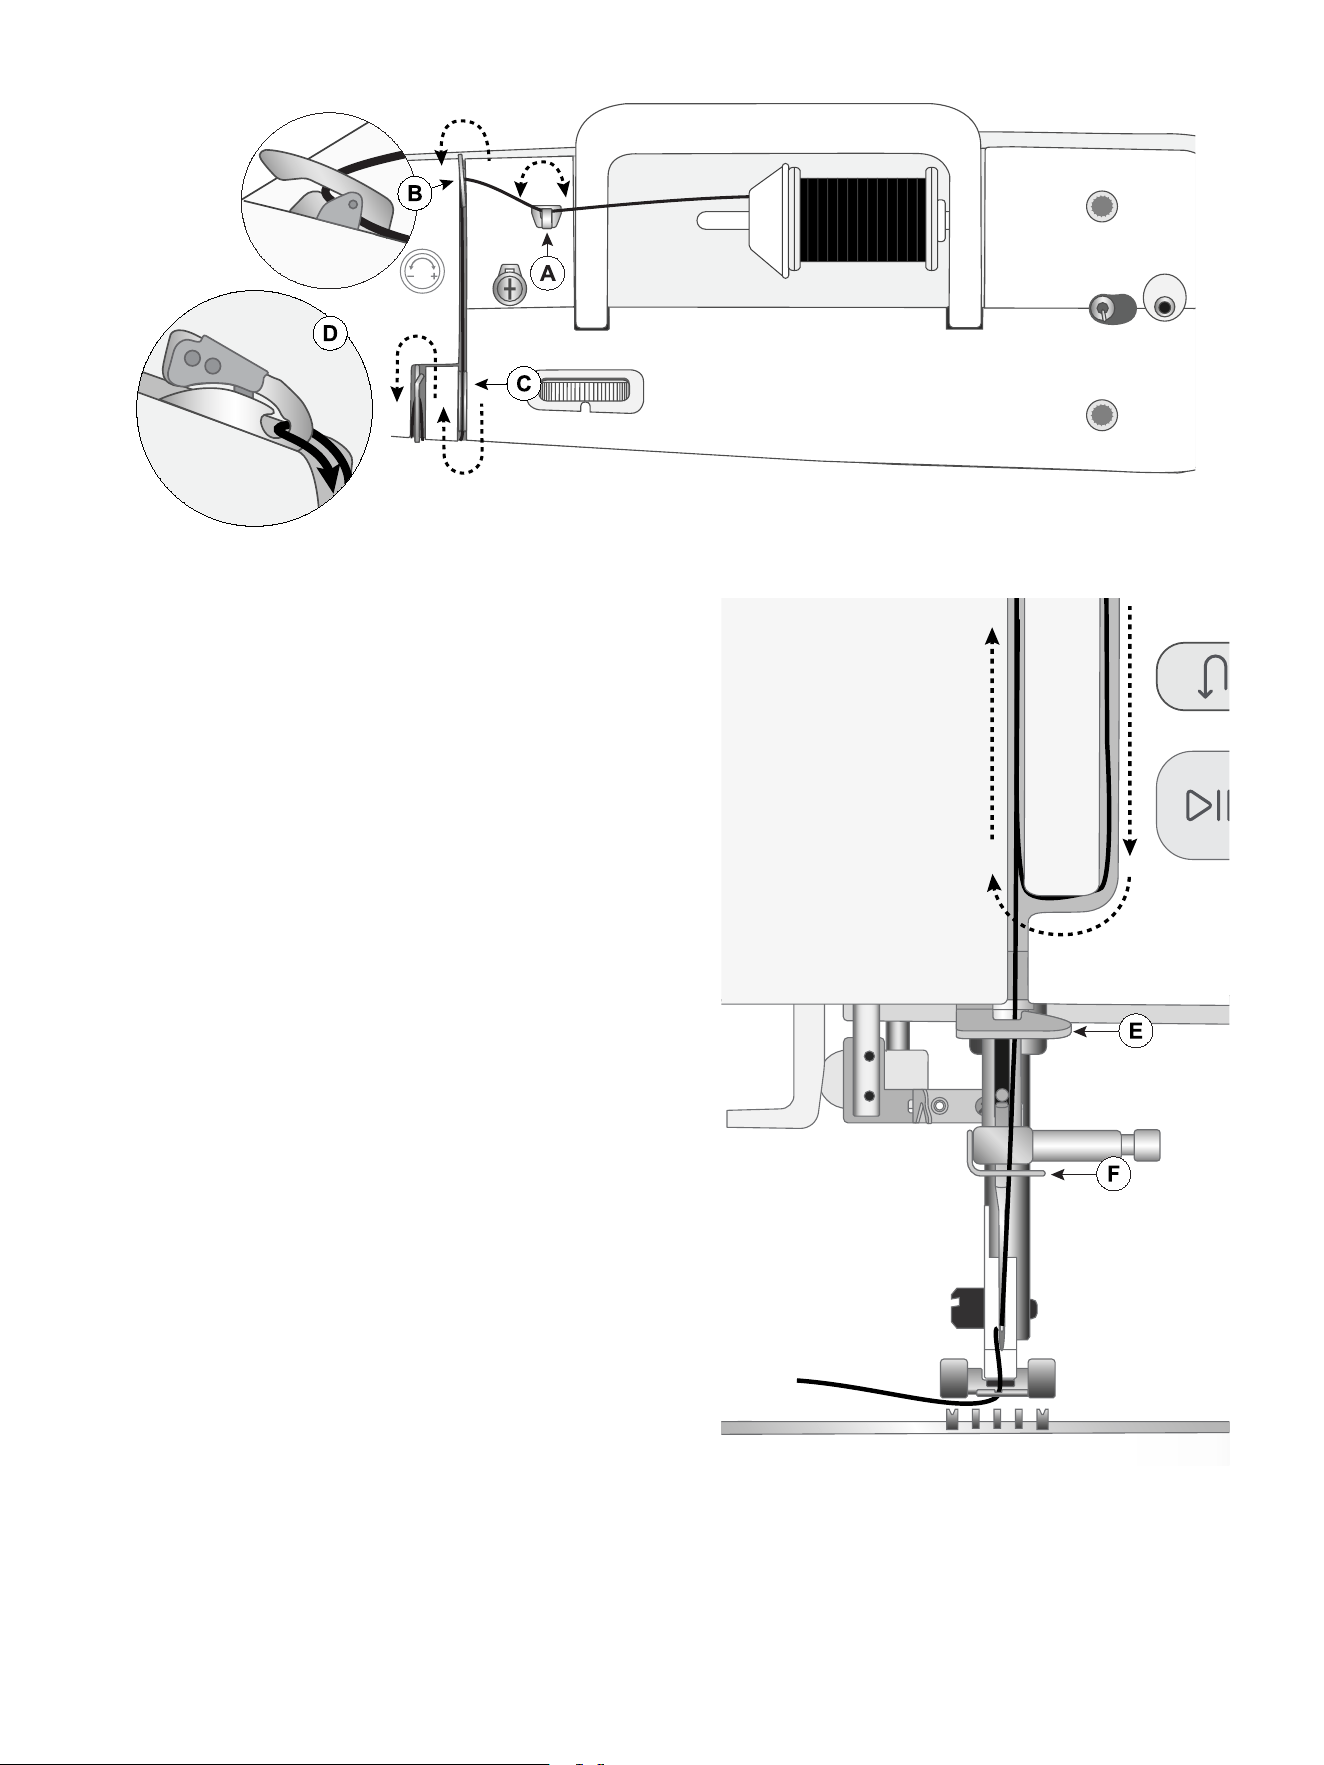
Thread the Machine
Machine from above
Machine from front
Important! Make sure that the presser foot is raised and
the needle is in its highest position by turning the
handwheel toward you. This is very important to help
ensure that the machine is correctly threaded. Not doing
so can result in poor stitch quality when you start to sew.
1. Place the thread on the spool pin and fit the
appropriately sized spool cap.
2. Pull the thread into the thread guide (A) from back to
the front and thread guide (B) from back to front.
Make sure the thread is placed correctly in the
tension disk.
3. Pull the thread between the tension discs (C).
4. Continue bringing the thread down through the right
threading slot, around the U-turn, then back upwards
through the left threading slot.
5. Bring the thread from the right into the take-up lever
(D) and down in the left-hand threading slot, from
right to left into the lower thread guide (E) and into
the needle thread guide (F).
6. Thread the needle from front to back.
Get Started – 19
English
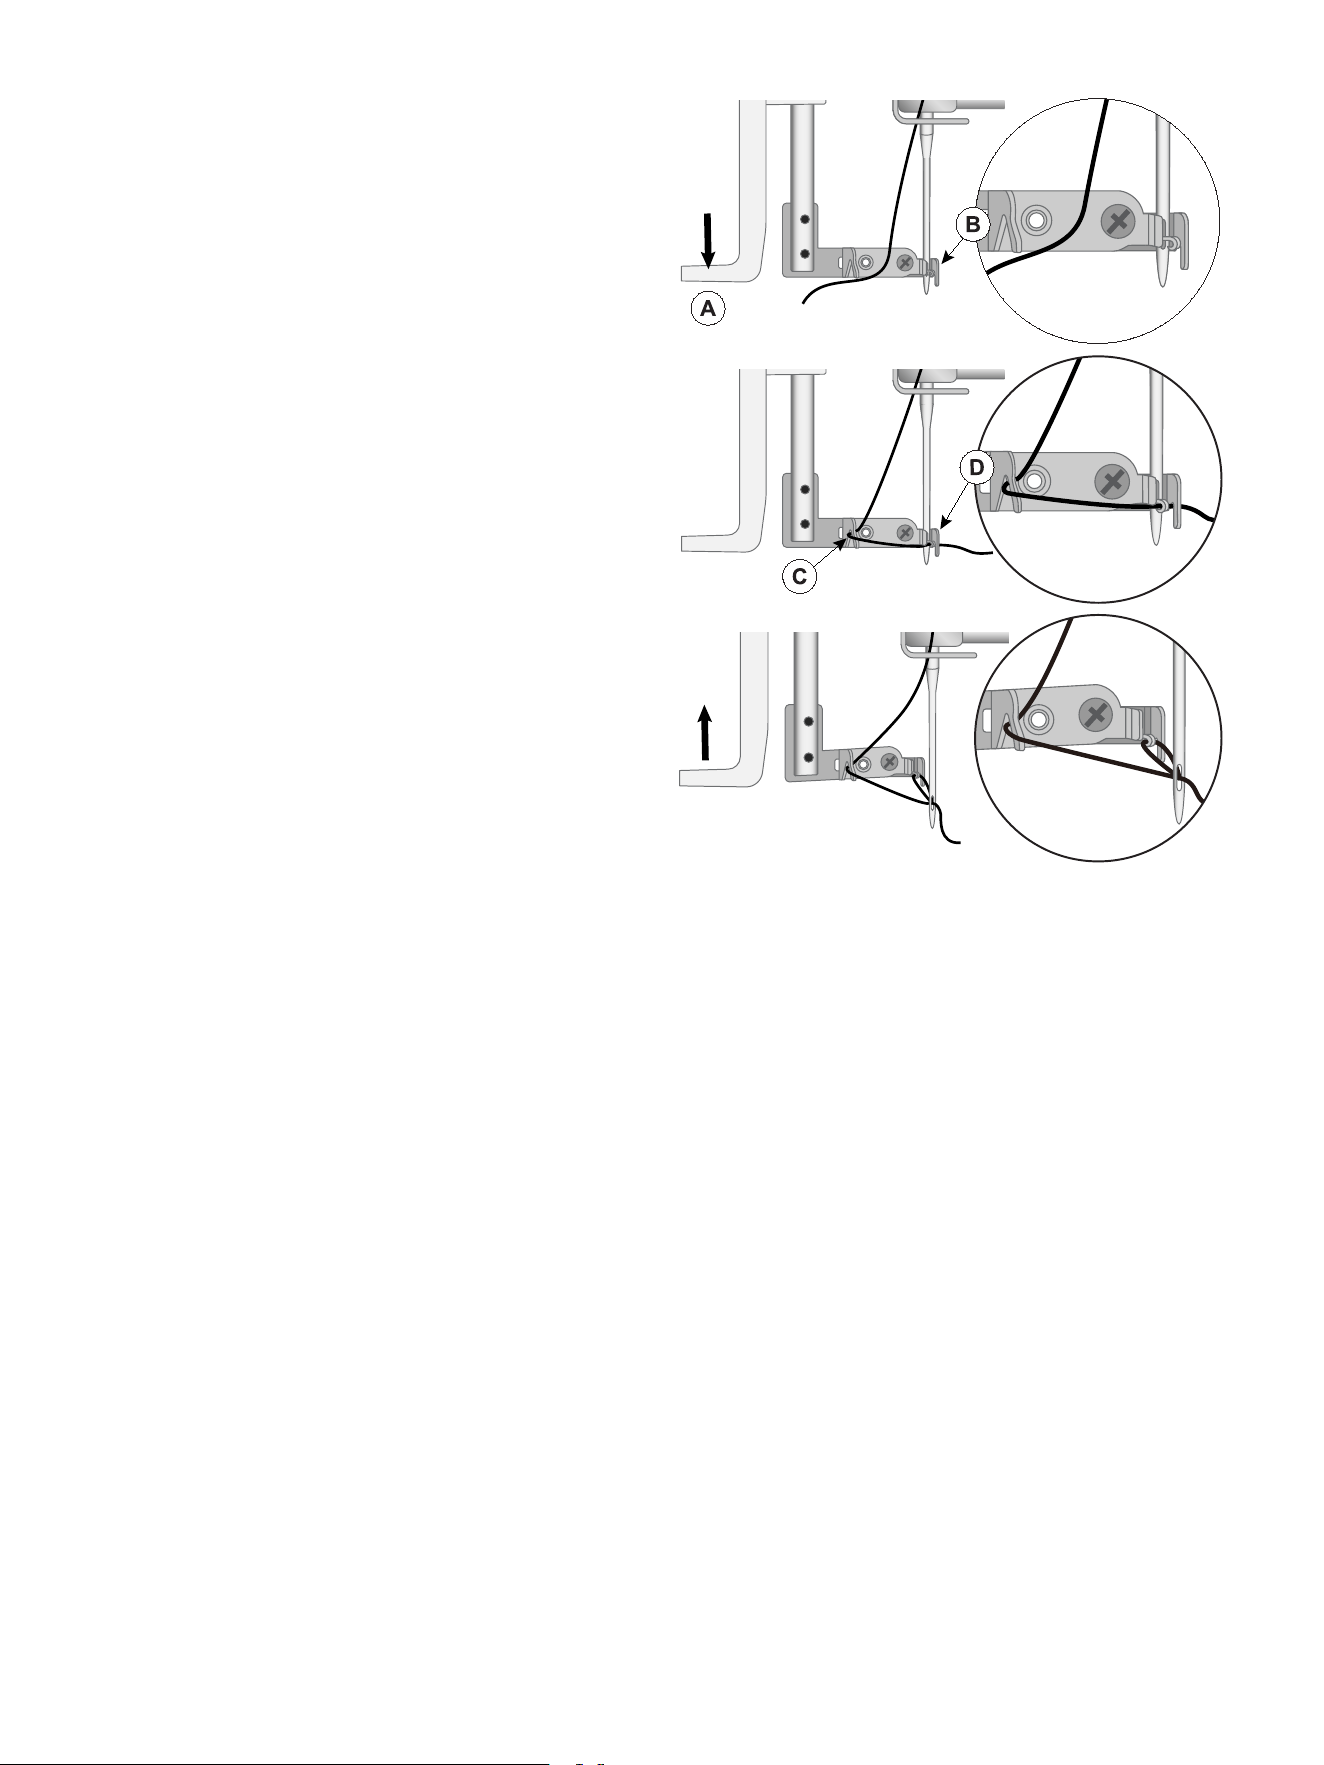
Needle Threader
The built-in needle threader allows you to thread the
needle quickly and easily.
The needle must be in its highest position to use the
built-in needle threader.
Press the needle up/down button until the needle is in its
highest position. It is also recommended that you lower
the presser foot.
• Use the handle (A) to gently pull the needle threader
all the way down. The metal flanges cover the needle.
A small hook will pass through the needle eye (B).
• Place the thread from the back over the thread guide
(C) and under the small hook (D).
• Let the needle threader gently swing back. The hook
pulls the thread through the needle eye and forms a
loop behind the needle. Pull the thread loop out
behind the needle.
• Raise the presser foot and place the thread under it.
• Pull out about 6–8” (15–20cm) of thread beyond the
needle eye. This will prevent the machine from coming
unthreaded when you start to sew.
Note: The needle threader is designed to be used for size
80-100 needles. You cannot use the needle threader for
wing needles or twin needles. There are also some
optional accessories that require manual threading of
the needle. When threading the needle manually, make
sure that the needle is threaded from front to back.
20 – Get Started
English
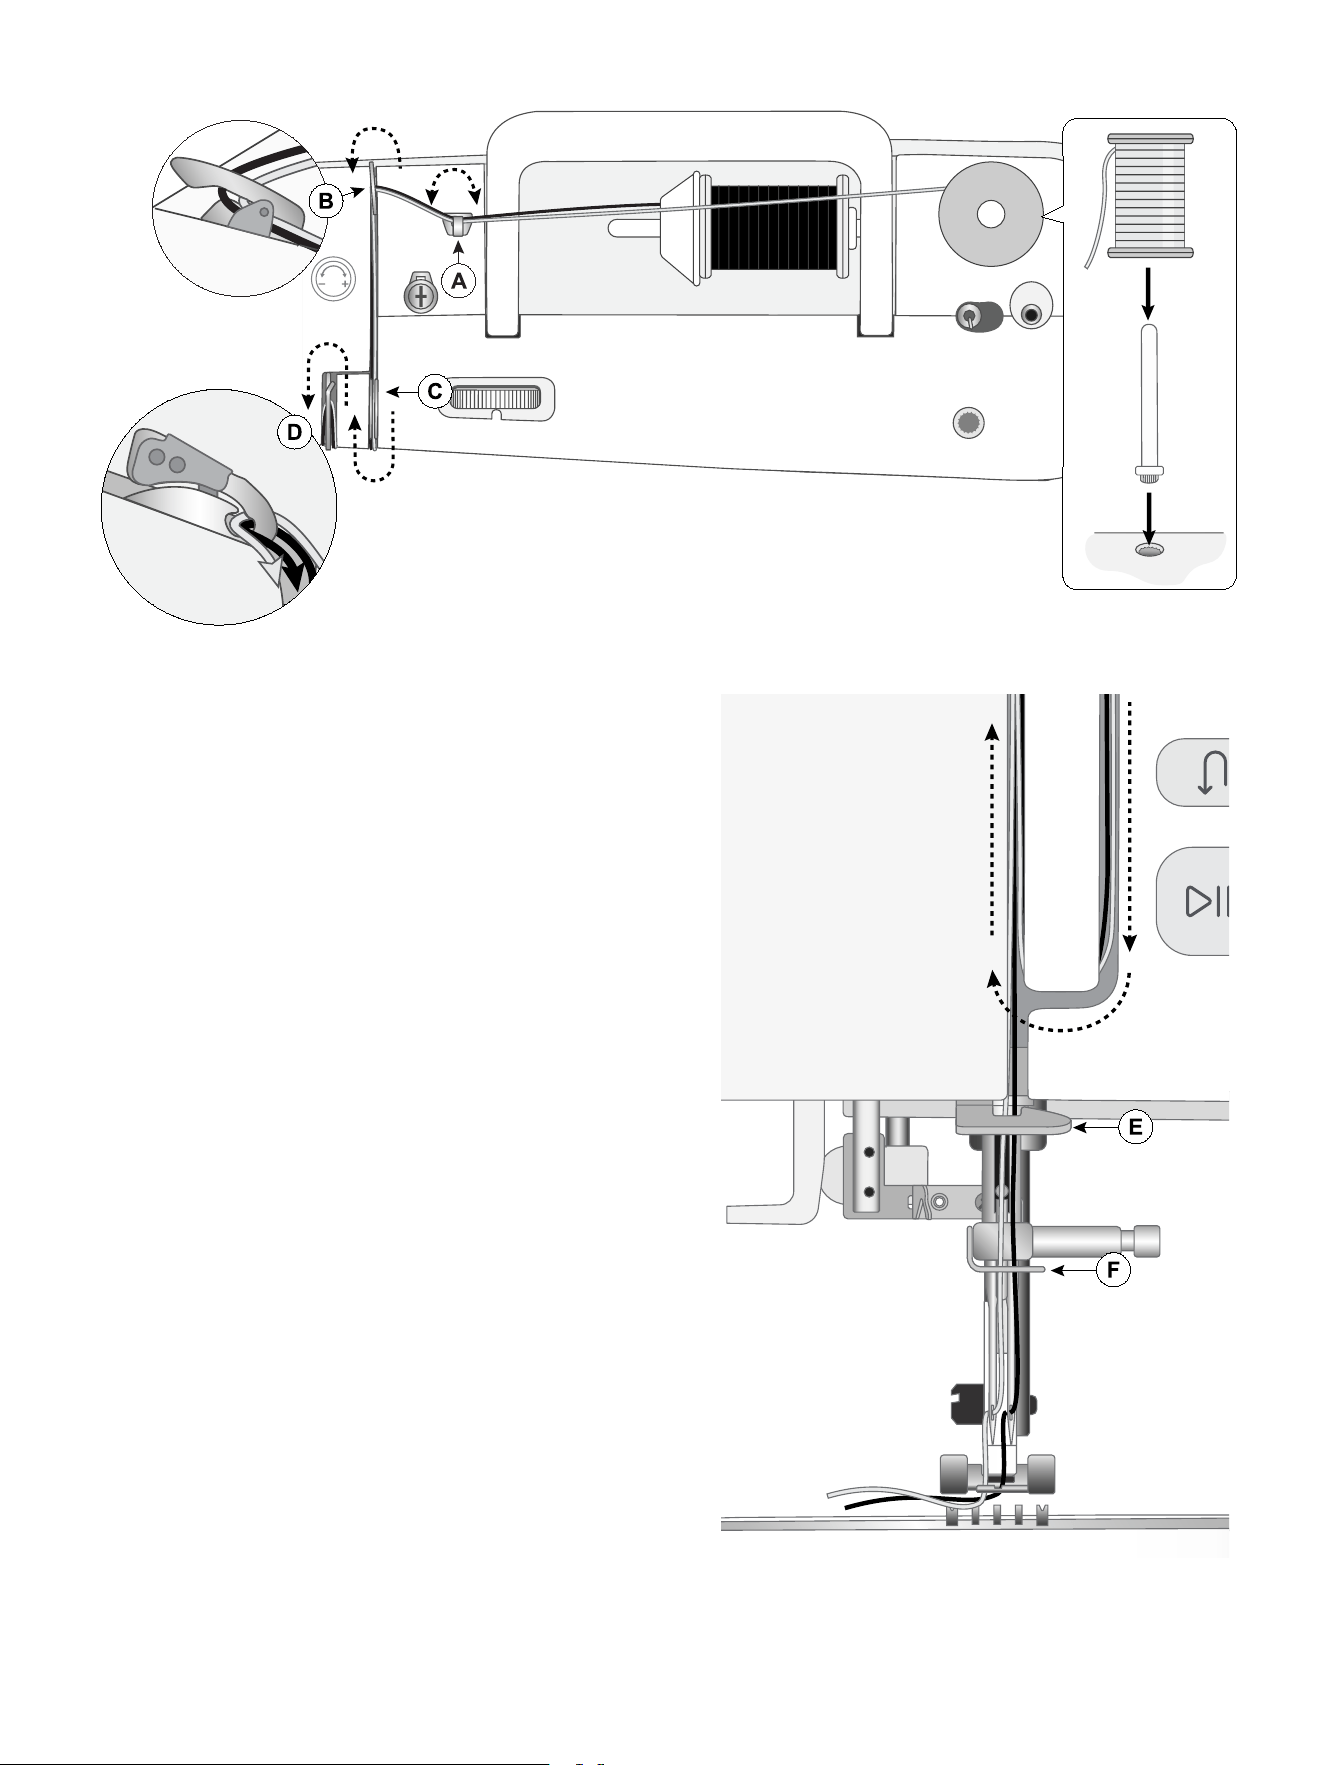
Threading for Twin Needle
Machine from above
Machine from front
Important! Replace the sewing needle with a twin needle.
Make sure the presser foot is raised and the needle is in
its highest position. Press the needle up/down button to
raise the needle.
1. Place the thread spool on the main spool pin and fit a
spool cap of the right size.
Insert the auxiliary spool pin in the rear of the two
holes at the top of the machine. Slide on a thread
spool to the spool pin.
Note: Do not use too large spools on the auxiliary
spool pin, that could affect the thread tension.
2. Hold both threads an floss the threads into the thread
guide (A) from back to the front and thread guide (B)
from back to front. Pull threads together back into
and through threading slot.
3. Pull the threads between the tension discs (C). Make
sure the thread is placed correctly in the tension disk.
4. Continue bringing the threads down through the right
threading slot, around the U-turn, then back upwards
through the left threading slot.
5. Bring the threads from the right into the take-up lever
(D) and down in the left-hand threading slot, from
right to left into the lower thread guide (E) and into
the needle thread guide (F).
6. Thread the needles manually from front to back.
Get Started – 21
English
SEWING
Note: To start sewing, your machine must be connected to the CREATIVATE™ App, since stitch and fabric selection as
well as stitch edits are made through the app.
Stitch Selector
In the Stitch Selector, you select your stitch and adjust its
settings. The stitch is then sent to your machine to be
stitched out. Recommended settings are shown based
on the selected stitch and fabric. The available options
and information may vary depending on the stitch and
fabric selected, allowing you to adjust the stitch for your
project.
Fabric Selection
Start your sewing by selecting the fabric that you will use.
After selecting a fabric, touch your desired stitch and then you will get recommended sewing techniques suitable for
your fabric.
Suggested fabrics for each fabric group you can choose from are listed below.
Note: Some fabrics have excess dye which can cause discoloration on other fabrics or on your sewing machine. This
discoloration may be very difficult or impossible to remove.
Fleece and denim fabric, especially red and blue, often contain excess dye.
If you suspect that your fabric/ready-to-wear garment contains a lot of excess dye, always pre-wash it before sewing/
embroidering to prevent discoloration of your machine.
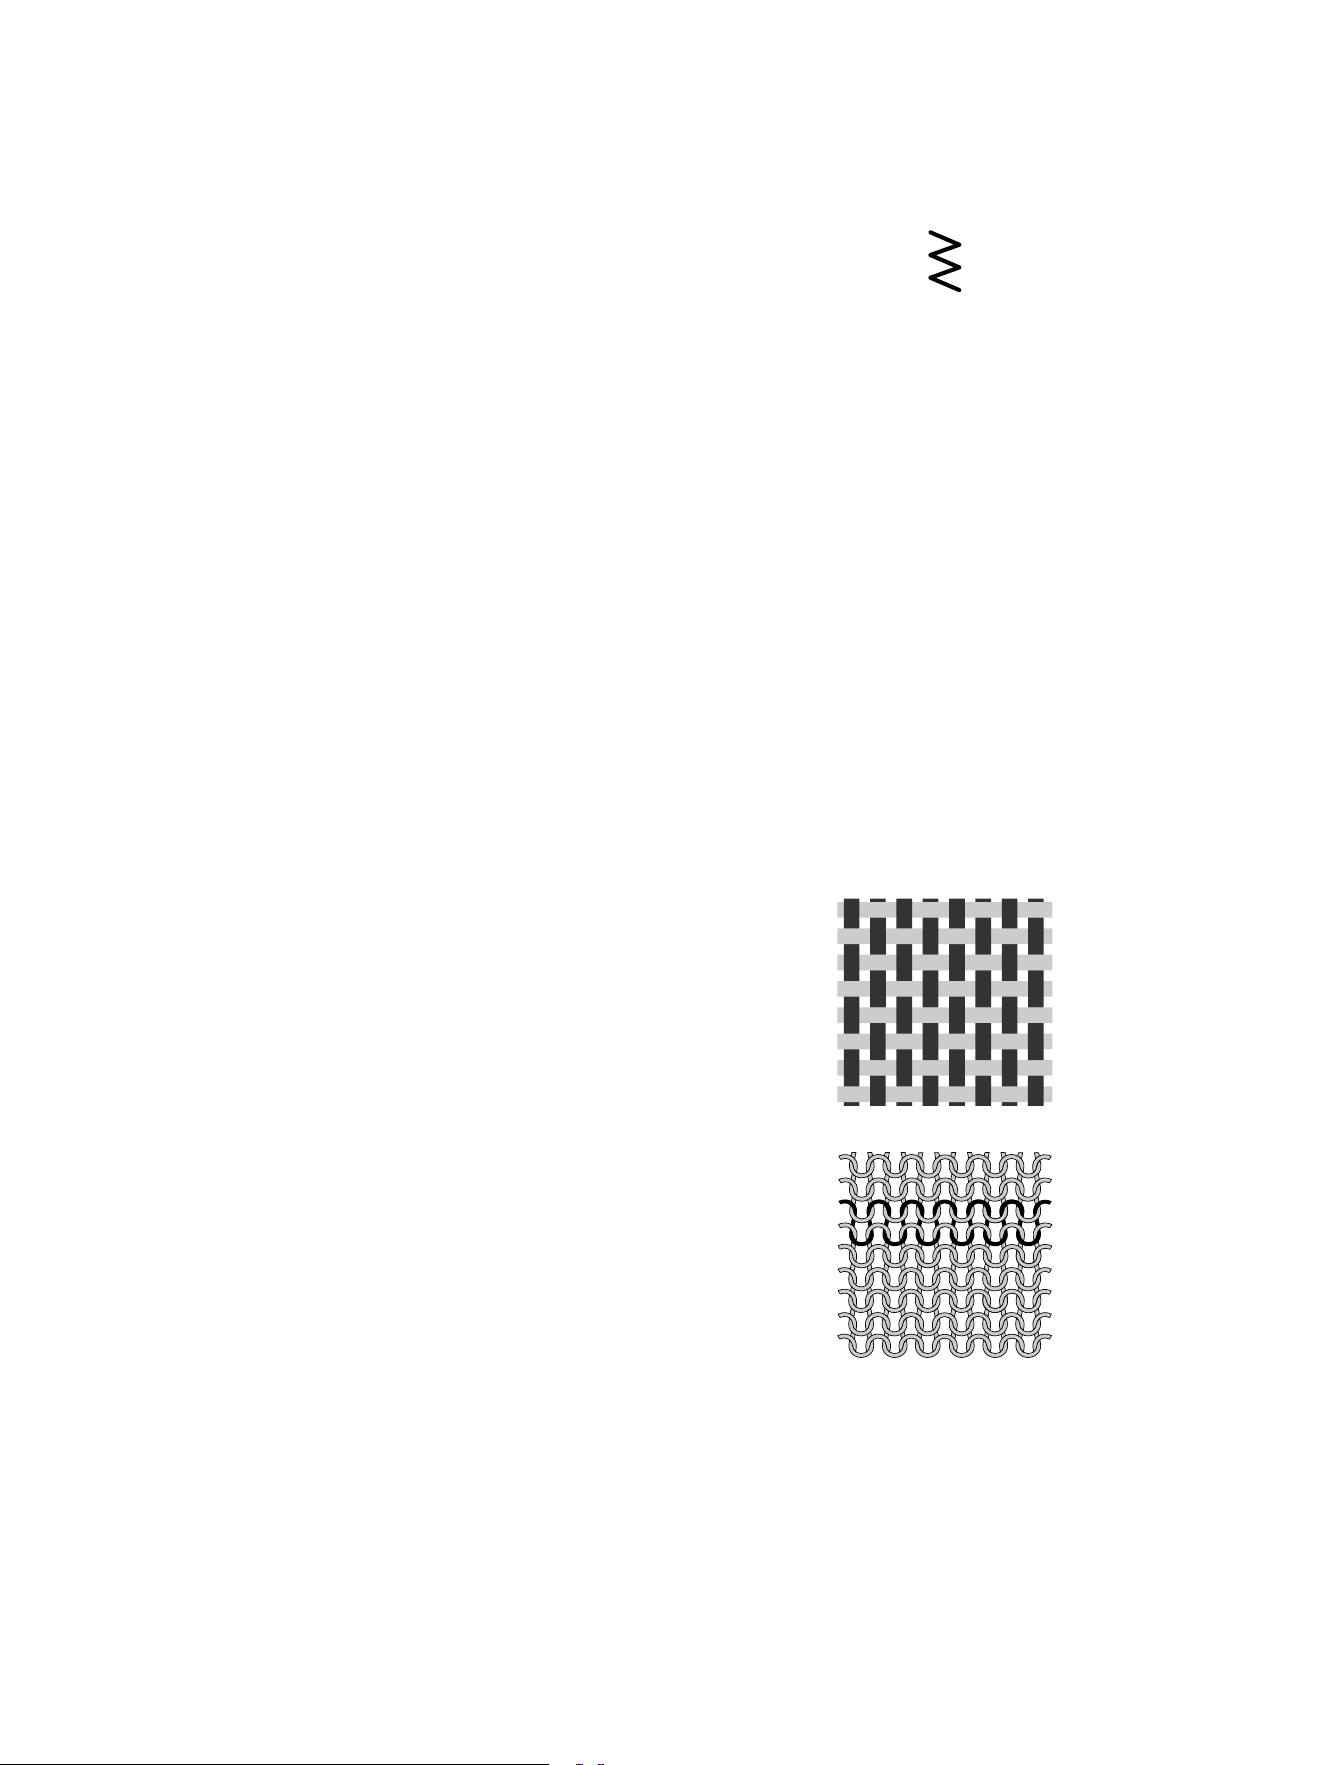
Woven or Stretch (Knit)
The difference between woven and stretch (knit) fabric is the way the threads are put together. Woven fabrics are
made of two thread system, warp lengthwise and weft crosswise, that intersect at right angles. A knit fabric is made of
one thread system with interlaced stitches. A knit fabric usually has stretch.
Woven fabric
WWoovveenn FFaabbrriicc
• WWoovveenn LLiigghhtt:: Chiffon, organza, batiste, challis, crepe
de chine etc.
• WWoovveenn MMeeddiiuumm:: Calico, quilting fabrics, crepe,
broadcloth, velvet etc.
• WWoovveenn HHeeaavvyy:: Denim, tweed, canvas, terrycloth etc.
Stretch fabric
SSttrreettcchh FFaabbrriicc ((KKnniitt))
• SSttrreettcchh LLiigghhtt:: Tricot, single knit jerseys etc.
• SSttrreettcchh MMeeddiiuumm:: Sweater knits, double knit, velour,
swimwear etc.
• SSttrreettcchh HHeeaavvyy:: Sweater knits, fleece etc.
22 – Sewing
English
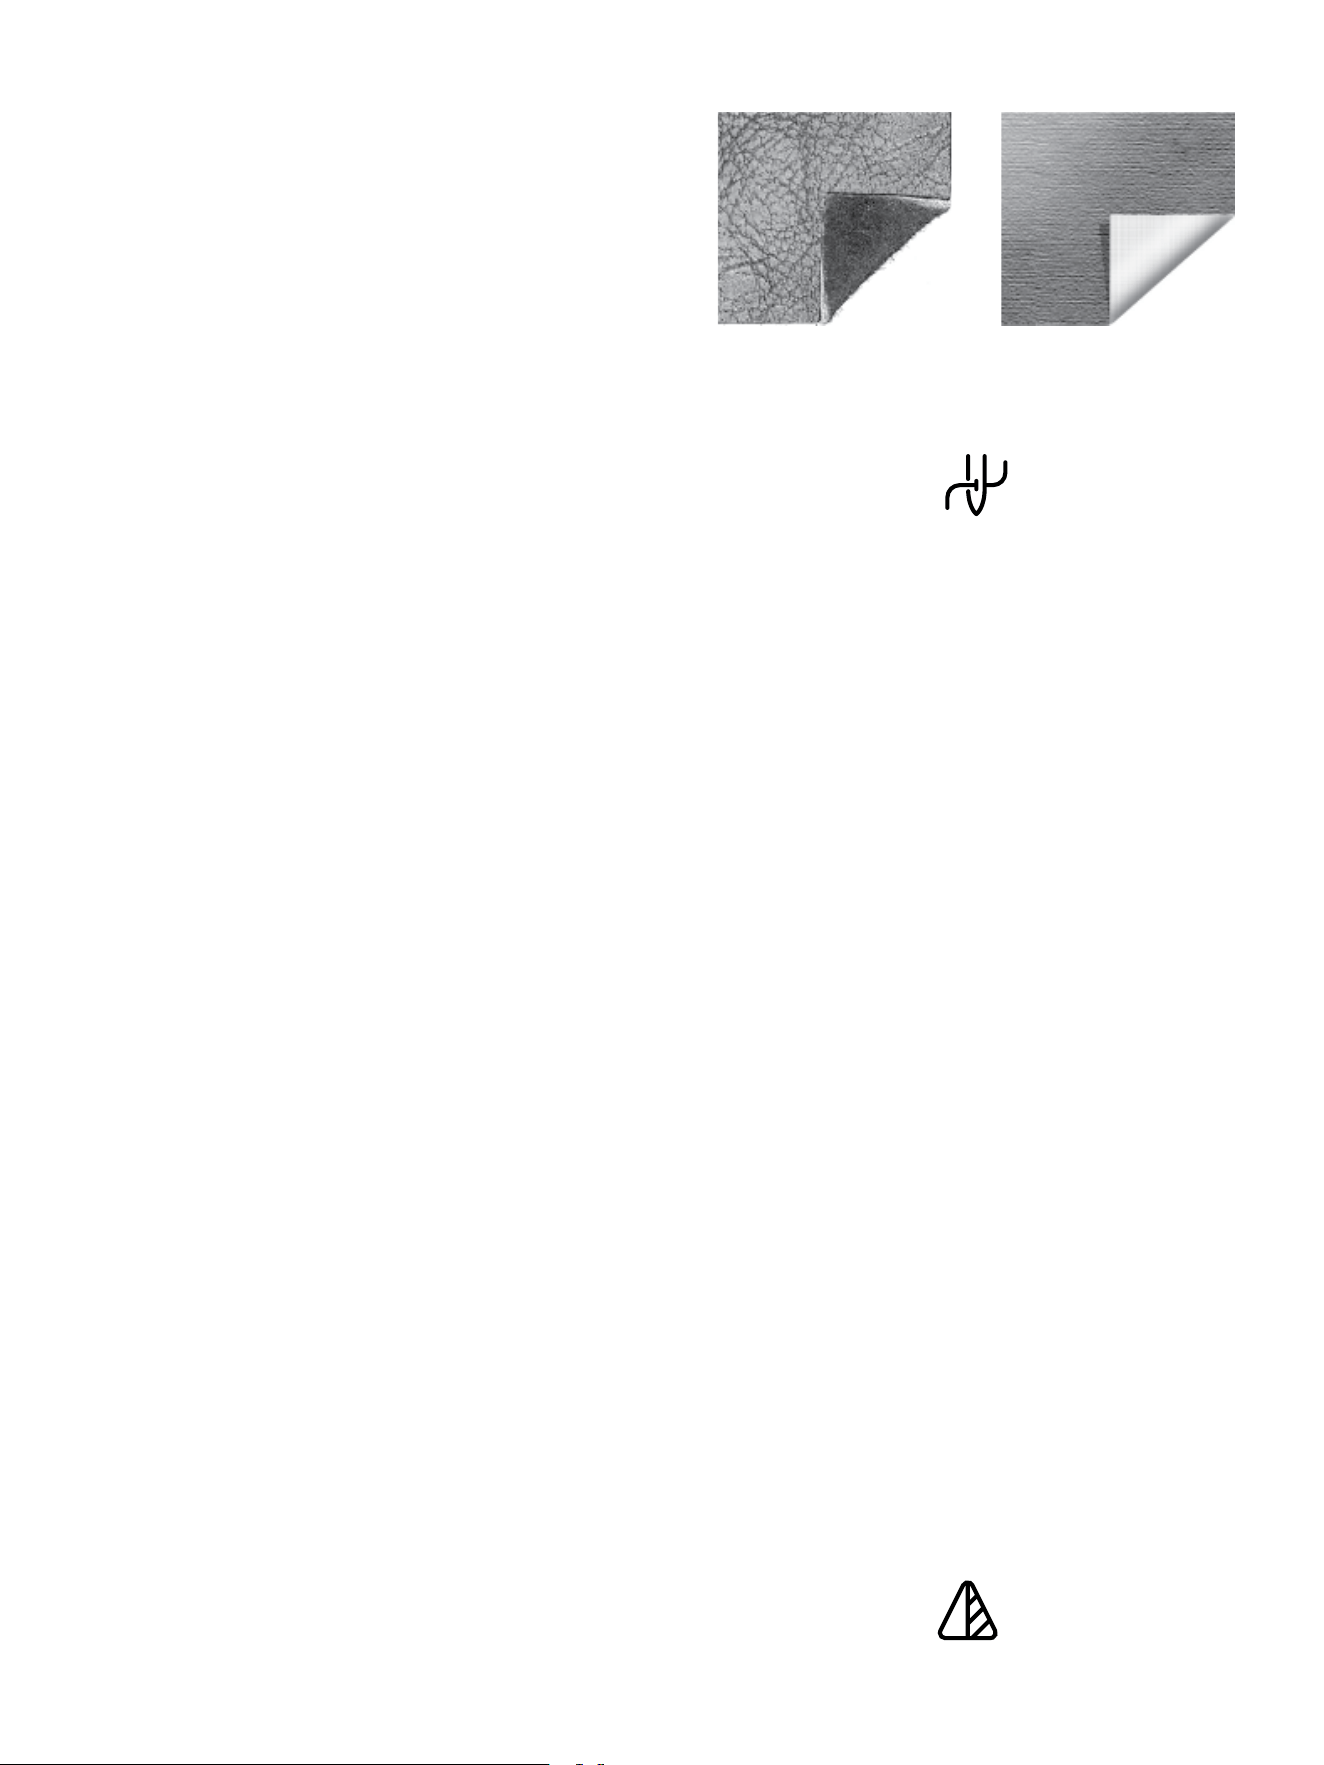
Leather and Vinyl
Leather Vinyl
For suede and leather. Leather is animal skin with the
coat (fur) removed. Leather can be smooth or sueded
and has some give.
For vinyl, faux leather and suede. Vinyl is a synthetic
material which often has a woven wrong side. Vinyl can
be smooth or patterned and some vinyls have stretch.
Load a Stitch
Open the Stitch Selector in the app to browse available
stitches. Stitch categories are shown horizontally. Swipe
to view more categories and select a stitch. A short
description of the selected stitch is shown.
Touch “Select” to open the stitch settings.
Recommended settings are displayed based on the
selected stitch and fabric. Some settings can be
adjusted in the app, and changing the fabric type
updates the settings.
Some settings must be adjusted on the machine, such
as presser foot, needle, thread tension, and stabilizer.
Confirm the settings in the app and make the required
adjustments on the machine.
When the “Ready to Sew” status is shown, the machine is
ready to sew. Settings can be adjusted for the current
stitch at any time.
Note: Stitches that are not compatible with the selected
fabric cannot be selected.
Stitch Settings
Your machine will set the recommended settings for each selected stitch. You can make your own adjustments to the
selected stitch. The changes will only affect the selected stitch and will be reset to default when selecting another
stitch or turning your machine off.
The controls available on the screen will change depending on what stitch or sequence is loaded. The different stitch
settings are described below.
Stitch Width
Decrease or increase the stitch width using – and + in the control in the app. The number shows stitch width in mm/
inch.
Stitch/Needle Positioning
On certain (straight) stitches with a width less than 7 mm it is possible to change the stitch position. Use – to move the
stitch to the left and + to move the stitch to the right. The number shows the needle start position in mm in relation to
center needle position. The machine has a maximum of 29 needle positions (for a straight stitch).
Stitch Length
Increase or decrease the stitch length using + and – in the control in the app. The number above the control shows the
set stitch length in mm/inch. If lengthening a zigzag stitch or a decorative stitch, the entire stitch will be stretched out.
Mirroring
To mirror a stitch or stitch sequence sideways, touch
mirror side to side.
Note: Some stitches e.g. buttonholes cannot be mirrored.
Sewing – 23
English
Save Stitch
You can choose to save your stitch or embroidery files to
the folder. Previously saved designs, stitches, sequences
and/or fonts are shown.
Sewing Techniques
In the CREATIVATE™ app, several basic sewing techniques are described. How to make a buttonhole is unique for this
machine model and is described below.
One-Step Buttonhole
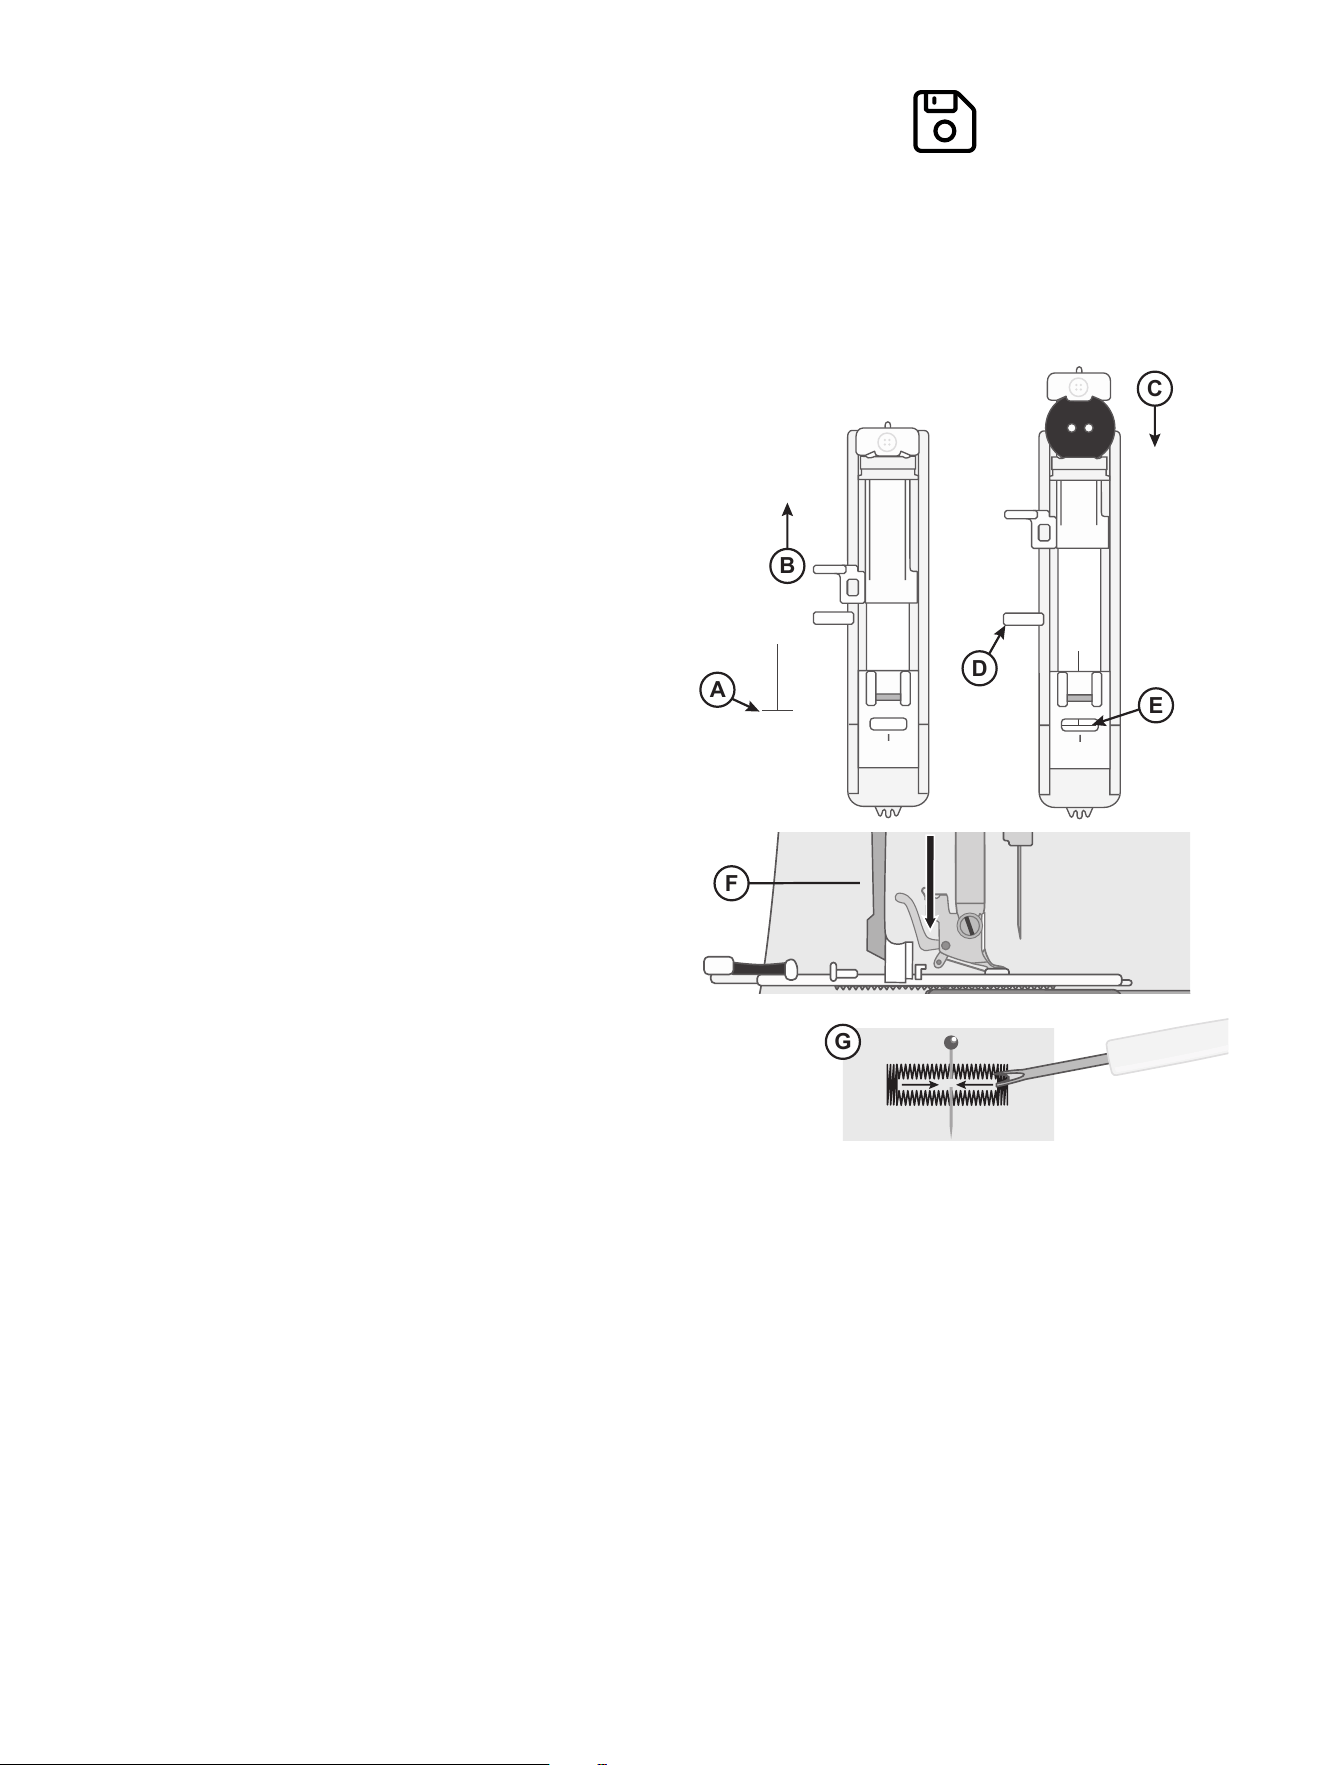
F
B
A
C
E
G
D
Sew buttonholes perfectly sized for your button. The
fabric should be interfaced and/or stabilized where
buttonholes are to be sewn.
1. Mark the start position of the buttonhole on the fabric
(A).
2. On the One-Step Buttonhole Foot, push the button
holder open by pushing the lever backwards (B).
Insert the button. Push the button holder forward until
the button is locked in place (C). The button will
determine the length of the buttonhole. The distance
between the button holder lever (B) and the stopper
(D) is the length of the buttonhole.
3. Attach the One-Step Buttonhole Foot.
4. Make sure that the thread is pulled though the hole in
the presser foot and placed under the foot.
5. Position your fabric under the presser foot so that the
marking on the fabric is aligned with the center of the
Buttonhole Foot (E).
6. Lower the Buttonhole Lever (F) all the way down. The
buttonhole lever should fit between the button holder
lever (B) and the stopper (D).
7. Hold the end of the upper thread and start sewing.
The buttonhole is sewn from the front of the presser
foot to the back. The machine stops automatically
when the buttonhole is finished.
8. Once the buttonhole is finished, raise the presser foot.
Push the buttonhole lever all the way up.
9. To secure the bartack, thread the end of the top
thread into a hand sewing needle, pull to the wrong
side and tie the end before cutting excess thread.
10. Use a seam ripper and cut the buttonhole open from
both ends towards the middle (G).
If you want to sew another buttonhole, do not push the
buttonhole lever up when the buttonhole is finished. Lift
the presser foot, position it for the next buttonhole, lower
the presser foot and sew.
Note: Always sew a test buttonhole on a piece of scrap
fabric.
24 – Sewing
English
EMBROIDERY PREPARATIONS
Note: If the embroidery unit is not included with your machine, it may be purchased separately from your authorized
SINGER® retailer.
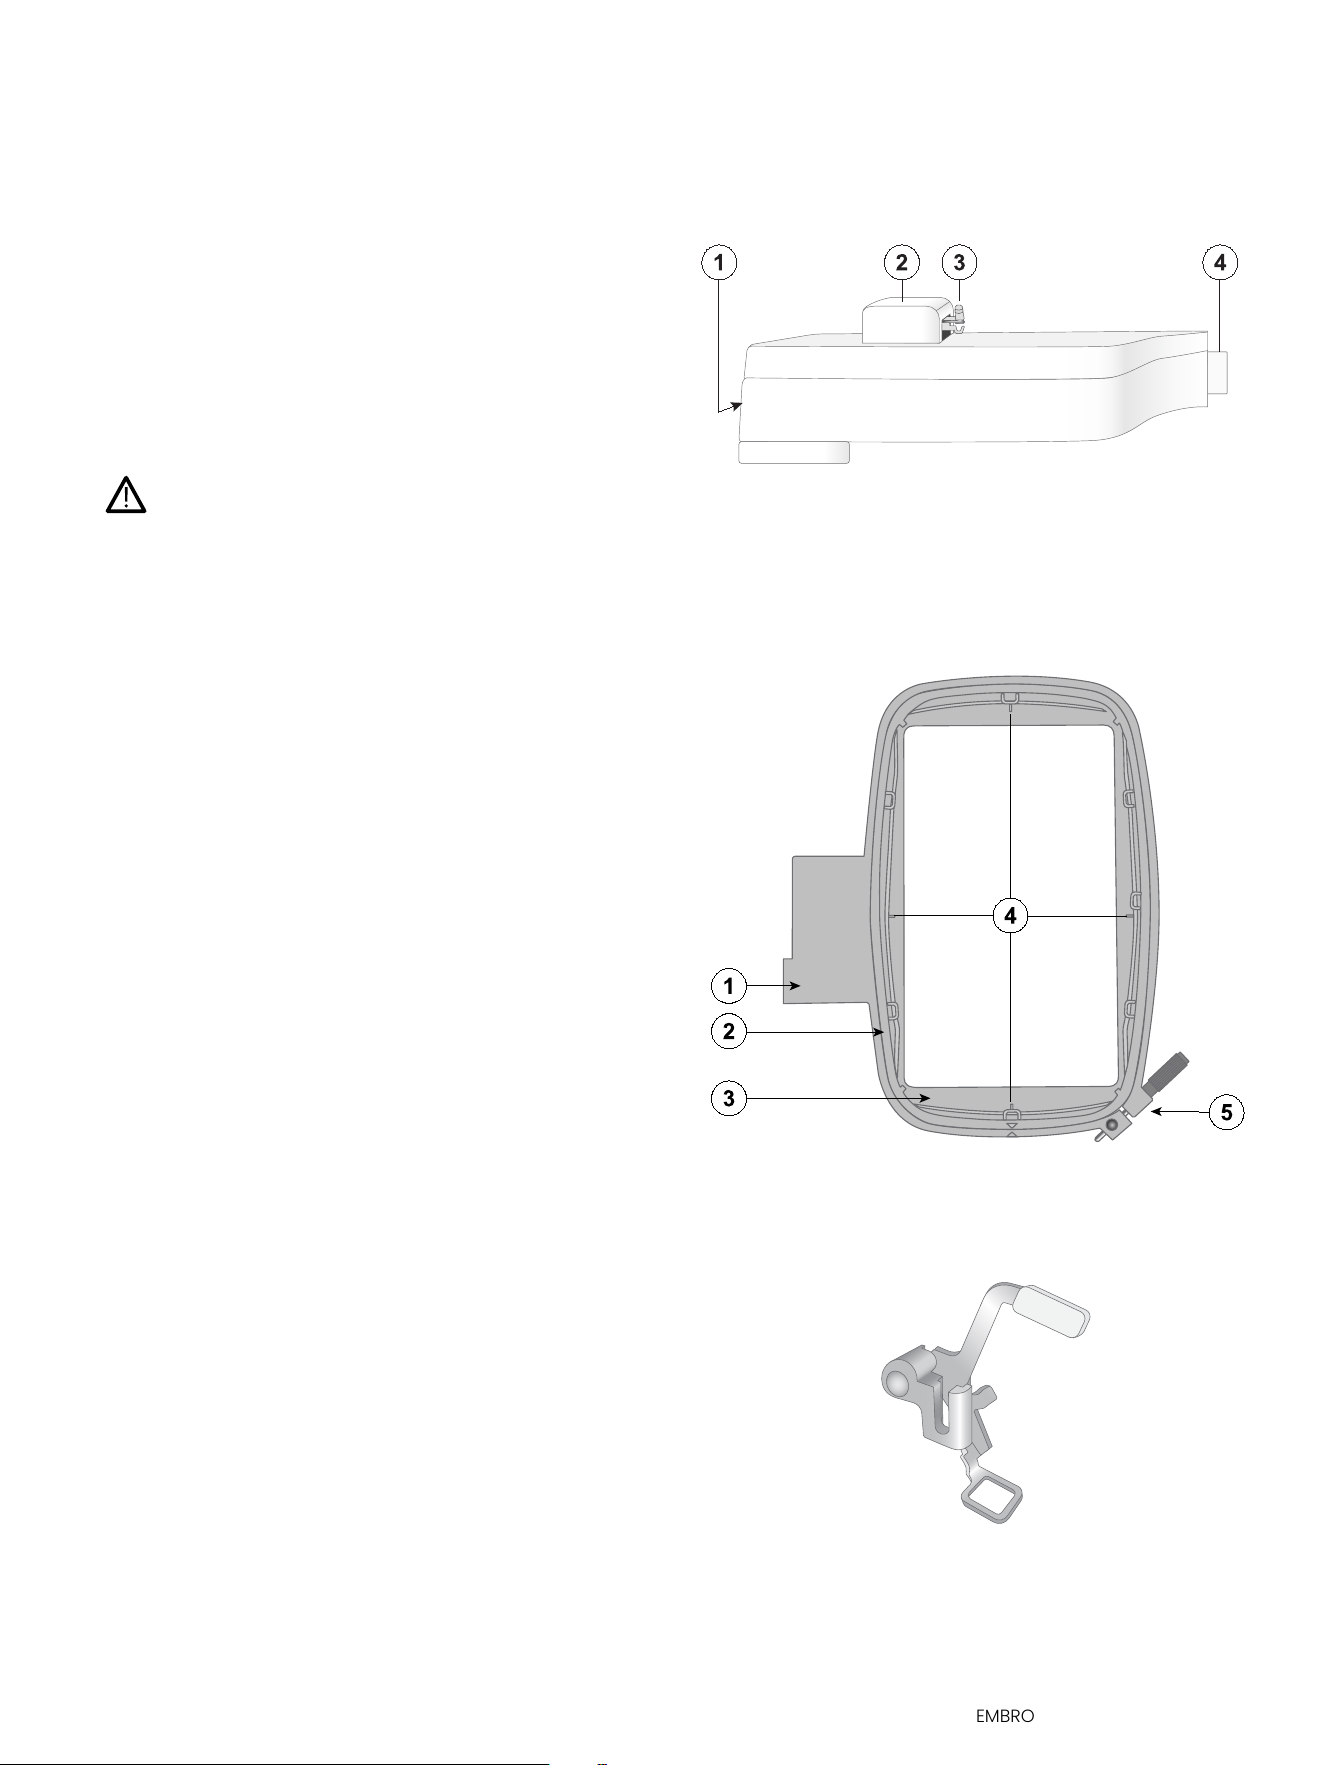
Embroidery Unit Overview
1. EEmmbbrrooiiddeerryy AArrmm — moves the embroidery hoop to
position designs during stitching
2. EEmmbbrrooiiddeerryy HHoooopp AAttttaacchhmmeenntt — secures the
embroidery hoop to the embroidery arm.
3. EEmmbbrrooiiddeerryy UUnniitt PPlluugg — connects the embroidery
unit to the machine.
4. EEmmbbrrooiiddeerryy UUnniitt RReelleeaassee BBuuttttoonn ((uunnddeerrssiiddee)) —
press and hold to detach the embroidery unit from
the machine.
When removing the embroidery unit from the
box for the first time, be sure to remove the
shipping brace at the underside of the
embroidery unit.
Embroidery Hoop Overview
1. Embroidery hoop connector
2. Outer hoop
3. Inner hoop
4. Center marks
5. Retaining screw
Embroidery Foot
The Embroidery Foot is used for hoop embroidery. It
releases the fabric when the needle is in the up position,
allowing the hoop to move freely during stitching.
1
2
3
5
4
EMBROIDERY PREPARATIONS – 25
English
Attach Embroidery Foot
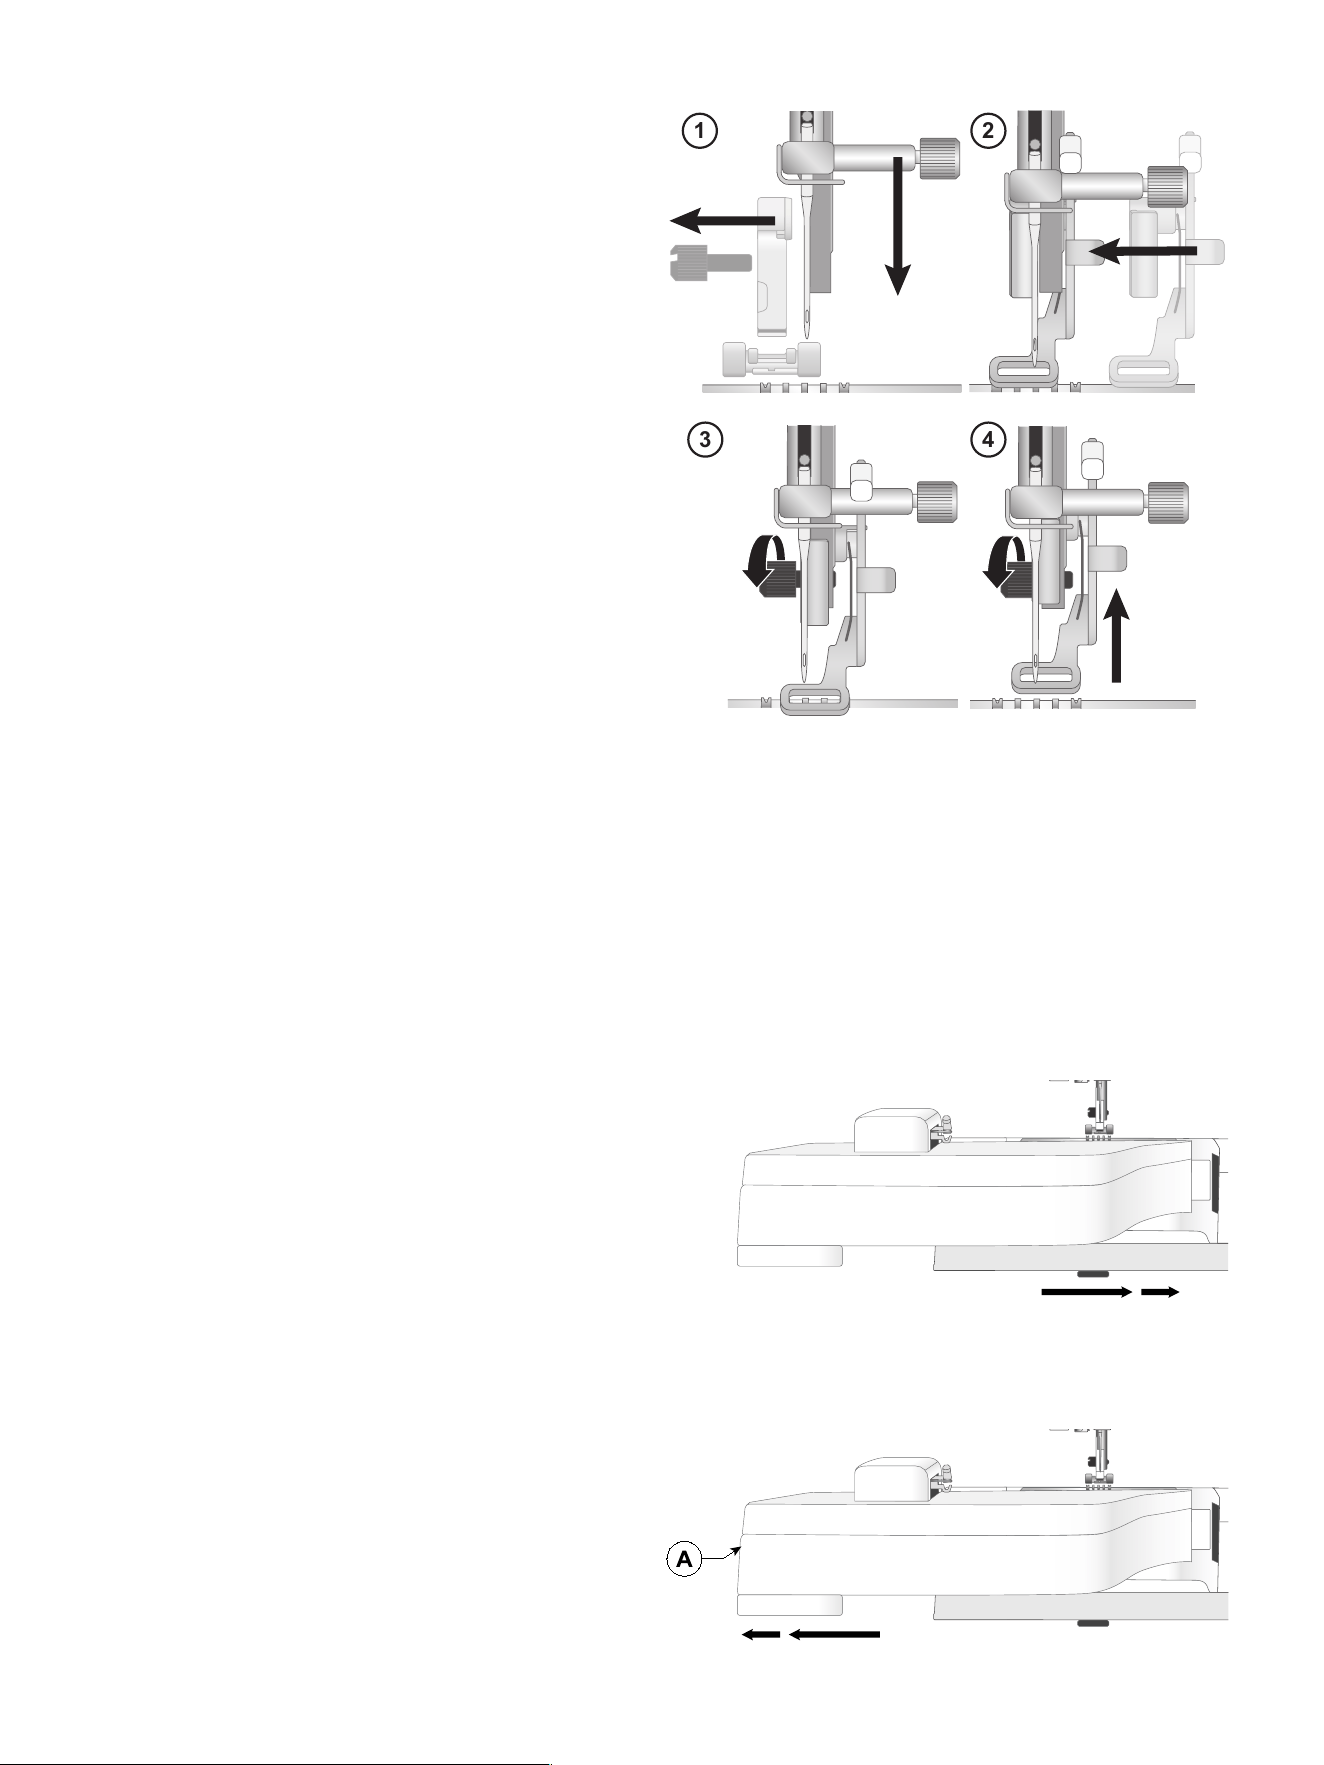
1 2
3 4
1. Remove the presser foot.
Using the screwdriver, loosen and remove the presser
foot ankle screw and ankle.
Lower the needle by turning the handwheel toward
you. Stop when the needle is approximately ⅛"
(3mm) above the needle plate.
2. Place the embroidery foot behind the presser foot bar.
Position the arm of the embroidery foot above the
needle clamp screw. Place the bottom of the foot
under the needle. Push the foot forward and then to
the right to fit it around the presser foot bar.
3. Insert the presser foot ankle screw and turn it a few
turns until the screw is barely visible on the right side
of the presser foot bar.
4. Push the presser foot upward until it meets the screw.
Then fully tighten the presser foot ankle screw.
Embroidery Designs
A variety of embroidery designs are included in the
CREATIVATE™ app for your machine.
All included designs are pictured with information about
stitch count (number of stitches in the design), design
size, a complete color block list as well as information
about special techniques (if applicable).
Attach the Embroidery Unit
1. Slide the accessory tray off.
2. Slide the embroidery unit onto the free arm of the
machine until it plugs firmly into the socket at the
front of the machine.
Remove the Embroidery Unit
1. Press the button at the left, underneath the
embroidery unit (A) and slide the unit to the left to
remove it.
2. Store the embroidery unit in the original packing
material.
26 – EMBROIDERY PREPARATIONS
English

Stabilizers
Stabilizers provide support during embroidery and help prevent puckering, stretching, or distortion. Place the stabilizer
beneath or on top of the fabric before hooping, depending on the type.
The type of stabilizer you choose depends on your fabric and embroidery technique. Always use a stabilizer when
embroidering for best results.
Tear-Away Stabilizers
Tear-away stabilizers are used with stable woven fabrics. Place the stabilizer underneath the fabric before hooping.
Gently remove excess stabilizer after stitching.
Iron-on Tear-Away
Iron-on tear-away is a more stable stabilizer that has a slick side that will iron on to fabric. It is recommended for knits
and all unstable fabrics. Fuse it to the wrong side of the fabric before hooping. Tear away excess stabilizer after
stitching.
Cut-Away Stabilizer
Cut-away stabilizer does not tear so the excess has to be cut away. It is recommended for hoop embroidery on knits
and all unstable fabrics. Place the stabilizer underneath the fabric before hooping.
Water Soluble Stabilizer
Water soluble stabilizer is placed on top of the fabric when embroidering napped and looped fabrics such as terry
cloth.
When embroidering cutwork, use it underneath the fabric. Place your work in water to dissolve the excess stabilizer. It is
available in different thicknesses.
Heat Soluble Stabilizer
Disintegrating stabilizer is a stable, loosely woven fabric that is used for techniques such as cutwork and to embroider
off the fabric edge
The stabilizer disappears with heat from an iron.
Sticky Stabilizer
Sticky stabilizer is used for hoop embroidery when the fabric is too delicate or too small to be hooped. Hoop the sticky
stabilizer with the paper side up.
Remove the paper and stick the fabric onto the sticky surface. Gently remove sticky stabilizer.
EMBROIDERY PREPARATIONS – 27
English
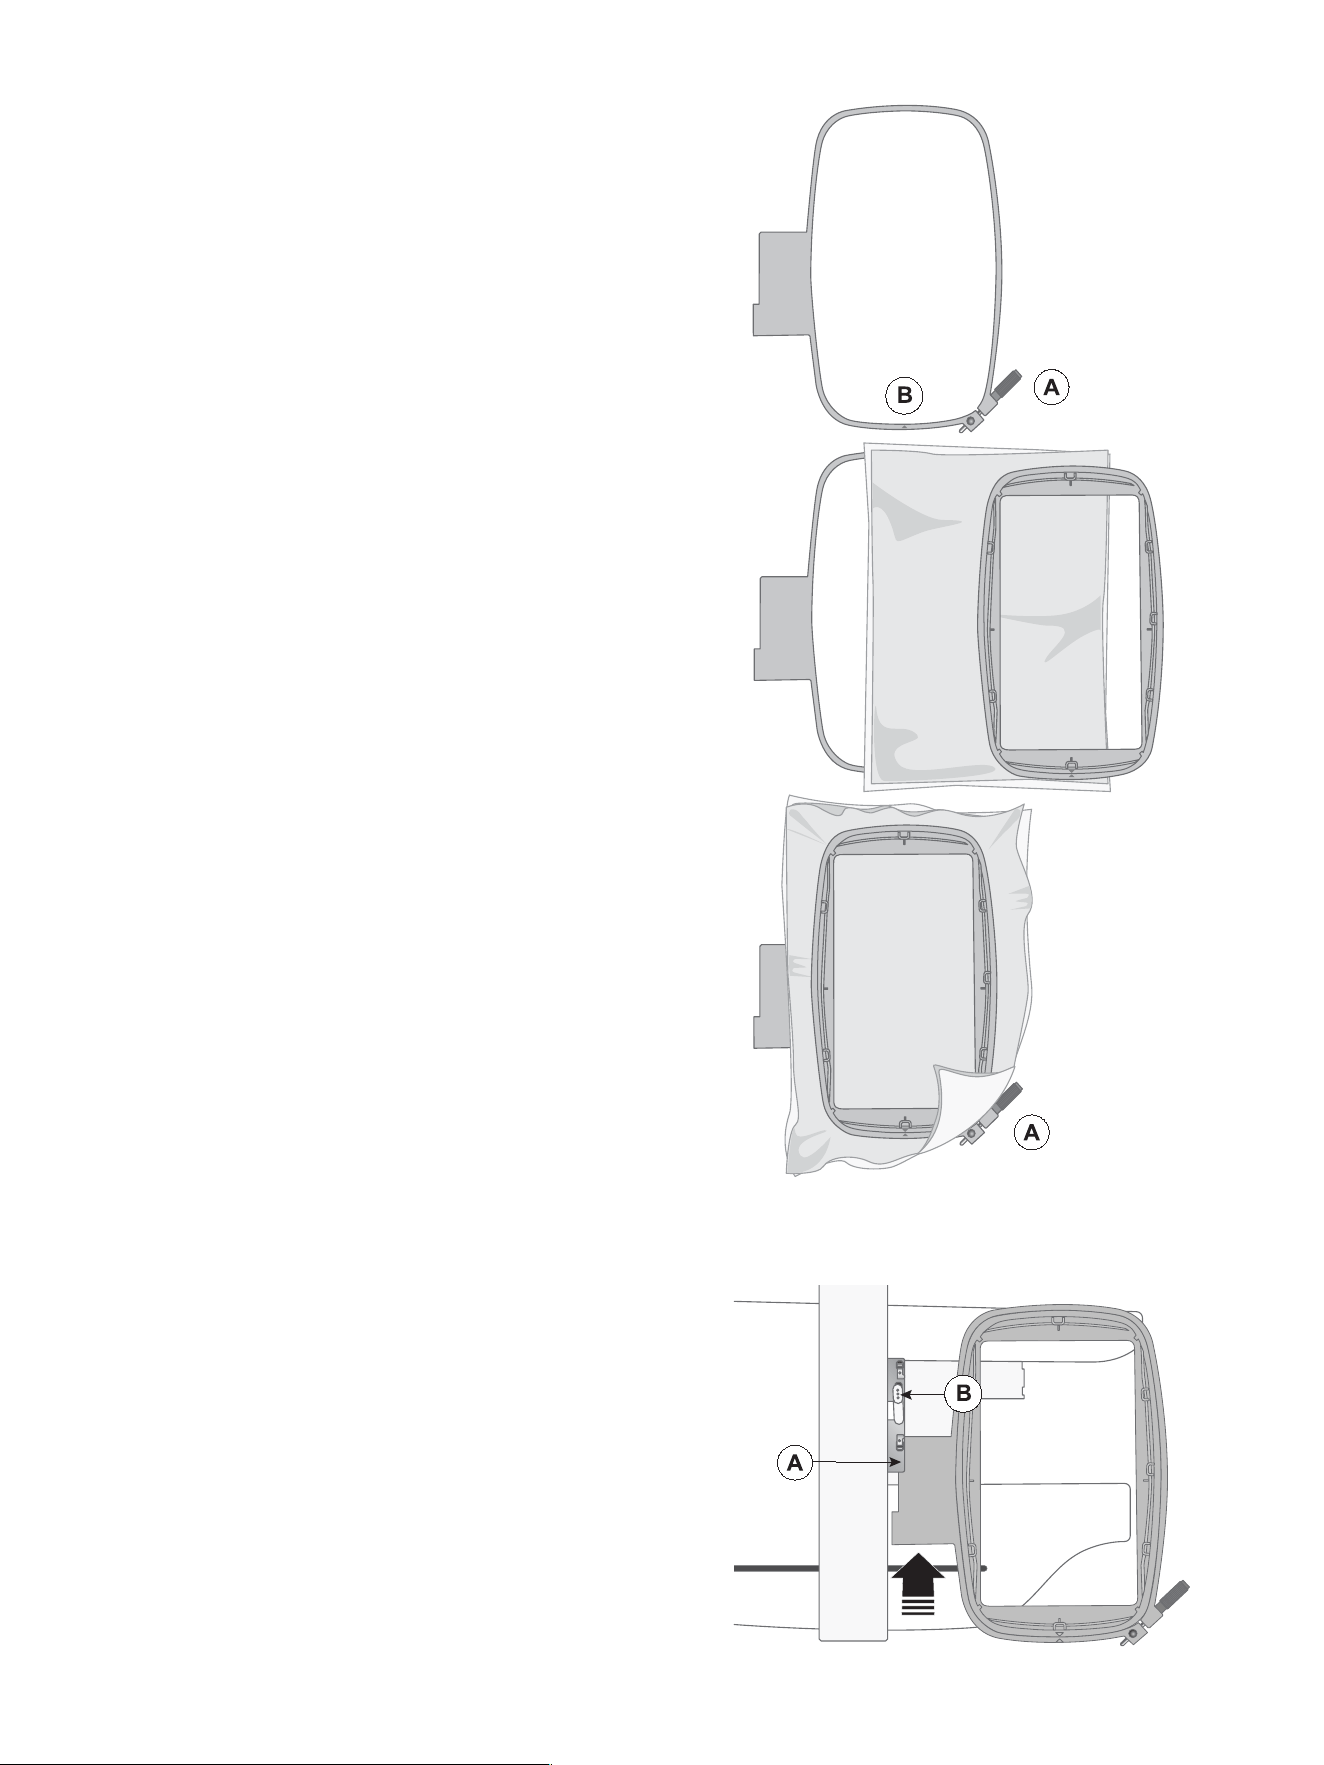
To Hoop the Fabric
For the best embroidery results, place a layer of stabilizer
beneath the fabric. When hooping stabilizer and fabric
make sure that they are smooth and securely hooped.
1. Loosen the screw (A) on the larger outer hoop.
Remove the inner hoop. Place the outer hoop on a
firm flat surface with the screw on the lower right.
There is a small arrow in the center of the lower edge
of the hoop (B) which will line up with a small arrow
on the inner hoop.
2. Place the stabilizer and fabric, with the right sides
facing up, on top of the outer hoop. Place the inner
hoop on top of the fabric with the small arrow at the
bottom edge. If you can see the hoop size in the
lower part of the inner hoop, you have attached it
correctly.
3. Push the inner hoop firmly into the outer hoop.
4. Tighten the hoop screw (A). The fabric should be taut
in the hoop for the best results.
Note: Be sure to loosen the hoop screw enough for the
fabric and stabilizer thickness so you can easily push the
inner hoop in place. Push in on the sides of the inner
hoop to be sure both hoops are even.
Attach/Remove the Hoop
1. Slide the hoop connector into the hoop attachment
(A) from front to back until it clicks into place.
2. To remove the hoop from the embroidery arm, press
and hold the grey button (B) on the hoop attachment
and slide the hoop towards you.
28 – EMBROIDERY PREPARATIONS
English

EMBROIDERY EDIT
Note: To start your embroidery project, your machine must be connected to the CREATIVATE™ App, as all embroidery
functions are controlled through the app.
In embroidery mode you can adjust, combine, save and delete designs, stitches and fonts.
You can edit your design combinations without having the embroidery unit connected to your machine. The loaded
design(s) are shown in the embroidery area.
Select Hoop
A list is shown with hoop choices, including hoops that
are available to purchase from your authorized SINGER®
retailer.
Touch one of the hoops in the hoop size list to select the
correct hoop size. Touch Select to confirm.
Load a Design
Three tabs are available at the top of the Design Selector.
Vault shows your personal CREATIVATE™ cloud storage,
where you can save and access your own designs
across devices.
Design Catalog gives you access to the full library of
embroidery designs available through CREATIVATE™,
which can be browsed, filtered, and downloaded to your
machine.
Device shows any compatible design files stored locally
on your mobile device. Swipe to browse within each tab.
Touch a design to select it. At the bottom of the screen,
the design dimensions, total stitch count, and number of
color blocks are shown for the selected design. Touch
Select to load the design into the embroidery area,
where it will be placed in the center of the hoop.
Embroidery Text
Text can be created with embroidery fonts and stitch
fonts. If you select a font the embroidery text keyboard
will open. Embroidery text allows you to create and edit
text using embroidery fonts. You can type your text using
the on-screen keyboard, change the font and size, and
add or delete individual letters within an existing text. Text
shaping is also supported, allowing your text to follow a
shaped path, which can be resized to your preference.
Position and Size
Use the Position and Size tabs to adjust the design's
thread colors, placement, and dimensions within the
hoop. These tabs are available when a design is selected.
Touch outside the design to deselect it when you are
done editing.
Cut/Copy and Paste
Cut removes the design from the embroidery area and
places it on the clipboard, ready to be pasted elsewhere.
Copy keeps the original design in place and creates a
copy on the clipboard. Paste places the clipboard
content into the embroidery area. These options are
available on long press of the design.
EMBROIDERY Edit – 29
English
Delete
Delete removes the selected design permanently from
the embroidery area. This option is available when a
design is selected.
Duplicate
Duplicate creates an identical copy of the selected
design and places it directly in the embroidery area
alongside the original. This option is available when a
design is selected.
Edit Colors
It is possible to select multiple color blocks at once to change thread colors. You can select individual blocks, all blocks
at once, or all blocks sharing the same color. Selected color blocks are highlighted, while unselected blocks are greyed
out in the embroidery area.
Scale
With the scale function, you can increase or decrease the size of the selected design without changing the number of
stitches. The current width and height of the design are shown in millimeters. Touch the Undo button to return the
design to its original size. This option is available when a design is selected.
Mirror Side to Side
To mirror a design horizontally, touch the mirror side to
side button.
Send Design to Machine
Embroidery designs are sent from the app to the
machine. Touch Send to Machine and select your
machine from the list. The design is then sent to the
machine and is ready to sew.
Note: The machine must be connected to the app to
send designs.
Stitch-Out Setup and Adjustments
In Embroidery Stitch Out, you can follow the progress of your embroidery as it stitches out. Before beginning, you can
make adjustments to your design such as moving and rotating. Make sure the machine is threaded with the correct
thread before you start. When you are ready, press the solid green Start/Stop button on the machine to begin stitching
Machine Setup for Embroidery
The app guides you through the following steps to prepare the machine for embroidery.
1. Attach the embroidery unit to the machine ( Attach the Embroidery Unit).
If the unit is successfully connected, the app proceeds automatically. If not, attach it securely and touch Try Again.
2. Touch Start Calibration and press Start/Stop on the machine to begin.
Make sure no hoop is attached during calibration.
3. When calibration is complete, attach the hoop ( Attach/Remove the Hoop).
Hoop detection is confirmed automatically before stitching out begins.
Once all steps are complete, the machine is ready to stitch out!
Note: Make sure the embroidery area is clear before starting calibration.
30 – EMBROIDERY Edit
English
EMBROIDERY STITCH OUT
In Embroidery Stitch Out, you can follow the progress of your embroidery as it stitches out. Before beginning, you can
make adjustments to your design such as moving and rotating. You can also do a corner check and basting. Make
sure the machine is threaded with the correct thread before you start. The app guides you through each thread color
change and displays your progress along the way. When you are ready, press the Start/Stop button on the machine to
begin your embroidery.
Adjustments
Touch the Adjustments tab to move, rotate, do a corner
check, activate basting, or access hoop positions before
or during stitch out. Use the on-screen controls to
reposition the design within the hoop. Touch outside the
design when you are satisfied with the placement.
Corner Check
Use corner check to verify the position of the design in
the hoop before stitching out.
The embroidery arm moves to each corner of the design
area so you can confirm the design is correctly placed
within the hoop.
Basting
Basting secures the fabric to the stabilizer before
stitching out begins. This is especially useful when the
fabric cannot be hooped directly, or when embroidering
on stretchy fabrics.
Touch the basting icon to activate basting. You can
choose to add a basting stitch around the design area,
around the hoop area, or both.
Hoop Positions
Touch Hoop Positions to move the embroidery arm to a
specific position. Hoop positions are only available when
the machine is idle or paused.
Current Stitch
Touch Current Stitch to move the hoop so that the needle is centered over the current stitch position. Use this to verify
placement or to resume stitching accurately after a pause.
Trim
Touch Trim to move the hoop towards you for easy access when trimming threads. The hoop remains in the trim
position until you resume embroidery or select another position.
Center
Touch Center to move the hoop to the center of the
embroidery area. Use this when removing the hoop from
the embroidery unit or when changing the bobbin.
Park
Touch Park to move the embroidery arm to the park position for safe removal and storage of the embroidery unit.
Note: Remove the hoop before selecting Park Position.
EMBROIDERY STITCH OUT – 31
English

Color Blocks
All colors in the loaded design(s) are shown in the order
they will be embroidered with thread color blocks.
The Color Block tab shows the color queue, which
displays the upcoming thread colors in stitching order.
The current color block is highlighted.
Open the go to stitch / color change to activate the next
or previous color block in the color block list by touching
a different color block.
Note: Your current stitch position will be lost when
jumping to a different color block.
Load Next Thread
When a color block is complete, the machine stops automatically and a pop-up appears prompting you to load the
next thread color.
Thread the upper thread with the color shown and press Start/Stop on the machine to continue stitching.
Return To Embroidery Edit
Touch the back arrow to return to Embroidery Edit and
make adjustments to your design, a pop-up message
will appear asking you to confirm. Note that any changes
made in Embroidery Stitch-Out will be lost.
Finishing and Removing the Embroidery
When the embroidery is finished, the machine stops automatically. Raise the presser foot lever and cut the threads
close to the fabric. Remove the hoop from the machine by releasing the hoop clamp and sliding the hoop off the
embroidery arm.
Remove the fabric from the hoop by loosening the outer hoop screw and separating the inner and outer hoop.
Carefully remove the excess stabilizer from the back of the fabric. If using cut-away stabilizer, trim the excess stabilizer
close to the embroidery with scissors.
Turn the fabric over and inspect the embroidery from the front. Trim any loose or excess threads close to the fabric on
both the front and back. If needed, press the embroidery from the back using a pressing cloth to protect the design.
32 – EMBROIDERY STITCH OUT
English
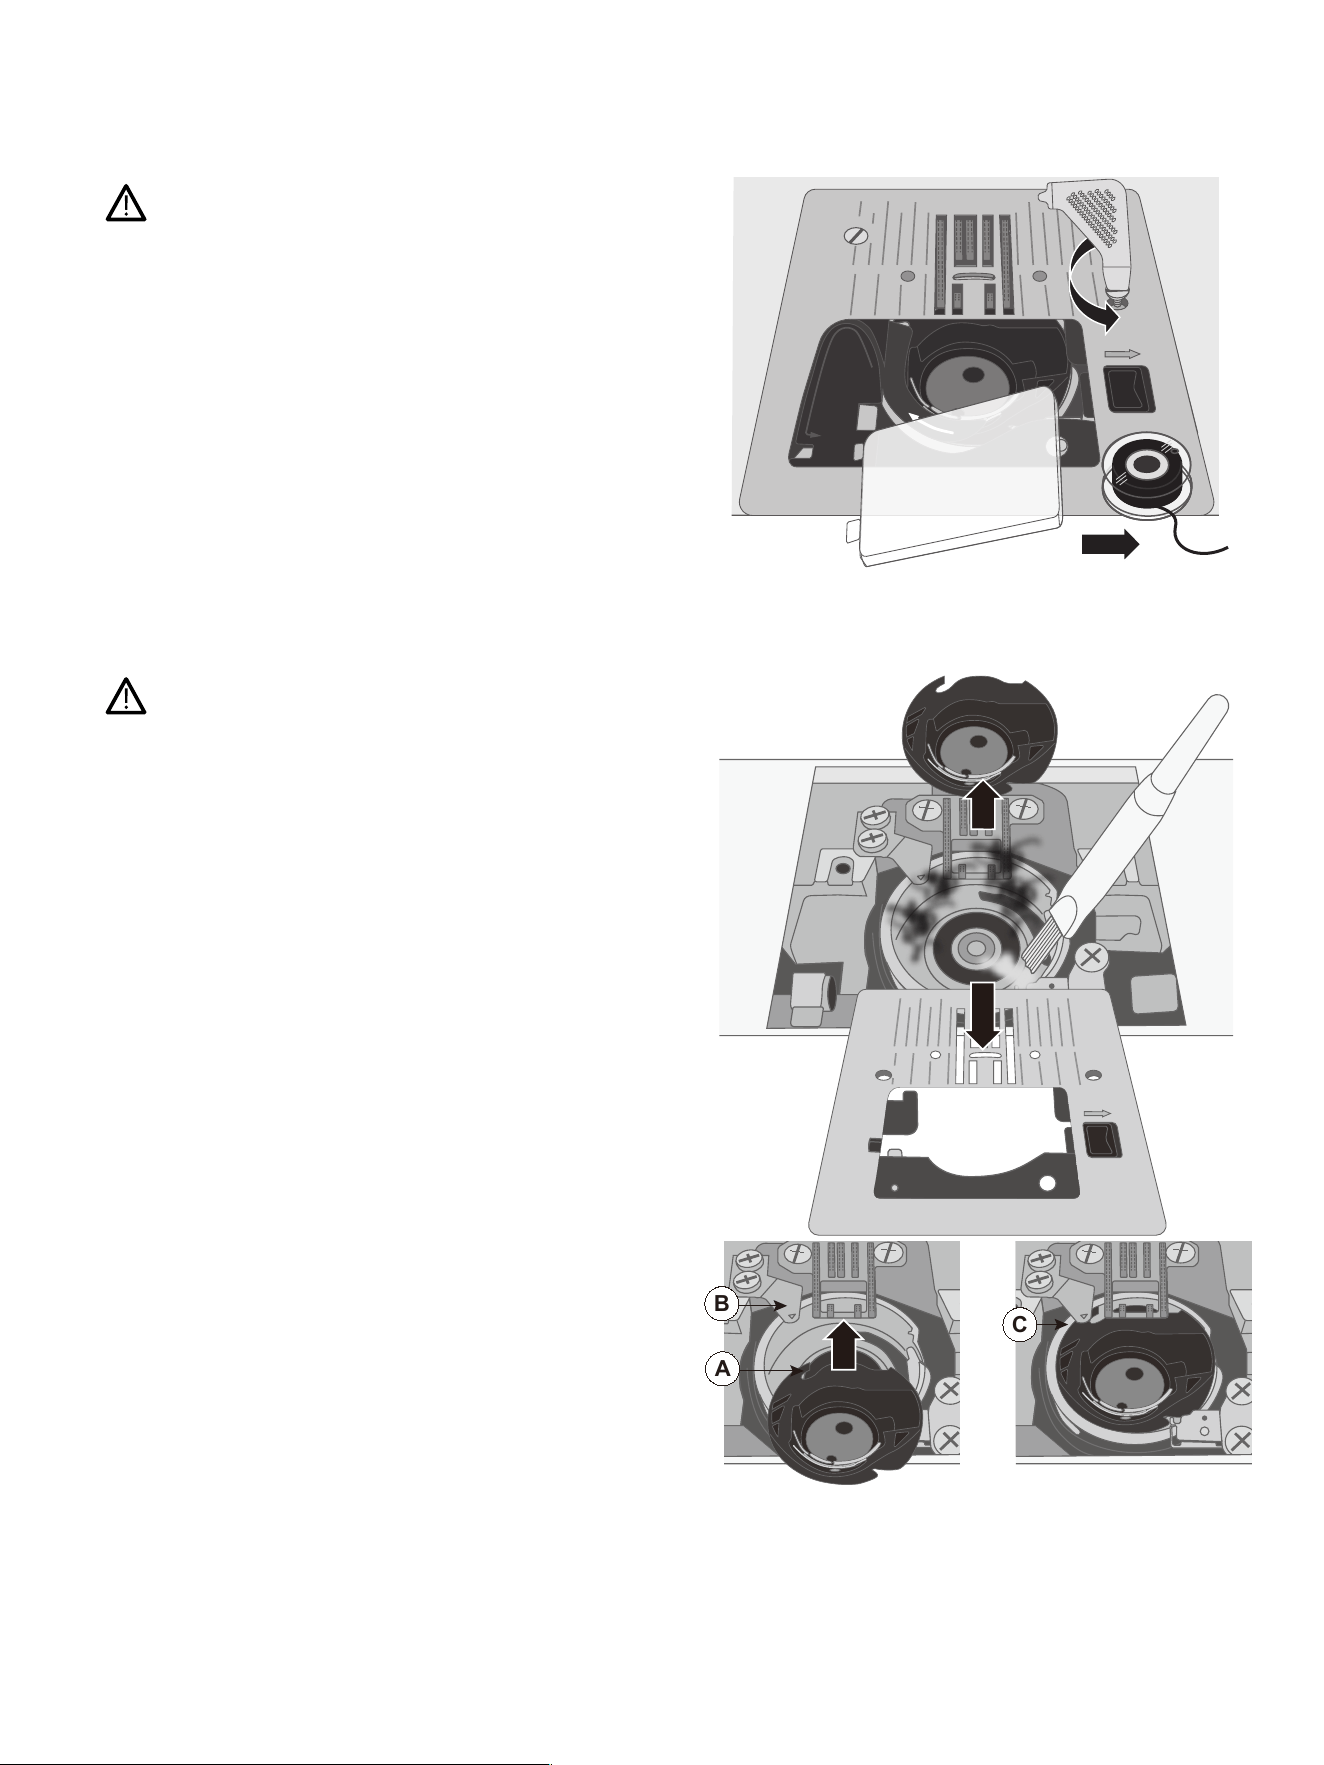
MAINTENANCE
Cleaning the Bobbin Area
Raise the needle and turn off the machine.
Remove the presser foot. Slide off the bobbin cover and
remove the bobbin.
Remove the screws in the needle plate by using the L-
screwdriver. Lift up and remove the needle plate.
Clean the feed teeth and the bobbin area with the brush
found among the accessories.
Place the needle plate over the feed teeth, replace and
tighten the screws.
Attach the presser foot, insert the bobbin and replace
the bobbin cover.
Cleaning under the Bobbin Area
Raise the needle and turn off the machine.
Clean the area under the bobbin case after sewing
several projects or any time you notice an accumulation
of lint in the bobbin case area.
Remove the presser foot. Slide off the bobbin cover and
remove the bobbin.
Remove the screws in the needle plate by using the L-
screwdriver. Lift up and remove the needle plate.
Remove the bobbin case by lifting it up. This is easier if
you push it slightly to the left or right as you lift.
Clean the area with the brush or with a dry cloth.
Note: Do not blow air into the bobbin case area. The dust
and lint will be blown into your machine.
Guide the “forked” end of the bobbin case (A) under the
bobbin case holder (B) and under the feed teeth. Move
the bobbin case slightly from right to left until it slips
correctly into the hook race (C). To make sure the bobbin
case is properly replaced, turn the handwheel towards
you. The hook race (C) should rotate freely in a counter-
clockwise direction.
Place the needle plate over the feed teeth, replace and
tighten the screws.
Attach the presser foot, insert the bobbin and replace
the bobbin cover.
A
B
C
Maintenance – 33
English

Troubleshooting
Thread Loops on Underside of Fabric
PPoossssiibbllee ccaauussee:: Thread looping on the underside of the fabric is always an indication that the upper thread is
not correctly threaded. This happens when the upper thread is not correctly placed in the
thread tension mechanism and has not been threaded through the take up lever.
SSoolluuttiioonn:: Rethread the machine, making sure to first raise the presser foot lifter before starting to thread,
so thread can be properly seated in the tension mechanism and take up lever. To know if you
have rethreaded the machine correctly, try this test:
• Raise the presser foot lifter (page 12) and thread the top of the machine (page 19).
• Thread the needle, but don't put the thread under the presser foot yet. As you pull the upper
thread to the left, it should pull freely.
• Put the presser foot lifter down. As you pull the upper thread to the left, you should feel
resistance. This means you are threaded correctly.
• Put the thread under the presser foot, and then draw up the bobbin thread. Slip both thread
tails under the presser foot towards the back. Lower the presser foot and begin sewing.
If you put the presser foot lifter down, but the thread still pulls freely (you feel no difference
whether the presser foot is up or down), this means that you have threaded incorrectly. Remove
the upper thread and rethread the machine.
Bobbin Thread Breaking
PPoossssiibbllee ccaauussee:: Bobbin threaded incorrectly.
SSoolluuttiioonn::
Check that bobbin is placed correctly in the bobbin holder (page 18).
PPoossssiibbllee ccaauussee:: Bobbin wound too full or unevenly.
SSoolluuttiioonn:: Bobbin thread may not have been correctly placed into bobbin winding tension disc during the
bobbin winding process (page 18).
PPoossssiibbllee ccaauussee:: Dirt or lint in bobbin holder.
SSoolluuttiioonn::
Clean bobbin holder (page 33).
PPoossssiibbllee ccaauussee:: Wrong bobbins being used.
SSoolluuttiioonn::
Use bobbins that are the same style as those that come with the machine (SINGER® Class 15
transparent bobbins) – don’t substitute.
Bobbin Thread Showing on Top of Fabric
PPoossssiibbllee ccaauussee:: Top thread too tight.
SSoolluuttiioonn:: Reduce upper thread tension.
PPoossssiibbllee ccaauussee:: Thread path is obstructed, putting extra tension on top thread.
SSoolluuttiioonn:: Check that the top thread path is not obstructed and thread is moving freely through the thread
path.
PPoossssiibbllee ccaauussee:: Bobbin thread not in bobbin case tension.
SSoolluuttiioonn::
Rethread bobbin (page 18).
Bobbin Winding Difficulties
PPoossssiibbllee ccaauussee:: Bobbin thread loosely wound on bobbin.
SSoolluuttiioonn:: Rewind bobbin, making sure that the thread is placed snuggly in the bobbin winding tension
disc (page 18).
PPoossssiibbllee ccaauussee:: Bobbin winding spindle not fully engaged, therefore bobbin not winding.
SSoolluuttiioonn:: Check that the bobbin winding spindle has been fully engaged before starting to wind.
34 – Maintenance
English

PPoossssiibbllee ccaauussee:: Bobbin is winding sloppily because thread end not held at beginning of winding process.
SSoolluuttiioonn::
Before starting to wind, hold the thread tail (coming out of the bobbin) securely, allow the
bobbin to partially fill, then stop to trim the thread tail close to the bobbin.
Fabric Puckers
PPoossssiibbllee ccaauussee:: Top thread is too tight.
SSoolluuttiioonn:: Reduce top thread tension.
PPoossssiibbllee ccaauussee:: Wrong style needle for fabric type.
SSoolluuttiioonn:: Use correct needle style and size for your fabric.
Fabric Is Tunneling Under Stitches
PPoossssiibbllee ccaauussee::
Fabric is not properly stabilized for the density of the stitches (for example, satin stitch applique).
SSoolluuttiioonn:: Add a fabric stabilizer underneath the fabric to help keep the stitches from tunneling in together,
forming a puckered ridge in fabric.
Loud Noise When Sewing
PPoossssiibbllee ccaauussee:: Thread not in take-up lever.
SSoolluuttiioonn:: Rethread the machine, making sure the take up lever is in its highest position so thread goes in
the eye of the take up lever — turn machine hand wheel toward you to raise the take up lever to
its highest position for threading.
PPoossssiibbllee ccaauussee:: Thread path is obstructed.
SSoolluuttiioonn:: Check that thread is not caught on the thread spool or behind the spool cap.
Machine Will Not Run
PPoossssiibbllee ccaauussee:: Bobbin winding spindle is engaged when you try to sew.
SSoolluuttiioonn:: Disengage bobbin winding spindle by pushing it to the left.
PPoossssiibbllee ccaauussee::
Power cord and/or foot control not plugged in correctly.
SSoolluuttiioonn::
Make sure power cord/foot control are correctly seated in machine and power supply (page 11).
PPoossssiibbllee ccaauussee:: Wrong bobbins being used.
SSoolluuttiioonn::
Use bobbins that are the same style as those that come with the machine (SINGER® Class 15
transparent bobbins)– don’t substitute.
Needles Breaking
PPoossssiibbllee ccaauussee:: Bent, dull or damaged needle.
SSoolluuttiioonn::
Discard needle, insert new needle (page 16).
PPoossssiibbllee ccaauussee:: Wrong size needle for fabric.
SSoolluuttiioonn::
Insert appropriate needle for fabric type (page 15).
PPoossssiibbllee ccaauussee:: Machine not threaded correctly.
SSoolluuttiioonn::
Rethread the machine completely (page 19).
PPoossssiibbllee ccaauussee:: “Pushing” or “pulling” fabric.
SSoolluuttiioonn::
Don’t manually push/pull fabric in order to sew, but allow the machine’s feed teeth to draw
fabric under the presser foot as you guide it.
Maintenance – 35
English

Skipping Stitches
PPoossssiibbllee ccaauussee:: Needle inserted incorrectly.
SSoolluuttiioonn:: Check that flat side of needle top is toward back of machine and needle is up as far as it can go,
then tighten needle clamp screw.
PPoossssiibbllee ccaauussee:: Wrong needle for fabric sewn.
SSoolluuttiioonn::
Use correct needle style and size for your fabric (page 15 and page 16).
PPoossssiibbllee ccaauussee:: Bent, dull or damaged needle.
SSoolluuttiioonn::
Discard needle and insert new needle (page 16).
Stitches Distorted
PPoossssiibbllee ccaauussee:: “Pushing” or “pulling” the fabric.
SSoolluuttiioonn::
Don’t manually push/pull fabric in order to sew, but allow the machine’s feed teeth to draw
fabric under presser foot as you guide it.
PPoossssiibbllee ccaauussee:: Stabilizer may be needed for technique.
SSoolluuttiioonn:: Place stabilizer underneath fabric.
Thread Bunching at Beginning
PPoossssiibbllee ccaauussee:: Top and bobbin threads have not been properly placed underneath presser foot before starting
to sew.
SSoolluuttiioonn:: Ensure that both the top thread and the bobbin thread are under the presser foot and toward
the back before starting to sew.
PPoossssiibbllee ccaauussee:: Sewing was started with no fabric under the presser foot.
SSoolluuttiioonn:: Place fabric under foot, making sure that needle comes down into fabric; lightly hold both
thread tails for first few stitches.
PPoossssiibbllee ccaauussee:: Stabilizer may be needed for technique.
SSoolluuttiioonn:: Place stabilizer underneath fabric.
PPoossssiibbllee ccaauussee:: Too many layers of fabric under the presser foot.
SSoolluuttiioonn:: Reduce the number or thickness of fabric layers under the presser foot.
Upper Thread Breaking
PPoossssiibbllee ccaauussee:: Thread path obstructed
SSoolluuttiioonn::
Check if thread is caught on thread spool (rough spots on the spool itself) or behind spool pin or
spool cap (if the thread has fallen behind the spool cap and therefore cannot feed freely
through the machine path).
PPoossssiibbllee ccaauussee:: Machine is not threaded correctly.
SSoolluuttiioonn:: Remove upper thread completely, raise presser foot lifter, rethread machine making sure thread
is in take-up lever (raise take up lever to its highest position by turning hand wheel toward you.
PPoossssiibbllee ccaauussee:: Upper tension too tight.
SSoolluuttiioonn:: Reduce upper thread tension .
Connectivity Issues
PPoossssiibbllee ccaauussee:: The machine will not connect to a WiFi network.
SSoolluuttiioonn:: Make sure WiFi is enabled on your mobile device and that the machine is in pairing mode. Hold
the Connect button for 10 seconds until the LED flashes fast blue. Open the CREATIVATE™ app and
follow the on-screen setup instructions.
PPoossssiibbllee ccaauussee:: The machine is not detected in the app.
36 – Maintenance
English
SSoolluuttiioonn:: Make sure the machine is turned on and that the Connect button LED is solid blue. If not, re-enter
pairing mode by holding the Connect button for 10 seconds.
PPoossssiibbllee ccaauussee:: The machine connects but then disconnects.
SSoolluuttiioonn:: Make sure your mobile device stays within range of the WiFi network. Check that the
CREATIVATE™ app is up to date.
PPoossssiibbllee ccaauussee:: The app is not responding to machine input.
SSoolluuttiioonn:: Close and reopen the CREATIVATE™ app. If the problem continues, turn the machine off and on
again and reconnect.
PPoossssiibbllee ccaauussee:: Cannot log in to CREATIVATE™ account.
SSoolluuttiioonn:: Check your credentials at creativate.com. If you do not have an account, you can create one for
free at creativate.com or in the CREATIVATE™ App.
Embroidery Problems
PPoossssiibbllee ccaauussee:: The embroidery design is distorted.
SSoolluuttiioonn:: • The fabric must be tightly hooped. Hoop the fabric in such a way that the inner hoop exactly
matches the outer hoop.
• Clear area around the embroidery unit.
• Make sure the hoop connector is inserted all the way into the hoop attachment on the
embroidery arm.
PPoossssiibbllee ccaauussee:: The embroidery design has puckered.
SSoolluuttiioonn:: Ensure you use the proper stabilizer for your technique or fabric type.
PPoossssiibbllee ccaauussee:: The machine will not embroider.
SSoolluuttiioonn:: • Make sure that the embroidery unit is properly attached into the socket.
• Slide on the correct hoop.
Technical Specification
TTyyppee ooff FFoooott CCoonnttrrooll
FC-9000, GTD-1
RRaatteedd VVoollttaaggee
240 V/50Hz, 230 V/50Hz, 220 V/50-
60Hz, 127 V/60 Hz, 120 V/60 Hz, 100V/
50-60Hz
SSeewwiinngg SSppeeeedd
Maximum 1000 ± 50rpm
(using straight stitch with default
stitch length)
PPrreesssseerr FFoooott RRiissee HHeeiigghhtt
6mm
SSttiittcchh WWiiddtthh
0–7.0mm
SSttiittcchh LLeennggtthh
0–4.5mm
PPrrootteeccttiioonn CCllaassss
II (Europe)
TTyyppee ooff LLiigghhtt
LED light
WWeeiigghhtt
7kg
MMaacchhiinnee DDiimmeennssiioonnss
Length: ≈440mm
Width: ≈190mm
Height: ≈280mm
WWiiFFii MMoodduullee
Frequency: 2.4 GHz 802.11 b/g/n
Transmitting power: +17 dBm
Receiver sensitivity: –97 dBm
TTyyppee ooff AACC//DDCC AAddaappttoorr
Meanwell NGE90I24-P1J
MMoobbiillee DDeevviiccee HHoollddeerr
Note: Make sure the mobile device is securely placed in the holder before operating the machine.
The mobile device holder is compatible with devices of up to 97.5 mm (3.84 in) width, 164.5 mm (6.48 in) length, and
820g (1.8 lb) weight. Do not exceed the maximum specified dimensions, as doing so may cause the device to fall,
resulting in damage.
The user is responsible for ensuring their mobile device is securely placed on the holder and is solely responsible for
any damage or loss to the mobile device caused by drops, falls, or inadequate securing of the device.
Maintenance – 37
English

INTELLECTUAL PROPERTY
SINGER® and CREATIVATE™ are exclusive trademarks of Singer Sourcing Limited LLC or
its Affiliates.
You have purchased a modern, updatable sewing and embroidery machine that
connects to the CREATIVATE™ app. We regularly release updates for both the machine
firmware and the app. As a result, there may be some differences between your
current version and what is described in this user's guide. To ensure the best
experience, keep both the machine firmware and the app updated to the latest
version. You can find update information in the app or by visiting our website at www.
singer.com. Consult your local authorized SINGER® retailer if you need assistance .
We reserve the right to change the machine equipment and the assortment of
accessories without prior notice, or make modifications to the performance or design.
Such modifications will always be to the benefit of the user and the product.
Please note that on disposal, this product must be safely recycled in
accordance with relevant National legislation relating to electrical/
electronic products. Do not dispose of electrical appliances as unsorted
municipal waste, use separate collection facilities. Contact your local
government for information regarding the collection systems available.
When replacing old appliances with new ones, the retailer may be
legally obligated to take back your old appliance for disposal free of
charge.
If electrical appliances are disposed of in landfills or dumps, hazardous
substances can leak into the groundwater and get into the food chain,
damaging your health and well-being.
Manufacturer
VSM GROUP AB, SSVVPP WWoorrllddwwiiddee
Soldattorpsgatan 3
SE-55474, Jonkoping, SWEDEN
Importer to the UK:
VVSSMM UUKK
Ravensbank House, Ravensbank Drive
North Moons Moat, Redditch. B98 9NA, United Kingdom

4711380-26I · English · © 2026 Singer Sourcing Limited LLC or its Affiliates. · All rights reserved