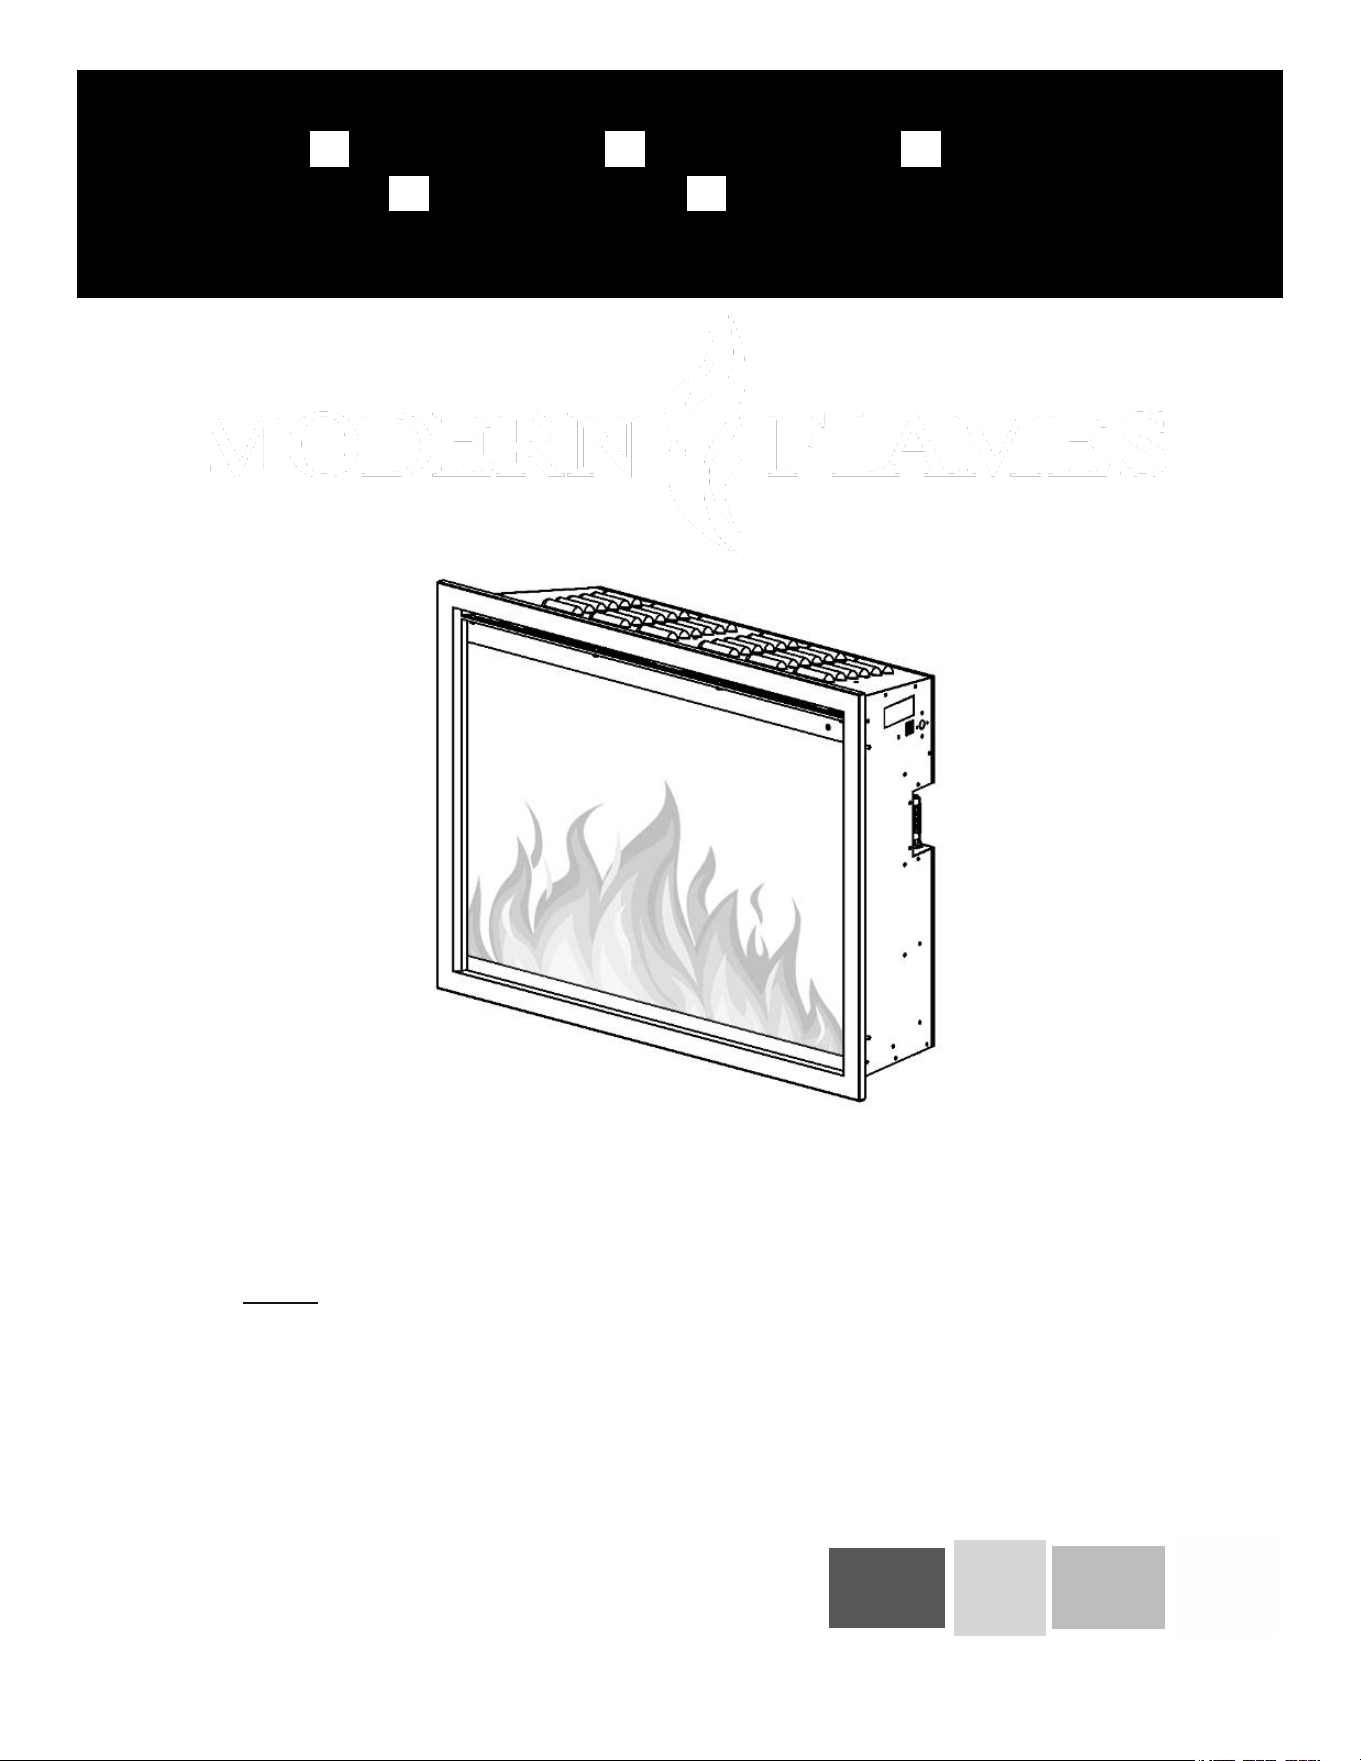
ORION TRADITIONAL BUILT-IN OR INSERT FIREPLACE
…. OR42-TRAD-INT …. OR54-TRAD-INT
INSTALLATION MANUAL
AC 220-240V 50Hz 2,000W (6,800BTU’s)
Read and understand this entire owner's manual, including all safety information,
before plugging in or using this product. Failure to do so could result in fire,
electric shock, or serious personal injury.
Keep this owner's manual
for future reference. If you sell or give this product away,
make sure this manual accompanies this product.
Model #: …. OR26-TRAD-INT …. OR30-TRAD-INT … OR36-TRAD-INT

2
www.modernflames.com
• Read all instructions before installing or using this heater.
• Use a dedicated 13 Amp (EU) or 10 Amp (AU/NZ) (or higher) circuit breaker.
• This heater is hot when in use. To avoid burns, DO NOT let bare skin touch hot surfaces. If
provided, use handles when moving this heater. Keep combustible materials, such as furniture,
pillows, bedding, papers, clothes, and curtains at least 3 feet (0.9m) from the front of the heater
and keep them away from the sides and rear.
• Extreme caution is necessary when any heater is used by or near children or invalids and
whenever the heater is left operating and unattended.
• Do not operate any heater if it malfunctions. Disconnect power at service panel and have the
heater inspected by a reputable electrician before reusing.
• To disconnect the heater, turn the controls to off, and turn off power to the heater circuit at the
main disconnect panel (or operate internal disconnect switch if provided).
• Do not insert or allow foreign objects to enter any ventilation or exhaust opening as this may
cause an electric shock, fire, or damage the heater.
• To prevent a possible fire, do not block air intakes or exhaust in any manner.
• A heater has hot arcing or sparking parts inside. Do not use in areas where gasoline, paint,
flammable vapors, or liquids are used or stored.
• Use this heater only as described in this manual. Any other use not recommended by the
manufacturer may cause fire, electric shock, or injury to persons.
• This heater may include an audible or visual alarm to warn that parts of the heater are getting
excessively hot. If the alarm sounds (or illuminates), immediately turn the heater off and
inspect for any objects on or adjacent to the heater that may have blocked the airflow or
otherwise caused high temperatures to have occurred. DO NOT OPERATE THE HEATER
WITH THE ALARM SOUNDING (OR ILLUMINATING).
• ALWAYS plug heaters directly into a wall outlet/receptacle. NEVER use with an extension cord
or relocatable power tap (outlet/power strip).
• NEVER use this heater in bathrooms, laundry rooms, or any other location where the heater
could fall into a bathtub, pool, become damp, or come in contact with water.
• AVOID FIRE! Regularly inspect all air vents to make sure they are free from dust, lint, or other
blockage. Unplug the unit and clean with a vacuum ONLY. DO NOT rinse or get wet.
• ALWAYS mount to wall bracket before use. DO NOT set on the floor, or other surface, to use.
• NEVER use a wall mount bracket from another manufacturer.
• This product is not intended to be a primary heat source. It is for supplemental heat only.
• INDOOR use only! NEVER use this heater outdoors! Doing so may result in electric shock!
3
www.modernflames.com
• ALWAYS disconnect this unit from the power supply before performing any assembly,
cleaning, or before relocating the electric fireplace.
• NEVER leave this heater unattended. ALWAYS unplug this heater when not in use.
• ALWAYS store this heater in a dry location. NEVER use the fireplace if it has become wet.
• NEVER plug this heater into an outlet that is old, cracked, or has loose wires or connections.
Plugging this heater into a faulty outlet could result in electric arcing within the outlet that could
cause the outlet to overheat or catch fire.
• ALWAYS check your heater cord and plug connections with each use.
i) MAKE SURE the plug fits tightly in the outlet. Faulty wall outlet connections or loose plugs
can cause the outlet to overheat.
ii) Heaters draw more current than small appliances. Overheating may occur even if it has not
occurred with the use of other appliances.
iii) During use, check frequently to see if the plug outlet or face plate is HOT.
iv) If the outlet or face plate is HOT, discontinue use immediately and have a qualified
electrician inspect and/or replace the faulty outlets.
FCC CAUTION
This device complies with part 15 of the FCC Rules. Operation is subject to the following two conditions: (1) this
device may not cause harmful interference, and (2) this device must accept any interference received, including
interference that may cause undesired operation.
Any changes or modifications not expressly approved by the party responsible for compliance
could void the user's authority to operate the equipment.
NOTE: This equipment has been tested and found to comply with the limits for a Class B digital device, pursuant
to Part 15 of the FCC Rules. These limits are designed to provide reasonable protection against harmful
interference in a residential installation. This equipment generates, uses and can radiate radio frequency energy
and, if not installed and used in accordance with the instructions, may cause harmful interference to radio
communications. However, there is no guarantee that interference will not occur in a particular installation.
If this equipment does cause harmful interference to radio or television reception, which can be
determined by turning the equipment off and on, the user is encouraged to try to correct the interference
by one or more of the following measures:
-- Reorient or relocate the receiving antenna.
-- Increase the separation between the equipment and receiver.
-- Connect the equipment into an outlet on a circuit different from that to which the receiver is connected.
-- Consult the dealer or an experienced radio/TV technician for help.
To maintain compliance with FCC’s RF exposure guidelines, this equipment should be installed and operated with
minimum distance between 20cm (8 inches) from the radiator and your body: Use only the supplied antenna.
SAVE THESE INSTRUCTIONS

4
www.modernflames.com
Table of Contents
PREPARATION ................................................................................................................................................................................... 5
PARTS AND HARDWARE .................................................................................................................................................................... 5
DIMENSIONS AND SPECIFICATIONS ................................................................................................................................................... 6
INSTALLATION AND ASSEMBLY ......................................................................................................................................................... 6
GLASS REMOVAL/INSTALLATION ....................................................................................................................................................... 7
BUILT-IN INSTALLATION FRAMING ..................................................................................................................................................... 8
BUILT-IN INSTALLATION ..................................................................................................................................................................... 9
INSERT INSTALLATION ..................................................................................................................................................................... 10
HARDWIRING INSTALLATION .......................................................................................................................................................... 11
DRIFTWOOD LOGS AND CRUSHED GLASS INSTALLATION ................................................................................................................ 12
OPERATION ..................................................................................................................................................................................... 13
OPERATION – TOUCH CONTROL PANEL ........................................................................................................................................... 15
OPERATION – REMOTE CONTROL .................................................................................................................................................... 16
DOWNLOAD SMART PHONE/TABLET APP ........................................................................................................................................ 18
WI-FI – INITIAL LOG-IN ............................................................................................................................................................................. 19
WI-FI – PAIRING ...................................................................................................................................................................................... 20
Add Manually .................................................................................................................................................................................. 20
Auto Scan ........................................................................................................................................................................................ 23
OPERATION – SMART PHONE/TABLET APP ......................................................................................................................................26
HOME SCREEN ......................................................................................................................................................................................... 26
FLAME STYLE OPTIONS .............................................................................................................................................................................. 27
FLAME STYLE ONE/TWO/THREE COLOR MENU .............................................................................................................................................. 28
CUSTOM MODE MENU ............................................................................................................................................................................. 29
DOWNLIGHT MENU .................................................................................................................................................................................. 30
EMBER BED MENU ................................................................................................................................................................................... 31
HEATER MENU ........................................................................................................................................................................................ 32
TIMER MENU .......................................................................................................................................................................................... 33
WEEKLY PROGRAM SCHEDULE MENU .......................................................................................................................................................... 34
DAILY PROGRAM SCHEDULE MENU .............................................................................................................................................................. 35
OPERATION – IMPORTANT WARNINGS ........................................................................................................................................... 36
CARE – CLEANING ............................................................................................................................................................................ 37
CARE – MAINTENANCE .................................................................................................................................................................... 37
OPTIONAL, EXTRA-WIDE TRIM ........................................................................................................................................................ 38
REPLACEMENT PARTS LIST............................................................................................................................................................... 39
TROUBLESHOOTING / FAQ .............................................................................................................................................................. 40
5
www.modernflames.com
Preparation
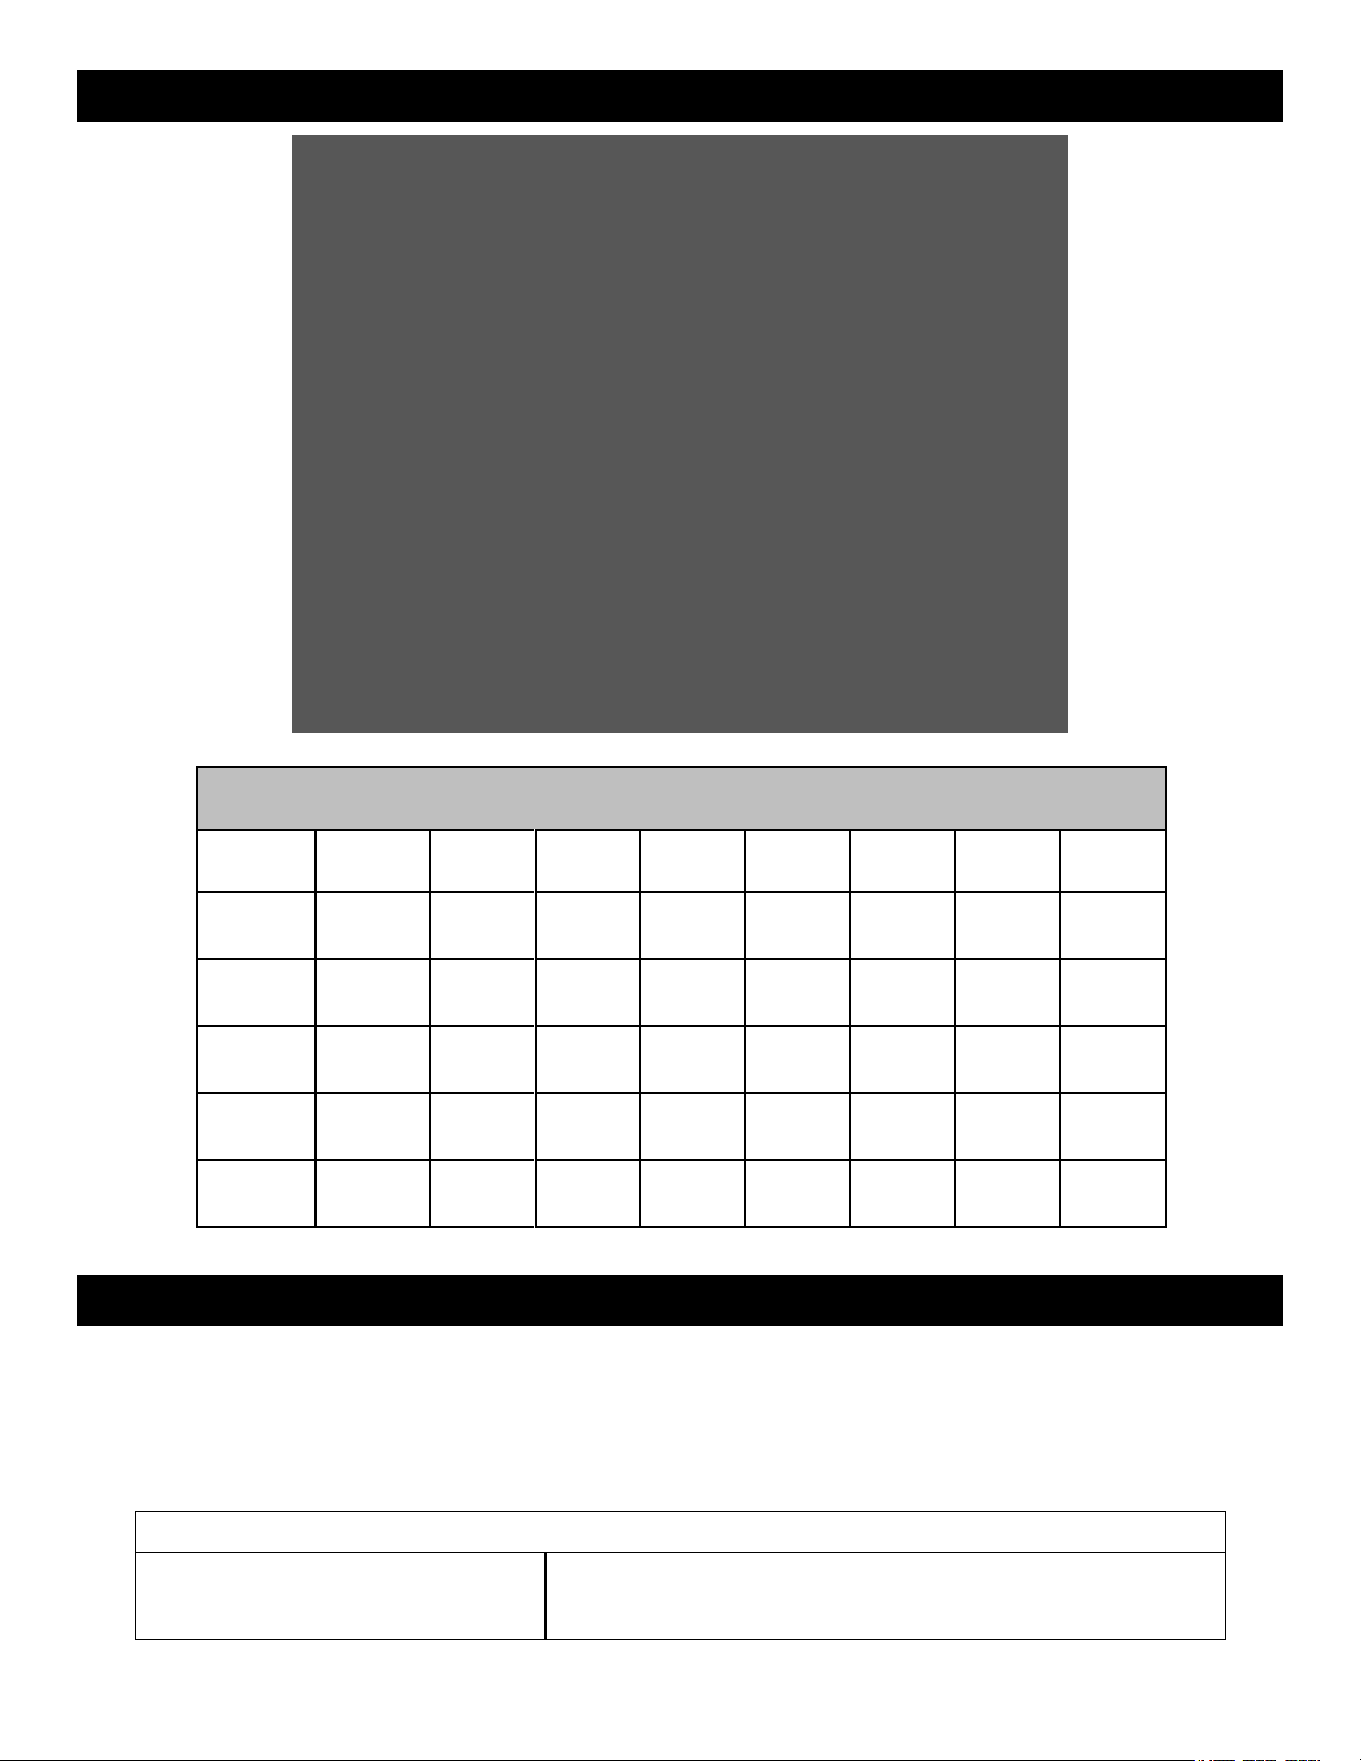
Remove all parts and hardware from the carton and place them on a clean, soft, dry surface. Parts and
assembly steps are grouped for wall-hanging or recessing use. Check the parts list to make sure nothing
is missing. Dispose of packaging materials properly. Please recycle whenever possible.
You will need the following tools (not included): Phillips screwdriver, level, tape measure, electric drill.
Parts and Hardware
PART NO.
DESCRIPTION
PART NO.
DESCRIPTION
A
Power Cover
E
Remote
B
Installation Screws
F
Log Set
C
Screw Covers
G
Crushed Glass Media
D
Power Grommet
This product includes a GLASS panel. Always use extreme caution when handling
glass. Failure to do so could result in personal injury or property damage.
6
www.modernflames.com
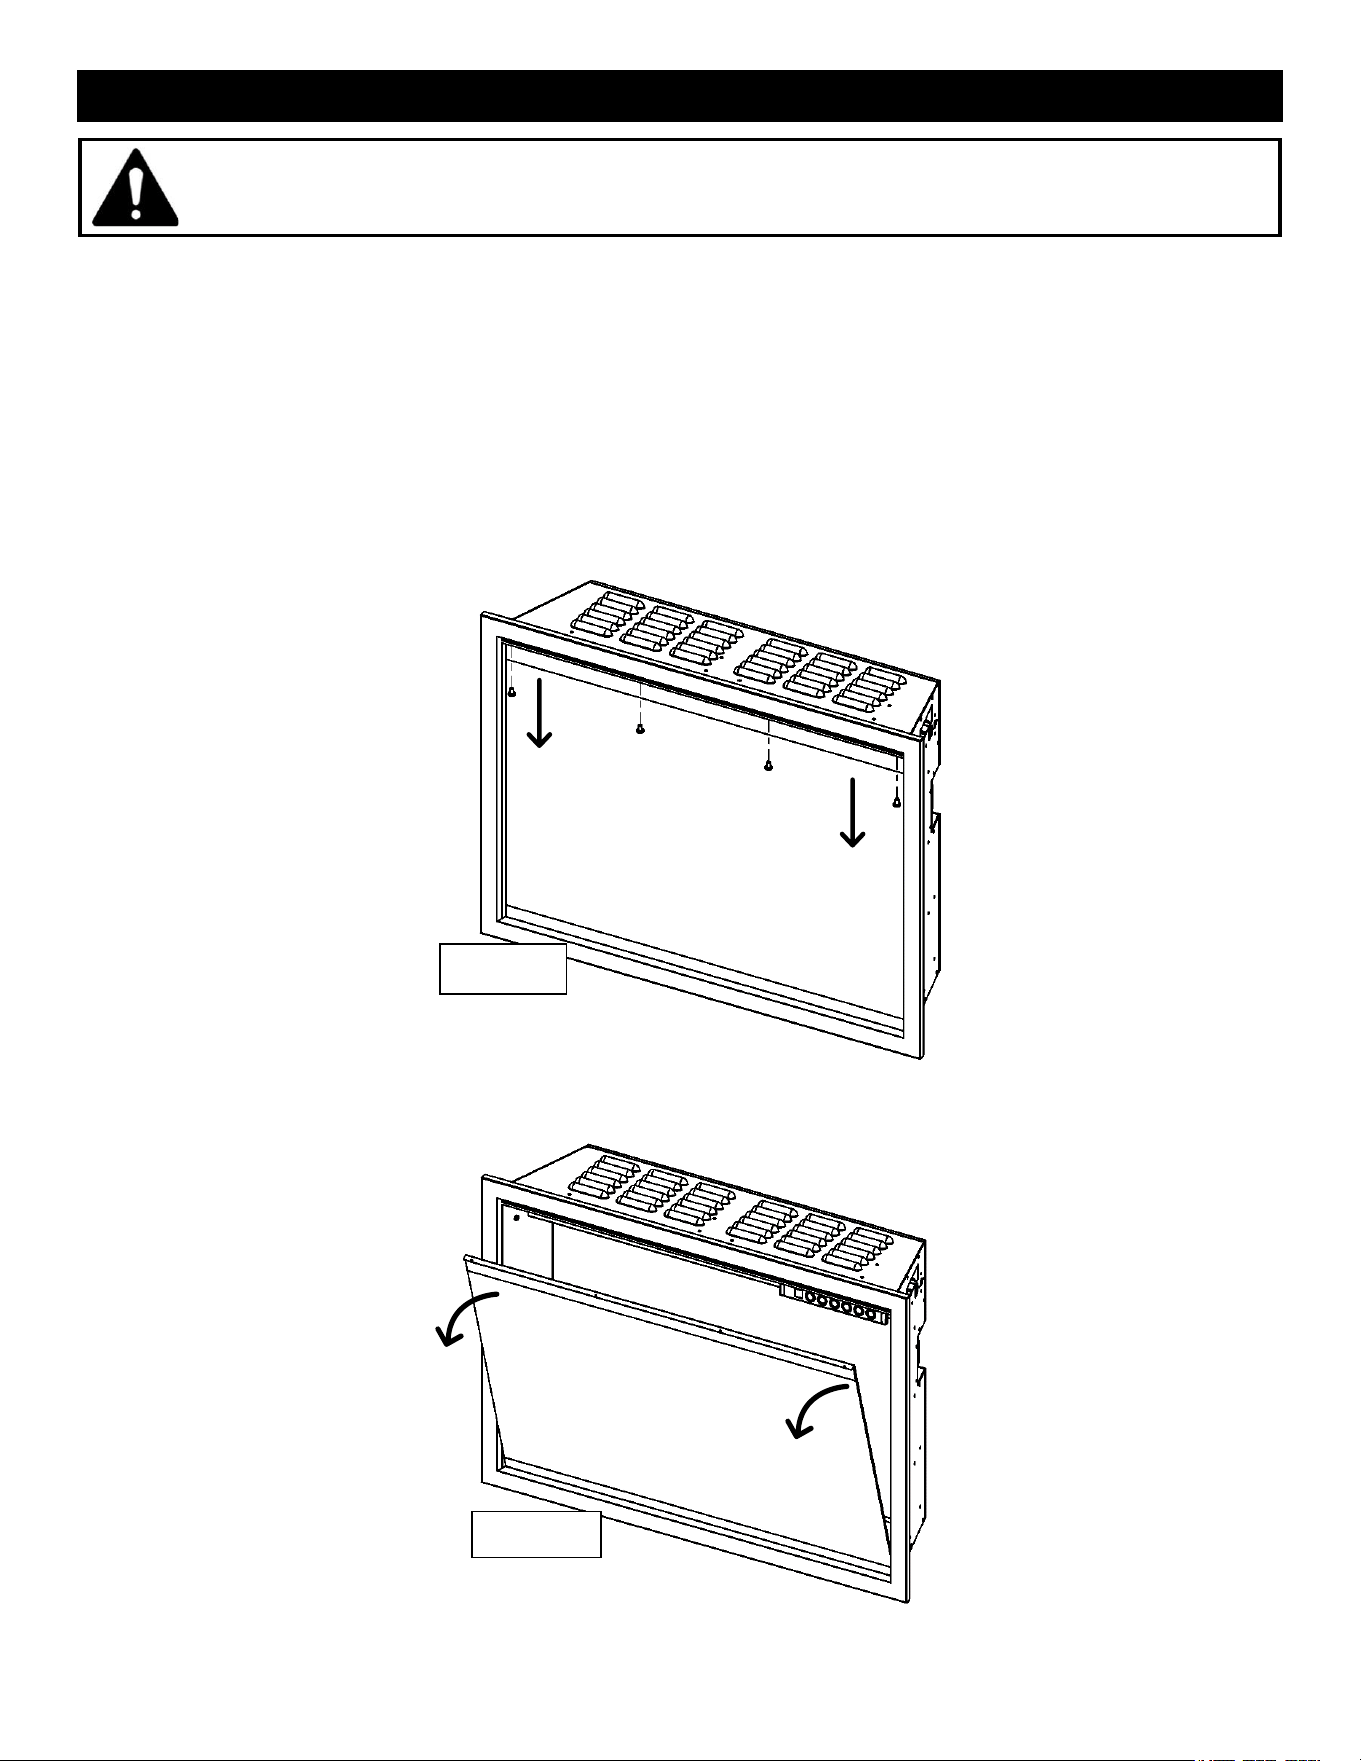
Dimensions and Specifications
PRODUCT DIMENSIONS
Model
Number
A
B
C
D
E
F
G
H
OR26-TRAD
25"
(636mm)
19-5/8"
(500mm)
9-7/8"
(250mm)
22-3/4"
(578mm)
18-1/2"
(470mm)
9-3/8"
(238mm)
22-7/16"
(570mm)
17-1/16"
(433mm)
OR30-TRAD
30-1/2"
(776mm)
19-5/8"
(500mm)
9-7/8"
(250mm)
28"
(711mm)
18-1/2"
(470mm)
9-3/8"
(238mm)
27-5/8"
(702mm)
17-1/16"
(433mm)
OR36-TRAD
35"
(890mm)
24-13/16"
(630mm)
9-7/8"
(250mm)
32-3/8"
(823mm)
23-5/8"
(600mm)
9-3/8"
(238mm)
32-1/8"
(816mm)
22-3/16"
(563mm)
OR42-TRAD
41"
(1042mm)
27-13/16"
(706mm)
9-7/8"
(250mm)
38-3/8"
(975mm)
26-5/8"
(676mm)
9-3/8"
(238mm)
38-1/8"
(968mm)
25-3/16"
(640mm)
OR54-TRAD
53-3/8"
(1355mm)
33-13/16"
(858mm)
9-7/8"
(250mm)
50-11/16"
(1288mm)
32-5/8"
(829mm)
9-3/8"
(238mm)
50-3/8"
(1280mm)
31-3/16"
(792mm)
Installation and Assembly
Your appliance is an insert and/or built-in installed appliance. Select a suitable location that is not
susceptible to moisture and is away from drapes, furniture, and high traffic areas.
NOTE: Follow all National and local electrical codes.
MINIMUM CLEARANCE TO COMBUSTIBLES
Measurements are taken from the glass front.
Bottom……………………...0"
Sides………………………..0"
Back………………………...0"
Top (to mantel)………………………11.8" (300mm)
Top (to TV)…………………………...11.8" (300mm)
Top (to ceiling)……………………….11.8" (300mm)
7
www.modernflames.com
Glass Removal/Installation
Removing Front Glass
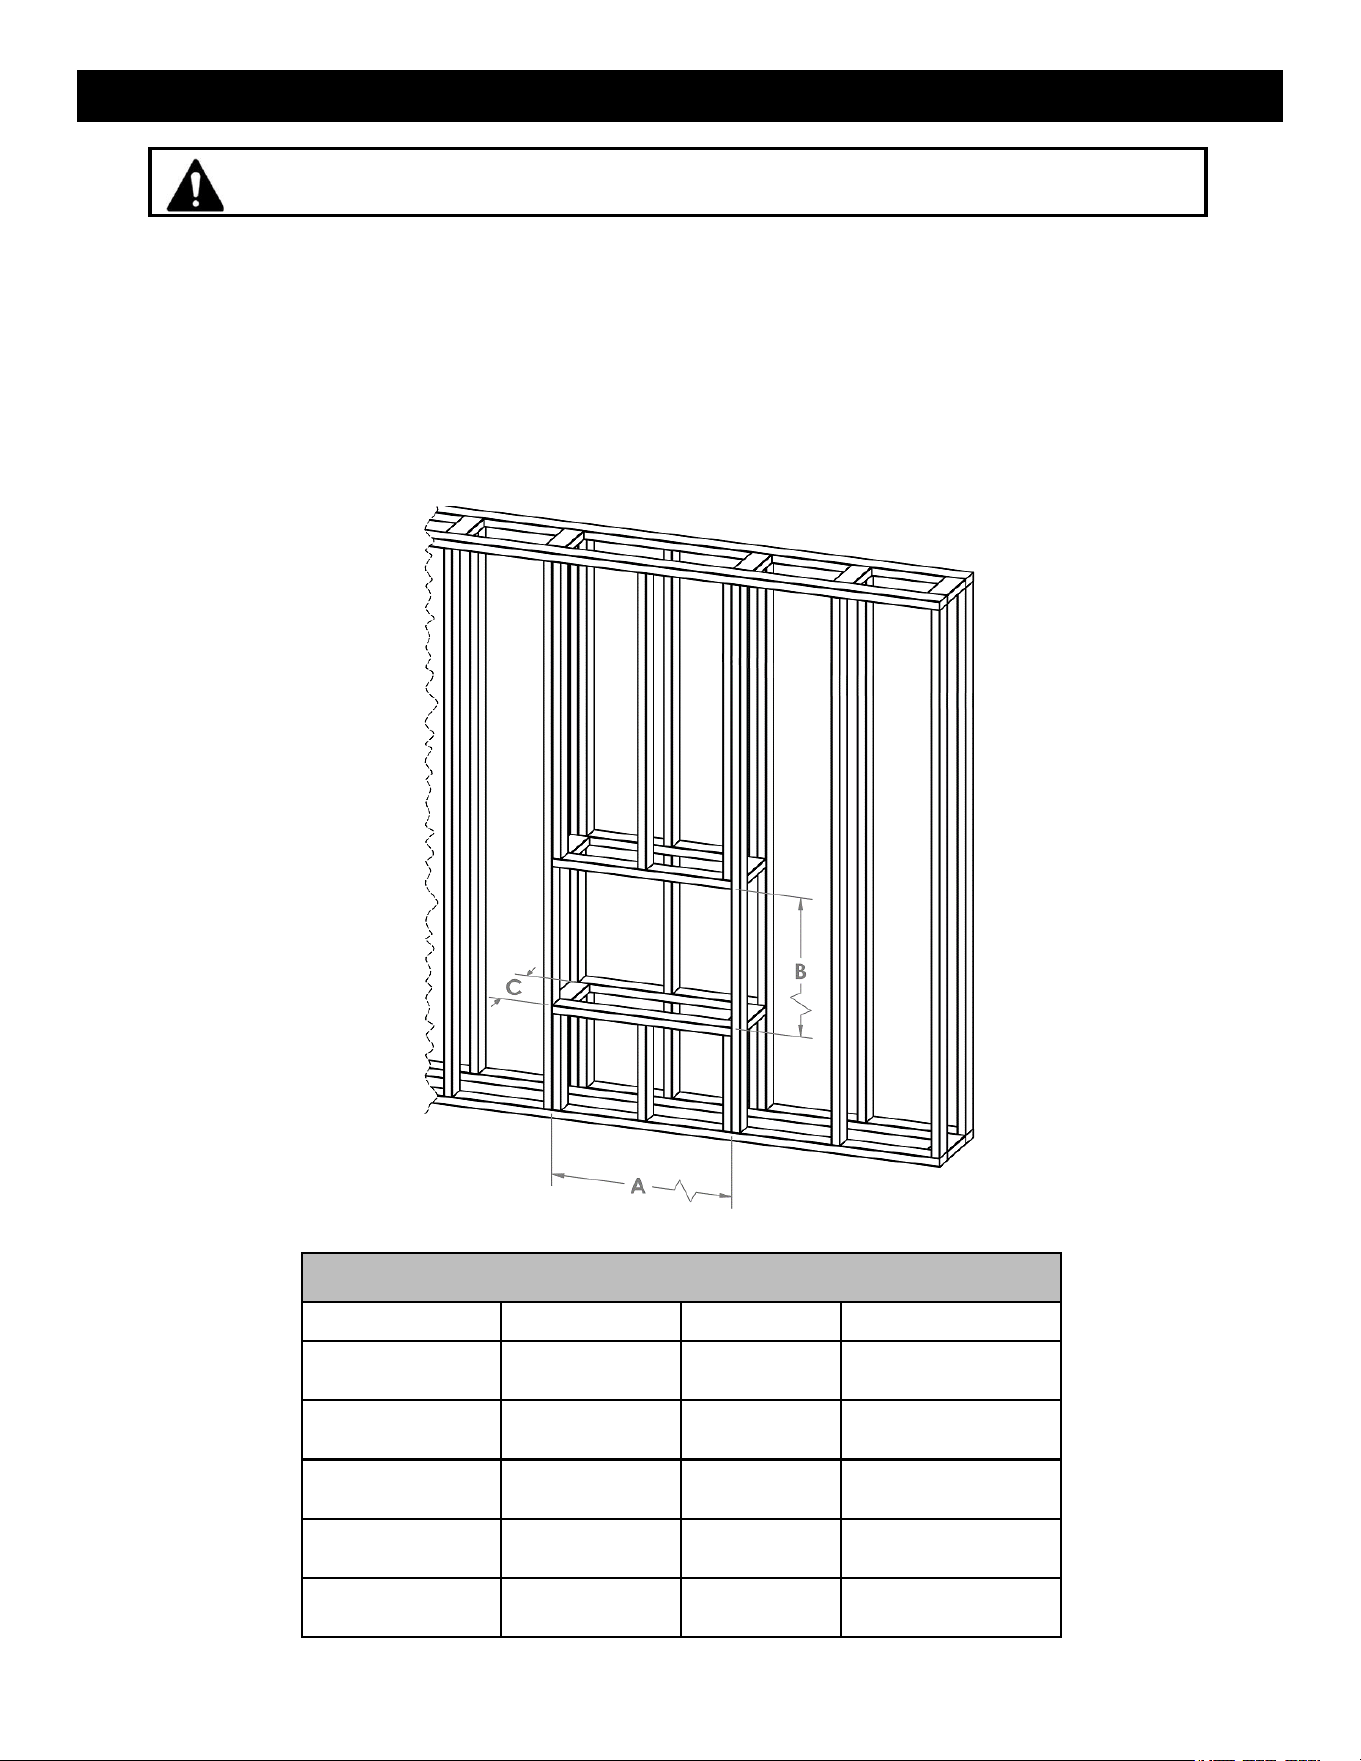
• With one hand on the front glass to prevent it from falling, remove the screws from the underside of
the viewing area of the fireplace (Fig. 1-1). Quantity of screws may change depending on fireplace
size. Set the screws aside.
• Carefully tilt the top edge of the glass away from the appliance (Fig. 1-2). Once the top edge of the
glass is free from the fireplace, lift up on the glass to fully remove it. Place the glass on a soft,
nonabrasive surface.
• Reverse these steps to reinstall the front glass.
Fig. 1-1
Fig. 1-2
This product includes a GLASS panel. Always use extreme caution when handling
glass. Failure to do so could result in personal injury or property damage.
8
www.modernflames.com
Built-In Installation Framing
• Select a location that is not prone to moisture and is located at least 36" (914mm) away from
combustible materials such as curtain drapes, furniture, bedding, paper, etc.
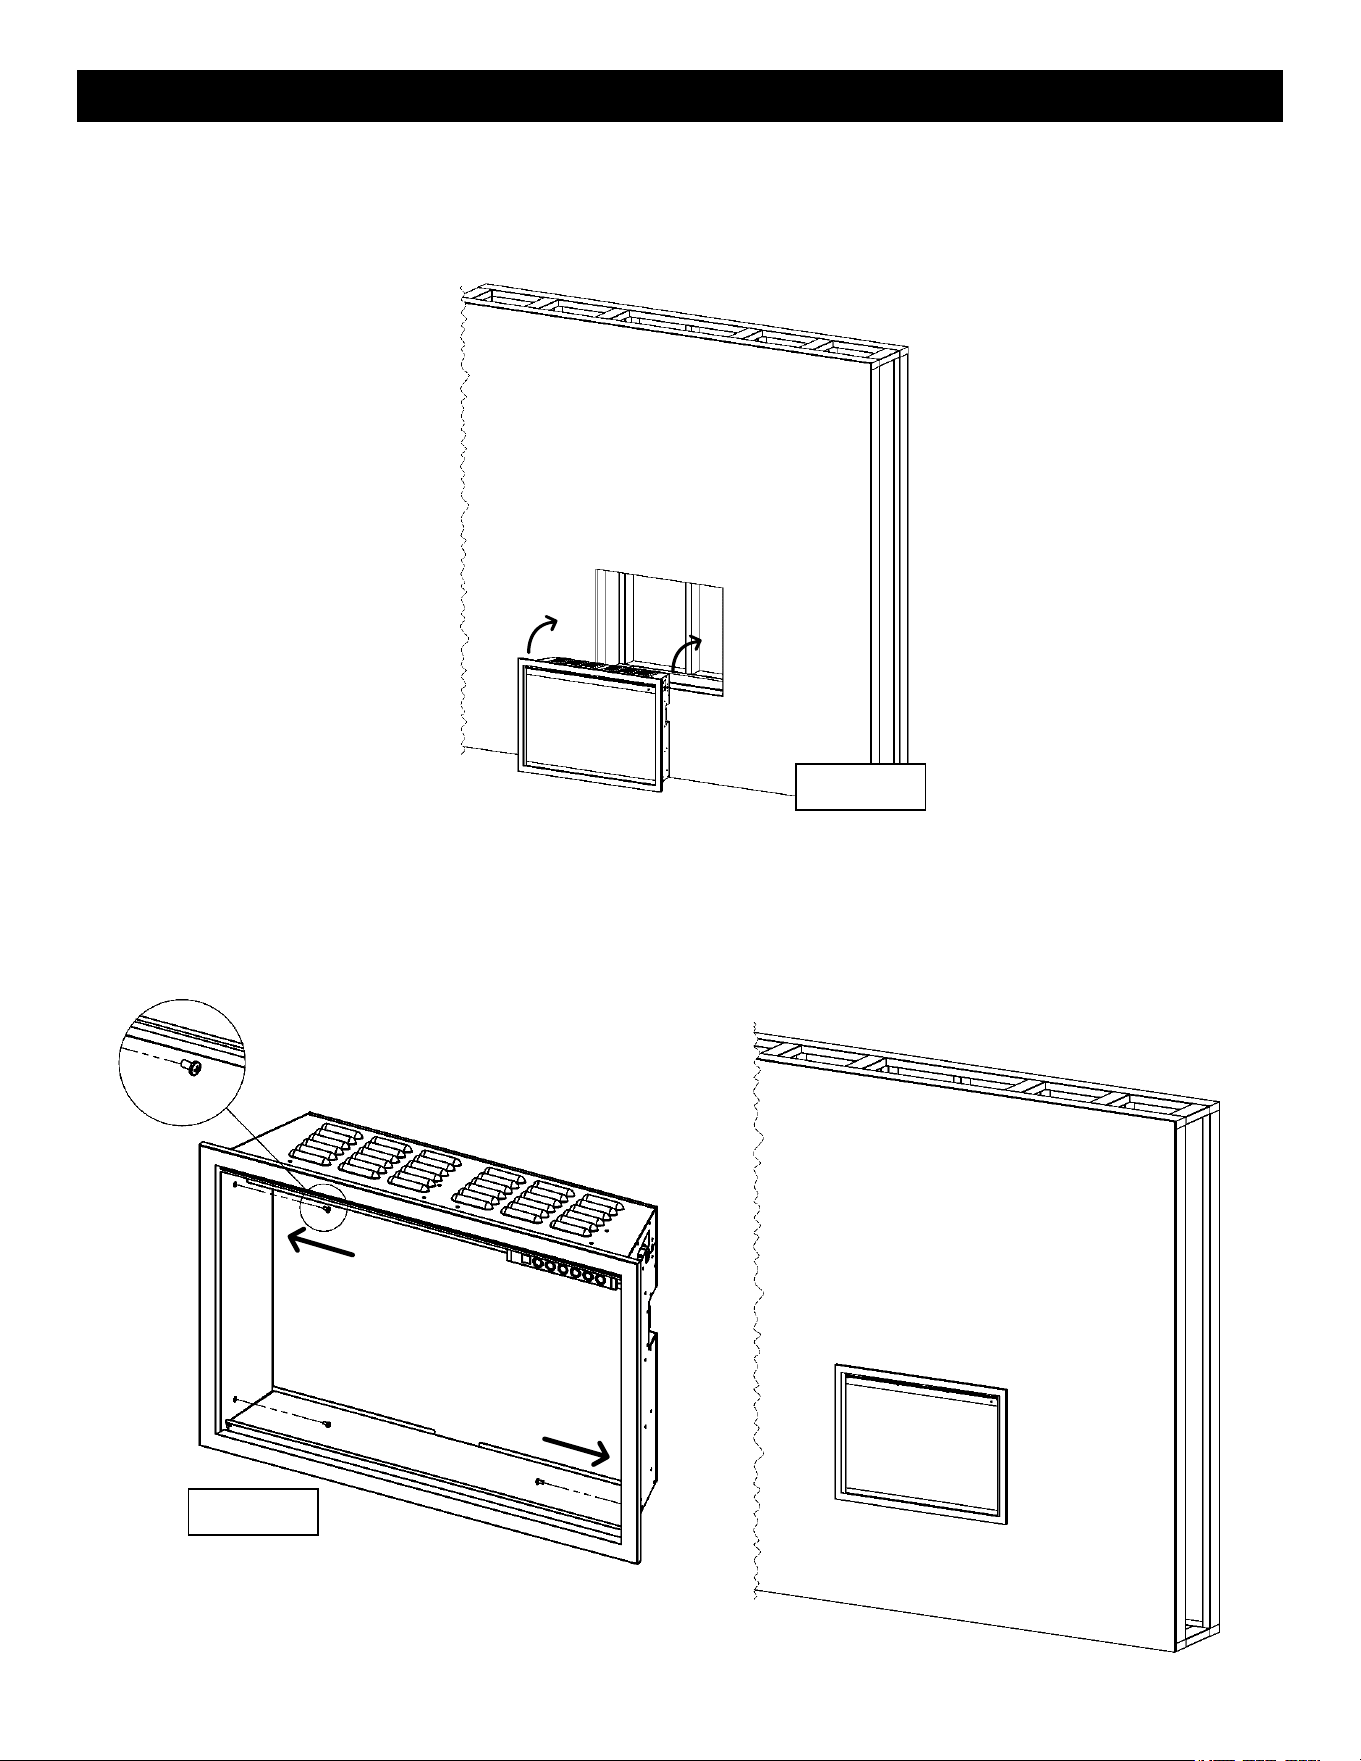
• Measure the appliance and create a rough-in frame with electrical (see “Rough Opening Framing
Dimensions”). Electrical to be at the top right of the rough-in framing.
• Remove the front glass (see “Glass Removal/Installation” section).
• Hold the appliance up to ensure it will fit into the framing.
ROUGH OPENING FRAMING DIMENSIONS
Model Number
A
B
C
OR26-TRAD-INT
23"
(584mm)
18-3/4"
(477mm)
10" min.
(254mm min.)
OR30-TRAD-INT
28-1/4"
(718mm)
18-3/4"
(477mm)
10" min.
(254mm min.)
OR36-TRAD-INT
32-5/8"
(829mm)
23-7/8"
(607mm)
10" min.
(254mm min.)
OR42-TRAD-INT
38-3/4"
(985mm)
26-3/4"
(680mm)
10" min.
(254mm min.)
OR54-TRAD-INT
50-15/16"
(1294mm)
32-3/4"
(832mm)
10" min.
(254mm min.)
Due to different materials used on different walls, it is highly recommended for
you to consult with your local builder before you install this electric fireplace.
9
www.modernflames.com
Built-In Installation
• Plug the fireplace into the dedicated circuit. If hardwiring the fireplace, see “Hardwiring Installation”.
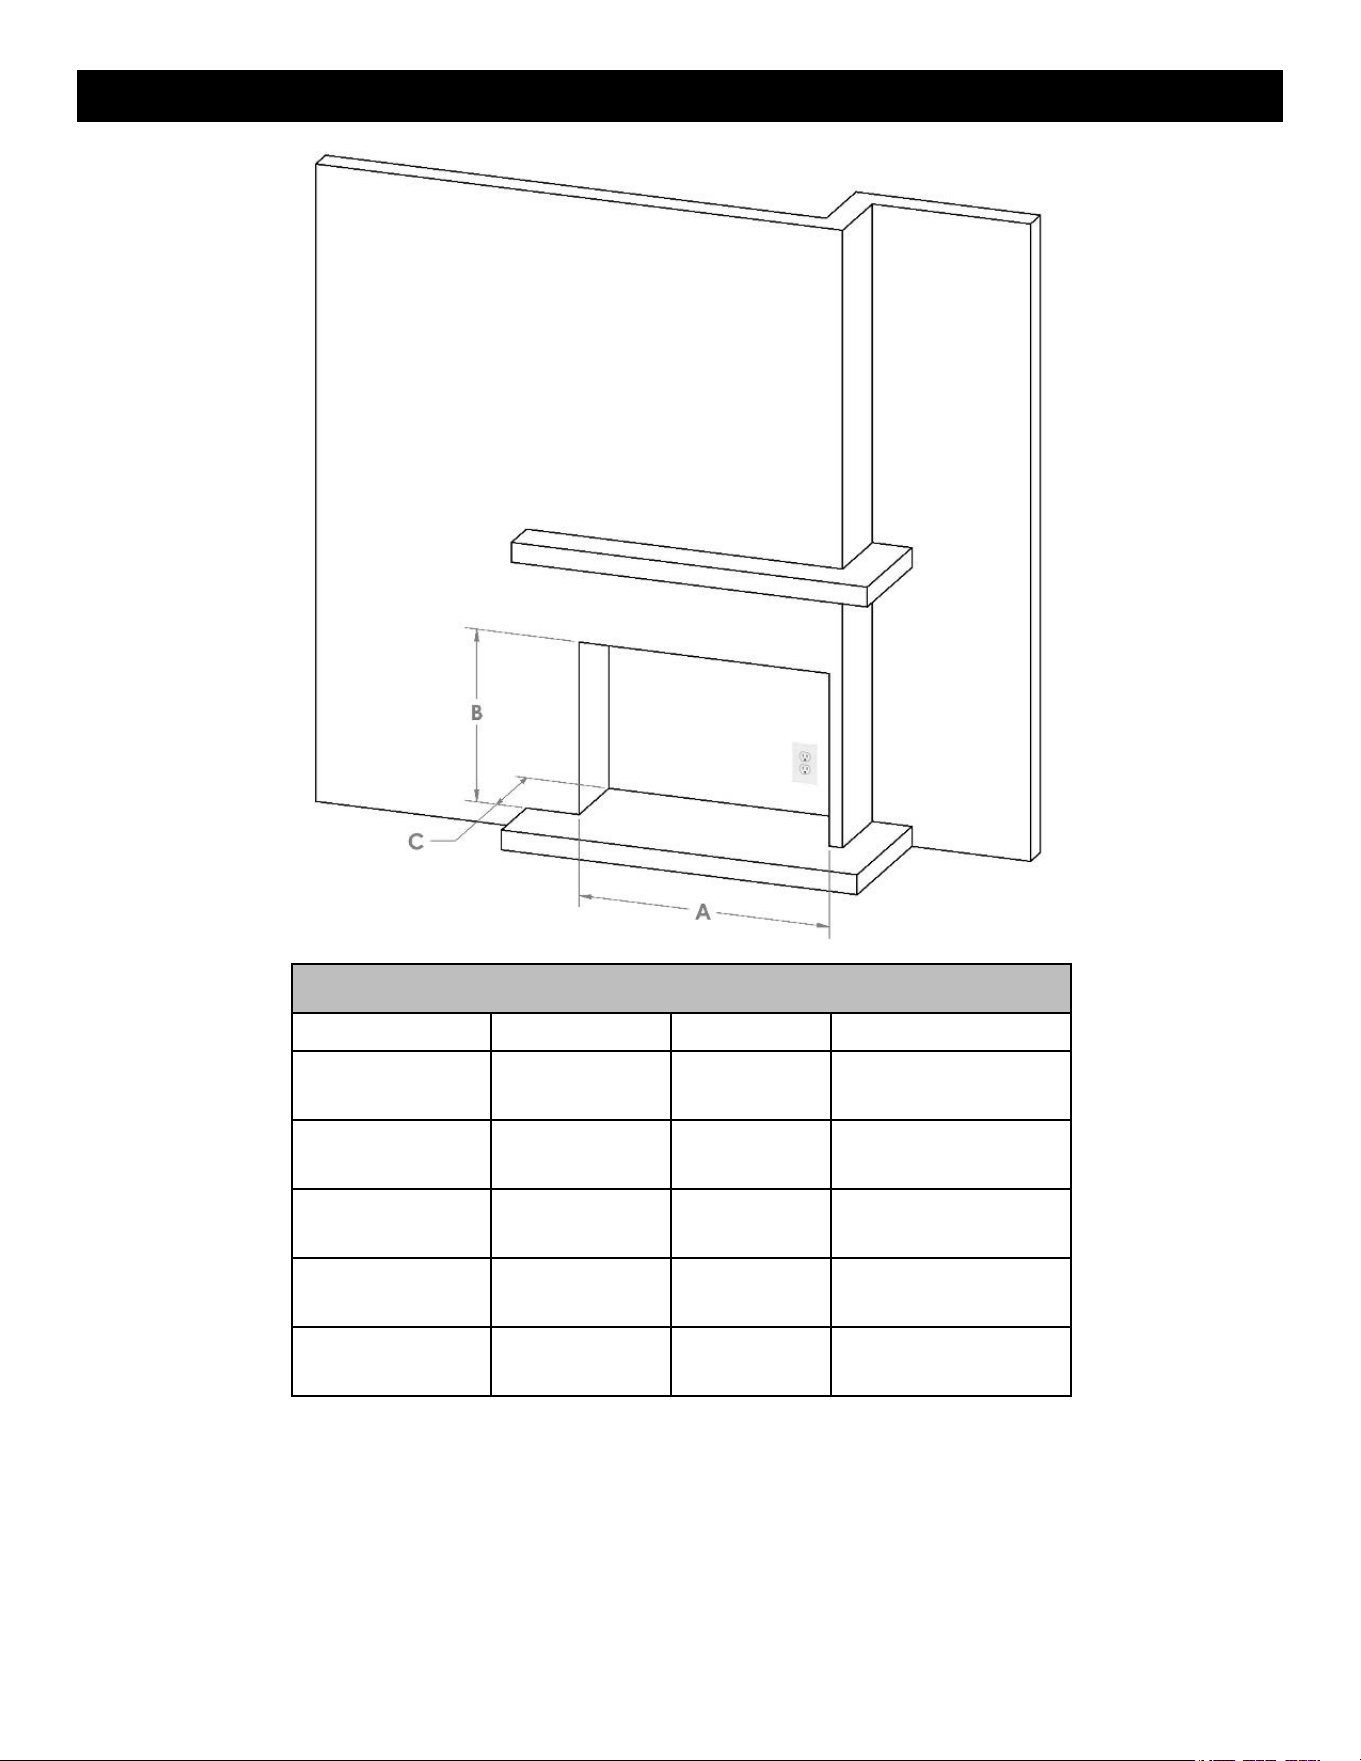
• Install the fireplace in the framed opening (Fig. 2-1). Adjust the adjustable feet as needed to ensure
the fireplace is level.
• Fasten the fireplace to the framing using the supplied screws (B) through the side holes (Fig. 2-2).
Cover the screw holes with the Screw Covers (C).
• Decorate according to media installation guide.
• Install the front glass. See “Glass Removal/Installation.”
Fig. 2-1
Fig. 2-2
10
www.modernflames.com
Insert Installation
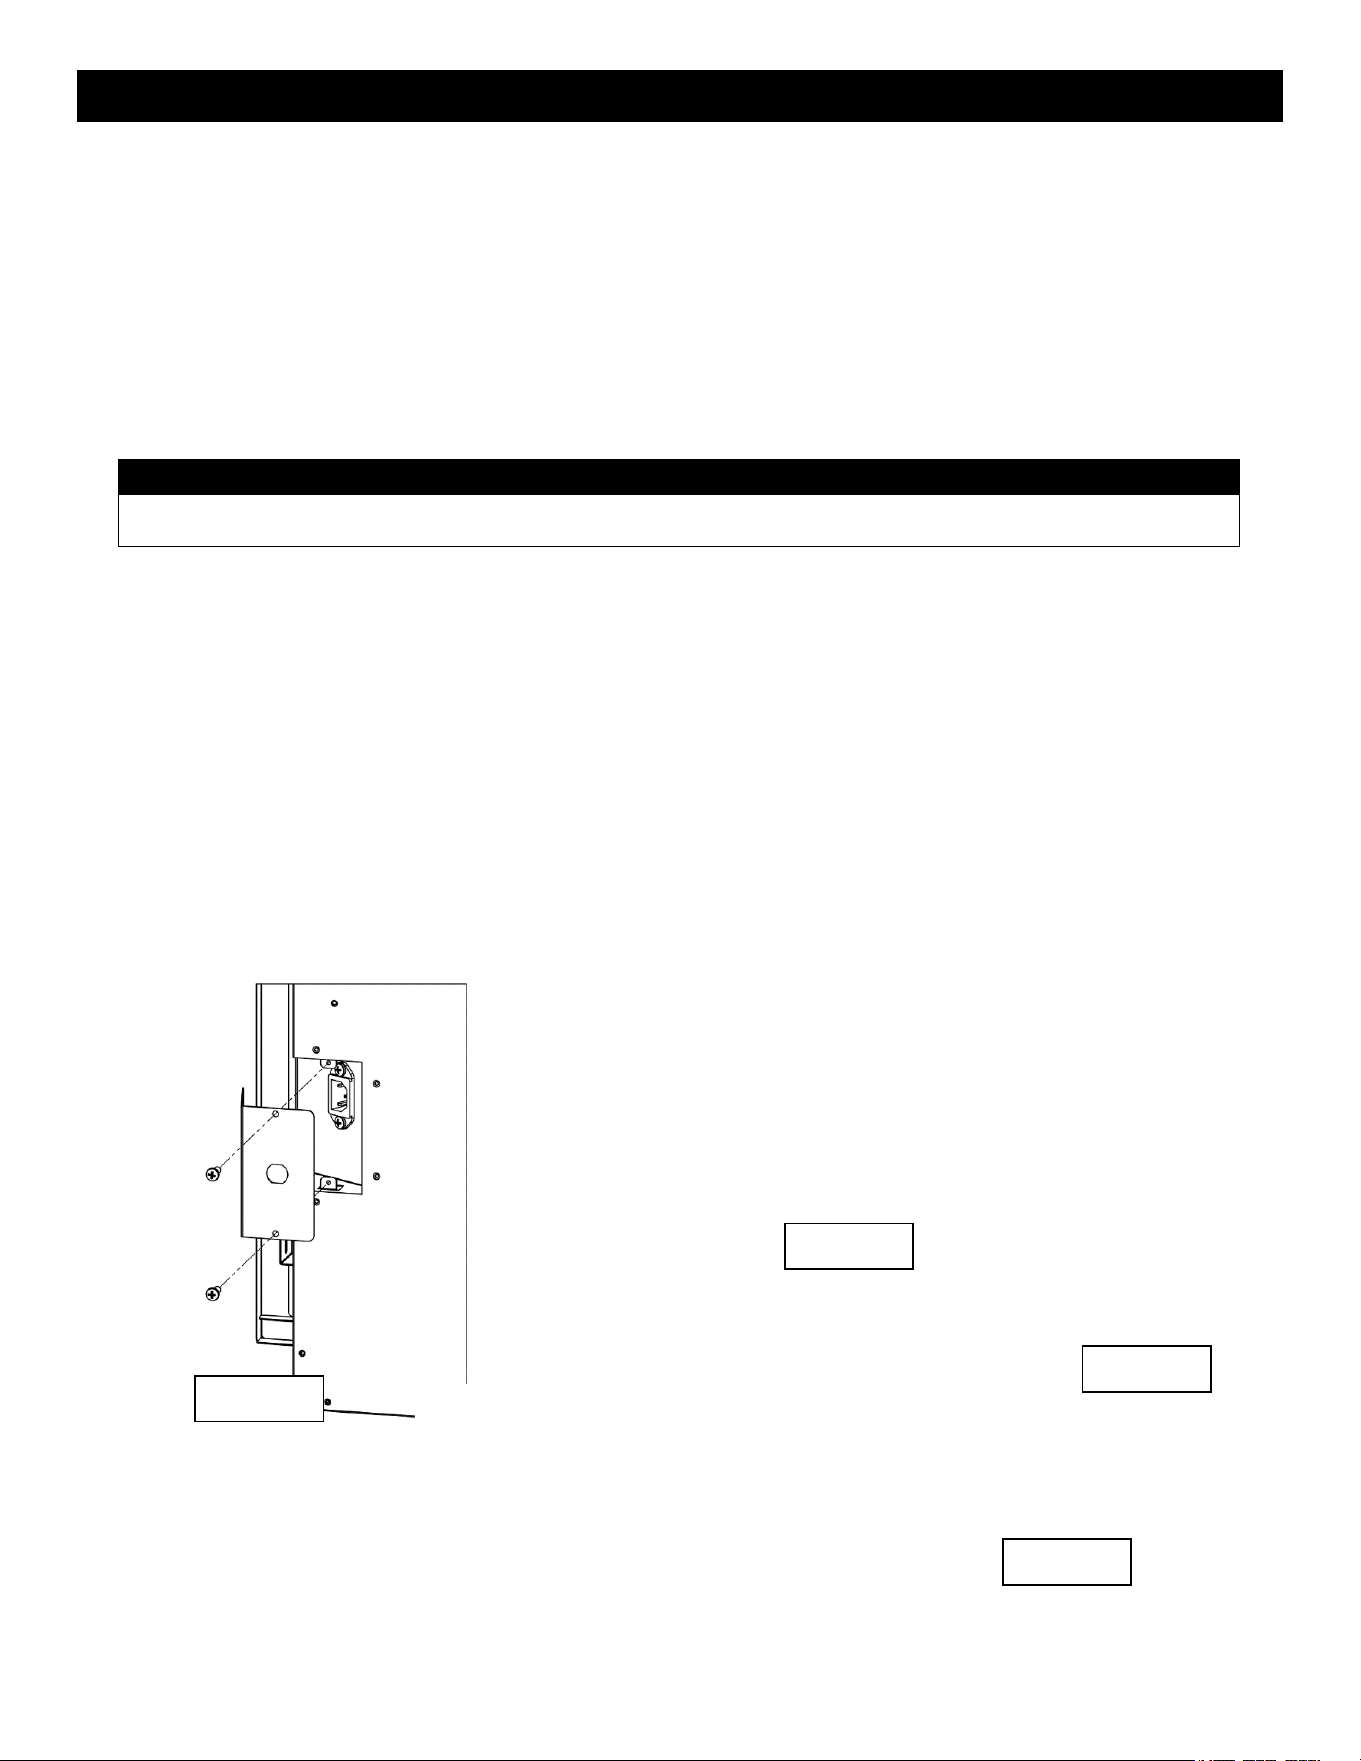
EXISTING FIREPLACE MIN. DIMENSIONS
Model Number
A
B
C
OR26-TRAD-INT
23"
(584mm)
18-3/4"
(477mm)
10" min.
(254mm min.)
OR30-TRAD-INT
28-1/4"
(718mm)
18-3/4"
(477mm)
10" min.
(254mm min.)
OR36-TRAD-INT
32-5/8"
(829mm)
23-7/8"
(607mm)
10" min.
(254mm min.)
OR42-TRAD-INT
38-3/4"
(985mm)
26-3/4"
(680mm)
10" min.
(254mm min.)
OR54-TRAD-INT
50-15/16"
(1294mm)
32-3/4"
(832mm)
10" min.
(254mm min.)
• Clear the existing fireplace of all debris.
• Ensure that an appropriate electrical outlet is installed in the back or side of the existing fireplace.
• Remove the front glass. See “Glass Removal/Installation”.
• Slide the fireplace into the existing fireplace. Adjust the adjustable feet as needed.
• Decorate according to media installation guide.
• Re-install the front glass. See “Glass Removal/Installation”.
11
www.modernflames.com
Hardwiring Installation
If it is necessary to hardwire this appliance, a qualified electrician must remove the cord connection and
wire the appliance directly to the household wiring.
NOTE: A dedicated 13 Amp (EU) or 10 Amp (AU/NZ) breaker is required.
Note:
There are 3 wires from the appliance junction box: white (neutral), black (power L1), and green (ground) that
are connected to 220-240V power source (circuit breaker panel).
• Ensure that power from the circuit breaker is off.
• Remove the 2 securing screws from the junction box cover plate, located on the middle, left-hand,
back-side of the appliance (Fig. 3-1).
• Remove the two screws from the power-in receiver.
• Gently pull the power-in receiver until the wire nuts on the wires are exposed (Fig 3-2).
• If the strain relief is not already installed, install it into the junction box cover plate (Fig. 3-3). Slide the
power supply wire through the strain relief.
• Separate the black, white, and green wires that have the wire nuts on them. Remove all the wire nuts
and store the power receiver in a safe place.
• Using the existing wire nuts, connect the green wire (G) to the supply ground wire, the white wire (N)
to the supply Neutral wire, and the black wire (L) to the supply L1 wire. (Fig. 3-4).
• Resecure the junction box cover plate using the 2 screws previously removed.
Fig. 3-1
Fig. 3-2
Fig. 3-3
Fig. 3-4

12
www.modernflames.com
Driftwood Logs and Crushed Glass Installation
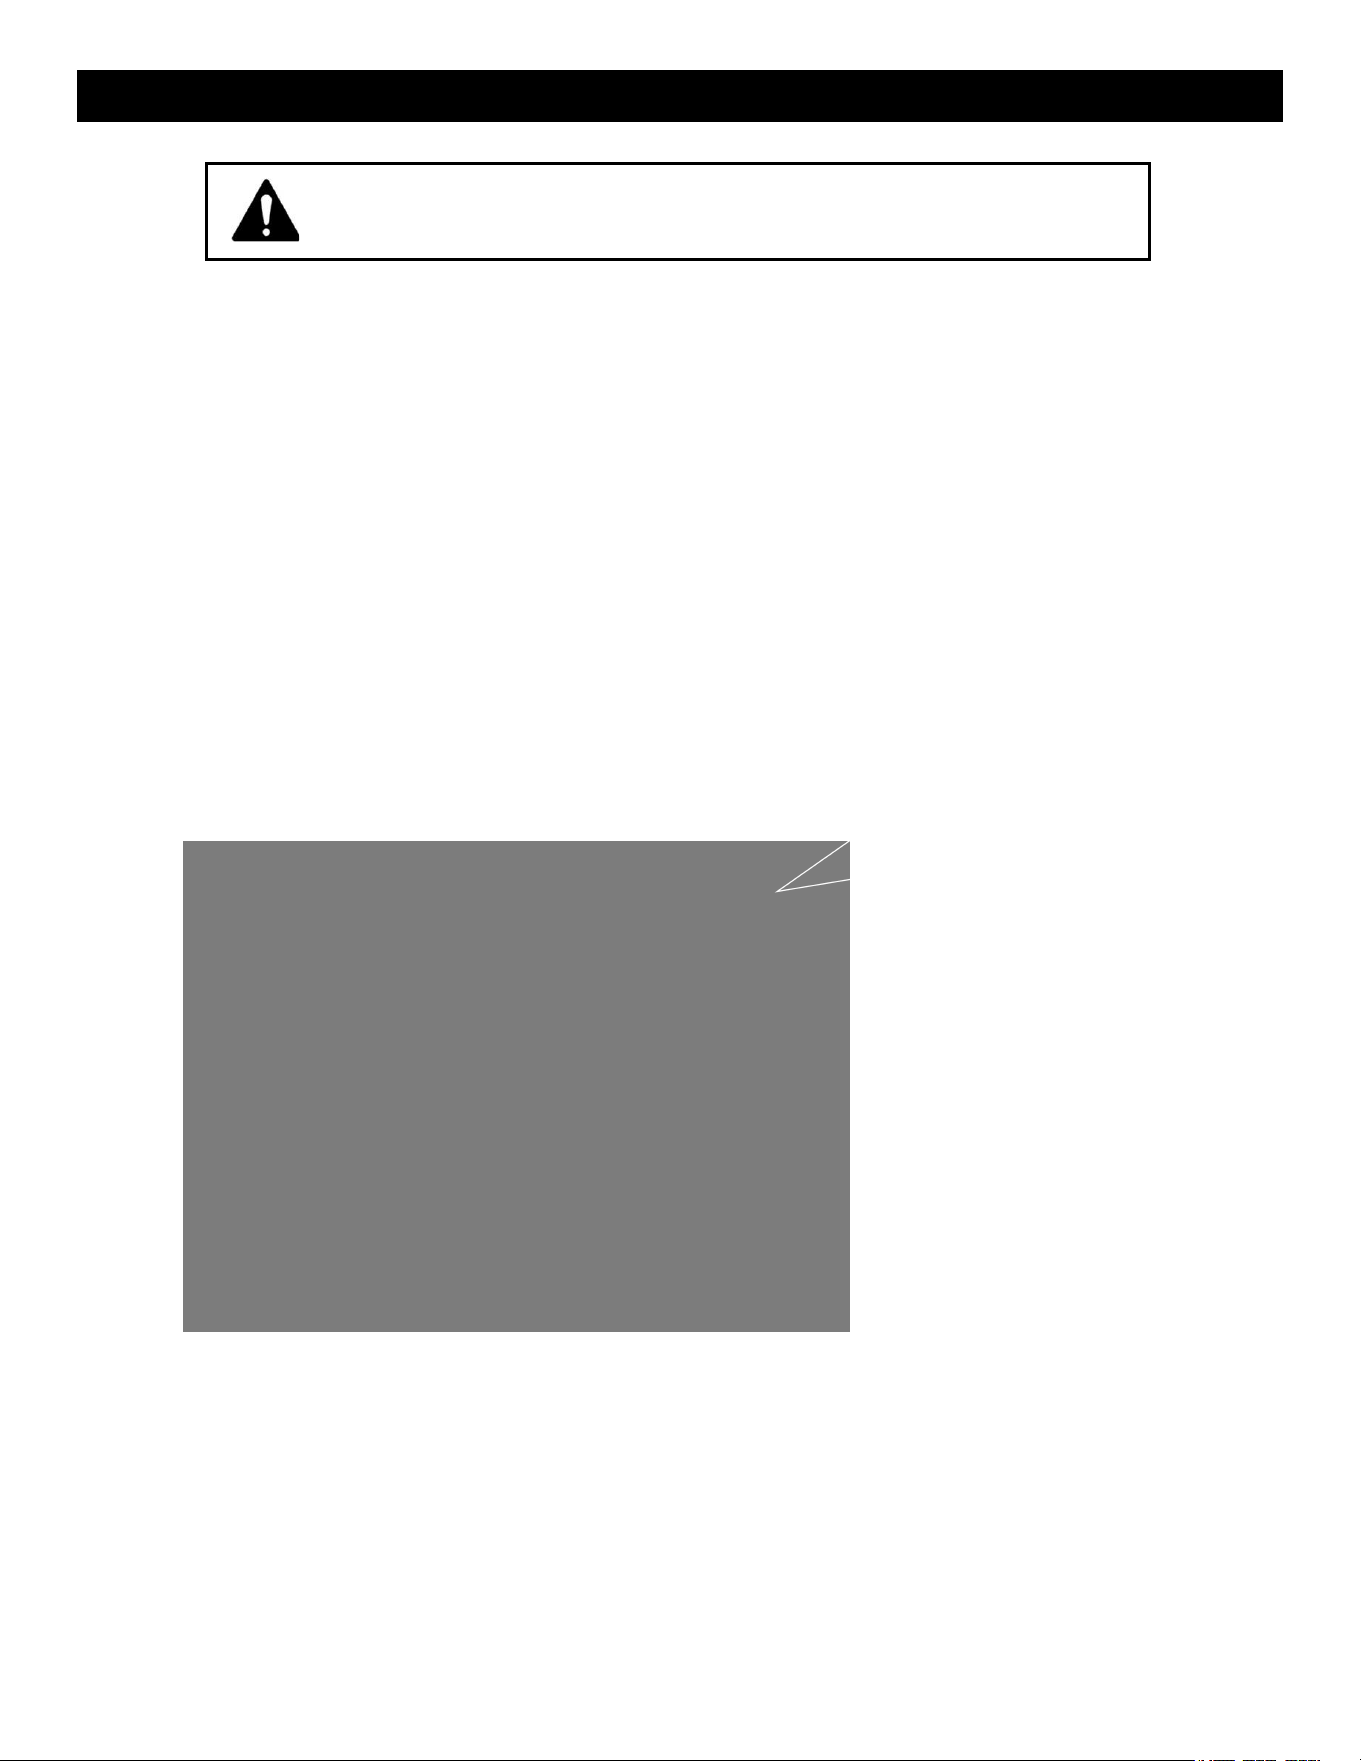
• Front glass must be removed and the appliance must be mounted in its final location before the
driftwood logs and crushed glass is installed.
• Install driftwood logs first by plugging the connector into the socket as shown below and placing it
in the ember bed.
• Add the crushed glass around logs.
13
www.modernflames.com
Operation
Power
Plug the power cord into a dedicated 240 Volt 13 Amp (EU) or 10 Amp (AU/NZ) grounded outlet (see
IMPORTANT SAFETY INFORMATION). A dedicated circuit is preferred but not essential in all cases. A
dedicated circuit will be required if after installation, the circuit breaker trips on a regular basis when
heater is operating. Make sure the outlet is in good condition and the plug is not loose. NEVER exceed
the maximum amperage for the circuit.
Master Power Switch
Located above the Touch Control Panel is the Master Power Switch. Ensure the rocker switch is pressed
in the “On” position prior to operating the fireplace.
Note: After resetting the Master Power Switch or from a loss of power, the fireplace takes 20-30
seconds before the fireplace is fully booted and operational.
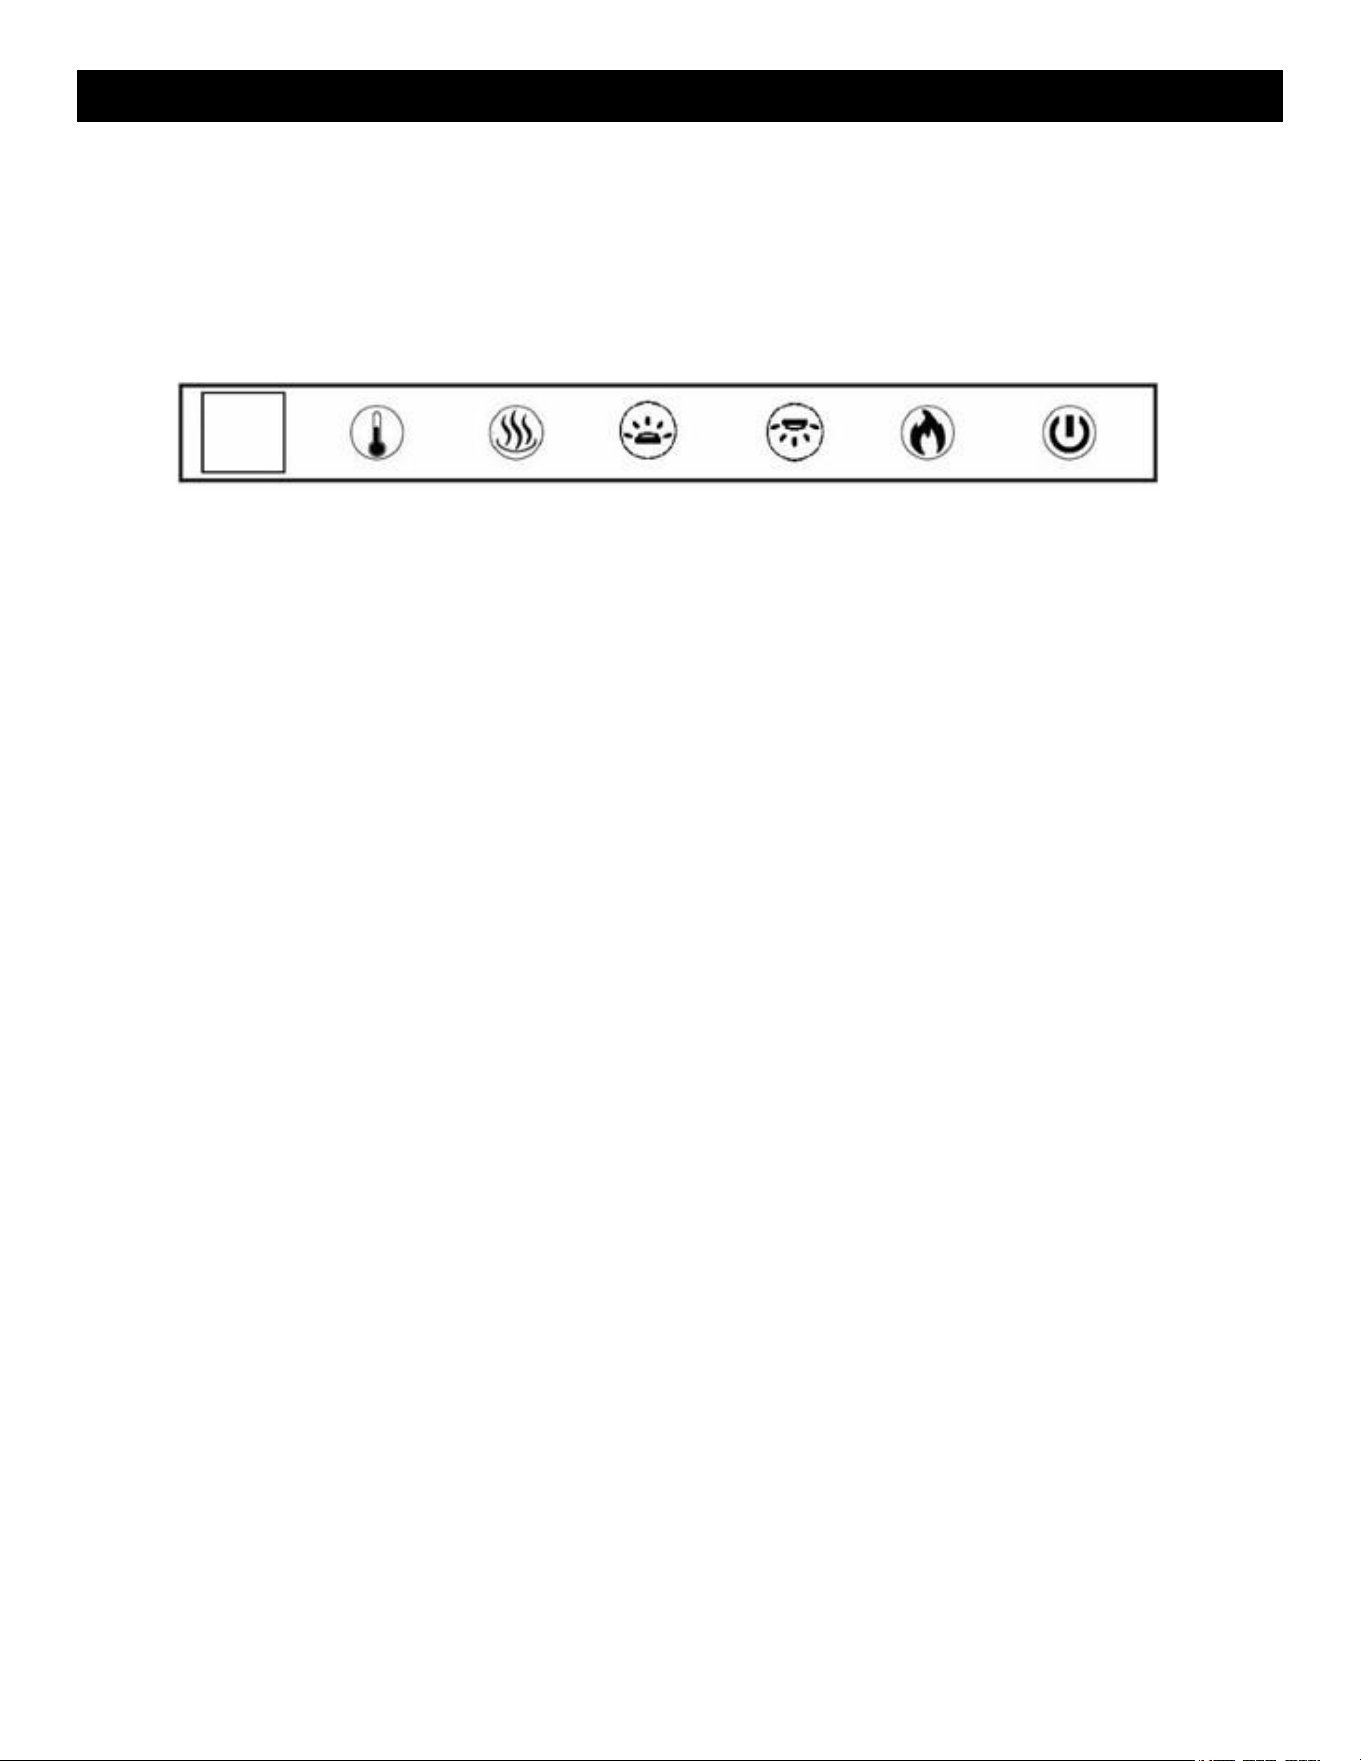
• With the fireplace ON, press and hold the Power button on the fireplace for 5 seconds until you
hear a beep from the fireplace. “P1” will be shown on the display.
• Within 5 seconds of the fireplace beeping, repeatedly press the power button on the remote until
the fireplace beeps again.
• Pairing must be completed within 5 seconds or the fireplace pairing will time out of pairing mode.
Read and understand this entire owner’s manual, including all safety
information, before plugging in or using this product. Failure to do so
could result in electric shock, fire, serious injury, or death.
Pairing the Remote
14
www.modernflames.com
Operation - (Continued)
Methods of Operation
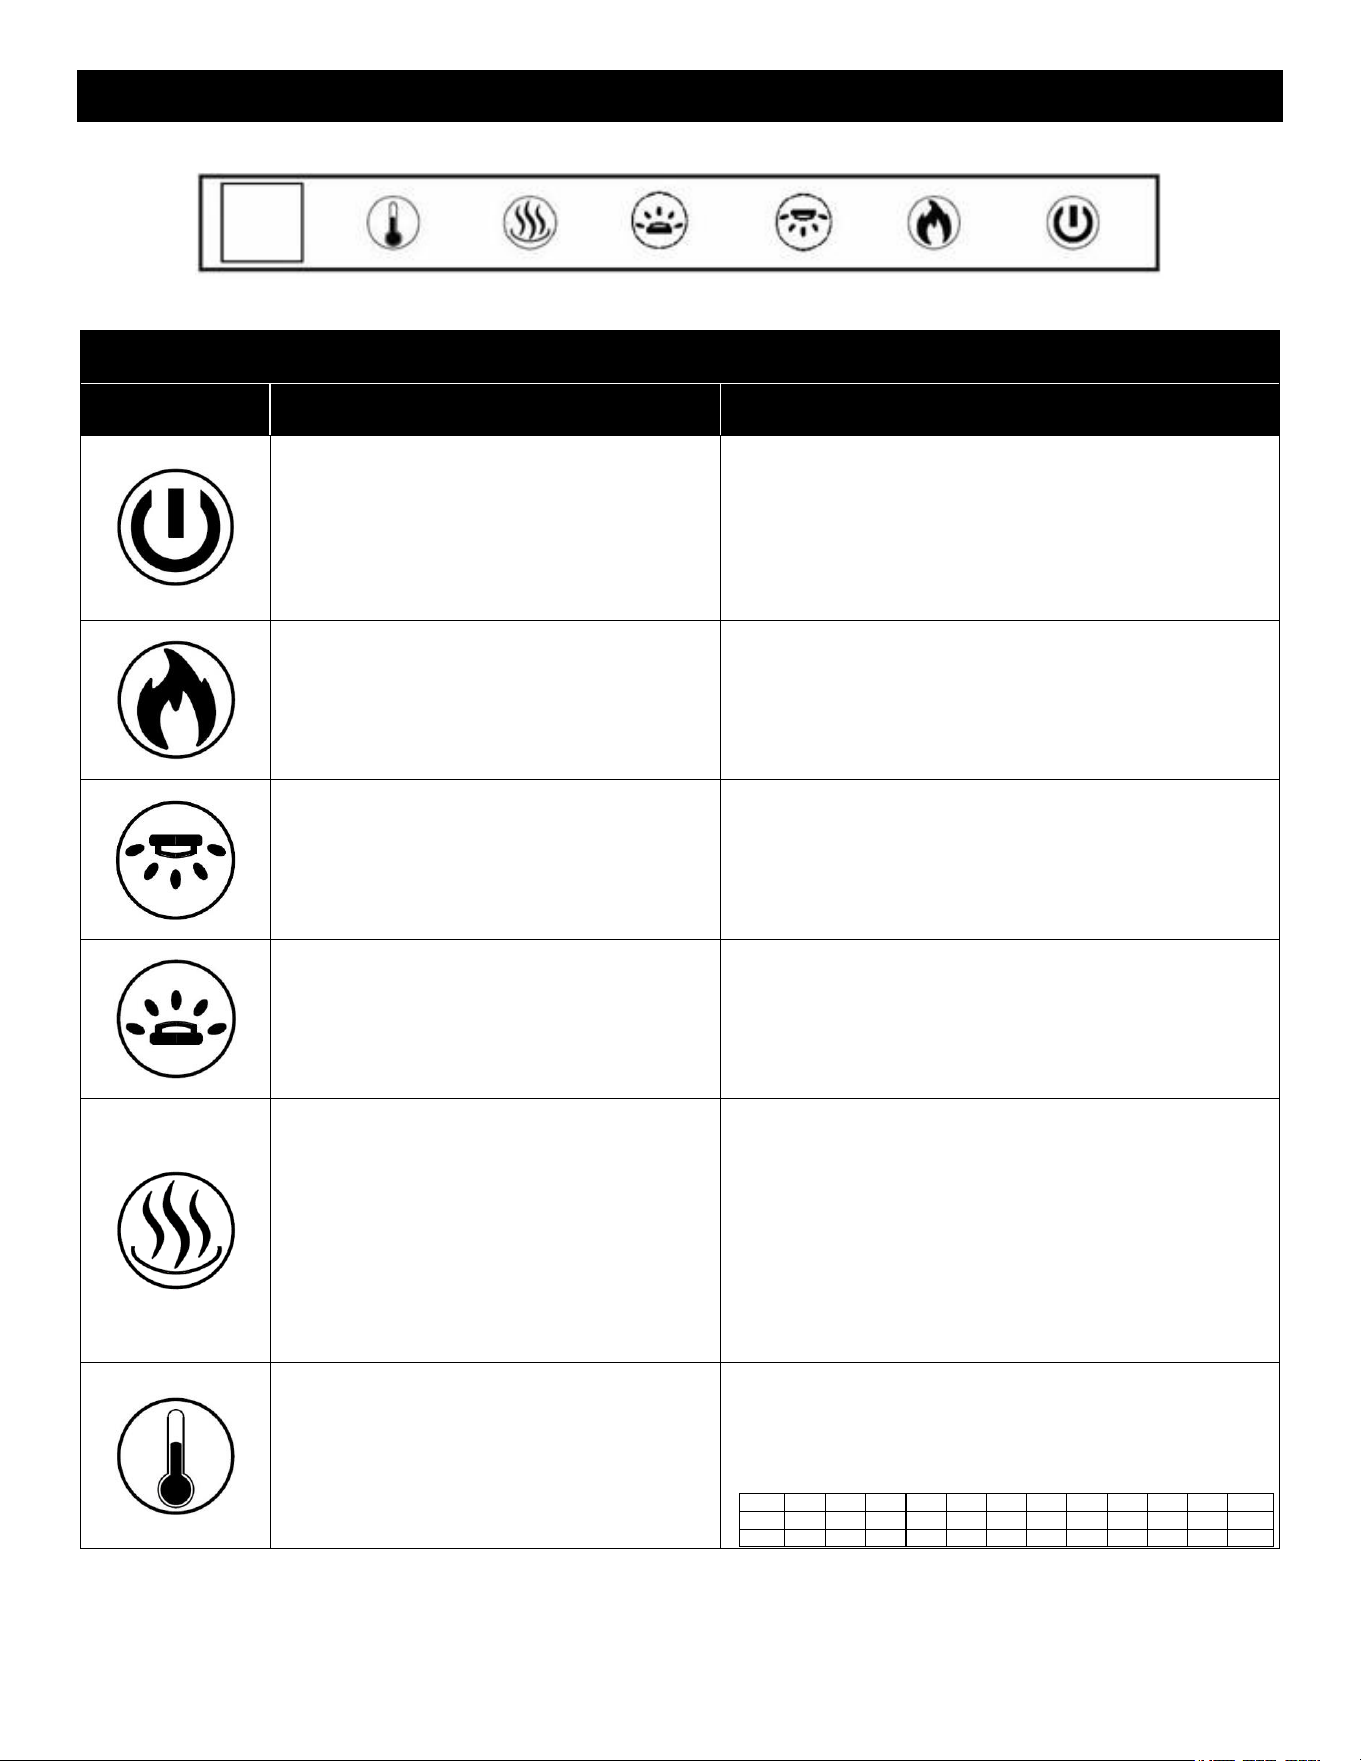
This electric fireplace can be operated by the Touch Control Panel located on the upper right corner of
the fireplace, by the battery-powered Remote Control, or by the Modern Flames APP using a smart
phone or tablet.
Remote Control Modern Flames App
Touch Control Panel
15
www.modernflames.com
Operation – Touch Control Panel
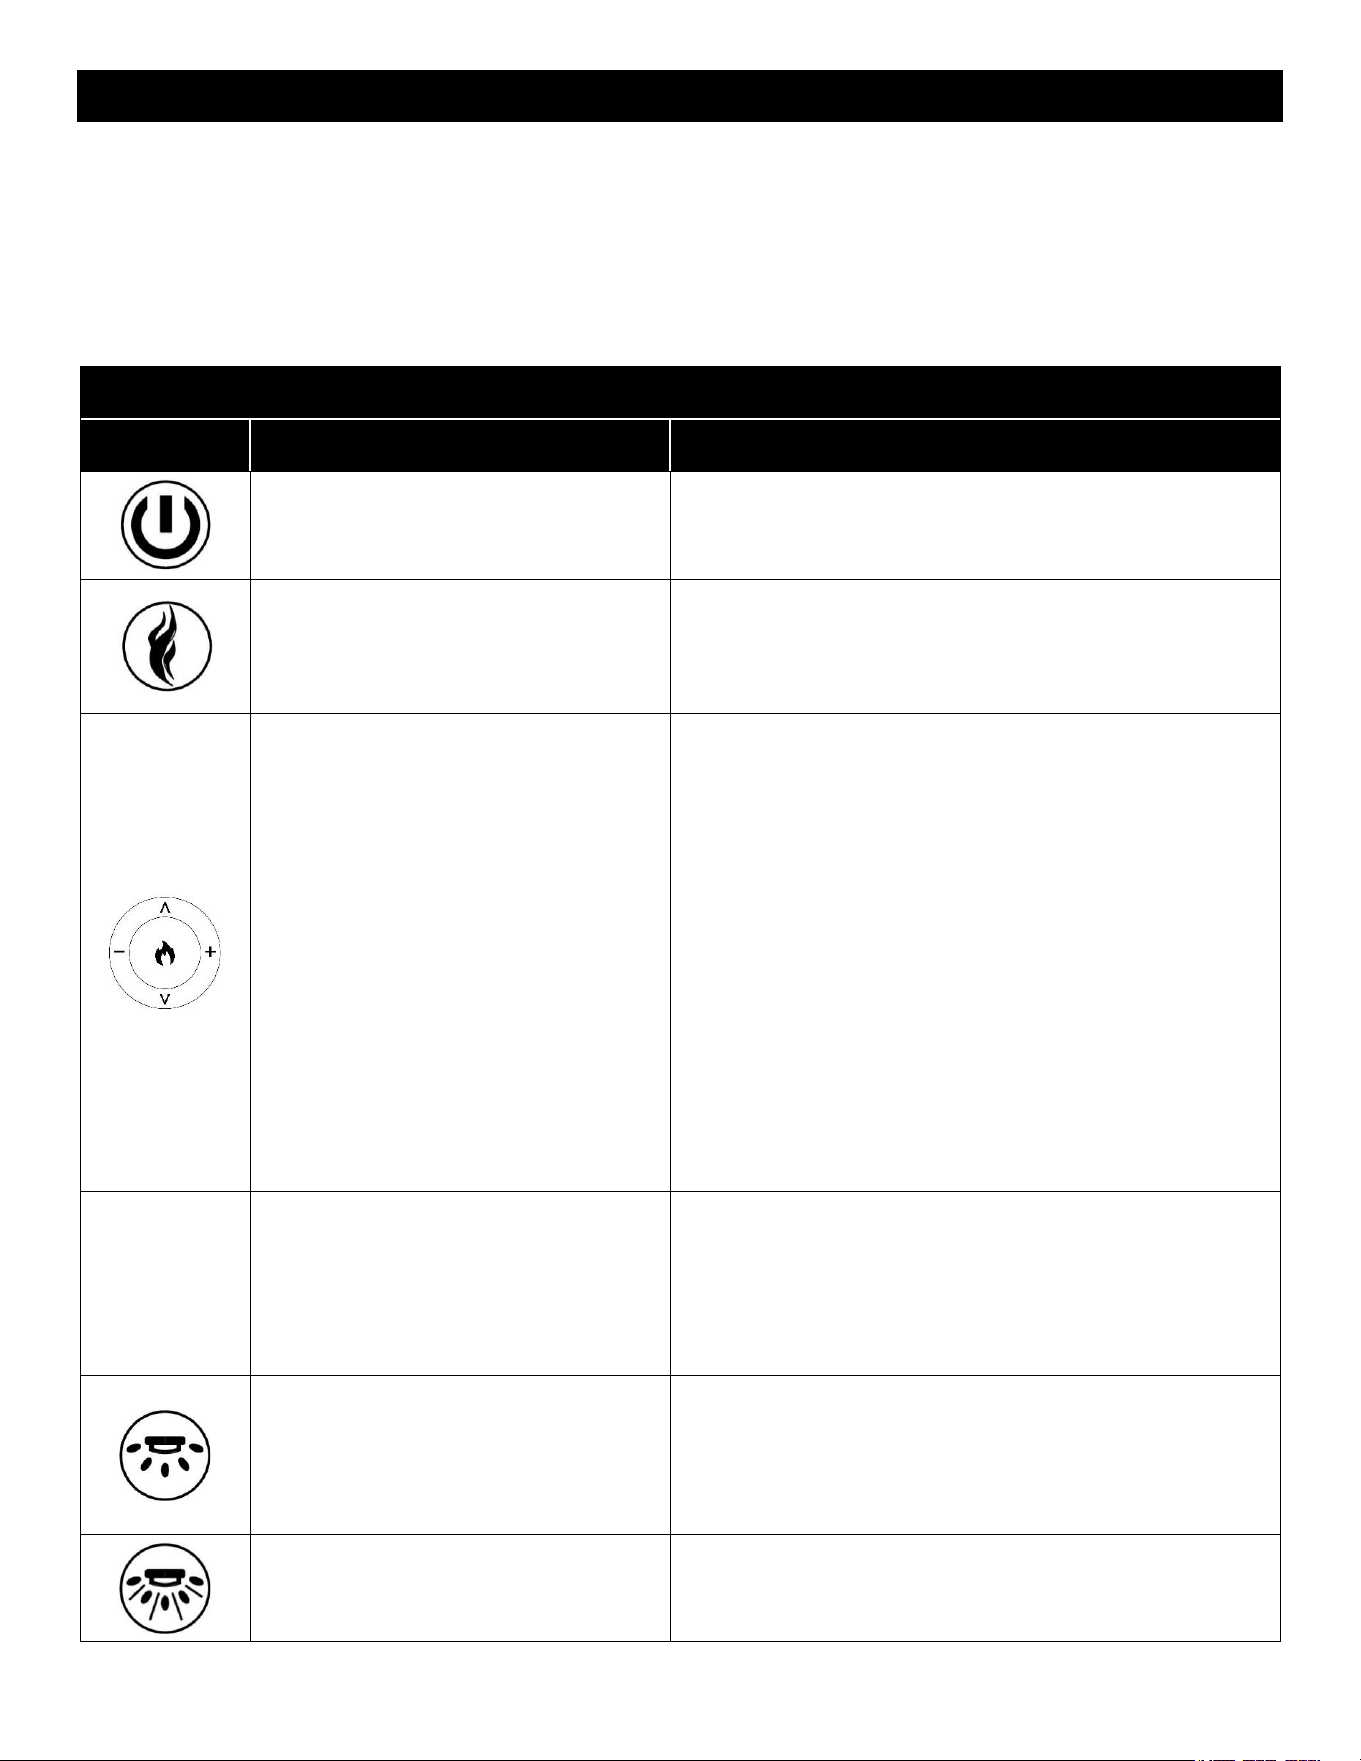
Touch Panel Operation
Button
Function
Action
ON: Enables control panel functions. Turns
on flame.
OFF: Disables control panel functions.
Turns off flame.
1. Press once: Indicator light turns on. Power turns
on. All functions enabled.
2. Press again: Flame turns off. Unit goes to standby.
All functions turn off.
3. NOTE: Press and Hold for 5 seconds: Places
fireplace in remote paring mode. Displays P1 during
pairing.
FLAME BUTTON: Changes between
flame presets.
NOTE: Color effect stays on until power
button is turned off.
This fireplace has memory function for
flame presets.
1. Press once: Flame color illuminates.
2. Press again until preset color is reached. In total,
three styles of flame with six colors for each flame.
NOTE: Press and hold for 5 seconds to start
connecting with App.
DOWNLIGHT BUTTON: Cycles down light
colors.
NOTE: Downlight color effect stays on until
power button is turned off.
This fireplace has memory function for
down light settings.
1. Press once: Cycle Down light.
2. Press again until desired color is reached. In total
ten colors and one fade
mode.01-02-03-04-05-06-07-08-09-10-11
NOTE: Press and hold for 5 seconds to turn on/off
night light mode.
MEDIA BED BUTTON: Cycles media bed
colors.
NOTE: Media bed color effect stays on
until power button is turned off.
This fireplace has memory function for
media bed settings.
1. Press once: Turns on ember bed.
2. Press again until desired color is reached. In total
ten colors and one fade
mode.01-02-03-04-05-06-07-08-09-10-11
HEATER BUTTON: Turns heater on and
off.
NOTE: The heater only works when the
flame is on. If the flame is off, the heater
will not turn on.
NOTE: To prevent overheating, the heater
fan will blow cool air for 8-10 seconds after
the heater turns off.
1. Press once: Turns the heater and blower on.
2. Press again until it cycles thru the heater settings.
Settings:
H0 - Heater and blower off
F – Fan only
H1 - Low Heater
H2 - High Heater
NOTE: Press and hold the heater button for 5
seconds to lock/unlock the heater and thermostat.
H0 will be displayed when locked.
THERMOSTAT BUTTON: Turns heater on
/ off to maintain room at selected
temperature.
NOTE: Press the button for 5 seconds to
switch between °C and °F.
1. Press once: Touch-on control panel indicator
becomes active.
2. Press again until desired temperature is reached.
Digital display shows settings 0-10. Table shows
corresponding temperatures.
NO
0
1
2
3
4
5
6
7
8
9
10
NO
°C
20
21
22
23
24
25
26
27
28
29
30
°C
°F
68
70
72
74
76
78
80
82
84
86
88
°F
NOTE: Press and hold for 5 seconds to turn the
logs/auxiliary on and off.
16
www.modernflames.com
Operation – Remote Control
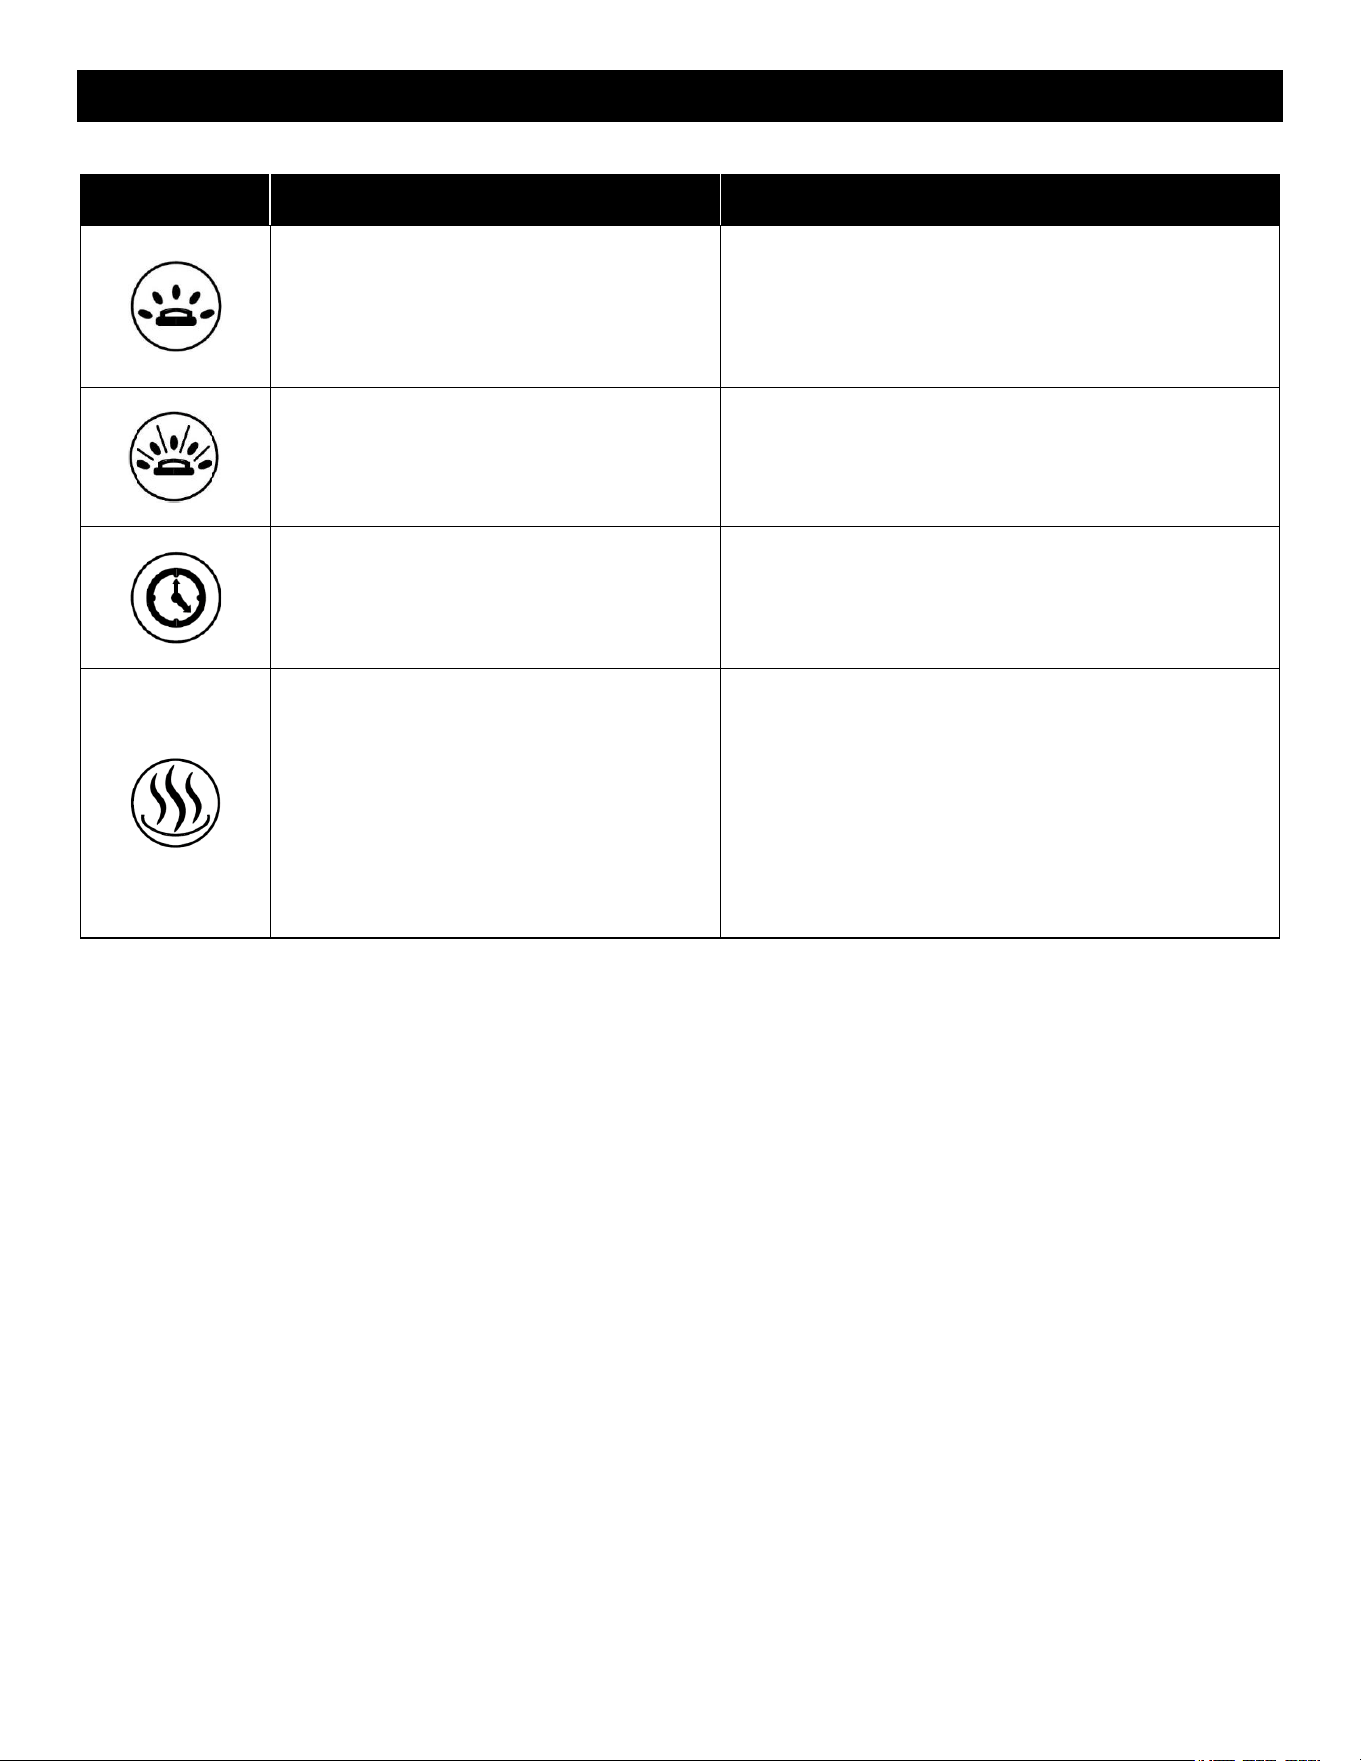
Remote Control Operation
Button
Function
Action
ON: Enables control panel functions.
Turns on flame.
OFF: Disables control panel functions.
Turns off flame.
1. Press once: Indicator light turns on. Power turns on. All
functions enabled.
2. Press again: Flame turns off. Unit goes to standby. All
functions turn off.
HOME BUTTON: Returns the fireplace
to the default color settings.
1. Press once: Flame video changes to flame style 1, color
yellow. Ember bed and down light changes to orange.
Flame speed changes to default and sound level changes
to low.
FLAME BUTTON: Cycles between
flame styles and colors.
ʌ: Cycles up between presets of
current flame styles.
v: Cycles down between presets of
current flame styles.
+: Increases flame speed of current
flame style and color.
--: Decrease flame speed of current
flame style and color.
NOTE: This fireplace has memory
function for flame.
1. Press flame button once: Flame switches to next flame
style in the sequence
2. Press flame button again until desired style is reached.
In total, three flame styles.
Note: Press and hold for 5 seconds enables Wi-Fi pairing
mode
3. Press ʌ once: Changes up to the next preset of current
flame style.
4. Press ʌ again until desired preset is selected from
1C-2C-3C-4C-5C-6C.
5. Press v once: Changes down to the next preset of
current flame style.
6. Press v again until desired preset is selected from
6C-5C-4C-3C-2C-1C.
7. Press + button to increase the flame speed.
Displayed: 01-02-03.
8. Press button to decrease the flame speed.
Displayed: 03-02-01.
AUDIO BUTTON: Raises and lowers
the audio from the fireplace.
1. Press once: Changes the volume level.
2. Press again cycles between volume settings.
Volume settings:
S0 - Off
S1 - Low
S2 - Medium
S3 - High
DOWNLIGHT BUTTON: Cycles down
light colors.
NOTE: Downlight color effect stays on
until power button is turned off.
This fireplace has memory function for
down light settings.
1. Press once: Cycle downlight.
2. Press again until desired color is reached. In total ten
colors and one fade
mode.01-02-03-04-05-06-07-08-09-10-11
NOTE: Press and hold for 5 seconds to turn on night light
mode.
DOWNLIGHT BRIGHTNESS BUTTON:
Makes downlight dimmer and brighter.
NOTE: LED down light brightness stays
on until power button is turned off.
1. Press once: Brightness becomes active.
2. Press again until desired setting is reached. In total 5
levels.
From L4 - L3 - L2 - L1 - L0 (off)
17
www.modernflames.com
Operation – Remote Control (Continued)
Button
Function
Action
MEDIA BED BUTTON: Cycles media bed
colors.
NOTE: Media bed color effect stays on
until power button is turned off.
This fireplace has memory function for
media bed settings.
1. Press once: Turns on ember bed.
2. Press again until desired color is reached. In total
ten colors and one fade.
mode.01-02-03-04-05-06-07-08-09-10-11
MEDIA BRIGHTNESS BUTTON: Makes
media bed dimmer and brighter.
NOTE: LED media light brightness stays
on until power button is turned off.
1. Press once: Brightness becomes active.
2. Press again until desired setting is reached.
In total 5 levels.
From E4 - E3 - E2 - E1 - E0 (off)
TIMER BUTTON: Controls timer settings
to turn off fireplace at selected time.
Settings range from 30 min to 8 hours.
1. Press once: Indicator light turns on. Timer defaults
to 0.5 hours.
2. Press again until desired setting is reached.
00 (off)-30-1H-2H-3H-4H-5H-6H-7H-8H
HEATER BUTTON: Turns heater on and
off.
NOTE: The heater only works when the
flame is on. If the flame is off, the heater
will not turn on.
NOTE: To prevent overheating, the heater
fan will blow cool air for 8-10 seconds after
the heater turns off.
1. Press once: Turns the heater and blower on.
2. Pressing Additionally: Cycles thru heater settings.
Settings:
H0 - Heater and blower off
F – Fan Only
H1 - Low Heater
H2 - High Heater
NOTE: Press and hold the heater button for 5 seconds
to lock/unlock the heater and thermostat.
H0 will be displayed when locked.
NOTE: Press and hold for 5 seconds to turn the
logs/auxiliary on and off.
18
www.modernflames.com
Download Smart Phone/Tablet App
Smart Phone/Tablet App Connection
Note: Download the Modern Flames App from your App store before connecting

19
www.modernflames.com
Wi-Fi – Initial Log-in
• Search for and install the “Modern Flames” app from the Google Play or Apple App store or scan the
QR code on the previous page.
• After the App is installed, log in to the Modern Flames App. Must have Wi-Fi and Bluetooth enabled
on your smart phone.
• Once opened from the home page, select the add “+” symbol.

20
www.modernflames.com
Wi-Fi – Pairing
Add Manually
• Select the series of fireplace that will be paired with and follow the instructions.
• When pairing via Wi-Fi, the 2.4 GHz Wi-Fi signal must be used. Ensure the appropriate login
information is entered before continuing to the next step.

21
www.modernflames.com
Wi-Fi – Pairing (Continued)
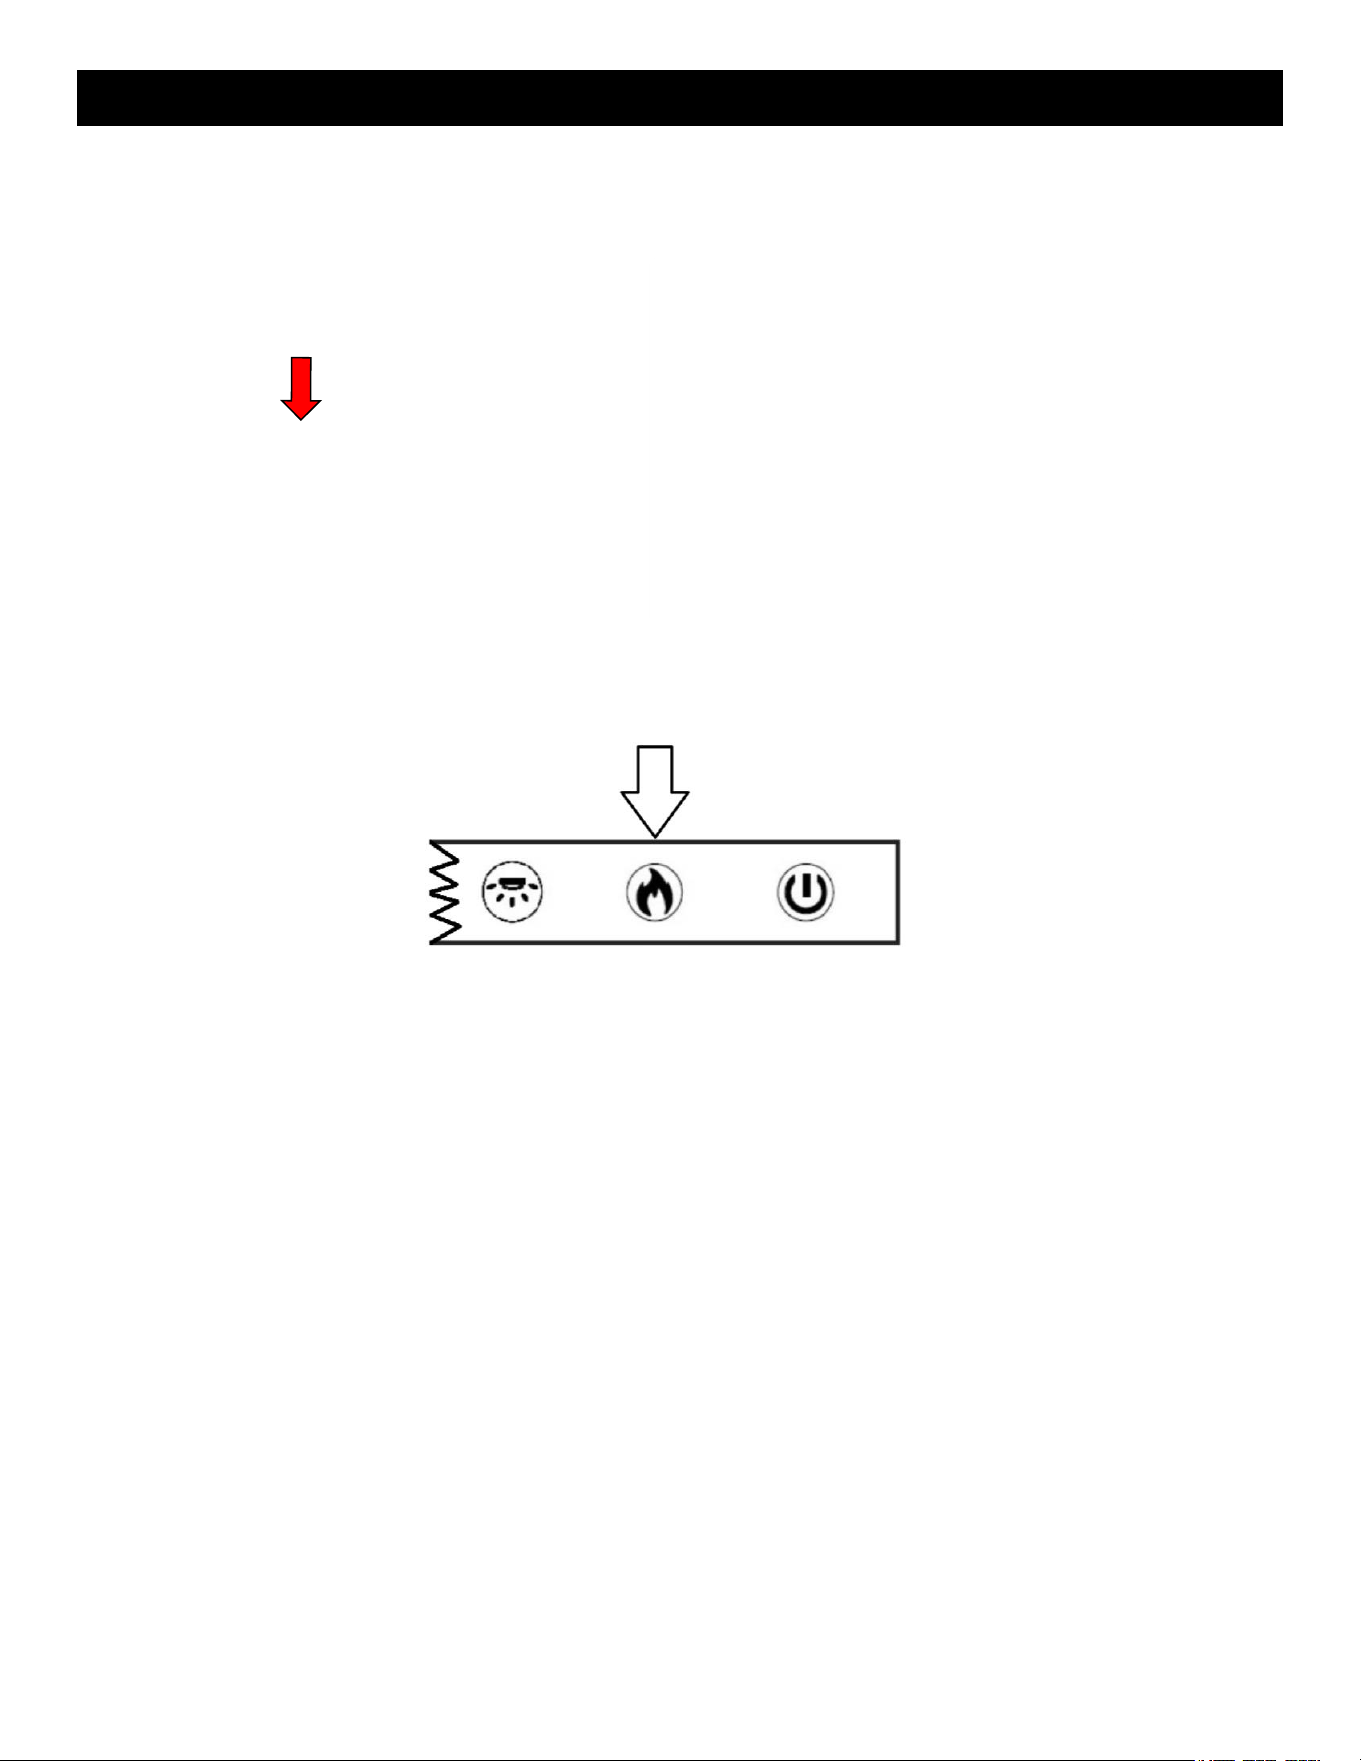
• Hold the “Flame” button on the manual touch controls for 5 seconds.
i. In EZ Mode, the fireplace will display “P0” (Recommended).
ii. In AP Mode, the fireplace will display “P2”
iii. Holding the flame button for an additional 5 seconds will cycle the fireplace between EZ
Mode and AP Mode.
• Device and APP should now begin to pair. Depending on Wi-Fi, this can take up to two minutes to
pair and may need to be repeated more than once.

22
www.modernflames.com
Wi-Fi – Pairing (Continued)
• The fireplace display will show “P4” and the downlight LEDs will blink green on a successful pair.
i. NOTE: Do not turn OFF or disconnect the fireplace from power while pairing the Wi-Fi or
performing updates. Failure to do so can result in damage to electrical components of the
fireplace. Damage as a result of this may not be covered under warranty. Questions or
assistance in pairing device, contact Modern Flames:
▪ Australia/New Zealand:
info@modernflames.com
07 5630 6837 Monday-Friday, 9:00 am – 4:00 pm (AEST).
▪ Europe:
europe@modernflames.com
+46 762 09 58 09 Monday – Friday, 9:00 am – 4:00pm (CEST)
23
www.modernflames.com
Wi-Fi – Pairing (Continued)
Auto Scan
• Select auto scan from the top of the App.
• On the fireplace touch controls, press and hold the “Flame” button for 5 seconds. The fireplace will
show either “P0” or “P2”. This will place the fireplace in pairing mode.

24
www.modernflames.com
Wi-Fi – Pairing (Continued)
• Auto scan will search for available devices. Upon selecting the available fireplace, select the “Next”
button if the app does not proceed automatically. If the scan fails to find a fireplace, press and hold
the “Flame” button on the manual touch controls to switch pairing modes.
• Enter in the Wi-Fi information. The information must be entered to be able to proceed to the next
step.
• The App will begin connecting.

25
www.modernflames.com
Wi-Fi – Pairing (Continued)
• The fireplace display will show “P4” and the downlight LEDs will blink green on a successful pair.
i. NOTE: Do not turn OFF or disconnect the fireplace from power while pairing the Wi-Fi or
performing updates. Failure to do so can result in damage to electrical components of the
fireplace. Damage as a result of this may not be covered under warranty. Questions or
assistance in pairing device, contact Modern Flames:
▪ Australia/New Zealand:
info@modernflames.com
07 5630 6837 Monday-Friday, 9:00 am – 4:00 pm (AEST).
▪ Europe:
europe@modernflames.com
+46 762 09 58 09 Monday – Friday, 9:00 am – 4:00pm (CEST)
26
www.modernflames.com
Operation – Smart Phone/Tablet App
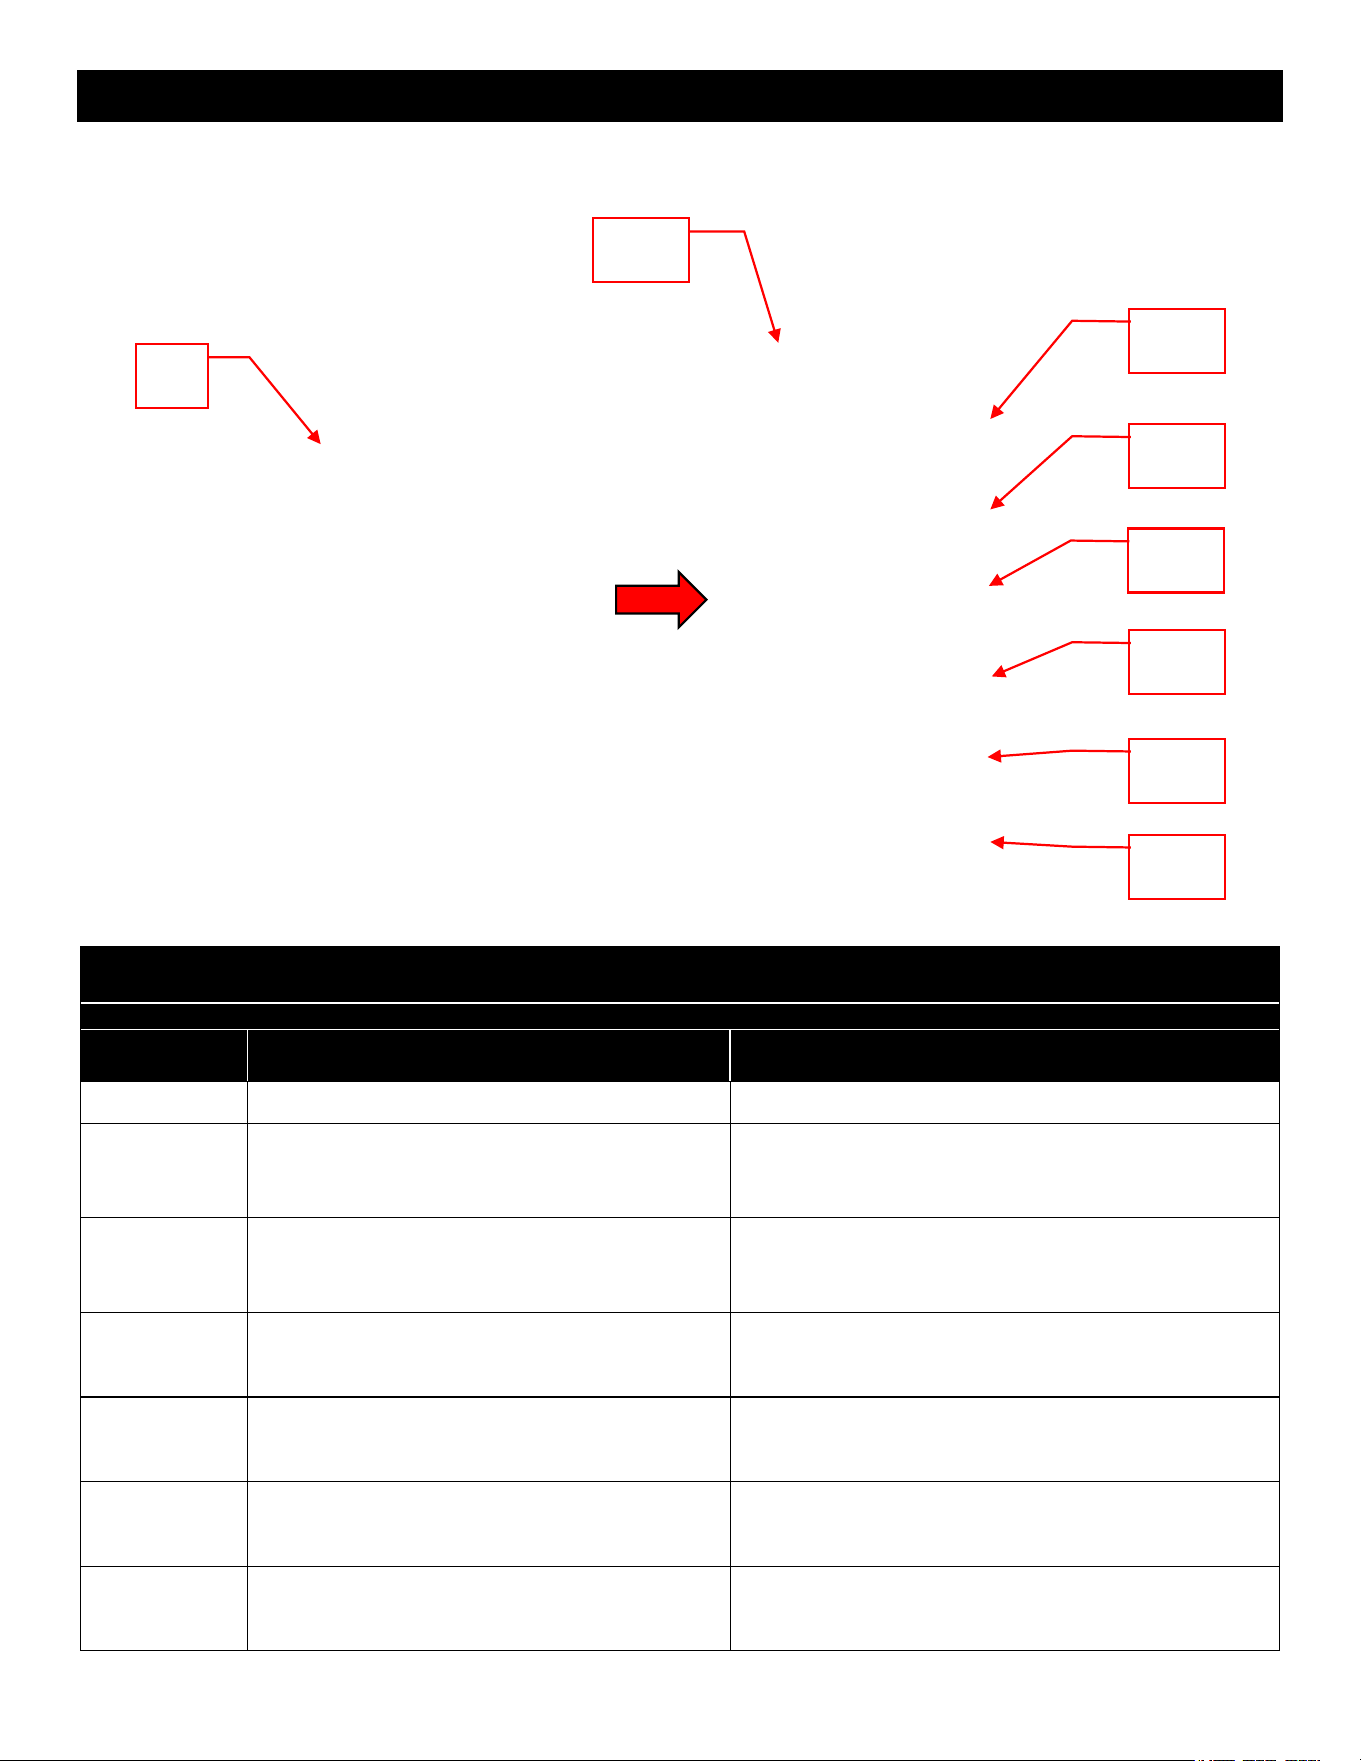
Home Screen
Button
Function
Action
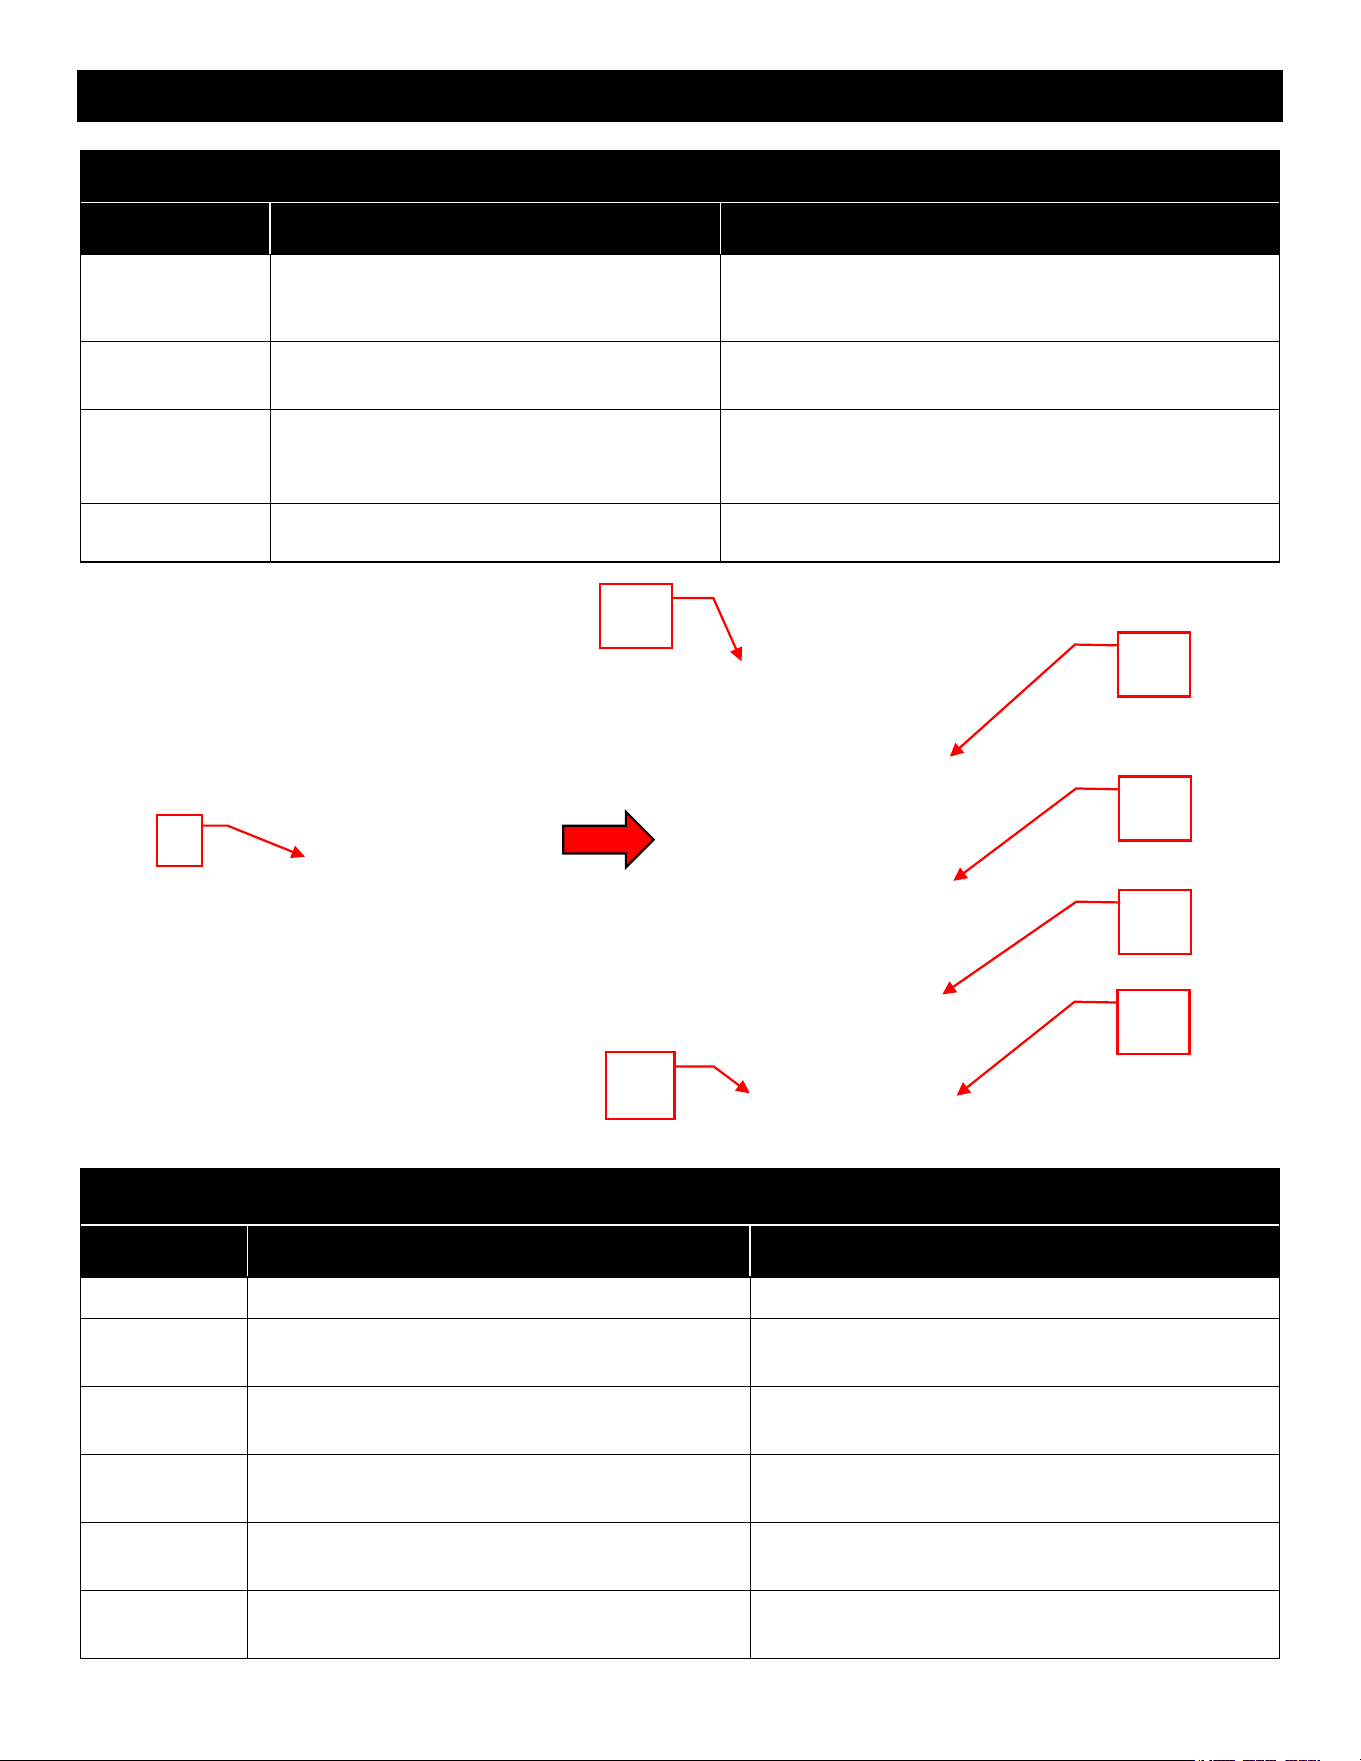
1
Home Button: Returns the fireplace to the
default color settings.
1. Press once: Flame video changes to flame style 1,
color yellow. Ember bed and down light changes to
orange. Flame speed changes to default and sound
level changes to low.
2
Power Off/On Slider: Turns the fireplace
off and on.
1. Slide to the Off position: Turns the fireplace OFF.
2. Slide to the On position: Turns the fireplace ON.
3
Flame Style: Opens flame style sub-menu
for selecting flame style and color. 3 styles
with 6 colors for each of the styles.
1. Press once: Opens the flame style sub-menu page
to select a new flame style.
4
Flame Speed Slider: Changes the flame
speed of currently displayed flame. Cycles
between SLOW, DEFAULT, and FAST.
1. Slide to the Slow position: Flame moves at the
slowest speed. Fireplace displays: 01
2. Slide to the Default position: Flame moves at the
default speed. Fireplace displays: 02
3. Slide to the Fast position: Flame moves at the
fastest speed. Fireplace displays: 03
5
Flame Volume Slider: Changes the sound
effect volume of the fireplace between 4
different volumes. Can cycle between OFF,
DEFAULT, MEDIUM, HIGH.
1. Slide to the Off position: Sound effects are turned
off. Fireplace displays: S0
2. Slide to the default position: Sound effects are at
the lowest/default sound level. Fireplace displays: S1
3. Slide to the Medium position: Sound effects are
at the middle sound level. Fireplace displays: S2
4. Slide to the High position: Sound effects are at
the highest sound level. Fireplace displays: S3
9
8
7
6
5
4
3
2
1
27
www.modernflames.com
Operation – Smart Phone/Tablet App (Continued)
Home Screen (Continued)
Button
Function
Action
6
Downlight Button: Opens the downlight
sub-menu.
1. Press once: Opens the downlight sub-menu page
to select new colors for downlighting.
7
Ember Bed Button: Opens the ember bed
sub-menu.
1. Press once: Opens the ember bed sub-menu page
to select new colors for the ember bed and log set.
8
Heater Button: Opens the heater sub-
menu.
1. Press once: Opens a new page to make changes
to the heater settings.
9
Timer Button: Opens the timer sub-menu.
1. Press once: Opens the timer sub-menu for various
timer related functions.
Flame Style Options
Button
Function
Action
3.1
Return Button: Returns to the previous page.
1. Press once: Returns to the previous page.
3.2
Style One Button: Opens the flame style one
sub-menu.
1. Press once: Opens the flame style one sub-
menu.
3.3
Style Two Button: Opens the flame style two
sub-menu.
1. Press once: Opens the flame style two sub-
menu.
3.4
Style Three Button: Opens the flame style
three sub-menu.
1. Press once: Opens the flame style three
sub-menu.
3.5
Menu Button: Opens the custom mode sub-
menu.
1. Press once: Opens the custom mode sub-
menu.
3.6
Custom Mode Button: Activates the custom
preset.
1. Press once: Changes the fireplace to the
custom mode as defined from the Menu button, 3.5
3.1
3
3.4
3.5
3.6
3.3
3.2
28
www.modernflames.com
Operation – Smart Phone/Tablet App (Continued)
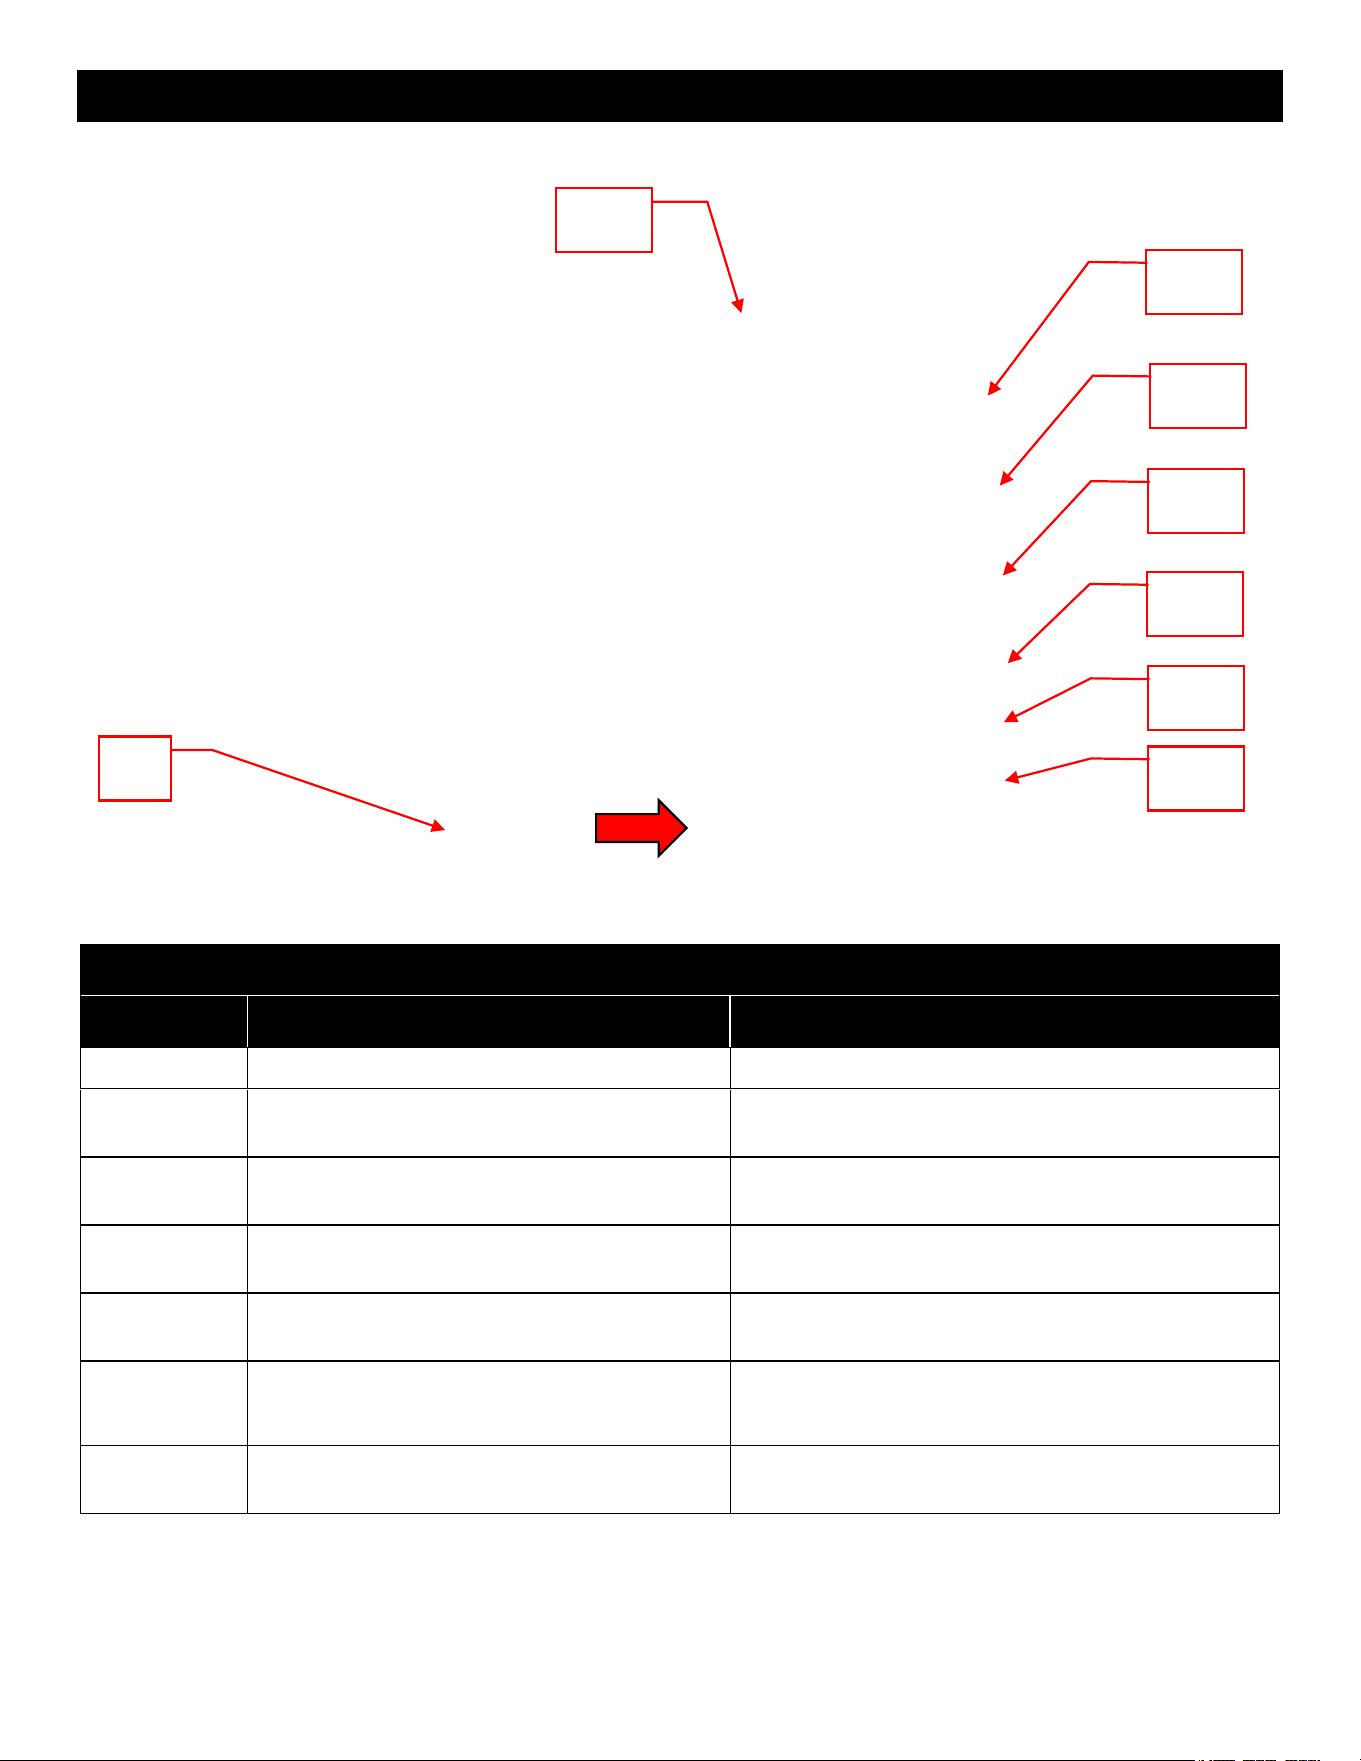
• 3.2 menu depicted. Functions and actions are the same for the 3.3 and 3.4 menu.
Flame Style One/Two/Three Color Menu
Note: Flame Style One (3.2), Two (3.3), and Three (3.4) all function the same as below
Button
Function
Action
3.2.1
Return Button: Returns to the previous page.
1. Press once: Returns to the previous page.
3.2.2
Yellow Flame Button: Changes the fireplace
to the Yellow flame.
1. Press once: Changes the fireplace to the Yellow
flame. Ember bed and downlighting change to the
designated preset.
3.2.3
Orange Flame Button: Changes the fireplace
to the Orange flame.
1. Press once: Changes the fireplace to the Orange
flame. Ember bed and downlighting change to the
designated preset.
3.2.4
Blue Flame Button: Changes the fireplace to
the Blue flame.
1. Press once: Changes the fireplace to the Blue
flame. Ember bed and downlighting change to the
designated preset.
3.2.5
Green Flame Button: Changes the fireplace
to the Green flame.
1. Press once: Changes the fireplace to the Green
flame. Ember bed and downlighting change to the
designated preset.
3.2.6
Purple Flame Button: Changes the fireplace
to the Purple flame.
1. Press once: Changes the fireplace to the Purple
flame. Ember bed and downlighting change to the
designated preset.
3.2.7
White Flame Button: Changes the fireplace
to the White flame.
1. Press once: Changes the fireplace to the White
flame. Ember bed and downlighting change to the
designated preset.
3.2.1
3.2.2
3.2.3
3.2.4
3.2.5
3.2.6
3.2.7
3.2
29
www.modernflames.com
Operation – Smart Phone/Tablet App (Continued)
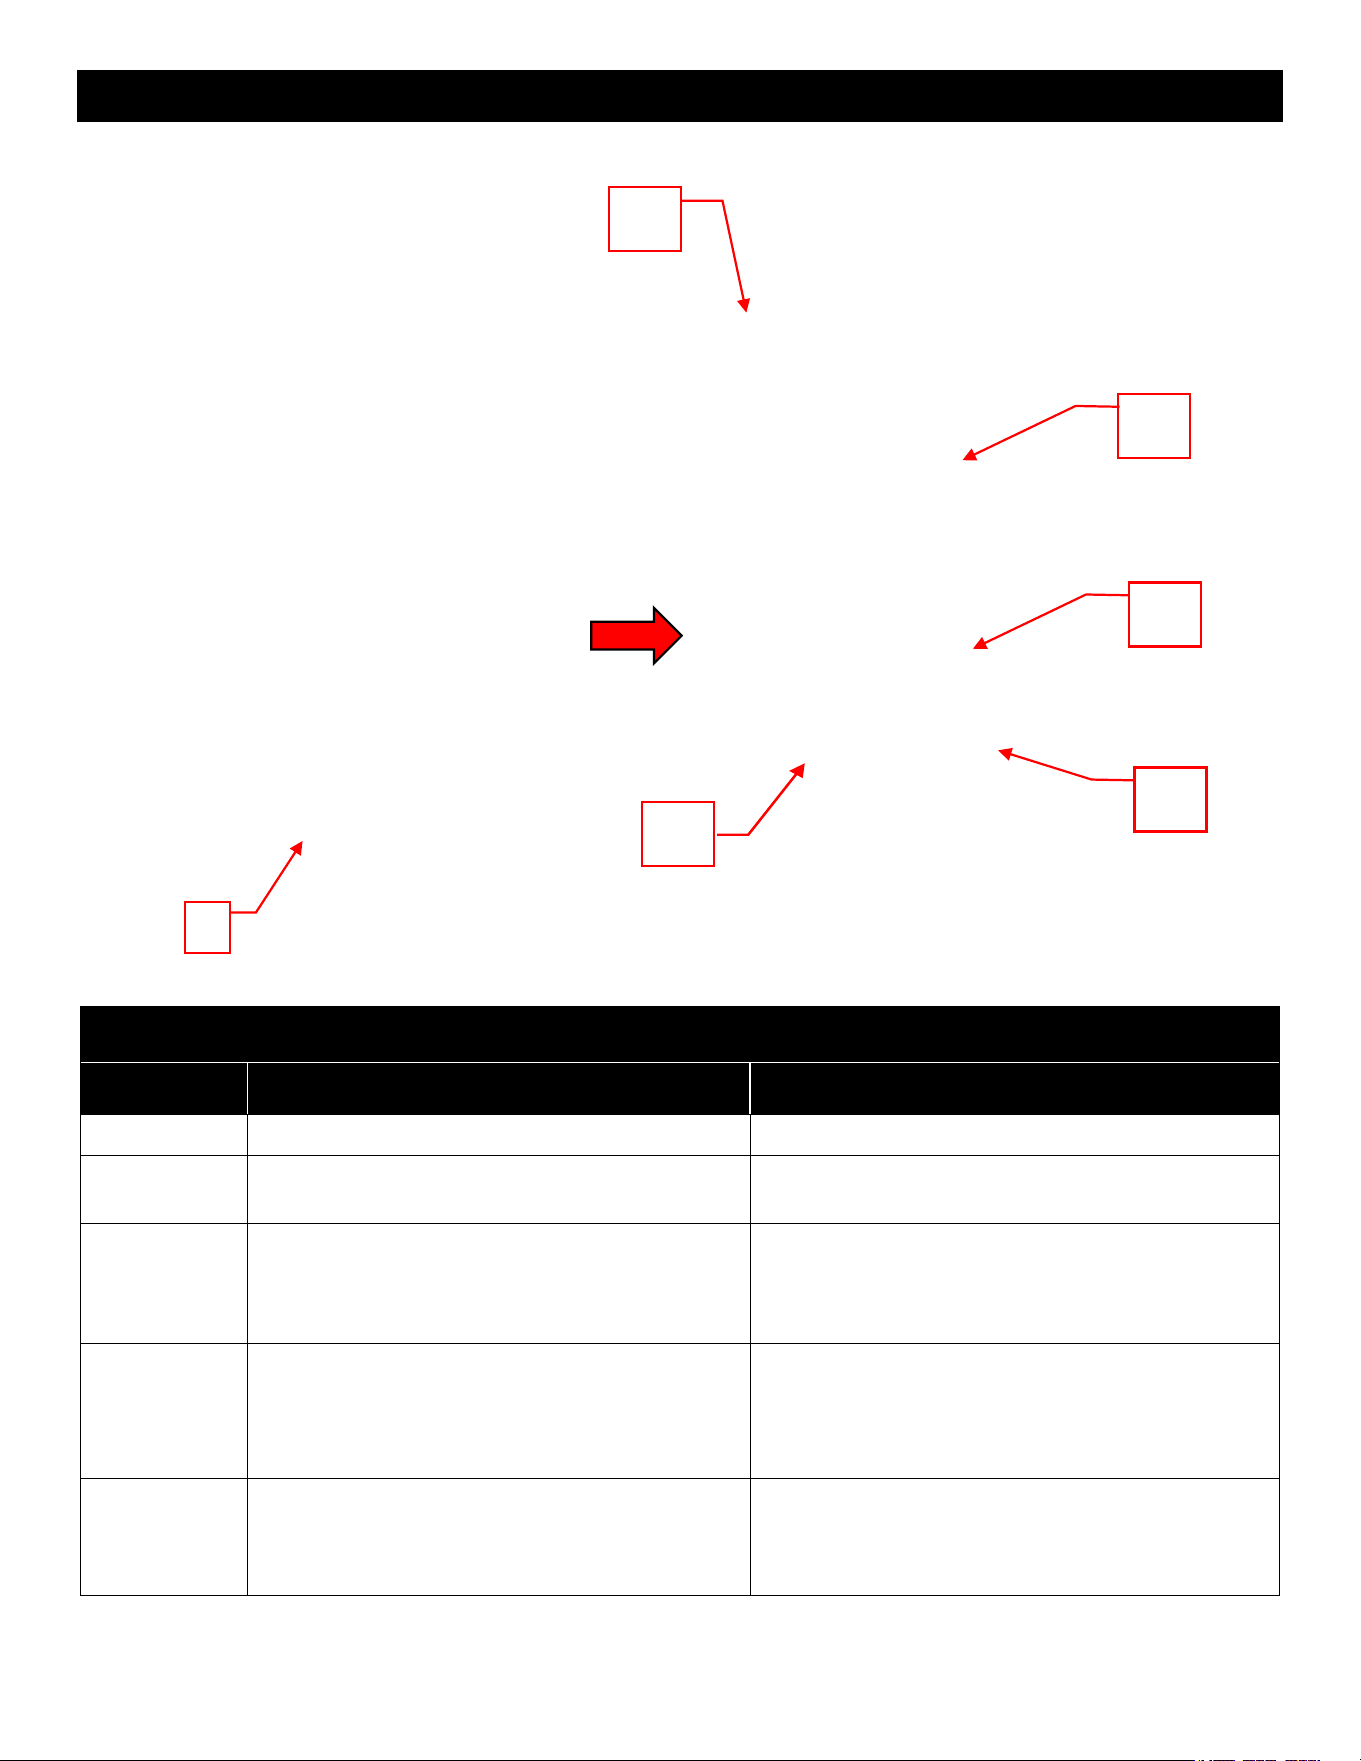
Custom Mode Menu
Button
Function
Action
3.5.1
Return Button: Returns to the previous page.
1. Press once: Returns to the previous page.
3.5.2
Flame Slider: Changes the style of flame.
1. Sliding to One/Two/Three: Changes the flame
style to flame style one, two, or three.
3.5.3
Flame Color Slider: Changes the color of the
flame.
1. Sliding to a color: Changes the flame color to the
selected color.
3.5.4
Ember Bed Slider: Changes the color of the
ember bed and log set.
1. Sliding to a color: Changes the ember bed color
to the selected color.
3.5.5
Downlight Slider: Changes the color of the
downlight.
1. Sliding to a color: Changes the downlight color to
the selected color.
3.5.6
Preview Button: Shows a preview of the
selected button combinations.
1. Press once: Changes the fireplace to show to the
current configuration of selections. Does not save the
current configuration.
3.5.7
Save Button: Saves the current configuration
of selections as the preset mode.
1. Press once: Saves the current configuration of
selections as the preset mode.
3.5.1
3.5.2
3.5.3
3.5.4
3.5.5
3.5.6
3.5.7
3.5
30
www.modernflames.com
Operation – Smart Phone/Tablet App (Continued)
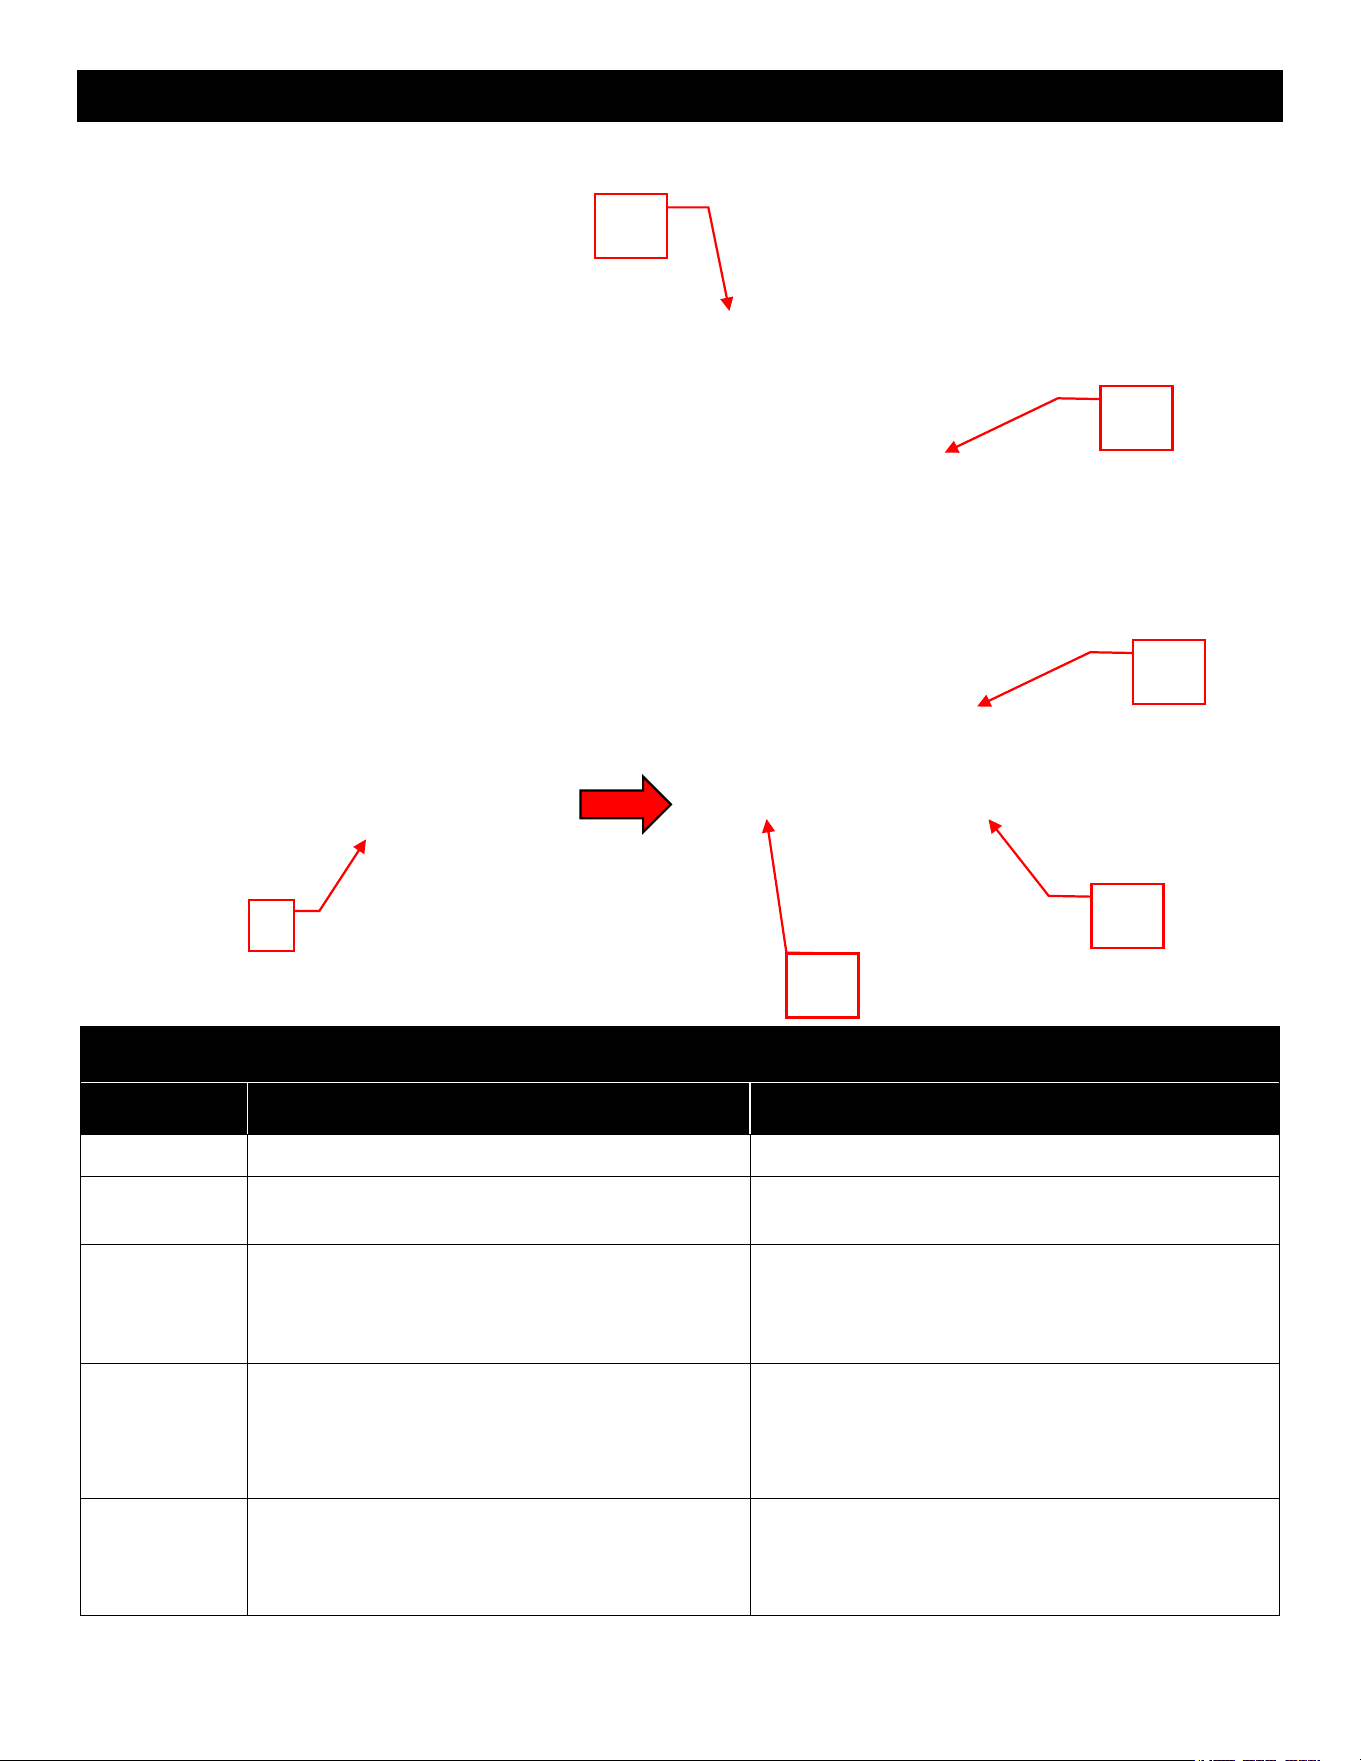
Downlight Menu
Button
Function
Action
6.1
Return Button: Returns to the previous page.
1. Press once: Returns to the previous page.
6.2
Color Wheel Button: Changes the color of the
downlight to the selected color.
1. Press once: Selecting a color, the downlight will
change to the selected color.
6.3
Brightness Slider: Changes the brightness of
the downlighting.
1. Sliding to the left/dark: Dims the brightness of
the downlight.
2. Sliding to the right/light: Brightens the
downlight.
6.4
Color Cycle Slider: Cycles the downlight colors
between all colors shown on the color wheel.
1. Slide to OFF position: Downlight stays a solid
color.
2. Slide to ON (Infinity) position: Downlight
cycles between the 10 colors shown on the color
wheel.
6.5
Night Mode Slider: Enables night light mode.
1. Slide to OFF position: Downlight is on and
fireplace functions like normal.
2. Slide to ON (Moon) position: Downlight is on
and all other functions of the fireplace are off.
6
6.2
6.3
6.4
6.5
6.1
31
www.modernflames.com
Operation – Smart Phone/Tablet App (Continued)
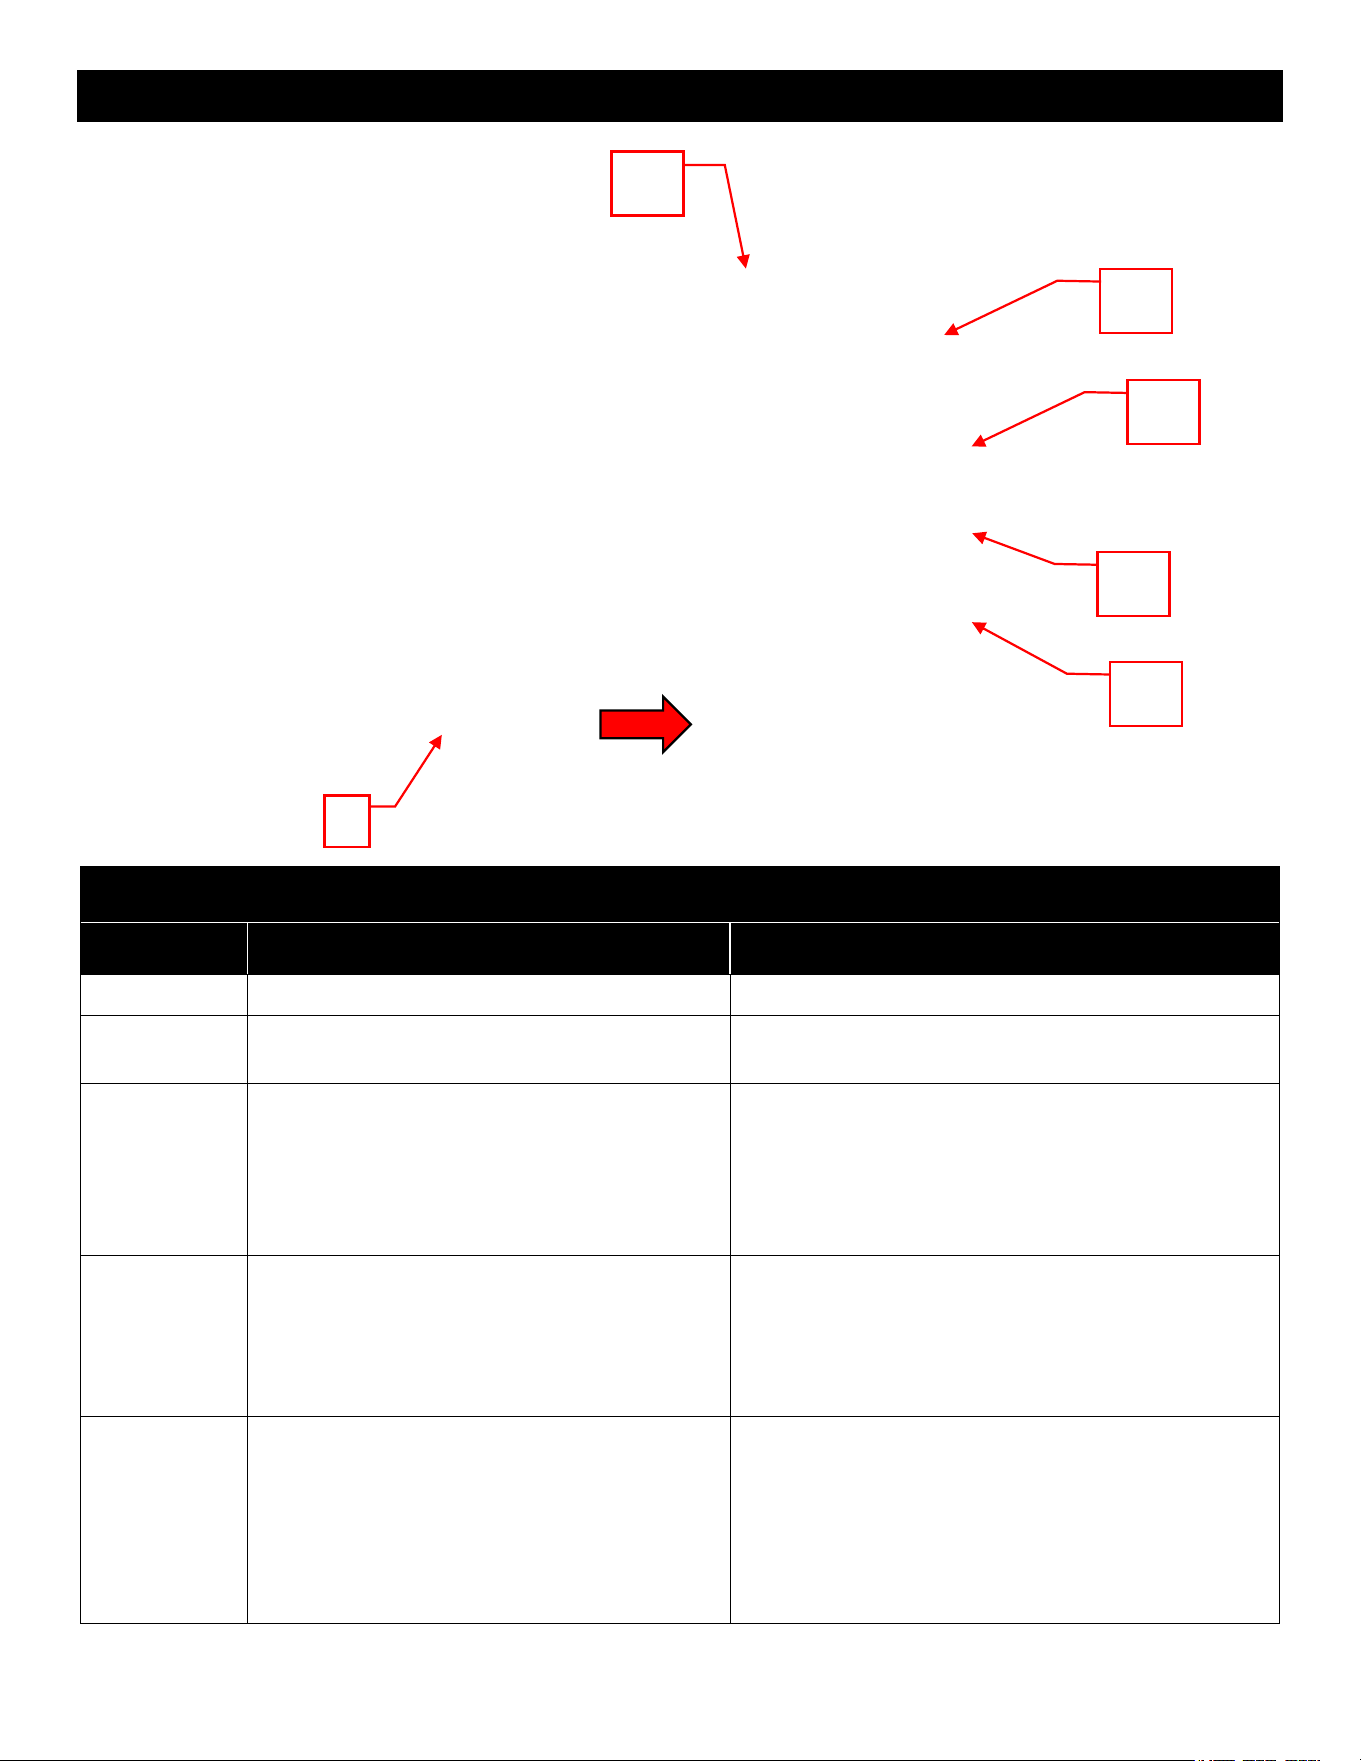
Ember Bed Menu
Button
Function
Action
7.1
Return Button: Returns to the previous page.
1. Press once: Returns to the previous page.
7.2
Color Wheel Button: Changes the color of the
ember bed to the selected color.
1. Press once: Selecting a color, the ember bed
will change to the selected color.
7.3
Brightness Slider: Changes the brightness of
the ember bed.
1. Sliding to the left/dark: Dims the brightness of
the ember bed.
2. Sliding to the right/light: Brightens the ember
bed.
7.4
Color Cycle Slider: Cycles the ember bed
colors between all colors shown on the color
wheel.
1. Slide to OFF position: Ember bed stays a solid
color.
2. Slide to ON (Infinity) position: Ember bed
cycles between all colors shown on the color
wheel.
7.5
Accessory Mode Slider: Enables ember bed
accessory.
Note: Not applicable to all models.
1. Slide to OFF position: Ember bed accessory is
off.
2. Slide to ON (Sun) position: Ember bed
accessory is on.
7
7.1
7.2
7.3
7.4
7.5
32
www.modernflames.com
Operation – Smart Phone/Tablet App (Continued)
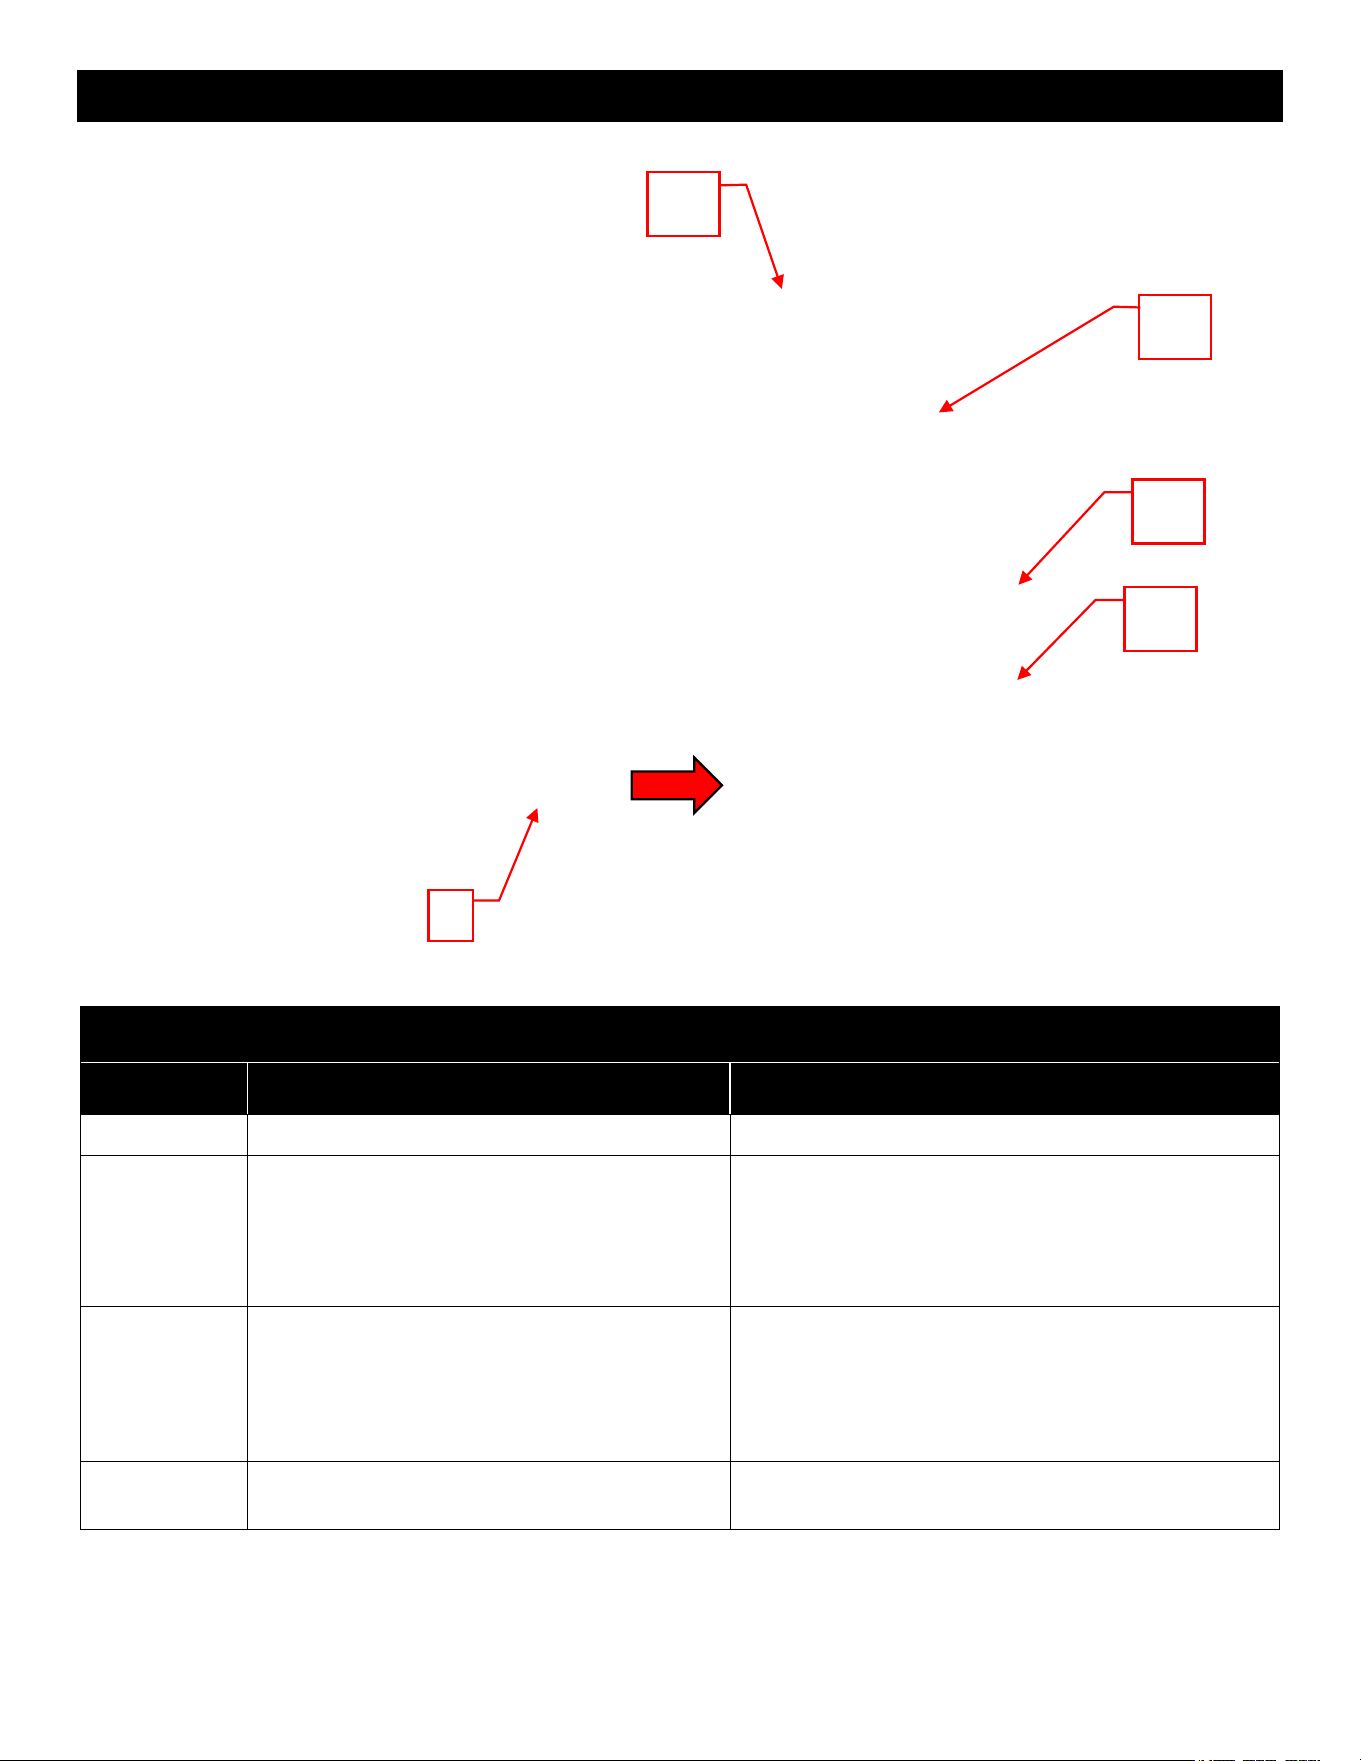
Heater Menu
Button
Function
Action
8.1
Return Button: Returns to the previous page.
1. Press once: Returns to the previous page.
8.2
Ambient Temperature: The fireplace ambient
air temperature reading.
1. Press once: No action.
8.3
Temperature Scale Slider: Changes
between Fahrenheit and Celsius.
1. Sliding to Fahrenheit: Changes the scale of the
ambient temperature, thermostat selector, and the
fireplace to Fahrenheit.
2. Sliding to Celsius: Changes the scale of the
ambient temperature, thermostat selector, and the
fireplace to Celsius.
8.4
Thermostat Temperature Slider: Changes
the thermostat value of the fireplace, enabling
or disabling the heater at the set temperature.
1. Slide to preset position: Changes the thermostat
to the selected number. Heater will turn on until the
ambient temperature reaches the selected
thermostat value. Heater will turn off once the
ambient temperature is equal to or greater than the
thermostat value.
8.5
Heat Output Slider: Changes whether the
heater is off, low heat, high heat, or
recirculation (fan only).
1. Slide to OFF position: The heater is off.
2. Slide to Low Heat position: The heater will run at
low power.
3. Slide to High Heat position: The heater will run
at high power.
4. Slide to Recirculation position: Fan is blowing to
recirculate the air. Heater is off.
8
8.1
8.2
8.3
8.4
8.5
33
www.modernflames.com
Operation – Smart Phone/Tablet App (Continued)
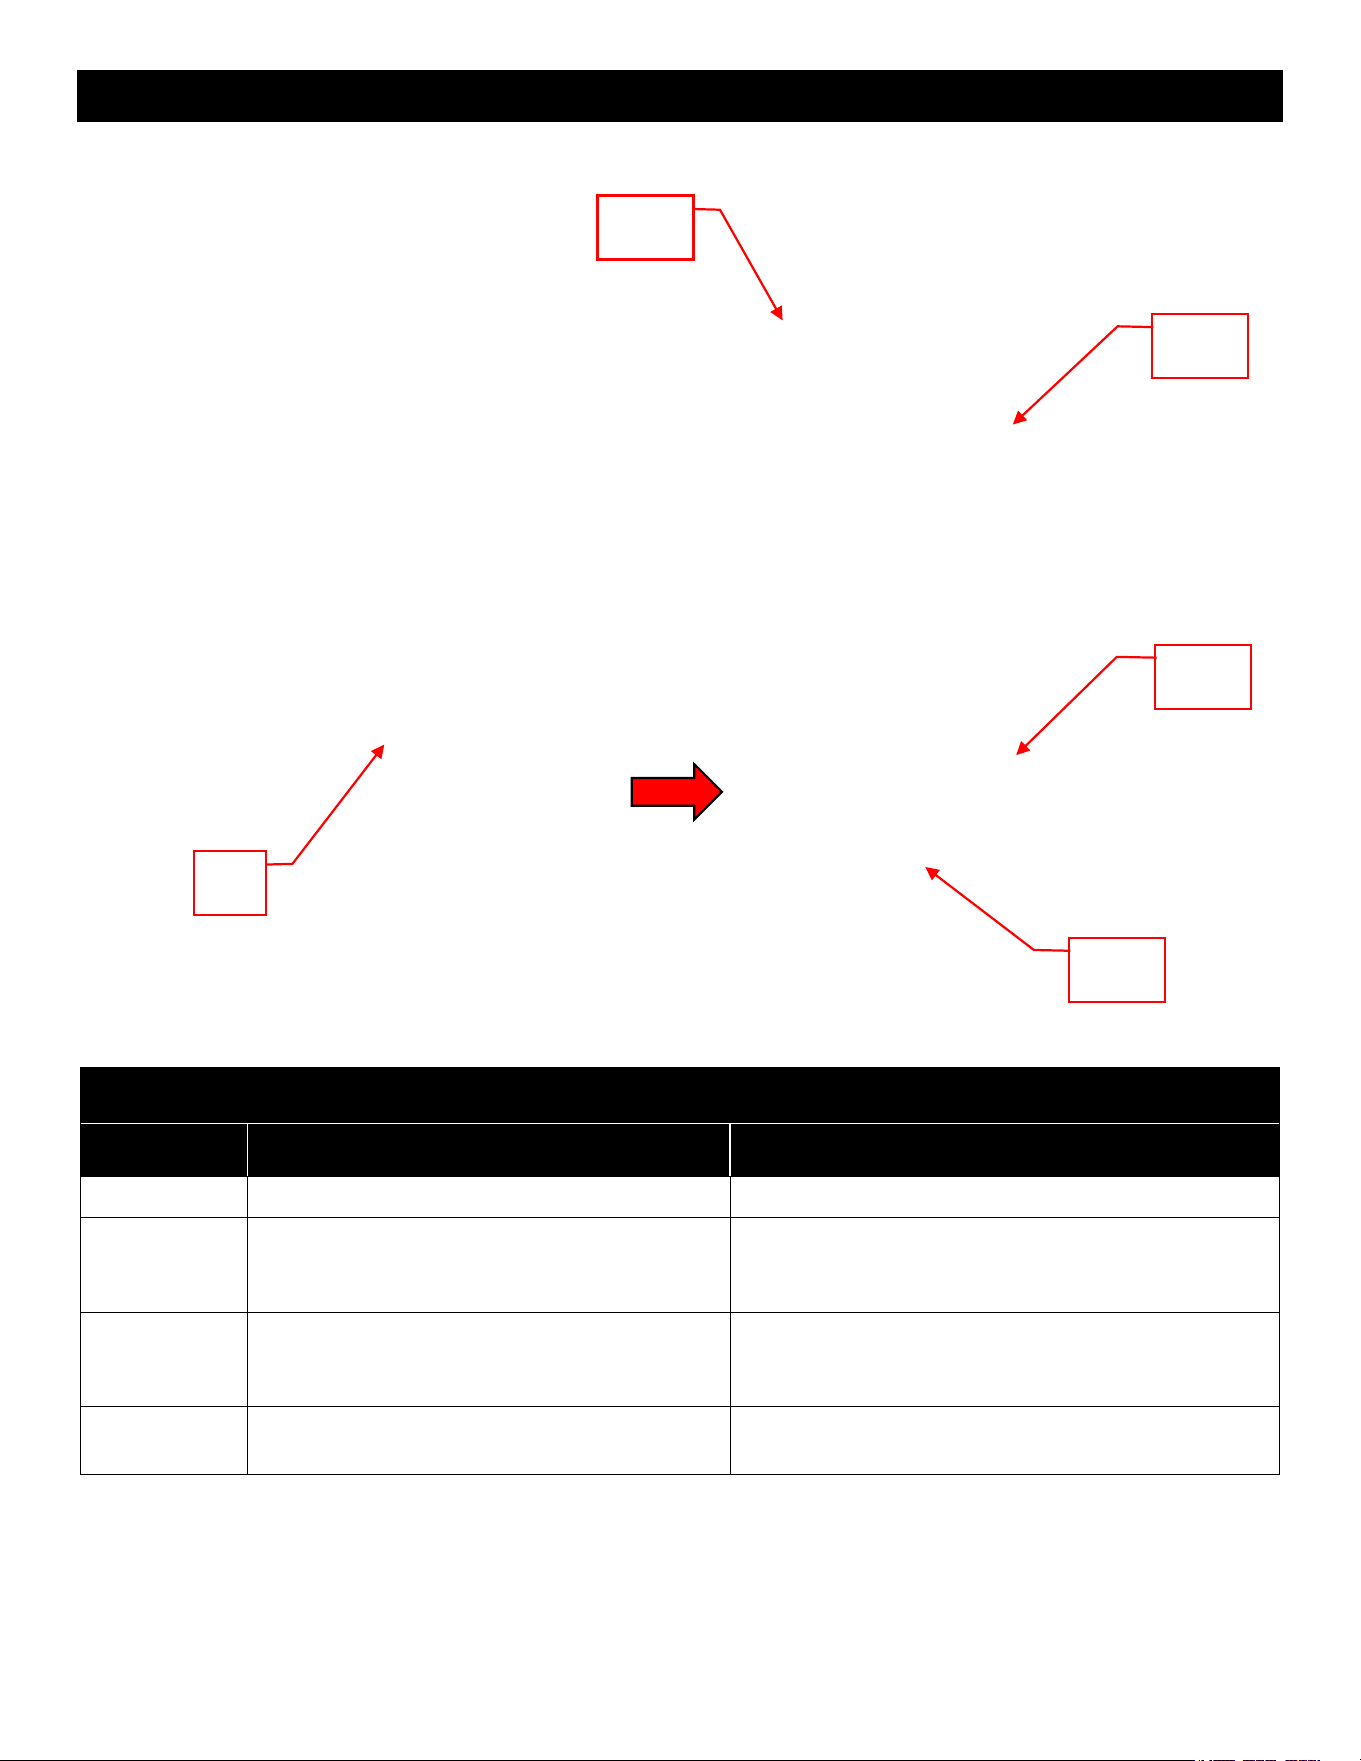
Timer Menu
Button
Function
Action
9.1
Return Button: Returns to the previous page.
1. Press once: Returns to the previous page.
9.2
Countdown Timer: Displays remaining time
left on the selected timer. Shows OFF when
not in use.
NOTE: Fireplace will turn off once the timer
reaches zero.
1. Press once: No action.
9.3
Preset Timer Options: Changes the amount
of time for the fireplace to run before turning
off.
1. Slide to preset position: Changes the timer to
the selected number. The fireplace will turn off once
the timer reaches zero.
2. Sliding to 00 position: Turns the timer off. The
fireplace will stay on until the user manually turns off
the fireplace.
9.4
Weekly Program Schedule: Opens the
Weekly Program Schedule sub-menu.
1. Press once: Opens the Weekly Program
Schedule sub-menu.
9.1
9
9.2
9.3
9.4
34
www.modernflames.com
Operation – Smart Phone/Tablet App (Continued)
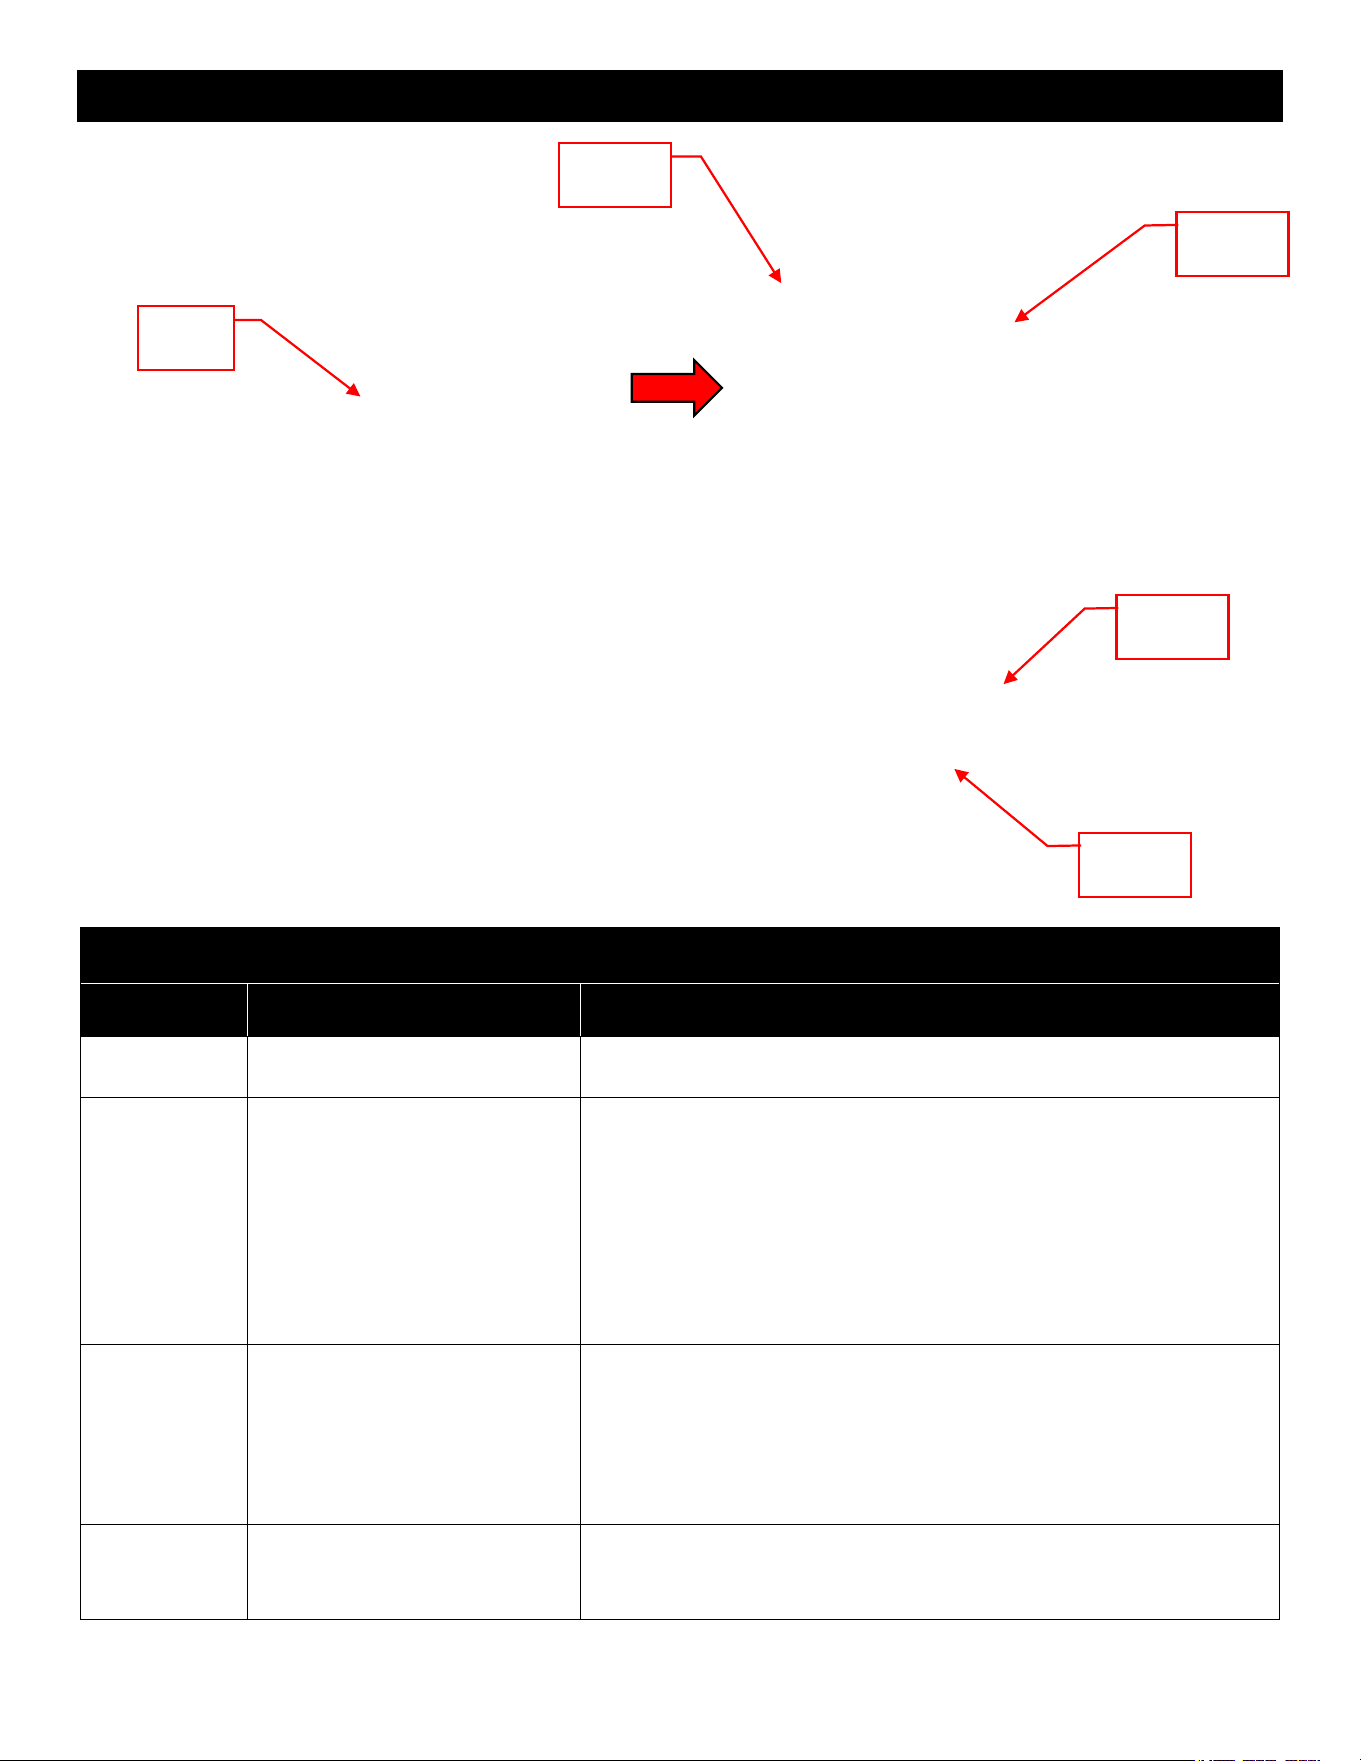
Weekly Program Schedule Menu
Button
Function
Action
9.4.1
Return Button: Returns to the previous page.
1. Press once: Returns to the previous page.
9.4.2
Programming Days: Displays if a day has a
program assigned to it. Selecting a day will
open that day’s sub-menu.
1. Press on a day once: Opens that day’s sub-
menu.
9.4.3
Color Key: Shows the meaning of the
different color codes used in the daily
programming.
1. Press once: No action.
9.4.4
Reset Button: Clears the programming from
ALL days.
1. Press once: Clears the programming from ALL
days. All days revert to default state.
9.4.2
9.4.1
9.4.3
9.4.4
9.4
35
www.modernflames.com
Operation – Smart Phone/Tablet App (Continued)
Daily Program Schedule Menu
Button
Function
Action
9.4.2.1
Return Button: Returns to the
previous page.
1. Press once: Returns to the previous page.
9.4.2.2
Individual Day
Programming: Shows the
programming for the selected
day. Allows for programming of
the selected day.
1. Highlight desired time frame: Applies desired function to
highlighted area.
Note: Must first select desired function from Color Key (9.4.2.3).
Note: Heater On and Recirculate can not be scheduled at the same
time.
Note: Off can not be scheduled at the same time as any other
programming mode.
Note: The app prevents from scheduling conflicting modes.
Note: Manual settings supersede programmed settings.
9.4.2.3
Color Key: Shows the
meaning of the different color
codes used in the daily
programming.
1. Press Off once: Allows to schedule the fireplace to turn off.
2. Press Heater On once: Allows to schedule the fireplace to turn
the heater on until the ambient air reaches or exceeds the
thermostat temperature.
3. Press Flames On once: Allows to schedule the flames to turn on.
4. Press Recirculate once: Allows to schedule the recirculating air.
9.4.2.4
Reset Button: Clears the
programming from the whole
day.
1. Press once: Clears the programming from the whole day. The
day revert to default state.
9.4.2
9.4.2.1
9.4.2.2
9.4.2.3
9.4.2.4
36
www.modernflames.com
Operation – Important Warnings
Note:
When the heater is first turned on, a slight odor may be present. This is normal and should not occur
again unless the heater is not used for a long period of time.
To improve operation, aim the remote control at the front of the fireplace. Quickly pressing buttons
on the remote without allowing the fireplace to complete the previous operation may result in
operational errors. Allow the fireplace to complete each command before issuing another.
Remote Control Battery Information
• Remote control uses one CR2032 battery (Included)
Adding the Remote Control Battery
• Looking at the backside of the remote, find the small hole with the paperclip symbol next to it.
• Using the supplied Push Tool (or a paperclip), push the tool into the small hole until the faceplate
of the remote separates from the back plate of the remote.
• Carefully remove the faceplate of the remote, ensuring the LED at the front of the remote is not
damaged.
• Taking the supplied battery, find the side that has the “+” symbol on it.
• Making sure that the “+” side of the battery is facing away from the green circuit board of the
remote, slide the battery into the battery holder. The “+” of the battery should match the “+” of the
battery holder.
• Carefully place the faceplate back onto the magnetic back plate of the remote, starting with
inserting the front of the faceplate.
Replacing the Remote Control Battery
• Follow the previous steps of adding the remote control battery to open up the remote, exposing the
old battery.
• Using the Push Tool (or a paperclip), push the old battery out of the battery holder.
• Dispose of the old battery at your local hazardous material processing center.
• See section “Adding the Remote Control Battery” to add a new battery.
Temperature Limiting Control
The heater is equipped with a Temperature Limiting Control. Should the heater reach an unsafe
temperature,the heater will automatically turn Off.
To Reset:
• Remove power from the fireplace. Wait 5 minutes.
o Unplug the fireplace or turn off the appropriate breaker at the circuit breaker box.
• Inspect the fireplace to ensure no vents are blocked or clogged with dust or lint. Using a vacuum
can help clear the areas if needed.
• Apply power to the fireplace.
• If problem continues, have the wiring and outlet inspected by a professional.
Never dispose of batteries in fire. Failure to observe this precaution
may result in an explosion. Dispose of batteries at your local
hazardous material processing center.
37
www.modernflames.com
Care – Cleaning
Metal:
• Clean using a soft cloth, slightly dampened with soapy water.
• DO NOT use a brass polish or household cleaners as these products will damage the metal trim.
Glass:
• Use an ammonia-free glass cleaner sprayed onto a cloth or towel. Dry thoroughly with a paper towel or
lint-free cloth.
• DO NOT use abrasive cleansers, liquid sprays, or any cleaner that could scratch the surface.
Vents:
• Use a vacuum or duster to remove dust and dirt from the heater and vent areas.
Plastic:
• Wipe gently with a slightly damp cloth and a mild solution of dish soap and warm water.
• DO NOT use abrasive cleaners, liquid sprays, or any cleaner that could scratch the surface.
Care – Maintenance
Electrical and Moving Parts:
• The fan motors are lubricated at the factory and do not require additional lubrication.
• Electrical components are integrated into the fireplace and are not serviceable by the consumer.
Storage:
• Store the fireplace in a clean, dry place when not in use.
Risk of electric shock! Do not open any panels! No user-serviceable parts
inside!
Always turn the heater OFF and unplug power cord from the outlet before
cleaning, performing maintenance, or moving this fireplace. Failure to do so
could result in electric shock, fire, or personal injury.
WARNING! NO SERVICING
of the internal or electrical parts should
be performed by the consumer.
Always turn heater OFF and unplug power cord from the outlet before
cleaning, performing maintenance, or moving this fireplace. Failure to do so
could result in electric shock, fire, or personal injury.
Never immerse in water or spray with water. Doing so could result in electric
shock, fire, or personal injury.
38
www.modernflames.com
Optional, Extra-Wide Surround
Extra-Wide Surround
Model
Number
Surround
Width
Overall Size
(with Wide Surround Kit Installed)
Part Number of
Surround Kit
OR26-
TRAD-INT
5" (127mm)
32-1/2" (825mm) x 23-3/8" (595mm) (thin bottom surround)
32-1/2" (825mm) x 27-1/16" (687mm) (wide bottom surround)
OTK-OR26-SM
7" (178mm)
36-1/2" (927mm) x 25-3/8" (645mm) (thin bottom surround)
36-1/2" (927mm) x 31-1/16" (789mm) (wide bottom surround)
OTK-OR26-LG
OR30-
TRAD-INT
5" (127mm)
38" (965mm) x 23-3/8" (594mm) (thin bottom surround)
38" (965mm) x 27-1/16" (687mm) (wide bottom surround)
OTK-OR30-SM
8" (203mm)
43-15/16" (1116mm) x 26-3/8" (670mm) (thin bottom surround)
43-15/16" (1116mm) x 33-1/16" (840mm) (wide bottom surround)
OTK-OR30-LG
OR36-
TRAD-INT
4" (102mm)
40-1/2" (1029mm) x 27-1/2" (699mm) (thin bottom surround)
40-1/2" (1029mm) x 30-1/4" (769mm) (wide bottom surround)
OTK-OR36-SM
6" (152mm)
44-1/2" (1130mm) x 29-1/2" (750mm) (thin bottom surround)
44-1/2" (1130mm) x 34-3/16" (868mm) (wide bottom surround)
OTK-OR36-LG
OR42-
TRAD-INT
Not
Available
Not Available Not Available
OR54-
TRAD-INT
Not
Available
Not Available Not Available
Some “insert” installations
re
quire “Extra-Wide Surround” to cover existing fireplace edges. For this
purpose,e
xtra-wi
de black surround sets are available and s
old separately. Each set comes with an extra
bottom piece of surround for low-clearance hearth installations.
39
www.modernflames.com
Replacement Parts List
REF.
SPARE PARTS, PART
NUMBERS
OR26-TRAD-INT OR30-TRAD-INT OR36-TRAD-INT OR42-TRAD-INT OR54-TRAD-INT
1
Front Glass
04-00065
04-00066
04-00067
04-00068
04-00069
2
Mirror Glass
04-00070
04-00071
04-00072
04-00073
04-00074
3
Virtual Screen
01-00179
01-00100
01-00173
01-00174
4
LED Ember Bed Strip
01-00169 01-00170 01-00169
01-00170
5
LED Downlight Strip
01-00119
6
Trim
02-00811
02-00812
02-00813
02-00814
02-00815
7
Protector Board
N/A
01-00140
8
Acrylic Ember Bed
03-00094
03-00095
03-00096
03-00097
03-00098
9
Lit Log Receiver
01-00183
10
Power Board
01-00104
01-00176
11
Main Circuit Board
01-00187
01-00177
12
USB Receiver
01-00163
13
Speaker
01-00111
14
Speaker Board
01-00107
15
Processor Board
01-00103
01-00178
16
Backlight Board
01-00188
N/A
17
Backlight Cable
01-00147
N/A
18
Heater
01-00186
19
Blower
01-00185
20
Thermostat
01-00009
21
Touch Controls
01-00109
22
EMI Shield
01-00172
23
Rocker Switch
01-00113
24
Remote
01-00110
25
Hardware Kit
09-00013
09-00012
26
Memory Stick
01-00184
27
Smoked Crush Glass
04-00075 04-00076 04-00075
28
Log Set - Driftwood
05-00163
05-00164
05-00165
05-00166
29
Log Set - Traditional
05-00168
05-00169
05-00170
05-00171
04-00077 04-00076
40
www.modernflames.com
Troubleshooting / FAQ
Symptom Problem Solution
Fireplace will not come on when
power button/switch is put into
the ON position.
Appliance is not plugged into an
electrical outlet.
Check plug. Plug in the fireplace if
necessary.
Hardwire connections are not correct. See “Hardwiring Installation” section.
Appliance has overheated and the
safety thermal switch has been
tripped.
Unplug power or turn off the circuit
breaker. Allow fireplace to cool for 15
minutes and then plug in the fireplace or
turn the breaker back on.
Main PCB board issue.
Inspect circuit boards for loose
connections or obvious damage. Call
Modern Flames Customer Service for
support (07 5630 6837 (AU/NZ) or
+46 762 09 58 09 (EU))
Fireplace has not fully turned on.
Allow 20-30 seconds for the fireplace to
fully turn on.
House circuit breaker not in “ON”
position.
Inspect circuit breaker. Turn breaker to
“ON” position.
Fireplace turns off and will not
turn on.
House circuit breaker has tripped. Reset the house circuit breaker.
Fireplace’s fuse has blown.
Inspect circuit boards for loose
connections or obvious damage. Call
Modern Flames Customer Service for
support (07 5630 6837 (AU/NZ) or
+46 762 09 58 09 (EU))
Fireplace has overheated and the
safety thermal switch has tripped.
Unplug power or turn off the circuit
breaker. Allow fireplace to cool for 15
minutes and then plug in the fireplace or
turn the breaker back on.
Remote control does not work.
Low/dead batteries. Replace the batteries in the remote control.
Remote receiver malfunction.
Ensure the remote receiver is not blocked.
Replace touch-on control panel if
necessary.
No warm air coming out of the
fireplace.
Heater setting is not selected. See “Operation” section.
Heater has been locked out. See “Operation” section.
Room temperature is higher than
fireplace setting (if not set to room
temperature).
Reset temperature setting.
Fireplace has overheated and safety
thermal switch has tripped.
Unplug power or turn off the circuit
breaker. Allow fireplace to cool for 15
minutes and then plug in the fireplace or
turn the breaker back on.
Hardwire connections are not correct. See “Hardwiring Installation” section.
Heater issue.
Inspect the blower and heater. Replace if
necessary.
Heater shuts off automatically. Room is too warm.
The heater has a built-in thermostat. It will
shut off automatically once the pre-set
temperature has been reached. It will turn
on automatically if the room temperature
drops below the pre-set temperature.
41
www.modernflames.com
Troubleshooting / FAQ (Continued)
Symptom Problem Solution
Dim or no flame.
Flame LCD issue. Inspect the LCD and replace if necessary.
Main PCB board issue.
Inspect circuit boards for loose
connections or obvious damage. Call
Modern Flames Customer Service for
support (07 5630 6837 (AU/NZ) or
+46 762 09 58 09 (EU))
Ember bed is dim or not glowing.
Brightness is not selected. See “Operation” section.
Ember bed LED issue.
Inspect circuit boards for loose
connections or obvious damage. Call
Modern Flames Customer Service for
support (07 5630 6837 (AU/NZ) or
+46 762 09 58 09 (EU))
Main PCB board issue.
Inspect circuit boards for loose
connections or obvious damage. Call
Modern Flames Customer Service for
support (07 5630 6837 (AU/NZ) or
+46 762 09 58 09 (EU))
No difference from setting
H1 to H2.
Main PCB board issues.
Inspect circuit boards for loose
connections or obvious damage. Call
Modern Flames Customer Service for
support (07 5630 6837 (AU/NZ) or
+46 762 09 58 09 (EU))
Heating element issue.
Inspect circuit boards for loose
connections or obvious damage. Call
Modern Flames Customer Service for
support (07 5630 6837 (AU/NZ) or
+46 762 09 58 09 (EU))
Error code “E1” Thermostat issue.
Inspect circuit boards for loose
connections or obvious damage. Call
Modern Flames Customer Service for
support (07 5630 6837 (AU/NZ) or
+46 762 09 58 09 (EU))

__________________________________________________________________________________________________
__________________________________________________________________________________________________
__________________________________________________________________________________________________
__________________________________________________________________________________________________
__________________________________________________________________________________________________
__________________________________________________________________________________________________
__________________________________________________________________________________________________
__________________________________________________________________________________________________
__________________________________________________________________________________________________
__________________________________________________________________________________________________
__________________________________________________________________________________________________
__________________________________________________________________________________________________
__________________________________________________________________________________________________
__________________________________________________________________________________________________
__________________________________________________________________________________________________
__________________________________________________________________________________________________
__________________________________________________________________________________________________
__________________________________________________________________________________________________
NOTES
42
www.modernflames.com

__________________________________________________________________________________________________
__________________________________________________________________________________________________
__________________________________________________________________________________________________
__________________________________________________________________________________________________
__________________________________________________________________________________________________
__________________________________________________________________________________________________
__________________________________________________________________________________________________
__________________________________________________________________________________________________
__________________________________________________________________________________________________
__________________________________________________________________________________________________
__________________________________________________________________________________________________
__________________________________________________________________________________________________
__________________________________________________________________________________________________
__________________________________________________________________________________________________
__________________________________________________________________________________________________
__________________________________________________________________________________________________
__________________________________________________________________________________________________
__________________________________________________________________________________________________
NOTES
43

07-00059 072023
DO NOT RETURN TO STORE!
CALL US FIRST
For immediate help with installation, product information or if your product arrives
damaged, please call our toll-free number at:
AUSTRALIA/NEW ZEALAND
07 5630 6837
(Monday – Friday, 9:00AM – 4:00PM, AEST)
Or email us at:
EUROPE
+46 762 09 58 09
(Monday – Friday, 9:00AM – 4:00PM, CEST)
Or email us at:
North America
1-877-246-9353
(Monday – Friday, 8:00AM – 5:00PM, AZ MST)
Or email us at:
OUR STAFF IS READY TO PROVIDE ASSISTANCE
Copyright © 2023 RPG Brands (Modern Flames). All rights reserved. Products and specifications subject to change without notice.
The product images shown are for illustration purposes only and may not be an exact representation of the product.
customerservice@modernflames.com modernflames.com