GRM05
EN Cordless Job Site Speaker Instruction manual 4
ESMX Altavoz Inalámbrico de Trabajo Manual de instrucciones 14
2
1
23 24
2
4
3
10 9 5678
1
12
11
13
14
15
1620
21
22
18 1719
3
4
2
5
3
6
1
2
LXT
XGT
LXT
1
2
XGT
4 ENGLISH
ENGLISH
(Original instructions)
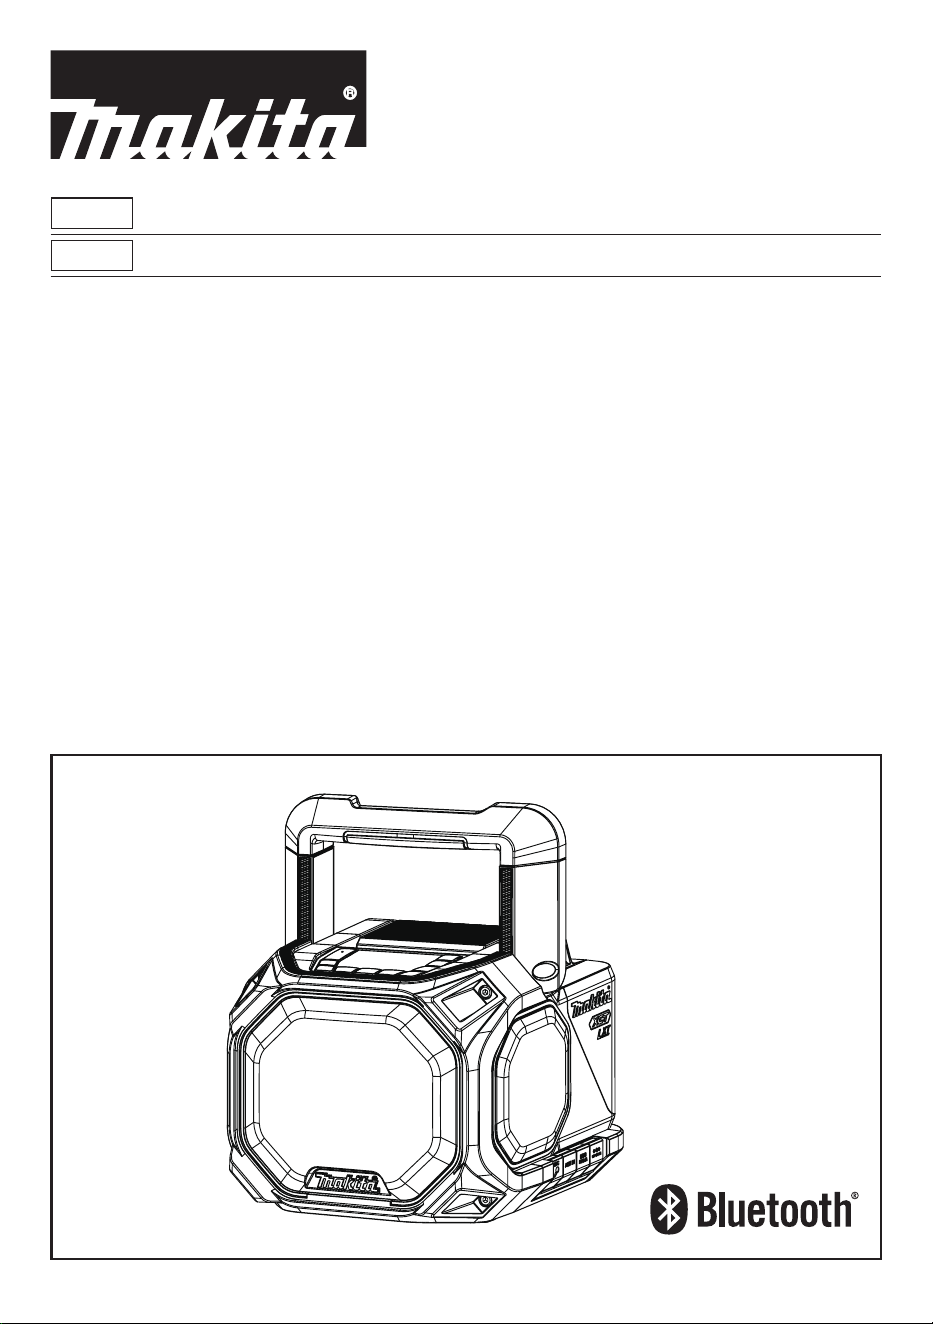
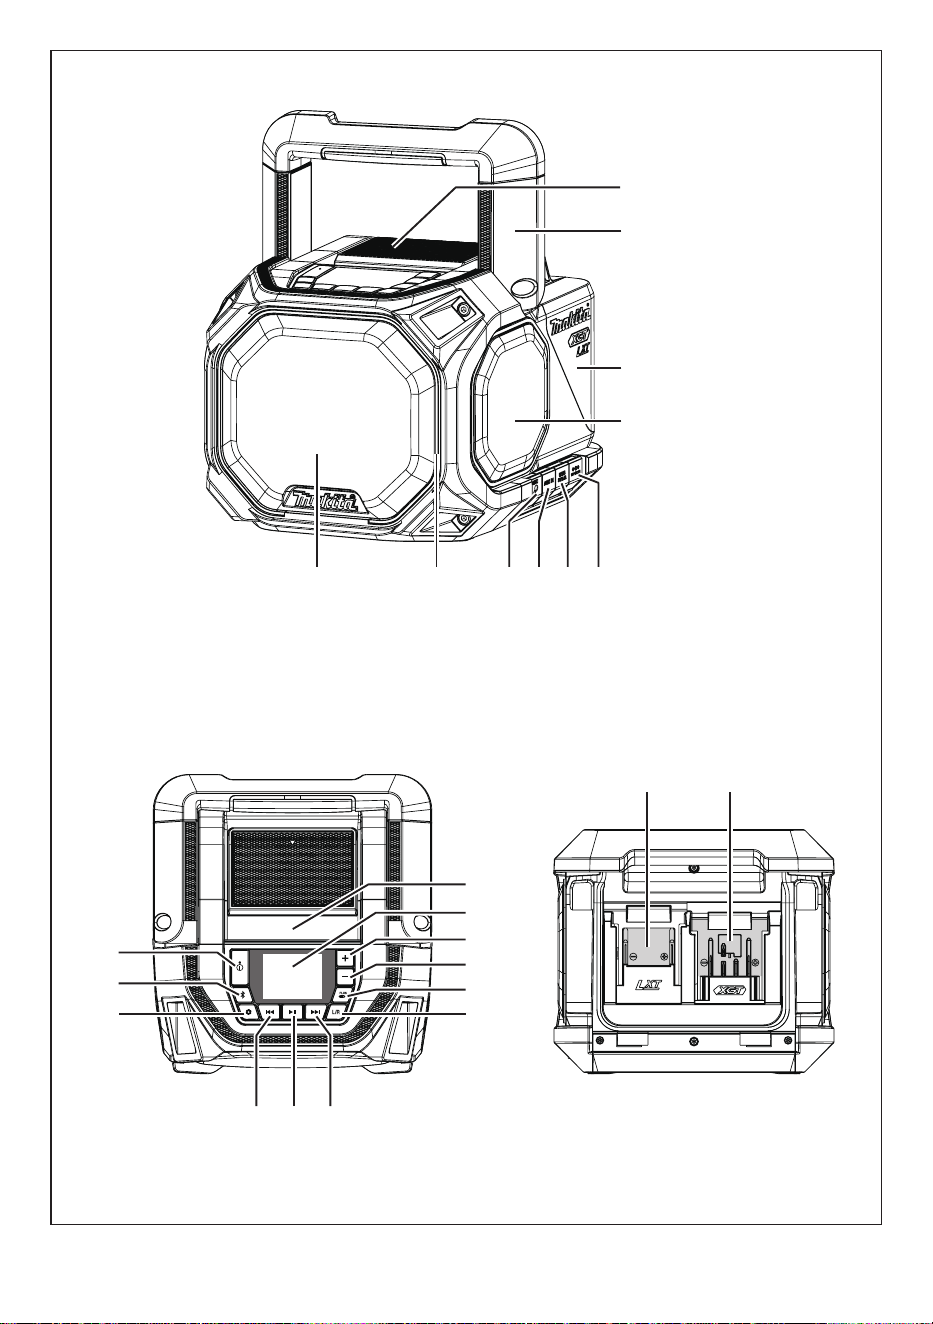
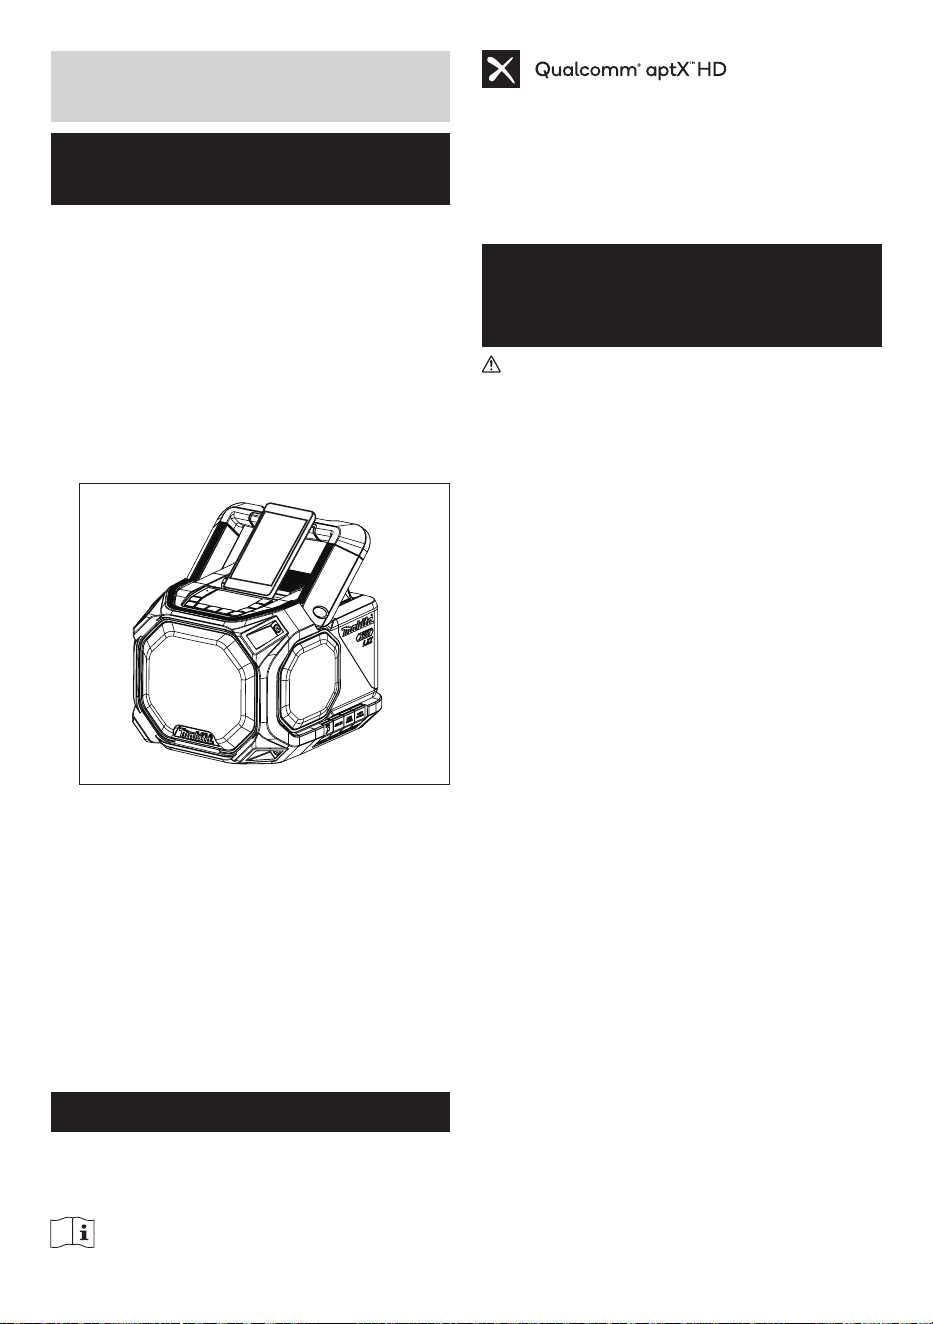
EXPLANATION OF GENERAL
VIEW (Fig. 1)
1. Battery compartment locker
2. Handle
3. Battery compartment cover (covering battery
cartridge)
4. Passive speaker
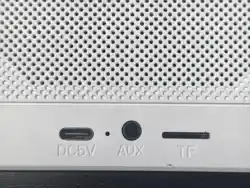
5. DC in socket
6. USB charging socket
7. Auxiliary input socket
8. Microphone socket
9. LED light
10. Speaker
11. Groove for placing a smartphone
12. LCD display
13. Volume up button
14. Volume down button
15. Plus button (Plus pair button)
16. L/R button
17. Next track/Fast forward button
18. Play/Pause button
19. Previous track/Rewind button
20. Menu button
21. Bluetooth pairing button
22. Power button
23. LXT battery terminal
24. XGT battery terminal
SYMBOLS
The following show the symbols used for the equipment.
Be sure that you understand their meaning before use.
Read instruction manual.
Qualcomm
®
aptX
TM
is a product of Qualcomm
Technologies, Inc. and/or its subsidiaries. Qualcomm
®
is
a trademark of Qualcomm Incorporated, registered in the
United States and other countries. aptX
TM
is a trademark
of Qualcomm Technologies International, Ltd., registered
in the United States and other countries.
IMPORTANT SAFETY
INSTRUCTIONS
WARNING:
When using electric tools, basic safety precautions should
always be followed to reduce the risk of re, electric
shock, and personal injury, including the following:
1. Read this instruction manual and the charger
instruction manual carefully before use.
2. Clean only with dry cloth.
3. Do not install near any heat sources such as
radiators, heat registers, stoves, or other apparatus
(including amplifiers) that produce heat.
4. Only use attachments/accessories specified by the
manufacturer.
5. Unplug this apparatus during lighting storms or when
unused for long periods of time.
6. A battery operated speaker with integral batteries or
a separate battery pack must be recharged only with
the specified charger for the battery. A charger that
may be suitable for one type of battery may create a
risk of fire when used with another battery.
7. Use battery operated speaker only with specifically
designated battery packs. Use of any other batteries
may create a risk of fire.
8. When battery pack is not in use, keep it away from
other metal objects like: paper clips, coins, keys, nails,
screws, or other small metal objects that can make a
connection from one terminal to another. Shorting the
battery terminals together may cause sparks, burns,
or a fire.
9. Avoid body contact with grounded surfaces such
as pipes, radiators, ranges and refrigerators. There
is an increased risk of electric shock if your body is
grounded.
10. Under abusive conditions, liquid may be ejected from
the battery; avoid contact. If contact accidentally
occurs, flush with water. If liquid contacts eyes,
additionally seek medical help. Liquid ejected from the
battery may cause irritation or burns.
11. Do not use a battery pack or tool that is damaged or
modified. Damaged or modified batteries may exhibit
unpredictable behavior resulting in fire, explosion or
risk of injury.
12. Do not expose a battery pack or tool to fire or

5 ENGLISH
excessive temperature. Exposure to fire or temperature
above 130°C (266°F) may cause explosion.
13. Follow all charging instructions and do not charge the
battery pack or tool outside the temperature range
specified in the instructions. Charging improperly
or at temperatures outside the specified range may
damage the battery and increase the risk of fire.
14. The MAINS plug is used as the disconnect device,
and it shall remain readily operable.
15. Do not use the product at a high volume for any
extended period. To avoid hearing damage, use the
product at moderate volume level.
16. (For products with LCD display only) LCD displays
include liquid which may cause irritation and
poisoning. If the liquid enters the eyes, mouth or skin,
rinse it with water and call a doctor.
17. Do not expose the product to rain or wet conditions.
Water entering the product will increase the risk of
electric shock.
18. This product is not intended for use by persons
(including children) with reduced physical, sensory
or mental capabilities, or lack of experience and
knowledge, unless they have been given supervision
or instruction concerning use of the product by a
person responsible for their safety. Children should
be supervised to ensure that they do not play with the
product. Store the product out of the reach of children.
19. Do not heat or expose the speaker to fire or leave it
in a hot location such as near a heat source, exposed
to direct sunlight, or inside a vehicle under the blazing
sun. Doing so may cause a fire or explosion and
result in personal injury.
20. Place the equipment on a level, flat surface or secure
the equipment in a stable location. Otherwise the
falling accident may occur.
SAVE THESE INSTRUCTIONS
SPECIFIC SAFETY RULES
FOR BATTERY CARTRIDGE
1. Before using battery cartridge, read all instructions
and cautionary markings on (1) battery charger, (2)
battery, and (3) product using battery.
2. Do not disassemble battery cartridge.
3. If operating time has become excessively shorter,
stop operating immediately. It may result in a risk of
overheating, possible burns and even an explosion.
4. If electrolyte gets into your eyes, rinse them out with
clear water and seek medical attention right away. It
may result in loss of your eyesight.
5. Do not short the battery cartridge:
(1) Do not touch the terminals with any conductive
material.
(2) Avoid storing battery cartridge in a container with
other metal objects such as nails, coins, etc.
(3) Do not expose battery cartridge to water or
rain. A battery short can cause a large current
ow, overheating, possible burns and even a
breakdown.
6. Do not store and use the tool and battery cartridge in
locations where the temperature may reach or exceed
50°C (122°F).
7. Do not incinerate the battery cartridge even if it is
severely damaged or is completely worn out. The
battery cartridge can explode in a fire.
8. Be careful not to drop or strike battery.
9. Do not use a damaged battery.
10. To avoid risk, the manual of replaceable the battery
should be read before use.
11. The contained lithium-ion-batteries are subject to
the Dangerous Goods Legislation requirements. For
commercial transports e.g. by third parties, forwarding
agents, special requirement on packaging and
labeling must be observed. For preparation of the item
being shipped, consulting an expert for hazardous
material is required. Please also observe possibly
more detailed national regulations. Tape or mask
off open contacts and pack up the battery in such a
manner that it cannot move around in the packaging.
12. When disposing the battery cartridge, remove it from
the tool and dispose of it in a safe place. Follow your
local regulations relating to disposal of battery.
13. Use the batteries only with the products specified
by Makita. Installing the batteries to non- compliant
products may result in a fire, excessive heat,
explosion, or leak of electrolyte.
14. If the tool is not used for a long period of time, the
battery must be removed from the tool.
15. Do not allow chips, dust, or soil stuck into the
terminals, holes, and grooves of the battery cartridge.
It may result in poor performance or breakdown of the
tool or battery cartridge.
16. Keep the battery away from children.
17. During and after use, the battery cartridge may take
on heat which can cause burns or low temperature
burns.
18. Do not touch the terminal of the tool immediately after
use as it may get hot enough to cause burns.
19. Unless the tool supports the use near a high-voltage
electrical power lines, do not use the battery cartridge
near a high-voltage electrical power lines. It may
result in a malfunction or breakdown of the tool or
battery cartridge.
20. Protect the battery from following conditions:
- replacement of a battery with an incorrect type that
can defeat a safeguard (for example, in the case of
some lithium battery types);

6 ENGLISH
- disposal of a battery into fire or a hot oven, or
mechanically crushing or cutting of a battery, that
can result in an explosion;
- leaving a battery in an extremely high temperature
surrounding environment that can result in an
explosion or the leakage of flammable liquid or gas;
and
- a battery subjected to extremely low air pressure
that may result in an explosion or the leakage of
flammable liquid or gas.
CAUTION:
● Danger of explosion if battery is incorrectly
replaced.
● Only use genuine Makita batteries. Use of non-
genuine Makita batteries, or batteries that have
been altered, may result in the battery bursting
causing fires, personal injury and damage. It will
also void the Makita warranty for the Makita tool
and charger.
Tips for maintaining maximum battery life
1. Charge the battery cartridge before completely
discharged. Always stop operation and charge the
battery cartridge when you notice less power.
2. Never recharge a fully charged battery cartridge.
Overcharging shortens the battery service life.
3. Charge the battery cartridge with room temperature at
10°C - 40°C (50°F - 104°F). Let a hot battery cartridge
cool down before charging it.
4. When not using the battery cartridge, remove it from
the tool or the charger.
5. Charge the battery cartridge if you do not use it for a
long period (more than six months).
For United States:
Cautions to the user
The changes or modifications not expressly approved
by the party responsible for compliance could void the
user’s authority to operate the equipment.
Radiation Exposure Statement:
The product comply with the FCC portable RF
exposure limit set forth for an uncontrolled environment
and are safe for intended operation as described in
this manual. The further RF exposure reduction can be
achieved if the product can be kept as far as possible
from the user body or set the device to lower output
power if such function is available.
Note: This equipment has been tested and found
to comply with the limits for a Class B digital device,
pursuant to part 15 of the FCC Rules. These limits
are designed to provide reasonable protection against
harmful interference in a residential installation. This
equipment generates, uses and can radiate radio
frequency energy and, if not installed and used in
accordance with the instructions, may cause harmful
interference to radio communications. However, there
is no guarantee that interference will not occur in a
particular installation. If this equipment does cause
harmful interference to radio or television reception,
which can be determined by turning the equipment
off and on, the user is encouraged to try to correct the
interference by one or more of the following measures:
● Reorient or relocate the receiving antenna.
● Increase the separation between the equipment and
receiver.
● Connect the equipment into an outlet on a circuit
different from that to which the receiver is connected.
● Consult the dealer or an experienced radio/TV
technician for help.

7 ENGLISH
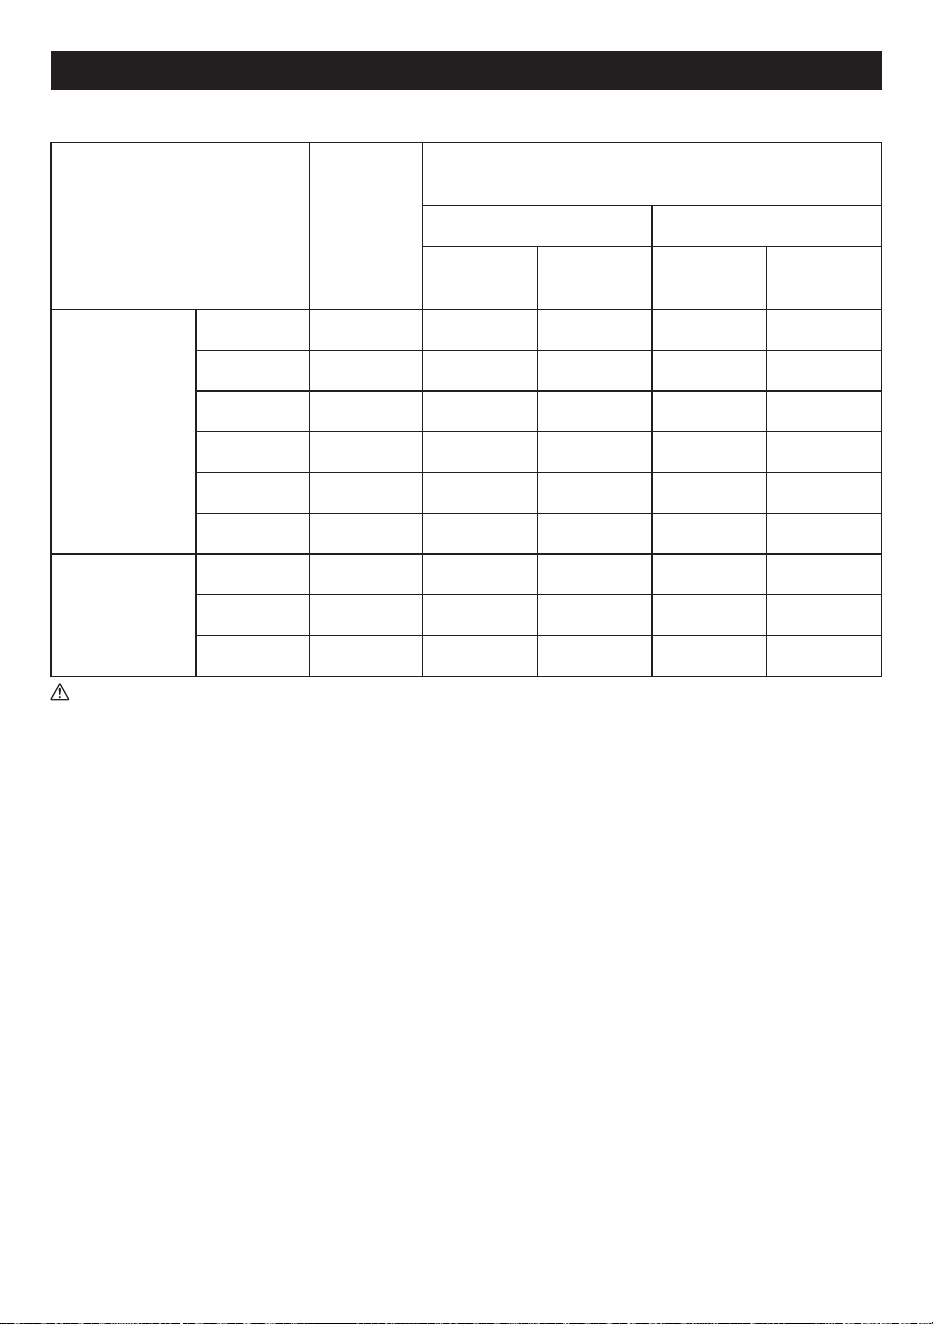
OPERATING TIME
* The suitable battery packs for this speaker listed as the following table.
* The following table indicates the operating time on a single charge.
Battery cartridge
Battery
capacity
AT SPEAKER OUTPUT = 100mW
Unit: Hour (Approximately)
Bluetooth AUX IN
LED ON LED OFF LED ON LED OFF
LXT (18V)
BL1815N 1.5 Ah 8.0 10 8.5 11
BL1820B 2.0 Ah 11 14 11 15
BL1830B 3.0 Ah 15 19 16 20
BL1840B 4.0 Ah 22 28 22 29
BL1850B 5.0 Ah 28 36 29 37
BL1860B 6.0 Ah 34 43 35 45
XGT
(36V - 40V max)
BL4020 2.0 Ah 19 23 19 24
BL4025 2.5 Ah 24 30 25 31
BL4040(F) 4.0 Ah 39 47 40 49
WARNING:
Only use the battery cartridges listed above. Use of any other battery cartridges may cause injury and/or re.
NOTE:
● Table regarding to the battery operating time above is for reference.
● The actual operating time may differ with the type of the battery, charging condition, or usage environment.
● Some of the battery cartridges and chargers listed above may not be available depending on your region of residence.
8 ENGLISH
INSTALLATION AND POWER
SUPPLY
CAUTION:
● Be careful not to pinch your fingers when opening
and closing the battery cover.
● Return the battery compartment locker to the
original position, after installing or removing
battery cartridge. If not, battery cartridge may
accidentally fall out of the speaker, causing injury
to you or someone around you.
● Always close and lock the battery compartment
locker before moving the speaker.
● Always switch off the speaker before installing or
removing the battery cartridge.
● Be careful not to drop or strike the speaker.
Broken shell may slash your finger or stab your
body. Damaged speaker may exhibit unpredictable
behavior resulting in fire, explosion or risk of
injury.
● Hold the speaker and the battery cartridge firmly
when installing or removing battery cartridge.
Failure to hold the speaker and the battery
cartridge firmly may cause them to slip off your
hands and result in damage to the speaker and
battery cartridge and a personal injury.
IMPORTANT:
● Reduced power, distortion, “stuttering sound” or a low
battery icon appearing on the display are all signs that
the main battery pack needs to be replaced.
● The battery cartridge can’t be charged via the supplied
AC power adaptor.
● The battery cartridge is not included as standard
accessories.
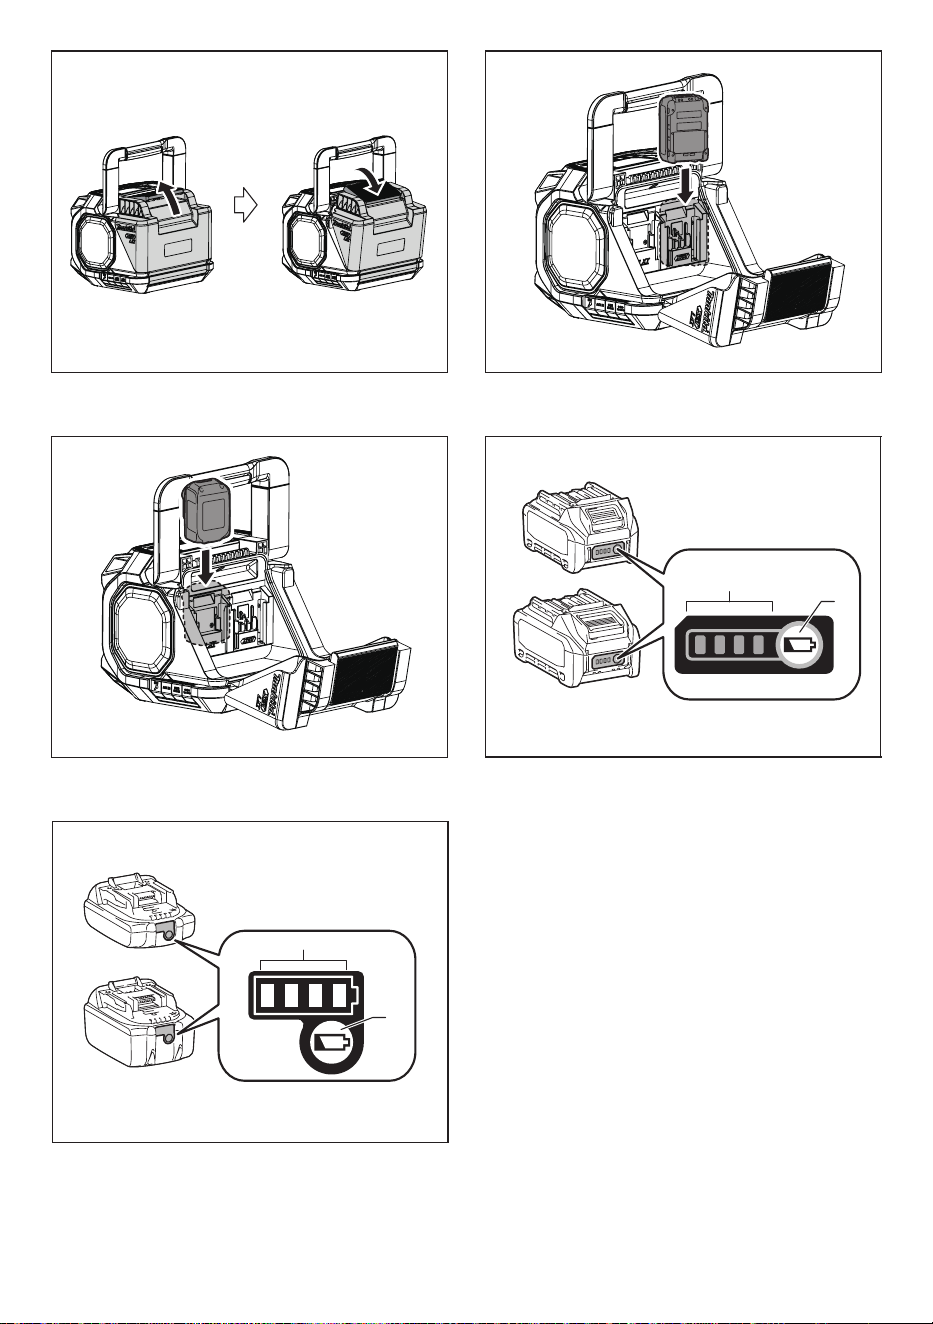
Installing or removing slide battery
cartridge (Fig. 2-4)
● To install the battery cartridge, align the tongue on the
battery cartridge with the groove in the housing and slip
it into place. Always insert it all the way until it locks in
place with a little click.
● If you can see the red indicator on the upper side of
the button, it is not locked completely. Install it fully
until the red indicator cannot be seen. If not, it may
accidentally fall out of the speaker, causing injury to
you or someone around you.
● Do not use force when inserting the battery cartridge.
If the cartridge does not slide in easily, it is not being
inserted correctly.
● To remove the battery cartridge, sliding it from the
speaker while pressing the button on the front of the
cartridge.
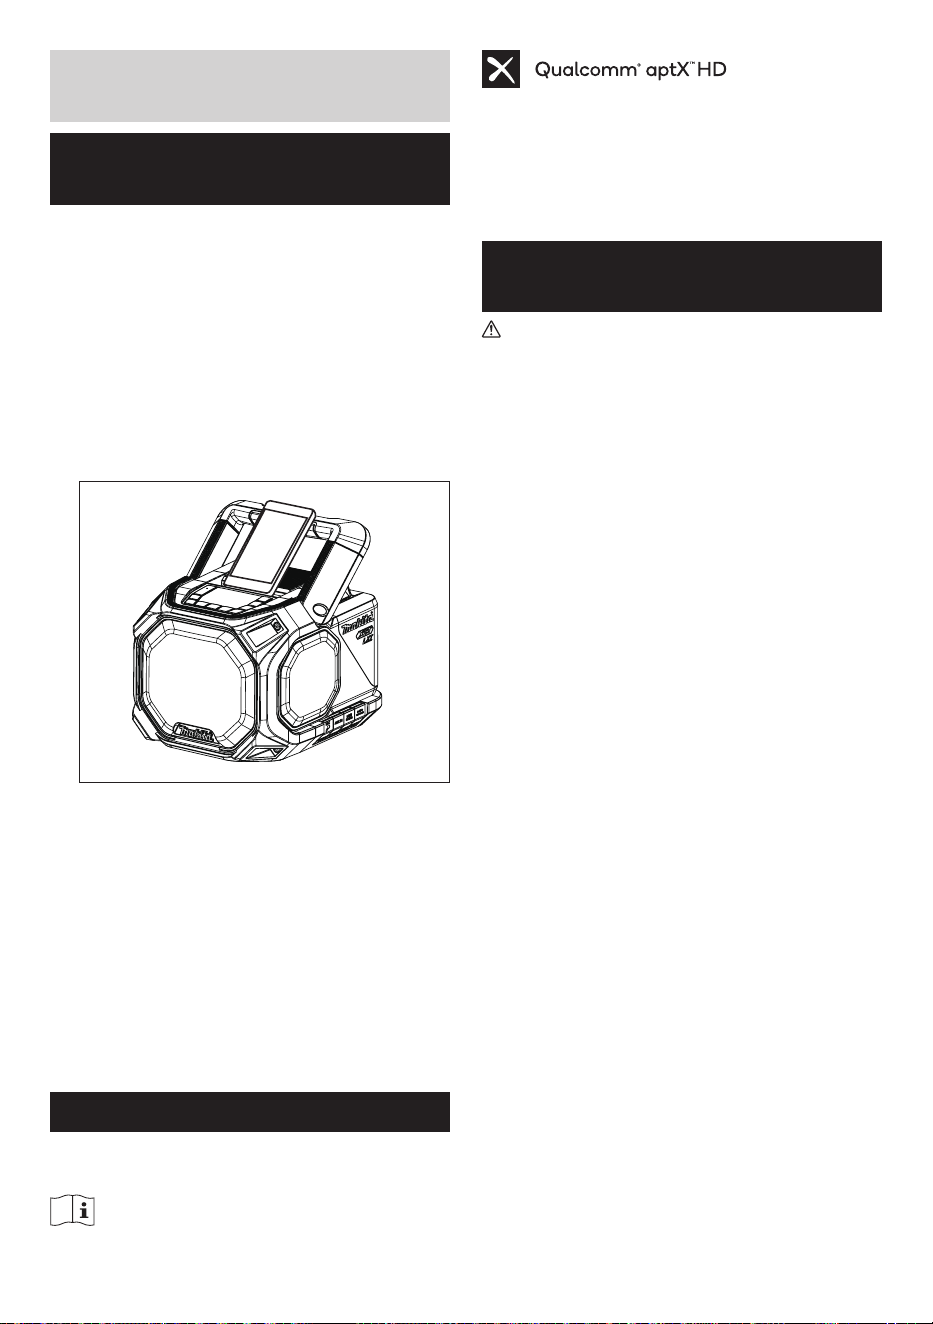
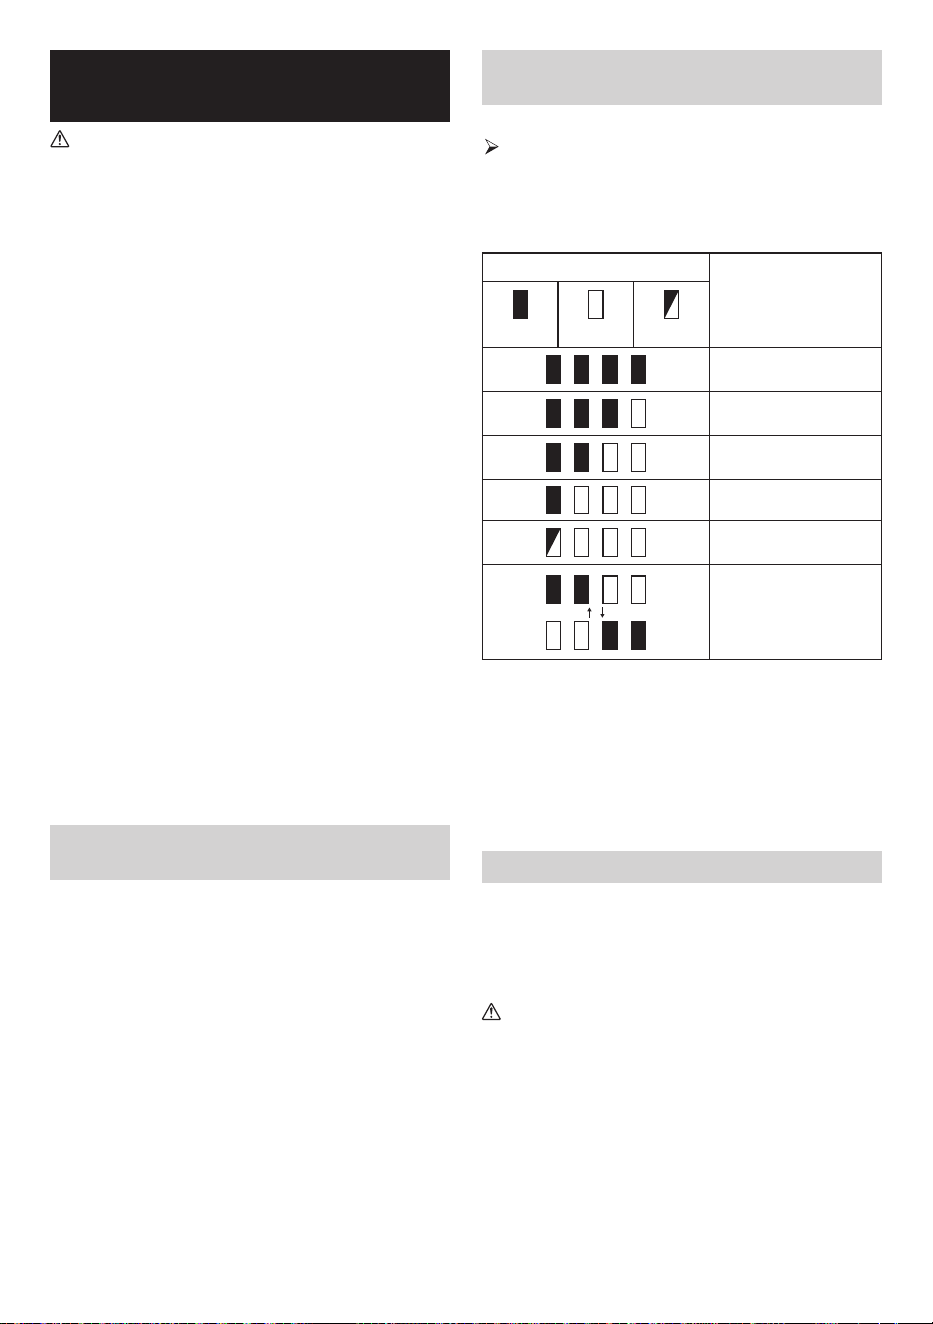
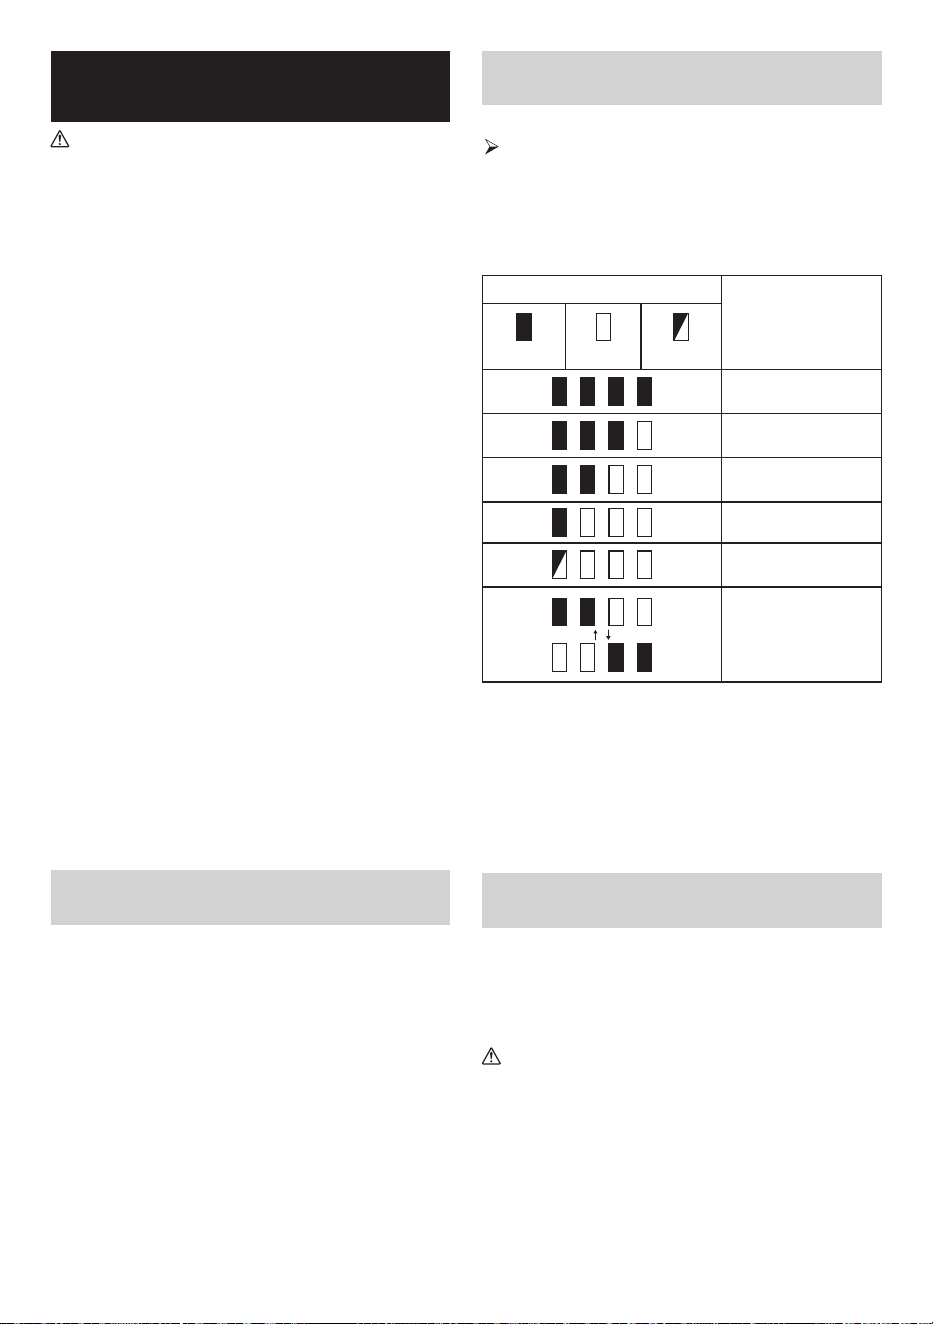
Indicating the remaining battery
capacity (Fig. 5-6)
Only for battery cartridges with the indicator
1. Indicator lamps 2. Check button
Press the check button on the battery cartridge to indicate
the remaining battery capacity. The indicator lamps light
up for few seconds.
● XGT/LXT battery cartridge
Indicator or lamps
Remaining capacity
Lighted Off Blinking
75% ~ 100%
50% ~ 75%
25% ~ 50%
0% ~ 25%
Charge the battery
The battery may have
malfunctioned
NOTE:
● Depending on the conditions of use and the ambient
temperature, the indication may differ slightly from the
actual capacity.
● The first (far left) indicator lamp will brink when the
battery protection system works.
● When the battery power is low, please replace the
battery.
Using supplied AC power adaptor
Remove the rubber protector and insert the adaptor
plug into the DC socket on the right hand side of the
speaker. Plug the adaptor into a standard mains socket
outlet. Whenever the adaptor is used, the battery pack is
automatically disconnected.
CAUTION:
● Always disconnect the AC power adaptor
completely before moving the speaker. If the AC
adaptor is not removed, it may cause an electric
shock.
● Never pull and/or drag the cord of the adaptor.
If not, the speaker may accidentally fall down,
causing injury to you or someone around you.
IMPORTANT:
● In order to disconnect the speaker, the mains adaptor
should be removed from the mains outlet completely.

9 ENGLISH
● Use the AC power adaptor supplied with the product or
specified by Makita only.
● Do not hold the power supply cable and plug by your
mouth. Doing so might cause an electric shock.
● Do not touch the power plug with wet or greasy hands.
● Damaged or entangled cords increase the risk of
electric shock. If the cord is damaged, have it replaced
by our authorized service center in order to avoid a
safety hazard. Do not use it before repair.
● After use, always store AC power adaptor out of the
reach of children. If Children play with the cord, they
may suffer injury.
USB power supply socket
This jack can be used to charge a mobile phone or any
other device that uses less than 2.4A of DC current.
Charging will only occur when the speaker is switched on.
Note: Ensure the specification of your external device
such as mobile phone or player is compatible with the
speaker. Please read instruction manual of your external
device before charging.
IMPORTANT:
● Before connecting USB device to the charger, always
backup your data of USB device. Otherwise your data
may lose by any possibility.
● The charger may not supply power to some USB
devices.
● When not using or after charging, remove the USB
cable and close the cover.
● Do not connect power source to USB port. Otherwise
there is risk of fire. The USB port is only intended for
charging lower voltage device. Always place the cover
onto the USB port when not charging the lower voltage
device.
● Do not insert a nail, wire, etc. into USB power supply
port. Otherwise a circuit short may cause smoke and
fire.
● Do not connect this USB socket with your PC USB port,
as it is highly possible that it may cause breakdown of
the units.
LISTENING TO MUSIC VIA
BLUETOOTH STREAMING
To play/stream Bluetooth music through the speaker, pair
your Bluetooth device with the speaker to enable the auto-
link.
Note:
To have the better sound quality, we recommend setting
the volume to more than two-thirds level on your Bluetooth
device and then adjust the volume on the speaker as
required. This operation is valid only when the Bluetooth
device is not absolute volume.
Pairing your Bluetooth device for the
rst time
1. Press the Power button to turn on the speaker. “Pairing”
will appear on the display to show the speaker is
discoverable.
2. Activate Bluetooth on your device according to the
device’s user manual to link to the speaker. Locate
the Bluetooth device list and select the device named
“GRM05” (With some mobiles which are equipped with
earlier versions than BT 2.1 Bluetooth device, you may
need to input the pass code “0000”).
3. Once connected, there will be a confirmation tone
sound. “Paired” will appear on the display. You can
simply select and play any music from your source
device. Volume control can be adjusted from your
source device, or directly from the speaker.
4. Use the controls on your Bluetooth-enabled device or
on the speaker to play/pause and navigate tracks.
Note:
● If 2 Bluetooth devices, pairing for the first time, both
search for the speaker, it will show its availability on both
devices. However, if one device links with this unit first,
then the other Bluetooth device won’t find it on the list.
● If your Bluetooth device is temporarily disconnected to
the speaker, then you need to manually reconnect your
device again to the speaker.
● If “GRM05” shows in your Bluetooth device list but
your device cannot connect with it, please delete the
item from your list and pair the device with the speaker
again following the steps described previously.
● Optimum Bluetooth streaming range is roughly 30
meters (100 feet) (line of sight) to the speaker but
distance up to 100 meters (328 feet) are possible.
● If Bluetooth connection is lost due to exceeding time of
separation, exceeding the optimum distance, obstacles
or otherwise, reconnecting your device with the
speaker may be necessary.
● Physical obstacles, other wireless devices or
electromagnetic devices may affect the connection quality.
● Bluetooth connectivity performance may vary
depending on the connected Bluetooth devices. Please
refer to the Bluetooth capabilities of your device before
connecting to the speaker. All features may not be
supported on some paired Bluetooth devices.
Playing audio les in Bluetooth mode
When you have successfully connected the speaker with
the chosen Bluetooth device, you can start to play your
music using the controls on your connected Bluetooth
device.
1. Once playing has started, adjust the volume to the
required setting using the Volume buttons on the
speaker or on your enabled Bluetooth device.

10 ENGLISH
2. Use the controls on your Bluetooth device to play/
pause and navigate tracks. Alternatively, control the
playback using Play/Pause, Next track and Previous
track buttons on your speaker.
3. Press and hold the Fast-forward button or Rewind
button to move through the current track. Release the
button when the desired point is reached.
Note:
● Not all player applications or devices may respond to
all of these controls.
● Some mobile phones may temporarily disconnect from
the speaker when you make or receive calls. Some
devices may temporarily mute their Bluetooth audio
streaming when they receive text messages, emails or
for other reasons unrelated to audio streaming. Such
behavior is a function of the connected device and
does not indicate a fault with the speaker.
● The display will show the track information such as title,
artist, album, etc., when playing in Bluetooth mode.
Playing a previously-paired Bluetooth
source device
The speaker can memorize up to 8 sets of paired
Bluetooth devices, when the memory exceeds this
amount, the earliest device with which the speaker was
paired will be overwritten in the speaker’s memory. If your
Bluetooth source device has previously paired with the
speaker, the speaker will still remember your Bluetooth
device and attempt to reconnect with the last connected
device within 1 minute. If the last connected device is not
available, the speaker will be discoverable.
Disconnecting your Bluetooth device
Press and hold the Bluetooth pairing button for 2-3
seconds until “Pairing” is shown on the display to
disconnect with your Bluetooth device or turn off Bluetooth
on your Bluetooth device to disable the connection.
Deleting Bluetooth paired device
memory
To clear the memory of all paired devices, press and hold
the Bluetooth pairing button for more than 7 seconds until
“Reset” is shown on the display.
TRUE WIRELESS STEREO
(TWS) FUNCTION
True wireless stereo (TWS) is a feature that allows one
device to wirelessly connect with another device. You can
use the TWS function to connect it to a second GRM05
and play your music through two speakers.
Setting up the rst speaker
1. Make sure the first speaker is in Bluetooth mode and
connect to a Bluetooth device.
2. Press the Plus button, the display will show
ST MULTI
.
ST
will flash on the display. Press the Plus button to
enter the “ST Pair” mode. If no buttons are pressed for
10 seconds, the speaker will also enter the “ST Pair”
mode. The display will show “ST Pair”.
Setting up the second speaker
1. Make sure the second speaker is in Bluetooth mode
and that it has not connected to a Bluetooth device.
2. Press the Plus button, the display will show
ST MULTI
.
ST
will flash on the display. Press the Plus button to
enter the “ST Pair” mode. If no buttons are pressed for
10 seconds, the speaker will also enter the “ST Pair”
mode.
When the speakers are successfully connected,
STL-
-R
will be shown on both displays at the same
time.
Note: Set up the second speaker within 1 minute of the
first one, otherwise the setting of the first speaker will be
canceled.
Starting playback
1. Start playback on the connected Bluetooth device and
adjust the volume on the Bluetooth device or one of the
speakers for comfortable listening.
Note: Volume or EQ settings of one speaker will be
reflected on the other.
2. Use the controls on your Bluetooth device to play/
pause and navigate tracks. Alternatively, control the
playback using Play/Pause, Next track and Previous
track buttons on either speaker.
3. Press and hold the Fast forward or Rewind button
on either speaker to fast forward or rewind within the
current track. Release the button when the desired
point is reached.
Switching the audio mode
1. Using two speakers, you can switch between
STL-
-R
,
STR-
-R
and
STL-
-L
mode.
2. Press the L/R button on either of the speakers to
change the audio mode.
3.
STL-
-R
mode: Both speakers play the same sound.
It is the initial setting.
4.
STR-
-R
and
STL-
-L
mode: One speaker plays
the sound on the right channel, while the other speaker
plays the sound on the left channel for stereo playback
between the speakers.
Disconnecting the TWS Function
Press and hold the Plus button to disconnect the TWS
function.
11 ENGLISH
ENJOYING WIRELESS
PLAYBACK USING MULTIPLE
SPEAKERS
You can enjoy music at the same time by combining up to
10 devices which are compatible with this function.
Setting up the rst speaker
1. Make sure the first speaker is in Bluetooth mode and
connect to a Bluetooth device.
2. Press the Plus button, the display will show
ST MULTI
.
3. Select
MULTI
by pressing the L/R button.
MULTI
will
flash on the display. Press the Plus button to enter
“MULTI Pair” mode. If no buttons are pressed for 10
seconds, the speaker will also enter the “MULTI Pair”
mode. The display will show “MULTI Pair”.
Setting up the second speaker
1. Ensure that the second speaker is in Bluetooth “Pairing”
mode.
2. Press the Plus button, the display will show
ST MULTI
.
3. Select
MULTI
by pressing the L/R button.
MULTI
will
flash on the display. Press the Plus button to enter the
“MULTI Pair” mode. If no buttons are pressed for 10
seconds, the speaker will also enter the “MULTI Pair”
mode. When the speakers are successfully connected,
the first speaker’s display will show “PARENT”
(indicating the master speaker) and the second
speaker’s display will show “CHILD” (indicating the
secondary speaker).
Note: Set up the second speaker within 1 minute of the
first one. When adding a new secondary speaker, the 1
minute will be recalculated.
Adding new secondary speakers
If you want to connect a third speaker or more new
speakers, follow these steps:
1. Ensure that the new speaker is in Bluetooth “Pairing”
mode.
2. Press the Plus button on the master speaker, the
display will show “MULTI ADD”.
3. Press the Plus button on the new speaker, the display
will show
ST MULTI
.
4. Select
MULTI
by pressing the L/R button.
MULTI
will
flash on the display. Press the Plus button to enter the
“MULTI Pair” mode. If no buttons are pressed for 10
seconds, the speaker will also enter the “MULTI Pair”
mode. When the speakers are successfully connected,
“CHILD”(indicating the secondary speaker) will be
displayed on the new speaker.
Starting playback
1. Start playback on the connected Bluetooth device and
adjust the volume on the Bluetooth device or on the
speakers for comfortable listening. The same music is
played from all speakers.
Note: Only the master speaker’s volume or EQ settings
will be synchronized with the other speakers. For the
other speakers, please set each speaker’s volume or
EQ individually.
2. Use the controls on your Bluetooth device to play/
pause and navigate tracks. Alternatively, control the
playback using Play/Pause, Next track and Previous
track buttons on the master speaker.
3. Press and hold the Fast forward or Rewind button on
the master speaker to fast forward or rewind within the
current track. Release the button when the desired
point is reached.
Disconnecting the multiple speakers
● To disconnect only one secondary speaker, press and
hold the Plus button of the secondary speaker you
want to disconnect.
● To disconnect all connections and exit the multiple
speakers group, press and hold the Plus button of the
master speaker.
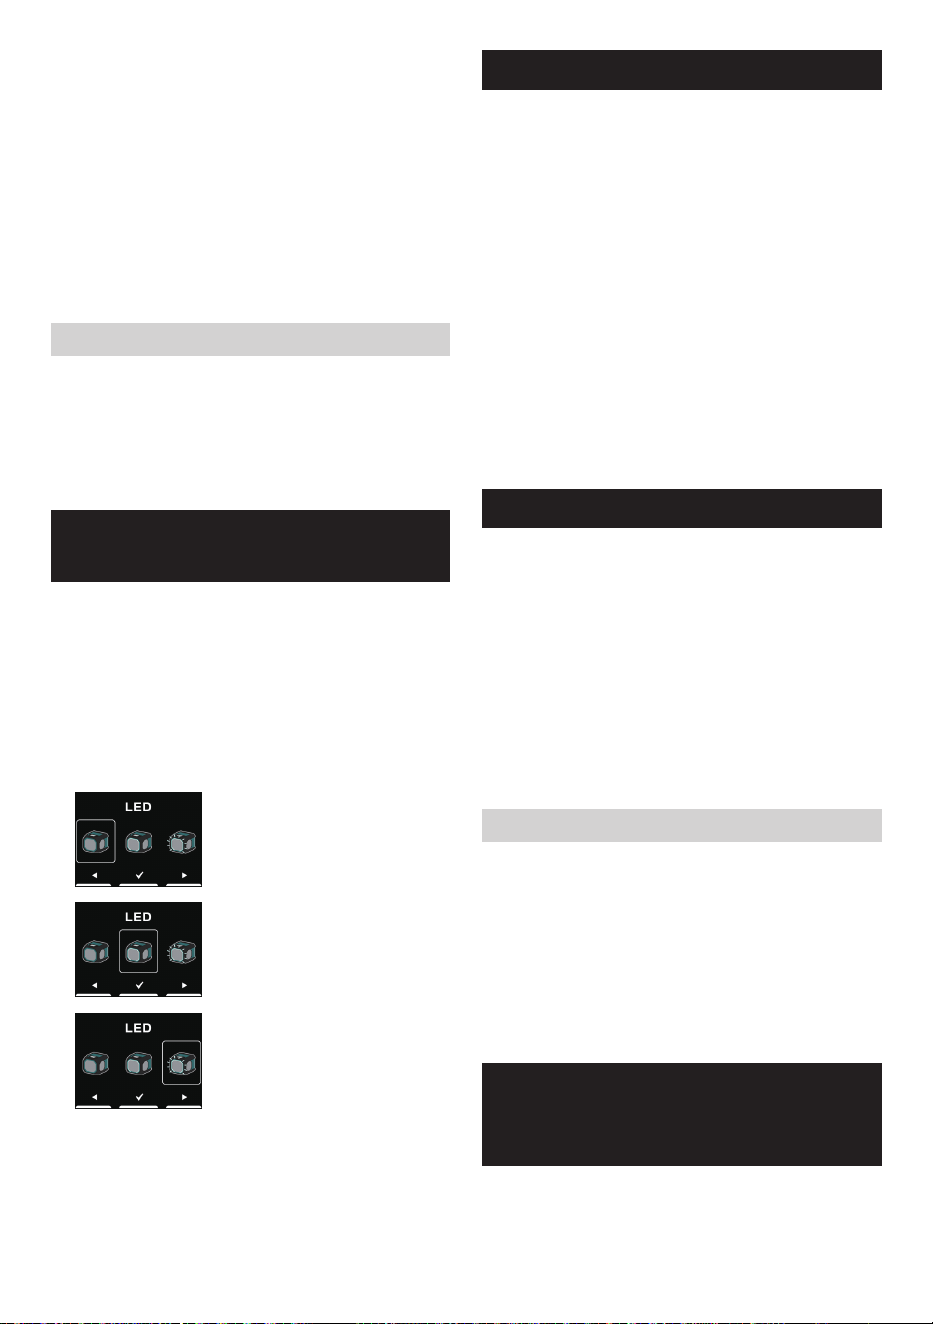
SELECT LIGHTING
FUNCTION
1. Press the Power button to switch on your speaker.
2. Press the Menu button, then press the Previous Track
button to enter the settings.
3. Press the Next Track or Previous Track button to select
the desired Lighting function. Then press the Play/
Pause button to confirm your selection.
Selecting this option indicates that
the LED light is turned off.
Selecting this option indicates
that the LED light remains
continuously illuminated. (Default)
Selecting this option indicates
that the LED light will flash with
the rhythm of the music. It is more
effective with music that has a
strong beat.
Note: This feature is suitable for music with a strong
rhythm. Otherwise, the LED light may not flash.
EQUALIZER FUNCTION
1. Press the Power button to switch on your speaker.

12 ENGLISH
2. Press the Menu button, then press the Play/Pause
button to enter the EQ selection menu.
3. Press the Next Track or Previous Track button to select
the desired equalizer mode or choose to configure
your own equalizer mode. Then, press the Play/
Pause button to confirm your selection. The available
equalizer modes are: “FLAT”, “JAZZ”, “ROCK”,
“CLASSIC”, “POP”, “NEWS”, and “MY EQ”.
4. If “MY EQ” is chosen in step 3, use the Next track,
Previous track and Play/Pause buttons to subsequently
configure the treble, middle and bass levels.
Note: If you increase the volume while emphasizing the
bass with an equalizer, crackling or distortion may occur.
In this case, adjust the volume.
MICROPHONE SOCKET
A 6.3mm microphone socket is provided on the right
side of your speaker for connecting the microphone (not
supplied).
1. Connect the microphone to the microphone (MIC)
socket.
2. Press the Power button to switch on your speaker.
3. Turn on the microphone.
4. Press the volume up/down buttons on the speaker as
needed to adjust the desired level.
Note:
Do not place the microphone against the speaker, it can
cause feedback echo and it will damage the speaker.
Setting the Microphone volume
1. Press the Power button to switch on your speaker.
2. Press the Menu button, then press the Next Track
button to enter the settings.
3. Press the Next Track or Previous Track button to select
the desired microphone volume level. Then press the
Play/Pause button to confirm your selection.
PLAYING MUSIC VIA
AUXILIARY INPUT SOCKET
A 3.5mm Auxiliary input socket is provided on the right
side of the unit for an audio signal from any devices that
features a headphone or audio output, such as MP3 or
CD player.
1. Connect a stereo or mono audio source (for example,
MP3 or CD player) to the Auxiliary input socket (marked
‘AUX IN’), the speaker will be switched from Bluetooth
to auxiliary input mode.
2. Adjust the Volume control on your MP3 or CD player to
ensure an adequate signal and then adjust the volume
on the speaker for comfortable listening.
Note:
In AUX IN mode, it is recommended to set the volume of
the external audio device to two-thirds or higher. Then,
adjust the speaker’s volume as needed to achieve optimal
sound quality. If the volume of the audio device is set
lower than two-thirds, it is possible that the LED light will
not flash.
The display does not show the information such as title,
artist, album, etc., when playing via auxiliary input socket.
MAINTENANCE
CAUTION:
● Never use gasoline, benzine, thinner, alcohol or
the like. Discoloration, deformation or cracks may
result.
● Do not wash the speaker with water.
13 ENGLISH
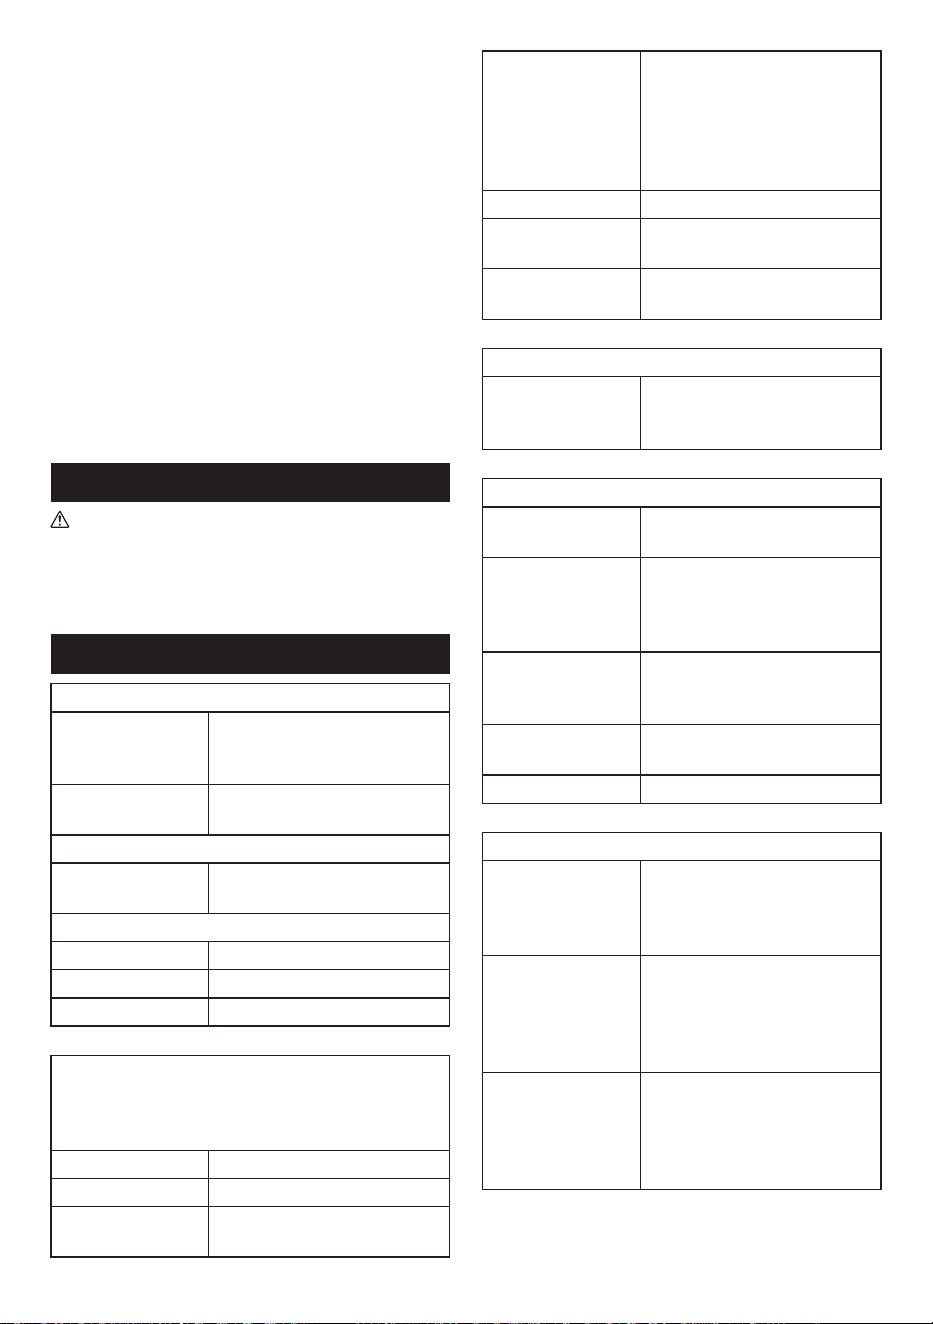
SPECIFICATIONS
Amplifier
Output power
14.4V: 15W
18V: 20W
36V: 20W
Frequency response 50Hz~20kHz
Aux In
Input sensitivity 300mVrms @100Hz
Speaker
Main speaker 140.8mm x 1 6ohm 25W
Tweeter speaker 40mm x 1 6ohm 10W
Passive radiator 100.7mm x 2
Bluetooth
®
(The Bluetooth
®
word mark and logos are registered
trademarks owned by Bluetooth SIG, Inc.)
Bluetooth version 5.1 Certified
Bluetooth Profiles A2DP/SCMS-T/AVRCP
Transmission Power Power Class 1
Transmisson Range
Optimum:
Max. 30 meters (100 feet)
Possible:
Max. 100 meters (328 feet)
(varies according to usage
conditions)
Supported codec SBC, AAC, aptX
TM
, aptX
TM
HD
Compatible
Bluetooth profile
A2DP/AVRCP
Operating
Frequency
2402MHz~2480MHz
USB charging socket
Maximum supplying
power of USB socket
5V, 2.4A
General
AC power adaptor DC in 18V 2A, center pin positive
Battery
Slide battery:
14.4V
18V
36V
Input terminal
3.5mm dia. (AUX IN)
6.3mm dia. (MICROPHONE)
Dimensions
(W x H x D)
236mm x 205mm x 243mm
Weight 3.8KG (without battery)
Information on Power Consumption
Off mode
This device has no standby
mode, and its power consumption
in the off mode is below 0.3W.
Bluetooth mode
In Bluetooth mode, when there is
no signal output, the idle power
consumption in this mode is
below 2W after 15 minutes.
AUX mode
In AUX mode, when there is no
signal output, the idle power
consumption in this mode is
below 0.8W after 15 minutes.
The company reserves the right to amend the
specifications without notice.
14 ESPAÑOL
ESPAÑOL
(Instrucciones originales)
EXPLICACIÓN DE LA VISTA
GENERAL (imagen 1)
1. Compartimiento de la batería
2. Asa
3. Tapa del compartimiento de la batería (que
cubre el cartucho de batería)
4. Parlante pasivo
5. Toma de entrada de CC
6. Toma de carga USB
7. Toma de entrada auxiliar
8. Toma de micrófono
9. Luz LED
10. Parlante
11. Ranura para colocar un teléfono celular
12. Pantalla LCD
13. Botón de subir volumen
14. Botón de bajar volumen
15. Botón Plus (botón de vinculación Plus)
16. Botón de L/R (izquierda/derecha)
17. Botón de pista siguiente/avance rápido
18. Botón de reproducir/pausar
19. Botón de pista anterior/rebobinar
20. Botón de menú
21. Botón de vinculación Bluetooth
22. Botón de encendido
23. Terminal de la batería LXT
24. Terminal de la batería XGT
SÍMBOLOS
A continuación se muestran los símbolos utilizados para
el equipo. Asegúrese de comprender su significado antes
de utilizarlo.
Lea el manual de instrucciones.
Qualcomm aptX es un producto de Qualcomm
Technologies, Inc. y sus subsidiarias. Qualcomm es una
marca comercial de Qualcomm Incorporated, registrada
en los Estados Unidos y otros países. aptX es una marca
comercial de Qualcomm Technologies International, Ltd.,
registrada en los Estados Unidos y otros países.
INSTRUCCIONES
IMPORTANTES DE
SEGURIDAD
ADVERTENCIA:
Cuando utilice herramientas eléctricas, para reducir
el riesgo de incendio, descarga eléctrica y lesiones
personales, siga siempre las precauciones básicas de
seguridad, incluyendo lo siguiente:
1. Lea el manual de instrucciones y el manual de
instrucciones del cargador detenidamente antes de
usarlos.
2. Limpie el equipo solo con un paño seco.
3. No instale cerca de fuentes de calor, como
radiadores, estufas, fuegos de cocina u otros
aparatos (incluyendo amplificadores) que produzcan
calor.
4. Utilice únicamente accesorios especificados por el
fabricante.
5. Desenchufe este aparato durante las tormentas o
cuando no vaya a usarlo por un periodo prolongado.
6. Un altavoz que funcione por medio de baterías
bien integradas o bien independientes, solo debe
cargarse con el cargador específico para la batería.
Un cargador adecuado para un tipo de batería, puede
crear riesgo de incendio cuando se usa con otra
batería.
7. Use un altavoz que funcione por medio de baterías
solo con baterías específicamente diseñadas. El uso
de otras baterías podría crear riesgo de incendio.
8. Cuando la batería no esté en uso, manténgala alejada
de otros objetos metálicos como: clips, monedas,
llaves, clavos, tornillos u otros objetos metálicos
pequeños que pudieran crear conexiones de un
terminal a otro. El contacto entre sí de los terminales
de las baterías puede provocar chispas, quemaduras
o fuego.
9. Evite contacto corporal con superficies conectadas
a tierra como tuberías, radiadores, estufas y
refrigeradores. Hay un incremento del riesgo de
descarga eléctrica si su cuerpo está conectado a
tierra.
10. En condiciones abusivas, puede que de la batería
se expulse líquido, evite el contacto. Si de forma

15 ESPAÑOL
accidental entra en contacto con el líquido, enjuague
con agua. Si el líquido entrase en contacto con los
ojos, busque ayuda médica. El líquido expulsado de
la batería puede causar irritación o quemaduras.
11. No use una batería o una herramienta dañada o
modificada. Las baterías dañadas o modificadas
puede presentar un comportamiento impredecible
causando incendios, explosiones y riesgos de
lesiones.
12. No exponga la batería o herramienta al fuego o a
temperaturas excesivas. La exposición al fuego o a
temperaturas mayores que 130°C (266°F) podrían
causar una explosión.
13. Siga todas las instrucciones de carga y no cargue
la batería o la herramienta fuera del rango de
temperatura especificado en las instrucciones. Cargar
incorrectamente o a temperaturas fuera del rango
especificado podrían dañar la batería e incrementar
el riesgo de fuego.
14. El enchufe principal de la red eléctrica se utiliza como
dispositivo de desconexión, y debe estar siempre
disponible.
15. No use este producto a volumen alto durante un
periodo prolongado. Para evitar daños auditivos, use
este producto a un nivel de volumen moderado.
16. (Solo para productos con pantalla LCD) Las pantallas
LCD incluyen líquidos que pueden causar irritación
y envenenamiento. Si el líquido entrase en contacto
con los ojos, boca o piel, enjuague con agua y llame
a un médico.
17. No exponga el producto a condiciones de lluvia o
humedad. El agua que entre al producto incrementará
el riesgo de descarga eléctrica.
18. Este aparato no es apto para su uso por personas
(niños incluidos) con las capacidades físicas,
sensoriales o mentales disminuidas, o por personas
que carezcan de experiencia y conocimiento, a no ser
que alguien que sea responsable de su seguridad,
les esté supervisando o les explique cómo deben
usar el aparato. Los niños deben ser supervisados
para asegurarse de que no jueguen con el producto.
Guarde el producto lejos del alcance de los niños.
19. No caliente ni exponga el altavoz al fuego o lo deje en
un lugar caliente como cerca de una fuente de calor,
expuesto a la luz solar directa o dentro de un vehículo
bajo un sol abrasador. Hacer esto puede causar un
incendio o explosión y provocar lesiones personales.
20. Coloque el equipo en una superficie nivelada y plana
o asegúrelo en una ubicación estable. De lo contrario,
podría producirse un accidente por caída.
GUARDE ESTAS INSTRUCCIONES
NORMAS DE SEGURIDAD
ESPECÍFICAS PARA
CARTUCHOS DE BATERÍA
1. Antes de utilizar el cartucho de batería, lea todas las
instrucciones y advertencias en (1) el cargador de
batería, (2) la batería y (3) el producto que utiliza la
batería.
2. No desmonte el cartucho de batería.
3. Si el tiempo de funcionamiento se ha acortado
excesivamente, deje de utilizarlo inmediatamente.
Puede haber riesgo de sobrecalentamiento, posibles
quemaduras e incluso una explosión.
4. Si el electrolito entra en contacto con los ojos,
enjuáguelos con agua limpia y busque atención
médica de inmediato. Puede provocar la pérdida de
la vista.
5. No cortocircuite el cartucho de batería:
(1) No toque los terminales con ningún material
conductor.
(2) Evite almacenar el cartucho de batería en un
recipiente con otros objetos metálicos como
clavos, monedas, etc.
(3) No exponga el cartucho de batería al agua
o la lluvia. Un cortocircuito en la batería
puede provocar un gran ujo de corriente,
sobrecalentamiento, posibles quemaduras e
incluso una avería.
6. No almacene ni utilice la herramienta ni el cartucho
de batería en lugares donde la temperatura pueda
alcanzar o superar los 50°C (122°F).
7. No incinere el cartucho de batería incluso si está
severamente dañado o completamente desgastado.
El cartucho de batería podría explotar en el fuego.
8. Tenga cuidado de no dejar caer ni golpear la batería.
9. No utilice una batería dañada.
10. Para evitar riesgos, debe leer el manual de la batería
reemplazable antes de utilizarla.
11. Las baterías de iones de litio contenidas están sujetas
a los requisitos de la Legislación sobre mercancías
peligrosas. Para su transporte comercial, como por
ejemplo por parte de terceros o transportistas, deben
respetarse los requisitos especiales en materia
de embalaje y etiquetado. Para la preparación del
artículo a enviar, se requiere consultar a un experto
en materiales peligrosos. Cumpla también las,
posiblemente más detalladas, normas nacionales.
Cubra los contactos abiertos y empaquete la batería de
tal manera que no pueda moverse dentro del embalaje.
12. Cuando deseche el cartucho de batería, retírelo de la
herramienta y deséchelo en un lugar seguro. Siga las
regulaciones locales relacionadas con la eliminación
de las baterías.
16 ESPAÑOL
13. Utilice las baterías únicamente con los productos
especificados por Makita. La instalación de baterías
en productos que no cumplen con las normas podría
provocar un incendio, calor excesivo, explosión o
fuga de electrolitos.
14. Si la herramienta no se utiliza durante un período
prolongado, se debe retirar la batería de la herramienta.
15. No permita que virutas, polvo o tierra se adhieran
a los terminales, orificios y ranuras del cartucho de
batería. Podría provocar un rendimiento pobre o
averías de la herramienta o del cartucho de batería.
16. Mantenga la batería fuera del alcance de los niños.
17. Durante y tras su utilización, el cartucho de batería
podría calentarse, lo que puede provocar quemaduras
o quemaduras por baja temperatura.
18. No toque el terminal de la herramienta inmediatamente
después de su utilización, ya que podría calentarse lo
suficiente como para causar quemaduras.
19. A menos que la herramienta admita su utilización
cerca de líneas eléctricas de alto voltaje, no utilice
el cartucho de batería cerca de líneas eléctricas de
alto voltaje. Podría provocar un mal funcionamiento o
avería de la herramienta o cartucho de batería.
20. Proteja la batería de las siguientes condiciones:
- reemplazo de una batería por una del tipo incorrecto
que pueda anular una protección (por ejemplo, en el
caso de algunos tipos de baterías de litio);
- tirar una batería al fuego o a un horno caliente,
aplastarla o cortarla mecánicamente, lo que puede
provocar una explosión;
- dejar una batería en un entorno con temperaturas
extremadamente altas que puedan provocar una
explosión o una fuga de líquido o gas inflamable;
- una batería sometida a una presión de aire
extremadamente baja que pueda provocar una
explosión o una fuga de líquido o gas inflamable.
PRECAUCIÓN:
● Peligro de explosión si la batería se reemplaza
incorrectamente.
● Utilice únicamente baterías Makita originales.
La utilización de baterías Makita no originales o
baterías que hayan sido alteradas puede provocar
que la batería explote y provoque incendios,
lesiones personales y daños. También anulará
la garantía de Makita para la herramienta y el
cargador de Makita.
Consejos para mantener la máxima vida
útil de la batería
1. Cargue el cartucho de batería antes de que se descargue
por completo. Detenga siempre su utilización y cargue el
cartucho de batería cuando note menos potencia.
2. Nunca cargue un cartucho de batería completamente
cargado. La sobrecarga acorta la vida útil de la batería.
3. Cargue el cartucho de batería a una temperatura
ambiente de entre 10°C y 40°C (entre 50°F y 104°F).
Antes de cargarlo, deje que un cartucho de batería
caliente se enfríe.
4. Cuando no utilice el cartucho de batería, retírelo de
la herramienta o del cargador.
5. Cargue el cartucho de batería si no lo utiliza durante
un período prolongado (más de seis meses).
Para Estados Unidos:
Precauciones para el usuario
Los cambios o modificaciones que no hayan sido
expresamente autorizados por la entidad responsable
por el cumplimiento de las regulaciones podrían anular
la autoridad del usuario de utilizar este equipo.
Declaración de exposición a la radiación:
El producto cumple con el límite de exposición a
radiofrecuencia portátil de la FCC establecido para un
entorno no controlado y es seguro para la operación
prevista como se describe en este manual. Se puede
lograr una mayor reducción de la exposición a la
radiofrecuencia si el producto se puede mantener lo
más alejado posible del cuerpo del usuario o configurar
el dispositivo para una potencia de salida más baja si
dicha función está disponible.
NOTA: Este equipo ha sido probado y cumple con los
límites correspondientes a un equipo digital de Clase
B, según lo señalado en la Parte 15 de las Normas
FCC (la Comisión Federal de Comunicaciones de EE.
UU.). Estos límites están diseñados para proporcionar
protección razonable contra interferencias perjudiciales
en una instalación residencial. Este equipo genera,
utiliza y puede emitir energía de frecuencias de radio y,
si no es instalado y usado de acuerdo a las
instrucciones, puede causar interferencias
perjudiciales en las comunicaciones de radio. Sin
embargo, no hay garantía de que no ocurrirán las
interferencias en una instalación determinada. Si este
equipo causa interferencias perjudiciales en la
recepción de radio o televisión, que se pueden
identificar encendiendo y apagando el equipo,
recomendamos al usuario que intente solucionar las
interferencias tomando una o más de las siguientes
medidas:
● Cambiar la orientación o posición de la antena
receptora.
● Aumentar la separación entre el equipo y el
receptor.
● Conectar el equipo a una toma de un circuito
diferente del conectado con el receptor.
● Consultar al proveedor o a un técnico de radio/TV
con experiencia para recibir ayuda.
17 ESPAÑOL
TIEMPO DE FUNCIONAMIENTO
* Los paquetes de baterías adecuados para este parlante se enumeran en la siguiente tabla.
* La siguiente tabla indica el tiempo de funcionamiento con una sola carga.
Cartucho de batería
Capacidad de
la batería
EN LA SALIDA DEL PARLANTE = 100 mW
Unidad: hora (aproximadamente)
Bluetooth AUX IN
LED
ENCENDIDO
LED
APAGADO
LED
ENCENDIDO
LED
APAGADO
LXT (18V)
BL1815N 1.5 Ah 8.0 10 8.5 11
BL1820B 2.0 Ah 11 14 11 15
BL1830B 3.0 Ah 15 19 16 20
BL1840B 4.0 Ah 22 28 22 29
BL1850B 5.0 Ah 28 36 29 37
BL1860B 6.0 Ah 34 43 35 45
XGT
(36V - 40V máx.)
BL4020 2.0 Ah 19 23 19 24
BL4025 2.5 Ah 24 30 25 31
BL4040(F) 4.0 Ah 39 47 40 49
ADVERTENCIA:
Utilice únicamente los cartuchos de batería enumerados anteriormente. La utilización de cualquier otro cartucho
de batería puede causar lesiones e incendios.
NOTA:
● La tabla anterior sobre el tiempo de funcionamiento de la batería es para referencia.
● El tiempo de funcionamiento real puede diferir según el tipo de batería, las condiciones de carga o el entorno de
utilización.
● Puede que algunos de los cartuchos de batería y cargadores enumerados anteriormente no estén disponibles según
su región de residencia.
18 ESPAÑOL
INSTALACIÓN Y
ALIMENTACIÓN
PRECAUCIÓN:
● Tenga cuidado de no pillarse los dedos al abrir y
cerrar la tapa de la batería.
● Tras instalar o quitar el cartucho de batería,
coloque de nuevo la tapa del compartimiento de la
batería en su posición original. De lo contrario, el
cartucho de batería podría caerse accidentalmente
del parlante y causarle lesiones a usted o a alguien
a su alrededor.
● Cierre y bloquee siempre el compartimiento de la
batería antes de mover el parlante.
● Apague siempre el parlante antes de instalar o
retirar el cartucho de batería.
● Tenga cuidado de no dejar caer ni golpear el
parlante. Una carcasa rota podría cortarle los dedos
o clavársele en el cuerpo. Un parlante dañado
puede exhibir un comportamiento impredecible
que resulte en un incendio, explosión o riesgo de
lesiones.
● Sujete firmemente el parlante y el cartucho de
batería al instalar o retirar el cartucho de batería. Si
no sujeta firmemente el parlante y el cartucho de
batería, es posible que se le resbalen de las manos
y se dañen, además de sufrir lesiones personales.
IMPORTANTE:
● Una potencia reducida, distorsión, "sonido
entrecortado" o la aparición de un icono de batería
baja en la pantalla, son señales de que es necesario
reemplazar el paquete de batería principal.
● El cartucho de batería no puede cargarse mediante el
adaptador de alimentación de CA suministrado.
● El cartucho de batería no está incluido como accesorio
estándar.
Instalación o retirada del cartucho de
batería deslizante (imágenes 2-4)
● Para instalar el cartucho de batería, alinee la lengüeta
del cartucho de batería con la ranura de la carcasa y
deslícela en su lugar. Insértelo siempre completamente
hasta que encaje en su lugar con un pequeño clic.
● Si puede ver el indicador rojo en la parte superior del
botón, no está completamente bloqueado. Instálelo
completamente hasta que no pueda verlo. De lo
contrario, podría caerse accidentalmente del parlante y
causarle lesiones a usted o a alguien a su alrededor.
● No utilice la fuerza al insertar el cartucho de batería. Si
el cartucho no se desliza suavemente, significa que no
está insertando correctamente.
● Para retirar el cartucho de batería, deslícelo hacia
fuera del parlante mientras presiona el botón en la
parte delantera del cartucho.
Indicación de la capacidad restante de
la batería (imágenes 5-6)
Solo para cartuchos de batería con indicador
1. Luces indicadoras 2. Botón de comprobación
Presione el botón de comprobación en el cartucho de
batería para indicar la capacidad restante de la batería.
Las luces indicadoras se encenderán durante unos
segundos.
● Cartucho de batería XGT/LXT
Indicador o luces
Capacidad restante
Iluminado Apagado Parpadeo
75% ~ 100%
50% ~ 75%
25% ~ 50%
0% ~ 25%
Cargue la batería
La batería puede
haber funcionado
mal
NOTA:
● Dependiendo de las condiciones de utilización y la
temperatura ambiente, la indicación puede diferir
ligeramente de la capacidad real.
● La primera luz indicadora (extremo izquierdo)
parpadeará cuando funcione el sistema de protección
de la batería.
● Cuando la carga de la batería sea baja, reemplácela.
Funcionamiento con el adaptador de
alimentación de CA suministrado
Retire el protector de goma e inserte el enchufe del
adaptador en la toma de CC situada en el lado derecho
del parlante. Conecte el adaptador a una toma de
corriente estándar. Siempre que se utilice el adaptador, el
paquete de batería se desconectará automáticamente.
PRECAUCIÓN:
● Antes de mover el parlante, desconecte siempre
completamente el adaptador de alimentación de
CA. Si no se retira el adaptador de CA, podría
provocar una descarga eléctrica.
● Nunca tire y arrastre del cable del adaptador.
De lo contrario, el parlante podría caerse
accidentalmente y causarle lesiones a usted o a
alguien a su alrededor.

19 ESPAÑOL
IMPORTANTE:
● Para desconectar el parlante, el adaptador de red debe
retirarse completamente de la toma de corriente.
● Utilice únicamente el adaptador de alimentación de
CA suministrado con el producto o especificado por
Makita.
● No sujete el cable de alimentación ni el enchufe con la
boca. Hacerlo podría provocar una descarga eléctrica.
● No toque el enchufe con las manos mojadas o
grasosas.
● Los cables dañados o enredados aumentan el riesgo
de descarga eléctrica. Si el cable está dañado, haga
que lo reemplace nuestro centro de servicio autorizado
para evitar riesgos para la seguridad. No lo utilice
antes de la reparación.
● Tras su utilización, guarde siempre el adaptador de
alimentación de CA fuera del alcance de los niños. Si
los niños jugasen con el cable, podrían sufrir lesiones.
Toma de corriente USB
Este conector puede utilizarse para cargar un teléfono
celular o cualquier otro dispositivo que utilice menos de
2,4A de corriente CC.
La carga solo se producirá cuando el parlante esté
encendido.
Nota: Asegúrese de que las especificaciones del
dispositivo externo, como un teléfono celular o
reproductor, sean compatibles con el parlante. Lea el
manual de instrucciones del dispositivo externo antes de
cargarlo.
IMPORTANTE:
● Antes de conectar el dispositivo USB al cargador,
haga siempre una copia de seguridad de los datos
del dispositivo USB. De lo contrario sus datos podrían
perderse.
● Es posible que el cargador no suministre energía a
algunos dispositivos USB.
● Cuando no lo utilice o tras la carga, retire el cable USB
y cierre la tapa.
● No conecte la fuente de alimentación al puerto USB.
De lo contrario, existe riesgo de incendio. El puerto
USB está diseñado para cargar solamente dispositivos
de menor voltaje. Coloque siempre la tapa en el puerto
USB cuando no esté cargando el dispositivo de menor
voltaje.
● No inserte clavos, cables, etc. en el puerto de
alimentación USB. De lo contrario, un cortocircuito
podría provocar humo y un incendio.
● No conecte esta toma USB al puerto USB de una
computadora, ya que es muy posible que provoque
daños en las unidades.
ESCUCHAR MÚSICA A
TRAVÉS DE TRANSMISIÓN
POR BLUETOOTH
Para reproducir/transmitir música Bluetooth a través del
parlante, vincule el dispositivo Bluetooth con el parlante
para habilitar el enlace automático.
Nota:
Para tener una mejor calidad de sonido, recomendamos
establecer el volumen a más de dos tercios del nivel en el
dispositivo Bluetooth y, a continuación, ajustar el volumen
en el parlante según sea necesario. Esta operación solo
es válida solo cuando el dispositivo Bluetooth no tiene el
volumen absoluto.
Vincular el dispositivo Bluetooth por
primera vez
1. Presione el botón de encendido para encender el
parlante. En pantalla se mostrará "Pairing" (Vinculando)
para indicar que el parlante es detectable.
2. Active el Bluetooth en el dispositivo según su manual
de usuario para enlazarlo al parlante. Vaya a la lista
de dispositivos Bluetooth y seleccione el dispositivo
llamado "GRM05" (en algunos celulares que están
equipados con versiones anteriores a Bluetooth BT2.1,
es posible que deba introducir la contraseña "0000").
3. Una vez conectado, se escuchará un tono de
confirmación. En pantalla se mostrará "Paired"
(Vinculado). Ahora puede seleccionar y reproducir
cualquier música desde el dispositivo fuente. El control
del volumen puede ajustarse desde el dispositivo
fuente o directamente desde el parlante.
4. Utilice los controles en el dispositivo habilitado para
Bluetooth o en el parlante para reproducir/pausar y
moverse por las pistas.
Nota:
● Si dos dispositivos Bluetooth, que estén vinculándose
por primera vez, buscan el parlante, se mostrará su
disponibilidad en ambos dispositivos. Sin embargo, si
un dispositivo se enlaza primero con la unidad, el otro
dispositivo Bluetooth no podrá encontrarla en la lista.
● Si el dispositivo Bluetooth se desconecta
temporalmente del parlante, deberá volver a conectar
manualmente su dispositivo al parlante.
● Si el "GRM05" se muestra en la lista de dispositivos
Bluetooth pero el dispositivo no puede conectarse con
él, elimine el elemento de la lista y vuelva a vincular
el dispositivo con el parlante siguiendo los pasos
descritos anteriormente.
● El alcance óptimo de la transmisión Bluetooth es de
aproximadamente 30 metros (100 pies) (línea directa
de visión) hasta el parlante, pero una distancia de
hasta 100 metros (328 pies) es posible.

20 ESPAÑOL
● Si se pierde la conexión Bluetooth debido a que
se excede el tiempo de separación, la distancia
óptima, obstáculos u otros motivos, es posible que
sea necesario volver a conectar el dispositivo con el
parlante.
● Los obstáculos físicos, otros dispositivos inalámbricos
o electromagnéticos pueden afectar la calidad de la
conexión.
● El rendimiento de la conectividad Bluetooth puede
variar dependiendo de los dispositivos Bluetooth
conectados. Consulte las características Bluetooth del
dispositivo antes de conectarlo al parlante. Es posible
que no todas las funciones no sean compatibles en
algunos dispositivos Bluetooth vinculados.
Reproducir archivos de audio en modo
Bluetooth
Cuando haya conectado con éxito el parlante con
el dispositivo Bluetooth elegido, puede comenzar a
reproducir música utilizando los controles en el dispositivo
Bluetooth conectado.
1. Una vez que haya comenzado la reproducción, ajuste
el volumen a la configuración requerida utilizando los
botones de volumen en el parlante o en el dispositivo
Bluetooth habilitado.
2. Utilice los controles del dispositivo Bluetooth
para reproducir/pausar y moverse por las pistas.
Alternativamente, controle la reproducción utilizando
los botones de reproducir/pausar, pista siguiente y
pista anterior en cualquiera de los parlantes.
3. Mantenga presionado el botón de avance rápido o
rebobinar para moverse por la pista actual. Suelte el
botón cuando alcance el punto deseado.
Nota:
● Puede que no todos los reproductores o dispositivos
respondan a todos estos controles.
● Algunos teléfonos celulares pueden desconectarse
temporalmente del parlante cuando realiza o
recibe llamadas. Algunos dispositivos pueden
silenciar temporalmente la transmisión de audio por
Bluetooth cuando reciben mensajes de texto, correos
electrónicos o por otros motivos no relacionados con
la transmisión de audio. Tal comportamiento es una
función del dispositivo conectado y no indica que haya
un problema con el parlante.
● La pantalla mostrará la información de la pista, como
título, artista, álbum, etc., cuando se reproduzca en
modo Bluetooth.
Reproducir un dispositivo fuente
Bluetooth vinculado previamente
El parlante puede memorizar hasta 8 juegos de
dispositivos Bluetooth vinculados. Cuando la memoria
exceda esa cantidad, el dispositivo que se vinculó con el
parlante hace más tiempo se sobrescribirá en la memoria
del parlante. Si el dispositivo fuente Bluetooth se vinculó
previamente con el parlante, el parlante aún lo recordará
e intentará volver a conectarse con el último dispositivo
conectado en el plazo de 1 minuto. Si el último dispositivo
conectado no está disponible, el parlante será detectable.
Desconectar el dispositivo Bluetooth
Mantenga presionado el botón de vinculación Bluetooth
de 2 a 3 segundos hasta que se muestre "Pairing"
(Vinculando) en pantalla para desconectarse del
dispositivo Bluetooth o apague el Bluetooth en el
dispositivo Bluetooth para desactivar la conexión.
Borrar la memoria de dispositivos
Bluetooth vinculados
Para borrar de la memoria todos los dispositivos
vinculados, mantenga presionado el botón de vinculación
Bluetooth durante más de 7 segundos hasta que en la
pantalla aparezca "Restablecer".
FUNCIÓN TRUE WIRELESS
STEREO (TWS)
La función True Wireless Stereo (TWS - estéreo
inalámbrico auténtico) es una característica que permite
que un dispositivo se conecte de forma inalámbrica
con otro dispositivo. Puede utilizar la función TWS para
conectarlo a un segundo GRM05 y reproducir música a
través de dos parlantes.
Congurar el primer parlante
1. Asegúrese de que el primer parlante esté en modo
Bluetooth y conéctese a un dispositivo Bluetooth.
2. Presione el botón Plus, en pantalla se mostrará
ST MULTI
.
ST
parpadeará en la pantalla. Presione el
botón Plus para acceder al modo "ST Pair" (vinculación
ST). Si no se presiona ningún botón durante 10
segundos, el parlante también accederá al modo "ST
Pair" (vinculación ST). En pantalla se mostrará "ST
Pair" (vinculación ST).
Congurar el segundo parlante
1. Asegúrese de que el segundo parlante esté en modo
Bluetooth y que no se haya conectado a un dispositivo
Bluetooth.
2. Presione el botón Plus, en pantalla se mostrará
ST MULTI
.
ST
parpadeará en la pantalla. Presione el
botón Plus para acceder al modo "ST Pair" (vinculación
ST). Si no se presiona ningún botón durante 10
segundos, el parlante también accederá al modo "ST
Pair" (vinculación ST).
Cuando los parlantes estén conectados correctamente,

21 ESPAÑOL
se mostrará
STL-
-R
en ambas pantallas al mismo
tiempo.
Nota: Configure el segundo parlante menos de 1 minuto
después que el primero, de lo contrario, se cancelará la
configuración del primer parlante.
Iniciar la reproducción
1. Inicie la reproducción en el dispositivo Bluetooth
conectado y ajuste el volumen en el dispositivo
Bluetooth o en uno de los parlantes para una escucha
agradable.
Nota: La configuración de volumen o ecualización de
un parlante se reflejará en el otro.
2. Utilice los controles del dispositivo Bluetooth
para reproducir/pausar y moverse por las pistas.
Alternativamente, controle la reproducción utilizando
los botones de reproducir/pausar, pista siguiente y
pista anterior en cualquiera de los parlantes.
3. Mantenga presionado el botón de avance rápido o
rebobinar en cualquiera de los parlantes para avanzar
rápidamente o rebobinar en la pista actual. Suelte el
botón cuando alcance el punto deseado.
Cambiar el modo de audio
1. Utilizando dos parlantes, puede cambiar entre los
modos
STL-
-R
,
STR-
-R
y
STL-
-L
.
2. Presione el botón de L/R en cualquiera de los parlantes
para cambiar el modo de audio.
3. Modo
STL-
-R
: ambos parlantes reproducirán el
mismo sonido. Es la configuración inicial.
4. Modo
STR-
-R
y
STL-
-L
: un parlante reproduce
el sonido en el canal derecho, mientras que el otro
lo hace en el canal izquierdo para una reproducción
estéreo entre los parlantes.
Desconectar de la función TWS
Mantenga presionado el botón Plus para desconectar la
función TWS.
DISFRUTAR DE LA
REPRODUCCIÓN
INALÁMBRICA UTILIZANDO
MÚLTIPLES PARLANTES
Puede disfrutar de la música al mismo tiempo combinando
hasta 10 dispositivos compatibles con esta función.
Congurar el primer parlante
1. Asegúrese de que el primer parlante esté en modo
Bluetooth y conéctese a un dispositivo Bluetooth.
2. Presione el botón Plus, en pantalla se mostrará
ST MULTI
.
3. Seleccione
MULTI
presionando el botón de L/R.
MULTI
parpadeará en la pantalla. Presione el botón Plus para
acceder al modo "MULTI Pair" (vinculación múltiple).
Si no se presiona ningún botón durante 10 segundos,
el parlante también accederá al modo "MULTI Pair"
(vinculación múltiple). En pantalla se mostrará "MULTI
Pair" (vinculación múltiple).
Congurar el segundo parlante
1. Asegúrese de que el segundo parlante esté en modo
de vinculación Bluetooth.
2. Presione el botón Plus, en pantalla se mostrará
ST MULTI
.
3. Seleccione
MULTI
presionando el botón de L/R.
MULTI
parpadeará en la pantalla. Presione el botón Plus para
acceder al modo "MULTI Pair" (vinculación múltiple).
Si no se presiona ningún botón durante 10 segundos,
el parlante también accederá al modo "MULTI Pair"
(vinculación múltiple). Cuando los parlantes estén
conectados correctamente, la pantalla del primer
parlante mostrará "PARENT" (que indica que es el
parlante principal) y la del segundo "CHILD" (que
indica que es el parlante secundario).
Nota: Configure el segundo parlante menos de 1 minuto
después que el primero. Al añadir un nuevo parlante
secundario, el minuto se reiniciará.
Añadir nuevos parlantes secundarios
Si desea conectar un tercer o más parlantes nuevos, siga
estos pasos:
1. Asegúrese de que el nuevo parlante esté en modo de
vinculación Bluetooth.
2. Presione el botón Plus en el parlante principal. En
pantalla se mostrará "MULTI ADD" (adición múltiple).
3. Presione el botón Plus en el nuevo parlante, en
pantalla se mostrará
ST MULTI
.
4. Seleccione
MULTI
presionando el botón de L/R.
MULTI
parpadeará en la pantalla. Presione el botón Plus para
acceder al modo "MULTI Pair" (vinculación múltiple).
Si no se presiona ningún botón durante 10 segundos,
el parlante también accederá al modo "MULTI Pair"
(vinculación múltiple). Cuando los parlantes estén
conectados correctamente, en el nuevo parlante
se mostrará "CHILD" (que indica que es el parlante
secundario).
Iniciar la reproducción
1. Inicie la reproducción en el dispositivo Bluetooth
conectado y ajuste el volumen en el dispositivo
Bluetooth o en los parlantes para una escucha
agradable. La misma música se reproducirá en todos
los parlantes.
Nota: Solo se sincronizarán los ajustes de
volumen o ecualización del parlante principal con
22 ESPAÑOL
los demás parlantes. Para los demás parlantes,
configure el volumen o ecualizador de cada parlante
individualmente.
2. Utilice los controles del dispositivo Bluetooth
para reproducir/pausar y moverse por las pistas.
Alternativamente, controle la reproducción con los
botones de reproducir/pausar, pista siguiente y pista
anterior en el parlante principal.
3. Mantenga presionado el botón de avance rápido
o rebobinar en el parlante principal para avanzar
rápidamente o rebobinar en la pista actual. Suelte el
botón cuando alcance el punto deseado.
Desconectar los múltiples parlantes
● Para desconectar solo un parlante secundario,
mantenga presionado el botón Plus del parlante
secundario que desee desconectar.
● Para desconectar todas las conexiones y salir del
grupo de múltiples parlantes, mantenga presionado el
botón Plus del parlante principal.
SELECCIONAR LA FUNCIÓN
DE ILUMINACIÓN
1. Presione el botón de encendido para encender el
parlante.
2. Presione el botón de menú y, a continuación,
presione el botón de pista anterior para acceder a la
configuración.
3. Presione el botón de pista siguiente o pista anterior
para seleccionar la función de iluminación deseada. A
continuación, presione el botón de reproducir/pausar
para confirmar la selección.
Seleccionar esta opción indica
que la luz LED está apagada.
Seleccionar esta opción indica
que la luz LED permanece
iluminada de forma continua
(predeterminado).
Seleccionar esta opción indica
que la luz LED parpadeará al
ritmo de la música. Es más
efectiva con música que tenga un
tiempo fuerte.
Nota: Esta función es adecuada para música con un
ritmo fuerte. De lo contrario, es posible que la luz LED no
parpadee.
FUNCIÓN DE ECUALIZADOR
1. Presione el botón de encendido para encender el parlante.
2. Presione el botón de menú y, a continuación, presione
el botón de reproducir/pausar para acceder al menú de
selección de ecualización.
3. Presione el botón de pista siguiente o pista anterior
para seleccionar el modo de ecualización deseado
o elija configurar su propio modo de ecualización. A
continuación, presione el botón de reproducir/pausar
para confirmar la selección. Los modos de ecualización
disponibles son: "FLAT", "JAZZ", "ROCK", "CLASSIC",
"POP", "NEWS" y "MY EQ".
4. Si elige "MY EQ" en el paso 3, utilice los botones de
pista siguiente, pista anterior y reproducir/pausar para
configurar los niveles de agudos, medios y graves.
Nota: Si aumenta el volumen mientras enfatiza los
graves con un ecualizador, pueden producirse crujidos o
distorsiones. En este caso, ajuste el volumen.
TOMA DE MICRÓFONO
En el lado derecho del parlante se proporciona una toma
de micrófono de 6,3mm para conectar un micrófono (no
incluido).
1. Conecte el micrófono a la toma de micrófono (MIC).
2. Presione el botón de encendido para encender el
parlante.
3. Encienda el micrófono.
4. Presione los botones de subir/bajar volumen en el
parlante según sea necesario para ajustar el nivel.
Nota:
No coloque el micrófono contra el parlante, esto podría
causar eco de acople y dañará el parlante.
Congurar el volumen del micrófono
1. Presione el botón de encendido para encender el
parlante.
2. Presione el botón de menú y, a continuación,
presione el botón de pista siguiente para acceder a la
configuración.
3. Presione el botón de pista siguiente o pista anterior
para seleccionar el nivel de volumen del micrófono
deseado. A continuación, presione el botón de
reproducir/pausar para confirmar la selección.
REPRODUCIR MÚSICA A
TRAVÉS DE LA TOMA DE
ENTRADA AUXILIAR
En el lado derecho de la unidad se proporciona una toma
de entrada auxiliar de 3,5mm para una señal de audio
desde cualquier dispositivo que cuente con audífonos o
salida de audio, como un reproductor de MP3 o CD.
23 ESPAÑOL
1. Conecte una fuente de audio estéreo o mono (por
ejemplo, un reproductor de MP3 o CD) a la toma de
entrada auxiliar (marcada como "AUX IN"). El parlante
cambiará del modo Bluetooth al modo de entrada auxiliar.
2. Ajuste el control del volumen del reproductor de
MP3 o CD para garantizar una señal adecuada y, a
continuación, ajuste el volumen del parlante para una
escucha agradable.
Nota:
En el modo de AUX IN, se recomienda establecer el
volumen del dispositivo de audio externo en dos tercios o
más. A continuación, ajuste el volumen del parlante según
sea necesario para lograr una calidad de sonido óptima. Si
el volumen del dispositivo de audio se establece por debajo
de dos tercios, es posible que la luz LED no parpadee.
Cuando se reproduce a través de una toma de entrada
auxiliar, la pantalla no mostrará información, como el
título, artista, álbum, etc.
MANTENIMIENTO
PRECAUCIÓN:
● Nunca utilice gasolina, bencina, diluyentes, alcohol
o similares. Podría producirse decoloración,
deformación o grietas.
● No lave el parlante con agua.
ESPECIFICACIONES
Amplificador
Potencia de salida
14,4V: 15W
18V: 20W
36V: 20W
Frecuencia en
respuesta
50Hz~20kHz
Entrada auxiliar
Sensibilidad de
entrada
300mVrms @ 100Hz
Parlante
Parlante principal 1 x 140,8mm, 6ohm 25W
Tweeter 1 x 40mm, 6ohm 10W
Radiador pasivo 2 x 100,7mm
Bluetooth
®
(La marca denominativa y los logotipos de Bluetooth
®
son marcas comerciales registradas propiedad de
Bluetooth SIG, Inc.)
Versión Bluetooth 5.1 certificado
Perfiles Bluetooth A2DP/SCMS-T/AVRCP
Potencia de
transmisión
Clase 1
Alcance de
transmisión
Óptimo:
30 metros máximo (100 pies)
Posible:
100 metros máximo (328 pies)
(varía según las condiciones de
utilización)
Códecs compatibles SBC, AAC, aptX
TM
, aptX
TM
HD
Perfiles Bluetooth
compatibles
A2DP/AVRCP
Frecuencia de
funcionamiento
2402MHz~2480MHz
Toma de carga USB
Potencia máxima
de suministro de la
toma USB
5V, 2,4A
General
Adaptador de
alimentación de CA
Entrada de CC 18V, 2A, pin
central positivo
Batería
Batería deslizante:
14,4V
18V
36V
Terminal de entrada
3,5mm de diámetro (AUX IN)
6,3mm de diámetro
(MICRÓFONO)
Dimensiones
(ancho x alto x largo)
236mm x 205mm x 243mm
Peso 3,8kg (sin la batería)
Información sobre el consumo de energía
Modo apagado
Este dispositivo no tiene modo
de espera y el consumo de
energía en el modo apagado es
inferior a 0,3W.
Modo Bluetooth
En el modo Bluetooth, cuando
no hay salida de señal y está
inactivo, el consumo de energía
es inferior a 2W después de 15
minutos.
Modo auxiliar
En el modo auxiliar, cuando
no hay salida de señal y está
inactivo, el consumo de energía
es inferior es inferior a 0,8W
después de 15 minutos.
La empresa se reserva el derecho de modificar las
especificaciones sin previo aviso.

SJN
3A81gC5Z30000
(2024.01.20)
GRM05-NA2-2312
www.makita.com
Makita Corporation
3-11-8, Sumiyoshi-cho,
Anjo, Aichi 446-8502 Japan