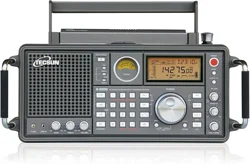
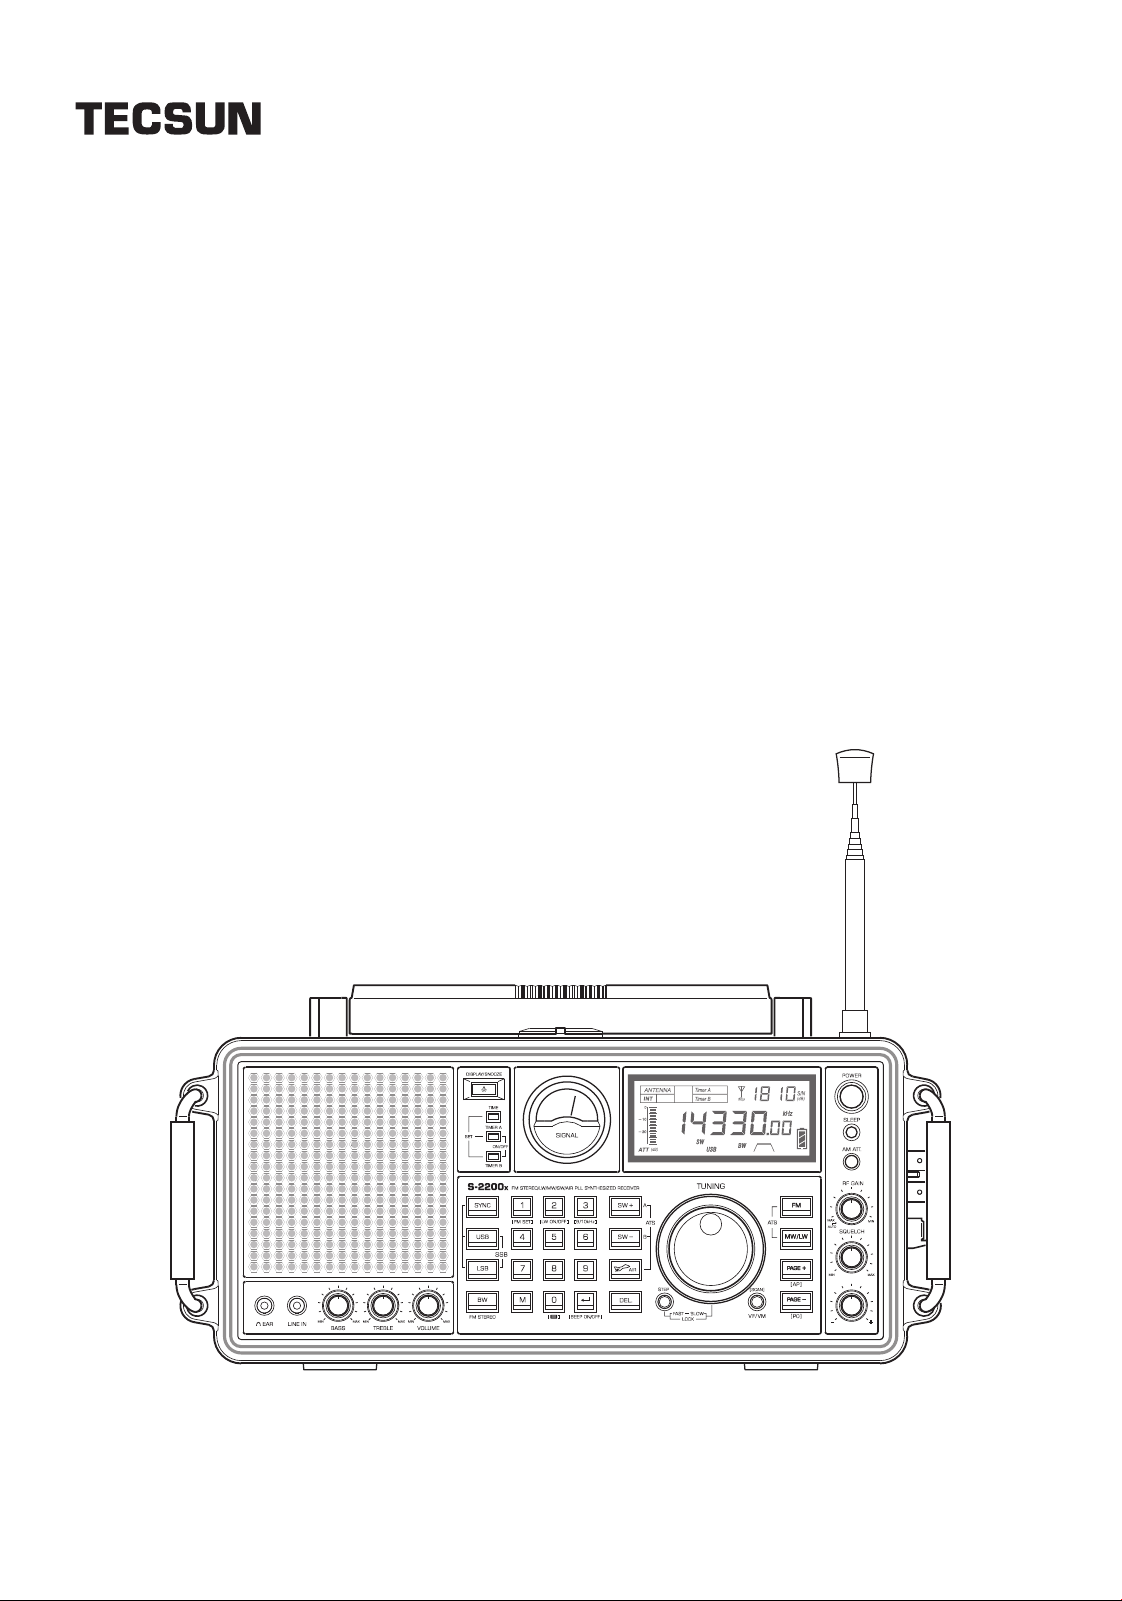
S-2200x
FM STEREO / LW / MW / SW ● SSB / AIRBAND
OPERATION MANUAL
TECSUN ELECTRONIC IND. LTD.
FINE TUNING


CONTENTS
Important (safety) considerations ................................................................................................................. 1
S-2200x at a glance .................................................................................................................................... 2
Powering your S-2200x .............................................................................................................................. 6
Using 4 D batteries ................................................................................................................................. 6
Using 2 18650 batteries .......................................................................................................................... 6
Charging the 18650 batteries .................................................................................................................. 7
Lithium battery safety instructions ........................................................................................................... 7
Setting up your S-2200x ............................................................................................................................. 8
Setting the clock (24-hour format) ........................................................................................................... 8
Setting the FM frequency range .............................................................................................................. 8
Setting the MW tuning step and AM (MW/LW/SW) frequency range ....................................................... 8
Enabling / Disabling longwave (LW) ........................................................................................................ 8
Turning the radio on / off ...................................................................................................................................9
Volume control ................................................................................................................................................ 9
Using internal / external antennas .................................................................................................................. 9
Longwave and medium wave (AM) antennas ............................................................................................. 9
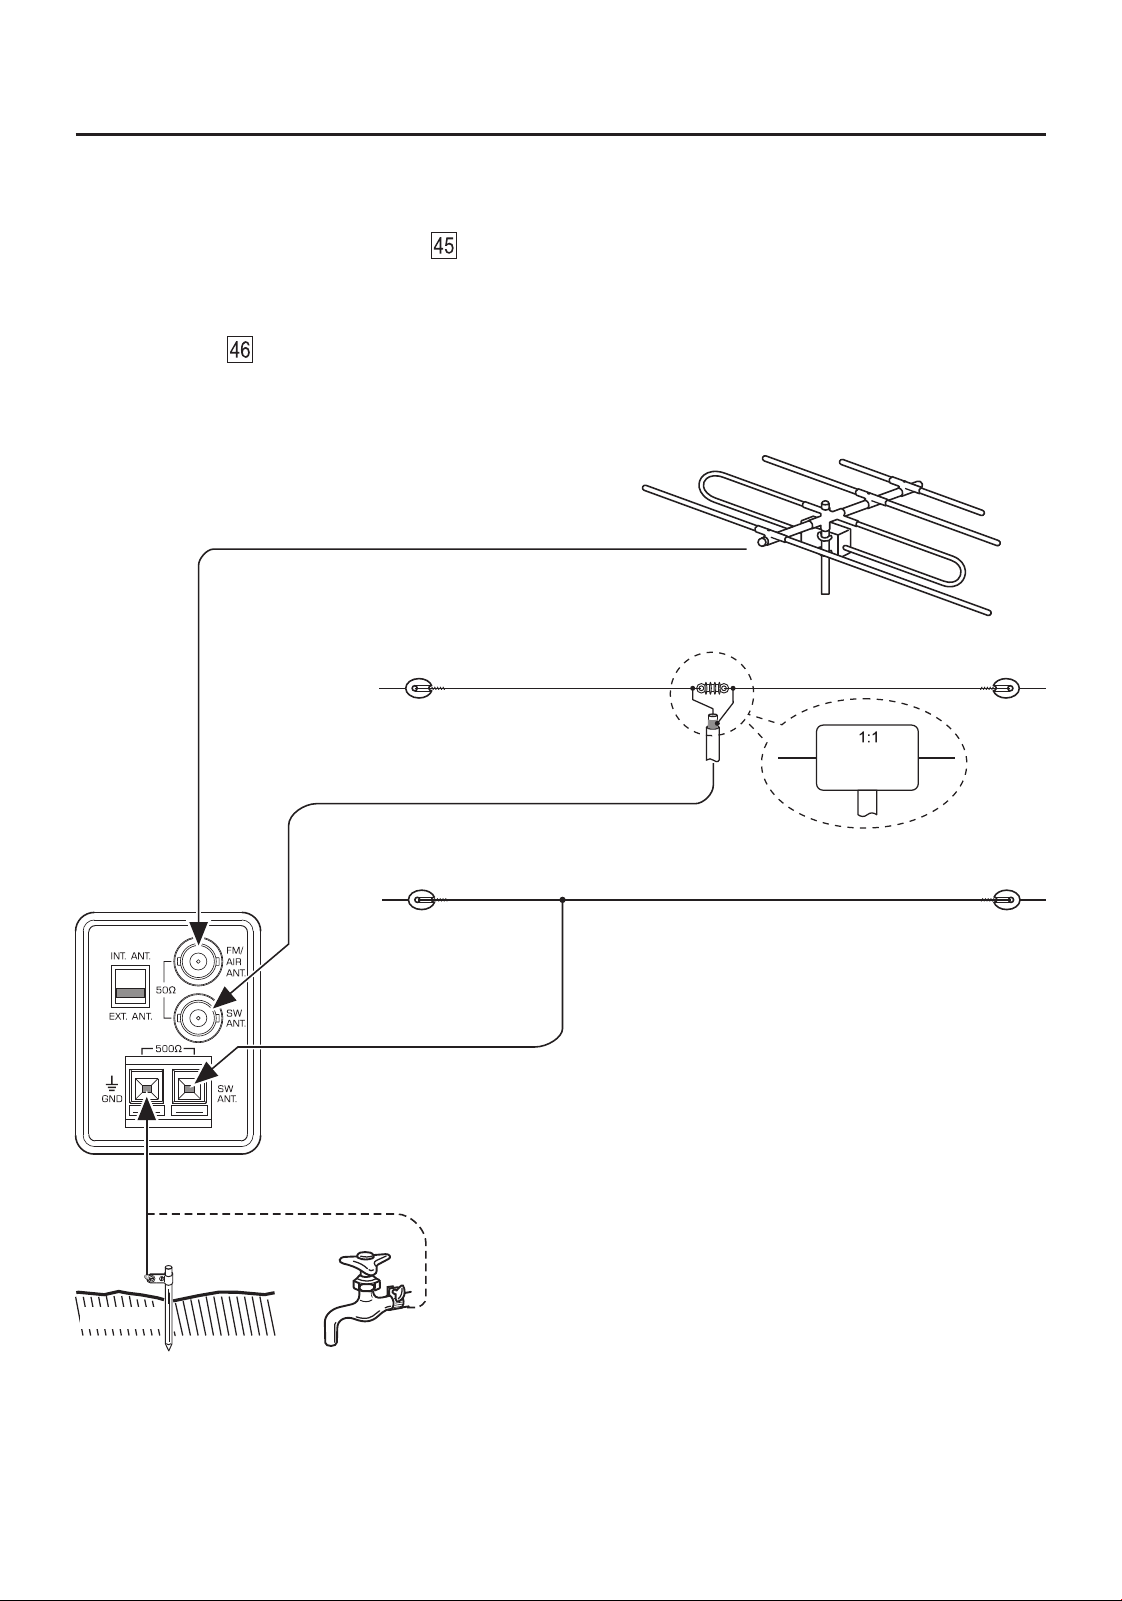
FM, airband and shortwave antennas ....................................................................................................... 10
Selecting FM, medium wave (AM), longwave, shortwave and airband ........................................................ 12
Tuning in stations (VF mode) ........................................................................................................................ 12
Manual tuning ........................................................................................................................................... 13
Auto scan .................................................................................................................................................. 13
Direct keypad entry ................................................................................................................................... 13
Storing frequencies into memory .................................................................................................................. 14
Storing frequencies manually ................................................................................................................... 15
Storing frequencies during auto scan ....................................................................................................... 16
Auto tuning storage (ATS) ......................................................................................................................... 16
Optimizing ATS frequency storage results ................................................................................................ 17
Setting the signal capture sensitivity of Auto Tuning Storage (ATS) ......................................................... 18
Auto sorting memory .................................................................................................................................. 18
Listening to stored frequencies (VM mode) .................................................................................................. 19
Recalling stored frequencies manually ..................................................................................................... 19
Recalling stored frequencies by scanning a memory page ...................................................................... 19
Deleting frequencies from memory ............................................................................................................... 20
Deleting a single frequency ...................................................................................................................... 20
Deleting frequencies during memory page scan ...................................................................................... 20
Deleting all stored frequencies in a memory page .................................................................................... 20
Deleting all stored frequencies form memory ........................................................................................... 20
GETTING STARTED
USING YOUR S-2200x

Auto Paging (AP) mode: Time-specific memories for MW (AM) and SW .................................................. 21
Using AP ATS to create time-specific memories for MW (AM) and SW .................................................. 21
Optimizing ATS frequency storage results in Auto Paging (AP) mode ................................................... 22
Setting the signal capture sensitivity of AP ATS ..................................................................................... 22
AP manual storage ................................................................................................................................ 22
Recalling AP time-specific MW (AM) and SW memories ....................................................................... 23
Antenna signal attenuation ....................................................................................................................... 24
RF gain control ......................................................................................................................................... 24
Squelch control ......................................................................................................................................... 24
SSB (Single Sideband) tuning .................................................................................................................. 25
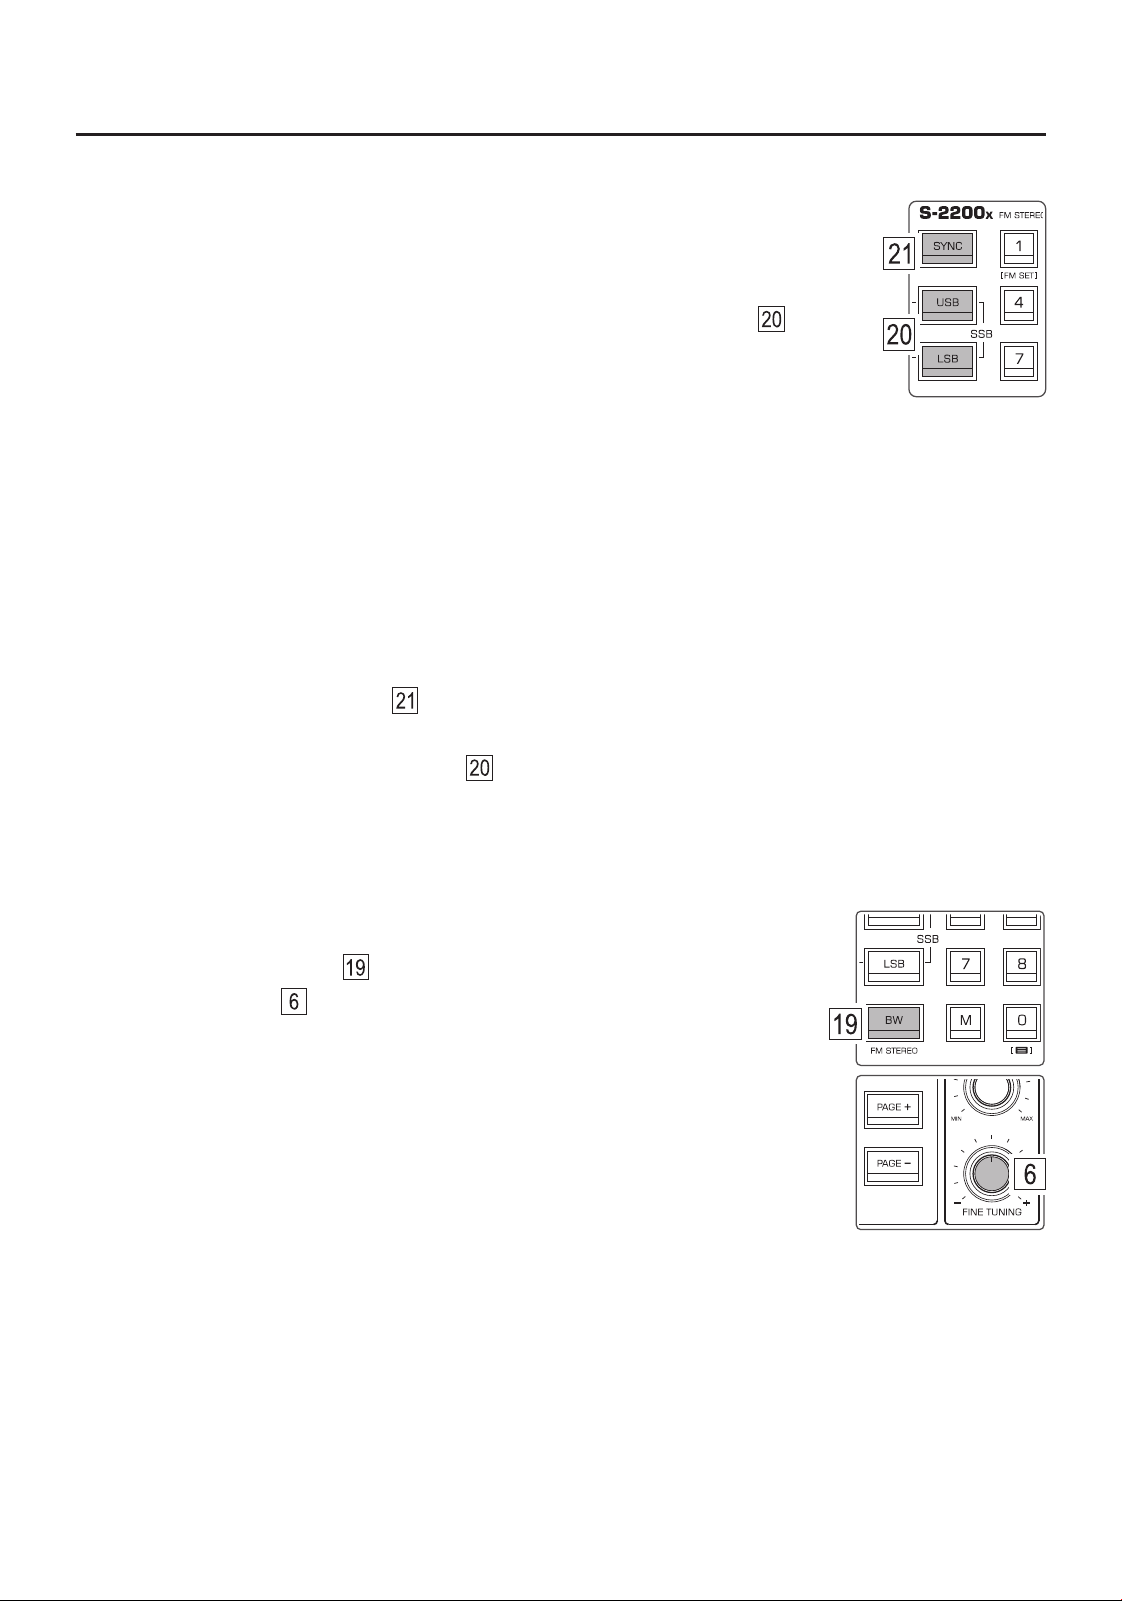
Synchronous detection (SYNC) ................................................................................................................ 25
AM bandwidth selection ............................................................................................................................ 25
FM de-emphasis time constant ................................................................................................................. 26
FM stereo/mono selection ........................................................................................................................ 26
Treble & bass control ................................................................................................................................ 26
Setting the sleep timer .............................................................................................................................. 26
Add seconds to the clock .......................................................................................................................... 26
Activating / deactivating the alarm ............................................................................................................ 26
Setting the alarm time ............................................................................................................................... 27
Setting a radio frequency for the alarm ..................................................................................................... 27
Alarm auto clearance ............................................................................................................................... 27
Alarm snooze function .............................................................................................................................. 28
Using headphones ................................................................................................................................... 28
Audio input (line in) ................................................................................................................................... 28
Audio output (line out) .............................................................................................................................. 28
Display options ......................................................................................................................................... 29
Display backlight ...................................................................................................................................... 29
Activate / deactivate ‘BEEP’ sound ........................................................................................................... 29
Keylock ..................................................................................................................................................... 29
Troubleshooting ........................................................................................................................................ 30
S-2200x specifications ............................................................................................................................. 31
MISCELLANEOUS
WARNING
● Keep it dry. Rain, humidity and other types of liquids or moisture can contain minerals that may cause
corrosion to components. If the device does accidentally get wet, remove the batteries immediately and
wait for the radio to dry completely before placing them back.
● Do not place or store the device in environments above +45°C. High temperatures can shorten the life
span of certain components.
● Do not place or store the device in cold environments below -5°C. Otherwise, once the surrounding
temperature rises, internal condensation may develop and damage the circuit board and LCD display.
● Clean only with a dry cloth. Do not use detergents or chemical solvents as this might damage the finish.
● Unplug and disconnect external antennas (not included) during lightning storms.
● Do not attempt to disassemble the device to adjust internal parameters.
● Refer servicing to qualified service personnel.
ENVIRONMENT
Disposal
If at any time in the future you should need to dispose of this product, please note that:
Waste electrical products should not be disposed off with household waste. Please recycle
where facilities exist. Check with your Local Authority or retailer for recycling advice.
(Waste Electrical and Electronic Equipment Directive)
(LITHIUM) BATTERY SAFETY INSTRUCTIONS
● Improper replacement of a lithium battery may result in an explosion. Replace only with a lithium battery of
the same type or equivalent (the lithium batteries used in this device are 18650 rechargeable Li-ion
batteries with a protection circuit).
Do not charge non-rechargeable batteries.●
Do not expose the batteries to heat sources (e.g. sunlight, fire), low temperatures, humidity, or high ●
pressure.
Dispose of a battery properly and prevent children from playing with electric currents.●
Do not short-circuit or disassemble a battery. If a battery is seriously inflated, please do not continue to ●
use it.
If not using for an extended period of time, remove the batteries and store them in a safe manner. Please ●
use non-conductive material to wrap a battery in order to avoid direct contact with metal. You can avoid
performance loss by keeping the batteries in a cool and dry place.
Please consciously abide by aviation regulations; lithium batteries are often prohibited from placing into ●
checked luggage.
GETTING STARTED - Important (Safety) Considerations
Read this user manual carefully before use and save it for future reference.
1
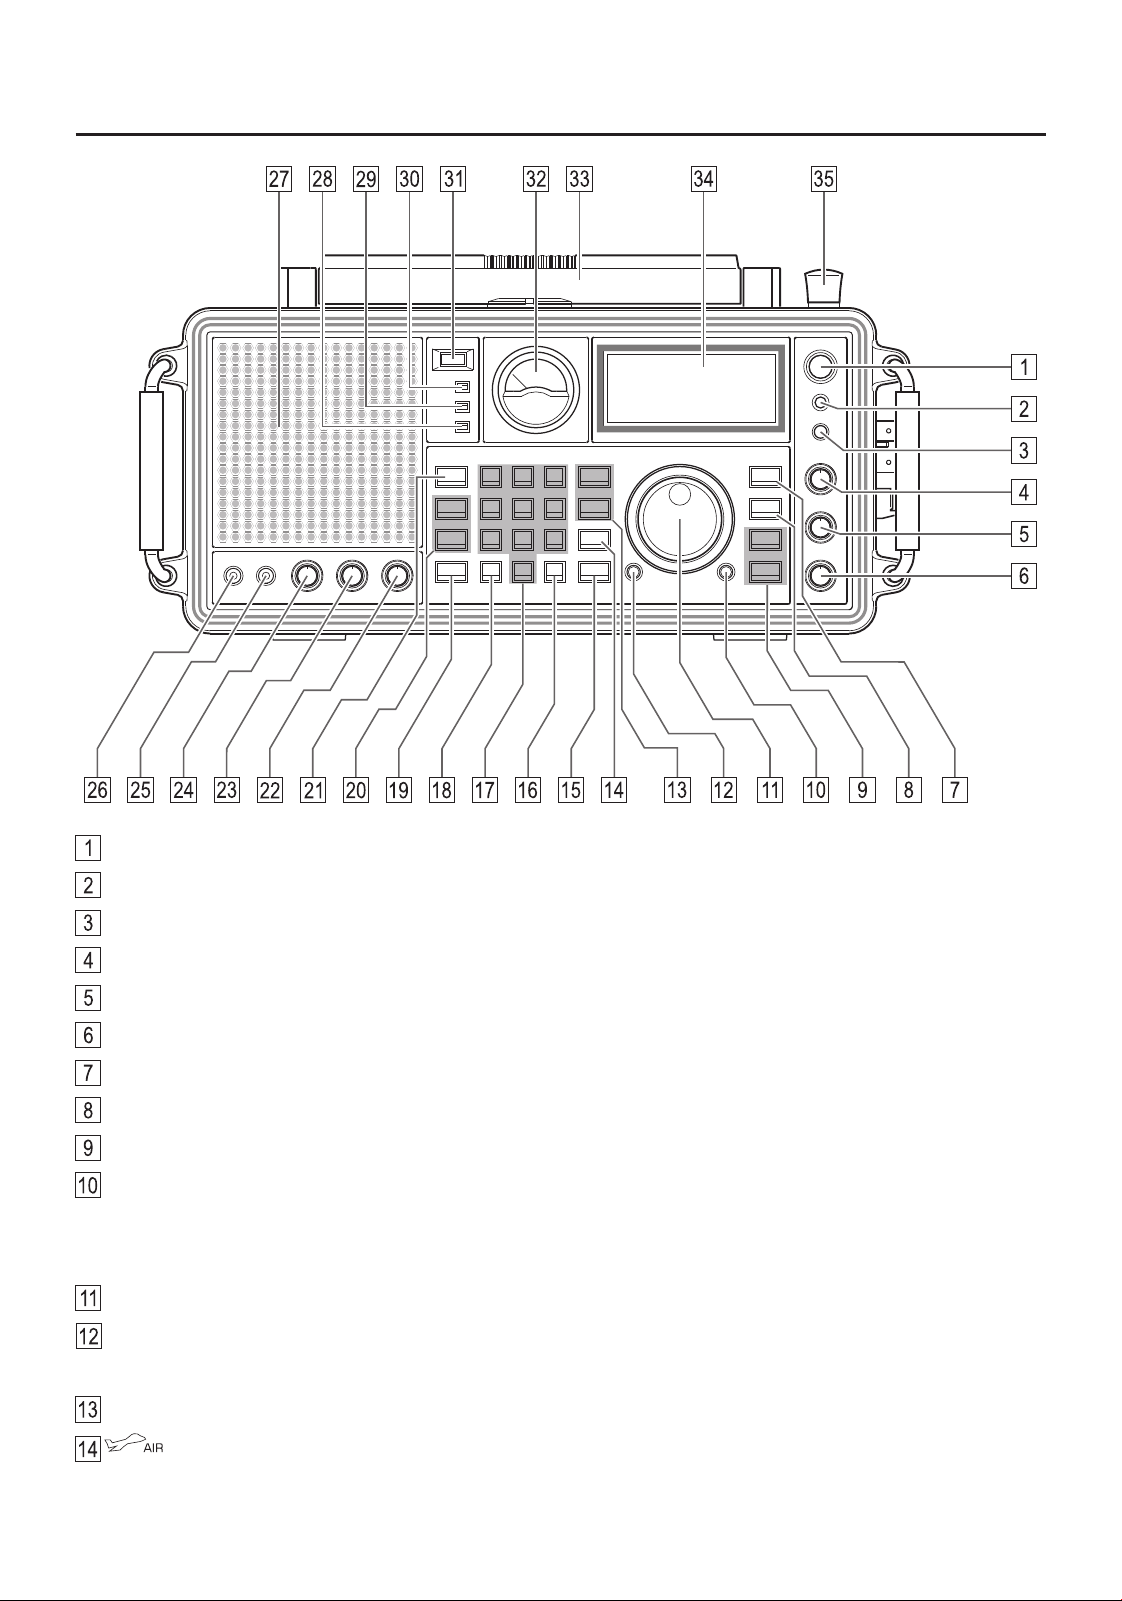
2
POWER: Power button
SLEEP: Sleep timer setting to auto turn off after a defined length of time.
AM ATT. : Antenna signal attenuation for LW, MW, and shortwave.
RF GAIN: Radio frequency gain control for LW, MW, and shortwave.
SQUELCH: Squelch control for LW, MW, shortwave, and airband.
FINE TUNING: Fine tuning adjustment of the frequency.
FM: FM band / Auto tune and store FM frequencies (ATS).
MW/LW: MW (AM) and LW bands / Auto tune and store LW/MW frequencies (ATS).
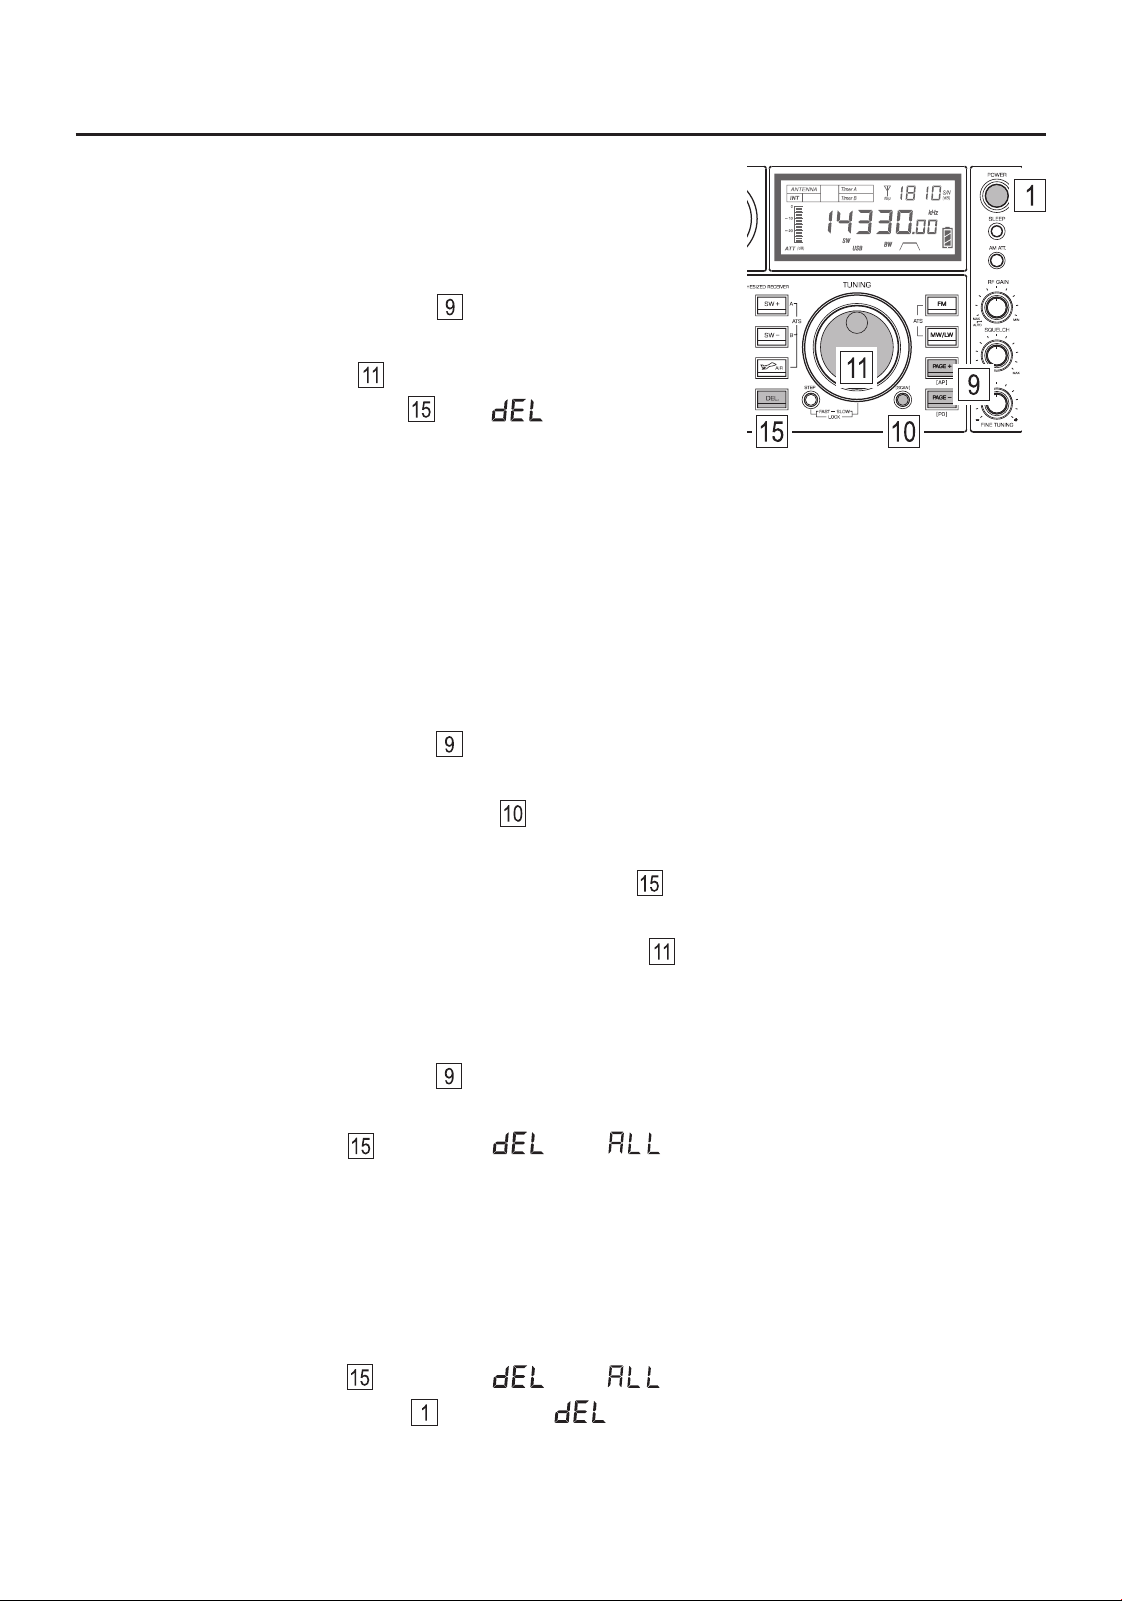
PAGE /AP, PAGE / P0: Select memory page / Auto Paging (AP) mode / Quick select P0.
VF/VM, SCAN:
● Switch between frequency tuning (VF) and memory (VM) modes.
● Auto scan a frequency band or memory page.
TUNING: Main tuning knob.
STEP FAST-SLOW, LOCK: Adjust the tuning speed of the main knob / (Un)lock the functions of
the buttons, main and fine-tuning knob.
SW , SW : Shortwave band / Change SW meter band / Auto tune and store SW frequencies (ATS).
: Airband / Auto tune and store airband frequencies (ATS).
Getting Started: S-2200x at a Glance
3
Getting Started: S-2200x at a Glance (continued)
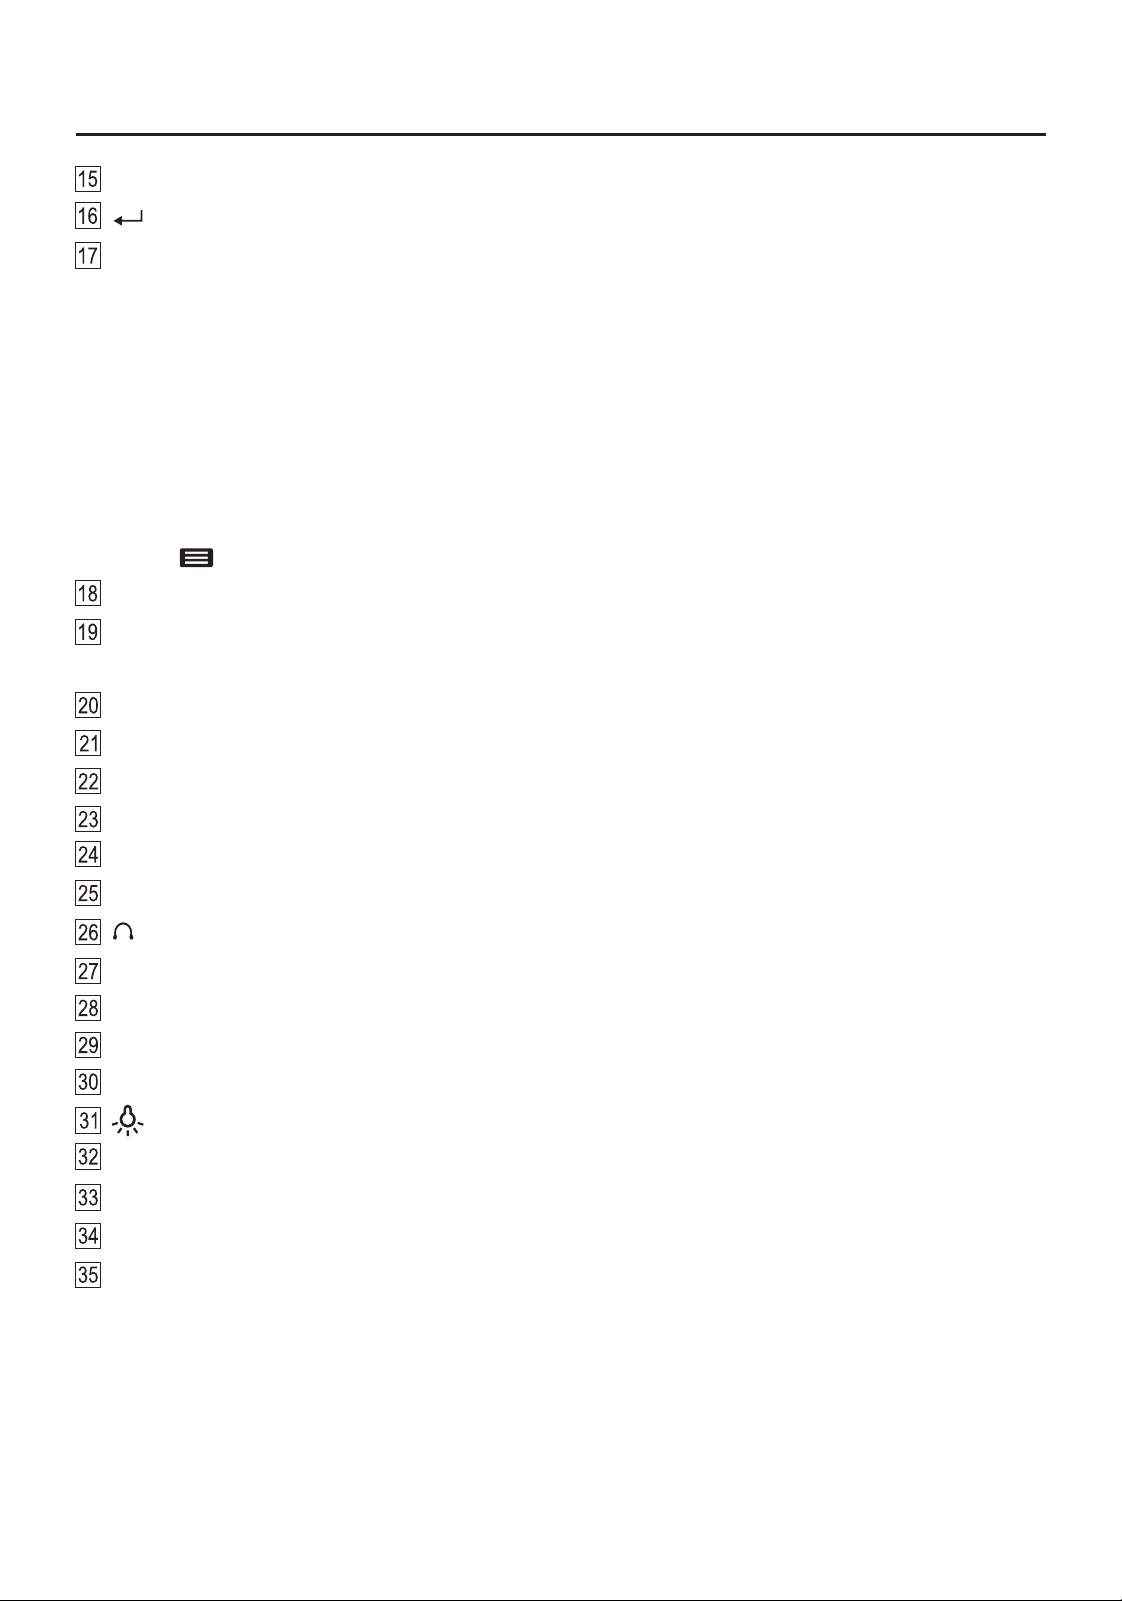
/BEEP ON/OFF: Confirm button / Activate or deactivate the beeping sound after a button press.
0-9: Numeric keys to input a frequency, a memory location, set the clock or an alarm.
Additionally,
[ 1 ] FM SET: Set the FM frequency range (in power off mode).
[ 2 ] LW ON/OFF: Enable/Disable the longwave (LW) band (in power off mode).
[ 3 ] 9kHz/10kHz: Set the medium wave (AM) tuning step and frequency range (in power off mode).
[ 4 ] Set FM de-emphasis time constant (while listening to FM).
[ 5 ] Set the signal capture sensitivity of ATS in Auto Paging (AP) mode.
[ 8 ] Display/Hide seconds on the clock (in power off mode).
[ 0 ] : Auto Sorting Memory: Organizes frequencies stored into the memory (in power off mode).
M: Store frequencies into memory.
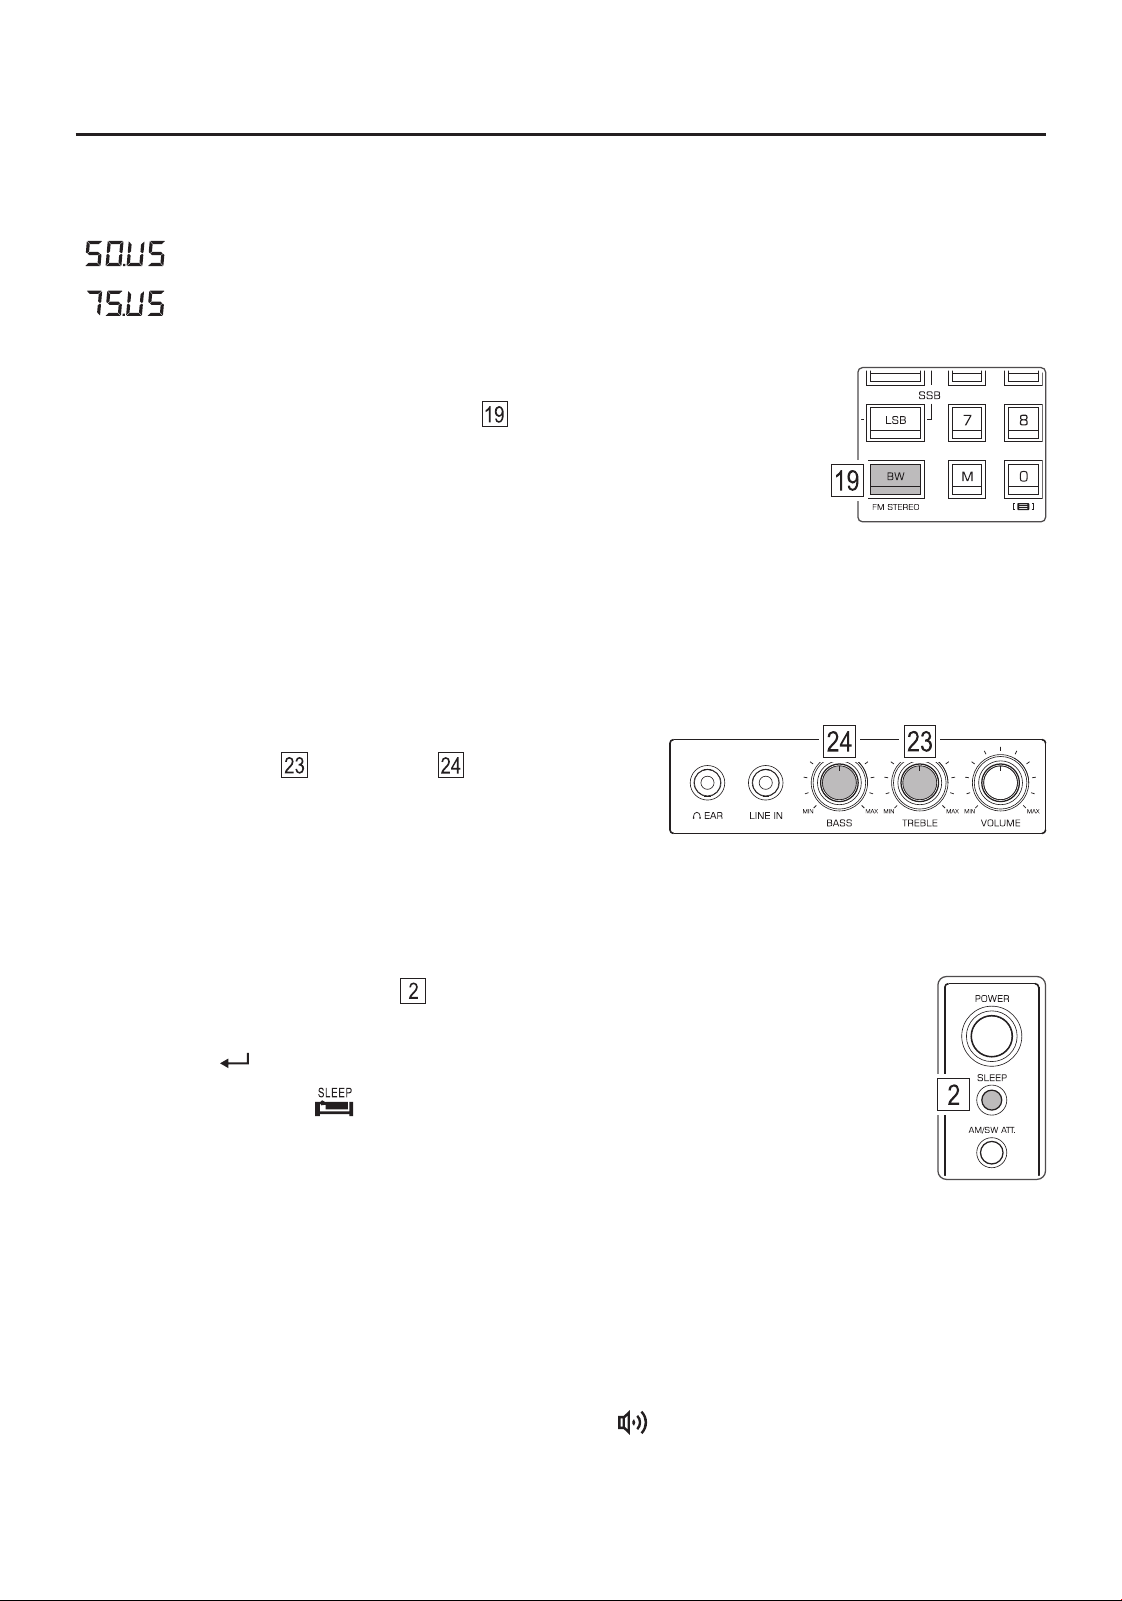
BW / FM STEREO: Adjust the AM bandwidth / Select FM stereo or mono mode / Adjust the signal
capture sensitivity of Auto Tuning Storage (ATS).
SSB: Enable/Disable Single Sideband mode (USB: Upper Sideband / LSB: Lower Sideband).
SYNC: Enable/Disable synchronous detection.
VOLUME: Volume adjustment knob
TREBLE: Treble adjustment knob
BASS: Bass adjustment knob
LINE IN: Audio input socket (Φ3.5 mm)
EAR: Stereo headphone socket (Φ3.5 mm)
Speaker
TIMER B: Set, enable/disable alarm B.
TIMER A: Set, enable/disable alarm A.
TIME: Set and display the clock.
, DISPLAY/SNOOZE: Backlight switch / Display mode / Enable/Disable alarm snooze function.
SIGNAL: Signal strength indicator
LW/MW ROTATABLE ANTENNA: Rotatable longwave / medium wave (AM) magnetic rod antenna
LCD screen
Whip antenna (for shortwave / FM / airband)
DEL. : Delete frequencies stored into memory.
4
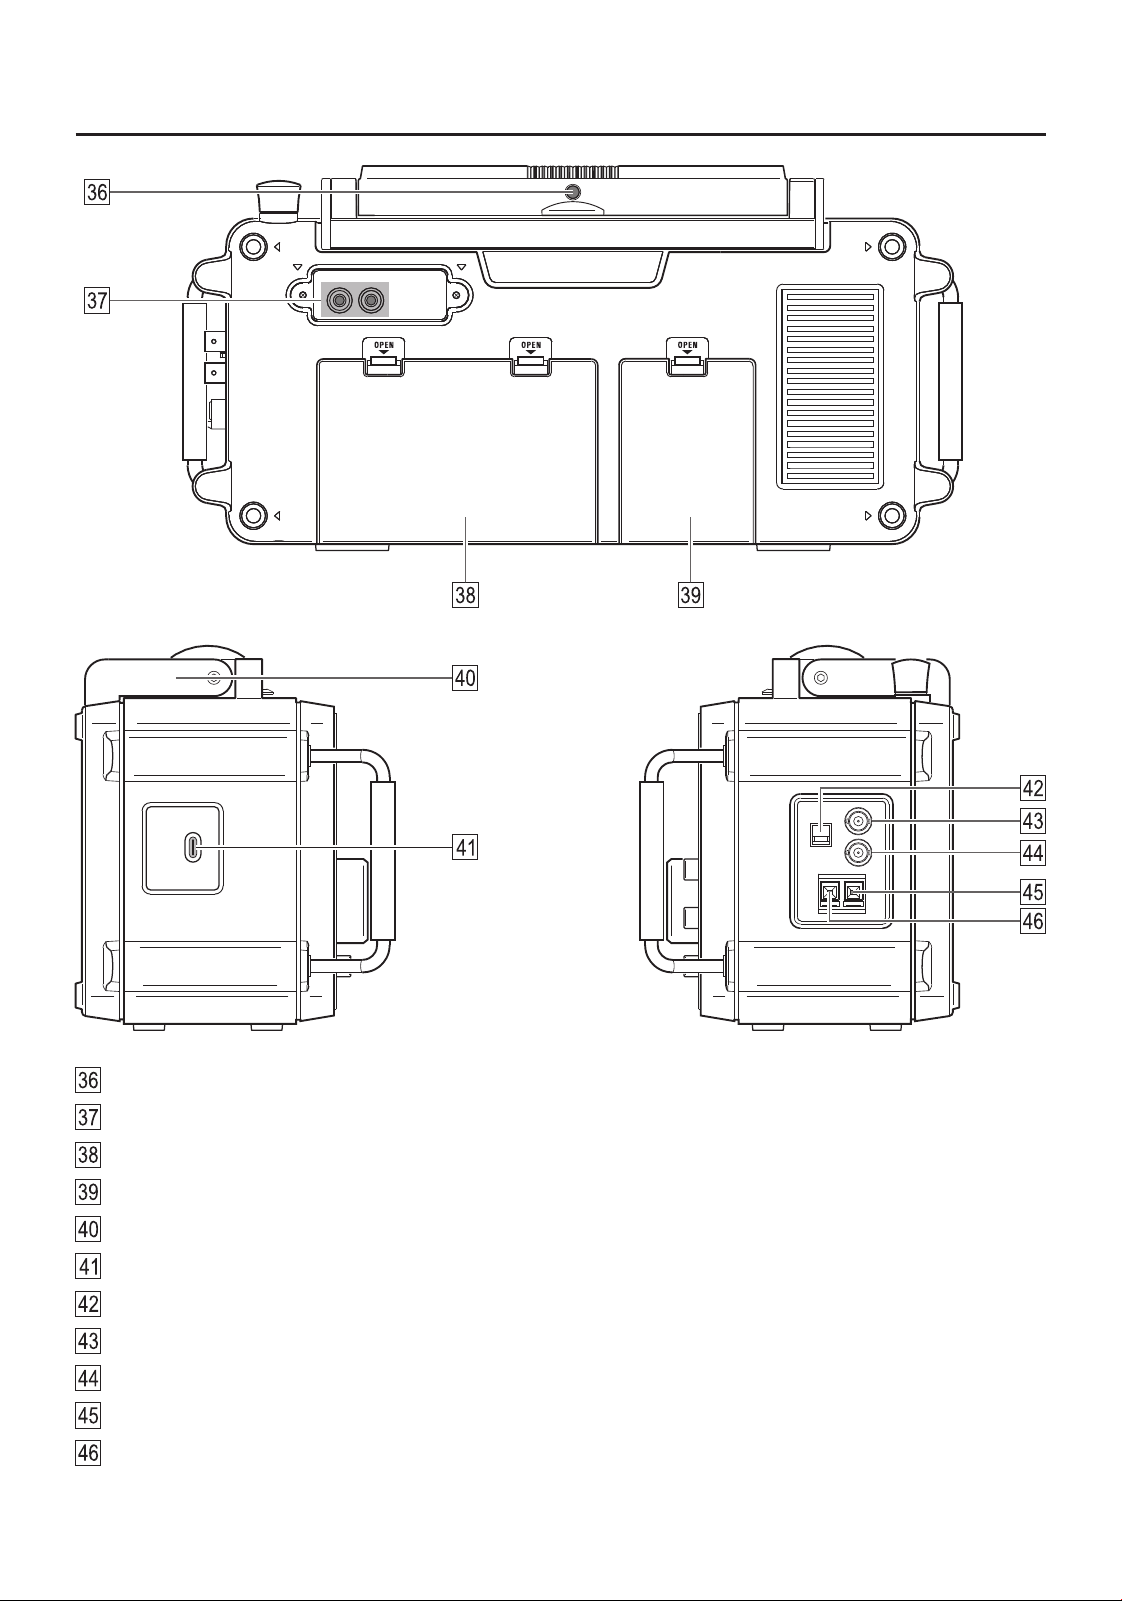
LW/MW ANTENNA INPUT: Longwave/Medium wave external antenna socket (Φ3.5 mm).
LINE OUT: Stereo audio output socket (RCA)
6V battery compartment. Insert 4 D-type (R20/UM1) 1.5V batteries.
8.4V battery compartment. Insert 2 18650 type 4.2V (nominal 3.7V) lithium batteries.
Retractable carry handle
DC 5V 2A: USB-C socket. DC input is only used for charging the 2 18650 lithium batteries.
INT. ANT. / EXT. ANT.: Switch between the telescopic antenna (SW/FM/AIR) and an external antenna.
FM/AIR ANT.: FM/Airband antenna socket (BNC)
SW ANT.: Low-impedance shortwave antenna socket (BNC)
SW ANT.: High-impedance shortwave antenna socket (red), used in conjunction with the ground socket.
GND: Ground socket (black)
Getting Started: S-2200x at a Glance (continued)
5
Getting Started: S-2200x at a Glance - Display Indication
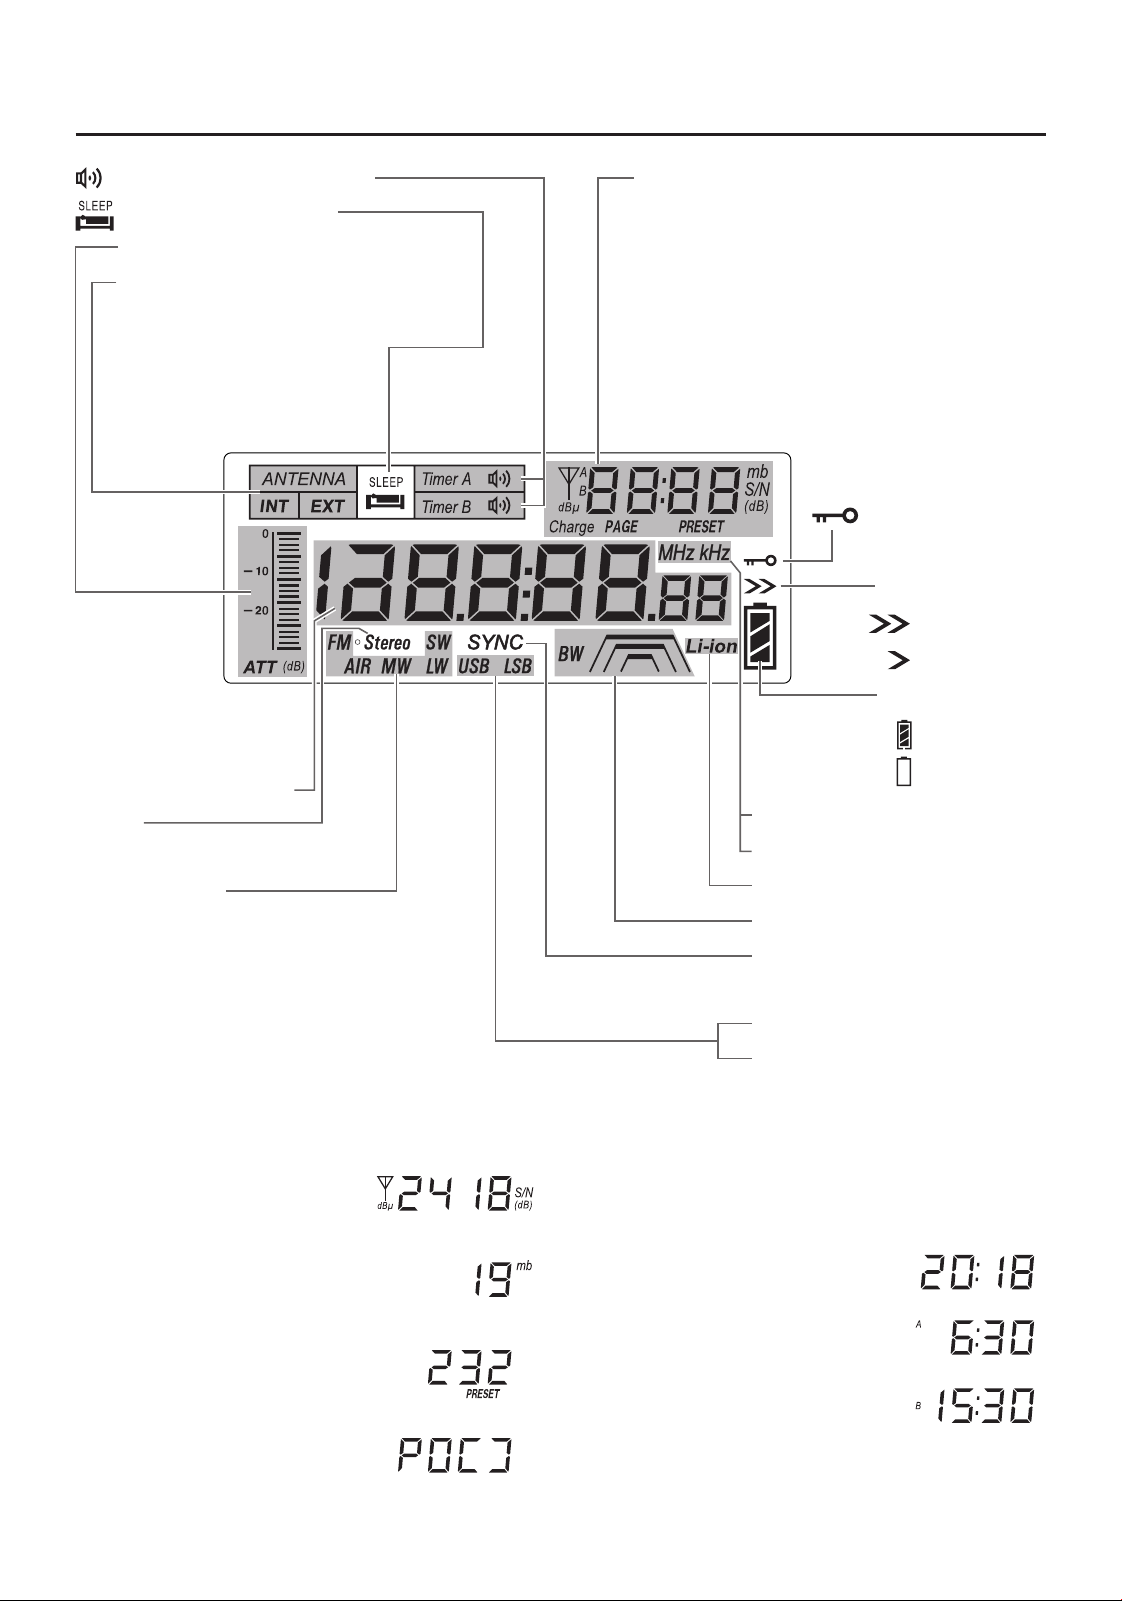
** Display indication examples:
Signal strength / S/N ratio: (signal strength: 24dBμ / S/N ratio: 18dB)
Shortwave meter band:
Organizing memory in progress
Location within memory page:
Clock time:
Alarm clock (Timer A):
Alarm clock (Timer B):
Clock/frequency display
Stereo:
FM-stereo reception
Frequency band
FM: FM SW: Shortwave
AIR: Airband MW: Medium Wave (AM)
LW: Longwave
z: Frequency unit FM/AIRMH
kHz: Frequency unit SW/MW/LW
Li-ion: 18650 lithium battery
BW: Selected AM bandwidth
SYNC: SYNC detection enabled
Single Sideband enabled:
USB: Upper Sideband
LSB: Lower Sideband
: Keylock
Tuning speed
: Fast
: Slow
Battery power:
: Sufficient
: Too low
: Alarm (Timer A/B) activated
: Sleep Timer activated
Antenna signal attenuation
Selected antenna for SW/FM/Airband
● INT: Telescopic
● EXT: External
** dBμ: Signal strength measuring unit
dB: Signal-to-noise ratio measuring unit
S/N: Signal-to-noise ratio
mb: Shortwave meter band
PAGE: Memory page number
PRESET: Location within memory page
Charge: Charging indicator
A/B: Alarm time
6
Getting Started - Powering Your S-2200x
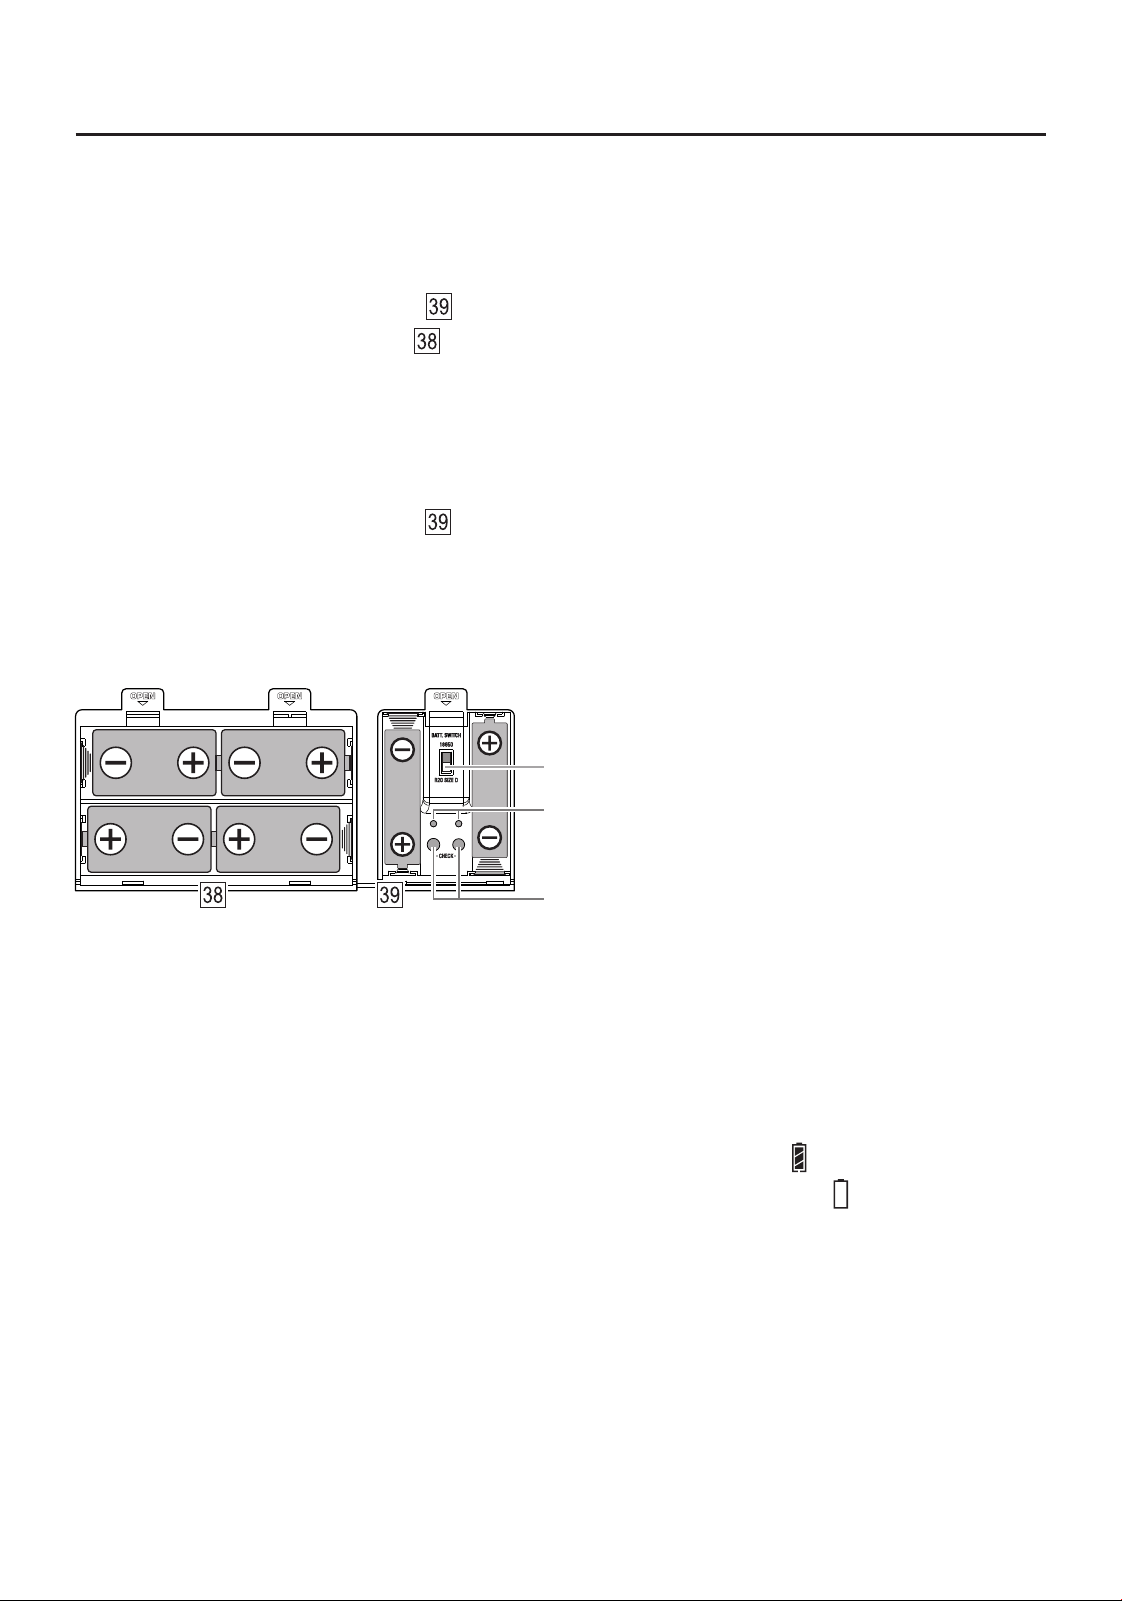
Battery selector switch: 18650 (up) or D (down)
18650 lithium battery detection indicator lights
18650 lithium battery detection buttons
Power the TECSUN S-2200x by installing 4 D (R20/UM1) 1.5V alkaline, lithium or NiMH batteries, or by
inserting 18650 lithium (Li-ion) batteries. two 4.2V (nominal 3.7V)
USING 4 D BATTERIES
1) Open the right battery compartment and push the battery selector switch into the “R20 Size D” position.
2) Open the left battery compartment and install 4 D 1.5V alkaline, lithium or NiMH batteries according to
the correct positive and negative polarity directions. The spring end of the battery compartment is for the
negative terminal of the battery.
USING 2 18650 BATTERIES
1) Open the right battery compartment and push the battery selector switch into the “18650” position.
2) Install two 4.2V (nominal 3.7V) 18650 lithium batteries into the battery compartment according to the
correct positive and negative polarity directions. The spring end of the battery compartment is for the
negative terminal of the battery.
Tips:
This device has 18650 battery detection circuits, supplied with detection buttons and indicator lights ●
(as shown in the image above). After inserting a 18650 battery, press the detection button. When the
indicator light is on, this indicates that the battery is suitable for use. If the light is dim, the battery is
low on power and should be charged. If the light is off, the battery is depleted or damaged.
When battery power is sufficient, the display shows the battery power as:●
When the battery is almost exhausted, the display shows the battery level as:●
If the radio will not be used for an extended period of time, please remove the batteries. ●

7
LITHIUM BATTERY SAFETY INSTRUCTIONS
● Improper replacement of a lithium battery may result in an explosion. Replace only with a lithium battery of
the same type or equivalent (the lithium batteries used in this device are 18650 rechargeable Li-ion
batteries with a protection circuit).
Do not charge non-rechargeable batteries.●
Do not expose the batteries to heat sources (e.g. sunlight, fire), low temperatures, humidity, or high ●
pressure.
Dispose of a battery properly and prevent children from playing with electric currents.●
Do not short-circuit or disassemble a battery. If a battery is seriously inflated, please do not continue to ●
use it.
If not using for an extended period of time, remove the batteries and store them in a safe manner. Please ●
use non-conductive material to wrap a battery in order to avoid direct contact with metal. You can avoid
performance loss by keeping the batteries in a cool and dry place.
Please consciously abide by aviation regulations; lithium batteries are often prohibited from placing into ●
checked luggage.
CHARGING THE 18650 BATTERIES
When the battery icon is displayed as “ , this indicates that battery power is about to run out. ”
To recharge the 18650 lithium batteries, connect a DC 5V/2A charger to the charging socket on the left
side of the device using a USB-C charging cable. While charging, the charging time is shown and the
charging indicator “Charge” flashes on the display and stops flashing once charging is complete.
Notes: In order to extend battery life, when the lithium batteries are fully charged but the device has not been
used for 6 days, the device enters into a self-discharge state. When the batteries are discharged to a safe
storage state (the remaining power is about 70%), the regulated self-discharge stops.
Attention!
Only use chargers that are appropriately certified and meet the safety standards in your region.●
Only use lithium batteries with built-in charge and discharge protection circuits. ●
Note:
To avoid electrical noise interference, do not charge the battery and listen to the radio at the same time.●
8
Getting Started - Setting up your S-2200x
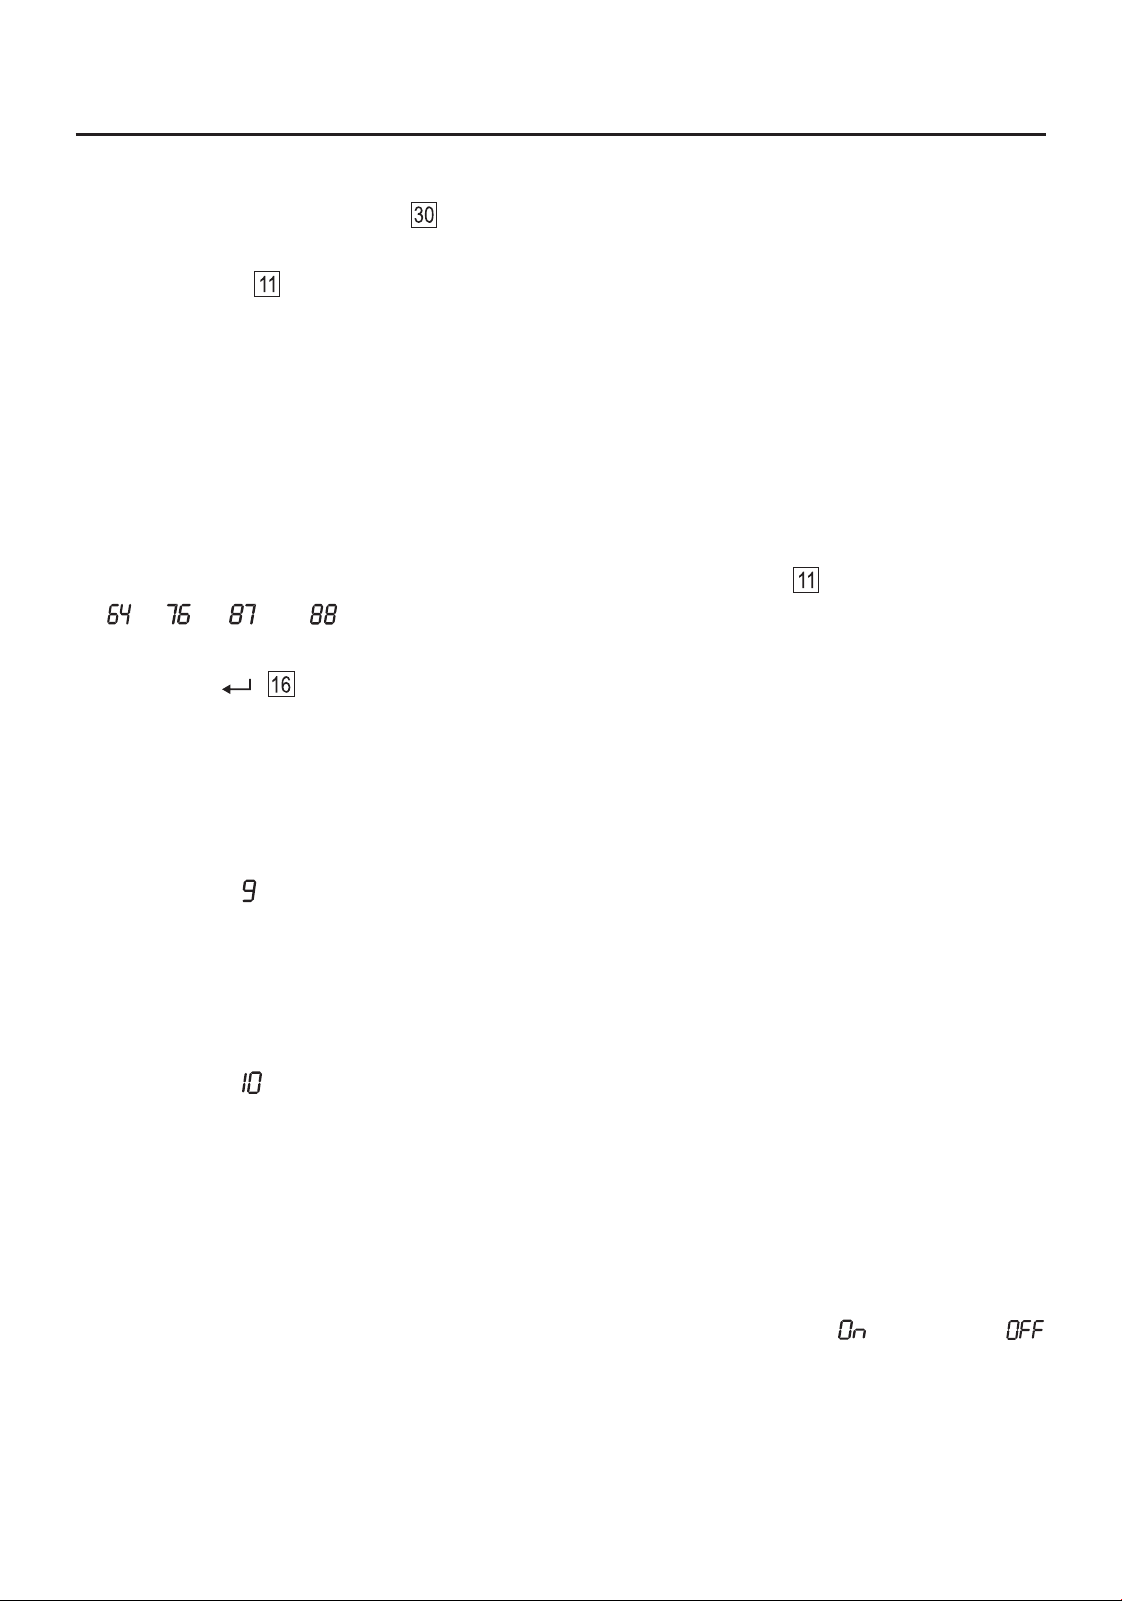
ENABLING/DISABLING LONGWAVE (LW)
With the device off, press and hold the [ 2 ] (LW ON/OFF) button, the display shows “ ” (enabled) or “ ”
(disabled). To select the LW frequency band, power on the device and then quick press the [ MW/LW ] button
to select the LW frequency band (press twice if necessary).
SETTING THE FM FREQUENCY RANGE
S to use the radioet the frequency range to correspond with the country in which .
1) Turn the device off.
2) the (FM SET) button, and then turn the main tuning knob . The Press and hold [ 1 ] display will show
- - -“ ”, “ ”, “ ” or “ ” to indicate the corresponding range: 64 108MHz, 76 108MHz, 87 108MHz
- . Instead of rotating the knob to select the FM range, you can also press [ 1 ] repeatedly.or 87.5 108MHz
3) Quick the FM rangepress [ ] to confirm , or wait for 2 seconds for the system to auto confirm.
Display indicates “ ”:
● tuning to .MW steps are set 9 kHz
● - Asia, MW frequency range is 522 1620 kHz (for Europe, Africa, Oceania).
LW frequency range is 50 - 522 kHz● .
SW frequency range is 1621 - 29999 kHz ● .
SETTING THE MW TUNING STEP AND AM (MW/LW/SW) FREQUENCY RANGE
the (9/10kHz) button With the device off, press and hold [ 3 ] to set the tuning step and frequency range of
MW that corresponds with the country in which the radio. to use
Display indicates “ ”:
MW tuning steps are set to 10 kHz.●
MW frequency range is 520 - 1710 kHz (for North and South America).●
LW frequency range is 100 - 519 kHz.●
SW frequency range is 1711 - 29999 kHz. ●
SETTING THE CLOCK (24-HOUR FORMAT)
1) Press and hold the [ TIME ] button until the hours indicator starts flashing.
2) Use the numeric keys to enter the current time (hours + minutes is four digits). Alternatively, rotate the
[ TUNING ] knob to adjust the hours, then quick press [ TIME ] to confirm. Then adjust the minutes,
followed by a quick press of the [ TIME ] button to confirm the setting.
Tip: With the device on, quick press [ TIME ] to display the current time. Quick press [ TIME ] again to return
to the radio frequency display.
9
Using Your S-2200x
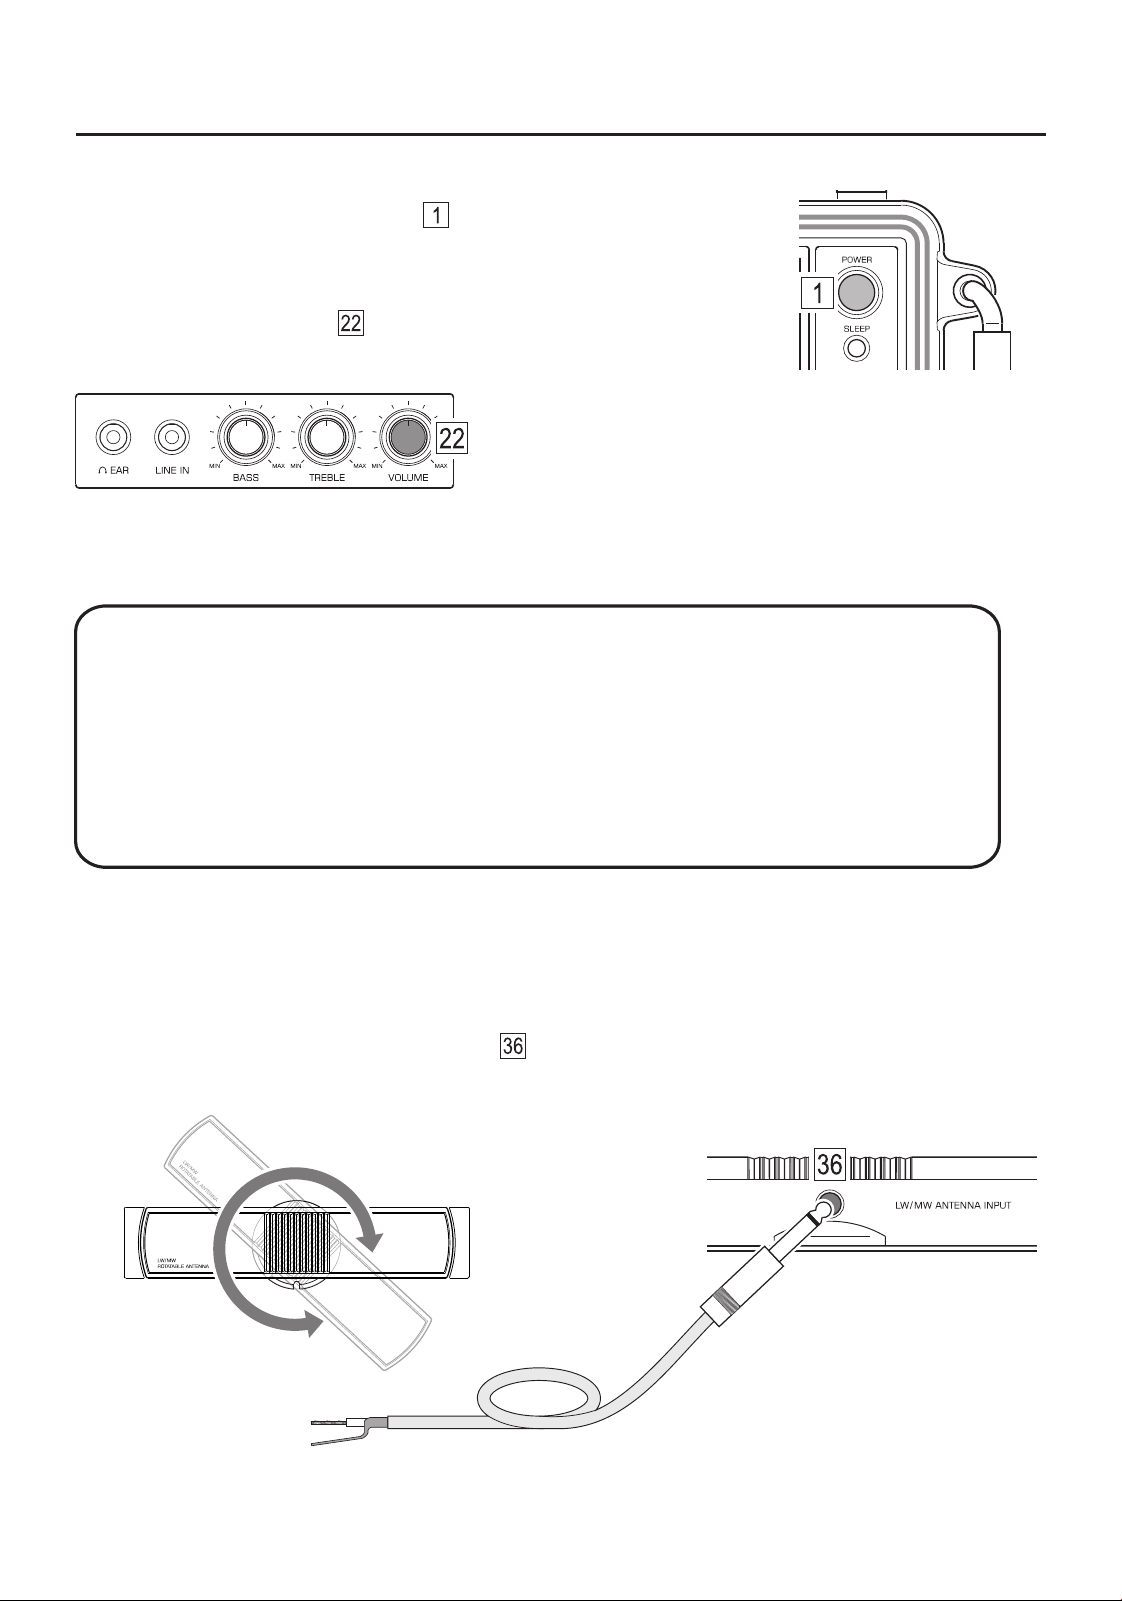
TURNING THE RADIO ON / OFF
Quick press the red [ POWER ] button to turn it on and off.
VOLUME CONTROL
Rotate the [ VOLUME ] knob clockwise or
counterclockwise to select your desired volume level.
Warning! Outdoor antennas require protection measures!
An outdoor antenna must be kept away from power lines! It must be windproof, waterproof, and ●
requires protection from lightning strikes.
Do not use gas pipes for grounding purposes.●
Do not use water pipes as ground wires for lightning protecting.●
During a thunderstorm, do not use an outdoor antenna! Disconnect the outdoor antenna from ●
the radio.
Longwave and Medium Wave (AM) antennas
When listening to longwave or medium wave broadcasts, rotating the LW/MW ROTATABLE ANTENNA on
top of the S-2200x can improve the reception. An external antenna can also be plugged into the
“LW/MW ANTENNA INPUT” socket (Φ3.5 mm) of the rotatable antenna (this will disconnect the receiving
function of the rotatable antenna).
External
LW/MW antenna
USING INTERNAL / EXTERNAL ANTENNAS
10
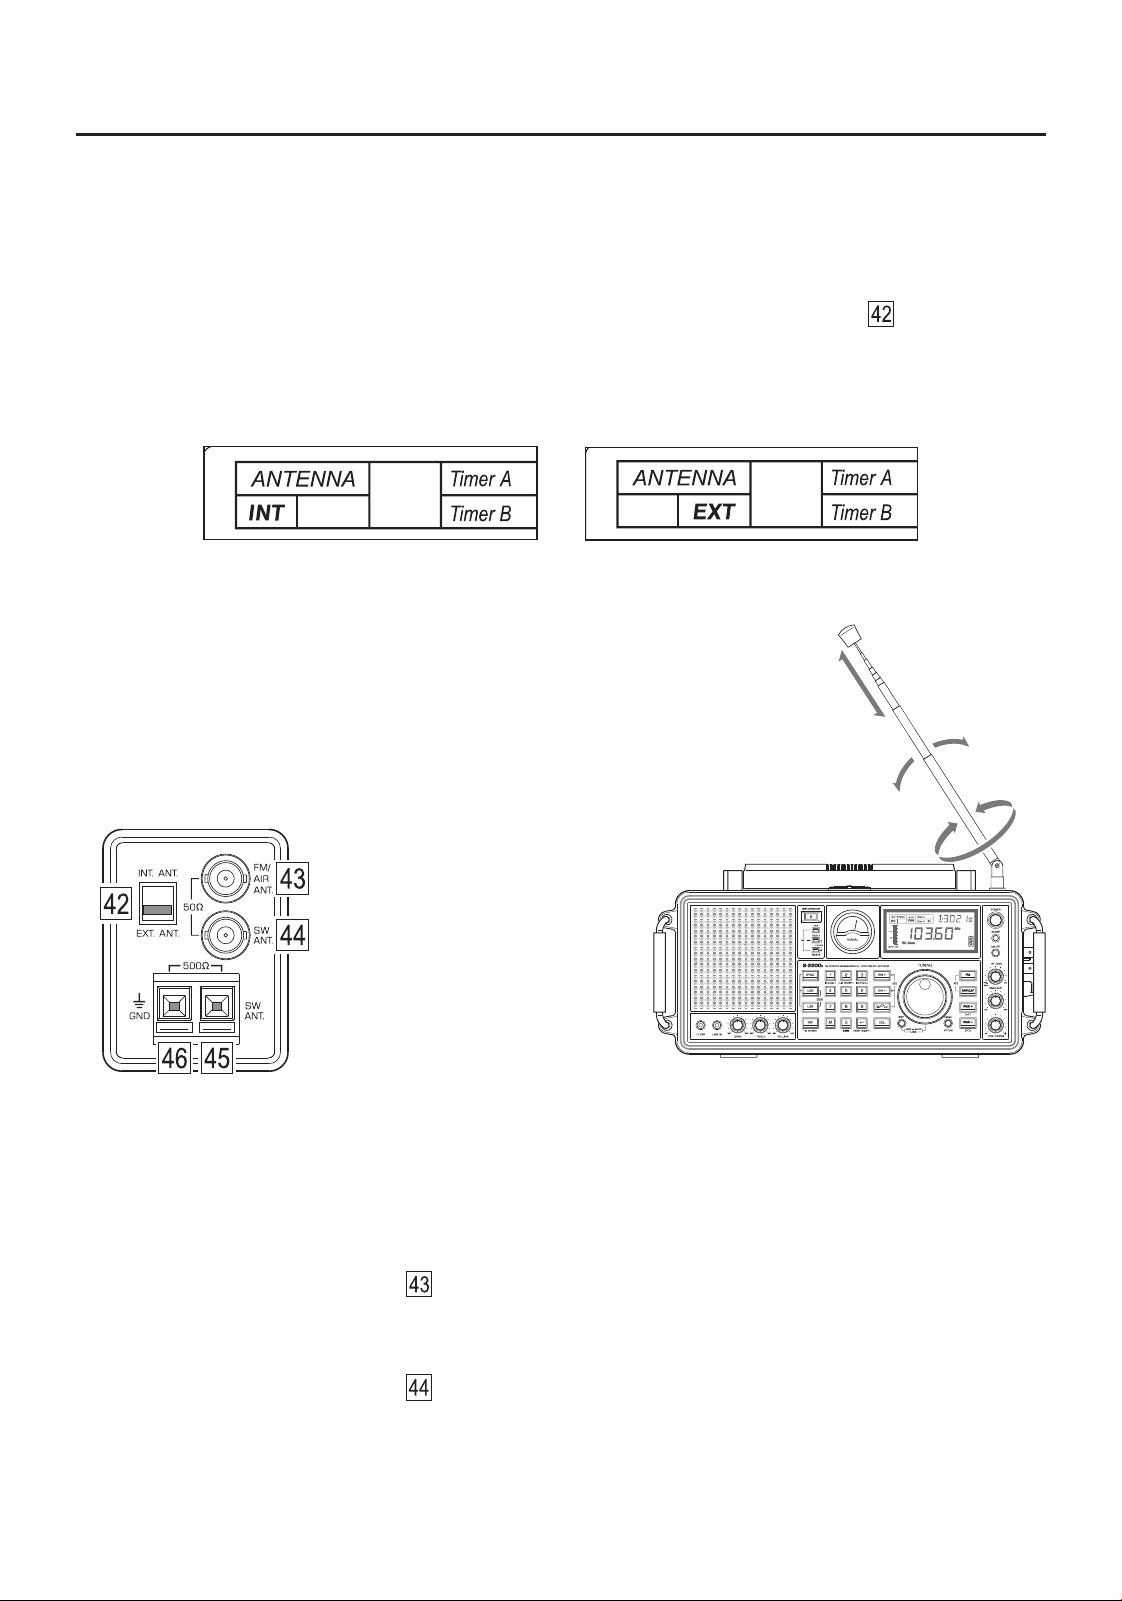
FM, Airband and Shortwave Antennas
For receiving FM, airband and shortwave broadcasts, you can either use the telescopic antenna or an
external antenna.
When using the telescopic (internal) antenna, push the [ INT ANT. / EXT ANT. ] switch to ANT.” ● the “INT
position. The display shows “INT” to indicate that the telescopic antenna is selected. Changing the length
and angle of the telescopic antenna can improve the reception.
Internal (telescopic) antenna selected
External antenna selected
● When using an antenna , push the switch to “EXT ANT.” position. external for FM, airband or shortwave the
The display shows “EXT” to indicate that the external antenna is selected. On the right side of the radio,
there are three external antenna sockets:
1) Low-impedance 50 BNC socket for FM and airband antennas. A 50 or 75 coaxial cable can
be used to a suitable antenna.connect
2) Low-impedance 50 BNC socket for shortwave (SW) antennas. A 50 or 75 coaxial cable can
be used to a suitable antenna.connect
Ω
Ω
Ω
Ω
FM / Airband antenna
low-impedance SW antenna
or
Balun
high-impedance SW antenna
or
wet soil
ground stake (iron)
grounded
metal water pipe
11
3) High-impedance 500 black and red spring terminals for shortwave (SW) antennas. These sockets
can be used with (for example) a long wire antenna. Take around 10-35 meters (30-100 feet) of wire and
plug it into the red “SW ANT.” socket . Position the wire above ground and make sure that it runs in a
straight line as much as possible. The wire should not touch any other metal objects. If you do this indoors,
position the wire as close to windows as possible. Then, plug a 10-20 meter (30-60 feet) wire into the black
“GND” socket and let it run on the floor/ground. Alternatively, connect the black spring terminal
to a cold water pipe with as short a piece of wire as possible.
Ω
12
SELECTING FM, MEDIUM WAVE (AM), LONGWAVE, SHORTWAVE AND AIRBAND
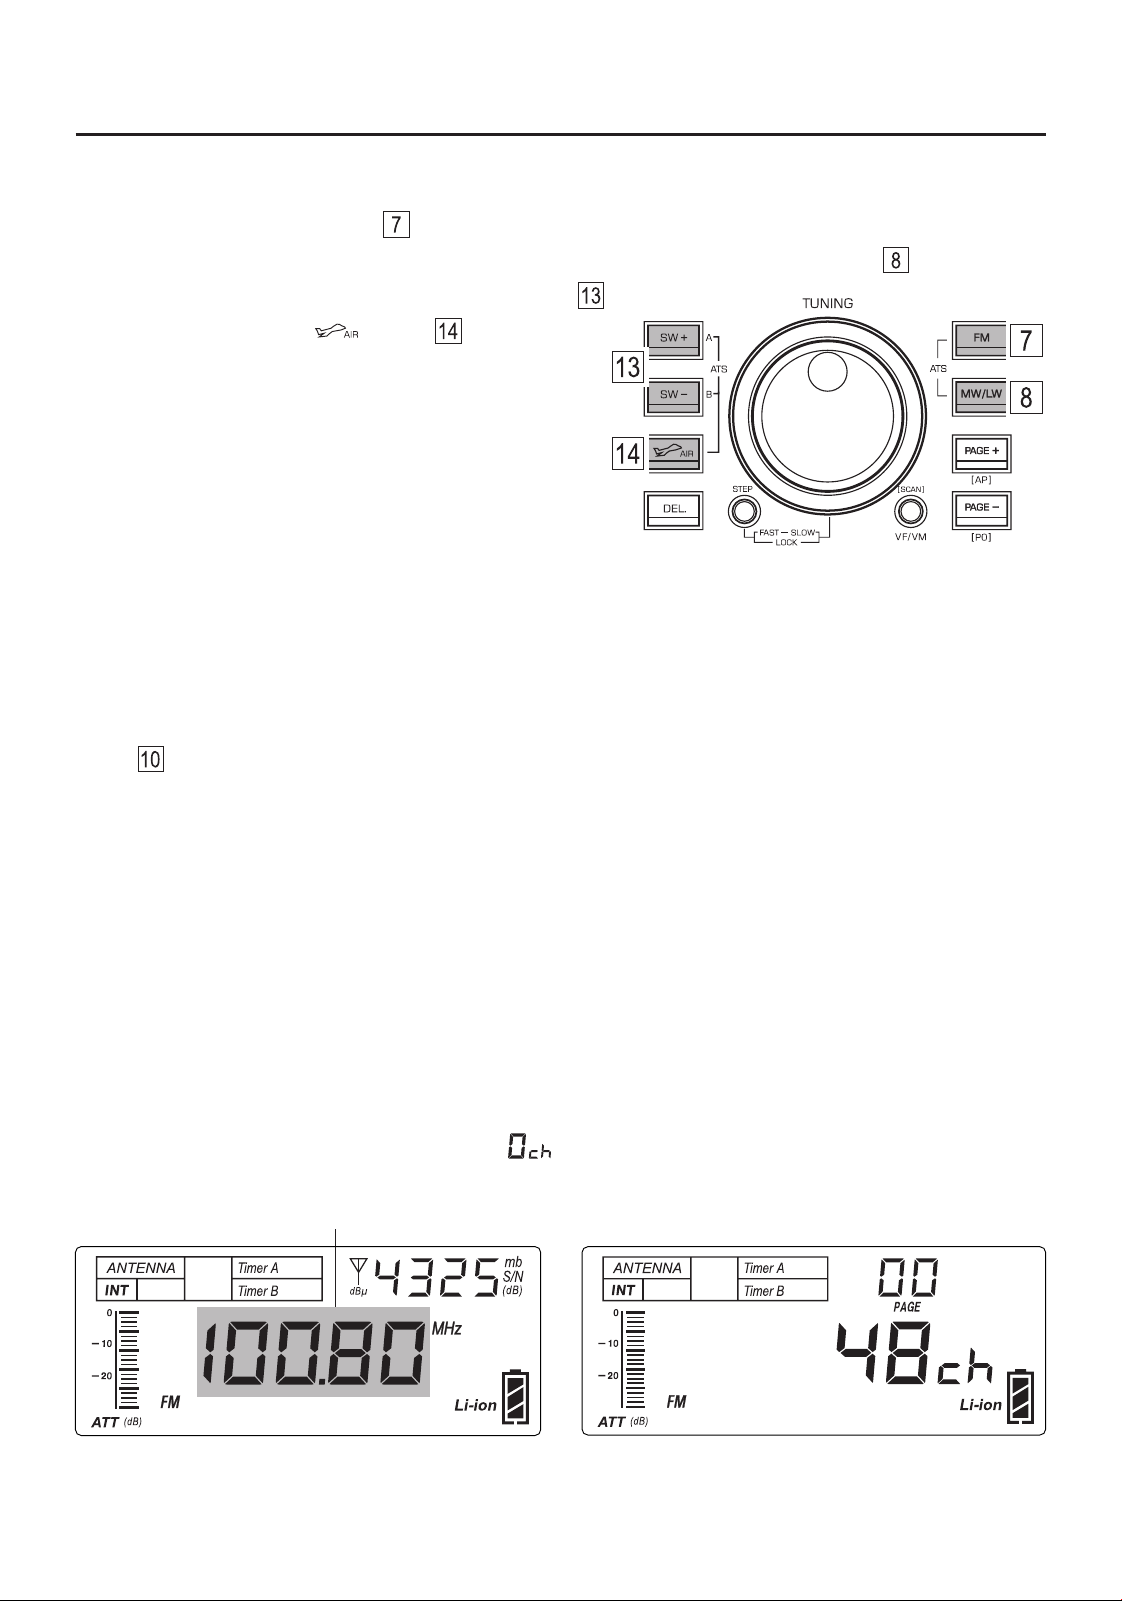
FM: Quick press the [ FM ] button .
Medium Wave / Longwave: Quick press the [ MW/LW ] button (press it twice if necessary) .
Shortwave: Quick press the [ SW ] or [ SW ] button .
Airband: Quick press the [ ] button .
Tips:
In the SW band, quick press the [ SW ] or [ SW ] ●
button repeatedly to change meter bands:
120m / 90m / 75m / 60m / 49m / 41m / 31m / 25m /
22m / 19m / 16m / 15m / 13m / 11m.
In SSB mode, quick press the [ SW ] or [ SW ] ●
button repeatedly to change meter bands:
160m / 80m / 60m / 40m / 30m / 24m / 20m / 17m / 15m / 12m / 10m.
TUNING IN STATIONS (VF MODE)
Tuning in to stations that have not been stored into memory is done in the VF mode. The [ VF/VM ] (SCAN)
button is used to switch between the frequency tuning (VF) mode and the memory (VM) mode. Once in
VF mode, you can tune in to stations by rotating the tuning and fine tuning knobs (manual tuning), using the
auto scan feature, or by entering a frequency with the keypad.
VF mode selection: Quick press the [ VF/VM ] (SCAN) button (press twice if necessary).
When the frequency indicator flashes, the VF mode is entered.
VF mode
Flashing 2 times
VM mode
● If there are no previously stored stations for the selected frequency band and memory page, switching
between the frequency tuning (VF) mode and the memory (VM) mode is not possible. After press the
[ VF/VM ] (SCAN) button, the display shows “ ” and remains in the frequency tuning (VF) mode.
Tips:
● If the display shows the number of frequencies stored into a particular memory page, VM mode is entered.
Press the [ VF/VM ] (SCAN) button again to enter VF mode.
13
Auto Scan
In VF mode, select the frequency band and then press and hold the [ VF/VM ] (SCAN) button . The
device will automatically scan the entire frequency band for available stations. When a station is found it will
stay there for about 5 seconds before continuing the search. When you find a station of your liking and wish
to stop the auto scan feature, quick press any button except [ DEL. ] and [ M ] .
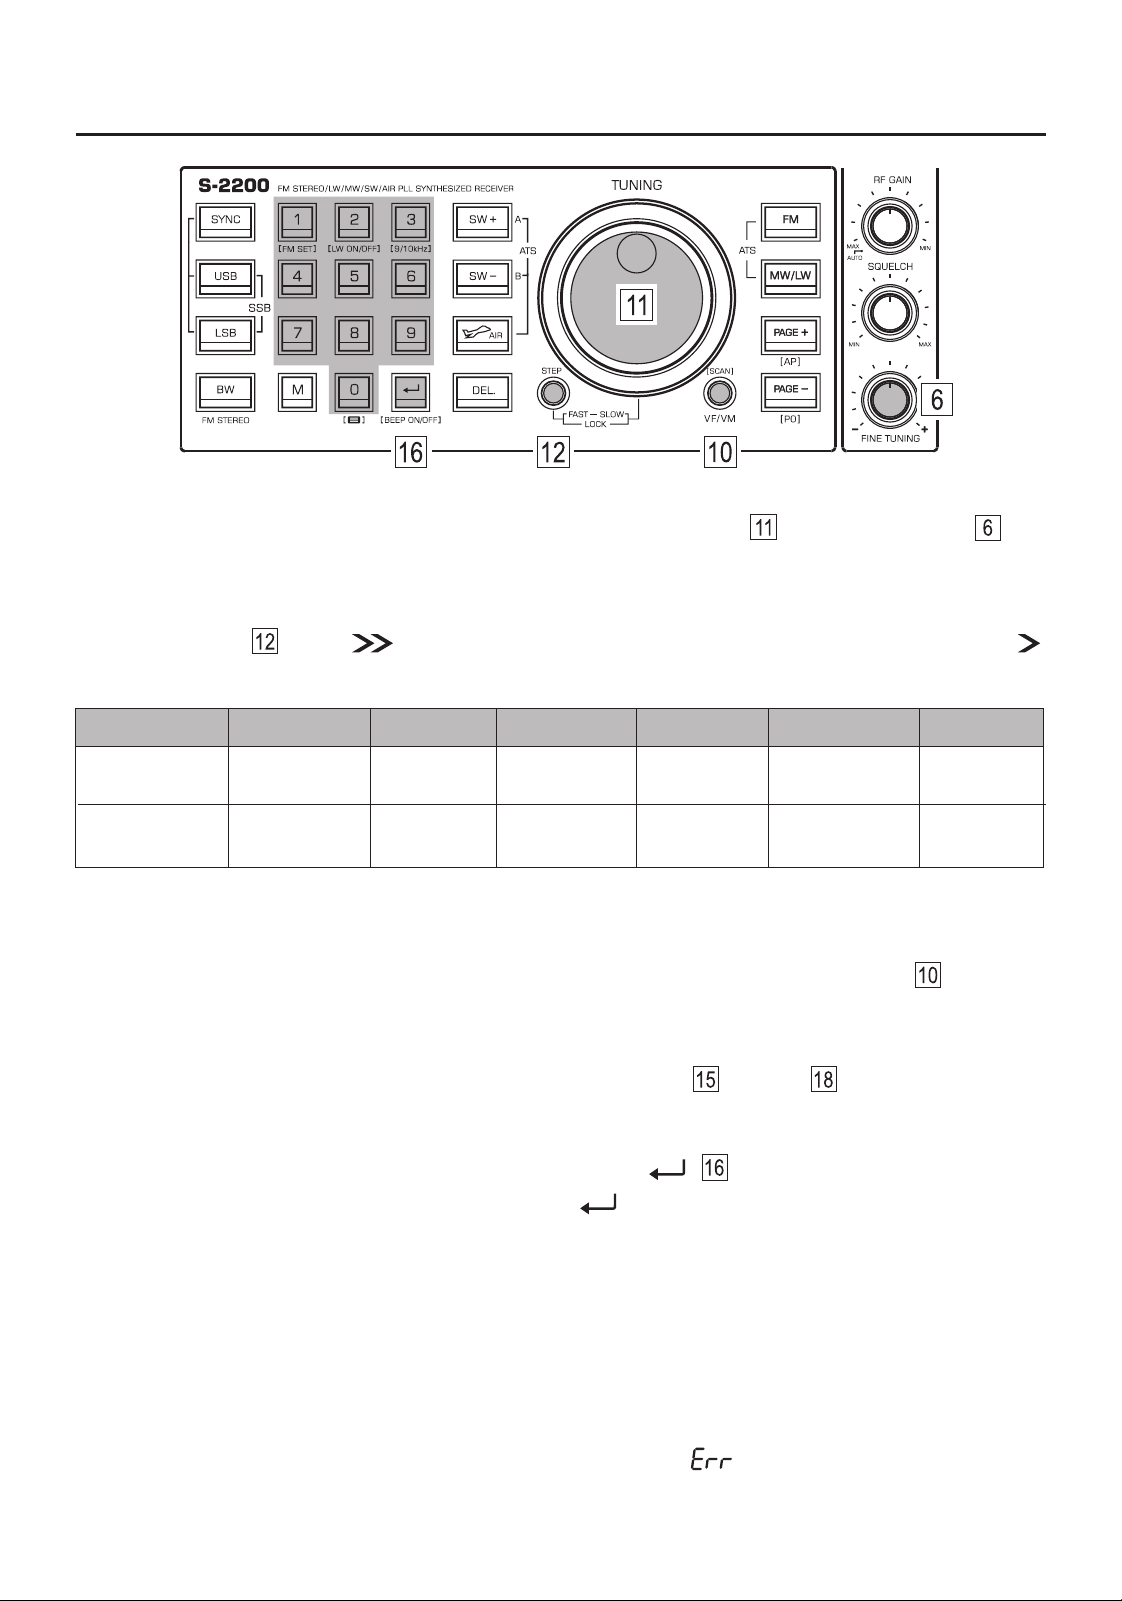
Manual Tuning
In VF mode, select the frequency band and then use the main tuning knob and fine tuning knob to
search for your desired stations.
Tip: When tuning for FM, MW/LW and SW broadcasts, adjust the tuning speed of the main tuning knob with
the [ STEP ] button . When is displayed, this indicates that fast tuning has been selected. When
is displayed, slow tuning has been selected. *This option is not available for AIR and SSB tuning.
FAST
SLOW / FINE
FM
MW (AM)
SW
AIR*
SSB*
0.1 **MHz
0.01 MHz
9 / 10 kHz
1 kHz
5 kHz
1 kHz
0.025 MHz
0.001 MHz
1 kHz
0.01 kHz
LW
9 kHz
1 kHz
**0.05 in 87.5-108 range when MW step is set to 9kHz. MHz MHz
Direct Keypad Entry
In VF mode, quick press the numeric keys [ 0 - 9 ] (followed by [ ] if necessary) to directly enter a
station frequency. For example, enter [ 2 ] [ 7 ] [ 5 ] [ 0 ] [ ] in sequence for listening to shortwave
frequency 2750 kHz, or press [ 1 ] [ 8 ] [ 5 ] [ 5 ] [ 7 ] for listening to shortwave frequency 18557 kHz.
Notes:
Shortwave (SW), medium wave (MW) and longwave (LW) frequencies are entered in kilohertz (kHz), for ●
example, 16875 kHz, 850 kHz, or 189 kHz.
FM and AIR frequencies are entered in megahertz (MHz), for example 101.5 MHz or 123.580 MHz. Ignore ●
the decimal point when inputting frequency numbers. For example, enter [ 1 ] [ 0 ] [ 1 ] [ 5 ] for 101.5 MH .z
● If the entered frequency is not within the covering range, the error “ ” symbol will be displayed.
14
STORING FREQUENCIES INTO MEMORY
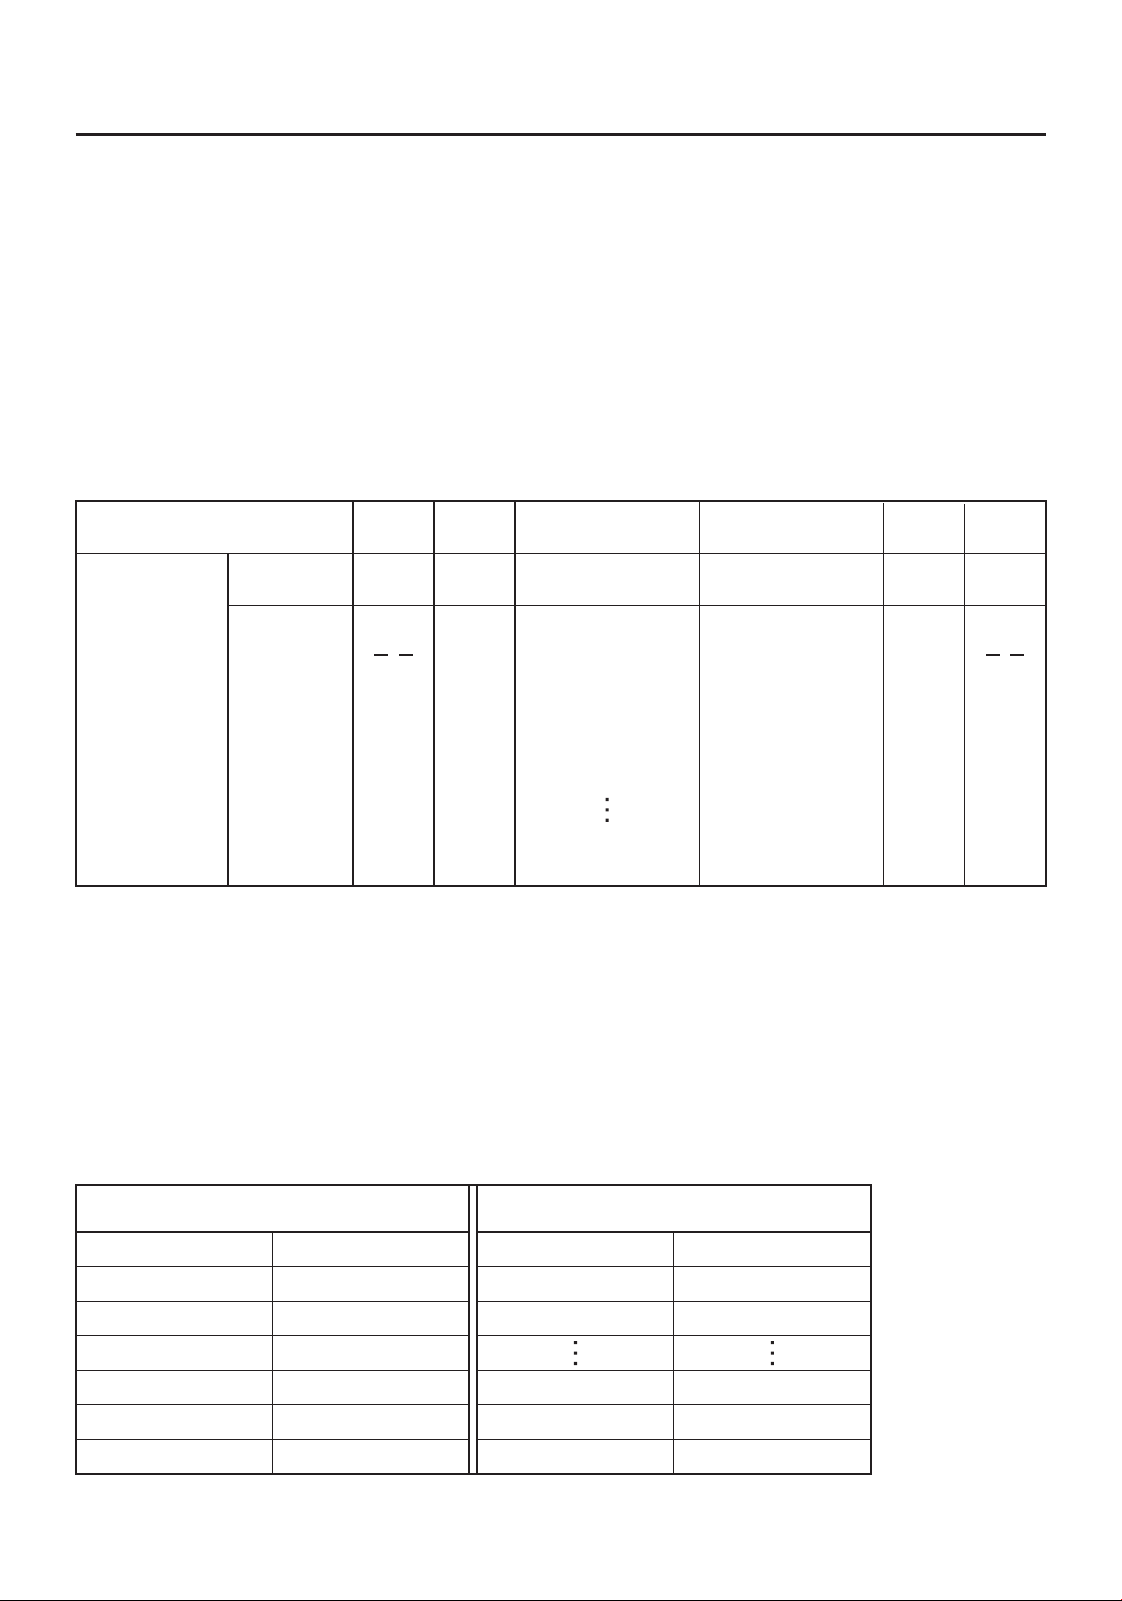
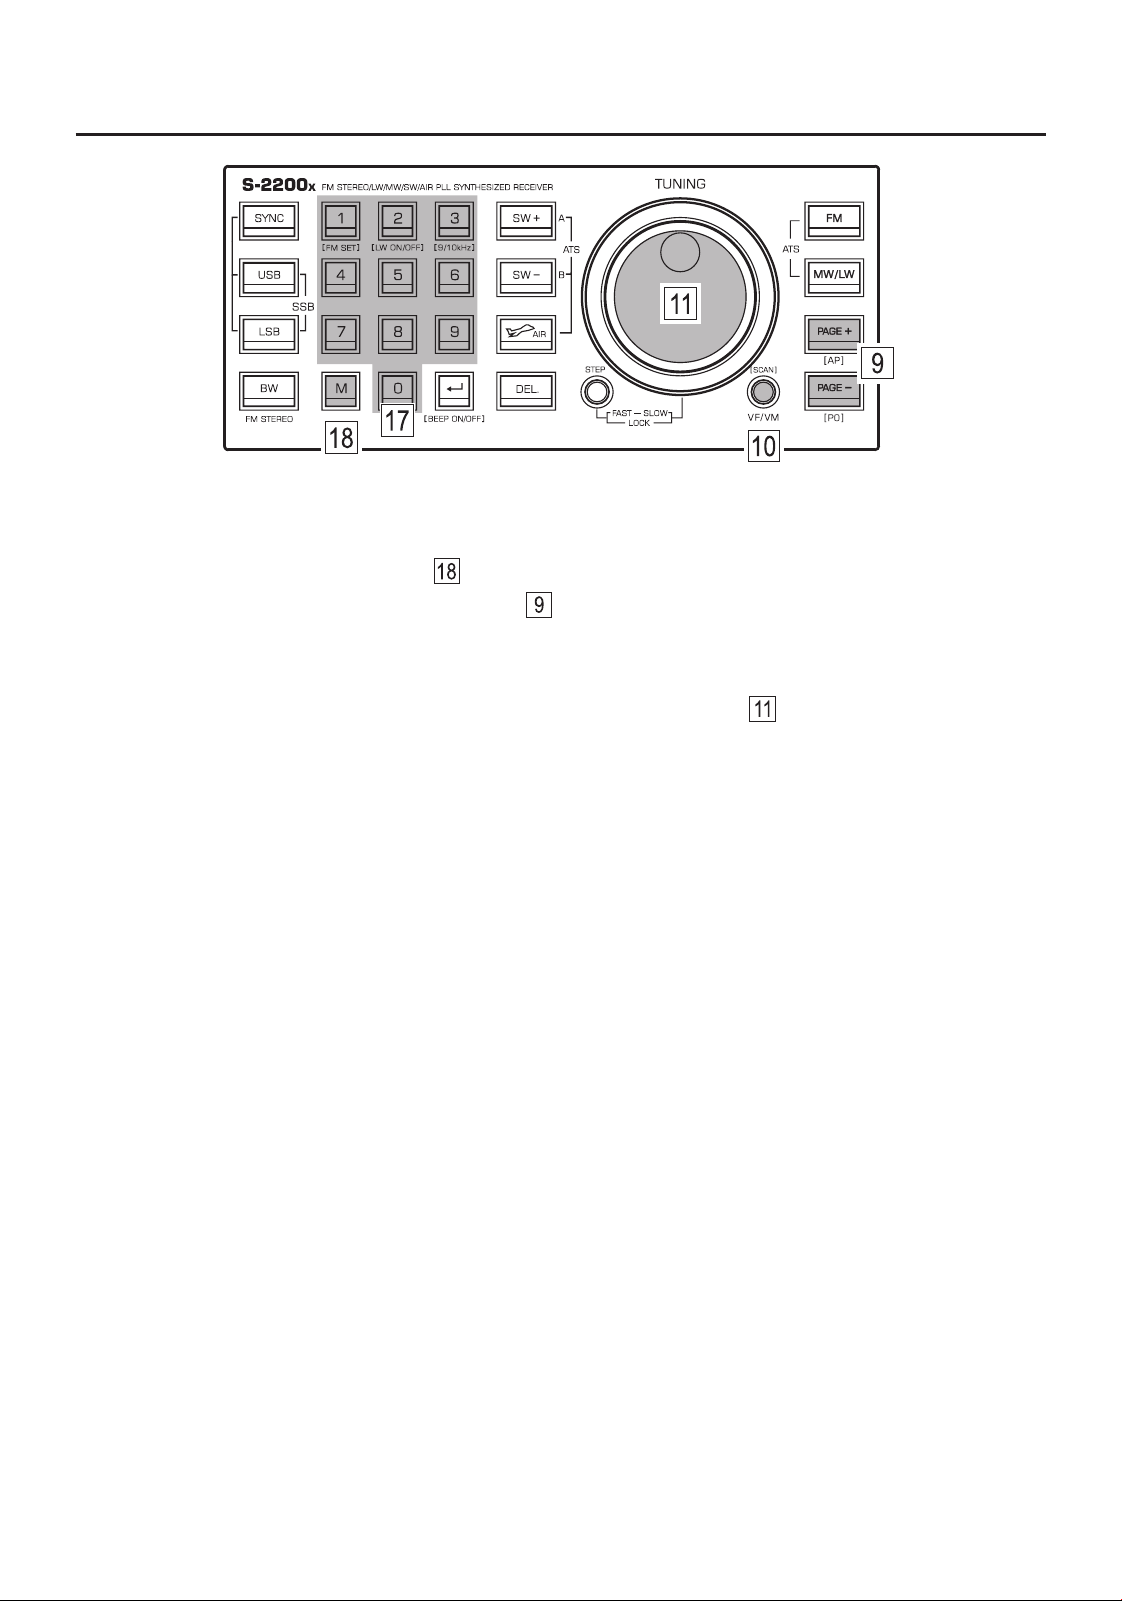
This device can store 9150 frequencies into memory. The memory is divided into 25 pages. Table 1 provides
an overview of the page allocation and number of storage locations available.
1) Page 0 (P0), indicated as “00 Page” on the display, stores 850 frequencies: 100 each for FM, LW, AIR
and SSB, 150 for MW (AM) and 300 for SW.
2) Pages 01-24, indicated as “01 Page” - “24 Page” on the display, store 100 frequencies for FM and LW,
900 for MW (AM) and 7200 for SW. MW and SW memory pages can also be used for time-specific
memory pages in the Auto Paging (AP) mode (see pages 21-23).
Table 2: Allocation of time-specific MW and SW memory pages in AP mode.
Medium Wave (AM)
Shortwave (SW)
Time Period Page
01:00 - 01:59
02:00 - 02:59
01:00 - 04:59
05:00 - 08:59
09:00 - 12:59
13:00 - 16:59
17:00 - 20:59
21:00 - 00:59
01
02
00:00 - 00:59
22:00 - 22:59
23:00 - 23:59
24
22
23
01 - 04
05 - 08
09 - 12
13 - 16
17 - 20
21 - 24
Time Period Page
Notes:
● For FM and LW, memory pages 01-24 are duplicates of one another. A frequency stored in one page is also
stored in all other pages.
● MW pages 01-24 are divided into 6 sections. A frequency stored in one page of a section is also stored in
the other pages of that section. SW pages 01-24 are divided into 24 sections. In AP mode, these sections
correspond to specific time periods. See Table 2 for an overview and pages 21-23 for further details.
Table 1: Page allocation and number of available storage locations.
Page allocation
and storage
locations
LW
MW (AM)
SWFMAIR SSB
100 150300 100100
100 100
Pages 01-04: 150
Pages 05-08: 150
Pages 09-12: 150
Pages 13-16: 150
Pages 17-20: 150
Pages 21-24: 150
24 x 300
100
Page 00
Page 01 - 24
6 x 150
Page 01: 300
Page 02: 300
Page 03: 300
Page 24: 300
15
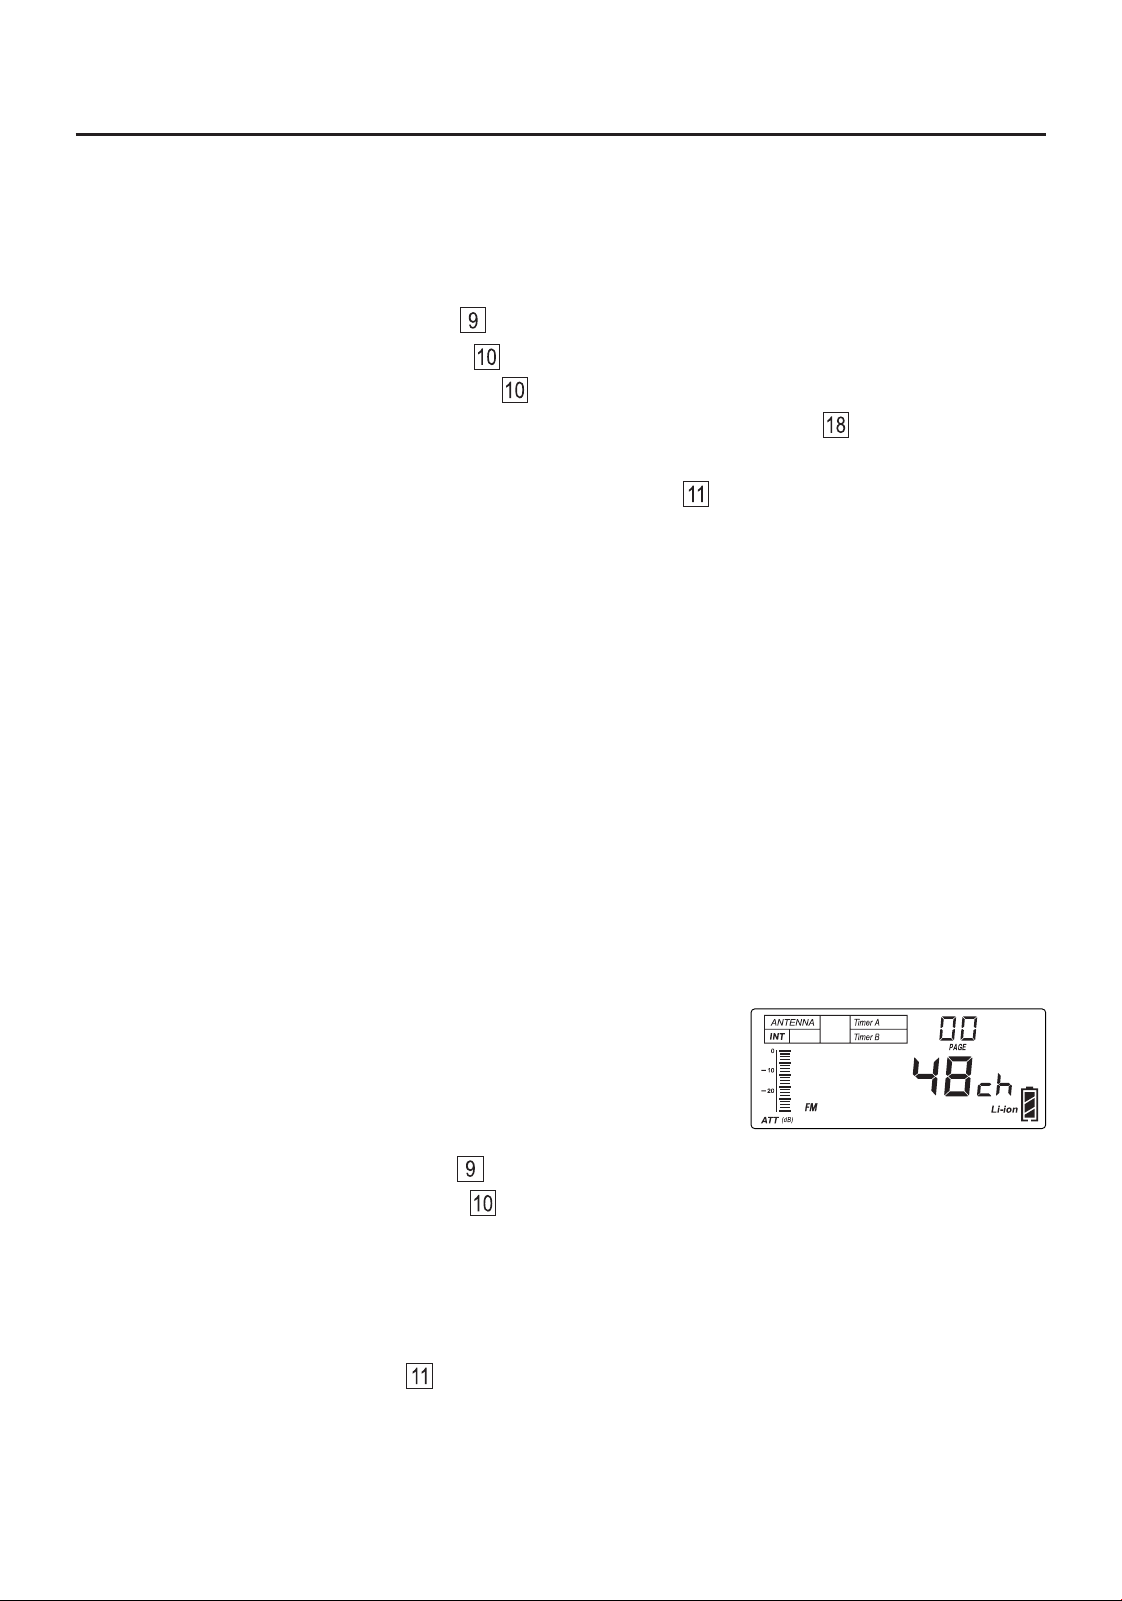
Storing Frequencies Manually
1) In VF mode, tune into a frequency.
2) Quick press the memory [ M ] button , “ PRESET ” flashes in the top right corner of the display.
3) Quick press the [ PAGE ] or [ PAGE ] button to select a memory page.
4) Quick press the [ M ] button to confirm the memory page, “ PRESET ” flashes in the top right corner of the
display and indicates the first available storage location in the selected memory page.
5) If desired, change the memory location by rotating the main tuning knob .
6) Quick press the [ M ] button to confirm the memory location.
Notes:
● Use this method to store SSB frequencies into memory. Stored SSB details include USB/LSB and
frequency information, but no frequency details smaller than 1 kHz.
● Steps 3 and 4 can be omitted for SSB and AIR frequencies, which are only available for storage in Page 00.
● When storing an MW (AM) frequency into memory pages 01-24, it will be stored in all other pages that
belong to the same time period, as indicated in Table 2 on page 14. These time periods are used in AP
mode when recalling frequencies (see also pages 21-23).
● When storing an SW frequency into memory pages 01-24, it will be recalled in AP mode during the
corresponding time period, as indicated in Table 2 on page 14.
16
Notes:
● For storing SSB frequencies, please use the manual storing method (see page 15).
● Auto scan tunes the frequency band in the direction of the last used tuning direction (upwards/downwards).
If you need to change the direction, stop the auto scan, rotate the main tuning knob in your preferred
direction and then restart auto scan.
● When storing an MW (AM) frequency into memory pages 01-24, it will be stored in all other pages that
belong to the same time period, as indicated in Table 2 on page 14. These time periods are used in AP
mode when recalling frequencies (see also pages 21-23).
● When storing an SW frequency into memory pages 01-24, it will be recalled in AP mode during the
corresponding time period, as indicated in Table 2 on page 14.
Auto Tuning Storage (ATS)
Automatically tune into and store FM, LW, MW, SW and AIR frequencies.
Operation for FM, MW/LW and AIR:
1) Select the frequency band.
2) Use the [ PAGE ] or [ PAGE ] button to select an (empty) memory page.
3) Quick press the [ VF/VM ] (SCAN) button .
4) Press and hold the corresponding band button ([ FM ], [ MW/LW ] or [ AIR ]) until “ PRESET ” flashes and
the frequency starts running.
5) After ATS is completed and frequencies were stored, the frequency band, memory page and the number of
stored frequencies will be displayed, as shown in the figure. To stop the ATS process before it has finished,
gently rotate the main tuning knob .
Storing Frequencies During Auto Scan
You can tune a frequency band with auto scan and then upon finding something of interest decide to store it
into memory.
1) Select the frequency band.
2) Use the [ PAGE ] or [ PAGE ] button to select a memory page.
3) Quick press the [ VF/VM ] (SCAN) button .
4) Press and hold the [ VF/VM ] (SCAN) button . The device scans the frequency band for available stations.
5) When a station of your liking is found, quick press the memory [ M ] button twice ; the device
continues to scan for the next available station.
6) To stop the auto scan feature, gently rotate the main tuning knob .

17
Tips:
● Airband is scanned continuously for 30 cycles. After the scan is completed, the frequencies are
automatically sorted.
● After ATS is completed, rotate the main tuning knob to view all stations that were stored during the scan.
● ATS (except in SW mode B) replaces previously stored radio stations within a memory page. To prevent this
from happening, please select an empty memory page before initiating ATS or choose manual or auto scan
storage to add new stations to a memory page that already contains stored stations.
● When storing an MW (AM) frequency into memory pages 01-24, it will be stored in all other pages that
belong to the same time period, as indicated in Table 2 on page 14. These time periods are used in AP
mode when recalling frequencies (see also page 23).
● When storing an SW frequency into memory pages 01-24, it will be recalled in AP mode during the
corresponding time period, as indicated in Table 2 on page 14.
Operation for SW:
1) Quick press [ SW ] or [ SW ] to select the SW frequency band.
2) Use the [ PAGE ] or [ PAGE ] button to select an (empty) memory page.
3) Quick press the [ VF/VM ] (SCAN) button .
4) There are two ATS modes for SW:
● Mode A: Press and hold the [ SW ] button to initiate ATS within all meter bands.
● Mode B: Press and hold the [ SW ] button to initiate ATS for stations within the selected meter band.
5) After ATS is completed and frequencies were stored, the frequency band, memory page and the number
of stored frequencies will be displayed. To stop the ATS process before it has finished, gently rotate the
main tuning knob .
Optimizing ATS Frequency Storage Results
The storage results of Auto Tuning Storage (ATS) depend on a variety of factors:
● Longwave (LW) and Medium Wave (MW) signals are directional. Adjusting the direction of the rotatable
antenna can improve the reception.
● Due to the nature of radio wave propagation, the number of longwave and medium wave broadcasts
received at night is greater than during the day.
● For shortwave, radio wave propagation is affected by ionospheric changes (different time periods in the
morning, noon, and evening, different seasons, sunspot cycles, etc.).
● Broadcasts may only take place during specific hours of the day.
● The receiving environment (geographical or local sources of interference) and the receiving equipment
(such as the antenna) impact the results.
By adjusting the capture threshold levels of the signal strength and signal-to-noise ratio, it is possible to try
and improve the auto tuning and storage results for LW, MW (AM), SW and FM under different signal
receiving conditions.
If the threshold levels for the signal strength and signal-to-noise ratio are set high, the capture sensitivity is
low, which means that broadcasts with weak signals will be missed. If the threshold levels for the signal
strength and signal-to-noise ratio are set low, the capture sensitivity is high, which will result in radio noise
mistakenly being regarded as radio signals and are stored into memory.
Signal-to-Noise ratio
Signal strength
Auto Sorting Memory
This feature can automatically organize all frequencies that have been stored into memory. Within a memory
page, duplicate frequencies are deleted and the remaining frequencies are sorted.
1) Turn the device off.
2) Press and hold the [ ] (0) button until the memory page number “ ” - “ ” on the display
starts running. It takes a few seconds for the sorting to complete.
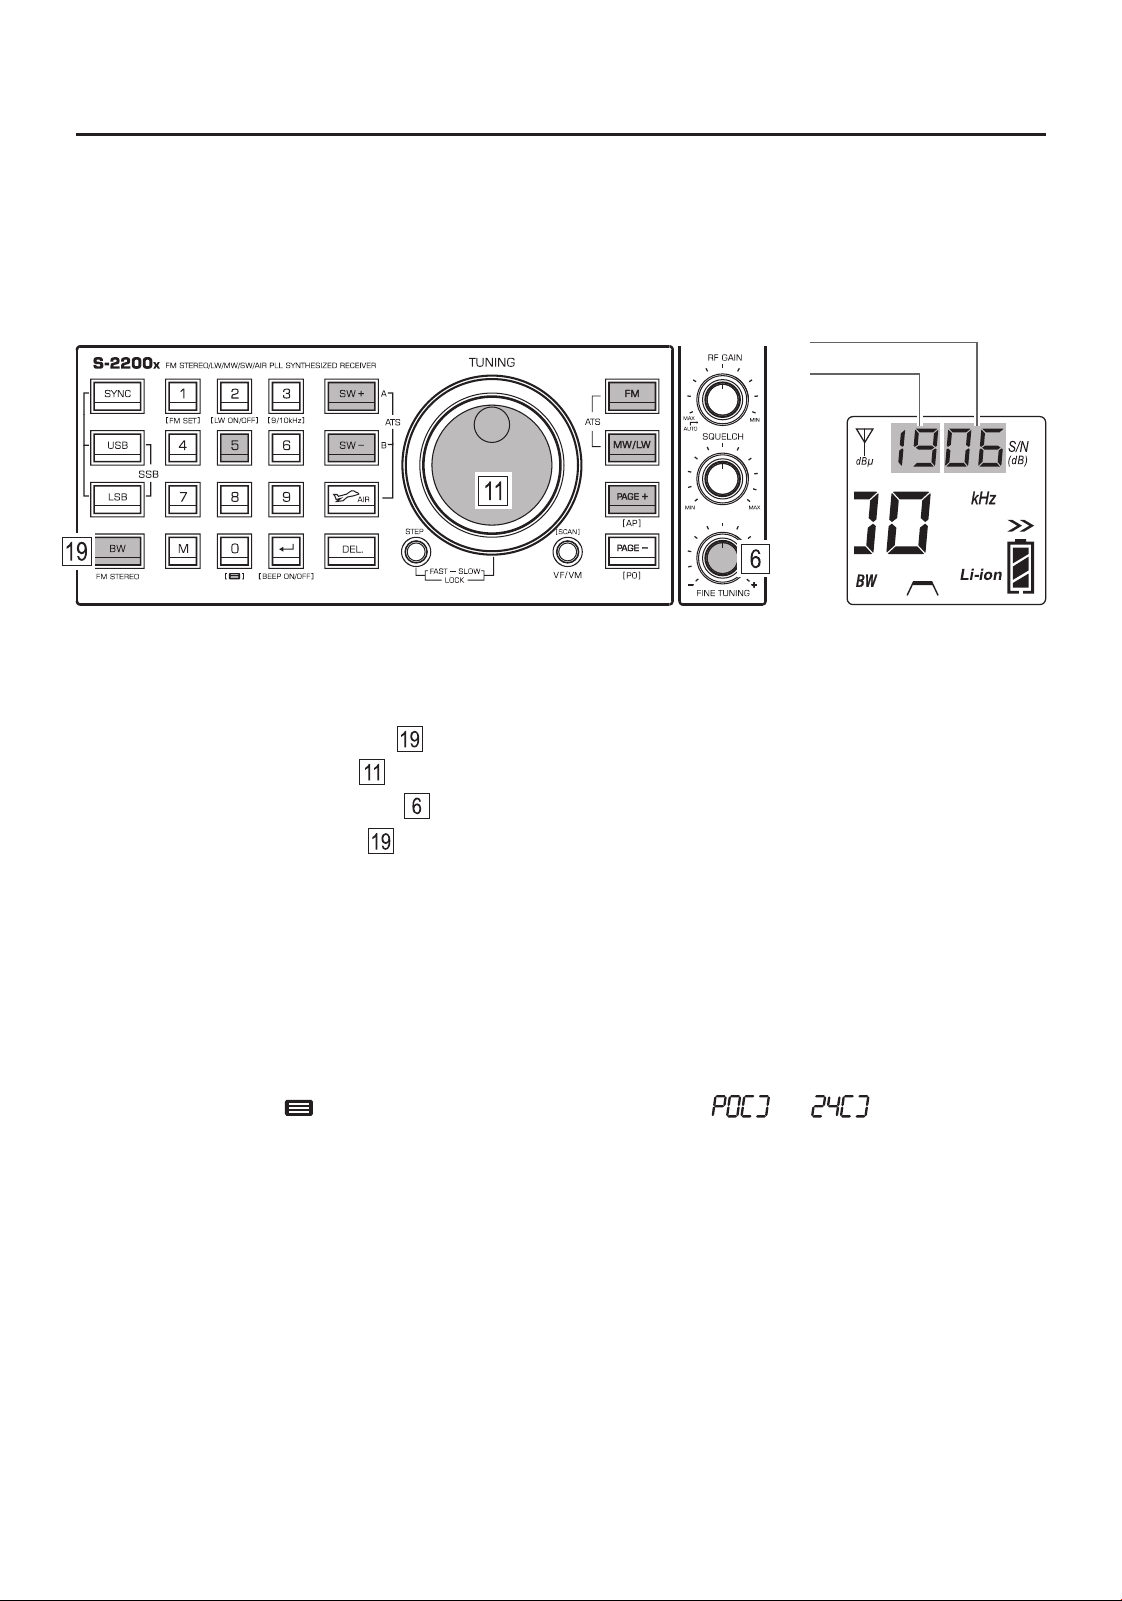
Setting the Signal Capture Sensitivity of Auto Tuning Storage (ATS)
1) Turn on the device and select a frequency band (FM, LW, MW, or SW).
2) Press and hold the [ BW ] button until the signal strength value flashes.
3) Rotate the main tuning knob to adjust the signal strength value.
4) Rotate the [ FINE TUNING ] knob to adjust the signal-to-noise ratio value.
5) Quick press the [ BW ] button to confirm.
Note: Adjustments to the signal capture sensitivity are band specific.
18
19
LISTENING TO STORED FREQUENCIES (VM MODE)
VM mode
Recalling Stored Frequencies Manually
1) Select the frequency band (FM, LW, MW, SW, AIR) or mode (SSB).
2) Quick press [ PAGE ] or [ PAGE ] to automatically enter VM mode and select a memory page (for
AIR and SSB, only page 00 is available ). If the display shows “ ”, the selected memory page has no
stored stations and the device remains in VF mode.
3) Rotate the main tuning knob to select a memory, or use the numeric keys to directly enter the preset
station number followed by a quick press of the [ ] button to confirm.
Notes:
If the selected page does not contain any stored frequencies, the device will automatically return to ●
VF mode.
If you find yourself in pages 01-24 and wish to return to page 00, press and hold the [ P0 ] (PAGE ) button.●
If the display shows “- - - -” after entering a preset station number with the numeric keys, this indicates●
that there is no stored frequency at that location.
Recalling Stored Frequencies by Scanning a Memory Page
This device can auto scan a memory page, staying on each stored frequency for about 5 seconds.
1) Select the frequency band (FM, LW, MW, SW, AIR) or mode (SSB).
2) Quick press [ PAGE ] or [ PAGE ] to automatically enter VM mode and select a memory page (for
AIR and SSB, only page 00 is available). If the display shows “ ”, the selected memory page has no
stored stations and the device remains in VF mode.
3) Press and hold the [ VF/VM ] (SCAN) button until “ PRESET ” flashes in the upper right corner of the
display. The device scans all stored frequencies within the selected memory page.
4) To stop scanning, quick press any button except [ DEL. ] and [ M ] .
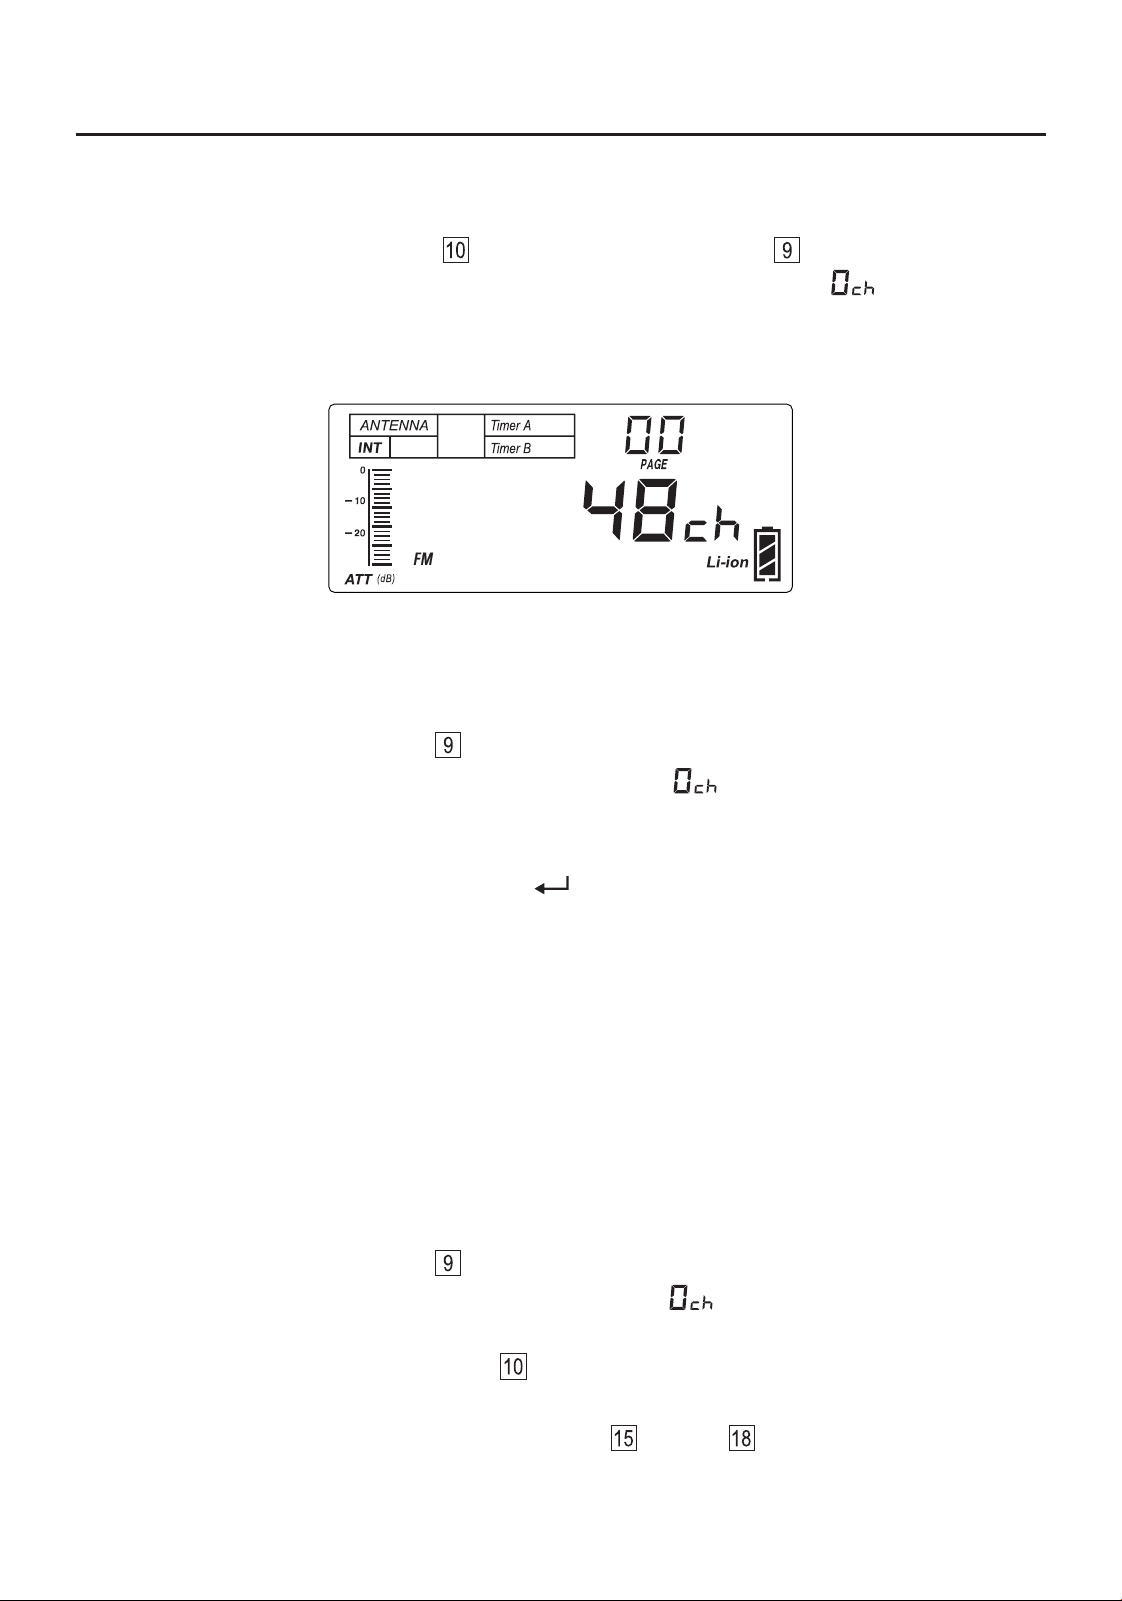
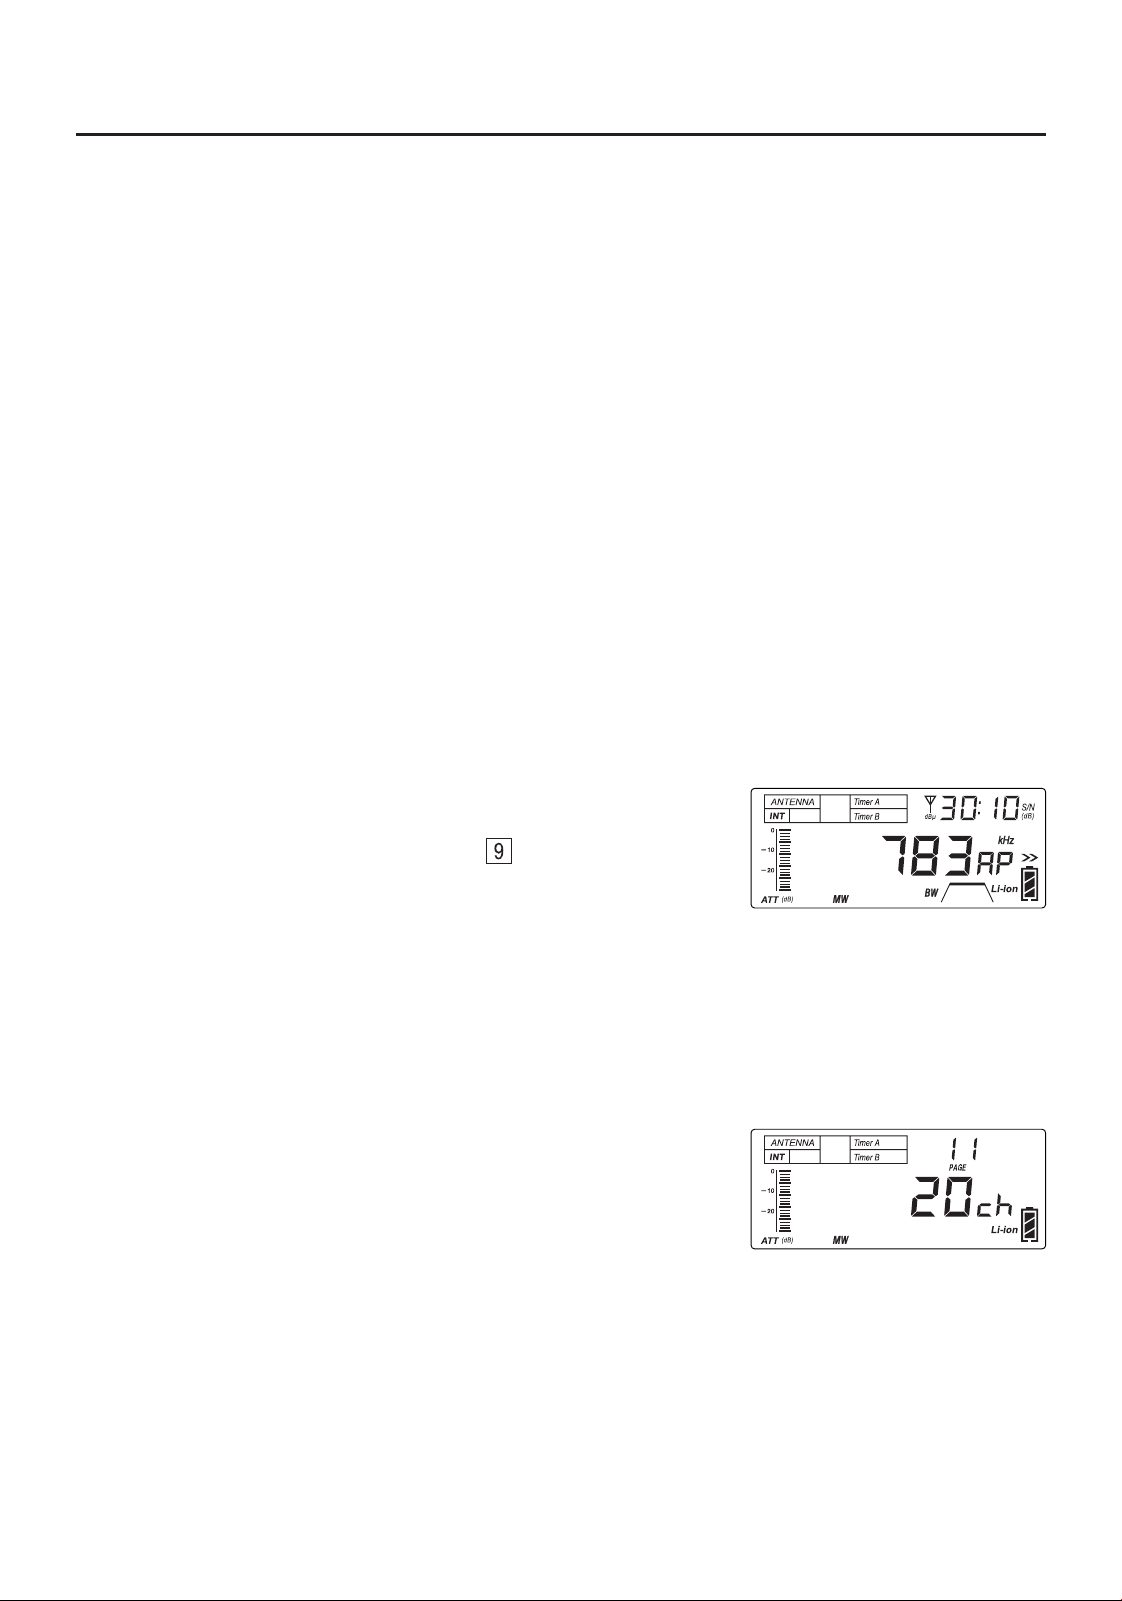
Recalling frequencies that have been stored into memory is done in the VM (memory) mode. You can enter
the memory using the [ VF/VM ] (SCAN) , [ PAGE ] or [ PAGE ] button . If no frequencies have
been stored for th ” and the device e selected frequency band and memory page, the display shows “
is in the VF mode. If there are stored frequencies, the display shows how many. For example, in the
figure below, the display indicates that 48 FM frequencies are stored in memory page 00.
20
1) Select the frequency band (FM, LW, MW, SW, AIR) or mode (SSB).
2) Quick press [ PAGE ] or [ PAGE ] to enter VM mode and select a memory page (for AIR and SSB
only page 00 is available).
3) Press and hold the [ VF/VM ] (SCAN) button until “ PRESET ” flashes in the upper right corner of the
display. The device scans all stored frequencies within the selected memory page.
4) Upon finding an unwanted station, press the [ DEL. ] button . No confirmation is required and scanning
continues immediately.
5) To stop the memory scan, gently rotate the main tuning knob .
Deleting Frequencies During Memory Page Scan
This device can auto scan all stored frequencies within a memory page, staying on each frequency for about
5 seconds, and giving you the opportunity to delete any unwanted frequencies.
Note: If the [ DEL. ] button is not pressed for confirmation within 3 seconds, the delete mode is cancelled.
Deleting All Stored Frequencies in a Memory Page
1) Select the frequency band (FM, LW, MW, SW, AIR) or mode (SSB).
2) Quick press [ PAGE ] or [ PAGE ] to enter VM mode and select a memory page (for AIR and SSB
only page 00 is available).
3) Press and hold the [ DEL. ] button until “ ” and “ ” flash on the display.
4) Quick press the [ DEL. ] button to confirm. All memories from the selected frequency band and memory
page are deleted.
Deleting All Stored Frequencies From Memory
1) Turn the device off.
2) Press and hold the [ DEL. ] button until “ ” and “ ” flash on the display.
3) Quick press the [ POWER ] button to confirm. “ ” is displayed for a few seconds while the memory
is cleared of all stored frequencies.
DELETING FREQUENCIES FROM MEMORY
Deleting a Single Frequency
1) Select the frequency band (FM, LW, MW, SW, AIR) or mode (SSB).
2) Quick press [ PAGE ] or [ PAGE ] to enter VM mode and
select a memory page (for AIR and SSB only page 00 is available).
3) Rotate the main tuning knob to select the frequency to be deleted.
4) Press and hold the [ DEL. ] button until “ ” and “ PRESET ”
flash on the display.
5) Quick press the [ DEL. ] button to delete the unwanted station.
Note: If the [ DEL. ] button is not pressed for confirmation within 3 seconds, the delete mode is cancelled.
Because broadcasts in the MW (AM) and SW bands may only be available during a certain time of day, you
can use ATS in Auto Paging (AP) mode to automatically search and store in the time-specifcfrequencies
as indicated in Table 2 on page 14 frequencies,memory pages 01-24 . Subsequently, when using AP to recall
frequencies a it will only show the that are stored in the memory pages of the current time period. In way, you
can then use pages 01-24 to create a broadcast frequency schedule.
● Medium Wave (AM) frequencies stored with AP ATS between 09:00 - 12:59 are automatically stored on
pages 09, 10, 11, and 12, frequencies stored between 13:00 - 16:59 are stored on pages 13, 14, 15 and 16.
When using AP to recall frequencies at 12:30, it will only show those frequencies stored in the 09:00 -
12:59 time period. In this way, it is possible to create 6 time-specific memories for MW (AM).
For example:
● Shortwave (SW) frequencies stored with AP ATS between 11:00 - 11:59 are automatically stored on page
11, frequencies stored between 17:00 - 17:59 are automatically stored on page 17. When using AP to
recall frequencies at 17:20, it will only show those frequencies stored on page 17. In this way, it is possible
to create 24 time-specific memories for SW.
Using AP ATS to Create Time-Specific Memories for MW (AM) and SW
Please make sure that the clock of your S-2200x has been correctly set
before using this feature (see page 8).
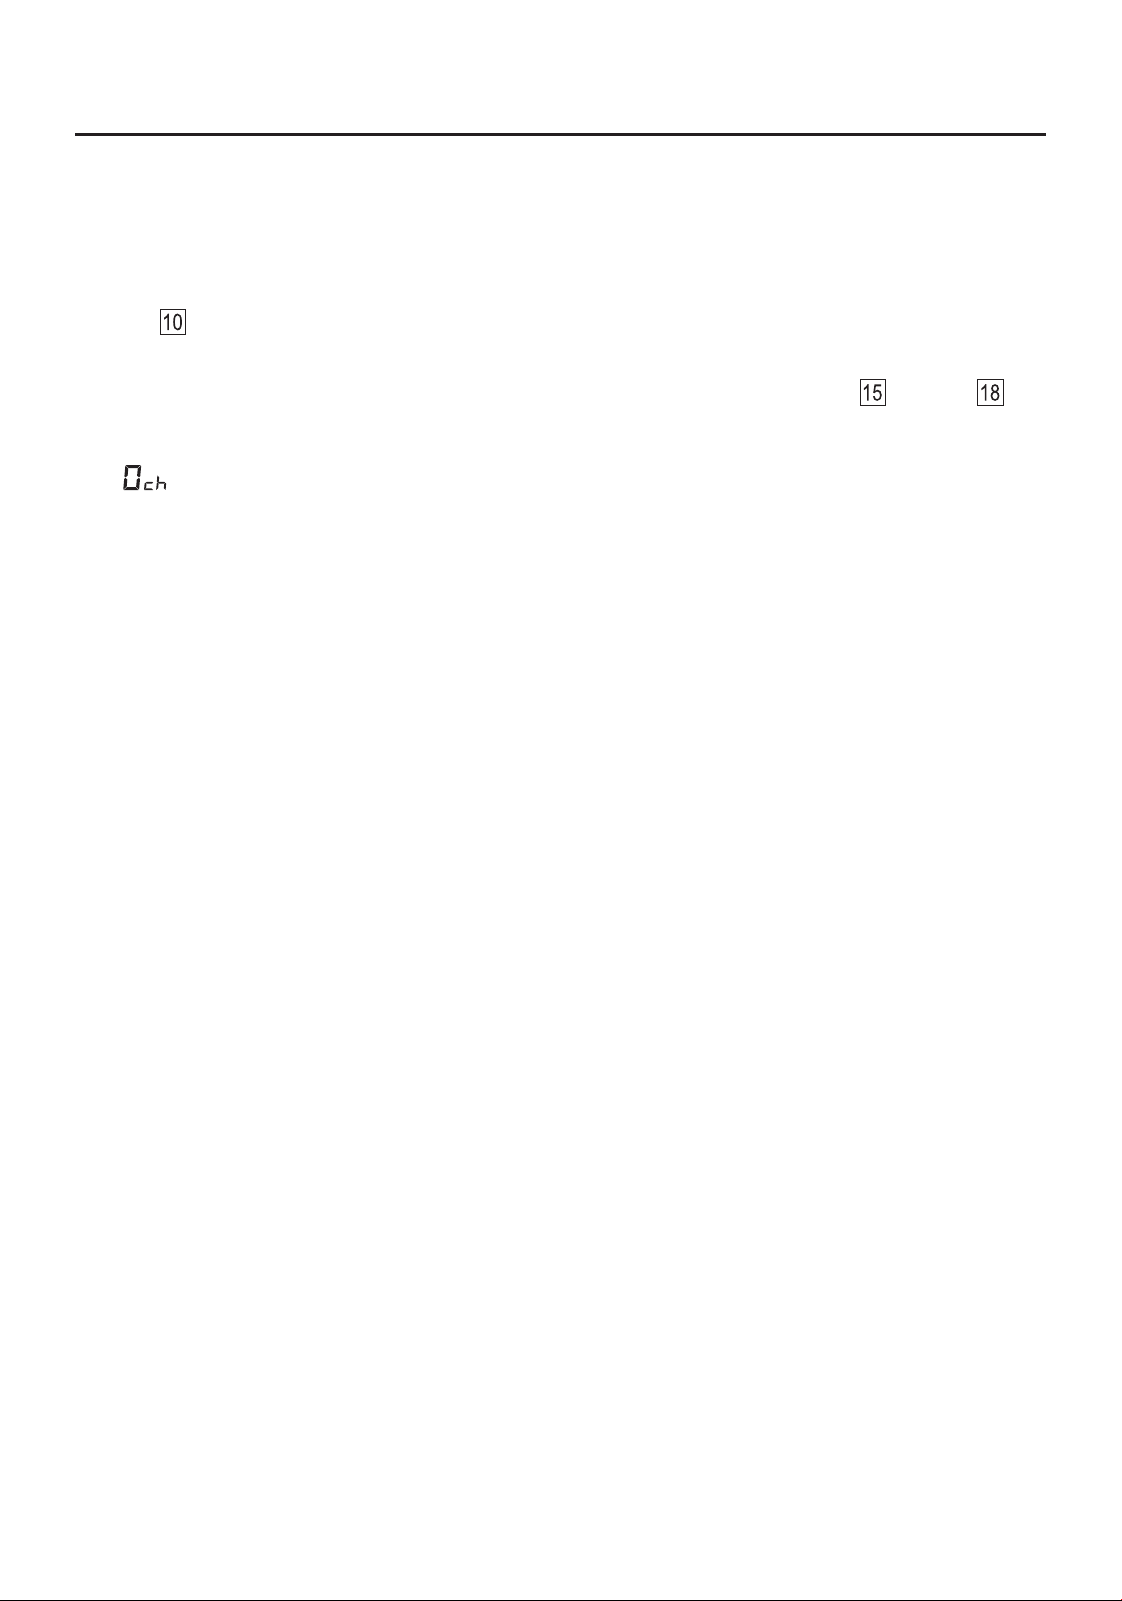
In the example on the right, "20ch", "MW" and “11” indicate that 20
medium wave broadcast frequencies were stored on page 11 during
AP ATS that took place between 11:00 - 11:59. Because 11:00 - 11:59
belongs to the 09:00 - 12:59 time interval (see Table 2 on page 14), all 20
medium wave frequencies are available on memory pages 09, 10, 11, and 12.
1) Press and hold the [ AP ] (PAGE ) button . “AP” is displayed
behind the frequency, indicating that the AP mode is entered, as
shown in the figure on the right.
2) Select the MW or SW frequency band.
3) Press and hold the related band button ([ MW/LW ], [ SW ] or [ SW ]) to initiate the AP auto tuning
and storage (ATS) feature.
4) When AP ATS is completed, the frequency band, time-specifc page number, and the number of
stored frequencies are displayed. To stop AP ATS before it has finished, rotate the main tuning knob.
Notes:
● There are two AP ATS modes for SW:
Mode A: Press and hold the [ SW ] button to scan and store broadcasts within all meter bands.
Mode B: Press and hold the [ SW ] button to scan and store broadcasts within the selected meter band.
● The ATS feature will replace any previously stored frequencies that are already available in the time-
21
AUTO PAGING (AP) MODE: TIME-SPECIFIC MEMORIES FOR MW (AM) AND SW

specific memory pages (pages 01-24). For example, if memory page 11 already contains frequencies that
were previously stored with other storage methods (manual storage, auto scan storage, ATS) then these
will be replaced when performing AP ATS during the 09:00 - 12:59 time interval.
● It is possible to perform AP ATS for FM and LW, but this will only replace the frequencies that are already
stored in memory pages 01-24 and not create time-specific memories. To automatically tune and store FM
and LW memories in pages 01-24, please use Auto Tuning Storage (ATS) as indicated on page 16.
● If there is a time period change during AP ATS, the device will stop scanning and delete all frequencies
stored in the previous time period, after which it automatically re-scans and stores the frequencies into the
new time period.
AP Manual Storage
If AP ATS missed certain frequencies (e.g. due to interference), then it is possible to add these manually:
1) Quick press the [ VF/VM ] (SCAN) button . The frequency flashes twice and enters VF mode.
2) Select the band and frequency.
3) Quick press the [ M ] button . “ PRESET ” flashes in the top right corner of the display.
4) Press and hold the [ PAGE ] (AP) button. “ ” and “ PRESET ” flash on the display.
5) Quick press the [ M ] button to confirm.
If the threshold levels for the signal strength and signal-to-noise ratio are set high, the capture sensitivity is
low, which means that broadcasts with weak signals will be missed. If the threshold levels for the signal
strength and signal-to-noise ratio are set low, the capture sensitivity is high, which will result in radio noise
mistakenly being regarded as radio signals and stored into memory.
Optimizing ATS Frequency Storage Results in Auto Paging (AP) Mode
The factors influencing the results of ATS in AP mode are the same as described for ATS on page 17. By
adjusting the capture threshold levels of the signal strength and signal-to-noise ratio, it is possible to try and
improve the ATS results in AP mode for MW (AM) and SW under different signal receiving conditions.
Setting the Signal Capture Sensitivity of AP ATS
Turn on the device and s a frequency 1) elect band.
button to e the 2) Press and hold the [ PAGE ] (AP) nter AP mode.
key signal 3) Press and hold the [ 5 ] until the strength value flashes.
Rotate main tuning adjust signal 4) the knob to the strength value.
Rotate the adjust 5) [ FINE TUNING ] knob to the signal-to-noise ratio value.
Quick key6) press the [ 5 ] to confirm.
22
23
Recalling AP Time-Specfic MW (AM) and SW Memories
1) Press and hold the [ PAGE ] (AP) button to enter the AP mode.
2) Select the MW (AM) or SW frequency band.
3) Rotate the main tuning knob to select a stored frequency. Alternatively, press and hold the [ VF/VM ] (SCAN)
button to perform a memory scan. The device scans all stored frequencies of the selected band in the
current time-specific memory, staying on each frequency for 5 seconds before continuing to the next
one. To stop the scan and listen to a memory, quick press any button except [ DEL. ] and [ M ] .
Tips:
If “ ” is displayed after entering MW or SW in AP mode, it means that there are no previously stored ●
frequencies in the current time period (see for an overview). Press and hold the Table 2 on page 14
frequency band button to auto tune and store frequencies in the current AP time period, or quick press the
[ VF/VM ] (SCAN) button to exit AP mode.
While in AP mode, it is possible to recall FM and LW frequencies that are stored in memory pages 01-24. ●
24
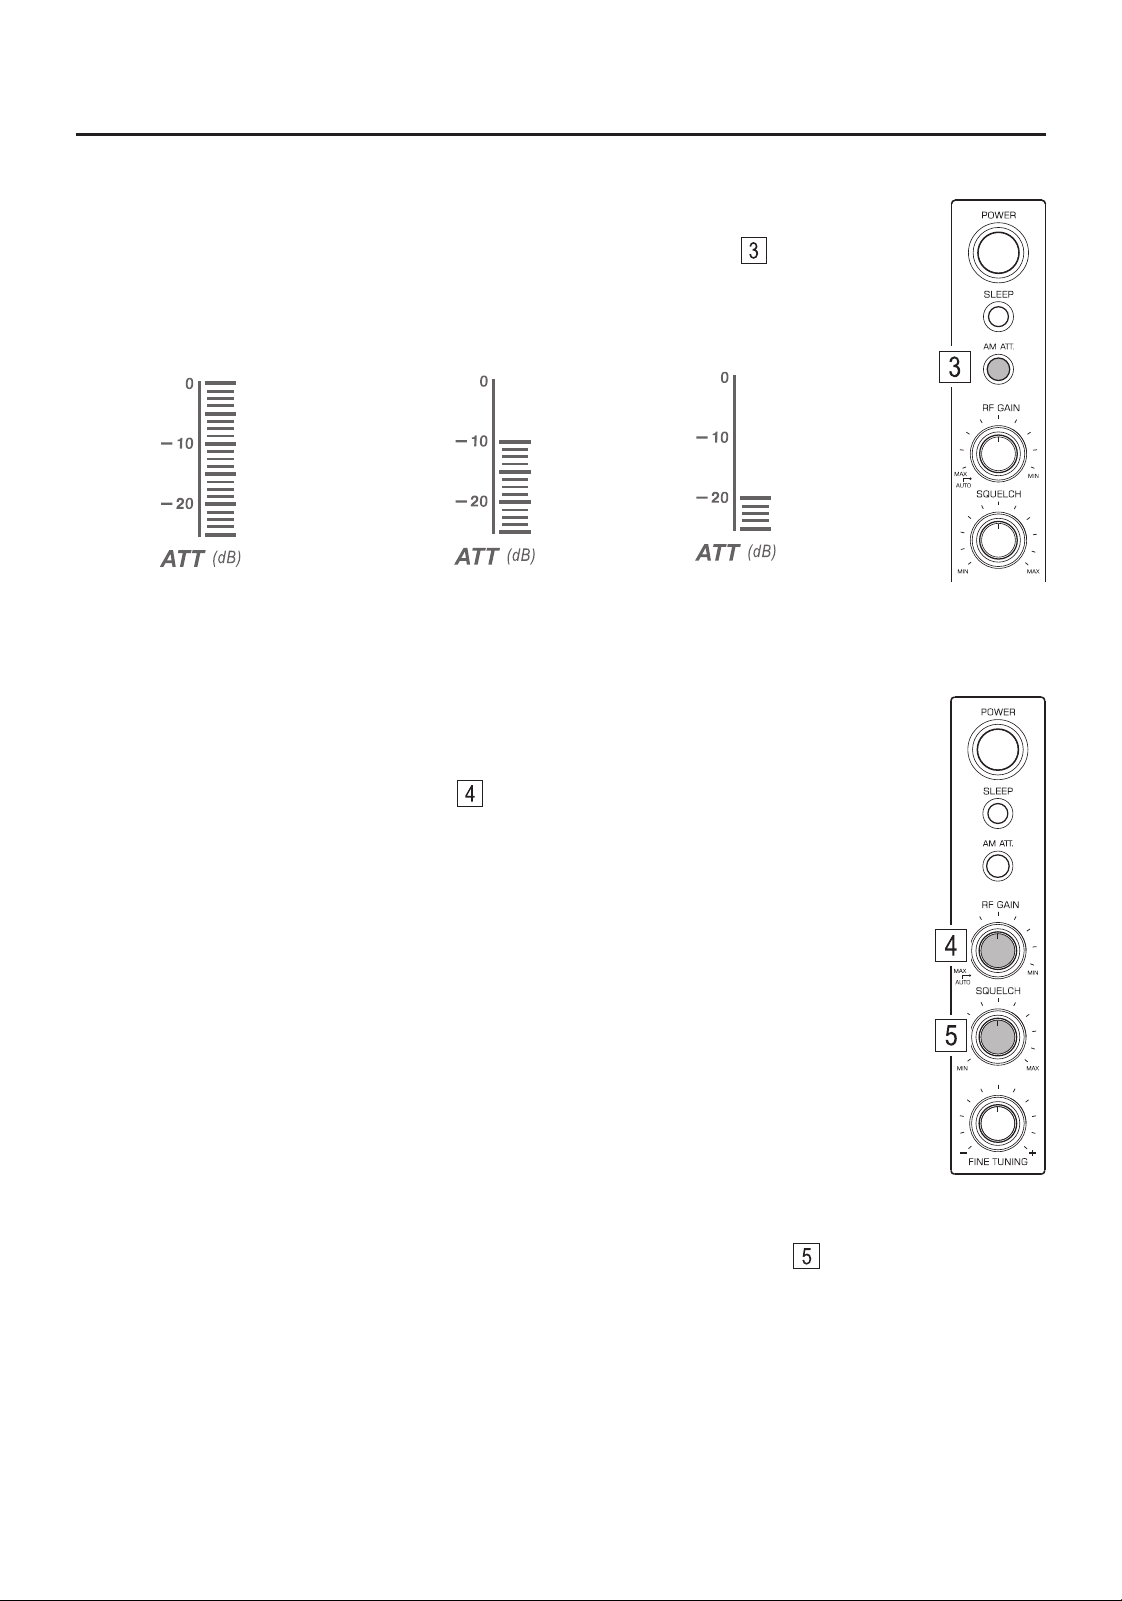
SQUELCH CONTROL
Using the squelch control knob may reduce or suppress background noise w (LW)hen listening to longwave ,
(MW), (SW) and airband. Turn the [ SQUELCH ] knob clockwise to increase the medium wave shortwave
squelch level, turn it counterclockwise to lower the squelch level.
Tip: If the squelch level is adjusted too high, weak radio signals will be missed. Turn off the squelch control
function completely by turning the [ SQUELCH ] knob fully counterclockwise until the knob makes a “click”
sound.
RF GAIN CONTROL
When listening to longwave (LW), medium wave (MW) or shortwave (SW) radio,
use the RF Gain control knob [ RF GAIN ] to adjust the gain for signals of different
strengths and obtain the best reception.
Automatic gain control: Turn the knob counterclockwise until it makes a “click” sound, ●
indicating that the gain control is AUTO.set to
Manual gain control: Turn the knob clockwise to reduce gain, counterclockwise to ●
increase gain. Using it manually may improve the rejection of interference from
adjacent frequencies that may interfere, especially on shortwave.
no signal attenuation
10dB signal attenuation
20dB signal attenuation
ANTENNA SIGNAL ATTENUATION
When listening to longwave (LW), medium wave (MW) or shortwave (SW) radio and
experiencing strong signal overloading, quick press the [ AM ATT. ] button to attenuate
the input signal by -10dB, -20dB or 0dB (no attenuation). Experiment with this control to see
how it works best with the signals that you listen to.
25
SSB (SINGLE SIDEBAND) TUNING
When receiving longwave, medium wave (AM) and shortwave broadcasts, you can
activate the SSB mode to receive particular signals like for example amateur radio
communication and Morse Code, but it can also help to mitigate interference.
Quick press the [ LSB ] (lower sideband) or [ USB ] (upper sideband) button to
enable the sideband. Quick press again to disable SSB.
SYNCHRONOUS DETECTION (SYNC)
When listening to longwave, medium wave (AM) and shortwave broadcasts, turning on synchronous
detection may reduce noise interference, eliminate distortion caused by local fading during signal
transmission, and suppress interference caused by adjacent stations.
Note: Enabling the SYNC detector does not always reduce interference.
Enable/Disable SYNC detection:
1) Quick press the [ SYNC ] button , the display shows “ SYNC ” and the radio enters the synchronous
detection mode.
2) Quick press the [ USB ] or [ LSB ] button to select Upper Sideband or Lower Sideband SYNC detection.
3) To disable, quick press [ USB ] or [ LSB ] again and “ SYNC ” disappears from the display.
Tip: In SSB, quick press the [ SW + ] or [ SW - ] button repeatedly to change meter
bands: 160m / 80m / 60m / 40m / 30m / 24m / 20m / 17m / 15m / 12m / 10m.
AM BANDWIDTH SELECTION
Quick press the [ BW ] button repeatedly, or press and then rotate the
[ FINE TUNING ] knob , to select different bandwidths to enhance the
intelligibility of longwave, medium wave, shortwave, airband and SSB signals.
Selectable bandwidths are:
LW/MW: 1.0, 2.3, 3.5, 5.0 and 9.0kHz.
SW/AIR: 1.0, 2.3, 3.5, 5.0 and 6.0kHz.
SSB: 0.5, 1.2, 2.3, 3.0 and 4.0kHz.
● Wider bandwidth: Has better audio fidelity when receiving strong signals or local stations.
● Narrower bandwidth: Limits interference from adjacent strong signals and background noise, thereby
especially suitable for receiving weak and distant stations.
26
FM STEREO/MONO SELECTION
Quick press the [ BW ] (FM STEREO) button . If the device detects that the
FM signal is in stereo the display shows “ Stereo ” behind the FM band indicator.
Quick press the [ BW ] (FM STEREO) button again to return to mono listening.
Tips:
● When the FM signal is broadcasted in mono, or broadcasted in stereo but the signal received is weak, the
audio output is in mono and “ Stereo ” is not displayed.
● When listening to FM from the built-in speaker, or when listening to FM broadcasts with a weak signal, it is
recommended to listen in mono.
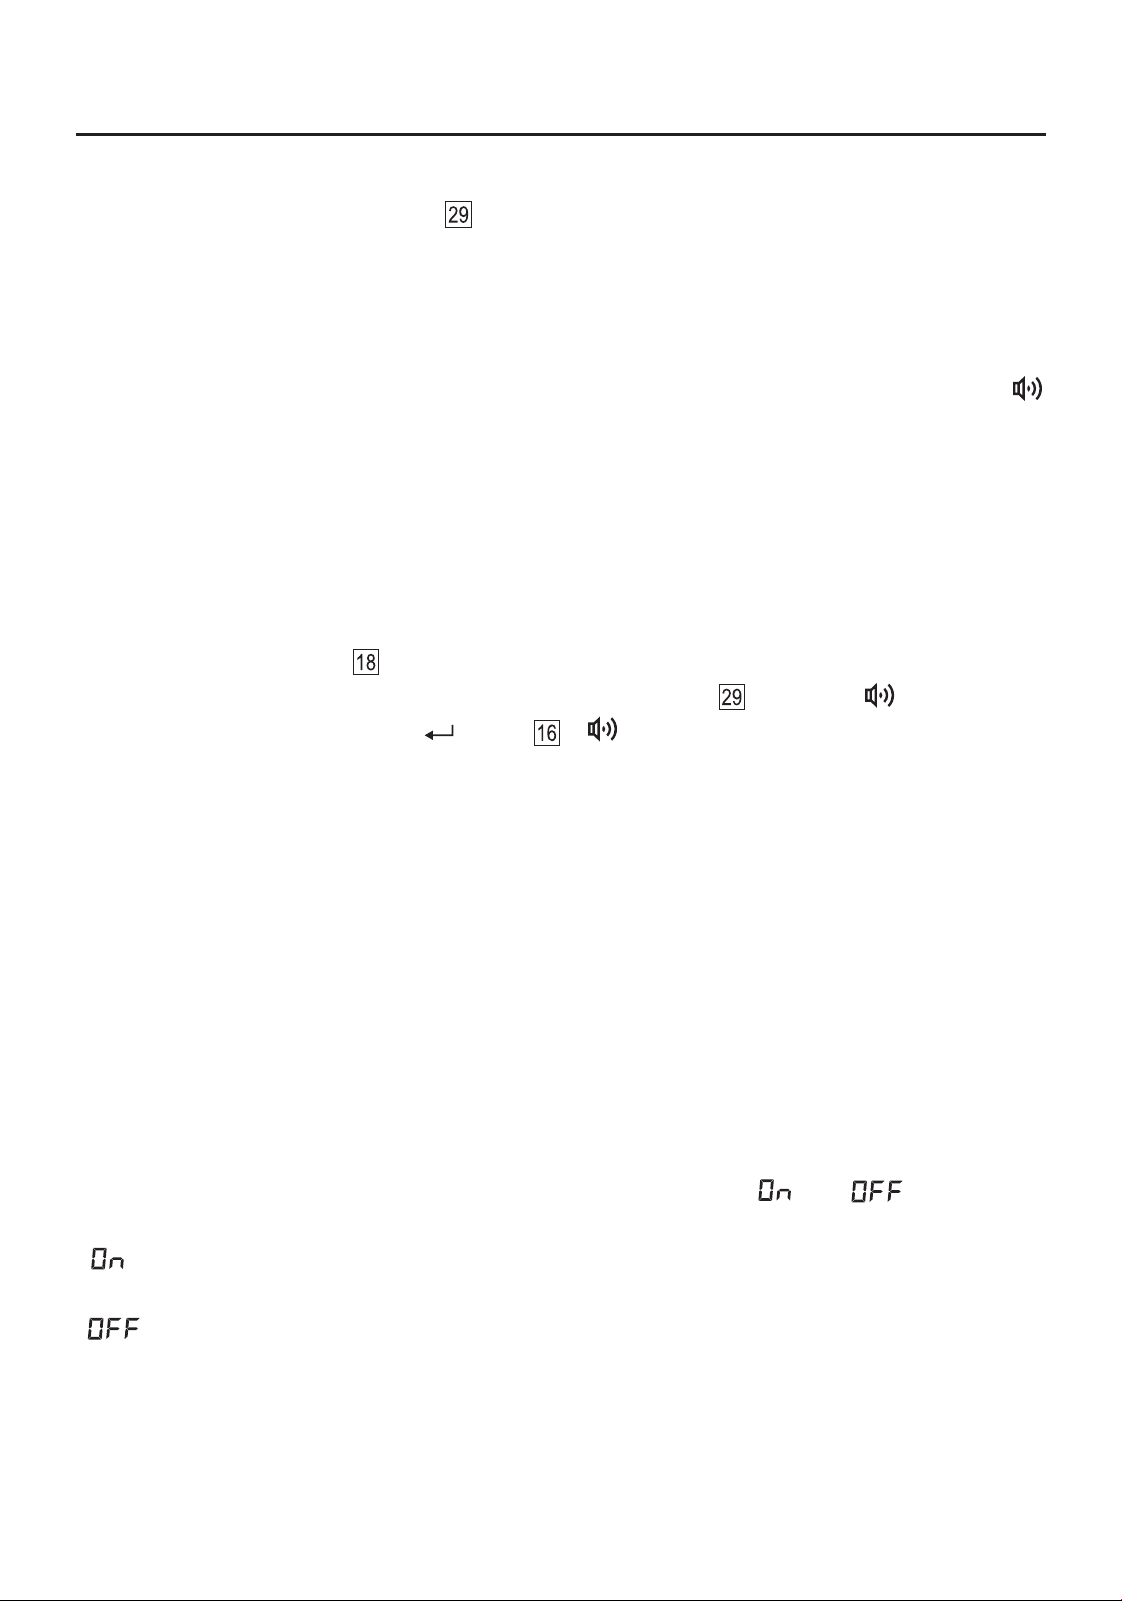
TREBLE & BASS CONTROL
Rotate the [ TREBLE ] and [ BASS ] knobs to adjust
the treble (higher frequencies) and bass (lower frequencies)
of the speaker sound.
ADD SECONDS TO THE CLOCK
With the device turned off, press and hold the [ 8 ] button to add seconds to the clock. Press and hold the
button again to hide the seconds from the clock.
ACTIVATING / DEACTIVATING THE ALARM
There are two independently programmable alarms to turn on the device at a specific time. Quick press
[ TIMER A ] or [ TIMER B ] to activate the alarm. The alarm “ ” icon is shown on the display to indicate
that the device will turn on at the preset time. Quick press again to deactivate the alarm setting.
FM DE-EMPHASIS TIME CONSTANT
While receiving FM broadcasts, long press [ 4 ] to adjust the de-emphasis setting to 50μs or 75μs.
“ ”: For Europe, Australia, Japan (and most other locations).
“ ”: For the Americas and South Korea.
1) Quick press the [ SLEEP ] button .
2) Rotate the main tuning knob to select a power-off timer of 1 – 120 minutes.
3) Quick press [ ] to confirm, or wait for 2 seconds for the system to auto confirm.
SETTING THE SLEEP TIMER
The sleep timer enables the device to play any length of time from 1 – 120 minutes and then turn off.
When the display shows “ ”, this indicates that the sleep timer has been activated.
When the preset time limit is reached, the radio automatically turns off.
27
SETTING A RADIO FREQUENCY FOR THE ALARM
1) Turn on the device, select the frequency you want to use as the alarm and adjust the volume to an
appropriate level.
2) Quick press the [ M ] button , the memory preset location will flash.
3) While still flashing, quick press the [ TIMER A ] or [ TIMER B ] button , the alarm “ ” icon will flash.
4) While still flashing, quick press the [ ] button , “ ” stops flashing and the setting is completed.
Tips:
Once the alarm time is reached, the radio turns on and stays on for as long as the alarm duration (01 – ●
60 minutes) was set. To turn off the device during the alarm playtime, quick press the red [ POWER ]
button twice.
If you wish to change the radio frequency during the alarm playtime, quick press the red [ POWER ] ●
button. This will deactivate the alarm after which you can adjust the frequency.
SETTING THE ALARM TIME
1) Press and hold the [ TIMER A ] button , the alarm time in the upper right corner of the display will start
to flash.
2) While still flashing, use the numeric keys to enter the time (4 digits in total). For example, 8:39 is entered
as [ 0 ], [ 8 ], [ 3 ], [ 9 ].
3) Now rotate the main tuning knob to set the duration after which the device should turn off (01 - 60 minutes).
4) Quick press [ TIMER A ] to confirm the setting, or wait for 2 seconds until it auto confirms. The alarm “ ”
icon for Timer A is shown on the display.
For setting [ TIMER B ] you can follow the same steps.
ALARM AUTO CLEARANCE
If the device is not used (turning knobs, pressing buttons) for three days, the alarm settings are automatically
cleared. To keep the alarm settings, you can turn off the automatic clearance feature.
1) Turn off the device.
2) Press and hold the [ VF/VM ] (SCAN) button for about 10 seconds, until “ ” or “ ” appears on
the display.
“ ” : The alarm auto clearance feature is turned on. Alarm settings are cleared after 3 days of not using
the device.
“ ” : The alarm auto clearance feature is turned off. Alarm settings are retained after 3 days of not
using the device.
28
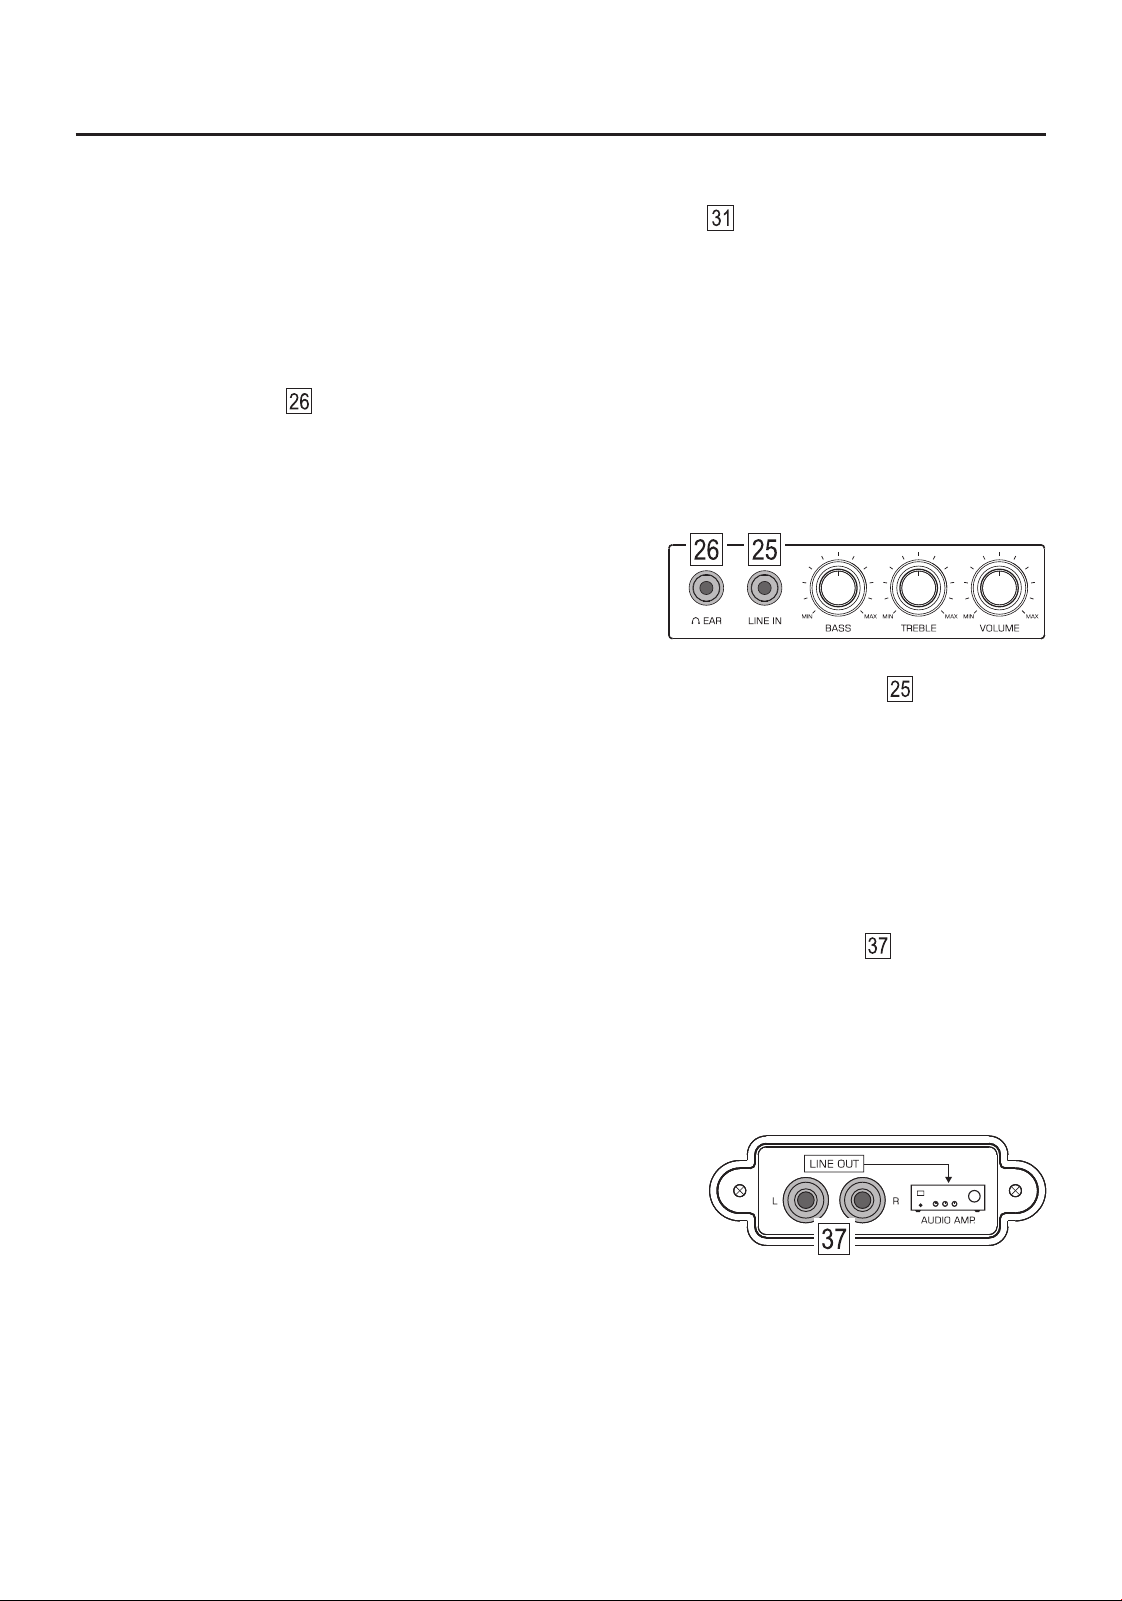
AUDIO INPUT (LINE IN)
The audio input socket is located on the lower left front of the radio and is labeled LINE IN . You can use
this device as an active speaker for an external audio source. Use a stereo audio cable with a Φ3.5 mm
(1/8 inch) plug to connect the [ LINE IN ] socket to the audio output socket of the source. Adjust the volume,
treble and bass with the knobs of this device. The built-in speaker output is mono and the headphone output
is stereo.
ALARM SNOOZE FUNCTION
When the alarm sounds, quick press the [ DISPLAY/SNOOZE ] button to temporarily turn off the alarm.
The alarm will go off again after 5 minutes. To disable this feature while still snoozing, quick press the red
[ POWER ] button.
Warning: Lower the volume before plugging in your headphones. To avoid hearing damage, do not use
headphones for long periods of time or at high volumes.
USING HEADPHONES
The headphone socket is located on the lower left front of the radio and is labeled EAR. Plug in
headphones (32-300Ω) using a Φ3.5 mm (1/8 inch) stereo plug.
AUDIO OUTPUT (LINE OUT)
The audio output sockets are located at the rear of the radio and are labeled LINE OUT . You can use this
device as a radio tuner for your home audio system.
Note: The treble and bass controls on this device are disabled while
feeding audio through the [ LINE OUT ] socket.
1) Use a stereo audio cable to connect the [ LINE OUT ] L (left channel) and R (right channel) sockets of this
device to the stereo audio input of the power amplifier.
2) ower on this device the v level power .L the volume to a minimum ( olume is controlled by the amplifier)
29
DISPLAY OPTIONS
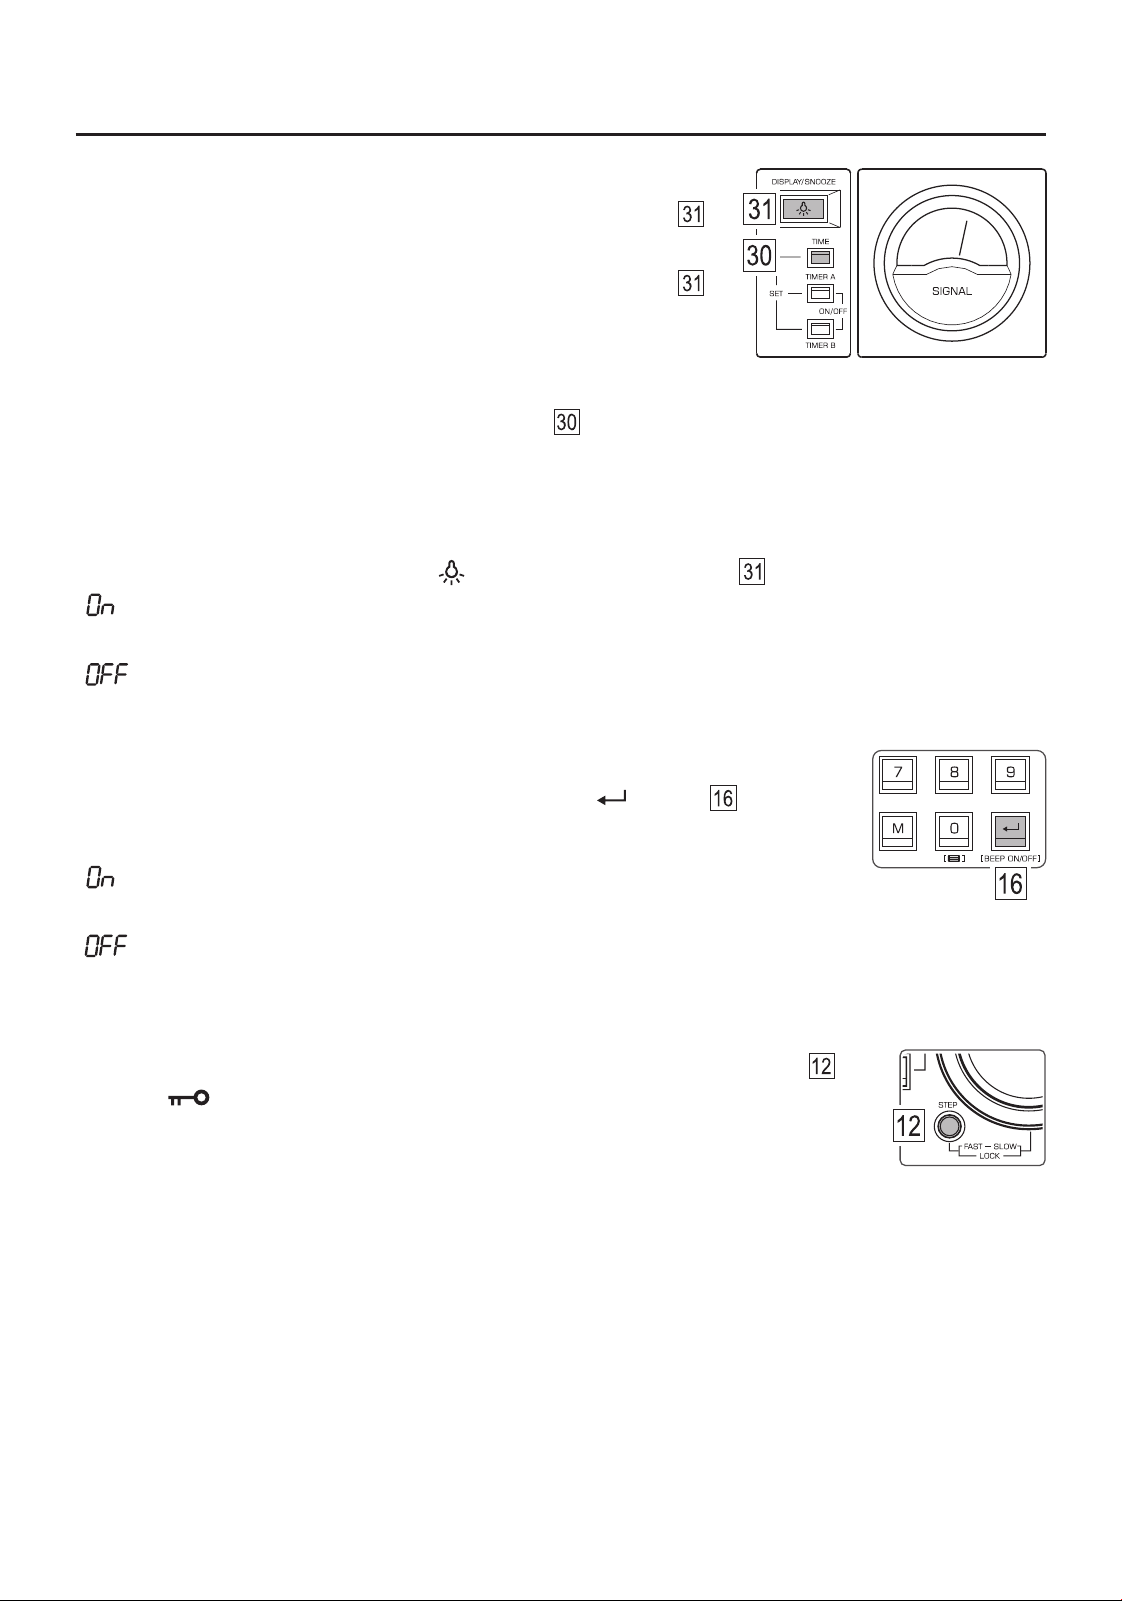
● With the device off, quick press the [ DISPLAY/SNOOZE ] button
repeatedly to view the alarm time of “Timer A” and “Timer B”.
With the device on, quick press the [ DISPLAY/SNOOZE ] button ●
repeatedly to view the signal strength/signal-to-noise ratio, the memory
location (preset) of the current frequency (in VM mode only, but not
in AP), the alarm time of Timer A and Timer B, and the current clock time.
With the device on, quick press the [ TIME ] button , the display will show the current time. Quick press ●
again to return to frequency display.
DISPLAY BACKLIGHT
With the device on, press and hold the [ ] (DISPLAY/SNOOZE) button to set your preference:
“ ”: Backlight is set to always-on. When turning the device off, the backlight turns off as well. When
pressing a button or rotating a tuning knob the backlight turns back on and is set to always-on.
“ ”: Backlight turns on when a button or tuning knob is operated and turns off after 5 seconds.
ACTIVATE / DEACTIVATE “BEEP” SOUND
With the device off, press and hold the [ BEEP ON/OFF ] ( ) button to activate
or deactivate the confirmation beep sound:
“ ” : Beep sound is heard when using the keypad to enter a frequency, alarm or
clock time and for (most) function buttons.
“ ” : Beep sound is turned off.
KEYLOCK
To activate the keylock, press and hold the [ STEP FAST-SLOW ] (LOCK) button .
The lock “ ” icon is displayed and the buttons and tuning knobs are disabled.
Press and hold the button again to unlock.
30
Troubleshooting
ISSUE
POSSIBLE CAUSE / SOLUTION
Unable to charge the
18650 batteries, or the
batteries drain quickly
.
T
he d
i
s
p
lay do
e
s no
t t
ur
n
o
n a
f
t
e
r in
s
t
a
ll
ing th
e
b
a
t
t
eri
e
s.
Radio auto turns of
f
while listening.
When using A
TS or
AP
ATS,
some broadcast signals are
skipped or some stored
frequencies have only noise.
Poor MW (AM) auto tune
and storage results while
using in North or South
America.
Only few FM stations can
be received.
Audio quality is not good
when listening to L
W
,
MW (AM) and SW
.
When the alarm goes off
the radio broadcast is
only noise.
Bat
t
e
ry s
w
i
t
c
h is n
o
t in t
he c
orr
e
ct p
osit
i
o
n
, th
e
re i
s an is
sue wi
t
h the ch
a
rg
e
r, on
e or bot
h b
at
t
e
ri
es
are n
o
t in g
o
o
d c
o
ndit
ion.
● P
us
h th
e b
att
er
y sw
i
t
c
h i
n t
h
e c
o
r
rec
t p
o
si
ti
on
.
● Chec
k t
he c
ha
rg
e
r a
nd c
ha
rg
ing c
ab
le.
● R
ep
l
ac
e t
h
e b
a
tt
er
ies
.
B
a
t
t
e
ri
es ha
ve n
o p
o
w
e
r
, a
r
e i
n
s
t
a
l
le
d in
co
rr
ect
ly, o
r the b
at
t
e
r
y s
w
it
c
h i
s no
t in t
he co
rr
e
c
t po
sit
i
o
n
.
● R
e
p
l
a
ce
, ch
ar
g
e o
r re
i
n
s
t
a
ll t
h
e ba
tte
r
ie
s.
● P
u
s
h t
he b
a
t
t
ery s
w
itch (lo
ca
t
ed i
n t
he 1
8
6
50 ba
tte
r
ies co
m
pa
r
tm
e
n
t) in t
h
e c
orr
e
c
t p
ositio
n.
B
att
e
r
ie
s h
a
v
e n
o p
ow
er o
r t
h
e s
le
e
p t
im
e
r wa
s a
c
t
i
v
a
te
d
.
● R
epl
a
ce o
r ch
a
rge t
h
e ba
tt
e
r
ie
s.
●
Tu
r
n the ra
d
i
o b
a
c
k on w
it
h
ou
t s
e
tt
ing th
e s
l
e
e
p t
im
e
r
.
T
he r
a
d
io s
ig
na
l i
s t
o
o w
ea
k, t
h
e
r
e i
s st
ro
n
g i
n
t
e
rf
e
re
n
ce
, or M
W (AM
) tu
n
i
ng st
e
ps ar
e not se
t
a
c
cu
r
at
e
l
y
.
● Se
a
r
ch an
d s
t
o
r
e st
a
tio
ns m
anu
all
y
.
● A
d
j
u
s
t t
h
e l
e
n
g
t
h a
n
d d
ire
c
t
i
o
n o
f t
h
e ant
e
n
na or c
h
an
g
e t
o a d
i
f
f
e
re
n
t l
o
c
a
t
i
o
n a
n
d t
r
y a
g
a
in
.
●
T
r
y ad
j
u
stin
g t
h
e s
igna
l c
a
p
tur
e s
e
n
si
t
i
vit
y o
f ATS a
n
d
A
P (see p
age
s 18 a
nd 22
)
.
MW (
AM
) s
ta
t
i
on
s ar
e sp
a
c
e
d a
t 1
0 k
H
z in th
e A
m
e
r
i
cas, th
e d
e
v
i
ce ma
y be s
et t
o 9 k
Hz
tun
i
ng s
te
p
s
.
●
T
u
rn o
f
f t
he d
ev
i
c
e
, th
en pre
s
s a
n
d h
ol
d th
e [ 3 ] but
t
o
n t
o ch
an
g
e th
e MW t
u
nin
g st
e
p to 1
0 kH
z
(
se
e al
s
o p
a
g
e 8
)
.
FM fr
e
q
u
en
c
y r
a
n
g
e may no
t b
e se
t c
o
r
re
ct
ly fo
r yo
u
r c
o
un
t
ry
.
● F
i
n
d in
fo
rm
at
i
on a
b
o
u
t th
e FM f
re
q
u
e
n
c
y c
o
vera
ge in yo
ur c
oun
try
. T
u
rn o
f
f t
h
e r
a
d
io
, pr
ess an
d
h
o
ld t
h
e [ 1 ] b
u
tt
on t
o se
l
e
ct a s
u
i
t
a
b
le r
a
nge
.
T
he
AM b
a
nd
w
idt
h i
s s
e
t t
o a to
o n
a
r
ro
w ban
d
, or p
e
rh
a
ps S
i
n
g
l
e S
ideb
a
n
d (
SS
B) i
s en
ab
l
ed
.
● P
re
ss the [ B
W ] b
u
tto
n r
e
p
e
a
t
e
dly to ch
a
ng
e t
o a wi
d
er ba
n
d
w
id
t
h
.
● E
x
i
t S
S
B u
si
n
g t
h
e co
r
re
s
p
o
nd
in
g s
i
d
eb
a
n
d (U
SB
/L
SB
) b
u
t
ton
s
.
A
l
a
rm p
r
e
se
t r
ad
i
o f
re
q
ue
n
cy w
a
s n
o
t p
ro
p
e
r
ly s
e
t, or t
h
ere a
r
e n
o br
oa
dcast
s a
t t
hat t
im
e.
●
A
ssu
re t
ha
t re
ceiv
i
ng a b
ro
a
dca
st is po
ss
i
bl
e at t
h
e a
l
a
r
m tim
e an
d th
e l
o
ca
t
i
o
n w
here t
h
e d
e
vice
i
s pl
a
ced.
Wh
e
n t
ur
ne
d o
n
, t
he b
u
t
t
o
ns
a
nd kn
o
bs do n
o
t r
e
spon
d
.
The d
i
s
p
l
a
y wo
r
k
s
, b
u
t t
h
e
de
v
i
ce do
e
s n
ot po
we
r o
n
.
The ke
yl
o
ck i
s ac
t
i
vat
e
d
, di
s
ab
l
i
n
g a
ll b
u
t
t
o
n
s an
d tu
n
in
g kn
o
b
s.
● Pre
s
s t
he [ S
TE
P
F
A
ST
-
SL
O
W ] (
L
OC
K
) bu
t
t
on un
til the “ ” di
sapp
ea
r
s f
ro
m th
e d
isp
l
a
y
.
Th
e k
ey
l
o
ck is activa
t
ed
, d
i
sabl
in
g all bu
tt
on
s a
n
d t
un
i
n
g k
nob
s
.
● P
r
es
s th
e [ S
TEP
FAS
T-S
LOW ] (L
O
C
K) bu
tt
o
n u
n
til t
h
e “ ” dis
a
pp
e
a
rs fr
o
m t
h
e d
i
s
p
lay.
In
AP
mode, the tuning
knob does not respond.
Th
e
re a
r
e no s
t
o
r
ed f
re
q
ue
n
ci
e
s for the c
urr
e
n
t t
i
m
e p
e
r
i
o
d.
● P
r
ess an
d h
o
ld t
h
e [ P
a
g
e ] (
A
P
) bu
t
t
o
n t
o p
e
r
fo
r
m AP
A
T
S to sca
n and st
o
re f
re
qu
e
ncie
s, o
r
q
u
ic
k pr
e
ss th
e [ VF/
V
M ] (SC
AN
) b
u
t
t
o
n to e
xit t
h
e
A
P mo
de
.

S-2200x Specifications
9150 in total
50 - 522kHz (MW 9kHz setting; see also page 8)
100 - 519kHz (MW 10kHz setting; see also page 8)
522 - 1620kHz (MW 9kHz setting; see also page 8)
520 - 1710kHz (MW 10kHz setting; see also page 8)
1621 - 29999kHz (MW 9kHz setting; see also page 8)
1711 - 29999kHz (MW 10kHz setting; see also page 8)
64 - 108MHz
76 - 108MHz
87 - 108MHz
87.5 - 108MHz
118 - 137MHz
< 3mV/m
< 1mV/m
< 20μV
< 1μV
< 3μV
< 5μV
> 40dB
> 40dB
> 40dB
> 65dB
> 60dB
31
Station Memory:
Frequency Range:
LW:
MW (AM):
SW:
FM:
AIR:
Sensitivity:
LW (S/N=26dB)
MW (S/N=26d B )
SW (S/N=26dB)
SSB (S/N=10dB)
FM (S/N=30dB)
AIR (S/N=26d B )
Selectivity:
LW
MW
SW
FM
AIR

S/N Ratio:
LW
MW
SW
FM
AIR
SYNC Lock Range:
IF Frequency:
AM:
FM:
FM Stereo Crosstalk:
(headphones)
Max. Output Power:
Shutdown Current:
Speaker:
Headphone Input:
Power Supply:
Charging:
Dimensions:
(excl. antenna and handle)
Weight (excl. battery):
> 40dB
> 40dB
> 45dB
> 60dB
> 60dB
+/- 1kHz
1st IF: 55.845MHz, 2nd IF: 10.7MHz, 3rd IF (DSP): 45kHz
128kHz
35dB
1500mW
< 100μA
Φ4'', 8Ω, 2W
Φ3.5mm (1/8 inch), 32Ω - 300Ω
6V (4 x D-type (R20/UM1) 1.5V batteries) or
8.4V (2 x 4.2V (3.7V nominal) 18650 Li-ion batteries)
DC 5V 2A, USB type-C socket
Approx. 372 (W) x 183 (H) x 153 (D) mm
Approx. 2.43kg
S-2200x Specifications (continued)
32
Memorandum


Address: Unit 11, 13/F, Block A, Hoi Luen Ind. Ctr., 55 Hoi Yuen Road,
Kwun Tong, Kowloon, Hong Kong.
E-mail: [email protected]
Website: www.tecsun.com.cn www.tecsun-audio.com
TECSUN ELECTRONIC IND. LTD.
V030624