1
WARNINGS
This product is intended for household use.
WARNING and CAUTION indicators are used throughout this manual. The information is important for safe and
ecient installation and operation of the appliance.
CAUTION: If the instructions are not observed, a situation that may result in product damage, serious injury,
or death.
Proper installation of the appliance is of the utmost importance. The product should be installed by a qualied
professional service technician.
Before installing the product, read this installation manual in full. The manual contains detailed instructions and
safety requirements to be observed during installation. If you have any questions about installation, contact
your dealer.
Important: When designing or manufacturing the appliance, safety matters and functions are accorded the
utmost importance. This appliance is designed and certied according to the UL 60335-2-24 safety
standard. The company does not bear any responsibility or liability for products that are modied,
installed with parts not supplied or approved, or used incorrectly. R.H. Peterson reserves the right
to change product specications and design at any time without prior notice.
Important: READ THESE INSTRUCTIONS CAREFULLY BEFORE STARTING INSTALLATION OR USE.
KEEP THIS MANUAL IN A SAFE PLACE AFTER READING IT.
Robert H. Peterson Co. • 14724 East Proctor Avenue • City of Industry, CA 91746
INSTALLATION INSTRUCTIONS
AND OWNER’S MANUAL
INSTALLER: Leave these instructions with consumer.
CONSUMER: Retain for future reference.
Certied to:
UL 60335-1
ANSI/UL 60335-2-24
Safety of Household and Similar Appliances
CAN/CSA C22.2 No. 60335-1
Safety of Household and Similar Electrical Appliances
CAN/CSA C22.2 No. 60335-2-24
REV 0 - A - 2603260835
L-C2-821
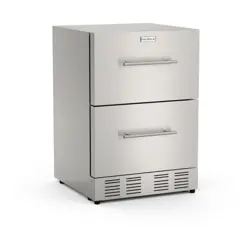
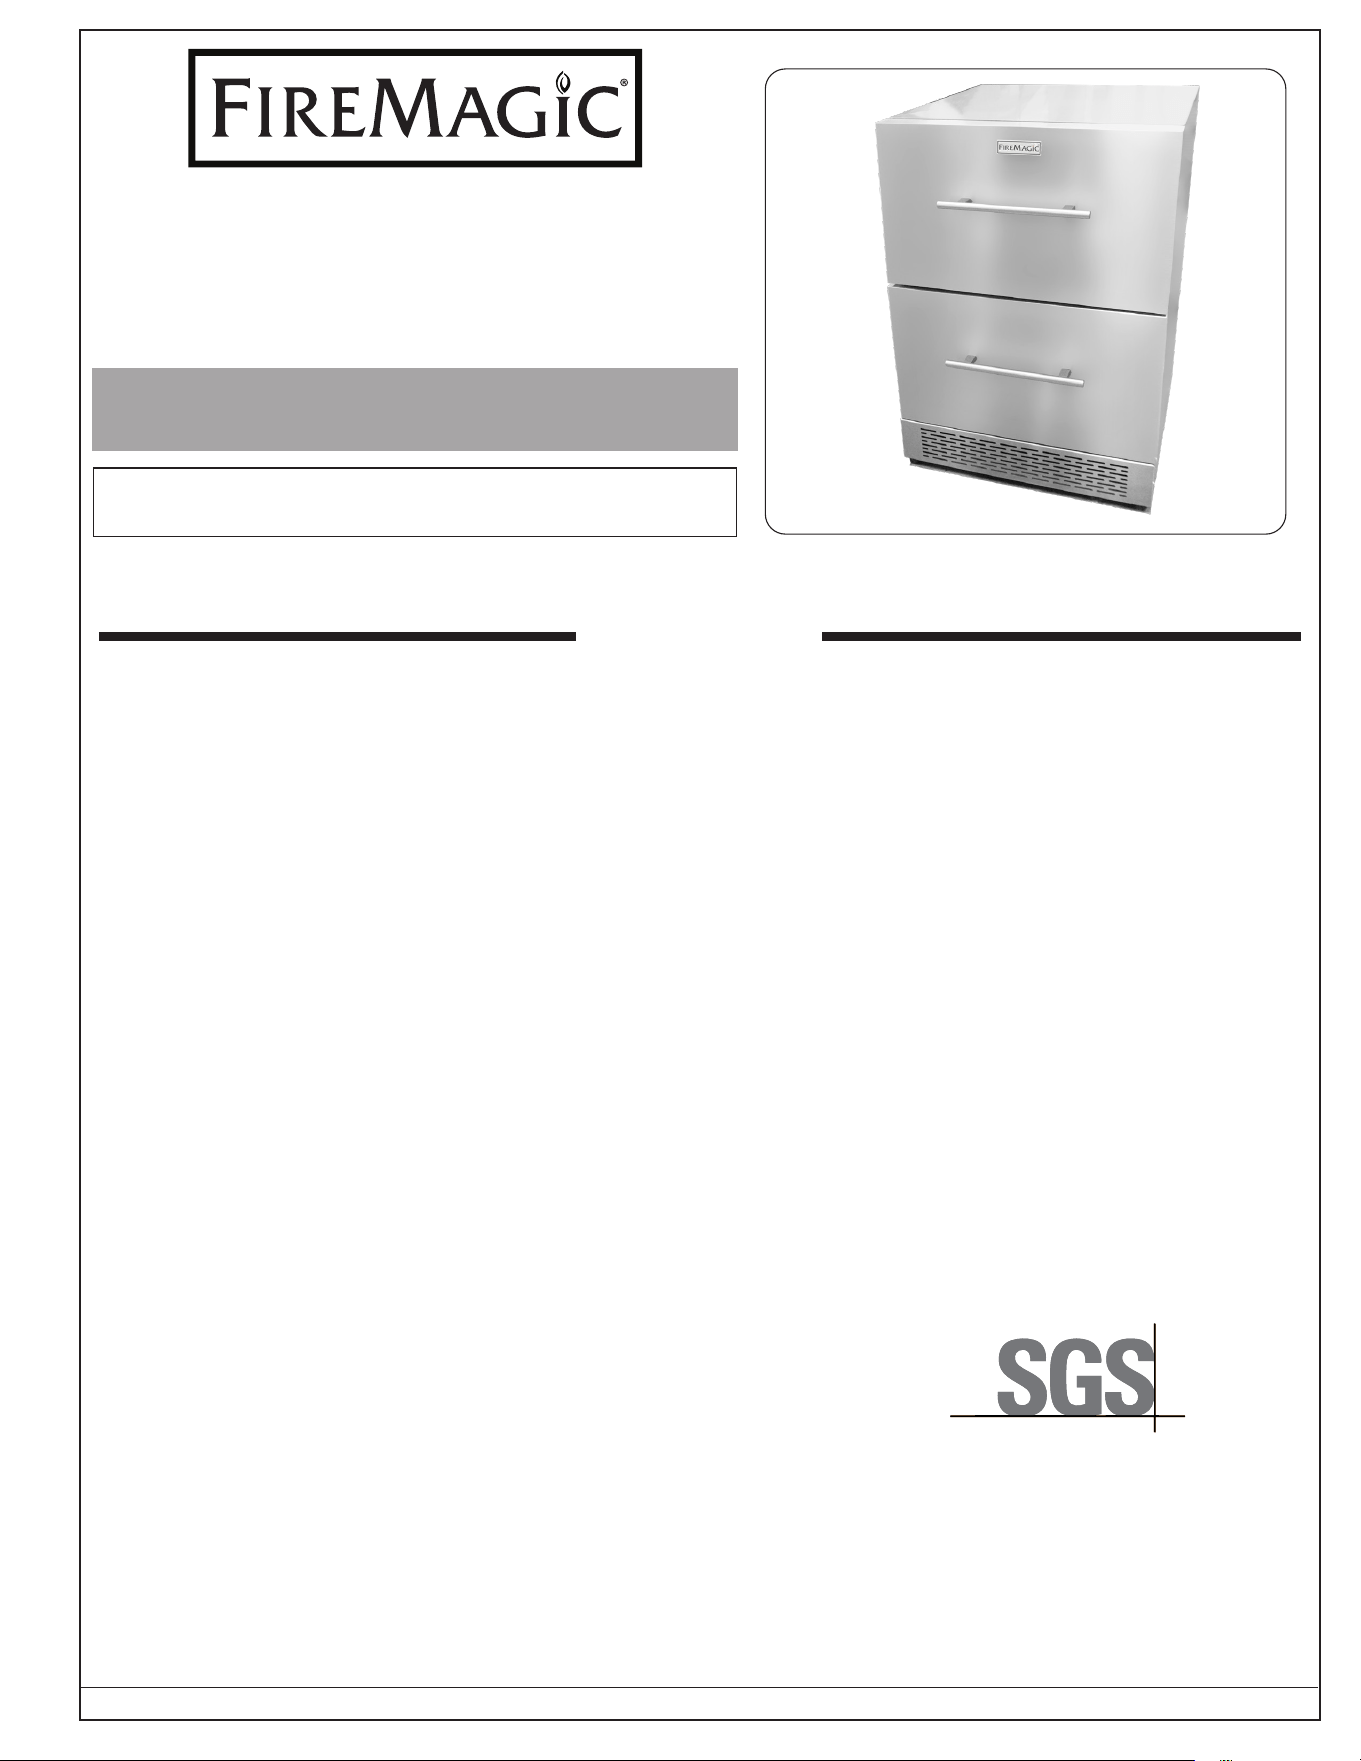
Cold Storage Double
Drawer Refrigerator
Model # 24-REF-DD
GETTING STARTED
2
CONTENTS
REV 0 - A - 2603260835
L-C2-821
GETTING STARTED
IMPORTANT INFORMATION ������������������������������������������������������������������������������������������������������������������������ 3
UNPACKING ����������������������������������������������������������������������������������������������������������������������������������������������� 4
VENTILATION/ CLEARANCE REQUIREMENTS ����������������������������������������������������������������������������������������������� 4
MAINTENANCE AND CLEANING������������������������������������������������������������������������������������������������������������������� 4
ELECTRICAL SAFETY INFORMATION ������������������������������������������������������������������������������������������������������� 5
SPECIFICATIONS AND DIMENSIONS ��������������������������������������������������������������������������������������������������������� 5
DOUBLE DRAWER FRIDGE REPLACEMENT PARTS LIST ����������������������������������������������������������������������� 7
INSTALLATION
INSTALLATION ���������������������������������������������������������������������������������������������������������������������������������������������� 8
INSTALL DOUBLE DRAWER REFRIGERATOR ������������������������������������������������������������������������������������������������� 8
CONNECT TO POWER ��������������������������������������������������������������������������������������������������������������������������������� 8
USE, CARE, & SERVICE
OPERATION ���������������������������������������������������������������������������������������������������������������������������������������������������� 9
OPERATION SAFETY INFORMATION������������������������������������������������������������������������������������������������������������� 9
USING THE DOUBLE DRAWER REFRIGERATOR �������������������������������������������������������������������������������������������� 9
ROUTINE MAINTENANCE AND CLEANING �������������������������������������������������������������������������������������������� 10
EXTERIOR ������������������������������������������������������������������������������������������������������������������������������������������������ 10
INTERIOR ������������������������������������������������������������������������������������������������������������������������������������������������ 10
SERVICE OF DOUBLE DRAWER FRIDGE ����������������������������������������������������������������������������������������������������� 11
CONDENSER �������������������������������������������������������������������������������������������������������������������������������������������� 11
APPLIANCE CARE ������������������������������������������������������������������������������������������������������������������������������������� 11
OUTDOOR PRODUCT LONG-TERM STORAGE / WINTERIZATION: ������������������������������������������������������������� 12
START-UP AFTER LONG-TERM STORAGE: ������������������������������������������������������������������������������������������������ 12
TROUBLESHOOTING ���������������������������������������������������������������������������������������������������������������������������������� 13
APPLIANCE COMPRESSOR ������������������������������������������������������������������������������������������������������������������������ 13
R-600A HANDLING �������������������������������������������������������������������������������������������������������������������������������������� 14
REQUIREMENT FOR SERVICE AND INSTALLATION OF APPLIANCES USING FLAMMABLE REFRIGERANTS ������� 14
R-600a SPECIFICATION ����������������������������������������������������������������������������������������������������������������������������� 14
LEAK DETECTION ������������������������������������������������������������������������������������������������������������������������������������ 15
NO IGNITION SOURCES ���������������������������������������������������������������������������������������������������������������������������� 15
VENTILATED AREA ����������������������������������������������������������������������������������������������������������������������������������� 15
CHECKING TO THE REFRIGERATING EQUIPMENT ������������������������������������������������������������������������������������� 15
CHECKING TO ELECTRICAL DEVICES �������������������������������������������������������������������������������������������������������� 15
REFRIGERANT CHARGING ������������������������������������������������������������������������������������������������������������������������ 16
REFRIGERANT RECOVERY ������������������������������������������������������������������������������������������������������������������������ 16
REFRIGERANT SAFETY ����������������������������������������������������������������������������������������������������������������������������� 17
SYSTEM REPAIR ���������������������������������������������������������������������������������������������������������������������������������������� 17
DECOMMISSIONING / DISPOSAL ��������������������������������������������������������������������������������������������������������������� 17
COMPRESSOR REPAIR ������������������������������������������������������������������������������������������������������������������������������ 17
WARRANTY ������������������������������������������������������������������������������������������������������������������������������������������������� 18
3
IMPORTANT INFORMATION
WARNING: This appliance must be safely stored and disposed of. The refrigerant and insulation blowing
gas are ammable. When disposing of the appliance, do so only at an authorized waste
disposal centre. Do not expose to ame. See the DECOMMISSING / DISPOSAL section
and the IMPORTANT box below.
WARNING: Do not use mechanical devices of other means to accelerate the defrosting process, other
than those recommended by the manufacturer.
WARNING: Service must be done by factory authorized service personnel. Any parts shall be replaced
with like components. Failure to comply could increase the risk of possible ignition due to
incorrect parts or improper service.
WARNING: This symbol is a warning and indicates the refrigerant and insulation blowing gas are
ammable. Risk of re / ammable materials.
WARNING: This appliance uses ammable gas cyclopentane as a blowing agent for its insulation.
Please check and obey all federal, state, and local regulations regarding the environmentally
safe disposal of this product.
WARNING: Refrigerant and foaming material is ammable. Take extra caution with all maintenance,
installation, handling and processing this product. Contact a specialized department for
wasted products, do not discard freely. See section R-600A HANDLING.
WARNING: Keep clear of obstruction to all ventilation openings in the appliance enclosure or in the
structure for building-in.
WARNING: Do not damage the refrigerating circuit.
WARNING: Do not store explosive substances such as aerosol cans with ammable propellant in this
appliance.
WARNING: This appliance is not intended for use by persons (including children) with reduced physical,
sensory or mental capabilities, or lack of experience and knowledge, unless they have been
given supervision or instruction concerning use of the appliance by a person responsible
for their safety.
WARNING: Children should be supervised to ensure they do not play with or climb on the appliance.
WARNING: Do not hang from its drawers, sit or stand on the appliance. They could damage the cooler.
IMPORTANT
This product cannot be treated as household waste. Instead, it should be taken to the appropriate
waste collection point for the recycling of electrical and electronic equipment. This will help prevent
potential negative consequences for the environment and human health, which could otherwise be
cause by inappropriate waste handling.
Risk of child entrapment and suocation. Before disposal of your old appliance, remove the double
drawers in place so children may not easily climb inside. Junked or abandoned appliance is still
dangerous even if just "sitting in the garage for a few days".
Contact your local council, household waster disposal service, or the shop where you purchased the
product. Do not discard freely. See DECOMMISSING / DISPOSAL section for more details.
REV 0 - A - 2603260835
L-C2-821
4
For safety, the product should be installed and used with caution in accordance with this manual. Incorrect installation
or careless use of the product may cause damage or injury to the environment, humans, animals, and/or materials
and property. Only use your
double drawer refrigerator for intended purposes, as described in this guide. The
manufacturer does not bear any responsibility for any damage or injury.
UNPACKING
CAUTION: If the appliance was shipped, handled, or stored in other than an upright position for any period of time,
allow the appliance to sit upright for a period of at least 24 hours before plugging in. This will assure oil
returns to the compressor. Plugging the appliance in immediately may cause damage to internal parts.
Important: When moving the product using a hand truck or dolly, place the dolly at the side of the product and
shut or x the door tightly to avoid possible opening during movement. Do not tilt the appliance at an
angle of more than 45°.
Note: Protect the bottom of the appliance with a suitable material to avoid possible damage when moving product.
Note: Keep your carton and packaging until your appliance has been thoroughly inspected and found to be in
good condition. If there is damage, the packaging will be needed as proof of damage, the packaging will be
needed as proof of damage in transit. Afterwards please dispose of all items responsibly.
After removing the packing materials, check the appearance of the appliance for possible defects or irregularities.
If the product shows any irregularity in its appearance, contact the dealer to inquire about it.
All the packing materials (strings, box, styrofoam, and wood, etc.) should not be left within reach of children and
should be disposed of responsibly.
Open the
double drawers and check to see that the inside is complete (drawer dividers, handle, display panel, etc.)
Use a clean soft cloth with soapy water solution to clean the interior, rinse carefully. Clean often during use. See
ROUTINE MAINTENANCE AND CLEANING section.
VENTILATION/ CLEARANCE REQUIREMENTS
WARNING: Ventilation openings in the appliance enclosure or in the built-in structure must be kept clear of
obstructions.
All ventilation requirements must be met to ensure proper operation of the appliance. If installing under a countertop,
ensure the clearances are met at all times.
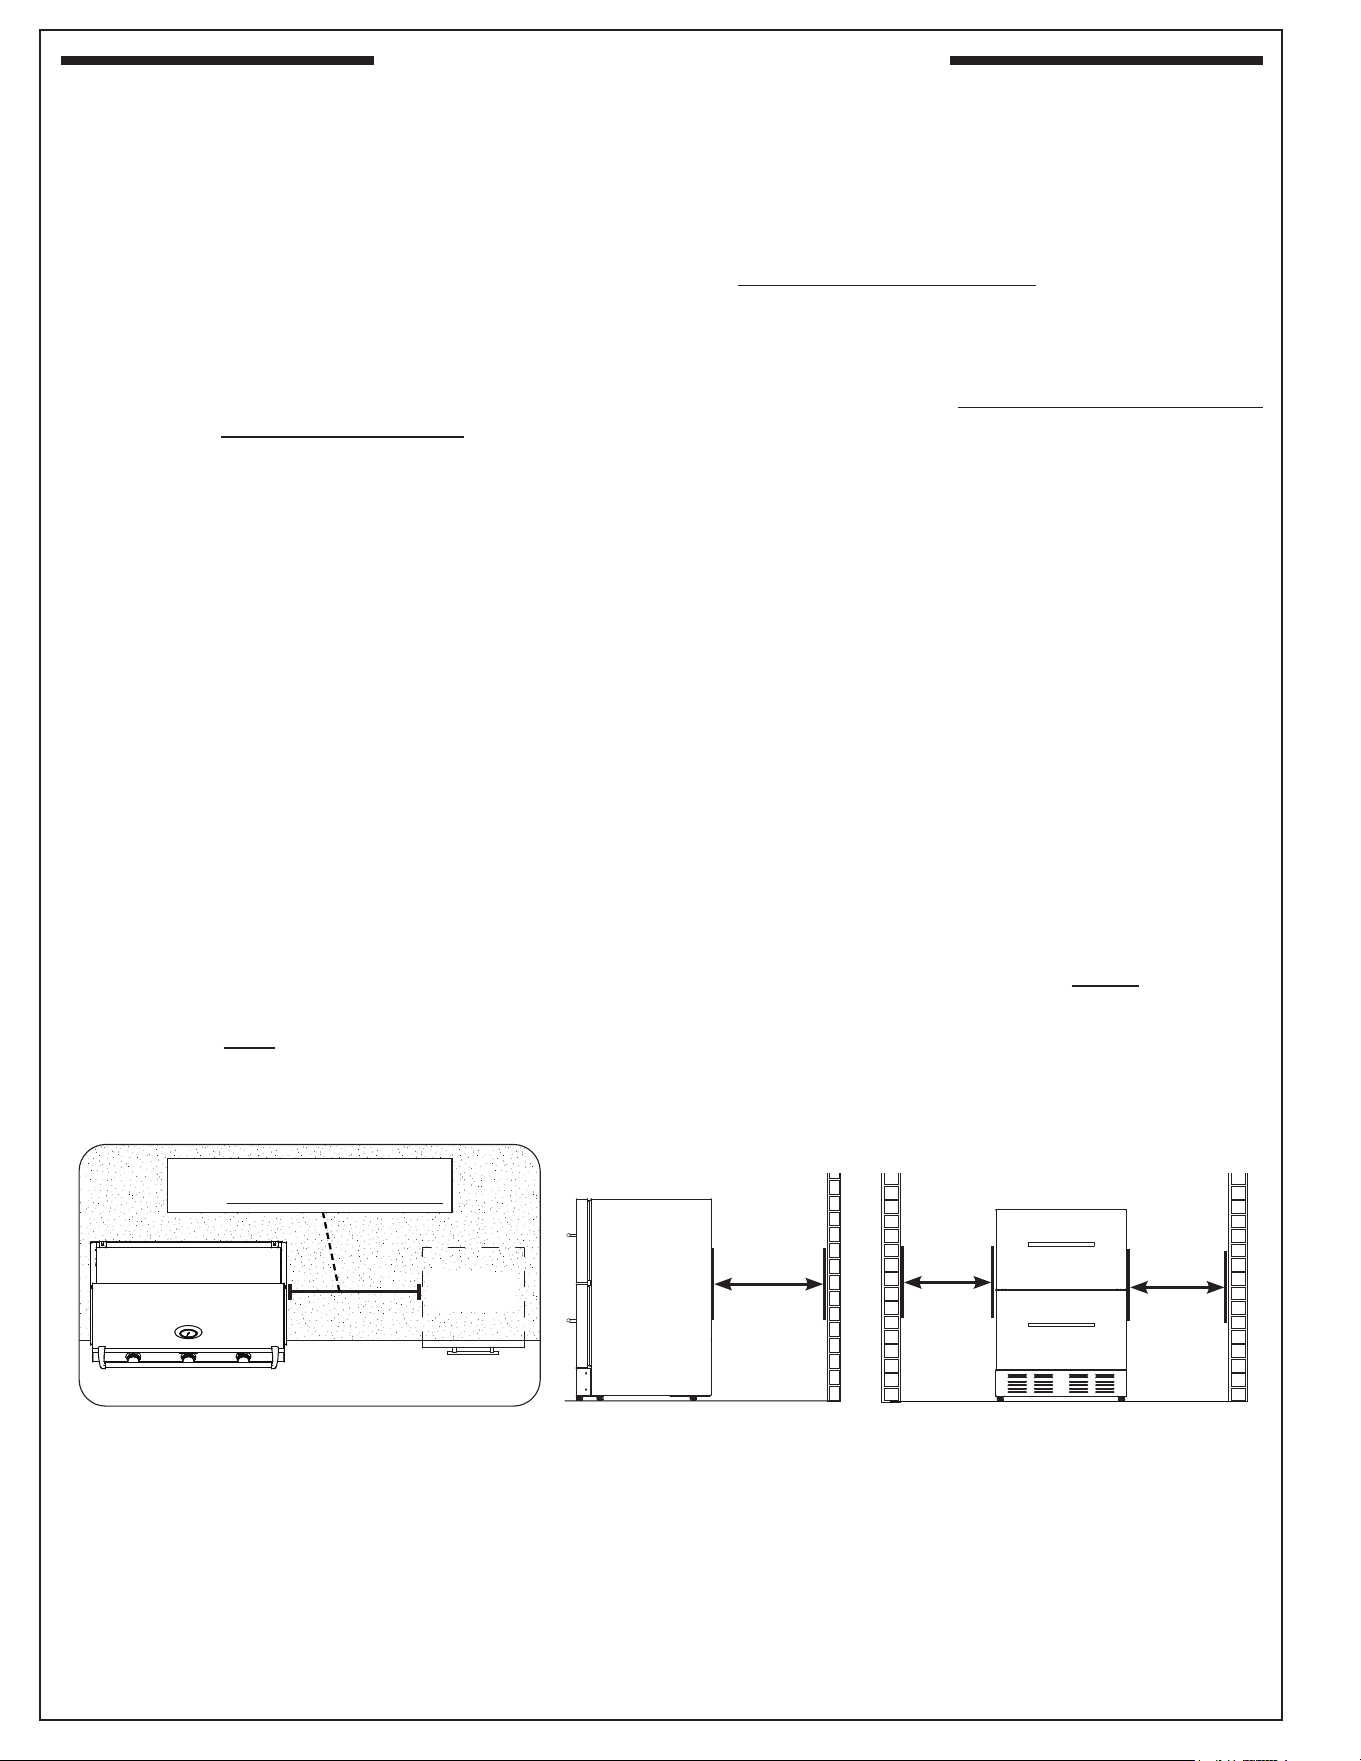
For custom enclosures, all ventilation requirements above and the clearance information below MUST be followed
(see Fig. 4-1 and Fig. 4-2):
• The unit must have a minimum clearance of 14" away from any heat source.
• Minimum of 3" inside the enclosure between the rear of the appliance to the rear wall.
• Minimum of 2" inside the enclosure between the left or right side of the appliance to wall.
IMPORTANT INFORMATION (cont.)
MAINTENANCE AND CLEANING
Proper operation and long-lasting performance of the appliance requires routine maintenance and cleaning, see the
ROUTINE MAINTENANCE AND CLEANING section for details.
Important: The unit must remain removable for servicing. Do not install any material at the front, upper or
lower end of the product which may prevent removal of the unit.
REV 0 - A - 2603260835
L-C2-821
3"
Rear clearance
to wall
Fig. 4-2 Cut out wall clearances
Side clearances
to walls
2"2"
Fig. 4-1 Clearance to heat source appliances
KEEP MINIMUM DISTANCE OF 14"
FROM HEAT SOURCE APPLIANCES
Double
drawer fridge
(Grill shown here)
5
ELECTRICAL SAFETY INFORMATION
• To protect against electric shock, do not immerse cord or plugs in water or other liquid.
• Unplug from the outlet when not in use and before cleaning.
• CAUTION: Risk of Electric Shock - Switch in OFF position does not de-energize the unit.
• Do not operate any appliance with a damaged cord, plug, or after the appliance malfunctions or has been
damaged in any manner. Contact the manufacturer for repair.
• Immediately repair or replace any worn or damaged cord, never use a cord that is split or which shows
signs of wear along its length or on its ends.
• Do not locate multiple portable socket-outlets or portable power supplies at the rear of the appliance.
• Do not let the cord touch hot surfaces.
• Do not use this appliance for purposes other than intended.
• Use only a properly wired and inspected 120VAC (15 AMP minimum) Ground Fault Circuit Interrupter
(GFCI) GROUNDED 3-wire receptacle with this appliance.
• The GFCI receptacle must be a WEATHER-PROOF IN-USE COVERED RECEPTACLE.
• Never remove the grounding plug or use with an adapter of 2 prongs.
• Do not use an extension cord or powerstrip. They can be hazardous and can degrade product performance.
• When positioning the appliance ensure the supply cord is not trapped or damaged.
• The provisions of the National Electric Code as well as any local codes must be observed when
installing the product.
SPECIFICATIONS AND DIMENSIONS
REV 0 - A - 2603260835
L-C2-821
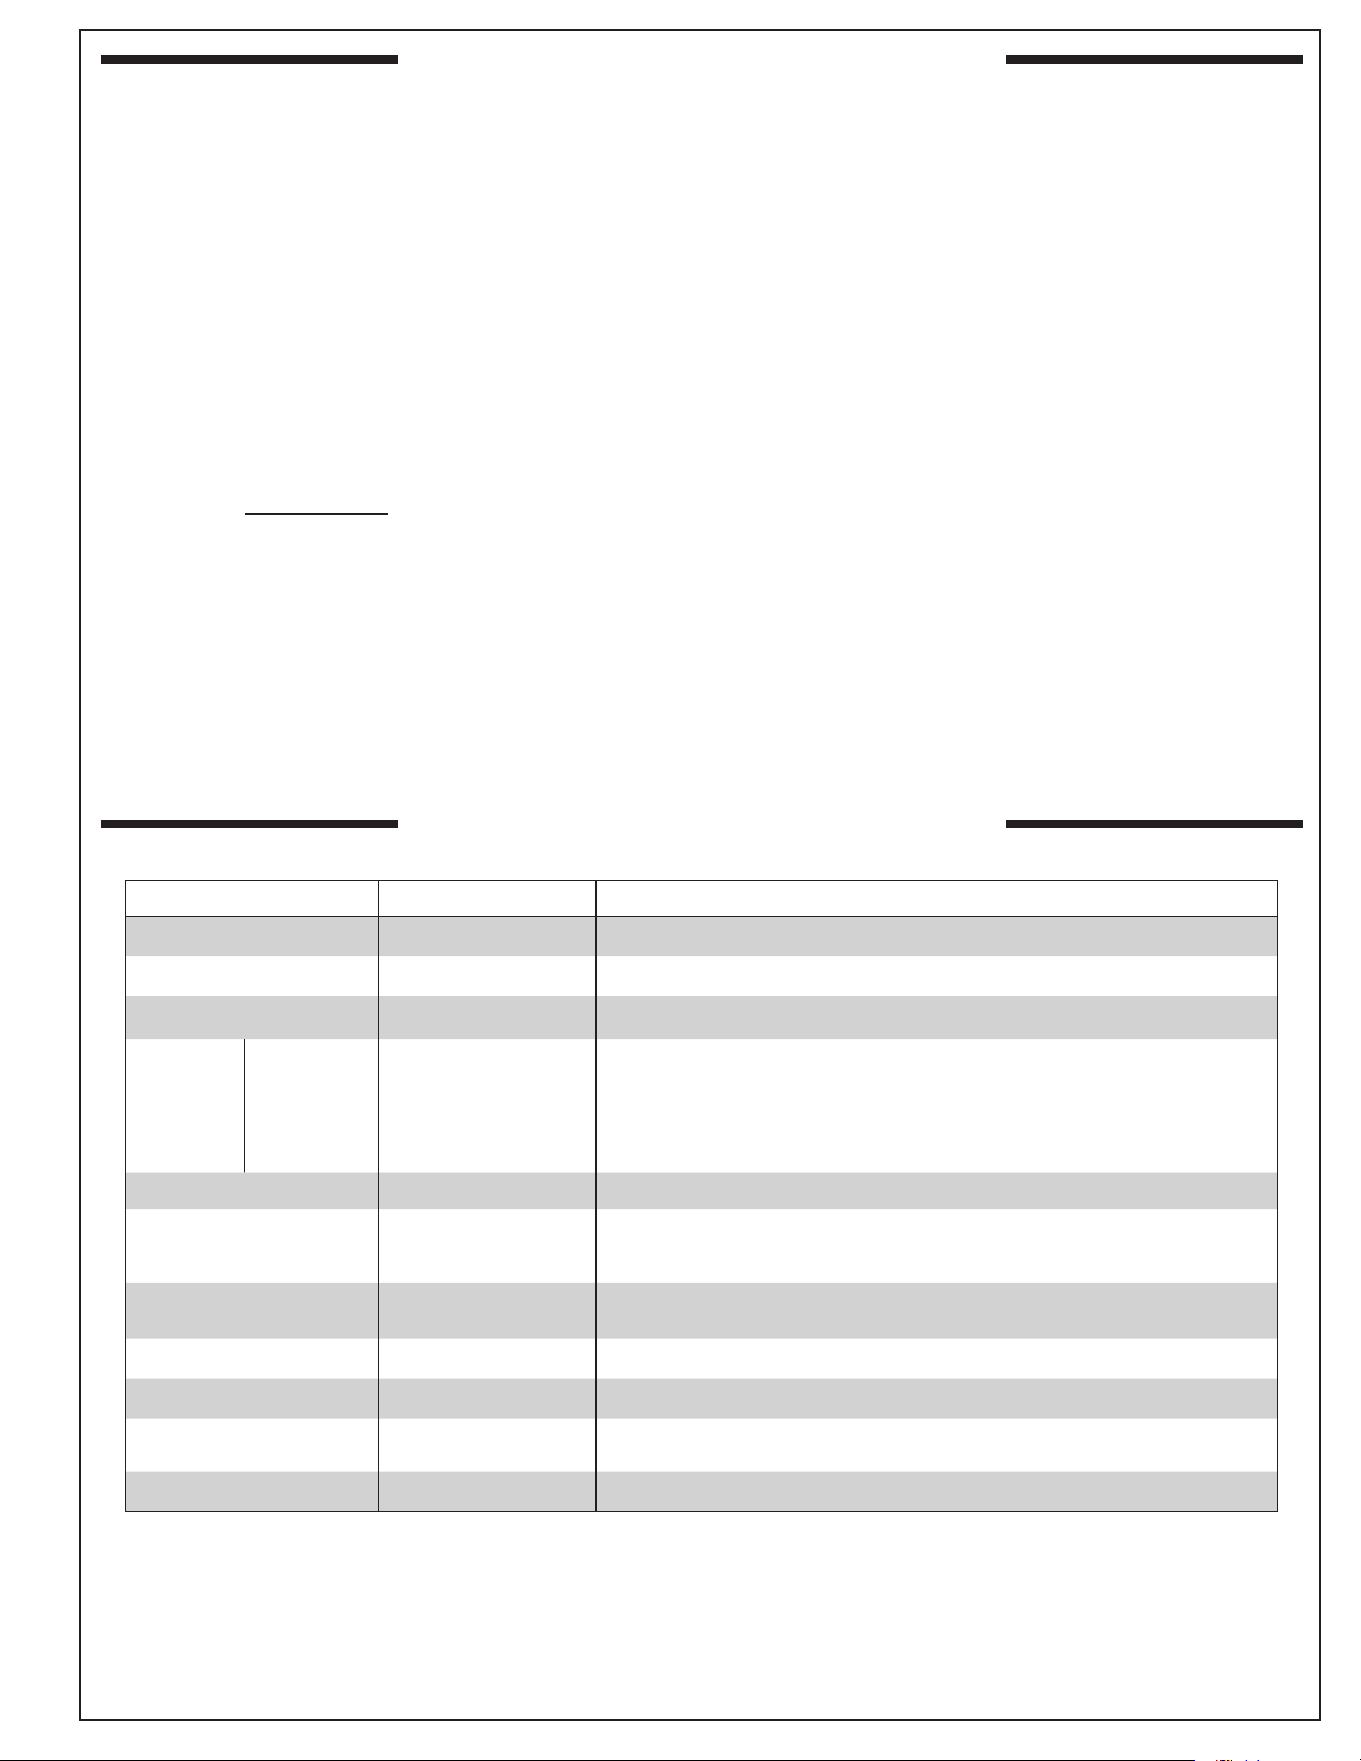
Description Measurement Specication
Rated power
V / A / Hz 115V / 0.8 A Max / 60Hz
Power consumption
W MAX 120
Overall dimension
W x D x H (inch) 23
7
/16 x 22
5
/6 x 34
1
/4
Weight
Net
lb 109.3
Gross
lb 127.9
Volume
cu. ft 5.3
Interior
--
Slide out stainless steel drawers with storage dividers, white interior
LED light, touch control board with LED temperature display
Exterior
-- Top, front, sides: durable stainless steel with handle
Refrigerant
-- R-600a/ 32g
Condenser
-- Air-cooled
Temperature range
°F (°C) 34~50 °F (1~10 °C)
Foaming agent
-- Cyclopentane
Table 1 - Product Specications
6
SPECIFICATIONS AND DIMENSIONS (cont.)
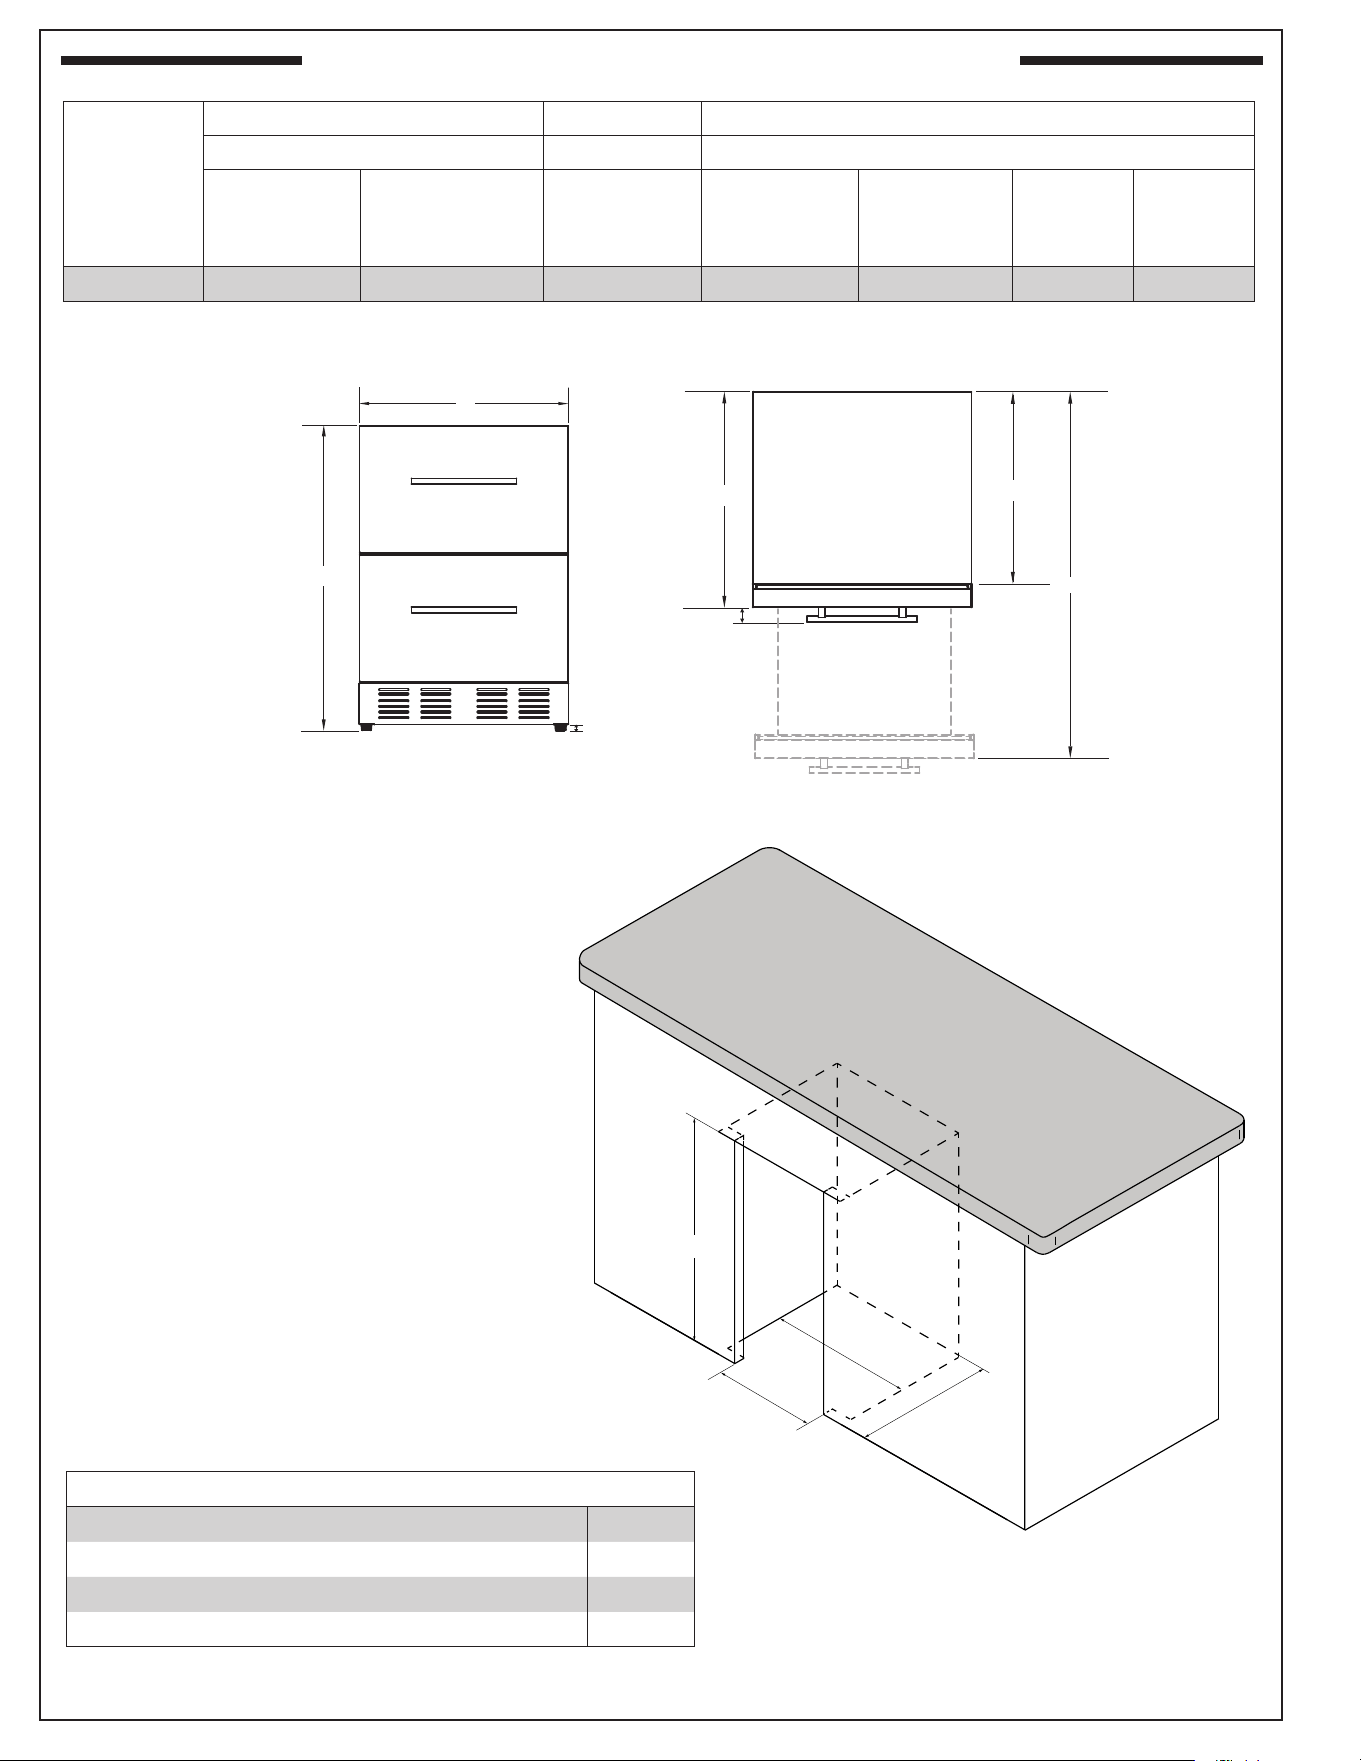
Note: If using a trim kit (#3822) (purchased
separately), cut-out dimensions remain
the same.
REV 0 - A - 2603260835
L-C2-821
Fig. 6-1 Unit dimensions
Table 2 Unit dimensions
Model
Height Width Depth
(Top to bottom) (Left to right) (Front to back)
Maximum
height
(A)
Leveler legs
maximum height
(B)
Maximum
width
(C)
With drawers
CLOSED
(D)
With drawers
OPENED
(E)
Body only
(F)
Handle
only
(G)
24-REF-DD 34
1
/2" 1" 23
1
/2" 23" 38
1
/2" 20
1
/2" 1
1
/2"
D
F
E
B
C
A
G
Table 3 Cut-out/ clearance dimensions
Cut-out/ clearance dimensions
H Height (top to bottom) min. cut-out/ clearance 35
1
/2"
I Front wall width (side to side) cut-out/ clearance 25"
J Width (side to side) cut-out/ clearance 27
1
/2"
K Depth (front to back) min. cut-out/ clearance 26"
Fig. 6-2 Cut-out/ clearance dimensions diagram
K
J
H
I
7
REV 0 - A - 2603260835
L-C2-821
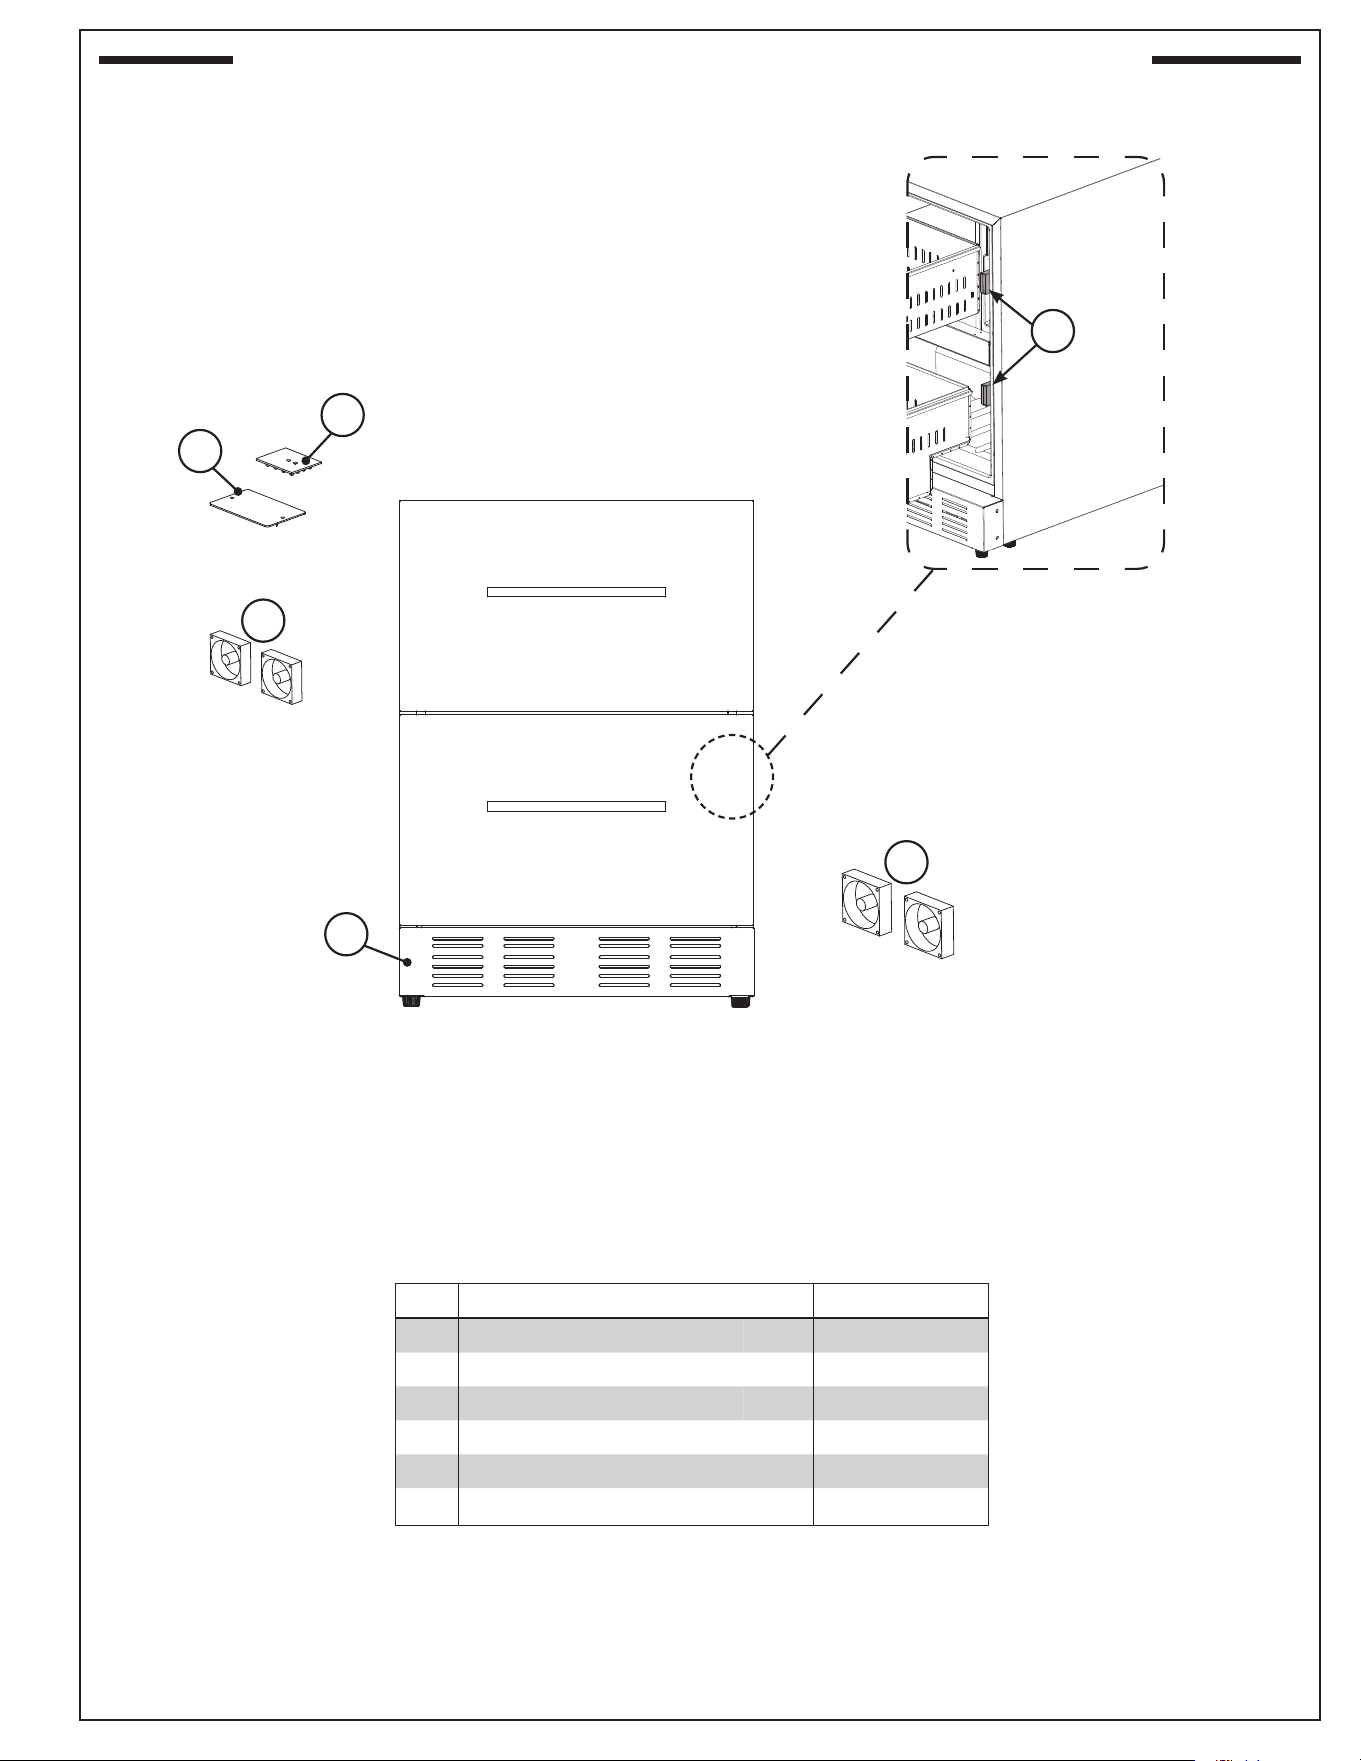
Item Description Qty. Part No.
1.
LED light
1 REF-1
2.
LED light cover
1 REF-2
3.
Evaporator fan (set of 2)
1 REF-3-2
4.
Front ventilation kick guard
1 REF-4-DD
5.
Guide rail
2 REF-5-DD
6.
Condenser fan (set of 2)
1 REF-6-2
DOUBLE DRAWER FRIDGE REPLACEMENT PARTS LIST
Part replacement must be performed by a qualied service technician
6
4
3
2
1
5
8
INSTALLATION
INSTALL DOUBLE DRAWER REFRIGERATOR
Important: When moving the product using a hand truck or dolly,
place the dolly at the side of the product and shut or
x the drawers tightly to avoid possible opening during
movement. Do not tilt the appliance at an angle of
more than 45°.
Important: The unit must remain removable for servicing. Do
not install any material at the front, upper or lower
end of the product which may prevent removal of
the unit.
1. Choose a location for your appliance and ensure it meets all
requirements stated in this manual. See the IMPORTANT
INFORMATION section.
Note: It is recommended to locate the appliance out of direct sunlight
and rain.
2. Place the appliance onto a flat level surface strong enough to
support the weight when fully loaded.
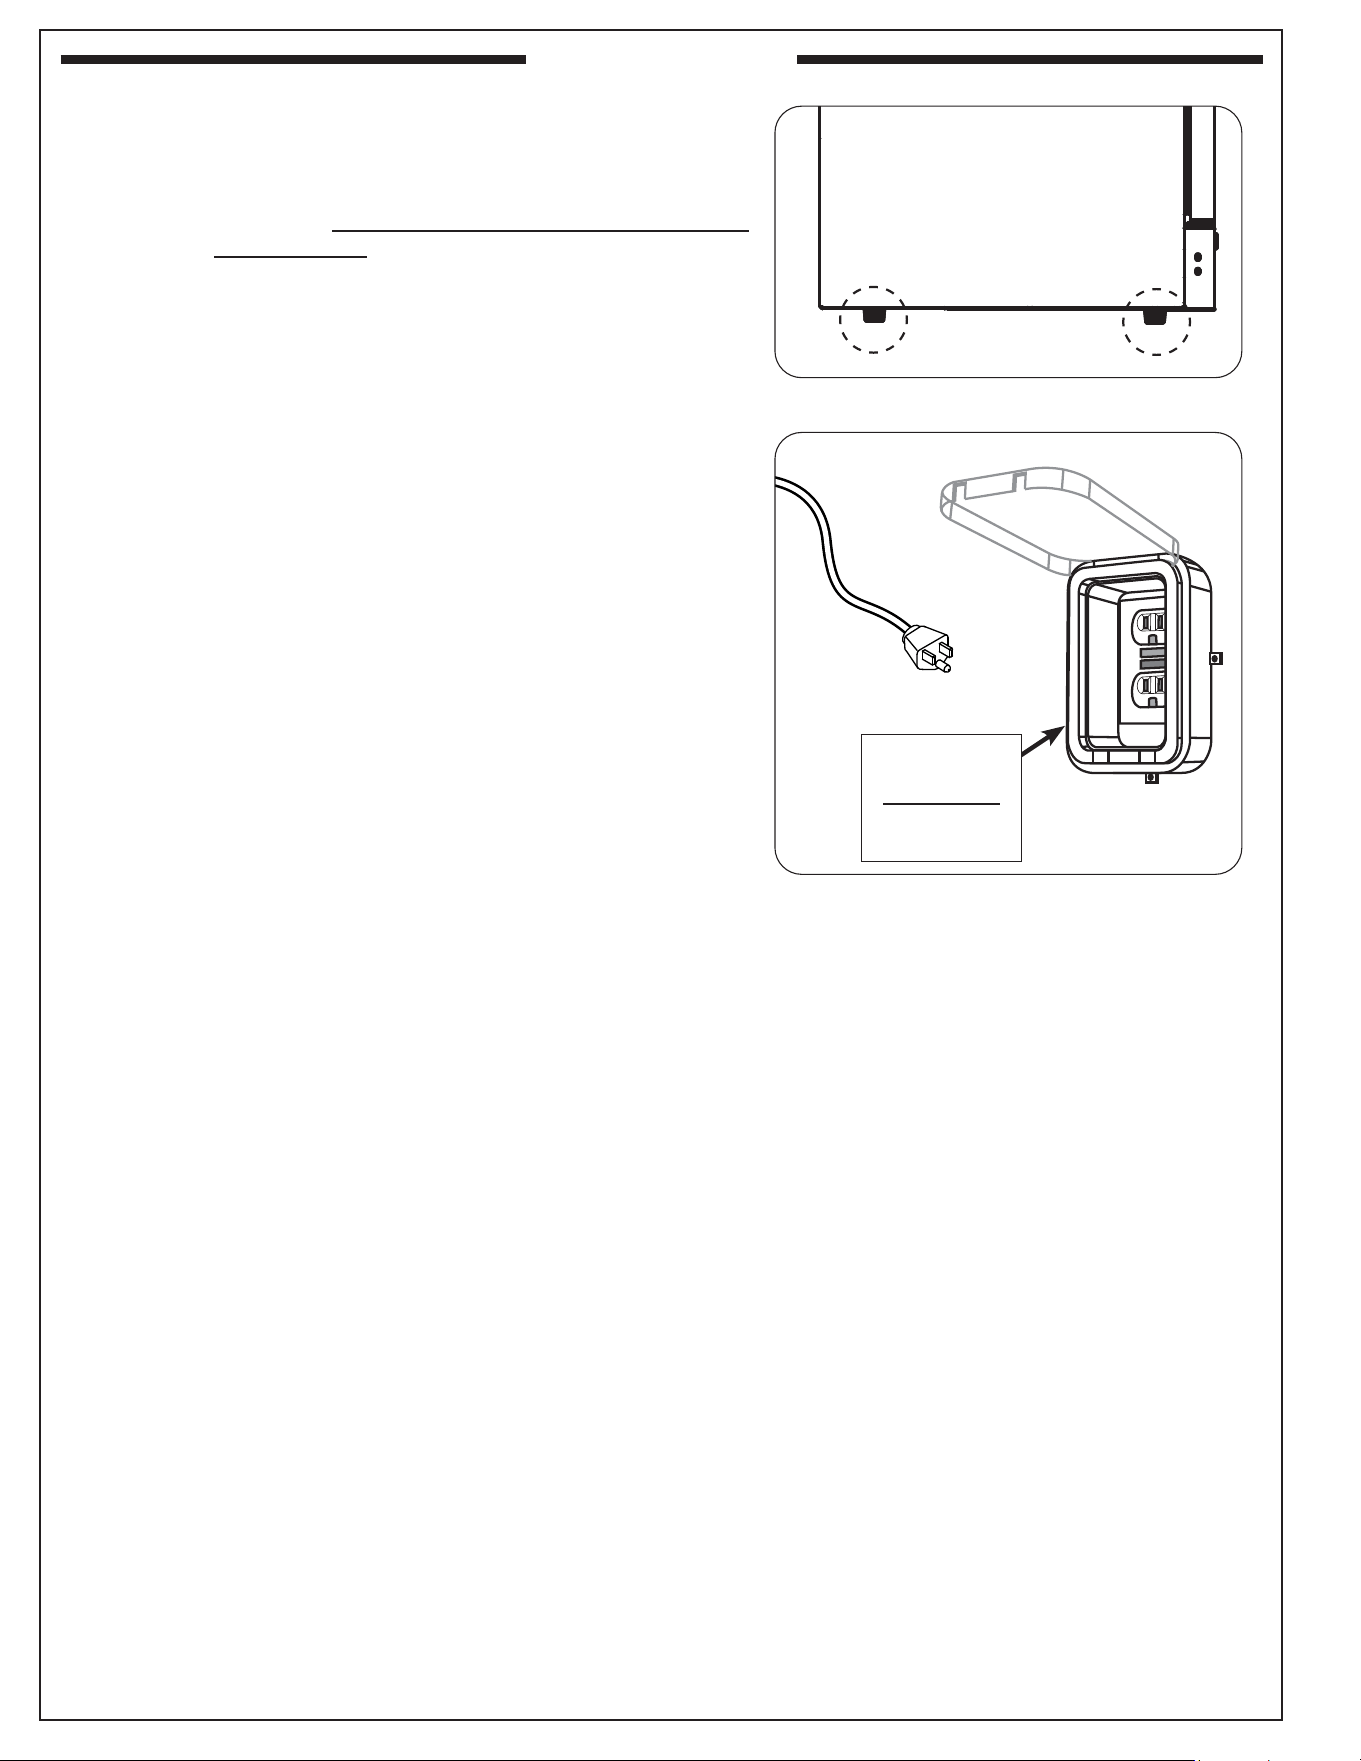
3. Level the appliance by adjusting the leveling legs. See Fig. 8-1
and following the steps below:
• With the assistance of another person, lean the appliance back
to adjust the front legs. Repeat the process for the rear legs
by tilting the appliance forward using caution.
• Turn counterclockwise to raise the unit, or clockwise to
lower it. See Fig. 8-1.
4. As applicable, check that all interior components are properly
placed.
5. Remove the zip ties from the drawer dividers inside of the
refrigerator drawers.
CONNECT TO POWER
Important: If product needs to be moved, do not tilt the appliance
at an angle of more than 45°. Once positioned, allow
10 minutes for the appliance to rest, before connecting.
Check the plug and cable for any damage before connecting to the
power source.
Ensure that your power source has the correct voltage. See the
ELECTRICAL SAFETY INFORMATION section for more details.
Connect to the power source.
Note: It may take up to 24 hours for your refrigerator to cool.
Fig. 8-1 Leveling legs
120VAC (15 AMP
minimum) GFCI
GROUNDED
3-wire
receptacle
Fig. 8-2 Connect to power
REV 0 - A - 2603260835
L-C2-821
INSTALLATION
9
OPERATION SAFETY INFORMATION
Refer to the IMPORTANT INFORMATION section for safety details
when operating your double drawer refrigerator.
Contain liquids properly to avoid leaks and/or damage to the appliance.
Do no overload the drawers. Spread items evenly so that the weight
is not concentrated in one area of the unit. Ensure items do not touch
the back of the cabinet.
Important: Never try to move a loaded drawer, remove everything
from the drawer before moving. Use both hands when
moving the drawer.
CAUTION: Do not obstruct the front grille. The openings within
the front grille allow air to ow through the condenser
heat exchanger. Restrictions to this air ow will result in
increased energy usage an loss of cooling capacity. For
this reason it is important this area not be obstructed
and the grille opening kept clean. Fire magic does not
recommend the use of a custom made grille as air ow
may be restricted.
USING THE DOUBLE DRAWER REFRIGERATOR
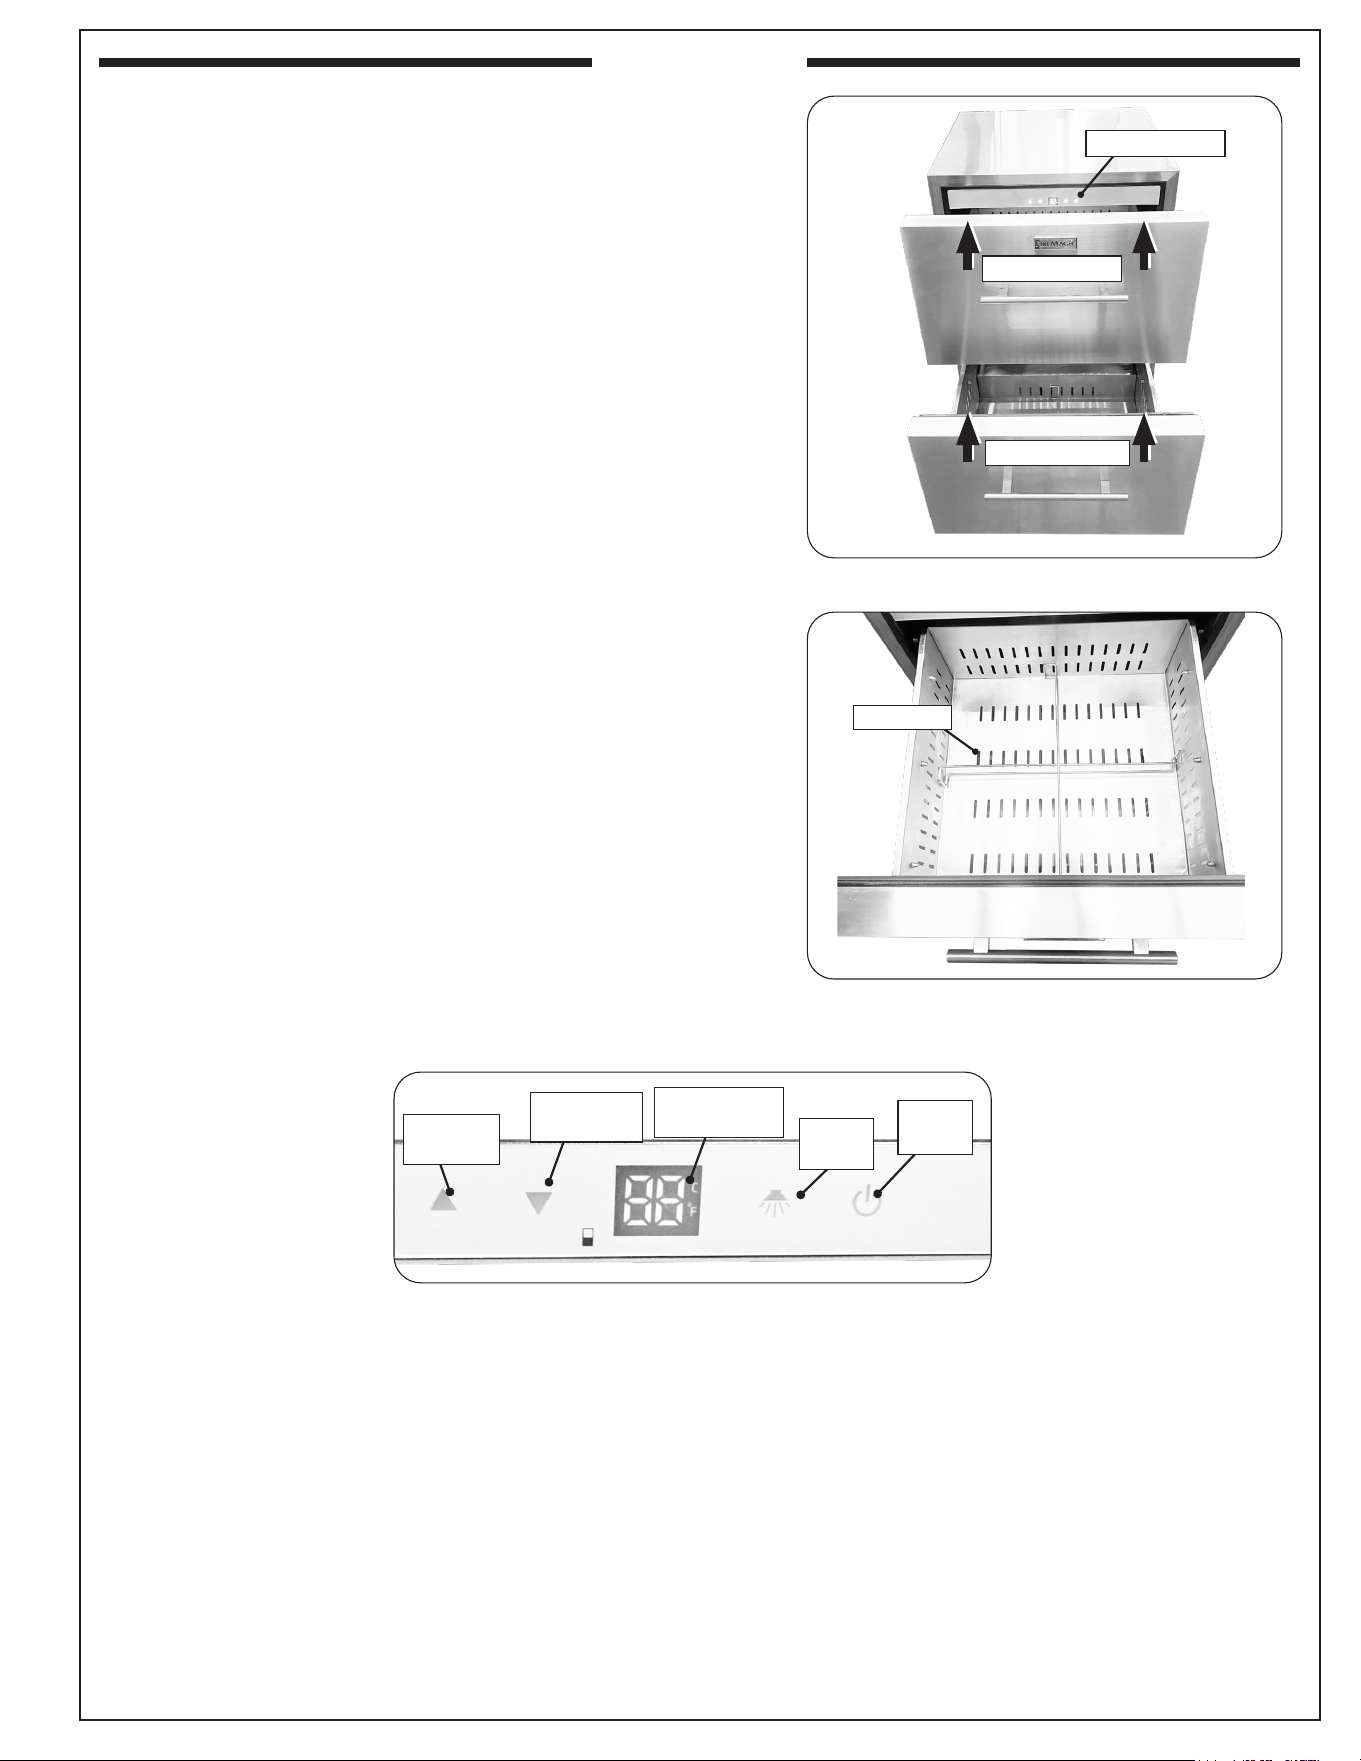
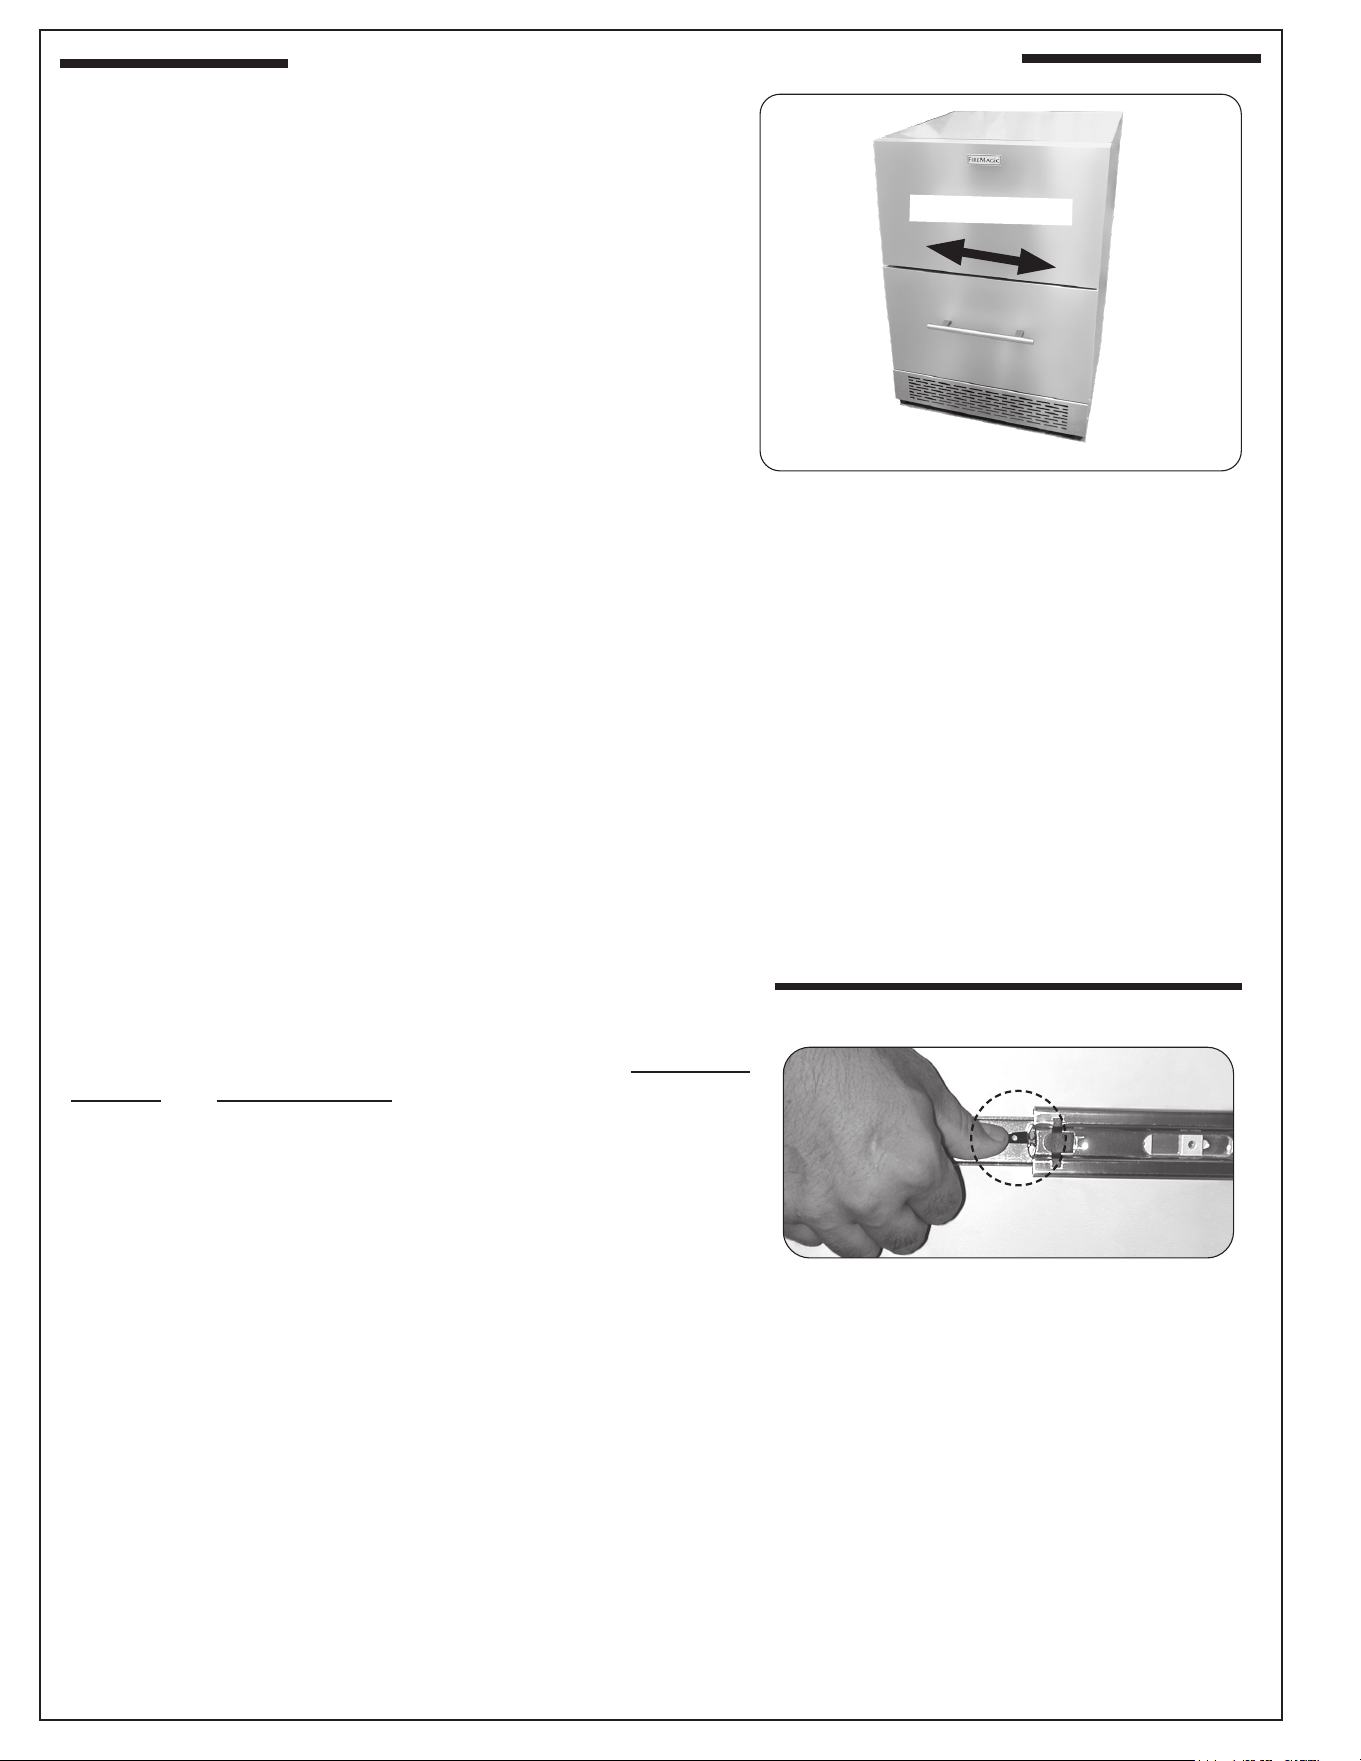
This appliance oers two drawers to store refrigerated items using a
temperature control display panel. See Fig. 9-1.
Ensure each drawer can be closed rmly, when loaded.
Do not block the air vents on the top drawer to help prevent the
blockage of airow throughout appliance. See Fig. 9-2.
Turn on your appliance by pressing the power button on the display
panel. See Fig. 9-3.
Use the up and down arrows to set your desired temperature as
applicable.
Note: It may take up to 24 hours for your refrigerator to reach
desired temperature. This will depend on the amount of
content loaded and how often the drawer is opened.
Temperature range setting:
34~50 °F (1~10 °C)
OPERATION
• Press and hold the up and down arrows on the temperature display to exchange between °C and °F.
• Use the arrows to increase or decrease the desired set temperatures.
• Keep the drawer openings to a minimum as the refrigerator reaches desired temperature.
CAUTION: In the unlikely event you lose cooling in your unit, do not unplug the product from the electric supply,
but do call a qualied service technician immediately. It is possible that the loss of cooling capacity
is a result of excessive frost build-up on the evaporator cooling coil. In this case, removing power to
the unit will result in the melting of this excessive quantity of ice, which could generate melt water that
exceeds the capacity of the defrost drain system and could result in water damage to your home. The
end-user will be ultimately responsible for any water damage caused by prematurely turning the unit
o without appropriately managing the excess water run-o.
• Press the light switch to turn on the interior light.
Note: The light will remain on indenitely until the light are manually turned o.
REV 0 - A - 2603260835
L-C2-821
Fig. 9-1 Double drawers
Fig. 9-2 Drawer air vents
Upper drawer
Lower drawer
Fig. 9-3 Display panel
Power
button
Light
switch
Decrease
temp
Increase
temp
Temperature
display
Display panel
Air vents
USE, CARE, & SERVICE
10
ROUTINE MAINTENANCE AND CLEANING
To assure that your appliance provides long-lasting service, you should
check it regularly. If anything unusual is found, Contact your dealer.
All the exterior and interior parts of the product should be kept clean.
CAUTION: Before service or cleaning is performed, ensure the
switch is in the OFF position and the power supply is
disconnected.
CAUTION: It is strongly recommended to periodically inspect and
thoroughly clean crevices, weld point, under gaskets,
rivets, bolt heads, and any locations where small
amounts of liquid could collect, become stagnant, and
concentrate contaminates. Additionally, any mounting
hardware that is showing signs of corrosion should be
replaced.
CAUTION: Never clean appliance parts with ammable uids. The
fumes can create a re hazard or explosion.
EXTERIOR
The exterior of the appliance should be cleaned by rst using stainless
steel cleaner to remove grease and dirt. Always wipe with the grain
(see Fig. 10-1). Next, apply stainless steel polish and wipe down
using polish wipes.
If the gasket has spots/stains on its surface, remove and clean using
soap and warm water. Use non-abrasive cloths or pads. Once cleaned,
press the gasket back into position onto the drawer(s) as previously
removed. Repeat for the other drawer gasket, if applicable.
Remove dust from the outside box twice a year.
INTERIOR
Clean the inside of your appliance thoroughly at least once a year.
Use water and mild cleaning product for the interior of the appliance,
then rinse carefully.
Remove the drawers as needed, see below.
DOUBLE DRAWERS
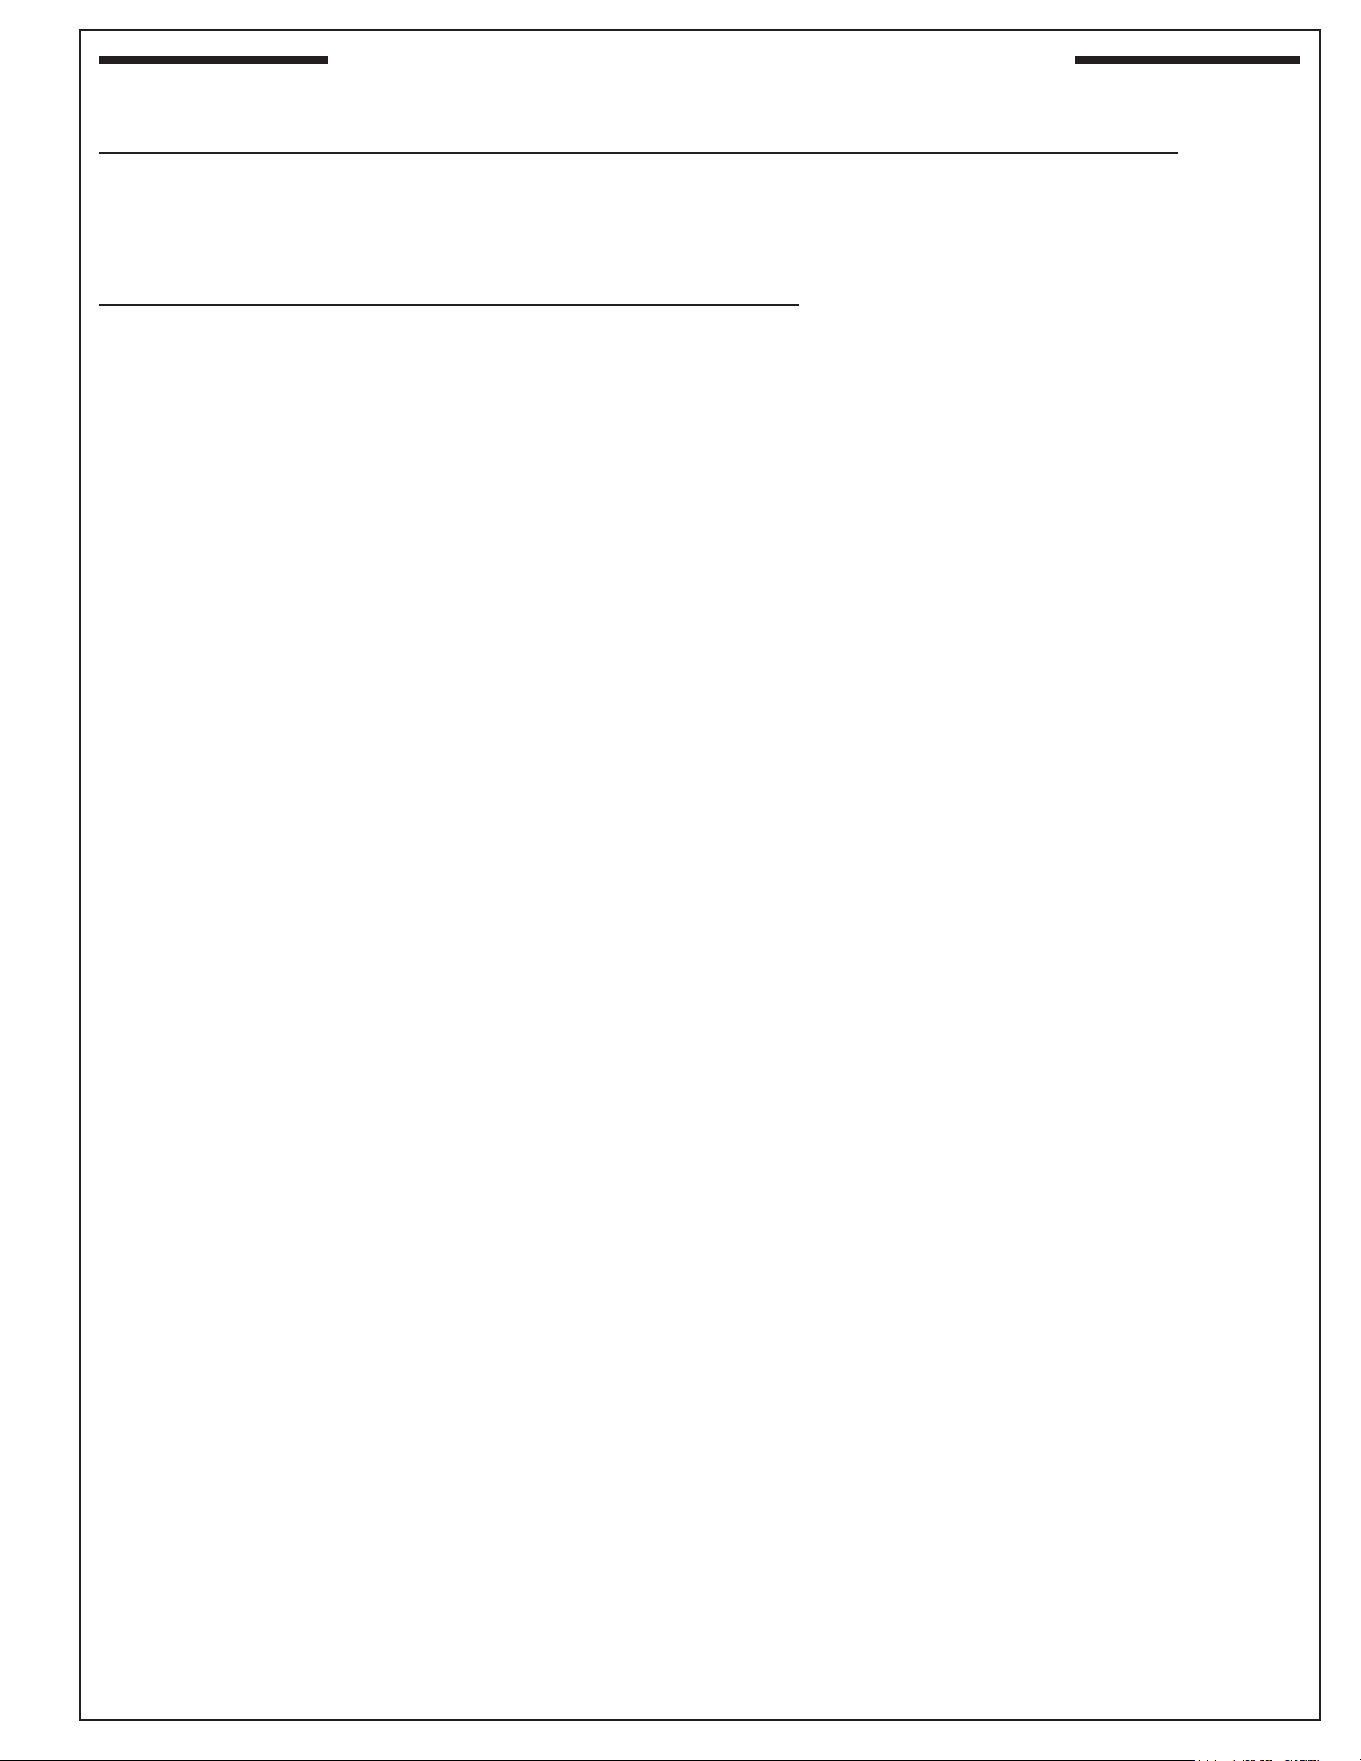
Remove the drawer: Completely pull out the drawer. Release the
drawer from the drawer slides by pressing the black lever down on the
right side, and up on the left side (Fig 10-2). Then pull outward on the
drawer until it comes free of the runners.
Install the drawer: Insert the drawer railings into the drawer slides and
push the drawer inwards into the housing until the latch is connected.
Open the drawer to verify that it is correctly installed into place.
REV 0 - A - 2603260835
L-C2-821
Fig. 10-1 Wipe with grain
Wipe with grain
Fig. 10-2 Releasing drawer from slides
11
ROUTINE MAINTENANCE AND CLEANING (cont.)
SERVICE OF DOUBLE DRAWER FRIDGE
ALL SERVICE AND CLEANING MUST BE DONE BY A QUALIFIED SERVICE TECHNICIAN.
Illuminating lamp:
WARNING: The LED illuminating lamp must only be replaced by a quailied professional service technician.
CONDENSER
MUST BE DONE BY A QUALIFIED SERVICE TECHNICIAN.
The condenser should be cleaned 2-3 times a year to remove any lint that has penetrated the condenser. When
cleaning the condenser, remove the front cover plate using a screwdriver. Then remove any dust and lint from
the condenser using a soft bristle brush and/or vacuum brush.
Important: To avoid possible bending of the condenser ns, clean the condenser in the direction of the ns (up
and down).
CAUTION: If the condenser is not cleaned, the temperature may drop or the machine may experience technical
problem or sustain damage.
APPLIANCE CARE
Avoid leaning on the drawers, you may bend the oor hinges or tip the appliance.
Exercise caution when sweeping, vacuuming or mopping near the front to the appliance. Damage to the grille
can occur.
Be sure that nothing obstructs the required air ow openings in front of the appliance. At least once or twice a
year, brush or vacuum lint and dirt from the front grille area.
REV 0 - A - 2603260835
L-C2-821
12
ROUTINE MAINTENANCE AND CLEANING (cont.)
OUTDOOR PRODUCT LONG-TERM STORAGE / WINTERIZATION:
It is time to winterize, when daily low ambient temperature is at or below 30 °F (3.3 °C).
CAUTION: Operation of the unit at ambient temperatures below the recommended Winterization
temperature will void your warranty.
1. Turn unit o.
2. Remove all contents.
3. If, necessary move the unit so you can gain access to the rear of the product. Do not tilt at 45°angle
4. Unplug the unit from the power outlet.
5. It is also recommended that the power to the outlet be turned-o if the circuit is not required for other
items during the Winter season.
6. When cleaning unit pay particular attention to any cracks and crevices that may have accumulated dirt
and debris.
7. Remove the front toe-grille and use a brush or vacuum to clean dirt and debris from beneath the unit.
8. Thoroughly clean the toe-grille and re-install on the unit.
9. Remove the rear access cover, and use a brush and vacuum to clean dirt and debris from the machine
compartment.
10. Thoroughly clean the rear access cover and re-install on the unit.
11. Wipe down all interior surfaces with anti-bacterial cleaner to be followed with clean rinse water to remove
any residual chemicals which could cause staining. Do not use any abrasive cleaners or scouring pads.
12. Leave the drawers open and allow to completely dry out before closing the drawers.
13. Thoroughly clean the drawer(s) gasket with anti-bacterial cleaner to be followed with clean rinse water to
remove any residual chemicals.
14. Thoroughly clean the exterior with a cleaner approved for stainless steel. Do not use any abrasive cleaners
or scouring pads. See the ROUTINE MAINTENANCE AND CLEANING section for details.
15. Any mounting hardware / fasteners that are showing signs of corrosion should be replaced.
16. Once the exterior has been thoroughly cleaned, you may want to apply a coating of car wax to help
protect against spotting from moisture, dirt, and debris that may accumulate on the surfaces during the
Winterization period.
17. Do not place a cover on the unit, as this can trap condensation
Note: You may choose to install the store the unit indoors, although this is not required.
Start-Up After Long-Term Storage:
If stored outside, it is recommended that the unit again be thoroughly inspected per the storage instructions
above to address any dirt or debris from the weather and/or animals/insects.
1. Connect the unit to electrical power.
2. Turn unit on and conrm your desired control settings.
3. Allow 24-hrs for the unit to stabilize before loading contents.
REV 0 - A - 2603260835
L-C2-821
13
TROUBLESHOOTING
APPLIANCE COMPRESSOR
Note:
• The compressor will not start if the room temperature is lower than the desired temperature, but item is still working with
heater inside till desired temperature achieved.
• The compressor will stop working when cooling system in the appliance reaches presetting temperature, and re-start
working until the desired temperature is achieved. Allow a minimum 5 minute interval before re-starting.
• Condensation formed inside the appliance is caused with high level humidity or the drawers of the refrigerator has been
left open for a long period. Frequently, wipe o the drawers and walls and leave the drawers closed as long as possible.
REV 0 - A - 2603260835
L-C2-821
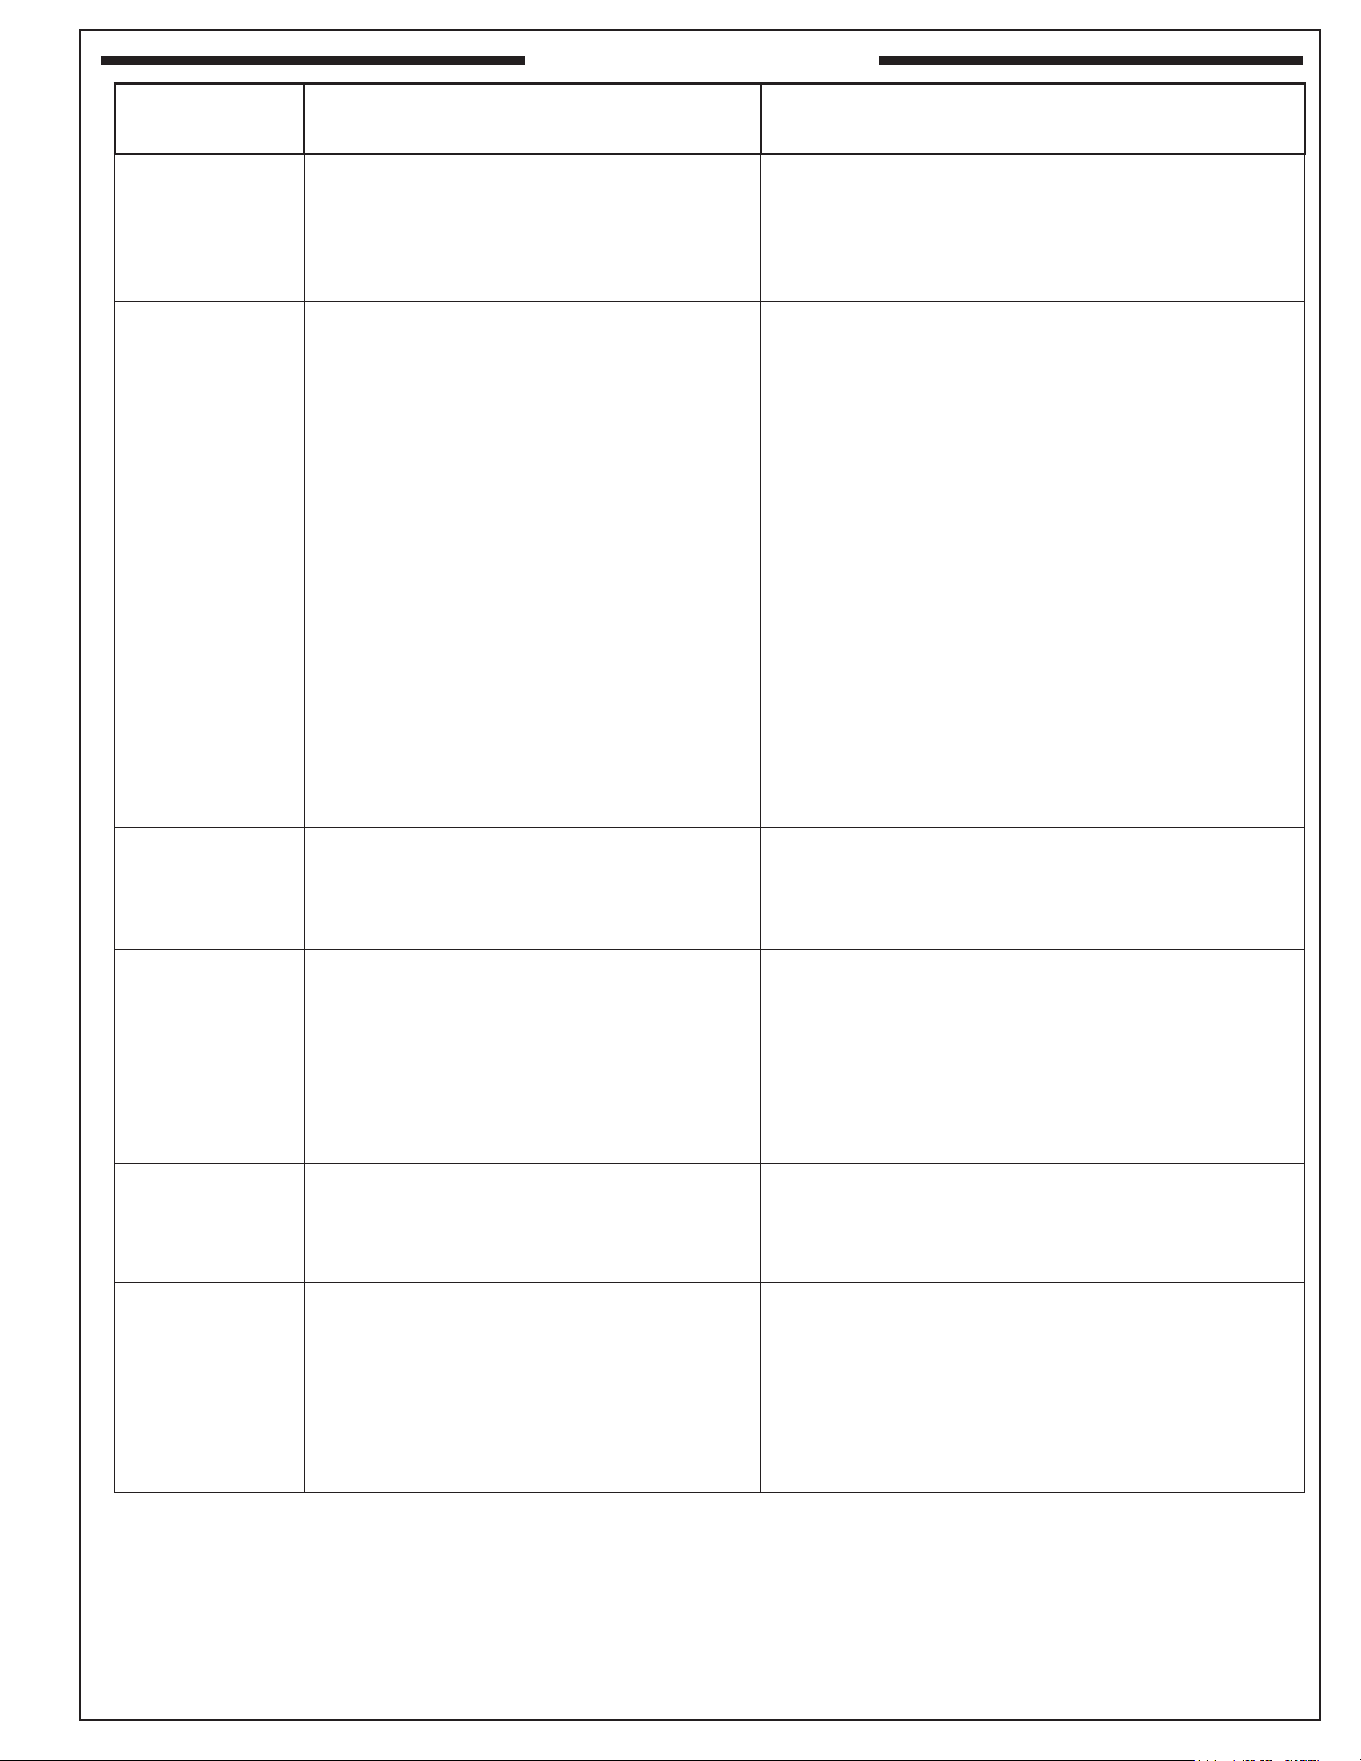
PROBLEM POSSIBLE CAUSE CORRECTION
Appliance does
not operate
1. Appliance is unplugged
2. Breaker tripped
3. Switch turned to “OFF”, no power
1. Plug the appliance in.
2. Reset breaker - if it happens again, call an authorized service
center.
3a. Ensure appliance is connected to power with the correct voltage.
3b. Turn switch to “ON”.
Appliance not
cooling
1. Not proper clearance to heat sources
2. Not proper ventilation
3. Drawer not closed properly or opened for too long
4. Drawer sealing problem or deformation
5. Loading too much into drawers
6. Air inlet or outlet blocked
7. Control setting needs adjustment
8. Control malfunction
9. Compressor does not operate properly or at all.
10. No airow
11. Not enough refrigerant
1. Remove heat source or relocate the appliance.
2. See VENTILATION section to meet necessary requirements.
3. Keep the refrigerator closed and secured.
4. Ensure that all components have been inspected with no damage.
Contact dealer.
5. Distribute items evenly throughout the appliance as applicable.
6. Contact dealer.
7. Set temperature as applicable.
8. Contact dealer.
9a. Ambient temperature is below the recommended winterization
temperature.
9b. Contact the dealer.
10a.
Fan motor does not operate or fan blade is broken, must be
replaced. Contact your dealer.
10b. Condenser completely blocked, must be cleaned.
11. Contact dealer.
Noisy
1. Appliance is not leveled
2. The appliance touches the wall
3. Some parts are loose or taken o
1. Use the bottom leveling legs to make sure appliance is leveled.
2. See VENTILATION section for correct placement.
3. Inspect the appliance for all components for damaging or missing
parts. Contact the dealer.
Turn on and o
frequently
1. The appliance is reaching temperature.
2. Overloaded appliance
3. Control setting adjustment
4. Not enough refrigerant
5. Hot and humid conditions
6. Drawer not closed properly or opened for too long
1. The room temperature is hotter than normal.
2. Distribute items evenly throughout the appliance as applicable.
3. Set correct temperature.
4. Contact dealer.
5. This may be normal to maintain constant temperature during
high temperatures and humid days.
6. Keep the refrigerator door closed and secured.
The drawer will
not close properly
1. The appliance is not leveled
2. The appliance was not properly installed
3. Drawers not properly positioned
1. Use the bottom leveling legs to make sure appliance is leveled.
2. Ensure all requirement have been met in this manual. See the
INSTALLATION section for more details.
3. See the INSTALLATION section for more details.
The light does not
work
1. Not plugged in
2. Breaker is tripped or fuse has blown
3. LED circuit board is burnt out
4. Switch turned to “OFF”, no power
1. Ensure that the appliance is plugged in correctly.
2. Reset breaker - if it happens again, call an authorized service
center.
3. Replace illuminating light. Contact your dealer.
4a. Ensure the appliance is connected to power with the correct
voltage.
4b. Turn switch to “ON”.
14
R-600A REFRIGERANT HANDLING
REQUIREMENT FOR SERVICE AND INSTALLATION OF APPLIANCES USING FLAMMABLE
REFRIGERANTS
DANGER
• Never apply a torch to a charged R-600a refrigeration system. R-600a is considered non-toxic but is
ammable when mixed with air.
• Under no circumstances shall the potential sources of ignition be used in the searching for or detection
of refrigerant leaks. Do not pierce or burn.
• The appliance shall be stored in a location without continuously operating ignition sources.
WARNING
• Only skilled and well-trained service technicians permitted to service R-600a equipped products.
• Replace components only with parts specied by the manufacturer. Other parts can result in the ignition
of refrigerant in the atmosphere from a leak.
• Prior to beginning work on systems containing FLAMMABLE REFRIGERANTS, safety checks are
necessary to ensure that the risk of ignition is minimized.
• Work shall be undertaken under a controlled procedure to minimize the risk of a ammable gas or vapor
being present while the work is being performed.
• If any hot work is to be conducted on the refrigerating equipment or any associated parts, appropriate
re extinguishing equipment shall be available on hand. A dry chemical or CO2 re extinguisher should
be adjacent to the charging area.
• Gloves and Eye Protection must be used.
• Use only a refrigerant grade R-600a from a properly labeled container.
• Do not remove or alter any R-600a labeling on the product.
• During repairs to sealed components, all electrical supplies shall be disconnected from the equipment
being worked upon prior to any removal of sealed covers, etc.
• If the evaporator is cold prior to service, it must be thawed prior to service.
• When using a vacuum pump, start pump before opening refrigerator n system. Vacuum pump and recovery
equipment should be at least 10 feet from the work area.
R-600a SPECIFICATION
• R-600a is considered non-toxic but is ammable when mixed with air.
• R-600a is heavier than air, do not allow any leakage/migration to low areas such as basements and stairs.
Work in conned spaces shall be avoided.
• Be aware that refrigerants may not contain an odor and color.
WARNING: Only skilled and well-trained service technicians permitted to service R-600a
equipped products.
REV 0 - A - 2603260835
L-C2-821
15
WARNING: Only skilled and well-trained service technicians permitted to service R-600a
equipped products.
R-600A REFRIGERANT HANDLING (cont.)
LEAK DETECTION
• The area shall be checked with an appropriate refrigerant detector prior to and during work, to ensure the
technician is aware of potentially toxic or ammable atmospheres.
• Ensure that the detector is not a potential source of ignition and is suitable for the refrigerant used.
• Electronic leak detection or soap solution can be used to check for nitrogen/helium leaks.
• If a leak is suspected, all naked ames shall be removed/extinguished.
• If a leakage of refrigerant is found which requires brazing, all of the refrigerant shall be recovered from
the system, or isolated (by means of shut o valves) in a part of the system remote from the leak.
• The high side of the refrigeration system (compressor discharge to outlet of drier) must be leak tested
with the compressor running.
• The low side of the refrigeration system (evaporator, compressor and suction line) must be leak tested
with the compressor o (equalized pressure).
NO IGNITION SOURCES
• All possible ignition sources, including cigarette smoking, should be kept suciently far away from the
site of installation, repairing, removing and disposal, during which refrigerant can possibly be released
to the surrounding space.
• Prior to work taking place, the area around the equipment shall be surveyed to make sure that there are
no ammable hazards or ignition risks. “No Smoking” signs shall be displayed.
VENTILATED AREA
• A degree of ventilation shall continue during the period that the work is carried out.
• The ventilation should safely disperse any released refrigerant and preferably expel it externally into the
atmosphere.
CHECKING TO THE REFRIGERATING EQUIPMENT
• Where electrical components are being changed, they shall be t for the purpose and to the correct
specication. At all times, the manufacturer’s maintenance and service guidelines shall be followed.
• If in doubt, consult the manufacturer’s technical department for assistance.
CHECKING TO ELECTRICAL DEVICES
• Repair and maintenance to electrical components shall include initial safety checks and component
inspection procedures.
• If a fault exists that could compromise safety, then no electrical supply shall be connected to the circuit
until it is satisfactorily dealt with.
Initial safety checks shall include:
• that capacitors are discharged: this shall be done in a safe manner to avoid possibility of sparking;
• that no live electrical components and wiring are exposed while charging, recovering or purging the
system;
• that there is continuity of earth bonding.
REV 0 - A - 2603260835
L-C2-821
16
WARNING: Only skilled and well-trained service technicians permitted to service R-600a
equipped products.
R-600A REFRIGERANT HANDLING (cont.)
REFRIGERANT CHARGING
• No air is ever to be allowed inside the refrigeration system (R-600a refrigerant or dry nitrogen only).
• Ensure that contamination of dierent refrigerants does not occur when using charging equipment.
• Hoses or lines shall be as short as possible to minimize the amount of refrigerant contained in them.
• Cylinders shall be kept in an appropriate position according to the instructions.
• Ensure that the REFRIGERATING SYSTEM is earthed prior to charging the system with refrigerant.
• Prior to recharging the system, it shall be pressure-tested with the appropriate purging gas.
• The system shall be leak-tested on completion of charging but prior to commissioning.
• A follow up leak test shall be carried out prior to leaving the site.
REFRIGERANT RECOVERY
• R-600a has been exempted from recovery/reclaiming requirements by the US EPA.
• Recovery/Reclaiming equipment must be approved for use with R290/R600a.
• When transferring refrigerant into cylinders, ensure that only appropriate refrigerant recovery cylinders
are employed.
• Do not mix refrigerants in recovery units and especially not in cylinders.
• Do not overll cylinders (no more than 80 % volume liquid charge).
REV 0 - A - 2603260835
L-C2-821
17
WARNING: Only skilled and well-trained service technicians permitted to service R-600a
equipped products.
R-600A REFRIGERANT HANDLING (cont.)
REFRIGERANT SAFETY
SYSTEM REPAIR
• Be aware that malfunction of the equipment can be caused by refrigerant loss and a refrigerant leak
is possible.
• Discharge capacitors in a way that won’t cause any spark.
• When brazing is required, Safely remove the refrigerant following local and national regulations.
• Take care that the drained refrigerant will not cause any danger. Take special care that drained refrigerant
will not oat back into the building.
• Carry out a leak test before charging with refrigerant.
DECOMMISSIONING / DISPOSAL
If the unit is being removed from service for disposal, check and obey all federal, state, and local regulations
regarding the disposal and recycling of refrigeration appliances, and follow these steps completely:
• Remove all consumable contents from the unit.
• Unplug the electrical cord from its socket.
• Remove the double drawers or permanently close the door so children may not easily climb inside.
• The REFRIGERANT CHARGE is to be removed before decommissioning.
• Ensure sucient ventilation at the equipment location.
• Discharge capacitors in a way that will not cause any spark.
• Put a label on the equipment that the refrigerant is removed.
• Cut out the compressor and drain the oil.
COMPRESSOR REPAIR
DANGER:
• Failure to follow electrical safety measures may result in serious injury, re or death.
• Never handle the unit in wet conditions as this can pose a severe danger of electric shock.
• Burns from hot or cold surfaces can cause serious injury.
REV 0 - A - 2603260835
L-C2-821
18
R.H. Peterson Co. • 14724 East Proctor Avenue • City of Industry, CA 91746
A COPY OF YOUR SALES SLIP FOR PROOF OF PURCHASE IS REQUIRED
This warranty applies to the original purchaser for products which are installed in the United States or Canada and which are operated and maintained as
intended for single family residential usage. This warranty is valid only with proof of purchase, commences on the date of purchase, and terminates (both as
to original and any replacement products) on the anniversary date of the original purchase of the product per the above schedules.
This warranty does not cover parts which become defective as a result of negligence, misuse, or use not in compliance with the Installation and Owner’s Manual,
accidental damage, improper handling, improper storage, improper installation, lack of required routine maintenance (as specied in the Installation and
Owner’s Manual), or electrical damage. Product must be installed as specied in the Installation and Owner’s Manual by a qualied professional installer.
This warranty does not apply to normal occurrences that may be expected with any outdoor product such as rust, corrosion, oxidation, or discoloration unless
the aected part becomes inoperable. RHP products including valves, pilots and controls are designed and certied to be used as a system. Modications to
products which are not specically authorized will void this warranty and could render the product to be unsafe. Burners, valves, parts, remotes, accessories,
etc. used with this product must be RHP products or this warranty is void.
Warrantied items will be repaired or replaced at RHP's sole discretion. This warranty does not cover labor or labor related charges, except as provided by
separate specic written programs from RHP. All repair work must be performed by a qualied professional service person and requires prior approval of RHP.
RHP may require the defective product or part to be returned to the factory to determine the cause of failure. RHP will pay freight charges if the product or part
is determined to be defective. This warranty does not cover breakage in shipment from our independent distributor to its customer if the damage is determined
to have occurred during that shipment.
This warranty specically excludes liability for indirect, incidental, or consequential damages. Some states and provinces do not allow the exclusion or
limitation of incidental or consequential damages, so the above exclusion may not apply to you. This warranty gives you specied legal rights, and you may
have other rights that vary from state to state or province.
For additional information regarding this warranty, or to place a warranty claim, contact the RHP dealer where the product was purchased.
When contacting your RHP dealer or the R.H. Peterson Co., please provide the following information:
- Your name, address, telephone number, e-mail
- Sales receipt showing where purchased and date purchased
- Model number, serial number of product, date code
- Relevant information: installer, additions, repairs, when defect was rst noted
TO REGISTER YOUR PRODUCT ONLINE GO TO: WWW.RHPETERSON.COM,
AND CLICK ON PRODUCT REGISTRATION. THANK YOU FOR YOUR PURCHASE.
ONE-YEAR WARRANTY - Fire Magic
®
electric accessories are warranted for one year
from the date of purchase.
WARRANTY