
MANUAL 15-000002 REV 0 (04/24)
$21.00
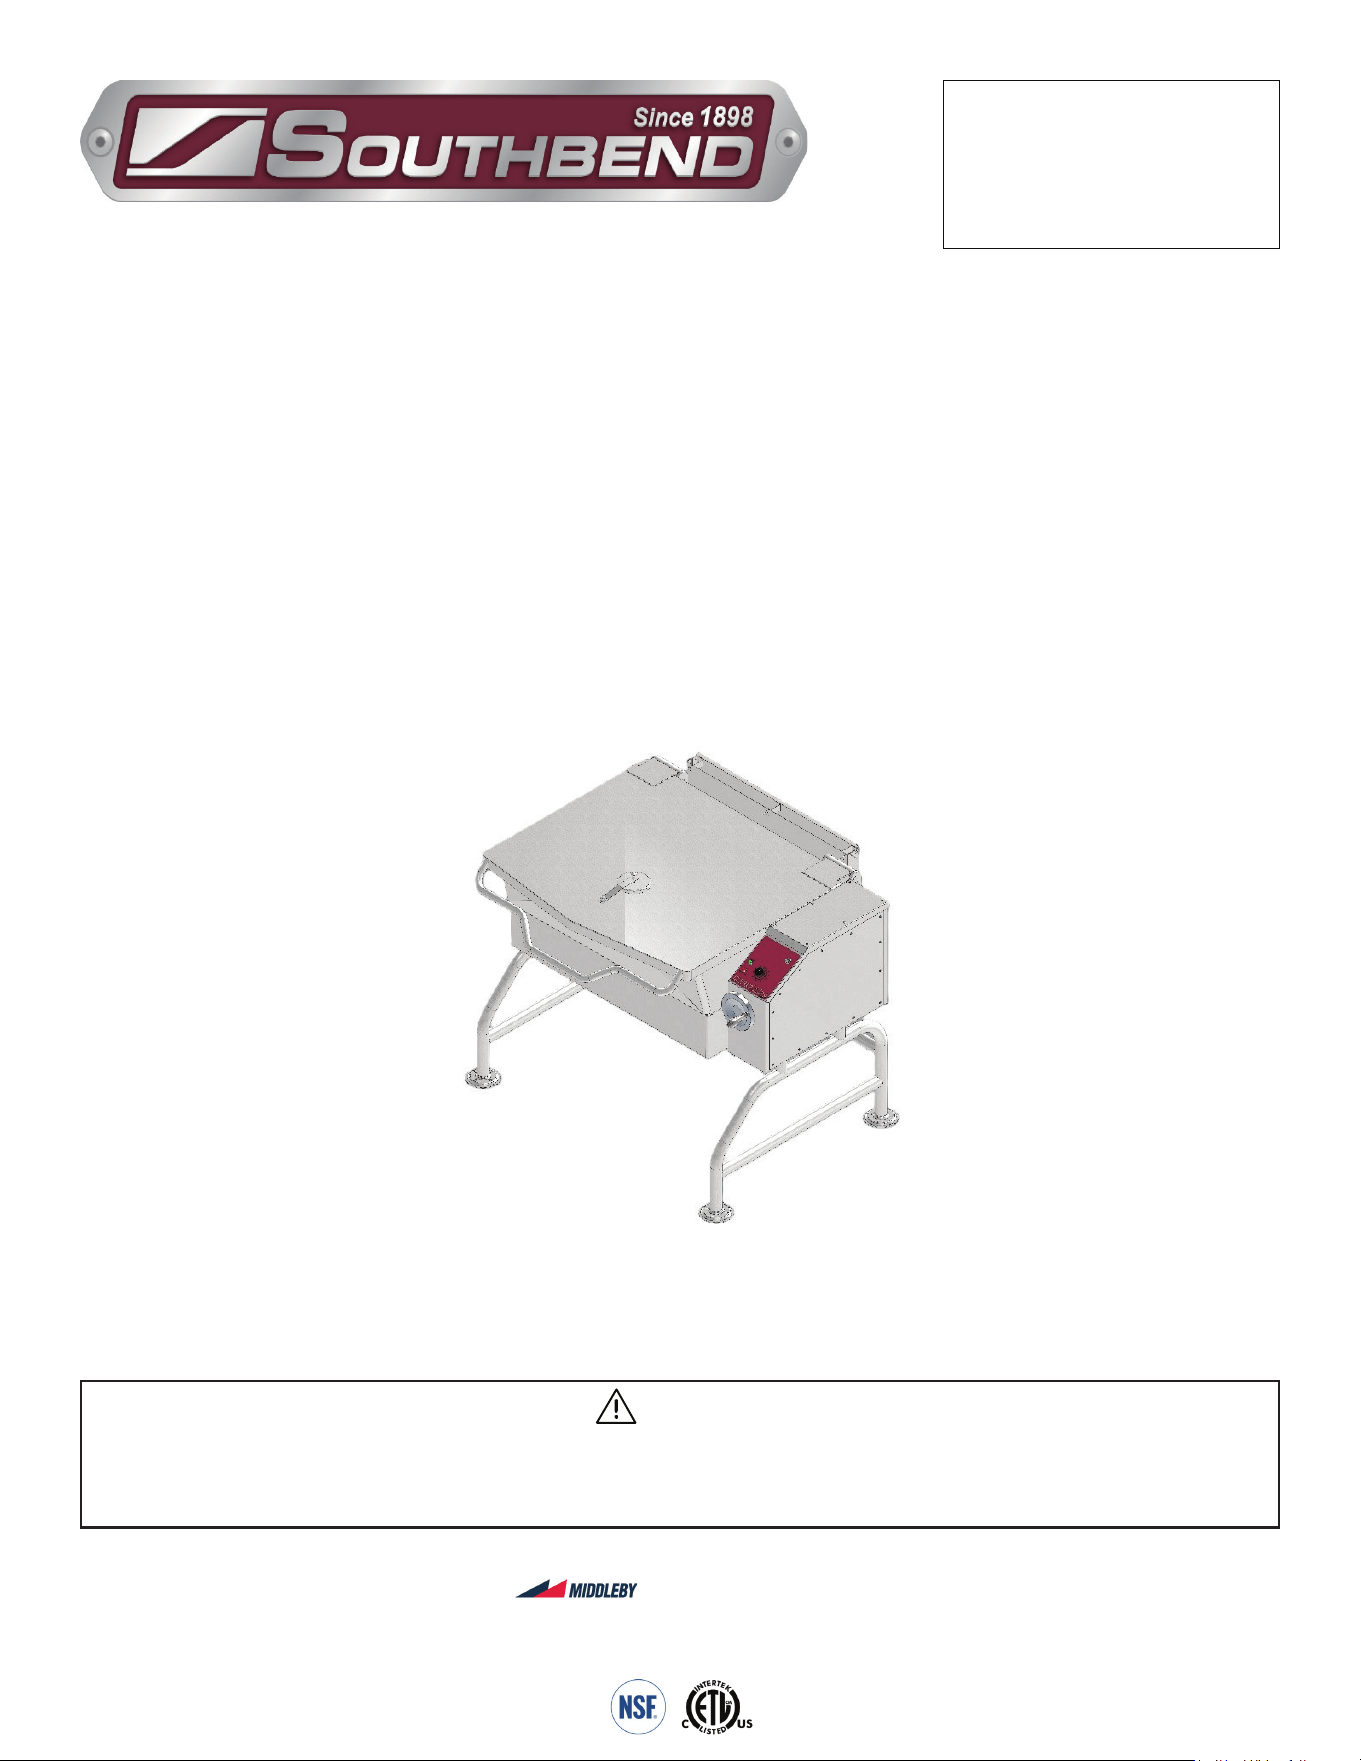
Gas Skillet
MANUAL SECTION CO
IMPORTANT FOR FUTURE REFERENCE
Please complete this information and retain this
manual for the life of the equipment:
Model #:
___________________________
Serial #:
___________________________
Date Purchased:
_____________________
WARNING
Improper installation, adjustment, alteration, service or maintenance can cause property damage, injury
or death. Read the installation, operating and maintenance instructions thoroughly before installing or
servicing this equipment.
Model SKG-40-SB
Gas Tilting Skillet
SKG-30-SB, SKG-40-SB, SKG-
30-PT-SB, & SKG-40-PT-SB
Installation & Operation Manual
SOUTHBEND STEAM
A Middleby Company
1100 Old Honeycutt Road Fuquay-Varina, North Carolina 27526 USA
www.southbendnc.com
INSTALLATION & OPERATION MANUAL 15-000002 REV 0 (04/24)
PAGE
2
OF 16
Gas Skillet
SAFETY PRECAUTIONS
Before installing and operating this equipment, be sure everyone involved in its operation is fully trained and aware of
precautions. Accidents and problems can be caused by failure to follow fundamental rules and precautions.
The following symbols, found throughout this manual, alert you to potentially dangerous conditions to the operator,
service personnel, or to the equipment.
CAUTION
WARNING
NOTICE
This symbol warns of immediate hazards that will result in severe injury or death.
This symbol refers to a potential hazard or unsafe practice that could result in injury or death.
This symbol refers to a potential hazard or unsafe practice that could result in injury, product
damage, or property damage.
This symbol refers to information that needs special attention or must be fully
understood, even though not dangerous.
DANGER
WARNING
Improper installation, operation, adjustment, alteration, service or maintenance can cause property damage, injury
or death. Read the installation, operating and maintenance instructions thoroughly before installing, operating or
servicing this equipment.
NOTICE
This manual should be retained for future reference.
NOTICE
This product is intended for commercial use only. NOT FOR HOUSEHOLD USE.
IMPORTANT NOTES FOR INSTALLATION AND OPERATION
WARNING
This is the safety alert symbol. It is used to alert you to potential personal injury hazards. Obey all safety messages
that follow this symbol to avoid possible injury or death.
WARNING
FOR YOUR SAFETY:
Do not store or use gasoline or other ammable vapors or liquids in the vicinity of this or any other appliance.
PURCHASER: Instructions to be followed in the event the operator of this appliance smells gas must be posted
in a prominent location. This information shall be obtained by consulting the local gas supplier.
Keep the appliance area free and clear from combustibles.
DO NOT obstruct the ow of combustion and ventilation air.
Adequate clearances MUST be maintained for servicing and proper operation.
Contact the factory, the factory representative or a local service company to perform maintenance and repairs
should the appliance malfunction. Refer to warranty terms.
Safety Precautions
Copyright © 2021 by Southbend Steam. All rights reserved. Published in the United States of America.

INSTALLATION & OPERATION MANUAL 15-000002 REV 0 (04/24)
PAGE
3
OF16
Gas Skillet
RETAIN THIS MANUAL FOR FUTURE REFERENCE.
Table of Contents
Important Notes For Installation and Operation .................................................................... 2
1.0 Service Connections ....................................................................................................... 5
2.0 Installation Instructions ................................................................................................... 8
3.0 Operation Instructions ..................................................................................................... 11
4.0 Test Kitchen Bulletin ........................................................................................................ 13
5.0 Maintenance and Troubleshooting .................................................................................. 14
Table of Contents
INSTALLATION & OPERATION MANUAL 15-000002 REV 0 (04/24)
PAGE
4
OF 16
Gas Skillet
SUMMARY OF SAFETY NOTES
The following general safety notices supplement the specic warnings and cautions contained in this technical manu-
al. They are recommended precautions that must be understood and adhered to during the installation, operation, and
maintenance of these electrically operated appliances
Supply wires must be suitable for temperature of at least 90 °C. Additionally, all wiring must conform to the require-
ments of local and national electric codes. Conduit and ttings should be watertight type.
Unit is equipped with a limit switch that shuts o gas to the burners when skillet pan is more than 10° above normal
horizontal cooking position.
Safety Precautions
CAUTION
Do not install in such a manner that the service person cannot remove the access panel.
WARNING
FOR YOUR SAFETY:
Be sure to wash inside of skillet pan, inside of cover including under drip-lip, and pouring spout area.
INSTALLATION & OPERATION MANUAL 15-000002 REV 0 (04/24)
PAGE
5
OF16
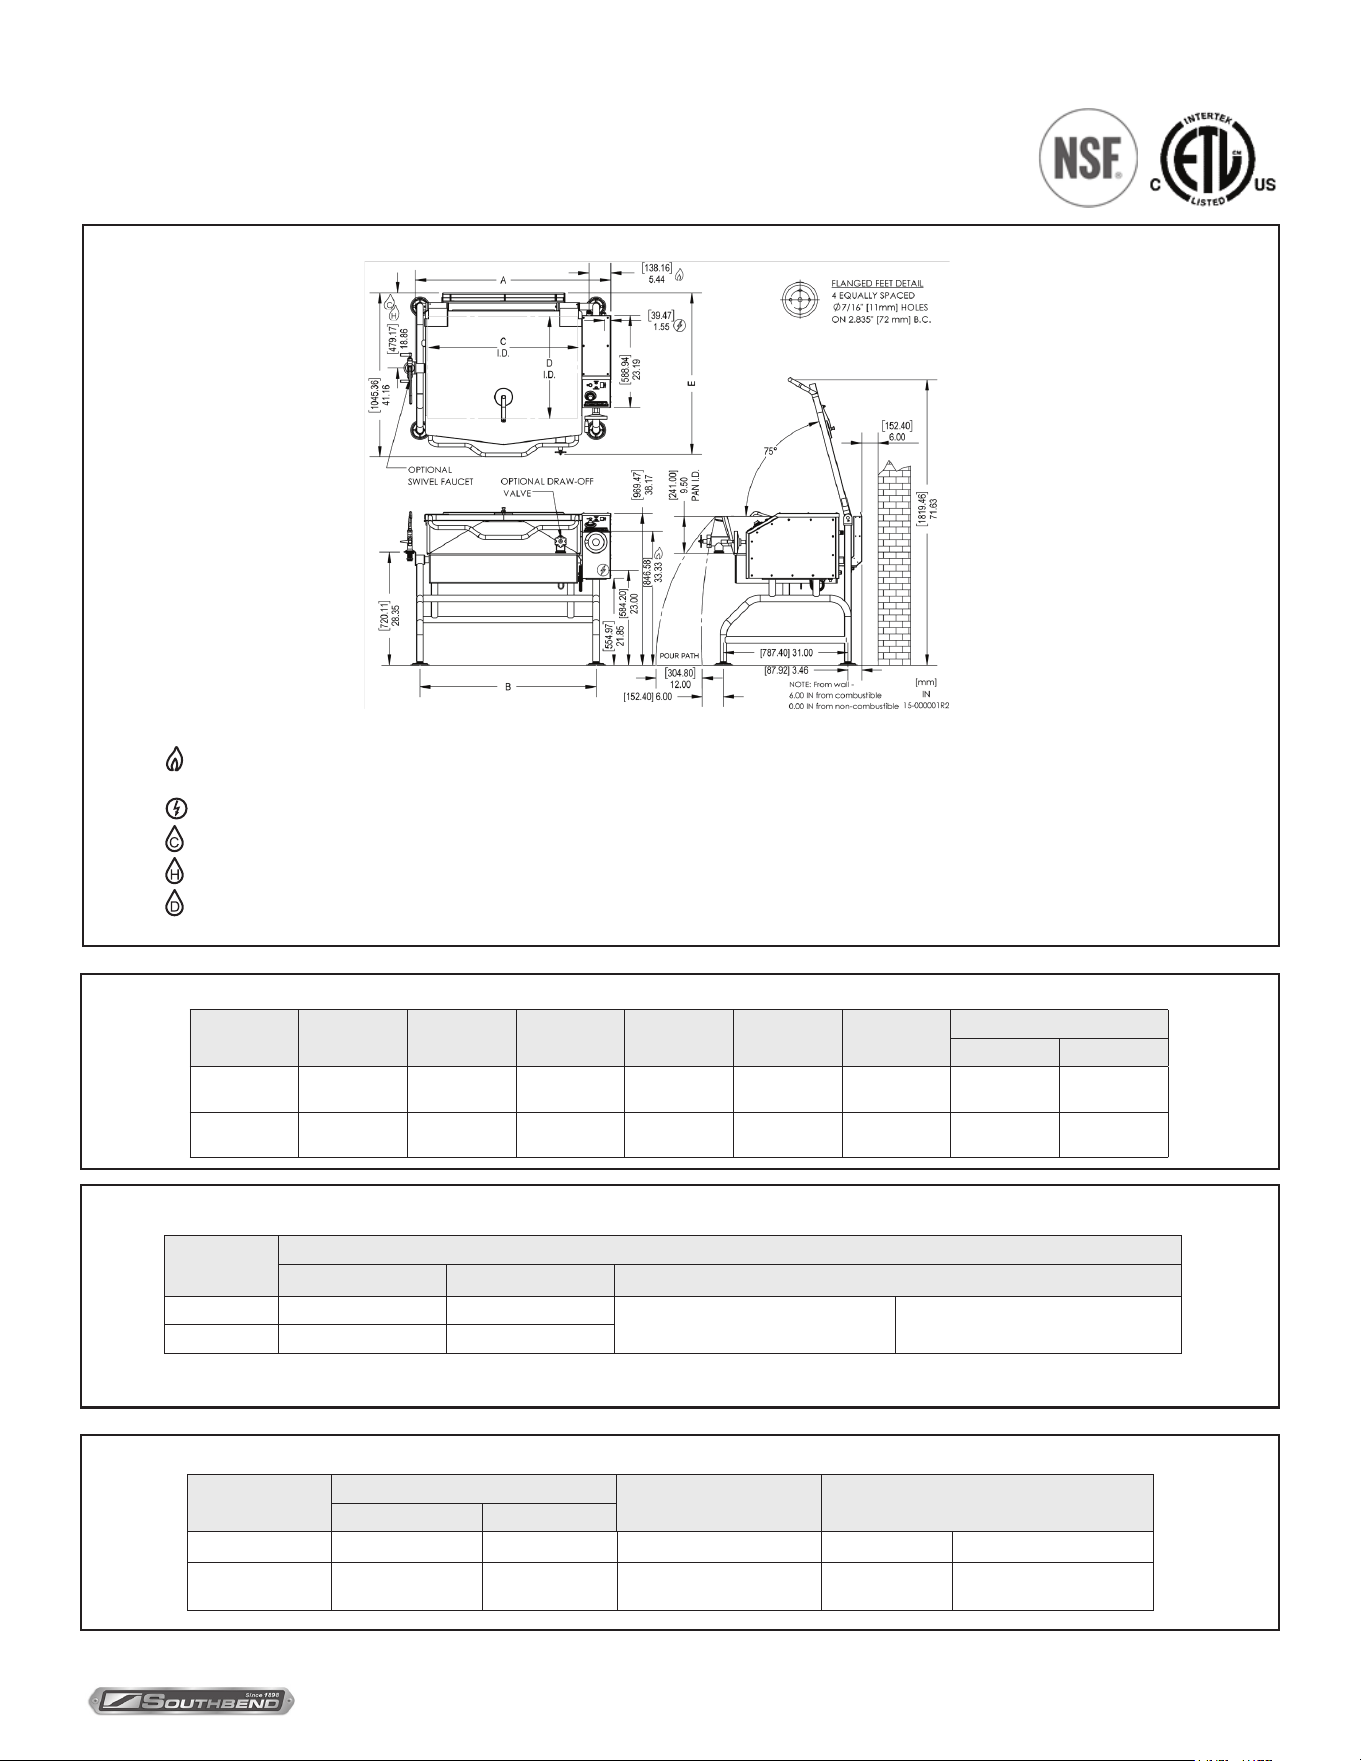
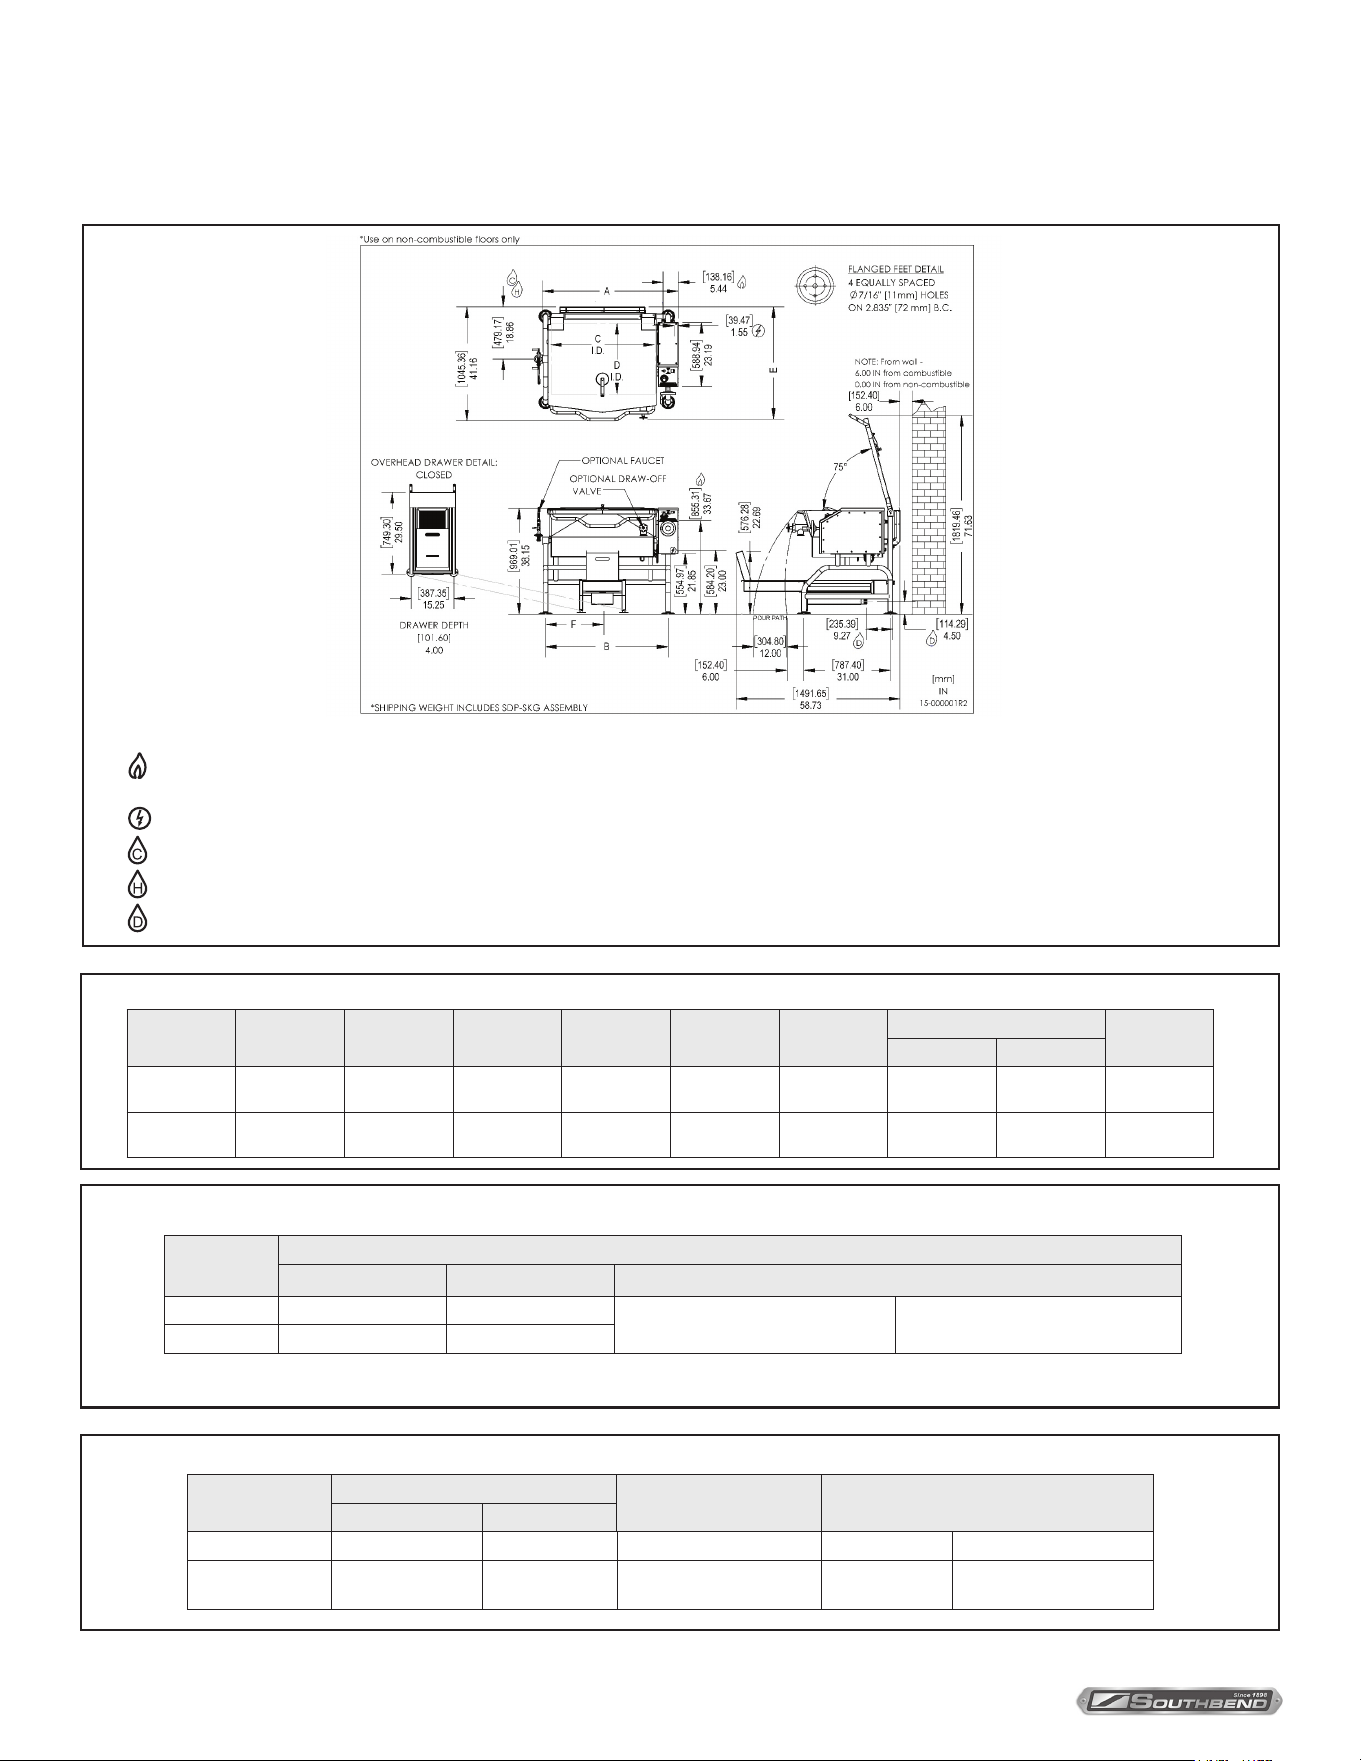
Gas Skillet SERVICE CONNECTIONS
SPECIFICATIONS
GAS CHARACTERISTICS
DIMENSIONS
* For use on non-combustible floors only.
As continued product improvement is a policy of Southbend, specications are subject to changge without notice.
Service Connections
Model
Gas Supply
BTU/HR kW/HR. Supply Pipe Pressure (W.C.)
SKG-30-SB 110,000 32.2
Natural
7” - 14” (178 mm - 356 mm)
Propane
11” - 14” (279 mm - 356 mm)
SKG-40-SB 156,000 45.7
Model Capacity Units A B C D
E
Ø2 Ø3
SKG-30-SB
30 Gallons
(114 liters)
inches
mm
38.64”
(981 mm)
33.84”
(860 mm)
27.88”
(708 mm)
25.54”
(649 mm)
38.25”
(972 mm)
42.75”
(1086 mm)
SKG-40-SB
40 Gallons
(152 liters)
inches
mm
48.62”
(1235 mm)
43.84”
(1114 mm)
37.88”
(962 mm)
25.54”
(649 mm)
38.25”
(972 mm)
42.75”
(1086 mm)
Model
Capacity
Shipping Weight Minimum Clearance *
Gallon Liter
SKG-30-SB 30 114
360 lbs. [163 kg]
Sides 0
SKG-40-SB 40 152
450 lbs. [204 kg]
Back
6”
(152 mm)
SERVICE CONNECTIONS
- GAS CONNECTION: Supplied through 3/4" NPT Pipe. A gas shut-o valve must be installed in supply piping convenient and adjacent to
appliance
–
ELECTRICAL CONNECTION: 120V Units supplied with 8' cord with 3 prong plug. Total Amps: 3A (220V & 208/240V options available).
– COLD WATER: 3/8” O.D. tubing to optional faucet. (OPTIONAL)
– HOT WATER: 3/8” O.D. tubing to optional faucet. (OPTIONAL)
– DRAIN: 1 1/2" - 11 1/2 NPT (OPTIONAL) - not shown here
INSTALLATION & OPERATION MANUAL 15-000002 REV 0 (04/24)
PAGE
6
OF 16
Gas Skillet
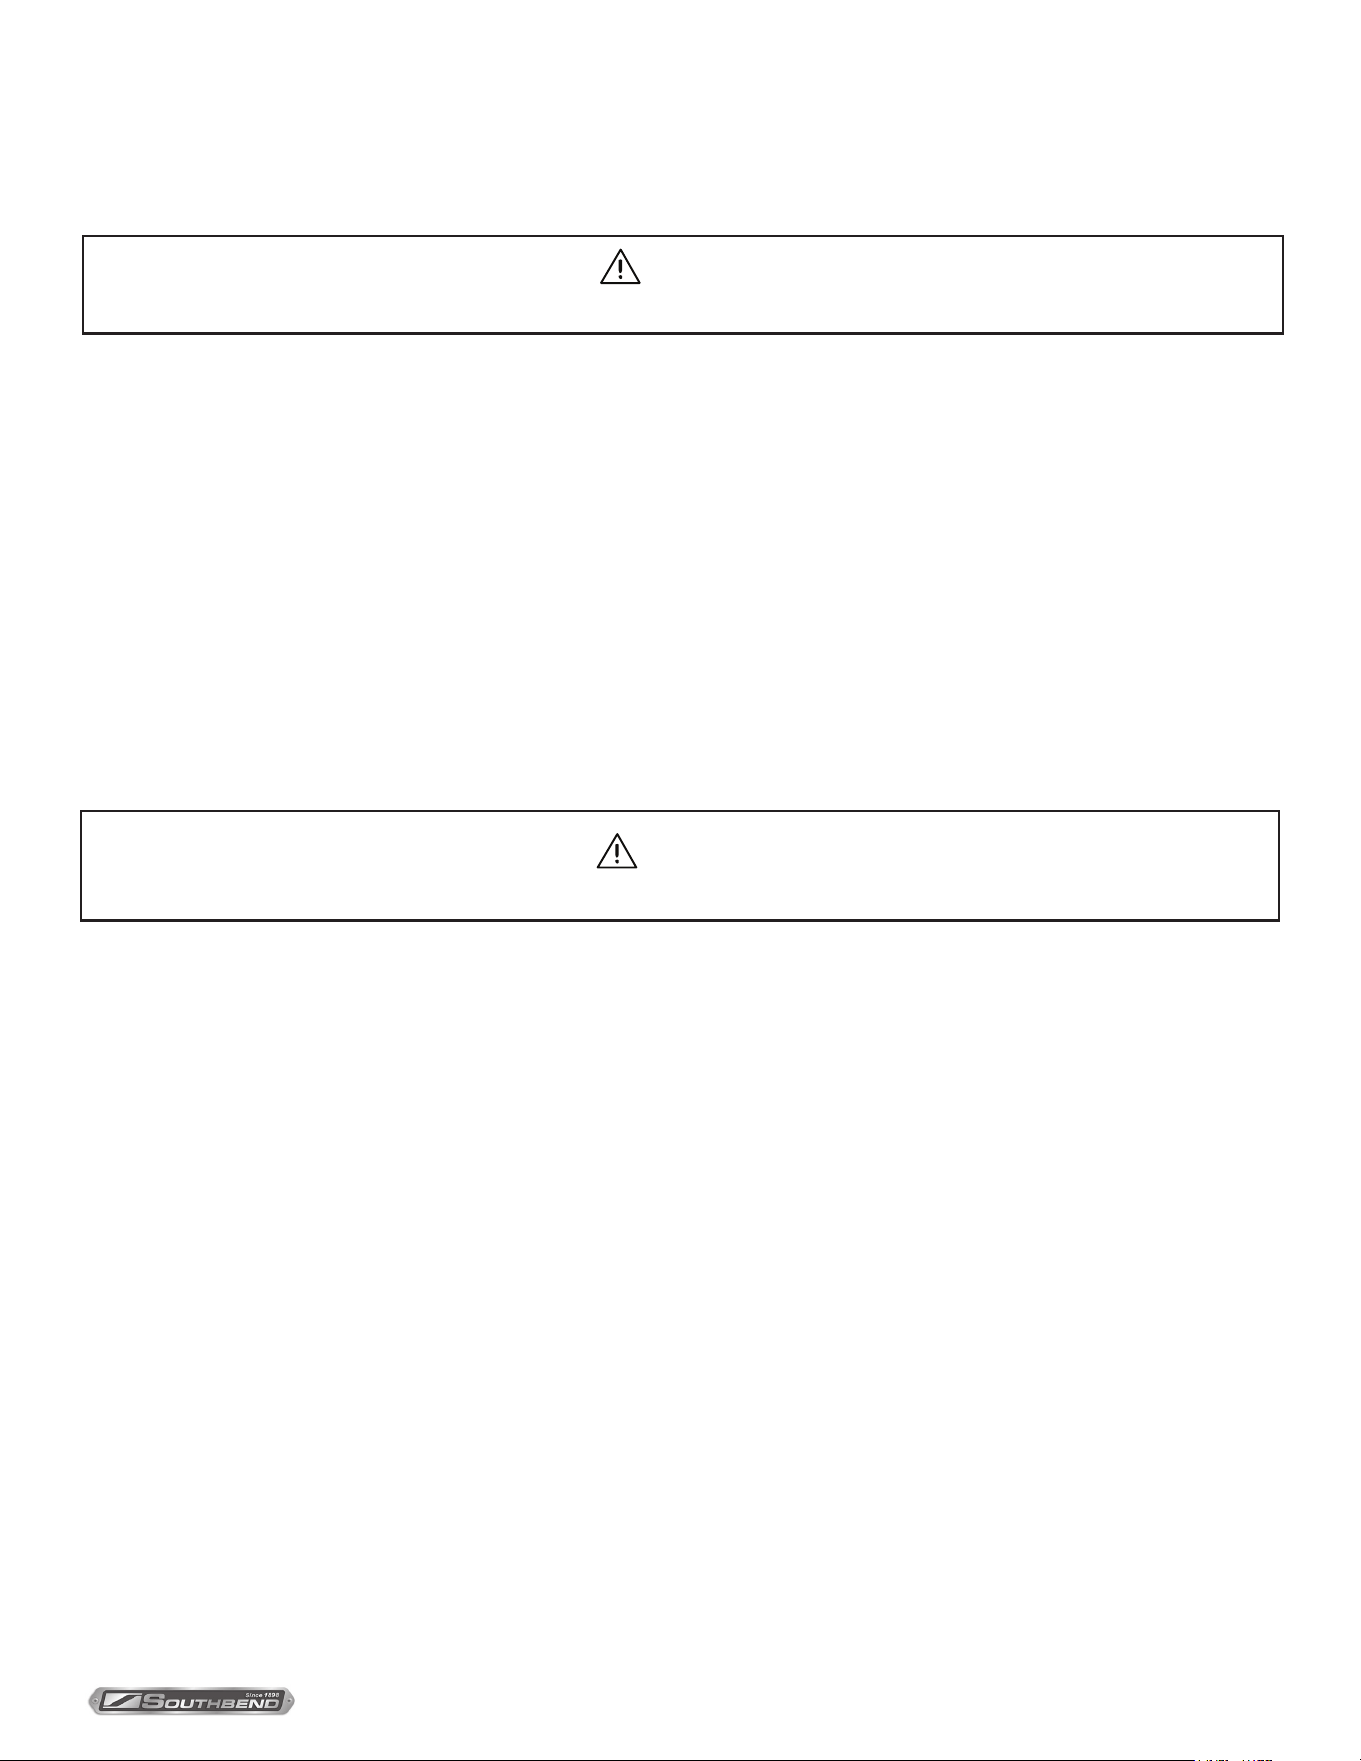
SPECIFICATIONS
GAS CHARACTERISTICS
DIMENSIONS
* For use on non-combustible floors only.
As continued product improvement is a policy of Southbend, specications are subject to changge without notice.
Service Connections
SERVICE CONNECTIONS
- GAS CONNECTION: Supplied through 3/4" NPT Pipe. A gas shut-o valve must be installed in supply piping convenient and adjacent to
appliance
–
ELECTRICAL CONNECTION: 120V Units supplied with 8' cord with 3 prong plug. Total Amps: 3A (220V & 208/240V options available).
– COLD WATER: 3/8” O.D. tubing to optional faucet. (OPTIONAL)
– HOT WATER: 3/8” O.D. tubing to optional faucet. (OPTIONAL)
– DRAIN: 1 1/2" - 11 1/2 NPT (OPTIONAL)
Model
Gas Supply
BTU/HR kW/HR. Supply Pipe Pressure (W.C.)
SKG-30-SB 110,000 32.2
Natural
7” - 14” (178 mm - 356 mm)
Propane
11” - 14” (279 mm - 356 mm)
SKG-40-SB 156,000 45.7
Model Capacity Units A B C D
E
F
Ø2 Ø3
SKG-30-SB
30 Gallons
(114 liters)
inches
mm
38.64”
(981 mm)
33.84”
(860 mm)
27.88”
(708 mm)
25.54”
(649 mm)
38.25”
(972 mm)
42.75”
(1086 mm)
16.92”
(429 mm)
SKG-40-SB
40 Gallons
(152 liters)
inches
mm
48.62”
(1235 mm)
43.84”
(1114 mm)
37.88”
(962 mm)
25.54”
(649 mm)
38.25”
(972 mm)
42.75”
(1086 mm)
21.92”
(556 mm)
Model
Capacity
Shipping Weight Minimum Clearance *
Gallon Liter
SKG-30-SB 30 114 400 lbs. [181 kg] Sides 0
SKG-40-SB 40 152 490 lbs. [222 kg] Back
6”
(152 mm)
SERVICE CONNECTIONS
INSTALLATION & OPERATION MANUAL 15-000002 REV 0 (04/24)
PAGE
7
OF16
Gas Skillet
• Keep this appliance area free and clear of combustibles.
• Do not obstruct the ow of combustion and ventilation air.
• Allow adequate ventilation to unit. Install under exhaust hood.
• Keep this manual for future reference.
• This installation must conform with local codes or, in the absence of local codes, with National Fuel Gas Code, ANSI
Z223.1 – latest edition; or the Natural Gas Installation Code, CAN/CGA–B149.1; or the Propane Installation Code,
CAN/CGA-B149.2, as applicable.
• The skillet and its individual shuto valve must be disconnected from the gas supply piping system during any
pressure testing of that system at test pressure in excess of 1/2 Psi (3.45 kPa).
• The skillet must be isolated from the gas supply system by closing its individual manual shuto valve during any
pressure testing of the gas supply piping system at test pressures equal to or less than 1/2 Psi (3.45 kPa).
• This unit is serviceable from the front. Do not install in such a manner that a service person cannot remove top panel
of the console. Be aware that the components and wires are attached to the bottom of the panel.
• When installed, this appliance must be electrically grounded in accordance with local codes, or, in the absence of
local codes, with the National Electric Code, ANSI/NFPA No. 70 – latest edition.
• In Canada, this installation must conform to C.S.A. Standard C22.2 Canadian Electrical Code.
• The wiring diagram adhesive label is located on the inside of the right console’s panel.
• The product must be installed in a room with adequate air supply for complete gas combustion.
• Do not place on or directly against the unit any objects that would block air openings into the combustion chamber.
• Suitable for use on combustible oors.
• Clearances from both combustible and noncombustible construction are 0” (0 mm) from side walls, 6” (152.4 mm)
from rear wall.
WARNING
Disconnect the power supply to the appliance before cleaning or servicing.
SERVICE CONNECTIONS
CAUTION
Be sure to read.
INSTALLATION & OPERATION MANUAL 15-000002 REV 0 (04/24)
PAGE
8
OF 16
Gas SkilletINSTALLATION INSTRUCTION
GENERAL INSTALLATION
1. Remove carton from skid, being careful not to dent or scratch nished surfaces of unit.
2. Inspect unit carefully for shipping damage. File claim with carrier immediately if damage is found.
3. Remove screws holding unit to skid.
4. Transfer unit to desired position and make level and steady by adjusting feet to compensate for oor irregularities. Bolt
the ange feet to oor.
5. Raise skillet cover to full open position. Check to make sure burners and carryover tube are in position and securely
seated.
6. Lower skillet by turning hand crank, until fully seated on frame. Skillet is equipped with limit switch, which does not
permit burners to ignite until skillet is lowered to less than 10° o normal horizontal cooking position.
7. Gas service connections:
a. This unit is factory-adjusted for gas consumption of 110,000 BTU/Hour (on 30-gallon unit) or 156,000
BTU/Hour (on 40-gallon unit) at the pressure indicated. Please read the rating plate on the back
side of the console. If this plate is marked for a dierent gas than that supplied, notify your dealer
immediately.
b. Use new 3/4 I.P.S. iron or steel pipe complying with ANSI Standard for Wrought-Steel and Wrought-
Iron Pipe B36 – latest edition, properly threaded, reamed, and free from chips, oil, and dirt. If pipe
dope is used, apply a moderate amount, leaving two end threads bare. Gas connection is on the rear
of the right console.
c. Natural gas units are equipped with a pressure regulator factory-adjusted to give 3.5” (89 mm) water
column manifold pressure. The supply pressure must be at least 7” (178 mm) water column pressure.
d. Propane gas units are equipped with a pressure regulator factory-adjusted to give 10.5” (266.7 mm)
water column manifold pressure for 30-gallon unit and 6” (152.4 mm) water column manifold pressure
for 40-gallon unit. The supply pressure must be at least 11” (279 mm) water column pressure.
e. Maximum supply pressure must not exceed 1/2 Psi (3.45 kPa) for both natural and propane gas.
f. Perform a gas leak test of all newly-made joints, as well as those leading to the main gas control valve
and pilot burner, using a soap solution. Do not use ame.
2.0 INSTALLATION INSTRUCTIONS
WARNING
DO NO CONNECT GAS LINES. Only a qualified installer or service man should make the installation.
INSTALLATION & OPERATION MANUAL 15-000002 REV 0 (04/24)
PAGE
9
OF16
Gas Skillet INSTALLATION INSTRUCTION
WARNING
Never use an open flame to check for gas leaks. Check all connections for leaks using soapy water
before use.
WARNING
For an appliance equipped with casters, the installation shall be made with an adequate flexible electrical
conduit; adequate means must be provided to limit the movement of the appliance without depending on
or transmitting stress to the electrical conduit; the location where’re straining means may be attached is
to the rear of the stand, below power supply connection.
INSTALLATION WITH CASTERS
1. Installation shall be made with a connector that complies with the Standard for Connectors for Moveable Gas
Appliances, ANSI Z21.69, CSA-6.16, and a quick-disconnect device that complies with the Standard for Quick-
Disconnect Devices for Use with Gas Fuel, ANSI Z21.41 or the Standard for Quick-Disconnect Devices for Use with
Gas Fuel, CSA-6.9.
2. Adequate means must be provided to limit the movement of the appliance without depending on the connector and
the quick-disconnect device or its associated piping to limit the appliance movement.
BEFORE USE
Using a non-corrosive, grease-dissolving commercial cleaner, clean the protective metal oils from all surface parts and the
interior of the tilting braising pan. Follow the cleaner manufacturer’s directions. Rinse thoroughly and drain the pan. Wipe
dry with a soft clean cloth.
START-UP PROCEDURE
1. Open manual gas shuto valve.
2. Ensure that the braising pan is in the DOWN position.
3. Push the power switch to ON position. Turn THERMOSTAT dial to desired setting. The red TEMPERATURE LIGHT
will come on. This will turn on the electronic ignition which will light the burners.
4. If the green IGNITION LIGHT does not come on after 35 seconds, it means that the gas module is not supplying
power to the gas valve. So, push the power button to OFF and then ON again for restart.
5. When braising pan has reached set temperature, the red TEMPERATURE LIGHT will go o and the burners will shut
o. The burners will cycle on and o thereafter to maintain set temperature. The red TEMPERATURE LIGHT will be
on when the burners are on and o when burners are o.
6. If gas supply is interrupted during operation, push the power switch to the OFF position and turn gas supply OFF. Wait
ve minutes, then repeat Steps 1 through 4 to restart.
7. Push power switch to OFF position when braising pan is not in use.

INSTALLATION & OPERATION MANUAL 15-000002 REV 0 (04/24)
PAGE
10
OF 16
Gas SkilletINSTALLATION INSTRUCTION
SHUTDOWN INSTRUCTIONS
Push the power switch to OFF position and close the manual gas shuto valve.

INSTALLATION & OPERATION MANUAL 15-000002 REV 0 (04/24)
PAGE
11
OF16
Gas Skillet OPERATION INSTRUCTION
3.0 OPERATION INSTRUCTIONS
The SKG Models SKG-30-SB (110,000 BTU input) and SKG-40-SB (156,000 BTU input) are electrically operated skillets,
tilting type, with 30-and 40-gallon capacities, respectively. They are equipped with a solid state thermostat and high-limit
control with a 60°F to 450°F temperature scale.
BASIC FUNCTIONS
The SKG Tilting Skillet is a very versatile cooking appliance. It can perform basic cooking functions, such as braising meat,
sautéing, pan-frying chicken, steaming vegetables, boiling, and simmering.
OPERATION OF SKG TILTING SKILLET WITH ELECTRONIC IGNITION
1. Check to see that the correct gas and electric connection has been made to the unit.
2. Be sure skillet has been or is cleaned before using.
3. Be certain skillet is lowered to the normal horizontal cooking position so burners will light.
4. Push the power switch to ON position and set the thermostat to the desired temperature.
5. Preheat to desired setting before grilling, pan frying, or any other type of cooking except boiling.
6. Cover should be up for most types of cooking, except simmering or boiling. The cover has a lip at the rear that will direct
condensate into the skillet rather than onto the cabinet base.
7. When food is cooked, it should be immediately removed from skillet to prevent overcooking.
8. To tilt the skillet in manual models use the hand crank and for “PT” models use the switch on top of the console.
Note: For best results, allow unit to cycle ON/OFF once.
a. To use the manual override feature in PT models, take the hand crank shaft of the clips from the
bottom of the right console.
b. Take o the plug from the front shaft hole of the console.
c. Push the handle through the hole and engage the male-female connection of the hand crank
shaft and gearbox shaft. Then start tilting.
9. For cleaning instructions, see Section 5–Maintenance and troubleshooting

INSTALLATION & OPERATION MANUAL 15-000002 REV 0 (04/24)
PAGE
12
OF 16
Gas SkilletOperation Instructions
• Disconnect the power supply to skillet before cleaning or servicing. (Note: “PT” models should have the skillet raised
to washing position before disconnecting power supply.)
• Keep this appliance area free and clear of combustibles.
• Do not obstruct the ow of combustion and ventilation air.
• If skillet pan is dicult to raise, the lift gears may need to be lubricated. The gears are located inside the right console.
Apply a liberal amount of grease along the helical thread of the worm where it engages the worm gear. Use multi-
purpose, NLGI #2 lithium-based, water-resistant grease.
• Keep this manual for future reference.
• Consult the factory, the factory representative, or a local service company to perform maintenance and repairs.
• In the event of a power failure, do not operate appliance.
• Periodically examine the ue outlet located behind the skillet cover for any obstructions.
• Appliances with casters are always to be restrained from movement. If removal of the restraint is necessary, always
reconnect the restraint when the appliance is returned to its originally installed position.
CAUTION
Be sure to read.

INSTALLATION & OPERATION MANUAL 15-000002 REV 0 (04/24)
PAGE
13
OF16
Gas Skillet Test Kitchen Bulletin
4.0 Test Kitchen Bulletin
Cooking Facts on Parade
1. The SKG Skillet is one of the most versatile pieces of equipment to be found in any restaurant or institutional kitchen.
2. This unit will stew, simmer, pan-fry, braise, grill, and sauté – and all with a very uniform heat pattern.
3. For best results, the Tilting Skillet should always be preheated and allowed to cycle once.
4. A great deal of heavy lifting and transferring of foods from one pan to another can be eliminated, and, therefore, pot
washing will be reduced.
5. This type of equipment usually reduces the total cooking time by as much as 25% on combination dishes.
6. Sauces usually lose less moisture, as the cover reduces evaporation.
7. Large batches of gourmet items can be prepared with less work and with more uniform results.
8. Frozen vegetables can be cooked in the SKG Skillet in the serving pan, then removed and transferred directly to the
serving line.
9. The following temperatures should be used: Simmering: Maximum of 200°F
Sautéing: 225 - 275°F
Searing: 300 - 350°F
Frying: 325 - 375°F
Grilling: 350 - 425°F
10. Temperatures of approximately 200°F should always be used for milk-based products, or scorching will take place.
Lower temperatures (150 - 175°F) prevent thickening.
11. Some items should be started at a high temperature and then reduced. This permit sealing for about 20% of the time
and cooking for the remaining 80%.
12. The cover has a lip at the back edge that directs the condensate on the cover back into the skillet.
13. The stainless steel SKG Skillet is rapidly cleaned with a mild detergent. Water, waste, and scraps are easily removed
into the receiving pan for disposal. (It is always recommended that this type of unit be pre-soaked if possible.)
14. Breakfast foods such as sausage, bacon, pancakes, fried eggs, scrambled eggs, and French toast are a few of the
more common items that can be cooked in the SKG Skillet.
15. When cooking meat or poultry, all pieces should be of fairly uniform size and weight and should be turned at least
once while simmering.
16. This unit can be converted to a proof box by placing a small amount of water in the pan to form steam and then
placing the food in another pan. The thermostat should be set very low (100 - 150°F).
17. The unit can also be used as a holding cabinet by adding water and settling the thermostat at approximately 175°F.
18. When using water over and over for vegetable cookery, be sure to add water occasionally to keep level at about 3 - 4
inches. Thermostat should be set at 250°F.
19. Perforated 2 ½” - deep pans are suggested for vegetables for the most satisfactory results. The pan can then be
removed easily and transferred to the serving line.
INSTALLATION & OPERATION MANUAL 15-000002 REV 0 (04/24)
PAGE
14
OF 16
Gas Skillet
5.0 MAINTENANCE AND TROUBLESHOOTING
CLEANING
After each use, allow the tilting braising pan to cool and clean it. Keep exposed cleanable areas of the tilting braising pan
clean at all times.
ADJUSTMENTS
All units are adjusted at the factory. In case of any problems in operation at initial installation, check type of gas and mani-
fold pressure and compare it with information on rating plate.
At least twice a year, have an authorized service person clean and adjust the tilting braising pan for maximum perfor-
mance.
COMMON PROBLEMS
Burners do not come on:
1. Gas supply to unit is “OFF”.
2. Manual shut o valve is “OFF”.
3. Power switch is not “ON”.
4. Pan not in lowest position.
5. Ignition control not functioning.
6. Unit electrical supply is not plugged in or turned on.
7. Braising pan has overheated, and burners were shut o by high-limit thermostat. Wait for pan to cool.
CAUTION
Disconnect the power supply to the appliance before cleaning or servicing.
1. The skillet should be cleaned daily.
2. Wash the skillet with a mild detergent and hot water. If food is stuck to the surface of the skillet pan, soak it and use a
little heat to loosen the food. Then, wash with clear water and dry.
3. Be sure to wash under the skillet cover and rinse with clean water.
4. Check the skillet pouring lip corners to be sure they are clean. Also, wash around the exterior of the skillet. Rinse with
clean water and air dry.
5. Clean around burner air mixers and orices (at rear of burner) if lint has accumulated.
CAUTION
The appliance and its parts are hot. Use care when operating, cleaning and servicing the appliance.

INSTALLATION & OPERATION MANUAL 15-000002 REV 0 (04/24)
PAGE
15
OF16
Gas Skillet
Burners produce carbon deposits:
1. Wrong size orices.
2. Burner air not adjusted properly.
3. Wrong gas supply.
4. Incorrect pressure at supply
Pan dicult to tilt:
1. Unit not level.
2. Segment gear worn.
3. Worm gear worn
INSTALLATION & OPERATION MANUAL 15-000002 REV 0 (04/24)
PAGE
16
OF 16
Gas Skillet
SKG-30-SB, SKG-40-SB, SKG-
30-PT-SB, & SKG-40-PT-SB
Gas Skillet
A product with the Southbend name incorporates the best in durability and low maintenance. We all recognize, however,
that replacement parts and occasional professional service may be necessary to extend the useful life of this appliance.
When service is needed, contact a Southbend Authorized Service Agency, or your dealer. To avoid confusion, always
refer to the model number, serial number, and type of your appliance.
SOUTHBEND STEAM
A Middleby Company
1100 Old Honeycutt Road Fuquay-Varina, North Carolina 27526 USA
www.southbendnc.com

