2
3
1

Contents
What’s in the box
............................................................
............................................................
................................................
.............................................................
.............................................................
..................................................................
......................................................
.......................................................
....................................................
............................
...........................................
.................................................................
..............................
...........................................................................
.......................................................
.......................................................
.......................................................................
........................................................
................................................
.......................................................................
........................
Product Overview
Screen Icons Description
LED Status Guide
Operation & Features
Wearing & Maintenance
Troubleshooting
Specifications
Safety & Compliance
Charging the Devices
Optimal Charging Station Placement
Acquiring a GPS/RF Signal
Power On/Off
Calibrating the Magnetic Compass
Pairing
Switching Channels
Light/Sound Control
Geo-fence
Live Tracking Mode
1.
2.
3.
4.
5.
6.
7.
8.
9.
10.
1.
2.
Proper Fit
How to Hold the Device for Max Range
2
3
5
6
19
21
22
..........................................................
The Hosmart Story
25
7
7
8
9
10
11
12
13
14
15
16
17
17
18
1
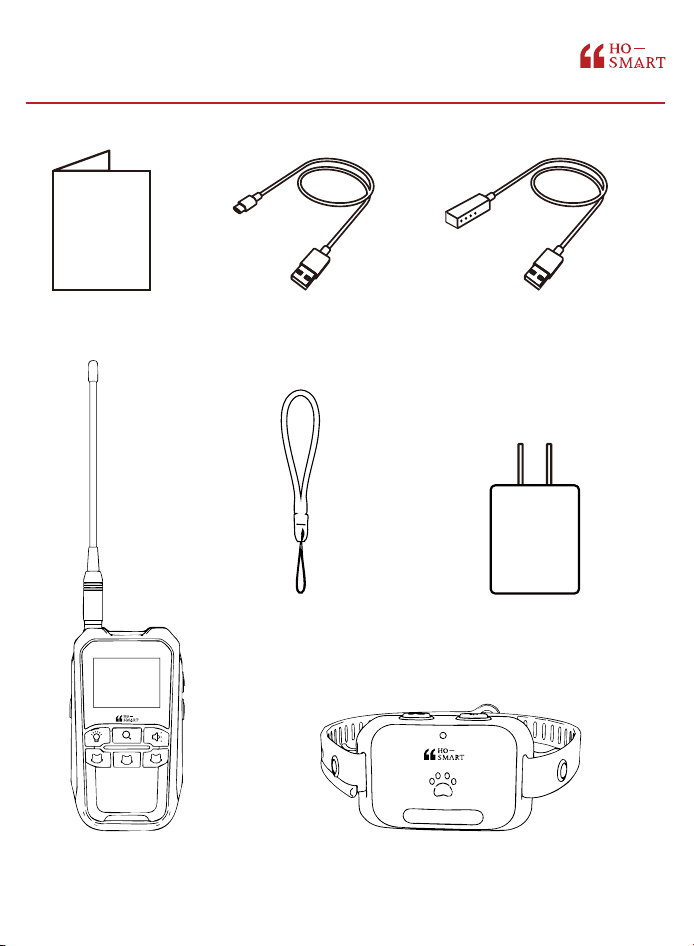
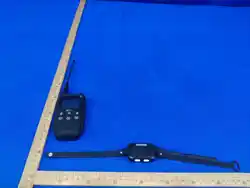
Controller Tracker
Type-C Charging Cable Magnetic Charging CableUser Manual
Adapter
User
Manual
Wrist Strap
2
3
1
What’s in the box
2
2
3
1
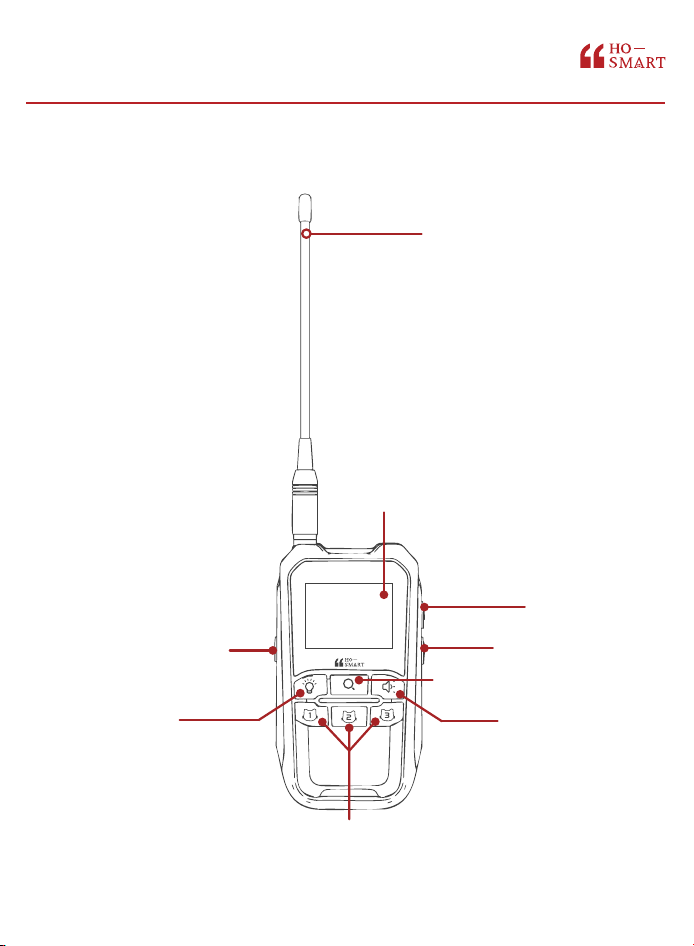
Antenna
Display Screen
Power Button
Pair Button
Geo-fence Button
Channel Button (1/2/3)
Live Tracking Button
Sound Button
Light Button
Product Overview
3
Controller (handheld device)
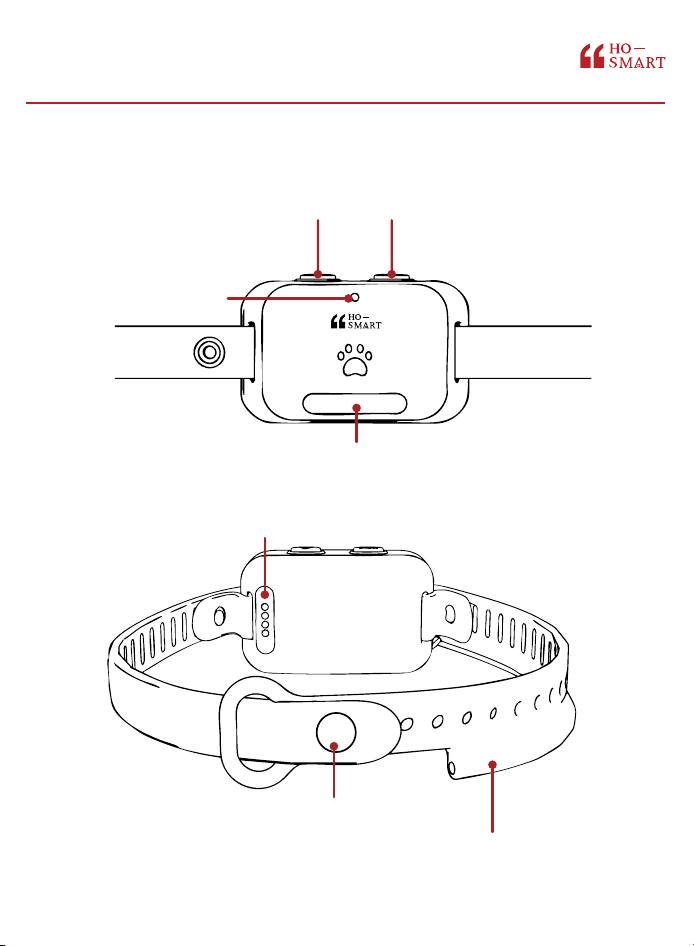
Pair Button
Locator Light
Power Button
Status Light
Breakaway Clasp
Concealed Collar
Antenna
Magnetic Charging Port
Product Overview
4
Tracker
(Top Left)
Tracker has GPS signal
Tracker doesn't have
GPS signal
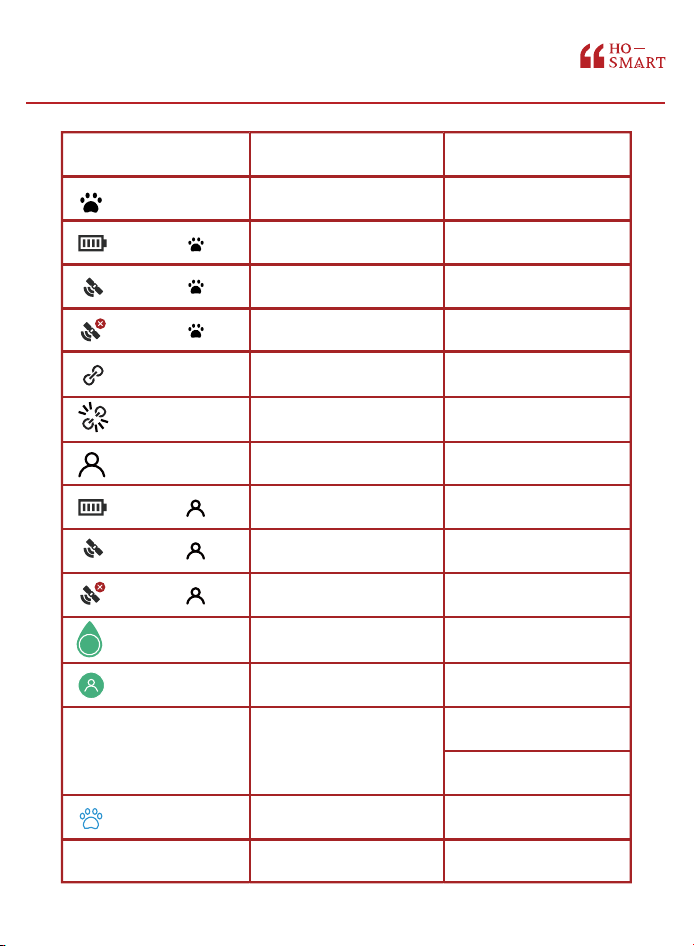
Shows the GPS signal received by
the Tracker.
Tracker may be obstructed.
Icon / Area
123
Item Name Function Description
Tracker
Displayed on the left side belongs
to the Tracker.
(Green Arc)
(Green Dot)
1 2 3
Last Position(Lower left)
(On Compass)
Directional Indicator
User Position
Channel / Cat ID
Cat/Tracker's Position
Last known location
The green arc acts as a compass,
pointing towards the Cat's current
location relative to where you are
standing.
Represents the center point (You/
Handheld). The distance and
direction are calculated from this
point.
Indicates which Cat is currently
being tracked or trained.
Example: If '1' is highlighted blue,
you are controlling Cat 1.
Indicates the current direction and
distance of your cat relative to your
position.
Tracker may be disconnected from
the controller. Therefore, the last
successfully recorded location is
displayed.
(Next to )
(Top Right)
(Top Right)
(Top Right)
(Next to )
Tracker Battery
Connection Established
Connection Lost
Controller
Controller Battery
Displays the remaining battery level
of the Cat tracker. Please charge
the tracker when this bar is low.
Displayed on the right side belongs
to the Controller.
Displays the remaining battery
level of the Controller.
Controller has GPS signal
Controller doesn't have
GPS signal
Shows the GPS signal received by
the Controller.
Please move to open area.
Controller is receiving data from
the Tracker.
Cannot communicate with Tracker.
Check distance or battery.
(Next to )
(Next to )
(Next to )
(Next to )
Screen Icons Description
(Controller)
5
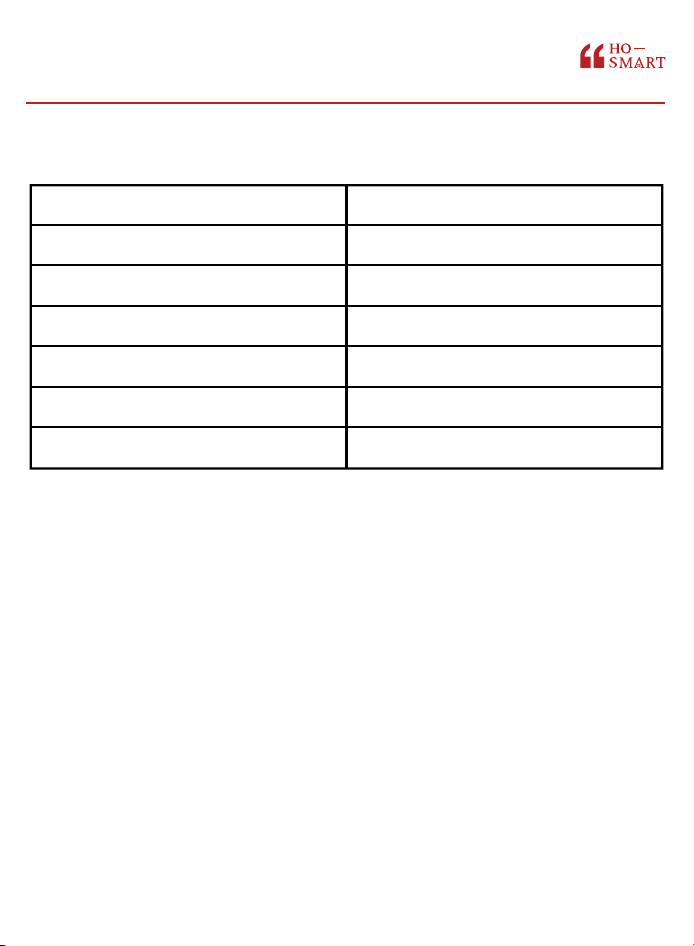
LED Behavior
Solid Blue
Fast Flashing Blue
Slow Flashing Blue
Solid RED
Solid Green
LED Off
Status Description
Tracker Powered On
Pairing Mode
Tracking Mode
Charging
Fully Charged
Standby / Power Off
LED Status Guide
6
LED Status Guide (Tracker)
Operation & Features
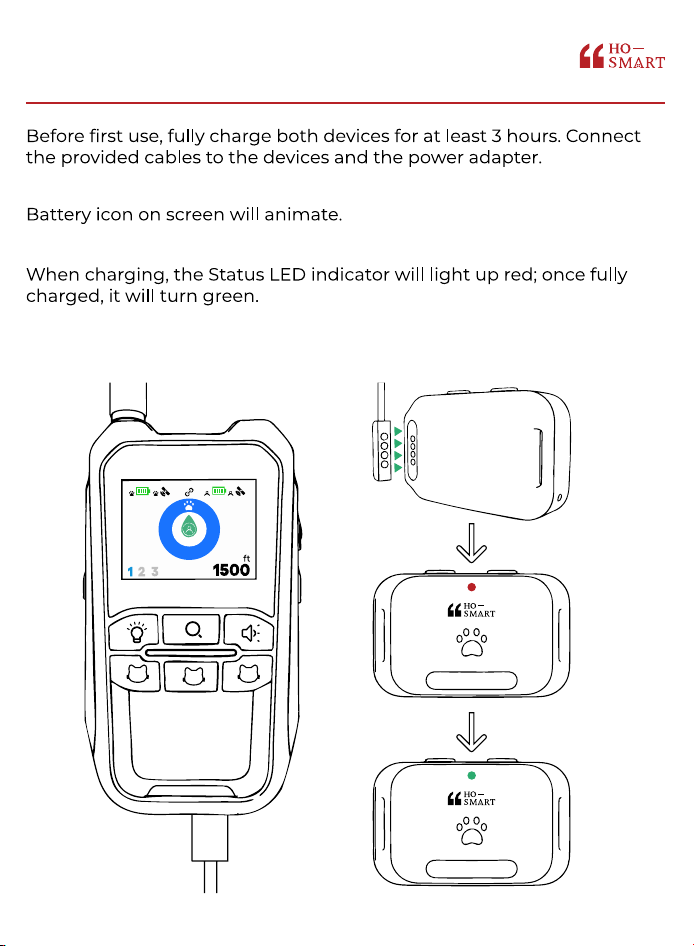
Charging the Devices
7
Controller
Tracker
2
3
1
Optimal Charging Station
Placement
8
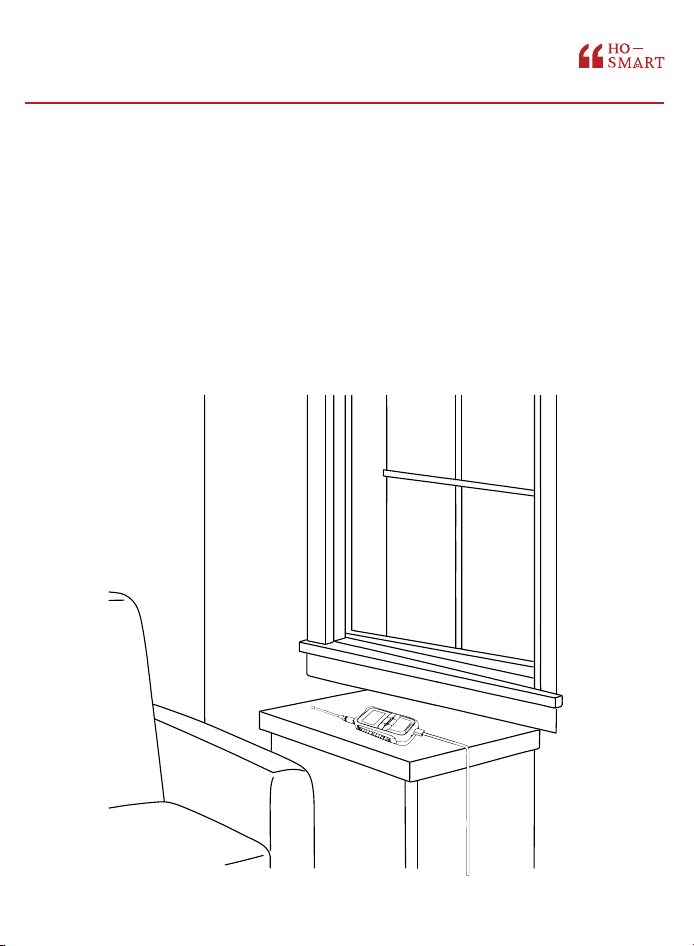
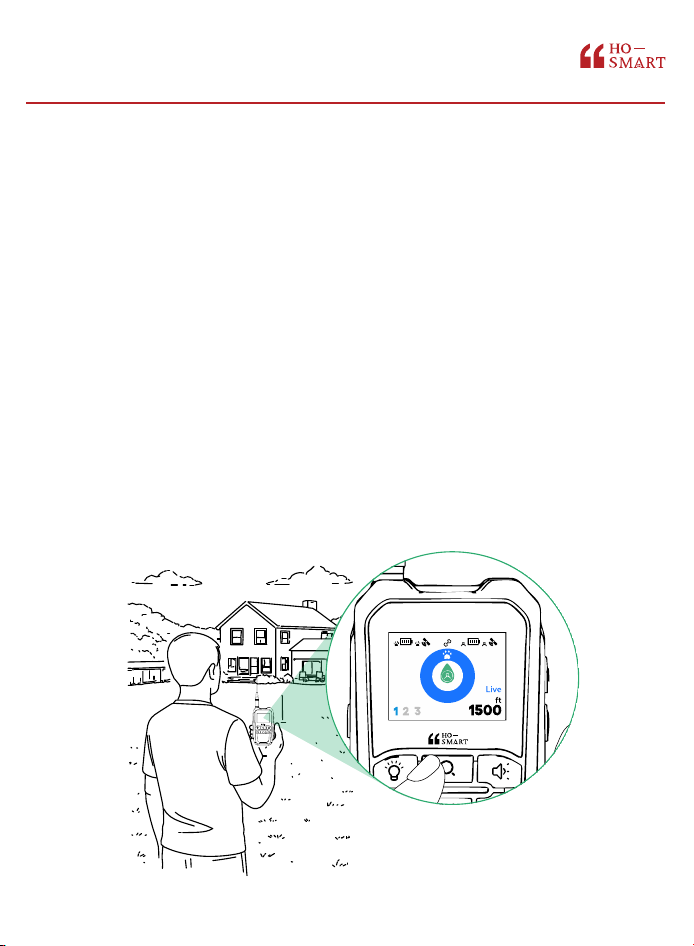
GPS signals can be obstructed by thick walls and
roofing. For the best performance, we recommend the
following:
Place by a window: Position your controller near a window where it
has a clear view of the sky. This ensures the device maintains a GPS
lock even while charging.
After Use: We recommend charge the handheld device immediately
after every session to ensure it is fully charged and ready for your next
outing.
Acquiring a GPS/RF Signal
9
If your handheld device is not showing a GPS
signal or the location is not updating:
1. Move to Open Ground: Move away from tall buildings, dense trees, or
structures to an open area. Stand still for about 1 min to allow the
device to acquire satellite data.
2. Use Live Tracking Mode: You can enable "Live Tracking Mode
(Real-Time Tracking)" to increase the data refresh rate. This forces the
device to actively search for a location fix, which can speed up the
initial satellite acquisition. After using this Real-Time Tracking
function, be sure to exit this mode to save battery power.
Note: We strongly recommend turning on "Live Tracking
Mode" when looking for your cat, when the GPS signal is lost,
or when the RF connection between the handheld device
and the pet unit is disconnected. This helps you quickly
acquire location data.
2
3
1
2
3
1
Power On/Off
10
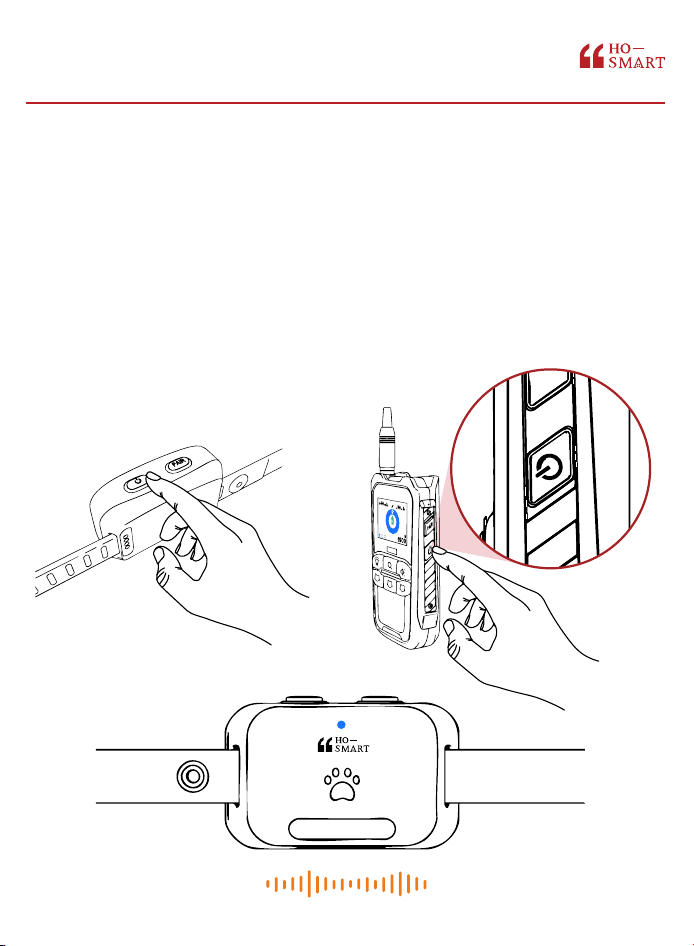
Turn ON: Press and hold the Power Button for 3 seconds.
Controller: Screen lights up.
Tracker: LED glows solid blue for 3 seconds and beeps.
Turn OFF: Press and hold the Power Button for 3 seconds.
Controller: Screen turns off.
Tracker: Blue LED turns off and beeps.
Note: A short press of the power button on the controller
locks the screen. Another short press unlocks it.
2
3
1
PAIR
Calibrating the Magnetic
Compass
11
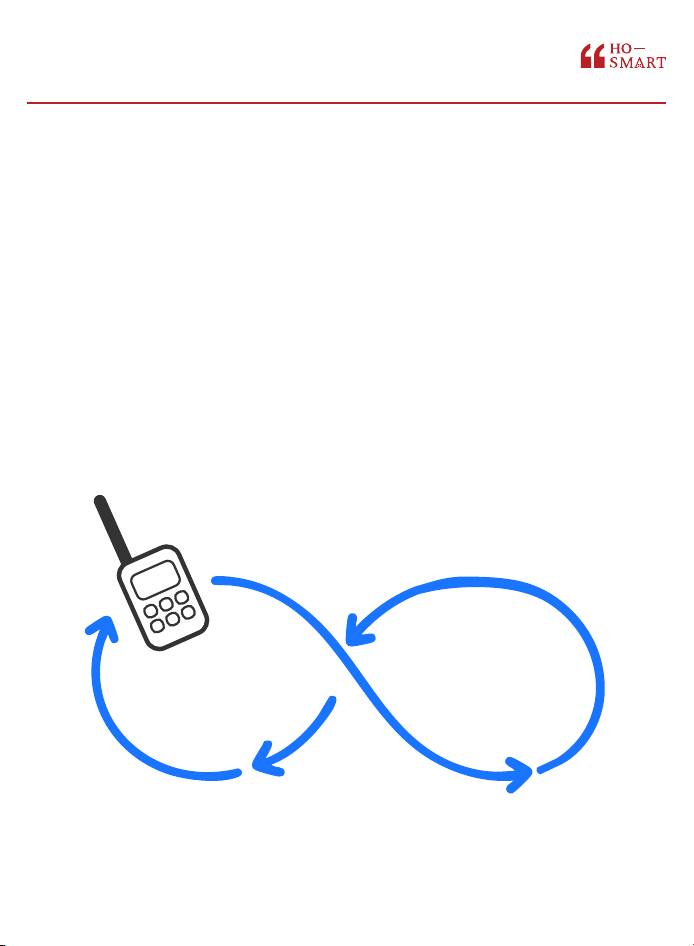
To ensure the directional accuracy of your controller, you may
need to calibrate the compass upon first use or if the device
has moved a significant distance while turned off.
1. Power on the controller.
2. Follow the on-screen prompts on the controller.
3. When prompted, rotate the device in a figure-8 motion as shown in
the diagram. This helps the internal sensors align with the magnetic
north.
Note: Please refer to the Figure 8 diagram for the correct
motion.
Pairing
(Connecting the Tracker)
12
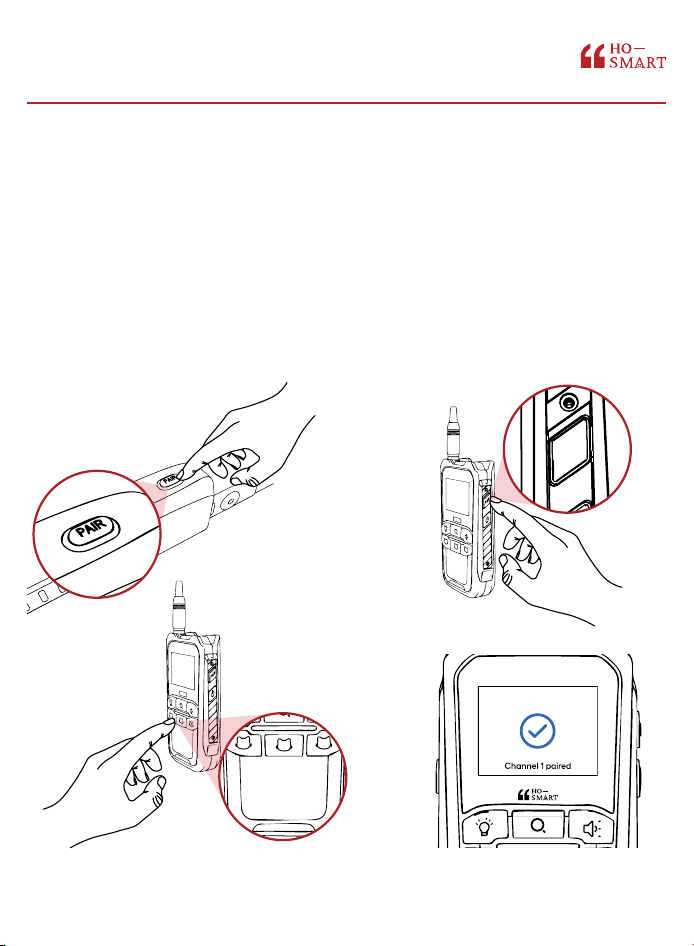
Note: The device usually comes pre-paired. Use this only if
adding a new Tracker.
1. Ensure both devices are ON.
2. On the Tracker, short-press the Pair Button. The blue LED will flash
rapidly.
3. Then, on the right side of the controller, short-press the Pair Button.
4. Press the Channel Button (1, 2, or 3) on the controller to assign the
Tracker to a slot.
5. The screen will display "Channel 1/2/3 paired".
2
3
1
2
3
1
1. 2.
4.3.
PAIR
2
3
1
Switching Channels
(Multi-Cat System)
13
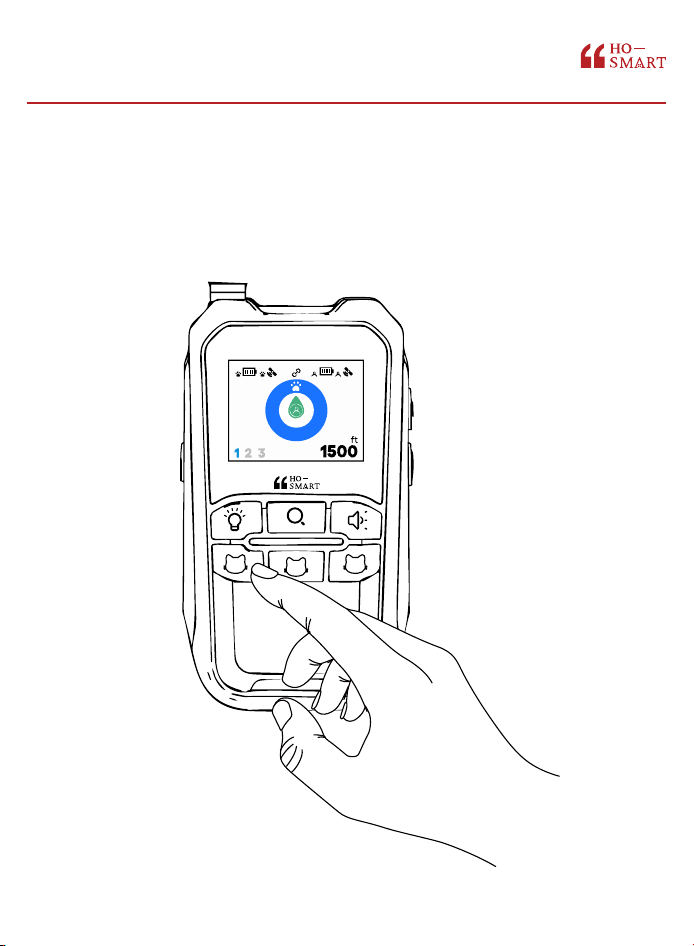
1. Press button 1, 2, or 3 on the Controller.
2. The screen will update to show the distance and direction of the
selected cat (e.g., Cat 1, Cat 2, or Cat 3).
2
3
1
Light/Sound Control
14
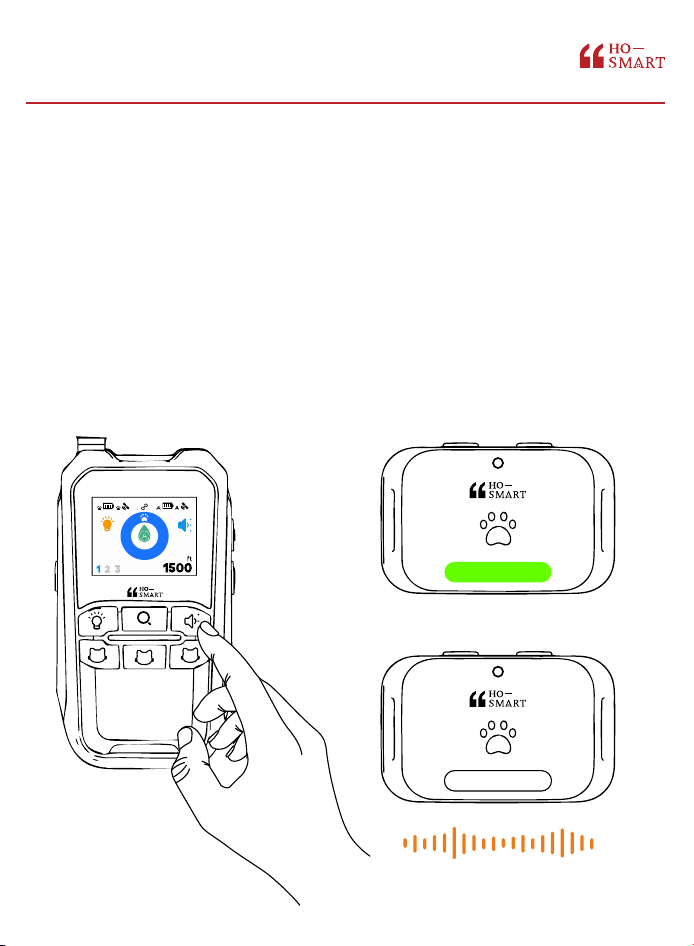
Use these features to locate your cat visually or audibly.
Light Control:
1. Turn On: Short-press the Light Button. A light icon appears on the
screen, and the tracker's LED bar will flash rhythmically.
2. Turn Off: Short-press the Light Button again. The icon disappears,
and the tracker light turns off.
Sound Control:
1. Turn On: Short-press the Sound Button to toggle the sound on.
2. Turn Off: Short-press the Sound Button again. The icon disappears,
and the tracker sound turns off.
2
3
1
Geo-fence (Loss Alert)
15
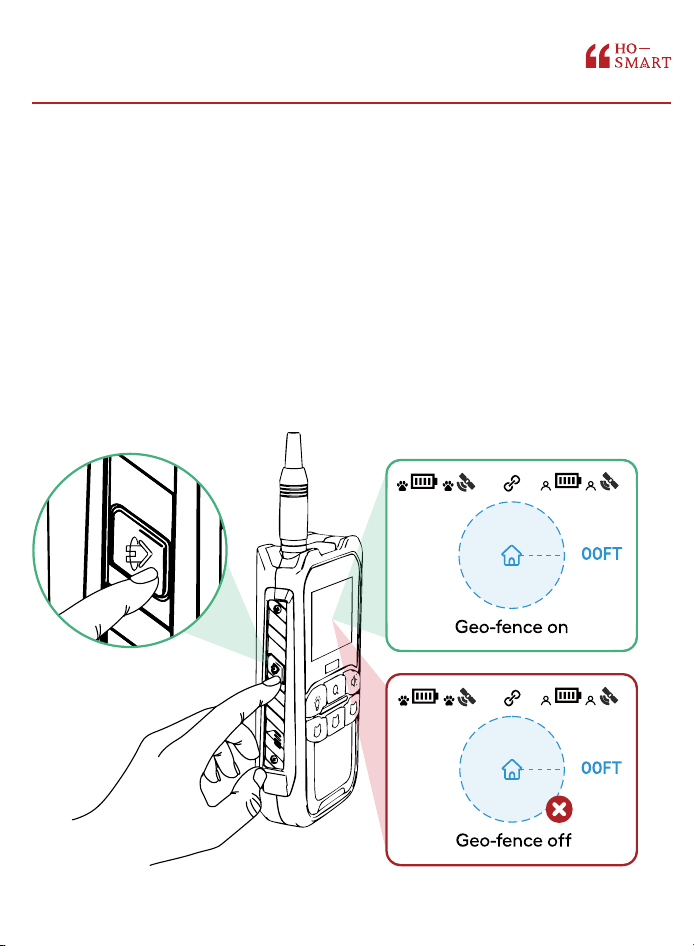
The Geo-fence creates a virtual circular boundary. If the cat
exits this circle, the controller will alarm.
1. Select the cat channel.
2. Activate: Short-press the Geo-fence Button. The icon(500FT Range)
will appear.
3. Alarm: If the cat leaves the zone, the controller will beep
continuously(alert that the cat is at risk of getting lost). Press any key
to silence.
4. Deactivate (Turn Off): Short-press the Geo-fence Button again. The
Geo-fence icon will disappear, indicating the Geo-fence is turned off.
5
2
3
1
5
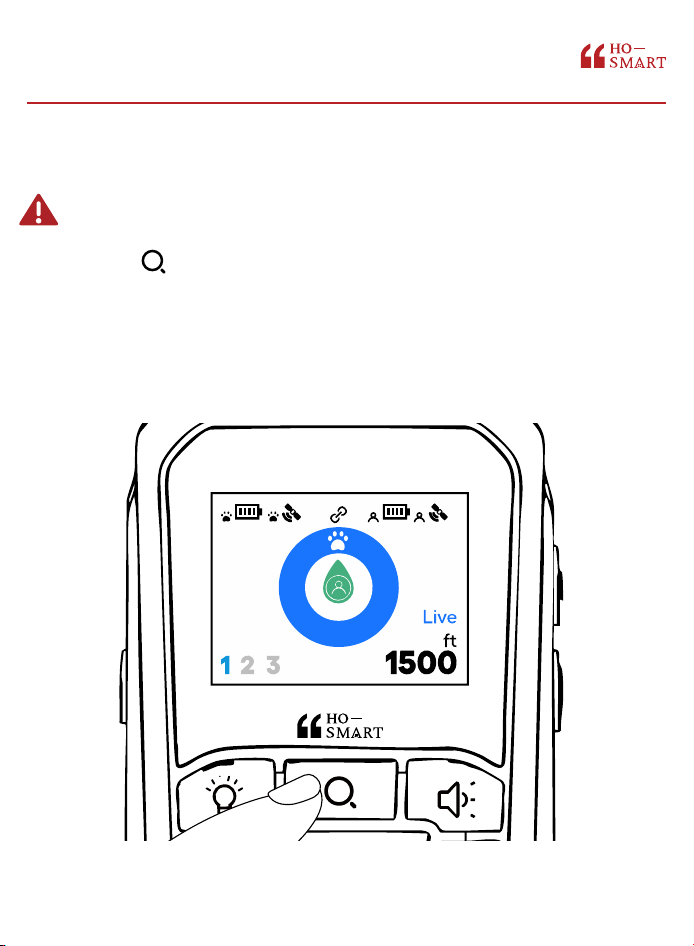
Standard mode updates the location periodically to save battery
(every 30 mins).
1. Press the Button.
2. Screen displays "Live". The update rate increases to every 5 seconds.
Live Tracking Mode
(Real-Time Tracking)
16
Please use the "Live Tracking Mode" if you require
precise tracking.
Note: This mode consumes battery faster. Please remember
to press again to exit when finished.
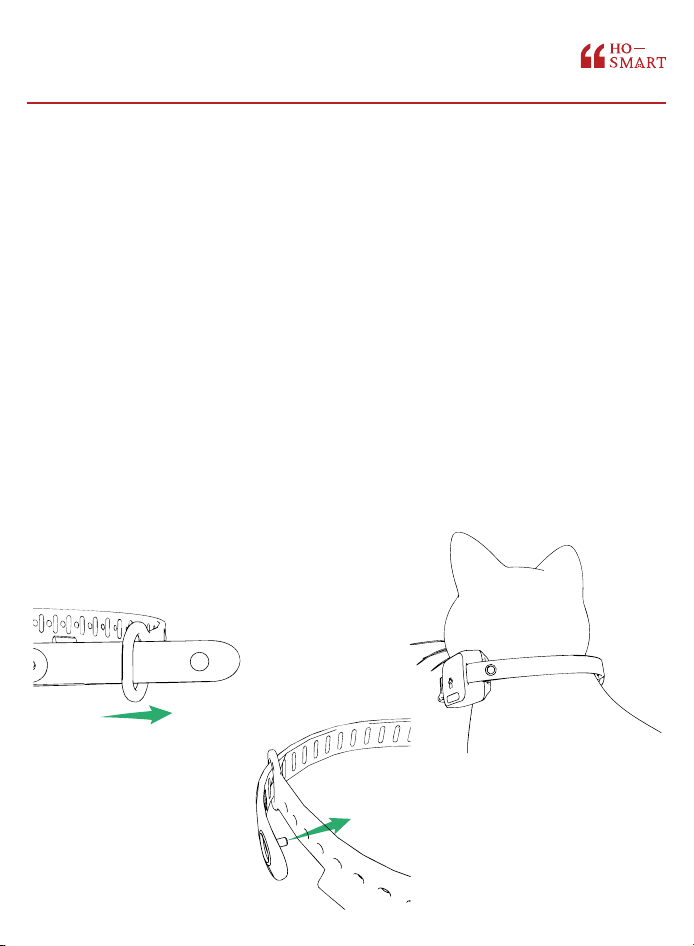
Wearing & Maintenance
17
1.Proper Fit
Place the collar on the cat's neck while the cat is standing.
The 2-Finger Rule: You should be able to comfortably fit two fingers
between the collar strap and the cat's skin.
Avoid Pressure Necrosis: Do not leave the collar on the cat for more
than 24 hours. Reposition the collar every so often if possible.
Remove the collar to charge it while your cat sleeps at night—this also
gives your cat's neck a full rest.
Safety Breakaway Clasp: It is designed to automatically separate if the
collar gets caught and the cat struggles, allowing the cat to escape
and preventing choking.
Recommended for cats 7 lb+ with neck sizes 8"+. The tracker device
measures approx. 2.2 x 1.3 x 0.8 inches and weighs about 1.6 oz.
Important: Place the tracker on the side or back of the neck, not
against the throat, so your cat can lower its head to eat and drink
comfortably.
1.
2.
3.
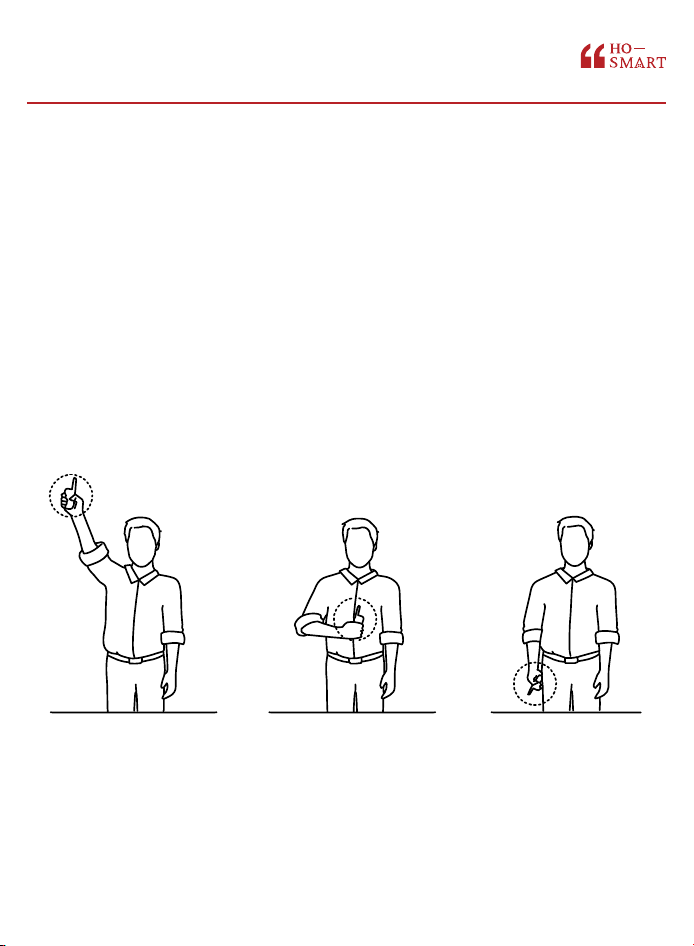
The position of the handheld device significantly impacts the
communication range between you and the tracker.
2.How to Hold the Device for Maximum Range
Wearing & Maintenance
18
Maximum range Typical range Minimum range
Maximum Range: Hold the device high above your head, away from your
body. Do not cover the antenna with your hand.
Typical Range: Holding the device at chest level, away from your body.
Minimum Range: Holding the device at your waist or in a pocket will
significantly reduce the signal range.

Troubleshooting
19
1. Q: The Tracker is near the Controller, but the screen indicates a
long distance.
Reason: In Standby Mode, the Tracker only updates its location
every 30 minutes. The screen displays the distance calculated at
the last update time.
Solution: Switch to Live Tracking Mode(Real-Time Tracking). In this
mode, the Tracker updates rapidly (every 5 seconds), allowing the
Controller to display an accurate, real-time location.
2. Q: The Tracker is far away from the Controller, but the screen
still displays "Nearby".
Reason: Similar to the above, in Standby Mode, the location data is
not real-time; it updates every 30 minutes. The screen is showing
the status from the last scheduled update.
Solution: Switch to Live Tracking Mode(Real-Time Tracking) to
force a rapid location update (every 5 seconds) and view the
correct distance.
3. Q: The screen shows "No GPS Signal" for both the Controller
and the Tracker.
Reason: The devices have not acquired a GPS lock, likely due to
weak signal strength or obstruction.
Solution: Please wait a few minutes for the devices to acquire a
signal (it may take longer if the device hasn't been used for a
while). Alternatively, move the devices to an open outdoor area to
establish a stable GPS connection.
4. Q: The screen displays "Last Position" and a Disconnected icon.
Reason: The Controller has lost connection with the specific
Tracker. This is usually caused by Out of Range: the Tracker is too
far away, causing data loss.
Solution: Try moving towards the "Last Position" shown on the
map. The connection should automatically re-establish once you
are within range.

Troubleshooting
20
5. Q: The screen displays "Nearby" and "Use light or sound to
find..."
Reason: The pet is located approximately 50 feet away from you.
Solution: Use sound/light controls to pinpoint the specific location.
6. Q: No Tracker information is displayed when the Controller is
turned on.
Reason: Upon startup, the Controller queries the Tracker's status. If
the Tracker is far away, there may be a delay in data transmission.
Solution: Please wait a few minutes. Once the signal is received,
the battery level and other information will appear on the screen.
7. Q: The Controller screen displays "Pairing Failed".
Solution: Please check the following:
1. Did you press the Pair Button on the Tracker? The blue light
should be flashing rapidly.
2. Is the Tracker already paired to another channel? (e.g., If Tracker
#l is already paired to Channel 1, trying to pair it to Channel 2 will
fail). Use the Light/Sound command on the Controller to verify if it
is already connected.
Note: If the above fails, restart the pairing process: First, enter
Pairing Mode on the Tracker, then enter Pairing Mode on the
Controller.
8.Q: How to use Fast Tracking (Real-time Tracking):
Short-press the Tracking Button to enter this mode. The location
will update every 5 seconds (automatically exits after 30 minutes).
The Controller screen will display a "Live" icon, indicating Tracking
Mode is active. The indicator light on the Tracker will flash Blue.
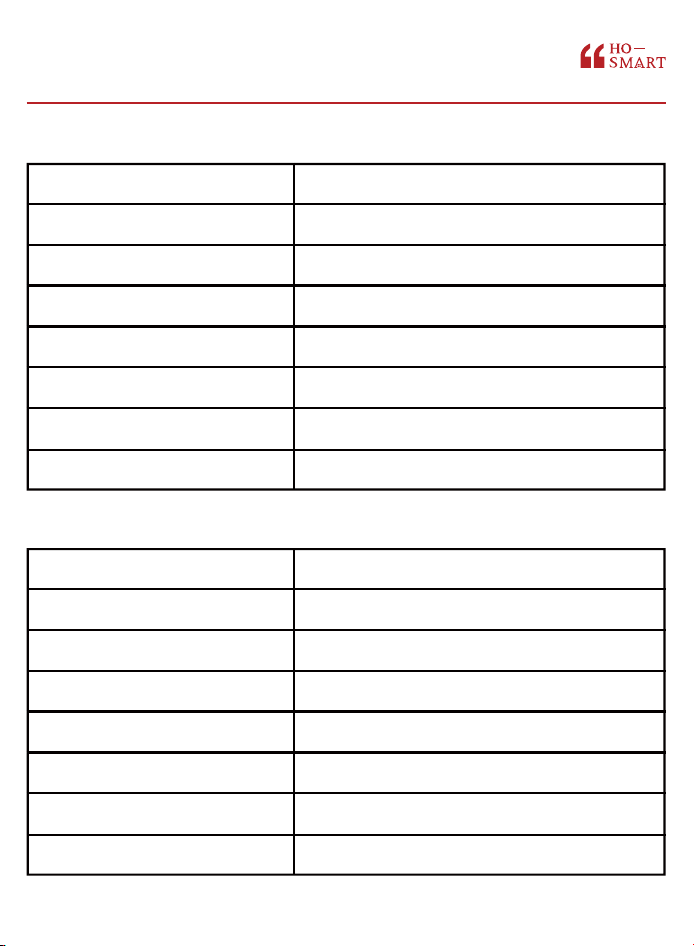
Handheld Controller:
Tracker:
Specifications
21
Power Supply
Audio Alert (Buzzer)
Operating Temperature
Charging Time
Battery Life
Dimensions / Weight
IP Rating (Waterproof)
Max. Paired Devices
5V DC via USB-C / Built-in Li-ion battery (3000 mAh)
≥ 70 dB @ 10 cm
-10°C ~ +55°C (14°F ~ 131°F)
Approx. 3 hours (via USB-C)
3-4 days (Depending on alert frequency)
122 × 69 × 24 mm(4.8*27.2*9.5 in) / 164g
IP55 (Dust protected & water jet resistant)
Supports up to 3 trackers
Power Supply
Audio Alert (Buzzer)
Operating Temperature
Charging Time
Battery Life
Dimensions / Weight
IP Rating (Waterproof)
Wireless Transmission Distance
5V DC via USB-C / Built-in Li-ion battery (550 mAh)
≥ 70 dB @ 10 cm
-10°C ~ +55°C (14°F ~ 131°F)
Approx. 3 hours (via USB-C)
7-9 days (Depending on tracking frequency)
55 X 34 X 20 mm (2.2*1.3*0.8 in) /46g (with collar)
IP67 (Dust tight & immersion up to 1m)
1500 Feet (500 meters) in empty open area

Safety & Compliance
22
FCC Radiation Exposure Statement for Tracker:
The equipment complies with FCC Radiation exposure limits set forth for
uncontrolled environment. This equipment should be installed and operated
with minimum distance 20cm between the radiator and your body.
FCC Radiation Exposure Statement for Controller:
The device has been evaluated to meet general RF exposure requirement.
The device can be used in the portable exposure condition without restriction.
This device contains licence-exempt transmitter(s)/receiver(s) that comply with
Innovation, Science and Economic Development Canada's licence-exempt
RSS(s). Operation is subject to the following two conditions:
Note: This equipment has been tested and found to comply with the limits for a
Class B digital device, pursuant to Part 15 of the FCC Rules. These limits are
designed to provide reasonable protection against harmful interference in a
residential installation. This equipment generates, uses, and can radiate radio
frequency energy and, if not installed and used in accordance with the
instructions, may cause harmful interference to radio communications.
1. This device may not cause interference.
2. This device must accept any interference, including interference that may
cause undesired operation of the device.
3. This equipment should be installed and operated with a minimum distance
of 20 cm between the radiator and your bod.
Le présent appareil est conforme aux CNR d'Industrie Canada applicables
auxappareils radio exempts de licence. L'exploitation est autorisée aux deux
conditions suivantes:
1. L'appareil ne doit pas produire de brouillage, et.
2. L'utilisateur de l'appareil doit accepter toutbrouillage radioélectrique subi,
même si le brouillage est susceptible d'en compromettre lefonctionnement.
3. Cet équipement doit être installé et utilisé avec une distance minimale de 20
cm entre le radiateur et votre corps.
FCC RF Radiation Exposure Statement
1.This Transmitter must not be co-located or operating in conjunction with any
other antenna or transmitter.
2. This equipment complies with RF radiation exposure limits set forth for an
uncontrolled environment.
3. This equipment should be installed and operated with minimum distance
20cm between the radiator & your body.
FCC Statement

Safety & Compliance
23
THE FCC WANTS YOU TO KNOW
Your intercom may cause TV or radio interference. To be a certain turn
off your intercom and check your TV or radio on its performance. If still
receiving interference, rest a sure it is not your intercom. You may try to
eliminate interference by:
*Moving your stations further away from the receiver.
*Moving your stations further away from your TV or radio.
If these options do not solve your problem the FCC requires you to stop
using your intercom. Change or modifications not approved by the party
responsible for compliance could void the user authority to operate the
equipment.
FCC Radiation Exposure Statement for Tracker :
The equipment complies with FCC Radiationexposure limits set forth for
uncontrolledenvironment. This equipment should beinstalled and
operated with minimum distance 20cm between the radiator and your
body.
FCC Radiation Exposure Statement for Controller:
The device has been evaluated to meetgeneral RF exposure
requirement. The device can be used in the portable exposure condition
without restriction.
This device contains a built-in Lithium-ion battery. To prevent injury or
damage:
Do not attempt to disassemble, crush, puncture, or shred the battery.
Do not expose the device to extreme heat (above 140°F / 60°C) or
dispose of it in fire.
Do not charge the device if the unit is damaged or swollen. Only use
the provided USB charging cables and the included UL-certified power
adapter.
Battery Safety Warning

FCC
FCC Statement
This equipment complies with Part 15 of the FCC Rules. Opera-
tion is subject to the following two conditions:
(1) This device may not cause harmful interference, and
(2) This device must accept any interference received, including
interference that may cause undesired operation.
NOTE: This equipment has been tested and found to comply
with the limits for a Class B digital device, pursuant to part 15 of
the FCC rules. These limits are designed to provide reasonable
protection against harmful interference in a residential installa-
tion. This equipment generates, uses and can radiate radio
frequency energy and, if not installed and used in accordance
with the instructions, may cause harmful interference to radio
communications.
However, there is no guarantee that interference will not occur
in a particular installation. If this equipment does cause harmful
interference to radio or television reception, which can be deter-
mined by turning the equipment off and on, the user is encour-
aged to try to correct the interference by one or more of the
following measures:
-Reorient or relocate the receiving antenna.
-Increase the separation between the equipment and receiver.
-Connect the equipment into an outlet on a circuit different
from that to which the receiver is connected.
-Consult the dealer or an experienced radio/TV technician for
help.
24
Safety & Compliance
25
This device contains licence-exempt transmitter(s)/receiver(s) that
comply with Innovation, Science and Economic Development Canada's
licence-exempt RSS(s). Operation is subject to the following two
conditions:
Le présent appareil est conforme aux CNR d'Industrie Canada
applicables auxappareils radio exempts de licence. L'exploitation est
autorisée aux deux conditions suivantes:
1. This device may not cause interference.
2. This device must accept any interference, including interference
that may cause undesired operation of the device.
3. This equipment should be installed and operated with a minimum
distance of 20 cm between the radiator and your bod.
1. L'appareil ne doit pas produire de brouillage, et.
2. L'utilisateur de l'appareil doit accepter toutbrouillage
radioélectrique subi, même si le brouillage est susceptible d'en
compromettre lefonctionnement.
3. Cet équipement doit être installé et utilisé avec une distance
minimale de 20 cm entre le radiateur et votre corps.
ISED Statement
This product manufactured by:
Macross Microelectronics (HK) Limited
FLAT/RM KYOO1 UNIT 3 27/F HO KING COMM CENTRE
NO.2-16FA YEENSTREET MONGKOK KL
The Hosmart Story
After tragically losing our grandmother in a
home accident, I was inspired to create
Hosmart tools specifically designed for the
mature and elderly. In honor of our grand-
mother, our goal is to make homes smarter,
safer, and more comfortable for seniors. We
genuinely hope that Hosmart products bring
convenience and peace of mind to both you
and your loved ones in their golden years. We
eagerly anticipate hearing your stories of how
our Hosmart products have improved the
lives of you or your senior family members,
making them easier and safer.
Inventor
If you have any questions, please contact us at:
+1 5022020003 (Mon-Fri)
WWW.MYHOSMART.COM
24-month limited warranty
@Hosmart @Hosmart @Hosmart

WELCOME
HOME