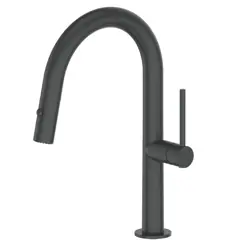

KITCHEN FAUCETS
zlinekitchen.com
Installation and User Manual

ZLINE Kitchen and Bath provides Attainable Luxury, where the kitchen and bath of your dreams
is never out of reach. Through our unique designs and unparalleled quality, we’re dedicated to
providing you an elevated experience in the heart of your home. With an endless selection of features
and finishes, our inspiration is your reality.

ZLINE is fueled by a passion for innovation; A relentless pursuit of bringing the
highest end luxury designs and professional features into everyone’s homes.
Because we continually strive to improve our products, we may change
specifications and designs without prior notice.
Scan the QR code to view the most up-to-date version of the Installation
Manual and User Manual.
WARNING: This product can expose you to chemicals including nickel, which is known to the
State of California to cause cancer. For more information, go to www.P65Warnings.ca.gov.

IMPORTANT SAFETY INFORMATION . . . . . . . . . . . . . . . . . . . 1
SPRING FAUCETS . . . . . . . . . . . . . . . . . . . . . . . . . . . . . . . . . . . . 3
PULL DOWN FAUCETS . . . . . . . . . . . . . . . . . . . . . . . . . . . . . . . . 6
DA VINCI PULL DOWN FAUCET . . . . . . . . . . . . . . . . . . . . . . . 10
SINGLE HANDLE FAUCETS . . . . . . . . . . . . . . . . . . . . . . . . . . . 13
DOUBLE HANDLE FAUCETS . . . . . . . . . . . . . . . . . . . . . . . . . . 17
CARE AND MAINTENANCE . . . . . . . . . . . . . . . . . . . . . . . . . . 21
TROUBLESHOOTING . . . . . . . . . . . . . . . . . . . . . . . . . . . . . . . . 22
WARRANTY . . . . . . . . . . . . . . . . . . . . . . . . . . . . . . . . . . . . . . . . 23
TABLE OF CONTENTS

1
Prior to Installation
IMPORTANT SAFETY INFORMATION
PRIOR TO INSTALLATION
• Make sure that the cold and hot water lines are turned off.
• Wrap all threaded connections with plumber’s tape. Always wrap in a clockwise direction.
• Cover your drain to avoid losing parts.
• Do not disassemble the main faucet body, as it has been installed and commissioned
correctly and precisely before delivery to the factory.
• To keep the faucet from jamming, flush the water pipe before installation.
Operating conditions: Working pressure at 7.3 psi–145 psi (0.05 MPa–1.0 MPa)
(including cold and hot water pressure) with applicable water temperature:
39.2 °F–194 °F (4 °C– 90 °C).
Water supply line length: 27 1/2" (699 mm)
Sprayer length: 46 1/2" (1181 mm)
INSTALLATION PREPARATION
1. Shut off the water and let the water in the current faucet drain.
2. The tools needed for each installation are included at the beginning of each section.
3. Loosen the hardware that keeps the current faucet in place. Remove faucet.
• If soldering the water connections when installing the faucet, remove the O-rings,
cartridges, and washers before applying any heat.
• Protect your eyes when cutting or soldering.
• Do not over tighten screws/nuts. Finger tighten, then use a wrench/Philips head
screwdriver to tighten the fixing screw/nut until snug.

2
Tools Needed
IMPORTANT SAFETY INFORMATION
TOOLS NEEDED:
• Wrench
• Phillips head screwdriver
• Bucket
TIME REQUIRED: +/- 45 minutes
LEGEND:
Hot Water
Cold Water
Grease
Warning
Plumber’s tape
3
Spring Faucets
SPRING FAUCETS
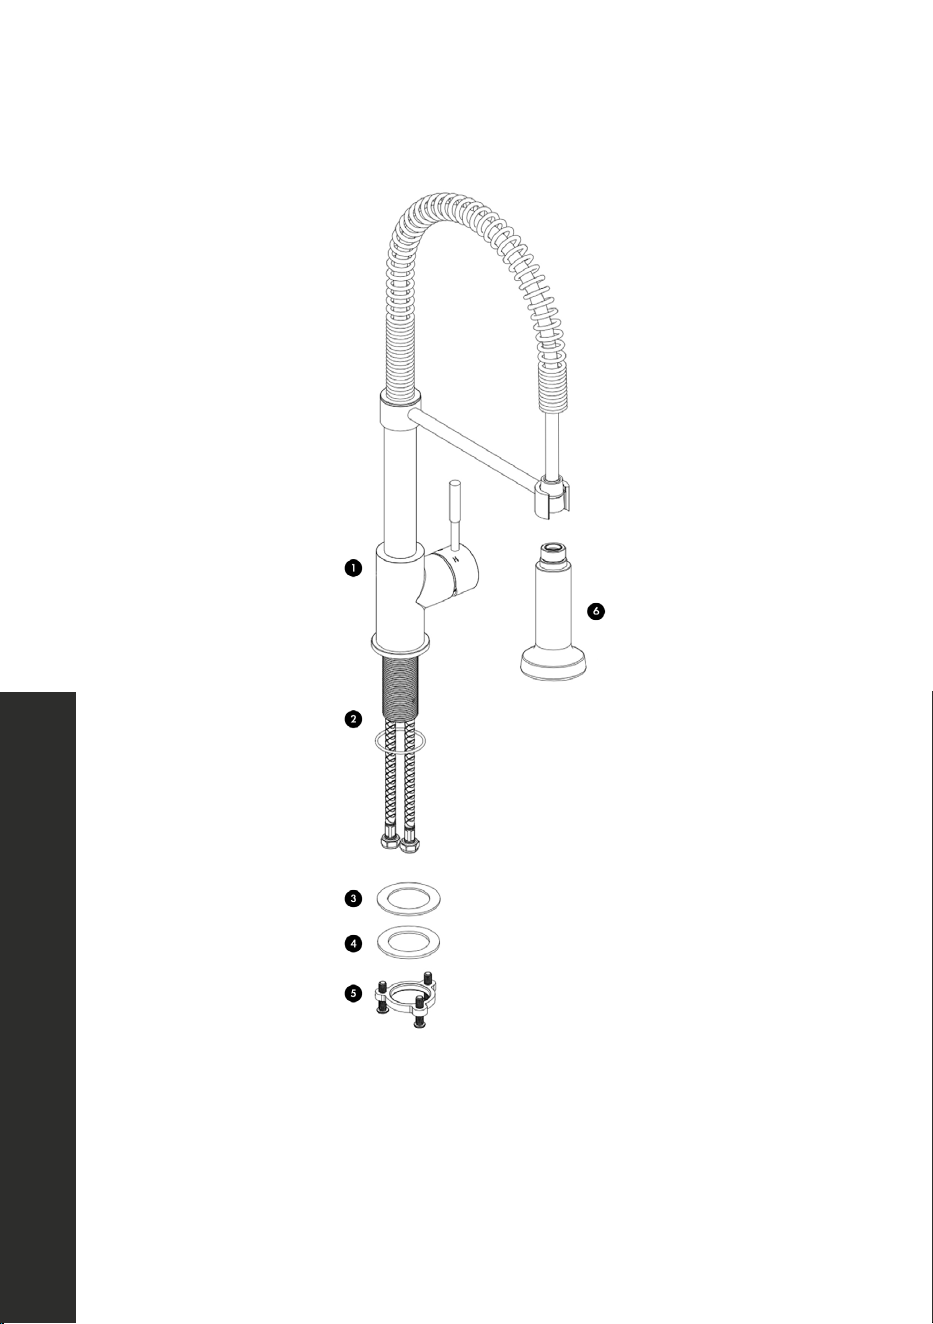
BEFORE INSTALLATION
1. Faucet Body
2. Base O-Ring
3. Rubber Washer
4. Metal Washer
5. Fixing Nut and Screws
6. Spray Head
4
SPRING FAUCETS
INSTALLATION
Spring Faucets
4
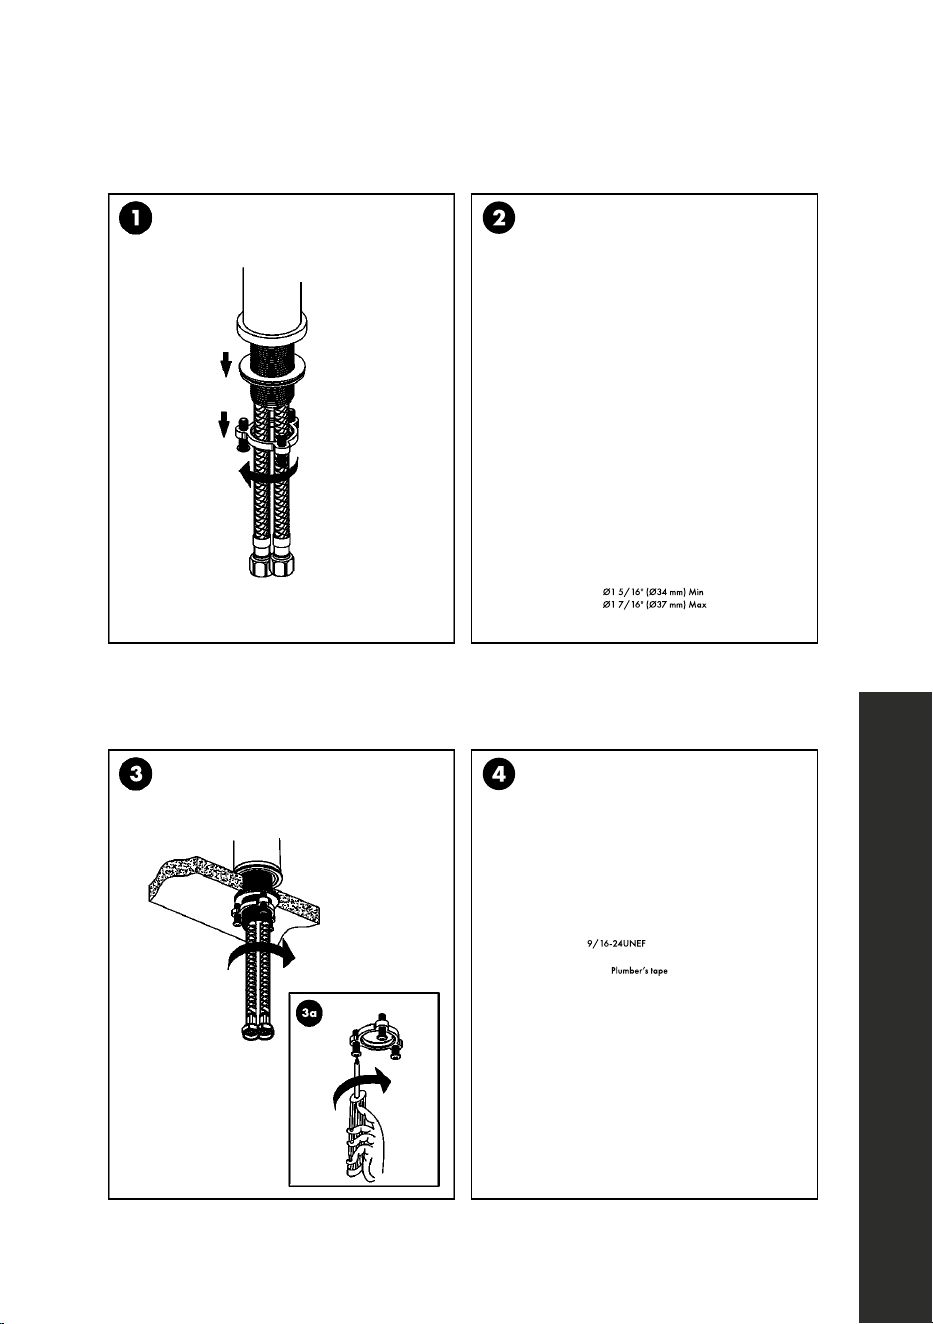
9/16-24UNEF
Plumber’s tape
3
3a
2
Ø1 5/16" (Ø34 mm) Min
Ø1 7/16" (Ø37 mm) Max
1
Secure the hoses to the hot (red) and cold
(blue) lines appropriately.
Secure the hardware into place with the base
O-ring, nuts, and screws.
Mount faucet to counter top.Loosen the fixing nut and screws
and put aside.
5
Spring Faucets
SPRING FAUCETS
OPERATION
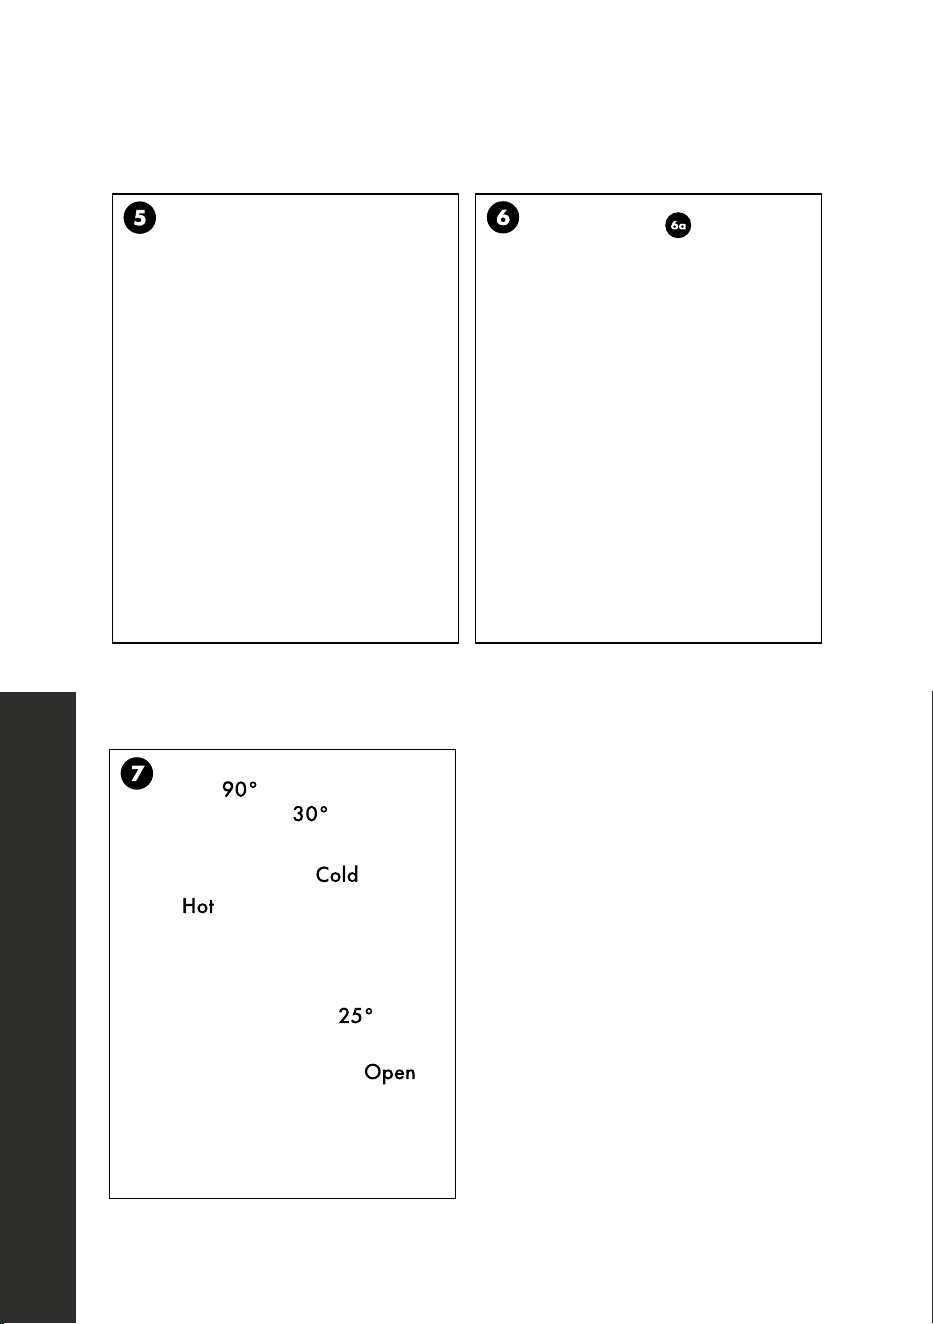
Cold
90°
25°
Open
30°
Hot
7
6
6a
5
Review the diagram to understand the hot,
cold, and open settings.
Make sure that the spray head is
properly secured.
Test the faucet.
6
Pull Down Faucets
PULL DOWN FAUCETS
BEFORE INSTALLATION
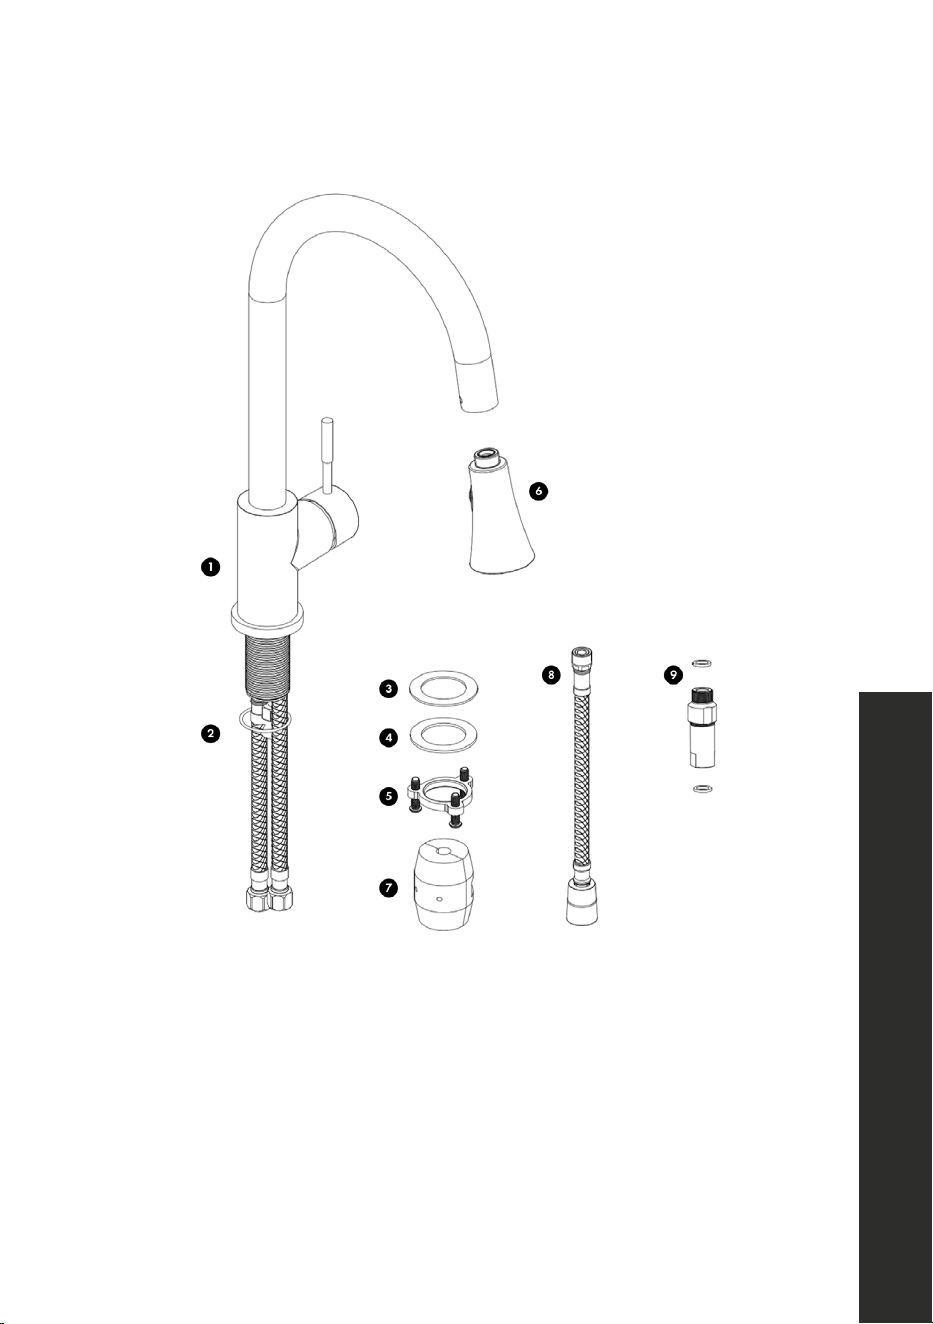
1. Faucet Body
2. Base O-Ring
3. Rubber Washer
4. Metal Washer
5. Fixing Nut and Screws
6. Spray Head
7. Weight
8. Water Line
9. Check Valve Assembly
6
7
Pull Down Faucets
PULL DOWN FAUCETS
INSTALLATION
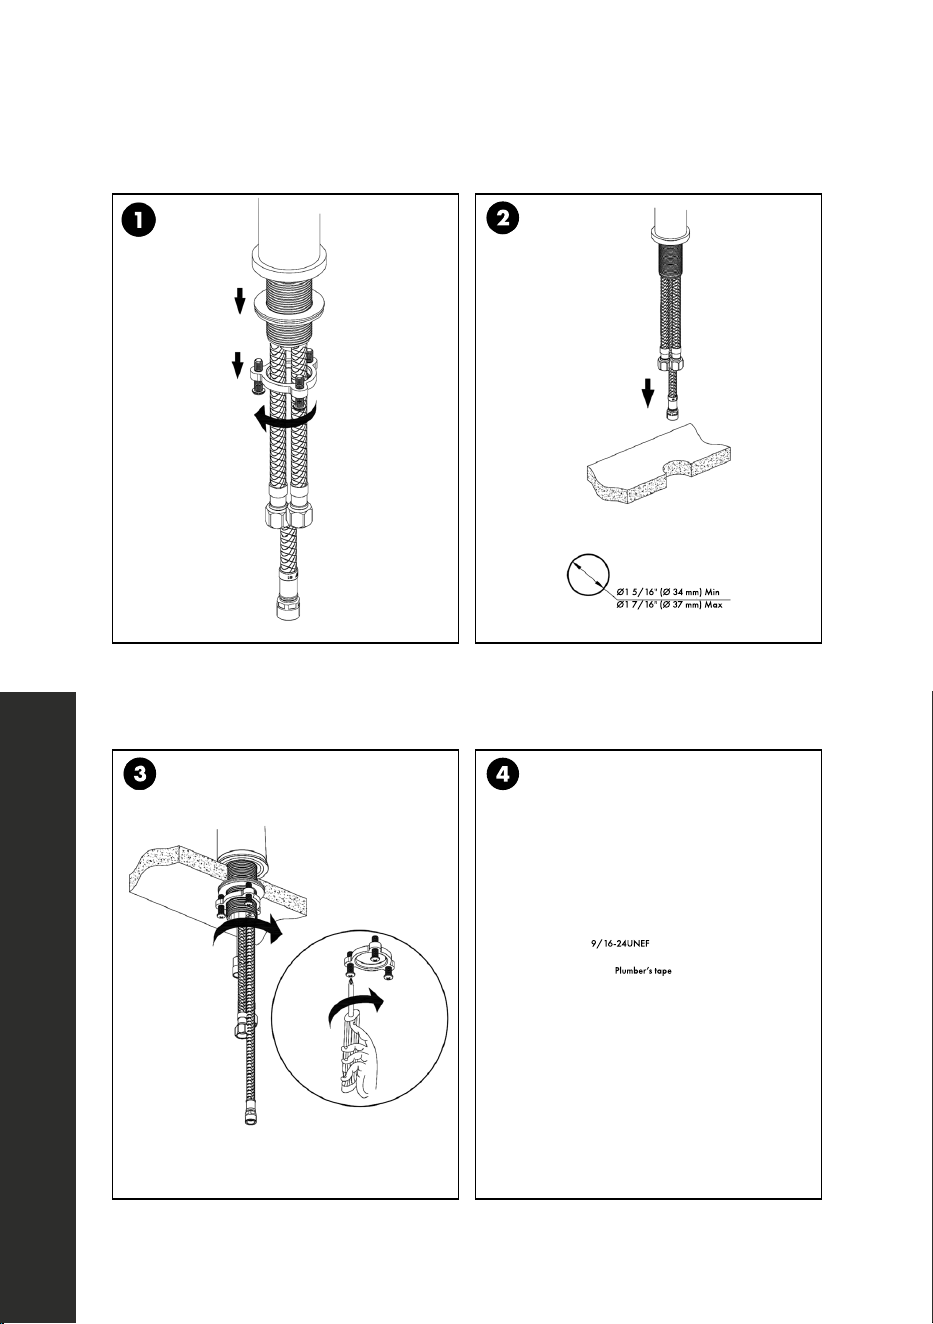
4
9/16-24UNEF
Plumber’s tape
3
2
Ø1 5/16" (Ø 34 mm) Min
Ø1 7/16" (Ø 37 mm) Max
1
Secure the hoses to the hot and cold lines
appropriately.
Secure the hardware into place with the base
O-ring, nuts, and screws.
Mount faucet to counter top.Loosen the fixing nut and screws
and put aside.
8
Pull Down Faucets
PULL DOWN FAUCETS
INSTALLATION
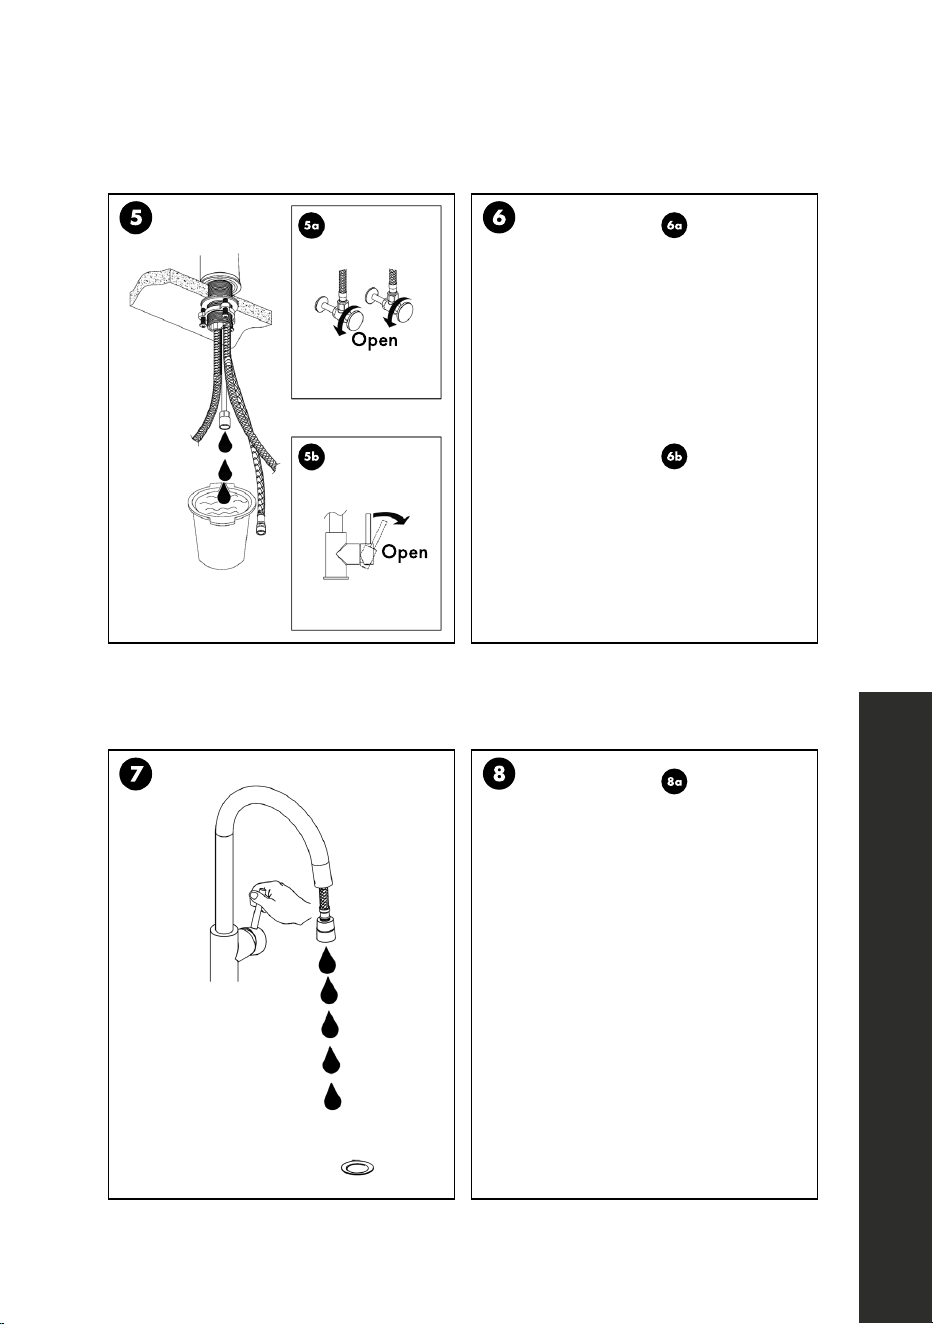
8
8a
7
6
6b
6a
5
5b
Open
Open
5a
Make sure that the spray head is
properly secured.
Test the faucet.
Secure the hardware into place.Drain the valve.
9
Pull Down Faucets
PULL DOWN FAUCETS
OPERATION
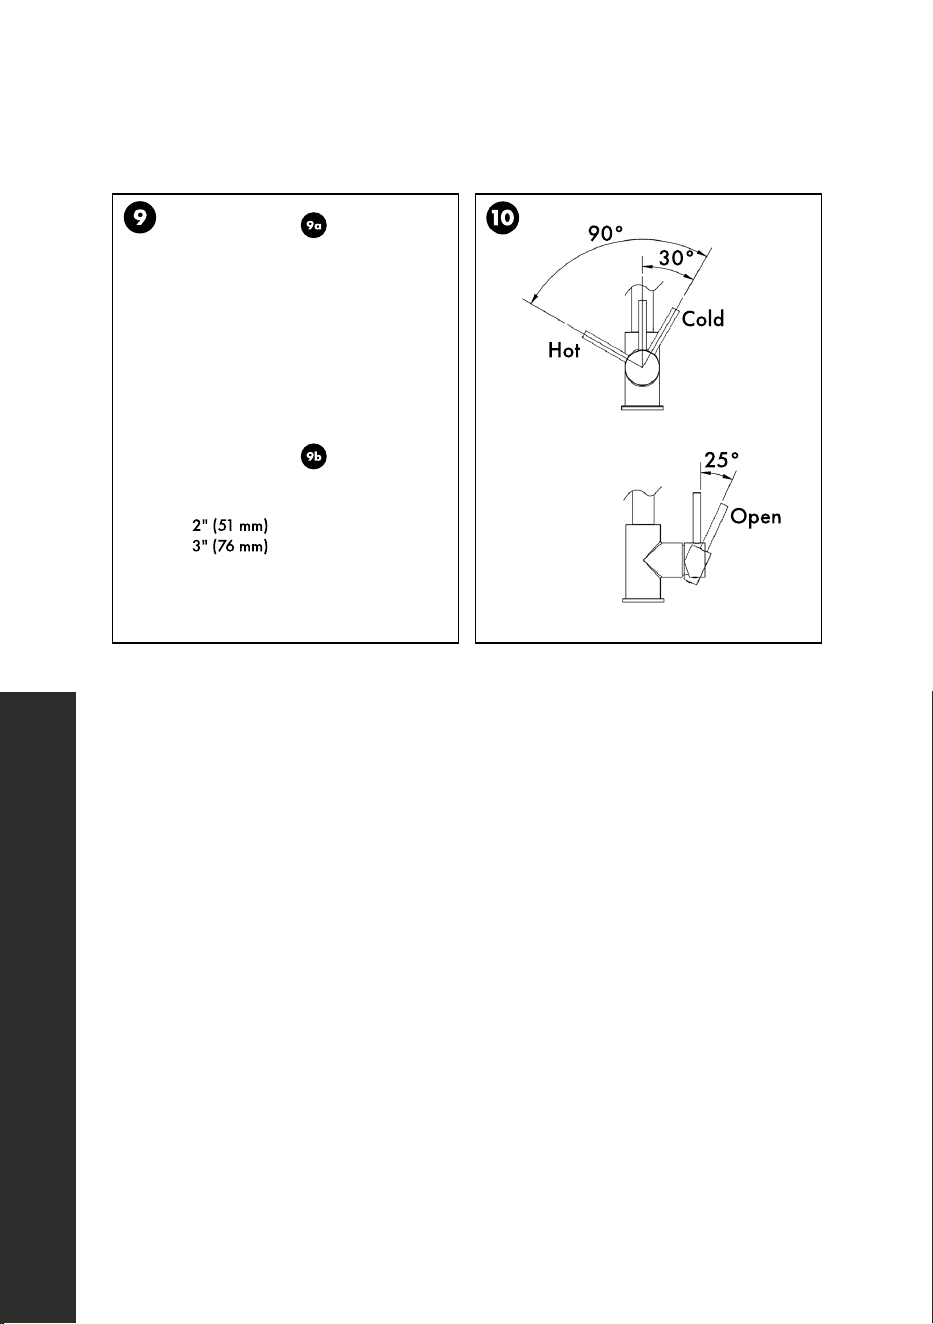
Cold
90°
25°
Open
30°
Hot
10
9
2" (51 mm)
3" (76 mm)
9b
9a
Review the diagram to understand the hot,
cold, and open settings.
Apply the weight to the center of the hose for
even distribution.
10
Da Vinci Pull Down Faucet
DA VINCI PULL DOWN FAUCET
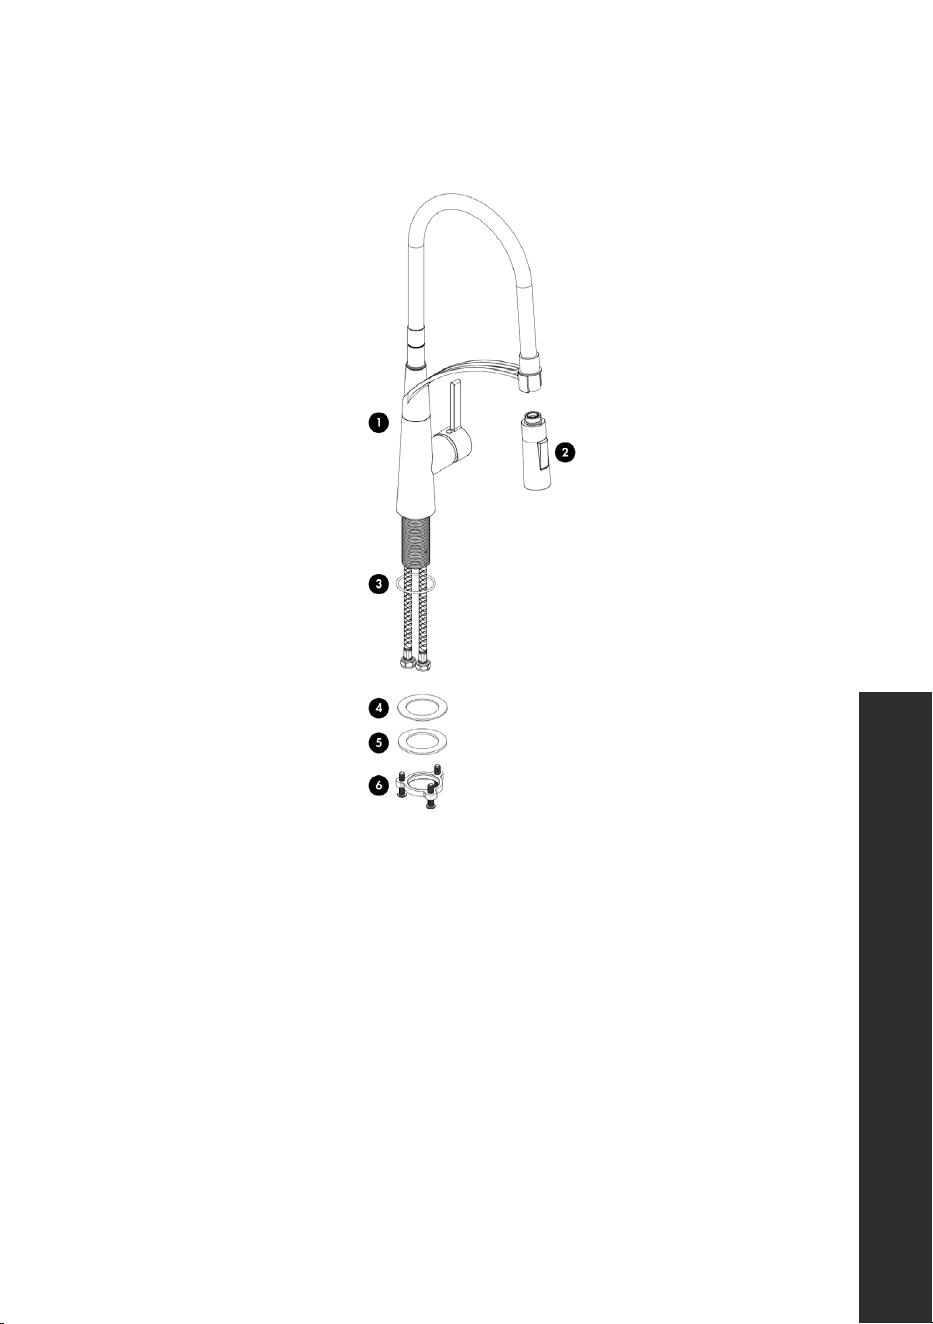
BEFORE INSTALLATION
1. Faucet Body
2. Spray Head
3. Base O-Ring
4. Rubber Washer
5. Metal Washer
6. Fixing Nut and Screws
10
11
DA VINCI PULL DOWN FAUCET
INSTALLATION
Da Vinci Pull Down Faucet
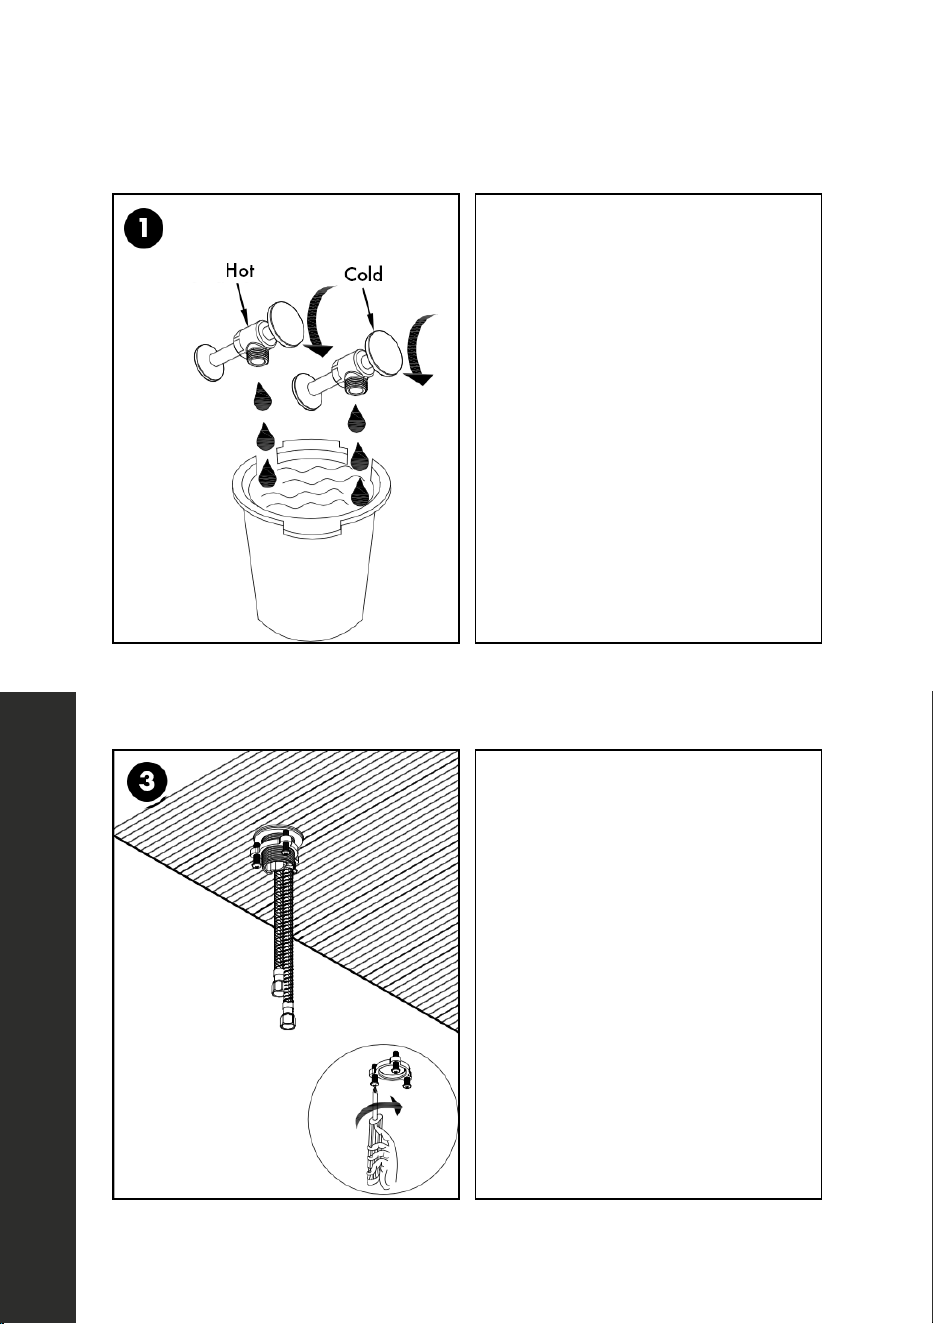
Turn off the water valves and place a bucket
beneath, in case of dripping.
Mount the faucet to the counter top.
Attach the hot and cold lines to the valves
appropriately.
Secure the hardware into place with the base
O-ring, nuts, and screws.
12
DA VINCI PULL DOWN FAUCET
OPERATION
Da Vinci Pull Down Faucet
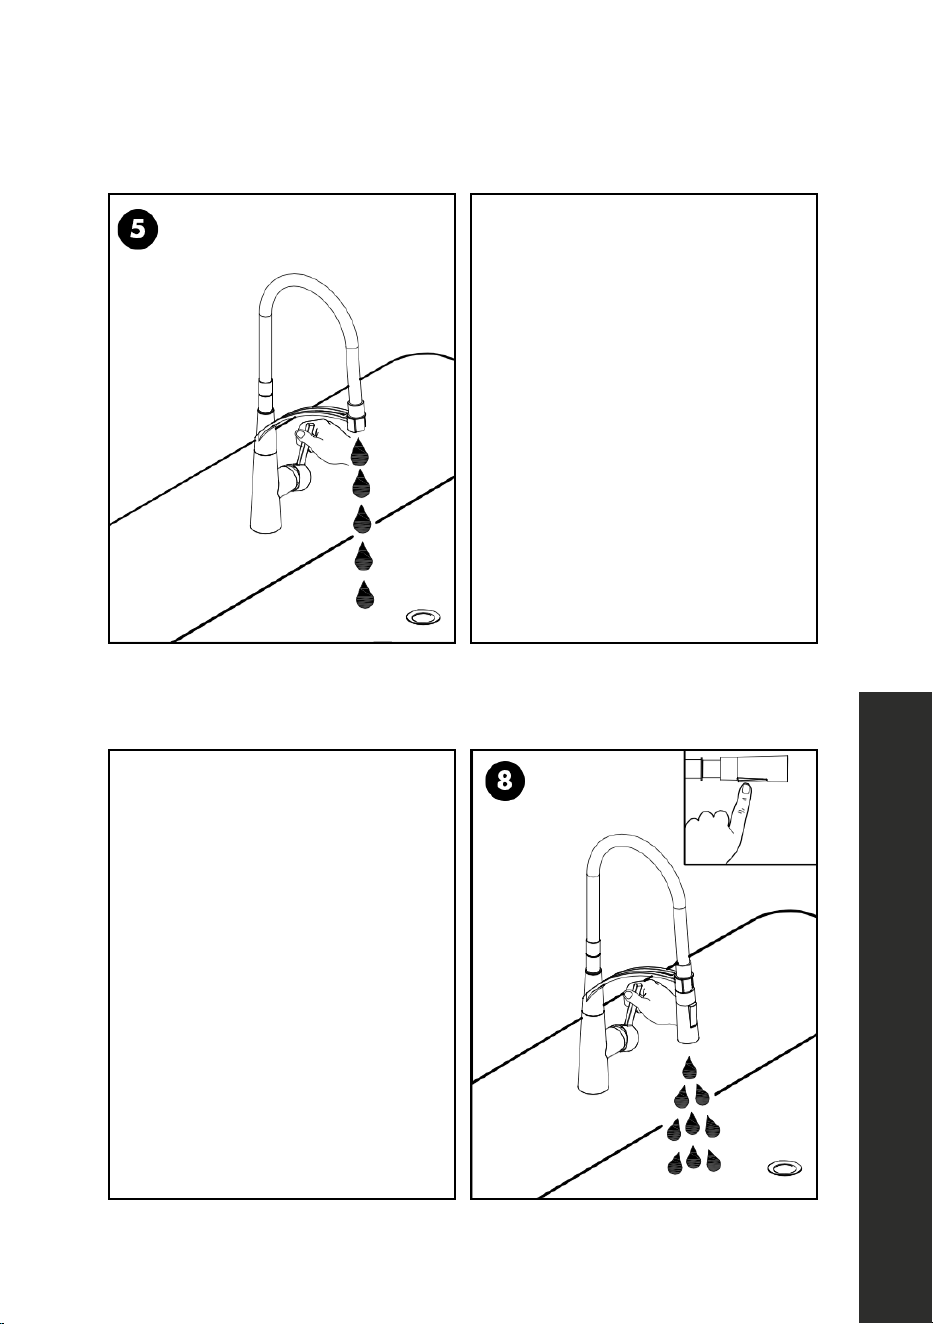
Test the faucet before installing
the spray head.
Make sure that the spray head is
properly secured.
Press the button to switch from
stream to spray.
Test the faucet.
13
SINGLE HANDLE FAUCETS
BEFORE INSTALLATION
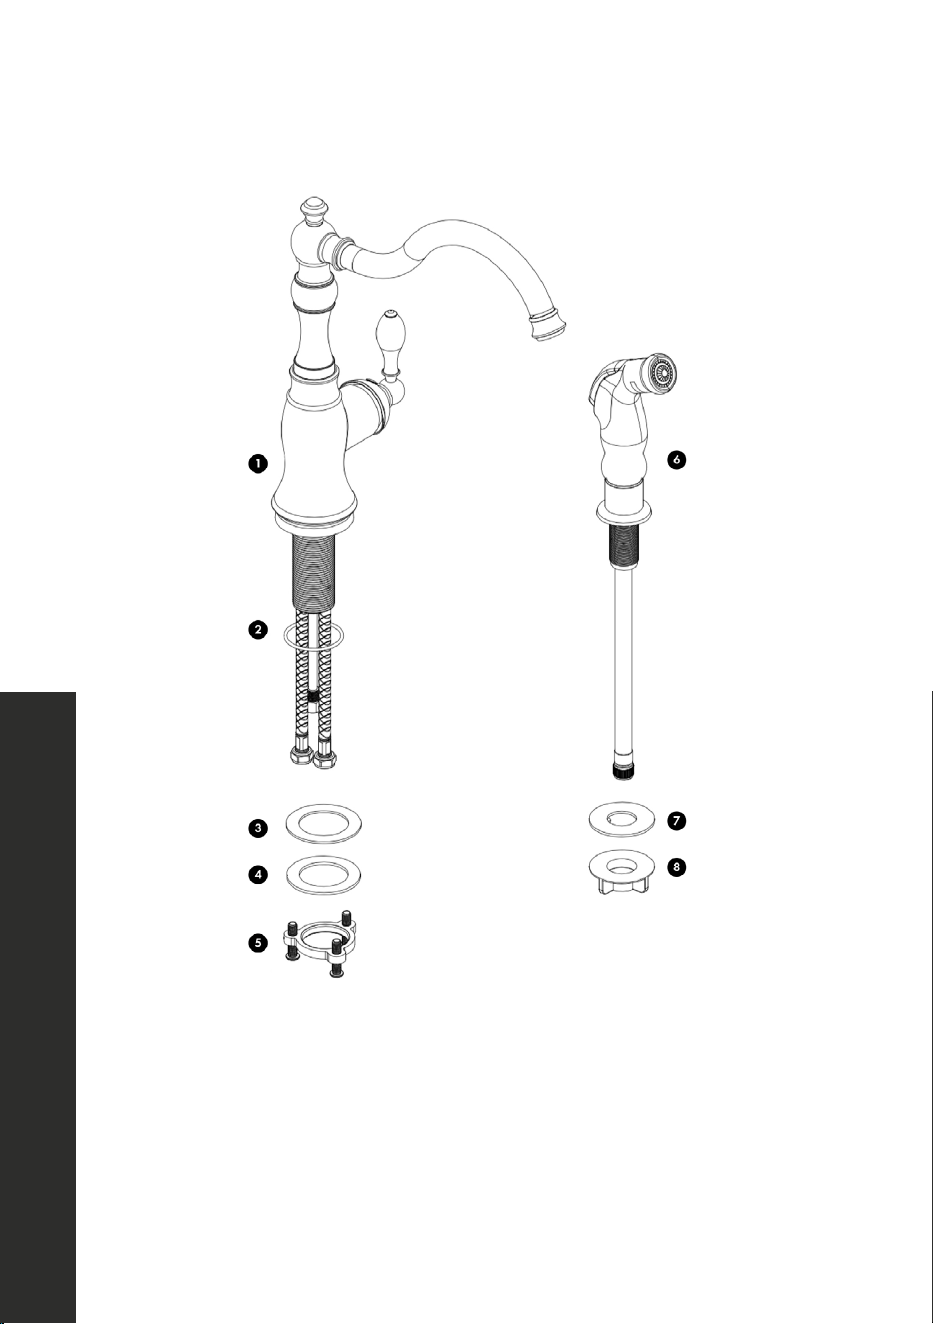
Single Handle Faucet
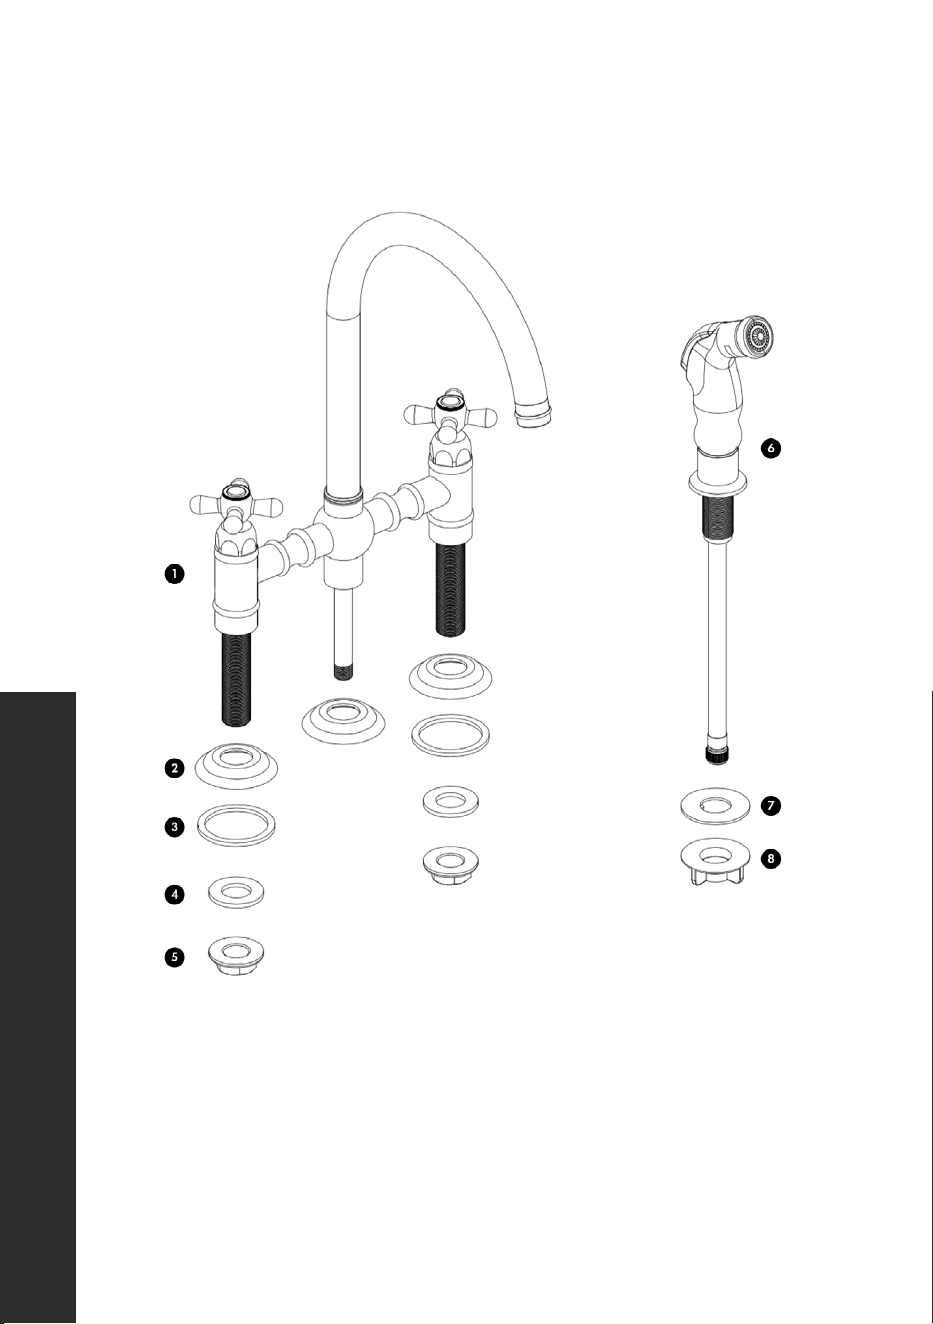
1. Faucet Body
2. Base O-Ring
3. Rubber Washer
4. Metal Washer
5. Fixing Nut and Screws
6. Spray Head
7. Washer
8. Nut
14
SINGLE HANDLE FAUCETS
INSTALLATION
Single Handle Faucet
3
3a
4
9/16-24UNEF
Plumber’s tape
2
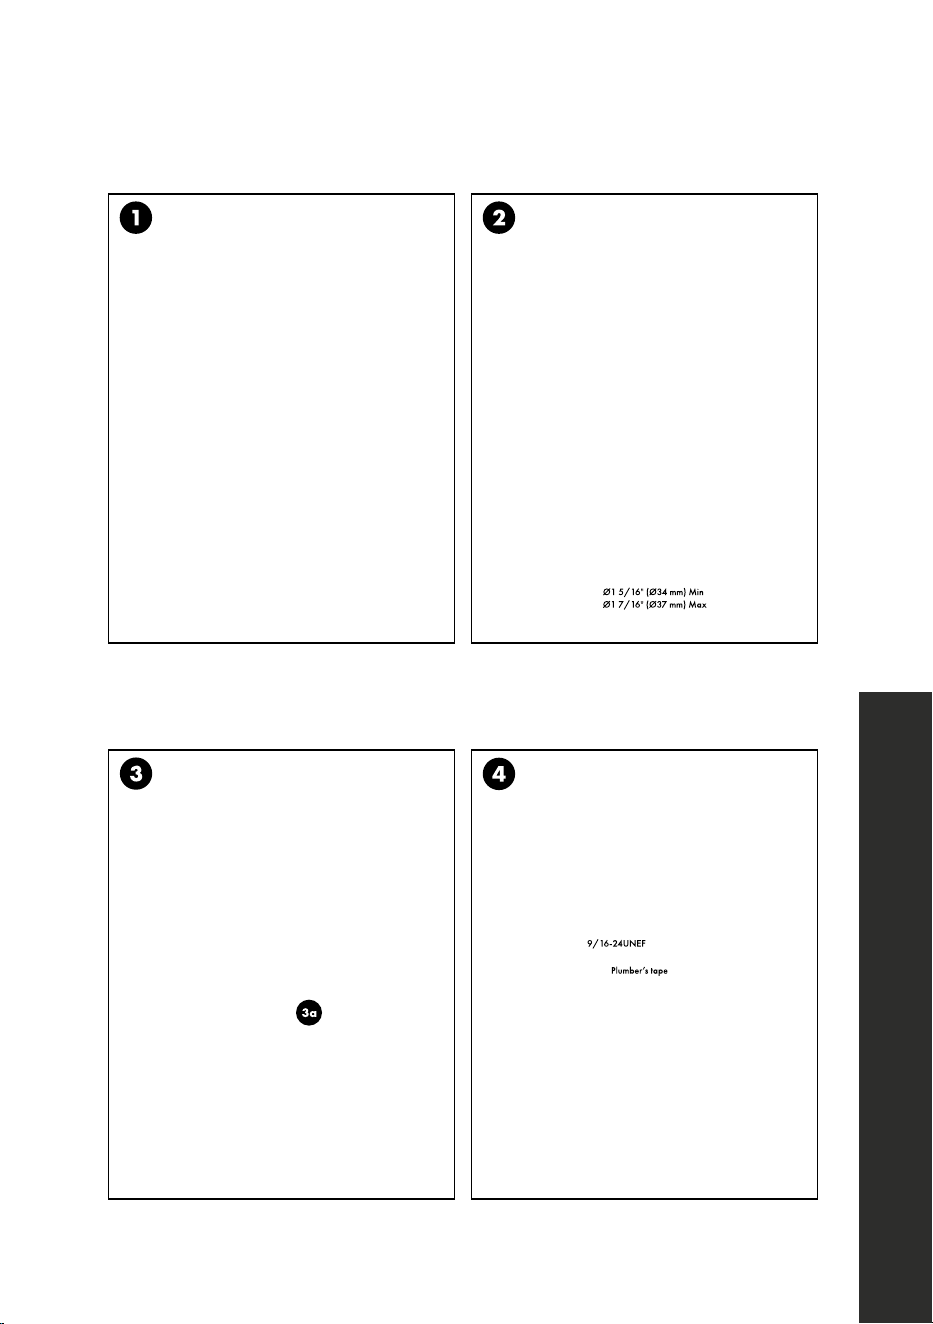
Ø1 5/16" (Ø34 mm) Min
Ø1 7/16" (Ø37 mm) Max
1
Loosen the fixing nut and screws
and put aside.
Mount faucet to counter top.
Secure the hoses to the hot and cold lines
appropriately.
Secure the hardware into place with the base
O-ring, nuts, and screws.
15
SINGLE HANDLE FAUCETS
INSTALLATION
Single Handle Faucet
8
8a
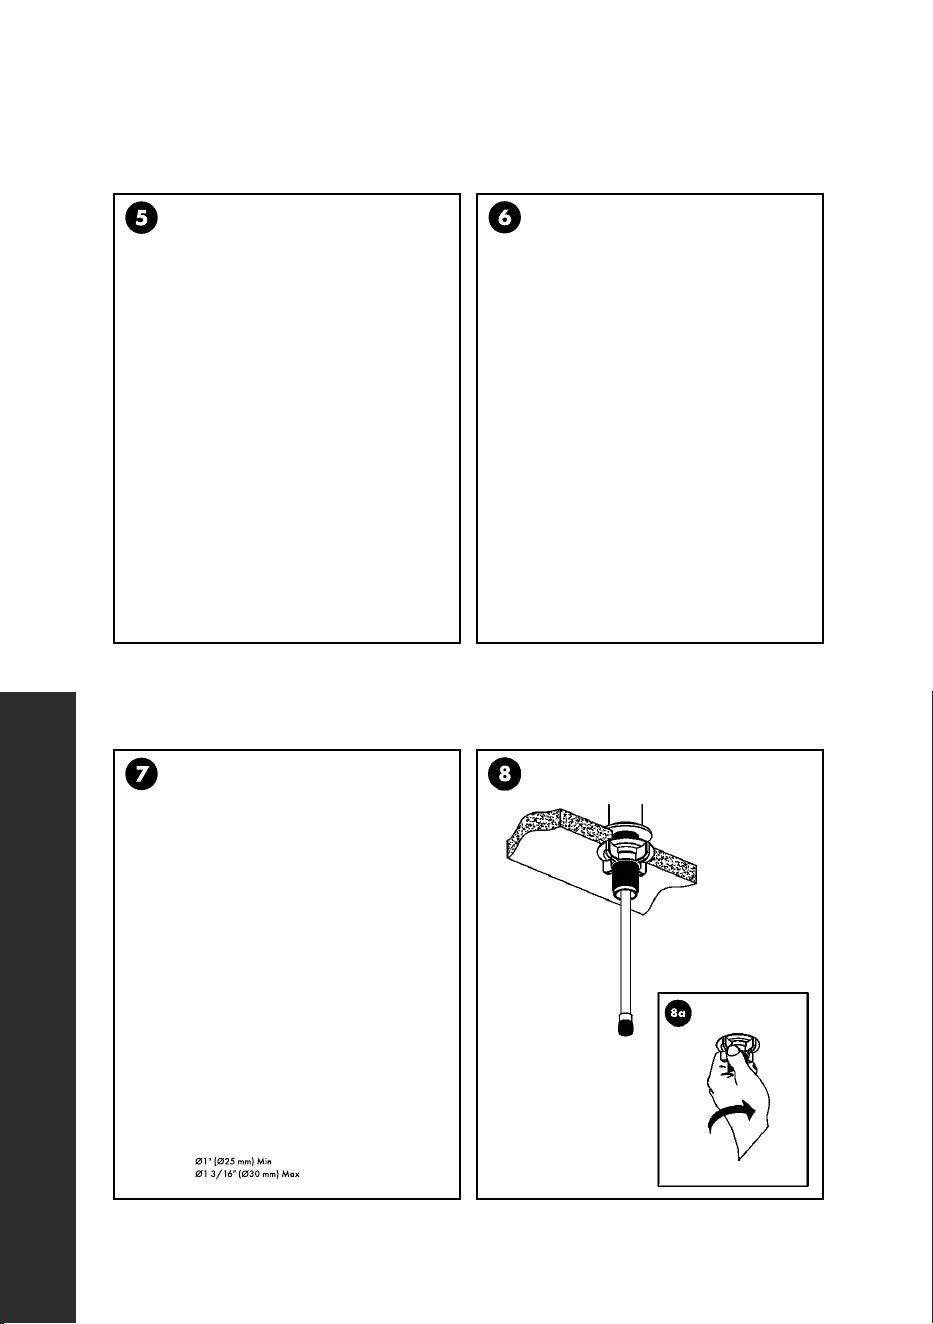
Ø1" (Ø25 mm) Min
Ø1 3/16" (Ø30 mm) Max
7
6
5
Loosen the washer on the spray head.Test the faucet.
Mount spray head to counter top. Secure the hardware into place with
nuts and screws.
16
SINGLE HANDLE FAUCETS
OPERATION
Single Handle Faucet
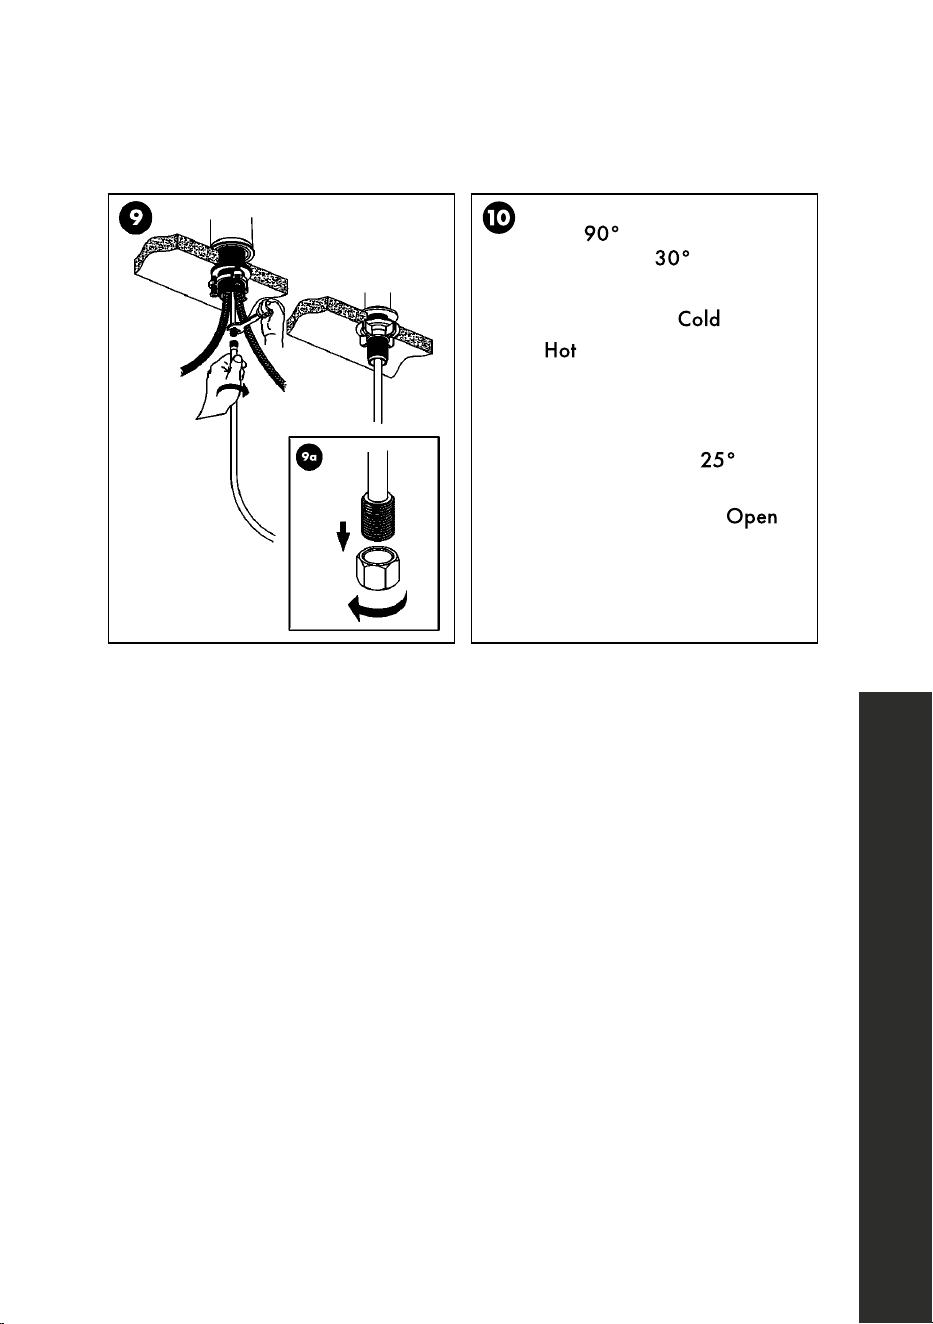
Cold
90°
25°
Open
30°
Hot
10
9
9a
Tighten the hardware. Review the diagram to understand the hot,
cold, and open settings.
17
DOUBLE HANDLE FAUCETS
BEFORE INSTALLATION
Double Handle Faucet
1. Faucet Body
2. Base O-Ring
3. Rubber Washer
4. Metal Washer
5. Fixing Nut and Screws
6. Spray Head
7. Washer
8. Nut
18
Double Handle Faucet
DOUBLE HANDLE FAUCETS
INSTALLATION
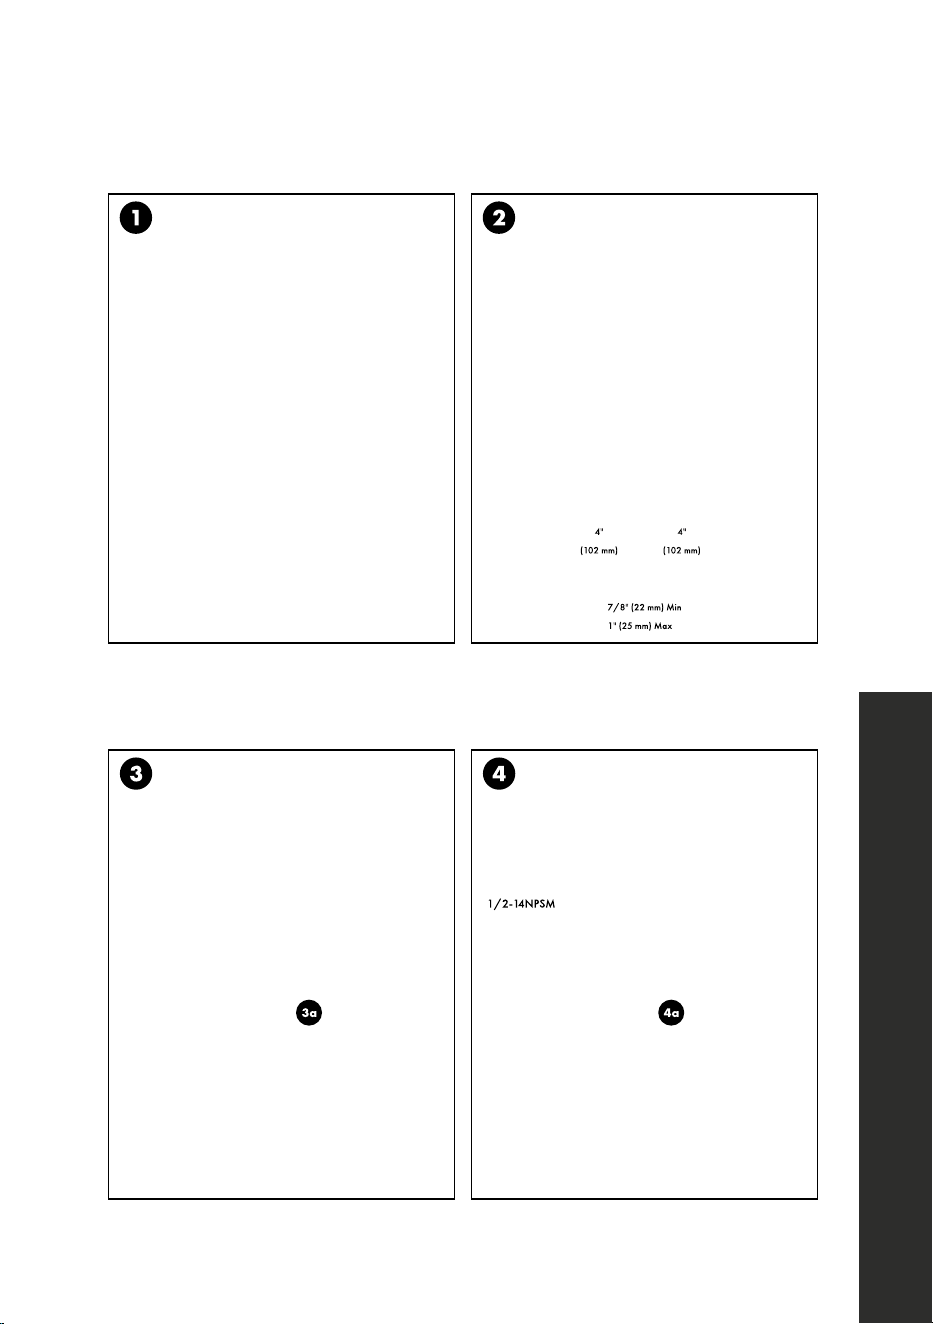
3
3a
4
1/2-14NPSM
4a
2
4"
(102 mm)
4"
(102 mm)
7/8" (22 mm) Min
1" (25 mm) Max
1
Loosen the fixing nut and washers
and put aside.
Mount faucet to counter top.
Secure the hoses to the hot and cold lines
appropriately.
Secure the hardware into place with the base
O-ring, nuts, and screws.
19
Double Handle Faucet
DOUBLE HANDLE FAUCETS
INSTALLATION
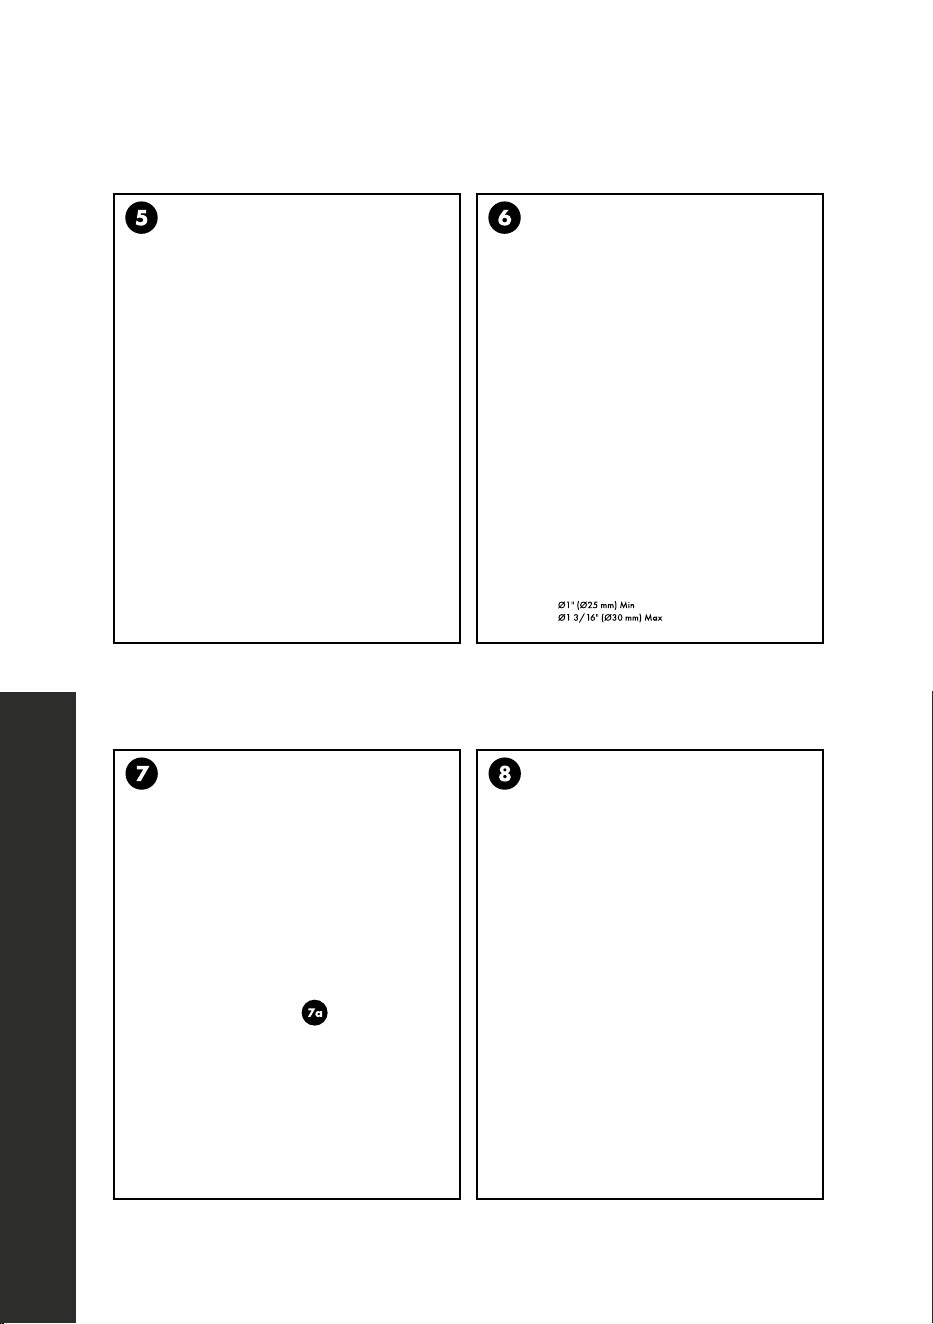
8
7
7a
6
Ø1" (Ø25 mm) Min
Ø1 3/16" (Ø30 mm) Max
5
Mount spray head to counter top.Loosen the washer on the spray head.
Secure the hardware into place with
nuts and screws.
Use the hose to connect the spray head and
main faucet head.
20
Double Handle Faucet
DOUBLE HANDLE FAUCETS
INSTALLATION
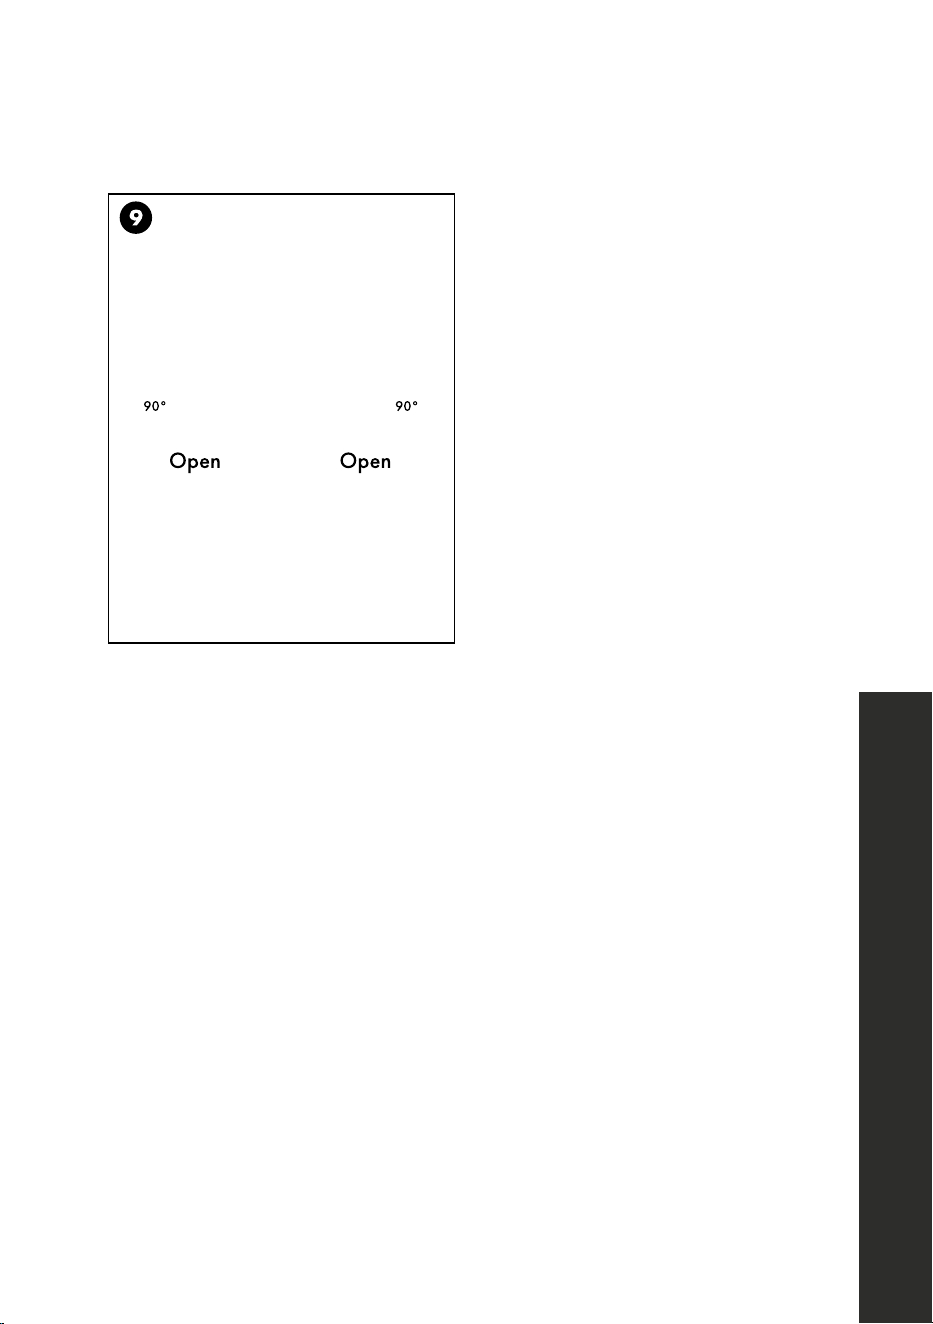
9
90°90°
OpenOpen
Review the diagram to understand the hot,
cold, and open settings.
21
Care and Maintenance
CARE AND MAINTENANCE
To keep the product clean and shining, follow the steps below:
1. Rinse clean with water and dry with a soft cloth.
2. Do not clean with soaps, acid, polish, abrasives, or harsh cleaners.
3. Do not use cloth with a coarse surface.
4. Unscrew the aerator and clean when necessary.
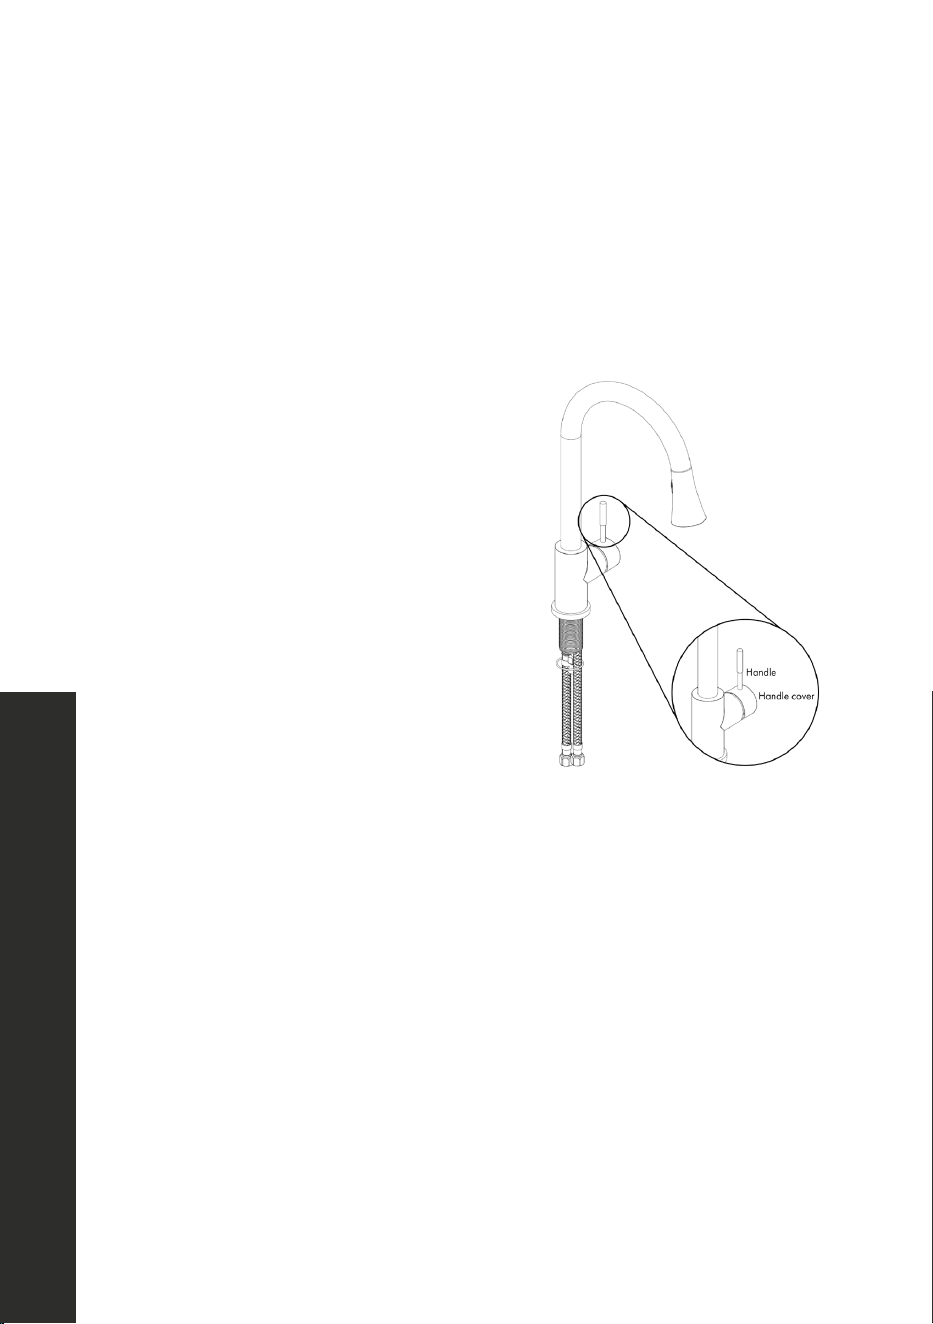
To tighten the handle:
1. Unscrew the handle from the handle cover
by turning it counterclockwise. This will
expose the set screw.
2. Using the included 2.5 mm Allen key, loosen
the set screw by turning it counterclockwise.
3. Remove the handle cover and place it back
on to reset it, being sure to align the set screw
with the screw hole.
4. Tighten the set screw with the Allen key.
5. Screw the handle back onto the handle
cover by turning it clockwise.

22
Troubleshooting
TROUBLESHOOTING
PROBLEM POSSIBLE CAUSE SOLUTIONS
There is leakage under
the handle.
The locking nut has come loose.
Unscrew the lever on the
handle by hand. Loosen set
screw with a hex wrench.
Remove the handle and
unscrew trim cap by hand.
Tighten locking nut with an
adjustable wrench.
Water will not shut
off completely.
Cartridge may be defective.
Unscrew the level on the
handle by hand. Loosen set
screw with a hex wrench.
Remove the handle and
unscrew trim cap by hand.
Unscrew the locking nut
with an adjustable wrench.
Remove ceramic disc
cartridge. Check for cracks.
There is a leak between
the spray head
and the hose.
The spray head may be loose
or the washer is not seated
correctly in the hose connection.
Tighten the spray head
by hand until snug.
Make sure the washer is
seated correctly.

COVERAGE
ZLINE Kitchen and Bath (“ZLINE”) plumbing products have a limited lifetime warranty from
the original purchase date for the original purchaser of the product.
ZLINE warranty periods begin from the original date of product delivery and solely cover
the original purchaser of the product, delivered new and in its original carton. ZLINE will
provide free-of-charge, non-consumable replacement parts for the components that failed
due to manufacturing defects. It is the responsibility of the customer to install all replacement
parts, as ZLINE does not perform service repairs on its plumbing products.
ZLINE’s liability is limited to the original purchase price of the product. Additional injuries,
losses, damages, or other inconveniences caused by product malfunction or defects in
materials are not covered under the terms of this warranty.
TERMS
ZLINE warranties apply only to the original purchaser of a ZLINE product installed for normal
residential use. This is defined as a single-family, residential dwelling in a non-commercial
setting. Any warranty claim stemming from installation, operation, or any other use within a
commercial setting is not covered under this limited warranty.
Commercial settings include, but are not limited to: schools, churches, hotels, restaurants,
vacation rentals such as Airbnb, daycare centers, private clubs, fire stations, common areas
in multi-family dwellings, nursing homes, food service locations, and institutional food
service locations such as hospitals or correctional facilities.
This warranty is non-transferable and will not under any circumstance be extended based
on the date of installation — the warranty period takes effect from the date of delivery and
only covers the original purchaser. The warranty applies only to products installed in the
contiguous United States and the District of Columbia.
Out-of-pocket payments will not be reimbursed for replacement parts unless prior approval is
received from ZLINE. Unapproved out-of-pocket payments for parts will not be reimbursed.
Out-of-pocket payments for any type of service will not be reimbursed, as ZLINE does not
perform service repairs on its plumbing products. All warranty procedures must be followed
to maintain warranty coverage.
WARRANTY

If ZLINE is unable to replace the defective part after a reasonable number of attempts,
ZLINE reserves the right to offer to replace the product or provide the original purchaser a
full refund of the purchase price of the product (not including installation, removal, or other
charges that were not included in the original purchase price).
The original purchaser of the product must provide the original proof of purchase, including
the purchase date, when filing a claim to obtain replacement parts or refunds. Additionally,
the original purchaser of the product must provide the serial number of the product when
filing a claim to obtain replacement parts or refunds.
This warranty shall not apply to any ZLINE product in which the original factory serial
number has been removed, altered, or cannot be readily determined for any reason.
Further, ZLINE is not responsible for damage resulting from, but not limited to: shipment,
delivery, or improper installation; negligence or improper maintenance, misuse, or abuse of
the product; unauthorized alteration, modification, or tampering with the product; accident,
fire, floods, pest infestations, pandemics, natural disasters, or any other unpreventable or
unexplained acts of nature, commonly referred to as “acts of God”; water leaks or water
damages caused by improper water supply or water connections associated with installation
or disassembly of the product; and service to correct installation not in accordance with the
instructions contained in ZLINE’s product manuals and/or with local government codes.
Additionally, this plumbing warranty does not apply to aesthetic damage, scratches,
or natural wear caused by normal use; second-hand, open box products, or products
purchased from an unauthorized retailer; consumable parts including, but not limited to,
touch in valves, aerators, diverter handles, sprayers, spouts, hoses, and flange covers; and
damages, problems, or any type of performance-related issues stemming from alteration
or tampering with the product, including, but not limited to, painting stainless steel, black
stainless, Satin Stainless Steel, or any other finishes or any portion of the product’s interior
or exterior.
Information contained within ZLINE’s installation and user manuals, in addition to product
information included on ZLINE’s website and all related digital listings, do not cover every
possible condition and situation that may occur during the installation or operation of
ZLINE products.
WARRANTY

ZLINE reserves the right to make changes at any time to its products when considered safe,
necessary, and useful. Always check the ZLINE website for the most up-to-date version of its
product manuals: www.zlinekitchen.com/pages/manuals.
Do not install or operate any ZLINE product if it has missing or broken parts or if it arrives
damaged due to shipping. If ZLINE products arrive damaged, contact ZLINE Customer
Experience at 1-614-777-5004 for help. Failure to report a damaged appliance prior to
installation or operation may void the warranty. ZLINE does not perform service repairs
on its plumbing products. ZLINE disclaims responsibility for damage or injury caused by
improper installation or use of any of its products.
WARRANTY

WARRANTY
SERVICE
For warranty service, please contact our Customer Service team at
1-614-777-5004 or visit www.zlinekitchen.com/contact to utilize
our online Customer Experience Portal.
Scan the QR code to view the most up-to-date version of our User
Manual and Installation Manual.
Need to purchase a part or accessory for your ZLINE product?
Visit www.zlineparts.com, ZLINE’s official parts distribution partner.