USER MANUAL
Product Overview:
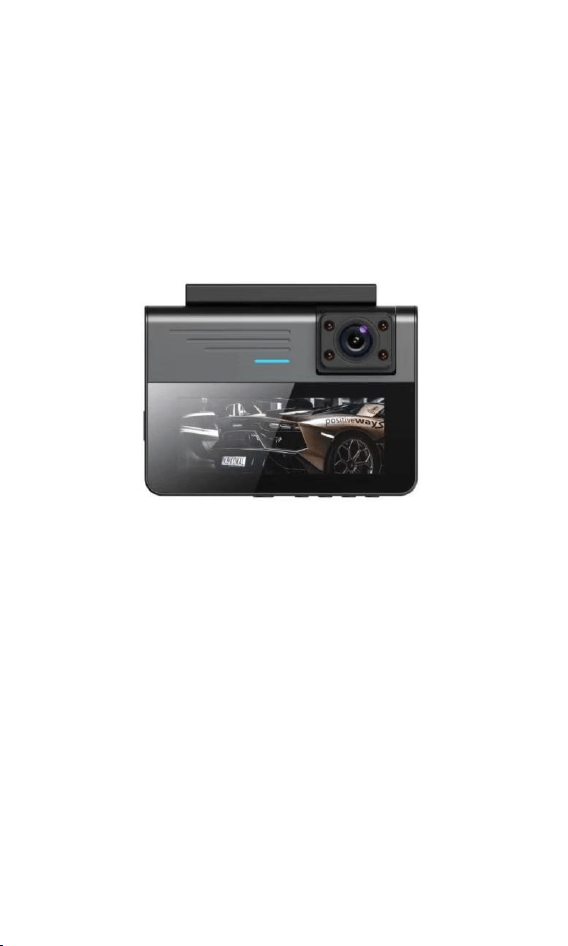
This product uses high performance chips to provide high definition
video and seamless dynamic lens. Please read this manual carefully
before using it and keep it for future reference. We hope this
product can meet your needs and provide you with lasting service.
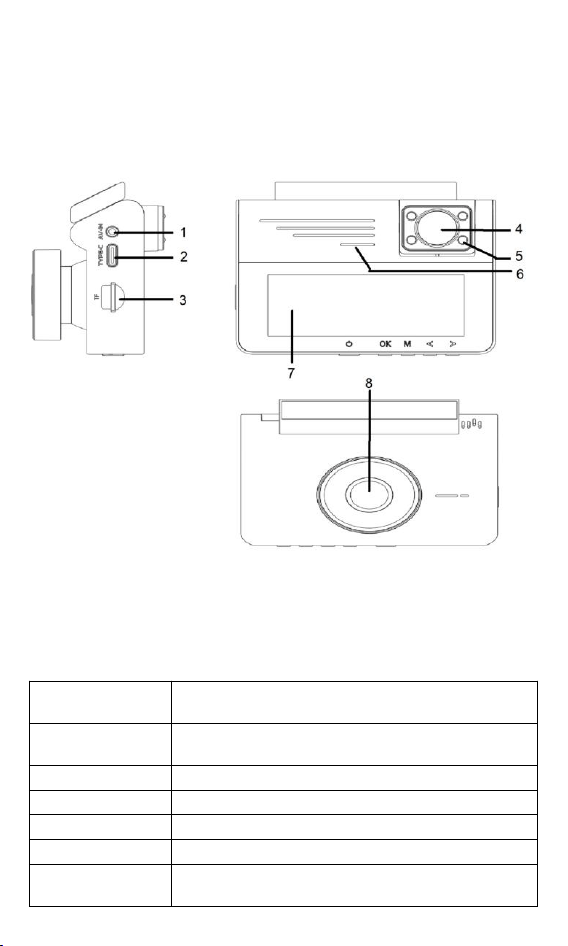
1. Rear camera port 2. Power port 3.TF card slot 4. Interior camera 5.
Infrared light 6. Indicator light 7. Screen 8. Front camera 1.
Rear camera port 2. Power port 3.TF card slot 4. Interior camera 5.
Infrared light 6. Indicator light 7. Screen 8. Front camera
Product Parameter :
Product
Features
HD camera, HD video
G-sensor
Built-in (automatically saved in case of
unexpected vehicle loss)
LCD screen size
3.16 inch
camera lens
wide-angle lens
Language
Supports multiple languages
file format
TS
Video
resolution
4K\2.5K\1080P

Video encoding
format
H.264
Turn on and off
the car
Supports car ignition and delayed shutdown
Month Day
Year
support
memory card
TF (Supports up to 256GB)
Photo Mode
8 million
Photo format
JPEG
microphone
support
WIFI function
Supports mobile connection
Rear camera
support
GPS
Support (optional)
Power interface
5V/2A
Installation Guide:
After checking that the package is correct, remove all accessories from
the package and prepare for installation.
1. Turn off the car engine.
2.Alignthe3Madhesivebracket with thebodybracket interface, then push itinto
theleftuntilfullyinstalled.
3. Insert the TF card into the recorder's card slot. [Note] Use a
high-speed TF card (U3 or higher).
[Note] To prevent crashes or screen flickering during recording caused
by abnormal files or viruses on the TF card, format the TF card with this
device before first use.
4.Beforeinstallingtherecorder,poweronthe deviceandobservethescreentosimulate
thedrivingsituation.Determinethe bestinstallationpositionandcleantheglasswith
wateroralcohol.
5. Next, remove the protective film from the 3M bracket, secure the
dashcam to the front windshield, and adjust it to the desired tilt angle.
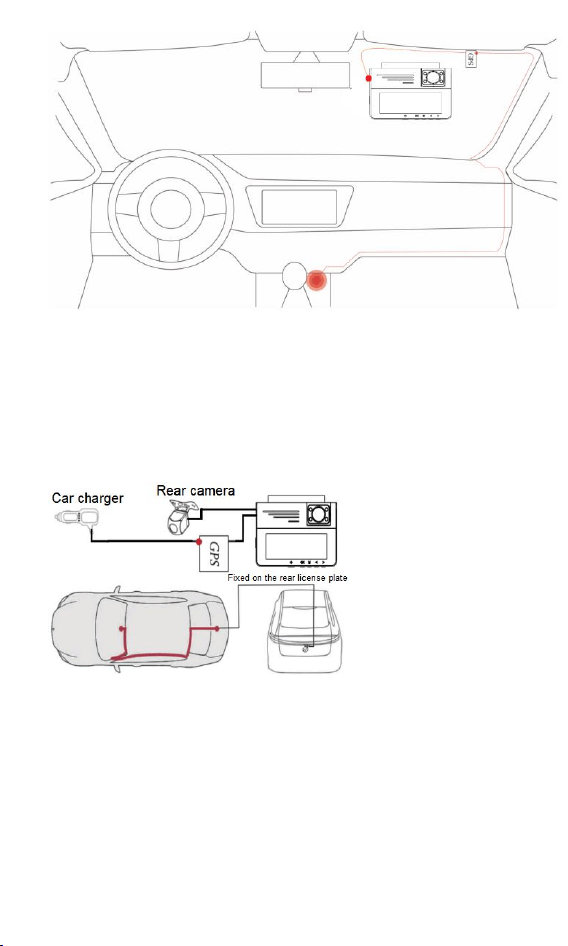
6. Insert the car charger into the cigarette lighter. Connect the charging
extension cable to the GPS via its Type-C port, then link it to the device.
Peel off the 3M tape from the GPS and apply it to the windshield. [Note]
When wiring, run the charging cable along the windshield edge as
shown in the figure below.
7. How to install a rearview camera:
The rearview camera is waterproof. It is recommended to install it in the
rear of the vehicle. Pay attention to the direction when installing.
Insert the camera cable into the cable connector, pass it through the gap
in the roof, connect it to the mounting position of the rearview camera,
and finally connect the rearview camera.
8. Adjust the lens position to ensure it is level with the ground.
9. Start the engine and check that the machine is installed correctly.
[Note] When the machine is installed correctly, it will enter the
recording state after startup. Check whether the display screen is
normal.
Button function description:
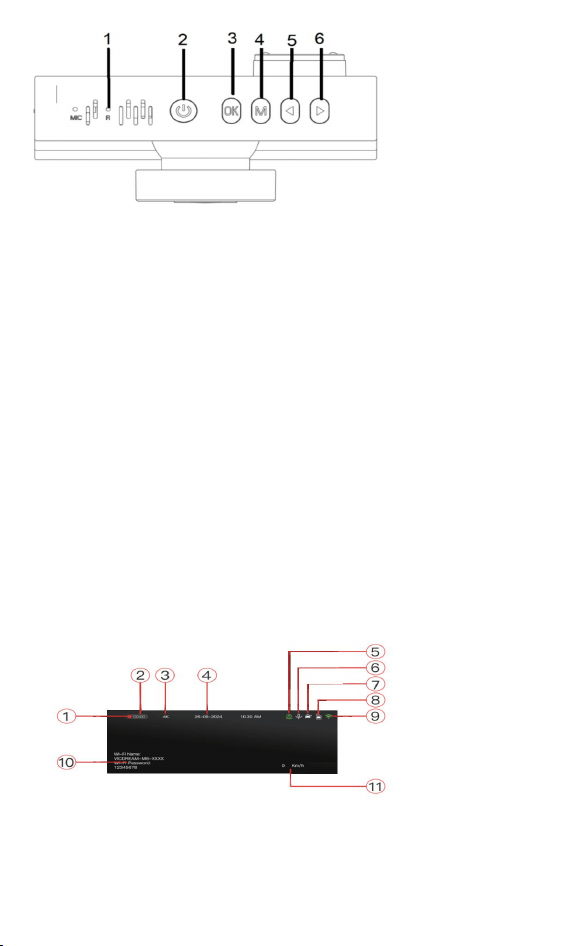
1. Reset button: The hole for the crash reset button.
2. Power button: Press and hold to turn the power on/off.
3. OK: Press and hold this key to start/stop recording and confirm
items in other interfaces.
4. Menu key: Press this key briefly to enter the main interface. Press
this key briefly while recording to lock the current video.
5. Up key: Short press this key on the preview interface to switch
to front, inner, or rear recording of videos and pictures. Press this
key in the menu and preview interface to move the interface
upward. You can turn on or off the recording function while
recording.
6. Down key: In recording mode, it captures a frame with one
click. In the preview interface, a short press switches the camera
view. In the menu and playback interface, pressing this key
moves the interface downward.
Preview interface introduction:
The dashcam enters this interface by default and starts recording when
the car starts
1. Recording status icon: blinking indicates normal recording, hidden
when not recording
2. Recording duration: Displays the recording duration during normal
recording. The default is 1 minute. You can adjust it by selecting loop
recording in the settings interface. It is hidden when not recording.
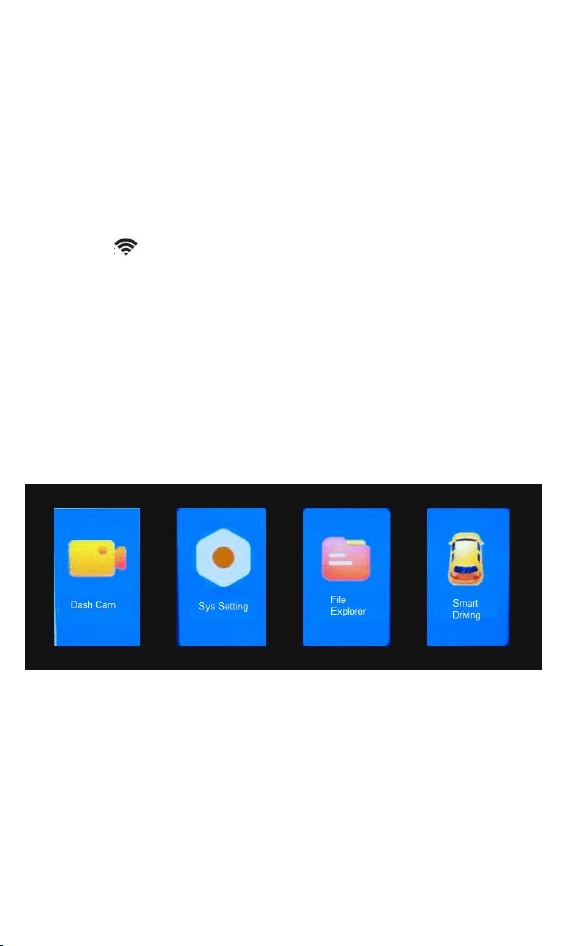
3. Resolution: 4K
4. System Time: Displays the current RTC time, which can be set in the
settings menu.
5.GPS icon: A red GPS icon appears when inserting the GPS module. If
not connected, the icon will turn off. Once GPS signal is received, the
icon will turn green.
6. Recording: Show recording status
7. Gravity sensor status: indicates whether the gravity sensor is off or on
8.TF card status: Check if the card is present or absent, and verify its
identification.
9.WiFi icon:
When Wi-Fi is on, a white Wi-Fi icon appears on the screen. You can
turn Wi-Fi on or off in Settings. If you are connected to a mobile app,
the icon turns green.
10.WiFi Name and password:
SSID is the Wi-Fi name.
PSD stands for Wi-Fi password.
11.GPS Speed:
When GPS receives a signal, the icon turns green and shows GPS
speed in km/h and mph. Note the difference between units.
Home screen introduction:
In the preview interface, press and hold the menu key to enter the main
interface, which includes: dashcam, system settings, file management.
Smart driving
System Settings Overview:
From the preview home screen, press and hold the menu key to access
system settings.
1. Video resolution:
Change the video resolution. The available options are 4K,2.5K and
1080P, which correspond to 3840x2160 and 2560 x1440 and 1920 x
1080 resolutions respectively. The default value is 4K.

2. Loop recording:
Enter the recording duration and file segment duration. Set the
recording cycle to 1, 2, or 3 minutes, with 1 minute as the default. Note:
When the SD card is full, the recorder will overwrite the earliest
recorded video clips.
3. Frequency:
Set to 50Hz or 60Hz to suppress flicker caused by different lighting
conditions. The default value is 50Hz.
4. Gravitational sensitivity:
Options: Off, Low, Medium, High. Default: Medium
5. Parking monitoring:
Options: Off, Low, Medium, High. Default is Off. When activated, if
the car stalls and a collision occurs, the recorder will start and record a
video, then turn off.
6. Time-lapse video:
Options: Off, 1FPS/S, 2FPS/S, 5FPS/S. "Off" means delayed recording
is disabled. Other options indicate the recording speed. Note:
Time-lapse recording and parking surveillance require a
voltage-lowering line power connection.
7. Duration of time-lapse recording:
Options: 12 hours, 24 hours, 48 hours, 72 hours. This indicates the
duration of delayed recording after the vehicle is turned off.
8. Recording:
Options: Off, On. When on, the environment sounds will be recorded
with the video; otherwise, no sound will be recorded.
9. Video watermark:
Options: On, Off. When On, timestamps will be added to the recorded
video. When Off, timestamps will not be displayed.
10.HDR:
Select: On or Off. Turn on for better exposure and a slightly darker
overall image.
11. Preview with built-in camera:
Options: Keep original, view mirror, record mirror, mirror, flip up and
down, flip up and down, and mirror left and right.
12. Internal record switch:
Option: Off, On.
13. Rear camera preview
Options: Keep original, view mirror, record mirror, mirror, flip
top/bottom, flip top/bottom and mirror left/right.
14. Volume settings:
Options: 1, 2, 3, 4 (off, low, medium, high) to set the voice prompt
volume

15. Button sound:
Option: Off, On
16. Summer Time:
Option: Off, On
17. Infrared fill light:
Options: Off, On, Auto.
18. Screen saver:
Options: Off, 1 minute, 3 minutes. When set to "Off", the screen stays
on. Other options specify the time after the screen turns off.
19. Speed units:
The GPS speed is in km/h or mph.
20. Time zone selection:
Choose from 24 global time zones as needed
21. Language:
Set languages for different countries.
22. Satellite information:
Display current GPS signal strength
23.WiFi Band:
The advantage of supporting two frequency bands: 2.4G and 5.8G.5.8G
is faster download speed.
24.WiFi Information:
Turn Wi-Fi on and off manually.
25. Time Settings:
Set the recorder's system time manually
26. Disk formatting
Format the TF memory card. We recommend using standard formatting.
27. Version Information
Display the firmware version of the recorder.
28. Restore factory settings
A dialog box appears to confirm whether to restore factory settings.
Confirm to reset all features to the factory settings interface.
Playback file list:
On the home screen, press and hold the menu button to access the
system interface. Select "File Management" to enter the playback
interface. Use the arrow keys to choose different videos (front view,
front view lock, front image, internal video, internal video lock, internal
image, rear view, rear view lock, rear image).
After entering the interface, you can now play the corresponding videos
and images. Use the left and right arrow keys to navigate to the previous
or next file. Press and hold the menu key to return to the previous layer
or exit playback.
Introduction to ADAS and BSD:
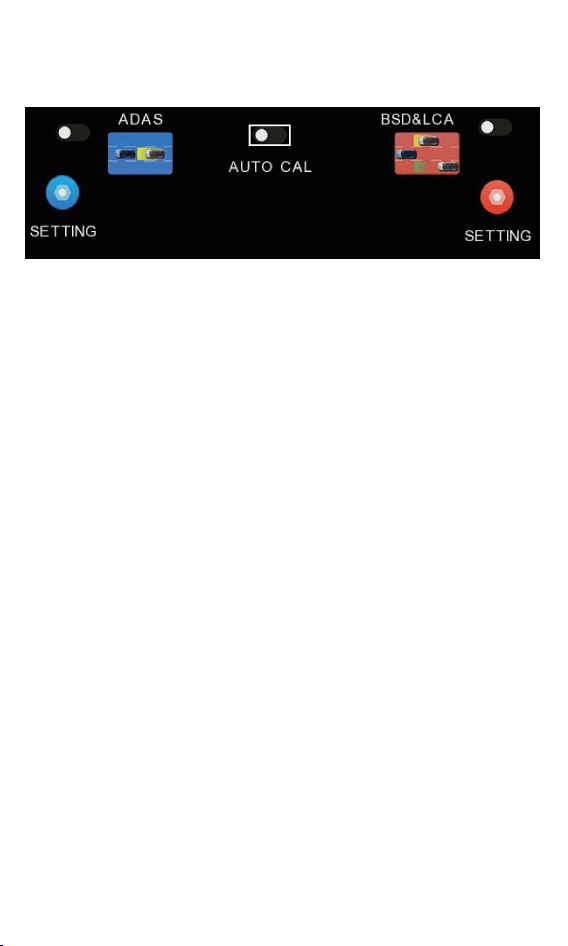
In the reading interface, press and hold the menu key to enter the main
interface. In the main interface, select the "Intelligent Driving" icon to
access the ADAS&BSD settings. Use the arrow keys to move the icon
and press OK to confirm the operation.
pay attention to :
1) ADAS and BSD can only select one at a time
2) When this feature is enabled, the recording resolution will be reduced
to 2K
3) This feature is auxiliary and not the basis for determining whether the
product is working properly
ADAS;
ADAS uses front-facing camera images and specialized image
recognition algorithms to detect various situations that may affect
driving safety, such as collisions, lane departure, and pedestrians. It
alerts the driver through voice and screen displays to pay attention to
driving safety.
1. Automatic calibration: Automatic calibration based on actual images.
2. Manual ADAS calibration: Enter manual calibration mode to adjust
the front view angle.
3.ADAS On/Off Switch: Note: Turning it on will reduce recording
resolution to 2K.
4.ADAS sensitivity settings: (after entering options)
4-1) Forward collision warning (off, low, medium (default), high);
voice prompt: "Attention collision".
4-2) Lane departure warning (off, low, medium (default), high); voice
prompt: "Please do not cross the line".
4-3) Pedestrian collision warning (off, low, medium (default), high);
voice prompt: "Pedestrians, please pay attention".
4-4) Forward vehicle start warning (off, low, medium (default), high);
voice prompt: "The vehicle in front has started."
4-5) Close-range warning (off, low, medium (default), high); voice
prompt: "Keep your distance".
4-6) Alarm sound (off, on); turning it off will disable the sound alarm.
4-7) Display the alarm area and prompt box (on/off); disabling will
disable
BDS;
Using rear camera images and specialized image recognition algorithms,
BSD detects vehicles and pedestrians in the left, center, and right
directions that may affect driving safety, and reminds the driver to pay
attention to driving safety through voice and screen display.
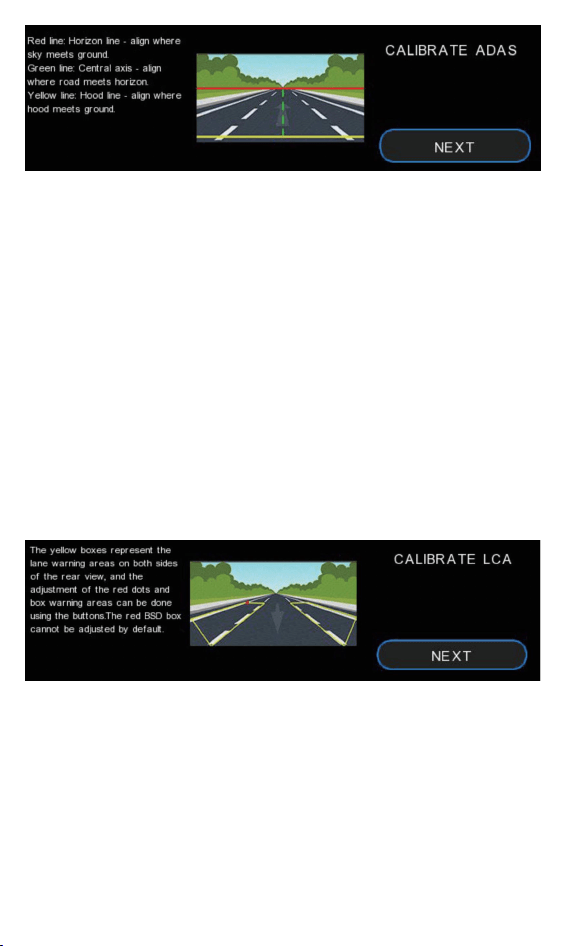
1. Manual calibration of BSD: Enter manual calibration mode to adjust
the rearview mirror angle.
2. BSD On/Off Switch: Note: Turning this switch on will reduce
recording resolution to 2K.
3.BSD sensitivity settings:
3-1) Alert sensitivity (low, medium, high)
3-2) Speed threshold (0, 30 km/h (default), 50 km/h, 80 km/h, 100
km/h); this feature is activated when the speed exceeds the specified
value.
3-3) Alarm sound (on/off); turning it off will disable the sound alarm.
3-4) Show alarm area and color border (on/off); turning it off will
disable the prompt box display.
Application installation and WiFi connection
instructions:
1. From the preview home screen, press and hold the menu button to
access system settings, select WiFi information, press and hold OK to
confirm, then enter WiFi mode. The screen will display the WiFi QR
code, name, and password.
2. Scan the QR code below with your phone to download and install the
app. For Android devices, select 'Safe Download'; iOS devices will
automatically redirect to the App Store.
3. Add device
For iPhone: Connect to the system's WiFi, select the recorder
CarDV_****, enter the default password 12345678 to connect, then
open the' Record Wind' app to complete the setup.
For Android devices: Launch the "Record Wind" app, tap "Add
Recorder". Follow the on-screen wizard to access the system's WiFi
interface. Select the recorder CarDV_**** and enter the default WiFi
password 12345678. After successful connection, tap "Back" to
complete the setup.
APP Introduction:
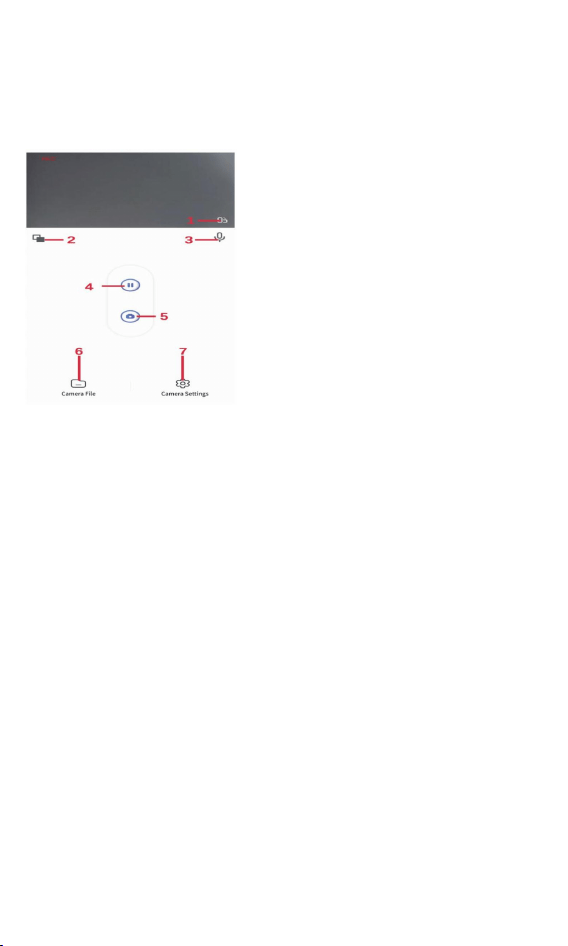
1. Recorder: This page manages recorders, allowing you to add, view,
delete recorders, and access their video preview interface.
2. Album: Manage photos and videos downloaded from the recorder to
the phone;
Play GPS trajectory map
(1)Download the video from the front road to the local album on the
APP.
(2)Disconnect the recorder from the phone's WiFi and use the
phone's data network
(3)In the local album section of the APP interface, tap the front road
video to view GPS trajectory details and vehicle speed.
3. Smart Cut: Edit photos and videos.
4. More: APP language settings, problem feedback, About, and other
information;
Description of recorder functions:
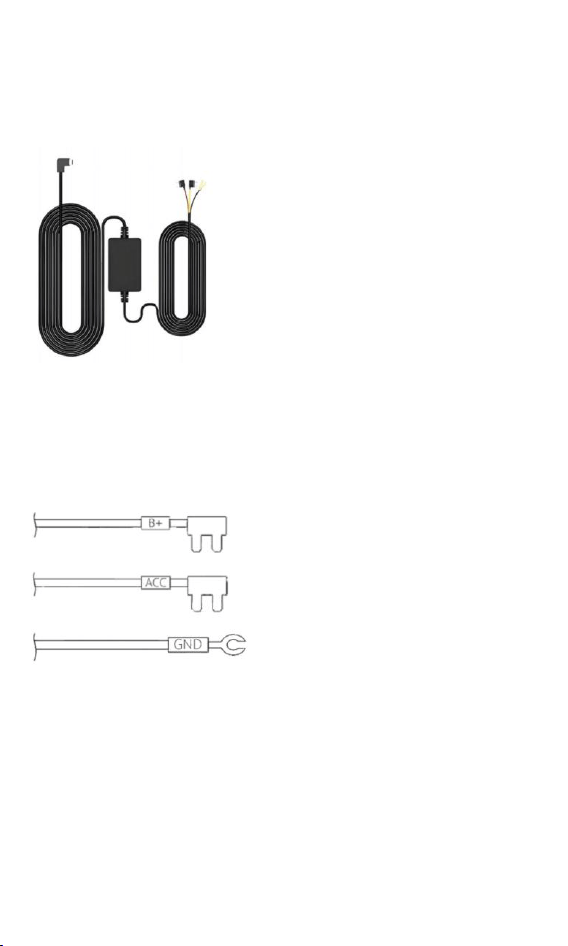
1. Full-screen display: Click to view the video in full-screen mode.
2. Scene switching: Click to switch between different scenes.
3. Microphone: Tap to turn the microphone on or off.
4. Video recording: Click to pause or resume. The video will be saved to
the recorder after completion.
5. Take a photo: Click to take a photo, and the photo will be saved on
the recorder after completion.
6. Recorder Files: Access the file list on the recorder by categorizing
them into loop video, snapshot events, emergency events, parking
surveillance, and local photo albums.
Download recorder files
Click "Record File" to access the file list. Select the desired image or
video, then click "Download" to start the process. The file will be saved
to your phone and can be viewed in the "Album".
Play the recorder file
Click "Record File" to access the file list interface. You can play the
video directly without downloading, and take a photo of the current
playback frame.
Download: Download the video to your phone;
Delete: Delete the selected file.
photo album
Go to "Album" to manage downloaded photos or videos. Click "All"
to view the video list. Files are sorted by date. Click "Select" to choose
multiple files for operations.
Video: All video files;
Photo: all photo files;
Urgent: collision sensing files;
7. Recorder Settings: Access the recorder's settings interface to adjust
microphone status, recording resolution, and video file duration.
Parking monitoring and time-limited recording (optional):
The hard-wired dash cam kit converts the vehicle's 12V-24V power
supply to the dash cam's standard 5V requirement.
A hardwired kit is required when using parking monitoring and
time-lapse video features to prevent car battery drain. (Not included,
purchase separately) Features:
Low battery voltage protection
Increase input power
> Universal Compatibility
Understanding the hardwired harness kit: Warning: Incorrect
connections may disable voltage protection and damage your vehicle.
Please operate under the guidance of a professional. How to install the
hardwired harness kit:
Red wire> ACC> Power only when the car key is open
Yellow wire> B+> always has power
Black wire> Grounding> Any grounding (negative) screw
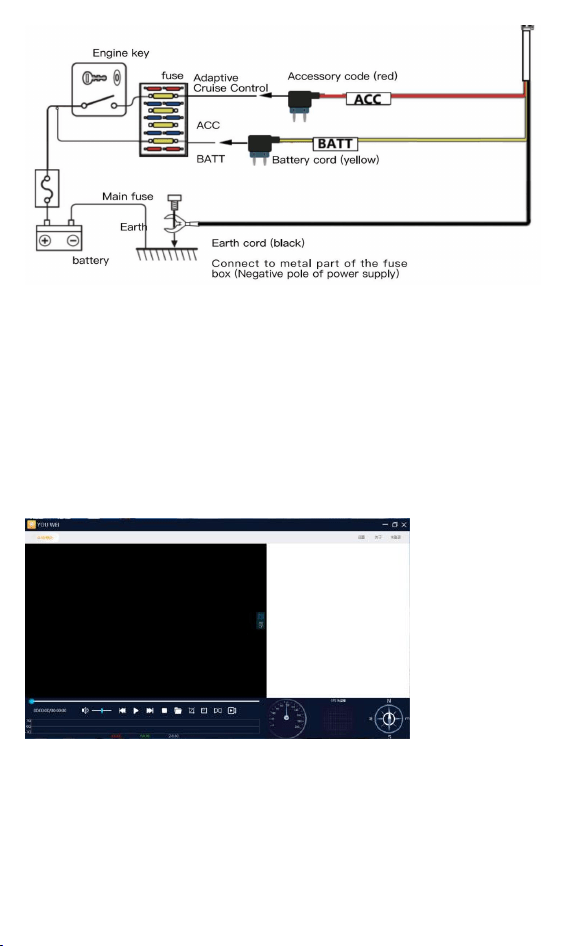
Pop-up: The fuse box panel is usually located on the driver's side
dashboard. If the fuse is small, you can cut the head of the wire and
connect it directly to the fuse.
Download GPS Track Map Player:
1.PC version enters the website http://www.sunningsoft.com/en/pcg
ps.html Download;
Note: System requirements: 1. Windows 7/8/10 operating system, 64-bit
or 32-bit (Windows XP is not supported).
2. Search for GXplayer directly in the Mac OS Store to download and
install.
After the download and installation, open the player and you
will see the
following interface:
3. After installation, open the software and play the video file, or drag
the file directly to the player bar. The GPS
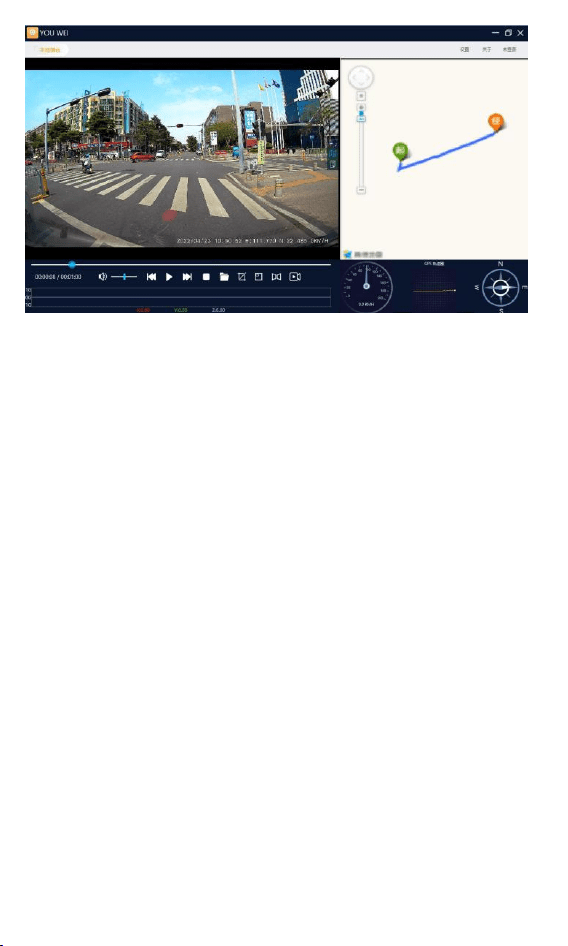
tr
ack will be displayed after playback.
Troubleshooting:
If the product has a problem under normal operation, refer to the
following method to solve it:
Can't take photos or videos
Check if the TF card has enough space and is locked.
The recording will stop automatically
Because HD video data is huge, use a high-speed TF card compatible
with SDHC. High-speed TF cards will have the U3 logo.
"Archive error" message appears when replaying images and videos
An error occurred while storing data on the TF card, resulting in
incomplete files. Use the camera's "Format" function to reformat the TF
card.
The resulting image is hazy
Check for dirt or fingerprints on the lens. Wipe the lens with lens
paper before shooting.
The image contains horizontal stripe interference
This is caused by setting the wrong "source frequency". Set it to "50Hz"
or "60Hz" according to the local power supply frequency.
FCC Statement
This device complies with Part 15 of the FCC
Rules.Operation is subject to the following two
conditions:
(1)This device may not cause harmful interference.
(2)This device must accept any interference
received,including

nterference that may cause undesired operation.
Caution: Any changes or modifications not
expressly approved by the party responsible for
compliance could void the user's authority to
operate the equipment.
Note: This equipment has been tested and found to
comply with the limits for a Class B digital device
under Part 15 of the FCC Rules.These limits are
designed to protect reasonably against harmful
interference in a residential installation.This
equipment generates uses and can radiate radio
frequency energy and,if not installed and used by
the instructions, may cause harmful interference to
radio communications.However,there is no
guarantee that interference will not occur in a
particular installation. Suppose this equipment does
cause harmful interference to radio or television
reception,which can be determined by turning the
equipment off and on.In that case,the user is
encouraged to try to correct the interference by one
or more of the following measures:
(1)Reorient or relocate the receiving antenna.
(2)Increase the separation between the equipment
and receiver.
(3)Connect the equipment to an outlet on a circuit
different from the receivers.
(4)Consult the dealer or an experienced radio/TV
technician for help.
Radio Frequency Exposure Statement
The device has been evaluated to meet general RF
exposure requirements.The device can be used
in fixed/mobile exposure condition.The min
separation distance is 20cm.

