
Digital Video Recorder
Quick Start Guide
For more information of your new system, please refer to www.zositech.com
V2.D.01.Z
Contents
Enlish
Español
Français
Deutsch
РУССКИЙ
1 - 17
18 - 34
35 - 51
52 - 68
69 - 85
1
1
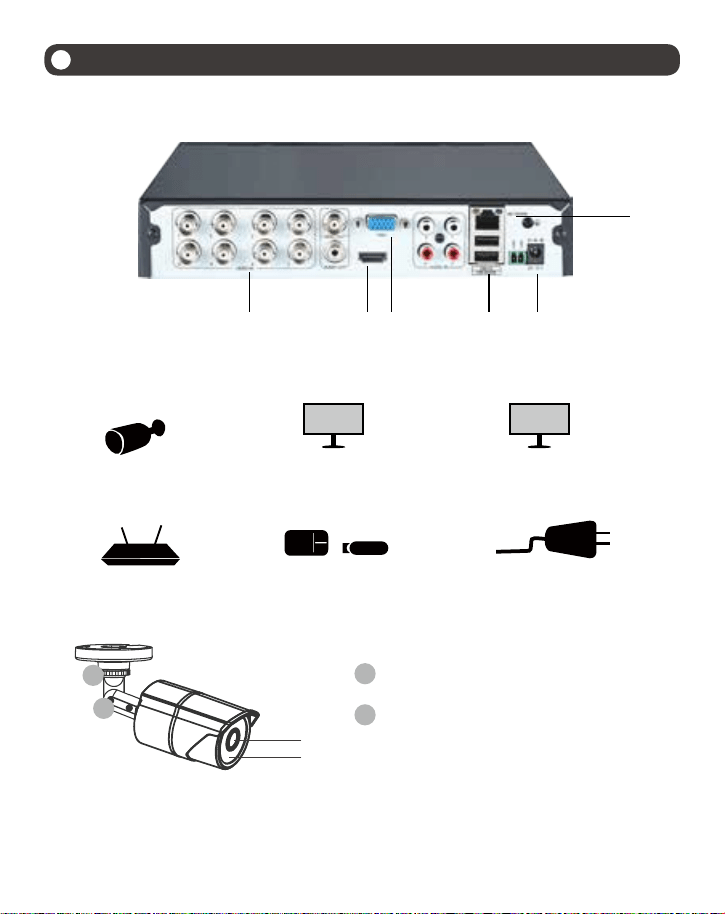
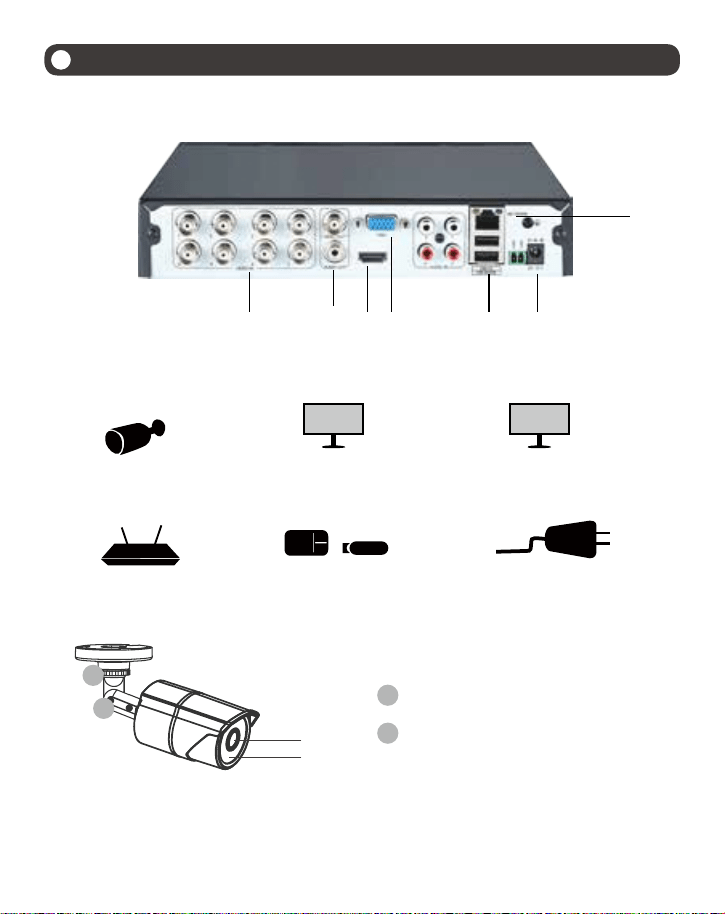
Introduction of System
1.1 DVR
1.2 Camera
① ② ③
④
⑤ ⑥
⑦ ⑧
HD lens LEDs IR 24pcs, 5mm
Adjust to the desired position.
The neck of the bracket is connected to
the mounting base. Rotate the bracket by
loosening the radial joint locking ring. Adjust
the position to the appropriate position and
tighten the locking ring.
A
B
⑦
⑧
A
B
①
④ ⑤ ⑥
② ③
Camera
Router Mouse Power Port
Monitor/Power(VGA)Monitor/Power(HDMI)
2
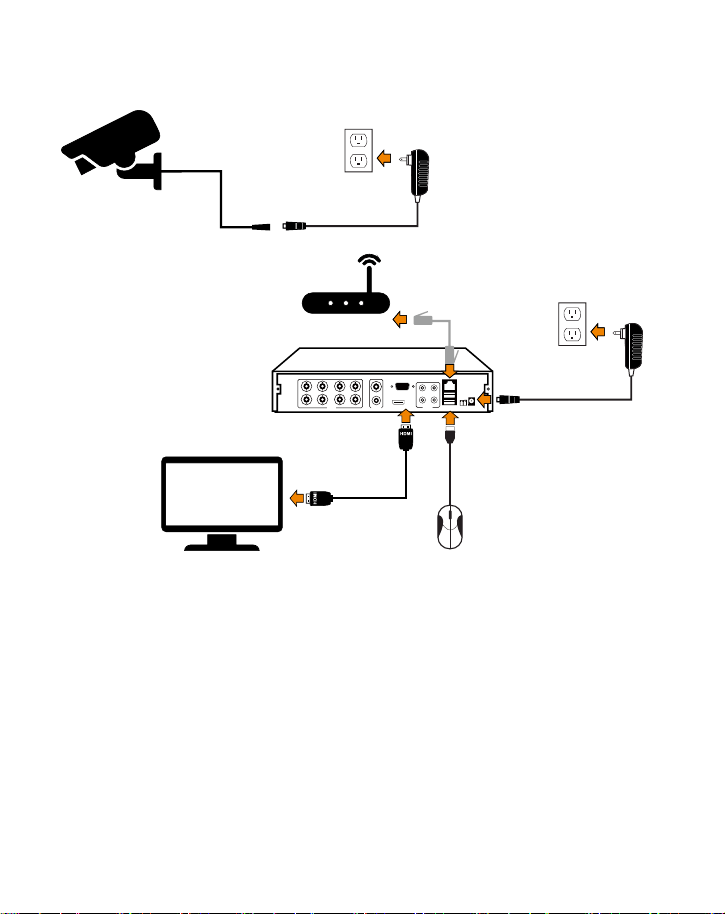
1.3 Connect the System
①Connect the Camera to DVR and Plug Camera to power.
②Connect monitor to the DVR with HDMI,VGA,BNC port.
③Connect the DVR to Router with an Ethernet cable.
④Plug the mouse to the USB port.
⑤Plug DVR to power.
8 channel configuration shown. 4/16 channel will have the respective number of video inputs.
VIDEO IN AUDIO OUT
VIDEO OUT
VGA
HDMI
AUDIO IN
USB 2.0 DC 12V
RG 45
3
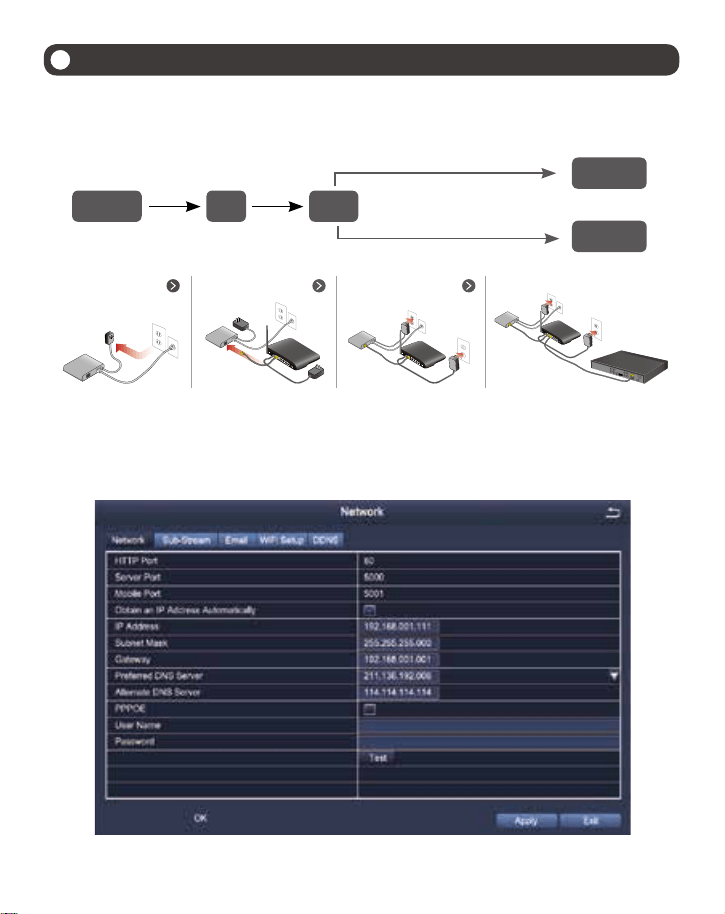
A:How to connect DVR to the LAN?
B:How to test the network status of the DVR?
(1)Right click Mouse > Go to Main Menu > Setup > Network
(2)Tick 'Obtain IP address automatically'
(3)Click 'Test', if 'OK' is displayed, the network is connected successfully.
Note: Please ensure DHCP in your router is open.
2
View on Smartphone (Add Device - Video Playback)
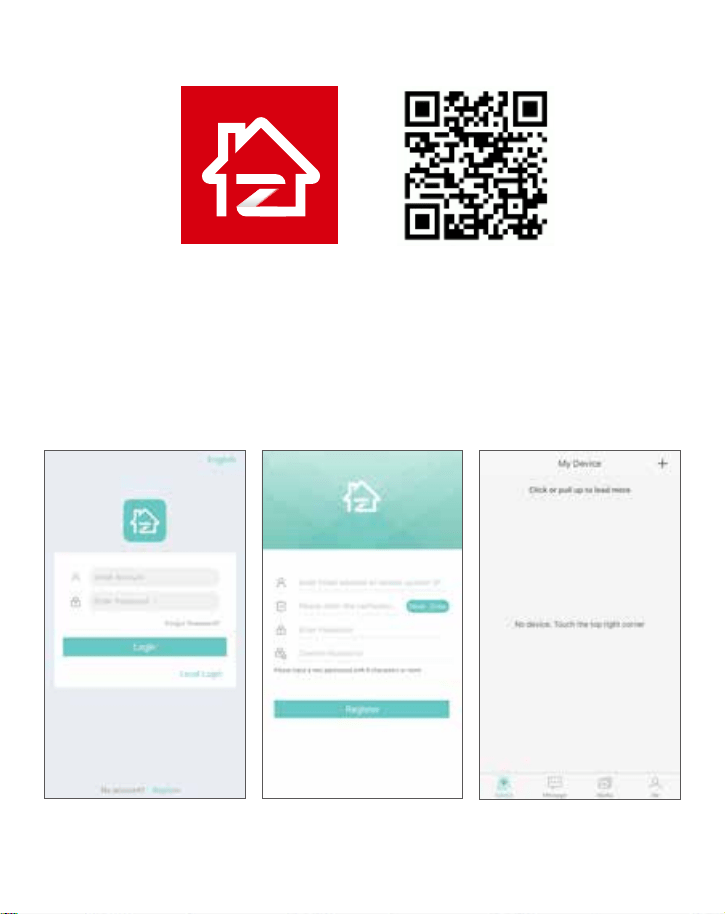
2.1 Connect the DVR to the Internet
Fibre Optic DSL
Router
DVR/NVR
PC
RJ45 cable
WIFI or RJ45 Cable
DSL/CABLE
modem
DSL/CABLE
modem
DSL/CABLE
modem
DSL/CABLE
modem
ROUTER
ROUTER
ROUTER
DVR
4
2.2 Download App
2.3 Run the App
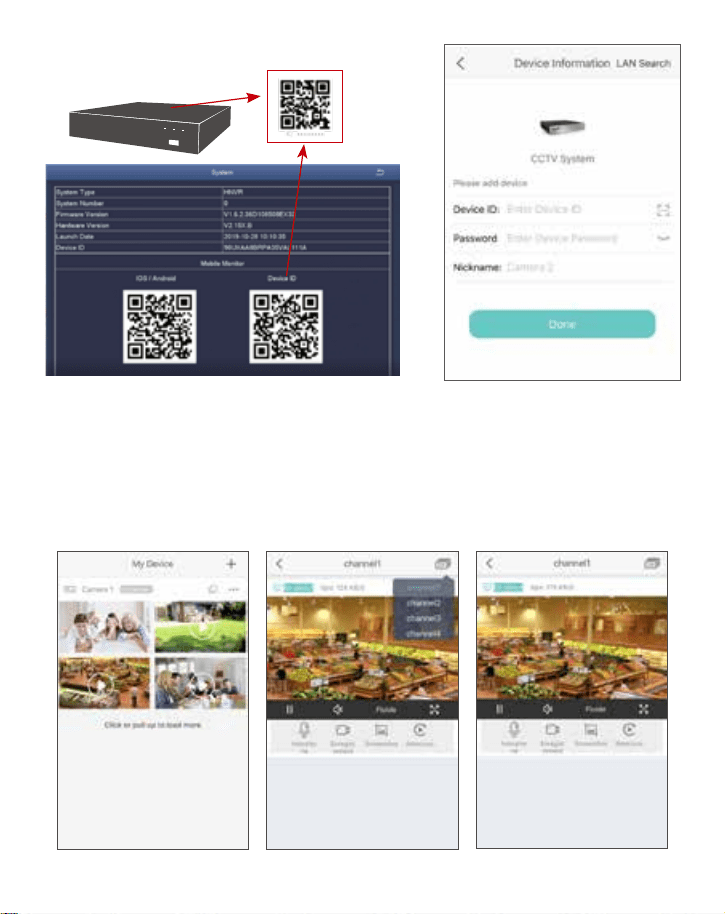
A: Install the free Zosi Smart App.
B: Tap Register and input your email box to get validation code, click next to set up password,then
save it, registration completed.
C: Login the App,get into the main interface (My Device), click”+”in the upper right corner to add
devices.
Zosi Smart App (iOS/Android)
Open the App Registration Click “+” to Add Devices
5
D: Enter the device uid by scanning code or hand-typing.
Enter the device password (the password is set by the device, and if the password is blank, it is no
need to enter the password.)
Enter the device name;
Click Finish to enter the device page and perform device operations (added devices are at the top of
the device page).
E: Then go back to the Device list > Tap the device > Tap “+” to select channel(all selected) > Tap
Confirm to start preview.
6
PC client AVSS is applied to DVR/NVR/IPC preview with real-time viewing, device management,
remote video playback and more functions.
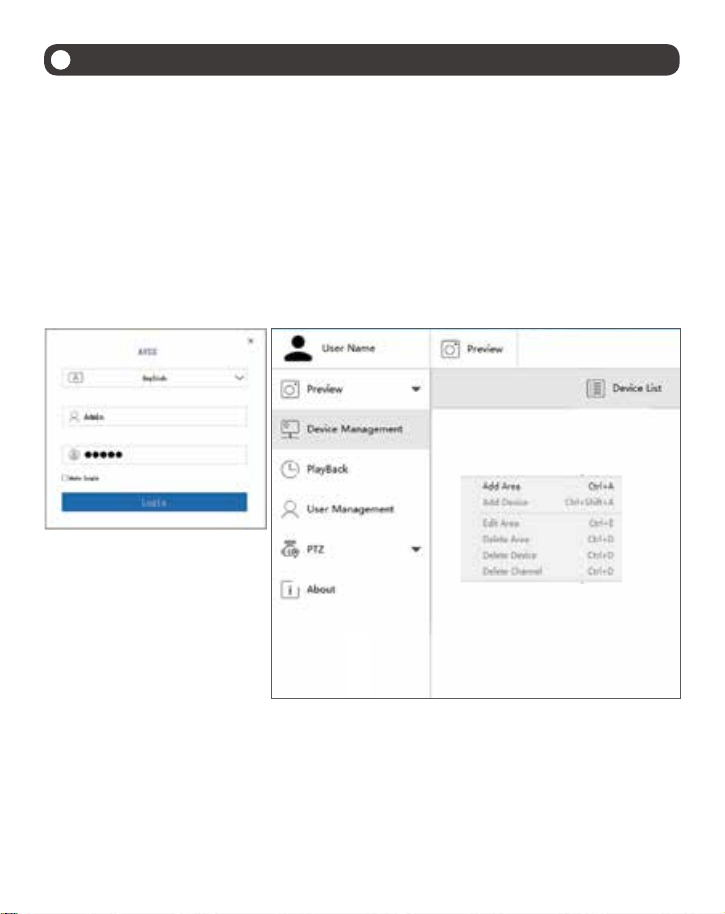
3.1 Login
3.2 Device Management (Add Devices After Adding the Area)
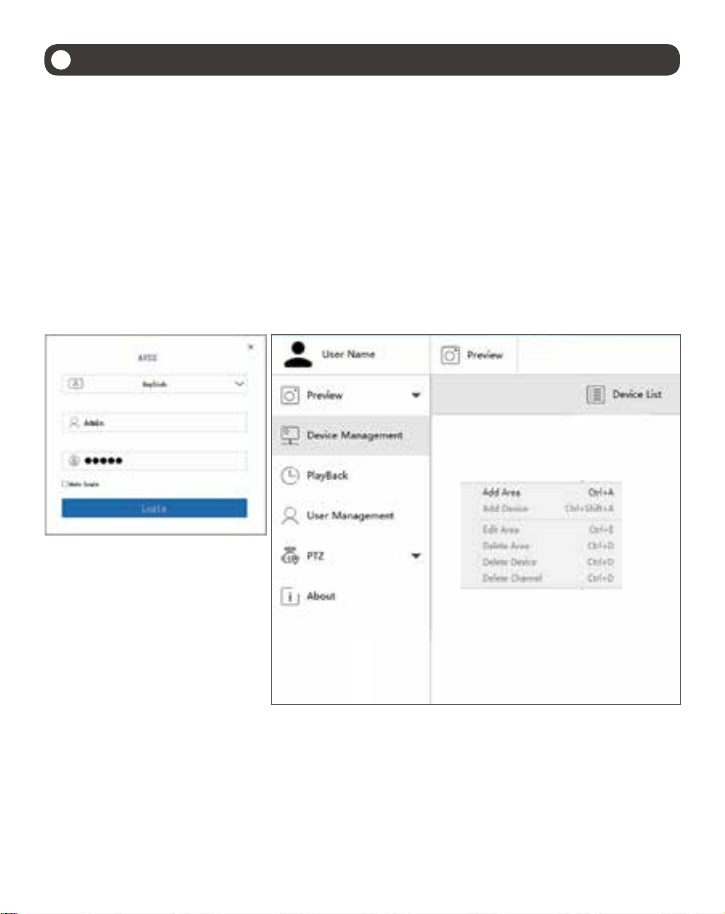
Install the PC client, double-click the icon AVSS to open, select the language and click Login.
Note: You can log in with the default username and password, or register a new account. The account
registered by the mobile app can also be used here.
① Click the Device Management> Add Area.
3
View on PC Client Software
② Add area: in the blank area of the device list > click the right mouse button > Add area and enter
the name of the area.
Note: The name of the area is used to name the monitored area.
7
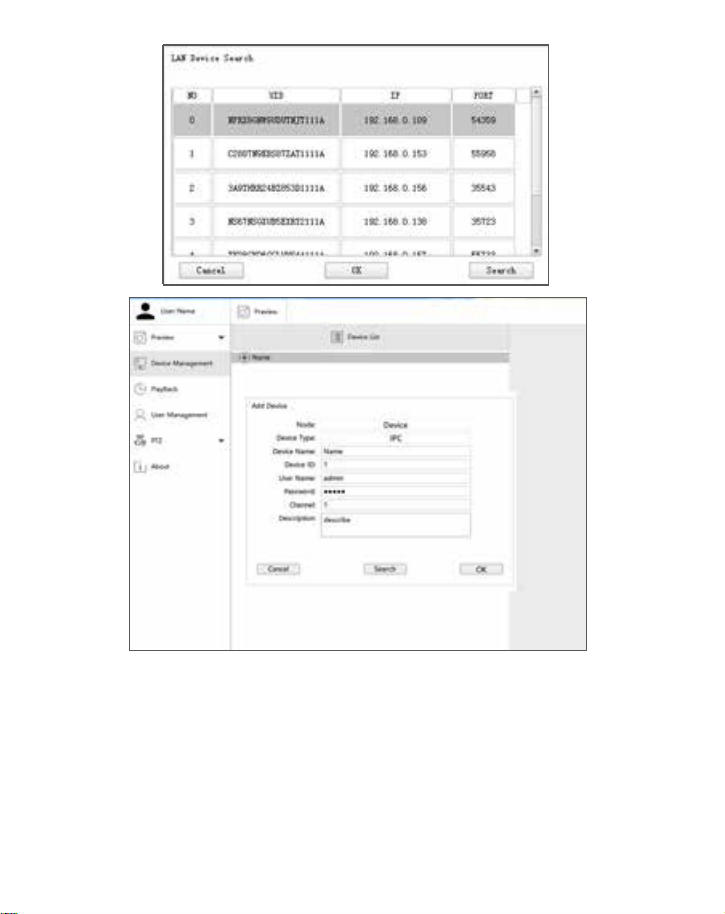
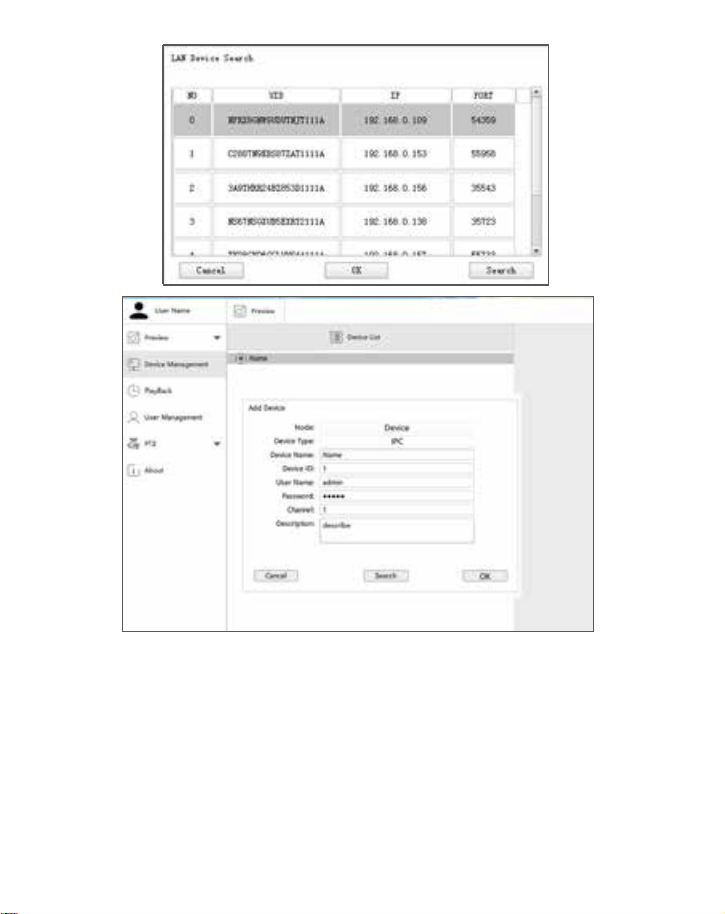
③ Add device: Select the area corresponding to the Device List > right click to add device > select
Device Type > enter Device Name, Device ID, User Name, Device Password and Channel Number >
click OK.
Note: ① Default User name is admin. ② When the computer and device are connected to the
same router, you can click “Search” to add the device.
3.3 Preview
Click "Preview" > Device List > select corresponding device > click the right mouse button > select
"Play All", "Stop All" in the menu to complete the video preview display and close.
8
①
③
②
④
4
Install a Hard Disk
The system may not include Hard Disk, it’s depending on the kit you selected. This system works with
most 3.5” SATA Hard Disk or 2.5” SATA Hard Disk.
Note: if your system has preinstalled hard disk, please skip this step.
Note:
After installing a hard disk, you need to first format the Hard Disk before recording.
Right click the mouse > go to Main Menu > Disk Management > Select the Hard Disk > Click Format >
Apply.
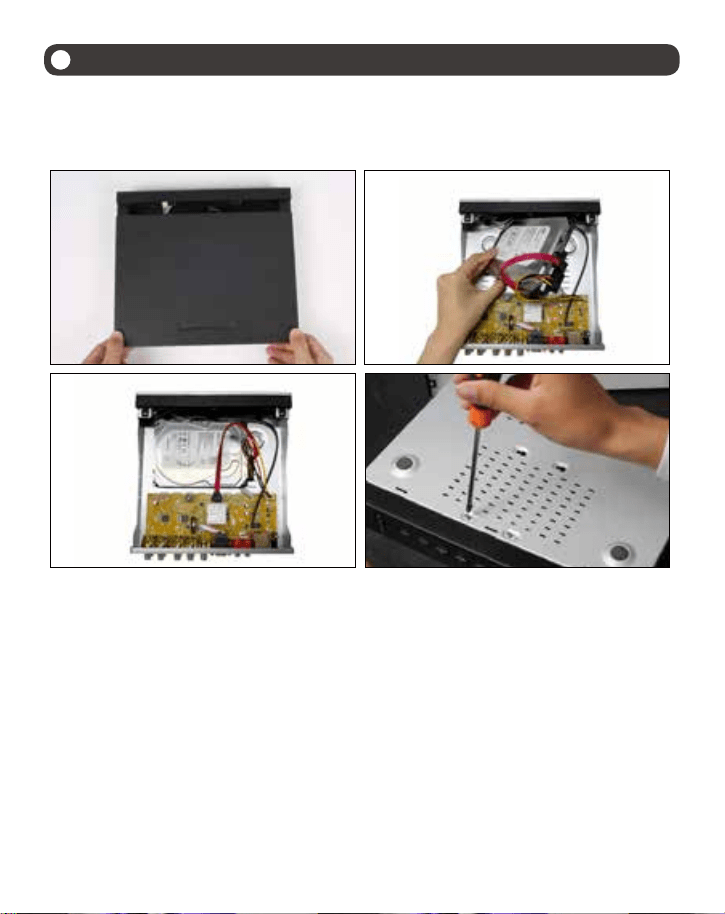
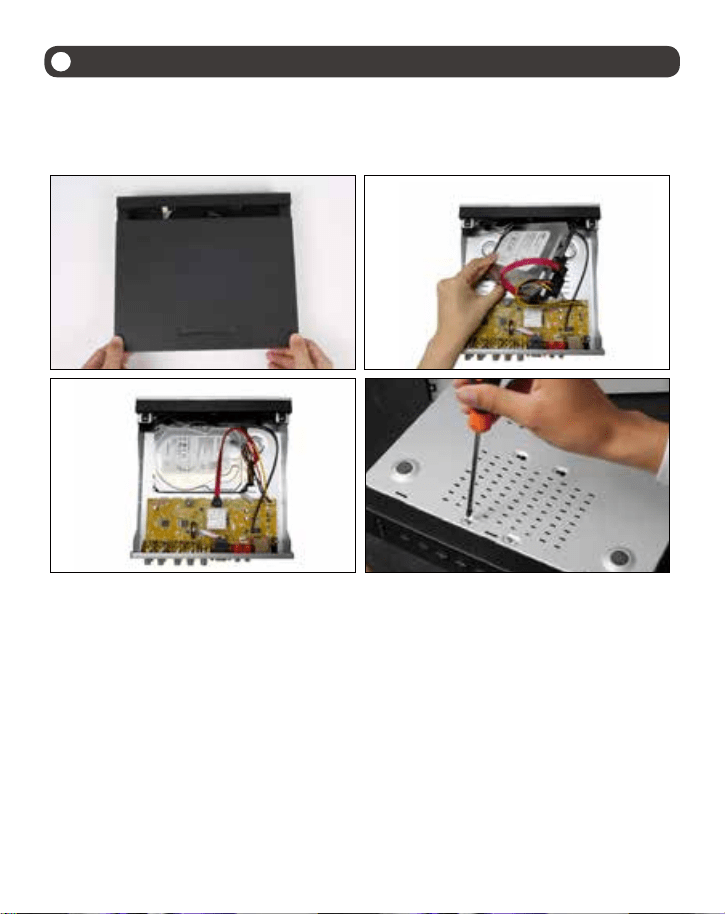
① Unplug your DVR from power, unscrew and remove the top cover.
② Connect the SATA power and data cables from the DVR to the corresponding ports on your hard
disk as shown.
③ Place the hard disk into the DVR. Any cable should cross up over the hard disk.
④ Holding the hard disk and the DVR, gently turn it over and line up the holes on the hard disk
with the holes on the DVR. Using a Phillips screwdriver, screw the provided screws into the holes.
Assemble the cover.
9
Right click mouse > Go to Main Menu > Setup > Record
You shall see the record settings for all channels. Change the record setting according to your preference and apply
the changes.
5.1 Motion Detection
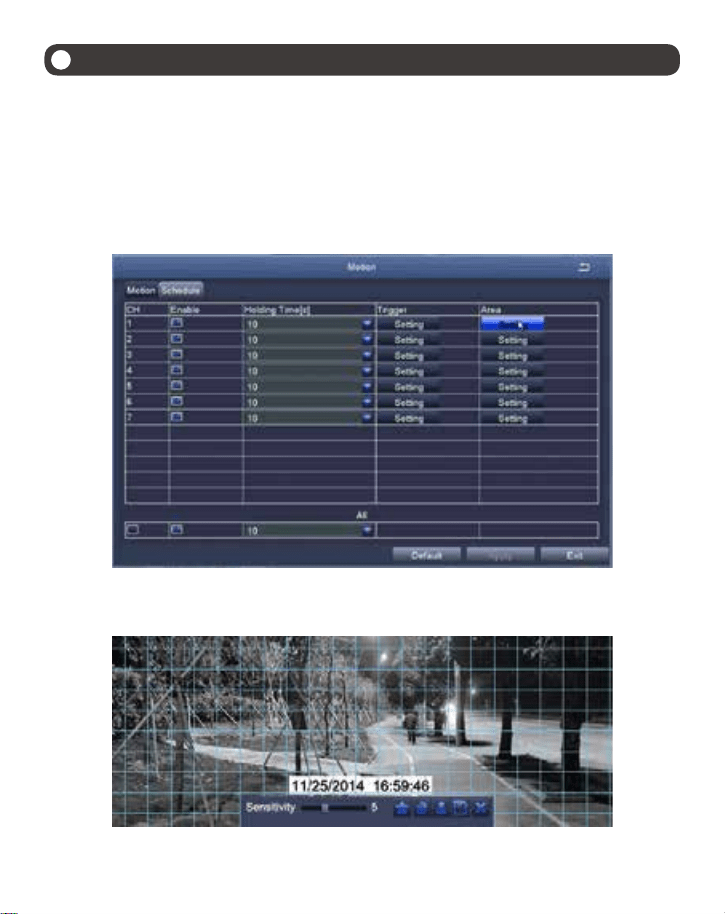
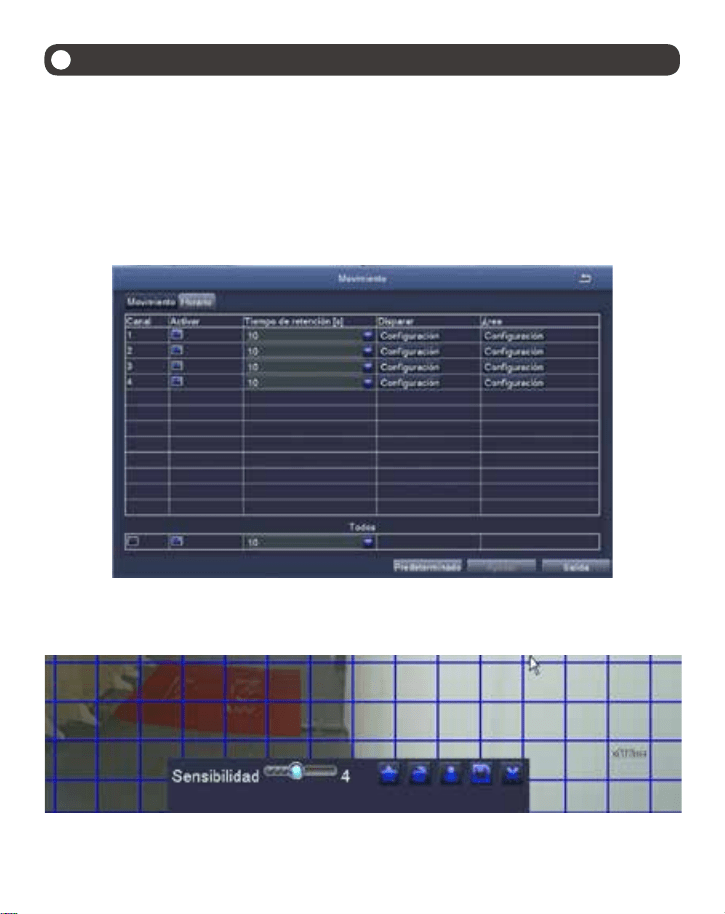
Set motion Detection,DVR will record only when motion or movement is detected. Right click mouse > Main Menu >
Setup > Alarm > Motion > Motion detection.
The system starts recording when motion is detected by the camera, and the monitoring picture will show at the
bottom left corner.
Select Camera. Tick the Channel you want to record on motion detection.
Area: It is allowed to set sensitivity area of camera viewing range.
5
Video Record
10
Click STAR to make the whole viewing range as sensitivity
Click Trash Box to remove sensitivity area
Click to save setting
Click to exit
As Color and luminance is important for sensitivity, so it's necessary to adjust its value at specific conditions. The
default value is 6 while value range is from 1 to 8.
Right click mouse to show or hide control menu at screen bottom.
Test the setting by moving something or some one walk through grid area within camera view range. If DVR detects
movement within grid area, a red hunanoid figure would be presented in the screen. The grid shall not cover flag,
trees or some other flying objects in the wind to avoid false alerts.
5.2 Scheduled Record
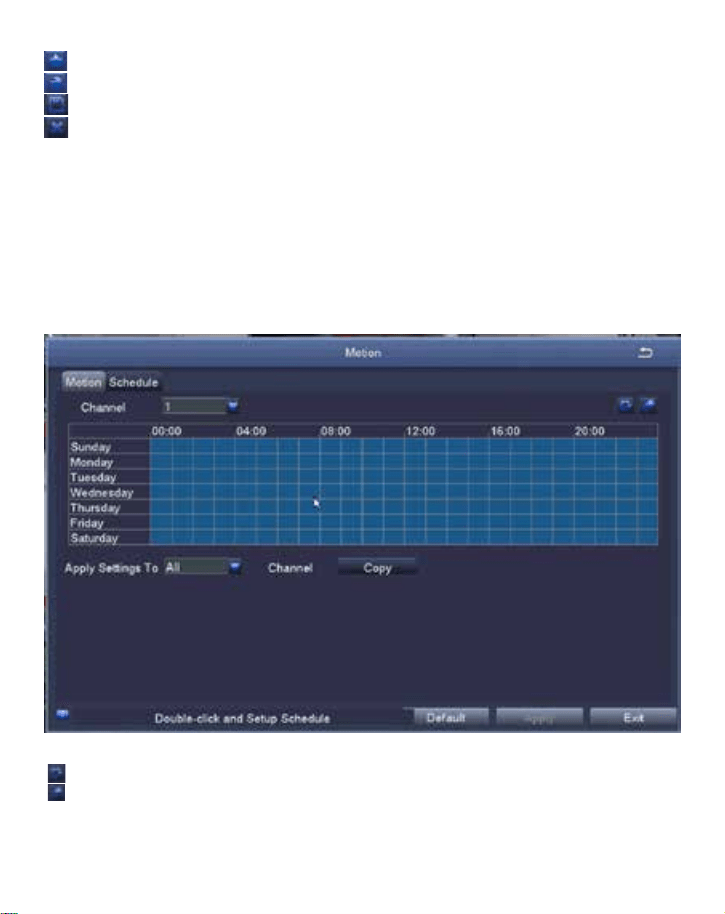
5.2.1 Set Time scheduled record, you may configure each channel to record at specific times based on time of day.
Right click the mouse > go to Main Menu >Setup > Schedule
Using the pencil tool to highlight the individual hours for specific days.
Using the adjacent eraser tool removes the highlighting in a block.
Settings can be copied and applied to any or all of the channels and to any other day.
11
5.3 Video Playback
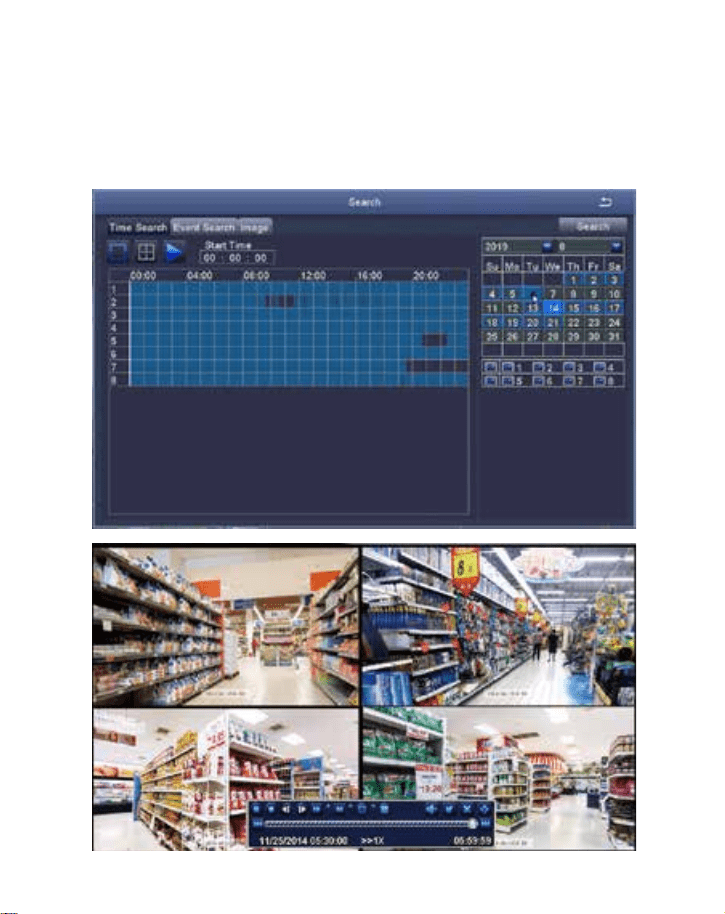
Get into system Main Menu > Search, system presents as following:
6.2.2 Blocks of time to be recorded can also be set up by double clicking on a field adjacent to a day. Multiple
schedules can be created and saved with start and stop times down to the minute. These can then be applied to
multiple days and cameras.
Search the video you want via time or Event, then play it.
12
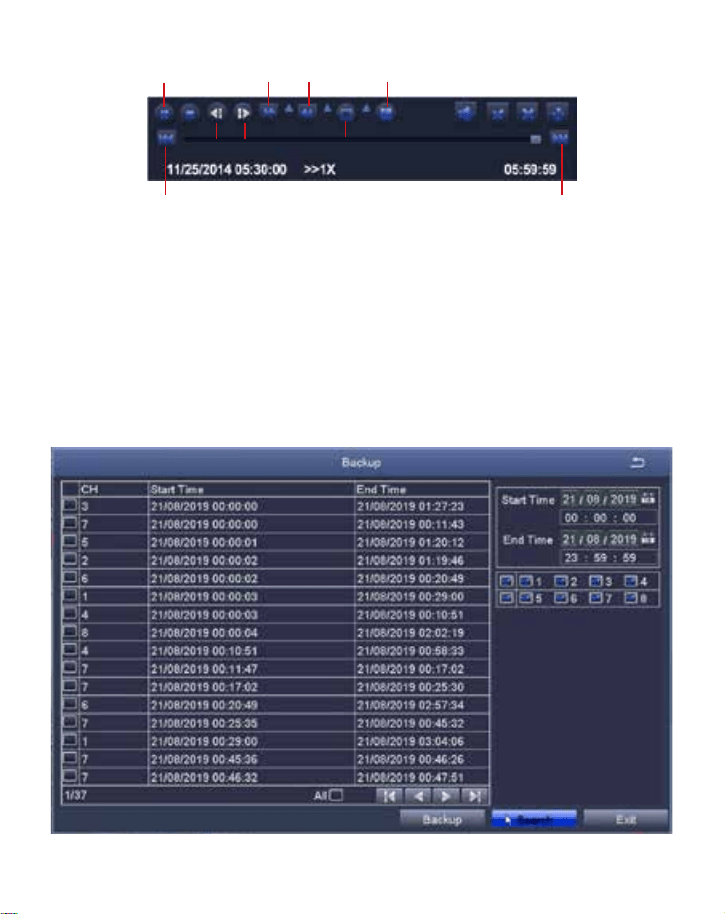
Previous Record: Move to last recorded event
Next Record: Move to next recorded event
Fast Forward: video can be played at different speed, from 1/4 times to 16 times.
Rewind: Video play can be rewinded at 1 time, 8 times, 16 times and 32 times.
Screen Display Mode: Both single-screen and multi-screen are available. You can choose how many channels you
want to playback one time.Channel without records presents blank screen.
5.4 Video Backup
① Plug an USB flash disk into your DVR’s USB port
② Right click the mouse > Main Menu > Backup > choose the channel and time period > Search > Choose the video
clips you want to backup > Click Backup
Previous Record Next Record
Rewind
Fast
Forward
Play/Pause
Next frame
Previous
frame
Single-screen display
Multi-screen display
13
5.5 PIR Detection (applicable to cameras with PIR features)
After setting the PIR motion detection mode, the DVR will only start recording when moving objects
with temperature about 37 degrees are detected.
Right Click > Main Menu > Setup > Alarm > PIR Detection.
When moving objects with temperature about 37 degrees are captured by the camera, the system
will start recording and will be displayed in the lower left corner of the screen.
Note: The PIR feature is fully enabled when motion detection mode and PIR detection mode are
both turned on. When is displayed in the lower left corner of the screen, it indicates that motion
detection and PIR detection are both triggered, which means moving objects with temperature
about 37 degrees being captured by the cameras.
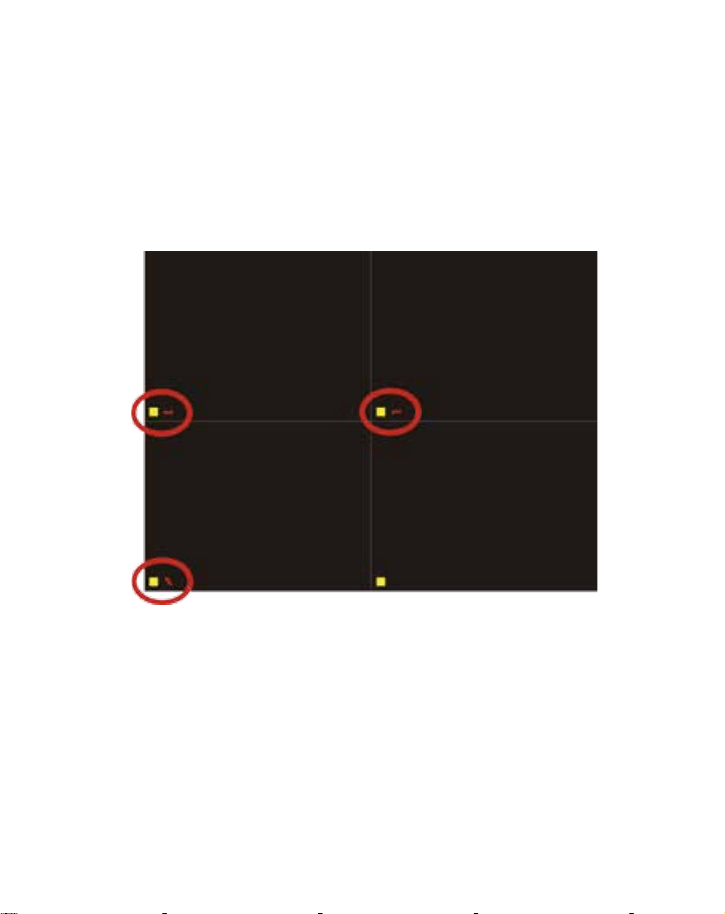
Note: Figure 1 indicates only motion detection is triggered; figure 2 indicates only PIR detection is
triggered; figure 3 indicates motion detection and PIR detection are both triggered at the same time.
Select Camera: Tick the channel you want to set PIR detection mode.
Holding Time: Set recording time length after motion stops.
Trigger: Multi-channels can be set to record when moving objects with temperature are detected
by one of cameras. For example, when camera 1 detects motion, camera 2 and camera 3 can be
triggered to record as well.
Schedule recording: Set the time period for turning PIR detection mode on and off (same as
scheduled recording operation).
Alarm setting: When the device triggers an alarm, you can turn the DVR's buzzer alarm or email
notification settings on and off.
Note: The above operations apply to the situation when both motion detection mode and PIR
detection mode are turned on.
14
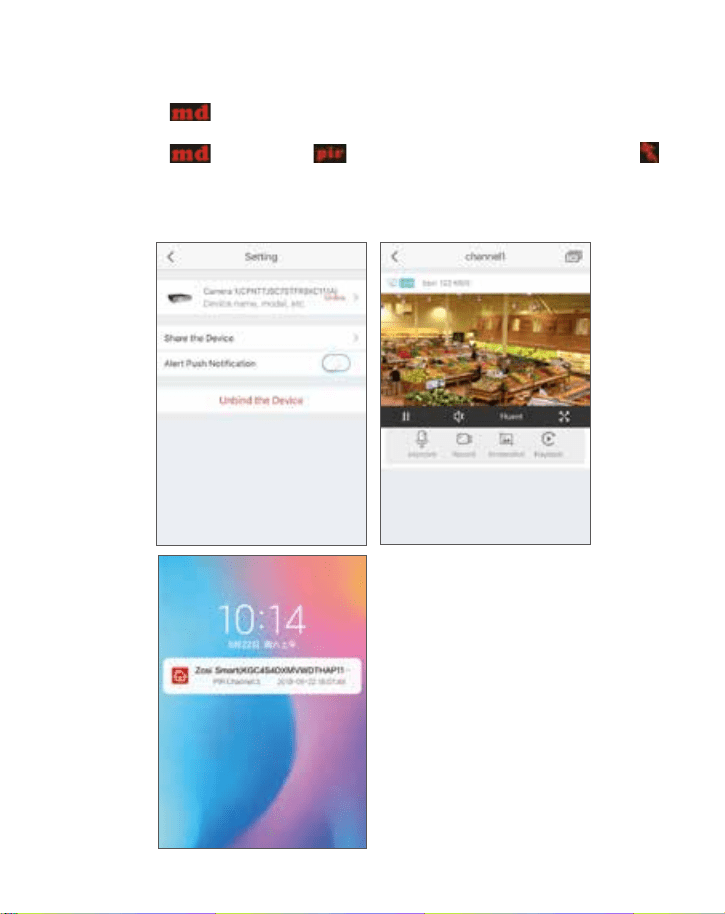
5.6 App Alarm Settings
There are two types of DVR alarm notification:
5.6.1 When motion
detection is triggered, DVR will send the alarm through email or mobile
phone notification.
5.6.2 When motion
ddetection and PIR detection are both triggered, alarm signal
will be displayed in the lower left corner of the screen and DVR will send the alarm through email or
mobile phone notification.
App alarm notification settings and effects are shown below:
15
6
User Setting or Change Password
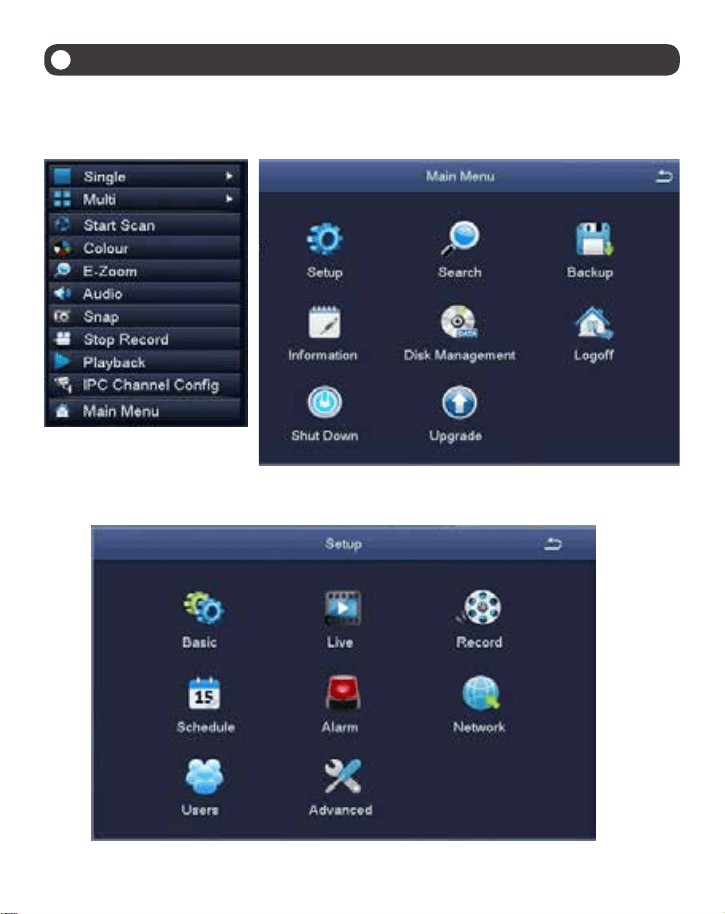
6.1 In the live viewing screen, right click the mouse, the option shown as below, click Main Menu
6.2 Click Setup to enter the function menu options.
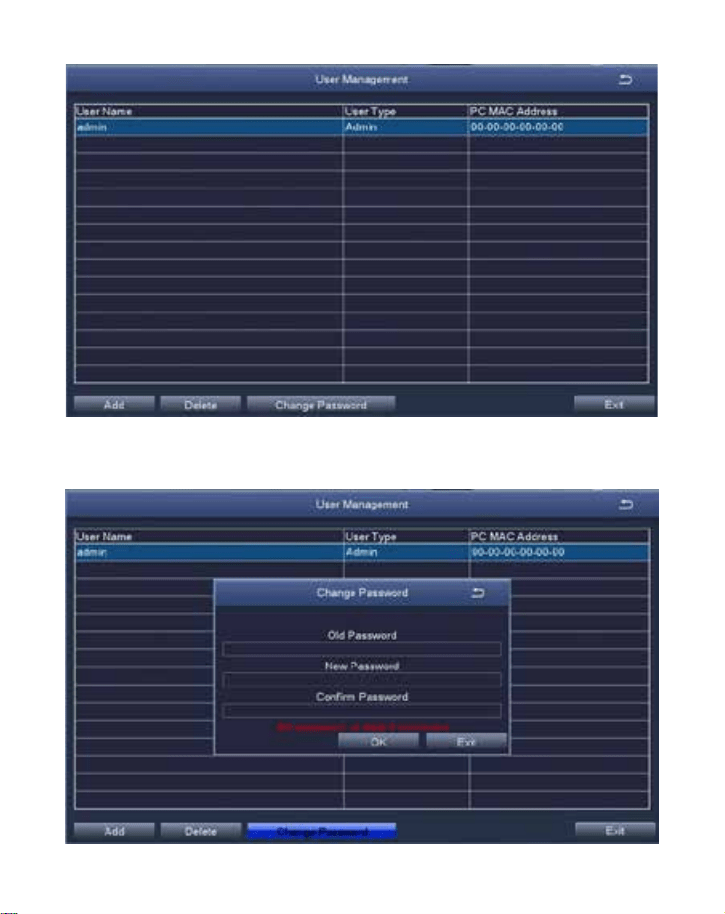
6.3 Click Users to enter the user management interface.
16
6.4 Click Change Password to enter the password setup page.
6.5 Set or change the password, please make sure both the input passwords are consistent, and no
less than six characters.
Please keep firmly in mind your password!

17
7
FAQs
Q: Why can't I search for devices when adding?
A: Make sure that the device and the mobile device are on the same LAN, otherwise please enter the
device ID manually;
Q: Why can't my device connect to the network?
A: Please check
· Is the device connected to the Internet?
· Is the router working properly?
· Is the router's DHCP server open?
Q: Why can't I find the video files?
A: Please check
· Is the hard drive broken?
· Is the search period valid?
· Whether the equipment system time is correct
Q: Why the monitor screen cannot display for some channels?
A: Please check
· Has the camera been added to the DVR?
· Is the camera too far away from the DVR?
· Is there a metal mesh or thick wall near the camera?
· It is recommended to use an extended antenna to bypass obstacles
18
1
Introducción del sistema
1.1 DVR
1.2 Cámara
① ② ③
④
⑤ ⑥
Salida de
video & audio
⑦
⑧
A
B
①
④ ⑤ ⑥
② ③
Entrada de cámara
Puerto LAN Puerto del ratón Puerto del adaptador
Salida de video VGA Salida de video HDMI
⑦ ⑧
HD Lente 5mm Luz Infrarroja
Ajuste la cámara al ángulo que quiera.
El cuello del soporte se conecta con la
base de instalación. Relaje el anillo y gire
el soporte a la posición que quiera, luego
apriete el anillo nuevamente.
A
B
19
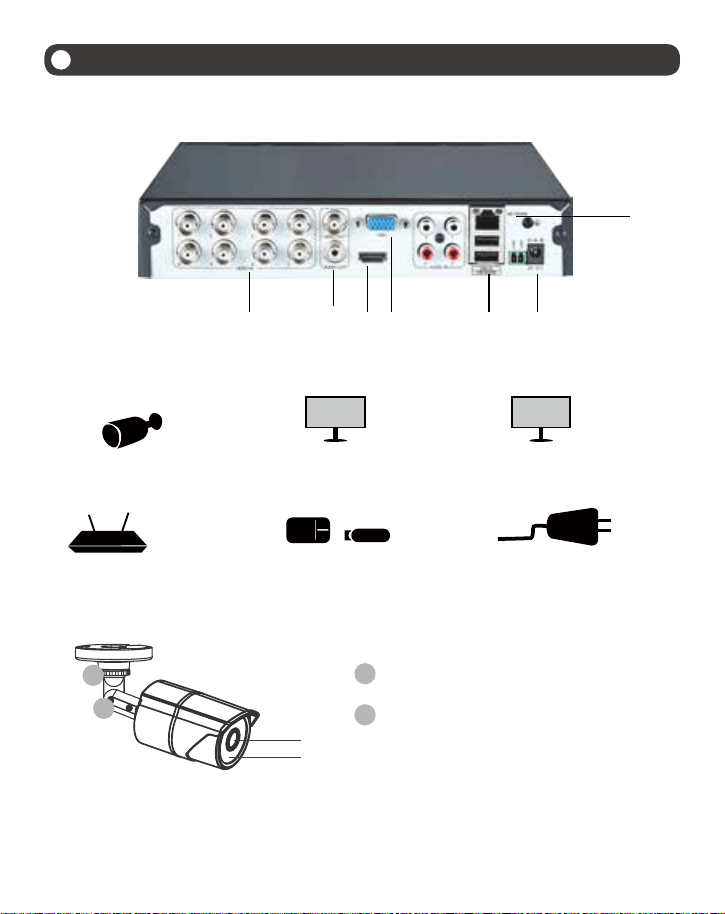
1.3 Diagrama de conexión del sistema
VIDEO IN AUDIO OUT
VIDEO OUT
VGA
HDMI
AUDIO IN
USB 2.0 DC 12V
RG 45
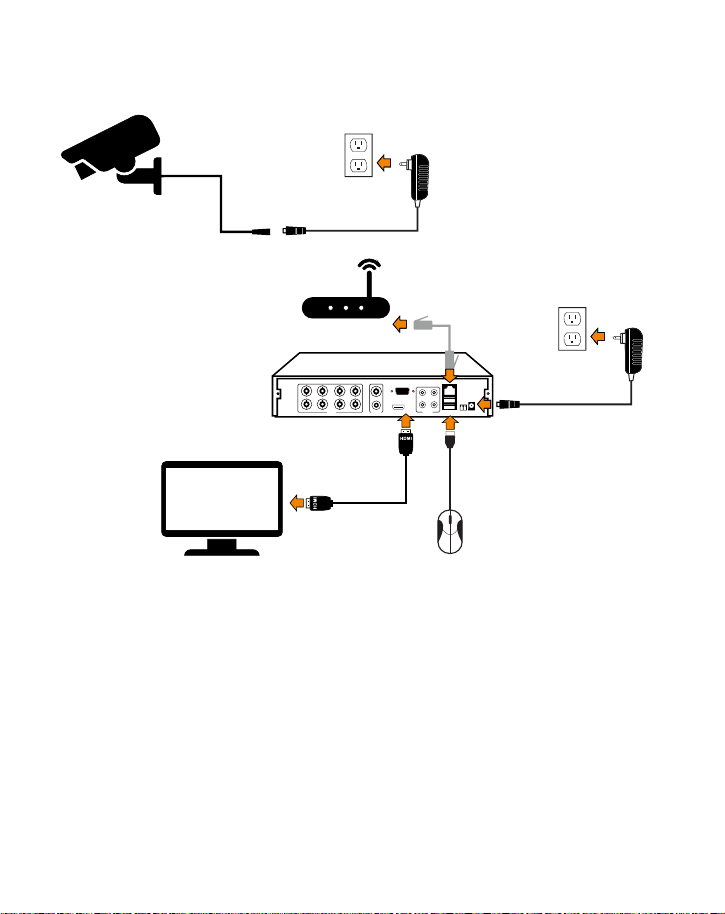
Ejemplar de 8 canales, los 4/16 canales tendrán el número respectivo de entradas de video.
①Conecte las cámaras al DVR, y conecte la cámara a la potencia.
②Conecte el DVR a una pantalla vía el puerto VGA, BNC o HDMI.
③Conecte el DVR al enrutador vía un cable de red.
④Inserte el ratón al puerto USB.
⑤Enchufe el DVR a la potencia.
20
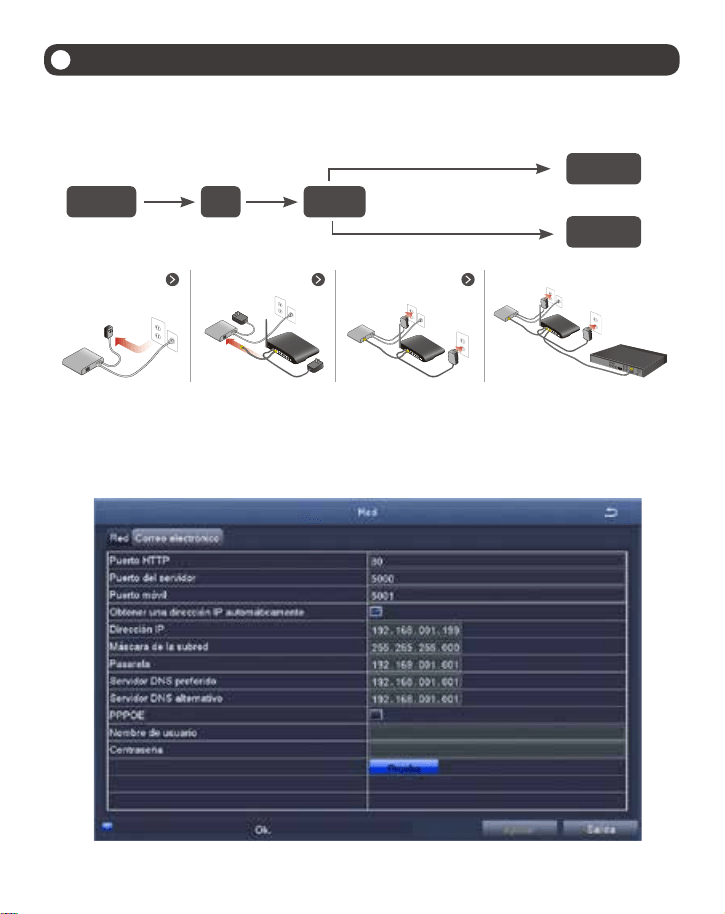
A:¿Cómo conectar el grabador DVR a LAN?
B:¿Cómo probar la red del grabador?
(1)Haga clic derecho del ratón > Menú principal > Configuración > Red
(2)Marque ‘Obtener una dirección IP automáticamente’
(3)Haga clic en ‘Prueba’, si se muestra ‘OK’, la red se conecta con éxito
Nota: asegúrese de que el DHCP en su enrutador esté abierto.
2
Ver en el móvil
2.1 Conectar el grabador a Internet
Fibra óptica DSL
Enrutador
DVR/NVR
PC
Cable RJ45
WIFI o Cable RJ45
DSL/CABLE
MODEM
DSL/CABLE
MODEM
DSL/CABLE
MODEM
DSL/CABLE
MODEM
Enrutador
Enrutador
DVR
21
2.2 Descargar la aplicación
2.3 Ejecutar la aplicación
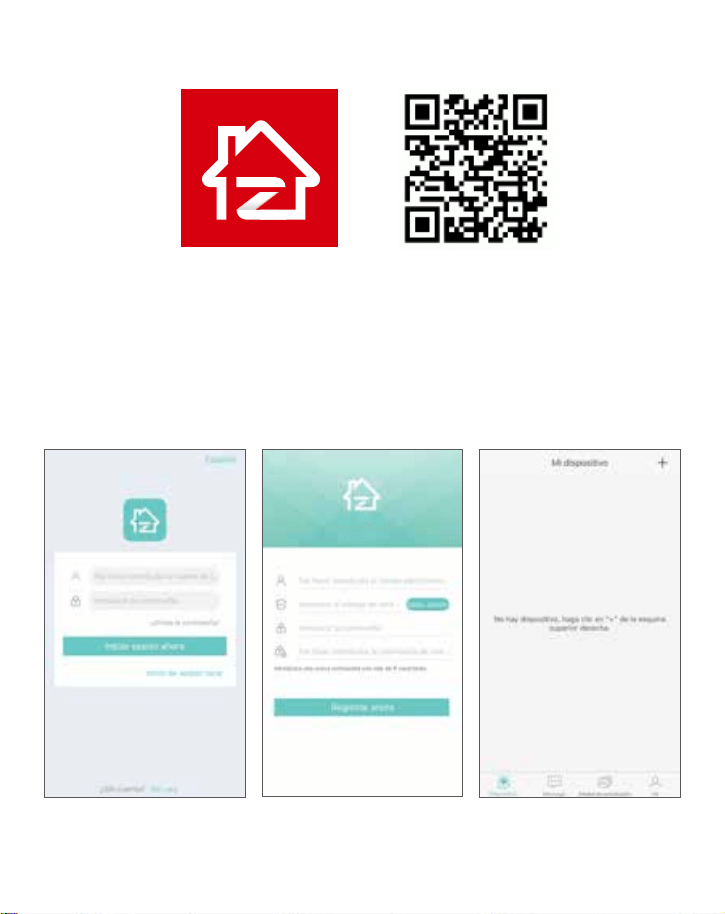
A: Instale la aplicación gratis Zosi Smart;
B: Haga clic en ‘Registrar' e ingrese su Email para obtener el código de validación, luego configure su
contraseña y completa el registro;
C: Inicie sesión en la aplicación, ingrese a la interfaz principal (Mi dispositivo), haga clic en ‘+' de la
esquina superior derecha. Luego haga clic en ‘Agregar el dispositivo’.
Zosi Smart App (iOS/Android)
22
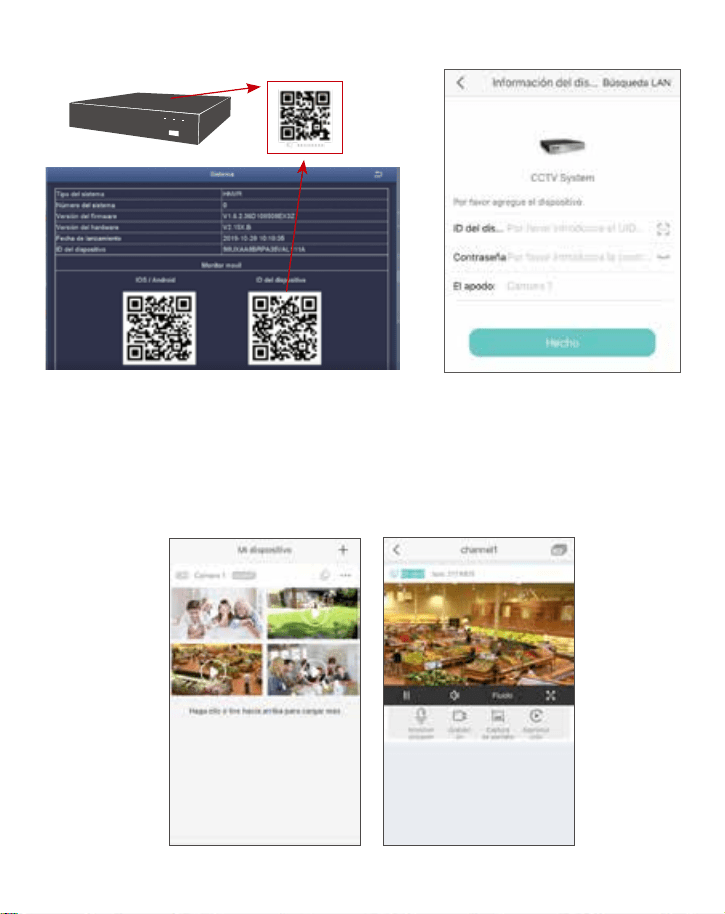
D: ①Introduzca la ID del dispositivo escaneando el código OR o introduzca manualmente.
②Introduzca la contraseña del dispositivo(la contraseña es configurada en el grabador, si no hay la
contraseña, por favor déjela en blanco).
③Introduzca un nombre para el dispositivo.
④Haga clic en “Hecho”, y luego vaya a la página “Mi dispositivo” para ver las imágenes(El dispositivo
agregado está en la parte superior de la página).
E: Luego volverá a la lista de dispositivo > haga clic en el dispositivo > haga clic en ‘+’ y luego seleccione
todos los canales > haga clic en ‘Confirmar’ para iniciar la vista previa.
23
El software de PC AVSS se aplica a la vista previa de DVR / DVR / IPC, con vista previa en tiempo real,
administración de dispositivos, reproducción remota de video y más.
3.1 Iniciar sesión
Instale AVSS, seleccione el idioma e inicie sesión.
Nota: Puede iniciar sesión con el nombre de usuario y contraseña predeterminados, o registrar un
nuevo usuario. La cuenta registrada por la aplicación móvil también se puede utilizar aquí.
3
Ver en el PC
3.2 Gestión del dispositivo
① Haga clic en ‘Device Management’ para crear un área
② Crear un área: haga clic derecho en el área vacía debajo de ‘Device List'> Add Area> introduzca
el nombre del área.
Nota: El nombre del área se usa para nombrar el área monitoreada.
24
③ Agregar el dispositivo: seleccione el área correspondiente en ‘Device List' > haga clic derecho >
Add Device > seleccione ‘DVR' en ‘Device Type'> introduzca el nombre del dispositivo(Device Name),
ID del dispositivo(Device ID), contraseña del dispositivo(Password) y número de canal(Channel) > y
haga clic en ‘OK';
Nota: ① El nombre de usuario predeterminado(User Name) es admin; ② Cuando el PC y el
dispositivo están conectados al mismo enrutador, puede hacer clic en ‘Search’ para agregar el
dispositivo.
3.3 Vista previa
Haga clic en "Preview" > seleccione el dispositivo debajo de 'Device List' > haga clic derecho del ratón
> seleccione "Play ALL" o "Stop ALL" para ver o detener la imagen.
25
①
③
②
④
4
Instalación del disco duro
Es posible que el sistema no incluya el disco duro, según el kit que seleccionó. Este sistema funciona
con la mayoría de los discos duros con SATA 3.5’’ o discos duros con SATA 2.5".
Nota: si su sistema tiene un disco duro preinstalado, omita este paso;
Nota: Después de instalar un disco duro, debe formatear el disco duro antes de grabar. Haga clic
derecho del ratón> Menú principal> Administración de disco> Seleccione el disco duro> Haga clic en
Formato> Aplicar.
① Desenchufe la fuente de alimentación del DVR, desenrosque los tornillos y retire la cubierta
superior.
② Conecte el cable de alimentación y de datos del disco duro a los puertos correspondientes del
grabador DVR (como se muestra).
③ Coloque el disco duro en el DVR. Cualquier cable debe cruzarse sobre el disco duro.
④ Sujetando el disco duro y el DVR, déle la vuelta suavemente y alinee los orificiOS del disco
duro con los orificiOS del DVR. Con un destornillador Phillips, atornille los tornillos provistos en los
orificiOS. Monte la cubierta superior.
26
Haga clic derecho del ratón > Menú Principal > Configuración > Grabar
Puede ver el ajuste de grabación para todos los canales. Cambie la configuración de grabación a su gusto y haga clic
en 'Aplicar'.
5.1 Detección de movimiento
Al configurar la detección de movimiento, DVR grabará solo cuando se detecte movimiento.
Haga clic derecho del ratón> Menú principal> Configuración> Alarma> Movimiento> Detección de movimiento,
El sistema graba cuando la cámara detecta movimiento. Se muestra un icono en la esquina inferior izquierda de la
pantalla cuando se detecta movimiento.
Seleccione la cámara: marque el canal que desea grabar la detección de movimiento.
Área: se permite configurar el área de sensibilidad del rango de visión de la cámara.
5
Ajustes de grabación
27
Haga clic para hacer que todo el rango de visualización sea un área de sensibilidad.
Haga clic para eliminar el área de sensibilidad.
Guardar la configuración
Salir
Como el color y la luminancia son importantes para la sensibilidad, es necesario ajustar el valor en condiciones
específicas. El valor predeterminado es 6, mientras que el rango de valores es de 1 a 8(1 es el más sensible).
Haga clic derecho del ratón para mostrar u ocultar el menú de control en la parte inferior de la pantalla.
Pruebe la configuración moviendo algo o alguien a lo largo del área de la cuadrícula dentro del rango de vista de la
cámara. Si el DVR detecta movimiento dentro del área de la cuadrícula, se presentará una figura de humano rojo en la
pantalla. La cuadrícula no pudo cubrir banderas, árboles u otros objetos de flujo en el viento para evitar falsas alertas.
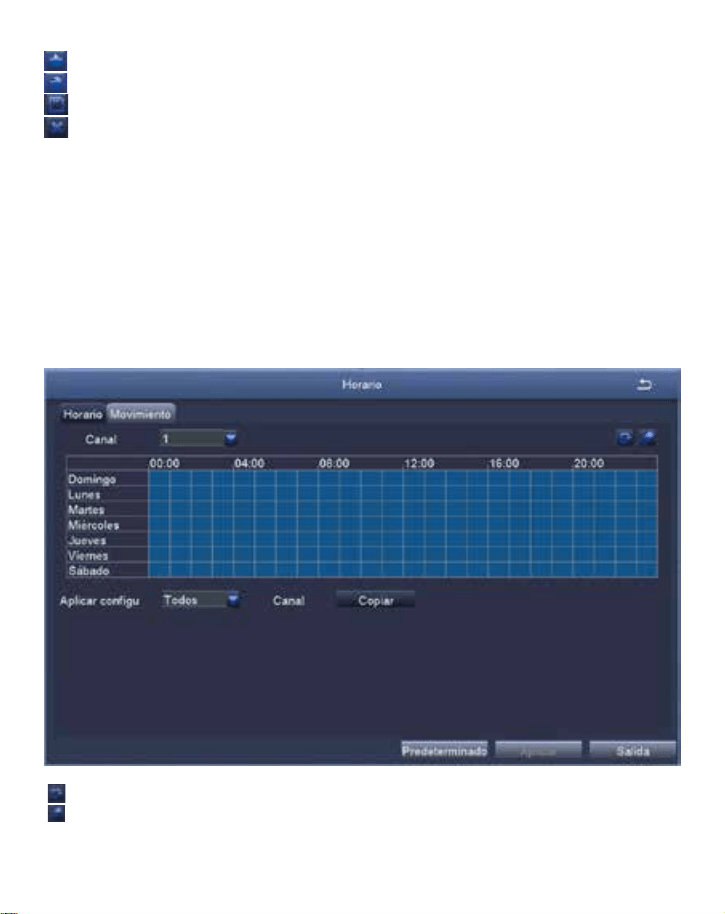
5.2 Plan de grabación
5.2.1 Establecer la grabación horaria, puede configurar cada canal para grabar en horas específicas según la hora del
día.
Haga clic derecho del ratón> Menú principal> Configuración> Horario
La grabación horaria se puede configurar de dos maneras.
Al resaltar las horas específicas de algún día usando la herramienta de lápiz.
Haga clic para eliminar las horas.
Las configuraciones se pueden copiar y aplicar a todos los canales y a cualquier otro día.
28
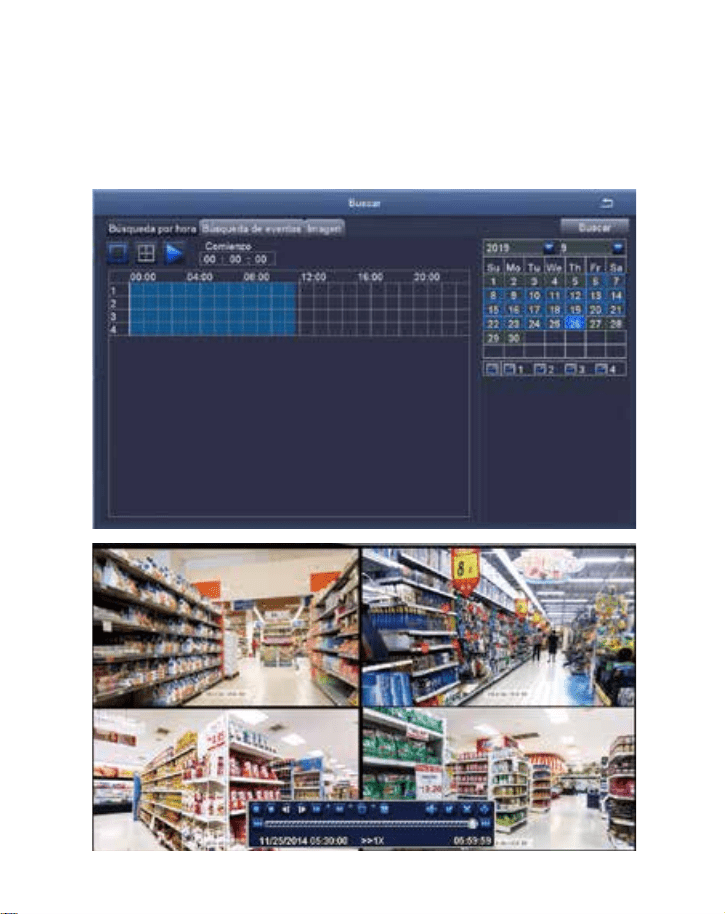
5.3 Reproducción de grabación
Ingrese al menú principal del sistema> Buscar, el sistema presenta la imagen de la siguiente manera.
5.2.2 Los bloques tiempo para grabar también se pueden configurar haciendo doble clic en un campo adyacente a un
día. Se pueden crear y guardar múltiples programaciones con tiempos de inicio y finalización hasta el minuto. Estos
se pueden aplicar a variOS días y cámaras.
Busque el video que desea a través del tiempo o evento, luego reprodúzcalo.
29
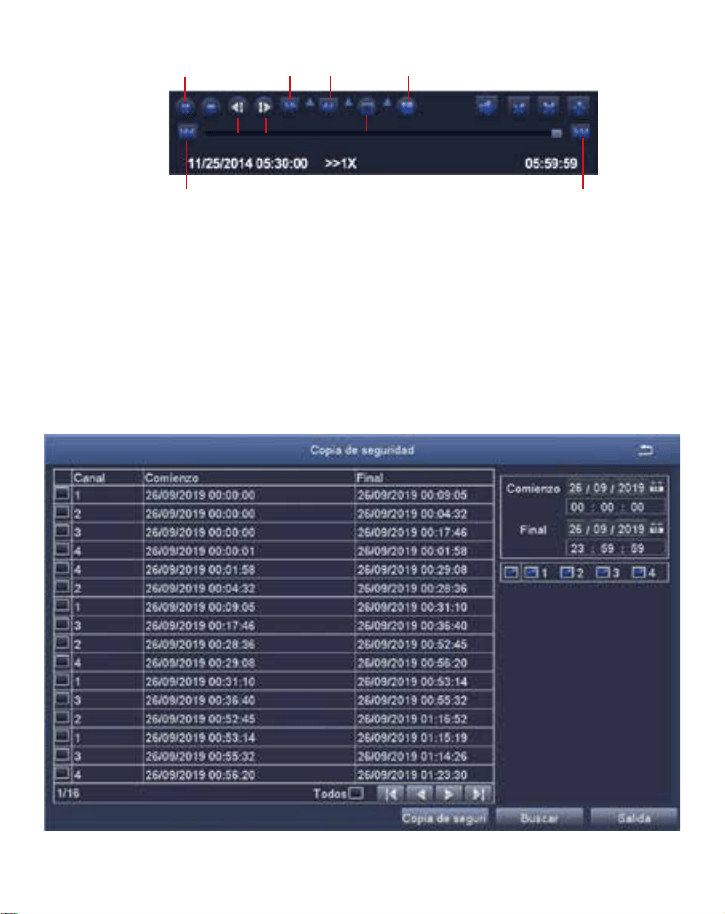
Vídeo anterior: Mover al último evento grabado
Vídeo siguiente: Mover al siguiente evento grabado
Avance rápido: El video se puede reproducir a diferentes velocidades, de 1/4 a 16 veces.
Rebobinar: La reproducción de vídeo se puede rebobinar 1 vez, 8 veces, 16 veces y 32 veces.
Modo de visualización de pantalla: Tanto la pantalla única como la pantalla múltiple están disponibles. Puede elegir
cuántos canales desea reproducir una vez. El canal sin récord presenta una pantalla en blanco.
5.4 Copia de seguridad
① Conecte una memoria USB al puerto USB de su grabador DVR.
② Haga clic derecho del ratón> Menú principal> Copia de seguridad> elija el canal y el período de tiempo> Buscar>
Elija los videos que desea copiar> Haga clic en Copia de seguridad.
Vídeo anterior Vídeo siguiente
Rebobinar
Avance
rápido
Reproducir/
pausar
Foto siguiente
Foto
anterior
Pantalla única
Pantalla multipantalla
30
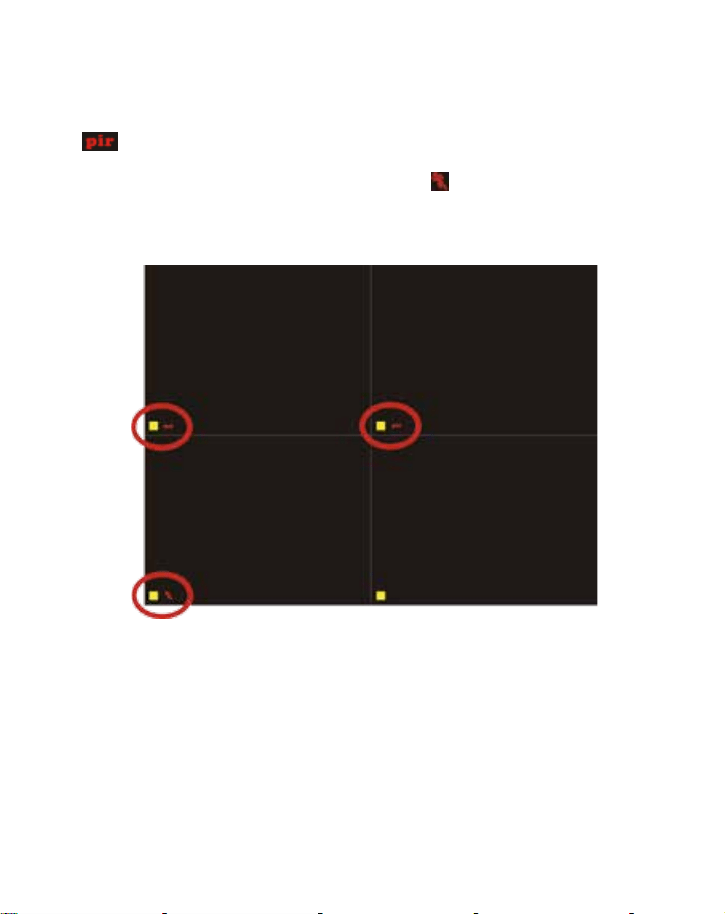
5.5 Detección PIR (aplicable a las cámaras con característica PIR)
Haga clic derecho del ratón - Menú principal - Configuración - Alarma - PIR.
Después de configurar el modo de detección de movimiento PIR, el DVR solo comenzará a grabar
cuando se detectan objetos con una temperatura de aproximadamente 37 grados y se mostrará el
icono
en la esquina inferior izquierda de la pantalla.
Nota: la función PIR solo está habilitada cuando el modo de detección de movimiento y el modo
de detección PIR están activados simultáneamente. Un icono
se muestra en la esquina inferior
izquierda de la pantalla, indica que detección de movimiento y detección PIR están activados.
También significa que las cámaras capturan objetos en movimiento con una temperatura de
alrededor de 37 grados.
Nota:
Figura 1: solo se activa la detección de movimiento; Figura 2: solo se activa la detección PIR;
Figura 3: la detección de movimiento y la detección PIR se activan al mismo tiempo.
Seleccione las cámaras: Marque los canales que desea configurar el modo de detección PIR.
Tiempo de retención: La duración de grabación después de parar el movimiento.
Disparar: Los canales se pueden configurar para grabar cuando detecta el movimiento por una de las
cámaras. Por ejemplo, cuando la cámara 1 detecta el movimiento, la cámara 2 y la cámara 3 pueden
activarse para grabar también.
Grabación PIR programada: Establezca el período de tiempo de detección PIR (igual que la operación
de grabación horaria).
Configuración de alarma: Cuando el dispositivo activa una alarma, puede activar y desactivar la
alarma o la notificación por correo electrónico.
31
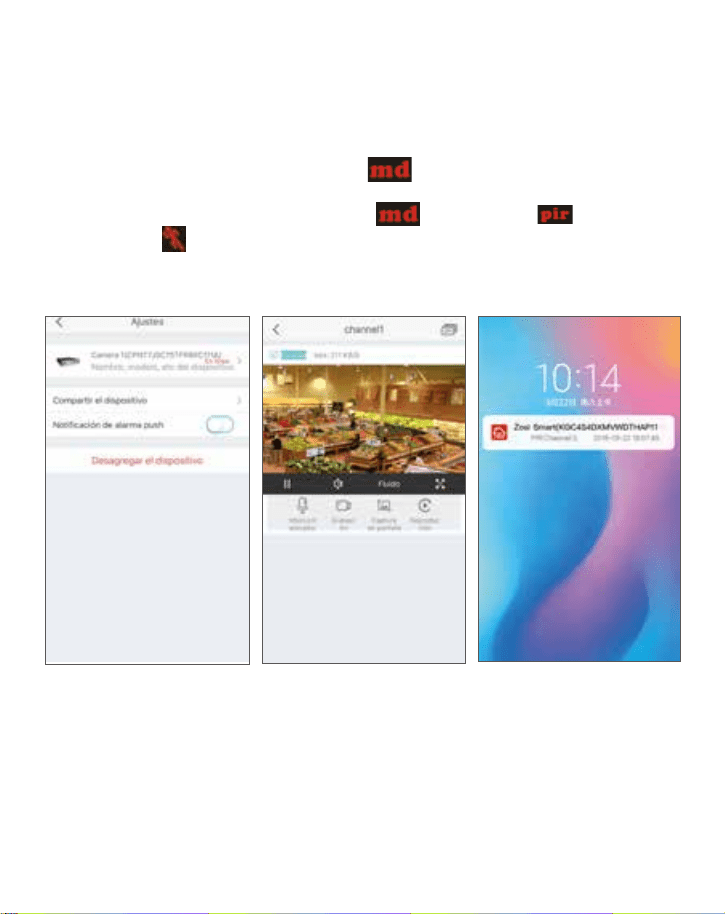
5.6 Configuración de la alarma de la aplicación
Nota: Las operaciones anteriores se aplican a la situación cuando tanto el modo de detección de
movimiento como el modo de detección PIR están activados.
Hay dos tipos de notificación de alarma:
5.6.1 Cuando se activa la detección de movimiento
, el DVR enviará la alarma a través de un
correo electrónico o notificación de App.
5.6.2 Cuando se activan la detección de movimiento
y la detección PIR
simultáneamente,
se mostrará en la esquina inferior izquierda de la pantalla y DVR enviará la
alarma a través de un correo electrónico o notificación de App.
Los ajustes y efectos de la notificación de alarma de App se muestran a continuación:
32
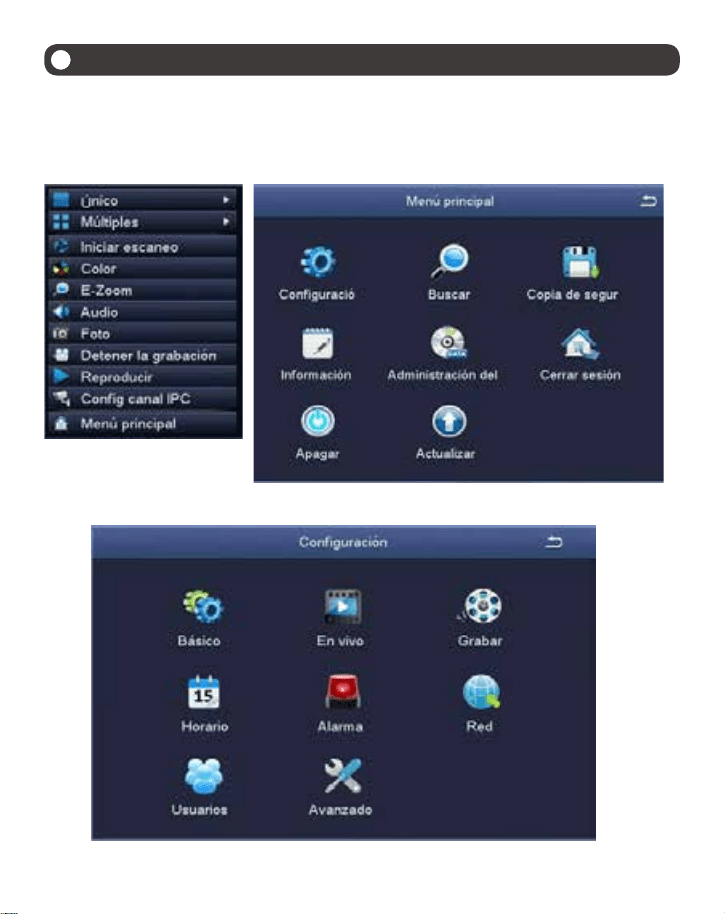
6
Configurar o cambiar la contraseña
6.1 Vaya a la página del dispositivo, haga clic derecho del ratón - Menú principal.
6.2 Haga clic en Configuración.
6.3 Haga clic en UsuariOS.
33
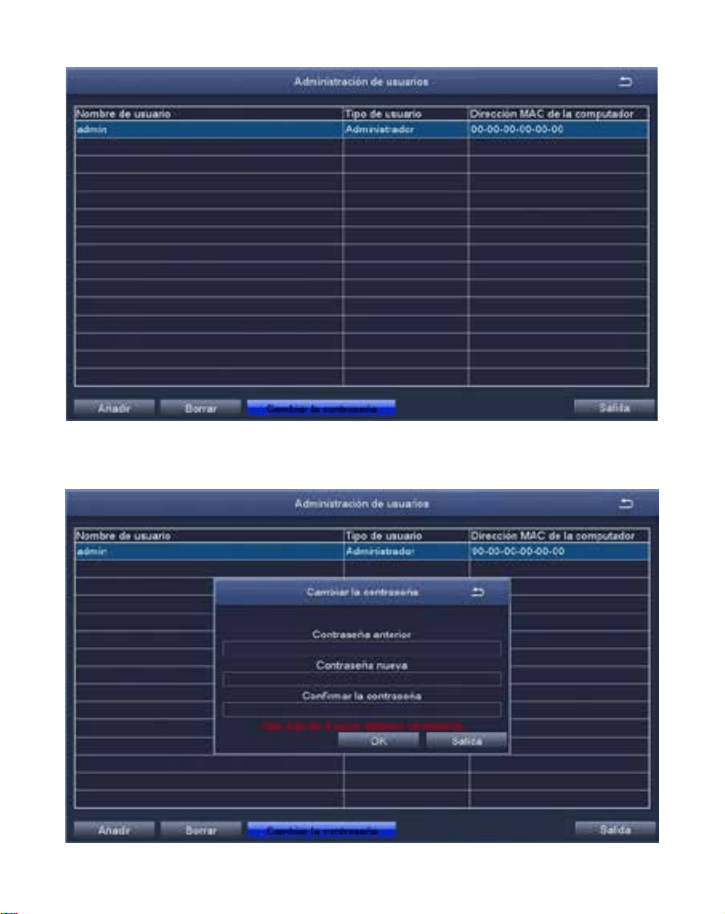
6.4 Haga clic en Cambiar Contraseña.
6.5 Configure o cambie su contraseña, que debe tener más de 6 caracteres.
¡Recuerda su contraseña por favor!

34
7
Preguntas frecuentes
Pregunta: ¿Por qué no se puede conectar al Internet?
Respuesta: por favor revise
·Si el dispositivo está conectado a Internet
·Si el enrutador funciona correctamente
·Si el servidor DHCP del enrutador está abierto
Pregunta: ¿Por qué no se puede buscar el archivo de grabación?
Respuesta: por favor revise
·Si el disco duro está roto
·Si el período de búsqueda es válido
·Si la hora del sistema del dispositivo es correcta
35
1
Connexion de votre système
1.1 DVR
1.2 Caméra
① ② ③
④
⑤ ⑥
Vidéo &
Audio Sortie
①
④ ⑤ ⑥
② ③
Connecter les caméras
Port LAN Port de la souris Port de la prise de courant
Sortie vidéo VGA Sortie vidéo HDMI
⑦ ⑧
Objectif HD LEDs IR 24pcs, 5mm
Ajustez la caméra à l’angle dont vous avez
besoin.
Le cou du support se lie avec la base
d’installation. Détendez l’anneau et tournez le
support à la position dont vous avez besoin,
puis serrez l’anneau de nouveau.
A
B
⑦
⑧
A
B
36
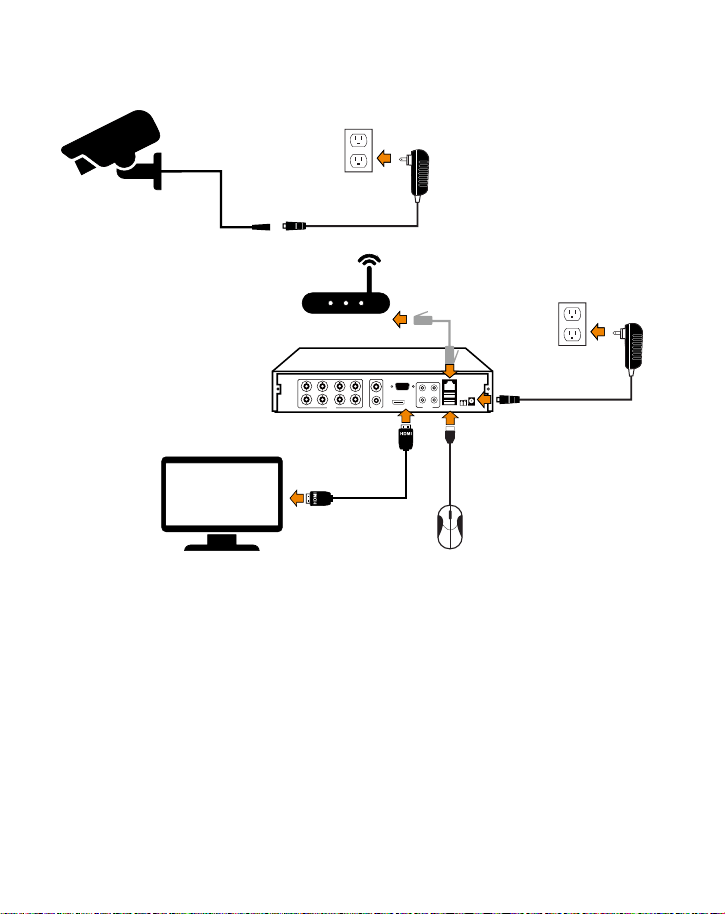
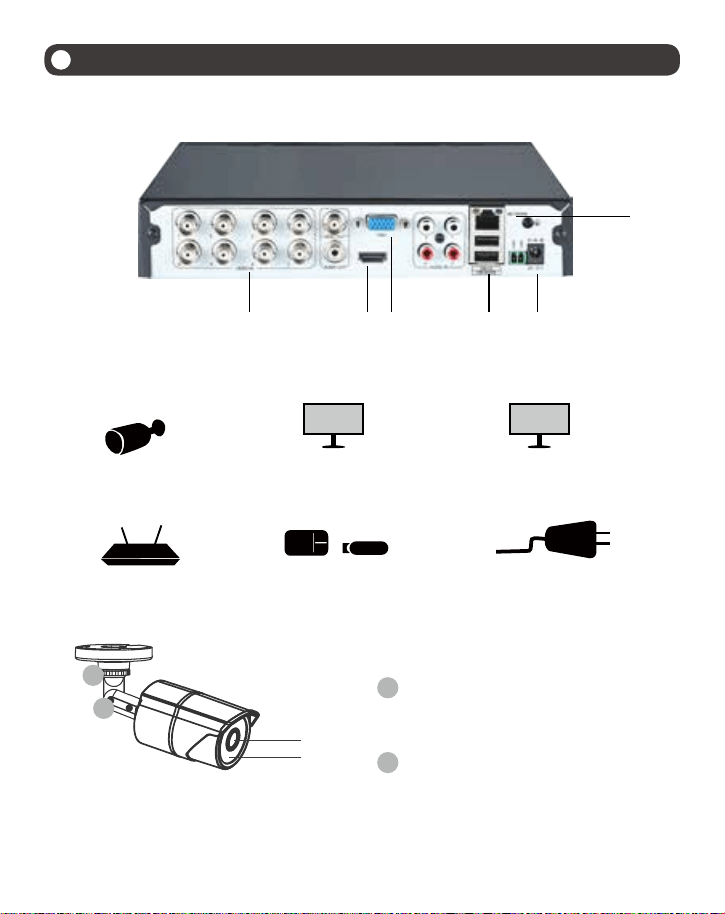
1.3 Branchement
①Branchez la caméra au DVR et la prise de courant au Power.
②Branchez le moniteur au DVR avec le port HDMI/VGA/BNC.
③Branchez le DVR au routeur avec un câble Ethernet.
④Branchez la souris USB au port USB de DVR.
⑤Branchez la prise de courant de DVR au Power.
①
②
③
④
⑤
Configuration de 8CH montrée. 4/16CH aura le nombre respectif de l'entrée vidéo.
*Ne pas inclure ou vendre séparamment.
VIDEO IN AUDIO OUT
VIDEO OUT
VGA
HDMI
AUDIO IN
USB 2.0 DC 12V
RG 45
37
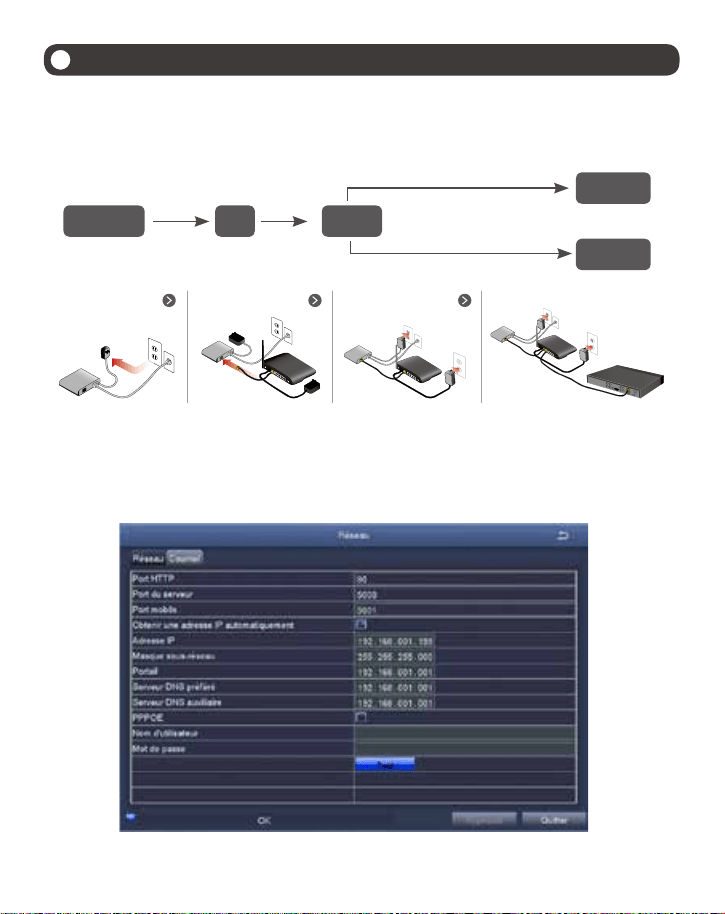
Fibre optique
DSL
Routeur
DVR/NVR
PC
Câble RJ45
Wifi ou Câble RJ45
A: Comment connecter le NVR au LAN?
B: Comment tester le réseau de votre NVR?
(1) Faites un clic droit de la souris > Allez au Menu principal > Réglages > Réseau.
(2) Cochez sur «Obtenir l'adresse IP automatiquement»
(3) Cliquez sur «Test», si «OK» s’affiche sur l’écran, cela signifie que le réseau a été connecté avec réussi.
2
Visualisation à distance avec un Smartphone
2.1 Connectez le NVR à l’Internet
DSL/CABLE
modem
DSL/CABLE
modem
DSL/CABLE
modem
DSL/CABLE
modem
Routeur
Routeur
Routeur
NVR
38
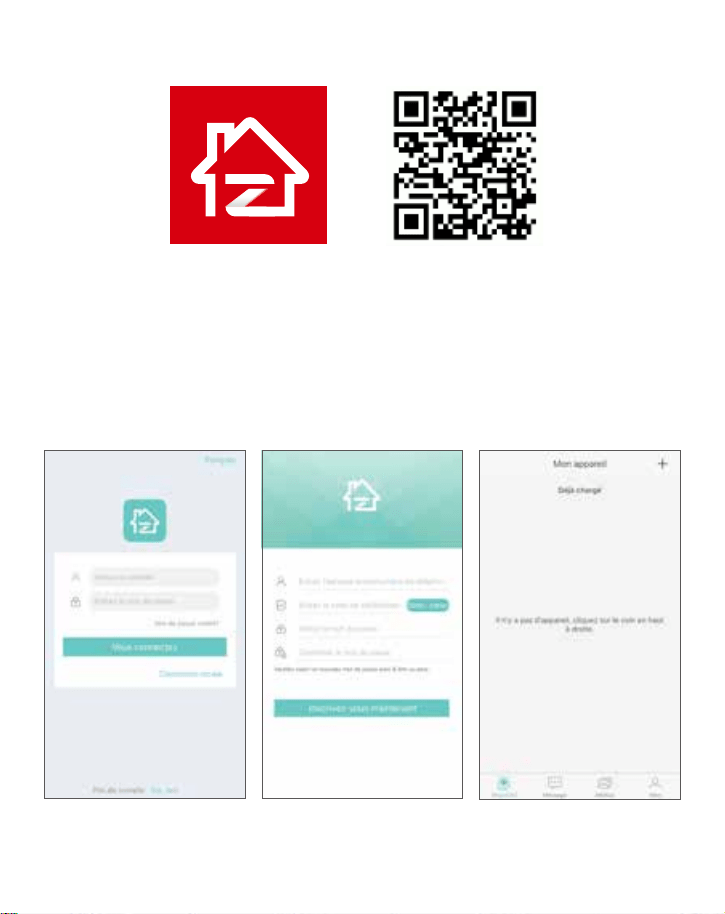
2.2 Téléchargez l’application
2.3 Connexion l’application
A: Installez l’applicaiton gratuite «Zosi Smart».
B: Cliquez sur «S’inscrire» et entrez votre numéro de téléphone mobile pour obtenir le code de
validation, cliquez sur cliquez sur «Suivant» pour saisir l’adresse e-mail, le mot de passe, puis
enregistrez-le.
C: Connectez-vous à l'application, entrez dans l'interface principale (My Device), cliquez sur «+»
dans le coin supérieur droit.
Zosi Smart App (iOS/Android)
Ouvrez l’application
Vous inscrivez
Cliquez sur «+» pour
rajouter un appareil
39
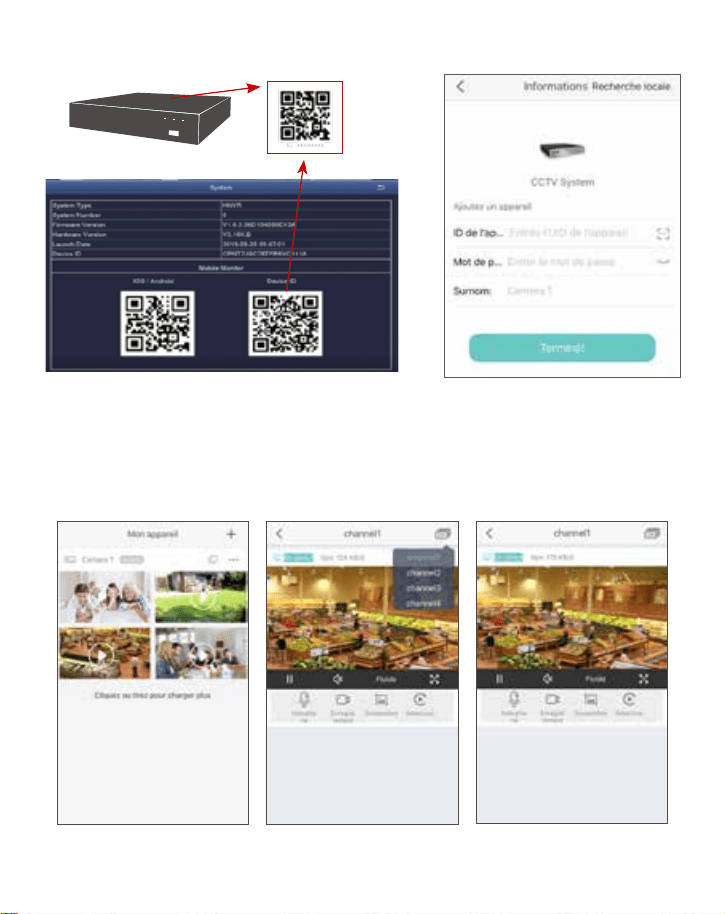
D: ①Balayez le code QR ou saisissez manuellement l'Identificant de l'appariel.
②Saisissez le mot de passe (il est soit visible soit invisible).
③Saisissez un nom pour l'appareil.
④Cliquez sur Enregistrer pour passer à la page suivante.
E:Retournez à la liste des appareils > Choisissez un appareil > Choisissez les canaux > Cliquez sur
«Confirmer» pour commencer la prévisualisation des vidéos.
40
L’application AVSS est appliquée sur l’ordinateur à la prévisualisation de DVR / NVR / IPC avec la
diffusion en temps réel, la gestion des périphériques, la prévisualisation vidéo à distance, etc.
3.1 Connexion de l’application
3.2 Gestions des appareils
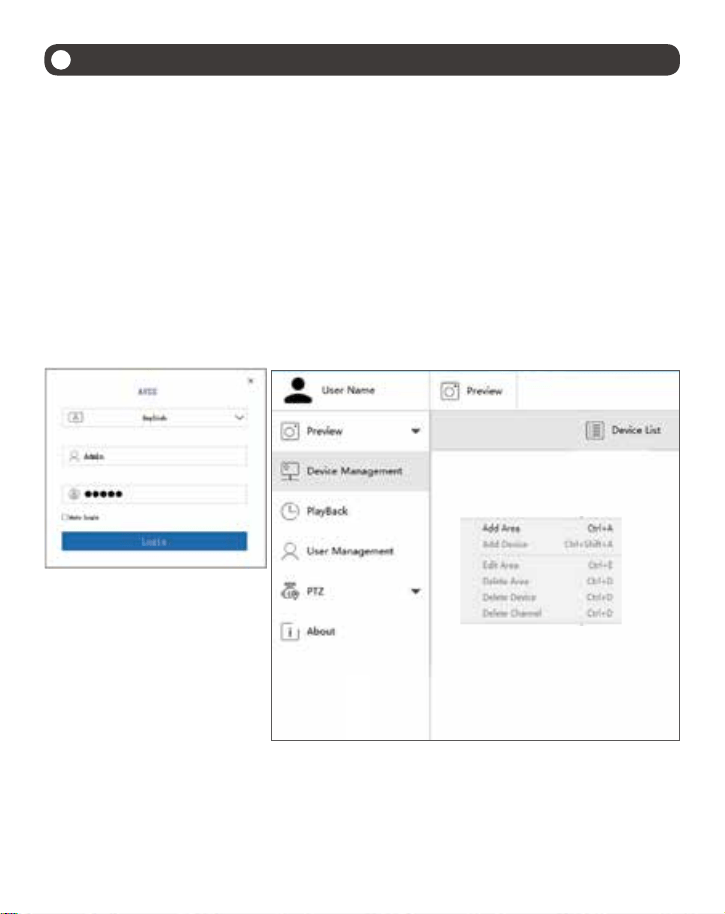
Installez et ouvrez l’application AVSS, choisissez une langue puis vous vous connectez à l’application.
Remarque: Vous pouvez vous connecter avec le compte créé sur votre smartphone, ou vous pouvez
aussi créer un nouveau compte. Et il est également possible de vous connecter avec le compte du
système par défaut.
① Cliquez sur «Device Management» pour ajouter des zones et des appareils;
3
Visualisation à distance avec un ordinateur
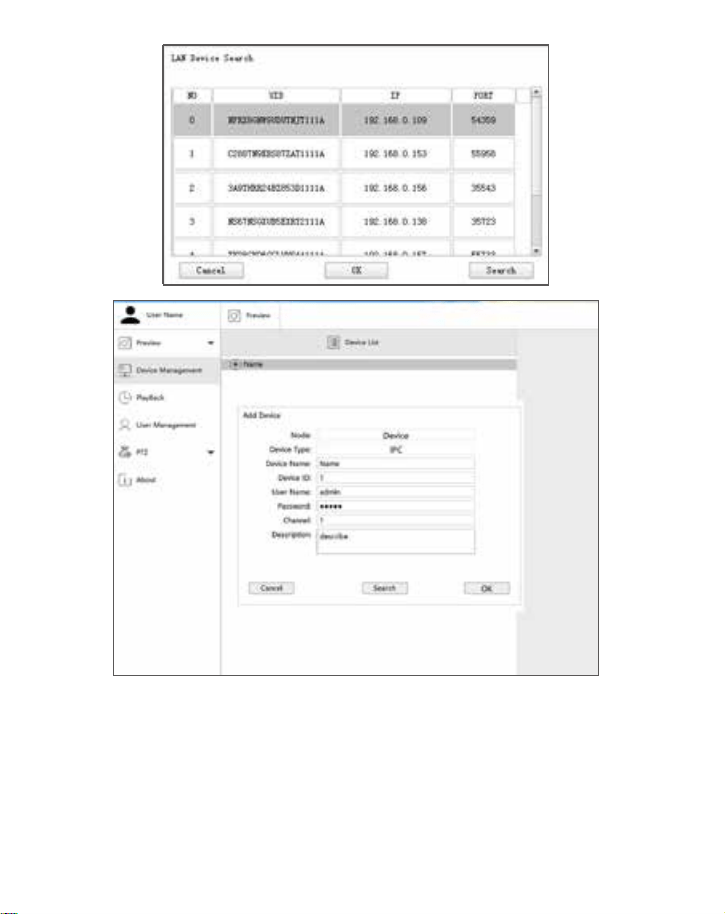
② Ajoutez une zone: faites un clic droit de la souris sur le blanc pour ajouter une zone et entrez un
nom pour cette zone. Ce nom devra être utilisé pour décrire l'endroit de surveillance.
41
③ Ajoutez un appareil: faites un clic droit de la souris sur le nom de la zone pour ajouter un appareil
et modifier le type de l’appareil. Saisissez le nom de l'appareil, l'ID de l'appareil, le nom d'utilisateur,
le mot de passe de l'appareil et le nombre du canal, puis cliquez sur «OK» pour l’enregistrer.
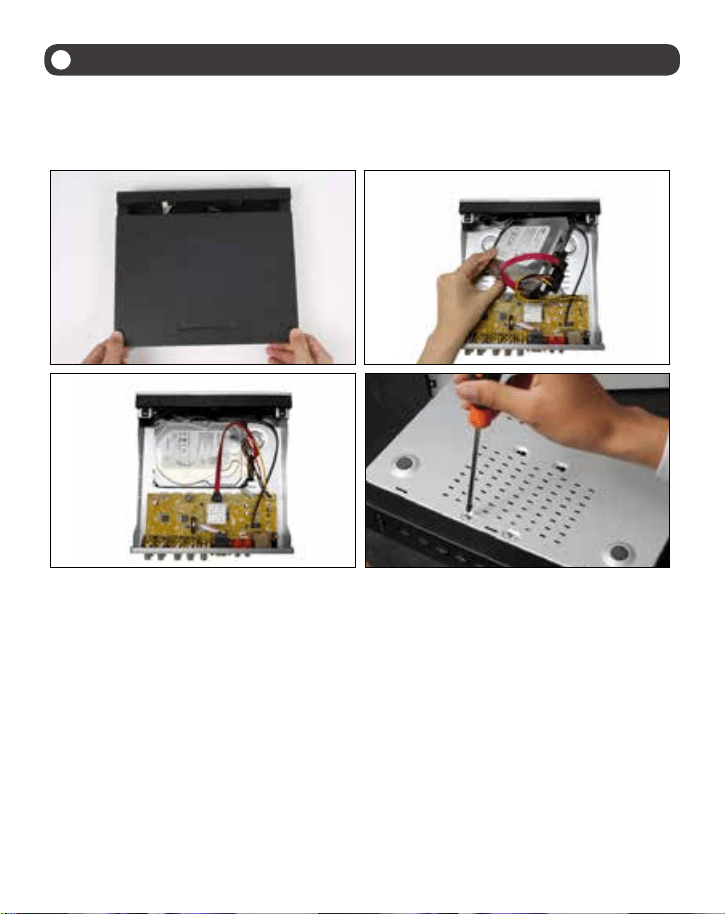
3.3 Prévisualisation des vidéos
Cliquez sur «Preview» pour afficher la liste des appareils, faites un clic avec le bouton droit sur la
«Preview» puis sélectionnez «Play all».
42
4
Installation d'un disque dur
S'il n'y a pas de disque dur dedans le DVR, nous vous proposons d’utiliser un disque dur interne de
type 2,5 pouces or 3,5 pouces sata. Si votre système a déjà pré-installé un disque dur, veuillez ignorer
cette manipulation.
Remarque:
Après avoir installé le disque dur, vous devez d’abord le formater avant l’utilisation.
Faites un clic droit de la souris > allez au Menu principal > Disques > Sélectionnez le disque dur >
Cliquez sur Formater > Appliquer.
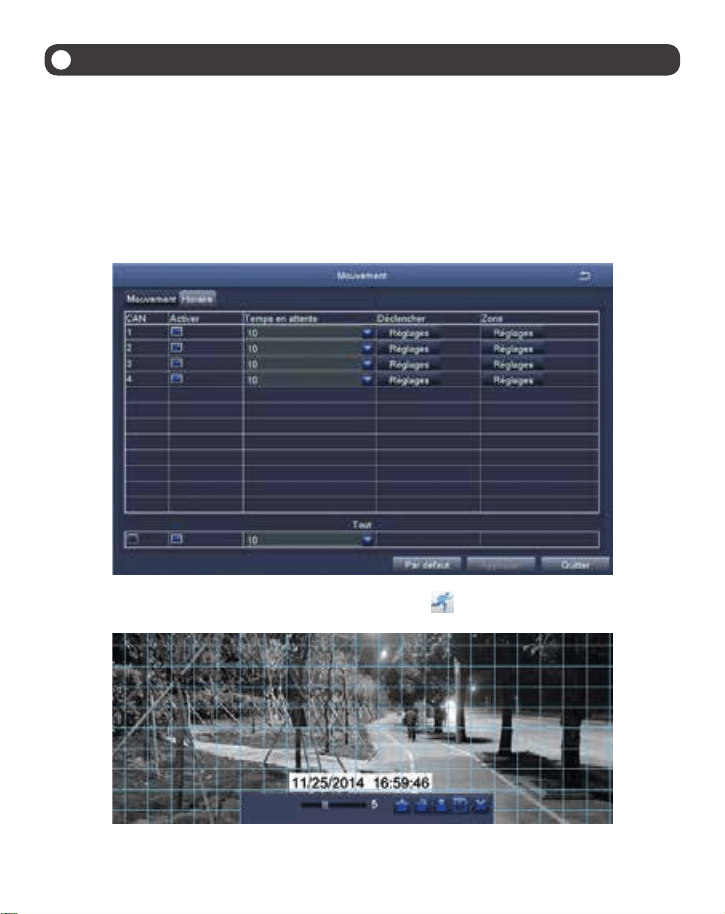
① Débranchez l’alimentation de NVR, dévissez et retirez le couvercle supérieur.
② Connectez les câbles d'alimentation et de données SATA du NVR aux ports correspondants de
votre disque dur (comme indiqué).
③ Placez le disque dur dans le NVR. Tous les câbles doit se croiser sur le disque dur.
④ En tenant le disque dur et le NVR, retournez-le doucement et alignez les trous du disque dur avec
ceux du NVR. À l’aide d’un tournevis cruciforme, vissez les vis fournies dans les trous. Assemblez la
couverture.
①
③
②
④
43
Faites un clic droit de la souris > allez au Menu principal > Réglages > Enregistrement. Tous les canaux sont réglables
ici, vous pouvez faire les paramètres selon votre besoin, puis cliquez sur «Appliquer» pour terminer les réglages.
5.1 Enregistrement sur détection de mouvement
Le NVR enregistre uniquement lorsqu'un mouvement est détecté une fois que vous sélectionnez l’enregistrement sur
détection de mouvement.
Faites un clic droit de la souris > Allez au Menu principal > Réglages > Alarme > Mouvement > Détection de
mouvement.
Lorsqu’il y a un mouvement, le NVR commence à enregistrer, et l’icône s'affiche à la fois au coin en bas à gauche.
5
Enregistrement
Sensitivité
44
Cliquez sur ce bouton pour faire tout l’endroit sur de surveillance comme zone sensible.
Cliquez sur ce bouton pour supprimer la zone sensible.
Cliquez sur ce bouton pour enregistrer les paramètres.
Cliquez sur ce bouton pour sortir du système.
Sélectionnez la caméra: cochez le canal sur lequel vous souhaitez enregistrer uniquement sur détection de
mouvement.
Zone: zone sensible dans l’endroit de surveillance de la caméra.
La couleur et la luminance sont importantes pour la sensibilité, il est donc nécessaire d’ajuster ses valeurs dans des
conditions spécifiques. La valeur par défaut est 6, tandis que la plage de valeurs est comprise entre 1 et 8.
Testez le réglage en déplaçant quelque chose ou une personne passe devant la caméra. Si le mouvement est détecté
par la caméra, un petit-homme en rouge s’affiche à l'écran. La grille doit ne pas couvrir les drapeaux, les arbres ou
autres objets de flux dans le vent pour éviter les fausses alertes.
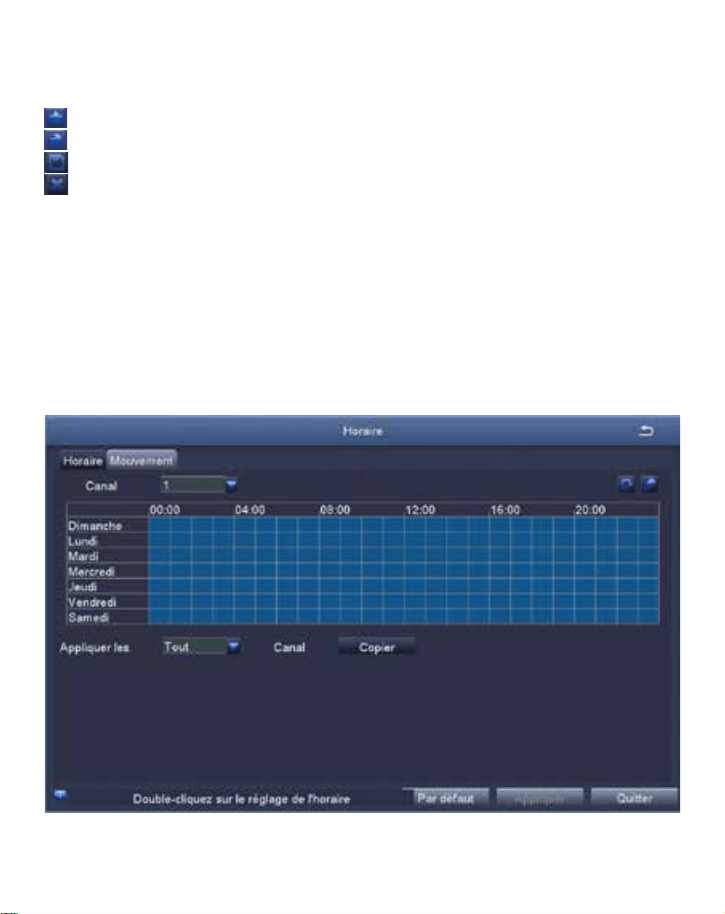
5.2 Enregistrement d’après les horaires
Ce réglage vous aide de configuer chaque canal pour enregistrer à des heures spécifiques en fonction de l'heure.
Faites un clic droit de la souris > Allez au Menu principal > Réglages > Horaire.
45
Cliquez sur ce bouton pour marquer les heures d’un jour spécifique.
Cliquez sur ce bouton pour déplacer les heures dans les carreaux.
Les paramètres peuvent être copiés et appliqués à tous ou une partie des canaux et à tout autre jour.
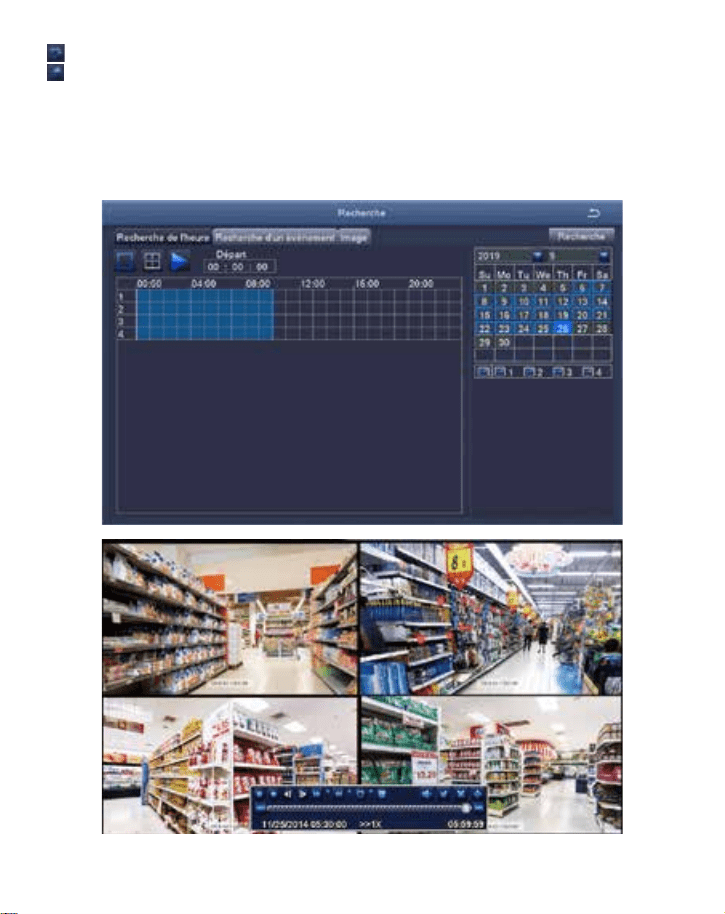
5.3 Rediffusions des enregistrements
Allez au Menu principal > Recherche, entrez à l’interface comme suivante:
Recherchez les enregistrements par date ou par événement puis cliquez sur les résultats pour les regarder.
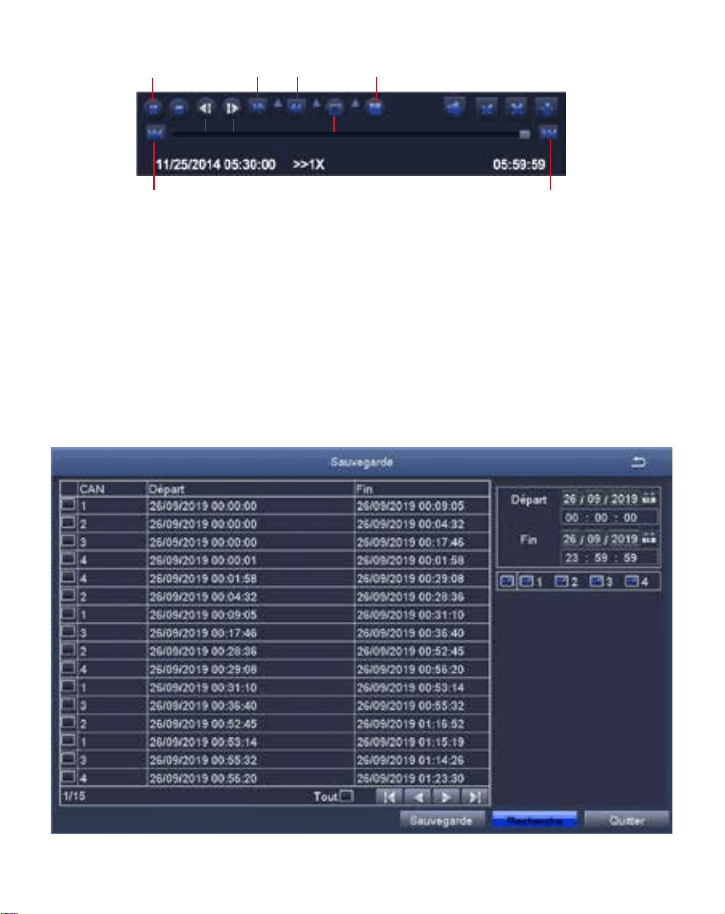
46
Fichier précédent: passer au dernier événement enregistré.
Fichier suivant: passer au prochain événement enregistré.
Avance rapide: la vidéo peut être lue à une vitesse différente, de 1/4 à 16 fois.
Rembobinage: la lecture vidéo peut être rembobinée 1 fois, 8 fois, 16 fois et 32 fois.
Mode d'affichage à l'écran: l’écran mono et les écrans multiples sont disponibles. Vous pouvez choisir le nombre
de canaux que vous souhaitez reproduire une fois. L’image du canal qui n’a pas de vidéo est en blanc au cours de la
lecture.
Enregistrement précédent Enregistrement suivant
Retour
rapide
Avance
rapide
Lecture / Pause
Image
suivante
Image
précédente
Affichage sur un seul écran
Affichage multi-écrans
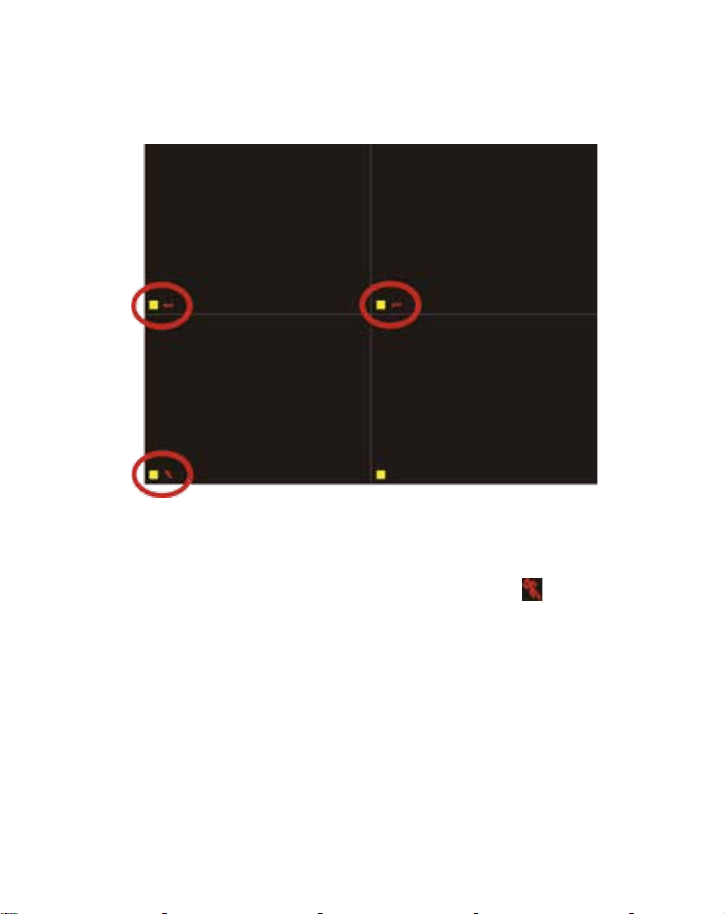
5.4 Copiez les enregistrements
① Insérez la clé USB au port USB de DVR.
② Faites un clic droit de la souris > allez au Menu principal > Sauvegarde > Sélectionnez le canal, la date et l’heure >
Recherchez > Cochez les fichiers d’enregistrement > Cliquez sur Sauvegarder.
47
5.5 Détection PIR (applicable aux caméras avec fonctions PIR)
Une fois le mode de détection de mouvement PIR activé, le DVR ne commence à enregistrer que
lorsque des objets en mouvement dont la température est d'environ 37 degrés sont détectés.
Faites un clic droit de la souris > «Menu principal» > «Réglages» > «Alarme» > «Détection PIR».
Lorsque la caméra enregistre des objets en mouvement dont la température est d'environ 37
degrés, le système commence à enregistrer et sera affiché dans le coin inférieur gauche de l'écran.
Remarque: la fonction PIR est complètement activée à condition que le mode de détection de
mouvement et le mode de détection PIR étaient tous deux activés. Lorsque
s'affiche dans le coin
inférieur gauche de l'écran, il indique que la détection de mouvement et la détection PIR sont toutes
deux déclenchées, ce qui signifie que les objets en mouvement capturés à une température d'environ
37 degrés sont capturés par les caméras.
Remarque: L’image 1 indique que seule la détection de mouvement est déclenchée. L’image 2
indique que seule la détection PIR est déclenchée; L’image 3 indique que la détection de mouvement
et la détection PIR sont toutes deux déclenchées en même temps.
Sélectionnez la Caméra. Cochez le canal que vous souhaitez enregistrer lors de la détection de
mouvement.
Temps de maintien. Définir la durée d'enregistrement après l'arrêt du mouvement.
Déclencheur. Plusieurs canaux peuvent être configurés pour enregistrer lors de la détection du
mouvement par l'une des caméras. Par exemple, lorsque la caméra 01 détecte un mouvement, la
caméra 02 et la caméra 03 peuvent également être déclenchées pour enregistrer.
48
Enregistrement programmé: Définissez la période d'activation et de désactivation du mode de
détection PIR (identique à l'enregistrement programmé).
Réglage de l'alarme: lorsque l'appareil déclenche une alarme, vous pouvez activer ou désactiver les
paramètres d'alarme de sonnerie ou de notification par courrier électronique du DVR.
Remarque: les opérations ci-dessus s'appliquent à la situation dans laquelle le mode de détection de
mouvement et le mode de détection PIR sont activés.
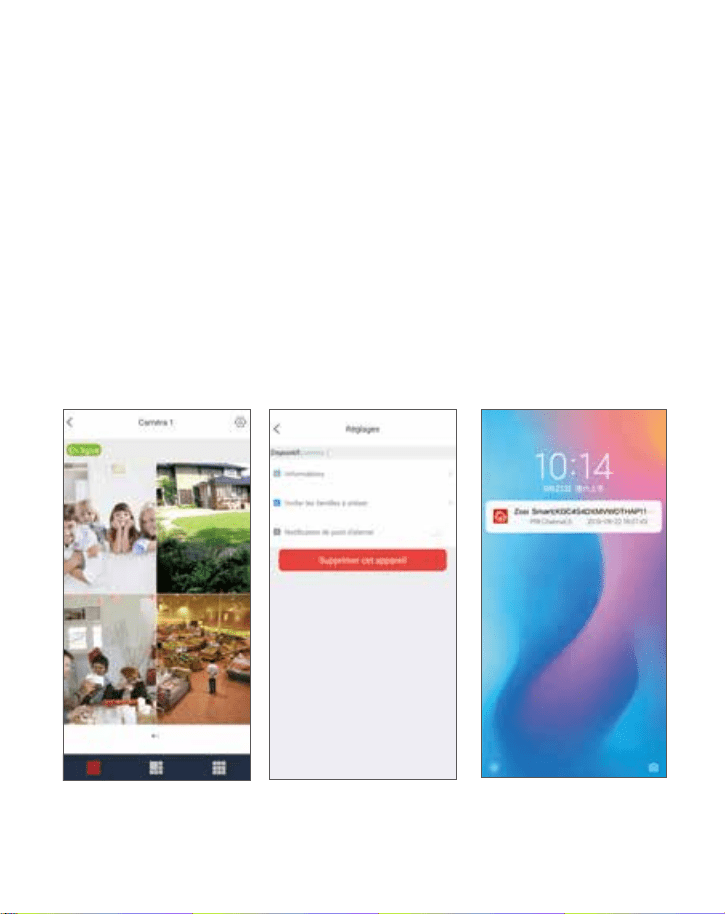
5.6 Réglages d’alarme de l’application
Il y a deux types de notification d'alarme de DVR:
5.6.1 Lorsque la détection de mouvement est déclenchée, le DVR envoie l'alarme par courrier
électronique ou par notification via un téléphone portable.
5.6.2 Lorsque la détection de mouvement et la détection PIR sont toutes les deux déclenchées,
un signal d'alarme s'affiche dans le coin inférieur gauche de l'écran et le DVR envoie l'alarme par
courrier électronique ou par notification par téléphone portable.
Remarque: lorsque le mode de détection PIR est activé et le mode de détection de mouvement est
désactivé, l'enregistrement d'alarme est déclenché mais le courrier électronique et le téléphone
mobile ne reçoivent aucune notification.
49
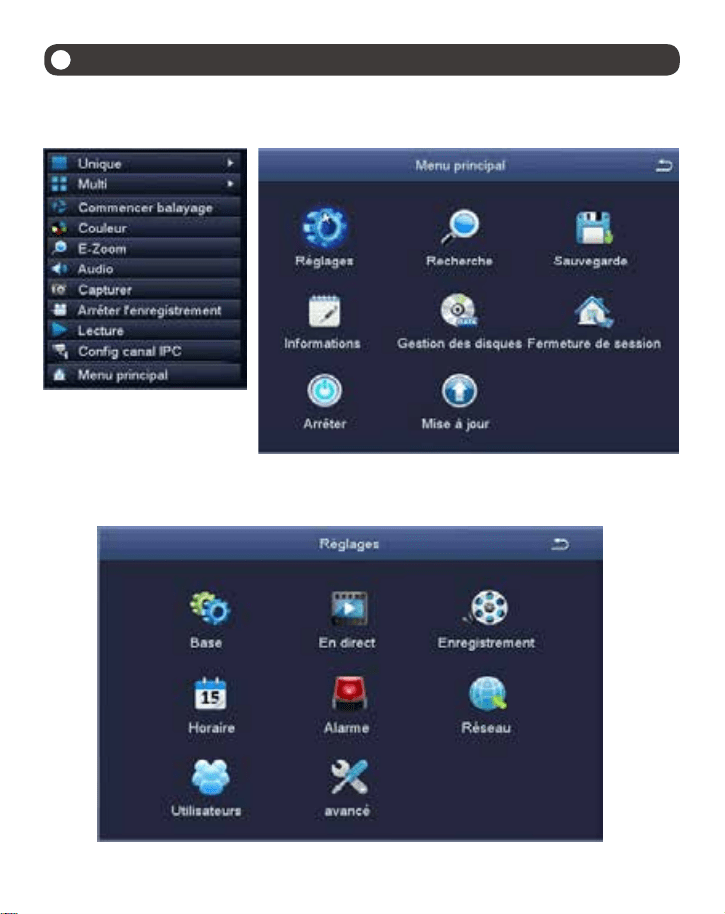
6
Gestion d’utilisateurs / Changer le mot de passe
6.1 Faites un clic droit de la souris et choisissez Menu Principal.
6.2 Cliquez sur Réglages.
6.3 Cliquez sur Utilisateurs.
50
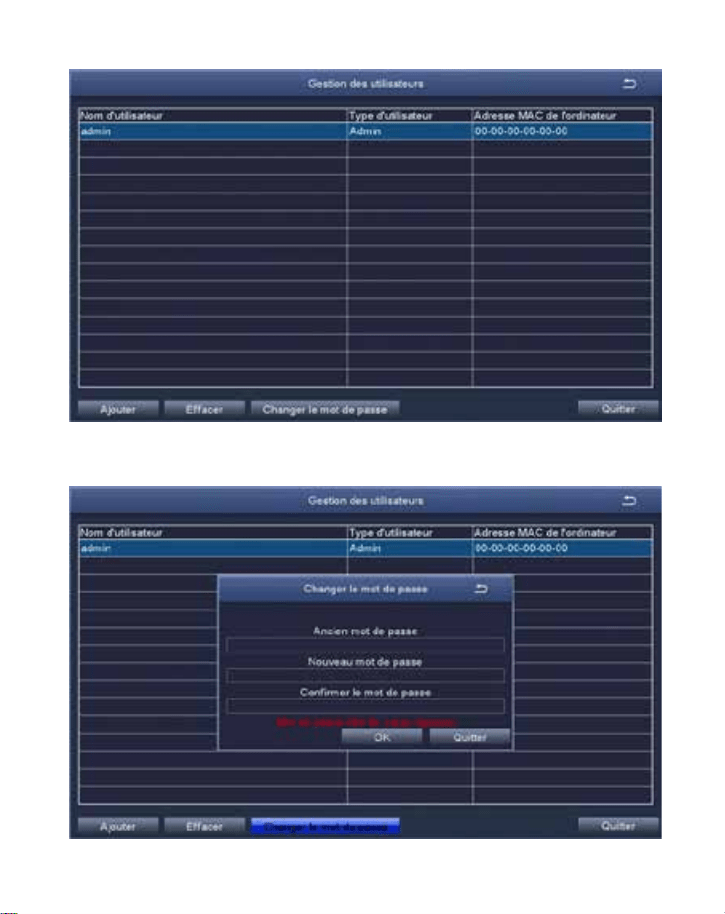
6.4 Cliquez sur Changer le mot de passe.
6.5 Définissez ou changer votre mot de passe, ce qui devrait être plus de 6 charactères.
Rappelez-vous votre mot de passe s’il vous plaît.

51
7
FAQs
Q: Why can't I search for devices when adding?
A: Make sure that the device and the mobile device are on the same LAN, otherwise please enter the
device ID manually;
Q: Why can't my device connect to the network?
A: Please check
· Is the device connected to the Internet?
· Is the router working properly?
· Is the router's DHCP server open?
Q: Why can't I find the video files?
A: Please check
· Is the hard drive broken?
· Is the search period valid?
· Whether the equipment system time is correct
Q: Why the monitor screen cannot display for some channels?
A: Please check
· Has the camera been added to the NVR?
· Is the camera too far away from the NVR?
· Is there a metal mesh or thick wall near the camera?
· It is recommended to use an extended antenna to bypass obstacles
52
1
Übersicht
1.1 DVR
1.2 Kamera
① ② ③
④
⑤ ⑥
⑦
⑧
A
B
①
④ ⑤ ⑥
② ③
Kamera
Netzwerk Port USB Port Strom Port
VGA VideoausgangHDMI Videoausgang
⑦ ⑧
Megapixel Linse 5mm IR LEDs
Das Kugelgelenk festdrehen.
Das Kugelgelenk aufdrehen und die
Halterung in die angepasste Richtung
verstellen.
A
B
53
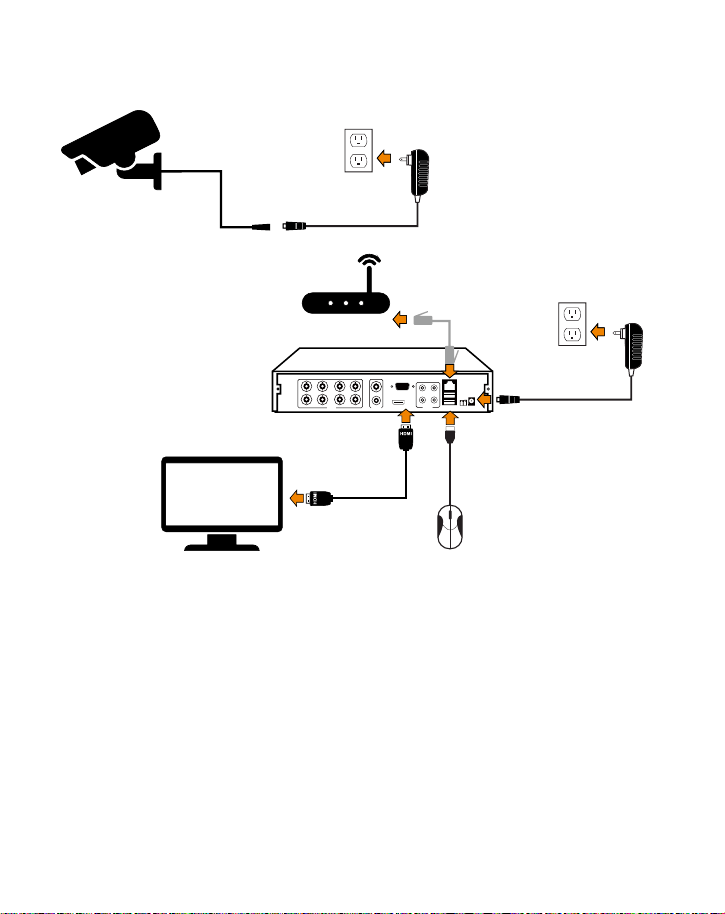
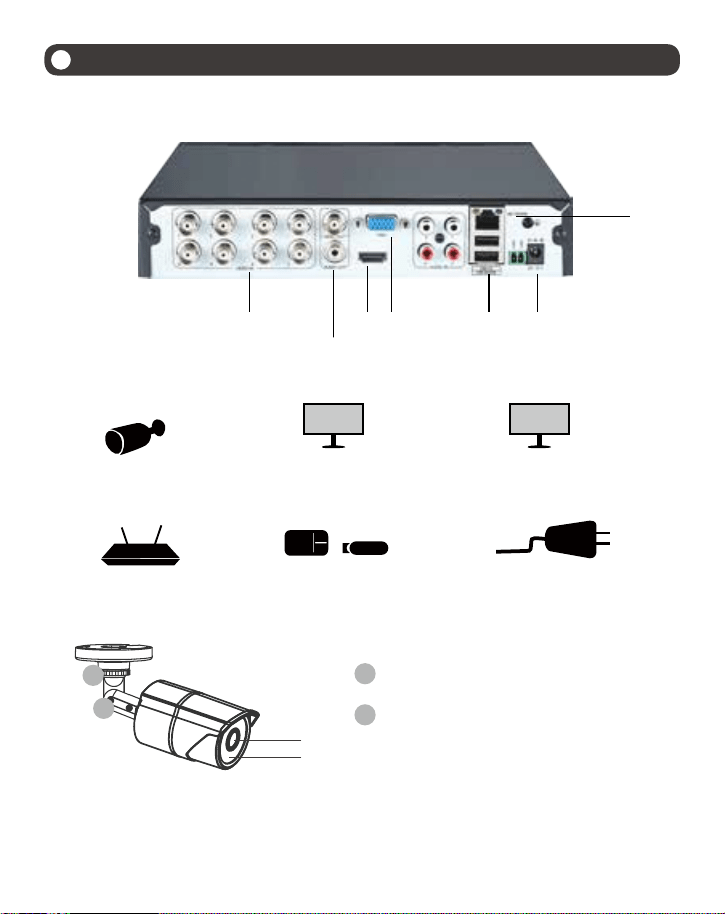
1.3 Anschluss
VIDEO IN AUDIO OUT
VIDEO OUT
VGA
HDMI
AUDIO IN
USB 2.0 DC 12V
RG 45
Hier wird der 8-Kanäle Recorder abgebildet. Der 4- oder 16-Kanäle Recorder hat die entsprechenden
Anschlüsse für Videoeingang.
1. Die Kamera über BNC Kabel an den DVR anschließen und mit dem Netzteil (mitgeliefert) verbinden
2. Den DVR über HDMI/VGA Kabel an den Bildschirm anschließen (HDMI/VGA Kabel und Bildschirm
nicht inklusive)
3. Den DVR über Netzwerk Kabel an den Router anschließen
4. Die Maus (mitgeliefert) an den USB Port des DVRs anschließen
5. Den NVR mit dem Netzteil (mitgeliefert) verbinden.
Warten Sie bis das System eingeschaltet wird. Das Live Video wird auf dem Bildschirm angezeigt.
#
54
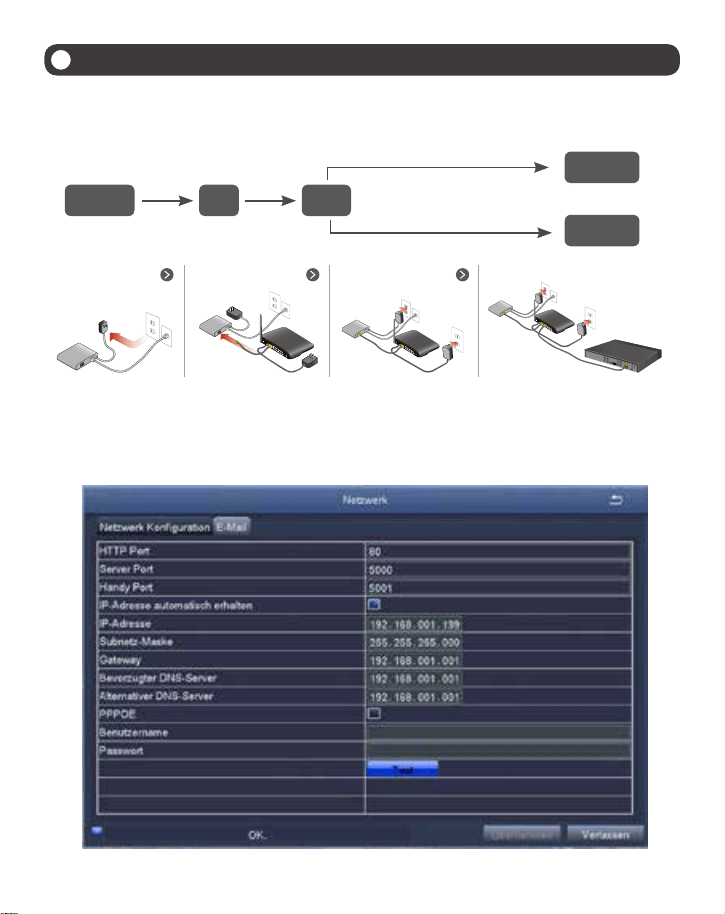
A: Wie verbindet man den DVR mit Internet?
B:Wie testet man den Netzwerkstatus des NVRs?
(1) Rechtsklick auf die Maustaste > Hauptmenü > Setup > Netzwerk
(2) "Die IP Adresse automatisch erhalten" abhaken
(3) Klick auf "Test". Wenn "OK" zeigt, ist die Netzwerkverbindung erfolgreich.
Achtung: DHCP im Router muss aktiviert werden.
2
APP Fernsteuerung(Gerät hinzufügen-Wiedergabe)
2.1 Den DVR mit Internet verbinden
DVR/NVR
Fiberoptik DSL
Router
DVR/NVR
PC
RJ45 Kabel
WIFI oder RJ45 Kabel
DSL/CABLE
MODEM
DSL/CABLE
MODEM
DSL/CABLE
MODEM
DSL/CABLE
MODEM
ROUTER
ROUTER
ROUTER
NVR
55
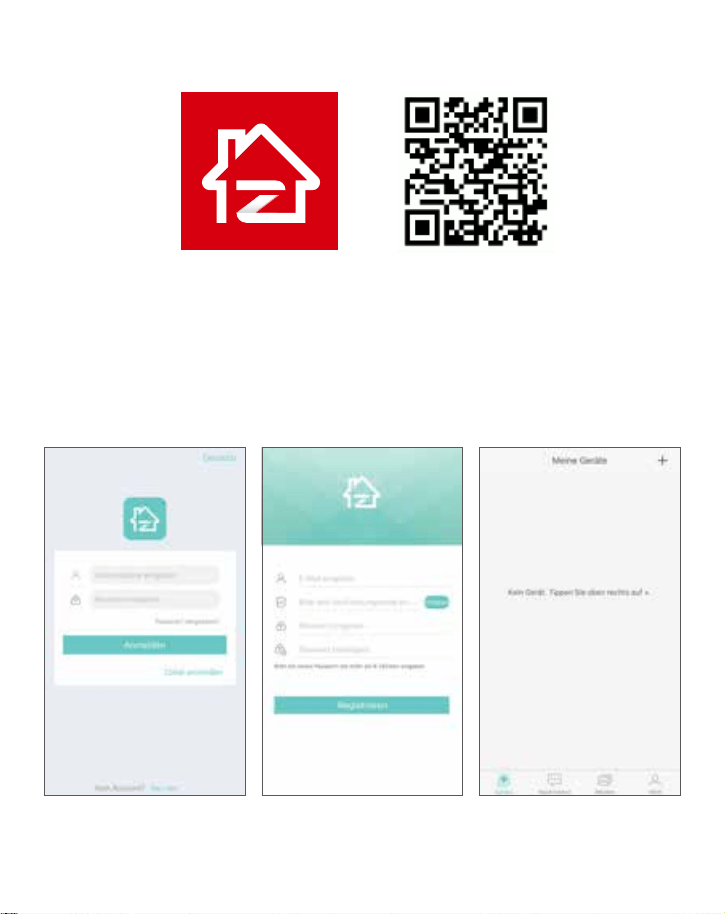
2.2 APP herunterladen
2.3 APP treiben
A: Treiben Sie die App und tippen Sie unten rechts auf „Registrieren“, um ein Konto zu erstellen.
B: Geben Sie Ihre E-Mail-Adresse ein und klicken Sie auf die Taste daneben, um den Bestätigungscode zu erhalten.
Geben Sie den Code ein. Legen Sie das Passwort fest. Klicken Sie auf „Erledigt“. Wenn Sie den Code nicht erhalten,
prüfen Sie ob es als Spam blockiert wird oder versuchen Sie es mit einer anderen E-Mail.
C: Melden Sie sich in die App ein und gehen Sie zum Menü (Meine Geräte). Tippen Sie oben rechts auf „+“, um den
DVR hinzuzufügen;
Zosi Smart App (IOS/Android)
App starten Registrieren Auf „+“ tippen um
Gerät hinzufügen
56
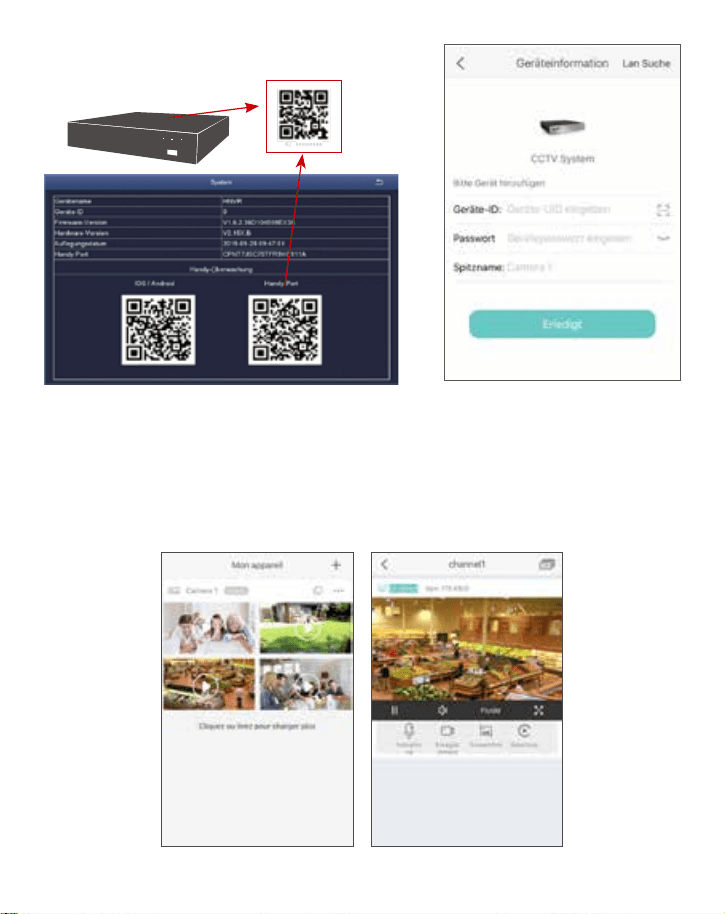
D:
①Die Geräte-ID scannen oder manuell eingeben.
E: Tippen Sie auf „Erledigt“ und zurück zur Geräteliste > Tippen Sie auf das Gerät > Wählen Sie die
Kanäle, um die Vorschau zu starten.
②Das Gerätepasswort eingeben (Wenn Sie noch kein Passwort eingerichtet haben, müssen Sie kein
Passwort eingeben).
③Einen Name für das Gerät eingeben.
④Auf Fertig klicken, um zur Geräteseite für den Gerätebetrieb zu gelangen (Das hinzugefügte Gerät
befindet sich oben auf der Geräteseite).
57
Besuchen Sie https://support.zositech.com/ um die Software AVSS herunterzuladen.
3.1 Anmelden
3.2 Geräteverwaltung (Erstellen Sie eine Gruppe zuerst)
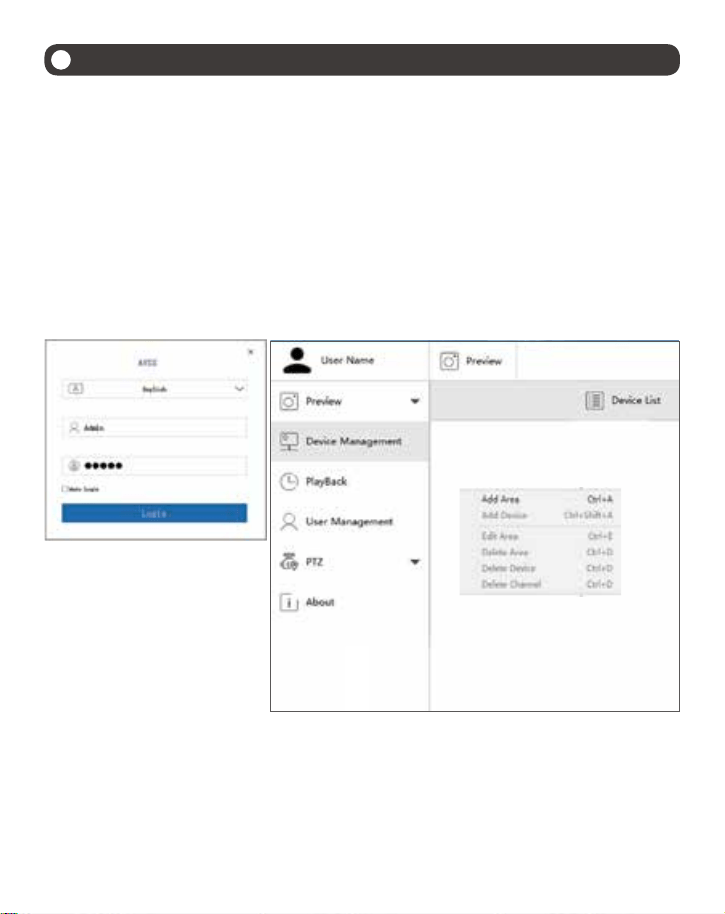
Treiben Sie die Software. Verwenden Sie den Standardbenutzername und das Standardpasswort
ODER die gleichen Anmeldedaten wie das Konto der App, die Sie auf Ihrem Smartphone erstellt
haben.
① Klicken Sie auf „Device Management“.
3
PC Client Software
② Klicken Sie mit der rechten Maustaste auf das leere Feld und wählen Sie „Add Area“, um eine
Gruppe zu erstellen.
58
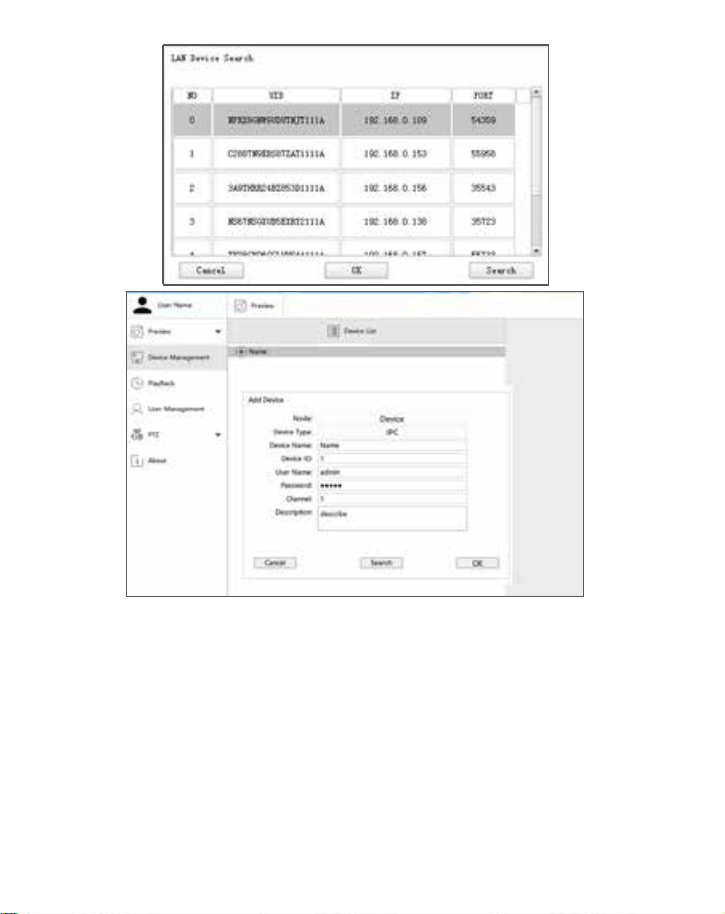
③Wählen Sie die erstellte Gruppe und klicken Sie mit der rechten Maustaste. Wählen Sie „Add
Device“, um ein Gerät unter diese Gruppe hinzuzufügen.
Geben Sie Gerätename, Geräte-ID, Benutzername, Gerätepasswort, Anzahl der Kanäle ein. Klicken
Sie auf „OK“.
Hinweis: 1. Der Benutzername ist admin. 2. Wenn der DVR und der PC an den gleichen Router
angeschlossen sind, können Sie auf „Search“ klicken, um das Gerät zu finden und hinzuzufügen.
3.3 Liveansicht
Klicken Sie auf „Preview“, um die Liste der Gruppe anzuzeigen.
Doppelklicken auf die Gruppe, um die Liste einzublenden.
Klicken Sie mit der rechten Maustaste auf die Geräteliste und wählen Sie „Play All“, um die Liveansicht
zu starten.
Klicken Sie auf „Stop All“ um die Liveansicht abzubrechen.
59
①
③
②
④
4
Einbau einer Festplatte
Für die Videoaufnahme ist eine Festplatte erforderlich. Der DVR arbeitet mit den meisten internen
2.5” oder 3.5” SATA Festplatten. PC-Festplatte wird nicht empfohlen.
Sie finden hier wie man die Festplatte installiert. Wenn Ihr System schon mit einer Festplatte
installiert ist, überspringen Sie bitte diesen Schritt.
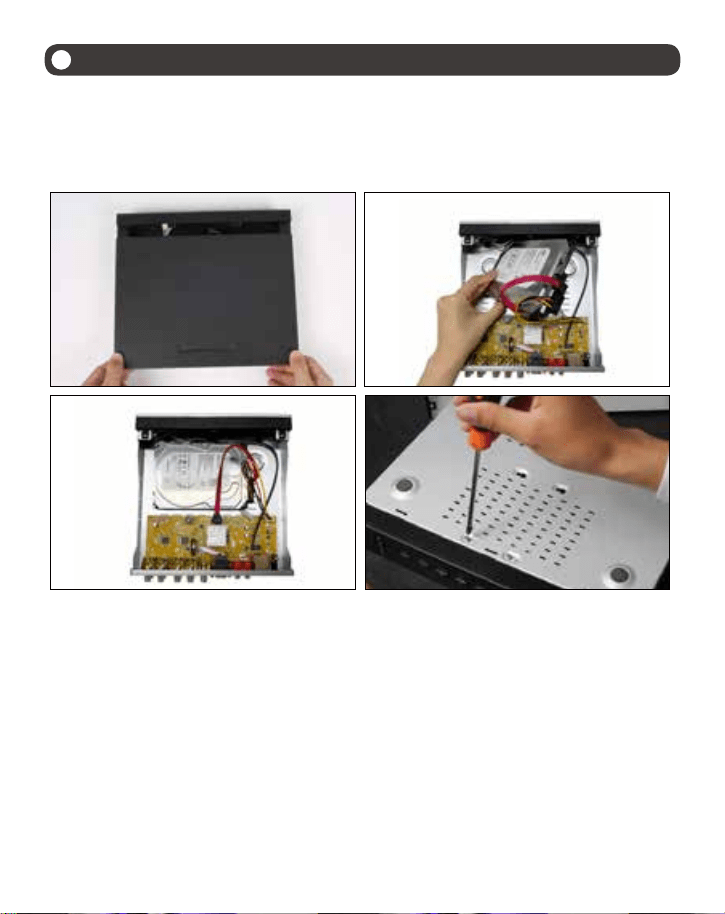
① Trennen Sie Ihren DVR von dem Strom, schrauben Sie die obere Abdeckung ab.
② Schließen Sie die SATA Strom- und Datenkabel vom DVR an die entsprechende Stelle auf Ihrer
Festplatte (siehe Abbildung) an.
③ Legen Sie die Festplatte in den NVR. Jedes Kabel sollte die Festplatte überqueren.
④ Halten Sie die Festplatte und den DVR fest und drehen Sie sie vorsichtig um. Richten Sie die
Löcher auf der Festplatte mit den Löchern auf dem DVR aus. Schrauben Sie die mitgelieferten
Schrauben in die Löcher ein. Montieren Sie die Abdeckung.
Hinweis: Nach der Installation sollen Sie die Festplatte formatieren bevor Aufnahme.
Rechtsklick auf die Maus > Hauptmenü > Festplatte > Wählen Sie die Festplatte aus > Klicken Sie auf
Formatieren > Übernehmen.
60
Rechtsklick auf die Maus > Hauptmenü > Setup > Aufnahme.
Sie finden hier die Aufnahmeeinstellungen für alle Kanäle. Ändern Sie die Aufnahmeeinstellungen nach Ihrem
Wunsch und übernehmen Sie die Änderungen.
5.1 Aufnahme bei Bewegung
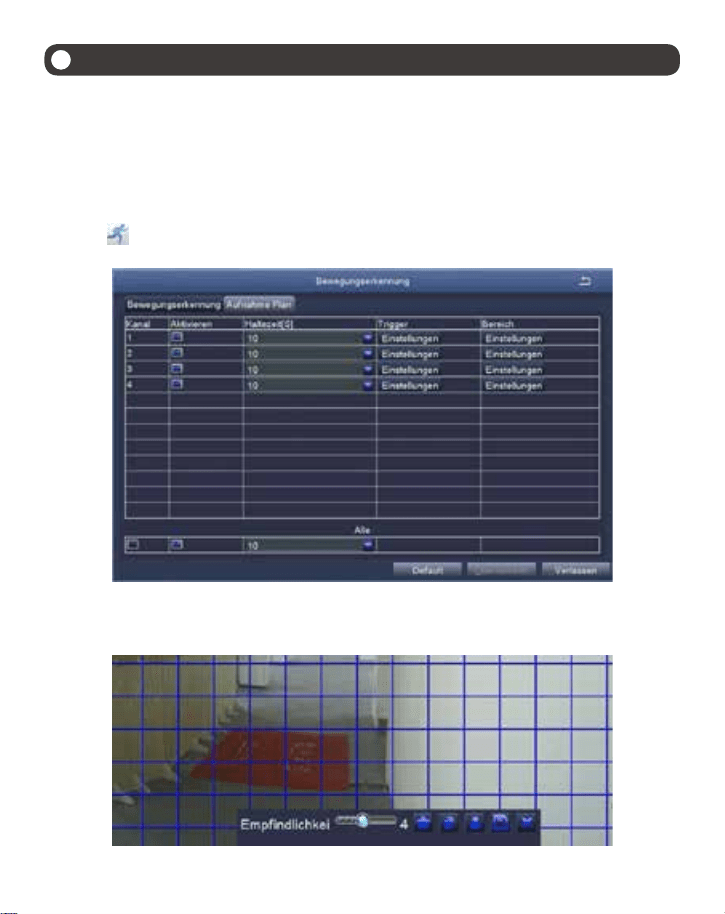
Stellen Sie die Bewegungserkennung ein und der DVR wird nur aufzeichnen, wenn eine Bewegung erkannt wird.
Rechtsklick auf die Maus> Hauptmenü > Setup > Alarm> Bewegung> Bewegungserkennung.
Ein Symbol
wird auf dem Kanal angezeigt wenn eine Bewegung erkannt wird.
Kamera wählen: Gewünschten Kanal abhaken, die bei einer Bewegung aufzeichnet.
Bereich: Empfindlichen Bereiche einstellen, wo die Bewegung erkannt wird.
5
Aufnahme
61
5.2 Aufnahme nach Zeitplan
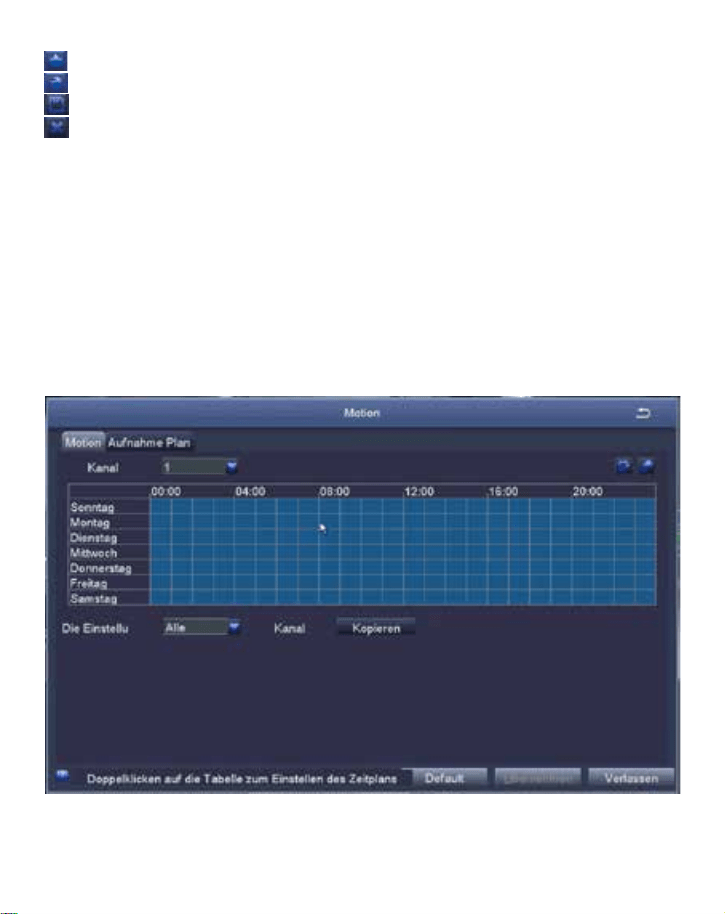
5.2.1 Stellen Sie Zeitpläne ein und Sie können jeden Kanal konfigurieren, dass sie in bestimmten Zeiten basierend auf
Tageszeit aufzeichnen.
Rechtsklick auf die Maustaste > Hauptmenü > Setup > Zeitplan.
Klicken, um gesamten Sichtbereich als empfindlichen Bereich einzustellen
klicken um empfindlichen Bereich zu entfernen
Klicken zum Speichern
Klicken zum Verlassen
Da die Empfindlichkeit von der Farbe und Helligkeit beeinflusst wird, ist es notwendig, den Wert der Empfindlichkeit
nach aktuellen Bedingungen anzupassen. Der Standardwert ist 6 und der Wertebereich ist von 1 bis 8 (Je kleiner der
Wert, desto empfindlicher).
Rechtsklick auf die Maustaste um die Menüleiste ein- oder auszublenden.
Testen Sie die Einstellungen der Bewegungserkennung, indem Sie ein Objekt innerhalb dem Sichtbereich der Kamera
mit Rasterfläche bewegen. Wenn eine Bewegung in dem Sichtbereich mit Rasterfläche erkannt wird, zeigt der DVR
eine rote Menschenfigur auf dem Bildschirm. Die Rasterfläche soll keine Flaggen, Bäume oder andere im Wind
bewegende Objekte decken, um Fehlalarme zu vermeiden.
62
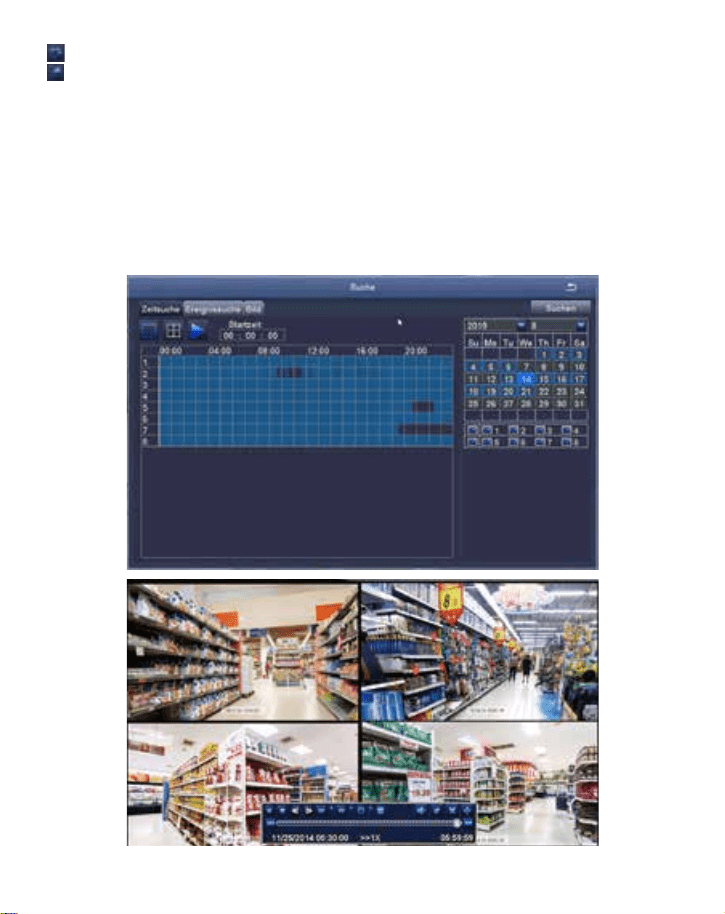
Klicken um individuelle Stunden für bestimmte Tage einzustellen.
Klicken, um die gewählte Zeit zu entfernen.
Die Einstellungen können an anderen oder alle Kanäle und jeden anderen Tag kopiert und angewendet werden.
5.2.2 Die Aufzeichnungszeit können auch durch Doppelklick auf ein Feld neben einem Tag eingestellt werden. Mehrere Zeitpläne
können mit der Start- und Schusszeit bis auf der Minute erstellt und gespeichert werden. Die Einstellungen können auf mehrere
Tage und Kameras angewendet werde.
Hinweis: Priorität der Aufnahme: Alarm >Bewegungserkennung > Manuell> Zeitplan
5.3 Wiedergabe
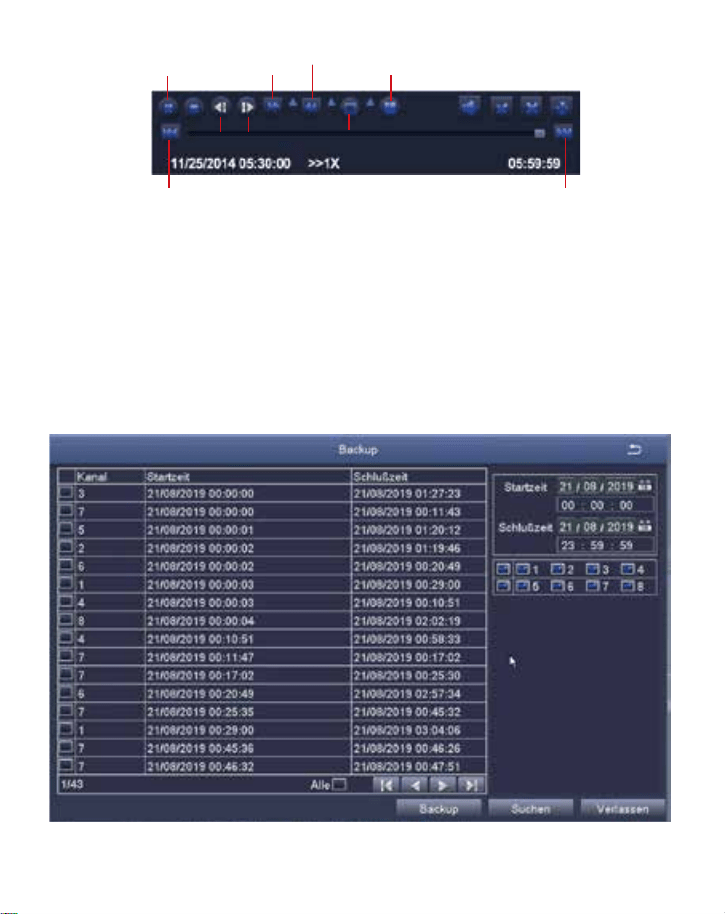
Gehen Sie zum Hauptmenü > Suchen. System wird wie folgt gezeigt:
Suchen Sie das gewünschte Video je nach Zeit oder Ereignis und spielen Sie es.
63
Vorherige Aufnahme: die letzte Aufnahme spielen
Nächste Aufnahme: die nächste Aufnahme spielen
Vorspulen: Video kann von 1/4-Fach bis 16-Fach abgespielt werden.
Zurückspulen: Video kann von 1-Fach, 8-Fach, 16-Fach und 32-Fach zurückgespult werden.
Ansicht Modus: Einzelbild- und Multibilder-Ansicht stehen zur Verfügung. Sie können sich wählen, wie viele Kanäle
einmal abgespielt werden. Kanal ohne Aufzeichnungen präsentiert leeren Bildschirm.
5.4 Backup
① Stecken Sie einen USB-Stick an den USB Port des NVRs.
② Rechtsklick auf die Maustaste > Hauptmenü > Backup > Wählen Sie die Zeit und den Kanal > Klicken Sie auf
Suchen > Wählen Sie die Aufnahme zum Backup > Klicken Sie auf Backup.
Vorherige Aufnahme Nächste Aufnahme
Zurückspulen
Vorspulen
Spieleny/
Pause
Nächstes Foto
Vorheriges
Foto
Einzelbild Ansicht
Multibilder Ansicht
64
5.5 PIR-Erkennung (für Kameras mit PIR-Funktionen)
Nach dem Einstellen der PIR-Erkennung startet der DVR die Aufzeichnung nur, wenn Objekte mit
einer Temperatur von etwa 37 Grad erfasst werden.
Rechtsklick> Hauptmenü> Setup> Alarm> PIR-Erkennung
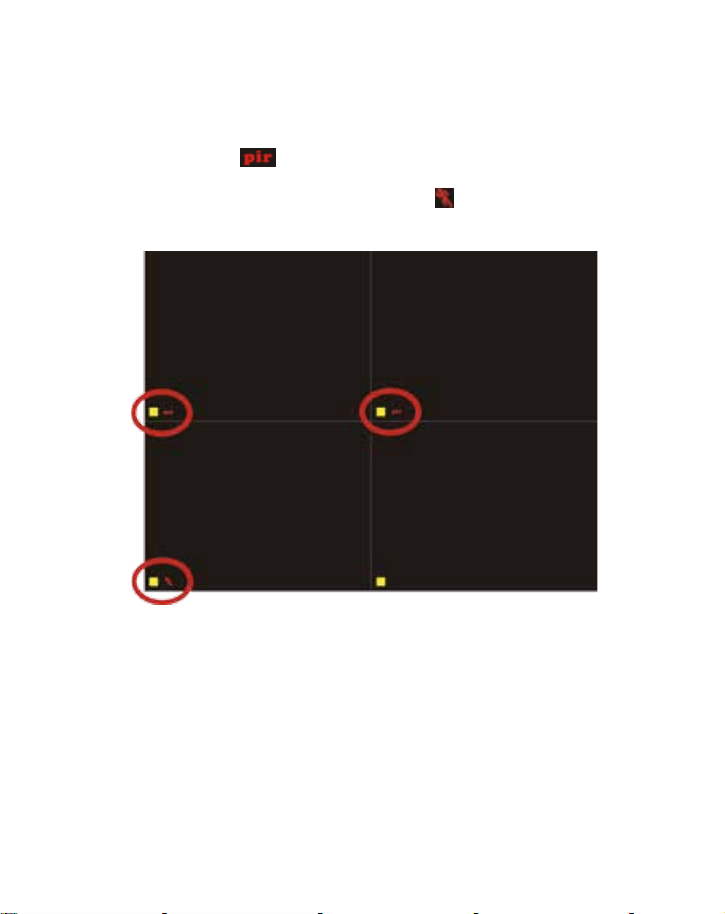
Wenn ein Objekt mit einer Temperatur von etwa 37 Grad von der Kamera erfasst wird, beginnt das
System mit der Aufnahme und
wird in der unteren linken Ecke des Bildschirms angezeigt.
Hinweis: Die PIR-Funktion ist nur vollständig aktiviert, wenn die Bewegungserkennung und PIR-
Erkennung beide eingeschaltet sind. Nach dem Auslösen wird
in der unteren linken Ecke des
Bildschirms angezeigt. Es bedeutet, dass die Bewegung eines Objekts mit einer Temperatur von etwa
37 Grad von den Kameras erfasst wird.
Hinweis: Abbildung 1 zeigt an, dass die Bewegung von dem System erkannt wird. Abbildung 2 zeigt
an, dass die PIR von dem System erkannt wird. Abbildung 3 zeigt dass die Bewegung von PIR von
dem System erkannt wird.
Kamera auswählen: den Kanal abhaken, für den Sie den PIR-Erkennung starten möchten.
Haltezeit: die Länge der Aufnahmezeit nach dem Anhalten der Bewegung einstellen.
Trigger: Multi-Kanäle können so eingestellt werden, dass sie aufzeichnen, wenn bewegte Objekte
mit Temperatur von einer der Kameras erfasst werden. Wenn z. B. Kamera 1 eine Bewegung
erkennt, können Kamera 2 und Kamera 3 ebenfalls zum Aufnehmen ausgelöst werden.
Zeitplan: die Zeitspanne für das Ein- und Ausschalten der PIR-Erkennung einstellen (wie bei der
geplanten Aufzeichnung).
Alarmeinstellung: Wenn ein Alarm ausgelöst wird, w die Alarm- oder E-Mail-Benachrichtigung des
DVRs ein- und ausgeschaltet werden.
65
Hinweis: Die obigen Vorgänge gelten für den Fall, dass sowohl die Bewegungserkennung als auch die
PIR-Erkennung aktiviert sind.
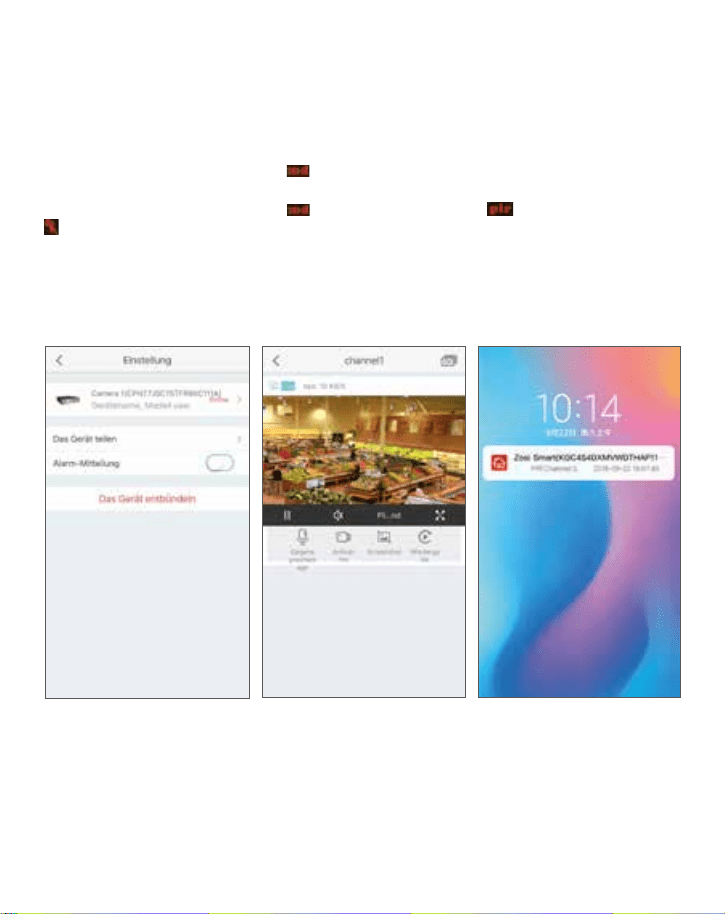
5.6 App Alarm Einstellungen
Es gibt zwei Arten von DVR-Alarmbenachrichtigungen:
5.6.1 Wenn die Bewegungserkennung
ausgelöst wird, sendet der DVR den Alarm per E-Mail oder
App Push.
5.6.2 Wenn die Bewegungserkennung
als auch die PIR-Erkennung ausgelöst werden, wird
in der unteren linken Ecke des Bildschirms angezeigt, und der DVR sendet den Alarm per E-Mail
oder App Push.
Hinweis: Wenn die PIR-Erkennung eingeschaltet ist und die Bewegungserkennung deaktiviert ist,
wird die Alarmaufnahme ausgelöst, aber die E-Mail und App Push werden nicht gesendet.
Einstellungen und Effekte von der App-Alarmbenachrichtigung werden unten angezeigt:
66
6
Benutzer und Passwort
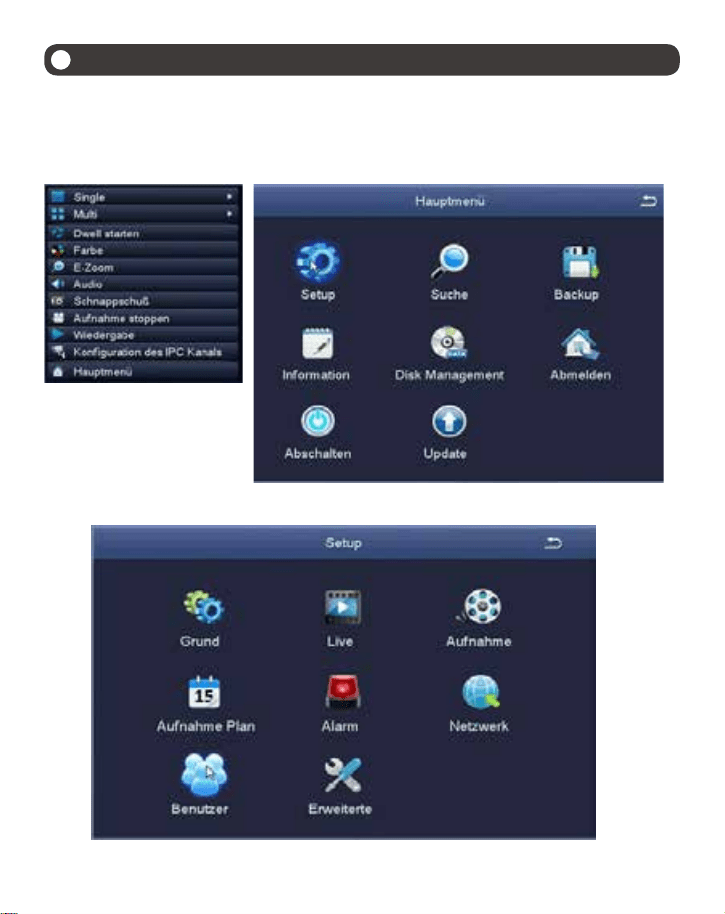
6.1 Bei Liveansicht klicken Sie mit der rechten Maustaste und klicken Sie auf „Hauptmenü“,.
6.2 Klicken Sie auf „Setup“,.
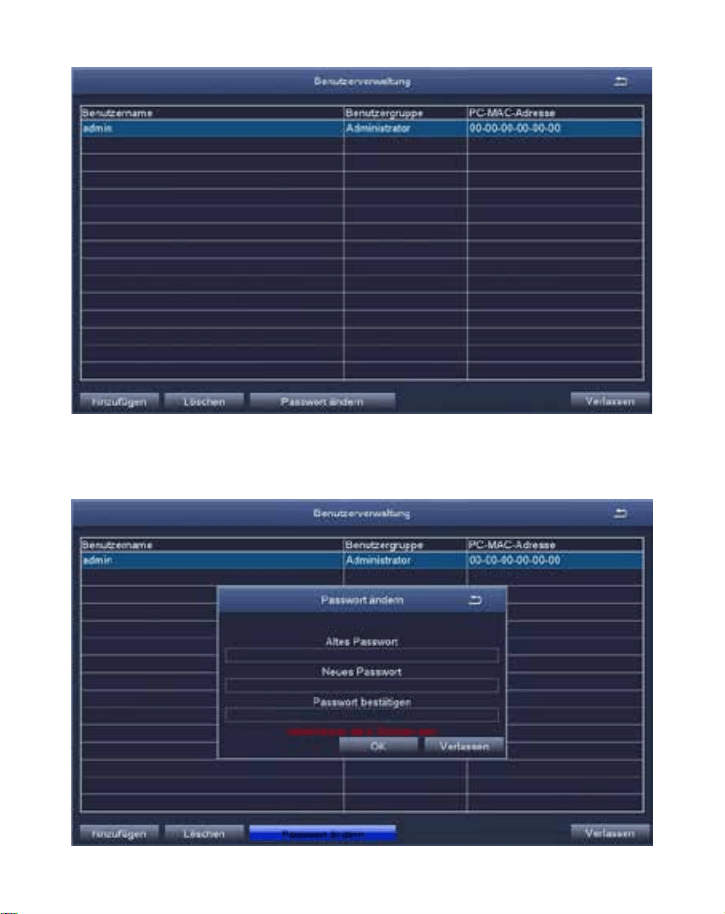
6.3 Klicken Sie auf „Benutzer“ zum Menü von der Benutzerverwaltung.
67
6.4 Klicken Sie auf „Passwort ändern“.
6.5 Hier können Sie das Passwort einrichten oder ändern. Bitte geben Sie das Passwort zweimal ein.
Das Passwort sollte mehr als 6 Zeichen sein.
Bitte merken Sie sich Ihr Passwort!

68
8
Häufig gestellte Fragen
F: Es wird kein Gerät bei Hinzufügen in der App gefunden.
A: Stellen Sie sicher, dass der DVR und Ihr Mobilegerät an den gleichen Router angeschlossen sind.
Wenn nicht, müssen sie die Geräte ID manuell eingeben.
F: Der DVR kann nicht mit Internet verbinden.
A: Bitte prüfen Sie:
ob der DVR über Netzwerkkabel an Router angeschlossen ist
ob der Router arbeitet
ob DHCP im Router aktiviert ist
F: Ich finde keine Aufzeichnungsdatei.
A: Bitte prüfen Sie:
ob die Festplatte defekt wurde
ob die gesuchte Zeit gültig ist
ob die Systemzeit richtig ist
F: Eine Kamera hat kein Video?
A: 1. Bitte wechseln Sie ein anderes Netzwerkkabel und schließen Sie die Kamera an einen anderen
POE Port von dem NVR.
2. Versuchen Sie die Kamera erneut zu verbinden (Punkt 4)
F: Ich habe das Passwort vergessen.
A: Kontaktieren Sie den Support um das Passwort zurückzusetzen.
69
1
Описание системы
1.1 DVR
1.2 Камера
① ② ③
④
⑤ ⑥
Выход Видео/Аудео
⑦
⑧
HD объектив
ИК светодиоды 24, 5мм
Отрегулируйте в нужном положении.
Шейка кронштейна соединена с
монтажным основанием. Поверните
кронштейн путем ослабления радиального
шарнира стопорного кольца. Отрегулируйте
камеру в необходимое положение и плотно
затяните стопорное кольцо.
A
B
⑦
⑧
A
B
①
④ ⑤ ⑥
② ③
Камера
Роутер Мышь Адаптер питания
Монитор/HDMI кабель Монитор/VGA кабель
70
1.3 Подключение системы
VIDEO IN AUDIO OUT
VIDEO OUT
VGA
HDMI
AUDIO IN
USB 2.0 DC 12V
RG 45
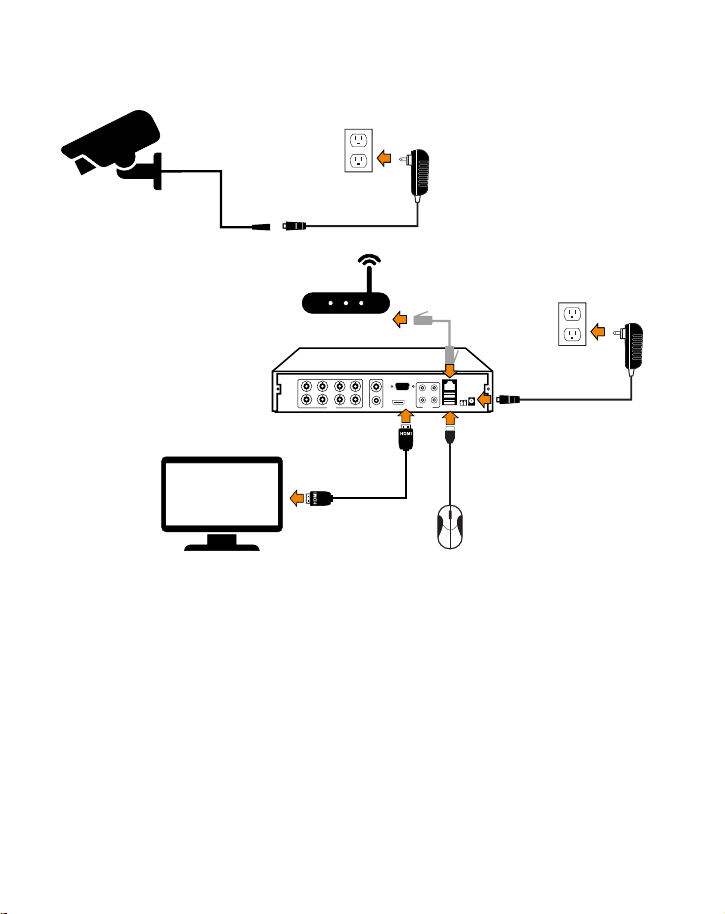
На рисунке показана 8ми канальная система, системы 4/16 каналов будет иметь
соответствующее количество видеовходов.
①Соедените камеру с DVR и подключите камеру к источнику питания.
②Подключите монитор к DVR при помощи HDMI, VGA кабеля через BNC-порт.
③Подключите видеорегистратор к маршрутизатору с помощью кабеля Ethernet.
④Подключите мышь к порту USB.
⑤Подключите DVR к источнику питания.
71
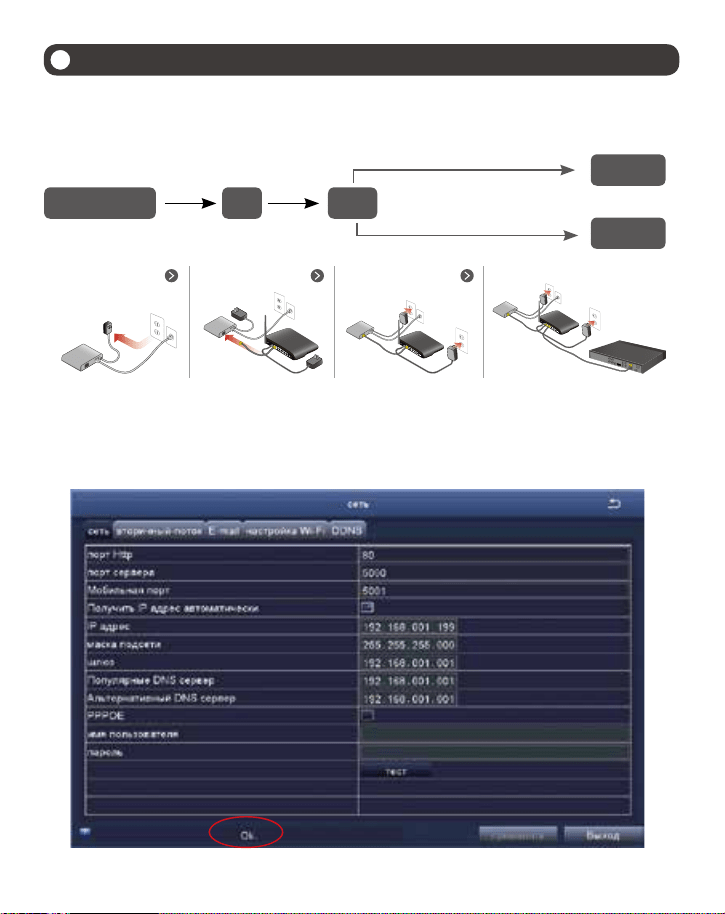
A:Как подключить DVR к LAN?
B:Как проверить состояние сети DVR?
(1) Клик правой кнопкой мыши > Основное меню > Установка > Network
(2) Поставить галочку «получить IP адрес автоматически
(3) Кликнуть «Проверить», если на дисплее отобразилось «OK», значит сеть успешно подключена.
Примечание: Пожалуйста, убедитесь DHCP в маршрутизаторе открыт.
2
Просмотр через смартфон ( добавление устройств – просмотр видеозаписей )
2.1 Подключение DVR к сети интернет
Оптоволоконный
кабель
DSL
роутер
DVR/NVR
PC
кабель RJ45
wi-fi или кабель RJ45
DCL/КАБЕЛЬ
МОДЕМА
DCL/КАБЕЛЬ
МОДЕМА
DCL/КАБЕЛЬ
МОДЕМА
DCL/КАБЕЛЬ
МОДЕМА
РОУТЕР РОУТЕР
РОУТЕР
DVR
72
2.2 Загрузка APP
2.3 Установка приложения
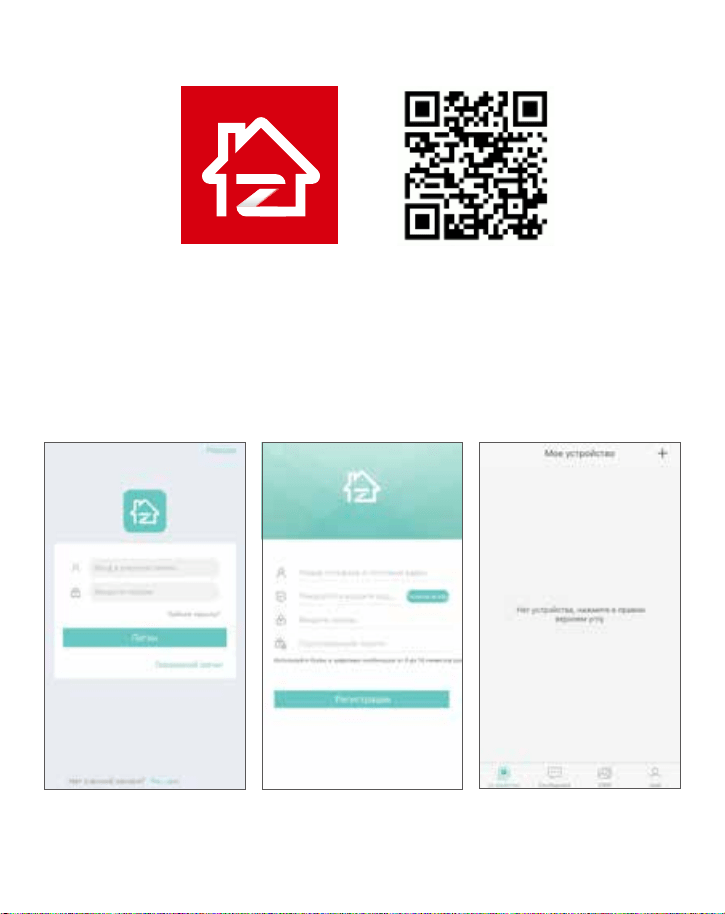
А: Установите бесплатное приложение “Zosi Smart” App.
B: Нажмите зарегистрироваться и введите данные вашего e-mail для получения кода проверки,
нажмите далее, чтобы установить пароль, затем сохраните его, регистрация завершена.
C: Войдите в приложение, войдите в основной интерфейс (Мое устройство), кликните «+» в
правом верхнем углу для того, чтобы добавить устройство.
Zosi Smart App (iOS/Android)
73
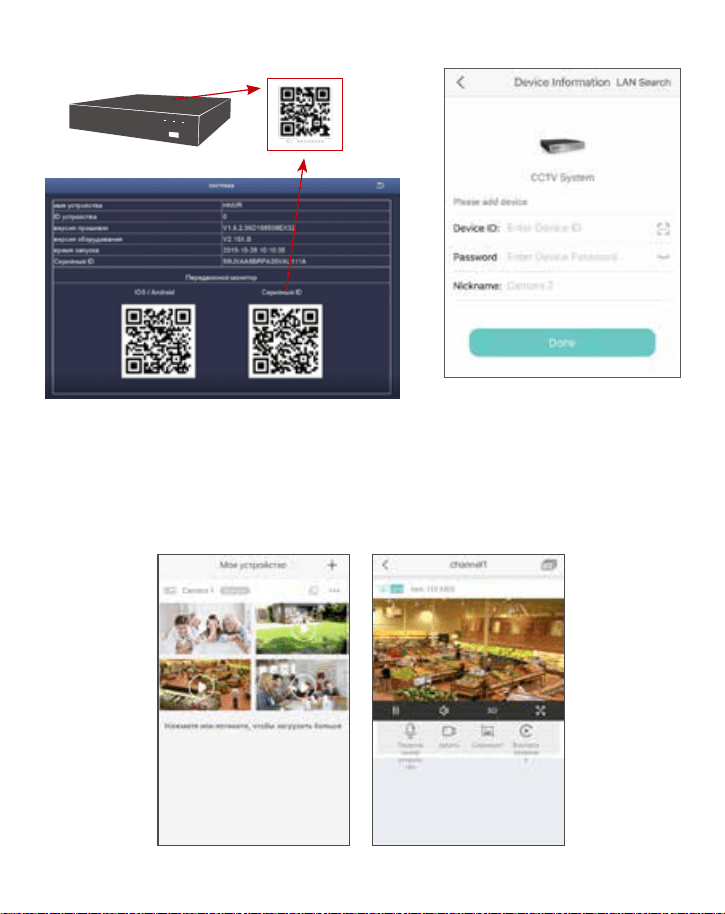
D: Добавьте устройство путем сканирования кода, либо вручную.
Введите пароль устройства, ( пароль устанавливается устройством, и если строка пароля не
заполнена, то вводить ее не нужно )
Введите имя устройства.
Нажмите завершить для осуществления входа на страницу устройства и выполнения операций
с устройством.
E: Затем вернитесь в список устройств > устройство > «+» для выбора канала (выбрать все) >
нажмите «подтвердить» чтобы начать предварительный просмотр.
74
PC Client AVSS применяется к DVR/NVR / IPC для просмотра в режиме реального времени,
управления устройствами, просмотра видеозаписей и многих других функций.
3.1 Регистрация
3.2 Менеджер устройств ( Добавление устройств после добавления области )
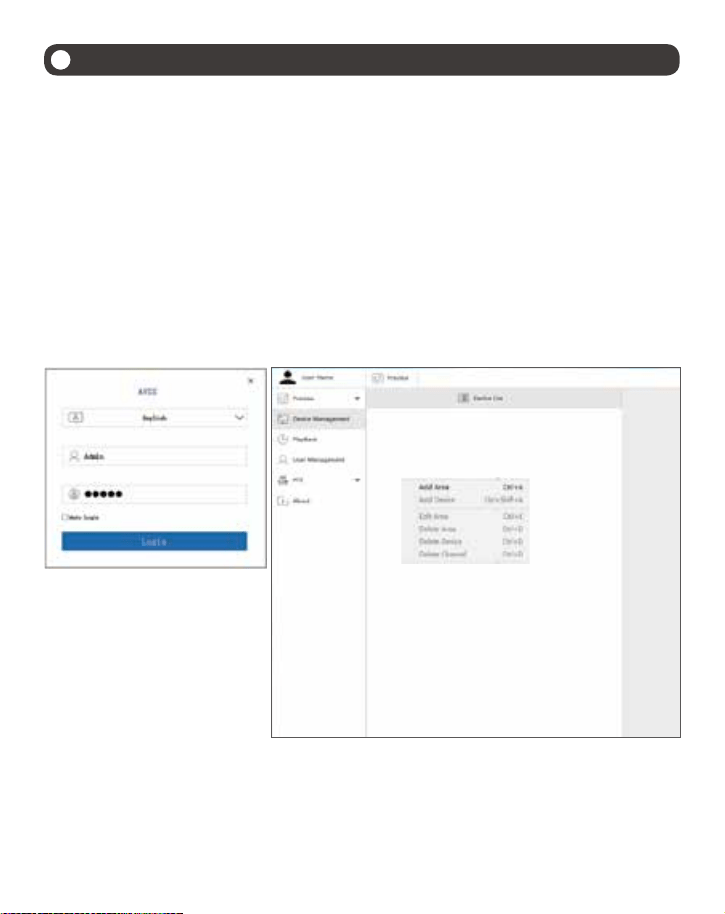
Установите PC client, двойным щелчком кликните по иконке AVSS, чтобы открыть, выберите
язык и кликните зарегистрироваться.
Примечание: вы можете зарегистрироваться пользователем по умолчанию и паролем по
умолчанию, либо зарегистрировать новый аккаунт. Регистрация аккаунта может производиться
с помощью мобильного приложения.
① Кликните Менеджер устройств > добавить область
3
Просмотр через PC Client Software
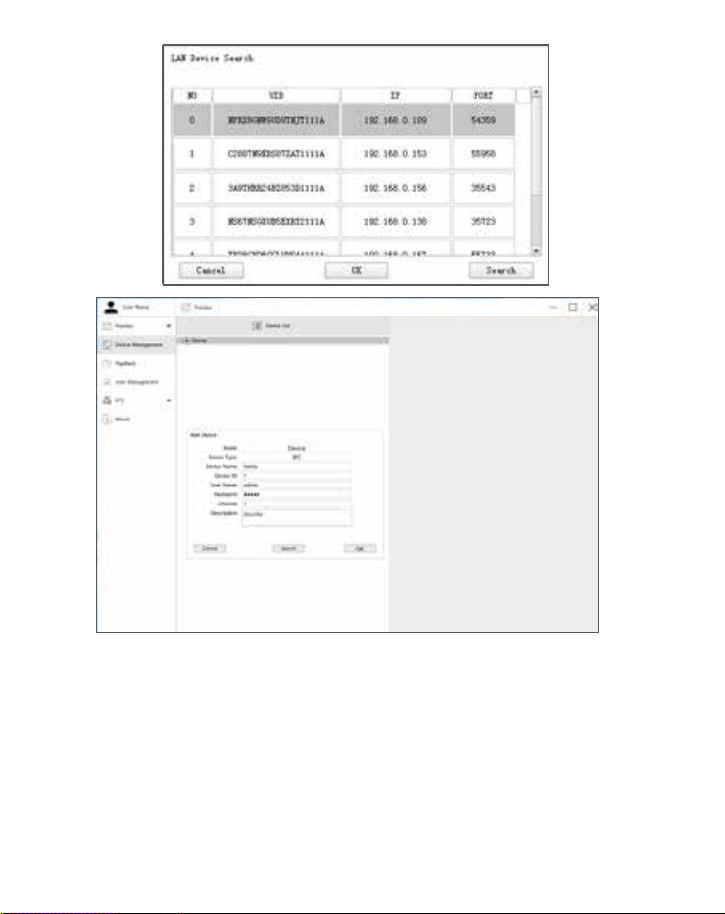
② Добавление области: в пустой области списка устройств кликните правой кнопкой мыши >
добавить область и имя области.
Примечание: вводите название непосредственно той области, за которой будет производиться
наблюдение.
75
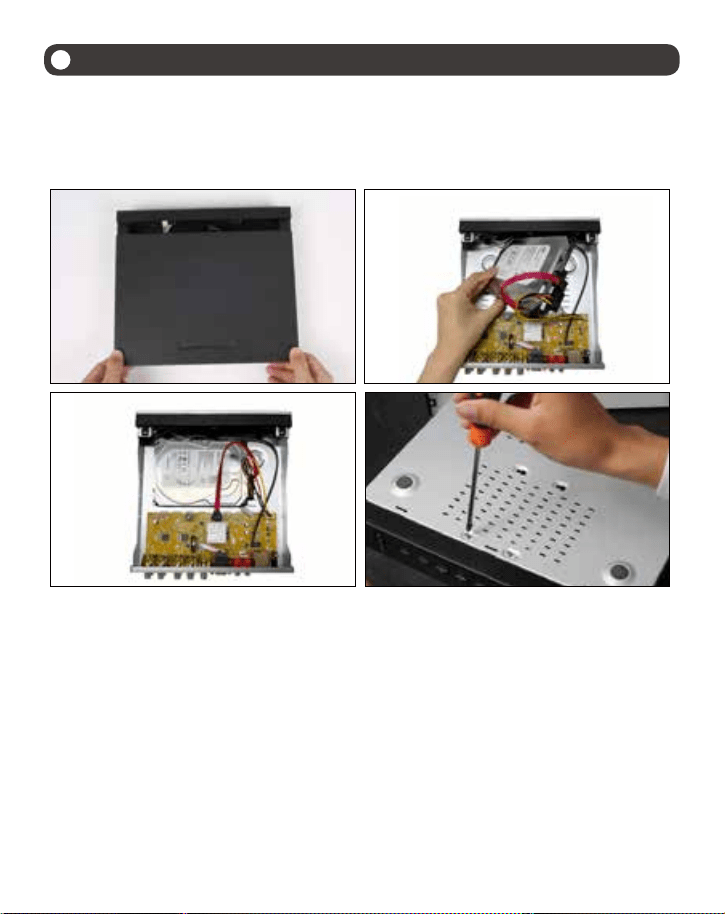
③ Добавление устройства: Выберите область соответствующую списку устройств > кликните
правой кнопкой мыши для добавления устройства > выбрать тип устройства > ввести имя
устройства, ID устройства, Имя пользователя, пароль устройства и номер канала > нажать ОК.
Примечание:① Имя пользователя по умолчанию admin. ② Когда компьютер и устройство
будут связаны с одним роутером, вы можете кликнуть «Поиск» для добавления устройства.
3.3 Предварительный просмотр
Кликните «Предпросмотр» > Список устройств > выберите соответствующее устройство >
кликните правой кнопкой мыши > выберите «воспроизвести все», «остановить все» в меню для
завершения просмотра и выхода.
76
①
③
②
④
4
Установка жесткого диска
В комплект системы может не входить жесткий диск, это зависит от комплекта, который вы
выбрали. Система работает с 3.5 SATA HDD 2.5 SATA HDD.
Примечание: если в комплекте вашей системы уже установден жесткий диск, пожалуйста,
пропустите этот шаг.
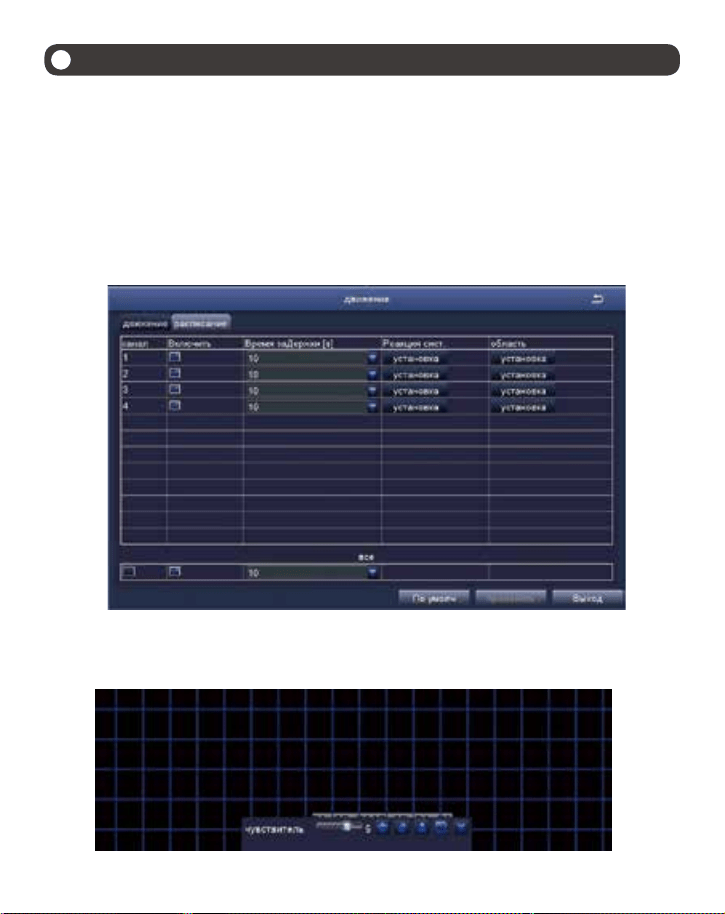
①Отключите ваш DVR от питания, открутите винты и уберите крышку.
②Подключите кабель питания и передачи данных SATA от DVR к соответствующим портам на
жестком диске, как показано на рисунке.
③Поместите жесткий диск в DVR. Кабели должны проходить над жестким диском.
④Придерживайте жесткий диск, аккуратно соедените отверстия на жестком диске с
отверстиями DVR. При помощи крестообразной отвертки, закрутите.
Примечание:
После установки жесткого диска, сперва необходимо отформатировать диск, перед началом
записи.
Клик правой кнопкой мыши > основное меню > управление дисками > выбрать жесткий диск >
форматировать > применить.
77
5
Запись видео
Правая кнопка мыши > основное меню > настройки > запись
Вы увидите настройки записей всех каналов. Измените настройки записи на ваше усмотрение.
5.1 Обнаружение движения
Установите функцию «Обнаружение движения», и ваш регистратор будет записывать видео
только при обнаружении движения. Щелкните правой кнопкой мыши > главное меню >
Настройка > тревога > движение > обнаружение движения.
Система записывает, когда камера обнаруживает движение и в нижнем левом углу появится
значок обнаружения движения.
Выберите камеру. Отметьте галочкой канал, по которому будет осуществляться запись по
движению.
Область. Допускается установка области чувствительности диапазона обзора камеры.
78
Нажмите «старт», «сделать чувствительным весь ряд просмотра».
Щелкните «корзина», «удалить область чувствительности».
Сохранить настройки
Выход
Поскольку цвет и яркость важны для чувствительности, поэтому необходимо регулировать ее значение при
определенных условиях. Значение по умолчанию-4, а диапазон значений-от 1 до 8. Щелкните правой кнопкой
мыши, чтобы отобразить или скрыть меню управления в нижней части экрана. Проверьте настройки, путем
перемещения предметов или прохождением кого-либо через область сетки в диапазоне обзора камеры. Если
NVR обнаруживает движение в пределах области сетки, на экране будет представлена желтая фигура человека.
Чтобы избежать ложных предупреждений, убедитесь, что сетку не перекрывает флаг, деревья или какие-либо
другие объекты, движущиеся под потоком ветра, для того.
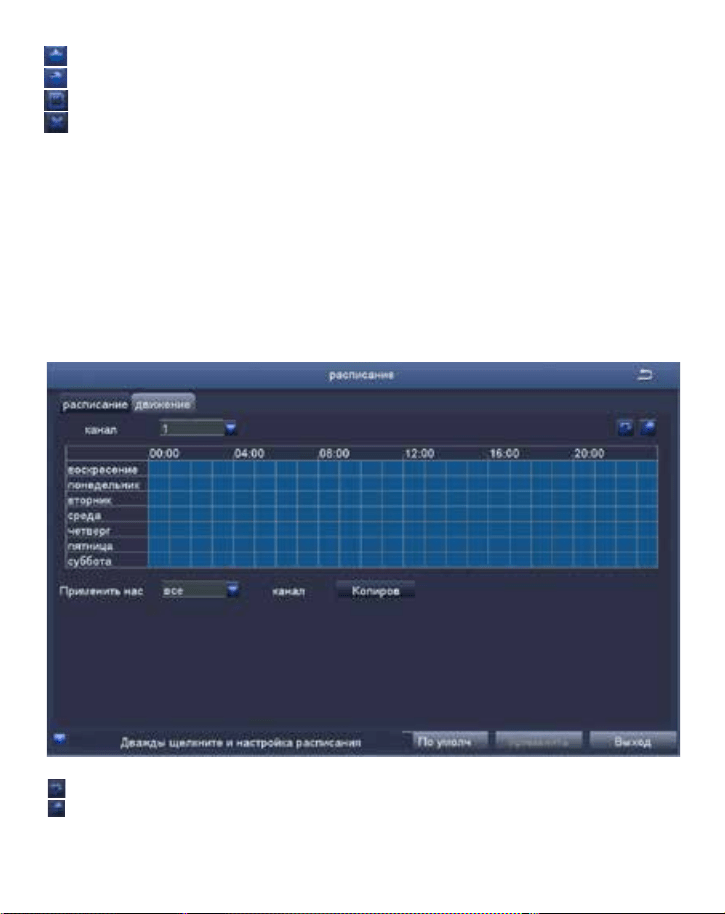
5.2 Запись по расписанию
5.2.1 Установите запись по расписанию, вы можете настроить каждый канал для записи в определенное
время, в зависимости от времени суток. Правая кнопка мыши > Основное меню >Настройки > Расписание
выделив отдельные часы для определенных дней с помощью инструмента карандаш
ластик удаляет подсветку в блоке
Настройки могут быть применены к одному или всем каналам и к любому дню.
79
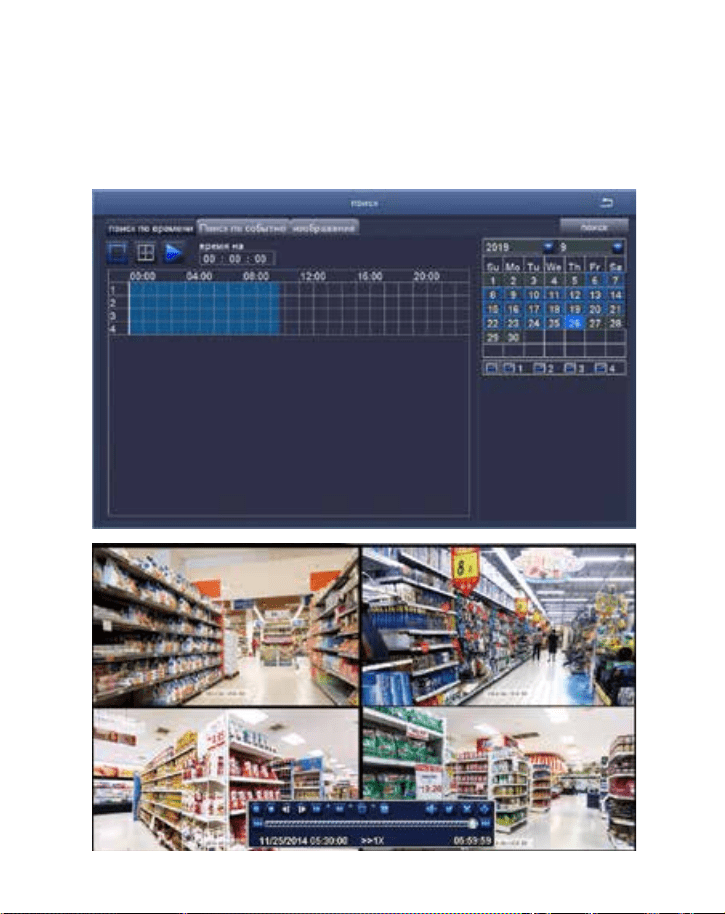
5.3 Воспроизведение видео
Войдите в Основное меню > Поиск, в системе появится подобная картинка.
5.2.2 Блоки времени для записи также можно настроить двойным щелчком мыши по полю рядом с днем.
Можно создавать несколько расписаний с началом и остановкой по минутам, и применять к нескольким дням
и камерам.
Найдите видео согласно времени или событию и просмотрите его.
80
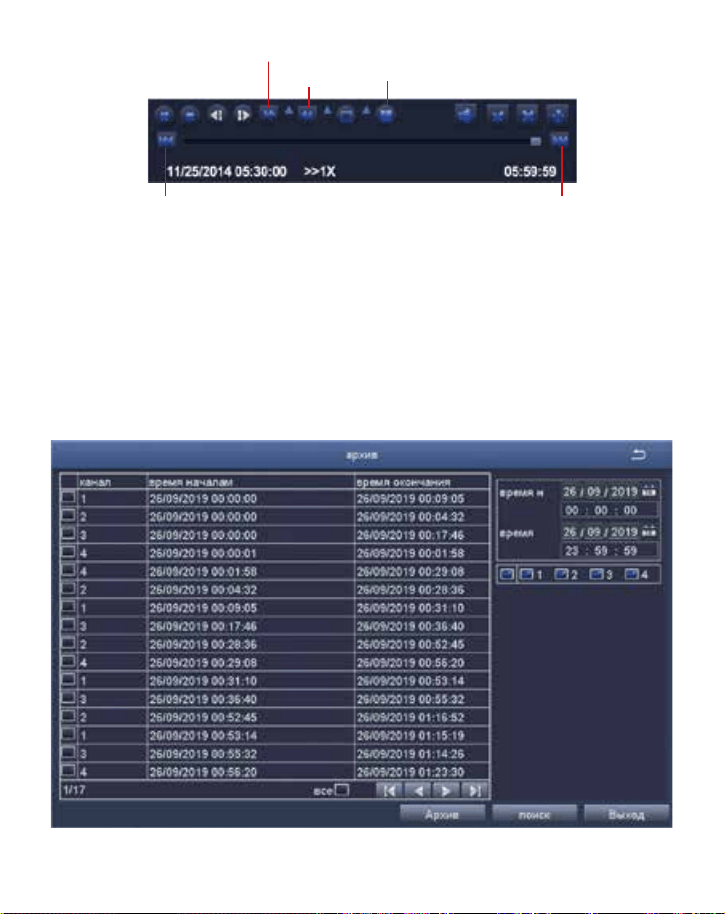
предыдущая запись : переход к последнему записанному событию
следующая запись: переход к следующему записанному событию
быстрая перемотка вперед: видео может воспроизводиться с разной скоростью, от 1/4 раза до 16 раз.
перемотка: видео можно перемотать в 1 раз, 8 раз, 16 раз и 32 раза.
режим отображения экрана: доступны как одноэкранные, так и многоэкранные режимы. Вы можете выбрать,
сколько каналов вы хотите воспроизвести. Канал без записей отображает пустой экран.
5.4 Резервное копирование видео
① Подключите USB накопитель к USB порту вашего DVR.
② Правая кнопка мыши > Основное меню > Резервное копирование > выберите канал и время записи> >
Выберите видео для резервного копирования > Резервное копирование.
предыдущая запись следующая запись
перемотка
быстрая перемотка вперед
режим отображения экрана
81
5.5 Датчик обнаружения движения PIR (для камер с ИК-функцией)
После установки режима обнаружения движения PIR, видеорегистратор начнет записывать
видео только при обнаружении движущихся объектов с температурой около 37 градусов.
Настройка:Правая кнопка мыши> Меню >Настройки> сигналы> обнаружения PIR.
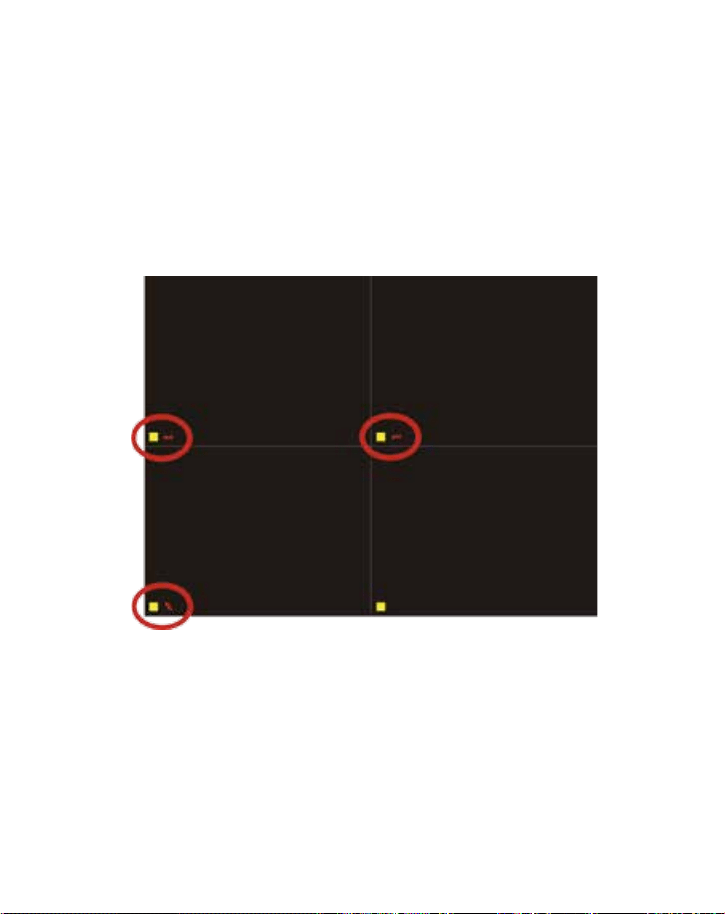
При обнаружении камерой движущихся объектов с температурой около 37 градусов система
начнет запись и в левом нижнем углу экрана отобразиться значок.
Примечание: функция PIR полностью включена, когда включены режим обнаружения
движения и режим обнаружения PIR.
Когда в нижнем левом углу экрана отображается значок, это указывает на то, что функция
обнаружение движения и датчик PIR включены, что означает, что камерой захватываются
только объекты с температурой 37 градусов.
Примечание:
На рисунке 1 показано, что срабатывает только датчик обнаружения движения;
на рисунке 2 показано, что срабатывает только датчик обнаружения PIR;
на рисунке 3 показано, что датчики обнаружения движения и обнаружение PIR срабатывают
одновременно.
Выберите камеру, выберите канал, на который вы хотите установить PIR.
Время удержания: установите продолжительность записи после остановки движения.
Триггер событий: мультиканальная запись может быть настроены на запись, при обнаружении
в поле зрения одной из камер движущихся объектов с температурой выше 37.
Запись по расписанию: установите период времени для включения и выключения режима
обнаружения движения по PIR
82
5.6 Сигналы тревоги APP
Существует два варианта установки тревожных оповещений DVR
。
5.6.1 При срабатывании сигнала тревоги, DVR отправит извещение о тревоге на электронную
почту или мобильный телефон.
5.6.2 При срабатывании датчика обнаружения движения и датчика PIR одновременно, на
экране в левом нижнем углу будет отображен сигнал тревоги и DVR отправит извещение о
тревоге на электронную почту или мобильный телефон
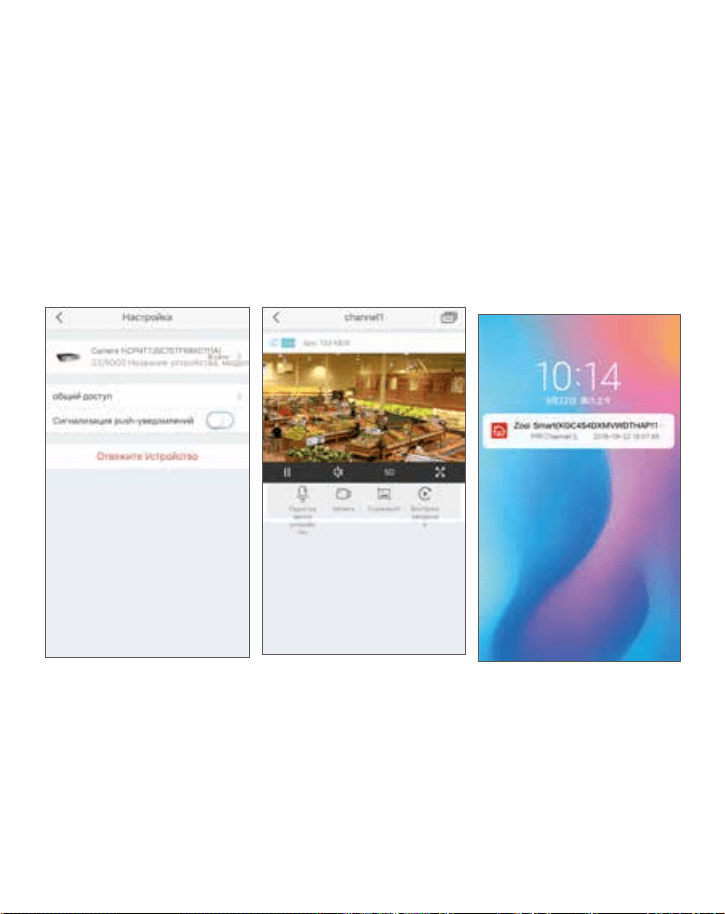
Сигналы оповещения о тревоге через APP представлены на картинке ниже:
Установка сигнала тревоги: вы можете установить извещения о тревоге и получать тревожные
сигналы через DVR, а также по e-mail, при возникновении тревожных ситуаций на ваш e-mail
будет отправлено уведомление.
83
6
Настройки пользователя и смена пароля
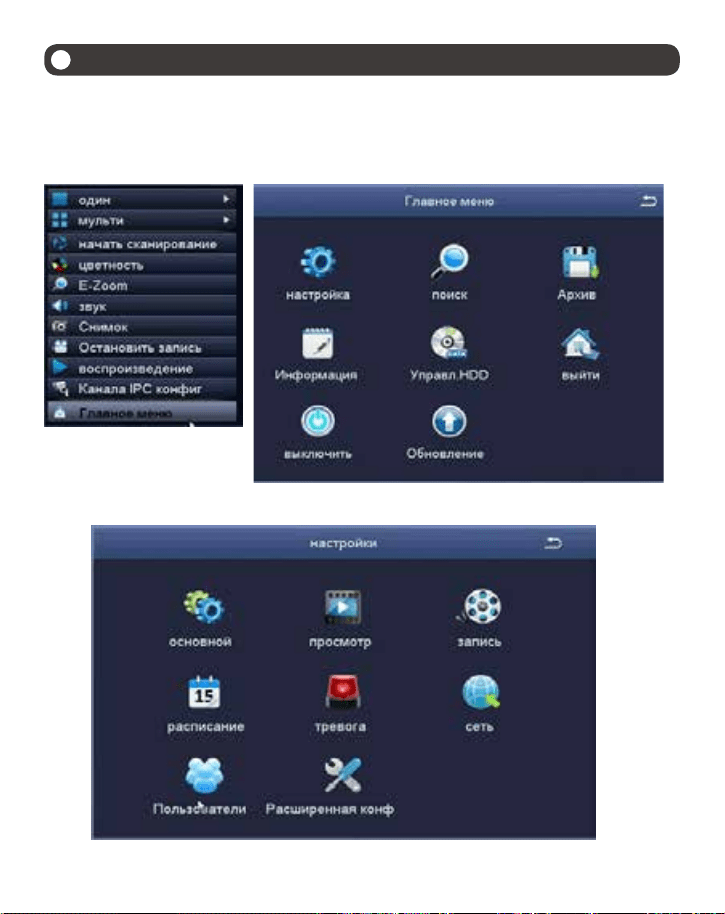
6.1 В режиме реального просмотра, кликните по экрану правой кнопкой мыши, далее
откроется меню, как представлено на картинке, кликните Основное меню.
6.2 Кликните Установки для входа в меню функций.
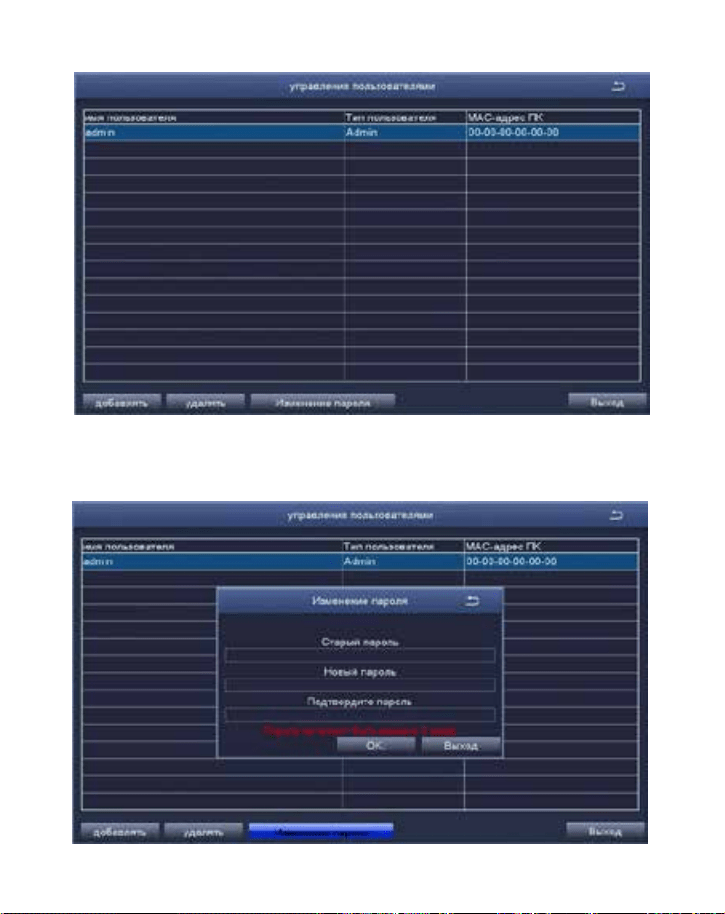
6.3 Кликните Пользователь для входа в пользовательскую систему.
84
6.4 Кликните Сменить пароль, для входа в окно смены пароля.
6.5 Установите, либо измените пароль, убедитесь что оба пароля верны и содержат не менее 6
символов
Пожалуйста, хорошо запомните свой пароль!

85
7
Вопросы и ответы
Q: Почему я не могу найти устройство при добавлении?
А: Убедитесь что ваше устройство и мобильное устройство подключены к одной сети LAN, либо
введите ID вручную
Q: Почему мое устройство не подключается к сети?
А: Пожалуйста, проверьте:
- Подключено ли устройство к интернету?
-Работает ли роутер должным образом?
- Открыт ли сервер DHCP?
Q: Почему я не могу найти некоторые видеофайлы ?
А: Пожалуйста, проверьте:
- Не сломан ли жесткий диск?
- Действителен ли период поиска?
- Верно ли установлено время в системе?

www.zositech.com
All rights reserved. No part of this publication may be reproduced by any means without written
permission from ZOSI. The information in this publication is believed to be accurate in all respects.
ZOSI cannot assume responsibility for any consequences resulting from the use thereof. The
information contained herein is subject to change without notice. Revisions or new editions to this
publication may be issued to incorporate such changes.
F921114Z3003110