V2 .N.01.Z
NVR Quick Start Guide
For more information of your new system, please refer to www.zositech.com
Contents
EN
ES
01
11
The electronic user manual can be viewed on
your mobile devices by scanning the QR code
using a browser or camera.
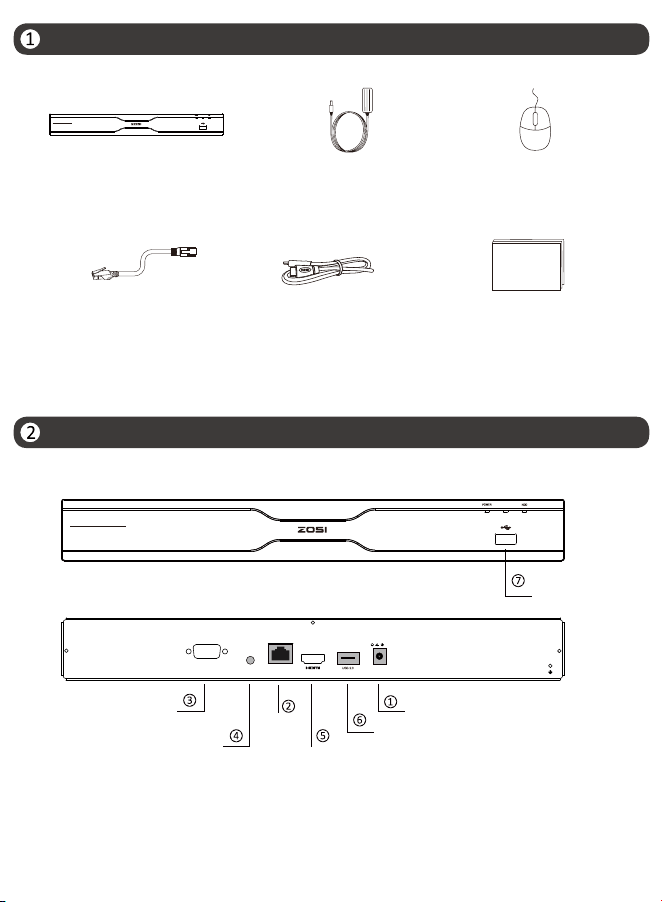
What’s in the box
Introduce the NVR
1
NOTE: The actual appearance and components may vary with different products, please
refer to the actual product.
NOTE: Products and accessories vary by product models, please refer to the actual product.
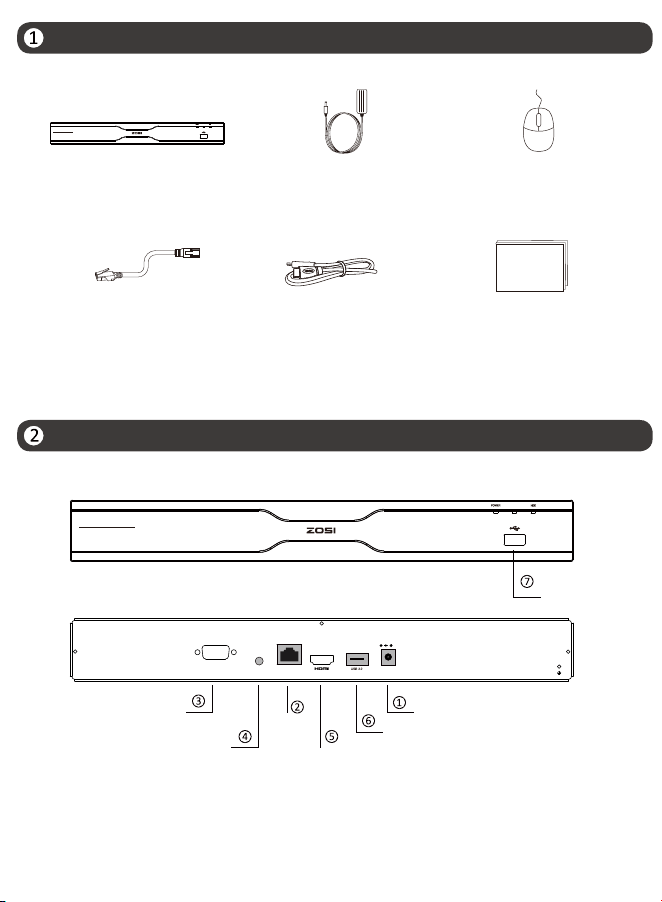
NVR NVR Power Adapter USB Mouse
3ft(1m) Ethernet Cable HDMI Cable Quick Start Guide
Quick Start Guide
Power Port
LAN Port
Audio Output
HDMI Port
USB2.0 Port
AUDIO OUT NETWORK DC12V
VGA
VGA Port
LAN
HD Network Video Recorder
LAN
HD Network Video Recorder
USB2.0 Port
2
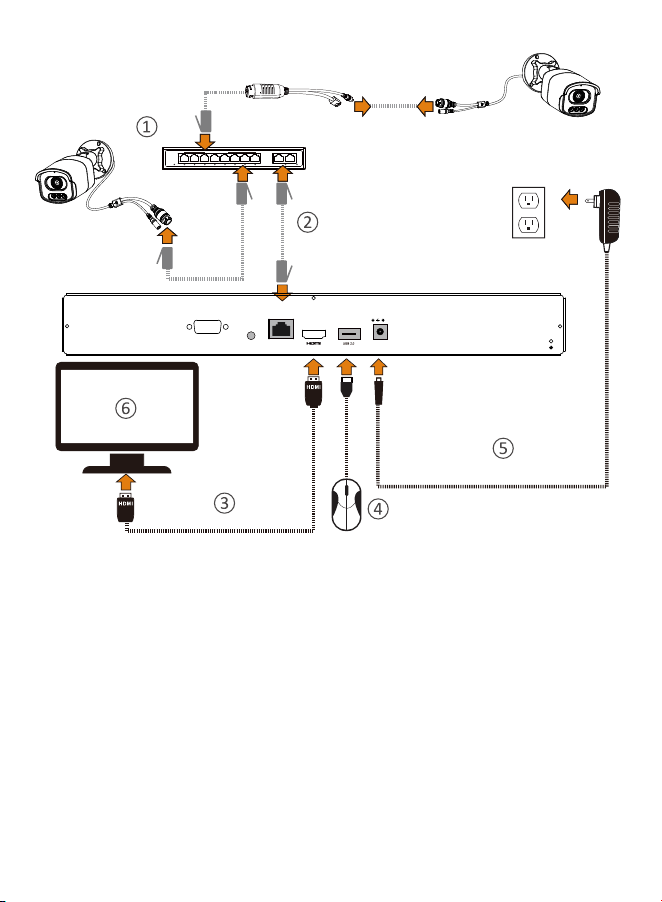
NOTE: To ensure the device works properly, it is recommended to power on the
NVR first for testing before a final installation.
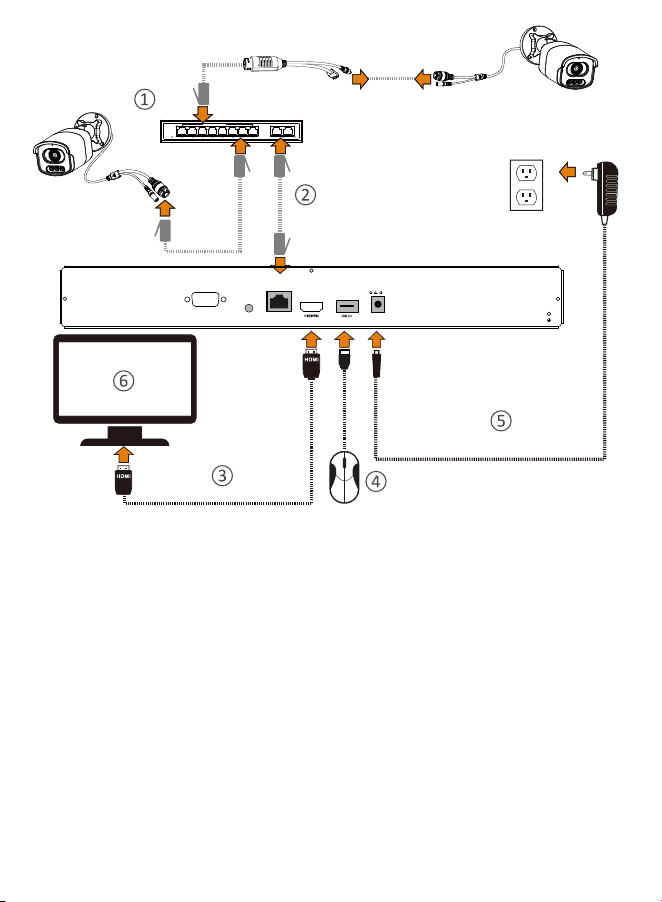
1. Connect the NVR network port to the PoE switch LAN port using an Ethernet cable.
2. Connect the PoE network port of the PoE splitter to the PoE camera or PoE
splitter + camera using an Ethernet cable.
3. Connect the NVR to the Monitor with VGA or HDMI Cable.
4. Connect the USB Mouse to the USB2.0 Port.
5. Connect the NVR to the Power Outlet.
6.The monitor will display live view of the camera.
PoE Splitter
PoE Switch
PoE Camera
Camera
AUDIO OUT NETWORK DC12V
VGA
Power
Gigabit PoE Switch
Uplink 1000Mbps
PoE port 100/1000Mbps
1 2 3 4 5 6 7 8
3
Access the System via Smartphone or PC
Set up the NVR System
3.1. Smartphone
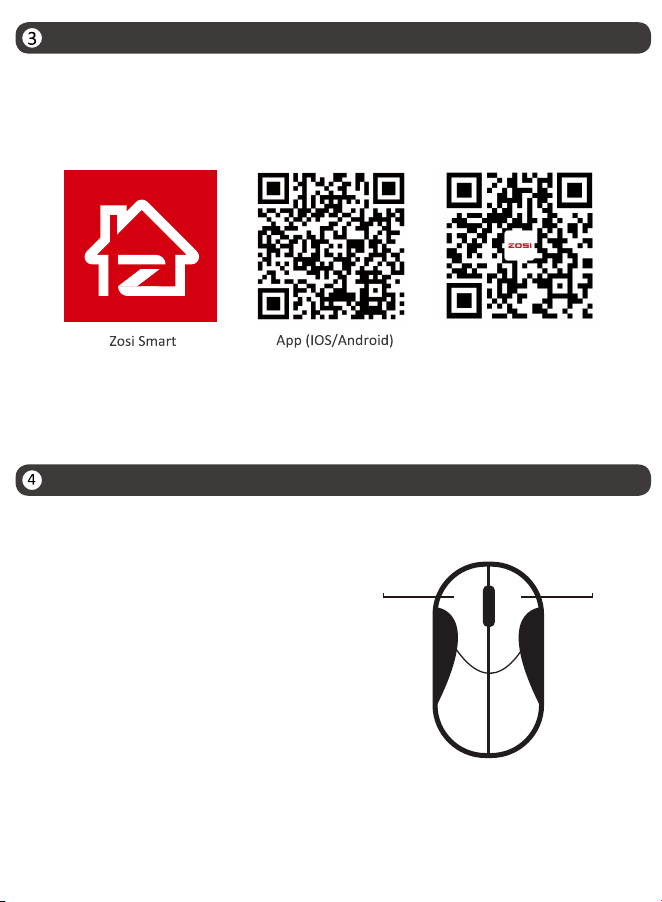
Search “Zosi Smart” in the APP Store or use a browser to scan the QR code below,
download and install the app and follow the instructions to register an account.
3.2. PC
Download path: Go to https://www.zositech.com/pages/app.
4.1. Mouse Operation:
Left Button:
• Preview or Playback Interface:
Double-click a single channel to enter full
screen and double-click again to exit full screen.
• Navigation Menu: Left click to select a menu option.
Right Button:
• Right click to bring up the main menu when the mouse
is on the preview interface.
• Navigation Menu: Right click to exit the menu or return
to previous menu option.
Left Button Right Button
App video operaon link
4
4.2. Introduce the Menu Bar:
4.3. System Password:
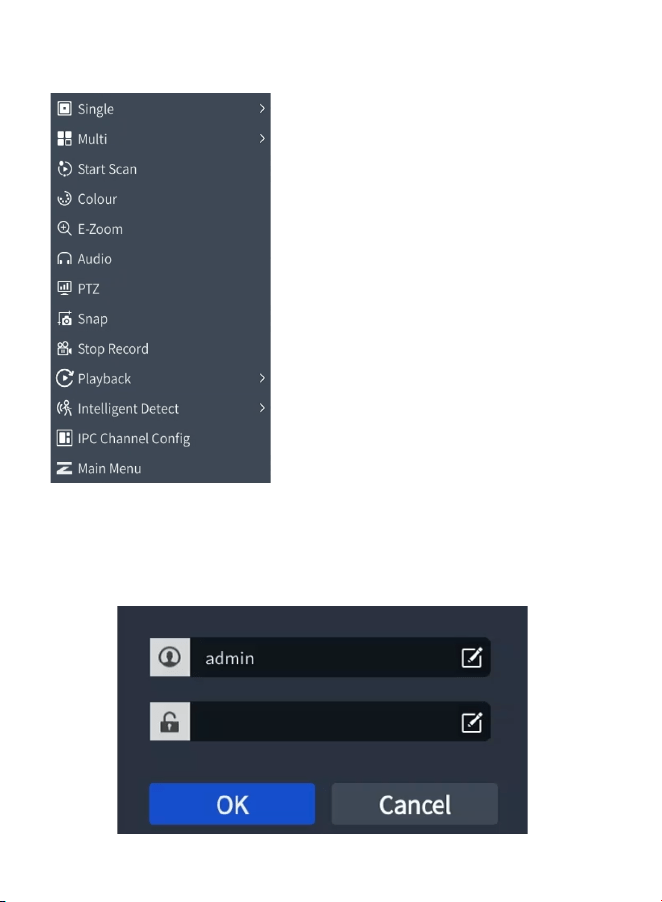
Right-click anywhere on the screen to open the menu bar.
The factory default username is “admin” and the password is empty, so the first
time users can login the system directly.
• Single - Select single channel for live viewing
• Main Menu - Enter the Main Menu
• IPC Channel Configuration - IPC channel
configuration management
• Intelligent Alarm - Set up Human Detection and
Siren-Light Alarm
• Playback - Search Video playback and quick playback
• Stop Record - Start/stop record
• Snap - Snap and save the live view images
• Audio - Adjust the camera volume
• PTZ: Control the rotation of PTZ camera
• E-Zoom - E-Zoom the preview interface
• Colour - Adjust colour and image settings
• Start Scan - Start/Stop Scan
• Multi - Select multi-channel for live viewing
Date & Time Setting
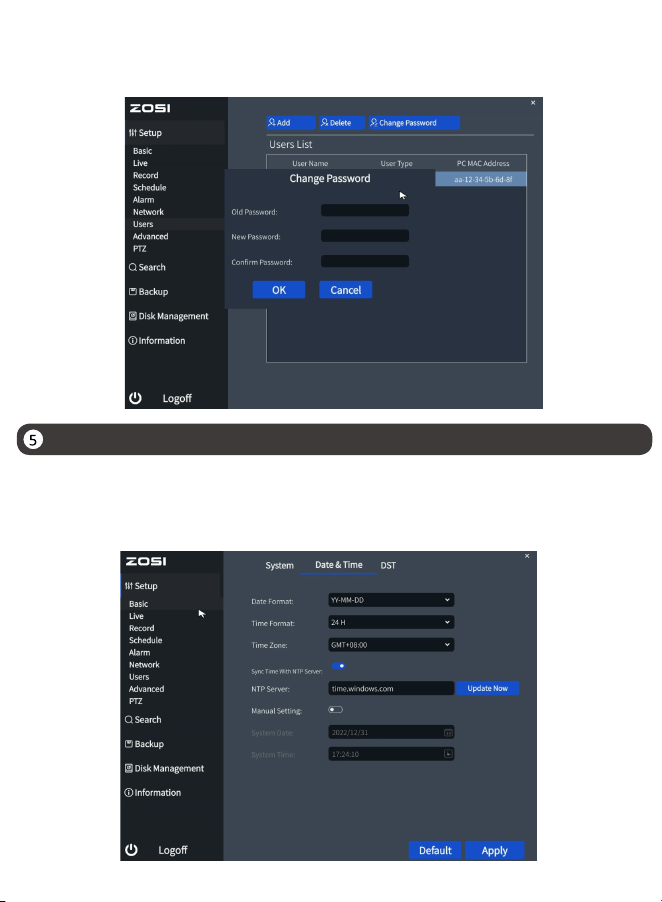
Change Password Path: Right click the mouse-Main Menu-Setup-Users-Change Password
NOTE: The new password setting cannot be less than 6 characters, please keep the
password properly.
Right click the mouse - Main Menu - Setup - Basic - Date & Time - Choose the
corresponding time according to your region and then click “Apply” to save.
NOTE: The default time zone is GMT, please choose the corresponding time
according to your region.
5
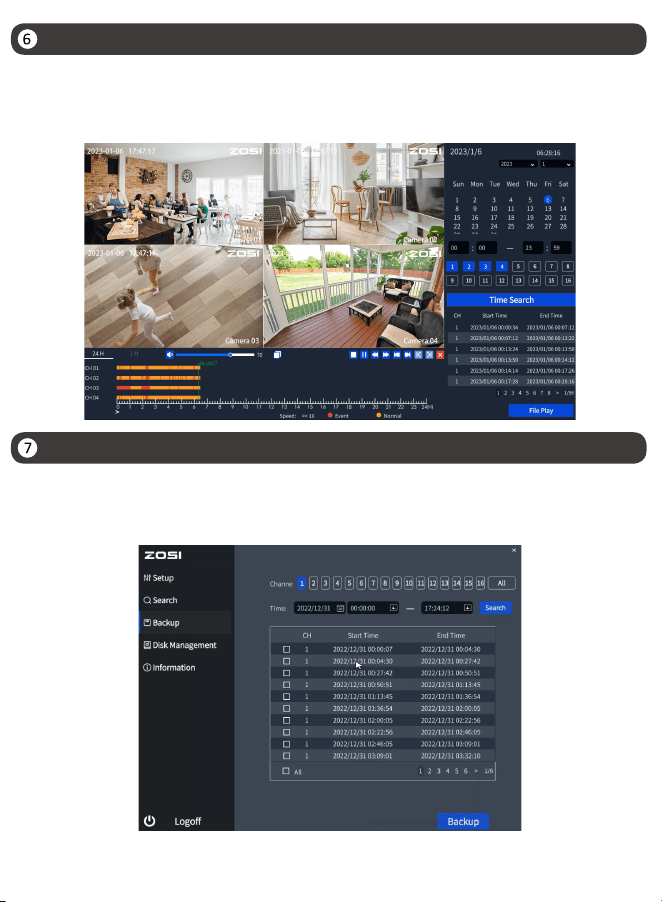
Video Playback
6
Right click on mouse - Playback - Time /Event
Time playback: View playback video based on time search
Event playback: View playback video based on event search
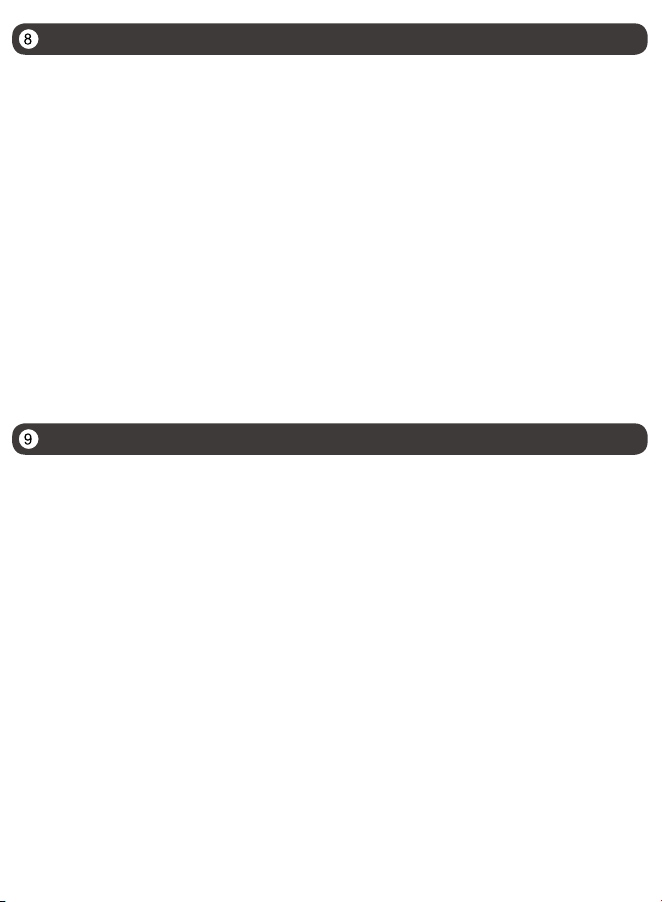
Backup
②Right click the mouse > Main Menu > Backup > Select channels and time period > Search >
Select the video clips you want to back up > Click “Apply”.
①Insert a USB into the USB 2.0 port on the PoE NVR.
Formoreinformationaboutthesystemoperationsettings,pleasevisit:https://bit.ly/3zQsdlv.
7
Usage Specification
● Use the camera only with compatible ZOSI NVRs.
● Read this guide carefully and keep it for future reference.
● Follow all instructions for safe use of the product and handle with care.
● Use the product within given temperature, humidity, voltage level noted in the
device’s specifications.
● Do not disassemble the product.
● Use only a regulated power supply with the product (optional). Use of a non-
regulated, non-conforming power supply can damage the product and void the
warranty.
● Periodic cleaning may be required. Use a damp cloth only. Do not use any harsh,
chemical-based cleaners.
● Do not use the product in a sealed, humid environment. It is recommended to
place it in a location that is easily ventilated for installation.
● Do not disassemble the device while power is on.
FAQ
Q: No Video Output on the Monitor?
• Ensure the lowest resolution of the monitor is no less than 720p.
• Ensure the NVR is powered on normally.
• Check the connection of the HDMI/VGA cable or use another cable to try again.
Q: Failed to Remotely Access the Camera via Mobile Phone or Computer?
• Ensure the NVR is connected to the network normally, you can go to the NVR
Menu-Network-Test
• Test and verify whether you can access the Internet by connecting your phone or
computer to the same network as the NVR.
• Reboot your NVR or router.
Q:Does the system support motion detection and image capture?
• It captures images automatically when people, cars, are detected or when there
is a change in detected images. Users can also manually capture images using our
ZOSI Smart APP.
8
FCC Compliance Statement
Simplified EU Declaration of Conformity
Correct Disposal of this Product
Notification of Compliance
This device complies with Part 15 of FCC Rules.
Operation is subject to the following two conditions:
(1) This device may not cause harmful interference.
(2) This device must accept any interference received, including inference that
may cause undesired operation.
ZOSI declares that the device is in compliance with the essential requirements and
other relevant provisions if Directive 2014/53/EU.
This marking indicates that this product cannot be disposed with other household
wastes throughout the EU. To prevent possible harm to the environment or human
health from uncontrolled waste disposal and promote the sustainable reuse of
material resources, please recycle it responsibly. To return your used device, please
visit the Return and Collection System or contact the retailer from whom the product
was purchased. They can take this product away for environmentally safe recycling.
10

NOTE: This equipment has been tested and found to comply with the limits for a
Class B digital device, pursuant to part 15 of the FCC Rules. These limits are
designed to provide reasonable protection against harmful interference in a
residential installation. This equipment generates, uses and can radiate radio
frequency energy and, if not installed and used in accordance with the instructions,
may cause harmful interference to radio communications. However, there is no
guarantee that interference will not occur in a particular installation. If this
equipment does cause harmful interference to radio or television reception, which
can be determined by turning the equipment off and on, the user is encouraged to
try to correct the interference by one or more of the following measures:
- Reorient or relocate the receiving antenna.
- Increase the separation between the equipment and receiver.
-Connect the equipment into an outlet on a circuit different from that to which the
receiver is connected.
-Consult the dealer or an experienced radio/TV technician for help
Changes or modifications not expressly approved by the party responsible for
compliance could void the user's authority to operate the equipment.
This device complies with Part 15 of the FCC Rules. Operation is subject to the
following two conditions:
(1) this device may not cause harmful interference, and (2) this device must accept
any interference received, including interference that may cause undesired
operation.
RF Exposure Warning Statements:
This equipment complies with FCC radiation exposure limits set forth for an
uncontrolled environment. This equipment shall be installed and operated with
minimum distance 20cm between the radiator & body.
9

This device contains licence-exempt transmitter(s)/receiver(s) that comply with
Innovation, Science and Economic Development Canada’s licence-exempt RSS(s).
Operation is subject to the following two conditions:
(1) This device may not cause interference.
(2) This device must accept any interference, including interference that may cause
undesired operation of the device.
L’émetteur/récepteur exempt de licence contenu dans le présent appareil est
conforme aux CNR d’Innovation, Sciences et Développement économique
Canada applicables aux appareils radio exempts de licence. L’exploitation est
autorisée aux deux conditions suivantes :
(1) L' appareil ne doit pas produire de brouillage;
(2) L' appareil doit accepter tout brouillage radioélectrique subi, même si le
brouillage est susceptible d' en compromettre le fonctionnement.
Radio Frequency Exposure Statement for IC
This equipment complies with IC exposure limits set forth for an uncontrolled
environment. The device can be used in portable exposure conditions. This
equipment shall be installed and operated with minimum distance 20cm
between the radiator & body.
Cet équipement est conforme aux limites d'exposition IC établies pour un
environnement non contrôlé. L'appareil peut être utilisé dans des conditions
d'exposition portables. Cet équipement doit être installé et utilisé avec une
distance minimale de 20 cm entre le radiateur et le corps.
10
11
Lista de empaque
Introducción del NVR
NOTA: La apariencia y los componentes variarán por diferentes productos, por favor
consulte el producto específico.
NOTA: Los productos y accesorios varían por diferentes modelos, por favor consulte el
producto específico.
NVR Fuente de alimentación
para NVR
Ratón USB
Cable Ethernet de 3ft(1m) Cable HDMI Manual
Quick Start Guide
LAN
HD Network Video Recorder
Puerto USB 2.0
Puerto de alimentación
AUDIO OUT NETWORK DC12V
VGA
LAN
HD Network Video Recorder
Puerto
LAN
Puerto VGA
Salida de audio
Puerto HDMI
Puerto USB 2.0
12
NOTA: Para asegurarse de que el dispositivo funcione correctamente, se recomienda
que probe el dispositivo antes de la instalación.
1. Conecte el puerto de red del NVR y el puerto LAN del Switch PoE a través de un
cable de red.
2. Conecte el puerto PoE del divisor PoE y la cámara PoE/divisor PoE + cámara a
través de un cable de red.
3.Conecte el NVR al monitor mediante un cable VGA o HDMI.
4. Conecte el ratón USB al puerto USB2.0.
5. Conecte el NVR a la toma de corriente.
6. El monitor mostrará la imagen de cámara en tiempo real.
Switch PoE
Divisor PoE
Cámara
Cámara PoE
AUDIO OUT NETWORK DC12V
VGA
Power
Gigabit PoE Switch
Uplink 1000Mbps
PoE port 100/1000Mbps
1 2 3 4 5 6 7 8
13
4.1. Operación del ratón:
Botón izquierdo:
• Interfaz de vista previa o reproducción:
Haga doble clic en único canal para entrar
en la pantalla completa y haga doble clic de
nuevo para salir de la pantalla completa.
• Menú de navegación: haga clic con el botón
izquierdo para seleccionar una opción en el
menú.
Botón derecho:
• Haga clic con el botón derecho para entrar en el menú principal cuando el ratón esté
en la interfaz de vista previa.
• Menú de navegación: haga clic con el botón derecho para salir del menú o volver a la
opción anterior.
Acceso al sistema a través de Teléfono Móvil o PC
3.1. Teléfono Móvil
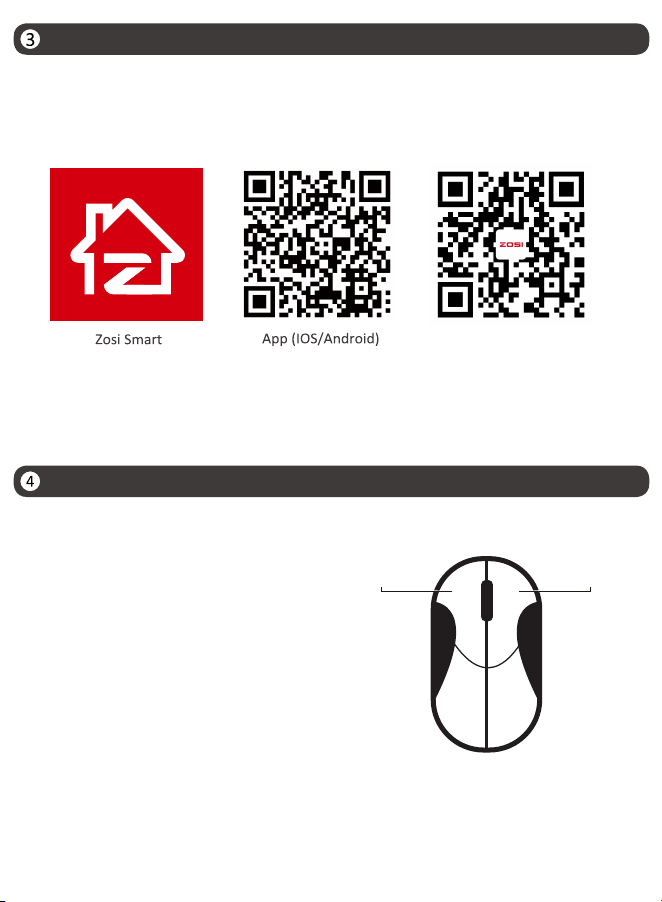
Busque "Zosi Smart" en la APP Store o escanee el código QR a continuación, descargue
e instale la aplicación siguiendo las instrucciones para registrar una cuenta.
3.2. PC
Página web de descarga: https://www.zositech.com/pages/app.
Botón izquierdo
Botón derecho
Configuración del sistema NVR
Enlace de video de
operación de la aplicación
14
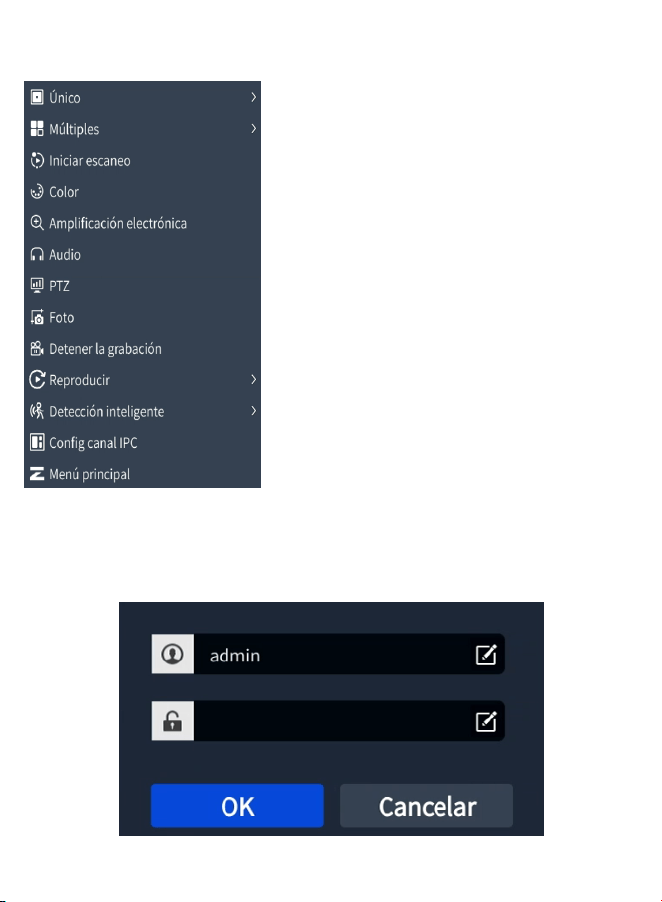
4.2. Introducción del menú:
4.3. Contraseña del sistema:
Haga clic derecho en cualquier lugar de la pantalla para abrir el menú.
El nombre de usuario por defecto es "admin" y la contraseña está vacía, así que los
usuarios pueden iniciar sesión en el sistema directamente por primera vez.
• Único: Seleccione un solo canal para vista en vivo
• Menú principal: Entre al Menú principal
• Config canal IPC: Gestione la configuración de canal
de IPC
• Alarma inteligente: Configure Detección Humana y
Alarma de Sonido&Luz
• Reproducir: Busque reproducción de video y
reproducción rápida
• Detener la grabación: Iniciar/Detener las grabaciones
• Foto: Capture y guarde imágenes de vista en vivo
• PTZ: Controlar el giro de la cámara
• Audio: Ajuste el volumen de la cámara
• E-Zoom: Agrande la interfaz de vista previa
• Color: Ajuste la configuración de color e imagen
• Iniciar escaneo: Iniciar/Detener escaneo
• Múltiples: Seleccione múlti-canales para vista en vivo
15
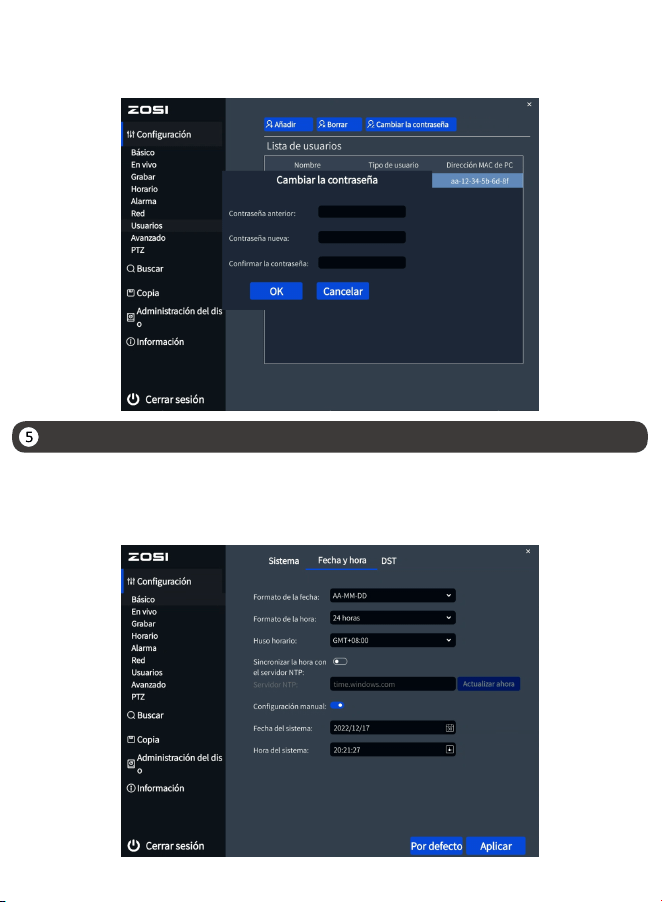
Configuración de la fecha y hora
Método de cambiar contraseña: haga clic con el botón derecho del ratón - Menú
principal - Configuración - Usuarios - Cambiar contraseña.
NOTA: La nueva contraseña no puede ser menos de 6 caracteres, por favor conserve
la contraseña correctamente.
Haga clic con el botón derecho del ratón - Menú principal - Configuración - Básico -
Fecha y hora - Elija la hora correspondiente según su región y luego haga clic en
"Aplicar" para guardar.
NOTA: El horario predeterminado es GMT, elija la hora correspondiente según su región.
16
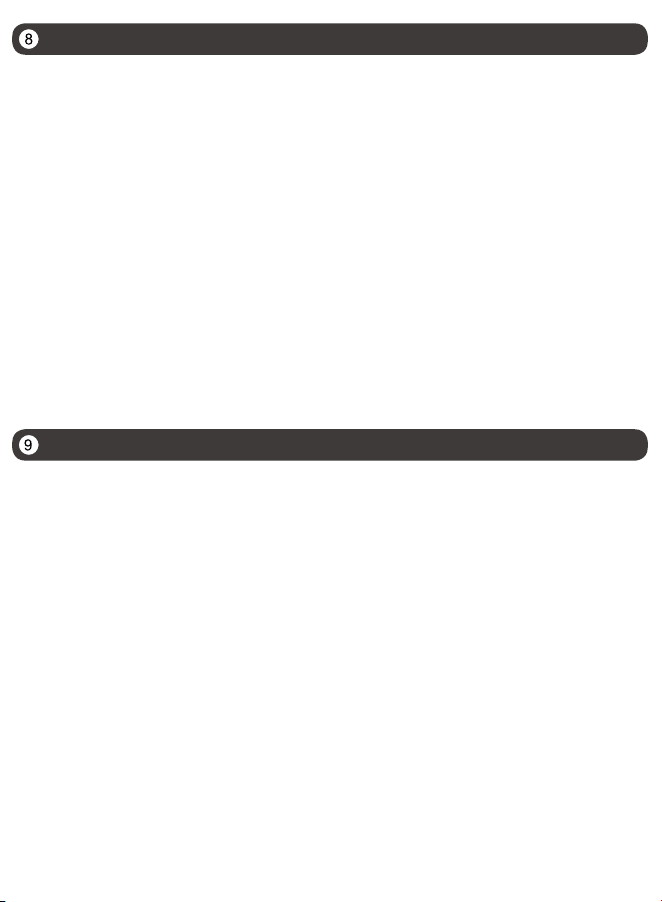
Copia de seguridad
②Haga clic derecho del ratón - Menú principal - Copia de seguridad - Elija el canal y el
período de tiempo - Buscar - Eliga los videos que desea copiar > Haga clic en "Aplicar".
①Inserte un pendrive USB en el puerto USB 2.0 del NVR.
Paraobtenermásinformaciónsobrelaconfiguracióndelsistema,porfavorvisite:
https://bit.ly/3zQsdlv.
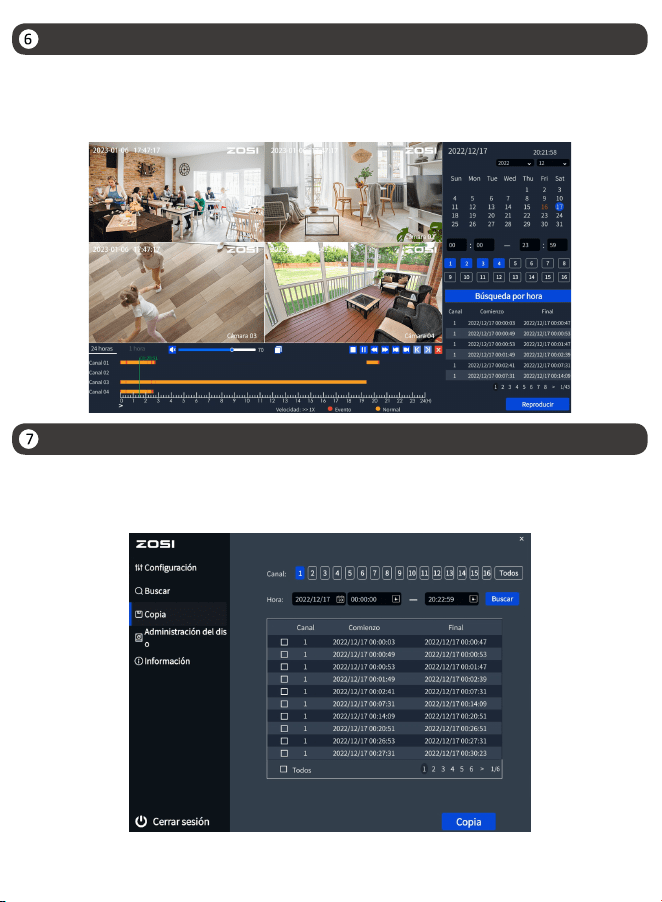
Reproducción de vídeos
Haga clic en el botón derecho del ratón - Reproducir - Reproducción de tiempo/
Reproducción de eventos.
Reproducción de tiempo: Buscar vídeos a través de la busqueda por hora
Reproducción de eventos: Buscar vídeos a través de la busqueda por evento
17
Especificación de uso
● Use cámara con ZOSI NVRs compatibles solamente.
● Lea esta guía detenidamente y consérvela para consultarla en el futuro.
● Siga todas las instrucciones para un uso seguro del producto y manéjelo con
cuidado.
● Utilice el producto dentro de la temperatura, la humedad y el nivel de voltaje
indicados en las especificaciones del dispositivo.
● No desmonte el producto.
● Use una fuente de alimentación regulada con el producto (opcional) solamente.
El uso de una fuente de alimentación no regulada y no conforme puede dañar el
producto y anular la garantía.
● Es posible que se requiera una limpieza periódica. Utilice únicamente un paño
húmedo. No utilice limpiadores agresivos a base de productos químicos.
● No utilice el producto en un entorno húmedo y sellado. Se recomienda
colocarlo en un lugar que sea fácilmente ventilado para su instalación.
● No desmonte el dispositivo mientras esté encendido.
Preguntas frecuentes
Q: ¿No hay salida de vídeo en el monitor?
• Asegúrese de que la resolución mínima del monitor no es inferior a 720p;
• Asegúrese de que el grabador está encendido correctamente;
• Por favor compruebe la conexión del cable HDMI/VGA o cambie un otro cable de
conexión/ monitor y vuelva a intentarlo;
Q: ¿No se puede acceder al dispositivo de forma remota por teléfono móvil o PC?
• Asegúrese de que el grabador está correctamente conectado a la red, Menú
principal - Red - Prueba;
• Por favor compruebe el estado de la red conectándose a la misma red que el
grabador por teléfono móvil o PC para la prueba;
• Reinicie el grabador o el router;
Q: ¿Soporta la detección de movimiento y la captura de imágenes el sistema?
A: Habilitarán la detección de movimiento y la captura de imágenes instantánea
si la cámara está conectada a un DVR compatible. Capturará imágenes
automáticamente cuando se detectan personas, vehículos o cuando el objetivo
detectado mueve. Los usuarios también pueden capturar imágenes manualmente
en la aplicación Zosi Smart.
18
Declaración de Cumplimiento de la FCC
Declaración de Conformidad de UE Simplificada
Eliminación Correcta de este Producto
Notificación de Cumplimiento
Este dispositivo cumple con la Parte 15 de las Normas de la FCC.
La operación está sujeta a las siguientes dos condiciones:
(1) Este dispositivo no puede causar interferencias perjudiciales.
(2) Este dispositivo debe aceptar cualquier interferencia recibida, incluidas
las inferencias que puedan provocar una operación no deseada.
ZOSI declara que el dispositivo cumple con los requisitos esenciales y otras
disposiciones relevantes de la Directiva 2014/53/UE.
Esta marca indica que este producto no se puede desechar con otros residuos
domésticos en toda la UE. Para evitar posibles daños al medio ambiente o la
salud humana por la eliminación descontrolada de desechos y promover la
reutilización sostenible de los recursos materiales, recíclelo de manera responsable.
Para devolver su dispositivo usado, visite el Sistema de Devolución y Recolección o
comuníquese con el minorista donde compró el producto. Pueden llevarse este
producto para un reciclaje seguro para el medio ambiente.
10
F921014Z3008740
www.zositech.com
Copyright © 2024 ZOSI Technology Co., Ltd.
No part of this publication may be reproduced in any way without the written
permission of ZOSI. The information in this publication is believed to be
accurate in all respects. ZOSI assumes no responsibility for any consequenc-
es resulting from their use. As our products require continuous improvement,
ZOSI reserves the right to modify product designs, specifications and prices
without notice and without any obligation. All rights reserved,and ZOSI
reserves the final interpretation right of this manual.
Support Email: [email protected]
Facebook: https://www.facebook.com/ZosiTechnology/
Whatsapp: +1-866-841-6932
UK Whatsapp: +86 18675610962
Responsible Party:Ansjer Electronics Co., Ltd
Company name :Loocam Technology LLC
Address: 2205 Hutton Dr, Unit 100, Carrollton TX 75006
Tel: 657-223-3477
E-mail: [email protected]

