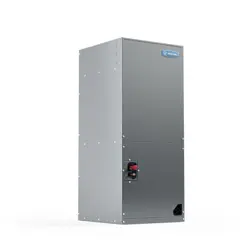

Installation & Owner’s
Manual
PRODIRECT™ SERIES
Air Handler HAH140*C
Copyright © 2021 MRCOOL, LLC
Thank you for choosing MRCOOL. Please read this manual carefully before installation and keep it for future reference.
Due to updates and constantly improving performance, the information and instructions within this
manual are subject to change without notice. Please visit www.mrcool.com/documentation to
ensure you have the latest version of this manual.
Version Date: 7-22-22
mrcool.com
INDOOR UNIT
WARNING
These instructions are intended as an aid for qualified,
licensed service personnel for proper installation,
adjustment, and operation of this unit. Read these
instructions thoroughly before attempting installation
or operation. Failure to follow these instructions may
result in improper installation, adjustment, service or
maintenance possibly resulting in fire, electrical shock,
property damage, personal injury or death.
INDOOR UNIT
mrcool.com | Page 1
INSTALLATION AND OWNER’S MANUAL
Table of Contents
INDOOR SPLIT-SYSTEM UNIT MODELS: UP TO 18 SEER 1.5 TO 5 TONS
1. SAFETY
2. GENERAL
3. UNIT DIMENSIONS
4. VERTICAL UPFLOW
5. VERTICAL DOWNFLOW
6. HORIZONTAL
7. ELECTRICAL WIRING
8. POWER WIRING
9. CONTROL WIRING
10. GROUNDING
11. ELECTRICAL DATA
12. REFRIGERANT CONNECTIONS
13. TXV EXPANSION VALVE INFORMATION
14. CONDENSATE DRAIN TUBING
15. AIR FILTER (not factory-installed)
16. FILTER INSTALLATION DIMENSIONS
17. WIRING DIAGRAMS
18. ELECTRIC WIRING GAUGE
19. ELECTRIC HEAT KIT INSTALLATION (Optional)
20. TROUBLESHOOTING
2
4
5
6
6
7
9
9
9
9
10
10
11
12
13
14
15
19
20
21
WARNING
WARNING
WARNING
WARNING
Disconnect all power to unit before installing or servicing.
More than one disconnect switch may be required to
de-energize the equipment. Hazardous voltage can cause
severe personal injury or death.
If removal of the blower assembly is required, all
disconnect switches supplying power to the equipment
must be de-energized and locked (if not in sight of unit),
so the field power wires can be safely removed from the
blower assembly. Failure to do so can cause electrical
shock, resulting in personal injury or death.
Because of possible damage to equipment or personal
injury, installation, service, and maintenance should only
be performed by trained, qualified service personnel.
Consumer service is recommended only for filter
cleaning/replacement. Never operate the unit with the
access panels removed.
These instructions are intended as an aid to qualified,
licensed service personnel for proper installation,
adjustment, and operation of this unit. Read these
instructions thoroughly before attempting installation or
operation. Failure to follow these instructions may result
in improper installation, adjustment, service or
maintenance possibly resulting in fire, electrical shock,
property damage, personal injury or death.
This document is customer property and needs to remain with this unit. These instructions do not
cover all of the different variations between systems, nor does it provide for every possible
contingency that can arise during installation. All phases of this installation must comply with
NATIONAL, STATE, AND LOCAL CODES. This manual could change without expressed written notice.
Please visit the documentation section of the MRCOOL website, www.mrcool.com/documentation for
the latest versions.
INDOOR UNIT
mrcool.com | Page 2
1 SAFETY
This is a safety alert symbol. When you see this symbol on labels or in manuals, be
alert to the potential for personal injury.
This is an attention alert symbol. When you see this symbol on labels or in manuals,
be alert to the potential for personal injury.
WARNING
WARNING
WARNING
PROPOSITION 65: This appliance contains fiberglass
insulation.
All manufacturer products meet current federal OSHA
Guidelines for safety. California Proposition 65 warnings
are required for certain products, which are not covered
by the OSHA standards.
California’s Proposition 65 requires warnings for products
sold in California that contain or produce any of the over
900 listed chemicals known to the State of California to
cause cancer or birth defects. These include, fiberglass
insulation, lead contained in brass, and combustion
products from natural gas.
All “new equipment” shipped for sale in California will
have labels stating that the product contains and/or
produces Proposition 65 chemicals. Although we have not
changed our processes, having the same label on all our
product facilitates manufacturing and shipping. We cannot
always know “when, or if” products will be sold in the
California market.
You may receive inquiries from customers about chemicals
found in, or produced by, some of our heating and
air-conditioning equipment, or found in natural gas used
with some of our products. Listed below are those
chemicals and substances commonly associated with
similar equipment in our industry and other
manufacturers.
• Glass Wool (Fiberglass) Insulation
• Carbon Monoxide (CO)
• Formaldehyde
• Benzene
More details are available at the websites for OSHA
(Occupational Safety and Health Administration), at
www.osha.gov and the State of California’s OEHHA (Office
of Environmental Health Hazard Assessment), at
www.oehha.org. Consumer education is important since
the chemicals and substances on the list are found in our
daily lives. Most consumers are aware that products
present safety and health risks, when improperly used,
handled and maintained.
INDOOR UNIT
mrcool.com | Page 3
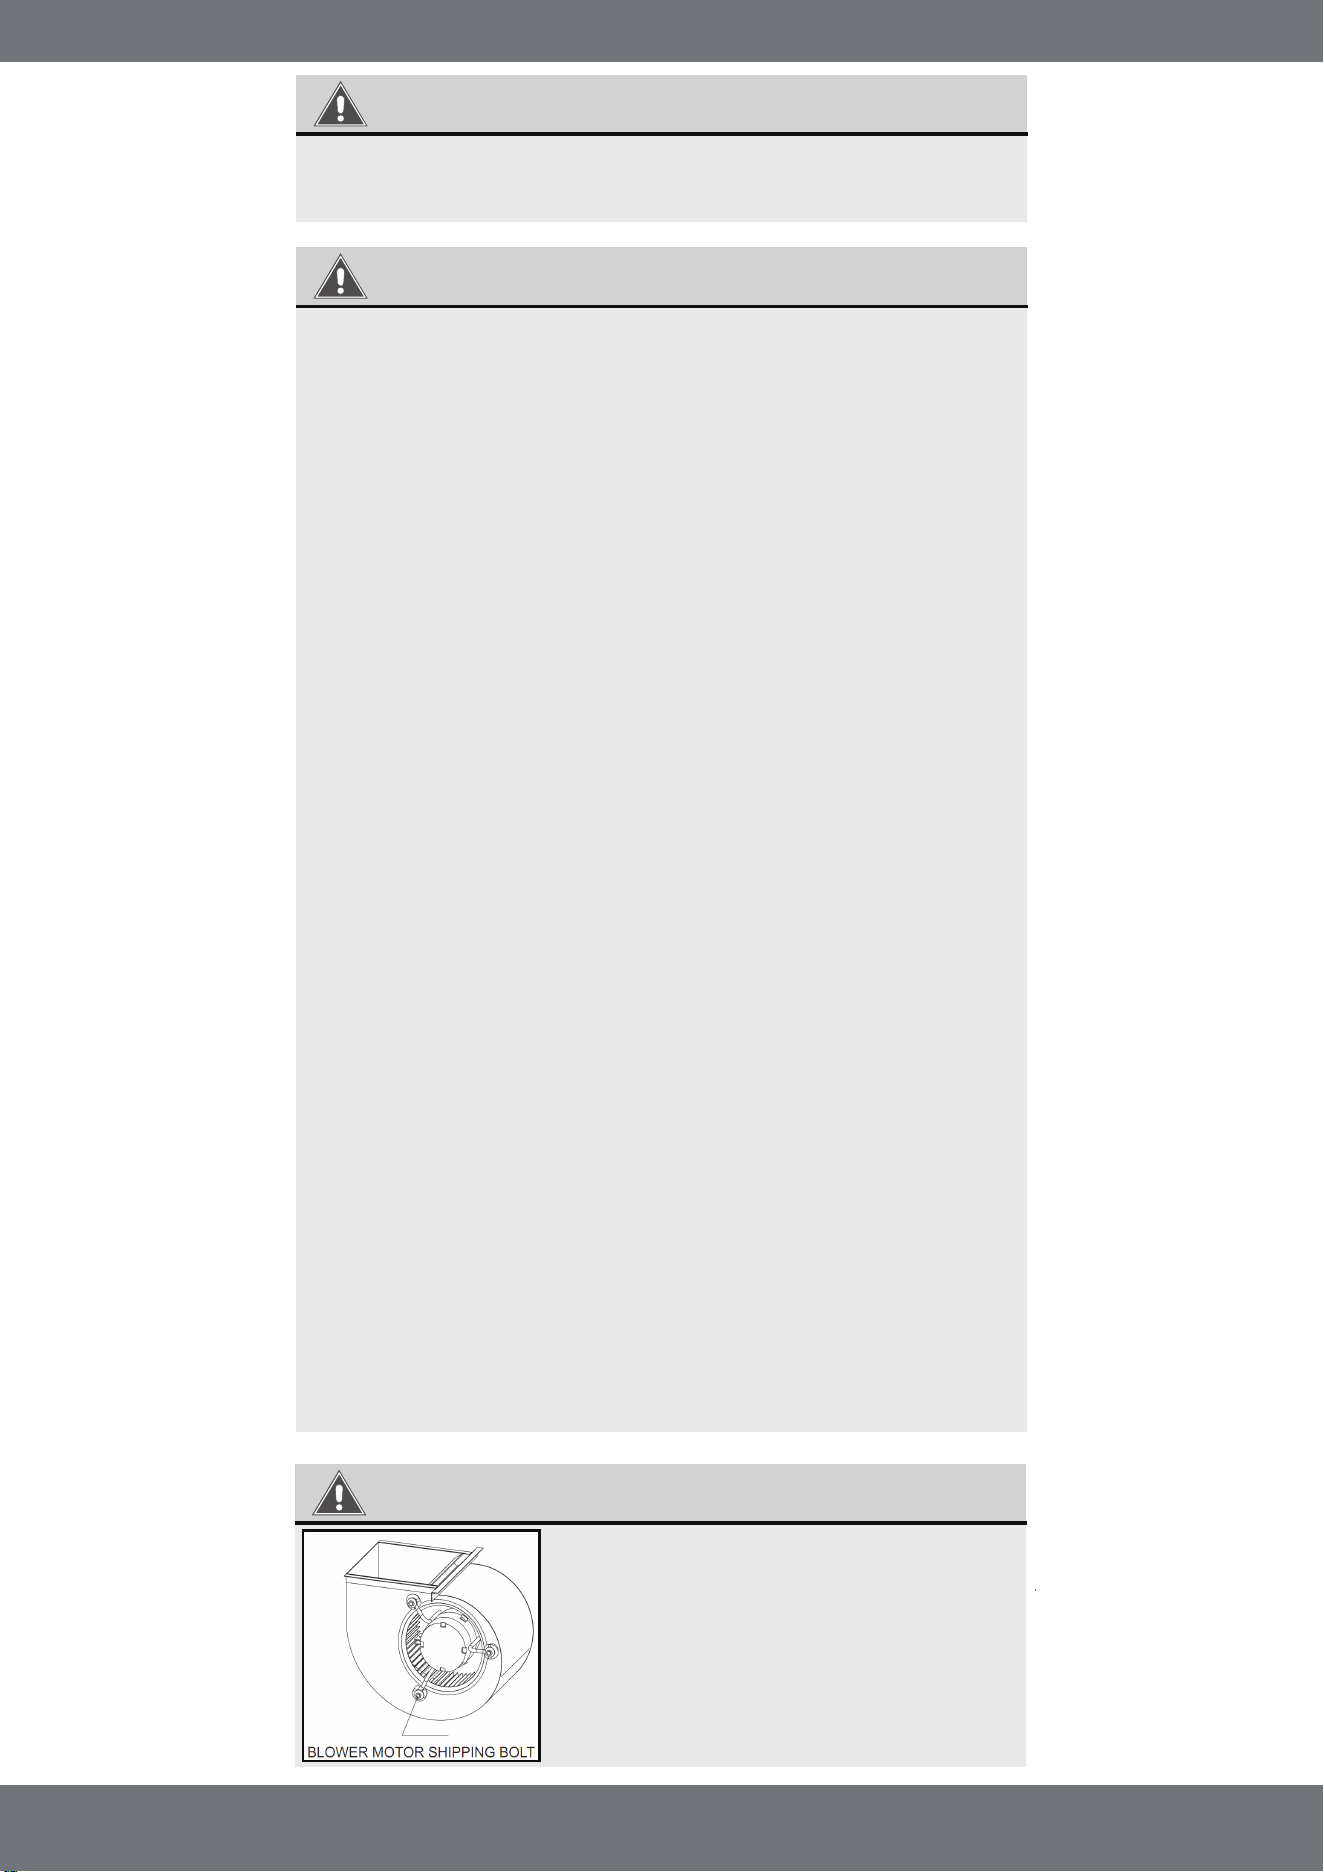
Make sure the blower motor support
is tight, which is secured by 3-motor
mount bolts. Then check to see if the
wheel is secured to motor shaft
before operating unit.
The unit must be properly and permanently grounded.
Failure to do so could result in electrical shock causing
personal injury or death.

WARNING
The first 3 ft (914.4 mm) of the supply air plenum and
ductwork must be constructed of sheet metal as required
by NFPA 90B. The supply air plenum or duct must also have
a solid sheet metal bottom directly under the unit with no
openings, registers or flexible air ducts located in it.
If flexible supply air ducts are used, they can only be
located in the vertical walls of the rectangular plenum and
must be a minimum of 6 in (152.4 mm) from the solid
bottom. The metal plenum of the duct may be connected
to the combustible floor base, if not, it must be connected
to the unit supply duct that is exposed to the supply air
opening from the downflow unit. Exposing combustible
(non-metal) material to the supply opening of a downflow
unit can cause a fire, resulting in property damage,
personal injury, or death.
Exception warning to downflow:
Installations on a concrete floor slab, with supply air
plenum and ductwork completely encased, must use at
least 2 in (50.8 mm) of concrete (See NFPA 90A).
The unit can be positioned for bottom return air in the upflow position, left and right return in the
horizontal position, or top return in downflow position.
This Air Handler provides the flexibility for installation in any upflow, downflow, or horizontal
application. The direct drive motors provide a selection of air volumes to match any application. The
3-Speed motor can be adjusted to provide air flow to meet desired applications.
Top and side power control wiring, and accessible screw terminals for control wiring, all combine to
make the installation easy, and minimize installation cost. Please contact your local distributor (Refer to
Fig.1).
The appliance is only intended to supply conditioned air to one room.
INDOOR UNIT
mrcool.com | Page 4
2 GENERAL
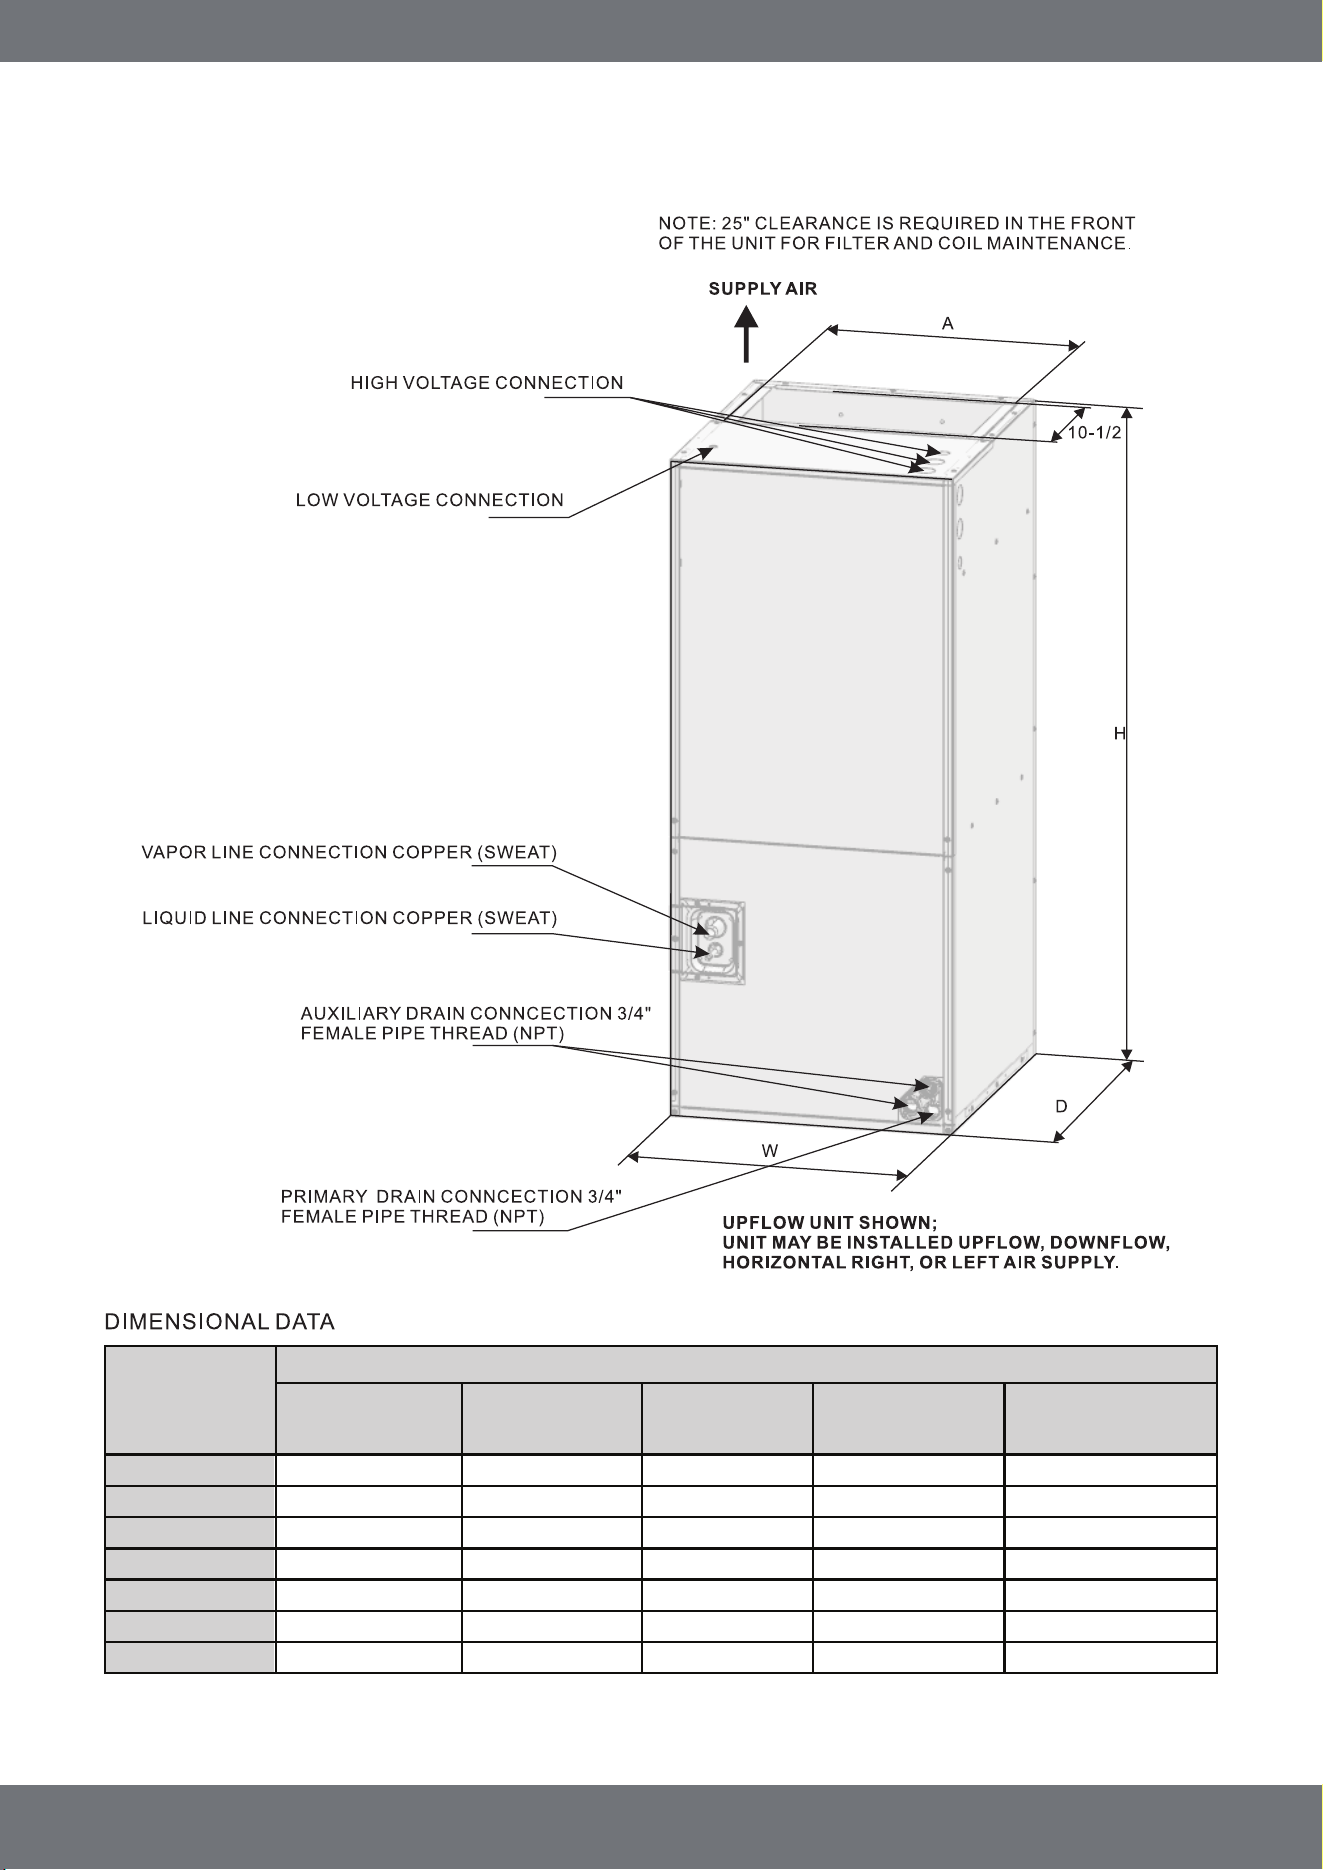
ELECTRICAL CONNECTIONS
CAN EXIT THE TOP, OR
EITHER SIDE, OF THE UNIT
3 UNIT DIMENSIONS
INDOOR UNIT
mrcool.com | Page 5
Table 1
MODEL SIZE
Dimensions inch [mm]
UNIT HEIGHT
(H) in [mm]
UNIT WIDTH
(W) in [mm]
UNIT DEPTH
(D) in [mm]
SUPPLY DUCT
(A) in [mm]
LIQUID LINE/
VAPOR LINE in
18K
24K
30K
36K
42K
48K
60K
45.75 [1162] 19.69 [500]
22.05 [560]
17.87 [454] 3/8” / 3/4”
3/8” / 3/4”17.87 [454]22.05 [560]19.69 [500]45.75 [1162]
45.75 [1162] 19.69 [500] 22.05 [560] 17.87 [454] 3/8” / 3/4”
3/8” / 3/4”
17.87 [454]22.05 [560]19.69 [500]45.75 [1162]
45.75 [1162] 19.69 [500] 22.05 [560] 17.87 [454] 3/8” / 3/4”
3/8” / 7/8”
3/8” / 7/8”19.53 [496]
19.53 [496]24.53 [623]
24.53 [623]22.05 [560]
22.05 [560]53.15 [1350]
53.15 [1350]
Fig. 1 Dimensions
5 VERTICAL DOWNFLOW
IMPORTANT NOTE:
4 VERTICAL UPFLOW
INDOOR UNIT
mrcool.com | Page 6
1.) Vertical Upflow configuration is the factory set on all models (Refer to Fig 1).
2.) If a side return air opening is required, field fabricate a return air plenum with an opening large enough
to supply the unit and strong enough to support the unit’s weight.
3.) If return air is to be ducted, install duct flush with floor. Use fireproof resilient gaskets with a thickness
of 1/8 in. to 1/4 in. (3.18 mm to 6.35 mm) , between the ducts, unit, and floor. Set the unit on the floor
over the opening.
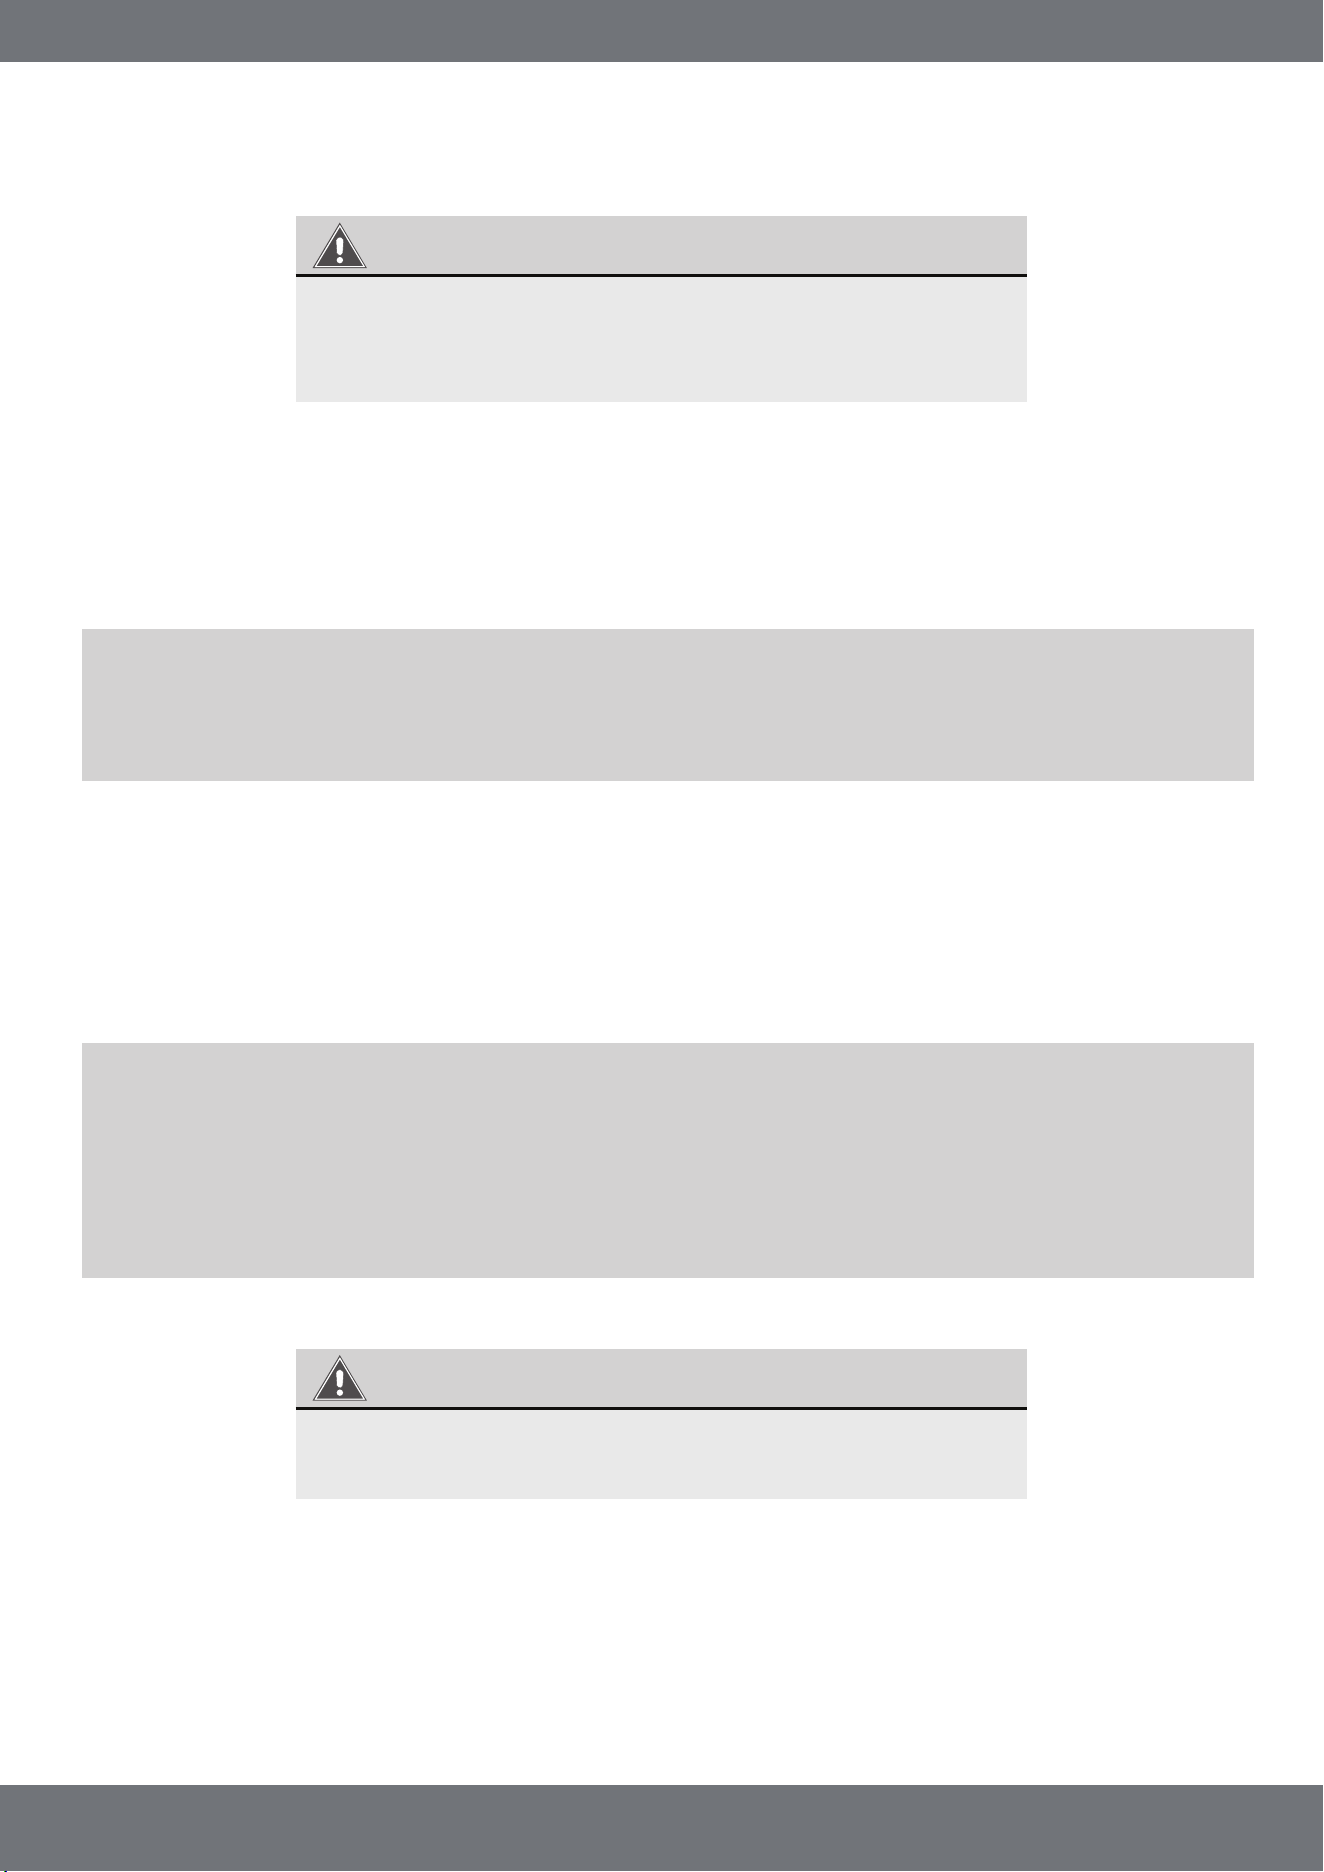
Conversion to Vertical Downflow: A vertical upflow unit may be converted to vertical downflow. Remove
the door and indoor coil and reinstall 180 degrees from its original position (Refer to Fig. 3).
IMPORTANT: To comply with certification agencies and the National Electric Code for horizontal
right application, the circuit breaker(s) on field-installed electric heater kits must be
re-installed, per the procedure below, so that the breaker switch ”on” position and marking is
up and, ”off” position and marking is down. To rotate the circuit breakers please follow the
steps below.
To rotate breaker(s): Rotate one breaker set (circuit) at a time, starting with the one on the right. Loosen
both lugs on the load side of the breaker (make sure that wires are identified and are reinstalled into
proper breaker). Wires are bundled with wire ties, one bundle going to the right lug and one bundle going
to the left lug. Use the steps on the following page to complete this process.
Torque applied to drain connections should not exceed 15 ft-lbs (20.34 Nm) (Refer to Figs. 1 & 2).
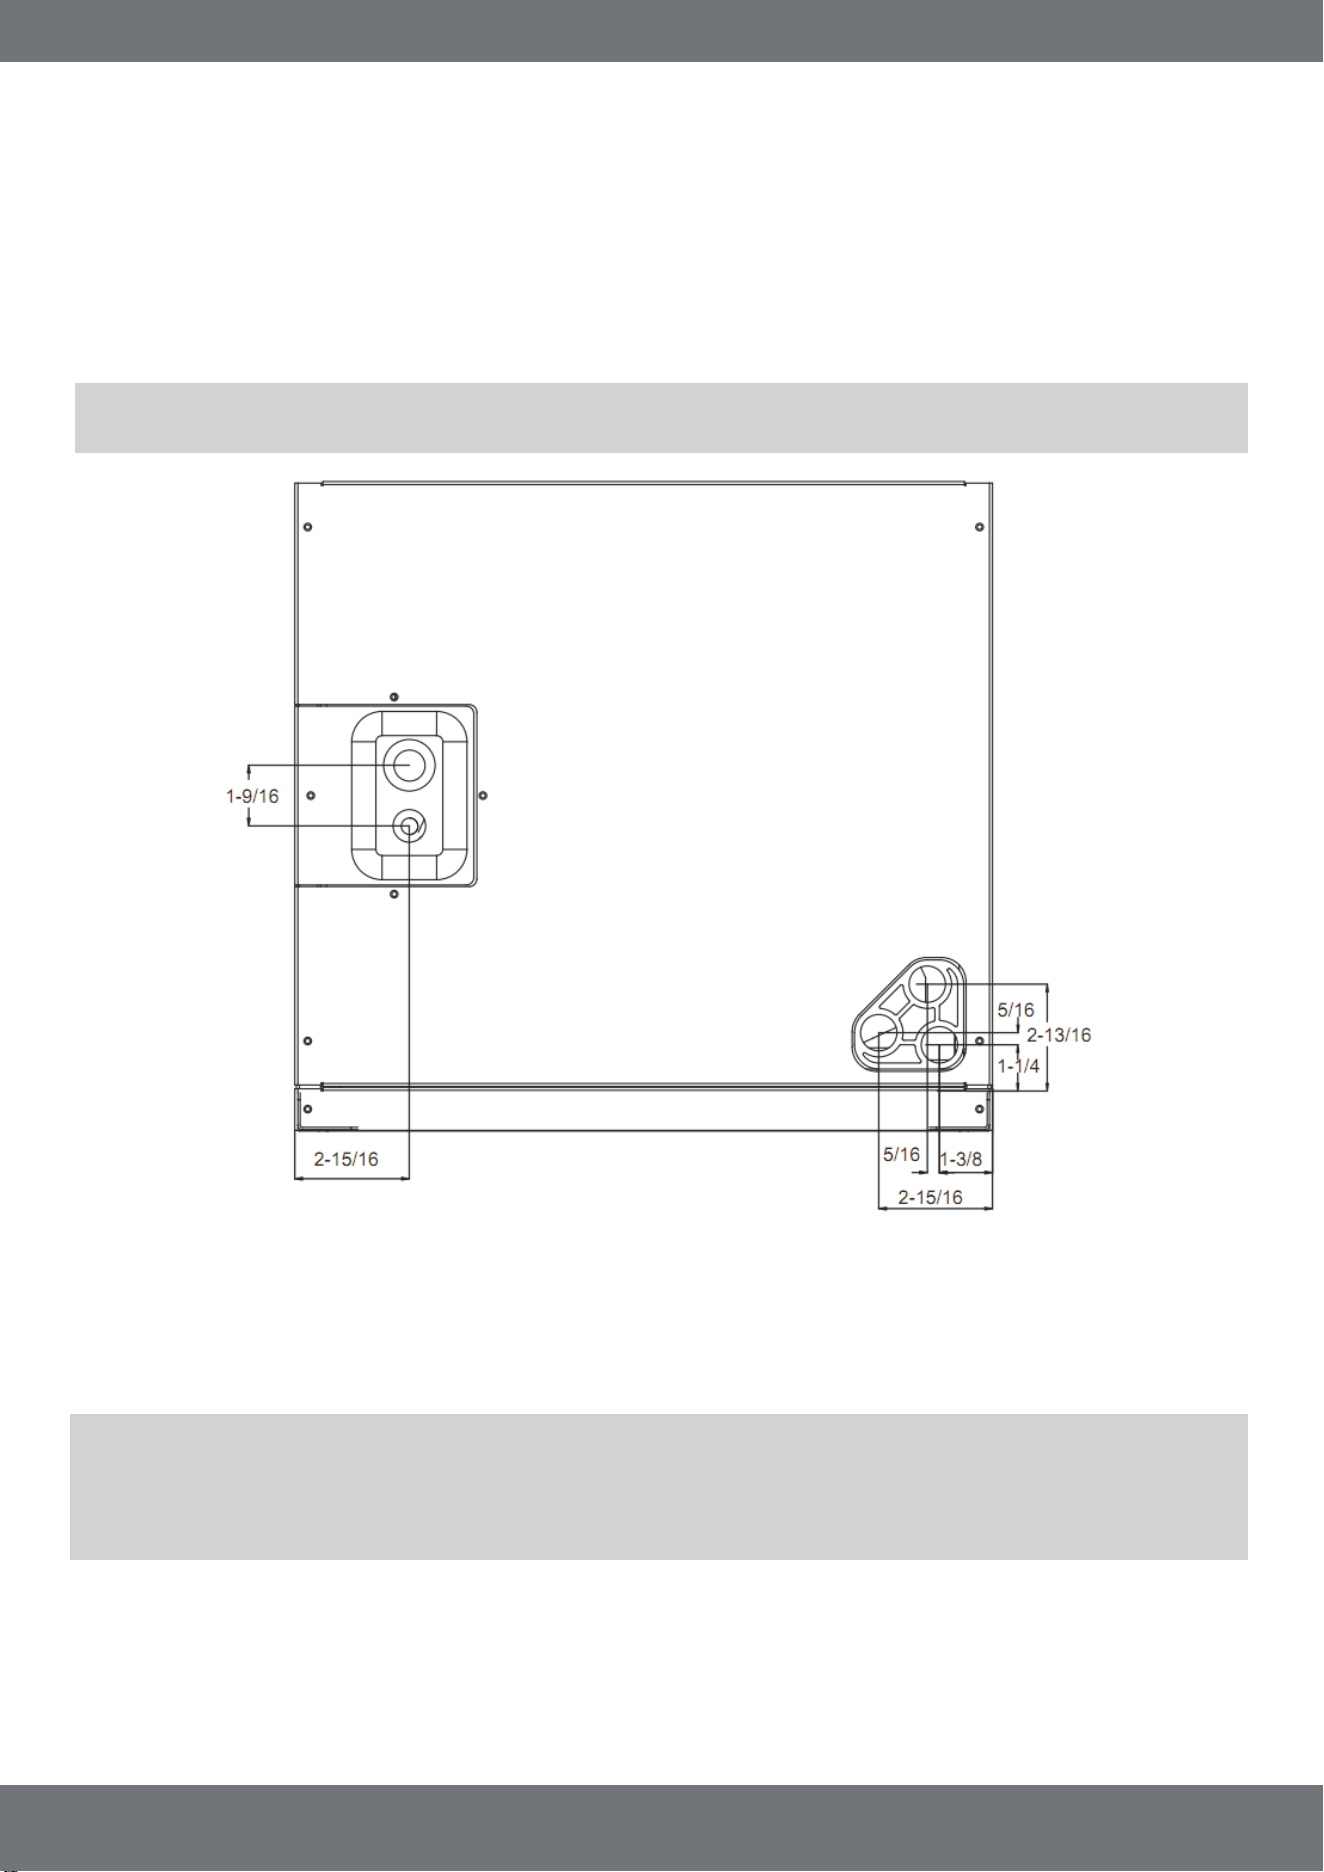
Fig. 2 Dimensions For Front Connect Coil
CAUTION
CAUTION
1.) Using a screwdriver, lift the blue plastic tab with a hole away from the breaker. Continue doing this until
breaker releases from its position.
2.) With breaker held in hand, rotate breaker so that the ”on” position is up, and ”off” position is down (with
unit in planned vertical mounting position). Insert right wire bundle into top right breaker lug, ensuring all
strands of all the wires are inserted fully into lug, and no wire insulation is in the lug.
3.) Tighten lug as tight as possible, while holding circuit breaker. Check wires and make sure each wire is
secure and none are loose. Repeat for left wire bundle in left top circuit breaker lug.
4.) Replace breaker by inserting the breaker mounting tab, opposite of the white pull tab in opening, hook
mounting tab over edge in opening.
5.) Using a screwdriver, pull the blue tab with a hole away from the breaker, while setting that side of the
breaker into the opening. When breaker is in place, release tab, which will lock circuit breaker into location
in opening.
6.) Repeat above operation for remaining breaker(s) (if more than one is provided).
7.) Replace single point wiring jumper bar, if it is used, on line side of breaker and tighten securely.
8.) Double check wires and lugs to make sure all are secure and tight. Check to make sure unit wiring to
circuit breaker load lugs match that shown on the unit wiring diagram.
INDOOR UNIT
mrcool.com | Page 7
When using the unit with the electrical heater, the switch
on the front of the panel is only used for the electrical
heater.
Horizontal right is the default factory configuration for the units.
Conversion to Horizontal: A vertical upflow unit may be converted to horizontal left by removing indoor
coil assembly and reinstalling coil in the unit as described in the steps below:
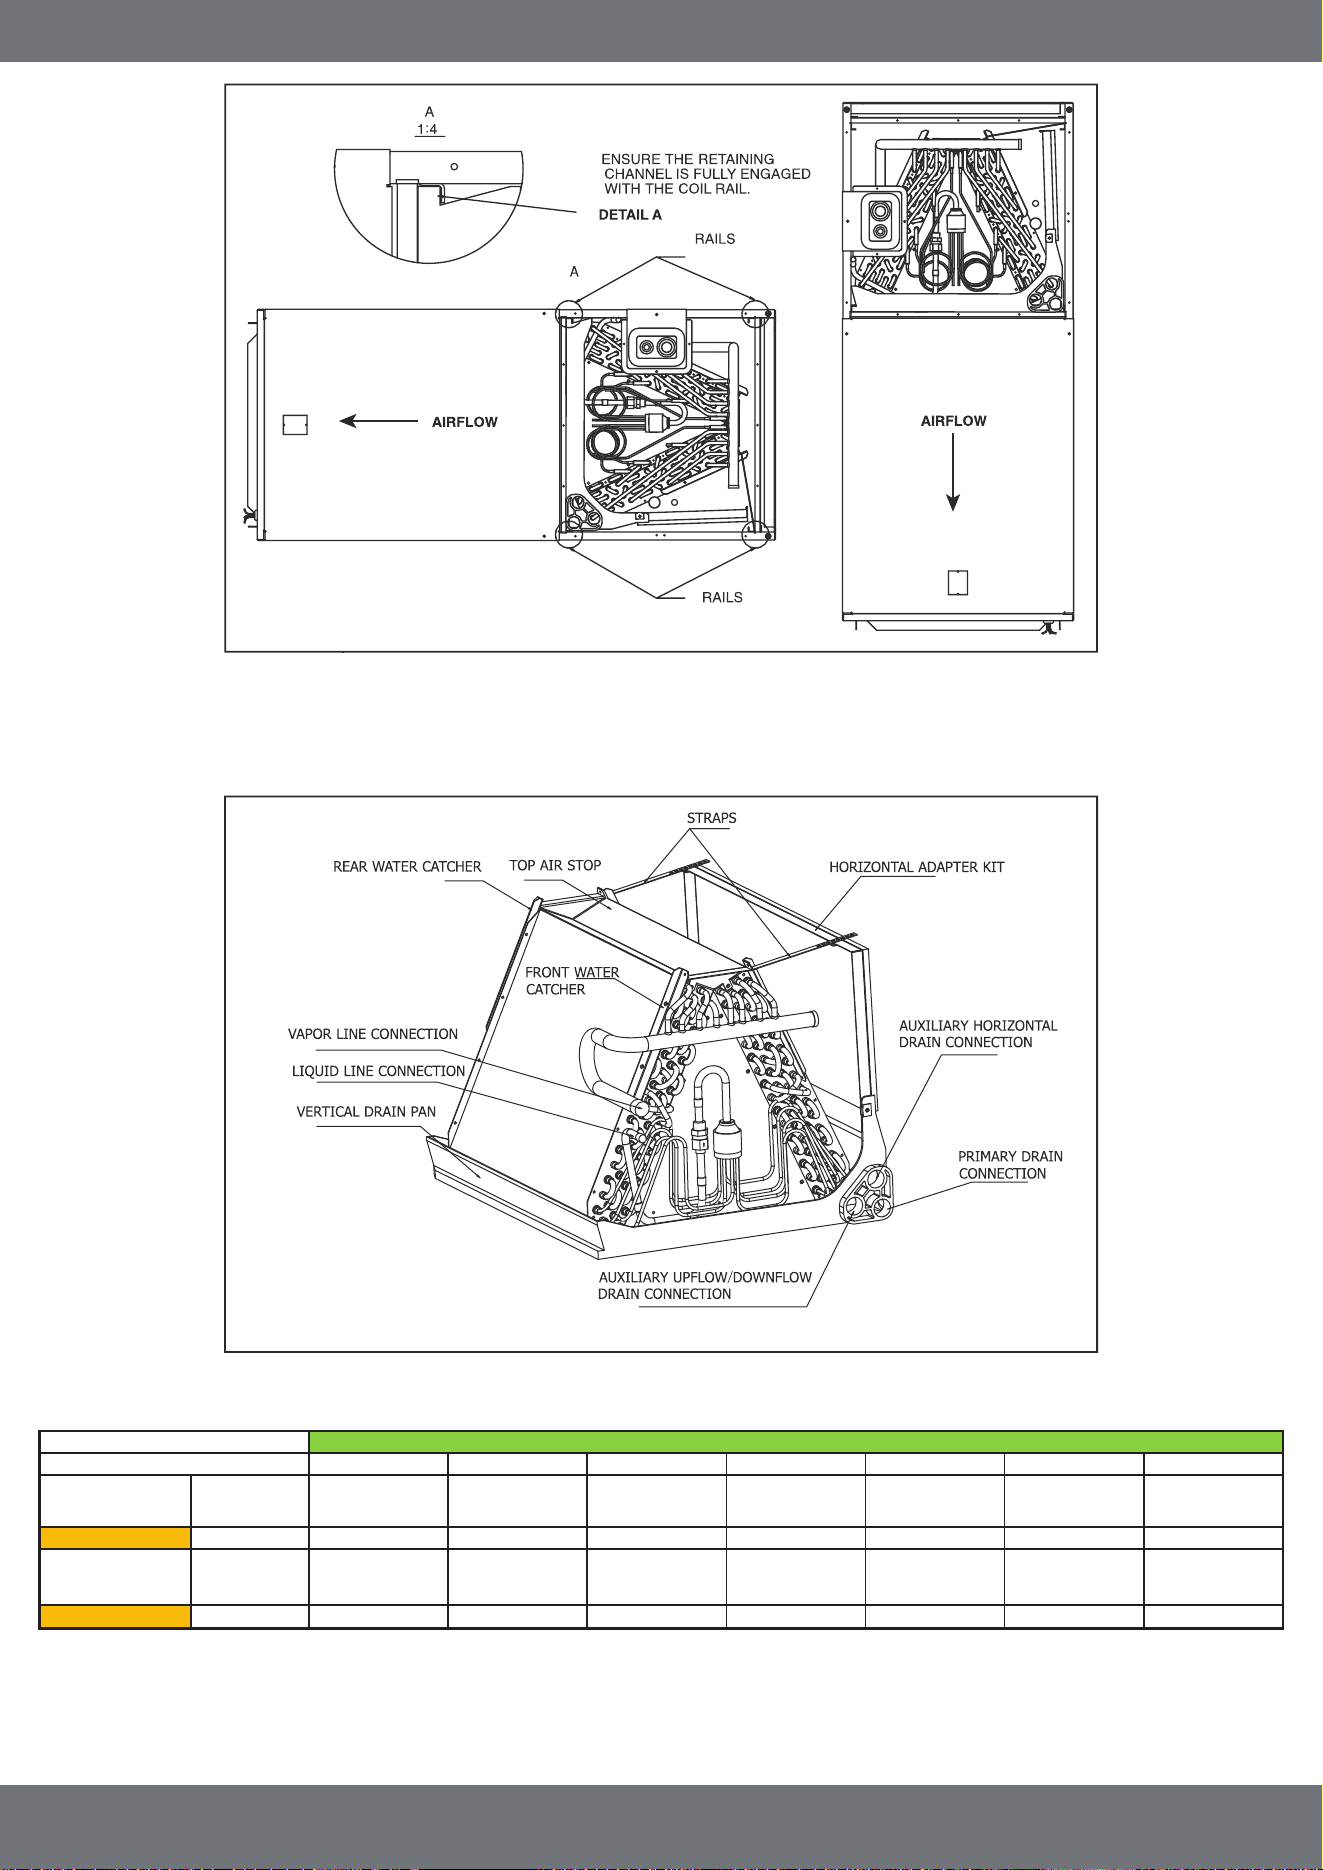
1.) Rotate unit into the downflow position, with the coil compartment on top and the blower compartment
on bottom (Refer to Fig. 3).
2.) Reinstall the indoor coil 180° from the original position. Ensure the retaining channel is fully engaged with
the coil rail (Refer to Fig. 3).
NOTE: Secondary drain pan kits are recommended when the unit is configured for the horizontal
position over a finished ceiling and/or living space.
Horizontal units must be configured for right-hand air
supply or left-hand air supply. The horizontal drain pan
must be located under indoor coil. Failure to use the drain
pan can result in property damage.
Conversion in Horizontal Direction: Horizontal right-hand supply can be changed to horizontal left-hand
supply by removing the indoor coil, rotating it 180 degrees from the original position, and then reinstalling it.
6 HORIZONTAL
INDOOR UNIT
mrcool.com | Page 8
HAH14018 HAH14024 HAH14030 HAH14036 HAH14042 HAH14048 HAH14060
InWC
InWC
0.10 0.10 0.15 0.15 0.15 0.20 0.20
CFM (hi/mi/lo)
723/610/500 938/804/738 1204/1060/919 1376/1235/1161 1562/1385/1208 1695/1574/1434 1695/1574/1434
0.18 0.18 0.23
0.23 0.23
0.28 0.28
CFM (hi/mi/lo)
1364/1229/849 1595/1366/1256 2046/1955/1562 2340/2100/1974 2480/2430/2074 2882/2676/2437 2882/2676/2437
Indoor external
static pressure
Indoor air flow
14SEER AHU
Market Model
Indoor air flow
Indoor external
static pressure
Table 2
Fig. 3 Vertical Downflow & Horizontal Left Applications
(shown with lower front service panel removed)
Fig. 4 Indoor Coil & Drain Pan Set-up
WARNING
WARNING
It is important that proper electrical power is available for connection to the unit model being installed.
Please refer to the unit nameplate, wiring diagram, and electrical data in the installation instructions.
• If required, install a branch circuit disconnect of adequate size, located within sight of, and readily
accessible to the unit.
IMPORTANT: After the Electric Heat Kit is installed, units may be equipped with one, two, or
three 30/60 amp. circuit breakers. These breaker(s) protect the internal wiring in the event of a
short circuit and also serve as a disconnect. Circuit breakers installed within the unit do not
provide overcurrent protection of the supply wiring and therefore may be sized larger than the
branch circuit protection.
• Supply circuit power wiring must be 167°F (75°C) minimum copper conductors only. Refer to the
Electrical Data In this section for ampacity, wire size, and circuit protector requirement. Supply circuit
protective devices may be either fuses or “HACR” type circuit breakers.
• Power wiring may be connected to either the right side, left side, or top. Concentric knockouts are
provided for connection of power wiring to unit.
• Power wiring is connected to the power terminal block in unit electric cabinet.
INDOOR UNIT
mrcool.com | Page 9
IMPORTANT: Class 2 low voltage control wiring should not be run in conduit with main power
wiring and must be separated from power wiring, unless class 1 wire of proper voltage rating
is used.
• Low voltage control wiring should be 18 AWG and color-coded. For lengths longer than 100 ft.,
16 AWG. wire should be used.
• See wiring diagrams attached to indoor and outdoor sections to be connected.
• Make sure, after installation, separation of control wiring and power wiring has been
maintained.
The unit must be properly and permanently grounded.
Failure to do so can result In electrical shock causing
personal injury or death.
• Grounding may be accomplished by grounding metal conduit when installed in accordance with
electrical codes to the unit cabinet.
• Grounding may also be accomplished by attaching ground wire(s) to ground lug(s) provided in the unit
wiring compartment.
• Ground lug(s) are located close to the wire entrance on the left side of the unit (upflow). Lug(s) may be
moved to marked locations near the wire entrance on right side of the unit (upflow) If this alternate
location is more convenient.
• Use of multiple supply circuits require grounding of each circuit to lug(s) provided in unit.
8 POWER WIRING
9 CONTROL WIRING
10 GROUNDING
7 ELECTRICAL WIRING
Field wiring must comply with the National Electric Code and any applicable local ordinance.
Disconnect all power to unit before installing or servicing.
More than one disconnect switch may be required to
de-energize the equipment. Hazardous voltage can cause
severe personal injury or death.
The air distribution system has the greatest effect on airflow. The duct system is totally controlled by
the contractor. For this reason, the contractor should use only industry-recognized procedures.
Heat pump systems require a specified airflow. Each ton of cooling requires between 350 and 450
cubic feet of air per minute (CFM), or 400 CFM nominally. Duct design and construction should be
carefully done. System performance can be lowered dramatically through bad planning or
workmanship.
Air supply diffusers must be selected and located carefully. They must be sized and positioned to
deliver treated air along the perimeter of the space. If they are too small for their intended airflow,
they become noisy. If they are not located properly, they can create drafts. Return air grilles must be
properly sized to carry air back to the blower. If they are too small, they also cause noise.
The installers should balance the air distribution system to ensure proper, quiet airflow to all rooms in
the home. This ensures a comfortable living space. An air velocity meter or airflow hood can give a
reading of system CFM.
INDOOR UNIT
mrcool.com | Page 10
11 ELECTRICAL DATA
Table 3 (Applicable to 13-14 SEER)
Keep the coil connections sealed until refrigerant connections are made. See the Installation
Instructions for the outdoor unit for details on line sizing, tubing installation, and charging information.
Coil is shipped with “No charge”. Evacuate the system before charging with refrigerant.
Install refrigerant tubing so that it does not block service access to the front of the unit.
Nitrogen should flow through the refrigerant lines while brazing.
Use a brazing shield to protect the cabinet’s paint, and a wet rag to protect the rubber grommet from
being damaged by torch flames. After the refrigerant connections are made, seal the gap around the
connections with a pressure sensitive gasket.
12 REFRIGERANT CONNECTIONS
MODEL VOLTAGE HERTZ HP
RPM
(low/med/high)
SPEEDS
CIRCUIT
AMPS
MAXIMUM CIRCUIT
PROTECTOR
18K
24K
30K
36K
42K
48K
60K
208/230
60
1/7
340/390/440 3 0.73
0.80
1.21
1.53
1.95
1.92
2.55
5(A)
5(A)
5(A)
5(A)
5(A)
5(A)
15(A)
3490/530/5701/660208/230
208/230 60
1/4
530/600/670 3
3
690/730/8052/760208/230
208/230 60 3/8 610/723/839 3
3
3820/870/920
820/870/9202/5
2/560
60208/230
208/230
13 TXV EXPANSION VALVE INFORMATION
INDOOR UNIT
mrcool.com | Page 11
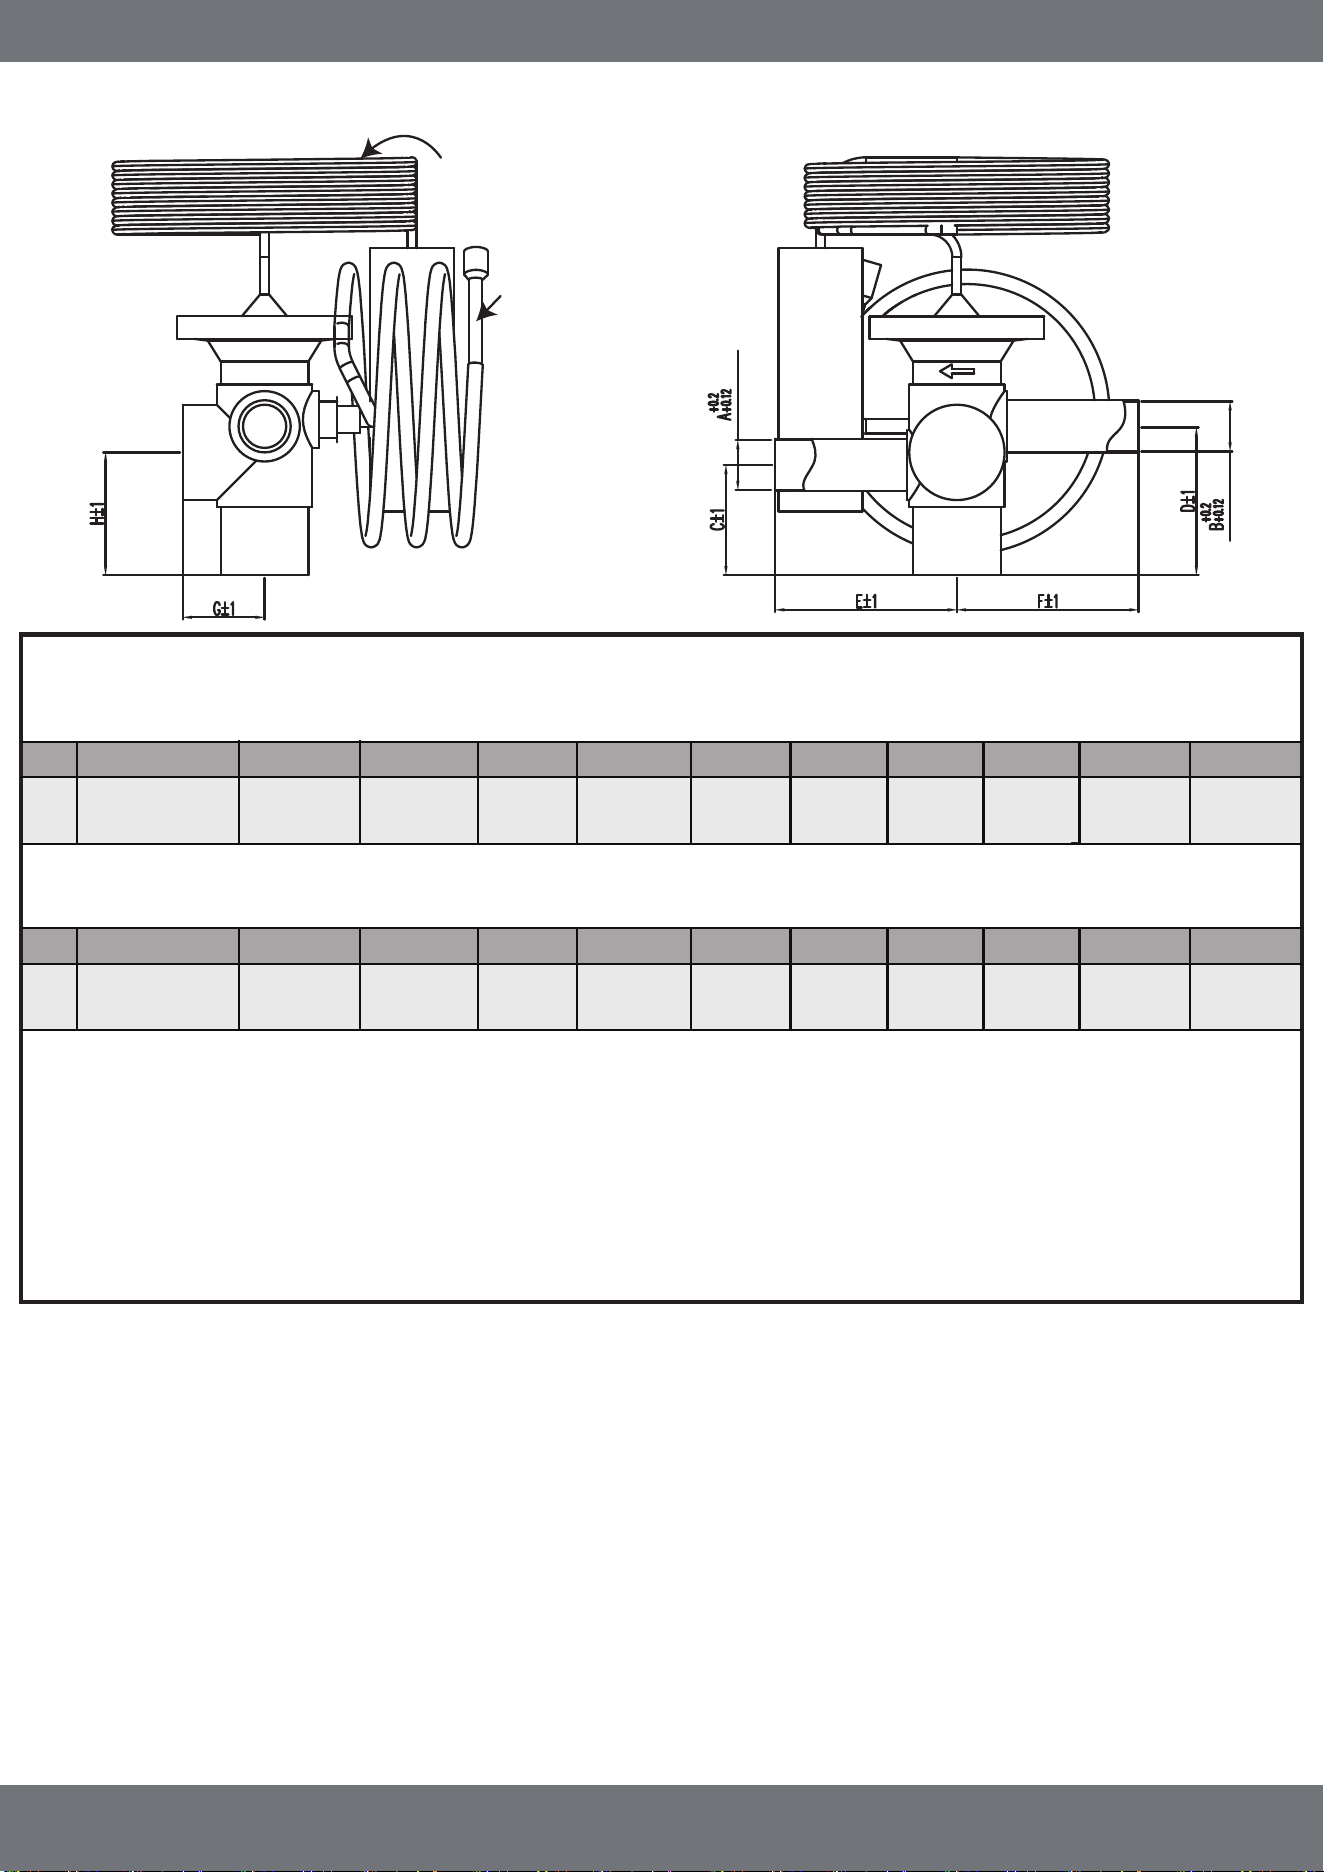
The length of warm wire should be L2≥
Balance tube length
L1≥
A: Outlet inner diameter
B: Inlet diameter
C: Length from outlet center to bottom of valve body
D: Length from inlet center to bottom of valve body
E: Length from outlet center to valve body center
F: Length from inlet center to valve body center
G: Length between the center of the adjustable screw and the back of the valve body
H: Length between the center of valve body and bottom of valve body
L1: Balance tube length
L2: Warm wire length
Thermal Expansion Valve Specifications
Units: inch (millimeter)
No. BOM A B C D E F G H L1 L2
1 801600400099
18K/24K/30K/36K Capacity Units
Emerson NCE3ZAA ODF
0.50 in
(12.7 mm)
0.375 in
(9.52 mm)
0.94 in
(24 mm)
1.28 in
(32.5 mm)
1.65 in
(42 mm)
1.65 in
(42 mm)
0.71 in
(18 mm)
1.06 in
(27 mm)
31.50 in
(800 mm)
31.50 in
(800 mm)
Units: inch (millimeter)
No. BOM A B C D E F G H L1 L2
1 801600400101
42K/48K/60K Capacity Units
Emerson NCE5ZAA ODF
0.50 in
(12.7 mm)
0.375 in
(9.52 mm)
0.94 in
(24 mm)
1.28 in
(32.5 mm)
1.65 in
(42 mm)
1.65 in
(42 mm)
0.71 in
(18 mm)
1.06 in
(27 mm)
31.50 in
(800 mm)
31.50 in
(800 mm)
INDOOR UNIT
mrcool.com | Page 12
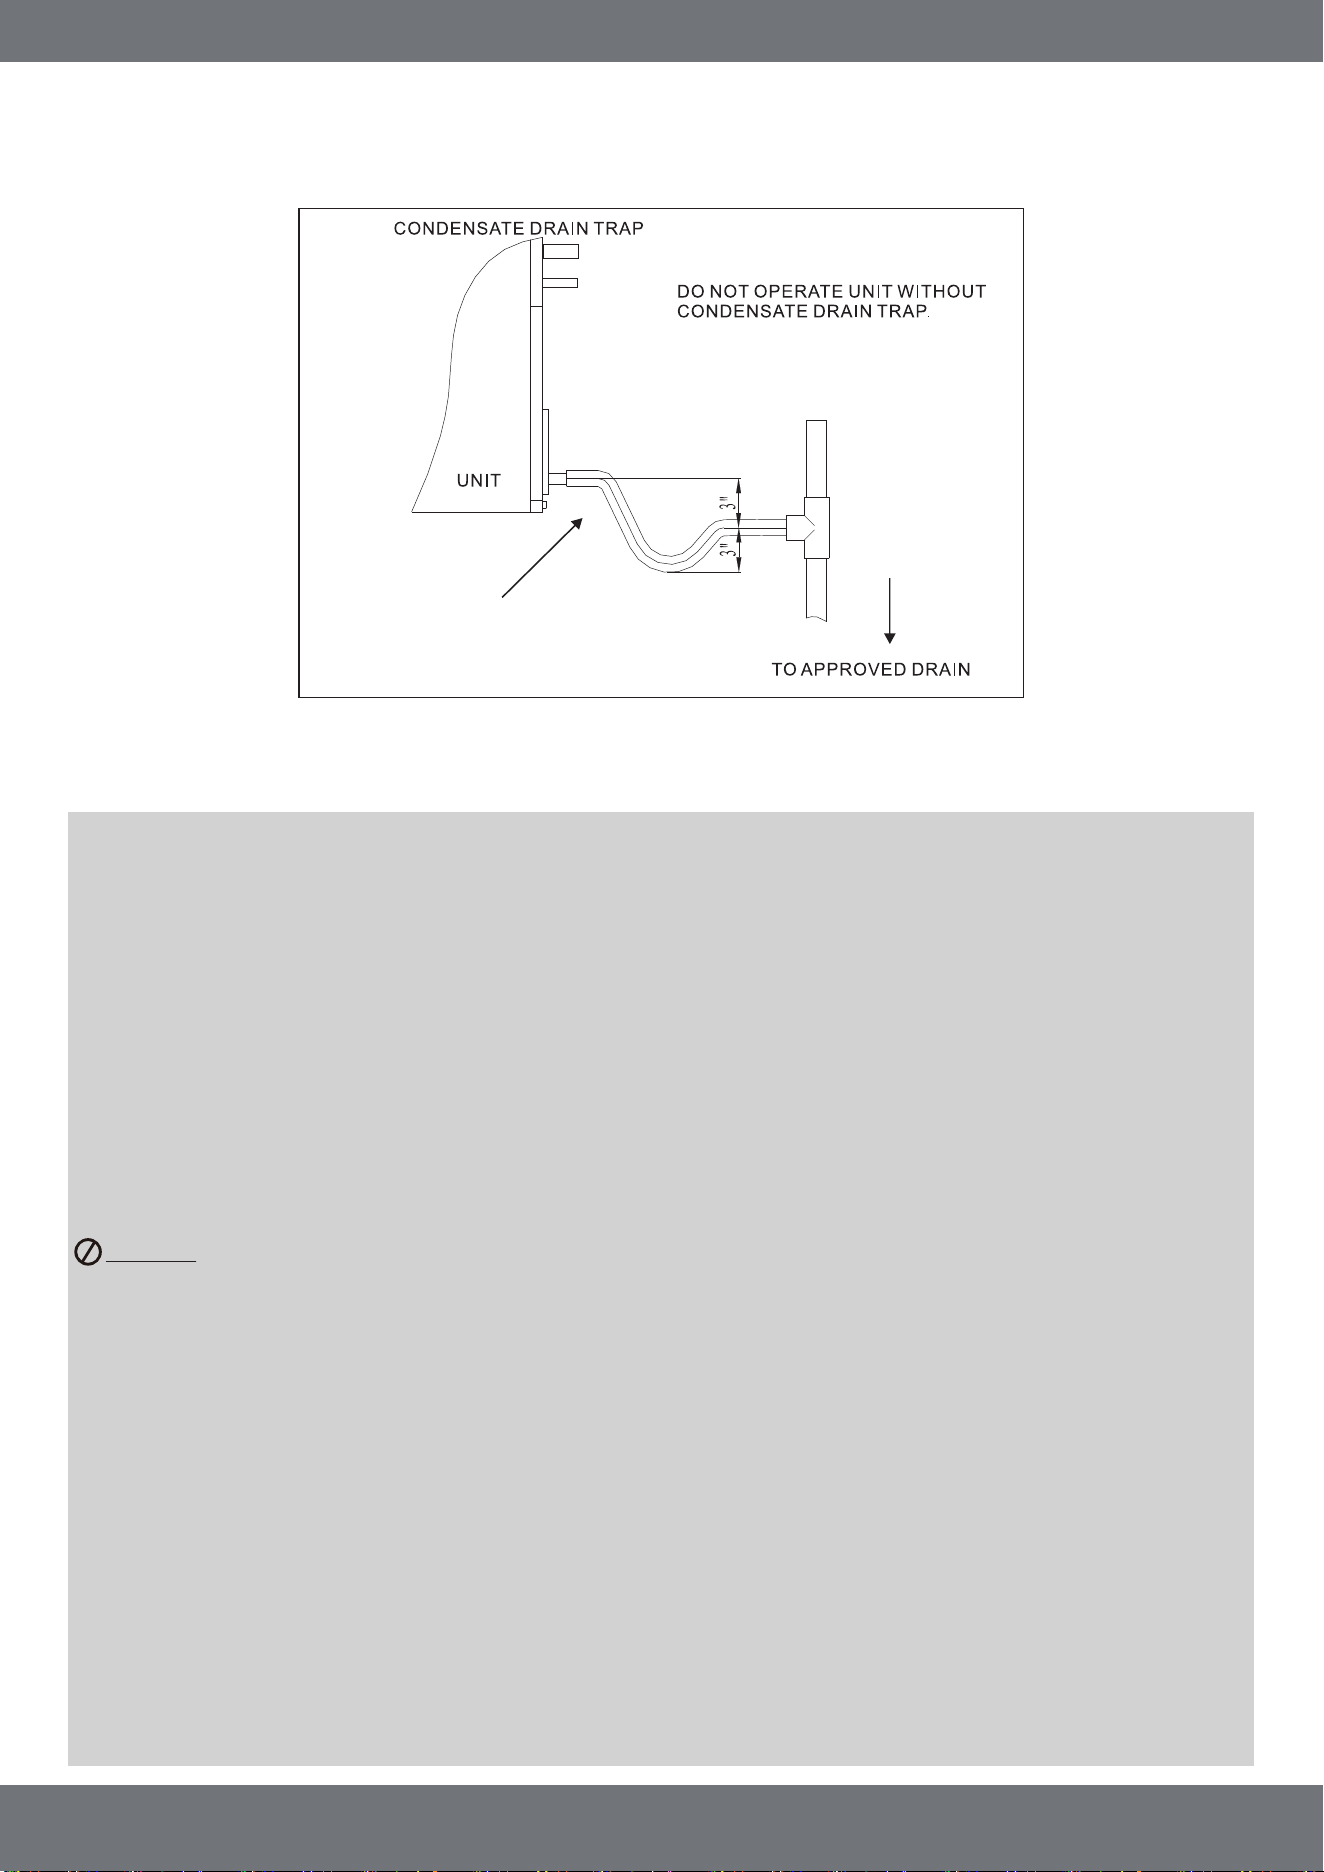
DO NOT OVER-TIGHTEN DRAIN FITTING
TOWARD DRAIN CONNECTION
UNIT MUST BE SLIGHTLY INCLINED
14 CONDENSATE DRAIN TUBING
IMPORTANT:
• When making drain fitting connections to the drain pan, use a thin layer of Teflon paste,
silicone, or Teflon tape and on the connections before they are installed. Hand-tighten the
fittings.
• When making drain fitting connections to the drain pan, do not over-tighten them. If the
fittings are over-tightened it can cause the pipe connections to split on the drain pan.
• Install drain lines so they do not block service access to front of the unit. A minimum
clearance of 2 ft (609.6 mm) is required for filter, coil or blower removal, and service access.
• Make sure unit is level or pitched slightly toward the primary drain connection so that water
will drain completely from the pan (Refer to Fig. 5)
• Use a drain line that is properly sized to match the size of condensate drain pan.
• All drain lines must be pitched downward and away from the unit with a minimum of 1/8 in.
per foot of line to ensure proper drainage.
DO NOT connect condensate drain line to a closed or open sewer pipe. Run condensate to an
open drain or run line to a safe outdoor area.
• The drain line should be insulated where necessary to prevent sweating and damage from
condensate forming on the outside surface of the line.
• Make provisions for disconnecting and cleaning of the primary drain line should it become
necessary. Install a 3 in (76.2 mm) trap in the primary drain line as close to the unit as
possible. Make sure that the top of the trap is below the connection to the drain pan to allow
complete drainage of pan (Refer to Fig. 5).
• An auxiliary drain line should be run to a place where it will be noticeable if it begins to drain.
The homeowner should be warned that a problem exists if water should begin running from
the auxiliary drain line.
• Plug the unused drain connection with the plugs provided in the parts bag, using a thin layer
of teflon paste, silicone, or teflon tape to form a water tight seal.
• Test condensate drain pan and drain line after installation is complete. Pour water into the
drain pan. Ensure the amount poured is enough to fill drain trap and line. Check to make sure
drain pan is draining completely, no leaks are found in the drain line fittings, and water is
draining from the termination of the primary drain line.
Fig. 5 Condensate Drain Trap
Consult Local Codes for Specific Requirements
INDOOR UNIT
mrcool.com | Page 13
• An external filter, or other means of filtration, is required. Units should be sized for a maximum of 300
feet/min. air velocity, or what is recommended for the filter type installed.
Filter application and placement are critical to airflow, which may affect the heating and cooling
performance of the system. Reduced airflow can shorten the life of the system’s major components, such
as the motor, limits, elements, heat relays, evaporator coil, and/or compressor. Consequently, we
recommend that the return air duct system have only one filter location. For systems with a return air filter
grill or multiple filter grills, they can have a filter installed at each of the return air openings.
If adding high efficiency filters or electronic air filtration systems, it is very important that the airflow is not
reduced by these. If airflow is reduced, the overall performance and efficiency of the unit will also be
reduced. It is strongly recommended that a professional installation technician is contacted to ensure
these filtration systems are installed correctly.
IMPORTANT:
DO NOT USE MORE THAN ONE FILTER IN THE RETURN AIR DUCT SYSTEM.
DO NOT INSTALL A FILTER FOR THE SUPPLY AIR DUCT SYSTEM.
THESE WILL REDUCE AIRFLOW AND AFFECT THE PERFORMANCE OF THE UNIT!
15 AIR FILTER (NOT FACTORY-INSTALLED)
WARNING
DO NOT operate the system without filters. A portion of
the dust in the air may temporarily lodge in the duct
runs and at the supply registers. Any circulated dust
particles could be heated and charred by contact with
the air handler elements. This residue could soil
ceilings, walls, drapes, carpets, and other articles in the
house. Soot damage may occur with filters in place,
when certain types of candles, oil lamps, or standing
pilots are burned.
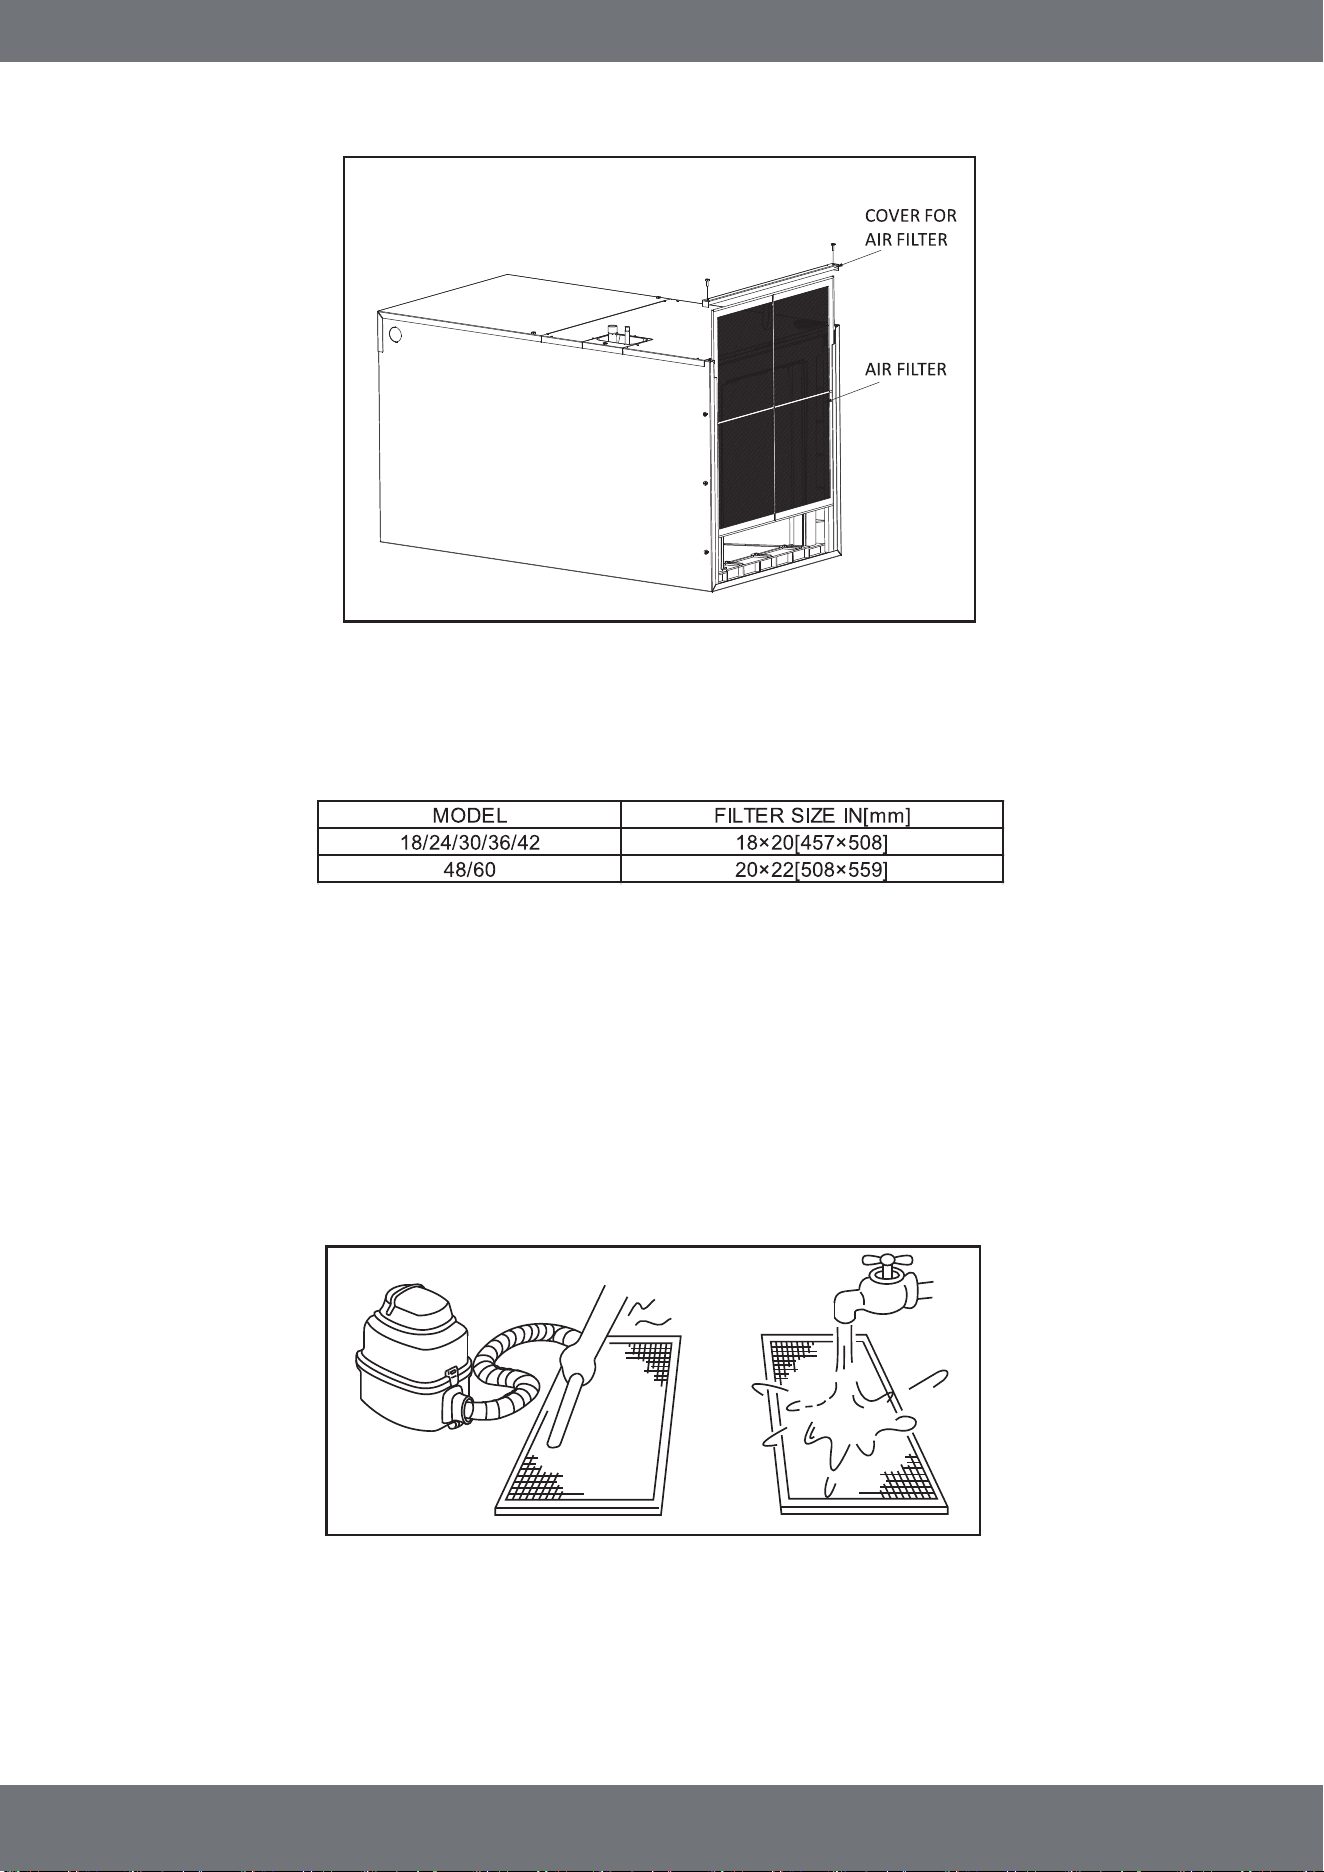
1.) Remove the two bolts marked A and B. Then remove the cover for air filter (Refer to Fig. 6).
2.) Hold the edge of the air filter and extract it.
3.) Clean the air filter by using a vacuum cleaner or pure water (Refer to Fig. 7). NOTE: If the air filter
has a heavy amount of dust accumulation, use a soft brush and mild detergent to clean it.
Then, allow it to dry out in a cool place.
16 FILTER INSTALLATION DIMENSIONS
INDOOR UNIT
mrcool.com | Page 14
AIR FILTER REMOVAL
Table 4
Fig. 6 External Filter Base
Air Filter Dimensional Data
Fig. 7
W/E
O/B
Y
C
G
R
RED
BROWN
GREEN
WHITE
BLACK
R C G W1 W2
BROWN
YELLOW
C Y
INDOOR UNIT OUTDOOR UNIT
THERMOSTAT
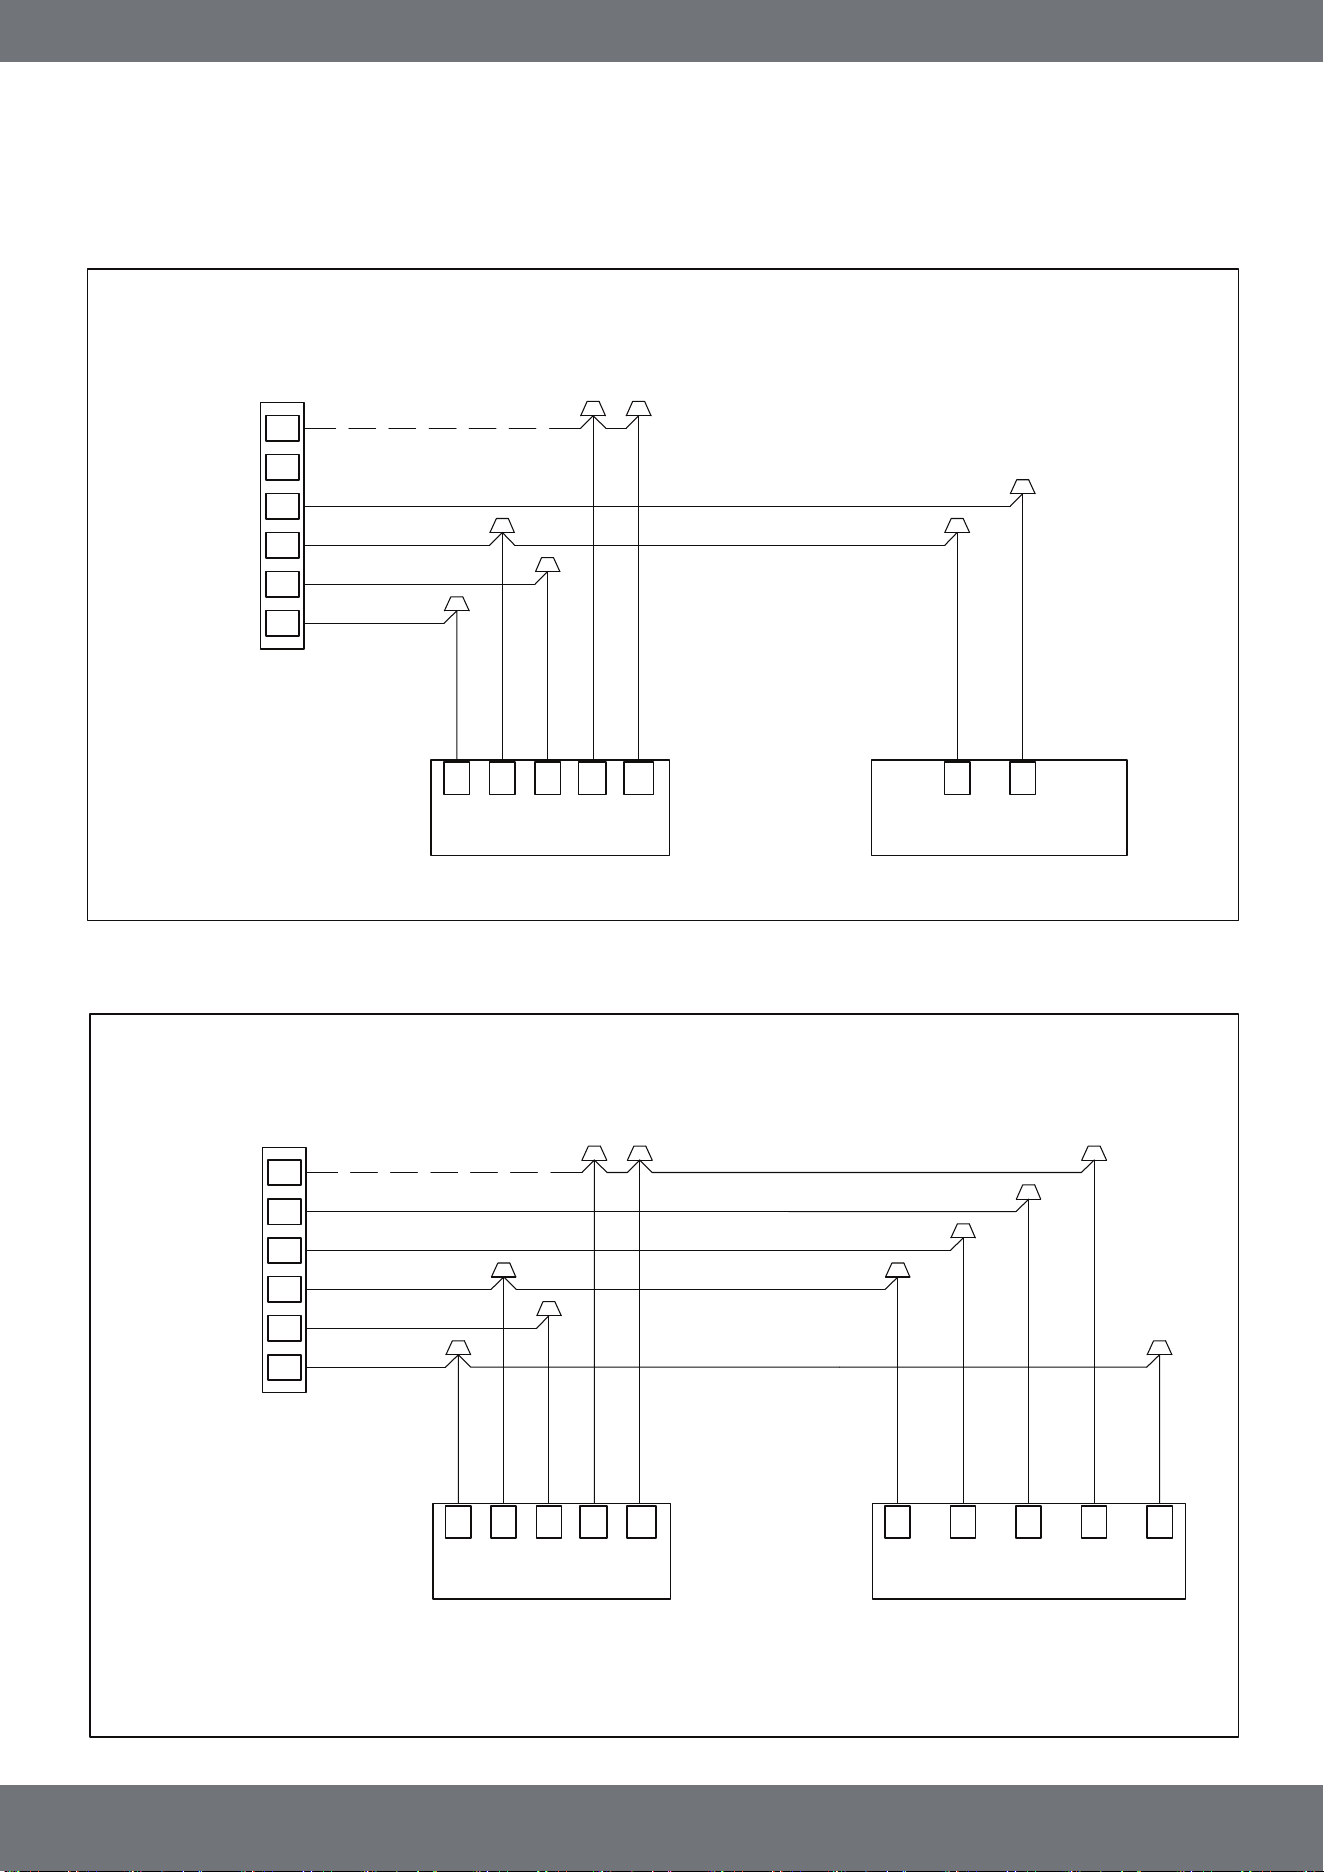
Note: The signal wire
should not be less
than 22 AWG.
W/E
O/B
Y
C
G
R
RED
BROWN
GREEN
WHITE
BLACK
R C G W1 W2
INDOOR UNIT
THERMOSTAT
BROWN
YELLOW
BLUE
WHITE
C Y B W R
OUTDOOR UNIT
Note: The signal wire
should not be less than
22 AWG.
RED
Note: Any the electric
heat elements are
active, the indoor fan
will run on the HIGH
setting.
mrcool.com | Page 15
INDOOR UNIT
17 WIRING DIAGRAMS
Thermostat Wiring - 6 Conductor | 18 Gauge | Low Voltage
Control Wiring for A/C Systems only
Control Wiring for Heat Pump Systems
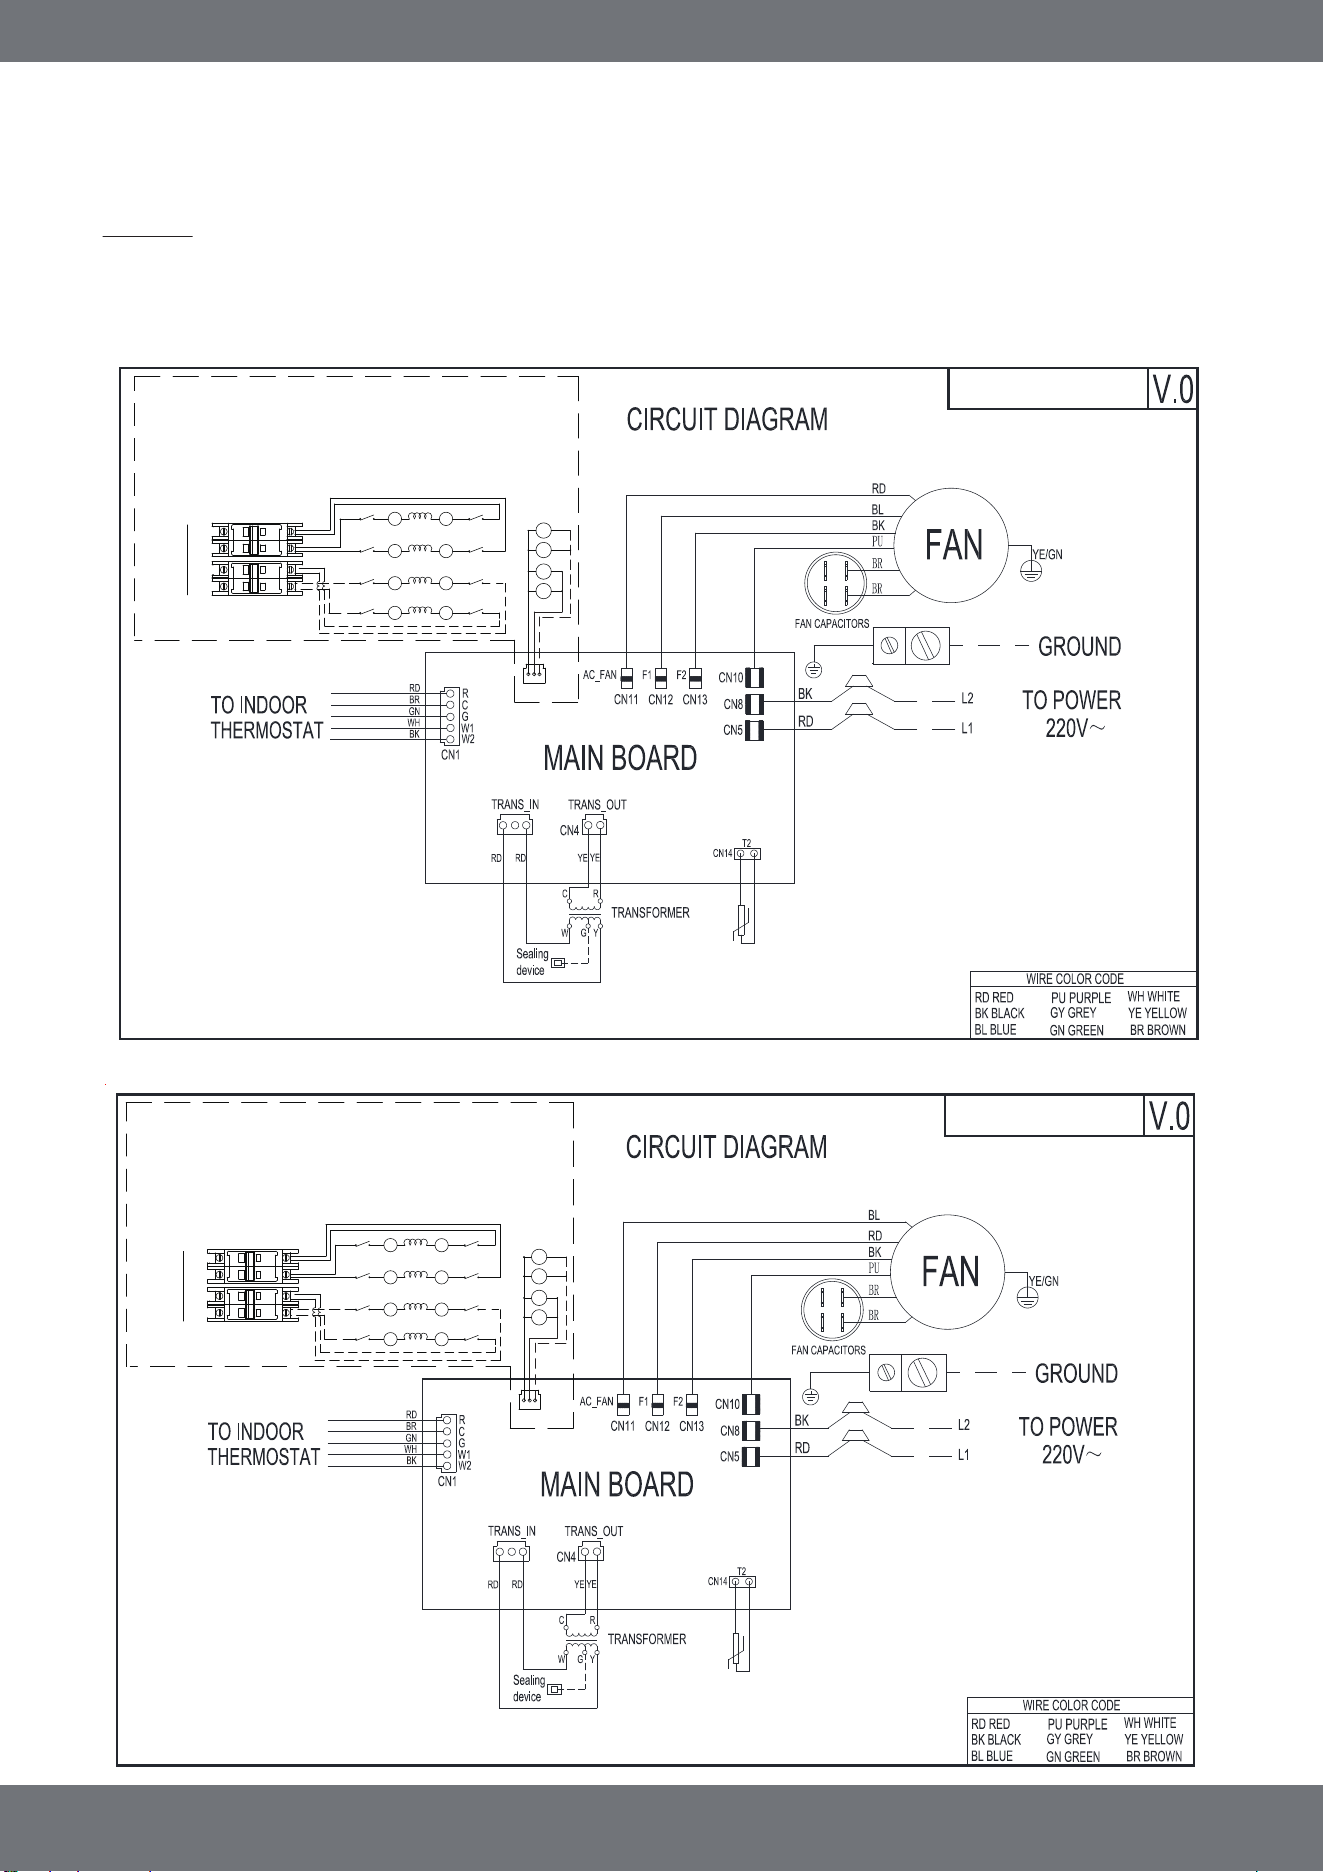
1.) To avoid the electrical shock, please connect the air conditioner with the ground lug. The main power
plug in the air conditioner has been joined with the ground wiring, please do not change it freely.
2.) Use a dedicated circuit.
3.) DO NOT pull the power wiring hard.
4.) When connecting the air conditioner with the ground, observe the local codes.
5.) If necessary, use the power fuse, circuit breaker, or the corresponding scale ampere.
INDOOR UNIT
mrcool.com | Page 16
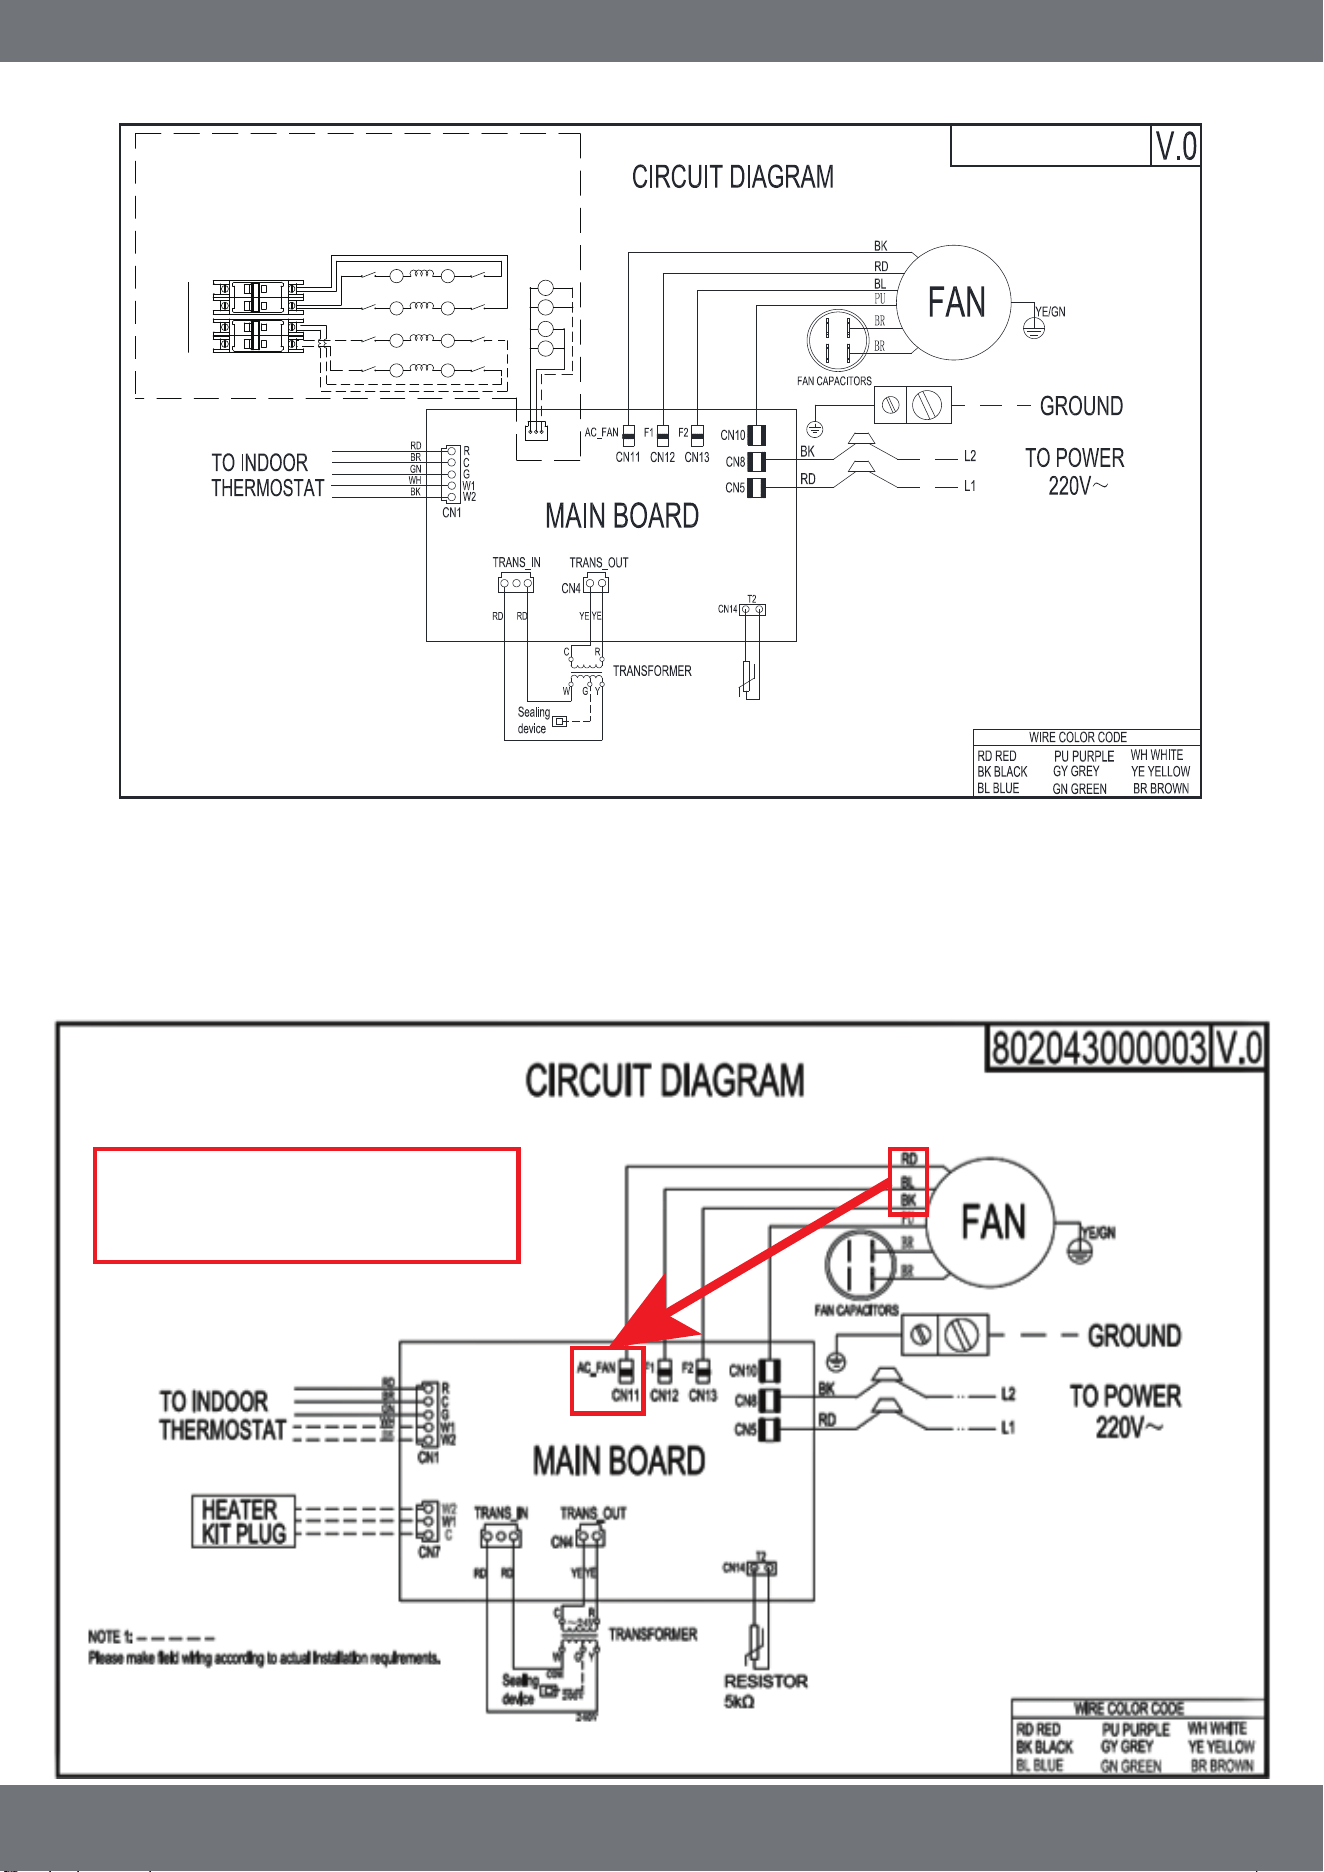
High Voltage Wiring
Applicable to 18k, 24k, 30k, 36k, 42k of 13-14 SEER
Applicable to 48K of 13-14 SEER
Note 1: Please make field
wiring according to actual
installation requirements.
~24V
COM
208V
240V
RESISTOR
5kΩ
802036000348
CN7
C W1W2
HS-4
HS-3
HS-2
HS-1
Electric
heating
control
LS1-1
HS-1
RD
HEAT 1
LS2-1
RD
BK
BK
HS-1
LS1-2
HS-2
RD
HEAT2
LS2-2
RD
BK
BK
HS-2
LS1-3
HS-3
RD
LS2-3
RD
BK
BK
HS-3
LS1-4
HS-4
RD
LS2-4
RD
BK
BK
HS-4
HEAT3
HEAT4
L1
L2
L1
L2
Electric
heating
power
CB1
CB2
One-stage electric heating 5-10KW, using One CB, signal line W1,C
Two-stage electric heating 11-20KW, using CB1、CB2, signal line W1, W2,C
For the optional electric heat kit:
due to the difference of electric heating power purchased by customers,
the specific wiring shall be subject to the actual situation
Note 1: Please make field
wiring according to actual
installation requirements.
~24V
COM
208V
240V
RESISTOR
5kΩ
802036000349
CN7
C W1W2
HS-4
HS-3
HS-2
HS-1
Electric
heating
control
LS1-1
HS-1
RD
HEAT 1
LS2-1
RD
BK
BK
HS-1
LS1-2
HS-2
RD
HEAT2
LS2-2
RD
BK
BK
HS-2
LS1-3
HS-3
RD
LS2-3
RD
BK
BK
HS-3
LS1-4
HS-4
RD
LS2-4
RD
BK
BK
HS-4
HEAT3
HEAT4
L1
L2
L1
L2
Electric
heating
power
CB1
CB2
One-stage electric heating 5-10KW, using One CB, signal line W1,C
Two-stage electric heating 11-20KW, using CB1、CB2, signal line W1, W2,C
For the optional electric heat kit:
due to the difference of electric heating power purchased by customers,
the specific wiring shall be subject to the actual situation
INDOOR UNIT
mrcool.com | Page 17
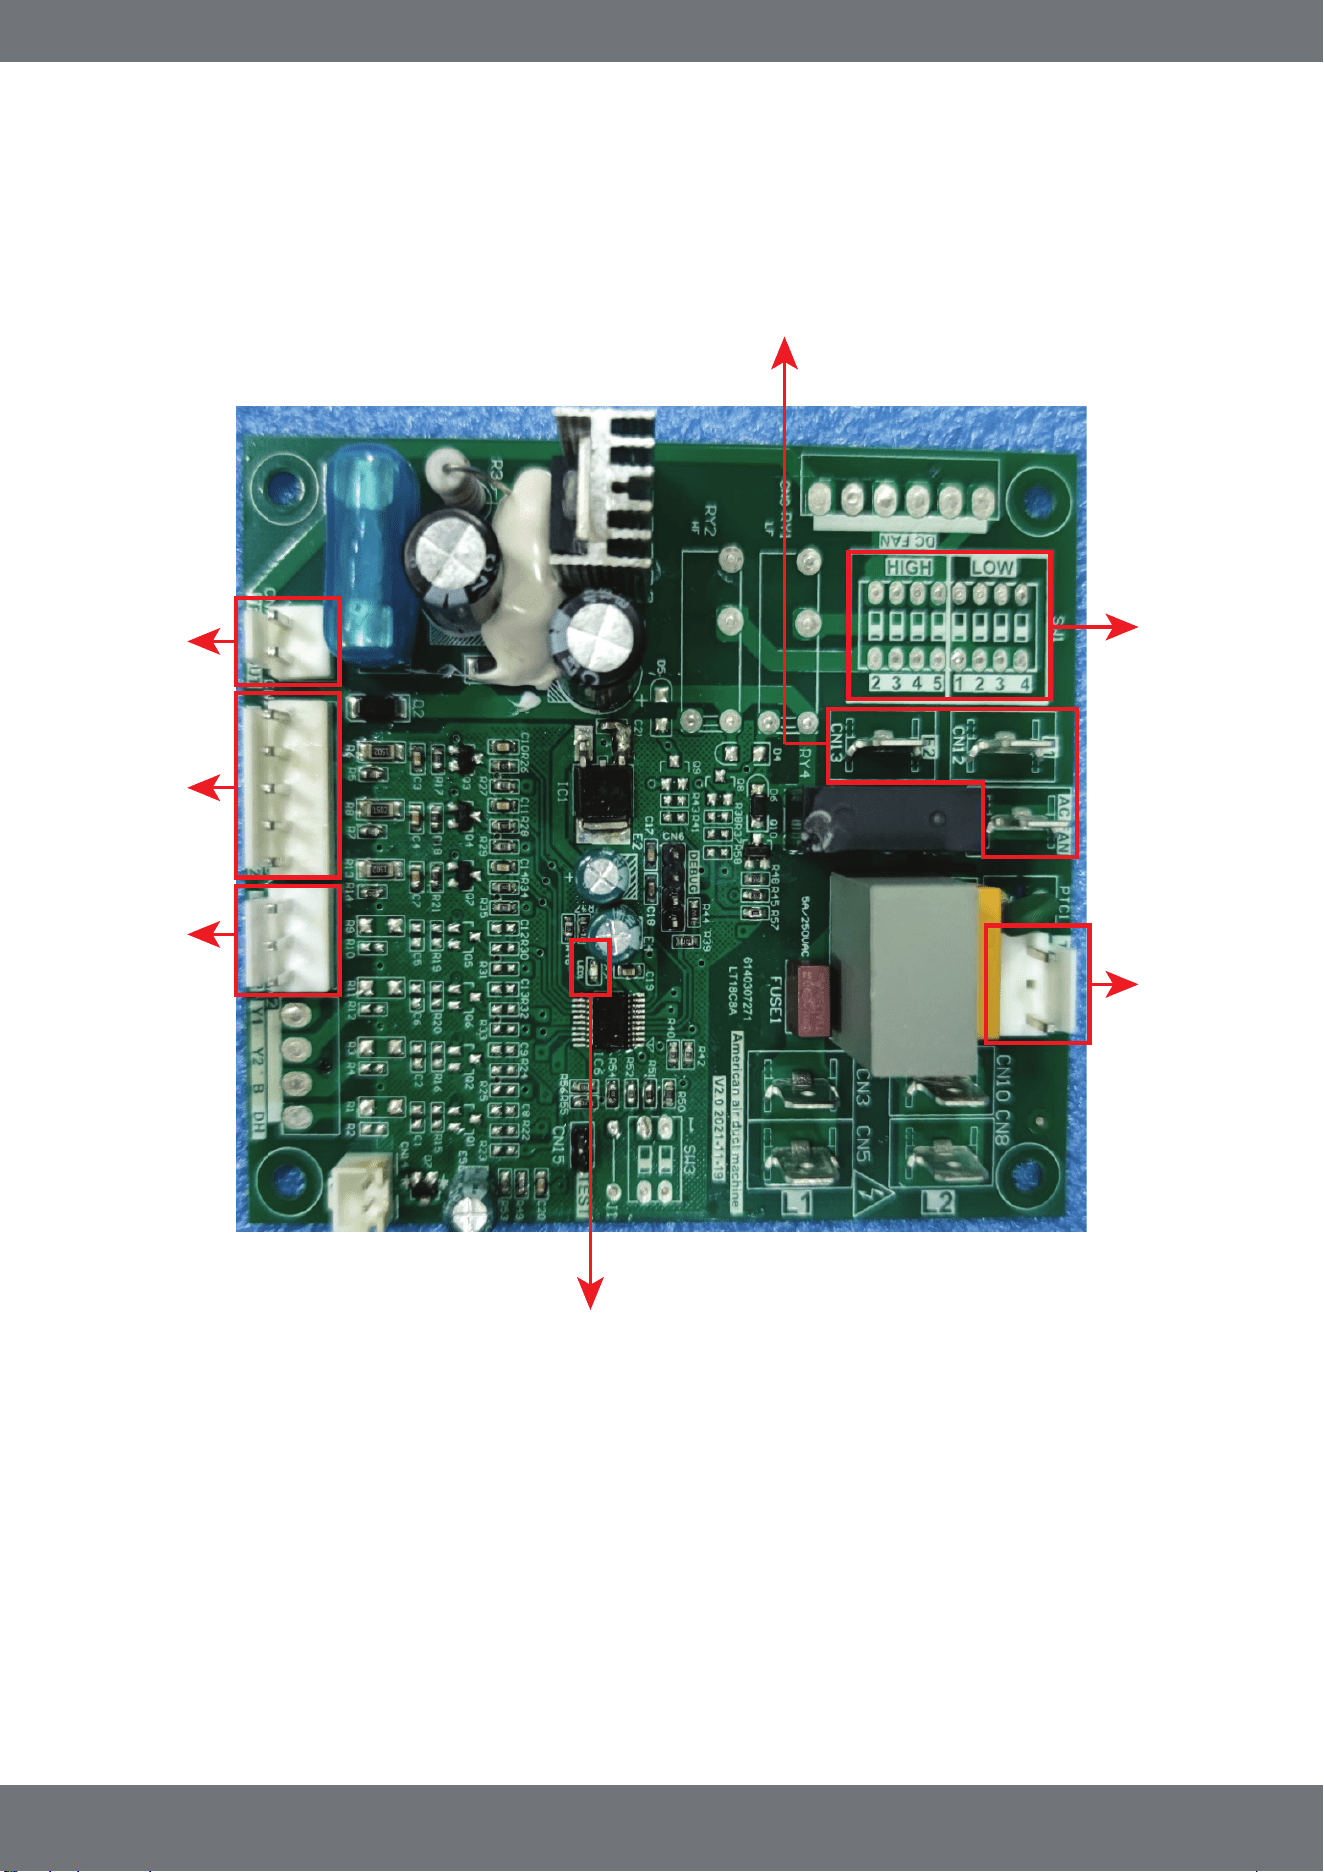
Applicable to 60K of 13-14 SEER
Instructions to Adjust Blower Volume Speed
To adjust blower speed, use the diagram below to wire according to the desired speed:
CN11 is the air volume output port. The air volume is adjusted by connecting one of the wires, each represents
a different motor speed, to the port CN11. Regardless of the speed selected, only one wire should be connected
to terminal CN11. Terminals CN12 & CN13 should be used as parking terminals for the two unused wires to be
connected to. NOTE: The circuit board used in the 18K, 24K, 30K, 36K,& 42K capacity units is shown
below as an example, but the same applies for the circuit boards used in the 48K and 60K units.
Note 1: Please make field
wiring according to actual
installation requirements.
Black Wire (BK) = High Speed
Red Wire (RD) = Medium Speed
Blue Wire (BL) = Low Speed
~24V
COM
208V
240V
RESISTOR
5kΩ
802036000350
CN7
C W1W2
HS-4
HS-3
HS-2
HS-1
Electric
heating
control
LS1-1
HS-1
RD
HEAT 1
LS2-1
RD
BK
BK
HS-1
LS1-2
HS-2
RD
HEAT2
LS2-2
RD
BK
BK
HS-2
LS1-3
HS-3
RD
LS2-3
RD
BK
BK
HS-3
LS1-4
HS-4
RD
LS2-4
RD
BK
BK
HS-4
HEAT3
HEAT4
L1
L2
L1
L2
Electric
heating
power
CB1
CB2
One-stage electric heating 5-10KW, using One CB, signal line W1,C
Two-stage electric heating 11-20KW, using CB1、CB2, signal line W1, W2,C
For the optional electric heat kit:
due to the difference of electric heating power purchased by customers,
the specific wiring shall be subject to the actual situation
INDOOR UNIT
mrcool.com | Page 18
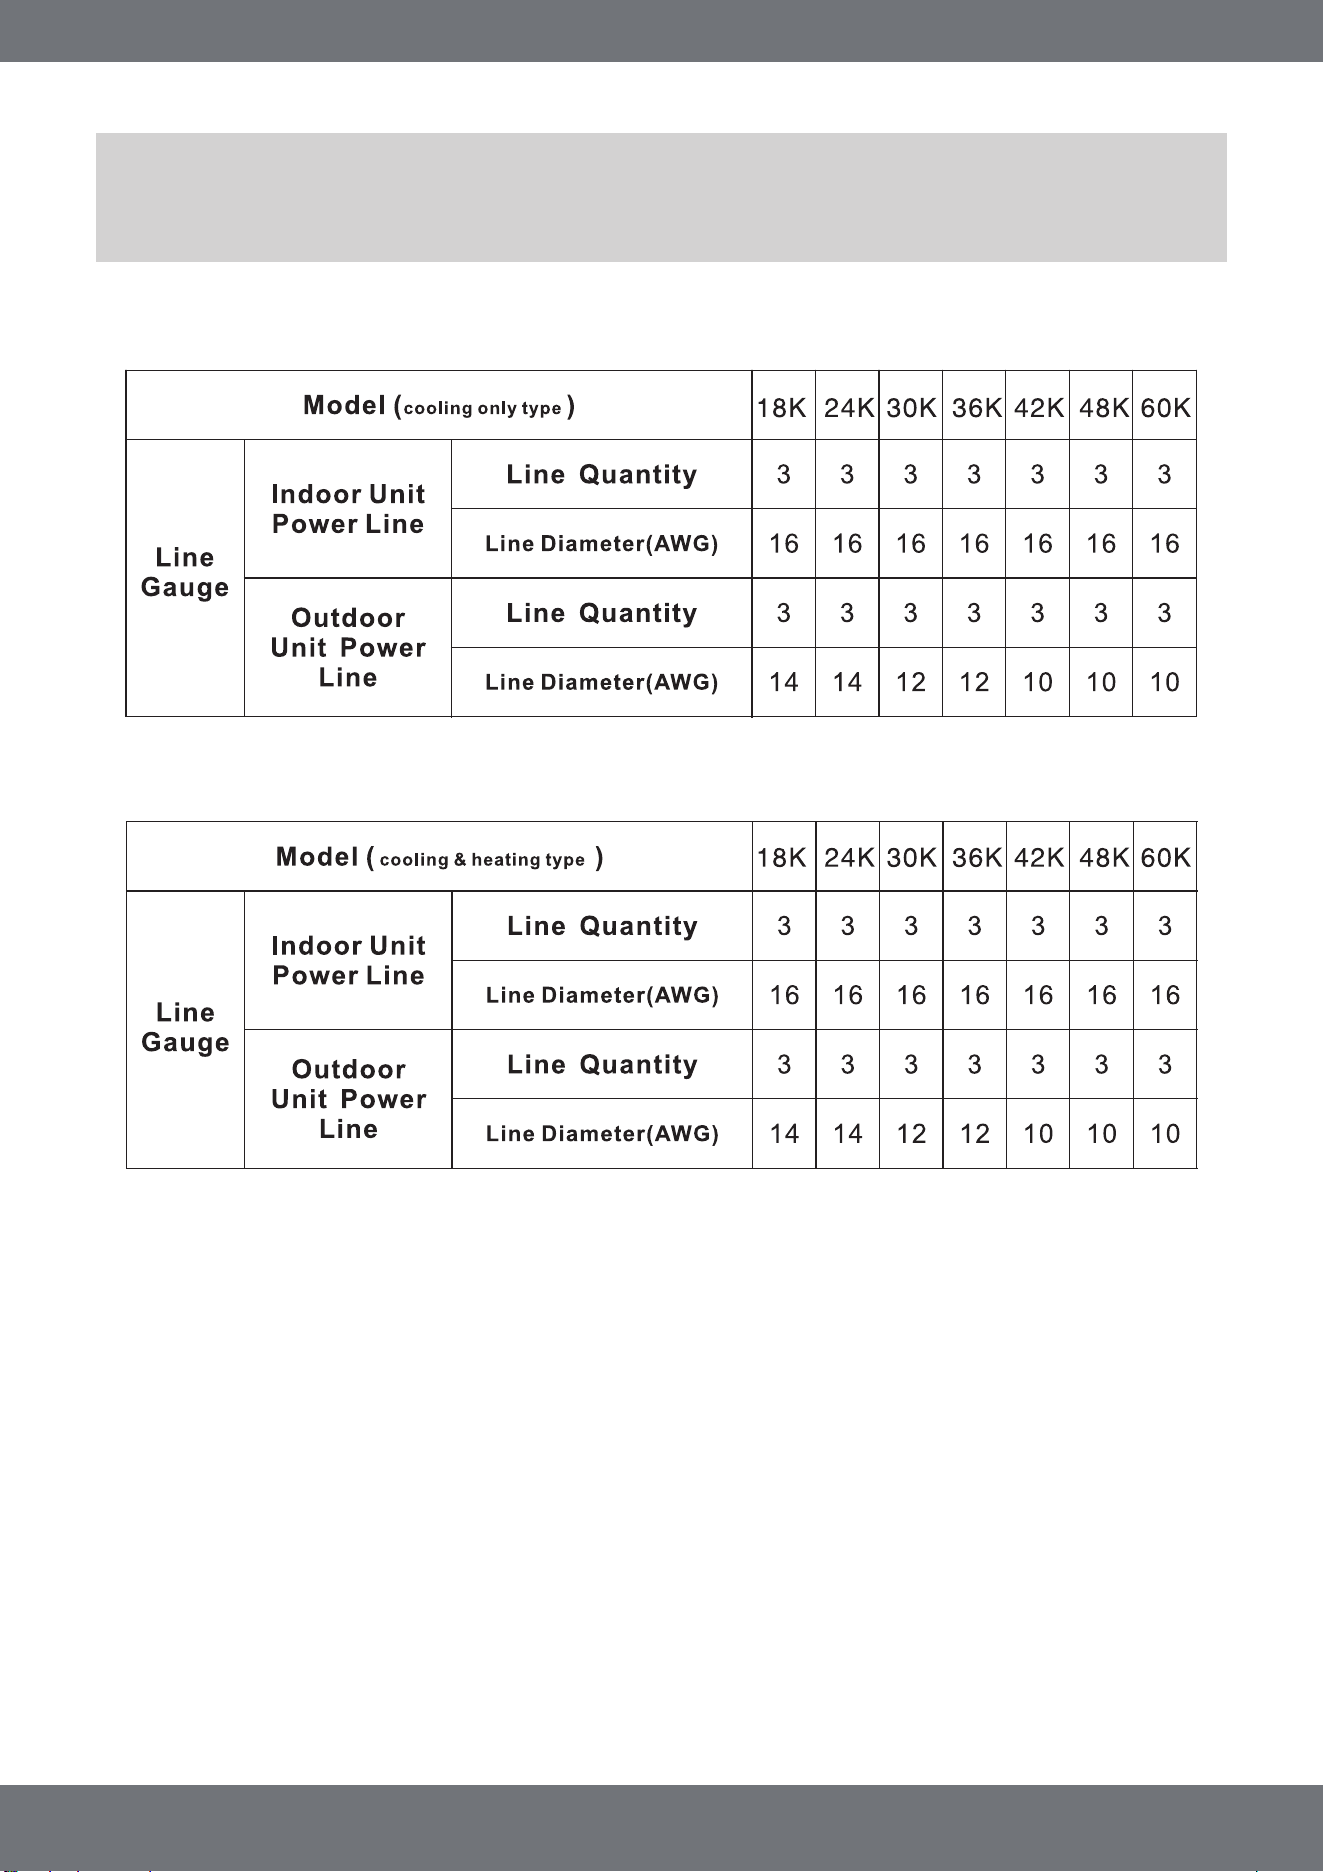
Air Handler Main Board Diagram
LED Display Lamp
Electric
Heat Kit
Connection
Terminal
Transformer
Input
Terminal
Reserved
fan gear
DIP Switches
for 18 SEER
Thermostat
Terminal
Transformer
Output
Terminal/24V
Fan Motor Terminals
• AC Fan Port: Used to Adjust Fan Speed/Output
• CN12 (F1) & CN13 (F2) Ports are Reserved
18 ELECTRIC WIRING GAUGE
INDOOR UNIT
mrcool.com | Page 19
NOTE: The cross-section areas of wires or lines should not be less than the corresponding
line measurements listed in the tables below; Additionally, if the power wires from the unit
are quite long, please select wiring that has a larger cross-sectional area in order to help
guarantee a normal supply of power over the distance of the wiring.
Table 5
Table 6
INDOOR UNIT
mrcool.com | Page 20
19 ELECTRIC HEAT KIT INSTALLATION (OPTIONAL)
CAUTION
1.) Ensure that all power supply is disconnected prior to installing
the heat kit.
2.) A means of strain relief and conductor protection must be
provided at the supply wire entrance into cabinet.
3.) Only use copper conductors.
4.) Installation must follow National Electric Code (NEC) and other
applicable codes.
5.) If this appliance is installed in an enclosed area such as a
garage or utility room with any carbon monoxide producing
appliance, ensure the area is properly ventilated to the
outside.
6.) A filter dryer is recommended for installation based on
nominals tonnage. One should be included and zip-tied to the
condenser.
7.) Use 0.96 as approximate SCFM correction factor for wet coil.
Installation Instructions:
1.) Refer to the Table below for the appropriate, optional heat kit.
2.) Check for any physical damage; do not install a damaged heat kit.
3.) Remove the upper side panel from air handler.
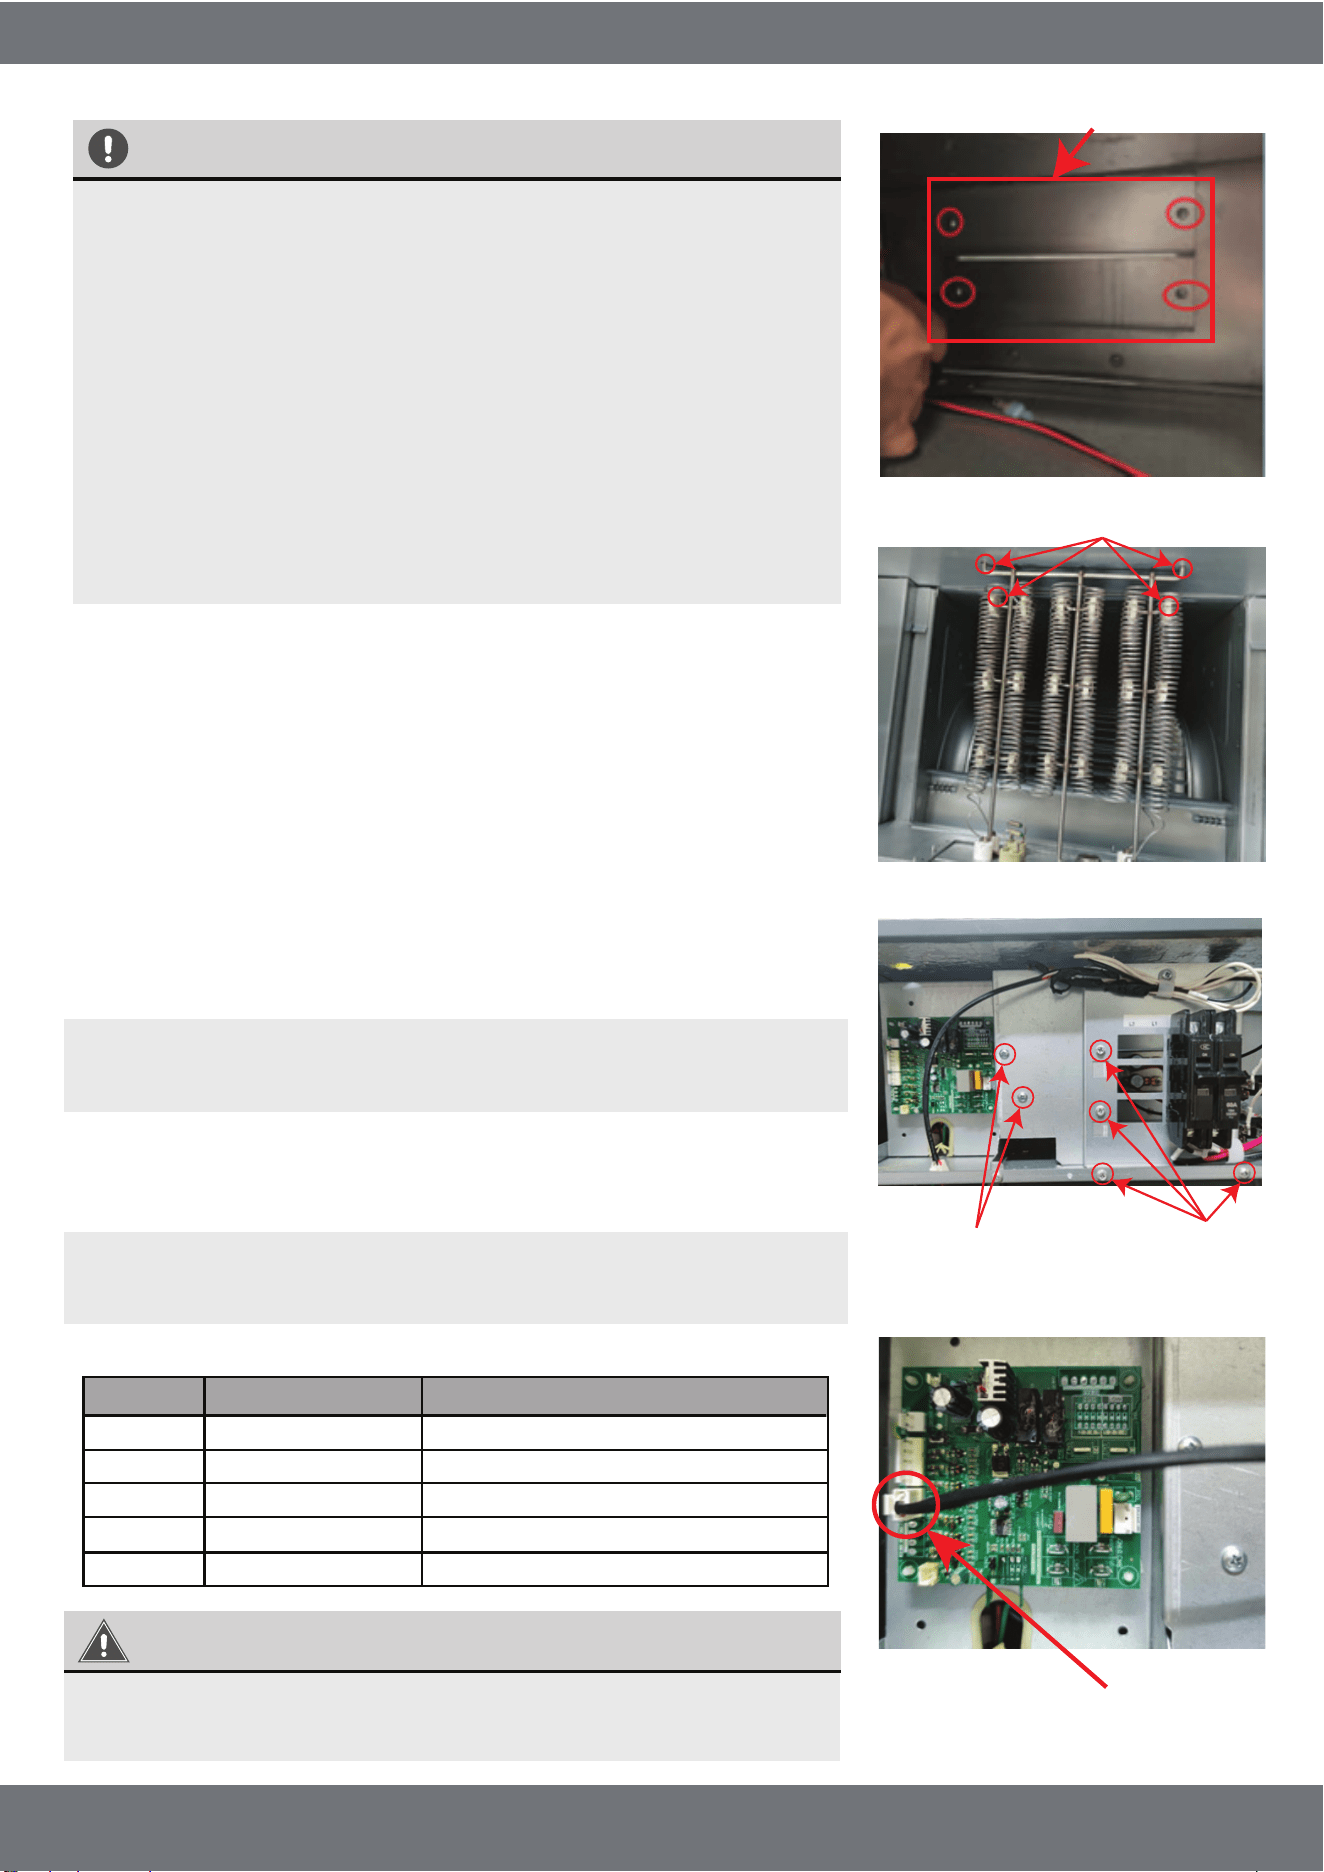
4.) Remove the air duct sealing plate from the air handler (See Fig. 8).
5.) Knock out the hole on the front panel.
6.) Install the heating bracket by sliding it into the air duct hole that
you removed the plate from in the previous steps. Align the 4
prongs at the end of the heat kit with the 4 corresponding holes
on the opposite side of the air duct hole. Install screws to secure
the heat kit to the air handler (See Fig. 9).
7.) Install the electrical board bracket and screw it into place. Then,
position, install, and fasten the electrical board on the bracket
which also screws into place (See Fig. 10).
8.) Insert the heat kit wiring connector into the correct terminal on the
air handler main board (See Fig. 11).
9.) Reinstall the upper side panel to the air handler and check
operation.
Heat Kit Compatibility Chart
IMPORTANT
You must use a compatible heat kit listed in the above chart.
Using an incorrect size, could cause the unit to overheat
and/or cause equipment damage.
NOTE: When installing the electrical boards, make sure the
indoor unit power cable does not snag or come in contact with
any of the sharp edges of the sheet metal.
NOTE: For more detailed information and illustrations on how
to properly install the electric heat kit, please refer to the
instruction manual provided with the heat kit.
PHK05H
PHK07H
5kW heat strip
7.5kW heat strip
PHK10H 10kW heat strip
Kit #. Description
18K/24K/30K/36K/42K/48K/60K
18K/24K/30K/36K/42K/48K/60K
24K/30K/36K/42K/48K/60K
Unit Capacity Compatibility
PHK15H
15kW heat strip
PHK20H 20kW heat strip
36K/42K/48K/60K
48K/60K
Plug electric heat kit
connector into
terminal on main board
Air Duct
Sealing Plate
Fig. 8
Fig. 9
4 Prongs
Fig. 10
Electrical Board
Mounting
Screws
Fig. 11
Electrical
Board Bracket
Mounting Screws
20 TROUBLESHOOTING INDOOR UNIT
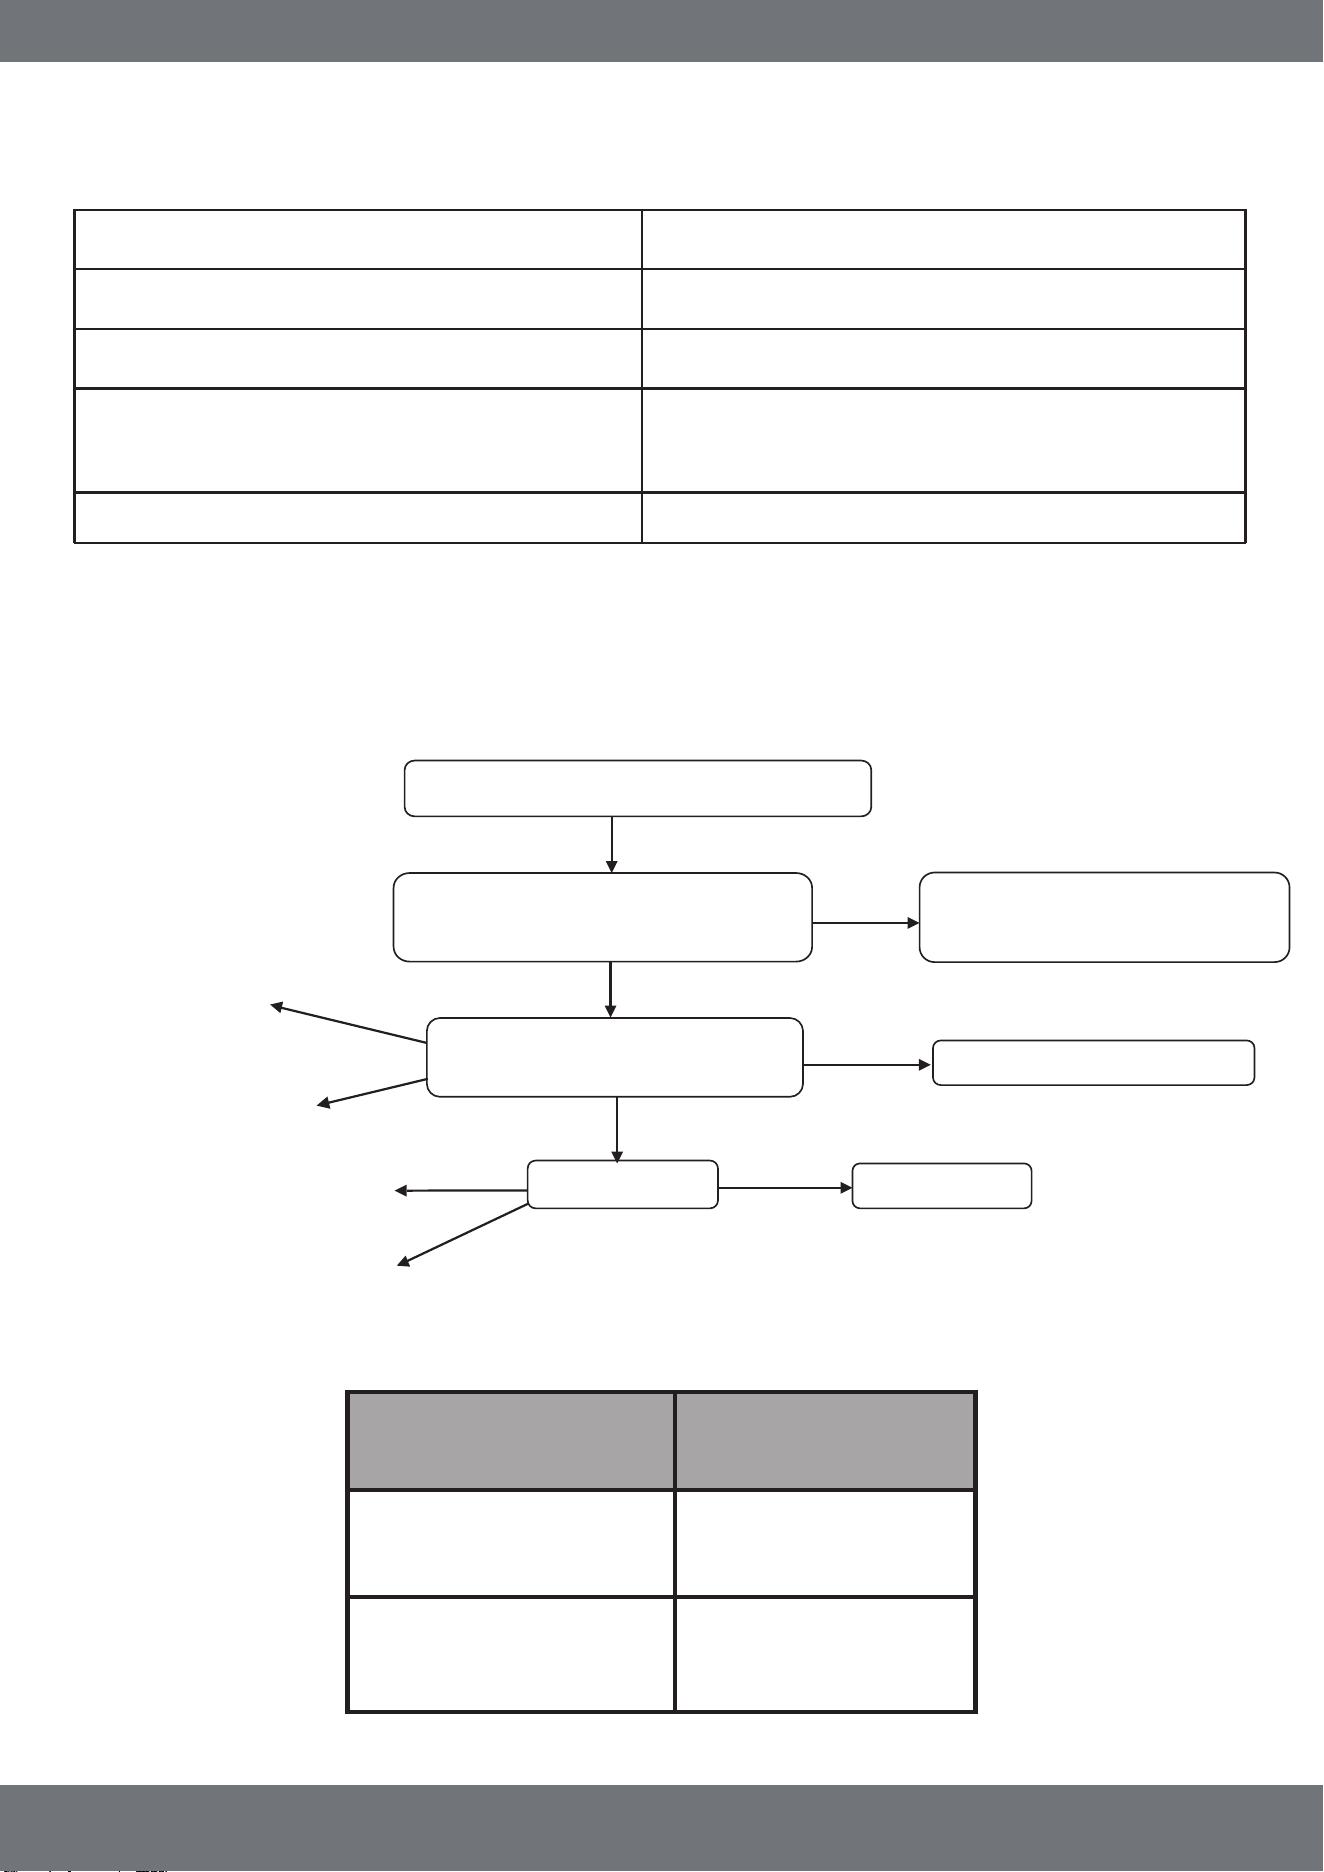
Display mode Status description
Green light always on No system alarm and error, normal standby
Red light always on Evaporator temperature sensor (T2) failure
Green light always on &
yellow light flashing
Evaporator high and low
temperature protection
Green light flashing System is in normal operating status
T2 Evaporator temperature sensor failure
Error
No
Check the sensor to see if it
is good or not?
Error
If properly connected, then
replace the sensor or PCB
Replace the bad sensor
Check the connection between
sensor and PCB
No
Check PCB
Is sensor in an open circuit?
Does the sensor
have a short circuit?
Is component damaged?
Wet?
Replace PCB
Evaporator temp. sensor abnormal
Error
INDOOR UNIT
mrcool.com | Page 21
Temperature
°Fahrenheit (°Celsius)
Resistor Value
(Kilo-ohms KΩ)
77°F (25°C)
95°F (35°C)
5.0 KΩ
3.5 KΩ
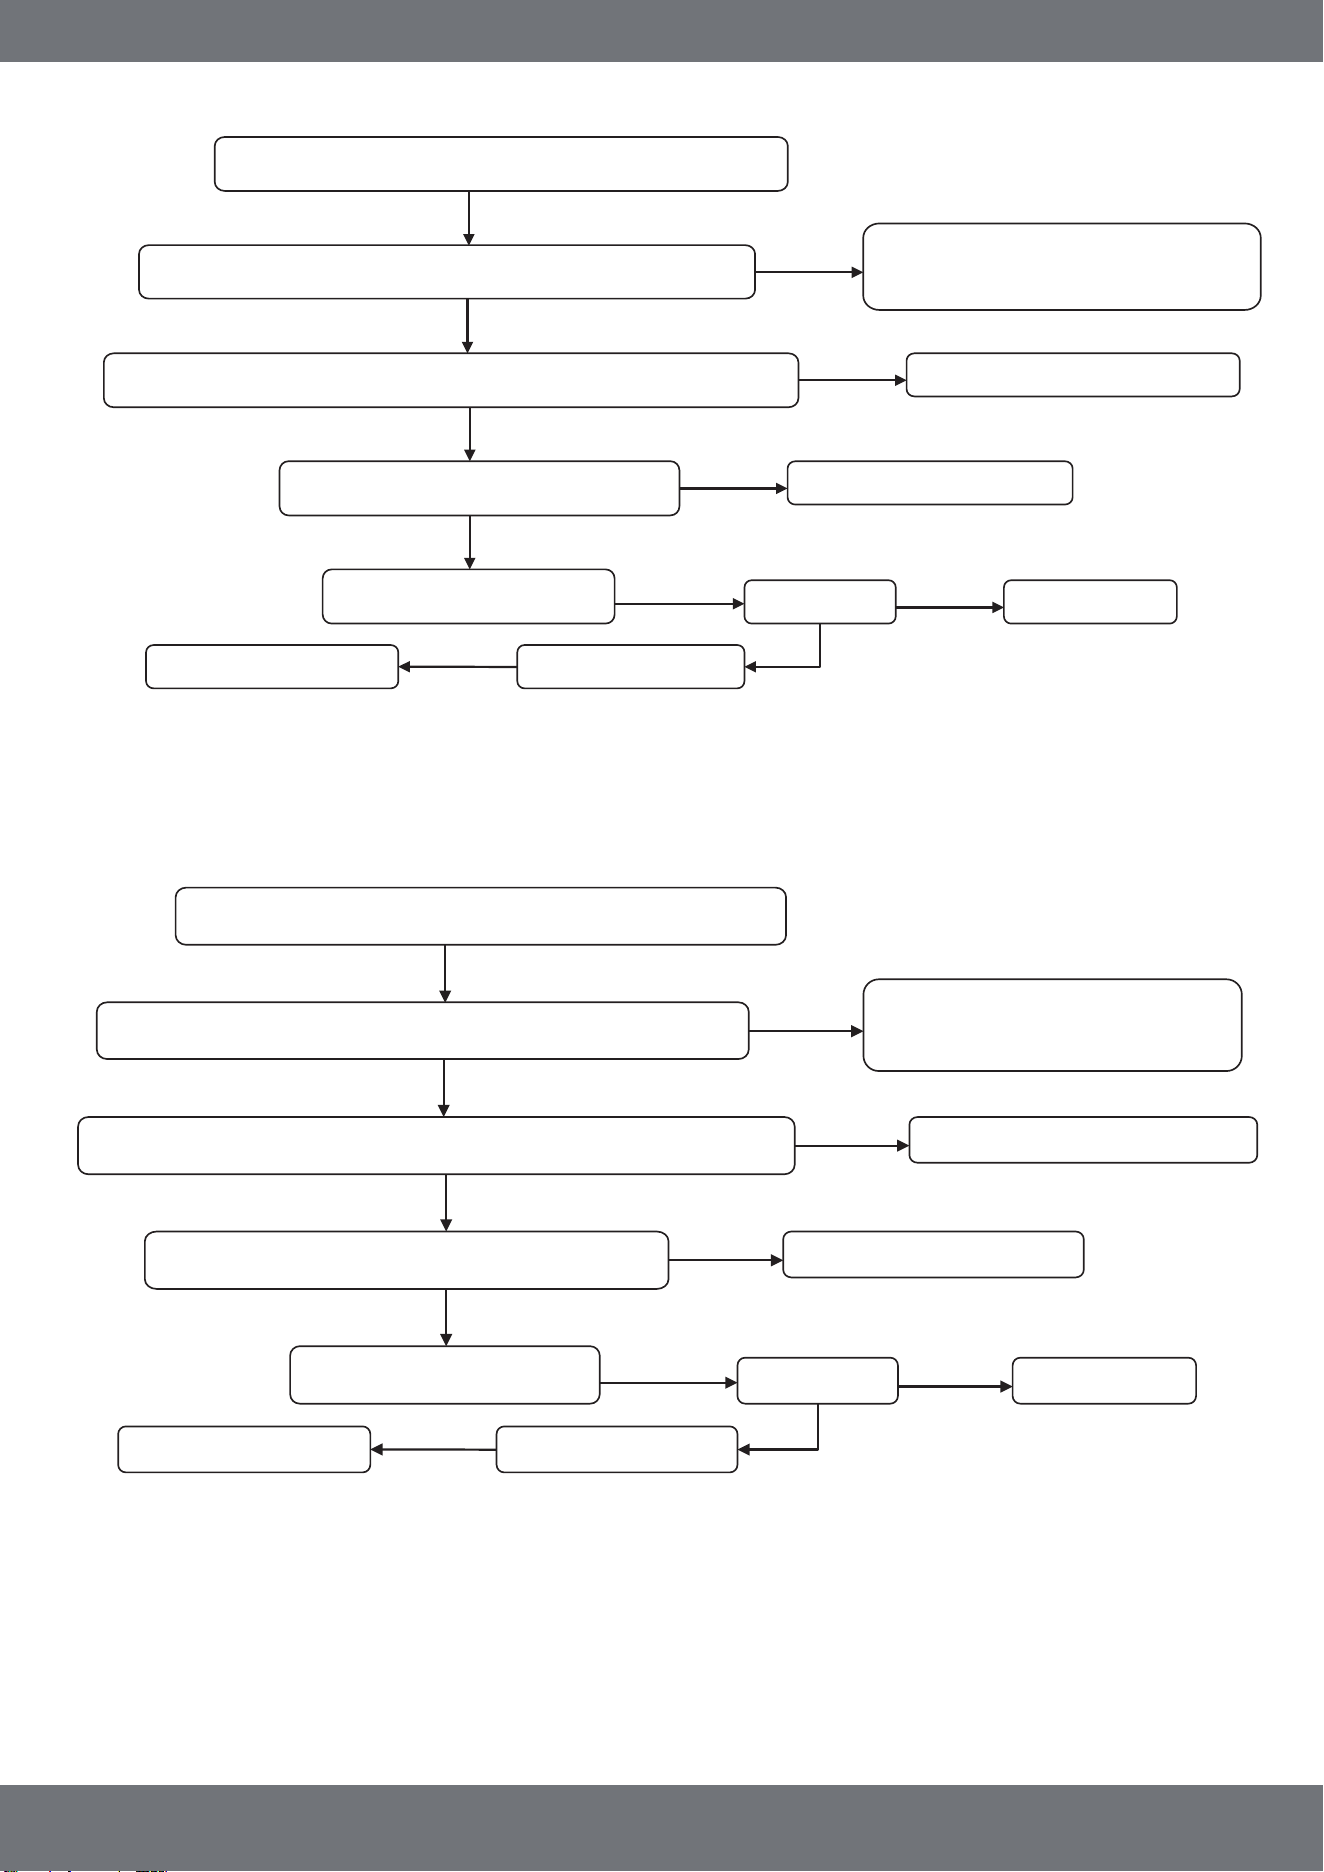
Evaporator high temperature protection (for heating mode)
Error
OK
Check if the Strainer is blocked
Check the connection between sensor and PCB
High temp. protection of Indoor evaporator
If properly connected, then
replace the sensor or PCB
OK
Check if evaporator surface is blocked in the system
OK
Error
Clean the evaporator
Check PCB
Error
Error
Replace the Strainer
Check the fan speed
Error
Replace PCB
Check fan motor
OK
Error
Replace fan motor
Evaporator low temperature protection (for cooling mode)
Error
OK
Check to see if the Strainer is blocked
Check the connection between sensor and PCB
High temp. protection of Indoor evaporator
If properly connected, then
replace the sensor or PCB
OK
Check if evaporator surface is blocked in the system
OK
Error
Clean the evaporator
Check PCB
Error
Error
Replace the Strainer
Check the fan speed
Error
Replace
PCB
Check fan motor
OK
Error
Replace fan motor
INDOOR UNIT
mrcool.com | Page 22

PRODIRECT™ Series
The design and specifications of this product and/or manual are subject to change without prior notice.
Visit www.mrcool.com for the latest documentation.