English
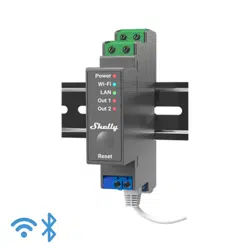
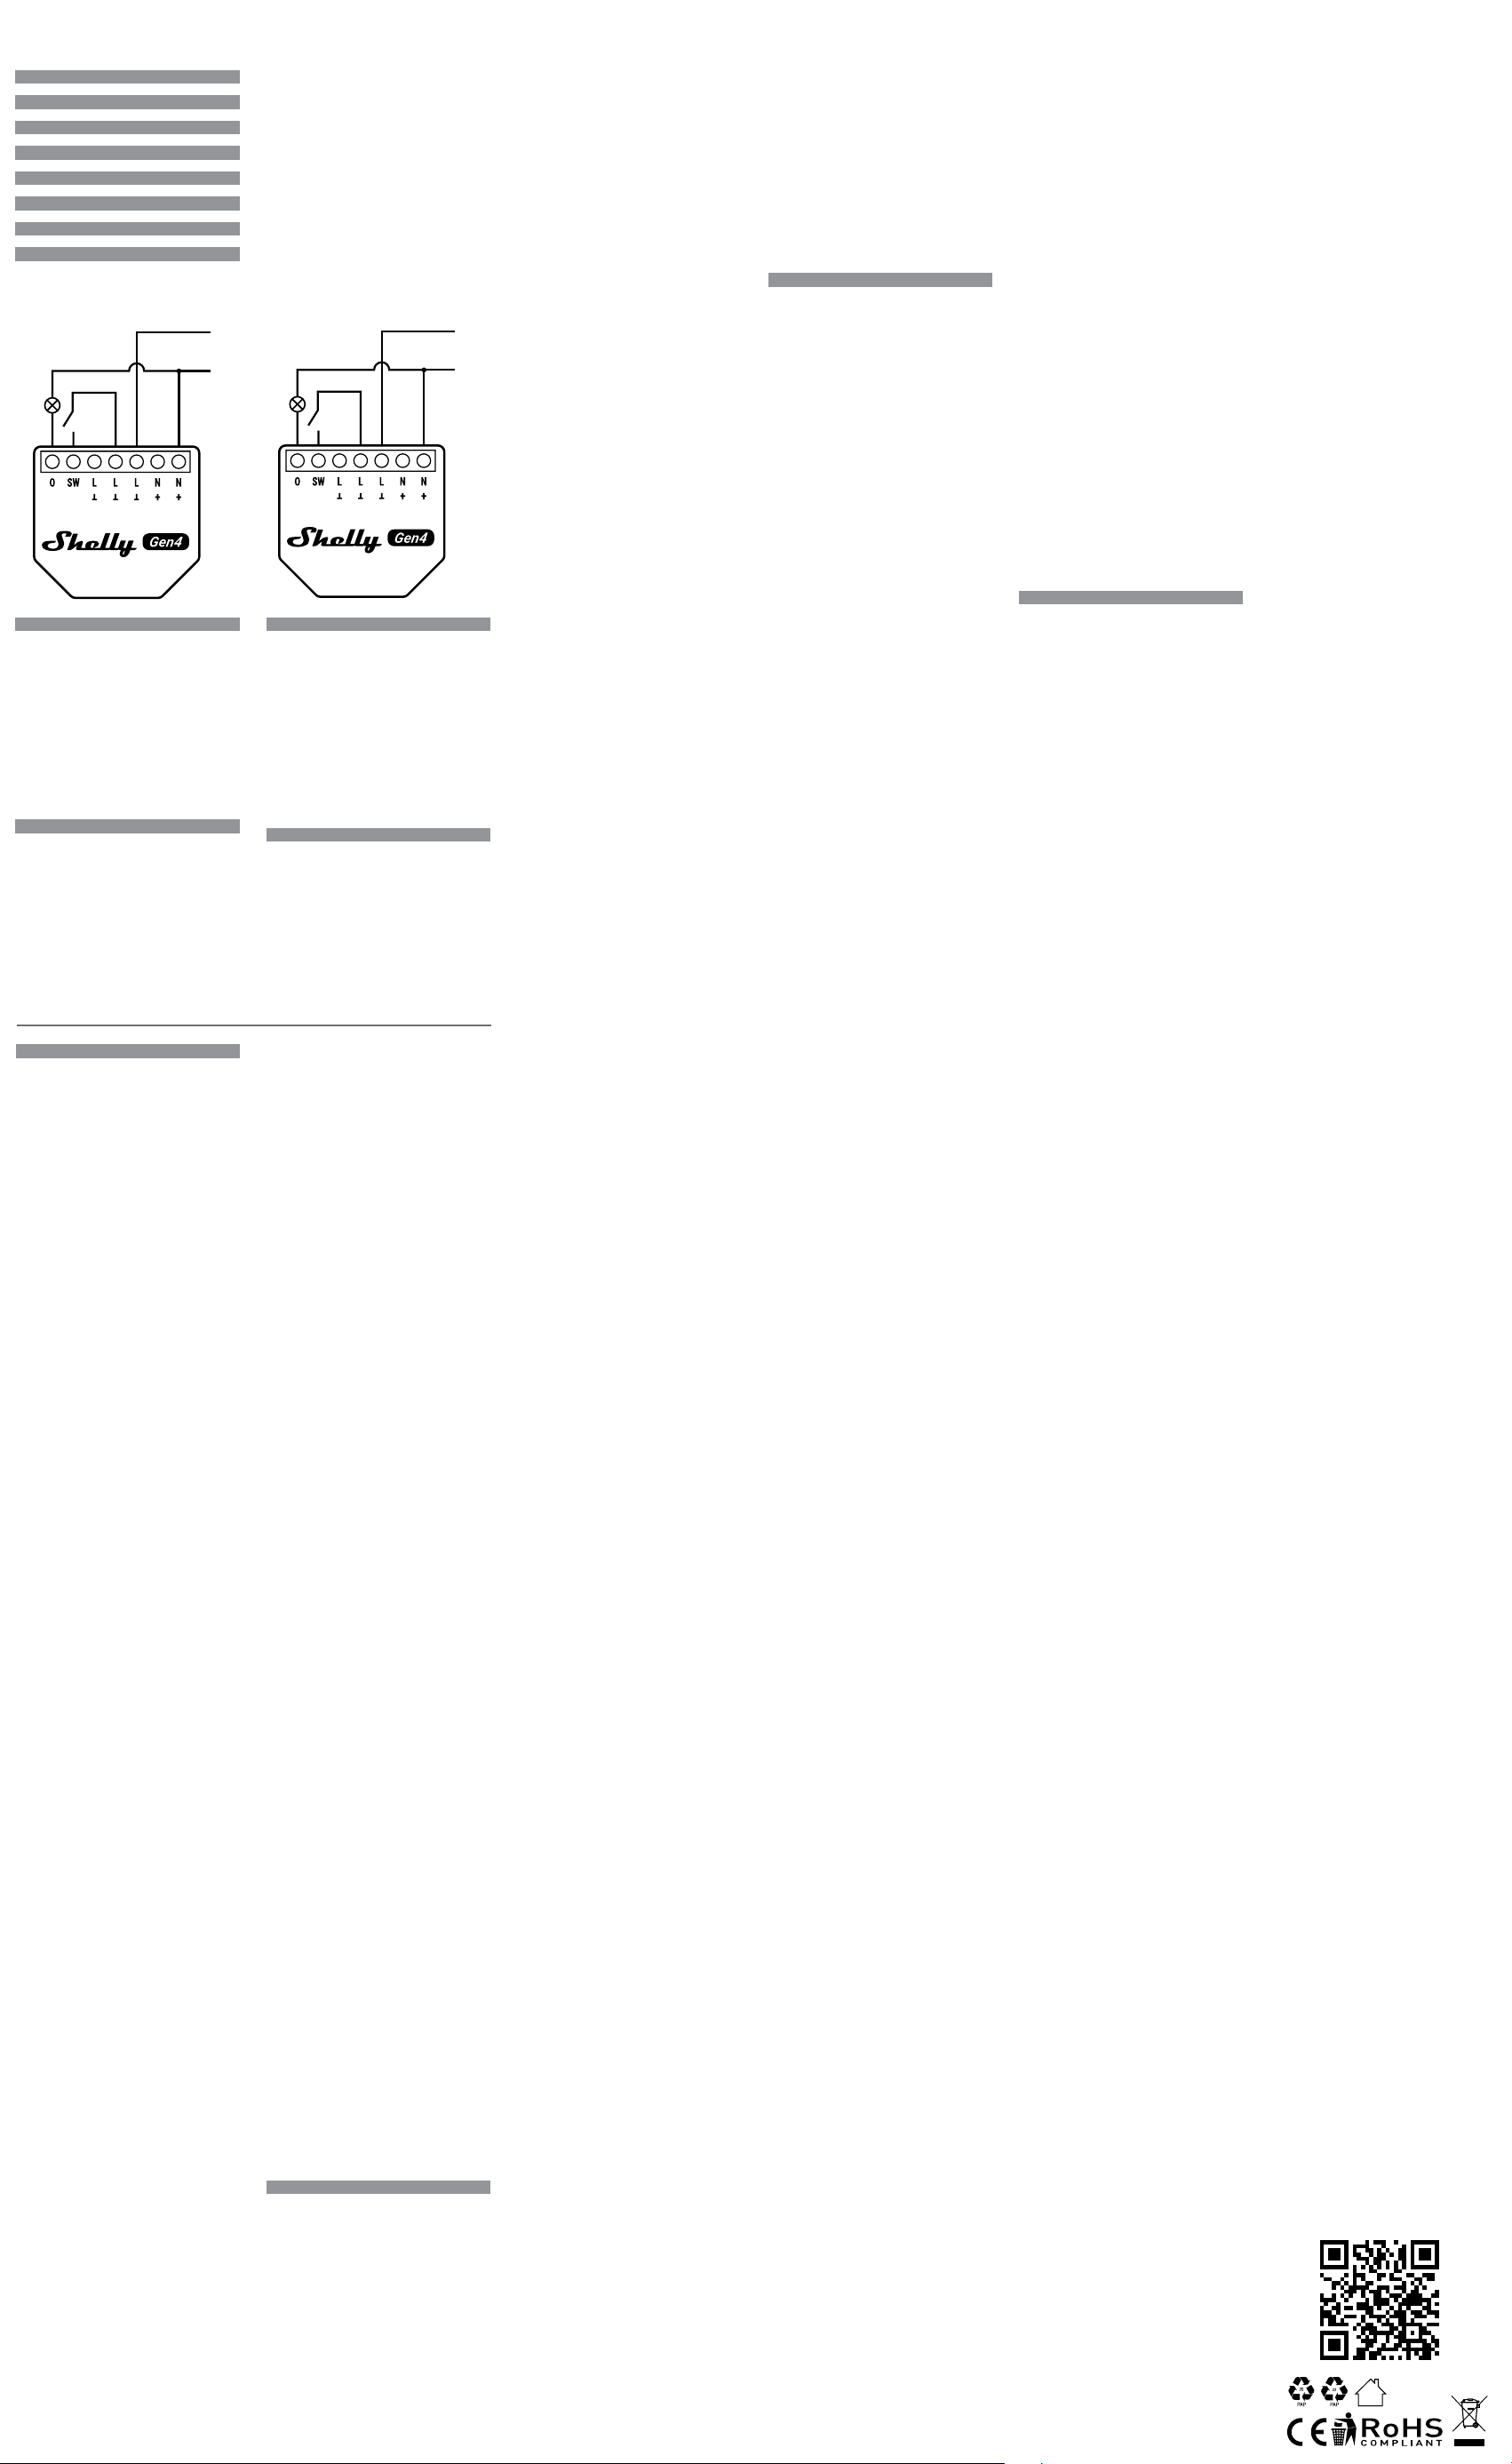
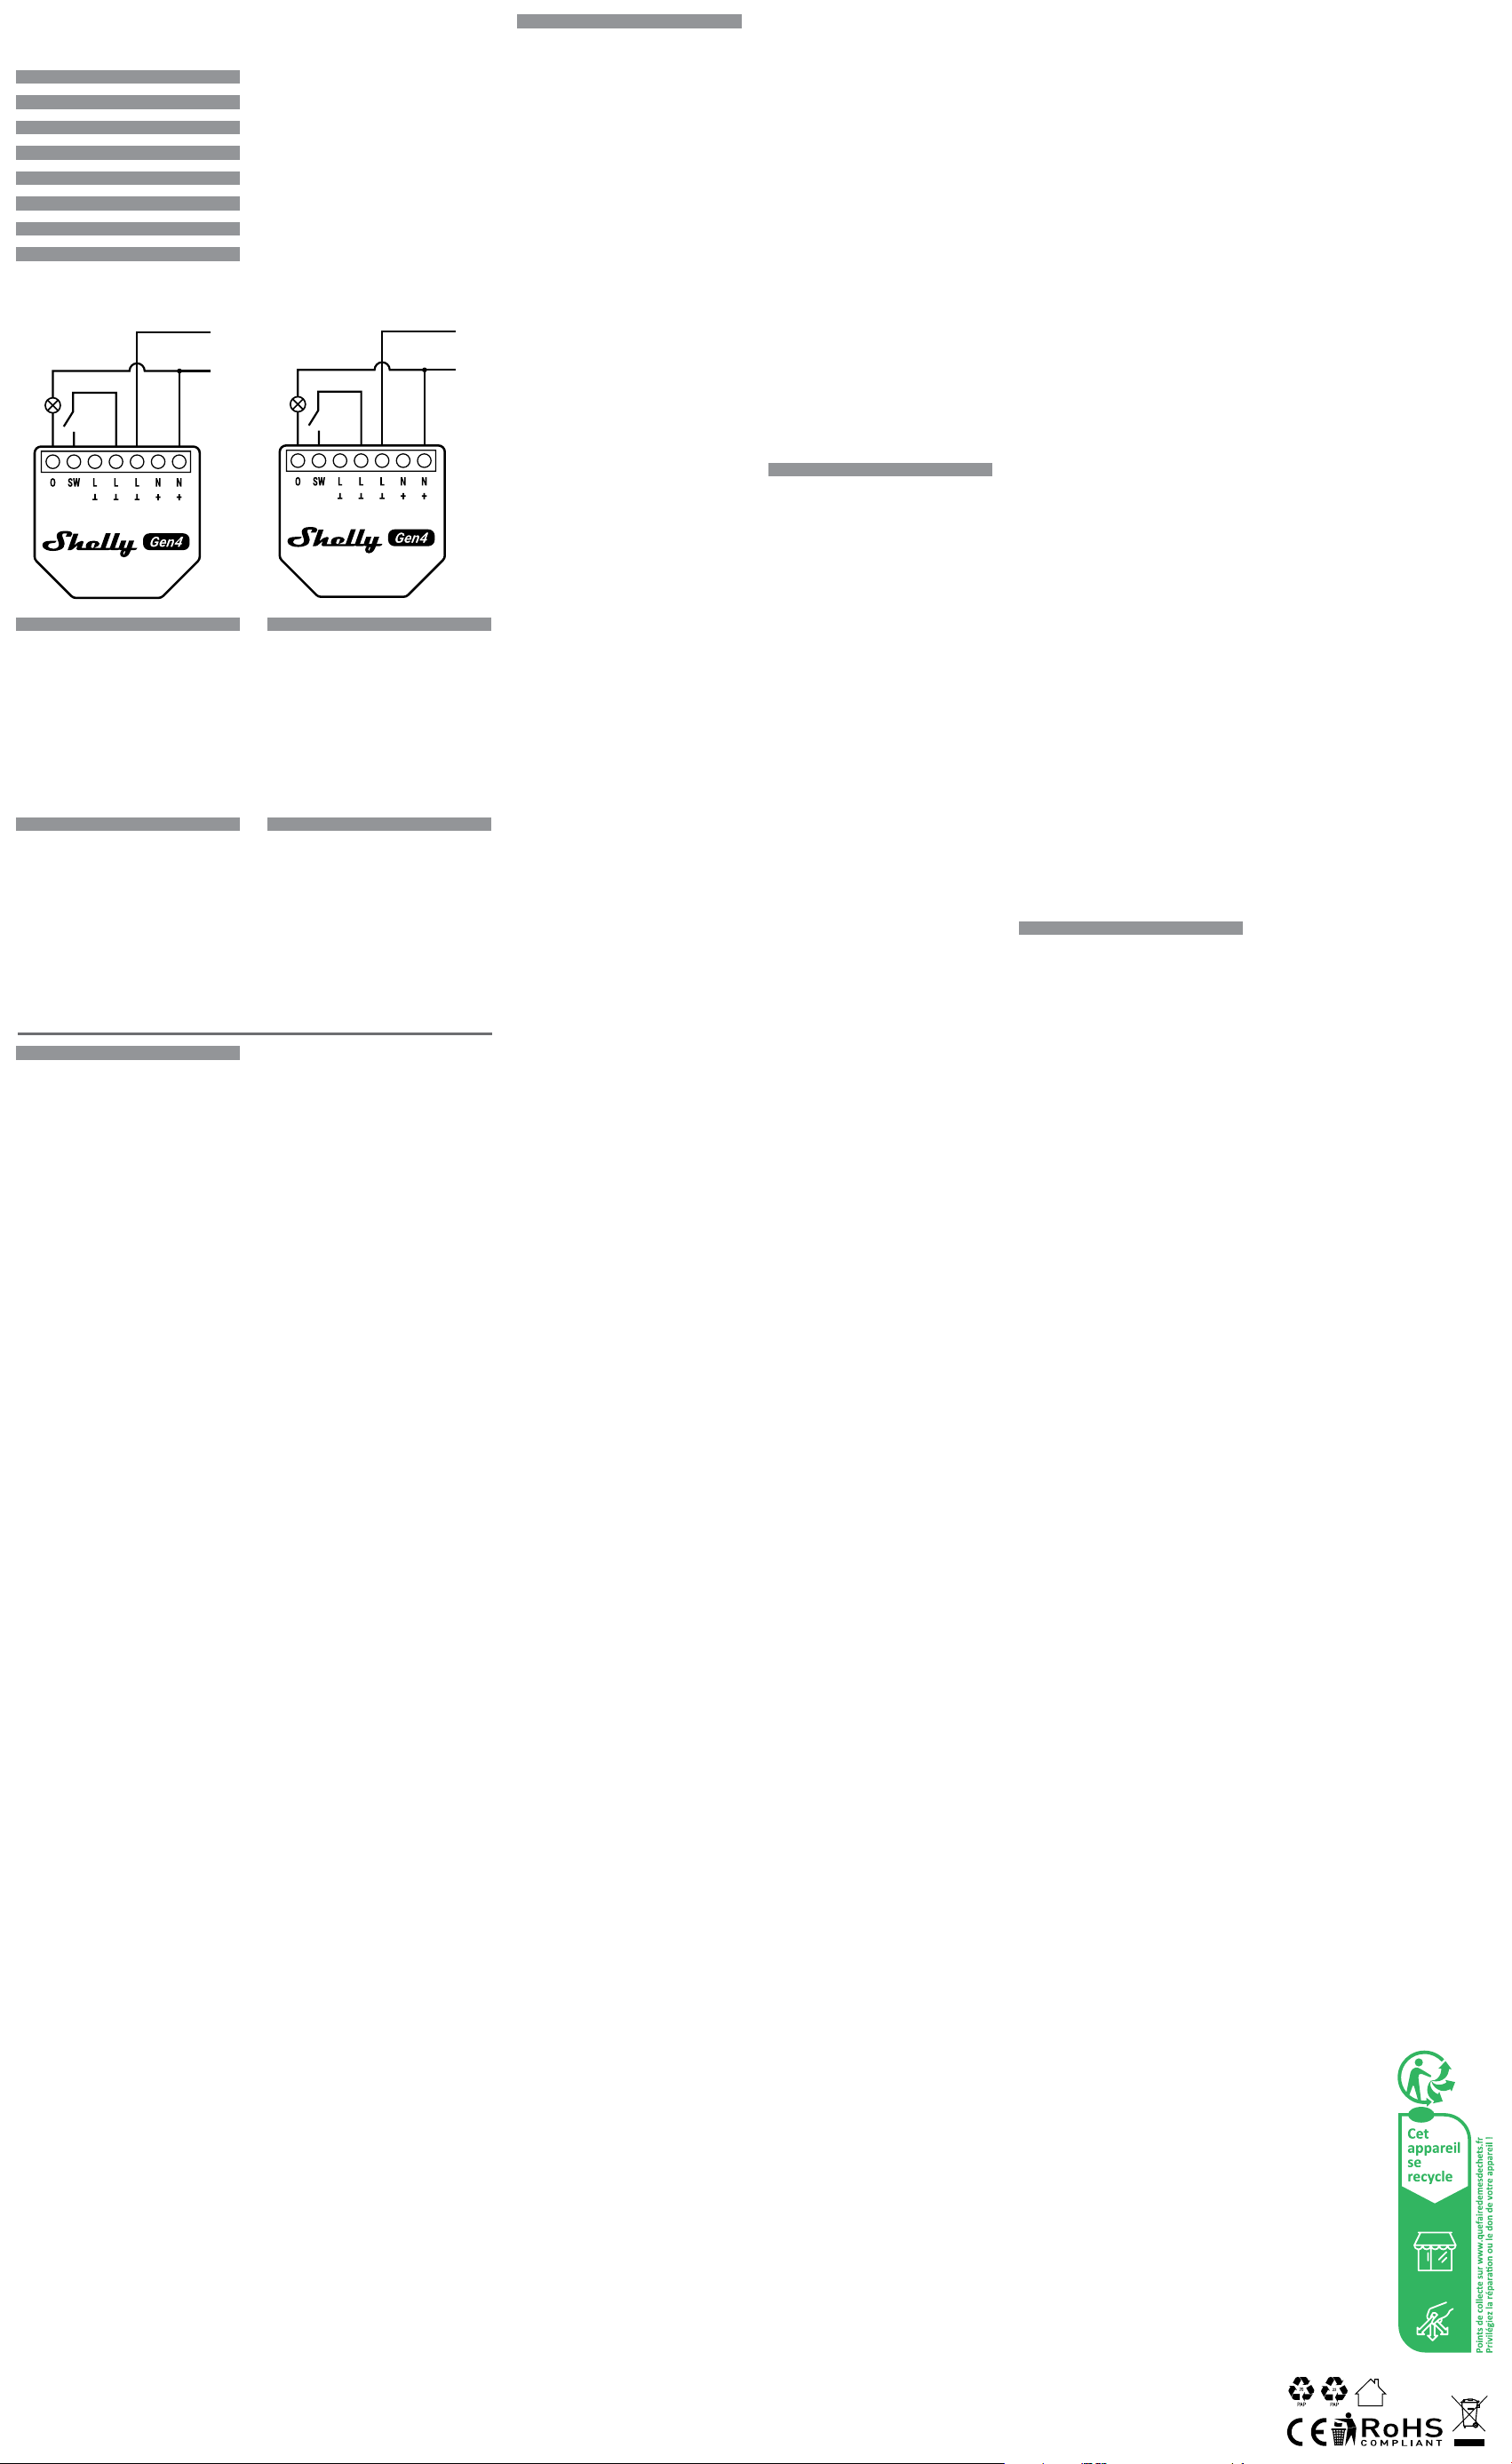
Wiring diagram
Fig. 1. 110-240 V~ power supply
Fig. 2. 24-30 V⎓ power supply
Legend
Device terminals
• O: Load circuit output terminal
• SW: Switch input terminal (controlling O)
• L: Live terminal (110-240 V~)
• N: Neutral terminal
• +: 24-30 V⎓ positive terminal
• Ʇ: 24-30V⎓ ground terminal
Wires
• L: Live wire (110-240 V~)
• N: Neutral wire
• +: 24-30V ⎓ positive wire
• GND: 24-30 V⎓ ground wire
Deutsch
Anschlussplan
Abb. 1. 110-240 V~ Stromversorgung
Abb. 2. 24-30 V⎓ Stromversorgung
Legende
Geräteanschlüsse
• O: Ausgangsklemme des Lastkreises
• SW: Eingangsklemme des Schalters (Steuerung O)
• L: Klemme für Phasenleiter (110-240 V~)
• N: Klemme für Neutralleiter
• +: 24-30V⎓ Positiver Anschluss
• Ʇ: 24-30V⎓ Erdungsklemme
Kabel
• L: Phasenleiterkabel (110-240 V~)
• N: Neutralleiterkabel
• +: 24-30V ⎓ Positives Kabel
• GND: 24 - 30 V⎓ Erdungskabel (Masse)
Italiano
Schema elettrico
Fig. 1. Alimentazione 110-240 V~
Fig. 2. Alimentazione 24-30 V⎓
Leggenda
Terminali del dispositivo
• O: Terminale di uscita del carico
• SW: Terminale d’ingresso dell’interruttore (controllo O)
• L: Terminale di Fase (110-240 V~)
• N: Terminale di neutro
• +: Terminale positivo 24-30V⎓
• Ʇ: 24-30V⎓ terminale di terra
Cavi
• L: Cavo di Fase (110-240 V~)
• N: Cavo neutro
• +: Terminale positivo 24-30V⎓
• GND: Cavo di terra 24 - 30 V⎓
Español
Esquema eléctrico
Fig. 1. Alimentación 110-240 V~
Fig. 2. Fuente de alimentación de 24-30 V⎓
Leyenda
Terminales del dispositivo
• O: Terminal de salida del circuito de carga
• SW: Terminal de entrada del interruptor (control O)
• L: Terminal de fase (110-240 V~)
• N: Terminal neutro
• +: Terminal positivo 24-30V⎓
• Ʇ: 24-30V⎓ terminal de tierra
Cables
• L: Cable de fase (110-240 V~)
• N: Cable neutro
• +: Cable positivo 24-30V⎓
• GND: Cable de tierra 24-30 V⎓
English
Deutsch
Italiano
Español
Português
Français
Polski
Nederlands
Shelly 1PM Gen4
zierten Elektrofachkraft durchgeführt werden.
⚠WARNUNG! Bevor Sie Änderungen an den Anschlüssen
vornehmen, stellen Sie sicher, dass an den Geräteklemmen
keine Spannung anliegt.
⚠ACHTUNG! Schließen Sie das Gerät nur an ein Stromnetz
und Geräte an, die allen geltenden Vorschriften entsprechen.
Ein Kurzschluss im Stromnetz oder in einem an das Gerät
angeschlossenen Gerät kann zu Bränden, Sachschäden und
Stromschlägen führen.
⚠ACHTUNG! Das Gerät darf nur an Stromkreise und Geräte
angeschlossen und gesteuert werden, die den geltenden Nor-
men und Sicherheitsnormen entsprechen.
⚠ACHTUNG! Schließen Sie das Gerät nicht an Geräte an,
die die angegebene maximale elektrische Belastung über
-
schreiten.
⚠ACHTUNG! Schließen Sie das Gerät nur auf die in dieser
Anleitung beschriebene Weise an. Jede andere Methode kann
zu Schäden und/oder Verletzungen führen.
⚠WARNUNG! Schalten Sie vor der Installation des Geräts die
Stromkreisunterbrecher aus. Verwenden Sie ein geeignetes
Prüfgerät, um sicherzustellen, dass an den anzuschließen
-
den Drähten keine Spannung vorhanden ist. Wenn Sie sicher
sind, dass keine Spannung vorhanden ist, fahren Sie mit der
Installation fort.
⚠ACHTUNG! Das Gerät und die daran angeschlossenen
Geräte müssen durch einen Leitungsschutzschalter nach
EN60898-1 abgesichert sein (Auslösecharakteristik B oder C,
max. 16 A Nennstrom, min. 6 kA Ausschaltvermögen, Energie-
begrenzungsklasse 3).
⚠ACHTUNG! Verwenden Sie das Gerät nicht, wenn es Anzei-
chen von Beschädigungen oder Defekten aufweist.
⚠ACHTUNG! Versuchen Sie nicht, das Gerät selbst zu
reparieren.
⚠ACHTUNG! Das Gerät ist nur für die Verwendung in Innen-
räumen vorgesehen.
⚠ACHTUNG! Halten Sie das Gerät von Schmutz und Feuch-
tigkeit fern.
⚠ACHTUNG! Erlauben Sie Kindern nicht, mit den an das Ge-
rät angeschlossenen Tasten/Schaltern zu spielen. Halten Sie
die Geräte (Mobiltelefone, Tablets, PCs) zur Fernsteuerung des
Shelly von Kindern fern.
Produktbeschreibung
Shelly 1PM Gen4 (das Gerät) ist ein Matter-kompatibler in-
telligenter Schalter mit Leistungsmessung. Ausgestattet mit
einer drahtlosen Multi-Protokoll-MCU, es unterstützt Zigbee-
und Bluetooth-Konnektivität für eine sichere Verbindung. Das
Gerät kann sowohl mit AC-Wechselstrom als auch mit DC-
Gleichstrom betrieben werden. Dank seiner kleinen Bauform
kann es in Standard-Wandsteckdosen, hinter Steckdosen,
Lichtschaltern oder an anderen Orten mit begrenztem Platz-
angebot nachgerüstet werden.
Das Gerät verfügt über eine integrierte Webschnittstelle zur
Überwachung, Steuerung und Anpassung seiner Einstellun-
gen. Die Webschnittstelle ist unter http://192.168.33.1 zu-
gänglich, wenn sie direkt mit dem Zugangspunkt des Geräts
verbunden ist, oder unter seiner IP-Adresse, wenn es mit
demselben Netzwerk verbunden ist.
Das Gerät kann auf andere intelligente Geräte oder Automati-
sierungssysteme zugreifen und mit ihnen interagieren, wenn
sie sich in derselben Netzwerkinfrastruktur benden. Shelly
Europe Ltd. bietet APIs für die Geräte, ihre Integration und die
Cloud-Steuerung. Für weitere Informationen besuchen Sie
https://shelly-api-docs.shelly.cloud.
ⓘDas Gerät wird mit einer werkseitig installierten Firmware
geliefert. Um es auf dem neuesten Stand und sicher zu halten,
stellt Shelly Europe Ltd. die neuesten Firmware-Updates kos-
tenlos zur Verfügung. Sie können auf die Updates entweder
über die eingebettete Weboberäche oder über die Shelly
Smart Control Mobilanwendung zugreifen, wo Sie Details über
die neueste Firmware-Version nden können. Die Entschei-
dung, die Firmware-Updates zu installieren oder nicht, liegt
in der alleinigen Verantwortung des Benutzers. Shelly Europe
Ltd. haftet nicht für Konformitätsmängel des Geräts, die da-
rauf zurückzuführen sind, dass der Benutzer die verfügbaren
Updates nicht rechtzeitig installiert hat.
Installationsanleitung
ⓘFür den Anschluss des Geräts empfehlen wir die Ver-
wendung von einadrigen Volldrähten oder Litzendrähte mit
Aderendhülsen. Die Drähte sollten eine Isolierung mit erhöhter
Wärmebeständigkeit haben, mindestens PVC T105°C (221°F).
ⓘVerwenden Sie keine Tasten oder Schalter mit eingebauten
LED- oder Neonglühlampen.
ⓘBerücksichtigen Sie beim Anschließen von Drähten an die
Geräteklemmen den angegebenen Leiterquerschnitt und die
Abisolierlänge. Schließen Sie nicht mehrere Drähte an eine
einzige Klemme an.
ⓘNachdem Sie das Gerät erfolgreich mit dem lokalen Wi-Fi-
Netzwerk verbunden haben, empfehlen wir Ihnen aus Sicher
-
heitsgründen, den Geräte-AP (Access Point) zu deaktivieren
oder mit einem Passwort zu schützen.
ⓘUm das Gerät auf die Werkseinstellungen zurückzusetzen,
halten Sie die Steuertaste 10 Sekunden lang gedrückt.
ⓘUm den Zugangspunkt und die Bluetooth-Verbindung des
Geräts zu aktivieren, halten Sie die Steuertaste 5 Sekunden
lang gedrückt.
ⓘVerwenden Sie den/die L-Anschluss(e) des Geräts nicht zur
Stromversorgung anderer Geräte.
Wenn Sie eine 110–240 V~ Stormversorgung verwenden
(Abb. 1):
1. Schließen Sie den Lastkreis an den O-Anschluss des Ge-
räts und den Neutralleiterkabel an.
2. Verbinden Sie das Phasenleiterkabel mit einem L-An-
schluss des Geräts.
3. Verbinden Sie das Neutralleiterkabel mit einem N-An
-
schluss des Geräts.
4. Schließen Sie einen Schalter oder Taster an den SW-Klem-
me des Geräts und einen der nicht verwendeten L-Klem-
men des Geräts an.
Wenn Sie eine 24-30 V⎓ Stromversorgung verwenden (Abb.
2):
ⓘBeachten Sie, dass die Leistungsmessung bei Gleichstrom
nicht möglich ist.
1. Schließen Sie die Last an den O-Klemme des Geräts und
das DC+ Kabel an.
2. Verbinden Sie das GND-Kabel mit einem Ʇ-Klemme des
Geräts.
3. Verbinden Sie das DC+ Kabel mit einem + Anschluss des
Geräts.
4. Schließen Sie einen Schalter oder Taster an den SW-An-
schluss und einen der nicht verwendeten Ʇ-Klemmen des
Geräts an.
Hinzufügen eines Zigbee-Geräts
• Um das Gerät von der Matter-Firmware (Standard) auf
Zigbee umzustellen, drücken Sie 5 Mal die Reset-Taste.
Das Gerät bleibt 2 Minuten lang im Pairing-Modus, und
Sie können es in Ihrer Heimautomatisierungsplattform
über den Zigbee-Hub nden. Wenn Sie das Gerät nicht
nden können, drücken Sie 3 Mal die Reset-Taste.
• Um das Gerät zu entfernen, gehen Sie auf seine Seite und
löschen Sie es aus Ihrer Heimautomatisierungsplattform.
ⓘIm Zigbee-Modus ist der AP des Geräts standardmäßig
nicht verfügbar. Um ihn zu aktivieren, müssen Sie die Reset-
Taste 5 Sekunden lang gedrückt halten.
Einrichten des Geräts über Matter
ⓘBevor Sie beginnen, stellen Sie sicher, dass Sie über Fol-
gendes verfügen:
• 2,4 GHz Wi-Fi-Netzwerk
• Einen Matter-kompatiblen Hub, der mit dem Internet
verbunden ist
• Ein mobiles Gerät mit aktiviertem Bluetooth und installier-
ter Matter-kompatibler App
1. Aktivieren Sie den Zugangspunkt des Geräts, indem Sie
die Reset-/Steuertaste 5 Sekunden lang gedrückt halten.
2. Scannen Sie den Matter-QR-Code im Inneren der Box.
3. Befolgen Sie die Anweisungen, die auf dem Bildschirm er-
scheinen, um den Vorgang abzuschließen.
ⓘBewahren Sie den QR-Code für spätere Zwecke auf. Wenn
Sie das Gerät zurücksetzen, benötigen Sie diesen Code erneut.
Spezikation
Physisch
• Abmessungen (HxBxT): 37x42x16 mm / 1.46x1.65x0.63
in
• Gewicht: 27 g / 0.95 oz
• Schraubklemmen max Drehmoment: 0.4 Nm / 3.5 lbin
• Querschnitt des Leiters: 0.2 bis 2.5 mm² / 24 bis 14 AWG
(Voll-, Litzen- und Aderendhülsen)
• Abisolierlänge des Leiters: 6 bis 7 mm / 0.24 bis 0.28 in
• Montage: Unterputzdose
• Gehäusematerial: Kunststoff
• Gehäusefarbe: Rot
Umwelt
• Arbeitstemperatur: -20°C bis 40°C / -5°F bis 105°F
• Luftfeuchtigkeit: 30% bis 70% RH
• Max. Höhe ü.M.: 2000 m / 6562 ft
Elektrisch
• Stromversorgung:
- 110-240V~
- 24-30V⎓
• Leistungsaufnahme: < 1.2 W
Nennwerte der Ausgangskreise
• Max. Schaltspannung:
- 240V~
- 30V⎓
• Max. Schaltstrom:
- 16A (240V~)
- 10A (30V⎓)
Sensoren, Messgeräte
• Interner Temperatursensor: Ja
• Voltmeter (AC): Ja
• Amperemeter (AC): Ja
Radio
WLAN
• Protokoll: 802.11 b/g/n
• HF-Band: 2401-2483 МHz
• Max. HF-Leistung: < 20 dBm
• Reichweite: Bis zu 50 m / 164 ft im Freien, bis zu 30
m / 98 ft in Gebäuden (abhängig von den baulichen
Gegebenheiten)
Bluetooth
• Protokoll: 4.2
• HF-Band: 2400-2483.5 MHz
• Max. HF-Leistung: <4 dBm
• Reichweite: Up to 30 m / 98 ft outdoors, up to 10 m / 33
ft indoors (depending on local conditions)
Zigbee
• Protokoll: 802.15.4
• HF-Band: 2400 - 2483.5 MHz
• Bande RF: 2400 - 2483.5 MHz
• Reichweite: Bis zu 100 m / 328 ft in Innenräumen, bis
zu 300 m / 984 ft im Freien (abhängig von den örtlichen
Gegebenheiten)
Microcontroller unit
• CPU: ESP-Shelly-C68F
• Flash: 8 MB
Firmware-Funktionen
• Zeitpläne: 20
• WebHooks (URL-Aktionen): 20 mit 5 URLs pro Hook
• Wi-Fi Range Extender: Ja
• BLE Gateway: Ja
• Skripting: Ja
• MQTT: Ja
• Verschlüsselung: Ja
Shelly Cloud-Einbindung
Das Gerät kann über unseren Shelly Cloud Hausautoma-
tisierungsdienst überwacht, gesteuert und eingerichtet
werden. Sie können den Dienst entweder über unsere An
-
droid-, iOS- oder Harmony OS-Mobilanwendung oder über
einen beliebigen Internetbrowser unter https://control.shelly.
cloud/ nutzen.
Wenn Sie sich dafür entscheiden, das Gerät mit der Anwen-
dung und dem Shelly Cloud-Dienst zu verwenden, nden Sie
Anweisungen zur Verbindung des Geräts mit der Cloud und
zu seiner Steuerung über die Shelly-App im Anwendungs
-
handbuch: https://shelly.link/app-guide.
Störungsbeseitigung
Sollten Sie Probleme mit der Installation oder dem Betrieb
des Geräts haben, sehen Sie auf der entsprechenden Wis-
sensdatenbank-Seite nach:
https://shelly.link/1PM_Gen4
Konformitätserklärung
Hiermit erklärt Shelly Europe Ltd., dass die Funkanlage Typ
Shelly 1PM Gen4 der Richtlinie 2014/53/EU, 2014/35/EU,
2014/30/EU, 2011/65/EU entspricht. Den vollständigen Text
der EU-Konformitätserklärung nden Sie unter folgender
Internetadresse:
https://shelly.link/1PM_Gen4_DoC
Hersteller: Shelly Europe Ltd.
Addresse: Cherni Vrah Blvd. 51, Gebäude 3, Etagen 2-3, Soa
1407, Bulgarien
Tel.: +359 2 988 7435
E-mail: support@shelly.cloud
Ozielle Website: https://www.shelly.com
Änderungen der Kontaktdaten werden vom Hersteller auf
dessen oziellen Website veröffentlicht.
Alle Rechte an der Marke Shelly® und anderen geistigen
Eigentumsrechten im Zusammenhang mit diesem Gerät ge
-
hören Shelly Europe Ltd.
Italiano
Guida all’uso e alla sicurezza
Shelly 1PM Gen4
Interruttore intelligente con misurazione della
potenza
Nel presente documento viene indicato come “il Dispositivo”
Informazioni sulla sicurezza
Per un uso sicuro e corretto, leggere questa guida e tutti gli
altri documenti che accompagnano il prodotto. Conserva-
teli per future consultazioni. La mancata osservanza delle
procedure di installazione può causare malfunzionamenti,
pericoli per la salute e la vita, violazione della legge e/o ri
-
uto delle garanzie legali e commerciali (se presenti). Shelly
Europe Ltd. non è responsabile di eventuali perdite o danni
in caso di installazione errata o di funzionamento improprio
del dispositivo a causa della mancata osservanza delle
istruzioni d’uso e di sicurezza contenute in questa guida.
⚠Questo cartello indica le informazioni sulla sicurezza.
ⓘQuesto segno indica una nota importante.
⚠AVVERTENZA! Rischio di scosse elettriche. L’installazione
del Dispositivo alla rete elettrica deve essere eseguita con cura
da un elettricista qualicato.
⚠AVVERTENZA! Prima di apportare qualsiasi modica ai
collegamenti, accertarsi che non vi sia tensione sui terminali
del Dispositivo.
⚠ATTENZIONE! Collegare il Dispositivo solo a una rete
elettrica e a dispositivi conformi a tutte le normative vigenti.
Un cortocircuito nella rete elettrica o in qualsiasi apparecchio
collegato al Dispositivo può causare incendi, danni materiali
e scosse elettriche.
⚠ATTENZIONE! Il Dispositivo può essere collegato e control-
lare solo circuiti e apparecchi elettrici conformi agli standard e
alle norme di sicurezza applicabili.
⚠ATTENZIONE! Non collegare il Dispositivo ad apparecchi
che superano il carico elettrico massimo specicato.
⚠ATTENZIONE! Collegare il Dispositivo solo nel modo in-
dicato in queste istruzioni. Qualsiasi altro metodo potrebbe
causare danni e/o lesioni.
⚠AVVERTENZA! Disattivare l’interruttore generale dell’im-
pianto prima di procedere con l’installazione. Utilizzare un
tester adeguato per vericare l’assenza di tensione sui li da
collegare. Una volta accertata l’assenza di tensione, procedere
all’installazione.
⚠ATTENZIONE! Il Dispositivo e gli apparecchi ad esso col-
legati devono essere protetti da un interruttore di protezione
dei cavi conforme alla norma EN60898-1 (caratteristica di
intervento B o C, corrente nominale massima di 16 A, potere di
interruzione minimo di 6 kA, classe di energia 3).
⚠ATTENZIONE! Non utilizzare il Dispositivo se presenta
segni di danni o difetti.
⚠ATTENZIONE! Non tentare di riparare il Dispositivo da soli.
⚠ATTENZIONE! Il Dispositivo è destinato esclusivamente
all’uso interno.
⚠ATTENZIONE! Tenere il Dispositivo lontano da sporco e
umidità.
⚠ATTENZIONE! Non permettere ai bambini di giocare con i
pulsanti/interruttori collegati al Dispositivo. Tenere i dispositivi
(telefoni cellulari, tablet, PC) per il controllo remoto di Shelly
lontano dai bambini.
Descrizione del prodotto
Shelly 1PM Gen4 (il Dispositivo) è un interruttore intelligen-
te compatibile con Matter con misurazione della potenza.
Dotato di una MCU wireless multiprotocollo, supporta la
connettività Zigbee e Bluetooth per una connessione si-
cura. Il dispositivo funziona sia in corrente alternata che in
corrente continua. Le sue dimensioni ridotte ne consentono
l’installazione in scatole elettriche a muro standard, dietro
prese di corrente, interruttori della luce o in altri luoghi con
spazio limitato.
Il Dispositivo dispone di un’interfaccia web integrata per mo
-
nitorare, controllare e regolare le impostazioni. L’interfaccia
web è accessibile all’indirizzo http://192.168.33.1 quando si
è collegati direttamente al punto di accesso del dispositivo
o al suo indirizzo IP quando si è collegati alla stessa rete.
Il Dispositivo può accedere e interagire con altri dispositivi
intelligenti o sistemi di automazione se si trovano nella stes-
sa infrastruttura di rete. Shelly Europe Ltd. fornisce API per
i dispositivi, la loro integrazione e il controllo via cloud. Per
ulteriori informazioni, visitare il sito https://shelly-api-docs.
shelly.cloud.
ⓘIl Dispositivo viene fornito con un rmware installato in fab-
brica. Per mantenerlo aggiornato e sicuro, Shelly Europe Ltd.
fornisce gratuitamente gli ultimi aggiornamenti del rmware.
È possibile accedere agli aggiornamenti tramite l’interfaccia
web incorporata o l’applicazione mobile Shelly Smart Control,
dove si possono trovare informazioni sull’ultima versione del
rmware. La scelta di installare o meno gli aggiornamenti del
rmware è di esclusiva responsabilità dell’utente. Shelly Euro
-
pe Ltd. non sarà responsabile di eventuali difetti di conformità
del Dispositivo causati dalla mancata installazione tempestiva
degli aggiornamenti disponibili da parte dell’utente.
Istruzioni per l’installazione
ⓘPer collegare il Dispositivo, si consiglia di utilizzare li uni-
polari solidi o li a trefoli con puntali. I li devono avere un iso-
lamento con una maggiore resistenza al calore, non inferiore
a PVC T105°C (221°F).
ⓘNon utilizzare pulsanti o interruttori con lampade a LED o
al neon incorporate.
ⓘQuando si collegano i cavi ai terminali del Dispositivo, tene-
re conto della sezione del conduttore e della lunghezza spe-
lata specicate. Non collegare più li a un singolo terminale.
ⓘPer motivi di sicurezza, dopo aver collegato il Dispositivo
alla rete Wi-Fi locale, si consiglia di disattivare o proteggere
con password l’AP (Access Point) del Dispositivo.
ⓘPer eseguire un reset di fabbrica del Dispositivo, tenere
premuto il pulsante di reset per 10 secondi.
ⓘPer attivare il punto di accesso e la connessione Bluetooth
del Dispositivo, tenere premuto il tasto di reset per 5 secondi.
ⓘNon utilizzare i terminali L del dispositivo per alimentare
altri dispositivi.
Se si utilizza un’alimentazione a 110 - 240 V~ (Fig. 1):
1. Collegare il circuito di carico al terminale O del Dispositivo
e al cavo neutro.
2. Collegare il cavo sotto tensione a un terminale L del Di-
spositivo.
3. Collegare il cavo neutro a un terminale N del Dispositivo.
4. Collegare un interruttore o un pulsante al terminale SW del
dispositivo e a uno qualsiasi dei terminali L inutilizzati del
Dispositivo.
Se si utilizza un’alimentazione da 24-30 V⎓ (Fig. 2):
ⓘSi noti che la misurazione della potenza non è disponibile
in corrente continua.
1. Collegare il carico al terminale O del Dispositivo e al cavo
CC+.
2. Collegare il cavo GND a un terminale Ʇ del Dispositivo.
3. Collegare il cavo CC+ a un terminale + del Dispositivo.
4. Collegare un interruttore o un pulsante al terminale SW e
a uno qualsiasi dei terminali Ʇ inutilizzati del Dispositivo.
Aggiunta di un Dispositivo Zigbee
• Per passare il dispositivo dal rmware Matter (prede-
nito) a Zigbee, premere 5 volte il pulsante Reset. Il
Dispositivo rimane in modalità di accoppiamento per 2
minuti ed è possibile trovarlo nella piattaforma domotica
attraverso l’hub Zigbee. Se non si riesce a trovare il
Dispositivo, premere 3 volte il pulsante Reset.
• Per rimuovere il dispositivo, accedere alla sua pagina ed
eliminarlo dalla piattaforma domotica.
ⓘIn modalità Zigbee, l’AP del Dispositivo non è disponibile
per impostazione predenita. Per abilitarlo, è necessario tene-
re premuto il pulsante Reset per 5 secondi.
Impostazione del dispositivo tramite Matter
ⓘPrima di iniziare, assicurarsi di disporre di:
• Rete Wi-Fi a 2,4 GHz
• Un hub compatibile con Matter collegato a Internet
• Un dispositivo mobile con Bluetooth abilitato e un’applica-
zione Matter compatibile installata
1. Abilitare il punto di accesso del dispositivo tenendo premu-
to il pulsante di reset/controllo per 5 secondi.
2. Scansionare il codice QR di Matter all’interno della con-
fezione.
3. Seguire le istruzioni visualizzate sullo schermo per com-
pletare la procedura.
ⓘConservare il codice QR per riferimenti futuri. Se si ripristina
il dispositivo, il codice sarà nuovamente necessario.
Speciche tecniche
Fisico
• Dimensioni (HxLxP): 37x42x16 mm / 1.46x1.65x0.63 in
• Peso: 27 g / 0.95 oz
• Coppia massima morsetti a vite: 0.4 Nm / 3.5 lbin
• Sezione del conduttore: Da 0.2 a 2.5 mm² / da 24 a 14
AWG (puntali solidi, a trefoli e bootlace)
• Conductor stripped length: Da 6 a 7 mm / Da 0.24 a
0.28 in
• Montaggio: Scatola da incasso
• Materiale del guscio: Plastica
• Colore della conchiglia: Rosso
Ambiente
• Temperatura di lavoro: -20°C a 40°C / -5°F a 105°F
• Umidità: 30% a 70% RH
• Altitudine massima: 2000 m / 6562 ft
Elettrico
• Alimentazione:
- 110-240V~
- 24-30V⎓
• Consumo di energia: < 1.2 W
Valori nominali dei circuiti di uscita
• Tensione di commutazione massima:
- 240V~
- 30V⎓
• Corrente di commutazione massima:
- 16A (240V~)
- 10A (30V⎓)
Sensori, misuratori
• Sensore di temperatura interno: Sì
• Volmetro (CA): Sì
• Amperometro (CA): Sì
Protocollo di comunicazione radio
Wi-Fi
• Protocollo: 802.11 b/g/n
• Banda RF: 2401-2483 МHz
• Max. Potenza RF: < 20 dBm
• Portata: Fino a 50 m / 164 ft all’aperto, no a 30 m / 98 ft
al chiuso (a seconda della struttura locale)
Bluetooth
• Protocollo: 4.2
• Banda RF: 2400-2483.5 MHz
• Max. Potenza RF: <4 dBm
• Portata: Fino a 30 / 98 ft all’aperto, no a 10 m / 33 ft al
chiuso (a seconda della struttura locale)
Zigbee
• Protocollo: 802.15.4
• Banda RF: 2400 - 2483.5 MHz
• Max. Potenza RF: <20 dBm
• Portata: Fino a 100 m / 328 ft all’interno, no a 300 m /
984 ft all’aperto (a seconda delle condizioni locali)
Microcontroller unit
• CPU: ESP-Shelly-C68F
• Flash: 8 MB
Funzionalità del rmware
• Pianicazioni: 20
• Webhook (azioni URL): 20 con 5 URL per hook
• Estensione della portata Wi-Fi: Sì
• BLE Gateway: Sì
• Scripting: Sì
• MQTT: Sì
• Cifratura: Sì
Shelly Cloud Inclusione
Il Dispositivo può essere monitorato, controllato e impostato
attraverso il nostro servizio di automazione domestica Shelly
Cloud. È possibile utilizzare il servizio tramite la nostra ap-
plicazione mobile per Android, iOS o Harmony OS o tramite
un qualsiasi browser Internet all’indirizzo https://control.
shelly.cloud/.
Se si sceglie di utilizzare il dispositivo con l’applicazione
e il servizio Shelly Cloud, è possibile trovare le istruzioni su
come collegare il dispositivo al Cloud e controllarlo dall’ap-
plicazione Shelly nella guida dell’applicazione: https://shelly.
link/app-guide.
Risoluzione dei problemi
In caso di problemi con l’installazione o il funzionamento
del Dispositivo, consultare la pagina della Knowledge Base:
https://shelly.link/1PM_Gen4
Dichiarazione di Conformità
Con la presente, Shelly Europe Ltd. dichiara che il tipo di
apparecchiatura radio Shelly 1PM Gen4 è conforme alla
Direttiva 2014/53/UE, 2014/35/UE, 2014/30/UE, 2011/65/
UE. Il testo completo della dichiarazione di conformità UE è
disponibile al seguente indirizzo internet:
https://shelly.link/1PM_Gen4_DoC
Produttore: Shelly Europe Ltd.
Indirizzo: 51 Cherni Vrah Blvd., edicio 3, piani 2-3, Soa
1407, Bulgaria
Tel.: +359 2 988 7435
E-mail: support@shelly.cloud
Sito uciale: https://www.shelly.com
Le modiche alle informazioni di contatto sono pubblicate
dal produttore sul sito web uciale.
Tutti i diritti sul marchio Shelly® e gli altri diritti intellettuali
associati a questo dispositivo appartengono a Shelly Euro-
pe Ltd.
Español
Manual de uso y seguridad
Shelly 1PM Gen4
Interruptor inteligente con medición de
potencia
Denominado en este documento “el Dispositivo”
Información de seguridad
Para un uso seguro y adecuado, lea este manual y cualquier
otro documento que acompañe a este producto. Consérve-
los para futuras consultas. El incumplimiento de los proce-
dimientos de instalación puede provocar un funcionamiento
incorrecto, peligro para la salud y la vida, violación de la
ley y/o denegación de garantías legales y comerciales (si
las hubiera). Shelly Europe Ltd. no se hace responsable de
ninguna pérdida o daño en caso de instalación incorrecta o
funcionamiento inadecuado de este aparato por no seguir
las instrucciones de uso y seguridad de este manual.
⚠Esta señal indica información de seguridad.
ⓘEste signo indica una nota importante.
⚠¡ADVERTENCIA! Riesgo de descarga eléctrica. La instala-
ción del Dispositivo a la red eléctrica debe ser realizada cuida-
dosamente por un electricista cualicado.
⚠¡ADVERTENCIA! Antes de realizar cualquier cambio en las
conexiones, asegúrese de que no haya tensión en los termi-
nales del Dispositivo.
⚠¡ATENCIÓN! Conecte el Dispositivo únicamente a una red
eléctrica y a aparatos que cumplan todas las normas aplica
-
bles. Un cortocircuito en la red eléctrica o en cualquier aparato
conectado al Dispositivo puede provocar incendios, daños
materiales y descargas eléctricas.
⚠¡ATENCIÓN! El Dispositivo sólo puede conectarse y contro-
lar circuitos eléctricos y aparatos que cumplan las normas y
reglas de seguridad correspondientes.
⚠¡ATENCIÓN! No conecte el Dispositivo a aparatos que
superen la carga eléctrica máxima especicada.
⚠¡ATENCIÓN! Conecte el Dispositivo sólo del modo indicado
en estas instrucciones. Cualquier otro método podría causar
daños y/o lesiones.
⚠¡ADVERTENCIA! Antes de instalar el Dispositivo, desco-
necte los disyuntores. Utilice un dispositivo de prueba adecua-
do para asegurarse de que no haya tensión en los cables que
desea conectar. Cuando esté seguro de que no haya tensión,
proceda a la instalación.
⚠¡ATENCIÓN! El Dispositivo y los aparatos conectados a él
deben estar protegidos por un interruptor de protección de
cables conforme a la norma EN60898-1 (característica de
disparo B o C, máx. 16 A de corriente nominal, mín. 6 kA de
capacidad de interrupción, clase de limitación de energía 3).
⚠¡ATENCIÓN! No utilice el Dispositivo si presenta algún
signo de daño o defecto.
⚠¡ATENCIÓN! No intente reparar el Dispositivo usted mismo.
⚠¡ATENCIÓN! El Dispositivo está destinado únicamente para
uso en interiores.
⚠¡ATENCIÓN! Mantenga el Dispositivo alejado de la sucie-
dad y la humedad.
⚠¡ATENCIÓN! No permita que los niños jueguen con los
botones/interruptores conectados al Dispositivo. Mantenga
los dispositivos (teléfonos móviles, tabletas, PC) de control
remoto de Shelly fuera del alcance de los niños.
Descripción del producto
Shelly 1PM Gen4 (el dispositivo) es un interruptor inteligente
compatible con Matter con medición de potencia. Equipado
con una MCU inalámbrica multiprotocolo, admite conectivi-
dad Zigbee y Bluetooth para una conexión segura. Funciona
tanto con corriente alterna como continua. Su pequeño ta-
maño permite instalarlo en cajas eléctricas de pared están-
dar, detrás de tomas de corriente, interruptores de luz u otros
lugares con espacio limitado.
El Dispositivo dispone de una interfaz web integrada para
supervisar, controlar y ajustar su conguración. La interfaz
web es accesible en http://192.168.33.1 cuando se conecta
directamente al punto de acceso del dispositivo o en su di-
rección IP cuando se conecta a la misma red.
El Dispositivo puede acceder e interactuar con otros dispo-
sitivos inteligentes o sistemas de automatización si se en-
cuentran en la misma infraestructura de red. Shelly Europe
Ltd. proporciona API para los dispositivos, su integración y
control en la nube. Para más información, visite https://she-
lly-api-docs.shelly.cloud.
ⓘEl Dispositivo viene con rmware de fábrica. Para mante-
nerlo actualizado y seguro, Shelly Europe Ltd. proporcionará
las últimas actualizaciones de rmware de forma gratuita.
Podrá acceder a las actualizaciones a través de la interfaz
web integrada o de la aplicación móvil Shelly Smart Control,
donde encontrará información detallada sobre la última ver-
sión del rmware. La elección de instalar o no las actualiza-
ciones del rmware es responsabilidad exclusiva del usuario.
Shelly Europe Ltd. no será responsable de ninguna falta de
conformidad del dispositivo causada por el hecho de que el
usuario no instale las actualizaciones disponibles en el mo-
mento oportuno.
Instrucciones de instalación
ⓘPara conectar el Dispositivo, se recomienda utilizar cables
rígidos de un solo núcleo o cables trenzados con casquillos.
Los cables deberán tener un aislamiento con mayor resisten-
cia al calor, no inferior a PVC T105°C (221°F).
ⓘNo utilice pulsadores o interruptores con lámparas LED o
de neón incandescentes incorporadas.
ⓘCuando conecte cables a los bornes del Dispositivo, tenga
en cuenta la sección transversal del conductor especicada
y la longitud pelada. No conecte varios cables a un mismo
borne.
ⓘPor razones de seguridad, después de conectar con éxito
el Dispositivo a la red Wi-Fi local, le recomendamos que des-
active o proteja con contraseña el AP (punto de acceso) del
Dispositivo.
ⓘPara realizar un restablecimiento de fábrica del Dispositivo,
mantenga pulsado el botón de control durante 10 segundos.
ⓘPara activar el punto de acceso y la conexión Bluetooth del
Dispositivo, mantenga pulsado el botón de control durante 5
segundos.
ⓘNo utilice los bornes L del Dispositivo para alimentar otros
dispositivos.
Si utiliza una fuente de alimentación de 110 - 240 V~ (Fig. 1):
1. Conecte el circuito de carga al terminal O del Dispositivo
y al cable Neutro.
2. Conecte el cable de Fase a un terminal L del Dispositivo.
3. Conecte el cable neutro a un terminal N del Dispositivo.
4. Conecte un interruptor o pulsador al terminal SW del dis-
positivo y a cualquiera de los bornes L no utilizados del
Dispositivo.
Si utiliza una fuente de alimentación de 24 - 30 V⎓ (Fig. 2):
ⓘ Tenga en cuenta que la medición de potencia no está
disponible en corriente continua.
1. Conecte la carga al terminal O del Dispositivo y al cable
DC+.
2. Conecte el cable GND a un terminal Ʇ del dispositivo.
3. Conecte el cable DC+ a un terminal + del Dispositivo.
4. Conecte un interruptor o pulsador al terminal SW y a cual-
quiera de los terminales Ʇ no utilizados del Dispositivo.
Añadir Dispositivo Zigbee
• Para cambiar el Dispositivo del rmware Matter (por
defecto) a Zigbee, pulse 5 veces el botón Reset. El
Dispositivo permanecerá en modo de emparejamiento
durante 2 minutos, y podrás encontrarlo en tu plataforma
domótica a través del Zigbee Hub. Si no encuentra el
Dispositivo, pulse 3 veces el botón Reset.
• Para eliminar el Dispositivo, vaya a su página y elimínelo
de su plataforma domótica.
ⓘ En el modo Zigbee, el AP del Dispositivo no está disponible
por defecto. Para activarlo, mantenga pulsado el botón Reset
durante 5 segundos.
Conguración del dispositivo a través de
Matter
ⓘ Antes de empezar, asegúrese de que dispone de:
• Una red Wi-Fi de 2,4 GHz
• Un concentrador compatible con Matter conectado
a Internet
• Un dispositivo móvil con Bluetooth activado y una app
compatible con Matter instalada
1. Habilite el punto de acceso del Dispositivo manteniendo
pulsado el botón de reinicio/control durante 5 segundos.
2. Escanee el código QR de Matter que se encuentra en el
interior de la caja.
3. Sigue las instrucciones que aparecen en su pantalla para
completar el proceso.
ⓘ Conserve el código QR para futuras consultas. Si restable-
ce el dispositivo, volverá a necesitar ese código.
Especicaciones
Físico
• Dimensiones (Alto x Ancho x Profundidad): 37x42x16
mm / 1.46x1.65x0.63 in
• Peso: 27 g / 0.95 oz
• Par máximo de los terminales de tornillo: 0.4 Nm /
3.5 lbin
• Sección transversal del conductor: 0.2 a 2.5 mm² / 24 a
14 AWG (casquillos macizos, trenzados y de cordón)
• Longitud pelada del conductor: 6 a 7 mm / 0.24 a 0.28 in
• Montaje: Caja empotrada
• Material de la cubierta: Plástico
• Color de la carcasa: Rojo
Ambiental
• Temperatura de funcionamiento: -20°C a 40°C
• Humedad: 30% a 70% RH
• Altitud máxima: 2000 m / 6562 ft
Eléctrico
• Alimentación:
- 110-240V~
- 24-30V⎓
• Consumo de energía: < 1.2 W
Valores nominales de los circuitos de salida
• Tensión de conmutación máx:
- 240V~
- 30V⎓
• Valores nominales de los circuitos de salida
- 16A (240V~)
- 10A (30V⎓)
Sensores, contadores
• Sensor de temperatura interno: Sí
• Voltímetro (CA): Sí
• Amperímetro (CA): Sí
Radio
Wi-Fi
• Protocolo: 802.11 b/g/n
• Banda RF: 2401-2483 МHz
• Max. Potencia RF: < 20 dBm
• Alcance: Hasta 50 m / 164 ft en exteriores, hasta 30 m /
98 ft en interiores (dependiendo de la construcción local)
Bluetooth
• Protocolo: 4.2
• Banda RF: 2400-2483.5 MHz
• Max. Potencia RF: <4 dBm
• Alcance: Hasta 30 m / 98 ft en exteriores, hasta 10 m /
33 ft en interiores (dependiendo de la construcción local)
Zigbee
• Protocolo: 802.15.4
• Banda RF: 2400 - 2483.5 MHz
• Max. Potencia RF: <20 dBm
• Alcance: Hasta 100 m / 328 ft en interiores, hasta 300 m
/ 984 ft en exteriores (dependiendo de las condiciones
locales)
Microcontroller unit
• CPU: ESP-Shelly-C68F
• Flash: 8 MB
Capacidades del rmware
• Horarios: 20
• Webhooks (acciones URL): 20 con 5 URLs por hook
• Extensor de alcance Wi-Fi: Sí
• BLE Gateway: Sí
• Scripting: Sí
• MQTT: Sí
• Cifrado: Sí
Inclusión de Shelly Cloud
El Dispositivo se puede supervisar, controlar y congurar a
través de nuestro servicio de domótica Shelly Cloud. Puede
utilizar el servicio a través de nuestra aplicación móvil An-
droid, iOS o Harmony OS o a través de cualquier navegador
de Internet en https://control.shelly.cloud/.
Si decide utilizar el Dispositivo con la aplicación y el servicio
Shelly Cloud, encontrará instrucciones sobre cómo conectar
el Dispositivo a la nube y controlarlo desde la aplicación She-
lly en la guía de la aplicación: https://shelly.link/app-guide.
Resolución de problemas
Si tiene problemas con la instalación o el funcionamiento del
Dispositivo, consulte la página de la base de conocimientos:
https://shelly.link/1PM_Gen4
Declaración de Conformidad
Por medio de la presente, Shelly Europe Ltd. declara que el
equipo de radio tipo Shelly 1PM Gen4 cumple con las direc
-
tivas 2014/53/UE, 2014/35/UE, 2014/30/UE, 2011/65/UE. El
texto completo de la declaración de conformidad de la UE
está disponible en la siguiente dirección web:
https://shelly.link/1PM_Gen4_DoC
Fabricante: Shelly Europe Ltd.
Dirección: Boulevard Cherni Vrah 51, edicio 3, plantas 2-3,
Sofía 1407, Bulgaria
Tel: +359 2 988 7435
E-mail: support@shelly.cloud
Sitio web ocial: https://www.shelly.com
El fabricante publicará los cambios en la información de con-
tacto en su sitio web ocial.
Todos los derechos sobre la marca comercial Shelly® y otros
derechos intelectuales asociados a este dispositivo pertene-
cen a Shelly Europe Ltd.
110-240 V~
N
L
24-30 V
⎓
GND
+
English
User and safety guide
Shelly 1PM Gen4
Smart switch with power measurement
Referred to in this document as “the Device”
Safety information
For safe and proper use, read this guide, and any other doc-
uments accompanying this product. Keep them for future
reference. Failure to follow the installation procedures can
lead to malfunction, danger to health and life, violation of
law, and/or refusal of legal and commercial guarantees (if
any). Shelly Europe Ltd. is not responsible for any loss or
damage in case of incorrect installation or improper opera-
tion of this device due to failure to follow the user and safety
instructions in this guide.
⚠This sign indicates safety information.
ⓘThis sign indicates an important note.
⚠WARNING! Risk of electric shock. Installation of the Device
to the power grid must be performed carefully by a qualied
electrician.
⚠WARNING! Before making any changes to the connections,
ensure there is no voltage present at the Device terminals.
⚠CAUTION! Connect the Device only to a power grid and
appliances that comply with all applicable regulations. A short
circuit in the power grid or any appliance connected to the
Device can cause re, property damage, and electric shock.
⚠CAUTION! The Device may be connected to and control
only electric circuits and appliances that comply with the ap-
plicable standards and safety norms.
⚠CAUTION! Do not connect the Device to appliances that
exceed the specied maximum electric load.
⚠CAUTION! Connect the Device only in the way shown in
these instructions. Any other method could cause damage
and/or injury.
⚠WARNING! Before installing the Device, turn the circuit
breakers off. Use a suitable test device to make sure there is
no voltage on the wires you want to connect. When you are
sure that there is no voltage, proceed to the installation.
⚠CAUTION! The Device and the appliances connected to it,
must be secured by a cable protection switch in accordance
with EN60898-1 (tripping characteristic B or C, max. 16 A rated
current, min. 6kA interrupting rating, energy limiting class 3).
⚠CAUTION! Do not use the Device if it shows any sign of
damage or defect.
⚠CAUTION! Do not attempt to repair the Device yourself.
⚠CAUTION! The Device is intended only for indoor use.
⚠CAUTION! Keep the Device away from dirt and moisture.
⚠CAUTION! Do not allow children to play with the buttons/
switches connected to the Device. Keep the devices (mobile
phones, tablets, PCs) for remote control of Shelly away from
children.
Product description
Shelly 1PM Gen4 (the Device) is a Matter-compatible smart
switch with power measurement. Equipped with a multi-pro-
tocol wireless MCU, it supports Zigbee and Bluetooth
connectivity for a secure connection. The Device operates
on both, AC and DC power. Its small form factor allows ret-
rotting into standard electrical wall boxes, behind power
sockets, light switches, or other places with limited space.
The Device has an embedded web interface to monitor, con-
trol, and adjust its settings. The web interface is accessible
at http://192.168.33.1 when connected directly to the Device
access point or at its IP address when accessed from the
same network.
The Device can access and interact with other smart devices
or automation systems if they are in the same network infra-
structure. Shelly Europe Ltd. provides APIs for the devices,
their integration, and cloud control. For more information,
visit https://shelly-api-docs.shelly.cloud.
ⓘThe Device comes with factory-installed rmware. To keep
it updated and secure, Shelly Europe Ltd. provides the latest
rmware updates free of charge. Access the updates through
either the embedded web interface or the Shelly Smart Control
mobile application. Installation of rmware updates is the us-
er’s responsibility. Shelly Europe Ltd. shall not be liable for any
lack of conformity of the Device caused by the failure of the
user to install the available updates in a timely manner.
Installation instructions
ⓘTo connect the Device, we recommend using solid sin-
gle-core wires or stranded wires with ferrules. The wires
should have insulation with increased heat resistance, not less
than PVC T105°C (221°F).
ⓘDo not use buttons or switches with built-in LED or neon
glow lamps.
ⓘWhen connecting wires to the Device terminals, consider
the specied conductor cross section and stripped length. Do
not connect multiple wires into a single terminal.
ⓘFor security reasons, after you successfully connect the
Device to the local Wi-Fi network, we recommend that you
disable or password-protect the Device AP (Access Point).
ⓘTo perform a factory reset of the Device, press and hold the
Reset/control button for 10 seconds.
ⓘTo enable the access point and the Bluetooth connection
of the Device, press and hold the Reset/control button for 5
seconds.
ⓘDo not use L terminal(s) of the device to power other
devices
If you are using 110 - 240 V~ power supply (Fig. 1):
1. Connect the load circuit to the O terminal of the Device and
the Neutral wire.
2. Connect the Live wire to an L terminal of the Device.
3. Connect the Neutral wire to an N terminal of the Device.
4. Connect a switch or button to the device SW terminal and
any of the unused L terminals of the Device.
If you are using 24 - 30 V⎓ power supply (Fig. 2):
ⓘ Note that power measurement is not available in DC power.
1. Connect the load to the O terminal of the Device and the
DC+ wire.
2.Connect the GND wire to a Ʇ terminal of the Device.
3. Connect the DC+ wire to a + terminal of the Device.
4. Connect a switch or button to the SW terminal and any of
the unused Ʇ terminals of the Device.
Adding Zigbee Device
• To switch the Device from Matter rmware (default)
to Zigbee,press 5 times the Reset button. The Device
stays in pairing mode for 2 minutes, and you can nd it
in your home automation platformthrough the Zigbee
Hub. If you cannot nd the Device,press the Reset
button3 times.
• To remove the Device, go to its page and delete it from
your home automation platform.
ⓘIn Zigbee mode, the AP of the Device is not available by
default. To enable it, the you should hold the Reset button for
5 seconds.
Setting up the Device via Matter
ⓘBefore you start, make sure you have:
• 2.4 GHz Wi-Fi network
• A Matter-compatible hub connected to the Internet
• A mobile device with Bluetooth enabled and a Matter-com-
patible app installed
1. Enable the access point of the Device by pressing and
holding the Reset/control button for 5 seconds.
2. Scan the Matter QR code inside the box.
3.Follow the instructions that appear on your screen to com-
plete the process.
ⓘKeep the QR code for future reference. If you reset the de-
vice, you will need that code again.
Specications
Physical
• Size (HxWxD): 37x42x16 mm / 1.46x1.65x0.63 in
• Weight: 27 g / 0.95 oz
• Screw terminals max torque: 0.4 Nm / 3.5 lbin
• Conductor cross section: 0.2 to 2.5 mm² / 24 to 14 AWG
(solid, stranded, and bootlace ferrules)
• Conductor stripped length: 6 to 7 mm / 0.24 to 0.28 in
• Mounting: Wall console / In-wall box
• Shell material: Plastic
• Shell color: Red
Environmental
• Ambient working temperature:-20°C to 40°C / -5°F
to 105°F
• Humidity: 30% to 70% RH
• Max. altitude: 2000 m / 6562 ft
Electrical
• Power supply:
- 110-240V~
- 24-30V⎓
• Power consumption: < 1.2 W
Output circuits ratings
• Max. switching voltage:
- 240V~
- 30V⎓
• Max. switching current:
- 16A (240V~)
- 10A (30V⎓)
Sensors, meters
• Internal-temperature sensor:Yes
• Voltmeter (AC): Yes
• Ammeter (AC): Yes
Radio
Wi-Fi
• Protocol: 802.11 b/g/n
• RF band: 2401-2483 МHz
• Max. RF power: < 20 dBm
• Range: Up to 50 m / 164 ft outdoors, up to 30 m / 98 ft
indoors (depending on local conditions)
Bluetooth
• Protocol: 4.2
• RF band: 2400-2483.5 MHz
• Max. RF power: <4 dBm
• Range: Up to 30 m / 98 ft outdoors, up to 10 m / 33 ft
indoors (depending on local conditions)
Zigbee
• Protocol: 802.15.4
• RF band: 2400 to 2483.5 MHz
• Max. RF power: < 20 dBm
• Range: Up to 100 m / 328 ft indoors and 300 meters /
984 ft outdoors (depends on local conditions)
Microcontroller unit
• CPU: ESP-Shelly-C68F
• Flash: 8 MB
Firmware capabilities
• Schedules: 20
• Webhooks (URL actions): 20 with 5 URLs per hook
• Wi-Fi range extender: Yes
• BLE Gateway: Yes
• Scripting: Yes
• MQTT: Yes
• Encryption: Yes
Shelly Cloud inclusion
The Device can be monitored, controlled, and set up through
our Shelly Cloud home automation service. You can use
the service through either our Android, iOS, or Harmony OS
mobile application or through any internet browser at https://
control.shelly.cloud/.
If you choose to use the Device with the application and
Shelly Cloud service, you can nd instructions on how to
connect the Device to the Cloud and control it from the Shelly
app in the application guide: https://shelly.link/app-guide.
Troubleshooting
In case you encounter problems with the installation or oper-
ation of the Device, check its knowledge base page:
https://shelly.link/1PM_Gen4
Declaration of Conformity
Hereby, Shelly Europe Ltd. declares that the radio equipment
type for Shelly 1PM Gen4 is in compliance with Directive
2014/53/EU, 2014/35/EU, 2014/30/EU, 2011/65/EU. The
full text of the EU declaration of conformity is available at the
following internet address:
https://shelly.link/1PM_Gen4_DoC
Manufacturer: Shelly Europe Ltd.
Address: 51 Cherni Vrah Blvd., bldg. 3, . 2-3, Soa 1407,
Bulgaria
Tel.: +359 2 988 7435
E-mail: support@shelly.cloud
Ocial website: https://www.shelly.com
Changes in contact information are published by the Manu-
facturer on the ocial website.
All rights to the trademark Shelly® and other intellectual
rights associated with this Device belong to Shelly Europe
Ltd.
Deutsch
Benutzer- und Sicherheitsanleitung
Shelly 1PM Gen4
Smarter Schalter mit Leistungsmessung
In diesem Dokument als “das Gerät” bezeichnet
Sicherheitsinformationen
Lesen Sie diese Anleitung und alle anderen Dokumente, die
diesem Produkt beiliegen, um es sicher und ordnungsge
-
mäß zu verwenden. Bewahren Sie sie zum späteren Nach-
schlagen auf. Die Nichtbeachtung der Installationsanwei-
sungen kann zu Fehlfunktionen, Gefahren für Gesundheit
und Leben, Gesetzesverstößen und/oder zur Verweigerung
gesetzlicher und kommerzieller Garantien (falls vorhanden)
führen. Shelly Europe Ltd. haftet nicht für Verluste oder
Schäden, die durch eine fehlerhafte Installation oder einen
unsachgemäßen Betrieb des Geräts aufgrund der Nicht-
beachtung der Benutzer- und Sicherheitshinweise in dieser
Anleitung entstehen.
⚠Dieses Zeichen weist auf Sicherheitshinweise hin.
ⓘDieses Zeichen weist auf einen wichtigen Hinweis hin.
⚠WARNUNG! Gefahr eines Stromschlags. Die Installation
des Geräts an das Stromnetz muss sorgfältig von einer quali-
B2502
For UK PSTI Act Statement of Compliance scan
the QR code
Português
Manual do utilizador e de segurança
Shelly 1PM Gen4
Interruptor inteligente com medição de
potência
Referido neste documento como “o Dispositivo”
Informações de segurança
Para uma utilização segura e correcta, leia este manual
e quaisquer outros documentos que acompanhem este
produto. Guarde-os para referência futura. O não cumpri
-
mento dos procedimentos de instalação pode levar a mau
funcionamento, perigo para a saúde e a vida, violação da lei
e/ou recusa de garantias legais e comerciais (se existirem).
A Shelly Europe Ltd. não se responsabiliza por quaisquer
perdas ou danos em caso de instalação incorrecta ou fun
-
cionamento inadequado deste dispositivo devido ao não
cumprimento das instruções de utilização e segurança
contidas neste guia.
⚠Este sinal indica informações de segurança.
ⓘEste sinal indica uma nota importante.
⚠ATENÇÃO! Risco de choque elétrico. A instalação do Dis-
positivo na rede eléctrica deve ser efectuada cuidadosamente
por um eletricista qualicado.
⚠ATENÇÃO! Antes de efetuar quaisquer alterações às liga-
ções, certique-se de que não existe qualquer tensão presen-
te nos terminais do Dispositivo.
⚠CUIDADO! Ligue o Dispositivo apenas a uma rede eléctrica
e a aparelhos que estejam em conformidade com todos os
regulamentos aplicáveis. Um curto-circuito na rede eléctrica
ou em qualquer aparelho ligado ao Dispositivo pode provocar
incêndios, danos materiais e choques eléctricos.
⚠CUIDADO! O Dispositivo só pode ser ligado e comandar cir-
cuitos eléctricos e aparelhos que estejam em conformidade
com as normas e regras de segurança aplicáveis.
⚠CUIDADO! Não ligue o Dispositivo a aparelhos que exce-
dam a carga eléctrica máxima especicada.
⚠CUIDADO! Ligar o Dispositivo apenas da forma indicada
nestas instruções. Qualquer outro método pode causar danos
e/ou ferimentos.
⚠ATENÇÃO! Antes de instalar o Dispositivo, desligue os
disjuntores. Utilize um Dispositivo de teste adequado para se
certicar de que não existe tensão nos cabos que pretende
ligar. Quando tiver a certeza de que não há tensão, prossiga
com a instalação.
⚠CUIDADO! O Dispositivo e os aparelhos a ele ligados de-
vem ser protegidos por um interrutor de proteção de cabos
em conformidade com a norma EN60898-1 (caraterística de
disparo B ou C, máx. 16 A de corrente nominal, mín. 6 kA de
capacidade de interrupção, classe de limitação de energia 3).
⚠CUIDADO! Não utilizar o Dispositivo se este apresentar
qualquer sinal de dano ou defeito.
⚠CUIDADO! Não tente reparar o Dispositivo por si próprio.
⚠CUIDADO! O Dispositivo destina-se apenas a ser utilizado
em interiores.
⚠CUIDADO! Manter o Dispositivo afastado de sujidade e
humidade.
⚠CUIDADO! Não permita que as crianças brinquem com os
botões/interruptores ligados ao Dispositivo. Mantenha os dis-
positivos (telemóveis, tablets, PCs) para controlo remoto do
Shelly afastados das crianças.
Descrição do produto
Shelly 1PM Gen4 (o Dispositivo) é um interrutor inteligente
compatível com Matter com medição de potência. Equipado
com um MCU sem os multiprotocolo, suporta conetividade
Zigbee e Bluetooth para uma ligação segura. O Dispositivo
funciona tanto em corrente alternada como em corrente
contínua. O seu formato pequeno permite a instalação
posterior em caixas de parede eléctricas normais, atrás de
tomadas de corrente, interruptores de luz ou outros locais
com espaço limitado.
O Dispositivo tem uma interface Web incorporada para mo-
nitorizar, controlar e ajustar as suas denições. A interface
Web está acessível em http://192.168.33.1 quando ligado
diretamente ao ponto de acesso do Dispositivo ou no seu
endereço IP quando ligado à mesma rede.
O Dispositivo pode aceder e interagir com outros dispositi-
vos inteligentes ou sistemas de automação se estiverem na
mesma infraestrutura de rede. A Shelly Europe Ltd. fornece
APIs para os dispositivos, a sua integração e o controlo na
nuvem. Para mais informações, visite https://shelly-api-do-
cs.shelly.cloud.
ⓘO Dispositivo vem com rmware instalado de fábrica. Para
o manter atualizado e seguro, a Shelly Europe Ltd. fornece
gratuitamente as últimas actualizações de rmware. Pode
aceder às actualizações através da interface web incorpora-
da ou da aplicação móvel Shelly Smart Control, onde pode
encontrar detalhes sobre a versão mais recente do rmware.
A escolha de instalar ou não as actualizações de rmware é
da exclusiva responsabilidade do utilizador. A Shelly Europe
Ltd. não será responsável por qualquer falta de conformidade
do Dispositivo causada pela falha do utilizador em instalar as
actualizações disponíveis de forma atempada.
Instruções de instalação
ⓘPara ligar o Dispositivo, recomendamos a utilização de os
sólidos de núcleo único ou os entrançados com virolas. Os
os devem ter um isolamento com maior resistência ao calor,
não inferior a PVC T105°C (221°F).
ⓘNão utilizar botões ou interruptores com lâmpadas LED ou
de néon incorporadas.
ⓘAo ligar os os aos terminais do Dispositivo, tenha em
consideração a secção transversal do condutor especica-
da e o comprimento da tira. Não ligue vários os a um único
terminal.
ⓘPor motivos de segurança, depois de ligar com êxito o
Dispositivo à rede Wi-Fi local, recomendamos que desactive
ou proteja com palavra-passe o AP (Ponto de acesso) do
Dispositivo.
ⓘPara efetuar uma reposição de fábrica do Dispositivo, pri-
ma sem soltar o botão Controlo durante 10 segundos.
ⓘPara ativar o ponto de acesso e a ligação Bluetooth do
Dispositivo, prima sem soltar o botão Controlo durante 5
segundos.
ⓘNão utilize o(s) terminal(is) L do dispositivo para alimentar
outros dispositivos
Se estiver a utilizar uma fonte de alimentação de 110-240
V~ (Fig. 1):
1. Ligue o circuito de carga ao terminal O do dispositivo e
ao cabo neutro.
2. Ligue o cabo ativo a um terminal L do Dispositivo.
3. Ligue o cabo neutro a um terminal N do Dispositivo.
4. Ligue um interrutor ou botão ao terminal SW do disposi-
tivo e a qualquer um dos terminais L não utilizados do
Dispositivo.
Se for utilizada uma fonte de alimentação de 24-30 V⎓
(Fig. 2):
ⓘNote-se que a medição da potência não está disponível em
corrente contínua.
1. Ligar a carga ao terminal O do dispositivo e ao o DC+.
2. Ligue o o GND a um terminal Ʇ do Dispositivo.
3. Ligue o o DC+ a um terminal + do dispositivo.
4. Ligue um interrutor ou botão ao terminal SW e a qualquer
um dos terminais Ʇ não utilizados do Dispositivo.
Adicionar Dispositivo Zigbee
• Para mudar o Dispositivo do rmware Matter (prede-
nição) para Zigbee, prima 5 vezes o botão Reset. O
Dispositivo permanece no modo de emparelhamento
durante 2 minutos e pode encontrá-lo na sua plataforma
de domótica através do Hub Zigbee. Se não conseguir
encontrar o Dispositivo, prima o botão Reset 3 vezes.
• Para remover o Dispositivo, aceda à sua página e
elimine-o da sua plataforma de domótica.
ⓘNo modo Zigbee, o AP do Dispositivo não está disponível
por defeito. Para o ativar, deve manter premido o botão Reset
durante 5 segundos.
Congurar o dispositivo via Matter
ⓘAntes de começar, certique-se de que tem:
• Uma rede Wi-Fi de 2,4 GHz
• Um hub compatível com o Matter ligado à Internet
• Um dispositivo móvel com Bluetooth ativado e uma
aplicação compatível com o Matter instalada
1. Active o ponto de acesso do Dispositivo premindo e
mantendo premido o botão de reinicialização/controlo
durante 5 segundos.
2. Digitalize o código QR da Matéria dentro da caixa.
3. Siga as instruções que aparecem no ecrã para concluir o
processo.
ⓘGuarde o código QR para referência futura. Se reiniciar o
dispositivo, precisará novamente desse código.
Especicações
Físico
• Tamanho (AxLxP): 37x42x16 mm / 1.46x1.65x0.63 in
• Peso: 27 g / 0.95 oz
• Tensão máxima de aperto nos terminais: 0.4 Nm /
3.5 lbin
• Secção transversal do condutor: 0.2 a 2.5 mm² / 24 a 14
AWG (ferrolhos maciços, entrançados e bootlace)
• Secção transversal do condutor: 6 a 7 mm / 0.24 a
0.28 in
• Montagem: Caixa de encastrar
• Material da casca: Plástico
• Cor da casca: Vermelho
Ambiental
• Temperatura de funcionamento: -20°C a 40°C / -5°F
a 105°F
• Umidade: 30% a 70% RH
• Altitude máxima: 2000 m / 6562 ft
Elétrico
• Fonte de alimentação:
- 110-240V~
- 24-30V⎓
• Consumo de energia: < 1.2 W
Classicações dos circuitos de saída
• Tensão máxima de comutação:
- 240V~
- 30V⎓
• Corrente máxima de comutação:
- 16A (240V~)
- 10A (30V⎓)
Sensores, contadores
• Sensor de temperatura interna: Sim
• Voltímetro (AC): Sim
• Amperímetro (AC): Sim
Rádio
Wi-Fi
• Protocolo: 802.11 b/g/n
• Banda RF: 2401-2483 МHz
• Máx. Potência de RF: < 20 dBm
• Alcance: Até 50 m / 164 ft no exterior, até 30 m / 98 ft no
interior (dependendo da construção local)
Bluetooth
• Protocolo: 4.2
• Banda RF: 2400-2483.5 MHz
• Máx. Potência de RF: <4 dBm
• Alcance: Até 30 m / 98 ft no exterior, até 10 m / 33 ft no
interior (dependendo da construção local)
Zigbee
• Protocolo: 802.15.4
• Banda RF: 2400 - 2483.5 MHz
• Máx. Potência de RF: <20 dBm
• Alcance: Até 100 m / 328 ft no interior, até 300 m / 984 ft
no exterior (dependendo das condições locais)
Microcontroller unit
• CPU: ESP-Shelly-C68F
• Flash: 8 MB
Funzionalità del rmware
• Horários: 20
• Webhooks (acções URL): 20 com 5 URLs por hook
• Extensor de alcance Wi-Fi: Sim
• BLE Gateway: Sim
• Scripting: Sim
• MQTT: Sim
• Encriptação: Sim
Shelly Cloud Inclusão
O Dispositivo pode ser monitorizado, controlado e congura-
do através do nosso serviço de automação residencial Shelly
Cloud. Pode utilizar o serviço através da nossa aplicação
móvel Android, iOS ou Harmony OS ou através de qualquer
navegador de Internet em https://control.shelly.cloud/ .
Se optar por utilizar o Dispositivo com a aplicação e o serviço
Shelly Cloud, pode encontrar instruções sobre como ligar o
Dispositivo à Cloud e controlá-lo a partir da aplicação Shelly
no guia da aplicação: https://shelly.link/app-guide.
Resolução de problemas
Se tiver problemas com a instalação ou o funcionamento
do Dispositivo, consulte a sua página da base de dados de
conhecimento:
https://shelly.link/1PM_Gen4
Declaração de Conformidade
A Shelly Europe Ltd. declara por este meio que o equipa-
mento rádio tipo Shelly 1PM Gen4 opera conforme a Diretriz
2014/53/EU, 2014/35/EU, 2014/30/EU, 2011/65/EU. O texto
completo da declaração da UE sobre a conformidade está
disponível no seguinte endereço de internet:
https://shelly.link/1PM_Gen4_DoC
Fabricante: Shelly Europe Ltd.
Endereço: 51 Cherni Vrah Blvd., edifício 3, pisos 2-3, Sóa
1407, Bulgária
Tel: +359 2 988 7435
E-mail: support@shelly.cloud
Site ocial: https://www.shelly.com
As alterações nas informações de contacto são publicadas
pelo fabricante no sítio Web ocial.
Todos os direitos sobre a marca registada Shelly® e outros
direitos intelectuais associados a este Dispositivo perten-
cem à Shelly Europe Ltd.
Português
Esquema elétrico
Fig. 1. Fonte de alimentação 110-240 V~
Fig. 2. Fonte de alimentação 24-30 V⎓
Legenda
Terminais do dispositivo
• O: Terminal de saída de circuito em carga
• SW: Terminal de entrada de comutador (controlo O)
• L: Terminal ativo (110-240 V~)
• N: Terminal de Neutro
• +: Terminal positivo 24-30V⎓
• Ʇ: Terminal de terra 24-30V⎓
Cabos
• L: Cabo ativo (110-240 V~)
• N: Cabo Neutro
• +: Cabo positivo 24-30V⎓
• GND: Cabo de terra de 24-30 V⎓
Français
Schéma de câblage
Image 1. Alimentation électrique 110-240 V~
Image 2. Alimentation 24-30 V⎓
Légende
Bornes du dispositif
• O : Borne de sortie du circuit de charge
• SW : Borne d’entrée de l’interrupteur/du commutateur
(controlo O)
• L : Borne pour la Phase (110-240 V~)
• N : Borne pour le Neutre
• + : Borne positive 24-30 V⎓
• Ʇ : Borne de terre 24-30V⎓
Fils
• L : Fil Phase (110-240 V~)
• N : Fil Neutre
• + : Fil positif 24-30 V⎓
• GND : Fil de terre 24-30 V⎓
Polski
Schemat połączeń
Rys. 1 Zasilanie 110-240 V~
Rys. 2. Zasilanie 24-30 V⎓
Legenda
Zaciski urządzenia
• O: Zacisk wyjściowy obwodu obciążenia
• SW: Zacisk wejściowy przełącznika (sterowanie O)
• L: Zacisk pod napięciem (110-240 V~)
• N: Zacisk neutralny
• +: 24-30 V⎓ zacisk dodatni
• Ʇ: 24-30V⎓ zacisk uziemienia
Przewody
• L: Przewód pod napięciem (110-240 V~)
• N: Przewód neutralny
• +: 24-30 V ⎓ przewód dodatni
• GND: przewód uziemiający 24-30 V⎓
Nederlands
Bedradingsschema
Fig. 1.110-240 V~ voeding
Fig. 2. 24-30 V⎓ voeding
Legenda
Apparaataansluitingen
• O: Uitgangsklem belastingscircuit
• SW: Ingangsklem voor schakelaar (besturing O)
• L: Voedingsklem (110-240 V~)
• N: Neutrale aansluiting
• +: 24-30 V⎓ positieve klem
• Ʇ: 24-30V⎓ aardklem
Draden
• L: stroomdraad (110-240 V~)
• N: Neutrale draad
• +: 24-30V ⎓ positieve draad
• GND: 24-30 V⎓ aardedraad
Shelly 1PM Gen4
110-240 V~
N
L
24-30 V
⎓
GND
+
Français
Notice d’utilisation et consignes de
sécurité
Shelly 1PM Gen4
Interrupteur/commutateur intelligent avec
mesure de la puissance
Désigné dans ce document par le terme “le Dispositif”
Informations de sécurité
Pour une utilisation sûre et appropriée, lisez cette notice
et tout autre document accompagnant ce produit. Conser-
vez-les pour pouvoir vous y référer ultérieurement. Le
non-respect des procédures d’installation peut entraîner
un dysfonctionnement, danger pour votre santé et vie,
une violation de la loi et/ou le refus des garanties légales
et commerciales (le cas échéant). Shelly Europe Ltd. n’est
pas responsable de toute perte ou de tout dommage en cas
d’installation incorrecte ou de fonctionnement incorrect de
ce dispositif en raison du non-respect des instructions d’uti
-
lisation et de sécurité contenues dans ce guide.
⚠Ce symbole indique une information de sécurité.
ⓘCe symbole indique une note importante.
⚠AVERTISSEMENT ! Risque d’électrocution. L’installation du
Dispositif sur le réseau électrique doit être effectuée avec soin
par un électricien qualié.
⚠AVERTISSEMENT ! Avant de modier les branchements,
assurez-vous qu’il n’y ait pas de tension aux bornes du Dis
-
positif.
⚠ATTENTION ! Ne raccordez le Dispositif qu’à un réseau
électrique et à des appareils conformes à toutes les réglemen-
tations en vigueur. Un court-circuit dans le réseau électrique
ou tout appareil connecté au Dispositif peut engendrer un in
-
cendie, choc électrique et des dommages matériels.
⚠ATTENTION ! Le Dispositif ne peut être raccordé et contrô-
ler que des circuits électriques et des appareils conformes aux
normes et aux règles de sécurité en vigueur.
⚠ATTENTION ! Ne pas brancher le Dispositif à des appareils
qui dépassent la charge électrique maximale indiquée.
⚠ATTENTION ! Branchez le Dispositif uniquement de la ma-
nière indiquée dans cette notice. Toute autre méthode pourrait
entraîner des dommages et/ou des blessures.
⚠AVERTISSEMENT ! Avant d’installer le Dispositif, mettez
les disjoncteurs hors tension. Utilisez un appareil de test ap-
proprié pour vous assurer qu’il n’y ait pas de tension sur les ls
que vous voulez brancher. Lorsque vous êtes sûrs qu’il n’y a
pas de tension, procédez à l’installation.
⚠ATTENTION ! Le Dispositif et les appareils qui y sont rac-
cordés doivent être protégés par un interrupteur de protection
de câbles conforme à la norme EN60898-1 (caractéristique de
déclenchement B ou C, 16 A de courant nominal max., 6 kA
de pouvoir de coupure min., classe de limitation d’énergie 3).
⚠ATTENTION ! N’utilisez pas le Dispositif s’il présente des
signes de détérioration ou de défaut.
⚠ATTENTION ! N’essayez pas de réparer le Dispositif vous-
même.
⚠ATTENZIONE! Il Dispositivo è destinato esclusivamente
all’uso interno.
⚠ATTENTION ! Conservez le Dispositif à l’abri de la saleté
et de l’humidité.
⚠ATTENTION ! Ne laissez pas les enfants jouer avec les
boutons/interrupteurs branchés au Dispositif. Gardez les
appareils (téléphones portables, tablettes, PC) permettant
de contrôler le dispositif Shelly à distance hors de portée des
enfants.
Présentation du produit
Shelly 1PM Gen4 (le Dispositif) est un interrupteur intelli-
gent compatible Matter avec mesure de puissance. Équipé
d’un MCU sans l multiprotocole, il prend en charge les
connexions Zigbee et Bluetooth pour une connexion sécu-
risée. Le dispositif fonctionne à la fois en courant alternatif
(AC) et en courant continu (DC). Son format compact permet
une installation dans des boîtiers électriques muraux stan-
dards, derrière des prises électriques, des interrupteurs ou
dans d’autres espaces réduits.
Le Dispositif est doté d’une interface web intégrée qui
permet de le surveiller, de le contrôler et d’en régler les
paramètres. L’interface web est accessible à l’adresse
http://192.168.33.1 lorsqu’il est connecté directement au
point d’accès de l’appareil ou à son adresse IP lorsqu’il est
connecté au même réseau.
Le Dispositif peut accéder à d’autres dispositifs connectés
ou systèmes d’automatisation et interagir avec eux s’ils se
trouvent dans la même infrastructure réseau. Shelly Europe
Ltd. fournit des API pour les dispositifs, leur intégration
et le contrôle dans le Cloud. Pour plus d’informations, ren-
dez-vous à l’adresse suivante https://shelly-api-docs.shelly.
cloud.
ⓘLe Dispositif est livré avec un micrologiciel installé en usine.
Pour le maintenir à jour et le sécuriser, Shelly Europe Ltd. four-
nit gratuitement les dernières mises à jour de celui-ci. Vous
pouvez accéder aux mises à jour via l’interface web intégrée
ou l’application mobile Shelly Smart Control, où vous trouverez
des détails sur la dernière version du micrologiciel. Le choix
d’installer ou non les mises à jour du micrologiciel relève de
la seule responsabilité de l’utilisateur. Shelly Europe Ltd. n’est
pas responsable de tout défaut de conformité du Dispositif
causé par le fait que l’utilisateur n’a pas installé les mises à
jour disponibles en temps voulu.
Instructions d’installation
ⓘPour brancher le Dispositif, nous recommandons d’utiliser
des ls unipolaires solides ou des ls torsadés avec des em-
bouts. Les ls doivent avoir une isolation avec une meilleure
résistance à la chaleur, pas moins que le PVC T105 °C (221 °F).
ⓘN’utilisez pas de boutons ou d’interrupteurs avec des
lampes LED ou néon intégrées.
ⓘLors du branchement des ls aux bornes du Dispositif,
tenez compte de la section du conducteur et de la longueur
dénudée spéciées. Ne pas brancher plusieurs ls à une
seule borne.
ⓘPour des raisons de sécurité, après avoir connecté le Dis-
positif au réseau Wi-Fi local, nous vous recommandons de
désactiver ou de protéger par mot de passe le point d’accès
(AP) du Dispositif.
ⓘPour effectuer une réinitialisation aux paramètres d’usine
du Dispositif, appuyez sur le bouton de commande et mainte
-
nez-le pendant 10 secondes.
ⓘPour activer le point d’accès (AP) et la connexion Bluetooth
du Dispositif, appuyez sur le bouton de commande et mainte-
nez-le pendant 5 secondes.
ⓘNe pas utiliser les bornes L du dispositif pour en alimenter
d’autres.
Si vous utilisez une alimentation 110-240 V~ (image 1) :
1. Branchez le circuit de charge à la borne O du Dispositif et
au l Neutre.
2. Branchez le l Phase à une borne L du Dispositif.
3. Branchez le l Neutre à la borne N du Dispositif.
4. Branchez un interrupteur ou un bouton-poussoir à la borne
SW du dispositif et à l’une des bornes L non utilisées du
Dispositif.
Si vous utilisez une alimentation 24 - 30 V⎓ (image 2) :
ⓘNotez que la mesure de la puissance n’est pas disponible
en courant continu.
1. Branchez la charge à la borne O du Dispositif et au l DC+.
2. Branchez le l GND à une borne Ʇ du Dispositif.
3. Branchez le l DC+ à une borne + du Dispositif.
4. Branchez un interrupteur ou un bouton-poussoir à la borne
SW et à l’une des bornes Ʇ non utilisées du Dispositif.
Ajout d’un dispositif Zigbee
• Pour passer le Dispositif du micrologiciel Matter (par
défaut) à Zigbee, appuyez 5 fois sur le bouton de réinitia
-
lisation. Le Dispositif reste en mode appairage pendant
2 minutes et vous pouvez le trouver sur votre plateforme
domotique via le Hub Zigbee. Si vous ne trouvez pas le
Dispositif, appuyez 3 fois sur le bouton de réinitialisation.
• Pour supprimer le Dispositif, allez sur sa page et suppri
-
mez-le de votre plateforme domotique.
ⓘEn mode Zigbee, l’AP du Dispositif n’est pas disponible par
défaut. Pour l’activer, vous devez maintenir le bouton Reset
enfoncé pendant 5 secondes.
Conguration du dispositif via Matter
ⓘAvant de commencer, assurez-vous que vous disposez
• d’un réseau Wi-Fi 2,4 GHz
• d’un hub compatible avec Matter connecté à l’Internet
• d’un dispositif mobile avec Bluetooth activé et une
application compatible avec Matter installée
1. Activez le point d’accès du Dispositif en appuyant sur le
bouton de réinitialisation/contrôle et en le maintenant
pendant 5 secondes.
2. Scannez le code QR Matter qui se trouve à l’intérieur de
la boîte.
3. Suivez les instructions qui s’achent à l’écran pour termi-
ner la procédure.
ⓘConservez le code QR pour vous y reporter ultérieurement.
Si vous réinitialisez le dispositif, vous aurez à nouveau besoin
de ce code.
Caractéristiques techniques
Physiques
• Dimensions (LxPxH) : 37x42x16 mm / 1.46x1.65x0.63 in
• Poids : 27 g / 0.95 oz
• Serrage max. du domino électrique : 0.4 Nm / 3.5 lbin
• Diamètre de câble : 0.2 à 2.5 mm² / 24 à 14 AWG
(embouts pleins, torsadés et à lacets)
• Longueur du conducteur dénudé : 6 à 7 mm / 0.24
à 0.28 in
• Montage : Boîte d’encastrement
• Matériau du boîtier : Plastique
• Couleur du boîtier : Rouge
Environnementales
• Température de fonctionnement : -20 °C à 40 °C / -5
°F à 105 °F
• Humidité : 30 % à 70 %
• Altitude max. : 2000 m / 6562 ft
Électriques
• Alimentation électrique :
- 110-240 V~
- 24-30 V⎓
• Consommation électrique : < 1.2 W
Caractéristiques des circuits de sortie
• Tension de commutation max. :
- 240 V~
- 30 V⎓
• Courant de commutation max. :
- 16 A (240 V~)
- 10 A (30 V⎓)
Capteurs, compteurs
• Capteur de température interne : Oui
• Voltmètre (AC) : Oui
• Ampèremètre (AC) : Oui
Protocole de communication radio
Wi-Fi
• Protocole: 802.11 b/g/n
• Bande RF : 2401 - 2483 МHz
• Puissance RF max. : < 20 dBm
• Portée : Jusqu’à 50 m / 164 ft à l’extérieur, jusqu’à 30 m /
98 ft à l’intérieur (en fonction des collectivités locales)
Bluetooth
• Protocole: 4.2
• Bande RF : 2400-2483.5 MHz
• Puissance RF max. : <4 dBm
• Portée : Jusqu’à 30 m / 98 ft à l’extérieur, jusqu’à 10 m /
33 ft à l’intérieur (en fonction des collectivités locales)
Zigbee
• Protocolo: 802.15.4
• Bande RF: 2400 - 2483.5 MHz
• Puissance RF max: <20 dBm
• Portée : Jusqu’à 100 m / 328 ft à l’intérieur, jusqu’à 300 m
/ 984 ft à l’extérieur (en fonction des collectivités locales)
Microcontroller unit
• CPU: ESP-Shelly-C68F
• Flash : 8 MB
Capacités du micrologiciel
• Programmations : 20
• Webhooks (actions URL) : 20 avec 5 URL par crochet
Web
• Répéteur Wi-Fi : Oui
• BLE Gateway: Oui
• Scripts : Oui
• MQTT : Oui
• Cryptage: Oui
Intégration de Shelly Cloud
Le Dispositif peut être surveillé, contrôlé et conguré par le
biais de notre service domotique Shelly Cloud. Vous pouvez
utiliser ce service depuis notre application Android, iOS ou
Harmony OS ou bien depuis n’importe quel navigateur Inter
-
net à l’adresse https://control.shelly.cloud/.
Si vous choisissez d’utiliser le Dispositif avec l’application et
le service Shelly Cloud, vous trouverez des instructions sur la
manière de connecter le dispositif au Cloud et de le contrôler
à partir de l’application Shelly dans le guide de l’application à
l’adresse suivante https://shelly.link/app-guide.
Résolution des problèmes
Si vous rencontrez des problèmes avec l’installation ou
le fonctionnement de ce Dispositif, consultez la Base de
connaissances :
https://shelly.link/1PM_Gen4
Déclaration de Conformité
Par la présente, Shelly Europe Ltd. déclare que l’équipement
radio de type Shelly 1PM Gen4 est conforme à la directive
2014/53/UE, 2014/35/UE, 2014/30/UE, 2011/65/UE. Le
texte intégral de la déclaration de conformité de l’UE est dis
-
ponible à l’adresse internet suivante :
https://shelly.link/1PM_Gen4_DoC
Fabricant : Shelly Europe Ltd.
Adresse : 51 Boulevard Cherni Vrah, bâtiment 3, étages 2-3,
Soa 1407, Bulgarie
Tél. : +359 2 988 7435
E-mail: support@shelly.cloud
Site Internet ociel : https://www.shelly.com
Les changements des coordonnées sont publiés par le fabri-
cant sur le site Internet ociel.
Tous les droits de la marque Shelly® et les autres droits
intellectuels associés à ce Dispositif appartiennent à Shelly
Europe Ltd.
Polski
Instrukcja obsługi i bezpieczeństwa
Shelly 1PM Gen4
Inteligentny przełącznik z pomiarem mocy
Zwane w niniejszym dokumencie “Urządzeniem”
Informacje dotyczące bezpieczeństwa
Aby zapewnić bezpieczne i prawidłowe użytkowanie, na-
leży przeczytać niniejszą instrukcję oraz wszelkie inne
dokumenty dołączone do tego produktu. Należy zachować
je na przyszłość. Nieprzestrzeganie procedur instalacji
może prowadzić do nieprawidłowego działania, zagrożenia
zdrowia i życia, naruszenia prawa i/lub odmowy gwarancji
prawnych i handlowych (jeśli takie istnieją). Shelly Europe
Ltd. nie ponosi odpowiedzialności za jakiekolwiek straty
lub szkody w przypadku nieprawidłowej instalacji lub nie-
właściwego działania tego urządzenia z powodu nieprze-
strzegania instrukcji obsługi i bezpieczeństwa zawartych w
niniejszej instrukcji.
⚠Ten znak wskazuje informacje dotyczące bezpieczeństwa.
ⓘTen znak oznacza ważną informację.
⚠OSTRZEŻENIE! Ryzyko porażenia prądem elektrycznym.
Podłączenie urządzenia do sieci elektrycznej musi zostać
wykonane przez wykwalikowanego elektryka.
⚠OSTRZEŻENIE! Przed dokonaniem jakichkolwiek zmian w
połączeniach należy upewnić się, że na zaciskach urządzenia
nie ma napięcia.
⚠UWAGA! Urządzenie należy podłączać wyłącznie do sieci
elektrycznej i urządzeń zgodnych z obowiązującymi przepisa
-
mi. Zwarcie w sieci elektrycznej lub jakimkolwiek urządzeniu
podłączonym do urządzenia może spowodować pożar,
uszkodzenie mienia i porażenie prądem.
⚠UWAGA! Urządzenie może być podłączane i sterowane
wyłącznie przez obwody elektryczne i urządzenia zgodne z
obowiązującymi standardami i normami bezpieczeństwa.
⚠UWAGA! Nie należy podłączać urządzenia do odbiorni-
ków przekraczających określone maksymalne obciążenie
elektryczne.
⚠UWAGA! Urządzenie należy podłączać wyłącznie w spo-
sób przedstawiony w niniejszej instrukcji. Każda inna metoda
może spowodować uszkodzenie i/lub obrażenia ciała.
⚠OSTRZEŻENIE! Przed instalacją urządzenia należy wy-
łączyć wyłączniki automatyczne. Użyj odpowiedniego urzą-
dzenia testowego, aby upewnić się, że na przewodach, które
chcesz podłączyć, nie ma napięcia. Gdy upewnisz się, że nie
ma napięcia, przejdź do instalacji.
⚠UWAGA! Urządzenie i podłączone do niego urządzenia
muszą być zabezpieczone wyłącznikiem kablowym zgodnym
z normą EN60898-1 (charakterystyka wyzwalania B lub C,
prąd znamionowy maks. 16 A prądu znamionowego, min. 6
kA prądu przerywanego, klasa ograniczenia energii 3).
⚠UWAGA! Nie używaj urządzenia, jeśli wykazuje ono jakie-
kolwiek oznaki uszkodzenia lub wady.
⚠UWAGA! Nie należy podejmować prób samodzielnej na-
prawy urządzenia.
⚠UWAGA! Urządzenie jest przeznaczone wyłącznie do użyt-
ku w pomieszczeniach.
⚠UWAGA! Urządzenie należy trzymać z dala od brudu i
wilgoci.
⚠UWAGA! Nie pozwalaj dzieciom bawić się przyciskami/
przełącznikami podłączonymi do urządzenia. Trzymaj urzą-
dzenia (telefony komórkowe, tablety, komputery PC) do zdal-
nego sterowania Shelly z dala od dzieci.
Opis produktu
Shelly 1PM Gen4 (Urządzenie) to kompatybilny z Matter
inteligentny przełącznik z pomiarem mocy. Wyposażony w
wieloprotokołowy bezprzewodowy MCU, obsługuje łącz-
ność Zigbee i Bluetooth w celu zapewnienia bezpiecznego
połączenia. Urządzenie działa zarówno na zasilaniu AC, jak i
DC. Jego niewielka obudowa umożliwia montaż w standar-
dowych elektrycznych puszkach ściennych, za gniazdkami
elektrycznymi, włącznikami światła lub w innych miejscach
o ograniczonej przestrzeni.
Urządzenie ma wbudowany interfejs sieciowy do monitoro-
wania, sterowania i dostosowywania jego ustawień. Interfejs
sieciowy jest dostępny pod adresem http://192.168.33.1 w
przypadku bezpośredniego połączenia z punktem dostępu
urządzenia lub pod adresem IP w przypadku dostępu z tej
samej sieci.
Urządzenie może uzyskiwać dostęp i wchodzić w interakcje
z innymi inteligentnymi urządzeniami lub systemami au-
tomatyki, jeśli znajdują się one w tej samej infrastrukturze
sieciowej. Shelly Europe Ltd. zapewnia interfejsy API dla
urządzeń, ich integrację i kontrolę w chmurze. Więcej in-
formacji można znaleźć na stronie https://shelly-api-docs.
shelly.cloud.
ⓘUrządzenie jest dostarczane z fabrycznie zainstalowanym
oprogramowaniem sprzętowym. Aby zapewnić jego aktuali-
zację i bezpieczeństwo, Shelly Europe Ltd. zapewnia najnow-
sze aktualizacje oprogramowania sprzętowego bezpłatnie.
Dostęp do aktualizacji można uzyskać za pośrednictwem
wbudowanego interfejsu internetowego lub aplikacji mobilnej
Shelly Smart Control. Za instalację aktualizacji oprogramo-
wania odpowiada użytkownik. Shelly Europe Ltd. nie ponosi
odpowiedzialności za brak zgodności urządzenia spowodo-
wany brakiem zainstalowania przez użytkownika dostępnych
aktualizacji w odpowiednim czasie.
Instrukcje instalacji
ⓘDo podłączenia urządzenia zaleca się stosowanie przewo-
dów jednożyłowych lub linkowych z tulejkami. Przewody po-
winny mieć izolację o podwyższonej odporności termicznej,
nie mniejszej niż PVC T105°C (221°F).
ⓘNie używaj przycisków lub przełączników z wbudowanymi
diodami LED lub neonowymi lampami jarzeniowymi.
ⓘPodłączając przewody do zacisków urządzenia, należy
wziąć pod uwagę określony przekrój przewodu i jego długość.
Nie podłączaj wielu przewodów do jednego zacisku.
ⓘZe względów bezpieczeństwa po pomyślnym podłączeniu
urządzenia do lokalnej sieci Wi-Fi zalecamy wyłączenie lub
zabezpieczenie hasłem punktu dostępowego urządzenia.
ⓘAby przywrócić ustawienia fabryczne urządzenia, naciśnij
i przytrzymaj przez 10 sekund przycisk resetowania/stero-
wania.
ⓘAby włączyć punkt dostępu i połączenie Bluetooth urzą-
dzenia, naciśnij i przytrzymaj przycisk resetowania/sterowa-
nia przez 5 sekund.
ⓘ Nie używaj zacisków L urządzenia do zasilania innych
urządzeń.
W przypadku korzystania z zasilania 110-240 V~ (rys. 1):
1. Podłącz obwód obciążenia do zacisku O urządzenia i
przewodu neutralnego.
2. Podłącz przewód pod napięciem do zacisku L urządzenia.
3. Podłącz przewód neutralny do zacisku N urządzenia.
4. Podłącz przełącznik lub przycisk do zacisku SW urządze-
nia i dowolnego z nieużywanych zacisków L urządzenia.
Jeśli używany jest zasilacz 24 - 30 V⎓ (rys. 2):
ⓘ Uwaga: pomiar mocy nie jest dostępny przy zasilaniu
prądem stałym.
1. Podłącz obciążenie do zacisku O urządzenia i przewodu
DC+.
2. Podłącz przewód GND do zacisku Ʇ urządzenia.
3. Podłącz przewód DC+ do zacisku + urządzenia.
4. Podłącz przełącznik lub przycisk do zacisku SW i dowol-
nego z nieużywanych zacisków Ʇ urządzenia.
Dodawanie urządzenia Zigbee
• Aby przełączyć urządzenie z rmware Matter (domyślne-
go) na Zigbee, naciśnij 5 razy przycisk Reset. Urządzenie
pozostanie w trybie parowania przez 2 minuty i można
je znaleźć na platformie automatyki domowej za pośred-
nictwem koncentratora Zigbee. Jeśli nie możesz znaleźć
urządzenia, naciśnij przycisk Reset 3 razy.
• Aby usunąć urządzenie, przejdź do jego strony i usuń je z
platformy automatyki domowej.
ⓘ W trybie Zigbee punkt dostępowy urządzenia nie jest
domyślnie dostępny. Aby go włączyć, należy przytrzymać
przycisk Reset przez 5 sekund.
Konguracja urządzenia za pomocą aplikacji
Matter
ⓘ Przed rozpoczęciem upewnij się, że posiadasz:
• Sieć Wi-Fi 2,4 GHz
• Koncentrator kompatybilny z Matter podłączony do
Internetu
• Urządzenie mobilne z włączoną funkcją Bluetooth i
zainstalowaną aplikacją kompatybilną z Matter
1. Włącz punkt dostępu urządzenia, naciskając i przytrzy
-
mując przycisk resetowania/sterowania przez 5 sekund.
2. Zeskanuj kod QR Matter znajdujący się wewnątrz pudełka.
3. Postępuj zgodnie z instrukcjami wyświetlanymi na ekra
-
nie, aby zakończyć proces.
ⓘ Zachowaj kod QR do wykorzystania w przyszłości. W
przypadku resetowania urządzenia kod ten będzie potrzebny
ponownie.
Specykacje
Fizyczny
• Rozmiar (wys. x szer. x gł.): 37x42x16 mm /
1.46x1.65x0.63 in
• Waga: 27 g / 0.95 oz
• Maksymalny moment obrotowy zacisków śrubowych:
0,4 Nm / 3,5 lbin
• Przekrój przewodu: 0,2 do 2,5 mm² / 24 do 14 AWG (żyły
pełne, skręcone i tulejki zaciskowe)
• Długość odizolowanego przewodu: 6 do 7 mm / 0,24
do 0,28 cala
• Montaż: Konsola ścienna / puszka naścienna
• Materiał obudowy: Tworzywo sztuczne
• Kolor skorupy: czerwony
Środowisko
• Temperatura robocza otoczenia: -20°C do 40°C / -5°F
do 105°F
• Wilgotność: od 30% do 70% wilgotności względnej
• Maksymalna wysokość: 2000 m / 6562 ft
Elektryczny
• Zasilanie:
- 110-240V~
- 24-30V⎓
• Pobór mocy: < 1.2 W
Wartości znamionowe obwodów wyjściowych
• Maks. napięcie przełączania:
- 240V~
- 30V⎓
• Maks. prąd przełączania:
- 16A (240V~)
- 10A (30V⎓)
Czujniki, mierniki
• Wewnętrzny czujnik temperatury:Tak
• Woltomierz (AC): Tak
• Amperomierz (AC): Tak
Radio
Wi-Fi
• Protokół: 802.11 b/g/n
• Pasmo RF: 2401-2483 MHz
• Maks. Moc RF: < 20 dBm
• Zasięg:Do 50 m / 164 stóp na zewnątrz, do 30 m / 98
stóp w pomieszczeniach (w zależności od warunków
lokalnych)
Bluetooth
• Protokół: 4.2
• Pasmo RF: 2400-2483,5 MHz
• Maks. Moc RF: <4 dBm
• Zasięg:Do 30 m / 98 stóp na zewnątrz, do 10 m / 33
stóp w pomieszczeniach (w zależności od warunków
lokalnych)
Zigbee
• Protokół: 802.15.4
• Pasmo RF: 2400 do 2483,5 MHz
• Maks. Moc RF: < 20 dBm
• Zasięg: Do 100 m / 328 stóp w pomieszczeniach i
300 metrów / 984 stóp na zewnątrz (w zależności od
warunków lokalnych)
Jednostka mikrokontrolera
• CPU: ESP-Shelly-C68F
• Flash: 8 MB
Możliwości oprogramowania układowego
• Harmonogramy: 20
• Webhooki (akcje URL): 20 z 5 adresami URL na hak
• Wzmacniacz zasięgu Wi-Fi: Tak
• Bramka BLE: Tak
• Obsługa skryptów: Tak
• MQTT: Tak
• Szyfrowanie: Tak
Włączenie Shelly Cloud
Urządzenie można monitorować, kontrolować i konguro-
wać za pośrednictwem naszej usługi automatyki domowej
Shelly Cloud. Z usługi można korzystać za pośrednictwem
naszej aplikacji mobilnej na system Android, iOS lub Harmo-
ny OS lub za pośrednictwem dowolnej przeglądarki interne-
towej pod adresem https://control.shelly.cloud/.
Jeśli zdecydujesz się używać urządzenia z aplikacją i
usługą Shelly Cloud, możesz znaleźć instrukcje dotyczące
podłączania urządzenia do chmury i sterowania nim z apli-
kacji Shelly w przewodniku po aplikacji: https://shelly.link/
app-guide.
Rozwiązywanie problemów
W przypadku napotkania problemów z instalacją lub działa-
niem urządzenia, należy sprawdzić jego stronę bazy wiedzy:
https://shelly.link/1PM_Gen4
Deklaracja zgodności
Niniejszym Shelly Europe Ltd. oświadcza, że typ urządze-
nia radiowego Shelly 1PM Gen4 jest zgodny z dyrektywą
2014/53/UE, 2014/35/UE, 2014/30/UE, 2011/65/UE. Pełny
tekst deklaracji zgodności UE jest dostępny pod następują-
cym adresem internetowym:
https://shelly.link/1PM_Gen4_DoC
Producent: Shelly Europe Ltd.
Adres: 51 Cherni Vrah Blvd., bldg. 3, . 2-3, Soa 1407,
Bułgaria
Tel: +359 2 988 7435
E-mail: support@shelly.cloud
Ocjalna strona: https://www.shelly.com
Zmiany danych kontaktowych są publikowane przez Produ
-
centa na ocjalnej stronie internetowej.
Wszelkie prawa do znaku towarowego Shelly® i inne prawa
intelektualne związane z tym urządzeniem należą do Shelly
Europe Ltd.
Nederlands
Gebruikers- en veiligheidsgids
Shelly 1PM Gen4
Slimme schakelaar met stroommeting
In dit document aangeduid als “het Apparaat”.
Veiligheidsinformatie
Lees voor veilig en juist gebruik deze handleiding en alle
andere documenten die bij dit product worden geleverd.
Bewaar ze voor toekomstig gebruik. Het niet volgen van
de installatieprocedures kan leiden tot storingen, gevaar
voor gezondheid en leven, overtreding van de wet en/of
weigering van wettelijke en commerciële garanties (indien
van toepassing). Shelly Europe Ltd. is niet verantwoorde-
lijk voor verlies of schade in geval van onjuiste installatie
of onjuist gebruik van dit apparaat als gevolg van het niet
opvolgen van de gebruikers- en veiligheidsinstructies in
deze handleiding.
⚠Dit symbool geeft veiligheidsinformatie aan.
ⓘDit teken geeft een belangrijke opmerking aan.
⚠WAARSCHUWING! Risico op elektrische schokken. De
installatie van het apparaat op het elektriciteitsnet moet
zorgvuldig worden uitgevoerd door een gekwaliceerde
elektricien.
⚠⚠WAARSCHUWING! Controleer voordat u wijzigingen
aanbrengt in de aansluitingen of er geen spanning aanwezig
is op de aansluitingen van het apparaat.
⚠LET OP! Sluit het Apparaat alleen aan op een elektriciteits-
net en apparaten die voldoen aan alle geldende voorschriften.
Kortsluiting in het elektriciteitsnet of in een apparaat dat op
het apparaat is aangesloten, kan brand, materiële schade en
elektrische schokken veroorzaken.
⚠LET OP! Het apparaat mag alleen worden aangesloten op
en worden bestuurd door elektrische circuits en apparaten
die voldoen aan de geldende normen en veiligheidsnormen.
⚠LET OP! Sluit het apparaat niet aan op apparaten die de
opgegeven maximale elektrische belasting overschrijden.
⚠LET OP! Sluit het apparaat alleen aan op de manier die in
deze instructies wordt aangegeven. Elke andere methode kan
schade en/of letsel veroorzaken.
⚠WAARSCHUWING! Schakel de stroomonderbrekers uit
voordat u het apparaat installeert. Gebruik een geschikt
testapparaat om te controleren of er geen spanning staat op
de draden die u wilt aansluiten. Ga verder met de installatie
als u zeker weet dat er geen spanning staat.
⚠LET OP! Het apparaat en de aangesloten apparaten moe-
ten worden beveiligd met een kabelbeveiligingsschakelaar
conform EN60898-1 (uitschakelkarakteristiek B of C, max.
16 A nominale stroom, min. 6 kA onderbrekingsvermogen,
energiebeperkingsklasse 3). 16 A nominale stroom, min. 6 kA
onderbrekingsvermogen, energiebeperkende klasse 3).
⚠LET OP! Gebruik het apparaat niet als het tekenen van
schade of defecten vertoont.
⚠LET OP! Probeer het apparaat niet zelf te repareren.
⚠LET OP! Het apparaat is alleen bedoeld voor gebruik
binnenshuis.
⚠LET OP! Houd het apparaat uit de buurt van vuil en vocht.
⚠LET OP! Laat kinderen niet spelen met de knoppen/scha-
kelaars die zijn aangesloten op het apparaat. Houd de appara-
ten (mobiele telefoons, tablets, pc’s) voor afstandsbediening
van Shelly uit de buurt van kinderen.
Productbeschrijving
Shelly 1PM Gen4 (het apparaat) is een Matter-compatibele
slimme schakelaar met energiemeting. Uitgerust met een
multiprotocol draadloze MCU, ondersteunt het Zigbee en
Bluetooth connectiviteit voor een veilige verbinding. Het
apparaat werkt zowel op wissel- als gelijkstroom. De kleine
vormfactor maakt montage achteraf in standaard inbouw-
dozen mogelijk, achter stopcontacten, lichtschakelaars of
andere plaatsen met beperkte ruimte.
Het Apparaat heeft een ingebouwde webinterface om de
instellingen te bewaken, te controleren en aan te passen.
De webinterface is toegankelijk via http://192.168.33.1 als
het rechtstreeks is aangesloten op het toegangspunt van
het Apparaat of via het IP-adres als het toegankelijk is vanuit
hetzelfde netwerk.
Het apparaat heeft toegang tot en kan communiceren met
andere slimme apparaten of automatiseringssystemen als
ze zich in dezelfde netwerkinfrastructuur bevinden. Shelly
Europe Ltd. levert API’s voor de apparaten, hun integratie en
cloudbesturing. Ga voor meer informatie naar https://shelly-
api-docs.shelly.cloud.
ⓘHet apparaat wordt geleverd met in de fabriek geïnstal-
leerde rmware. Om de rmware up-to-date en veilig te hou-
den, biedt Shelly Europe Ltd. de nieuwste rmware-updates
gratis aan. Krijg toegang tot de updates via de ingebouwde
webinterface of de Shelly Smart Control mobiele applicatie.
Installatie van rmware-updates is de verantwoordelijkheid
van de gebruiker. Shelly Europe Ltd. is niet aansprakelijk voor
een gebrek aan conformiteit van het Apparaat als gevolg van
het niet tijdig installeren van de beschikbare updates door de
gebruiker.
Installatie-instructies
ⓘ Om het apparaat aan te sluiten, raden we aan massieve
eenaderige draden ofaderige draden met adereindhulzen
te gebruiken. De draden moeten isolatie hebben met een
verhoogde hittebestendigheid, niet minder dan PVC T105°C
(221°F).
Gebruik geen knoppen of schakelaars met ingebouwde LED-
of neonlampen.
ⓘBij het aansluiten van draden op de aansluitklemmen van
het apparaat moet u rekening houden met de opgegeven
draaddoorsnede en gestripte lengte. Sluit niet meerdere dra
-
den aan op één klem.
ⓘ Om veiligheidsredenen raden we u aan om, nadat u het
apparaat met succes hebt aangesloten op het lokale Wi-Fi-
netwerk, het AP (Access Point) van het apparaat uit te scha-
kelen of met een wachtwoord te beveiligen.
ⓘ Om een fabrieksreset van het apparaat uit te voeren, houdt
u de toets Reset/bediening 10 seconden ingedrukt.
ⓘ Om het toegangspunt en de Bluetooth-verbinding van het
apparaat in te schakelen, houdt u de toets Reset/control 5
seconden ingedrukt.
ⓘ Gebruik de L-aansluiting(en) van het apparaat niet om
andere apparaten van stroom te voorzien.
Als u een 110 - 240 V~ voeding gebruikt (Fig. 1):
1. Sluit het belastingscircuit aan op de O-aansluiting van het
Apparaat en de Neutrale draad.
2. Sluit de stroomdraad aan op een L-aansluiting van het
apparaat.
3. Sluit de Neutrale draad aan op een N-aansluiting van het
Apparaat.
4. Sluit een schakelaar of knop aan op de SW-aansluiting van
het apparaat en een van de ongebruikte L-aansluitingen
van het apparaat.
Als u een voeding van 24 - 30 V⎓ gebruikt (Fig. 2):
ⓘ Let op: vermogensmeting is niet beschikbaar bij ge-
lijkstroom.
1. Sluit de belasting aan op de O-aansluiting van het appa-
raat en de DC+ draad.
2. Sluit de GND-draad aan op een Ʇ-aansluiting van het
apparaat.
3. Sluit de DC+ draad aan op een + aansluiting van het Ap
-
paraat.
4. Sluit een schakelaar of knop aan op de SW-aansluiting en
een van de ongebruikte Ʇ-aansluitingen van het apparaat.
Zigbee-apparaat toevoegen
• Om het apparaat om te schakelen van Matter
rmware (standaard) naar Zigbee, druk je 5 keer op de
Reset-knop. Het apparaat blijft 2 minuten in de koppel-
modus en je kunt het terugvinden in je domoticaplatform
via de Zigbee Hub. Als je het apparaat niet kunt vinden,
druk dan 3 keer op de Reset-knop.
• Om het Apparaat te verwijderen, ga je naar de pagina en
verwijder je het uit je domoticaplatform.
ⓘ In de Zigbee-modus is het AP van het apparaat standaard
niet beschikbaar. Om het in te schakelen moet je de Re-
set-knop 5 seconden ingedrukt houden.
Het apparaat instellen via Matter
ⓘVoordat je begint, moet je ervoor zorgen dat je:
• 2,4 GHz Wi-Fi-netwerk
• Een Matter-compatibele hub aangesloten op het internet
• Een mobiel apparaat waarop Bluetooth is ingeschakeld en
een Matter-compatibele app is geïnstalleerd
1. Schakel het toegangspunt van het Apparaat in door de
Reset-/besturingstoets 5 seconden ingedrukt te houden.
2. Scan de Matter QR-code in de doos.
3. Volg de instructies die op het scherm verschijnen om het
proces te voltooien.
ⓘBewaar de QR code voor toekomstig gebruik. Als u het
apparaat reset, hebt u die code opnieuw nodig.
Specicaties
Fysiek
• Afmetingen (HxBxD): 37x42x16 mm / 1,46x1,65x0,63 in
• Gewicht: 27 g
• Schroefaansluitingen max koppel: 0,4 Nm / 3,5 lbin
• Doorsnede geleider: 0,2 tot 2,5 mm² / 24 tot 14 AWG
(massief, geslagen en gevlochten adereindhulzen)
• Gestripte geleiderlengte: 6 tot 7 mm / 0,24 tot 0,28 in
• Montage: Wandconsole / Inbouwdoos
• Materiaal buitenkant: Kunststof
• Kleur schelp: Rood
Milieu
• Omgevingstemperatuur:-20°C tot 40°C / -5°F tot 105°F
• Vochtigheid: 30% tot 70% RH
• Max. hoogte: 2000 m / 6562 ft
Elektrisch
• Stroomvoorziening:
- 110-240V~
- 24-30V⎓
• Stroomverbruik: < 1.2 W
Uitgangscircuits
• Max. schakelspanning:
- 240V~
- 30V⎓
• Max. schakelstroom:
- 16A (240V~)
- 10A (30V⎓)
Sensoren, meters
• Interne-temperatuursensor:Ja
• Voltmeter (AC): Ja
• Ampèremeter (AC): Ja
Radio
Wi-Fi
• Protocol: 802.11 b/g/n
• RF-band: 2401-2483 МHz
• Max. RF-vermogen: < 20 dBm
• Bereik: tot 50 m / 164 ft buiten, tot 30 m / 98 ft binnen
(afhankelijk van plaatselijke omstandigheden)
Bluetooth
• Protocol: 4.2
• RF-band: 2400-2483,5 MHz
• Max. RF-vermogen: <4 dBm
• Bereik: tot 30 m / 98 ft buiten, tot 10 m / 33 ft binnen
(afhankelijk van plaatselijke omstandigheden)
Zigbee
• Protocol: 802.15.4
• RF-band: 2400 tot 2483,5 MHz
• Max. RF-vermogen: < 20 dBm
• Bereik: Tot 100 m binnenshuis en 300 meter buitenshuis
(afhankelijk van plaatselijke omstandigheden)
Microcontroller
• CPU: ESP-Shelly-C68F
• Flash: 8 MB
Firmwaremogelijkheden
• Roosters: 20
• Webhooks (URL-acties):20 met 5 URL’s per haak
• Bereikvergroter voor Wi-Fi: Ja
• BLE-gateway: Ja
• Scripting: Ja
• MQTT: Ja
• Encryptie: Ja
Shelly Wolk opname
Het Apparaat kan worden gemonitord, bestuurd en ingesteld
via onze Shelly Cloud domoticadienst. Je kunt de service
gebruiken via onze mobiele applicatie voor Android, iOS of
Harmony OS of via elke internetbrowser op https://control.
shelly.cloud/.
Als u ervoor kiest om het Apparaat te gebruiken met de ap-
plicatie en de Shelly Cloud service, vindt u instructies over
hoe u het Apparaat kunt verbinden met de Cloud en kunt
bedienen vanaf de Shelly app in de applicatiegids: https://
shelly.link/app-guide.
Problemen oplossen
Als je problemen ondervindt met de installatie of werking
van het Apparaat, raadpleeg dan de kennisbankpagina:
https://shelly.link/1PM_Gen4
Conformiteitsverklaring
Hierbij verklaart Shelly Europe Ltd. dat het type radioappa-
ratuur voor Shelly 1PM Gen4 in overeenstemming is met
Richtlijn 2014/53/EU, 2014/35/EU, 2014/30/EU, 2011/65/
EU. De volledige tekst van de EU-conformiteitsverklaring is
beschikbaar op het volgende internetadres:
https://shelly.link/1PM_Gen4_DoC
Fabrikant: Shelly Europe Ltd.
Adres: 51 Cherni Vrah Blvd., gebouw 3, . 2-3, Soa 1407,
Bulgarije
Tel: +359 2 988 7435
E-mail: support@shelly.cloud
Ociële website: https://www.shelly.com
Veranderingen in contactgegevens worden door de fabrikant
op de ociële website gepubliceerd.
Alle rechten op het handelsmerk Shelly® en andere intellec-
tuele rechten in verband met dit apparaat behoren toe aan
Shelly Europe Ltd.
English
Deutsch
Italiano
Español
Português
Français
Polski
Nederlands
OU À DÉPOSER
EN MAGASIN
OU À DÉPOSER
EN DÉCHÈTERIE
FR
B2502