
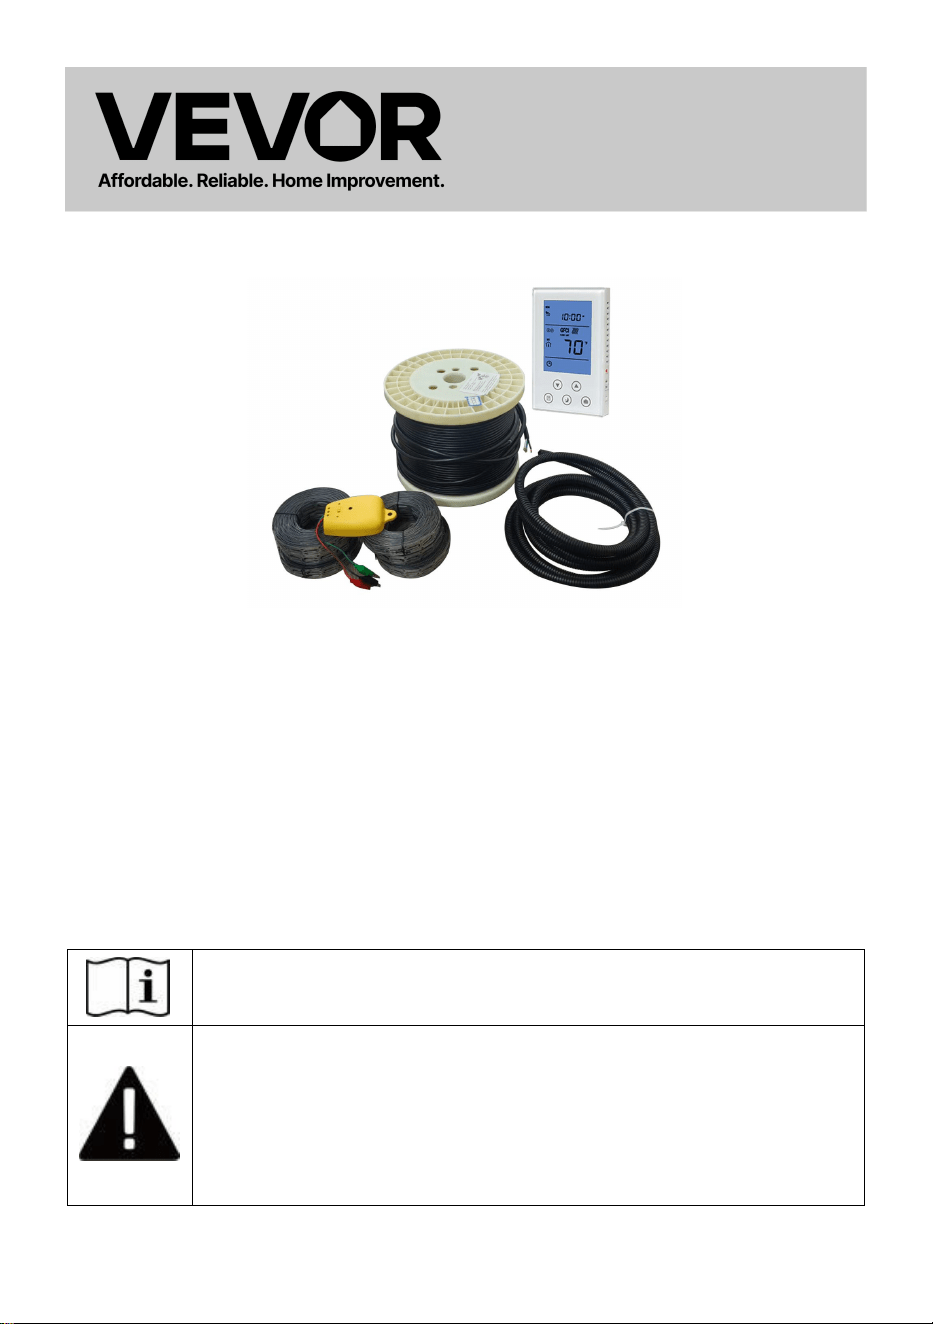
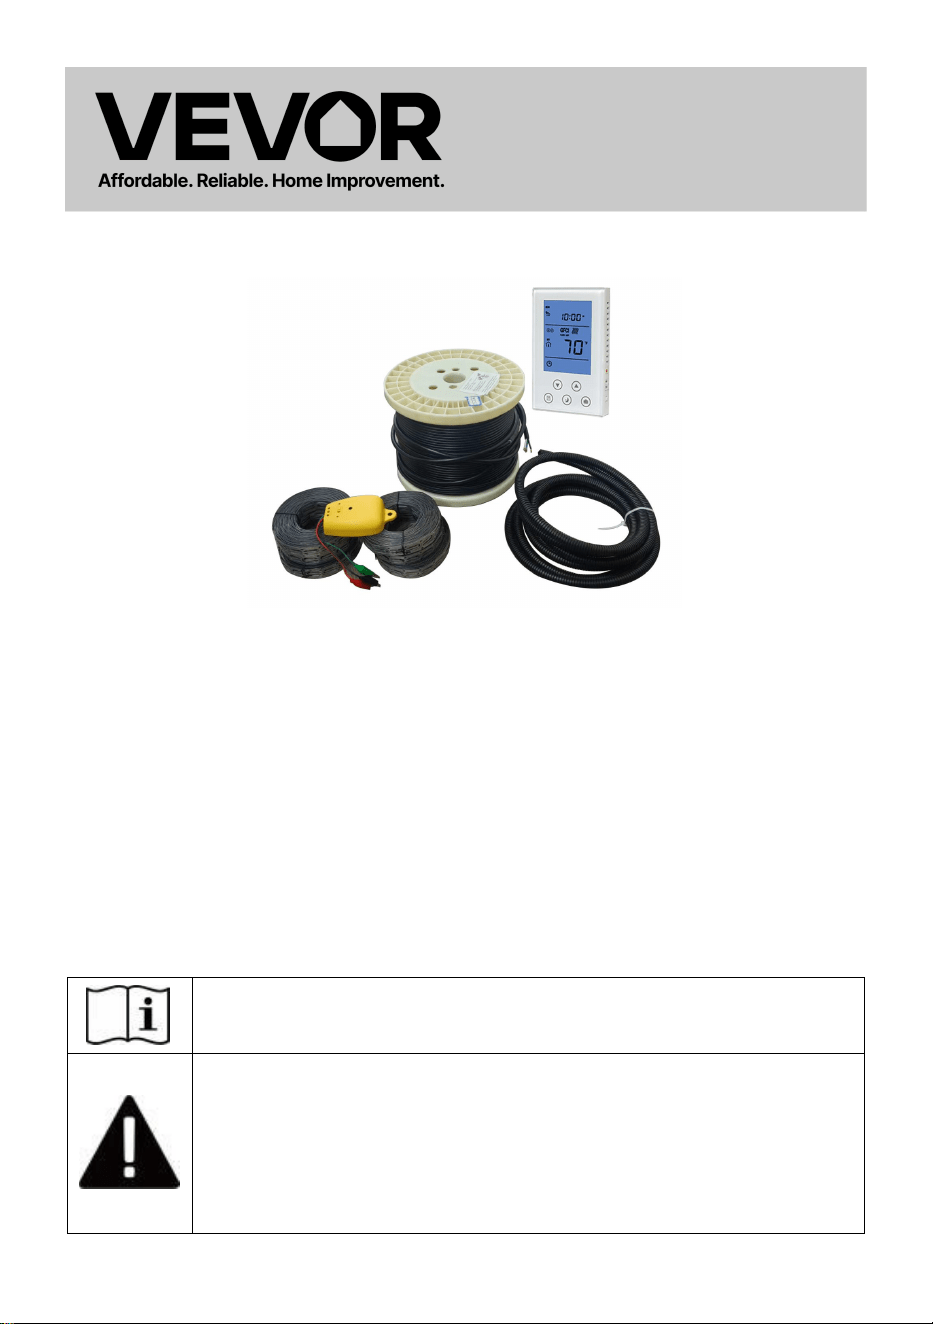
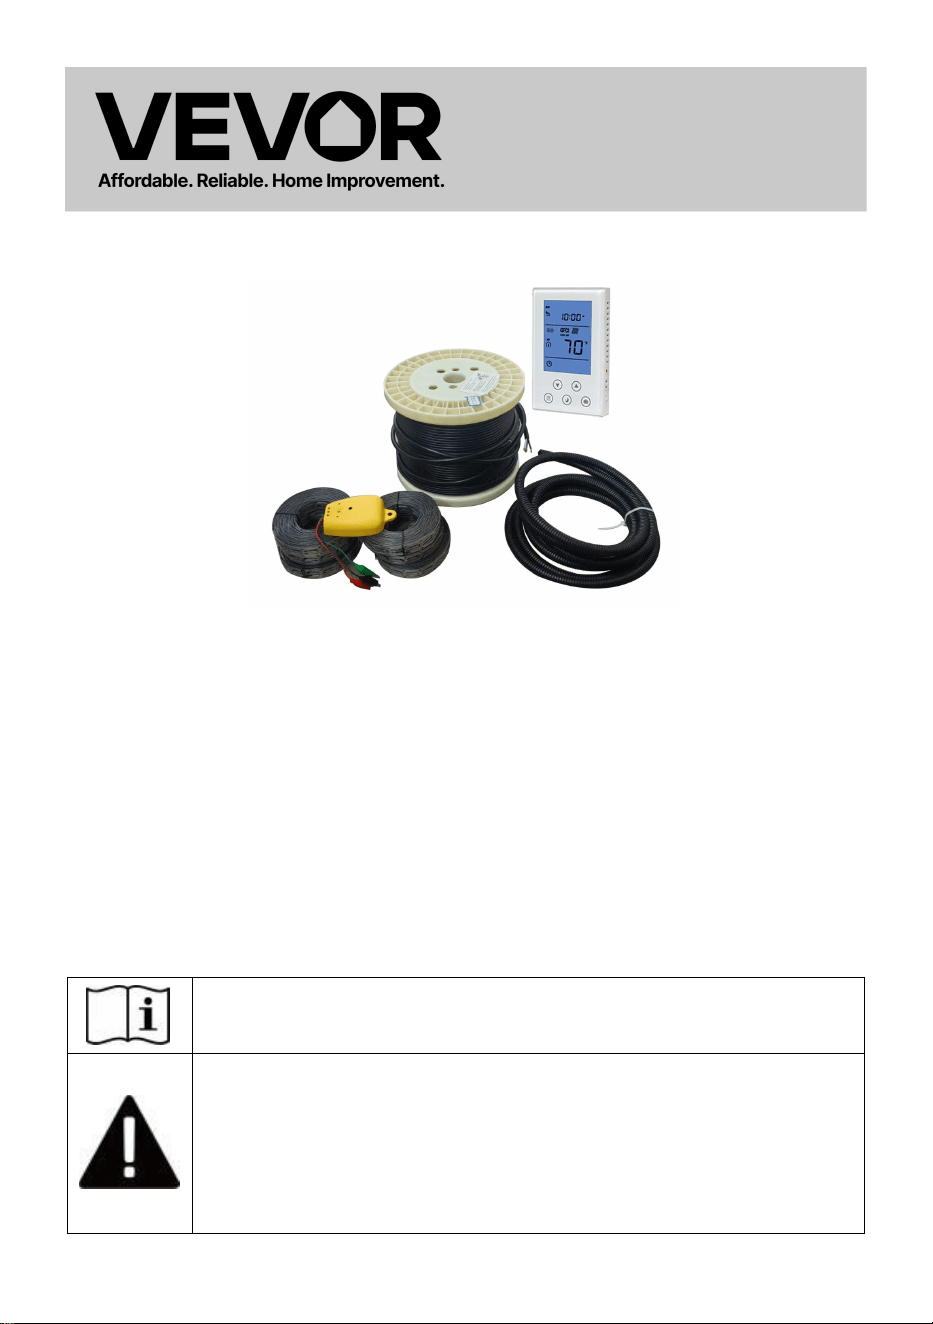
ELECTRIC FLOOR HEATING CABLE KIT
MODEL:
SHHC-K-600 \ SHHC-K-1200 \ SHHC-K-2400
- 1 -
MODEL:SHHC-K-600 \ SHHC-K-1200 \ SHHC-K-2400
This is the original instruction, please read all manual instructions
carefully before operating. VEVOR reserves a clear interpretation of our
user manual. The appearance of the product shall be subject to the
product you received. Please forgive us that we won't inform you again if
there are any technology or software updates on our product.
IMPORTANT SAFEGUARDS
When using electrical appliances, basic safety precautions should
always be followed:
Warning - To reduce the risk of injury, user must read
instructions manual carefully.
This symbol, placed before a safety comment, indicates a
kind of precaution, warning, or danger. Ignoring this warning
may lead to an accident. To reduce the risk of injury, fire, or
electrocution, please always follow the recommendation
shown below.
ELECTRIC FLOOR
HEATING CABLE KIT
- 2 -
Alternating current.
FOR HOUSEHOLD USE ONLY.
Correct Disposal of this product:
This marking indicates that this product should not be
disposed with other household wastes throughout the EU. To
prevent possible harm to the environment or human health
from uncontrolled waste disposal, recycle it responsibly to
promote the sustainable reuse of material resources. To
return your used device, please use the return and collection
systems or contact the retailer where the product was
purchased. They can take this product for environmental
safe recycling.
WARNING:
1.Read instruction manual carefully before installing the mat!
2.Don't heat test until the product is fully unfolded.
3.Never cut the heating (red or blue color) wire!
4.Never join two or more mats together in series!
5.Check that the voltage indicated on the data plate corresponds with that
of the local network before connecting the appliance to the mains power
supply.
6.If the supply cord is damaged, it must be replaced by the manufacturer,
its service agent or similarly qualified persons in order to avoid a hazard.
7. Do not leave the appliance unattended whilst connected to the mains
power supply.
8. Do not immerse the appliance in water or any other liquids.
9. Close supervision is required when using this appliance near children.
10. This appliance is not intended for use by persons (including children)
with reduced physical, sensory or mental capabilities, or lack of experience
- 3 -
and knowledge, unless they have been given supervision or instruction
concerning use of the appliance by a person responsible for their safety.
Children should be supervised to ensure that they do not play with the
appliance.
11. Never leave the appliance within reach of children.
12. Repairs to electrical appliances should only be performed by a qualified
electrician. Improper repairs may place the user at serious risk.
SAVE THESE INSTRUCTIONS
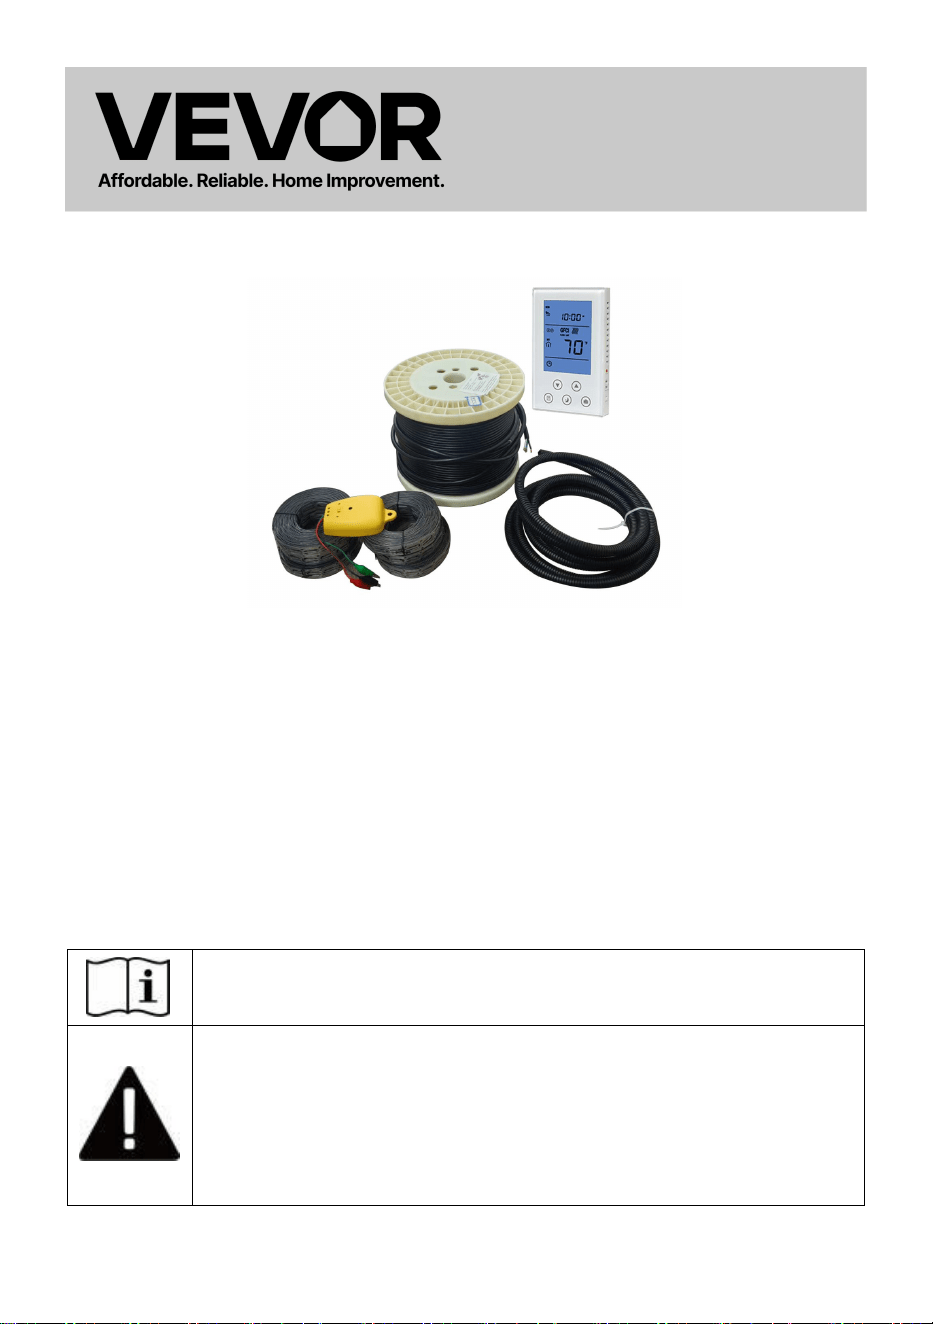
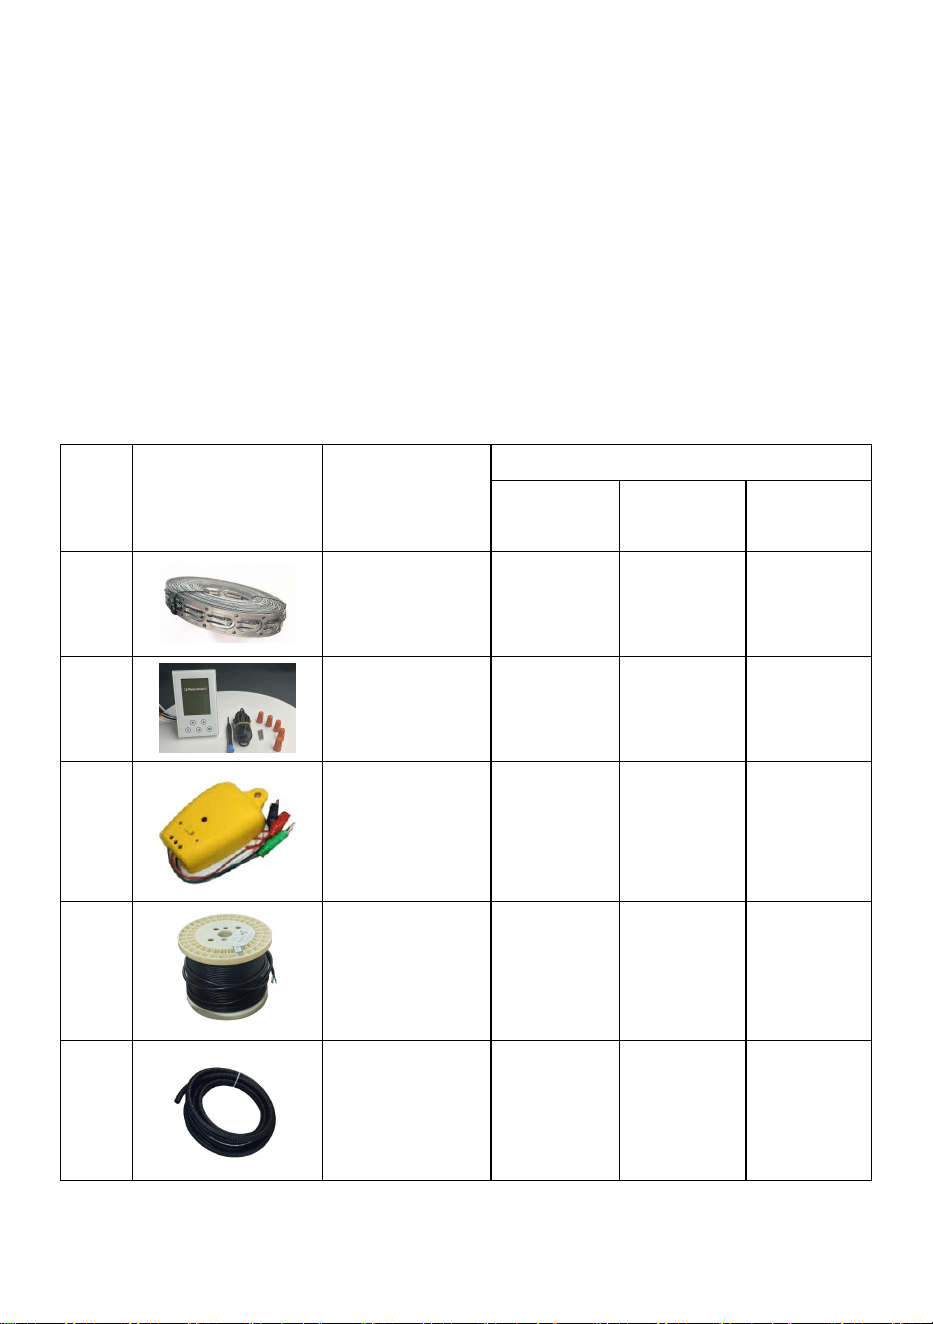
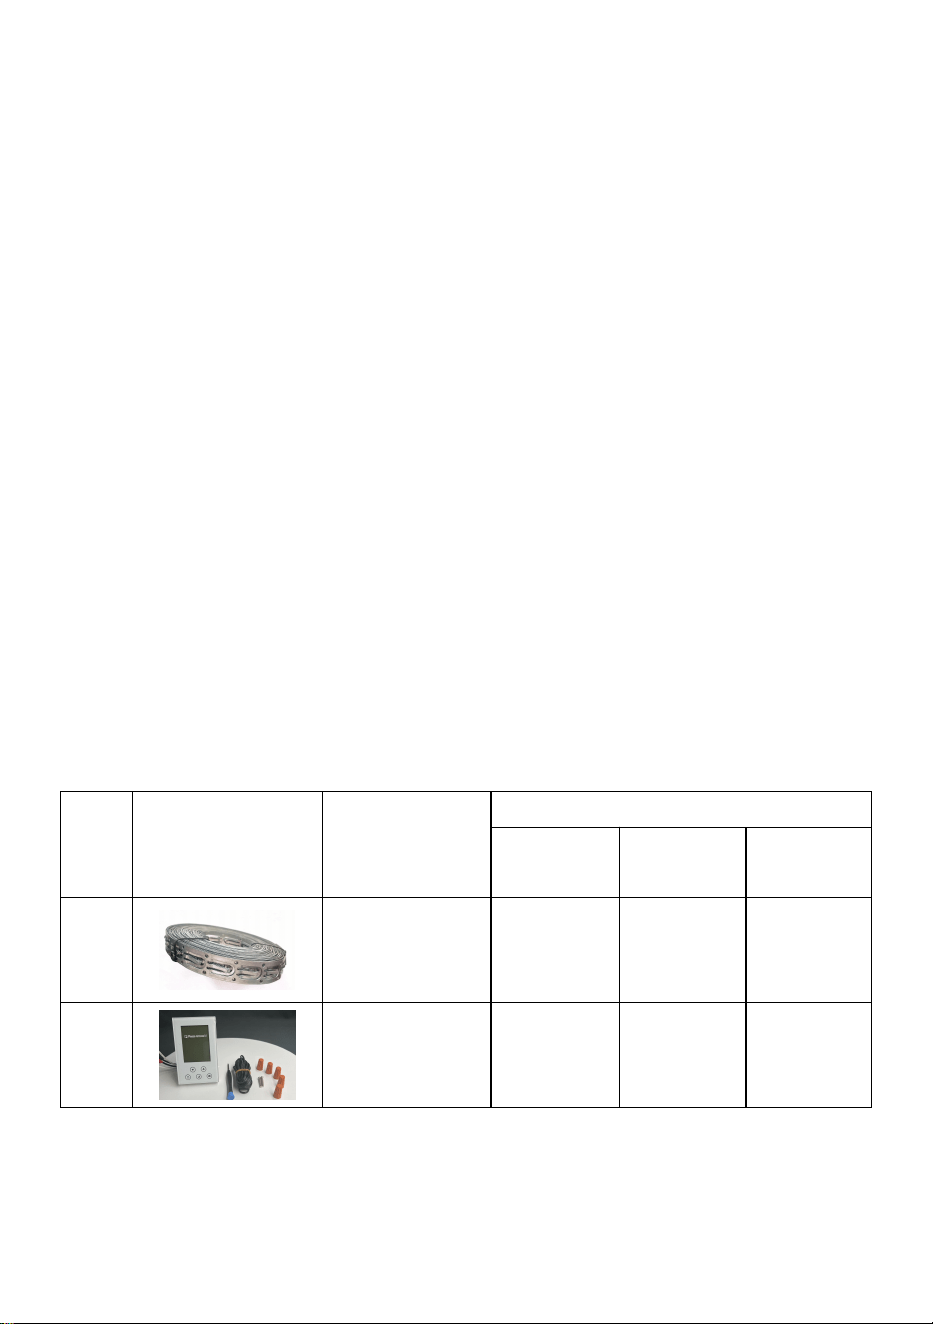
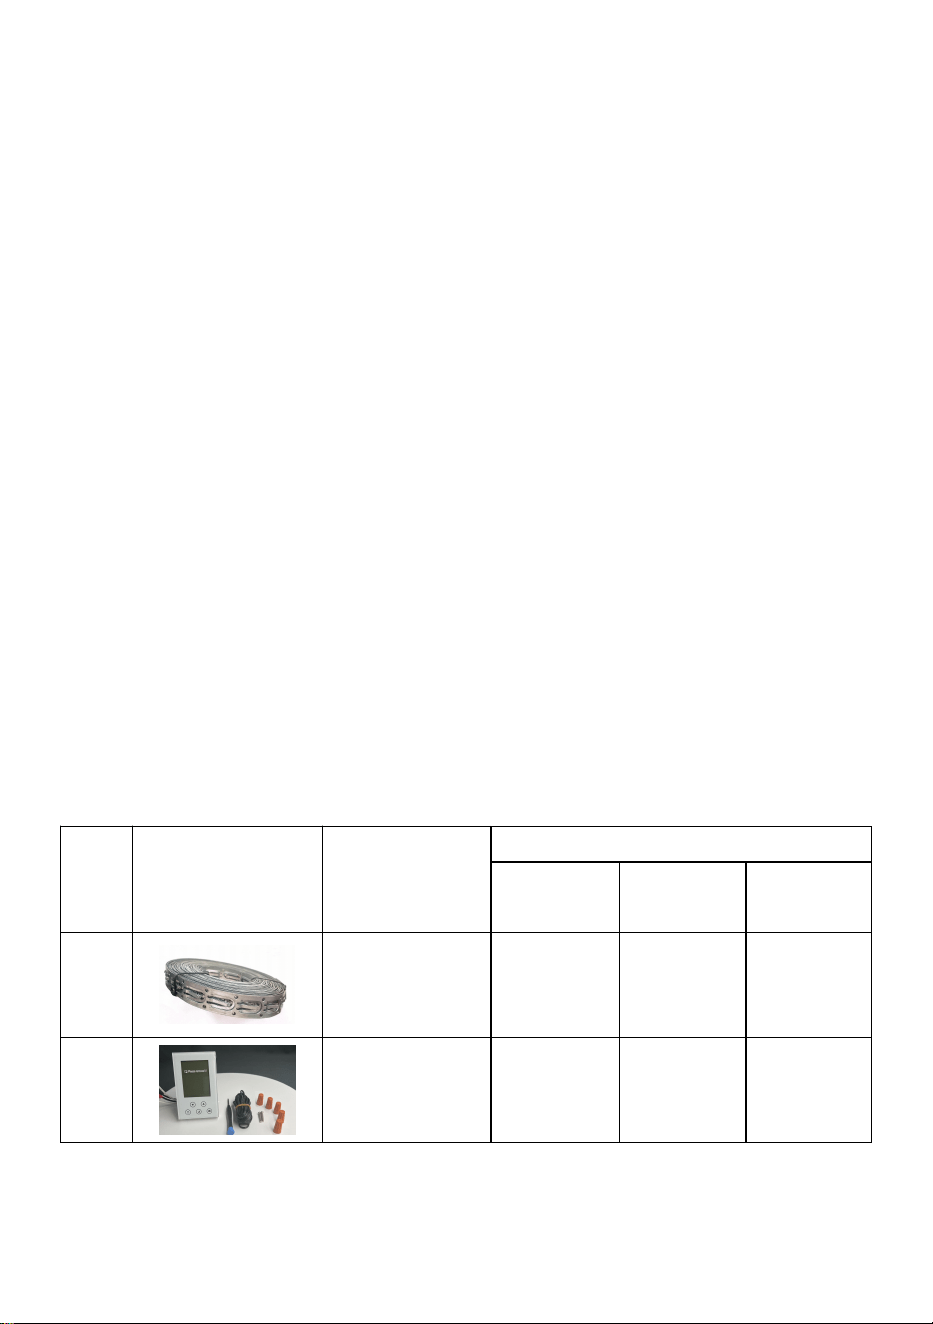
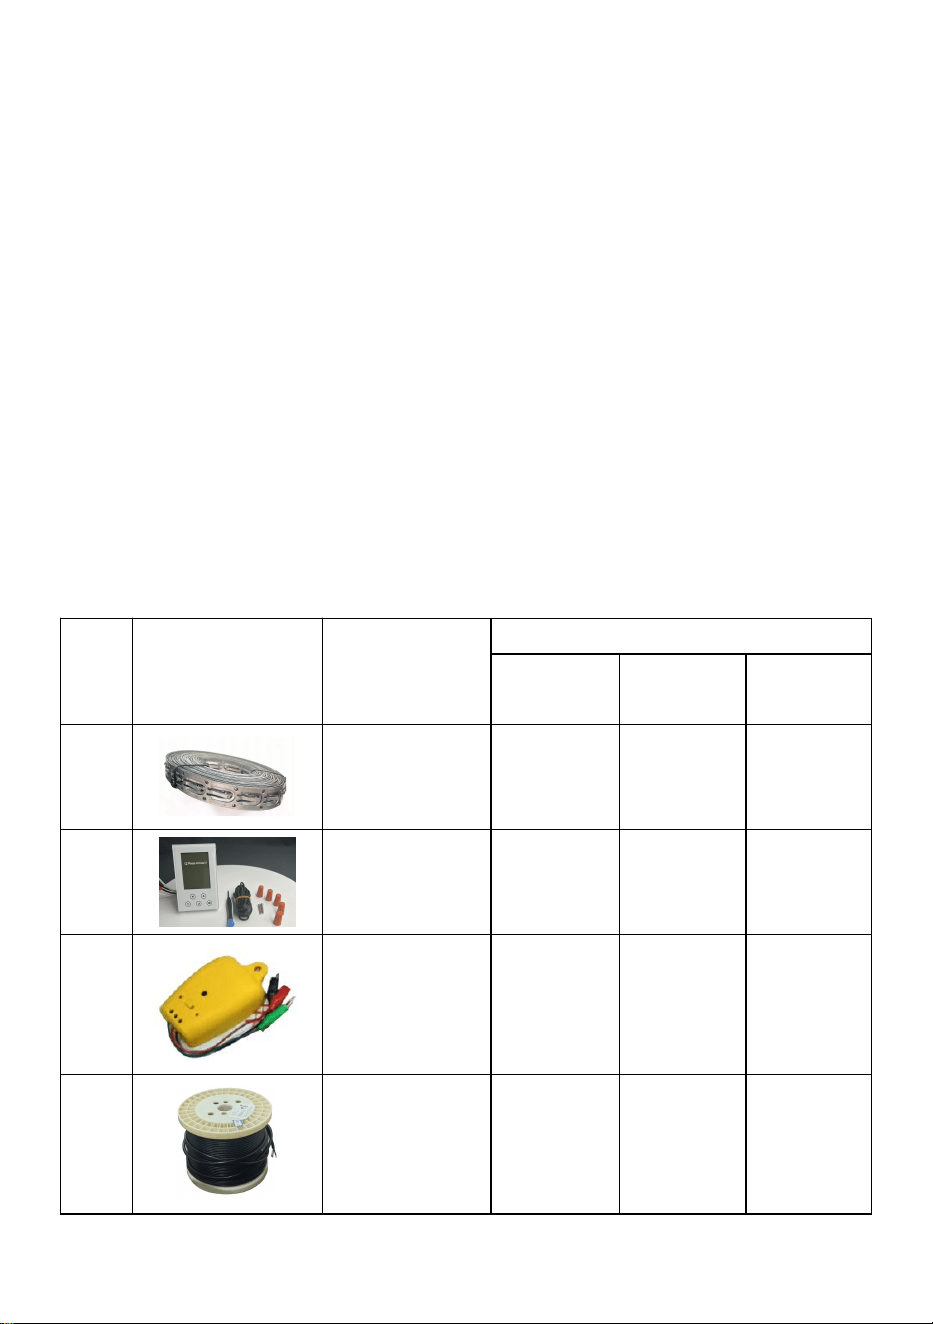
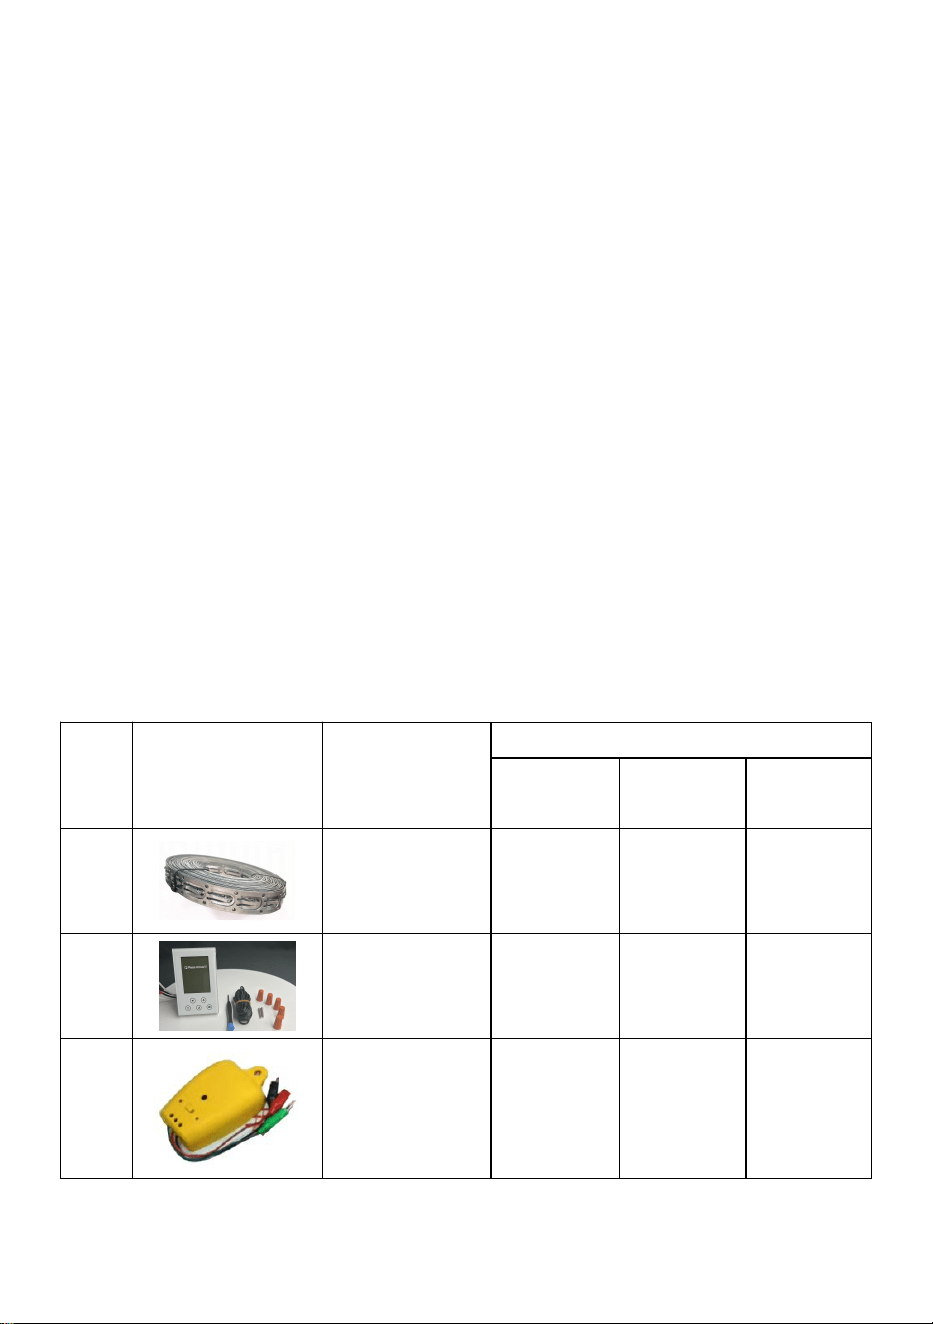
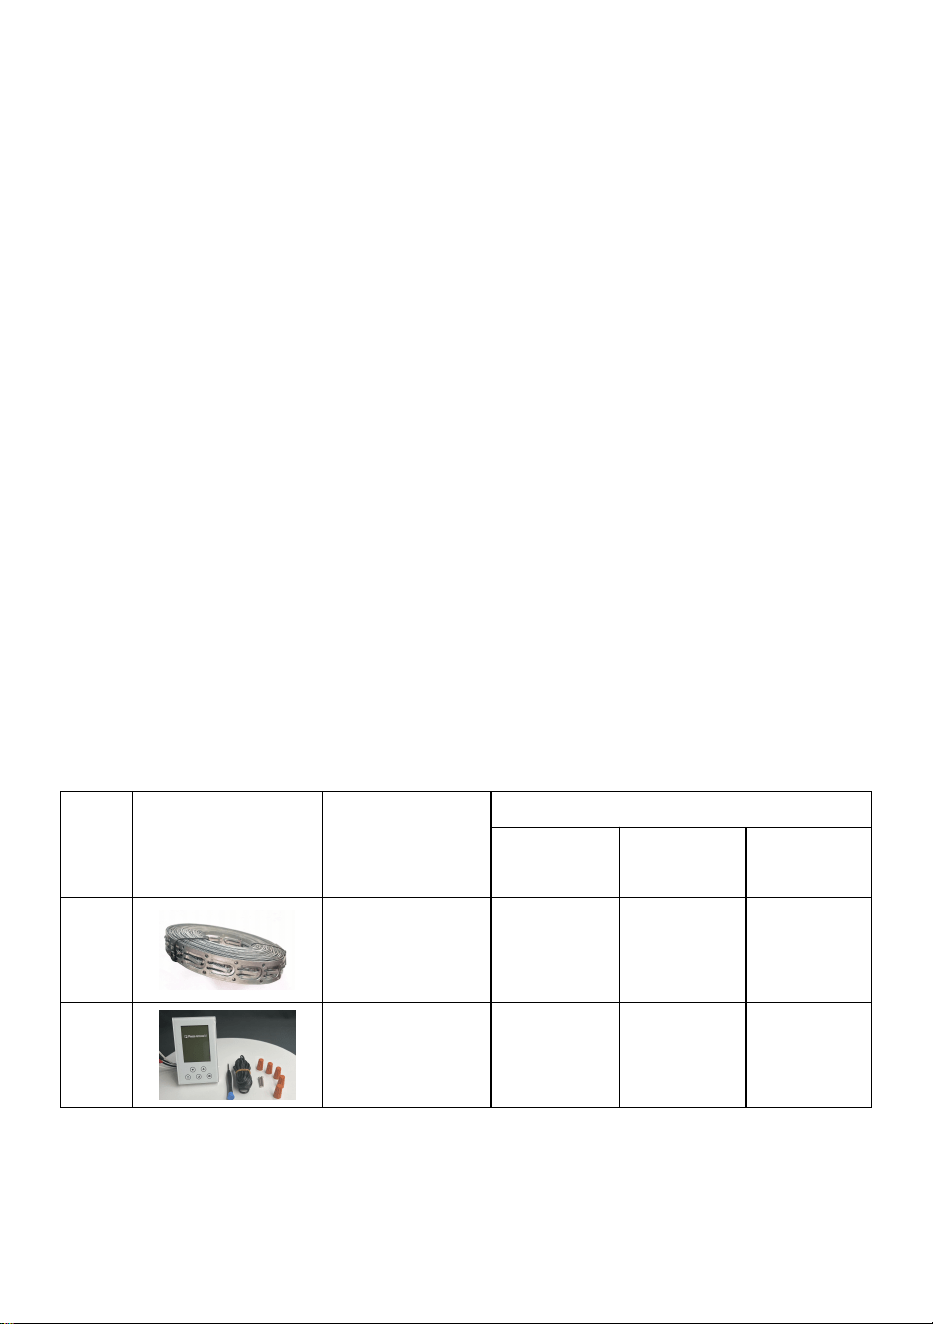
Part List
NO.
Picture
Part name
QTY
SHHC-K-
600
SHHC-K-
1200
SHHC-K
-2400
1
Metal Cable
Straps
2
3
6
2
Thermostat
1
1
1
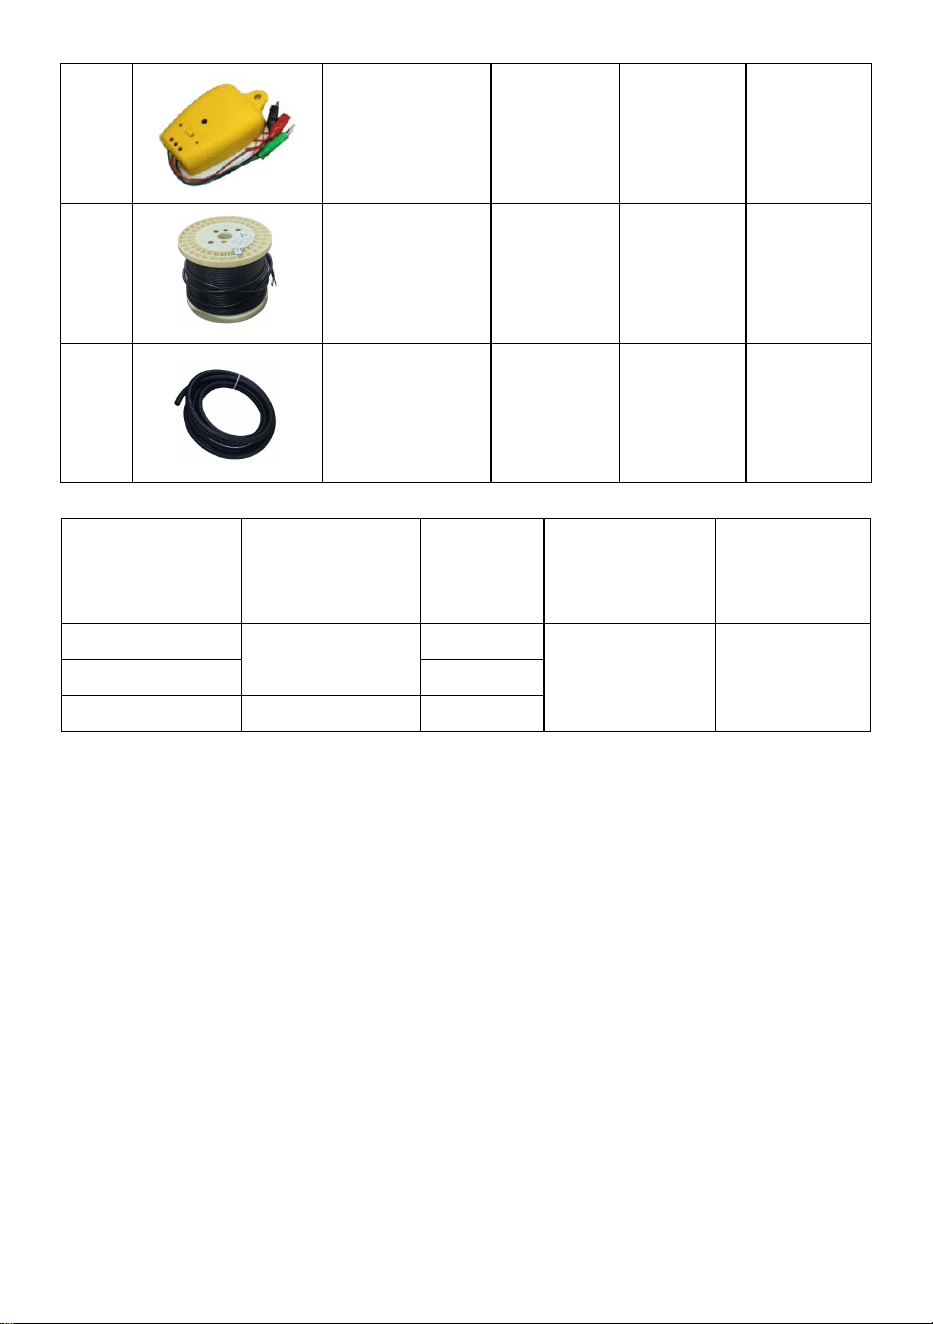
3
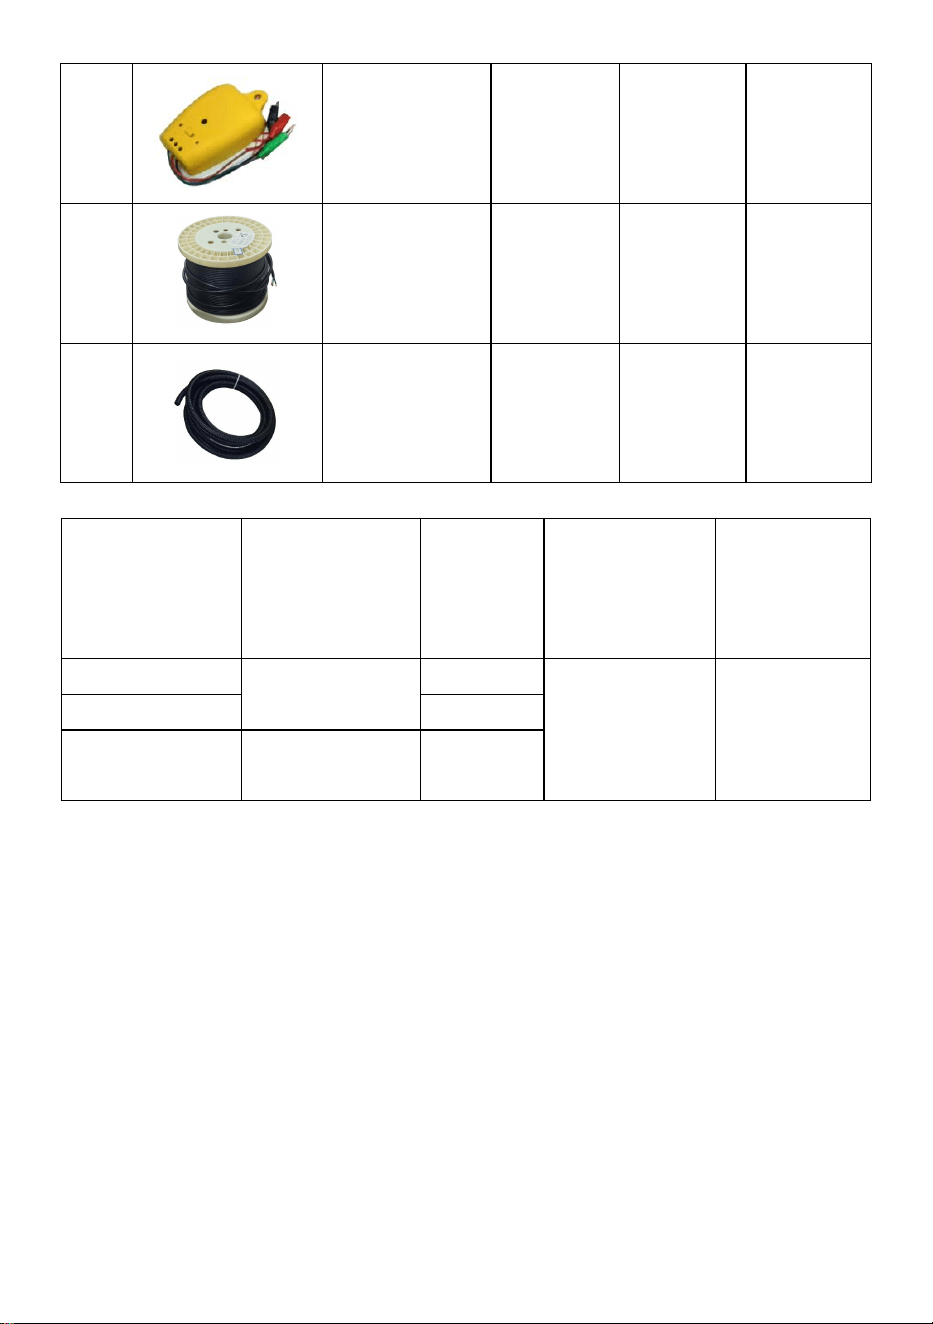
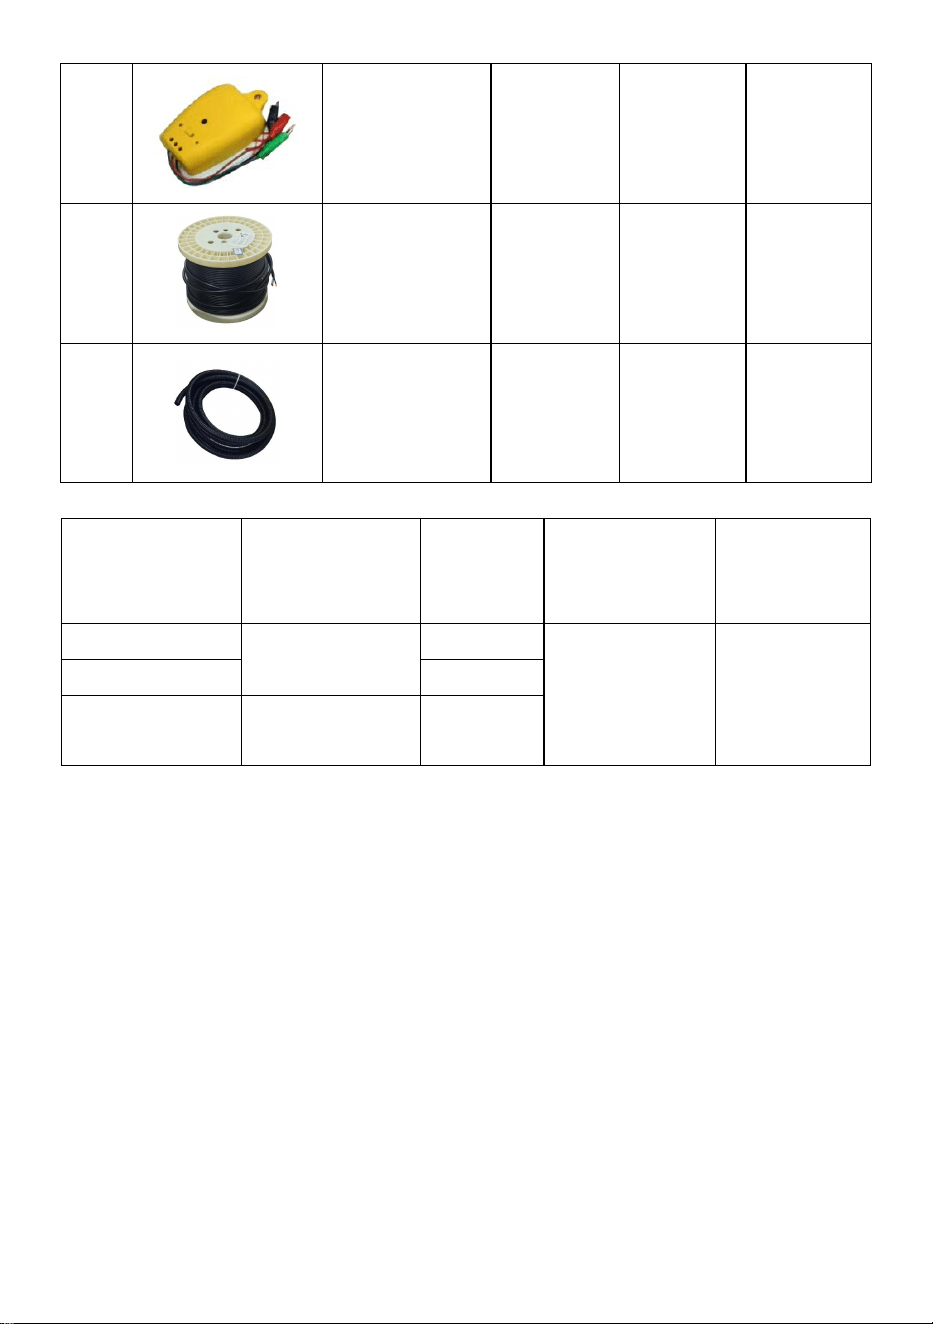
Cable Tester
1
1
1
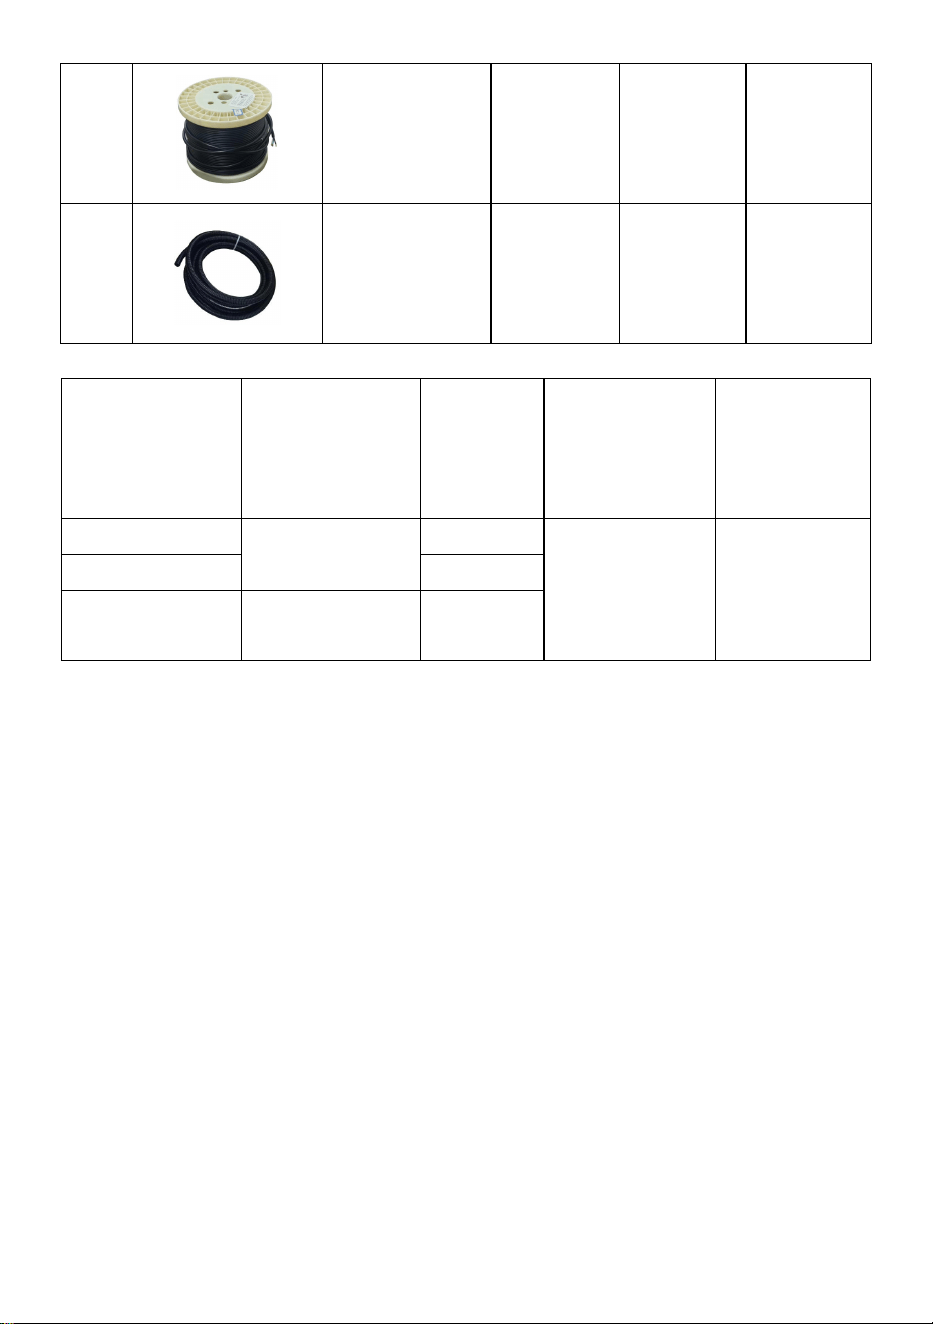
4
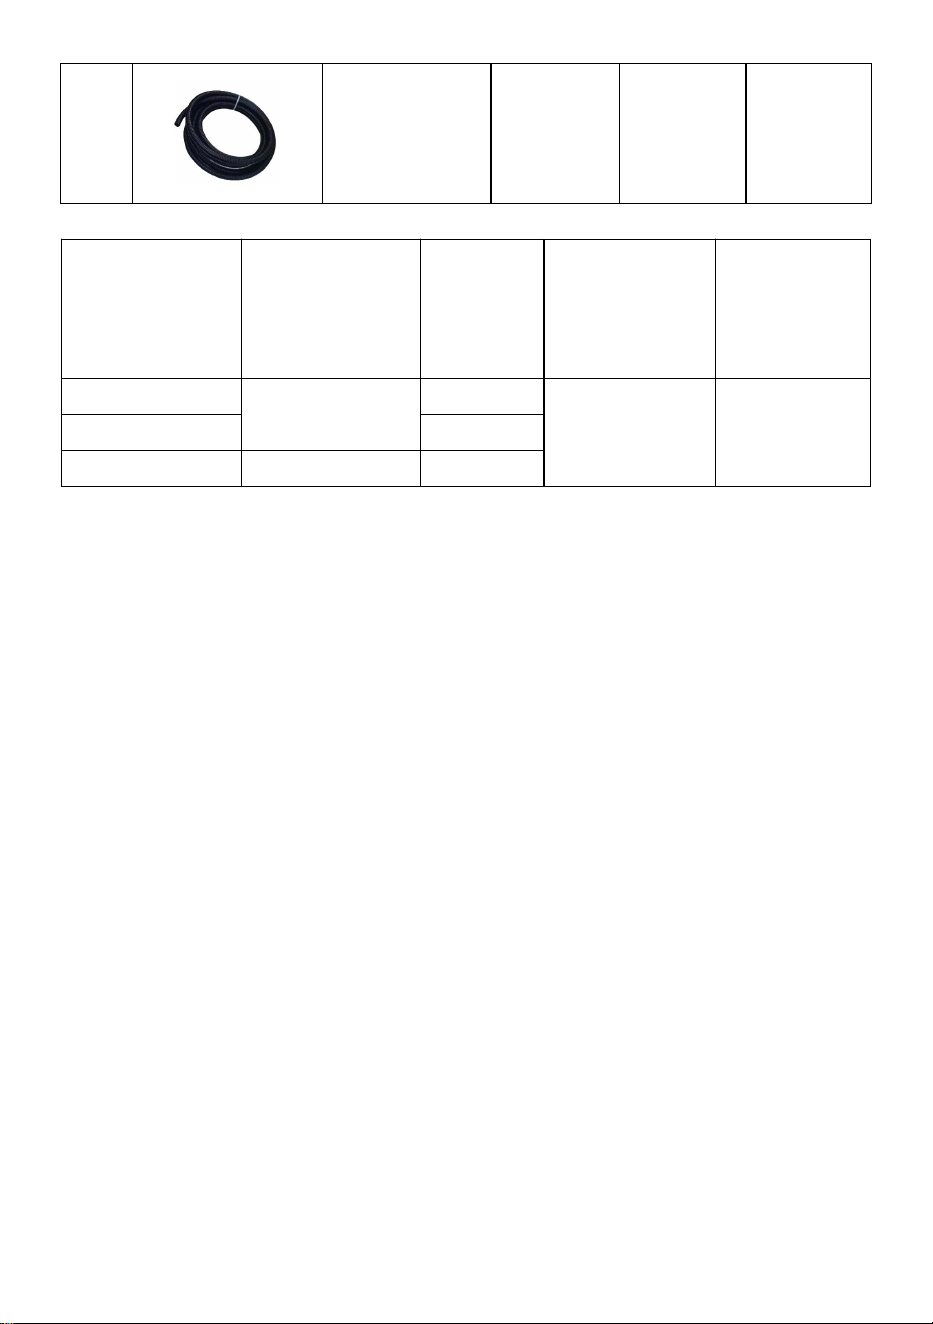
Heating
Cable
1
1
1
5
Corrugated
Pipe
1
1
1

- 4 -
Model
Power supply
Power
Max.
exposure
temp.
Min.
installation
temp.
SHHC-K-600
AC120V 60Hz
600W
194℉(90℃)
41℉(+5℃)
SHHC-K-1200
1200W
SHHC-K-2400
AC240V 60Hz
2400W
Installation Advice
All electrical wiring must be done by a fully qualified electrician and in
accordance with the current IEE wiring regulations in order to validate
product warranty.
• Always round down your floor space area e.g. 60sq.ft of floor will require
190.7ft of cable.
• Never overlap the cable, always ensure a min.50mm(1.97inch) spacing
between the wires for optimum heat distribution.
• If there is a heat cable shortfall in your floor space then concentrate the
heat cable in heavily trafficked areas.
• A Residual Current Device(RCD) should be used with this system(must
be bought separately) .
• Floor must be clean and free from dust & dirt.
• Never cut the heating (red or blue color) wire! Never join two or more
mats together in series! If you want to join two or more mats together,
please use a junction box.
• The wire is tough but extra care must be taken when using sharp objects
near the cable. A plastic trowel is advisable.
• Check your system with a multi-meter before tile installation.
• Ensure your tile adhesive is suitable for use with undertile heating e.g.
highly polymer modified(flexible).
• Your substrate and floor covering, e.g. tile adhesive or screed, must be
completely dry before switching on your system for the first time.
• Wear gloves when handling the cable (to avoid irritation to skin).
• Take care when tiling to ensure you do not damage the heat cable.

- 5 -
• The insulation board is not suitable for floor strengthening and structural
reinforcing.
• Matting and insulation board should not be passed under permanent
fixings e.g. bath, toilet, etc.
• Do not store objects on top of the matting during installation e.g. tiles.
• Remove old floor coverings.
Installation Instructions
Heating cable can not be cut at will, or overlapping, and the cable space
cannot be closer than the spacing of cables assembled on the mat.
Heating cable can be installed under floor tiles, natural stone, laminate or
wooden floor.
Thermal resistance of the floor construction above heating cable should be
as low as possible.
Do not step on the cables during installation.
Avoid sharp objects and incautious pouring of concrete or filler. No big air
gaps are allowed in the concrete or filler. Always pay attention to
instructions for the floor covering adhesive. Heating cable shall be installed
in min. 5 mm(1.97inch) of concrete or filler.
Do not lay heating cable in areas that might be damaged by drilling, might
be covered by cupboards or under a heat source such as a stove etc.
The subfloor should be clean, plain, stable and rigid, without cracks, sharp
objects. The concrete subfloor must be completely dry before installing the
floor heating system.
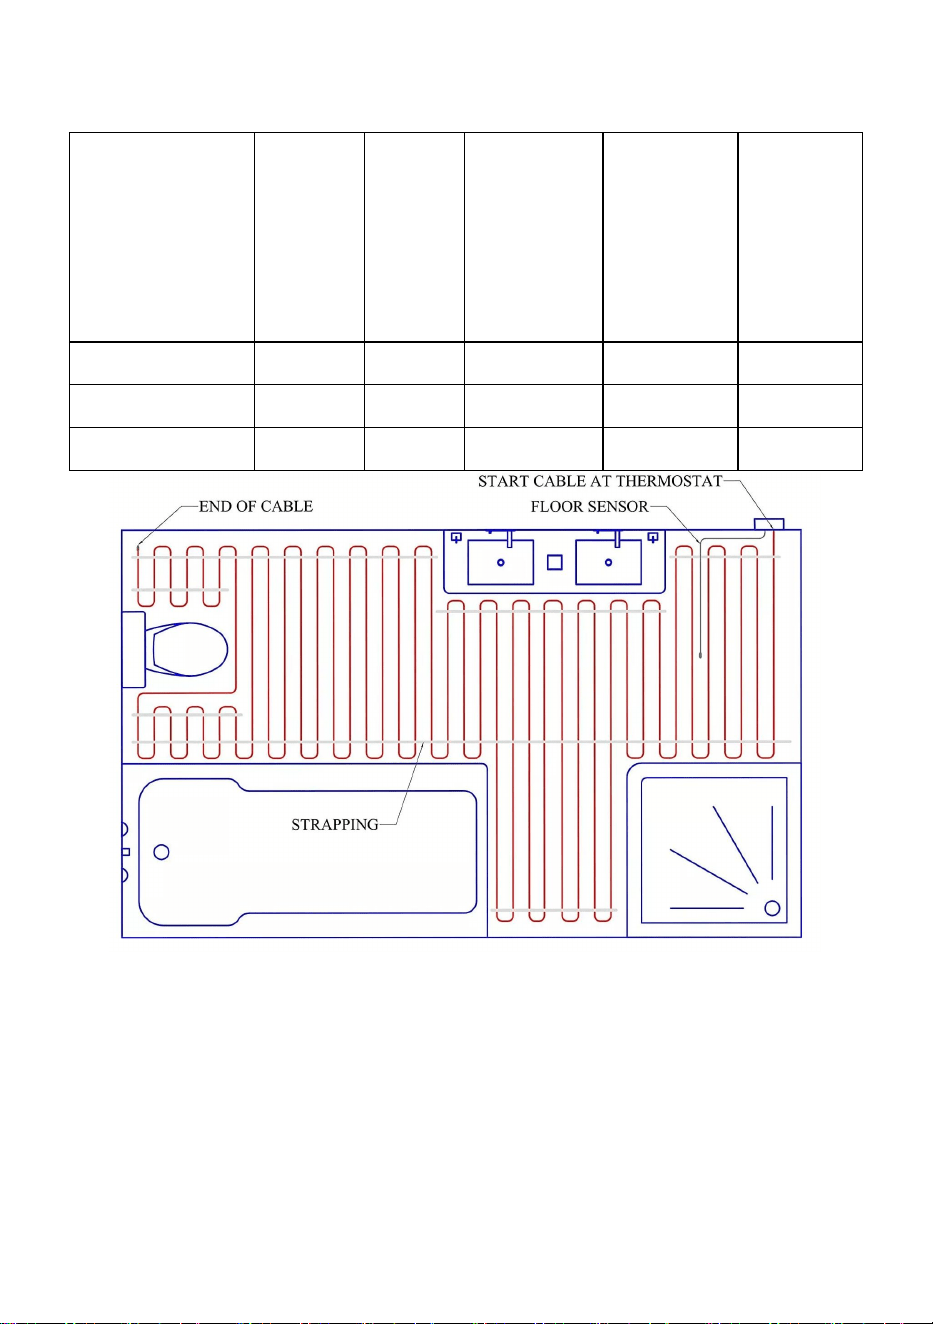
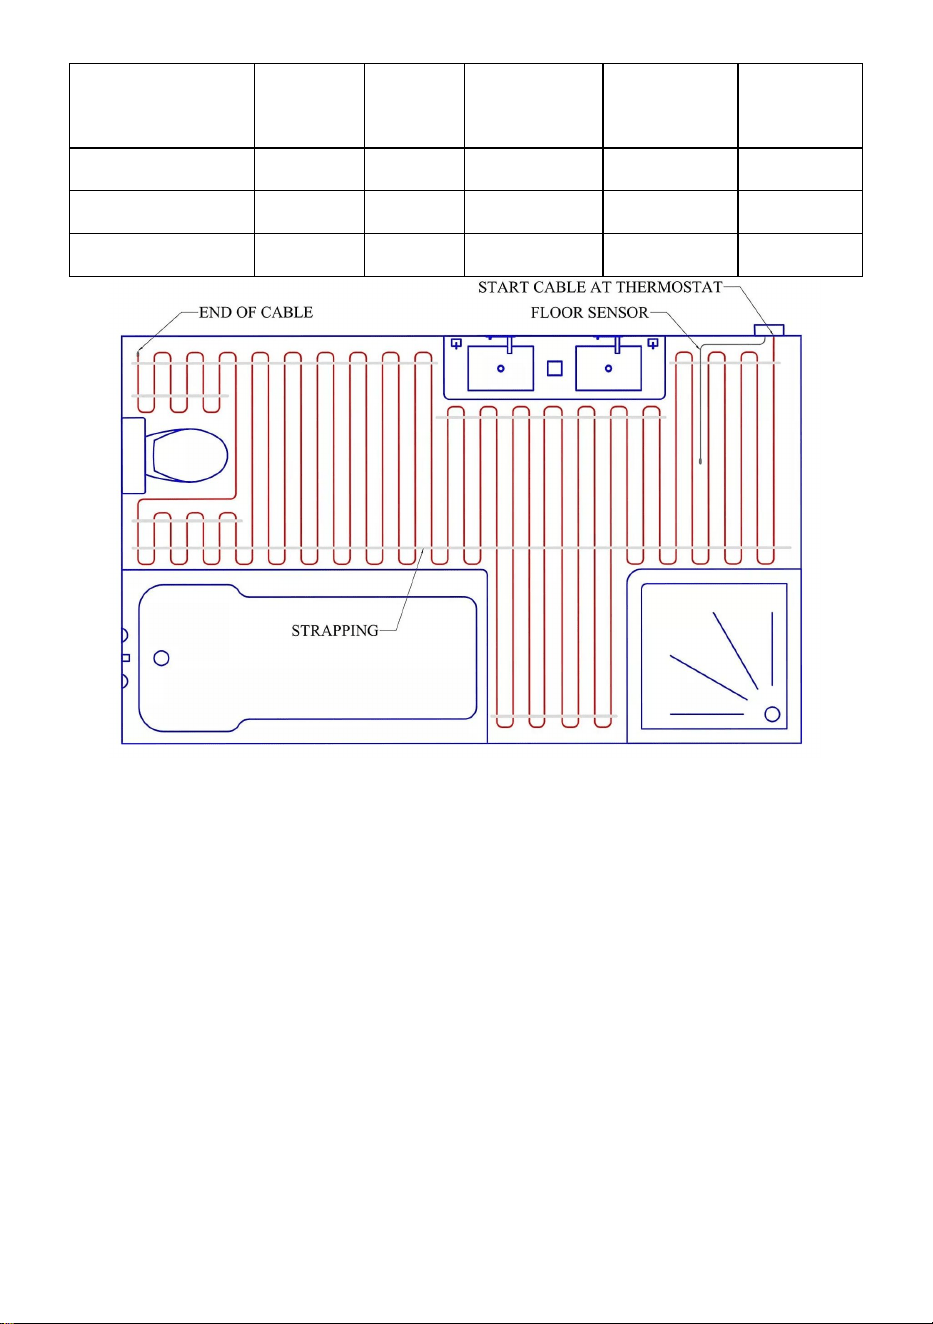
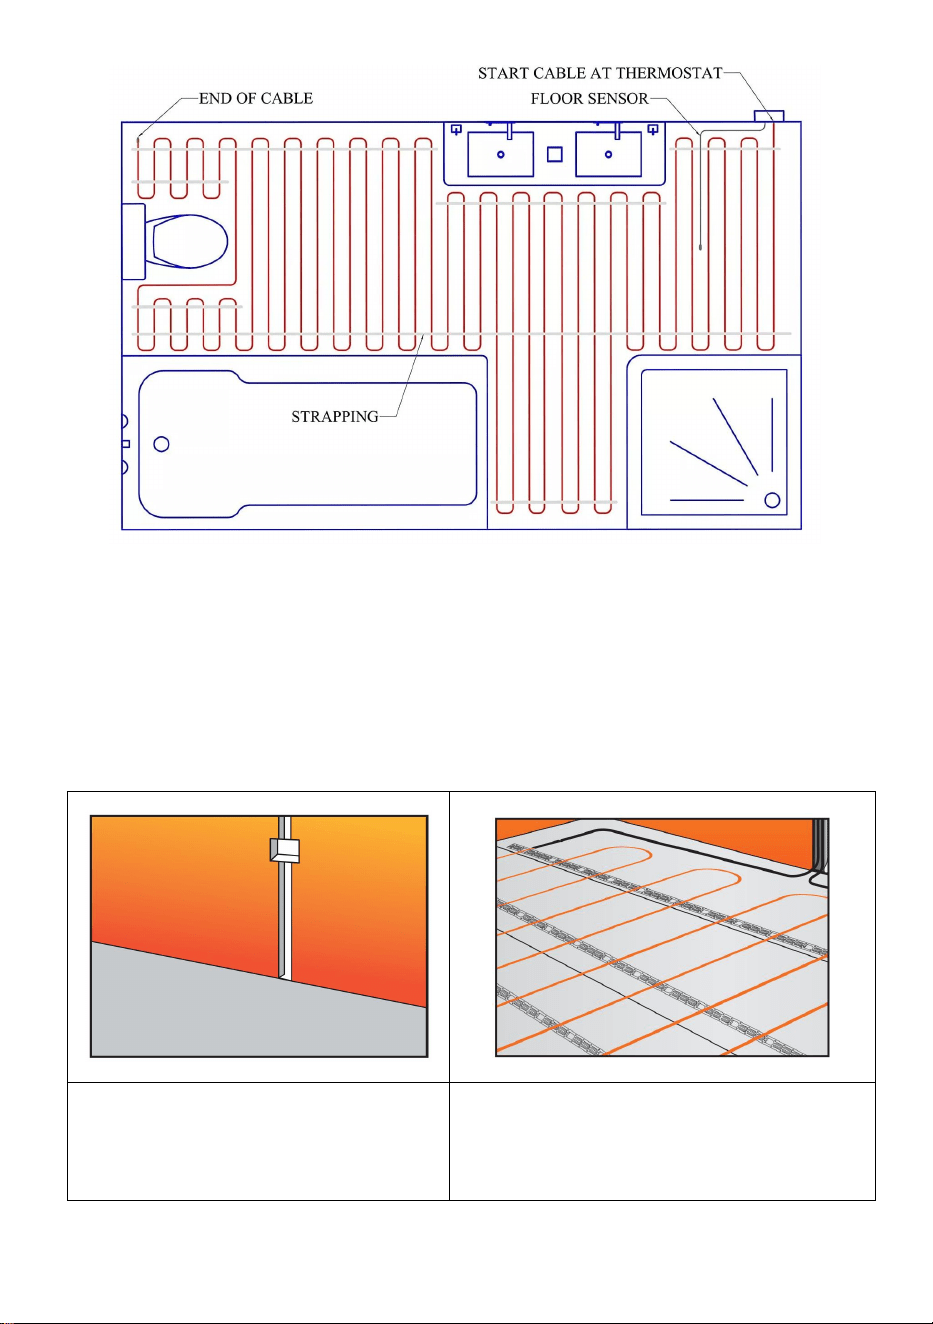
Heating cable can be fixed by the metal cable straps. The hoops on the
straps are spaced 0.984 inches (2.5 cm) apart. The heating cable can be
installed every 3, 4 or 5 hoops. It is recommended to prioritize spacing
every 3 or 4 hoops, resulting in a cable spacing of 2.95 inches (7.5 cm) or
3.94inch (10cm).
Select a heating cable of appropriate length based on the room area (refer
to the sizing table). If the cable length is slightly too long or short, adjust the
spacing within the layout area to 1.97 inches (5 cm) or 4.92 inches (12.5
- 6 -
cm) as needed.
Model
Cable
Length
(ft)
Cable
Length
(m)
2.95 inch
Cable
Space
Install
Area
(sq.ft)
3.94 inch
Cable
Space
Install
Area
(sq.ft)
4.92 inch
Cable
Space
Install
Area
(sq.ft)
SHHC-K-600
190.7
58.13
46.9
62.6
78.2
SHHC-K-1200
381
116.13
93.8
125
156
SHHC-K-2400
762
232.26
187.5
250
312
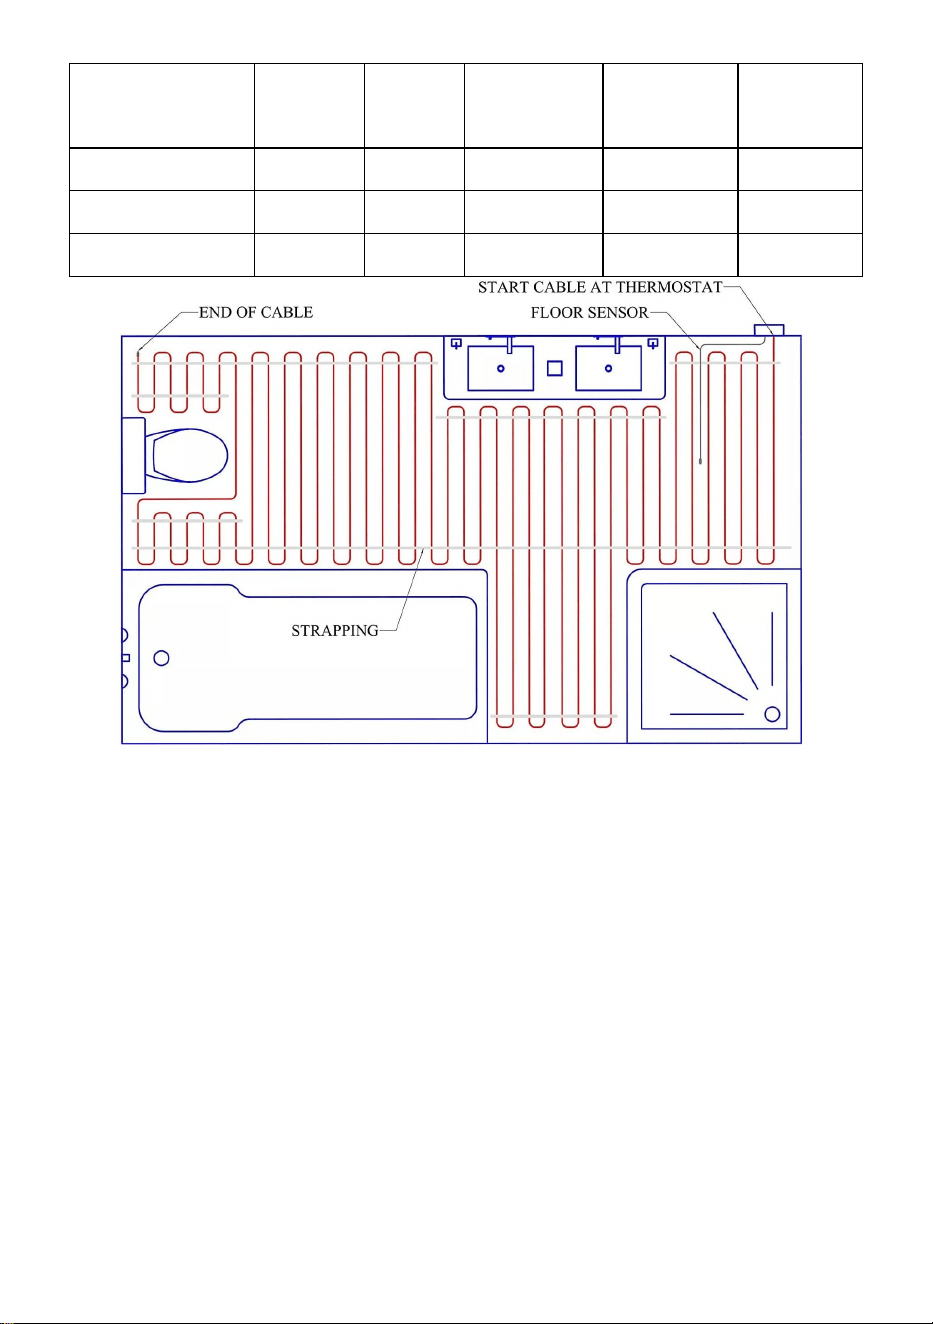
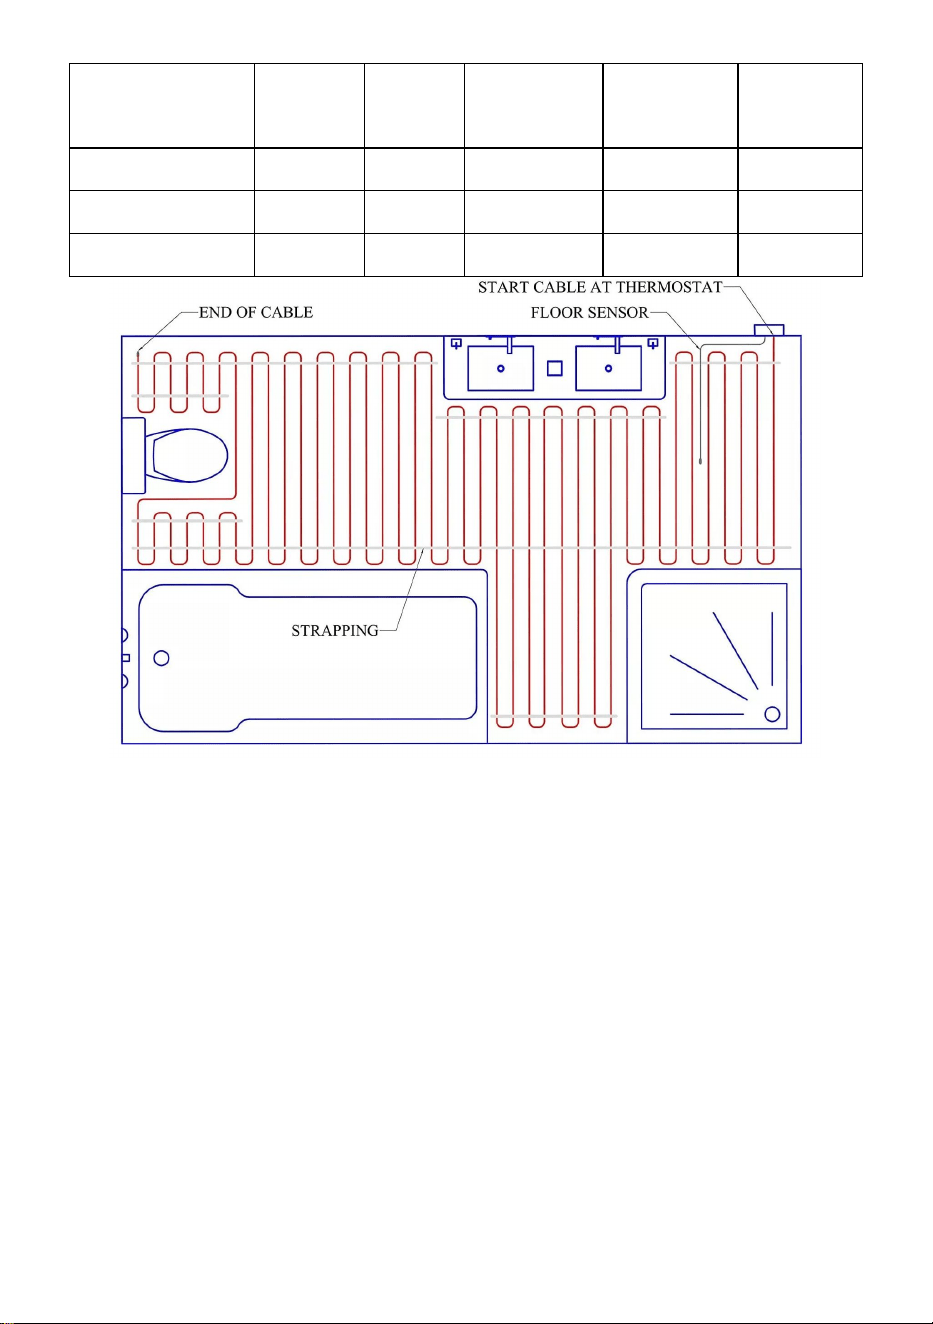
Measure carefully, allowing for
-At least 3" to walls and fixtures
- At least 6" to centre of toilet drain
-At least 8" to HVAC vents or other heating appliances
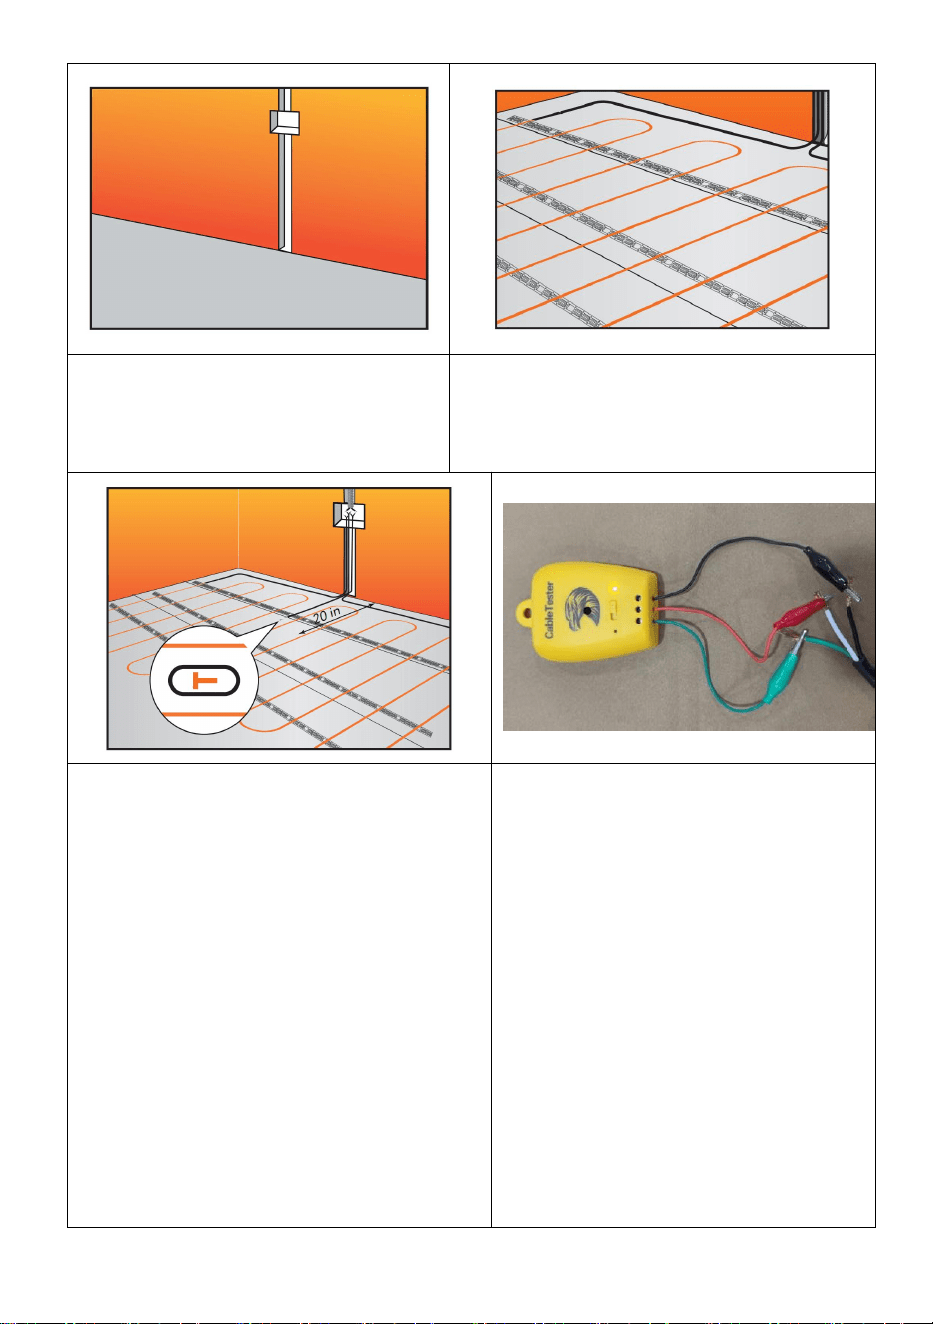
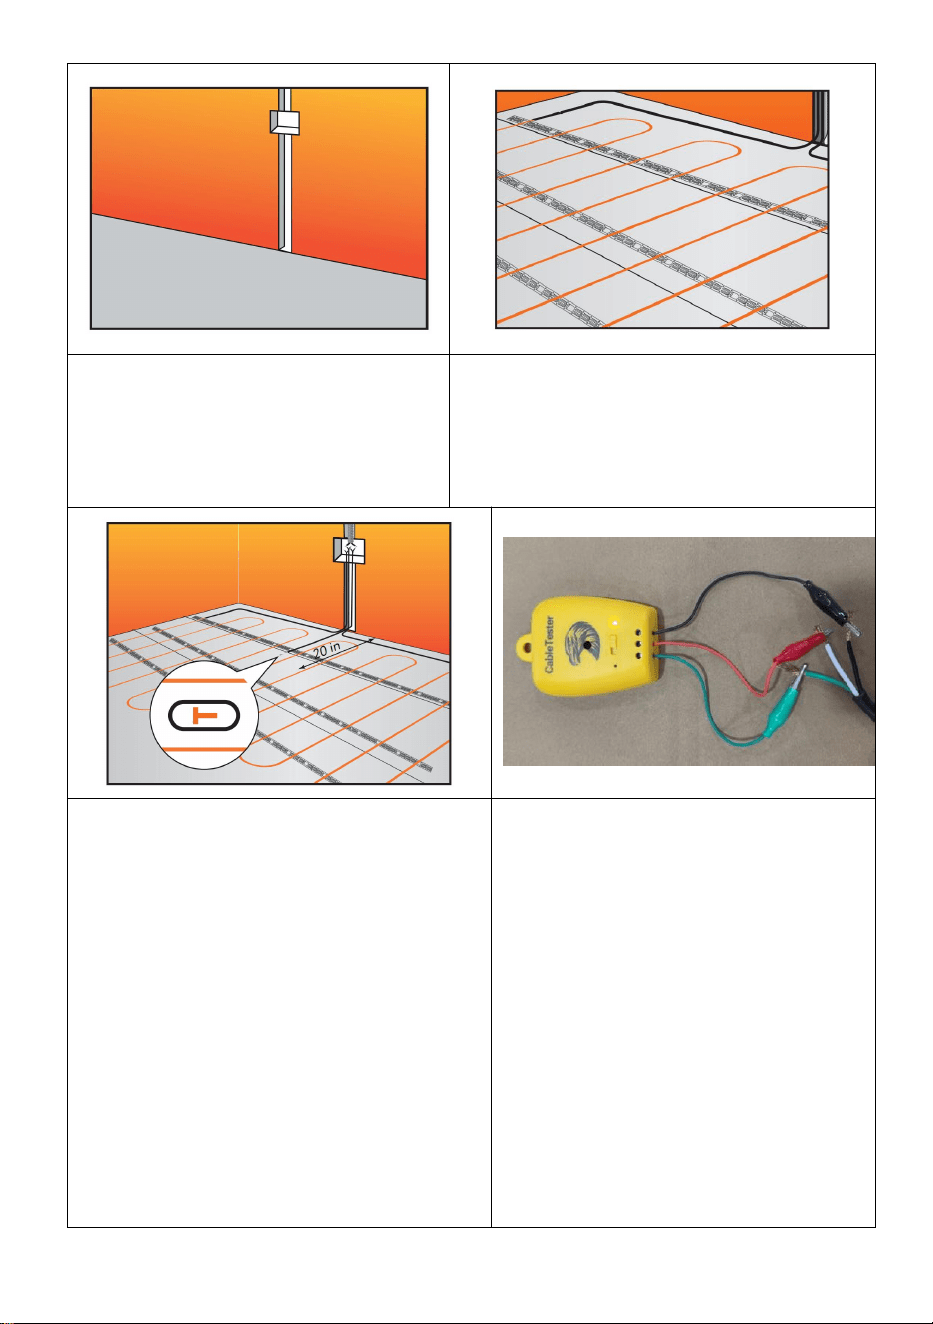
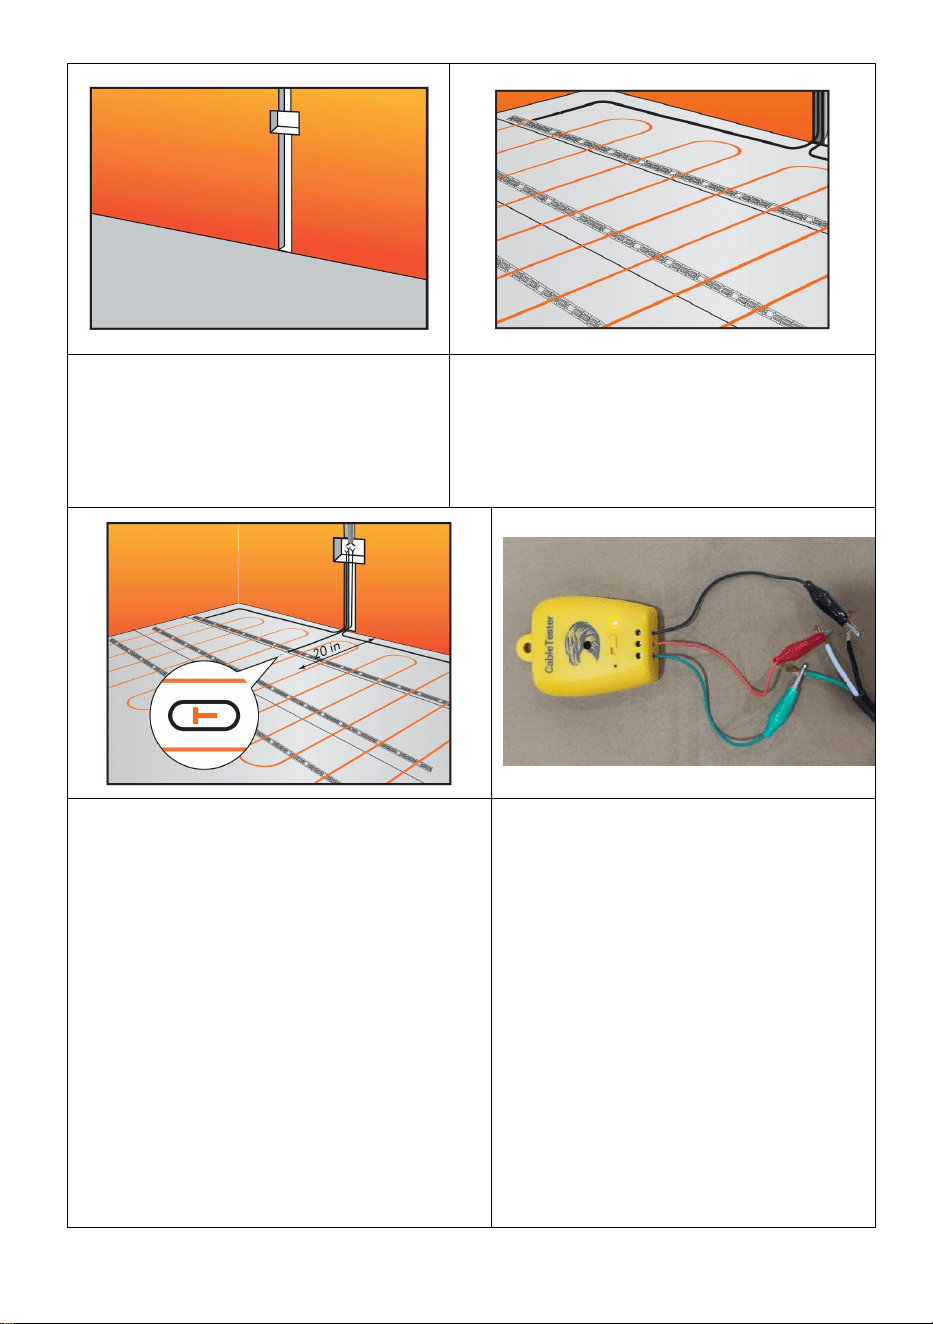
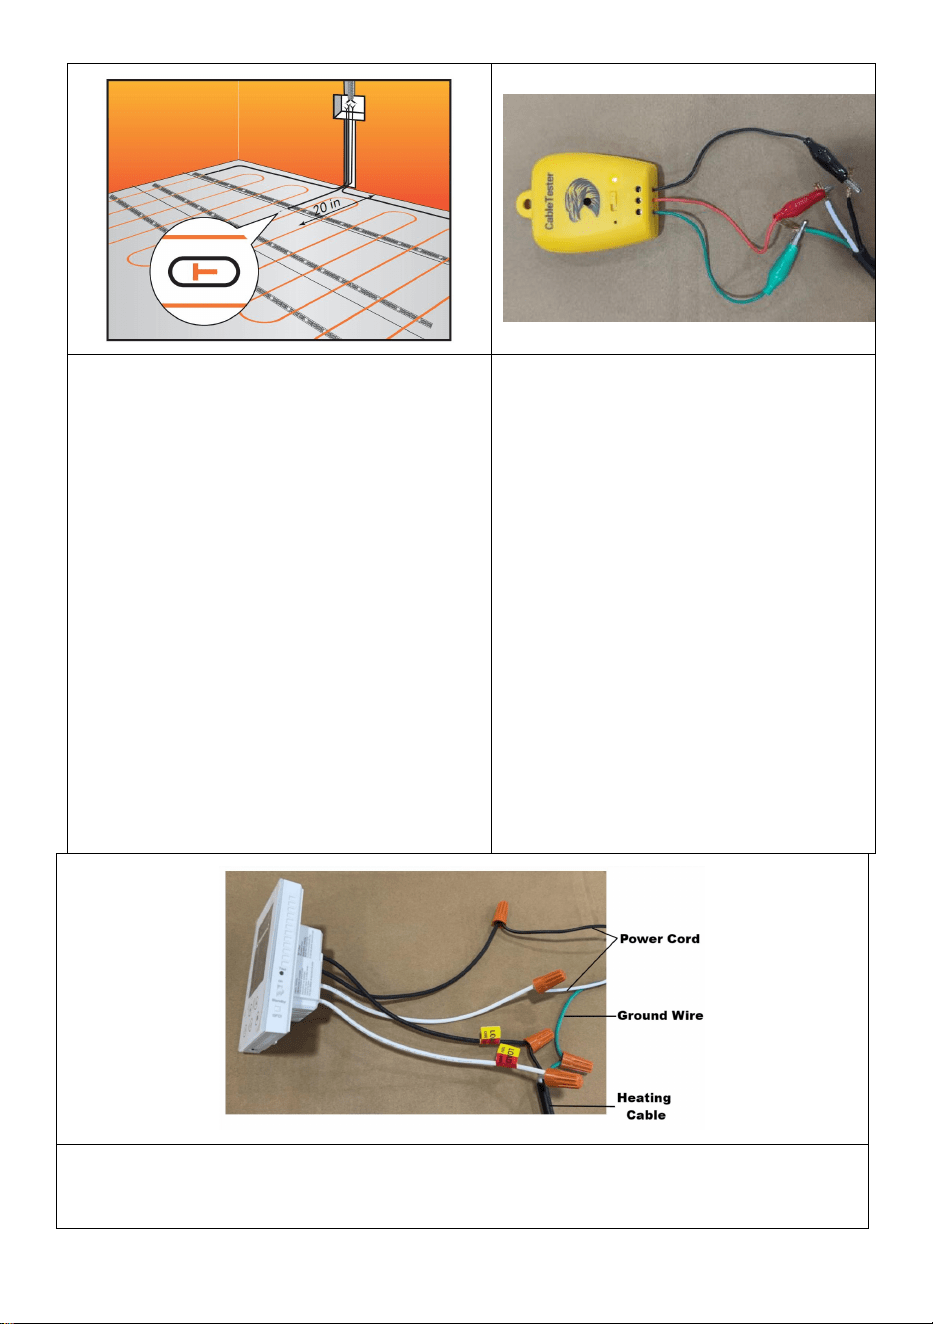
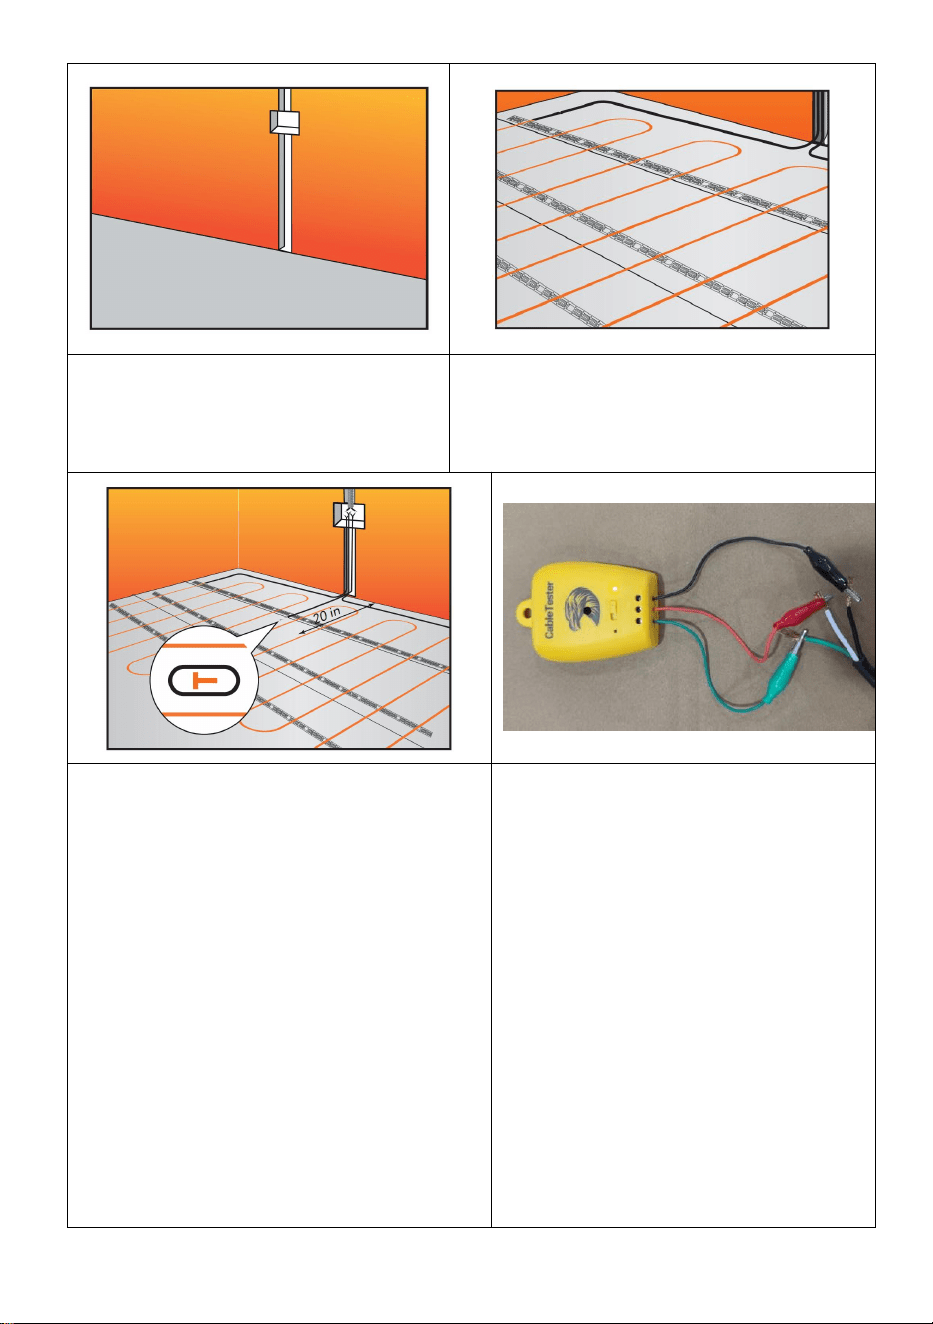
Step1:Prepare the hole in the wall for the thermostat installation.
- 7 -
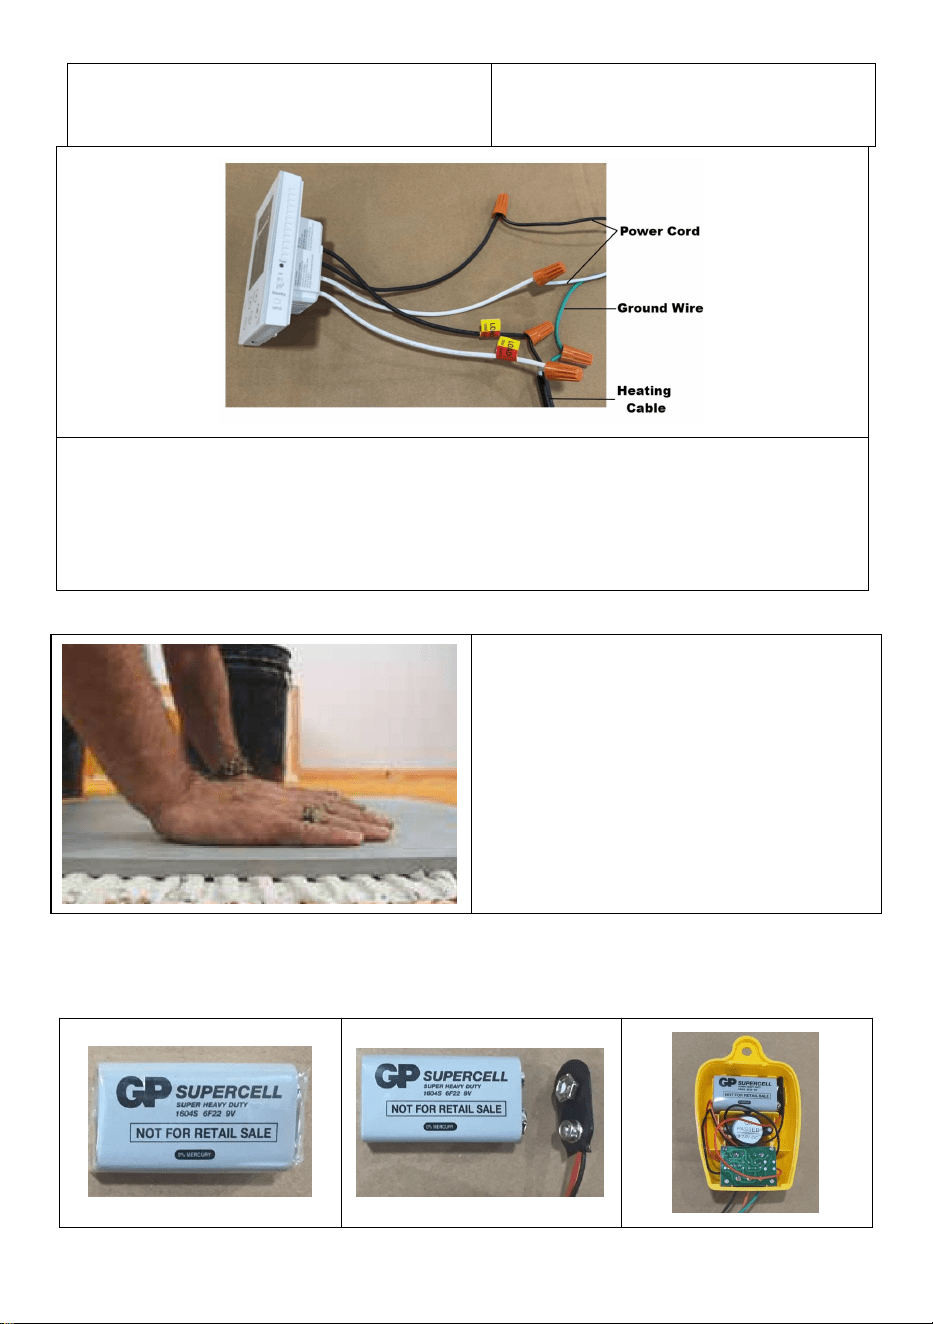
Step 2::Fix the mounting band to
the floor.
Step 3:Layout the cable according to
the pitch you determined, and attach
it to the lugs of the mounting band.
Step 4:Install the temperature
sensor:
a. Place the temperature sensor on
the floor in the location according to
your layout plan.
b. The sensor must be placed
between passes of the heating cable,
equally spaced from them. The
sensor’s installation wires must be
led to the thermostat or terminal box.
c. Fix the sensor to the floor with a
small amount of tile adhesive or hot
glue.
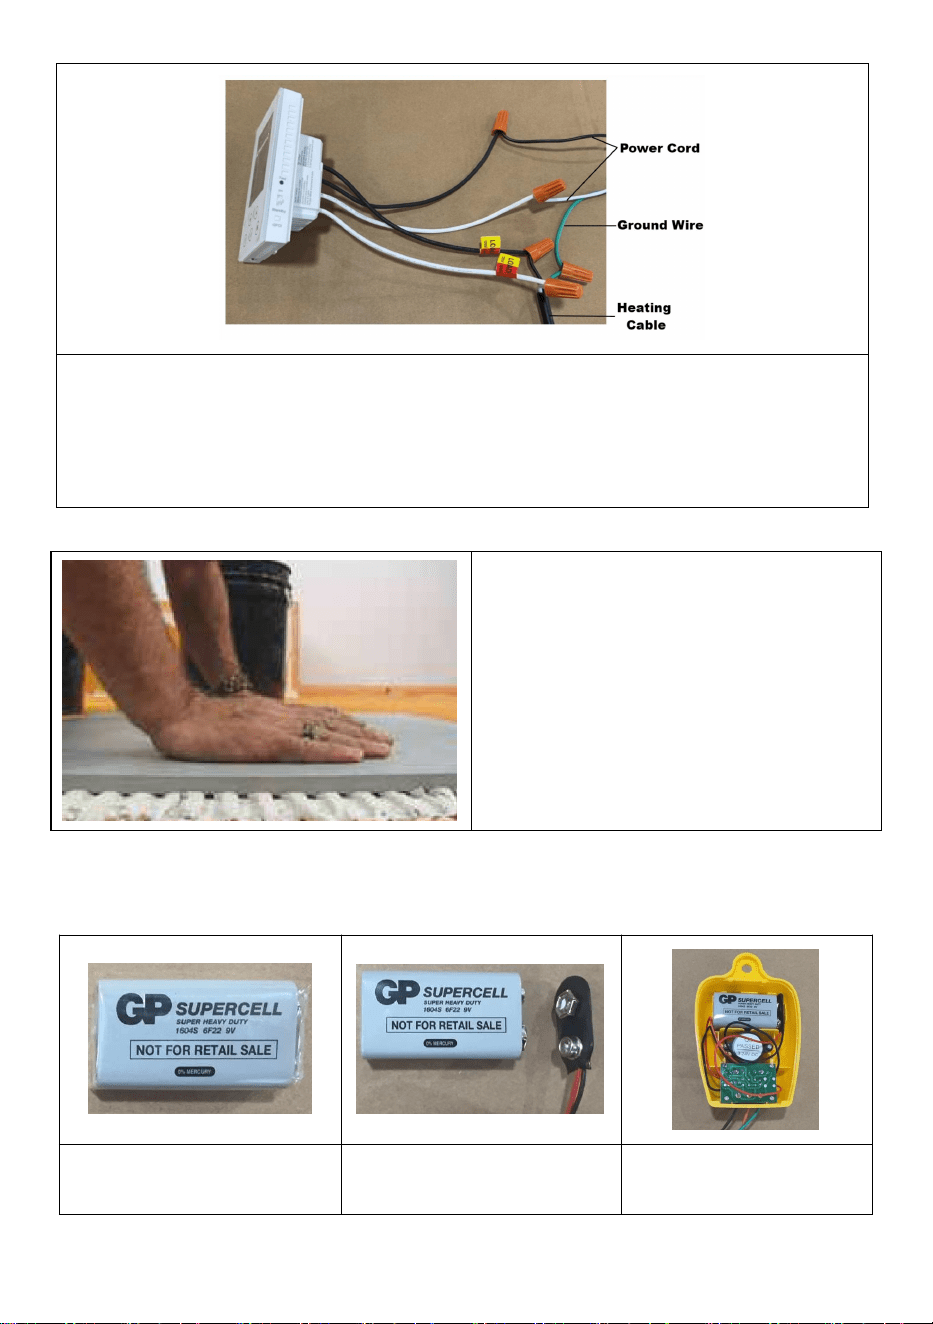
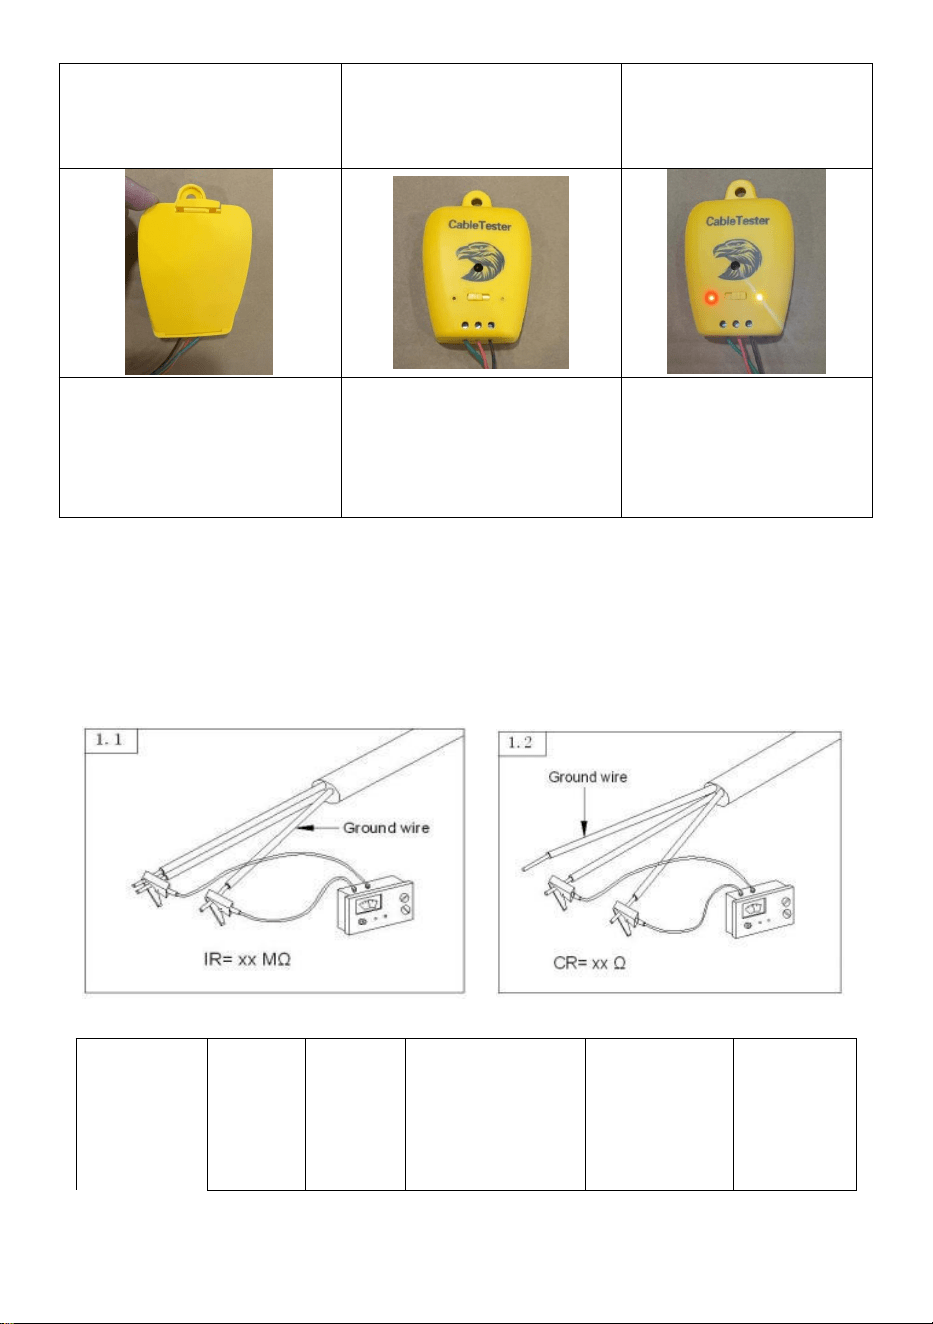
Step 5: Inspection cable.
The wiring method is shown in
the figure above.
If there is no abnormality in the
heating cable, the cable tester
will not emit an alarm.
- 8 -
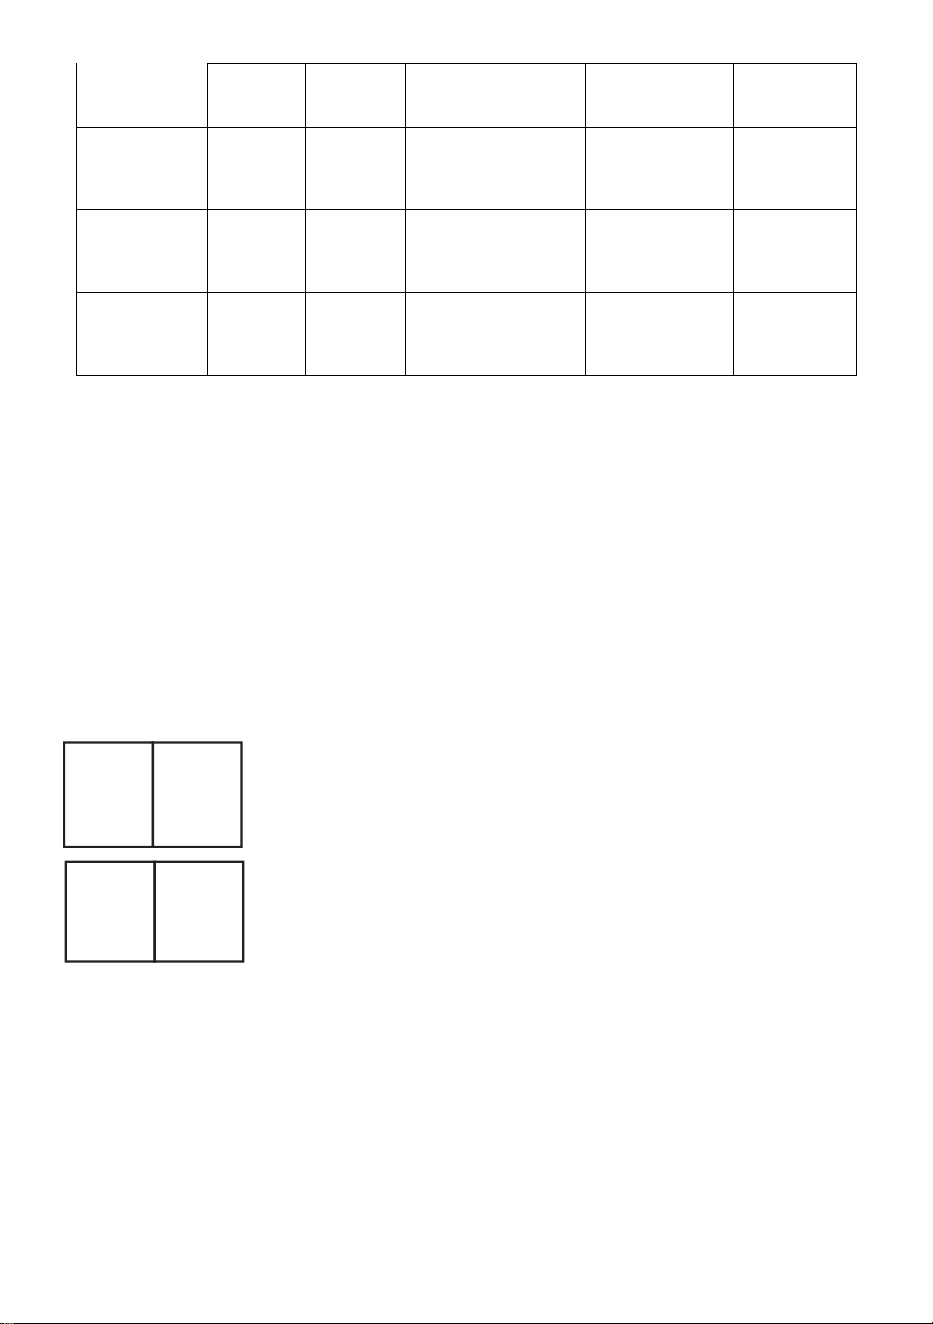
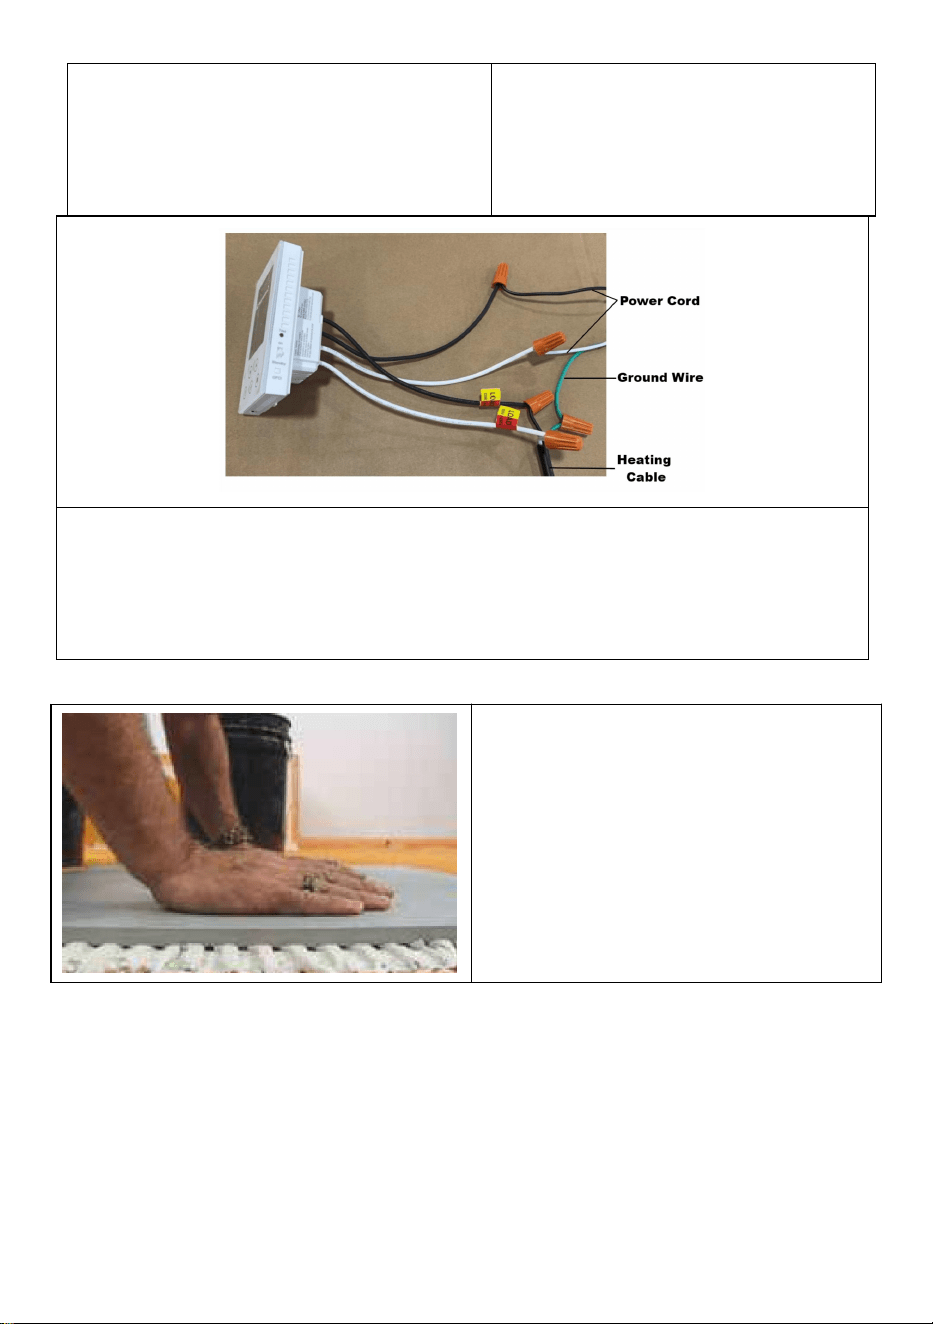
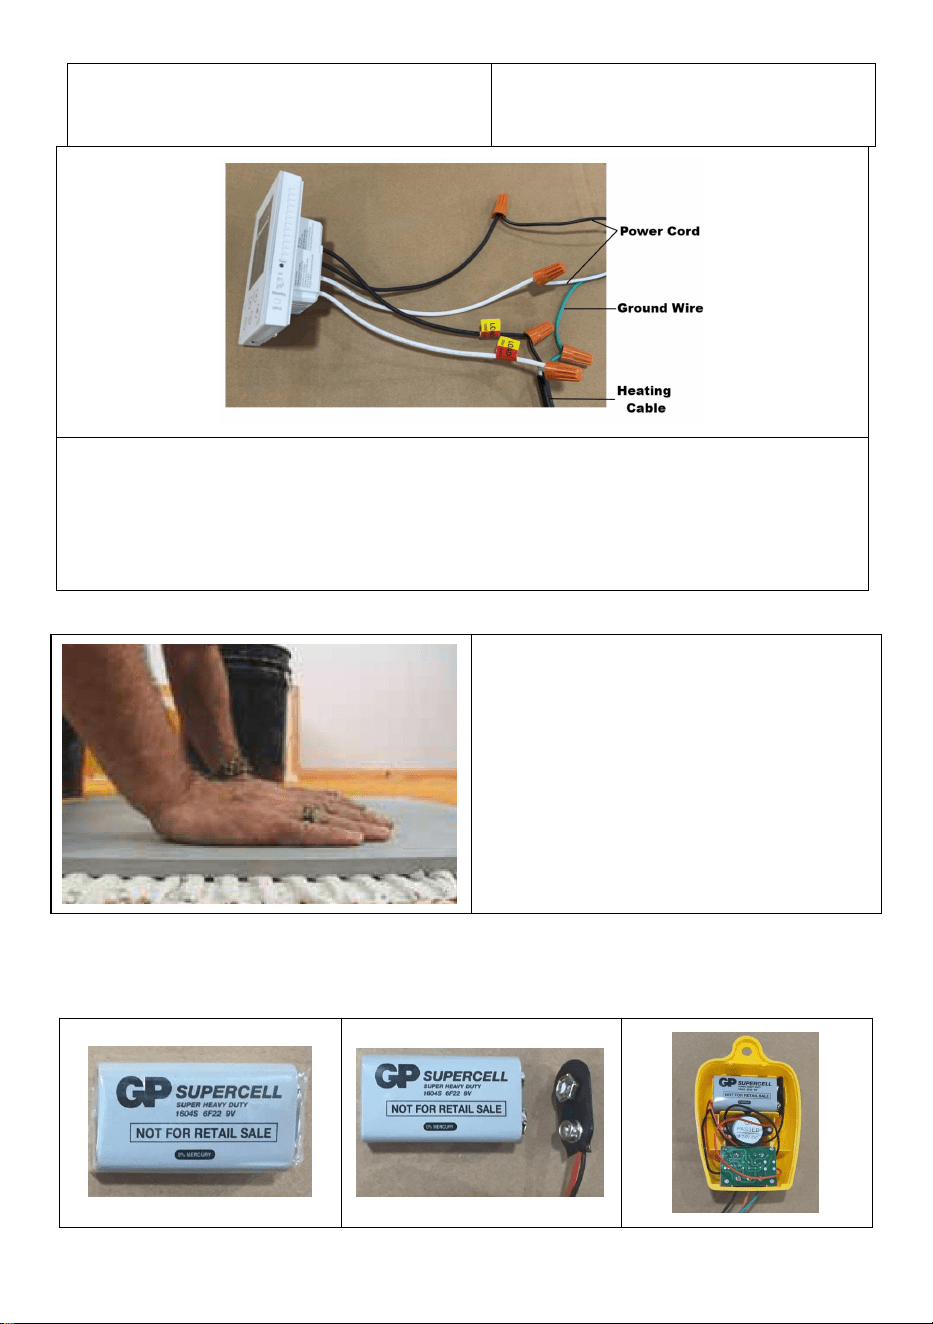
Step 6:Lead the installation wires of the heating cable(s) to the location
of the thermostat.
Install the thermostat (with the supply voltage disconnected!) according
to the instructions attached to it.
Step 7:Lead the installation wires
of the heating cable(s) to the
location of the thermostat.
Install the thermostat (with the
supply voltage disconnected!)
according to the instructions
attached to it.
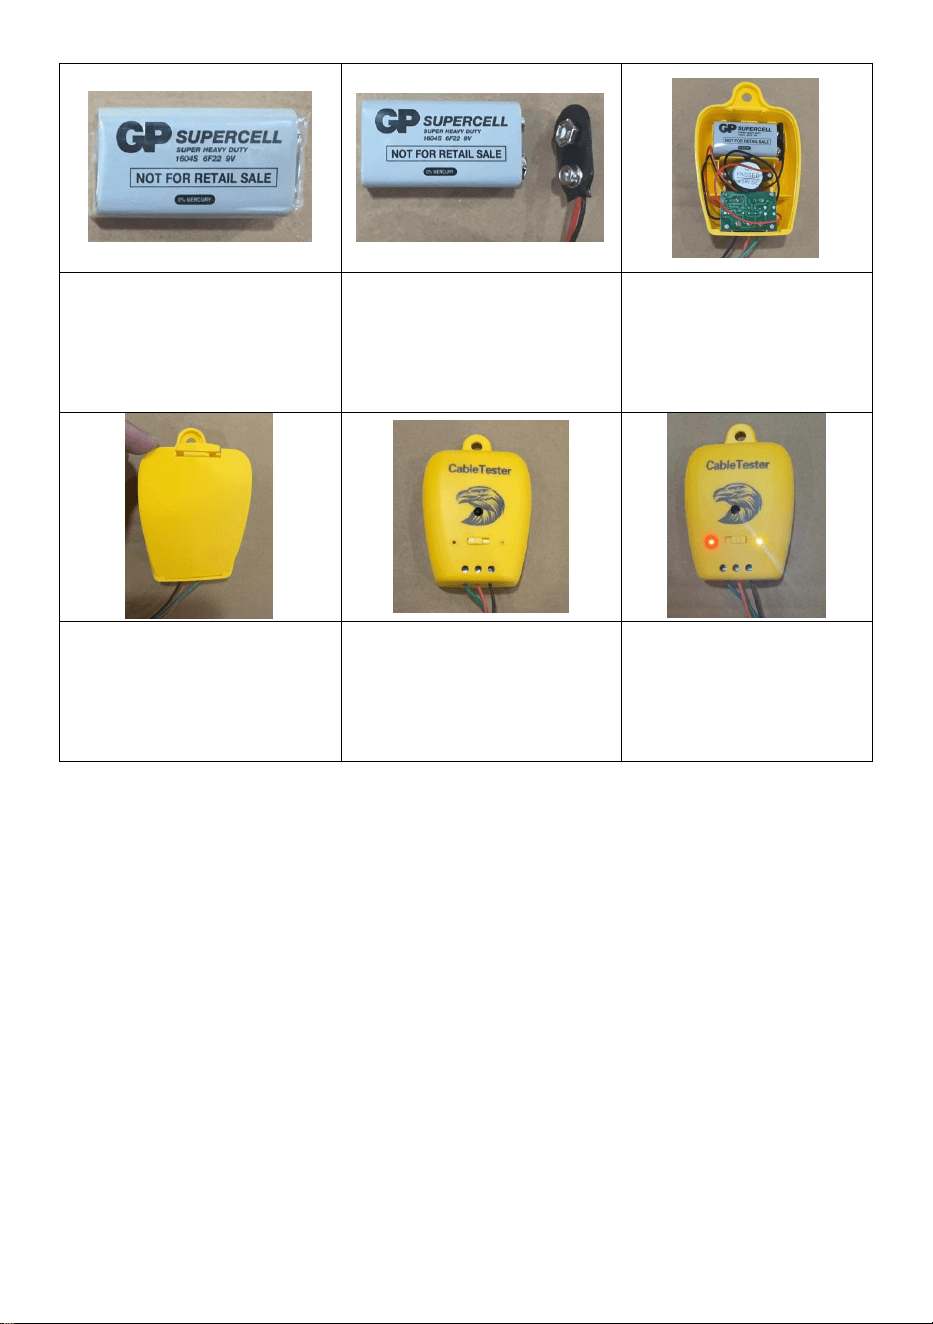
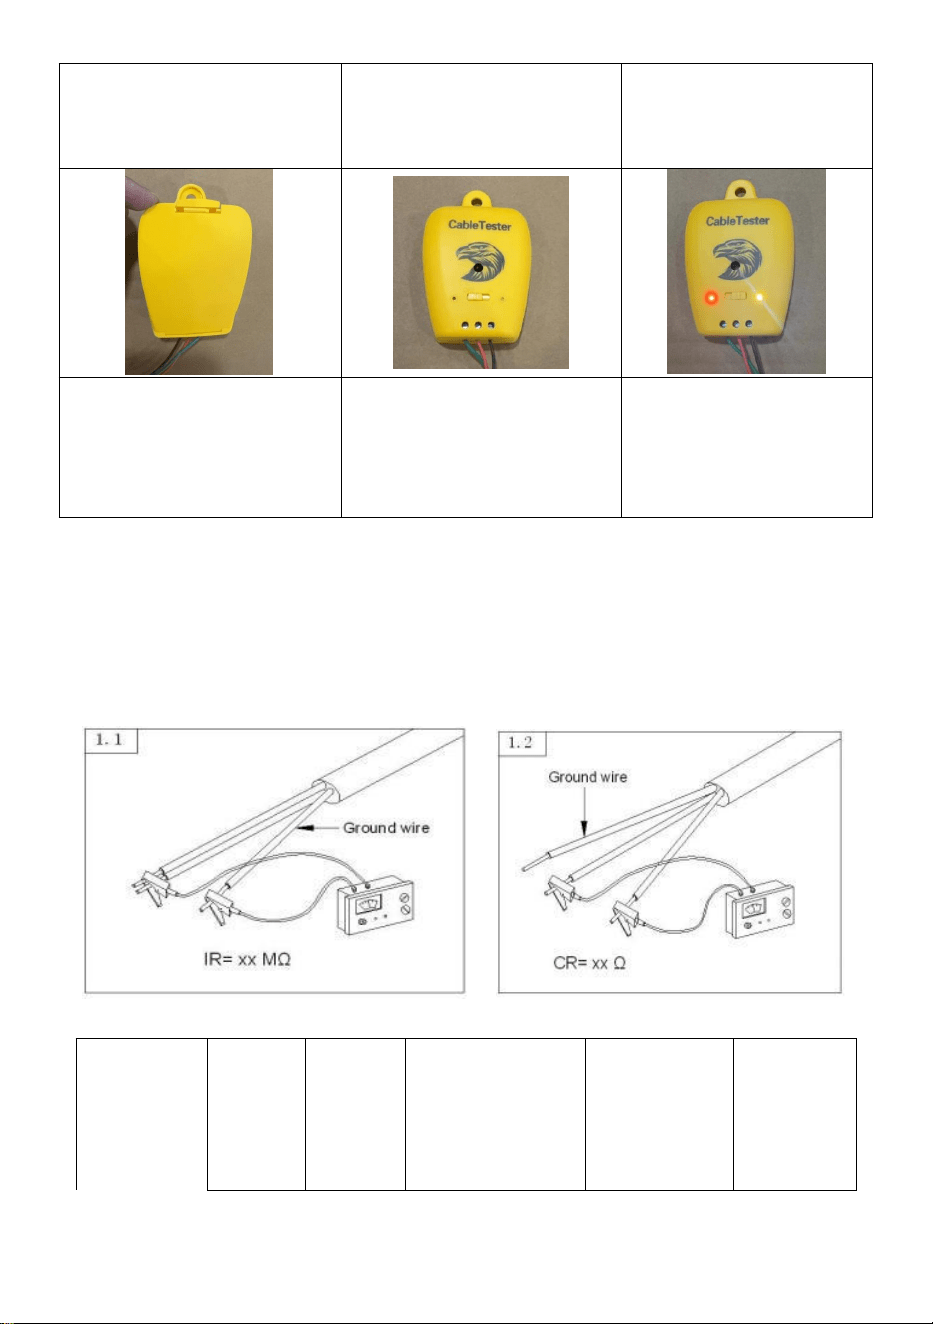
Cable Tester Installation
1.Remove the battery
from the detector.
2.Remove the plastic
bag and connect the
3.Load the battery
into the cable tester.
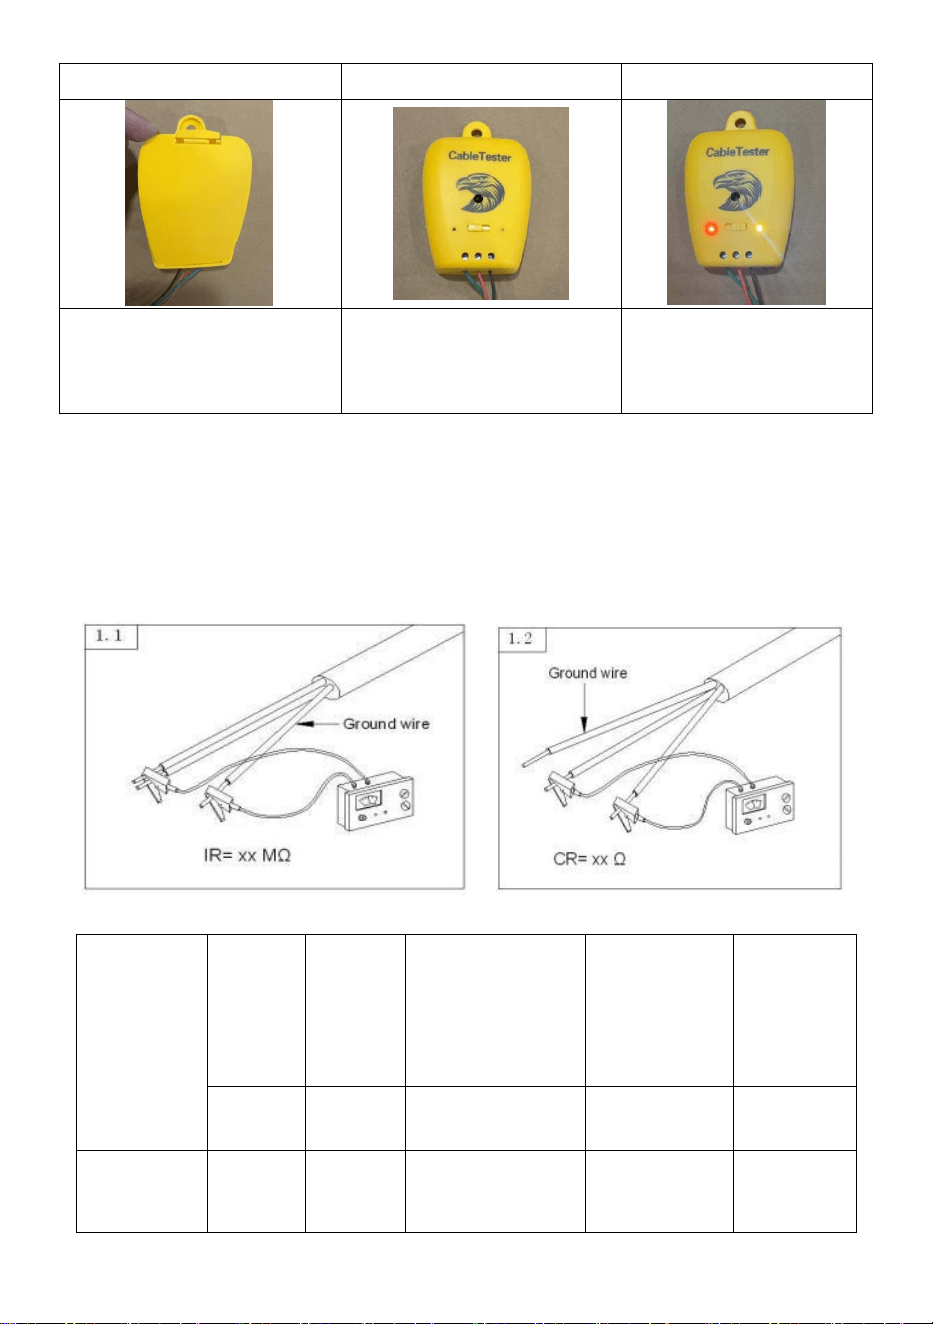
- 9 -
electrical plug.
4.Install the back cover.
5.Installation complete.
6.If the power supply
is normal, an alarm
tone will sound.
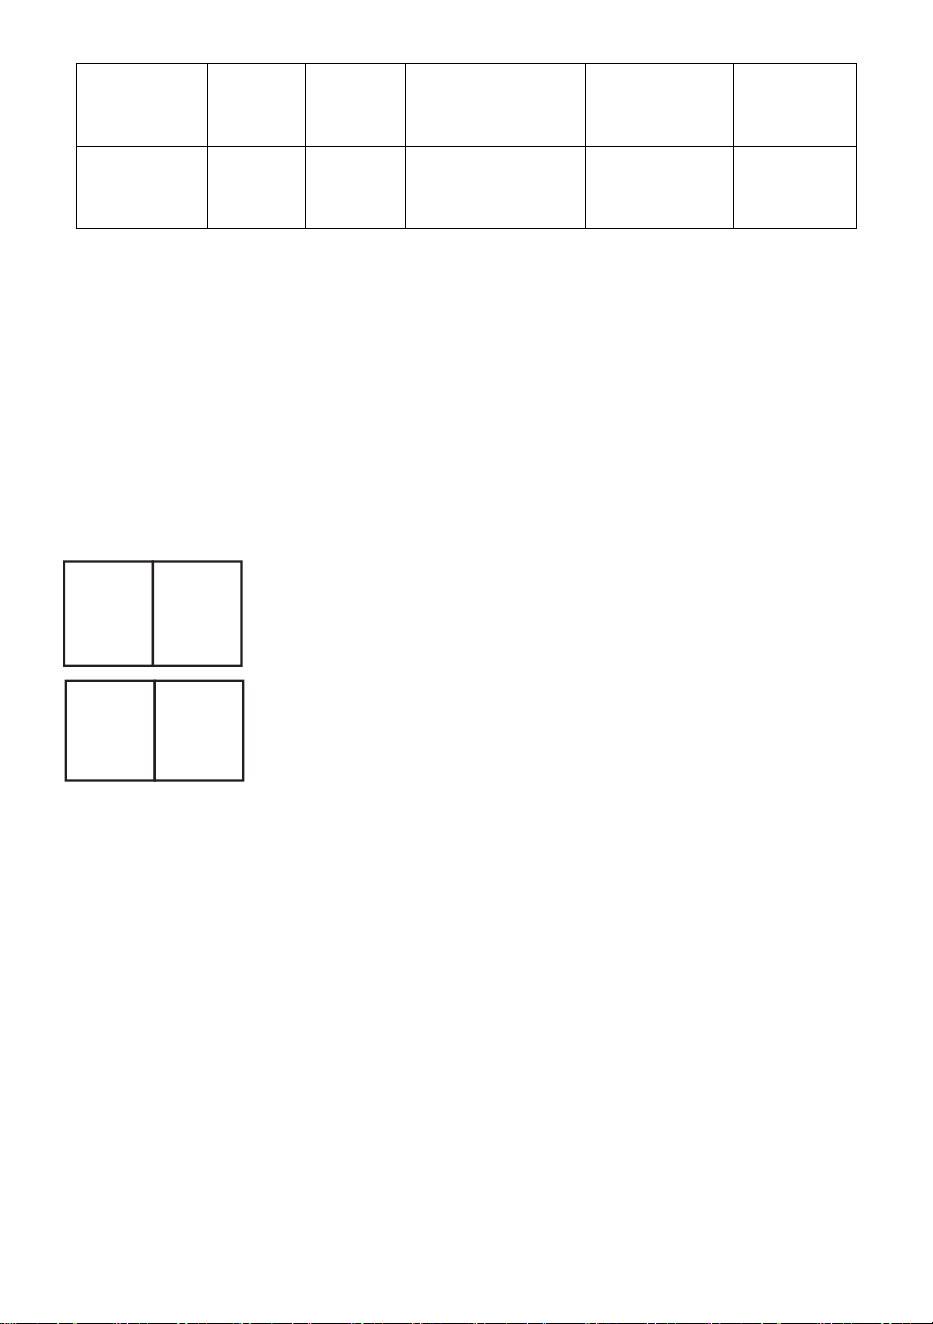
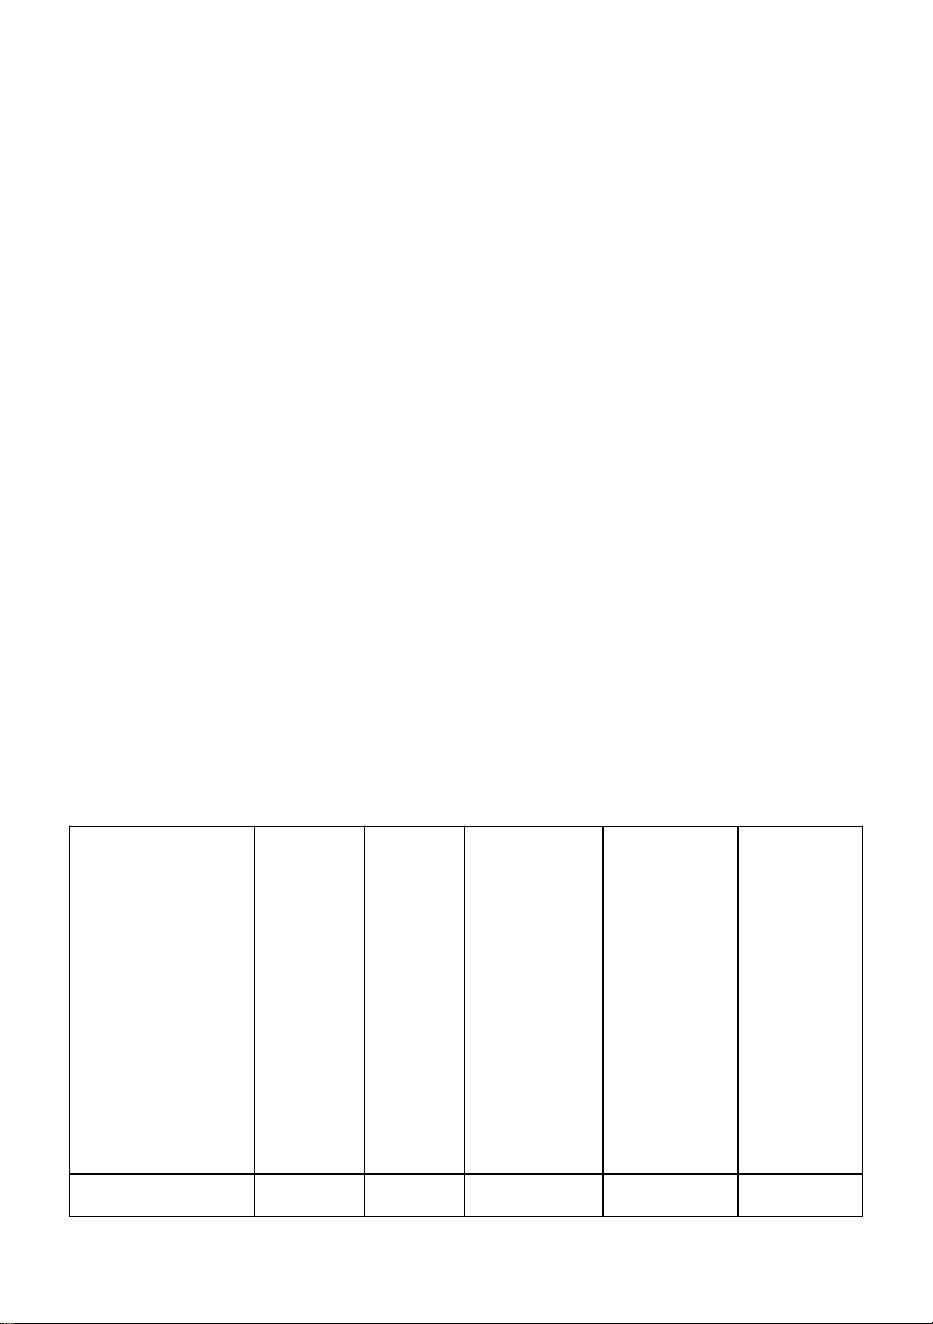
TEST STEPS: (The most important)
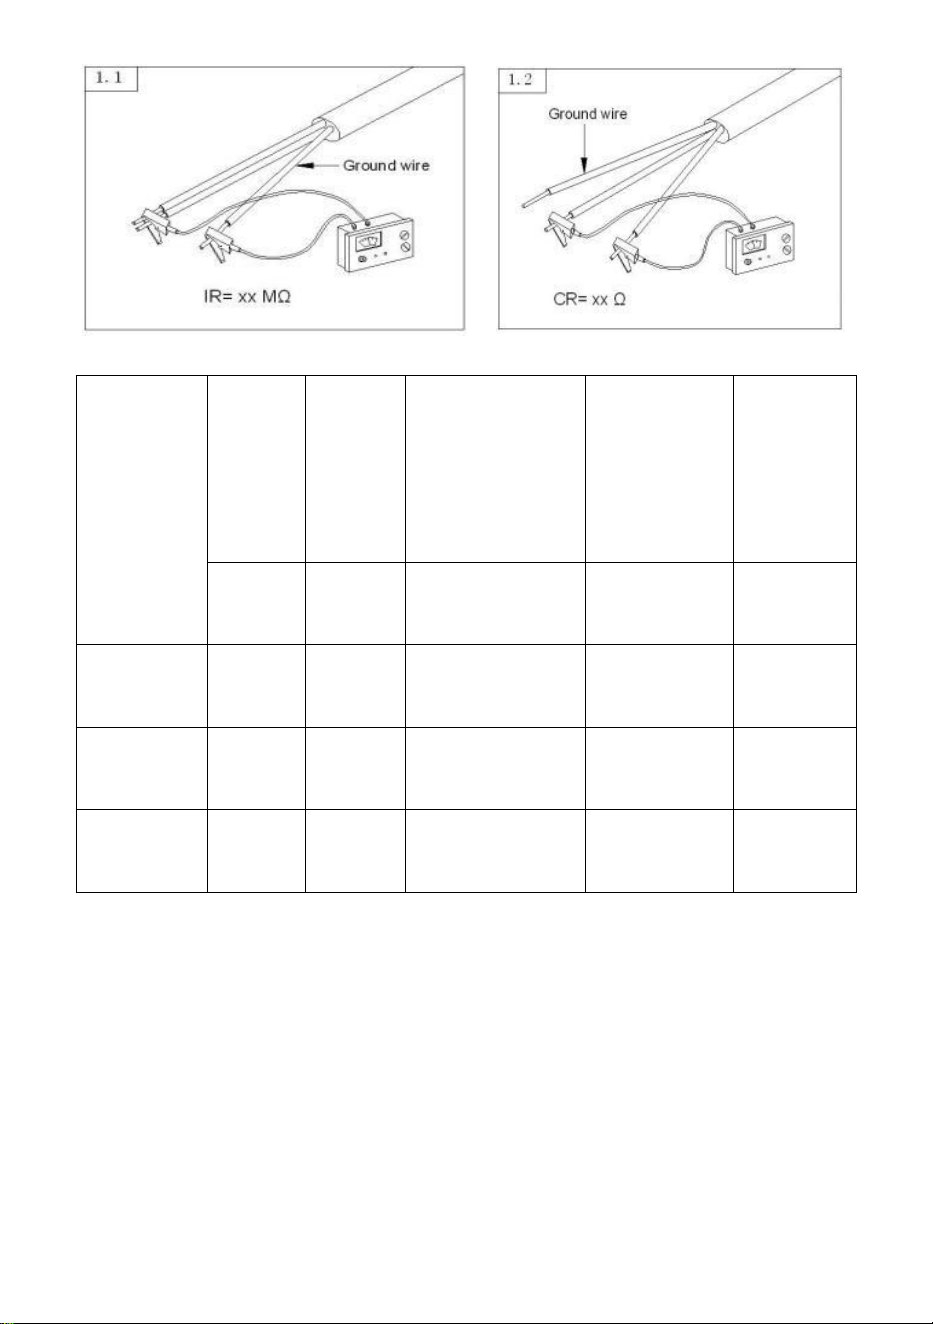
Test the heating mat’s insulation resistance(IR) and conductor
resistance(CR) (as the picture 1.1 and 1.2) to make sure the two items are
both good.
Type
Voltage
Rated
power
Resistance
@20oC+10/-5
%
Installation
area scope
Cable
Length
V
W
(CR) Ω
Sq.ft
ft
SHHC-K-6
00
120
600
24
46.9~78.2
190.7
- 10 -
SHHC-K-1
200
120
1200
20
93.8~156
381.0
SHHC-K-2
400
240
2400
24
187.5~312
762.0
Manufacturer: Shanghaimuxinmuyeyouxiangongsi
Address: Shuangchenglu 803nong11hao1602A-1609shi, baoshanqu,
shanghai 200000 CN.
Imported to AUS: SIHAO PTY LTD. 1 ROKEVA STREETEASTWOOD
NSW 2122 Australia
Imported to USA: Sanven Technology Ltd. Suite 250, 9166 Anaheim
Place, Rancho Cucamonga, CA 91730
REP
UK
YH CONSULTING LIMITED. C/O YH Consulting
Limited Office 147, Centurion House, London
Road, Staines-upon-Thames, Surrey, TW18 4AX
REP
EC
E-CrossStu GmbH
Mainzer Landstr.69,
60329 Frankfurt am Main.

- 1 -

- 2 -
KIT DE CÂBLE DE CHAUFFAGE AU SOL
ÉLECTRIQUE
MODÈLE:
SHHC-K-600 \ SHHC-K-1200 \ SHHC-K-2400

- 3 -
- 1 -
MODÈLE : SHHC-K-600 \ SHHC-K-1200 \ SHHC-K-2400
Ceci est le mode d'emploi d'origine. Veuillez lire attentivement l'intégralité
du manuel avant utilisation. VEVOR se réserve le droit d'interpréter
clairement ce manuel d'utilisation. L'apparence du produit dépend du
produit que vous avez reçu. Veuillez nous excuser pour les éventuelles
mises à jour technologiques ou logicielles.
MESURES DE SÉCURITÉ IMPORTANTES
Lors de l’utilisation d’appareils électriques, des précautions de
sécurité de base doivent toujours être respectées :
Avertissement - Pour réduire le risque de blessure,
l'utilisateur doit lire attentivement le manuel d'instructions.
Ce symbole, placé avant un commentaire de sécurité,
indique un type de précaution, avertissement ou danger.
Ignorer cet avertissement peut entraîner une accident. Pour
réduire les risques de blessures, d'incendie ou
d'électrocution, veuillez toujours suivre les recommandations
ELECTRIC FLOOR
HEATING CABLE KIT
- 2 -
ci-dessous.
Courant alternatif .
POUR USAGE DOMESTIQUE UNIQUEMENT .
Élimination correcte de ce produit :
Ce marquage indique que ce produit ne doit pas être jeté
avec les autres déchets ménagers dans l'UE. Pour éviter tout
dommage potentiel à l'environnement, Pour protéger
l'environnement et la santé humaine contre l'élimination
incontrôlée des déchets, recyclez-le de manière responsable
afin de promouvoir une réutilisation durable des ressources
matérielles. Pour retourner votre appareil usagé, veuillez
utiliser les systèmes de retour et de collecte ou contacter le
revendeur où vous l'avez acheté. Ce dernier pourra le
reprendre pour un recyclage respectueux de
l'environnement.
AVERTISSEMENT:
1. Lisez attentivement le manuel d’instructions avant d’installer le tapis !
2. Ne pas effectuer de test thermique tant que le produit n'est pas
complètement déplié.
3. Ne coupez jamais le fil chauffant (couleur rouge ou bleu) !
4. Ne jamais joindre deux ou plusieurs tapis ensemble en série !
5. Vérifiez que la tension indiquée sur la plaque signalétique correspond à
celle du réseau local avant de brancher l'appareil au secteur.
6. Si le cordon d'alimentation est endommagé, il doit être remplacé par le
fabricant, son agent de service ou des personnes de qualification similaire
- 3 -
afin d'éviter tout danger.
7. Ne laissez pas l’appareil sans surveillance lorsqu’il est branché sur le
secteur.
8. Ne pas immerger l’appareil dans l’eau ou tout autre liquide.
9. Une surveillance étroite est requise lors de l’utilisation de cet appareil à
proximité d’enfants.
10. Cet appareil n'est pas destiné à être utilisé par des personnes (y
compris des enfants) dont les capacités physiques, sensorielles ou
mentales sont réduites, ou qui manquent d'expérience et de
connaissances, sauf si elles sont sous la surveillance ou ont reçu des
instructions concernant l'utilisation de l'appareil par une personne
responsable de leur sécurité. Les enfants doivent être surveillés afin de
s'assurer qu'ils ne jouent pas avec l'appareil.
11. Ne laissez jamais l’appareil à la portée des enfants.
12. Les réparations sur les appareils électriques doivent être effectuées
uniquement par un électricien qualifié. Des réparations incorrectes peuvent
exposer l'utilisateur à de graves risques.
CONSERVEZ CES INSTRUCTIONS
Liste des pièces
NO
N .
Image
Nom de la
pièce
Qté
SHHC-K-
600
SHHC-K-
1200
SHHC-K
-2400
1
Sangles de
câbles
métalliques
2
3
6
2
Thermostat
1
1
1
- 4 -
3
Testeur de
câbles
1
1
1
4
Câble
chauffant
1
1
1
5
tuyau ondulé
1
1
1
Modèle
Alimentation
électrique
Pouvoir
Température
d'exposition
max.
Températur
e
d'installatio
n minimale
SHHC-K-600
CA 120 V 60
Hz
600 W
194℉ (90℃)
41℉ (+5℃)
SHHC-K-1200
1200W
SHHC-K-2400
CA 240 V 60
Hz
2400W
Conseils d' installation
Tout le câblage électrique doit être effectué par un électricien entièrement
qualifié et conformément aux réglementations de câblage IEE en vigueur
afin de valider la garantie du produit.
• Arrondissez toujours la surface de votre espace au sol vers le bas, par
exemple 60 pieds carrés de sol nécessiteront 190,7 pieds de câble .
• Ne jamais chevaucher le câble , toujours assurer un espacement
minimum de 50 mm (1,97 pouce) entre les fils pour une répartition optimale
de la chaleur.
• S’il y a un manque de câble chauffant dans votre espace au sol,

- 5 -
concentrez le câble chauffant dans les zones à fort trafic.
• Un dispositif à courant résiduel (RCD) doit être utilisé avec ce système
(doit être acheté séparément).
• Le sol doit être propre et exempt de poussière et de saleté.
• Ne jamais couper le fil chauffant (rouge ou bleu) ! Ne jamais joindre deux
tapis ou plus. ensemble en série ! Si vous souhaitez joindre deux tapis ou
plus, veuillez utiliser un boîte de jonction.
• Le fil est résistant, mais des précautions supplémentaires doivent être
prises lors de l’utilisation d’objets pointus à proximité du câble. Une truelle
en plastique est conseillée.
• Vérifiez votre système avec un multimètre avant l’installation des tuiles.
• Assurez-vous que votre colle à carrelage est adaptée à une utilisation
avec un chauffage sous carrelage, par exemple hautement modifiée par
polymère (flexible).
• Votre support et votre revêtement de sol, par exemple colle à carrelage
ou chape, doivent être complètement secs avant la première mise en
marche de votre système.
• Portez des gants lors de la manipulation du câble (pour éviter toute
irritation de la peau).
• Lors de la pose du carrelage, veillez à ne pas endommager le câble
chauffant.
• Le panneau isolant ne convient pas au renforcement des sols et au
renforcement structurel.
• Les tapis et les panneaux isolants ne doivent pas passer sous des
fixations permanentes, par exemple une baignoire, des toilettes, etc.
• Ne stockez pas d'objets sur le tapis pendant l'installation, par exemple
des carreaux.
• Retirer les anciens revêtements de sol.
Installation Instructions
Le câble chauffant ne peut pas être coupé à volonté, ni se chevaucher, et
l'espacement des câbles ne peut pas être plus proche que l'espacement

- 6 -
des câbles assemblés sur le tapis.
Le câble chauffant peut être installé sous du carrelage, de la pierre
naturelle, du stratifié ou du parquet.
La résistance thermique de la construction du sol au-dessus du câble
chauffant doit être aussi faible que possible.
Ne marchez pas sur les câbles pendant l'installation.
Évitez les objets tranchants et le coulage imprudent du béton ou du mastic.
Évitez les vides d'air importants dans le béton ou le mastic. Respectez
toujours les instructions concernant le sol. Adhésif de recouvrement. Le
câble chauffant doit être installé dans au moins 5 mm (1,97 po) de béton
ou de remplissage.
Ne posez pas le câble chauffant dans des zones qui pourraient être
endommagées par le perçage, qui pourraient être couvertes par des
placards ou sous une source de chaleur telle qu'une cuisinière, etc.
Le support doit être propre, lisse, stable et rigide, exempt de fissures et
d'objets pointus. Le support en béton doit être parfaitement sec avant
l'installation du chauffage par le sol. système.
Le câble chauffant peut être fixé à l'aide de colliers métalliques . Les
anneaux des colliers sont espacés de 2,5 cm . Le câble chauffant peut être
installé tous les 3, 4 ou 5 anneaux . Il est recommandé de privilégier un
espacement de 3 ou 4 anneaux. cerceaux , ce qui donne un espacement
des câbles de 2,95 pouces ( 7,5 cm) ou 3,94 pouces (10 cm) .
Choisissez un câble chauffant de longueur adaptée à la surface de la pièce
(consultez le tableau des dimensions). Si le câble est légèrement trop long
ou trop court, ajustez l'espacement à 5 cm ( 1,97 po) ou 12,5 cm (4,92 po )
selon vos besoins.
Modèle
Longue
ur du
câble
(pieds)
Longu
eur du
câble
(m)
2,95
pouces
Espace
câble
Surface
d'installati
3. 9 4
pouce
Espace
câble
Surface
d'installati
4. 9 2
pouce
Espace
câble
Surface
d'installa
- 7 -
on (pi²)
on (pi²)
tion (pi²)
SHHC-K-600
190,7
58.13
46,9
62,6
78,2
SHHC-K-1200
381
116.13
93,8
125
156
SHHC-K-2400
762
232,26
187,5
250
312
Mesurez soigneusement, en tenant compte de
-Au moins 3" des murs et des luminaires
- Au moins 6" du centre du drain des toilettes
-Au moins 8" aux évents CVC ou autres appareils de chauffage
Étape 1 : Préparez le trou dans le mur pour l’installation du thermostat.
- 8 -
Étape 2 : Fixez la bande de
montage au sol.
Étape 3 : Disposez le câble selon le
pas que vous avez déterminé et
fixez-le aux cosses de la bande de
montage.
Étape 4 : Installer le capteur de
température :
a. Placez le capteur de température
sur le sol à l’emplacement prévu
dans votre plan d’aménagement.
b. La sonde doit être placée entre les
passages du câble chauffant, à
égale distance de ceux-ci. Les fils
d'installation de la sonde doivent être
acheminés jusqu'au thermostat ou
au boîtier de raccordement.
c. Fixez le capteur au sol avec une
Étape 5 : Câble d' inspection .
La méthode de câblage est
illustrée dans la figure ci-dessus .
S'il n'y a aucune anomalie
dans le câble chauffant, le
testeur de câble n'émettra pas
d'alarme .
- 9 -
petite quantité de colle à carrelage
ou de colle chaude.
Étape 6 : Acheminez les fils d’installation du ou des câbles chauffants
jusqu’à l’emplacement du thermostat.
Installer le thermostat (avec le (tension d'alimentation déconnectée !)
selon les instructions qui y sont jointes .
Étape 7 : Acheminez les fils
d’installation du ou des câbles
chauffants jusqu’à l’emplacement
du thermostat.
Installer le thermostat (avec le
(tension d'alimentation
déconnectée !) selon les
instructions qui y sont jointes .
Testeur de câbles Installation
- 10 -
1.Retirez la batterie du
détecteur.
2.Retirez le sac en
plastique et branchez
la prise électrique.
3. Chargez la
batterie dans le
testeur de câble.
4.Installez le couvercle
arrière.
5. Installation terminée.
6. Si l'alimentation
électrique est
normale, une alarme
retentit.
ÉTAPES DU TEST : (Les plus importantes)
Testez la résistance d'isolement (IR) du tapis chauffant et résistance du
conducteur (CR) (comme sur l'image 1.1 et 1.2) pour s'assurer que les
deux éléments sont tous les deux bons.
Taper
Tension
Noté
pouvoir
Résistance
à 20 °C
+10/-5 %
Portée de la
zone
d'installation
Câble
Longueur
- 11 -
V
W
(CR) Ω
Pieds carrés
pieds
SHHC-K-6
00
1 2 0
600
24
46,9~78,2
190,7
SHHC-K-1
200
1 2 0
120 0
20
93,8~156
381,0
SHHC-K-2
400
24 0
240 0
24
187,5~312
762,0
Fabricant : Shanghaimuxinmuyeyouxiangongsi
Adresse : Shuangchenglu 803nong11hao1602A-1609shi, baoshanqu,
Shanghai 200 000 CN.
Importé en Australie : SIHAO PTY LTD. 1 ROKEVA STREET, ASTWOOD
NSW 2122 Australie
Importé aux États-Unis : Sanven Technology Ltd. Suite 250, 9166
Anaheim
Lieu, Rancho Cucamonga, CA 91730
REP
UK
YH CONSULTING LIMITED. C/O YH Consulting
Limited Office 147, Centurion House, London
Road, Staines-upon-Thames, Surrey, TW18 4AX
REP
EC
E-CrossStu GmbH
Mainzer Landstr.69,
60329 Frankfurt am Main.

- 1 -

- 2 -
KABELSATZ FÜR ELEKTRISCHE
FUßBODENHEIZUNG
MODELL:
SHHC-K-600 \ SHHC-K-1200 \ SHHC-K-2400

- 3 -
- 1 -
MODELL: SHHC-K-600 \ SHHC-K-1200 \ SHHC-K-2400
Dies ist die Originalanleitung. Bitte lesen Sie alle Anweisungen sorgfältig
durch, bevor Sie das Gerät in Betrieb nehmen. VEVOR behält sich das
Recht vor , die Bedienungsanleitung klar und deutlich zu interpretieren.
Das Aussehen des Produkts hängt vom gelieferten Produkt ab. Bitte
haben Sie Verständnis dafür, dass wir Sie nicht erneut über Technologie-
oder Software-Updates informieren.
WICHTIGE SICHERHEITSHINWEISE
Beim Umgang mit Elektrogeräten sollten grundsätzlich die
grundlegenden Sicherheitsvorkehrungen beachtet werden:
Warnung – Um das Verletzungsrisiko zu verringern, muss der
Benutzer die Bedienungsanleitung sorgfältig lesen.
Dieses Symbol vor einem Sicherheitshinweis weist auf eine
Art Vorsichtsmaßnahme, Warnung oder Gefahr. Das
Ignorieren dieser Warnung kann zu einem Unfallgefahr. Um
das Risiko von Verletzungen, Bränden oder Stromschlägen
zu verringern, befolgen Sie bitte immer die unten
ELECTRIC FLOOR
HEATING CABLE KIT
- 2 -
aufgeführten Empfehlungen.
Wechselstrom .
NUR FÜR DEN HAUSHALTSGEBRAUCH .
Korrekte Entsorgung dieses Produkts:
Diese Kennzeichnung weist darauf hin, dass dieses Produkt
innerhalb der EU nicht mit dem Hausmüll entsorgt werden
darf. Um mögliche Schäden an der Umwelt und Gesundheit
durch unkontrollierte Abfallentsorgung gefährden, recyceln
Sie es verantwortungsvoll und fördern Sie die nachhaltige
Wiederverwendung von Materialressourcen. Nutzen Sie zur
Rückgabe Ihres Altgeräts bitte die Rückgabe- und
Sammelsysteme oder wenden Sie sich an den Händler, bei
dem Sie das Produkt gekauft haben. Dort kann das Produkt
umweltgerecht recycelt werden.
WARNUNG:
1. Lesen Sie die Bedienungsanleitung sorgfältig durch, bevor Sie die Matte
installieren!
2. Führen Sie keinen Wärmetest durch, bis das Produkt vollständig
entfaltet ist.
3. Schneiden Sie niemals das Heizkabel (rot oder blau) durch!
4. Verbinden Sie niemals zwei oder mehr Matten in Reihe miteinander!
5. Prüfen Sie, ob die auf dem Typenschild angegebene Spannung mit der
des örtlichen Netzes übereinstimmt, bevor Sie das Gerät an das Stromnetz
anschließen.
6. Wenn das Netzkabel beschädigt ist, muss es vom Hersteller, seinem
- 3 -
Kundendienst oder ähnlich qualifizierten Personen ersetzt werden, um
Gefahren zu vermeiden.
7. Lassen Sie das Gerät nicht unbeaufsichtigt, während es an das
Stromnetz angeschlossen ist.
8. Tauchen Sie das Gerät nicht in Wasser oder andere Flüssigkeiten.
9. Bei der Verwendung dieses Geräts in der Nähe von Kindern ist strenge
Aufsicht erforderlich.
10. Dieses Gerät ist nicht für die Benutzung durch Personen (einschließlich
Kinder) mit eingeschränkten physischen, sensorischen oder geistigen
Fähigkeiten oder mangelnder Erfahrung und Kenntnissen bestimmt, es sei
denn, sie werden von einer für ihre Sicherheit verantwortlichen Person
beaufsichtigt oder in die Benutzung des Geräts eingewiesen. Kinder
sollten beaufsichtigt werden, um sicherzustellen, dass sie nicht mit dem
Gerät spielen.
11. Lassen Sie das Gerät niemals in Reichweite von Kindern.
12. Reparaturen an Elektrogeräten dürfen nur von einem qualifizierten
Elektriker durchgeführt werden. Unsachgemäße Reparaturen können zu
ernsthaften Gefahren für den Benutzer führen.
BEWAHREN SIE DIESE ANWEISUNGEN AUF
Teileliste
NEI
N .
Bild
Teilename
MENGE
SHHC-K-
600
SHHC-K-
1200
SHHC-K
-2400
1
Metallkabelbi
nder
2
3
6
2
Thermostat
1
1
1
- 4 -
3
Kabeltester
1
1
1
4
Heizungskab
el
1
1
1
5
Wellrohr
1
1
1
Modell
Stromversorg
ung
Leistung
Max.
Einwirktempe
ratur
Min.
Installations
temp.
SHHC-K-600
AC120V 60Hz
600 W
194℉(90℃)
41℉(+5℃)
SHHC-K-1200
1200 W
SHHC-K-2400
AC240V 60Hz
2400 W
Installationshinweis
Damit die Produktgarantie gültig ist, müssen alle elektrischen Leitungen
von einem voll qualifizierten Elektriker und in Übereinstimmung mit den
aktuellen IEE-Leitungsvorschriften ausgeführt werden.
• Runden Sie Ihre Bodenfläche immer ab. Beispielsweise werden für 60
Quadratfuß Boden 190,7 Fuß Kabel benötigt .
Kabel niemals und achten Sie für eine optimale Wärmeverteilung immer
auf einen Abstand von mindestens 50 mm (1,97 Zoll) zwischen den
Drähten.
auf Ihrer Bodenfläche ein Mangel an Heizkabeln besteht, konzentrieren
Sie die Heizkabel in stark frequentierten Bereichen.
• Mit diesem System sollte ein Fehlerstrom-Schutzschalter (RCD)

- 5 -
verwendet werden (muss separat erworben werden).
• Der Boden muss sauber und frei von Staub und Schmutz sein.
• Schneiden Sie niemals den Heizdraht (rot oder blau) ab! Verbinden Sie
niemals zwei oder mehr Matten zusammen in Reihe! Wenn Sie zwei oder
mehr Matten miteinander verbinden möchten, verwenden Sie bitte eine
Anschlussdose.
• Das Kabel ist robust, dennoch ist besondere Vorsicht geboten, wenn in
der Nähe des Kabels scharfe Gegenstände verwendet werden. Eine
Kunststoffkelle ist empfehlenswert.
• Überprüfen Sie Ihr System vor der Fliesenverlegung mit einem
Multimeter.
• Stellen Sie sicher, dass Ihr Fliesenkleber für die Verwendung mit
Fußbodenheizungen geeignet ist, z. B. hochpolymermodifiziert (flexibel).
• Ihr Untergrund und Bodenbelag, zB Fliesenkleber oder Estrich, muss vor
dem ersten Einschalten Ihrer Anlage vollständig trocken sein.
• Tragen Sie beim Umgang mit dem Kabel Handschuhe (um
Hautreizungen zu vermeiden).
• Achten Sie beim Fliesenlegen darauf, dass Sie das Heizkabel nicht
beschädigen.
• Die Dämmplatte ist nicht zur Bodenverstärkung und Strukturverstärkung
geeignet.
• Matten und Dämmplatten dürfen nicht unter dauerhaften Befestigungen
wie Badewannen, Toiletten usw. hindurchgeführt werden.
• Lagern Sie während der Installation keine Gegenstände auf der Matte, z.
B. Fliesen.
• Alte Bodenbeläge entfernen.
Installation Anweisungen
Heizkabel können nicht beliebig zugeschnitten oder überlappend verlegt
werden und der Abstand zwischen den Kabeln darf nicht geringer sein als
der Abstand der auf der Matte montierten Kabel .
Heizkabel können unter Bodenfliesen, Naturstein, Laminat oder Holzböden

- 6 -
verlegt werden.
Der Wärmewiderstand der Bodenkonstruktion über dem Heizkabel sollte
so gering wie möglich sein.
Treten Sie während der Installation nicht auf die Kabel .
Vermeiden Sie scharfe Gegenstände und unvorsichtiges Einbringen von
Beton oder Spachtelmasse. Es dürfen keine großen Luftspalte im Beton
oder Spachtel vorhanden sein. Beachten Sie stets die Anweisungen für
den Bodenbelag. Abdeckkleber. Das Heizkabel muss in mindestens 5 mm
(1,97 Zoll) Beton oder Füllmaterial installiert werden.
Verlegen Sie Heizkabel nicht in Bereichen, die durch Bohren beschädigt
werden könnten, durch Schränke verdeckt sein könnten oder unter einer
Wärmequelle wie einem Ofen usw.
Der Unterboden sollte sauber, eben, stabil und steif sein, ohne Risse und
scharfe Gegenstände. Der Betonunterboden muss vor der Installation der
Fußbodenheizung vollständig trocken sein. System.
Das Heizkabel kann mit Metallkabelbindern befestigt werden . Die Ringe
an den Bändern haben einen Abstand von 2,5 cm . Das Heizkabel kann
alle 3, 4 oder 5 Ringe installiert werden. Es wird empfohlen, den Abstand
alle 3 oder 4 zu priorisieren. Reifen , wodurch sich ein Kabelabstand von
2,95 Zoll ( 7,5 cm) bzw. 3,94 Zoll (10 cm) ergibt .
Wählen Sie ein Heizkabel mit der passenden Länge entsprechend der
Raumfläche (siehe Größentabelle). Sollte die Kabellänge etwas zu lang
oder zu kurz sein, passen Sie den Abstand innerhalb der Verlegefläche je
nach Bedarf auf 5 cm ( 1,97 Zoll) oder 12,5 cm (4,92 Zoll ) an.
Modell
Kabellä
nge (ft)
Kabell
änge
(m)
2. 95 Zoll
Kabelabst
and
Installatio
nsbereich
(Quadratf
uß)
3. 9 4 Zoll
Kabelabst
and
Installatio
nsbereich
(Quadratf
uß)
4. 9 2
Zoll
Kabelab
stand
Installati
onsberei
ch
(Quadrat
- 7 -
fuß)
SHHC-K-600
190,7
58,13
46,9
62,6
78,2
SHHC-K-1200
381
116.13
93,8
125
156
SHHC-K-2400
762
232,26
187,5
250
312
Messen Sie sorgfältig und berücksichtigen Sie
- Mindestens 3 Zoll zu Wänden und Armaturen
- Mindestens 6 Zoll bis zur Mitte des Toilettenabflusses
- Mindestens 8" zu HVAC-Lüftungsöffnungen oder andere Heizgeräte
Schritt 1: Bereiten Sie das Loch in der Wand für die Thermostatinstallation
vor.
- 8 -
Schritt 2: Befestigen Sie das
Montageband am Boden.
Schritt 3: Verlegen Sie die Kabel
entsprechend der ermittelten Teilung
und befestigen Sie diese an den
Laschen des Montagebandes.
Schritt 4 : Installieren Sie den
Temperatursensor :
a. Platzieren Sie den
Temperatursensor an der Stelle auf
dem Boden, die Ihrem Lageplan
entspricht.
b. Der Fühler muss zwischen den
Heizkabeldurchgängen in
gleichmäßigem Abstand platziert
werden. Die Anschlusskabel des
Fühlers müssen zum Thermostat
oder Klemmenkasten geführt
Schritt 5: Inspektionskabel .
Die Verdrahtungsmethode ist in
der Abbildung oben dargestellt .
Wenn keine Auffälligkeiten am
Heizkabel vorliegen, gibt der
Kabeltester keinen Alarm aus .
- 9 -
werden.
c. Befestigen Sie den Sensor mit
etwas Fliesenkleber oder Heißkleber
am Boden.
Schritt 6: Führen Sie die Installationsdrähte des/der Heizkabel(s) zum
Standort des Thermostats.
Den Thermostaten (mit der Versorgungsspannung abgeschaltet!) gemäß
der beiliegenden Anleitung .
Schritt 7: Führen Sie die
Installationsdrähte des/der
Heizkabel(s) zum Standort des
Thermostats.
Den Thermostaten (mit der
Versorgungsspannung
abgeschaltet!) gemäß der
beiliegenden Anleitung .
Kabeltester Installation
- 10 -
1.Entfernen Sie die
Batterie aus dem
Detektor.
2. Entfernen Sie die
Plastiktüte und
schließen Sie den
Netzstecker an.
3.Legen Sie die
Batterie in den
Kabeltester ein.
4. Bringen Sie die
hintere Abdeckung an.
5.Installation
abgeschlossen.
6.Wenn die
Stromversorgung
normal ist, ertönt ein
Alarmton.
TESTSCHRITTE: (Die wichtigsten)
Prüfen Sie den Isolationswiderstand (IR) der Heizmatte und
Leiterwiderstand (CR) (wie in Abbildung 1.1 und 1.2), um sicherzustellen,
dass beide Elemente in Ordnung sind.
- 11 -
Typ
Stroms
pannun
g
Bewert
et
Leistun
g
Widerstand
bei 20 °C
+10/-5 %
Umfang des
Installations
bereichs
Kabel
Länge
V
W
(CR) Ω
Quadratfuß
Fuß
SHHC-K-6
00
1 2 0
600
24
46,9 bis
78,2
190,7
SHHC-K-1
200
1 2 0
120 0
20
93,8~156
381,0
SHHC-K-2
400
24 0
240 0
24
187,5~312
762,0
Hersteller: Shanghaimuxinmuyeyouxiangongsi
Adresse: Shuangchenglu 803nong11hao1602A-1609shi, baoshanqu,
Shanghai 200.000 CN.
Importiert nach AUS: SIHAO PTY LTD. 1 ROKEVA STREETEASTWOOD
NSW 2122 Australien
Importiert in die USA: Sanven Technology Ltd. Suite 250, 9166 Anaheim
Place, Rancho Cucamonga, CA 91730

- 12 -
REP
UK
YH CONSULTING LIMITED. C/O YH Consulting
Limited Office 147, Centurion House, London
Road, Staines-upon-Thames, Surrey, TW18 4AX
REP
EC
E-CrossStu GmbH
Mainzer Landstr.69,
60329 Frankfurt am Main.

- 1 -

- 2 -
KIT CAVI PER RISCALDAMENTO
ELETTRICO A PAVIMENTO
MODELLO:
SHHC-K-600 \ SHHC-K-1200 \ SHHC-K-2400

- 3 -
- 1 -
MODELLO: SHHC-K-600 \ SHHC-K-1200 \ SHHC-K-2400
Queste sono le istruzioni originali, si prega di leggere attentamente tutte
le istruzioni del manuale prima di utilizzare il prodotto. VEVOR si riserva la
piena interpretazione del manuale utente. L'aspetto del prodotto
dipenderà dal prodotto ricevuto. Vi preghiamo di non informarvi
ulteriormente in caso di aggiornamenti tecnologici o software relativi al
nostro prodotto.
IMPORTANTI MISURE DI SICUREZZA
Quando si utilizzano apparecchi elettrici, è necessario seguire
sempre le precauzioni di sicurezza di base:
Avvertenza - Per ridurre il rischio di lesioni, l'utente deve
leggere attentamente il manuale di istruzioni.
Questo simbolo, posto prima di un commento di sicurezza,
indica un tipo di precauzione, avvertimento o pericolo.
Ignorare questo avvertimento può portare a un incidente. Per
ridurre il rischio di lesioni, incendi o folgorazione, seguire
sempre le raccomandazioni riportate di seguito.
ELECTRIC FLOOR
HEATING CABLE KIT
- 2 -
Corrente alternata .
SOLO PER USO DOMESTICO .
Smaltimento corretto di questo prodotto:
Questa marcatura indica che questo prodotto non deve
essere smaltito con altri rifiuti domestici in tutta l'UE. Per
prevenire possibili danni all'ambiente L'ambiente o la salute
umana derivanti dallo smaltimento incontrollato dei rifiuti,
riciclarlo responsabilmente per promuovere il riutilizzo
sostenibile delle risorse materiali. Per restituire il dispositivo
usato, utilizzare i sistemi di restituzione e raccolta
differenziata o contattare il rivenditore presso il quale è stato
acquistato il prodotto. Il rivenditore può ritirare il prodotto per
un riciclaggio ecocompatibile.
AVVERTIMENTO:
1. Leggere attentamente il manuale di istruzioni prima di installare il
tappetino!
2. Non effettuare il test di riscaldamento finché il prodotto non è
completamente dispiegato.
3. Non tagliare mai il filo riscaldante (rosso o blu)!
4. Non unire mai due o più tappetini in serie!
5. Prima di collegare l'apparecchio alla rete elettrica, verificare che la
tensione indicata sulla targhetta dati corrisponda a quella della rete locale.
6. Se il cavo di alimentazione è danneggiato, deve essere sostituito dal
produttore, dal suo agente di assistenza o da personale qualificato per
evitare pericoli.
7. Non lasciare l'apparecchio incustodito mentre è collegato alla rete
elettrica.
8. Non immergere l'apparecchio in acqua o altri liquidi.
- 3 -
9. Quando si utilizza questo apparecchio in presenza di bambini, è
necessaria un'attenta supervisione.
10. Questo apparecchio non è destinato all'uso da parte di persone
(bambini inclusi) con capacità fisiche, sensoriali o mentali ridotte, o con
mancanza di esperienza e conoscenza, a meno che non siano
supervisionate o istruite sull'uso dell'apparecchio da una persona
responsabile della loro sicurezza. I bambini devono essere sorvegliati per
assicurarsi che non giochino con l'apparecchio.
11. Non lasciare mai l'apparecchio alla portata dei bambini.
12. Le riparazioni degli elettrodomestici devono essere eseguite
esclusivamente da un elettricista qualificato. Riparazioni improprie
possono esporre l'utente a gravi rischi.
CONSERVARE QUESTE ISTRUZIONI
Elenco delle parti
NO
.
Immagine
Nome della
parte
QUANTITÀ
SHHC-K-
600
SHHC-K-
1200
SHHC-K
-2400
1
Cinghie per
cavi metallici
2
3
6
2
Termostato
1
1
1
3
Tester per
cavi
1
1
1
4
Cavo
riscaldante
1
1
1
- 4 -
5
Tubo
ondulato
1
1
1
Modello
Alimentazione
elettrica
Energia
Temperatura
massima di
esposizione
Temperatur
a minima di
installazion
e.
SHHC-K-600
AC120V 60Hz
600W
194℉ (90℃)
41℉ (+5℃)
SHHC-K-1200
1200W
SHHC-K-2400
AC240V 60Hz
2400W
Consigli per l'installazione
Per convalidare la garanzia del prodotto, tutti i cablaggi elettrici devono
essere eseguiti da un elettricista pienamente qualificato e in conformità
con le attuali normative IEE in materia di cablaggi.
• Arrotonda sempre per difetto la superficie calpestabile, ad esempio 60
piedi quadrati di pavimento richiederanno 190,7 piedi di cavo .
• Non sovrapporre mai i cavi , garantire sempre una spaziatura minima di
50 mm (1,97 pollici) tra i fili per una distribuzione ottimale del calore.
• Se nello spazio disponibile sul pavimento manca il cavo scaldante ,
concentrarlo nelle aree più trafficate.
• Con questo sistema è necessario utilizzare un dispositivo di corrente
residua (RCD) (da acquistare separatamente).
• Il pavimento deve essere pulito, privo di polvere e sporcizia.
• Non tagliare mai il filo riscaldante (rosso o blu)! Non unire mai due o più
tappetini. insieme in serie! Se vuoi unire due o più tappetini insieme, usa
un scatola di giunzione.
• Il filo è resistente, ma occorre prestare particolare attenzione quando si
utilizzano oggetti appuntiti in prossimità del cavo. Si consiglia di utilizzare
una cazzuola di plastica.

- 5 -
• C ontrollare il sistema con un multimetro prima di installare le piastrelle.
• Assicurarsi che l'adesivo per piastrelle sia adatto all'uso con
riscaldamento sottopiastrella, ad esempio altamente modificato con
polimeri (flessibile).
• Prima di accendere il sistema per la prima volta, il substrato e il
rivestimento del pavimento, ad esempio l'adesivo per piastrelle o il
massetto, devono essere completamente asciutti.
• Indossare guanti quando si maneggia il cavo (per evitare irritazioni alla
pelle).
• Durante la posa delle piastrelle, prestare attenzione a non danneggiare il
cavo riscaldante.
• Il pannello isolante non è adatto al rinforzo del pavimento e al rinforzo
strutturale.
• Le stuoie e i pannelli isolanti non devono essere fatti passare sotto
elementi di fissaggio permanenti, ad esempio vasca, WC, ecc.
• Non riporre oggetti sopra la stuoia durante l'installazione, ad esempio
piastrelle.
• Rimuovere i vecchi rivestimenti del pavimento.
Installazione Istruzioni
Il cavo scaldante non può essere tagliato a piacimento, né sovrapposto, e
la distanza tra i cavi non può essere inferiore a quella tra i cavi assemblati
sul tappetino.
Il cavo scaldante può essere installato sotto le piastrelle del pavimento, la
pietra naturale, il laminato o il pavimento in legno.
La resistenza termica della struttura del pavimento sopra il cavo scaldante
deve essere la più bassa possibile.
Non calpestare i cavi durante l'installazione.
Evitare oggetti appuntiti e colate incaute di calcestruzzo o stucco. Non
sono ammesse ampie fessure d'aria nel calcestruzzo o nello stucco.
Prestare sempre attenzione alle istruzioni per il pavimento. Adesivo di
copertura. Il cavo scaldante deve essere installato in almeno 5 mm (1,97
- 6 -
pollici) di calcestruzzo o materiale di riempimento.
Non posare il cavo scaldante in aree che potrebbero essere danneggiate
dalla perforazione, potrebbero essere coperte da armadi o sotto una fonte
di calore come una stufa, ecc.
Il massetto deve essere pulito, liscio, stabile e rigido, senza crepe o oggetti
taglienti. Il massetto in cemento deve essere completamente asciutto
prima di installare il riscaldamento a pavimento. sistema.
Il cavo scaldante può essere fissato tramite le apposite fascette
metalliche . Gli anelli delle fascette sono distanziati di 2,5 cm l' uno
dall'altro. Il cavo scaldante può essere installato ogni 3, 4 o 5 anelli . Si
consiglia di dare priorità alla spaziatura ogni 3 o 4 anelli. cerchi , con
conseguente spaziatura dei cavi di 2,95 pollici ( 7,5 cm) o 3,94 pollici (10
cm) .
Selezionare un cavo scaldante di lunghezza adeguata in base all'area
della stanza (fare riferimento alla tabella delle dimensioni). Se la lunghezza
del cavo è leggermente eccessiva o eccessiva, regolare la spaziatura
all'interno dell'area di installazione a 5 cm ( 1,97 pollici) o 12,5 cm (4,92
pollici ), a seconda delle esigenze.
Modello
Lunghe
zza del
cavo
(piedi)
Lungh
ezza
del
cavo
(m)
2,95
pollici
Spazio via
cavo Area
di
installazio
ne (piedi
quadrati)
3. 9 4
pollice
Spazio
via cavo
Area di
installazio
ne (piedi
quadrati)
4. 9 2
pollice
Spazio
via cavo
Area di
installazi
one
(piedi
quadrati)
SHHC-K-600
190.7
58.13
46.9
62.6
78.2
SHHC-K-1200
381
116.13
93,8
125
156
SHHC-K-2400
762
232.26
187,5
250
312
- 7 -
Misurare attentamente, tenendo conto di
-Almeno 3" da pareti e infissi
- Almeno 15 cm al centro dello scarico del water
-Almeno 8" alle prese d'aria HVAC o altri apparecchi di riscaldamento
Fase 1: Preparare il foro nel muro per l'installazione del termostato.
Fase 2: : Fissare la fascia di
montaggio al pavimento.
Fase 3: Disporre il cavo in base al
passo determinato e fissarlo ai
terminali della fascetta di montaggio.
- 8 -
Fase 4 : Installare il sensore di
temperatura :
a. Posizionare il sensore di
temperatura sul pavimento nel punto
indicato nella planimetria.
b. Il sensore deve essere
posizionato tra i passaggi del cavo
scaldante, a distanza uniforme da
essi. I cavi di installazione del
sensore devono essere collegati al
termostato o alla morsettiera.
c. Fissare il sensore al pavimento
con una piccola quantità di adesivo
per piastrelle o colla a caldo.
Fase 5: Cavo di ispezione .
Il metodo di cablaggio è illustrato
nella figura sopra .
Se non vi sono anomalie nel
cavo scaldante, il tester del
cavo non emetterà alcun
allarme .
Fase 6: Far passare i cavi di installazione del/i cavo/i scaldante/i fino alla
posizione del termostato.
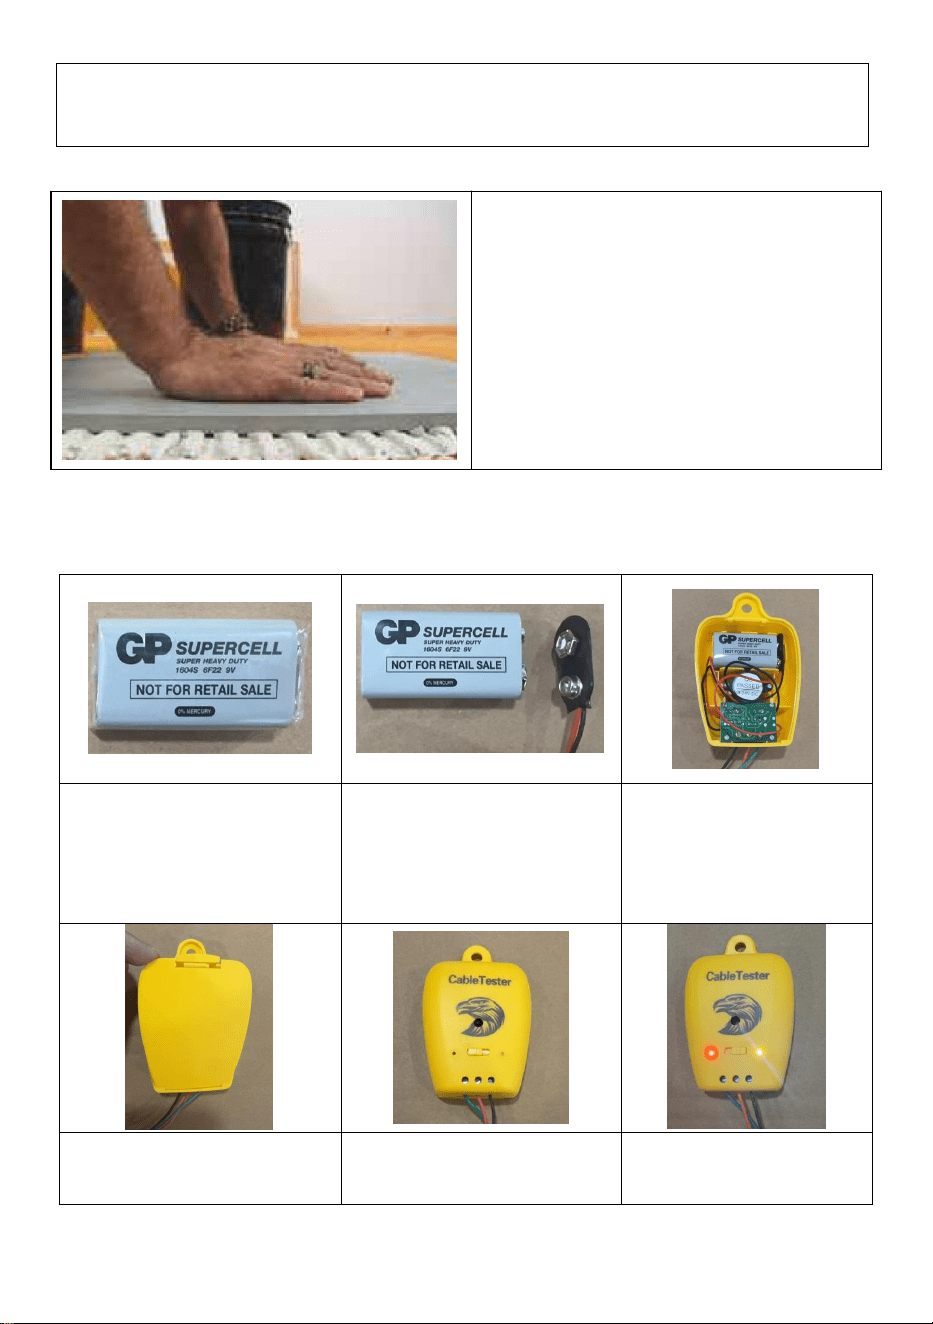
- 9 -
Installare il termostato (con il tensione di alimentazione scollegata!)
secondo le istruzioni allegate .
Fase 7: Far passare i cavi di
installazione del/i cavo/i scaldante/i
fino alla posizione del termostato.
Installare il termostato (con il
tensione di alimentazione
scollegata!) secondo le istruzioni
allegate .
Tester per cavi Installazione
1. Rimuovere la batteria
dal rilevatore.
2. Rimuovere il
sacchetto di plastica e
collegare la spina
elettrica.
3.Caricare la batteria
nel tester per cavi.
4. Installare il coperchio
posteriore.
5.Installazione
completata.
6. Se l'alimentazione
è normale, verrà
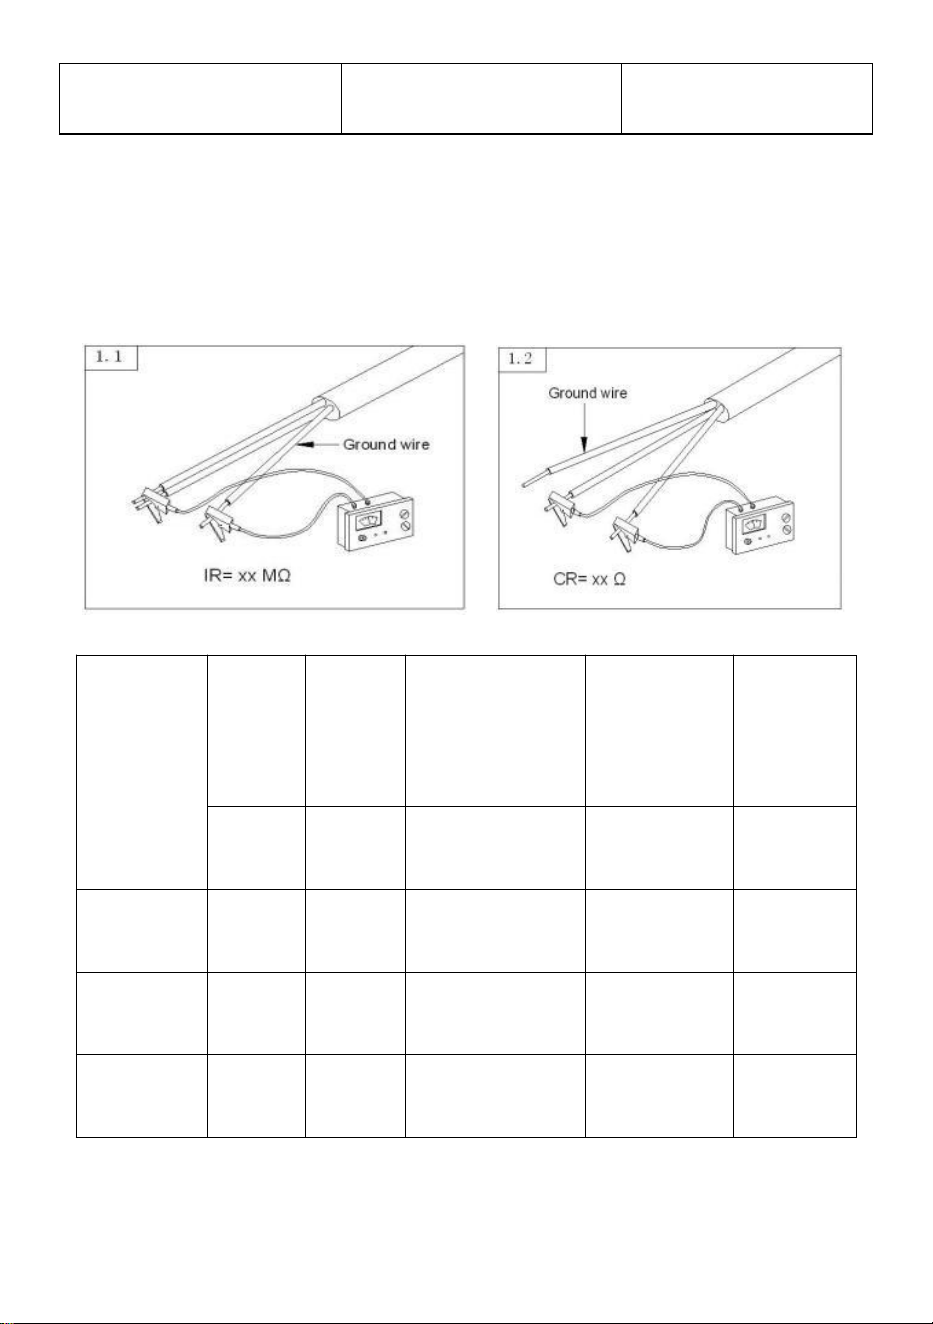
- 10 -
emesso un tono di
allarme.
FASI DEL TEST: (I più importanti)
Testare la resistenza di isolamento del tappetino riscaldante (IR) e
resistenza del conduttore (CR) (come nelle immagini 1.1 e 1.2) per
assicurarsi che entrambi gli elementi siano buoni.
Tipo
Voltagg
io
Valutat
o
energia
Resistenza
@20oC+10/-5
%
Ambito
dell'area di
installazione
Cavo
Lunghezz
a
V
O
(CR)Ω
piedi
quadrati
piedi
SHHC-K-6
00
1 2 0
600
24
46,9~78,2
190.7
SHHC-K-1
200
1 2 0
120 0
20
93,8~156
381.0
SHHC-K-2
400
24 0
240 0
24
187,5~312
762.0
- 11 -
Produttore: Shanghaimuxinmuyeyouxiangongsi
Indirizzo: Shuangchenglu 803nong11hao1602A-1609shi, baoshanqu,
shanghai 200000 CN.
Importato in AUS: SIHAO PTY LTD. 1 ROKEVA STREETEASTWOOD
Nuovo Galles del Sud 2122 Australia
Importato negli USA: Sanven Technology Ltd. Suite 250, 9166 Anaheim
Luogo, Rancho Cucamonga, CA 91730
REP
UK
YH CONSULTING LIMITED. C/O YH Consulting
Limited Office 147, Centurion House, London
Road, Staines-upon-Thames, Surrey, TW18 4AX
REP
EC
E-CrossStu GmbH
Mainzer Landstr.69,
60329 Frankfurt am Main.

- 1 -

- 2 -
KIT DE CABLE PARA CALEFACCIÓN DE
SUELO ELÉCTRICO
MODELO:
SHHC-K-600 \ SHHC-K-1200 \ SHHC-K-2400

- 3 -
- 1 -
MODELO: SHHC-K-600 \ SHHC-K-1200 \ SHHC-K-2400
Estas son las instrucciones originales; lea atentamente todas las
instrucciones del manual antes de utilizarlo. VEVOR se reserva el
derecho de interpretar su manual de usuario. La apariencia del producto
dependerá del producto que haya recibido. Le rogamos que nos disculpe
si no le informamos de nuevo si hay actualizaciones tecnológicas o de
software en nuestro producto.
MEDIDAS DE SEGURIDAD IMPORTANTES
Al utilizar aparatos eléctricos, siempre se deben seguir precauciones
básicas de seguridad:
Advertencia: para reducir el riesgo de lesiones, el usuario
debe leer atentamente el manual de instrucciones.
Este símbolo, colocado antes de un comentario de
seguridad, indica un tipo de Precaución, advertencia o
peligro. Ignorar esta advertencia puede provocar una
Accidente. Para reducir el riesgo de lesiones, incendio o
electrocución, siga siempre las recomendaciones que se
ELECTRIC FLOOR
HEATING CABLE KIT
- 2 -
muestran a continuación.
Corriente alterna .
SOLO PARA USO DOMÉSTICO .
Eliminación correcta de este producto:
Esta marca indica que este producto no debe desecharse
con otros residuos domésticos en toda la UE. Para evitar
posibles daños a la Para proteger el medio ambiente y la
salud humana de la eliminación incontrolada de residuos,
recíclelo responsablemente para promover la reutilización
sostenible de los recursos materiales. Para devolver su
dispositivo usado, utilice los sistemas de devolución y
recogida o póngase en contacto con el vendedor donde lo
adquirió. Ellos podrán reciclarlo de forma segura para el
medio ambiente.
ADVERTENCIA:
1. ¡Lea atentamente el manual de instrucciones antes de instalar el tapete!
2. No realice la prueba de calor hasta que el producto esté completamente
desplegado.
3. ¡Nunca corte el cable calefactor (color rojo o azul)!
4. ¡Nunca una dos o más tapetes en serie!
5. Compruebe que el voltaje indicado en la placa de datos corresponde
con el de la red local antes de conectar el aparato a la red eléctrica.
6. Si el cable de alimentación está dañado, deberá ser reemplazado por el
fabricante, su agente de servicio o personas igualmente calificadas para
evitar un peligro.
- 3 -
7. No deje el aparato desatendido mientras esté conectado a la red
eléctrica.
8. No sumerja el aparato en agua ni en ningún otro líquido.
9. Se requiere una estrecha supervisión cuando se utiliza este aparato
cerca de niños.
10. Este aparato no está diseñado para ser utilizado por personas
(incluidos niños) con capacidades físicas, sensoriales o mentales
reducidas, o con falta de experiencia y conocimientos, a menos que sean
supervisadas o instruidas sobre su uso por una persona responsable de
su seguridad. Los niños deben ser supervisados para asegurarse de que
no jueguen con el aparato.
11. Nunca deje el aparato al alcance de los niños.
12. Las reparaciones de electrodomésticos solo deben ser realizadas por
electricistas cualificados. Las reparaciones inadecuadas pueden poner en
grave riesgo al usuario.
GUARDE ESTAS INSTRUCCIONES
Lista de piezas
NO
.
Imagen
Nombre de
la pieza
CANTIDAD
SHHC-K-
600
SHHC-K-
1200
SHHC-K
-2400
1
Correas de
cable de
metal
2
3
6
2
Termostato
1
1
1
3
Probador de
cables
1
1
1
- 4 -
4
Cable de
calefacción
1
1
1
5
Tubo
corrugado
1
1
1
Modelo
Fuente de
alimentación
Fuerza
Temperatura
máxima de
exposición.
Temperatur
a mínima
de
instalación.
SHHC-K-600
CA 120 V 60
Hz
600 W
194 ℉
(90 ℃)
41 °F
(+5 °C)
SHHC-K-1200
1200 W
SHHC-K-2400
CA 240 V 60
Hz
2400 W
Consejos de instalación
Todo el cableado eléctrico debe ser realizado por un electricista totalmente
calificado y de acuerdo con las regulaciones de cableado IEE actuales
para validar la garantía del producto.
• Siempre redondee hacia abajo el área del piso, por ejemplo, 60 pies
cuadrados de piso requerirán 190,7 pies de cable .
• Nunca superponga el cable , asegúrese siempre de dejar un espacio
mínimo de 50 mm (1,97 pulgadas) entre los cables para una distribución
óptima del calor.
• Si hay un déficit de cable calefactor en su espacio, concentre el cable
calefactor en áreas con mucho tráfico.
• Se debe utilizar un dispositivo de corriente residual (RCD) con este
sistema (debe comprarse por separado).
• El piso debe estar limpio y libre de polvo y suciedad.

- 5 -
• ¡Nunca corte el cable calefactor (de color rojo o azul)! Nunca una dos o
más esterillas. ¡Juntos en serie! Si quieres unir dos o más tapetes, usa un
caja de conexiones.
• El cable es resistente, pero se debe tener especial cuidado al utilizar
objetos afilados cerca de él. Es aconsejable utilizar una llana de plástico.
• Revise su sistema con un multímetro antes de instalar las baldosas.
• Asegúrese de que el adhesivo para baldosas sea adecuado para su uso
con calefacción por suelo radiante, por ejemplo, altamente modificado con
polímeros (flexible).
• El sustrato y el revestimiento del piso, por ejemplo, el adhesivo para
baldosas o la solera, deben estar completamente secos antes de
encender el sistema por primera vez.
• Use guantes al manipular el cable (para evitar irritación en la piel).
• Tenga cuidado al colocar las baldosas para asegurarse de no dañar el
cable calefactor.
• El tablero aislante no es adecuado para reforzar pisos ni estructuras.
• Los paneles aislantes y de esteras no deben pasarse por debajo de
fijaciones permanentes, por ejemplo, bañeras, inodoros, etc.
• No guarde objetos encima de la alfombra durante la instalación, por
ejemplo, baldosas.
• Retire los revestimientos de piso viejos.
Instalación Instrucciones
El cable calefactor no se puede cortar a voluntad ni superponer, y el
espacio entre los cables no puede ser menor que el espaciado de los
cables ensamblados en la estera.
El cable calefactor se puede instalar debajo de baldosas, piedra natural,
suelos laminados o de madera.
La resistencia térmica de la construcción del piso sobre el cable calefactor
debe ser lo más baja posible.
No pise los cables durante la instalación.
Evite el uso de objetos afilados y el vertido imprudente de hormigón o
- 6 -
relleno. No se permiten grandes huecos de aire en el hormigón ni en el
relleno. Preste siempre atención a las instrucciones del suelo. Adhesivo de
recubrimiento. El cable calefactor se instalará en un espesor mínimo de 5
mm (1,97 pulgadas) de hormigón o relleno.
No coloque el cable calefactor en zonas que puedan dañarse al perforar,
que puedan estar cubiertas por armarios o debajo de una fuente de calor
como una estufa, etc.
El subsuelo debe estar limpio, liso, estable y rígido, sin grietas ni objetos
punzantes. El subsuelo de hormigón debe estar completamente seco
antes de instalar la calefacción por suelo radiante. sistema.
El cable calefactor se fija mediante las abrazaderas metálicas . Los aros
de las abrazaderas tienen una separación de 2,5 cm ( 0,984 pulgadas). El
cable calefactor se puede instalar cada 3, 4 o 5 aros . Se recomienda
priorizar la separación cada 3 o 4 aros. aros , lo que da como resultado
una separación de cables de 2,95 pulgadas ( 7,5 cm) o 3,94 pulgadas (10
cm) .
Seleccione un cable calefactor de la longitud adecuada según el área de la
habitación (consulte la tabla de dimensiones). Si la longitud del cable es
ligeramente superior o inferior, ajuste la separación dentro del área de
diseño a 5 cm ( 1,97 pulgadas) o 12,5 cm (4,92 pulgadas ), según sea
necesario.
Modelo
Longitu
d del
cable
(pies)
Longit
ud del
cable
(m)
2,95
pulgadas
Espacio
de cable
Área de
instalació
n (pies
cuadrados
)
3. 9 4
pulgada
Espacio
de cable
Área de
instalació
n (pies
cuadrado
s)
4. 9 2
pulgada
Espacio
de cable
Área de
instalaci
ón (pies
cuadrad
os)
SHHC-K-600
190.7
58.13
46.9
62.6
78.2
- 7 -
SHHC-K-1200
381
116.13
93.8
125
156
SHHC-K-2400
762
232.26
187.5
250
312
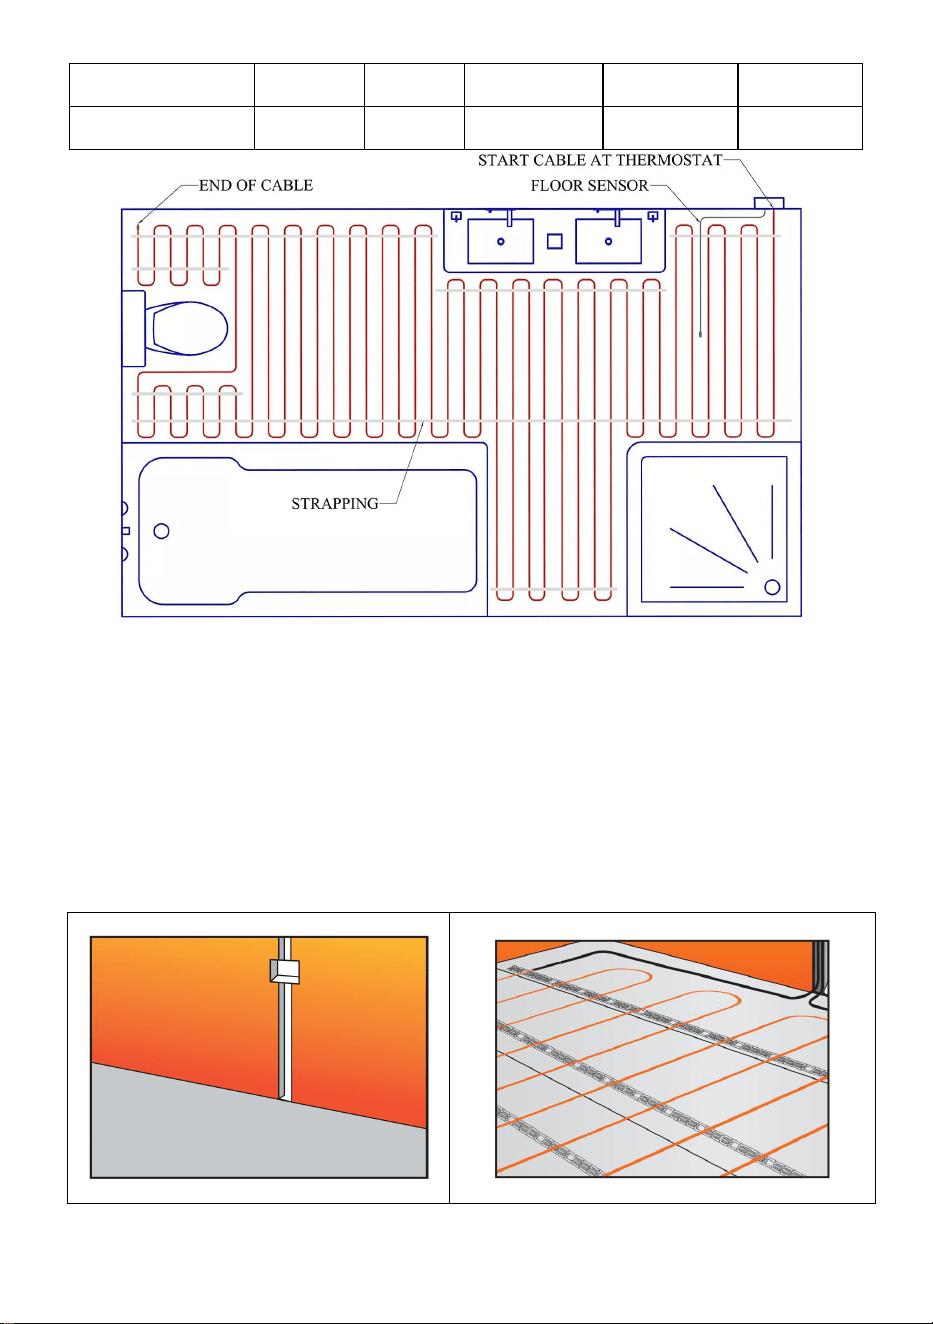
Mida con cuidado, teniendo en cuenta
-Al menos 3" a paredes y accesorios.
- Al menos 6" hasta el centro del desagüe del inodoro
-Al menos 8" hasta las rejillas de ventilación del sistema HVAC o otros
aparatos de calefacción
Paso 1: Prepare el orificio en la pared para la instalación del termostato.
- 8 -
Paso 2: Fije la banda de montaje
al suelo.
Paso 3: Coloca el cable según el
paso que hayas determinado y fíjalo
a las orejetas de la banda de
montaje.
Paso 4 : Instale el sensor de
temperatura :
a. Coloque el sensor de temperatura
en el piso en el lugar indicado en su
plano de distribución.
b. El sensor debe colocarse entre las
pasadas del cable calefactor,
equidistantes entre sí. Los cables de
instalación del sensor deben dirigirse
al termostato o a la caja de
terminales.
c. Fije el sensor al suelo con una
pequeña cantidad de adhesivo para
baldosas o pegamento caliente.
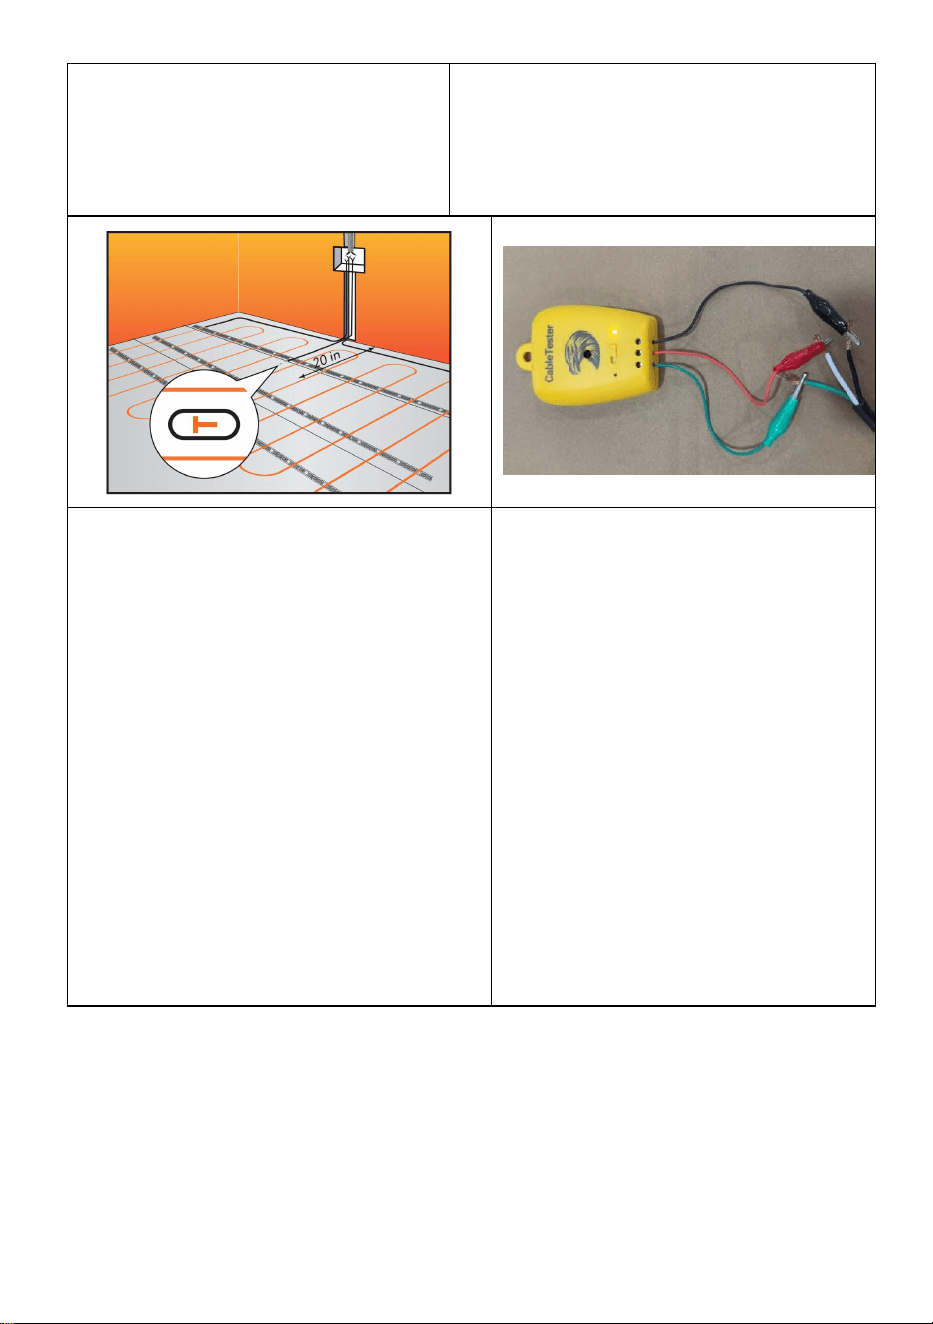
Paso 5: Cable de inspección .
El método de cableado se
muestra en la figura anterior .
Si no hay ninguna anomalía en
el cable calefactor, el
comprobador de cables no
emitirá ninguna alarma .
- 9 -
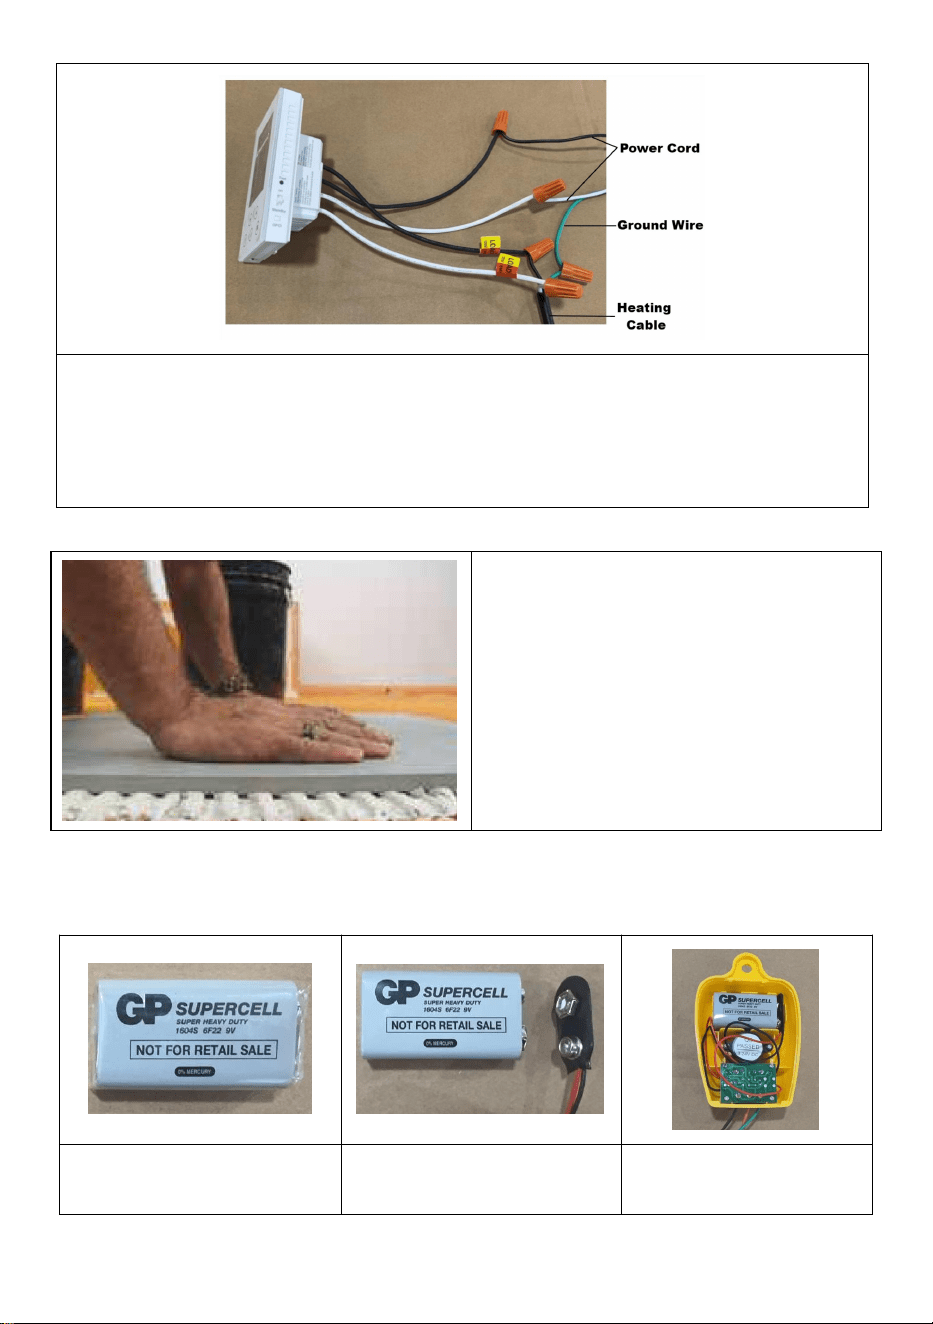
Paso 6: Lleve los cables de instalación del(los) cable(s) calefactor(es) a
la ubicación del termostato.
Instale el termostato (con el tensión de alimentación desconectada!)
según las instrucciones adjuntas .
Paso 7: Lleve los cables de
instalación del(los) cable(s)
calefactor(es) a la ubicación del
termostato.
Instale el termostato (con el tensión
de alimentación desconectada!)
según las instrucciones adjuntas .
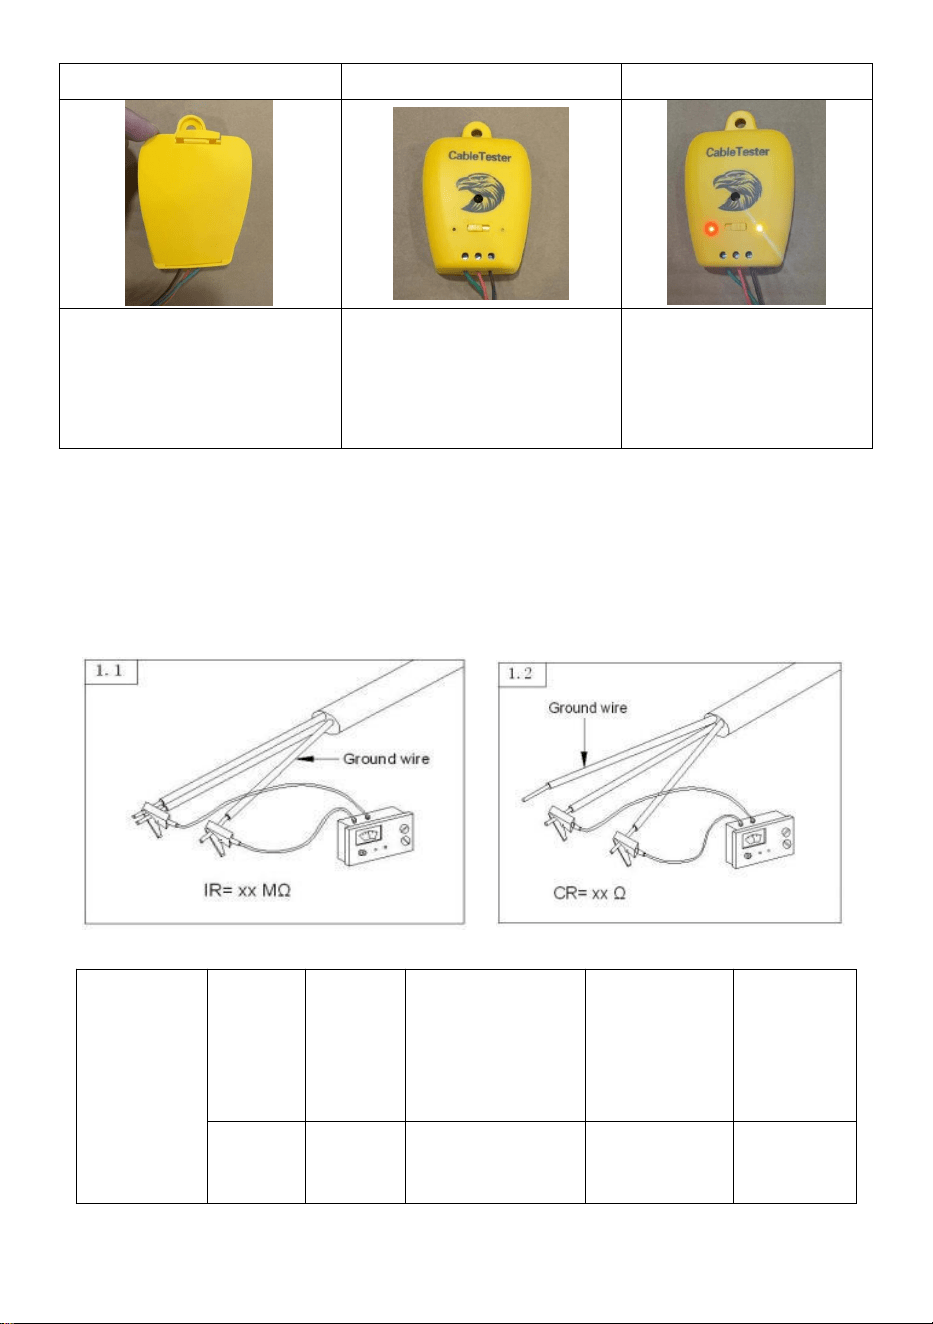
Probador de cables Instalación
1. Retire la batería del
detector.
2. Retire la bolsa de
plástico y conecte el
3. Cargue la batería
en el comprobador
- 10 -
enchufe eléctrico.
de cables.
4. Instale la cubierta
posterior.
5.Instalación
completada.
6.Si la fuente de
alimentación es
normal, sonará un
tono de alarma.
PASOS DE LA PRUEBA: (Los más importantes)
Pruebe la resistencia de aislamiento (IR) de la estera calefactora y
resistencia del conductor (CR) (como en la imagen 1.1 y 1.2) para
asegurarse de que ambos elementos estén en buen estado.
Tipo
Voltaje
Califica
do
fuerza
Resistencia
@20oC+10/-5
%
Alcance del
área de
instalación
Cable
Longitud
V
Yo
(CR) Ω
Pies
cuadrados
pie

- 11 -
SHHC-K-6
00
1 2 0
600
24
46,9~78,2
190.7
SHHC-K-1
200
1 2 0
120 0
20
93,8~156
381.0
SHHC-K-2
400
24 0
240 0
24
187,5~312
762.0
Fabricante: Shanghaimuxinmuyeyouxiangongsi
Dirección: Shuangchenglu 803nong11hao1602A-1609shi, baoshanqu,
Shanghái 200000 CN.
Importado a AUS: SIHAO PTY LTD. 1 ROKEVA STREET, EASTWOOD
NSW 2122 Australia
Importado a EE. UU.: Sanven Technology Ltd. Suite 250, 9166 Anaheim
Lugar, Rancho Cucamonga, CA 91730
REP
UK
YH CONSULTING LIMITED. C/O YH Consulting
Limited Office 147, Centurion House, London
Road, Staines-upon-Thames, Surrey, TW18 4AX
REP
EC
E-CrossStu GmbH
Mainzer Landstr.69,
60329 Frankfurt am Main.

- 1 -

- 2 -
ZESTAW KABLI DO OGRZEWANIA
PODŁOGOWEGO ELEKTRYCZNEGO
MODEL:
SHHC-K-600 \ SHHC-K-1200 \ SHHC-K-2400

- 3 -
- 1 -
MODELE: SHHC-K-600 \ SHHC-K-1200 \ SHHC-K-2400
To jest oryginalna instrukcja, przed użyciem należy uważnie przeczytać
wszystkie instrukcje. VEVOR zastrzega sobie jasną interpretację naszej
instrukcji obsługi. Wygląd produktu będzie zależał od produktu, który
otrzymałeś. Prosimy o wybaczenie, że nie poinformujemy Cię ponownie,
jeśli w naszym produkcie pojawią się jakiekolwiek aktualizacje
technologiczne lub oprogramowania.
WAŻNE ZABEZPIECZENIA
Podczas korzystania z urządzeń elektrycznych należy zawsze
przestrzegać podstawowych zasad bezpieczeństwa:
Ostrzeżenie - Aby zminimalizować ryzyko obrażeń,
użytkownik powinien uważnie przeczytać instrukcję obsługi.
Ten symbol, umieszczony przed komentarzem dotyczącym
bezpieczeństwa, oznacza rodzaj środek ostrożności,
ostrzeżenie lub niebezpieczeństwo. Zignorowanie tego
ostrzeżenia może prowadzić do wypadku. Aby zmniejszyć
ryzyko obrażeń, pożaru lub porażenia prądem, zawsze
ELECTRIC FLOOR
HEATING CABLE KIT
- 2 -
postępuj zgodnie z poniższymi zaleceniami.
Prąd przemienny .
TYLKO DO UŻYTKU DOMOWEGO .
Prawidłowa utylizacja tego produktu:
To oznaczenie oznacza, że tego produktu nie należy
wyrzucać razem z innymi odpadami domowymi w całej UE.
Aby zapobiec możliwym szkodom dla środowiska lub zdrowia
ludzkiego przed niekontrolowaną utylizacją odpadów, należy
je poddać recyklingowi w sposób odpowiedzialny, aby
promować zrównoważone ponowne wykorzystanie zasobów
materialnych. Aby zwrócić zużyte urządzenie, należy
skorzystać z systemów zwrotu i odbioru lub skontaktować się
ze sprzedawcą, u którego produkt został zakupiony. Mogą
oni przyjąć ten produkt do bezpiecznego dla środowiska
recyklingu.
OSTRZEŻENIE:
1. Przed montażem maty należy uważnie przeczytać instrukcję obsługi!
2. Nie przeprowadzaj testu cieplnego, dopóki produkt nie zostanie
całkowicie rozłożony.
3. Nigdy nie przecinaj przewodu grzejnego (czerwonego lub niebieskiego)!
4. Nigdy nie łącz ze sobą dwóch lub więcej mat w szeregu!
5. Przed podłączeniem urządzenia do sieci elektrycznej należy sprawdzić,
czy napięcie podane na tabliczce znamionowej jest zgodne z napięciem w
sieci lokalnej.
6. Jeśli przewód zasilający jest uszkodzony, musi zostać wymieniony przez
- 3 -
producenta, jego przedstawiciela serwisowego lub podobnie
wykwalifikowaną osobę, aby uniknąć zagrożenia.
7. Nie pozostawiaj urządzenia bez nadzoru, gdy jest podłączone do
zasilania sieciowego.
8. Nie zanurzaj urządzenia w wodzie ani innych płynach.
9. Używając tego urządzenia w pobliżu dzieci należy zachować ścisły
nadzór.
10. To urządzenie nie jest przeznaczone do użytku przez osoby (w tym
dzieci) o ograniczonych zdolnościach fizycznych, sensorycznych lub
umysłowych lub z brakiem doświadczenia i wiedzy, chyba że są one
nadzorowane lub poinstruowane w zakresie korzystania z urządzenia
przez osobę odpowiedzialną za ich bezpieczeństwo. Dzieci powinny być
nadzorowane, aby mieć pewność, że nie bawią się urządzeniem.
11. Nigdy nie pozostawiaj urządzenia w zasięgu dzieci.
12. Naprawy urządzeń elektrycznych powinny być wykonywane wyłącznie
przez wykwalifikowanego elektryka. Niewłaściwe naprawy mogą narazić
użytkownika na poważne ryzyko.
ZAPISZ TE INSTRUKCJE
Lista części
NIE
.
Zdjęcie
Nazwa
części
ILOŚĆ
SHHC-K-
600
SHHC-K-
1200
SHHC-K
-2400
1
Metalowe
paski
kablowe
2
3
6
2
Termostat
1
1
1
- 4 -
3
Tester kabli
1
1
1
4
Kabel
grzewczy
1
1
1
5
Rura
karbowana
1
1
1
Model
Zasilacz
Moc
Maksymalna
temperatura
ekspozycji.
Min.
temperatur
a instalacji.
SHHC-K-600
Prąd zmienny
120 V 60 Hz
600 W
194℉(90℃)
41℉(+5℃)
SHHC-K-1200
1200 W
SHHC-K-2400
Prąd zmienny
240 V 60 Hz
2400 W
Instalacja Porady
Aby zachować gwarancję na produkt, wszelkie prace związane z
okablowaniem elektrycznym muszą zostać wykonane przez
wykwalifikowanego elektryka i zgodnie z obowiązującymi przepisami IEE
dotyczącymi okablowania.
• Zawsze zaokrąglaj powierzchnię podłogi w dół, np. do 60 stóp
kwadratowych podłogi potrzebne będzie 190,7 stóp kabla .
• Nigdy nie układaj kabli na siebie , zawsze zachowaj odstęp co najmniej
50 mm (1,97 cala) między przewodami, aby zapewnić optymalne
rozprowadzanie ciepła.
• Jeśli na danej powierzchni podłogi brakuje kabla grzewczego , należy

- 5 -
skoncentrować go w obszarach o dużym natężeniu ruchu.
• W tym systemie należy stosować wyłącznik różnicowoprądowy (RCD)
(należy go zakupić osobno).
• Podłoga musi być czysta, wolna od kurzu i brudu.
• Nigdy nie przecinaj przewodu grzewczego (czerwonego lub niebieskiego)!
Nigdy nie łącz dwóch lub więcej mat razem w serii! Jeśli chcesz połączyć
dwie lub więcej mat, użyj skrzynka przyłączeniowa.
• Przewód jest wytrzymały, ale należy zachować szczególną ostrożność
podczas używania ostrych przedmiotów w pobliżu kabla. Zaleca się
używanie plastikowej kielni.
• Przed montażem płytek sprawdź system za pomocą multimetru.
• Upewnij się, że klej do płytek nadaje się do stosowania z ogrzewaniem
pod płytkami, np. jest wysoce modyfikowany polimerami (elastyczny).
• Podłoże i pokrycie podłogi, np. klej do płytek lub wylewka, muszą być
całkowicie suche przed pierwszym uruchomieniem systemu.
kabla należy nosić rękawice (aby uniknąć podrażnienia skóry).
• Podczas układania płytek należy zachować ostrożność, aby nie
uszkodzić kabla grzewczego.
• Płyta izolacyjna nie nadaje się do wzmacniania podłóg i wzmacniania
konstrukcji.
• Maty i płyty izolacyjne nie powinny być układane pod stałymi elementami
mocującymi, np. pod wanną, toaletą itp.
• Podczas montażu nie należy przechowywać przedmiotów na macie, np.
płytek.
• Usuń stare wykładziny podłogowe.
Instalacja Instrukcje
Kable grzewcze nie mogą być dowolnie przecinane ani na siebie
nachodzić, a odstępy między kablami nie mogą być mniejsze niż odstępy
między kablami ułożonymi na macie.
Kable grzejne można instalować pod płytkami podłogowymi, kamieniem
naturalnym, laminatem lub podłogą drewnianą.

- 6 -
Opór cieplny konstrukcji podłogi nad kablem grzewczym powinien być jak
najniższy.
Nie stawaj na kablach podczas instalacji.
Unikaj ostrych przedmiotów i nieostrożnego wylewania betonu lub
wypełniacza. W betonie lub wypełniaczu nie mogą być duże szczeliny
powietrzne. Zawsze zwracaj uwagę na instrukcje dotyczące podłogi. klej
pokrywający. Przewód grzejny należy zainstalować w betonie lub
wypełniaczu o grubości min. 5 mm (1,97 cala) .
Nie należy układać kabla grzejnego w miejscach, które mogą zostać
uszkodzone na skutek wiercenia, ani w miejscach, w których kabel jest
przykryty szafkami lub znajduje się pod źródłem ciepła, np. kuchenką itp.
Podłoże powinno być czyste, równe, stabilne i sztywne, bez pęknięć,
ostrych przedmiotów. Podłoże betonowe musi być całkowicie suche przed
zainstalowaniem ogrzewania podłogowego. system.
Przewód grzejny można zamocować za pomocą metalowych pasków
kablowych . Obręcze na paskach są rozmieszczone w odstępach 0,984
cala ( 2,5 cm). Przewód grzejny można instalować co 3, 4 lub 5 obręczy .
Zaleca się priorytetowe rozmieszczenie co 3 lub 4 obręcze , co daje
odstępy między kablami wynoszące 2,95 cala ( 7,5 cm) lub 3,94 cala (10
cm) .
Wybierz kabel grzewczy o odpowiedniej długości w zależności od
powierzchni pomieszczenia (patrz tabela rozmiarów). Jeśli długość kabla
jest nieco za długa lub za krótka, dostosuj odstęp w obszarze układu do
1,97 cala ( 5 cm) lub 4,92 cala (12,5 cm ) w zależności od potrzeb.
Model
Długoś
ć kabla
(ft)
Długo
ść
kabla
(m)
2. 95 cala
Przestrze
ń kablowa
Powierzch
nia
instalacji
(ft2)
3.94
cal
Przestrze
ń kablowa
Powierzc
hnia
instalacji
(ft2)
4.92
cal
Przestrz
eń
kablowa
Powierzc
hnia
instalacji
- 7 -
(ft2)
SHHC-K-600
190,7
58.13
46,9
62,6
78.2
SHHC-K-1200
381
116.13
93,8
125
156
SHHC-K-2400
762
232,26
187,5
250
312
Zmierz dokładnie, uwzględniając
-Co najmniej 3" do ścian i elementów wyposażenia
- Co najmniej 6" do środka odpływu toalety
-Co najmniej 8" do otworów wentylacyjnych HVAC lub inne urządzenia
grzewcze
Krok 1: Przygotuj otwór w ścianie do montażu termostatu.
- 8 -
Krok 2: Przymocuj taśmę
montażową do podłogi.
Krok 3: Ułóż kabel zgodnie z
ustalonym odstępem i przymocuj go
do uchwytów opaski montażowej.
Krok 4 : Zainstaluj czujnik
temperatury :
a. Umieść czujnik temperatury na
podłodze w miejscu zgodnym z
planem układu.
b. Czujnik musi być umieszczony
pomiędzy przejściami kabla
grzewczego, w równych odstępach
od nich. Przewody instalacyjne
czujnika muszą być doprowadzone
do termostatu lub skrzynki
zaciskowej.
c. Przymocuj czujnik do podłogi za
Krok 5: Kabel inspekcyjny .
Sposób podłączenia pokazano
na powyższym rysunku .
Jeżeli w kablu grzejnym nie ma
żadnych nieprawidłowości,
tester kabli nie wyemituje
alarmu .
- 9 -
pomocą niewielkiej ilości kleju do
płytek lub gorącego kleju.
Krok 6: Poprowadź przewody instalacyjne kabla(ów) grzejnego(ych) do
miejsca, w którym znajduje się termostat.
Zainstaluj termostat (z (odłącz napięcie zasilania!) zgodnie z dołączoną
do niego instrukcją .
Krok 7: Poprowadź przewody
instalacyjne kabla(ów)
grzejnego(ych) do miejsca, w
którym znajduje się termostat.
Zainstaluj termostat (z (odłącz
napięcie zasilania!) zgodnie z
dołączoną do niego instrukcją .
Tester kabli Instalacja
- 10 -
1. Wyjmij baterię z
detektora.
2. Zdejmij plastikową
torbę i podłącz wtyczkę
elektryczną.
3. Włóż baterię do
testera kabli.
4.Zamontuj tylną
pokrywę.
5. Instalacja zakoń
czona.
6. Jeżeli zasilanie
jest prawidłowe,
rozlegnie się dźwięk
alarmu.
KROKI TESTOWE: (Najważniejsze)
Przetestuj rezystancję izolacji (IR) maty grzewczej i rezystancję
przewodnika (CR) (jak na rysunkach 1.1 i 1.2), aby upewnić się, że oba
elementy są dobre.
Typ
Napięci
e
Ocenio
ny
moc
Opór
@20oC+10/-5
%
Zakres
obszaru
instalacji
Kabel
Długość
- 11 -
V
W
(CR) Ω
Stopa
kwadratowa
stopy
SHHC-K-6
00
1 2 0
600
24
46,9~78,2
190,7
SHHC-K-1
200
1 2 0
120 0
20
93,8~156
381,0
SHHC-K-2
400
24 0
240 0
24
187,5~312
762,0
Producent: Shanghaimuxinmuyeyouxiangongsi
Adres: Shuangchenglu 803nong11hao1602A-1609shi, baoshanqu,
Szanghaj 200000 CN.
Importowane do AUS: SIHAO PTY LTD. 1 ROKEVA
STREETEASTWOOD
NSW 2122 Australia
Importowane do USA: Sanven Technology Ltd. Suite 250, 9166 Anaheim
Miejsce, Rancho Cucamonga, CA 91730
REP
UK
YH CONSULTING LIMITED. C/O YH Consulting
Limited Office 147, Centurion House, London
Road, Staines-upon-Thames, Surrey, TW18 4AX
REP
EC
E-CrossStu GmbH
Mainzer Landstr.69,
60329 Frankfurt am Main.

- 1 -

- 2 -
ELEKTRISCHE
VLOERVERWARMINGSKABELSET
MODEL:
SHHC-K-600 \ SHHC-K-1200 \ SHHC-K-2400

- 3 -
- 1 -
MODEL: SHHC-K-600 \ SHHC-K-1200 \ SHHC-K-2400
Dit is de originele handleiding. Lees alle instructies zorgvuldig door
voordat u het product gebruikt. VEVOR behoudt zich het recht voor om de
gebruiksaanwijzing duidelijk te interpreteren. Het uiterlijk van het product
is afhankelijk van het product dat u hebt ontvangen. Neemt u het ons niet
kwalijk dat we u niet meer op de hoogte stellen van eventuele
technologische of software-updates voor ons product.
BELANGRIJKE VEILIGHEIDSMAATREGELEN
Bij het gebruik van elektrische apparaten moeten altijd de volgende
basisveiligheidsmaatregelen in acht worden genomen:
Waarschuwing - Om het risico op letsel te verminderen, dient
de gebruiker de gebruiksaanwijzing zorgvuldig te lezen.
Dit symbool, geplaatst vóór een veiligheidsopmerking, geeft
een soort voorzorgsmaatregel, waarschuwing of gevaar. Het
negeren van deze waarschuwing kan leiden tot een Om het
risico op letsel, brand of elektrocutie te verminderen, dient u
altijd de onderstaande aanbevelingen op te volgen.
ELECTRIC FLOOR
HEATING CABLE KIT
- 2 -
Wisselstroom .
ALLEEN VOOR HUISHOUDELIJK GEBRUIK .
Correcte verwijdering van dit product:
Deze markering geeft aan dat dit product niet met ander
huishoudelijk afval in de EU mag worden weggegooid. Om
mogelijke schade aan de Het product kan schadelijk zijn voor
het milieu of de menselijke gezondheid door
ongecontroleerde afvalverwerking. Recycle het daarom
verantwoord om duurzaam hergebruik van grondstoffen te
bevorderen. Om uw gebruikte apparaat te retourneren, kunt
u gebruikmaken van de retour- en inzamelsystemen of
contact opnemen met de winkel waar u het product heeft
gekocht. Zij kunnen dit product innemen voor
milieuvriendelijke recycling.
WAARSCHUWING:
1. Lees de gebruiksaanwijzing zorgvuldig door voordat u de mat installeert!
2. Voer de hittetest pas uit als het product volledig is uitgevouwen.
3. Knip nooit de verwarmingsdraad (rood of blauw) door!
4. Verbind nooit twee of meer matten in serie met elkaar!
5. Controleer of de spanning die op het typeplaatje staat aangegeven,
overeenkomt met de spanning van het lokale netwerk voordat u het
apparaat op het lichtnet aansluit.
6. Indien het netsnoer beschadigd is, dient dit vervangen te worden door
de fabrikant, diens serviceagent of een persoon met vergelijkbare
kwalificaties om gevaar te voorkomen.
7. Laat het apparaat niet onbeheerd achter terwijl het op het lichtnet is
aangesloten.
8. Dompel het apparaat niet onder in water of andere vloeistoffen.
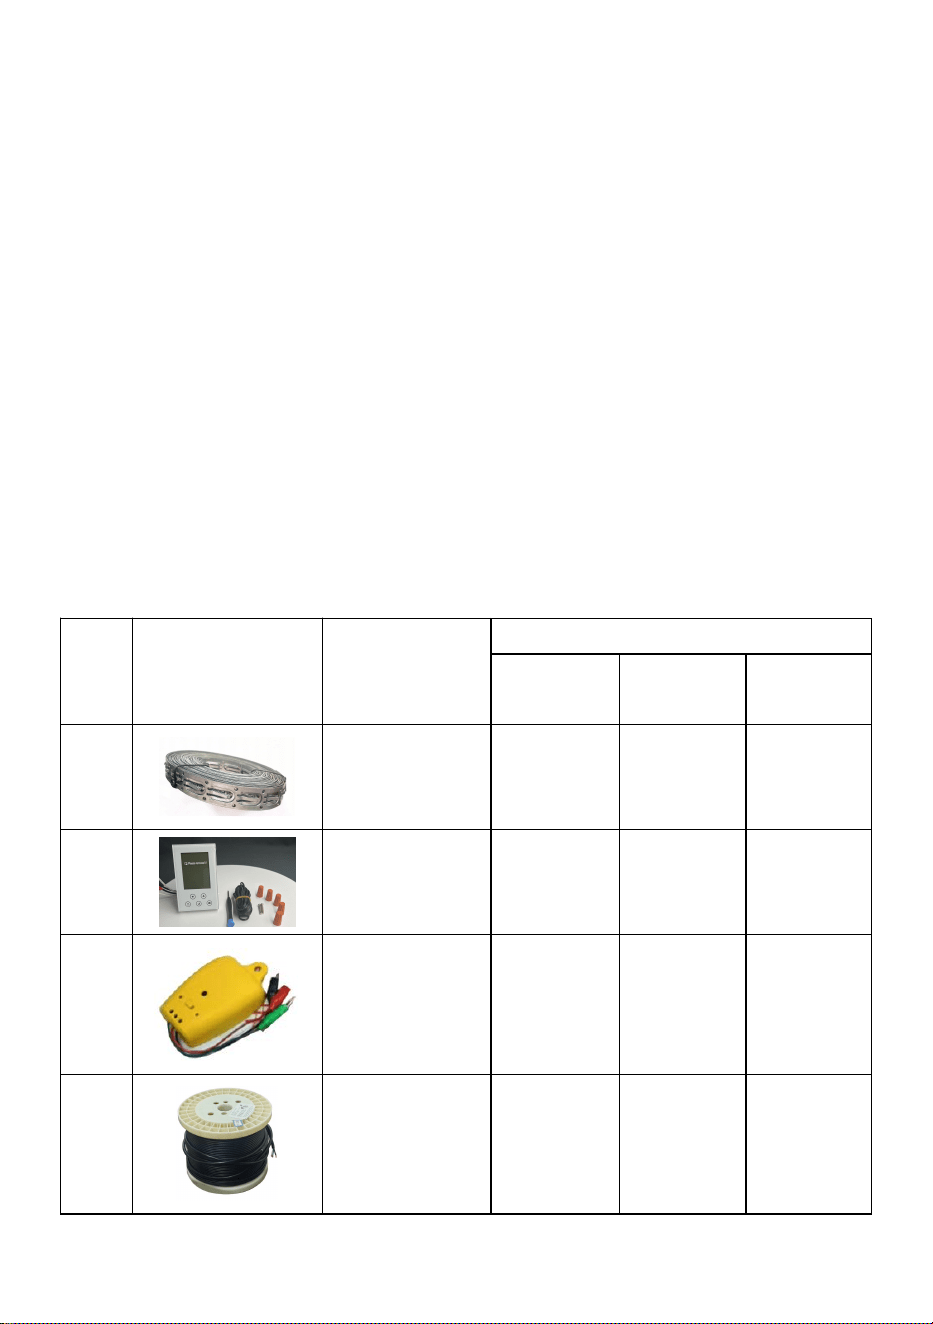
- 3 -
9. Wanneer u dit apparaat in de buurt van kinderen gebruikt, is nauwkeurig
toezicht vereist.
10. Dit apparaat is niet bedoeld voor gebruik door personen (inclusief
kinderen) met verminderde fysieke, sensorische of mentale vermogens, of
met een gebrek aan ervaring en kennis, tenzij zij onder toezicht staan of
instructies hebben gekregen over het gebruik van het apparaat door een
persoon die verantwoordelijk is voor hun veiligheid. Kinderen dienen onder
toezicht te staan om te voorkomen dat ze met het apparaat spelen.
11. Laat het apparaat nooit binnen bereik van kinderen achter.
12. Reparaties aan elektrische apparaten mogen alleen worden uitgevoerd
door een gekwalificeerde elektricien. Onjuiste reparaties kunnen de
gebruiker ernstig in gevaar brengen.
BEWAAR DEZE INSTRUCTIES
Onderdelenlijst
NE
E .
Afbeelding
Onderdeelna
am
AANTAL
SHHC-K-
600
SHHC-K-
1200
SHHC-K
-2400
1
Metalen
kabelriemen
2
3
6
2
Thermostaat
1
1
1
3
Kabeltester
1
1
1
4
Verwarmings
kabel
1
1
1
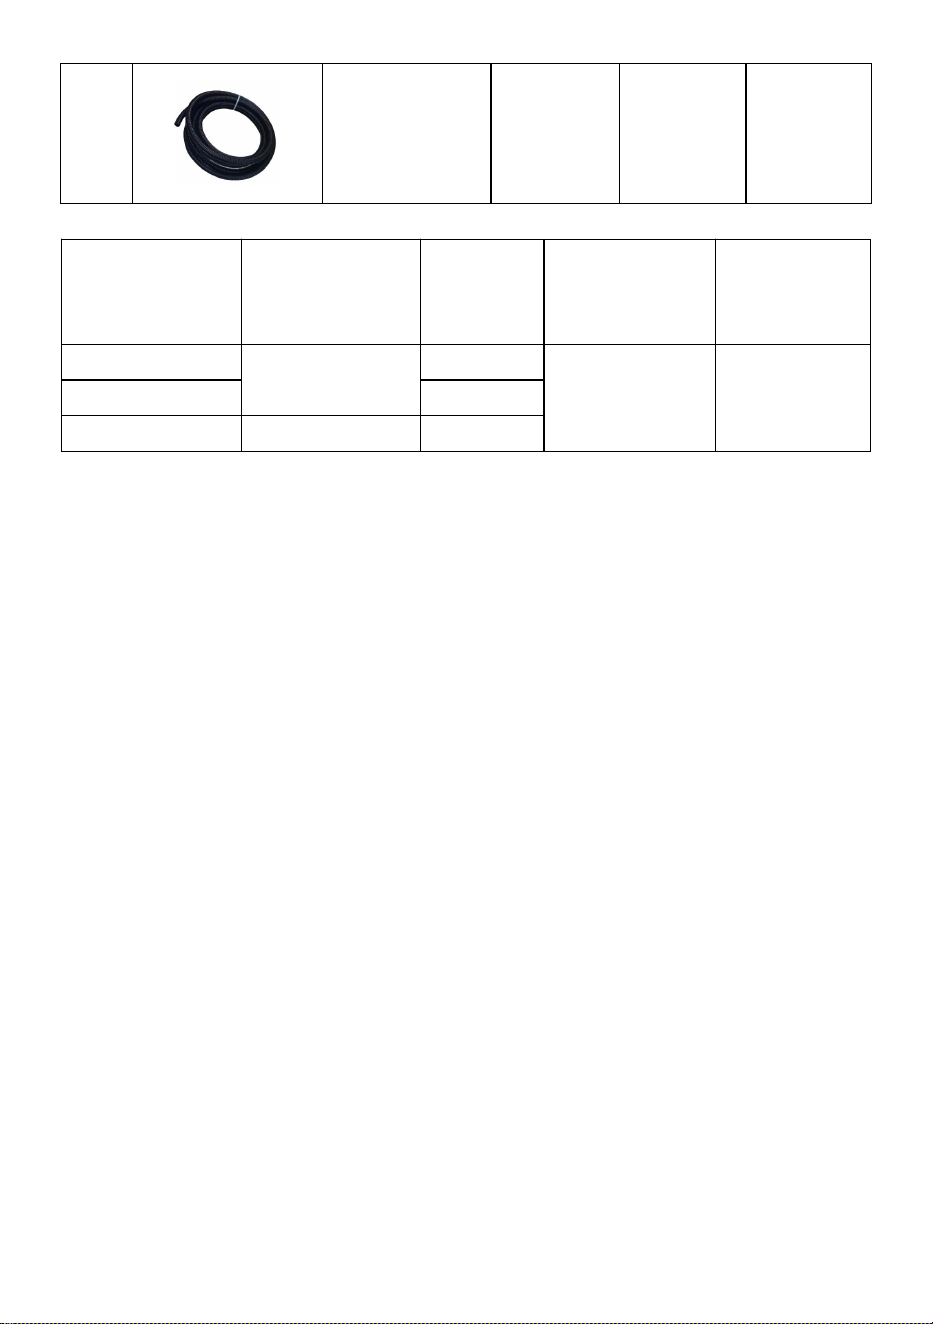
- 4 -
5
Gegolfde
buis
1
1
1
Model
Voeding
Stroom
Max.
blootstellings
temperatuur
Minimale
installatiete
mp.
SHHC-K-600
AC120V 60Hz
600W
90℃
41℉ (+5℃)
SHHC-K-1200
1200W
SHHC-K-2400
AC240V 60Hz
2400W
Installatie advies
Om de productgarantie te valideren, moet alle elektrische bedrading
worden uitgevoerd door een volledig gekwalificeerde elektricien en in
overeenstemming met de huidige IEE-bedradingsvoorschriften.
• Rond het vloeroppervlak altijd naar beneden af, bijvoorbeeld voor 60
vierkante voet vloer is 190,7 voet aan kabel nodig .
• Laat de kabel nooit overlappen , zorg altijd voor een minimale afstand van
50 mm (1,97 inch) tussen de draden voor een optimale warmteverdeling.
• Als er een tekort is aan verwarmingskabels in uw vloeroppervlak,
concentreer de verwarmingskabel dan op plekken waar veel gelopen
wordt.
• Er moet een aardlekschakelaar (RCD) worden gebruikt bij dit systeem
(moet apart worden aangeschaft).
• De vloer moet schoon en vrij van stof en vuil zijn.
• Knip nooit de verwarmingsdraad (rood of blauw) door! Verbind nooit twee
of meer matten. samen in serie! Als u twee of meer matten aan elkaar wilt
koppelen, gebruik dan een aansluitdoos.
• De draad is stevig, maar u moet extra voorzichtig zijn bij het gebruik van
scherpe voorwerpen in de buurt van de kabel. Het is aan te raden een
kunststof troffel te gebruiken.

- 5 -
• Controleer uw systeem met een multimeter voordat u de tegels
installeert.
• Zorg ervoor dat uw tegellijm geschikt is voor gebruik met vloerverwarming,
bijvoorbeeld sterk polymeergemodificeerd (flexibel).
• Voordat u het systeem voor de eerste keer inschakelt, moeten de
ondergrond en de vloerbedekking, bijvoorbeeld tegellijm of dekvloer,
volledig droog zijn.
• Draag handschoenen bij het hanteren van de kabel (om huidirritatie te
voorkomen).
verwarmingskabel niet beschadigt .
• De isolatieplaat is niet geschikt voor vloerversterking en constructieve
versterking.
• Matten en isolatieplaten mogen niet onder permanente bevestigingen
worden aangebracht, bijvoorbeeld onder een bad, toilet, etc.
• Leg tijdens de installatie geen voorwerpen op de matten, bijvoorbeeld
tegels.
• Verwijder oude vloerbedekking.
Installatie Instructies
Verwarmingskabels mogen niet willekeurig worden doorgeknipt of
overlappend worden gelegd. Bovendien mag de kabelafstand niet kleiner
zijn dan de afstand tussen de kabels die op de mat zijn gemonteerd .
Verwarmingskabels kunnen onder vloertegels, natuursteen, laminaat of
houten vloeren worden geïnstalleerd.
De warmteweerstand van de vloerconstructie boven de verwarmingskabel
moet zo laag mogelijk zijn.
Stap niet op de kabels tijdens de installatie.
Vermijd scherpe voorwerpen en onvoorzichtig storten van beton of
vulmiddel. Er mogen geen grote luchtspleten in het beton of de vulstof
zitten. Volg altijd de instructies voor de vloer. afdeklijm. Verwarmingskabel
moet worden geïnstalleerd in minimaal 5 mm (1,97 inch) beton of
vulmiddel.
- 6 -
Leg geen verwarmingskabels op plekken waar u kunt boren, die bedekt
zijn door kasten of onder een warmtebron zoals een fornuis, etc.
De ondervloer moet schoon, vlak, stabiel en stevig zijn, zonder scheuren of
scherpe voorwerpen. De betonnen ondervloer moet volledig droog zijn
voordat de vloerverwarming wordt geïnstalleerd. systeem.
De verwarmingskabel kan worden bevestigd met de metalen kabelriemen .
De ringen op de riemen hebben een onderlinge afstand van 2,5 cm . De
verwarmingskabel kan om de 3, 4 of 5 ringen worden geïnstalleerd . Het
wordt aanbevolen om prioriteit te geven aan een afstand van 3 of 4 ringen.
hoepels , wat resulteert in een kabelafstand van 2,95 inch ( 7,5 cm) of 3,94
inch (10 cm) .
Kies een verwarmingskabel met de juiste lengte op basis van de
kameroppervlakte (raadpleeg de maattabel). Als de kabellengte iets te lang
of te kort is, pas dan de afstand binnen het lay-outgebied aan tot 5 cm of
12,5 cm , indien nodig .
Model
Kabelle
ngte (ft)
Kabell
engte
(m)
2,95 inch
Kabelruim
te
Installatie
oppervlak
(m²)
3.94
duim
Kabelruim
te
Installatie
oppervlak
(m²)
4.92
duim
Kabelrui
mte
Installati
eoppervl
ak (m²)
SHHC-K-600
190.7
58.13
46.9
62.6
78.2
SHHC-K-1200
381
116.13
93,8
125
156
SHHC-K-2400
762
232.26
187,5
250
312
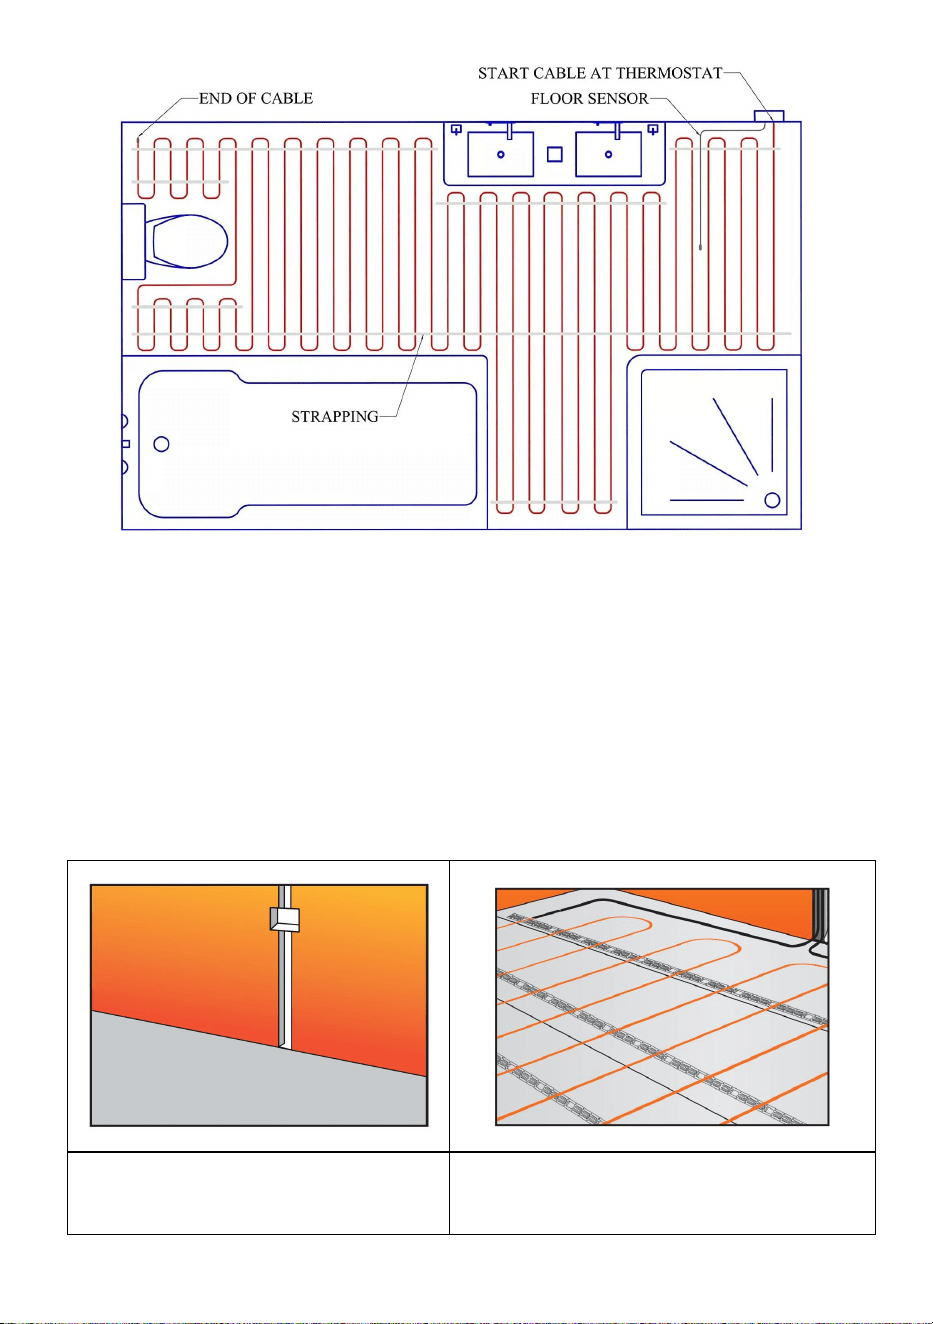
- 7 -
Meet zorgvuldig en houd rekening met:
- Minimaal 3 inch tot muren en armaturen
- Minimaal 15 cm tot het midden van de toiletafvoer
- Minimaal 8 inch tot HVAC-ventilatieopeningen of andere
verwarmingsapparaten
Stap 1: Maak het gat in de muur gereed voor de installatie van de
thermostaat.
Stap 2: Bevestig de
montageband aan de vloer.
Stap 3: Leg de kabel op de
gewenste afstand en bevestig deze
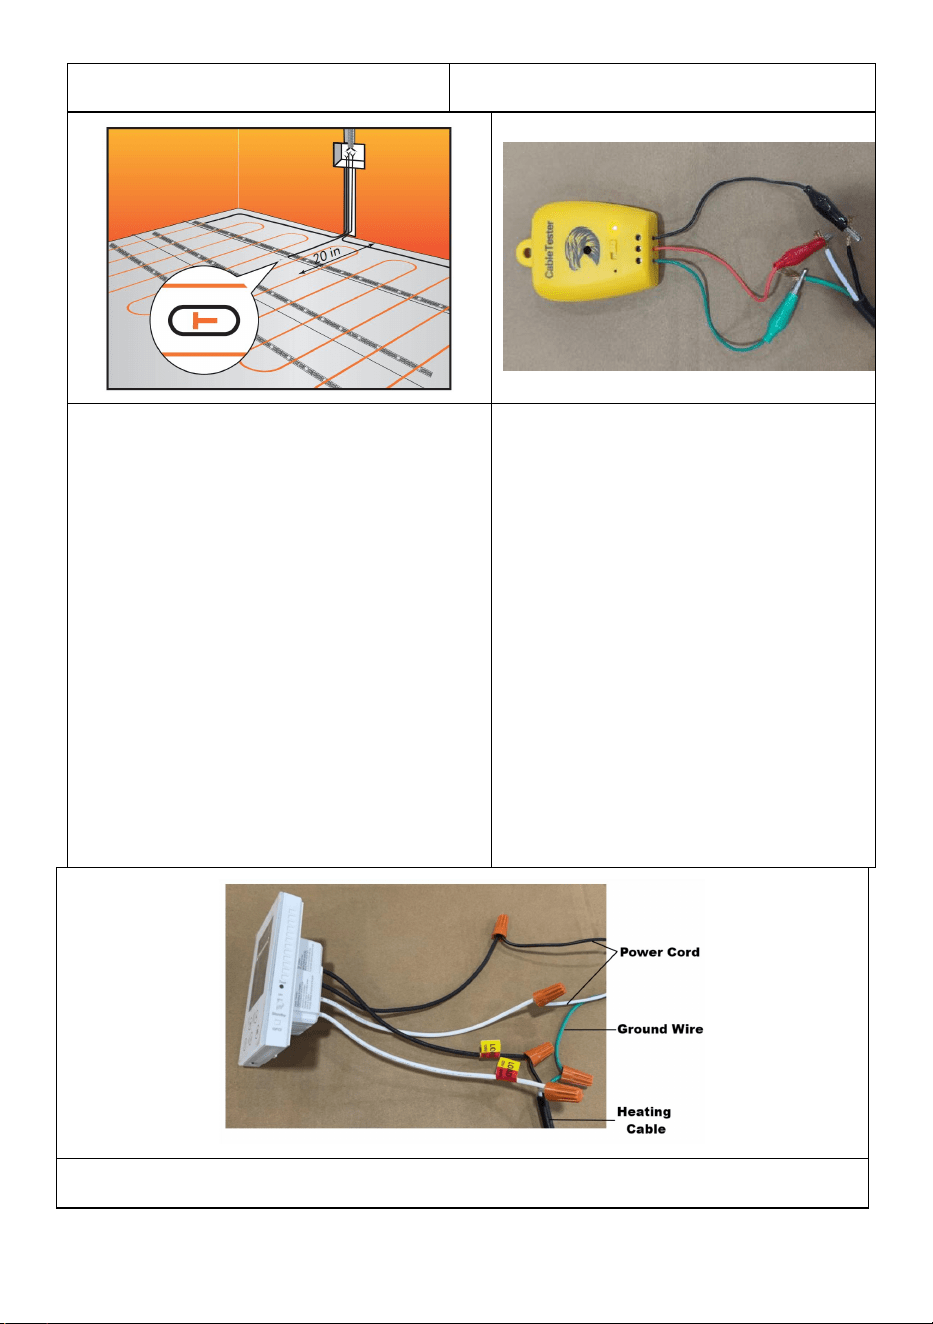
- 8 -
aan de nokken van de montageband.
Stap 4 : Installeer de
temperatuursensor :
a. Plaats de temperatuursensor op
de vloer op de locatie die
overeenkomt met uw plattegrond.
b. De sensor moet tussen de
verwarmingskabels worden
geplaatst, op gelijke afstand van
elkaar. De installatiedraden van de
sensor moeten naar de thermostaat
of aansluitdoos worden geleid.
c. Bevestig de sensor met een beetje
tegellijm of lijm aan de vloer.
Stap 5: Inspectiekabel .
De bedradingsmethode wordt in
de bovenstaande afbeelding
weergegeven .
Als er geen afwijking in de
verwarmingskabel zit, zal de
kabeltester geen alarm
afgeven .
Stap 6: Leid de installatiedraden van de verwarmingskabel(s) naar de
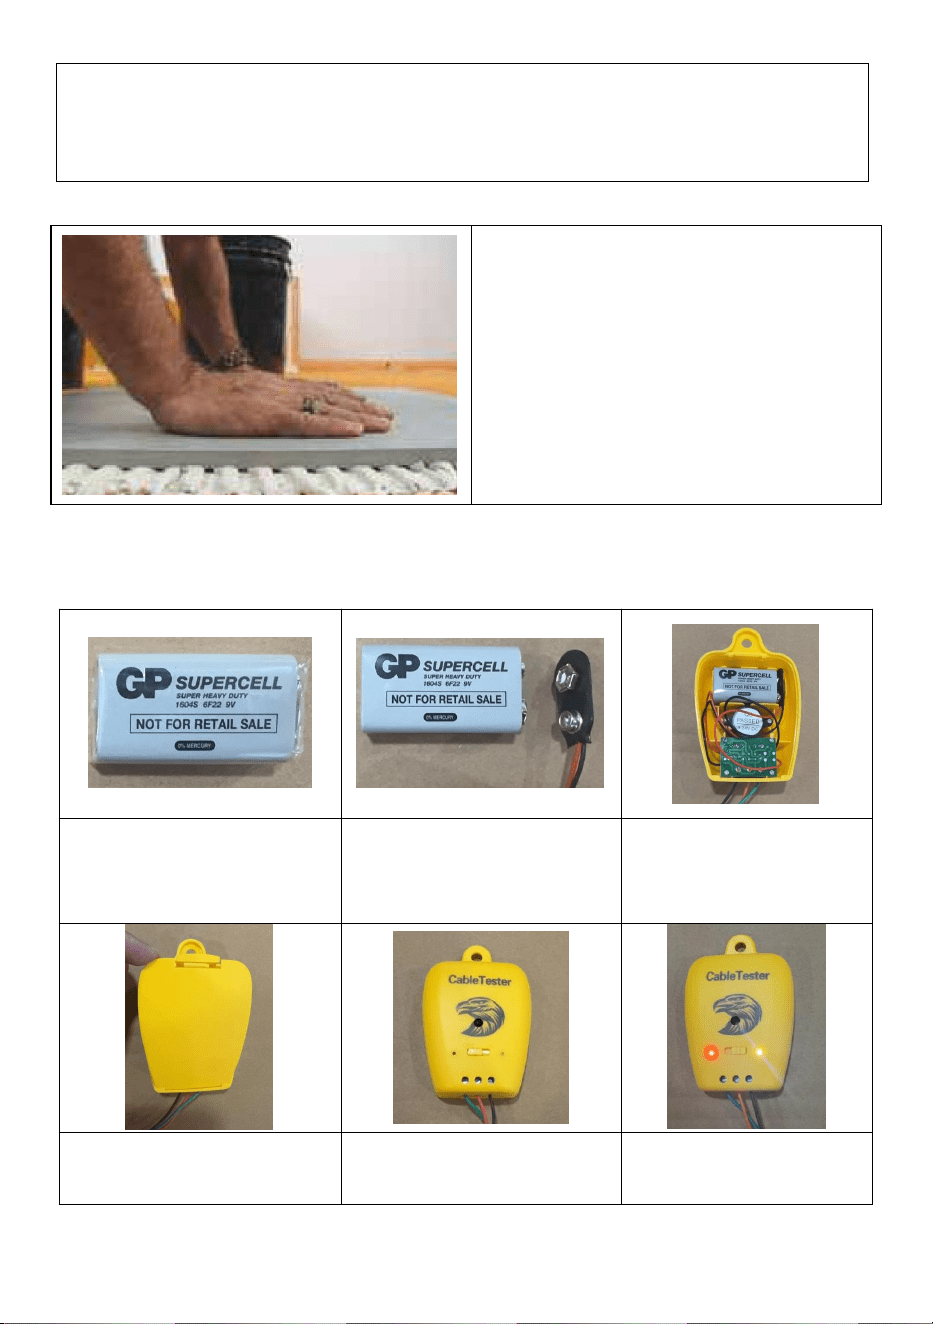
- 9 -
locatie van de thermostaat.
Installeer de thermostaat (met de (voedingsspanning losgekoppeld!)
volgens de bijgevoegde instructies .
Stap 7: Leid de installatiedraden
van de verwarmingskabel(s) naar
de locatie van de thermostaat.
Installeer de thermostaat (met de
(voedingsspanning losgekoppeld!)
volgens de bijgevoegde instructies .
Kabeltester Installatie
1. Verwijder de batterij
uit de detector.
2. Verwijder de plastic
zak en sluit de stekker
aan op het stopcontact.
3. Plaats de batterij
in de kabeltester.
4. Plaats de achterklep.
5.Installatie voltooid.
6.Als de
stroomvoorziening
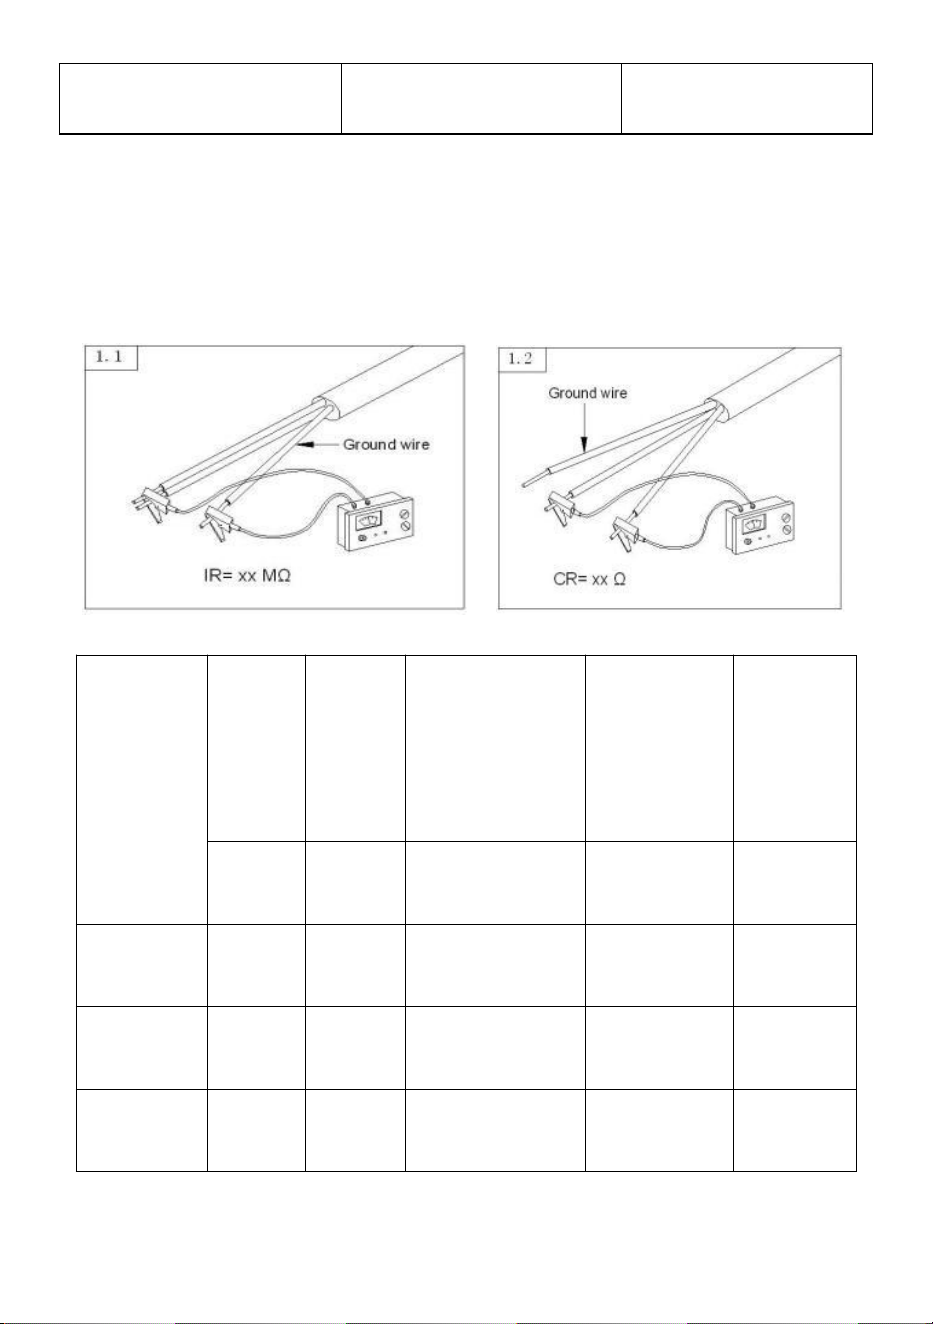
- 10 -
normaal is, klinkt er
een alarmtoon.
TESTSTAPPEN: (De belangrijkste)
Test de isolatieweerstand (IR) van de verwarmingsmat en
geleiderweerstand (CR) (zoals op afbeelding 1.1 en 1.2) om te controleren
of de twee items allebei goed zijn.
Type
Spanni
ng
Beoord
eeld
stroom
Weerstand
@20oC+10/-5
%
Omvang
van het
installatiege
bied
Kabel
Lengte
V
W
(CR) Ω
vierkante
voet
voet
SHHC-K-6
00
1 2 0
600
24
46,9~78,2
190.7
SHHC-K-1
200
1 2 0
120 0
20
93,8~156
381.0
SHHC-K-2
400
24 0
240 0
24
187,5~312
762.0
- 11 -
Fabrikant: Shanghaimuxinmuyeyouxiangongsi
Adres: Shuangchenglu 803nong11hao1602A-1609shi, baoshanqu,
shanghai 200000 CN.
Geïmporteerd naar AUS: SIHAO PTY LTD. 1 ROKEVA
STREETEASTWOOD
NSW 2122 Australië
Geïmporteerd naar de VS: Sanven Technology Ltd. Suite 250, 9166
Anaheim
Plaats, Rancho Cucamonga, CA 91730
REP
UK
YH CONSULTING LIMITED. C/O YH Consulting
Limited Office 147, Centurion House, London
Road, Staines-upon-Thames, Surrey, TW18 4AX
REP
EC
E-CrossStu GmbH
Mainzer Landstr.69,
60329 Frankfurt am Main.

- 1 -

- 2 -
ELEKTRISK GOLVVÄRMEKABELSATS
MODELL:
SHHC-K-600 \ SHHC-K-1200 \ SHHC-K-2400

- 3 -
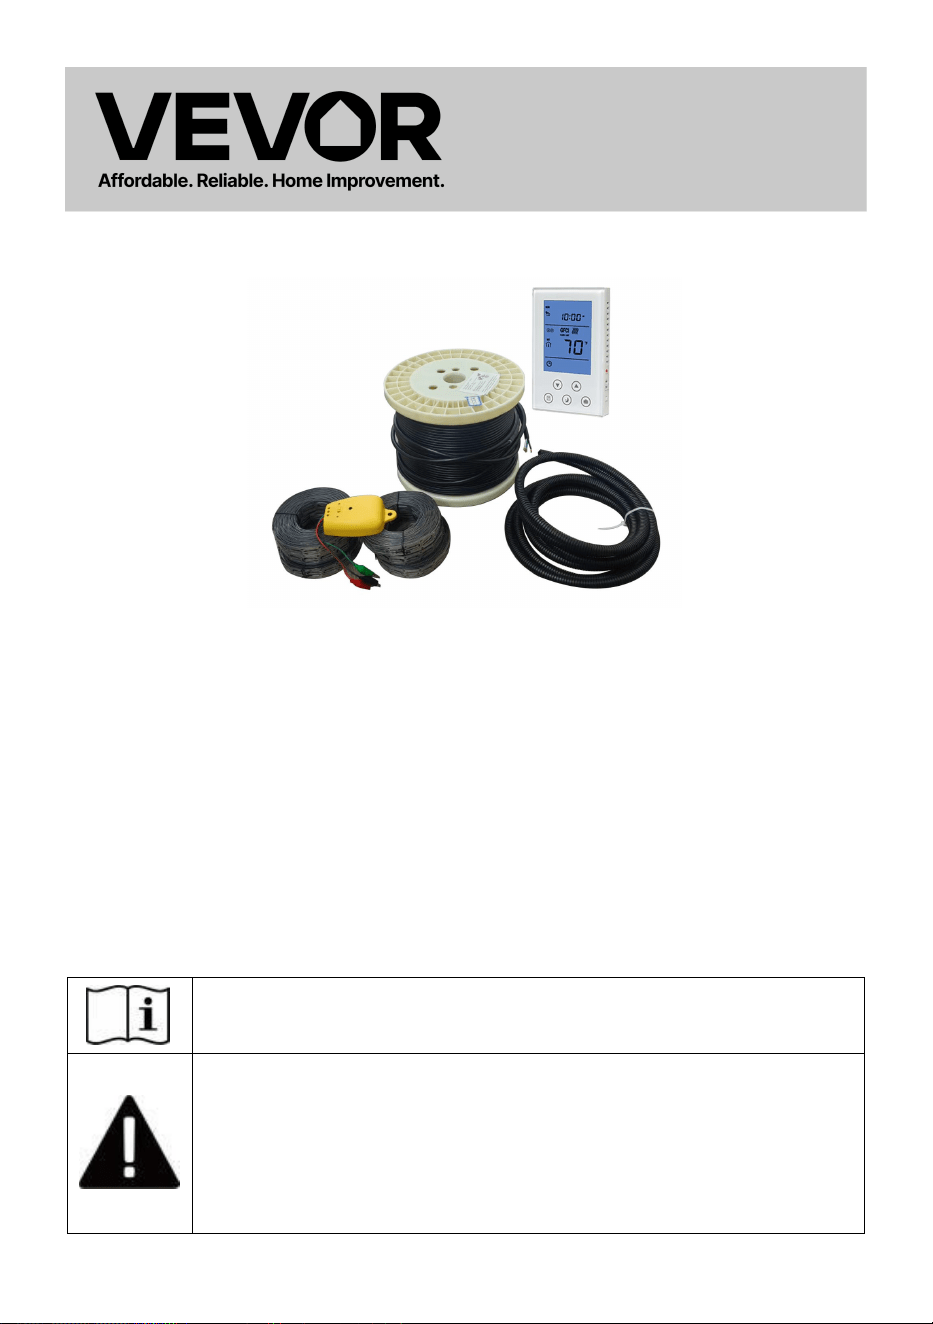
- 1 -
MODELL: SHHC-K-600 \ SHHC-K-1200 \ SHHC-K-2400
Detta är originalinstruktionerna, vänligen läs alla instruktioner noggrant
innan du använder produkten. VEVOR förbehåller sig en tydlig tolkning av
vår användarmanual. Produktens utseende ska vara beroende av den
produkt du mottagit. Vi ber om ursäkt för att vi inte kommer att informera
dig igen om det finns några teknik- eller programuppdateringar för vår
produkt.
VIKTIGA SÄKERHETSÅTGÄRDER
Vid användning av elektriska apparater bör grundläggande
säkerhetsåtgärder alltid följas:
Varning - För att minska risken för skador måste användaren
läsa instruktionsmanualen noggrant.
Denna symbol, placerad före en säkerhetskommentar,
indikerar en typ av försiktighetsåtgärd, varning eller fara. Att
ignorera denna varning kan leda till en olycka. För att minska
risken för skada, brand eller elchock, följ alltid
rekommendationerna nedan.
ELECTRIC FLOOR
HEATING CABLE KIT
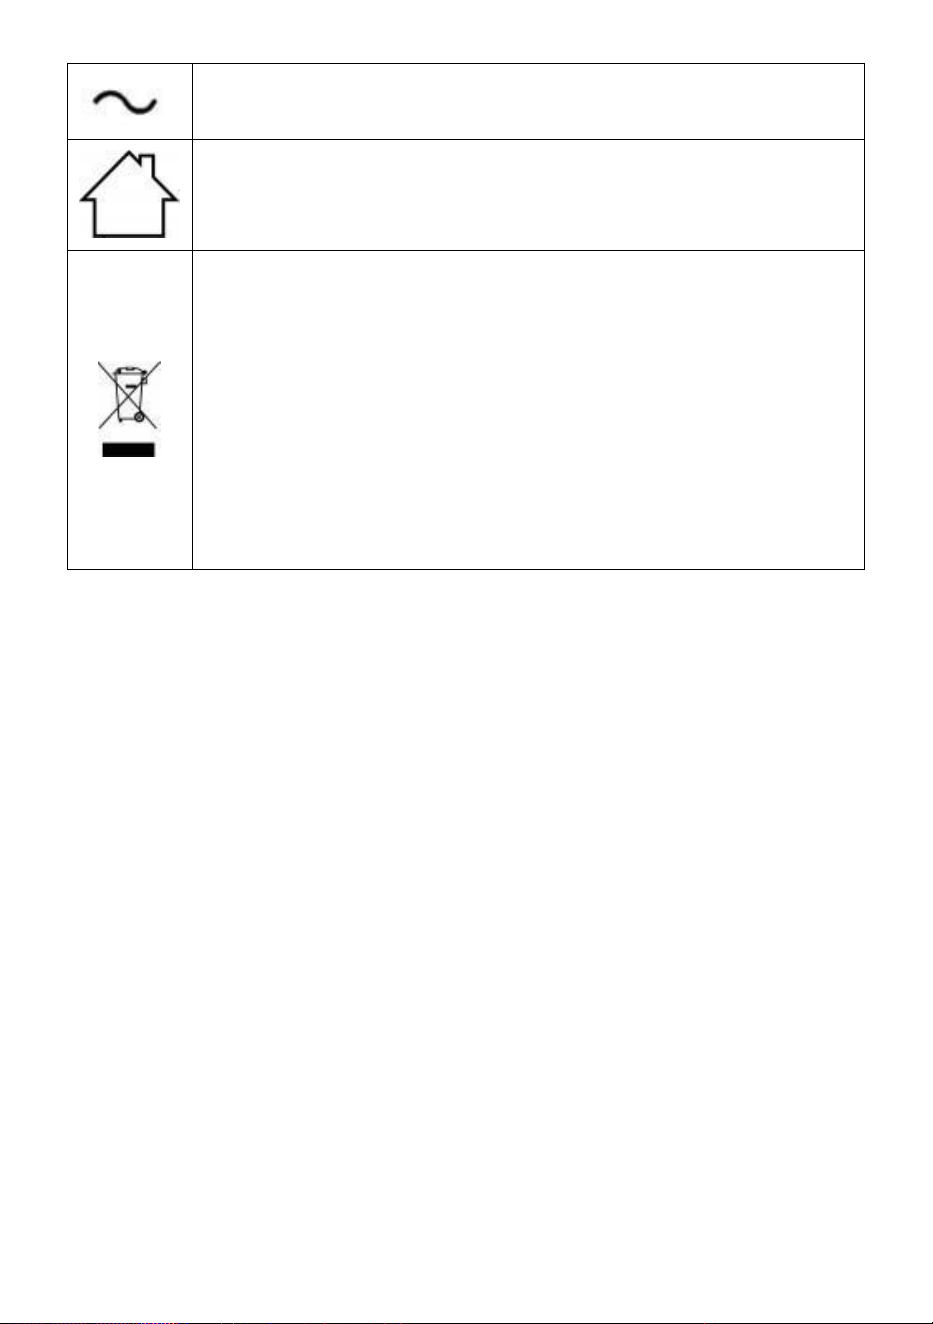
- 2 -
Växelström .
ENDAST FÖR HUSHÅLLSBRUK .
Korrekt avfallshantering av denna produkt:
Denna märkning anger att produkten inte ska kasseras med
annat hushållsavfall inom EU. För att förhindra eventuella
skador på miljön eller människors hälsa från okontrollerad
avfallshantering, återvinn den ansvarsfullt för att främja
hållbar återanvändning av materialresurser. För att returnera
din använda enhet, använd retur- och insamlingssystemen
eller kontakta återförsäljaren där produkten köptes. De kan ta
in produkten för miljövänlig återvinning.
VARNING:
1. Läs instruktionsmanualen noggrant innan du installerar mattan!
2. Värm inte förrän produkten är helt utfälld.
3. Klipp aldrig av värmekabeln (röd eller blå färg)!
4. Koppla aldrig ihop två eller fler mattor i serie!
5. Kontrollera att spänningen som anges på typskylten överensstämmer
med den i det lokala elnätet innan du ansluter apparaten till elnätet.
6. Om nätsladden är skadad måste den bytas ut av tillverkaren, dess
servicerepresentant eller liknande kvalificerad person för att undvika fara.
7. Lämna inte apparaten utan uppsikt medan den är ansluten till elnätet.
8. Doppa inte apparaten i vatten eller andra vätskor.
9. Noggrann övervakning krävs när apparaten används nära barn.
10. Denna apparat är inte avsedd att användas av personer (inklusive barn)
med nedsatt fysisk, sensorisk eller mental förmåga, eller bristande
erfarenhet och kunskap, såvida de inte har fått handledning eller
instruktioner om användningen av apparaten av en person som ansvarar
för deras säkerhet. Barn bör övervakas för att säkerställa att de inte leker
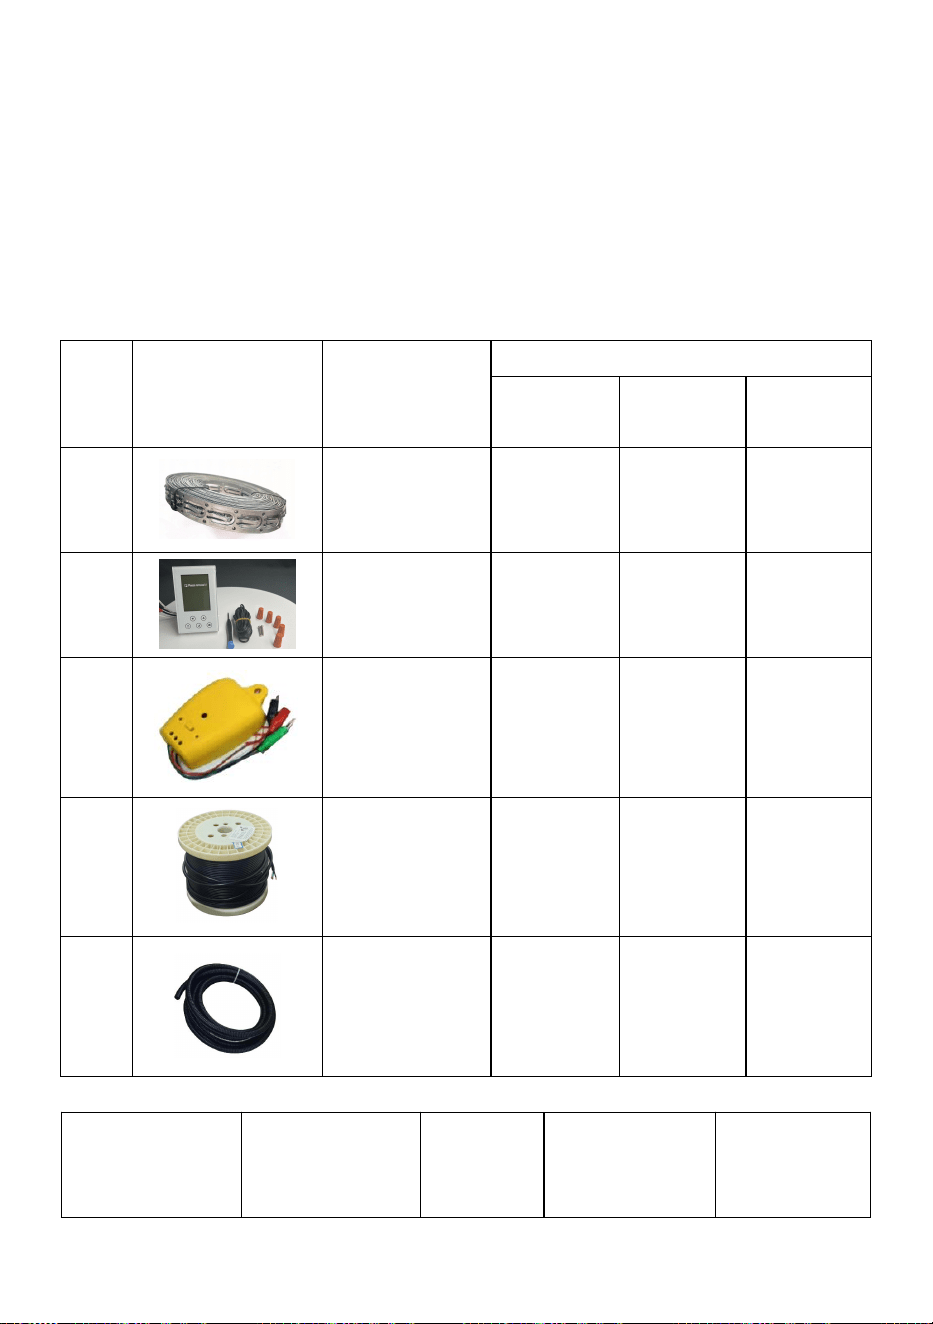
- 3 -
med apparaten.
11. Lämna aldrig apparaten utom räckhåll för barn.
12. Reparationer av elektriska apparater bör endast utföras av en behörig
elektriker. Felaktiga reparationer kan utsätta användaren för allvarlig risk.
SPARA DESSA INSTRUKTIONER
Dellista
NEJ
.
Bild
Delnamn
ANTAL
SHHC-K-
600
SHHC-K-
1200
SHHC-K
-2400
1
Metallkabelr
emmar
2
3
6
2
Termostat
1
1
1
3
Kabeltestare
1
1
1
4
H ätande C
kapabel
1
1
1
5
Korrugerat
rör
1
1
1
Modell
Strömförsörjni
ng
Driva
Max.
exponeringst
emperatur
Minsta
installations
temperatur

- 4 -
SHHC-K-600
AC120V 60Hz
600W
90 ℃ (194
℉)
41℉(+5℃)
SHHC-K-1200
1200W
SHHC-K-2400
AC240V 60Hz
2400W
Installationsråd
All elektrisk kabeldragning måste utföras av en fullt kvalificerad elektriker
och i enlighet med gällande IEE-föreskrifter för att produktgarantin ska
gälla.
• Avrunda alltid golvytan nedåt, t.ex. 5,6 kvadratmeter golv kräver 190,7
meter kabel .
• Överlappa aldrig kabeln , se alltid till att det finns ett avstånd på minst 50
mm (1,97 tum) mellan ledningarna för optimal värmefördelning.
• Om det finns ett underskott av värmekablar i golvytan, koncentrera
värmekablarna i områden med hög trafik.
• En jordfelsbrytare (RCD) bör användas med detta system (måste köpas
separat).
• Golvet måste vara rent och fritt från damm och smuts.
• Klipp aldrig av värmekabeln (röd eller blå)! Sammanfoga aldrig två eller
fler mattor tillsammans i serie! Om du vill sammanfoga två eller fler mattor,
använd en kopplingsdosa.
• Tråden är tålig men extra försiktighet måste iakttas vid användning av
vassa föremål nära kabeln. En plastslev är lämplig.
• Kontrollera ditt system med en multimeter innan kakelinstallation.
• Se till att ditt kakellim är lämpligt för användning med värme under kakel,
t.ex. högpolymermodifierat (flexibelt).
• Ditt underlag och golvbeläggning, t.ex. kakellim eller spackel, måste vara
helt torra innan du slår på systemet för första gången.
• Använd handskar när du hanterar kabeln (för att undvika hudirritation).
• Var försiktig vid kakelläggning så att du inte skadar värmekabeln.
• Isoleringsskivan är inte lämplig för golvförstärkning och strukturell
förstärkning.
• Mattor och isoleringsskivor bör inte föras under permanenta infästningar,

- 5 -
t.ex. badkar, toalett etc.
• Förvara inga föremål ovanpå mattan under installationen, t.ex. kakel.
• Ta bort gamla golvbeläggningar.
Installation Instruktioner
Värmekabeln kan inte kapas valfritt eller överlappa, och kabelavståndet får
inte vara kortare än avståndet mellan kablarna som monteras på mattan .
Värmekabel kan installeras under golvplattor, natursten, laminat eller
trägolv.
Golvkonstruktionens värmemotstånd ovanför värmekabeln bör vara så lågt
som möjligt.
Trampa inte på kablarna under installationen.
Undvik vassa föremål och oförsiktig hällning av betong eller spackel. Inga
stora luftspalter är tillåtna i betongen eller spackeln. Följ alltid
instruktionerna för golvet. täckande lim. Värmekabeln ska installeras i
minst 5 mm (1,97 tum) betong eller spackel.
Lägg inte värmekabel i områden som kan skadas av borrning, täckas av
skåp eller under en värmekälla som en spis etc.
Undergolvet ska vara rent, slätt, stabilt och styvt, utan sprickor eller vassa
föremål. Betongundergolvet måste vara helt torrt innan golvvärmen
installeras. system.
Värmekabeln kan fästas med hjälp av metallkabelremmarna . Bygeln på
remmarna är placerade med 2,5 cm mellanrum . Värmekabeln kan
installeras med 3, 4 eller 5 bygelringar . Det rekommenderas att prioritera
avståndet var 3:e eller 4:e . bågar , vilket resulterar i ett kabelavstånd på
7,5 cm ( 2,95 tum) eller 10 cm (3,94 tum) .
Välj en värmekabel med lämplig längd baserat på rummets yta (se
storlekstabellen). Om kabellängden är något för lång eller kort, justera
avståndet inom layoutområdet till 5 cm eller 12,5 cm efter behov .
Modell
Kabellä
ngd
Kabell
ängd
2,95
tum
3. 9 4 tum
Kabelutry
4. 9 2
tum
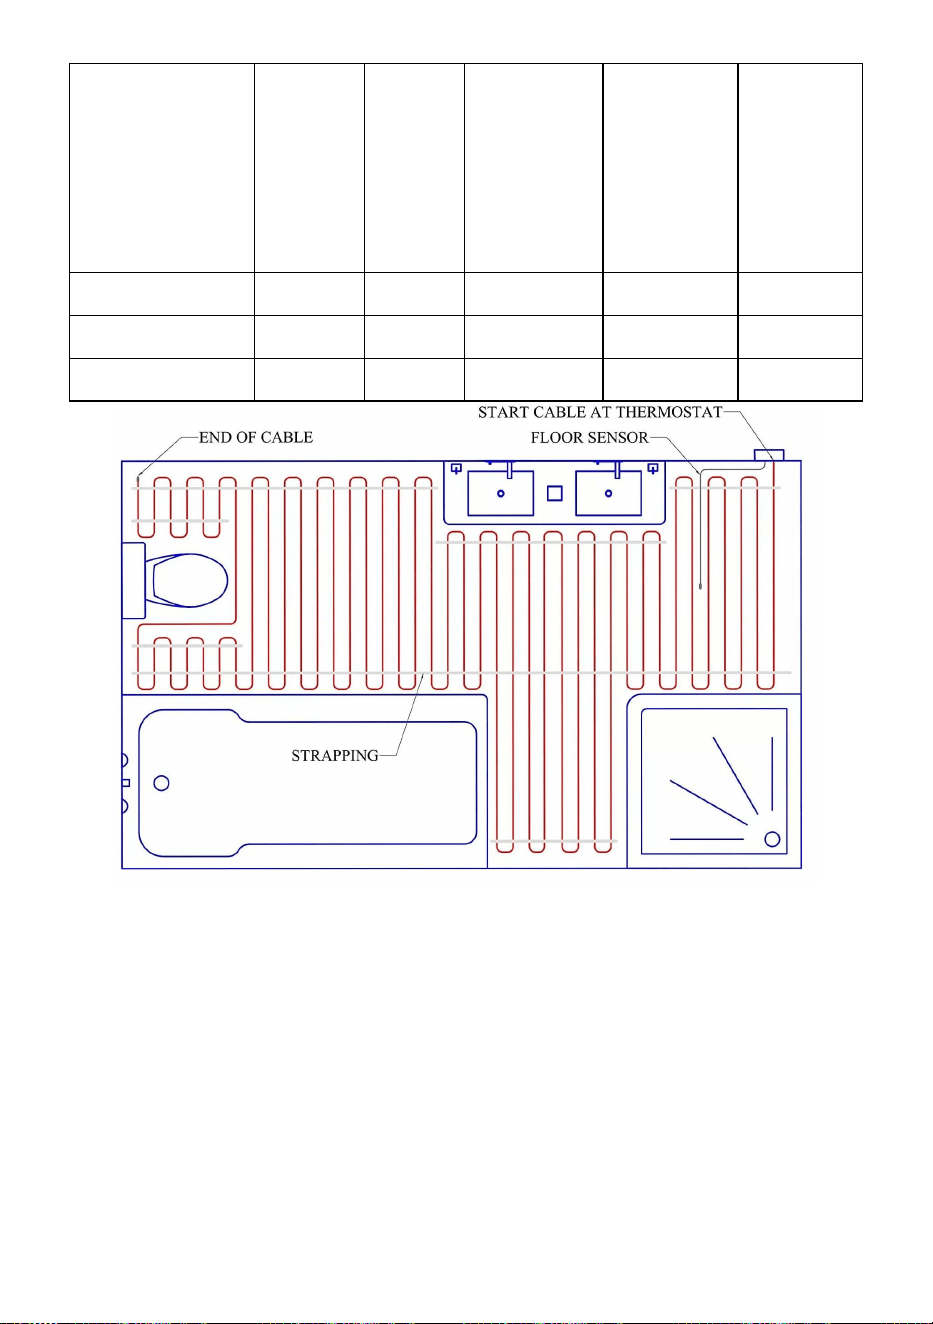
- 6 -
(fot)
(m)
Kabelutry
mme
Installatio
nsyta
(kvadratfo
t)
mme
Installatio
nsyta
(kvadratfo
t)
Kabelutr
ymme
Installati
onsyta
(kvadratf
ot)
SHHC-K-600
190,7
58,13
46,9
62,6
78,2
SHHC-K-1200
381
116,13
93,8
125
156
SHHC-K-2400
762
232,26
187,5
250
312
Mät noggrant, med hänsyn till
- Minst 7,5 cm till väggar och armaturer
- Minst 15 cm till mitten av toalettavloppet
-Minst 20 cm till HVAC-ventiler eller andra värmeapparater
Steg 1: Förbered hålet i väggen för installationen av termostaten.
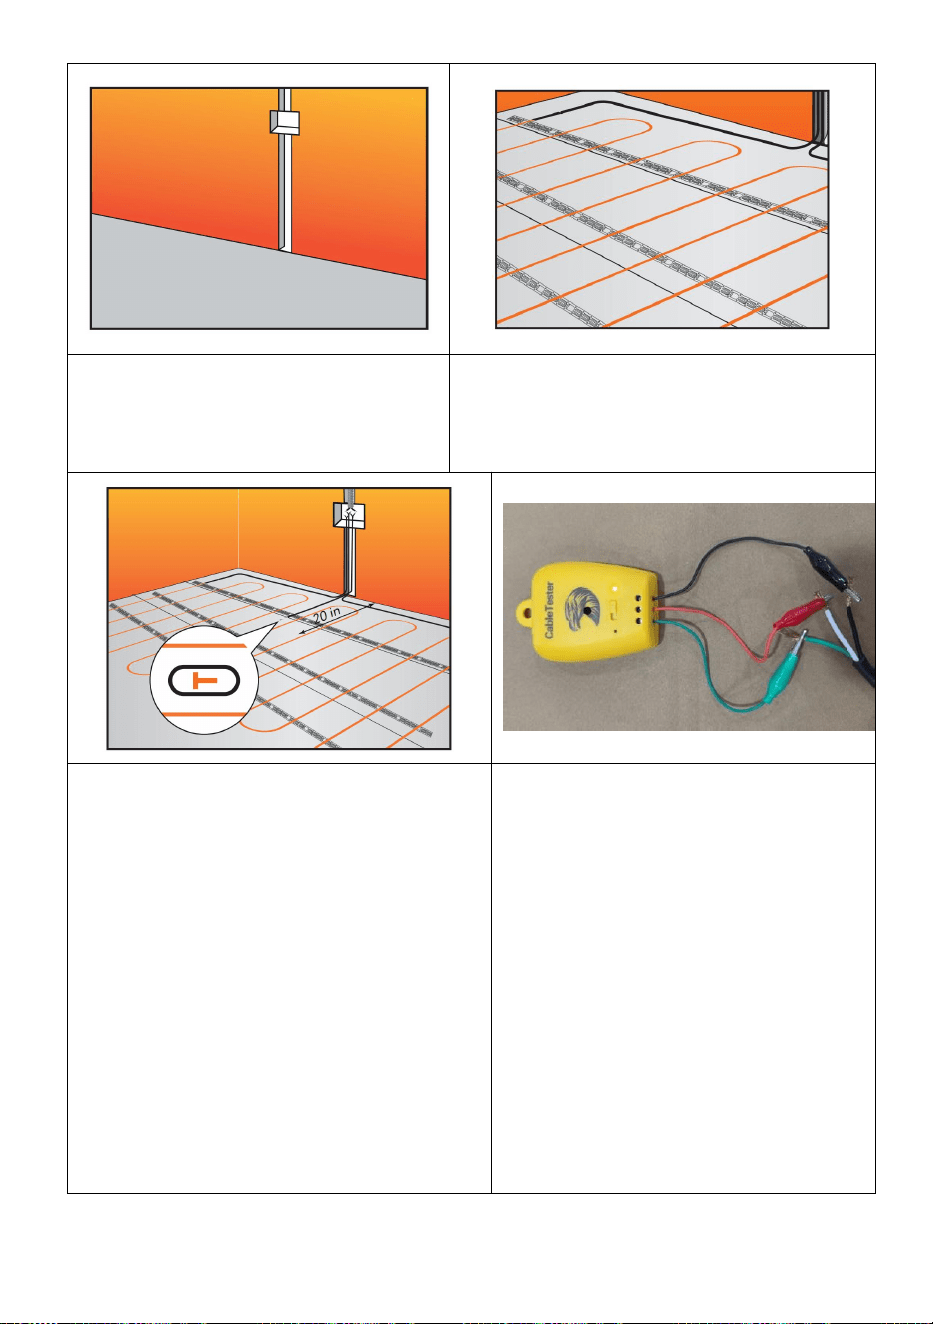
- 7 -
Steg 2: Fäst monteringsbandet i
golvet.
Steg 3: Lägg kabeln enligt den
bestämda stigning och fäst den på
fästbandets fästklackar.
Steg 4 : Installera
temperatursensorn :
a. Placera temperatursensorn på
golvet på platsen enligt din
planritning.
b. Givaren måste placeras mellan
värmekabelns passager, med jämnt
avstånd från dem. Givarens
installationskablar måste ledas till
termostaten eller kopplingsboxen.
c. Fäst sensorn på golvet med en
liten mängd kakellim eller varmt lim.
Steg 5: Inspektion möjlig .
Kopplingsmetoden visas i bilden
ovan .
Om det inte finns något
avvikande problem med
värmekabeln kommer
kabeltestaren inte att avge
något larm .
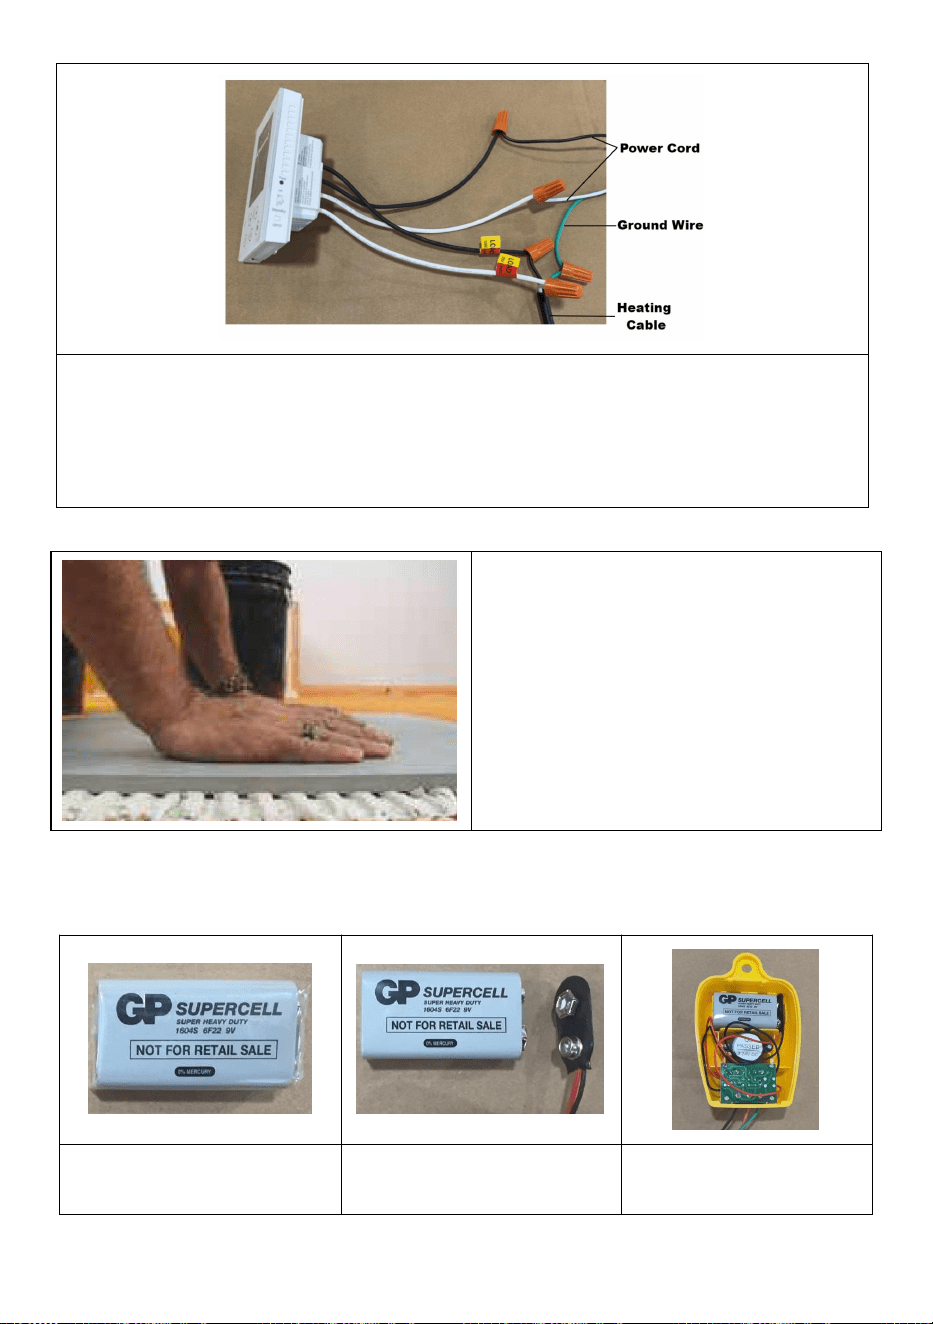
- 8 -
Steg 6: Led installationskablarna för värmekabeln/kablarna till
termostatens plats.
Installera termostaten (med matningsspänningen frånkopplad!) enligt de
bifogade instruktionerna .
Steg 7: Led installationskablarna
för värmekabeln/kablarna till
termostatens plats.
Installera termostaten (med
matningsspänningen frånkopplad!)
enligt de bifogade instruktionerna .
Kabeltestare Installation
1. Ta ut batteriet ur
detektorn.
2. Ta bort plastpåsen
och anslut elkontakten.
3. Sätt i batteriet i
kabeltestaren.
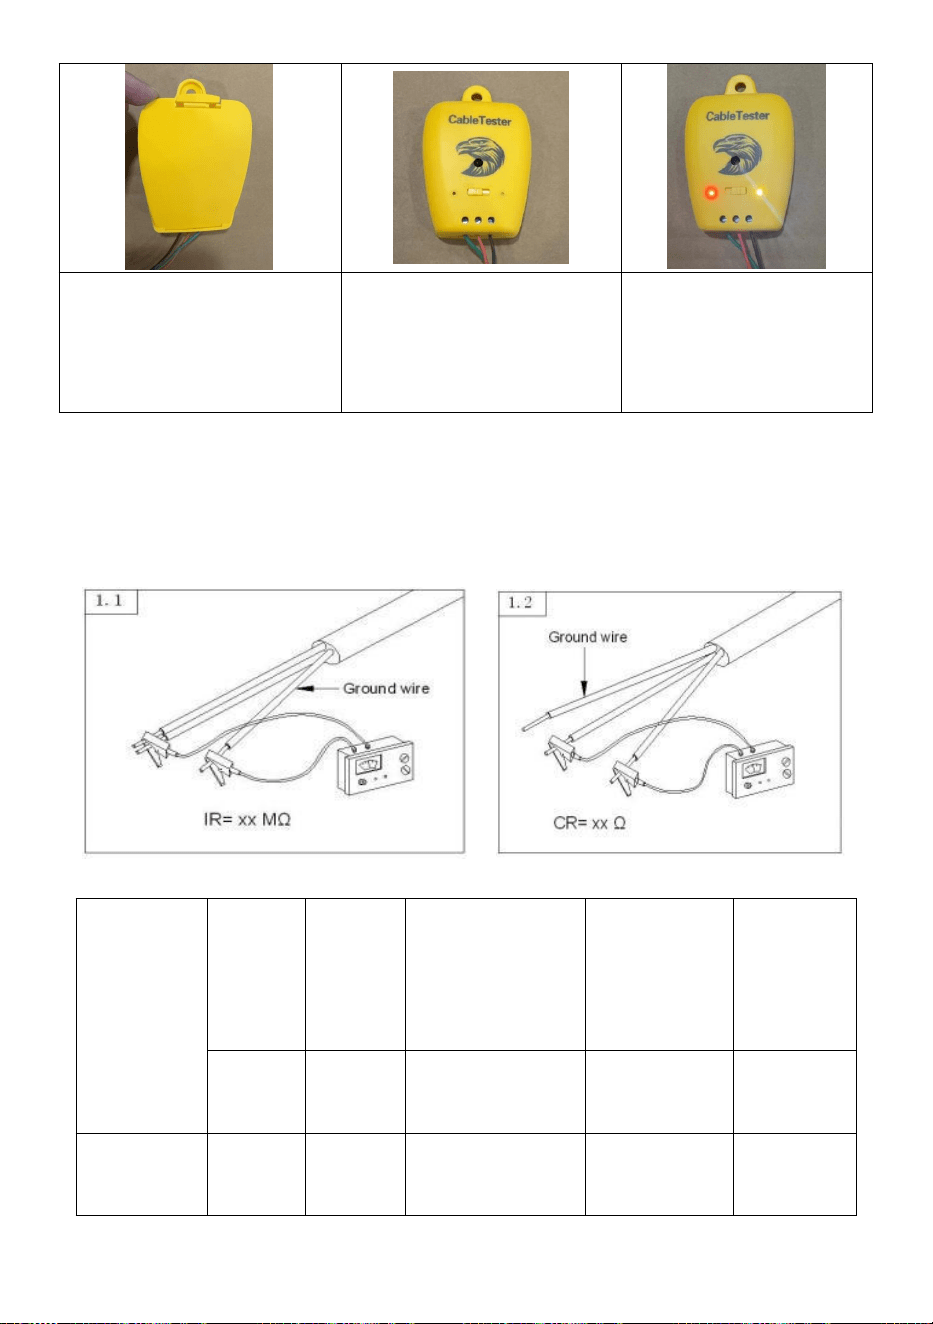
- 9 -
4. Montera bakstycket.
5. Installationen är klar.
6. Om
strömförsörjningen
är normal ljuder en
larmsignal.
TESTSTEG: (Det viktigaste)
Testa värmemattans isolationsmotstånd (IR) och ledarresistansen (CR)
(som på bild 1.1 och 1.2) för att säkerställa att båda elementen är i ordning.
Typ
Spänni
ng
Betygs
att
driva
Motstånd
@20°C+10/-5
%
Installations
områdets
omfattning
Kabel
Längd
V
V
(CR) Ω
Kvadratfot
fot
SHHC-K-6
00
1 2 0
600
24
46,9~78,2
190,7
- 10 -
SHHC-K-1
200
1 2 0
120 0
20
93,8~156
381,0
SHHC-K-2
400
24 0
240 0
24
187,5~312
762,0
Tillverkare: Shanghaimuxinmuyeyouxiangongsi
Adress: Shuangchenglu 803nong11hao1602A-1609shi, baoshanqu,
Shanghai 200 000 kanadensiska republiken.
Importerad till Australien: SIHAO PTY LTD. 1 ROKEVA
STREETEASTWOOD
NSW 2122 Australien
Importerad till USA: Sanven Technology Ltd. Suite 250, 9166 Anaheim
Plats, Rancho Cucamonga, Kalifornien 91730
REP
UK
YH CONSULTING LIMITED. C/O YH Consulting
Limited Office 147, Centurion House, London
Road, Staines-upon-Thames, Surrey, TW18 4AX
REP
EC
E-CrossStu GmbH
Mainzer Landstr.69,
60329 Frankfurt am Main.