APPROACH
®
J1
Junior GPS Golf Watch
Owner's
Manual

Table of Contents
Introduction......................................4
Device Overview.............................. 4
Getting Started................................ 4
Using the Watch Features............... 4
Pairing Your Phone...........................4
Charging the Watch..........................5
Product Updates..............................5
Setting Up Garmin Express
™
............ 5
Playing Golf......................................6
Forward Tees..................................6
Changing Your Tee Box Level.......... 6
Setting Your Personal Par.................. 7
Golf Menu...................................... 7
Viewing the Green............................ 7
Viewing Hazards and Layups..............7
Changing Holes............................... 8
Keeping Score.................................8
Enabling Statistics Tracking............ 8
Score History............................... 9
Viewing Round Information................ 9
Automatic Shot Detection..................9
Viewing Measured Shots................ 9
Adding a Shot Manually................ 10
Ending a Round..............................10
Connectivity................................... 11
Phone Connectivity Features............ 11
Turning Off the Bluetooth
®
Phone
Connection................................ 11
Turning On and Off Phone Connection
Alerts........................................11
Phone Apps and Computer
Applications..................................11
Garmin Golf
™
App........................ 11
Garmin Connect
™
........................ 11
Glances.......................................... 13
Viewing the Glance Loop................. 13
Controls......................................... 14
Customizing the Controls Menu........ 14
Activities........................................ 15
Starting an Activity......................... 15
Stopping an Activity........................ 15
Going for a Pool Swim.....................15
Swim Terminology.......................15
Outdoor Activities...........................15
Clocks............................................ 16
Setting an Alarm............................ 16
Using the Stopwatch.......................16
Starting the Countdown Timer.......... 16
Activity Tracking............................ 17
Auto Goal..................................... 17
Move IQ
®
...................................... 17
Activity Tracking Settings.................17
Turning Off Activity Tracking......... 17
Customizing Your Device................18
Changing the Watch Face................ 18
Editing a Watch Face................... 18
Golf Settings................................. 18
Activities and App Settings...............18
Customizing the Data Screens....... 19
Satellite Settings......................... 19
Activity Alerts............................. 19
User Profile...................................20
Setting Up Your User Profile.......... 20
Gender Settings.......................... 20
System Settings.............................20
Time Settings............................. 20
Customizing the Display Settings... 21
Battery Manager Settings..............21
Changing the Units of Measure...... 21
Resetting All Default Settings.........21
Advanced Settings...................... 21
Device Information......................... 22
About the AMOLED Display.............. 22
Changing the Band......................... 22
Specifications............................... 23
Battery Information......................23
Device Care...................................23
Cleaning the Watch......................23
Long-Term Storage......................23
Viewing Device Information..............23
Viewing E-label Regulatory and
Compliance Information............... 24

Troubleshooting............................. 25
Getting More Information.................25
Maximizing Battery Life................... 25
My device cannot find nearby golf
courses........................................25
Is my phone compatible with my
watch?......................................... 25
My phone will not connect to the
watch.......................................... 25
My device is in the wrong language....25
My device displays the wrong units of
measure.......................................25
Restarting Your Watch.....................26
Acquiring Satellite Signals................26
Improving GPS Satellite Reception.. 26
Activity Tracking............................ 26
My daily step count does not
appear...................................... 26
My step count does not seem
accurate....................................26
The step counts on my watch and my
Garmin Connect
™
account don't
match....................................... 26
Appendix........................................ 27
Data Fields................................... 27
Introduction
WARNING
See the Important Safety and Product Information guide in the product box for product warnings and other
important information.
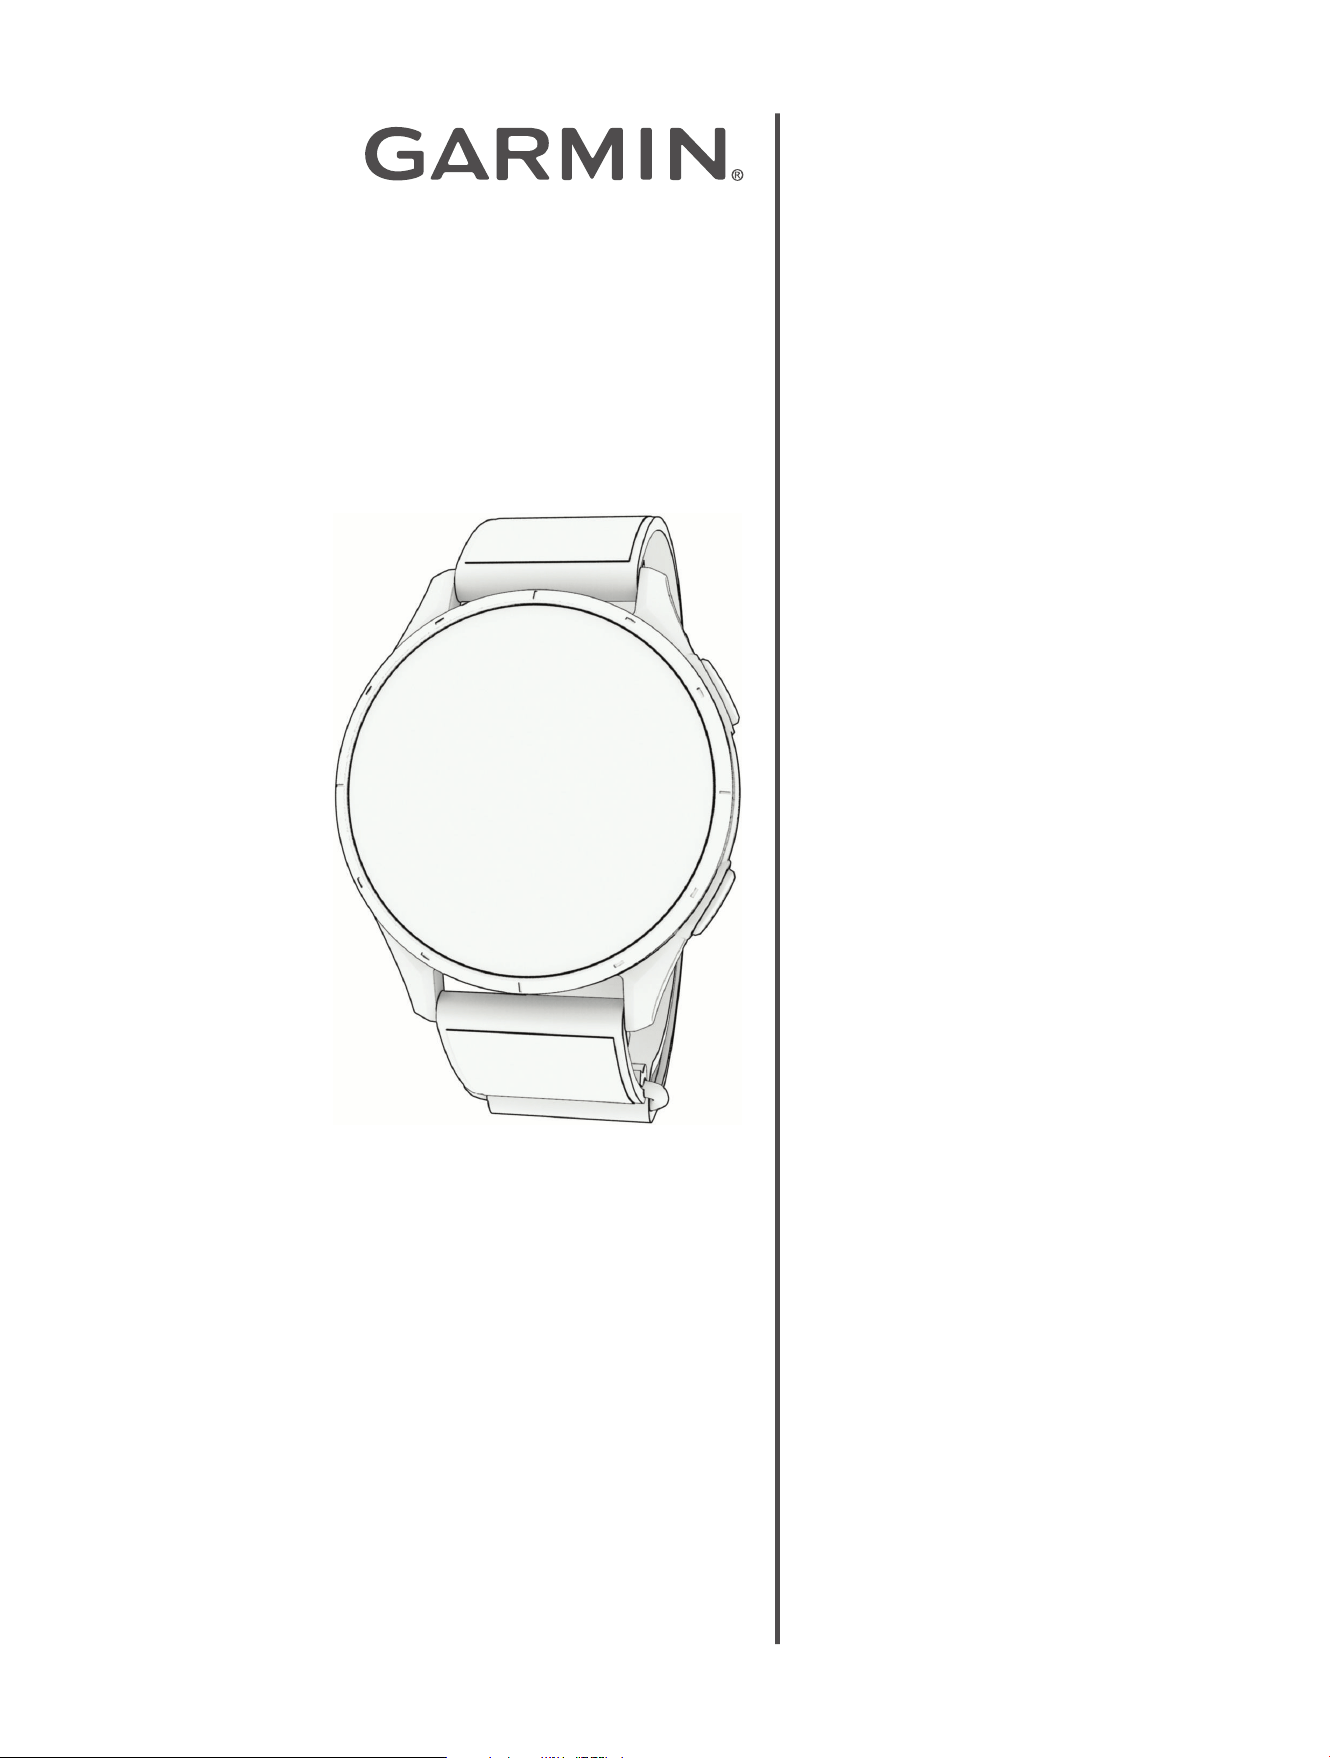
Device Overview
1
Touchscreen: Tap to choose an option in a menu.
Swipe up or down to scroll through the glance loop and menus (Glances, page13).
2
Top button : Press to start a round of golf.
Press to start an activity or app.
Hold to turn the watch on.
Hold to view the controls menu and watch settings (Controls, page14).
3
Bottom button : Press to return to the previous screen.
During an activity, press to record a lap or rest.
Getting Started
When using your watch the first time, you should complete these tasks to set it up and get to know the basic
features.
1 Hold to turn on the watch (Device Overview, page4).
2 Answer the device prompts.
3 Pair your phone (Pairing Your Phone, page4).
Pairing your phone gives you access to scorecard syncing, phone alerts, and more.
4 If necessary, follow the on-screen instructions to complete the initial setup.
5 Charge the watch completely so that you have enough charge for a round of golf (Charging the Watch,
page5).
Using the Watch Features
● From the watch face, swipe up or down to scroll through the glance loop.
Your watch comes preloaded with glances that provide quick information. More glances are available when
you pair your watch with a phone.
● From the watch face, press , and select to start an activity or open an app.
● Hold , and select Settings to adjust settings and customize the watch face.
Pairing Your Phone
To use the connected features on your watch, you must pair it directly through the Garmin Golf
™
app, instead
of from the Bluetooth
®
settings on your phone. Your Garmin Golf account must be approved and managed by a
parent or guardian (Garmin Connect
™
Child Accounts, page12).
4
Approach® J1 Junior GPS Golf Watch
Owner's Manual
Introduction
1 During the initial setup on your watch, select when you are prompted to pair with your phone.
NOTE: If you previously skipped the pairing process, you can hold , and select Settings> Phone> Pair
Phone.
2 Scan the QR code with your phone.
3 With the help of your parent or guardian, follow the on-screen instructions to complete the pairing and setup
process.
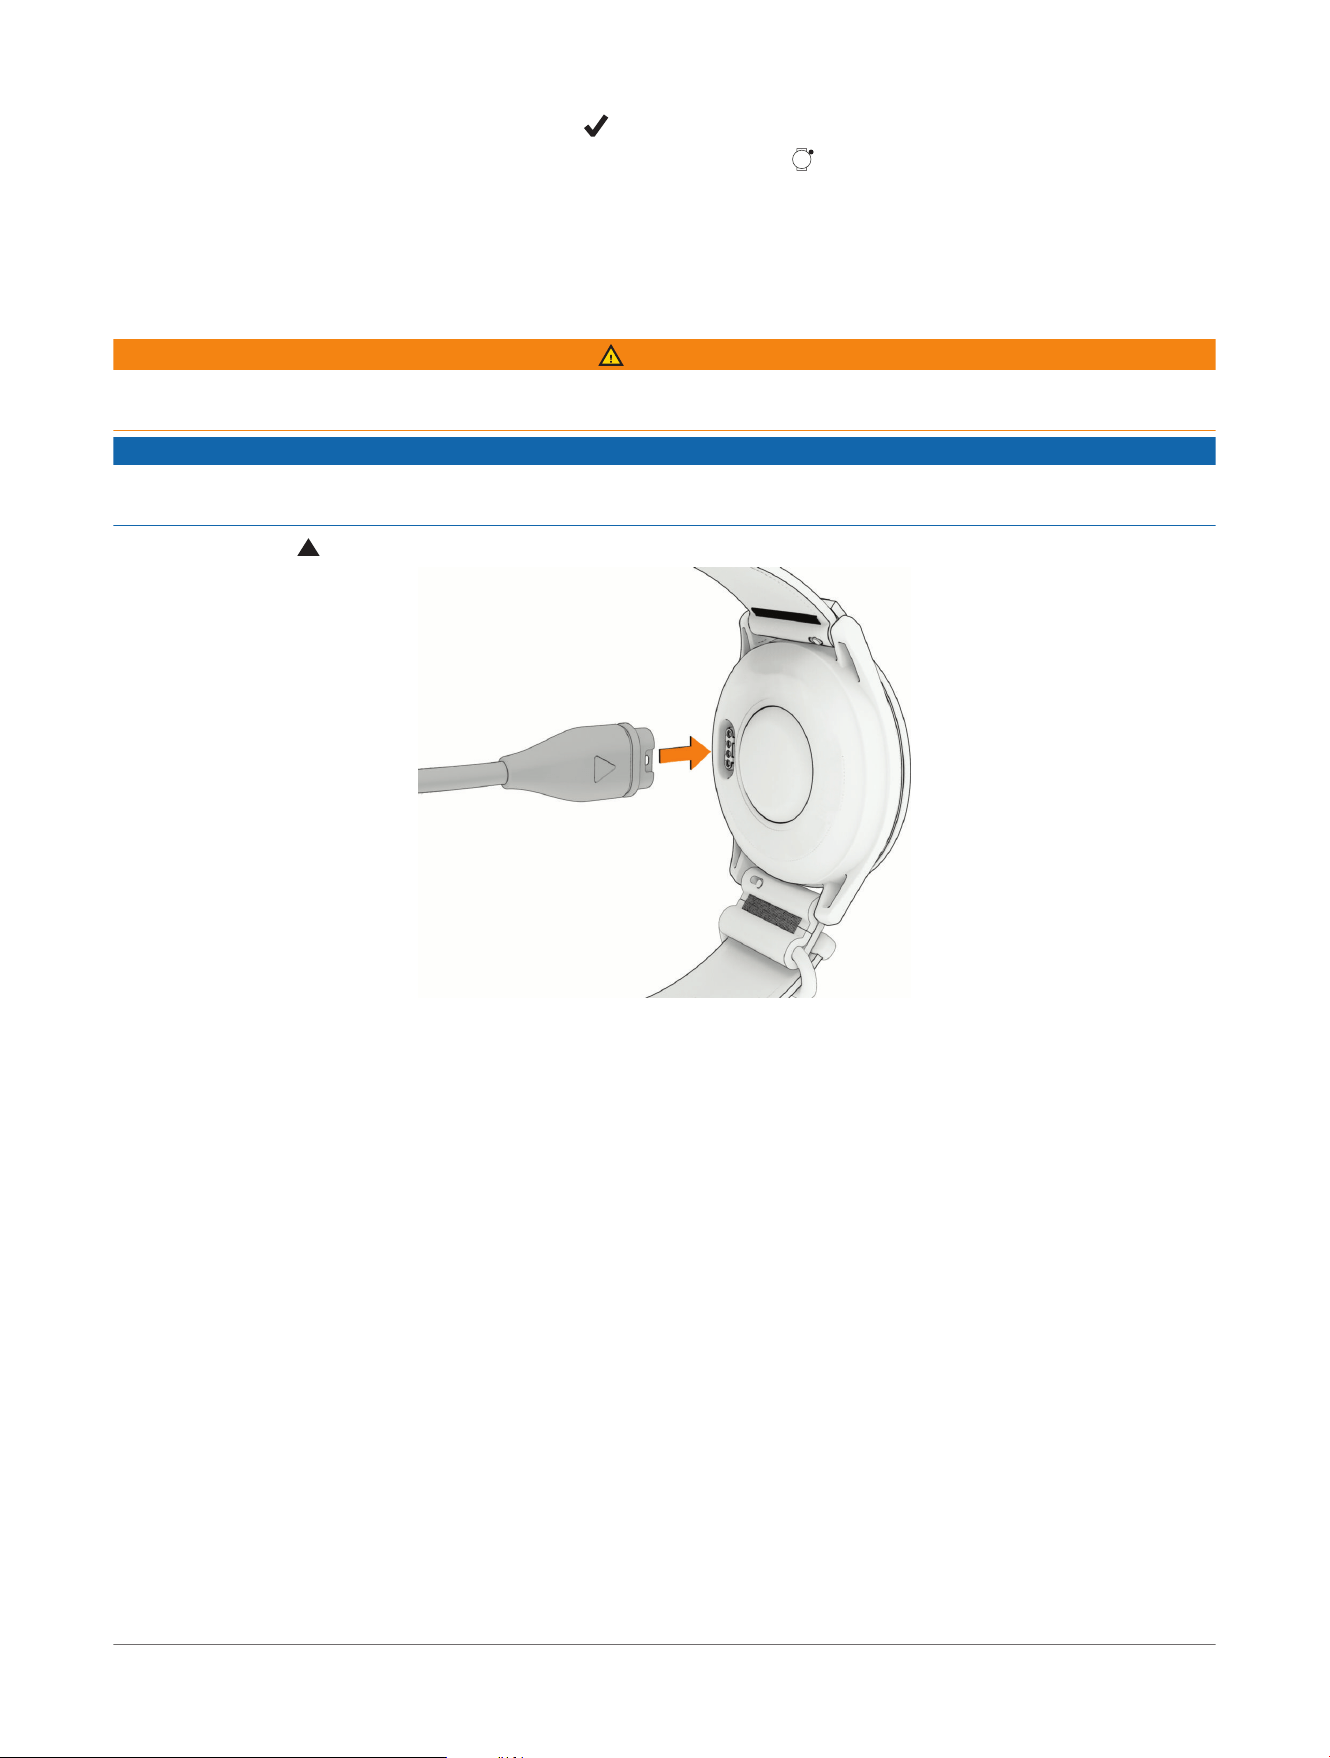
Charging the Watch
WARNING
This device contains a lithium-ion battery. See the Important Safety and Product Information guide in the product
box for product warnings and other important information.
NOTICE
To prevent corrosion, thoroughly clean and dry the contacts and the surrounding area before charging or
connecting to a computer.
1 Plug the cable ( end) into the charging port on your watch.
2 Plug the other end of the cable into a USB charging port.
The watch displays the current battery charge level.
Product Updates
On your computer, install Garmin Express
™
(www.garmin.com/express). On your phone, install the Garmin Golf
™
app.
This provides easy access to these services for Garmin
®
devices:
● Software updates
● Course updates
● Data uploads to Garmin Golf
● Product registration
Setting Up Garmin Express
™
1 Connect the device to your computer using a USBcable.
2 Go to garmin.com/express.
3 Follow the on-screen instructions.
Introduction
Approach® J1 Junior GPS Golf Watch
Owner's Manual
5
Playing Golf
Before you play golf, you should charge the watch (Charging the Watch, page5).
1 Press .
2 Select Play Golf.
The device locates satellites, calculates your location, and selects a course if there is only one course
nearby.
3 If the course list appears, select a course from the list.
4 Select to keep score.
5 Confirm the suggested tee box level, or select a tee box or tee box level (Forward Tees, page6).
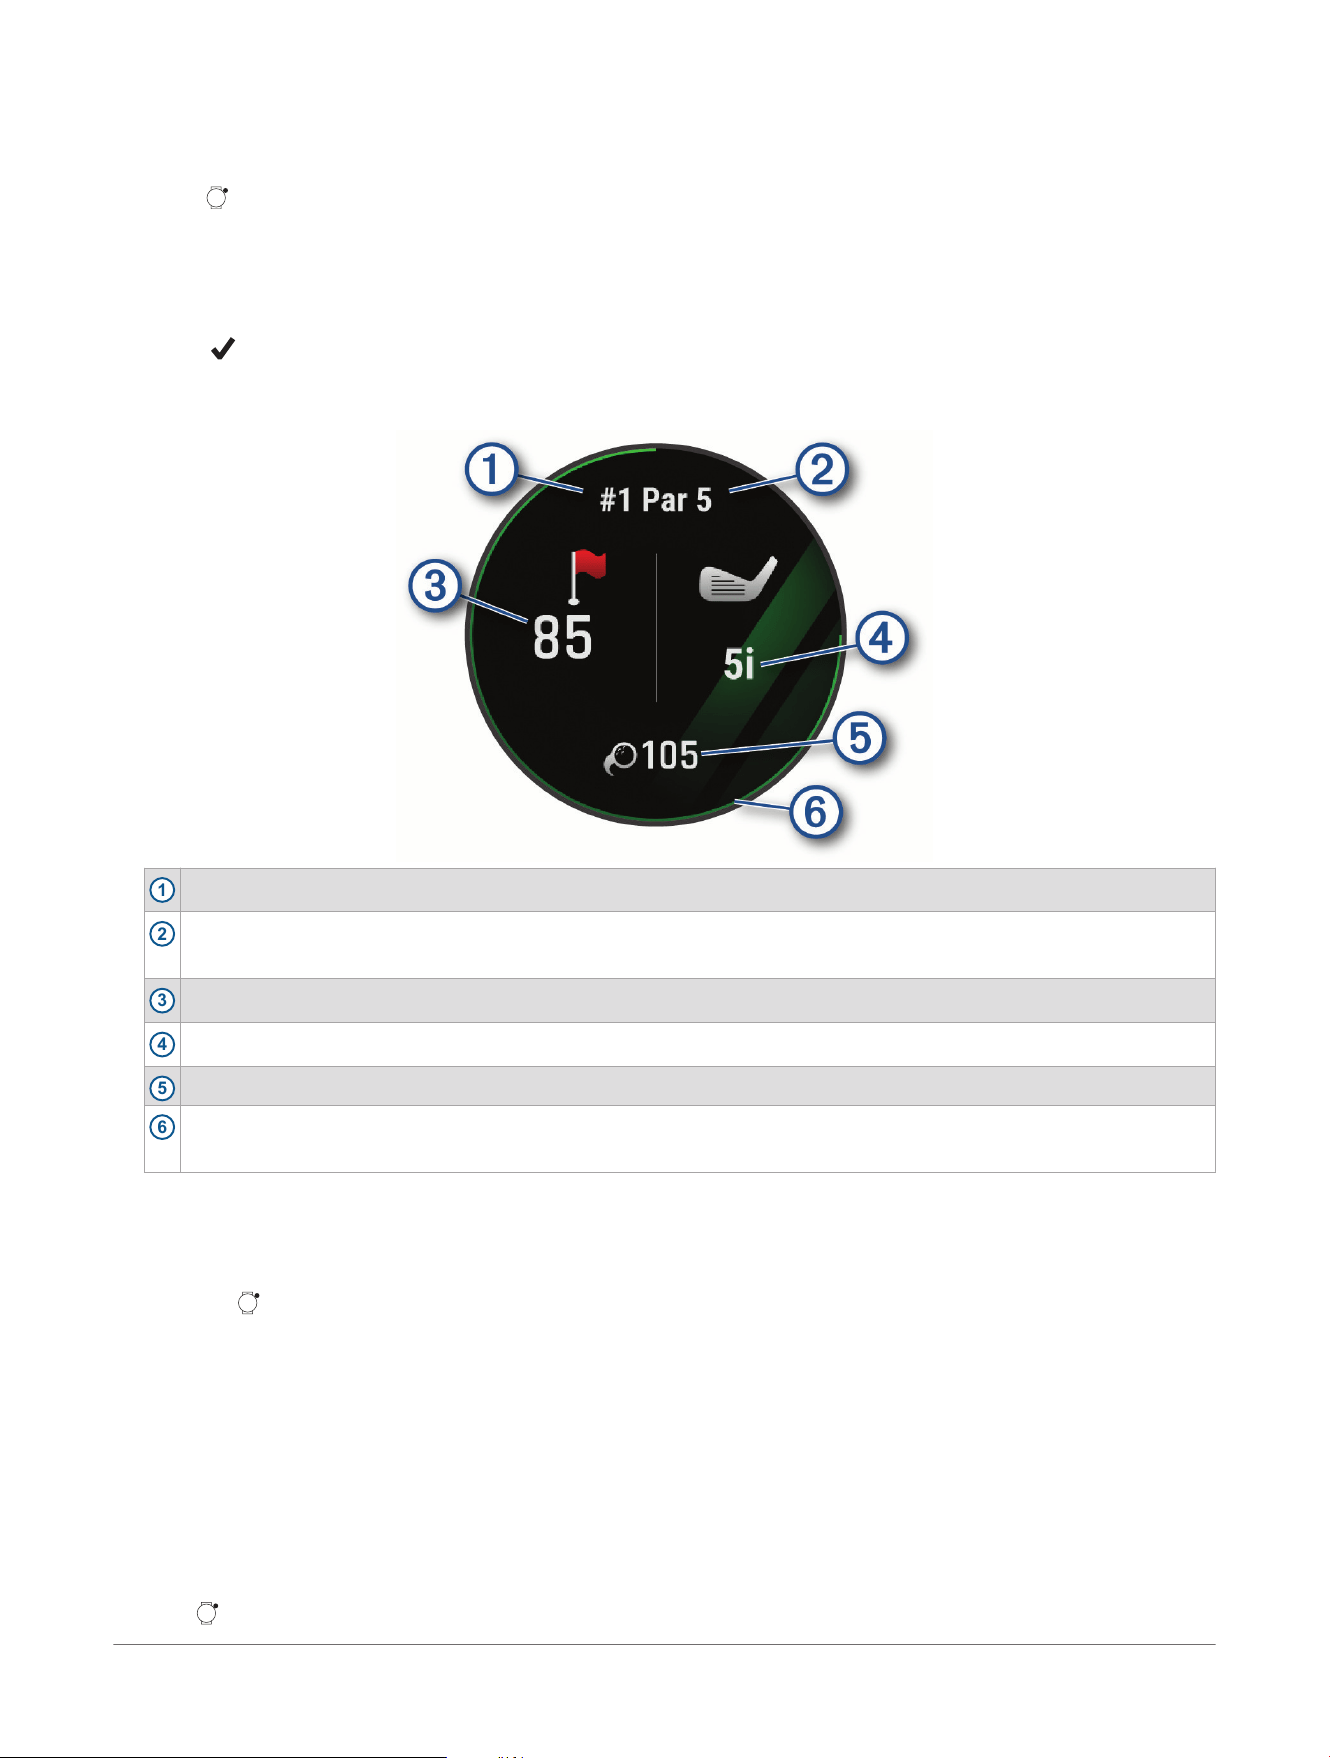
The hole information screen appears.
1
The current hole number.
2
Par for the current hole. Your personal par is displayed if the setting is enabled (Setting Your Personal Par,
page7).
3
The distance to the middle of the green.
4
The recommended club for the next shot if the Club Tracking setting is enabled (Golf Settings, page18).
5
The distance of the previous shot (Automatic Shot Detection, page9).
6
The pace of play timer. You should hit your shot before the countdown is complete and the colored ring
disappears from the screen.
6 Select an option:
● Swipe up or down to view the green, along with distances to the front, middle, and back of the green.
NOTE: Because pin locations change, the watch calculates the distance to the front, middle, and back of
the green, but not the actual pin location.
● Press to open the golf menu (Golf Menu, page7).
When you move to the next hole, the watch automatically transitions to display the new hole information.
Forward Tees
You are assigned a tee box level during initial setup based on your age. This can help make any golf course
playable, regardless of age or skill level. Higher levels are placed at the on-course tee boxes, while lower levels
are placed closer to the hole down the fairway. The watch provides on-screen directions to the tee location for
tee boxes on the fairway. You can manually change your tee box level (Changing Your Tee Box Level, page6)
Changing Your Tee Box Level
A tee box level is automatically assigned to you during initial setup based on your age. You can manually
change the tee level, or disable the feature.
1 Hold .
6
Approach® J1 Junior GPS Golf Watch
Owner's Manual
Playing Golf
2 Select Settings> Golf Settings> Forward Tees.
3 Select a tee level.
NOTE: Lower tee levels are closer to the hole down the fairway.
Setting Your Personal Par
The personal par setting adds a specified number of strokes to the par for every hole. This can be useful in
setting a realistic goal for less experienced players.
1 Hold .
2 Select Settings> Golf Settings> Personal Par.
3 If necessary, select Status> On.
4 Select Personal Par Per Hole.
5 Select an option.
Golf Menu
During a round, you can press to access additional features in the golf menu.
Hazards and Layups: Shows the location and distance to a layup or to the front and back of a hazard (Viewing
Hazards and Layups, page7).
View Green: Displays the shape and layout of the green. You can also move the pin location to get a more
precise distance measurement (Viewing the Green, page7).
Change Hole: Changes the current hole (Changing Holes, page8).
Change Green: Changes the green when more than one green is available for a hole (Changing Holes, page8).
Scorecard: Opens the scorecard for the round (Keeping Score, page8).
NOTE: If scoring is not enabled, you can select Start Scoring.
Round Info: Shows your score, statistics, and step information (Viewing Round Information, page9).
Last Shot: Shows the distance of your previous shot recorded with the Garmin AutoShot
™
feature (Viewing
Measured Shots, page9). You can also manually record a shot (Adding a Shot Manually, page10).
Add Back Nine: Adds the back nine holes when playing on a nine-hole course, allowing you to play a full round.
Settings: Customizes the golf activity settings (Activities and App Settings, page18).
End Round: Ends the current round (Ending a Round, page10).
Viewing the Green
While playing a round, you can take a closer look at the green and move the pin to get a more precise distance
measurement.
1 Press .
2 Select View Green.
3 Tap or drag to move the pin location.
The distances on the hole information screen are updated to reflect the new pin location. The pin location is
saved for only the current round.
Viewing Hazards and Layups
While playing a round, you can view the hazards and layups for the current hole.
1 Press .
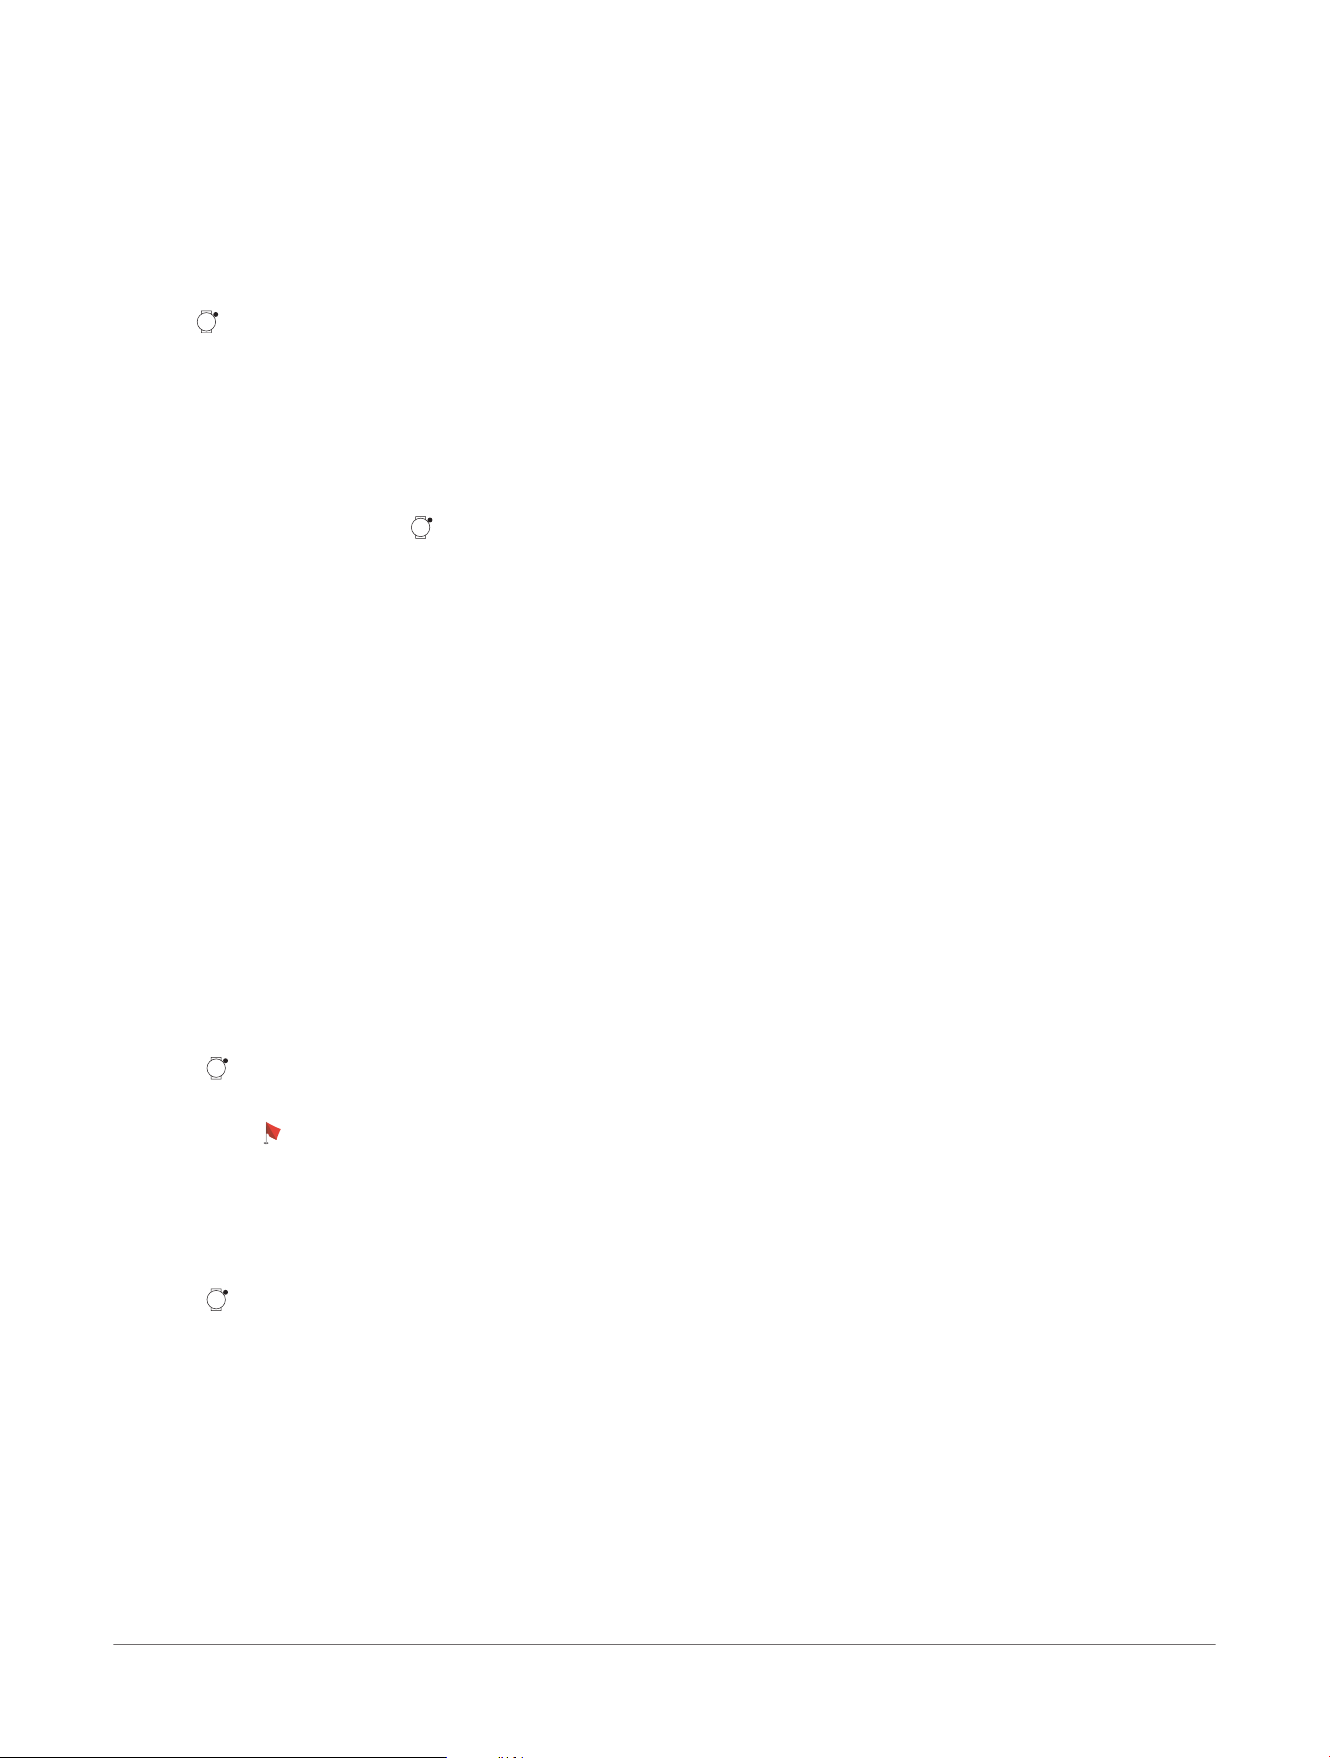
2 Select Hazards and Layups.
NOTE: A map of the current hole appears.
Playing Golf
Approach® J1 Junior GPS Golf Watch
Owner's Manual
7
1
The type of hazard or the layup distance.
2
The location of the hazard or layup.
3
Layup distances to the pin in meters or yards: redis100, whiteis150, blueis200, and yellowis250.
4
The distance to the layup or to the front and back of the hazard.
5
Arrows you can tap to view other hazards or layups for the hole.
Changing Holes
You can change holes manually from the hole view screen.
1 Press .
2 Select Change Hole.
3 Swipe up or down to select the hole.
Keeping Score
1 Press .
2 Select Scorecard.
NOTE: If scoring is not enabled, you can select Start Scoring.
3 Select a hole.
4 Select or to set the score.
Enabling Statistics Tracking
When you enable statistics tracking on the device, you can view your statistics for the current round (Viewing
Round Information, page9). You can compare rounds and track improvements using the Garmin Golf
™
app.
1 Hold .
2 Select Settings> Golf Settings> Stat Tracking> Status> On.
3 If necessary, select Fairway Tracking to track fairway information.
Recording Statistics
Before you can record statistics, you must enable statistics tracking (Enabling Statistics Tracking, page8).
1 From the scorecard, select a hole.
2 Enter the total number of strokes taken, including putts, and select Next.
3 Set the number of putts taken, and select Next.
NOTE: The number of putts taken is used for statistics tracking only and does not increase your score.
4 If necessary, select an option:
8
Approach® J1 Junior GPS Golf Watch
Owner's Manual
Playing Golf
NOTE: If you are on a par 3 hole or have the Fairway Tracking setting disabled (Enabling Statistics Tracking,
page8), fairway information does not appear. Fairway information also does not appear when using
Approach
®
sensors.
● If your ball hit the fairway, select .
● If your ball missed the fairway, select or .
5 If necessary, enter the number of penalty strokes.
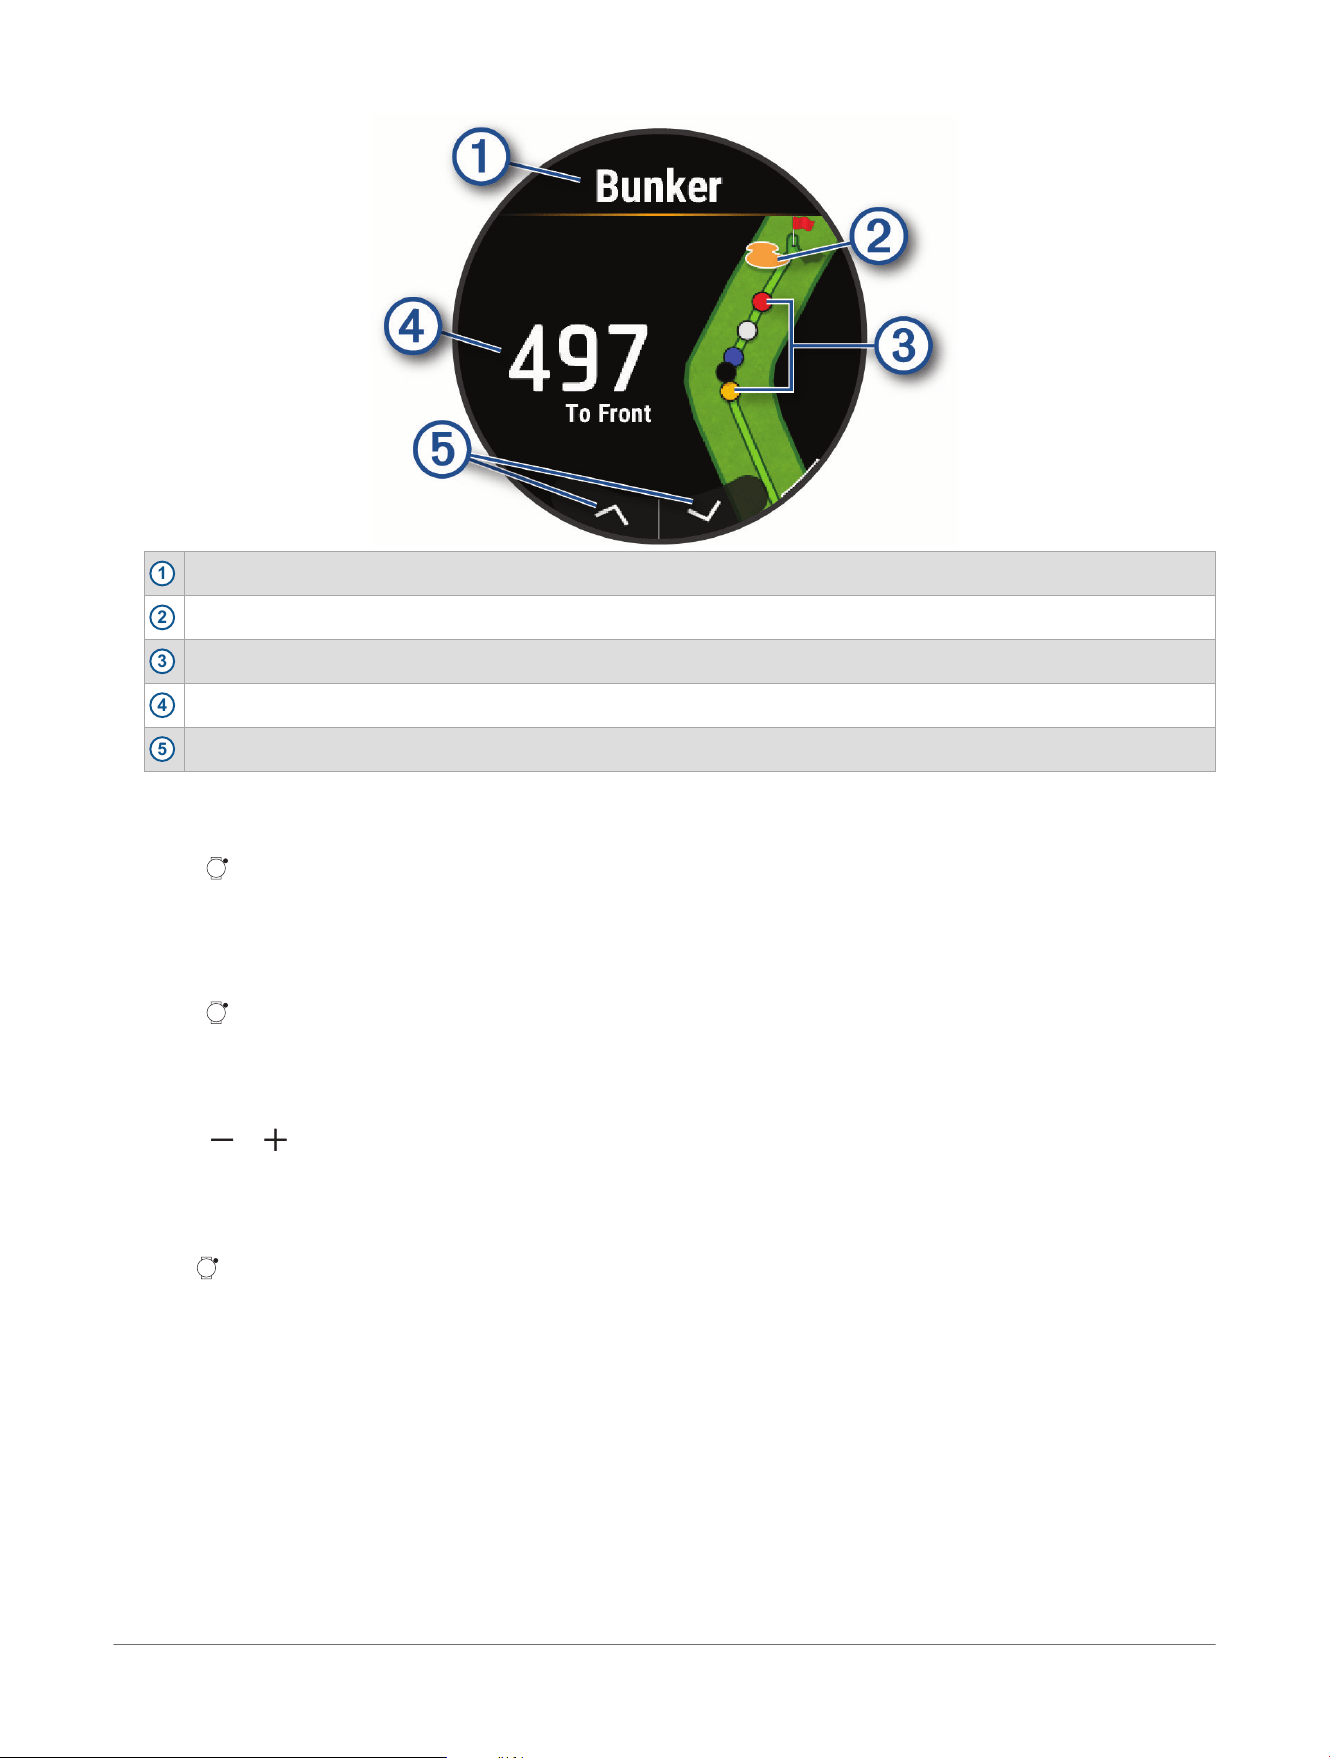
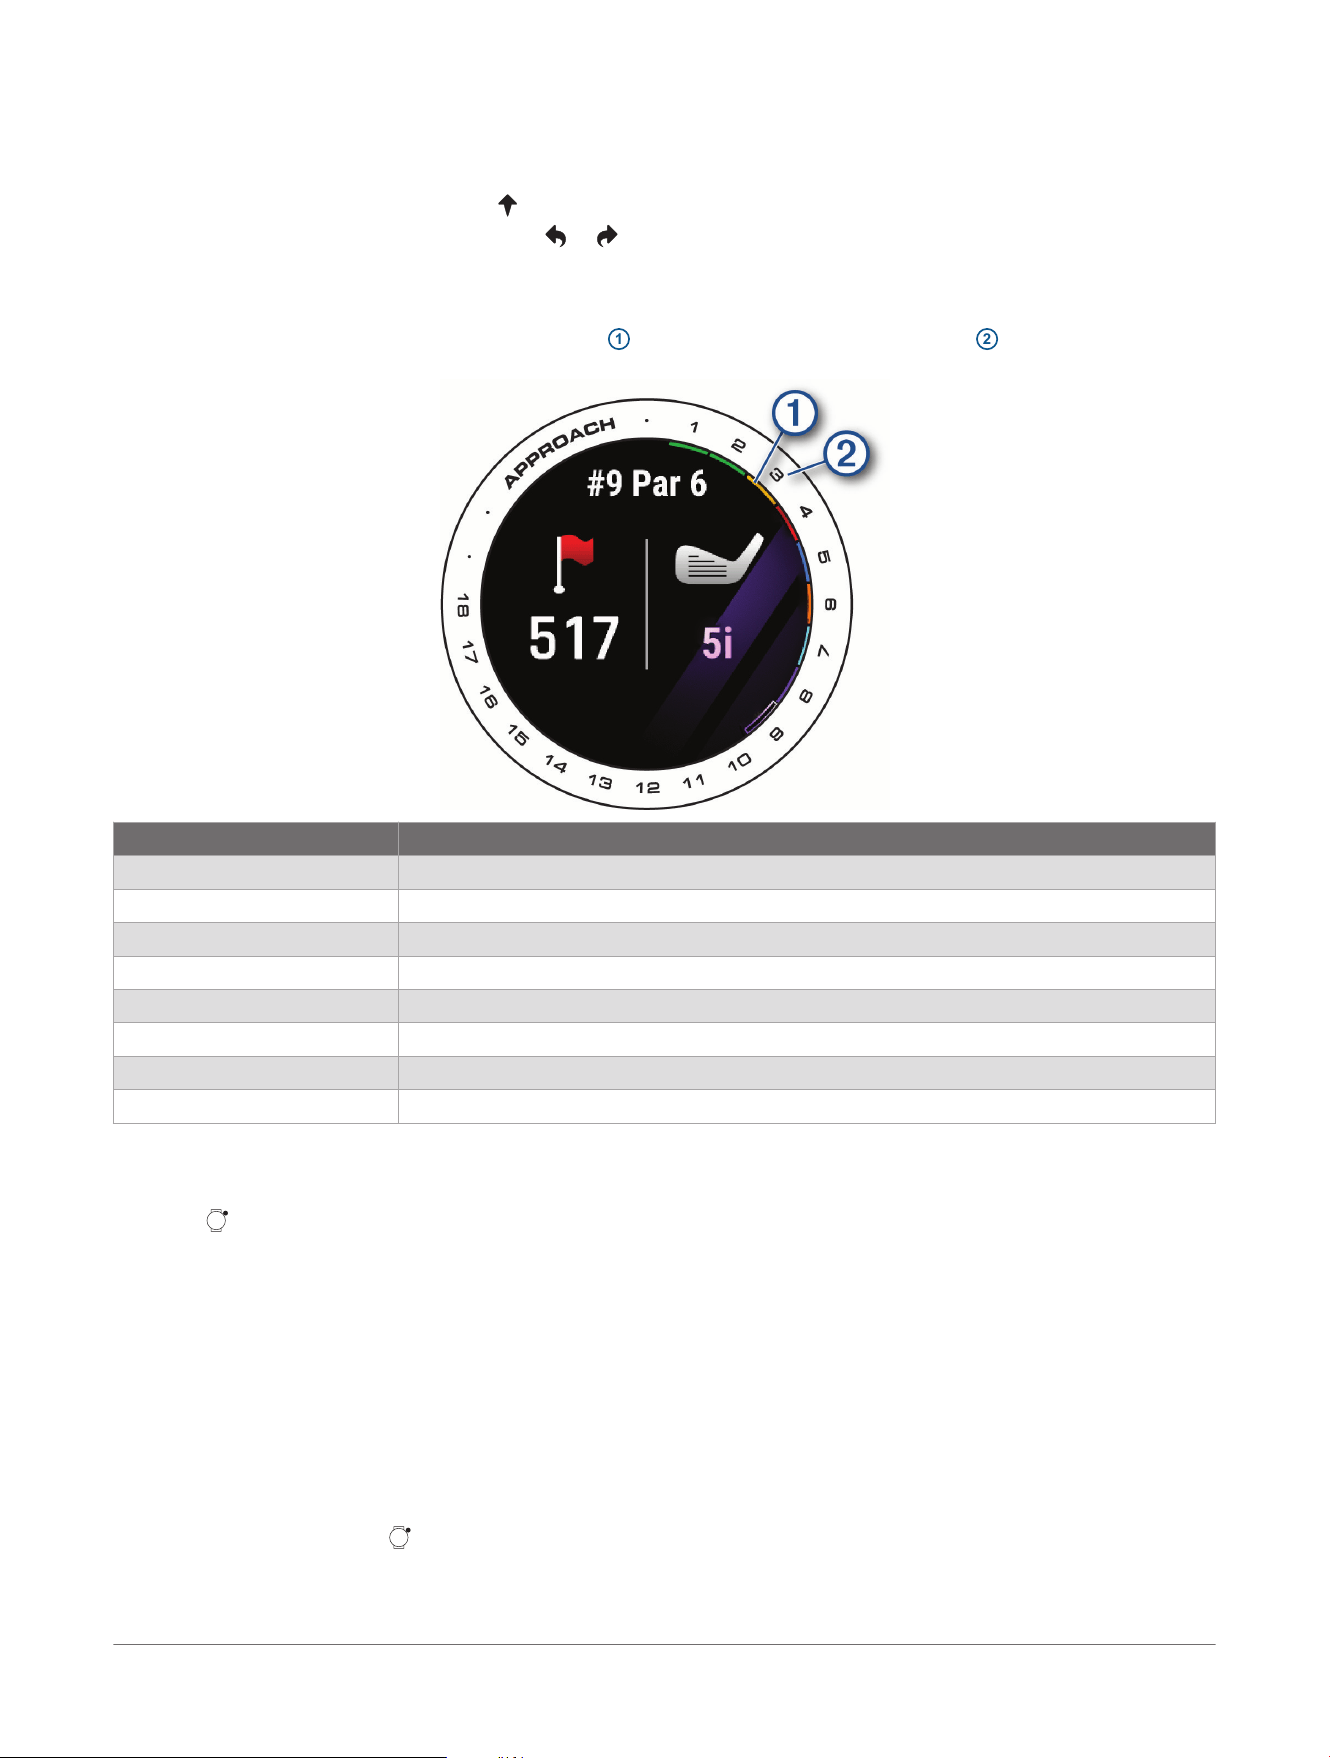
Score History
While playing a round, your watch displays a color
1
next to each of the hole indicators
2
along the bezel to
indicate your score on that hole.
Color Strokes Taken Relative to Par
Purple 5 or more over
Pink 4 over
Red 3 over
Orange 2 over
Yellow 1 over
Green Par
Light blue 1 under
Dark blue 2 or more under
Viewing Round Information
During a round, you can view your score, statistics, and step information.
1 Press .
2 Select Round Info.
3 Swipe up.
Automatic Shot Detection
Your watch features automatic shot detection and recording. Each time you take a shot along the fairway, the
watch records your shot distance so you can view it later.
TIP: Automatic shot detection works best when you wear the watch on your leading wrist and make good
contact with the ball. Putts are not detected by the watch. To detect putts automatically, you must be paired to
an Approach
®
golf club tracking accessory.
Viewing Measured Shots
1 While playing golf, press .
2 Select Last Shot.
Your last shot distance appears.
Playing Golf
Approach® J1 Junior GPS Golf Watch
Owner's Manual
9

NOTE: The distance automatically resets when you hit the ball again, putt on the green, or move to the next
hole.
3 Select > View More to view all recorded shot distances.
NOTE: The distance from the most recent shot also displays on the hole information screen.
Adding a Shot Manually
You can manually add a shot if the device doesn't detect it. You must add the shot from the location of the
missed shot.
1 Press .
2 Select Last Shot> > Add Shot.
3
Select to start a new shot from your current location.
Ending a Round
1 Press .
2 Select End Round.
3 Swipe up.
4 Select an option:
● To save the round and return to watch mode, select Save.
● To edit your scorecard, select Edit Score.
● To discard the round and return to watch mode, select Discard.
● To pause the round and resume it at a later time, select Pause.
10
Approach® J1 Junior GPS Golf Watch
Owner's Manual
Playing Golf

Connectivity
Connectivity features are available for your watch when you pair with your compatible phone (Pairing Your
Phone, page4).
Phone Connectivity Features
Phone connectivity features are available for your Approach
®
watch when you pair it using the Garmin Golf
™
app
(Pairing Your Phone, page4).
● App features from the Garmin Golf app (Garmin Golf
™
App, page11)
● App features from the Garmin Connect
™
app (Garmin Connect
™
, page11)
● Glances (Glances, page13)
● Controls menu features (Controls, page14)
Turning Off the Bluetooth
®
Phone Connection
1 Hold .
2 Select Settings> Phone> Status> Off to turn off the Bluetooth phone connection on your Approach
®
watch.
Refer to the owner's manual for your phone to turn off Bluetooth technology on your phone.
Turning On and Off Phone Connection Alerts
You can set the Approach
®
J1 watch to alert you when your paired phone connects and disconnects using
Bluetooth
®
technology.
NOTE: Phone connection alerts are turned off by default.
1 Hold .
2 Select Settings> Phone> Connected Alerts.
Phone Apps and Computer Applications
You can connect your watch to multiple Garmin
®
phone apps and computer applications using the same Garmin
account.
Garmin Golf
™
App
The Garmin Golf app allows you to upload scorecards from your Approach
®
J1 device to view detailed statistics
and shot analyses. Golfers can compete with each other at different courses using the Garmin Golf app. More
than 43,000 courses have leaderboards that anyone can join. You can set up a tournament event and invite
players to compete.
The Garmin Golf app syncs your data with your Garmin Connect
™
account. You can download the Garmin Golf
app from the app store on your phone (garmin.com/golfapp).
Automatic Course Updates
Your Approach
®
device features automatic course updates with the Garmin Golf
™
app. When you connect your
device to your smartphone, the golf courses you use most frequently are updated automatically.
Garmin Connect
™
When you pair your watch with your phone using the Garmin Golf
™
app, a Garmin Connect account is
automatically created. The Garmin Golf app syncs your data with your Garmin Connect account. You can
download the Garmin Connect app from the app store on your phone.
Your Garmin Connect account allows you to track your fitness and wellness performance and connect with your
friends. It gives you the tools to track, analyze, share, and encourage each other. You can record the events of
your active lifestyle, including runs, rides, swims, and more.
Store your activities: After you complete and save a timed activity with your watch, you can upload that activity
to your Garmin Connect account and keep it as long as you want.
Analyze your data: You can view more detailed information about your fitness and outdoor activities, including
time, distance, calories burned, an overhead map view, and pace and speed charts. You can also view
customizable reports.
Track your progress: You can track your daily steps, join a friendly competition with your connections, and meet
your goals.
Share your activities: You can connect with friends to follow each other's activities or post links to your
activities on your favorite social networking sites.
Connectivity
Approach® J1 Junior GPS Golf Watch
Owner's Manual
11

Garmin Connect
™
Child Accounts
A parent or guardian can create or approve child accounts for users who are under the digital age of consent.
This allows the child to have their own account and pair a device to the app, and it provides the parent or
guardian oversight of the child account. The adult account owner has access to the child account's settings and
data, and has the ability to receive notifications about the child account's activity. Once the child has reached
the age of consent, their account is converted into a standard Garmin Connect account.
Using the Smartphone Apps
After you pair your device with your smartphone (Pairing Your Phone, page4), you can use the Garmin Golf
™
and
Garmin Connect apps to upload all of your data to your Garmin
®
account.
1 Open the Garmin Golf or Garmin Connect app on your smartphone.
TIP: The app can be open or running in the background.
2 Bring your device within 10m (30ft.) of your smartphone.
Your device automatically syncs your data with your account.
Updating the Software Using the Smartphone Apps
After you pair your device with your smartphone (Pairing Your Phone, page4), you can use the Garmin Golf
™
and
Garmin Connect apps to update your device software.
Sync your device with one of the apps (Using the Smartphone Apps, page12).
When new software is available, the app automatically sends the update to your device.
Using Garmin Connect
™
on Your Computer
The Garmin Express
™
application connects your compatible Garmin
®
golf watch to your Garmin Connect account
using a computer.
1 Connect your Garmin golf watch to your computer using the USB cable.
2 Go to garmin.com/express.
3 Download and install the Garmin Express application.
4 Open the Garmin Express application, and select Add Device.
5 Follow the on-screen instructions.
Updating the Software Using Garmin Express
™
Before you can update your watch software, you must download and install the Garmin Express application and
add your watch (Using Garmin Connect
™
on Your Computer, page12).
1 Connect the watch to your computer using the USB cable.
When new software is available, the Garmin Express application sends it to your watch.
2 After the Garmin Express application finishes sending the update, disconnect the watch from your computer.
Your watch installs the update.
12
Approach® J1 Junior GPS Golf Watch
Owner's Manual
Connectivity
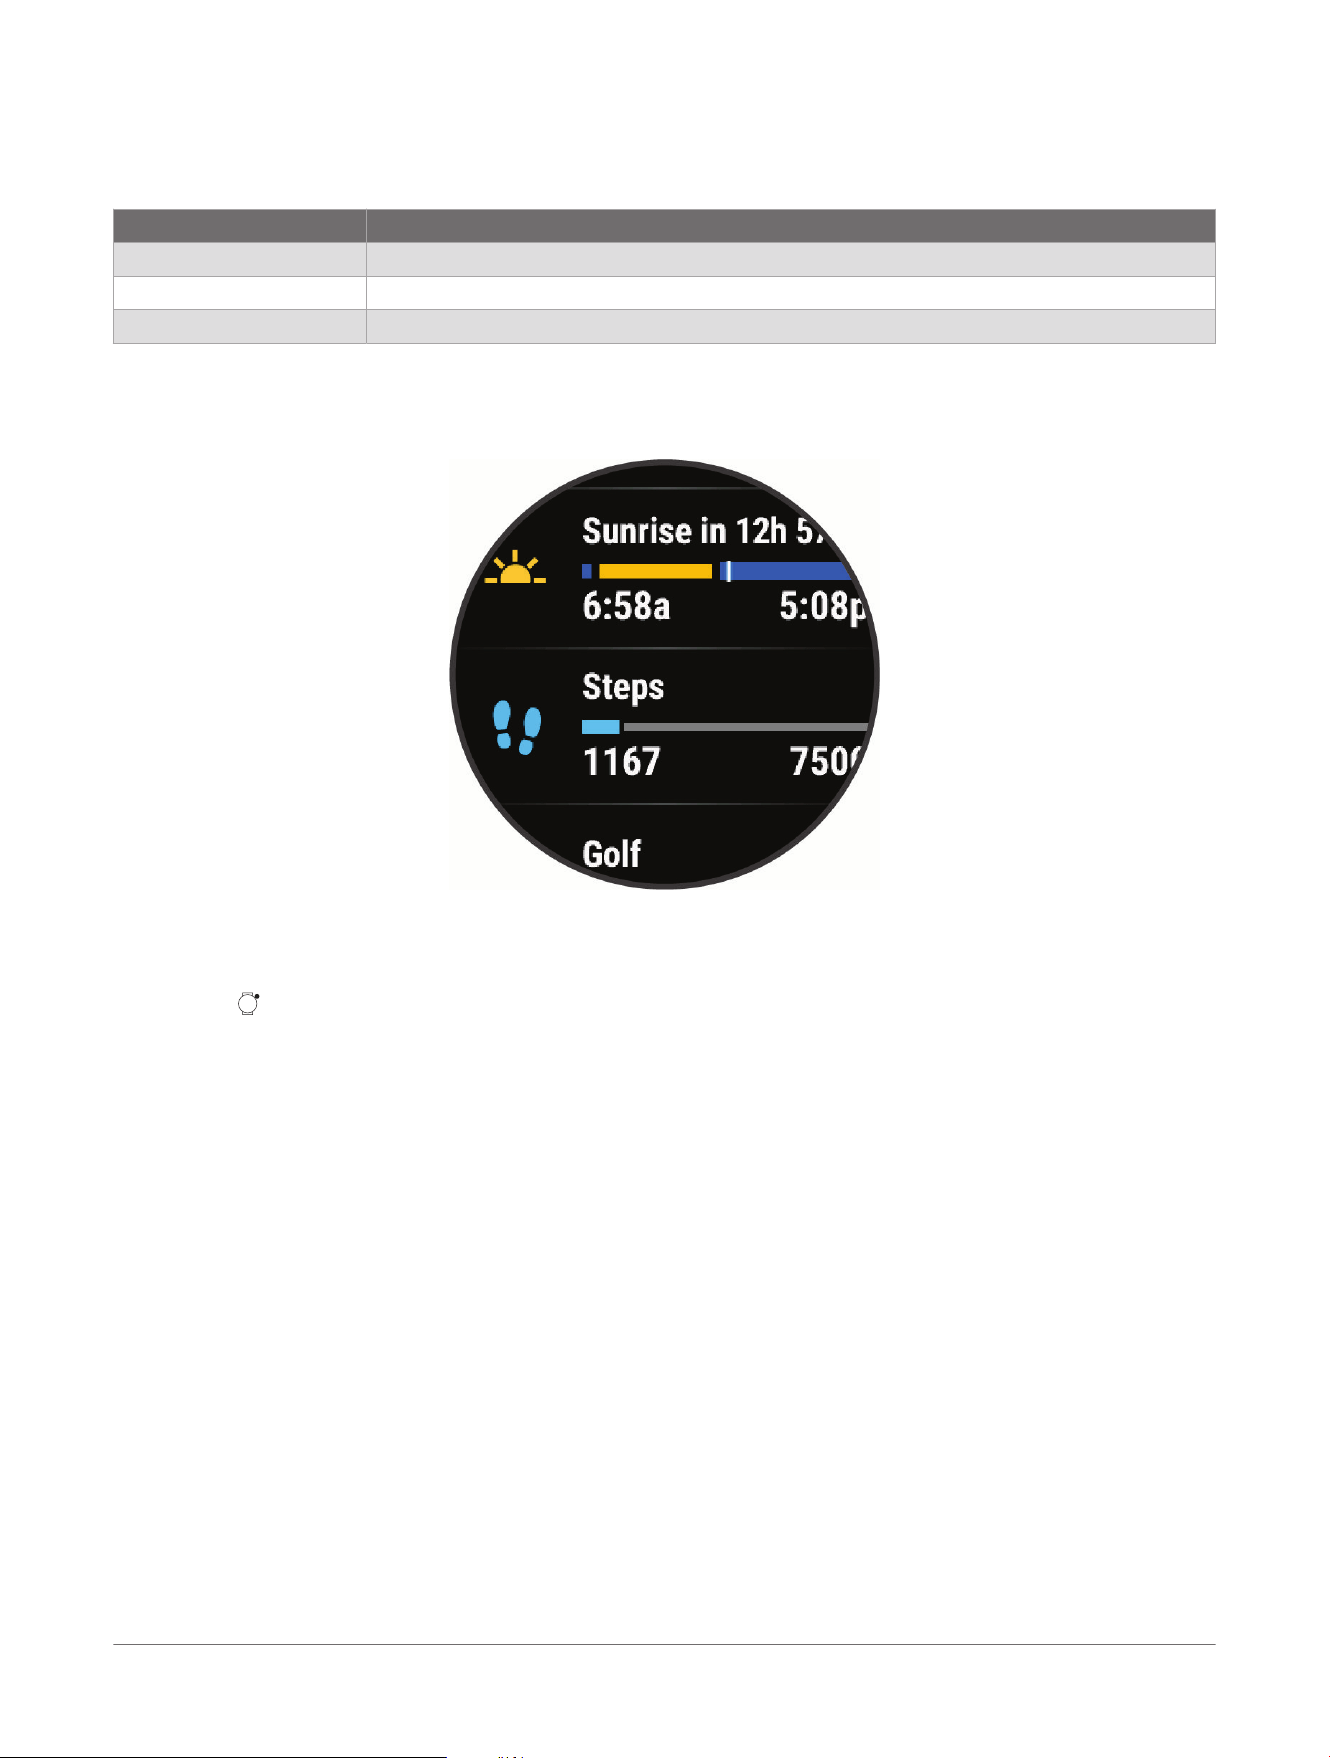
Glances
Your watch comes preloaded with glances that provide quick information (Viewing the Glance Loop, page13).
Some glances require a Bluetooth
®
connection to a compatible phone.
Name Description
Golf Displays golf scores and statistics for your last round.
Steps Tracks your daily step count, step goal, and data for previous days.
Sunrise and sunset Displays sunrise, sunset, and civil twilight times.
Viewing the Glance Loop
1 From the watch face, swipe up or down.
The watch scrolls through the glance loop and displays summary data for each glance.
2 Tap the touchscreen to view more information for the glance.
3 Select an option:
● Swipe up to view details about a glance.
● Press to view additional options and functions for a glance.
Glances
Approach® J1 Junior GPS Golf Watch
Owner's Manual
13
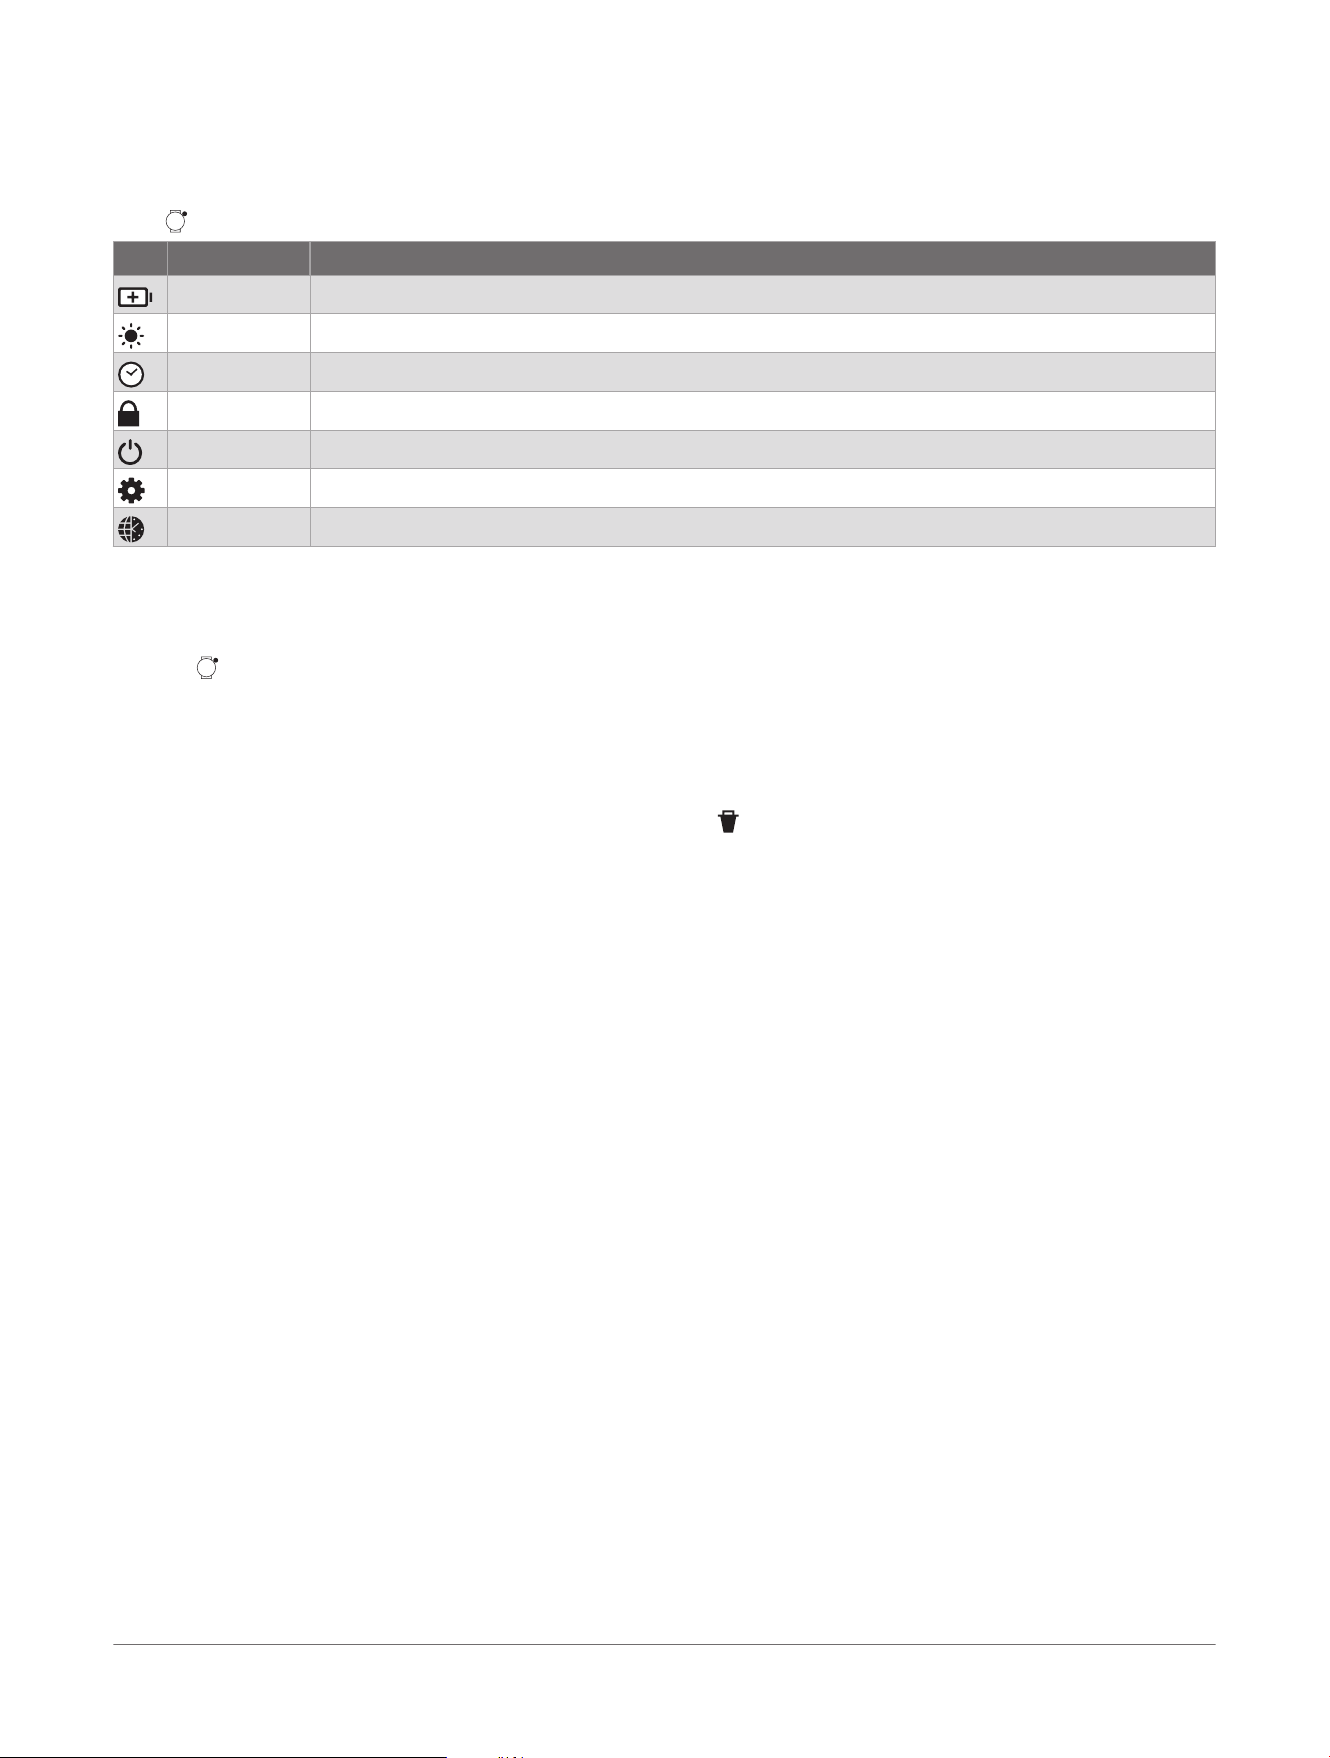
Controls
The controls menu lets you quickly access watch features and options. You can add, reorder, and remove the
options in the controls menu (Customizing the Controls Menu, page14).
Hold .
Icon Name Description
Battery Saver Select to enable the battery saver feature (Battery Manager Settings, page21).
Brightness Select to adjust the screen brightness (Customizing the Display Settings, page21).
Clocks Select to open the Clocks app to set an alarm, timer, or stopwatch (Clocks, page16).
Lock Screen Select to lock the buttons and the touchscreen to prevent inadvertent presses and swipes.
Power Off Select to turn off the watch.
Settings Select to open the settings menu.
Time Sync Select to sync your watch with the time on your phone or using satellites.
Customizing the Controls Menu
You can add, remove, and change the order of the shortcut menu options in the controls menu (Controls,
page14).
1 Hold .
2 Select Edit.
3 Select a shortcut to customize.
4 Select an option:
● To change the location of the shortcut in the controls menu, swipe up or down.
● To remove the shortcut from the controls menu, select .
5 If necessary, select Add to add an additional shortcut to the controls menu.
14
Approach® J1 Junior GPS Golf Watch
Owner's Manual
Controls
Activities
Starting an Activity
When you start an activity, GPSturns on automatically (if required).
1 Press .
2 Select .
3 Select an activity.
4 If the activity requires GPS signals, go outside to an area with a clear view of the sky, and wait until the
device is ready.
5 Press to start the activity timer.
The device records activity data only while the activity timer is running.
Stopping an Activity
1 Press .
2 Select an option:
● To save the activity, select .
● To discard the activity, select .
● To resume the activity, press .
Going for a Pool Swim
NOTE: The touchscreen is not available during swim activities.
1 Press .
2 Select .
3 Select Pool Swim.
4 Select your pool size, or enter a custom size.
5 Press to start the activity timer.
6 Start swimming.
The watch automatically records swim intervals and lengths.
7 Press when you rest.
TIP: You can enable the Auto Rest feature to set the watch to automatically detect when you are resting
and create a rest interval.
The rest screen appears.
8 Press to restart the interval timer.
9 After you complete your activity, press to stop the activity timer.
10 Select an option:
● To save the activity, hold .
● To discard the activity, hold .
Swim Terminology
Length: One trip down the pool.
Interval: One or more consecutive lengths. A new interval starts after a rest.
Stroke: A stroke is counted every time your arm wearing the device completes a full cycle.
Swolf: Your swolf score is the sum of the time for one pool length and the number of strokes for that length.
For example, 30 seconds plus 15 strokes equals a swolf score of 45. Swolf is a measurement of swimming
efficiency and, like golf, a lower score is better.
Outdoor Activities
The Approach
®
watch comes preloaded with outdoor activities, such as running and biking. GPS is turned on for
outdoor activities.
Activities
Approach® J1 Junior GPS Golf Watch
Owner's Manual
15
Clocks
Setting an Alarm
You can set multiple alarms. You can set each alarm to occur once or to repeat regularly.
1 Hold .
2 Select Clocks> Alarms> Add Alarm.
3 Enter a time.
4 Select the alarm.
5 Select Repeat, and select an option.
6 Select Label, and select a description for the alarm.
Using the Stopwatch
1 Hold .
2 Select Clocks> Stopwatch.
3 Press to start the timer.
4 Press to restart the lap timer.
The total stopwatch time continues running.
5 Press to stop the timer.
6 Select an option:
● To reset the timer, swipe down.
● To save the stopwatch time as an activity, swipe up, and select Save.
● To review the lap timers, swipe up, and select Review Laps.
● To exit the stopwatch, swipe up, and select Done.
Starting the Countdown Timer
1 Hold .
2 Select Clocks> Timer.
3 Enter the time, and select .
4 Press .
16
Approach® J1 Junior GPS Golf Watch
Owner's Manual
Clocks

Activity Tracking
You can view activity tracking data and recorded activities in the Garmin Connect
™
app.
Auto Goal
Your device creates a daily step goal automatically, based on your previous activity levels. As you move during
the day, the device shows your progress toward your daily goal.
If you choose not to use the auto goal feature, you can set a personalized step goal on your Garmin Connect
™
account.
Move IQ
®
When your movements match familiar exercise patterns, the Move IQ feature automatically detects the event
and displays it in your timeline. The Move IQ events show activity type and duration, but they do not appear in
your activities list or newsfeed.
The Move IQ feature can automatically start a timed activity for walking and running using time thresholds you
set in the Garmin Connect
™
app or the watch activity settings. These activities are added to your activities list.
Activity Tracking Settings
Hold , and select Settings> Activity Tracking.
Status: Turns off the activity tracking features.
Move IQ: Allows you to turn on and off Move IQ events.
Auto Activity Start: Allows your watch to create and save timed activities automatically when the Move IQ
feature detects you are walking or running. You can set the minimum time threshold for running and walking.
Turning Off Activity Tracking
When you turn off activity tracking, your steps and Move IQ events are not recorded.
1 From the watch face, hold .
2 Select Settings> Activity Tracking> Status> Off.
Activity Tracking
Approach® J1 Junior GPS Golf Watch
Owner's Manual
17
Customizing Your Device
Changing the Watch Face
You can choose from several preloaded watch faces. You can also edit each watch face (Editing a Watch Face,
page18).
1 Hold .
2 Select Settings> Watch Face.
3 Swipe right or left to scroll through the available watch faces.
4 Tap the touchscreen to select the watch face.
Editing a Watch Face
You can customize the style and data fields for the watch face.
NOTE: You cannot edit some watch faces.
1 Hold .
2 Select Settings> Watch Face.
3 Swipe right or left to scroll through the available watch faces.
4 Select to edit a watch face.
5 Select an option to edit.
6 Swipe up or down to scroll through the options.
7 Press to select the option.
8 Tap the touchscreen to select the watch face.
Golf Settings
Hold , and select Settings> Golf Settings to customize golf settings and features.
Personal Par: Sets the number of strokes that are automatically added to the par for every hole (Setting Your
Personal Par, page7).
Forward Tees: Sets your tee box level (Forward Tees, page6).
Stat Tracking: Enables statistics tracking for the number of putts, greens in regulation, and fairways hit while
playing golf (Recording Statistics, page8).
Driver Distance: Sets the average distance the ball travels from the tee box on your drive. This helps determine
your club recommendation.
Golf Distance: Sets the unit of measure for distance while playing golf.
Club Tracking: Displays a recommended club for each shot, and allows you to manage what clubs are available
for recommendations.
Activities and App Settings
These settings allow you to customize each preloaded activity app based on your needs. For example, you can
customize data pages and enable alerts and training features. Not all settings are available for all activity types.
From the watch face, press , select , select an activity, and select .
TIP: You can also edit the activity settings while you are exercising. During an activity, hold , select Settings,
and select Current Activity.
Accent Color: Sets the accent color of each activity to help identify which activity is active.
Alerts: Sets the training or navigation alerts for the activity (Activity Alerts, page19).
Auto Lap: Marks laps automatically at a specified distance. This feature is helpful for comparing your
performance over different parts of an activity (for example, every 1 mile or 5 kilometers).
Auto Pause: Sets the device to stop recording data when you stop moving or when you drop below a specified
speed. This feature is helpful if your activity includes stop lights or other places where you must stop.
Auto Rest: Automatically creates a rest interval when you stop moving during a pool swim activity.
Data Screens: Customizes data screens and adds new data screens for the activity (Customizing the Data
Screens, page19).
GPS: Sets the satellite system to use for the activity (Satellite Settings, page19).
Pool Size: Sets the pool length for pool swimming.
Rename: Sets the activity name.
18
Approach® J1 Junior GPS Golf Watch
Owner's Manual
Customizing Your Device
Customizing the Data Screens
You can customize the data fields for each data screen.
1 Press .
2 Select .
3 Select an activity.
4 Select .
5 Select Data Screens.
6 Select one or more options:
NOTE: Not all options are available for all activities.
● To adjust the style and number of data fields on each data screen, select the screen, and select Layout.
● To customize the fields on a data screen, select the screen, and select Edit Data Fields.
● To show or hide a data screen, select the toggle switch next to the screen.
Satellite Settings
You can change the satellite settings to customize the satellite systems used for each activity. For more
information about satellite systems, go to garmin.com/aboutGPS.
Press , select , select an activity, select , and select GPS.
NOTE: This feature is not available for all activities.
Off: Disables satellite systems for the activity.
GPS Only: Enables the GPS satellite system.
All Systems: Enables multiple satellite systems. Using multiple satellite systems together offers increased
performance in challenging environments and faster position acquisition than using GPS only. However,
using multiple systems can reduce battery life more quickly than using GPS only.
Activity Alerts
You can set alerts for each activity, which can help you to train toward specific goals or increase your
awareness of your environment. Some alerts are available only for specific activities. There are three types
of alerts: event alerts, range alerts, and recurring alerts.
Event alert: An event alert notifies you once. The event is a specific value. For example, you can set the watch to
alert you when you burn a specified number of calories.
Range alert: A range alert notifies you each time the watch is above or below a specified range of values. For
example, you can set the watch to alert you when your pace is above 10 minutes per mile and below 15
minutes per mile.
Recurring alert: A recurring alert notifies you each time the watch records a specified value or interval. For
example, you can set the watch to alert you every 30minutes.
Alert Name Alert Type Description
Cadence Range You can set minimum and maximum cadence values.
Calories Event, recurring You can set the number of calories.
Custom Event, recurring You can select an existing message or create a custom message and select an alert
type.
Distance Recurring You can set a distance interval.
Pace Range You can set minimum and maximum pace values.
Run/Walk Recurring You can set timed walking breaks at regular intervals.
Speed Range You can set minimum and maximum speed values.
Stroke Rate Range You can set high or low strokes per minute.
Time Event, recurring You can set a time interval.
Setting an Alert
1 Press .
2 Select .
3 Select an activity.
4 Select .
Customizing Your Device
Approach® J1 Junior GPS Golf Watch
Owner's Manual
19

5 Select Alerts.
6 Select an option:
● Select Add New to add a new alert for the activity.
● Select the alert name to edit an existing alert.
7 If necessary, select the type of alert.
8 Select a zone, enter the minimum and maximum values, or enter a custom value for the alert.
9 If necessary, turn on the alert.
For event and recurring alerts, a message appears each time you reach the alert value. For range alerts, a
message appears each time you exceed or drop below the specified range (minimum and maximum values).
User Profile
You can update your user profile on your watch or on the Garmin Connect
™
app.
Setting Up Your User Profile
You can update your age, gender, and golf swing hand preference. The watch uses this information to calculate
accurate training data.
1 Hold .
2 Select Settings> User Profile.
3 Select an option.
Gender Settings
When you first set up the watch, you must choose a sex. Most fitness and training algorithms are binary. For the
most accurate results, Garmin
®
recommends selecting your sex assigned at birth. After the initial setup, you can
customize the profile settings in your Garmin Connect
™
account.
Profile & Privacy: Enables you to customize the data on your public profile.
User Settings: Sets your sex. If you select Not Specified, the algorithms that require a binary input will use the
sex you specified when you first set up the watch.
System Settings
Hold , and select Settings> System.
Display: Adjusts the screen settings (Customizing the Display Settings, page21).
Vibration: Turns vibration on or off and sets the vibration intensity.
Battery Manager: Sets how the remaining battery life displays and enables Battery Saver to extend battery life
(Battery Manager Settings, page21).
Time: Adjusts the time settings (Time Settings, page20).
Units: Sets the units of measure used on the watch (Changing the Units of Measure, page21).
Auto Lock: Locks the buttons and touchscreen automatically to prevent accidental button presses and
touchscreen swipes.
Language: Sets the language displayed on the watch.
Reset: Resets the default settings or deletes personal data and resets the settings (Resetting All Default
Settings, page21).
Software Update: Checks for software updates.
About: Displays device, software, license, and regulatory information.
Advanced: Sets advanced system settings (Advanced Settings, page21).
Time Settings
Hold , and select Settings> System> Time.
Time Format: Sets the watch to show time in a 12-hour, 24-hour, or military format.
Time Source: Sets the time for the watch. The Auto option sets the time automatically based on your GPS
position.
Time: Adjusts the time if the Time Source option is set to Manual.
Time Sync: Allows you to manually sync the time when you change time zones, and to update for daylight
saving time.
20
Approach® J1 Junior GPS Golf Watch
Owner's Manual
Customizing Your Device

Customizing the Display Settings
1 Hold .
2 Select Settings> System> Display.
3 Turn Large Fonts on to increase the size of the text on the screen.
4 Select Brightness to set the brightness level of the screen.
5 Select General Use or During Activity.
6 Select an option:
● Select Timeout to set the length of time before the screen turns off.
● Select Always On to keep the watch face data visible and turn down the brightness and background. This
option impacts the battery and display life (About the AMOLED Display, page22).
● Select Gesture to turn on the screen by raising and turning your arm to look at your wrist.
● Select Sensitivity to adjust the gesture sensitivity to turn on the display more or less often.
7 Select During Sleep> Watch Face to choose a sleep watch face with minimal, dim settings or to keep the
default watch face on during your sleep window.
NOTE: Your sleep window is from 10:00 p.m. until 6:00 a.m.
Battery Manager Settings
Hold , and select Settings> System> Battery Manager.
Battery Saver: Turns off certain features to maximize battery life.
Battery %: Displays the battery life as a remaining percentage.
Battery Est.: Displays the battery life as a remaining time estimate.
Changing the Units of Measure
You can customize units of measure for distance, pace and speed, weight, height, and temperature.
1 Hold .
2 Select Settings> System> Units.
3 Select a measurement type.
4 Select a unit of measure.
Resetting All Default Settings
Before you reset all default settings, you should sync the watch with the Garmin Connect
™
app to upload your
activity data.
You can reset all of the watch settings to the factory default values.
1 Hold .
2 Select Settings> System> Reset.
3 Select an option:
● To reset all of the watch settings to the factory default values, including user profile data, but save activity
history and downloaded apps and files, select Reset Default Settings.
● To reset all of the watch settings to the factory default values and delete all user-entered information and
activity history, select Delete Data and Reset Settings.
Advanced Settings
Hold , and select Settings> System> Advanced.
Data Recording: Sets how the device records activity data. The Smart recording option (default) allows for
longer activity recordings. The Every Second recording option provides more detailed activity recordings, but
may not record entire activities that last for longer periods of time.
USB Mode: Sets the watch to use MTP (media transfer protocol) or Garmin
®
mode when connected to a
computer. Garmin mode allows you to continue using the watch while it is plugged in to a power source.
Customizing Your Device
Approach® J1 Junior GPS Golf Watch
Owner's Manual
21
Device Information
About the AMOLED Display
By default, the watch settings are optimized for battery life and performance (Maximizing Battery Life,
page25).
Image persistence, or pixel "burn-in," is normal behavior for AMOLED devices. To extend the display life, you
should avoid displaying static images at high brightness levels for long time periods. To minimize burn-in, the
Approach
®
J1 display turns off after the selected timeout (Customizing the Display Settings, page21). You can
turn your wrist toward your body, tap the touchscreen, or press a button to wake the watch.
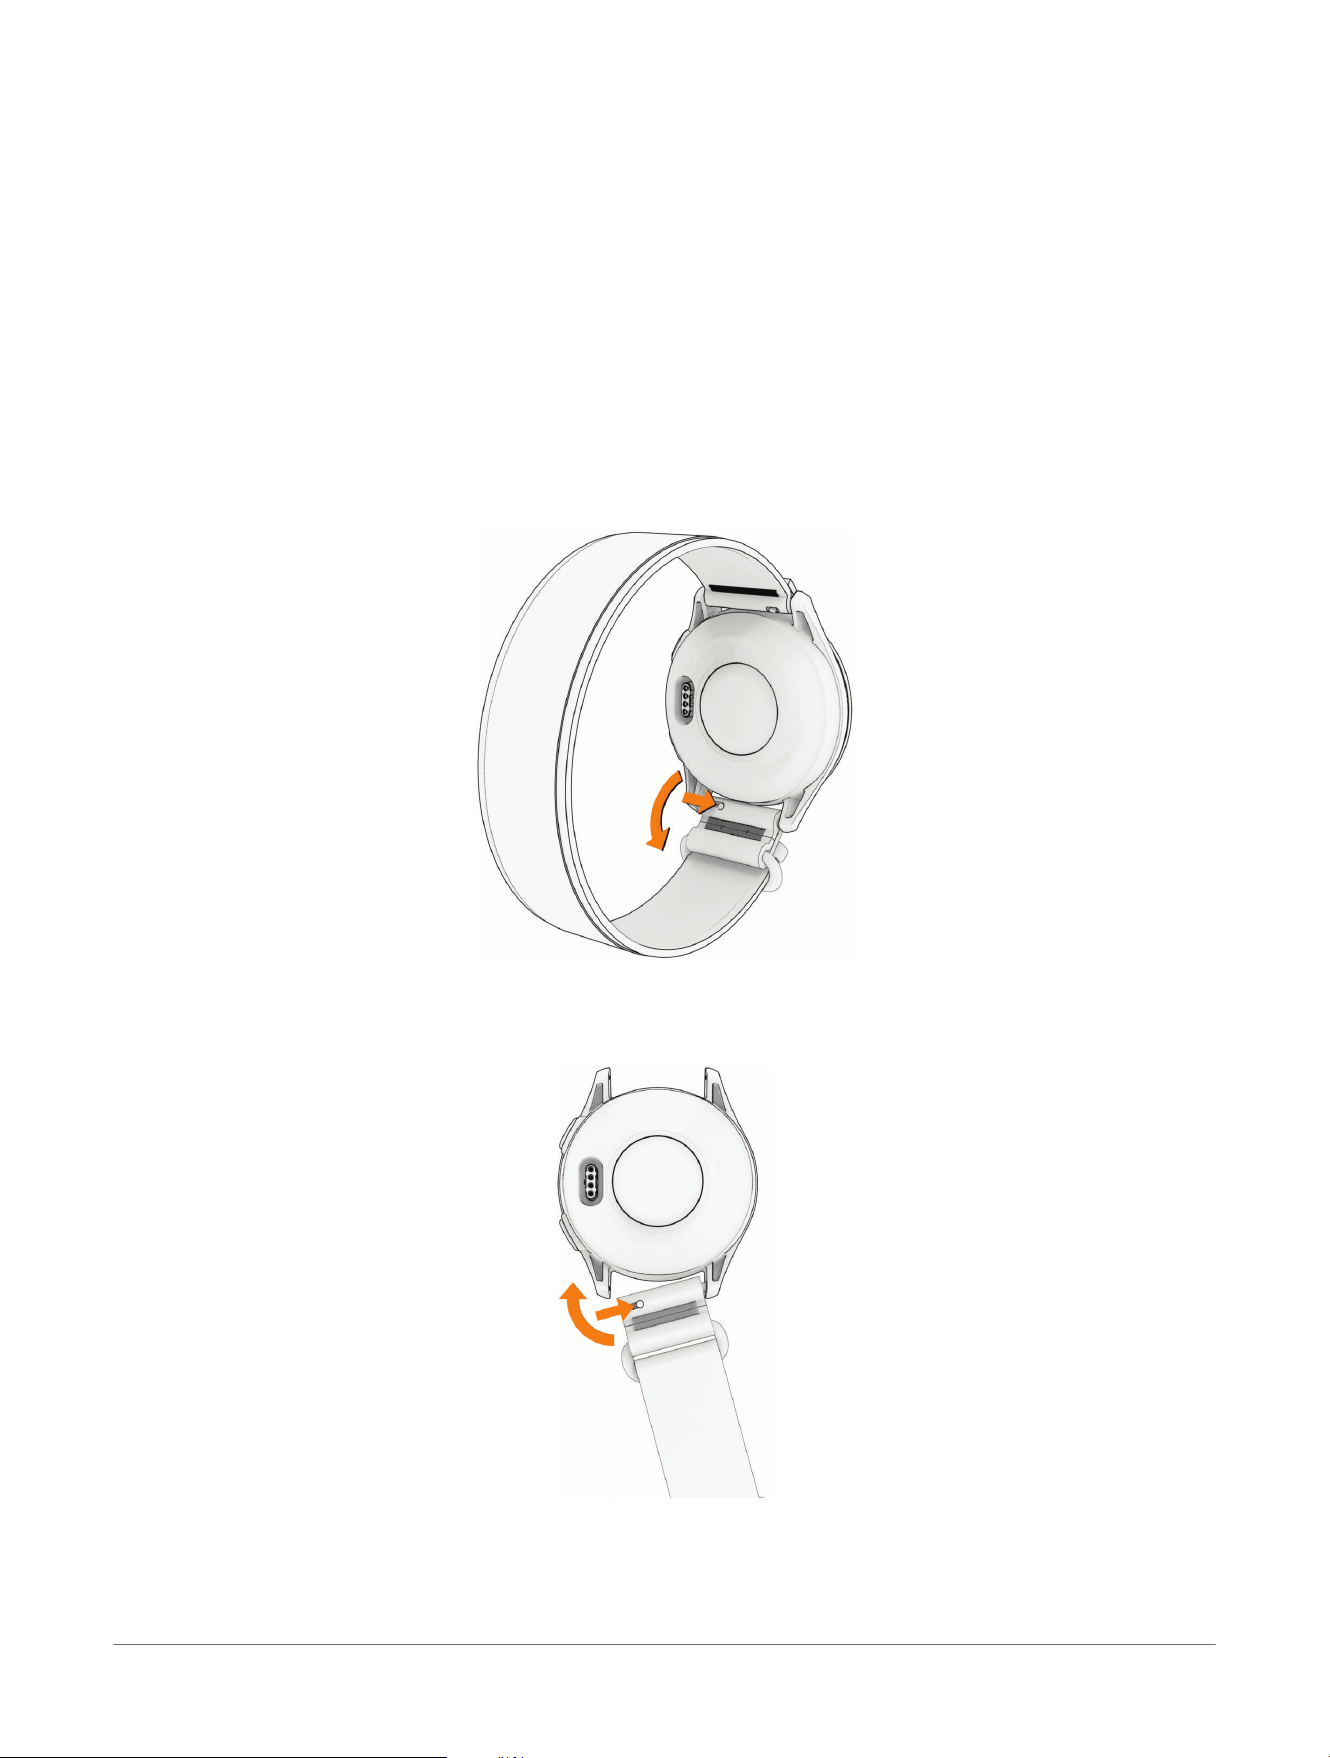
Changing the Band
You can replace the band with a new Approach
®
J1 band. To purchase replacement bands, go to
buy.garmin.com.
NOTE: The watch is not compatible with third-party bands.
1 Slide the quick-release pin on the spring bar to remove one end of the band.
2 Repeat the step to remove the other end of the band.
3 Insert one side of the spring bar for the new band into the watch.
4 Slide the quick-release pin, and press the band into place.
5 Repeat the steps to install the other end of the band.
22
Approach® J1 Junior GPS Golf Watch
Owner's Manual
Device Information

Specifications
Battery type Rechargeable, built-in lithium-ion battery
Water rating
5ATM
1
Operating and storage temperature range From -20º to 60ºC (from -4º to 140ºF)
Charging temperature range From 0º to 45ºC (from 32º to 113ºF)
European Union (EU) wireless frequencies (power) 2,4 GHz: <13 dBm; 13,56 MHz: <42 dBuA/m @ 10m
Battery Information
The actual battery life depends on the features enabled on your watch.
Mode Battery Life
Smartwatch mode Up to 10 days typical use
All satellite systems mode Up to 15 hr. typical use
Device Care
NOTICE
Avoid extreme shock and harsh treatment, because it can degrade the life of the product.
Avoid pressing the buttons under water.
Do not use a sharp object to clean the device.
Never use a hard or sharp object to operate the touchscreen, or damage may result.
Avoid chemical cleaners, solvents, and insect repellents that can damage plastic components and finishes.
Thoroughly rinse the device with fresh water after exposure to chlorine, salt water, sunscreen, cosmetics,
alcohol, or other harsh chemicals. Prolonged exposure to these substances can damage the case.
Do not store the device where prolonged exposure to extreme temperatures can occur, because it can cause
permanent damage.
Cleaning the Watch
CAUTION
Some users may experience skin irritation after prolonged use of the watch, especially if the user has sensitive
skin or allergies. If you notice any skin irritation, remove the watch and give your skin time to heal. To help
prevent skin irritation, ensure the watch is clean and dry, and do not overtighten the watch on your wrist.
NOTICE
Even small amounts of sweat or moisture can cause corrosion of the electrical contacts when connected to a
charger. Corrosion can prevent charging and data transfer.
TIP: For more information, go to garmin.com/fitandcare.
1 Rinse with water, or use a damp lint-free cloth.
2 Allow the watch to dry completely.
Long-Term Storage
When you do not plan to use the device for several months, you should charge the battery to at least 50% before
you store the device. You should store the device in a cool, dry place with temperatures around the typical
household level. After storage, you should fully recharge the device before using it.
Viewing Device Information
You can view device information, such as the unit ID, software version, regulatory information, and license
agreement.
1 Hold .
2 Select Settings> System> About.
1
The device withstands pressure equivalent to a depth of 50m. For more information, go to www.garmin.com/waterrating.
Device Information Approach® J1 Junior GPS Golf Watch
Owner's Manual
23

Viewing E-label Regulatory and Compliance Information
The label for this device is provided electronically. The e-label may provide regulatory information, such as
identification numbers provided by the FCC or regional compliance markings, as well as applicable product and
licensing information.
1 Hold .
2 From the settings menu, select System.
3 Select About.
24 Approach® J1 Junior GPS Golf Watch
Owner's Manual
Device Information

Troubleshooting
Getting More Information
You can find more information about this product on the Garmin
®
website.
● Go to support.garmin.com for additional manuals, articles, and software updates.
● Go to buy.garmin.com, or contact your Garmin dealer for information about optional accessories and
replacement parts.
Maximizing Battery Life
You can do several things to extend the life of the battery.
● Turn on Battery Saver (Battery Manager Settings, page21).
● Stop using the Always On display timeout option, and select a shorter display timeout (Customizing the
Display Settings, page21).
● Reduce the display brightness (Customizing the Display Settings, page21).
● Switch from a live watch face to a watch face with a static background (Changing the Watch Face, page18).
● Turn off Bluetooth
®
technology when you are not using connected features (Turning Off the Bluetooth
®
Phone
Connection, page11).
● Turn off activity tracking (Activity Tracking Settings, page17).
My device cannot find nearby golf courses
If a course update is interrupted or canceled before it completes, your device may be missing course data. To
repair missing course data, you must update the courses again.
1 Download and install course updates from the Garmin Express
™
application (Updating the Software Using
Garmin Express
™
, page12).
2 Safely disconnect your device.
3 Go outside, and start a test round of golf to verify the device finds nearby courses.
Is my phone compatible with my watch?
The Approach
®
J1 watch is compatible with phones using Bluetooth technology.
Go to garmin.com/ble for Bluetooth compatibility information.
My phone will not connect to the watch
If your phone will not connect to the watch, you can try these tips.
● Turn off your phone and your watch, and turn them back on again.
● Enable Bluetooth
®
technology on your phone.
● Update the Garmin Golf
™
app to the latest version.
● Remove your watch from the Garmin Golf app and the Bluetooth settings on your phone to retry the pairing
process.
● If you bought a new phone, remove your watch from the Garmin Golf app on the phone you intend to stop
using.
● Bring your phone within 10m (33ft.) of the watch.
● On your phone, open the Garmin Golf app, and select Profile> My Devices> Add Device to enter pairing
mode.
● From the watch face, hold , and select Settings> Phone> Pair Phone.
My device is in the wrong language
1 Hold .
2 Select .
3 Scroll down to the last item in the list, and select it.
4 Scroll down to the seventh item in the list, and select it.
5 Select your language.
My device displays the wrong units of measure
● Verify you selected the correct units of measure setting on the device (Changing the Units of Measure,
page21).
Troubleshooting
Approach® J1 Junior GPS Golf Watch
Owner's Manual
25

● Verify you selected the correct units of measure setting on your Garmin Golf
™
account.
If the units of measure on the device do not match your Garmin Golf account, your device settings may be
overwritten when you sync your device.
Restarting Your Watch
1 Hold until the watch turns off.
2 Hold to turn on the watch.
Acquiring Satellite Signals
The device may need a clear view of the sky to acquire satellite signals. The time and date are set automatically
based on the GPS position.
TIP: For more information about GPS, go to garmin.com/aboutGPS.
1 Go outdoors to an open area.
The front of the device should be oriented toward the sky.
2 Wait while the device locates satellites.
It may take 30–60 seconds to locate satellite signals.
Improving GPS Satellite Reception
● Frequently sync the watch to your Garmin
®
account:
● Connect your watch to a computer using the USB cable and the Garmin Express
™
application.
While connected to your Garmin account, the watch downloads several days of satellite data, allowing it to
quickly locate satellite signals.
● Take your watch outside to an open area away from tall buildings and trees.
● Remain stationary for a few minutes.
Activity Tracking
For more information about activity tracking accuracy, go to garmin.com/ataccuracy.
My daily step count does not appear
The daily step count is reset every night at midnight.
If dashes appear instead of your step count, allow the device to acquire satellite signals and set the time
automatically.
My step count does not seem accurate
If your step count does not seem accurate, you can try these tips.
● Wear the watch on your non-dominant wrist.
● Carry the watch in your pocket when pushing a stroller or lawn mower.
● Carry the watch in your pocket when actively using your hands or arms only.
NOTE: The watch may interpret some repetitive motions, such as washing dishes, folding laundry, or
clapping your hands, as steps.
The step counts on my watch and my Garmin Connect
™
account don't match
The step count on your Garmin Connect account updates when you sync your watch.
1 Select an option:
● Sync your step count with the Garmin Express
™
application (Using Garmin Connect
™
on Your Computer,
page12).
● Sync your step count with the Garmin Connect app (Using the Smartphone Apps, page12).
2 Wait while your data syncs.
Syncing can take several minutes.
NOTE: Refreshing the Garmin Connect app or the Garmin Express application does not sync your data or
update your step count.
26
Approach® J1 Junior GPS Golf Watch
Owner's Manual
Troubleshooting

Appendix
Data Fields
Average Lap Time: The average lap time for the current activity.
Average Speed: The average speed for the current activity.
Average Swolf: The average swolf score for the current activity. Your swolf score is the sum of the time for one
length plus the number of strokes for that length (Swim Terminology, page15).
Avg. Pace: The average pace for the current activity.
Avg. Stks./Len.: The average number of strokes per length during the current activity.
Distance: The distance traveled for the current track or activity.
Elapsed Time: The total time recorded. For example, if you start the timer and run for 10 minutes, then stop the
timer for 5 minutes, then start the timer and run for 20 minutes, your elapsed time is 35 minutes.
Heading: The direction you are moving.
Int. Stks./Len.: The average number of strokes per length during the current interval.
Interval Distance: The distance traveled for the current interval.
Interval Lengths: The number of pool lengths completed during the current interval.
Interval Pace: The average pace for the current interval.
Interval Swolf: The average swolf score for the current interval.
Interval Time: The stopwatch time for the current interval.
Int Strk Type: The current stroke type for the interval.
L. Len. Stk. Type: The stroke type used during the last completed pool length.
L. Len. Strokes: The total number of strokes for the last completed pool length.
Lap Distance: The distance traveled for the current lap.
Lap Pace: The average pace for the current lap.
Laps: The number of laps completed for the current activity.
Lap Speed: The average speed for the current lap.
Lap Steps: The number of steps during the current lap.
Lap Time: The stopwatch time for the current lap.
Last Int. Swolf: The average swolf score for the last completed interval.
Last Lap Dist.: The distance traveled for the last completed lap.
Last Lap Pace: The average pace for the last completed lap.
Last Lap Speed: The average speed for the last completed lap.
Last Lap Time: The stopwatch time for the last completed lap.
Last Len. Swolf: The swolf score for the last completed pool length.
Last Length Pace: The average pace for your last completed pool length.
Lengths: The number of pool lengths completed during the current activity.
Maximum Speed: The top speed for the current activity.
Moderate Minutes: The number of moderate intensity minutes.
Pace: The current pace.
Speed: The current rate of travel.
Steps: The number of steps during the current activity.
Sunrise: The time of sunrise based on your GPS position.
Sunset: The time of sunset based on your GPS position.
Swim Time: The swimming time for the current activity, not including rest time.
Time of Day: The time of day based on your current location and time settings (format, time zone, daylight
saving time).
Timer: The stopwatch time for the current activity.
Timer: The current time of the activity timer.
Total Minutes: The total number of intensity minutes.
Vigorous Minutes: The number of vigorous intensity minutes.
Appendix
Approach® J1 Junior GPS Golf Watch
Owner's Manual
27

support.garmin.com
© 2026 Garmin Ltd. or its subsidiaries
Garmin
®
, the Garmin logo, Approach
®
, and Move IQ
®
are trademarks of Garmin Ltd. or its subsidiaries, registered in the USA and other countries. Garmin
AutoShot
™
, Garmin Connect
™
, Garmin Express
™
, and Garmin Golf
™
are trademarks of Garmin Ltd. or its subsidiaries. These trademarks may not be used
without the express permission of Garmin.
The Bluetooth
®
word mark and logos are owned by Bluetooth SIG, Inc. and any use of such marks by Garmin is under license. Other trademarks and trade
names are those of their respective owners.
M/N: AA4999
2024/3784
January 2026 GUID-A699B5E3-A65C-4F44-B23C-C376C2891F3F v1