ELECTRIC TRICYCLE
ASSEMBLY MANUAL
Stronger Solutions, Better Value

CONTENTS
Components Name
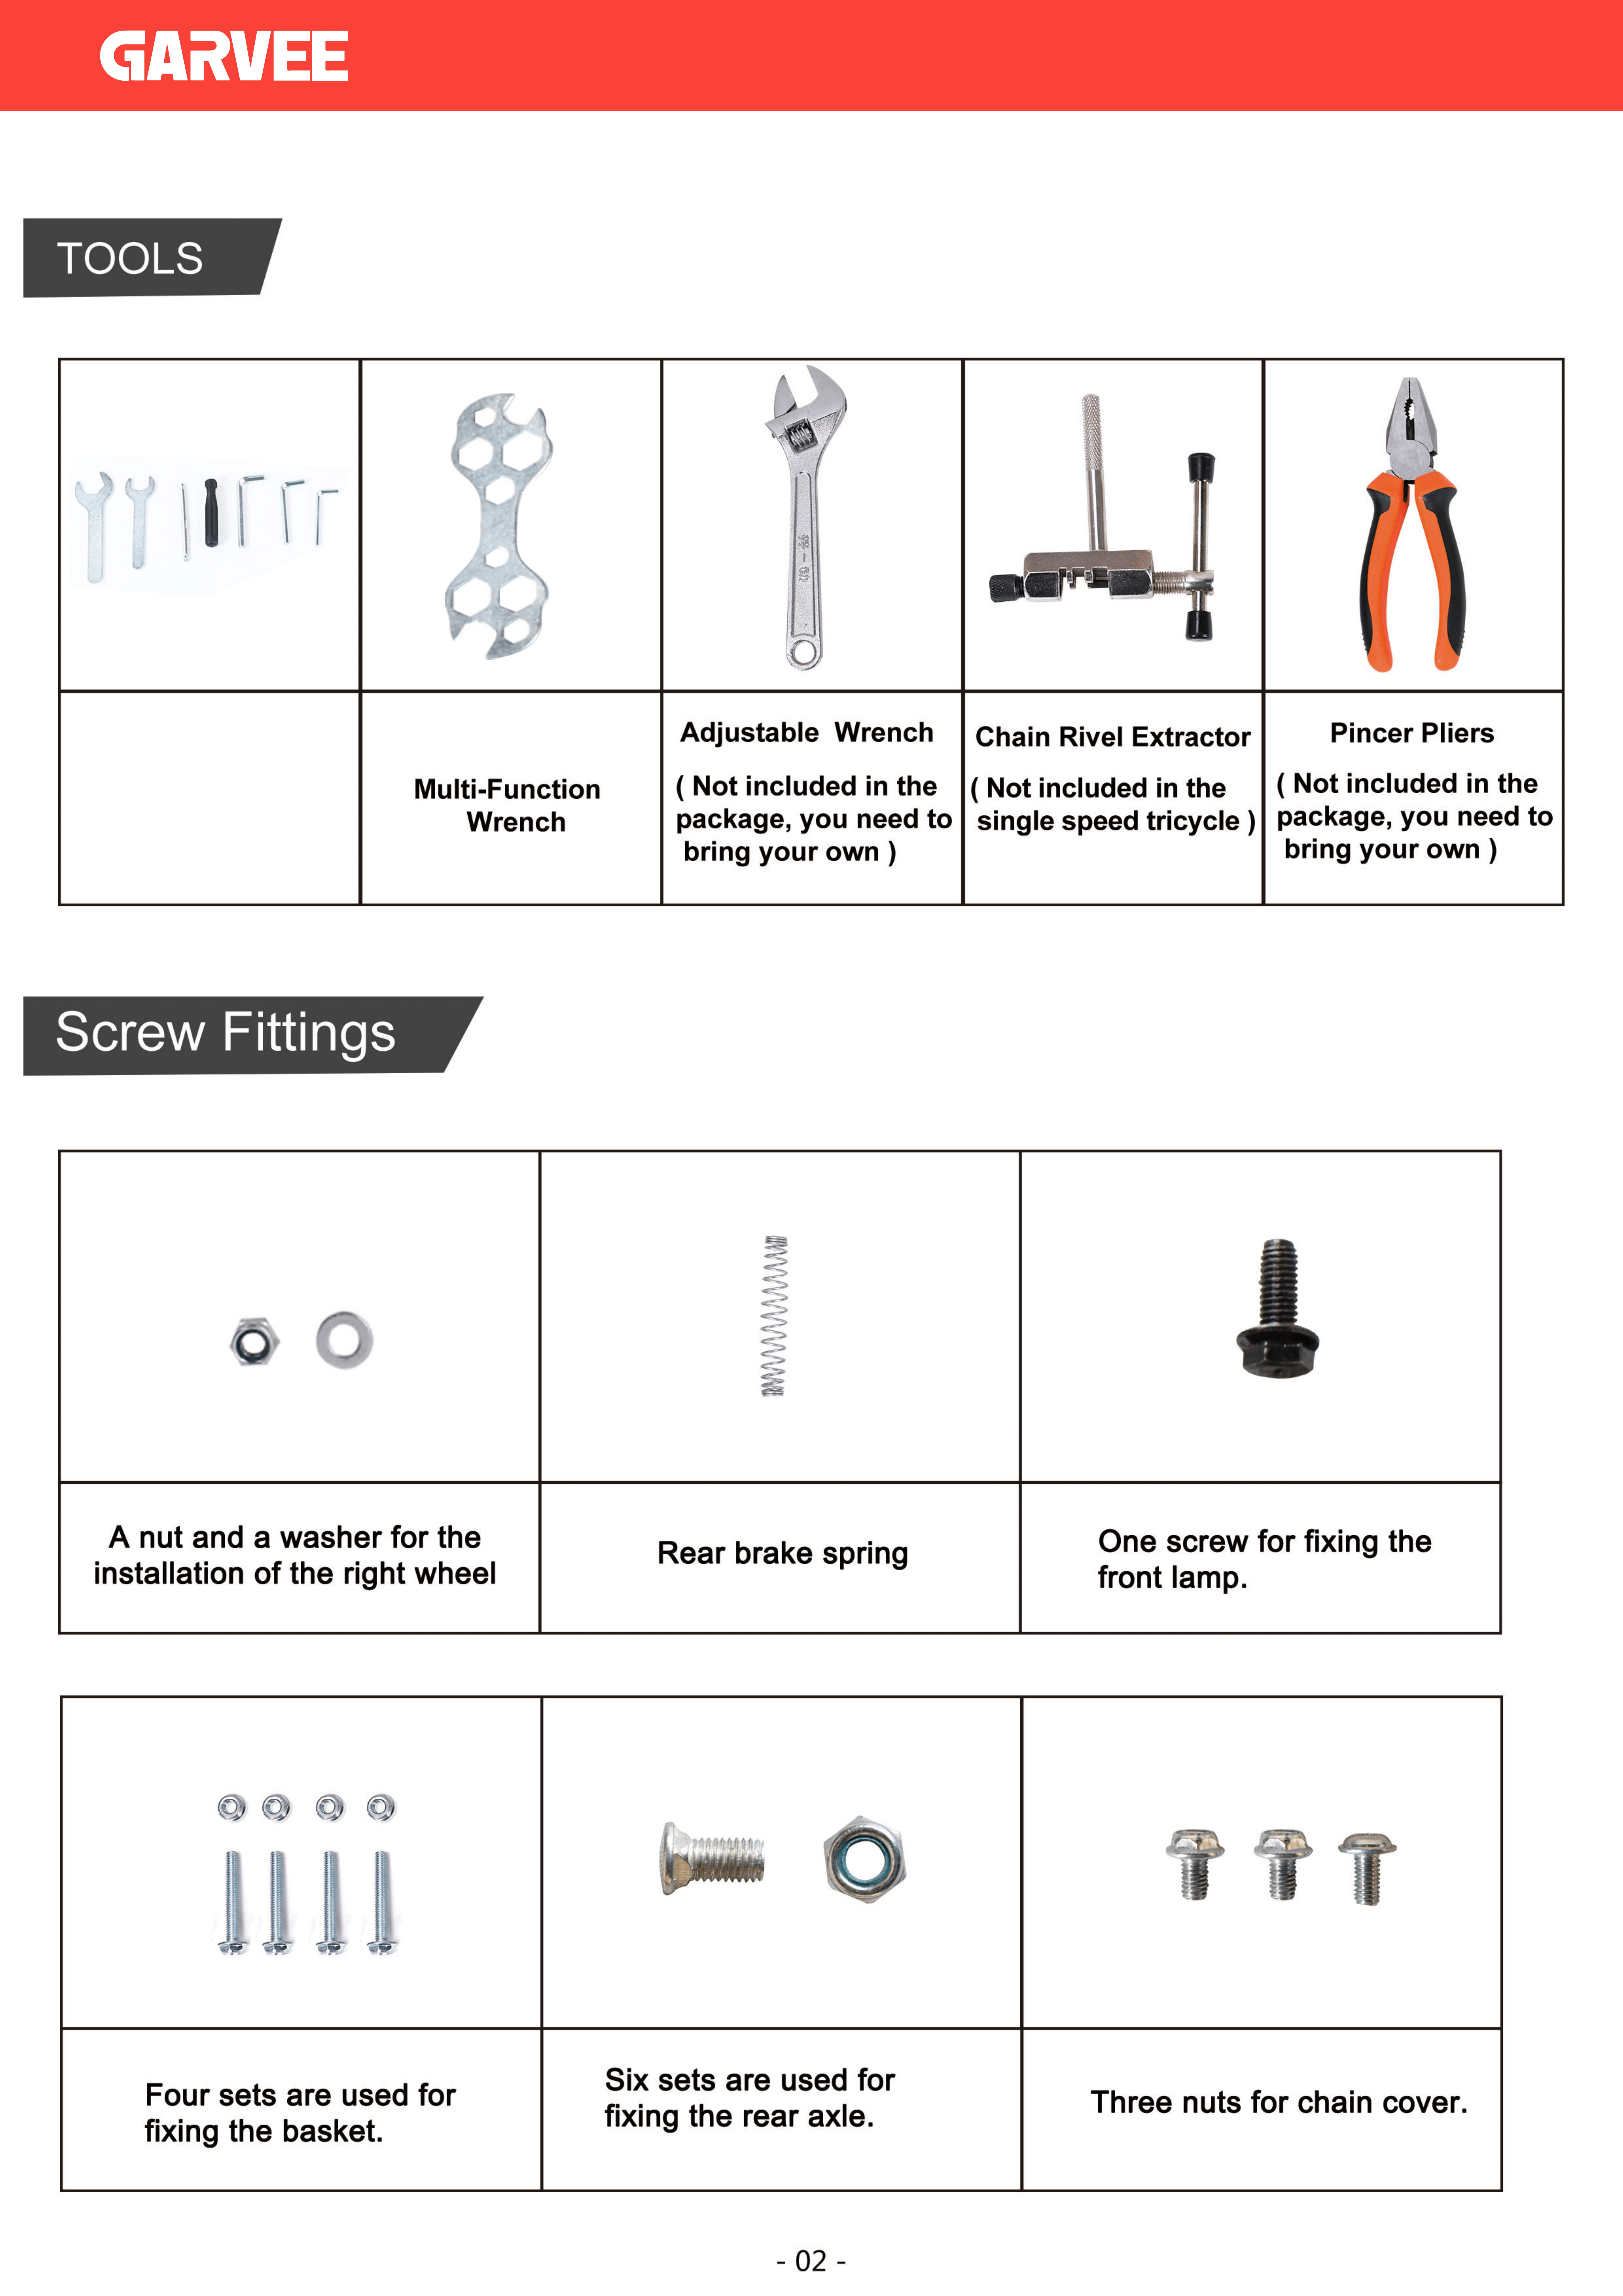
Tools & Screws & Fittings
Detailed assembling steps
Warning
01
02
03-24
25-43
Dear Customer,
Thank you for choosing our tricycle. This manual will show you how to assemble your tricycle. Please
read the manual and follow it. The manual contains important information regarding assembling of the
tricycle. But it is not intended to be a authoritative manual. lf you encounter any missueswhile assem-
bling the tricycle, We recommend you to aska tricycle specialistfor help. You can also contact us through
your shopping account.
Scan the QR code to watch
the product installation
CONTACT US
Thank you for choosing our products! If you have any questions or
suggestions, contact us at
and we'll resolve
your issue ASAP!

SAFETY INFORMATION
1
• Install and adjust this tricycle ONLY in accordance with these instructions. Read them
completely prior to assembly and use. Contact customer service if any point is unclear.
Provide this manual to anyone who will use this tricycle and provide it with this tricycle (whether
already assembled or not) if it is ever given or sold to a third party. Failure to do so may lead
to serious property damage and severe personal injury.
• ALWAYS obey all applicable local and national laws and regulations while riding. Do not ride
this tricycle in any area prohibited to electric bicycles or tricycles. Always wear your helmet
equipment.
• ALWAYS check whether the brakes function well using the brake levers BEFORE riding.
Even when power is cut to the motor, the inertia of the tricycle will often require active braking
power.
• ALWAYS ensure all fasteners and components are intact and securely tightened before and
after every use.
• DO NOT ride this tricycle if any part is damaged or shows any sign of malfunction. Repair
or replace worn and broken components before further use. Never replace any parts with
nonidentical ones.
• Pay attention to the remaining power before setting out and during use. Recharge your
battery as needed to ensure it never runs out of power at a moment where you are taken by
surprise.
• DO NOT allow use by children or persons unfamiliar with this tricycle or these instructions.
• DO NOT wear loose footwear or clothing that may become caught in the wheels or any other
moving parts.
• It is recommended that you not ride your tricycle fast until you are fully familiar with your new
electric tricycle and its controls.
• ALWAYS be alert for people, animals, or any obstacles that may appear in front of you
while riding your tricycle. Be aware that pedestrians and drivers may not expect the speed
or responsiveness of your tricycle. Adjust your behavior accordingly. It is advisable to install
warning devices to draw their attention, but always be ready to turn safely out of their way if
needed. Do not focus on the display panel for extended periods of time while riding.
• NEVER ride at a speed where your stopping distance exceeds your visibility. We do not
recommend that you ride your tricycle at night or in an environment with poor visibility. If you
have an emergency that makes it necessary to do so, keep your light on and limit your speed
appropriately.
• NEVER use the throttle or pedal assist system (PAS) in any situation, road condition,
or
terrain where doing so might impair your control of your tricycle.
• DO NOT load this tricycle with more than 330 pounds (150 kilograms).
Warning!

SPECIFICATIONS
2
• ALWAYS avoid direct pressurized spray that might allow the interior of the battery, display
panel, front light, and other electronic components to become wet. If the interior of the battery
accidentally becomes wet, replace it with a new identical one. For the other electronic parts,
wait for them to completely dry before any further use.
• ALWAYS
the battery socket. Always fully remove the battery from this tricycle before performing any
cleaning, servicing, and storage.
• NEVER
it to radiation or excessive pressure. Only charge the battery in locations with an ambient
temperature between 32° and 113°F (0–45°C).
• NEVER modify the battery or power cord. Only use the provided charger with this tricycle.
Never get the charger or power cord wet or operate them with wet hands.
• If the battery is ever damaged, avoid all contact with it or any leaking fluid. Remove
with the skin. If contact accidentally occurs with the eyes, IMMEDIATELY flush them with
copious amounts of water for at least 15 minutes while seeking medical attention.
Motor Power 350 W
Battery
Type 36V Lithium
Waterproof Rating IP64
Operational Temp. Range
°F °C
Charging Temp. Range 32 to 113°F 0 to 45°C
Optimal Storage Temp. Range
°F °C
Weight Capacity 330 lb. 150 kg
Max. Speed 28 mph* 45 km/h*
* Based on unloaded wheel rotation at full power without friction. True maximum speed will vary according to
variables such as battery strength and load but should remain ±1 mph of the preset value.
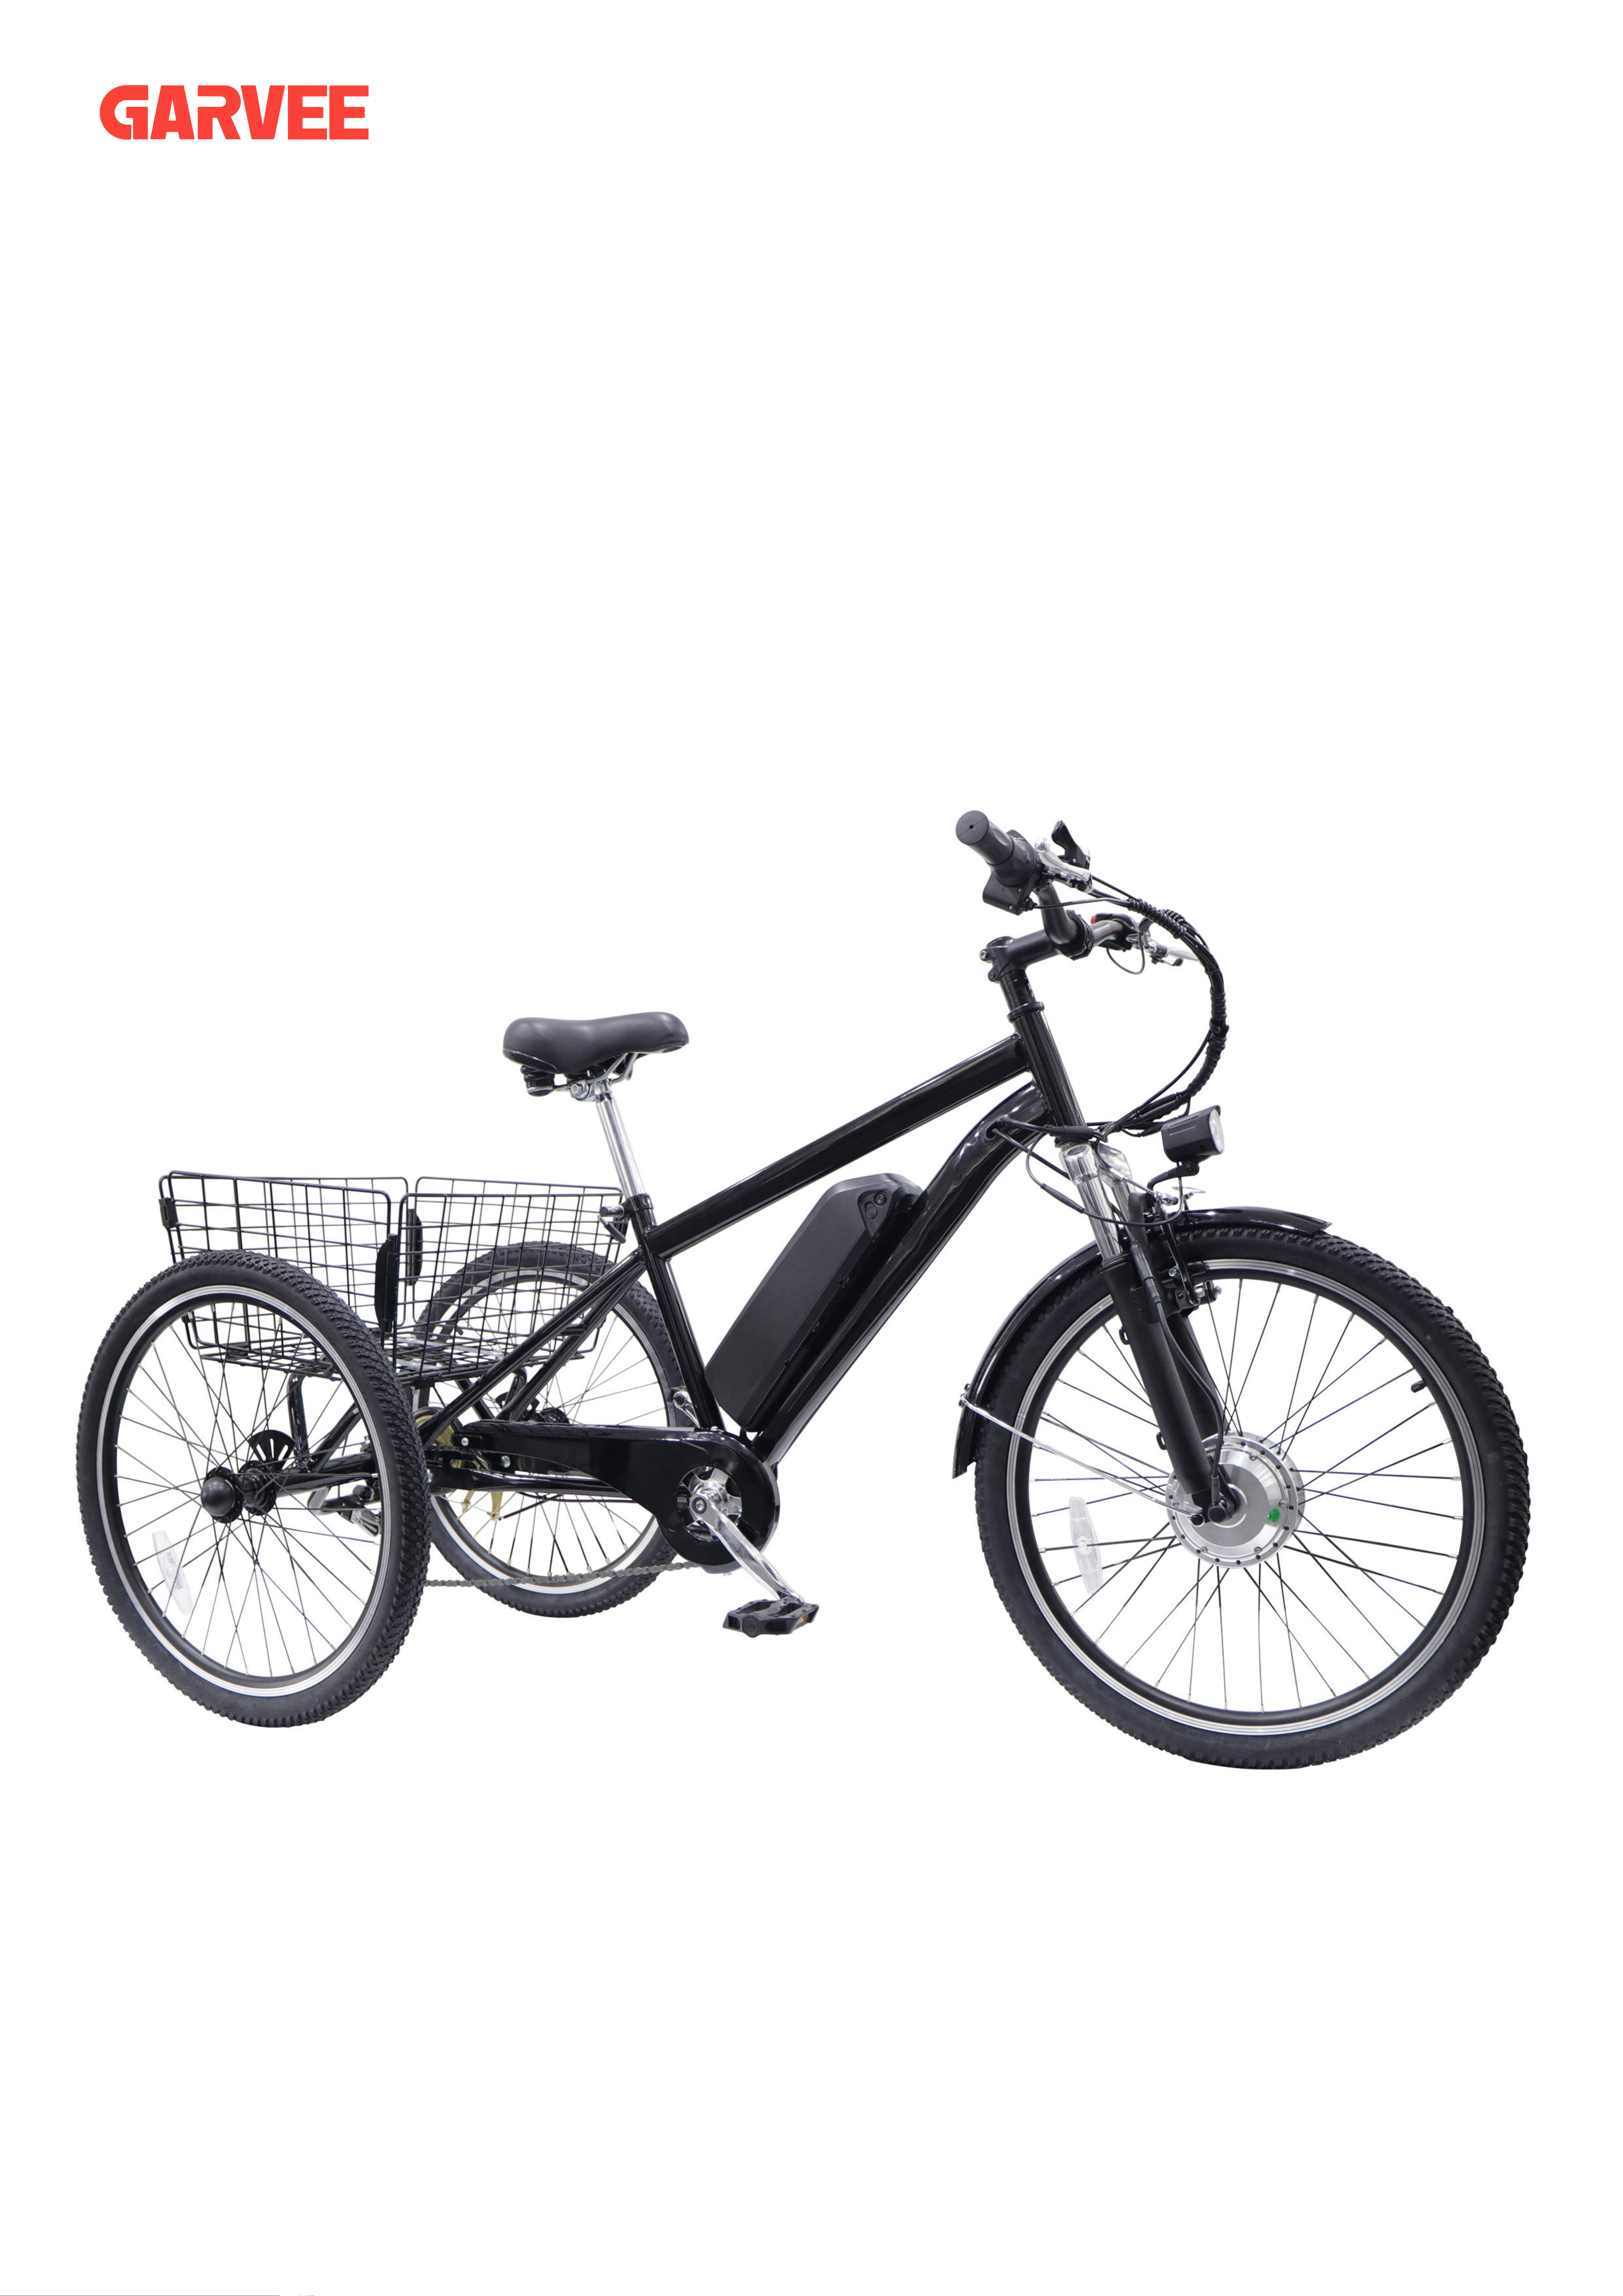
Front Fork
Battery
Front Fender
Crank Arm
Chain Guard
Motor
Head Tube
Front Light
Handlebars
Seat
Reflectors
Basket
Seat Tube
Rear Wheel Caps
Overview
- 01 -
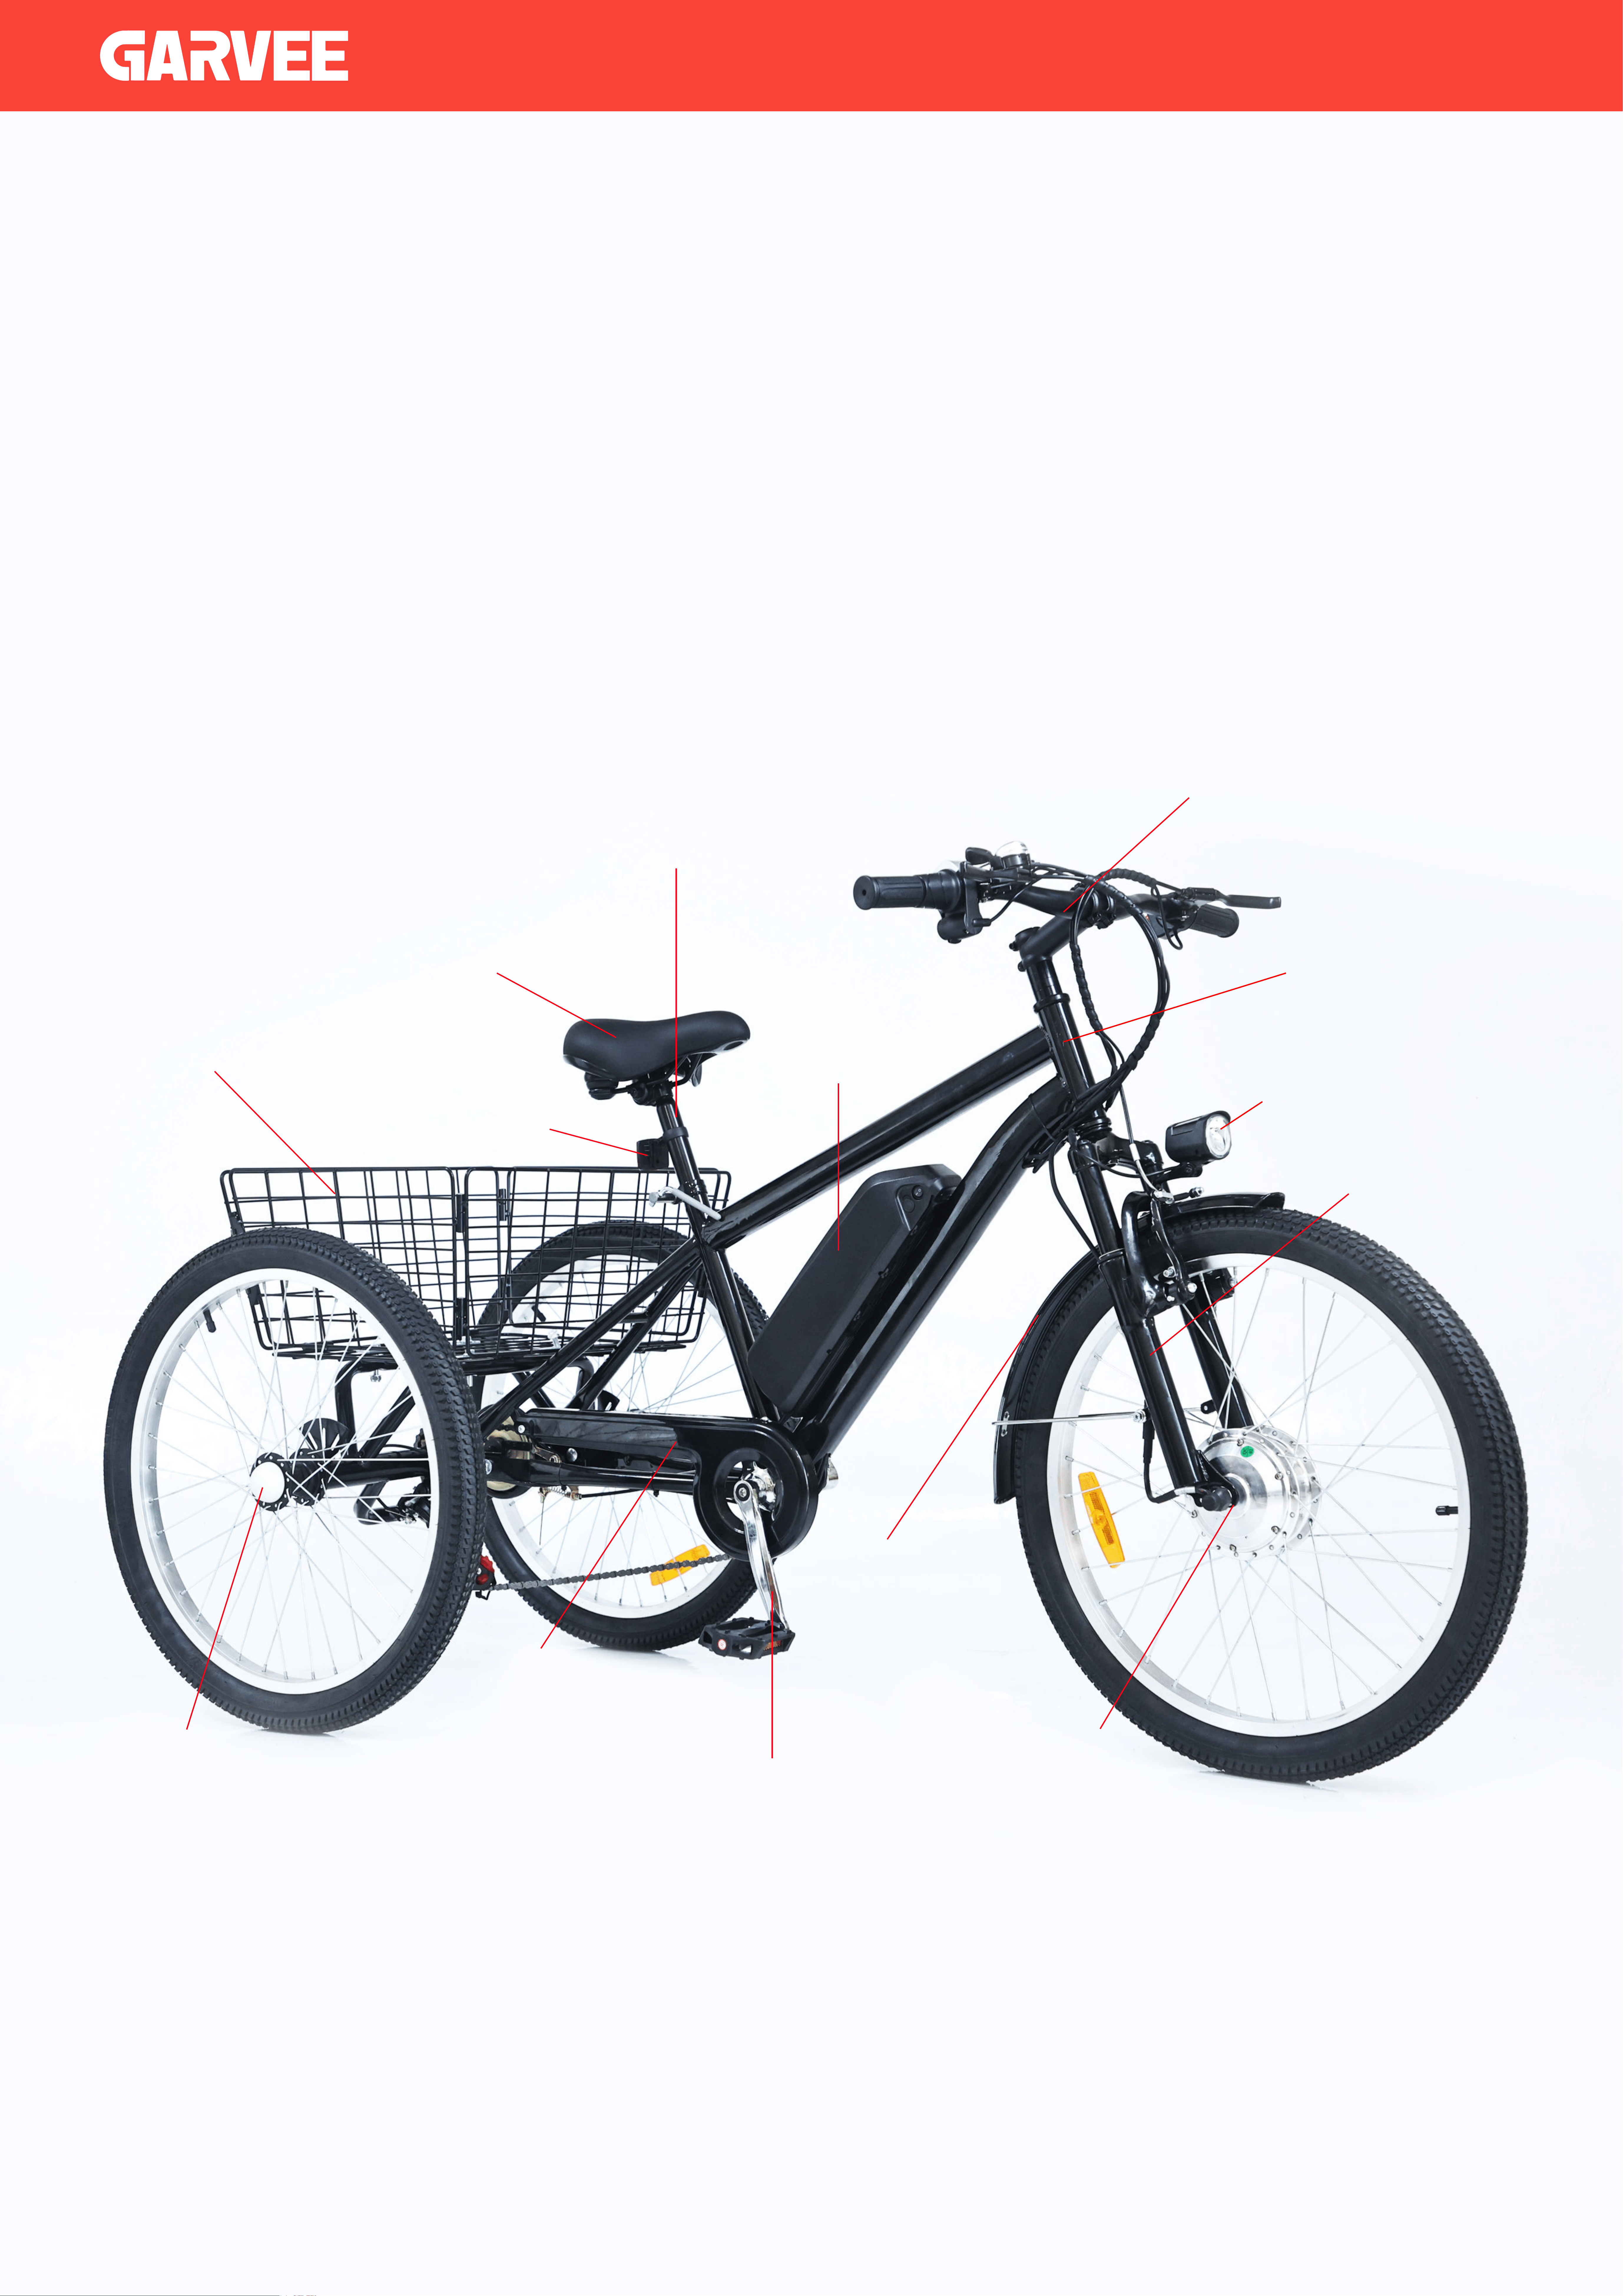
Parts
Item Name Qty.
1
2
3
4
5
6
7
8
9
10
11
12
13
Basket
Long Bolts & Nuts
Handlebars
Main Frame with Battery
Rear Frame
Chain Guard
Zip Ties
Rear Wheel Caps
Front Wheel Cap
Front Fender
Front Fender Stay
Seat
Chain
1
2
1
1
1
1
1
1
1
2
2
1
2
Item Name Qty.
14
15
16
17
18
19
20
21
22
23
24
25
Front Light
Screws
Brake Line Caps
Connecting Plate
Spring
Slats
Pedals
Charger
Tool
Multifunctional WrenchFront Wheel
Rear Wheels
2
2
1
2
1
3
2
1
1
1
6
1
26
Rear Reflectors
1
1
5
7
8
9
11 12 11
10
2
6
3
4
13
14
19
15
16
20
18
21
22
23
24
25
26
17
All bolts & nuts are pre-installed where they will be needed.
Tool
5
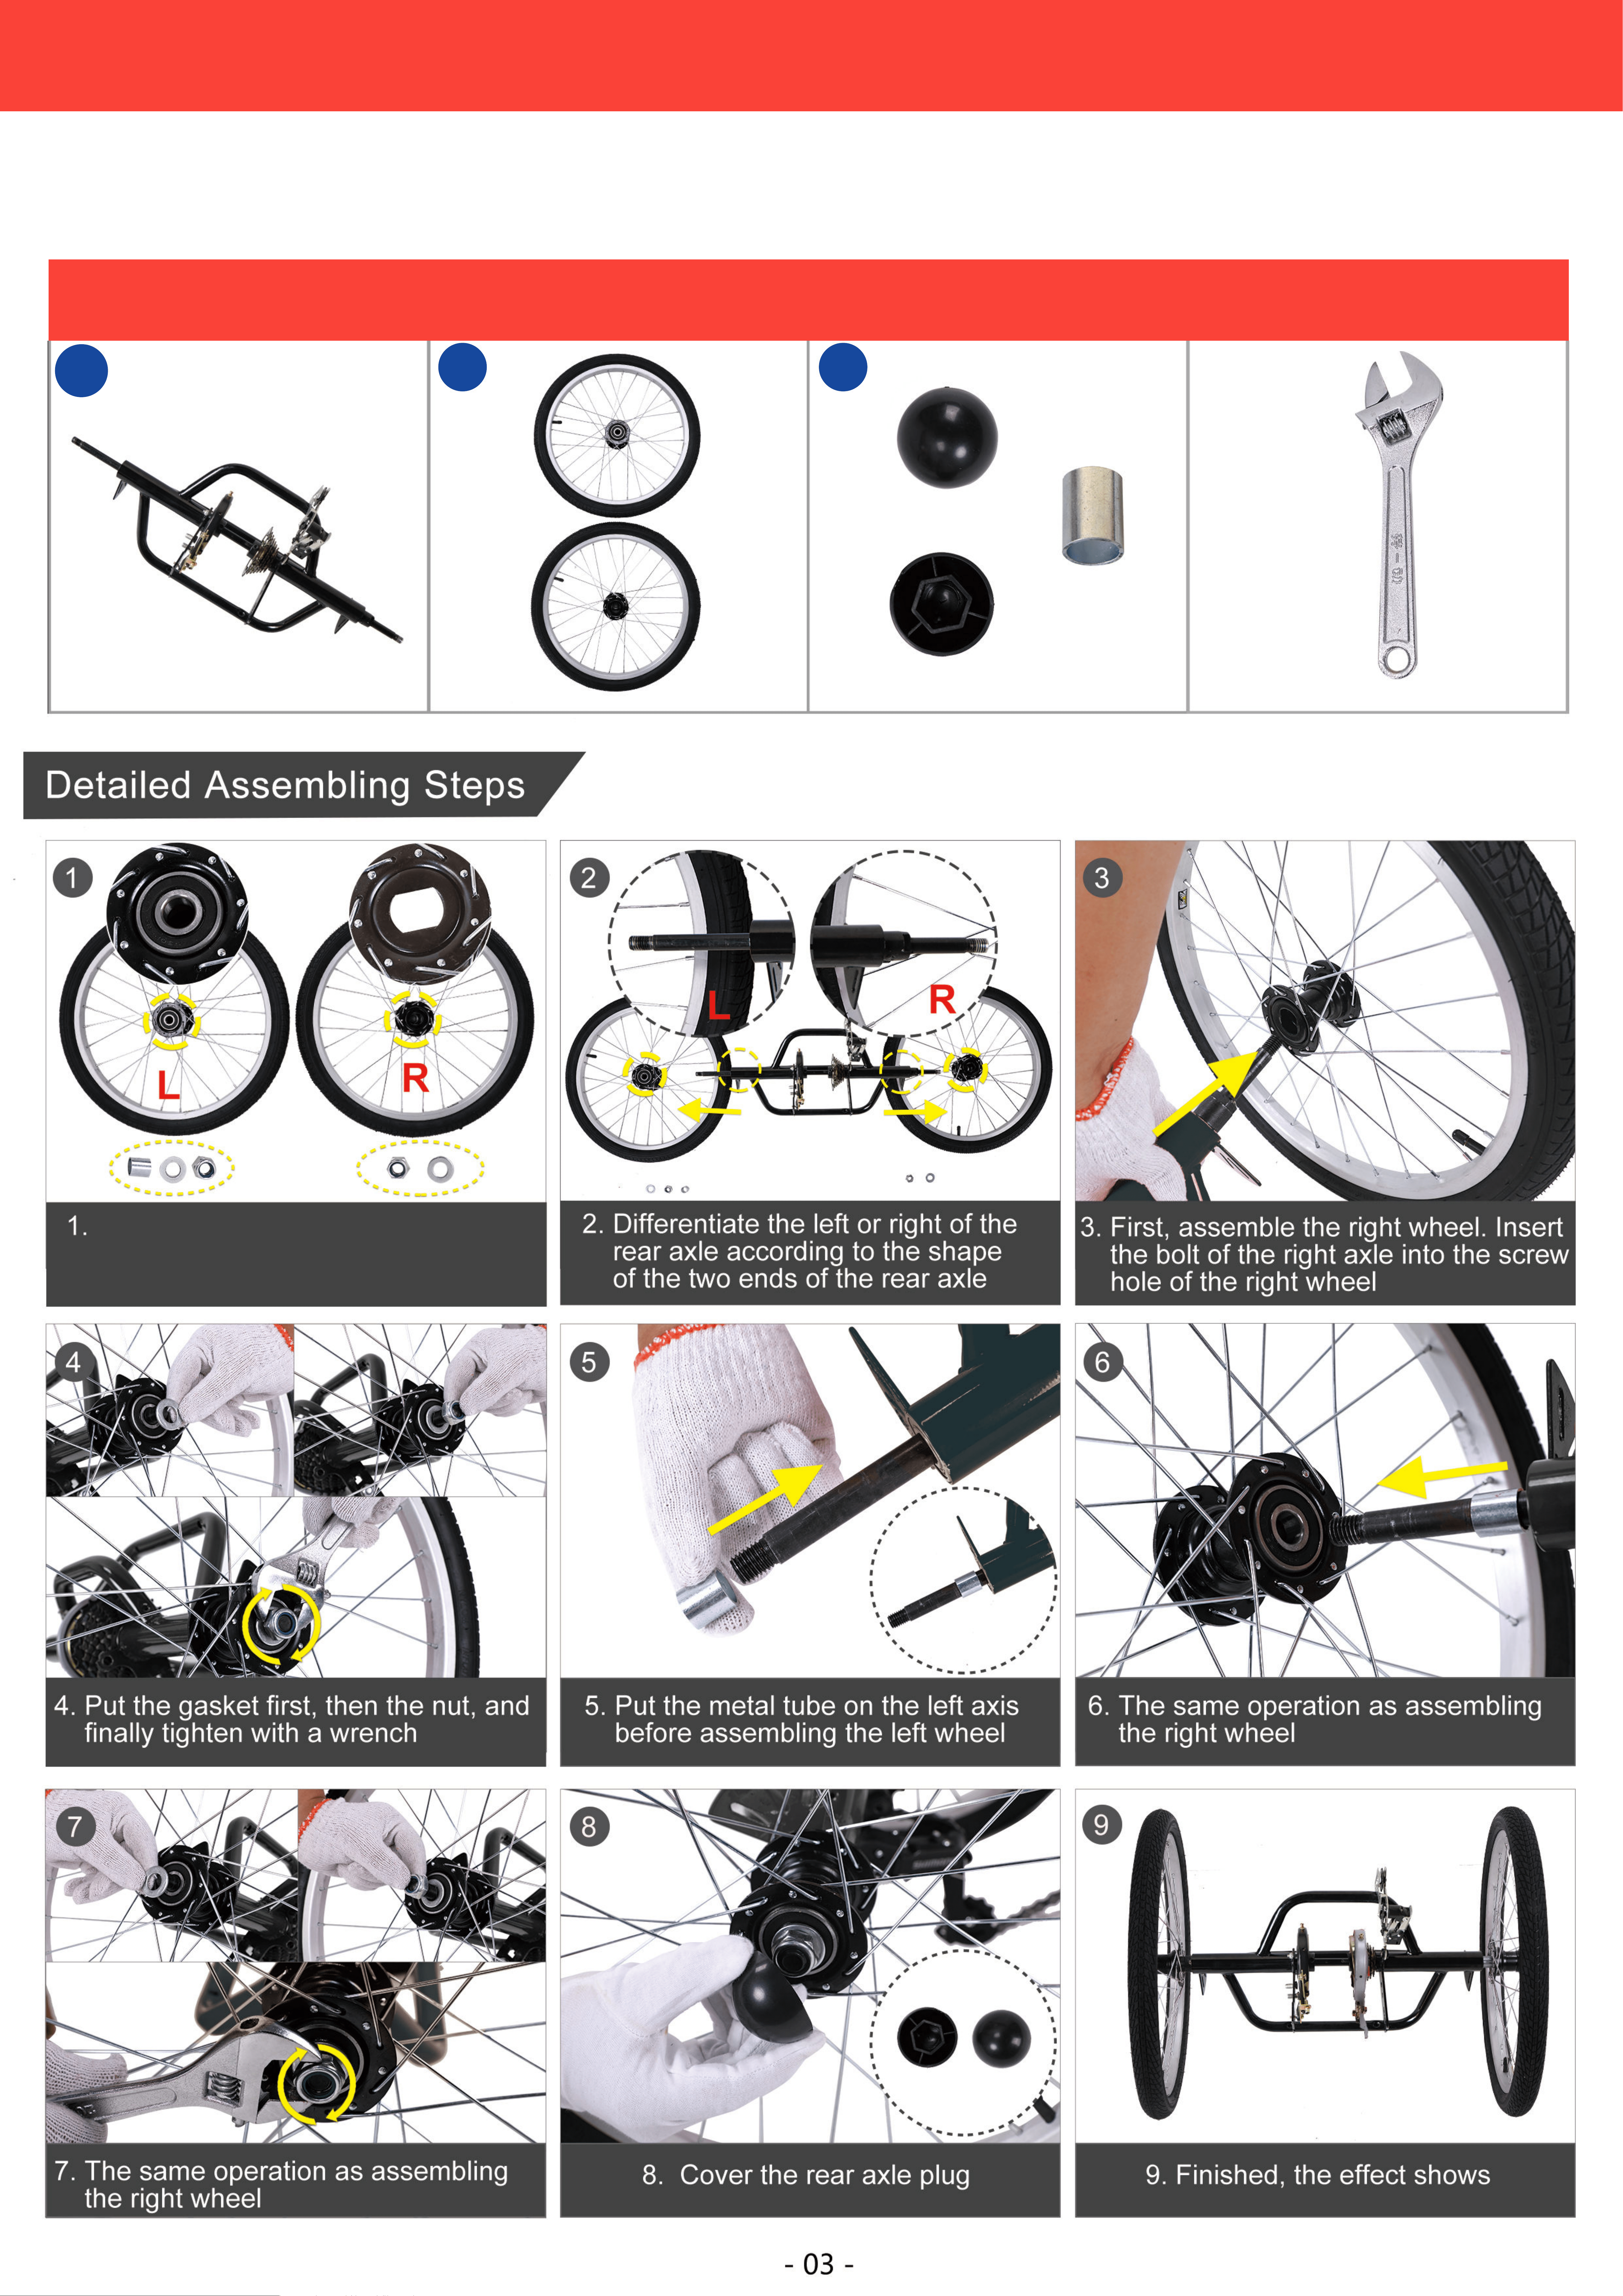
Differentiate the left or right wheel
according to the shape of the
screw hole
THE ASSEMBLING OF REAR WHEEL
01
Assembled Parts Rear Wheel Rear Axle Parts Adjustable Wrench
Required Parts And Tools
11 17
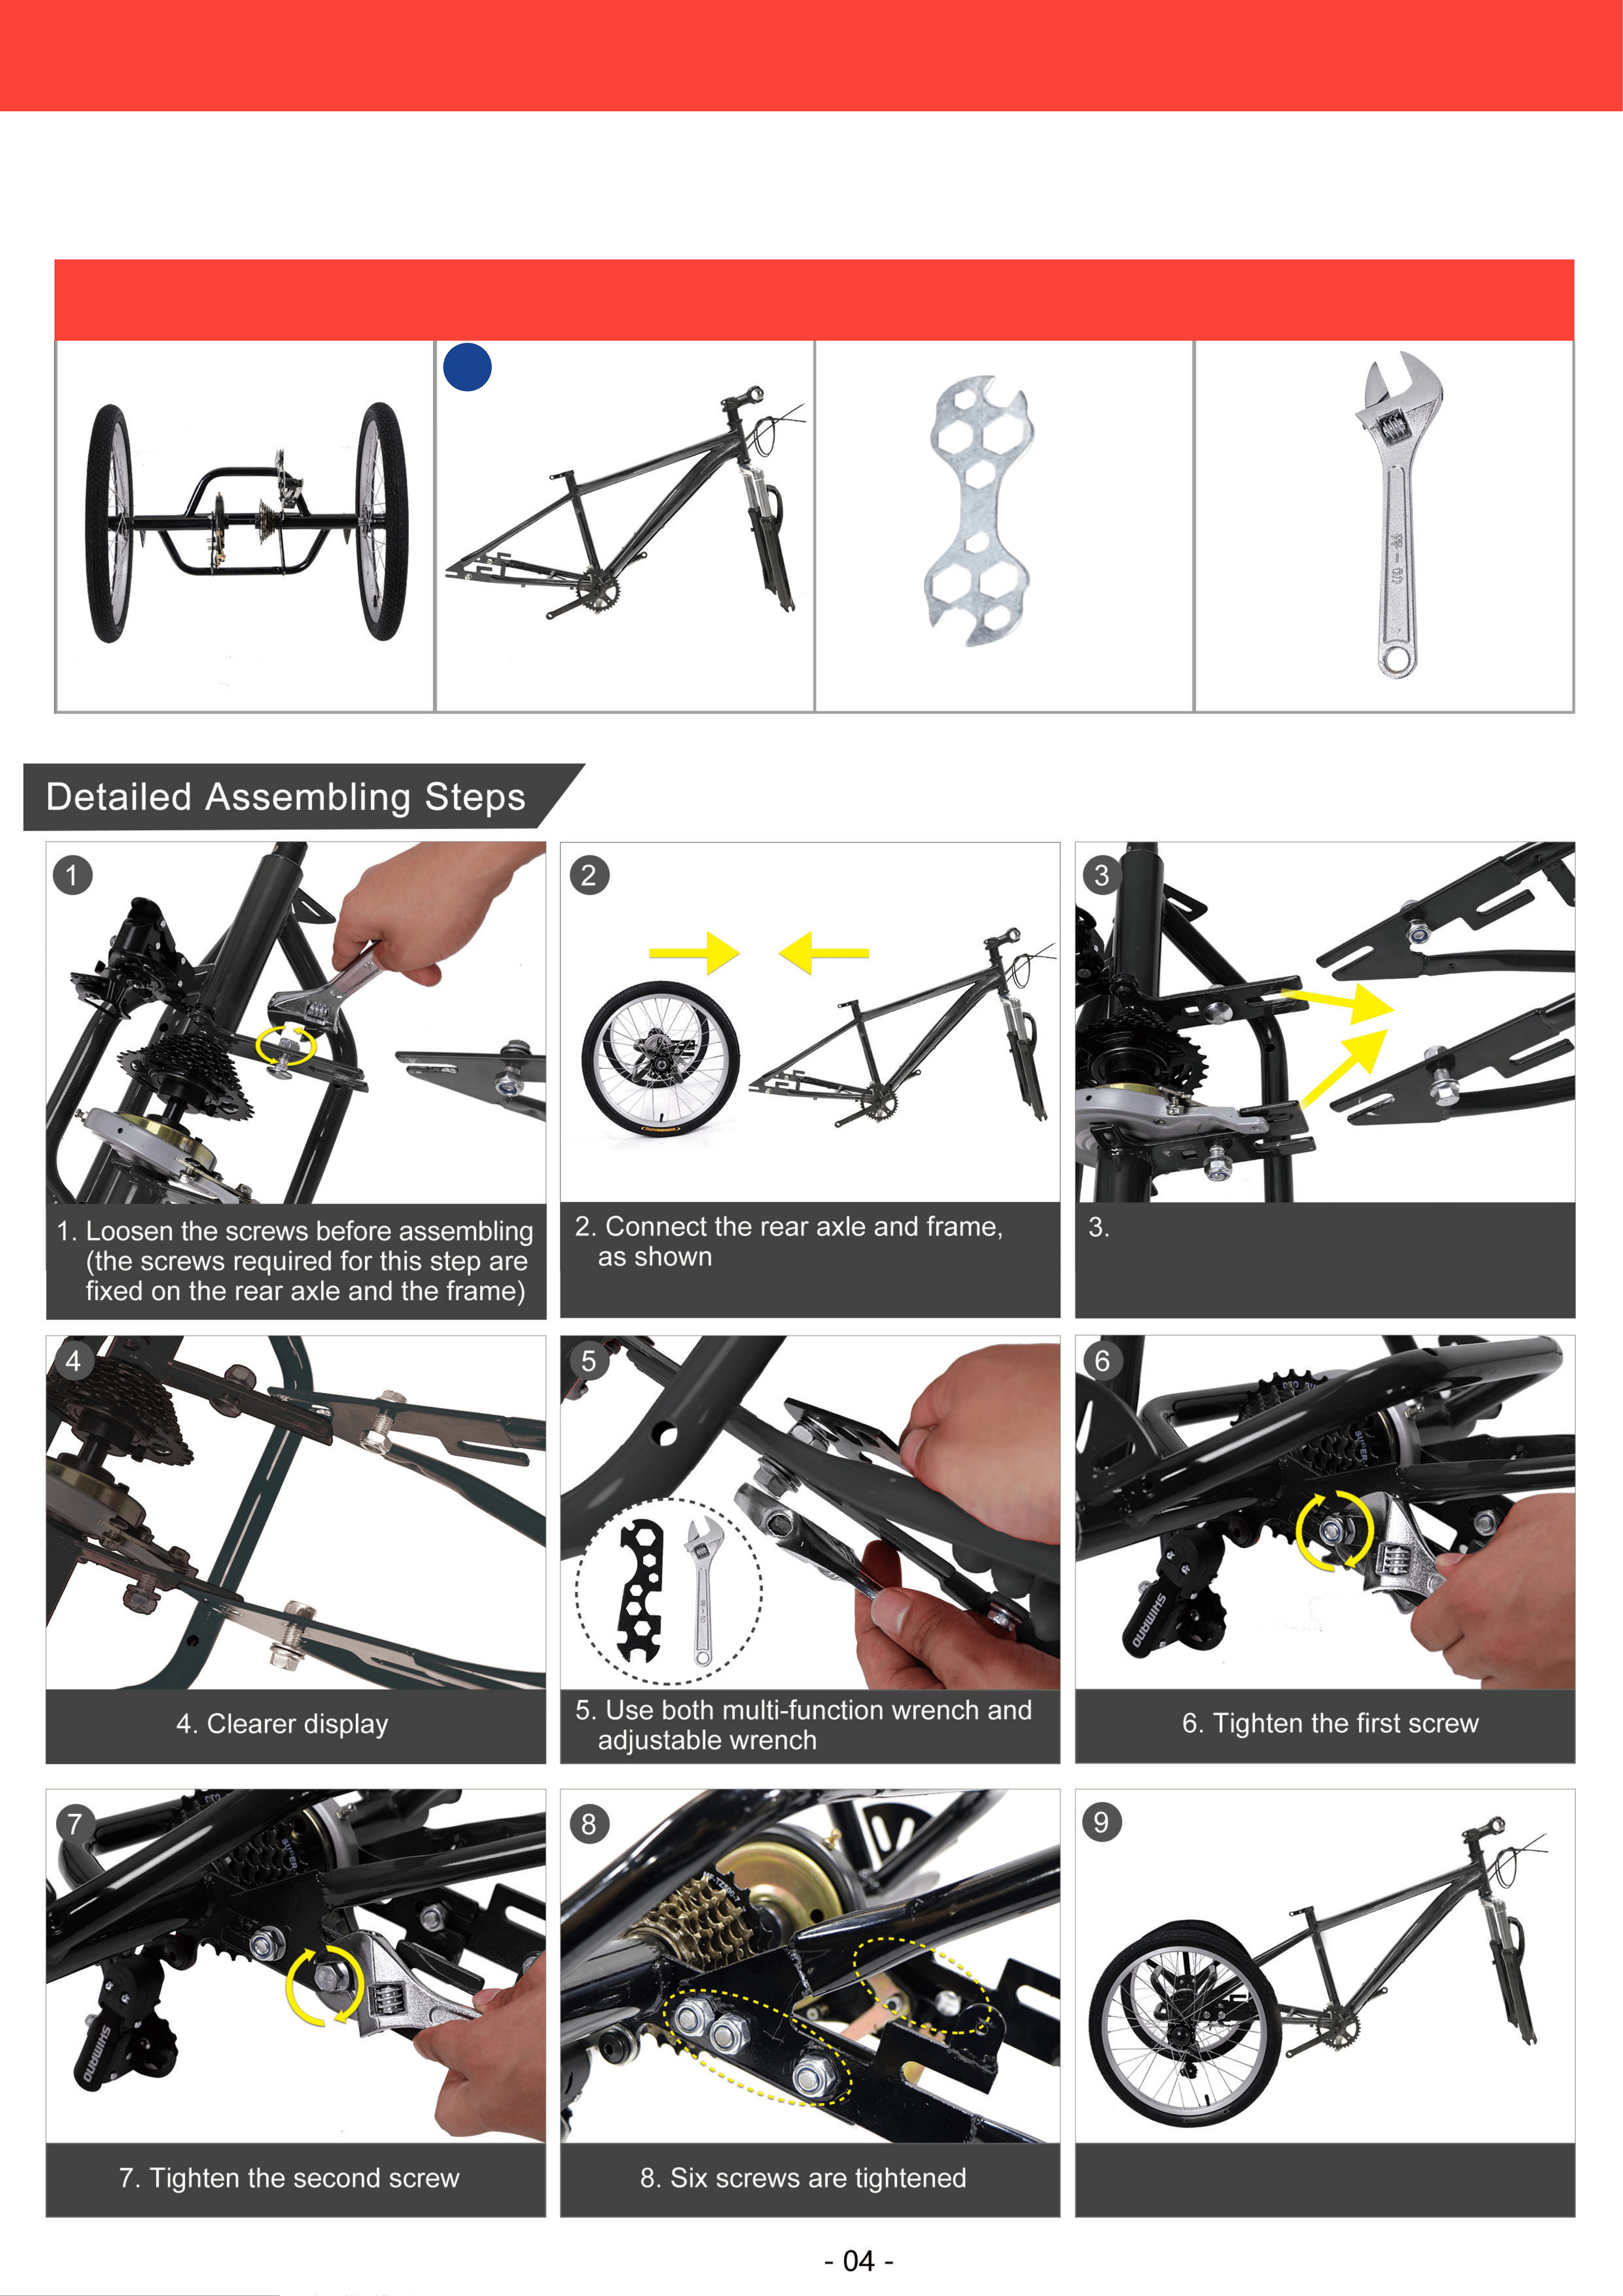
The connector on the rear axle faces
inward and the connector on the frame
faces outward
9.Finished, the effect shows
CONNECTING THE REAR AXLE TO THE FRAME
02
Assembled Parts Frame Multi-Function Wrench Adjustable Wrench
Required Parts And Tools
3

9.Finished,the effect shows
4. Chain passes through the front
chain wheel
THE ASSEMBLING OF CHAIN
03
Assembled Parts Chain Chain Rivel Extractor
Required Parts And Tools
9
Tool
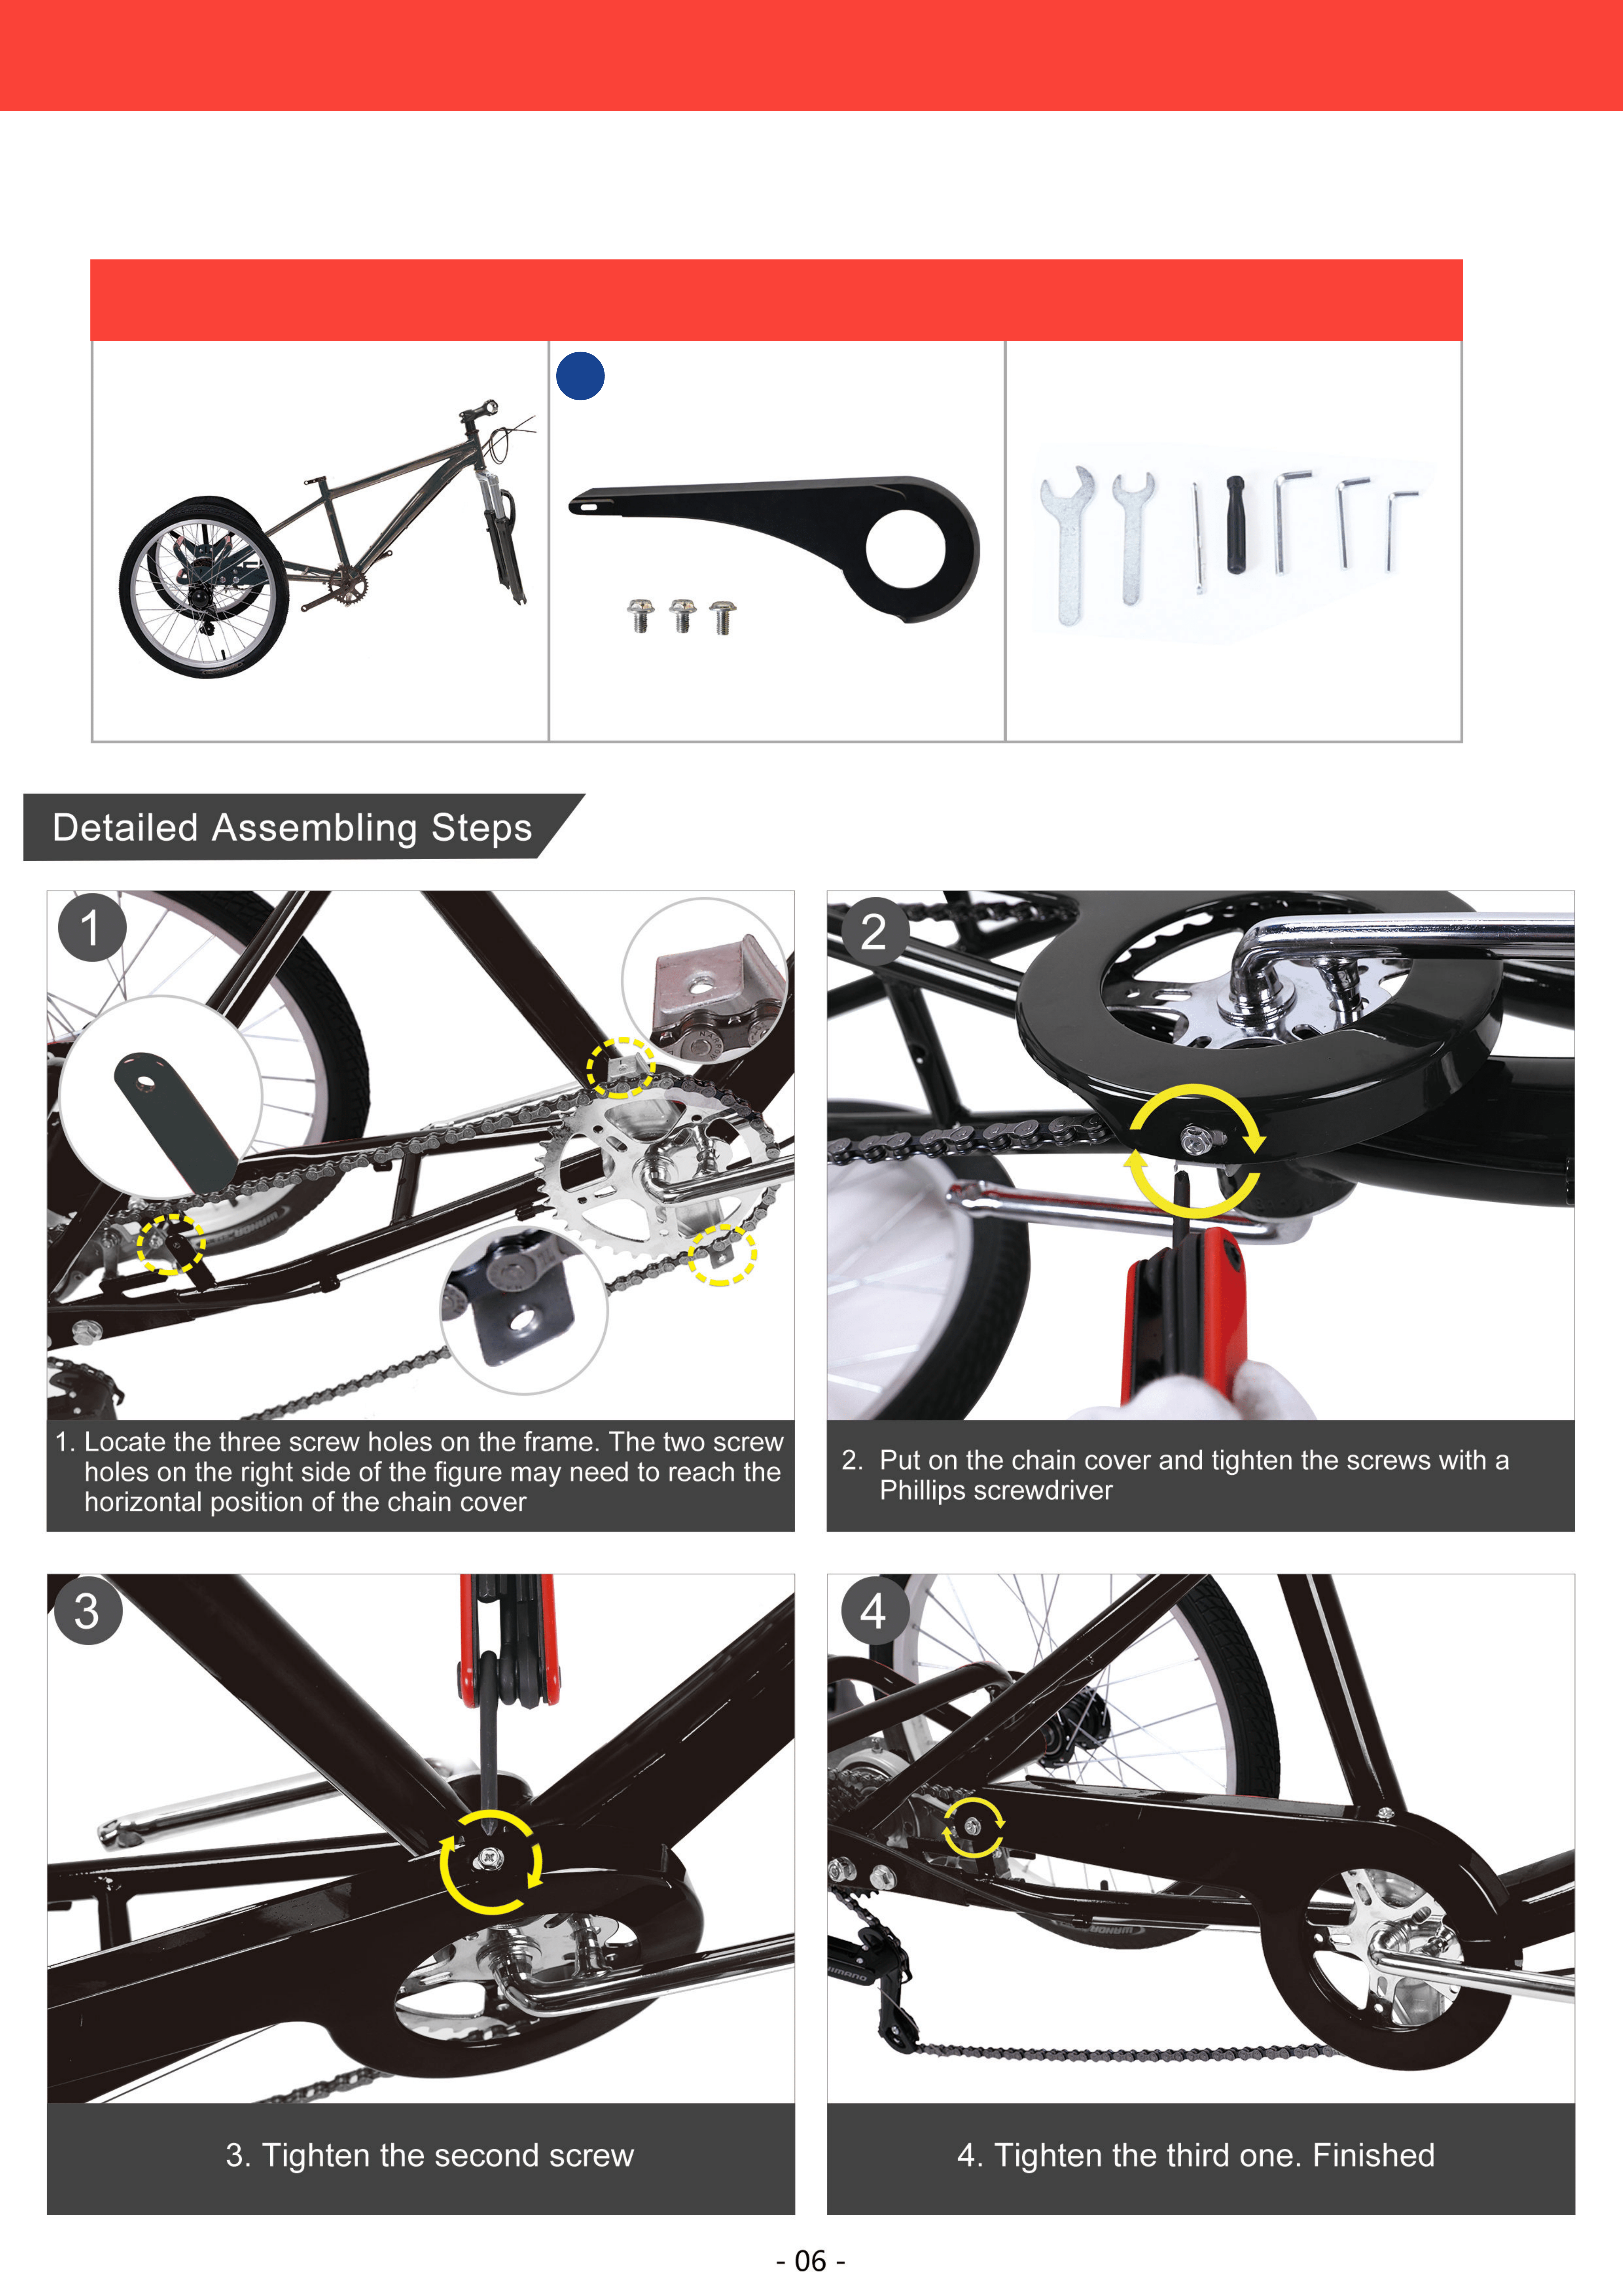
THE ASSEMBLING OF CHAIN COVER
04
Assembled Parts Chain Tool
Required Parts And Tools
6
8 21 23
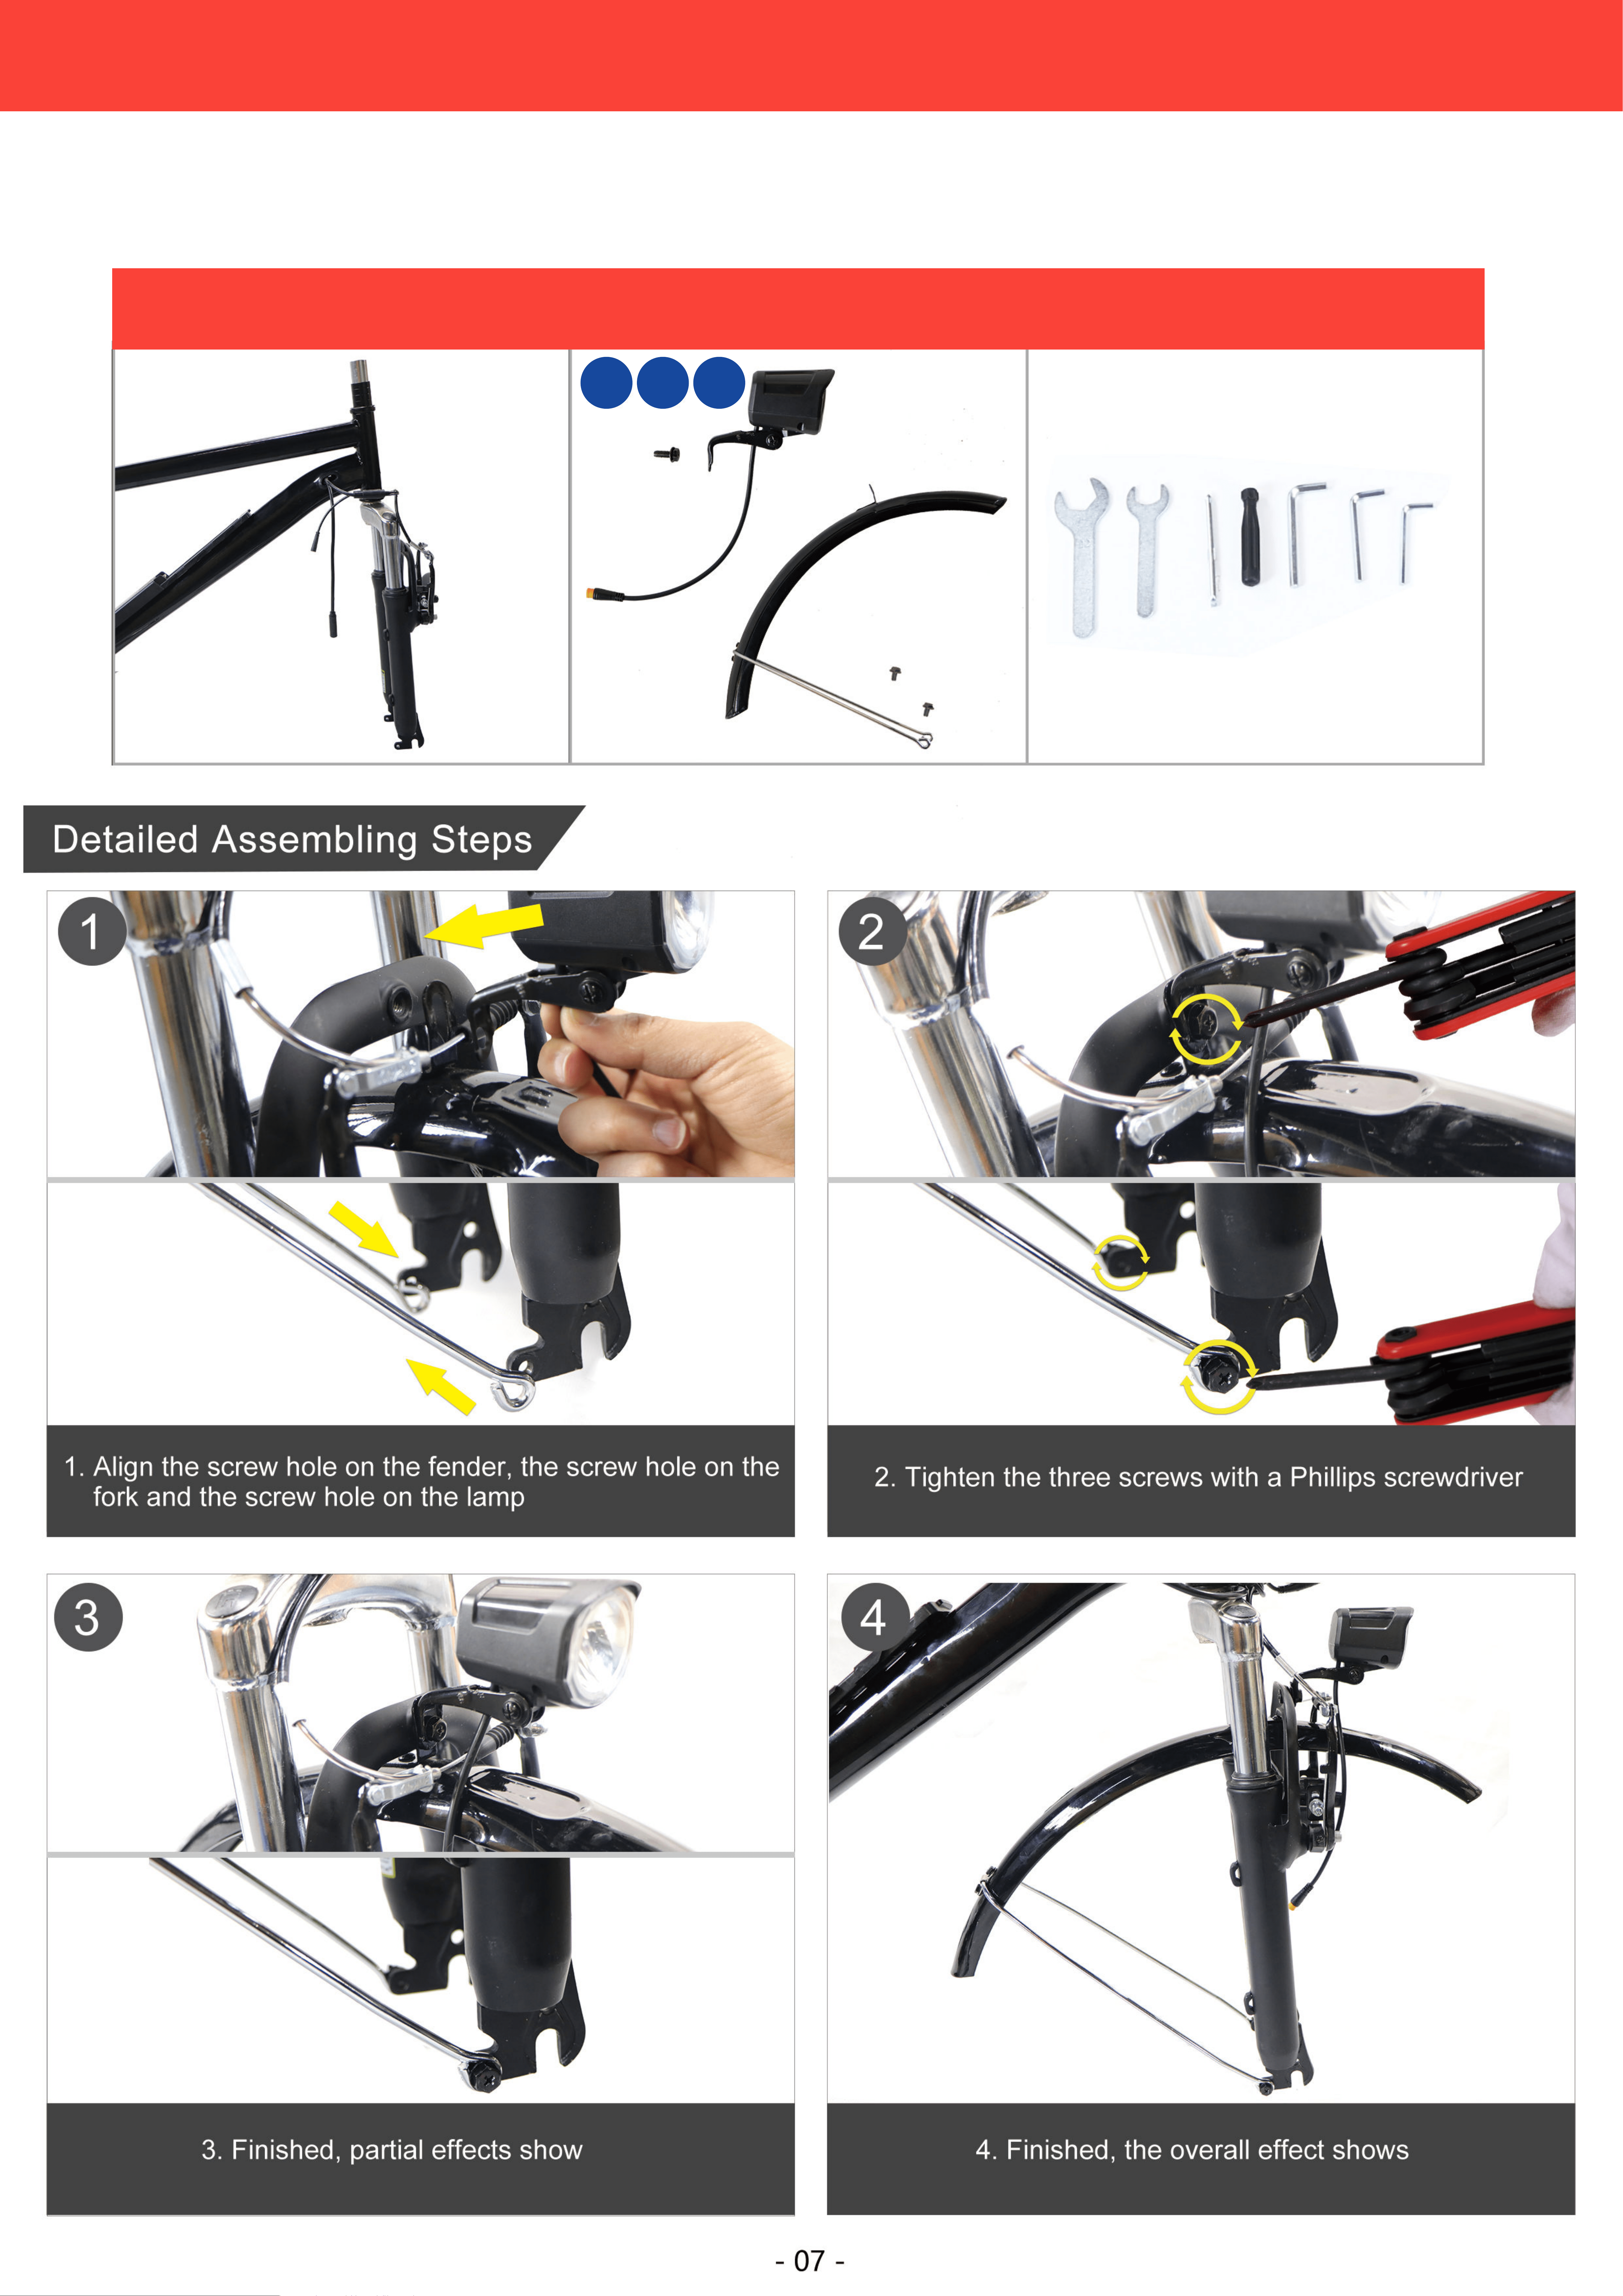
THE ASSEMBLING OF FRONT FENDER AND LAMP
05
Assembled Parts Chain Chain Rivel Extractor
Required Parts And Tools
3.Assembly Spacer
3
1.Assemble front fork
1
2.Assembly Spacer A.
Note: The protrusion of the spacer A must
snap into the front fork notch
2
4.Assemble screw nut
4
7.Assemble screw nut
7
5.Assemble plug
5
6. Place two spacers and front fork as shown
Note: The protrusion of the spacer A must
snap into the front fork notch
6
12 18
A
A
A
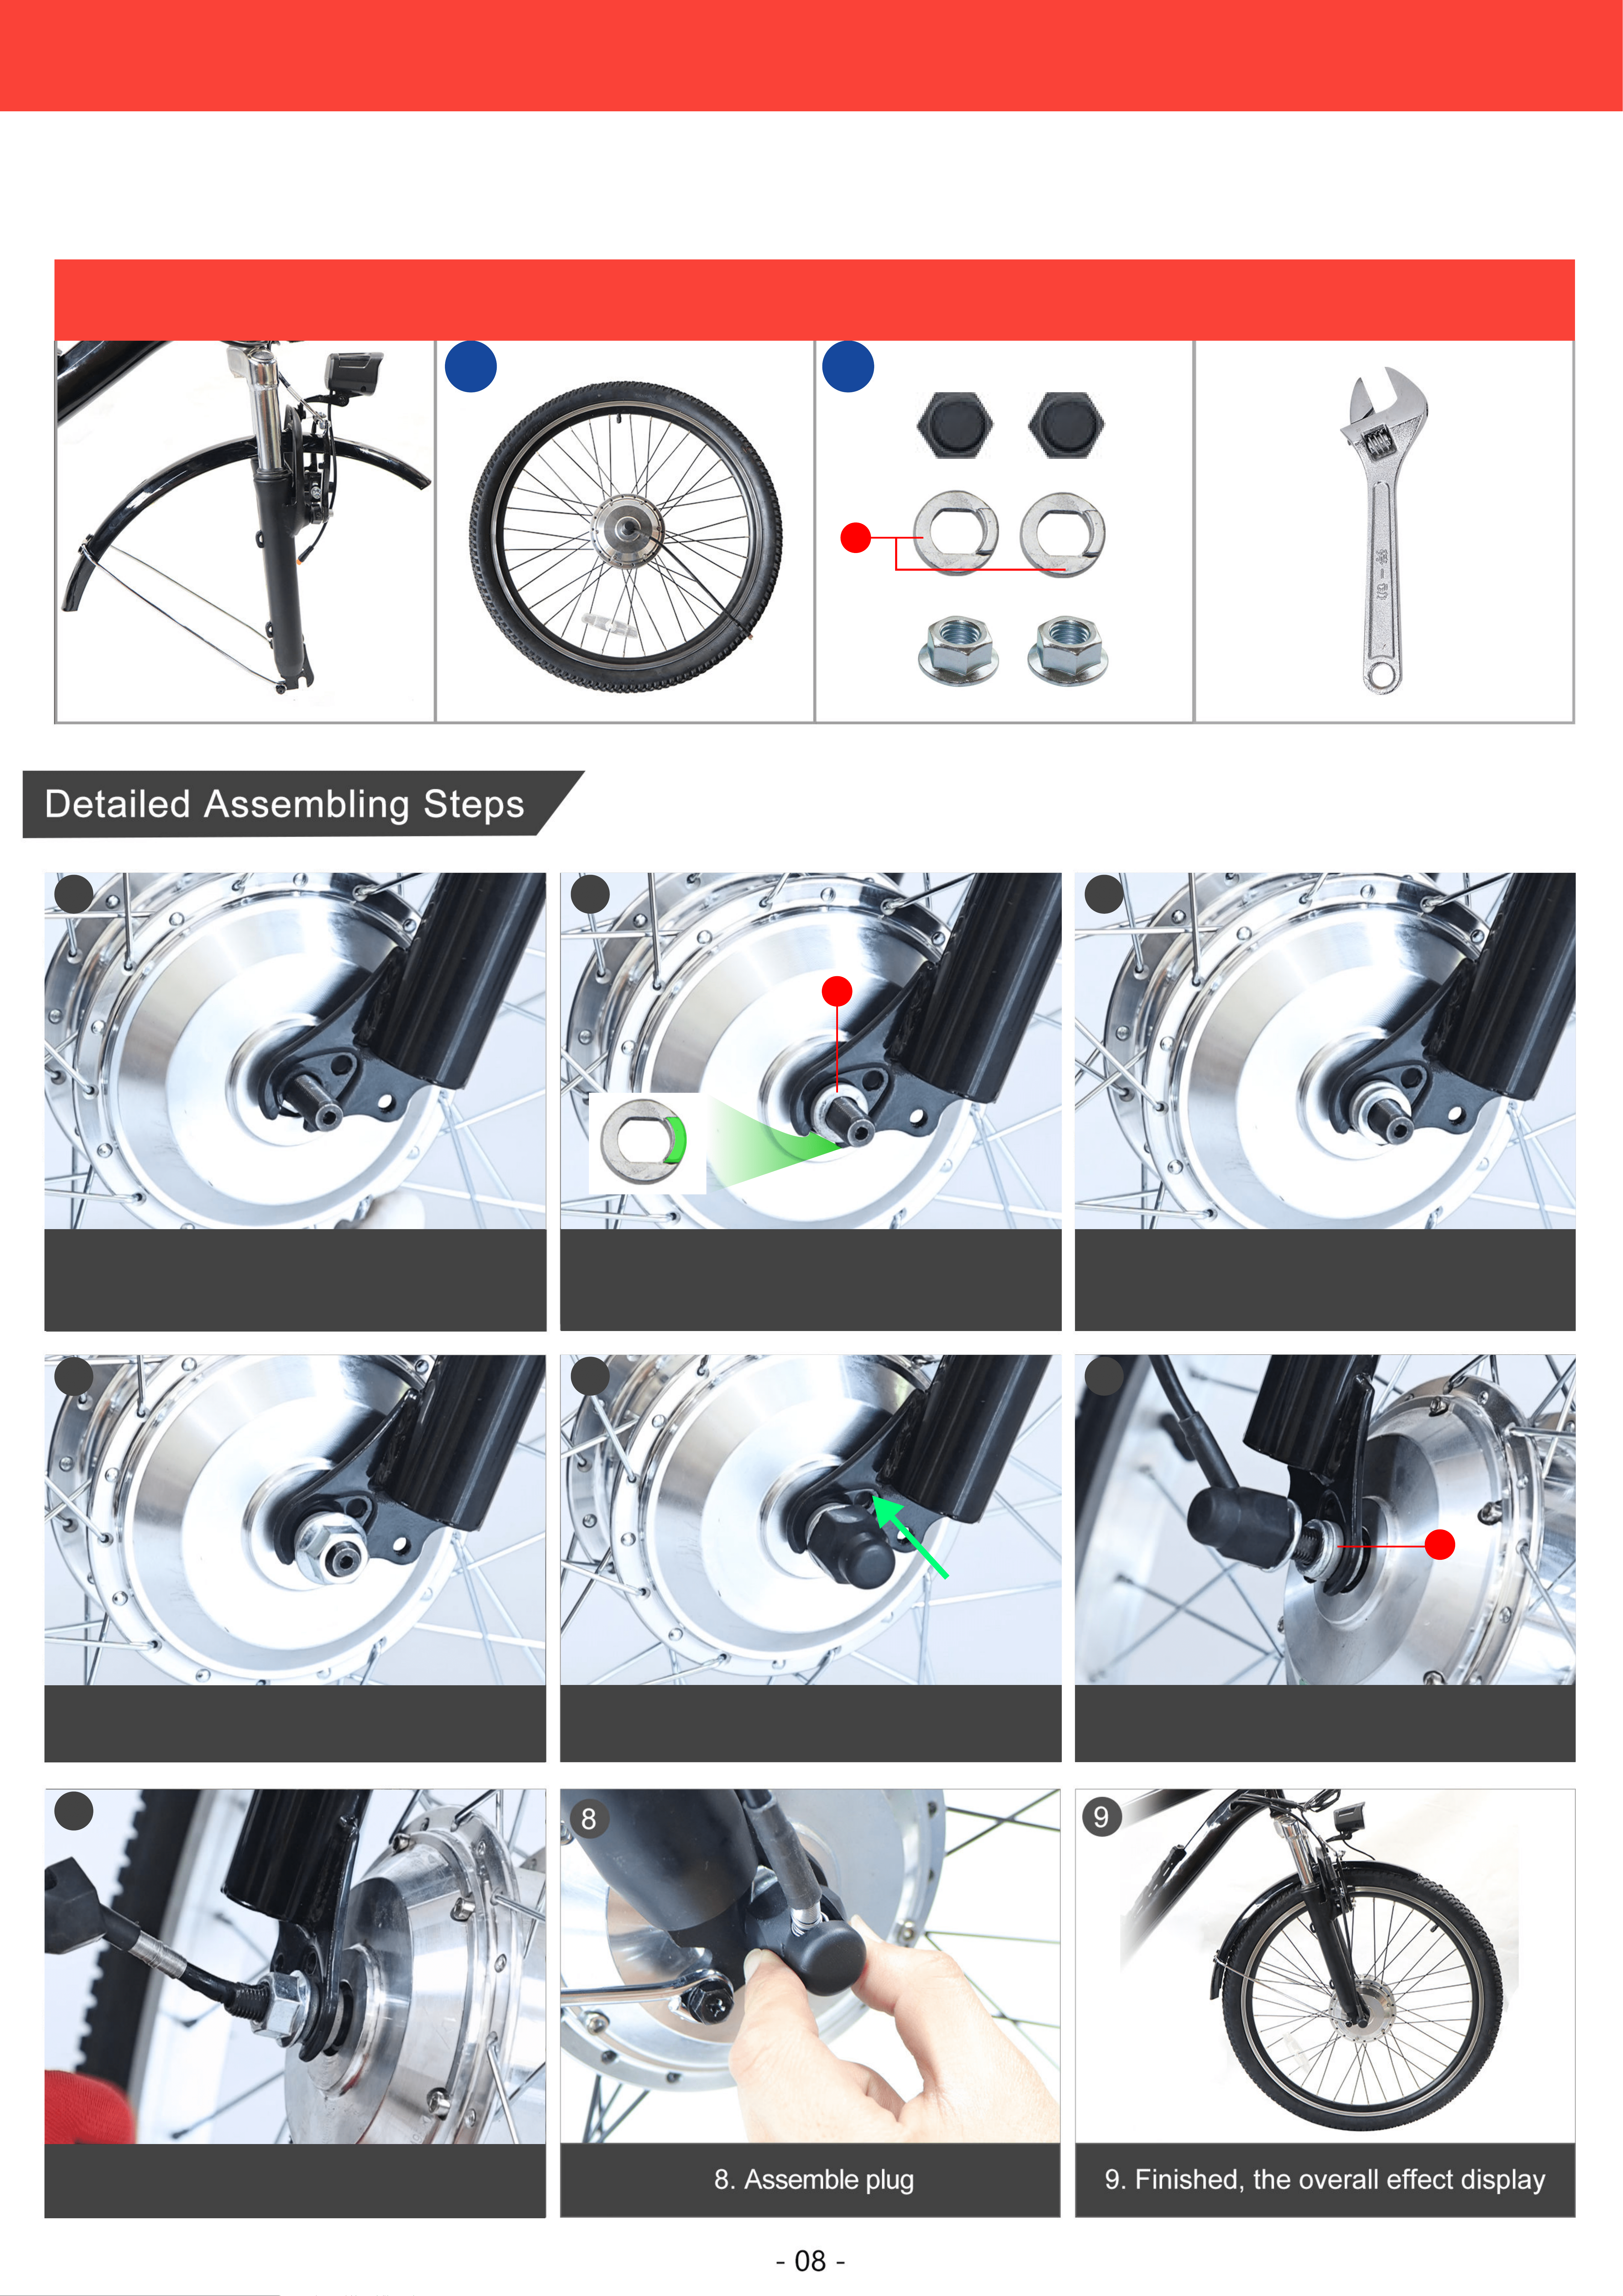
THE ASSEMBLING OF FRONT WHEEL
06
Fork Front Wheel Front wheel Parts Adjustable Wrench
Required Parts And Tools
Tool
4.Finished, the effect shows
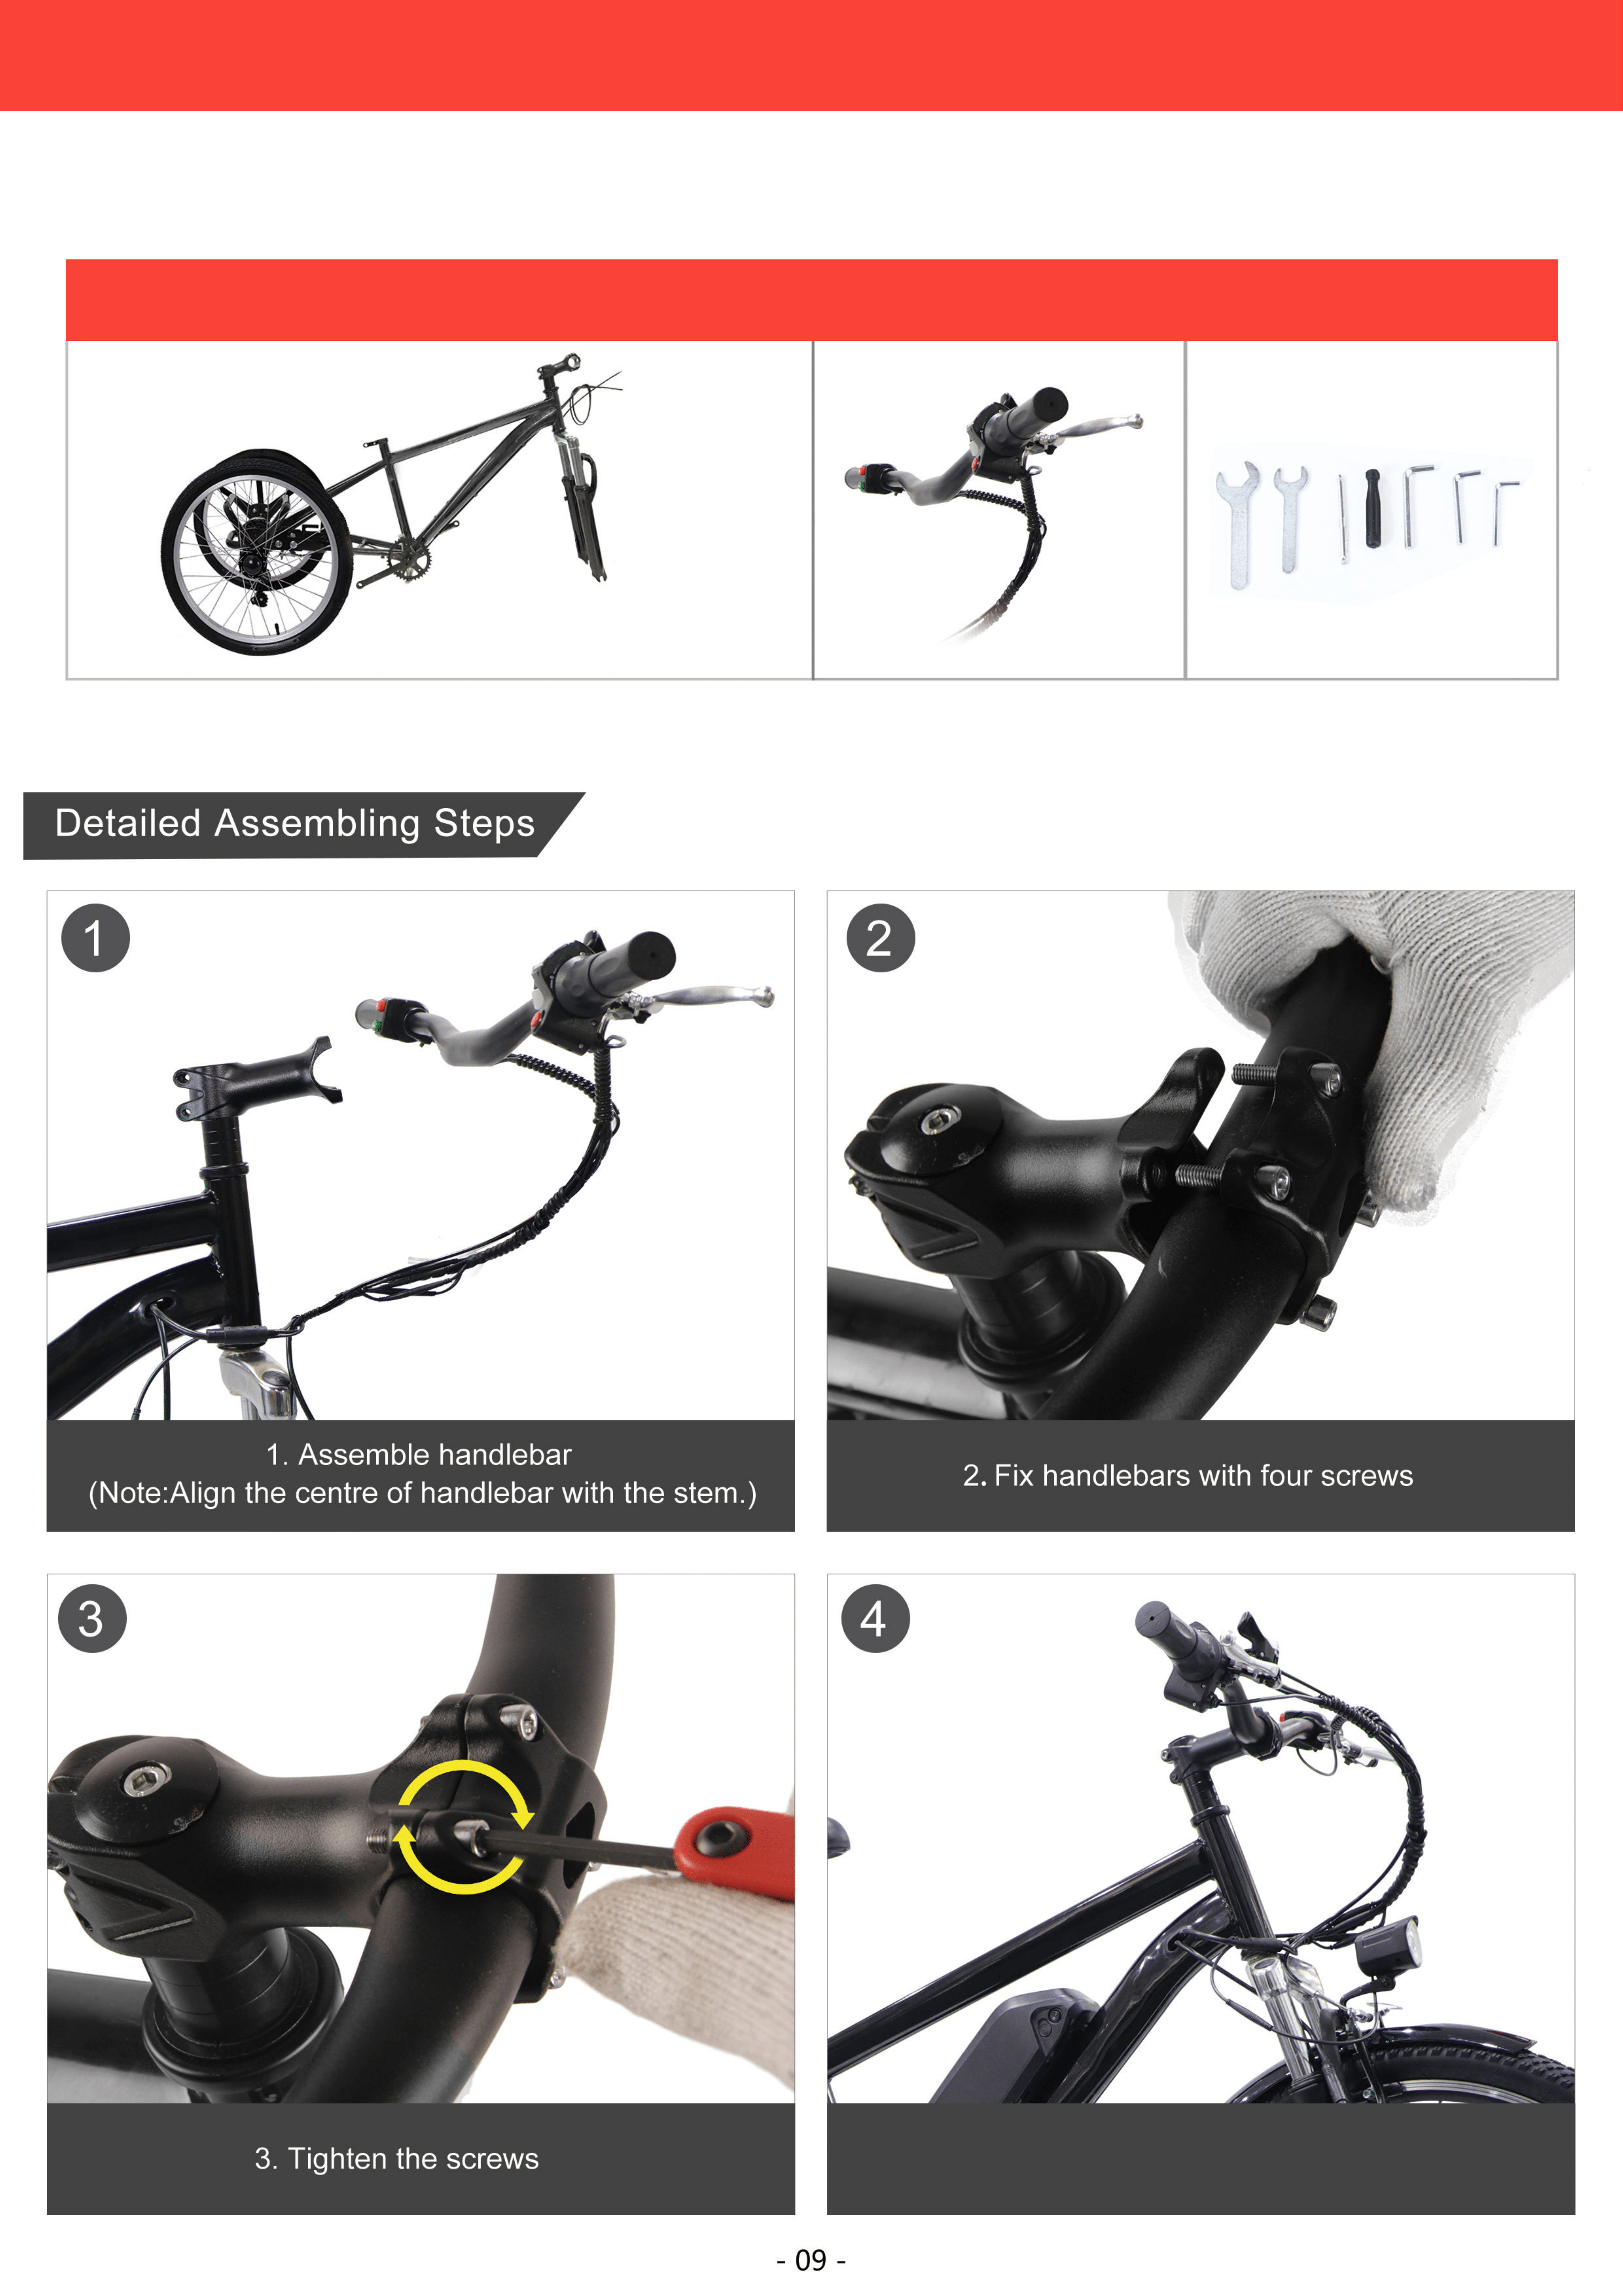
THE ASSEMBLING OF HANDLEBAR
07
Frame Handlebar Tool
Required Parts And Tools

7 7
THE ASSEMBLING OF SADDLE
08
Seat Tube Seat Post Saddle Multi-Function Wrench
Required Parts And Tools
10
4. Finished,the effect shows
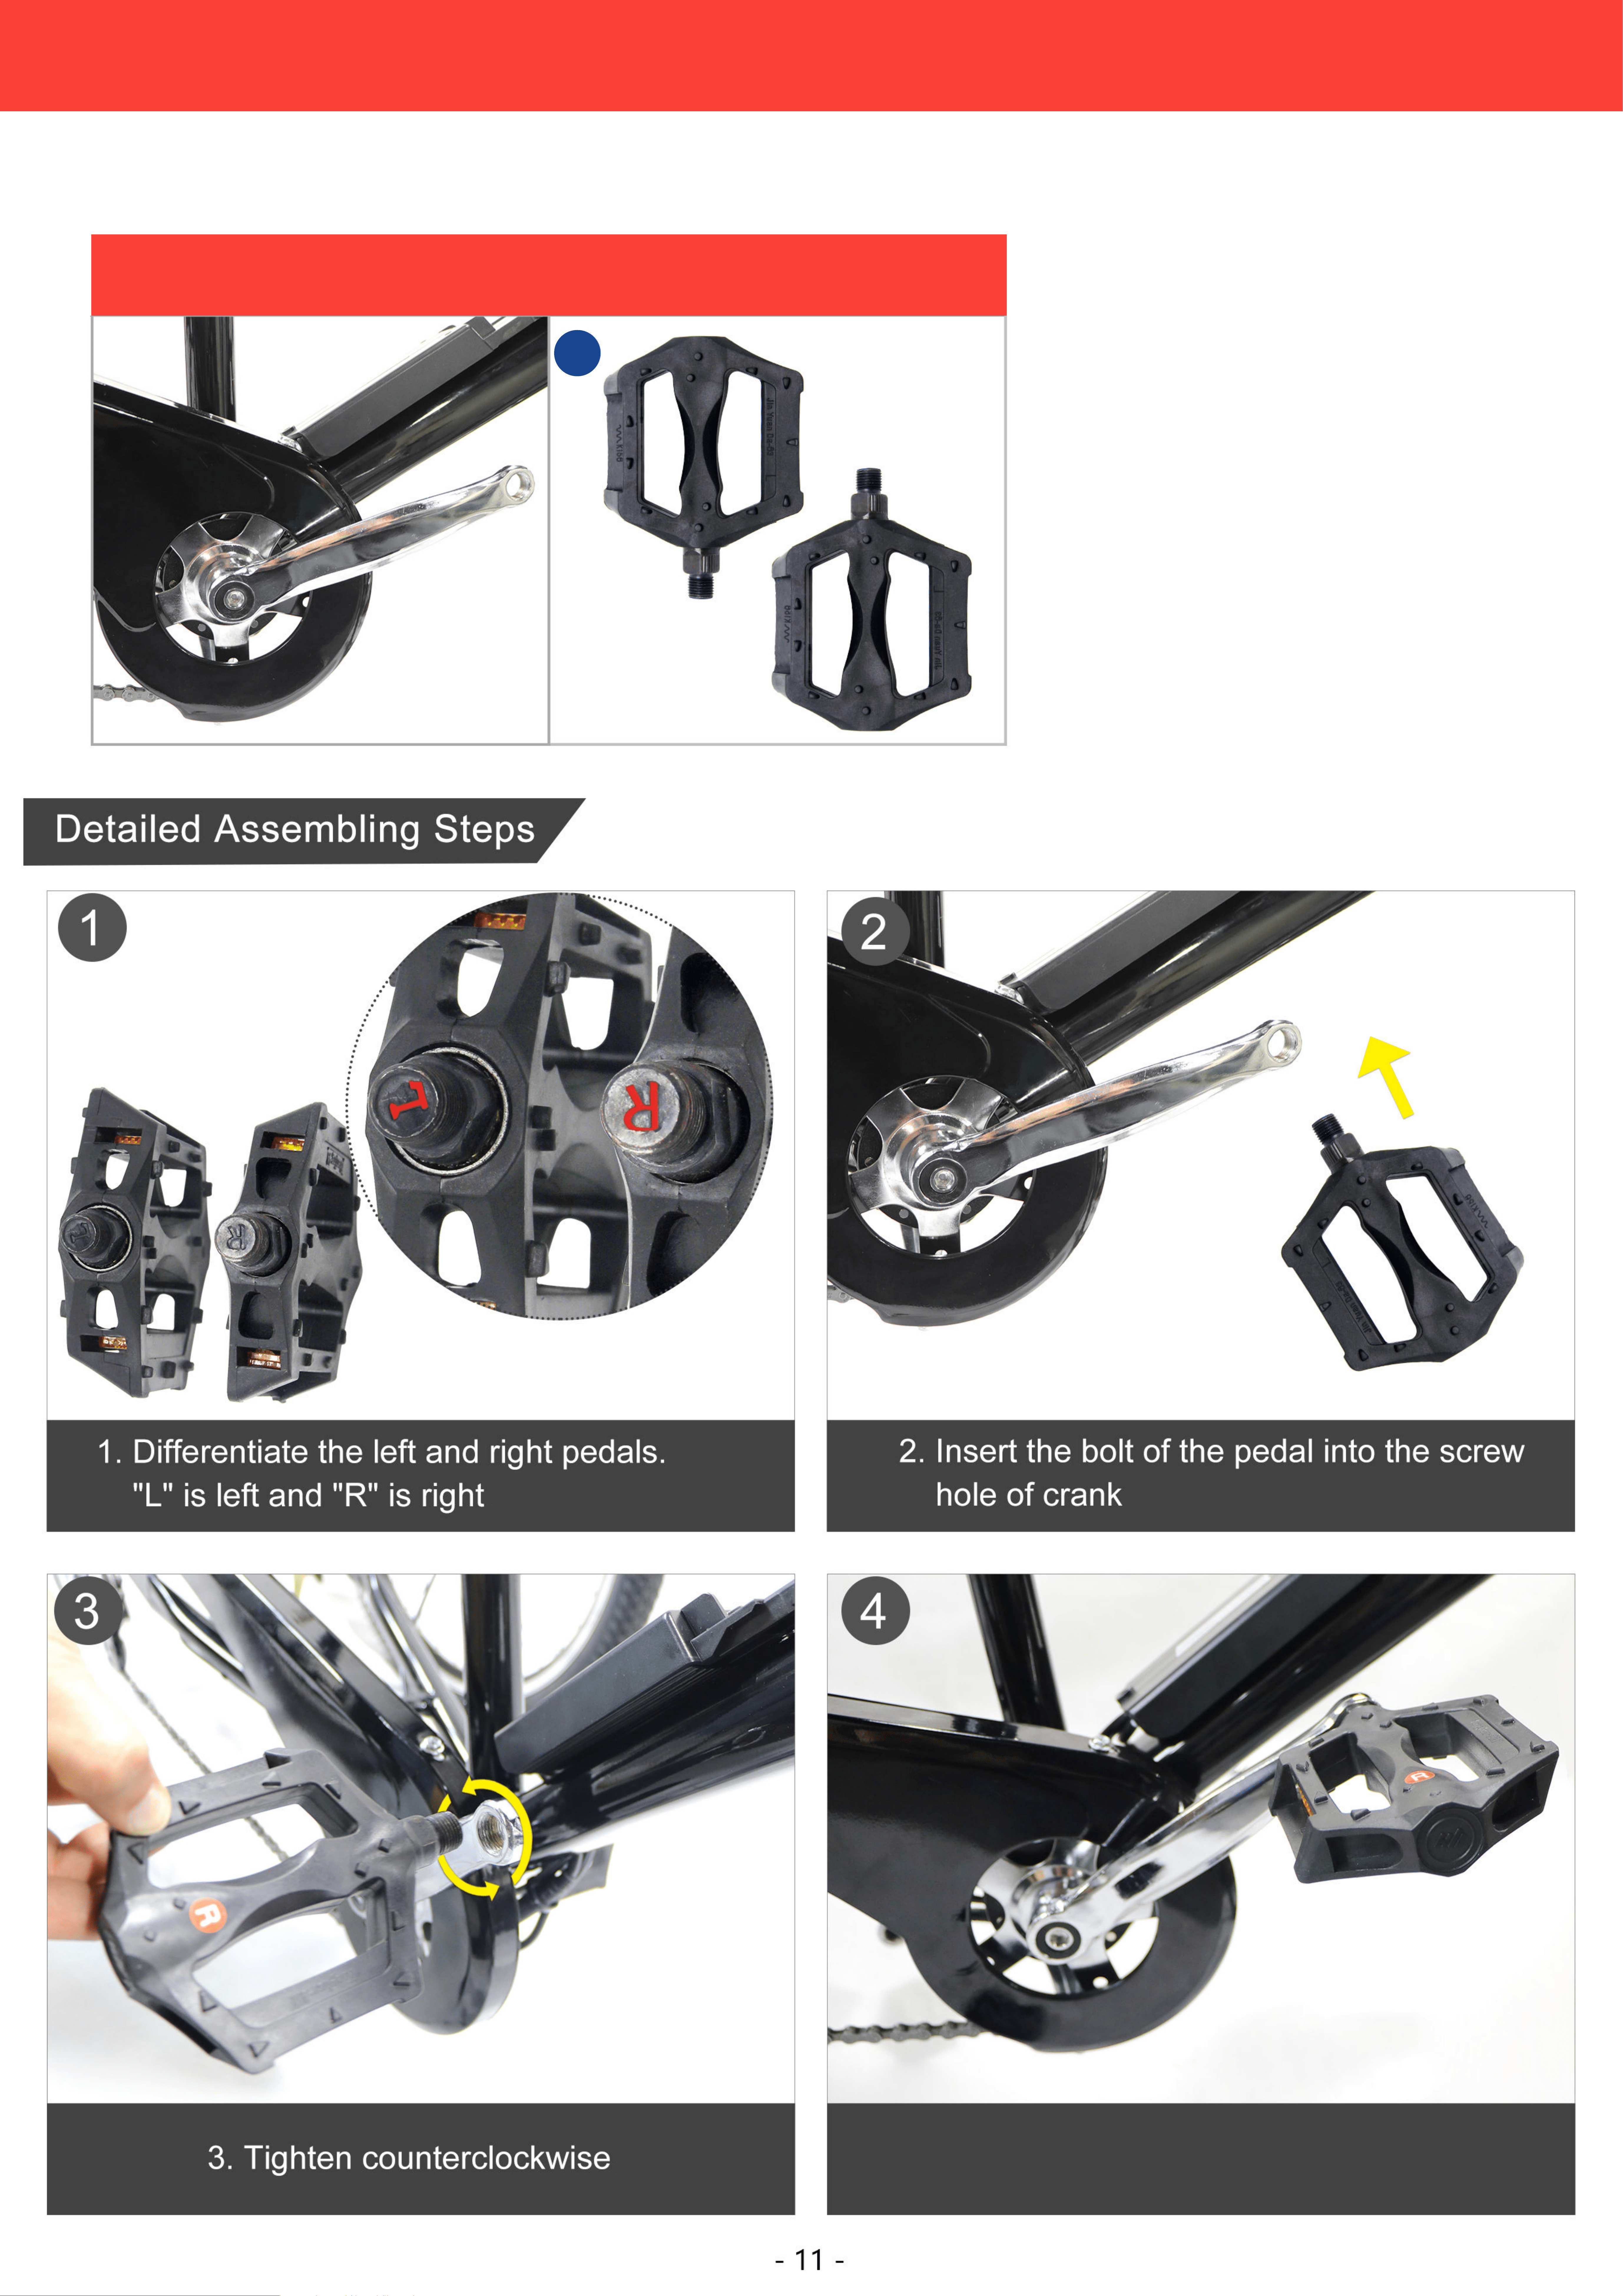
THE ASSEMBLING OF PEDAL
09
Crank Pedal
Required Parts And Tools

Tool
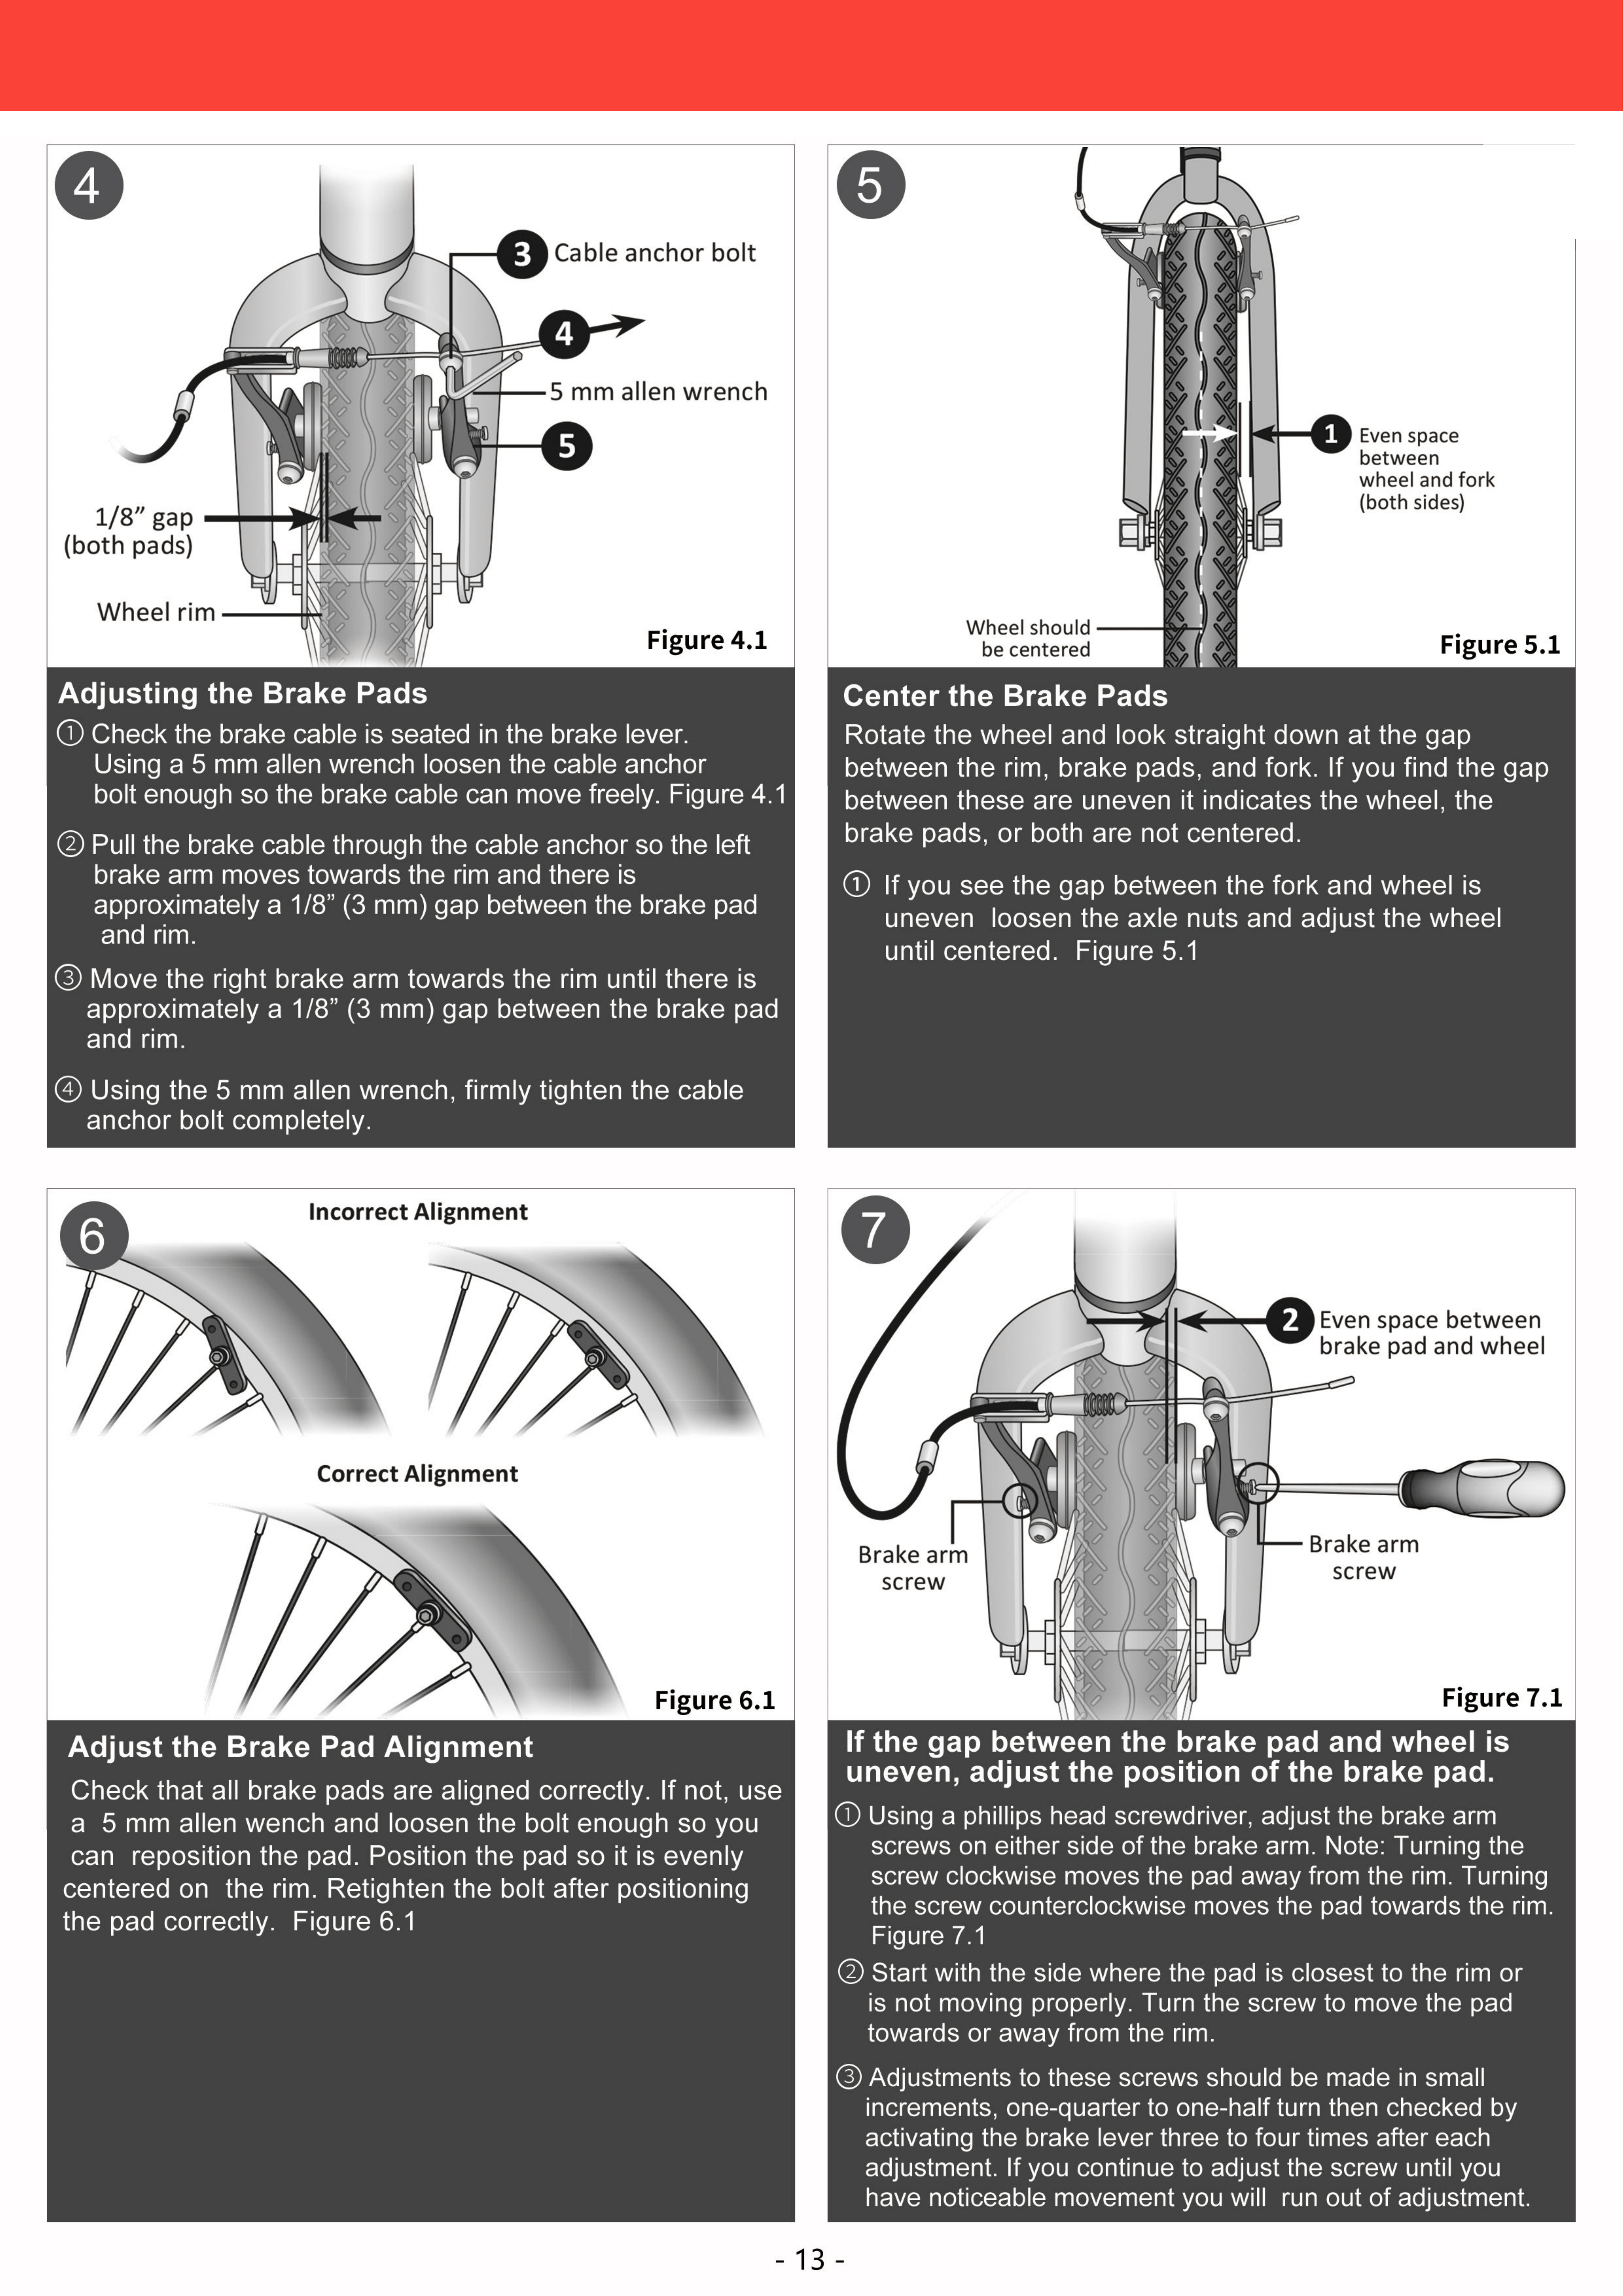
THE ASSEMBLING OF FRONT BRAKE
10
Left Brake Lever Front Brake & Brake Cable Tool
Required Parts And Tools
THE ASSEMBLING OF FRONT BRAKE
10
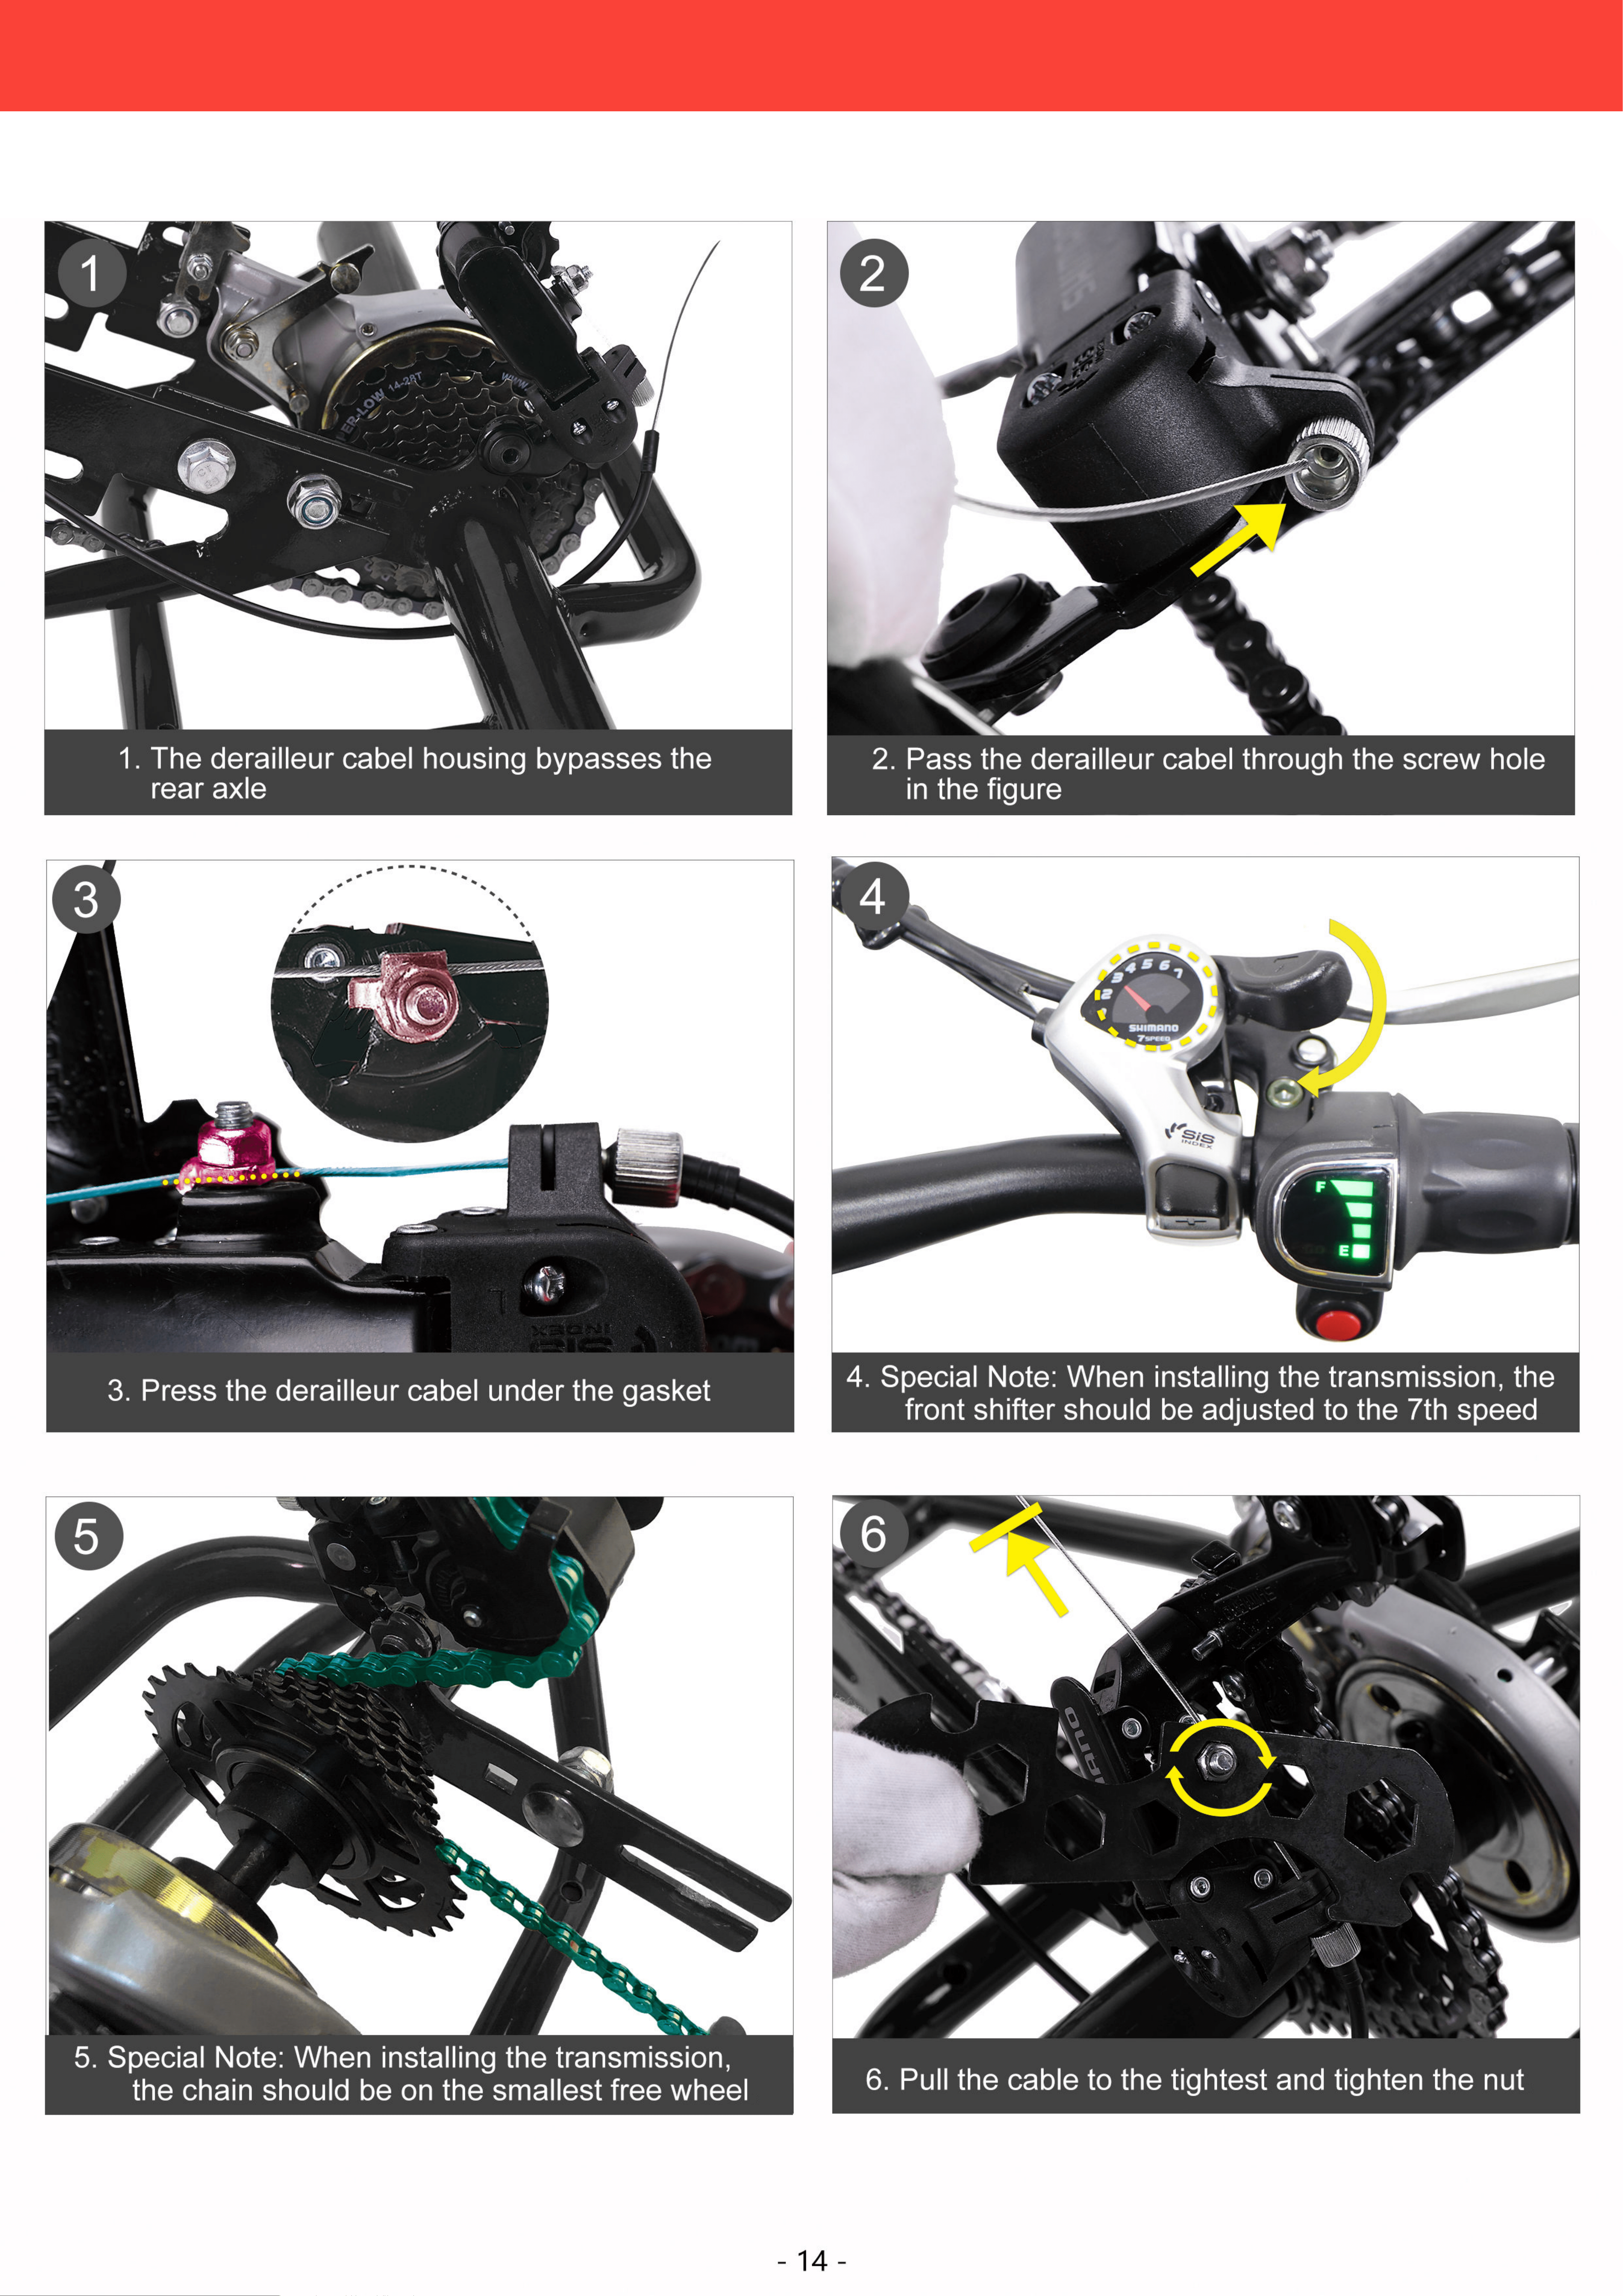
THE ASSEMBLING OF SHIFTER CABLE
11
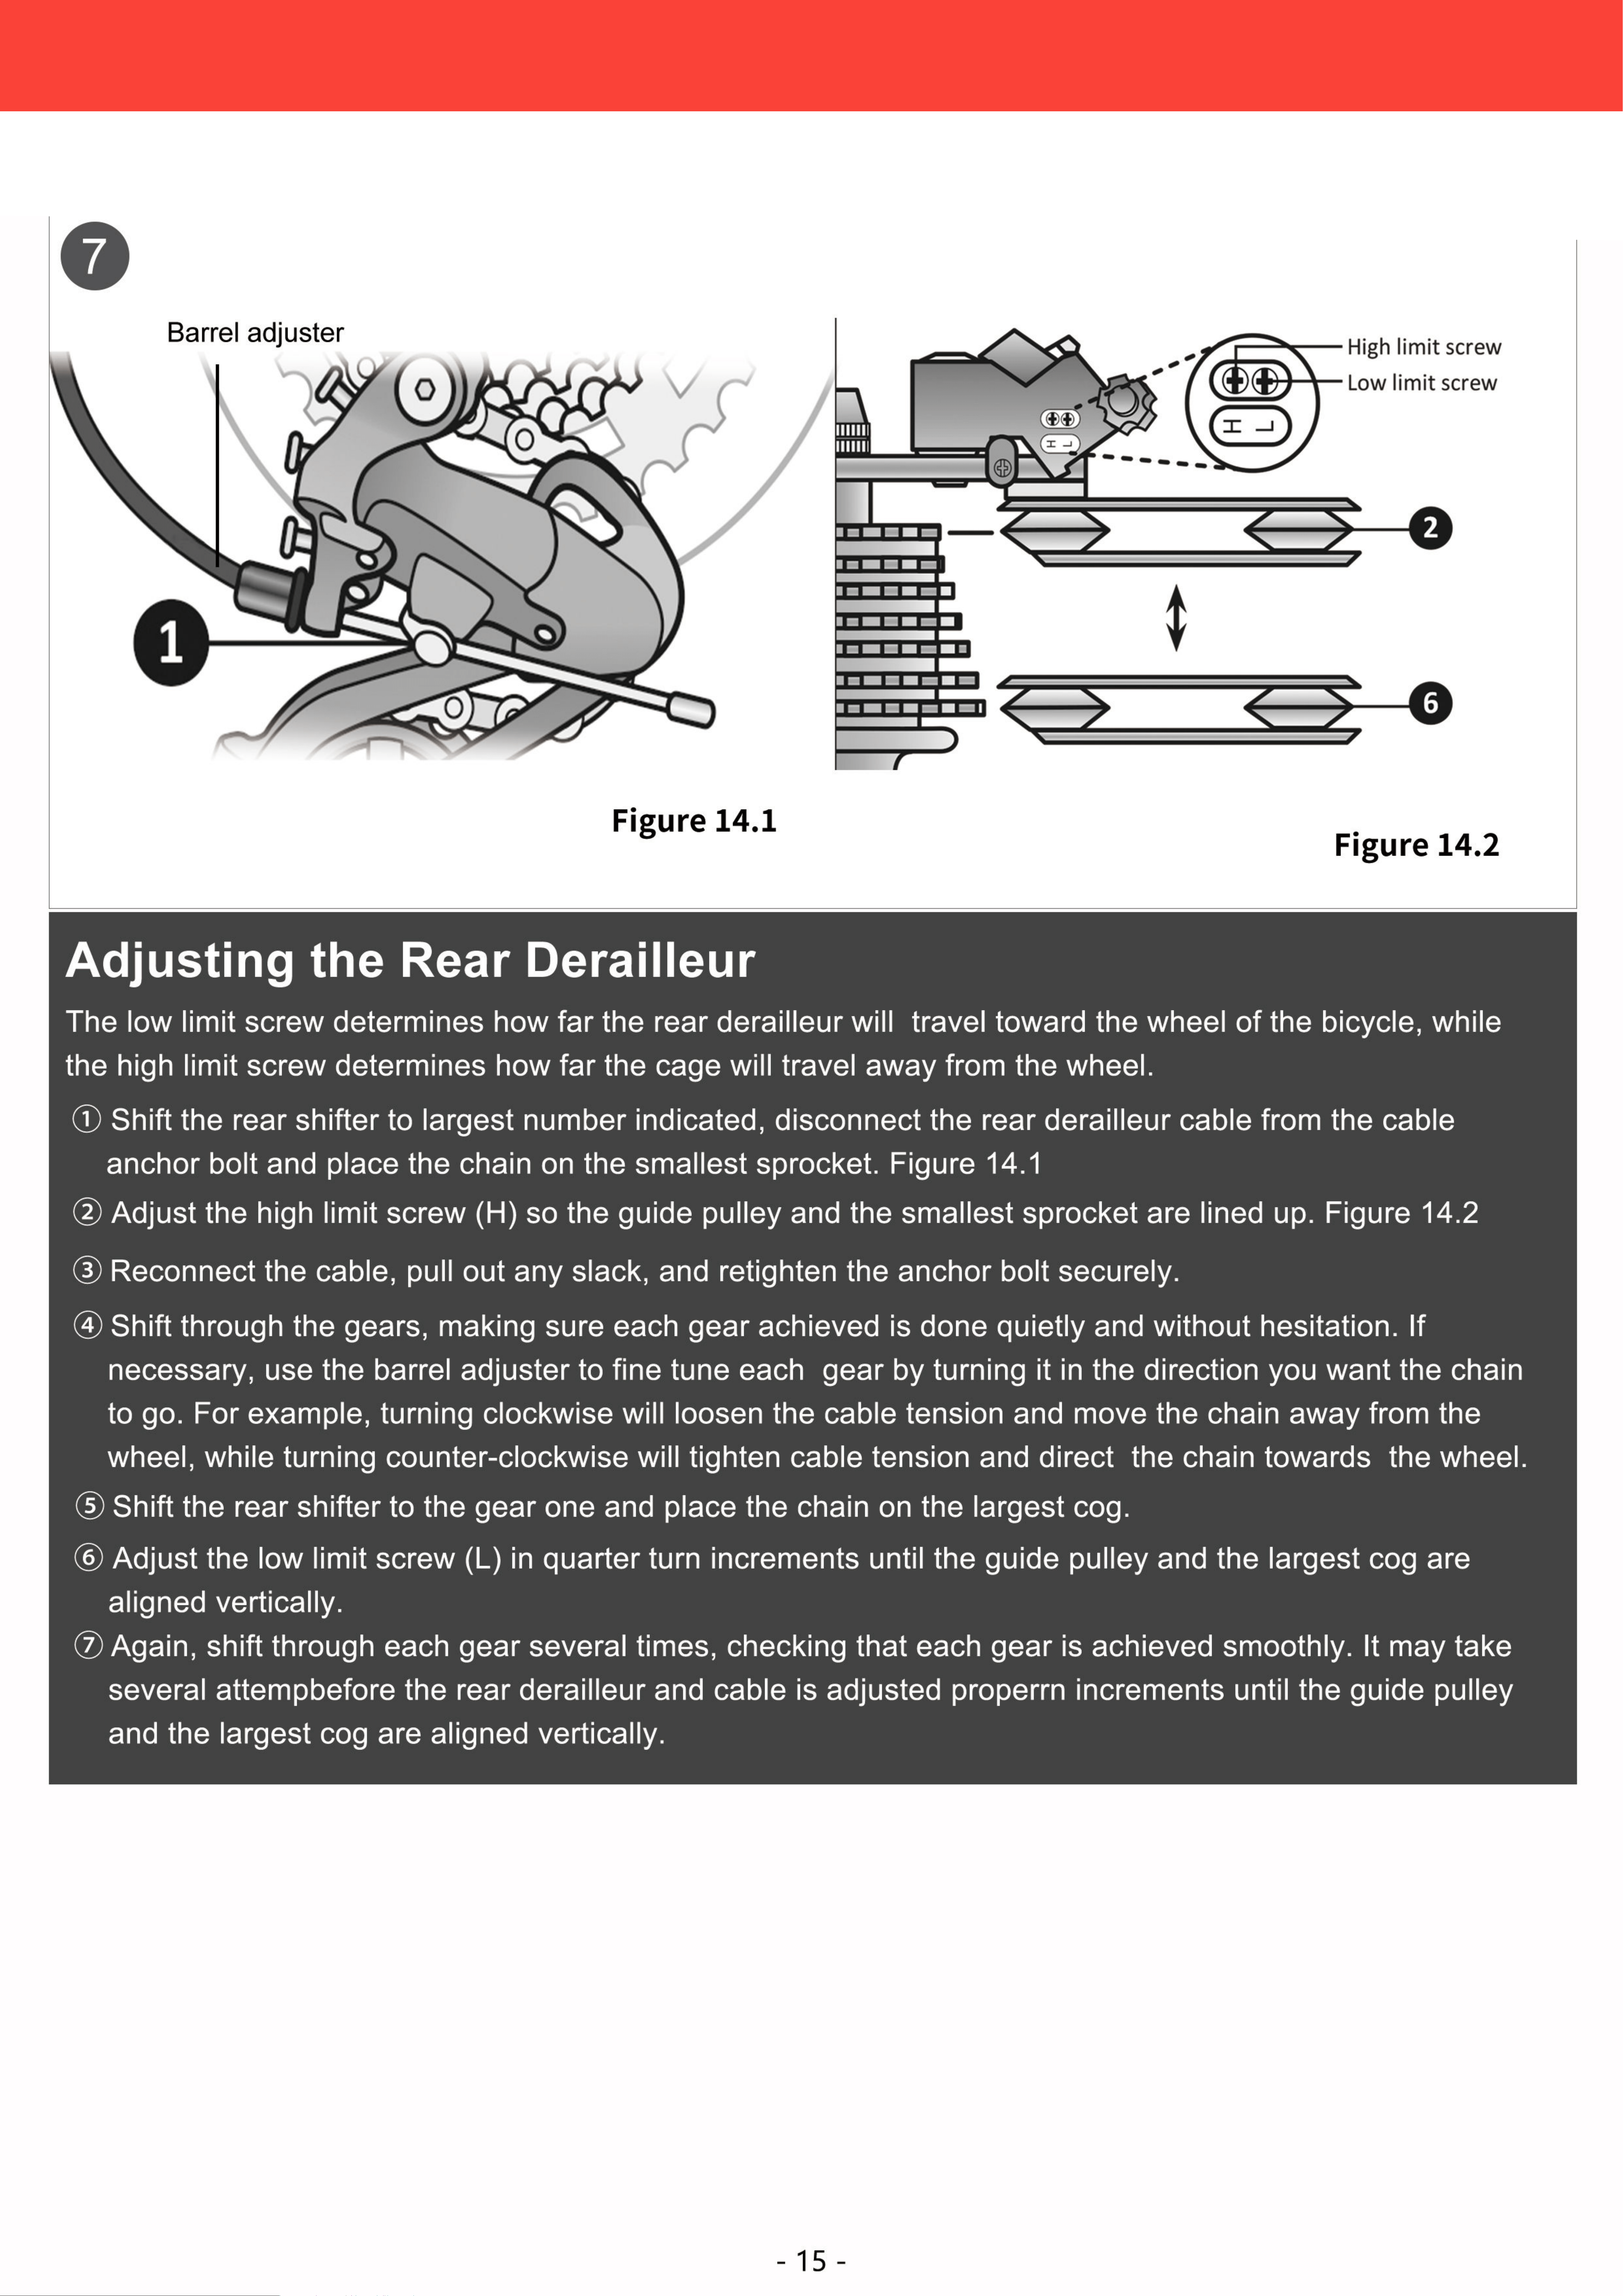
THE ASSEMBLING OF SHIFTER CABLE
11
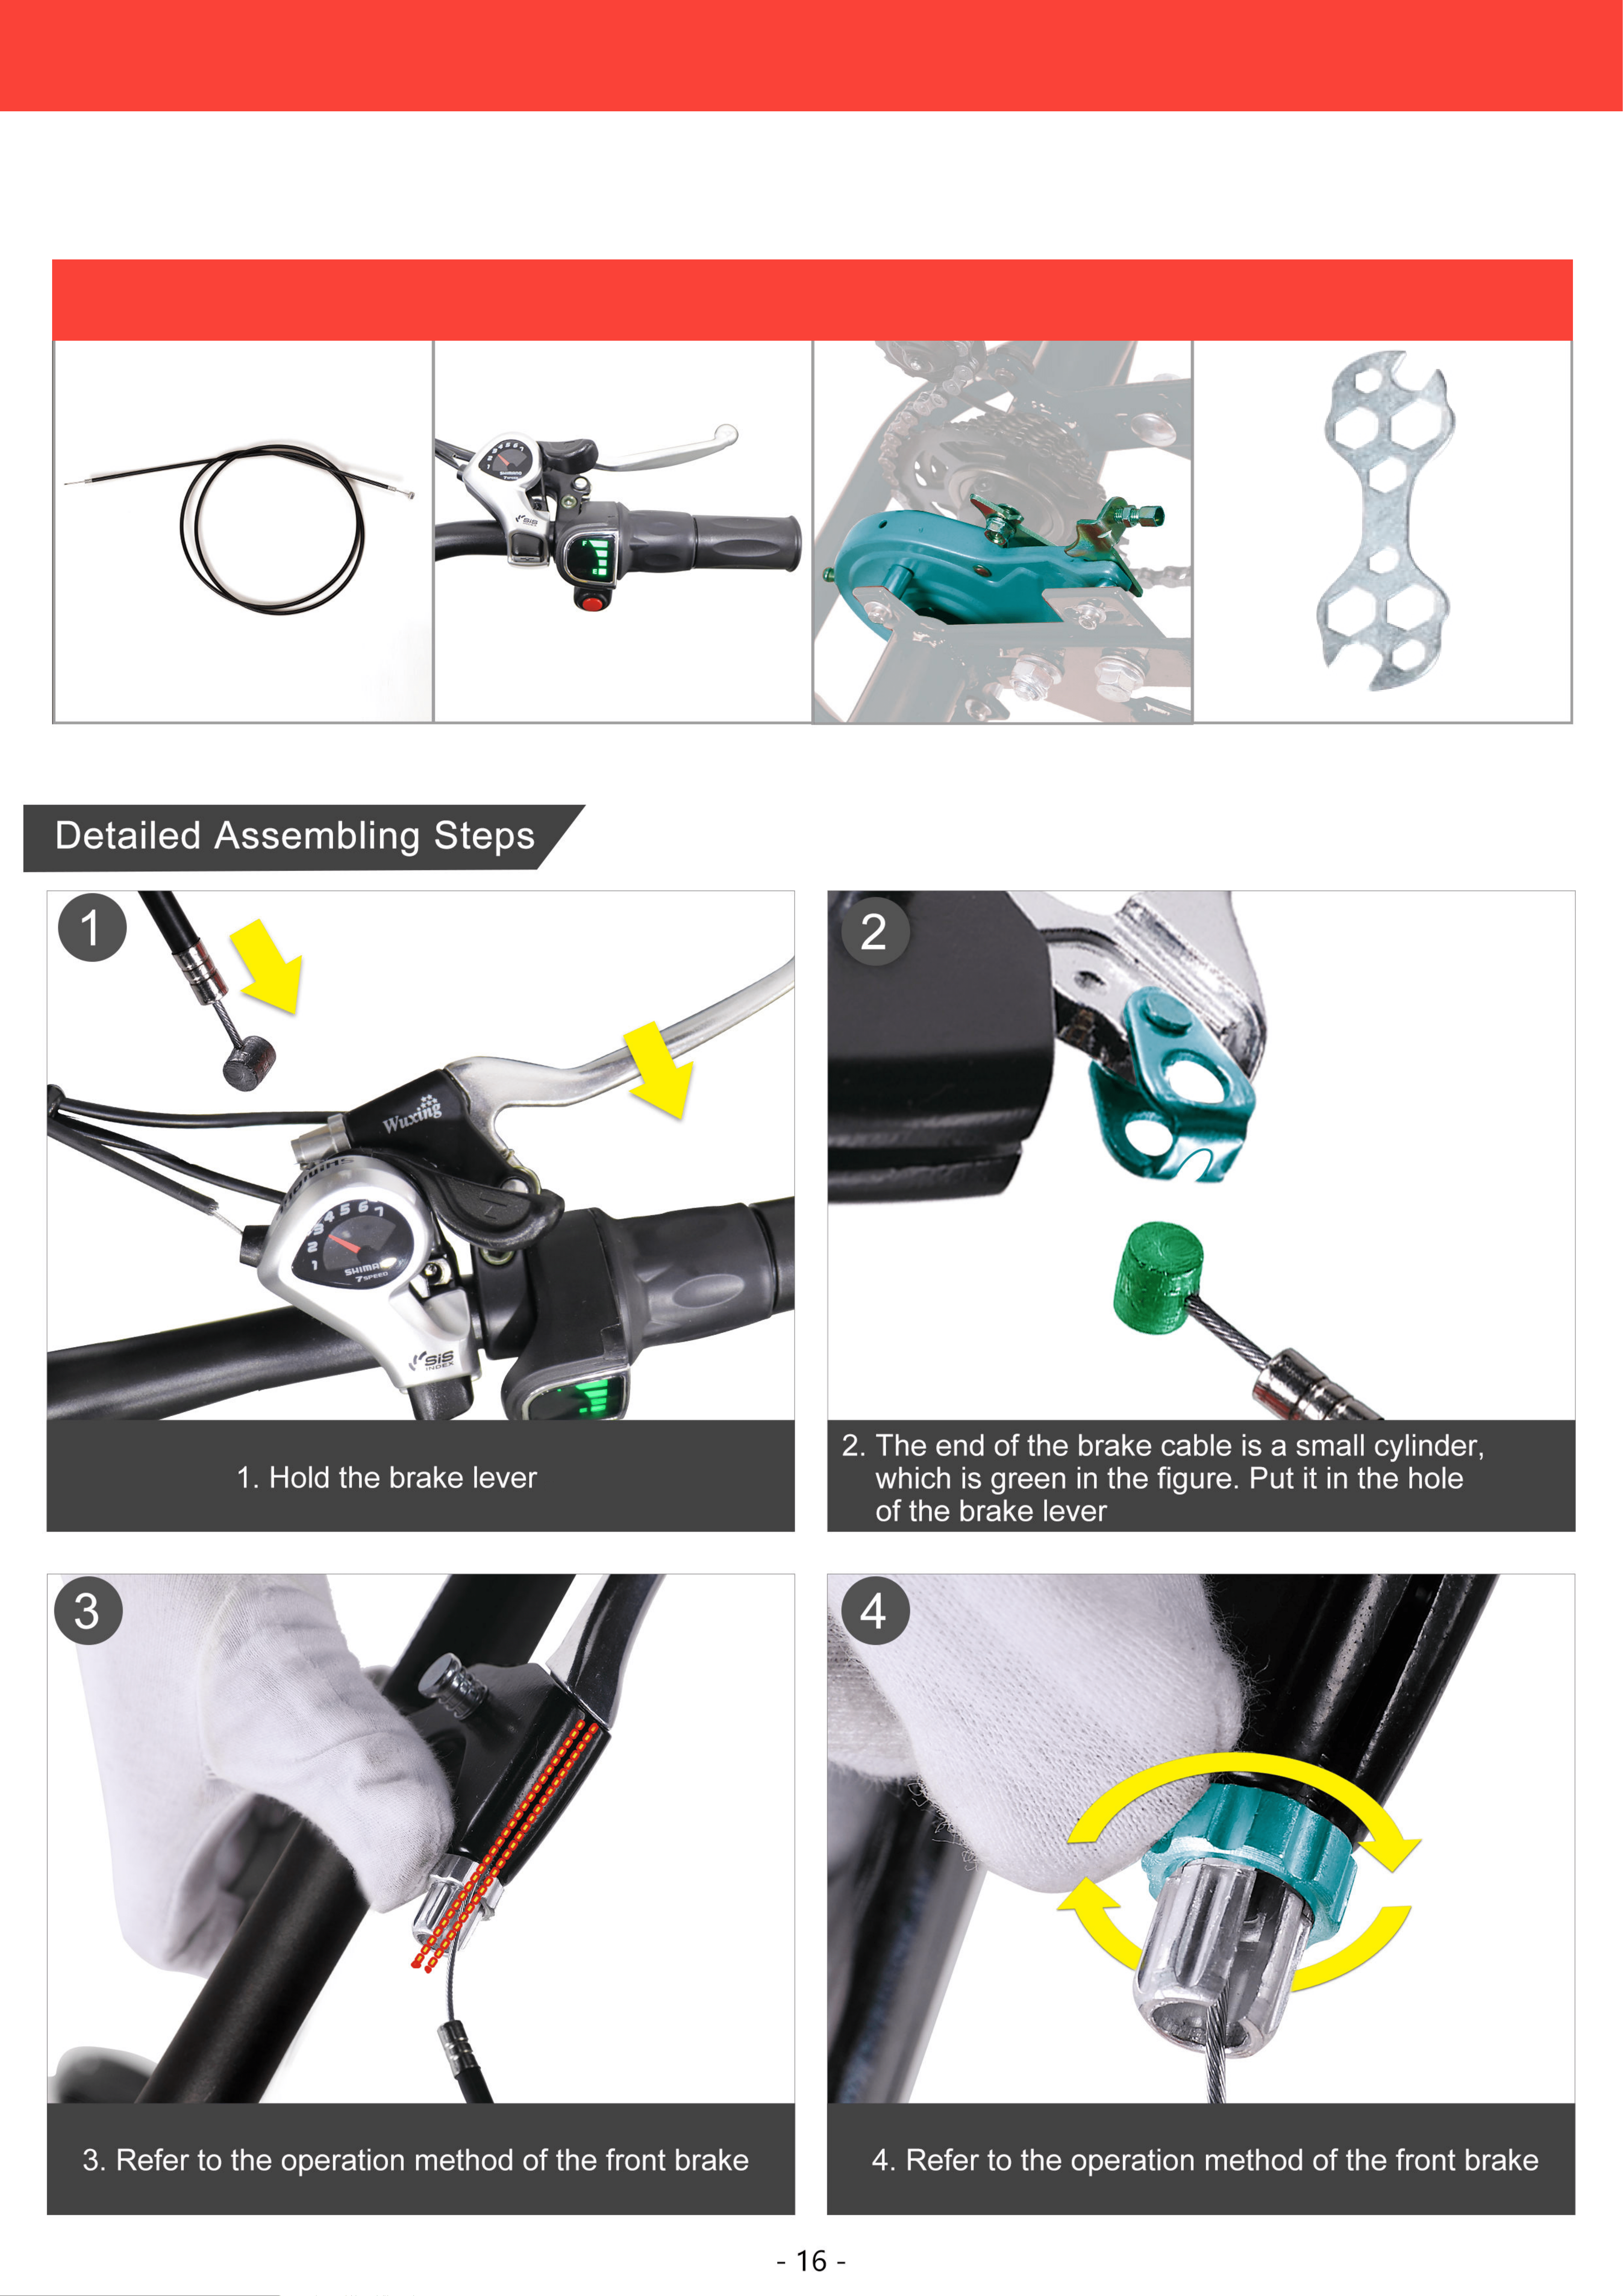
THE ASSEMBLING OF REAR BRAKE
12
Rear Brake Cable Right Brake Lever Rear Brake Multi-Function Wrench
Required Parts And Tools

THE ASSEMBLING OF REAR BRAKE
12
1 20
Tool
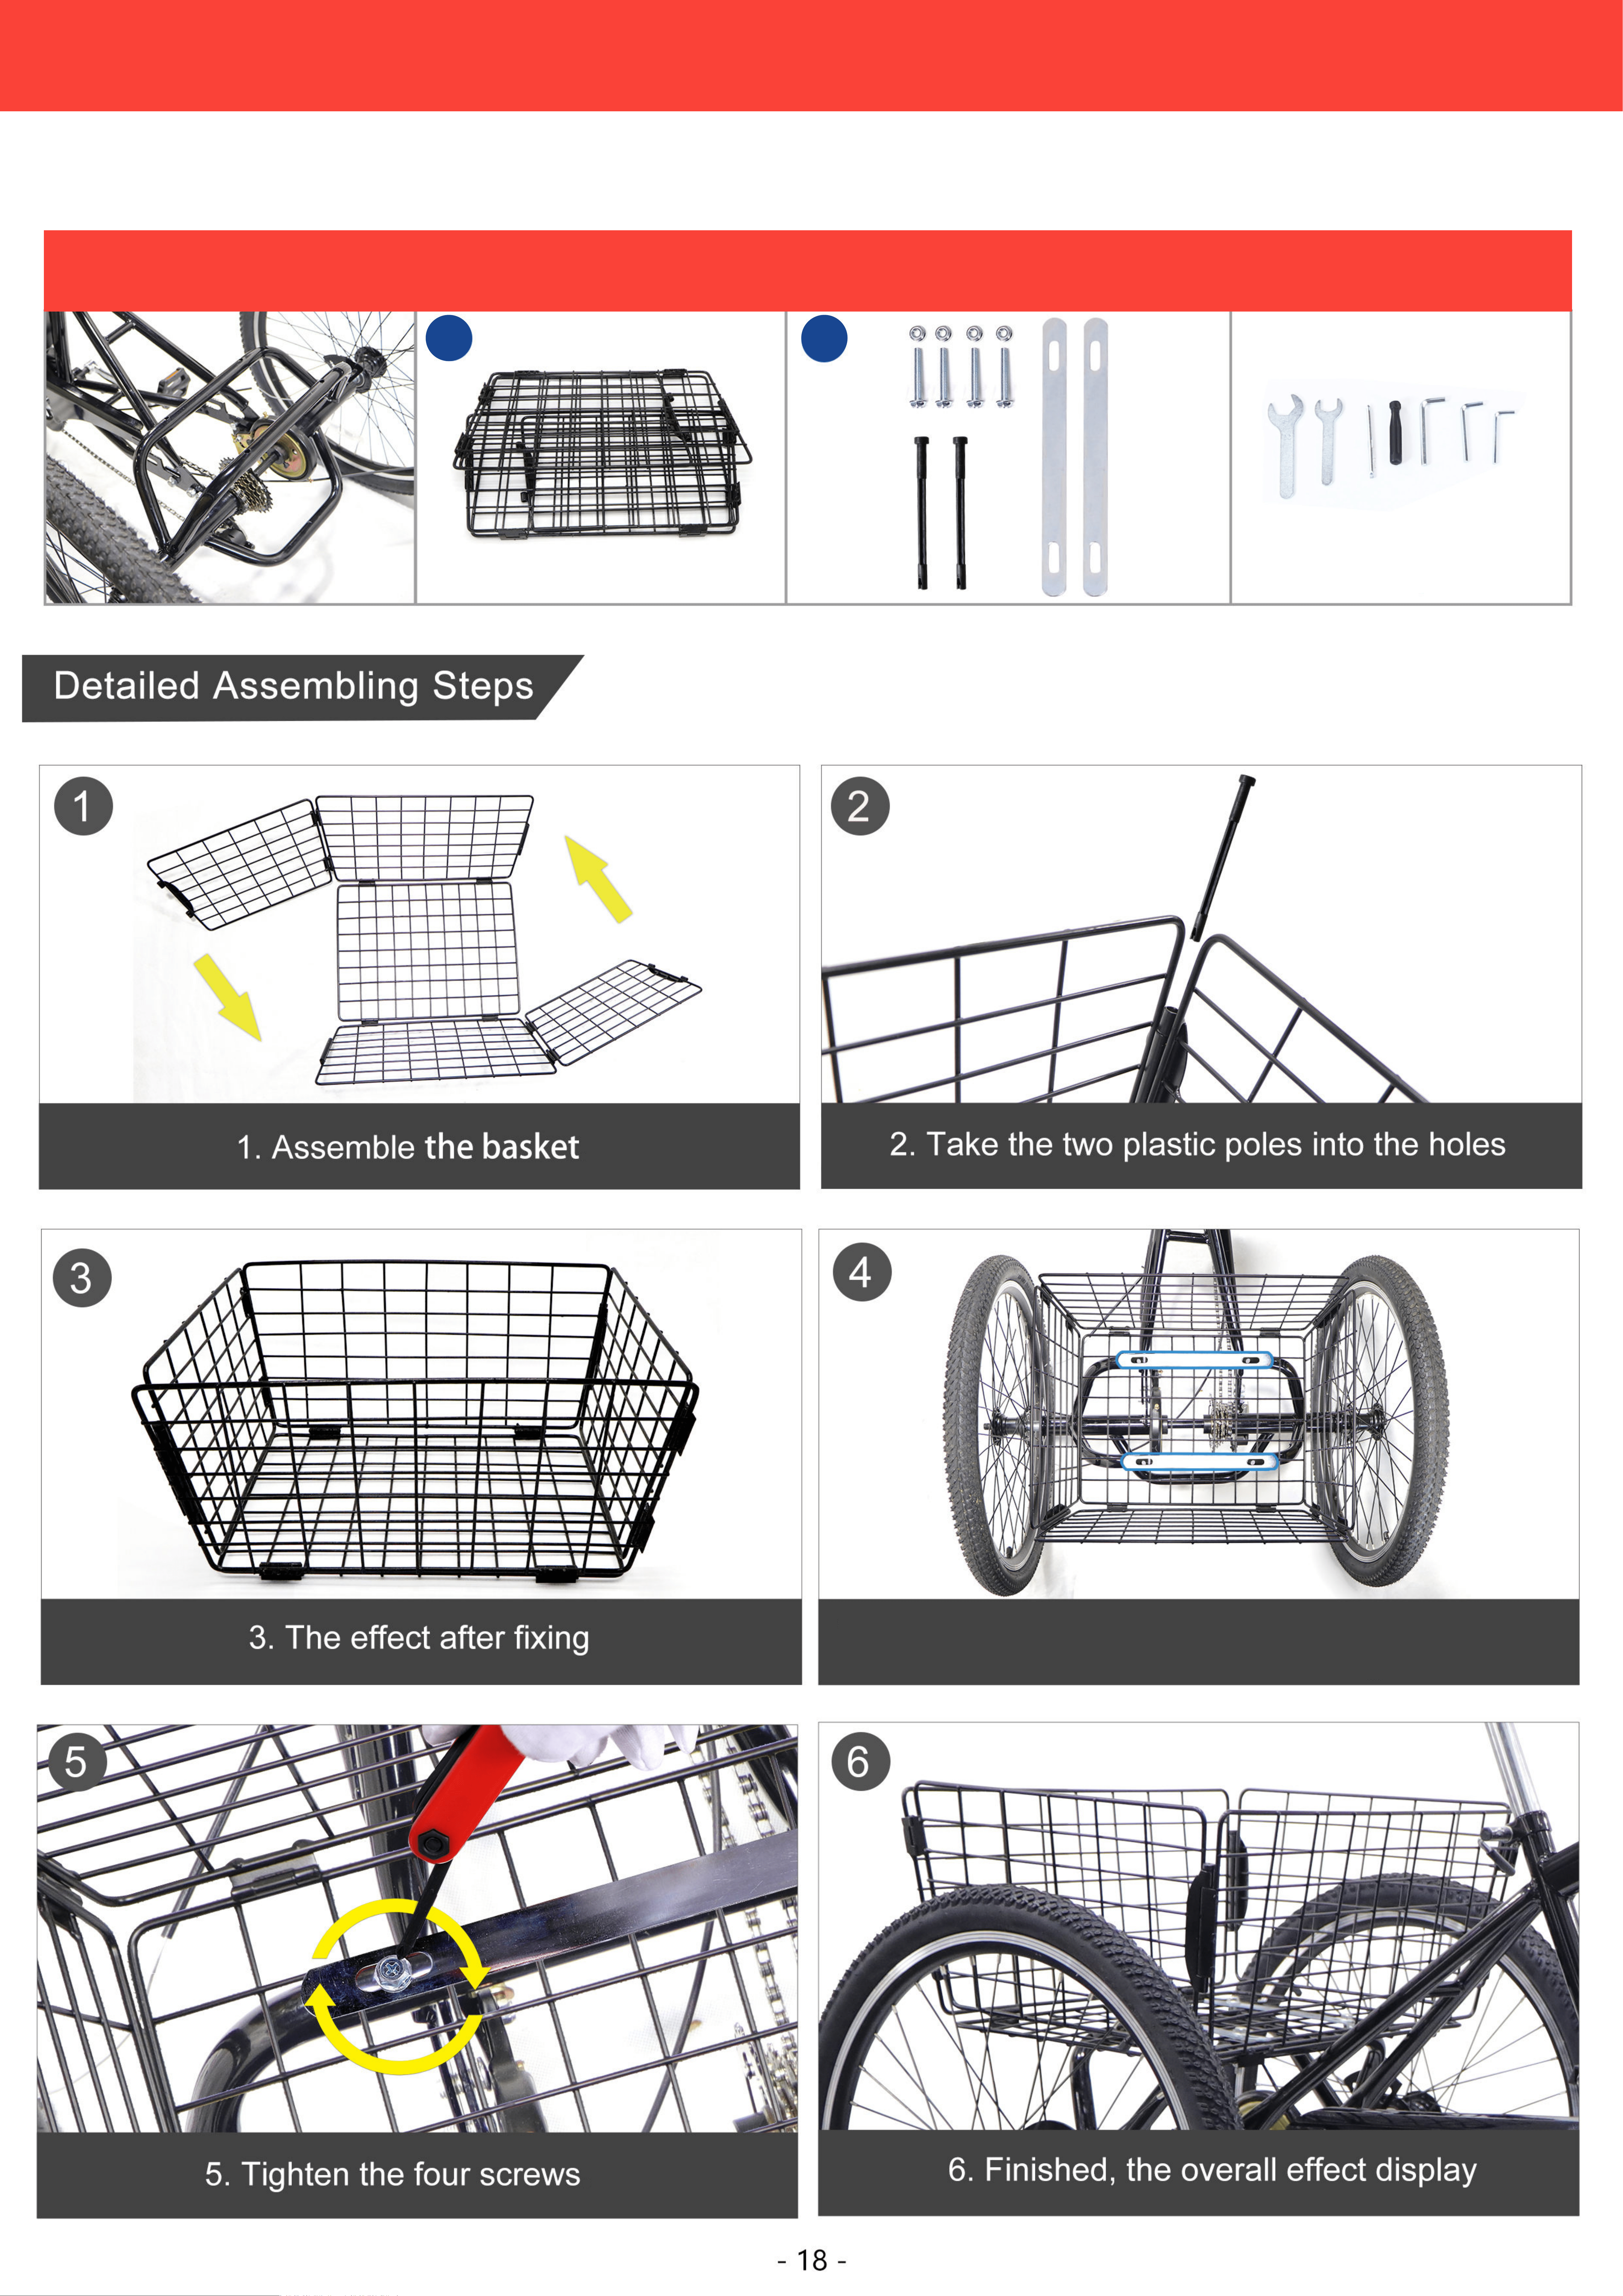
4. Place the basket and then the two long washers.
Make sure the screw holes are aligned.
THE ASSEMBLING OF BASKET
13
Rear Axle Basket Basket parts Tool
Required Parts And Tools
13
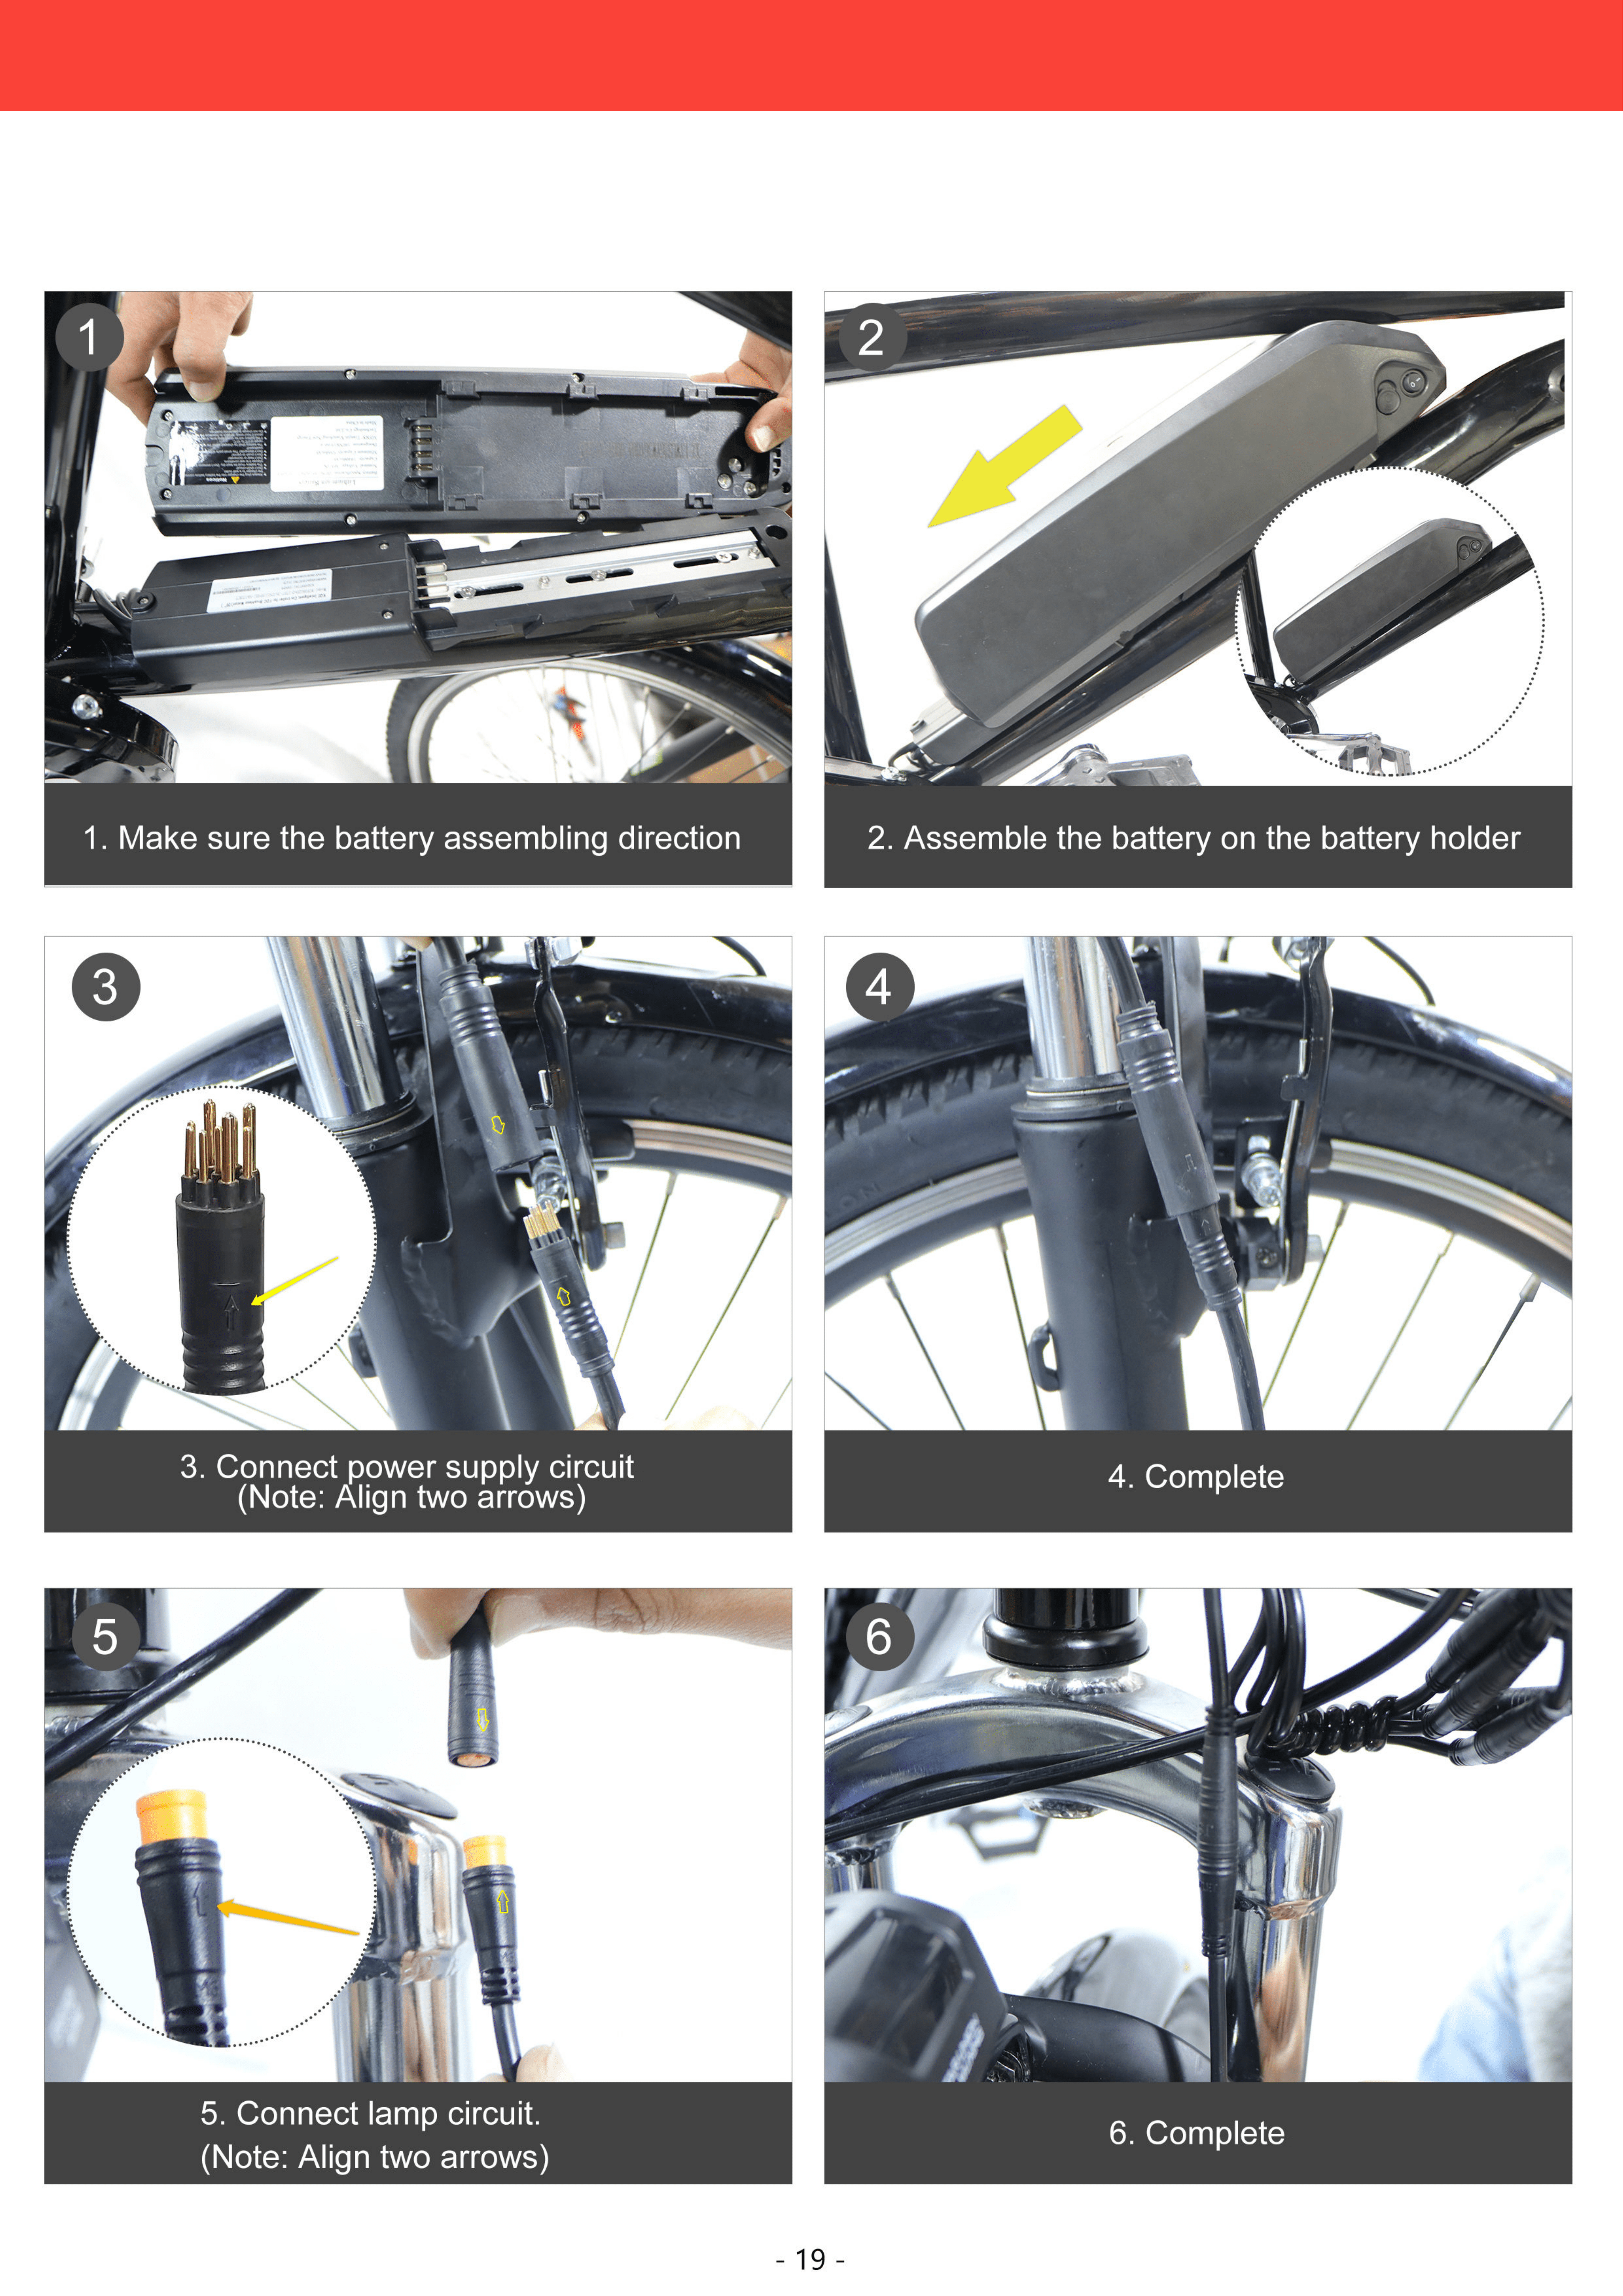
THE ASSEMBLING OF POWER SUPPLY
14
Detailed Assembling Steps
Tool
14
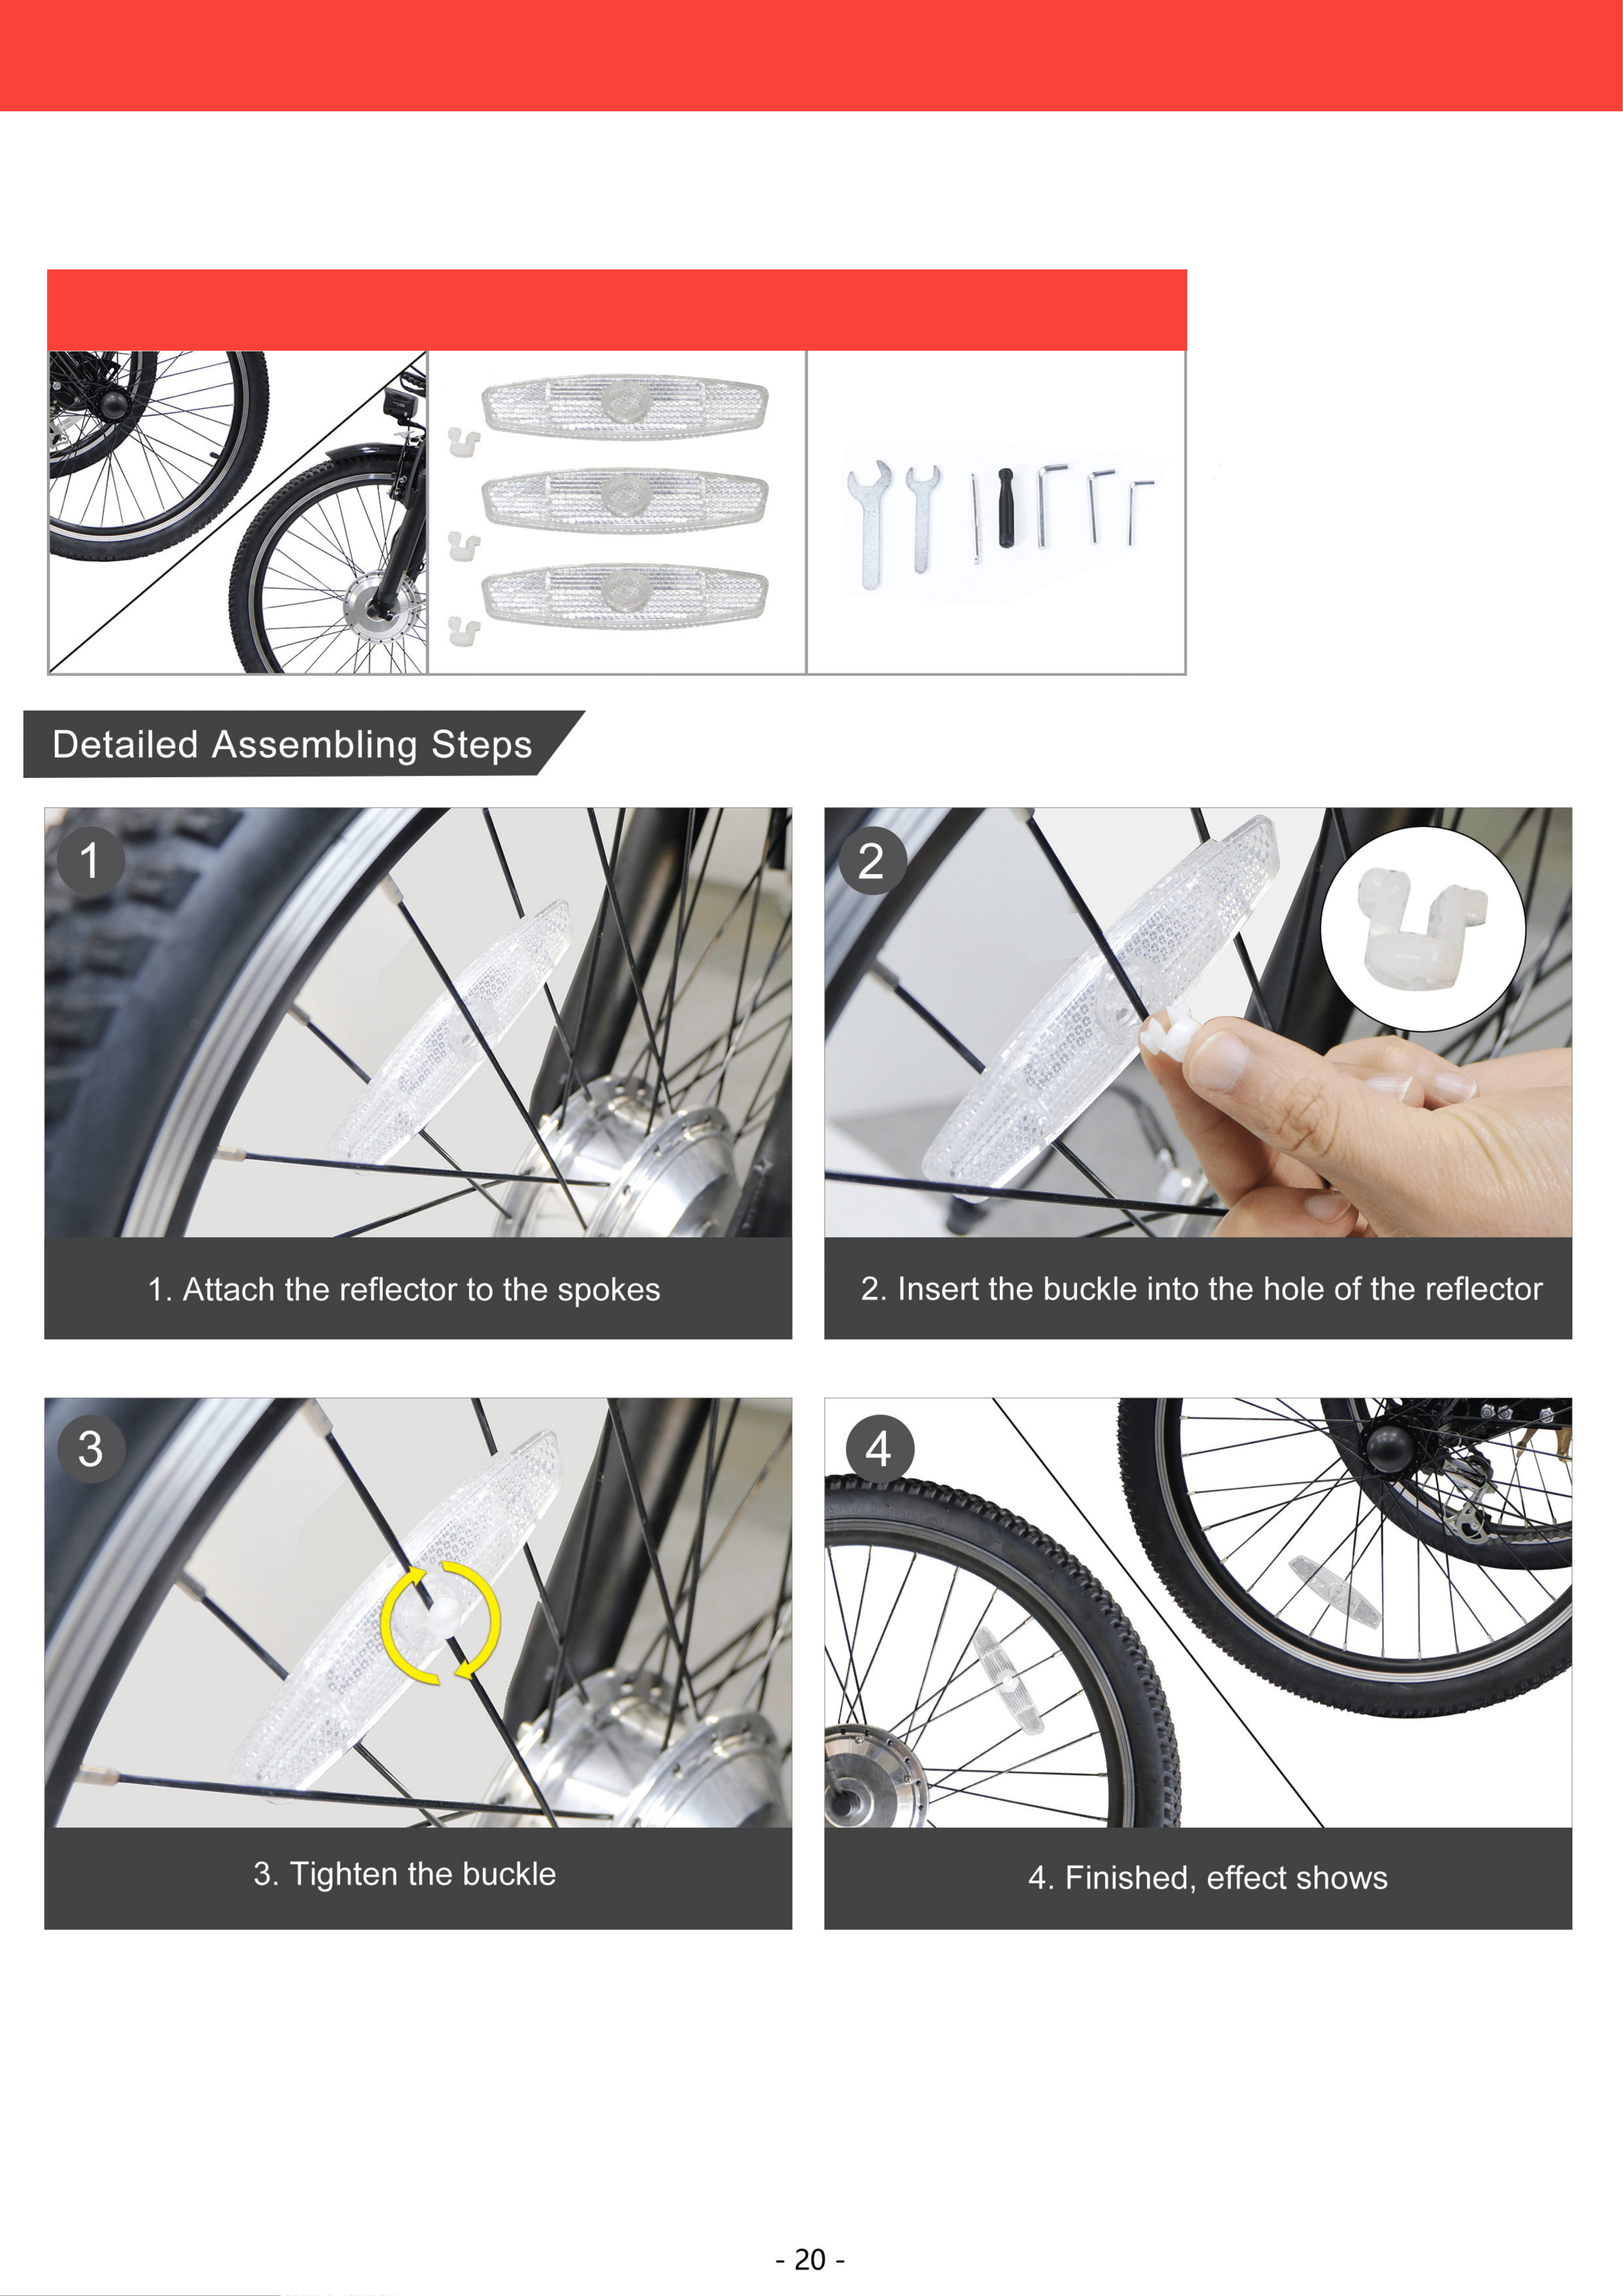
THE ASSEMBLING OF REFLECTORS
15
Wheels Wheel Reflectors Tool
Required Parts And Tools
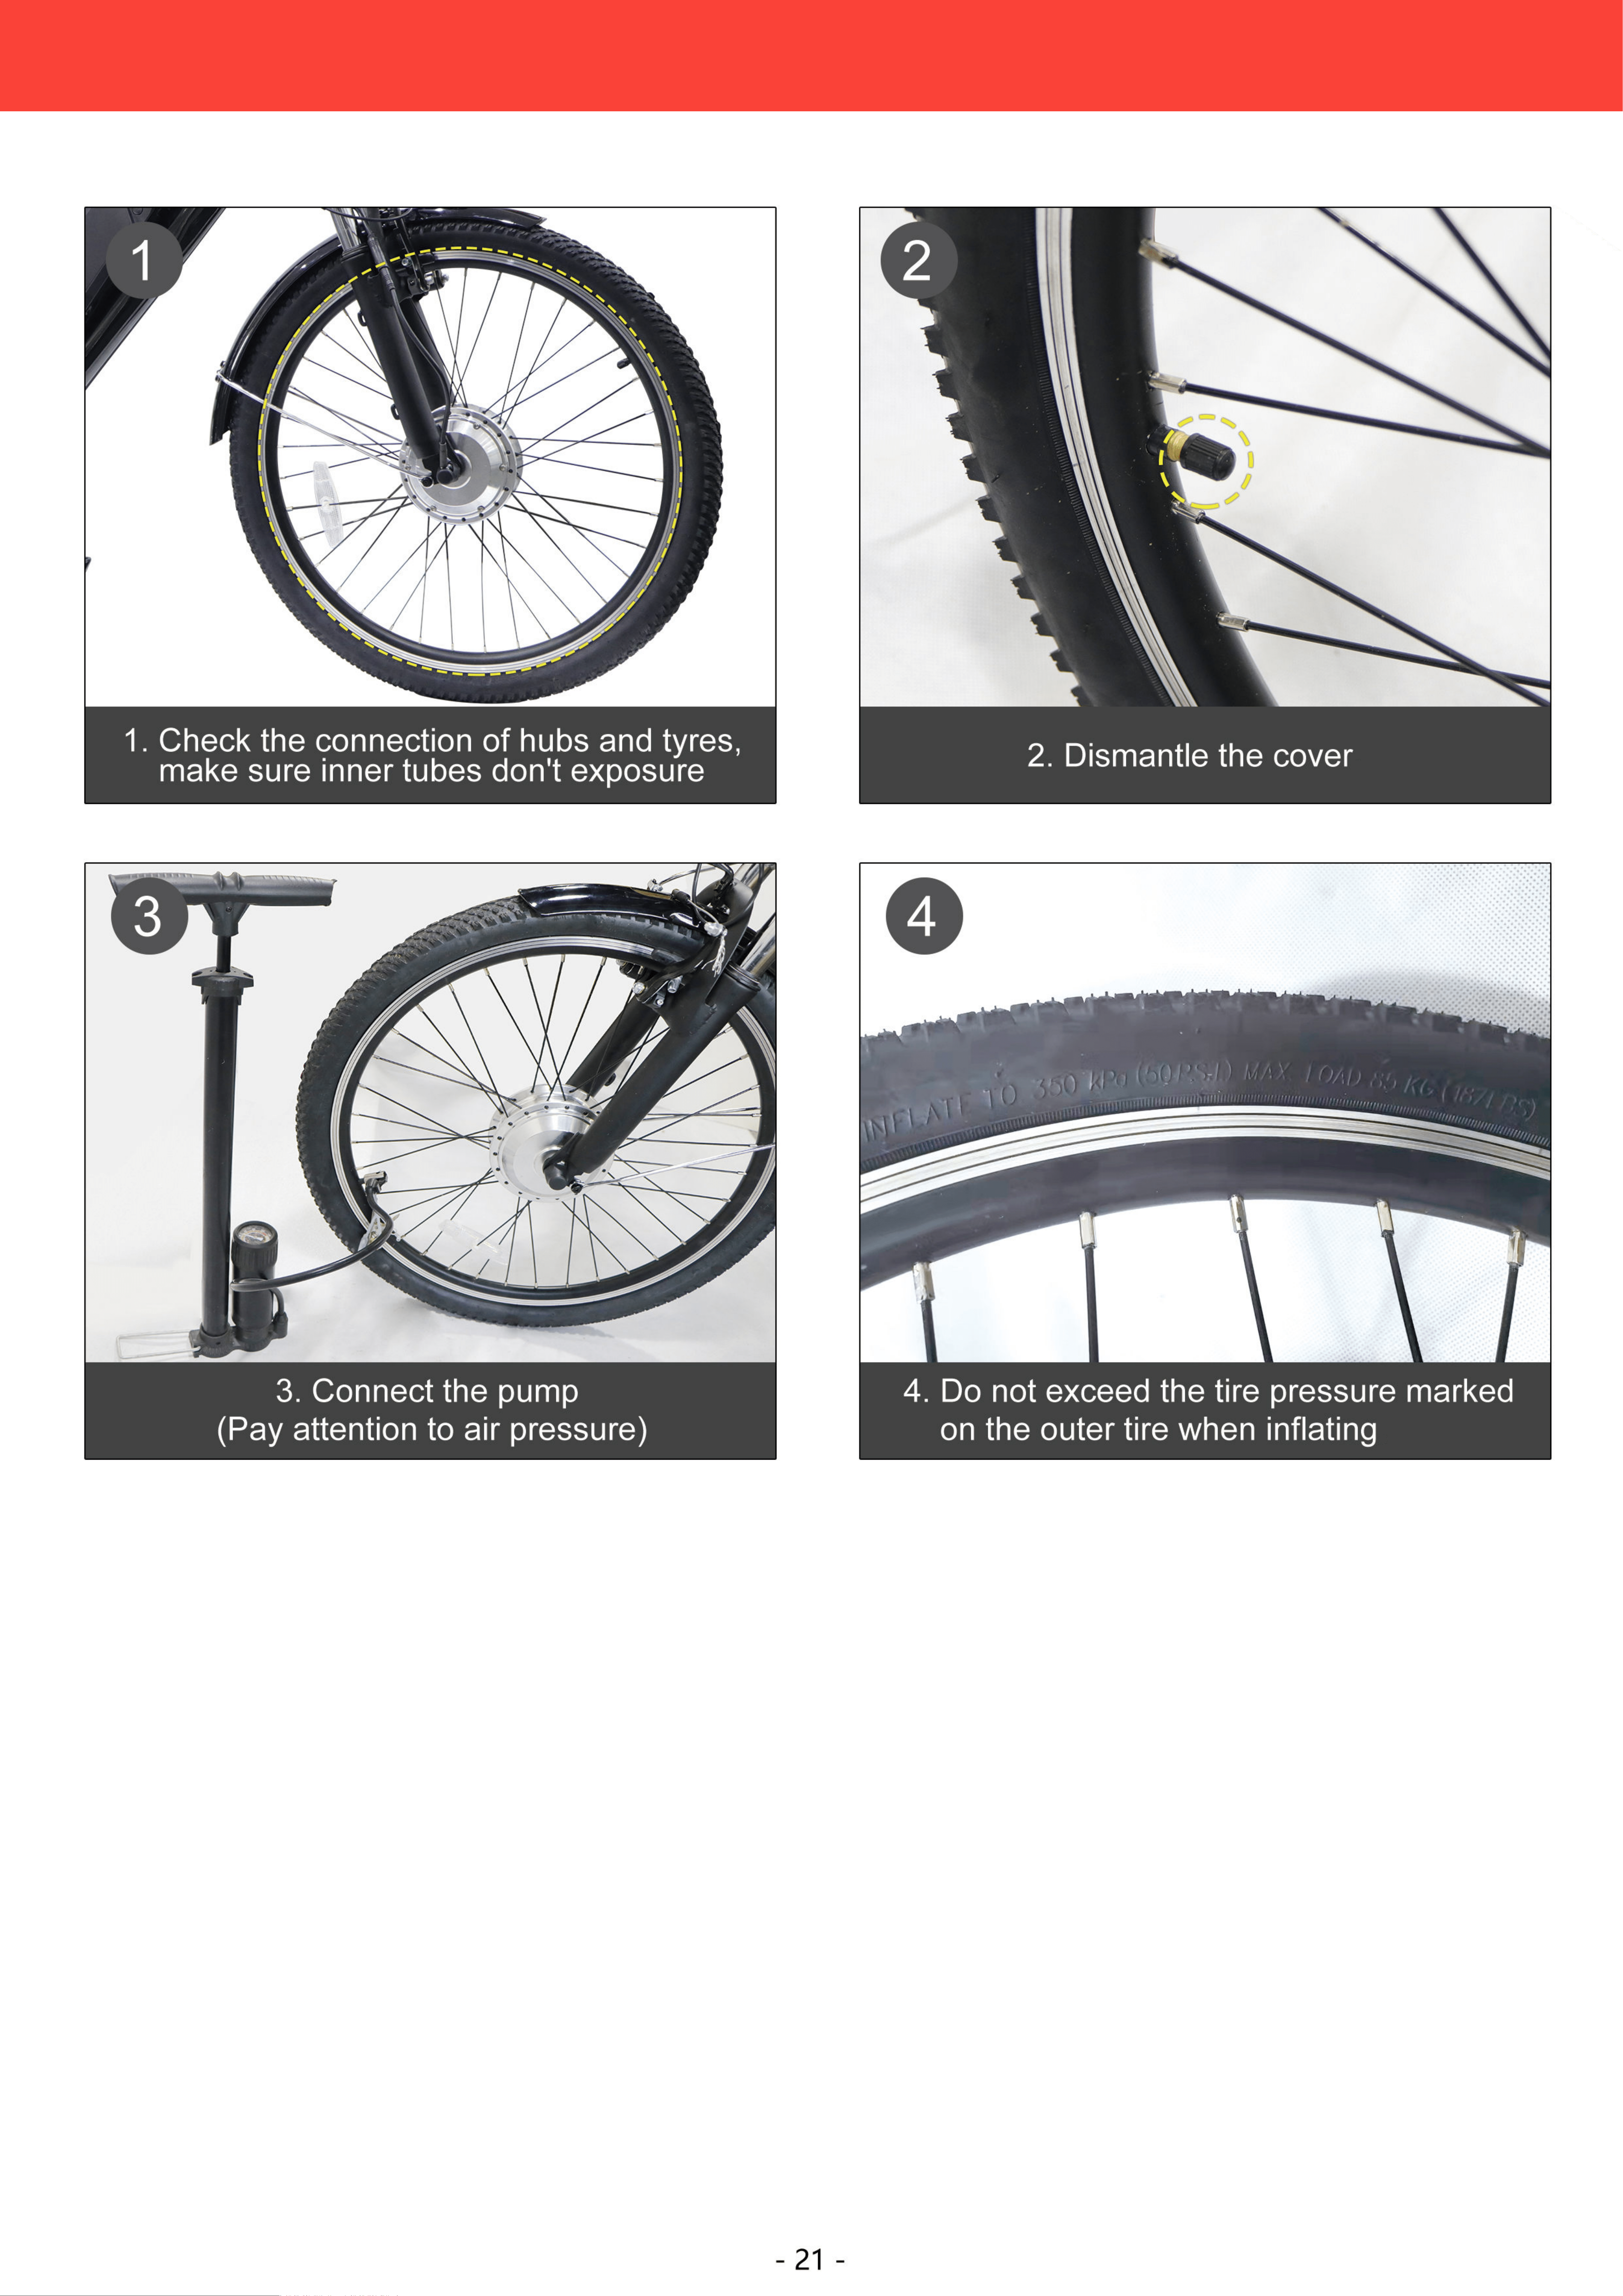
INFLATE TIRES
16

5.Make sure the screem work,press in
the red button
6. Turn the accelerator, make sure
frontwheel rotate
16
CIRCUIT TESTING
17
CHARGING
18
18
Safety
1

Parts Identification
2
Adjustments
3
Use
4
Maintenance
5

Warranty
6

Activating and Deactivating the Battery
Your battery was charged at the factory but may have run down during shipping. Check the battery’s
remaining power for the first use and refill it using the provided charger as described in the Charging
section below.
- 40 -
1. Insert the attached power plug into the socket on the right side of the battery.
2.
Unfasten the keys from beside the battery and insert one into its socket on the left side of the battery.
3. To activate the battery, turn the key clockwise to “ON”. The display panel on the right handlebar should turn on,
displaying the remaining power of the battery.
4. To deactivate the battery, turn the key counterclockwise to “OFF” and the display panel will turn off.
Always turn the battery off between uses and remove the key to prevent unauthorized use
We do not recommend you shut off the battery while riding the tricycle, as this distraction can invite accidents.
Riding with Pedal Assist Control
The pedal assist system (PAS) is available when the battery and display panel are on, which requires you to continue using
the pedals to keep the motor active but provides additional speed and strength as you ride. To use PAS only, it is recommended
to disable the throttle by pressing the red button below the display panel on the right handlebar.
The PAS automatically pauses and the motor temporarily shifts to neutral in the following cases:
• You stop pedaling
• You press either brake lever
• Your tricycle accelerates on a slope to a speed faster than the 15.5 mph (25 km/h) top speed
The PAS reactivates once both brakes are released, your speed is at or below the top speed,and you resume pedaling.
If you turn the throttle while PAS is active, the tricycle will activate throttle control and accelerate to its top speed, unless the
throttle is already disabled as mentioned above. lf you turn off the battery while PAS is active, the motor will stop and the
tricycle will only operate manually.
Operation

Riding with Throttle Control
Throttle control automatically pauses and the motor temporarily shifts to neutral in the following
The throttle control is available when the battery and display panel are on, enabling your tricycle to run at the 15.5 mph (25 km/h)
top speed using the throttle handle on the right handlebar. Turn the throttle handle, stop pedaling the tricycle, and your tricycle
will continue along at the top speed. If necessary, hit the red button below the display panel to disable the throttle, cutting off the
power immediately even if the throttle handle is not released.
cases:
• You release the throttle handle completely
• You press either brake lever
• You accelerate beyond the 15.5 mph (25 km/h) top speed
• You disable the throttle as mentioned above, even without releasing the throttle handle
If you begin pedaling while the throttle control is active, the tricycle will activate PAS control. If you turn off the battery while
throttle control is active, the motor will stop and the tricycle will only operate manually.
The motor will resume working once the throttle handle is turned again, both brakes are released, your speed is at or
below the top speed, or the throttle handle is reactivated while it is turned after the aforesaid red button is pressed again.
Ride with Manual Control
To ride your tricycle normally, leave the key at “OFF” on the battery or remove the battery. (See Steps 1–2 in the Charging section
below for how to remove the battery.)
- 41 -
In addition to the handlebar display, your tricycle's current power level can be checked on the battery itself.
Press the power display button and see how many of the battery's indicator lights turn on. 3 lights indicate a full battery, while 1
light indicates a weak one.
Power Indicator Lights
Power Display Button
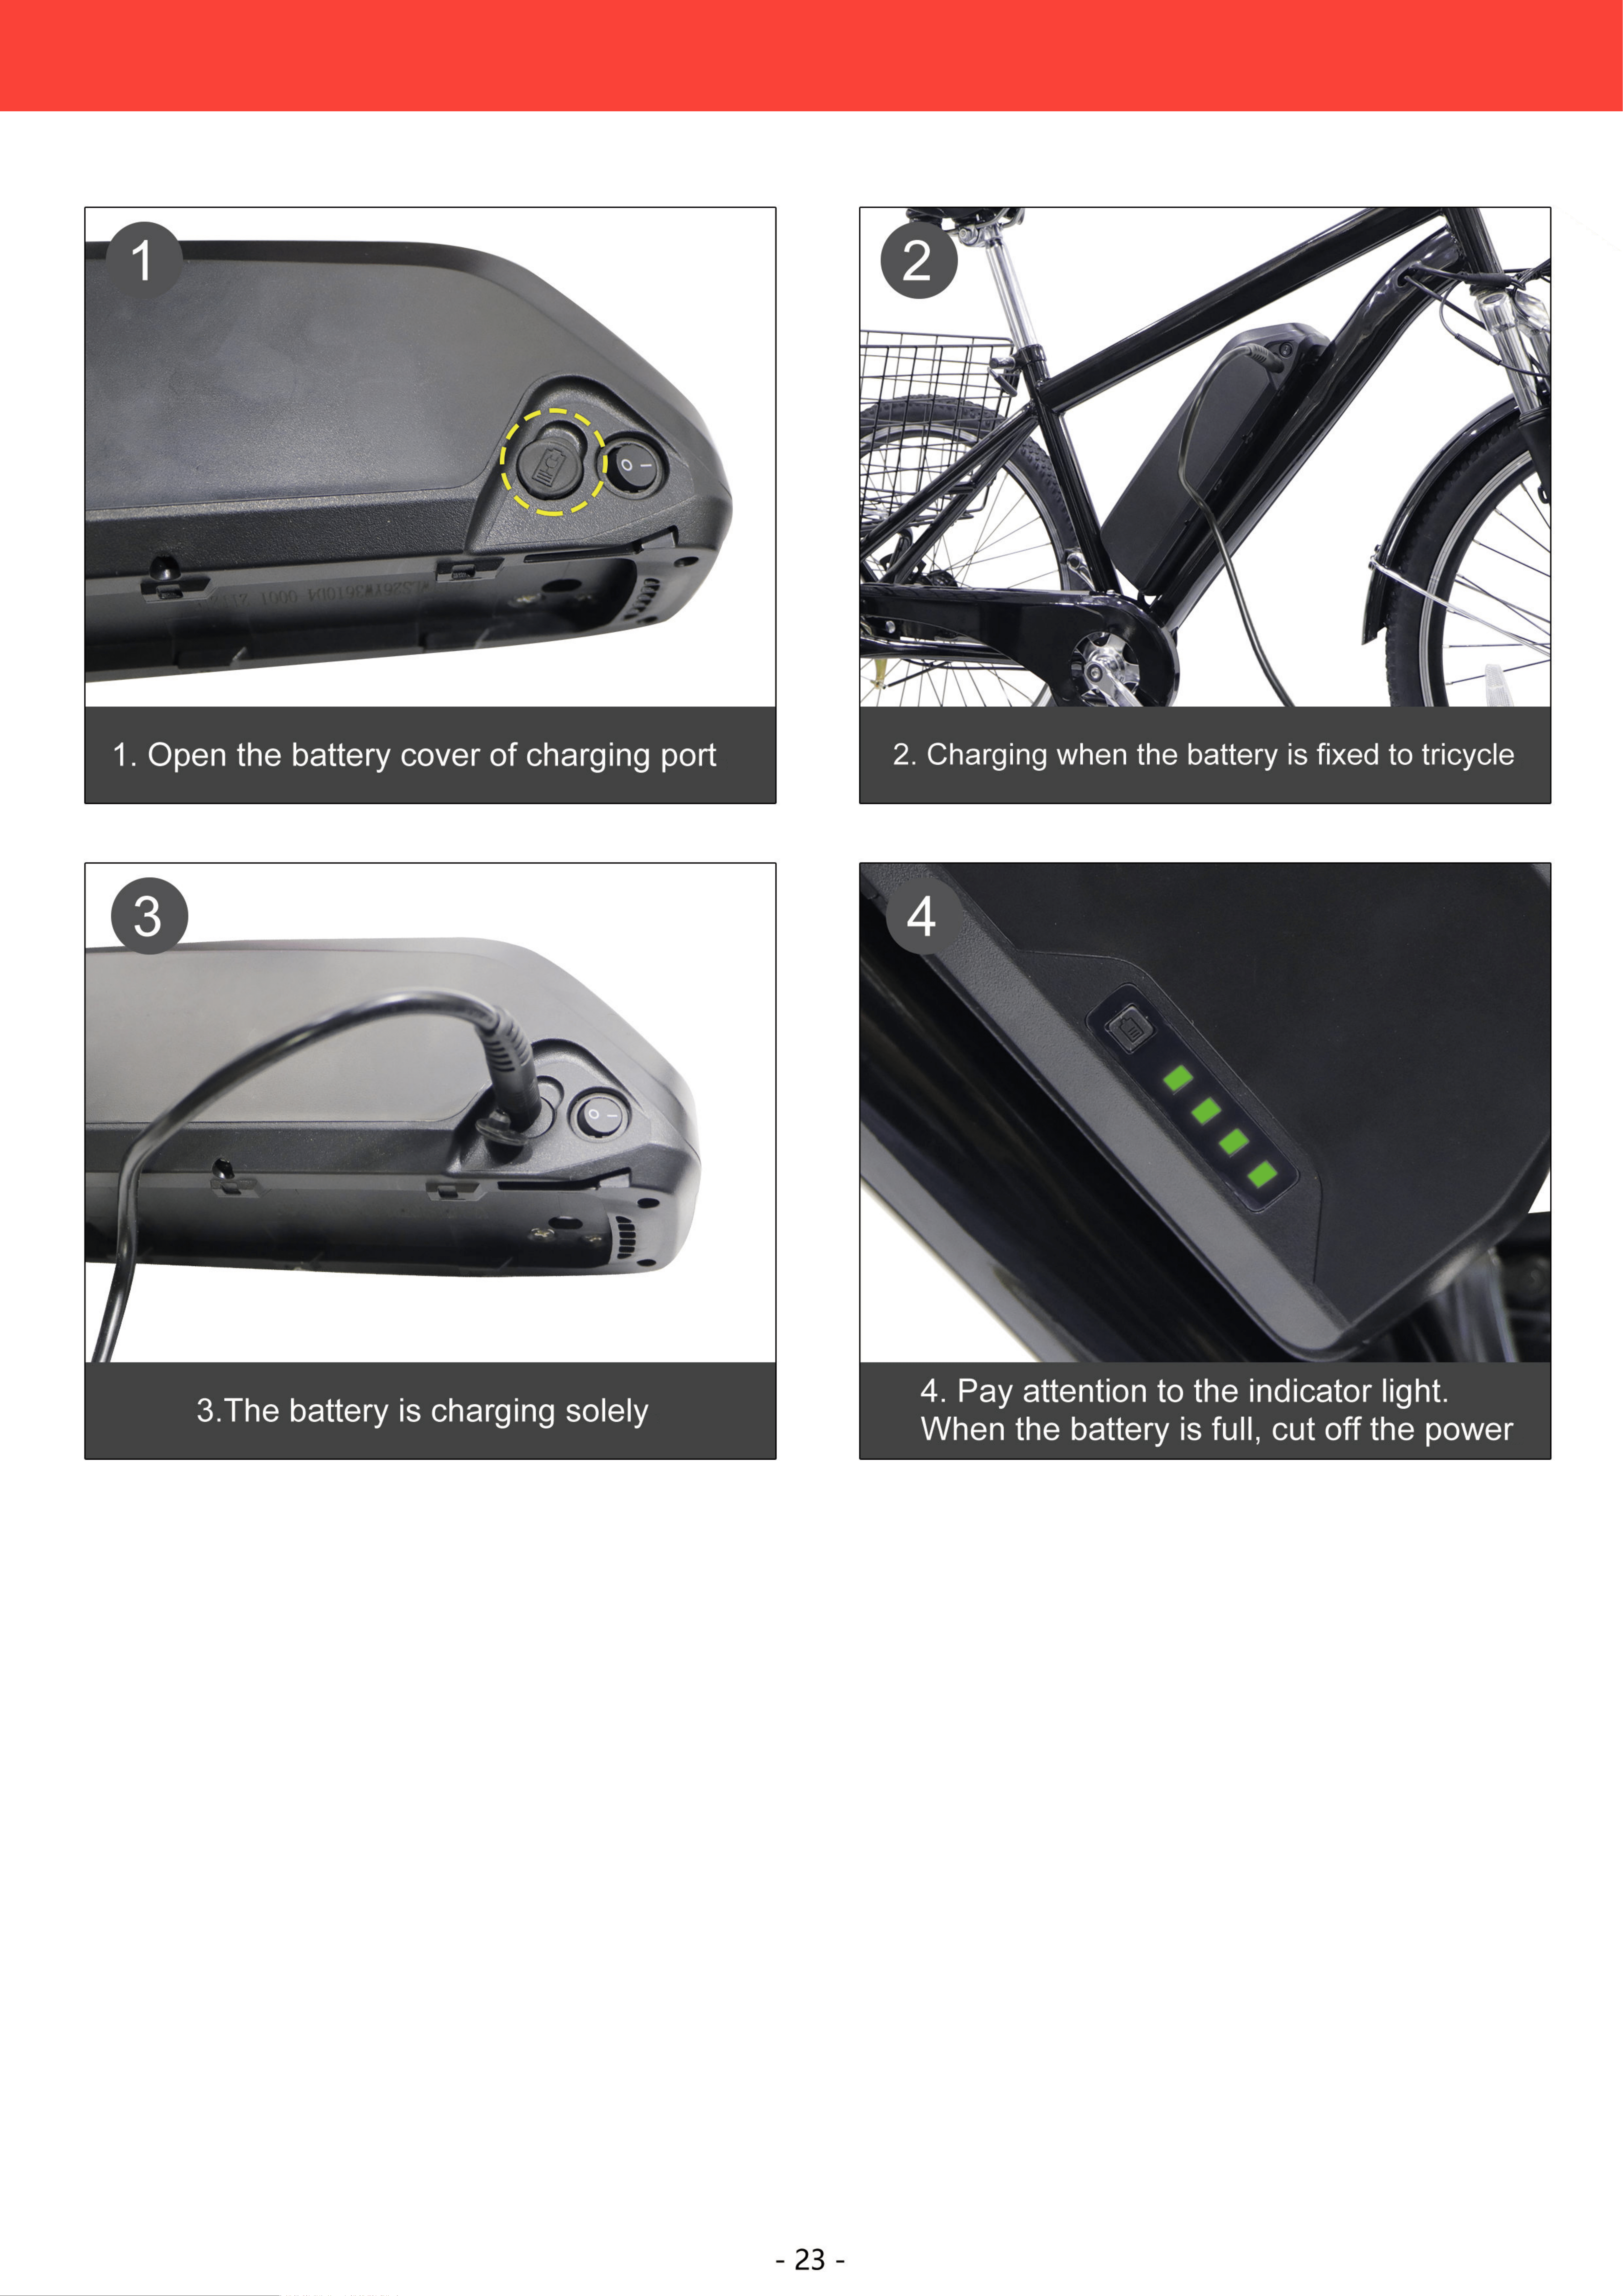
Charging

- 42 -
1. Unlock the battery by turning the key counterclockwise to “Unlock”.
2. Remove the battery from the tricycle.
3. Connect the provided charger (25) to its power cord (26) and the charging port beside the battery's key hole.
4.
Connect the charger to a stable and compatible power source. The charger's power indicatorlight should turn red and
charging should begin.
5. Periodically check the state of the battery with the power display button. There is no need to fully recharge the battery. Either
2 or 3 lights should provide strong and responsive service. For best results. however. do not allow the battery to ever drain
completely and avoid leaving it connected to power once it is already charged.
• Always disconnect the battery before undertaking any cleaning, maintenance. or repair. For the longest possible service life,
disconnect the battery between uses.
Check the parts of the tricycle for any looseness, stiffness, wear, or damage after each use. Tighten, lubricate, repair, or
replace any problematic parts before further use. Only replace components of this tricycle and its accessories with identical
parts.
• The exterior of the tricycle can be cleaned with a soft damp cloth. Do not use harsh abrasives or caustic chemicals. The display
panel and front light have IPX4 environmental protection and the battery has IP64 waterproofing adequate for rain, but avoid
direct pressurized spra that might allow the interior of electronic components to become wet, never charge the battery while it
or your hands are wet, and immediately replace the battery if it ever begins to swell or leak fluid.
• If the tricycle will not be used for an extended period of time, remove the battery and store everything in a cool dry place away
from direct sunlight and inaccessible to children. Avoid storing electronics in plastic bags, which might allow humidity to build
up over time. For best results, check the battery every three months. lf its power sinks below 3 (2 of the 3 indicatoi lights),
recharge to at least that full before returning it to storage.
Maintenance

