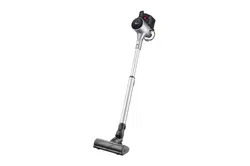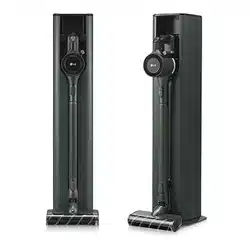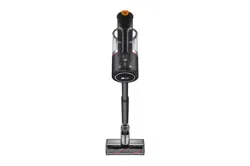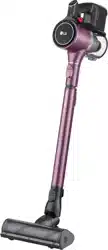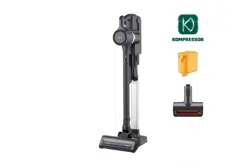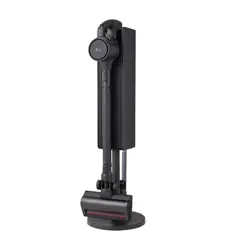
OWNER'S MANUAL
VACUUM CLEANER
Before beginning installation, read these instructions
carefully. This will simplify installation and ensure that the
product is installed correctly and safely. Leave these
instructions near the product after installation for future
reference.
ENGLISH
A9L-AIR / A9L-STORM
MFL71935420
Rev.00_062526
www.lg.com
Copyright © 2026 LG Electronics. All Rights Reserved
Scan the QR code to see the manual.

TABLE OF CONTENTS
This manual may contain images or
content that may be different from the
model you purchased.
This manual is subject to revision by the
manufacturer.
SAFETY INSTRUCTIONS
READ ALL INSTRUCTIONS BEFORE USE...........................................................3
WARNING............................................................................................................3
CAUTION ...........................................................................................................10
INSTALLATION
Product Overview.............................................................................................13
Installing the Charging Station ......................................................................17
Storing the Accessories ...................................................................................18
OPERATION
Getting Started .................................................................................................20
Charging the Battery .......................................................................................22
Using the Mop Nozzle .....................................................................................25
Using the Nozzles and Tools...........................................................................28
MAINTENANCE
Cleaning the Appliance ...................................................................................31
Cleaning the Nozzles .......................................................................................40
TROUBLESHOOTING
Before Calling for Service................................................................................44
3
SAFETY INSTRUCTIONS
ENGLISH
SAFETY INSTRUCTIONS
READ ALL INSTRUCTIONS BEFORE USE
The following safety guidelines are intended to prevent unforeseen
risks or damage from unsafe or incorrect operation of the appliance.
The guidelines are separated into ‘
WARNING
’ and ‘
CAUTION
’ as
described below.
Safety Messages
WARNING
WARNING
• To reduce the risk of explosion, fire, death, electric shock, injury or
scalding to persons when using this product, follow basic
precautions, including the following:
Technical Safety
• This appliance is not intended for use by persons (including children)
with reduced physical, sensory or mental capabilities, or lack of
experience and knowledge, unless they have been given supervision
or instruction concerning use of the appliance by a person
This symbol is displayed to indicate matters and
operations that can cause risk. Read the part with this
symbol carefully and follow the instructions in order to
avoid risk.
WARNING
This indicates that the failure to follow the instructions can
cause serious injury or death.
CAUTION
This indicates that the failure to follow the instructions can
cause the minor injury or damage to the product.

4
SAFETY INSTRUCTIONS
responsible for their safety. Children should be supervised to ensure
that they do not play with the appliance.
• Do not allow the appliance to be used as a toy. Close attention is
necessary when used by or near children.
• Do not allow children to play with or hang on the appliance.
• Do not use the appliance with damaged power cord or plug. The cord
must be replaced. If the appliance is not working as it should, has
been dropped, damaged, left outdoors, or dropped into water, return
it to an LG Electronics service centre.
• Do not pull or carry by cord, use cord as a handle, close a door on
cord, or pull cord around sharp edges or corners. Do not run
appliance over cord. Keep cord away from heated surfaces.
• Do not unplug by pulling on cord. To unplug, grasp the plug, not the
cord.
• Place the cords from other appliances out of the area to be cleaned.
Battery
• Never use the battery, adapter, and the charging station from other
appliances with this appliance. Use only the battery and the charging
station provided by LG Electronics.
• Never use the battery, adapter, and the charging station from this
appliance with other appliances.
• Use appliances only with specifically designated battery packs. Use of
any other battery packs may create a risk of injury and fire.
• Recharge only with the charger specified by the manufacturer. A char
gerthat is suitable for one type of battery pack may create a risk of fire
when used with another battery pack.
• Unplug the power cord and remove the battery if the appliance will
not be used for an extended period of time.
• Do not use modified or damaged batteries.
• Do not disassemble, remove or short-circuit the battery.
• When disposing of the battery or the appliance, remove the battery
from the appliance and safely dispose of it.

5
SAFETY INSTRUCTIONS
ENGLISH
• Do not use a battery pack or appliance that is damaged or modified.
Damaged or modified batteries may exhibit unpredictable behavior
resulting in fire, explosion or risk of injury.
• Have specifically designated battery packs replaced when it is no
longer able to hold a charge.
• Refer to the
Charging the Battery
section instructions for the
method of replacing the battery.
• When disposing of this appliance, follow regulations for disposal of
rechargeable lithium-ion batteries.
• Follow all local ordinances and regulations when handling or
disposing of the battery.
• Prevent unintentional starting. Ensure the switch is in the off position
before connecting to the battery pack, picking up or carrying the
appliance. Carrying the appliance with your finger on the switch or
energizing an appliance that has the switch on invites accidents.
• Disconnect the battery pack from the appliance before making any
adjustments, changing accessories, cleaning, servicing, or storing
appliance.
• When battery pack is not in use, keep it away from other metal
objects, like paper clips, coins, keys, nails, screws or other small metal
objects, that can make a connection from one terminal to another.
Shorting the battery terminals together may cause burns or a fire.
• Under abusive conditions, liquid may be ejected from the battery. If
this happens, avoid contact. If contact accidentally occurs, flush with
water. If liquid contacts eyes, additionally seek medical help. Liquid
ejected from the battery may cause irritation or burns.
• If the appliance is to be stored unused for a long period, the batteries
should be removed.
• Before removing the battery, you must turn off this appliance.
• When fitting the battery into the product body, insert it completely
until it clicks.
• Do not modify or attempt to repair the appliance or the battery pack
(as applicable) except as indicated in the instructions for use and care.

6
SAFETY INSTRUCTIONS
Battery Specifications
•
Battery Model Name
: EAC633822**
•
Type
: Rechargeable Lithium-ion Battery
•
Rated Capacity
: 2400 mAh
Installation
• To avoid an electrical shock or fire, do not install, charge or store the
appliance where it may be exposed to water, rainfall or high
humidity.
• Install, charge and store the appliance in a well-ventilated place.
• Avoid operating the appliance in areas where there is a risk of
leakage of flammable gas, industrial oil or metallic dust.
• Do not store or install the appliance, power cord or plug near heating
devices or open flames.
• Install the charging station on a firm, level surface.
• Install the device so that it does not tip over.
• Do not use or store the appliance at temperatures below 5 ℃ or
above 38 ℃.
• Do not store or install the appliance where it is exposed to
temperatures below freezing or exposed to outdoor weather
conditions.
• When installing or moving the appliance, be careful not to pinch,
crush, or damage the power cord or plug.
Operation
• This appliance is exclusively for use with the LG Electronics CordZero
Vacuum Cleaner. Do not use it for other appliances or other
purposes.
• Read all instructions before using the appliance, and save these
instructions.
• Use only as described in this manual. Use only manufacturer’s
recommended attachment.

7
SAFETY INSTRUCTIONS
ENGLISH
• This appliance is designed for normal indoor domestic use only. It is
not to be used for any non-residential, commercial, or industrial
application.
• Do not use or store the appliance in any outdoor location, garage
environment or on wet surfaces.
• This appliance is equipped with a double insulated power cord.The
power plug must be plugged into an appropriate outlet socket that is
installed in accordance with all local codes and ordinances.
• This product should only be used with a 220 - 240 V~ 50/60 Hz outlet.
Make sure to check the power specifications of the place where you
intend to use the appliance.
• Do not handle the power cord, plug, or appliance controls with wet
hands.
• Wipe any moisture or dirt off the cord or plug with a dry cloth.
• Unplug the power cord using the plug, not the cord. Pulling on the
cord can damage it and result in electric shock or fire.
• Never attempt to operate this appliance if it is damaged,
malfunctioning, partially disassembled, or has missing or broken
parts, including a damaged cord or plug. Take it to an authorized LG
Electronics service centre or dealer for assistance.
• Do not apply excessive force to the power cord to bend it, or place it
under a heavy object as this will damage it.
• Do not use multiple-outlet adapters with this appliance. Make sure to
use a power socket with a capacity of 10 A.
• Do not plug the appliance into a damaged or loose outlet.
• Make sure to unplug the power cord when the appliance is not to be
used for an extended period of time.
• Do not damage, alter, excessively bend, twist, pull, pinch or heat the
power cord.
• Before using the appliance, remove any wire or string on the floor.
• Avoid touching the prongs of the power plug with your finger(s) when
unplugging the power cord.
• Do not cover the power cord with a rug or carpeting.

8
SAFETY INSTRUCTIONS
• Push the power plug firmly into the wall outlet so that it is not loose.
• If the product has been submerged, contact an LG Electronics service
centre or dealer for instructions before resuming use.
• If the product makes a strange noise or emits an odour or smoke,
discontinue use and contact an LG Electronics customer information
centre.
• Only qualified technicians or service personnel from LG Electronics
may disassemble, repair or modify the appliance.
• Never insert a sharp metallic object such as a pin, nail or knife in a
hole or gap in the appliance or the charging station.
• Do not vacuum liquids with this appliance. Make sure that no water,
beverage or detergent gets inside the appliance or the charging
station.
• Do not allow the appliance to sweep up blades, thumb tacks,
sawdust, sharp objects, or hot or cold ashes.
• Do not allow children to use the appliance.
• Do not let children or pets get close to the appliance when using,
charging or storing.
• Do not insert the nozzle or tools in your mouth.
• Keep clothing and hair, fingers, or other parts of the body away from
openings and moving parts.
• Do not operate the appliance with the suction inlet or outlet blocked.
• Do not use the appliance without the dust bin and filters in place.
• Do not use in an enclosed space where vapors are present from paint
thinner, mothproofing substances, flammable dust or other
explosive or toxic materials.
• Make sure that the filter is installed before use.
• Do not touch the charging terminals on the appliance or the charging
station, or insert an electrified object inside the appliance or the
station.
• Always store the appliance on the charging station when it is not in
use.
• Do not lean the appliance on walls, chairs or tables.

9
SAFETY INSTRUCTIONS
ENGLISH
• If the earth leakage breaker is tripped when the product is put on the
charging station, immediately remove the appliance from the
charging station. Contact an LG Electronics customer service centre.
• Use extra care when cleaning on stairs.
• Do not use or store a heating device or flammable substance(ether,
benzene, alcohol, chemicals, combustible sprays, insecticide, air
freshener or cosmetics) in close proximity to the appliance.
• Do not attempt to clean up a liquid substance (water, beverage),
odourous substances (candy, chocolate, pet excrement), metallic
objects (blades, pins), flammable substances, burning/
smoking(cigarettes, matches, or hot ashes), surfactants, or glass
shards with this appliance.
• In the event of a gas leak(natural gas, propane gas, etc.), do not
operate this or any other appliance. Open a window or door to
ventilate the area immediately.
• Do not hold the charging station upside down.
• Do not expose the appliance, and the battery in particular, to heat, a
heating device or direct sunlight.
• Do not keep the appliance or its battery inside a vehicle which is
exposed to direct sunlight.
• Never allow any water, beverage or detergent to get inside the
battery.
• Do not apply physical impacts to the battery.
Maintenance
• Make sure to unplug the power cord when cleaning or maintaining
the charging station.
• Do not wash the inlet port or the dust bin with water or detergent.
• Do not use detergents, polishes or air fresheners to clean the dust
bin.
• Do not spray or use water, inflammable materials such as gasoline or
thinners, or surfactants such as detergent or bath soap near the
appliance.
10
SAFETY INSTRUCTIONS
• Do not apply or spray a flammable substance (gasoline or thinner) or
surfactants (detergent or bath soap) on the appliance.
• Wash hands after handling nozzles. The nozzles contain carbon fiber,
and contact may cause minor skin irritation.
Disposal
• Keep packing materials out of the reach of children. Packaging
materials can pose a suffocation risk for children.
• Destroy the carton, plastic bag, and other packing materials after the
appliance is unpacked. Children might use them for play. Cartons
covered with rugs, bedspreads, or plastic sheets can become airtight
chambers.
• Dispose of this appliance according to local, state, and regional laws
and regulations.
• Contact your local city council or the related government authority
before disposing of this appliance.
Mop Nozzle
• Do not vacuum sharp objects (glass pieces, wire, blades, pins, etc.)
with the mop nozzle attached. When cleaning the mop pads after
mopping, you could be injured by a sharp object embedded in the
mop.
CAUTION
CAUTION
• To reduce the risk of injury to persons, malfunction, or damage to the
product or property when using the appliance, follow basic safety
precautions, including the following:
Operation
• Do not open the door of the product using excessive force.

11
SAFETY INSTRUCTIONS
ENGLISH
• Do not carry the product with the Vacuum Cleaner, nozzles, or
accessories inside; it may cause injury or product damage.
• When opening and closing the product door, be careful not to get
your fingers caught.
• Remove all the protective plastic from the Vacuum Cleaner before
use. Otherwise, it may cause abnormal noise during the dust
emptying operation.
• Keep the area around the charging station clean. A strong air stream
can be emitted from the exhaust on the back of the product, causing
dust to accumulate on the floor.
• This appliance has a built-in safety device to prevent damage from
overheating. If the appliance becomes overheated after extended
use, it may automatically turn off. If this occurs, leave the appliance
in a cool, well-ventilated area for about an hour before turning on the
power again.
• Do not subject the product to shocks or drop it.
• Do not install wet or damp filters.
• Always use a soft cloth to clean the appliance. Do not clean the
product with a volatile or organic solvent(thinner or acetone).
• Remain aware of your surroundings while using the appliance to
avoid colliding with people or animals.
• Do not kick or apply force to the appliance.
• Do not put any object other than the appliance, especially a metallic
or magnetic object, on the charging station.
• Do not clean the same spot repeatedly for an extended period of
time. Doing so may damage the carpet or flooring surface.
• Keep fingers away from pinch points when assembling the appliance
or the charging station.
• Do not let a child or a pet hang onto the charging station.
• Follow all applicable state and local codes and regulations when
installing the mounting station.
• Do not apply force or any impact to the Cyclonic Mesh Filter.
• Do not remove the battery during operation.

12
SAFETY INSTRUCTIONS
Mop Nozzle
• Do not use the mop nozzle for any purpose(for example, polishing a
car, cleaning windows) other than domestic floor cleaning.
• Do not use the mop nozzle to vacuum up liquids(water, beverage).
• When using the mop nozzle, always attach the mop pads.
• Do not clean a coated, rough or delicate floating floor and carpets
with the mop nozzle.
• Do not use the mop nozzle to clean the same spot repeatedly for an
extended period of time. The water injection at the mop nozzle may
cause water to get into the dust inlet and damage the appliance.
• Do not step on the mop nozzle.
• Wet floors can pose a slip hazard. Allow floors to dry completely
before allowing anyone to walk on them.
• Do not store the appliance by attaching the water tank filled with
water to the mop nozzle.
13
INSTALLATION
ENGLISH
INSTALLATION
Product Overview
The images in this guide may be different from the actual components and accessories, which are subject
to change by the manufacturer without prior notice for product improvement purposes.
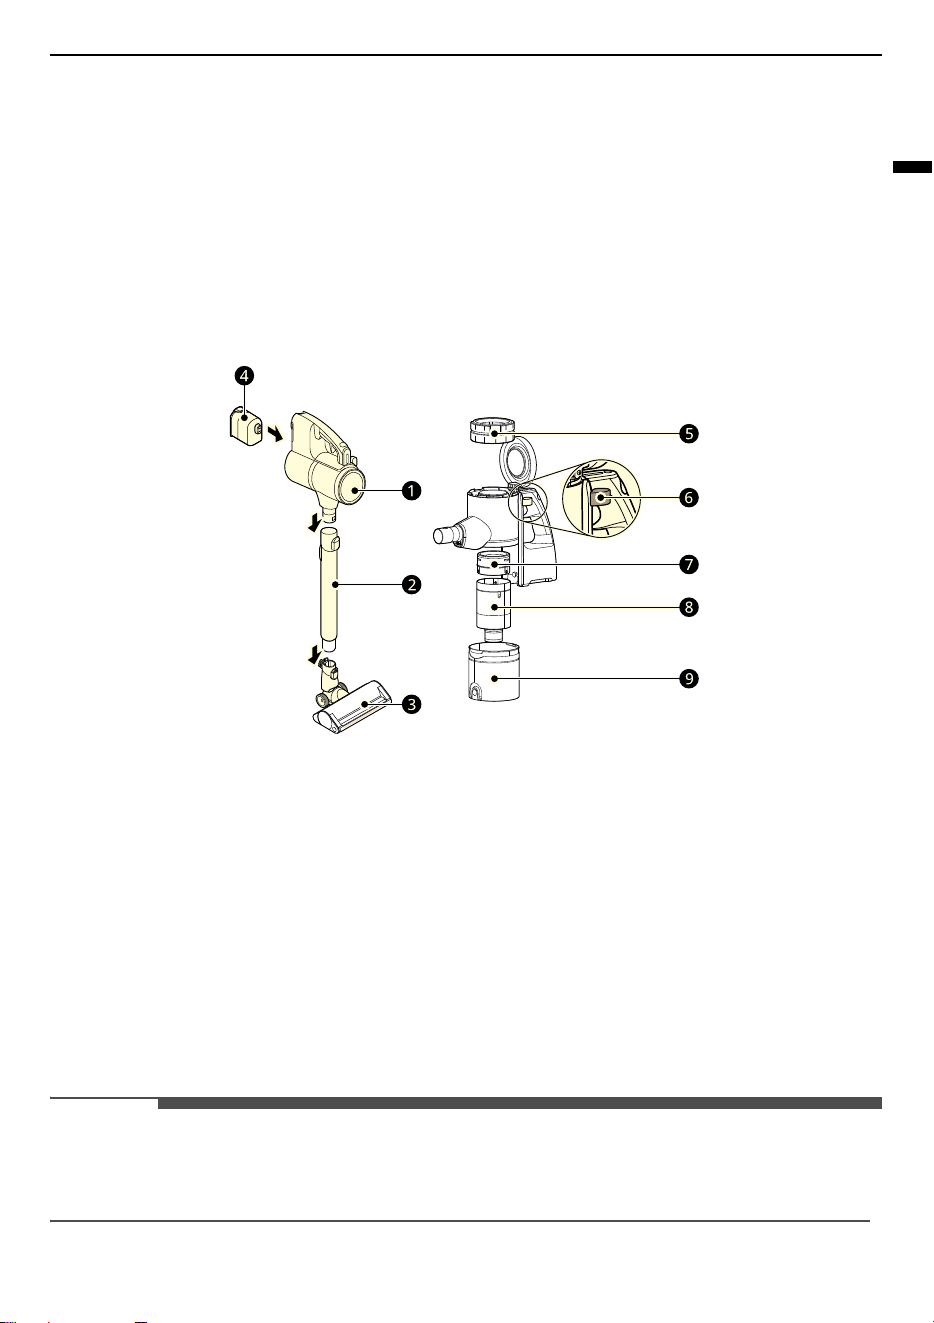
Front View
Vacuum Cleaner
a
Product Body
b
Extension Pipe
c
Nozzle
d
Battery
e
Exhaust Filter
f
Kompressor Lever
g
Micro Filter
h
Cyclonic Mesh Filter
i
Dust Bin
NOTE
• Use the vacuum cleaner only with the provided charging station. Using a charging station other than the
one designed to be used with the vacuum cleaner, as improper sealing of the chagring station may
result and dust not being emptied from vacuum cleaner.
14
INSTALLATION
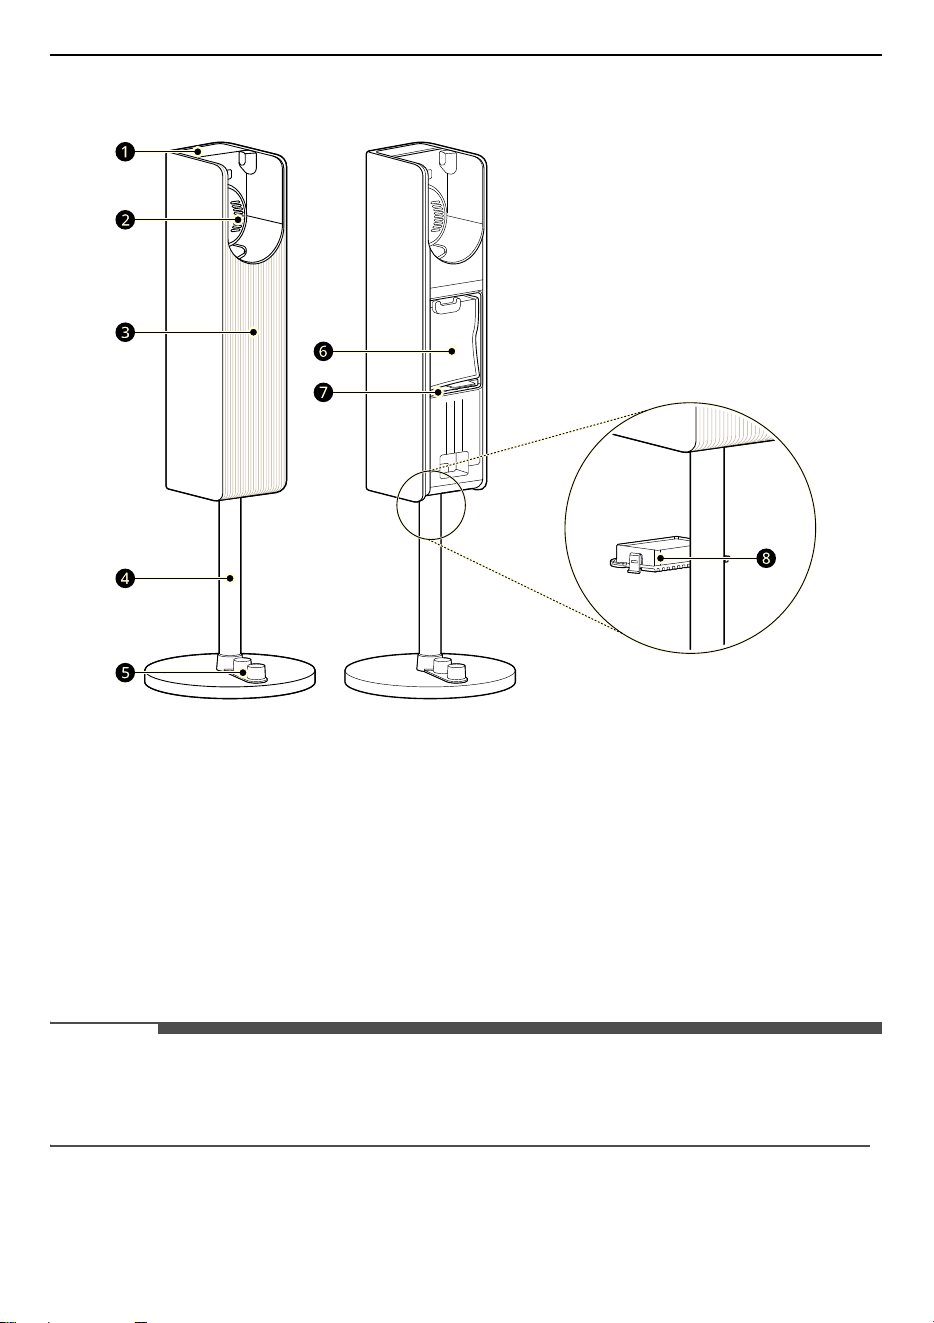
Charging Station
a
Control Panel
b
Vacuum Cleaner Mounting Unit
c
Front Cover
d
Stand Pipe
e
Accessory Holder
f
Dust Bag (Expendable)
g
Motor Protection Filter (Expendable)
h
Exhaust Filter (Expendable)
NOTE
• Use the charging station only with the provided vacuum cleaner. Using a vacuum cleaner other than the
one designed to be used with the charging station may result in improper sealing of the product and
failure to empty dust from the vacuum cleaner.
15
INSTALLATION
ENGLISH
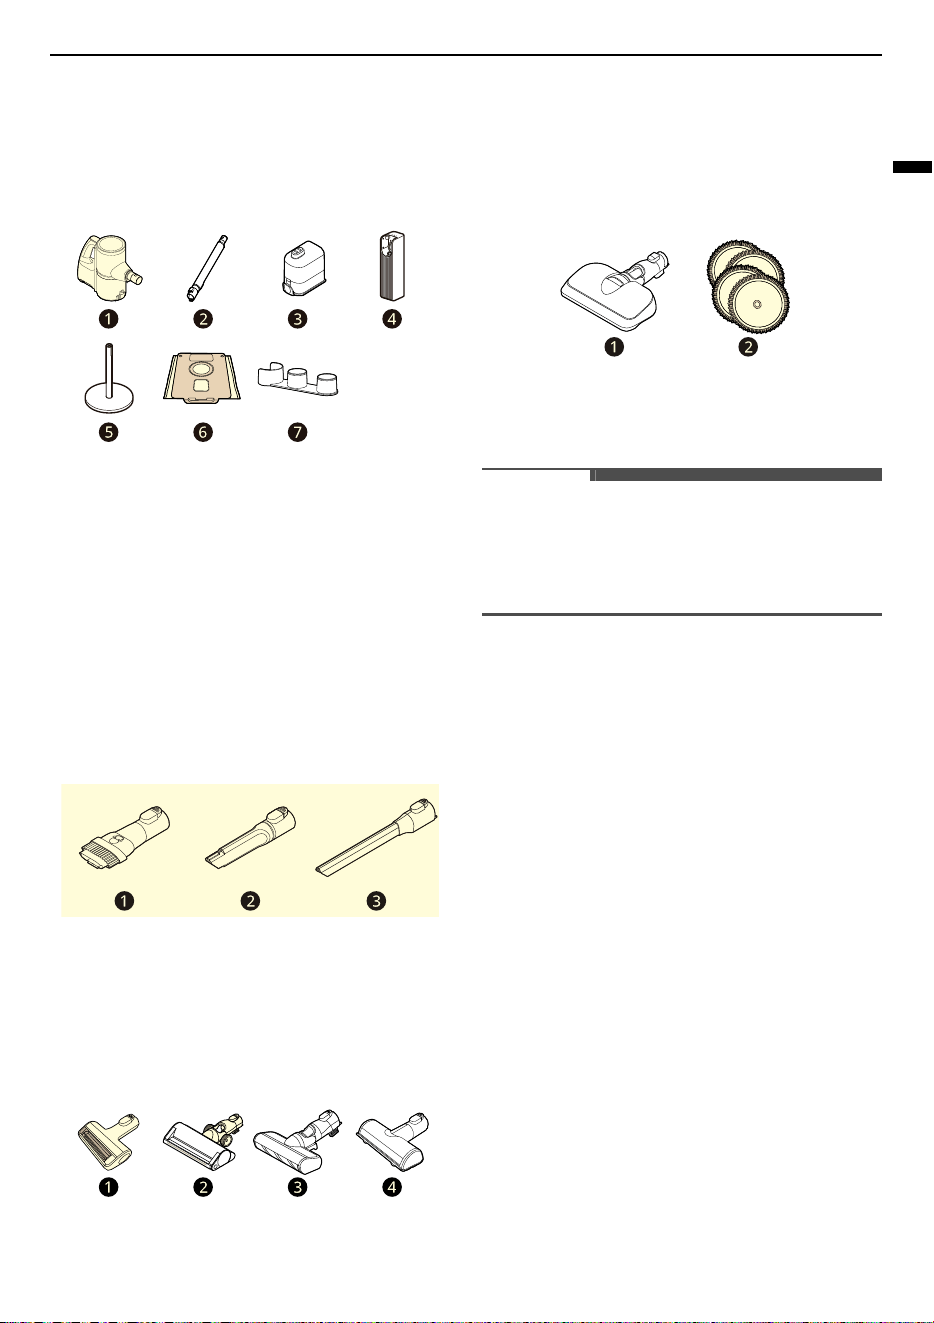
Accessories
*1 This accessory is only available on some models.
Included Accessories
a
Product Body
b
Extension Pipe
c
Battery
d
Charging Station
e
Stand Pipe
f
Dust Bag (Expendable)
g
Accessory Holder
Basic Accessories
a
Combination Tool
b
Crevice Tool
*1
c
LED Crevice
*1
Nozzles
a
Pet Nozzle
*1
b
Dual Floor Max Nozzle
c
Slim Floor nozzle
*1
d
Bedding Nozzle
*1
Mop kit
a
Mop Nozzle
*1
b
Mop
*1
NOTE
• The mop pads, batteries, exhaust filter and the
Micro filter will eventually need to be replaced.
Contact an LG Electronics customer service
centre.
16
INSTALLATION
Specifications
Appliance
• Dimensions are given for the assembled product body, extension pipe and nozzle.
• Suction power is an average of suction power with IEC 62885-2, 5.8 standard tested by an independent
test lab. Individually measured data would be different from a lab test result.
• Battery run time is the result of using a fully charged battery according to the LG Electronics test
standard. Results may be different depending on actual use environment and period of use.
• Recommended maximum run time when using the mop nozzle is 80 minutes. Otherwise, the motor may
overheat.
Charging Station
The provided charging station is different by the purchased models.
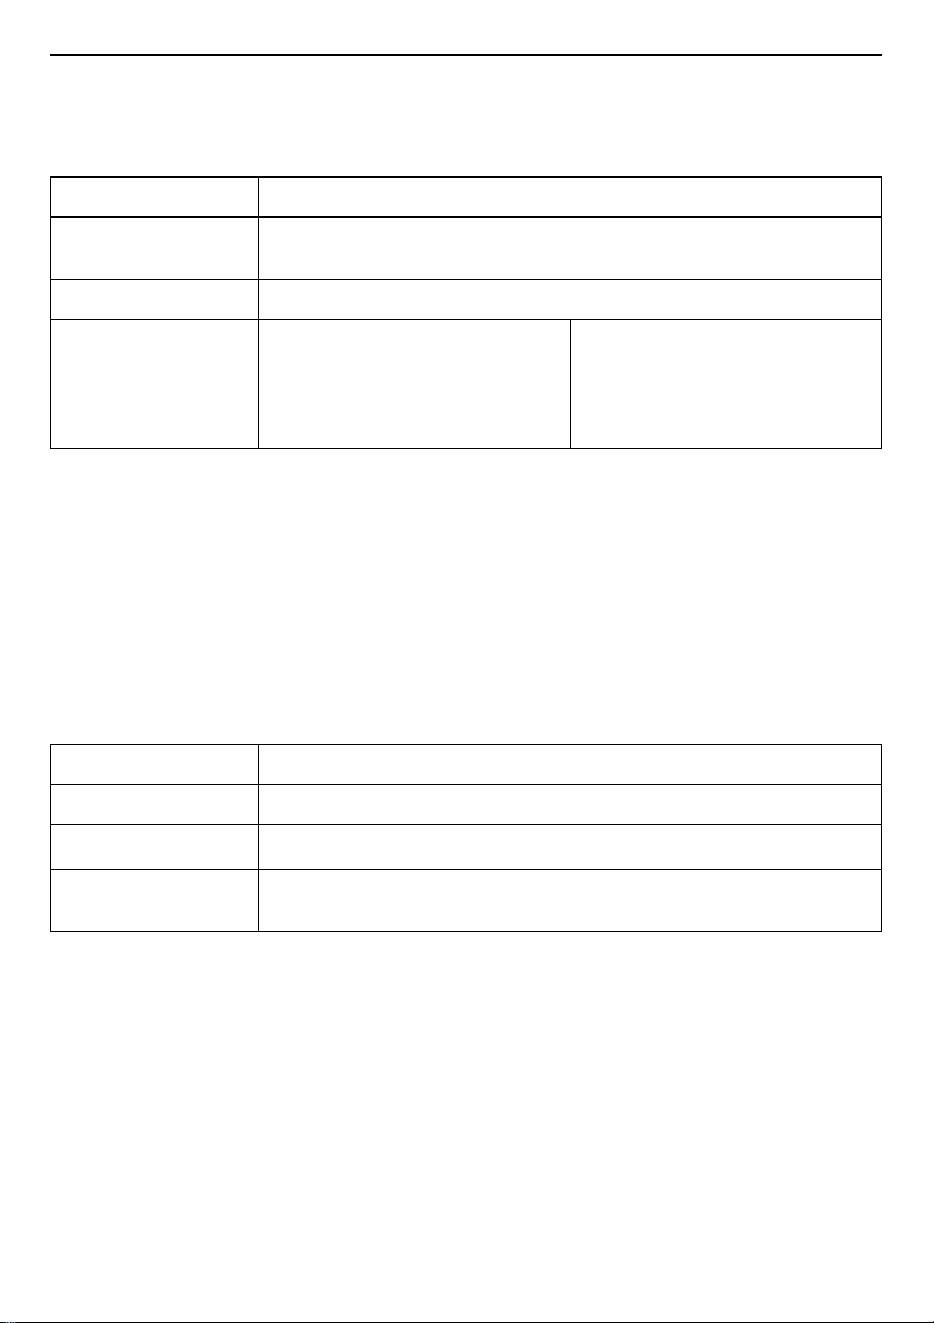
Model
A9L-AIR / A9L-STORM
Dimensions
(Width X
Depth X Height)
265 mm X 305 mm x 1120 mm
Weight
Approximately 2.88 kg
Battery Run Time
(Using one battery)
Using with the Nozzle
Up to 6 minutes in
Turbo Mode
Up to 13 minutes in
Power Mode
Up to 20 minutes in
Normal Mode
Up to 35 minutes in
Eco Mode
Without any Nozzle
Up to 7 minutes in
Turbo Mode
Up to 15 minutes in
Power Mode
Up to 30 minutes in
Normal Mode
Up to 60 minutes in
Eco Mode
Model
VDS-STC**
Input
220-240V~ 50/60 Hz
Output
28.3 V
%
/ 1.15 A
Power Consumption
1200 W (Cleaning)
0.4 A (Charging)
17
INSTALLATION
ENGLISH
Installing the Charging
Station
CAUTION
• Do not allow children or pets to hang onto the
charging station. They could be injured or cause
damage to the appliance.
• Take care not to drop the product parts while
unpacking them to avoid appliance damage or
personal injury.
NOTE
• The cost of a service call to install or reinstall the
charging station is not covered under the
warranty.
Installation
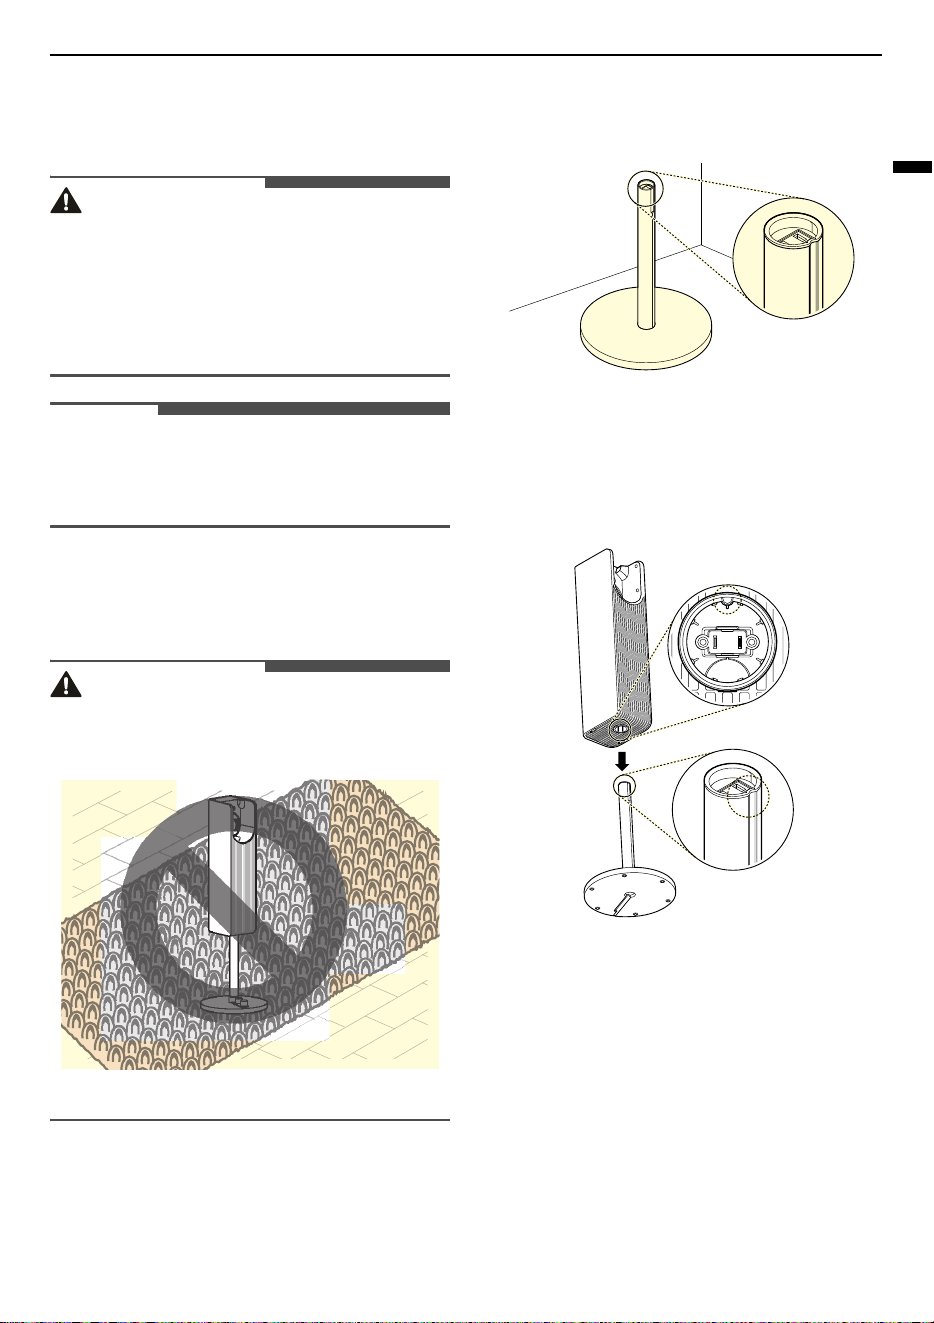
Follow the steps below to install the charging
station on a hard and level floor.
CAUTION
• Do not install on carpeted floors or rugs. The
product may fall, causing injury or damage.
1
Place the stand pipe on a solid, flat surface.
• Ensure that the grooved section at the top of
the stand pipe is facing towards the front.
2
Align the groove found on the connection point
at the bottom of the charging station body with
the groove located at the top of the stand pipe,
and insert it.
18
INSTALLATION
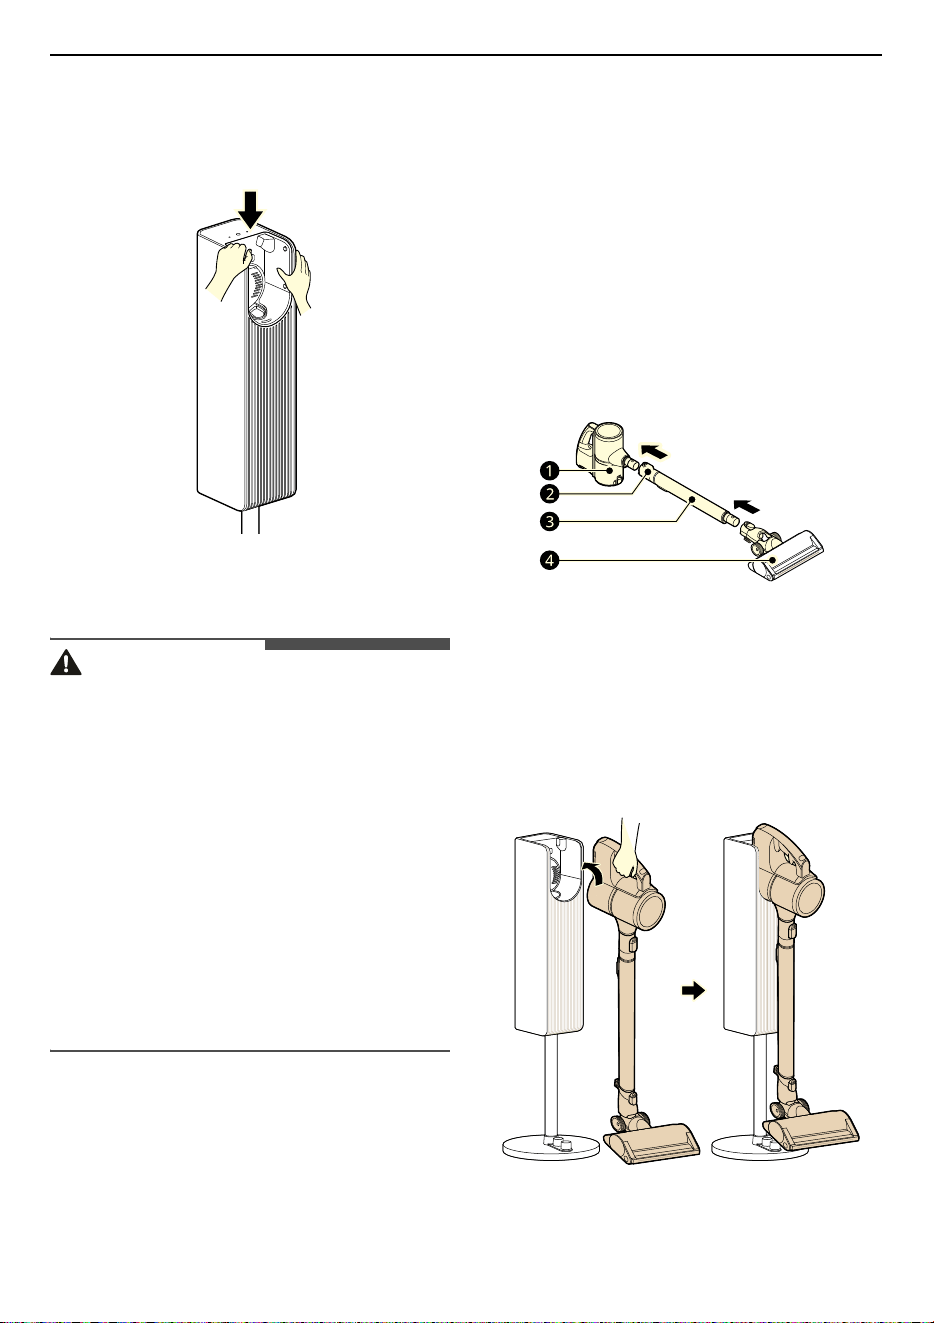
3
Push the charging station body down onto the
stand pipe firmly until a distinct 'click' sound is
heard to ensure it is assembled correctly.
4
Plug the power plug into the outlet.
WARNING
• Carefully read and follow the guidelines in order
to prevent property damage or personal injury.
• Do not lean against the product or place a heavy
object on top of it.
• Manage and supervise children or pets to
prevent them from knocking into or climbing on
the product.
• If you prefer not to install this kit immediately,
ensure that you keep it out of the reach of
children.
• Do not use this kit for purposes other than the
installation of the charging sattion.
• Wear gloves and protective clothing in order to
prevent personal injury.
Storing the Accessories
Assembling and Storing the
Appliance
Follow these steps to safely assemble the
appliance.
1
Firmly attach the extension pipe
c
, nozzle
d
,
or tool onto the product body
a
.
• To detach the extension pipe, press the
extension pipe release button
b
.
2
Put the product body on the charging station.
• If the vacuum cleaner fits properly inside the
charging station, the alarm will sound. Wait
several seconds and if the alarm does not
sound, reinsert the vacuum cleaner, making
sure that the nozzle is horizontal.
19
INSTALLATION
ENGLISH
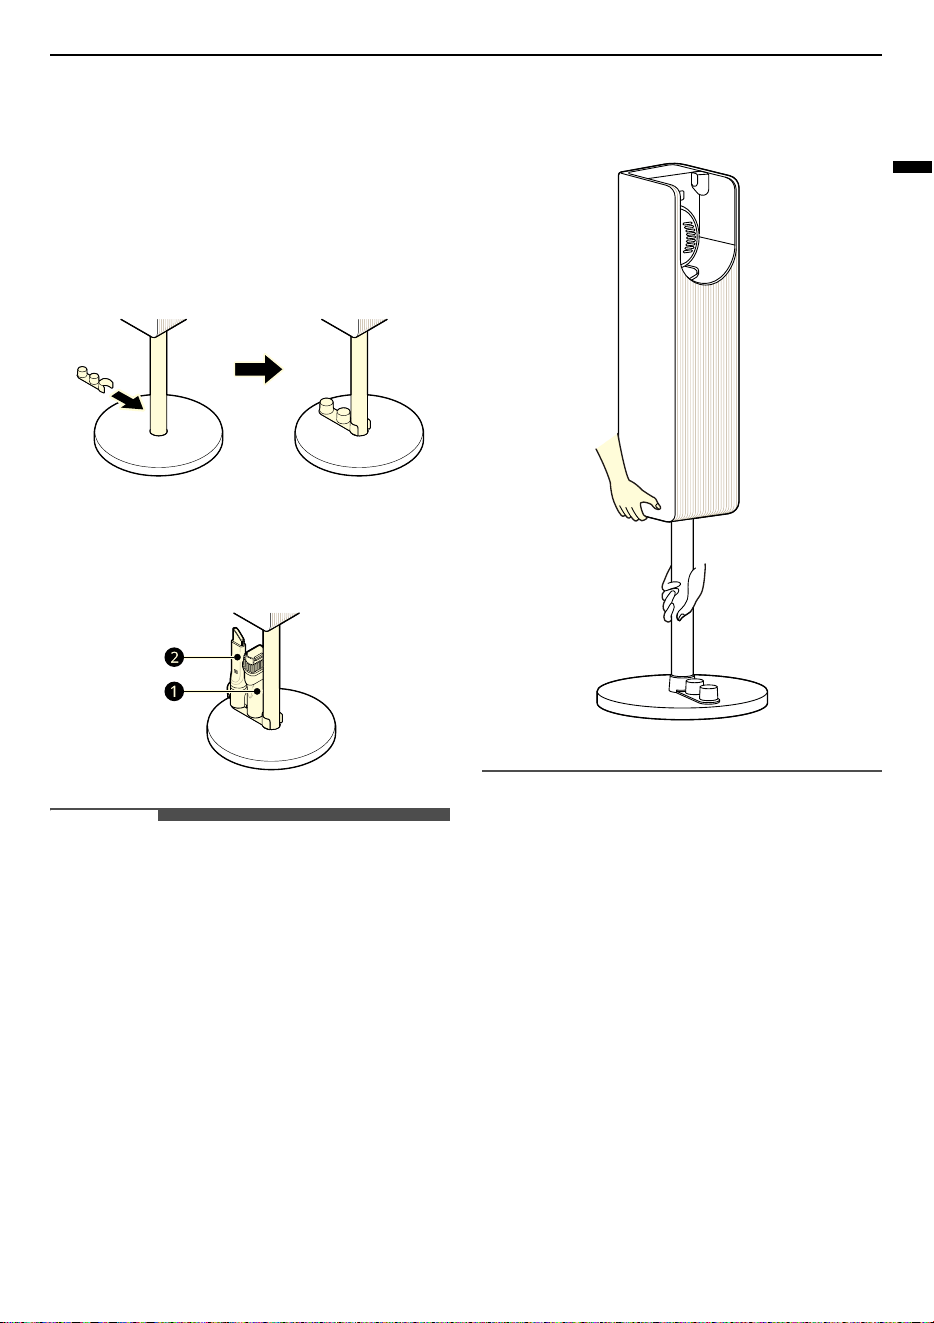
Storing the Tools
The components may differ depending on the
vacuum cleaner model.
Using the accessory holder
1
Install the accessory holder on lower of
charging station pipe.
2
Insert the combination tool
a
and the crevice
tool
b
into the accessory holder for storage.
NOTE
• Before moving the product, unplug it and
remove the vacuum cleaner, nozzles, and
accessories.
• To carry the product, grab the charging station
pipe.
20
OPERATION
OPERATION
Getting Started
Before Using the Appliance
• Support the bottom of the appliance when
cleaning an elevated surface.
• To avoid scratches on polished floors, keep tools
and the brushes and rollers of the nozzles free
from hair, grit, sand, or abrasive objects.
• Make sure that the exhaust filter, micro filter and
the dust bin are properly assembled before
using the appliance.
• Close the dust bin cover properly before using
the appliance. If the dust bin cover is left open,
the suction strength may deteriorate and affect
the cleaning results.
• Store the appliance in the charging station or
place it flat on the floor when not in use. Leaning
the appliance against a wall or chair can result in
product damage or personal injury if the
appliance falls.
• Environmental conditions such as temperature
and humidity may cause static electricity to
accumulate on the appliance. Please contact LG
Electronics customer information centre if the
problem persists.
• Make sure to remove any foreign object such as
a sock or stocking before using the appliance.
Any foreign object on the inlet port or extension
pipe will prevent the appliance from functioning
properly.
• Please use the product at normal room
temperatures as the battery runtime may
deteriorate severely if used at temperatures
lower than 5 ℃ or higher than 38 ℃ for an
extended period of time.
• The battery runtime is dependent on the surface
type and the suction power.
• Follow manufacturer’s recommendations when
cleaning flooring, carpets, and rugs.
• Refer to the
Specifications
section for battery
runtime details.
Assembling Attachments
Nozzles and tools can be attached to either the
product body or the end of the extension pipe.
CAUTION
• Running the appliance for a long period of time
with a tool connected may cause the motor to
overheat.
• This appliance has a built-in safety device to
prevent overheating. If the appliance becomes
overheated after extended use, it may
automatically turn off. If this occurs, leave the
appliance in a cool, well-ventilated area for
about an hour before turning on the power
again.
• Do not use the Kompressor lever while the
appliance is running. Doing so may cause
product damage.
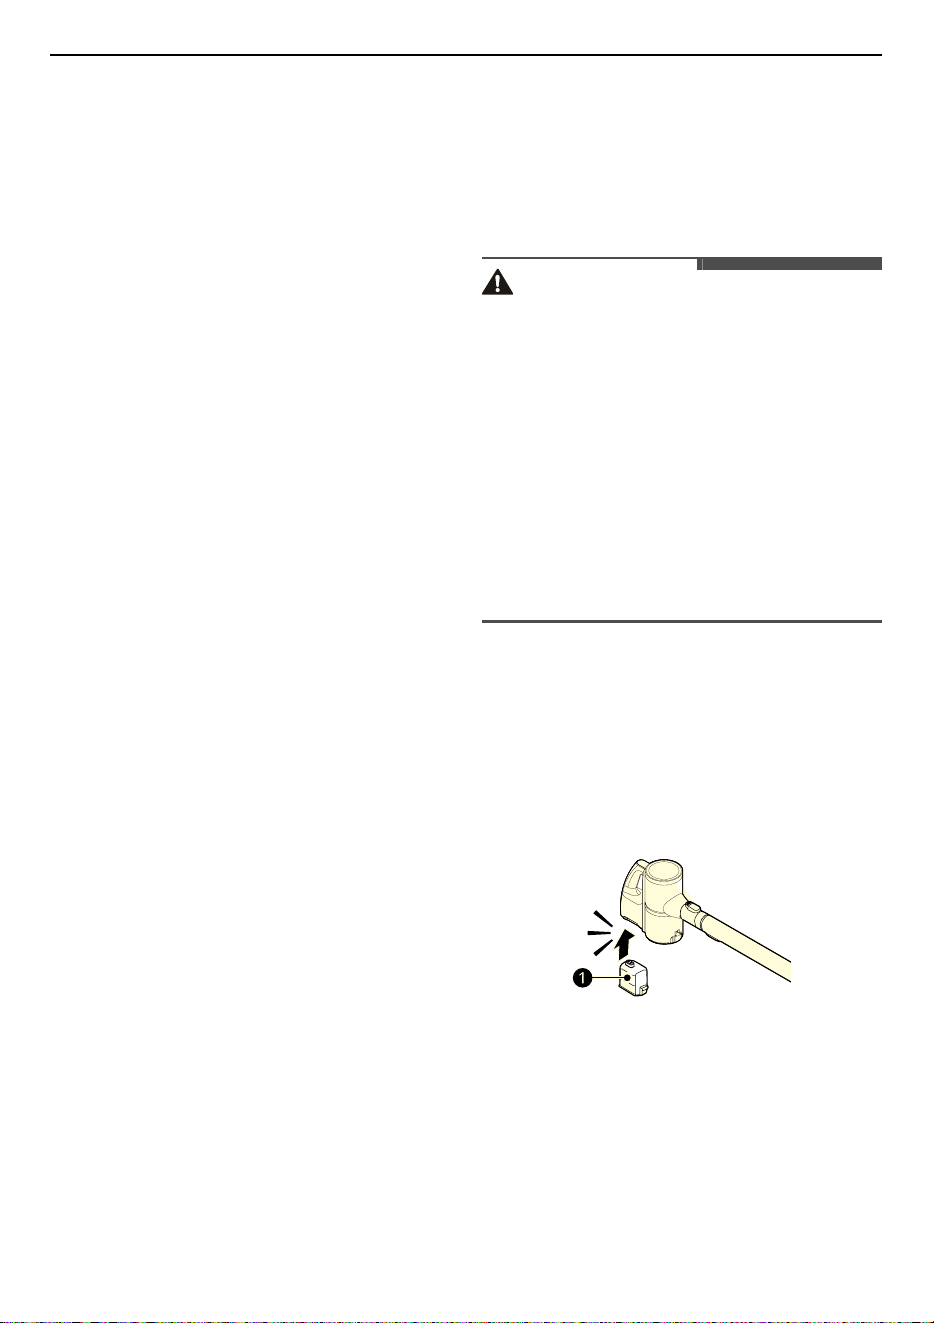
1
Insert the fully charged battery
a
into the
cavity at the bottom of the handle on the
product body and push the battery until it
clicks.
• If it is not properly inserted, the battery may
fall out, causing product to malfunction or
personal injury.
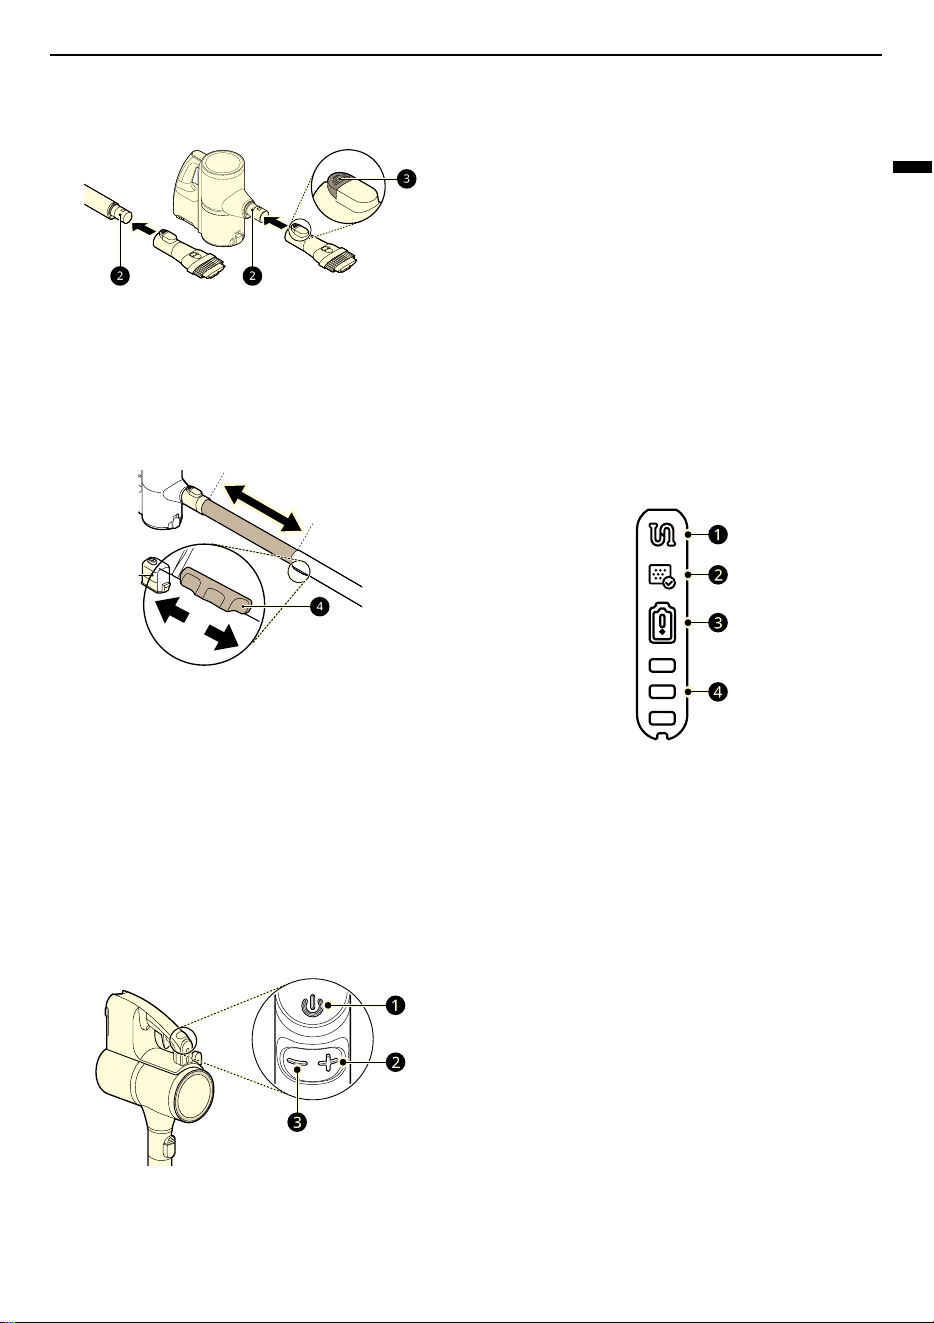
2
Attach the nozzles, tools, or extension pipe by
sliding them onto the inlet
b
on the body until
they click into place. The nozzles and tools can
also be attached to the end of the extension
pipe
b
.
21
OPERATION
ENGLISH
• Detach the accessories by pressing the
release button
c
.
3
Adjust the extension pipe by pressing the
length adjustment button
d
on the back of the
pipe and sliding until it clicks into place at the
desired length.
• The extension pipe extends in four steps.
4
Press the
Power
button to activate the
Normal
mode.
• To turn off the appliance, press the
Power
button again.
Adjusting the Suction Power
Adjust the suction power using the suction power
adjustment button on the handle.
a
Power
Button
• Press the
Power
button to turn the appliance
on or off.
• Press the
Power
button to activate
Normal
mode.
b
Suction Power Up (+) Button
• Press the + button to increase the suction
power. (
Eco
~
Normal
~
Power
~
Turbo
)
c
Suction Power Down (-) Button
• Press the - button to decrease the suction
power. (
Turbo
~
Power
~
Normal
~
Eco
)
Display
The handle of the appliance displays indicators for
clogged objects, filter cleaning alerts, battery
management, and the remaining battery charge.
a
Clogged Objects Indicator
• This indicator lights up when the interior of
the product body, Fixed pipe, inlets, nozzle,
exhaust filter, pre-filter, or cyclonic mesh
filter is clogged with foreign objects.
• If clogging persists, the motor will cycle and
the appliance will shut off. Remove the
foreign objects and clean the exhaust filter,
micro filter and cyclonic mesh filter following
the steps in the
Removing Foreign Objects
section.
b
Filter Cleaning Cycle Alarm Indicator
• This indicator lights up when the appliance is
used for a certain period of time. Clean the
exhaust filter, pre-filter and cyclonic mesh
filter if necessary.
c
Battery Management Icon
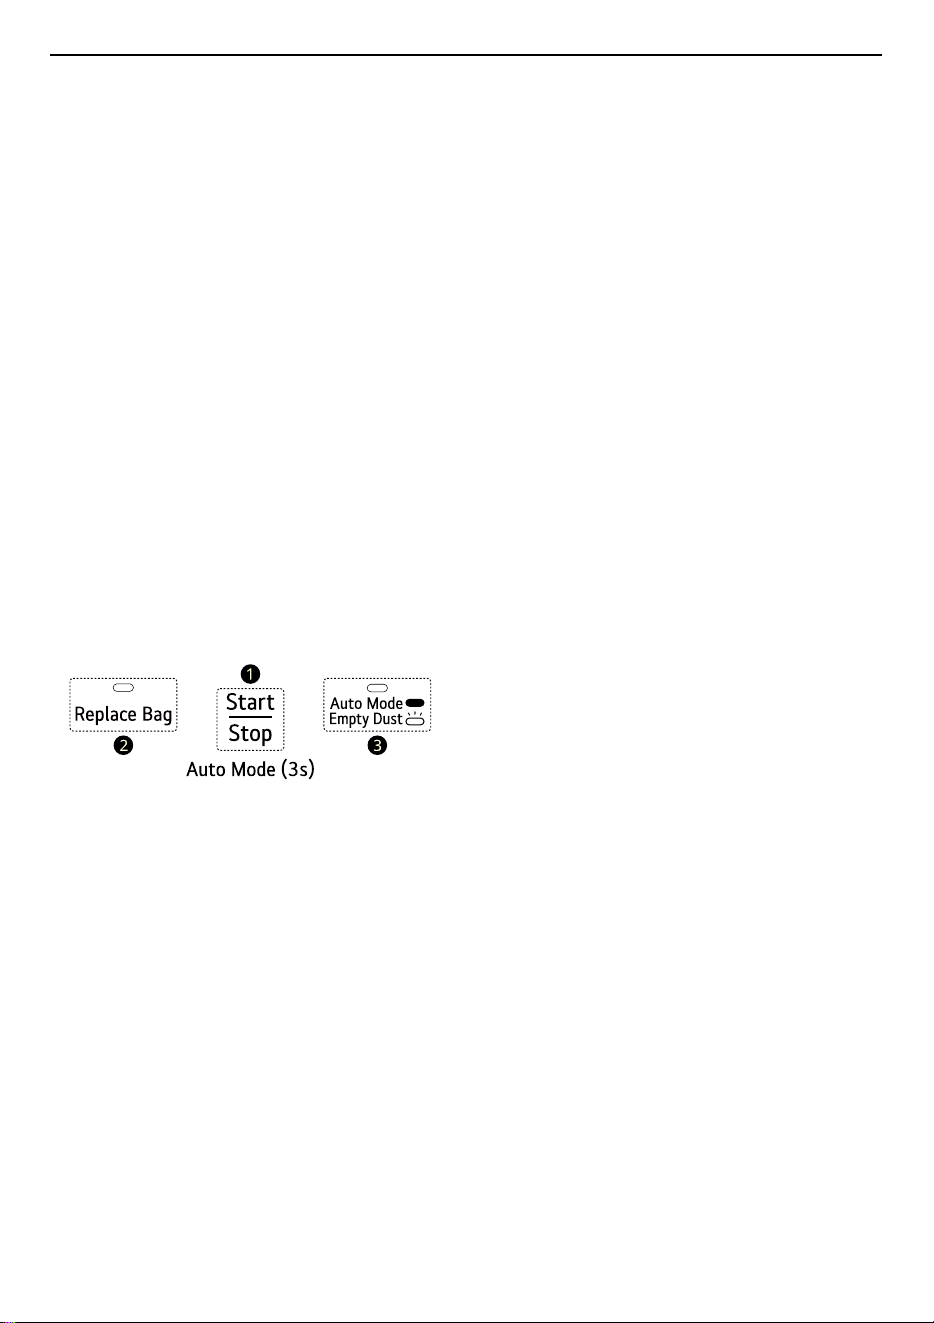
22
OPERATION
• Genuine Battery Certification Notification: If
the battery is not genuine, the icon will flash
a red light.
• Battery Life Expiration Replacement
Notification: When the battery has reached
the end of its life and needs to be replaced,
the icon will display a solid red light.
d
Battery Level Indicator
• The remaining battery level is displayed in 3
stages according to the remaining battery
power.
• The battery level indicator blinks when the
battery needs to be charged.
• As the product is charging, bars light up on
the battery level indicator to indicate the level
of charge.
• The battery level indicator light down when
the battery is fully charged.
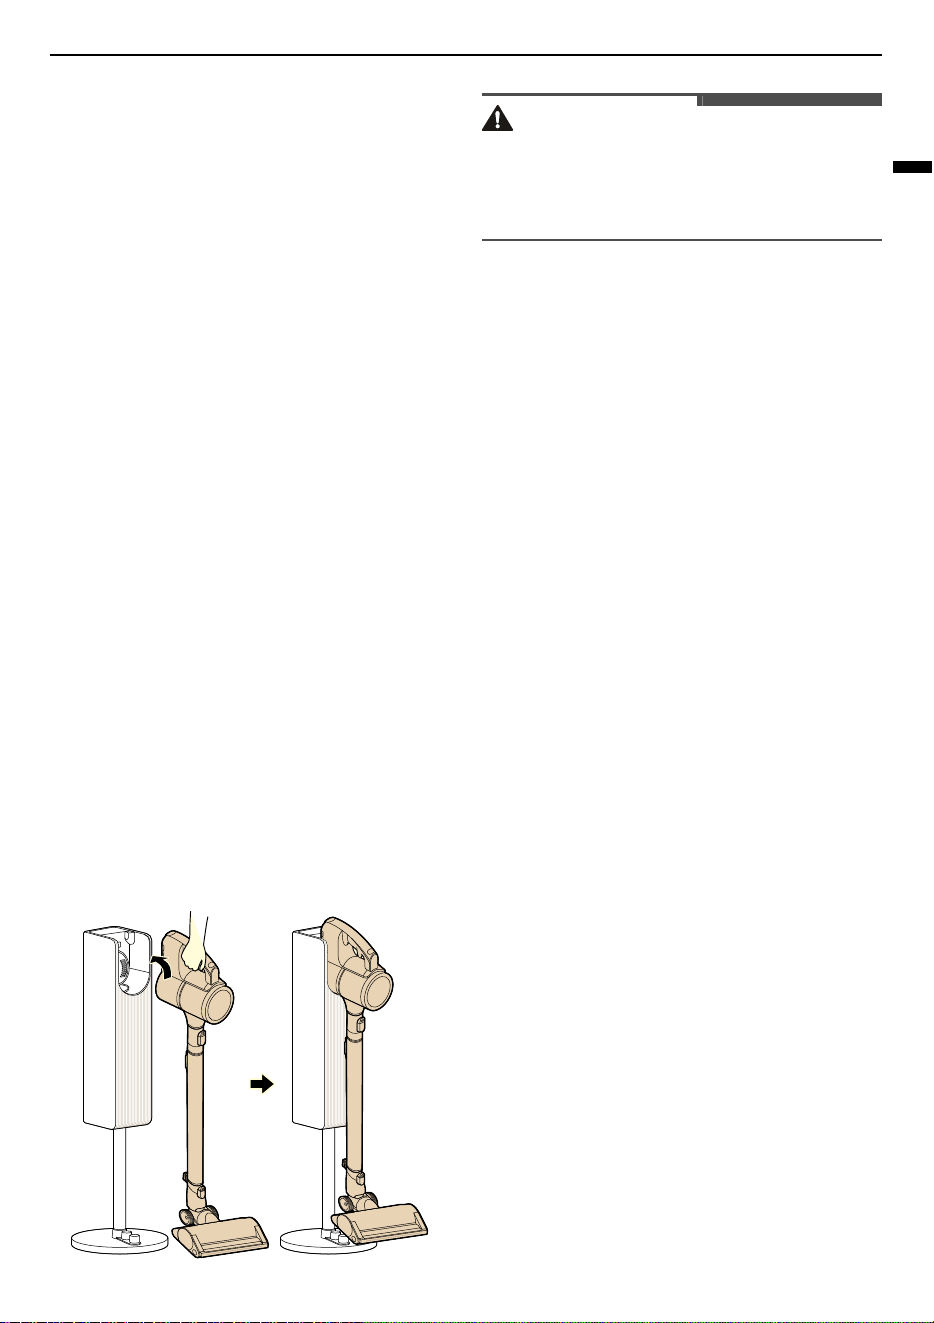
Control Panel(Charging Station)
a
Start/Stop
button
• When you press the
Start/Stop
button, the
dustbin cover opens after about 3 seconds
and the dust emptying operation begins.
• Press the
Start/Stop
button for 3 seconds to
change mode.
(Manual mode
&
Auto mode)
[Manaul Mode]
• When you purchase the product, the manual
dust emptying mode is set by default.
• When the vacuum cleaner is properly
installed, Press the
Start/Stop
button to start
dust removal operation.
[Auto Mode]
• When the vacuum cleaner is properly
installed onto the Charging Station, it will
automatically start emptying the dust.
• Press the
Start/Stop
button, If you want to
cancel dust removal due to activities such as
receiving a call while the product is operating.
- When the dust removal operation is
cancelled, the product returns to the
charging status.
- During the period when operation is
canceled and dust removal is stopped,
pressing the
Start/Stop
button will not
resume the operation.
- If the dust removal operation is cancelled,
the dust bin may not be emptied
completely and dust will remain on the
duct suction area.
- Complete the dust removal operation
before using the vacuum cleaner.
b
Replace Bag Indicator
• Indicates when to replace the dust bag.
- If the indicator light turns red, replace the
dust bag to maintain product performance
and operation.
c
Auto Emptying Indicator
• Lights to indicate that the automatic dust
emptying mode is on.
- Automatic dust emptying mode
automatically starts the operation every
time the vacuum cleaner is mounted
correctly onto the product.
Charging the Battery
Before Charging the Battery
• Make sure that the charging station is connected
to the power outlet.
• Fully charging a single battery usually takes 4
hours.
• The battery will not be charged if the indoor
temperature is below 5 ℃. Only charge the
battery when indoor temperatures are between
5 ℃ and 38 ℃.
• The battery will eventually need to be replaced.
Due to the battery characteristics, runtime is
shortened after using the appliance repeatedly
for an extended period without charging or if the
battery is charged when its hot from use.
23
OPERATION
ENGLISH
• The last bar on the battery indicator begins to
flash when the battery needs to be recharged.
Continuing to run the unit until it turns off when
the last bar is flashing will also reduce its life
span. Use the appliance with a fully charged
battery.
Charging the Vacuum Cleaner
Storing the appliance on the charging station
automatically recharges the battery.
1
Press the
Power
button to turn the appliance
off.
2
Put the product body on the charging station.
• Make the extension pipe its shortest length
before placing the vacuum onto the charger.
• The appliance cannot be loaded onto the
charging station if either the combination
tool or the crevice tool is inserted. Use the
charging station only after removing the
combination tool or the crevice tool, if either
happens to be fitted
• When the vacuum is properly placed on the
charging station, the battery charge level is
displayed on the status display with the beep
sound. If you don't hear a beep, reload the
appliance on the charging station.
• When the charging is complete, the status
display turns off.
WARNING
• Make sure to securely fit the product body onto
the charging station. If the appliance falls off the
charging station, it could cause injuries, property
damage or product damage.
Emptying the Vacuum's Dust
Bin
Using the Auto Mode
When the automatic dust removal mode is set, the
dust removal operation starts automatically
whenever the vacuum cleaner is properly inserted
into the product.
1
Press the charging station
Start/Stop
button
for 3 seconds to change from the Manual mode
to the Auto mode.
2
Inserting the vacuum cleaner onto the
Charging Station.
• After adjusting the length of the telescopic
pipe of the vacuum cleaner to the shortest
length, attach it to the Charging Station.
• If the vacuum cleaner pipe is connected to a
combination tool or a crevice tool, the
vacuum cleaner won't fit inside the Charging
Station. Fit it without any combination tool
or crevice tool.
• If the vacuum cleaner is fitted properly
inside the Charging Station, the Chime will
sound. If the Chime does not sound, reinsert
the vacuum cleaner, making sure that the
floor nozzle sits flat on the floor.
• Before starting the dust removal operation,
press the Kompressor lever on the vacuum
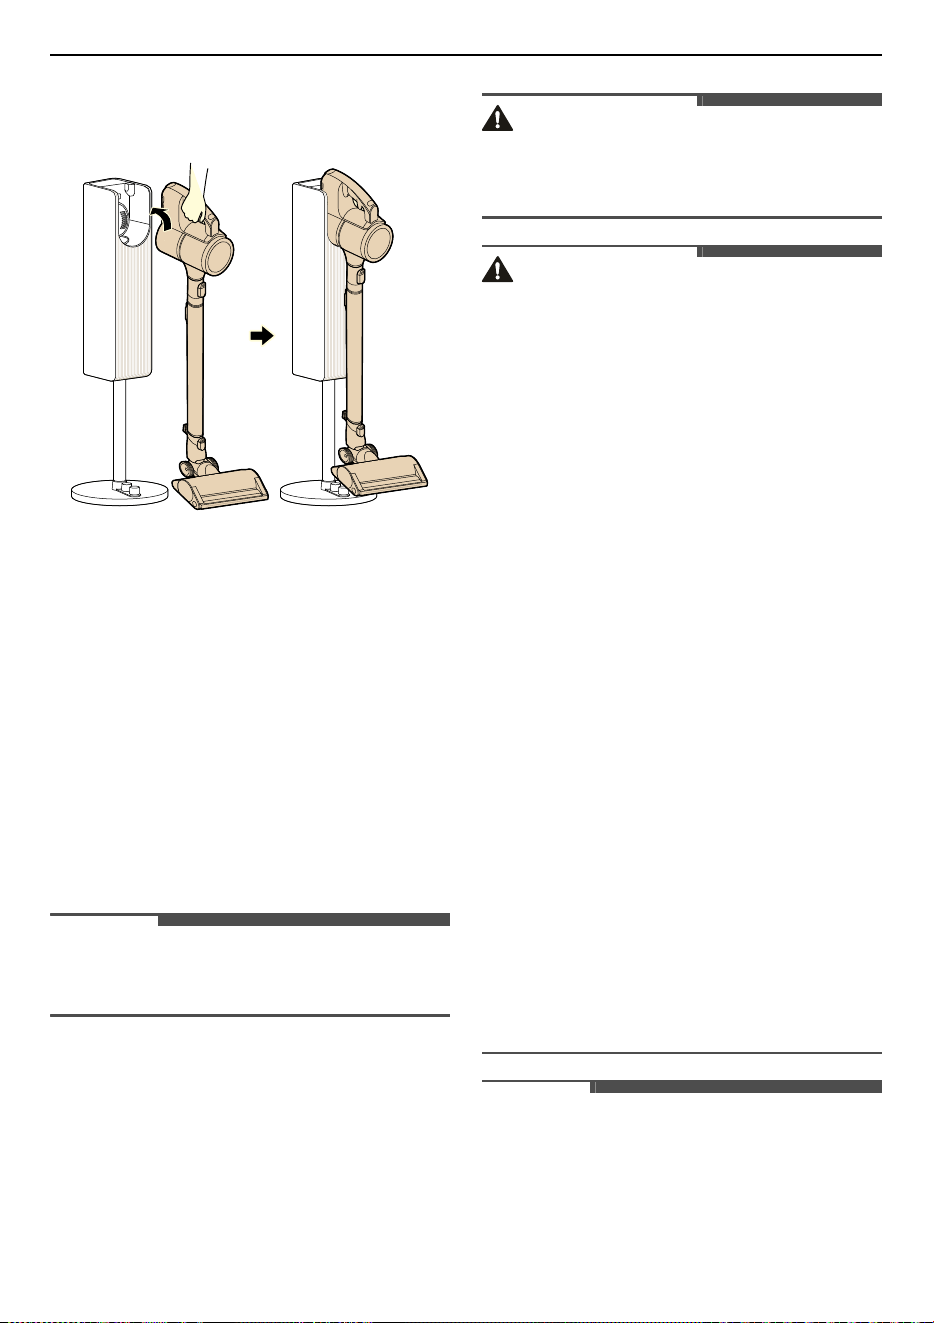
24
OPERATION
cleaner down 2 or 3 times to aid in the dust
extraction operation.
3
When the dust emptying operation is
complete, the auto mode LED stops blinking,
and the vacuum cleaner starts charging.
Using the Manual Mode
1
Insert the vacuum cleaner into the Charging
Station.
2
Press the
Start/Stop
button. The empty dust
LED flashes white, and the dust emptying
operation begins after about 3 seconds.
NOTE
• Do not try to remove the vacuum from the
Charging Station once the operation starts.
3
When the dust emptying operation is
complete, the empty dust LED stops blinking,
and the vacuum cleaner starts charging.
WARNING
• Do not wash the vacuum cleaner body or the
inlet with water. If water enters the built-in
motor, it can cause electric shock or fire.
CAUTION
• Do not forcibly remove the vacuum cleaner
during the dust removal operation. Because the
vacuum cleaner is mounted, the product may
break or fall, causing injury or product damage.
- Remove the vacuum cleaner after the dust
removal is completed.
• Do not put foreign objects such as hands,
garbage, or toys in the dust suction area of the
Charging Station. Doing so will cause damage to
both the cleaner and the Station.
• Do not push, pull, or lean on the product; it may
fall, causing injury or damage.
• Do not put objects like smartphones on the
product's control panel. The product may
malfunction due to vibration, or the object may
fall to the floor, causing injury or damage.
• If the power suddenly turns off while emptying
the dust bin, the dust removal operation will
stop with the dust bin cover of the vacuum
cleaner open. Do not attempt to remove the
cleaner at this time. When power is restored, the
unit should self reset to the stand by position.
Causes for power loss include a power outage, a
turned off power strip, an unplugged power
cord, and a tripped circuit breaker.
- When the product settings are initialized after
the power is supplied again, separate the
vacuum cleaner.
• After the power comes back on, only then should
you remove the cleaner from the Charging
Station.
NOTE
• The sound of the high-performance motor may
be louder than any existing wireless vacuum
cleaner. It is normal to hear sounds such as the
vacuum cleaner, dust bin cover opening,
product operating unit, and suction.
25
OPERATION
ENGLISH
• It is normal to hear a 'clicking' sound as the
vacuum bin opens, closes and engages with the
charging station during dust removal operation.
• For best results in areas with extra hair or pet
dander, empty the vacuum dust bin more often
during cleaning.
• Replace the dust bag every month to maintain
the dust removal performance. The replacement
cycle may vary depending on the environment,
and may be especially short in conditions with a
lot of dust or pet hair.
• The dust bin may not be emptied completely
under certain conditions (very full, contains long
hairs, etc.). If this happens, press
Start/Stop
button to repeat the removal process.
• The cleaners dust bin, Kompressor lever,
Cyclonic and Micro filters must also be manually
cleaned regularly, as the Auto clean mode
cannot clean these parts.
Using the Mop Nozzle
Before Using the Mop Nozzle
• The mop pads only rotate at one speed
regardless of what suction power setting the
product body is set to.
• To prevent product damage, the mop
attachment plate will automatically stop if there
are foreign objects stuck in the plate or if it is
subjected to a strong impact. Turn the appliance
off immediately and remove the foreign objects
or obstructions before resuming use.
• If you hear a noise while mopping, the mop pad
may have dropped off the mop attachment
plate. Turn off the product immediately and
reattach the mop to the attachment plate before
resuming use.
• Do not use a soiled mop pad to clean floors.
Using soiled mop pads or pads containing debris
can damage flooring. Always check the pads
after each use.
• Use only authorized LG Electronics mop pads.
• Empty the dust bin and clean the exhaust filter
and the micro filter after using the mop nozzle.
Using the Wet Mop Pads
Press the
Power
button. You can use the only mop
mode and not turn on the dust suction function.
• Press the
~
button to turn on the dust suction
function.
• Press the
!
button once while pressing the
~
button once to turn off the dust suction function.
CAUTION
• Do not assemble or disassemble the nozzle while
the appliance is turned on. Doing so may result
in injury.
• Set the water adjustment button to the
STOP
position when not using the appliance for an
extended period of time. Failure to do so may
result in product failure.
• Do not let the appliance stand on the floor while
the wet mop pads are attached. Doing so may
result in damage or swelling to wood flooring.
• Do not use on PVC or PU mat for infants or
children. Friction can cause the motor to
overheat.
• If you use the mop nozzle for a long time with the
suction off, the motor may overheat
(recommended duration of use: 80 minutes).
When the moter overheats, the overheating
prevention function is activated and the
appliance is automatically turned off. Use the
appliance after cooling the heat for about one
hour in a cool, well-ventilated place.
Filling the Water Tank
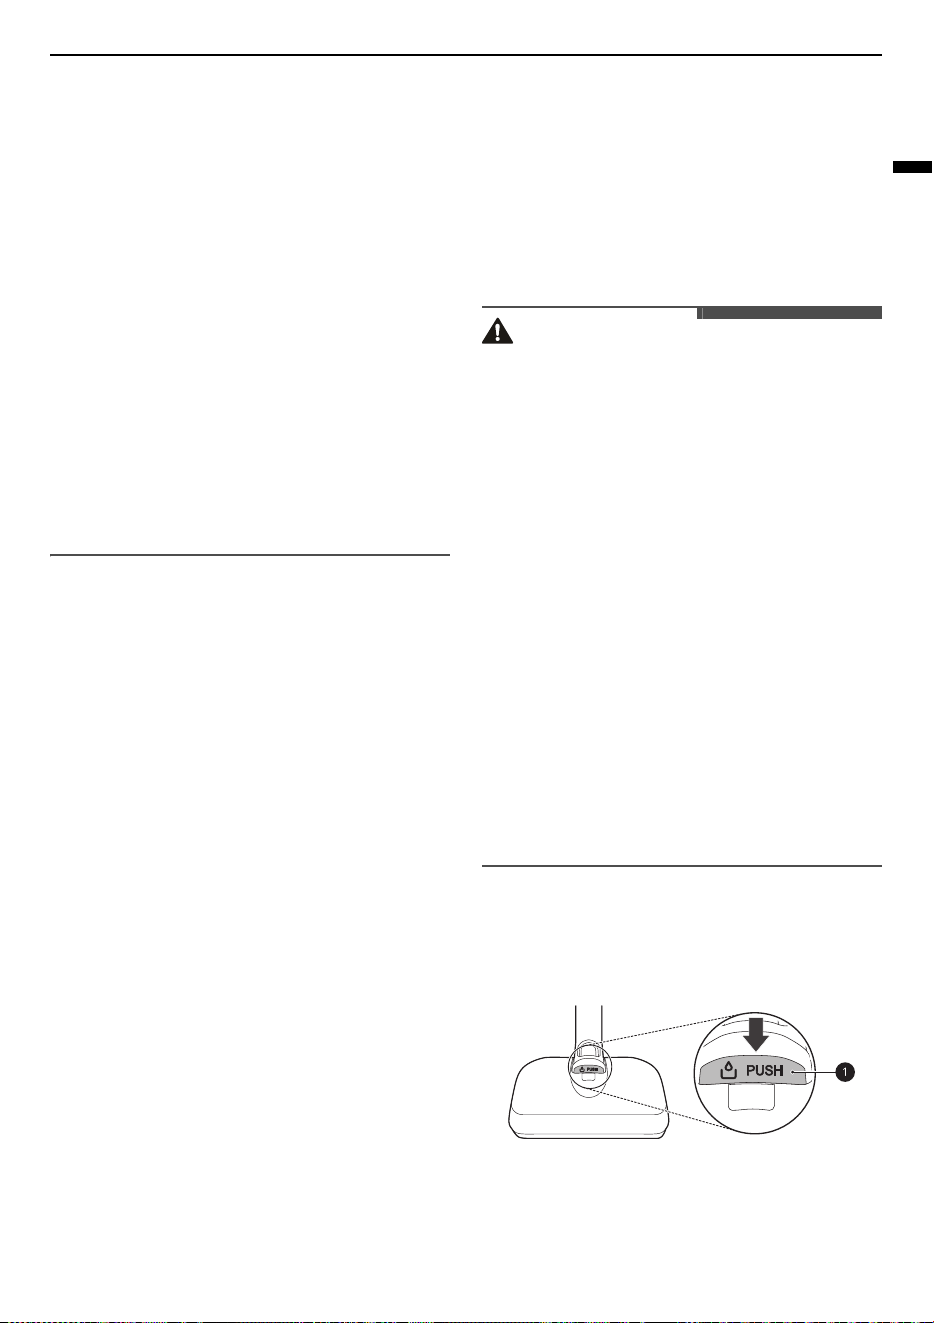
1
Press the
PUSH
button
a
to remove the water
tank from the mop nozzle.
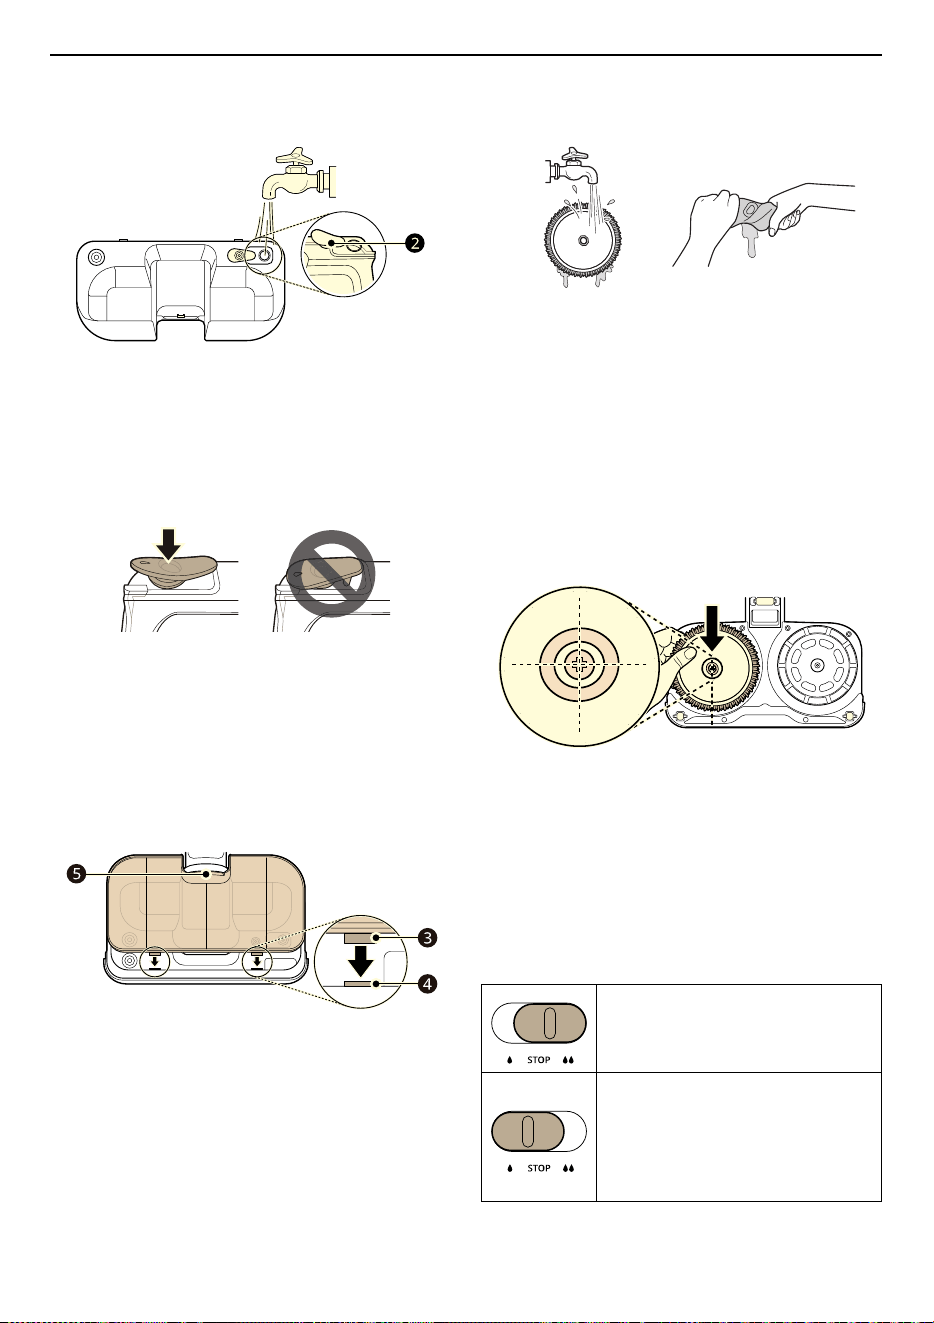
2
Open the water inlet cap
b
of the water tank
and fill the tank with water.
26
OPERATION
• Only put purified water in the water tank. Do
not put other liquids or hot water in it.
3
Close the water inlet cap tightly.
• If the water inlet cap is not closed properly,
water may leak.
4
Attach the water tank to the mop nozzle again.
• Insert the 2 tabs
c
at the front of the water
tank into the slots
d
on the top of the mop
nozzle. Press down at the centre
e
to lock
the tank in place.
Attaching the Mop Pads
1
Wet both sides of the mop pads with water
then squeeze out any excess water before
attaching the pads.
• Do not attach pads while they are dripping
wet.
• Attaching and using mop pads while they
are dry may affect the cleaning results.
2
Place the mop nozzle upside down on the floor.
3
Align and attach the centre of the mop pad
with the centre of the mop attachment plate.
• Attach the Velcro on the mop pad to the mop
plate. Attaching the mop pad upside down
or improperly may affect the cleaning
results.
4
Assemble the mop nozzle to the appliance.
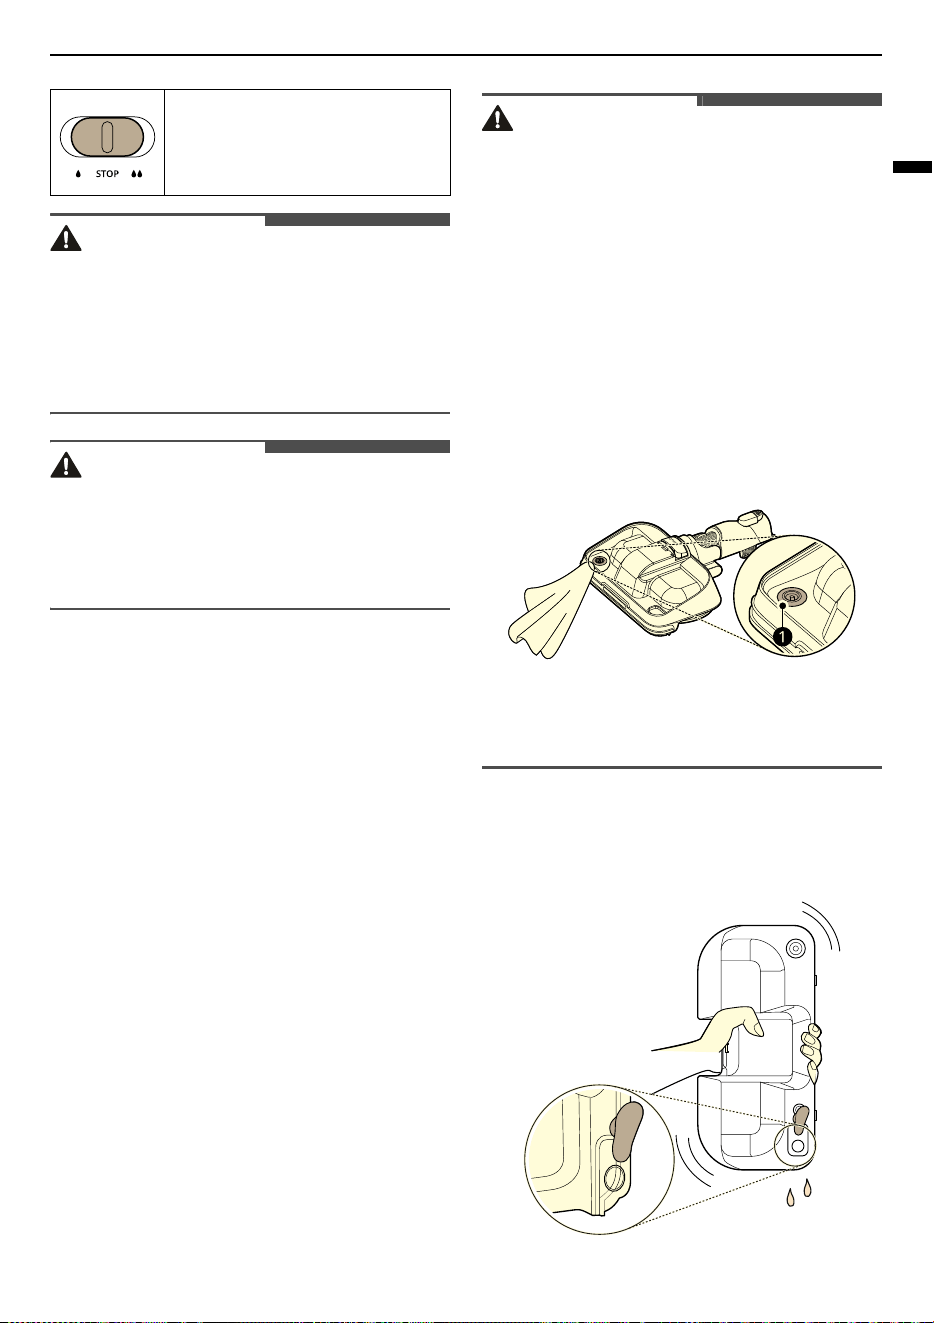
Adjusting the Amount of Water
Slide the water adjustment slider button to adjust
the amount of water released onto the mop pad to
either
High Mode
or
Low Mode
.
High Mode
: Slide the slider
button to clean ingrained dirt or
supply a large amount of water.
Low Mode
: Slide the slider
button to supply a small amount
of water for cleaning wood or
other flooring that can be
damaged by too much water.
27
OPERATION
ENGLISH
WARNING
• To avoid injury, do not attach the mop pad while
the mop attachment plate is rotating.
• Do not insert your hand between the rotating
mop plates. Doing so may result in injury. Never
use the Mop nozzle without fitting the damp
mop pads as this will damage the flooring.
CAUTION
• Do not let the appliance stand on the floor while
the wet mop pads are attached. Doing so may
result in damage or swelling to wood flooring.
Always check with the flooring manufacturer or
supplier for wet mopping suitability.
Using with the Mop Nozzle
1
Attach the water tank and mop pads to the
mop nozzle.
2
Slide the water adjustment slider button to
adjust the amount of water released onto the
mop pad to either
High Mode
or
Low Mode
.
3
Press the
Power
button to start cleaning.
Drying the Water Tank and Mop
Pads
Drying the Water Tank
When cleaning is completed, make sure to empty
the water tank and dry it before storing the mop
nozzle.
CAUTION
• Turn the water inlet caps to make sure they
remain open when storing the water tank. If
caps are closed and not properly dried, it may
cause odour.
• Do not remove the water inlet caps from the
water tank. Caps may tear.
• Do not add detergent, vinegar or baking soda to
the water tank when washing. It is not easily
removed in the water tank, which may soil the
floor.
• After cleaning, wipe off any remaining water on
the water supply inlet
a
on the mop nozzle with
a soft cloth. The water could drip onto the floor
and damage it.
• Do not pull or stretch the rubber gasket on the
water supply inlet. Doing so may tear or damage
it.
1
Open the water inlet cap on the side of the
water tank and empty the water tank. Shake
the water tank to remove the remaining water.
STOP
: Position the slide button in
the centre. This stops the supply
of water so you can go over areas
that are already wet.
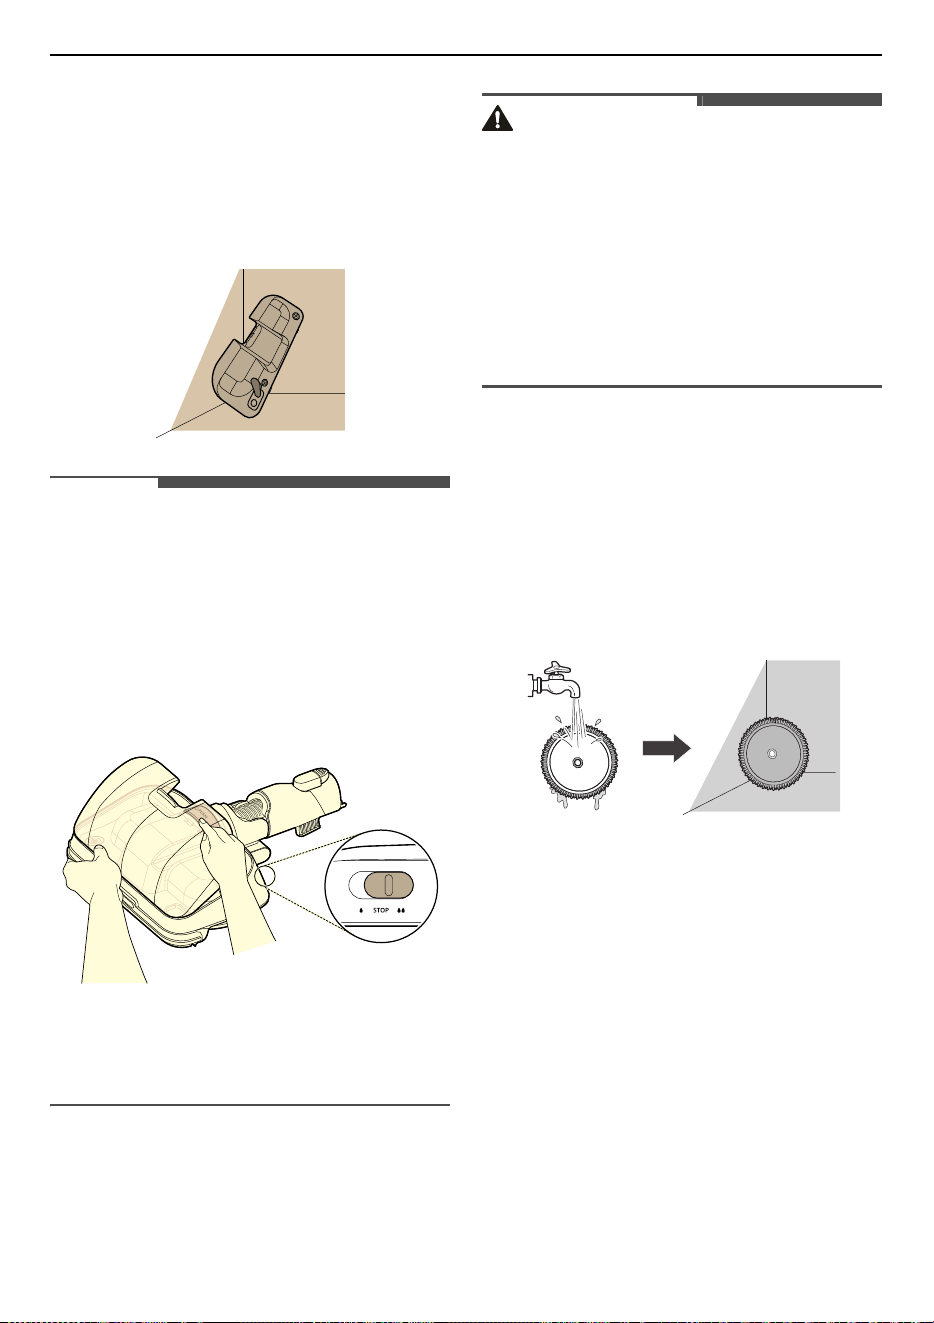
28
OPERATION
2
Leave the water inlet cap open and allow the
water tank to dry in a well-ventilated area out
of direct sunlight for at least 24 hours.
• Keep the water tank after water is
completely empty and dry. Moisture or
residual water in the tank may cause odour.
NOTE
• If the water supply pipe inside the mop nozzle is
filled with water, water may not come out
properly when the mop nozzle is used. If water
does not come out properly, follow the steps
below.
1
Attach a wet mop to the mop nozzle where
the water tank is separated and set the
amount of water to
High Mode
.
2
Place the mop nozzle on the floor, turn on
the power, and let it run for about 1 minute.
Drying the Mop Pads
After using the mop pads, hand wash them and
allow them to dry before storing them.
CAUTION
• Do not use as follows, as it may become
deformed.
- Do not use bleach or fabric softener when
washing the mop pads.
- Do not dry the pads in a clothes dryer.
- Do not boil the mop pad.
- Mop pads are a consumable item and should
be replaced when they wear or no longer
clean.
1
Separate the mop pads from the mop
attachment plate.
2
Hand wash the pads with a neutral detergent.
• Storing mop pads in a damp state can result
in an unpleasant odour. Set the pads in a
well-ventilated area out of direct sunlight for
at least 24 hours or until completely dry.
Using the Nozzles and
Tools
Before Using the Nozzles and
Tools
Some accessories are only available on some
models.
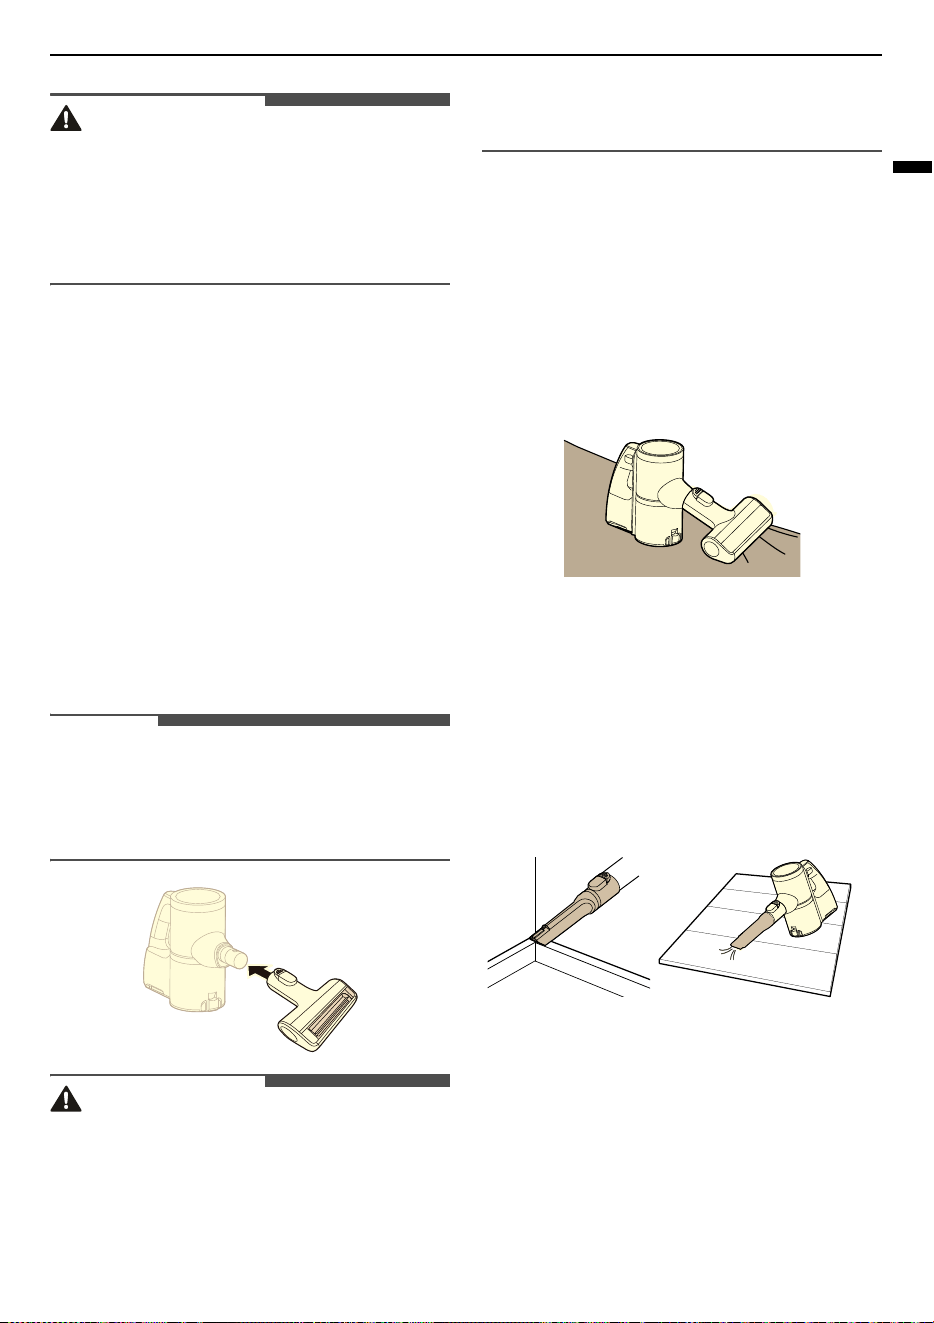
Specialized attachments can help you clean more
effectively. Tools and nozzles can be attached to
the product body or the extension pipe.
• Adjust the suction power if the inlet gets stuck on
the floor, carpet, or bedding.
• Each Nozzle is equipped with a motor and may
make a sound when operating.
29
OPERATION
ENGLISH
CAUTION
• Do not use the Multi-Surface Nozzle or Slim Hard
Floor Nozzle on PVC or polyurethane mats for
infants and children. The mat may stick to the
nozzle, making it difficult to operate, causing
damage to the mat or static electricity on the
appliance. Clean mats using the crevice tool.
Dual Floor Max Nozzle
Use this nozzle to clean carpets, rugs or hard floor
surfaces.
Slim Hard Floor Nozzle
Use this nozzle to clean hard floor surfaces.
Pet Nozzle
Use this nozzle for soft surfaces and pet hair
removal.
NOTE
• Always check the nozzle brushes and rollers for
embedded debris which, when not removed
from the brush, can damage the Floor during
operation.
CAUTION
• Do not use the nozzle on the surfaces listed
below. Do not use it to clean coated or lacquered
floors especially, as repeated use can wear down
the coating.
- Clothing, bedding
- Leather sofas, cushions
- Carpet
- Vinyl flooring, tiles, marble
Bedding Nozzle
This nozzle lets you clean sheets and bedding more
effectively. It removes dust in bedding using strong
suction and a punching motion.
• Lower the suction level when vacuuming
bedding such as duvet covers to avoid the thin
fabric getting sucked into the nozzle.
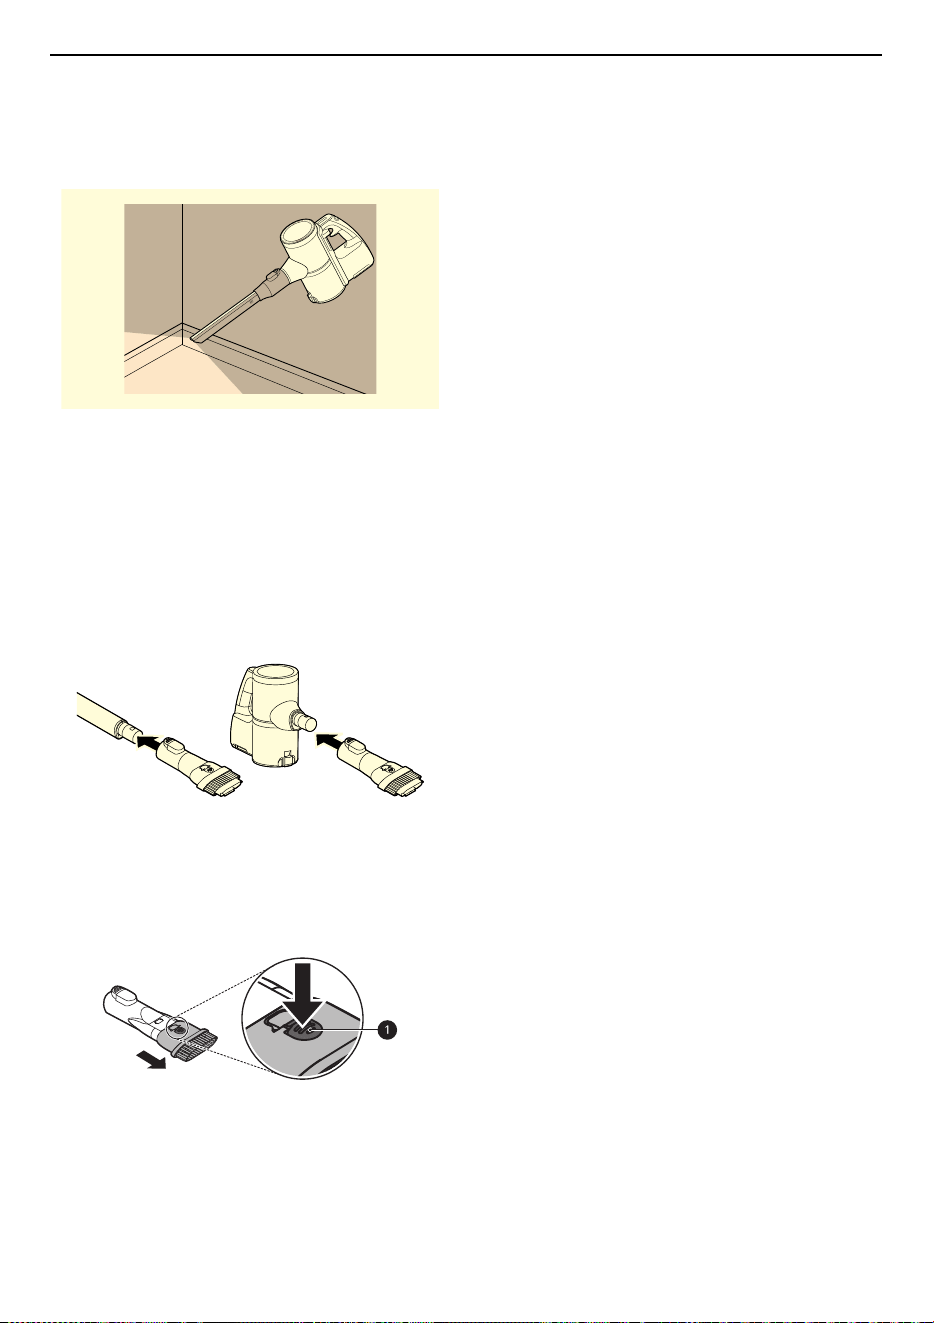
Crevice Tool
Use this tool to remove dust from corners or
narrow spaces.
• Use it for areas with static electricity such as
mats.
• Use the
Turbo
mode to clean pet hair out of
furniture, mats, or tight areas like corners.
30
OPERATION
LED Crevice Tool
• Use this tool to remove dust from dark corners
and dark narrow spaces.
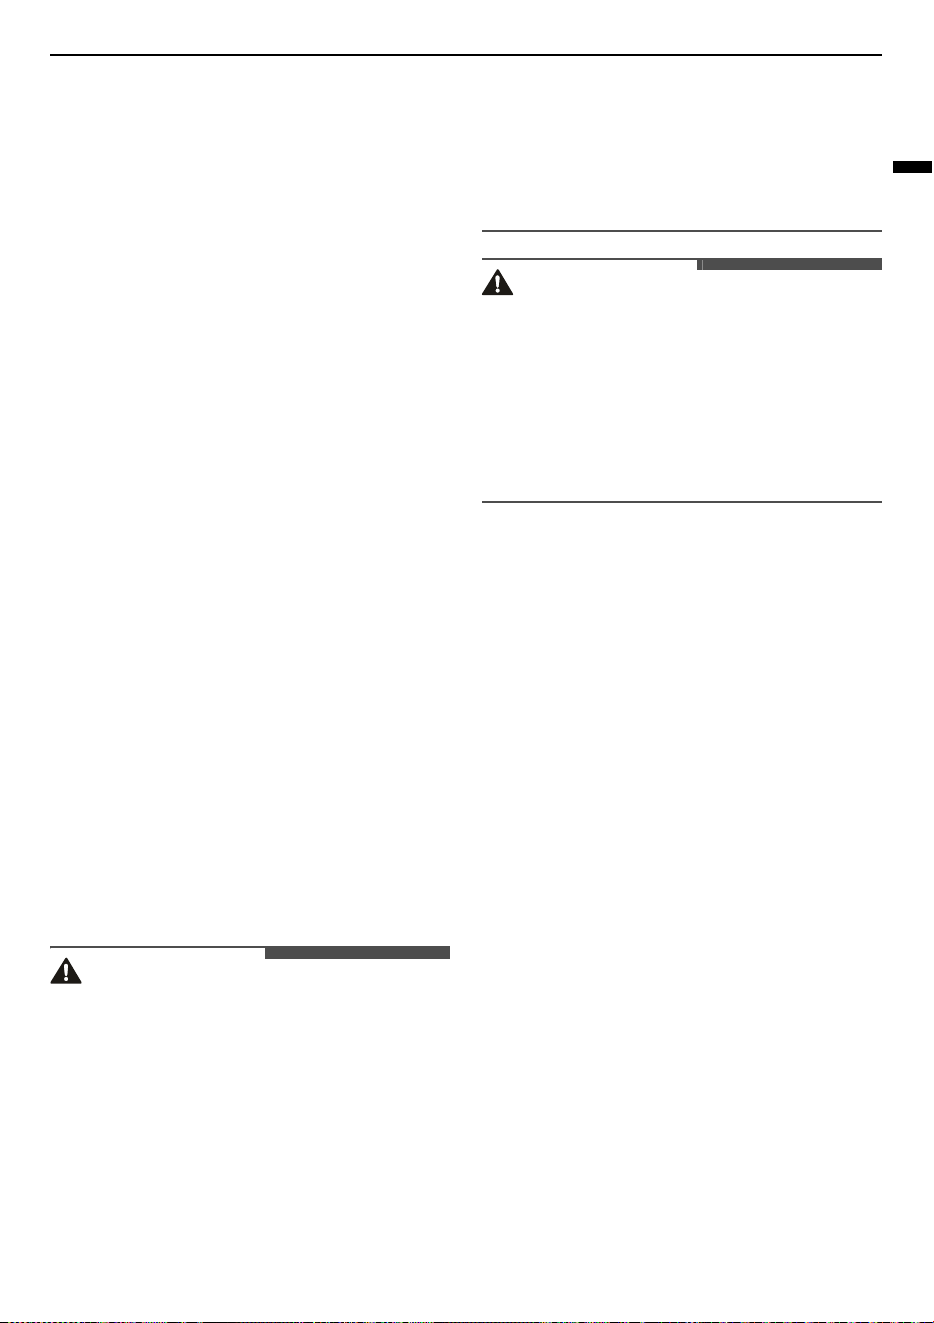
Combination Tool
Can be used in either crevice mode or brush mode
for cleaning corners or small gaps where dust and
dirt gather.
•
Crevice Mode
Use the tool in the crevice mode to clean flat
surfaces such as sofas or mattresses.
•
Brush Mode
Use the tool in the brush mode to clean delicate
surfaces such as frames or furniture.
- To convert modes, press the adjustment
button
a
and push forward.
31
MAINTENANCE
ENGLISH
MAINTENANCE
Cleaning the Appliance
Before Cleaning the Appliance
To maintain the optimum suction power, the dust
bin filter, the exhaust filter and the micro-filter
should be cleaned regularly and washed under
running water at least once a month.
• Turn off the power before cleaning the
appliance.
• The frequency of cleaning varies depending on
the usage environment and usage time. In a
dusty environment, clean frequently.
• Replace the dust bag when the dust bag
replacement indicator light turns red.
• Replace the dust bag every month to maintain
the dust removal performance.
• Clean the motor protection filter and the exhaust
filter every 3 months or if the dust removal
function seems weaker.
• Disconnect the power plug from the outlet
before cleaning the product.
• If the product smells, replace the dust bag and
clean the filter.
• The frequency of cleaning varies depending on
the usage environment and usage time. In a
dusty environment, clean frequently.
• Fine dust may remain on the dust bin cover due
to static electricity generated during the dust
removal operation; periodically clean the dust
bin cover.
WARNING
• Never wash the nozzle, rotating brush or
product body with water. Water could reach the
motor and cause electric shock or fire.
• Do not use the cleaner without any of the filter
fitted as this will allow foreign objects to enter
the motor. Doing so may cause electric shock,
fire or product damage.
• Do not allow foreign objects to enter the motor.
Doing so may cause electric shock, fire or
product damage.
• Do not insert fingers or sharp objects into the
motor. Doing so could cause product damage,
personal injury or electric shock.
CAUTION
• Do not apply force or allow impacts to the dust
bin filter. Doing so could deform the filter,
compromise product performance, or cause the
product to malfunction.
• If the Kompressor lever does not return to the
top, remove the dust bin filter from the dust bin
and clean it. A clogged or dirty filter may cause
poor product performance.
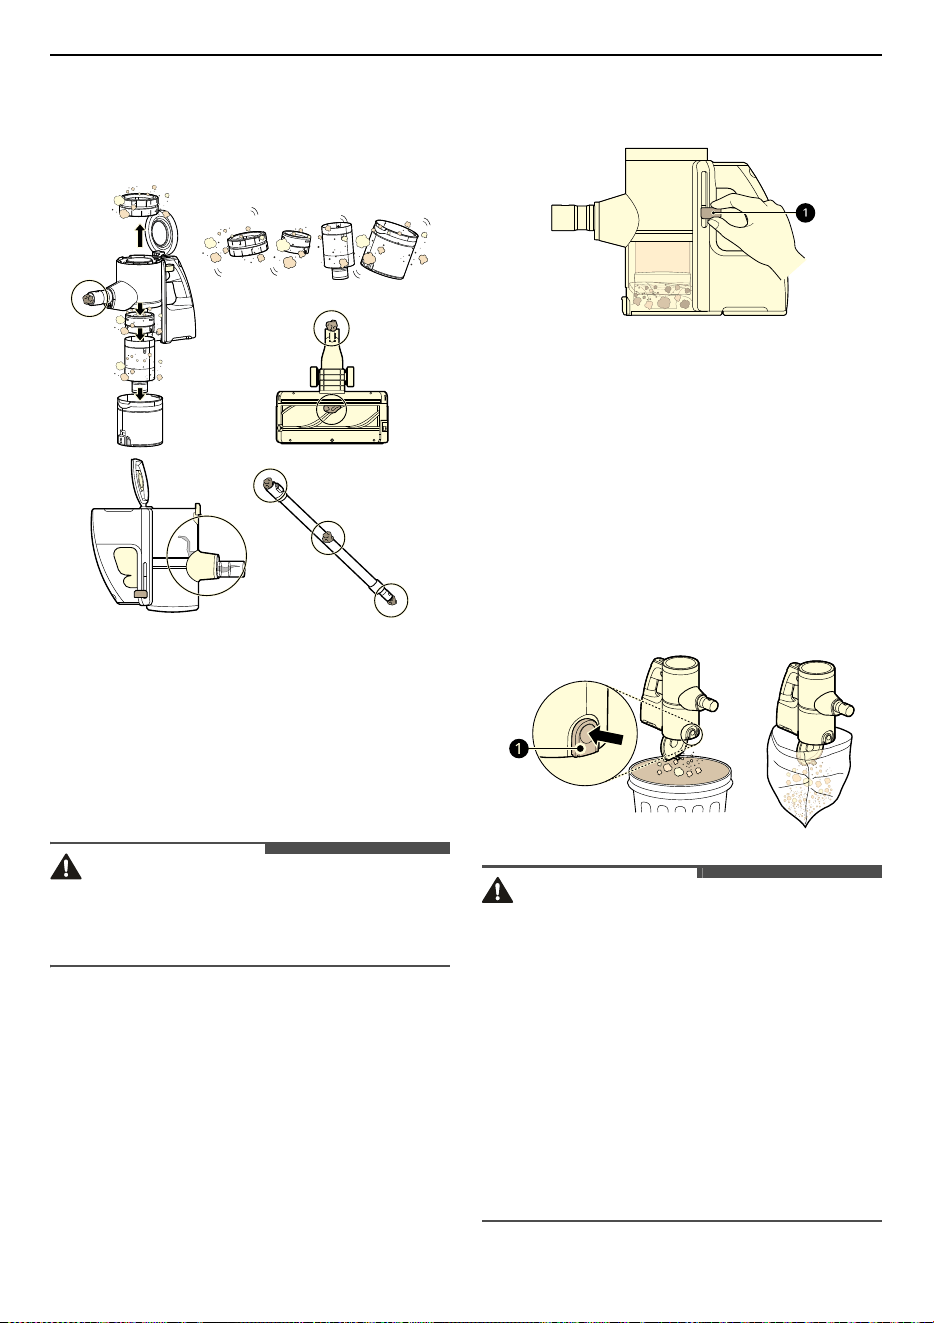
Removing Foreign Objects
If the appliance is clogged with foreign objects, the
suction power changes, the motor cycles
repeatedly, and the foreign objects clogging alarm
icon blinks.
If clogging persists, the appliance will turn off
automatically to prevent damage. Separate the
battery from the product body and remove the
foreign objects before resuming use of the
appliance.
• Check the inside of the product body, above the
Kompressor working plate, the Fixed pipe, inlets,
exhaust filter, micro filter and cyclonic mesh
filter for foreign objects.
• If the inlets are not completely blocked, the
foreign objects clogging alarm indicator may not
light up.
32
MAINTENANCE
• If the sound of the appliance becomes loud or
the cleaning performance is poor, check for
foreign objects.
Cleaning the Dust Bin
Empty and clean the dust bin after every use.
• If the dust bin is completely full of dust or the
filter is clogged, the suction power may be
reduced.
CAUTION
• Do not use the appliance without the cyclonic
mesh filter installed. Doing so could damage the
appliance.
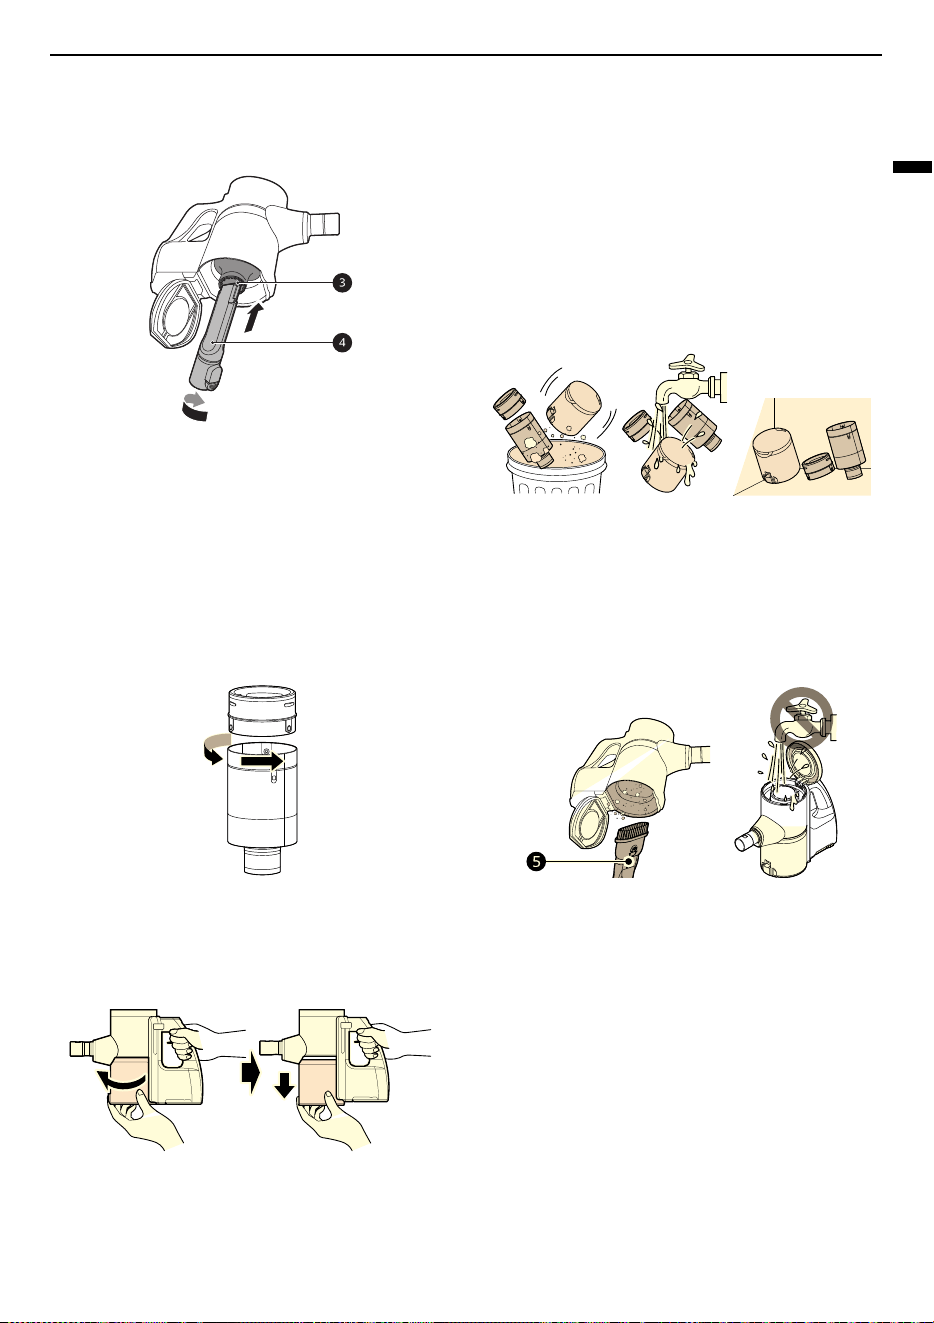
1
Remove the battery from the product body
before cleaning the dust bin.
2
Push down the Kompressor lever
a
several
times to collect and compact the dust from the
outside of the cyclonic mesh filter and the
interior walls of the dust bin.
• Foreign objects which become lodged in the
cyclonic mesh filter may be difficult to
dislodge with the Kompressor lever. Remove
the cyclonic mesh filter and use a soft brush
to clean it.
3
Press the dust bin cover release button
b
to
open the dust bin cover. Shake the dust bin to
empty it.
• Be careful as dust or foreign objects may
spill out when opening the dust bin. Empty
the dust bin into a wastebasket or where
dust and foreign objects can be easily
removed.
• The dust bin can be wrapped in a plastic bag
to contain the dust when emptying the dust
bin.
WARNING
• If the Kompressor lever does not slide down
smoothly, foreign objects may be trapped
between the dust bin and the cyclonic mesh
filter. Clean the dust bin and cyclonic mesh filter
to avoid product damage.
• Do not force the Kompressor lever down if
foreign objects are caught around the working
plate of the Kompressor system. Doing so may
cause product damage. Never hit the main body
of the unit or its filters against a hard surface to
remove debris or blockages with or without the
telescopic pipe attached. Doing so can severely
damage the unit.
33
MAINTENANCE
ENGLISH
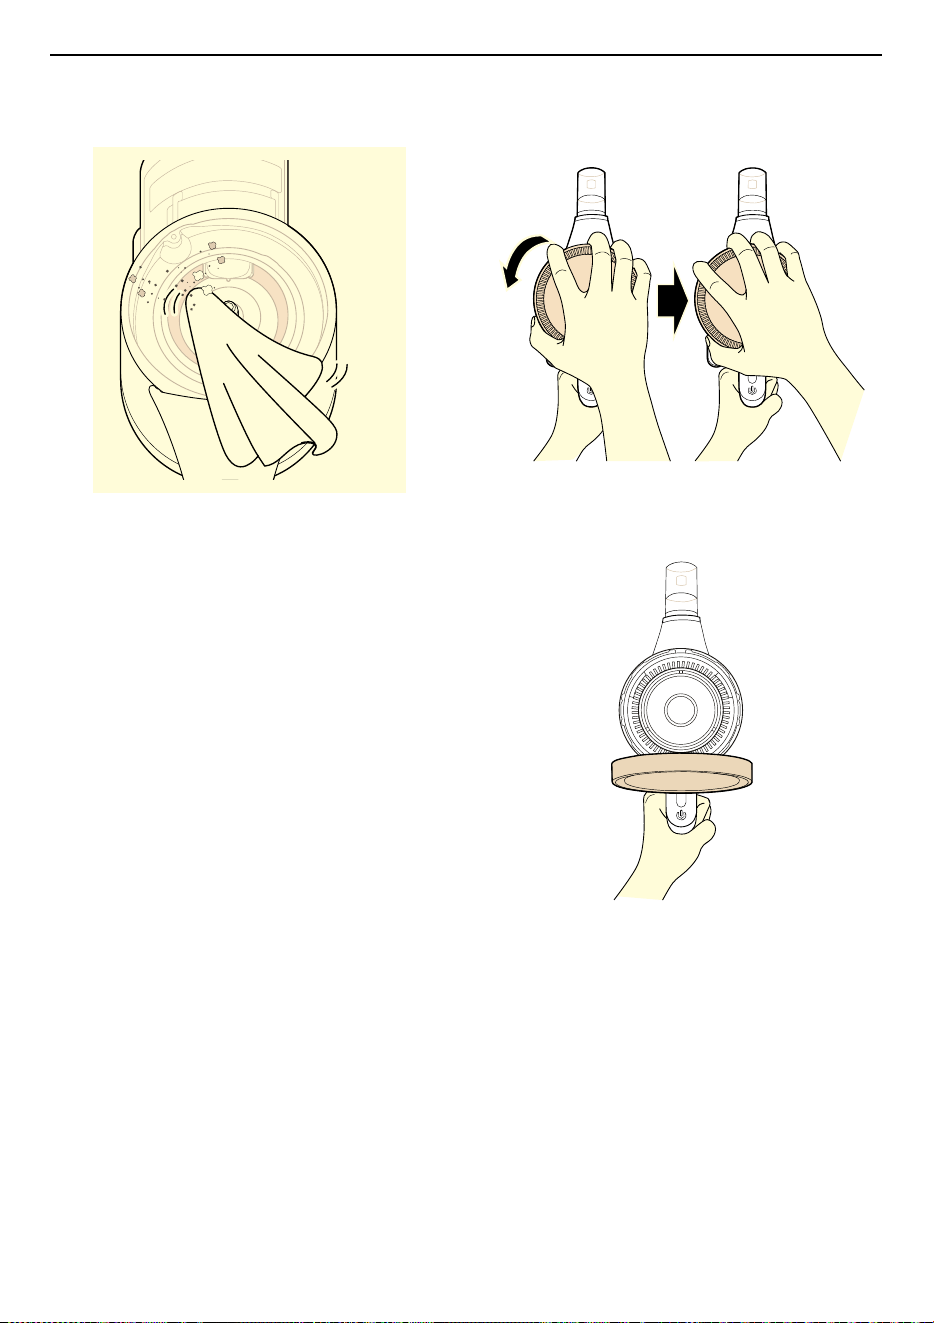
4
Insert the crevice tool
d
into the cyclonic mesh
filter
c
and turn it counterclockwise to remove
the filter.
5
Remove the micro filter from the Cyclonic Mesh
Filter.
• When separating the Cyclonic Mesh Filter,
the micro filter is separated in an assembled
state. If it was not separated together with
the Cyclonic Mesh Filter, check the inside of
the vacuum cleaner and take out the micro
filter.
6
Grab the dustbin and turn it to the left to
separate the dustbin.
7
Remove dust from the dust bin, Cyclonic Mesh
Filter, and micro filter using a cleaning brush,
etc., and wash them with water at least once a
month.
• If any stains remain, soak in lukewarm water
(about 40 degrees) for 30 minutes and then
wash with a brush.
• To avoid odor and the malfunction of the
motor, allow the cyclonic mesh filter to dry
completely in a well-ventilated area out of
direct sunlight for at least 24 hours before
reassembling.
8
Use the combination tool
e
to clean out dust
or foreign objects inside the dust bin.
• Do not wash the product body or motor with
water.
9
Turn the product body over again and shake it
while pressing down the lever to remove the
dust.
10
Turn the product body over, lift the
Kompressor lever up, and clean the inside of
the working plate with a damp paper towel.
34
MAINTENANCE
• Do not push the Kompressor lever down
hard. The working plate may be damaged.
Cleaning the Filters
Clean the exhaust filter regularly and wash them in
running water at least once a month to maintain
the optimum suction power of the appliance.
Allow them to dry in the sun before re installing
them.
• The frequency of cleaning depends on where
and how often you use the product. Clean the
filters more frequently if the appliance is used
regularly or in areas with a lot of dust.
• Filters are consumables. Please purchase more
filters from an authorized service centre.
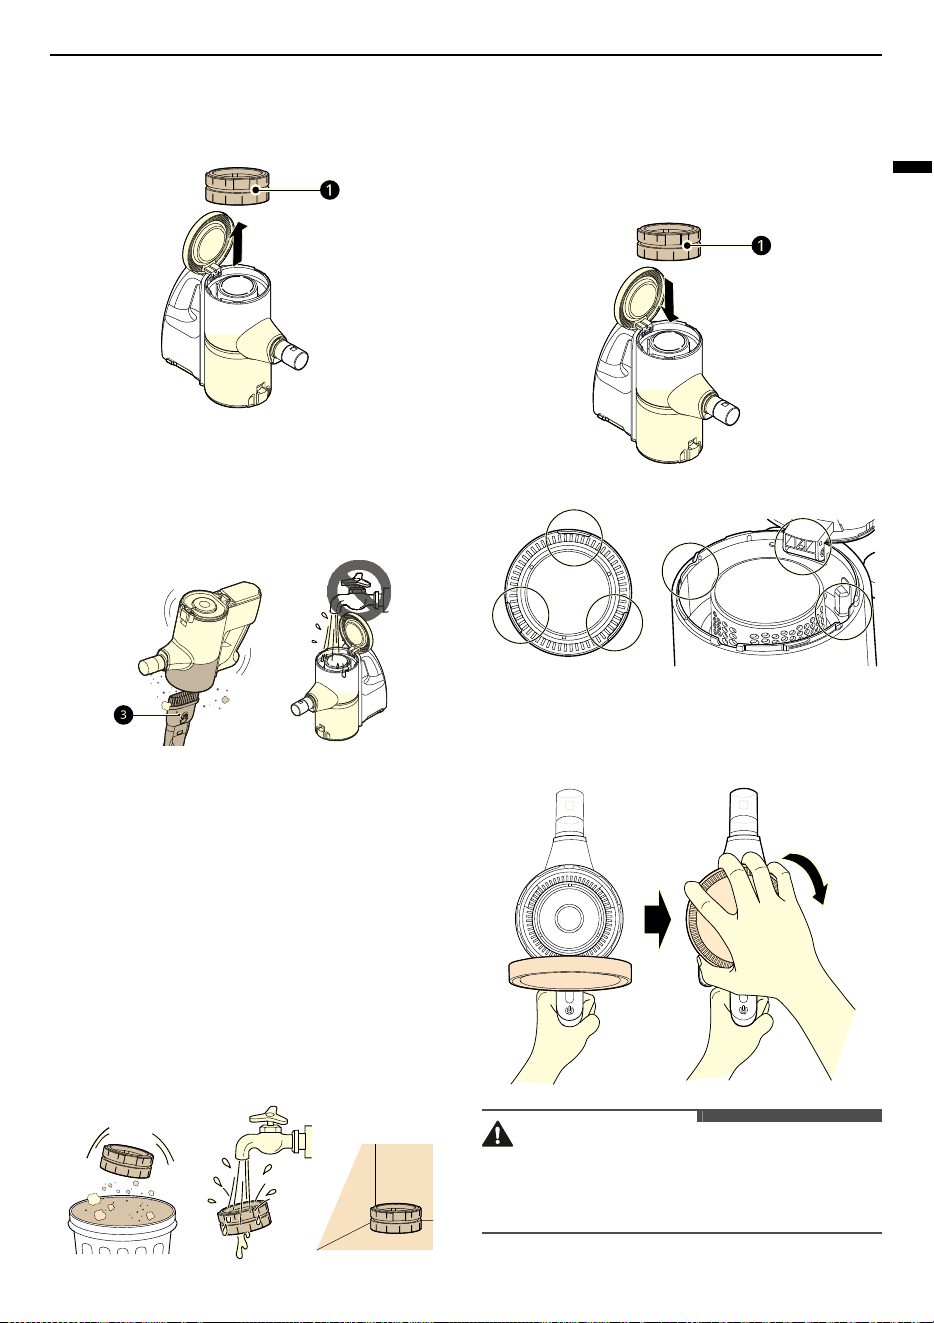
1
Remove the battery from the product body.
2
Grasp the exhaust filter cover and turn it to the
left to open the cover.
3
Lift the open cover.
35
MAINTENANCE
ENGLISH
4
Lift out the exhaust filter
a
from the product
body.
5
Use the combination tool
c
to clean any dust
off the motor.
• Do not wash the motor with water.
6
Clean the exhaust filter by brushing the dust
off it regularly and wash it in running water at
least once a month.
• Do not remove the sponge filter attached to
the exhaust filter when washing the exhaust
filter. Otherwise, the sponge filter may be
lost or damaged.
• To avoid odor and the malfunction of the
motor, allow the exhaust filter to dry
completely in a well-ventilated area out of
direct sunlight for at least 24 hours before
reassembling.
7
Assemble a completely dry exhaust filter
a
to
the product.
• When assembling the exhaust filter,
assemble it according to the groove.
8
Close the exhaust filter cover, press down and
turn it to the right to lock the cover.
CAUTION
• Do not use the appliance without the exhaust
filter installed. Doing so could result in product
damage.
36
MAINTENANCE
Cleaning the Product Body
1
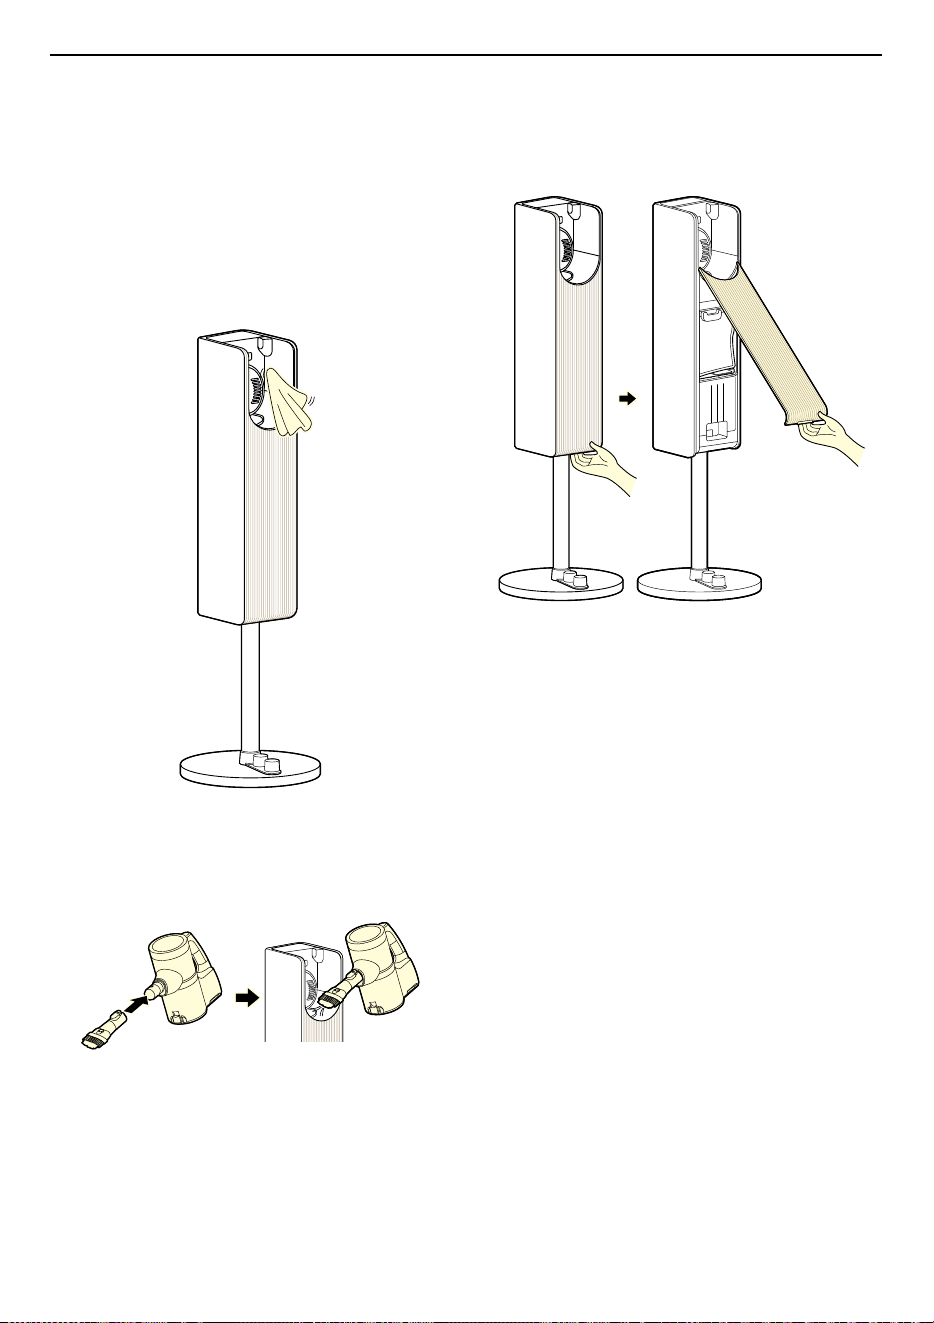
Disconnect the power plug from the outlet.
2
Wipe the control panel using a soft cloth.
• Product may malfunction if there is dust on
the control panel.
3
Clean the dust around the dust suction area
using a vacuum cleaner.
Changing the Dust Bag
1
Remove the front cover of the charging station.
37
MAINTENANCE
ENGLISH
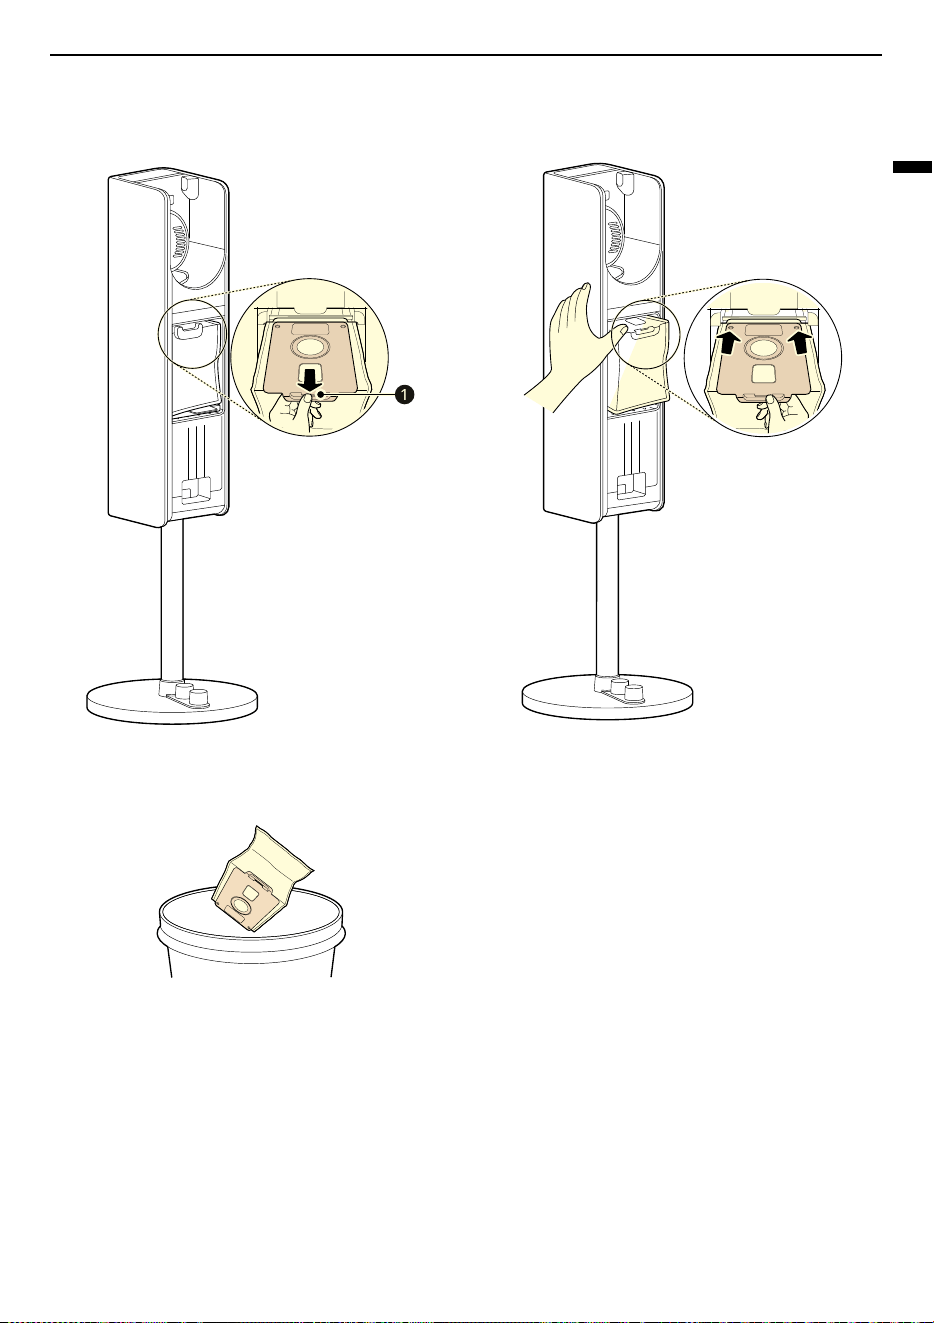
2
Pull out the dust bag lever
a
to remove the
dust bag.
3
Throw away the dust bag.
4
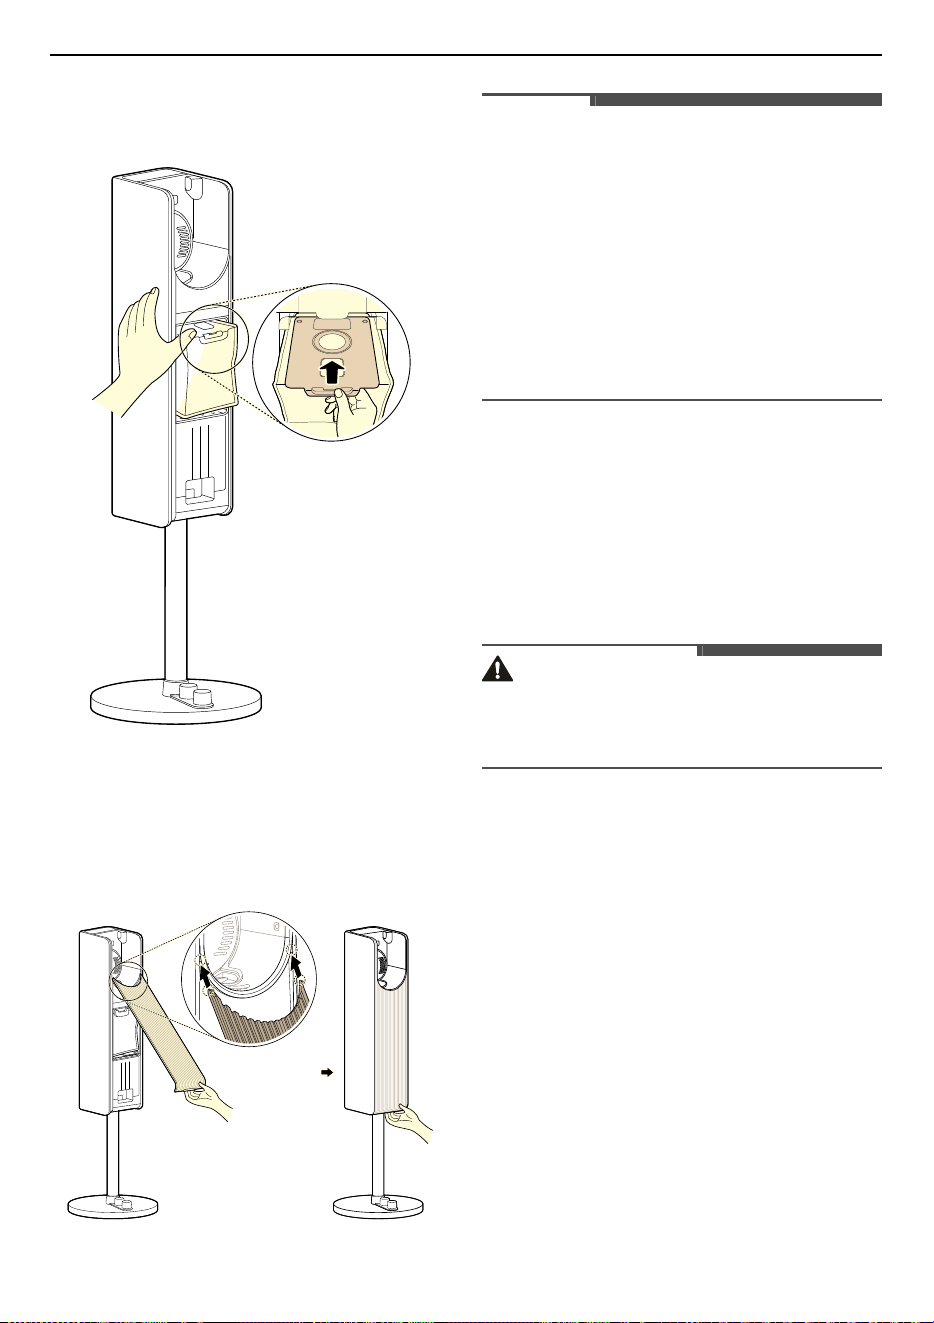
Prepare a new dust bag.
• To avoid odors, do not reuse the dust bags.
5
Place the end of the dust bag on the rail inside
the product.
• Make sure that the dust bag is level, with
both sides sitting properly on the rails.
• If the bag is not inserted properly, dust will
escape from the top of the bag.
38
MAINTENANCE
6
Slide the dust bag in along the rails of the
product until it is completely inserted.
7
Reassemble the front cover of the charging
station.
• When assembling the front cover, align it
with the groove of the charging station.
NOTE
• Dispose of the used dust bag and be sure to put
a new dust bag in its place.
• Replace the dust bag once every 3 months.
There placement cycle may vary depending on
the environment.
• Replace the dust bag if it smells, even if it is not
full.
• The motor protection filter will eventually need
to be replaced. Contact an LG Electronics
customer service centre.
Cleaning the Filters
clean the motor protection filter and the exhaust
filter every 3 months or sooner if the dust emptying
function seems weaker.
• Clean the filters more frequently if the appliance
is used regularly or in areas with a lot of dust.
CAUTION
• Do not use the appliance without the exhaust
filter and the motor protection (Micro) filter
installed. Doing so will result in product damage.
39
MAINTENANCE
ENGLISH
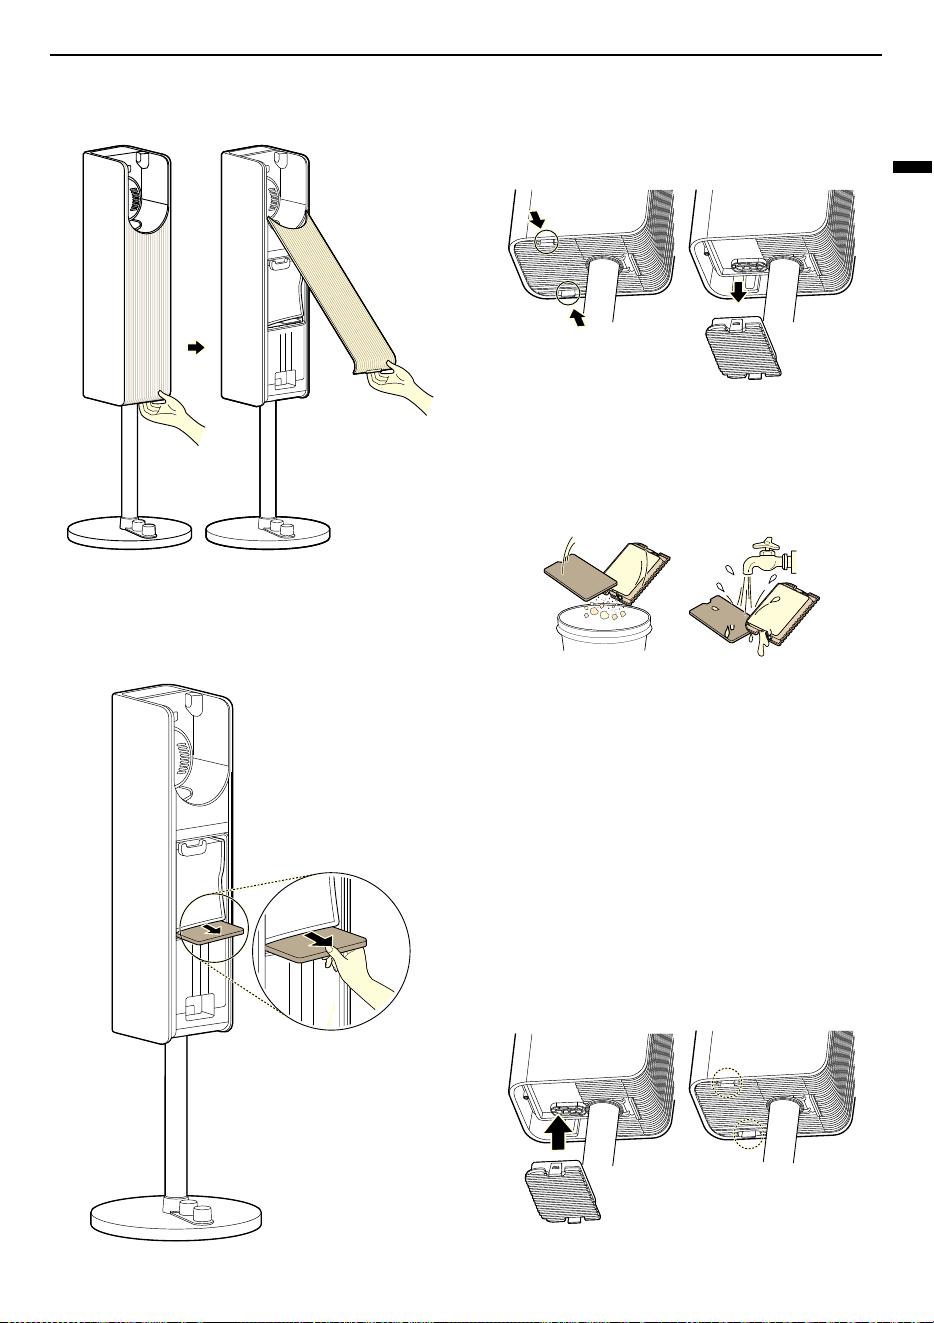
1
Remove the front cover of the charging sation.
2
Hold the product with one hand and take out
the motor protection filter with the other hand.
3
Press both hooks and separate the exhaust
filter cover at the bottom of the charging
station downward.
4
Remove dust from the motor protection filter
and exhaust filter once every 3 months and
wash it using room temperature water.
• To avoid odor and the malfunction of the
motor, allow the motor protection filter and
the exhaust filter to dry completely in a well-
ventilated area out of direct sunlight for at
least 24 hours before reassembling.
5
Push the motor protection filter and exhaust
filter back into their original positions.
• Make sure that the filters are in place before
using the product.
• Push the exhaust filter hook all the way in
until it clicks.
40
MAINTENANCE
Cleaning the Nozzles
Clean the nozzle and rotating brush regularly.
CAUTION
• Always separate the nozzle from the product
body or remove the battery before cleaning. If
the nozzle starts to operate during cleaning, it
could cause an injury.
• Keep fingers away from pinch points when
assembling the nozzle on the appliance or the
rotating brush on the nozzle.
• Do not use the rotating brush as a wet mop. It
may cause product damage.
• Do not rinse or submerge the rotating brush or
nozzle in water. It may cause product damage.
Cleaning the Dual Floor Max
Nozzle
Clean the brush and roller heads before each use.
• If the brush contains foreign objects, the brush
may not spin or a noise may occur during
operation. This could also damage the flooring.
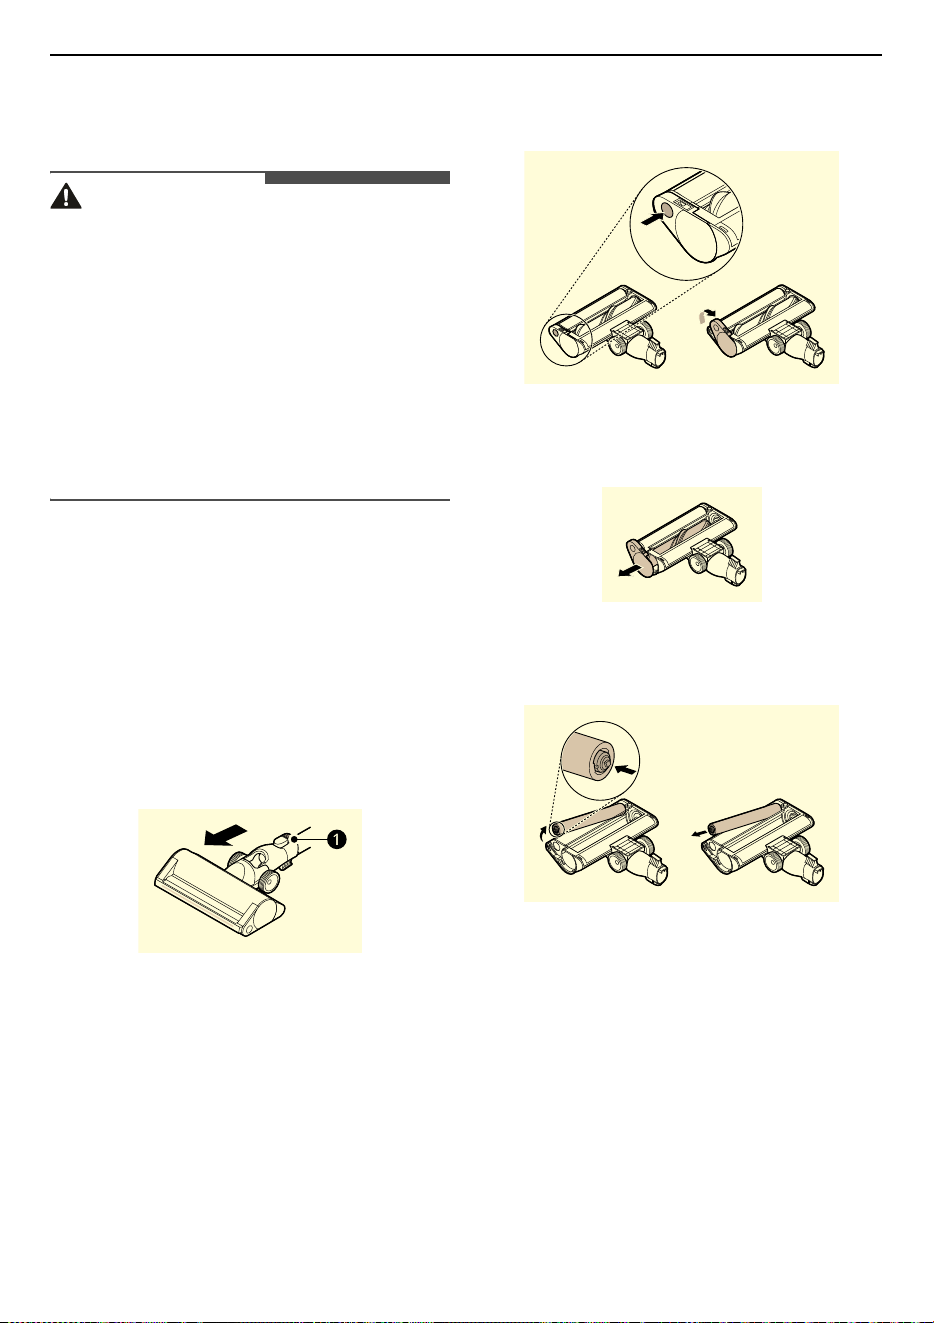
1
Press the nozzle release button
a
to remove
the nozzle from the extension pipe or product
body.
2
Turn the nozzle upside down. Press the button
on the nozzle and turn the cover lock clockwise.
3
Pull the brush cover forward and pull the main
brush out.
4
With the left button of the sub-brush pressed,
pull the sub-brush out.
5
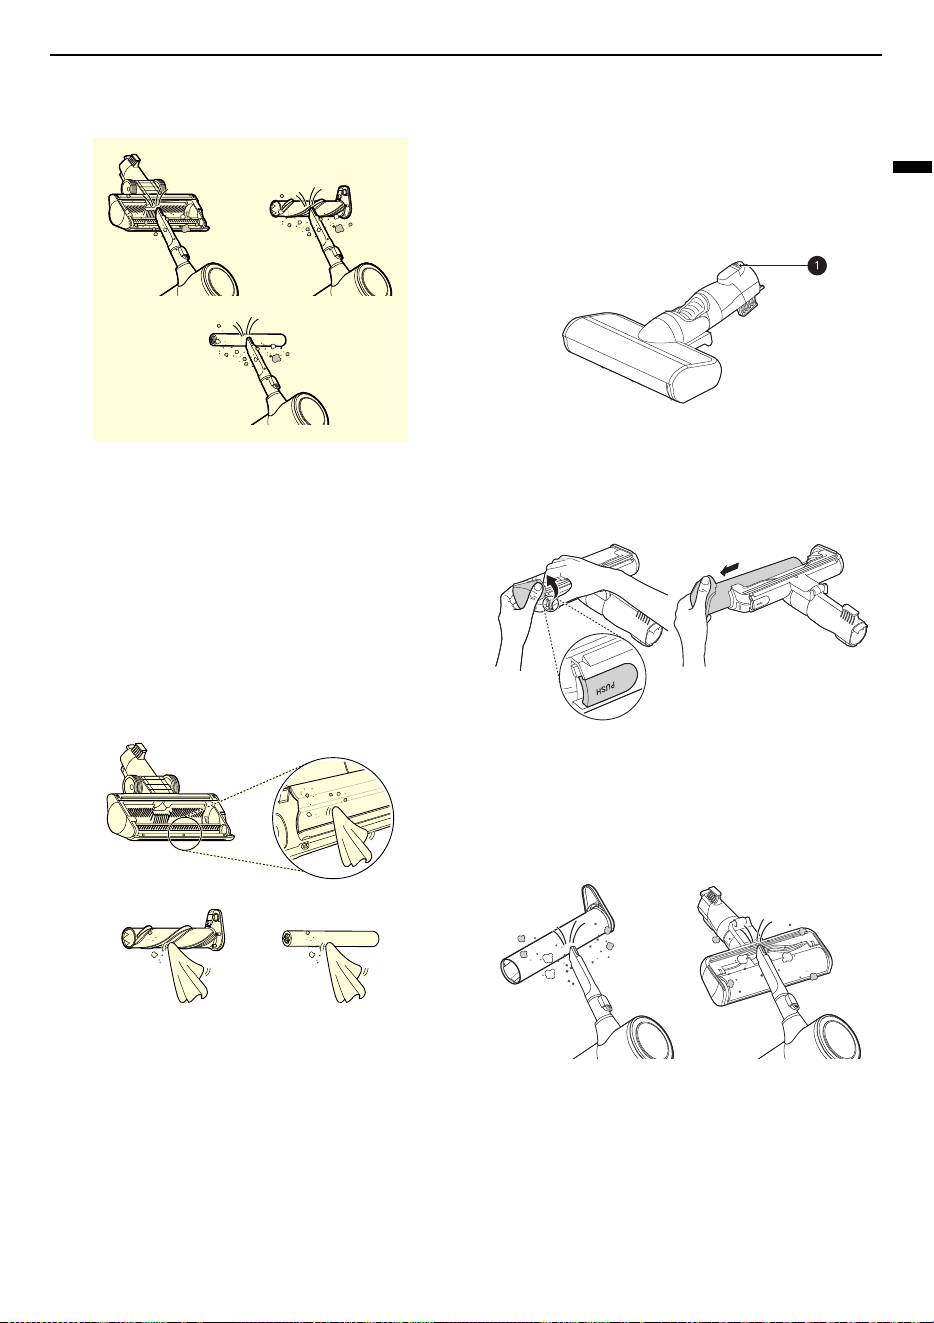
Attach the crevice tool to the product body and
use the vacuum to remove foreign objects and
41
MAINTENANCE
ENGLISH
dust from the main brush, sub-brush and the
bottom of the nozzle.
6
Use a damp towel or cloth to remove any
remaining foreign objects and dust from both
the brush and the bottom of the nozzle.
• Carefully use a tweezers to remove foreign
objects from the nozzle rollers.
• Do not rinse or submerge the rotating brush
or nozzle in water.
• Use a wet towel or cloth to clean both the
rotating brush and nozzle.
7
Slide the brushes back into the nozzle and
rotate the cover back into place. Turn the cover
lock clockwise to lock the cover.
Cleaning the Slim Hard Floor
Nozzle
1
Press the nozzle release button
a
to remove
the nozzle from the extension pipe or product
body.
2
Turn the nozzle upside down and remove the
rotating brush while holding down the
PUSH
button on the nozzle.
3
Attach the crevice tool to the product body and
use the vacuum to remove foreign objects and
dust from the brush and the bottom of the
nozzle.
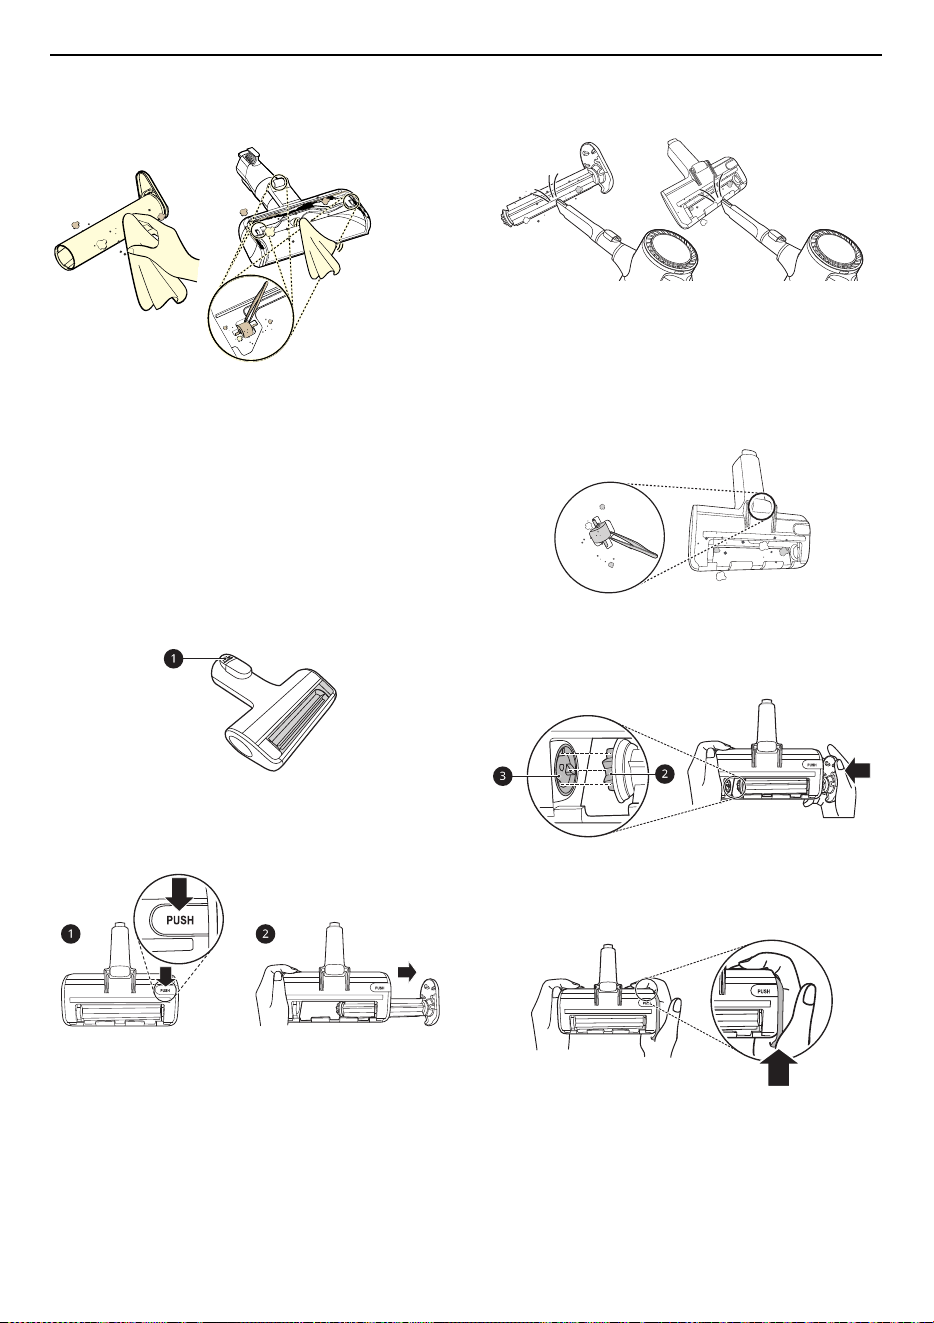
4
Use a damp towel or cloth to remove any
remaining foreign objects and dust from the
brush and the bottom of the nozzle. Remove
foreign objects, debris and hair from all Rollers
of the nozzles using tweezers.
42
MAINTENANCE
• Use a wet towel or cloth to clean the rotating
brush and nozzle.
5
Slide the brush back into the nozzle until it
clicks into place.
Cleaning the Pet Nozzle
1
Press the nozzle release button
a
to remove
the nozzle from the extension pipe or product
body.
2
Hold down the
PUSH
button on the nozzle
while removing the rotating brush.
3
Attach the crevice tool to the product body and
use the vacuum to remove foreign objects and
dust from the brush and the bottom of the
nozzle.
4
Use a damp towel or cloth to remove any
remaining foreign objects and dust from the
brush and the bottom of the nozzle. Remove
foreign objects, debris and hair from all nozzle
rollers using tweezers.
5
Insert the left side of the brush
b
into the
groove
c
inside the nozzle.
6
Press the brush cover until it clicks to lock the
brush in place.
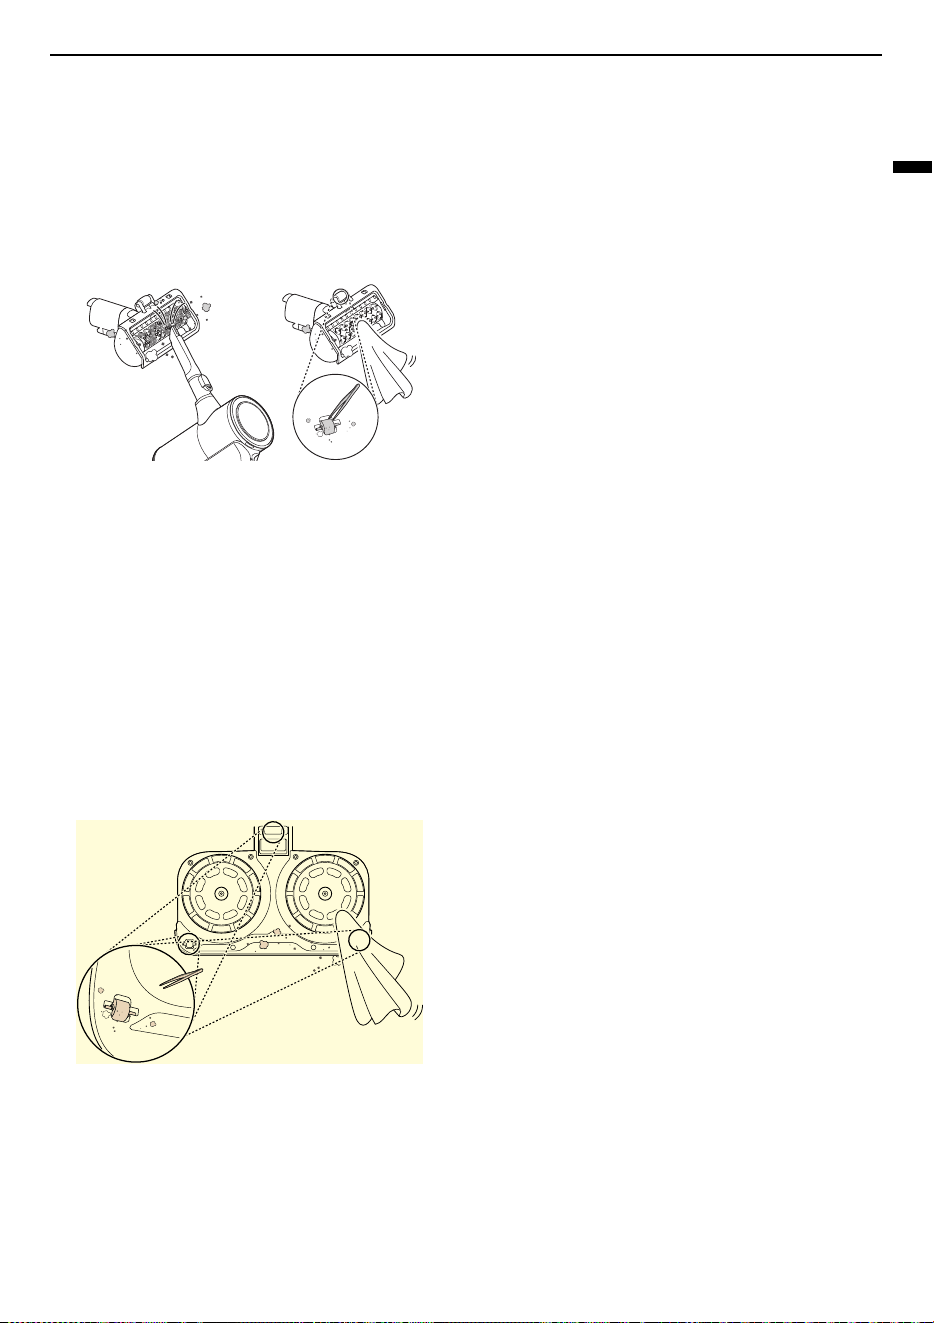
Cleaning the Bedding Nozzle
1
Press the nozzle release button to remove the
nozzle from the extension pipe or product
body and turn the nozzle upside down.
43
MAINTENANCE
ENGLISH
2
Attach the crevice tool to the product body and
use the vacuum to remove foreign objects and
dust from the bottom of the nozzle. Use a
damp towel or cloth to remove any remaining
foreign objects and dust from the bottom of
the nozzle. Remove foreign objects, debris and
hair from all Rollers of the nozzles using
tweezers.
Cleaning the Mop Nozzle
1
Press the nozzle release button to remove the
mop nozzle from the extension pipe and turn
the nozzle upside down.
2
Use a damp towel or cloth to remove any
remaining foreign objects and dust from the
bottom of the mop nozzle. Remove foreign
objects, debris and hair from all nozzle rollers
using tweezers.
44
TROUBLESHOOTING
TROUBLESHOOTING
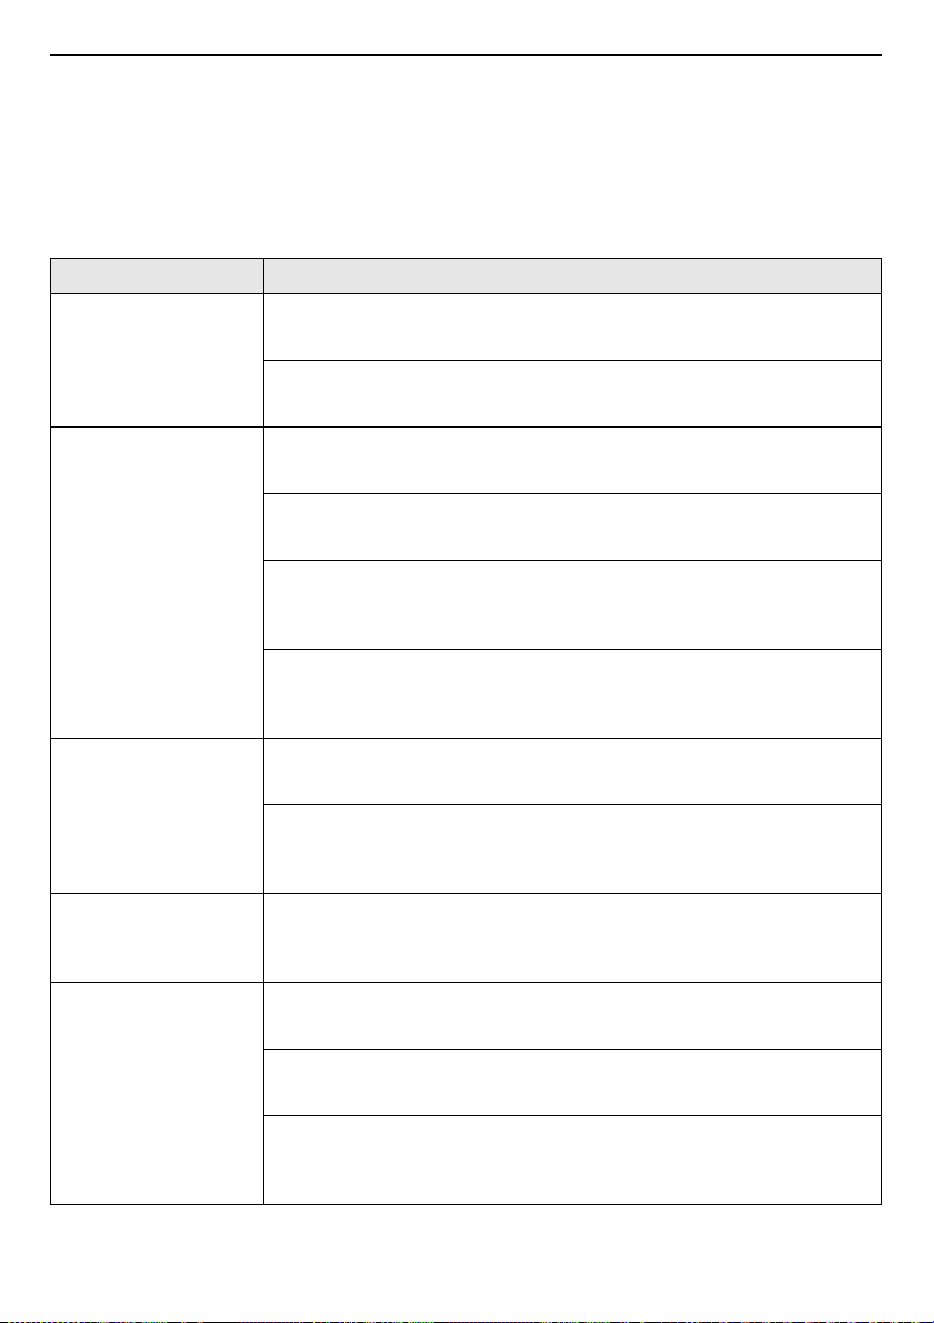
Before Calling for Service
Operation
Symptoms Possible Cause & Solution
The appliance does not
operate.
Battery is fully discharged.
• Charge the battery.
Appliance is turned off.
• Press the
Power
button to turn on the appliance.
Suction power is too
weak.
Dust bin is full of dust.
• Empty the dust bin.
Filters are clogged.
• Clean the micro filter and the exhaust filter.
Inlet is clogged.
• Remove any foreign objects from inside the product body or the extension
pipe.
Foreign object is on rotating brush, or in inlet port.
• Remove any foreign objects (thread, hair) from the rotating brush or the
inlet port.
The product body does
not appear to be
charging.
Power cord is unplugged.
• Plug the power cord securely into the outlet.
Foreign object is on the charging terminals.
• Remove dirt or foreign objects from the charging terminals with a dry
cloth.
Hot air is coming from
the product body.
Motor is cooling.
• If the appliance is running normally, the hot air is a result of the motor
cooling and is not a sign of malfunction.
A strange odour is
coming from the
appliance.
Appliance was purchased within the last 3 months.
• The cleaner may emit a smell of rubber for about 3 months after purchase.
Dust bin is full of dust.
• The dust in the bin may cause some odour. Empty the bin and clean it.
Foreign object is on the filter.
• The filter may emit an odour if it has not been cleaned for some time. Clean
the micro filter and exhaust filter regularly.
45
TROUBLESHOOTING
ENGLISH
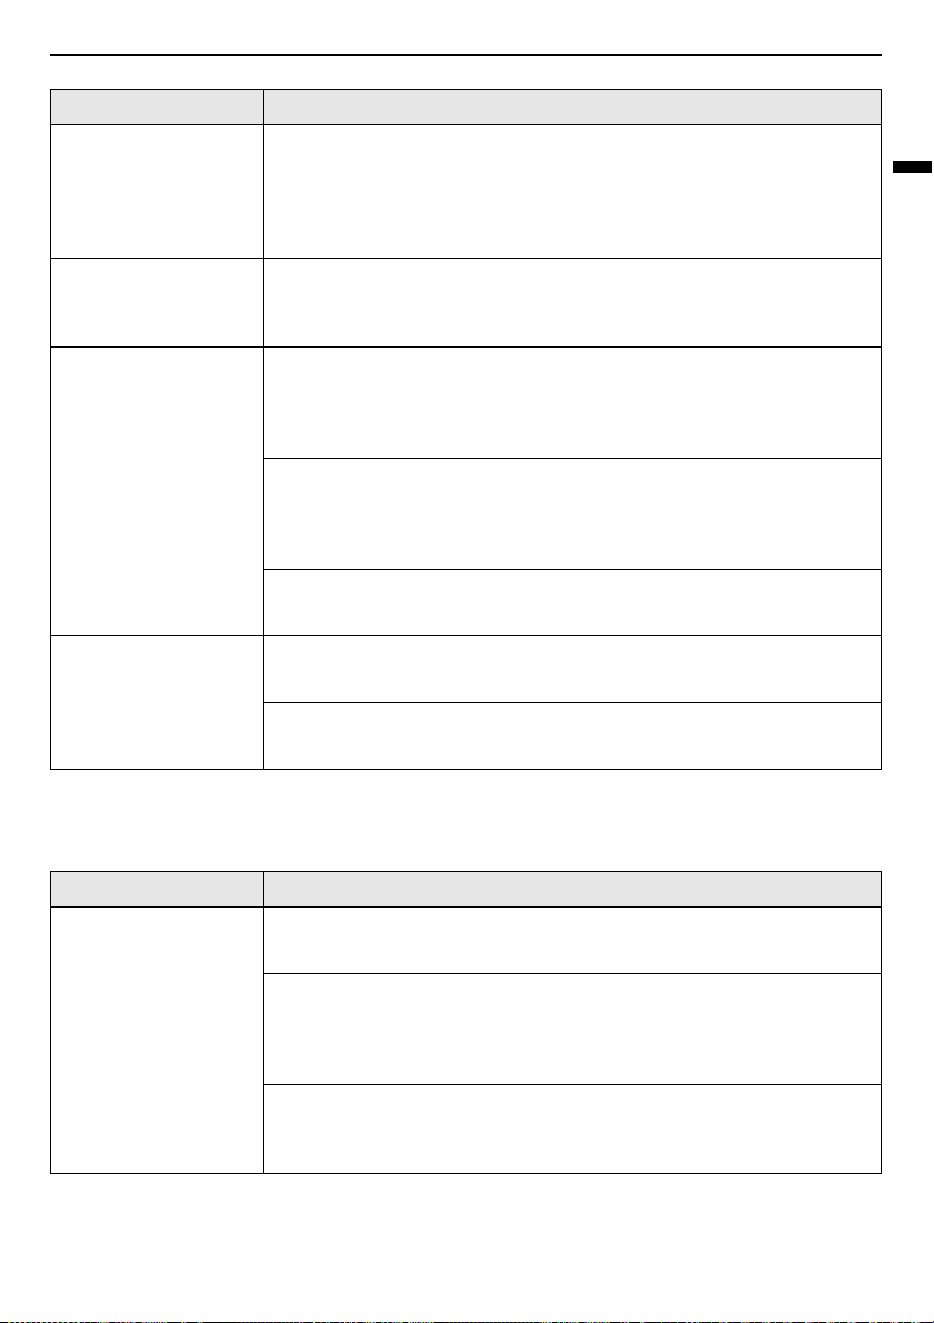
Operation (Charging Station)
A strange odour is
coming from the
appliance.
Micro filter, Exhaust filter or the Cyclonic Mesh Filter were installed
while damp or wet.
• Wash the filters with running water. To avoid odour, allow the filters to dry
completely in a well-ventilated area out of direct sunlight for at least 24
hours before reassembling.
The appliance makes
too much noise.
Vacuum cleaner is running in Turbo mode.
• The motor may be louder at the higher suction power settings. This is
normal.
The appliance turns off
unexpectedly or by
itself after the motor
speed fluctuates
repeatedly.
Battery is not fully charged.
• The battery must be fully charged before cleaning. If the problem persists
when the battery is fully charged and the pipes and attachments are clear
from obstructions, contact an LG customer information centre for service.
Foreign object is in the product body, extension pipe, inlet port or
nozzle.
• Remove any foreign objects from the product body, extension pipe, inlet
port or nozzle.
Filters are clogged.
• Clean the micro filter and the exhaust filter.
The rotating brush
does not rotate.
Brush is improperly installed.
• Remove the brush, clean it if necessary and attach it again.
Foreign object is on rotating brush.
• Remove any foreign objects from the rotating brush.
Symptoms Possible Cause & Solution
Dust emptying doesn't
work.
The power plug is not connected.
• Connect the power plug to an outlet.
The charging station body and the stand pipe are not assembled
correctly.
• Check that the charging station body and the pipe are properly assembled.
A 'click' sound is heard when fastened correctly.
The Vacuum Cleaner is not properly inserted into the product.
• Remove the Vacuum Cleaner and reinsert it. If it is installed properly, a
beep will sound.
Symptoms Possible Cause & Solution
46
TROUBLESHOOTING
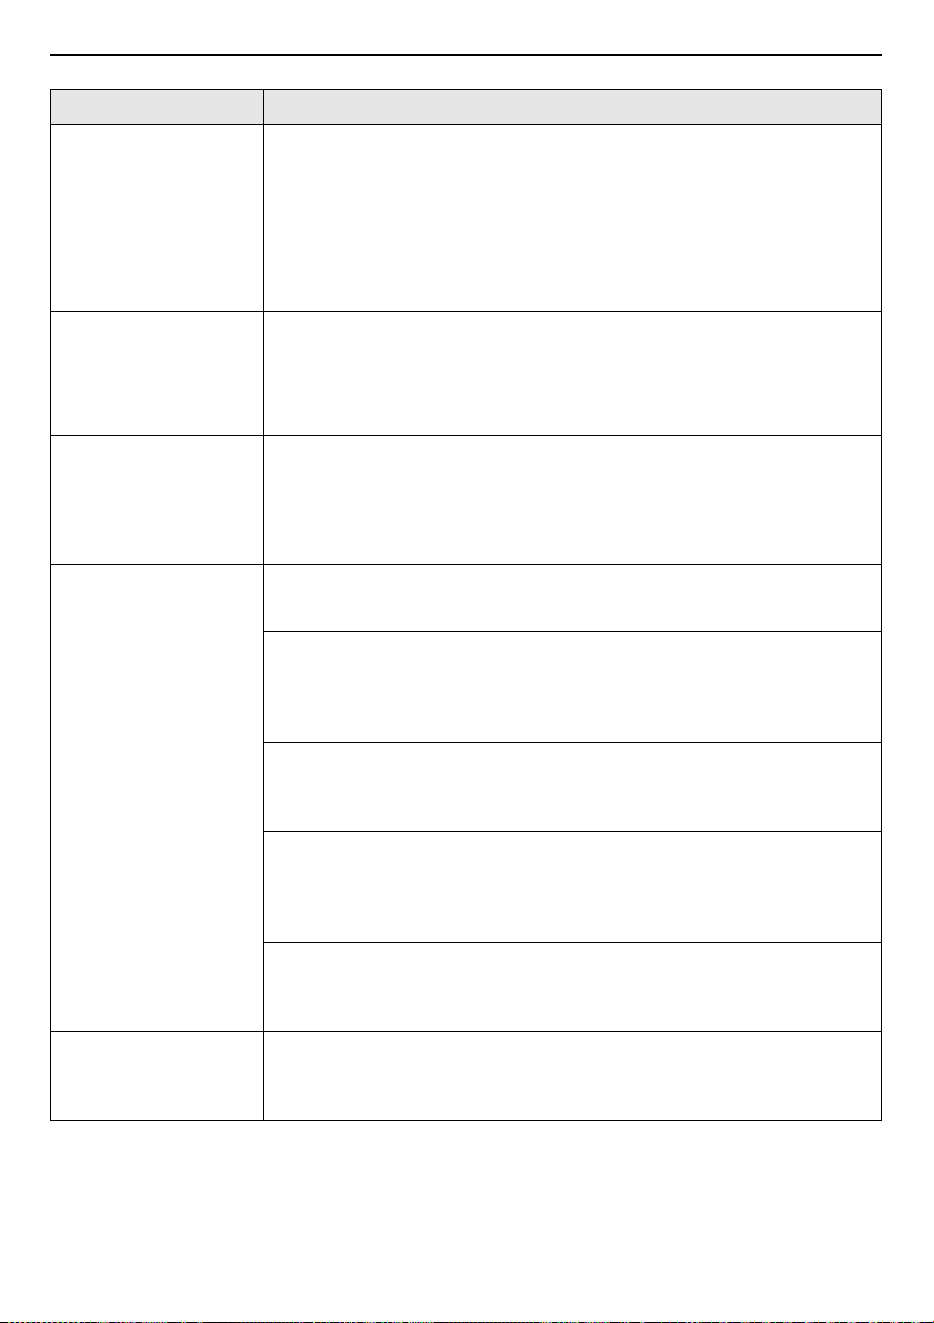
Dust emptying doesn't
work.
It is set to automatic or manual dust emptying mode.
• When you purchase the product, the manual dust emptying mode is set by
default. After inserting the Vacuum Cleaner into the product, pressing the
Start/Stop
button starts the dust emptying operation.
• When it is in automatic dust emptying mode, the dust emptying operation
starts automatically whenever the vacuum cleaner is properly inserted
into the product.
Product setting
initialization doesn't
work even after the
power plug is plugged
in again.
The internal motor of the product is not operating properly .
• Disconnect the power plug from the outlet and contact an LG Electronics
Service Centre.
The power supply has
been cut off.
The power supply has been cut off.
• Check whether the power plug is connected correctly to the outlet.
• If using a multi-outlet strip, make sure the strip is turned on.
• Check if the breaker is tripped or there is a power outage.
It won't charge. It is not plugged in.
• Plug it into an outlet.
The charging station body and the stand pipe are not assembled
correctly.
• Check that the charging station body and the pipe are properly assembled.
A 'click' sound is heard when fastened correctly.
There is a foreign object on the charging terminals.
• After unplugging from the outlet, wipe off any foreign matter from the
charging terminal with a dry cloth.
The room temperature was 5 °C or less during charging.
• Charging may not work if the temperature where you are charging is 5 °C
or less. Before use, fully charge the vacuum cleaner at a temperature
above 5 °C.
The vacuum cleaner is not properly inserted into the product.
• When the vacuum cleaner is properly inserted into the product, a beep
sounds. If the beep does not sound, reinsert the vacuum cleaner.
The product has a
strange smell.
The product is purchased within 3 months.
• The odors from manufacturing the product should be gone within 3
months.
Symptoms Possible Cause & Solution
47
TROUBLESHOOTING
ENGLISH
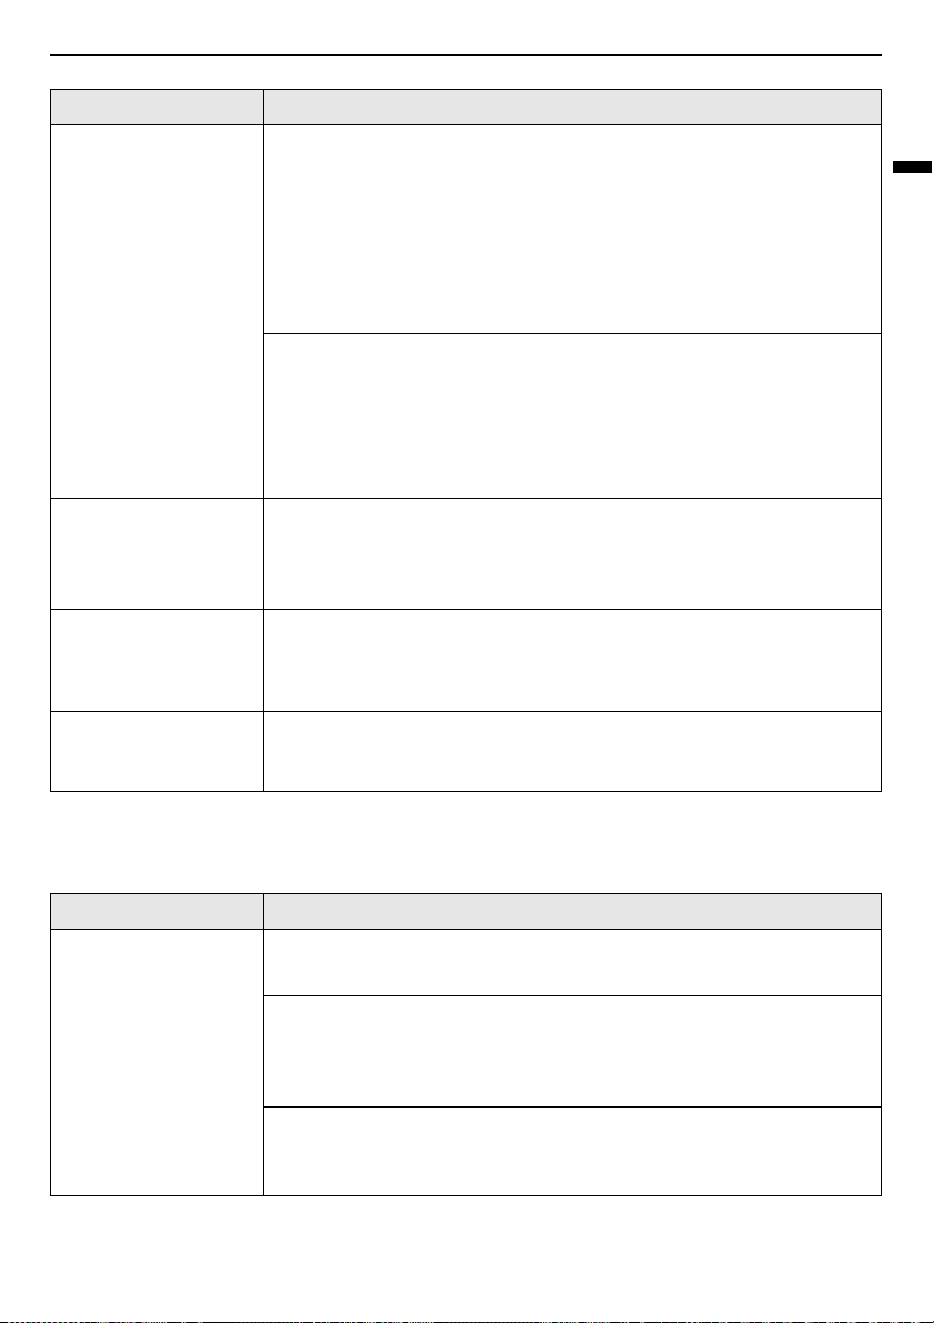
Mop Nozzle
The product has a
strange smell.
The Vacuum Cleaner smells.
• After cleaning with the mop nozzle, the wet dust may emit an odor. After
finishing cleaning, remove the damp dust from the mop nozzle before
storing the vacuum.
• The micro filter, exhaust filter, or large dust separator may smell after
washing if it isn’t dried completely. After washing with water, dry them
thoroughly in well-ventilated shade for at least 24 hours before using them
again.
The dust bag smells.
• If you clean foreign matter that smells (such as pet excrement) with an
vacuum cleaner, the vacuum may smell even if you do not have a full dust
bag. Replace the new dust bag even if it isn't full.
• If you have not replaced the dust bag for a long time, it may smell. Replace
it with a new dust bag even if it isn't full.
Two icons [Replace Bag
and Empty Dust] flash
simultaneously.
The motor that closes the dust bin cover of the vacuum cleaner does not
operate normally.
• Disconnect the power plug from the outlet and contact an LG Electronics
Service Centre.
During the dust
emptying operation,
the Replace Bag LED is
displayed in red.
The dust bag is full.
• Throw away the used dust bag and replace it with a new dust bag.
The Replace Bag LED is
displayed in red for
about 10 seconds.
The dust bag is full.
• Throw away the used dust bag and replace it with a new dust bag.
Symptoms Possible Cause & Solution
The mop pad
attachment plate does
not rotate.
Mop pads are improperly installed.
• Remove the mop pads, clean them if necessary and attach them again.
Mop nozzle is pressed too hard against the floor.
• The mop attachment plate stops automatically to protect the product. This
is not a failure. Attach the mop pads securely to the mop attachment plate
and press the power button to resume use.
Foreign object is between mop attachment plate and mop pads.
• Remove foreign objects from the mop nozzle attachment plate and press
the power button to resume use.
Symptoms Possible Cause & Solution
48
TROUBLESHOOTING
There is no water
coming out of the mop
nozzle.
Water tank is empty.
• Fill the water tank. Remove the battery or detach the nozzle before filling
the water tank.
Water tank is improperly attached to mop nozzle.
• Properly attach the water tank to the mop nozzle. Remove the battery or
detach the nozzle before properly securing the water tank to the nozzle.
Water supply adjustment button is set to STOP.
• Press the
High
or
Low
water adjustment button all the way down. The
water will not come out if the button is set to
STOP
.
The water outlet was clogged by hard water scale or other foreign
substances.
• Use a sharp pin to remove the blockage.
There is moisture in
the water tank.
Water tank is not allowed to dry completely after use.
• Empty the water tank, set it out of direct sunlight, and allow it to dry
completely after use.
A strange odour is
coming from the
appliance.
Foreign object is on the dust inlet of the mop nozzle.
• Wet dust in the mop nozzle may result in odour. Make sure to wipe the
dust inlet of the mop nozzle with a wet wipe after each use.
Mop pads make the
floor dirty.
Mop pads are not cleaned properly after use.
• Clean the mop pads thoroughly after each use. Using soiled mop pads may
make the floor dirtier.
The appliance makes
too much noise.
This is the sound generated when the pump at the inlet of the mop is
operating.
• This is normal.
The mop pads were improperly attached on the plates.
• Align and attach the centre of the mop pad with the centre of the mop
attachment plate.
Symptoms Possible Cause & Solution
Memo
Memo
Memo