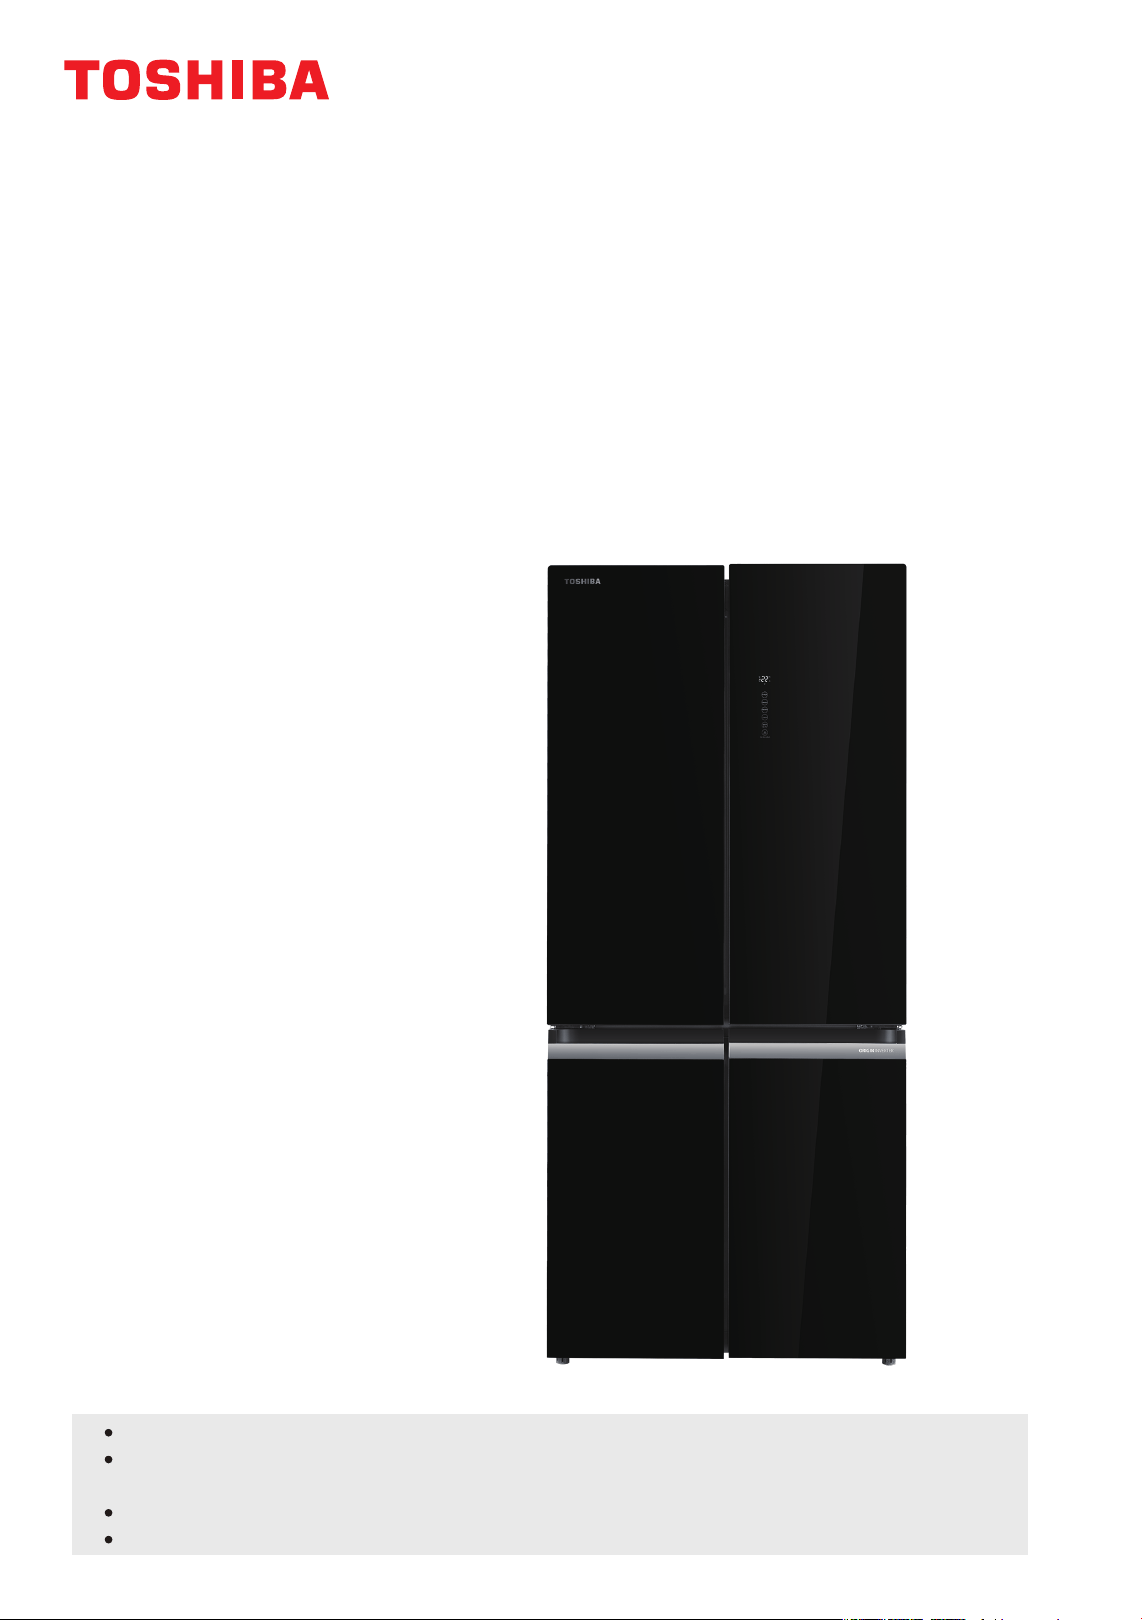
GR-RF665WIA-PGY(22)
REFRIGERATOR FREEZER
For Home Use Only
Owner’s Manual
Thank you very much for purchasing this Toshiba product.
Read this Owner’s Manual and become completely familiar with the product before
use in order to use this product safely and correctly.
Keep this Owner’s Manual in a handy place for future reference.
Make sure that you received your warranty.

CONTENTS
1. Safety warnings
1.1 Warning
1.2 Meaning of safety warning symbols
1.3 Electricity related warnings
1.4 Warnings for using
1.5 Warnings for placement
1.6 Warnings for energy
1.7 Warnings for disposal
2. Proper use of the refrigerator
2.1 Placement
2.2 Leveling feet
2.3 Leveling door
2.4 Changing the Light
2.5 Starting
2.6 Energy saving tips
3. Structure and functions
3.1 Key components
3.2 Functions
4. Maintenance and care of the refrigerator
4.1 Overall cleaning
4.2
4.3
Cleaning of Glass shelf
Cleaning of door tray
4.4
4.5
Defrosting
Out of operation
5. Trouble shooting
6.
Disposal of your appliance
...........................................................................................................................
.....................................................................
......................................................................................
......................................................................................................
...........................................................................................
...................................................................................................
.................................................................................................
......................................................................................................................
..................................................................................................................
...............................................................................................................
.....................................................................................................
............................................................................................................................
.......................................................................................................
..........................................................................................................
........................................................................................................................
1
5
5
6
7
8
8
9
10
11
12
12
12
13
15
..................................................... 19
............................. 20
13
9
1
...........................................................................................................
20
................................................................................................
20
.........................................................
................................................
......................................................................
.......................................................................................................................
21
...............................................................................................
21
...........................................................................................................
21
4.6
Precautions for the use of ice maker
4.7
4.8
Use and cleaning of ice storage box
Cleaning of water tank and water way of ice maker
.....................................................................
25
...................................................................
22
.......................................
26
.................................................................... 27
28....................................................
3.3 Instructions for water tank use and addition
1
READ SAFETY PRECAUTIONS BEFORE INSTALLATION
To prevent injury to the user or other people and property damage,
the following instructions must be followed. Incorrect operation due
to ignoring of instructions may cause harm or damage.
Warning: risk of fire / flammable materials
WARNING: Risk of fire disaster and explosion
1. Open the windows for ensuring good ventilation.
2. No fire around and please do not use other electric appliance.
Children should be supervised to ensure that they do not play with the
appliance.
WARNING: Risk of fire disaster and electric shock
The power cord should be replaced when it has been damaged. please
contact the distributor or local service agent for replacement.
Please unplug the power plug from socket when clean the appliance or
leave the appliance nonuse for a long time.
This appliance is intended to be used in household and similar
applications such as staff kitchen areas in shops, offices and other
working environments; farm houses and by clients in hotels, motels and
other residential type environments; bed and breakfast type
environments; catering and similar non-retail applications.
The refrigerant of the appliance is flammable, please be care not to
damage the cooling pipes during installation and transportation. if gas
leakage happens, please contact the distributor or local service agent,
and the following precautions should be always taken:
Do not use extension cord or ungrounded (two prong) adapters.
1.1 Warning
1. Safety warnings
2
WARNING: Keep ventilation openings, in the appliance enclosure or in
the built-in structure, clear of obstruction.
WARNING: Do not use mechanical devices or other means to accelerate
the defrosting process, other than those recommended by the
manufacturer.
WARNING: Do not damage the refrigerant circuit.
WARNING: Please abandon the refrigerator according to local regulators
for it use flammable cyclopentane foaming material and refrigerant.
WARNING: When positioning the appliance, ensure the supply cord is
not trapped or damaged.
WARNING: Do not locate multiple portable socket-outlets or portable
power supplies at the rear of the appliance.
Take of the doors.
Refrigerant and cyclopentane foaming material used for the refrigerator
are flammable. Therefore, when the refrigerator is scraped, it shall be
kept away from any fire source and be recovered by a special recovering
company with corresponding qualification other than be disposed by
combustion, so as to prevent damage to the environment or any other
harm.
The refrigerator must be disconnected from the source of electrical
supply before attempting the Installation of accessory.
Leave the shelves in place so that children may not easily climb
inside.
DANGER: Risk of child entrapment. Before you throw away your old
refrigerator or freezer:
WARNING: Do not use electrical appliances inside the food storage
compartments of the appliance, unless they are of the type
recommended by the manufacturer.
3
For EN standard: This appliance can be used by children aged from 8
years and above and persons with reduce physical sensory or mental
capabilities or lack of experience and knowledge If they have been given
supervision or instruction concerning use of the appliance in a safe way
and understand the hazards involved. Children shall not play with the
appliance. Cleaning and user maintenance shall not be made by children
without supervision.
For IEC standard: This appliance is not intended for use by persons
(including children) with reduced physical, sensory or mental
capabilities, or lack of experience and knowledge, unless they have been
given supervision or instruction concerning use of the appliance by a
person responsible for their safety.
Please do not use the appliance on traffic means
(such as ship and so on).
Please do not put your hands under or behind the appliance to prevent
from being hurt.
Please leave the packing materials and other parts out of the reach of
children to prevent from risk of suffocation.
If noise, odor and smoking happens, please unplug the power plug
Immediately, and contact the distributor or local service agent.
To avoid contamination of food, please respect the following
instructions:
Opening the door for long periods can cause a significant increase of
the temperature in the compartments of the appliance.
Clean regularly surfaces that can come in contact with food and
accessible drainage systems.
Clean water tanks if they have not been used for 48h, flush the water
system connected to a water supply if water has not been drawn for
5days. (note 1)
Store raw meat and fish in suitable containers in the refrigerator, so
that it is not in contact with or drip onto other food.
Two-star frozen-food compartments are suitable for storing pre-frozen
food, storing or making ice-cream and making ice cubes. (note 2)
One-, two- and three star compartments are not suitable for the
freezing of fresh food. (note 3)
For appliances without a 4-star compartment: this refrigerating
appliance is not suitable for freezing foodstuffs. (note 4)
If the refrigerating appliance is left empty for long periods, switch
off, defrost, clean, dry, and leave the door open to prevent mouldy
developing within the appliance.
Note 1,2,3: Please confirm whether it is applicable according to your
product compartment type.
For a freestanding appliance: this refrigerating appliance is not intended
Any replacement or maintenance of the LED lamps is intended to be
made by the manufacturer, its service agent or similar qualified person.
This product contains a light source of energy efficiency class (G).
to be used as a built in appliance.
4
5
1.2 Meaning of safety warning symbols
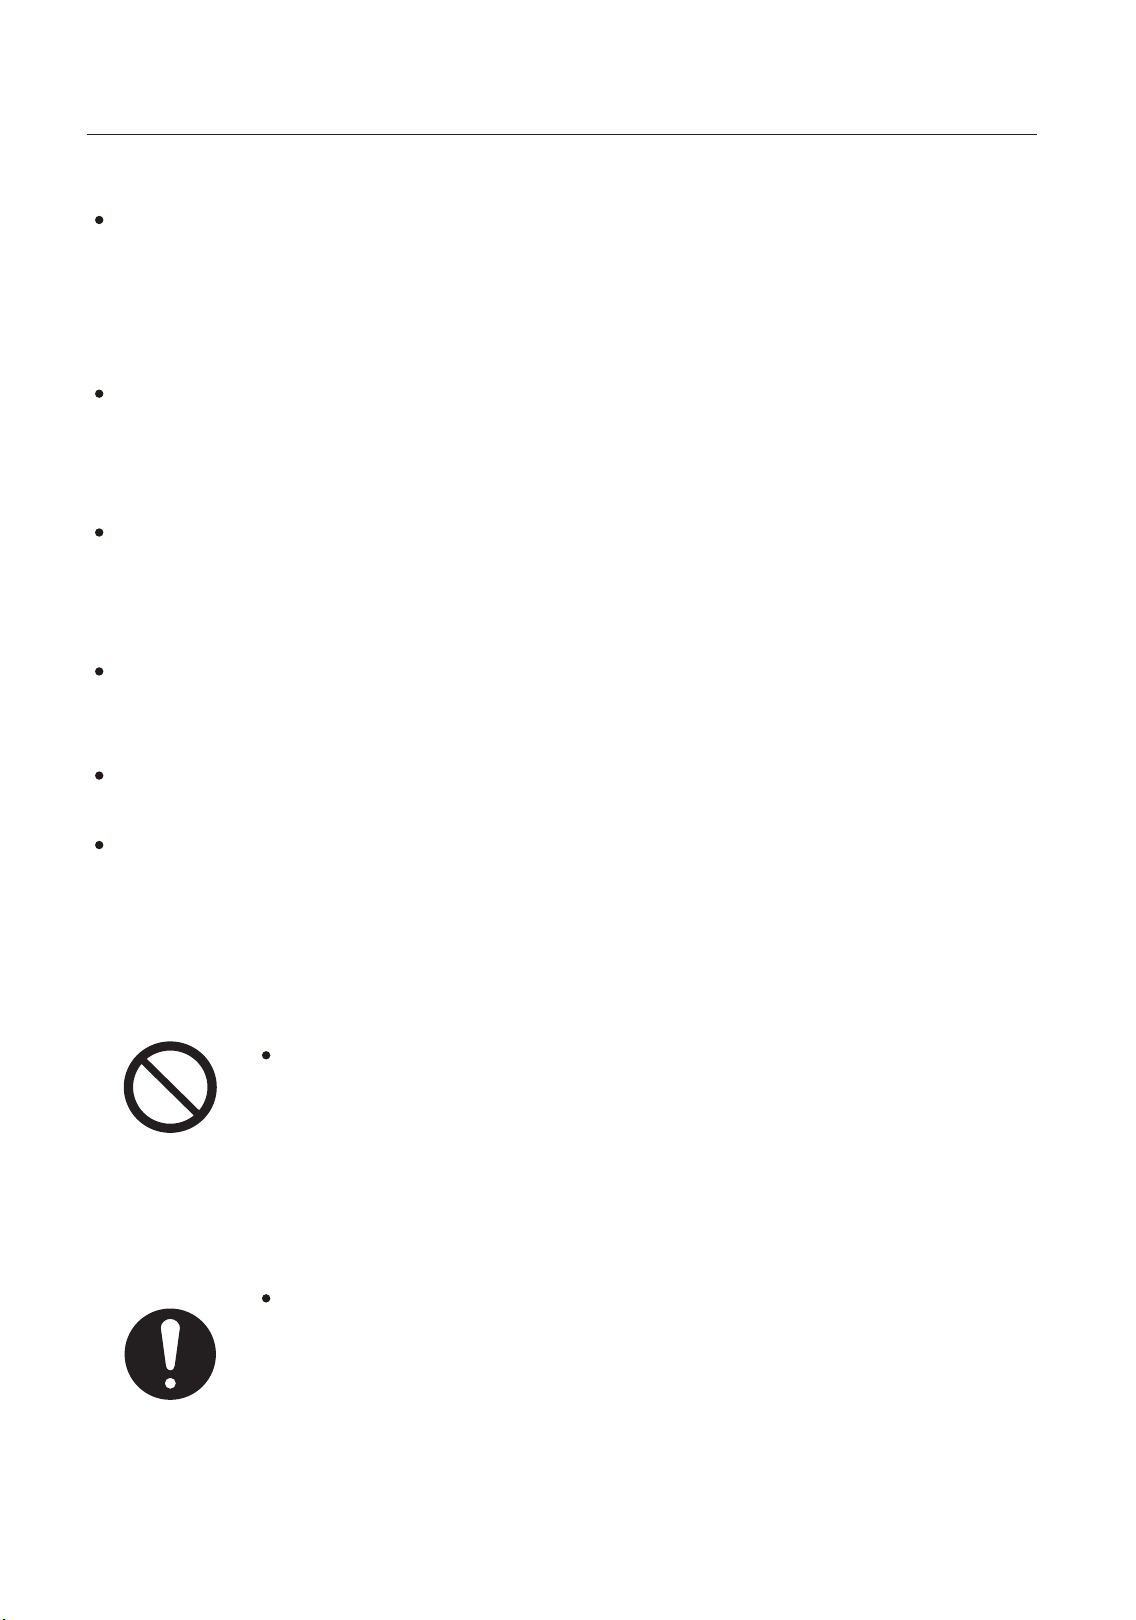
This is a prohibition symbol.
This is a mandatory symbol.
This is a cautioning symbol.
This manual contains lots of important safety information which shall
be observed by the users.
Any incompliance with instructions marked with
this symbol may result in damage to the product
or endanger the personal safety of the user.
It is required to operate in strict observance of
instructions marked with this symbol; or otherwise
damage to the product or personal injury may be
caused.
Instructions marked with this symbol require special
caution. Insufficient caution may result in slight or
moderate injury, or damage to the product.
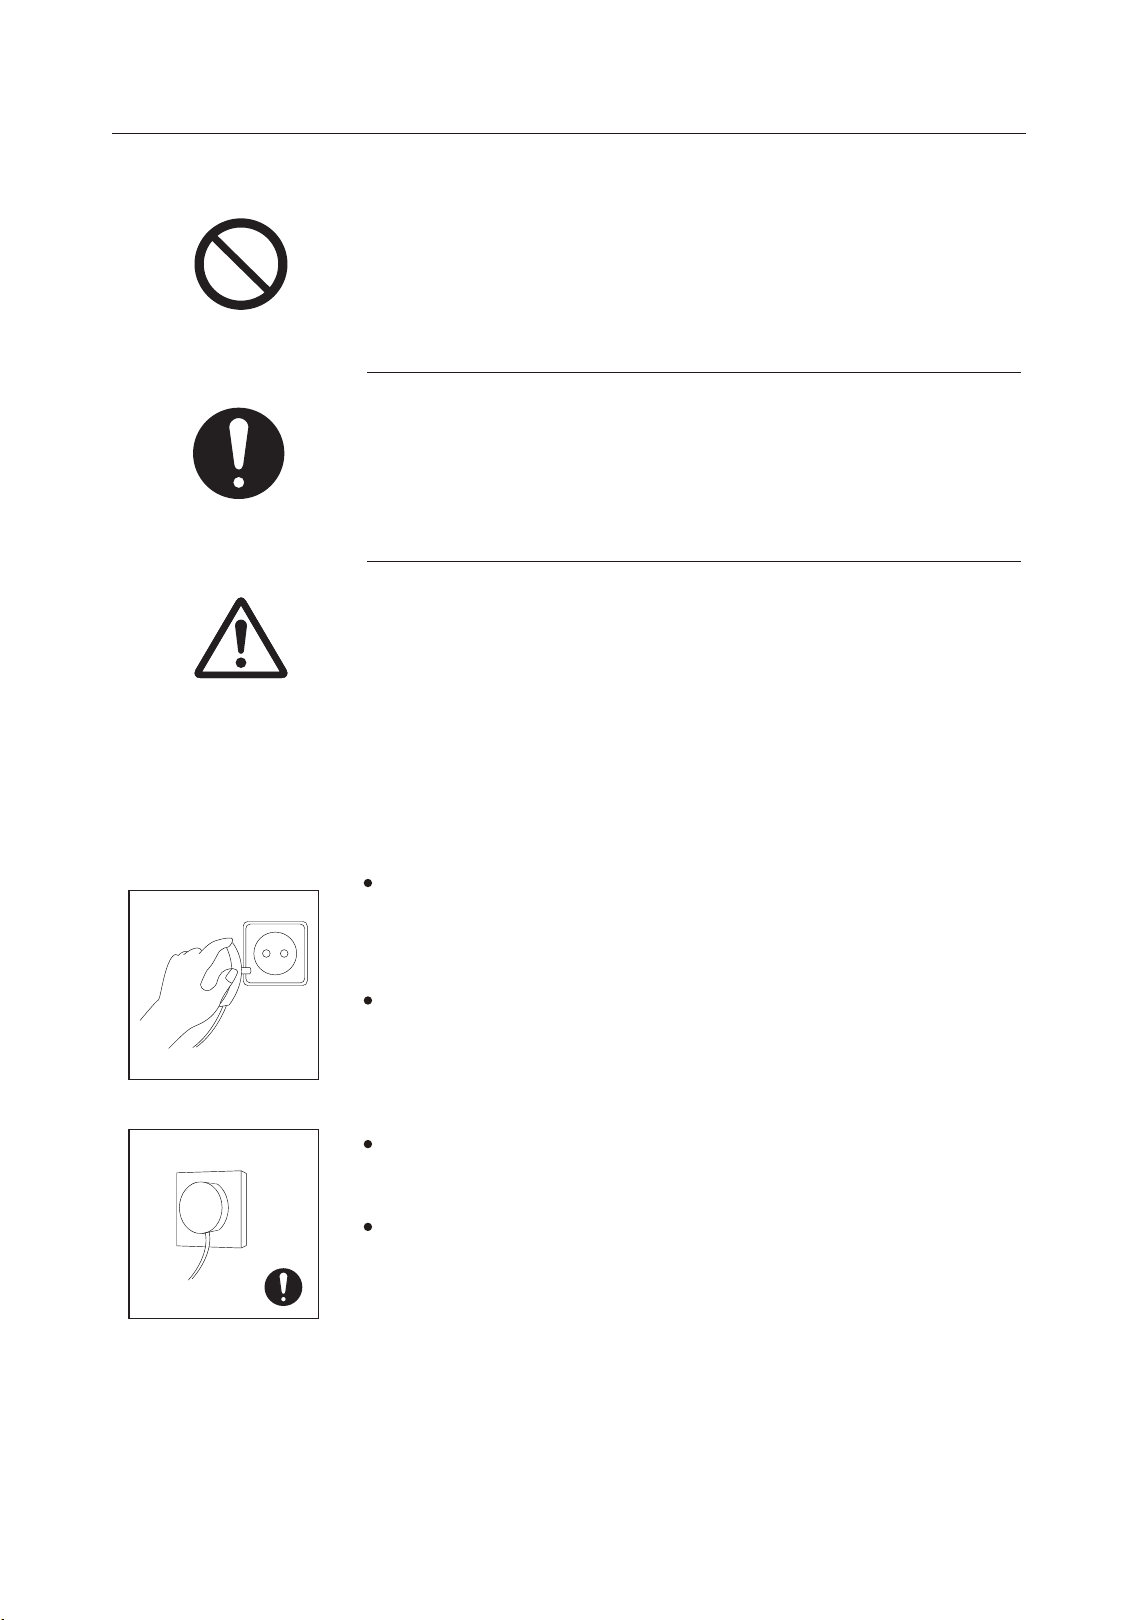
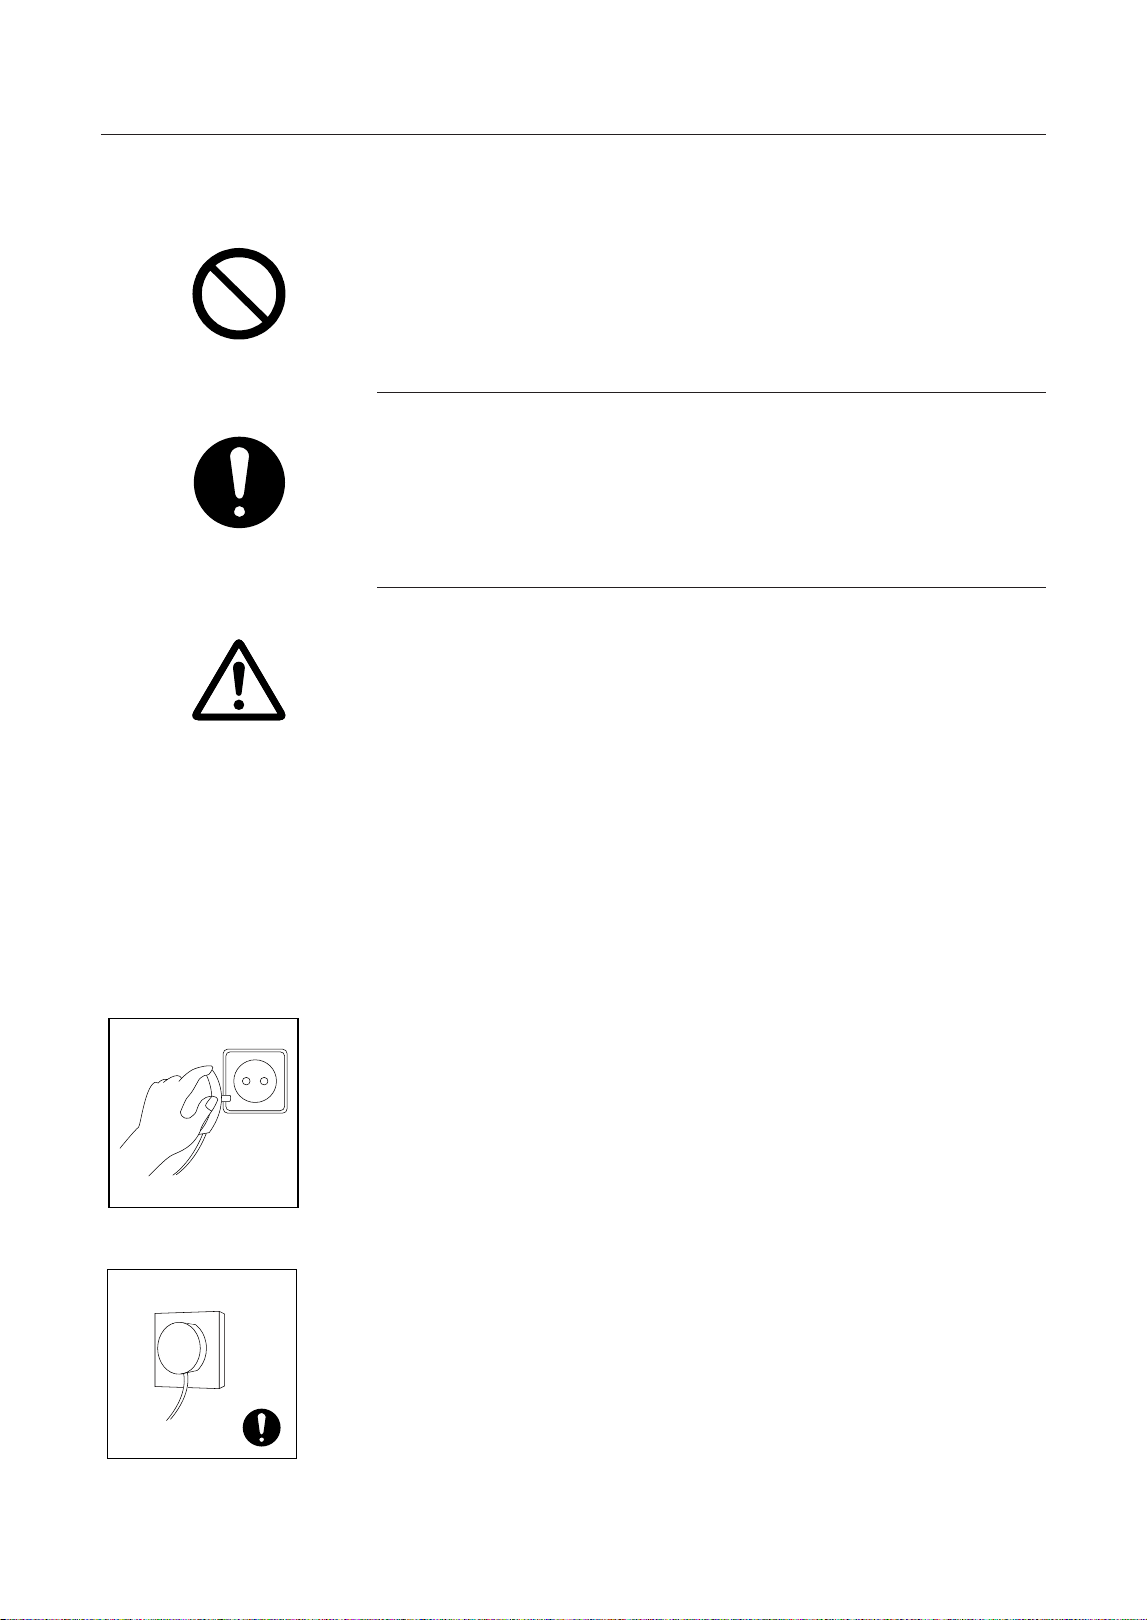
Do not pull the power cord when pulling the
power plug of the refrigerator. Please firmly grasp
the plug and pull out it from the socket directly.
To ensure safe use, do not damage the power
cord or use the power cord when it is damaged or
worn.
Please do not touch the power plug with wet
hand to prevent from electric shock.
Please use a dedicated power socket and the
power socket shall not be shared with other
electrical appliances. The power plug should
be firmly contacted with the socket or else
fires might be caused.
Mandatory
Prohibition symbol
Cautioning symbol
1.3 Electricity related warnings
symbol
6
Please ensure that the grounding electrode of the
power socket is equipped with a reliable grounding
line.
Please ask for help from persons with professional
qualification to examine whether the socket is with
reliable grounding line or not.
It is the end-consumers' responsibility to change
the ungrounded socket into grounded socket.
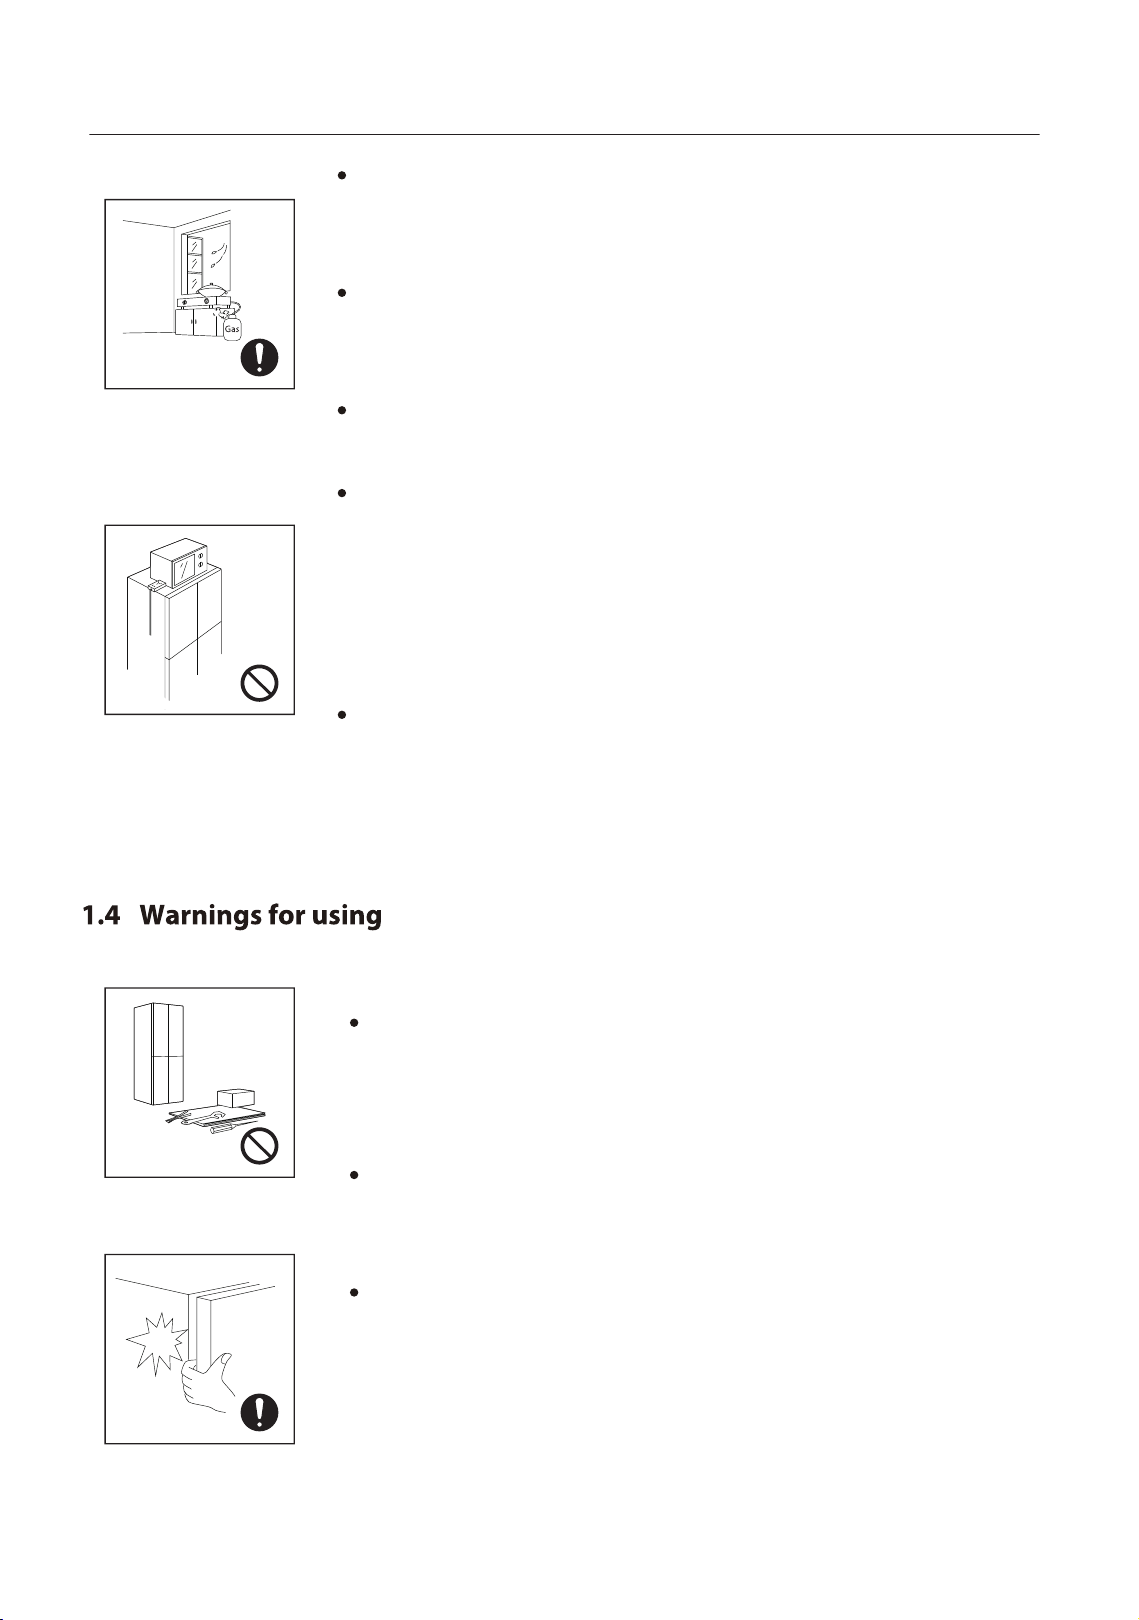
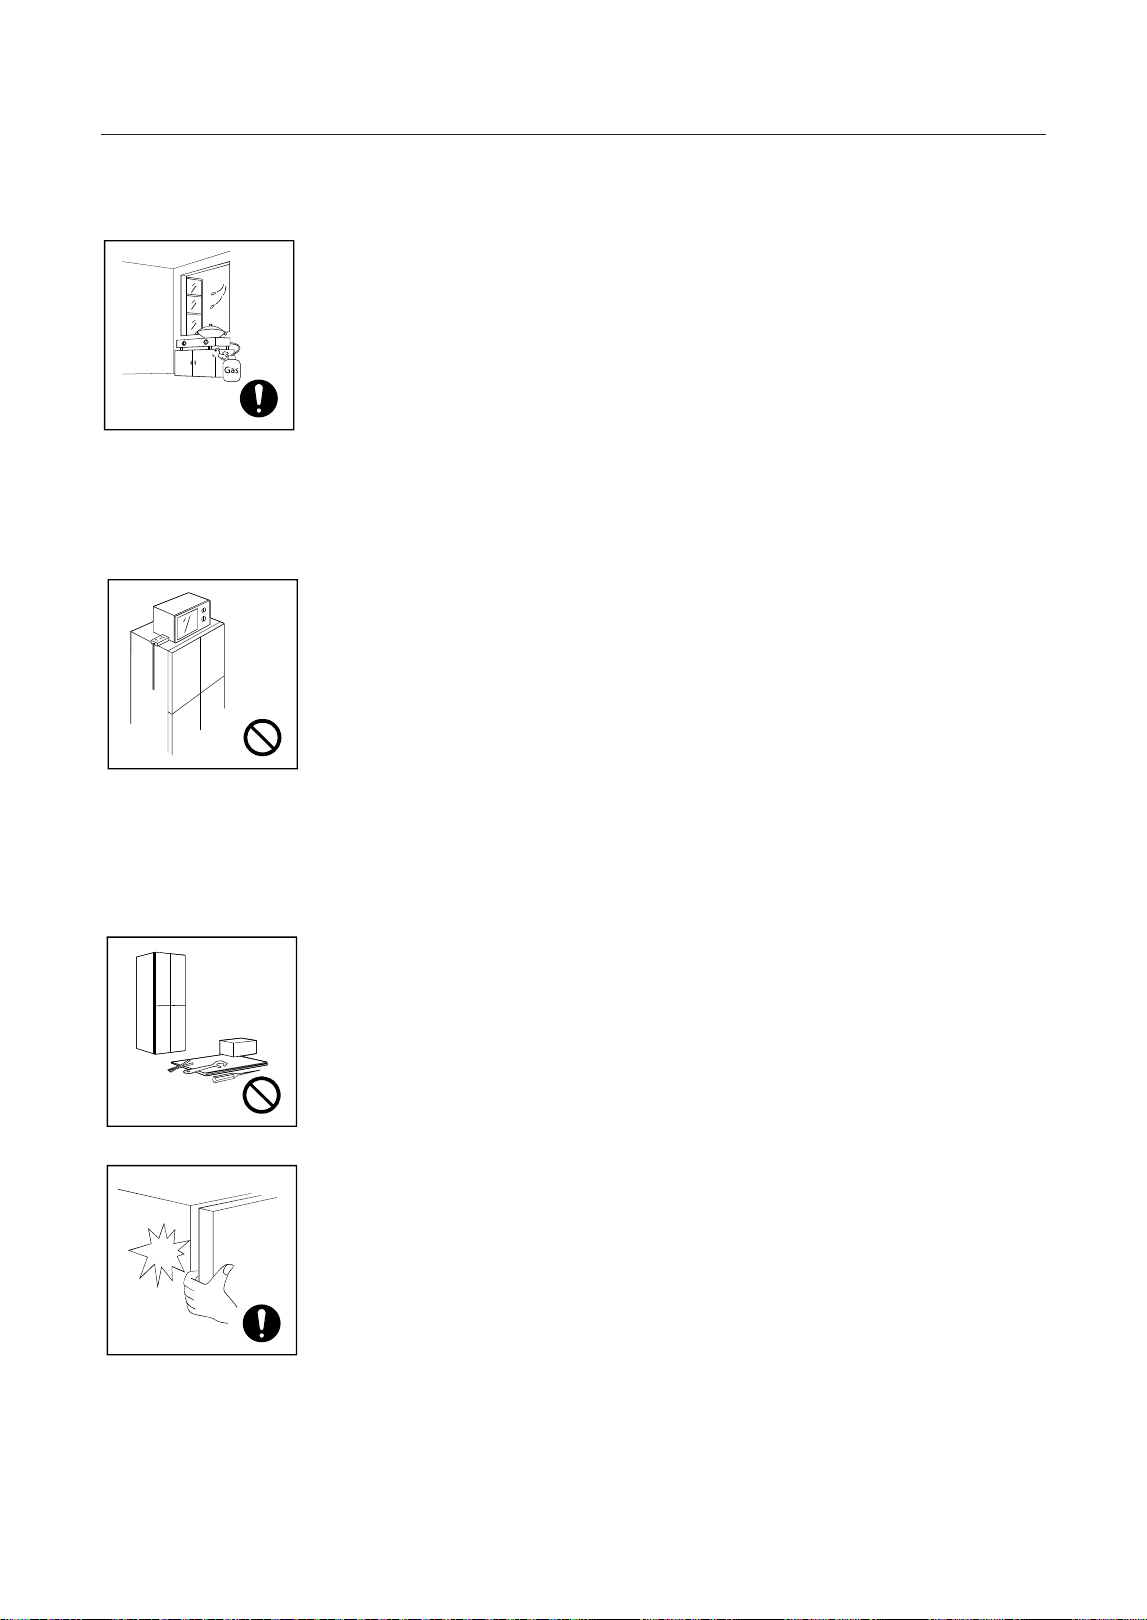
Please turn off the valve of the leaking gas and
then open the doors and windows in case of
leakage of gas and other flammable gases. Do not
unplug the refrigerator and other electrical
appliances considering that spark may cause a fire.
Do not use electrical appliances on the top of the
appliance, unless they are of the type recommended
by the manufacturer.
Do not arbitrarily disassemble or reconstruct the
refrigerator, nor damage the refrigerant circuit;
maintenance of the appliance must be conducted
by a specialist.
Damaged power cord must be replaced by the
manufacturer, its maintenance department or
related professionals in order to avoid danger.
The gaps between refrigerator doors and between
doors and refrigerator body are small, be noted not
to put your hand in these areas to prevent from
squeezing the finger. Please be gentle when close
the refrigerator door to avoid falling articles.
7
Do not pick foods or containers with wet hands in
the freezing chamber when the refrigerator is
running, especially metal containers in order to
avoid frostbite.
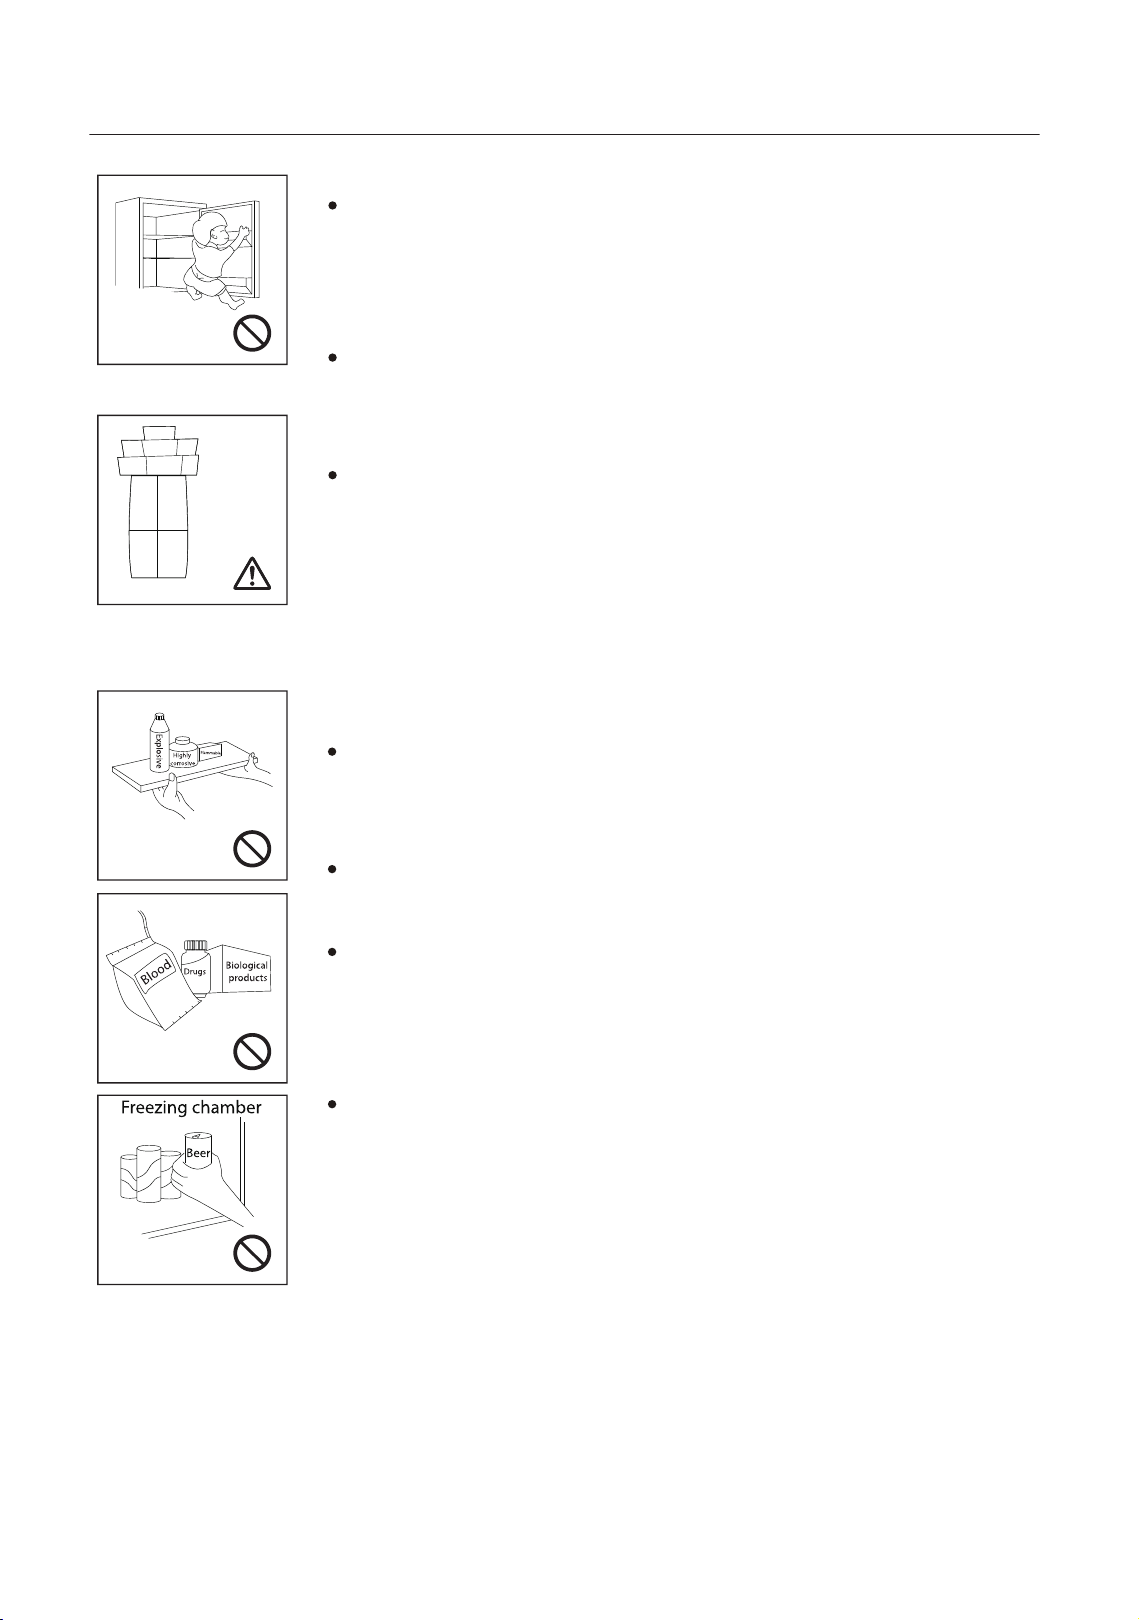
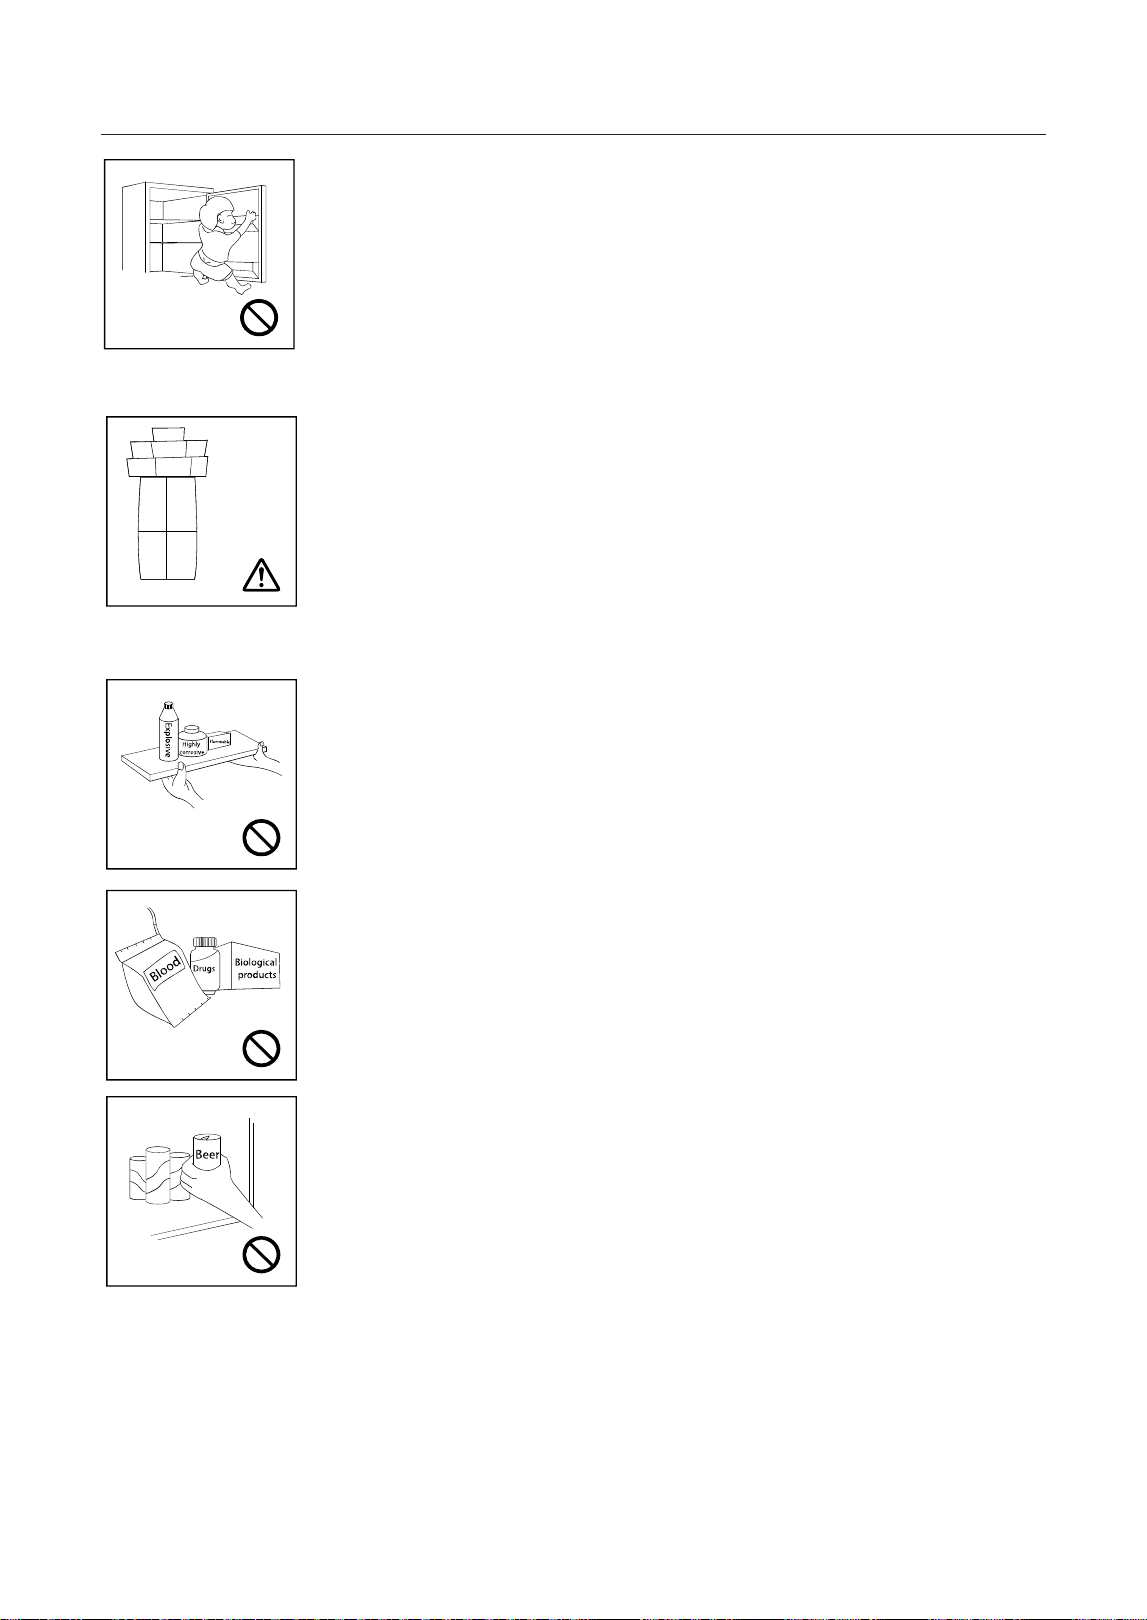
Do not allow any child to get into or climb the
refrigerator; otherwise suffocation or falling injury
of the child may be caused.
Please do not put heavy or dangerous objects on
top of the appliance (bottles, tableware, or
something containing liquid)
Do not put flammable, explosive, volatile and
highly corrosive items in the refrigerator to
prevent damages to the product or fire accidents.
Do not place flammable items near the
refrigerator to avoid fires.
The refrigerator is intended for household use,
such as storage of foods; it shall not be used for
other purposes, such as storage of blood, drugs
or biological products, etc.
Do not store beer, beverage or other fluid
contained in bottles or enclosed containers in the
freezing chamber of the refrigerator ; or otherwise
the bottles or enclosed containers may crack due
to freezing to cause damages.
1.5 Warnings for placement
8
Refrigerating appliances might not operate consistently (possibility of
defrosting of contents or temperature becoming too warm in the frozen
food compartment) when sited for an extended period of time below
the cold end of the range of temperatures for which the refrigerating
appliance is designed.
The fact that effervescent drinks should not be stored in food freezer
compartments or cabinets or in low-temperature compartments or
cabinets, and that some products such as water ices should not be
consumed too cold.
The need to not exceed the storage time(s) recommended by the food
manufacturers for any kind of food and particularly for commercially
quick-frozen food in food-freezer and frozen-food storage
compartments or cabinets.
The precautions necessary to prevent an undue rise in the temperature
of the frozen food while defrosting the refrigerating appliance, such as
wrapping the frozen food in several layers of newspaper.
The fact that a rise in temperature of the frozen food during manual
defrosting, maintenance or cleaning could shorten the storage life.
The necessity that, for doors or lids fitted with locks and keys, the keys
be kept out of the reach of children and not in the vicinity of the
refrigerating appliance, in order to prevent children from being locked
inside.
Refrigerant and cyclopentane foaming material used for
the refrigerator are flammable. Therefore, when the
refrigerator is scrapped, it shall be kept away from any
fire source and be recovered by a special recovering
company with corresponding qualification other than
be disposed by combustion, so as to prevent damage
to the environment or any other harm.
When the refrigerator is scrapped, disassemble the
doors, and remove gasket of door and shelves; put the
doors and shelves in a proper place, so as to prevent
trapping of any child.
1.6 Warnings for energy
1.7 Warnings for disposal
9
2.1 Placement
Precautions before installation:
Before installation or adjusting of accessories, it shall be ensured
that the refrigerator is disconnected from power. Precautions shall
be taken to prevent fall of the handle from causing any personal
injury.
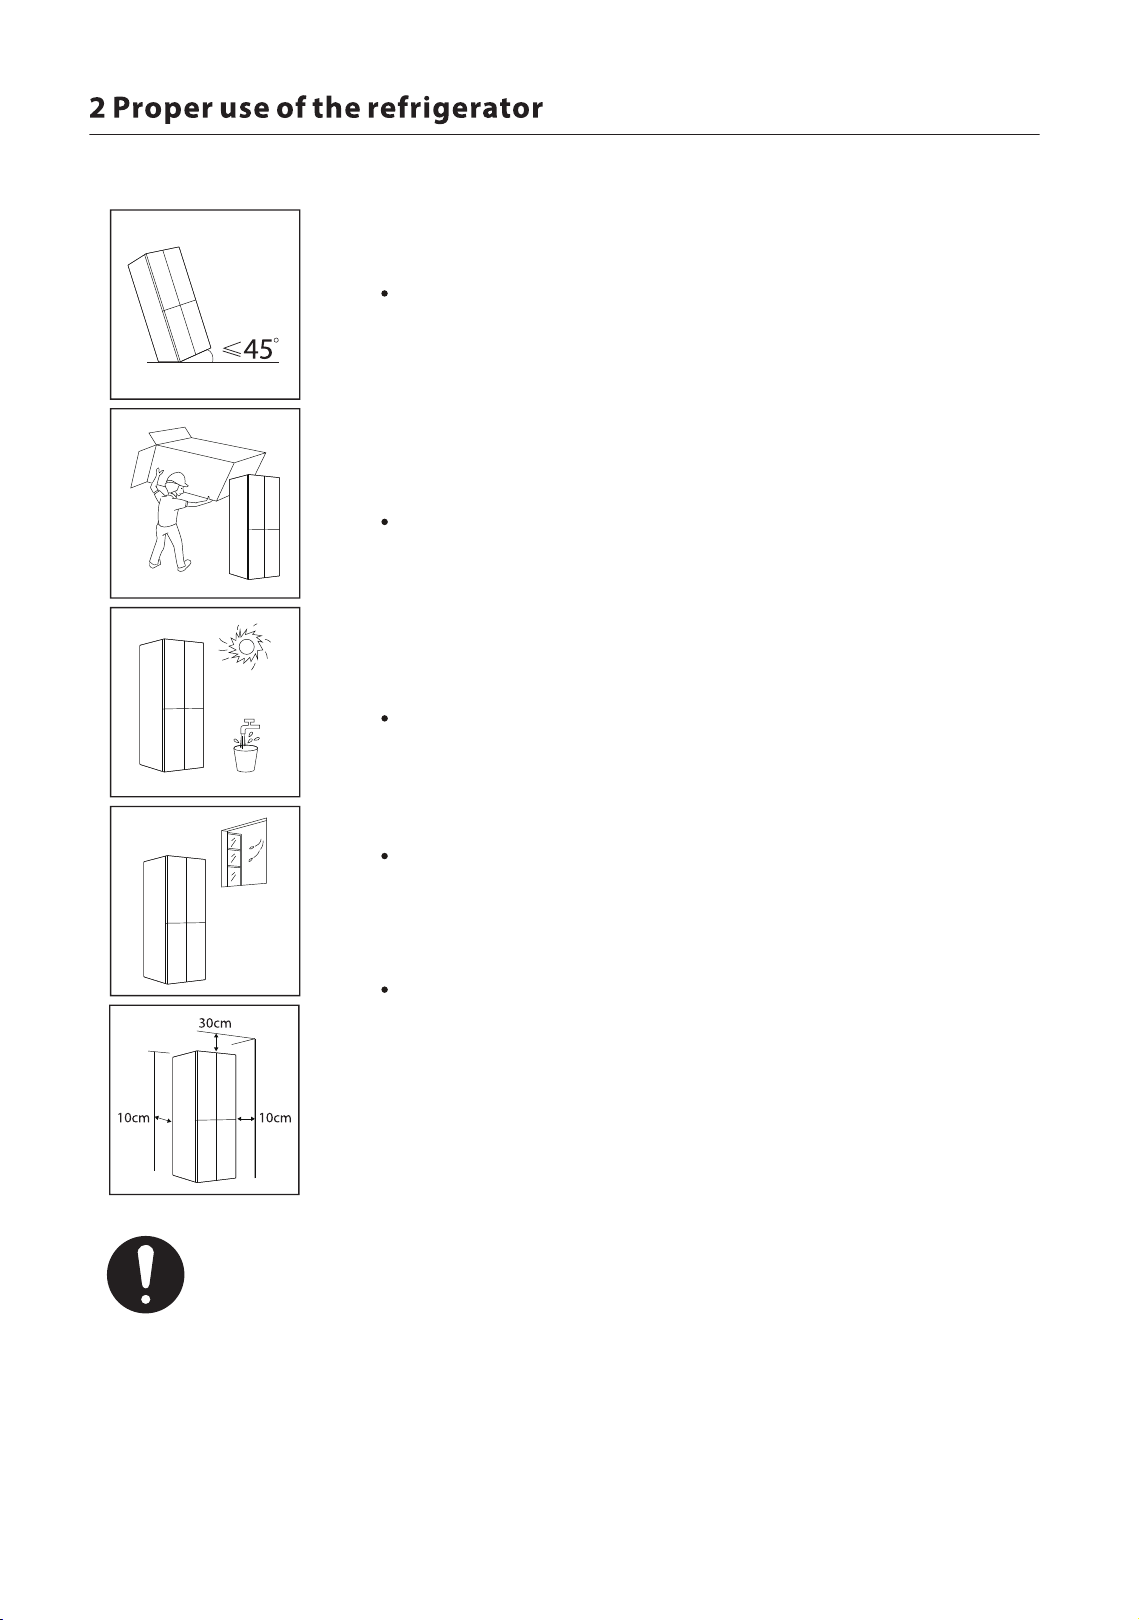
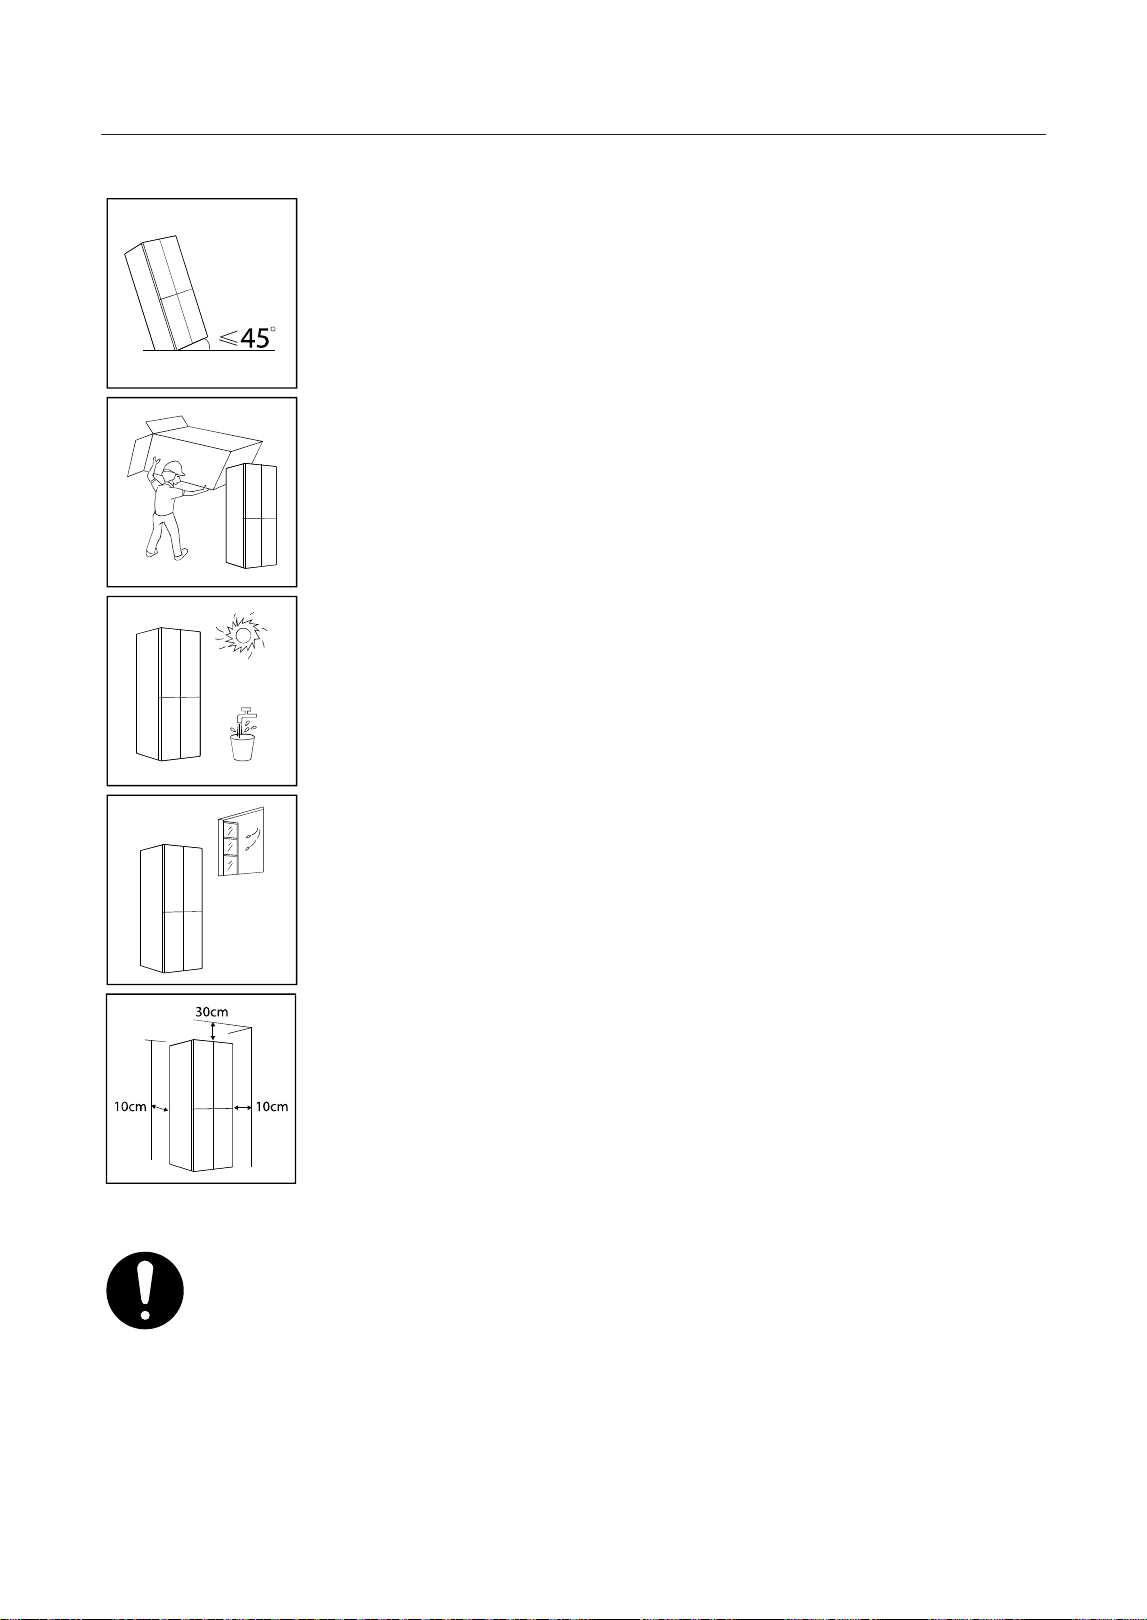
Before the refrigerator is moved, take all objects inside out, fix
the glass partitions, vegetable holder, freezing chamber
drawers and etc. with tape, and tighten the leveling feet; close
the doors and seal them with tape. During moving, the
appliance shall not be laid upside down or horizontally, or be
vibrated; the inclination during movement shall be no more
than 45°.
Before use, remove all packing materials, including button
cushions, foam pads and tapes inside of the refrigerator; tear
off the protective film on the doors and the refrigerator body.
Keep away from heat and avoid direct sunlight. Do not place
the freezer in moist or watery places to prevent rust or
reduction of insulating effect.
Do not spray or wash the refrigerator; do not put the
refrigerator in moist places easy to be splashed with water so
as not to affect the electrical insulation properties of the
refrigerator.
The refrigerator is placed in a well-ventilated indoor place; the
ground shall be flat, and sturdy (rotate left or right to adjust the
wheel for leveling if unstable).
The top space of the refrigerator shall be greater than 30cm,
and the refrigerator should be placed against a wall with a free
distance more than 10cm to facilitate heat dissipation.
10
1. Precautions before operation:
Before operation of accessories, it shall be ensured that the refrigerator is disconnected from
power.
Before adjusting the leveling feet, precautions shall be taken to prevent any personal injury.
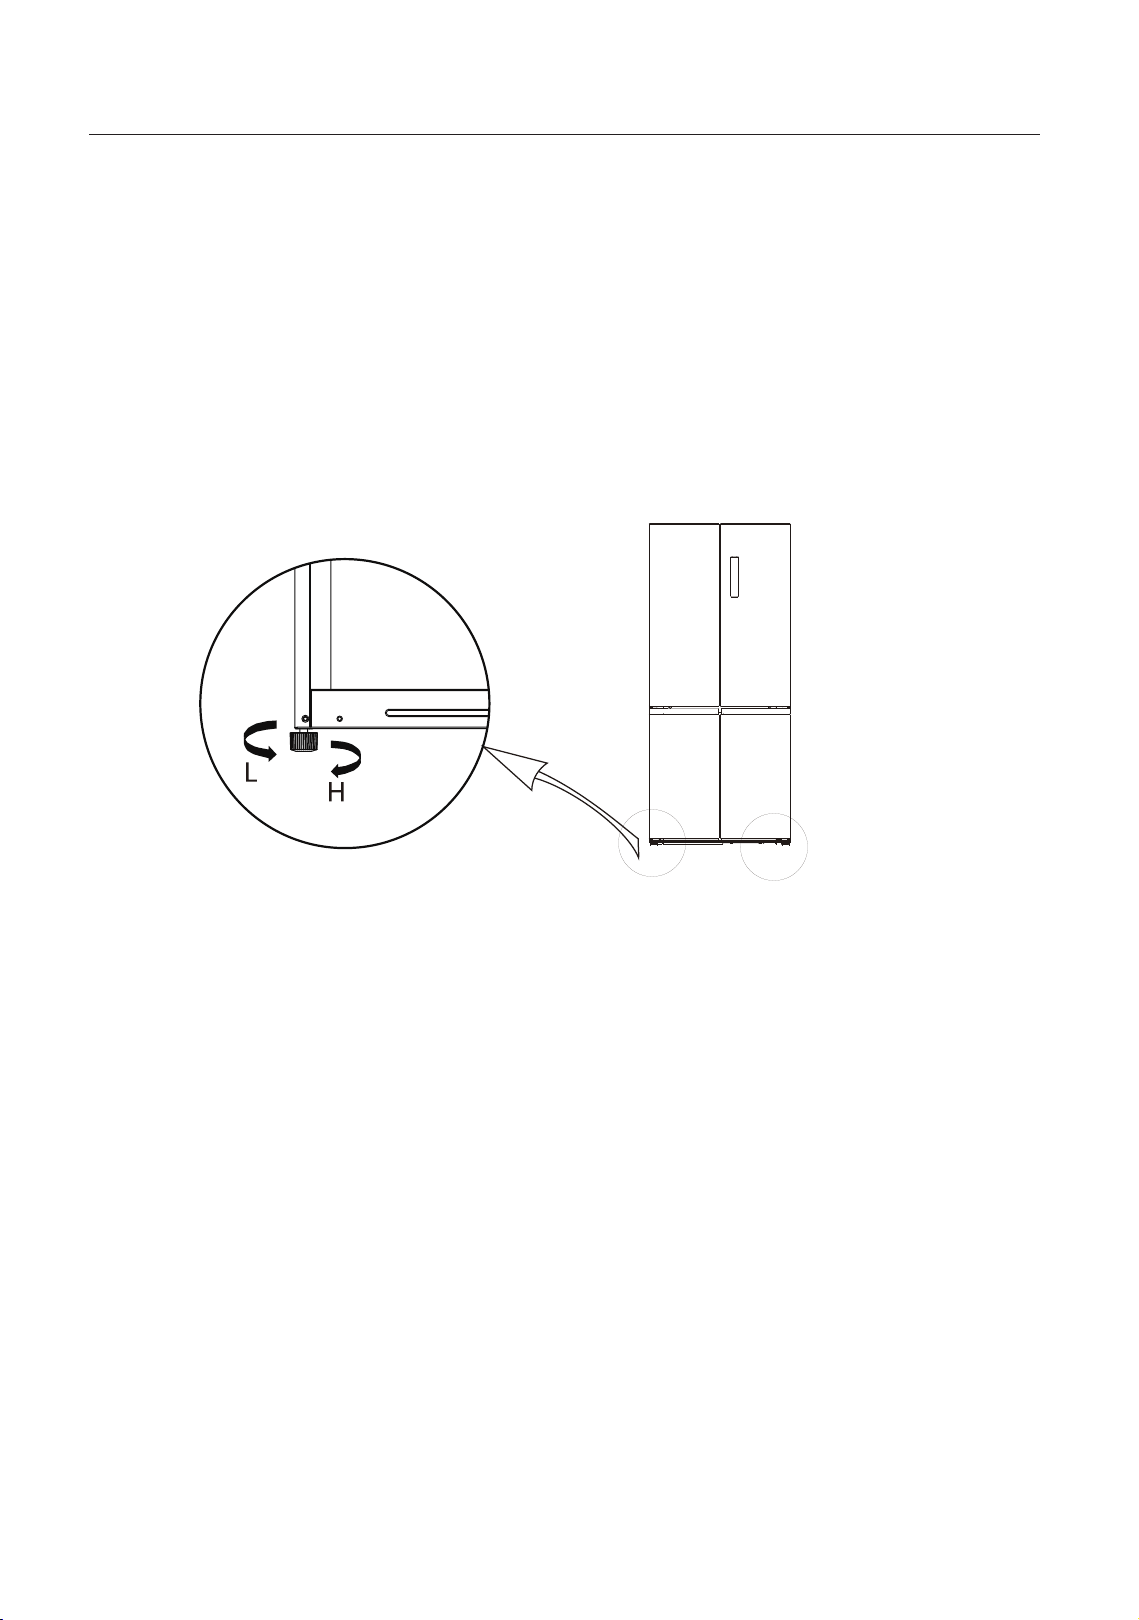
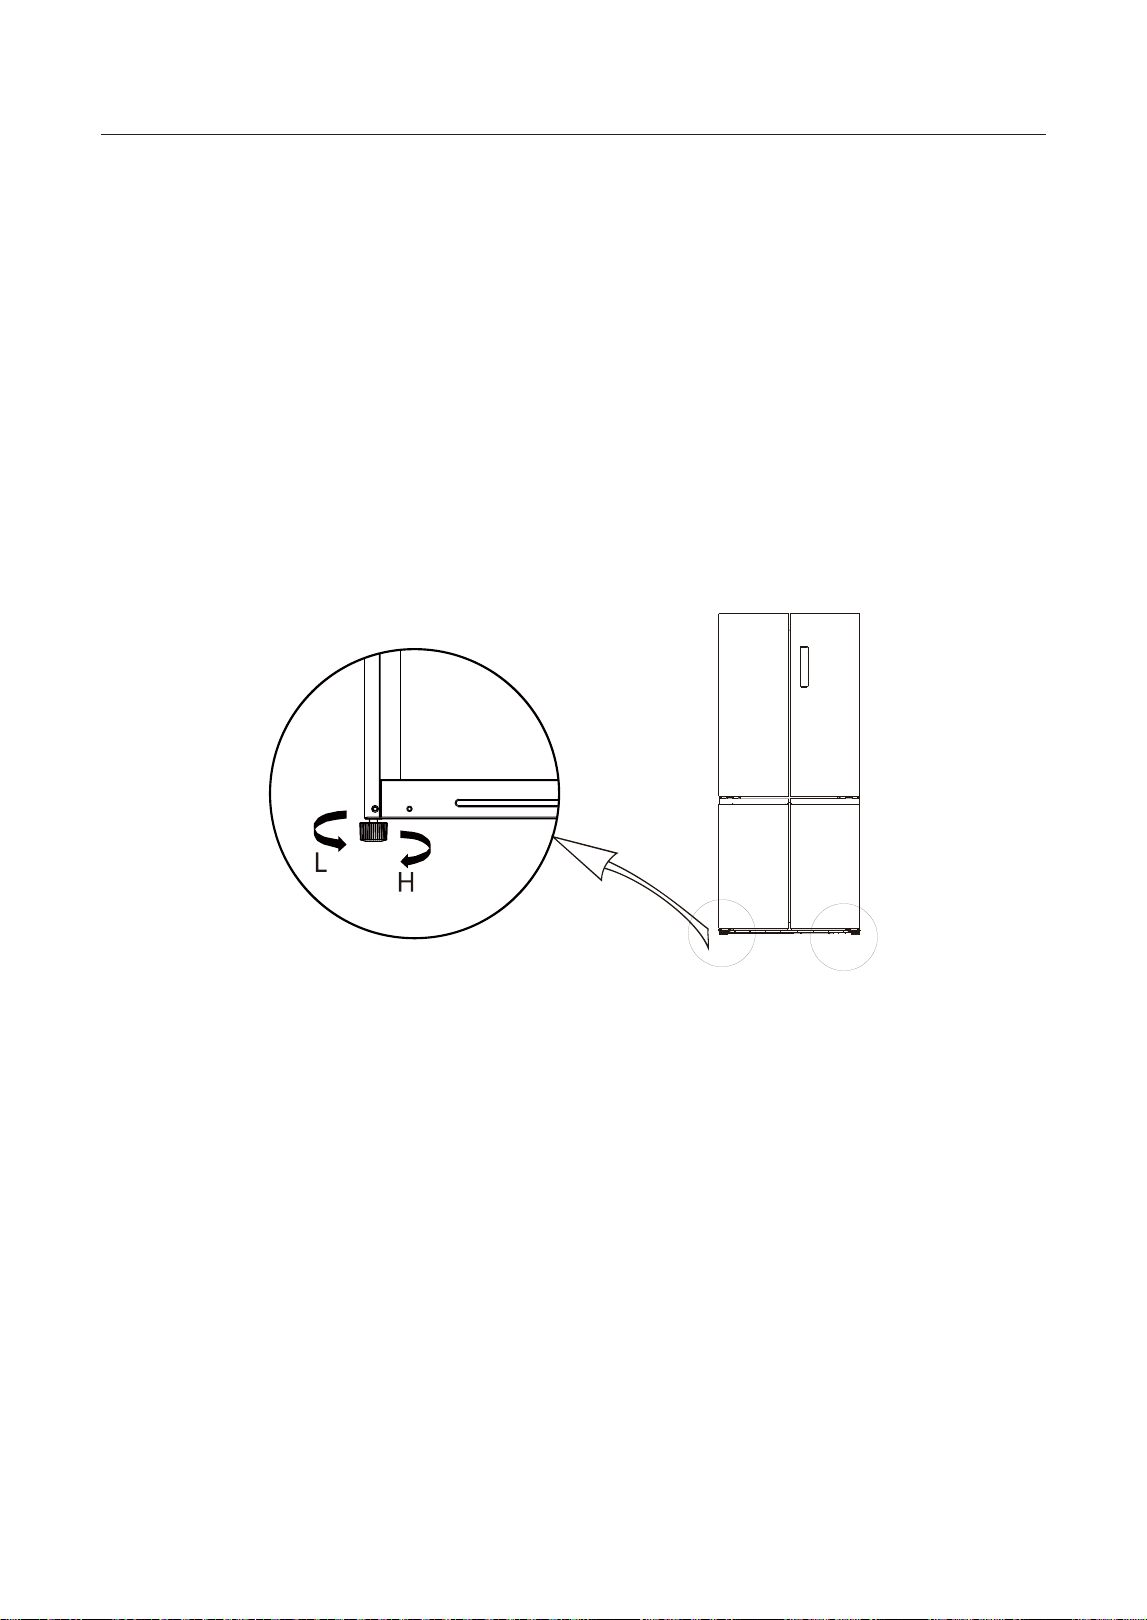
2. Schematic diagram of the levelling feet:
3. Adjusting procedures:
a. Turn the feet clockwise to raise the refrigerator;
b. Turn the feet counterclockwise to lower the refrigerator;
c. Adjust the right and left feet based on the procedures above to a horizontal level.
2.2 Leveling feet
(The picture above is only for reference. The actual configuration will depend on the physical
product or statement by the distributor)
11
1. Precautions before operation:
Before operation of accessories, it shall be ensured that the refrigerator is disconnected from
power.
Before adjusting the door, precautions shall be taken to prevent any personal injury.
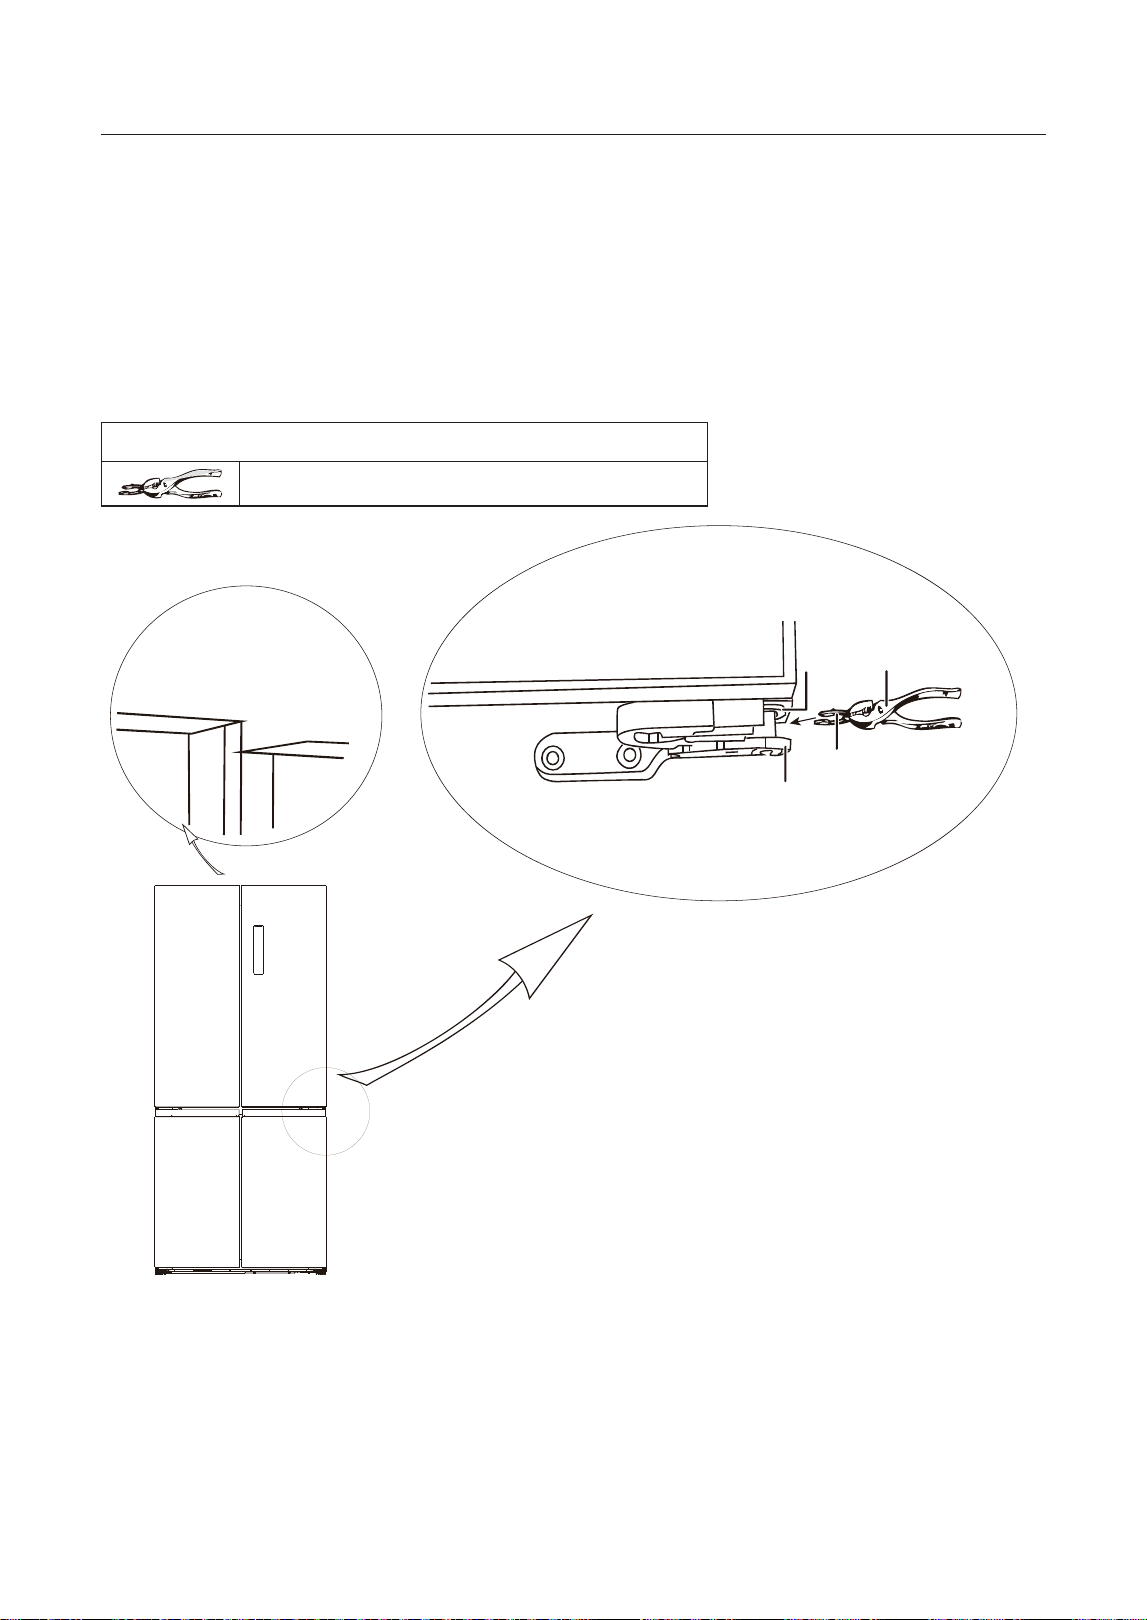
2. Schematic diagram of levelling the door body.
2.3 Leveling door
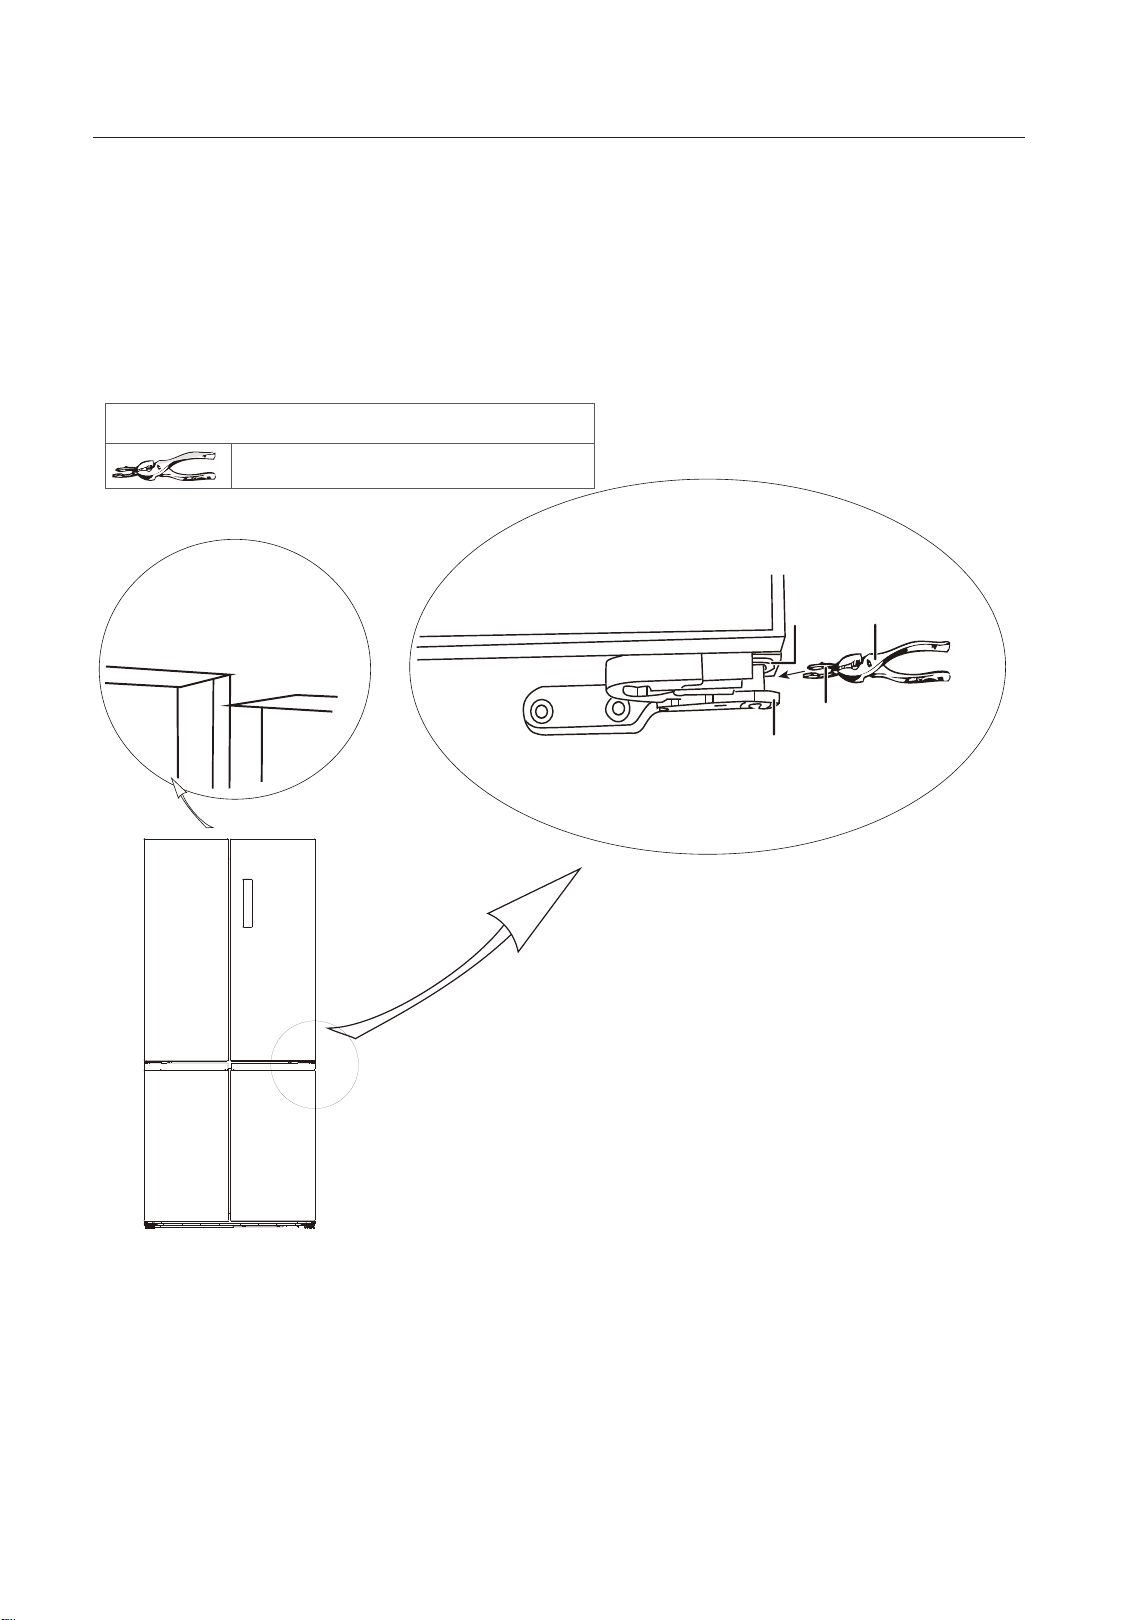
List of tools to be provided by the user
Plier
Not level
Hinge
grommet
Pliers
Fastener-ring
Lower hinge
(The picture above is only for reference. The actual configuration will depend on the physical
product or statement by the distributor)
1) Raise the lower door up to the level of the higher door.
2) Insert the supplied fastener-ring by using plier in the gap between the hinge-grommet and
the lower hinge. The number of fasten-rings you will need to insert depends on the gap.
12
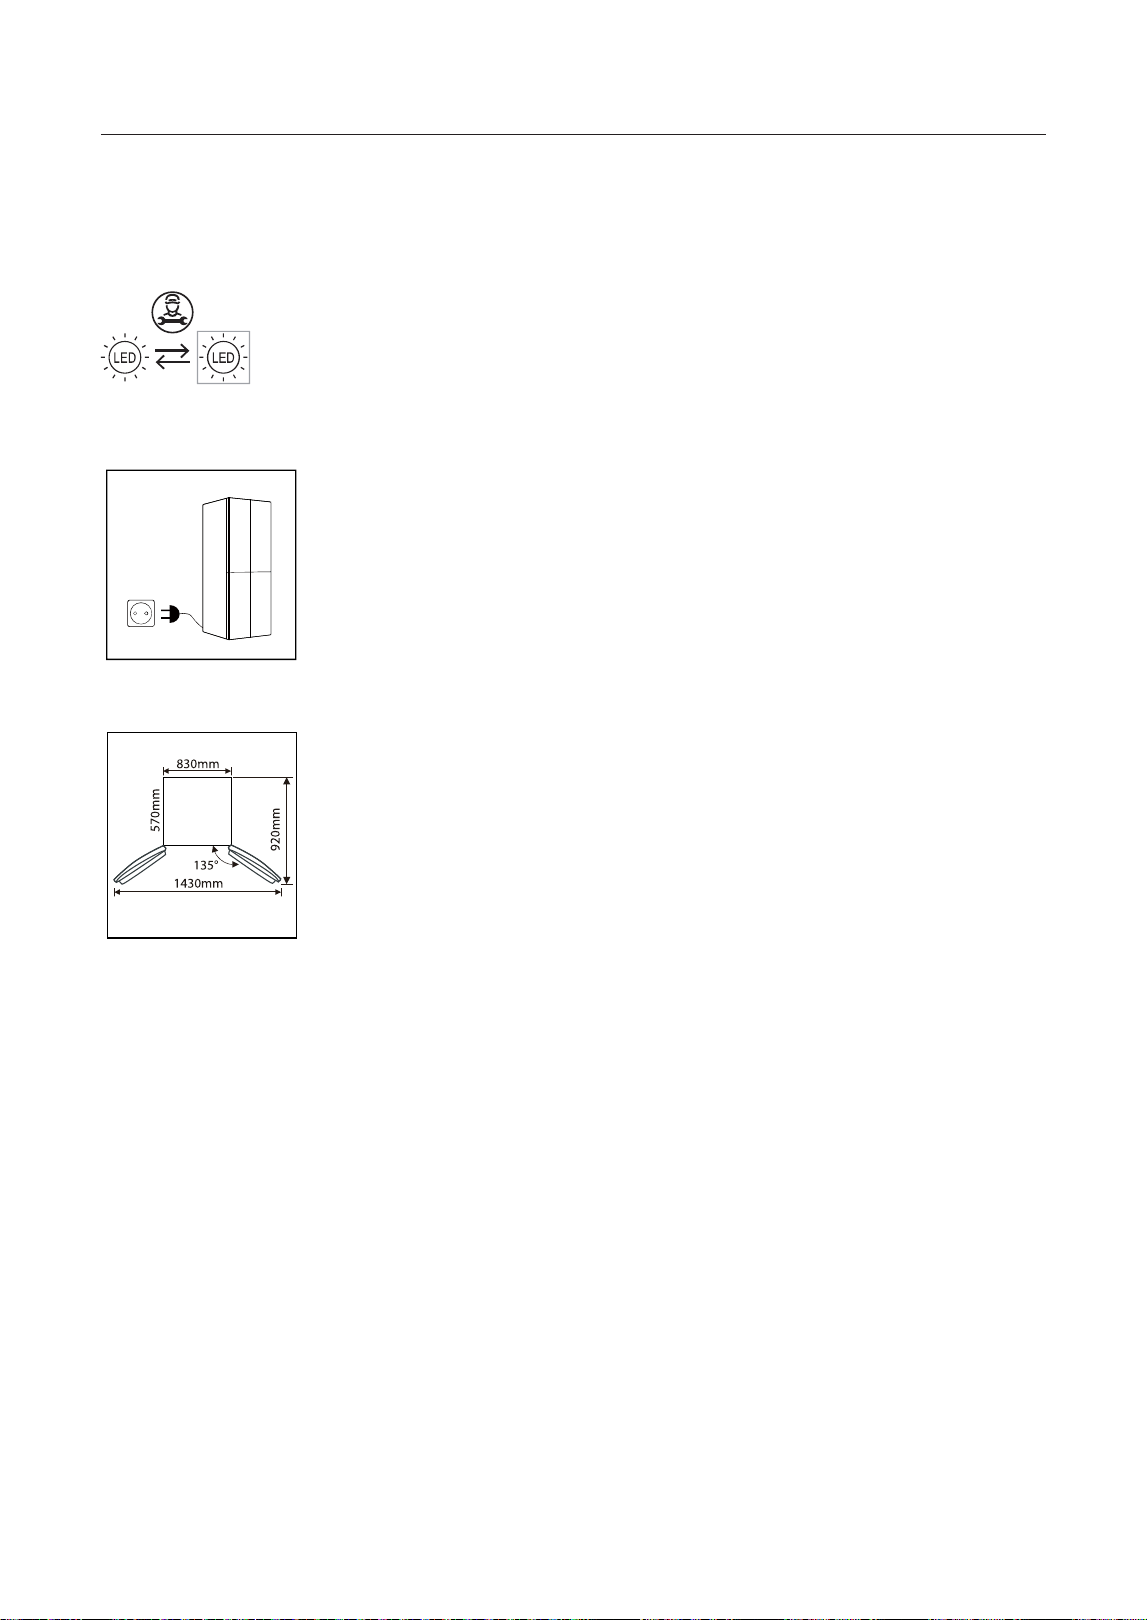
2.4 Changing the Light
Any replacement or maintenance of the LED lamps is intended to be made by the manufacturer,
its service agent or similar qualified person.
Before putting any fresh or frozen foods, the refrigerator shall have
run for 2-3 hours, or for above 4 hours in summer when the ambient
temperature is high.
Before initial start, keep the refrigerator still for half an hour before
connecting it to power supply.
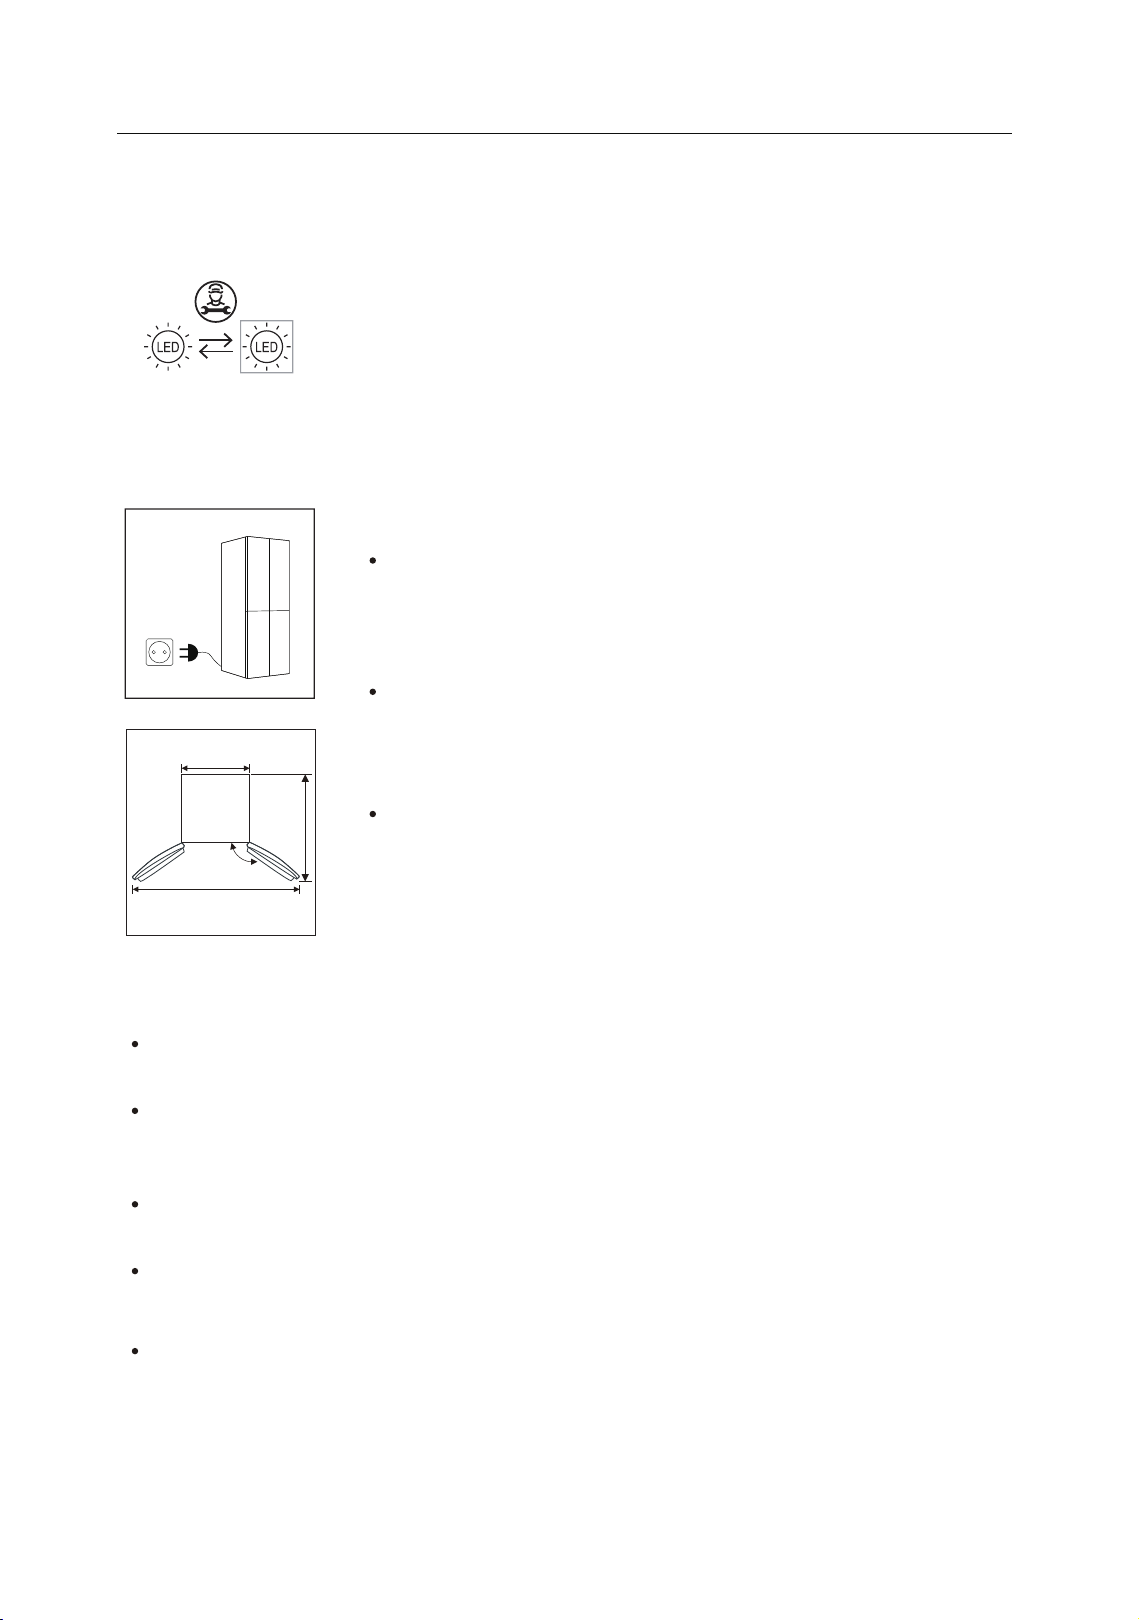
Spare enough space for convenient opening of the doors and
drawers or statement by the distributor.
2.5 Starting
1430mm
830mm
135°
920mm
570mm
The appliance should be located in the coolest area of the room, away from heat producing
appliances or heating ducts, and out of the direct sunlight.
Let hot foods cool to room temperature before placing in the appliance. Overloading the
appliance forces the compressor to run longer. Foods that freeze too slowly may lose quality,
or spoil.
Be sure to wrap foods properly, and wipe containers dry before placing them in the appliance.
This cuts down on frost build-up inside the appliance.
Appliance storage bin should not be lined with aluminum foil, wax paper, or paper toweling.
Liners interfere with cold air circulation, making the appliance less efficient.
Organize and label food to reduce door openings and extended searches. Remove as many
items as needed at one time, and close the door as soon as possible.
2.6 Energy saving tips
13
3. Structure and functions
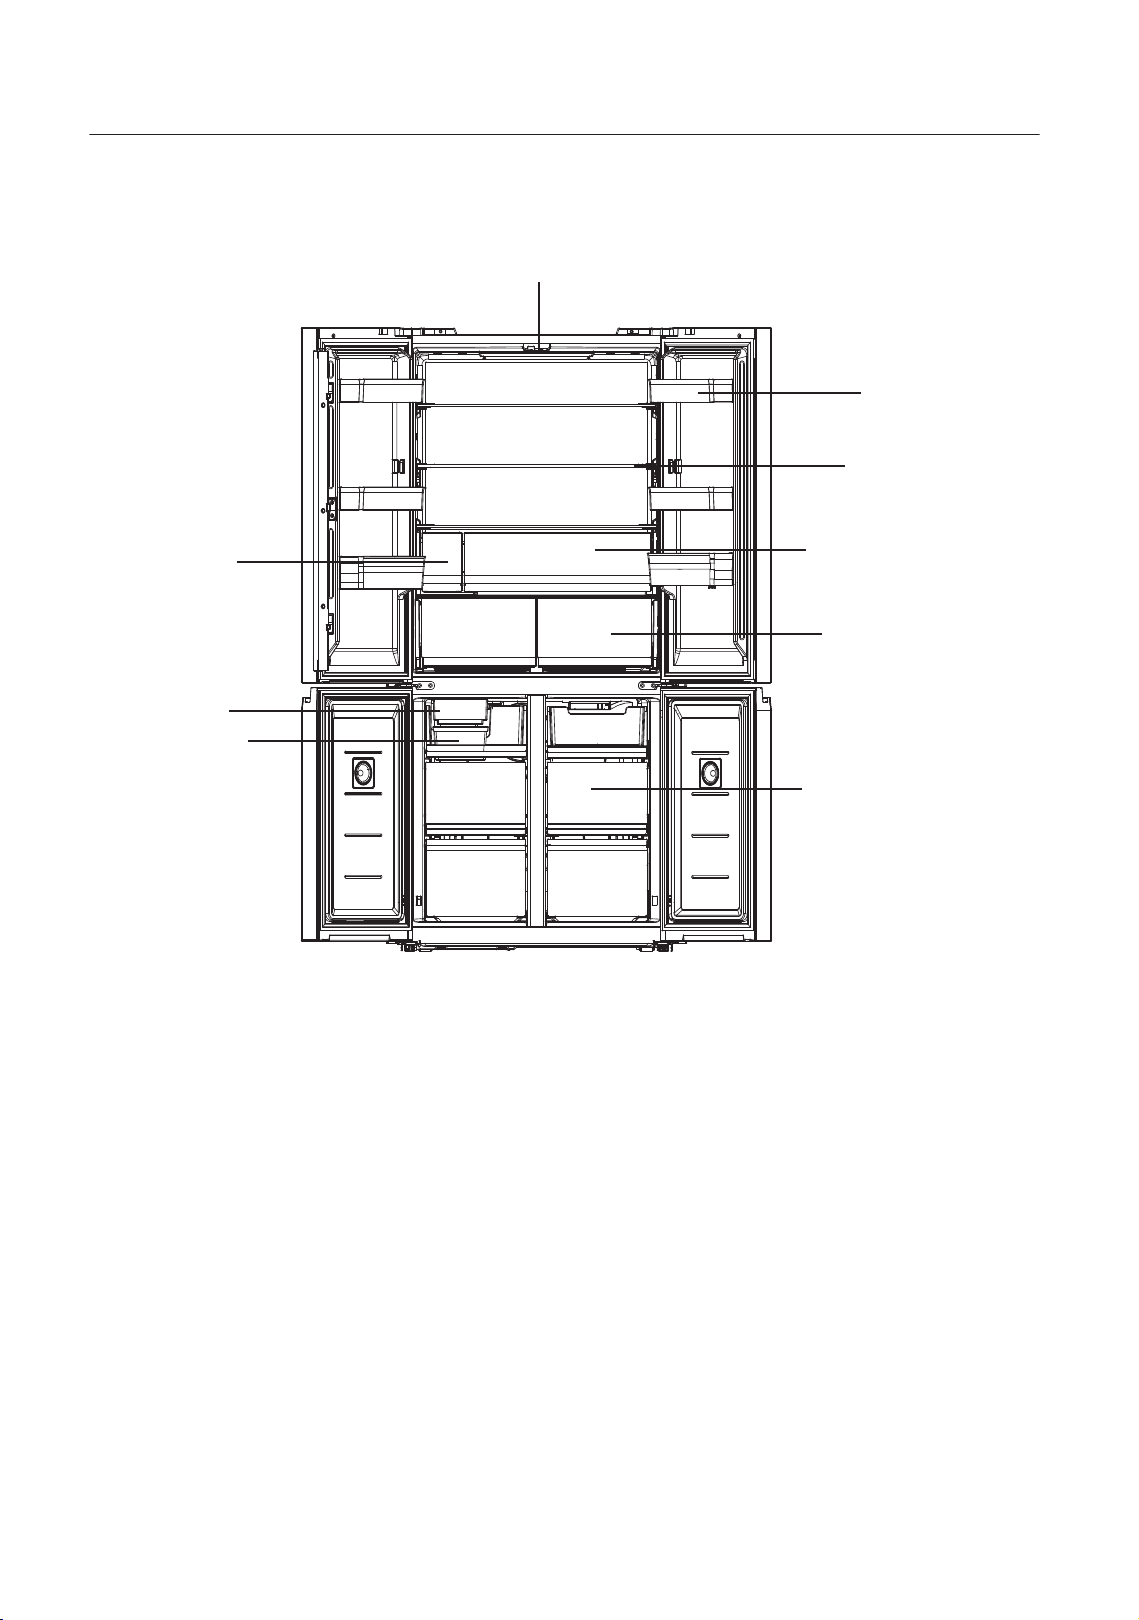
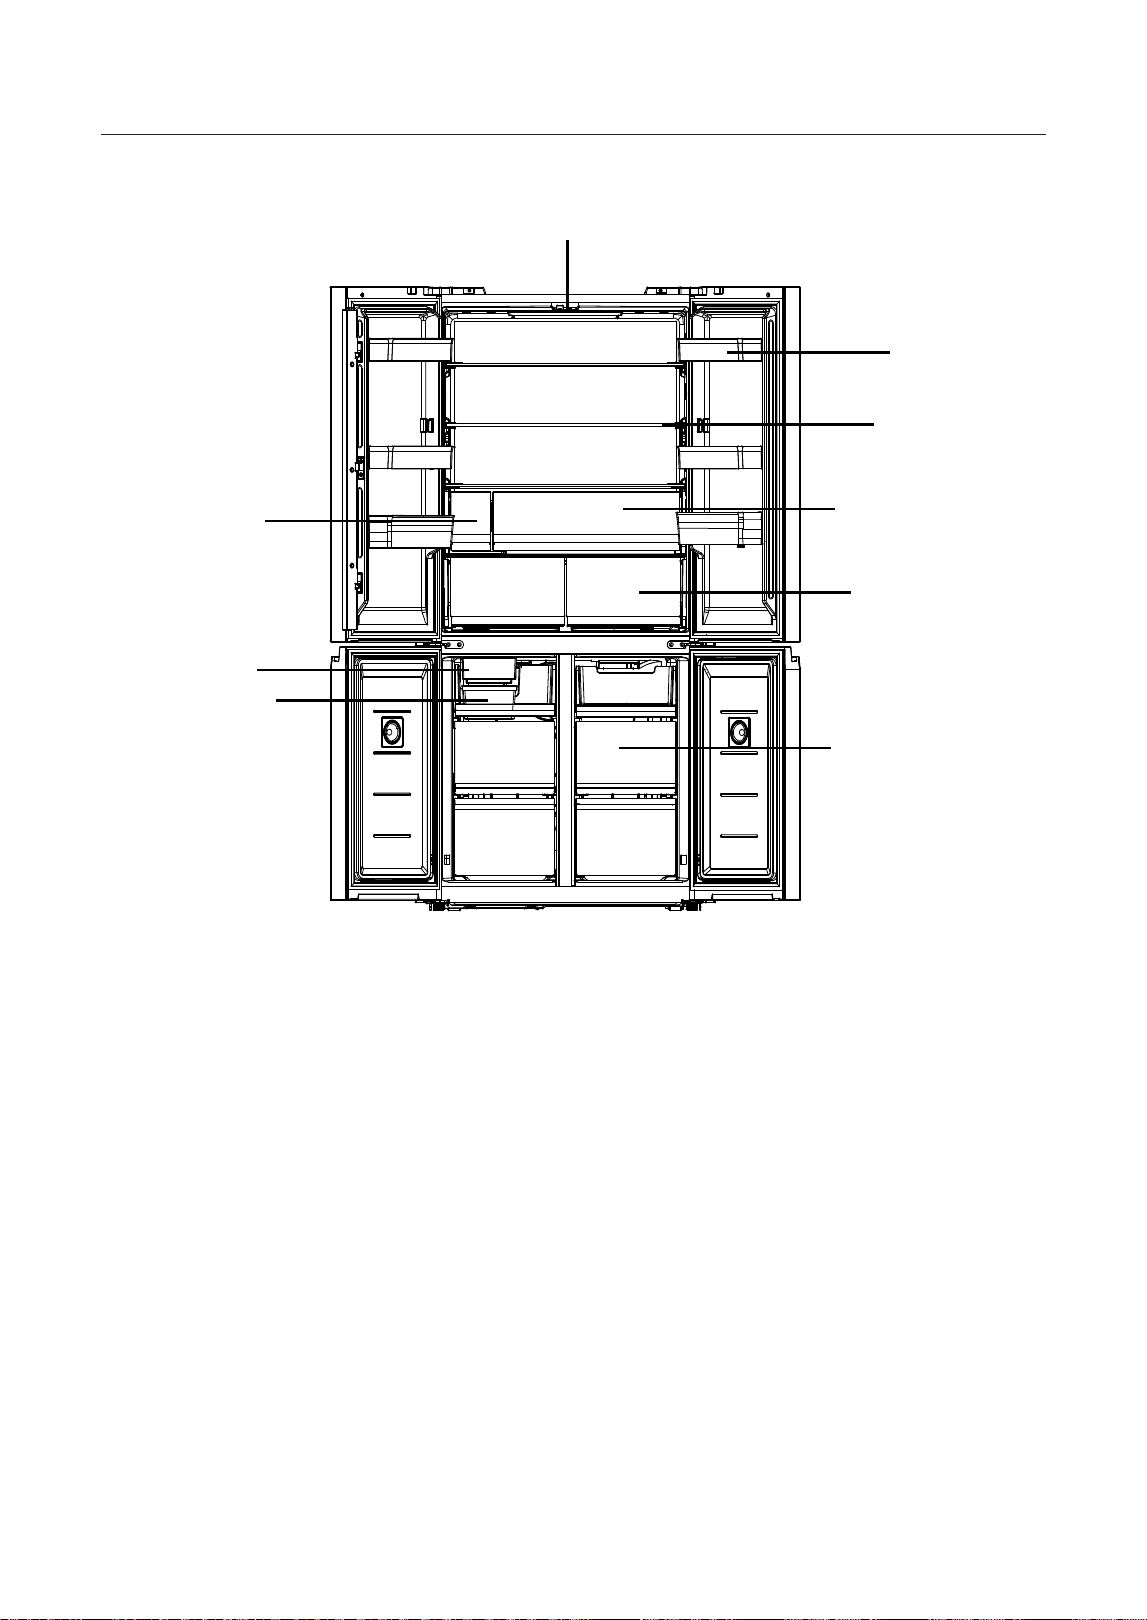
3.1 Key components
Door tray
Soft light panel
Glass shelf
Water tank
Ice maker
Ice storage b
ox
Fruits and vegetables box
(The picture above is only for reference. The actual configuration will depend on the physical
product or statement by the distributor)
MOISTURE ZONE
FROZEN ZONE
14
The Refrigerating chamber is suitable for storage of a variety of fruits, vegetables, beverages and
other food consumed in the short term, suggested storage time 3days to 5 days.
Cooking foods shall not be put in the refrigerating chamber until cooled to room temperature.
Foods are recommended to be sealed up before putting into the refrigerator.
The glass shelves can be adjusted up or down for a reasonable amount of storage space and easy
use.
The low temperature freezing chamber may keep food fresh for a long time and it is mainly used
to store frozen foods and making ice.
Chunks of meat are preferably to be divided into small pieces for easy access. Please be noted food
shall be consumed within the shelf time.
Drawers, food boxes, shelves, etc. placed according to the position in the picture above are the most
energy efficient.
Refrigerating chamber
Freezing chamber
The freezing chamber is suitable for storage of meat, fish, rice balls and other foods not to
be consumed in short term.
Note: Storage of too much food during operation after the initial
refrigerator. Foods stored shall not block the air outlet; or otherwise the freez
ing effect will also be adversely affected.
15
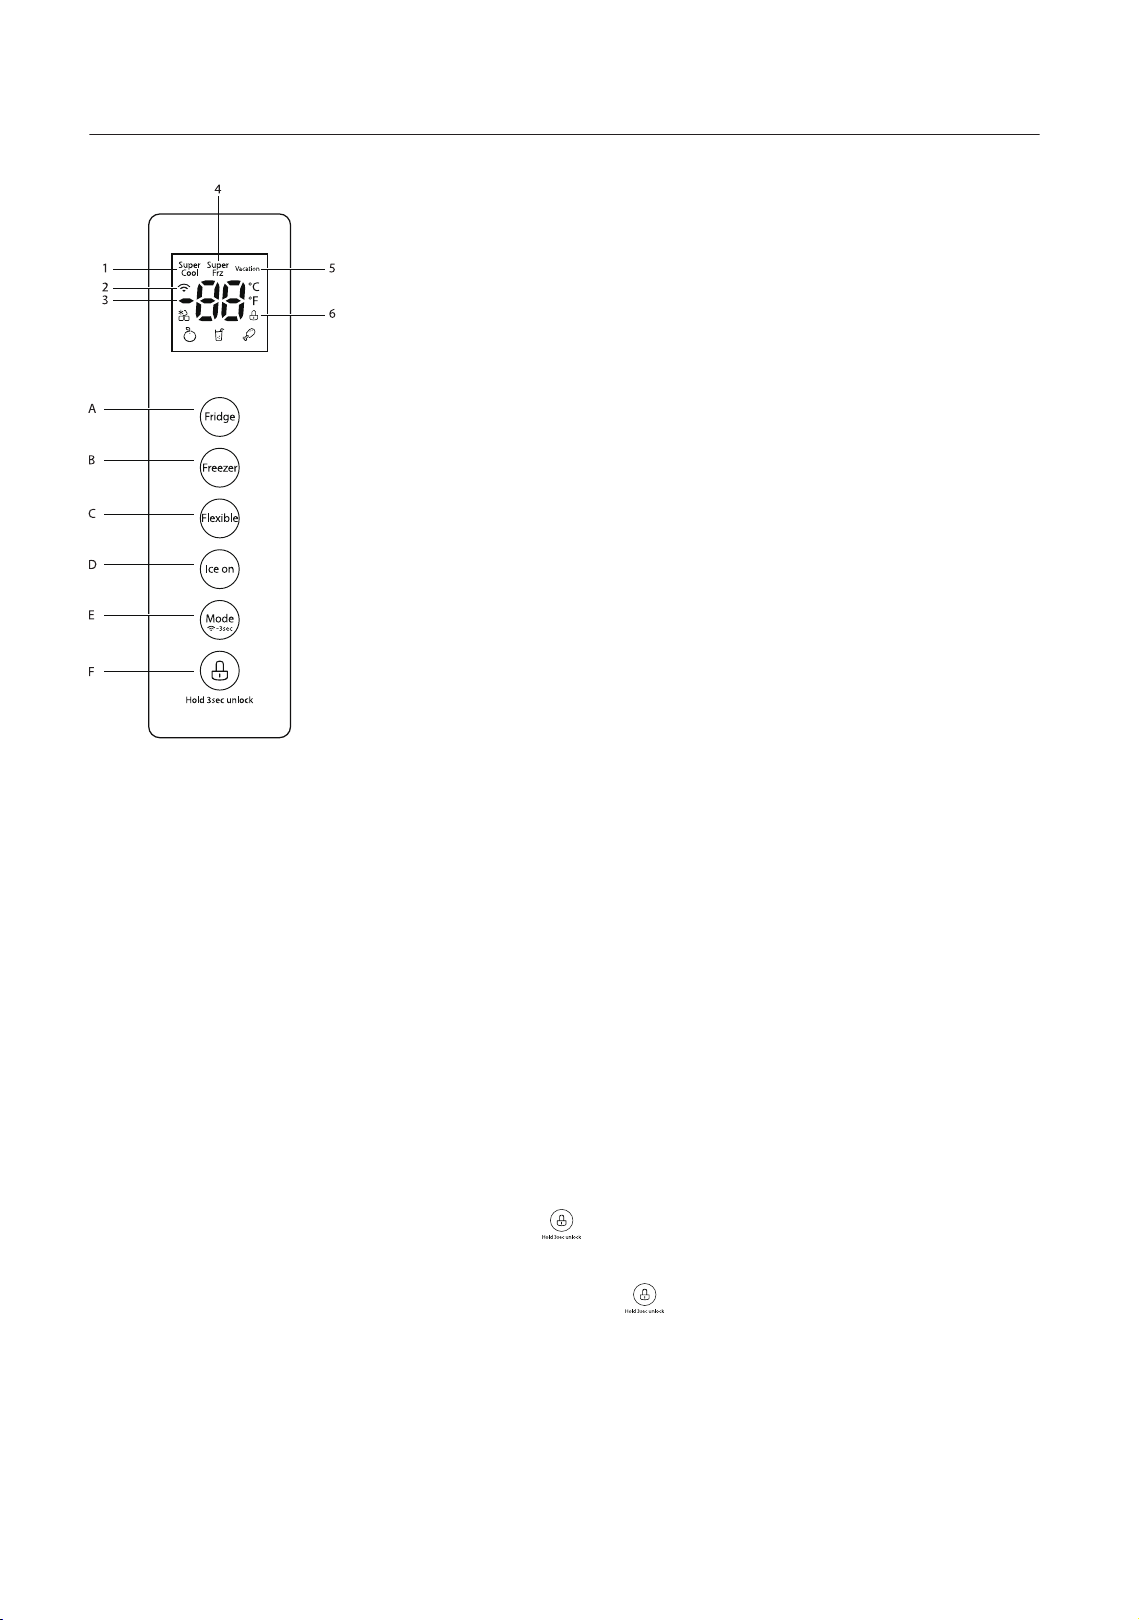
3.2 Functions
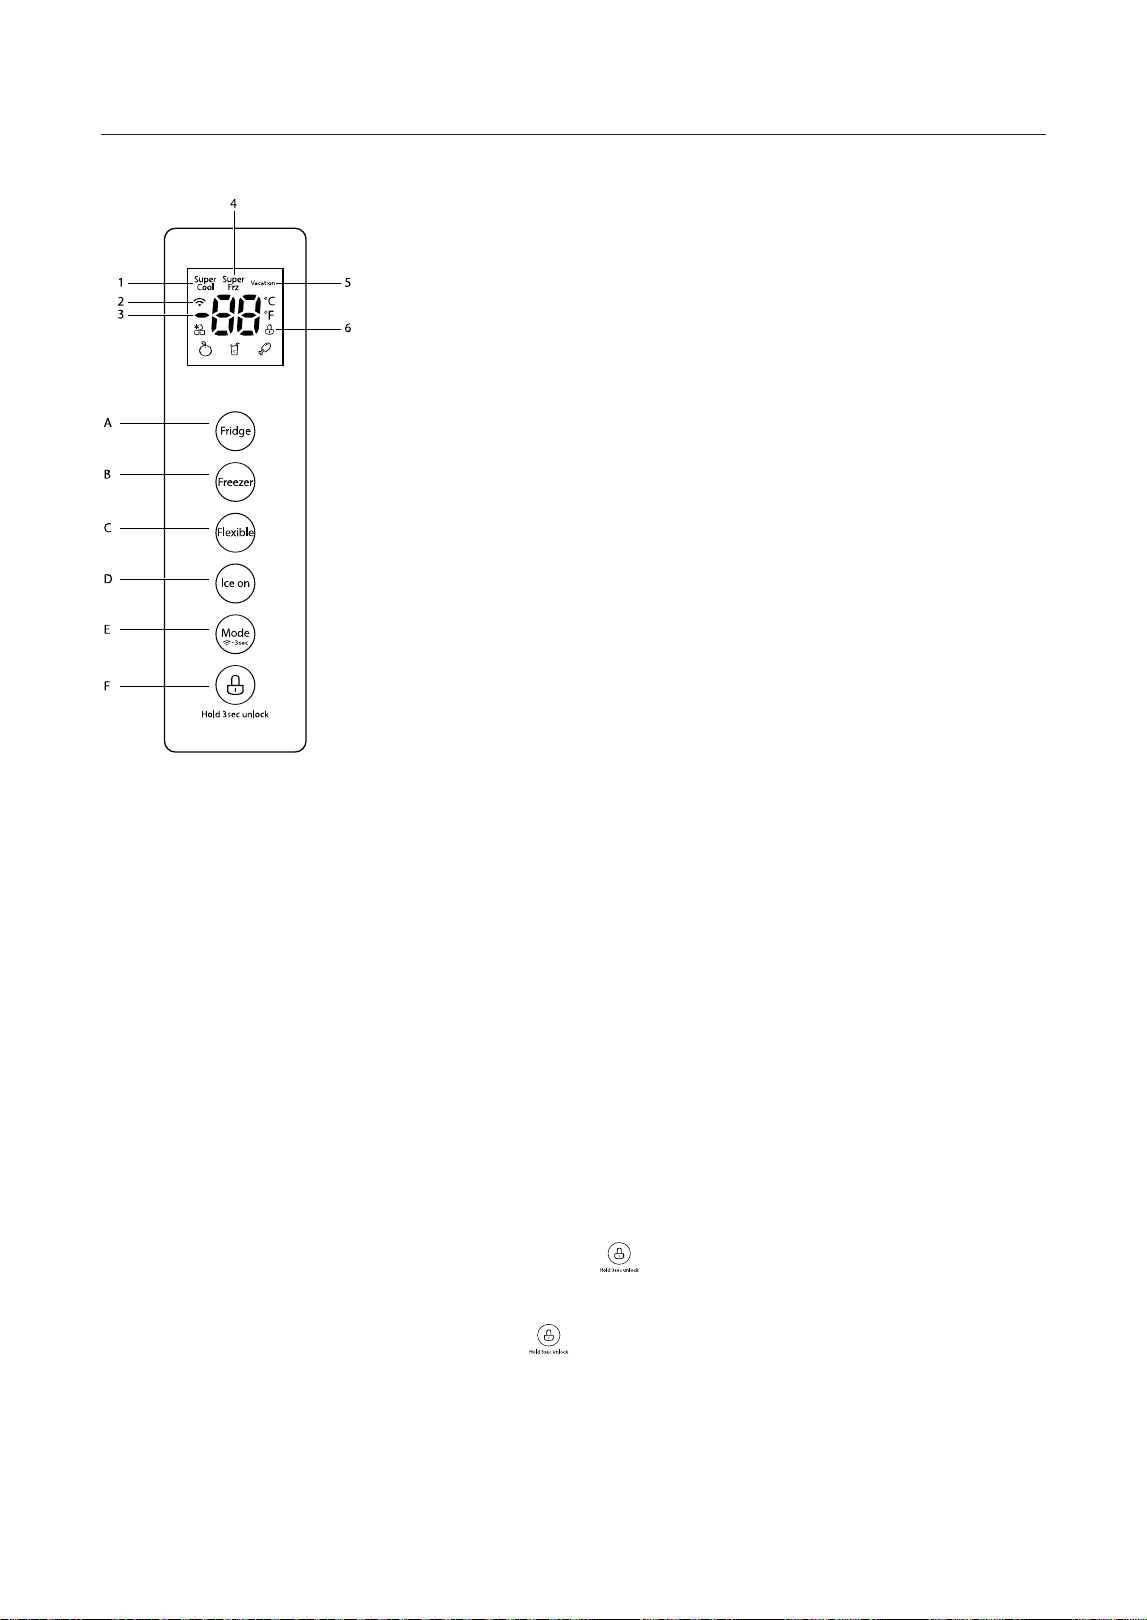
1. Display
1) Super Cool 2) Wireless network 3) Temperature
4) Super Freeze 5) Vacation 6) Lock/Unlock
2. Buttons
A Fridge B Freezer C Flexible button
D Ice
button E Mode/Network F Lock button
3. Operation instructions
1 ) Display
The first time the refrigerator is electrified, the screen will be bright for three
seconds, and a ringtone indicates that the machine has powered on. The
refrigerator will function, and the display on the screen will be back to normal.
The Wireless network icon is usually bright. When a snag happens, it presents
the snag code (in a cycle display mode).
When the door is closed, and no button is pressed within 30 seconds, the screen
will be locked. The light of the screen will be off in 30 seconds. It'll be on again
when any button is pressed.
a )
b)
c)
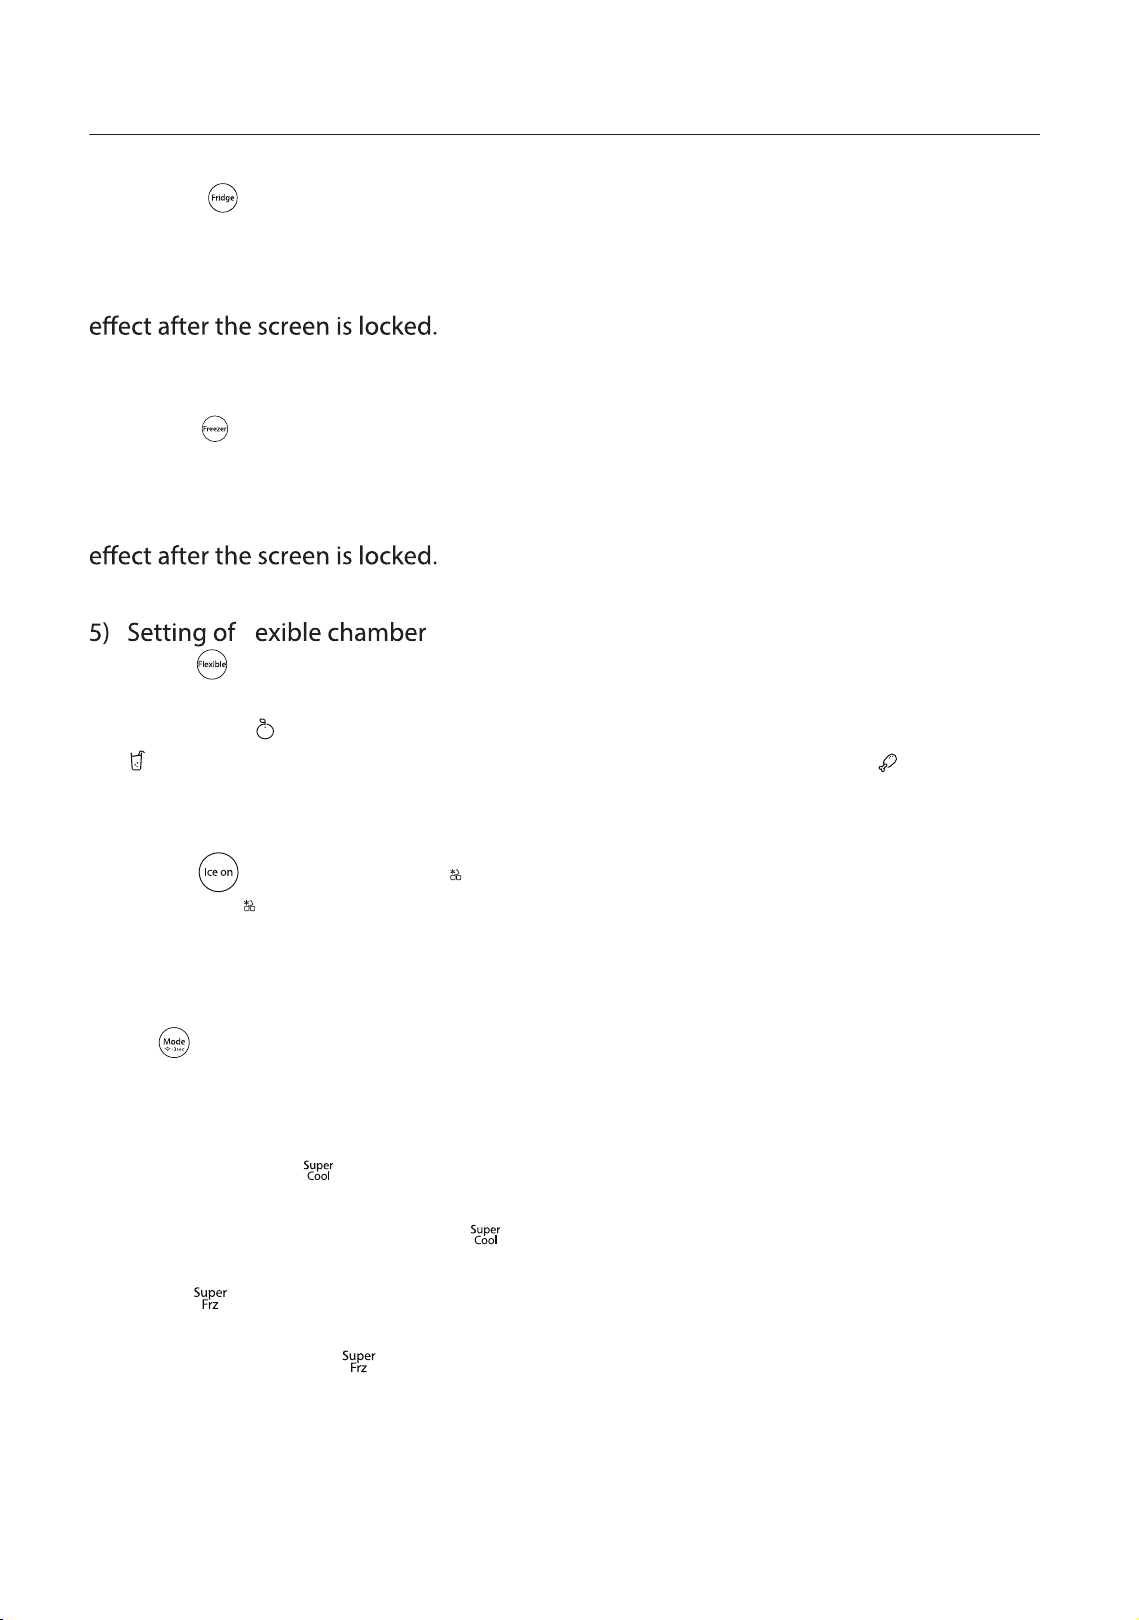
2) Lock and unlock
In the unlock state, hold the button for three seconds to have the screen
locked with a buzz.
a
b) When the screen is locked, hold the button for three seconds to unlock it
with a buzz.
c) If no button is pressed within 30 seconds, the screen will be locked automatically.
d) The alarm can be disabled when the screen is locked. Other operations with the
buttons can only be done when the screen is unlocked.
)
16
6) Ice Making Setting
Press the button once, the “ ” icon lights up, and enter the ice-making mode. Press
it again, the “ ” icon goes out, and the ice-making mode is turned off.
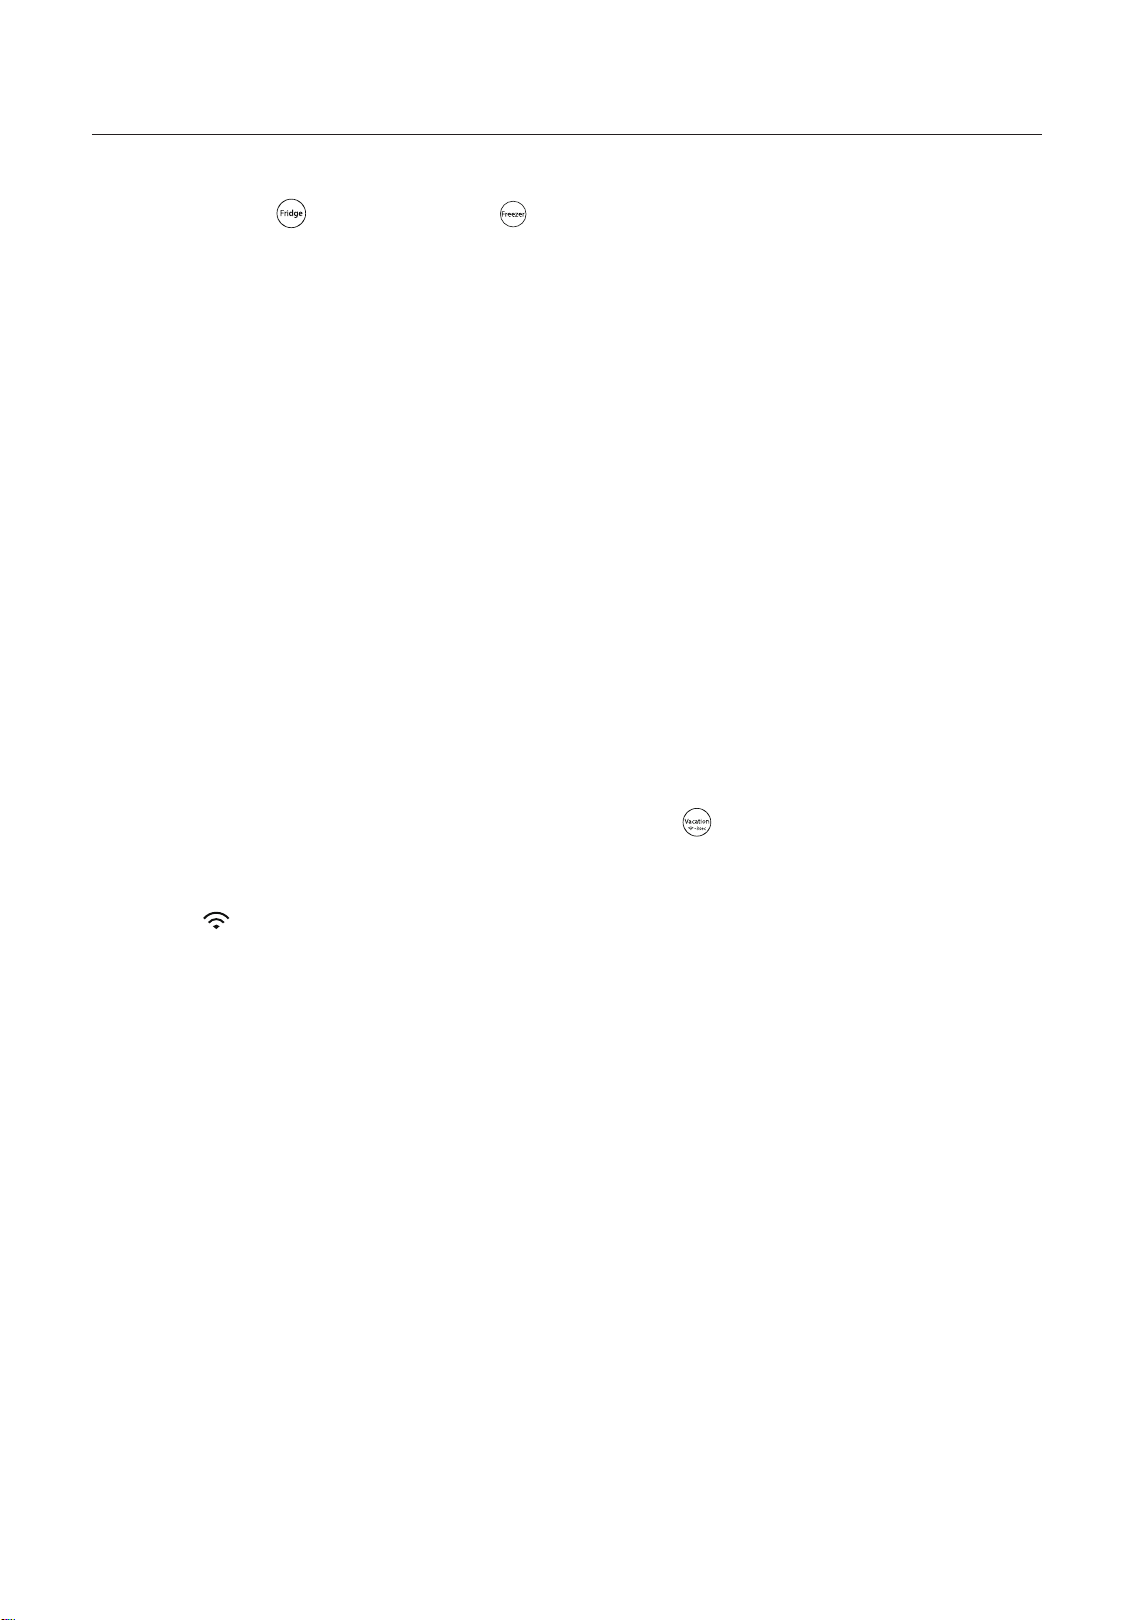
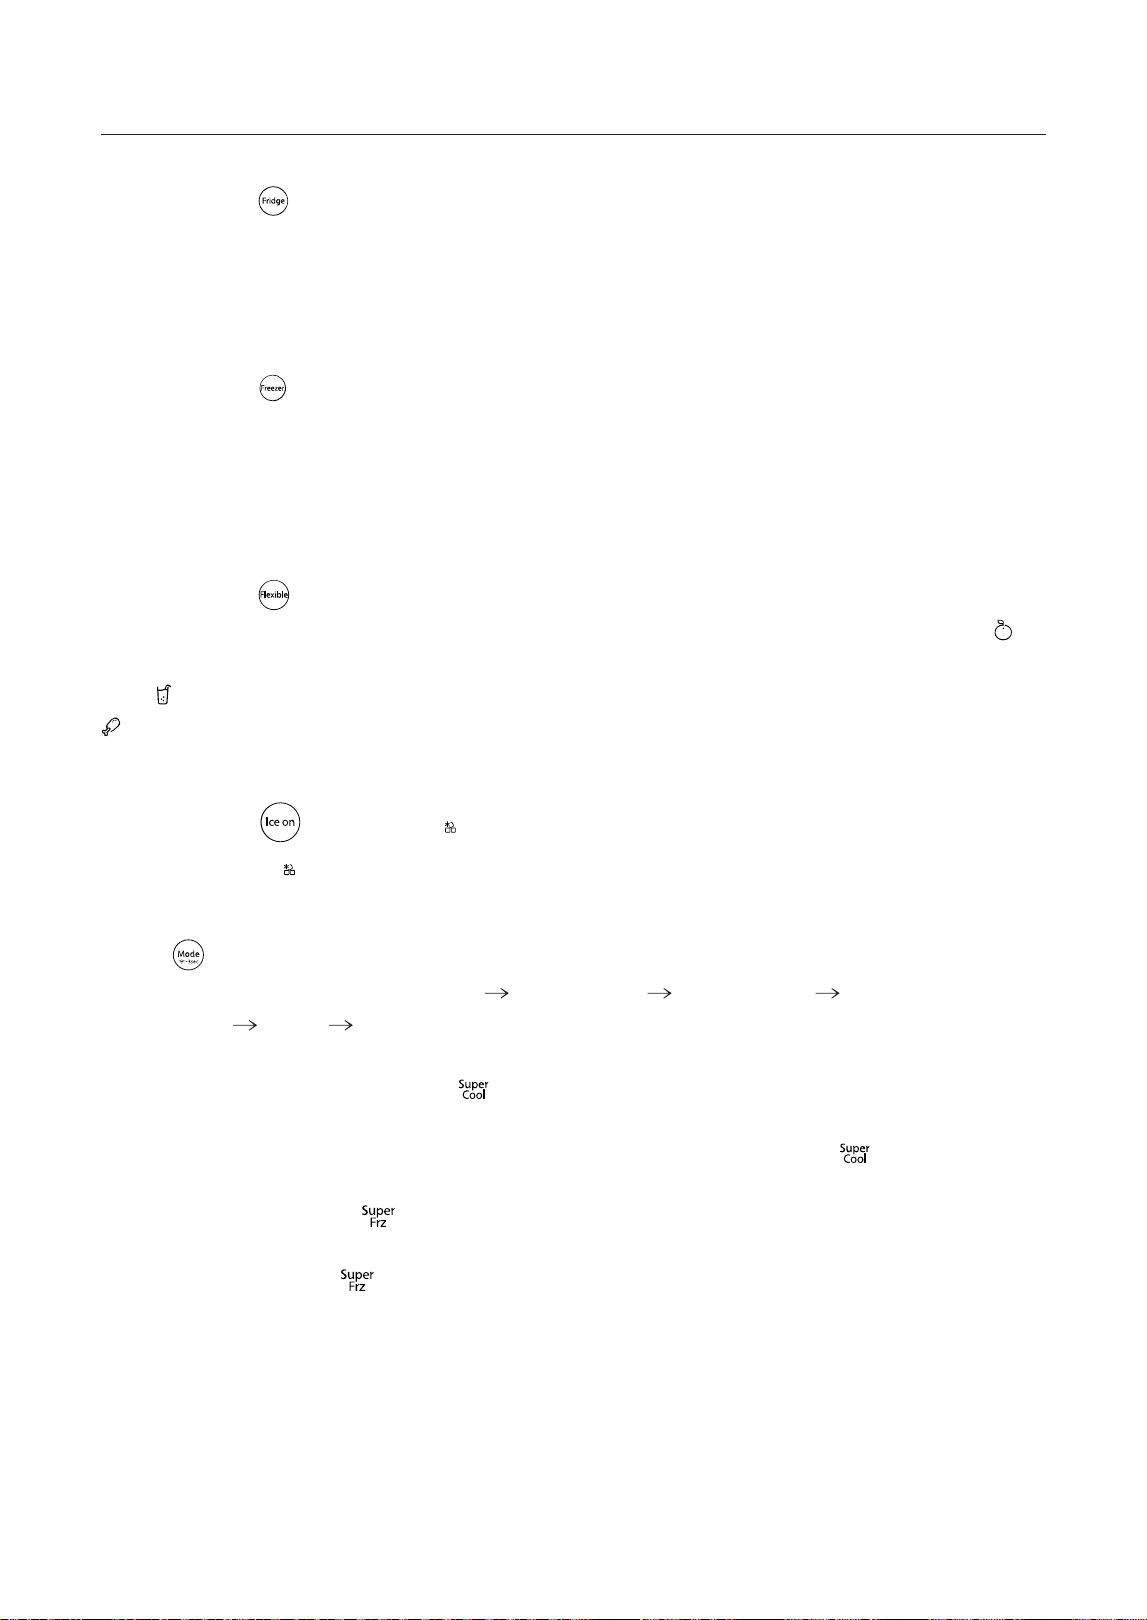
3) Setting of the temperature of the fridge
Press the button to set the range of the fridge's temperature. Press it again to
adjust the temperature. Each press of the button causes the temperature to drop by
1°C. When the temperature reaches 2°C, press the button again, and the temperature
will be set for 8°C. Then, the range of the fridge will be 2°C-8°C. The setting will take
4) Setting of the temperature of the freezer
Press the button to set the range of the fridge's temperature. Press it again to adjust
the temperature. Each press of the button causes the temperature to drop by 1°C. When
the temperature reaches -24°C, press the button again to set the temperature set for
-16°C.The range of the freezer's temperature will be -24°C-16°C. The setting will take
Press the button to adjust the mode of the flexible chamber. Each time it is pressed,
fl
the mode of the flexible chamber changes once; when the "Fruit and Vegetable" mode
is enabled, the icon lights up; Press it again to set the Cold Drinks mode, and then
the icon lights up; press it again to set the Chilled mode, and then the icon lights up.
7) Mode setting
Press to cycle among Super Cool, Super Freeze and Vacation modes as follows:
Cycle setting: Vacation → Super Freeze → Super Cool → Super Cool and Super
Freeze → None → Vacation...
When Super Cool mode is set, the refrigerating chamber temperature is automatically
set to 2°C, and the icon illuminates; when the system exits Super Cool mode, the set
temperature of the refrigerating chamber automatically returns to the temperature set
before Super Cool mode, and the icon goes out.
When Super Freeze mode is set, the freezer temperature is automatically set to -24°C,
and the icon illuminates; when the system exits Super Freeze mode, the set
temperature of the freezer automatically returns to the temperature set before Super
Freeze mode, and the icon goes out.
When Vacation mode is set, the refrigerating mode is turned off and the Vacation icon
illuminates; when the system exits Vacation mode, the refrigerating chamber
automatically returns to the temperature set before Vacation mode, and the Vacation
icon goes out.
17
8) Setting of the notification sound of door opening
Hold down the button and the button simultaneously for three seconds to
set the notification sound of door opening.
The user can close the notification sound with a buzz (in a falling tone) by holding
down the two buttons after it's activated.
Holding down the two buttons again, the user can activate the notification sound
with a buzz (in a rising sound).
Note: when the refrigerator is first electrified, the notification sound is on by default.
9) Door opening alarm
When the door of the fridge or the freezer has been open for more than two seconds,
an alarm will sound. It's three buzzes for the first time. Then, it has one more buzz
every minute and will have 30 minutes at most in a minute until the door is closed.
The user can shut off the alarm by pressing any button.
10) Setting of wireless network
After the refrigerator powers on, "AP" will be shown in the temperature area on the
display control panel when the user holds down the button for three seconds. It
means the wireless network is accessible. The user can log in TSmartLife App and
connect the refrigerator with the wireless network according to the app's guidance.
The sign will brighten when the connection is done. For the download of TSmartLife
App and the way of connecting with the wireless network, please refer to the appendixes.
18
Ice maker not making ice
EP
EC
EEPROM fault
EEPROM fault (only displayed during
self-inspection)
Control according to factory
settings
Abnormal Hall sensor signal detected during
Abnormal zeroing of ice machine during
initialization
Wait for the ice machine to restart
EE Ice machine sensor fault
The measured temperature value of the heat
detector is <-50°C or >+60°C.
Ice machine does not make ice
E0 Ice machine fault
Ice maker off-ice fault
the off-ice process
E7 Ambient temperature fault
The measured temperature value of the heat
detector is ˘-30°C or >+65°C.
Execute with the ambient temperature
as 25°C;
EH Humidity sensor fault
Measured humidity < 5% RH or measured humidity
> 105% RH (no alarm after 3 minutes)
Execute with the humidity as 85%;
E5
Freezing and defrosting sensor
fault
The measured temperature value of the heat
detector is <-50°C or >+60°C.
During defrosting, the defroster heater
exits according to the specified time;
E6
Communication fault between
motherboard and display board
No successful communication after 8s of
startup/1min of operation
Set the master control board to the
pre-fault state.
Freezer temperature sensor fault
The measured temperature value of the heat
detector is <-50°C or >+60°C.
Execute refrigeration in the freezer
according to the start-stop cycle at a
specified time period;
E3
Flexible chamber temperature sensor
fault
The measured temperature value of the heat
detector is <-50°C or >+60°C.
Execute refrigeration in the flexible
chamber according to the start-stop
cycle at a specified time period;
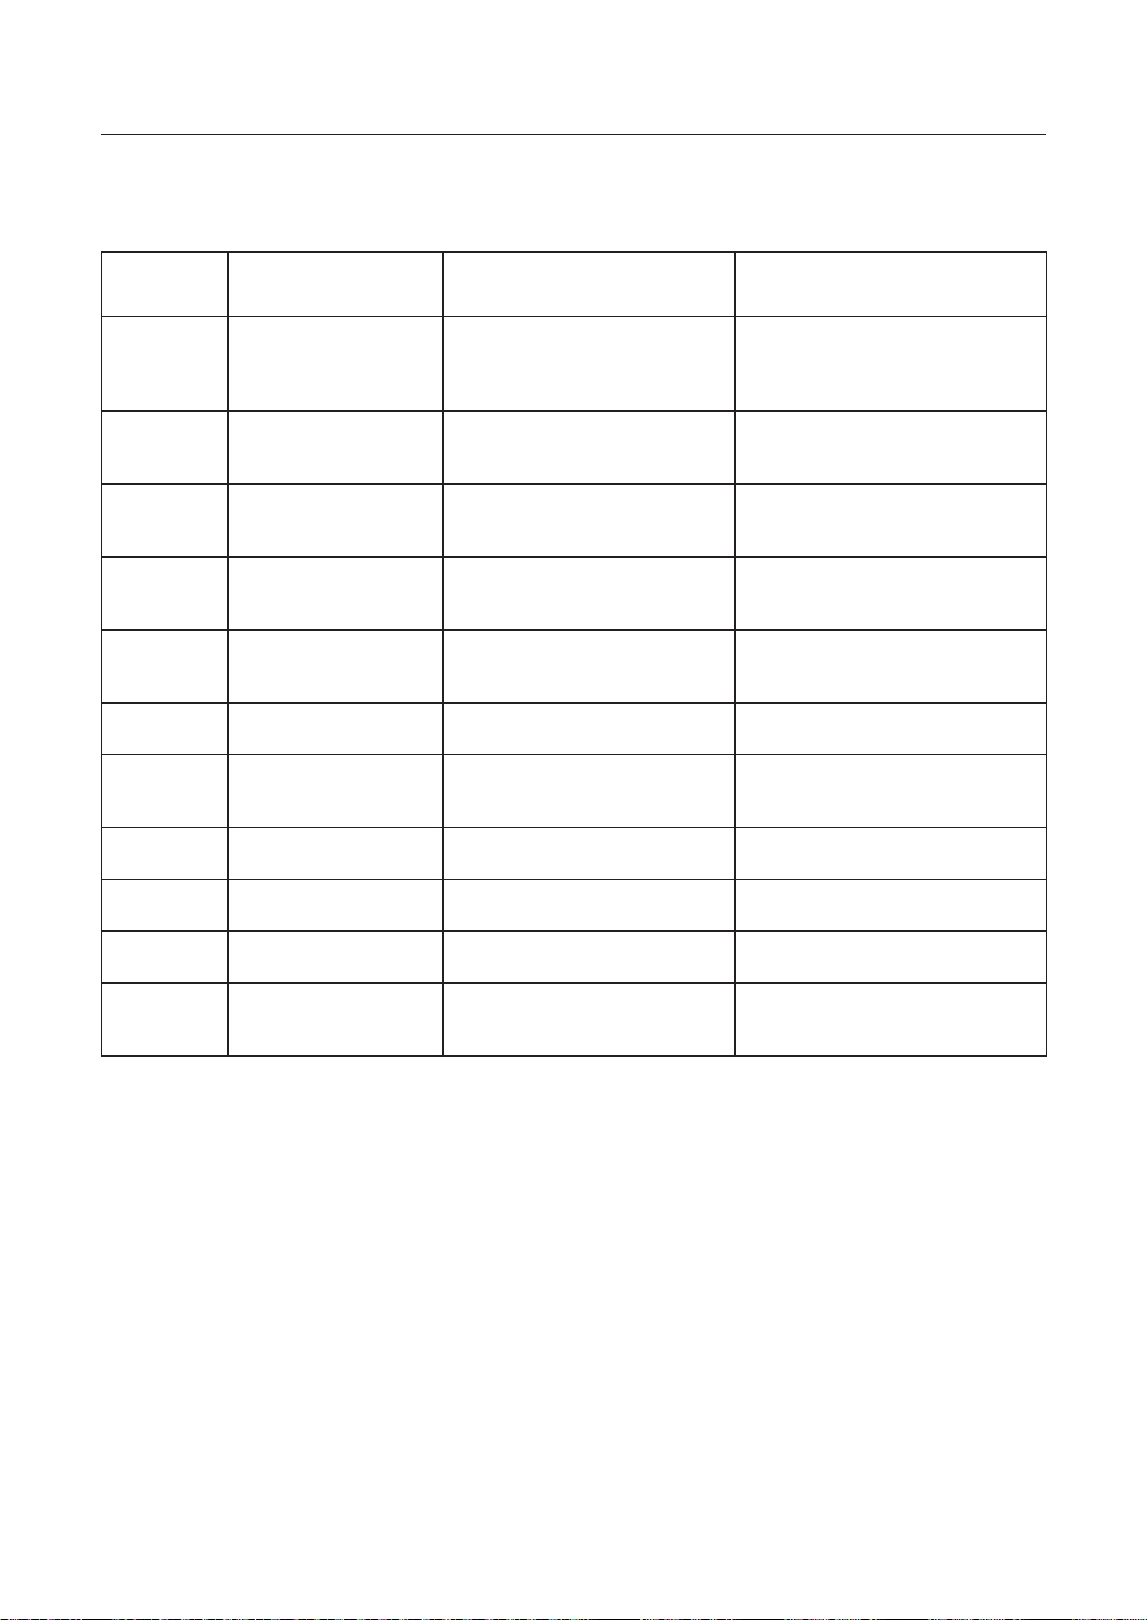
Fault code Fault name Fault entry
Troubleshooting
E1
Refrigerating chamber temperature
sensor fault
The measured temperature value of the heat
detector is <-50°C or >+60°C.
Execute refrigeration in the refrigerating
chamber according to the start-stop
cycle at a specified time period
E2
11) Notification of errors
The following notifications on the screen means malfunctions of the refrigerator.
19
3.3 Instructions for water tank use and addition
Steps of adding water:
1) Pull out the water tank from the refrigerator.
2) Open the water-injection cover.
3)Add bottled drinking water or alkaline water, without exceeding the Max level.
• It is recommended not to exceed 3L, otherwise the water will overflow
• Fill the tank only with potable water such as mineral or purified water.
Do not use other liquid. It is not allowed to add juice, milk and cola in
the water tank.
4) Close the water-injection cover filtered water.
5) Push the water tank inside until it is fixed.
• After the water tank is pushed in, please wait for 30s before taking the
first cup of water.
• Make sure the water tank fits into the shelf. Otherwise, the water tank
may not operate properly.
• Do not use the refrigerator without inserting the water tank. This may
decrease the cooling performance.
refrigerator
20
Gas
Detergent
Bananaoil
Alcohol
Dusts behind the refrigerator and on the ground shall be timely cleaned to improve the
cooling effect and energy saving.
Check the door gasket regularly to make sure there are no debris. Clean the door gasket with
a soft cloth dampened with soapy water or diluted detergent.
The interior of the refrigerator should be cleaned regularly to
avoid odor.
Please turn off the power before cleaning interior, remove all
foods, drinks, shelves, drawers, etc.
Use a soft cloth or sponge to clean the inside of the
refrigerator, with two tablespoons of baking soda and a quart
of warm water. Then rinse with water and wipe clean. After
cleaning, open the door and let it dry naturally before turning
on the power.
For areas that are difficult to clean in the refrigerator (such as
narrow sandwiches, gaps or corners), it is recommended to wipe them regularly with a soft
rag, soft brush, etc. and when necessary, combined with some auxiliary tools (such as thin
sticks) to ensure no contaminants or bacterial accumulation in these areas.
Do not use soap, detergent, scrub powder, spray cleaner, etc. as these may cause odors in
the interior of the refrigerator or contaminated food.
Clean the bottle frame, shelves and drawers with a soft cloth dampened with soapy water or
diluted detergent. Dry with a soft cloth or dry naturally.
Wipe the outer surface of the refrigerator with a soft cloth dampened with soapy water,
detergent, etc., and then wipe dry.
Do not use hard brushes, clean steel balls, wire brushes, abrasives (such as toothpastes),
organic solvents (such as alcohol, acetone, banana oil, etc.), boiling water, acid or alkaline
items, which may damage the fridge surface and interior. Boiling water and organic solvents
such as benzene may deform or damage plastic parts.
Do not rinse directly with water or other liquids during cleaning to avoid short circuits or
affect electrical Insulation after immersion.
4.1 Overall cleaning
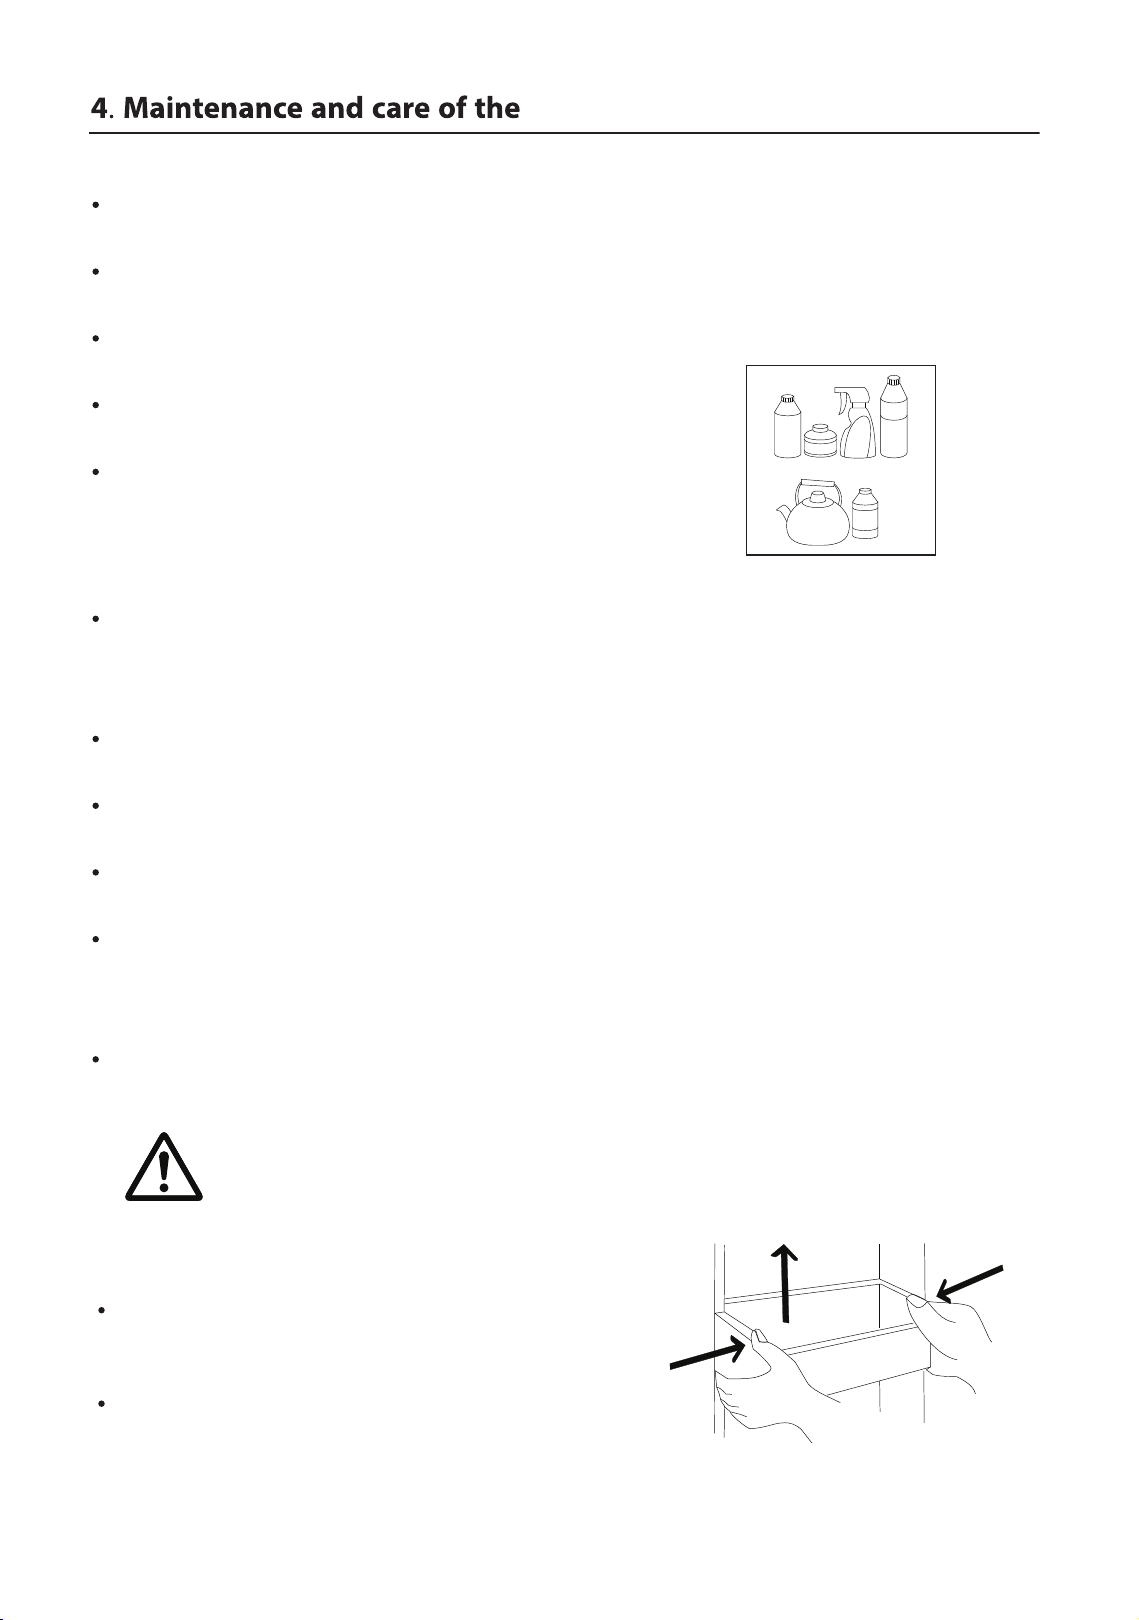
According to the direction arrow in the figure below,
use both hands to squeeze the tray, and push it
upward, then you can take it out.
After washing the tray having been taken out, you can
adjust its installing height in accordance with your
requirement.
4.2 Cleaning of door tray
Please unplug the refrigerator for defrost and cleaning.
Power failure: In case of power failure, even if it is in summer, foods inside the appliance can be
kept for several hours; during the power failure, the times of door opening shall be reduced, and
no more fresh food shall be put into the appliance.
Long-time nonuse: The appliance shall be unplugged and then cleaned; then the doors are left
open to prevent odor.
vegetable holder, freezing chamber drawers and etc. with tape, and tighten the leveling feet; close
the doors and fix them with tape. During moving, the appliance shall not be laid upside down or
Moving: Before the refrigerator is moved, take all objects inside out, fix the glass partitions,
horizontally, or be vibrated; the inclination during movement shall be no more than 45°.
The refrigerator is made based on the air-cooling principle and thus has automatic defrosting
function. Frost formed due to change of season or temperature may also be manually removed by
disconnection of the appliance from power supply or by wiping with a dry towel.
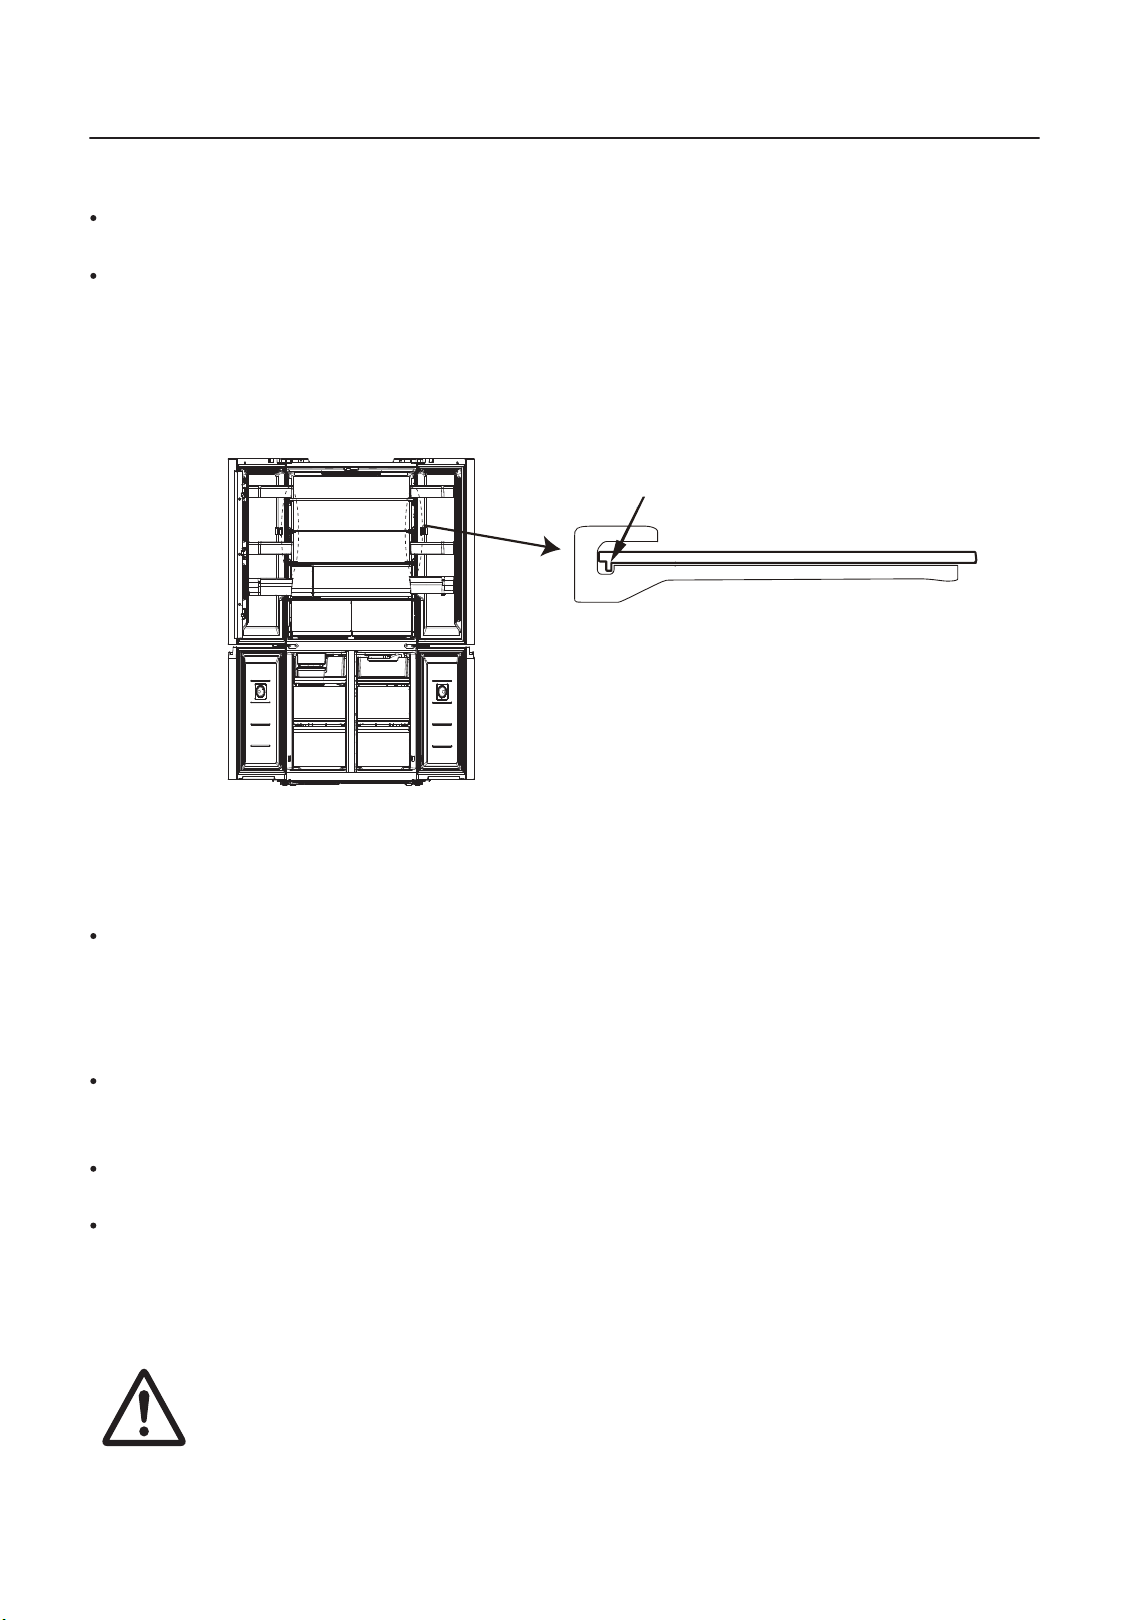
As the innermost part of the refrigerator liner where contacting the shelves has a backstop, you
shall raise the shelves upward, then you can be able to take it out.
Adjust or clean the shelves according to your requirement. Soft towels or sponge dipped in water
and non-corrosive neutral detergents are suggested for cleaning. The freezer of shall be finally
cleaned with clean water and dry cloth. Open the door for natural drying before the power is
turned on. Do not use hard brushes, clean steel balls, wire brushes, abrasives, such as toothpastes,
organic solvents (such as alcohol, acetone, banana oil, etc.), boiling water, acid or alkaline items
clean refrigerator considering that this may damage the fridge surface and interior.
21
4.3 Cleaning of Glass shelf
backstop
raise the glass shelf upwardsk
then pull it out
4.4 Defrosting
4.5 Out of operation
The appliance shall run continuously once it is started.
Generally, the operation of the appliance shall not be
interrupted; otherwise the service life may be impaired.
(The picture above is only for reference. The actual configuration will depend on the physical
product or statement by the distributor)
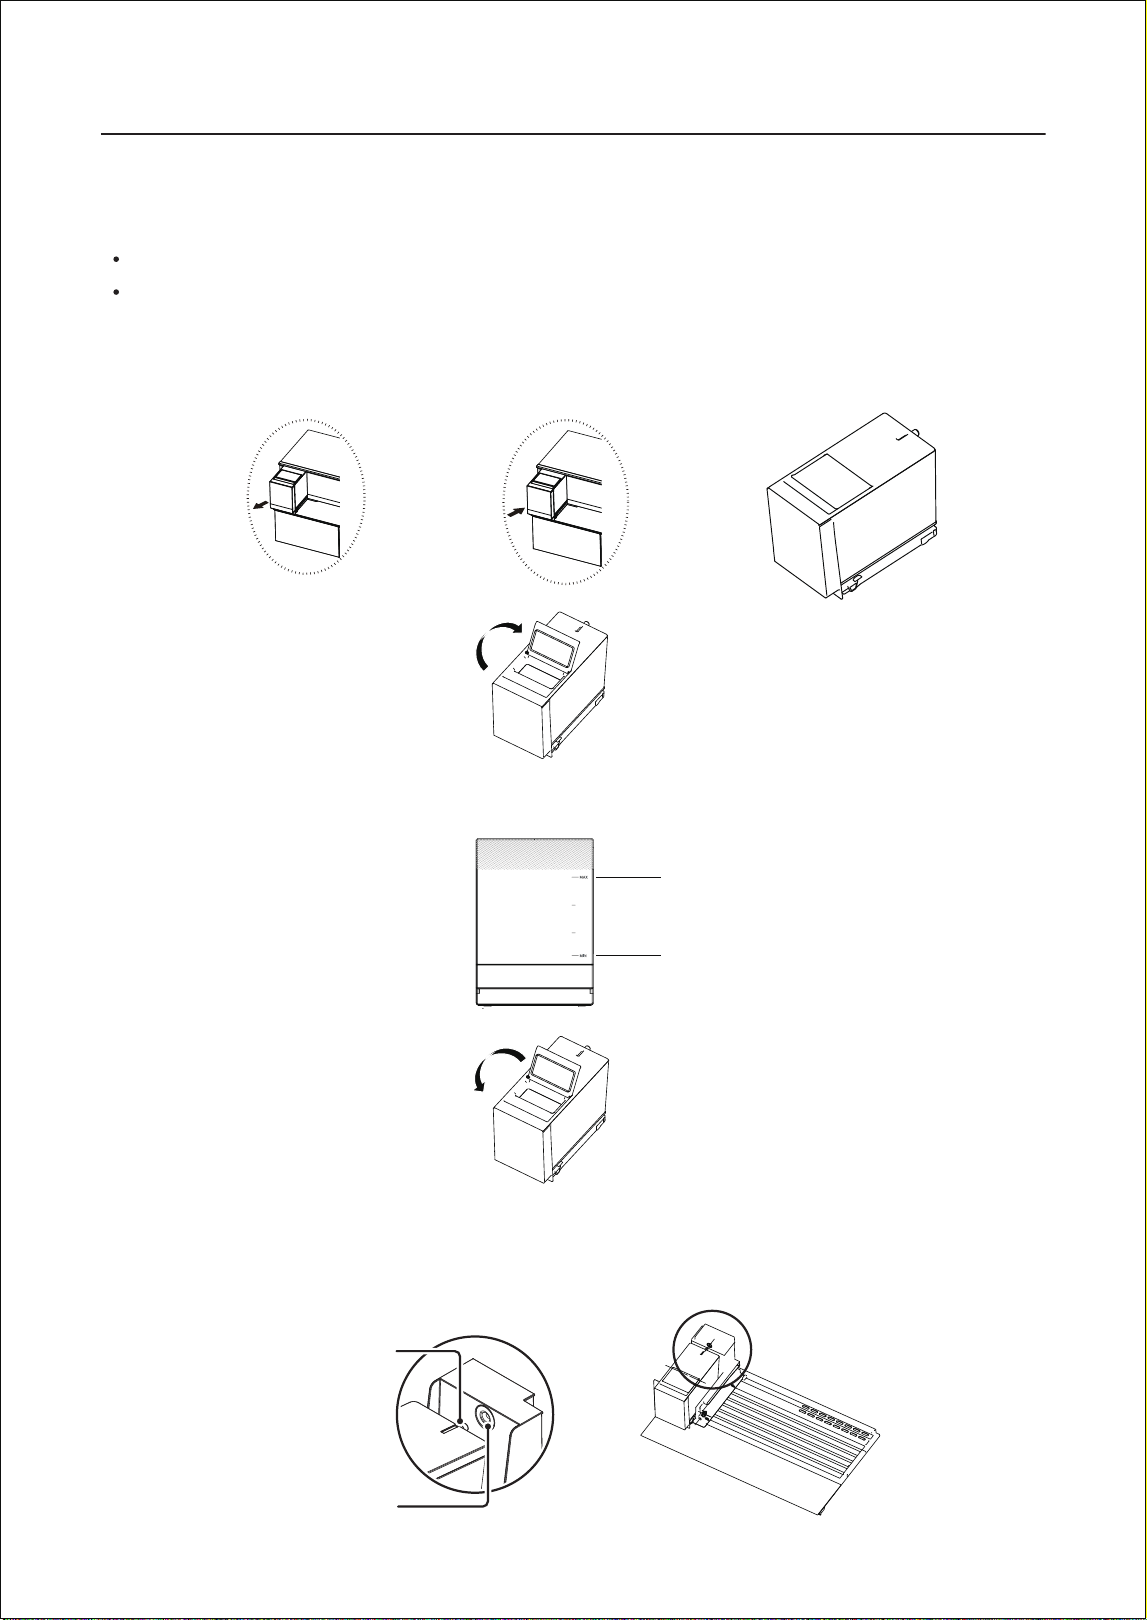
Water source: bottled purified water or potable water.
Water adding steps:
a) Lift up and pull out the water tank of ice maker in the refrigerator, with the water
filling port vertically upward, and the water tank placed flat on the stable surface.
c) Bottled water or potable water shall not exceed the maximum water level mark
MAX-3L or be lower than the minimum water level mark MIN.
MAX
MIN
e) Push the water tank into the refrigerator in parallel, fully push the water outlet
nozzle of the water tank to the circular water inlet, and clip the groove at the
bottom of the water tank into the base bulge to ensure the accurate pushing
position of the water tank of ice maker.
b) Open the water filling cover.
4.6 Precautions for the use of ice maker
Outlet
Inlet
d) Close the water filling cover.
1) Instructions for using and adding water to the water tank of ice make
22
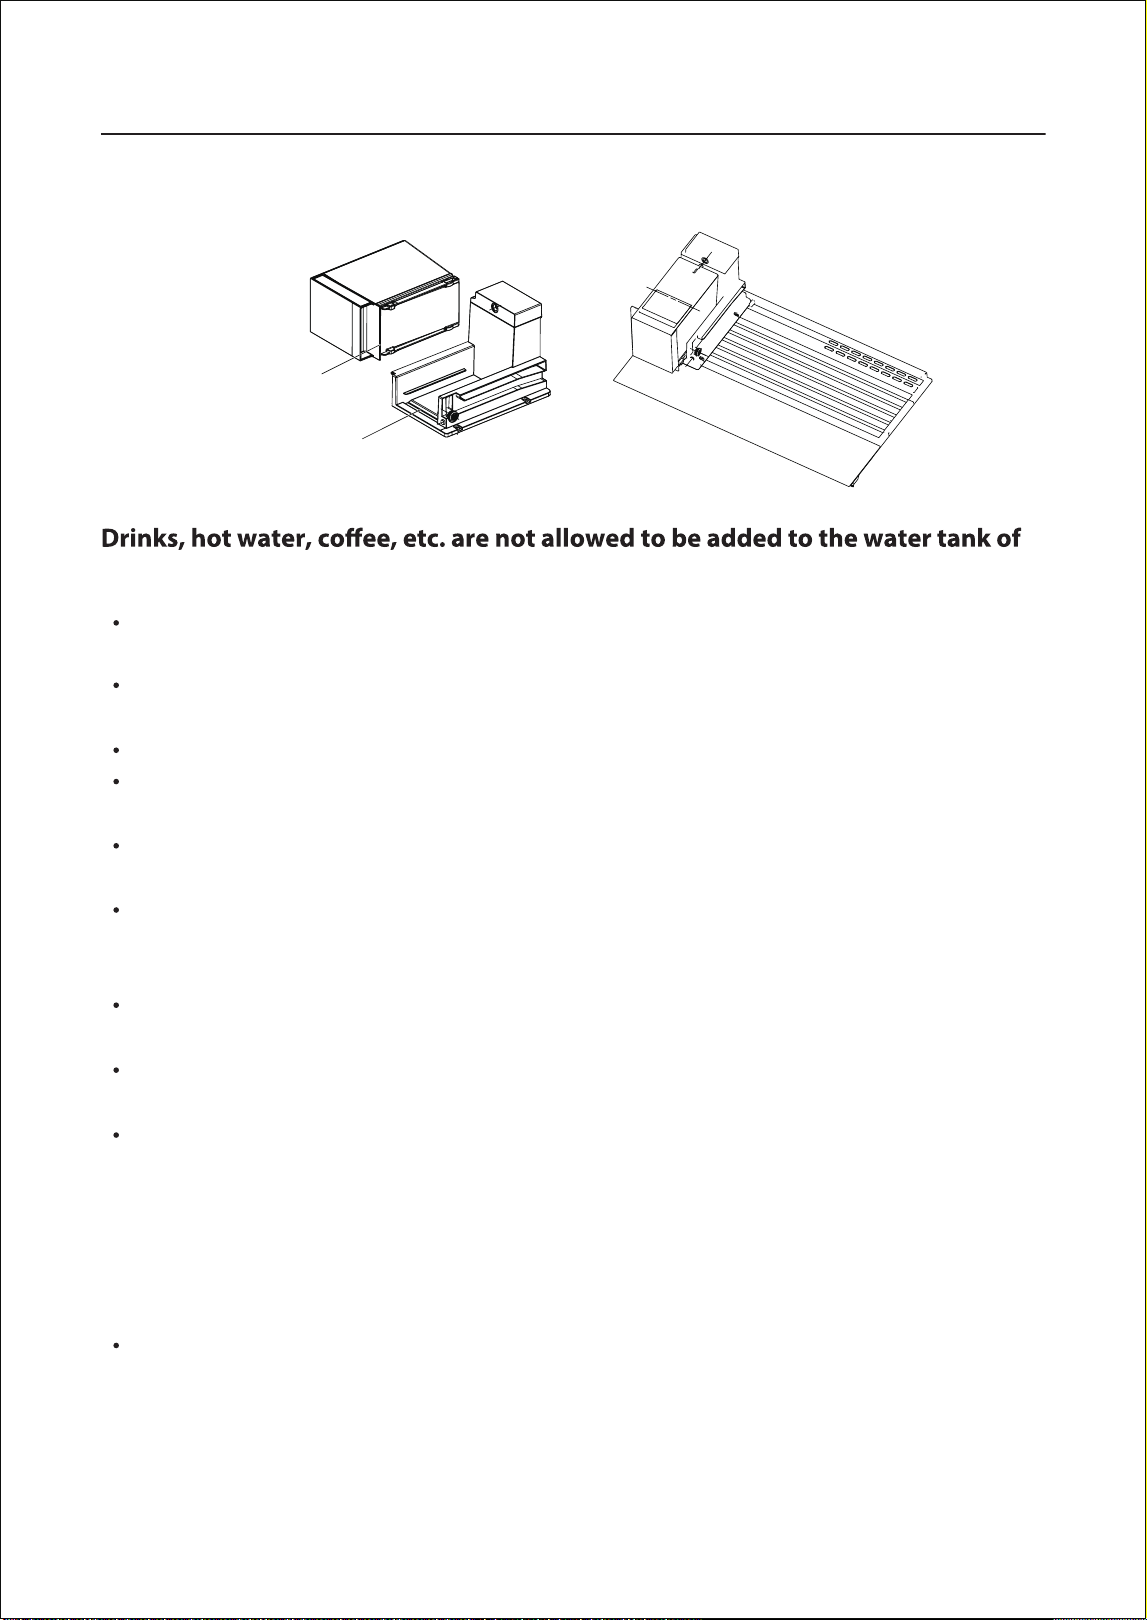
NOTE:
ice maker.
When disassembling the water tank used in the ice maker, a small amount of
water will spill onto the glass shelf. When water spills, wipe dry with a soft cloth.
Drinks, hot water, coffee, etc. are not allowed to be added to the water tank of ice
maker. It may cause system failure and water leakage.
Please clean the water tank before use.
Do not remove the water tank bracket or damage the water pipe. It may cause
system failure and water leakage.
Discard the drained water (about 5 cups) and ice (about 30 pieces) from the first
use. It may contain impurities.
Ensure that the water outlet of the ice maker water tank and the inlet of the
water tank bracket are fully inserted. Incomplete insertion may cause system
failure or water leakage.
If the water supply system of the ice maker is not used for 2-3 days, discard the
ice in first use, which may have smell or dust.
If you do not use the ice maker system for about 2 weeks, discard the water in the
water tank. The water in the water tank may have been contaminated.
It is recommended that you supplement appropriate purified water to the water
tank of ice maker within 2-3 days. The purified water can also be added to the
water tank of ice maker according to the actual amount of ice cubes used. The
water volume shall be kept within the normal range, not exceeding the maxi-
mum level MAX and not lower than the minimum level MIN.
f) Snap the groove at the bottom of the water tank into the protrusion of the base to
ensure that the water tank of the ice maker is pushed in the correct position.
2) Notes for use of ice maker
Bulge
Groove
Ice making time and ice storage capacity
23
Generally, each ice making time is 100min. 100g ice can be made each time,
about 10 ice cubes. (The ambient temperature is 25℃ and the door is not
opened or closed).
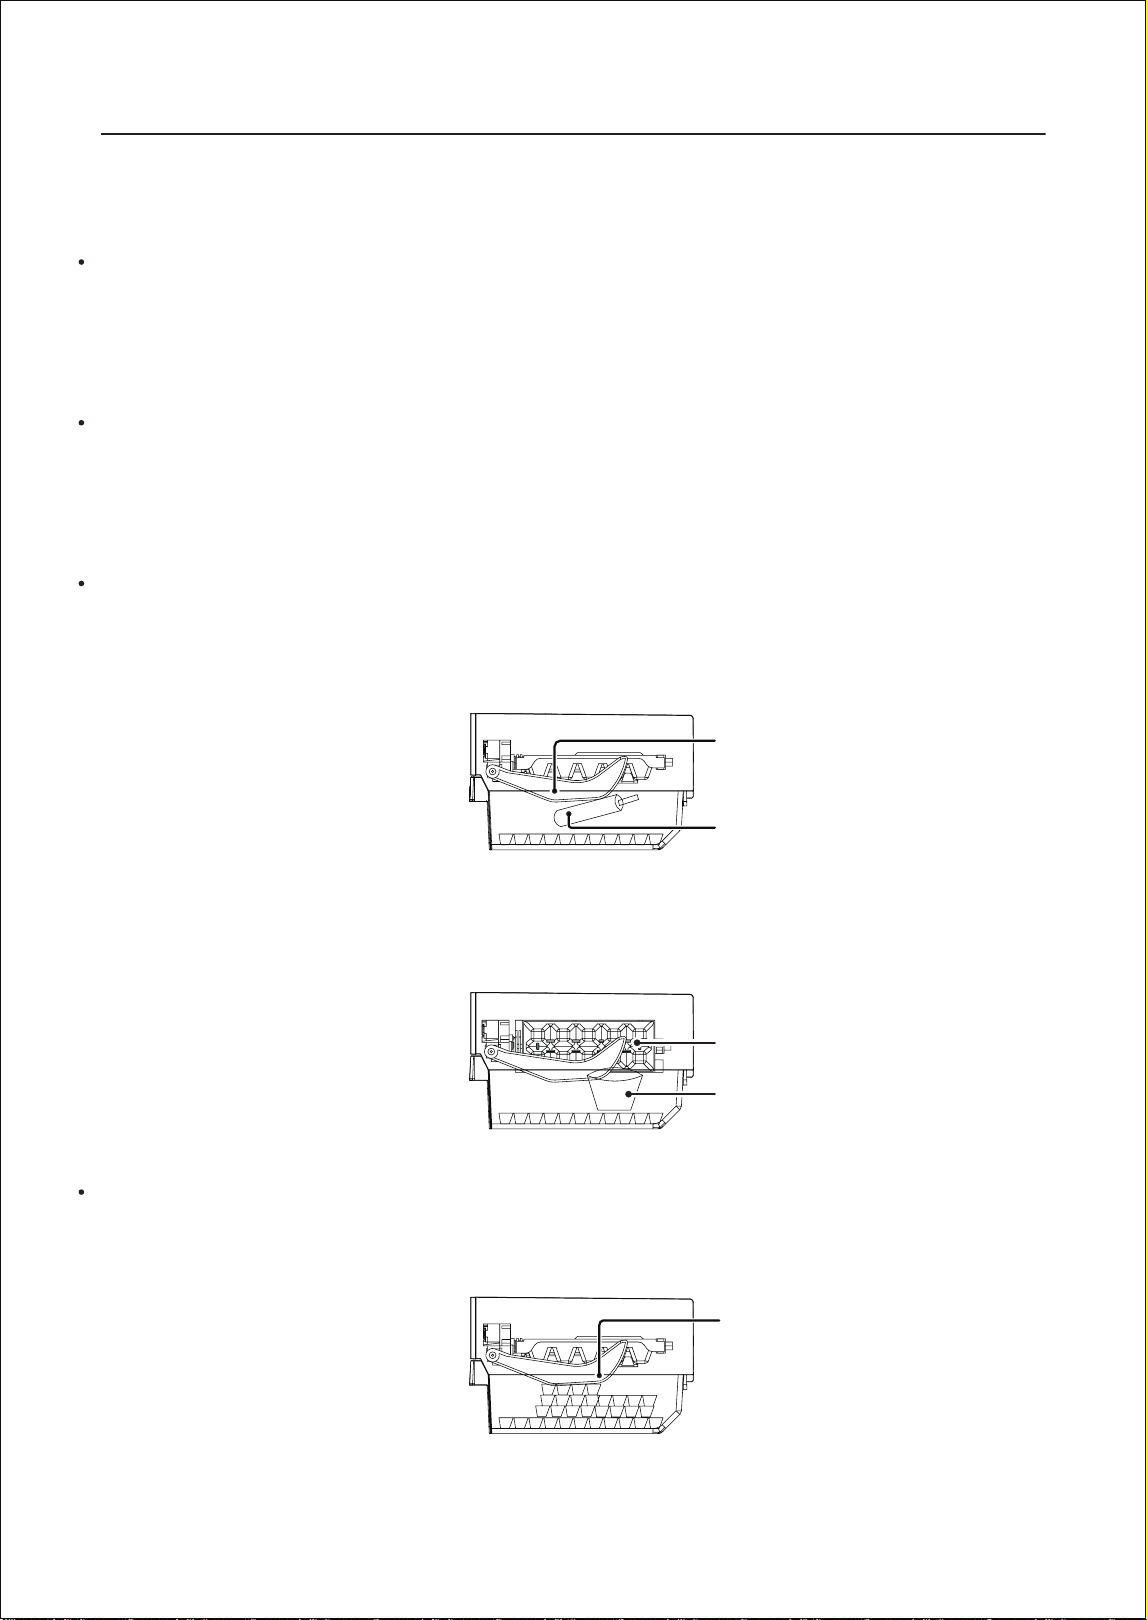
The ice storage box can be full after 8-10 times ice making, with 80-100 ice cubes.
The ice making time may be extended due to different running states of the refriger-
ator.
The ice making time may be extended in the following situations
Freezing chamber is not fully cooled at the beginning of use.
The temperature is low in winter or the ambient temperature is high in summer. The
door is opened and closed more times; or more food is put in at one time.
The space around the refrigerator is too narrow.
Notes for ice making
The ice detection rod of this ice maker will continue to make ice before touching the
ice; when the ice detection rod touches the ice in the ice storage box, the ice making
process stops. At this time, ice storage box
is full of ice.
The following situation may prevent the ice from being made even though
there is water in the water tank:
a)
Foreign matters other than ice cubes in the ice storage box contact the detection
rod.
Detection rod
Foreign matter
Ice making grid
Foreign matter
b)
Foreign matters other than ice cubes in the ice storage box cause collision or ice
making stop when the ice making grid is overturned.
The following situation may reduce the amount of ice made:
Some ice cubes piling up in some areas may hit the detection rod too early, leading
to ice making being stopped when ice making is insufficient.
Detection rod
To solve this problem, please avoid storing other items in the ice storage box and
stack the ice cubes evenly in ice storage box.
24
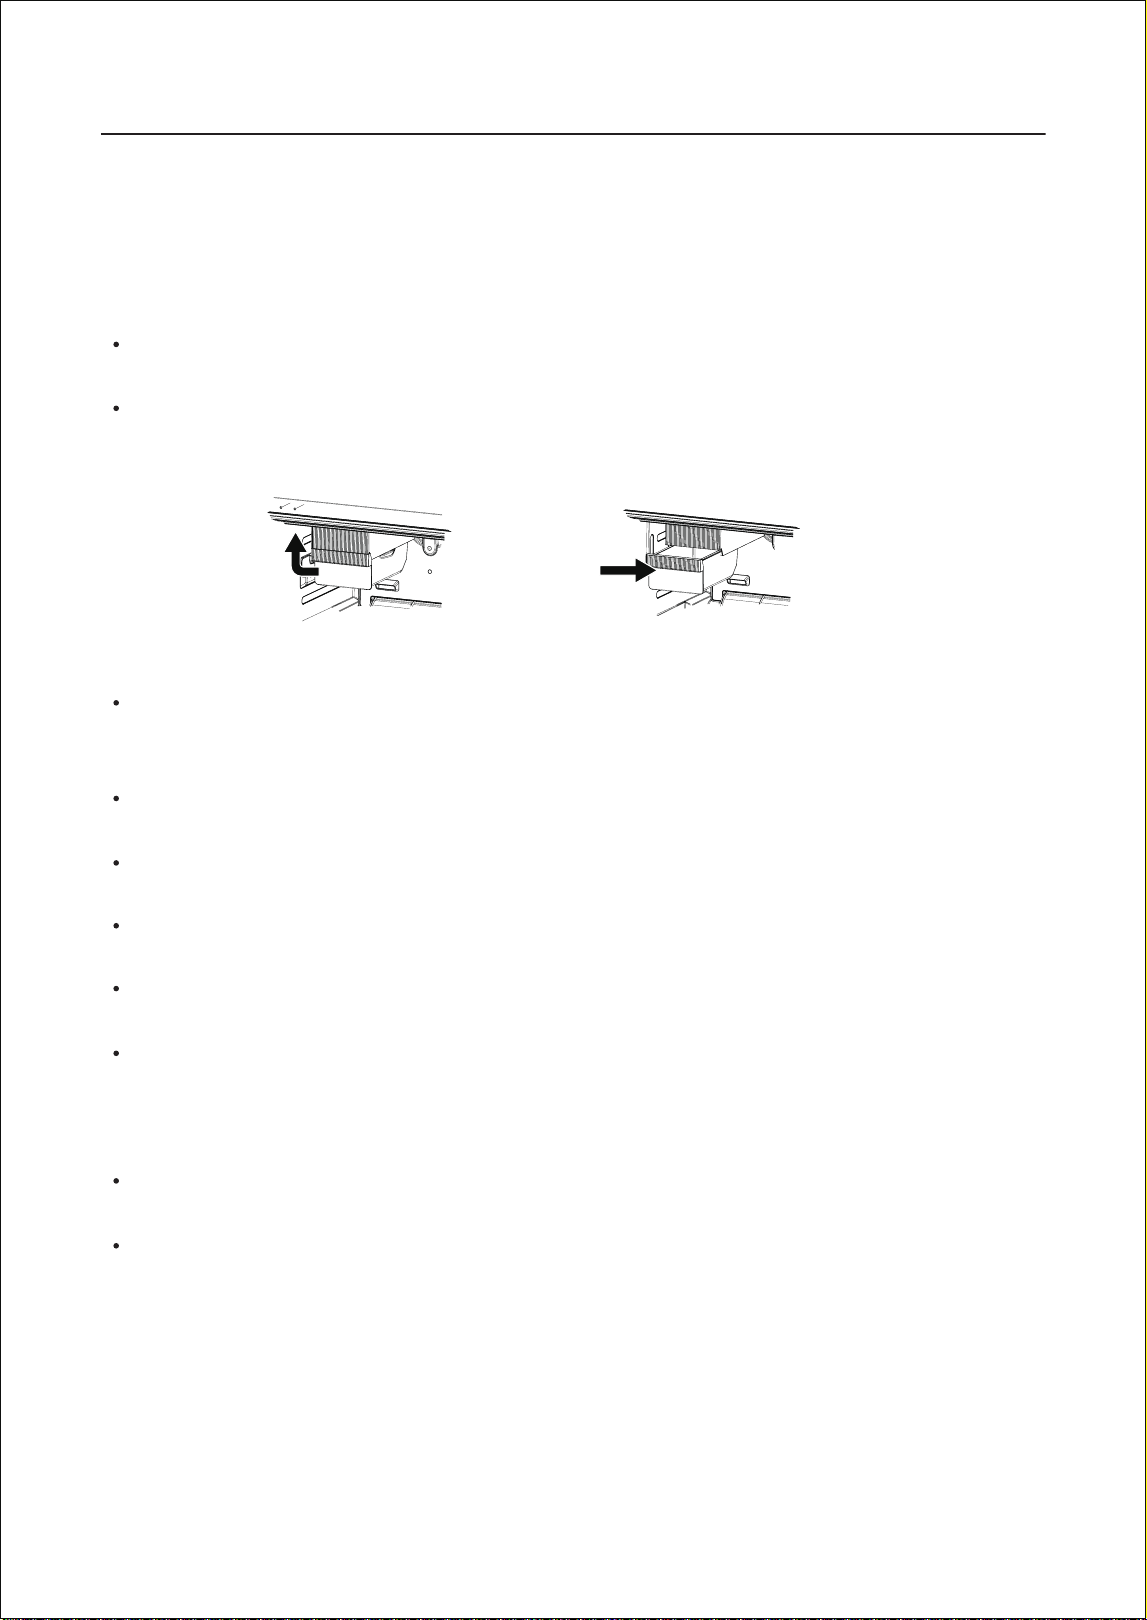
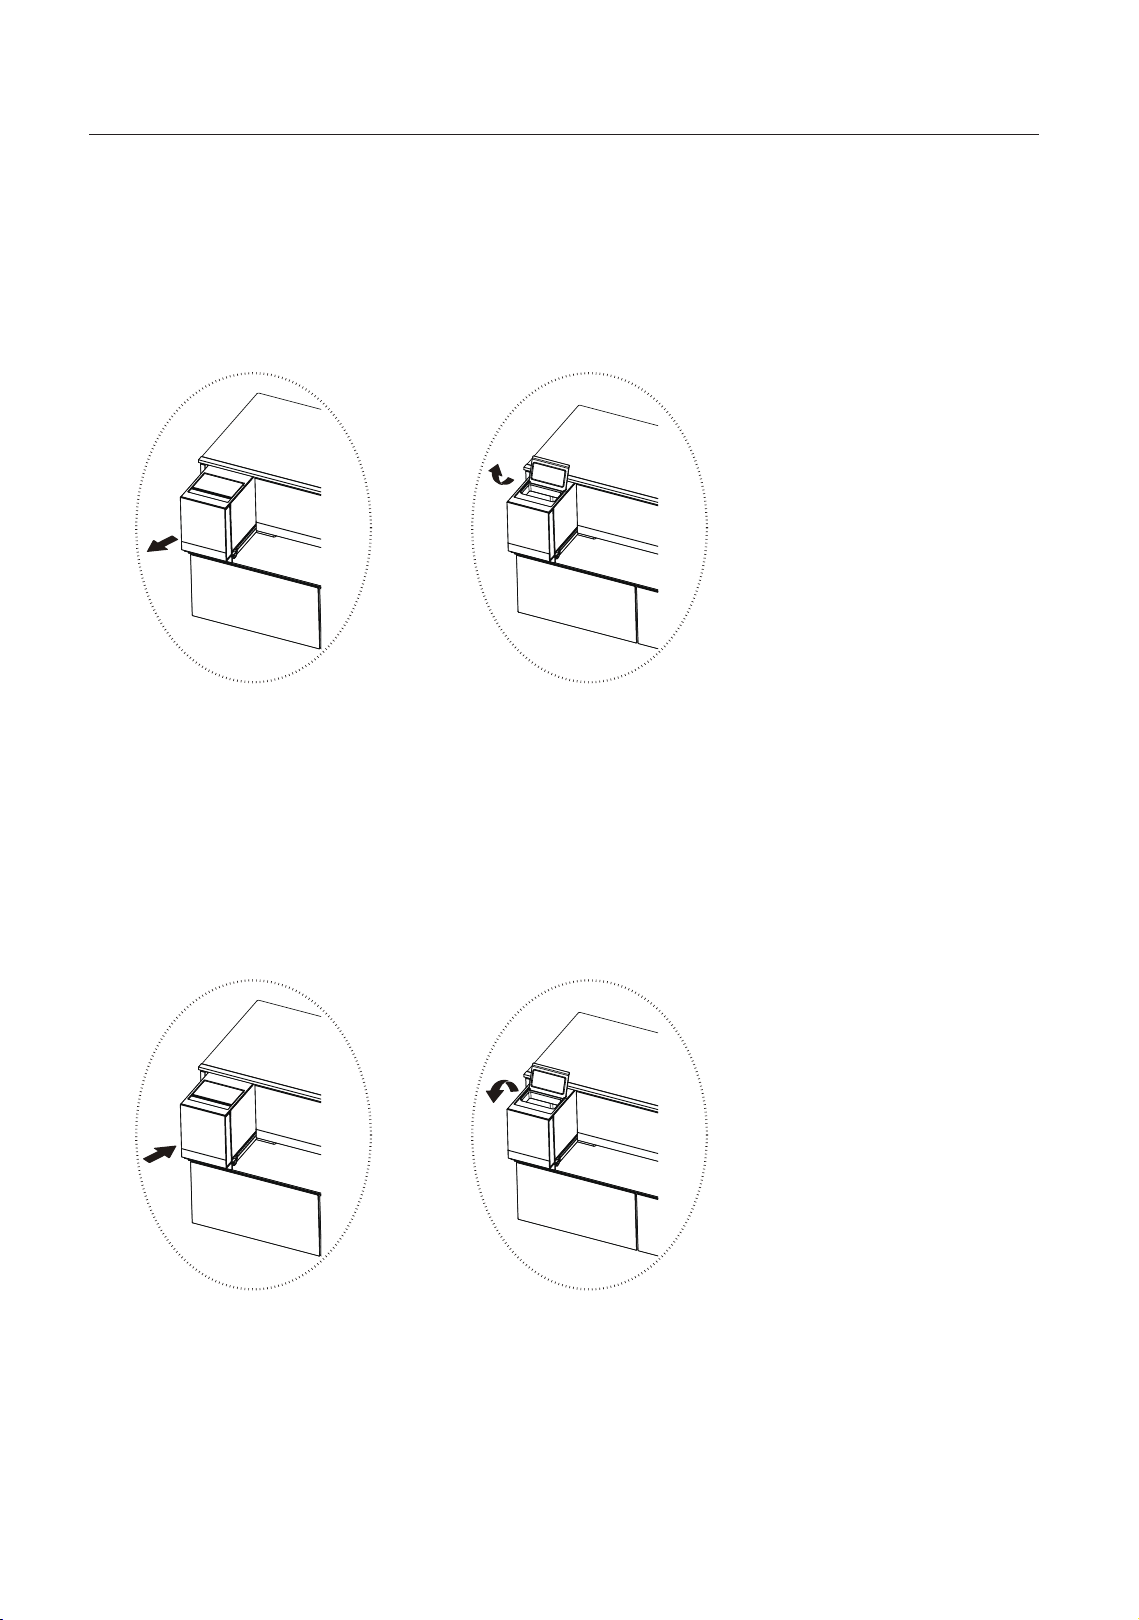
Pull out the ice storage box horizontally according to the arrow direction in
the figure below, and then lift up to take out the ice storage box.
After taking out the ice storage box or cleaning, push the ice storage box
horizontally according to the arrow direction in the figure below.
The ice in the ice storage box may be lumped or the outlet may be blocked for other
reasons. In such cases, the ice storage container needs to be cleaned or to remove
the blockage.
Please clean the ice storage box
before use.
4.7 Use and cleaning of ice storage box
When using the ice maker, do not put anything other than ice cubes in the ice
storage box. Putting something other than ice will cause collision damage or
ice making stop when the ice making grid is overturned.
If you need to store other items in the ice storage box, please stop using the ice
making function.
When the ice making function is enabled again, please remove other items in
the ice storage box and clean the ice storage box.
When putting other items into the ice storage box, please be careful of high
items to avoid jamming the ice maker.
If not used for a long time, the ice cubes in the ice storage box, ice maker,
should be discarded.
Be sure to use a soft wet cloth or sponge for cleaning, and rinse the parts to be
rinsed with clean water. (To avoid mold, water rust, etc.) Do not use the follow-
ing items: detergent, bleach, abrasive powder, brush, diluent, gasoline, etc.
(Otherwise, peculiar smell or malfunction may be caused.)
Do not disassemble, modify, or repair the automatic ice maker in the freezer by
yourself.
Do not touch the ice making part of the automatic ice maker with your hands
(upper side of the ice-making box.)
Warning:
25
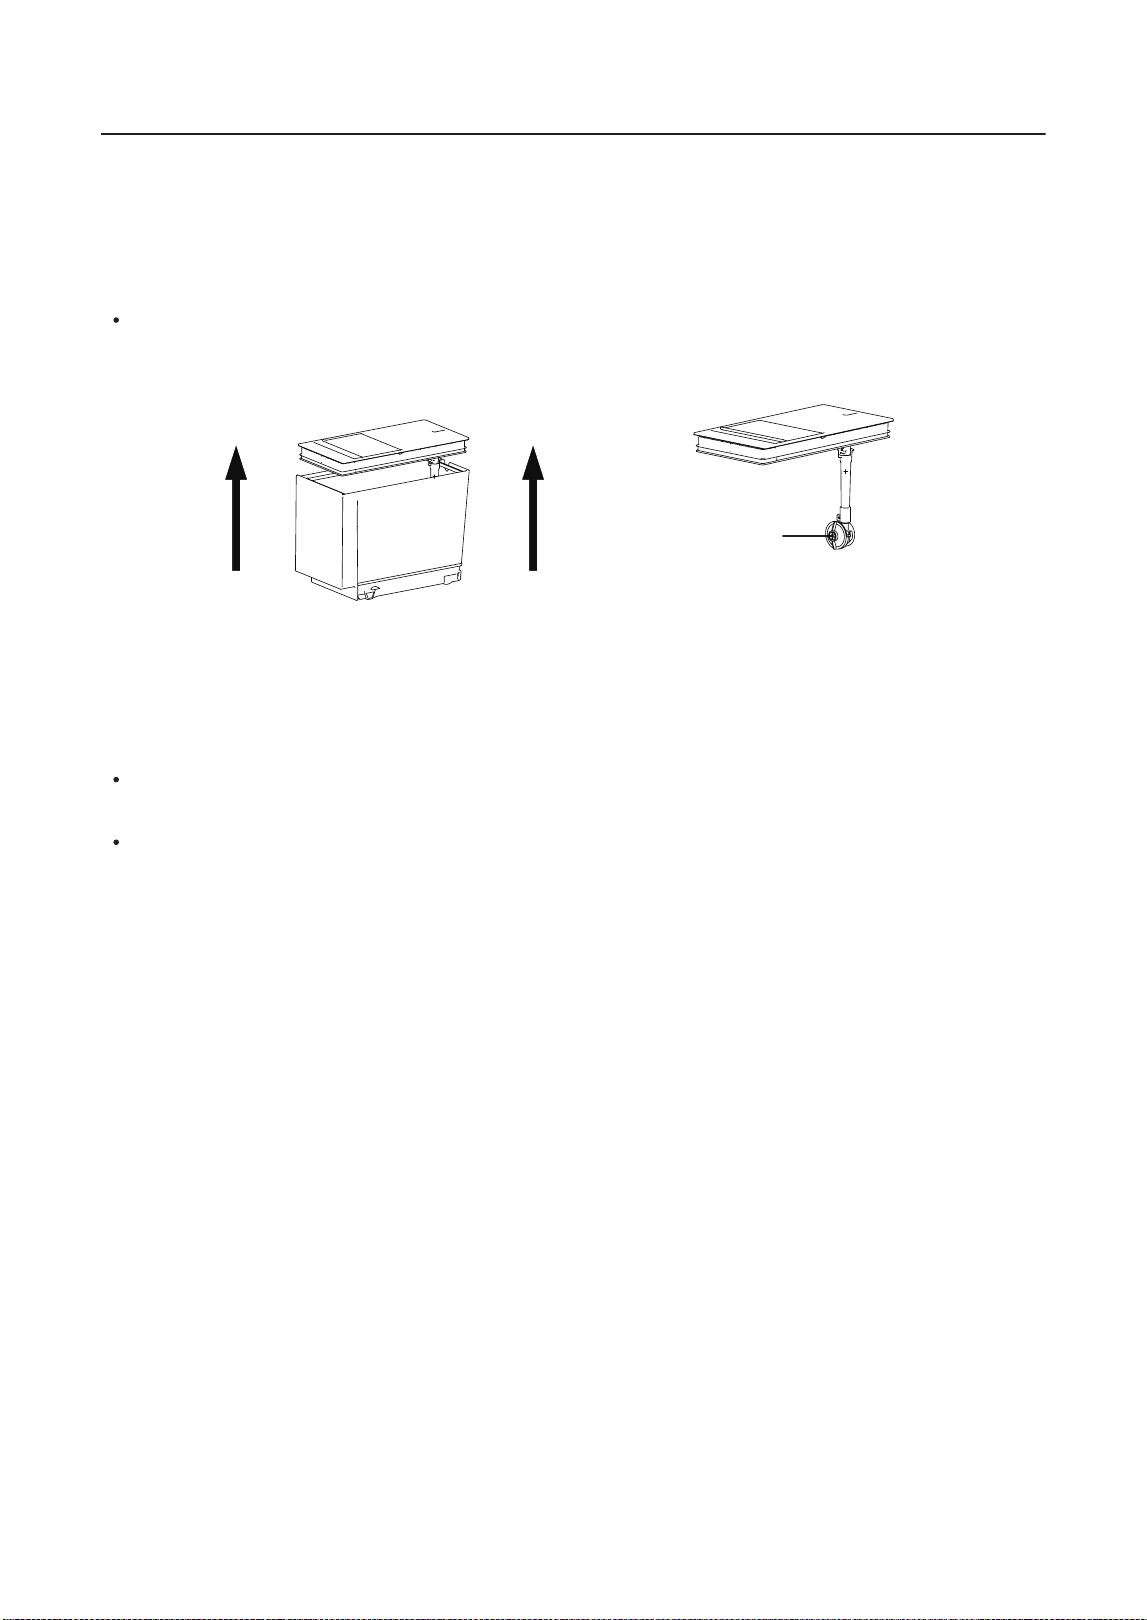
Open the ice maker water tank cover upward; after the cover assembly and water
box are separated, clean the box and cover assembly respectively, and clean with
brush or other tool filter head.
If the ice making function is not used for a period of time, please clear the ice block in
the ice storage box before using again; make full ice once, and then empty the ice
storage box again to use it normally.
4.8 Cleaning of water tank and water way of ice maker
(The picture above is only for reference. The actual configuration will
depend on the physical product or statement by the distributor)
Filter head
If it is not installed in place, water supply and ice making will not start, or the
water supply pump will make noise.
Be sure to use a soft wet cloth or sponge for cleaning, and rinse the parts to be
rinsed with clean water. (To avoid mold, water rust, etc.) Do not use the follow-
ing items: detergent, bleach, abrasive powder, brush, diluent, gasoline, etc.
(Otherwise, peculiar smell or malfunction may be caused.)
Warning:
26
27
You may try to solve the following simple problems by yourself. If them cannot be solved,
please contact the after-sales department.
5. Trouble shooting
Occurrence
Failed operation
Odor
Light fails to get lit
Loud noise
Water pan overflows
Hot housing
Surface condensation
Abnormal noise
Buzz: The compressor may produce buzzes during operation, and the
buzzes are loud particularly upon start or stop. This is normal.
Creak: Refrigerant flowing inside of the appliance may produce creak,
which is normal
Condensation on the exterior surface and door seals of the refrigerator
is normal when the ambient humidity is too high. Just wipe the condensate
with a clean towel
Heat dissipation of the built-in condenser via the housing, which is normal
When housing becomes hot due to high ambient temperature,
storage of too much food or shutdown of the compressor is shut down,
provide sound ventilation to facilitate heat dissipation
There is too much food in the chamber or food stored contains
too much water,resulting in heavy defrosting
The doors are not closed properly, resulting in frosting due to entry
of air and increased water due to defrosting
Remove foreign matters on the door seal
Heat the door seal and then cool it for restoration
(or blow it with an electrical drier or use a hot towel for heating)
Door seal fails to
be tight
Check whether the floor is level and whether the refrigerator is placed stably
Check whether accessories are placed at proper locations
The door is stuck by food packages Too much food is placed
The refrigerator is tilted
Doors cannot be
properly closed
Check whether the refrigerator is connected to power supply and
whether the illuminating light is damaged
Have the light replaced by a specialist
Long-time operation
of the compressor
Odorous foods shall be tightly wrapped
Check whether there is any rotten food
Clean the inside of the refrigerator
Long operation of the refrigerator is normal in summer
when the ambient temperature is high
It is not suggestible having too much food in the appliance at the
same time
The doors are opened too frequently
Check whether the appliance is connected to power or
whether the plug is in well contact
Check whether the voltage is too low
Check whether there is a power failure or partial circuits have tripped
Possible cause/inspection items
Food shall get cool before being put into the appliance
28
6. Disposal of your appliance
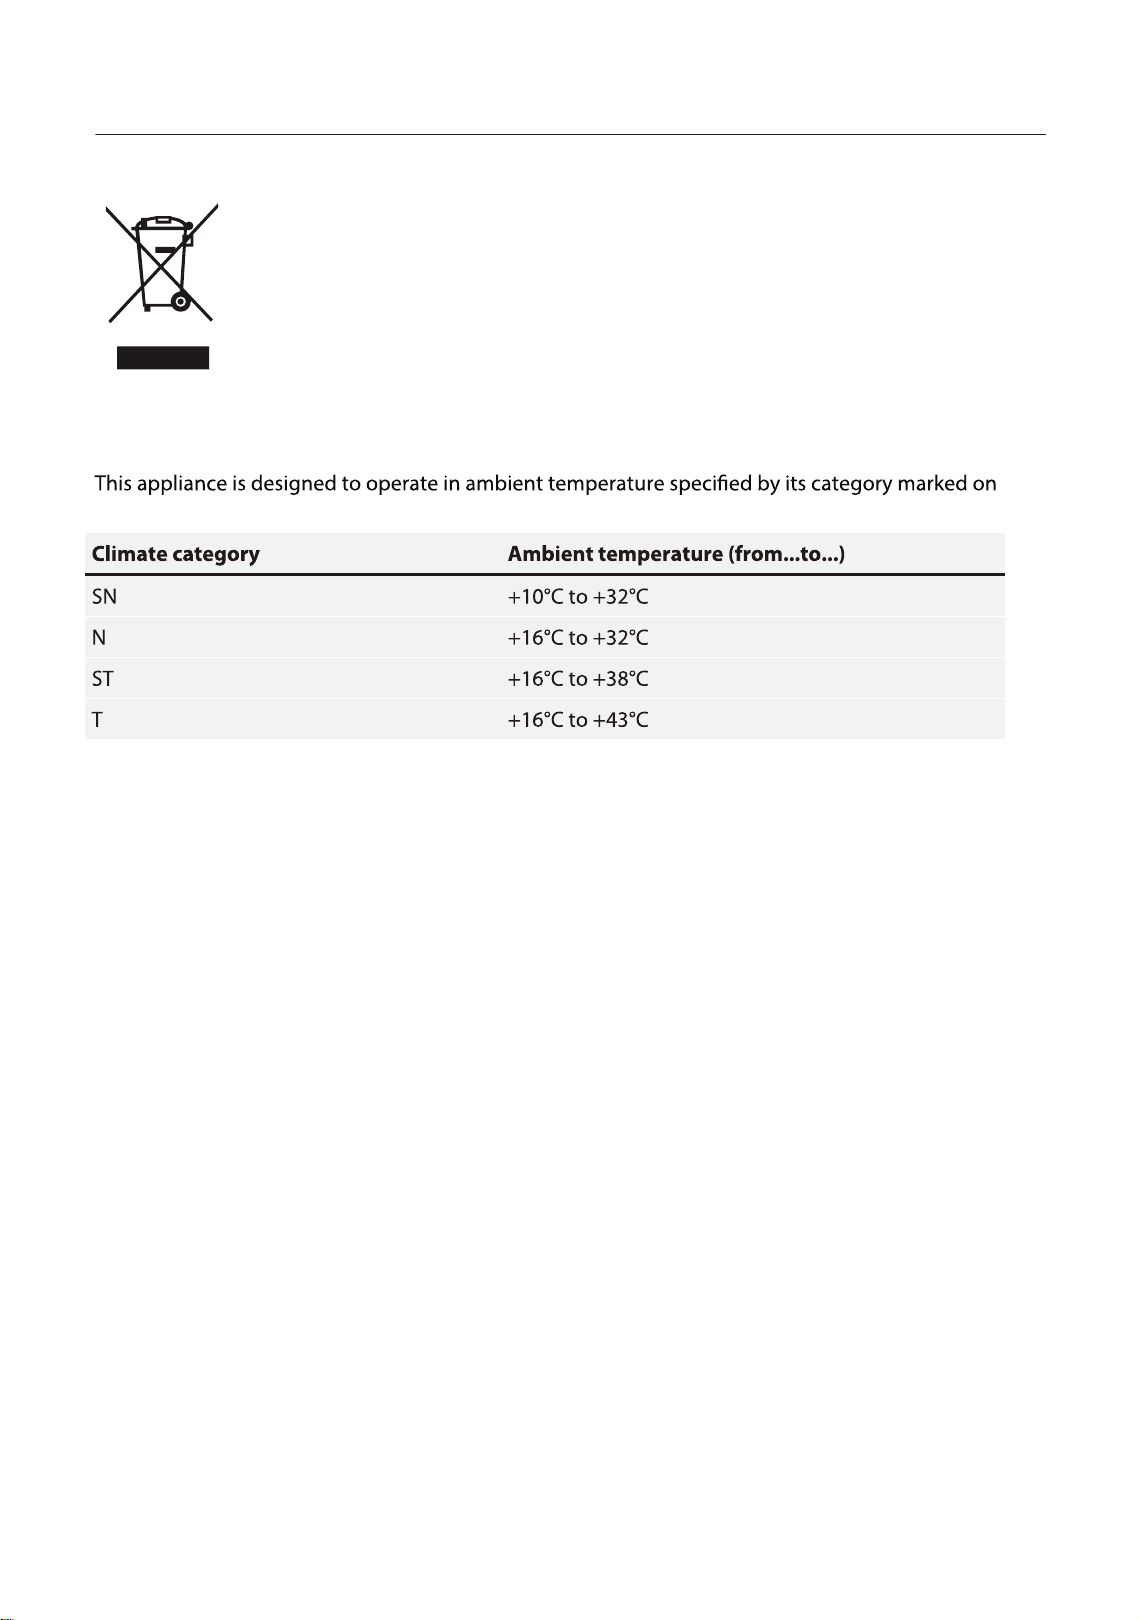
AMBIENT TEMPERATURE
Correct Disposal of this product:
This marking indicates that this product should not be disposed with other
household wastes throughout the EU. To prevent possible harm to the environment
or human health from uncontrolled waste disposal, recycle it responsibly to promote
the sustainable reuse of material resources. To return your used device, please use
the return and collection systems or contact the retailer where the product was
purchased. They can take this product for environmental safe recycling.
the rating plate.

MADE IN CHINA
Hefei Hualing Co., Ltd.
No.176 JinXiu Road, Hefei Economy & Technology
Development Area, 230601, Hefei, Anhui, P.R. China
Manual Pemilik
PEMBEKU PETI SEJUK
Untuk Kegunaan Rumah Sahaja
GR-RF665WIA-PGY(22)
●
Terima kasih banyak kerana membeli produk Toshiba ini.
●
Baca Manual Pemilik ini dan fahami sepenuhnya produk sebelum digunakan untuk
menggunakan produk ini dengan selamat dan betul.
●
Simpan Manual Pemilik ini di tempat yang berguna untuk rujukan masa hadapan.
●
Pastikan anda telah menerima waranti anda.

1. Amaran keselamatan .................................................................. 1
1.1 Amaran ····································································································································1
1.2 Maksud simbol amaran keselamatan ··········································································5
1.3 Amaran berkaitan elektrik ································································································ 5
1.4 Amaran penggunaan ········································································································· 6
1.5 Amaran peletakan ··············································································································· 7
1.6 Amaran untuk tenaga ········································································································8
1.7 Amaran pelupusan ·············································································································8
2. Penggunaan betul peti sejuk ..................................................... 9
2.1 Peletakan ································································································································9
2.2 Kaki perata ···························································································································10
2.3 Pintu perata ·························································································································11
2.4 Mengubah Lampu ············································································································12
2.5 Bermula ·································································································································12
2.6 Petua penjimatan tenaga ·······························································································12
3. Struktur dan fungsi ................................................................... 13
3.1 Komponen utama ·············································································································13
3.2 Fungsi ····································································································································15
3.3 Arahan untuk penggunaan dan penambahan tangki air ···································19
4. Penyelenggaraan dan penjagaan peti sejuk .......................... 20
4.1 Pembersihan keseluruhan ·····························································································20
4.2 Pembersihan dulang pintu ····························································································21
4.3 Membersihkan Rak kaca ·································································································21
4.4 Penyahfrosam ·····················································································································21
4.5 Tidak operasi ·······················································································································22
4.6 Langkah berjaga-jaga untuk penggunaan pembuat ais ····································22
4.7 Penggunaan dan pembersihan kotak penyimpanan ais ····································26
4.8 Pembersihan tangki air dan cara air pembuat ais ·················································27
5. Penyelesaian Masalah .............................................................. 28
6. Pelupusan perkakas anda ........................................................ 29
KANDUNGAN
1
1. Amaran keselamatan
BACA LANGKAH BERJAGA-JAGA KESELAMATAN SEBELUM PEMASANGAN
Untuk mengelakkan kecederaan kepada pengguna atau orang lain dan
kerosakan harta benda, arahan berikut mesti dipatuhi. Operasi yang salah
kerana mengabaikan arahan boleh menyebabkan bahaya atau kerosakan.
1.1 Amaran
AMARAN
Amaran: risiko kebakaran / bahan mudah terbakar
Ɣ
AMARAN: Risiko kebakaran/bencana dan letupan
Bahan penyejuk perkakas mudah terbakar, sila berhati-hati agar tidak
merosakkan paip penyejuk semasa pemasangan dan pengangkutan. Jika
kebocoran gas berlaku, sila hubungi pengedar atau ejen servis tempatan, dan
langkah berjaga-jaga berikut hendaklah sentiasa diambil:
1. Buka tingkap untuk memastikan pengudaraan yang baik.
2. Tiada api di sekeliling dan sila jangan gunakan perkakas elektrik lain.
Ɣ
Perkakas ini bertujuan untuk digunakan dalam rumah dan penggunaan yang
serupa seperti kawasan dapur staf di kedai, pejabat dan persekitaran kerja
lain; rumah ladang dan oleh pelanggan di hotel, motel dan persekitaran jenis
kediaman lain; persekitaran jenis penginapan dan sarapan; katering dan
penggunaan bukan runcit yang serupa.
Ɣ
Kanak-kanak perlu diawasi untuk memastikan mereka tidak bermain dengan
perkakas ini.
Ɣ
AMARAN: Risiko bencana kebakaran dan kejutan elektrik
Kord kuasa hendaklah diganti apabila ia rosak. Sila hubungi pengedar atau
ejen servis tempatan untuk penggantian.
Ɣ
Sila cabut palam kuasa daripada soket apabila membersihkan perkakas atau
apabila perkakas tidak digunakan untuk masa yang lama.
Ɣ
Jangan gunakan kord sambungan atau penyesuai yang tidak dibumikan (dua
serampang).

2
Ɣ
AMARAN: Pastikan pengudaraan dibuka, dalam kurungan perkakas atau dalam
struktur terbina dalam, bebas daripada halangan.
Ɣ
AMARAN: Jangan gunakan peranti mekanikal atau cara lain untuk
mempercepatkan proses penyahfros, selain cara yang disyorkan oleh
pengilang.
Ɣ
AMARAN: Jangan rosakkan litar bahan penyejuk.
Ɣ
AMARAN: Jangan gunakan perkakas elektrik di dalam petak penyimpanan
makanan perkakas, melainkan ia daripada jenis yang disyorkan oleh pengilang.
Ɣ
AMARAN: Sila tinggalkan peti sejuk mengikut regulator lokal kerana ia
menggunakan bahan busa siklopentana dan penyejuk mudah terbakar.
Ɣ
AMARAN: Apabila meletakkan perkakas, pastikan kord bekalan tidak
terperangkap atau rosak.
Ɣ
AMARAN: Jangan letak soket alur keluar mudah alih yang pelbagai atau
bekalan kuasa mudah alih di bahagian belakang perkakas.
Ɣ
BAHAYA: Risiko kanak-kanak terperangkap. Sebelum anda membuang peti
sejuk atau pembeku lama anda:
-
Tanggalkan pintu.
-
Biarkan rak di tempatnya supaya kanak-kanak tidak mudah memanjat ke
dalam.
Ɣ
Peti sejuk mesti diputuskan sambungan daripada sumber bekalan elektrik
sebelum mencuba pemasangan aksesori.
Ɣ
Bahan penyejuk dan busa siklopentana yang digunakan untuk peti sejuk
adalah mudah terbakar. Oleh itu, apabila peti sejuk dibuang, ia hendaklah
dijauhkan daripada mana-mana punca kebakaran dan diambil oleh syarikat
pengambilan khas dengan kelayakan yang sepadan bukannya dilupuskan
melalui pembakaran, untuk mengelakkan kerosakan kepada alam sekitar atau
sebarang bahaya lain.

3
Ɣ
Untuk standard IEC: Perkakas ini tidak dimaksudkan untuk digunakan oleh
orang (termasuk kanak-kanak) yang kurang keupayaan fizikal, deria atau
mental, atau kurang pengalaman dan pengetahuan, melainkan mereka
mendapat pengawasan atau arahan mengenai penggunaan perkakas oleh
orang yang bertanggungjawab untuk keselamatan mereka.
Ɣ
Untuk standard EN: Perkakas ini boleh digunakan oleh kanak-kanak berumur
8 tahun dan ke atas dan orang yang mempunyai kemampuan fizikal, deria atau
mental yang kurang atau kurang pengalaman dan pengetahuan jika mereka
telah diberi pengawasan atau arahan mengenai penggunaan perkakas secara
selamat dan memahami bahaya terbabit. Kanak-kanak tidak boleh bermain
dengan perkakas. Pembersihan dan penyelenggaraan pengguna tidak boleh
dilakukan oleh kanak-kanak tanpa penyeliaan.
Ɣ
Tolong jangan gunakan perkakas pada tempat pengangkutan (seperti kapal
dan sebagainya).
Ɣ
Jika terdapat bunyi bising, bau dan asap, sila cabut plag kuasa dengan segera,
dan hubungi pengedar atau ejen perkhidmatan tempatan.
Ɣ
Tolong jangan letakkan tangan anda di bawah atau di belakang perkakas
untuk mengelakkan daripada cedera.
Ɣ
Sila tinggalkan bahan pembungkusan dan bahagian lain di luar jangkauan
kanak-kanak untuk mengelakkan risiko lemas.

4
Ɣ
Untuk mengelakkan pencemaran makanan, sila patuhi arahan berikut:
-
Membuka pintu untuk tempoh yang lama boleh menyebabkan peningkatan
ketara suhu dalam petak perkakas.
-
Bersihkan dengan kerap permukaan yang bersentuhan dengan makanan
dan sistem saliran yang boleh diakses.
-
Bersihkan tangki air jika ia tidak digunakan selama 48 jam; siram sistem air
yang disambungkan kepada bekalan air jika air tidak diambil selama 5 hari.
(nota 1)
-
Simpan daging dan ikan mentah dalam bekas yang sesuai di dalam peti
sejuk, supaya ia tidak bersentuhan atau menitis ke makanan lain.
-
Petak makanan sejuk beku dua bintang sesuai untuk menyimpan makanan
prabeku, menyimpan atau membuat ais krim dan membuat kiub ais. (nota 2)
-
Petak satu, dua dan tiga bintang tidak sesuai untuk membekukan makanan
segar. (nota 3)
-
Untuk perkakas tanpa petak 4 bintang: perkakas penyejukan ini tidak sesuai
untuk membekukan bahan makanan. (nota 4)
-
Jika perkakas penyejuk dibiarkan kosong untuk tempoh yang lama,
matikan, nyahfros, bersihkan, keringkan, dan biarkan pintu terbuka untuk
mengelakkan kulat berkembang di dalam perkakas.
Ɣ
Nota 1, 2, 3: Sila sahkan sama ada ia boleh digunakan mengikut jenis petak
produk anda.
Ɣ
Untuk perkakas berdiri bebas: perkakas penyejukan ini bukan bertujuan untuk
digunakan sebagai perkakas terbina dalam.
Ɣ
Sebarang penggantian atau penyelenggaraan lampu LED bertujuan untuk
dilakukan oleh pengilang, ejen servisnya atau orang berkelayakan yang serupa.
Ɣ
Produk ini mengandungi sumber cahaya kelas kecekapan tenaga (G).
5
1.2 Maksud simbol amaran keselamatan
Simbol larangan
Ini ialah simbol larangan.
Sebarang ketidakpatuhan terhadap arahan yang
ditandakan dengan simbol ini boleh mengakibatkan
kerosakan pada produk atau membahayakan keselamatan
diri pengguna.
Simbol mandatori
Ini ialah simbol mandatori.
Anda mestilah menjalankan operasi dengan kepatuhan
ketat bagi arahan yang ditanda dengan simbol ini;
atau boleh menyebabkan kerosakan pada produk atau
kecederaan peribadi.
Simbol peringatan
Ini ialah simbol berwaspada.
Arahan yang ditanda dengan simbol ini memerlukan
perhatian khusus. Berhati-hati yang tidak mencukupi boleh
mengakibatkan kecederaan ringan atau sederhana, atau
kerosakan pada produk.
Manual ini mengandungi banyak maklumat keselamatan penting yang
perlu dipatuhi oleh pengguna.
1.3 Amaran berkaitan elektrik
Ɣ
Jangan tarik kord kuasa semasa menarik plag kuasa peti
sejuk. Sila genggam palam dengan kuat dan cabut terus
dari soket.
Ɣ
Untuk memastikan penggunaan yang selamat, jangan
rosakkan kord kuasa atau gunakan kord kuasa apabila ia
rosak atau haus.
Ɣ
Tolong jangan sentuh plag kuasa dengan tangan yang
basah untuk mengelakkan daripada renjatan elektrik.
Ɣ
Sila gunakan soket kuasa khusus dan soket kuasa tidak
boleh dikongsi dengan perkakas elektrik lain. Plag kuasa
hendaklah dipasang rapat pada soket atau kebakaran
mungkin berlaku.
6
Ɣ
Sila pastikan bahawa elektrod pembumian soket kuasa
dilengkapi dengan talian pembumian yang boleh
dipercayai.
Ɣ
Sila minta bantuan daripada orang yang mempunyai
kelayakan profesional untuk memeriksa sama ada soket
itu mempunyai talian pembumian yang boleh dipercayai
atau tidak.
Ɣ
Adalah menjadi tanggungjawab pengguna akhir untuk
menukar soket yang tidak dibumikan kepada soket yang
dibumikan.
Ɣ
Sila matikan injap gas yang bocor dan kemudian buka
pintu dan tingkap sekiranya berlaku kebocoran gas dan
gas mudah terbakar lain. Jangan cabut plag peti sejuk
dan perkakas elektrik lain kerana percikan api boleh
menyebabkan kebakaran.
Ɣ
Jangan gunakan perkakas elektrik di atas perkakas,
melainkan ia daripada jenis yang disyorkan oleh
pengilang.
1.4 Amaran penggunaan
Ɣ
Jangan sewenang-wenangnya membuka atau membina
semula peti sejuk, atau merosakkan litar penyejuk;
penyelenggaraan perkakas mesti dijalankan oleh pakar.
Ɣ
Kord kuasa yang rosak mesti diganti oleh pengilang,
jabatan penyelenggaraannya atau profesional yang
berkaitan untuk mengelakkan bahaya.
Ɣ
Jurang antara pintu peti sejuk dan antara pintu dan badan
peti sejuk adalah kecil, jangan meletakkan tangan anda di
kawasan ini untuk mengelakkan tersepit jari. Sila berhati-
hati semasa menutup pintu peti sejuk untuk mengelakkan
barang terjatuh.
7
Ɣ
Jangan ambil makanan atau bekas dengan tangan basah
di dalam ruang pembekuan semasa peti sejuk beroperasi,
terutamanya bekas logam untuk mengelakkan luka beku.
Ɣ
Jangan benarkan mana-mana kanak-kanak masuk
ke dalam atau memanjat peti sejuk; jika tidak boleh
menyebabkan kanak-kanak lemas atau cedera apabila
terjatuh.
Ɣ
Tolong jangan letakkan objek berat atau berbahaya di atas
perkakas (botol, pinggan mangkuk, atau sesuatu yang
mengandungi cecair)
1.5 Amaran peletakan
Ɣ
Jangan letakkan barang mudah terbakar, mudah meletup,
meruap dan sangat menghakis di dalam peti sejuk untuk
mengelakkan kerosakan pada produk atau kemalangan
kebakaran.
Ɣ
Jangan letak barang mudah terbakar berhampiran peti
sejuk untuk mengelakkan kebakaran.
Ɣ
Peti sejuk bertujuan untuk kegunaan isi rumah, seperti
penyimpanan makanan; ia tidak boleh digunakan untuk
tujuan lain, seperti penyimpanan darah, ubat-ubatan atau
produk biologi, dsb.
Ruang pembekuan
Ɣ
Jangan simpan bir, minuman atau cecair lain dalam botol
atau bekas tertutup di dalam ruang pembekuan peti
sejuk; jika tidak, botol atau bekas tertutup mungkin retak
akibat pembekuan dan menyebabkan kerosakan.
8
1.6 Amaran untuk tenaga
Ɣ
Perkakas penyejukan mungkin tidak beroperasi secara konsisten (berkemungkinan
penyahfros kandungan atau suhu menjadi terlalu hangat dalam petak makanan
beku) apabila diletakkan untuk tempoh masa yang panjang di bawah julat suhu
sejuk yang direka untuk perkakas penyejuk ini.
Ɣ
Minuman berbuih tidak boleh disimpan dalam petak atau kabinet pembeku
makanan suhu rendah, dan sesetengah produk seperti ais air tidak boleh diambil
terlalu sejuk.
Ɣ
Jangan melebihi masa penyimpanan yang disyorkan oleh pengilang makanan
untuk apa-apa jenis makanan dan khususnya untuk makanan cepat beku
komersial dalam ruang atau kabinet penyimpanan makanan beku cepat dan beku.
Ɣ
Langkah berjaga-jaga adalah perlu untuk mengelakkan kenaikan suhu makanan
sejuk beku yang tidak wajar semasa menyahfros perkakas penyejuk, seperti
membungkus makanan sejuk beku dalam beberapa lapisan surat khabar.
Ɣ
Ketahui bahawa kenaikan suhu makanan beku semasa penyahfros manual,
penyelenggaraan atau pembersihan boleh memendekkan hayat penyimpanan.
Ɣ
Adalah menjadi keperluan untuk pintu atau penutup yang dipasang dengan
mangga dan kunci, kunci itu dijauhkan daripada capaian kanak-kanak dan bukan
di sekitar alat penyejukan, untuk mengelakkan kanak-kanak daripada terkunci di
dalam.
1.7 Amaran pelupusan
Ɣ
Bahan penyejuk dan busa siklopentana yang digunakan untuk peti
sejuk adalah mudah terbakar. Oleh itu, apabila peti sejuk dibuang,
ia hendaklah dijauhkan daripada mana-mana punca kebakaran
dan diambil oleh syarikat pengambilan khas dengan kelayakan
yang sepadan bukannya dilupuskan melalui pembakaran, untuk
mengelakkan kerosakan kepada alam sekitar atau sebarang bahaya
lain.
Ɣ
Apabila peti sejuk dibuang, tanggalkan pintunya, dan keluarkan
gasket pintu dan rak; letakkan pintu dan rak di tempat yang betul,
untuk mengelakkan kanak-kanak terperangkap.
9
2. Penggunaan betul peti sejuk
2.1 Peletakan
Ɣ
Sebelum peti ais dipindahkan, keluarkan semua objek
di dalamnya, lekatkan petak kaca, pemegang sayur-
sayuran, laci ruang penyejukbekuan dan dsb. dengan pita,
dan ketatkan kaki perata, tutup pintu dan kedapkannya
dengan pita. Semasa memindahkan, perkakas tidak
boleh diletakkan terbalik atau mendatar, atau digetarkan;
kecondongan semasa pemindahan hendaklah tidak lebih
daripada 45°.
Ɣ
Sebelum menggunakan, keluarkan semua bahan
pembungkus termasuk kusyen bawah dan pad busa
dan pita di dalam peti sejuk, koyakkan filem pelindung
pada pintu dan badan peti sejuk. Jauhkan daripada haba
dan elakkan cahaya matahari langsung. Jangan letakkan
pembeku di tempat yang lembap atau berair untuk
mengelakkan karat atau pengurangan kesan penebat.
Ɣ
Jangan sembur atau basuh peti sejuk; jangan letakkan peti
sejuk di tempat yang lembap mudah terkena air supaya
tidak menjejaskan sifat penebat elektrik peti sejuk.
Ɣ
Peti sejuk diletakkan di tempat tertutup dengan
pengudaraan baik; lantai hendaklah rata, dan kukuh (putar
ke kiri atau kanan untuk melaraskan roda untuk meratakan
jika tidak stabil).
Ɣ
Ruang atas peti sejuk hendaklah lebih besar daripada
30 cm, dan peti sejuk perlu diletakkan lebih daripada
10 cm dari dinding untuk memudahkan pelesapan haba.
Langkah berjaga-jaga sebelum pemasangan:
Sebelum pemasangan dan pelarasan aksesori, pastikan peti sejuk
diputuskan daripada kuasa. Langkah berjaga-jaga hendaklah diambil
untuk mengelakkan kejatuhan pemegang yang boleh menyebabkan
kecederaan diri.
10
2.2 Kaki perata
1. Langkah berjaga-jaga sebelum operasi:
Sebelum pengoperasian aksesori, pastikan peti sejuk diputuskan daripada kuasa.
2. Gambarajah skematik kaki perata:
Sebelum melaraskan kaki perata, langkah berjaga-jaga hendaklah diambil untuk
mengelakkan sebarang kecederaan diri.
3. Prosedur pelarasan:
a. Pusingkan kaki mengikut arah jam untuk meninggikan peti sejuk;
b. Pusingkan kaki melawan arah jam untuk merendahkan peti sejuk;
c. Laraskan kaki kanan dan kiri berdasarkan prosedur di atas pada tahap mendatar.
(Gambar di atas hanya untuk rujukan. Konfigurasi sebenar akan bergantung pada
produk fizikal atau kenyataan oleh pengedar)
11
2.3 Pintu perata
1. Langkah berjaga-jaga sebelum operasi:
Sebelum pengoperasian aksesori, pastikan peti sejuk diputuskan daripada kuasa.
Sebelum melaraskan pintu, langkah berjaga-jaga hendaklah diambil untuk
mengelakkan sebarang kecederaan diri.
2. Gambarajah skema meratakan badan pintu.
Senarai alatan yang perlu disediakan oleh pengguna
Piler
Tidak rata
Engsel
gromet
Playar
Cincin pengikat
Engsel bawah
(Gambar di atas hanya untuk rujukan. Konfigurasi sebenar akan bergantung pada
produk fizikal atau kenyataan oleh pengedar)
1) Naikkan pintu bawah sehingga paras pintu yang lebih tinggi.
2) Masukkan cincin pengikat yang dibekalkan dengan menggunakan playar di celah
antara engsel gromet dan engsel bawah. Bilangan cincin pengikat yang perlu anda
masukkan bergantung pada jurang.
12
2.4 Mengubah Lampu
Sebarang penggantian atau penyelenggaraan lampu LED bertujuan untuk dilakukan
oleh pengilang, ejen servisnya atau orang berkelayakan yang serupa.
2.5 Bermula
Ɣ
Sebelum permulaan awal, biarkan peti sejuk selama setengah
jam sebelum menyambungkannya ke bekalan kuasa.
Ɣ
Sebelum meletakkan apa-apa makanan segar atau beku, peti
sejuk hendaklah beroperasi selama 2-3 jam, atau melebihi
4 jam pada musim panas apabila suhu ambien tinggi.
Ɣ
Berikan ruang yang cukup untuk membuka pintu dan laci
atau dengan mudah mengikut panduan oleh pengedar.
2.6 Petua penjimatan tenaga
Ɣ
Perkakas hendaklah terletak di kawasan paling sejuk di dalam bilik, jauh dari
peralatan penghasil haba atau saluran pemanas, dan jauh dari cahaya matahari
langsung.
Ɣ
Biarkan makanan panas sejuk pada suhu bilik sebelum dimasukkan ke dalam
perkakas. Membebankan perkakas memaksa pemampat untuk beroperasi lebih
lama. Makanan yang membeku terlalu perlahan boleh kehilangan kualiti, atau
rosak.
Ɣ
Pastikan anda membungkus makanan dengan betul, dan lap bekas sehingga
kering sebelum meletakkannya di dalam perkakas. Ini mengurangkan
pembentukan fros di dalam perkakas.
Ɣ
Tong penyimpanan perkakas tidak boleh dialas dengan kerajang aluminium,
kertas lilin atau tuala kertas. Pelapik mengganggu peredaran udara sejuk,
menjadikan perkakas kurang cekap.
Ɣ
Susun dan labelkan makanan untuk mengurangkan bukaan pintu dan carian yang
lama. Keluarkan seberapa banyak item yang diperlukan pada satu masa, dan tutup
pintu secepat mungkin.
13
3. Struktur dan fungsi
3.1 Komponen utama
Tangki air
Panel cahaya lembut
ZON BEKU
ZON LEMBAPAN
Kotak buah dan
sayur
Rak Kaca
Dulang pintu
Pembuat ais
Tong
penyimpanan
ais
(Gambar di atas hanya untuk rujukan. Konfigurasi sebenar akan bergantung pada
produk fizikal atau kenyataan oleh pengedar)
14
Ruang penyejukan
Ɣ
Ruang Penyejukan sesuai untuk menyimpan pelbagai jenis buah, sayur,
minuman dan makanan lain yang diambil dalam jangka pendek. Cadangan masa
penyimpanan 3 hari hingga 5 hari.
Ɣ
Makanan dimasak tidak boleh dimasukkan ke dalam ruang penyejukan sehingga
ia disejukkan ke suhu bilik.
Ɣ
Makanan disyorkan untuk ditutup sebelum dimasukkan ke dalam peti sejuk.
Ɣ
Rak kaca boleh dilaraskan ke atas atau ke bawah untuk amaun sewajarnya bagi
penyimpanan dan kemudahan guna.
Ruang pembekuan
Ɣ
Ruang penyejukbekuan suhu rendah boleh memastikan makanan segar untuk
masa yang lama dan ruang ini digunakan terutamanya untuk menyimpan
makanan sejuk beku dan membuat ais.
Ɣ
Ruang pembekuan sesuai untuk penyimpanan daging, ikan, bebola nasi dan
makanan lain yang tidak boleh dimakan dalam jangka pendek.
Ɣ
Ketulan daging sebaiknya dibahagikan kepada kepingan kecil untuk memudahkan
akses. Sila ambil perhatian bahawa makanan hendaklah dimakan dalam masa
penyimpanan.
Laci, kotak makanan, rak dan sebagainya yang diletakkan mengikut kedudukan
dalam gambar di atas adalah yang paling jimat tenaga.
Nota: Penyimpanan terlalu banyak makanan semasa operasi selepas peti sejuk
awal. Makanan yang disimpan tidak boleh menghalang saluran keluar udara;
atau boleh menjejaskan kesan pembekuan.
15
3.2 Fungsi
1. Paparan
1) Super Sejuk 2) Rangkaian
wayarles
3) Suhu
4) Super Beku 5) Percutian 6) Kunci/Buka
2. Butang
A Peti Sejuk B Pembeku C Butang fleksibel
D Butang ais E Mod/Rangkaian F Butang kunci
3. Arahan operasi
1) Paparan
a) Kali pertama peti sejuk dihidupkan, skrin akan terang selama tiga saat, dan nada
dering berbunyi menunjukkan bahawa mesin telah dihidupkan. Peti sejuk akan
berfungsi, dan paparan pada skrin akan kembali normal.
b) Ikon rangkaian wayarles biasanya terang. Apabila berlaku masalah, ia
menunjukkan kod masalah (dalam mod paparan kitaran).
c) Apabila pintu ditutup, dan tiada butang ditekan dalam masa 30 saat, skrin akan
dikunci. Lampu skrin akan padam dalam masa 30 saat. Ia akan dihidupkan semula
apabila ada butang ditekan.
2) Kunci dan buka kunci
a) Dalam keadaan buka kunci, tahan butang
selama tiga saat untuk memastikan
skrin dikunci dengan bunyi baz.
b) Apabila skrin dikunci, tahan butang
selama tiga saat untuk membuka kuncinya
dengan bunyi baz.
c) Jika tiada butang ditekan dalam masa 30 saat, skrin akan dikunci secara automatik.
d) Penggera boleh dilumpuhkan apabila skrin dikunci. Operasi lain dengan butang
hanya boleh dilakukan apabila skrin dibuka kunci.
16
3) Penetapan suhu peti sejuk
Tekan butang untuk menetapkan julat suhu peti sejuk. Tekan sekali lagi untuk
melaraskan suhu. Setiap kali butang ditekan suhu akan turun sebanyak 1°C. Apabila
suhu mencapai 2°C, tekan butang sekali lagi, dan suhu akan ditetapkan pada 8°C.
Julat peti sejuk akan menjadi 2°C-8°C. Tetapan akan berlaku selepas skrin dikunci.
4) Penetapan suhu pembeku
Tekan butang
untuk menetapkan julat suhu peti sejuk. Tekan sekali lagi untuk
melaraskan suhu. Setiap kali butang ditekan suhu akan turun sebanyak 1°C. Apabila
suhu mencapai -24°C, tekan butang sekali lagi untuk menetapkan suhu pada -16°C.
Julat suhu pembeku akan menjadi -24°C-16°C. Tetapan akan berlaku selepas skrin
dikunci.
5) Penetapan ruang fleksibel
Tekan butang
untuk melaraskan mod ruang fleksibel. Setiap kali ia ditekan, mod
ruang fleksibel berubah sekali; apabila mod "Buah dan Sayuran" didayakan, ikon
menyala; Tekan sekali lagi untuk menetapkan mod Minuman Sejuk, dan kemudian
ikon
menyala; tekan sekali lagi untuk menetapkan mod Sejuk, dan kemudian ikon
menyala.
6) Tetapan Membuat Ais
Tekan butang
sekali, ikon " " menyala, dan masukkan mod membuat ais. Tekan
sekali lagi, ikon "
" padam, dan mod membuat ais dimatikan.
7) Tetapan mod
Tekan
untuk memilih antara mod Super Sejuk, Super Beku dan Percutian seperti
berikut: Tetapan kitaran: Percutian
Super Beku Super Sejuk Super Sejuk dan
Super Beku Tiada Percutian...
Apabila mod Super Sejuk ditetapkan, suhu ruang penyejukan ditetapkan secara
automatik kepada 2°C, dan ikon menyala; apabila sistem keluar dari mod Super
Sejuk, suhu yang ditetapkan bagi ruang penyejukan secara automatik kembali
kepada suhu yang ditetapkan sebelum mod Super Sejuk, dan ikon padam.
Apabila mod Super Beku ditetapkan, suhu pembeku ditetapkan secara automatik
kepada -24°C, dan ikon menyala; apabila sistem keluar dari mod Super Beku, suhu
set peti sejuk secara automatik kembali kepada suhu yang ditetapkan sebelum mod
Super Beku, dan ikon padam.
Apabila mod Percutian ditetapkan, mod penyejukan dimatikan dan ikon Percutian
menyala; apabila sistem keluar dari mod Percutian, ruang penyejukan secara
automatik kembali kepada suhu yang ditetapkan sebelum mod Percutian, dan ikon
Percutian padam.
17
8) Tetapan bunyi pemberitahuan pembukaan pintu
Tahan butang dan butang secara serentak selama tiga saat untuk menetapkan
bunyi pemberitahuan pembukaan pintu.
Pengguna boleh menutup bunyi pemberitahuan dengan baz (dalam nada menurun)
dengan menahan dua butang selepas ia diaktifkan.
Tahan kedua-dua butang itu sekali lagi, pengguna boleh mengaktifkan bunyi
pemberitahuan dengan baz (dalam nada menaik).
Nota: apabila peti sejuk pertama kali dihidupkan, bunyi pemberitahuan dihidupkan
secara lalai.
9) Penggera membuka pintu
Apabila pintu peti sejuk atau pembeku dibuka lebih daripada dua saat, penggera
akan berbunyi. Ia tiga bunyi baz untuk kali pertama. Kemudian, akan ada satu lagi
baz setiap minit dan ia sepanjang 30 minit dalam satu minit sehingga pintu ditutup.
Pengguna boleh mematikan penggera dengan menekan mana-mana butang.
10) Tetapan rangkaian wayarles
Selepas peti sejuk dihidupkan, "AP" akan ditunjukkan dalam kawasan suhu pada
panel kawalan paparan apabila pengguna menahan butang
selama tiga saat. Ini
bermakna rangkaian wayarles boleh diakses. Pengguna boleh log masuk Aplikasi
TSmartLife dan menyambungkan peti sejuk dengan rangkaian wayarles mengikut
panduan aplikasi. Tanda
akan cerah apabila sambungan selesai. Untuk muat turun
Aplikasi TSmartLife dan cara menyambung dengan rangkaian wayarles, sila rujuk
lampiran.
18
11) Notifikasi ralat
Pemberitahuan berikut pada skrin bermakna kerosakan pada peti sejuk.
Kod
kerosakan
Nama kerosakan Kemasukan kerosakan Penyelesaian Masalah
E1
Kerosakan sensor suhu
ruang penyejukan
Nilai suhu yang diukur bagi pengesan
haba ialah <-50°C atau >+60°C.
Laksanakan penyejukan dalam ruang
penyejukan mengikut kitaran mula-
henti pada tempoh masa yang
ditetapkan
E2
Kerosakan sensor suhu
pembeku
Nilai suhu yang diukur bagi pengesan
haba ialah <-50°C atau >+60°C.
Laksanakan penyejukan di dalam peti
sejuk mengikut kitaran permulaan henti
pada tempoh masa yang ditetapkan;
E3
Kerosakan sensor suhu
ruang pembekuan fleksibel
Nilai suhu yang diukur bagi pengesan
haba ialah <-50°C atau >+60°C.
Laksanakan penyejukan dalam ruang
fleksibel mengikut kitaran mula-henti
pada tempoh masa tertentu;
E5
Kerosakan sensor
pembekuan dan
penyahfrosan
Nilai suhu yang diukur bagi pengesan
haba ialah <-50°C atau >+60°C.
Semasa penyahfrosan, pemanas
penyahfros keluar mengikut masa yang
ditetapkan;
E6
Kesalahan komunikasi
antara papan induk dan
papan paparan
Tiada komunikasi yang berjaya
selepas 8s permulaan/1minit operasi
Tetapkan papan kawalan induk kepada
keadaan prakerosakan.
E7 Kerosakan suhu sekitar
Nilai suhu yang diukur bagi pengesan
haba ialah <-30°C atau >+65°C.
Laksanakan dengan suhu ambien pada
25°C;
EH
Kerosakan sensor
kelembapan
Kelembapan terukur < 5% RH atau
kelembapan terukur > 105% RH (tiada
penggera selepas 3 minit)
Laksanakan dengan kelembapan pada
85%;
EE Kerosakan sensor mesin ais
Nilai suhu yang diukur bagi pengesan
haba ialah <-50°C atau >+60°C.
Mesin ais tidak membuat ais
E0 Kerosakan mesin ais
Penetapan semula mesin ais yang
tidak normal semasa pemulaan
Tunggu mesin ais untuk mula semula
EP
Kerosakan tiada ais mesin
ais
Isyarat sensor Hall yang tidak normal
dikesan semasa proses tiada ais
Pembuat ais tidak membuat ais
EC Kesalahan EEPROM
Kesalahan EEPROM (hanya
dipaparkan semasa pemeriksaan
sendiri)
Kawalan mengikut tetapan kilang
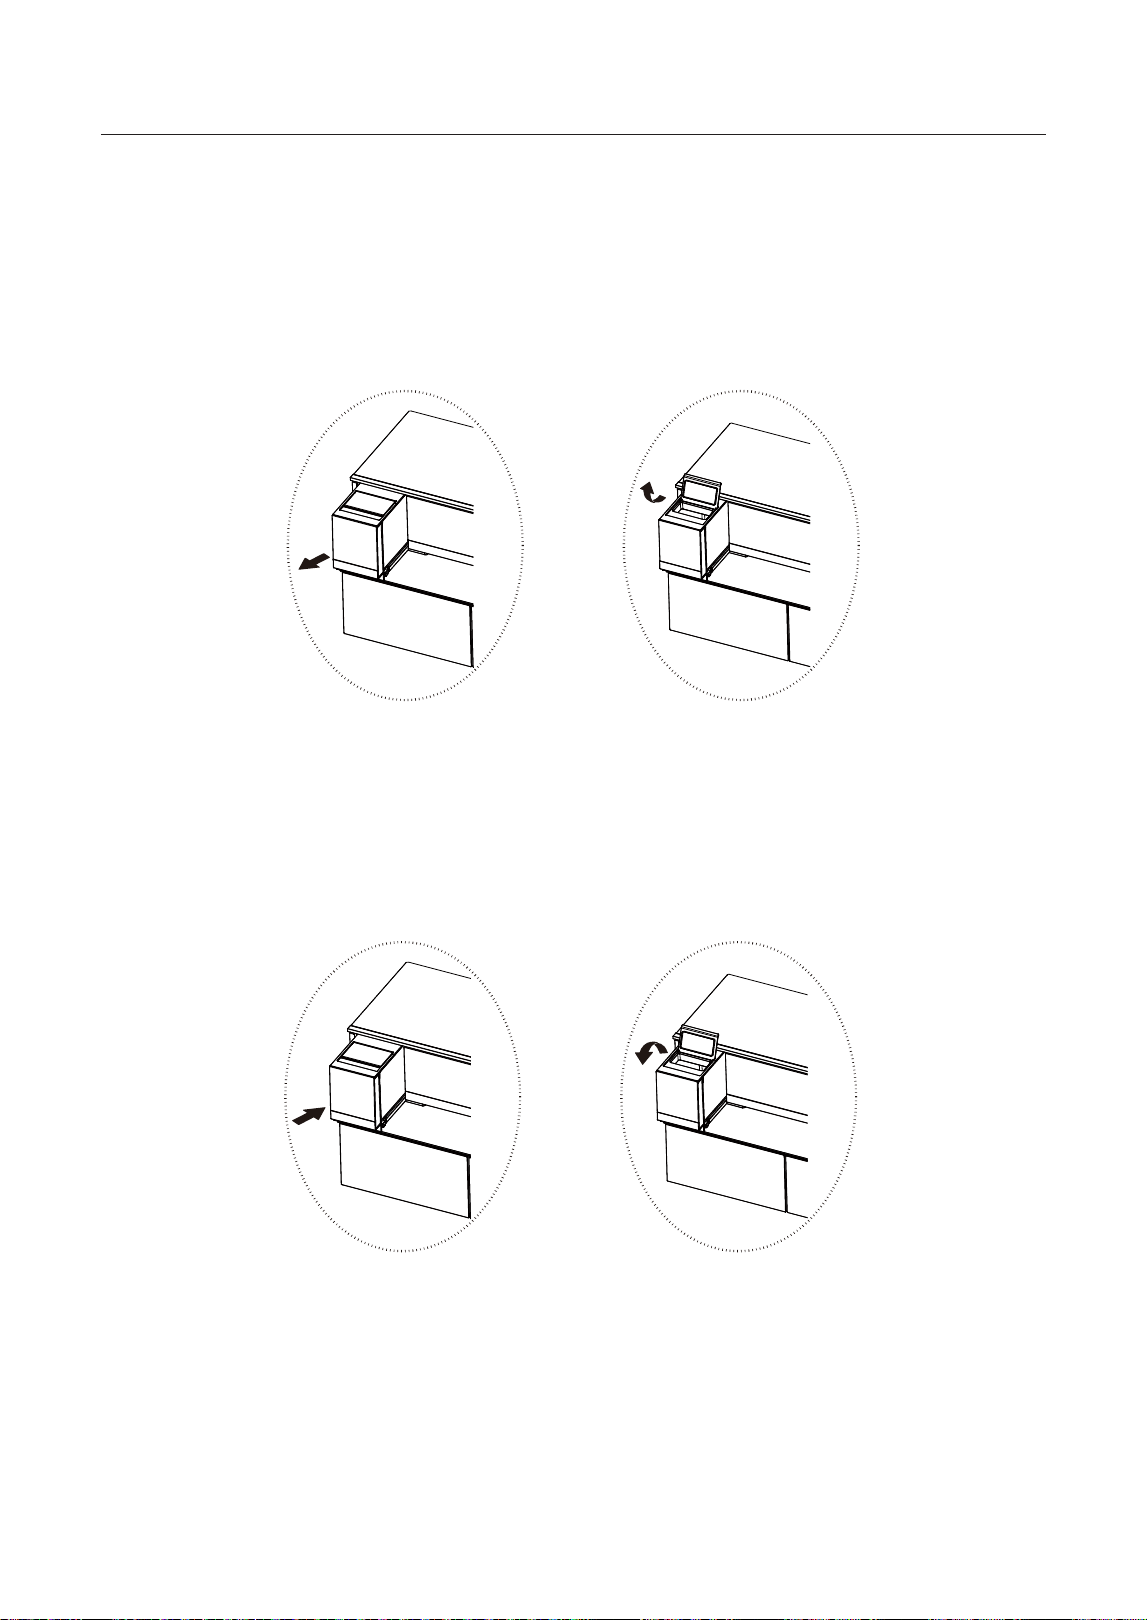
19
3.3 Arahan untuk penggunaan dan penambahan tangki air
Langkah menambah air:
1) Keluarkan tangki air daripada peti sejuk.
2) Buka penutup suntikan air.
3) Tambahkan air minuman atau air alkali yang dibotolkan, tanpa melebihi paras
Maks.
Ɣ
Adalah disyorkan untuk tidak melebihi 3L, jika tidak air akan melimpah
Ɣ
Isikan tangki hanya dengan air minuman seperti air mineral atau air tulen.
Jangan guna cecair lain. Jangan menambah jus, susu dan cola ke dalam
tangki air.
4) Tutup air bertapis penutup suntikan air.
5) Tolak tangki air ke dalam sehingga ia terlekat pada tempatnya.
Ɣ
Selepas tangki air ditolak masuk, sila tunggu selama 30s sebelum mengambil
air yang pertama dalam cawan.
Ɣ
Pastikan tangki air melekap pada rak. Jika tidak, tangki air tersebut mungkin
tidak beroperasi dengan betul.
Ɣ
Jangan gunakan peti sejuk tanpa memasukkan tangki air. Ini boleh
mengurangkan prestasi penyejukan.
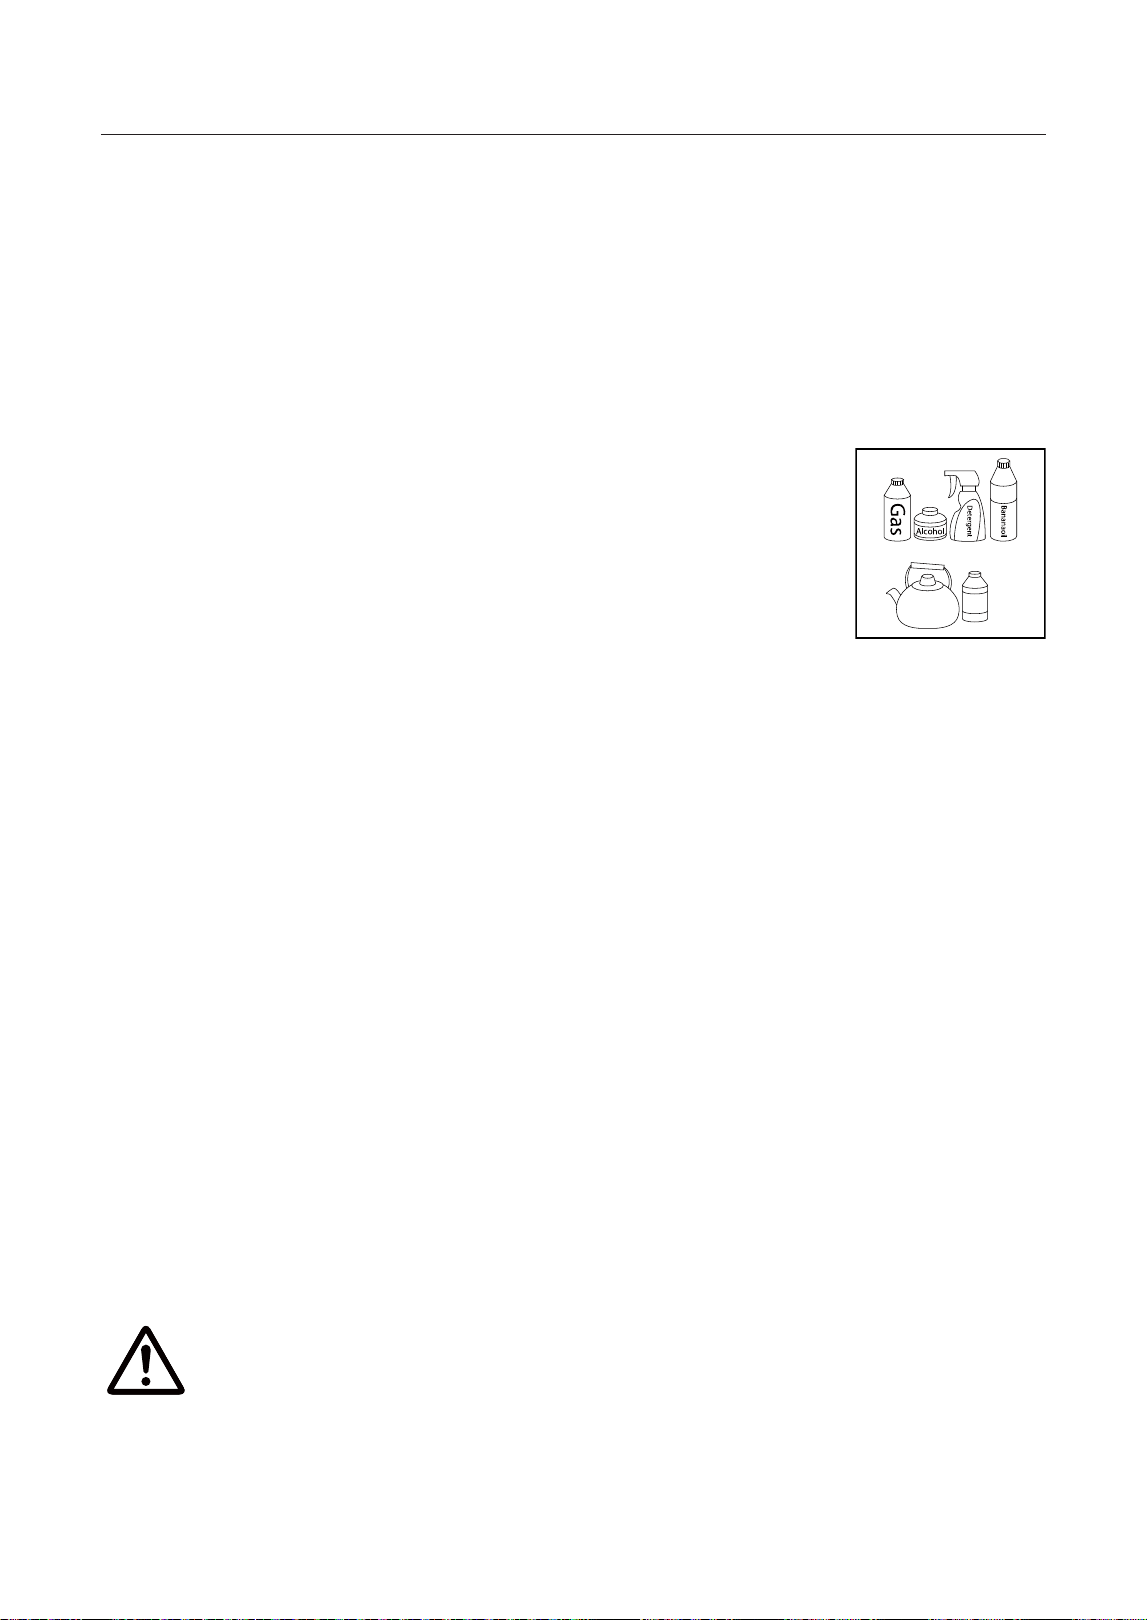
20
4. Penyelenggaraan dan penjagaan peti sejuk
4.1 Pembersihan keseluruhan
Ɣ
Habuk di belakang peti sejuk dan di atas lantai hendaklah dibersihkan mengikut
masanya untuk meningkatkan kesan penyejukan dan penjimatan tenaga.
Ɣ
Periksa gasket pintu dengan kerap untuk memastikan tiada serpihan. Bersihkan
gasket pintu dengan kain lembut yang dilembapkan dengan air sabun atau
detergen cair.
Ɣ
Bahagian dalam peti sejuk perlu dibersihkan dengan kerap untuk mengelakkan
bau.
Ɣ
Sila matikan kuasa sebelum membersihkan bahagian dalam,
keluarkan semua makanan, minuman, rak, laci, dsb.
Ɣ
Gunakan kain lembut atau span untuk membersihkan bahagian
dalam peti sejuk, dengan dua sudu besar soda penaik dan satu
liter air suam. Kemudian bilas dengan air dan lap hingga bersih.
Selepas membersihkan, buka pintu dan biarkan ia kering secara
alami sebelum menghidupkan kuasa.
Ɣ
Untuk kawasan yang sukar dibersihkan di dalam peti sejuk (seperti kawasan tindih
sempit, celah atau sudut), disyorkan untuk mengelapnya dengan kerap dengan
kain lembut, berus lembut, dll. dan apabila perlu, digabungkan dengan beberapa
alat tambahan (seperti kayu nipis) untuk memastikan tiada bahan cemar atau
bakteria terkumpul di kawasan ini.
Ɣ
Jangan gunakan sabun, detergen, serbuk gosok, pembersih semburan, dll., kerana
ini boleh menyebabkan bau di bahagian dalam peti sejuk atau makanan tercemar.
Ɣ
Bersihkan bingkai botol, rak dan laci dengan kain lembut yang dilembapkan
dengan air sabun atau detergen cair. Keringkan dengan kain lembut atau
keringkan secara alami.
Ɣ
Lap permukaan luar peti sejuk dengan kain lembut yang dilembapkan dengan air
sabun, detergen, dsb., dan kemudian lap kering.
Ɣ
Jangan gunakan berus keras, bebola keluli pembersih, berus dawai, bahan pelelas
(seperti ubat gigi), pelarut organik (seperti alkohol, aseton, minyak pisang, dll.),
air mendidih, bahan asid atau alkali, yang boleh merosakkan permukaan dan
dalaman peti sejuk. Air mendidih dan pelarut organik seperti benzena boleh
merubah bentuk atau merosakkan bahagian plastik.
Ɣ
Jangan bilas terus dengan air atau cecair lain semasa pembersihan untuk
mengelakkan litar pintas atau menjejaskan penebat elektrik selepas rendaman.
Sila cabut plag peti sejuk untuk nyahfros dan pembersihan.
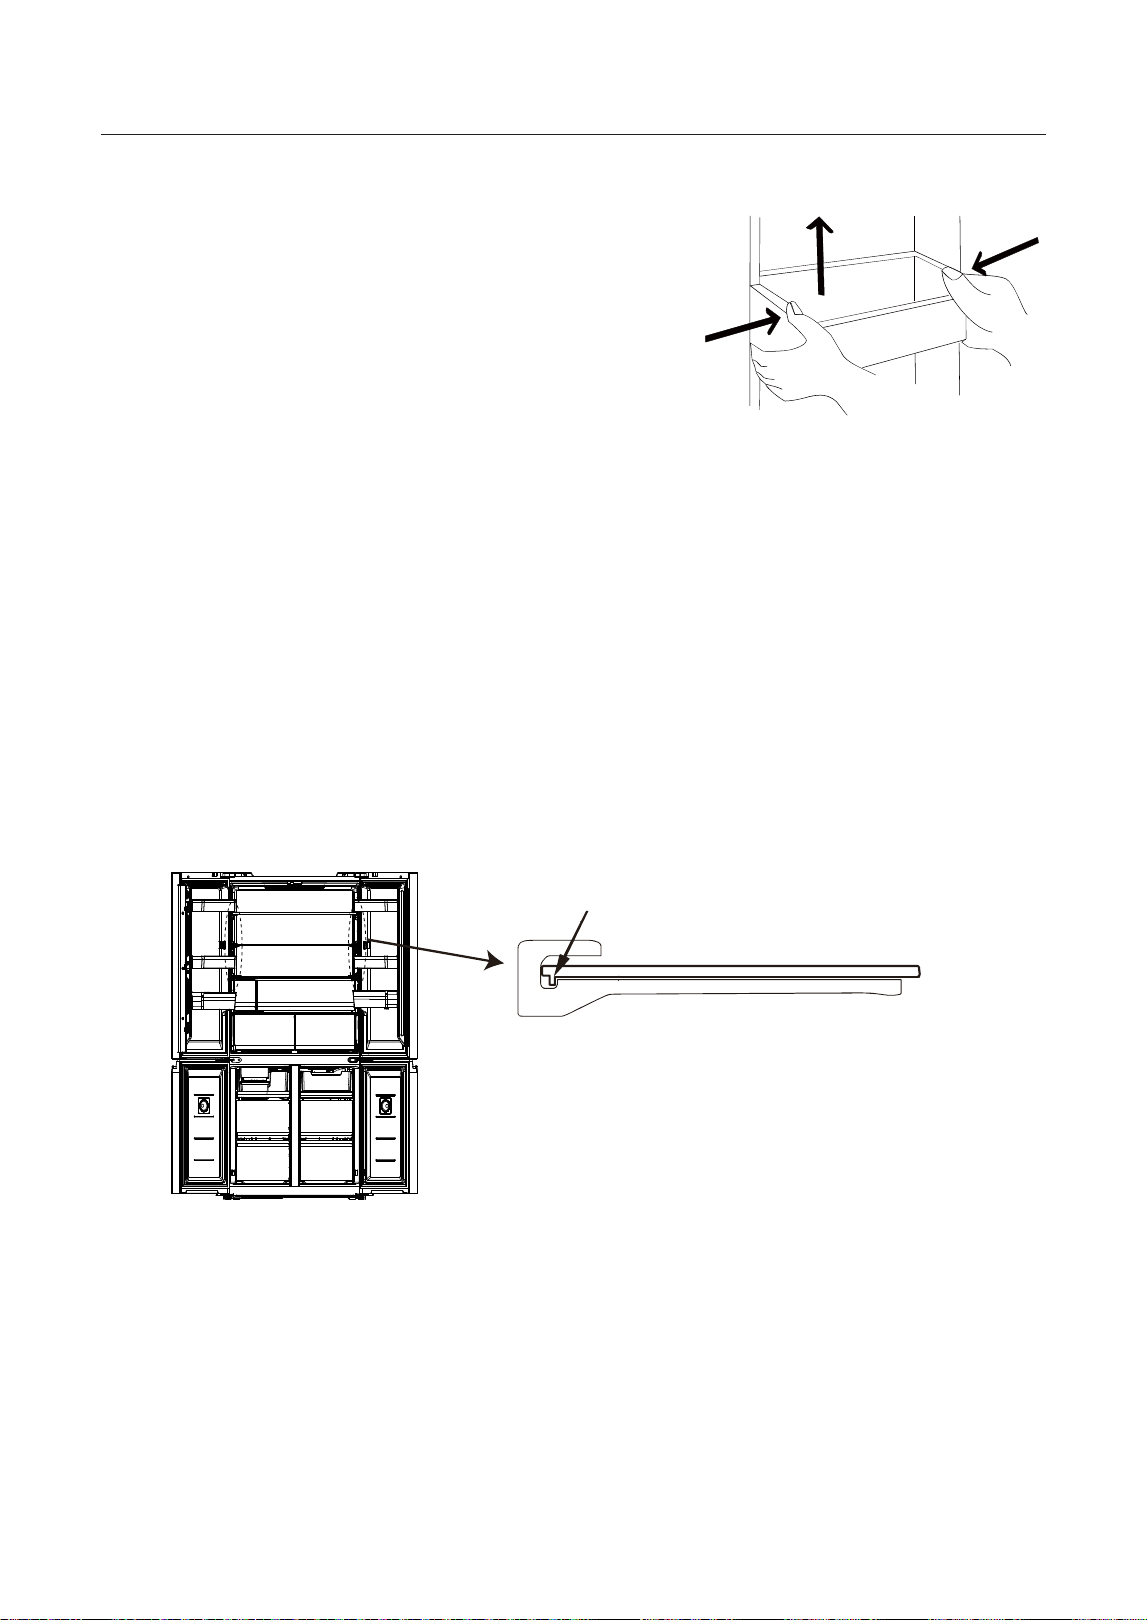
21
4.2 Pembersihan dulang pintu
Ɣ
Mengikut anak panah arah dalam rajah di bawah,
gunakan kedua-dua tangan untuk memicit dulang,
dan tolaknya ke atas, kemudian anda boleh
mengeluarkannya.
Ɣ
Selepas membasuh dulang yang telah dikeluarkan,
anda boleh melaraskan ketinggian pemasangannya
mengikut keperluan anda.
4.3 Membersihkan Rak kaca
Ɣ
Oleh kerana bahagian paling dalam pelapik peti sejuk yang menyentuh rak
mempunyai pengadang, anda harus menaikkan rak ke atas, kemudian anda akan
dapat mengeluarkannya.
Ɣ
Laraskan dan bersihkan rak menurut keperluan anda. Tuala lembut atau span yang
direndam ke dalam air dan detergen neutral tidak mengakis dicadangkan untuk
pembersihan. Pembeku hendaklah dibersihkan akhirnya dengan air bersih dan
kain kering. Buka pintu untuk pengeringan semula jadi sebelum kuasa dihidupkan.
Jangan gunakan berus keras, bebola keluli pembersih, berus dawai, bahan pelelas
(seperti ubat gigi), pelarut organik (seperti alkohol, aseton, minyak pisang, dll.),
air mendidih, bahan asid atau alkali untuk bersihkan pembeku kerana boleh
merosakkan permukaan dan dalaman peti sejuk.
belakang
naikkan rak kaca ke atas,
kemudian tarik ia keluar
(Gambar di atas hanya untuk rujukan. Konfigurasi sebenar akan bergantung
pada produk fizikal atau kenyataan oleh pengedar)
4.4 Penyahfrosam
Ɣ
Peti sejuk dibuat berdasarkan prinsip penyejukan udara dan oleh itu mempunyai
fungsi penyahfrosan automatik. Fros yang terbentuk akibat perubahan musim
atau suhu juga boleh dikeluarkan secara manual dengan memutuskan sambungan
perkakas daripada bekalan kuasa atau dengan mengelap dengan tuala kering.
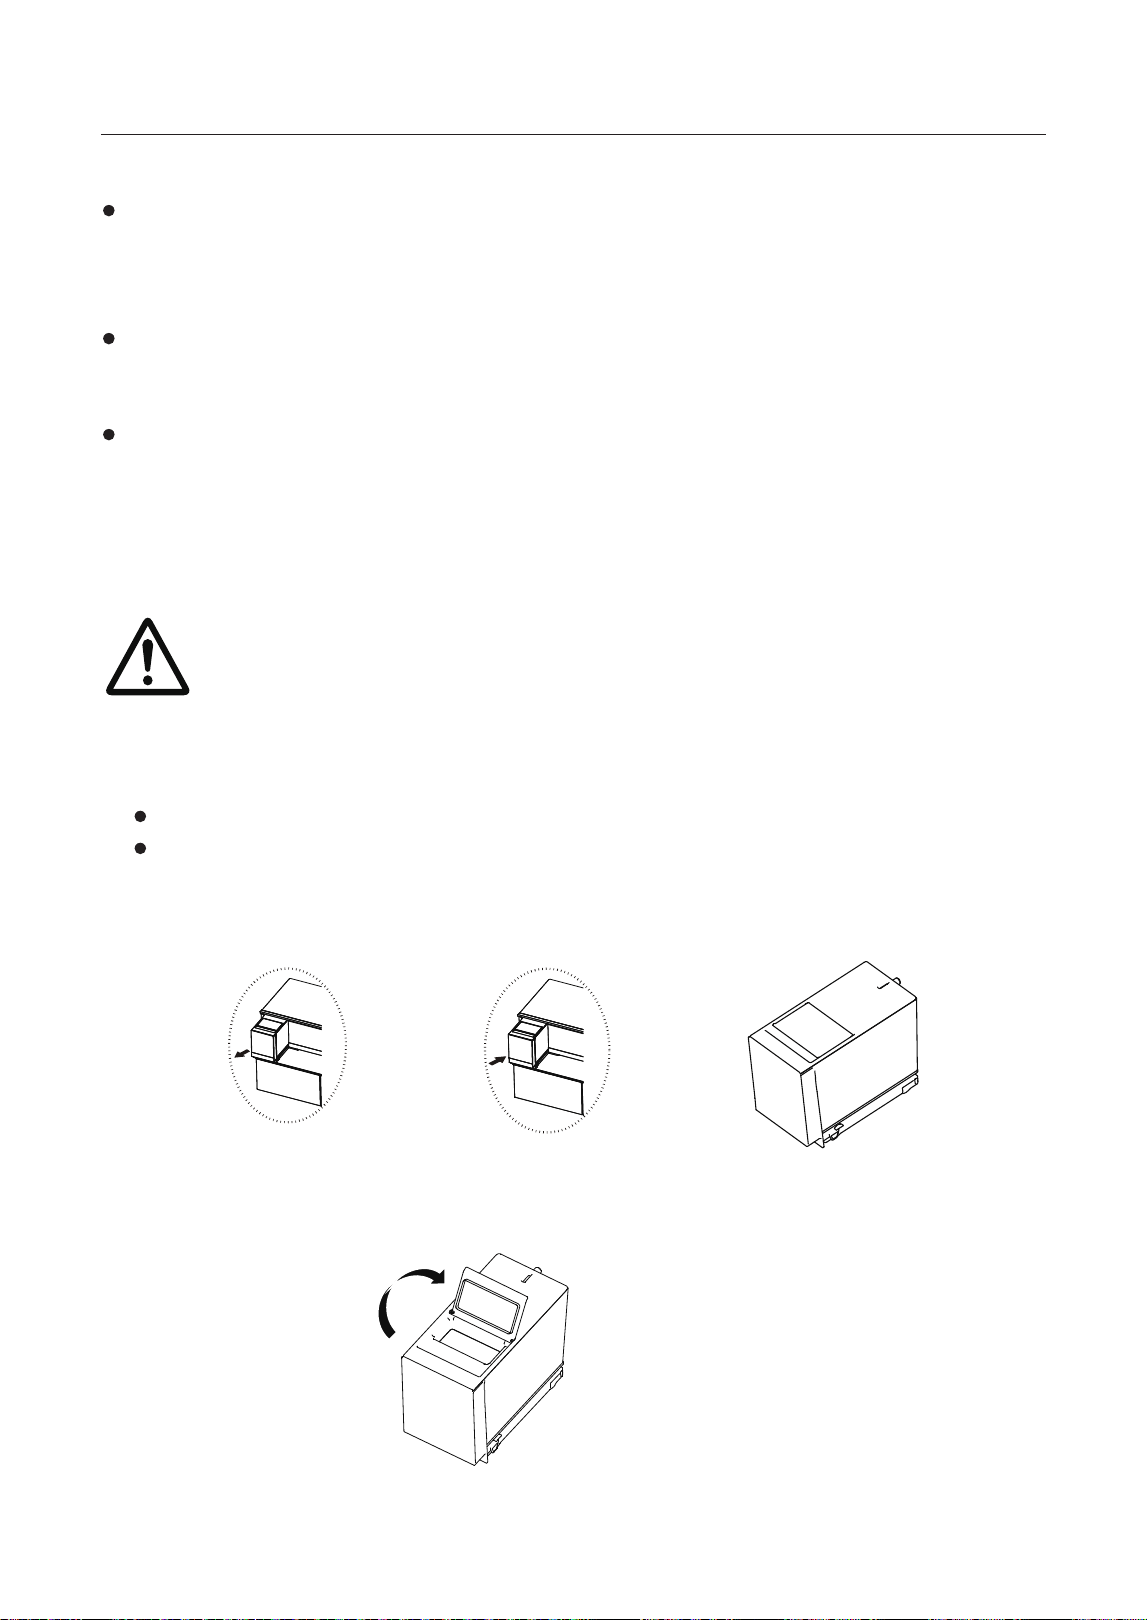
22
4.5 Tidak operasi
Kegagalan kuasa: Sekiranya berlaku kegagalan kuasa, walaupun pada musim
panas, makanan di dalam perkakas boleh disimpan selama beberapa jam; semasa
kegagalan kuasa, masa pembukaan pintu hendaklah dikurangkan, dan jangan
masukkan lagi makanan segar ke dalam perkakas.
Tidak digunakan untuk masa yang lama: Perkakas hendaklah dicabut plag dan
kemudian dibersihkan; kemudian pintu dibiarkan terbuka untuk mengelakkan
bau.
Pemindahan: Sebelum peti ais dipindahkan, keluarkan semua objek di dalamnya,
lekatkan petak kaca, pemegang sayur-sayuran, laci ruang penyejukbekuan
dan dsb. dengan pita, dan ketatkan kaki perata, tutup pintu dan kedapkannya
dengan pita. Semasa memindahkan, perkakas tidak boleh diletakkan terbalik atau
mendatar, atau digetarkan; kecondongan semasa pemindahan hendaklah tidak
lebih daripada 45°.
Perkakas hendaklah beroperasi secara berterusan sebaik sahaja ia
dimulakan. Secara amnya, operasi perkakas tidak boleh diganggu
kerana boleh menjejaskan hayat perkhidmatan.
4.6 Langkah berjaga-jaga untuk penggunaan pembuat ais
1) Arahan untuk menggunakan dan menambah air ke dalam tangki air buat ais
Sumber air: air tulen dalam botol atau air boleh diminum.
Langah menambah air:
a) Angkat dan tarik keluar tangki air pembuat ais di dalam peti sejuk, dengan port
pengisian air menegak ke atas, dan tangki air diletakkan rata pada permukaan
yang stabil.
b) Buka penutup pengisian air.
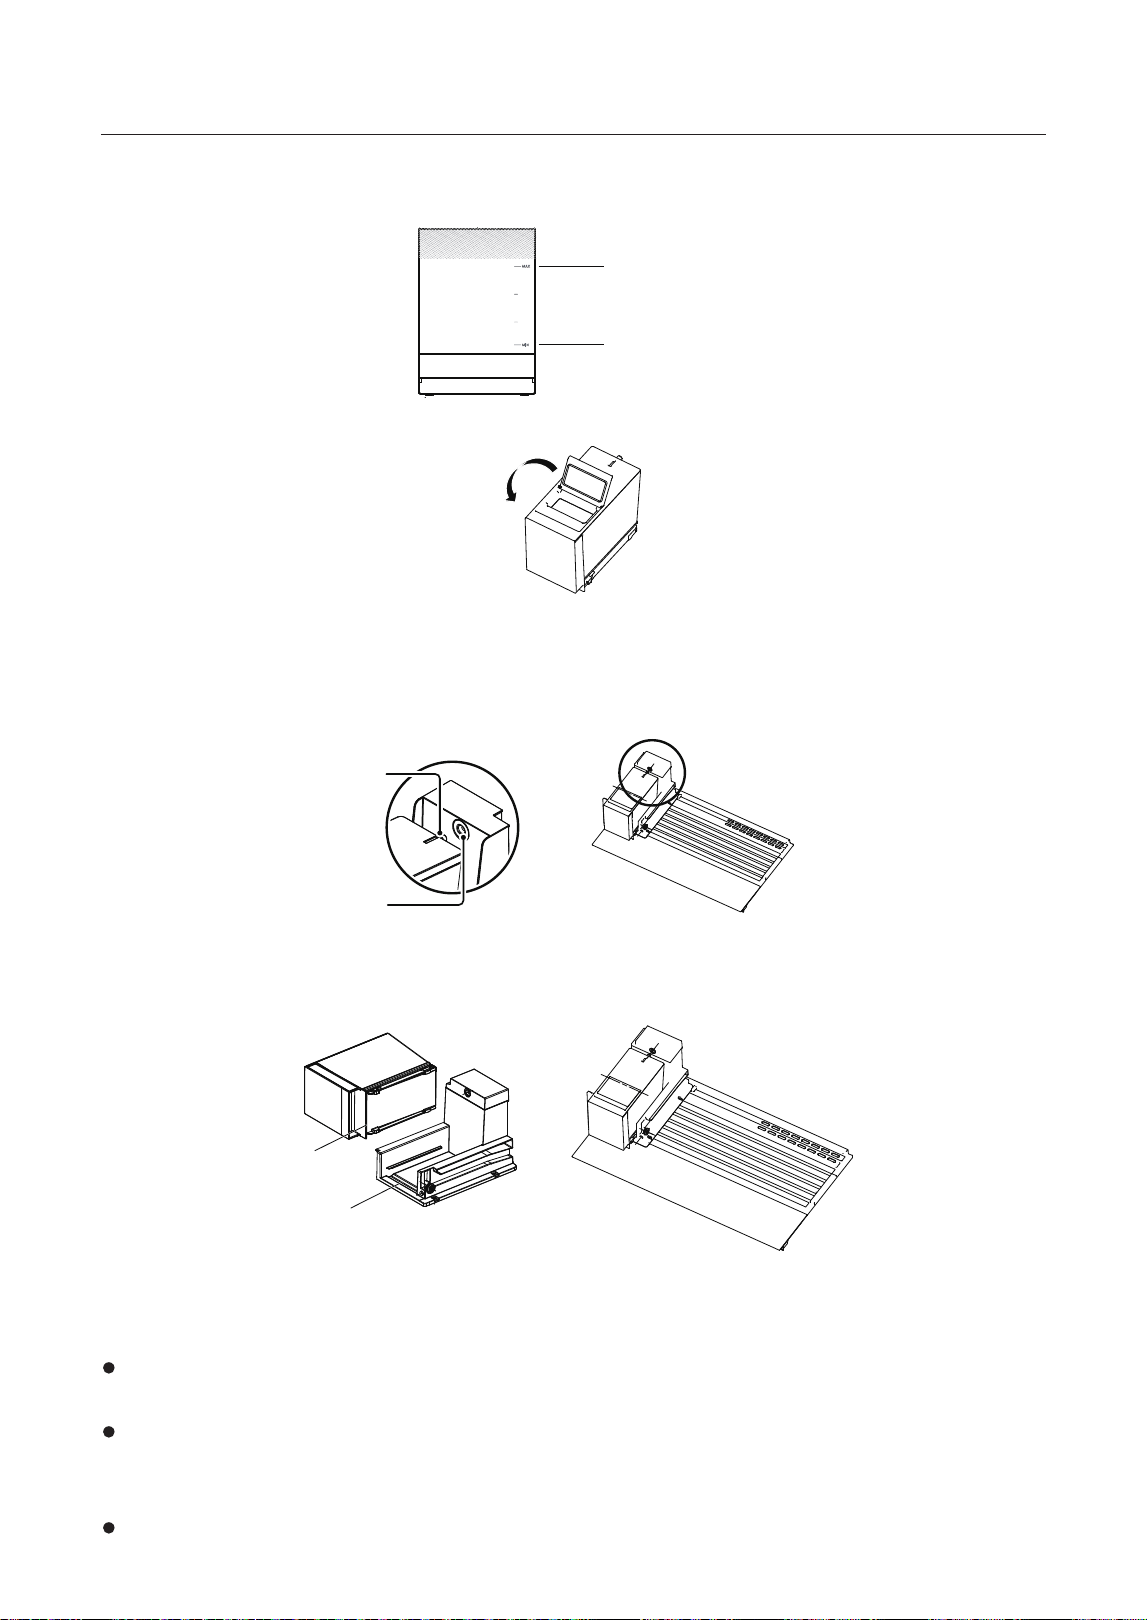
23
MAK
MIN
d) Tutup penutup pengisian air.
e) Tolak tangki air ke dalam peti sejuk secara selari, tolak sepenuhnya muncung
keluar air tangki air ke salur masuk air bulat, dan klipkan alur di bahagian bawah
tangki air ke dalam bonjolan tapak untuk memastikan kedudukan tolakan air yang
tepat bagi tangki air pembuat ais.
Saluran keluar
Saluran masuk
f) Selitkan alur di bahagian bawah tangki air ke dalam tonjolan tapak untuk
memastikan tangki air pembuat ais ditolak dalam kedudukan yang betul.
Alur
Bonjolan
NOTA:
Minuman, air panas, kopi dan sebagainya tidak dibenarkan untuk dimasukkan
ke dalam tangki air pembuat ais.
Apabila membuka tangki air yang digunakan dalam pembuat ais, sedikit air akan
tumpah ke rak kaca. Apabila air tumpah, lap kering dengan kain lembut.
Minuman, air panas, kopi dan sebagainya tidak dibenarkan untuk dimasukkan
ke dalam tangki air pembuat ais. Ia boleh menyebabkan kegagalan sistem dan
kebocoran air.
Sila bersihkan tangki air sebelum digunakan.
c) Air botol atau air boleh diminum tidak boleh melebihi tanda aras air maksimum
MAX-3L atau lebih rendah daripada tanda aras air minimum MIN.
24
Jangan tanggalkan pendakap tangki air atau rosakkan paip air. Ia boleh
menyebabkan kegagalan sistem dan kebocoran air.
Buang air yang ditapis (kira-kira 5 cawan) dan ais (kira-kira 30 keping) daripada
penggunaan pertama. Ia mungkin mengandungi kekotoran.
Pastikan saluran keluar air tangki air pembuat ais dan salur masuk pendakap tangki
air dimasukkan sepenuhnya. Kemasukan yang tidak lengkap boleh menyebabkan
kegagalan sistem atau kebocoran air.
Jika sistem bekalan air pembuat ais tidak digunakan selama 2-3 hari, buang ais
pada penggunaan pertama, yang mungkin mempunyai bau atau habuk.
Jika anda tidak menggunakan sistem pembuat ais selama kira-kira 2 minggu,
buang air di dalam tangki air. Air dalam tangki air mungkin telah tercemar.
Adalah disyorkan agar anda menambah air tulen yang sesuai ke dalam tangki air
pembuat ais dalam masa 2-3 hari. Air tulen juga boleh ditambah ke dalam tangki
air pembuat ais mengikut jumlah sebenar ketulan ais yang digunakan. Isipadu air
hendaklah dikekalkan dalam julat normal, tidak melebihi paras maksimum MAX
dan tidak lebih rendah daripada paras minimum MIN.
2) Nota untuk penggunaan pembuat ais
Masa membuat ais dan kapasiti penyimpanan ais
Secara amnya, setiap masa membuat ais ialah 100min. 100g ais boleh dibuat
setiap kali, kira-kira 10 kiub ais. (Suhu ambien ialah 25 °C dan pintu tidak dibuka
atau ditutup).
Kotak penyimpanan ais boleh penuh selepas 8-10 kali membuat ais, dengan 80-
100 kiub ais.
Masa membuat ais mungkin dilanjutkan kerana status berjalan peti sejuk yang
berbeza.
Masa membuat ais boleh dilanjutkan dalam situasi berikut
Ruang pembekuan tidak disejukkan sepenuhnya pada permulaan penggunaan.
Suhu rendah pada musim sejuk atau suhu persekitaran tinggi pada musim panas.
Pintu dibuka dan ditutup lebih banyak kali; atau lebih banyak makanan
dimasukkan pada satu masa.
Ruang di sekeliling peti sejuk terlalu sempit.
Nota untuk pembuatan ais
Batang pengesanan ais pembuat ais ini akan terus membuat ais sebelum
menyentuh ais; apabila batang pengesanan ais menyentuh ais dalam kotak
penyimpanan ais, proses membuat ais berhenti. Pada masa ini, kotak penyimpanan
ais penuh dengan ais.
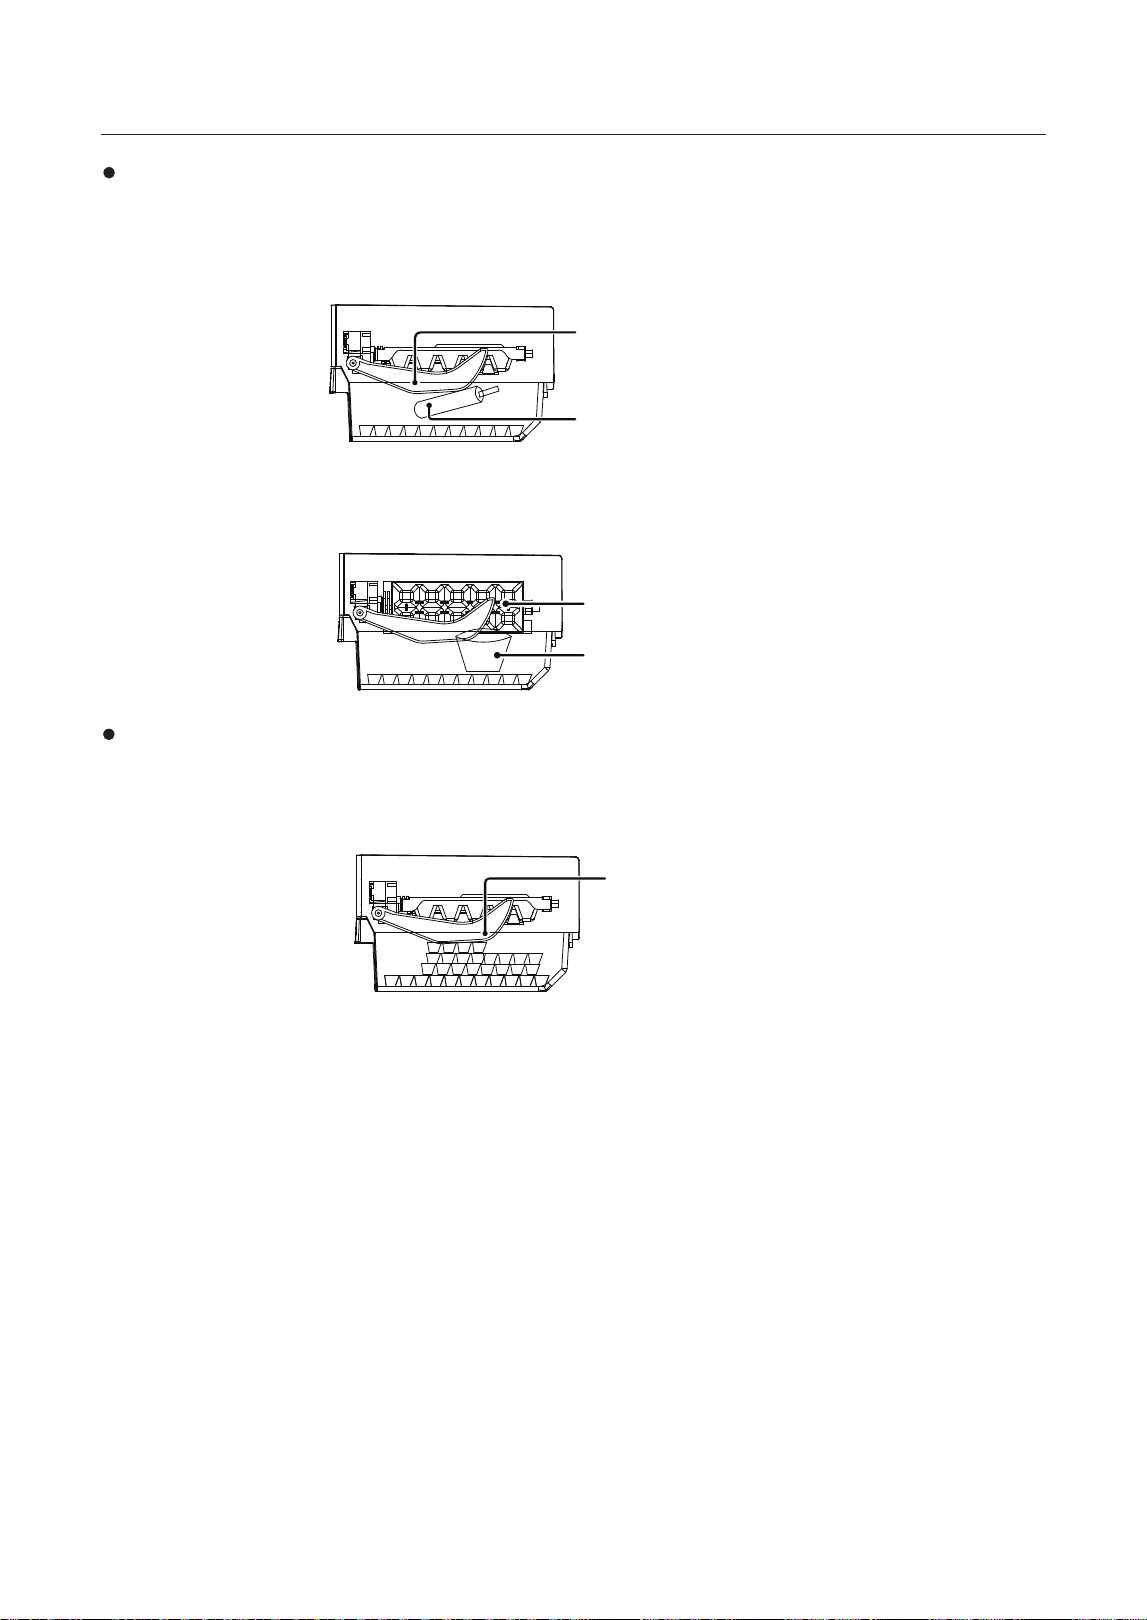
25
a) Benda asing selain ketulan ais dalam kotak penyimpanan ais menyentuh batang
pengesanan.
Batang pengesanan
Benda asing
b) Benda asing selain ketulan ais dalam kotak penyimpanan ais menyebabkan
perlanggaran atau membuat ais berhenti apabila grid membuat ais terbalik.
Grid membuat ais
Benda asing
Keadaan berikut boleh mengurangkan jumlah ais yang dibuat:
Sesetengah ketulan ais yang bertimbun di sesetengah kawasan mungkin terkena
batang pengesanan terlalu awal, menyebabkan pembuatan ais dihentikan apabila
pembuatan ais tidak mencukupi.
Batang
pengesanan
Untuk menyelesaikan masalah ini, sila elakkan menyimpan barang lain di
dalam kotak penyimpanan ais dan susun kiub ais secara sama rata dalam kotak
penyimpanan ais.
Keadaan berikut mungkin menghalang ais daripada dibuat walaupun
terdapat air di dalam tangki air:
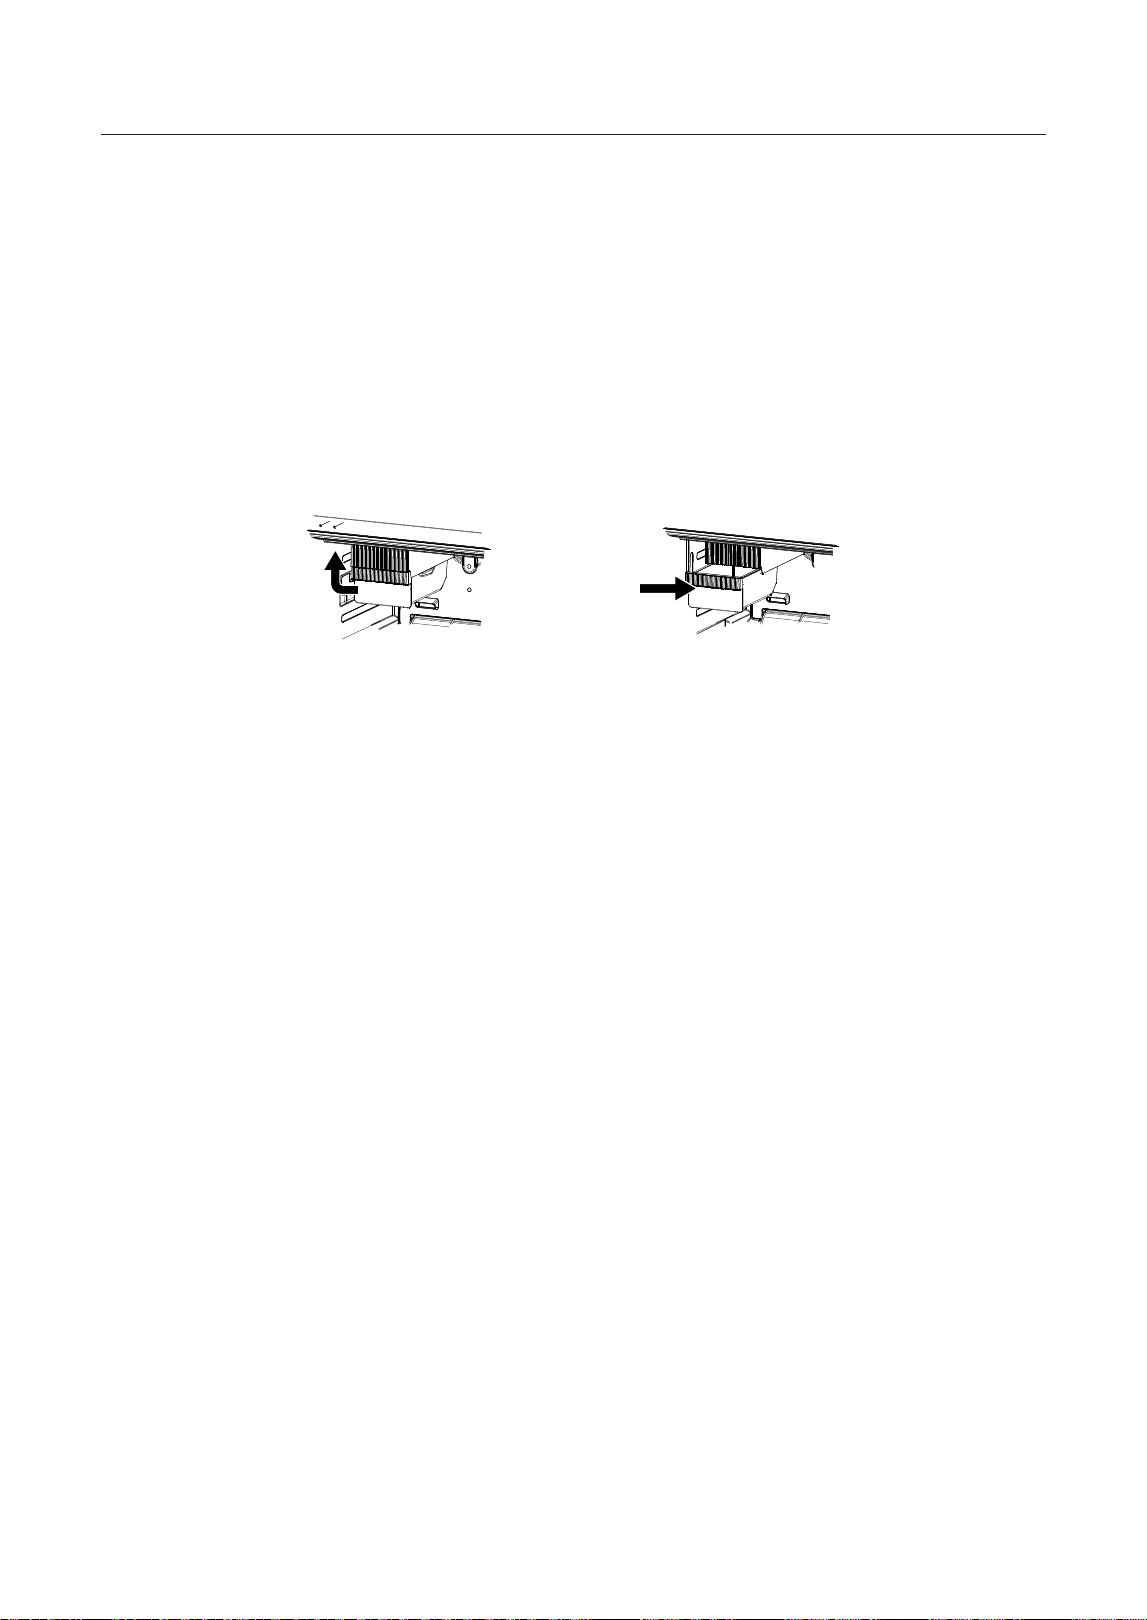
26
4.7 Penggunaan dan pembersihan kotak penyimpanan ais
Ais di dalam kotak penyimpanan ais mungkin bergumpal atau alur keluar mungkin
tersumbat atas sebab lain. Dalam kes ini, kotak penyimpanan ais perlu dibersihkan
atau buang sumbatan.
Bersihkan kotak penyimpanan ais sebelum digunakan.
Ɣ
Tarik keluar kotak penyimpanan ais secara mendatar mengikut arah anak panah
dalam rajah di bawah, dan kemudian angkat ke atas untuk mengeluarkan kotak
penyimpanan ais.
Ɣ
Selepas mengeluarkan kotak penyimpanan ais atau pembersihan, tolak kotak
penyimpanan ais secara mendatar mengikut arah anak panah dalam rajah di
bawah.
Amaran:
Ɣ
Apabila menggunakan pembuat ais, jangan letakkan apa-apa selain ketulan ais
ke dalam kotak penyimpanan ais. Meletakkan sesuatu selain daripada ais akan
menyebabkan kerosakan perlanggaran atau membuat ais berhenti apabila grid
membuat ais terbalik.
Ɣ
Jika anda perlu menyimpan item lain dalam kotak penyimpanan ais, sila berhenti
menggunakan fungsi membuat ais.
Ɣ
Apabila fungsi membuat ais didayakan semula, sila keluarkan item lain dalam
kotak penyimpanan ais dan bersihkan kotak penyimpanan ais.
Ɣ
Apabila meletakkan item lain ke dalam kotak penyimpanan ais, sila berhati-hati
dengan item tinggi untuk mengelakkan menyekat pembuat ais.
Ɣ
Jika tidak digunakan lama, kiub ais di dalam kotak penyimpanan ais, pembuat ais,
dulang kiub ais hendaklah dibuang.
Ɣ
Pastikan anda menggunakan kain basah atau span lembut untuk pembersihan,
dan bilas bahagian yang hendak dibilas dengan air bersih. (Untuk mengelakkan
kulat, karat air, dll.) Jangan gunakan item berikut: detergen, peluntur, serbuk
pelelas, berus, pelarut, petrol, dll. (Jika tidak, bau pelik atau kerosakan mungkin
berlaku.)
Ɣ
Jangan buka, ubah suai atau baiki sendiri pembuat ais automatik di dalam peti
sejuk.
Ɣ
Jangan sentuh bahagian pembuat ais daripada pembuat ais automatik dengan
tangan anda (bahagian atas kotak membuat ais.)
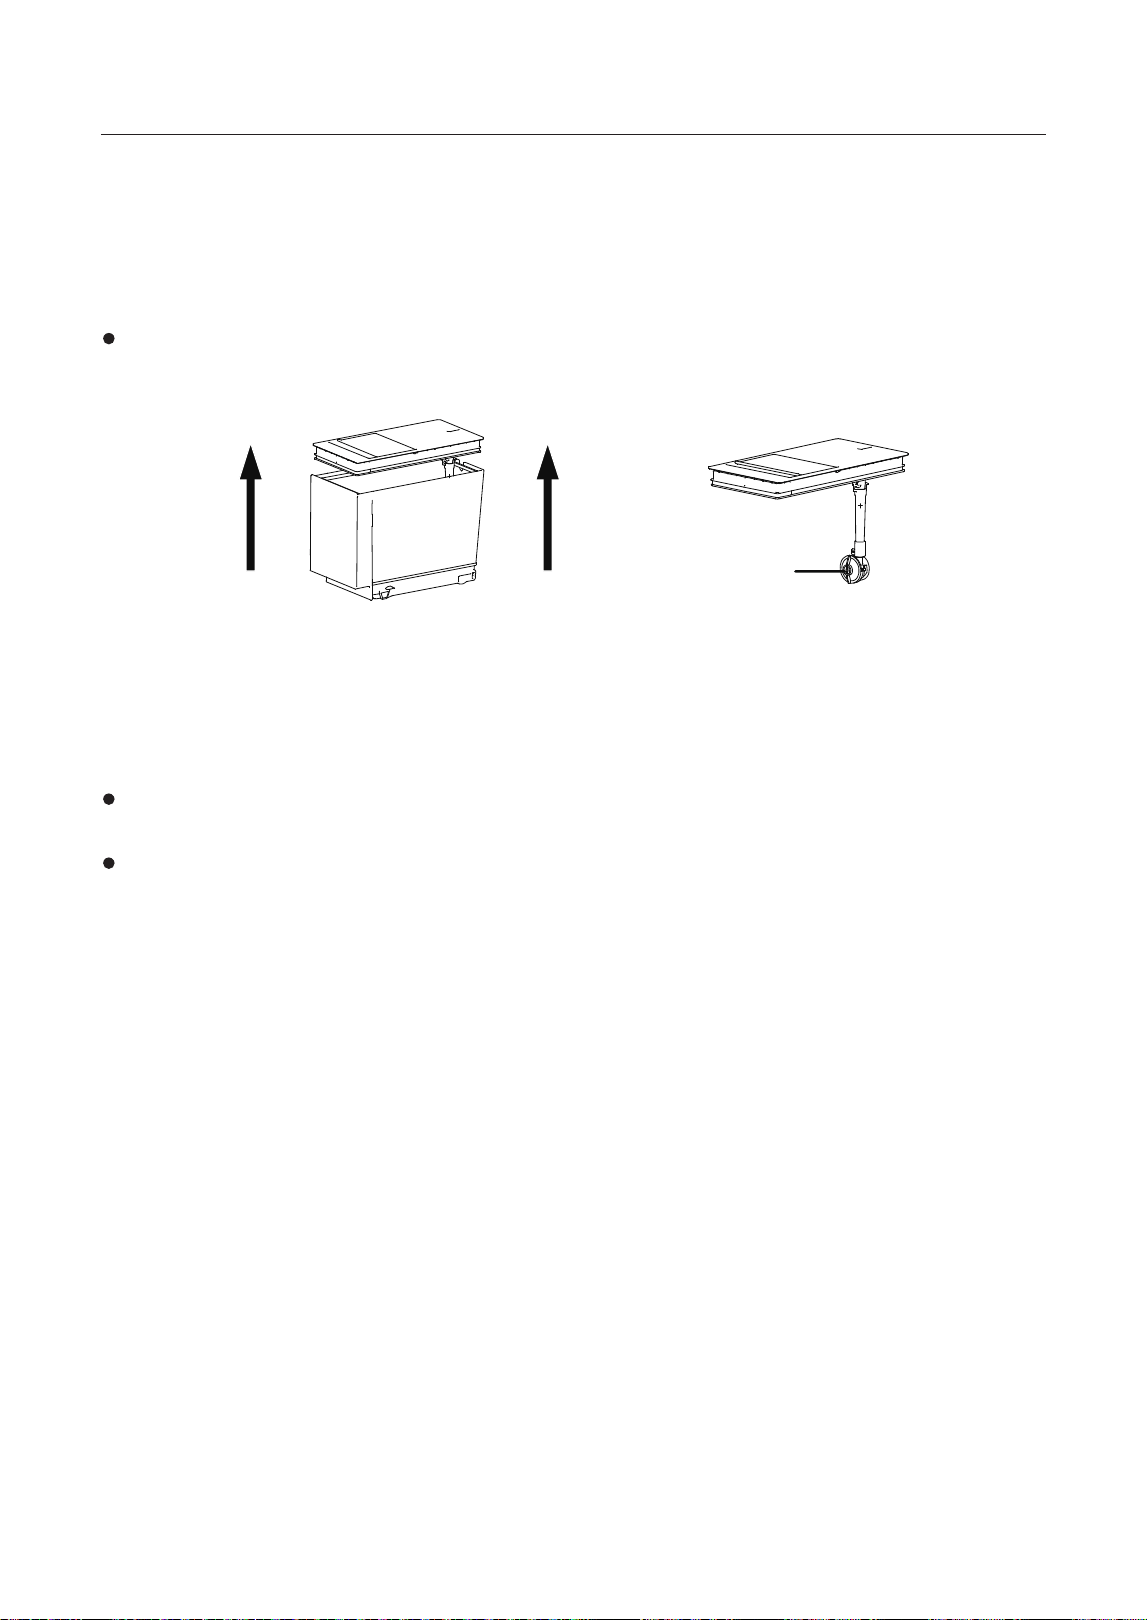
27
4.8 Pembersihan tangki air dan cara air pembuat ais
Jika fungsi membuat ais tidak digunakan untuk satu tempoh masa, sila kosongkan
bongkah ais dalam kotak penyimpanan ais sebelum menggunakan semula; buat
ais penuh sekali, dan kemudian kosongkan kotak penyimpanan ais sekali lagi untuk
menggunakannya seperti biasa.
Buka penutup tangki air pembuat ais ke atas; selepas pemasangan penutup dan
kotak air diasingkan, bersihkan kotak dan pemasangan penutup masing-masing,
dan bersihkan dengan berus atau kepala penapis alat lain.
Kepala penapis
(Gambar di atas hanya untuk rujukan. Konfigurasi sebenar akan bergantung pada
produk fizikal atau kenyataan oleh pengedar)
Amaran:
Jika ia tidak dipasang di tempatnya, bekalan air dan pembuatan ais tidak akan
bermula, atau pam bekalan air akan membuat bunyi.
Pastikan anda menggunakan kain basah atau span lembut untuk pembersihan,
dan bilas bahagian yang hendak dibilas dengan air bersih. (Untuk mengelakkan
kulat, karat air, dll.) Jangan gunakan item berikut: detergen, peluntur, serbuk
pelelas, berus, pelarut, petrol, dll. (Jika tidak, bau pelik atau kerosakan mungkin
berlaku.)
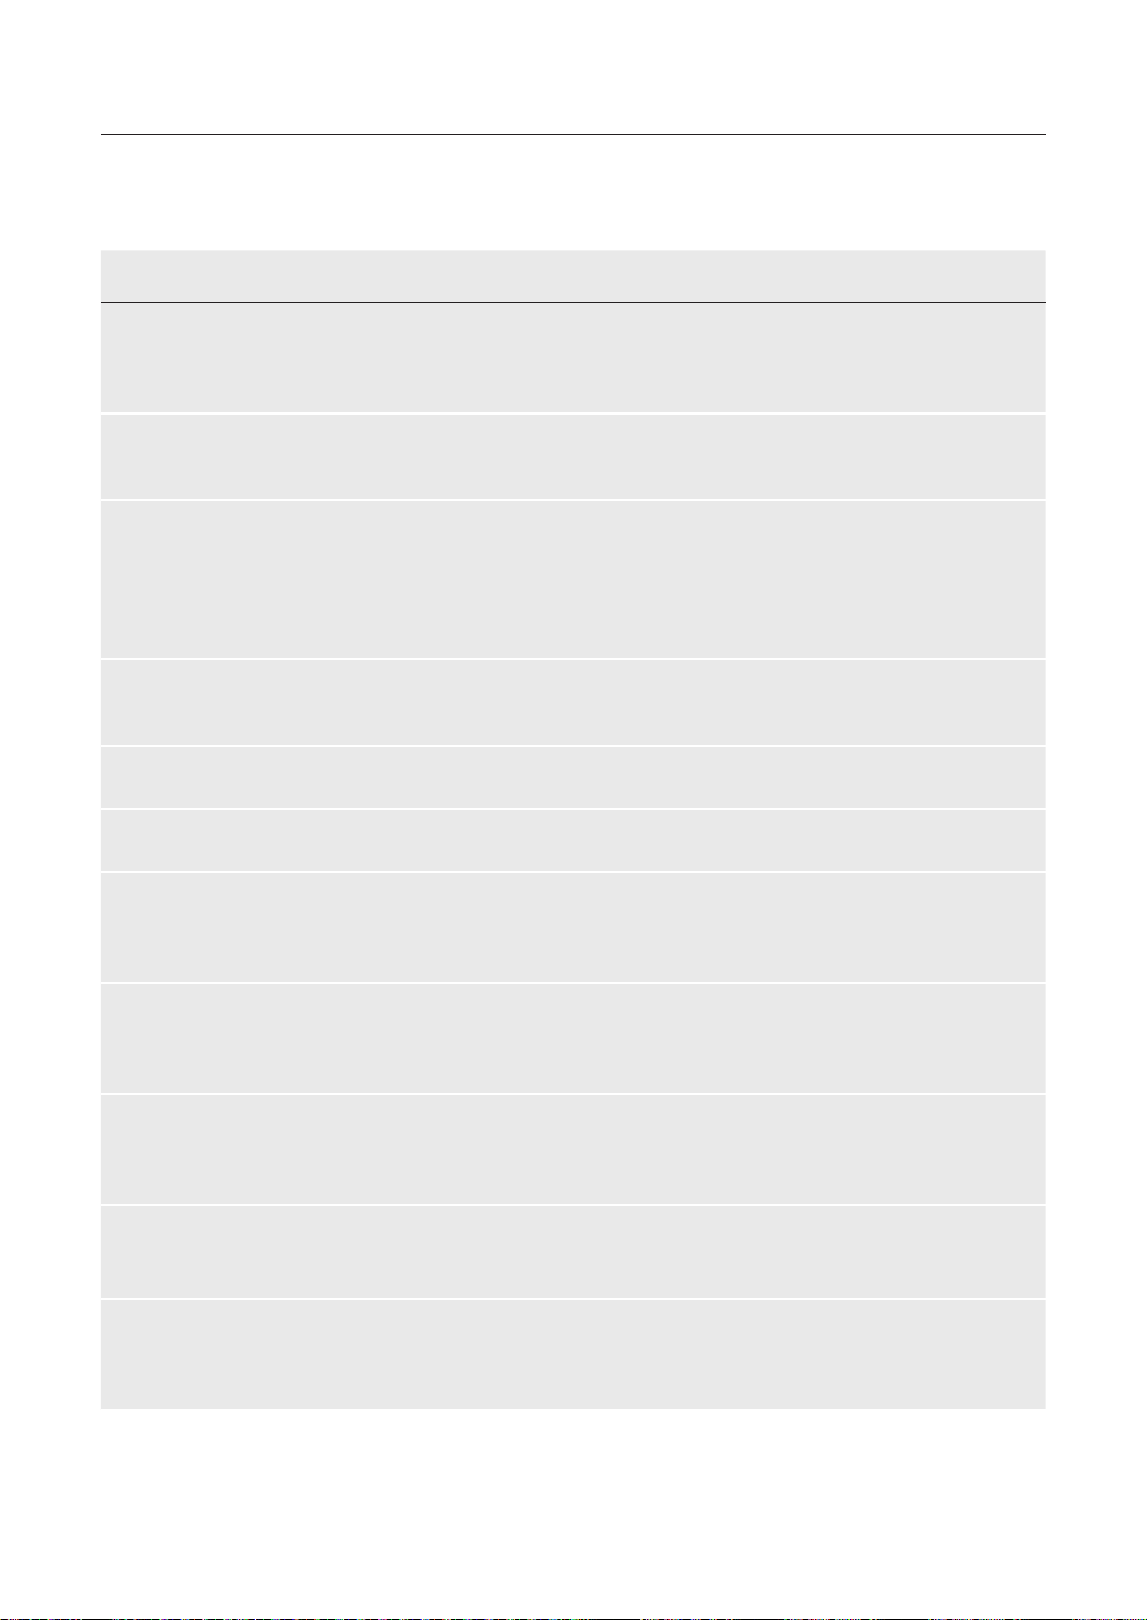
28
5. Penyelesaian Masalah
Ɣ
Anda boleh cuba menyelesaikan masalah mudah itu dengan sendiri. Jika ia tidak
dapat diselesaikan, sila hubungi jabatan selepas jualan.
Kejadian Kemungkinan sebab/item pemeriksaan
Operasi gagal
Periksa sama ada perkakas disambungkan kepada kuasa atau plag dipasang
dengan baik
Periksa sama ada voltan terlalu rendah
Periksa sama ada terdapat kegagalan kuasa atau litar pintas separa
Bau
Makanan berbau hendaklah dibalut dengan ketat
Periksa sama ada terdapat sebarang makanan yang busuk
Bersihkan bahagian dalam peti sejuk
Operasi pemampat untuk
masa yang lama
Operasi lama peti sejuk adalah perkara biasa pada musim panas apabila suhu
ambien adalah tinggi
Tidak digalakkan mempunyai terlalu banyak makanan dalam perkakas pada
masa yang sama
Makanan hendaklah menjadi sejuk sebelum dimasukkan ke dalam perkakas
Pintu dibuka terlalu kerap
Lampu gagal bercahaya
Periksa sama ada peti sejuk disambungkan kepada bekalan kuasa dan sama
ada lampu pencahayaan rosak
Panggil pakar untuk menggantikan lampu
Pintu tidak boleh ditutup
dengan betul
Pintu tersekat oleh bungkusan makanan Terlalu banyak makanan diletakkan
Peti sejuk senget
Bunyi kuat
Periksa sama ada lantai adalah rata dan sama ada peti sejuk diletakkan dengan
stabil Periksa sama ada aksesori diletakkan di lokasi yang betul
Kedap pintu gagal menjadi
rapat
Buang benda asing pada kedap pintu
Panaskan kedap pintu dan kemudian sejukkan untuk pemulihan
(atau tiup dengan pengering elektrik atau gunakan tuala panas untuk
memanaskan)
Dulang air melimpah
Terdapat terlalu banyak makanan di dalam ruang atau makanan yang disimpan
mengandungi terlalu banyak air, mengakibatkan penyahfrosan tinggi
Pintu tidak ditutup dengan betul, mengakibatkan pemfrosan akibat kemasukan
udara dan peningkatan air akibat penyahfrosan
Perumah panas
Pelesapan haba kondensor terbina dalam melalui perumah, yang memang
normal Apabila perumah menjadi panas disebabkan suhu sekitar yang tinggi,
penyimpanan terlalu banyak makanan atau penutupan pemampat ditutup,
memberikan pengudaraan yang baik untuk memudahkan pelepasan haba
Pemeluwapan permukaan
Pemeluwapan pada permukaan luar dan kedap pintu peti sejuk adalah normal
apabila kelembapan ambien terlalu tinggi. Hanya lap lembapan dengan tuala
bersih
Hingar tidak normal
Bunyi buz: Pemampat mungkin mengeluarkan bunyi semasa operasi, dan
bunyi itu kuat terutamanya semasa mula atau berhenti. Ini adalah normal.
Bunyi derit: Bahan penyejuk yang mengalir di dalam perkakas mungkin
menghasilkan bunyi berderit, yang merupakan perkara biasa
29
6. Pelupusan perkakas anda
Pelupusan Betul untuk produk ini:
Tanda ini menunjukkan bahawa produk ini tidak boleh dibuang
bersama sisa isi rumah yang lain di seluruh EU. Untuk mengelakkan
kemungkinan bahaya kepada alam sekitar atau kesihatan manusia
daripada pembuangan sisa yang tidak terkawal, kitar semula secara
bertanggungjawab untuk menggalakkan penggunaan semula sumber
bahan secara mampan. Untuk memulangkan perkakas terpakai anda,
sila gunakan sistem pemulangan dan pengumpulan atau hubungi
penjual tempat produk itu dibeli. Mereka boleh mengambil produk ini
untuk kitar semula yang selamat untuk alam sekitar.
SUHU AMBIEN
Perkakas ini direka bentuk untuk beroperasi dalam suhu ambien yang ditentukan
oleh kategorinya yang ditanda pada plat penarafan.
Kategori iklim Suhu ambien (dari...hingga...)
SN +10°C hingga +32°C
N +16°C hingga +32°C
ST +16°C hingga +38°C
T +16°C hingga +43°C

MADE IN CHINA
Hefei Hualing Co., Ltd.
No.176 JinXiu Road, Hefei Economy & Technology
Development Area, 230601, Hefei, Anhui, P.R. China