
用戶手冊
東芝家庭雪櫃
GR-RM598WE-PGA(B3)
GR-RM598WE-PGA(UC)
中文
安全信息
在安裝和使用電器前,仔細閱讀用戶手冊。
製造商不承擔錯誤安裝或使用可能造成人身傷害
或損壞的責任。
請妥善保管用戶手冊以供後續使用。
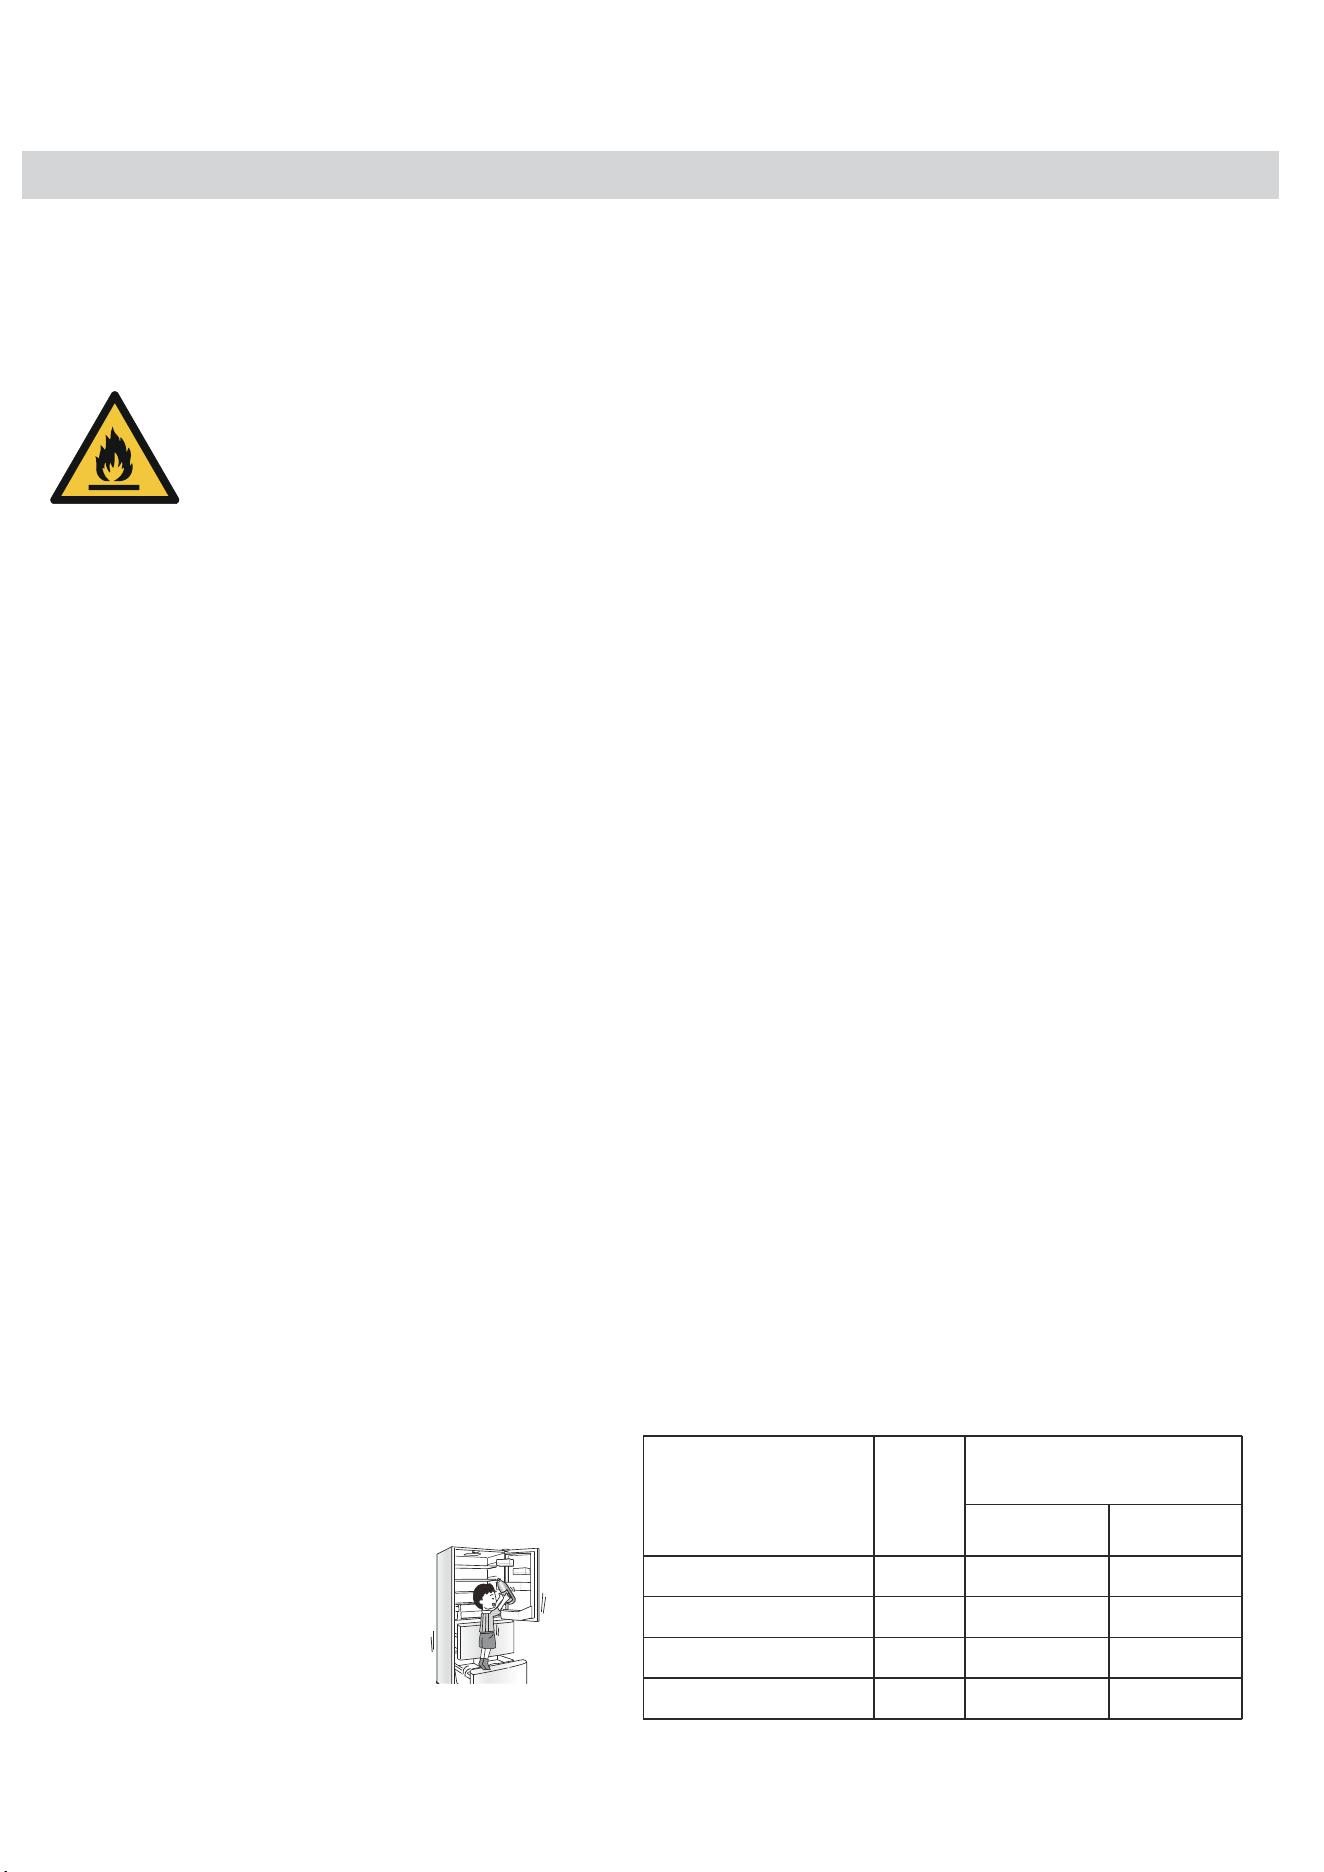
警告: 火/易燃材料的危險
•
•
•
本雪櫃含功能性接地結構。
如果電源線破損,必須由製造商、其服務代理
商或類似的合格人員進行更換,以避免危險。
•
•
警告:保持雪櫃外殼或內置結構通風孔暢通無
•
•
警告:請勿在雪櫃的食物儲藏室內使用非製造商所
建議類型的電器。
請勿在本雪櫃中存放易燃性推進劑等易燃物,例如
氣霧罐。
•
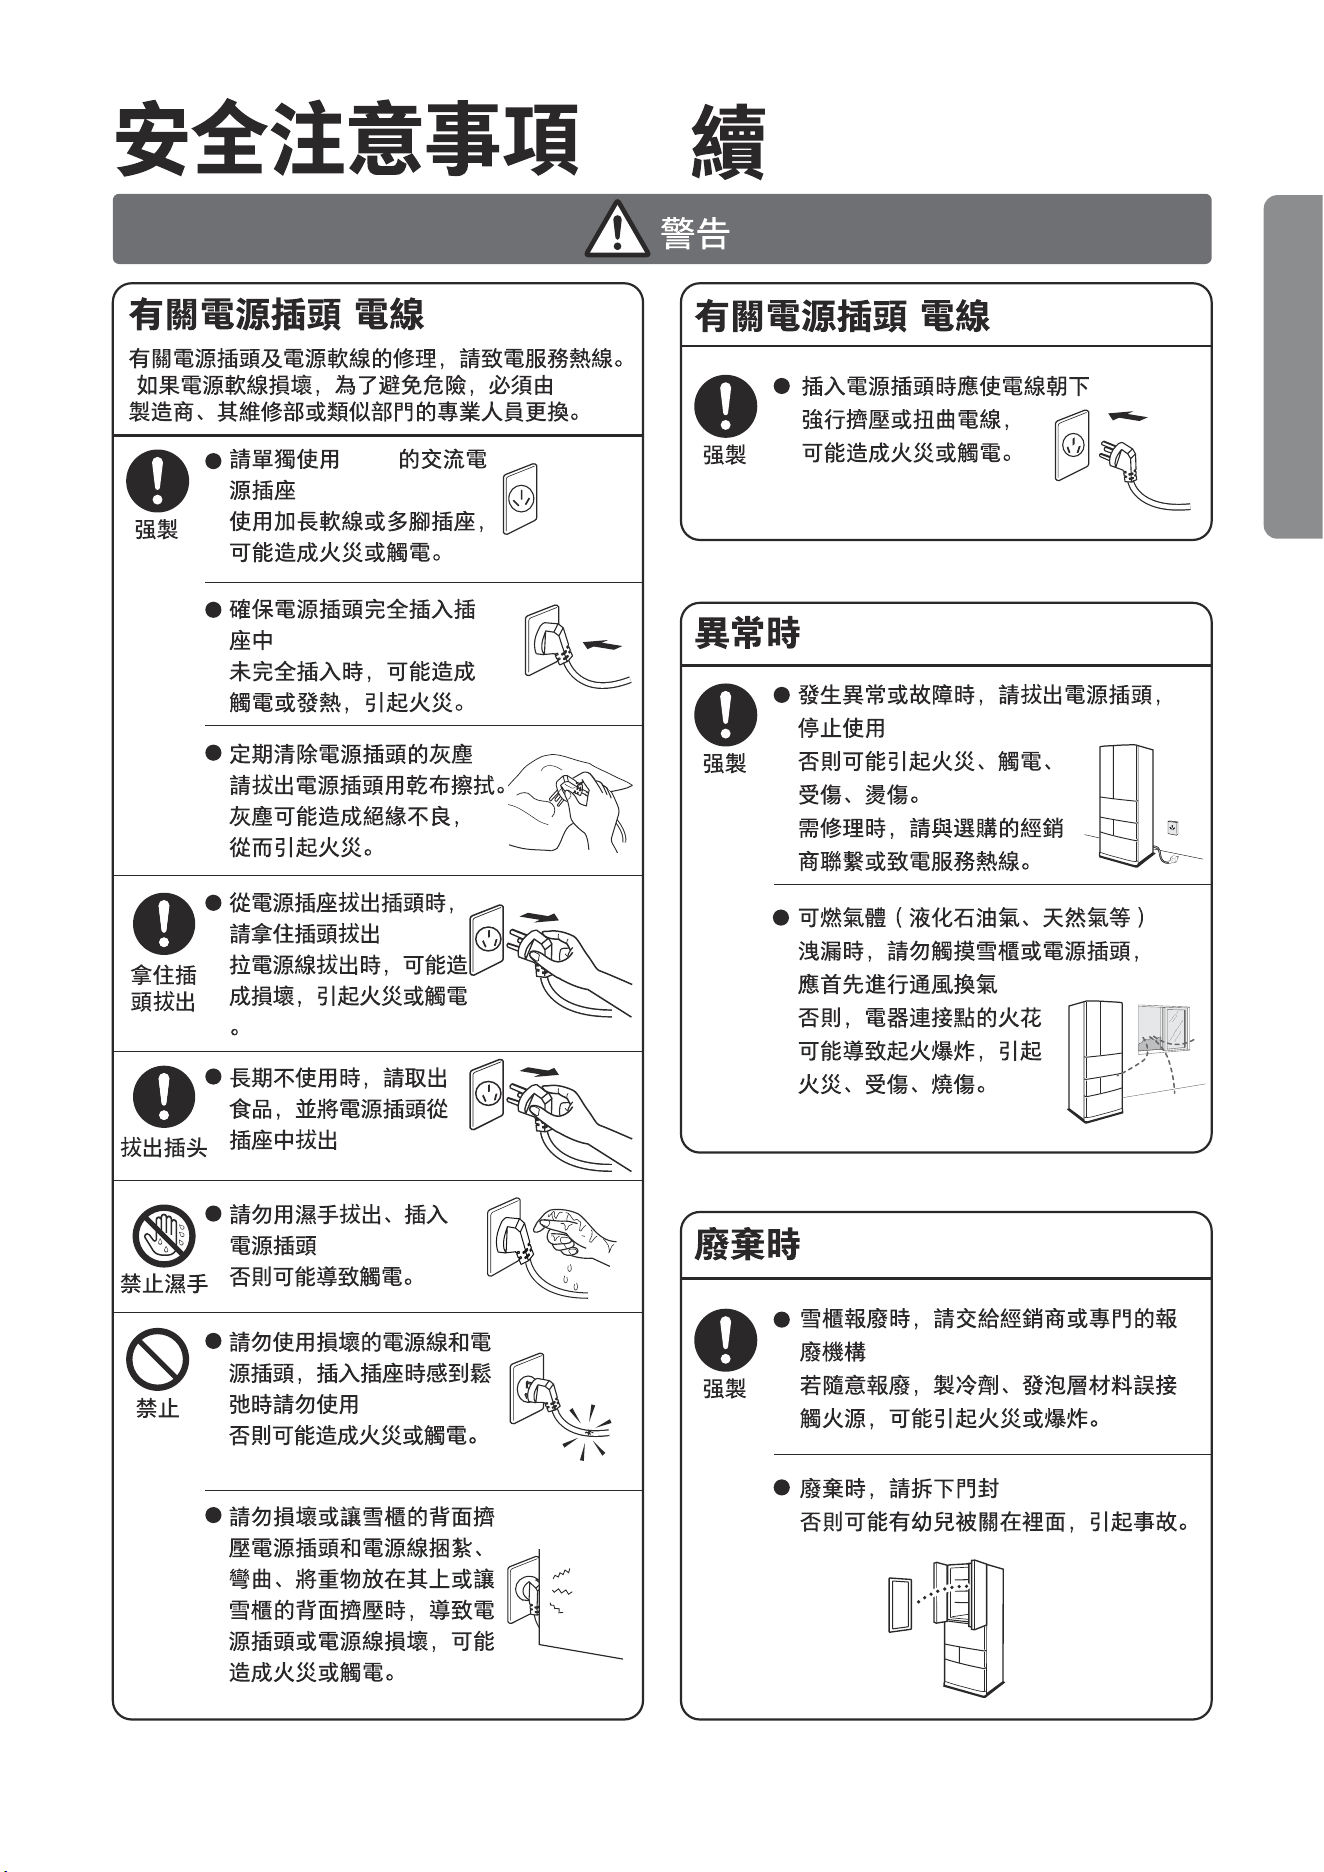
警告:為電器設備定位時,確保電源線沒有被夾住
或損壞。
•
•
警告:請勿在雪櫃背面放置多個便攜式插座或便攜
式電源供應器。
本雪櫃不適合肢體、感官或心智能力較弱的人
•
•
本雪櫃的製冷劑為可燃製冷劑,在安裝和運輸
(包括兒童)或缺乏經驗和知識的人使用,除
非負責其安全的人員已監督或指示他們使用該
設備。
應監督兒童確保他們不玩此雪櫃。
警告:只能裝飲用水。
警告:為了避免由於雪櫃固定不穩導致的危險,必
•
警告:請勿使用製造商建議的方法以外的機械
請勿讓兒童攀爬雪櫃,以免
裝置或其他任何方法加速除霜程序。
•
•
本雪櫃旨在家用或類似應用,例如:
——商店、辦公室和其他工作環境中的員工廚房區
——農舍以及客戶在酒店、汽車旅館和其他住宅類
型環境中的住房;
——床和早餐類型的環境;
——餐飲和類似的非零售應用。
等級
亞溫帶
符號
SN
N
ST
T
周邊環境溫度範圍(℃)
IEC 62552
(ISO 15502)
+10 to +32
+16 to +32
+16 to +38
+16 to +43
ISO 8561
+10 to +32
+16 to +32
+18 to +38
+18 to +43
須按照說明的要求來安裝固定。
雪櫃的設計能在其額定等級指定的溫度範圍內正常
運轉。
溫帶
亞熱帶
熱帶
02
在對雪櫃進行保養、維護、安裝和維修工作之前,
請將電源插頭從電源插座上拔出。
LED燈的更換或維護應由製造商,其服務代理或類
似的合格人員進行。
如果雪櫃在其額定的氣候等級(環境溫度範圍)之
外運行,則它可能無法保持令人滿意的內部溫度。
過程中,請注意不要損壞冷卻管。如果發生氣
體洩露,請與經銷商或當地服務代理聯繫,並
採取以下預防措施:
打開窗戶,確保通風良好。
確保四周無火源,並勿使用其他電器。
雪櫃被廢棄時,應遠離火源,由具有相應資質
的專門回收公司進行回收,不得進行燃燒處理,
以免破壞環境或造成其他危害。
阻。
域;
造成雪櫃倒下、部件鬆脫或
兒童被關入雪櫃,傷及兒童。
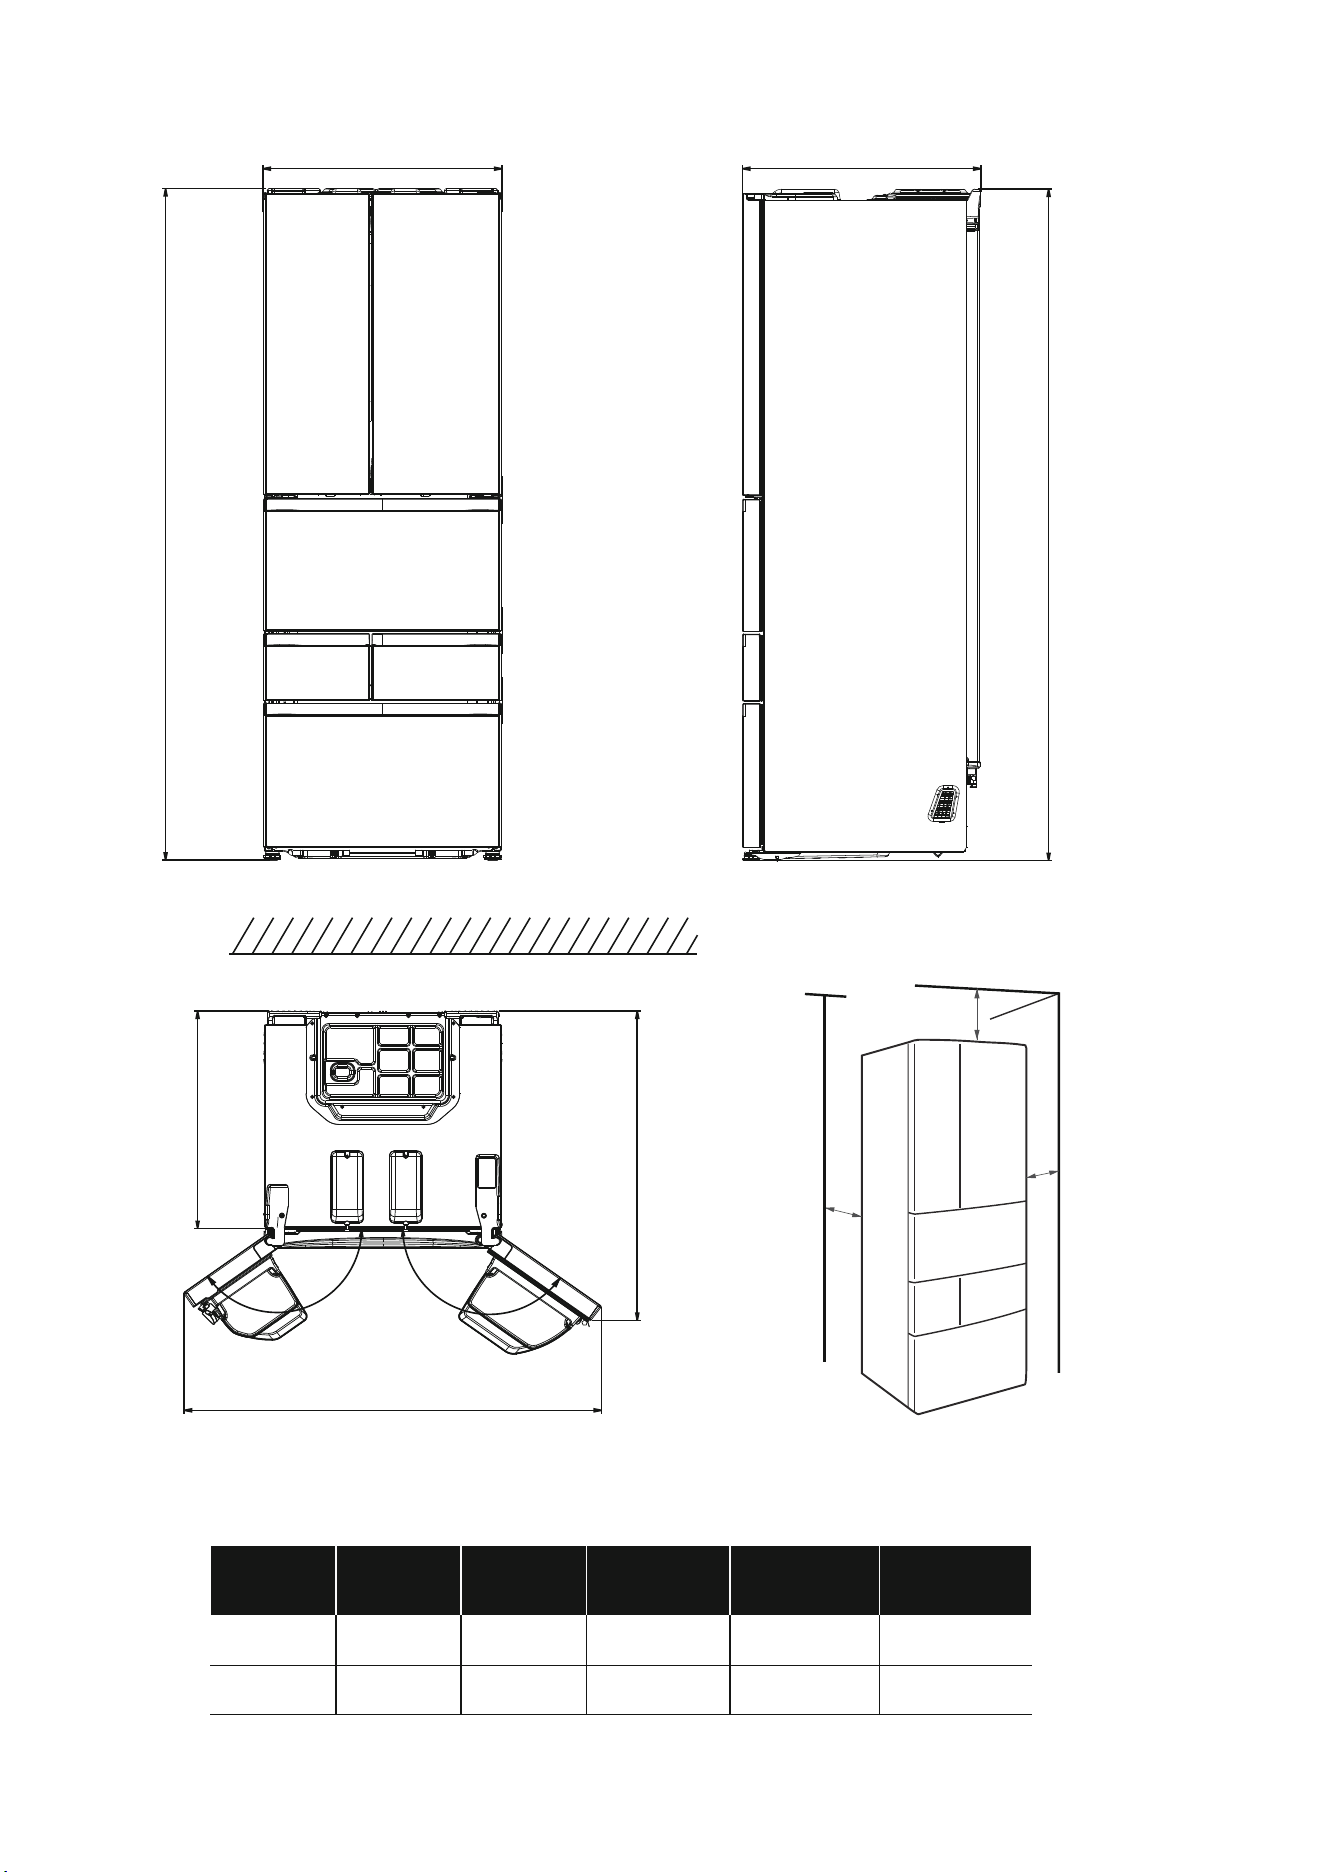
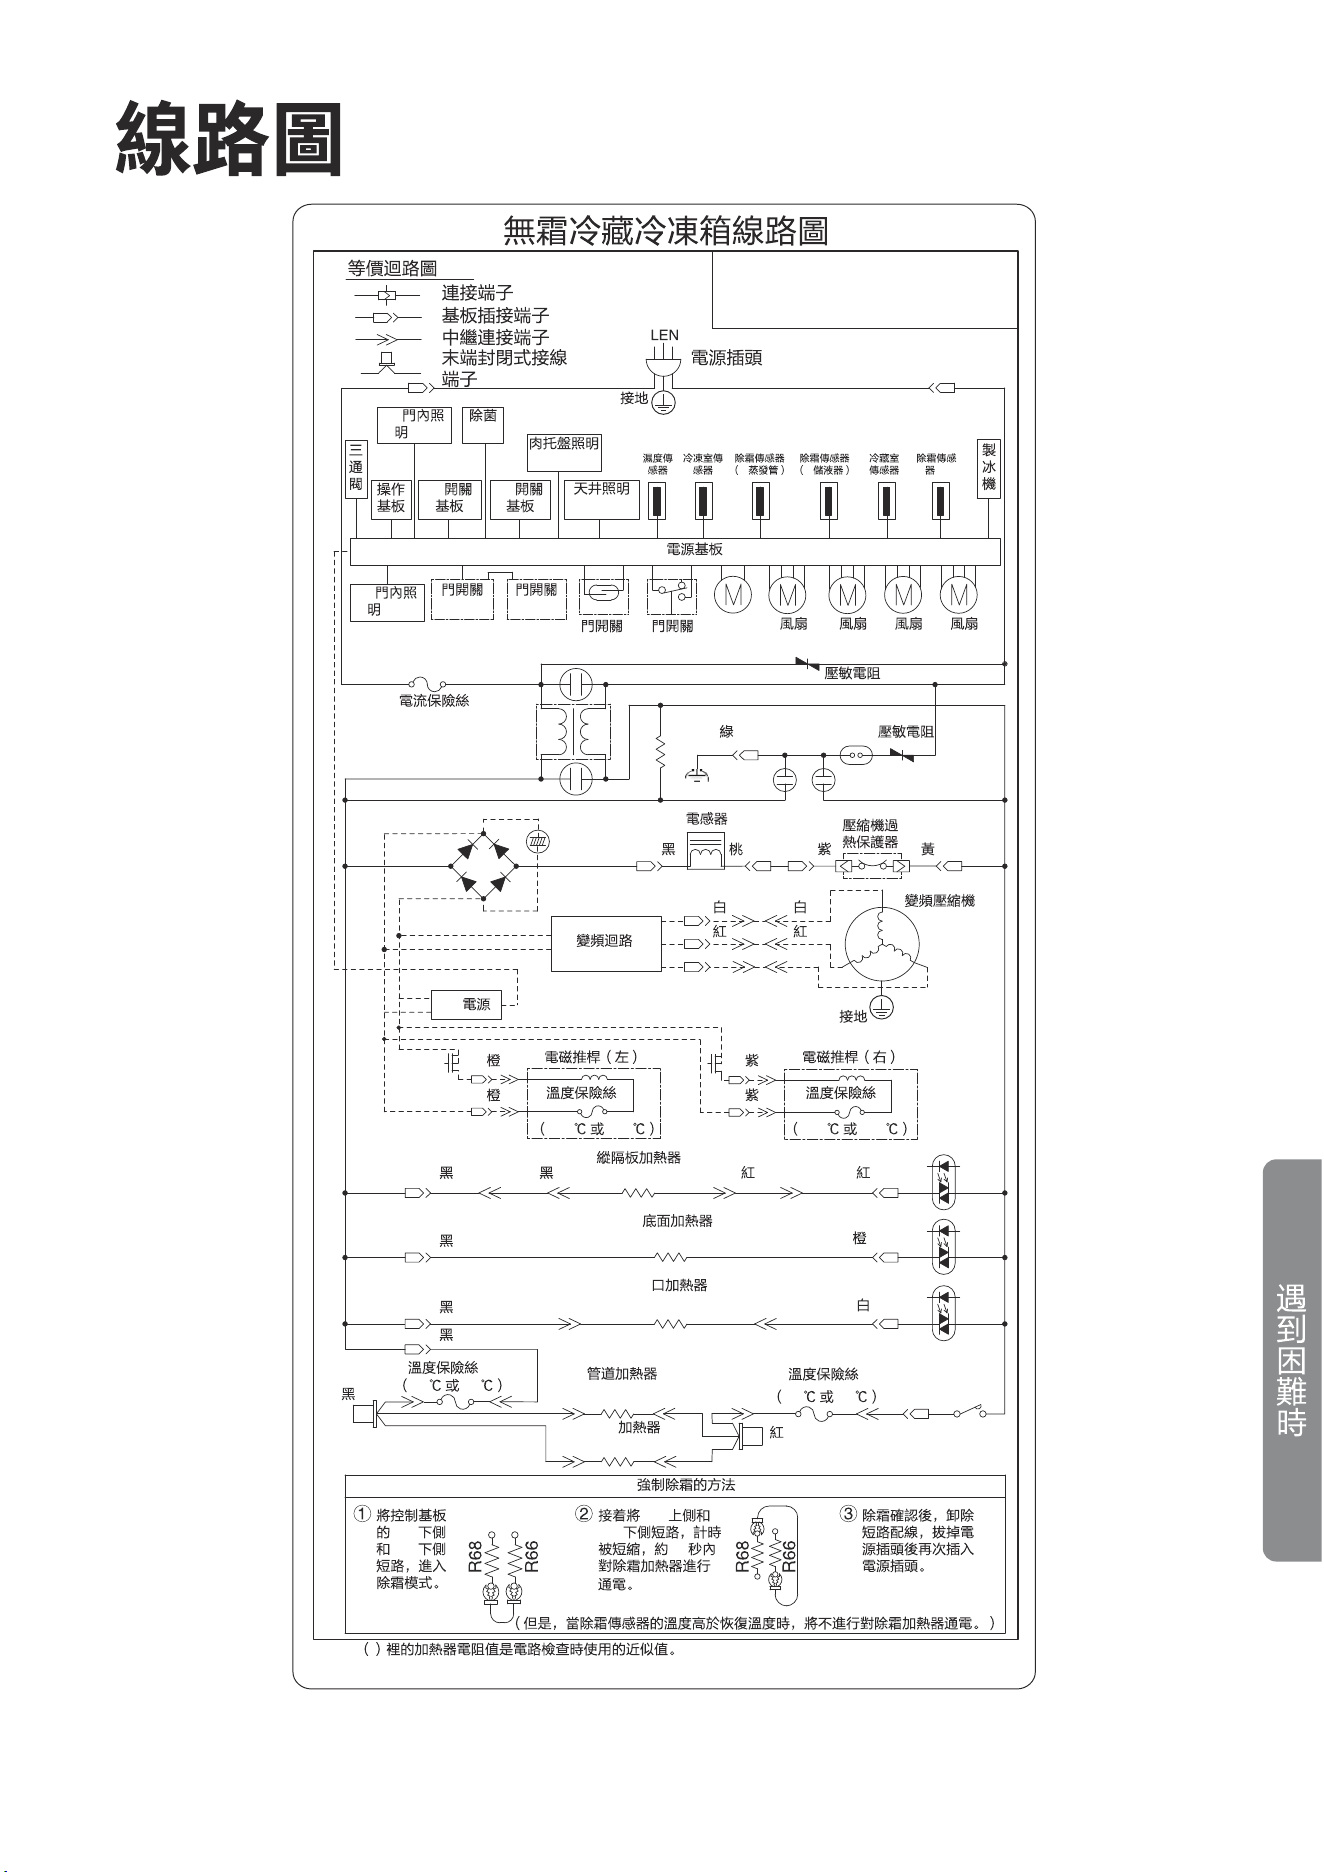
A B C C1 D E
03
所需空間示意圖(門開啟及關閉時)
寬度 總高度 深度 僅櫃體深度
門打開145°
時深度
門打開145°
時寬度
650 6521833 592 845 1141
註: 尺寸均以 mm 為單位
雪櫃頂部空間應大於100mm,雪櫃側面空間應大於50mm,雪櫃背面空間應大於50mm,以便雪櫃散熱。
100mm
50mm
50mm
A
C
B
B
C1
145°
145°
D
E
客戶經常詢問的問題
接通電源后,待
食品的貯存位置及溫度
關閉、有錯位?
?
輕觸面板
的使用方法
嗶

目錄
尊敬的用戶:
• 感謝惠購東芝產品,謹在此致以誠摯謝意。
• 為了您正確使用本產品,請在產品安裝和使用前仔細閱讀本用戶手冊,並妥
善保管以供日後參考。
• 您所使用的東芝產品,需要定期進行清洗與保養。如未能正確的清洗與保養,
其故障率將增加且適用壽命大為縮減。
• 請您每年定期與東芝當地服務網點或直接與本公司聯絡,我們將指派專業人
員給您提供有償的檢查和保養服務。
1.安全注意事項 .................................................................................... 06
2.安裝方法 ............................................................................................ 10
3.輕觸面板的功能 ................................................................................ 12
4.冷藏室................................................................................................ 17
5.蔬果保鮮室 ........................................................................................ 20
6.速凍保鮮室、冷凍室 ........................................................................ 21
7.冷凍功能 ........................................................................................ 22
8.製冰室(自動製冰機) .......................................................................... 24
9.節能功能 ............................................................................................ 26
10.清潔保養 .......................................................................................... 27
11.自動製冰機的保養........................................................................... 32
12.各種處理.......................................................................................... 34
13.遇到故障時 ...................................................................................... 36
14.搬運、遷居時 .................................................................................. 42
15.線路圖.............................................................................................. 43
16.規格.................................................................................................. 44
17.附件.................................................................................................. 45
05
06
*1
*2 *3
*1
*2
*3
1.
2.
07
220V~
“
”
220V
/
/
…
使
用
前
…
08
噴
霧
劑
…
09
鈎
制
制
速凍保鮮室
使
用
前
90°
10
1
2
6~4
90°
50mm
100mm
50mm
(
)
11
3
1
1
2
35
220V
使
用
前
2
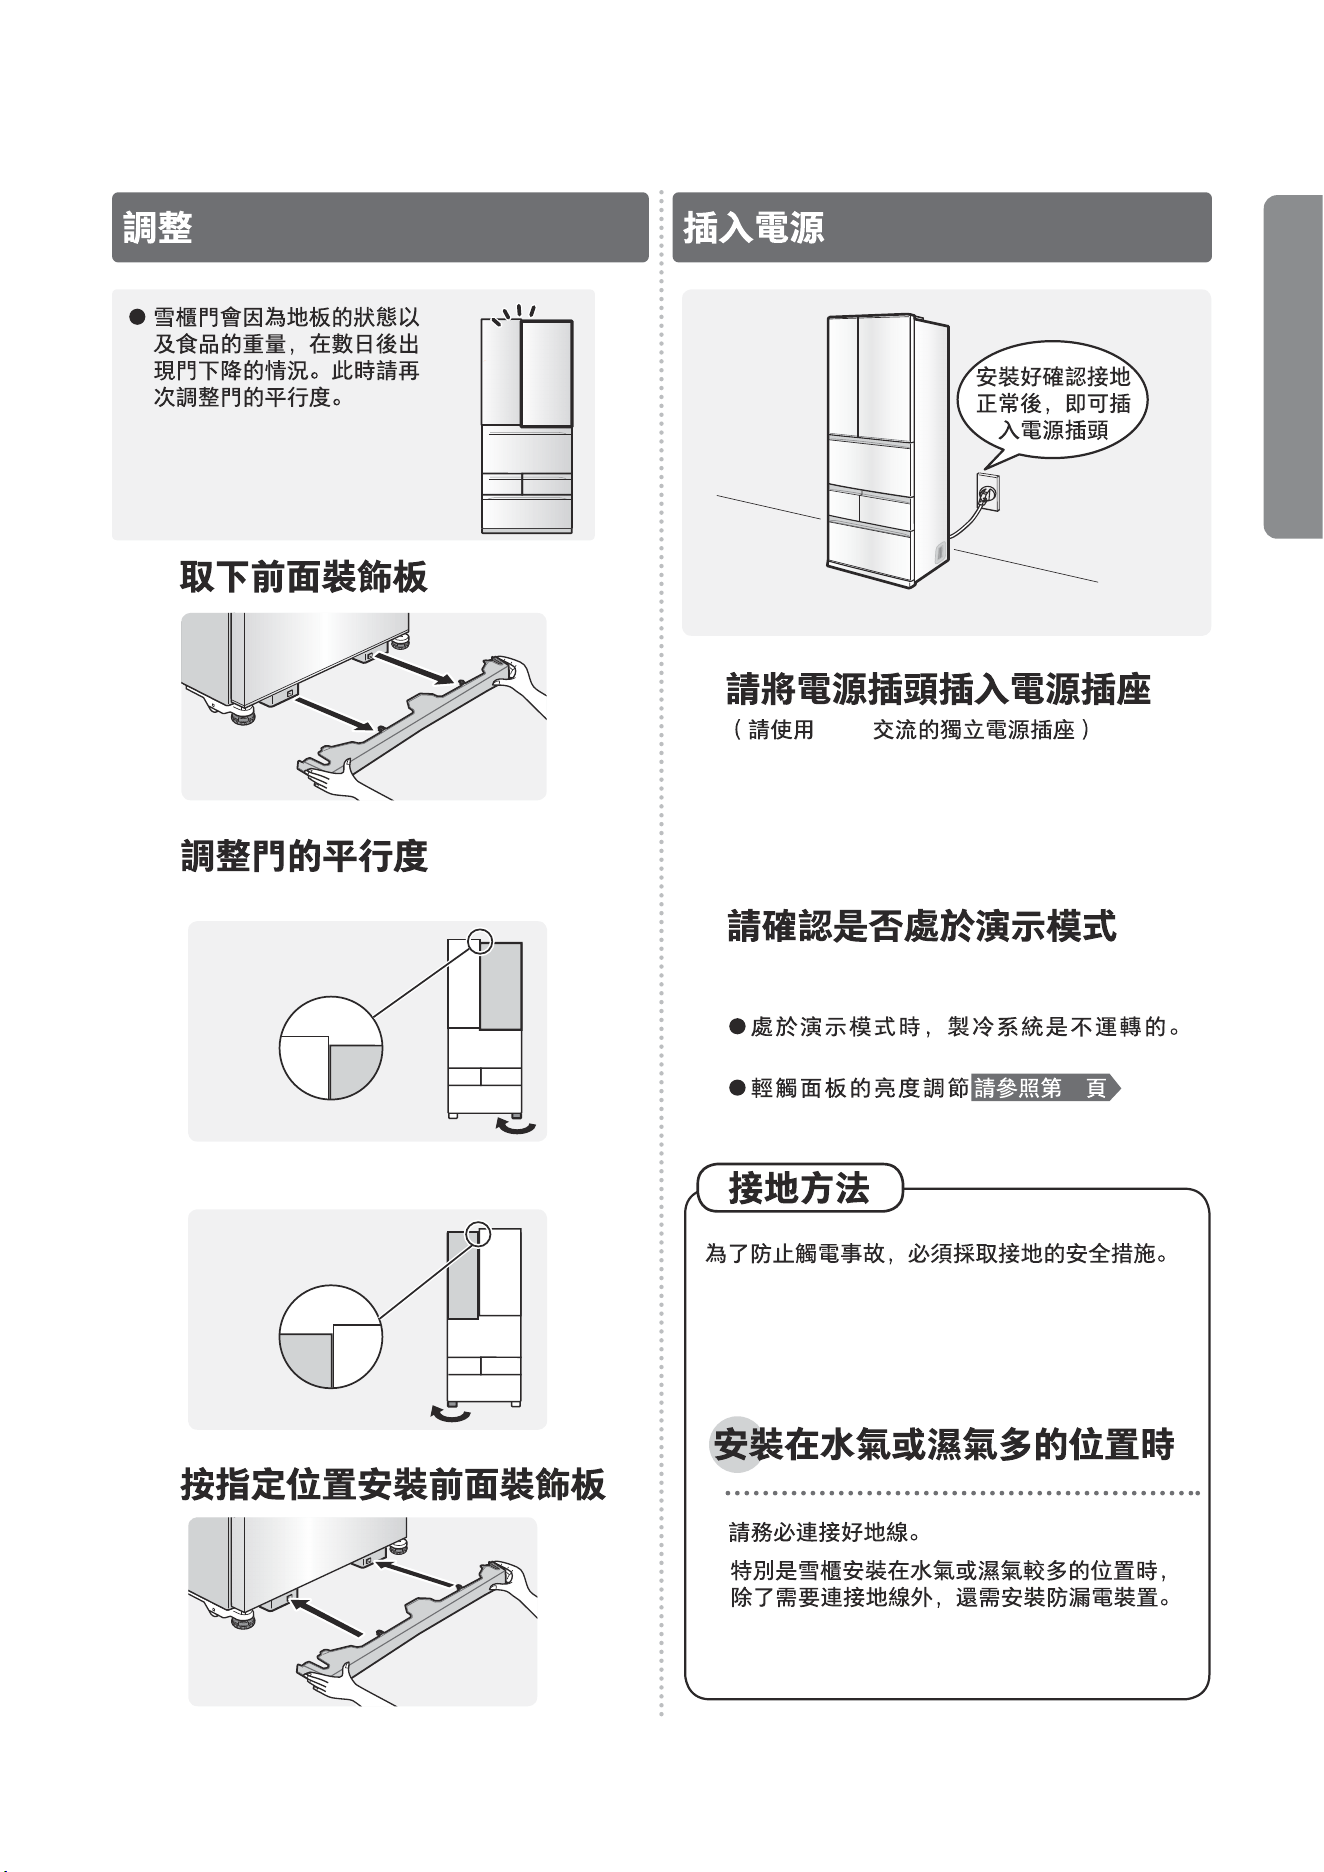
●右側門過低時
●左側門過低時
將右側的調整腳
按箭頭方向旋轉
將左側的調整腳
按箭頭方向旋轉
12
13
35
1
2
3
1
2
3
)
1
2
3
1
2
2~5
溫度調節檔位的顯示在觸摸操作中斷10秒後熄燈。
在處於自動節能時,不能進行溫度調節。
輕觸面板的顯示從上向下相繼變化
自動節能模式的解除
約
2~3
2~3
2~3
2~3
-18 -20
14
15
1
2
3
( )
10
1
2
1
3
2
3
3
選
選
選
觸控門
選單鍵 3
選
使
用
方
法

16
17
1010
使
用
方
法
層
18
19
1
2
3
2
1
1
1
2
3
.......................... 120
.................................... 60
使
用
方
法


1
1
1
2
2
21
22
55
·
·
21
2
1
2
3
1
2
3
( )
23
…
.......................................... 180
.......................................... 180
..................................... 8
1
…
…
使
用
方
法
1
2
1
2
21
24
*1 *2
1.1L
儲
儲
冰勺
儲冰盒
20 )
· 1 10
2 /
1 /
8 /
/
130
50 100
1
30
60
10
26
24
25
100mg/L
·
1
·
·
·
·
·
·
·
使
用
方
法
儲
*1
*2
GB21551.2-2010
98%
GB21551.2-2010
90%
10%
24 20%
1 2
32
20% 10%
20%
·
·
*1.2 32
1
2
3
1
2
3
26
自動節能
節能
自動節能
節能
節能
節能
節能
節能
節能
節能
選
選
節能
電
*1
*2
1
2
27
·
·
·
·
1 2 /
45
使
用
方
法
15、16
1 2
21
28
·
…
將速冷冰鮮盒頂板稍稍旋轉取出。
冷凍室滑動盒
儲存容器
格
強化玻璃層架
冷凍室滑動盒
儲存容器
29
·
3
“ ”
2
使
用
方
法
30
·
1
2
1
2
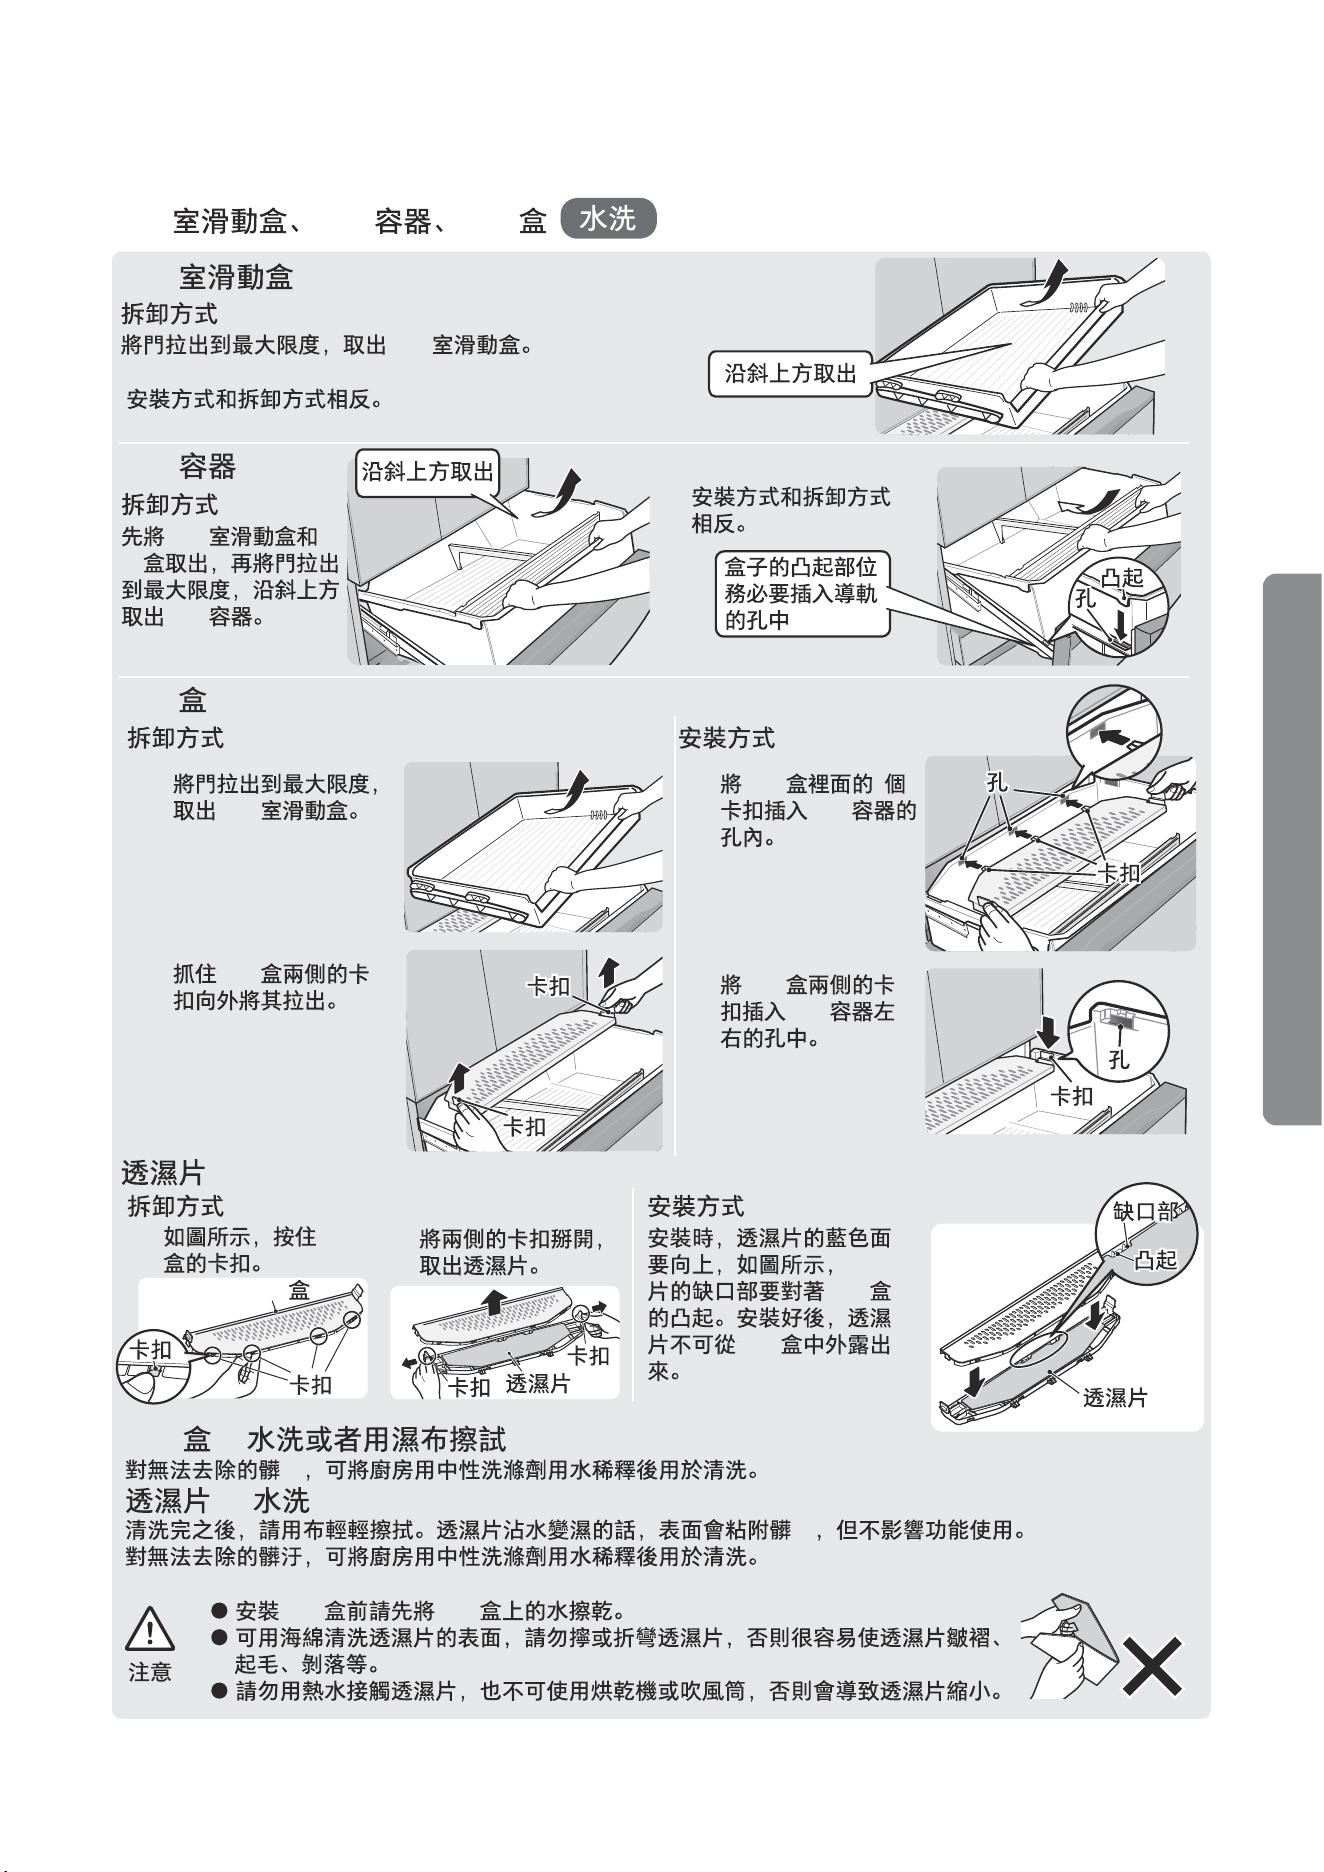
冷凍室滑動盒、儲存容器
將門拉出到最大限度,取出冷凍室滑動盒。
冷凍室滑動盒
將門向上抬起的同時繼續拉出,直到門
碰到地為止,沿斜上方取出儲存容器。
將門向上抬起的同時向外拉出直到門
碰到地為止,放入儲存容器。
裝
凍室滑動盒。
蔬果室滑動盒
蔬果容器
儲冷凍冷凍隔熱墊
裝
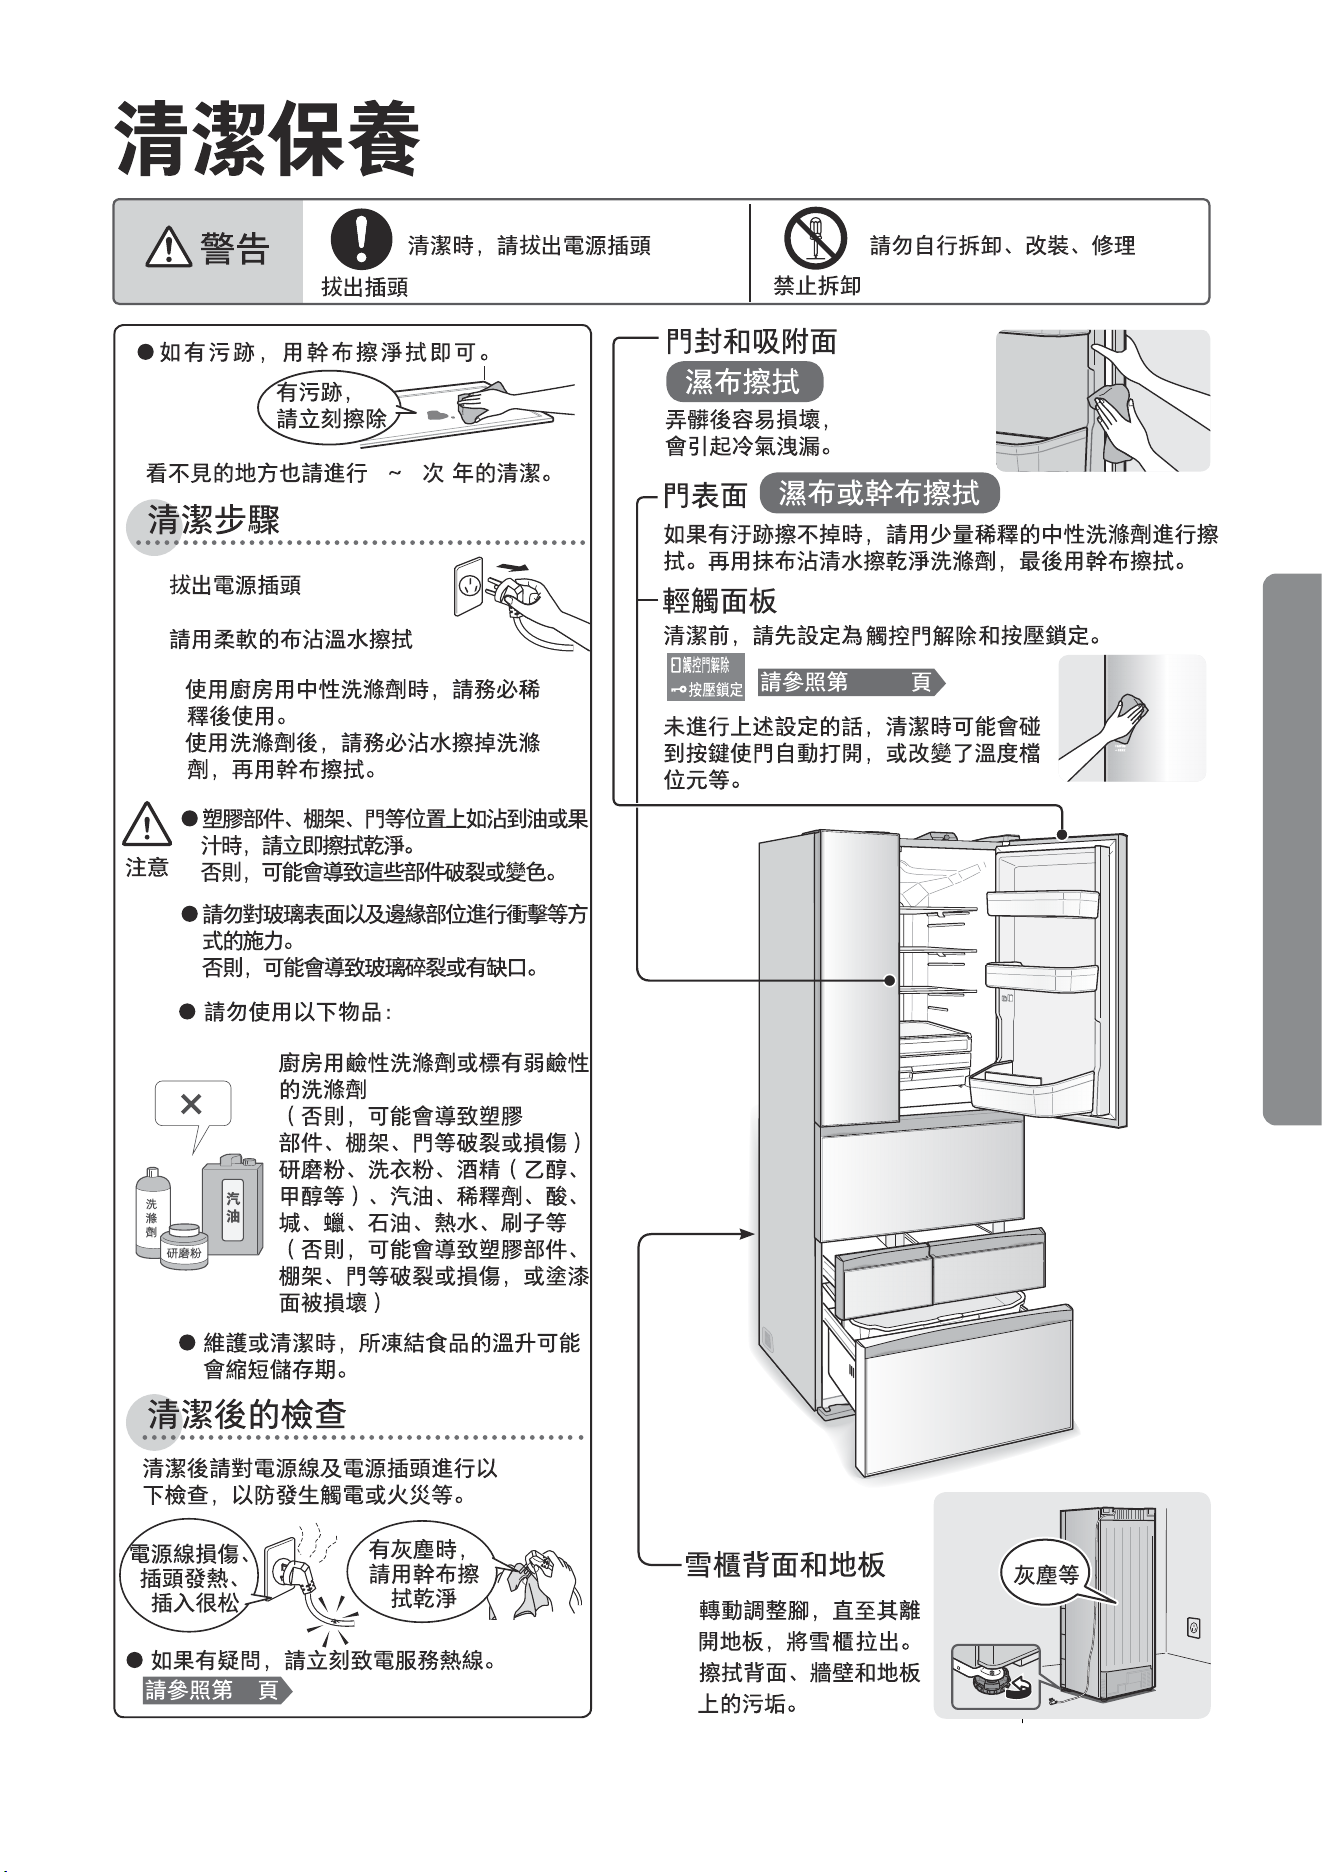
冷凍隔熱墊弄髒
請
濕布
清潔保養
…
31
·
1 2
1 1
2
2
…
…
3
·
蔬果
蔬果
蔬果
保鮮
蔬果
保鮮
污
污
蔬果
蔬果保
鮮
蔬果
蔬果
保鮮
保鮮
保鮮
保鮮
保鮮保鮮
透濕
保鮮
保鮮
保鮮
蔬果
保鮮
蔬果
使
用
方
法
32
33
2
3
1
1 2
1 /
1 /
·
·
·
1 /
“ ”
使
用
方
法
34
1
2
2
2~3
1
3
2
3 3
1
3
10
2 3
42
5
6
3
35
1
2
3
10
1.5 0.3
GR-RM598WE-PGA(B3)
GR-RM598WE-PGA(UC)
10.5kg
9.5kg
9.5kg
6.5kg
20.0kg
8.0kg
9.5kg
22.0kg
17
20
21
21
層架
層
層
層
儲
選
選
蔬果保鮮室
蔬果
蔬果
速凍保鮮室
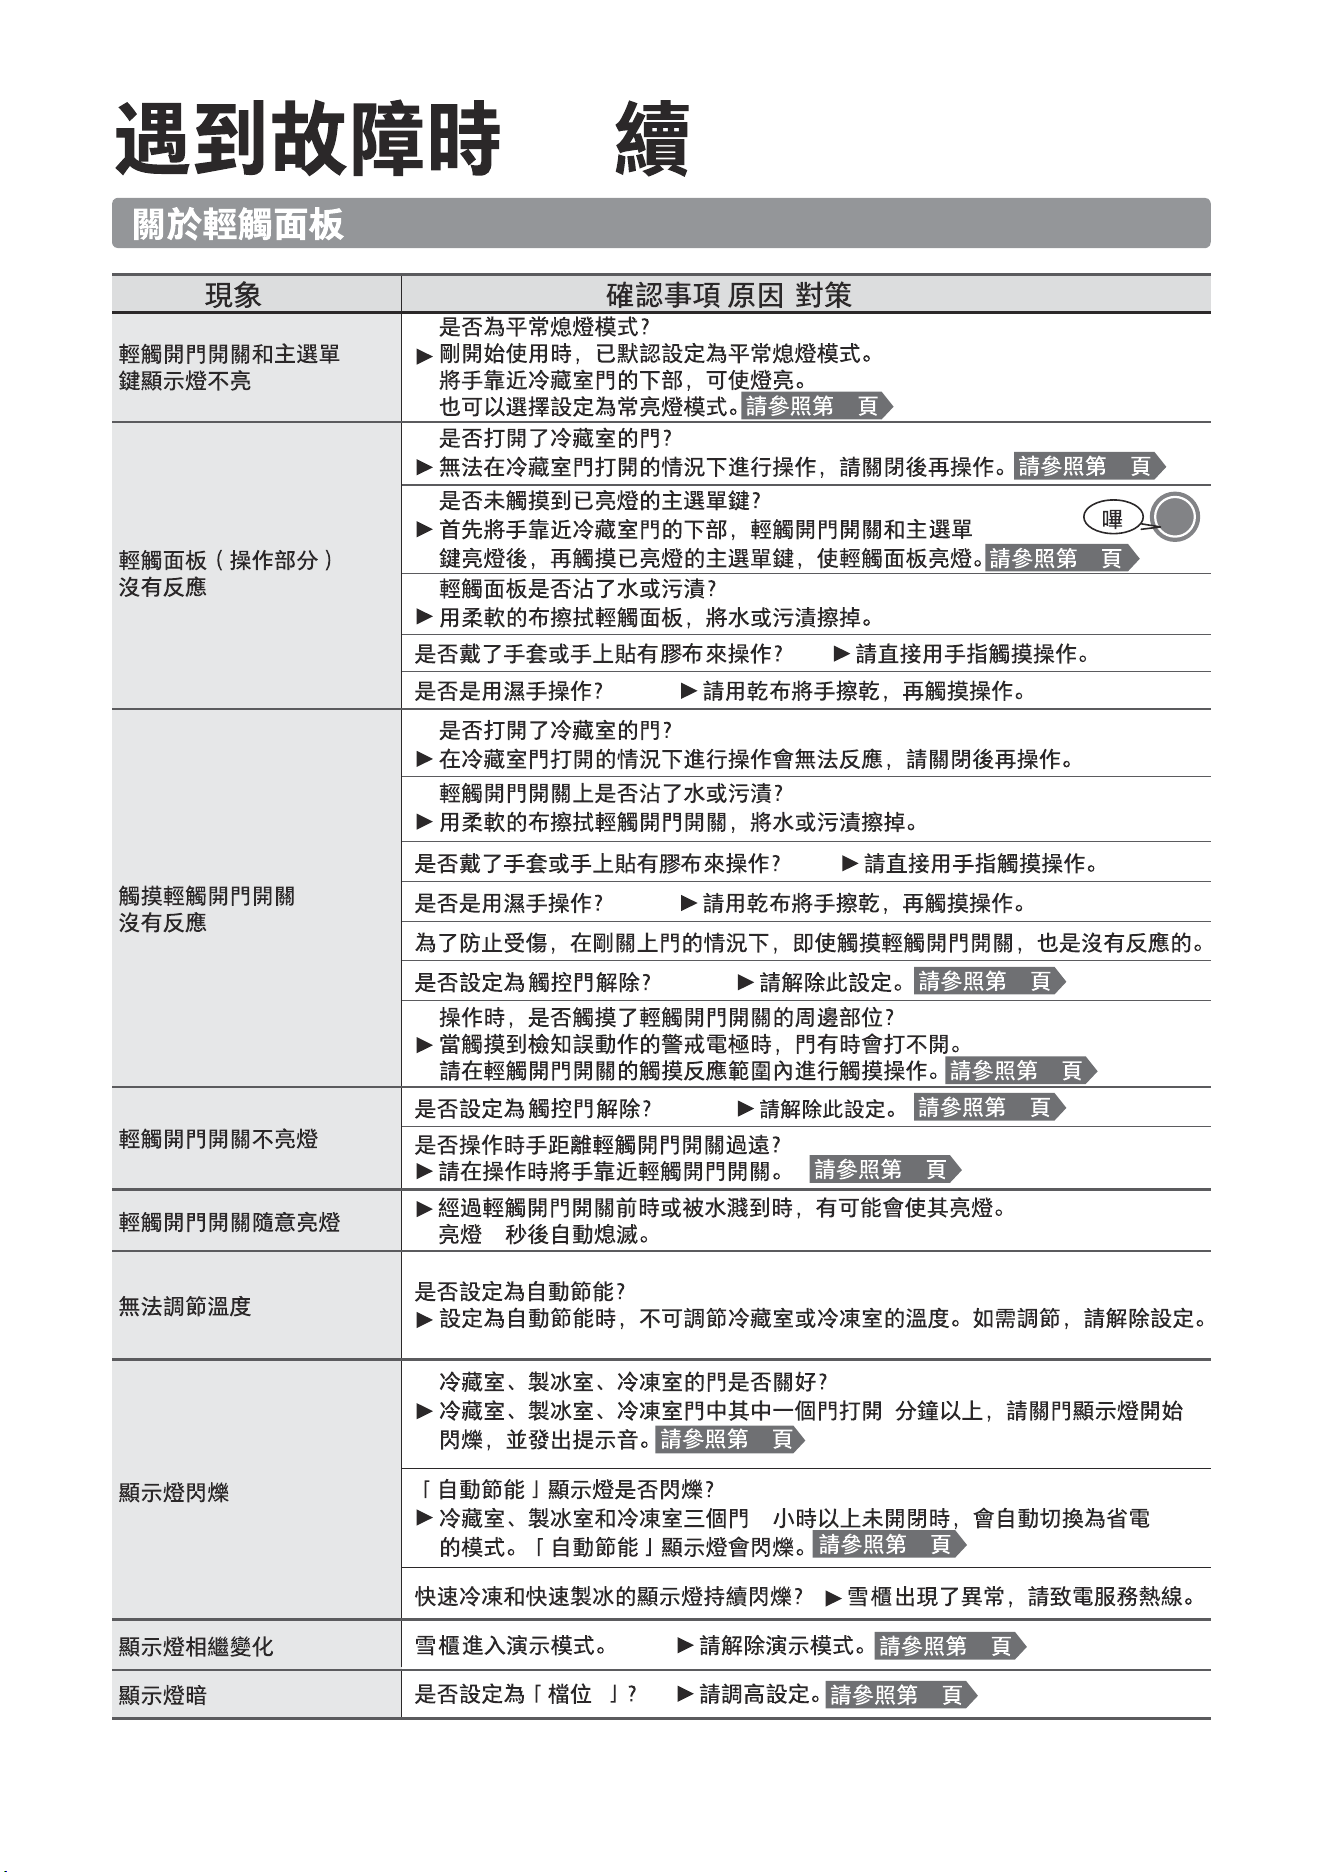
遇到故障時
▲▲▲▲▲▲
▲
▲
▲
▲
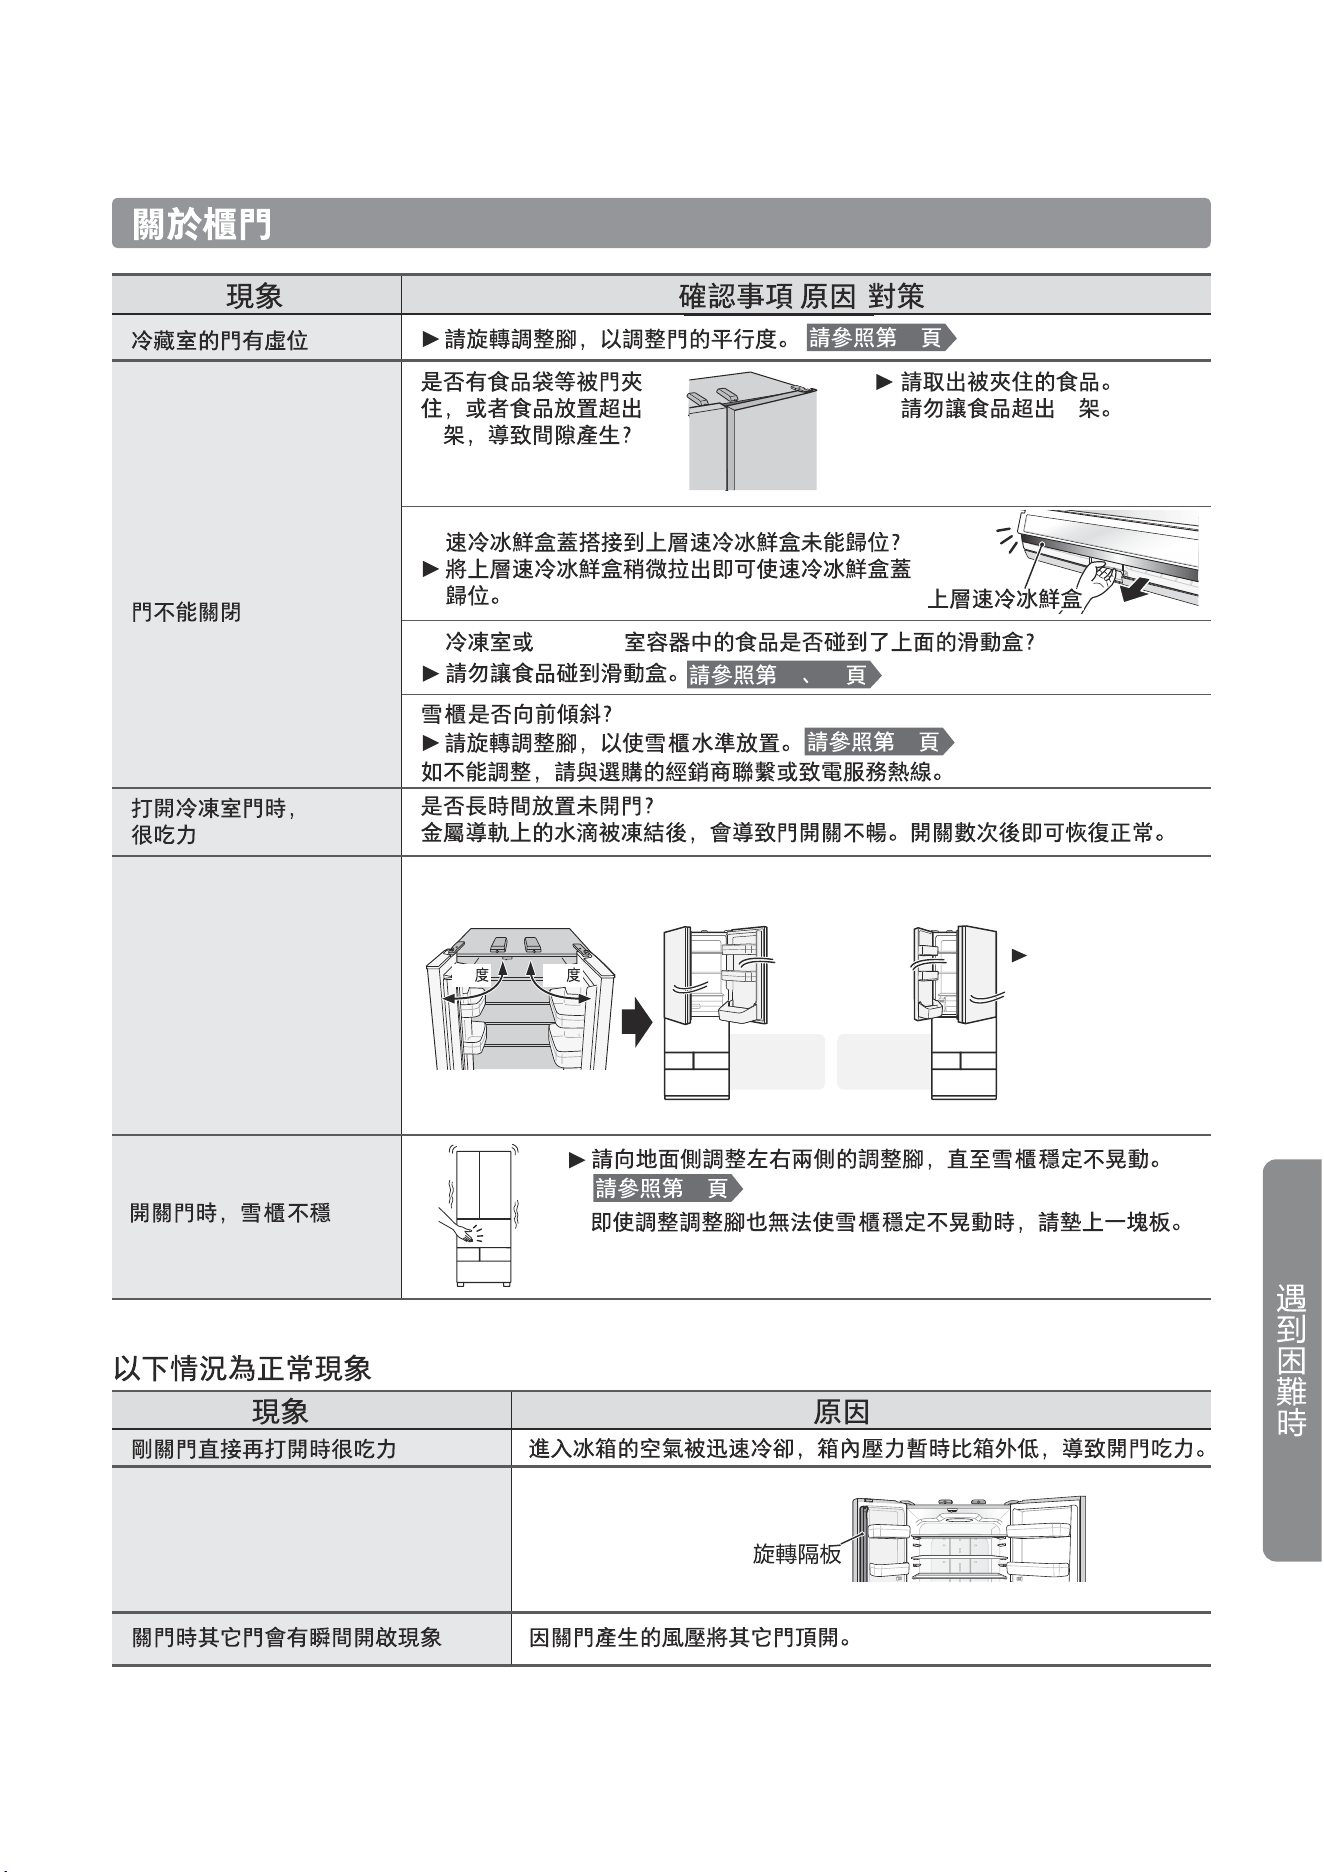
門
▲
▲
36
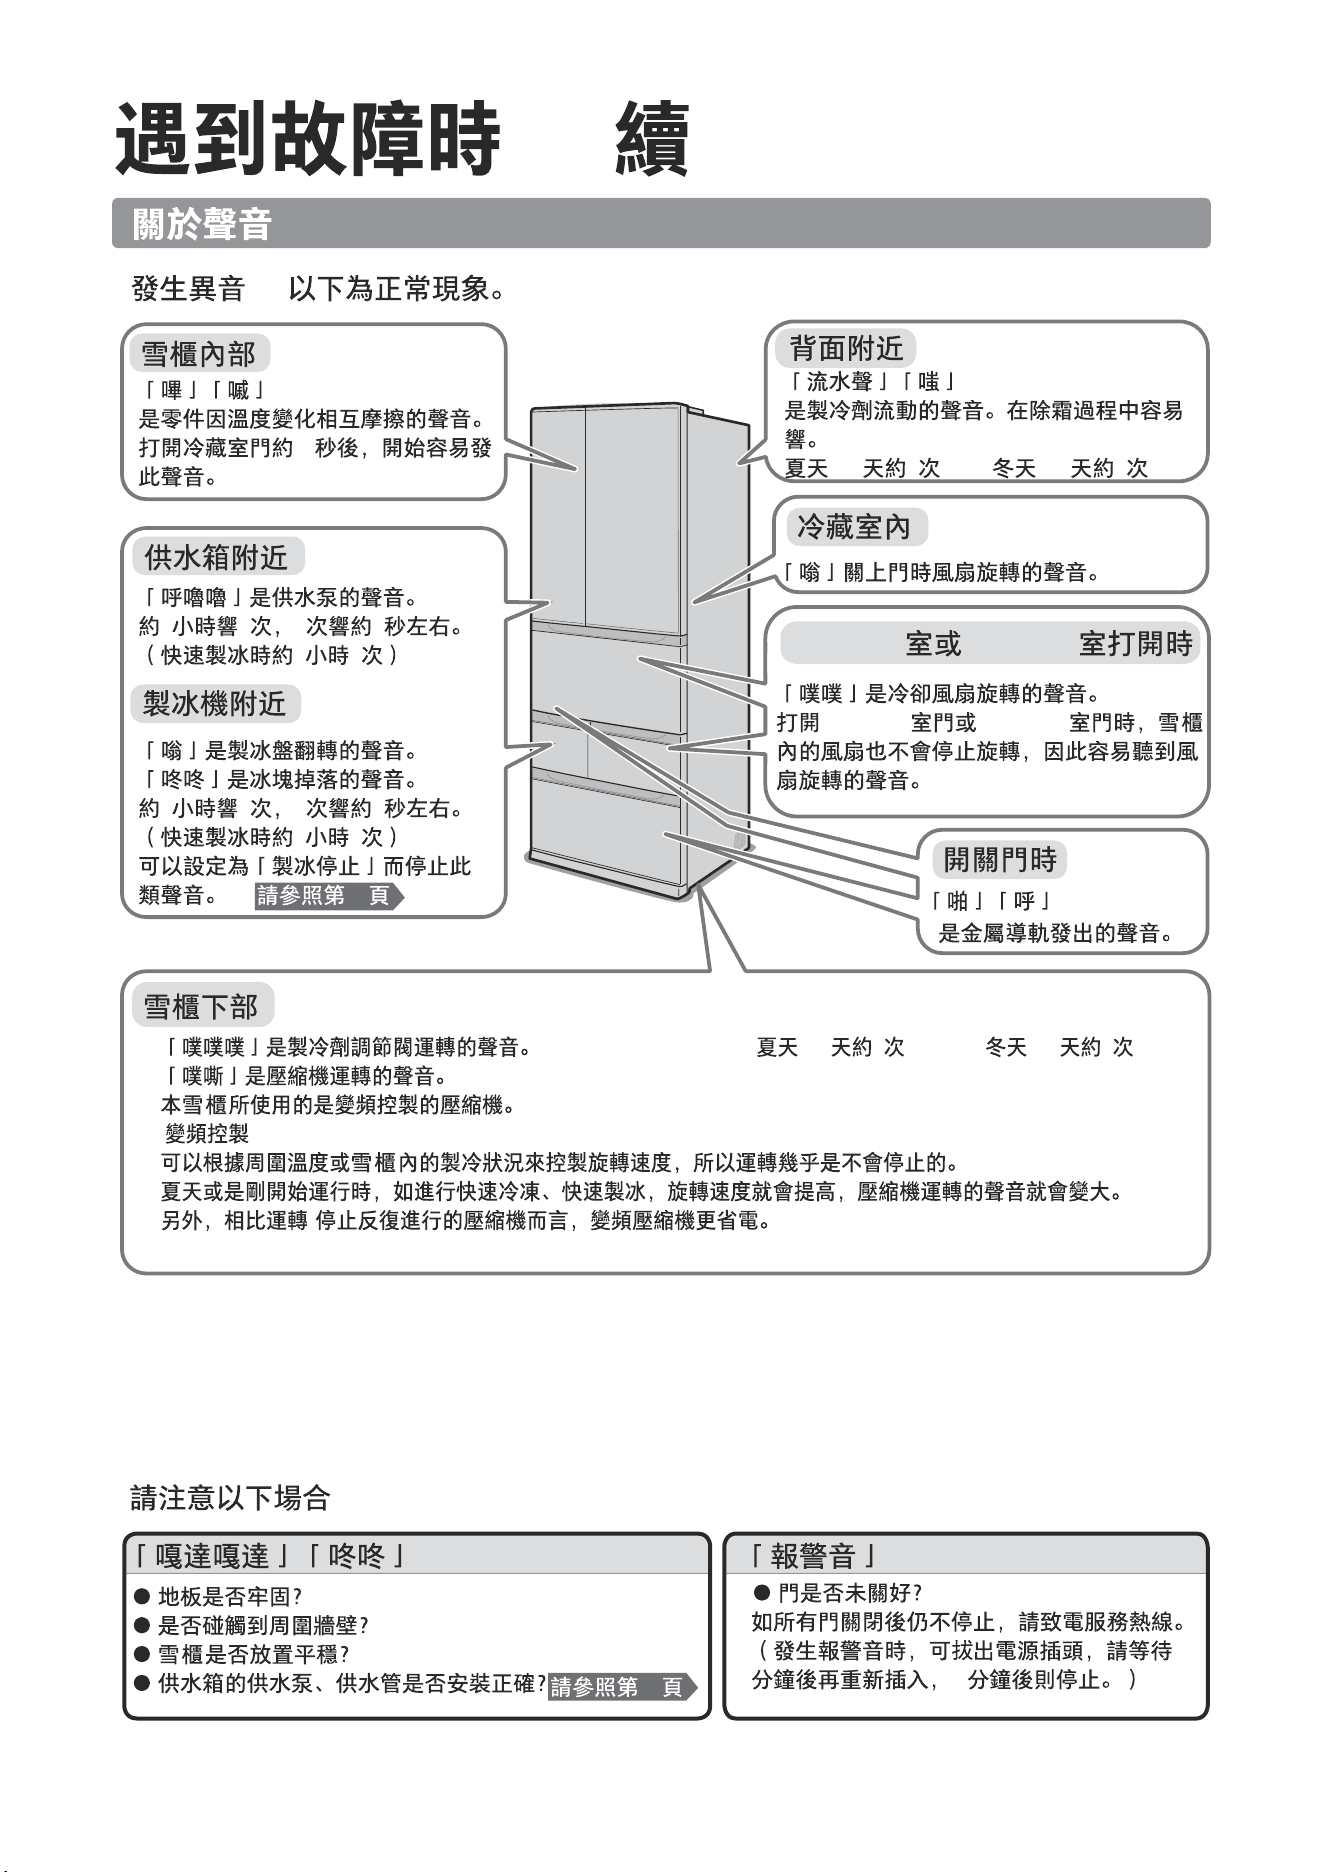
關於製冷
現象確認事項·原因/對策
冷藏室的食品結凍
是否將水分過多的食品放入冷藏室的最裡面或速冷冰鮮盒內?
速冷冰鮮盒內的食品通常不會結凍。
(但是,放在冷風吹出口附近的食品可能會出現結凍的現象。)
快速微凍通常不會使食品微結凍(軟冷凍)。
(但是,放在冷風吹出口附近的食品可能會出現結凍的現象。)
是否將食品存放在了上層速冷冰鮮盒的裡側?
裡側位置離冷風吹出口較近,因此容易結凍。
是否存放了水分過多的食品?
請勿將水分過多的食品放在冷風吹出口的前面。
當食物較厚或者堆放密集時,有可能無法在設定的時間內完成解凍。
雪糕鬆軟
是否放在速凍保鮮室?請放在冷凍室。
完全不製冷·冷卻能力差…請按照順序確認以下事項。
確認事項·原因/對策
電源
是否正常供電?
請確認電源插頭是否鬆脫,總開關或保險絲是否斷開。
電源接通多久
雪櫃內部製冷需要一定時間,夏季等炎熱時製冷可能需1天以上。
是否處於演示模式?請解除演示模式。
溫度調節檔位元是不是設定為「弱」
是否設定了「自動節能」?請解除設定。
請勿讓食品超出層架。
冷藏室門的情況
輕觸面板
請參照第13頁
請參照第26頁
請參照第20、21頁
由於冷藏室深處離冷風吹出口近,且速冷冰鮮盒內溫度較低,製冷過快。
請勿將水分過多的食品放在冷風吹出口前面。
請參照第17、19頁
請參照第18、19頁
請參照第18、19頁
請參照第21頁
請勿將食品放在冷風吹出口的前面。
▲
請將溫度調節檔位元設定為「中」或「強」
門的密封條
周圍是否有
間隙?
蔬果保鮮室門或冷凍室門的情況
是否有食品袋子卡住了門,導致門產生了
間隙?
另外,容器中的食品有無頂到滑動盒?
如有,則會導致門關閉不良,漏冷而
使製冷效果變差。
層架上的食品是否超出層架而
頂到雪櫃門,使之產生間隙?
是否頻繁開啟
雪櫃門?
速冷冰鮮盒中的食品不
會微結凍(軟冷凍)
設定為快速微凍時,食品
也不會微結凍(軟冷凍)
設定為快速微凍時,
食品結凍
即使設定為解凍,
食物也未能解凍
頻繁開啟雪櫃門會導致外界空氣(暖氣)進入雪櫃,使雪櫃內溫
度暫時上升。大約一晚上的時間溫度會恢復正常,請留意觀察。
▲
?
。
▲
▲
▲
▲
輕触面板
請參照第32頁
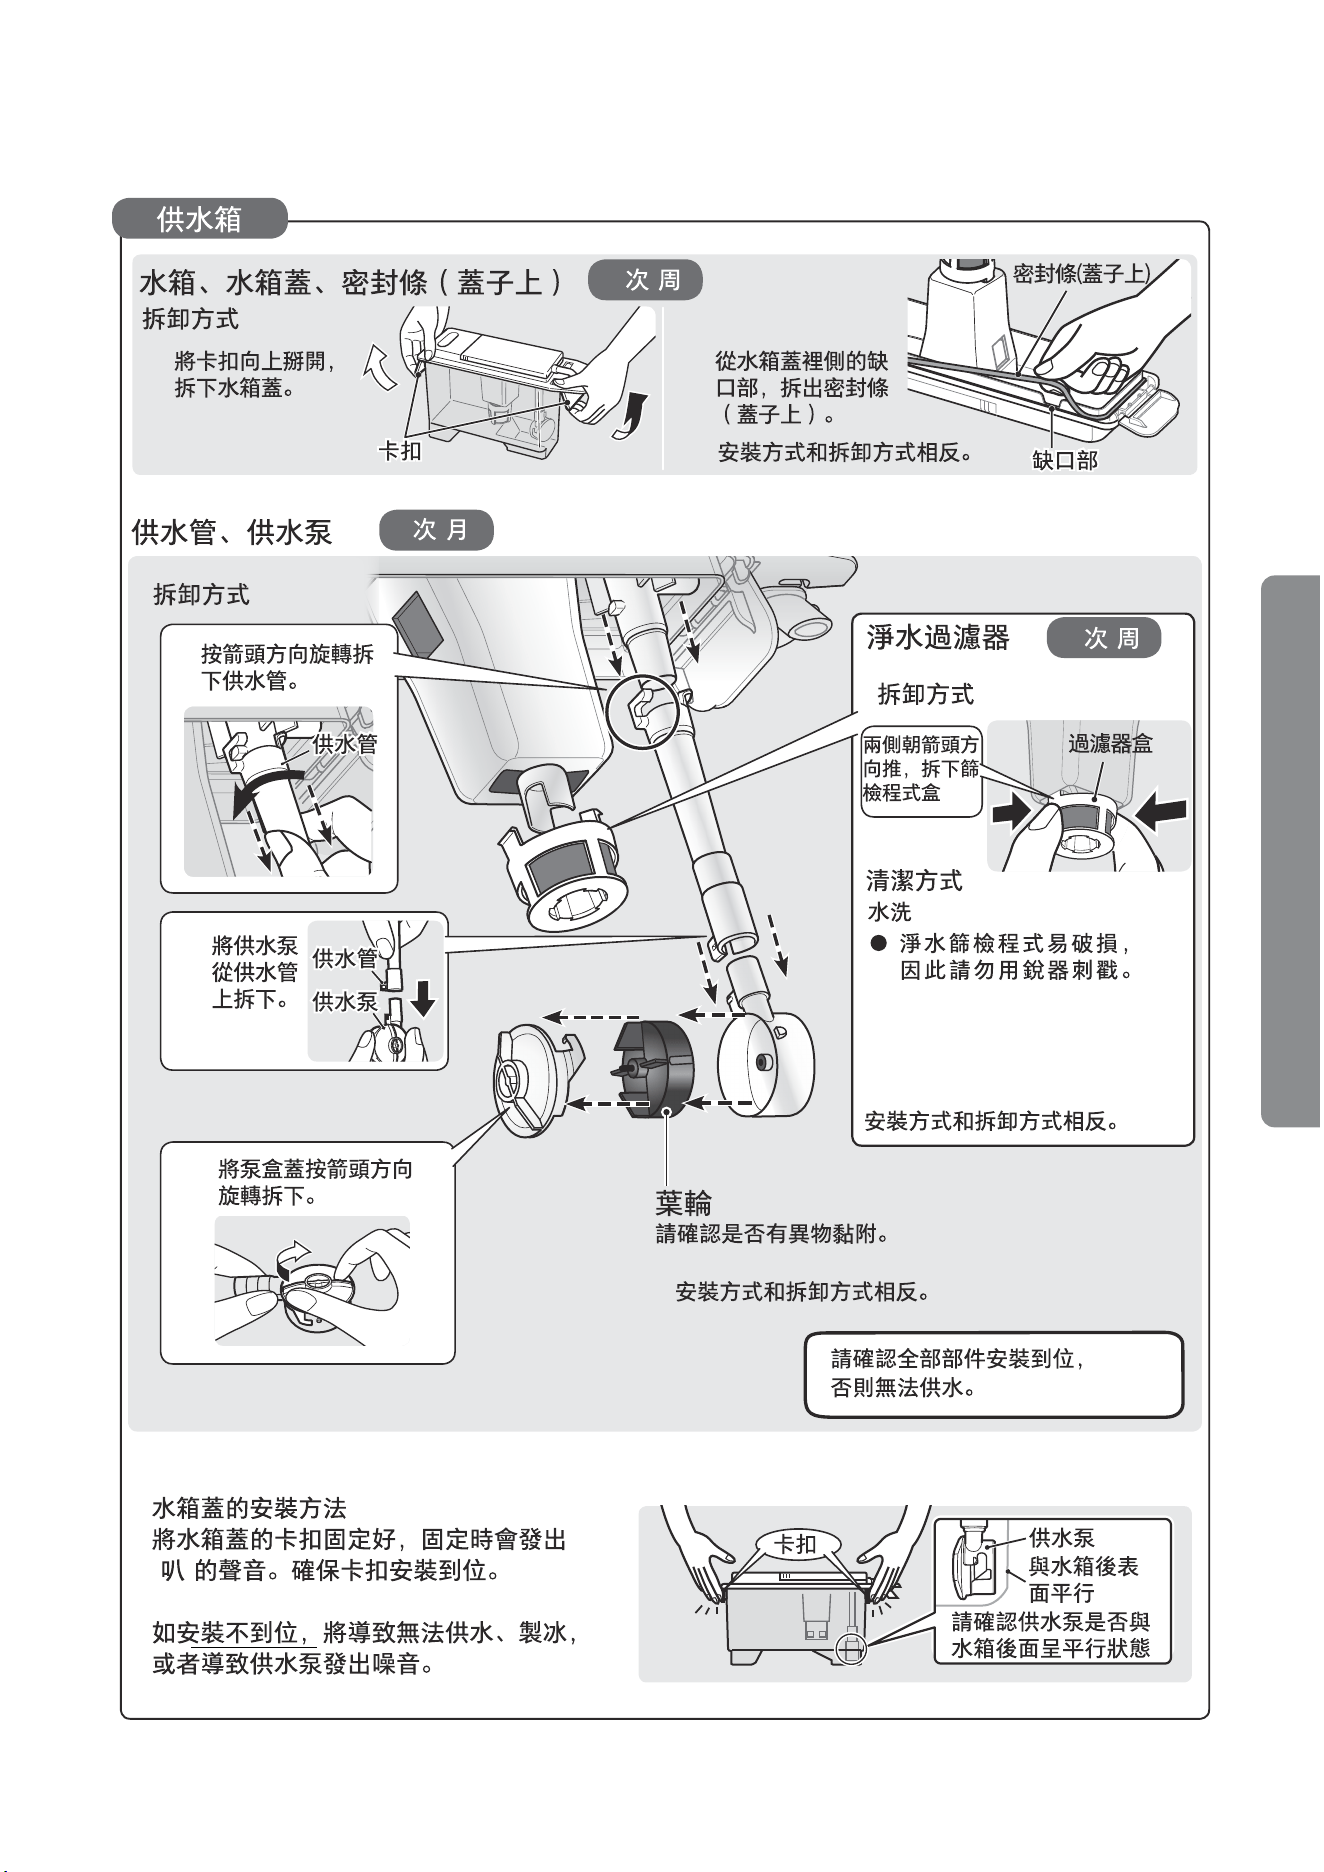
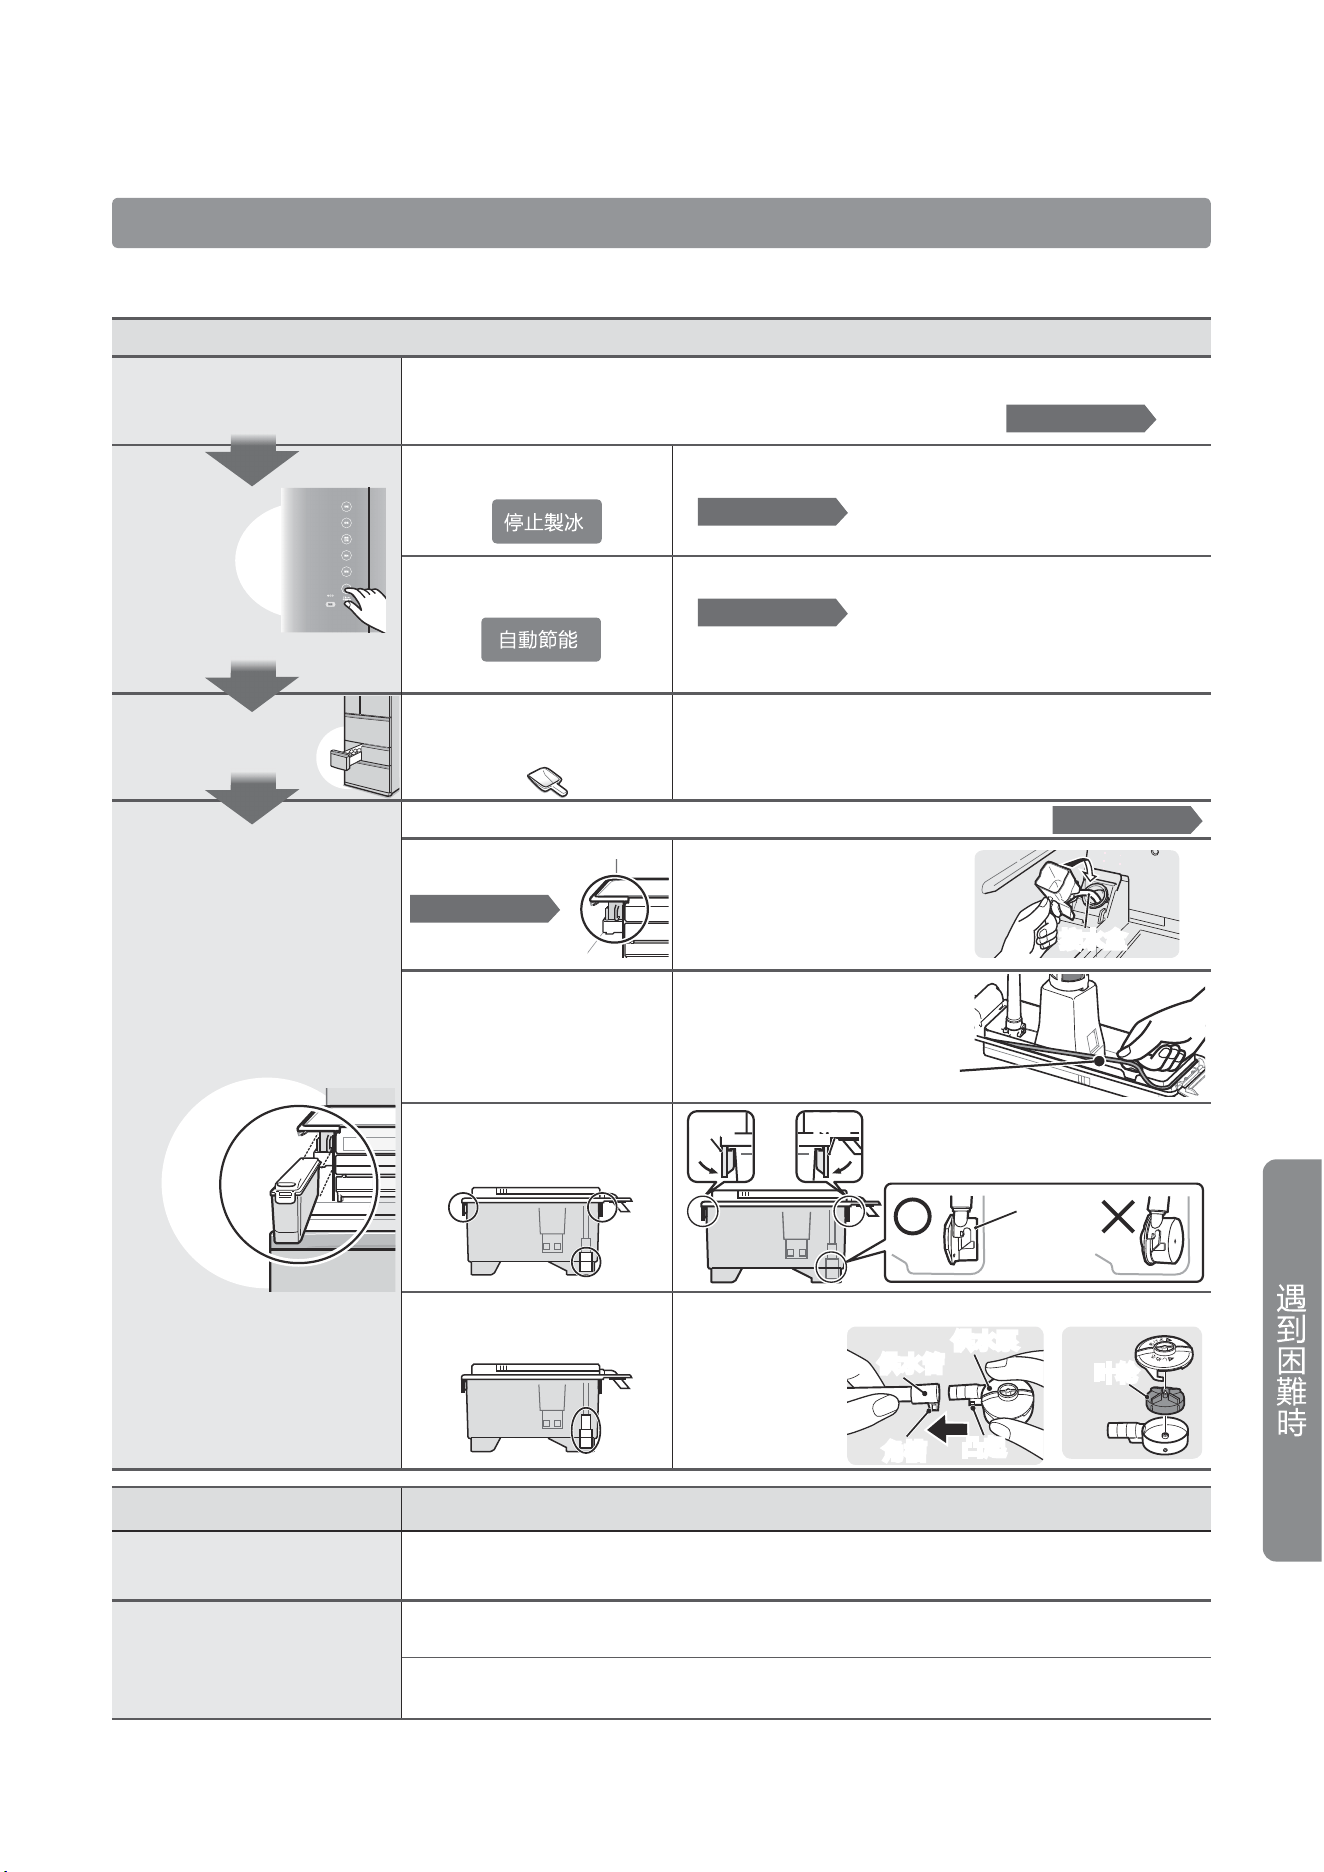
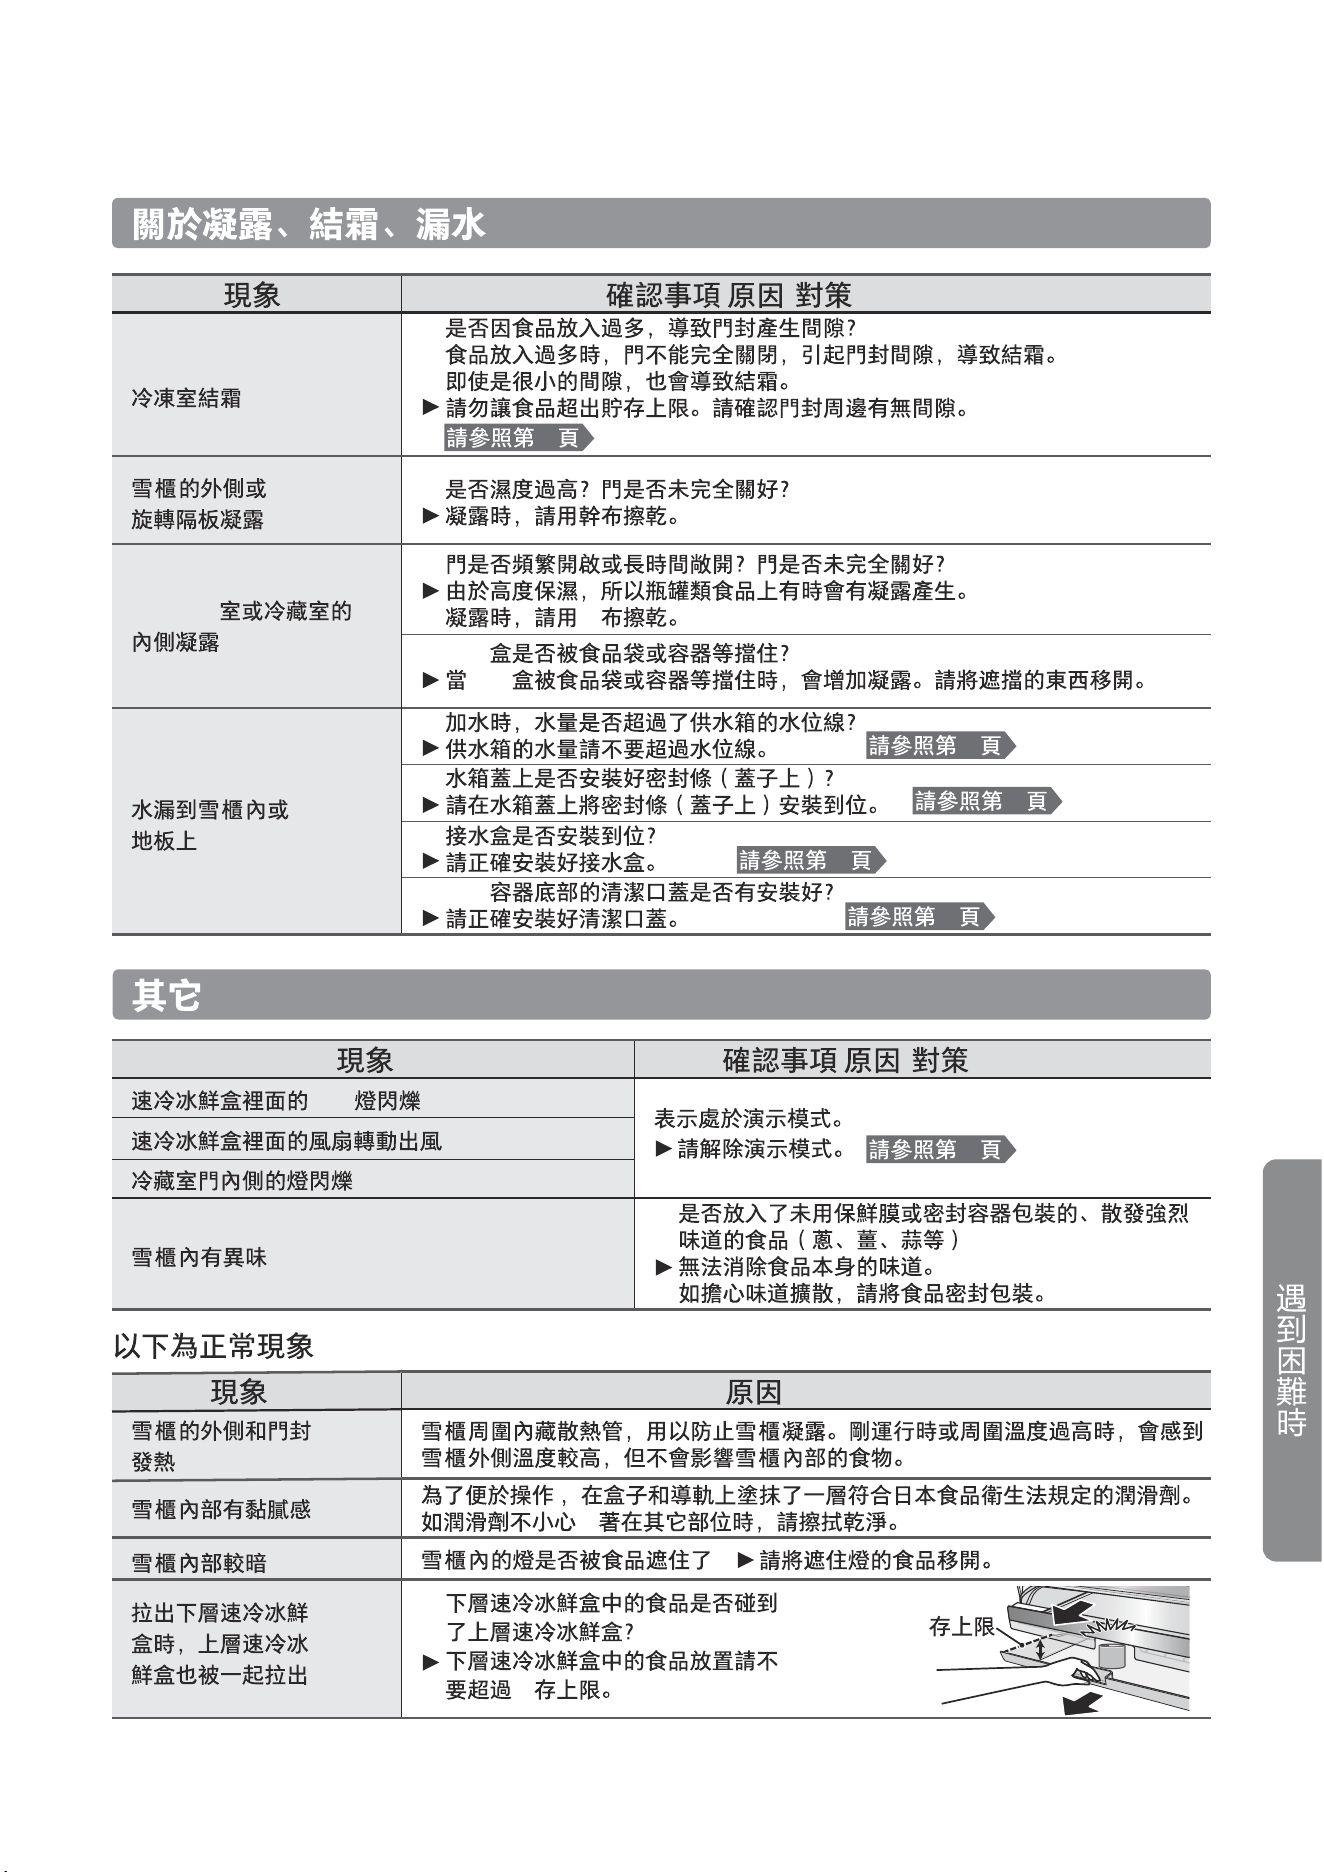
接水盒
接水盒
卡扣
卡扣
供水管
供水管
供水泵
供水泵
角槽
角槽
凸起
凸起
叶轮
叶轮
37
「停止製冰」的顯示有無
亮燈?
「自動節能」的顯示有無
亮燈?
是否將冰塊以外的物品放
入儲冰盒內?
是否忘記安裝
接水盒?
是否忘記安裝供水箱蓋的
密封條(蓋子上)?
供水箱的卡扣和供水泵是
否確實安裝好?
供水管和葉輪是否確實
安裝好?
冰塊互相黏結,或呈
圓球狀,或變小
冰塊呈白色,
或有沉澱物
是否長時間儲冰?
可能因昇華作用而使冰塊變成圓球狀,變圓、變小。
是否設定為快速製冰或快速冷凍模式?
因加快結冰速度,造成水分中的空氣被封在冰塊中形成氣泡,使冰塊看起來發白。
是否使用了礦物質含量較高的水(礦泉水等)?
因礦物質結凍,出現白色沉澱物,使冰塊看起來發白,但是無害。
供水管和供水泵
請將供水泵的凸
起部分安裝到供
水管的角槽內
請將密封條(蓋子上)
安裝到供水箱蓋上。
請勿將冰塊以外的物品放入儲冰盒內。
物品可能會碰到檢測杆導致製冰停止,或使製冰盤翻
轉時受到撞擊而破損,造成無法製冰。
使用完冰勺後,請將其放回原位。
關於製冰
無法製冰·製冰少…請按照順序確認以下事項。
確認事項·原因/對策
電源接通多久
雪櫃剛開始運行等未充分製冷的情況下,需要約5~6小時才能製出冰塊。
夏季等炎熱時可能需1天以上,請根據實際情況留意觀察。
儲冰盒
供水箱·接水盒
供水箱內是否有充足的水?請將水加入供水箱至水位線位置。
請安裝好接水盒。
請將卡扣固定好。
與水箱後
表面平行
供水泵
葉輪
現象確認事項·原因/對策
密封條(蓋子上)
請參照第24頁
請參照第25頁
請解除停止製冰功能。
請參照第24頁
請解除自動節能功能。
請參照第26頁
卡扣
卡扣
…
· /
1
14
12
12
15
15
16
26
14
14
13
34
38
10
1
24 20%
39
20 21
· /
10
10
11
層
層
蔬果保鮮
門隨意晃動
打開冷藏室門時,左門比右門吃力左門上有旋轉隔板。
僅單側門晃動的話,沒有問題。但是兩側門都向同一方向晃動的話,則是雪櫃傾
斜較大導致的。請調整水平放置。
將冷藏室的兩側門呈
90度打開,然後放開手
向右傾斜的情況 向左傾斜的情況
90
90
兩側門向
右晃動
兩側門向
左晃動
請旋轉調整腳,調
整門的平行度。
或在腳輪下墊上一
塊板。
…
…
24
33
40
5
2 1 1 3
1 1
2 1 1 3
1 1
5
3
…1 1 …2 1
…1 4 …1 1
· …
/
蔬果保鮮速凍保鮮
蔬果保鮮速凍保鮮
41
· /
20
32
33
24
21
· /
LED
13
?
?
乾
黏
儲
儲
蔬果保鮮
蔬果
保鮮
保鮮
(3)
10
1
2
42
3
4
5
6
(2)
(1)
(1)
2cm
(2)
2
(3)
(4)
(5)
2
43
GR-RM598WE-PGA(B3)
GR-RM598WE-PGA(UC)
76 77
76 77
LED
R1
LED
R2
LED
LED
LED
R2
(F)
(R1)
(R2)
(I)
(F)
(250V ~ 6.3A)
DC
R68
R66
R68
R66
20
R R
R
1
R
2
C
F
R1
130 133 130 133
(8.6kΩ)
V
(6.8kΩ)
(12kΩ)
(685Ω)
DP
(2.1kΩ)
馬達馬達 馬達馬達馬達
棕棕
藍
220-240V~/50Hz
給水
給水
44
649mm
GR-RM598WE-PGA(B3)/GR-RM598WE-PGA(UC)
451L
231L
81L
100L
39L
220-240V~
50Hz
6.0kg/24h
1.2kg/24h
1.01A
226kWh/y
5.4W
39dB(A)
R600a
650mmx652mmx1833mm
關於冷凍室
速凍保鮮室
關於自動除霜
..................................................2
........................................1
...................................1
...................................1
...................................1
........................................1
...............................1
.......................................................1
..................................................1
..............................2
...............................1
..............................2
..............................1
............................................................1
........................................1
..................................................1
.......................................................1
.......................................................1
............................................................1
.......................................................1
..................................................1
...................................1
........................................1
..................................................1
..................................................1
.............................................1
層
層
儲
儲
蔬果
蔬果
保鮮
門上置物架(左)
雙瓶置物架(左)
門上置物架(右)
雙瓶置物架(右)
45

USER
MANUAL
REFRIGERATOR FREEZER
For Home Use Only
GR-RM598WE-PGA(B3)
GR-RM598WE-PGA(UC)
ENGLISH
Safety information
Before the installation and use of the appliance,
carefully read the supplied instructions. The
manufacturer is not responsible if an incorrect
installation or use causes injuries or damages.
Always keep the instructions with the appliance
for future reference.
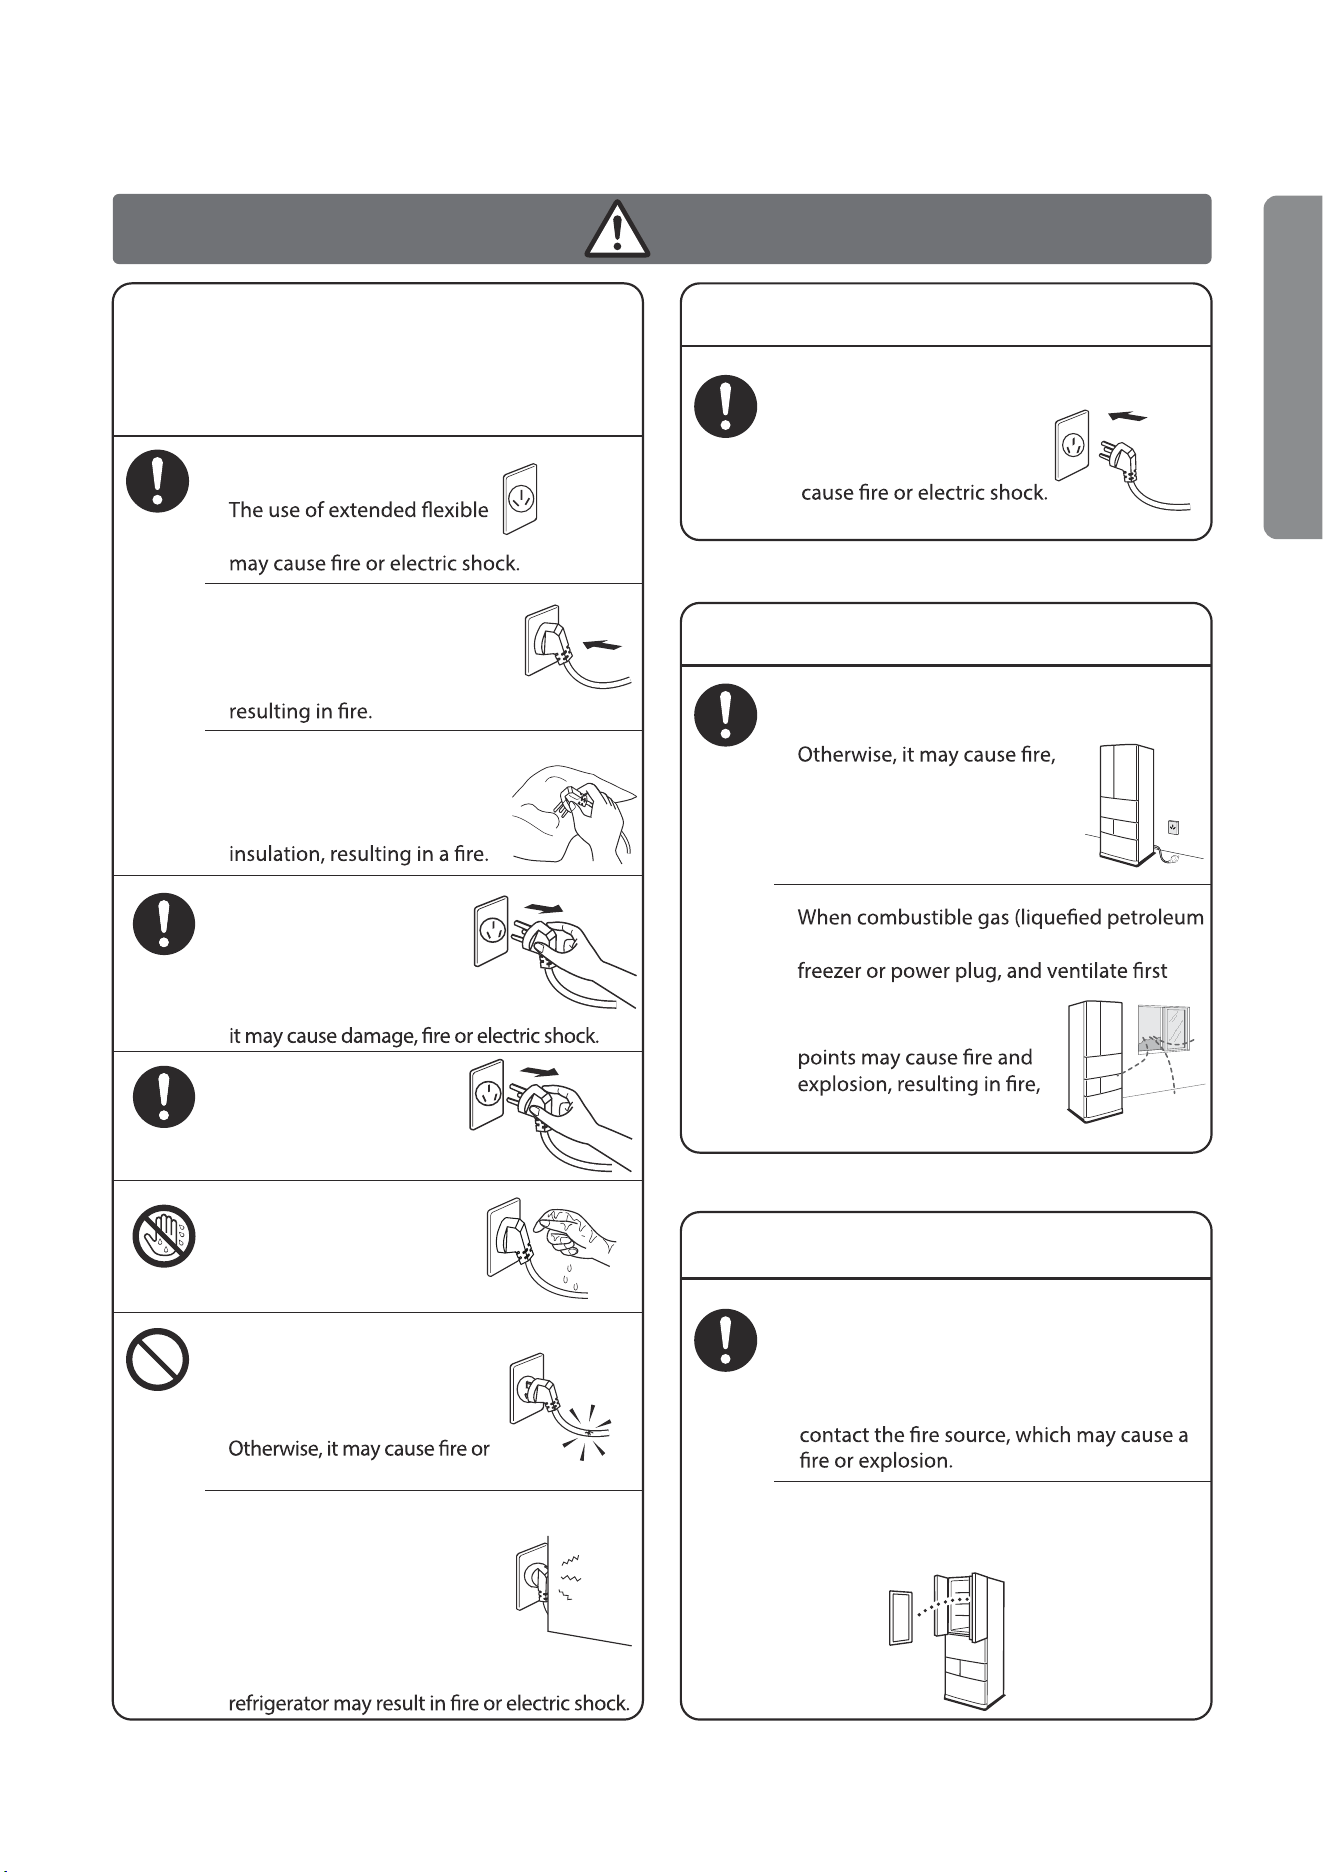
WARNING:
Risk of fire / Flammable materials
•
•
•
This appliance incorporates an earth connection
for functional purposes.
If the supply cord is damaged, it must be replaced
by the manufacturer, its service agent or similarly
qualified persons in order to avoid a hazard.
•
•
WARNING:
the appliance enclosure or in the built-in
structure, clear of obstruction.
•
•
WARNING:
Do not use electrical appliances
inside the food storage compartments of the
appliance, unless they are of the type recommended
by the manufacturer.
Do not store explosive substances such as aerosol
cans with a flammable propellant in this appliance.
•
WARNING:
When positioning the appliance,
ensure the supply cord is not trapped or damaged.
•
•
WARNING:
Do not locate multiple portable
socket-outlets or portable power supplies at the
rear of the appliance.
This appliance is not intended for use by persons
•
•
The refrigerant of the appliance is flammable,
(including children) with reduced physical,
sensory or mental capabilities, or lack of
experience and knowledge, unless they have
beengiven supervision or instruction concerning
useof the appliance by a person responsible for
their safety.
Children should be supervised to ensure that
they do not play with the appliance.
WARNING:
:
Fill with potable water only.
WARNING
To avoid a hazard due to instability
•
WARNING:
Do not use mechanical
devices or other means to accelerate the
defrosting process, other than those
recommended by the manufacturer.
Keep ventilation openings, in
•
•
This appliance is intended to be used in household
and similar applications such as:
——staff kitchen areas in shops, offices and other
working environments;
——farm houses and by clients in hotels, motels
and other residential type environments;
——bed and breakfast type environments;
——catering and similar non-retail applications.
Class
Extended Temperate
Symbol
SN
N
ST
T
Ambient Temperature
IEC 62552
(ISO 15502)
+10 to +32
+16 to +32
+16 to +38
+16 to +43
ISO 8561
+10 to +32
+16 to +32
+18 to +38
+18 to +43
range
(℃)
of the appliance, it must be fixed in accordance with
The refrigerator is designed to operate normally
in the temperature range specified by its class
rating.
Temperate
Subtropical
Tropical
02
the instructions.
Disconnect the mains plug from the mains socket
before carrying out care, maintenance, installation
and repair work on the product.
Any replacement or maintenance of the LED lamps
is intended to be made by the manufacturer, its
service agent or similar qualified person.
If the refrigerator operates outside the climate
class (ambient temperaturerange) for which it
is rated then it may not be able to maintain
satisfactory internal temperatures.
please be care not to damage the cooling
pipes during installation and transportation.
If gas leakage happens, please contact the
distributor or local service agent, and the
following precautions should be always taken:
Open the windows for ensuring good ventilation.
No fire around and please do not use other
electric appliance.
When the refrigerator is scraped, it shall be kept
away from any fire source and be recovered by a
special recovering company with corresponding
qualification other than be disposed by
combustion, so as to prevent damage to the
environment or any other harm.
Please do not allow children to climb
the refrigerator to prevent tipping,
component detachment, or accidental
entrapment, which could cause injury.
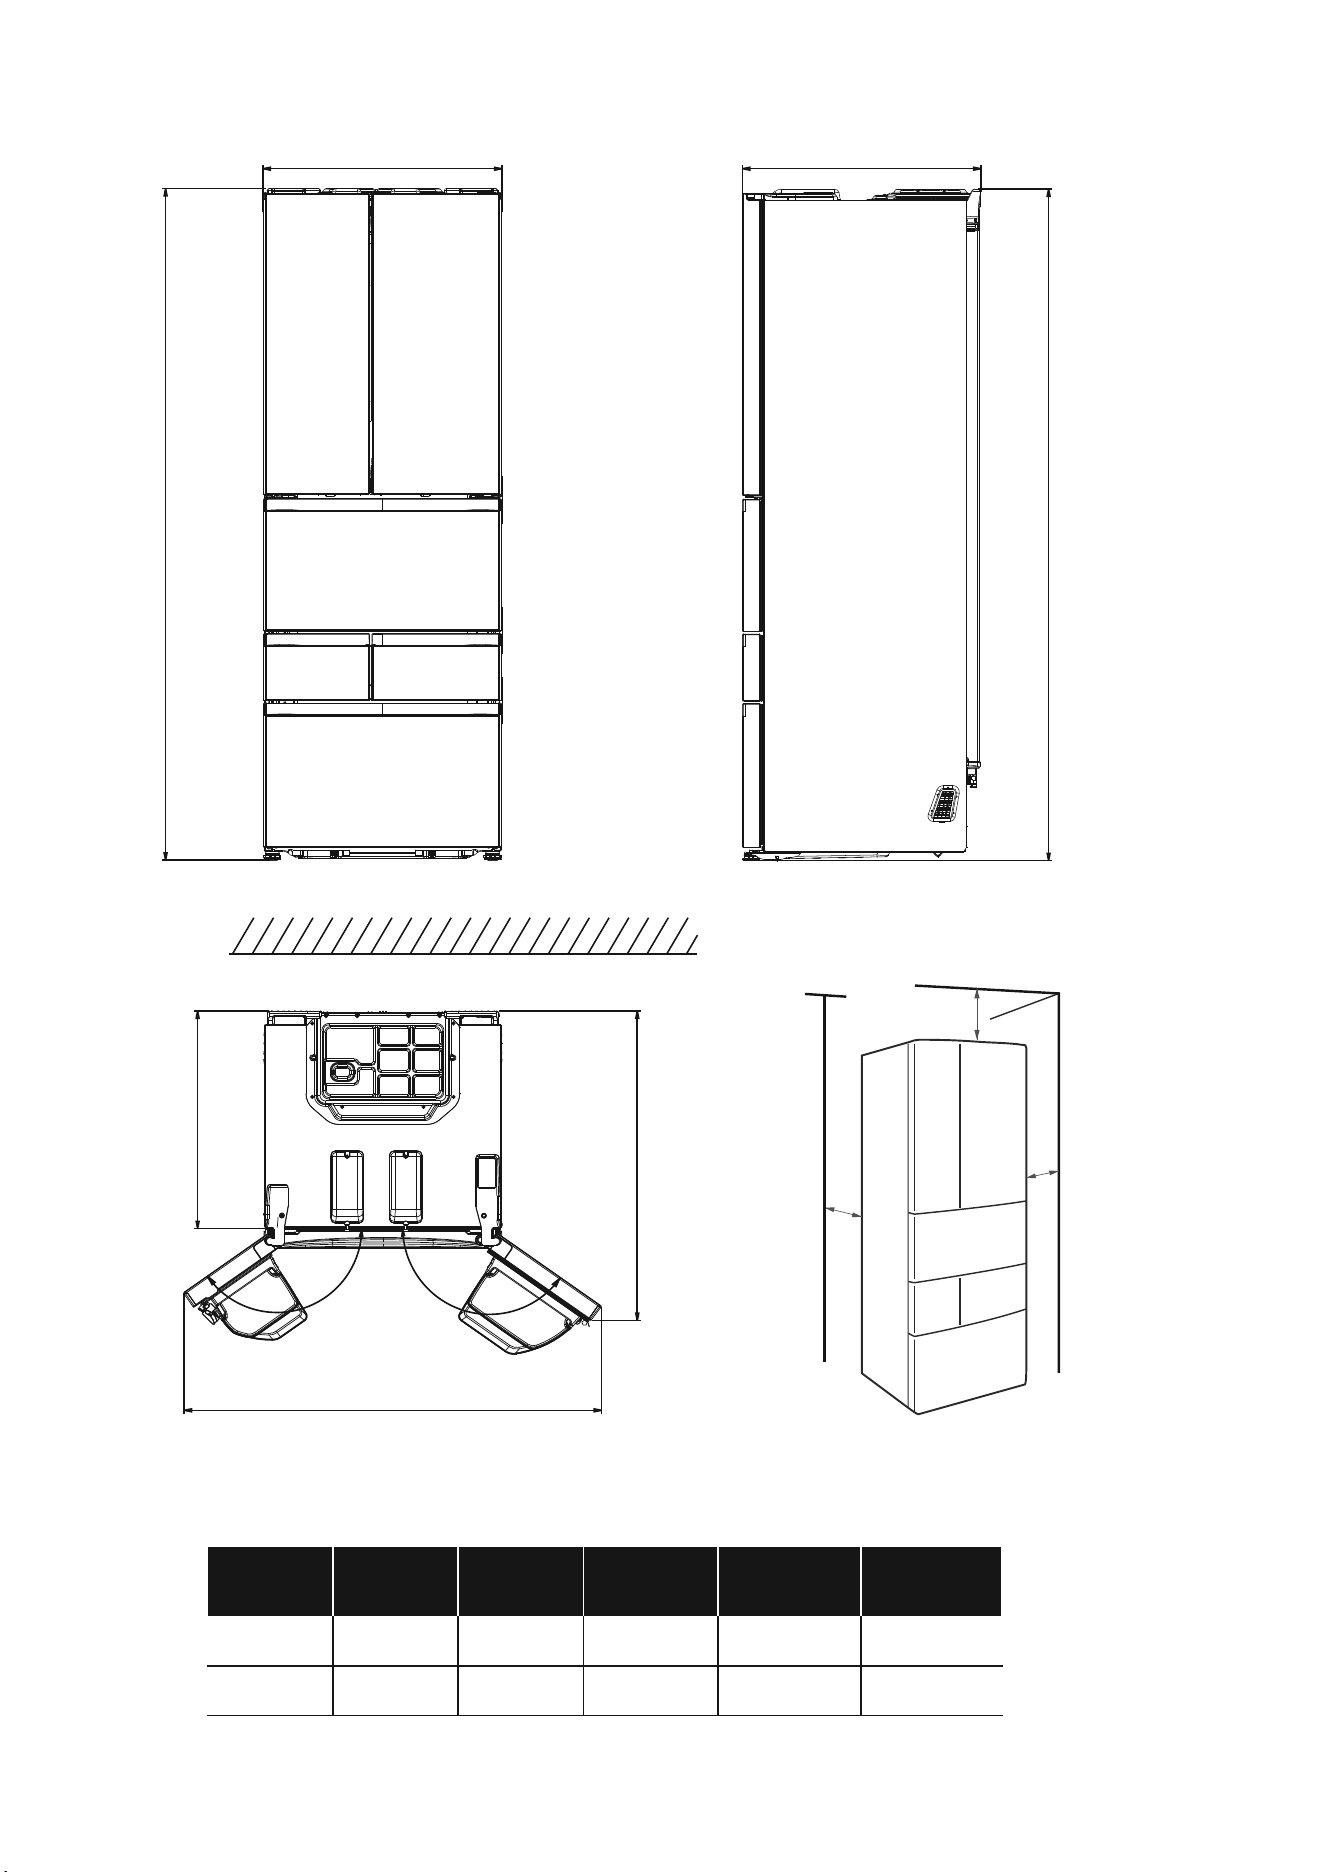
03
100mm
50mm
50mm
A
C
B
B
C1
145°
145°
D
E
A B C C1 D E
Width
650 6521833 592 845 1141
Overall
Height
Depth
Depth Only
Cabinet
Depth doors
open 145°
Width doors
open 145°
Space requirement diagram (when the door is open and when the door is closed)
Notice: All dimensions in mm
The top space of the refrigerator shall be greater than 100mm, the side space of the refrigerator shall be
greater than 50mm, and the refrigerator should be placed against a wall with a free distance more than
50mm to facilitate heat dissipation.
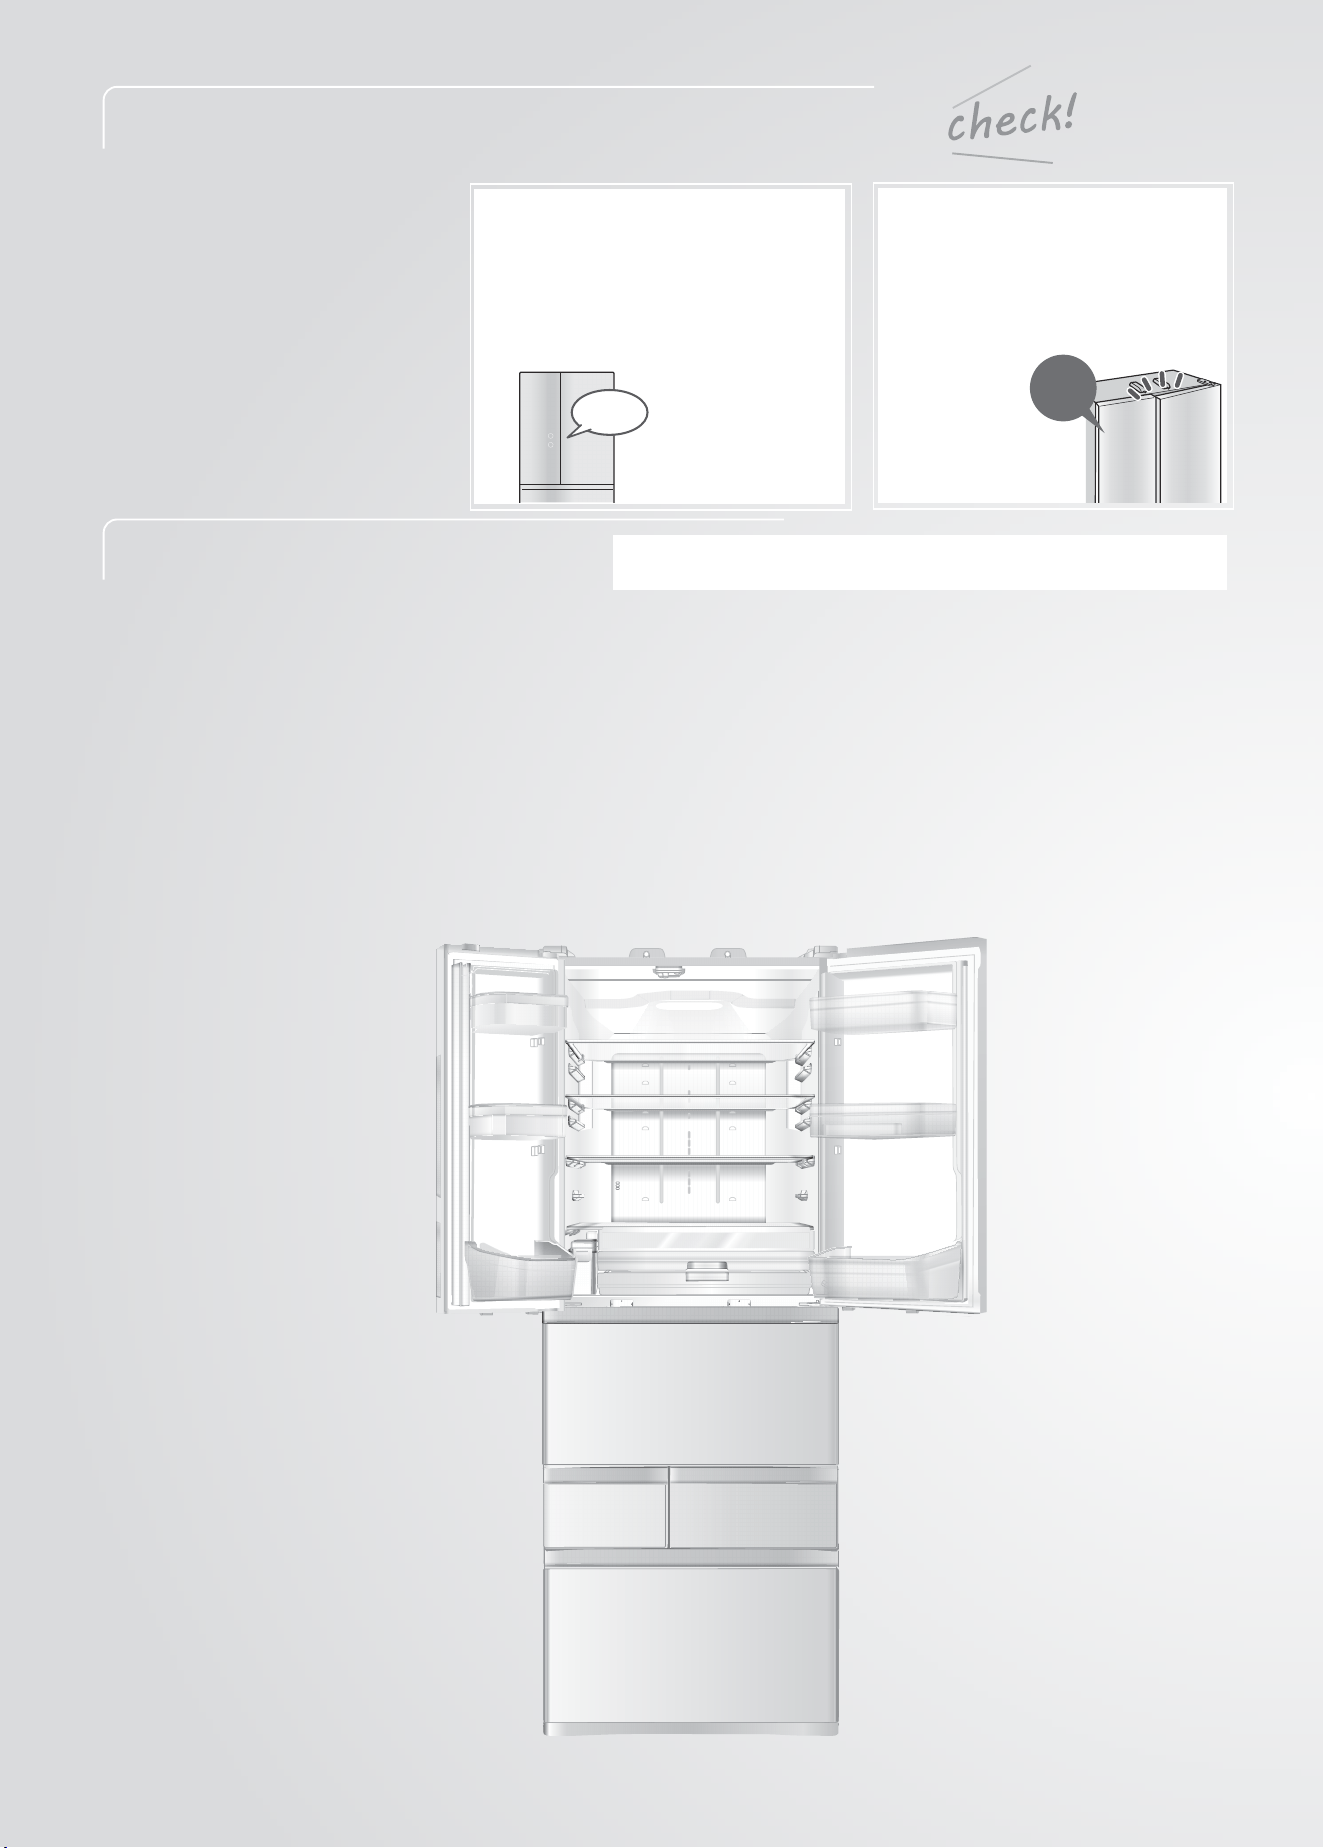
Questions frequently asked by customers
?
Beep!

Contents
Dear User:
• Thank you for purchasing Toshiba products.
• In order for you to use this product correctly, please read this manual carefully
before installation and use, and keep it properly for future reference.
• The Toshiba products you use need to be cleaned and maintained regularly. If
it is not properly cleaned and maintained, its failure rate will increase and the
applicable life will be greatly reduced.
• Please contact Toshiba's local service outlets regularly or directly with our
company every year. Our company will assign professionals to provide you
with paid inspection and maintenance services.
1. Safety Precautions............................................................................ 06
2. Installation Method ........................................................................... 10
3. Functions of touch panel.................................................................. 12
4. Refrigeration compartment.............................................................. 17
5. Fruit & Vegetable compartment ....................................................... 20
6. Frozen food storage compartment, freezing compartment............. 21
7. Freezing function.............................................................................. 22
8. Ice making compartment(automatic ice maker)............................... 24
9. Power saving function...................................................................... 26
10. Cleaning and maintenance............................................................ 27
11. Maintenance of Automatic Ice Machine........................................ 32
12. Various treatments......................................................................... 34
13. In case of fault................................................................................. 36
14. During transportation and relocation ............................................. 42
15. Circuit diagram............................................................................... 43
16. Specification................................................................................... 44
17. Accessory........................................................................................ 45
05
Indicates mandatory (always)
Notes
Relevant Settings
Note
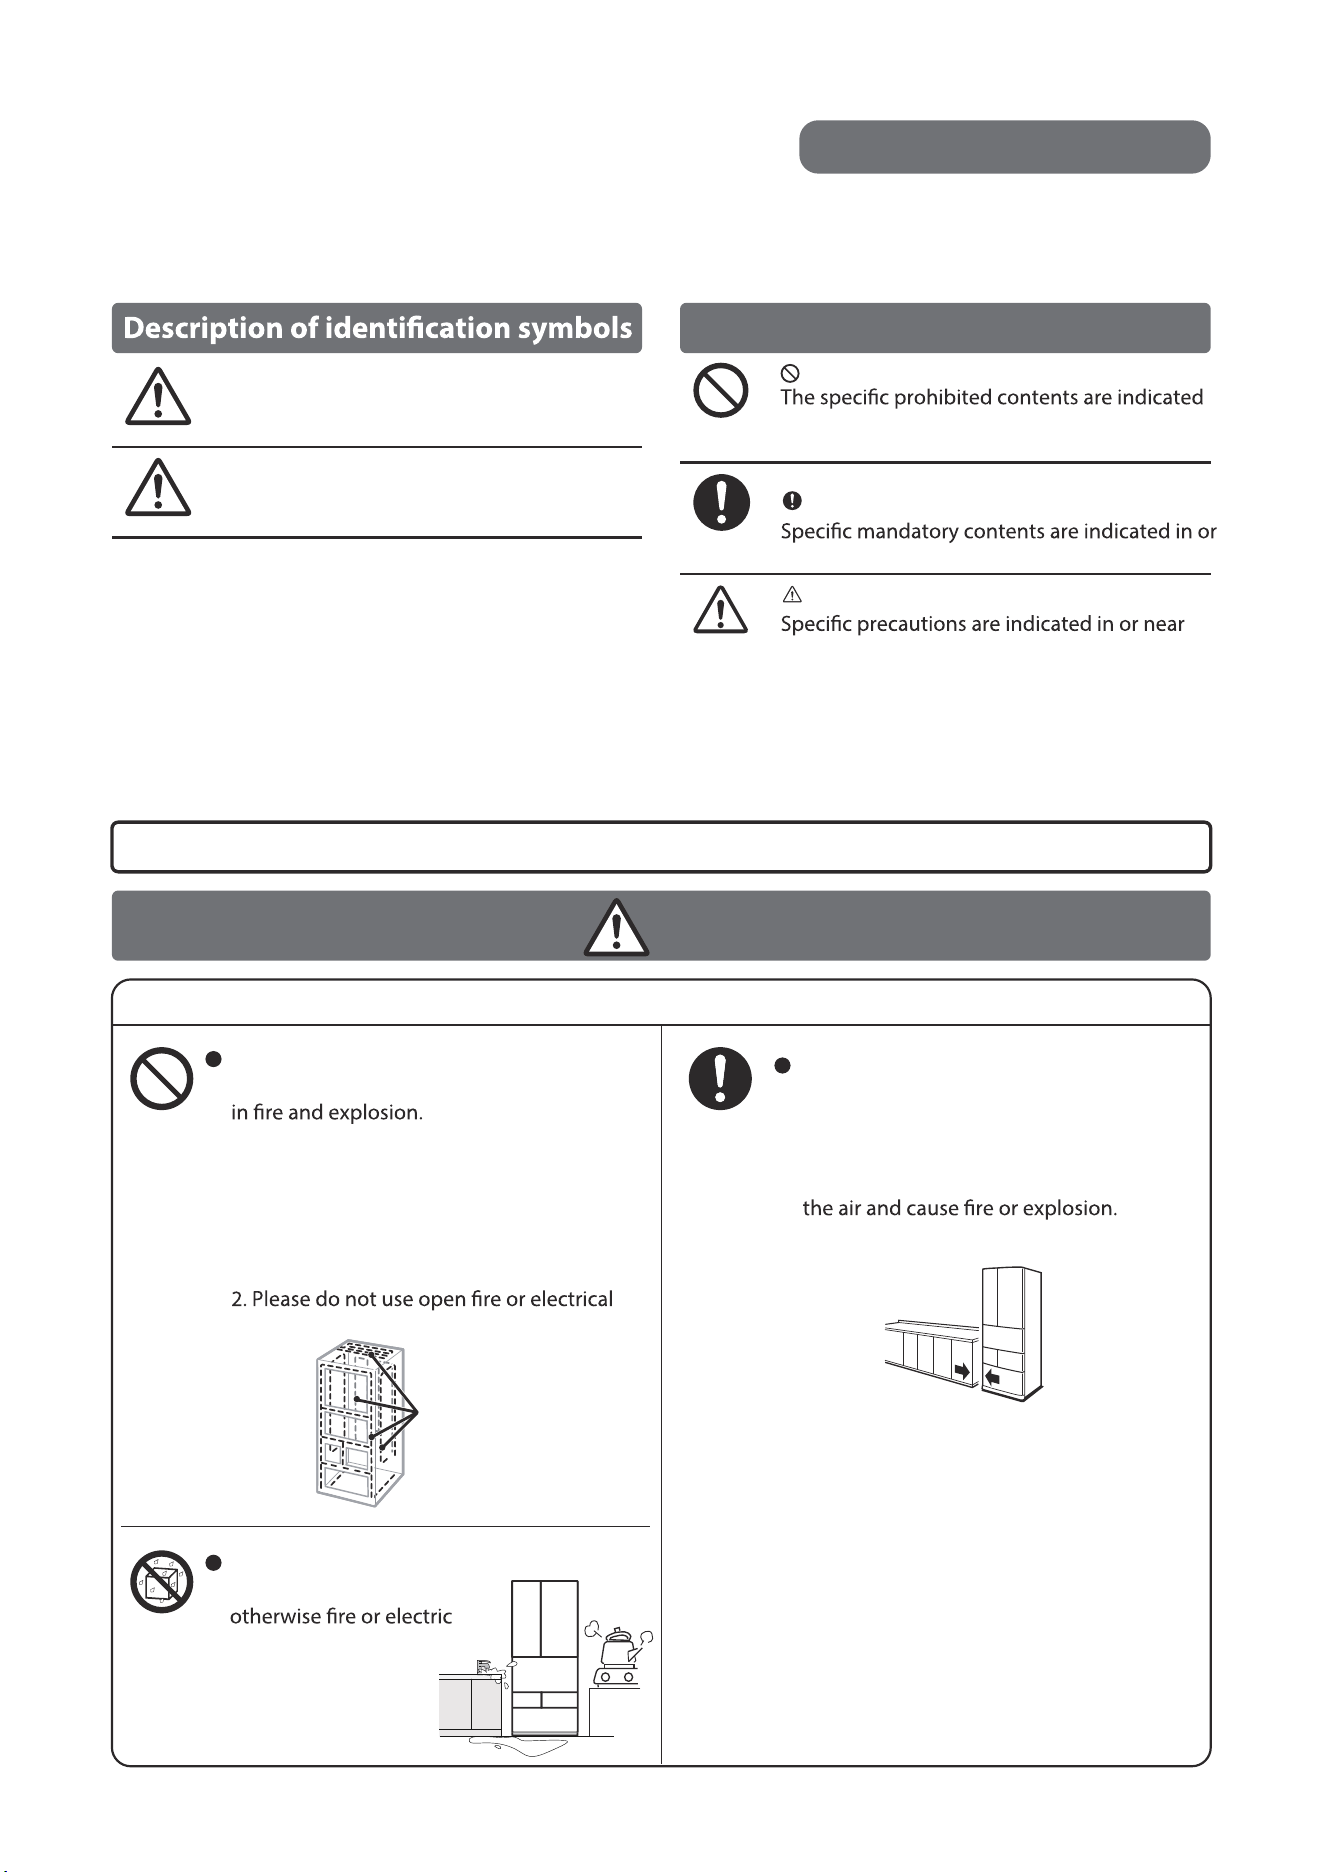
For safe and correct use of this product, please read it carefully.
Safety Precautions
Explanation of graphical symbols
Warning
Warning
Prohibited
Mandatory
Note
Mandatory for Safety
06
No
moisture
Condenser tube
(refrigerant loop)
In order to prevent injury or property damage to the user or others and enable users to use this product safely and
correctly, important contents related to safe use are recorded in this manual. Please read the text after fully
understanding the following contents (marks and graphic symbols), and observe the recorded matters.
It indicates that death or serious
injury may be caused by
misoperation (*1).
Indicates prohibited (not allowed)
in or near the pictorial symbols with pictures or
words.
near the pictorial symbols with pictures or words.
the pictorial symbol with pictures or words.
It indicates that maloperation
may cause injury (*2) or damage
to articles (*3).
*1: Serious injury refers to personal injury caused by
sequelae such as blindness, burns, scalds, frostbite
(high temperature and low temperature), electric shock,
fracture and poisoning, and requiring hospitalization
or long-term treatment in the hospital.
*2: Injuries refer to injuries, scalds or electric shocks that
do not require hospitalization for treatment or
long-term medical visits.
*3: Damage to items refers to long-term injury to
household property, raised animals or pets.
Warning: Do not damage the chilling loop
If damaged, the refrigerant may leak, resulting
In case of damage, please do not touch the
refrigerator, handle it according to the
following relevant matters, and contact the
selected dealer or call the service hotline.
1. Open the window and replace the indoor air.
(Please do not use exhaust fan)
appliances.
Warning: There is no obstruction around
the appliance or in the embedded
structure, and keep smooth
ventilation
When the refrigerant leaks, it may stay in
Do not place it in a damp place or a place
prone to splashing water,
shock may be caused.
Do not
damage the
refrigeration
circuit
Reserve a
certain space
●
●
●
●
●
●
Safety Precautions
.....Continued
Warning
Prohibited
07
●
220V~
●
●
●
●
For the repair of power plug and power cord, please call the
service hotline. "Any damaged power cord must be replaced
by professionals from the manufacturer, its maintenance
department, or similar departments to avoid danger."
Use a separate 220V AC
power socket
cords or multi-pin sockets
Ensure that the power plug is
fully inserted into the socket
Incomplete insertion may
cause electric shock or heat,
Regularly remove dust from the power plug
Please pull out the power plug
and wipe it with a dry cloth.
Dust may cause poor
When pulling out the plug
from the power socket,
please hold the plug and
pull it out
When the power cord is pulled out,
When not in use for a long
time, please take out the
food and pull the power
plug from the socket
Do not pull out or insert the
power plug with wet hands.
Otherwise, it may lead to
electric shock.
Do not use damaged power
cords and plugs, or when you
feel loose when inserting them
into the socket
electric shock.
Do not damage or let the back
of the refrigerator squeeze
the power plug and cable.
Damage to the power plug
or cable when strapping,
bending, placing heavy objects on
it, or being squeezed by the back of the
The power plug should be
inserted with the cord
facing down. Forcing or
twisting the cord may
In case of abnormality or fault, please
pull out the power plug and stop using it.
electric shock, injury and scald.
If repair is required, please
contact the selected dealer
or call the service hotline.
gas, natural gas, etc.) leaks, do not touch the
Otherwise, sparks at the
electrical connection
injury and burn.
When the refrigerator is scrapped, please
hand it over to a dealer or special scrap-
ping organization.
If it is scrapped at will, the refrigerant and
foaming layer materials may accidentally
Please remove the door seal when discarding
Otherwise, a small child may be locked
inside and cause an accident.
About power plug/wire
About power plug/wire
In abnormal cases
When scrapped
Hold the
plug and
pull it out
No wet
hands
Mandatory
Mandatory
Mandatory
Mandatory
●
●
Remove
the plug
Before Use
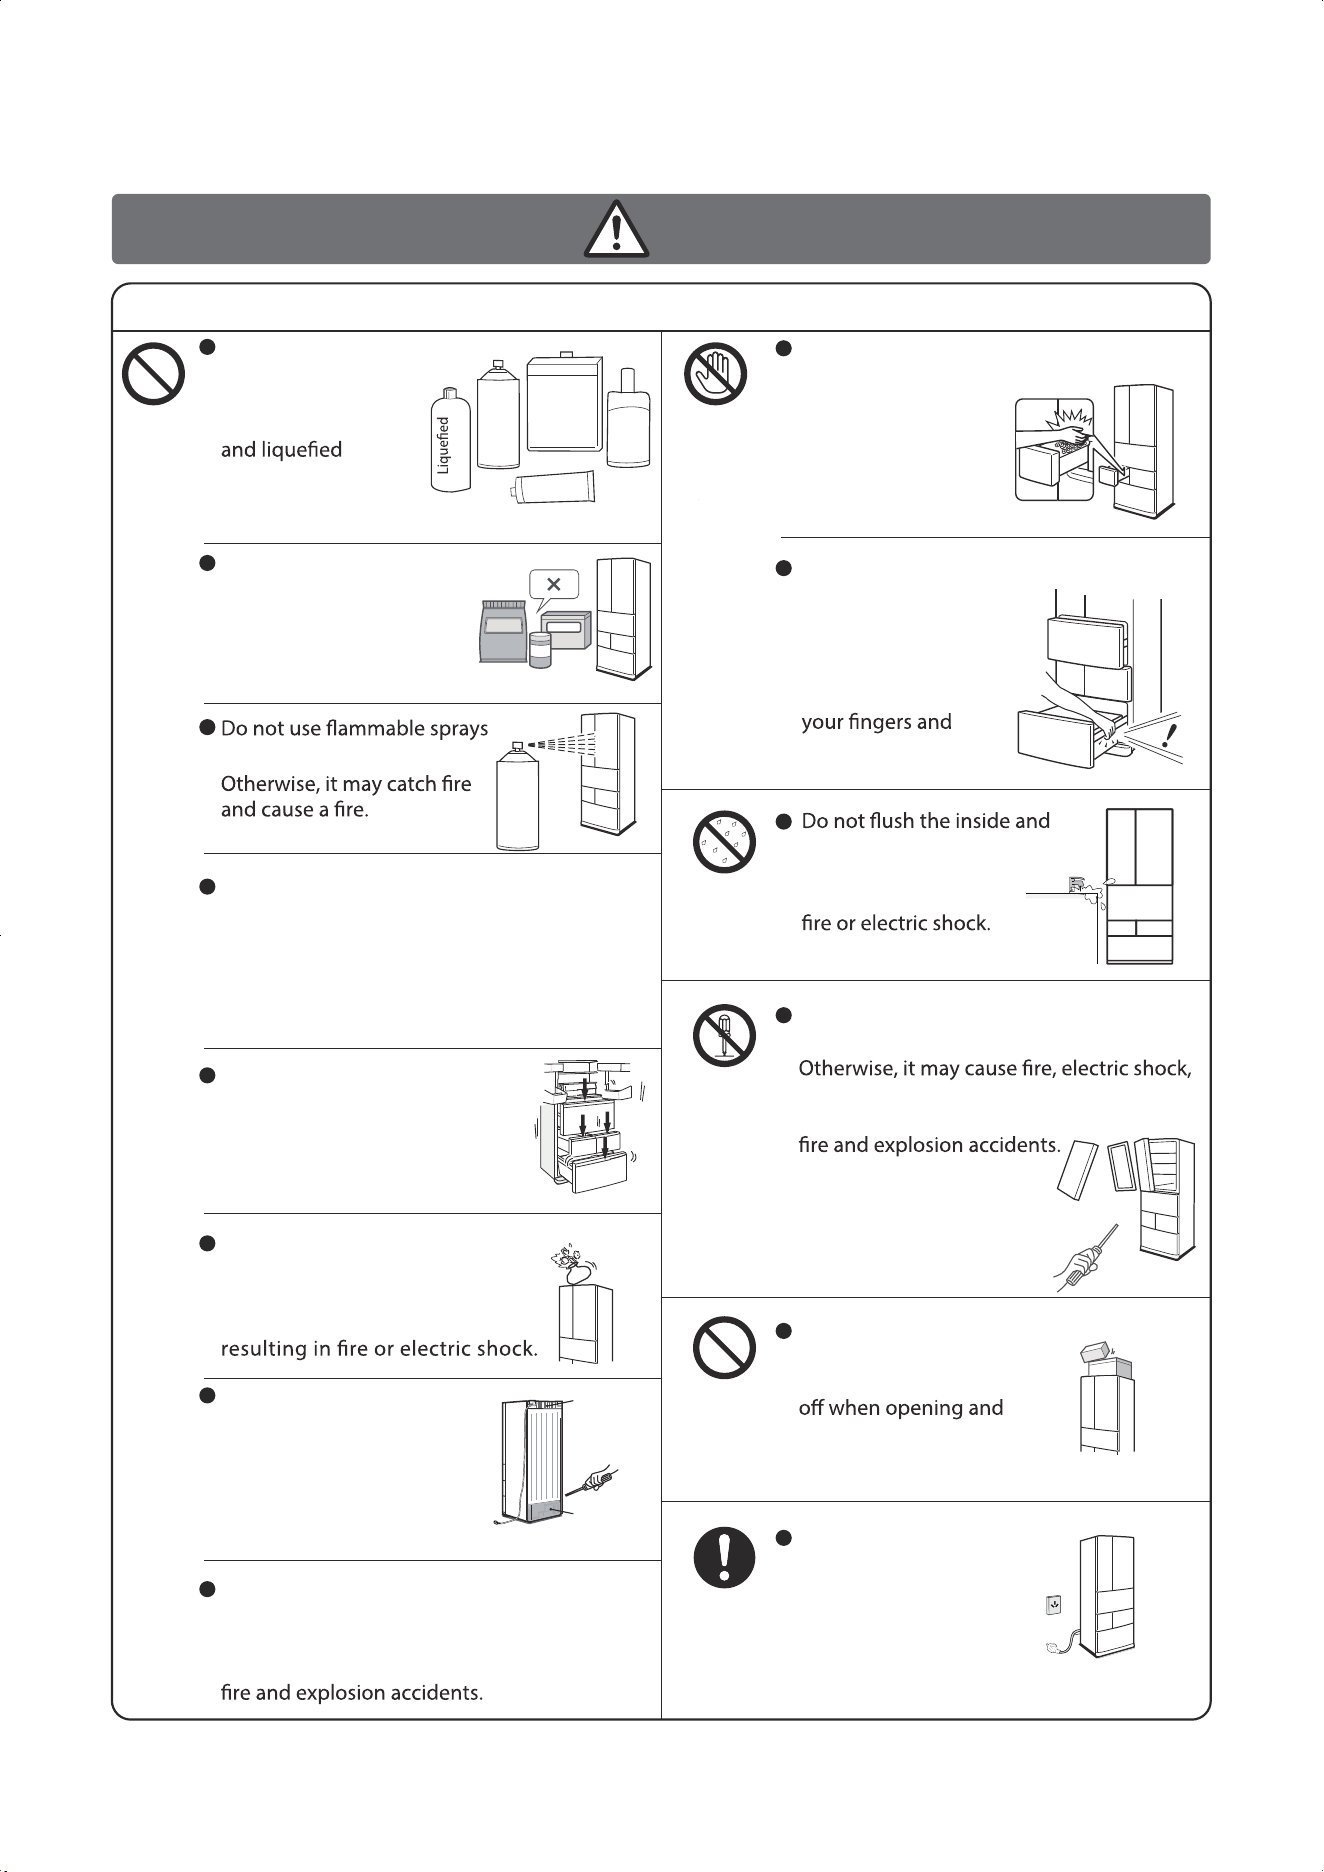
Safety Precautions
.....Continued
Warning
About Use
Prohibited
Prohibited
Flushing
prohibited
No
disassembly
Remove
the plug
08
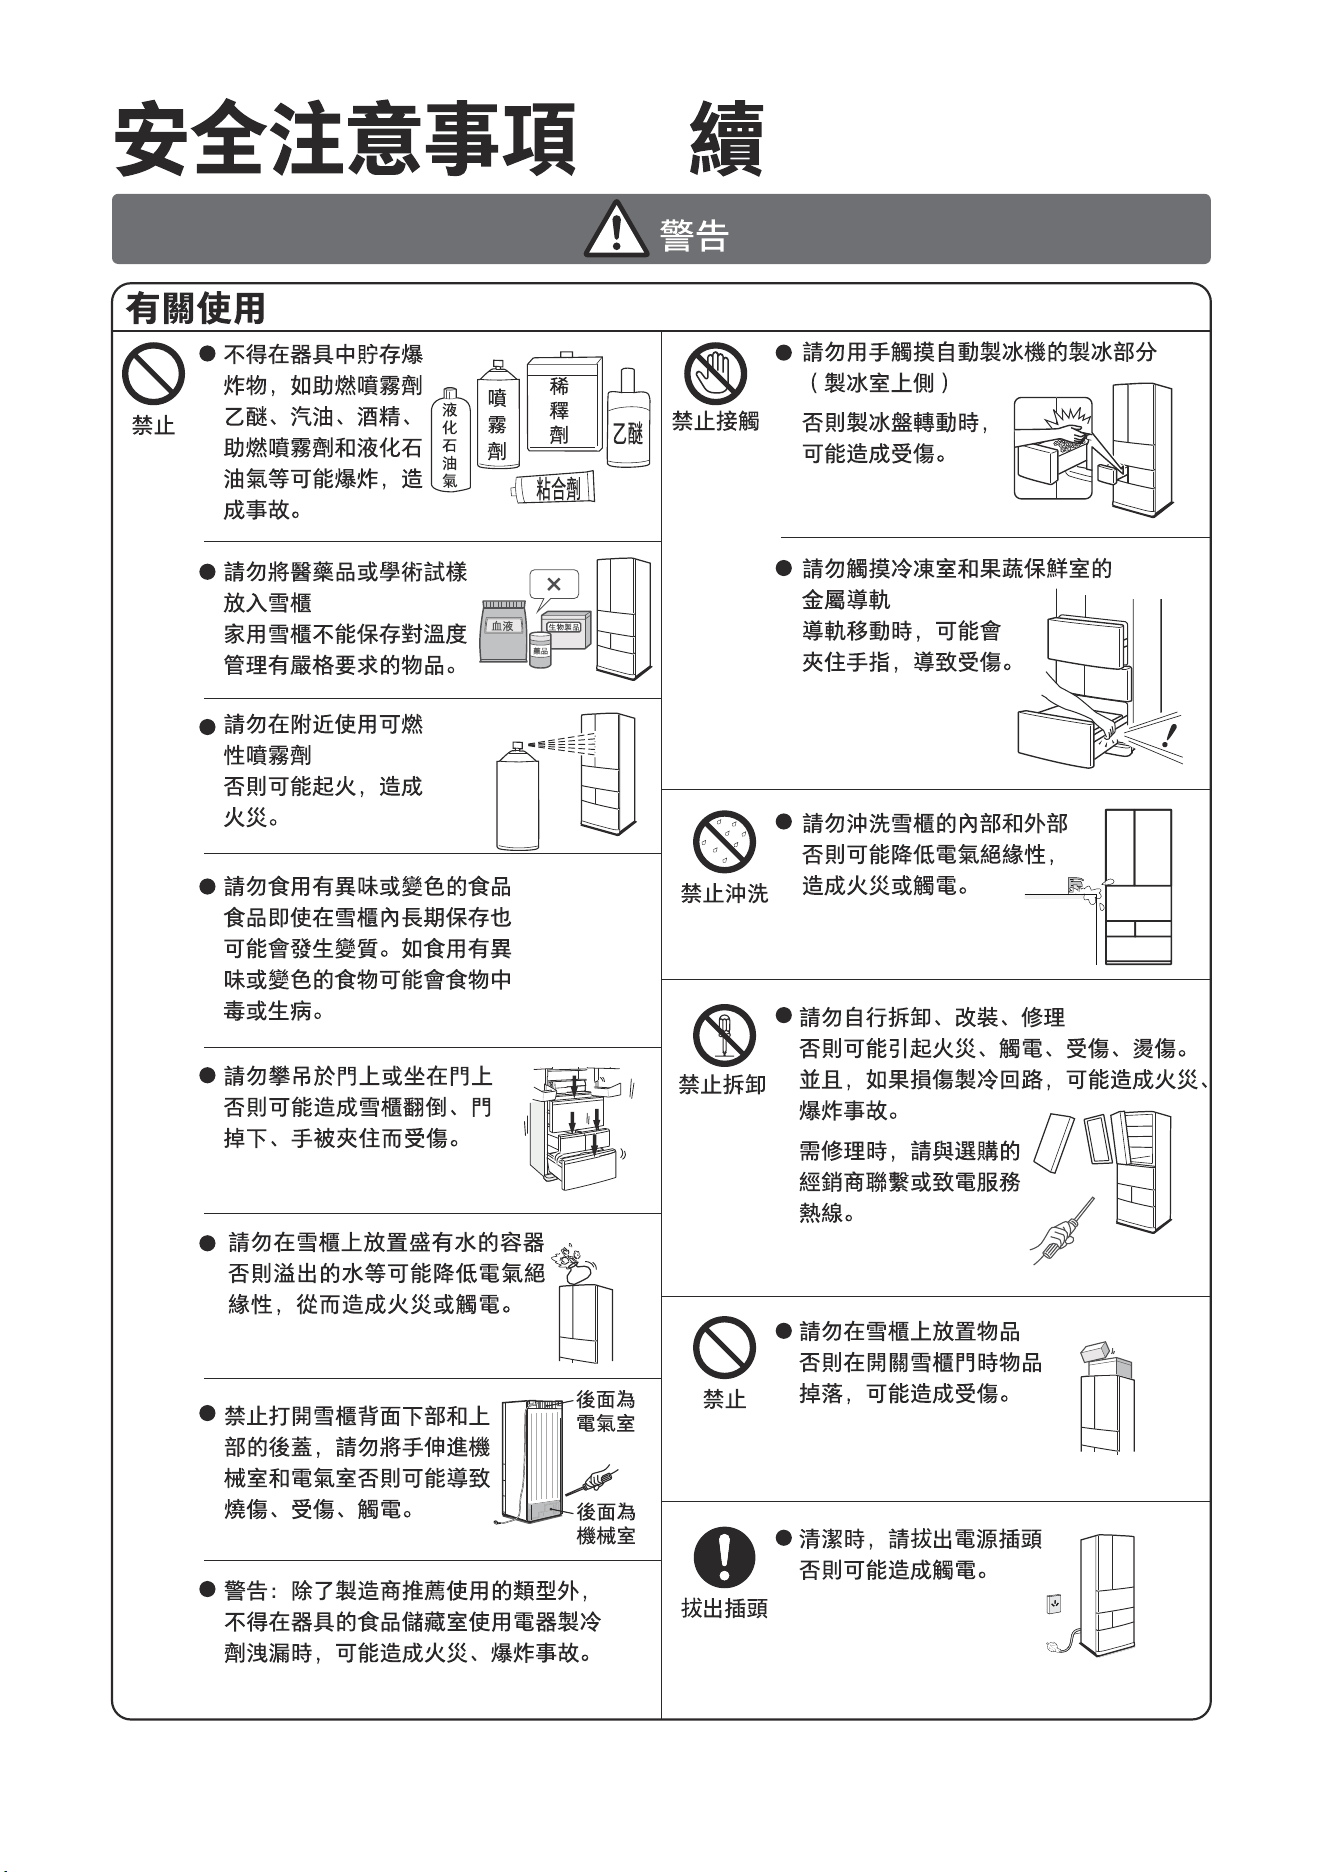
Do Not
Touch
Ether
Adhesive
Blood
Biological products
Pharmaceuticals
Do not store explosives, such as
ether, gasoline, alcohol
and other combustion-
supporting sprays,
petroleum gas, in
the freezer, which may
explode and cause accidents.
Do not touch the ice making part of the
automatic ice maker with your
hands (upper side of
the ice making
compartment)
Do not touch the metal guide rails of
freezing compartment
and fruit & vegetable
compartment
When the guide rail
moves, it may pinch
cause injury.
outside of the freezer as this
may reduce electrical
insulation and cause
Do not disassemble, modify or repair it by
yourself.
injury and scald. In addition, damage to the
refrigeration circuit may cause
If repair is required, please
contact the selected
dealer or call the service
hotline.
Do not place items on the
refrigerator
Otherwise, objects may fall
closing the refrigerator
door, resulting in injury.
Before cleaning the freezer,
please disconnect the
power plug or it may
cause electric shock.
Otherwise, it may cause
injury when the ice
making tray rotates.
Do not put pharmaceuticals or
academic samples in the freezer
Household refrigerators
cannot store items that
have strict requirements
for temperature management.
nearby
Do not eat foods that smell or change color.
Food may deteriorate even if stored in the
freezer for a long time. Food poisoning or
sickness may occur if you eat food with
peculiar smell or discoloration.
Do not climb or sit on the door
Otherwise, the refrigerator
may overturn, the door may
fall down and your hands may
be pinched.
Do not place containers containing
water on the refrigerator.
Otherwise, spilled water may
reduce the electrical insulation,
Do not open the lower and
upper rear covers on the back
of the freezer, or put your
hands into the mechanical
and electrical compartments,
otherwise, it may cause burns,
injuries, or electric shock.
Warning: Except for the type recommended
by the manufacturer, do not use electrical
appliances in the refrigeration compartment
of the freezer. Refrigerant leaks may cause
petroleum gas
Spray
Spray
Diluent
Electrical
compartment
behind
Mechanical
compartment
behind
Safety Precautions
.....Continued
Precautions for Use
●
●
●
●
●
Note
Prohibited
Precautions for handling and moving
●
●
●
Forbidden
09
Precautions for door switch
●
●
●
●
●
●
Prohibited
No wet
hands
Do Not
Touch
Mandatory
Mandatory
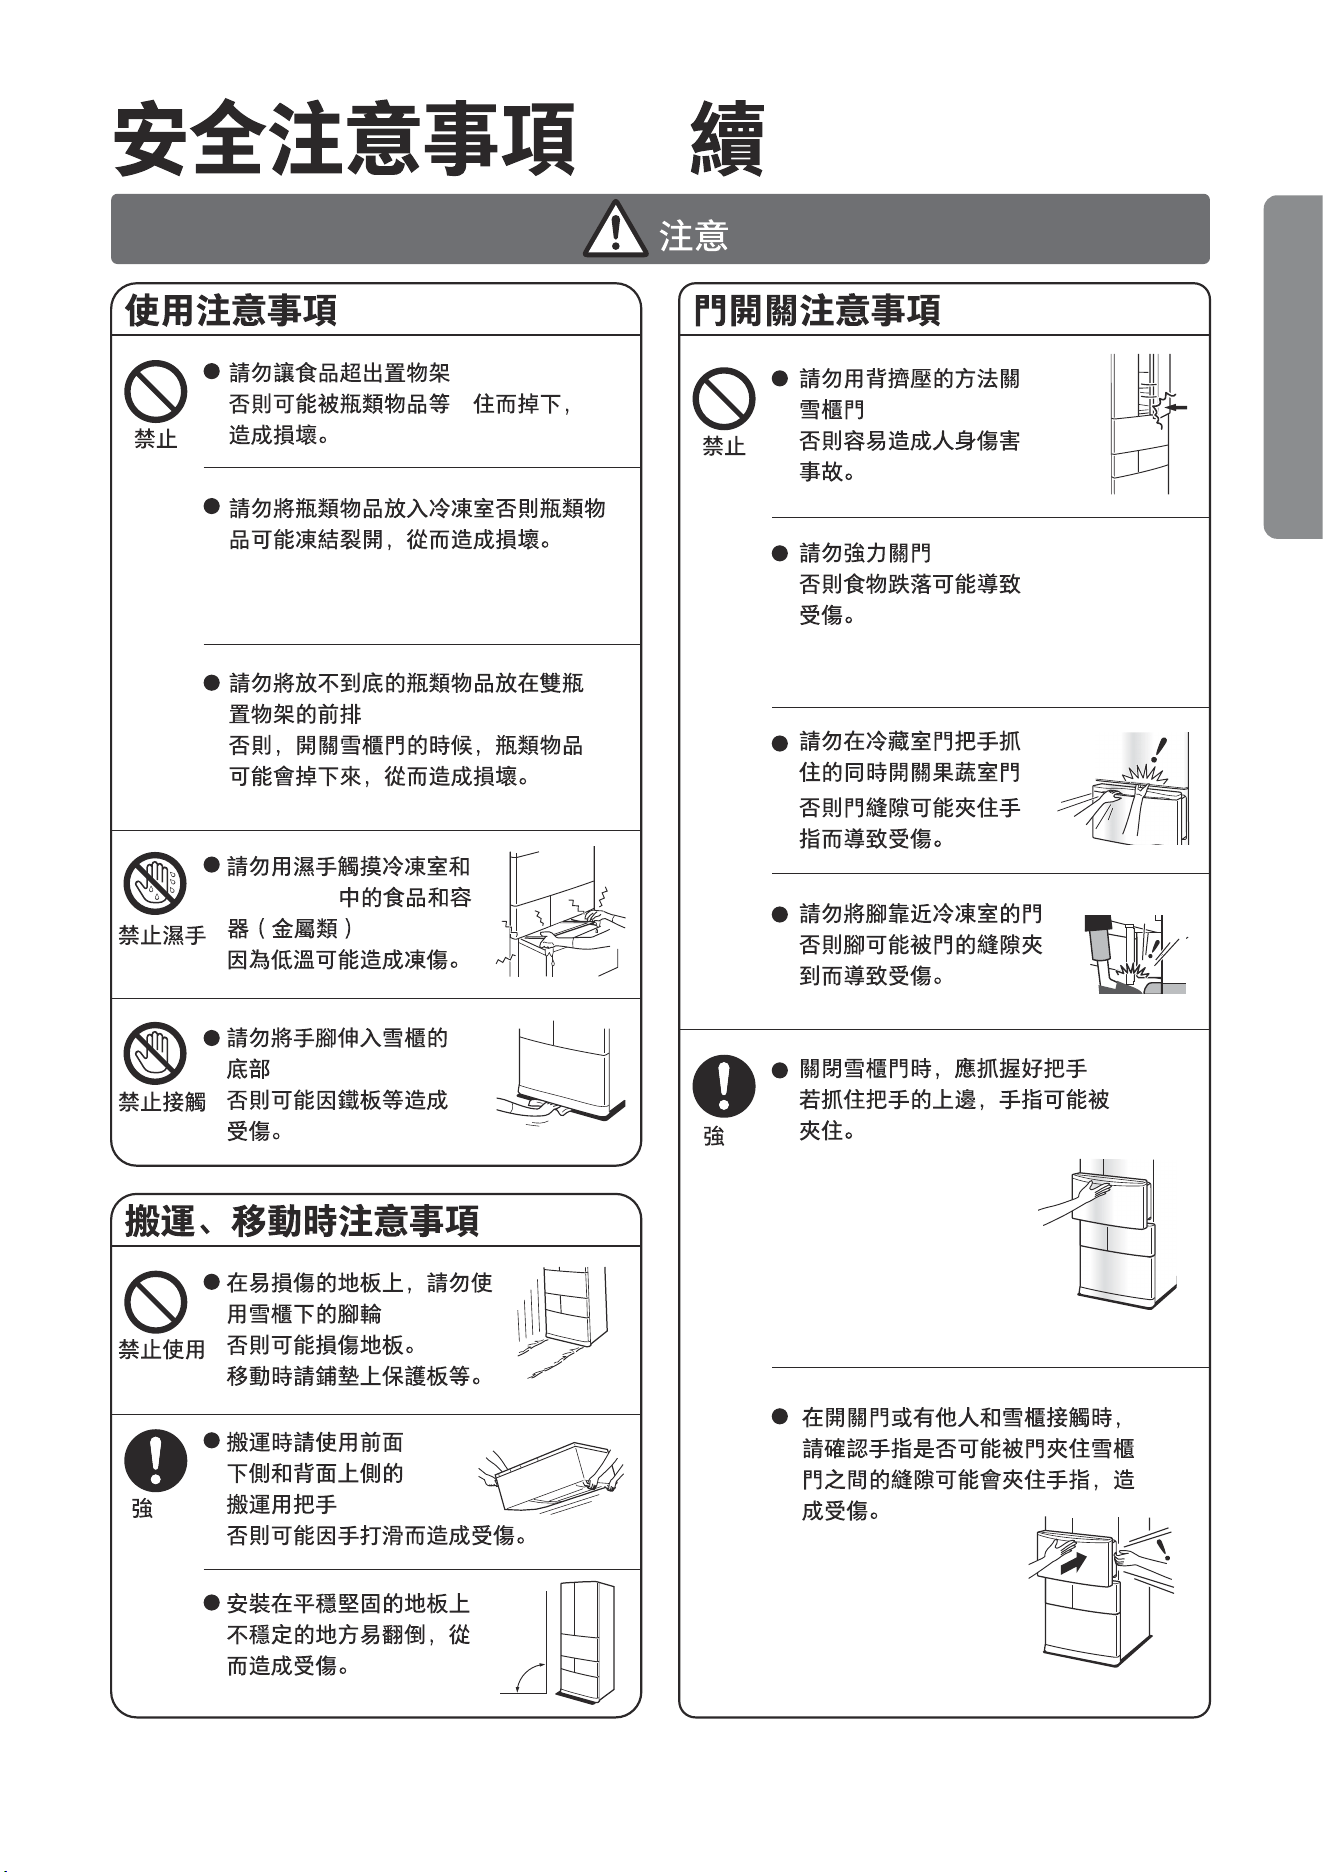
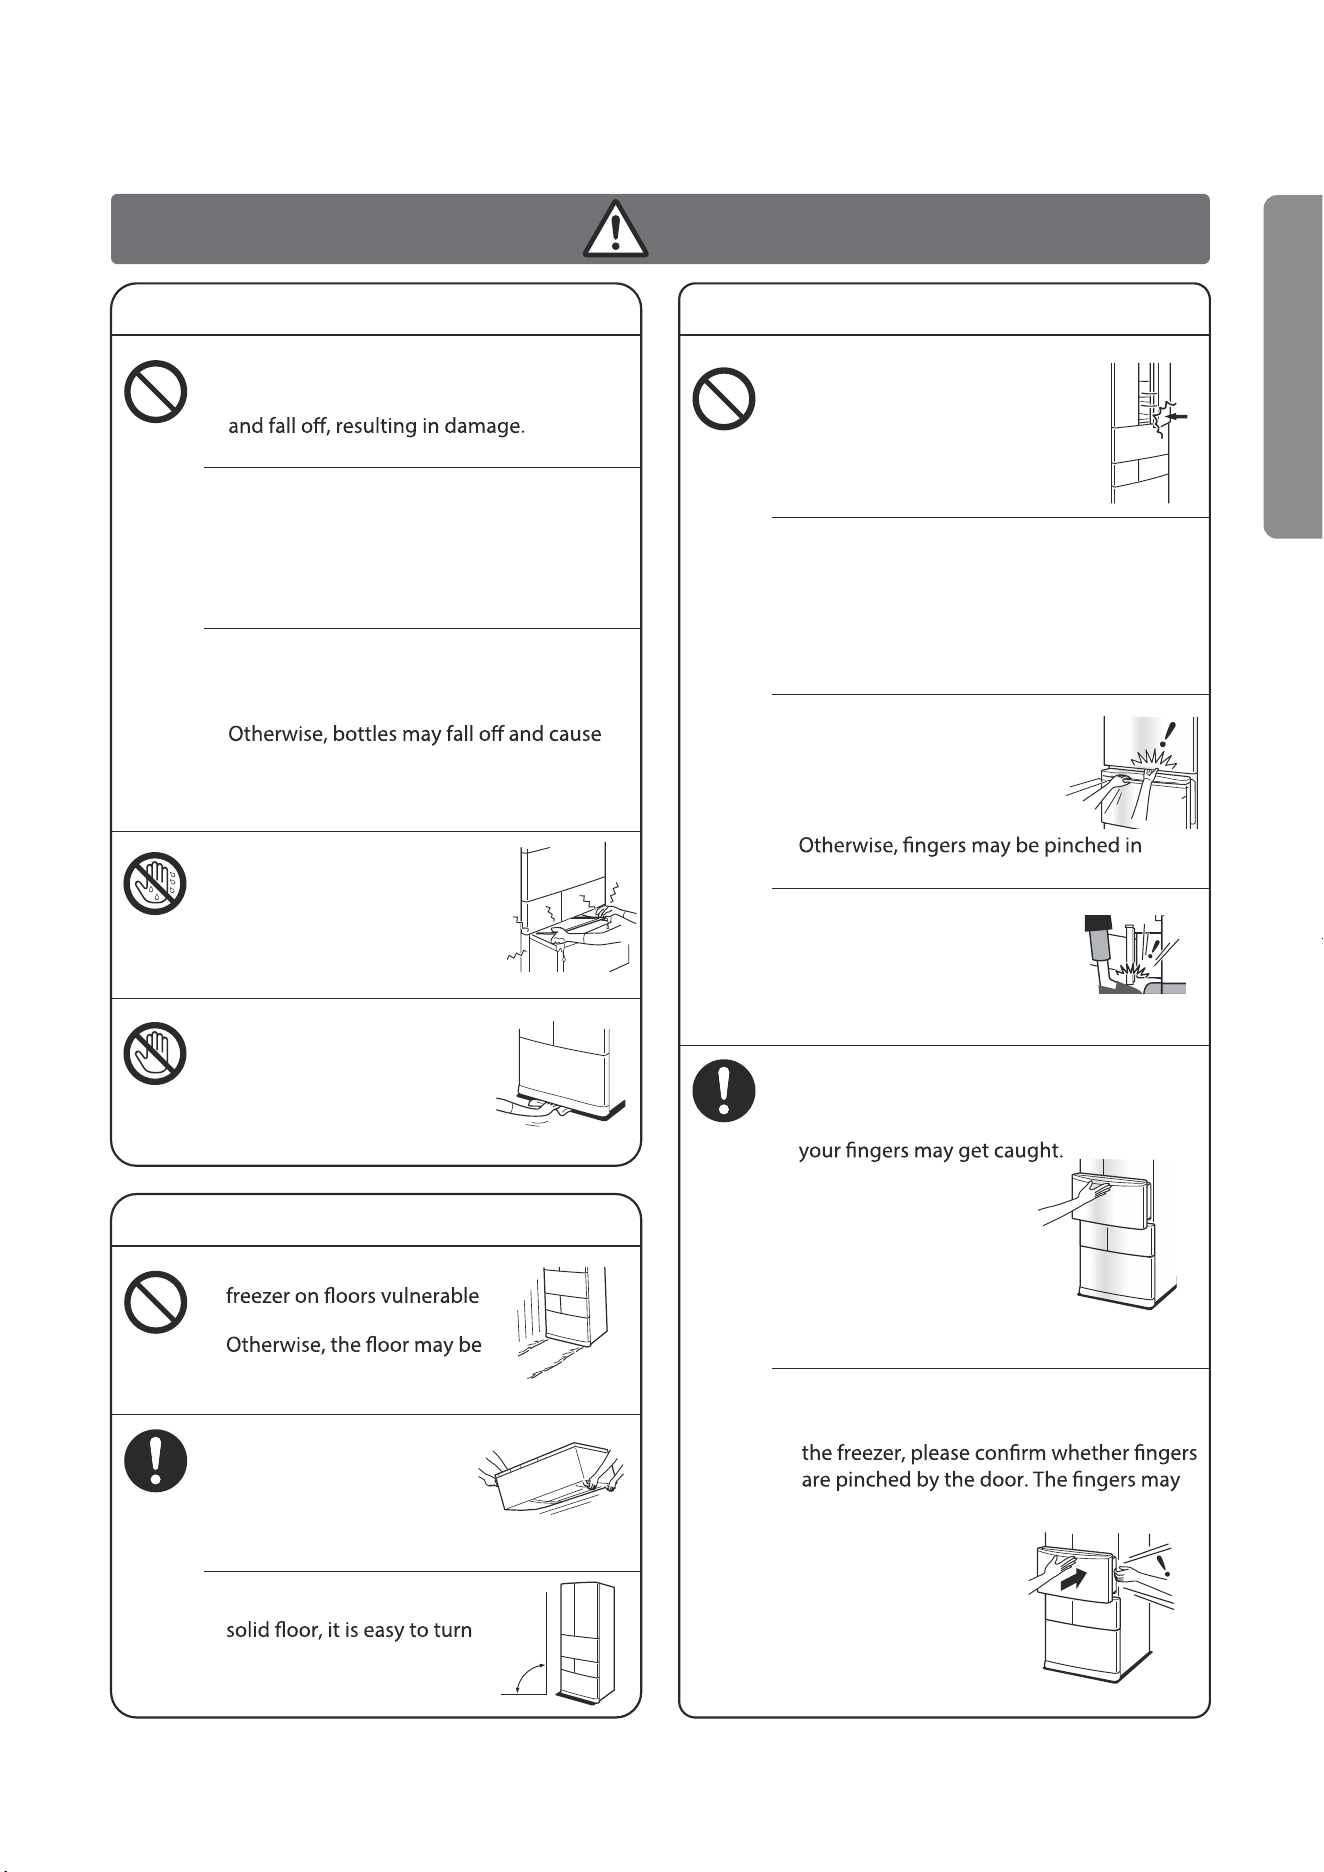
Do not let food go beyond the shelf
Otherwise, it may be hooked by bottles
Do not close the freezer door
with your back
Otherwise, it is easy to cause
personal injury accidents.
Do not close the door forcibly
Failure to do so may result in injury.
Do not open or close the fruit
and vegetable compartment
door while grasping the door
handle of the refrigeration
compartment.
the door gap and injuries may occur.
Do not put your feet close to
the door of the freezing
compartment
Otherwise, the foot may be
clamped by the gap of the
door and cause injury.
Grasp the handle when closing the
refrigerator door
If you grasp the upper side of the handle,
When opening and closing the door or
when someone else comes in contact with
be caught in the door slot, causing injury.
Do not store bottles in the freezing
compartment, or bottles may crack
after being frozen, causing damage.
Do not place bottles that cannot be placed
to the bottom in the front row of the
double-bottle shelf.
damage when opening or closing the
refrigerator door.
Do not touch food and containers
(metallic) in the freezing
compartment and frozen
food storage compartment
with wet hands.
Low temperature may cause frostbite.
Do not put your hands and
feet into the bottom of the
freezer
Otherwise, injuries may be
caused by iron plates.
Do not use casters under the
to damage
damaged. Please pave a
protective plate when moving.
Please use the handling handles
on the front lower side
and the back upper side
during handling.
Otherwise, it may cause injury due to
slipping of hands.
If installed on a stable and
over, causing injury.
Before Use
90°
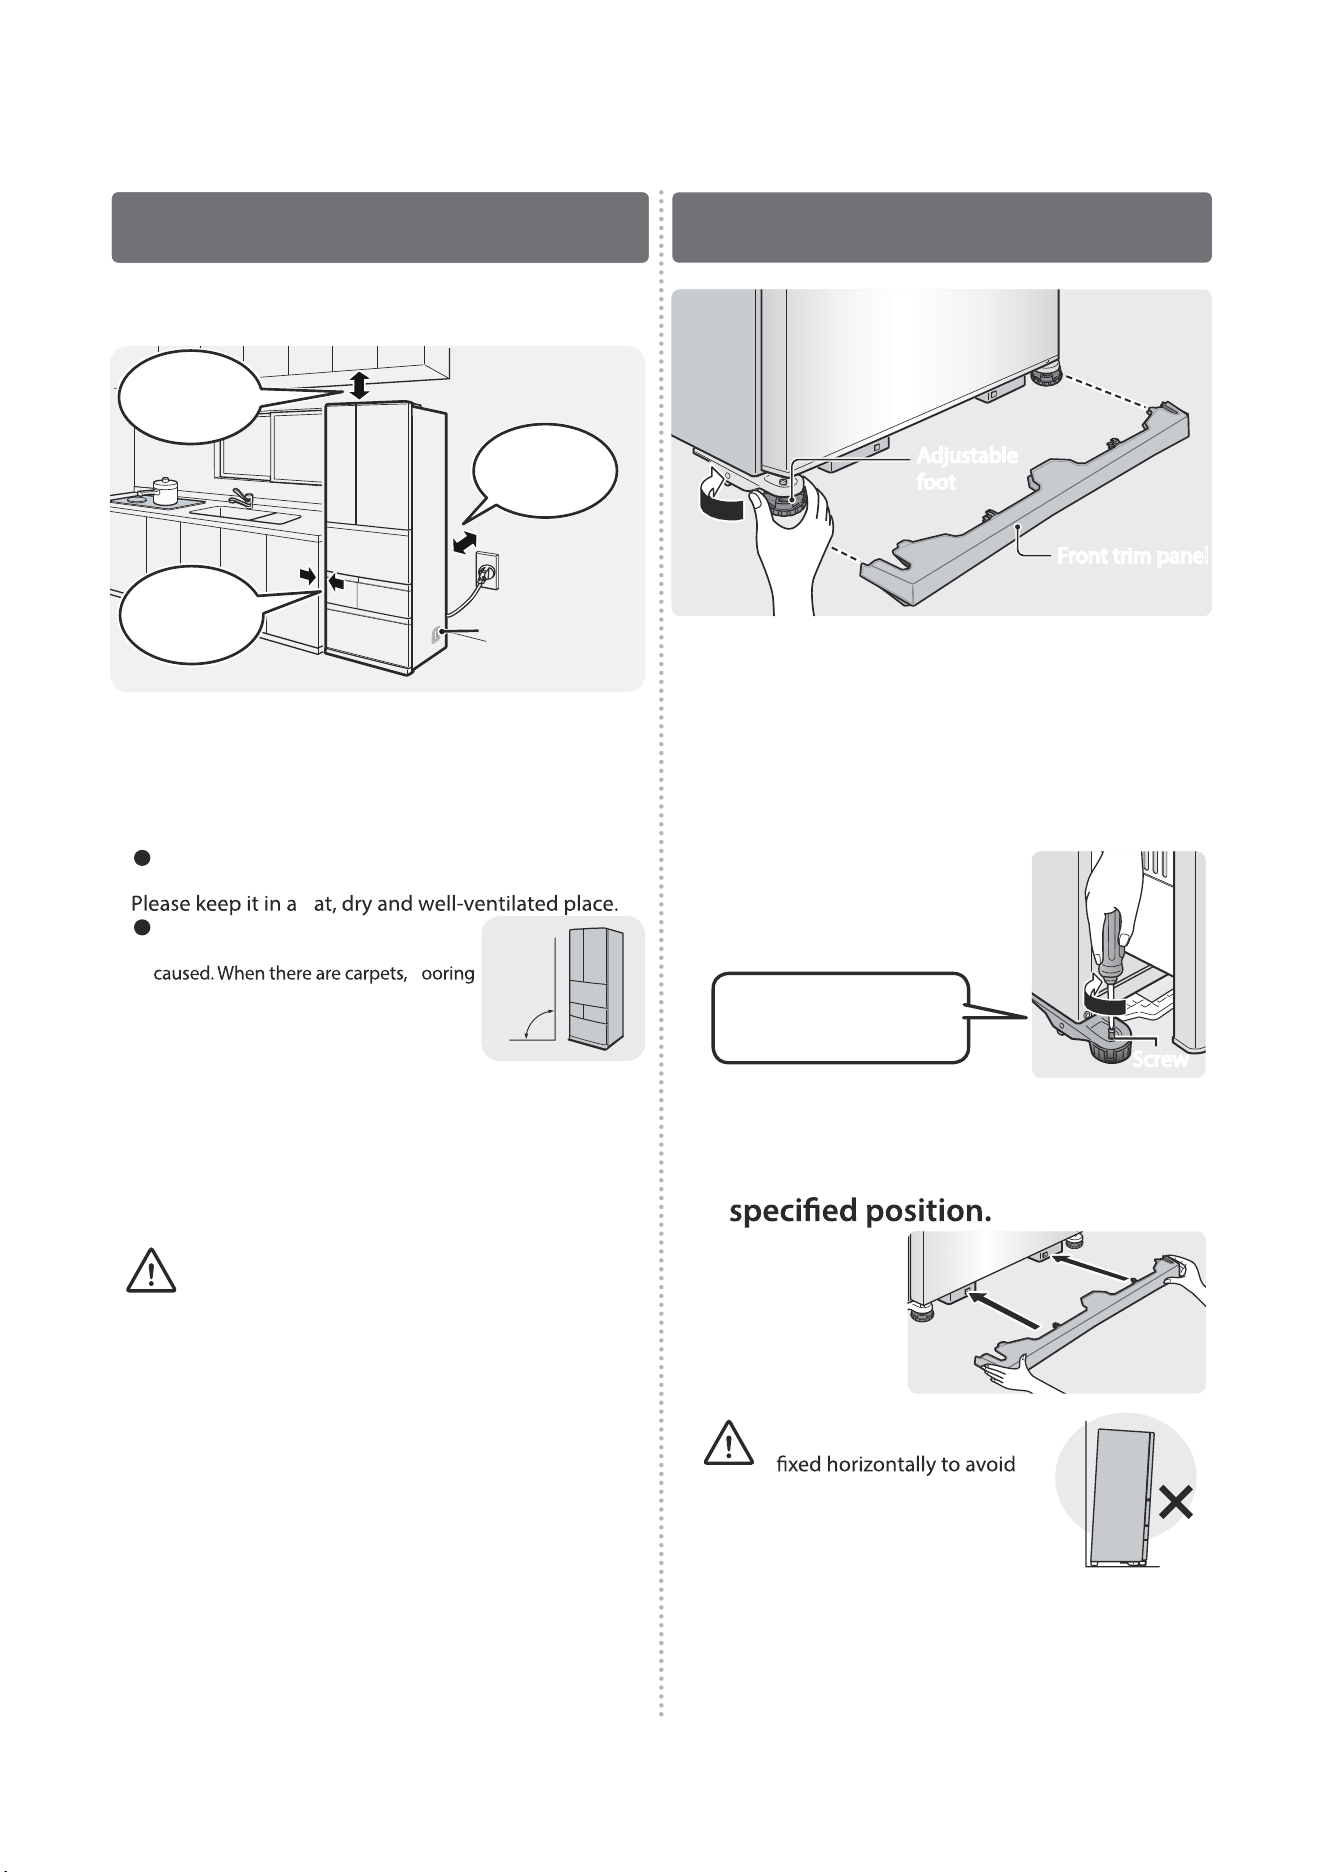
10
Installation Fixation
Note
1
2
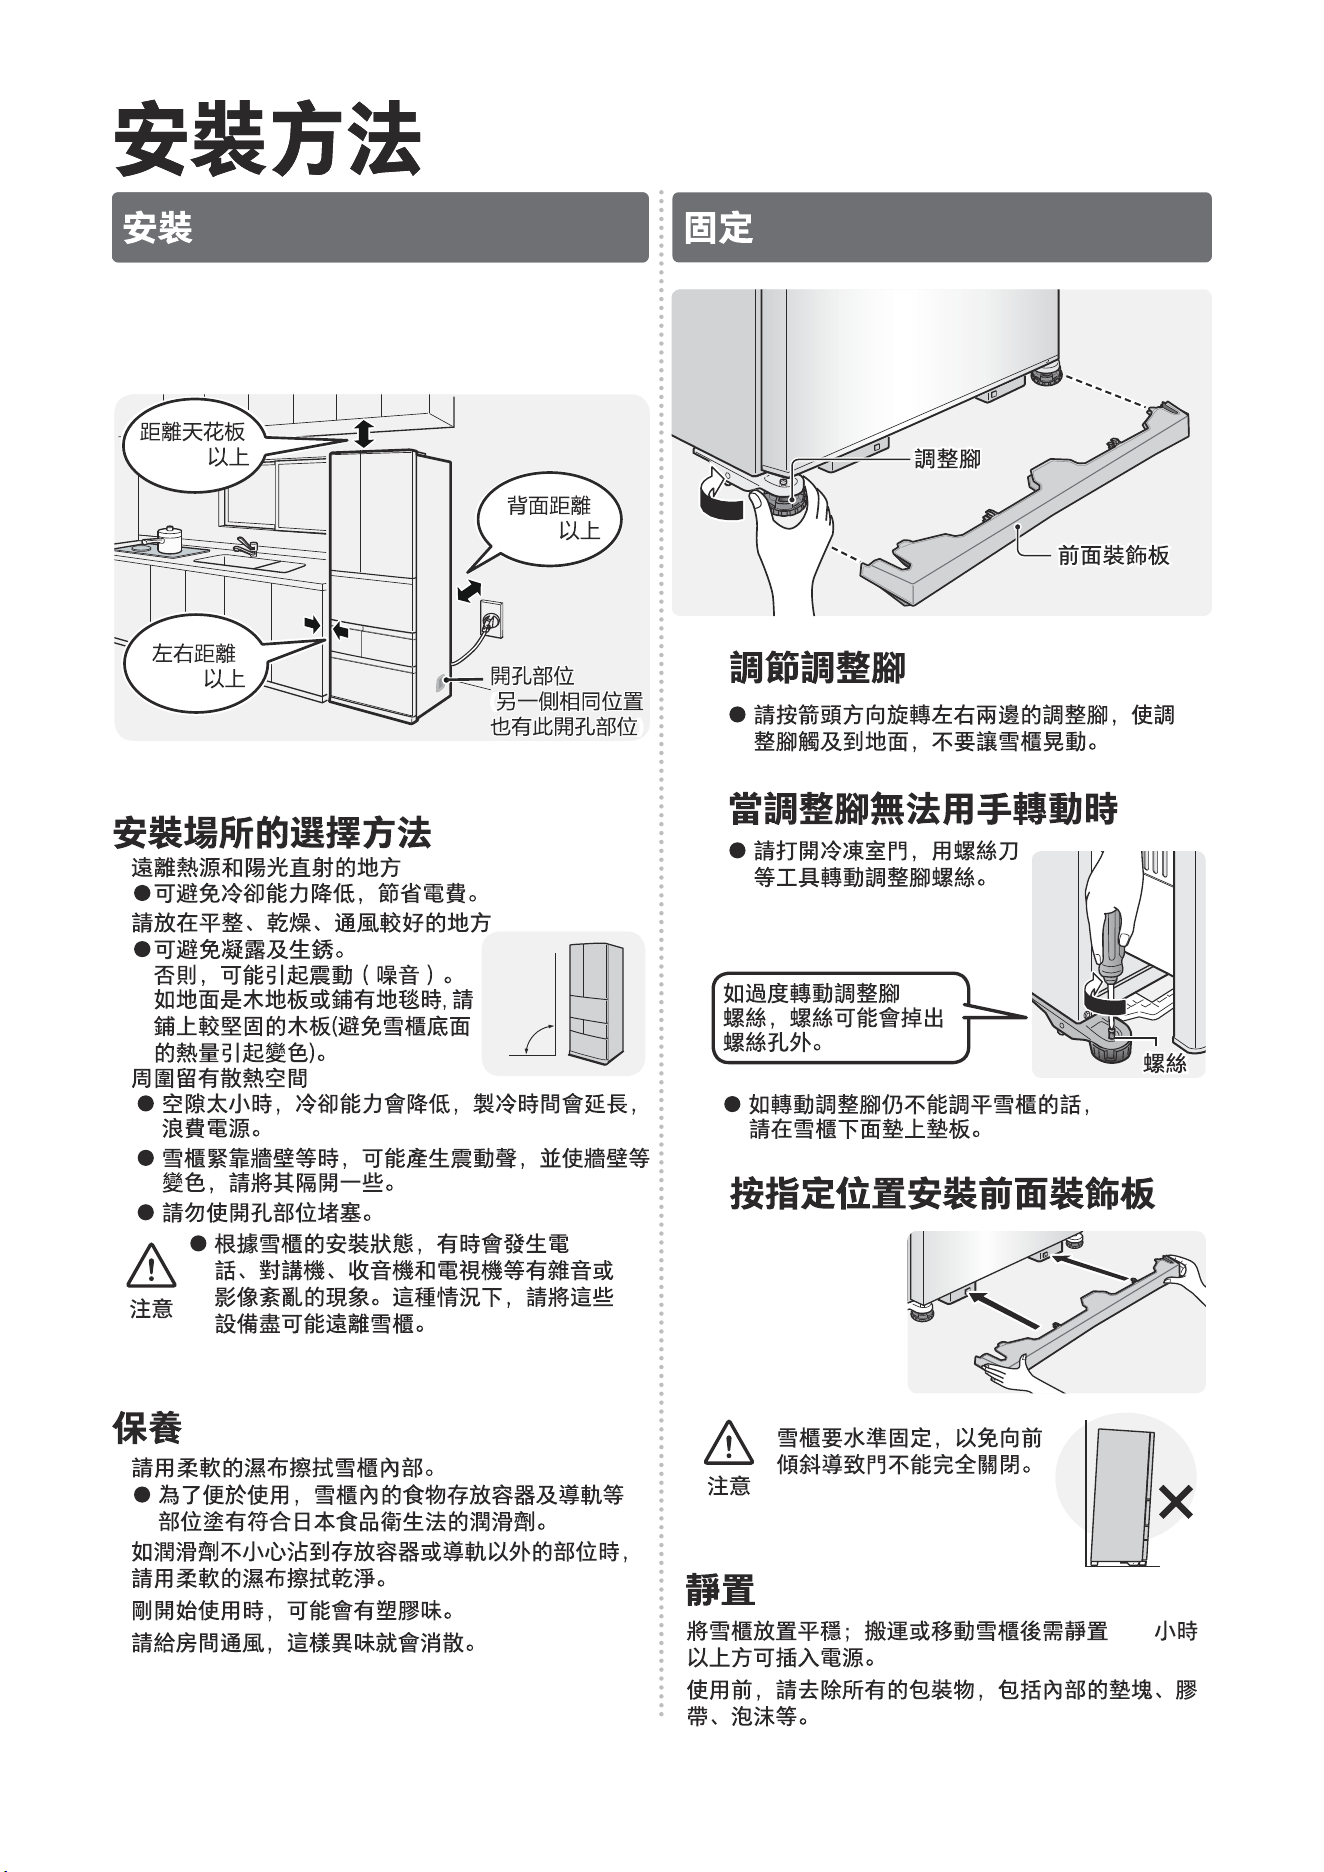
Adjust the adjusting foot
Install the front trim panel at the
When the adjusting foot cannot be
rotated by hand,
Adjustable
foot
Adjustable
foot
Front trim panelFront trim panel
Placement
Installation Method
Installation
Wipe the inside of the freezer with a soft wet cloth.
Servicing
Condensation and rusting can be avoided.
Keep away from heat sources and direct sunlight
It can avoid the reduction of cooling capacity and
save electricity cost.
Selection method of installation site
90°
Note
Otherwise, vibration (noise) may be
and PVC products on the ground, the
heat at the bottom of the refrigerator
will cause discoloration. Please pave a
solid wooden board.
●
If the gap is too small, the cooling capacity will be
reduced and the refrigeration time will be prolonged,
wasting electricity.
●
When the refrigerator is close to the wall, it may produce
vibration sound and discolor the wall. Please separate it.
●
Do not block the opening.
●
In order to facilitate use, the food storage containers
and guide rails in the refrigerator are coated with
lubricants that conform to Japan's Food Hygiene Law.
If the lubricant is accidentally stained on any part other
than the storage container or guide rail, please wipe it
clean with a soft wet cloth.
At the beginning of use, there may be a plastic odor.
Ventilate the compartment so that the odor will dissipate.
The freezer should be placed stably, and can only be powered
at least 4~6 hours after being transported or moved.
Before use, please remove all packaging materials, including
cushion blocks, adhesive tapes, and foam inside.
The refrigerator should be
tilting forward, resulting in
the door not being fully closed.
●
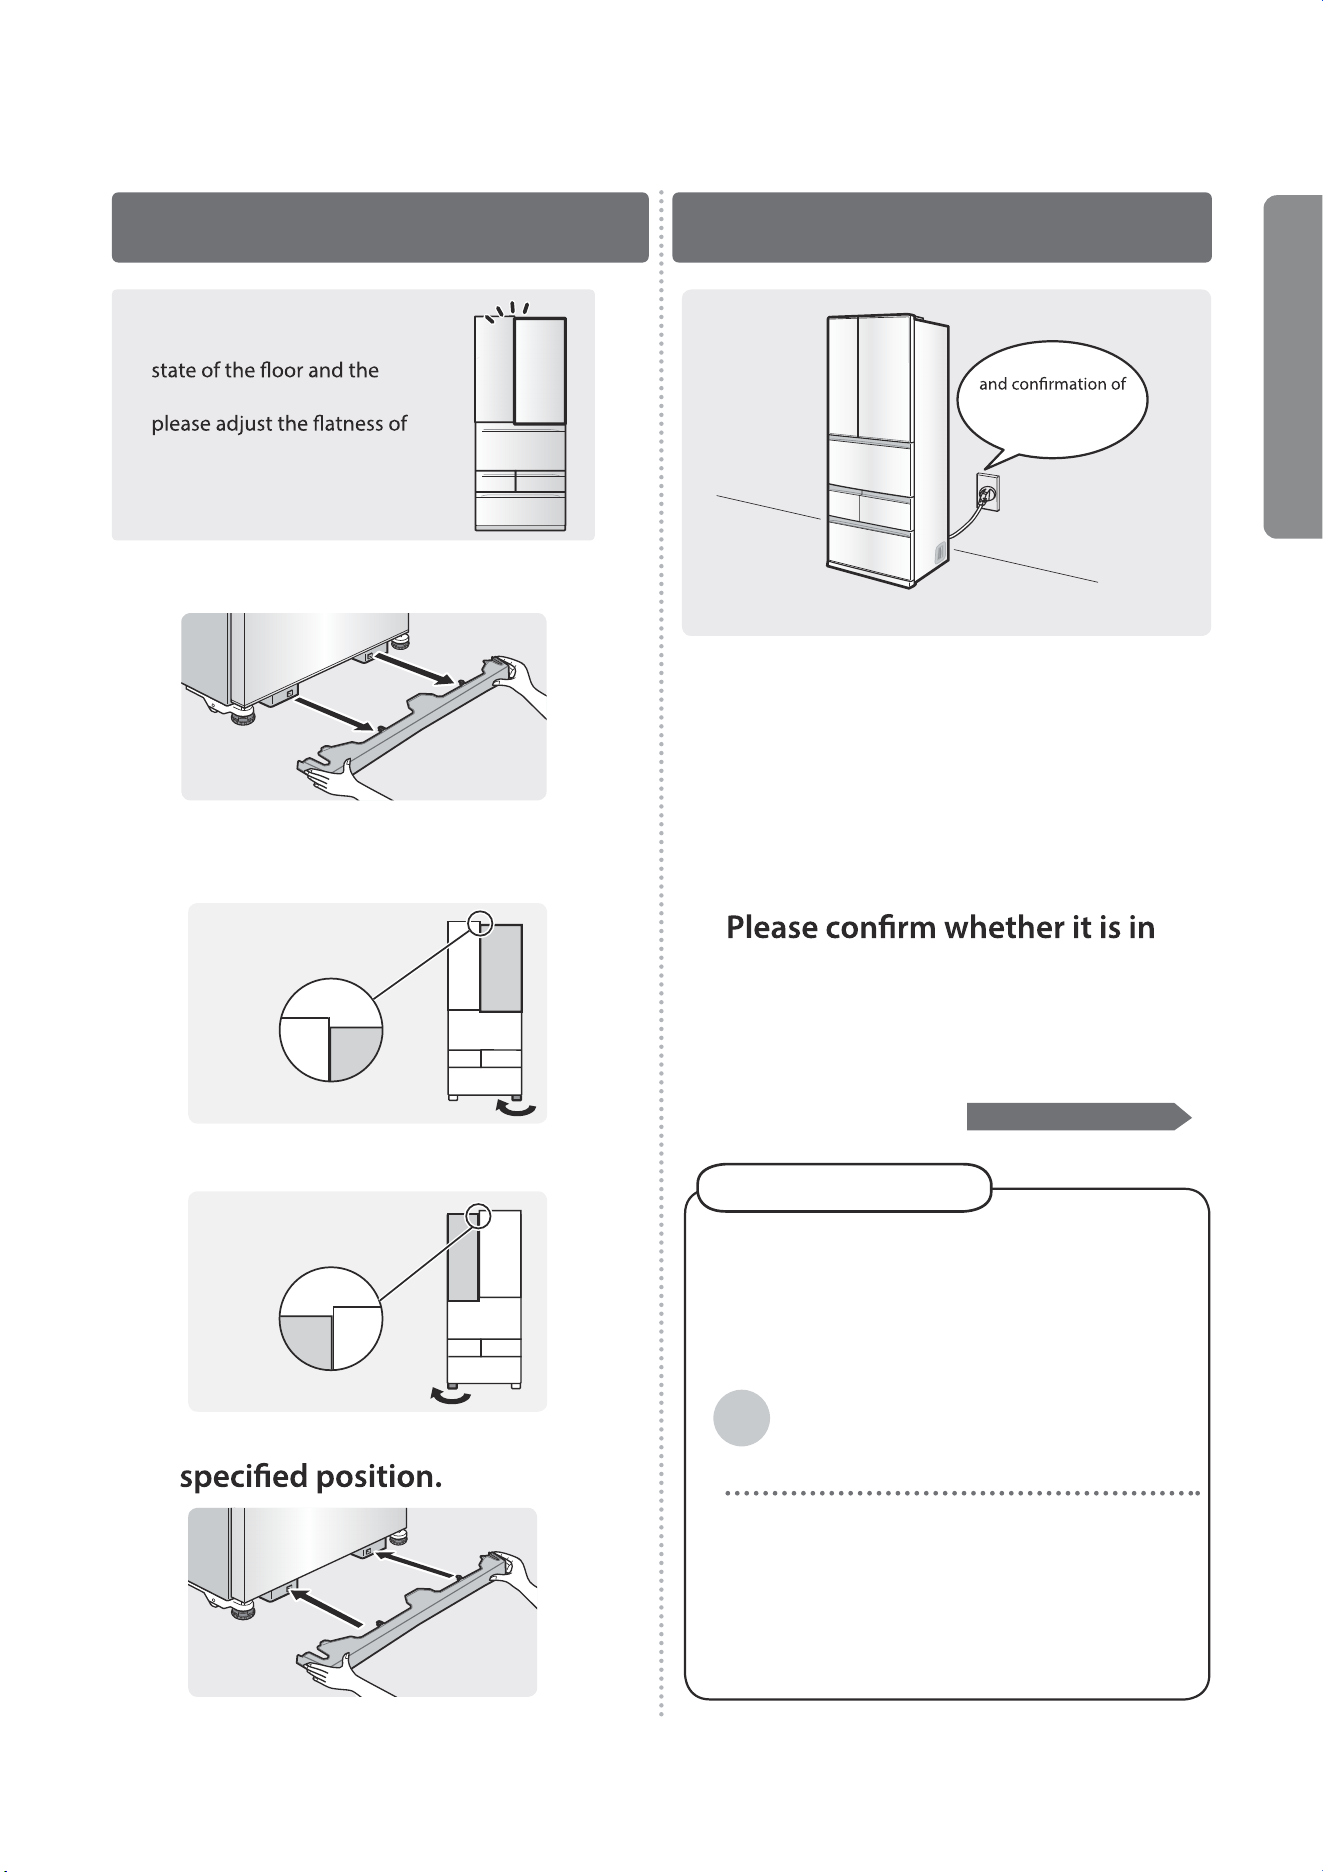
If the refrigerator cannot be leveled by rotating the
adjusting foot, please put a pad under it.
If the adjusting foot screw is
turned excessively, the screw
may fall out of the screw hole.
●
Please open the freezing
compartment door and turn
the adjusting foot screw with
a screwdriver or other tools.
●
Please rotate the adjusting feet on the left and right
sides in the direction of the arrow to make them
touch the ground, and do not shake the refrigerator.
●
Depending on the installation status of the
refrigerator, noise or image disorder may occur
in telephones, walkie-talkies, radios and TV sets.
In this case, please keep these devices as far
away from the refrigerator as possible.
Voids around
Adjustable
foot
Front trim panel
Screw
Screw
More than
100mm from the
top
The back distance
is more than
50 mm
more than 50mm
The side space
Opening position
(The same position
on the other side also
has this opening part)
fl
fl
Installation
11
ylppus rewop tresnItnemtsujdA
2
3
1
Remove the front trim panel
Adjust the parallelism of door
Install the front trim panel at the
1
Insert the power plug into the
power outlet.
2
demonstration mode
●
In the demonstration mode, the refrigeration
system is not running.
●
Touch the brightness adjustment of the panel
When installed in a location with
much water vapor or moisture
Be sure to connect the ground wire.
In order to prevent electric shock accidents,
grounding safety measures must be taken.
Grounding method
Please refer to Page 35
●
The freezer door will drop
several days later due to the
weight of food. In this case,
the door again.
After installation
normal grounding, the
power plug can be
inserted
(Please use a separate power socket of 220V AC)
Especially when the refrigerator is installed in a
place with more moisture, an anti-leakage device
shall be installed in addition to connecting the
ground wire.
Before Use
●When the height of the right door is too low
●When the height of the left door is too low
Rotate the right adjusting
foot in the direction
of arrow
Rotate the left adjusting
foot in the direction
of arrow
12
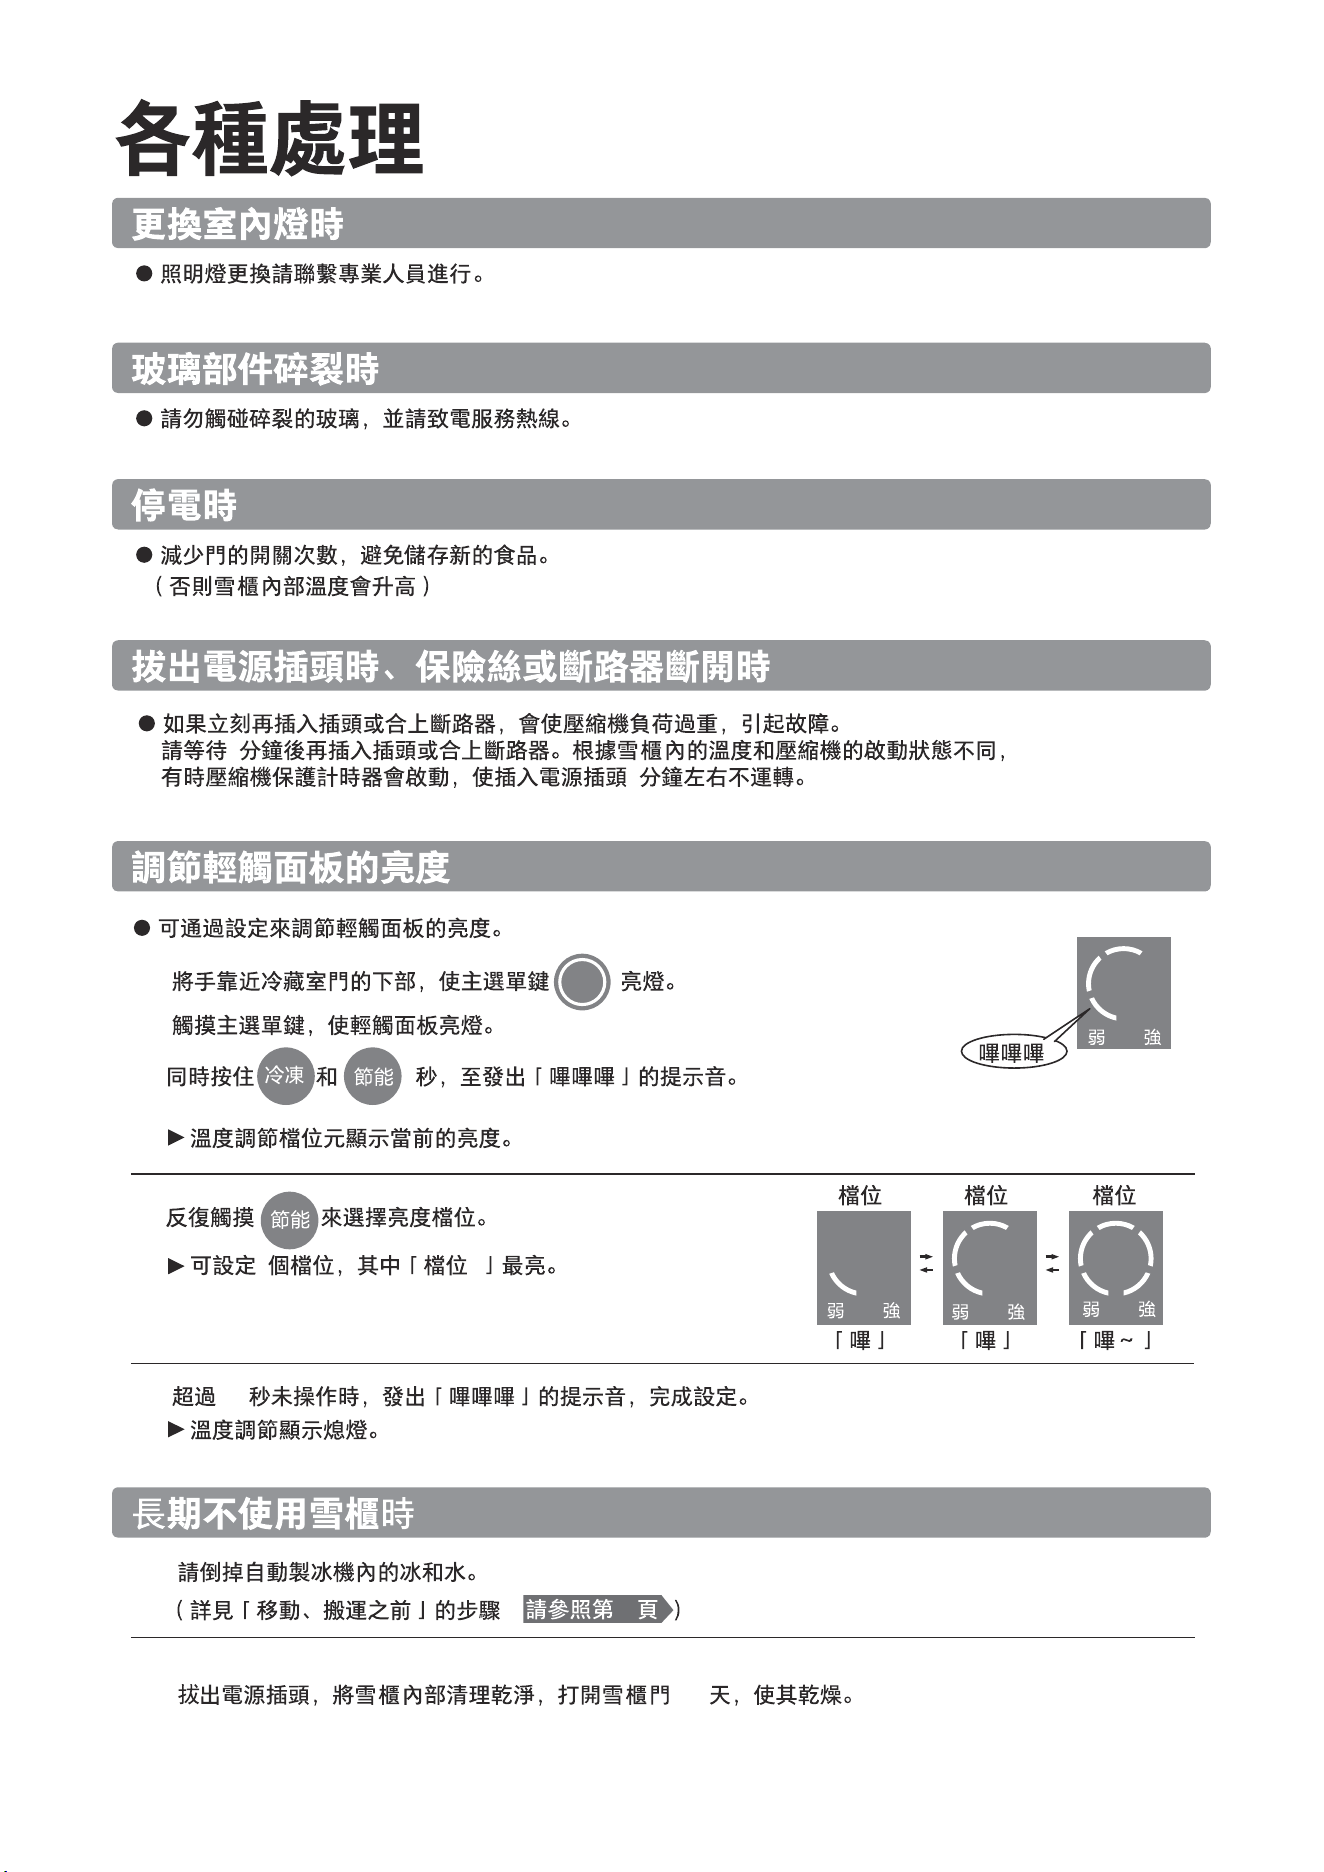
Functions of touch panel
eco mode, wet display lamp
At the beginning of use, the refrigerator has been
The contents of the diagram will not
be displayed completely during use,
and are for illustration only.
Put your hand close to the lower part
of the refrigeration compartment
door, and gently touch the door
opening switch and main menu
button to turn on the light.
●
Touch the main menu key to
light up the operation part of
touch panel.
Touch the main menu key, and
touch the operation part of the
panel gently to turn on the light.
Select the operation to be
performed.
After the operation is interrupted
for 10 seconds, touch the panel
●
When the refrigeration compartment door is opened, even if
you touch the main menu key, the operation part of the panel
cannot be operated by gently touching it.
●
The main menu button can also keep the normally on mode.
●
The eco mode and wet display lamp are only used to indicate the
operation status of the refrigerator, and their ON/OFF cannot be set
forcibly.
●
The time interval of touching is too short (i.e. the key is touched too fast).
●
The operating part of the panel is wet or dirty (stained with oil or food, etc.)
when touching it gently.
●
The temperature and humidity of the surrounding environment, the physical
condition of the user, and the operating state of the surrounding electrical
When the light is on, it indicates that the
refrigerator is in a stable refrigeration
state and runs with a small amount of
electricity.
When the light is on, it indicates that
the refrigerator is sending moist cold air
to the refrigeration compartment,
quick-chilling fresh food box and fruit &
vegetable compartment.
●
Even if you touch with force,
Display part
Operation part
In the following cases, touching the operating part of the panel
may not respond.
Tips
Wet display lamp
Touch the door opening switch gently
The light will be on when the hand is approached.
The door can be opened automatically by
touching it with hands.
Please refer to Page 14
Wet display lamp
Please refer to Page 12
Main menu button
Please refer to Page 12
Please close
the door
Please refer to Page 16
Automatic door
opening release
Please refer to Page 15
Key lock
Please refer to Page 16
ECO mode
Please refer to Page 12
1
2
3
Tips
Please refer to Page 14
It will be displayed when the refrigerator compartment door is opened or the main menu
key is touched.
It will not be displayed when the door is opened and closed for many times or just powered on.
ECO mode
Main menu
button
Touch the door
opening switch
gently
Main menu
button
Touch the door
opening switch
gently
Beep!
Beep!

13
1
2
3
1
2
3
1
2
3
Lower than
"Moderate"
1
2
2~3°C
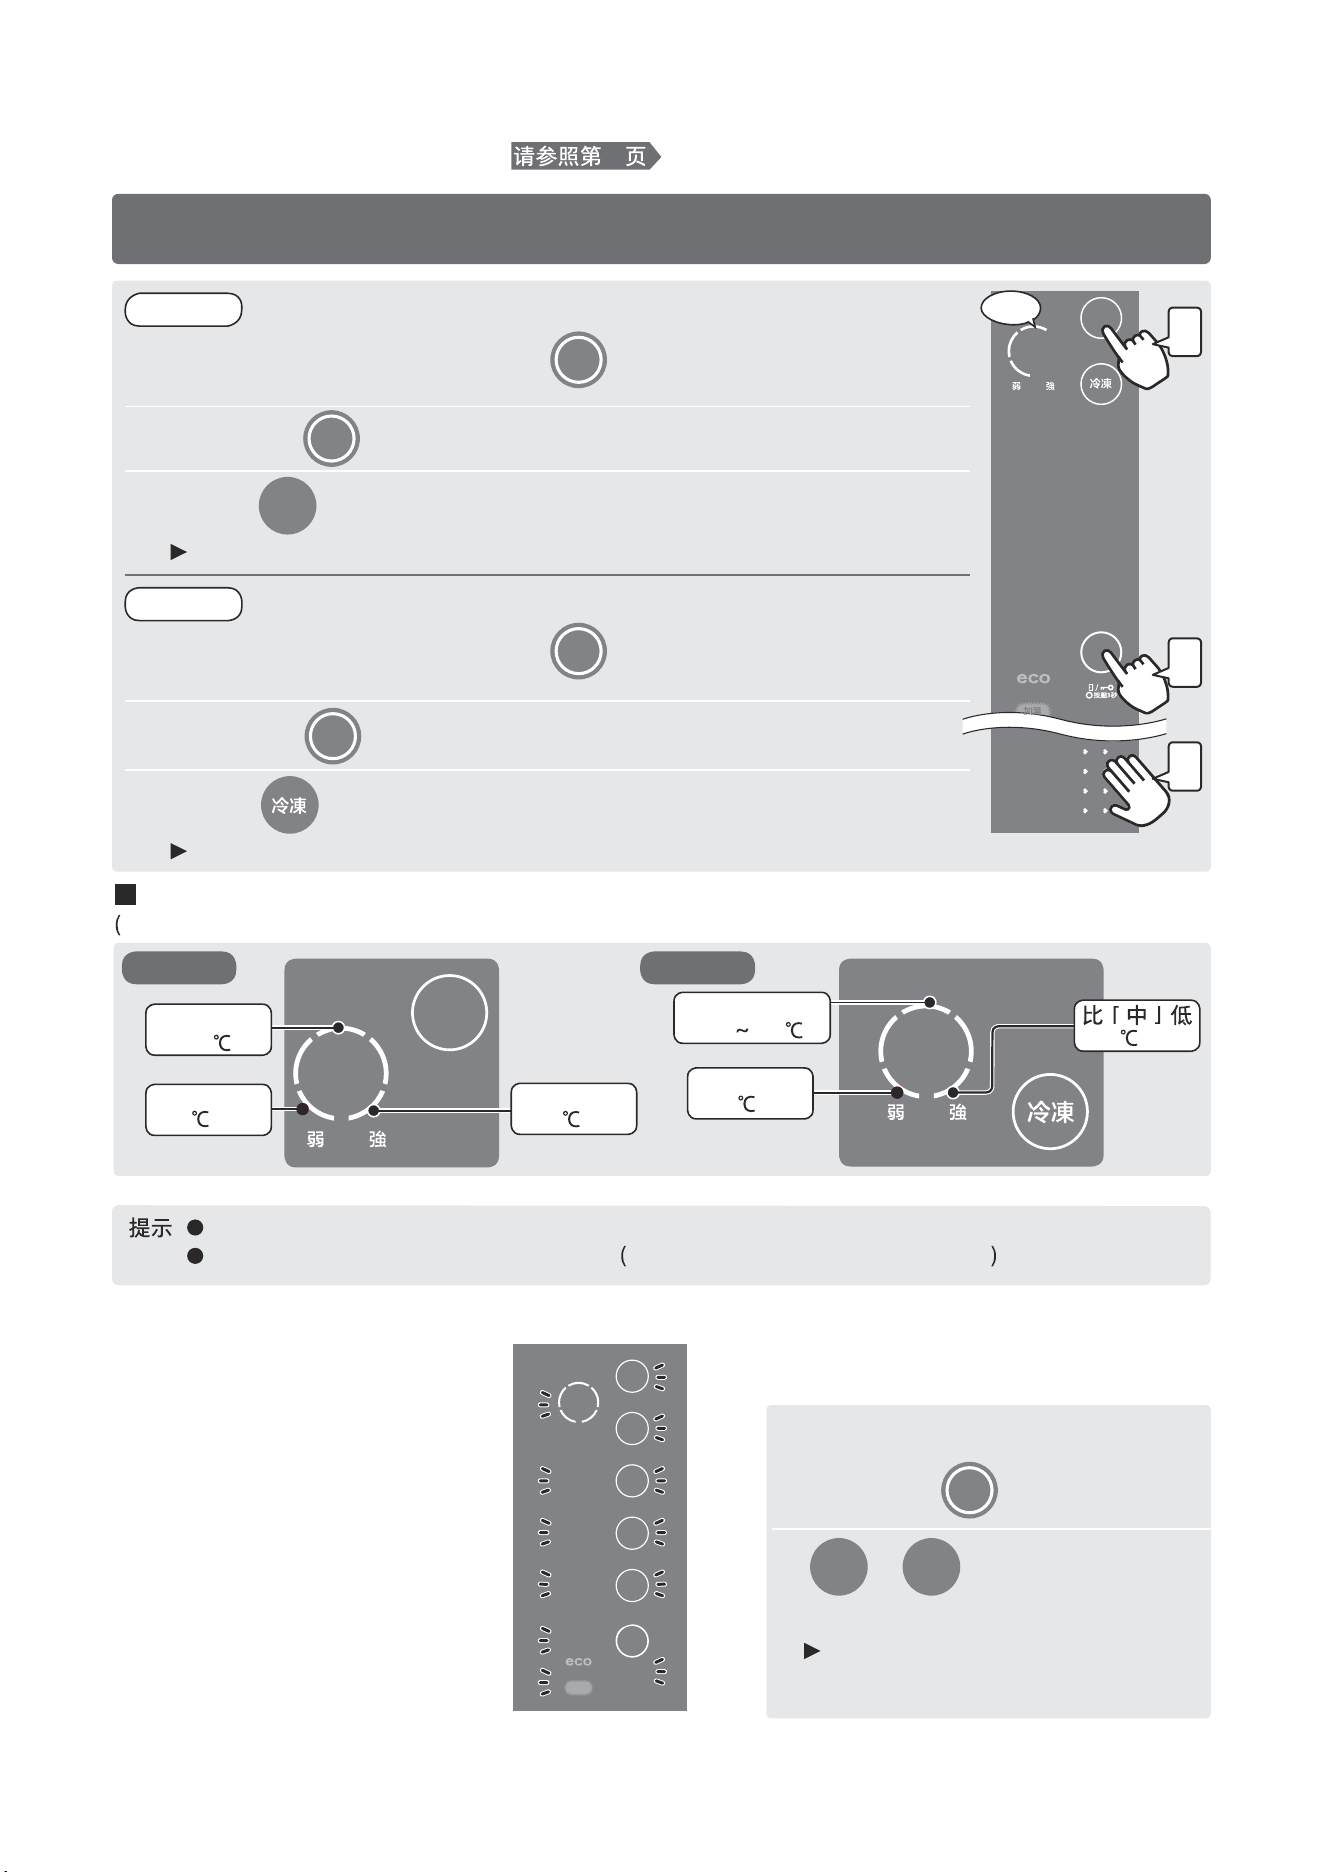
Temperature regulation
Put your hand close to the lower part of the refrigeration compartment door, so that the main menu key
lights up.
Touch the main menu key to light up the touch panel.
Touch repeatedly to set the desired temperature level.
The setting is completed when the desired temperature position lights up.
When the temperature of the freezing compartment is adjusted, the temperature of the frozen
food storage compartment will also change.
Put your hand close to the lower part of the refrigeration compartment door, so that the main menu key
lights up.
Touch the main menu key to light up the touch panel.
Touch repeatedly to set the desired temperature level.
The setting is completed when the desired temperature position lights up.
Display of temperature regulation gear and temperature in the refrigerator
Beep!
(The contents of the display panel are for illustration only)
Refrigeration
compartment
Freezing
compartment
Lower than
"Moderate"
Higher than
"Moderate"
Higher than
"Moderate"
[Moderate]
[Moderate]
Release Demo Mode
Even if the temperature is not adjusted,
is in demonstration mode. The display
of the panel changing from top to
bottom indicates that it is in Demo
mode. At this time, the refrigerator does
not refrigerate.
Touch the main menu key to light up the touch
panel.
Touch and simultaneously for
3 seconds, until a beep tone is sounded.
The panel start displaying relevant contents, and
the demo mode is released.
Demonstration mode release method
When adjusting the brightness of touch panel...
Please refer to Page 35
When adjusting the temperature of the refrigeration compartment, the temperatures of the
quick-chilling box and the fruit and vegetable compartment will also change together.
Refrigeration
compartment
Freezing
compartment
te", no food is
put in, the refrigerator door is closed and the temperature is stable.
2~5°C
°C
2~3°C
°C
°C
Tips
When the power is saved automatically, the temperature cannot be adjusted.
(Release of automatic power saving mode )
Please refer to Page 26
The display of the panel changing from top to bottom
Method of Use
14
Functions of touch panel
.....Continued
Display part
Operation part
1
2
1
The contents of the diagram will not
be displayed completely during use,
and are for illustration only.
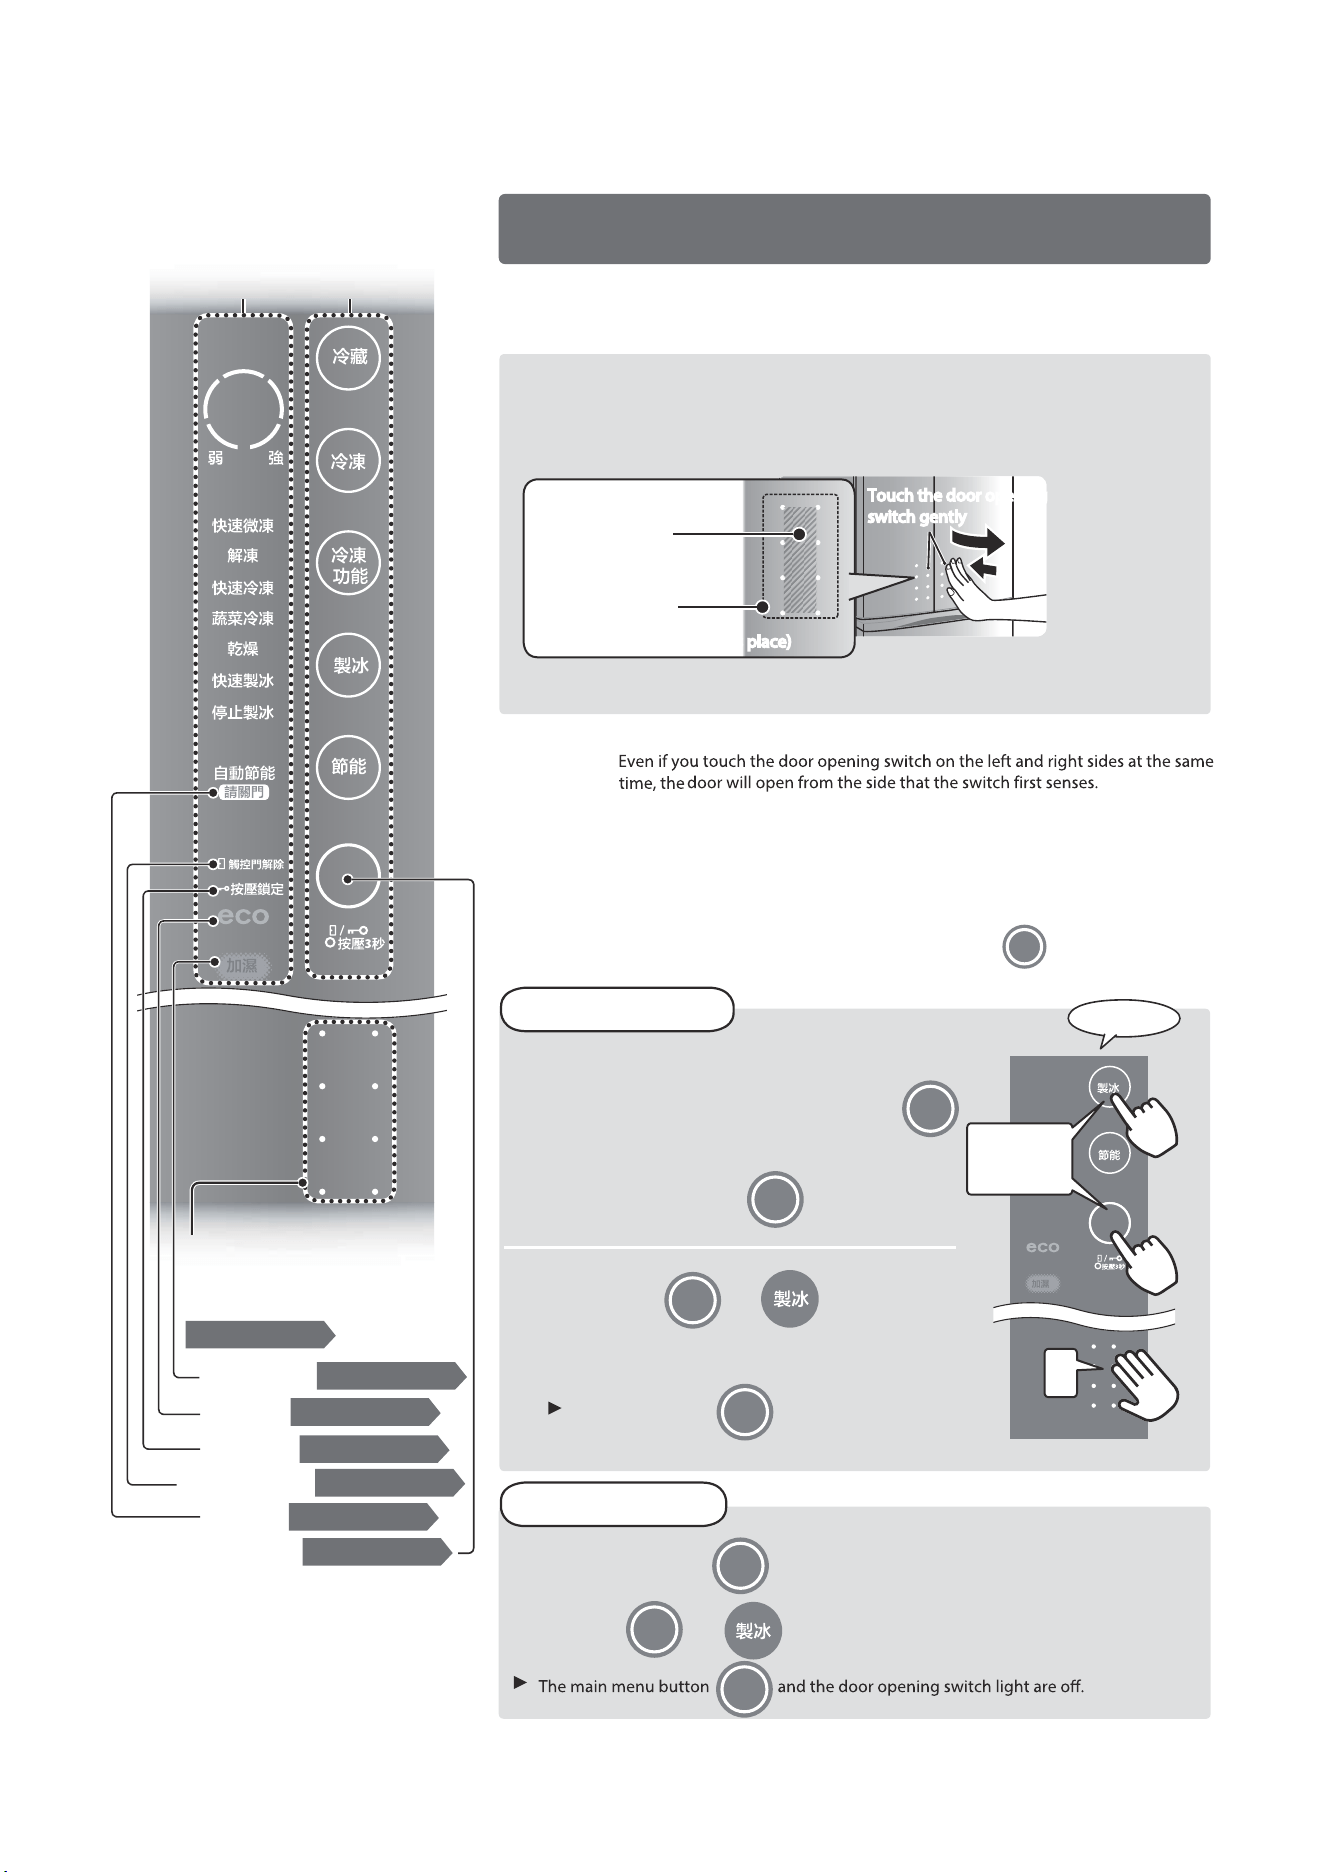
Put your hand close to the lower part of the refrigeration
compartment door, so that the main menu key
lights up.
Press and hold and for 3 seconds at the
same time until beep tone is sounded
Auto Door Open
Touch the door opening switch gently, and the door will open automatically.
When the door opening switch and main menu button are touched gently,
the light is always on (always on mode)
At this time, touch the door opening switch and main menu button to keep the light on.
Touch the main menu key to light up the
touch panel.
Main menu button and touch the door opening
switch to turn on the light.
Touch the main menu key to light up the touch panel.
Press and hold and for 3 seconds at the same time until a beep tone is
sounded
Release method
Setting Method
Beep Beep
2
(The contents of the display panel
are for illustration only)
Press and hold
for 3 seconds
simultaneously
Touch the door opening switch gently
Put your hand close to the lower part of the refrigeration compartment
door, gently touch the door open switch to turn it on, and touch it again
The door can be opened automatically by touching the door open switch.
Touch the door opening switch gently
The light will be on when the hand is approached.
The door can be opened automatically
by touching it with hands.
Please refer to Page 14
Please refer to Page 12
Please refer to Page 12
Please refer to Page 16
Please refer to Page 15
Please refer to Page 16
Please refer to Page 12
Wet display lamp
The main menu button
Please close
the door
Automatic door
opening release
Key lock
eco mode
●
Tips
Touch response
range of door
opening switch
warning electrode
(There may be no
responsewhen touching this place)
(There may be no
responsewhen touching this place)
Touch the door opening
switch gently
Touch the door opening
switch gently
15
Temperature regulation
Touch the door opening switch gently
1
Put your hand close to the lower part of the refrigeration compartment door, so that the main menu key
lights up.
2
Touch the main menu key for 3 seconds, Until the beep tone is sounded.
▲
3
Touch the main menu key repeatedly to turn on the light.
▲
Each time this button is touched, the display will be
(Release)
Beep! Beep! Beep!
Beep~
After the operation is completed for about 10 seconds, the light will be on to complete the setting.
▲
and are on.
1
2
light.
When automatic door opening is not used
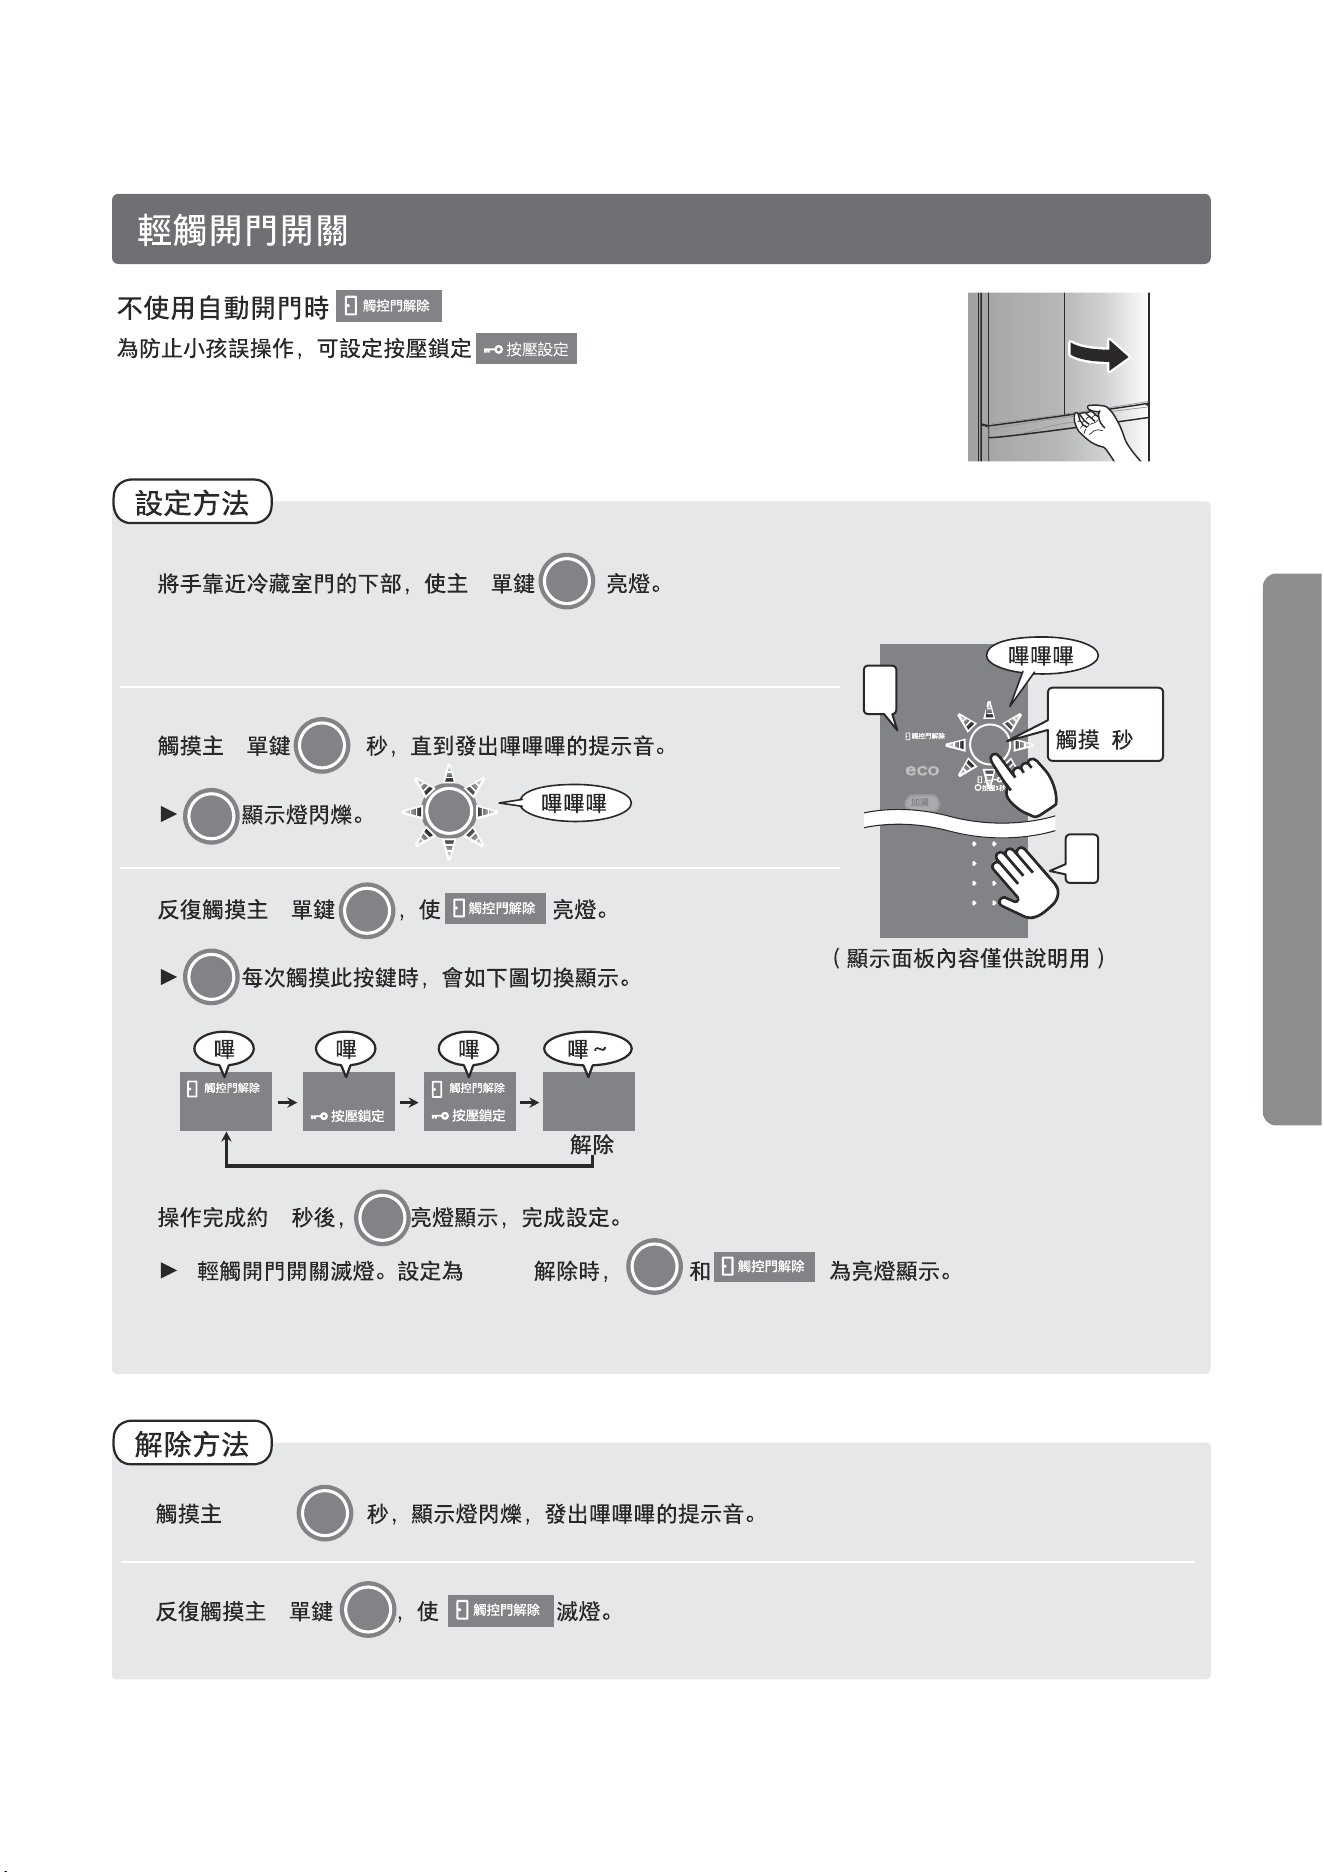
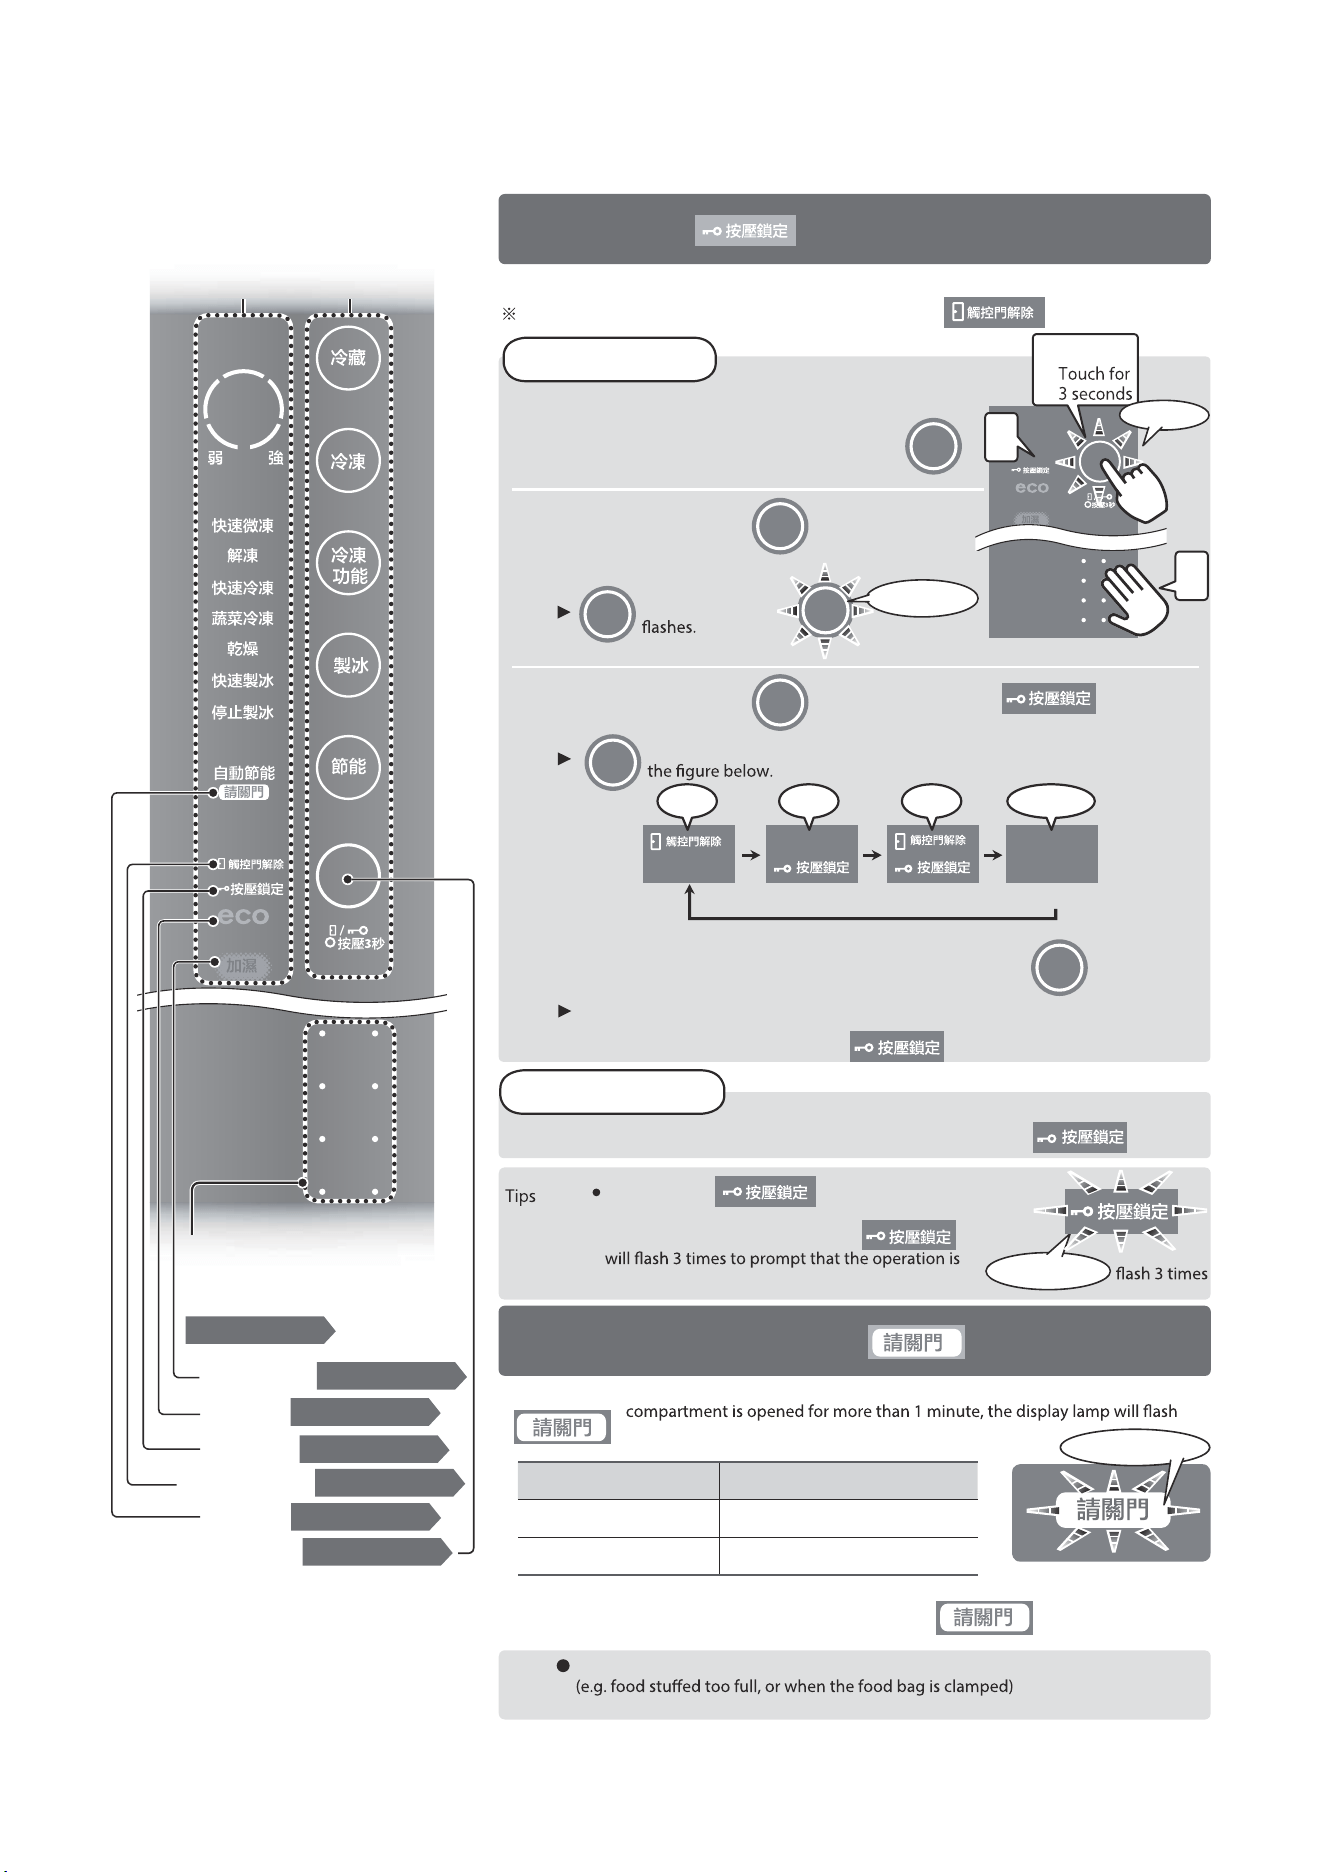
※ It can be set at the same time as key locking .
1
3
2
touch for
3 seconds
Beep
(The contents of the display
panel are for illustration only)
Beep! Beep!
Release method
Setting Method
Method of Use
16
Functions of touch panel
.....Continued
Please close the door
Setting Method
Release method
Beep~
1
2
3
Beep Beep
(Release)
Beep
Beep Beep
Beep~
1
3
2
Beep Beep
Beep~ Beep~
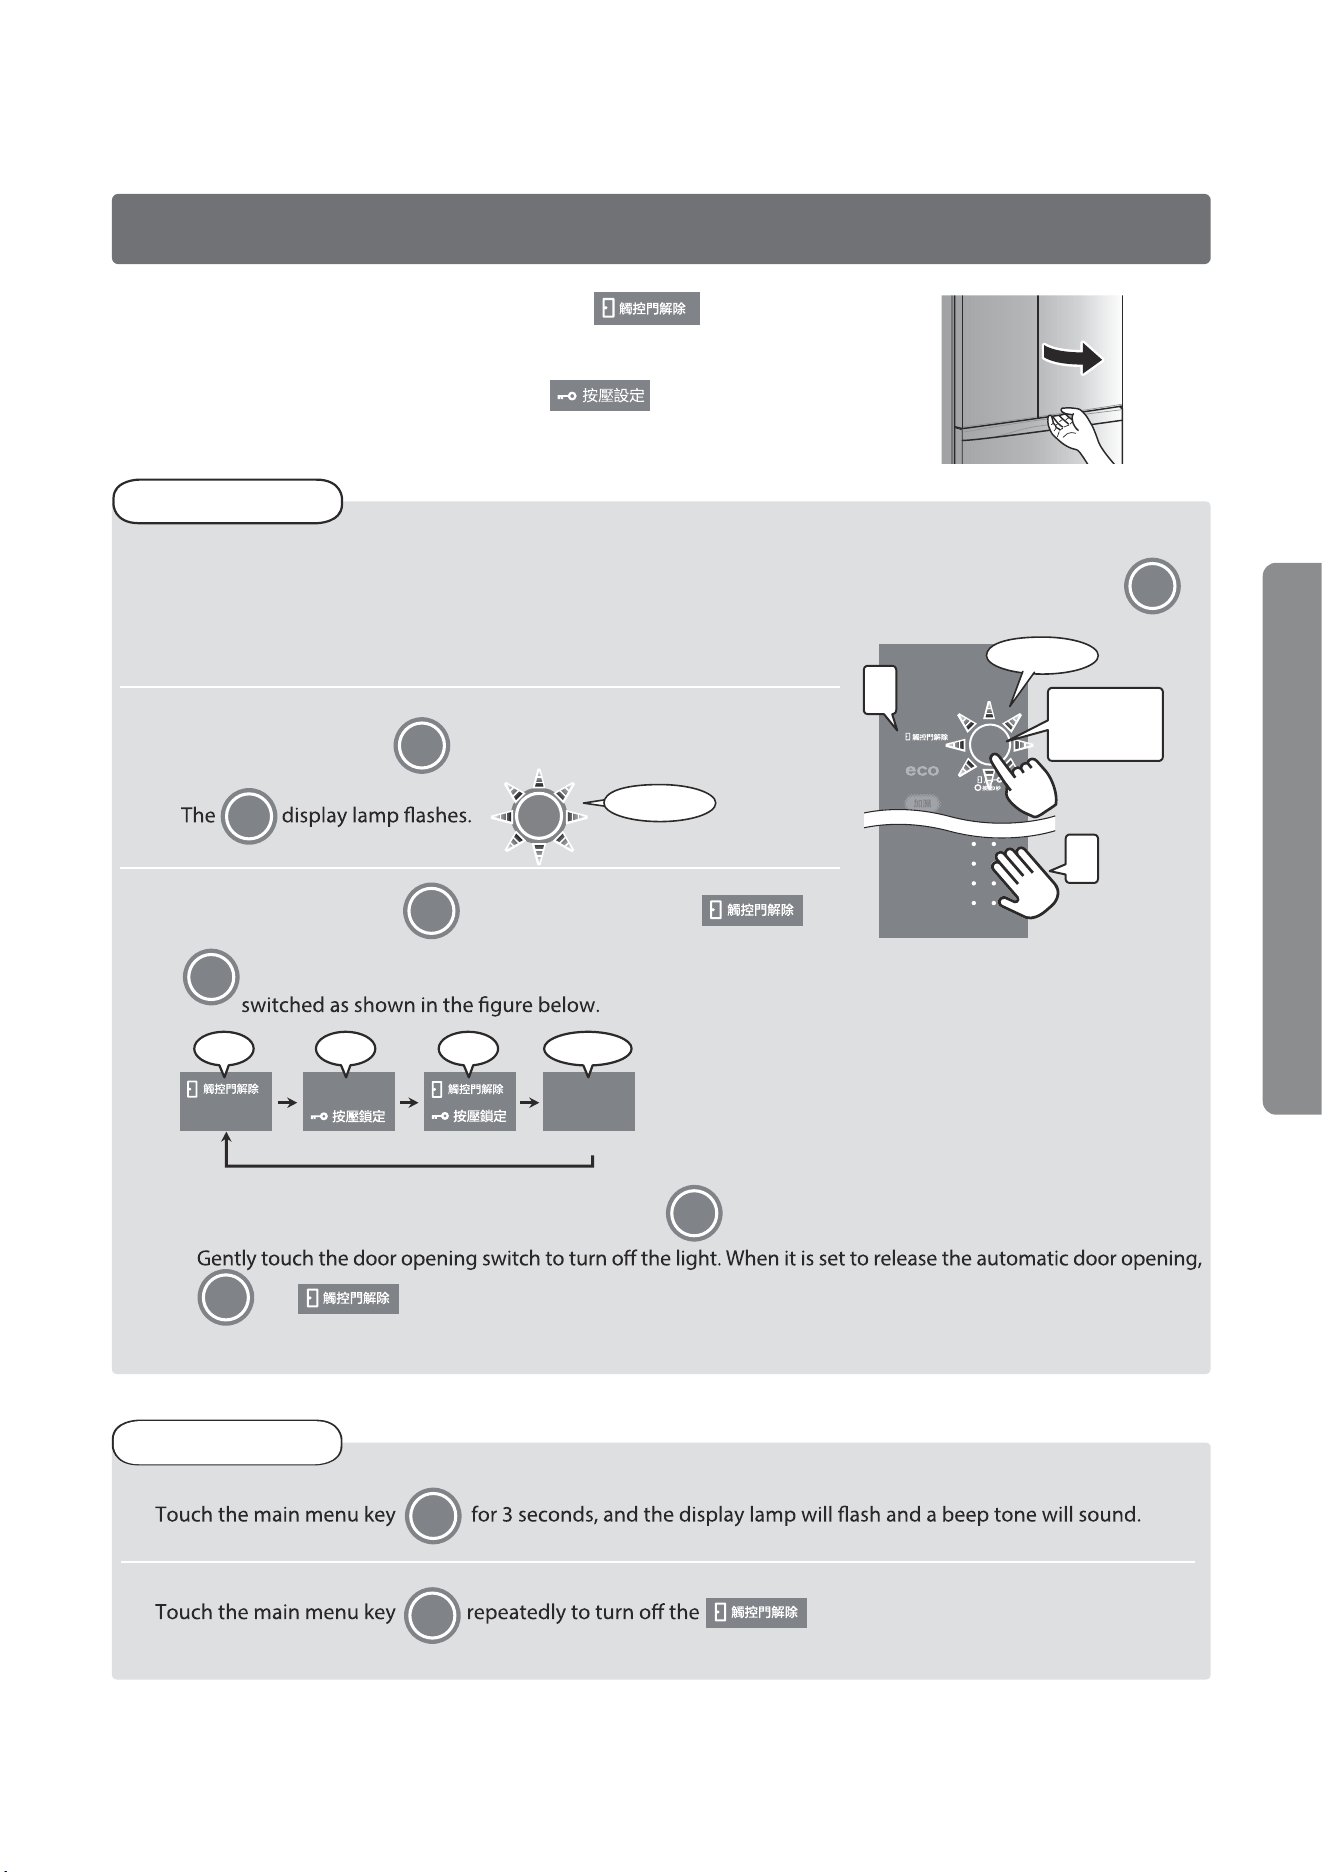
Key lock
Display part
Operation part
The contents of the diagram will not
be displayed completely during use,
and are for illustration only.
Put your hand close to the lower part of the refrigeration
compartment door, so that the main menu key
lights up.
Touch the main menu key for 3 seconds until
a beep tone sounds.
The display lamp
Prevent misuse by naughty children.
At the same time, you can also set the disabling function by touching the door open switch.
Touch the main menu key repeatedly to turn on the light.
Each time this button is touched, the display will be switched as shown in
During setting , operations other than
unlocking cannot be performed.
If other operations are carried out,
not possible.
When any door of the refrigeration compartment, ice making compartment and freezing
and sound a prompt tone (as shown in the table below).
The operation steps are the same as the setting method, until the light is off.
After the operation is completed for about 10 seconds, the light will be on to
complete the setting.
After the setting is completed, there is no response to touch panel operation.
When the button is set to be locked, will light up.
(The contents of the display panel
are for illustration only)
Touch the door opening switch gently
The light will be on when the hand is approached.
The door can be opened automatically
by touching it with hands.
Please refer to Page 14
Wet display lamp
The main menu button
Please close
the door
Automatic door
opening release
Key lock
eco mode
Please refer to Page 12
Please refer to Page 12
Please refer to Page 16
Please refer to Page 15
Please refer to Page 16
Please refer to Page 12
Once the door is closed, the prompt tone will stop and the display light will go out.
Door opening time Prompt tone
After 1 minute, 2 minutes Sounds 7 times
After 3 minutes Continuous tone
Tips When the door is opened a little, there will be no prompt tone.
Refrigeration compartment
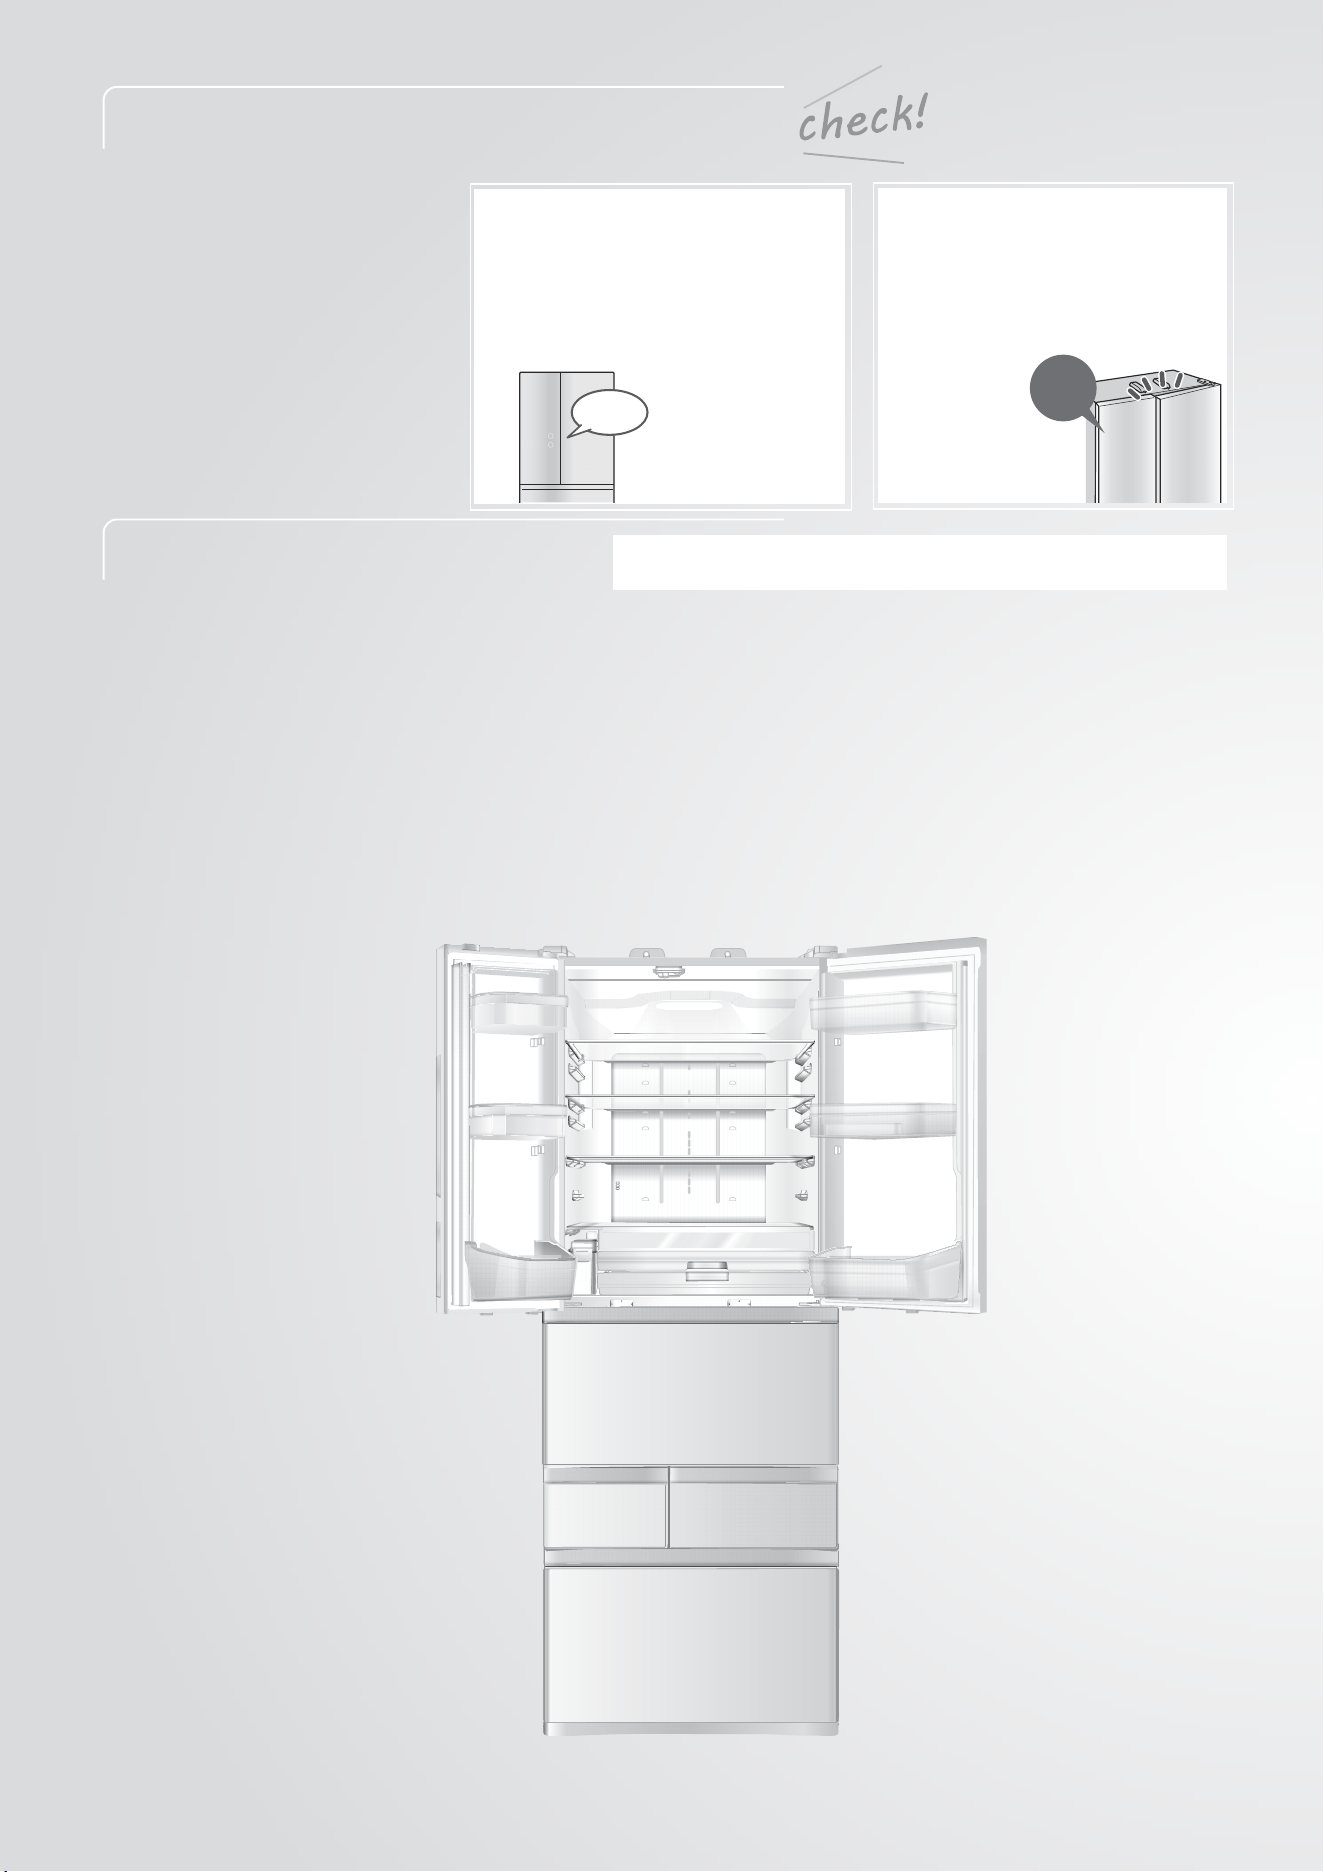
17
10
Please rotate the adjusting foot to
adjust the parallelism of the door.
Please refer to Page 18
Quick-chilling
Fresh Box
Please refer to Page 18
Top plate of instant
chilling box
Water tank partition
Tips
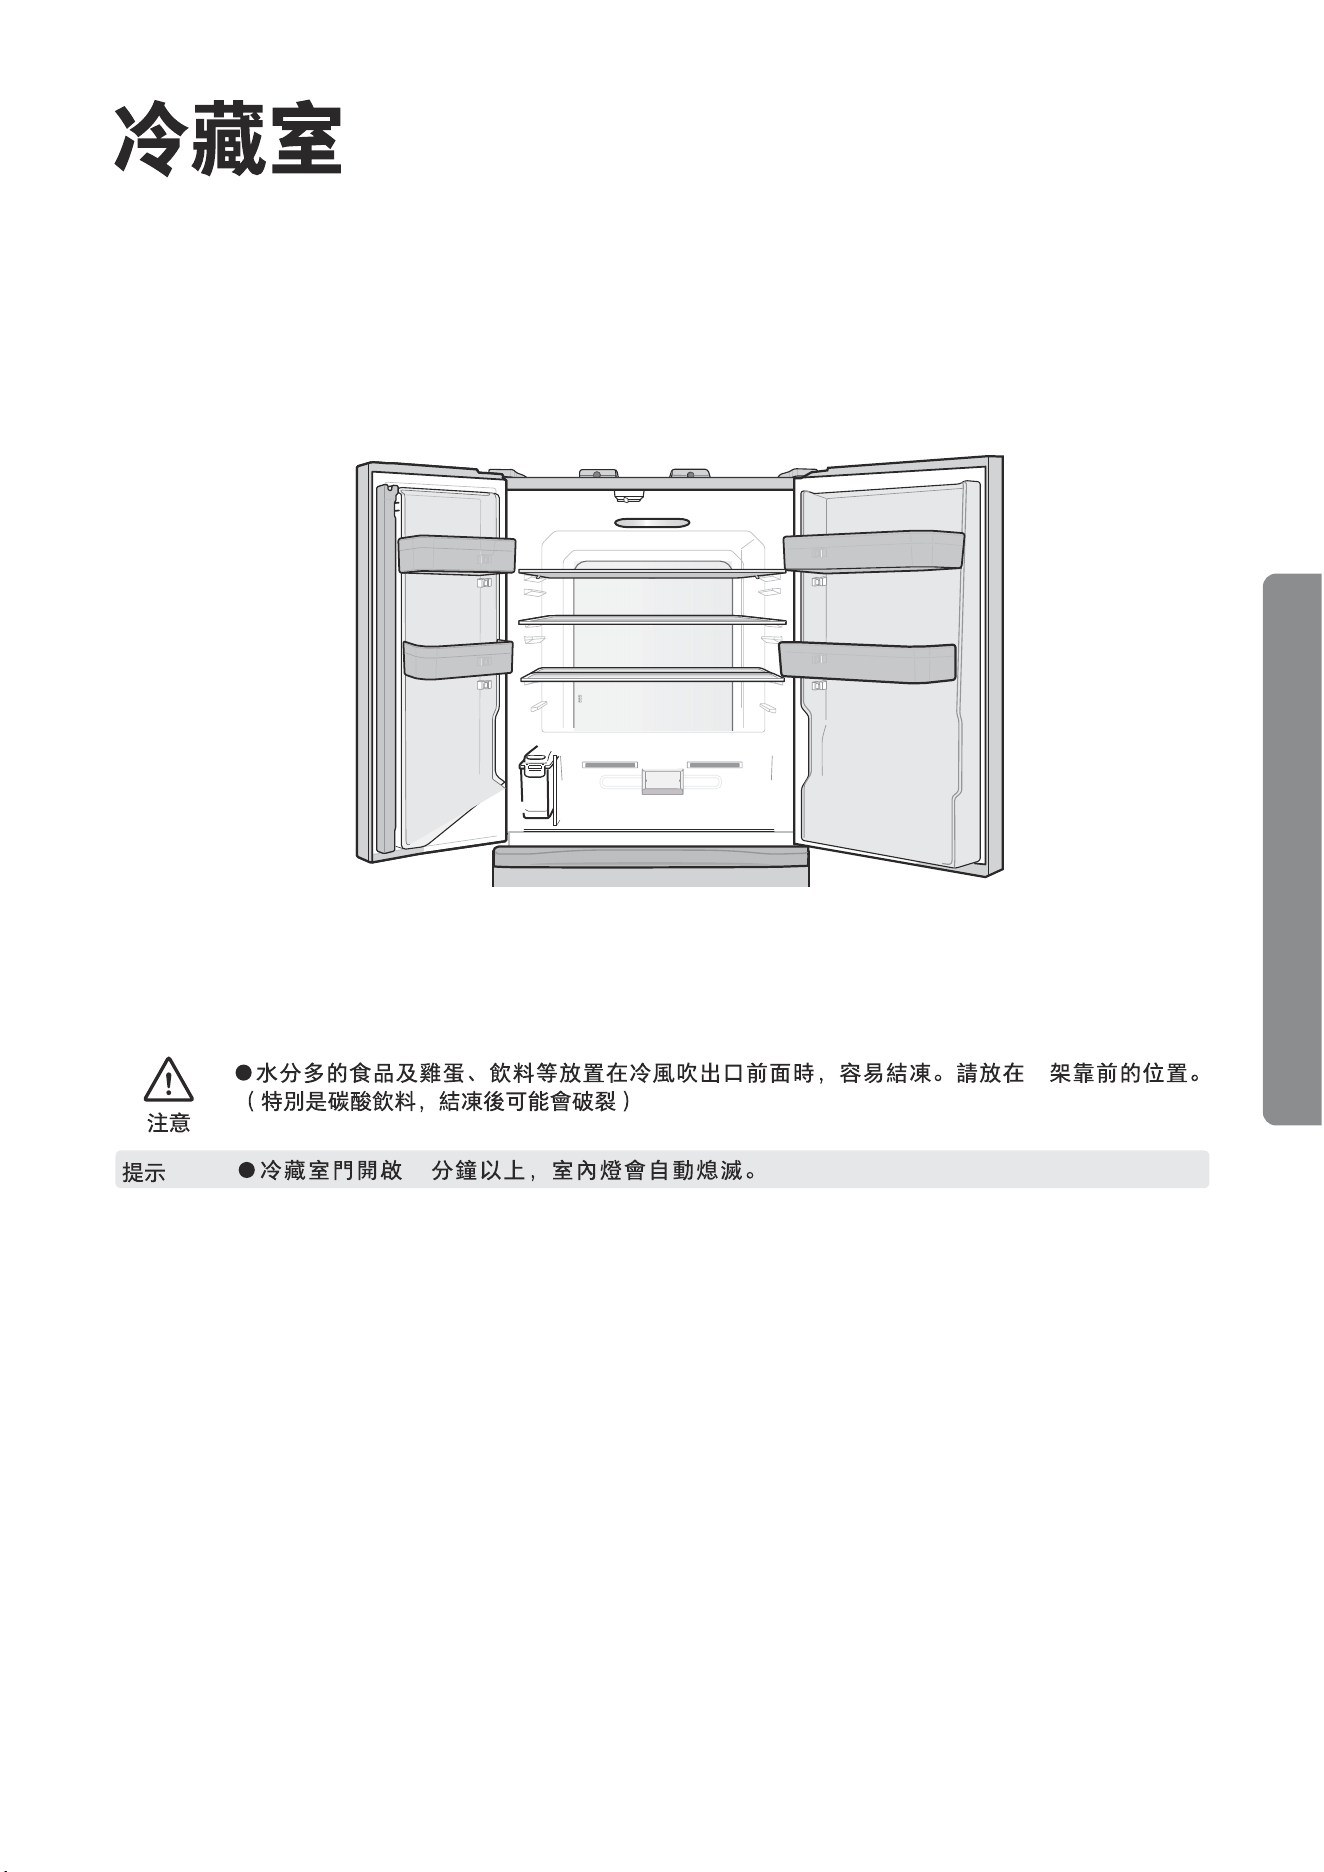
When the door of the refrigeration compartment is opened for more than 10 minutes, the interior lights will go out automatically.
Food, eggs and beverages with high moisture are easy to freeze when placed in front of the cold air outlet. Place in front of the trellis.
(especially carbonated drinks, which may break when frozen)
Note
*1
Test unit: Japan (Yicai) Beili Environmental Science Center
Test method: Place the strain in a 410L test box, and measure the change of bacterial count after photocatalysis.
Objects: fruit and vegetable compartment, refrigeration compartment, and quick-chilling fresh box
actual use space.
*2
Purify the odor by decomposing odor molecules. Not all tastes are completely removed.
Method of Use
Refrigeration compartment
.....Continued
Please refer to Page 28
18
1 2
Note
Section II movable
Shelf on door, movable shed frame
placed with both hands.
(Disassembly and assembly method )
Please refer to Page 28
As a common trellis. Remove the front shelf and install
it to the lower layer.
It can be used to place small pieces
of food, plastic bottles, etc.
Quick-chilling Fresh Box
Upper quick-chilling box
Soft freezing and unfreezing are allowed
It is usually used as a quick-chilling box.
refrigeration compartment.
The minimum temperature of the quick-chilling fresh box is about -2°C.
Cold air outlet
Quick-chilling refrigerator lid
Lower quick-chilling box
Upper storage limit
Please refer to Page 19
Please do not exceed the upper storage limit shown in the
quick-chilling box. Otherwise, when the lower quick-chilling
box is pulled out, the food inside will touch the upper
quick-chilling box, so that the upper quick-chilling boxes are
pulled out together. Forcibly pulling it out may cause damage
to the quick-chill box components.
The shelf on the door and movable shed on the left side can be adjusted in two layers according to the height of food.
(Disassembly and assembly method )
1
1
2
2
1
2
1
2
1
2
1
2
19
Note
1
2
3
2
1
1
1
2
3
Beep
(Release)
Beep
Beep Beep
Beep Beep Beep~
Use of soft freezing and unfreezing function
Preparation
After the automatic operation ends, the display lamp goes out.
Soft freezing .................................................About 120 minutes
Unfreezing ....................................................About 60 minutes
Food that has been quickly soft-frozen or unfreezed can always be placed on an aluminum tray (soft freezing).
When the food is thick or overlapped, it cannot be unfreezed within the set time.
When stopping halfway
corresponding function indicator.
Put your hand close to the lower part of the refrigeration compartment door, so that the main menu
key lights up.
Touch the main menu key to light up the touch panel.
The setting is completed when the required function lights up.
Tips
Soft freezing, unfreezing, quick freezing, vegetable freezing and freeze drying of vegetables cannot be
set at the same time.
Setting Method
Preparation
Setting
Soft freezing Unfreezing
The operation method is the same.
Soft freezing Unfreezing
Food with high moisture is easy to freeze when placed in front of the cold air outlet. Please keep a distance.
(The contents of the display panel
are for illustration only)
Aluminum tray (slightly frozen)
Aluminum tray (slightly frozen)
and use them when you want to unfreeze quickly.
Place the frozen food on an
aluminum tray (micro-frozen)
in a quick chill box on top. It
is ok to place other foods on
aluminum trays
(micro-frozen).
Place the food on an
aluminum tray (micro-frozen)
in a quick chill box on top. It
is ok to place other foods on
aluminum trays (micro-frozen).
Touch repeatedly
to set the desired function.
Method of Use
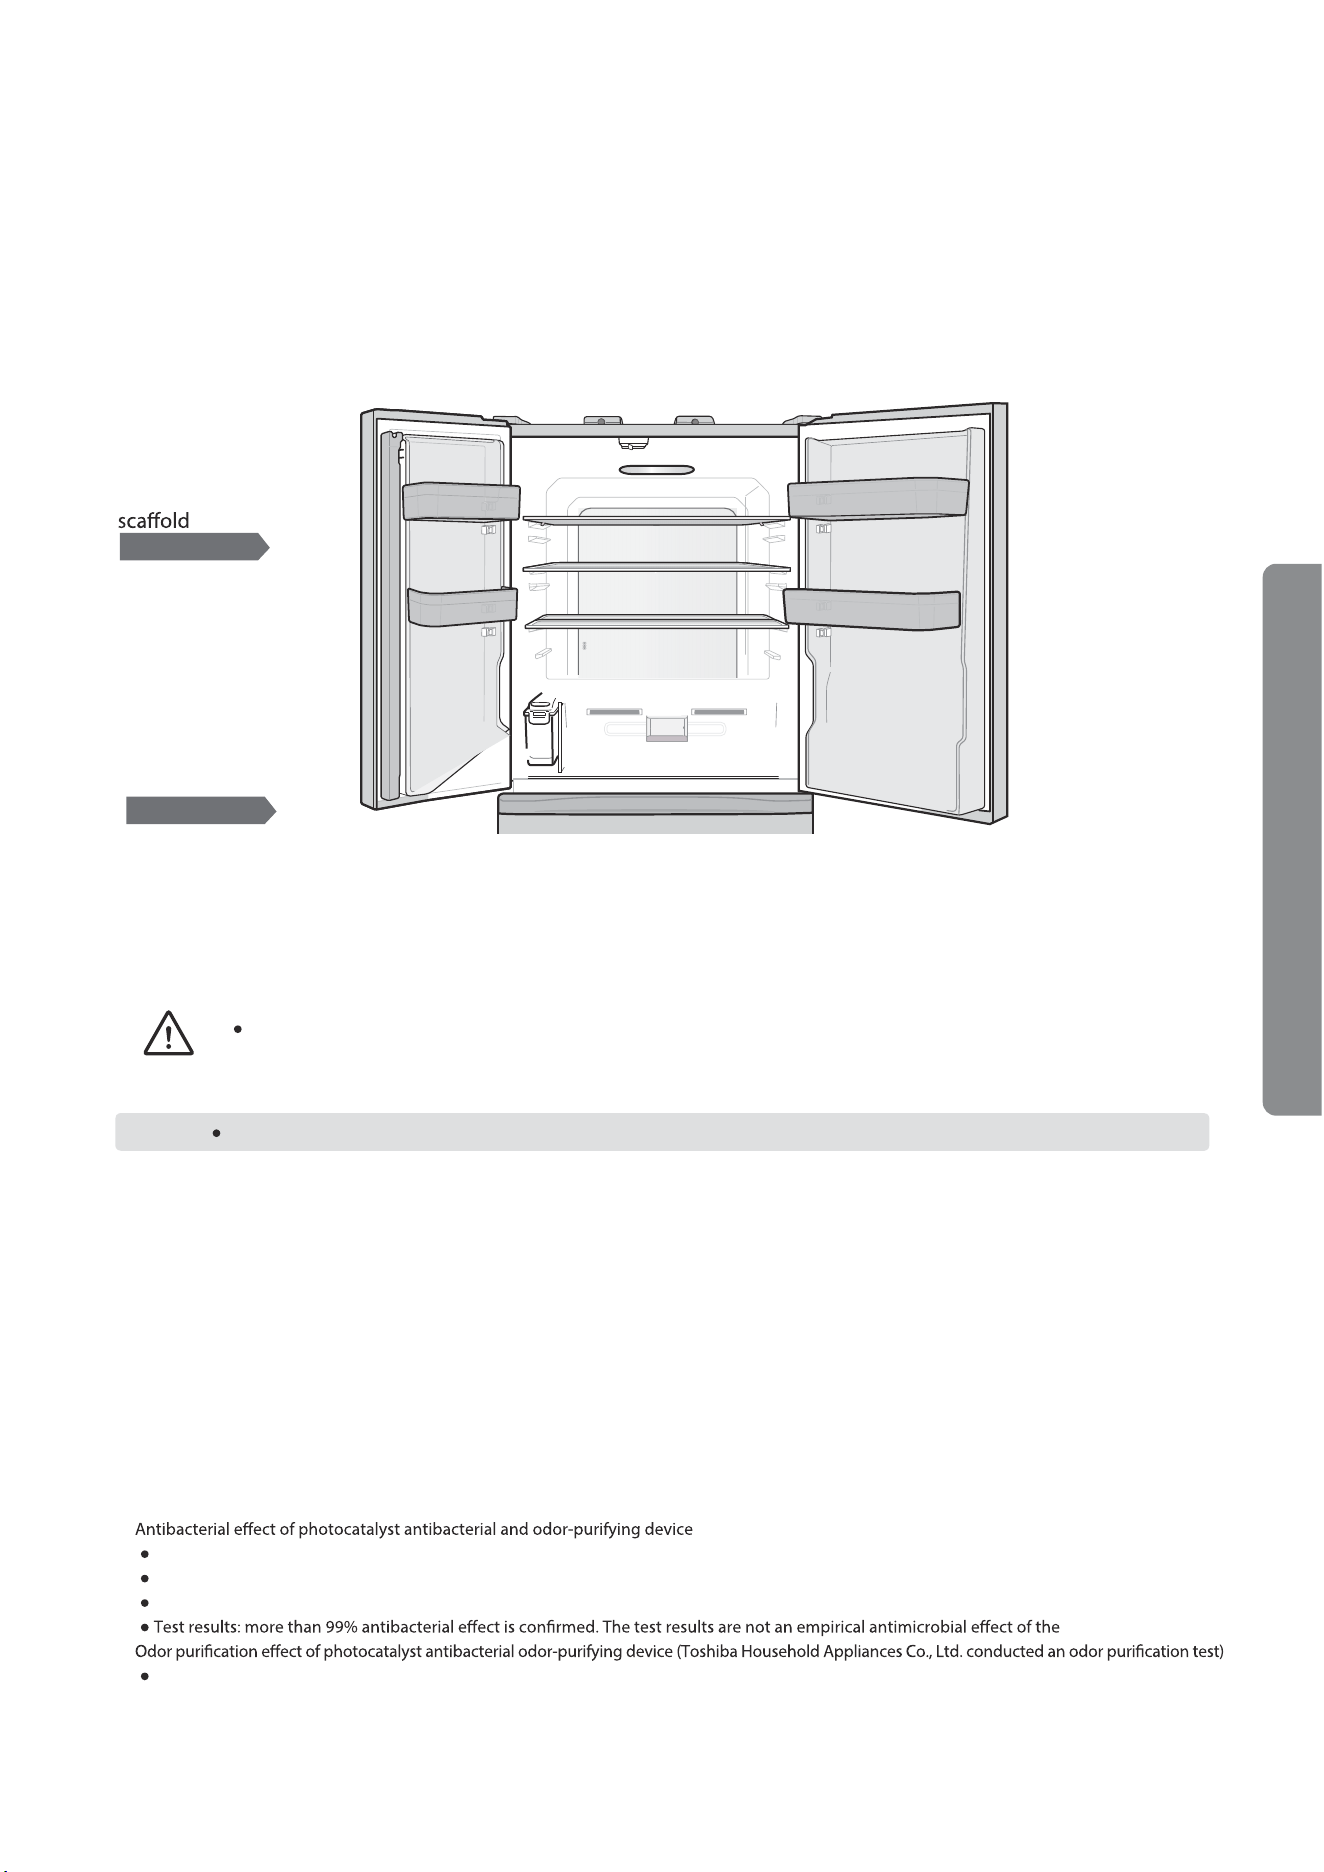
Fruit & Vegetable compartment
Note
20
Please refer to Page 16
Located at the bottom of the
fruit and vegetable container.
It is convenient to clean the
broken leaves and other
garbage in the container.
It can store large and medium-sized
fruits and vegetables.
• Seasoning bottles can be placed
vertically in the right concave part.
• There is a partition in the box.
Do not remove it by yourself.
When the lid cannot be removed, you
can open the fruit and vegetable
compartment, put your hand under
the fruit and vegetable compartment,
and push the lid out by hand.
After cleaning up the garbage, please be
sure to reset and lock the cover, otherwise
it will cause water loss in the fruit
vegetable compartment.
It is normal that the food in a vegetable container sometimes has condensation on its surface.
Moisture in vegetables will sometimes condense or accumulate water in the container. If there is condensation or accumulated water,
please wipe it with a dry cloth.
Even if the door of the fruit and vegetable compartment is not fully closed, it will not give a prompt tone for closing the door.
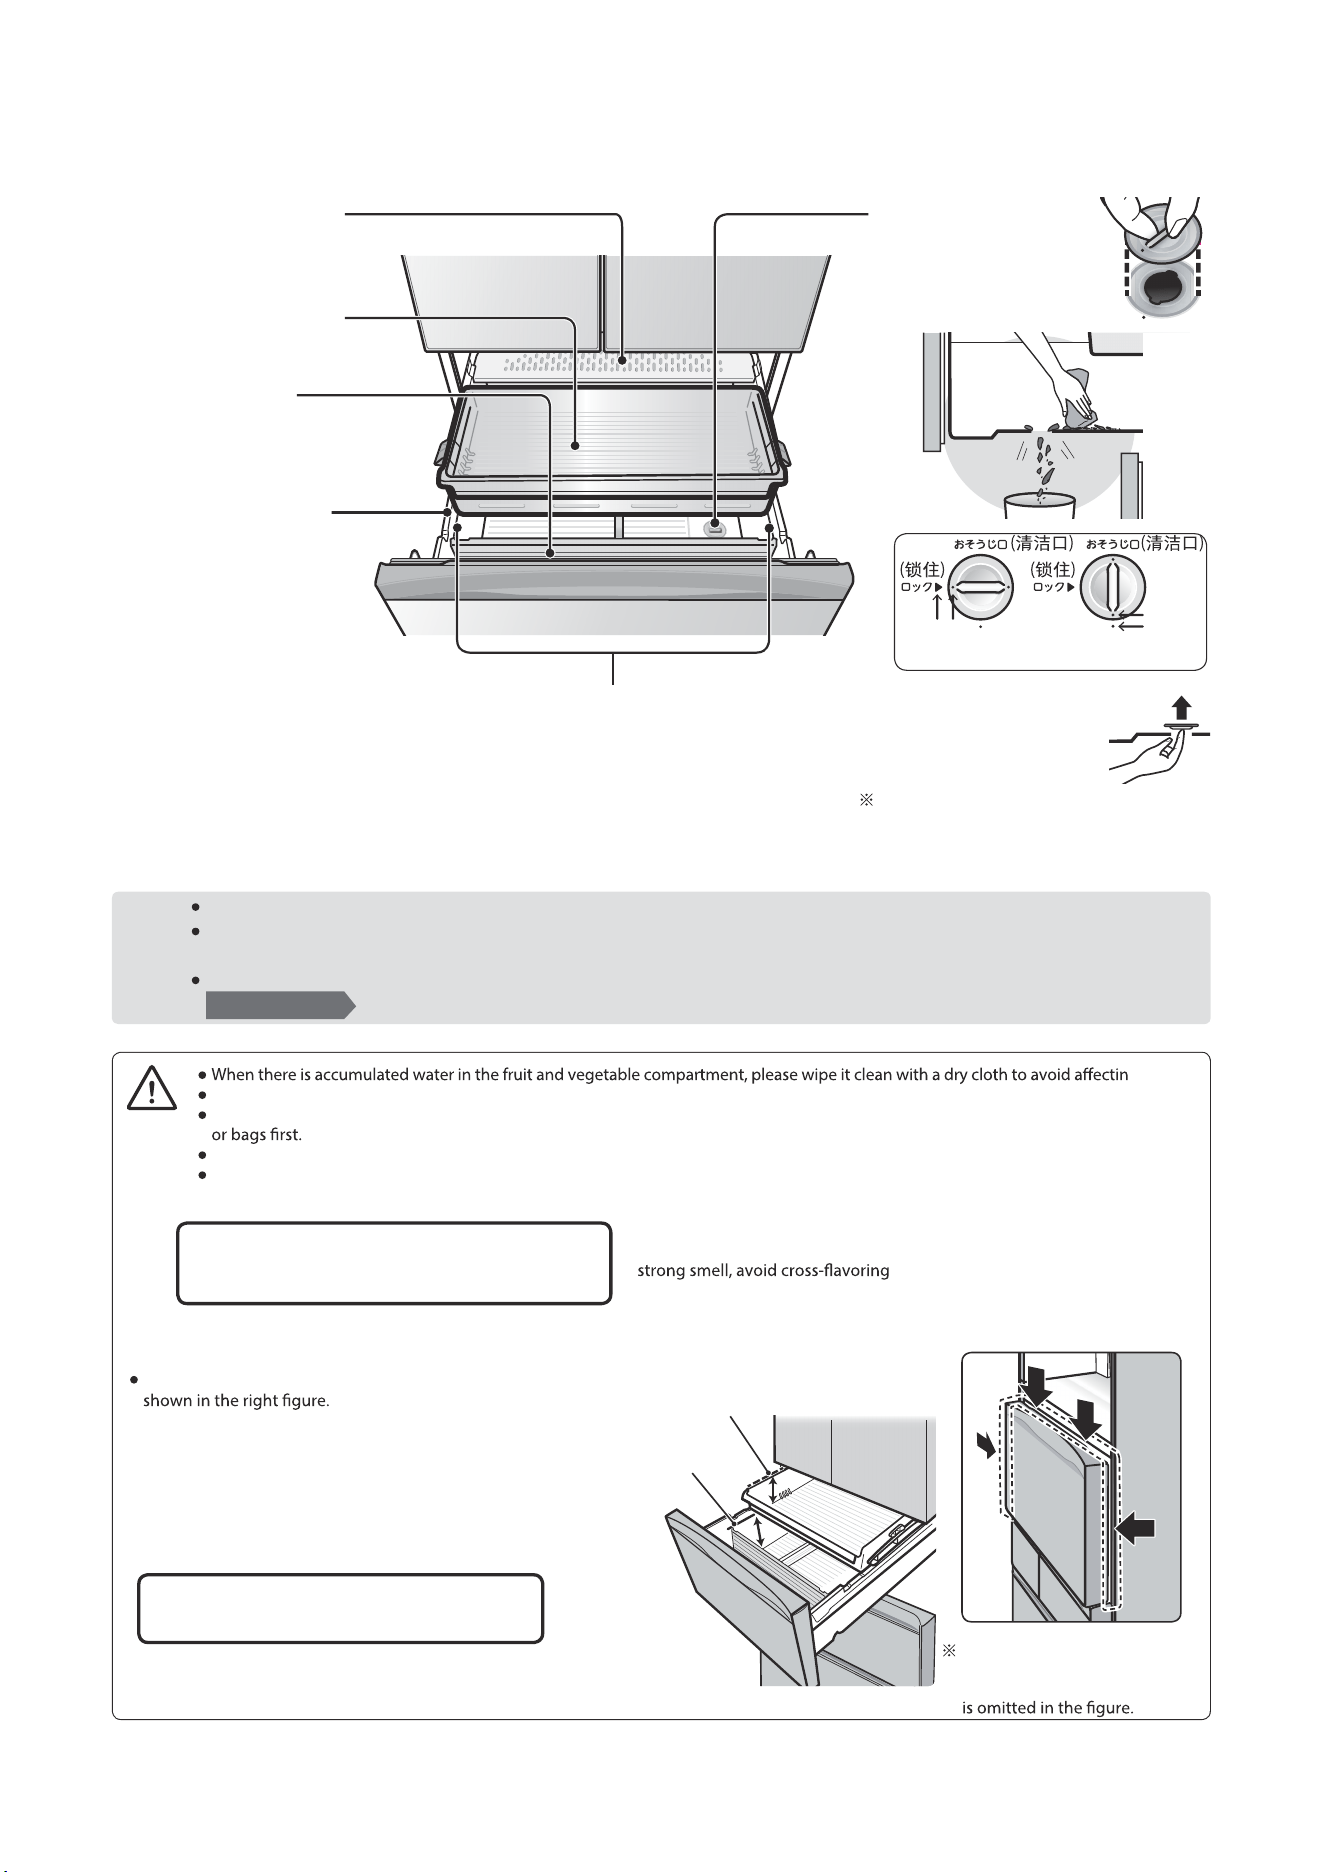
g food.
Condensation will occur when the moisture-permeable box is blocked by food bags and boxes. Please wipe them clean with a dry cloth.
When rice, seaweed and other dry foods need to be placed in the fruit and vegetable compartment, please seal them with containers
The storage status of vegetables and fruits varies with the amount, type and freshness.
When there is a small amount of food stored in the fruit and vegetable compartment, it may not be able to maintain high humidity.
• When you don't want to condense the food surface
• When preserving green onions, leeks, celery and other vegetables with
• When storing leafy vegetables that are easy to dry for a long time
Otherwise, the door cannot be completely closed,
resulting in a gap between the door seals, which will
not only reduce the refrigeration performance and
cause condensation, but also may damage the
components.
Food exceeding the upper storage limit will
cause the door to fail to close. (Gap)
Gap state
For the convenience of illustration,
the representation of the
refrigeration compartment door
Upper storage limit of
sliding box in fruit and
vegetable compartment
Upper storage limit of fruit
and vegetable containers
Lock cover status Opening state
When storing food, do not exceed the upper storage limit
In these cases, it is recommended to use plastic
wrap or plastic bags.
Sliding box for fruit and
vegetable compartment
Small fruits and vegetables can be stored.
Moisture-permeable box
Moist cold air can be delivered to the
fruit and vegetable compartment.
Bottle placing area
Store 2L bottled drinks, etc.
Cleaning access cover
Fruit and vegetable
Upper storage limit
(Represented by raised line)
Tips
container
Note
21
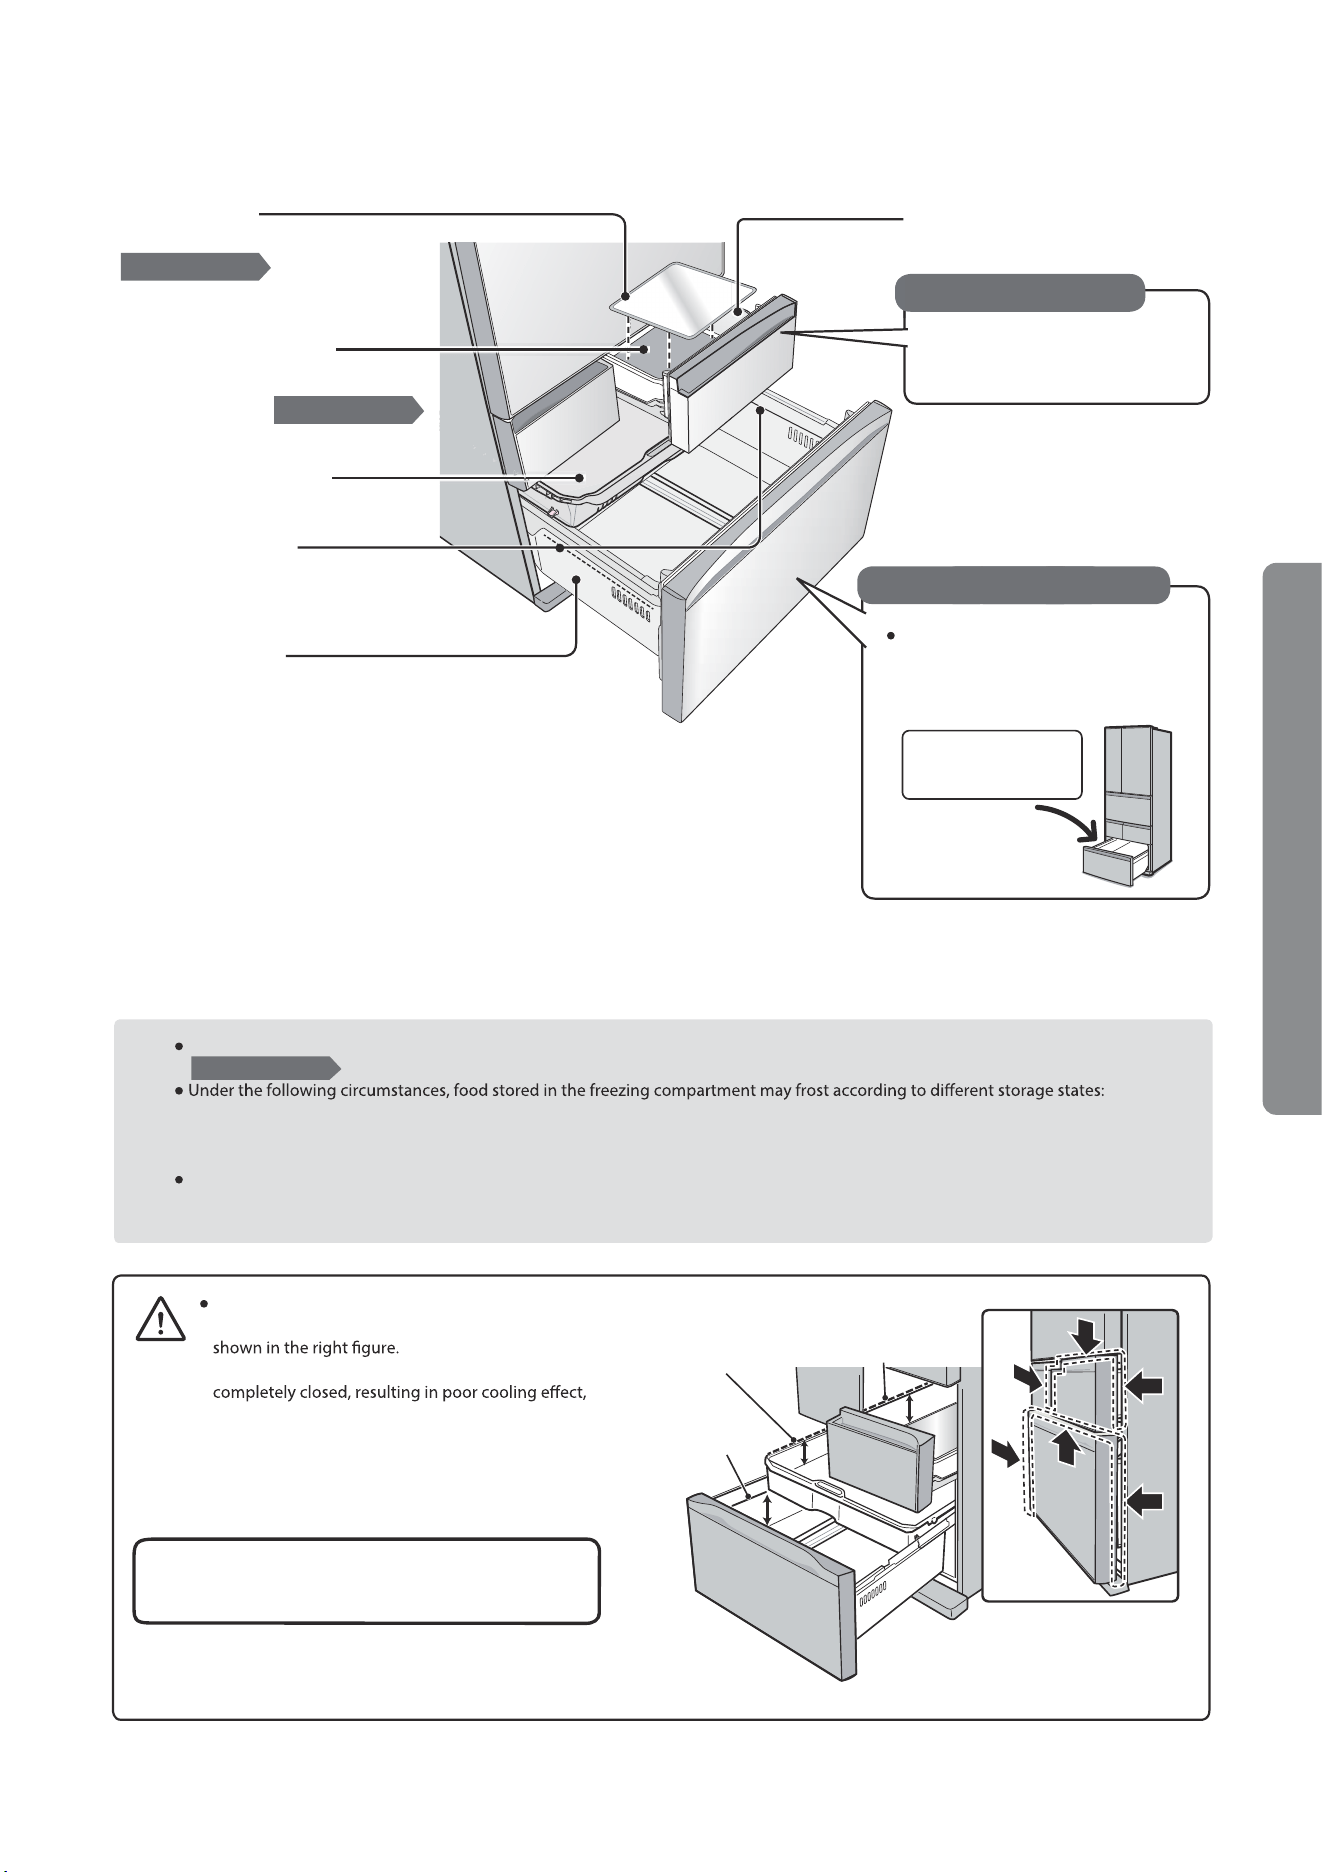
Frozen food storage compartment,
freezing compartment
Freezing compartment
sliding box
Aluminum tray
Can be used for quick freezing.
Vegetable freezing
insulation mat
Freezing vessel
Upper storage limit
Storage container
Frozen pantry
Please refer to Page 22
Please refer to Page 22
Please keep it in the factory
installation state during normal use.
It can be used for vegetable freezing
and freeze-drying.
On both sides of the storage container.
(Represented by raised line)
A compartment for quick freezing,
vegetable freezing and freeze-drying
of vegetables.
Please keep ice cream and other
foods that need to be completely
frozen in the freezing compartment.
Keep ice cream in the
freezing compartment!
Upper storage
limit of freezing
container
Upper storage limit of
sliding box in freezing
compartment
Upper storage limit
of storage container
• There is a partition in the box. Do not remove it by yourself.
Tips
Even if the door of the frozen food storage compartment is not fully closed, there will be no prompt tone for closing the door.
When it is set to quick ice making.
When the refrigerator door is opened frequently, or for a long time.
• When putting in hot food.
No frozen food can be in direct contact with the food stored in the compartment, and if it is necessary to freeze the food every day, the
amount of frozen food should be reduced.
Please refer to Page 16
Gap state
Do not allow the amount of food stored in the
container or storage box to exceed the upper limit
Otherwise, the refrigerator door will not be
frosting or damage.
Food exceeding the upper storage limit will
cause the door not to close completely. (Gap)
Freezing compartment
Method of Use

Freezing function
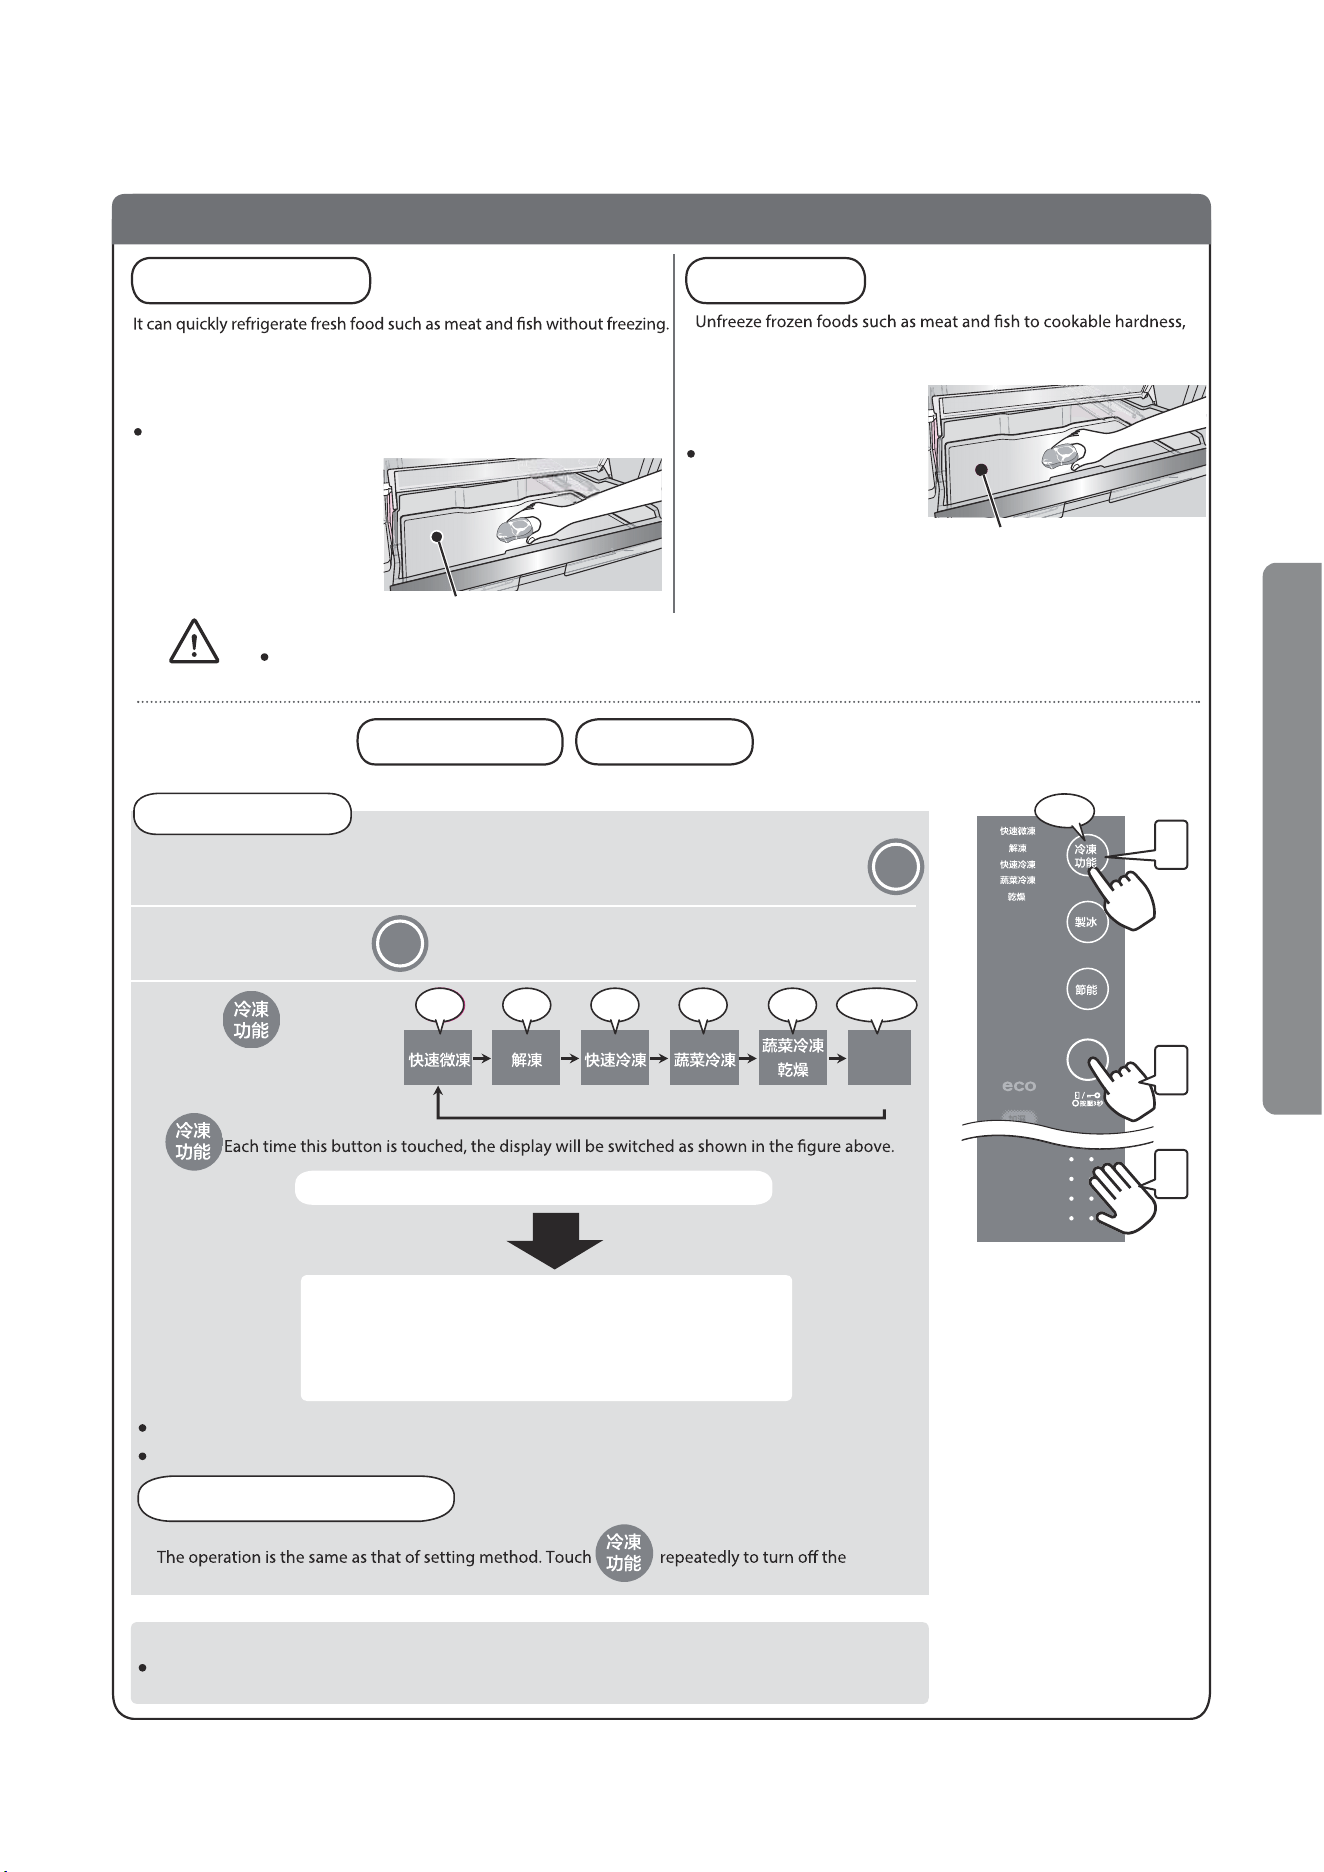
1
Frozen Pantry
Quick Freezing
Frozen vegetables
Vegetable freeze-drying
1
1
2
2
Applicable vegetables
Frozen vegetables
Vegetable freeze-drying
Cabbage
Radish
Carrot
Onion
Red pepper
Zucchini
Pumpkin
Sweet potato, yam and taro
(Remove astringent taste with water)
Mushrooms (shiitake, etc.)
Asparagus chinensis
Rape
Chinese cabbage
Celery
Beans
Broad bean
Tomato
Bean sprouts
Potato
Corn
Mushroom
Okra
Frozen Pantry
Vegetable freezing insulation mat
Vegetable freezing insulation mat
Please refer to Page 21
22
Precautions for
Refrigerating
Please choose food with good freshness.
To prevent food from drying, please use plastic wrap or sealed containers and bags to store
food. (except for freeze drying of vegetables)
worse.
Do not touch the frozen aluminum tray with wet hands, otherwise it may cause frostbite.
Do not put food that will burn your hands (above 55°C),
otherwise it may cause scald or container deformation.
Cut the fresh vegetables to size for cooking, remove moisture and seal.
To prevent the vegetables from drying, please use plastic wrap or
sealed containers and special sealing bags for freezing.
Place the sealed vegetables
on a frozen insulation mat.
(If there is an aluminum tray
freshness or variety of vegetables,
sometimes slightly poor.
Unsuitable vegetables
• Eggplant, spinach, burdock, peas and
other astringent vegetables
• Lettuce, cucumber, perilla leaves, radish
seedlings and other raw vegetables
Vegetables that can be prepared for
stewing, frying, etc. by removing
moisture with dry cold air
Cut fresh vegetables to the right size for cooking and remove
moisture. To prevent the stacking of fresh vegetables, place
them on a shallow unsealed container or plastic wrap.
Place fresh vegetables on a
frozen insulation mat.
(If there is an aluminum tray
Use frozen vegetable insulation mats in the frozen food storage
compartment.
(Vegetable freeze insulation mat underneath
aluminum tray)
Preparation
Please refer to Page 21
Frozen Pantry
Aluminum tray
Quick freezing of foods.
Place the sealed food on an aluminum tray.
Note
Can be used for vegetables requiring
long-term preservation or cut leftovers
Use frozen vegetable insulation mats in the frozen food storage compartment.
(Vegetable freeze insulation mat underneath
aluminum tray)
Direct freezing of vegetables
Setting (same operation)
2
During cooking
Note
(Release)
Beep! Beep! Beep! Beep! Beep! Beep~
1
2
3
If the display light is on, it indicates that the
corresponding function starts to run.
1
2
3
Beep!
(The contents of the display
panel are for illustration only)
Setting Method
Tips
When stopping halfway
The operation is the same as that of setting method.
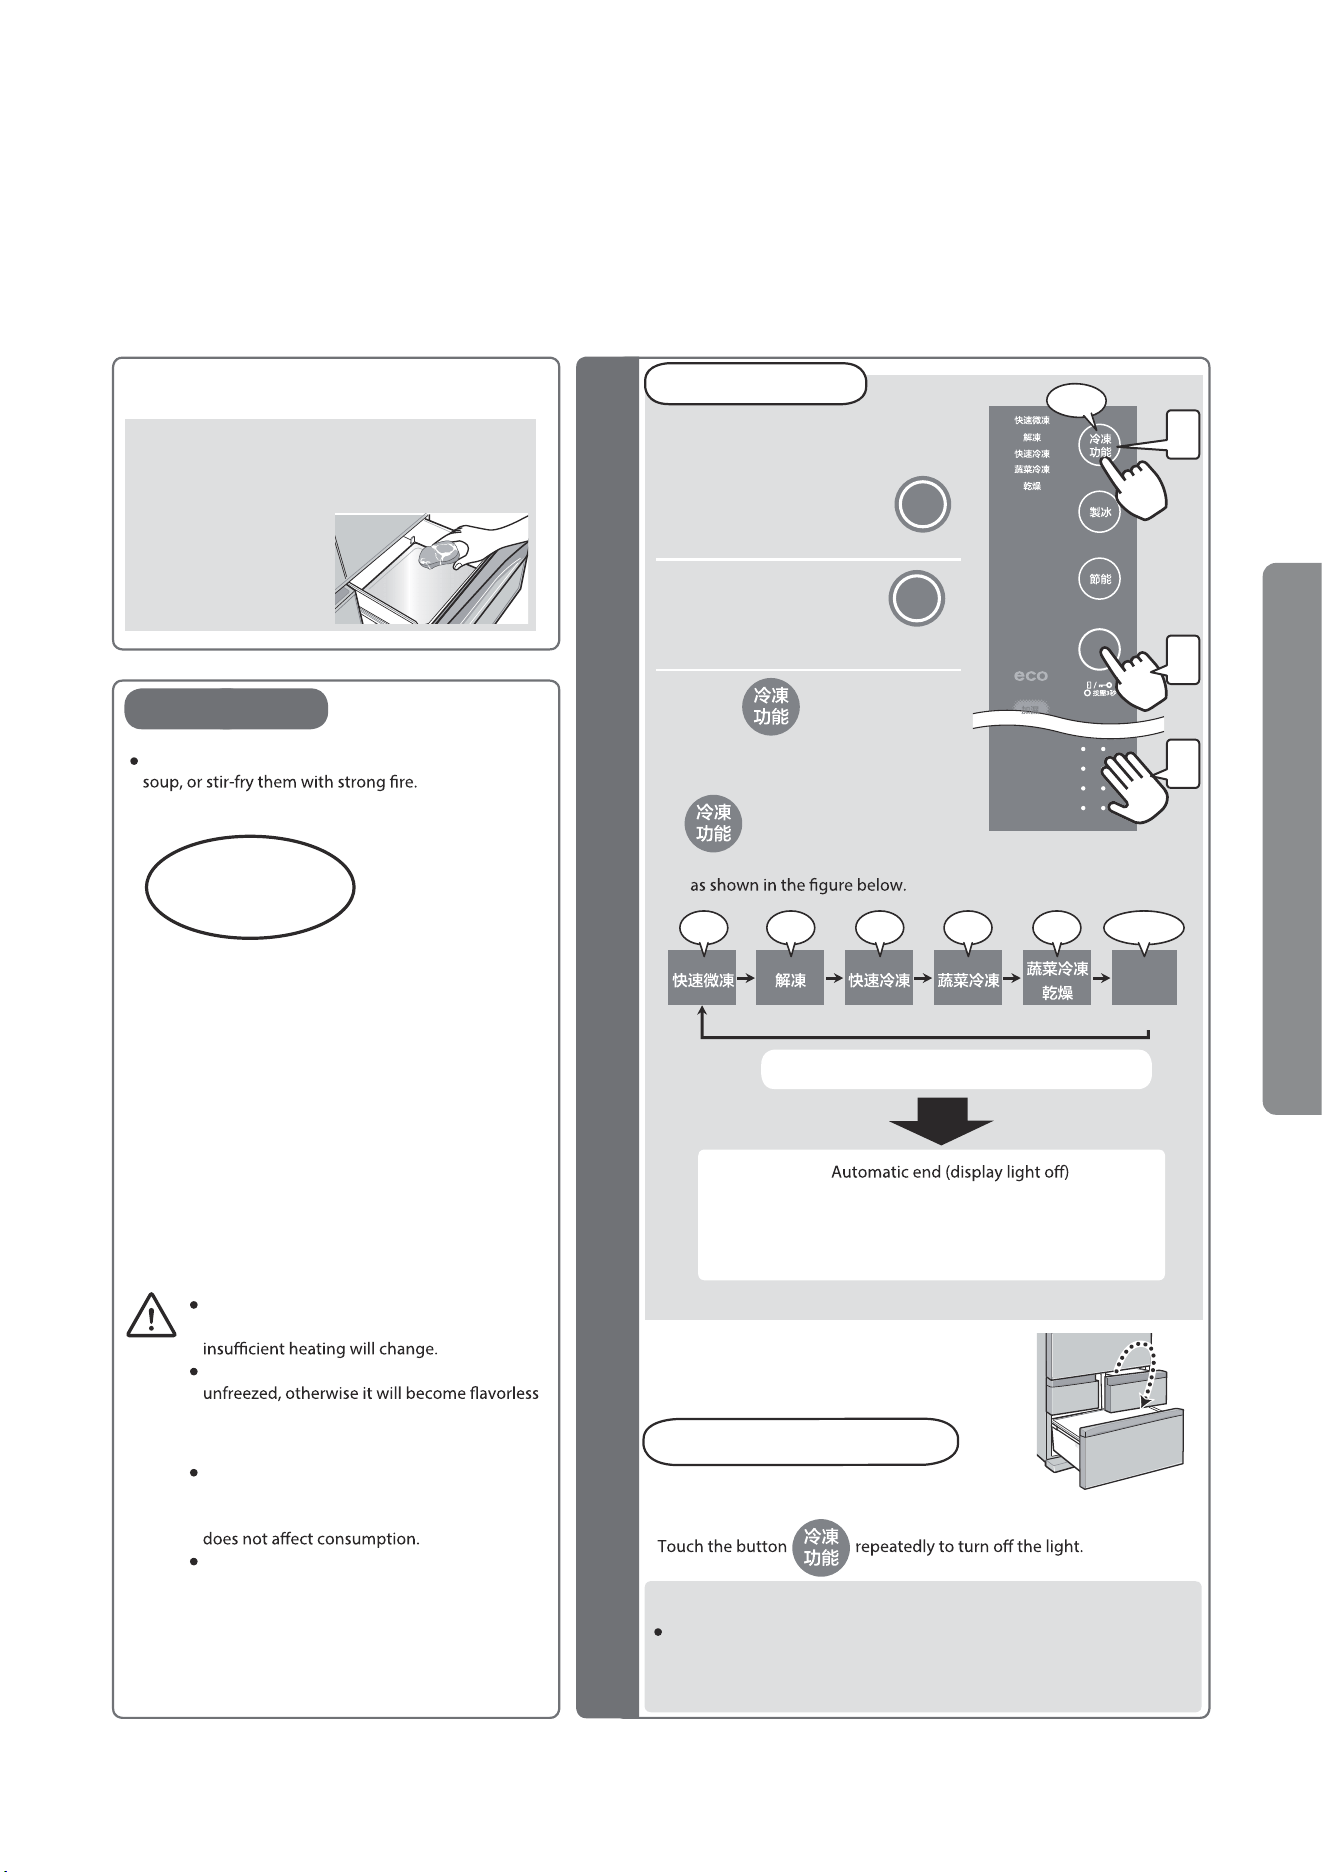
23
Freezing function
.....Continued
Quick freezing of warm foods.
When warm food is quickly frozen, please do not put
it together with other frozen food to avoid heat
transfer.
Put your hand close to the lower part of
the refrigeration compartment door,
so that the main menu key
lights up.
Touch the main menu key
to light up the touch panel.
Touch repeatedly until the
function to be set is on.
Each time this button is
touched, the display will be switched
Quick Freezing .................................About 180 minutes
Frozen vegetables ..........................About 180 minutes
Vegetable freeze-drying ........................About 8 hours
Please store the frozen and dried vegetables in a
freezing compartment.
Soft freezing, unfreezing, quick freezing, vegetable freezing and
vegetable freeze drying cannot be set at the same time.
Quickly heat the frozen vegetables into boiling
Do not heat and cook with a microwave oven.
Due to uneven heating, the color of places with
Please use up all the food that has been
or taste worse.
Tips
Depending on the variety of vegetables or
their freshness before freezing, discoloration,
taste or odor may occur after freezing, but this
The storage life of "direct freezing of
vegetables" is about 1 month. (However, it
will vary according to the freshness before
freezing.)
Cooking method after [freezing vegetables] ...
boiling, stir-frying Cooking method after
[freeze-drying vegetables] ... boiling, stir-frying,
and deep frying (dry frying is not allowed)
Do not fry vegetables that have been frozen
with vegetables.
Because of moisture, the oil is easy to splash out
and cause burns.
Rapid heating
from frozen state!
Method of Use
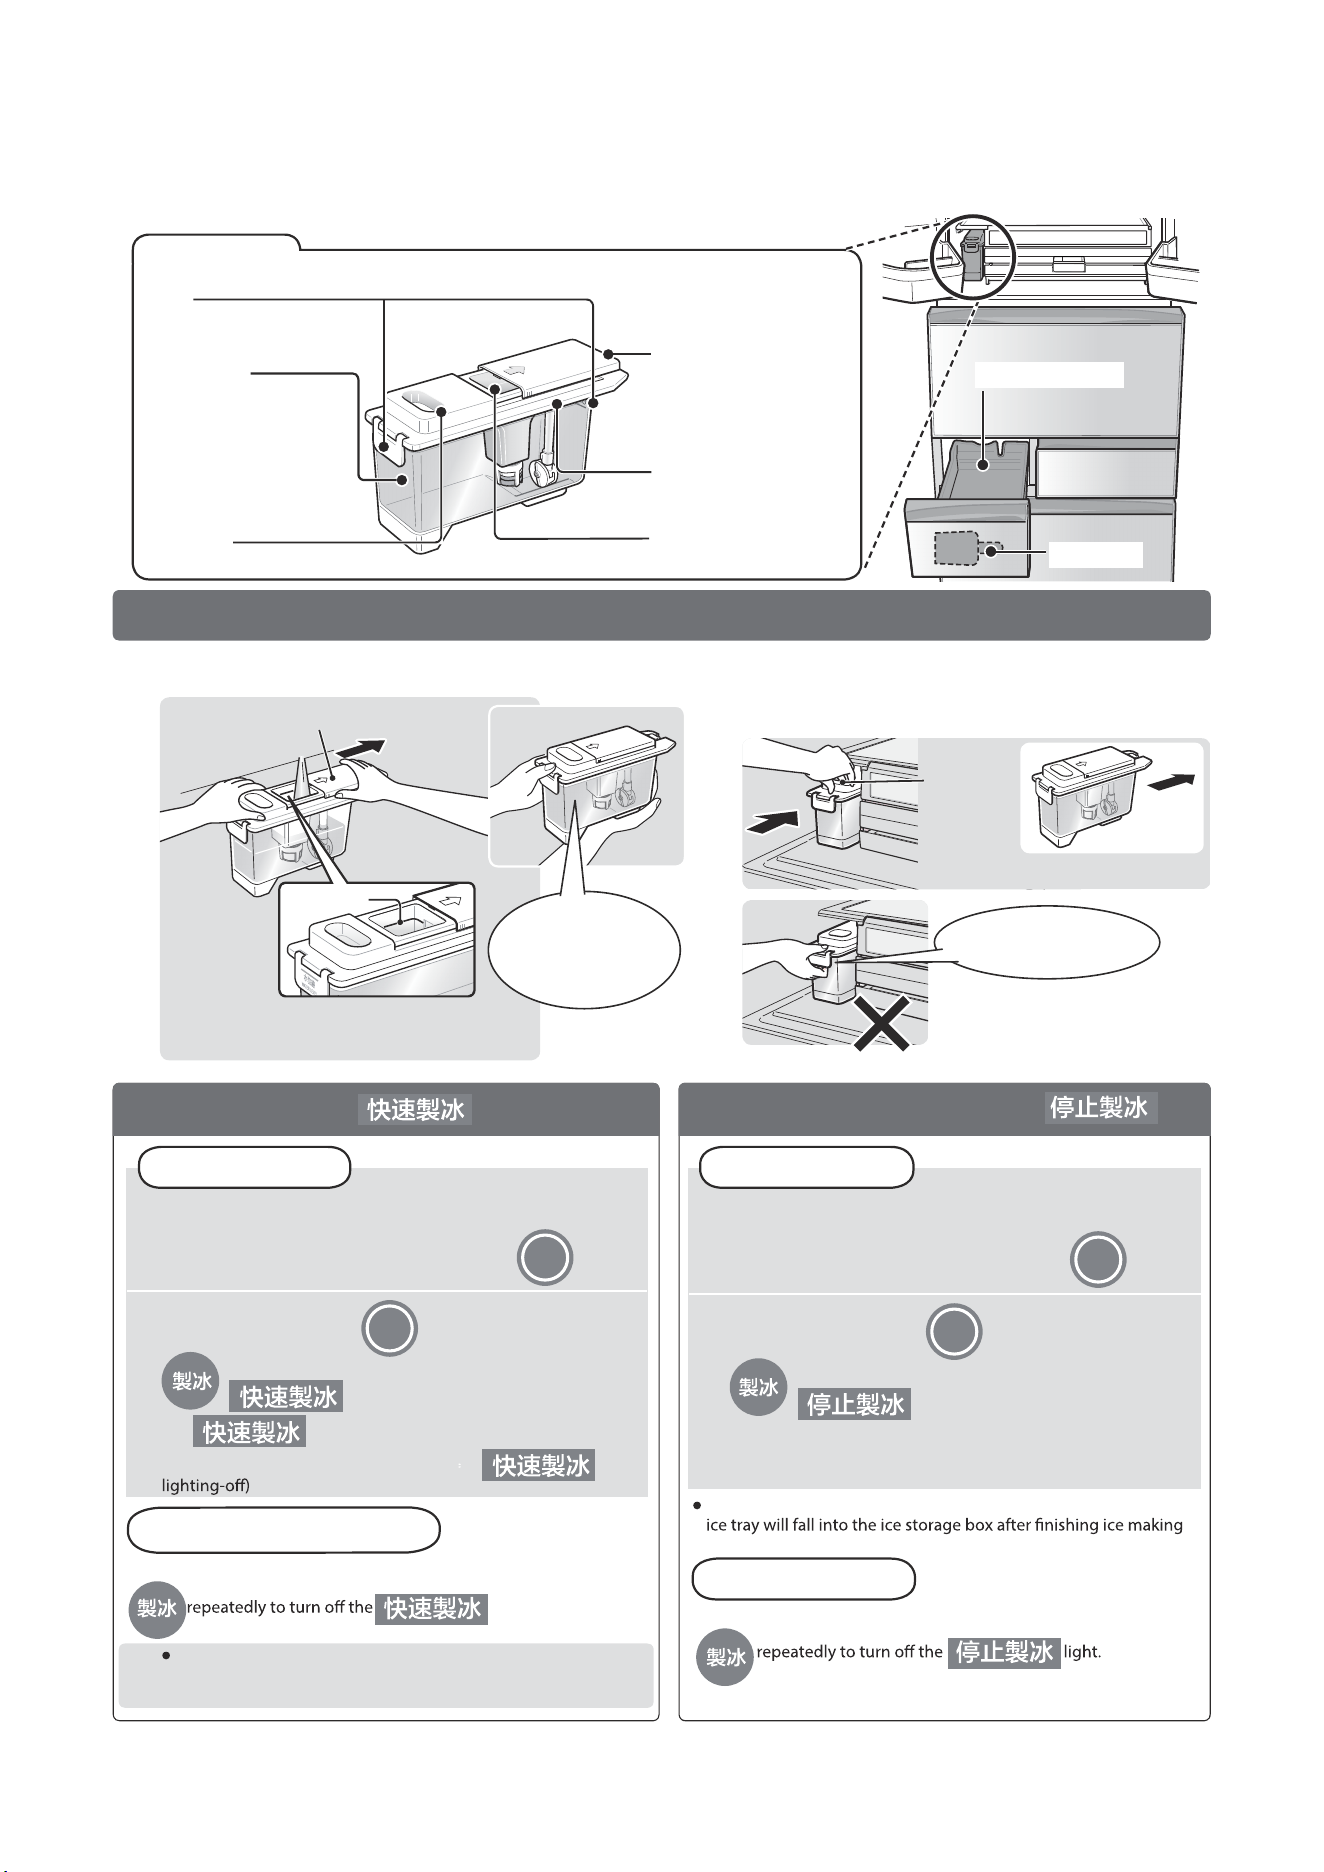
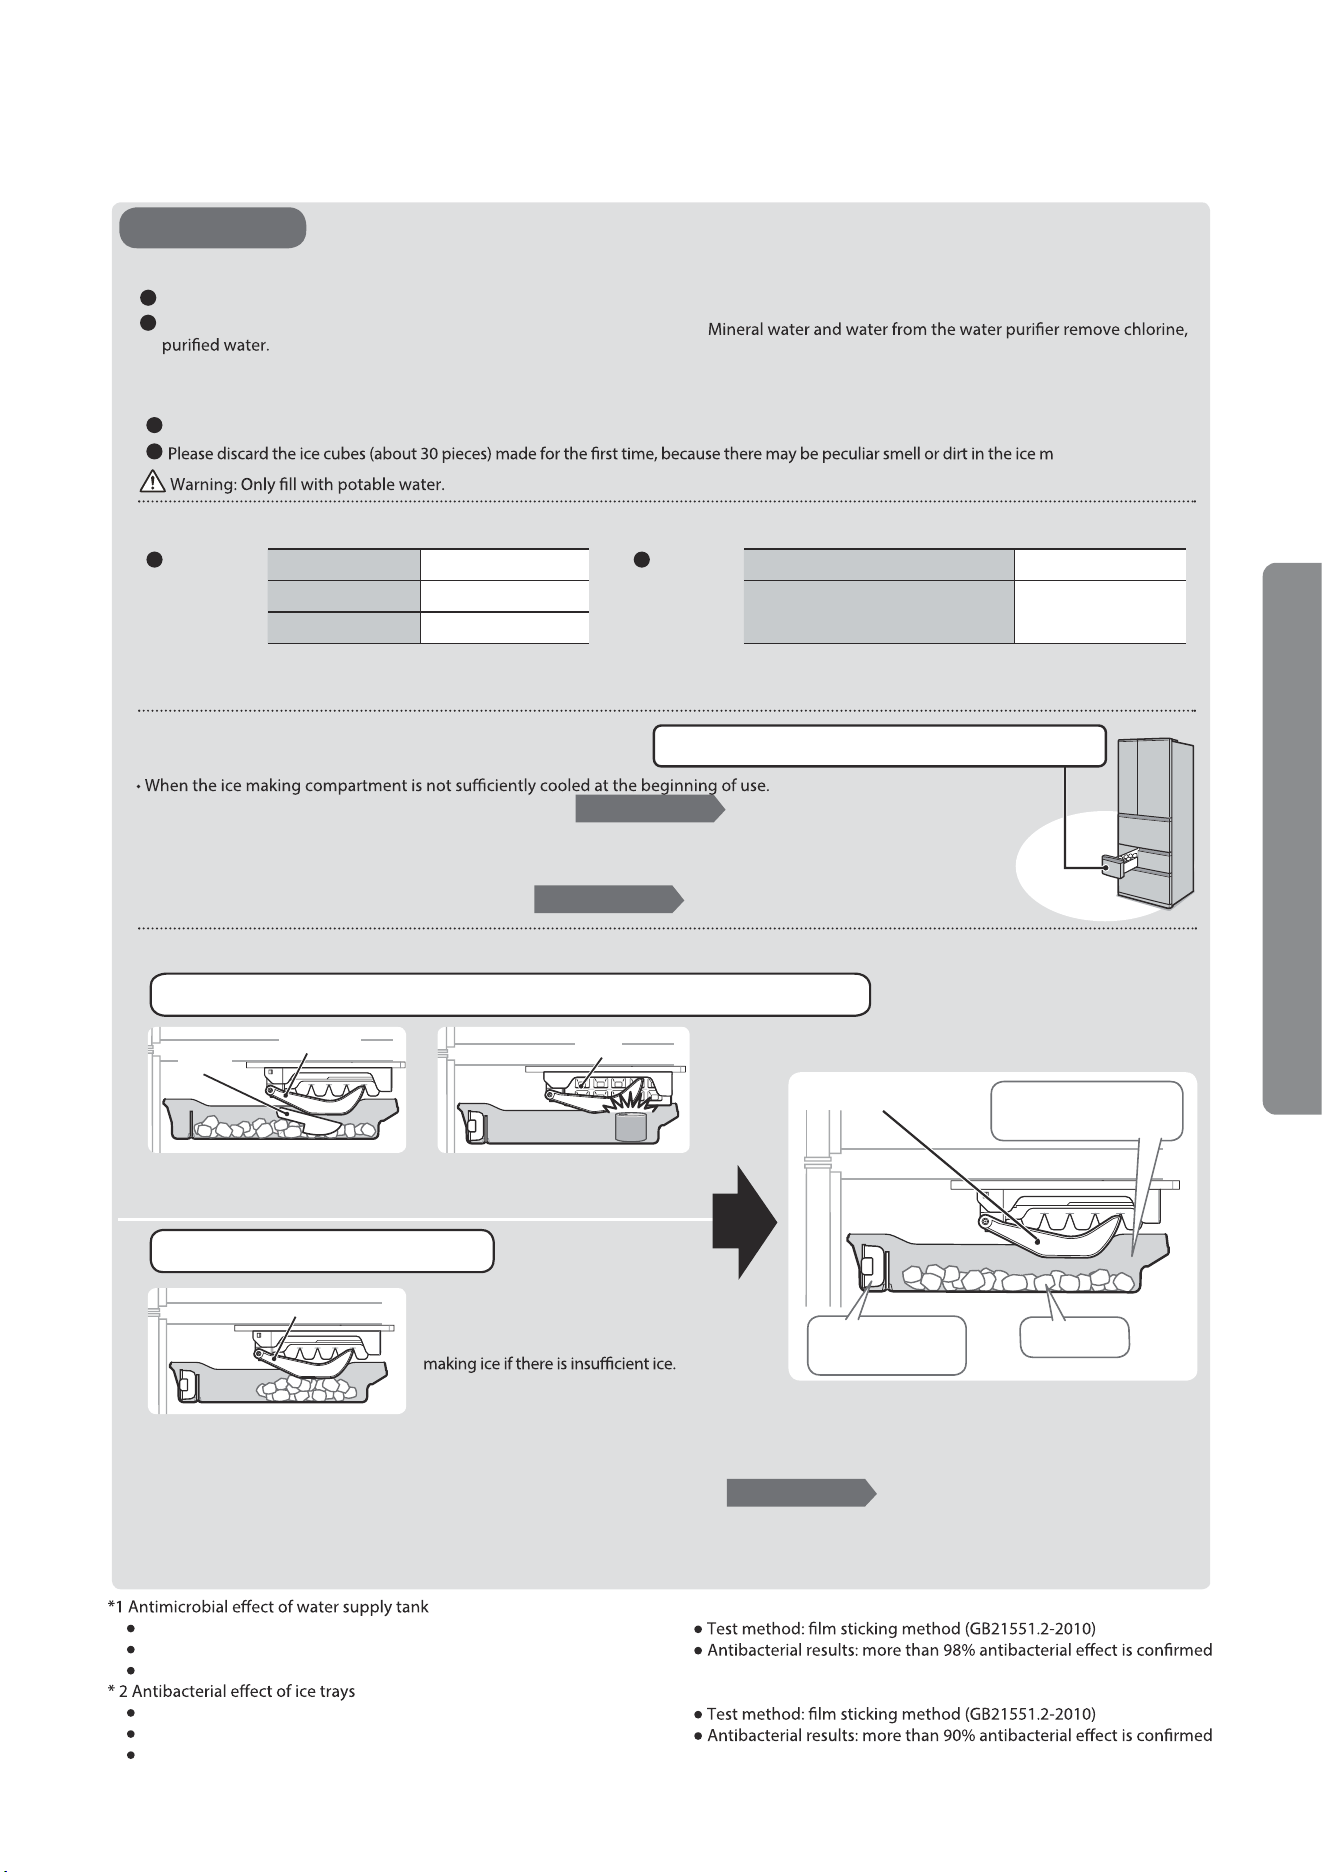
Ice making compartment
(automatic ice maker)
Release method
1
2
▲
1
2
▲
▲
Setting Method Setting Method
Water supply inlet cover
Water level
line
21
When stopping halfway
24
Water supply tank
*1
and ice tray
*2
with antimicrobial treatment
Water supply tank
Handle
Clip
Water supply inlet cover
Water tank cover
Water tank
(Capacity: about 1.1L)
Water supply port
When the ice making
function is not used
Rapid ice making
Before ice making
Push the water supply tank into it.
Ice making will not be possible without pushing it inside.
Installation direction
of water supply tank
Open the water supply port cover and add water to the "water level line".
Handle
outward
If the amount of water added exceeds the "water
level line", it is easy to spill water when installing
the water supply tank.
Put your hand close to the lower part of the refrigeration
compartment door, so that the main menu key lights up.
Put your hand close to the lower part of the refrigeration
compartment door, so that the main menu key lights up.
The operation is the same as that of setting method. Touch the button
The operation is the same as that of setting method. Touch the button
light.
Tips
When there is no water in the water supply tank or the ice of the
ice storage box is full, set quick ice making. Even if the indicator
light is on, it will not be used for quick ice making.
When it is set to stop ice making, the ice or water remaining in the
and stop ice making.
Move slowly to
prevent water from
spilling out.
Do not hook the buckle
and pull out the water
supply tank
Otherwise, the water tank
cover will become loose and
cause water to splash out.
Touch the main menu key to light up the touch panel.
Touch this button repeatedly to turn on the
light.
Quick ice making begins.
Touch the main menu key to light up the touch panel.
Touch this button repeatedly to turn on the
light.
Ice making stops.
Start making ice.
After about 8 hours, it ends automatically. (
Ice storage box
Ice scoop
(Ambient temperature: 20°C, without door opening and closing)
Ice-making
time
• In the general ice making mode, about 10 ice blocks can be made at one time. The ice making time may be prolonged depending on the
operating state of the refrigerator.
General ice making Once every about 2 hours
Rapid ice making Once every about 1 hour
Automatic Power Saving Once every about 8 hours
Water before/during ice making
Precautions for Ice Making
Ice making time and ice storage capacity
The ice making time may be prolonged in the
following cases.
Ice will continue to be made until the probe touches the ice.
Precautions
Ice storage
capacity
When the ice cubes are spread out for
continuous ice making
About 130
About 50~100
Detecting rod
Flatten ice
Ice cannot be made when there is water in the supply tank. The following situations may occur:
The amount of ice making is small, and the
following situations may occur
Detecting rod
ice tray
Detecting rod
Ice scoop
At high ambient temperatures, ice making may take more
than 1 day.
It is recommended that the user use
Before use, please clean the water supply tank with water to prevent scale or microorganism.
aking compartment.
Do not put hot water above 60°C or liquid other than clear water such as fruit juice, otherwise it will cause failure.
Please refer to Page 10
Please refer to Page 26
Please refer to Page 24
25
When using mineral water to make ice,
please use mineral water with a
hardness of less than 100mg/L.
which is easy to breed miscellaneous bacteria and scale, and cause
sticky inner wall of the water supply tank. Therefore, it needs to be
cleaned carefully.
Especially when the ambient temperature is high such as ( ) during automatic power saving
setting or summer, it may even take more than 1 day.
• When the refrigerator door is opened and closed many times, or when a large amount of food is put in at one time.
• When the compartment temperature is low in winter or very hot in summer.
• When the gap around the refrigerator is too narrow.
When ice blocks are accumulated in local
areas and the door of the ice making
compartment is not opened or closed
Items other than ice are stored
and the detection rod is touched
There are items other than ice stored,
resulting in collision when the ice making
tray is turned over or ice making stops
When some ice cubes are accumulated
in local areas, they may touch the
detection rod prematurely and stop
• When using the ice maker, please do not place items other than ice in the ice storage box. If you put items other than ice into it, collision
damage or ice making stop will be caused when the ice tray is turned over.
• When other items need to be stored, please stop using the ice making function.
• When the ice making function is enabled again, please remove other items from the ice storage box and clean it.
• When putting in other items, please be careful not to go too high to avoid jamming the ice maker.
Test sponsor: Guangdong Microbiological Analysis and Testing Center
Antibacterial method: antibacterial materials
Antibacterial object: water supply tank
Test sponsor: Guangdong Microbiological Analysis and Testing Center
Antibacterial method: antibacterial materials
Antibacterial object: ice tray
Do not put anything
other than ice
After the ice spoon
is used up, please
put it back in place
Method of Use

When the Automatic ECO Mode is enabled, the freezer can save about 10%
*1
of electricity and run more quietly.
When the three doors of refrigeration compartment, ice making compartment and freezing compartment are not opened or
closed for more than 24 hours, they will automatically switch to the power-saving mode of 20%
*2
.
If you want to save power or go out for a long time, it is recommended to use the automatic power saving function.
Operate at a temperature that has no impact on food. (The temperature of the refrigeration compartment and freezing
compartment is about 1~2°C higher)
(The temperature value is measured when the ambient temperature is 32°C, the temperature adjustment gear is "Moderate", no food is put in, the
refrigerator door is closed and the temperature is stable.)
When it is set to automatic power saving, the temperature cannot be adjusted. If you need to adjust the temperature, please cancel the setting.
In the automatic power saving mode of about 20%, as long as any door of the refrigeration compartment, ice making compartment or freezing
compartment is opened, it will automatically switch to the power saving mode of 10%.
When switching to the automatic power saving mode of about 20%, the
• When set to freezing functions such as quick freezing
• When the ambient temperature, door opening and closing frequency, temperature adjustment gear and food storage capacity are d
When it is set to automatic power saving, the ice making time may be prolonged and the number of times will also decrease.
*1.2
Comparison of general operation and automatic power saving modes. Values measured under the experimental conditions of our environmental
laboratory. Conditions: When the ambient temperature is 32°C, set the refrigeration compartment to "Moderate" and the freezing compartment to
"Moderate". There is no door opening or closing action, and ice making operates. Depending on the use environment, the measured values will vary.
Power saving function
The same as the setting method. Touch until the lamp is on.
Release method
1
Put your hand close to the lower part of the refrigeration compartment door, so that the main menu key
lights up.
2
Touch the main menu key to light up the touch panel.
3
Touch until the lamp is on.
The required function lights up to complete the setting.
Setting and release methods
Setting Method
Overcrowding not allowed Minimize the number of door opening and closing Store after cooling
Automatic Power Saving
Save electricity
(The contents of the display
panel are for illustration only)
26
Over-crowded food storage
will cause poor circulation
of cold air.
Opening and closing the door too
frequently will cause cold air leakage
and increase the temperature in the
refrigerator.
Hot rice and hot dishes shall be
stored after cooling to prevent the
temperature in the refrigerator
from rising.
1
2
3
Beep!
1
2
Dust, etc.
Note
27
Warning
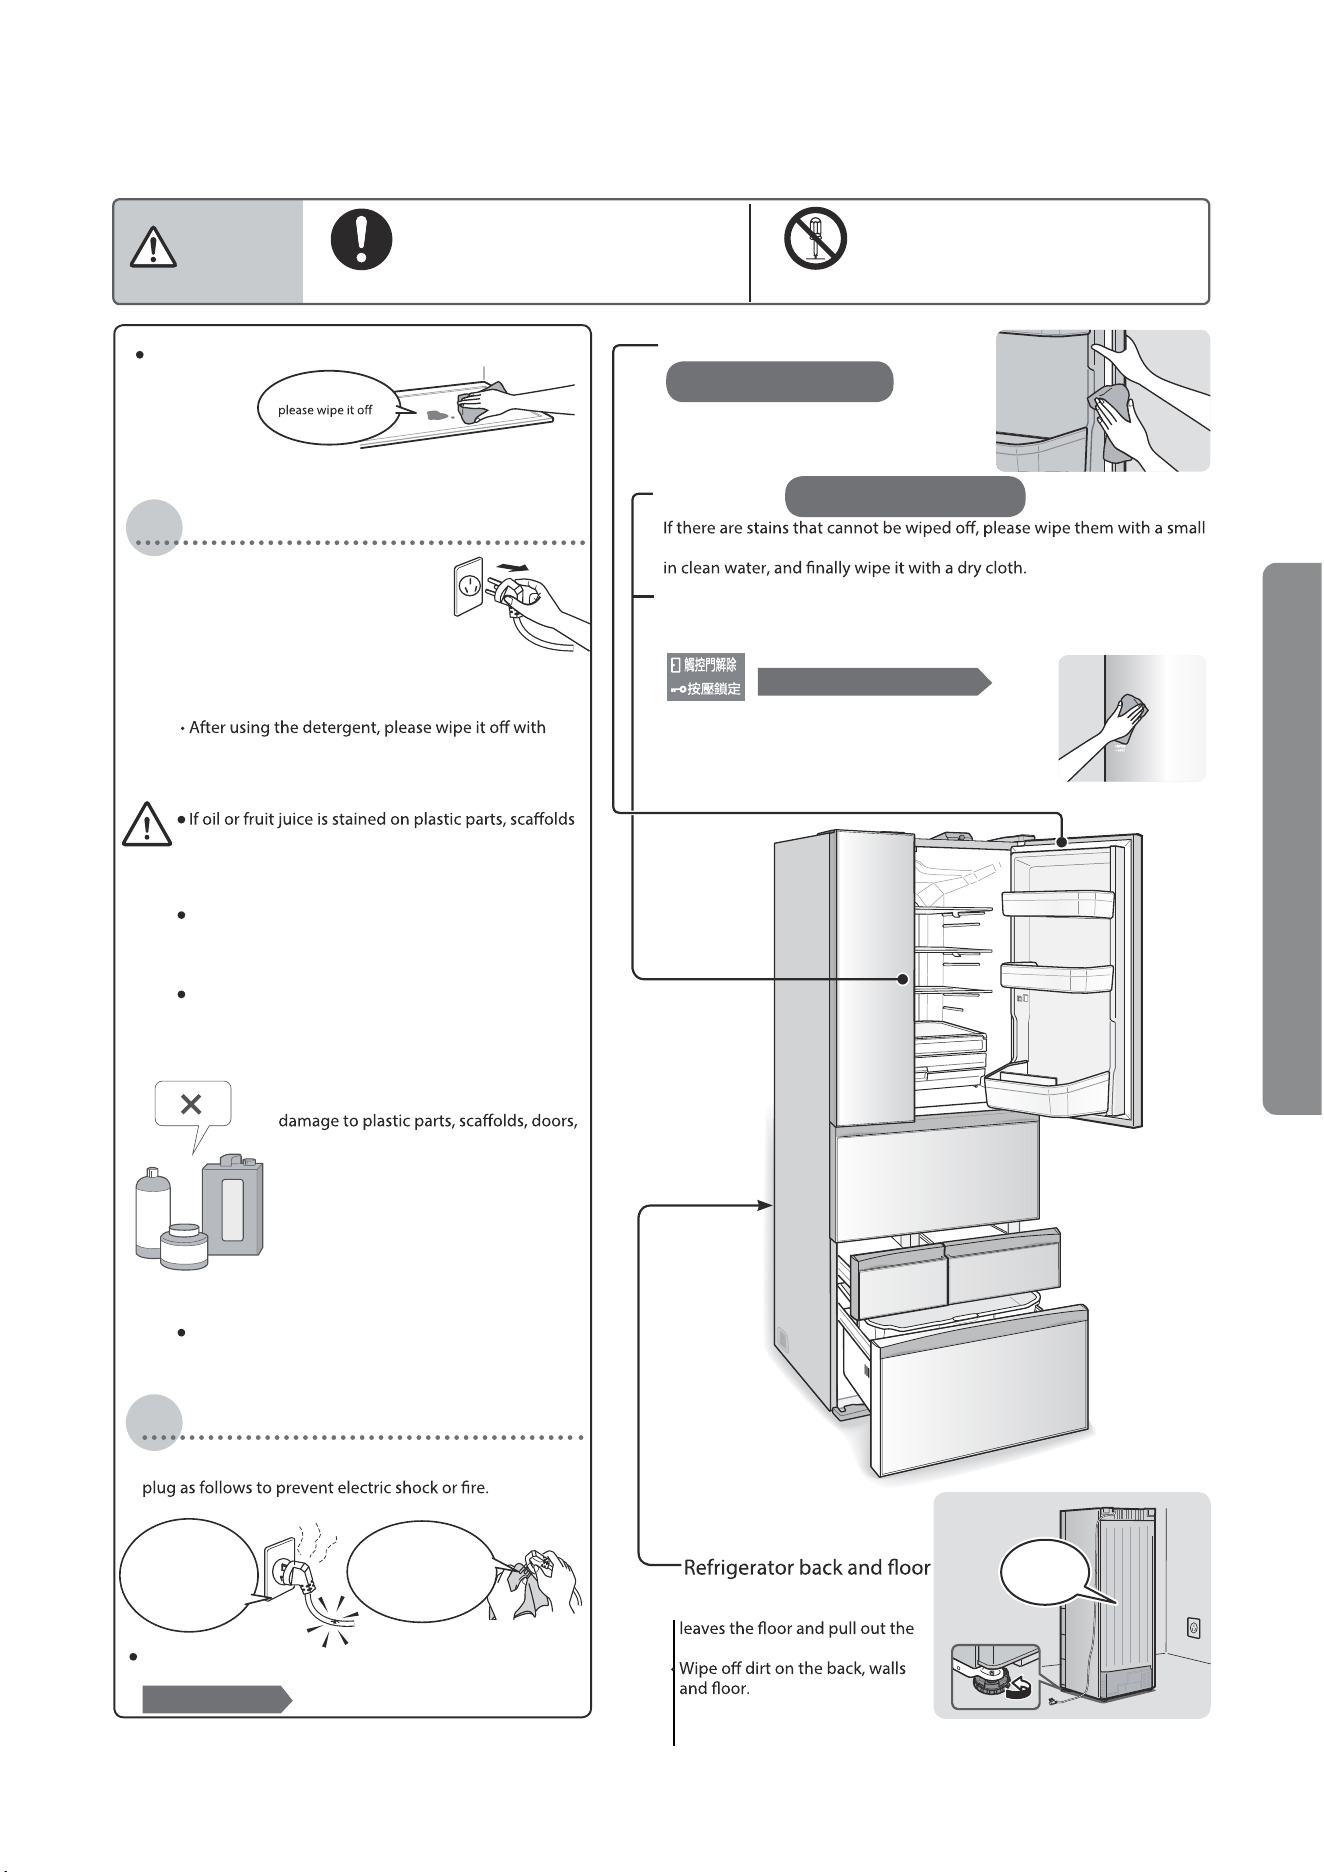
Cleaning and maintenance
Door seal and adsorption surface
Door surface
Touch panel
Before cleaning, please set the automatic door opening unlocking
and key locking.
No disassembly
Do not disassemble, modify or repair it
by yourself.
Please unplug the power plugwhen cleaning
Remove the plug
Pull out the power plug
Do not use the following items:
Cleaning Procedure
Inspection after cleaning
If there is any stain at ordinary times, wipe it with a dry cloth.
Please wipe with a soft cloth dipped
in warm water
Wipe with a wet or dry cloth
Wipe with a wet cloth
Please refer to Page 45
If there is any stain,
immediately
It is easy to be damaged after being
dirty, which will cause cold air leakage.
amount of diluted neutral detergent. Wipe the detergent with a rag dipped
If the above settings are not made, the door may be
opened automatically by touching the button
during cleaning or the temperature level is changed.
• When using neutral detergent for kitchen,
please dilute it before use.
water and then with a dry cloth.
and doors, please wipe them clean immediately.
Failure to do so may cause these components to
crack or discolor.
Do not apply force to the glass surface and edges
by impact. Otherwise, the glass may be broken or
chipped.
The temperature rise of frozen foods during
maintenance or cleaning may shorten the storage
period.
If you have any questions, please call the service hotline
immediately.
After cleaning, please check the power cord and
• Rotate the adjusting foot until it
refrigerator.
The power
cord is damaged,
the plug is heated
and inserted
very loosely
When there is
dust, please wipe
it clean with a
dry cloth.
Alkaline detergents for kitchen use or
those labeled as mildly alkaline
(Otherwise, it may cause breakage or
etc)
Grinding powder, washing powder,
alcohol (ethanol, methanol, etc.),
gasoline, thinner, acid, alkali, wax,
petroleum, hot water, brush, etc.
(otherwise, it may cause crack or damage
to plastic parts, shed frame, door, etc., or
painted surface is damaged)
Please clean the invisible parts once or twice a year.
Detergent
Grinding
powder
Gasoline
Please refer to Page 15 and page 16
Method of Use
Cleaning and maintenance
.....Continued
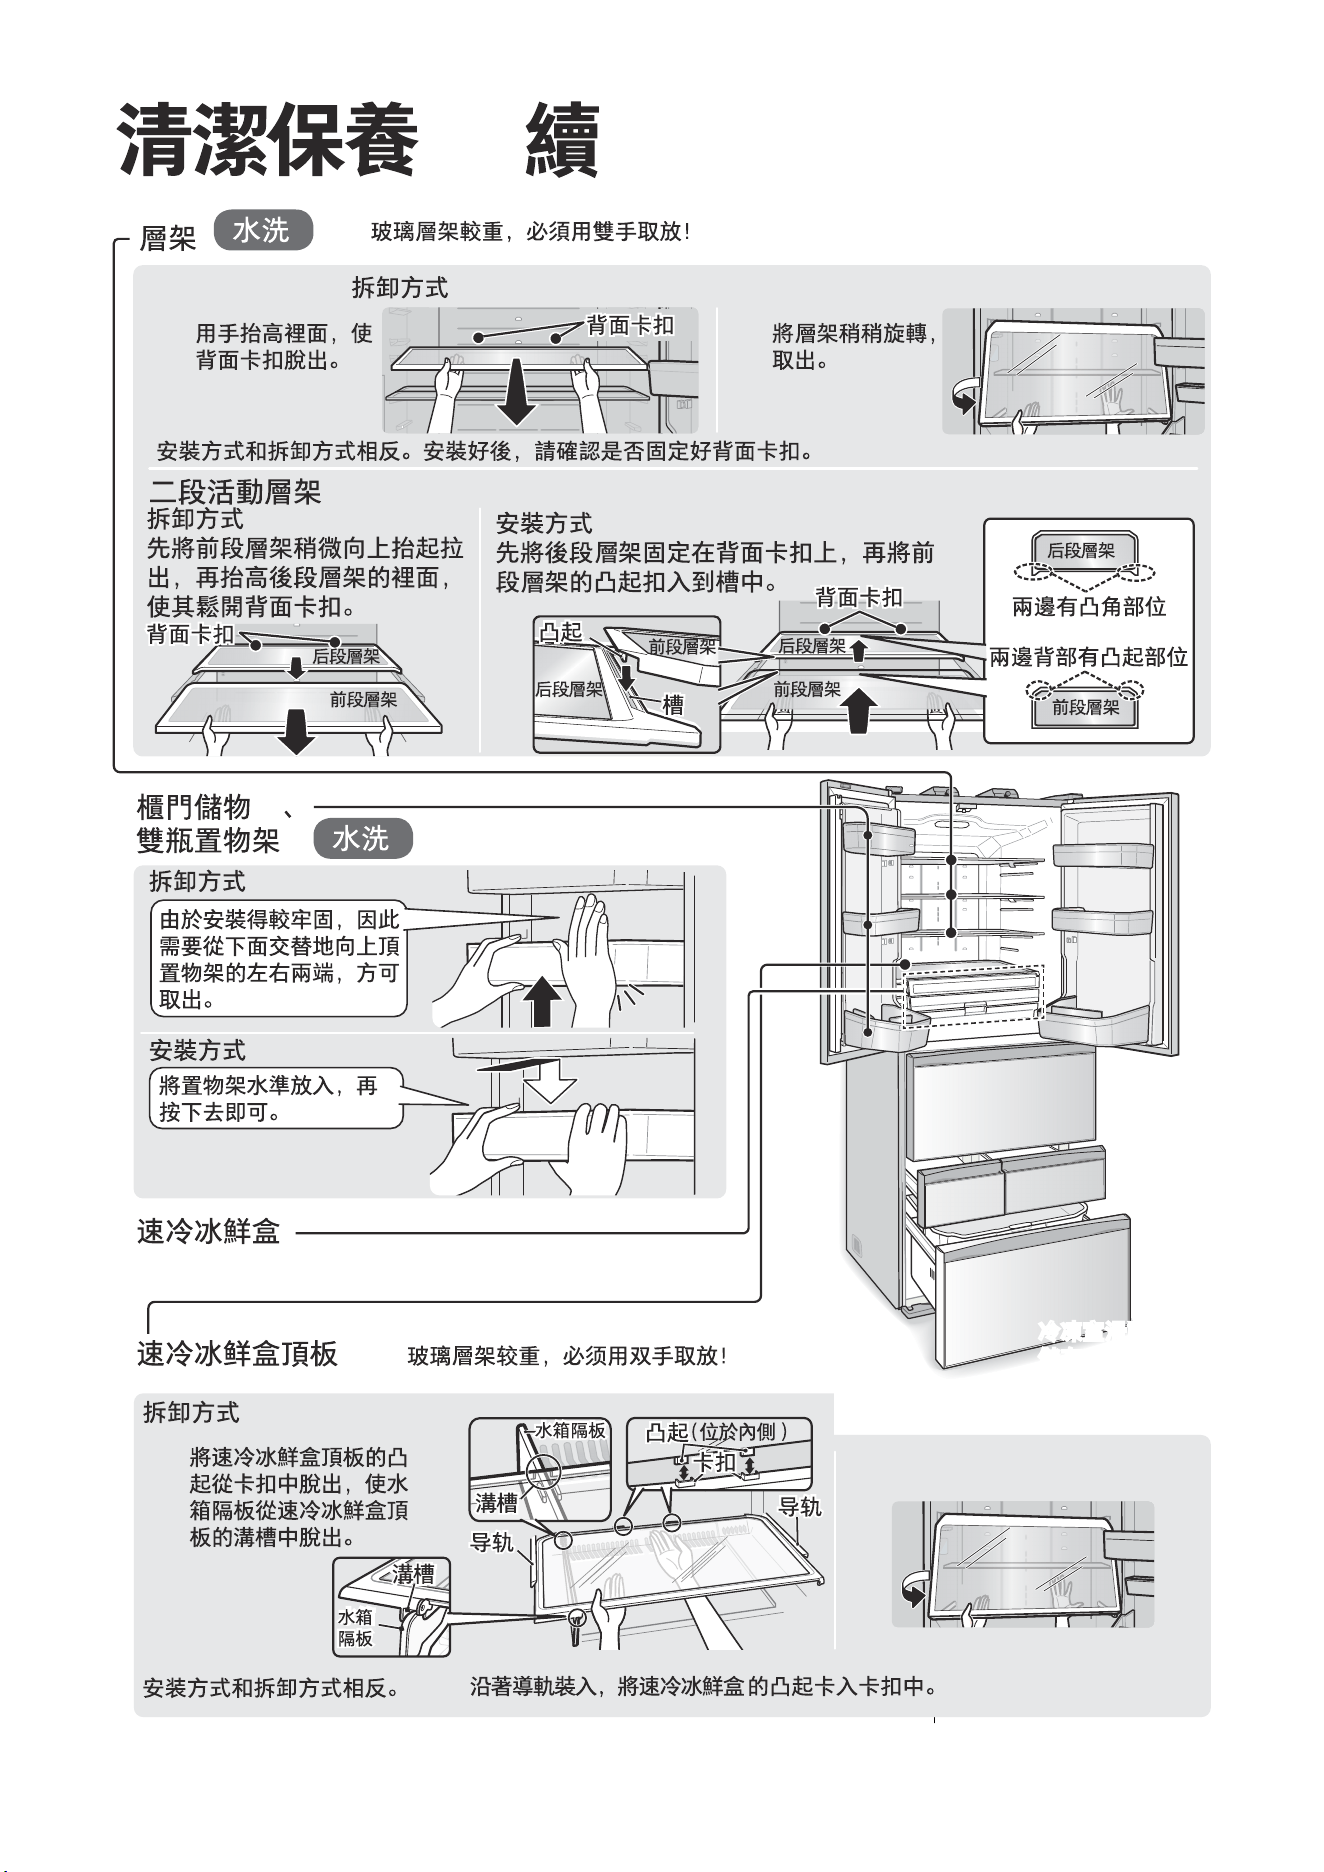
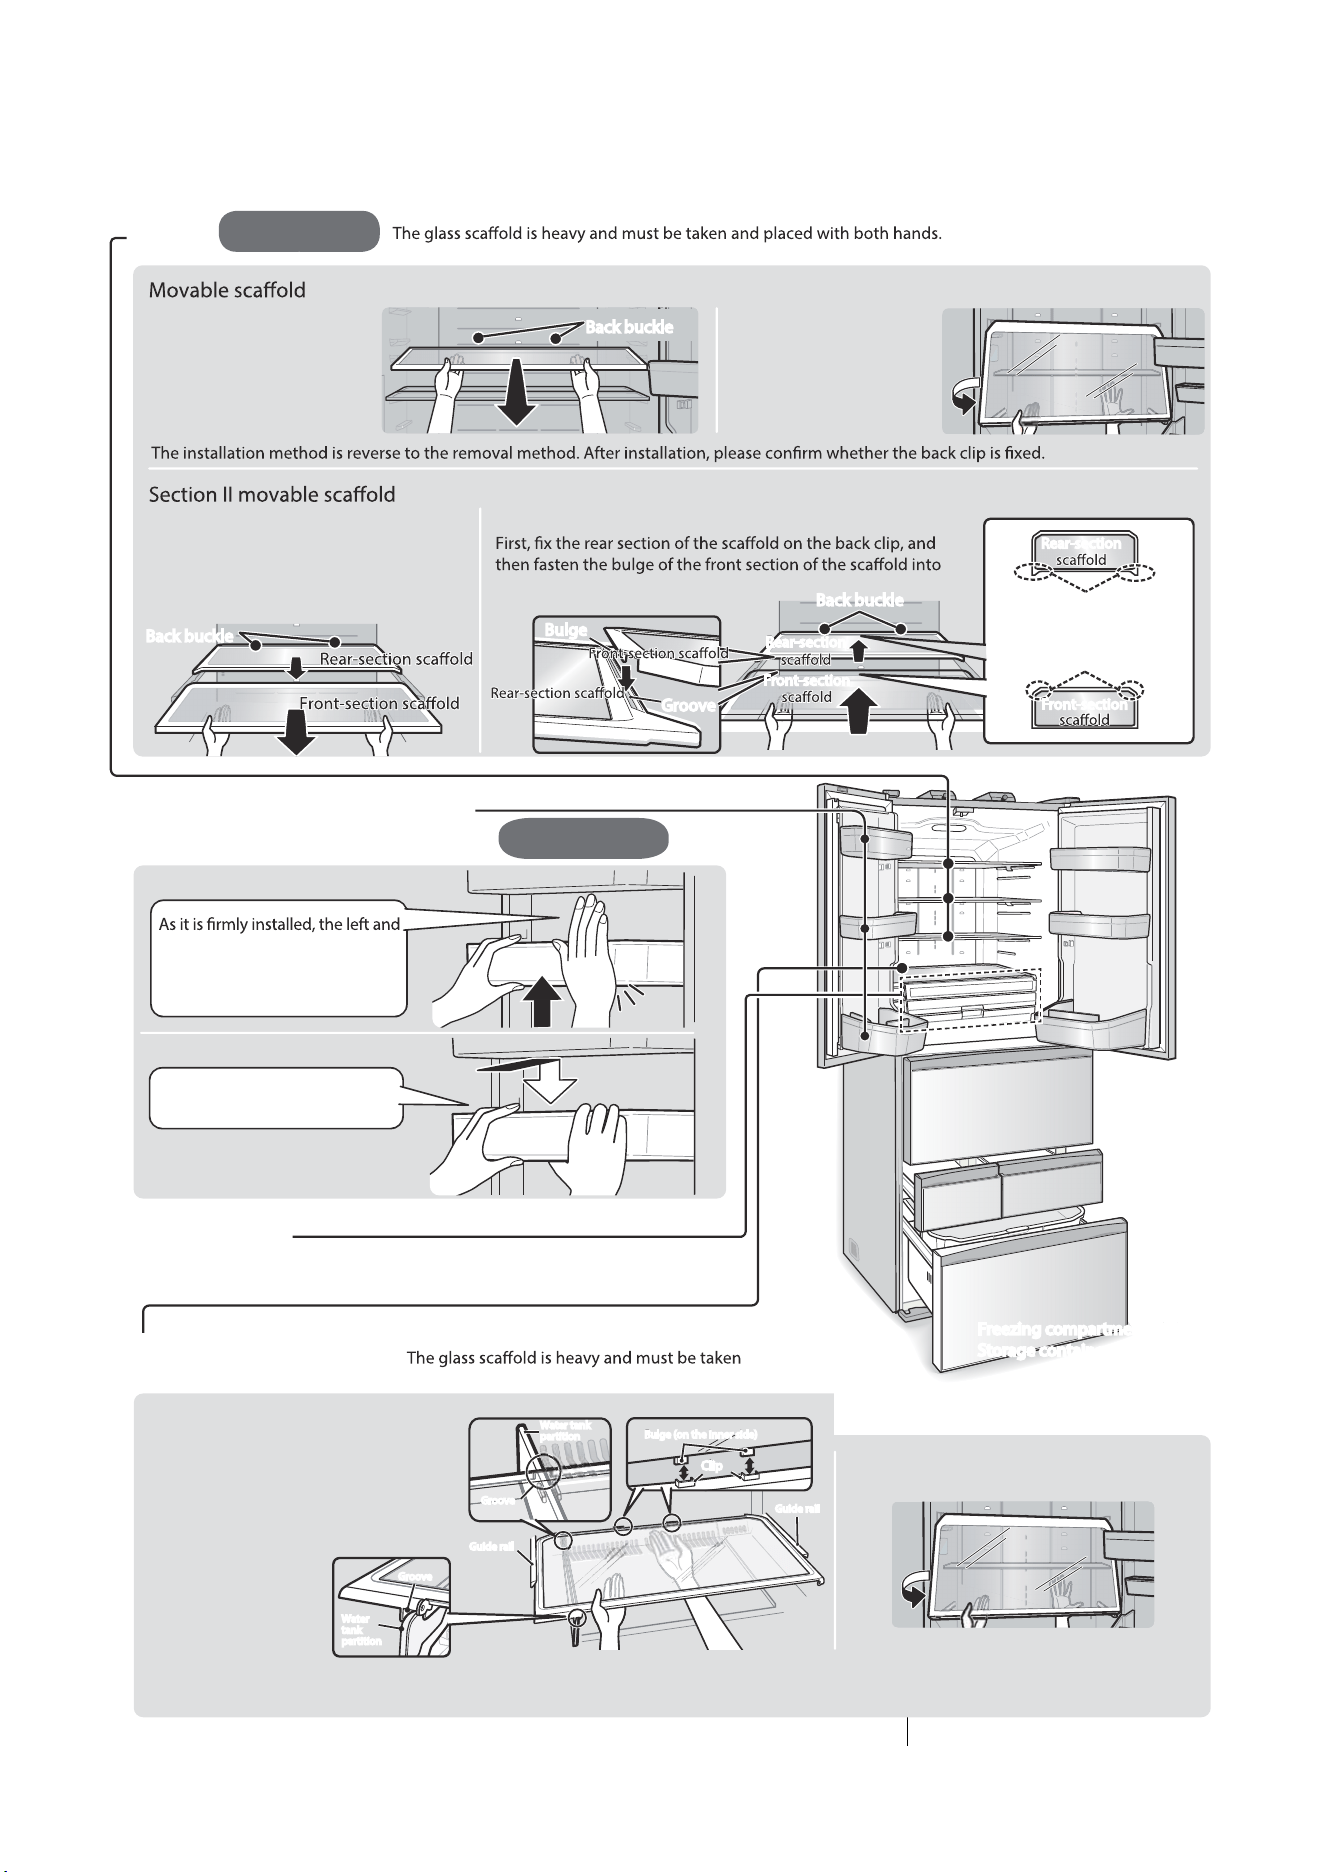
Scaffold
Disassembly method
1 2
The installation method is reverse to
the removal method.
Install along the guide rail, and snap the protrusion of the quick-cooling refrigerator box into the buckle.
Rotate the top plate of the quick-chilling
refrigerator box slightly and take it out.
21
Water washing
Water washing
28
Raise the inside by
hand to disengage the
clip on the back.
Disassembly method
Lift and pull out the front truss slightly, then
lift the inside of the rear truss to loosen its
back buckle.
Mounting method
the groove.
Rotate the trellis
slightly and take it
out.
Positions with convex
corners on both sides
There are bulges on the
back of both sides
Racks and bottle racks on the door
Rack for double bottles and small rack
Disassembly method
Mounting method
Quick-chilling
Fresh Box
right ends of the overhead rack
need to be alternately lifted from
below before being taken out.
Place the shelf horizontally and
then press it down.
Pull out the bulge of the top plate of
the quick-chilling refrigerator box
from the buckle, so that the water
tank partition can be pulled out
from the groove of the top plate of
the quick-chilling refrigerator box.
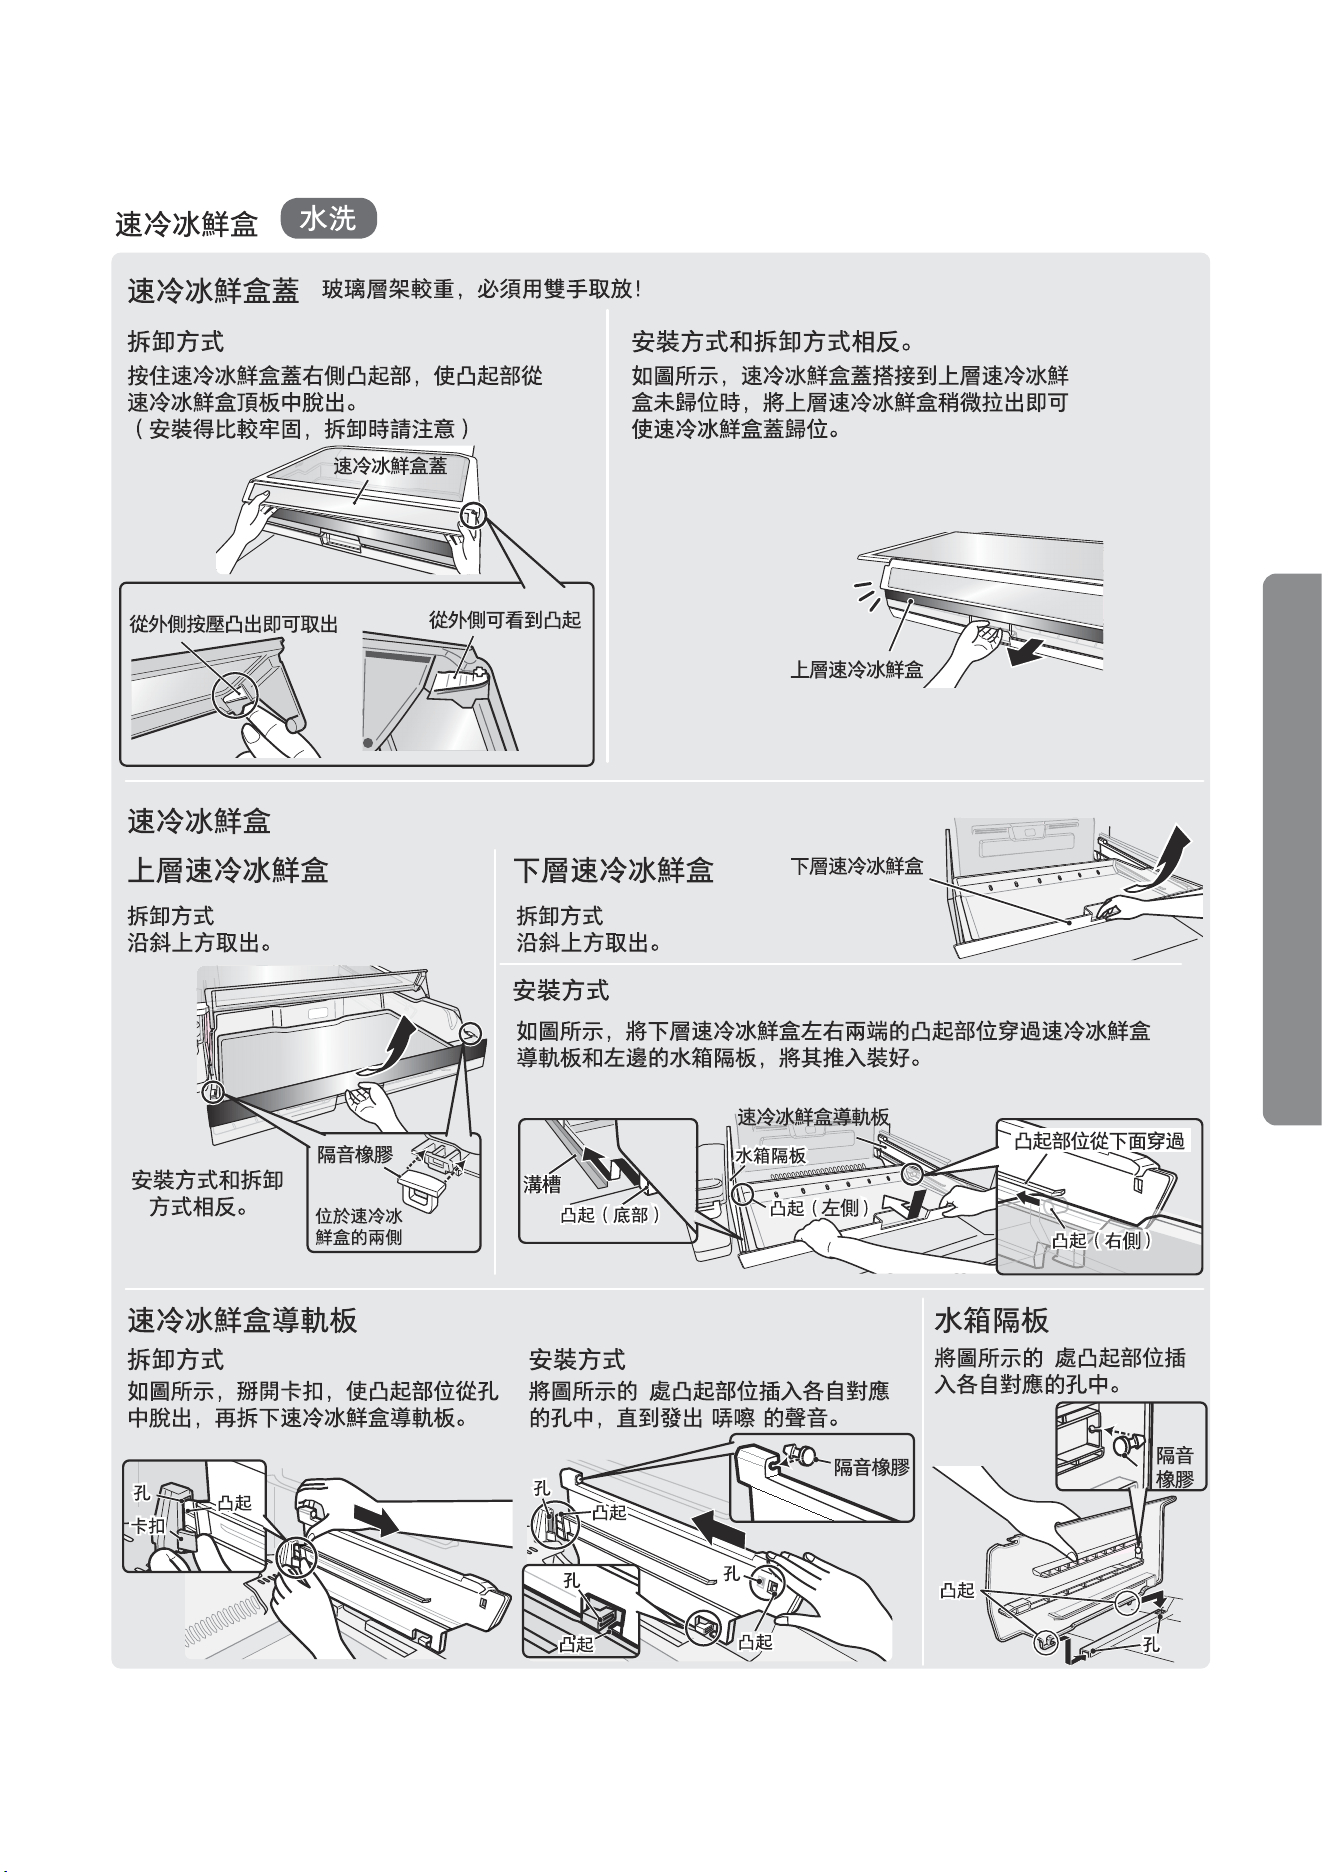
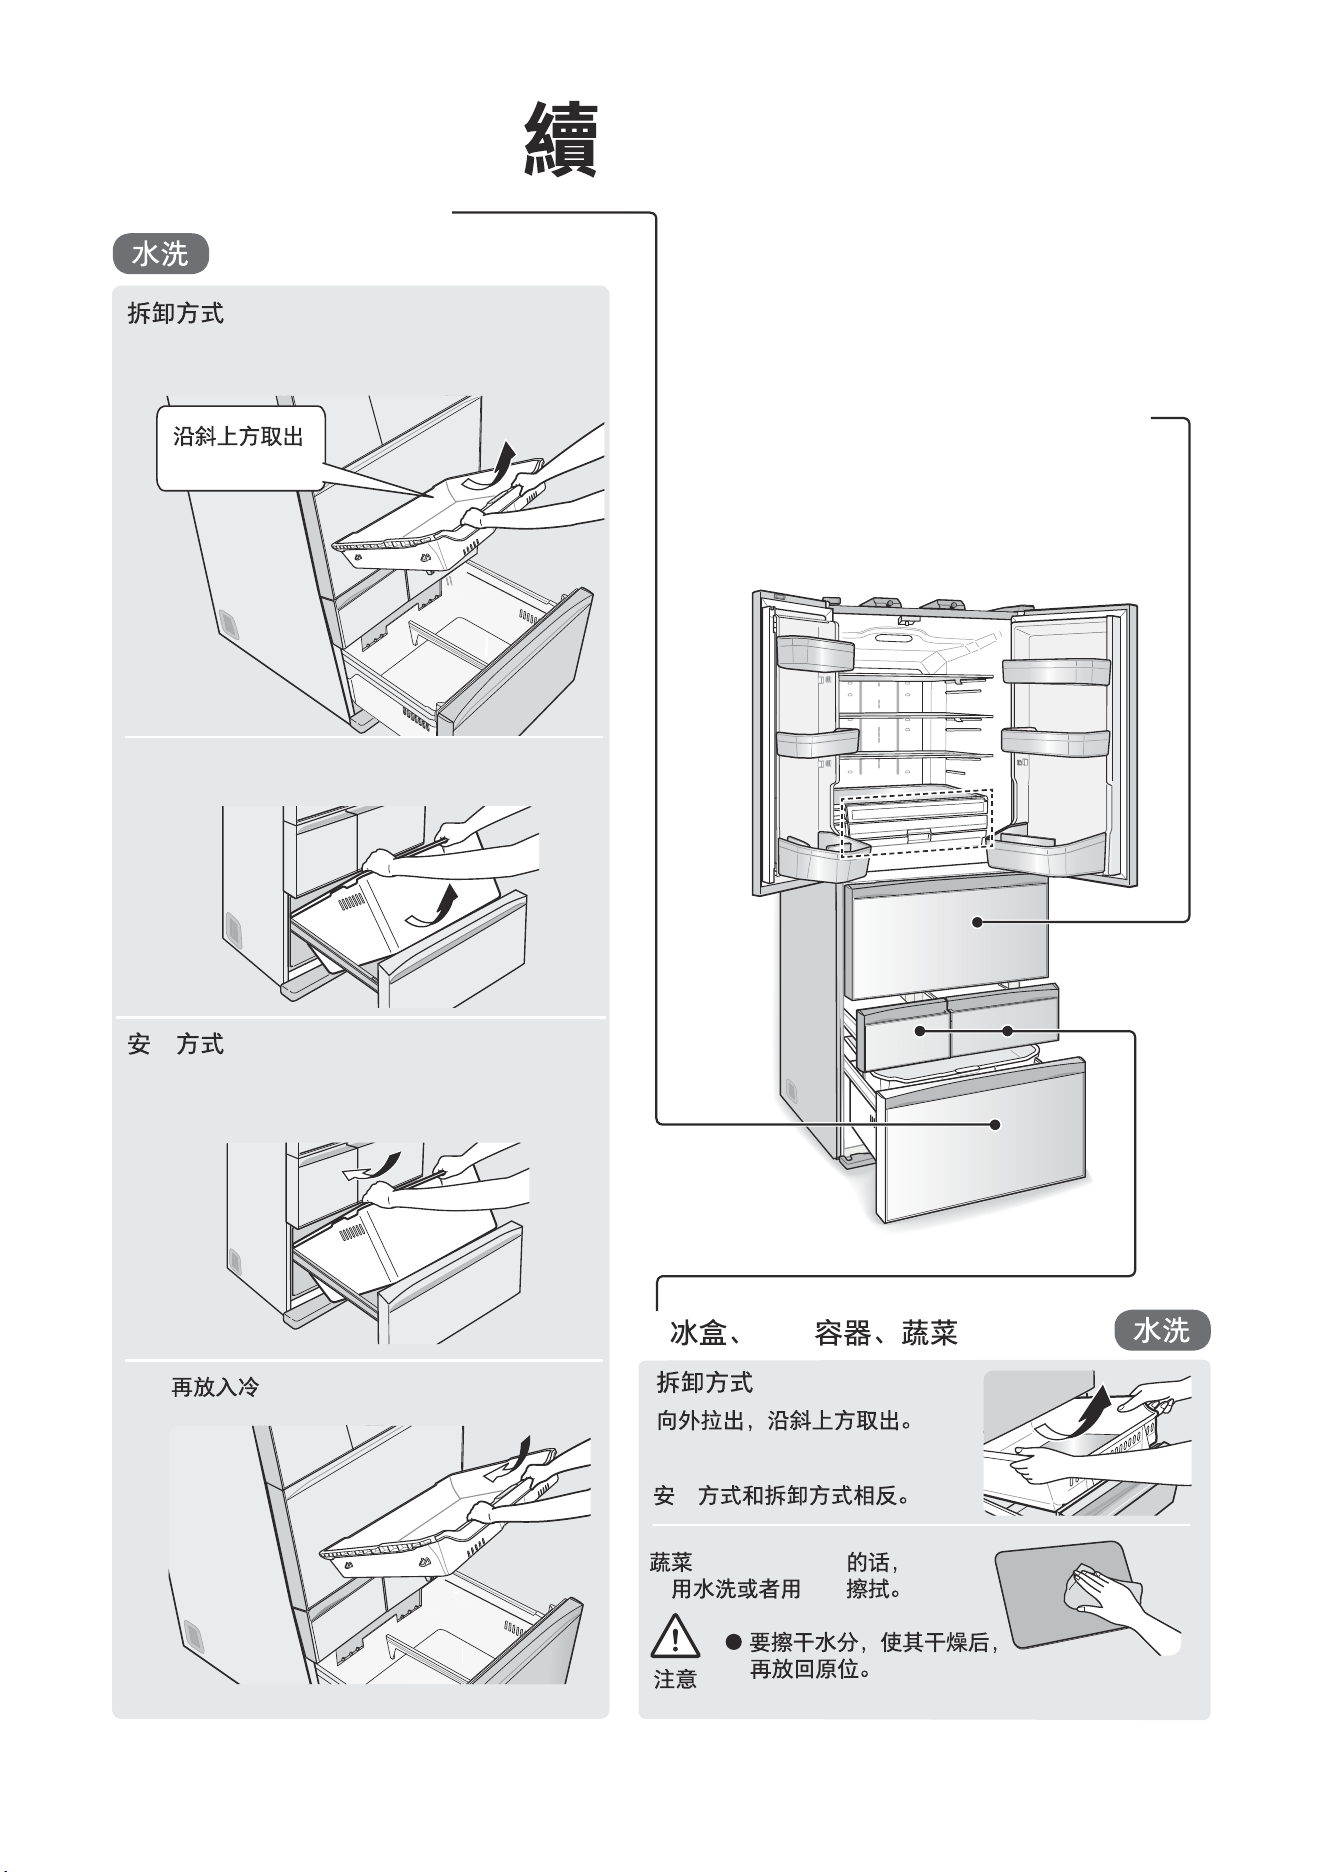
Disassembly method
Top plate of instant
chilling box
and placed with both hands.
Freezing compartment sliding box
Storage container
BulgeBulge
Groove
Water
tank
partition
Water
tank
partition
Water tank
partition
Water tank
partition
Back buckleBack buckle
Back buckle
Back buckle
Groove
Back buckleBack buckle
Rear-section
Rear-section
Front-section
Front-section
Rear-section
Rear-section
Front-section
Front-section
Bulge (on the inner side)Bulge (on the inner side)
Groove
Groove
Guide railGuide rail
Clip
Clip
Guide rail
Guide rail
Groove
Groove
Freezing compartment sliding box
Storage container
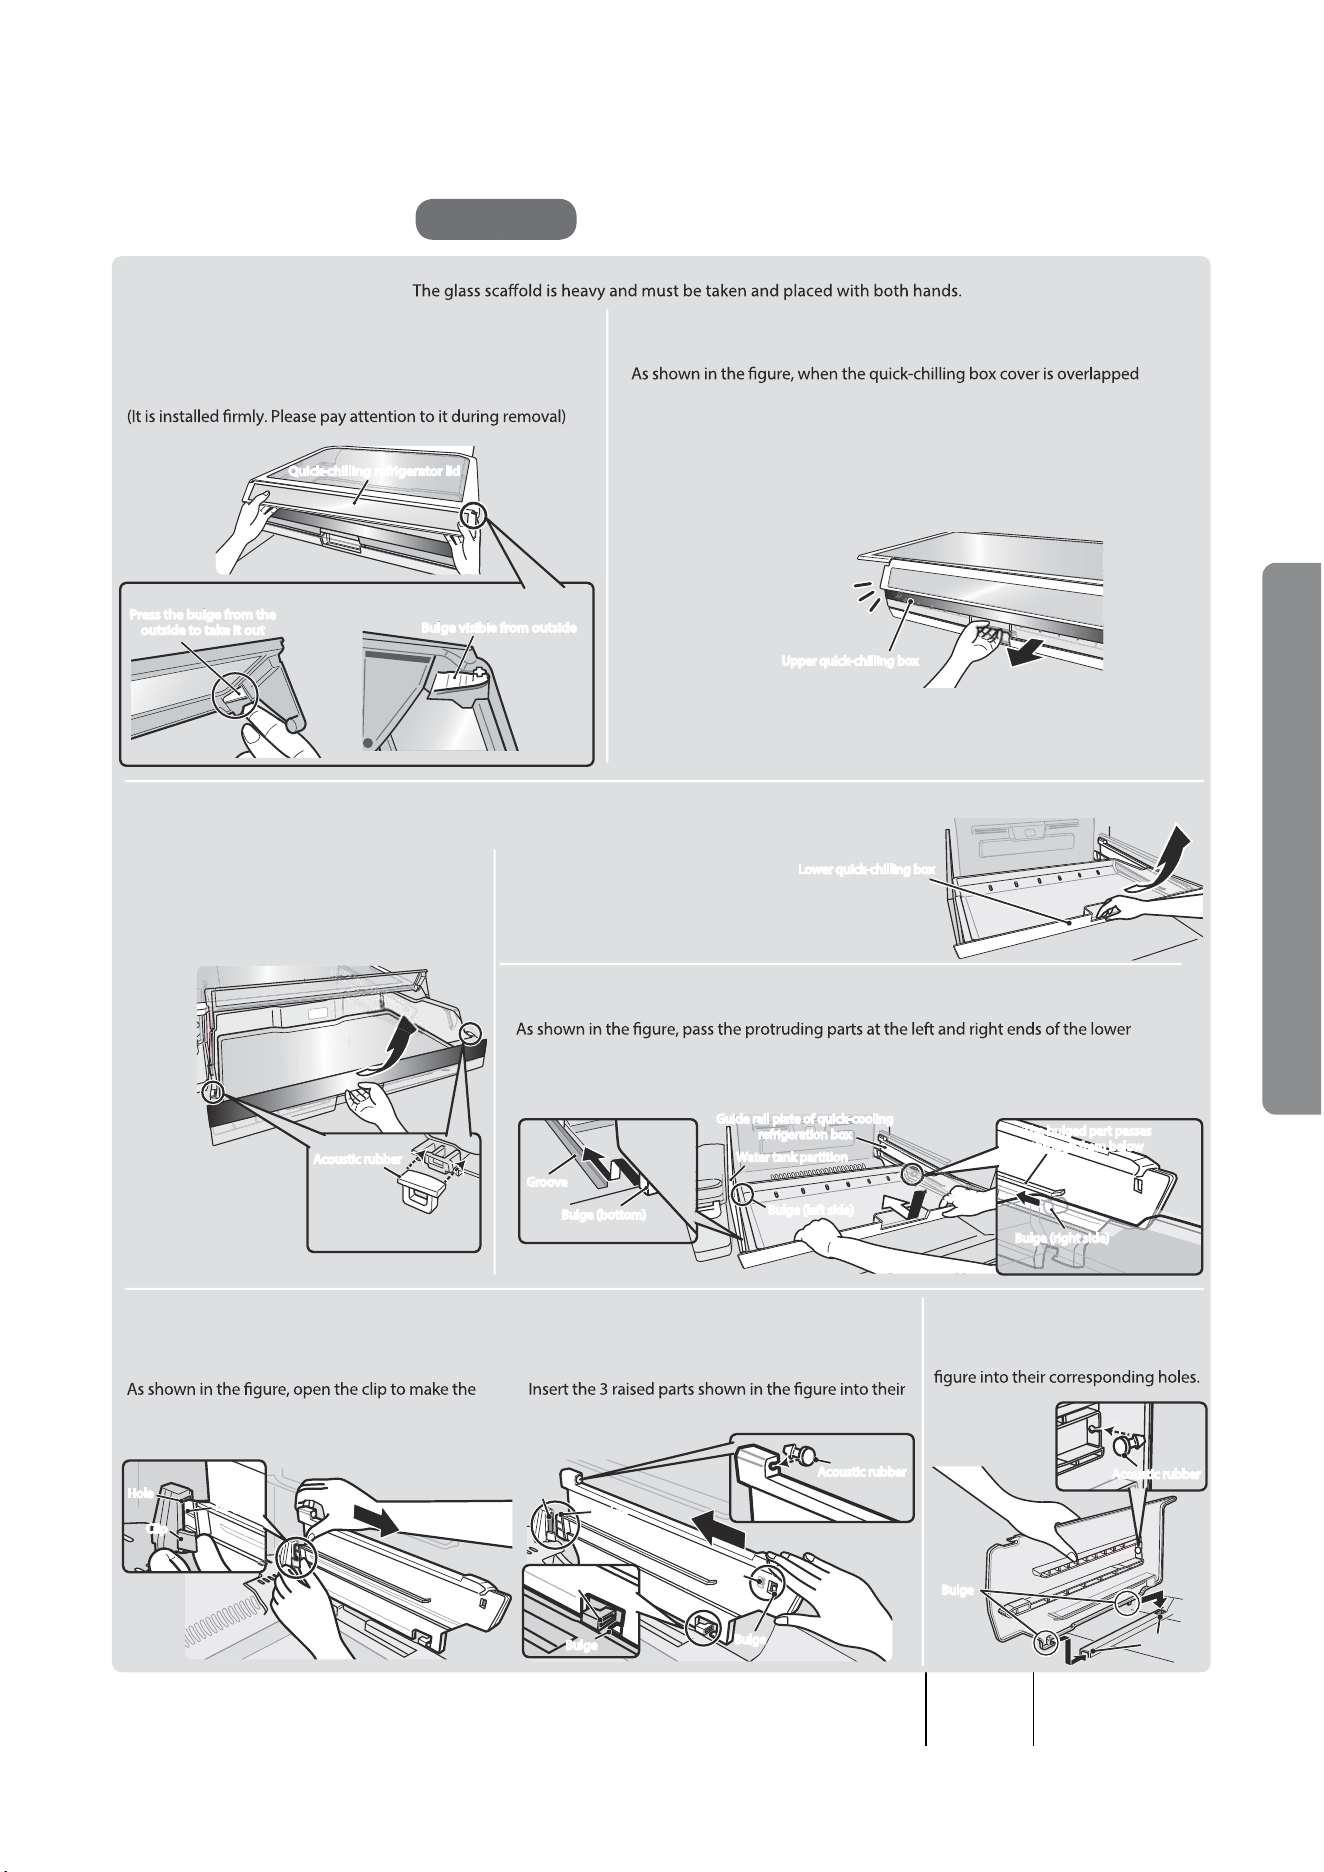
29
Water washing
Bulge
BulgeBulge
Bulge
Bulge
Bulge
Bulge
Bulge
Bulge
Bulge
Hole
Hole
Clip
Clip
Press and hold the bulge on the right side of the quick-chill box
cover to separate it from the top plate of the quick-chill box. with the upper quick-chilling box and not returned to its original position,
pull out the upper quick-chilling box slightly to return the quick-chilling
box cover to its original position.
The installation method is reverse to the removal method.Disassembly method
Quick-chilling refrigerator lid
Quick-chilling Fresh Box
During transportation and relocation
Upper quick-chilling box Lower quick-chilling box
Quick-chilling Fresh Box
Water tank partitionGuide rail plate of quick-cooling refrigeration box
Disassembly method Mounting method
Take it out obliquely upward.
• The installation
method is reverse to
the removal method.
raised part come out of the hole, and then remove the
guide rail plate of the quick-freezing refrigerator box.
corresponding holes until a "click" sound is heard.
Insert the 2 raised parts shown in the
Located on both sides of
the quick-chill box
Take it out obliquely
upward.
quick-chilling refrigerator box through the guide rail plate of the quick-chilling refrigerator
box and the water tank partition on the left to push it into place.
Upper quick-chilling box
Lower quick-chilling box
Hole
Hole
Hole
Hole
Lower quick-chilling box
Quick-chilling refrigerator lidQuick-chilling refrigerator lid
Upper quick-chilling box
Press the bulge from the
outside to take it out
Press the bulge from the
outside to take it out
Bulge visible from outside
Bulge visible from outside
Acoustic rubberAcoustic rubber
Groove
Groove
Bulge (bottom)
Bulge (bottom)
Guide rail plate of quick-cooling
refrigeration box
Guide rail plate of quick-cooling
refrigeration box
Water tank partition
Water tank partition
Bulge (left side)
Bulge (left side)
Bulge (right side)
Bulge (right side)
The bulged part passes
through from below
The bulged part passes
through from below
Acoustic rubber
Acoustic rubber
Acoustic rubber
Acoustic rubber
Method of Use
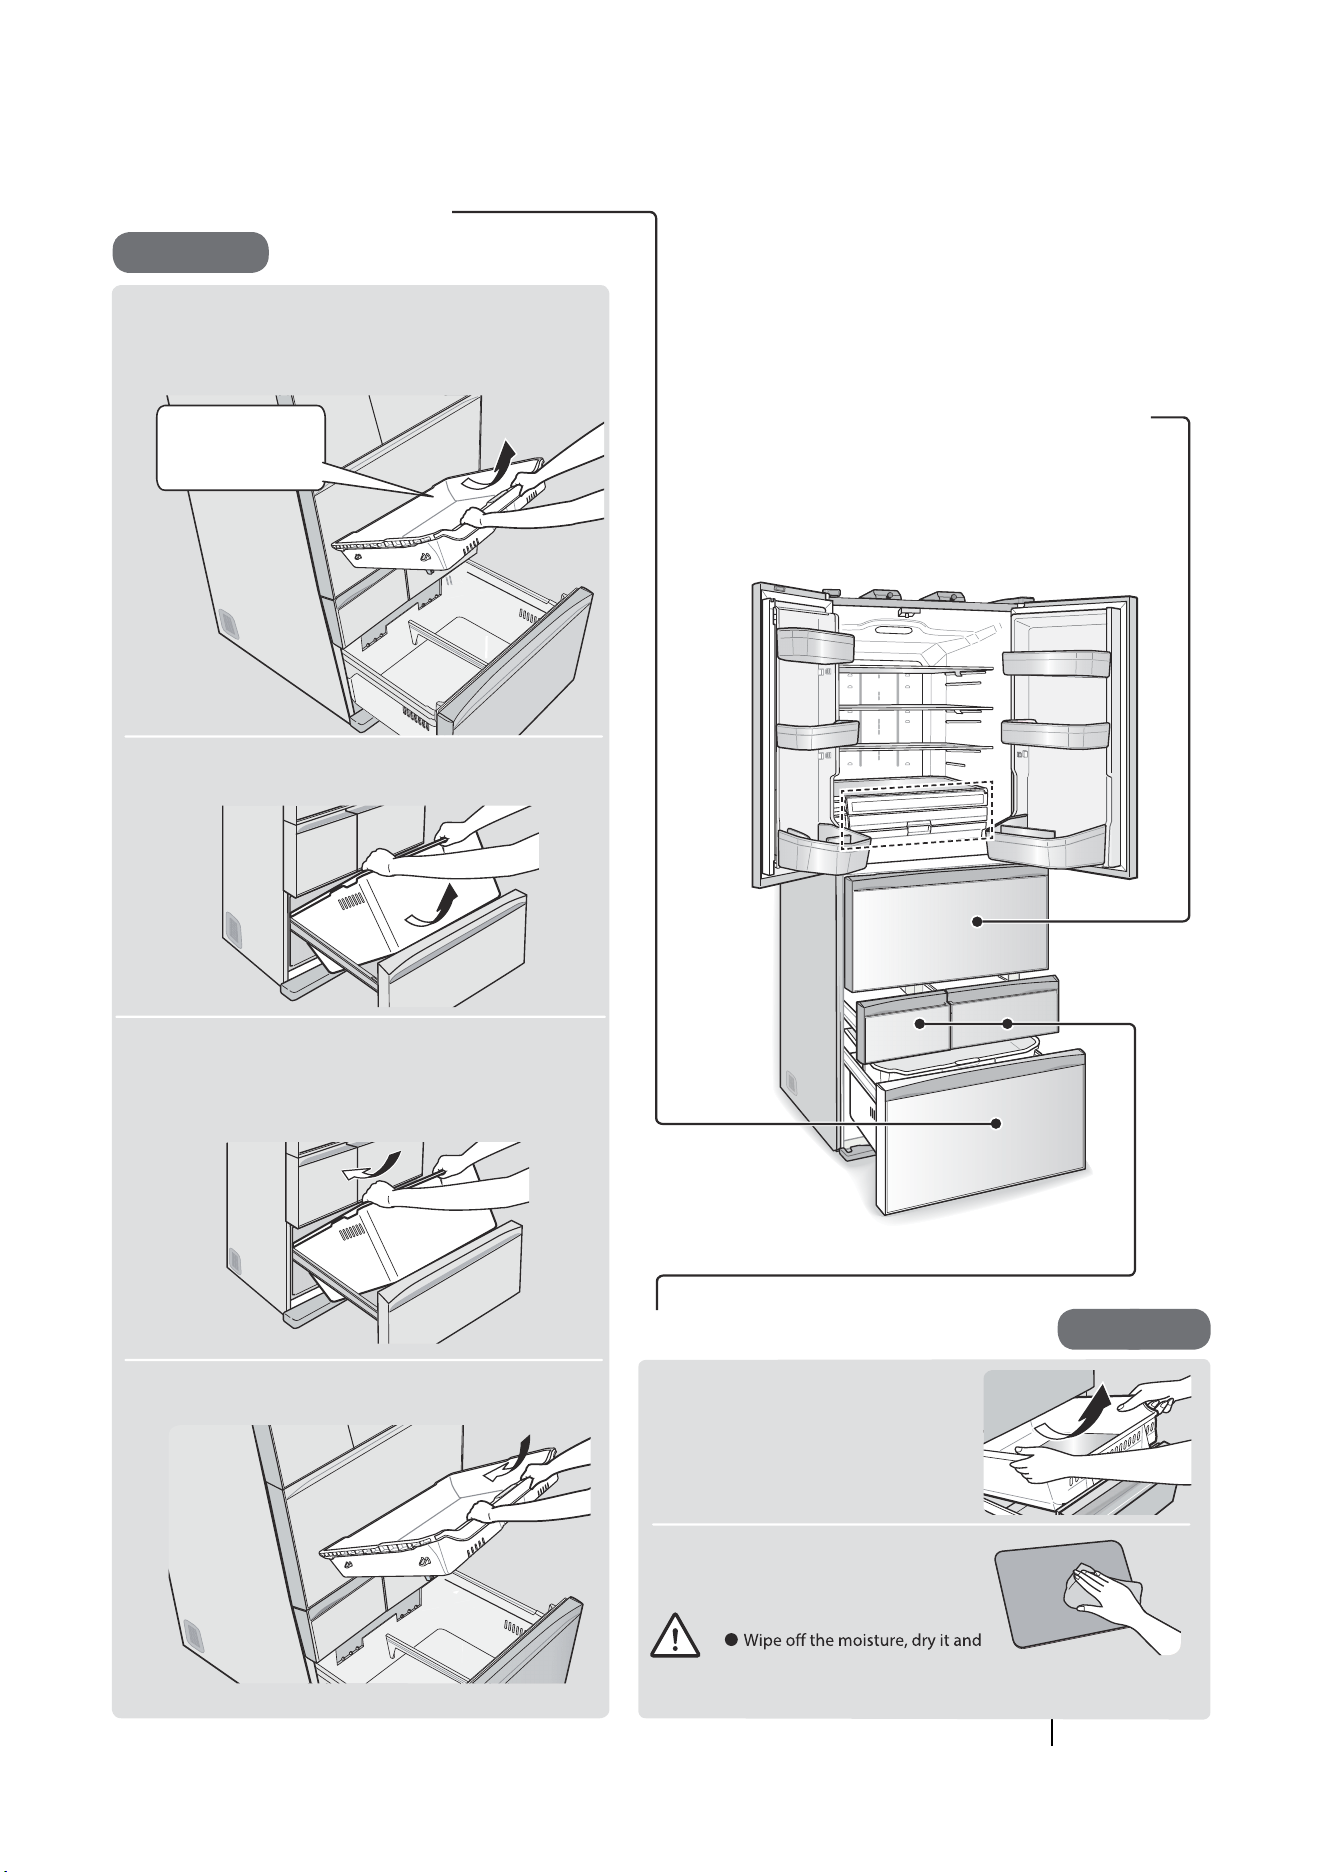
30
1
2
1
2
Disassembly method
Water washing
Ice storage box, freezing container and
vegetable freezing insulation mat
Pull it out and take it out obliquely upward.
• The installation method is reverse to the
removal method.
Disassembly method
Then put it into the sliding box of freezing compartment.
Mounting method
Pull the door out to the maximum extent and remove
the freezer sliding box.
Water washing
Note
Remove the freezing
compartment sliding
box obliquely upward
Lift the door and continue to pull it out until it touches
the ground, and take out the storage container obliquely
upward.
Lift the door and pull it out until it touches the
ground, and put it into the storage container.
If the vegetable freezing insulation mat
is dirty, please wash it with water or wipe
it with a damp cloth.
then put it back to its original
position.
Sliding box, fruit and
vegetable container, and
moisture-permeable box
Cleaning and maintenance
.....Continued
Freezing compartment sliding box,
storage container
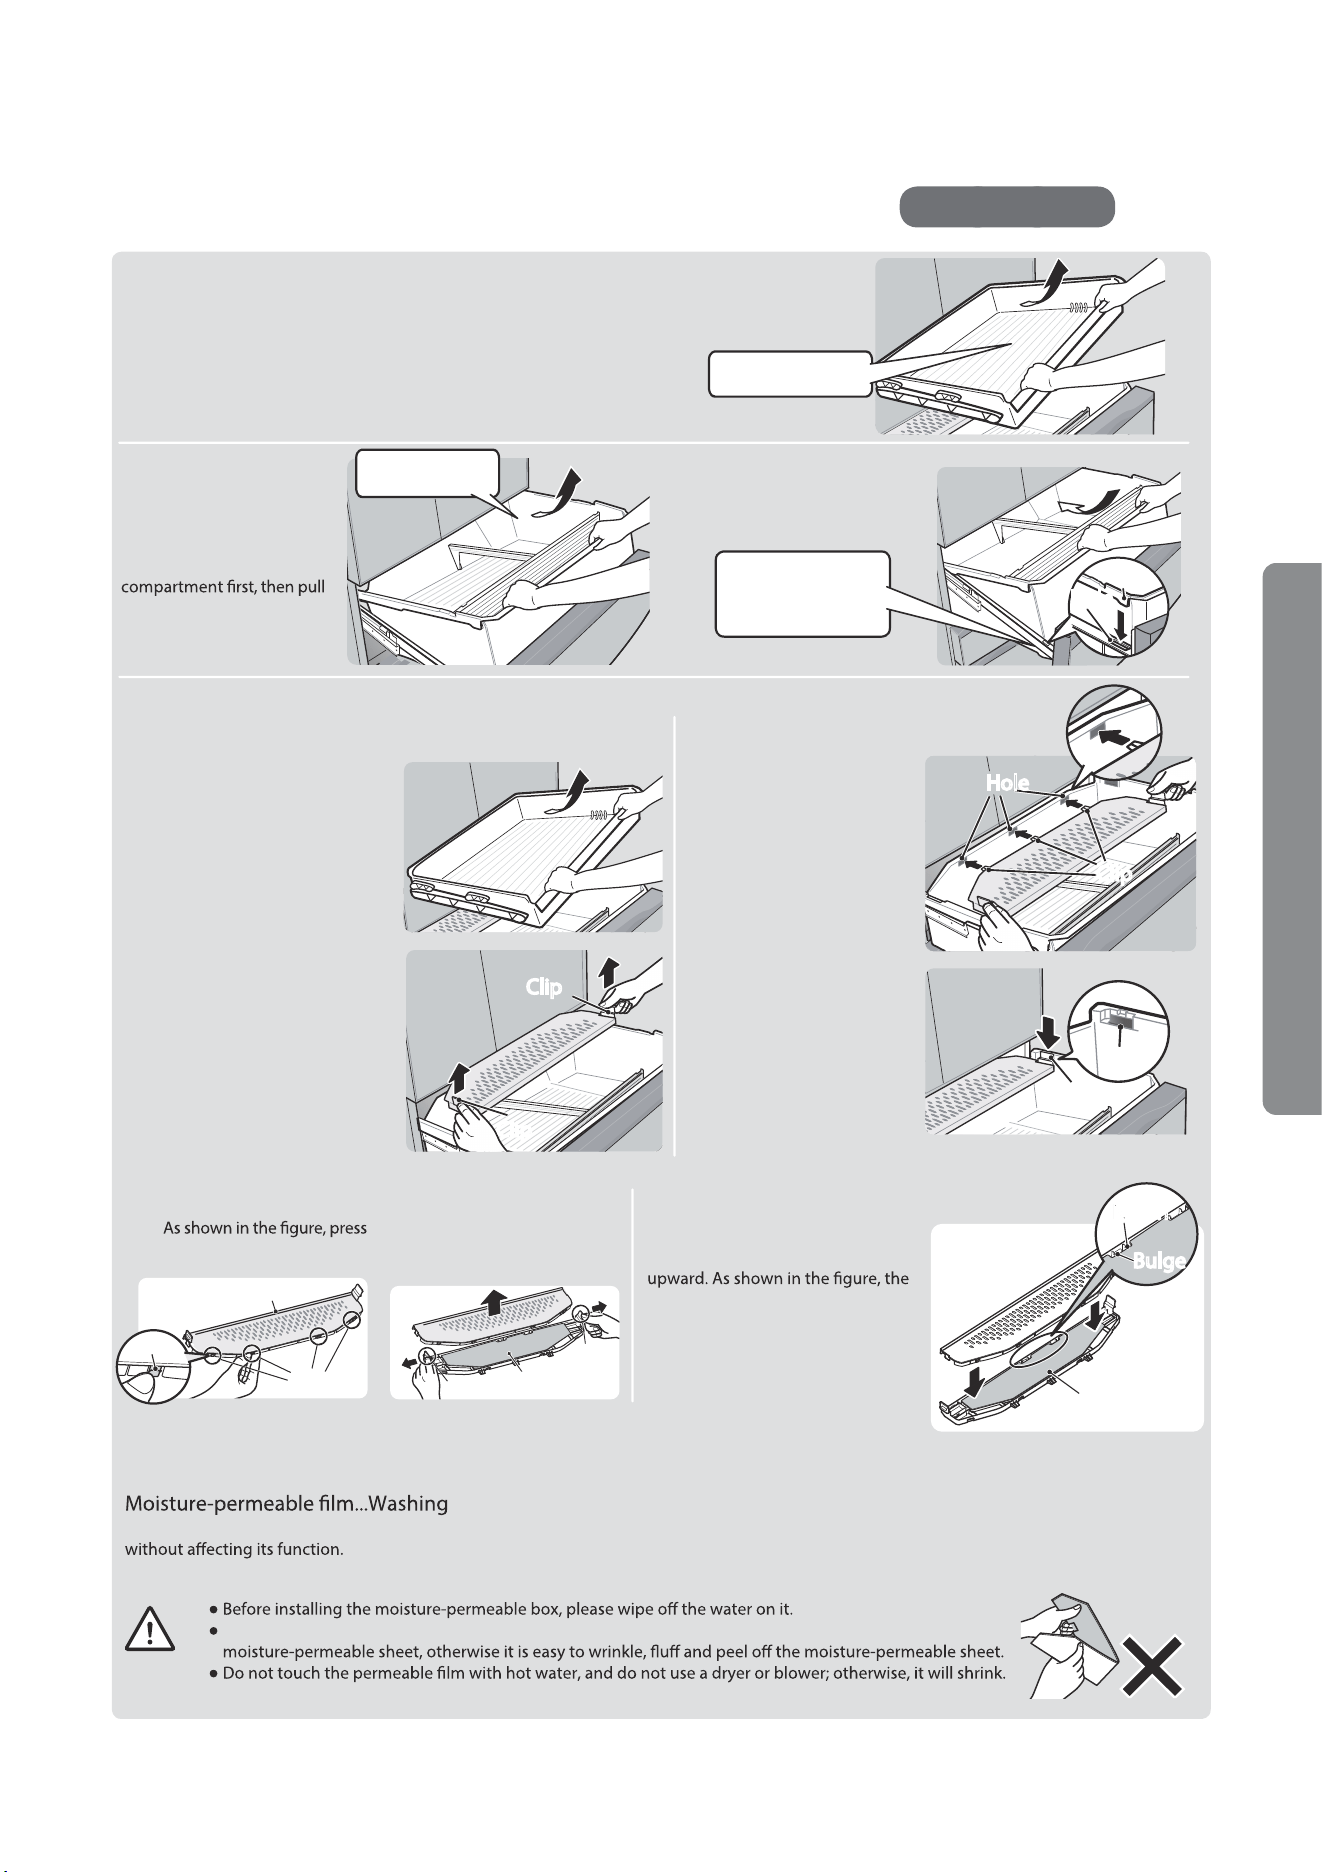
31
Sliding box, fruit and vegetable container, and moisture-permeable box in the fruit
and vegetable compartment
Sliding box for fruit and vegetable compartment
Fruit and vegetable
container
Moisture-permeable box
Moisture-permeable tablet
Disassembly method
Pull the door out to the maximum extent and take out the sliding box of
fruit and vegetable compartment.
• The installation method is reverse to the removal method.
Disassembly method
Mounting method
Take it out
obliquely upward
Disassembly method
Disassembly method
1
Mounting method
2
1 1
2
2
Moisture-permeable box ... wash with water or wipe with a wet cloth
For dirt that cannot be removed, the kitchen can be diluted with neutral detergent and used for cleaning.
Take it out
obliquely upward
Note
Bulge
Hole
Clip
Clip
Hole
Hole
Clip
Clip
Clip
Clip
Clip
Moisture-permeable box
Clip
Clip
Moisture-
permeable tablet
Moisture-permeable
tablet
Take out the sliding box and
moisture-permeable box of
the fruit and vegetable
out the door to the maximum
extent, and take out the fruit
and vegetable container
obliquely upward.
Pull the door out to the
maximum extent and take out
the sliding box of fruit and
vegetable compartment.
Grasp the clips on both sides
of the moisture-permeable
box and pull it out.
and hold the clip of the
moisture-permeable box.
Open the clips on both sides
and take out the
moisture-permeable sheet.
During installation, the blue side of
the moisture permeable sheet shall be
notch of the moisture permeable
sheet shall face the bulge of the
moisture-permeable box. After
installation, the moisture permeable
sheet shall not be exposed from the
moisture-permeable box.
The surface of the moisture-permeable sheet can be cleaned with sponge. Do not twist or bend the
After cleaning, please gently wipe it with a cloth. If the moisture-permeable sheet becomes wet with water, the surface will be adhered to dirt
For dirt that cannot be removed, the kitchen can be diluted with neutral detergent and used for cleaning.
Insert the 3 clips in the
moisture-permeable box
into the holes of the fruit
and vegetable container.
Insert the clips on both
sides of the
moisture-permeable box
into the left and right
holes of the fruit and
vegetable container.
The raised part of the
box must be inserted
into the hole of the
guide rail
• The installation method is
reverse to the removal method.
Water washing
Clip
Clip
Bulge
Hole
Hole
Hole
Clip
Clip
Notch
Notch
BulgeBulge
Method of Use

32
Water supply pipe
Note
Water supply tank
Do not disassemble, modify or repair
it by yourself.
Warning
No disassembly
Do not touch the ice-making part of the automatic
ice maker with your hands.
Do Not Touch
(Upper side of ice-making compartment)
Do not use the following items:
Hot water
(The heat resistance temperature of
each component is 60°C)
Maintenance of Automatic Ice Machine
Be sure to use a soft wet cloth or sponge
for cleaning, and clean the parts to be
cleaned with clear water.
(Prevent mould, rust, etc.)
Detergents, bleaching agents, grinding
powders, brushes, thinners, gasoline, etc.
(Otherwise, odor or malfunction may result)
Disassembly method
Mounting method
Water receiving box
and then grab the handle of the water
receiving box to take out the water
receiving box.
Wipe the mounting groove of the
water box (on the refrigerator) with
a soft wet cloth.
Do not spray water or other cleaning agents on the
rinsing tank, otherwise it will cause failure of the ice
machine.
Do not remove the water supply hose from the water
box; otherwise, it is easy to cause water leakage.
into the slot of the water supply tank.
Detergent
Gasoline
Grinding
powder
1-2 times/year
Water receiving boxWater receiving box
Handle
Handle
Water supply hose
Water supply hose
Water supply hose
Water supply hose
Slot
Slot
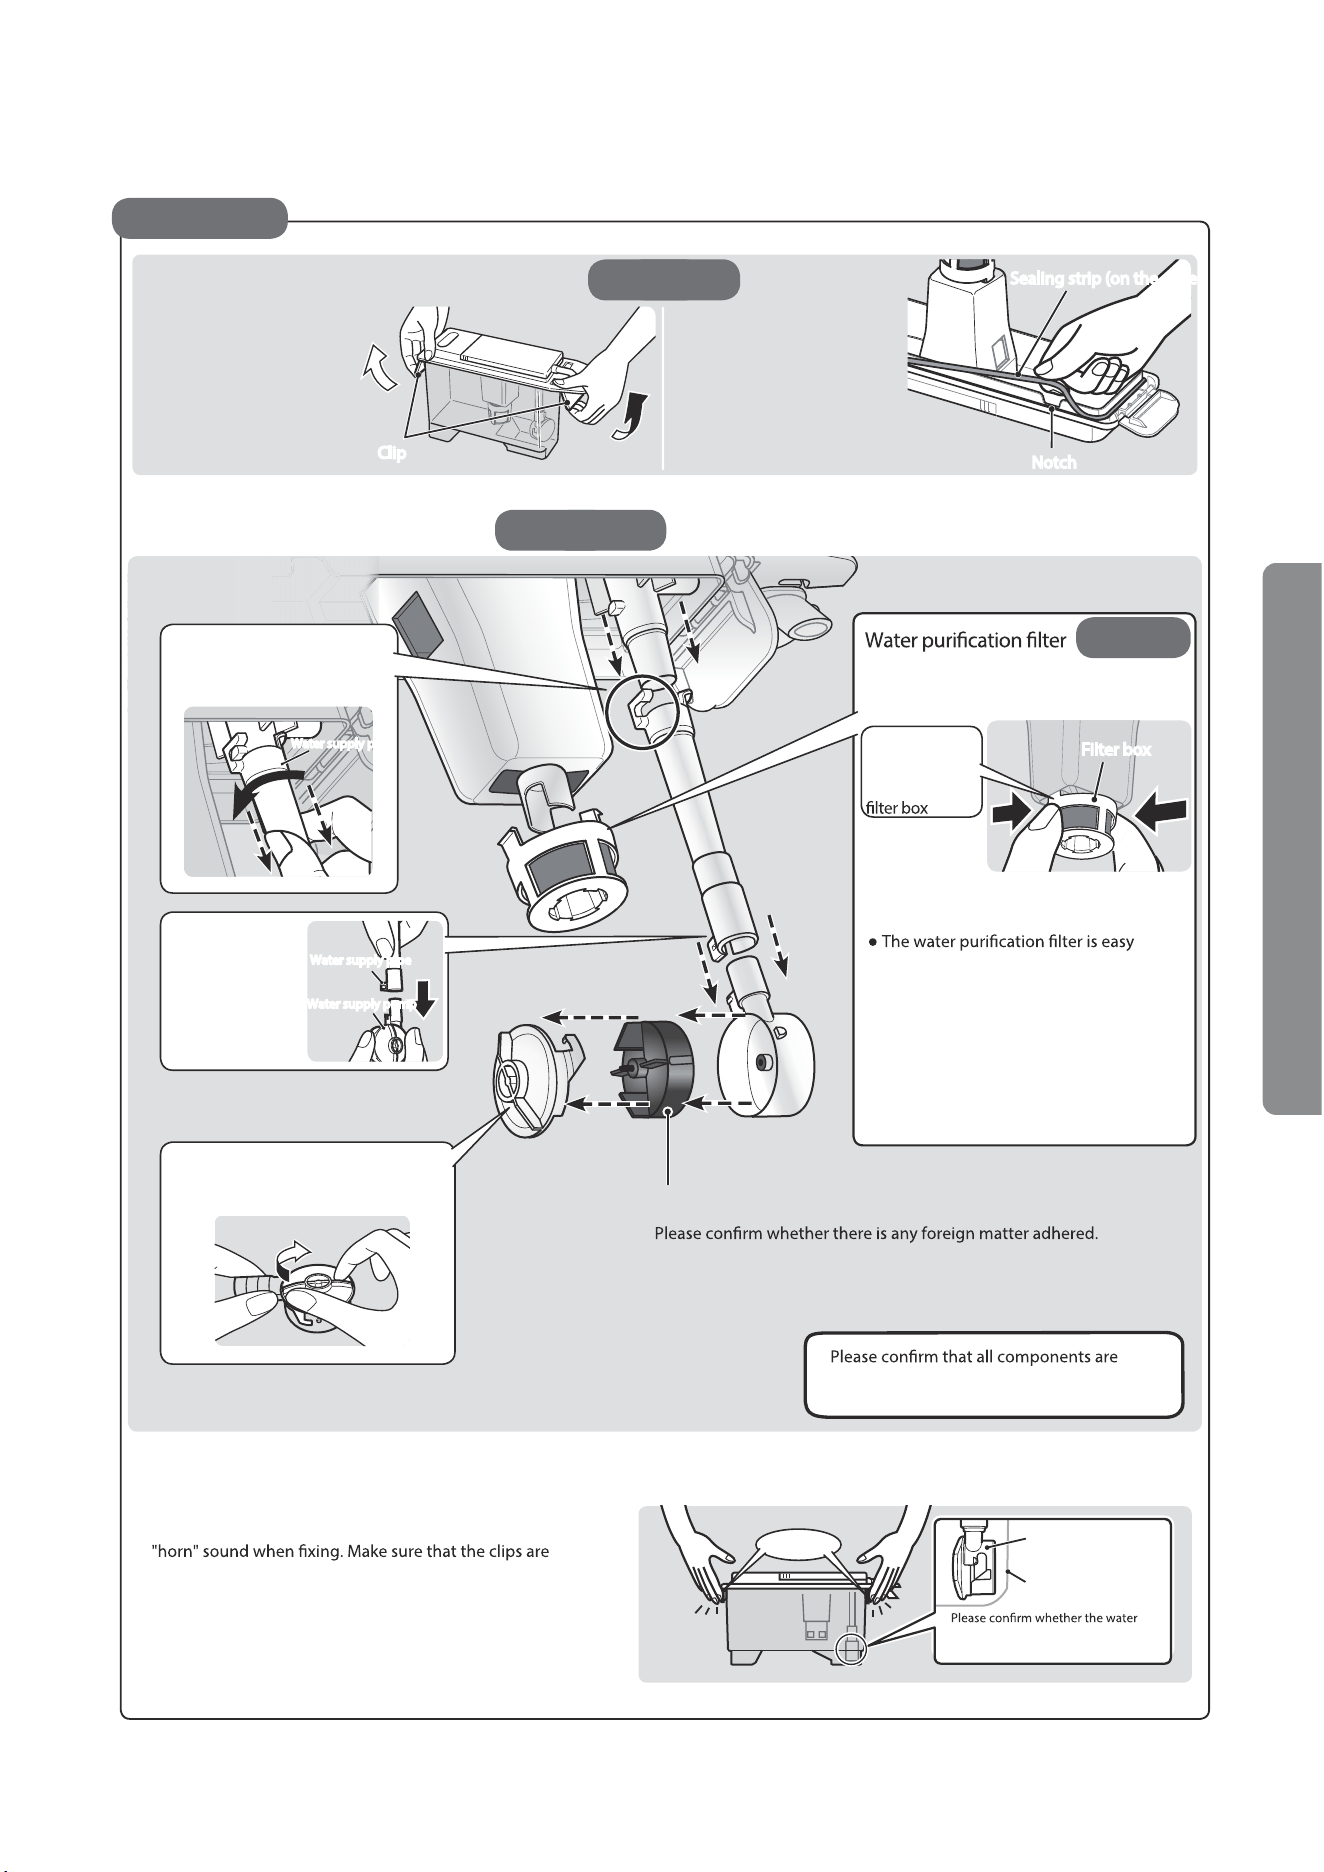
33
2
3
1
Water supply tank
1 2
Water supply pump
Parallel to the rear
Clip
Open the clip upward and
remove the water tank
cover.
Rotate and remove the
water supply pipe in
the direction of arrow.
Remove the
water supply
pump from
the water
supply pipe.
Rotate the pump box cover in
the direction of arrow and
remove it.
installed in place, otherwise water supply
cannot be provided.
supply pump is parallel to the back of
the water tank
Push both sides
in the direction
of the arrow to
remove the
to be damaged, so please do not
stab it with sharps.
Remove the sealing strip
(on the cover) from the
notch on the inside of the
water tank cover.
Impeller
Disassembly method
• The installation method is reverse to the removal method.
The installation method is reverse to
the removal method.
Water tank, water tank cover and sealing strip
(on the cover)
The installation method is reverse to the
removal method.
Disassembly method
Cleaning mode
Water washing
Disassembly method
Once a week
Once a week
Installation method of water tank cover
Fix the buckle of the water tank cover, and it will make a
installed in place.
If the installation is not in place, it will lead to failure of water
supply and ice making or noise from the water supply pump.
Clip
Clip
Sealing strip (on the cover)
Sealing strip (on the cover)
Notch
Notch
Once a month
Water supply pipe, water supply pump
Water supply pipe
Water supply pipeWater supply pipe
Water supply pump
Water supply pump
Filter box
Filter box
Method of Use
Water supply pipe
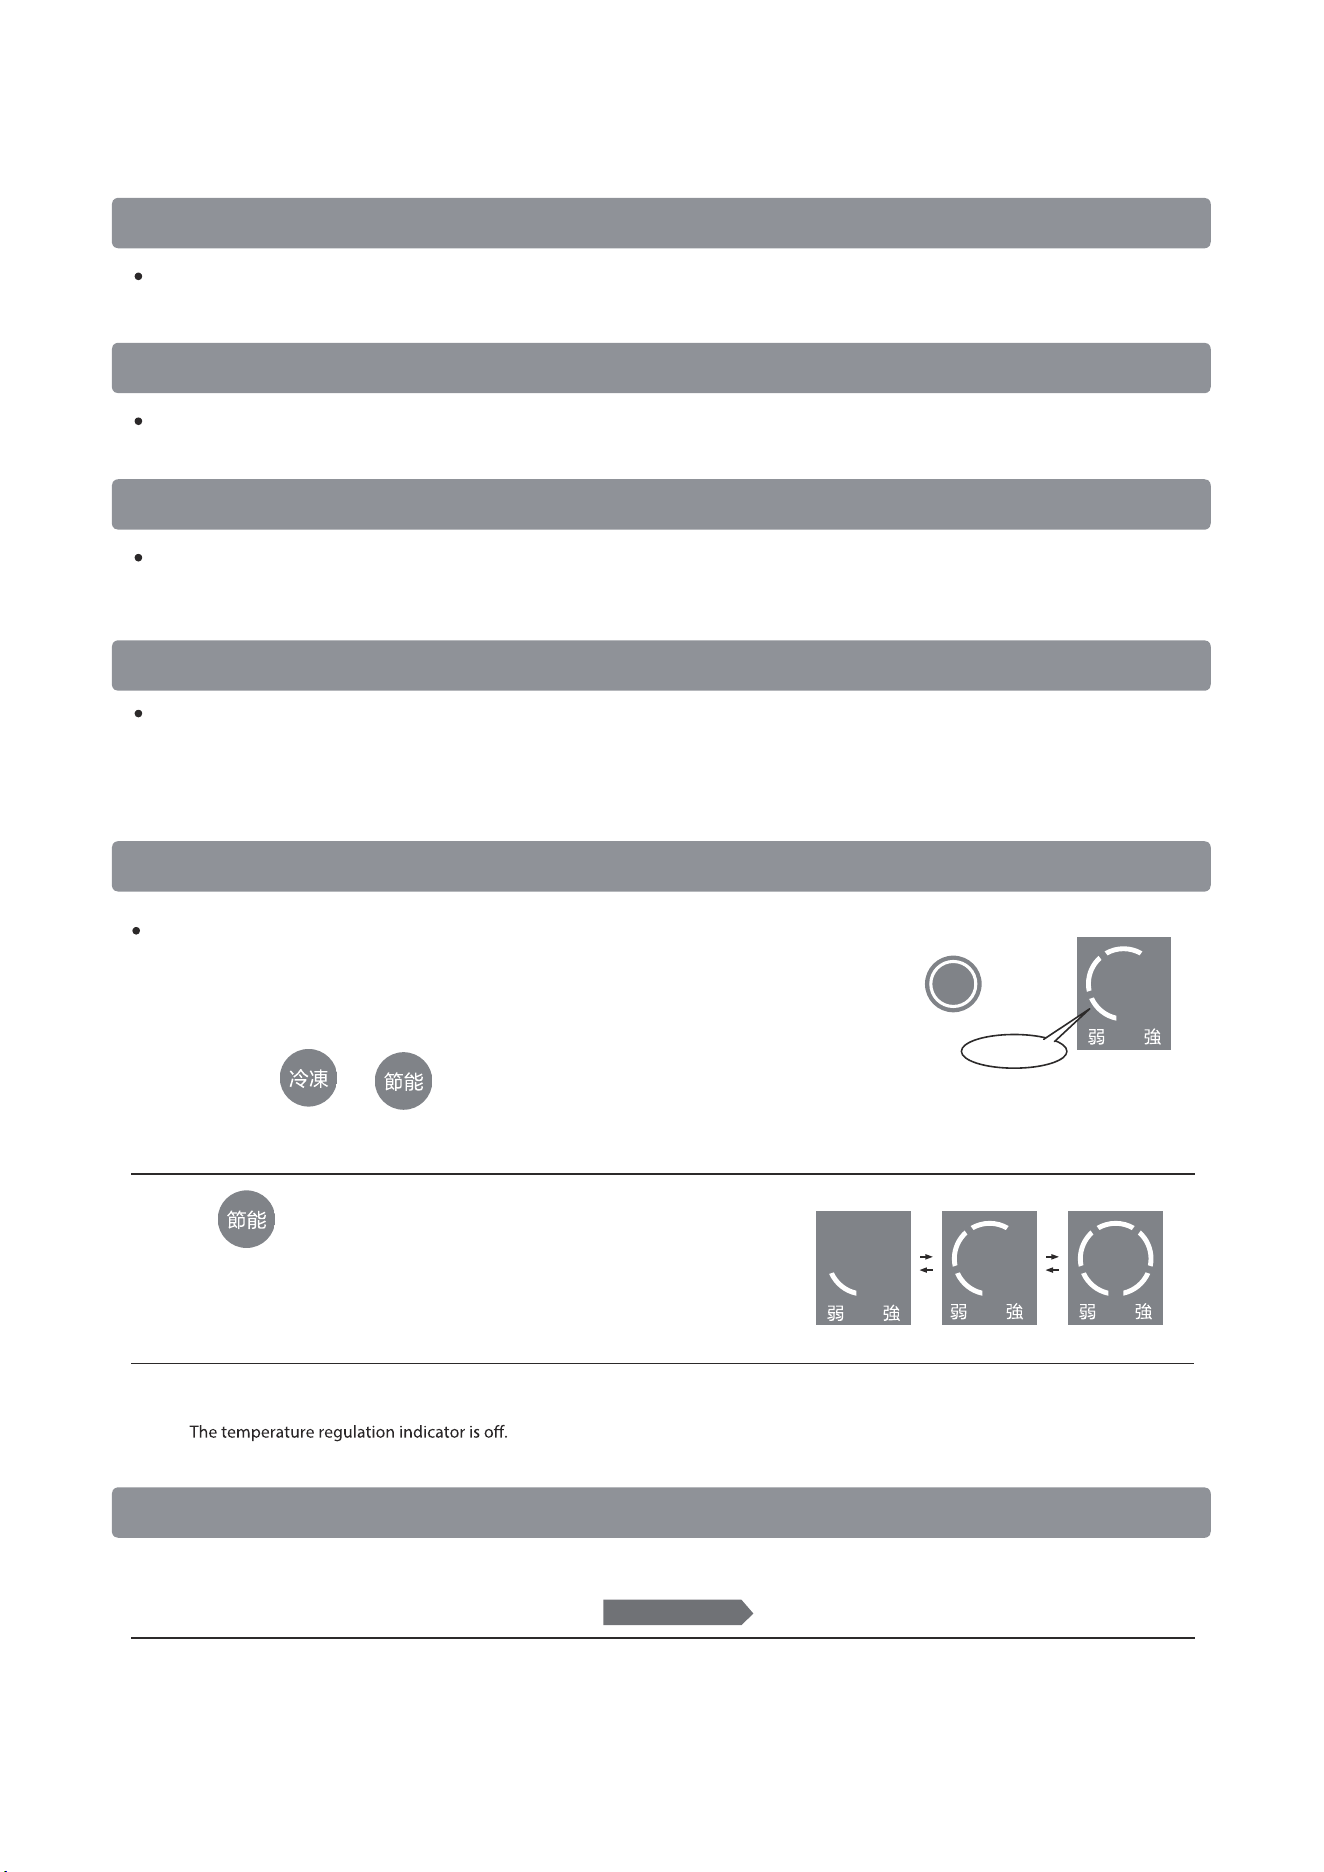
34
When the power plug is pulled out and the fuse or circuit breaker is disconnected
During power failure
When the glass part is broken
Reduce the opening and closing times of doors to avoid storing new food.
(Otherwise, the temperature inside the refrigerator will rise)
Do not touch the broken glass and call the service hotline.
When replacing the interior light
Please contact professionals to replace the interior light .
When the refrigerator is not used for a long time
1
Please discard the ice and water in the automatic ice machine.
(See Step 2 of "Before Movement and Handling" for details )
2
Pull out the power plug, clean up the inside of the refrigerator, open the refrigerator door for 2-3 days and dry it.
Adjust the brightness of touch panel
The brightness of the touch panel can be adjusted by setting.
1
Put your hand close to the lower part of the refrigeration compartment door, so that the main menu key lights up.
Press and hold and for 3 seconds at the same time until a beep tone is sounded.
▲
The temperature adjustment level displays the current brightness.
Beep
2
Touch repeatedly to select the brightness level.
▲
Three gears can be set, of which "Gear 3" is the brightest.
Tap1
「Beep~」Beep!Beep!
3
If no operation is performed for more than 10 seconds, a "beep" tone will sound to complete the setting.
▲
Touch the main menu key to light up the touch panel.
Various treatments
Tap2 Tap3
Please refer to Page 42
If the plug is inserted again or the circuit breaker is closed immediately, the compressor will be overloaded and cause faults.
Please wait for 5 minutes before inserting the plug or closing the circuit breaker. Depending on the temperature in the refrigerator and the
starting state of the compressor, sometimes the compressor protection timer will start so that it does not run for about 6 minutes after being
inserted into the power plug.
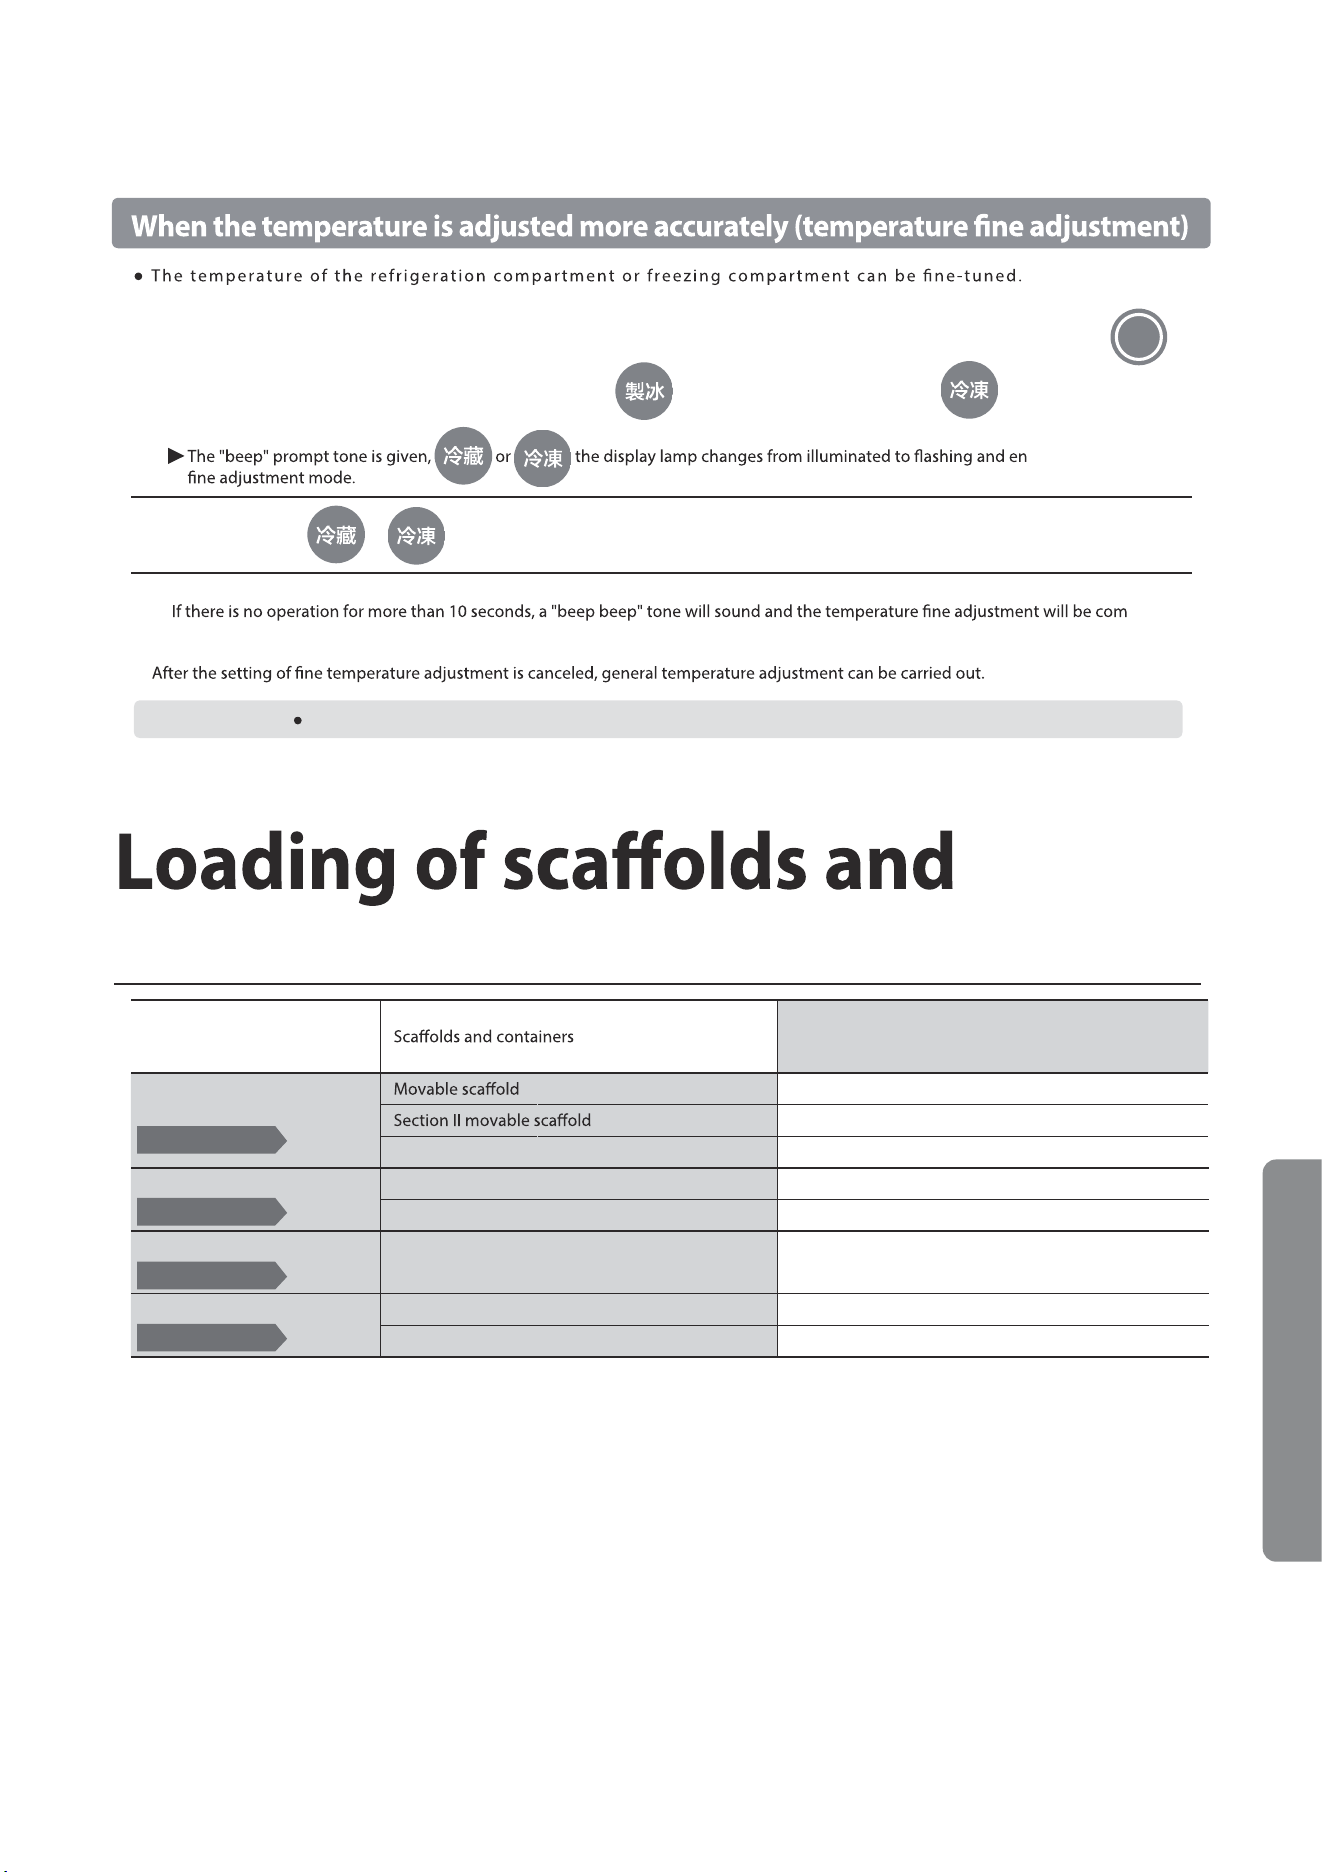
35
containers
1
ters the temperature
2
Repeatedly touch or button to select the temperature adjustment gear.
3
pleted.
Tips
Each time the button is pressed, the temperature will change by 0.3~1.5°C.
Location
Top plate of instant chilling box
Sliding box for fruit and vegetable compartment
Fruit and vegetable container
Freezing vessel
Freezing compartment sliding box
Storage container
10.5kg
9.5kg
9.5kg
6.5kg
20.0kg
8.0kg
9.5kg
22.0kg
Refrigeration
compartment
Please refer to Page 17
Fruit & Vegetable Compartment
Please refer to Page 20
Frozen Pantry
Please refer to Page 21
Freezing compartment
Please refer to Page 21
When all doors are closed, put your hand close to the lower part of the refrigeration compartmentdoor to turn on the main menu key .
Touch the main menu key to light up the touch panel. Press 3 times while pressing and holding .
GR-RM598WE-PGA(B3)
GR-RM598WE-PGA(UC)
When encountering difficulties
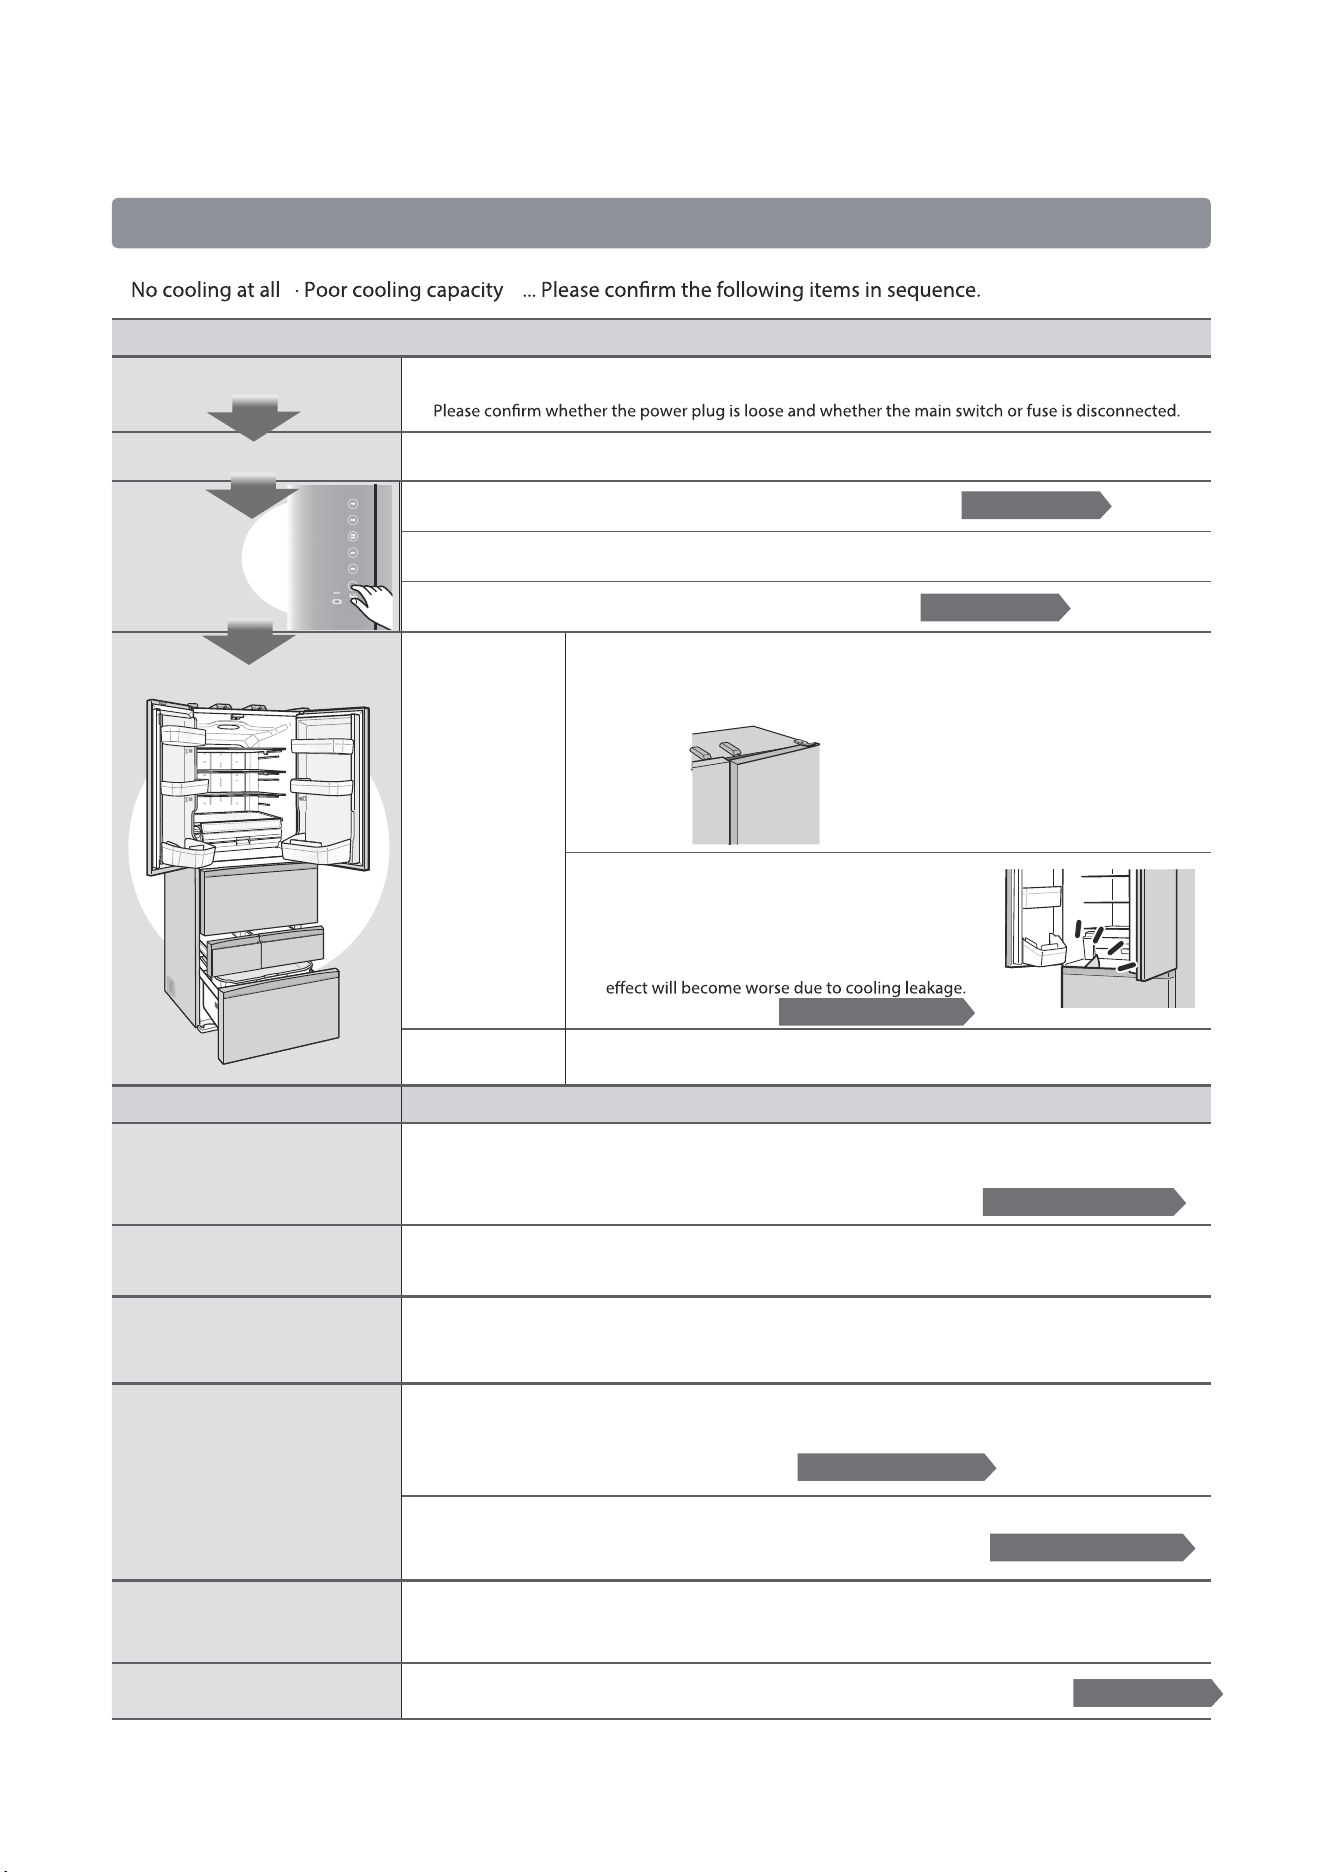
In case of fault
▲ ▲ ▲ ▲ ▲
▲
▲
▲
▲
▲
Door
▲
▲
36
About refrigeration
Phenomena Checklist · Causes / Solutions
Freezing of food in the refrigeration
compartment
Are foods with excessive moisture placed in the innermost part of the refrigeration compartment or in a quick-chilling box?
The food in the quick-chilling box does not usually freeze.
(However, food placed near the cold air outlet may freeze.)
Soft freezing generally does not cause the food to freeze slightly (soft freezing).
(However, food placed near the cold air outlet may freeze.)
Is the food stored on the inside of the upper quick-chilling box?
The inner side is close to the cold air outlet, so it is easy to freeze.
Are foods with excessive moisture stored?
Do not place food with excessive moisture in front of the cold air outlet.
When food is thick or stacked densely, it may not be able to unfreeze within the set time.
Ice cream soft
Is it placed in the frozen food storage
compartment?
Please keep it in the freezing compartment.
Checklist · Causes / Solutions
Power supply
Is the power supply normal?
How long is the power on?
It takes a certain time to refrigerate inside the refrigerator, and it may take more than 1 day to refrigerate
in hot summer.
Is it in Demo Mode? Please release the demo mode.
Is the temperature regulation gear set to "weak"?
Is "Automatic Power Saving" set? Please cancel the setting.
Do not allow food to go beyond the shelf.
Condition of the refrigeration compartment door
Touch panel
Please refer to Page 13
Please refer to Page 26
Please refer to pages 20 and 21
The refrigeration is too fast because the deep part of the refrigeration compartment is close to the cold
air outlet, and the temperature in the quick-chilling fresh box is low.
Do not place food with excessive moisture in front of the cold air outlet.
Please refer to pages 17 and 19
Please refer to pages 18 and 19
Please refer to pages 18 and 19
Please refer to Page 21
Do not place food in front of the cold air outlet.
▲
Please set the temperature adjustment gear to
"Moderate" or "Strong".
Is there any gap
around the door
sealing strip?
Condition of fruit and vegetable compartment door or
freezing compartment door
Is there a food bag stuck in the door that creates gaps?
In addition, does the food in the container reach the
sliding box?
If it is, the door will be poorly closed and the cooling
Does the food on the trellis project
beyond the trellis and against the
refrigerator door to create a gap?
Do you open the
refrigerator door
frequently?
Foods in quick-chilling fresh
food boxes will not be slightly
frozen (soft freezing)
When the soft freezing mode is
enabled, the food will not be
partially (soft) frozen
When the soft freezing mode is
enabled, the food will be frozen.
Food does not unfreeze
even if set to unfreeze
Frequent opening of the refrigerator door will cause outside air (heating) to enter the
refrigerator, thus temporarily increasing the temperature in the refrigerator. The
temperature will return to normal in about one night. Please observe carefully.
▲
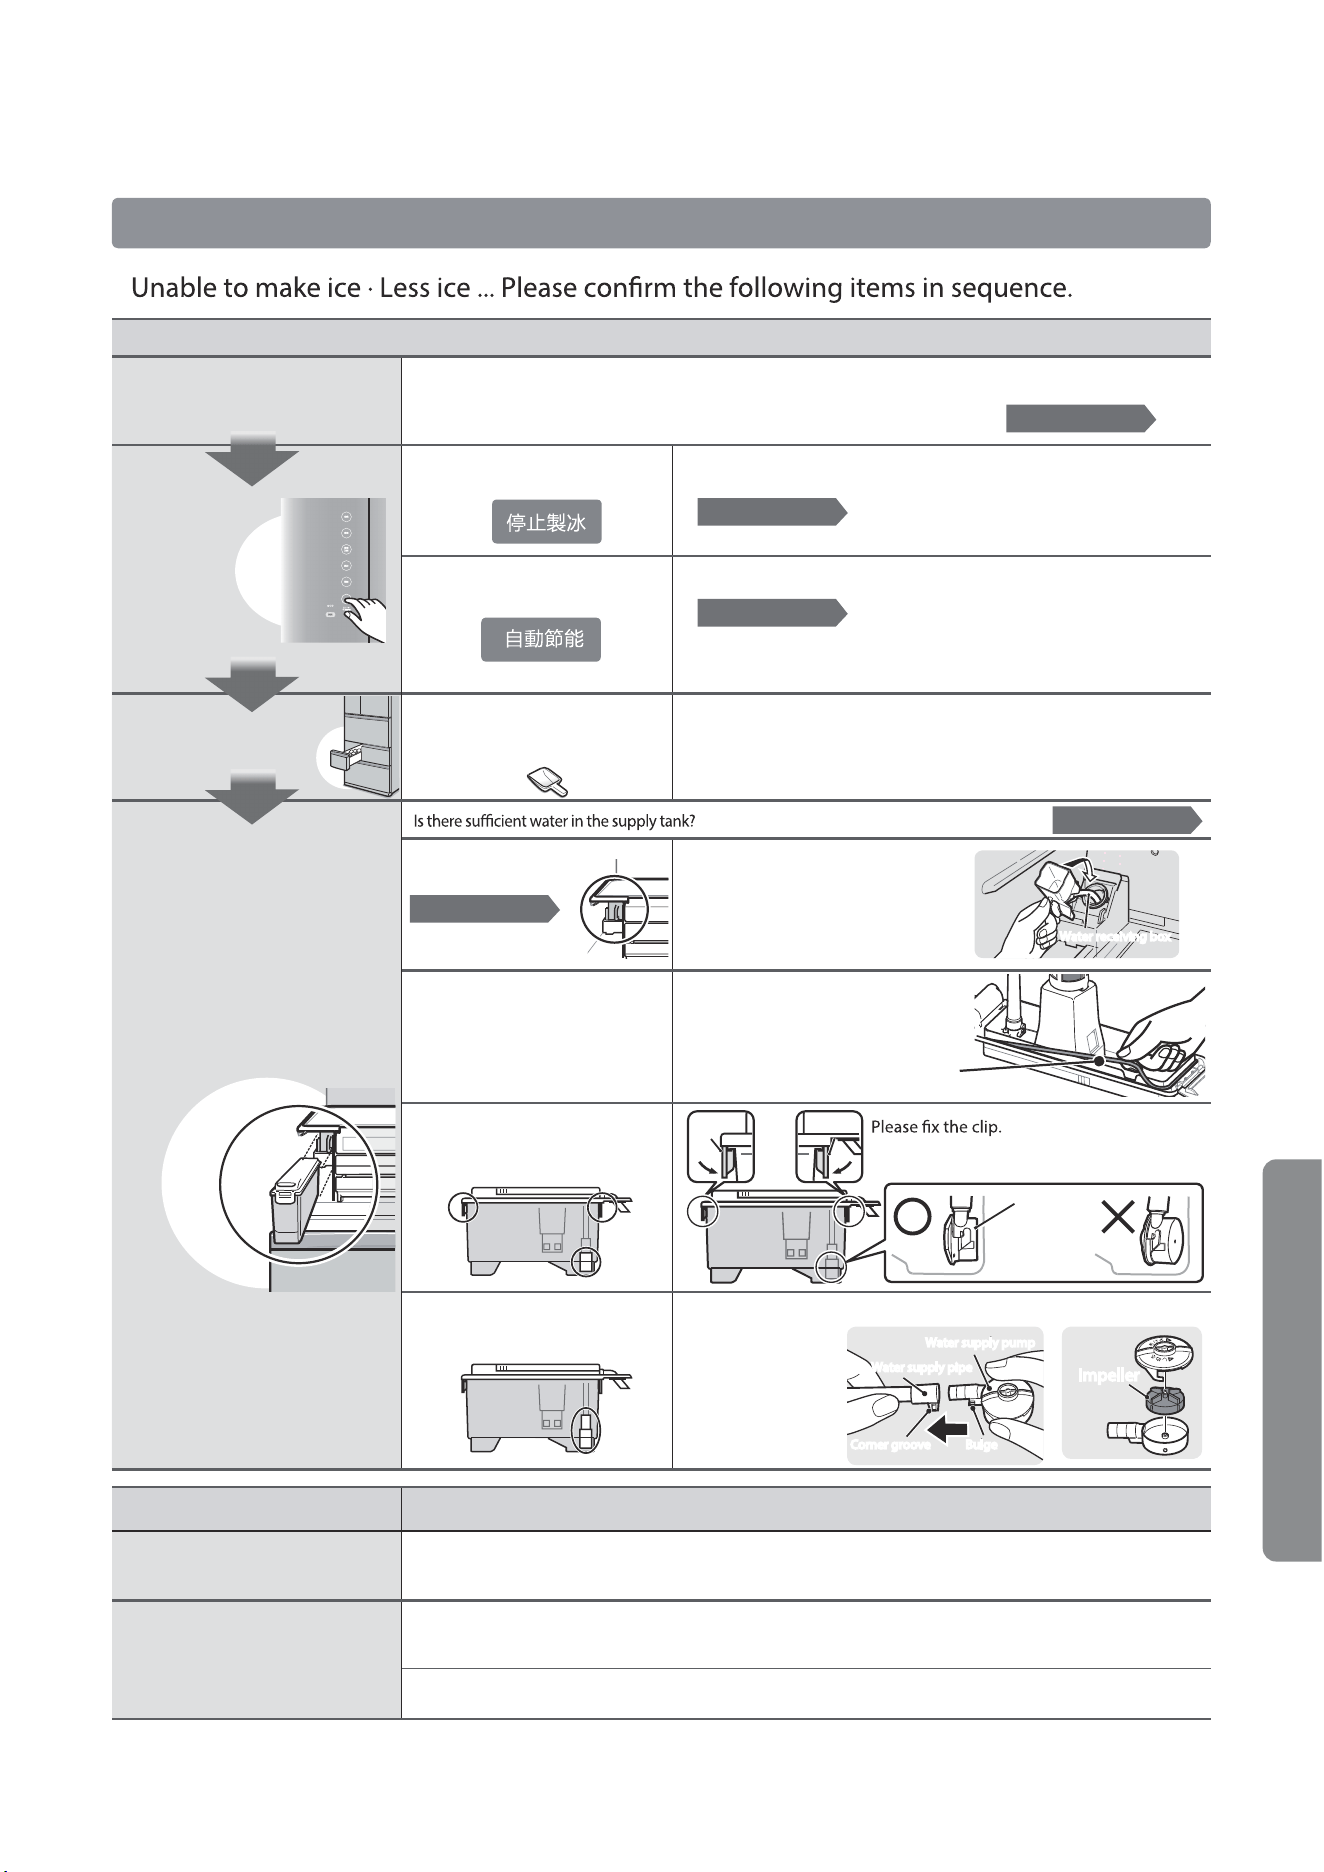
▲
▲
▲
▲
Touch panel
Please refer to Page 32
37
ImpellerImpeller
Does the "制冰停止" display light
up?
Is the "Automatic Power Saving"
indicator on?
Are items other than ice placed in
the ice storage box?
Have you forgotten to
install the water box?
Have you forgotten to install the
sealing strip (on the cover) of the
water supply tank cover?
Are the buckles of water supply
tank and water supply pump
properly installed?
Is the water supply pipe and
impeller installed properly?
Ice cubes are bonded to each other,
or in spherical shape or become
smaller
Ice is white, or with sediment
Is ice stored for a long time?
Ice may become spherical, rounded and smaller due to sublimation.
Is it set to quick ice making or quick freezing mode?
As the icing speed is accelerated, air in moisture will be sealed in ice cubes to form bubbles and make them
look white.
Are waters with high mineral content (mineral water, etc.) used?
As the minerals freeze, a white precipitate appears that makes the ice look white but harmless.
Water supply pipes
and pumps
Please install the
raised part of the
water supply pump
into the corner groove
of the water supply
pipe.
Please install the sealing strip
(on the cover) on the water
supply tank cover.
Do not put anything other than ice into the ice storage box.
The object may touch the detection rod to stop ice making, or cause
damage due to impact when the ice tray is turned over, resulting in
failure of ice making.
After using the ice spoon, return it to its original position.
About Ice Making
Checklist · Causes / Solutions
Fruit & Vegetable Compartment
When the refrigerator is not fully refrigerated at the beginning of operation, it takes about 5-6 hours
to make ice cubes.
It may take more than 1 day in hot summer, so please pay attention to
observation according to the actual situation.
Ice storage box
Water supply tank •
water receiving box
Please add water into the supply tank to the
water level line.
Please install the water box.
Parallel to the rear
Water supply pump
Impeller
Phenomena Checklist · Causes / Solutions
Sealing strip (on the cover)
Please refer to Page 24
Please refer to Page 25
Please disable the ice making stop function.
Please refer to Page 24
Please disable the automatic power saving function.
Please refer to Page 26
Clip
Water receiving boxWater receiving box
Clip
Clip
Clip
Water supply pump
Water supply pump
Water supply pipe
Water supply pipe
Corner groove
Corner groove BulgeBulge
When encountering difficulties
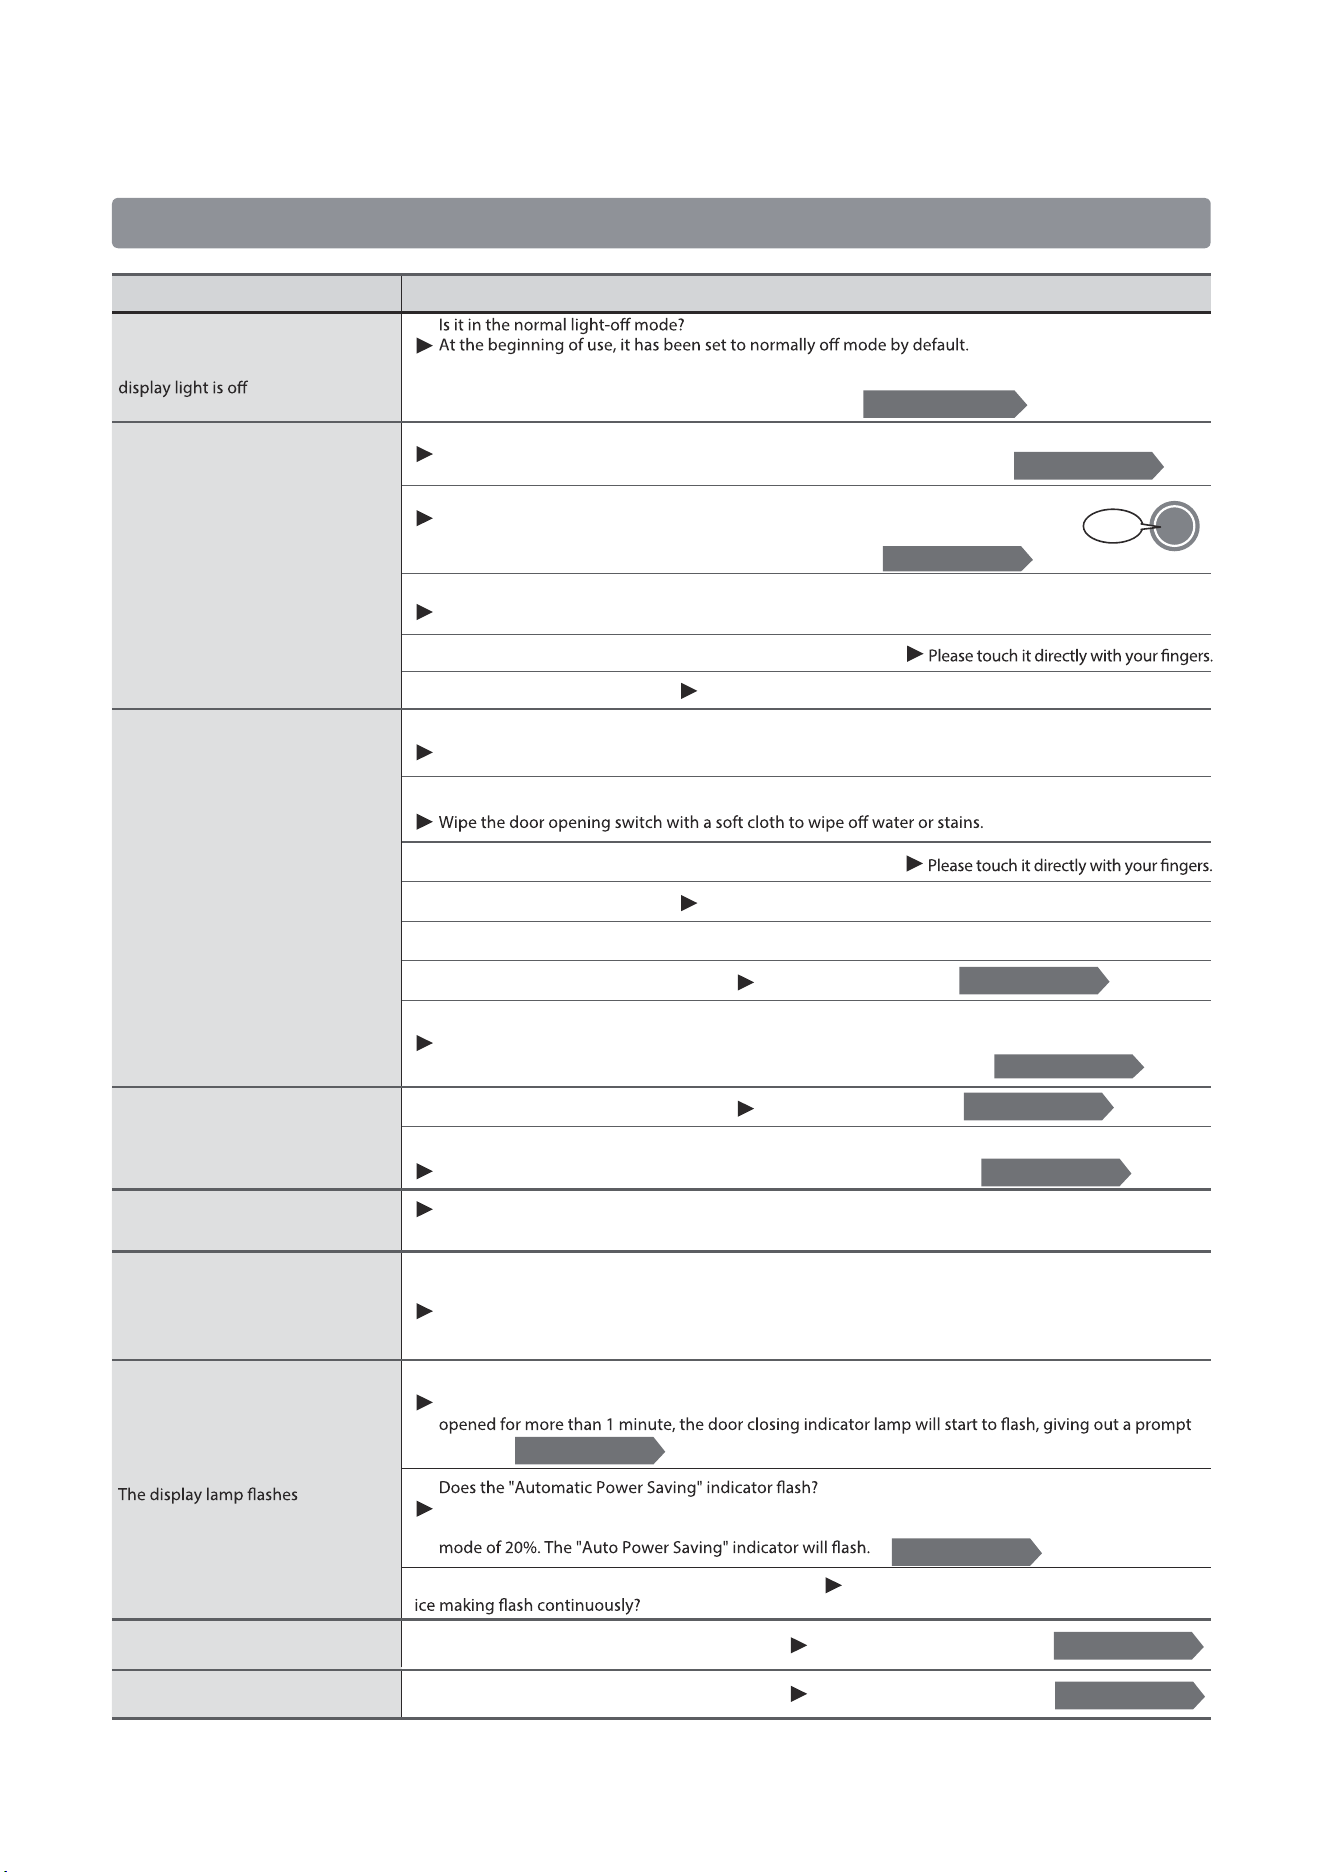
About touch panel
In case of fault
......continued
Phenomena Checklist · Causes / Solutions
Beep!
Are gloves worn or band-aids attached to your hands for operation?
Is it operated with wet hands?
Please wipe your hands with a dry cloth before touching them.
Are gloves worn or band-aids attached to your hands for operation?
Is it operated with wet hands?
Please wipe your hands with a dry cloth before touching them.
In order to prevent injury, even touching the door opening switch gently will not respond when the door
is just closed.
Is it set to release automatic door opening?
Please cancel this setting.
Touch the door opening switch
gently, and the lamp does not light up.
Is it set to release automatic door opening?
Please cancel this setting.
Is the hand too far away from gently touching the door opening switch during operation?
Please put your hand close to the door opening switch during operation.
Touch the door opening switch to
light up at will
Failure to adjust the temperature
Does the display lamp for quick freezing and quick If the refrigerator is abnormal, please call the
service hotline.
The display lamps change successively
The refrigerator enters the demonstration mode.
Please release the demo mode.
Dim display light
Is it set to "Gear 1"?
Please raise the setting.
Please refer to Page 14
Please refer to Page 12
Please refer to Page 12
Please refer to Page 15
Please refer to Page 15
Please refer to Page 16
Please refer to Page 26
Please refer to Page 14
Please refer to Page 14
Please refer to Page 13
Please refer to Page 34
38
Touch the door opening switch
and main menu button, and the
No response after touching the
panel (operation part)
No response after
touching the door
opening switch
The light can be turned on by placing your hand close to the lower part of the refrigeration
compartment door.
You can also choose to set it to the normally on mode.
Is the door of the refrigeration compartment opened?
If the operation cannot be carried out when the door of refrigeration
compartment is opened, please close it before operation.
Is the main menu key that is on not touched?
First, put your hand close to the lower part of the refrigeration compartment door, gently
touch the door open switch and the main menu button to turn them on, and touch the
main menu button that is on to make the panel indicator on.
Is the panel gently touched with water or stains?
Wipe the panel lightly with a soft cloth to remove water or stains.
Is the door of the refrigeration compartment opened?
Operation with the refrigeration compartment door open will not respond. Please close it before operation.
Is there any water or stain on the door opening switch by gently touching it?
During operation, is the surrounding part of the door opening switch touched gently?
When the warning electrode that detects misoperation is touched, the door sometimes cannot be opened.
Please touch within the touch response range of the door opening switch.
The light may be turned on when the door is opened or splashed by water.
The lamp will automatically go out 10 seconds after being on.
Is it set to automatic power saving?
When set to automatic power saving, the temperature of refrigeration compartment or freezing
compartment cannot be adjusted. If adjustment is required, please cancel the setting.
Are the doors of refrigeration compartment, ice making compartment and freezing compartment closed?
If one of the doors of refrigeration compartment, ice making compartment and freezing compartment is
tone.
When the three doors of refrigeration compartment, ice making compartment and freezing compartment
are not opened or closed for more than 24 hours, they will automatically switch to the power-saving
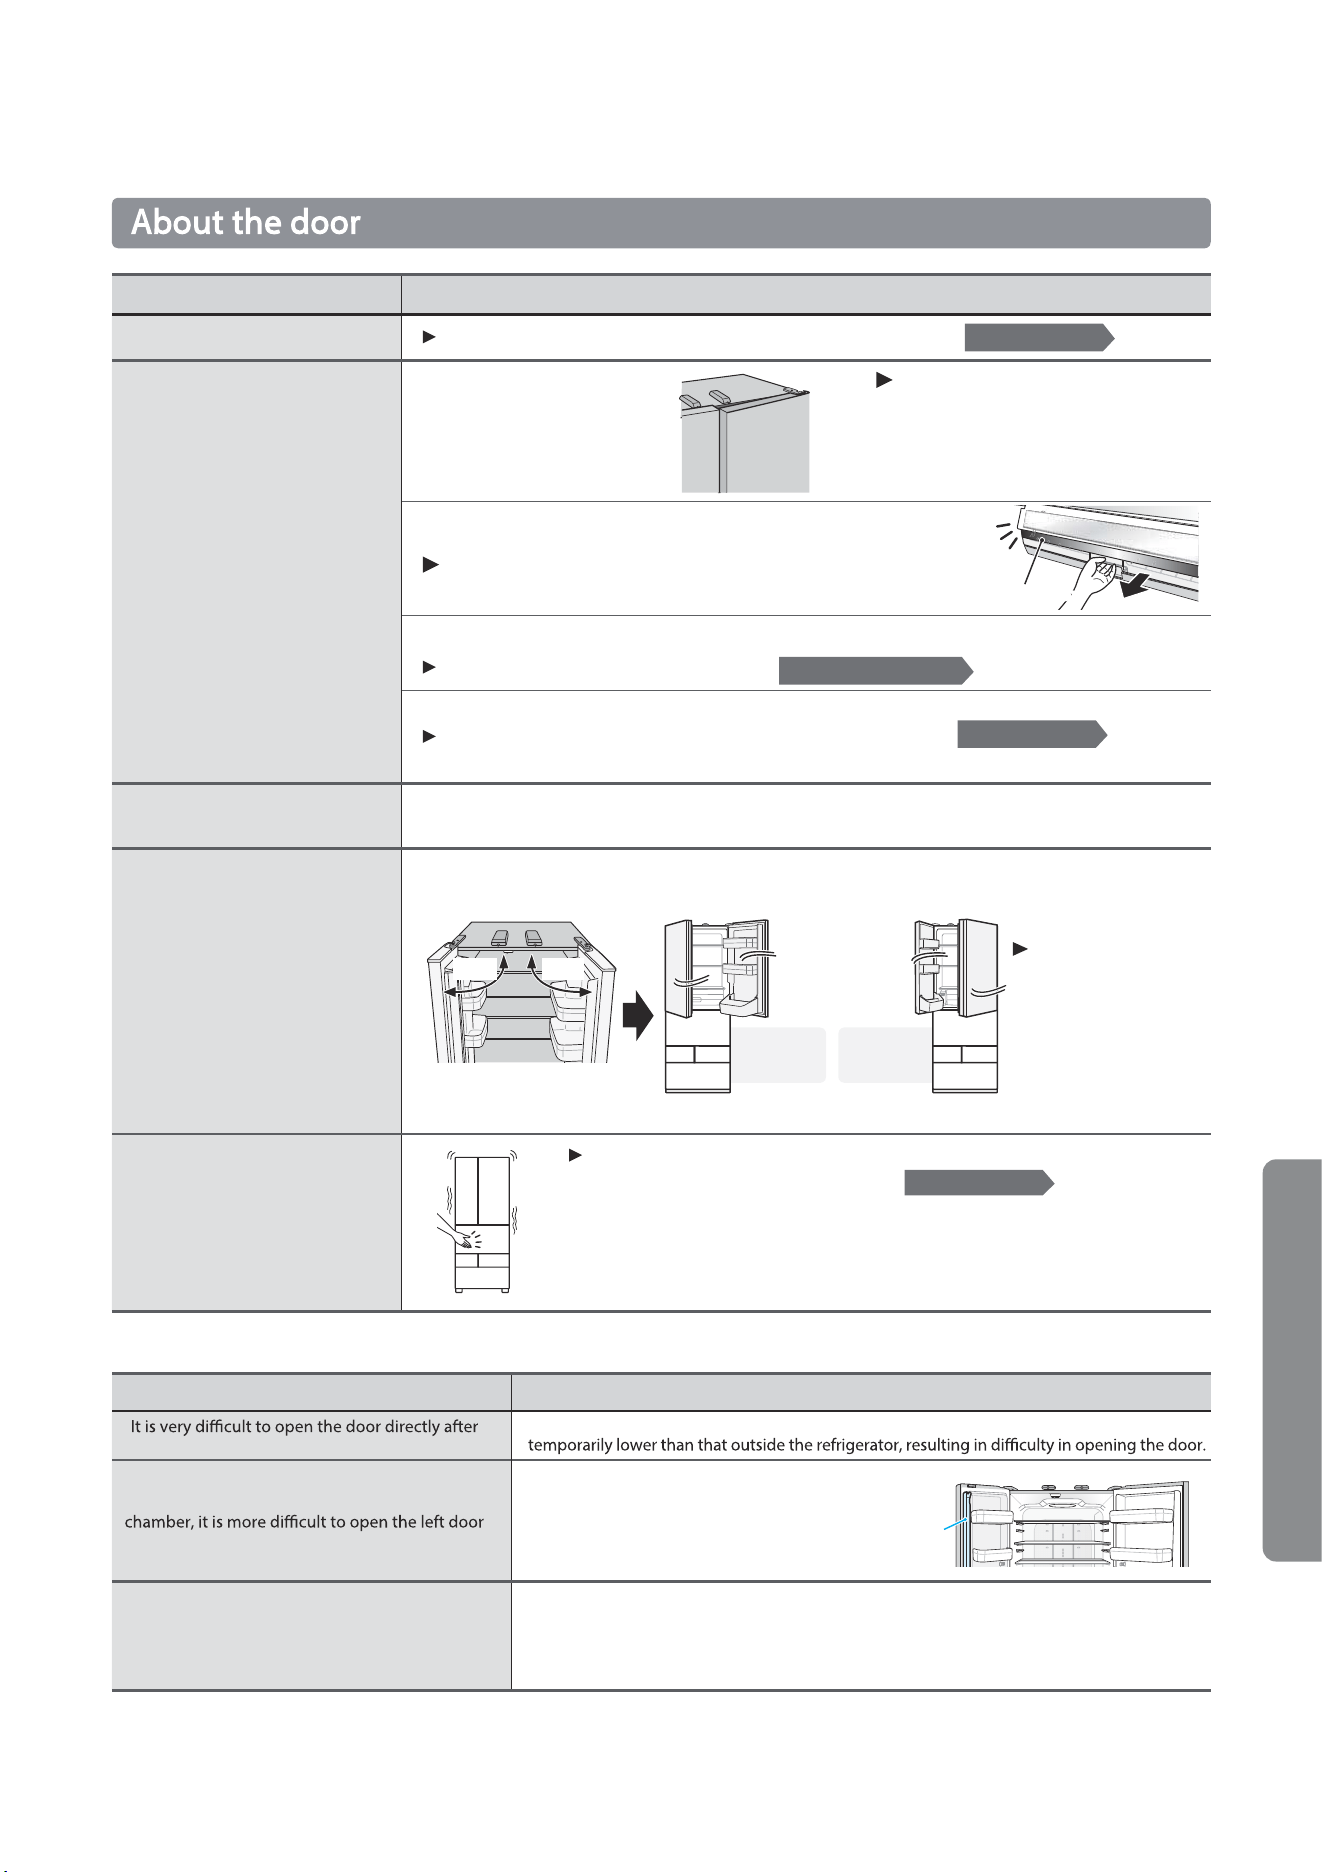
Reasons
39
Phenomena
The door of the refrigeration
compartment is misaligned
The door cannot be closed
The refrigerator is unstable when
opening and closing the door
Please refer to pages 20 and 21
Checklist · Causes / Solutions
Please rotate the adjusting foot to adjust the parallelism of the door.
Please refer to Page 10
Please refer to Page 10
Please adjust the adjusting feet on the left and right sides to the ground side until
the refrigerator is stable without shaking.
When the refrigerator cannot be stabilized without shaking even by adjusting the
adjustment foot, please put a plate on it.
Are there any food bags, etc.
caught by the door, or are the
food placed beyond the shed,
resulting in gaps?
Does the quick-chilling box cover overlap with the upper quick-chilling
box and fail to return to its original position?
Slightly pull out the upper quick-chilling box to return it to its original
position.
Does the food in the freezing compartment or fruit and vegetable compartment container touch the
sliding box above?
Do not allow food to touch the slide box.
Is the refrigerator tilted forward?
Please rotate the adjusting foot to make the refrigerator horizontal.
If it cannot be adjusted, please contact the selected dealer or call the service hotline.
Is the door left unopened for a long time?
Water droplets on the metal guide rail will freeze, causing unsmooth door opening and closing. After
several times of switching, it can return to normal.
When opening the freezing
compartment door, it is very
laborious
Please take out the trapped
food. Do not allow food to go
beyond the shelf.
Please refer to Page 11
Phenomena
it is closed
The air entering the refrigerator is quickly cooled, and the pressure inside the refrigerator is
Other doors will open instantaneously
when closing
The air pressure generated by closing the door
pushes other doors open.
The following conditions are normal
Upper quick-chilling boxUpper quick-chilling box
When encountering difficulties
If only one side door shakes, there is no problem. However, if the doors on both sides shake in the same
direction, this is caused by the large tilt of the refrigerator. Please adjust the horizontal placement.
Open the doors on both sides of the
refrigerating chamber at 90 degrees, and
then release your hand
Tilt to the righ Tilt to the left
Please rotate the
adjustment foot to
adjust the parallelism
of the door.
Or put a board under
the caster.
The door shakes at will
The doors on
both sides
sway to the
right
The doors on
both sides
sway to the
left
90
degree
90
degree
When opening the door of the refrigerating
than the right door
There is a rotating
partition board on the
left door.
Rotating
partition board
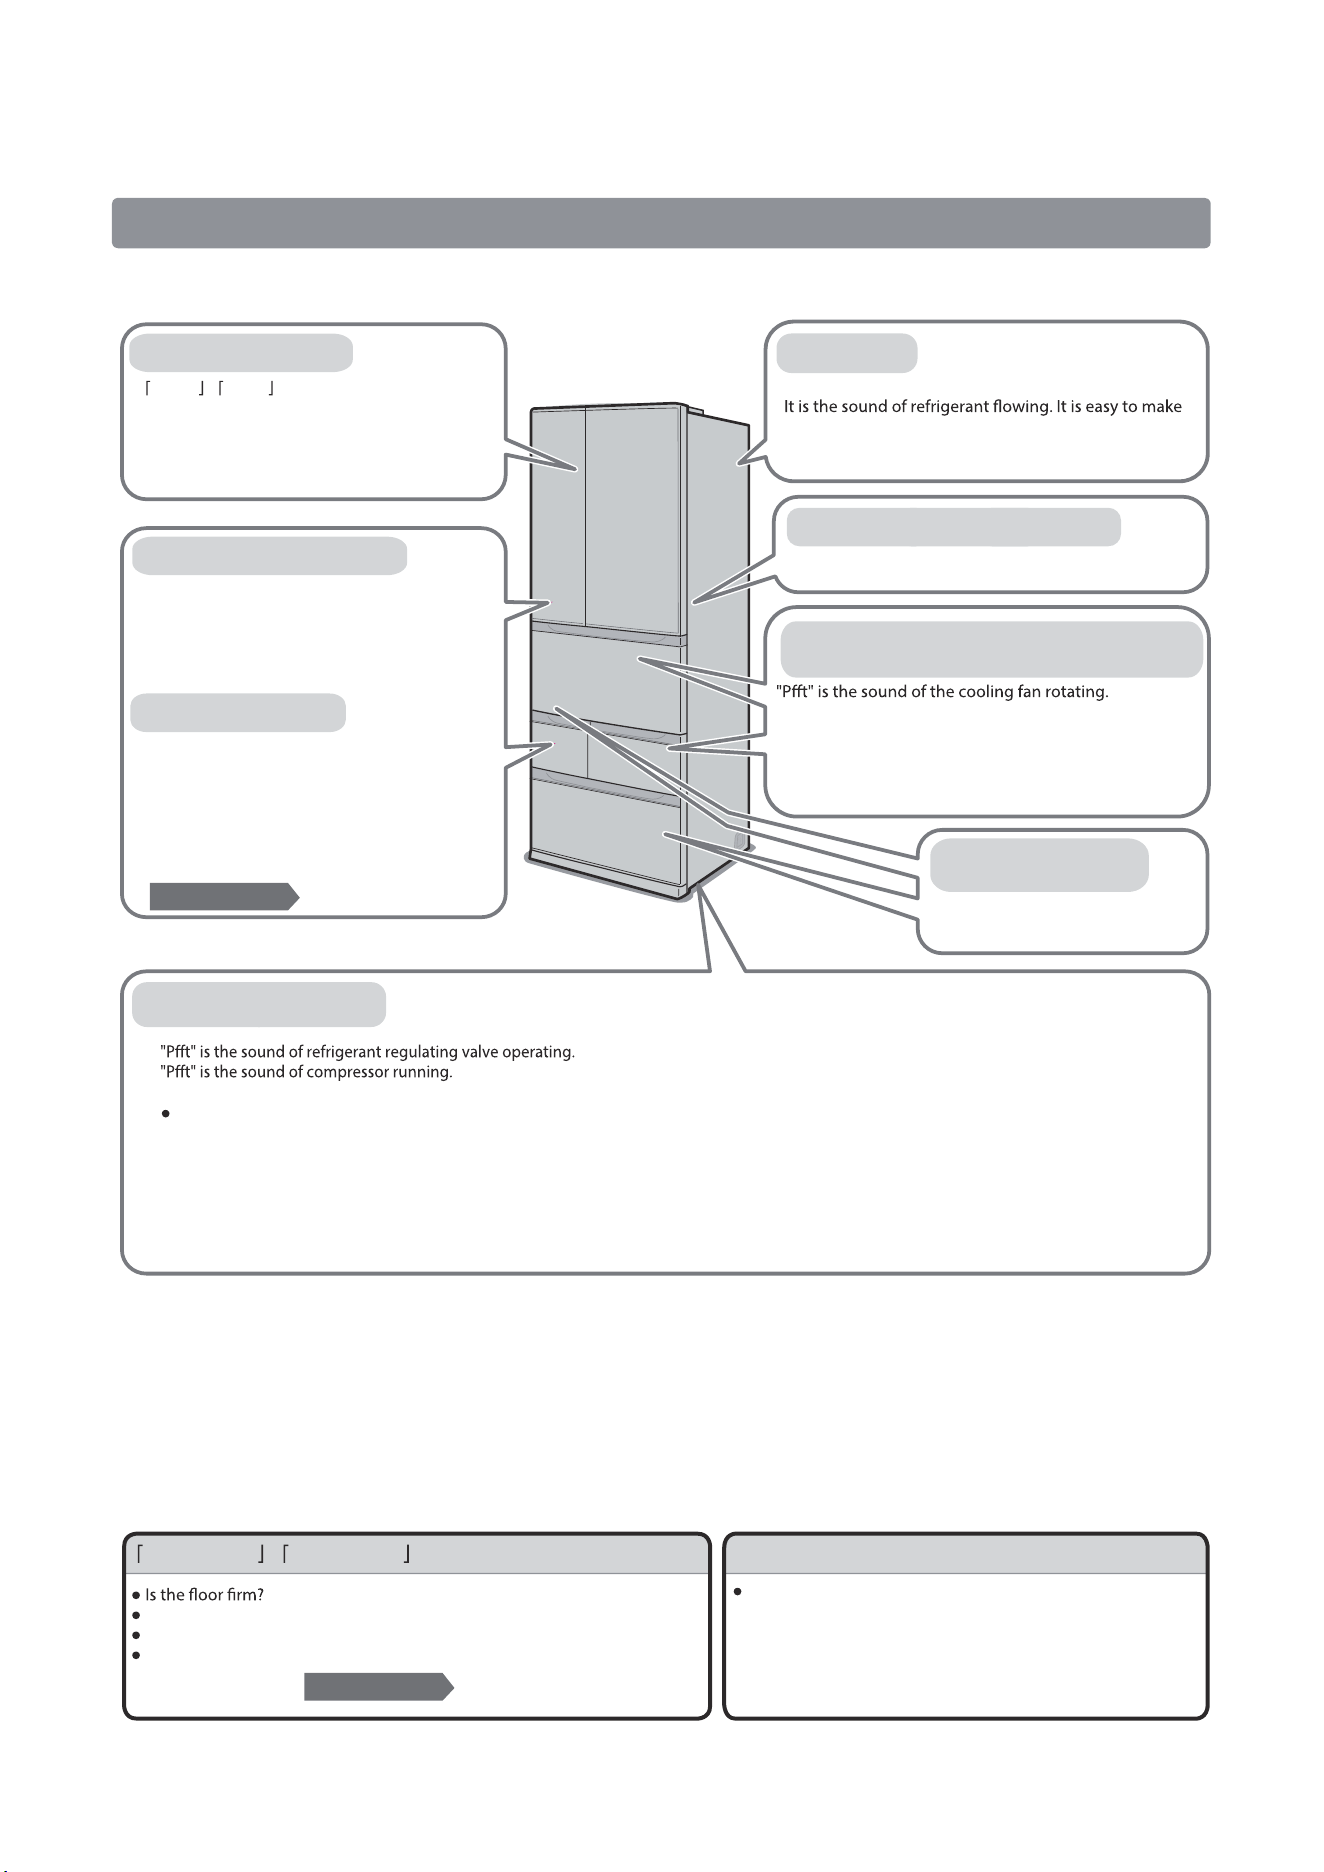
About Sound
In case of fault
......continued
The sound of the fan rotating when the door is closed.
In the refrigeration compartment
Abnormal sound ... The following is normal.
Please note the following occasions
Gada Gada Dongdong Alarm tone
Inside the refrigerator
Near the water supply tank
Near the ice machine
Near the back
When the fruit and vegetable compartment or
frozen food storage compartment is opened
“Ba”“Hu”
It is a sound from the metal guide rail.
When opening and
closing the door
Lower part of refrigerator
Please refer to Page 24
Please refer to Page 33
40
Beep Tsuk
It is the sound of friction between parts due to
temperature change.
After opening the refrigeration compartment
door for about 5 seconds, it starts to make this
sound easily.
"Snoring" is the sound of a water supply pump.
It rings once every 2 hours, and one time lasts for
about 3 seconds.
(Approximately once every 1 hour during rapid
ice making)
"Buzz" is the sound of the ice tray turning over.
"Knock knock" is the sound of falling ice.
It rings once every 2 hours, and one time lasts
for about 3 seconds.
(Approximately once every 1 hour during rapid
ice making)
You can set "Ice Stop" to stop such sounds.
The fan in the refrigerator will not stop rotating when
opening the door of fruit and vegetable compartment or
frozen food storage compartment, so it is easy to hear the
sound of fan rotation.
Does it touch the surrounding wall?
Is the refrigerator placed stably?
Whether the water supply pump and pipe of the water supply tank are
installed correctly?
Is the door not closed properly?
If all doors do not stop after closing, please call the service
hotline. (When an alarm sounds, the power plug shall be
disconnected, and then connected after 5 min, and the alarm
stops after 3 min.)
"Running water sound" and "sneering"
noise during defrosting.
Summer...about once a day
Winter...about once every 2 days
Summer...about 4 times a day Winter...about 1 time a day
The refrigerator is equipped with a compressor controlled by frequency conversion.
Variable frequency control...
The rotation speed can be controlled according to the ambient temperature or the refrigeration condition in the refrigerator, so the operation
will hardly stop.
In summer or at the beginning of operation, if quick freezing and ice making are carried out, the rotation speed will increase and the sound of
compressor running will be louder.
In addition, the inverter compressor is more power-saving than the compressor that runs/stops repeatedly.
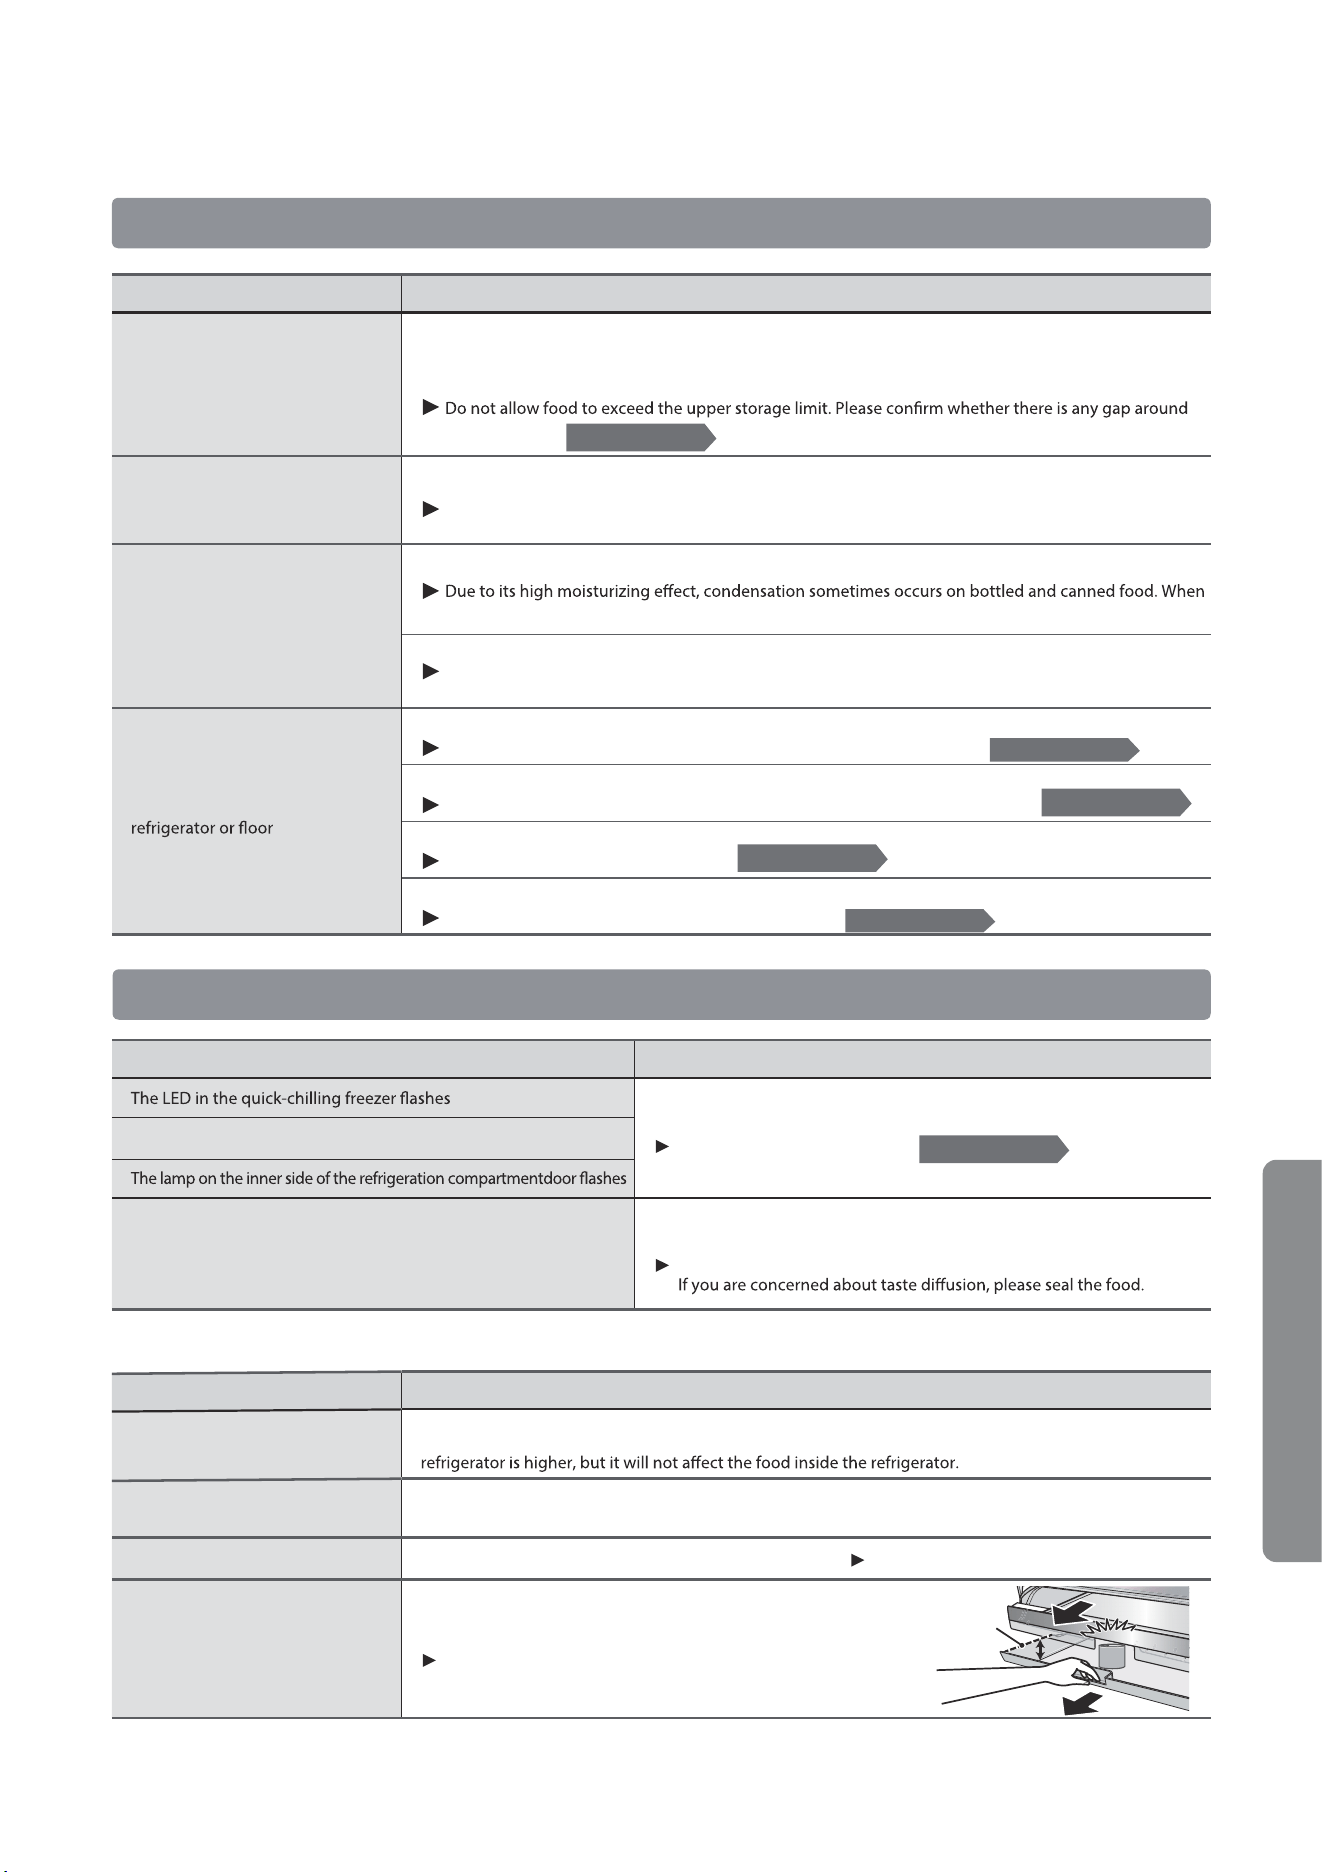
41
About condensation, frosting and water leakage
Phenomena
Checklist · Causes / Solutions
Frosting in the freezing
compartment
Please refer to Page 20
Please refer to Page 33
Please refer to Page 24
Please refer to Page 21
Other
The following is normal.
Phenomena Reasons
The inside of the refrigerator
feels sticky
The inside of the refrigerator is dark
Please remove the food that covers the lamp.
Phenomena
Checklist · Causes / Solutions
Indicates that it is in Demo Mode.
Please release the demo mode.
The fan in the quick-cooling refrigerator box rotates to blow air
There is a peculiar smell in the refrigerator
Please refer to Page 13
Upper storage limit
Is there any gap in the door seal due to excessive food?
When food is put in too much, the door cannot be fully closed, causing a gap between the door seals and
frosting.
Even small gaps can cause frosting.
the door seal.
Is the humidity too high? Is the door not fully closed?
When condensation occurs, please dry it with a dry cloth.
Is the door open frequently or for a long time? Is the door not fully closed?
condensation occurs, please dry it with a dry cloth.
Is the moisture-permeable box blocked by food bags or containers?
When the moisture-permeable box is blocked by food bags or containers, condensation will be
increased. Please remove the obstruction.
When adding water, does the amount of water exceed the water level line of the supply tank?
Please do not exceed the water level of the water supply tank.
Are sealing strips installed on the water tank cover (on the cover)?
Please install the sealing strip (on the cover) in place on the water tank cover.
Is the water box installed in place?
Please install the water box correctly.
Are cleanouts at the bottom of fruit and vegetable containers installed?
Please install the cleanout correctly.
Are foods (onions, ginger, garlic, etc.) that emit a strong taste and are not
packed in plastic wrap or sealed containers placed?
The taste of the food itself cannot be eliminated.
The radiator tube is hidden around the refrigerator to prevent condensation. At the beginning of
operation or when the ambient temperature is too high, you will feel that the outside temperature of the
For easy operation, a layer of lubricant conforming to the provisions of Japan's Food Hygiene Law is
applied on the box and guide rail. If the lubricant accidentally sticks to other parts, please wipe it clean.
Does the food in the lower quick-chill box bump into the
upper quick-chill box?
Please do not place the food in the lower quick-chilling
refrigerator above the upper storage limit.
Are the lights in the refrigerator covered by food?
Condensation on the outside of
refrigerator or rotating partition
Inside condensation of fruit and
vegetable compartment or
refrigeration compartment
Water leaks into the
The outside and door seals of the
refrigerator are hot
When pulling out the lower
quick-chill box, the upper
quick-chill box is also pulled out
together
Please refer to Page 32
When encountering difficulties
(3) Put your hand close to the lower part of the refrigeration
compartmentdoor, turn on the main menu key ,
touch the main menu key, and gently touch the panel to
turn on the light. Press and hold and for
about 10 seconds at the same time until a "beep beep" sound
is heard, and then close the ice making compartment door.
1
2
42
During transportation and relocation
Warning
Do not damage the refrigeration circuit on the back or side.
3
4
5
Pour out the water from the ice tray.
Pull out the power plug.
Take out the food in the refrigerator.
6
Close the drain plug.
(To prevent water leakage, be sure to close the drain
plug tightly.)
Before moving and handling
(2) Open the door of ice making
compartment.
Movement, handling
At the time of relocation
Cleaning cloth
Drain Hydrant
Cleaning
cloth
Do not damage
the refrigeration
circuit
(1) Take out the water supply
tank and pour away the
residual water.
Remove the front trim panel, and raise the adjusting foot
so that the bottom caster contacts the ground.
If anti-overturning measures are installed, they must be
removed.
Pull the refrigerator forward to drain the water in the
evaporation tray (located at the lower part of the back).
(1) Place a water receiving container (with a height of less
than 2cm) under the drain outlet. As water may spill out,
please spread rags under or around the container.
(2) Rotate and remove the drain plug, and puncture the
more than 2 times).
out. As there is still a small amount of water left, hold
the handling handle on the upper part of the back and
remaining water is discharged. (When the container
touches the refrigerator so that it cannot be tilted,
below and let the water drain on the rag until all the
remaining water is discharged.)
At this time, the ice making tray starts to rotate and water and
ice will be automatically poured into the ice storage box.
Therefore, please make sure to close the door of the ice
making compartment.
To avoid automatic door
opening, please seal the door
with adhesive tape.
the compressor may fail.
(4) After
compartment door and pour out water and ice in the ice
storage box.
(5) Clean the ice storage box, ice spoon and water supply tank
with water, wipe them clean and put them back in place.
After the ice making compartment
door is closed,
More than 2 persons are required for handling.
When handling the refrigerator, please lay a protective
evaporation tray may not be completely drained and
When handling the refrigerator, please be sure to hold
the handle rather than the door handle or door.
Otherwise, the refrigerator may be dropped, damaged or
injured.
Always wear anti-skid gloves when handling the
refrigerator. Otherwise, the refrigerator may be dropped,
damaged or injured.
(Lower back of refrigerator)
Drain outlet
(Lower back of refrigerator)
Drain outlet
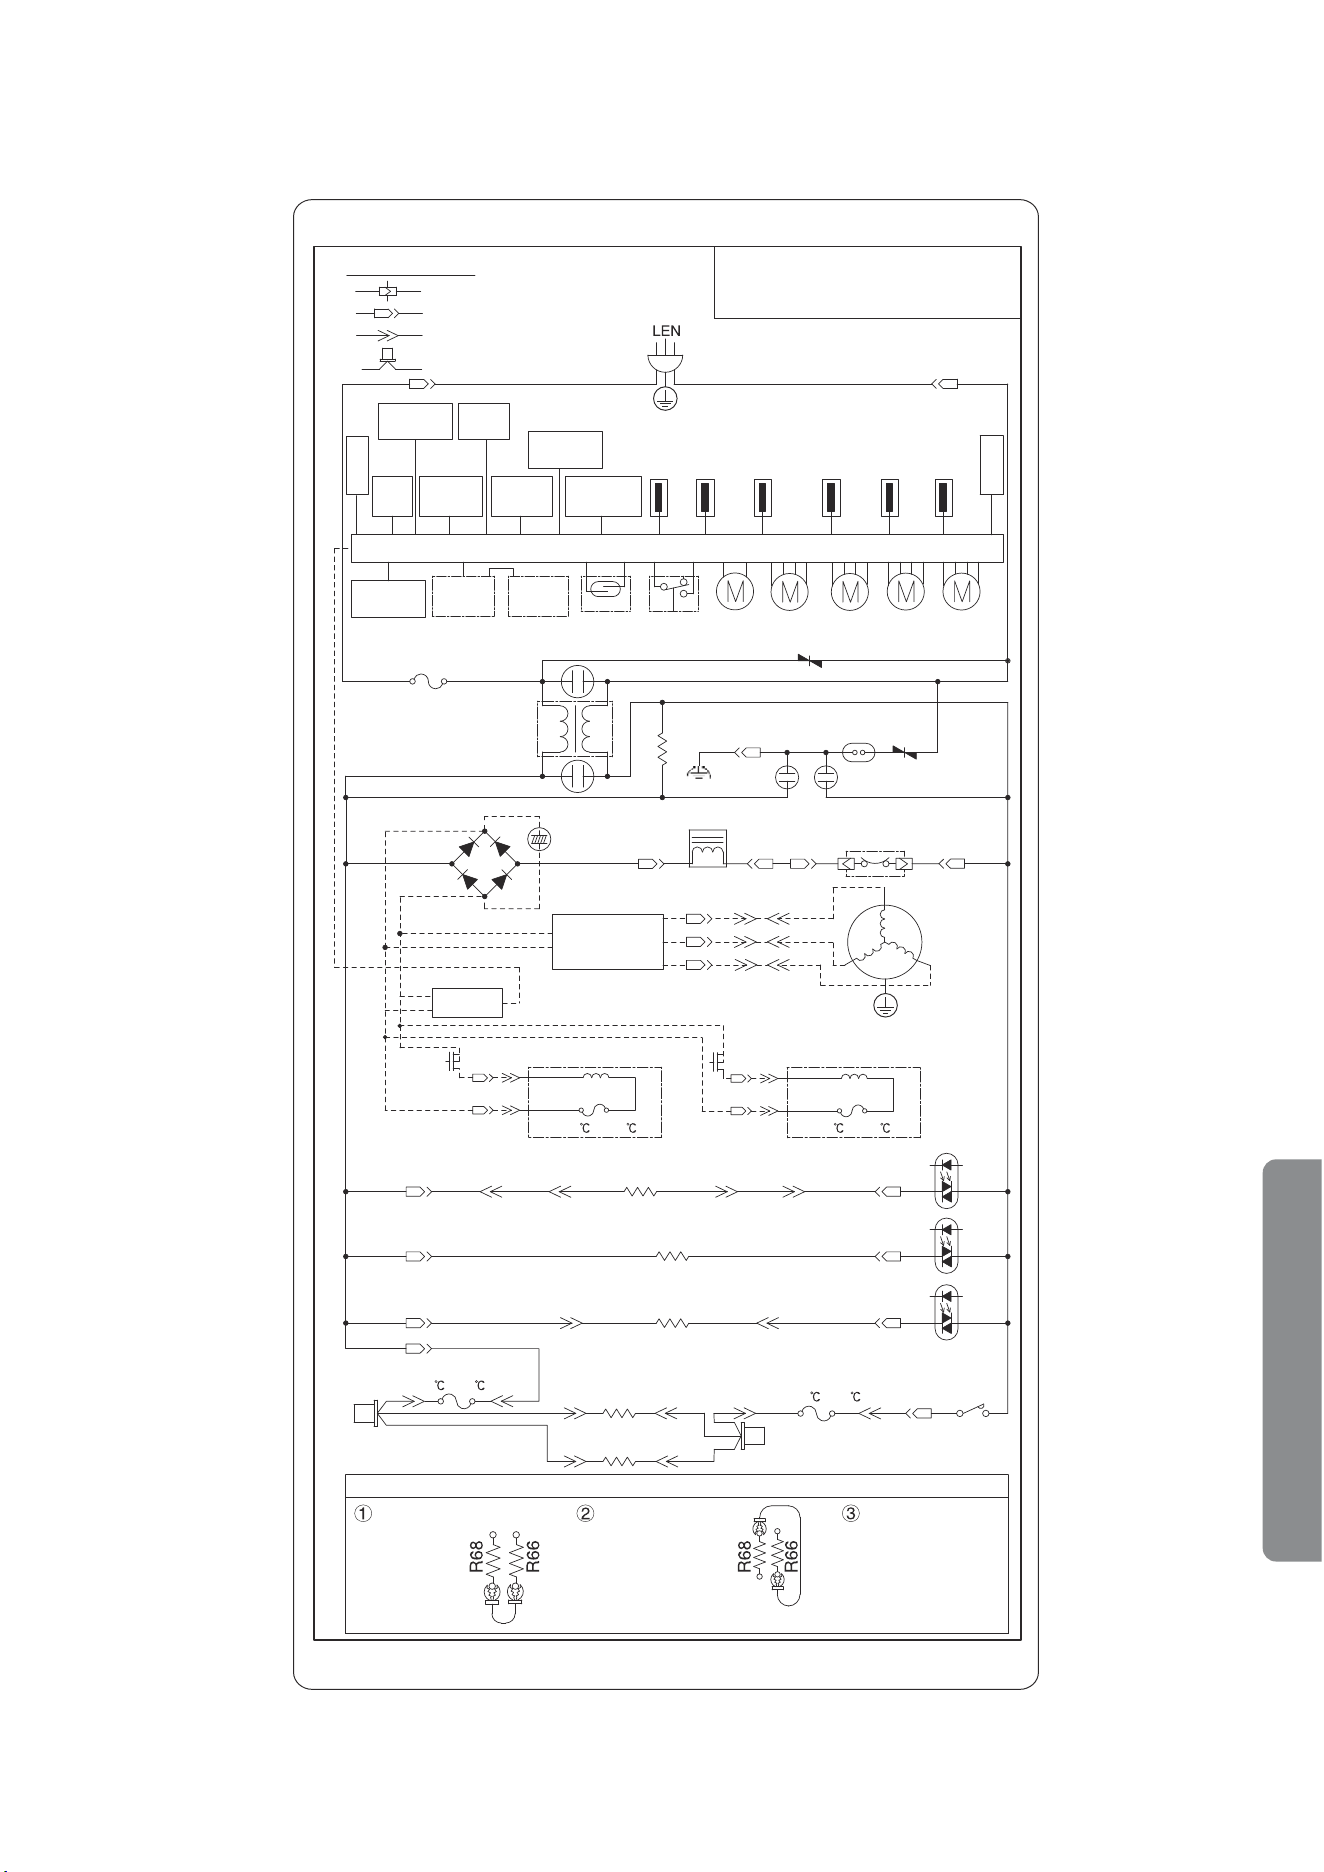
Circuit diagram
43
When encountering difficulties
(76 or 77 )
(76
or 77 )
Equivalent circuit diagram
Connection terminal
PCB Connectors
Chain Terminals
Closed-end splice
Power plug
Three-way
valve
Meat tray
lighting LED
R1 door interior
lighting LED
R2 door interior
lighting LED
Sterilization
LED
Protective earth
Sensor of
freezing
room
Sensor of
R room
Defrost
sensor (F)
Ice maker
Door switch
(R1)
Door switch
(R2)
Door
switch (I)
Door
switch (F)
Current fuse
(250V~6.3A)
Green
Varistor
Varistor
Peach
Inductor
White
Orange
Orange
White
Red Red
BrownBrown
DC power
supply
Method of forced defrosting
After defrosting is
short circuit wiring, unplug
the power plug and plug
the power plug in again.
(However, when the temperature of the defrost sensor is higher than the recovery temperature, the
defrost heater will not be powered on.)
The heater resistance value in () is the approximate value used in circuit inspection.
Defrost sensor
(R evaporating
pipe)
Defrost sensor
(R reservoir)
Black YellowPurple
Humidity
sensor
R fan
motor 1
R fan
motor 2
C fan
motor
F fan
motor
Water
supply
motor
(130 or 133 ) (130 or 133 )
Purple
Purple
RedRed
BlackBlack
Black
Black
Orange
White
Blue
Red
Thermal fuse
Thermal fuse
DP heater
(2.1kΩ)
Black
Black
Circuit diagram of frost-free refrigerator-freezer
GR-RM598WE-PGA(B3)
GR-RM598WE-PGA(UC)
220-240V~/50Hz
Operati
on PCB
R1 touch
opening PCB
R2 touch
opening PCB
R room
lighting LED
Over-Temperature
Protection
Inverter PCB
Inverter
Compressor
Protective earth
Thermal fuse
Soleniod (left)
Thermal fuse
Soleniod (right)
V PATI heater
(8.6kΩ)
V bottom heater
(6.8kΩ)
Water supply pipe heater
(12kΩ)
Pipe heater
(685Ω)
Short-circuit the
lower side of R68 and
R66 of the PCB to
enter the defrosting
mode.
Then the upper side of R68
and the lower side of R66
are short-circuited, the
timing is shortened, and the
defrost heater is powered
on in about 20 seconds.
confirmed, dismount the
Power PCB
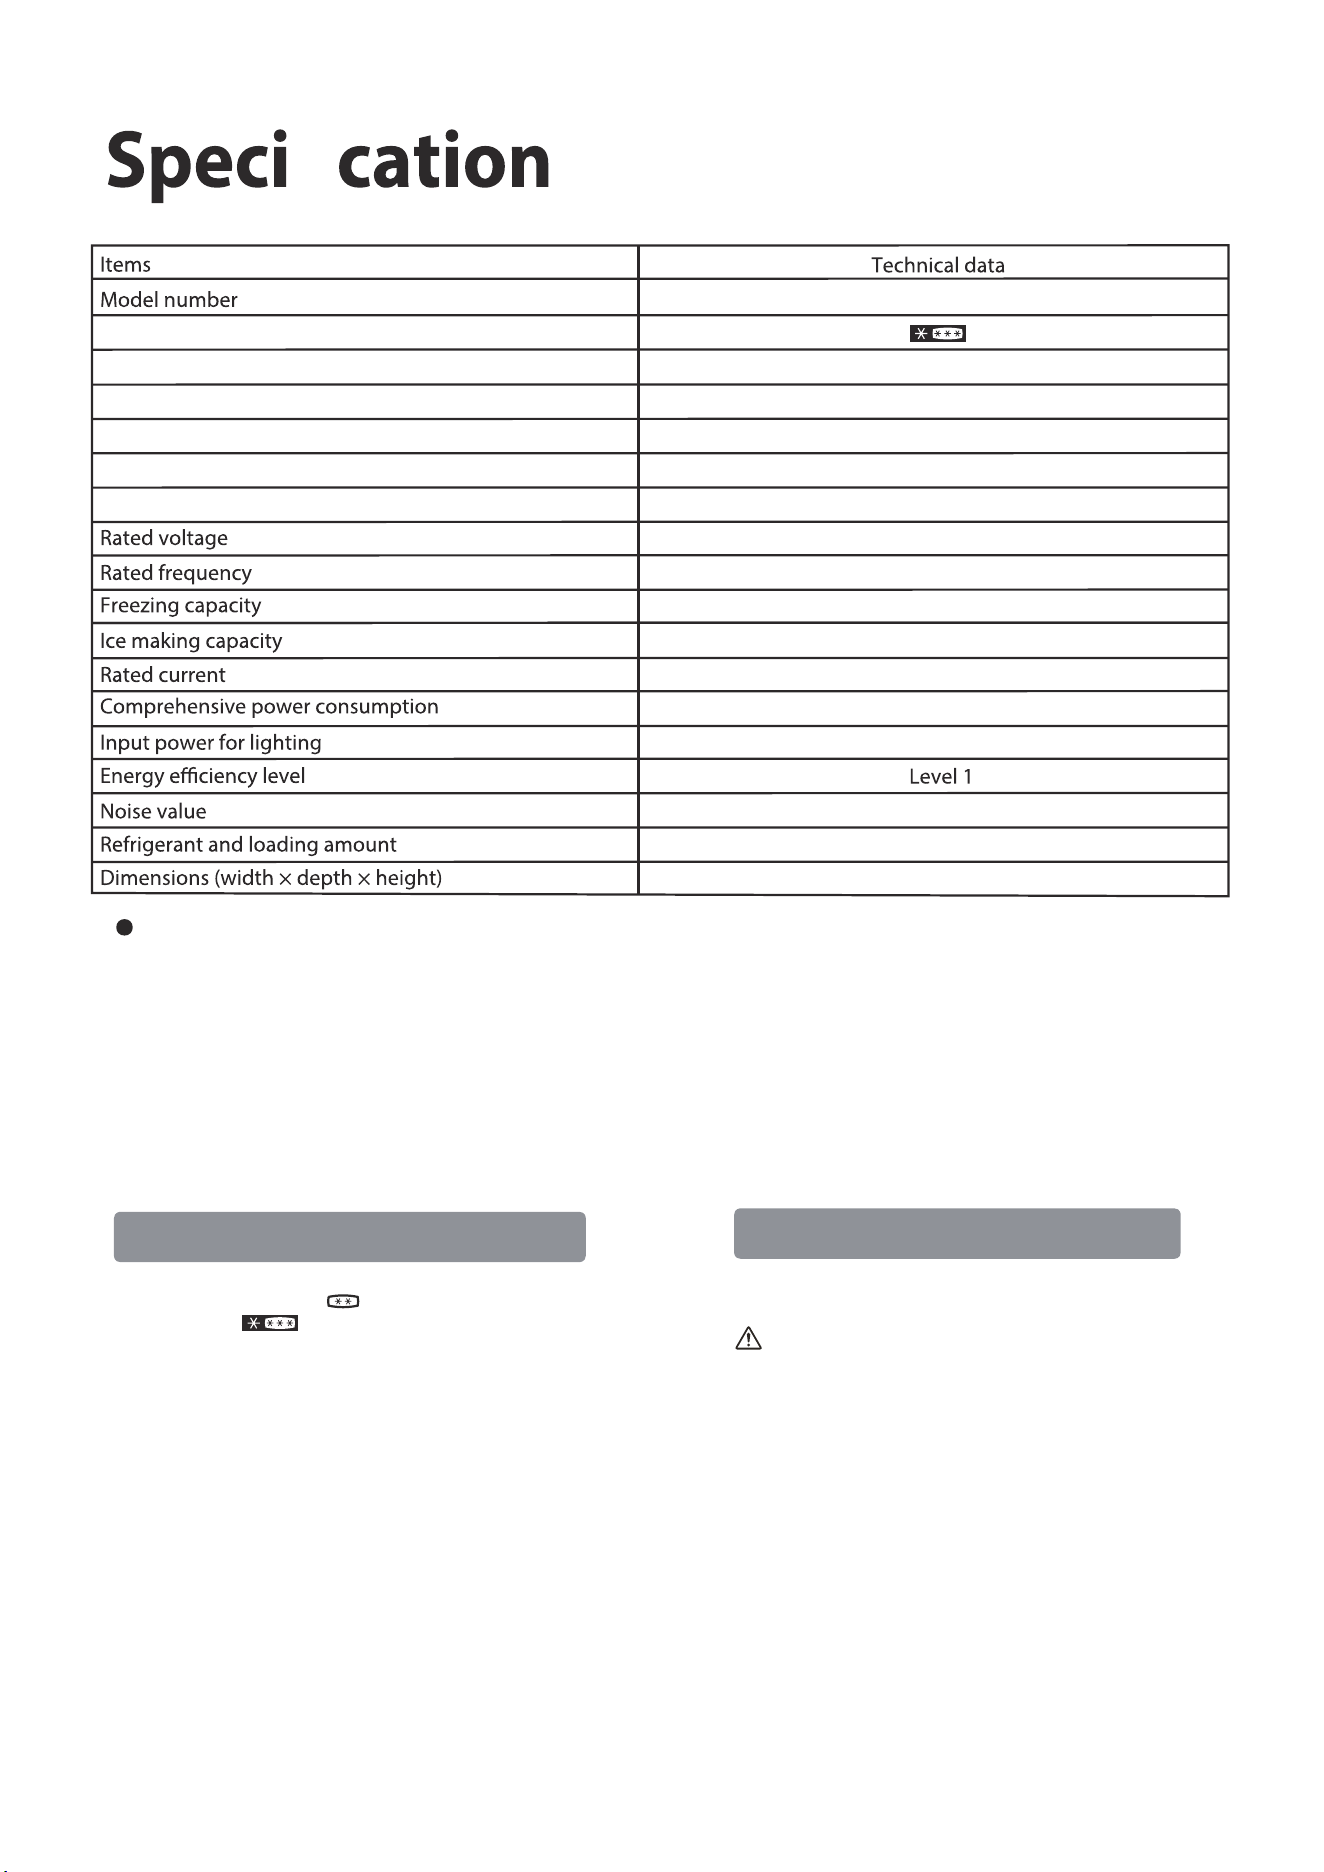
44
This refrigerator is automatically defrosted and does not
require manual defrosting.
About automatic defrosting
About Freezing Compartment
Excluding handle and adjusting foot, maximum push-in depth: 649mm
The star rating of the frozen food storage compartment and the
ice-making compartment is , and that of the freezing
compartment is .
WARNING: Do not use mechanical equipment or other
means to speed up the defrosting process except as
recommended by the manufacturer.
Freezer compartment stars
GR-RM598WE-PGA(B3)/GR-RM598WE-PGA(UC)
451L
231L
81L
100L
39L
220-240V~
50Hz
6.0kg/24h
1.2kg/24h
1.01A
226kWh/y
5.4W
39dB(A)
R600a
650mmx652mmx1833mm
fi
Total volume
Fresh Food Storage Volume
Frozen Food Storage Volume
Cellar Storage Volume (Fruit and Vegetable compartment)
Freezer Storage Volume
Accessory
After-sales Service Contact Information
Section II movable ............................1
Upper quick-chilling box .................................1
Lower quick-chilling box .................................1
Top plate of instant chilling box ...................1
Quick-chilling refrigerator lid ........................1
Aluminum tray (slightly frozen) ....................1
Movable box ........................................................1
Water supply tank ..............................................1
Water tank partition ..........................................1
Door rack(left) ................................................2
................................................2
Double bottle rack(left) ....................................1
Double bottle rack(right) ...............................1
Door rack(right)
Egg rack ...................................................................1
Sliding box for fruit and vegetable
compartment .........................................................1
Fruit and vegetable container .........................1
Moisture-permeable box M...............................1
Ice storage box ......................................................1
Ice scoop ..................................................................1
Water receiving box ............................................1
Freezing vessel ......................................................1
Vegetable frozen insulation mat ....................1
Freezing compartment sliding box ...............1
Storage container .................................................1
Aluminum tray ......................................................1
Front trim panel ....................................................1
When encountering difficulties
45

version:(X4HL-A)
