D1.1.4_KD010637000
User Manual

Dear xTooler:
Thank you for choosing xTool S1. We are so grateful for your recognition, and
sincerely hope you will enjoy it!
xTool S1 is an easy-to-use powerful laser cutter and engraver with high
processing speed and accuracy, supporting accurate coordinates-based
positioning, automatic focus, and curved surface engraving. Whether you are
a novice or an expert, whether you use it at home or for business purposes,
xTool S1 is ready to give you the best laser engraving & cutting experience.
Our mission is to make it easier for everyone to create with our machine. We
attach great importance to product experience and user suggestions. Please
let us know if you have any questions anytime. We are always here to help. You
can join our Facebook group to share creative ideas and get inspired by others.
By visiting our online store, you can also find our latest accessories and various
materials to maximize the magic of xTool S1.
Thanks again for your support, and we will consistently provide quality
products and services in the future.
Sincerely,
CEO
Official website: xtool.com
Facebook group: xTool S1 Official Group
Support center: support.xtool.com
Technical support: [email protected]om
Video tutorial: youtube.com/c/xToollaserbox?sub_confirmation=1
Contents
Safety first (important)
List of items
Meet your xTool S1
Use your xTool S1
Use xTool S1 with the air assist set
Use xTool S1 with the riser base
Use xTool S1 with the honeycomb panel
Use xTool S1 with the rotary attachment
Understand the annular indicator
After-sales services
FAQs
Statement
01
02
04
05
17
22
27
31
32
32
33
34
0201
Safety first (important)
1. General safety
Read and get familiar with all safety precautions and procedures
before using the machine. Strictly follow all safety precautions.
Ensure that the machine is properly assembled and is working
properly.
■ Check the machine for damage every time before you use it. Do
not operate it in any way when any damage or defect is found.
■ Ensure that the workspace is clean and flat.
■ Do not disassemble the machine or change its structure in any
way without authorization. Do not modify or decompile its
operating system.
■ Do not leave the device unattended during operation. Pay
attention to whether it is working properly.
■ Keep the inside of the machine clean. Residues and chippings
accumulated during cutting and engraving are dangerous and
may cause a fire. Clean the chippings and residues inside the work
area regularly.
■ The machine works properly at the temperature of 0°C to +35°C
and can be stored properly at the temperature of –10°C to +40°C.
Do not operate it at a temperature lower than 0°C.
Follow the operating principles:
Caution
2. Laser safety
Generally, the laser module is completely enclosed in the casing
and light shield during operation. The device has a safety interlock
switch. If the lid is lifted during operation, the device will stop
working and no harm will be done to people.
■ Do not operate the machine when any part of it is removed.
Removing any part may expose the laser system and cause damage
to the machine.
■ Do not engrave or cut any material that contains PVC or vinyl
(processing plastics is not recommended). These materials (and other
materials containing chlorine/chloride) can generate corrosive vapor
that is extremely harmful to the human body and can cause damage
to the device. Any damage caused by engraving or cutting any
material containing PVC or vinyl is not covered by the Company's
warranty.
■ Do not engrave or cut any unknown materials. Vaporization or
melting of many materials, which include but are not limited to PVC
and polycarbonate, may release harmful smoke.
■ Laser operation is prohibited when the lid is lifted. Make sure that
the lid is closed during operation and do not tamper with the safety
mechanism of the lid.
■ Do not leave the device unattended during operation. Pay attention
to whether it is working properly.
The reference standards for laser safety are the American National
Standard for Safe Use of Lasers (Z136.1-2022), International
Electrotechnical Commission Standard (IEC 60825-1:2014), and
European Standards (EN 60825-1:2014/A11:2021).
Follow the operating principles:
Warning
A high-density laser beam is used by the device to irradiate the
material to be cut or engraved, so as to heat up the material surface
and vaporize the material without burning. But most materials are
inherently flammable and may be ignited to form an open flame
that can burn down the device (even if it is made of
flame-retardant materials) and its surroundings. Experience shows
that vector
cutting with a laser is most likely to produce an open flame. In
particular, acrylic has proven to be extremely flammable in vector cutting.
3. Fire safety
Do not leave the
device unattended
when it is working.
Keep combustible
materials away from
the device.
■ Ensure that the workspace is well-ventilated so that the generated
smoke can be discharged in time.
■ Do not stack materials (especially organic ones, such as paper)
around the machine. They may cause the spread of flames and
increase the risk of material ignition.
■ Do not leave the machine unattended when it is working. If the
machine works with setting errors and is left unattended for a long
period of time, or if a mechanical or electrical fault occurs, a fire may
be caused.
■ Clean the device regularly. Excessive accumulation of residues and
chippings from cutting and engraving would increase the risk of fire.
The internal working area needs to be cleaned periodically to ensure
that there is no residue or chipping inside the device.
■ Ensure that the area around the machine is clean without any
cluttered flammable materials, explosives, or volatile solvents, such as
acetone, alcohol, or gasoline.
■ Keep a fire extinguisher and perform regular maintenance and
inspection of it.
■ If a fire occurs during processing, take good care of yourself. For a
small flame, you can wait for it to go off; for a larger fire, please keep a
safe distance and use a fire extinguisher to put it out.
Read the following warnings and suggestions carefully:
Danger
4. Electrical safety
■ Do not open any access panel on the device when the device is
connected to the power supply. Accidental contact with the power
supply may cause injury.
■ Do not touch any electronic area with your hands or other tools
when the machine is connected to a power supply.
■ The power switch is on the back of the device. Press (-) to power it
on and press (o) to power it off.
Read the following warnings and suggestions carefully:
Caution
On xTool S1, the warning and instruction signs are labeled where
physical injuries or damage to the machine may be caused
before and/or during operation. If a sign is damaged or lost,
replace it immediately. You can use the following template to
print the sign you need.
5. Warning and instruction signs
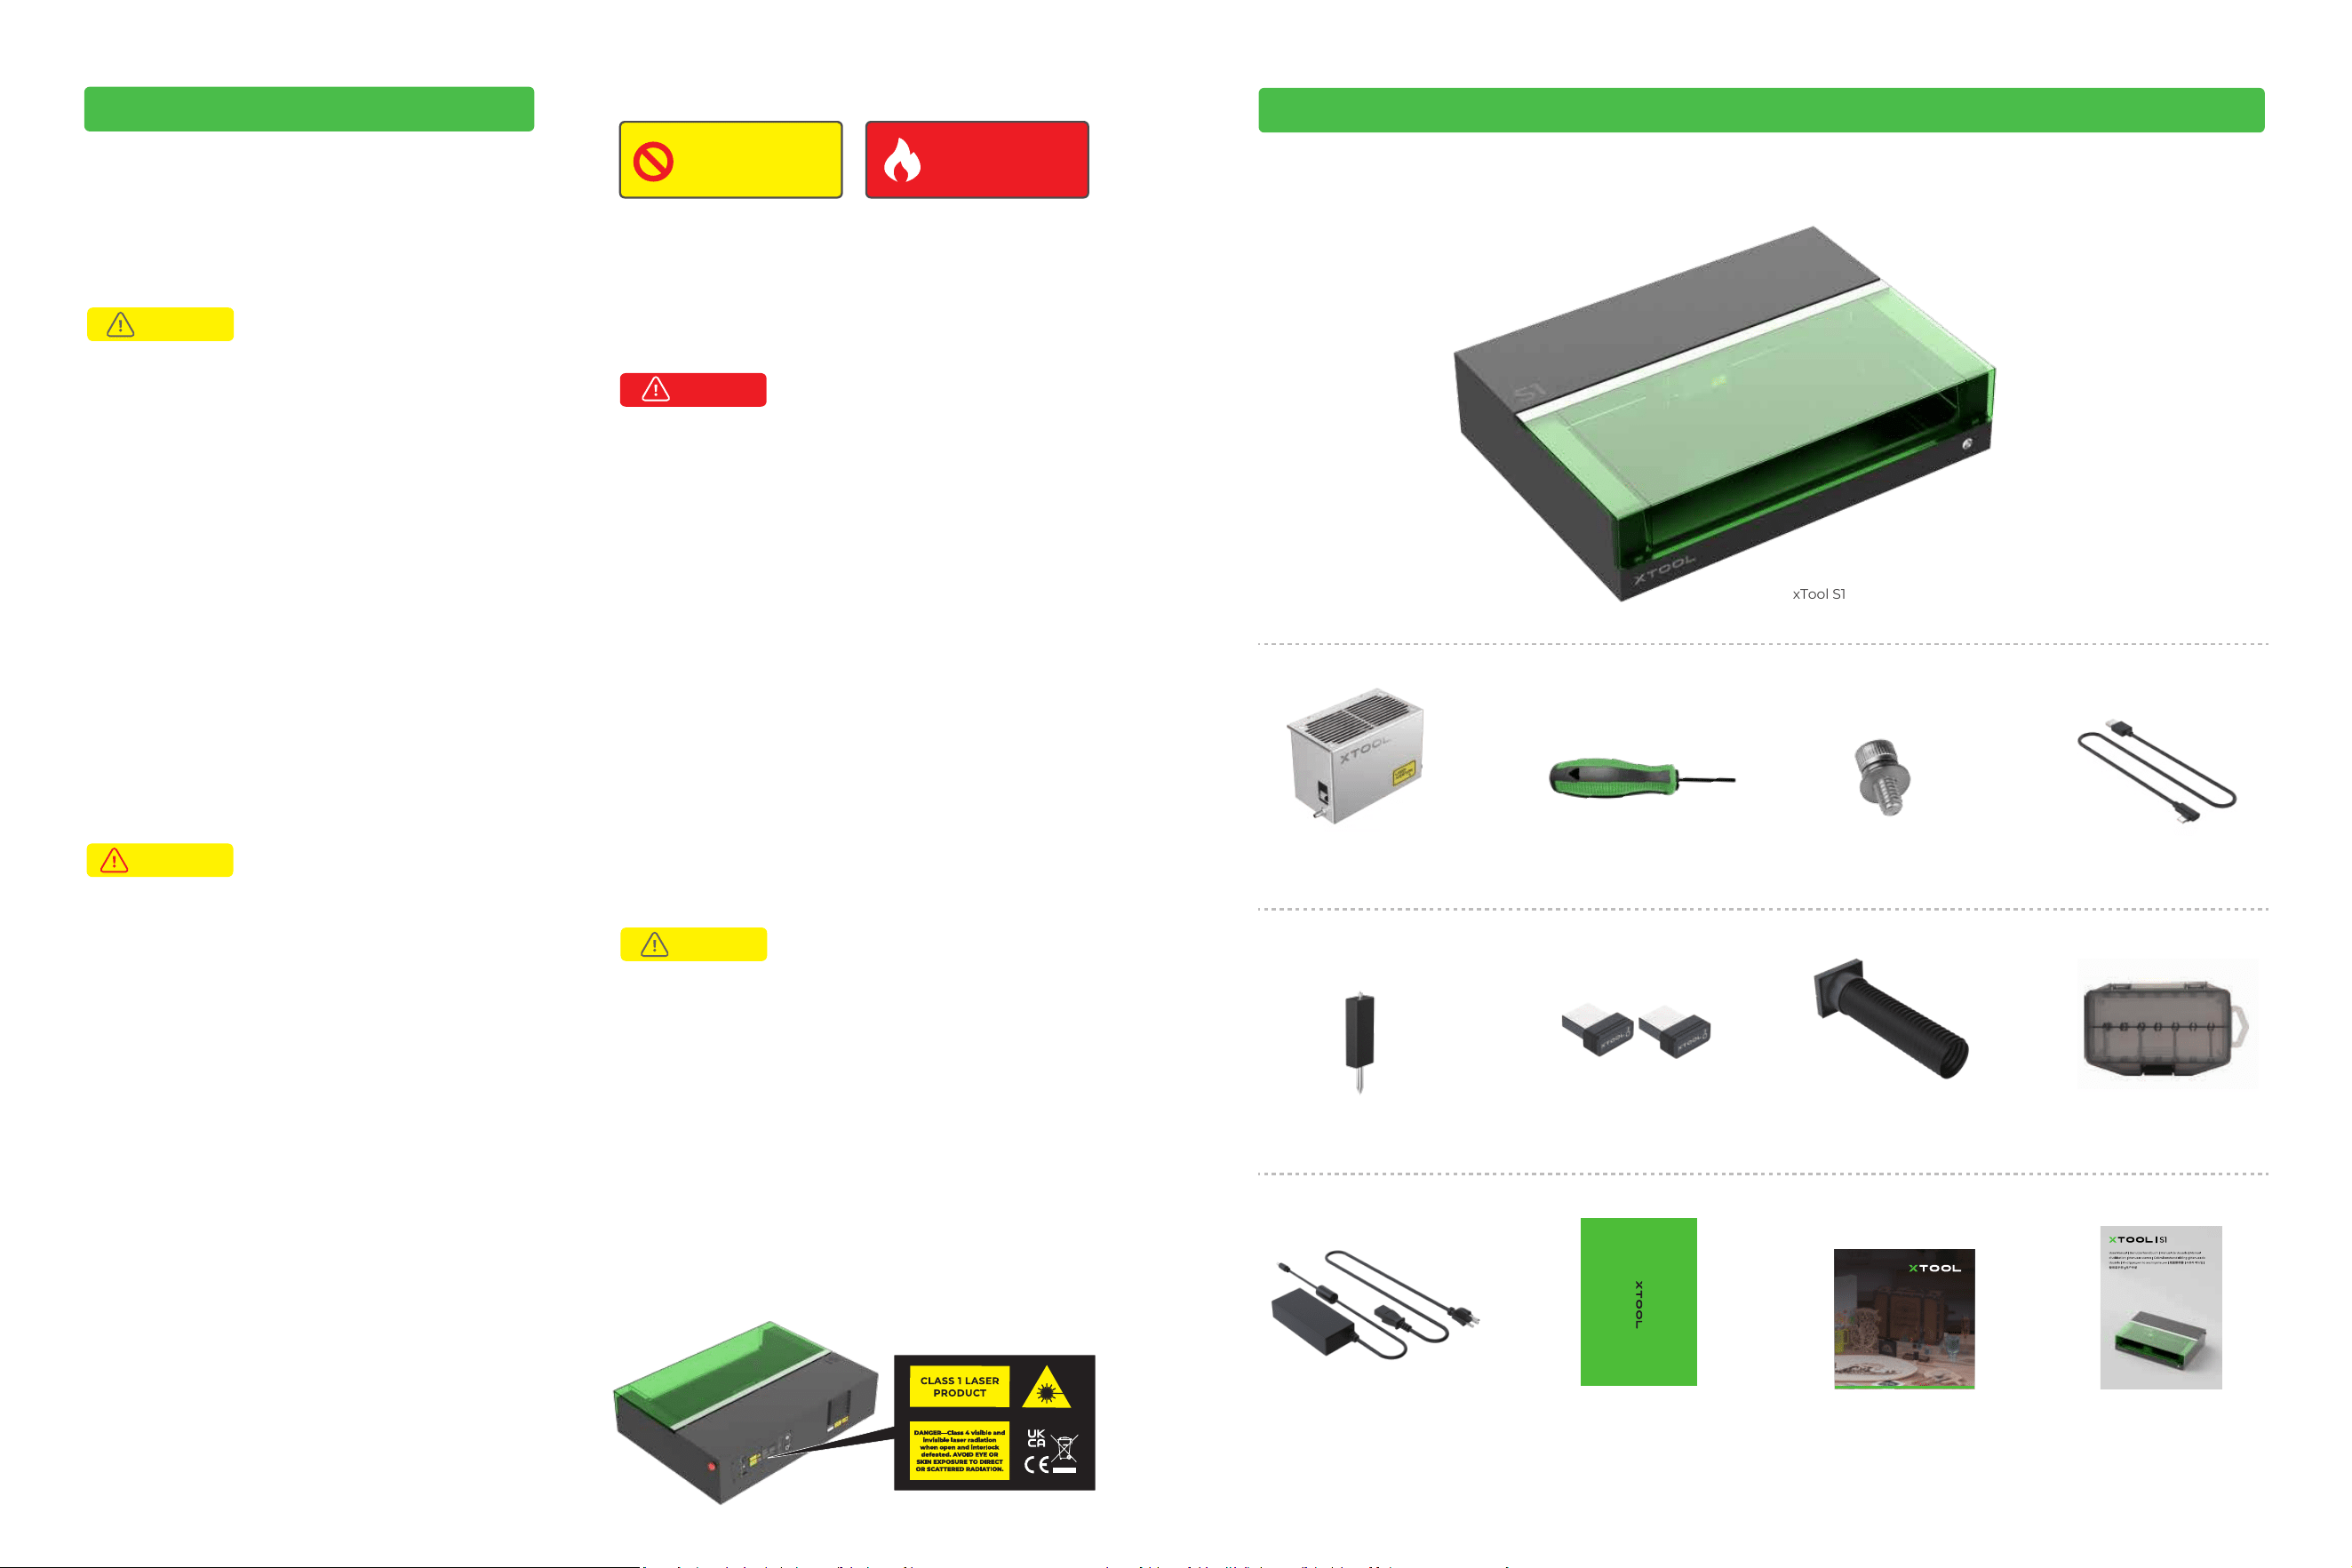
xTool S1
Key
Distance sensor Parts storage boxSmoke exhaust pipe
Laser module
USB cableScrewdriver Screw M3*8
x 11
Brochure User manualMaterial packPower cable and adapter
XTOOL
SELECTED
WITH
CREATITY
D1.1.3_DPB01001300
List of items
0403
14
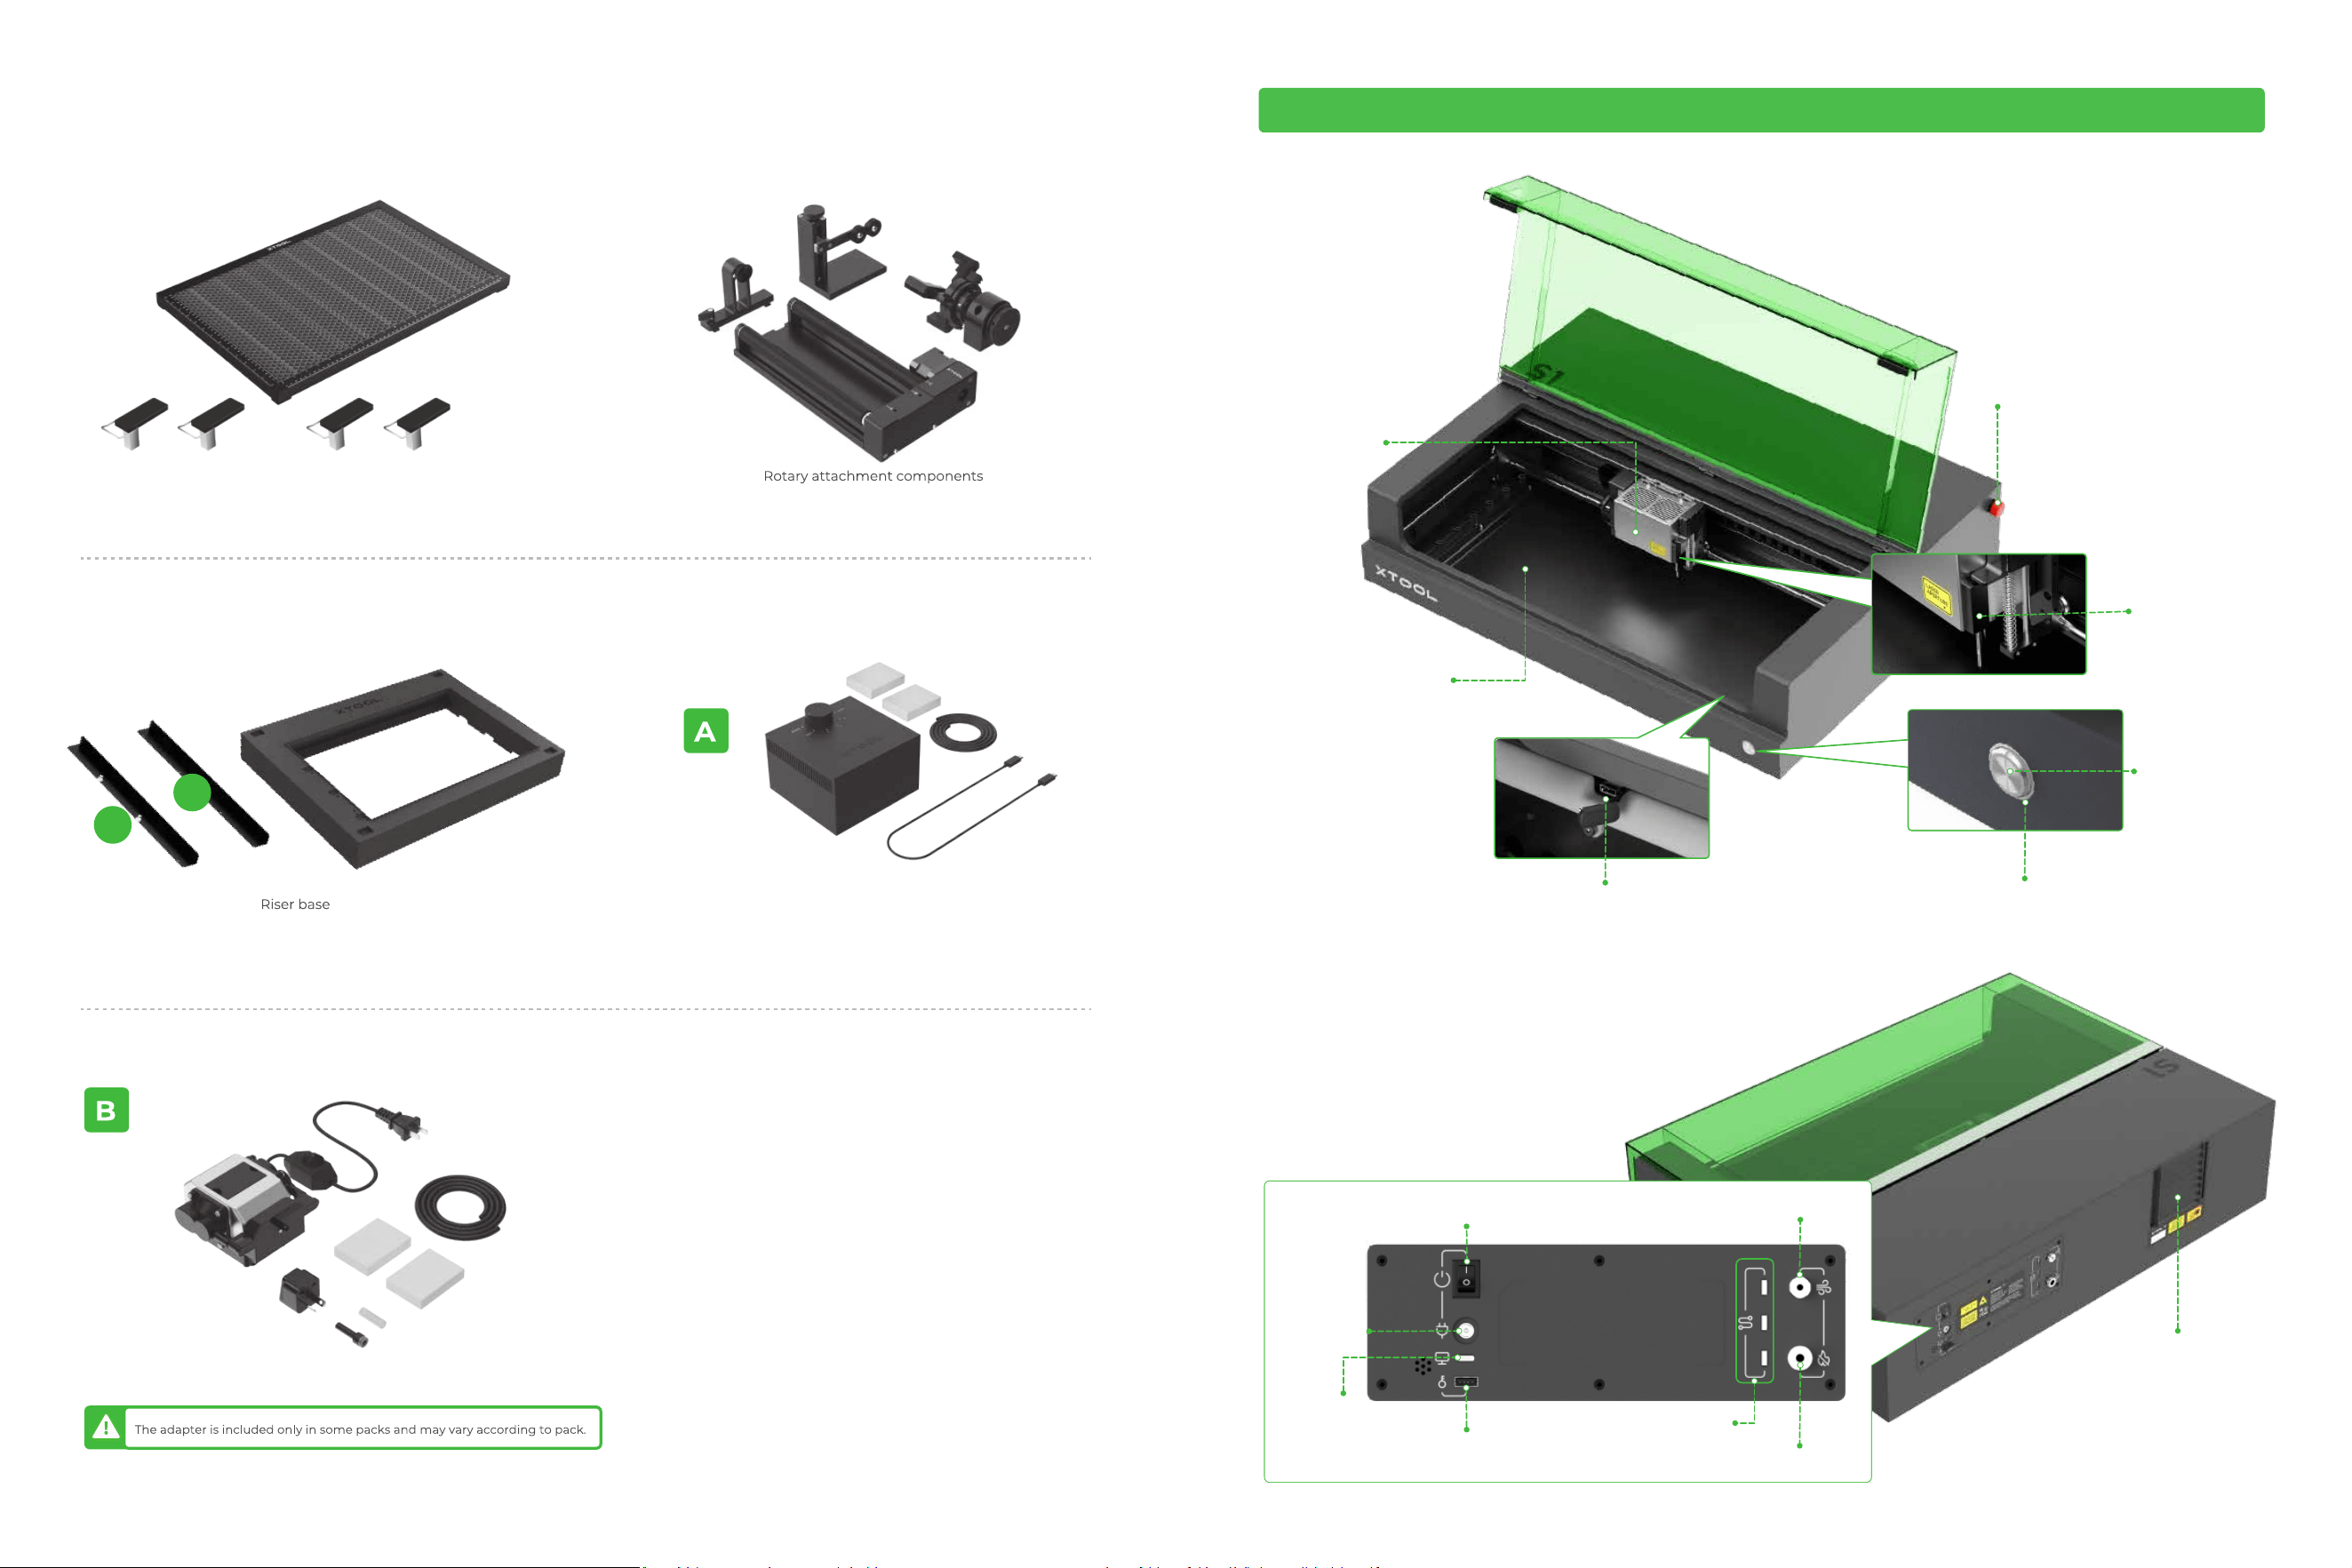
The following items are included only in some packs.
Annular indicator
Power switch
Power port
Tube fitting for the air assist set
USB port
Port for the key
Tube fitting for the fire safety set
Extension port × 3
Smoke outlet
Extension port
Laser module
Baseplate
Distance sensor
Emergency stop switch
Button
Honeycomb panel components
Air assist set components
Air assist set components
P1
P2
Meet your xTool S1
0605
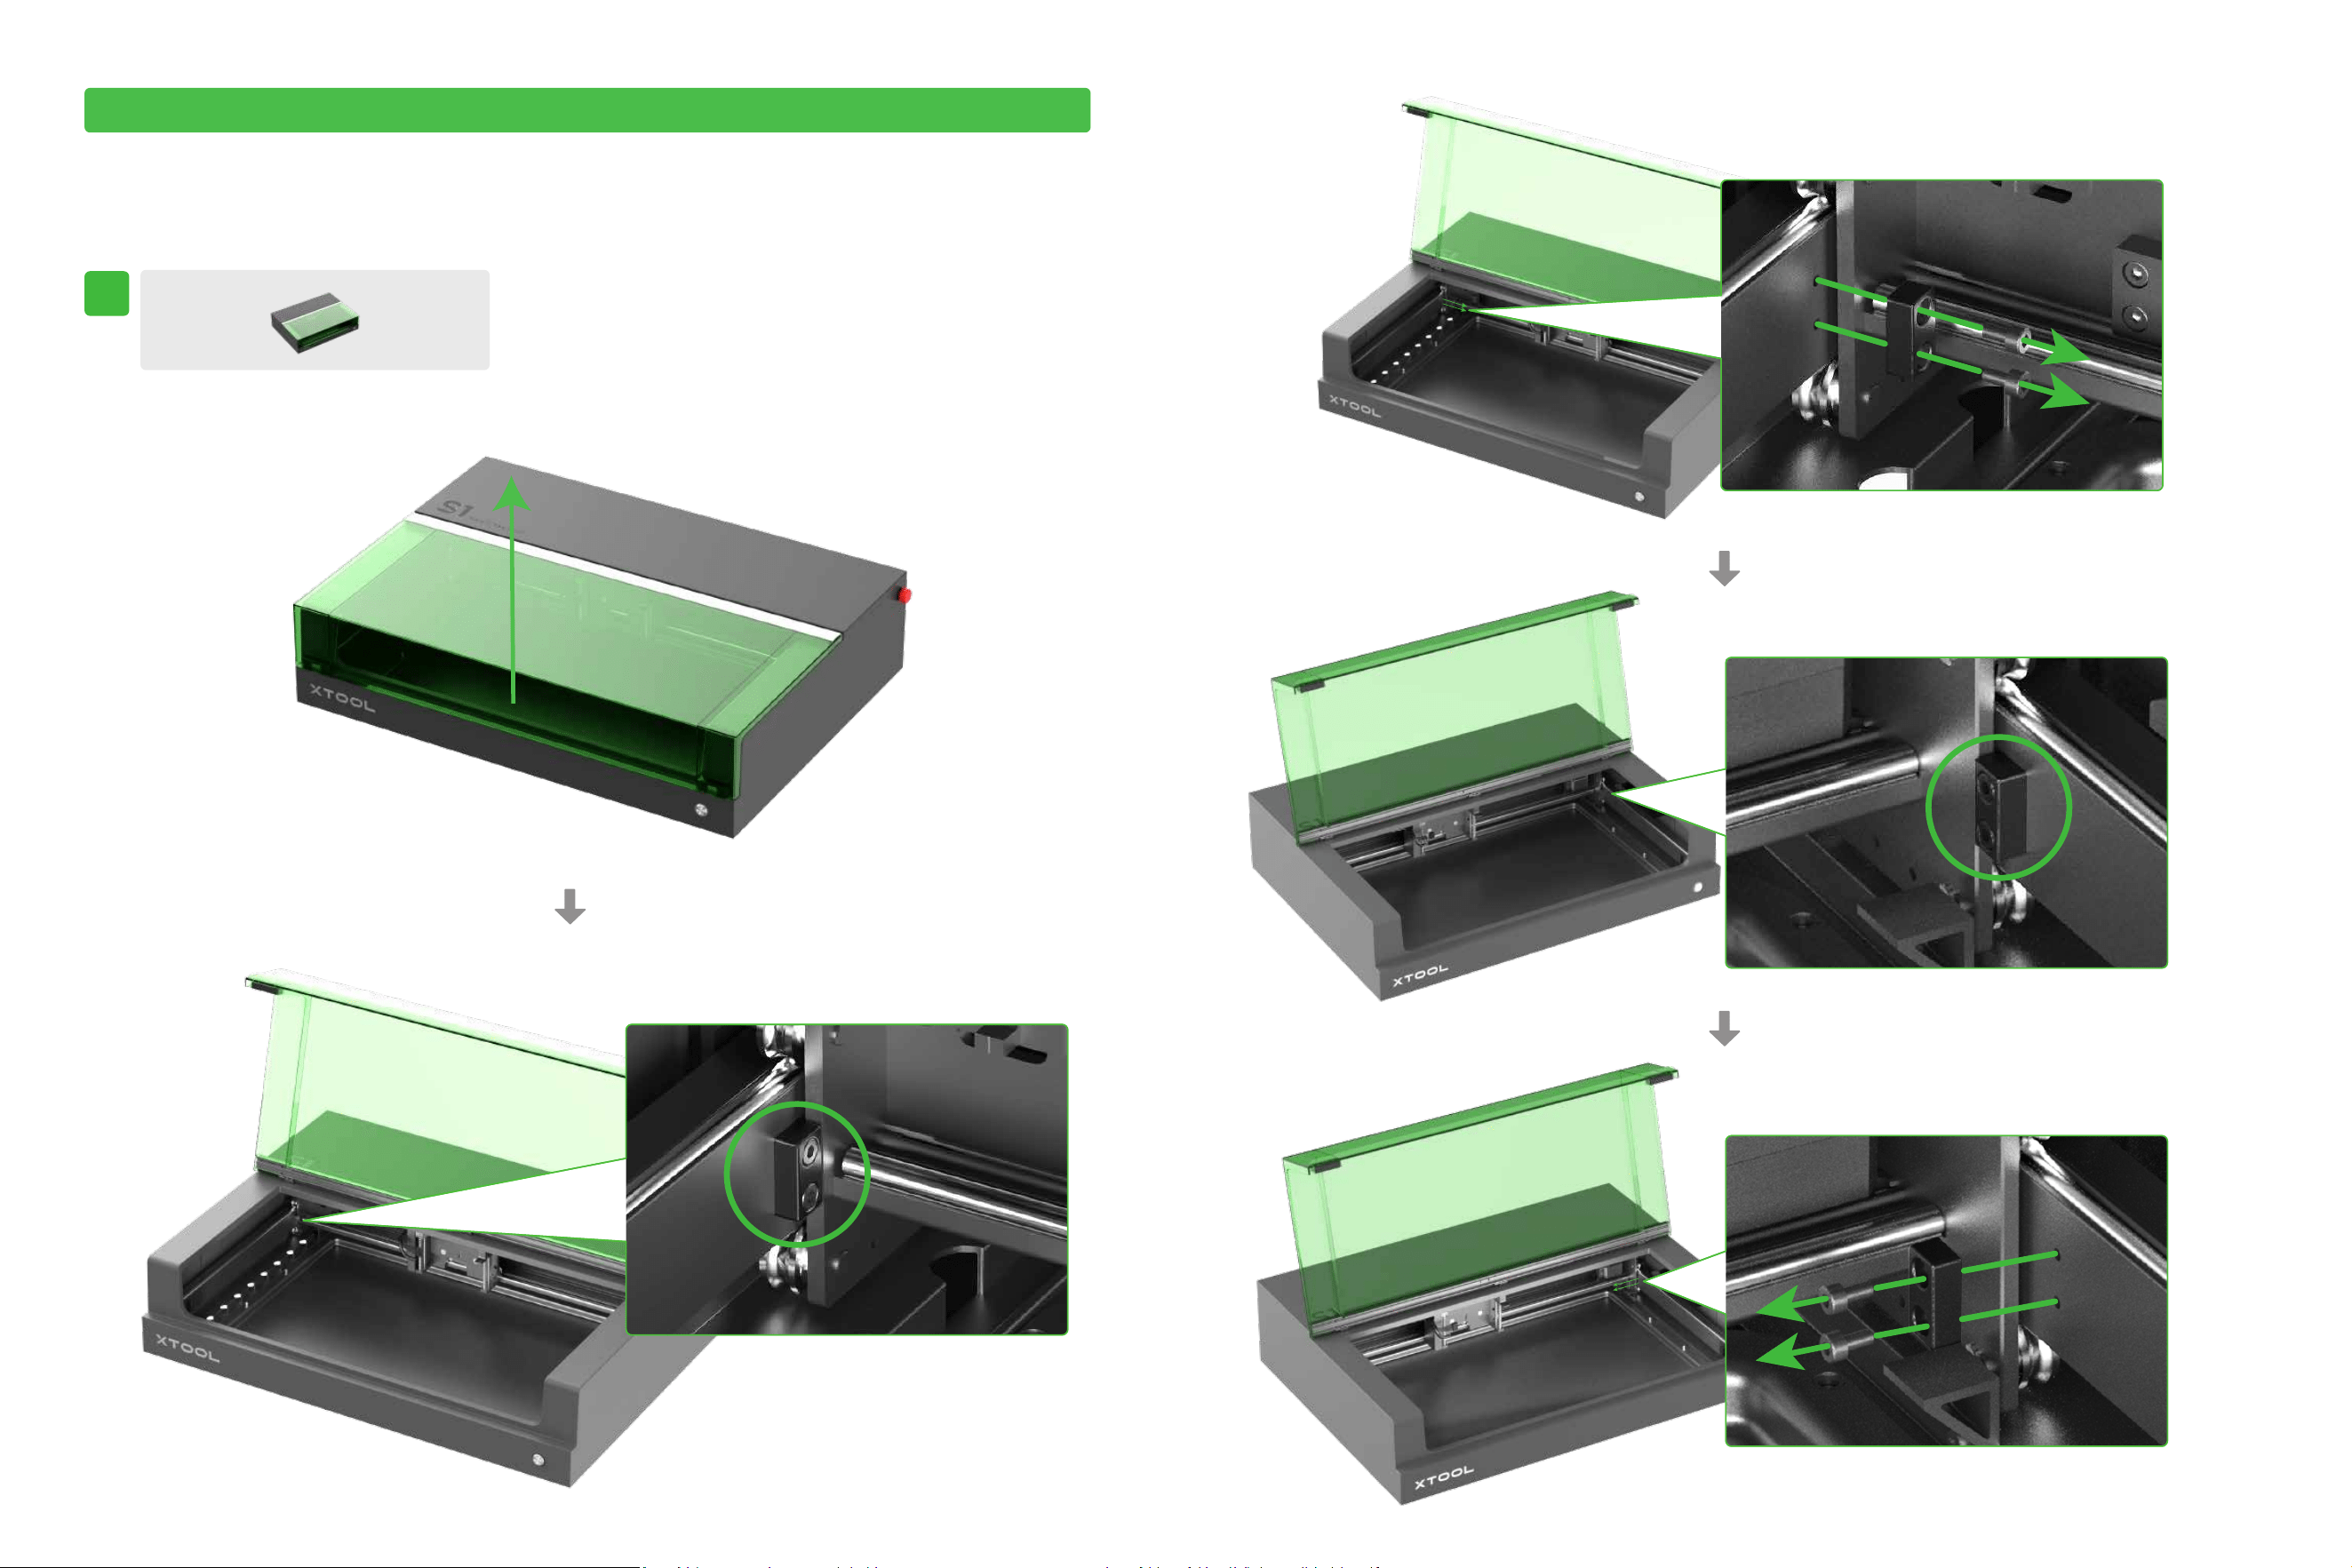
Preparations
1
Use your xTool S1
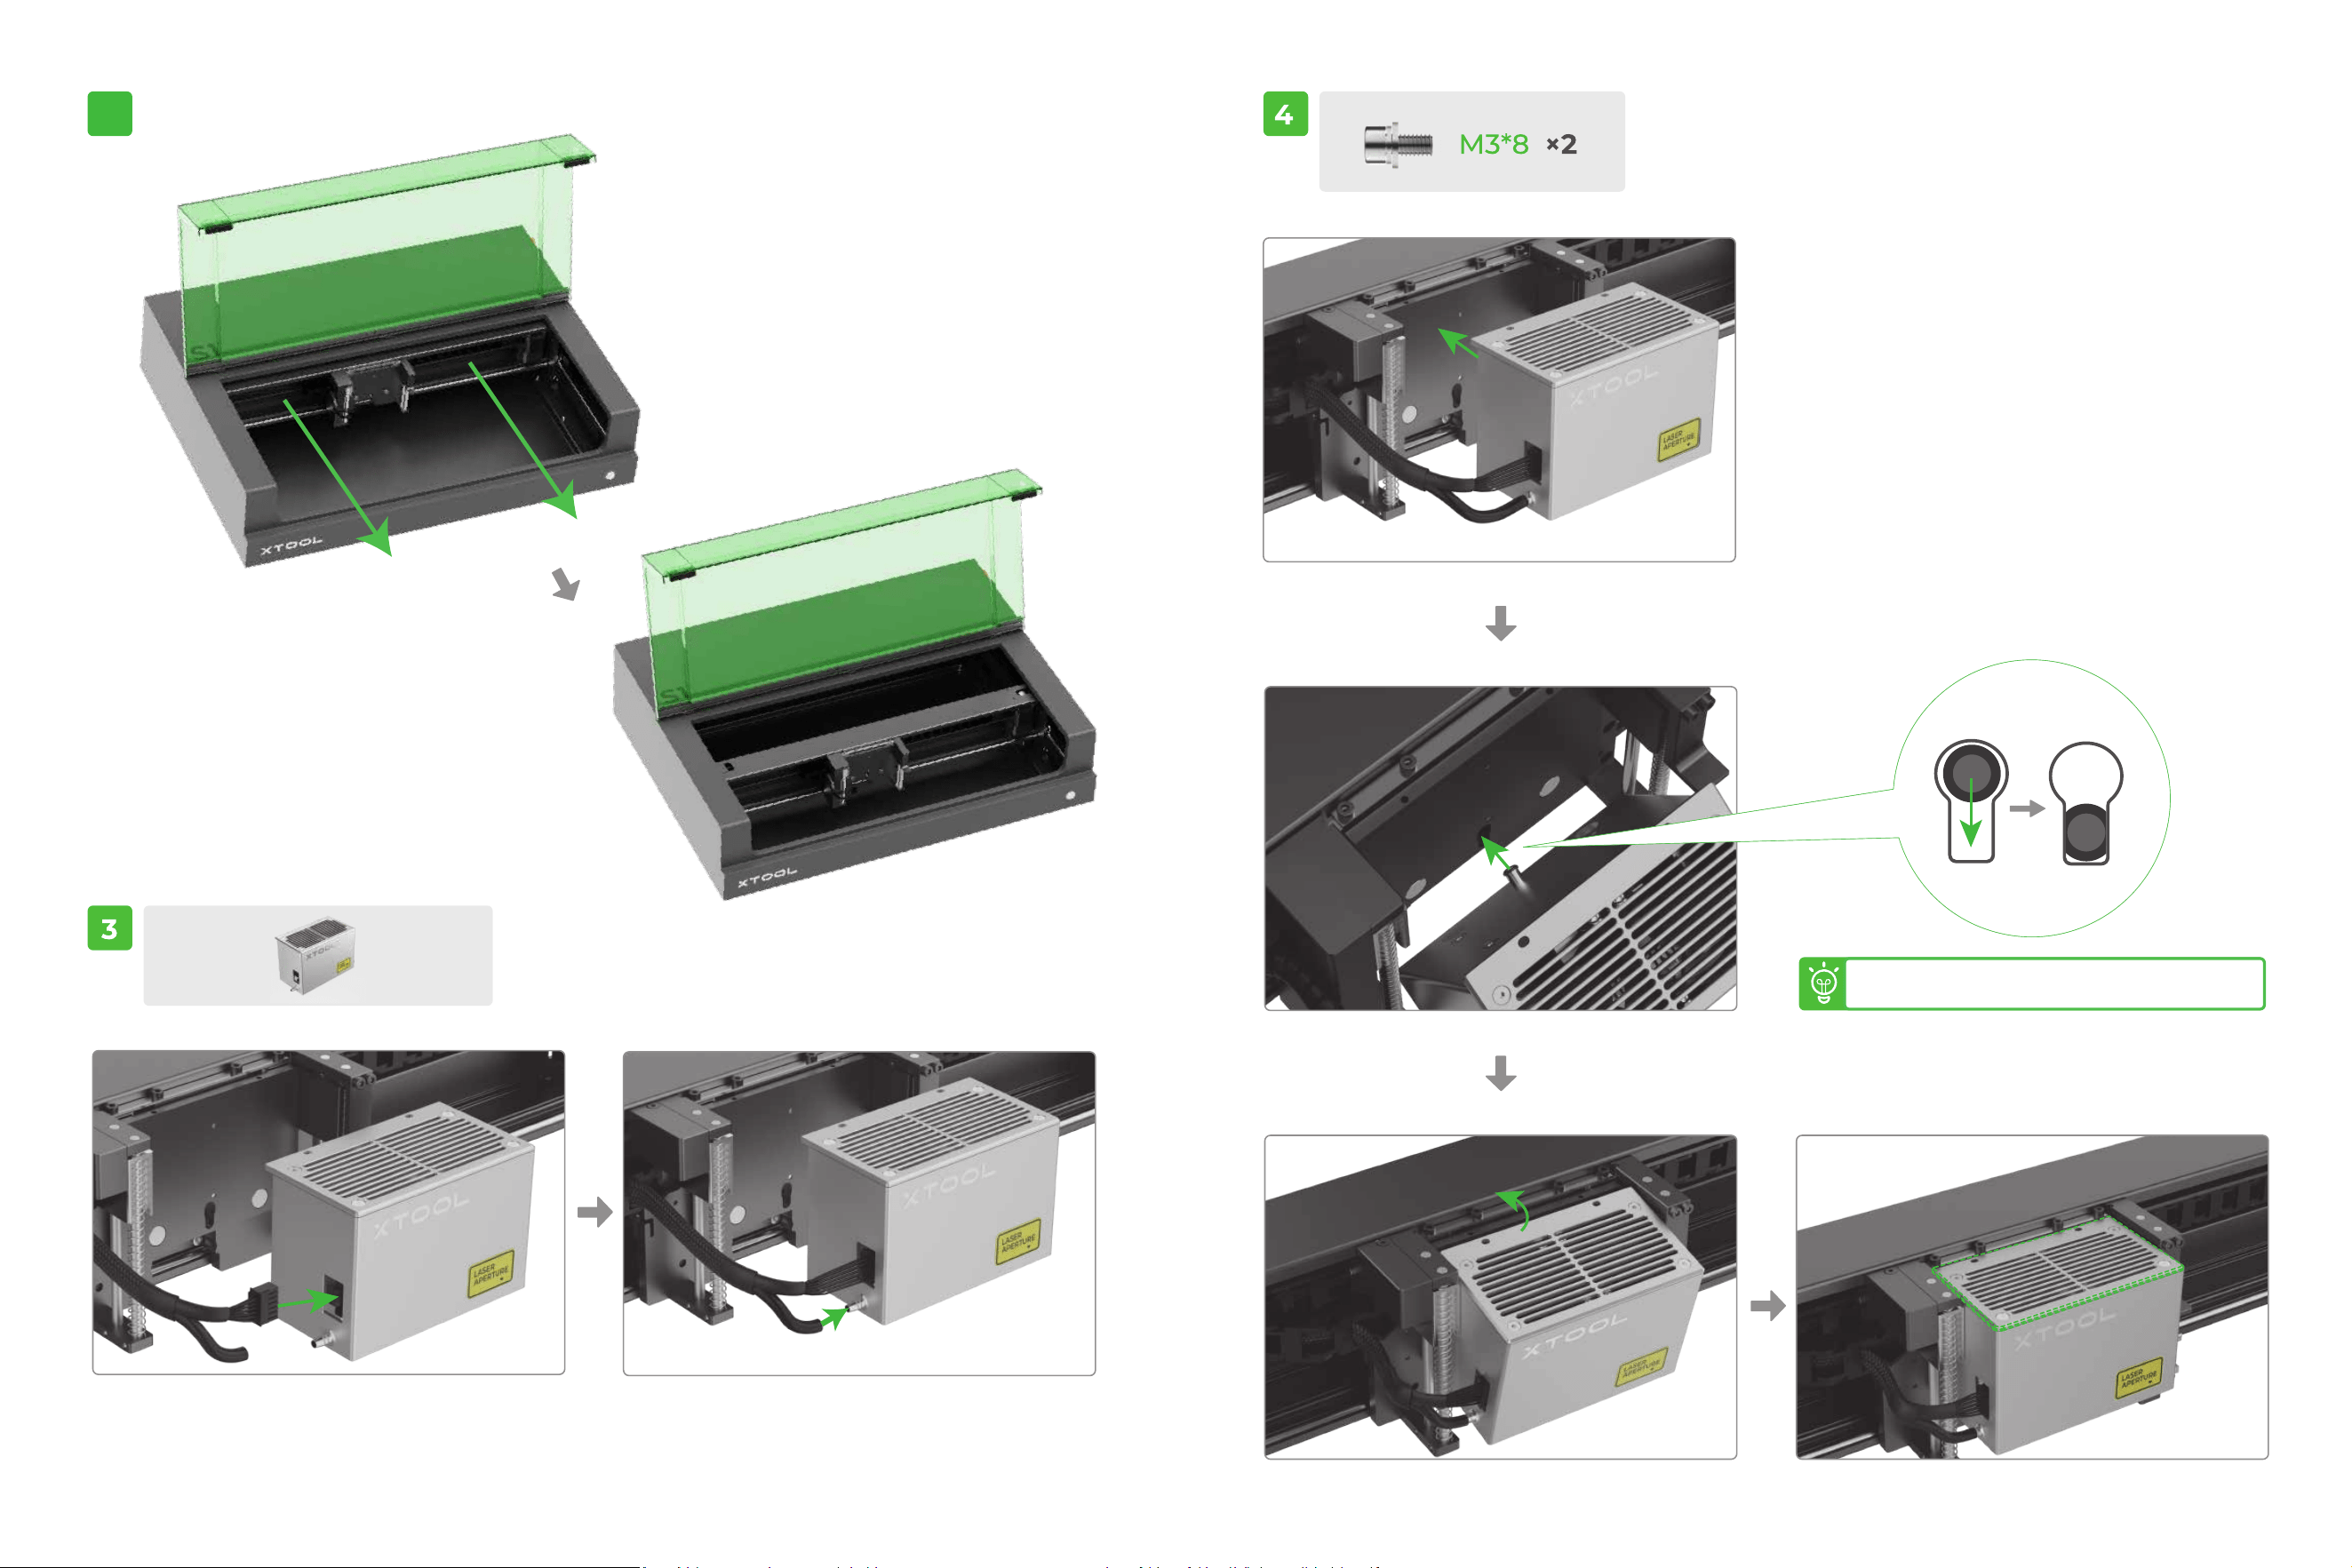
0807
2
After inserting the locating pin, move it down to lock it in the slot.
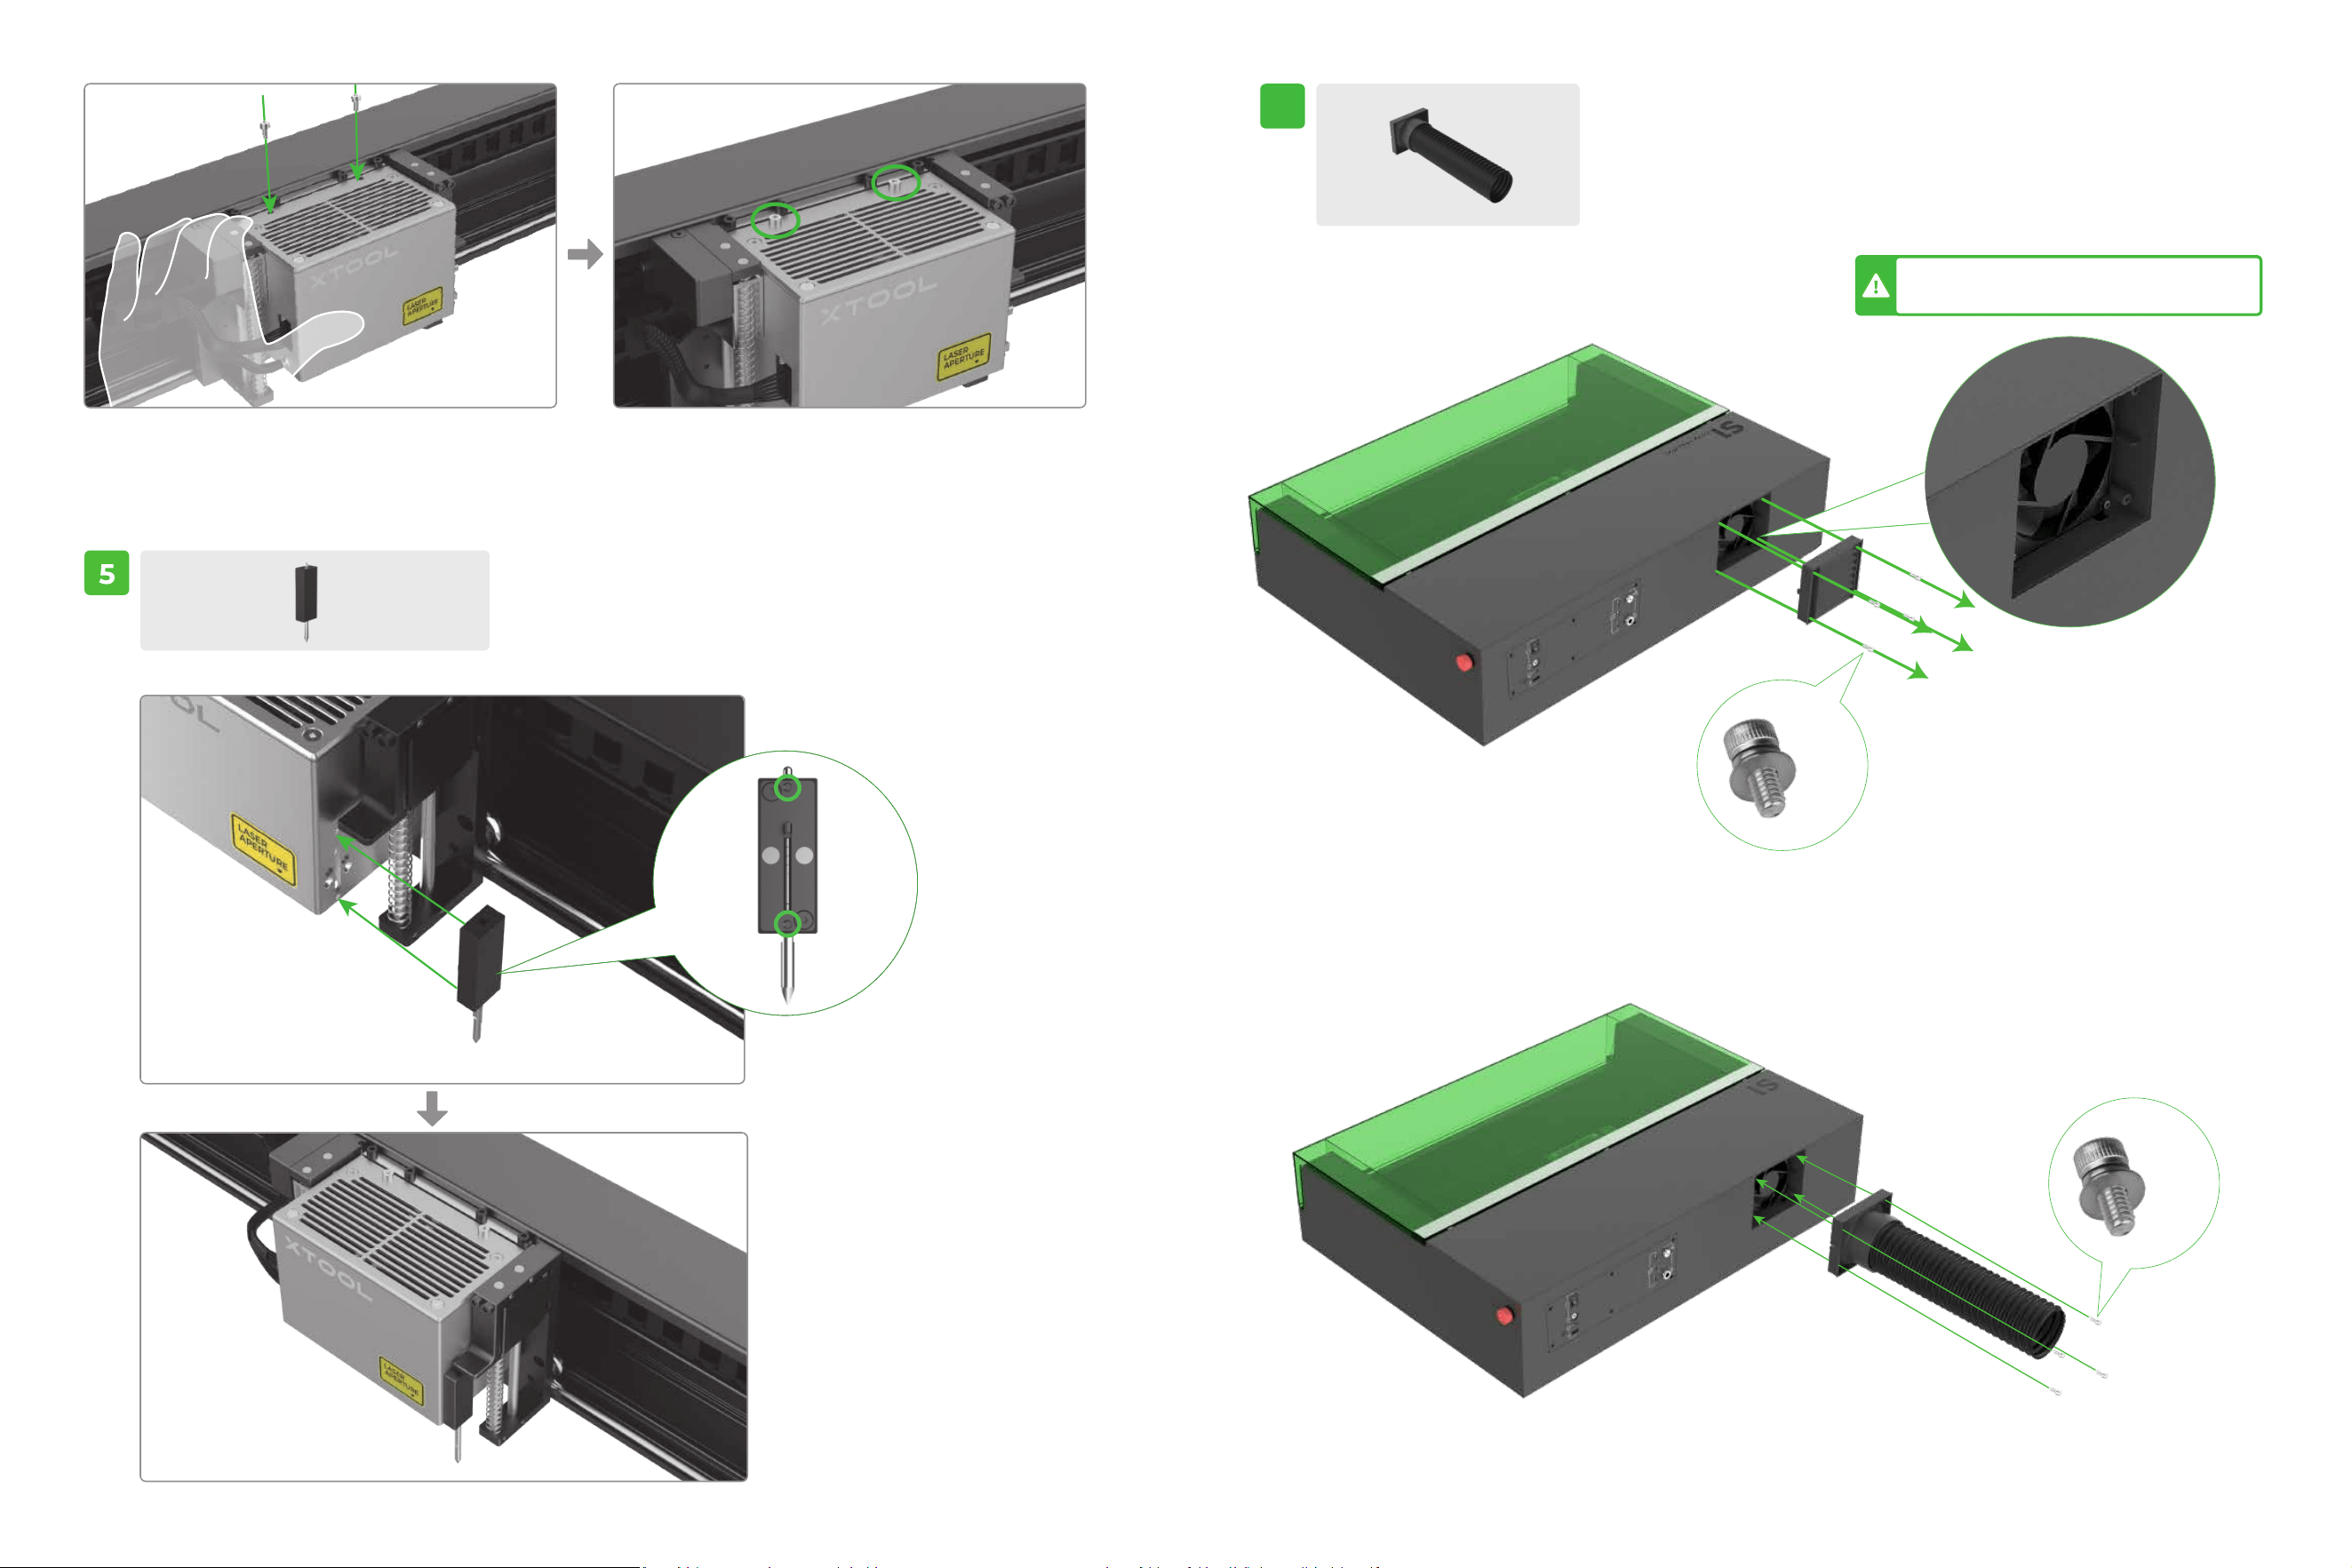
1009
6
Do not leave the fan exposed. Laser beams may leak out,
and your hands may get hurt when touching the fan.
M3*8
×4
M3*8
×4
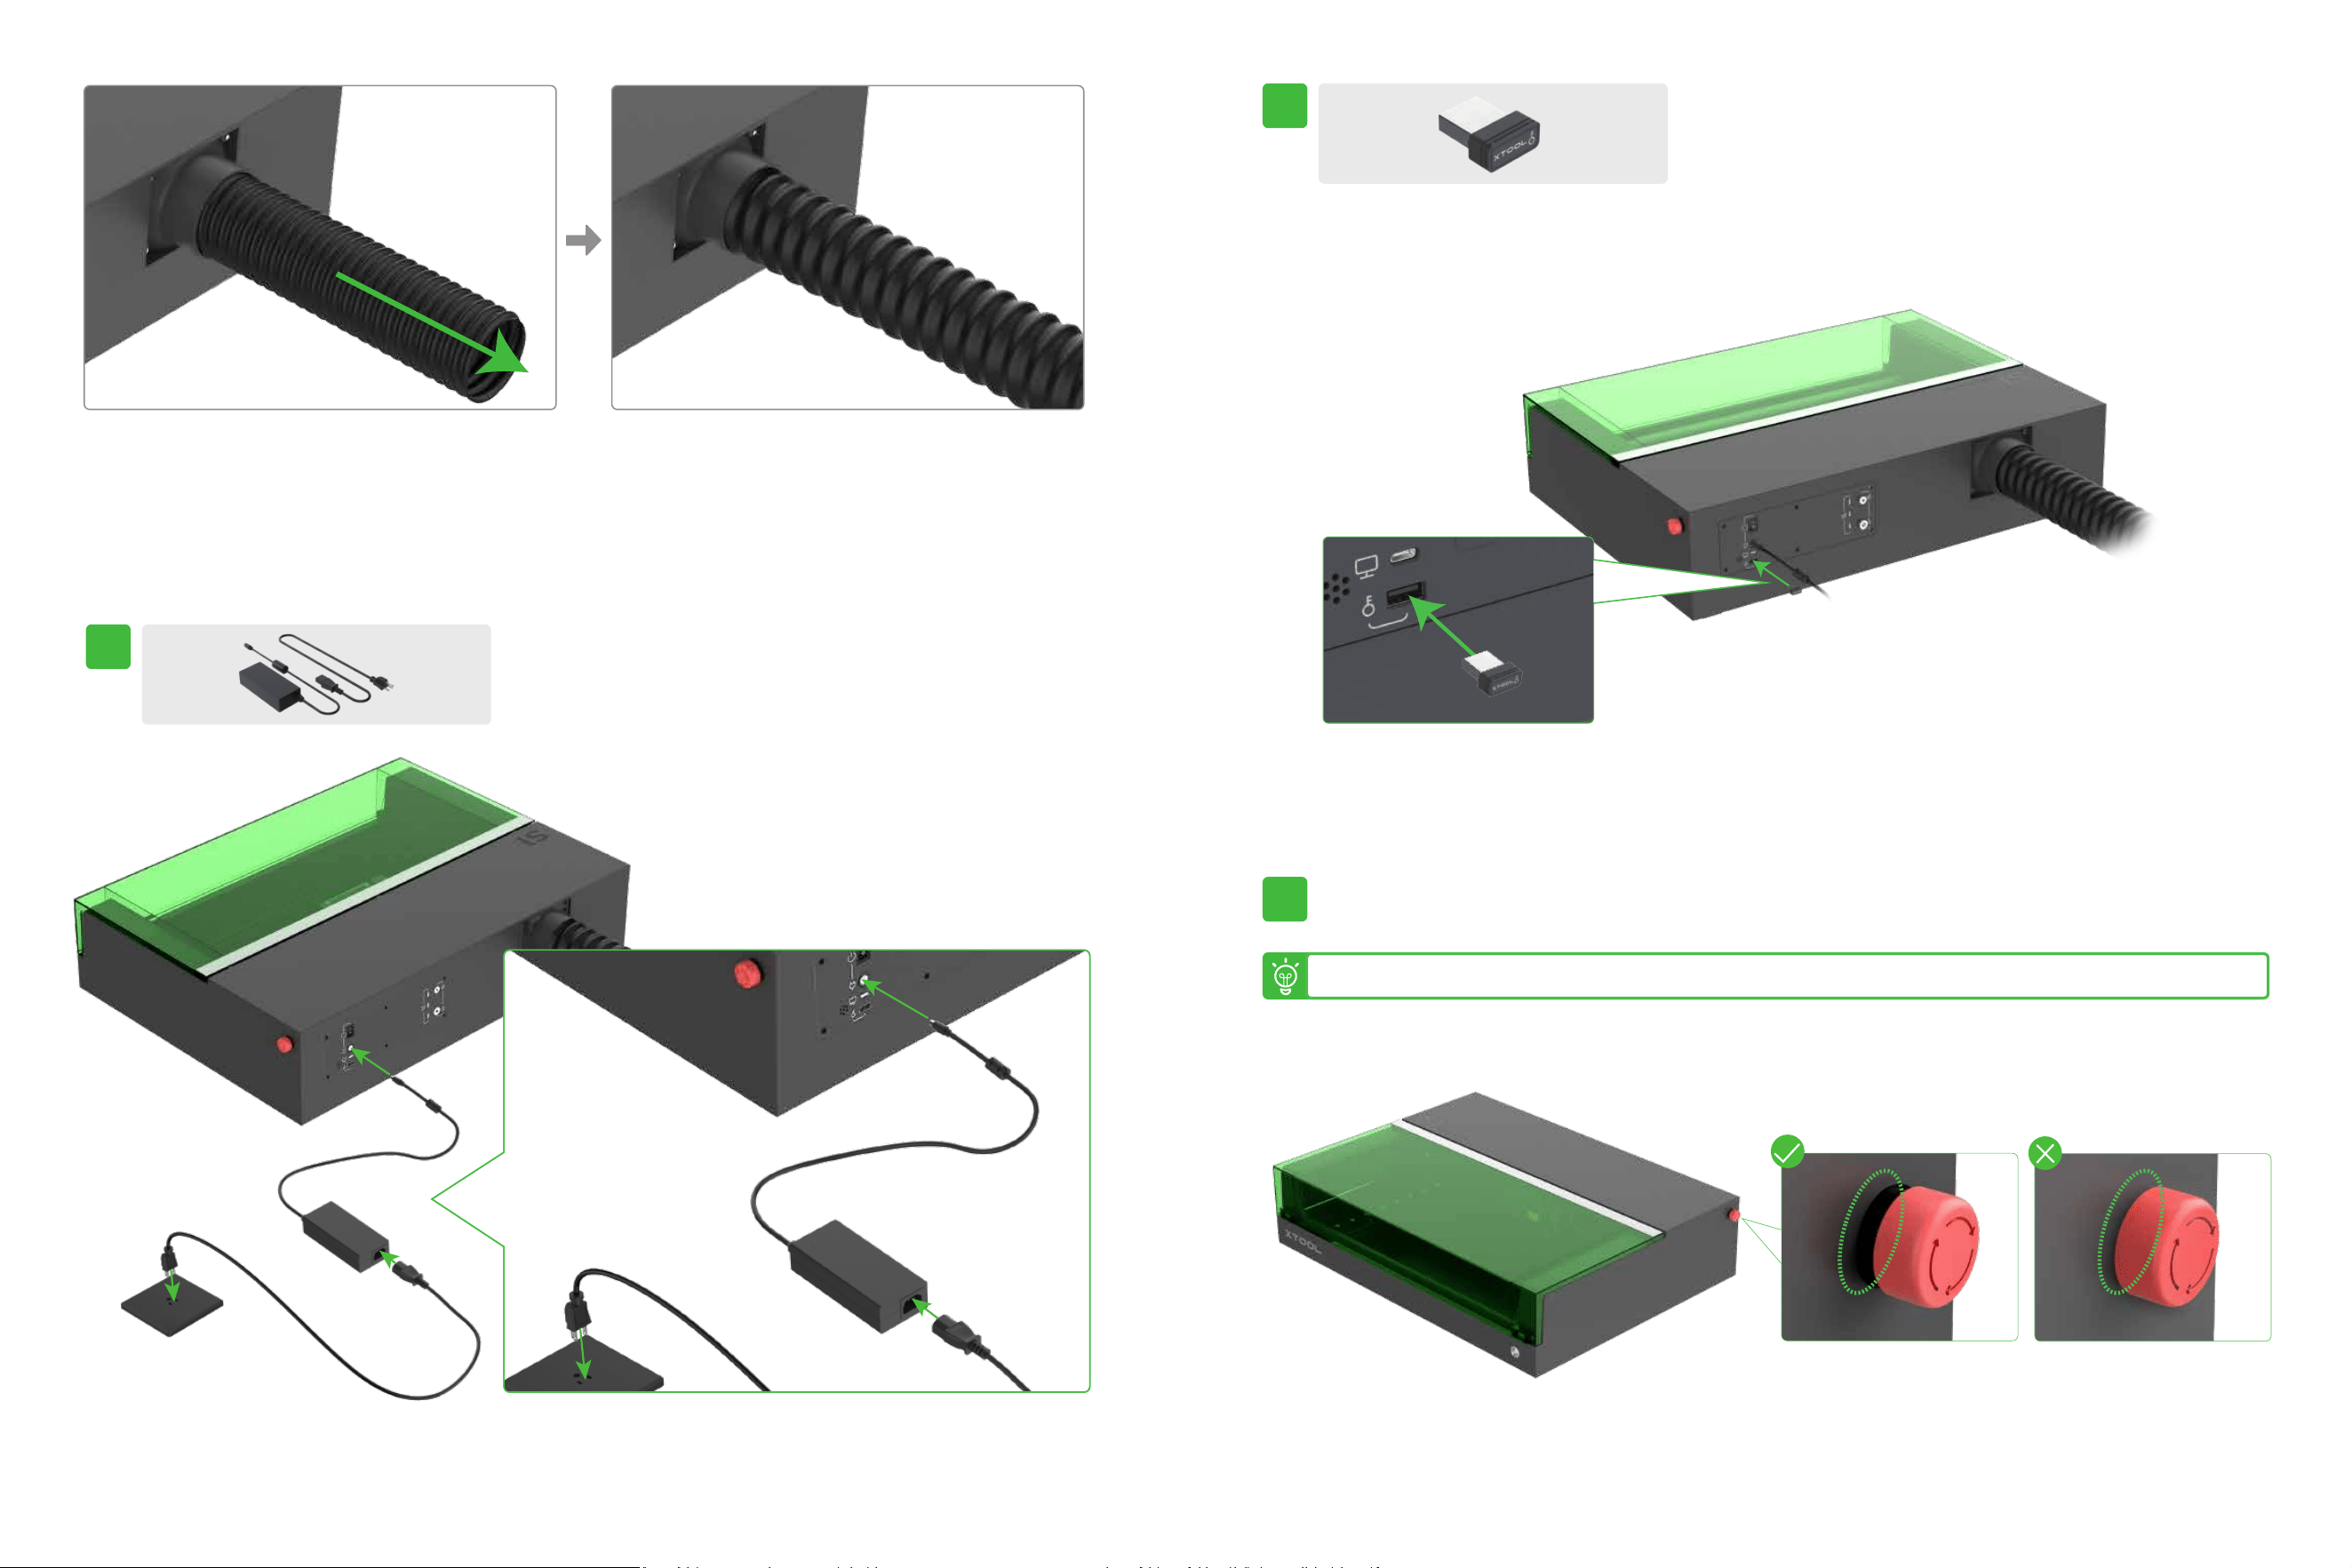
1211
7
8
9
Ensure that the emergency stop switch is not pressed.
1413
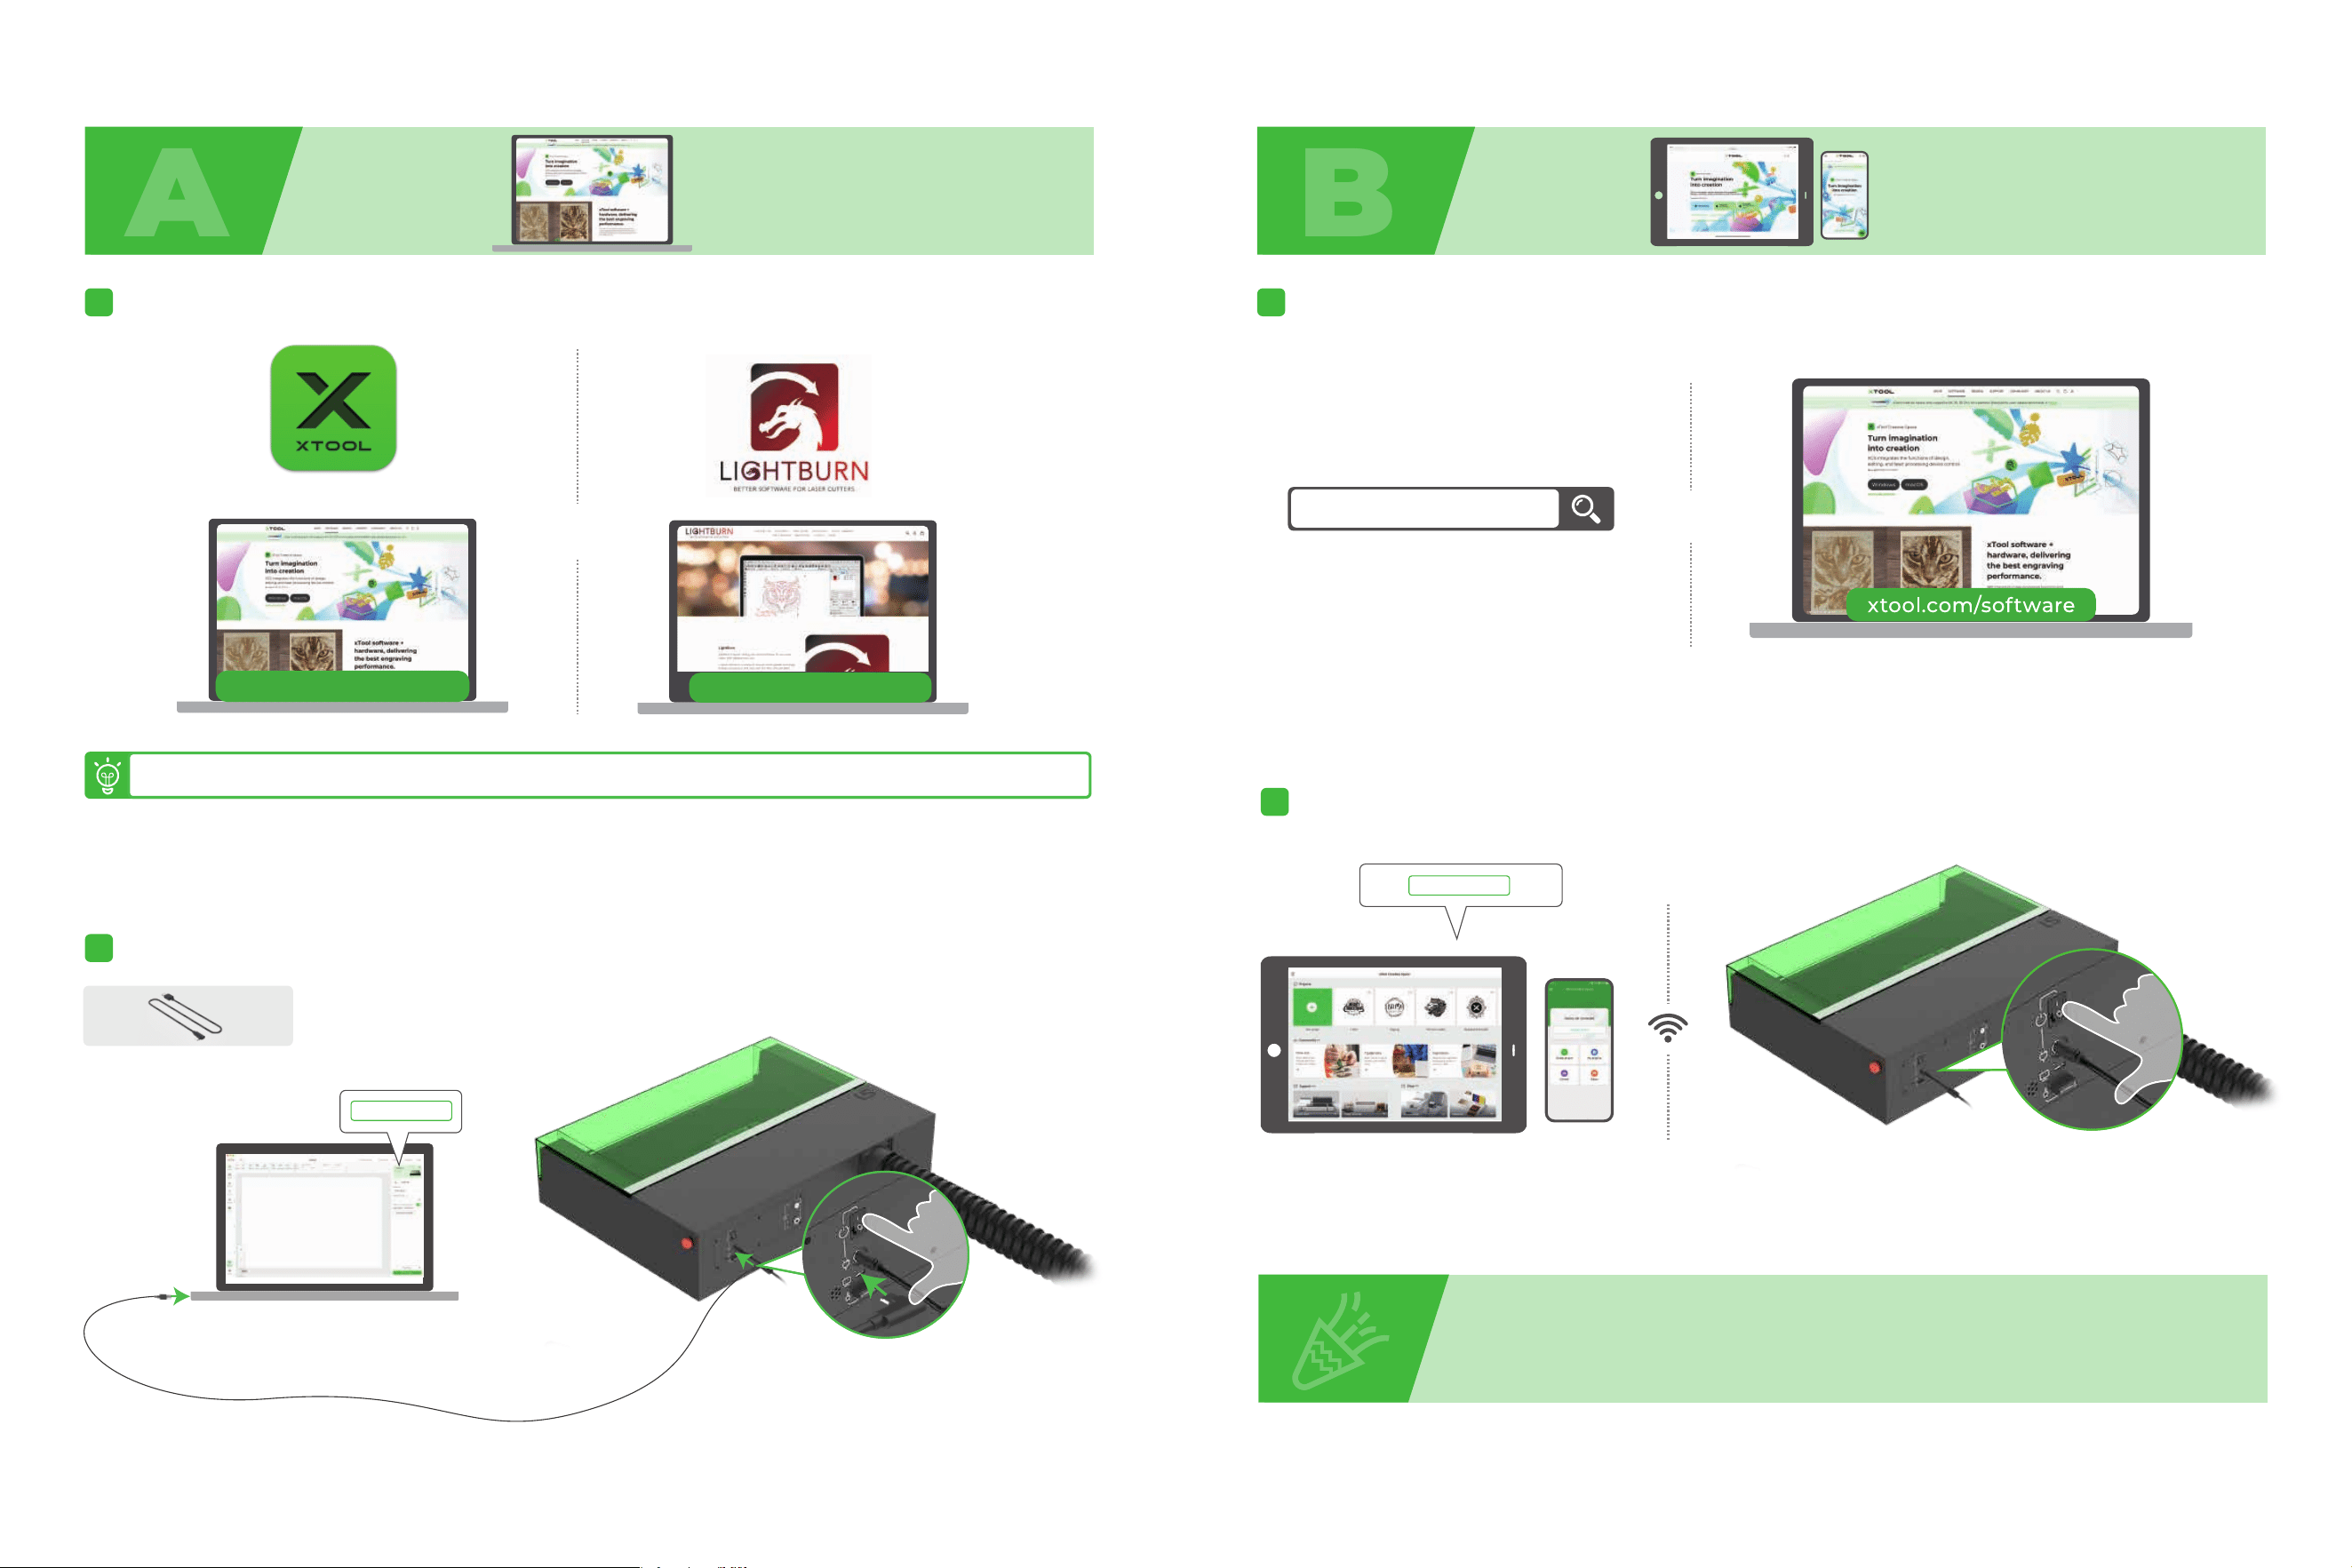
Use software to operate xTool S1
1
Download and install xTool Creative Space (XCS) or the third-party software Lightburn.
2
Turn on xTool S1, connect it to a PC, and then connect it on the software.
OR
xTool Creative Space
xtool.com/software
lightburnsoftware.com
A
xtool.com/software
You need to purchase Lightburn before using it.
2
Turn on xTool S1. Follow the instructions on XCS to connect xTool S1.
1
Search for xTool Creative Space in an app store or visit xtool.com/software to download and install the app.
xTool Creative Space
OR
B
You can start your creation after connecting xTool S1 to the software.
For details about how to use the software to operate xTool S1 for material processing, visit support.xtool.com.
Connect device
Connect device
1615
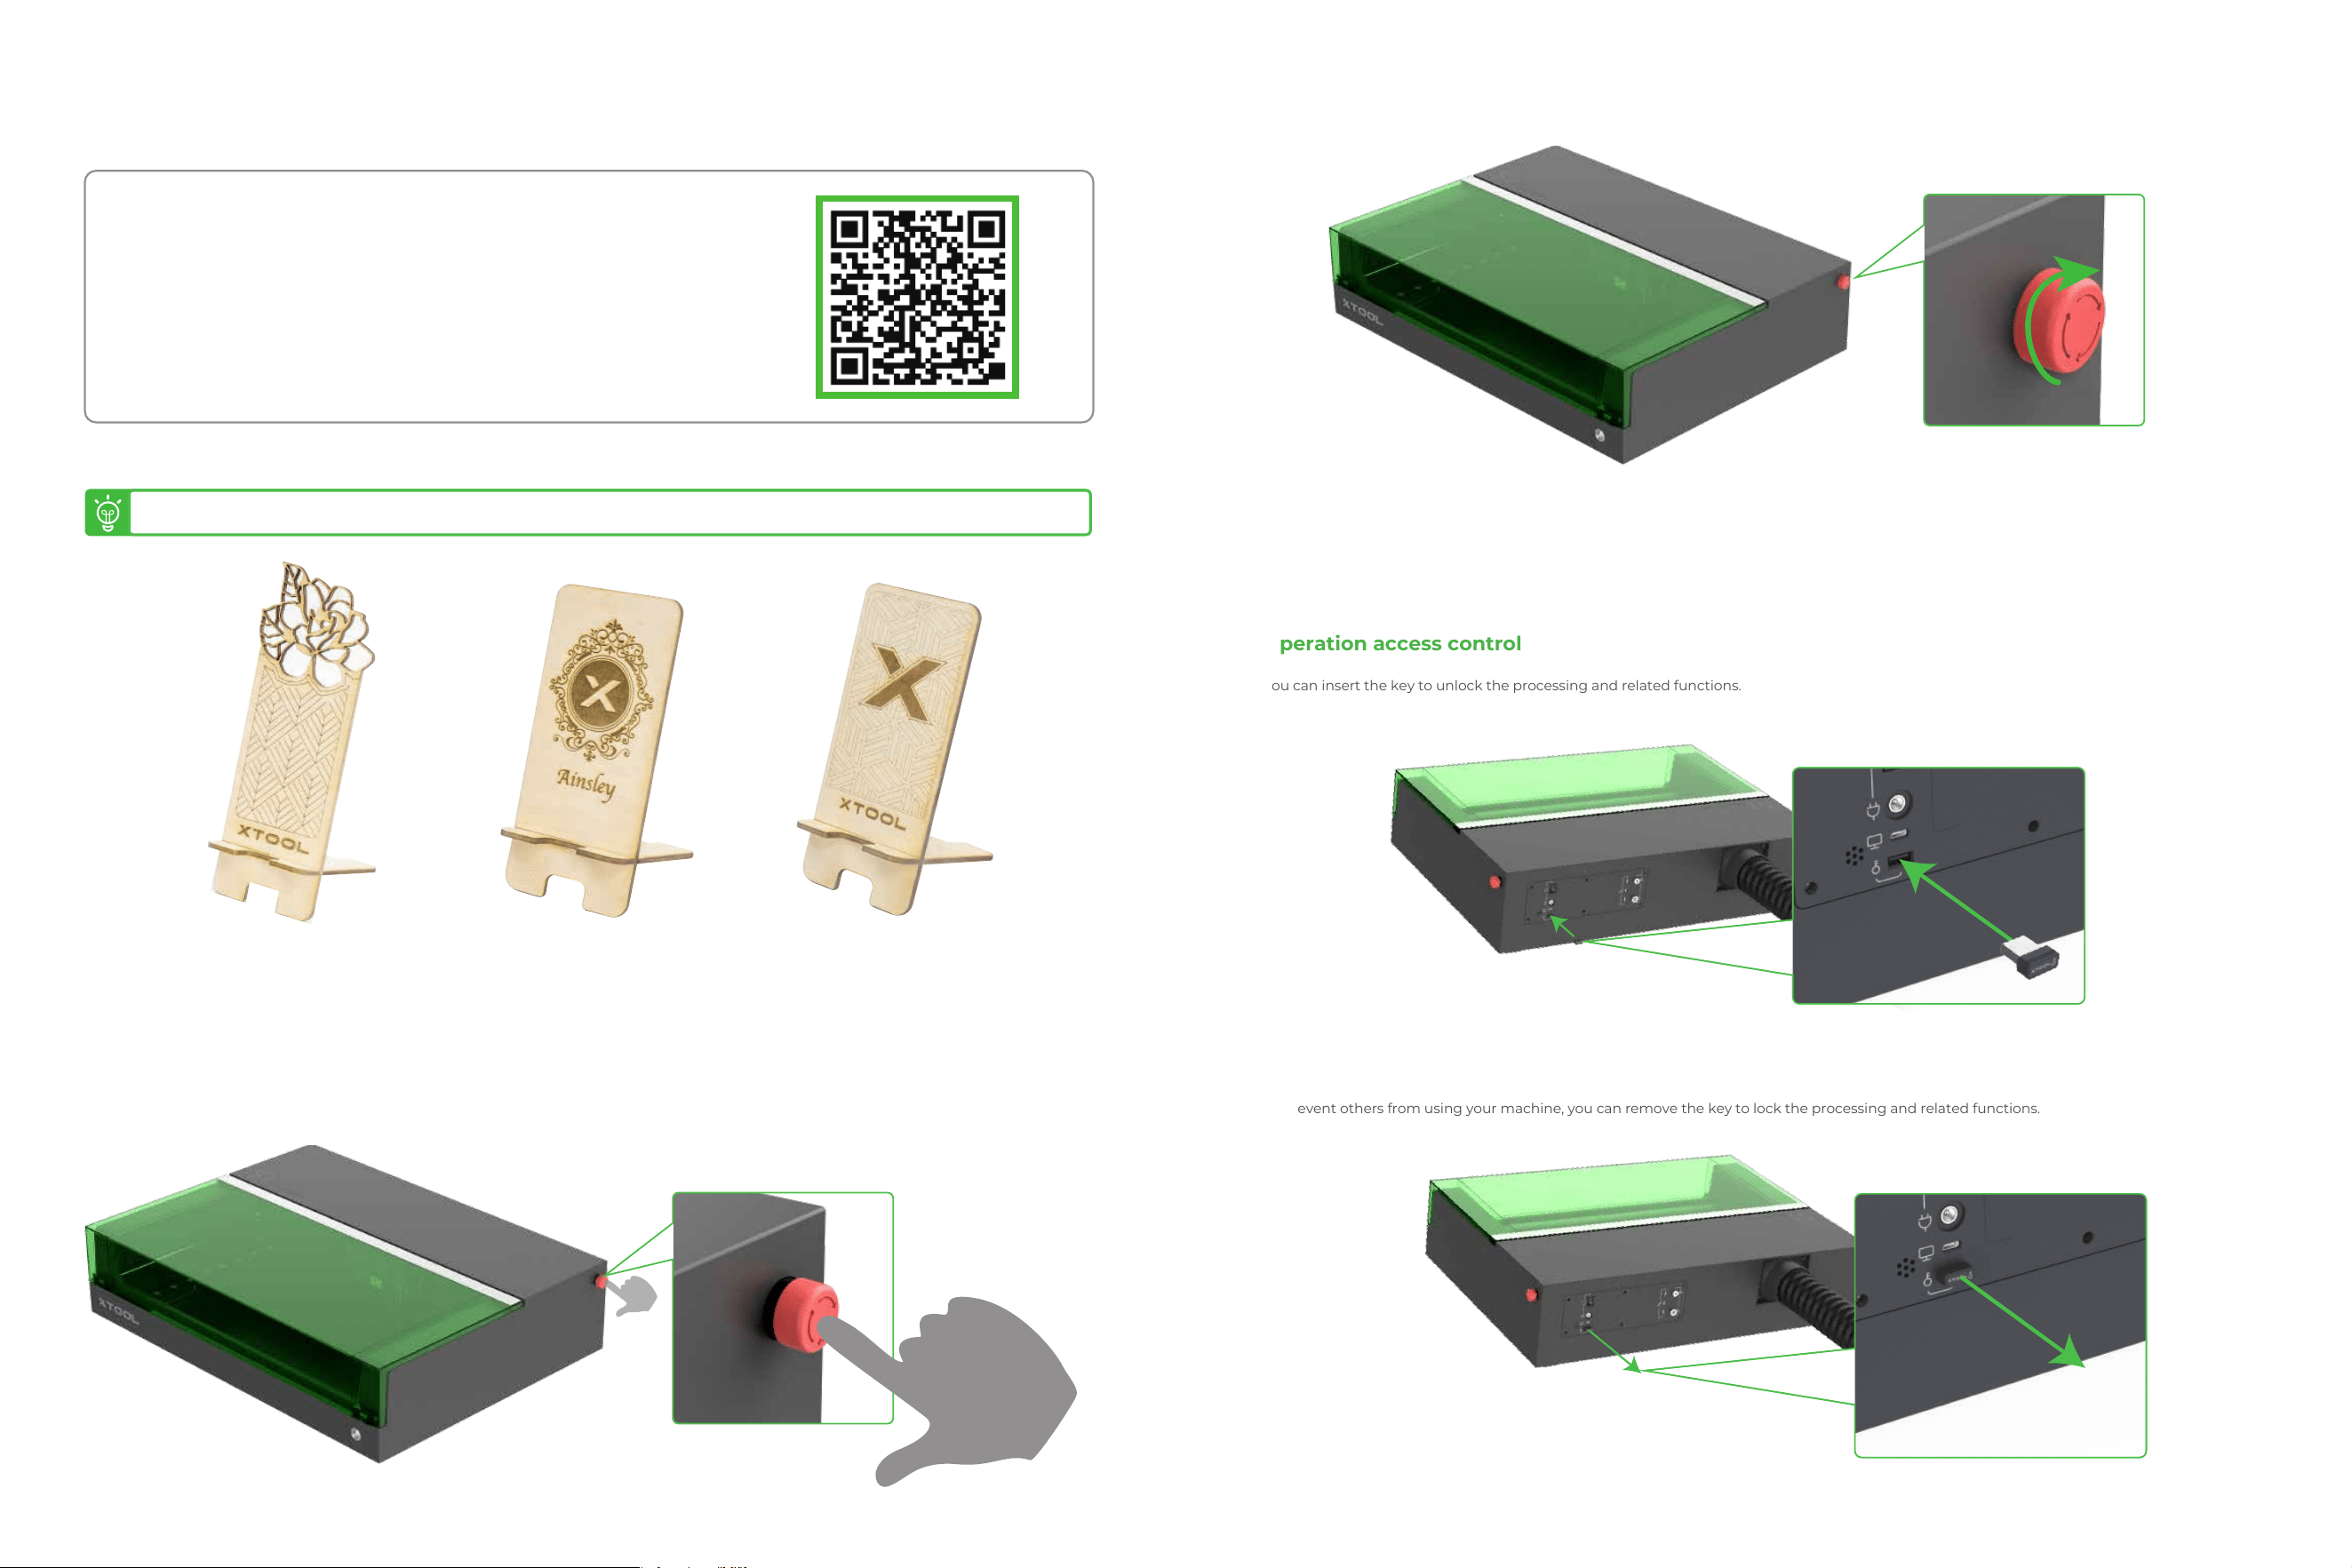
If an emergency occurs, you can press the emergency stop switch to shut off the machine.
You can insert the key to unlock the processing and related functions.
To prevent others from using your machine, you can remove the key to lock the processing and related functions.
After dealing with the emergency, you can turn the emergency stop switch to reset it.
xTool S1 is delivered with a material pack that allows you to start your creation.
Example projects
Operation access control
Emergency stop
Scan the QR code to find example projects and tutorials. Alternatively, you can visit
support.xtool.com and click xTool S1 to view example projects and tutorials.
2
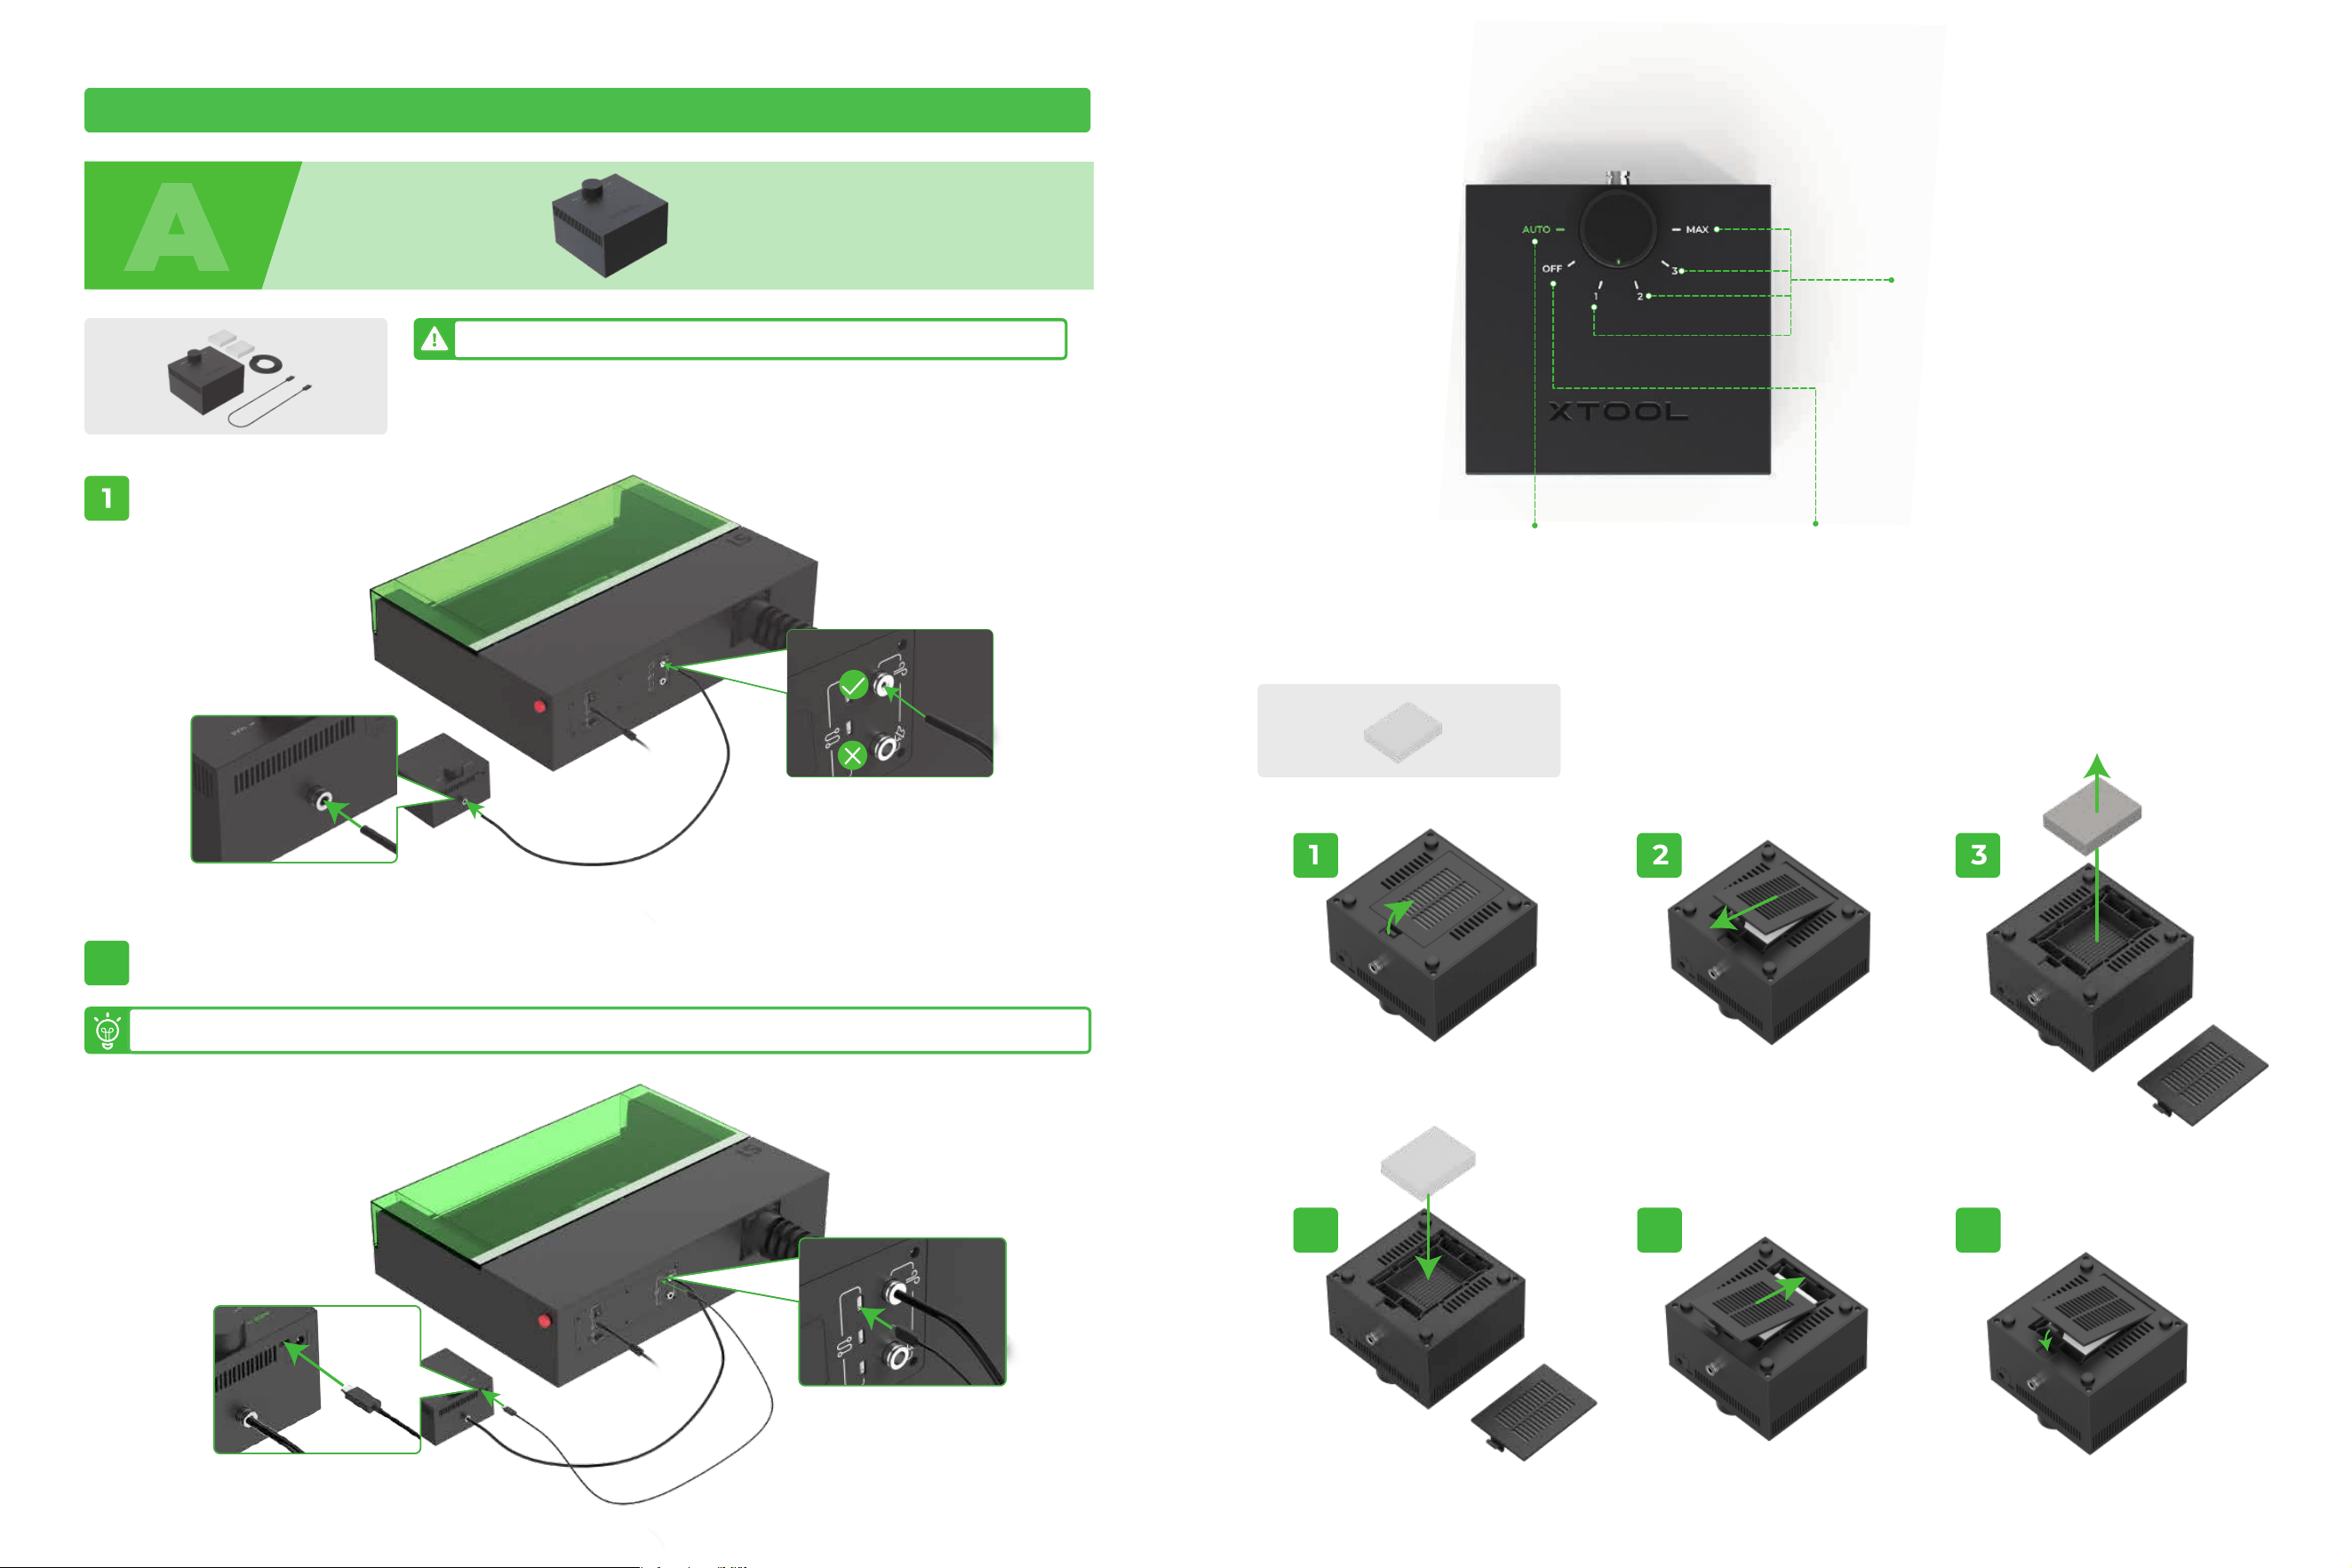
The airflow increases from 1 to MAX.
You are advised to use a small airflow
for engraving and a large airflow for
cutting.
Powered off
The airflow is automatically adjusted by XCS.
31 2
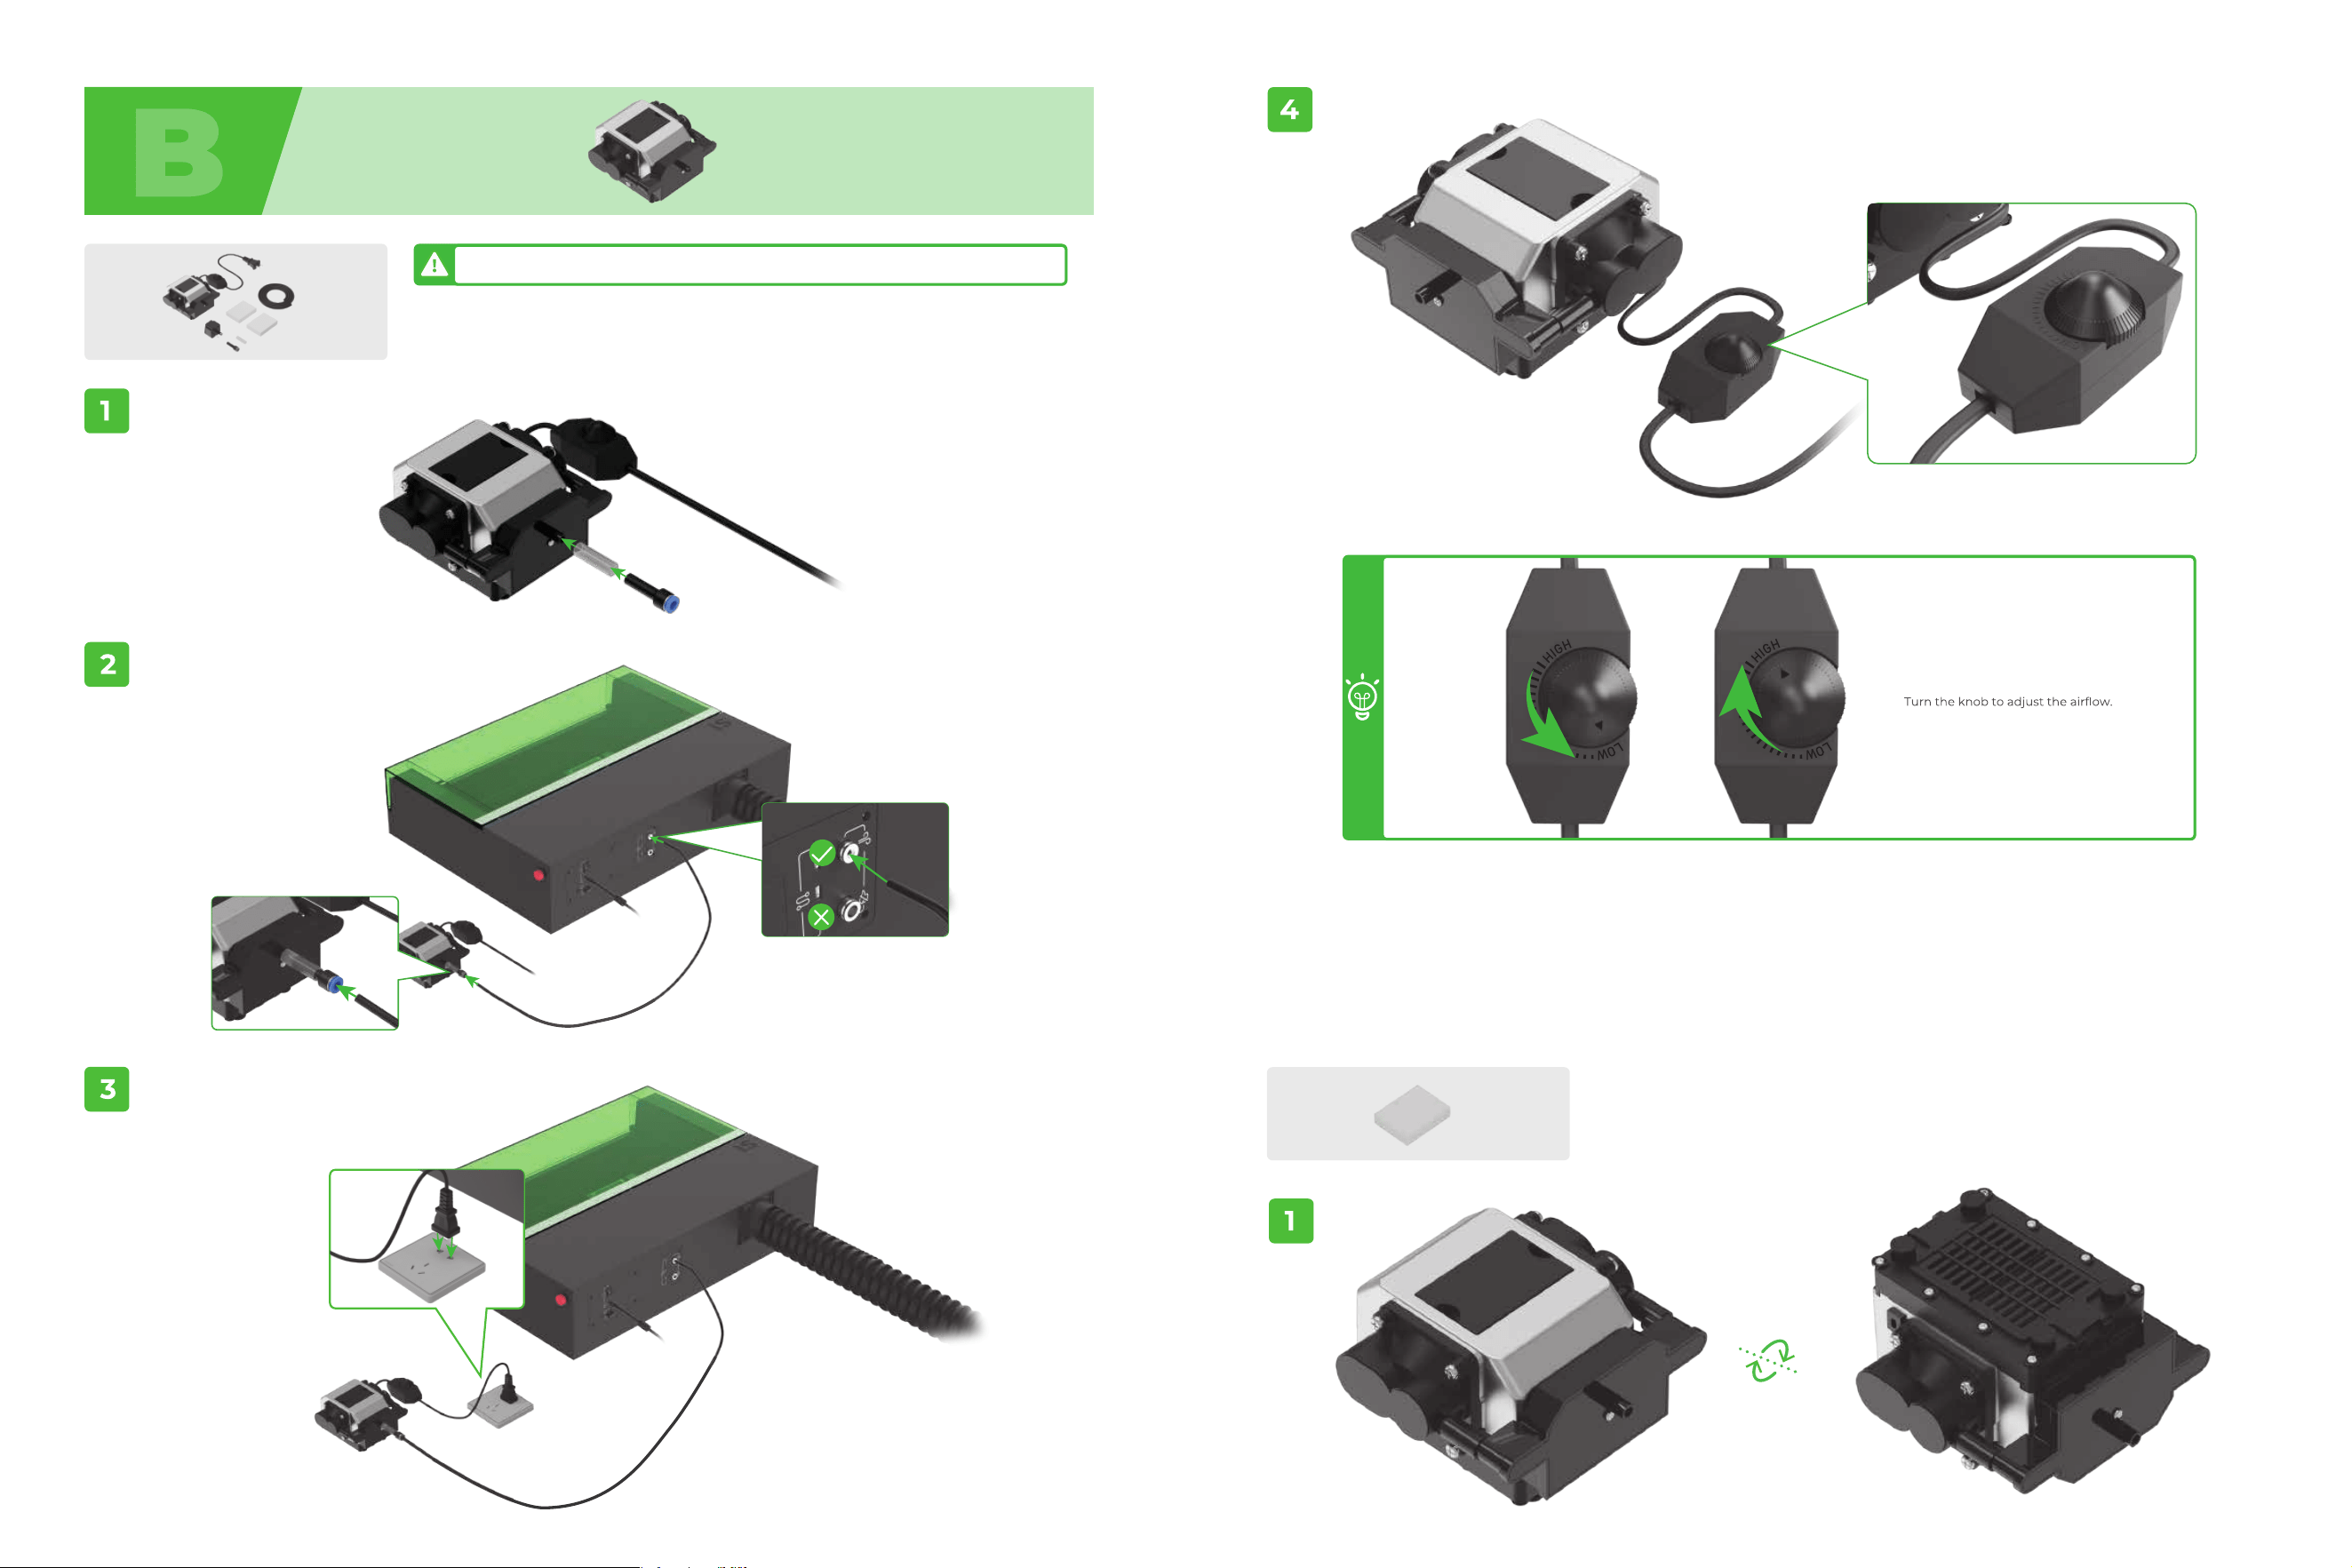
Airflow adjustment
Replace the filter
Use xTool S1 with the air assist set
If the pack you purchase does not include the air assist set, you need to purchase one before using it.
The air assist set will be powered by xTool S1.
1817
4
5
6
2019
If the pack you purchase does not include the air assist set, you need to purchase one before using it.
Replace the filter
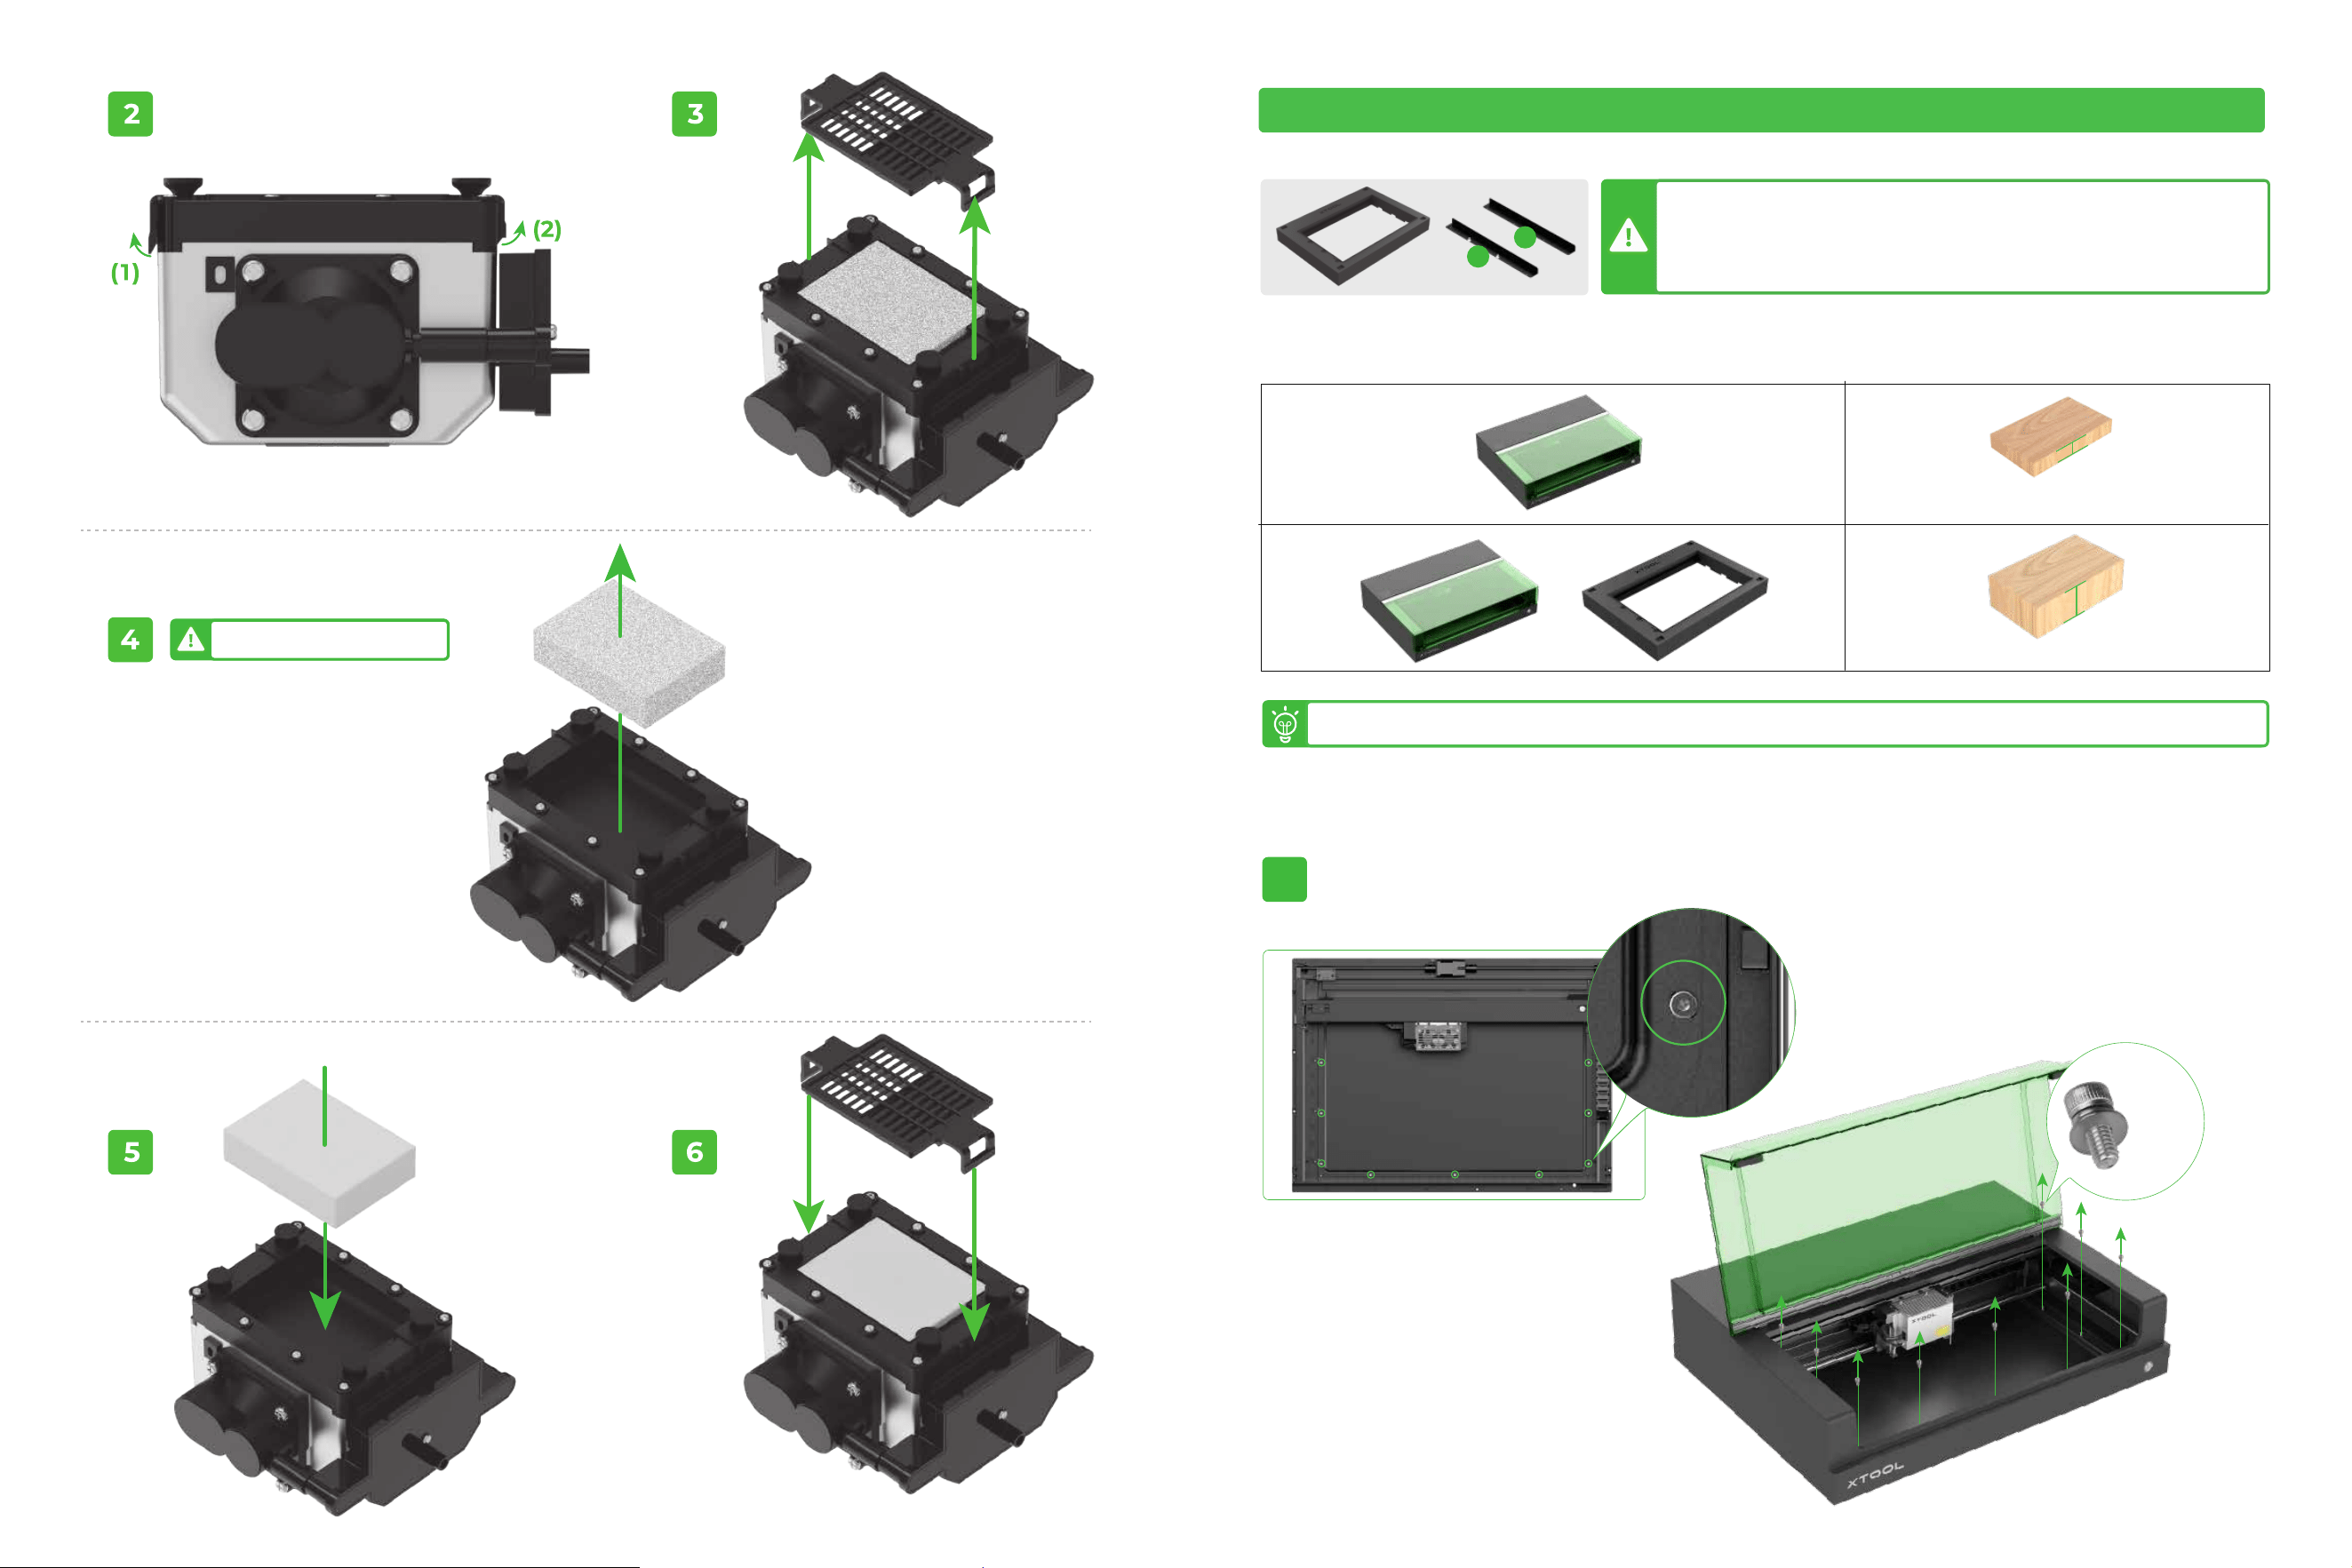
Do not use the filter if it is moistened.
Use xTool S1 with the riser base
H
H
70 mm ≤ H ≤ 125 mm
0 mm < H ≤ 42 mm
+
M3*8
×9
1
If the pack you purchase does not include the riser base, you need to purchase one before
using it.
If you do not need to use the riser base, do not place the machine on it. The riser base will block
the air inlet of the machine (with the baseplate in place).
P1
P2
Thickness of materials supported (H)
To process a material of thickness 42 mm < H < 70 mm , you need to use an object to raise the height of the material.
22
21
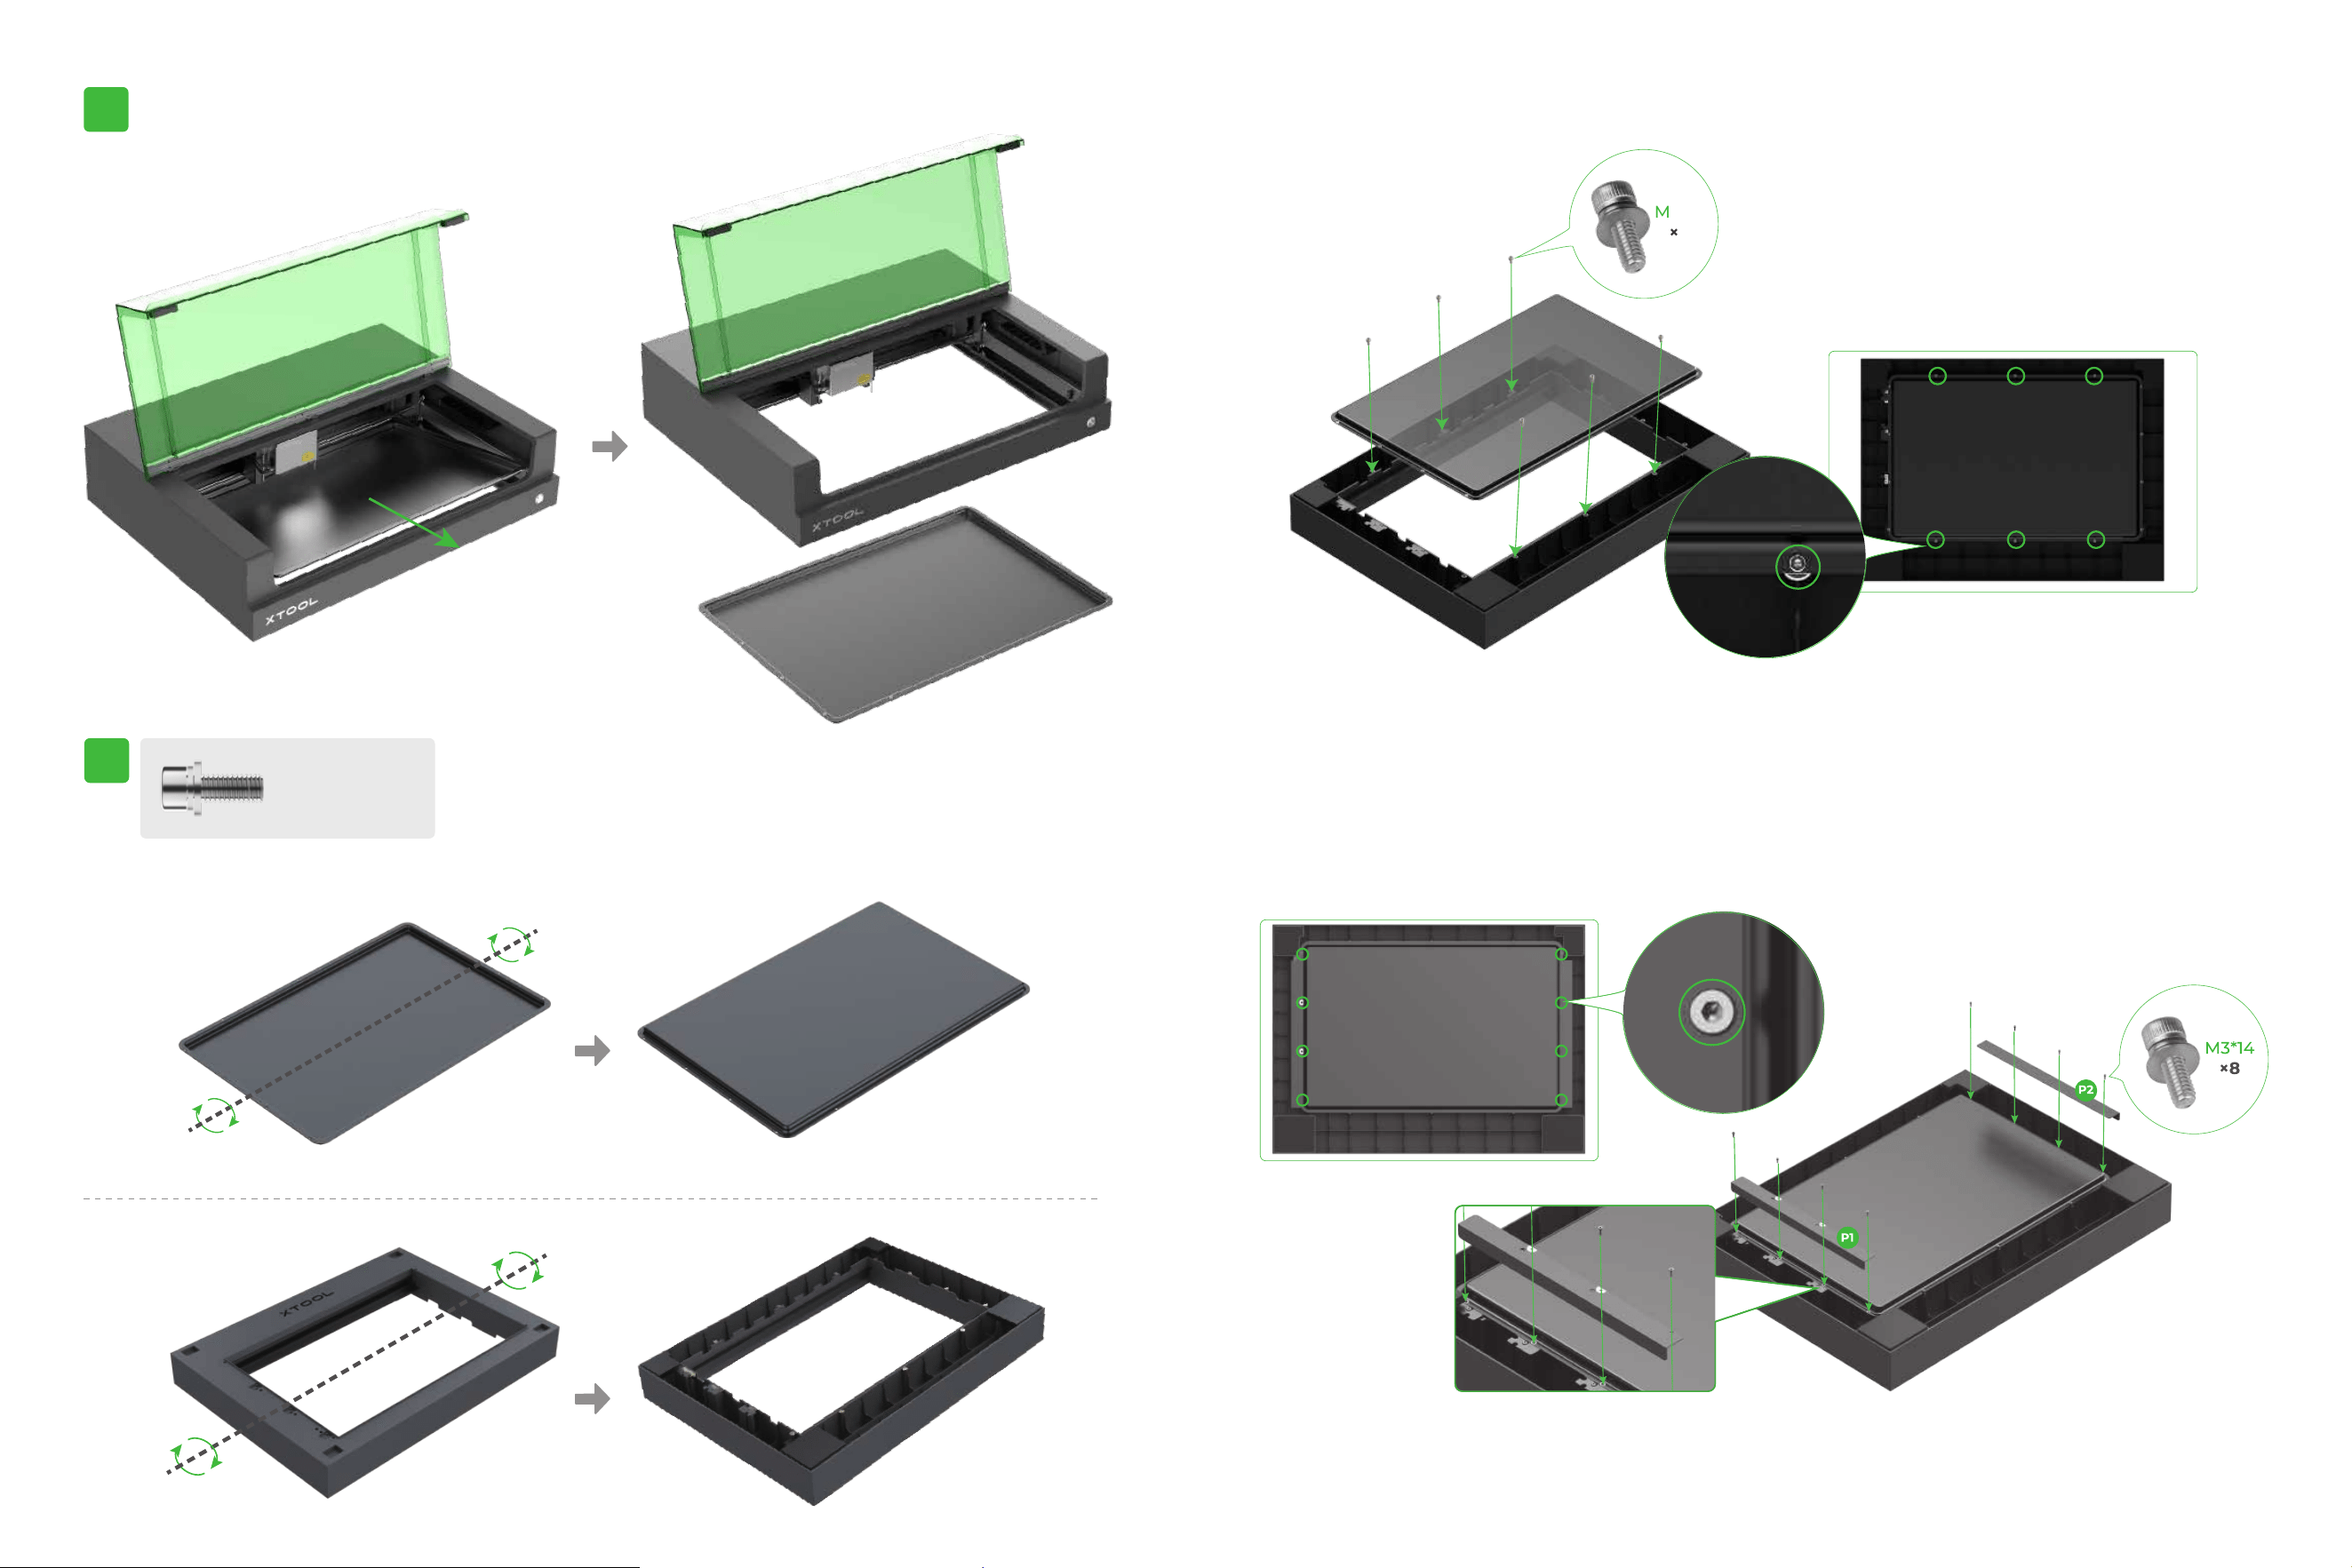
2423
3
M3*14 ×14
2
M3*14
×6
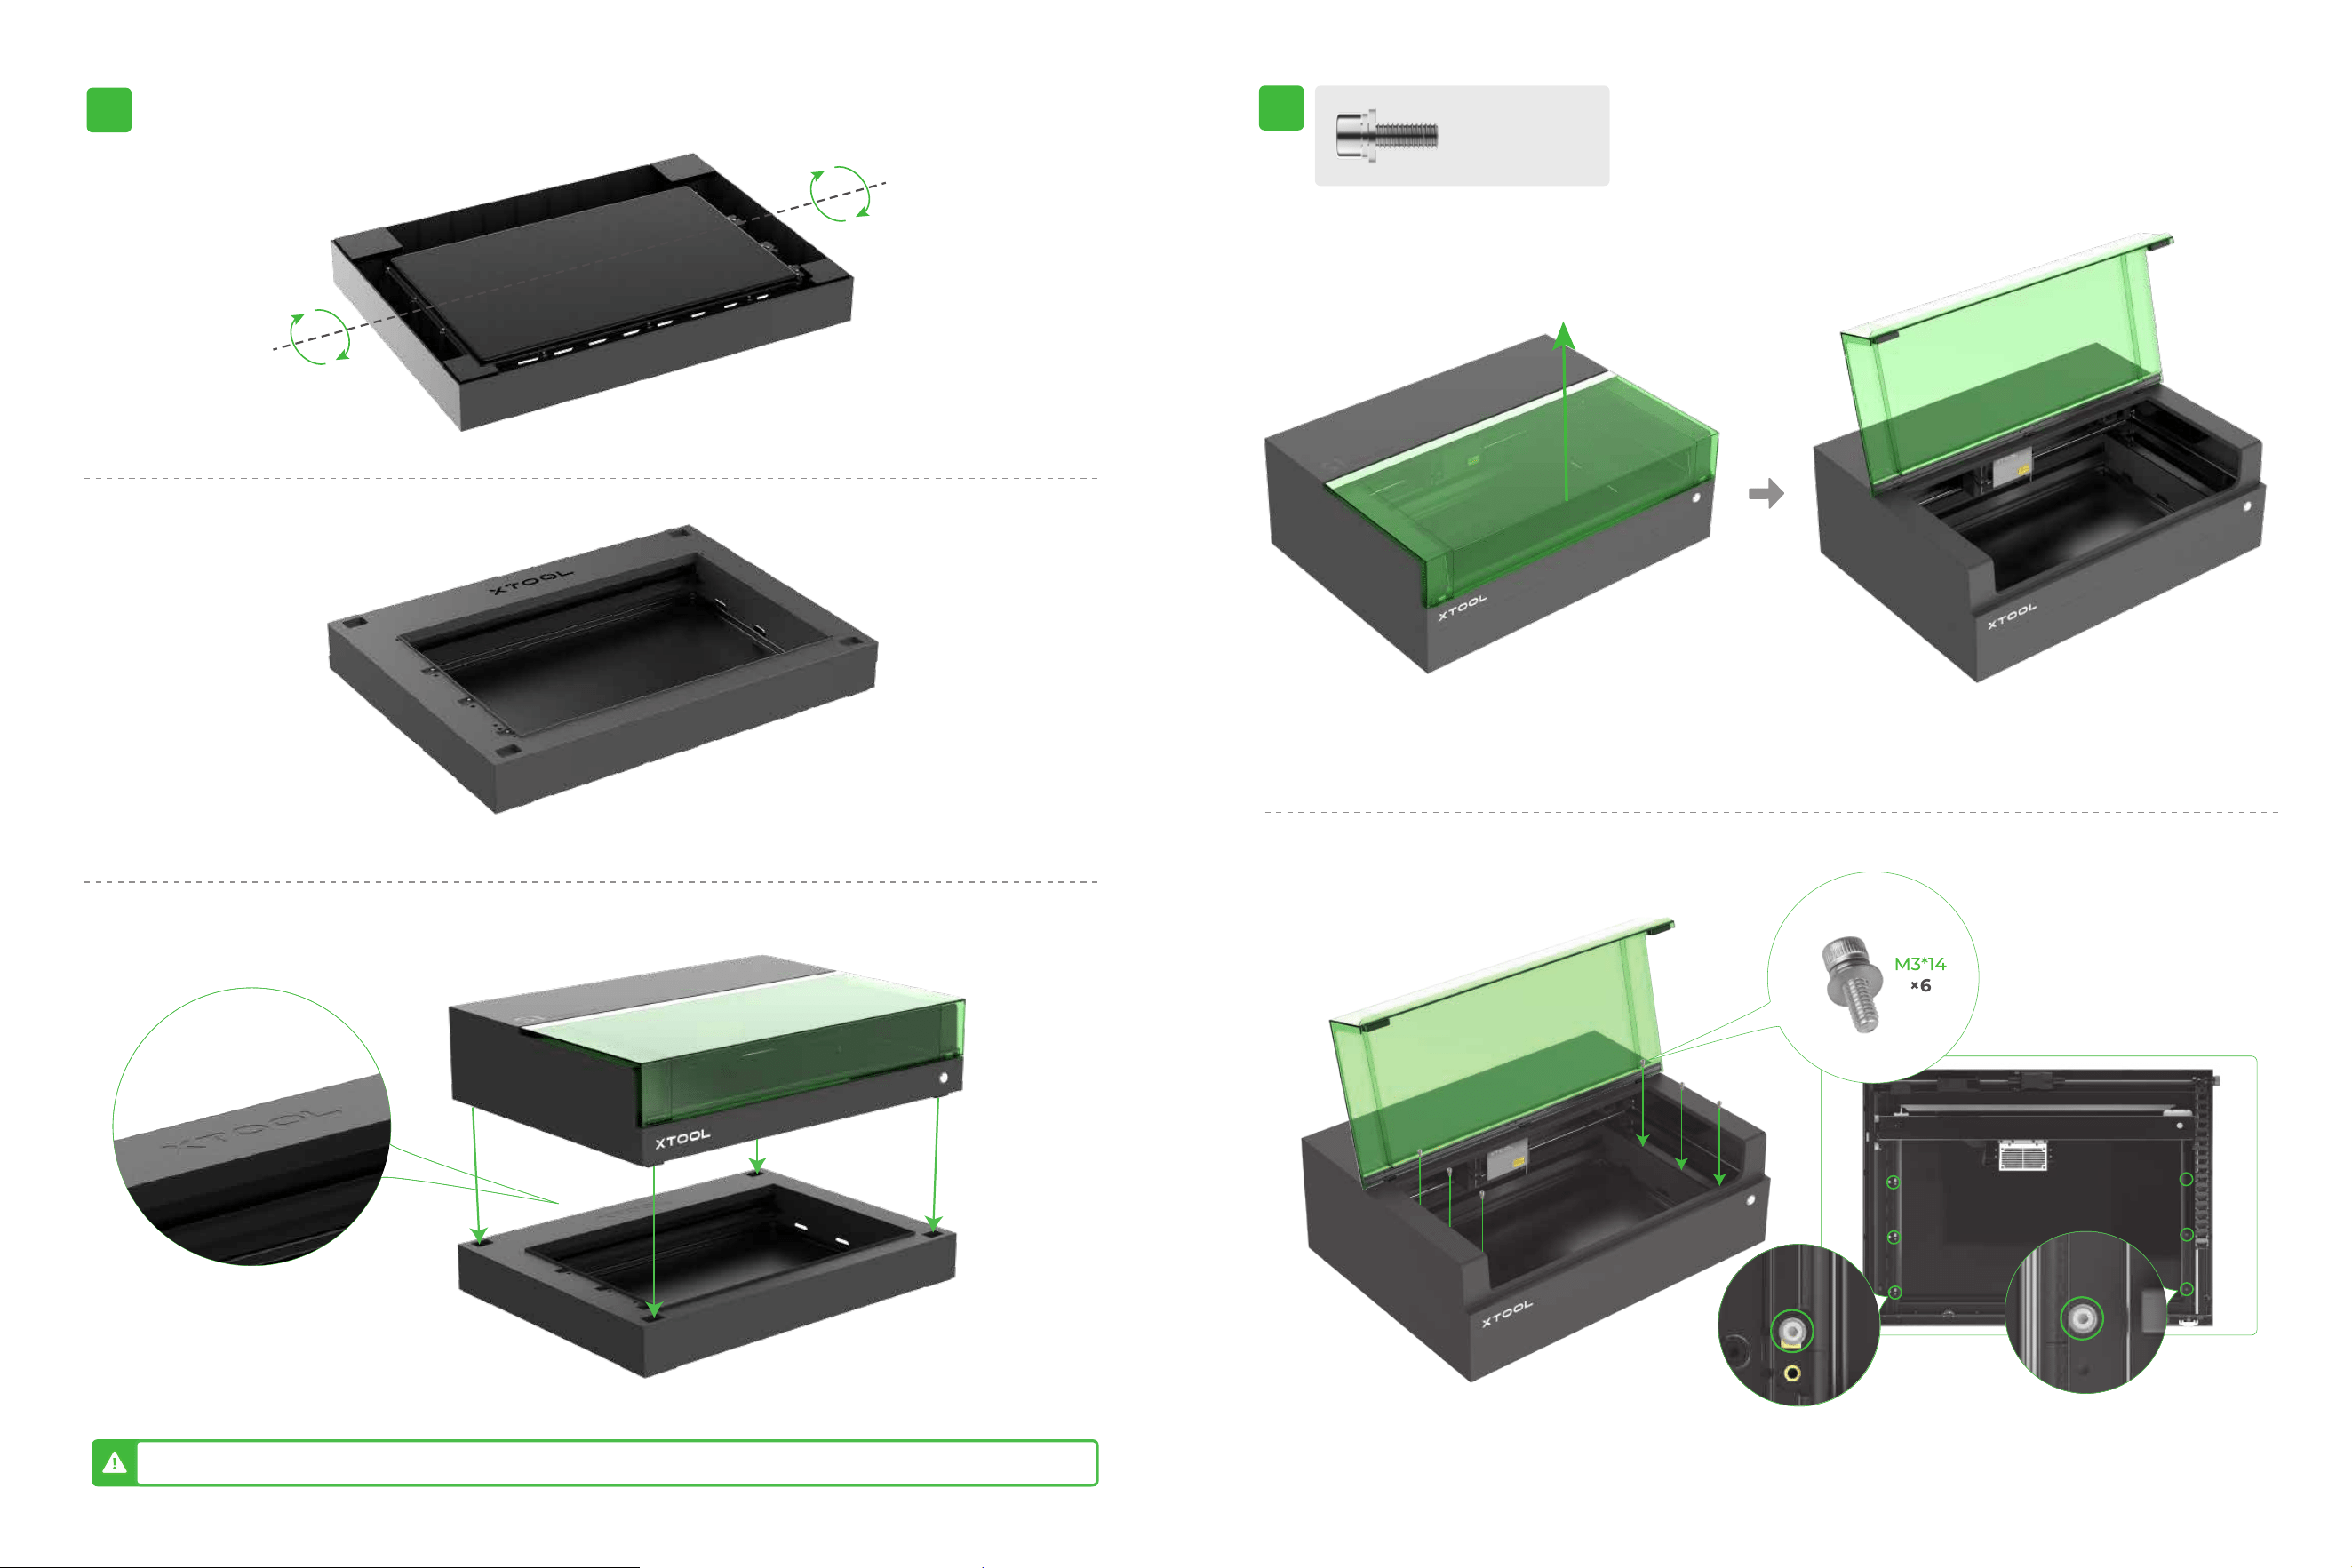
2625
5
4
M3*14 ×6
Place the side with the "xTool" logo as the rear side.
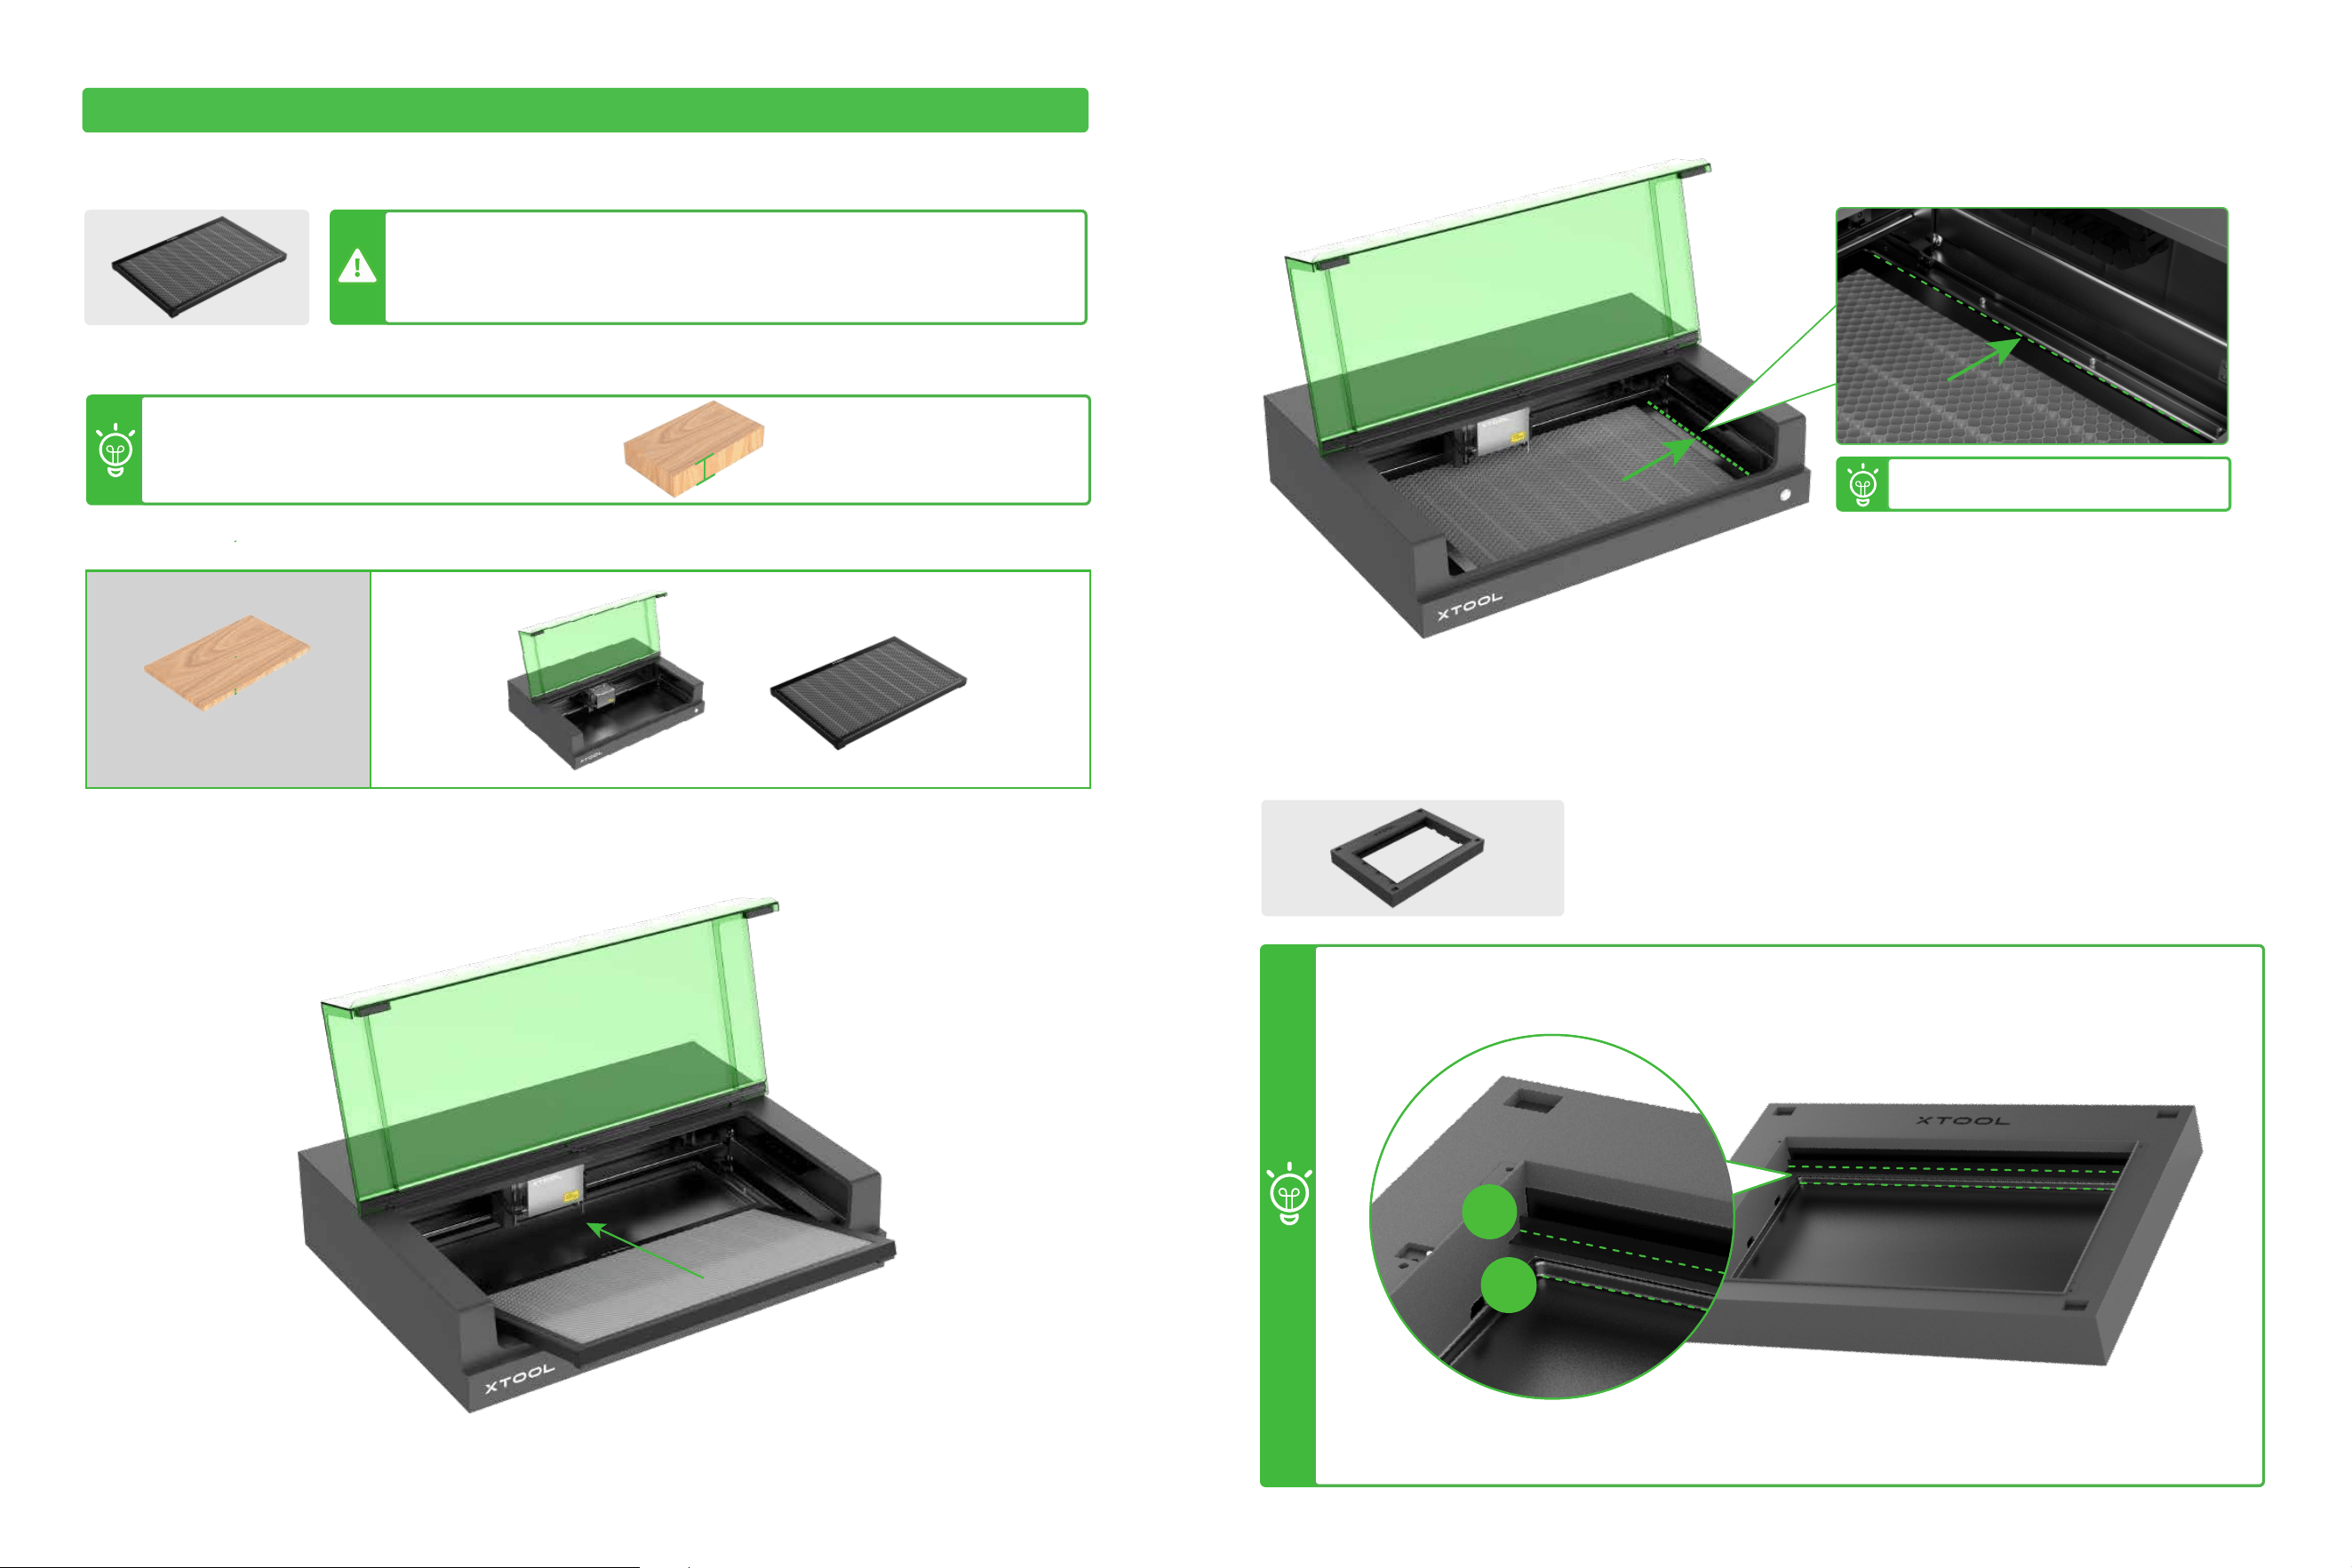
2827
Thickness of materials supported (H)
H
B
A
� mm < H ≤ �� mm
+
H
If the pack you purchase does not include the honeycomb panel, you need to purchase one before using it.
For laser cutting, the honeycomb panel can reduce the areas burned during material processing and protect
the baseplate.
Use xTool S1 with the honeycomb panel
Move the honeycomb panel to the right.
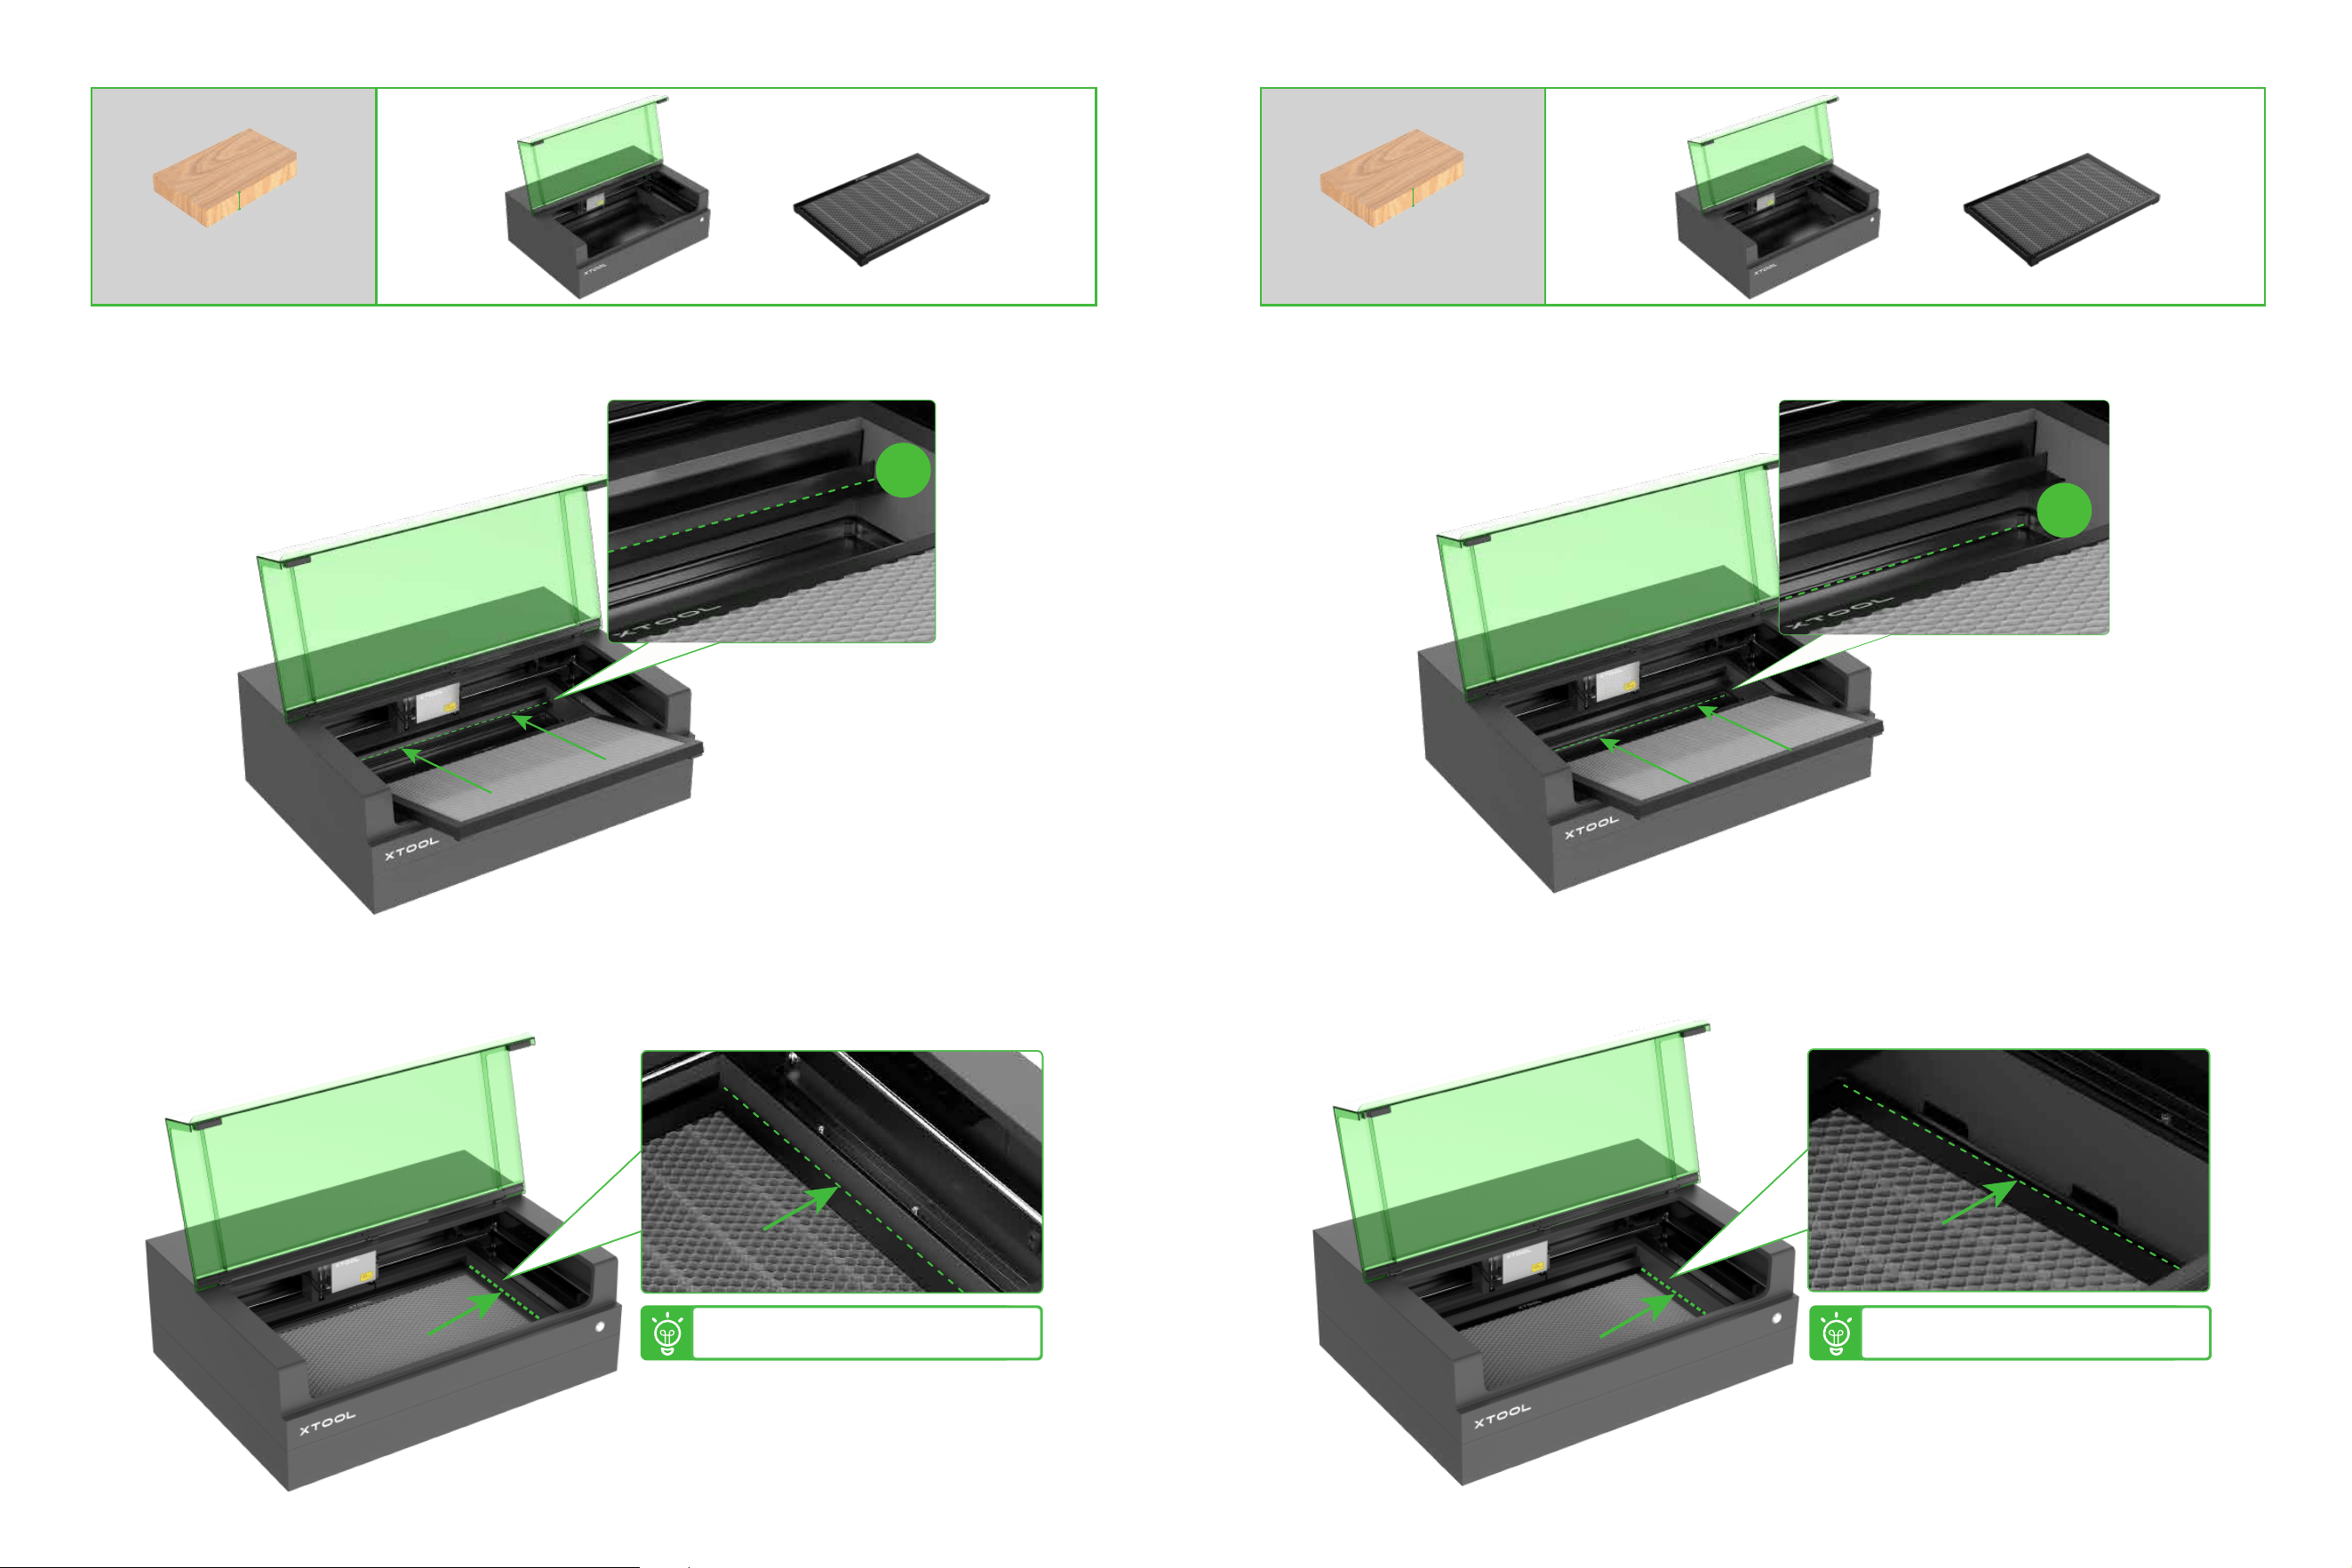
3029
�� mm ≤ H ≤ �� mm
H
A
B
+
Move the honeycomb panel to the right. Move the honeycomb panel to the right.
� mm < H ≤ �� mm
H
+
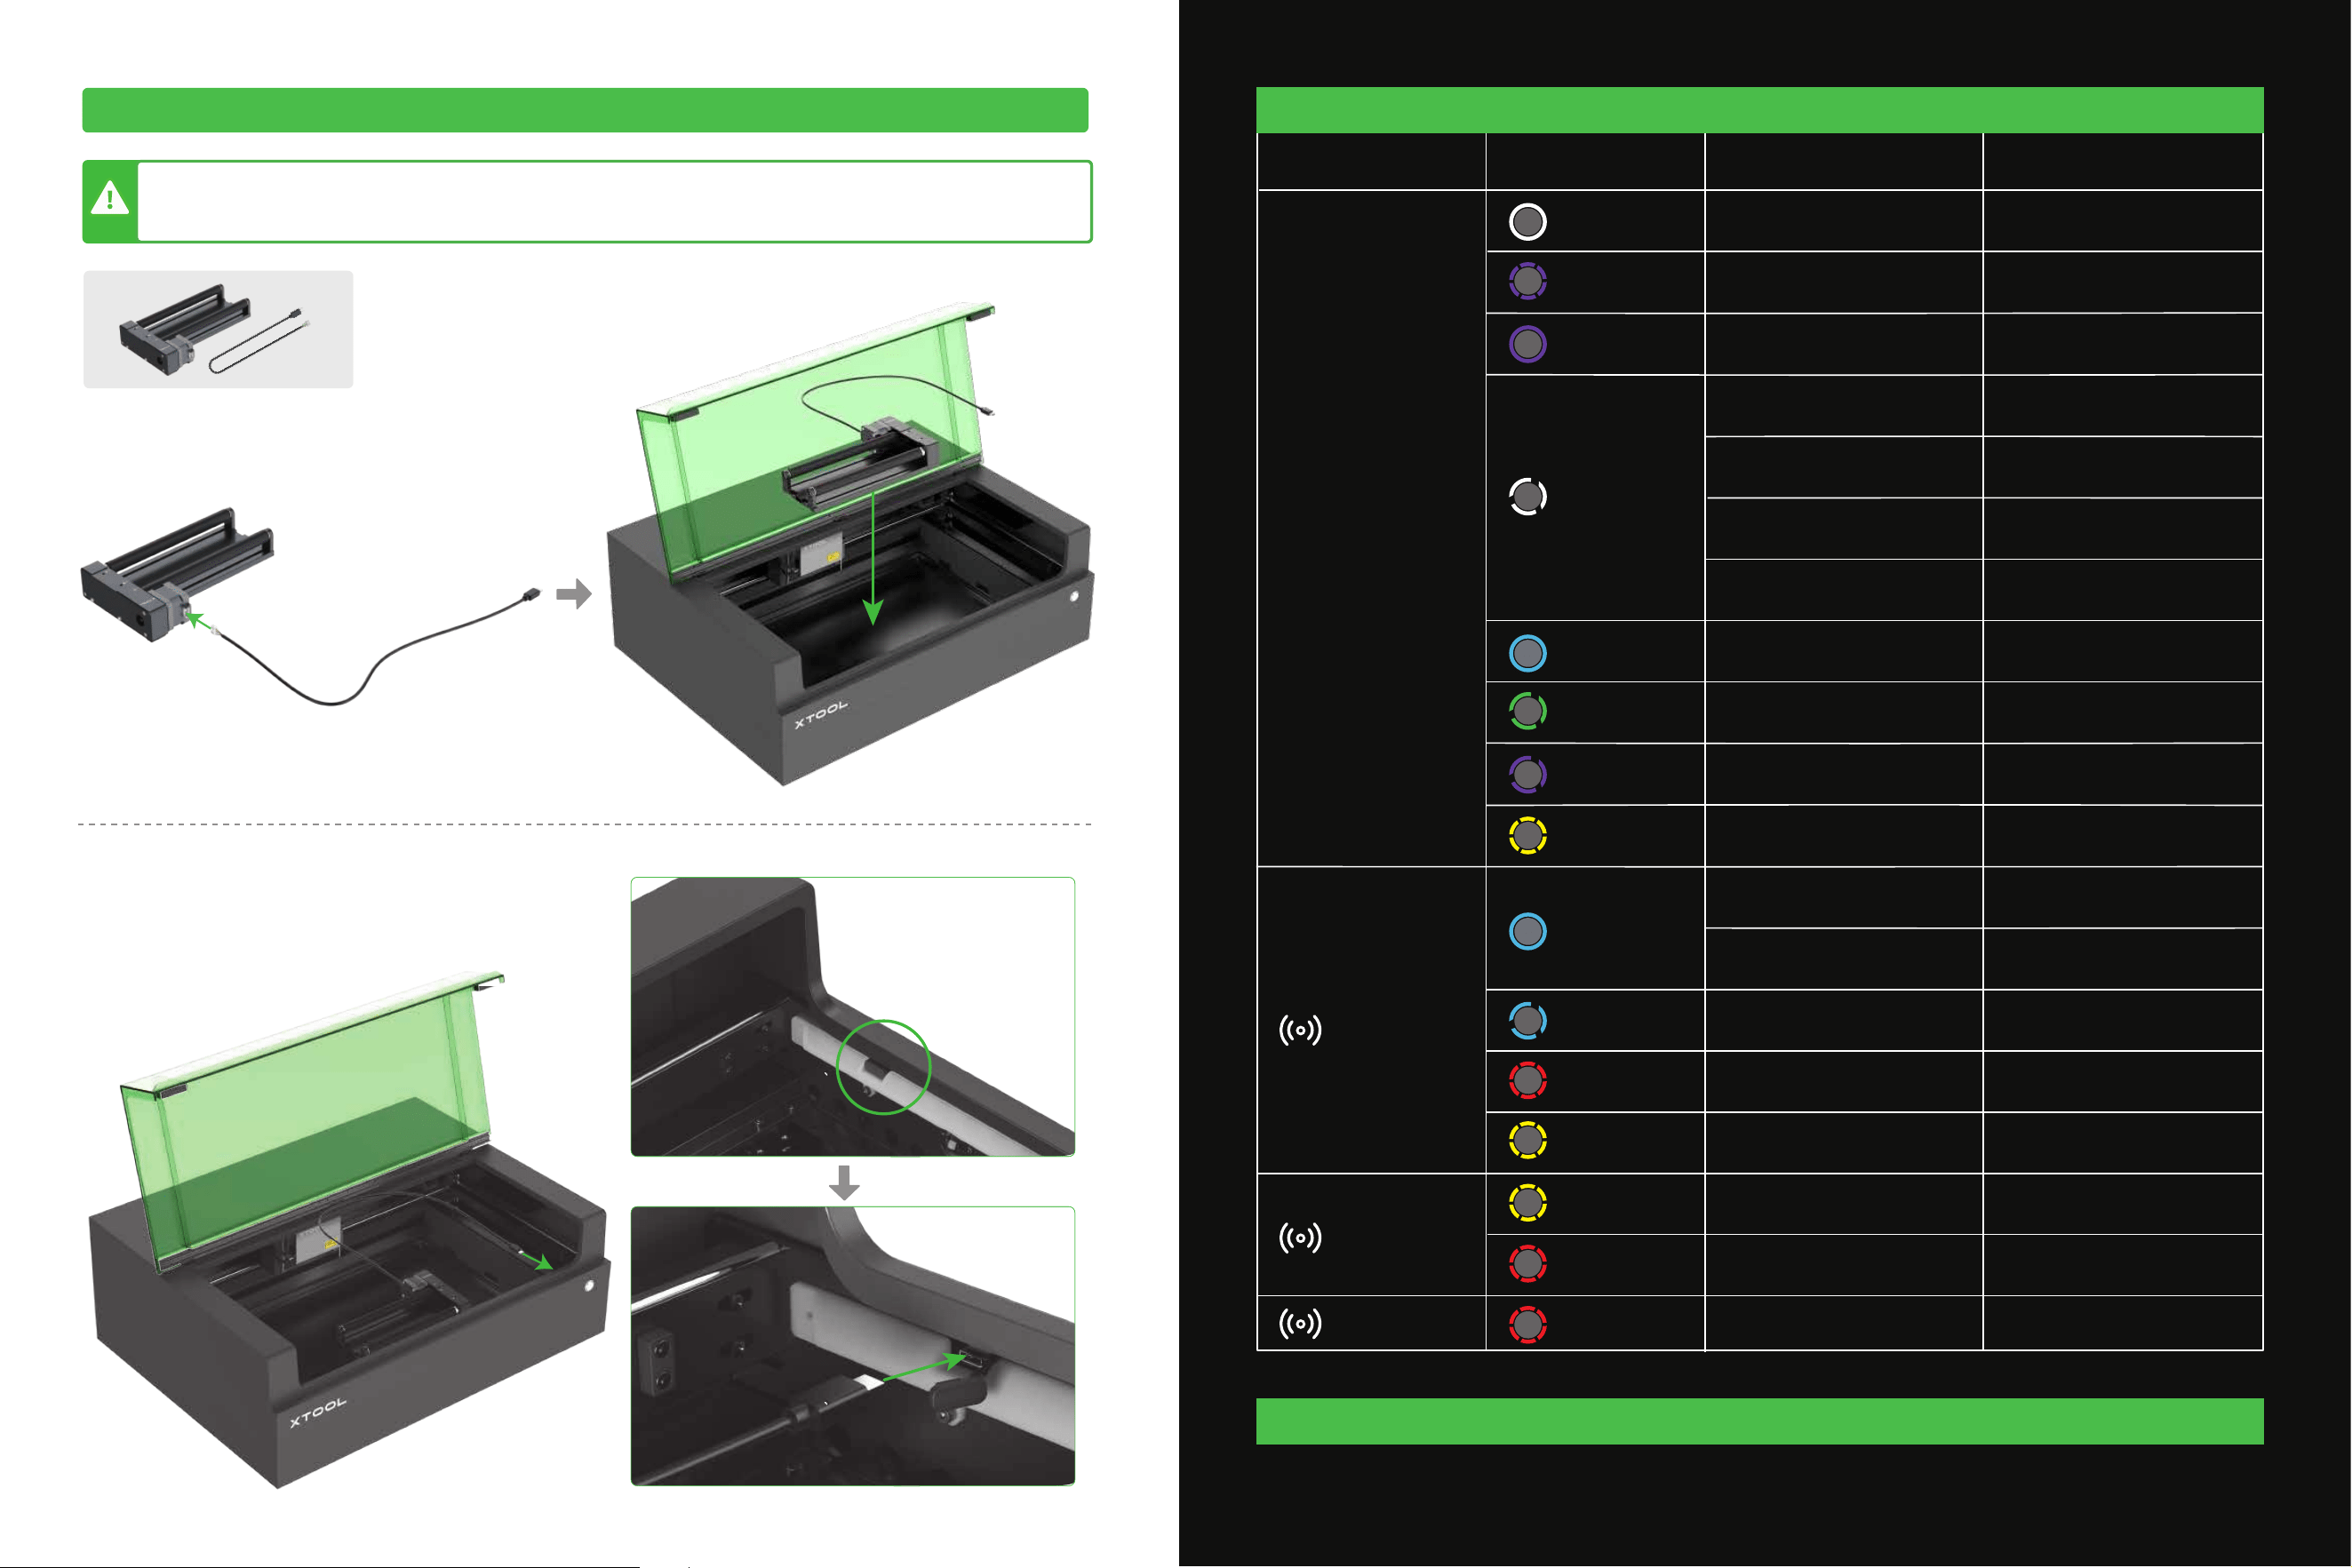
The rotary attachment needs to be used together with the riser base on xTool S1. If the pack you purchase does not include the rotary attachment or riser
base, you need to purchase them before using them.
With the rotary attachment, you can use xTool S1 to process cylindrical materials.
Use xTool S1 with the rotary attachment
After-sales services
For technical support, contact us at [email protected].
For more information about after-sales services, visit support.xtool.com.
32
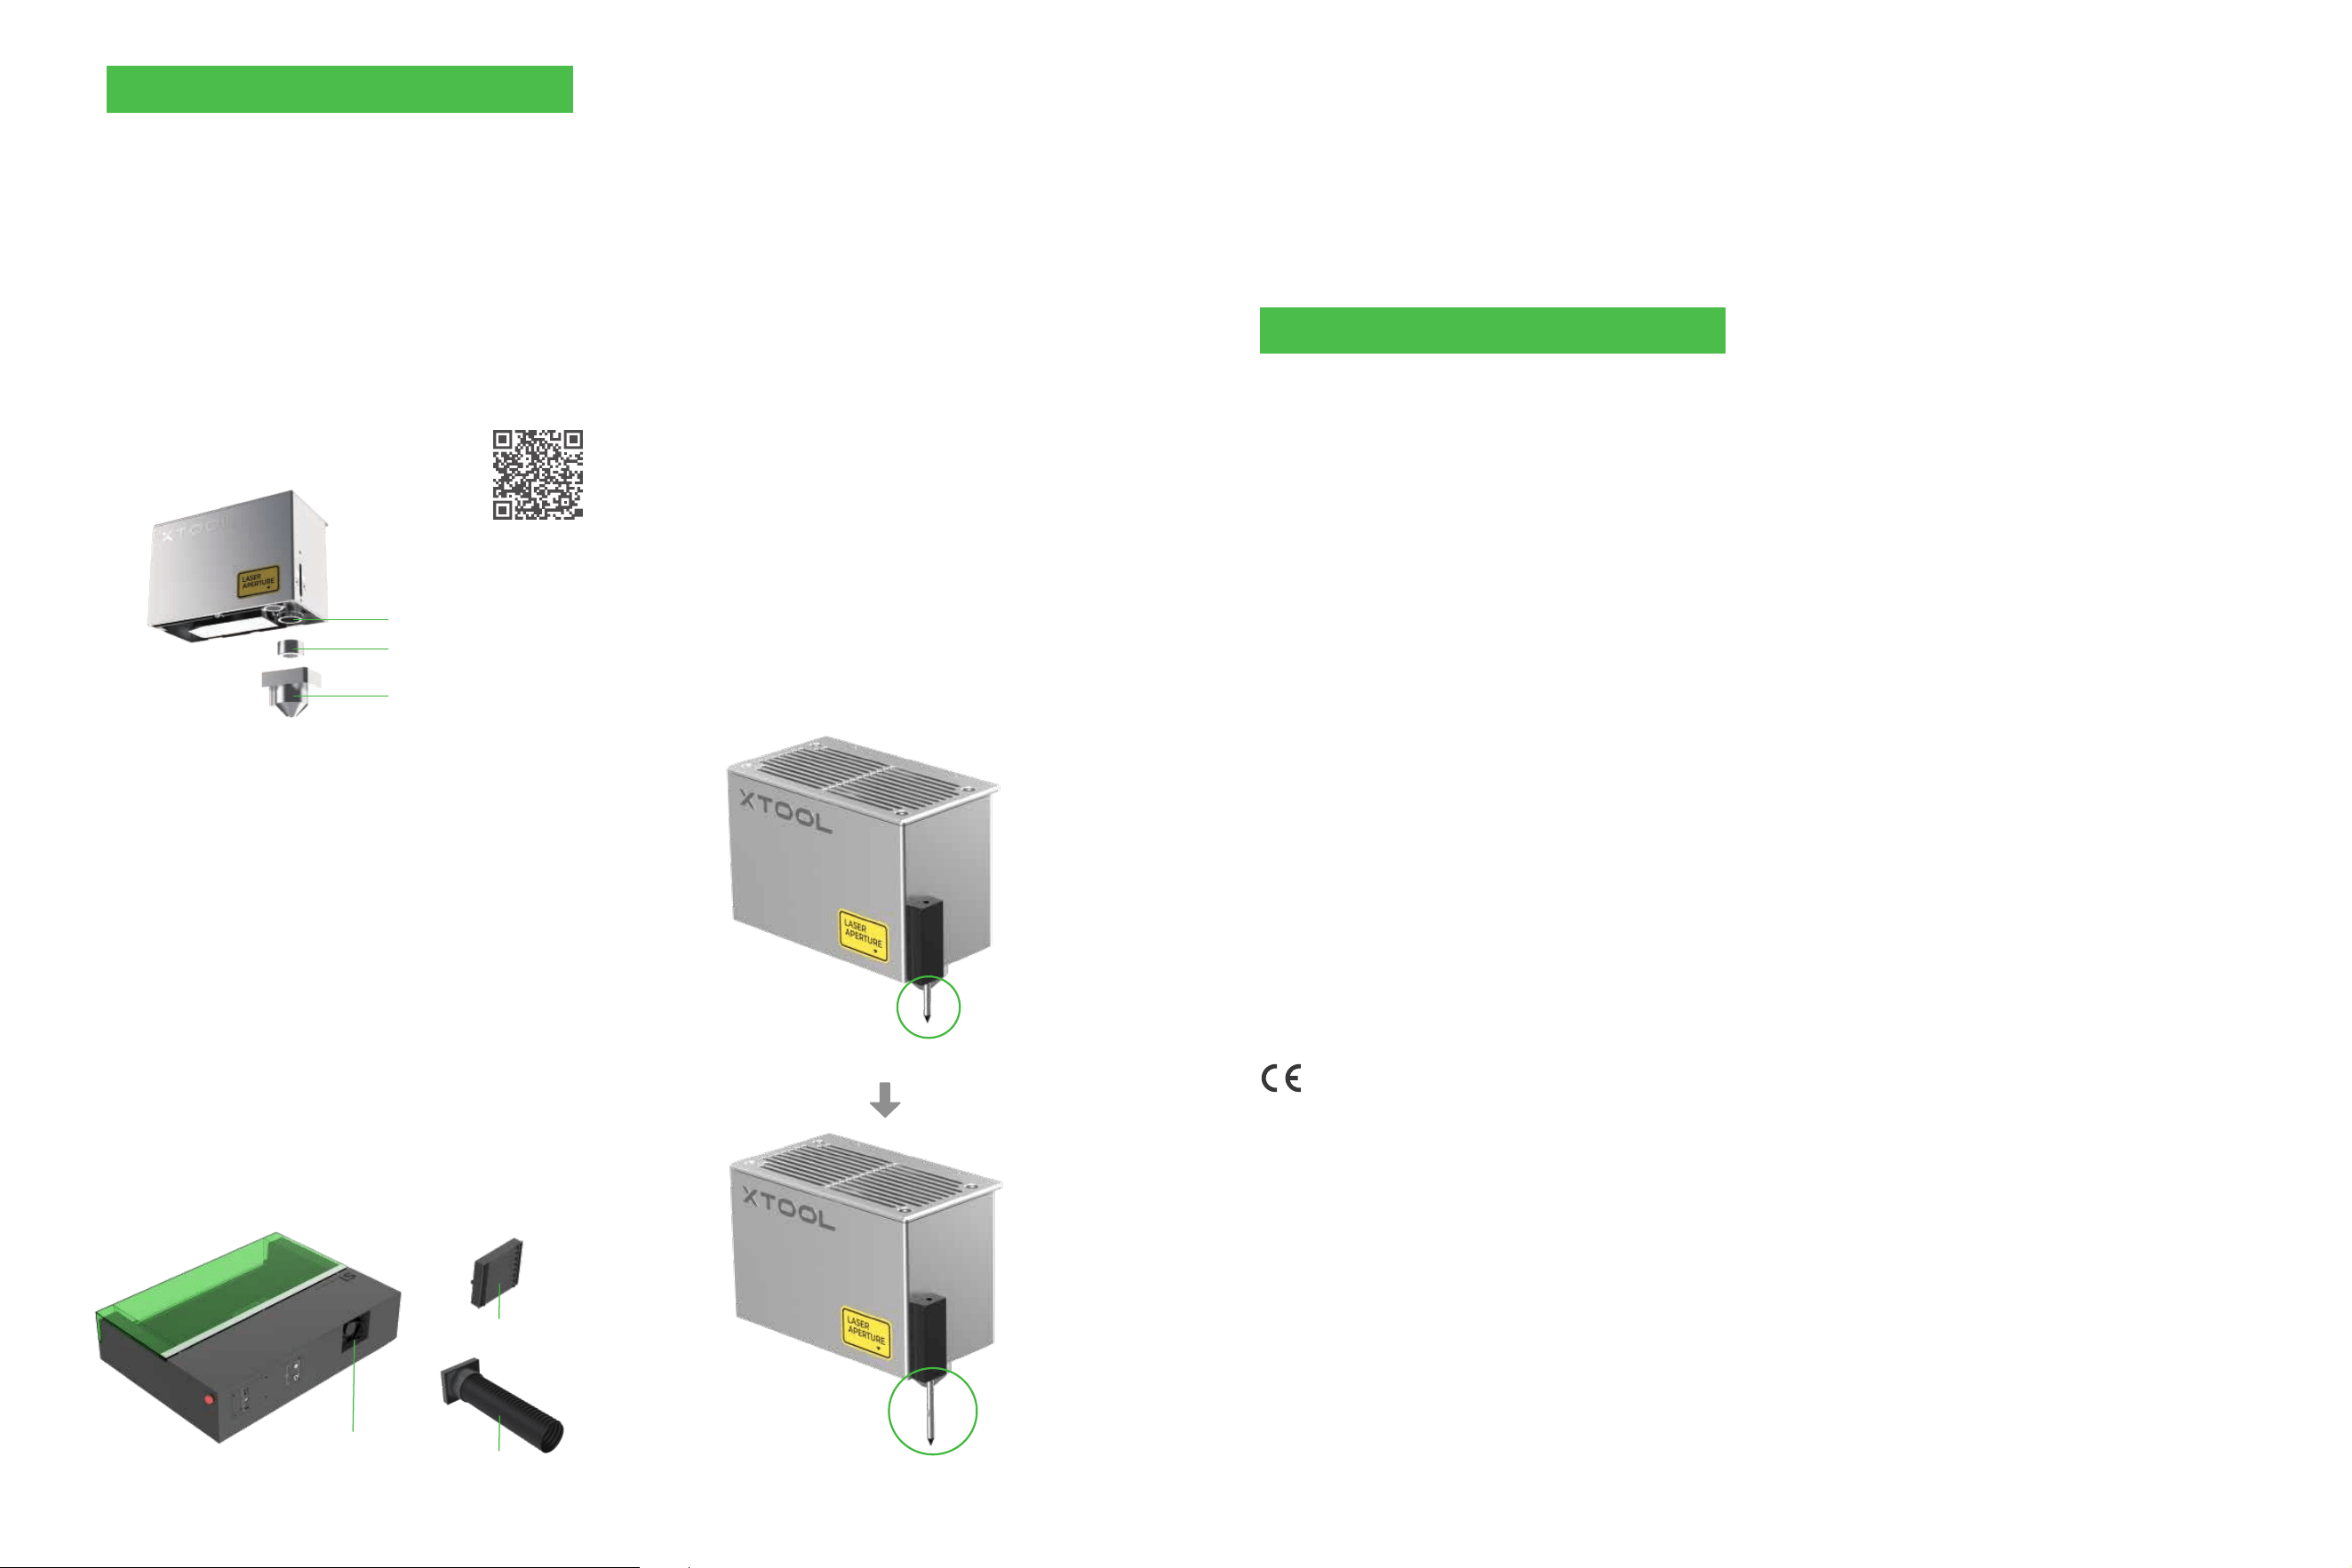
Buzzer Machine state
Solid white
/
Buzzing for 3
seconds
Buzzing for once
Standby
Auto focusing
Framing
Locating the material
Performing a task
Ready for framing
Task paused
Ready to work
Exceptions occur
Flame detected
Firmware updating
Network setting (device
disconnected from the software)
Standby, connected to the software
via Wi-Fi
Measuring curved surface
TF card exceptions occur
Exceptions occur on
movement
The lid is not fully closed during
operation.
Exceptions occur on Wi-Fi
communication
Starting
/
Short press to stop the warning
/
/
/
/
Long press to cancel auto focus
/
/
/
Long press to set the network
Long press to cancel curved surface
measurement
Short press to pause the processing;
long press to cancel the processing
Short press to mark a vertex; long
press to cancel material locating
Short press to start framing; long
press to cancel framing
Short press to start the processing;
long press to cancel the processing
Short press to continue the
processing; long press to cancel the
processing
Short press to stop the warning
Short press to stop the warning
Keeping buzzing
Blinking purple
Solid purple
Blinking white
slowly
Blinking green
slowly
Blinking purple
slowly
Blinking yellow for
3 times
Solid blue
Solid blue
Blinking blue slowly
Blinking red
Blinking red
Blinking red
Blinking yellow
Blinking yellow
Button operationAnnular indicator
Understand the annular indicator
31
3433
FAQs
1. Do I need to clean the laser module? If yes, how often?
Yes, you need to clean the laser module regularly. Laser processing
often produces a large amount of smoke, which may cause the lens
protector to get dirty or block the nozzle. If you do not clean the
laser module in a timely manner, the laser power may be reduced
and the laser module may be damaged.
Cleaning steps:
■ 10 W laser module: clean it after every 2 hours of processing
■ 20 W laser module: clean it after every 1 hour of processing
■ 40 W laser module: clean it after every 0.5 hours of processing
Without the air assist set, you are advised to clean the laser module
at the following frequencies:
2. The smoke is exhausted slowly. Why?
Too much dust accumulates on the exhaust fan.
Possible cause:
(1) Turn off the machine and remove the louver or smoke exhaust
pipe from the machine.
(2) Clean the exhaust fan with a tissue or cotton swab moistened
with clean water or alcohol.
(3) Install the louver or smoke exhaust pipe back to the machine.
Otherwise, laser beams may leak out, and your hands may get hurt
if touching the fan.
Solution:
With the air assist set, you can clean the laser module at a lower
frequency.
(1) Turn off the machine and remove the laser module from the
machine.
(2) Remove the nozzle and lens protector one by one from the laser
module.
(3) Clean the laser lens, lens protector, and nozzle one by one with a
lint-free cloth moistened with alcohol.
For more information on how to clean the laser
module, scan the QR code to watch the video.
3. The distance sensor does not work in auto focus.
What can I do?
(1) The initialization of the distance sensor fails due to improper
installation or early firmware version, and the probe doesn't extend.
(2) The probe of the distance sensor cannot move smoothly due to
hardware faults.
(3) The material is too thick or thin, and the material surface to be
processed is out of the focusing range.
(4) On a curved material, the probe may slip in a part with a steep
angle, causing a distance measurement failure.
(5) The laser module cannot execute the distance sensing function.
(1) Check whether the probe of the distance sensor extends during
auto focus. If no, try to reinstall the distance sensor. If the probe still
fails to extend, try to update the firmware to the latest version.
(2) Remove the distance sensor and check whether its probe can
move smoothly. If no, please contact our after-sales service to
replace the distance sensor.
(3) Refer to the user manual and use a processing way applicable to
your material thickness.
(4) For a curved material, you can try to adjust the processing area
to a flatter one, so that the probe can measure the distance in a
flatter area.
(5) If the distance sensor still fails to measure distance, please
contact our after-sales service. Before the problem is solved, you can
measure the distance manually. For more information on how to
measure the distance, see support.xtool.com.
Possible causes:
Solution:
(Probe not extending)
(Probe extending)
Louver
Exhaust fan
Smoke exhaust pipe
Laser lens
Lens protector
Nozzle
4. The software prompts that the baseplate is not
installed properly. What can I do?
The screws securing the baseplate are loose.
Possible cause:
Tighten all the screws to keep the baseplate in place.
Solution:
Statement
Thank you for choosing xTool products!
If you use the product for the first time, read carefully all the
accompanying materials of the product to improve your experience
with it. If you do not use the product according to the instructions
and requirements of the Manual, or mis-operate the product due to
misunderstanding, etc., the Company shall bear no responsibility for
any loss resulting therefrom.
The Company has collated the content of the Manual rigorously and
carefully, but errors or omissions may remain.
The Company is committed to continuously improving product
functions and service quality, and therefore reserves the right to
change any product or software described in the Manual and the
content of the Manual at any time.
The Manual is intended to help you use the product properly and
does not include any description of hardware and software
configuration. For product configuration, refer to the related contract
(if any) and packing list, or consult your distributor. Images in the
Manual are for reference only and the actual product may vary.
Protected by copyright laws and regulations, the Manual shall not be
reproduced or transcribed in any way, or be transmitted on any wired
or wireless network in any manner, or be translated into any
language, or be modified in any way, such as content, image, or
layout modification, without the prior written authorization of the
Company.
The Company is committed to continuously improving the product
and related materials. The product and the Manual are subject to
change, and updates can be found at xtool.com.
DECLARATION OF CONFORMITY
Hereby, Makeblock Co., Ltd., declares that this product is in
compliance with the essential requirements and other relevant
provisions of Directive RED 2014/53/EU and the RoHS directive
2011/65/EU & (EU) 2015/863.
FCC statement
This device complies with Part 15 of the FCC Rules. Operation is
subject to the following two conditions:
(1) This device may not cause harmful interference, and (2) This
device must accept any interference received, including
interference that may cause undesired operation.
Warning: Changes or modifications not expressly approved by the
party responsible for compliance could void the user's authority to
operate the equipment.
NOTE: This equipment has been tested and found to comply with the
limits for a Class B digital device, pursuant to Part 15 of the FCC Rules.
These limits are designed to provide reasonable protection against
harmful interference in a residential installation.
This equipment generates uses and can radiate radio frequency
energy and, if not installed and used in accordance with the
instructions, may cause harmful interference to radio
communications.
However, there is no guarantee that interference will not occur in a
particular installation. If this equipment does cause harmful
interference to radio or television reception, which can be determined
by turning the equipment off and on, the user is encouraged to try to
correct the interference by one or more of the following measures:
■ Reorient or relocate the receiving antenna.
■ Increase the separation between the equipment and receiver.
■ Connect the equipment into an outlet on a circuit different from
that to which the receiver is connected.
■ Consult the dealer or an experienced radio/TV technician for help.
FCC Radiation Exposure Statement
This equipment complies with FCC radiation exposure limits set
forth for an uncontrolled environment. This equipment should be
installed and operated with a minimum distance of 20 cm between
the radiator and your body.