5240 Willis Rd.
Theodore, AL 36582 USA
Toll Free: 1 (855) 223-2665
Tel: 1 (805) 933-9970
coolboss.com
Cool Boss™ Portable Evaporative Air Cooler with
Swing Louvers
Installation and Operation Manual
Manual Revision A6 — August 2024 — Manual P/N 5900274
Models:
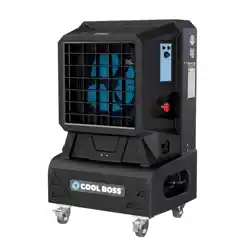
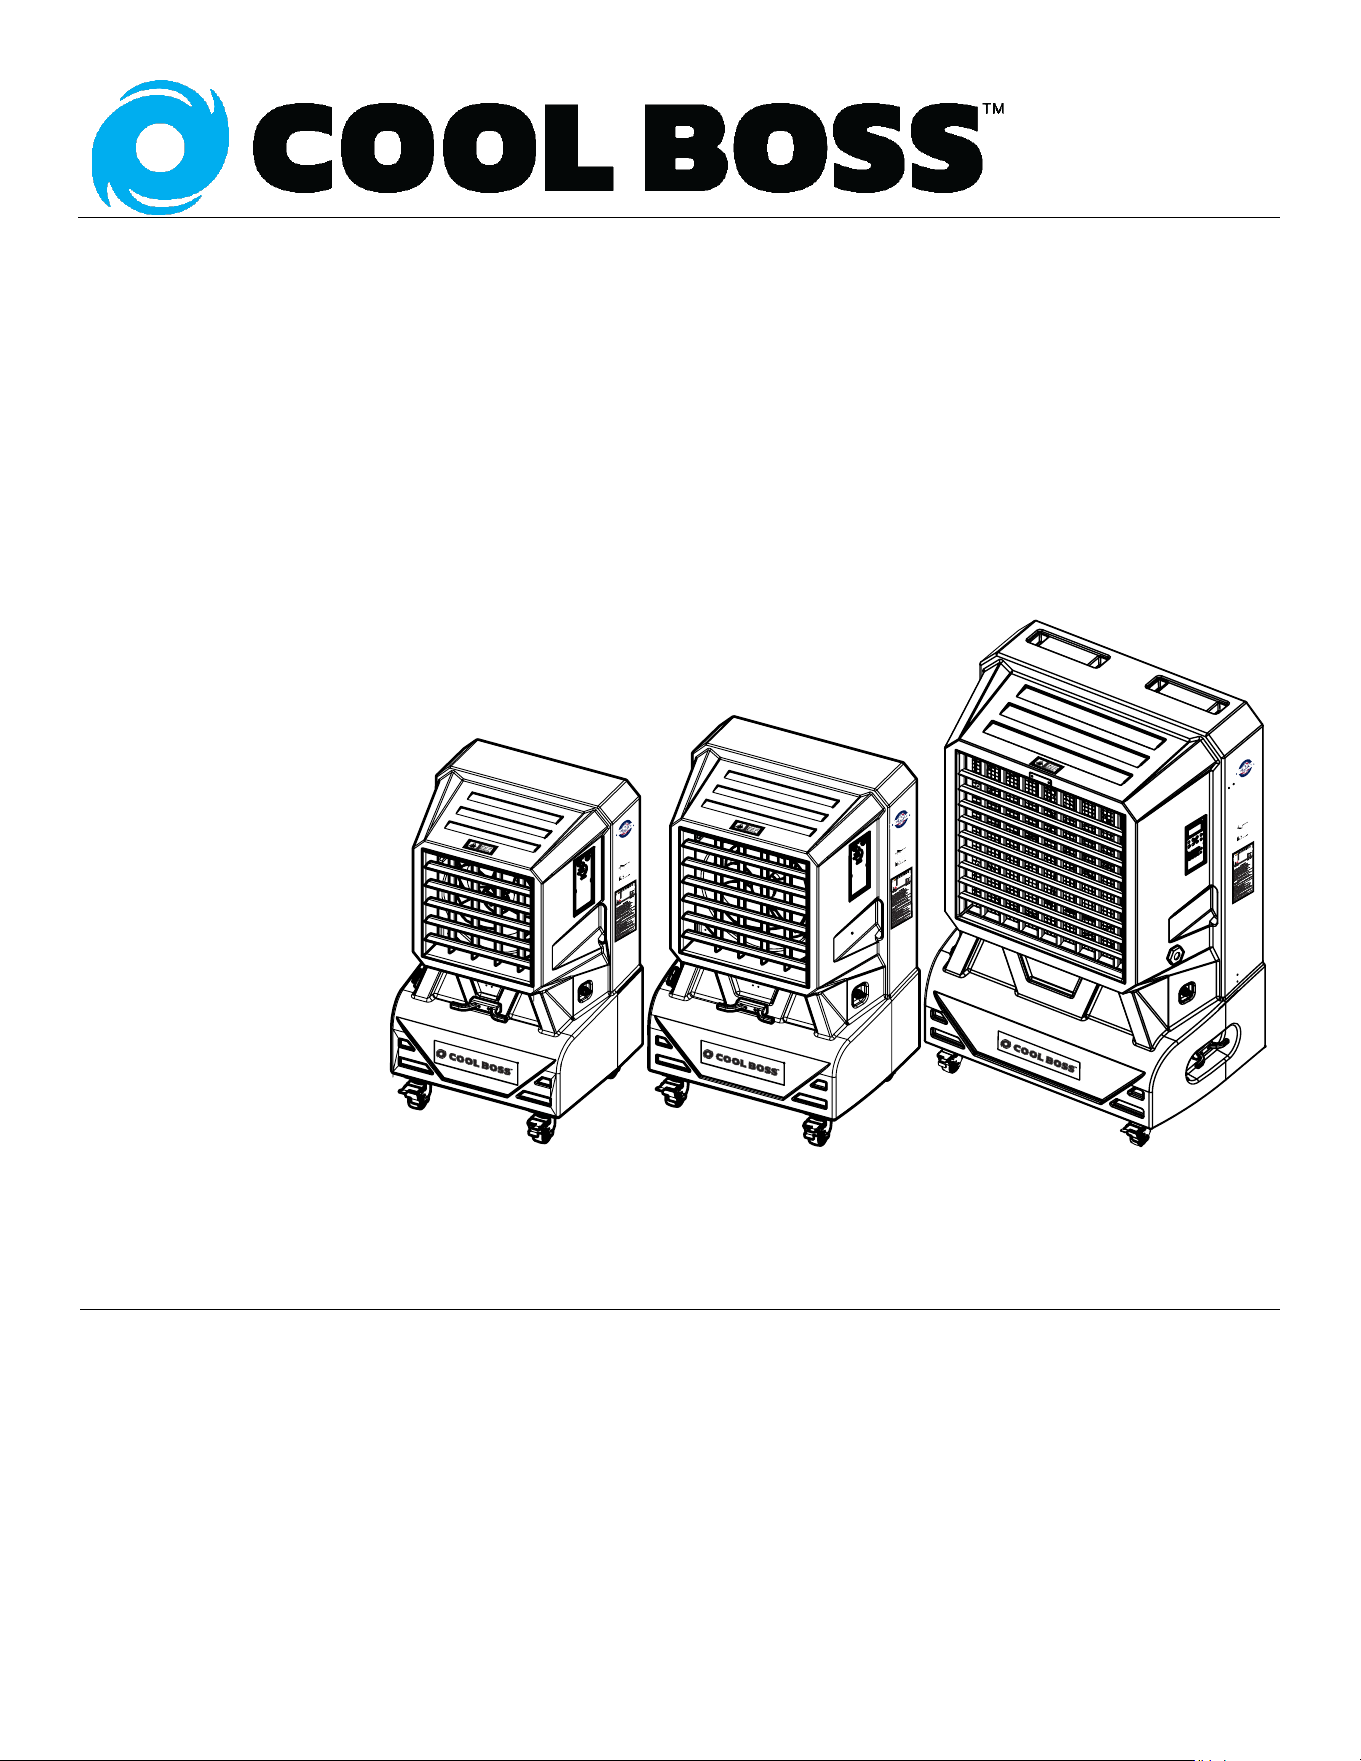
CB-12SL / SLH
CB-14SL / SLH
CB-26SL / SLH
⚠
DANGER
Read the entire contents of this manual before using this product. Failure to follow the
instructions and safety precautions in this manual can result in severe injury or death. Make sure all
other operators also read this manual. Keep the manual near the product for future reference. By
proceeding with setup and operation, you agree that you fully understand the contents of
this manual and assume full responsibility for product use.
CB-14SL / SLH
CB-26SL / SLH
CB-12SL / SLH
Manual. Cool Boss™ Portable Evaporative Air Cooler with Swing Louvers, Installation and Operation Manual,
P/N 5900274, Manual Revision A6, August 2024.
Copyright. Copyright © 2024 by BendPak Inc. All rights reserved. No part of this manual may be reproduced,
adapted, translated, or transmitted by any means, electronic or mechanical, for any purpose or in any form,
without prior written permission of BendPak Inc.
Trademarks. Cool Boss, the Cool Boss logo, and BendPak are trademarks of BendPak Inc. All other company,
product, and service names are used for identification only. All trademarks and registered trademarks mentioned
in this manual are the property of their respective owners.
Limitations. Every effort has been made to ensure complete and accurate instructions are
included in this manual. However, product updates, revisions, and/or changes may have occurred
since this manual was published. BendPak reserves the right to change any information in this
manual without incurring any obligation for equipment previously or subsequently sold. BendPak is
not responsible for typographical errors in this manual.
Warranty. The Cool Boss warranty is more than a commitment to you: it is also a commitment to
the value of your new product. Visit coolboss.com/warranty for complete warranty information.
Safety. Your new product was designed and manufactured with safety in mind. Your safety also depends on
proper training and thoughtful operation. Do not set up, operate, maintain, or repair your Cool Boss without
reading and understanding this manual and the labels on the unit.
Owner Responsibility. In order to maintain your product properly and to ensure operator safety, it is the
responsibility of the product owner to read and follow these instructions:
• Follow all setup, operation, and maintenance instructions.
• Make sure product setup conforms to all applicable local, state, and federal codes, rules, and regulations,
such as state and federal OSHA regulations and electrical codes.
• Read and follow all safety instructions. Keep them readily available for operators.
• Make sure all operators are properly trained, know how to safely operate the unit, and are properly supervised.
• Do not operate the product until you are certain that all parts are in place and operating correctly.
• Carefully inspect the product on a regular basis and perform all maintenance as required.
• Service and maintain the unit only with approved replacement parts.
• Keep all instructions permanently with the product and make sure all labels are clean and visible.
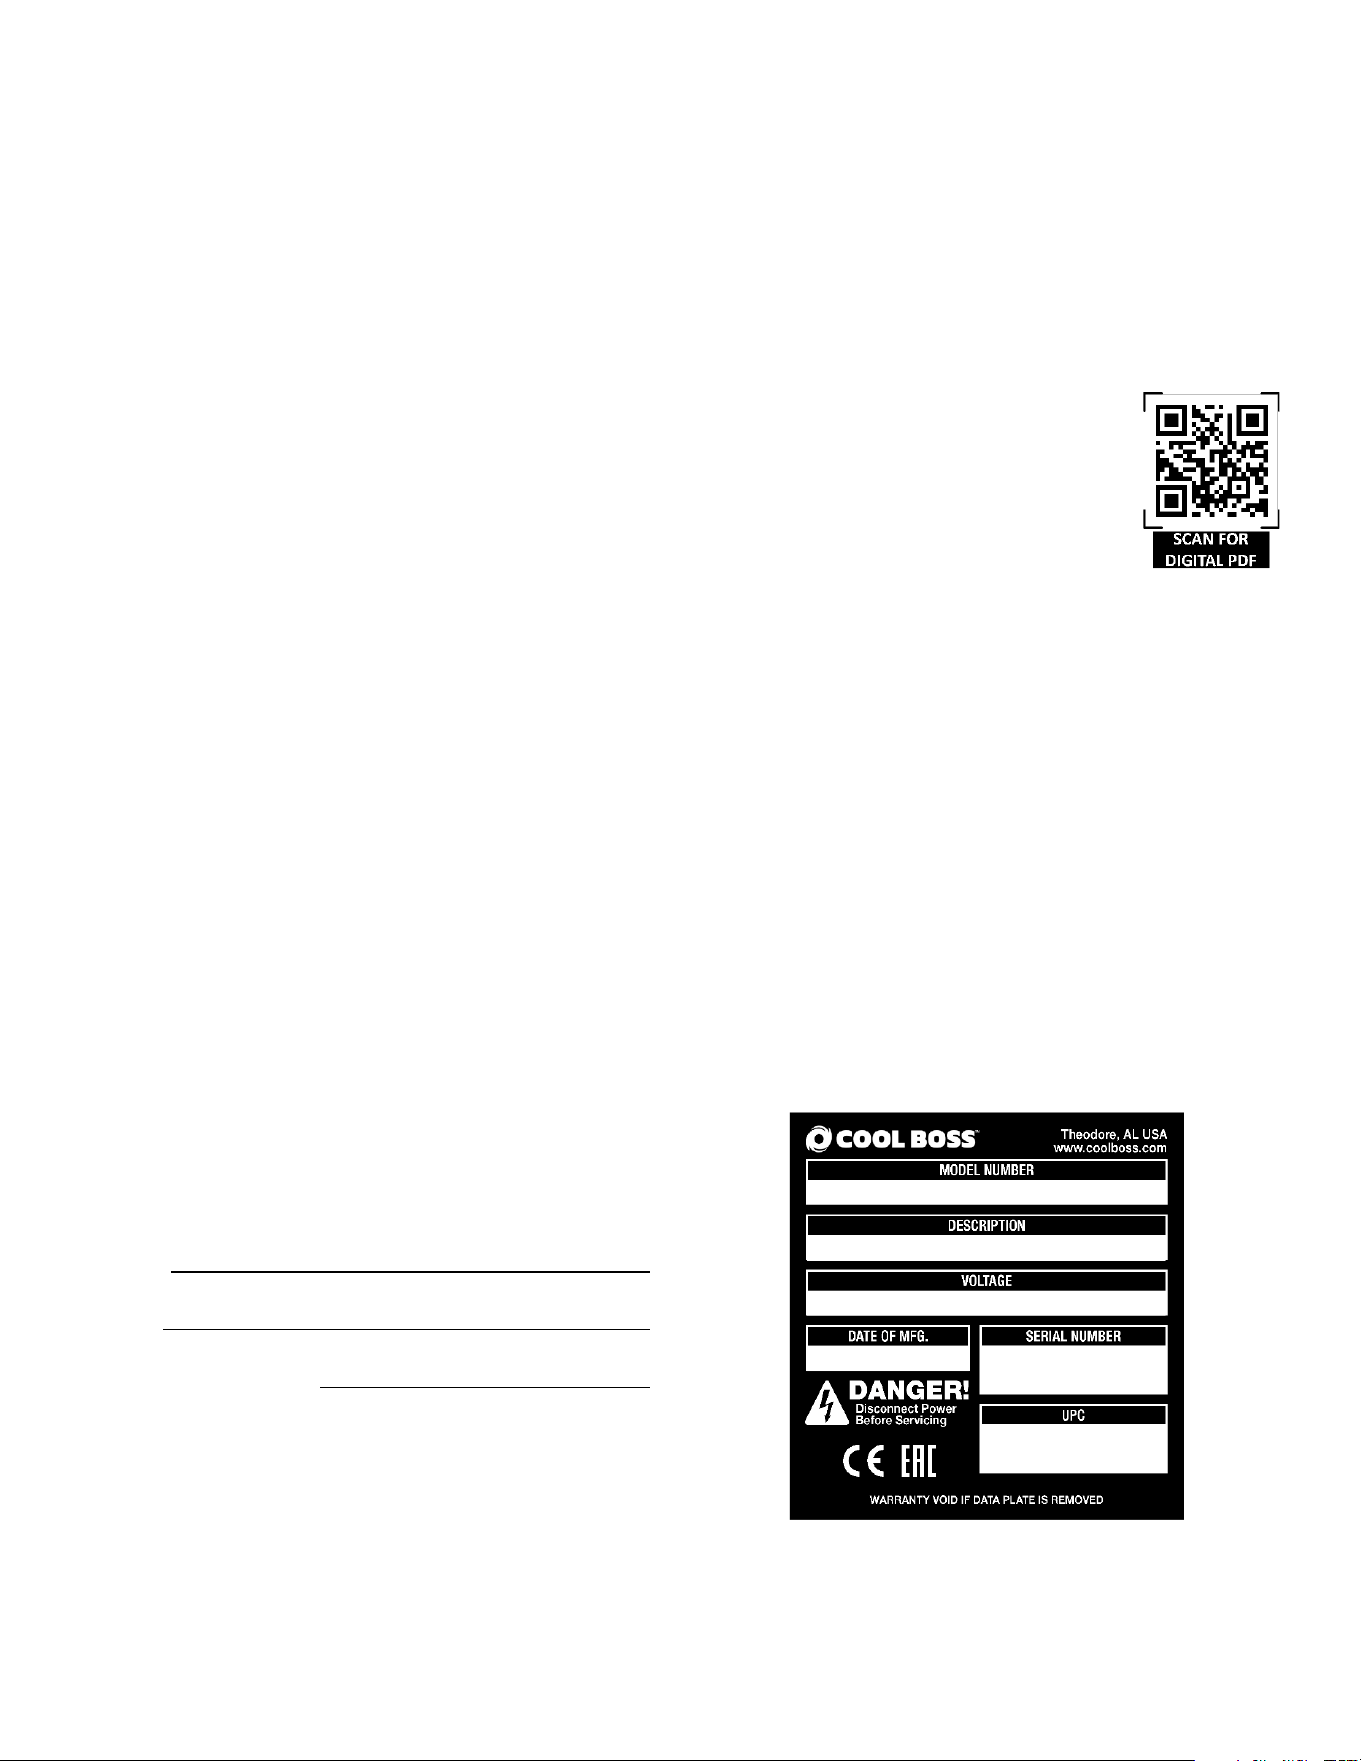
Unit Information. Enter the Model Number, Serial
Number, and Date of Manufacture from the label on
your unit. This information is required for part or
warranty issues.
Model:
Serial:
Date of Manufacture:

Cool Boss Evaporative Air Cooler 3 P/N 5900274 —Rev. A6—August 2024
Table of Contents
Introduction 3 Operation 23
Shipping Information 4 Maintenance 31
Safety Considerations 4 Troubleshooting 34
Frequently Asked Questions 6 Parts Diagram 36
Specifications 7 Labels 38
Components 9 Maintenance Log 40
Setup 11
Introduction
This manual describes the Cool Boss Portable Evaporative Air Cooler with Swing Louvers, which
keeps your home, shop, or workplace cool and comfortable on even the hottest summer days.
This manual covers Cool Boss models with a fan diameter of 12 in. (305 mm), 14 in. (356 mm), and 26
in. (660 mm) with Swing Louvers. Each model may be ordered in a 110 VAC or a 220 VAC version:
• CB-12SL: 110 VAC, 0.88A Max., 60 Hz, single phase.
• CB-12SLH: 208 to 230 VAC, 0.5A Max., 50-60 Hz, single phase.
• CB-14SL: 110 VAC, 1.0A Max., 60 Hz, single phase.
• CB-14SLH: 208 to 230 VAC, .5A Max., 50-60 Hz, single phase.
• CB-26SL: 110 VAC, 5.2A Max., 60 Hz, single phase.
• CB-26SLH: 208 to 230 VAC, 2.75A Max., 60 Hz, single phase.
The Cool Boss units described here operate similarly and will be referred to as Cool Boss or Cooler
throughout this manual. Any differences based on the selected power supply, function, or controls will
be called out in the text by the unit’s specific model number.
This manual is mandatory reading for all users of the Cool Boss, including anyone who sets up,
operates, maintains, or repairs it.
⚠ DANGER Be very careful when setting up, operating, maintaining, or repairing this equipment;
failure to do so correctly could result in property damage, product damage, injury,
or (in very rare cases) death. Make sure only authorized personnel operate this
equipment. All repairs must be performed by an authorized technician. Do not
make modifications to the unit; this voids the warranty and increases the chances
of injury or property damage. Make sure to read and follow the instructions on the
labels mounted on the unit.
Keep this manual on or near the equipment so that anyone who uses or services the unit can read it.

Cool Boss Evaporative Air Cooler 4 P/N 5900274 —Rev. A6—August 2024
Assistance with your Cool Boss is available from your dealer by calling Cool Boss at
(805) 933-9970, or by emailing support@coolboss.com. You may also contact Cool Boss for
parts replacement (please have the serial number and model number of your unit available).
Shipping Information
Your equipment was carefully checked before shipping. Nevertheless, you should thoroughly inspect
the shipment before you sign to acknowledge that you received it.
When you sign the bill of lading, it tells the carrier the items on the invoice were received in good
condition.
Do not sign the bill of lading until
after
you have inspected the shipment.
If any of the
items listed on the bill of lading are missing or are damaged, do not accept the shipment until the
carrier makes a notation on the bill of lading that lists the missing and/or damaged goods.
If you discover missing or damaged goods after you receive the shipment and have signed the bill of
lading, notify the carrier at once and request the carrier to make an inspection. If the carrier will not
make an inspection, prepare a signed statement to the effect that you have notified the carrier (on a
specific date) and that the carrier has failed to comply with your request.
It is difficult to collect for loss or damage after you have given the carrier a signed bill of lading. If this
happens to you, file a claim with the carrier promptly. Support your claim with copies of the bill of
lading, freight bill, invoice, and photographs, if available. Our willingness to assist in helping you
process your claim does not make us responsible for the collection of claims or replacement of lost or
damaged materials.
Safety Considerations
Read this manual carefully before using your new product. Do not set up or operate
the product until you are familiar with all operating instructions and warnings. Do not allow anyone else
to operate the product until they are also familiar with all operating instructions and warnings.
⚠ WARNING California Proposition 65. This product can expose you to chemicals including
styrene and vinyl chloride which are on a list of over 900 chemicals identified by the
State of California to cause birth defects or reproductive harm. ALWAYS use this
product in accordance with Cool Boss BendPak’s instructions. For more
information go to www.P65Warnings.ca.gov.
Safety Information
• This Cool Boss product is an air-cooling device. Use it only for its intended purpose.
• The product should only be operated by authorized personnel. Children should not be allowed to
operate the Cool Boss. Make sure all operators read and understand the Warning labels and the
Installation and Operation Manual. Keep the manual near the device at all times.
• Never operate the Cool Boss with a damaged Power Cord or Plug.
• When the product is in use, keep all body parts and loose clothing away from it.
• Only use the product indoors in a well-ventilated area. Ensure a window or door is open to allow
adequate air flow.
• Do not make any modifications to the product. This voids the warranty and increases the chances
of injury or property damage.
Cool Boss Evaporative Air Cooler 5 P/N 5900274 —Rev. A6—August 2024
• Avoid using an extension cord; they can overheat. If you must use an extension cord, make sure it
is a three conductor No. 14 AWG minimum with a three-prong plug/receptacle and does not
exceed 50-feet in length. For 100-foot in total extension cords use 12 AWG minimum.
• Do not spray the outside of the Cooler with water. Moisture can harm the motor and other parts of
the electrical system.
• Only connect the power cord to a grounded, three-prong receptacle.
• Lock at least two Casters before turning on the fan.
• Make a visual inspection of the product before using it. Check for damaged or missing parts. Do
not use the product if you find problems with the unit. Instead, remove it from service,
then contact your dealer, call Cool Boss at (805) 933-9970, or email Cool Boss at
support@coolboss.com.
• Do not operate the Cool Boss if the Fan has cracked or has damaged blades.
• Do not operate the Cool Boss unless the Media is securely in place.
• Do not operate the Cool Boss within 35-ft. (10.6 m) of an open flame or spark.
• Always remove the plug from the electrical receptacle by pulling on the plug, not the power cord.
• BendPak recommends making a thorough inspection of the product at least once a year. Replace
any damaged or severely worn parts, decals, or warning labels.
Save these instructions!
Symbols
Following are the symbols used in this manual:
⚠ DANGER Calls attention to an immediate hazard that will result in death or severe injury.
⚠ WARNING Calls attention to a hazard or unsafe practice that could result in death or severe
personal injury.
⚠ CAUTION Calls attention to a hazard or unsafe practice that could result in minor personal
injury, product, or property damage.
Tip Calls attention to information that can help you use your product better.
Liability Information
BendPak Inc. assumes no liability for damages resulting from:
• Use of the equipment for purposes other than those described in this manual.
• Modifications to the equipment without prior, written permission from BendPak Inc.
• Injury or death caused by modifying, disabling, overriding, or removing safety features.
• Damage to the equipment from external influences.
• Incorrect operation of the equipment.
Cool Boss Evaporative Air Cooler 6 P/N 5900274 —Rev. A6—August 2024
Frequently Asked Questions
Question: Is the Cool Boss an air conditioner?
Answer: No. it is an evaporative air cooler, sometimes called a swamp cooler. The fan pulls in hot air,
a water drip spray system releases water into a Media, the water droplets evaporate when they meet
the hot air, lowering the ambient air temperature by as much as 26°F, (14°C), and the fan blows the
cooled air in the desired direction.
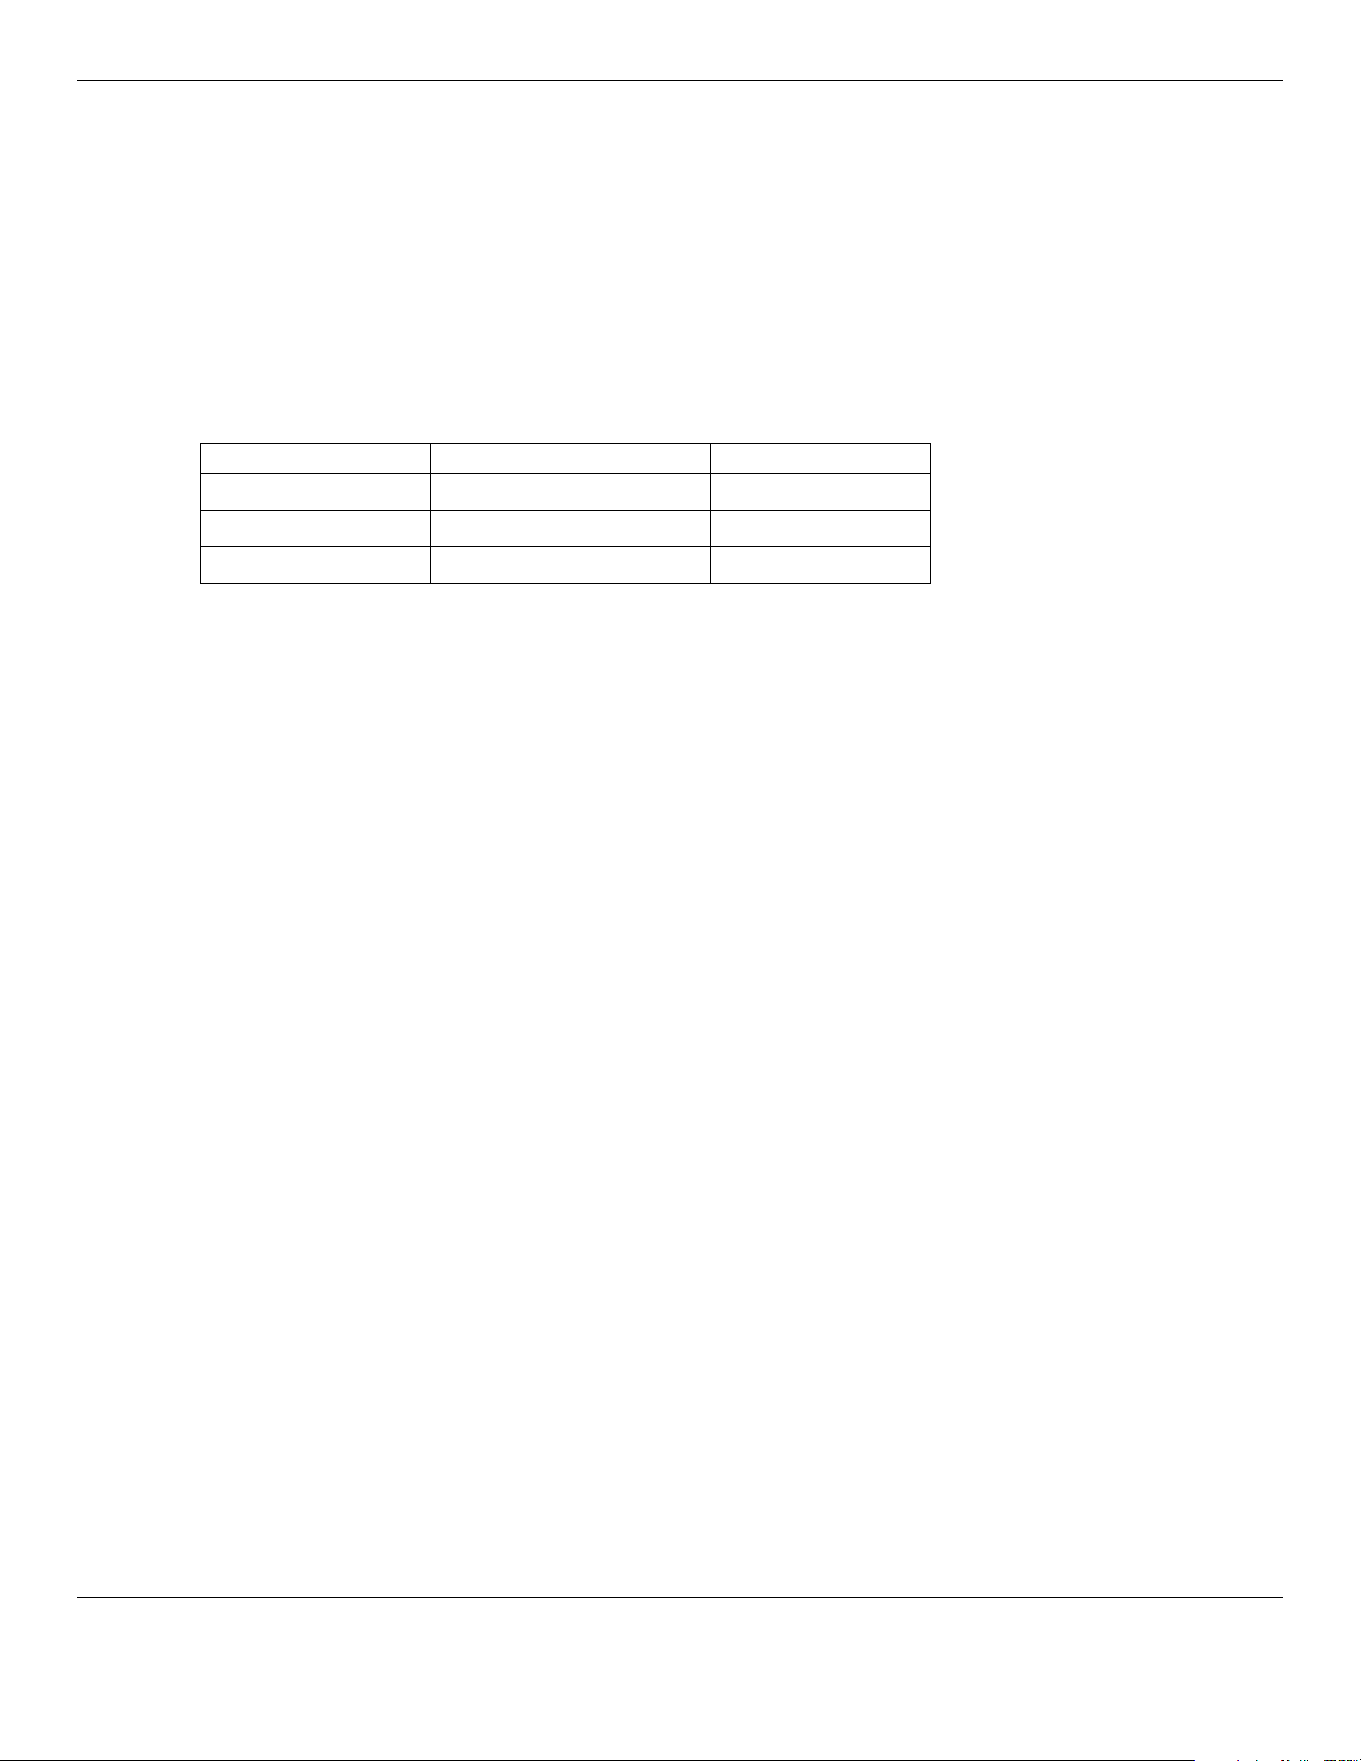
Q: How much air does the Cool Boss cool?
A: Each Model can cool approximately:
Model
Airflow
Cooling Area
CB-12SL / SLH
1,850 cfm / 52 cmm
770 ft
2
/ 72 m
2
CB-14SL / SLH
2,715 cfm / 77 cmm
1,005 ft
2
/ 93 m
2
CB-26SL / SLH
7,115 cfm / 201 cmm
3,055 ft
2
/ 284 m
2
Actual airflow and area cooled may vary based on temperature, humidity and obstructions or shape of
the area to be cooled.
Q: What is the best way to set up my Cool Boss?
A: With the back of the unit facing a source of hot, dry air – which is what the Cool Boss will cool—and
the front facing the area you want to keep cool. It will need to be near a power source also. And
remember, it is portable. You may move the Fan to where you need it; it does not have to stay in the
same place the whole time.
Q: Does it require special water?
A: No. Clean, ordinary tap water and note that there must always be water in the reservoir
or damage to the unit will occur.
Q: Is it hard to control the Cool Boss?
A: Not at all. Only three, easy-to-understand controls on the CB-12 and CB-14 units. The CB-26
though utilizes a membrane switch panel with an LED display.
Q: How much maintenance is required?
A: Very little. Basically, keep the Water Reservoir filled with clean tap water and clean the Media as
needed. Dirt and other pollutants from the environment accumulate in the Media and the Reservoir, so
it is best to clean periodically. Do not clean the Media by spraying it with high pressure water while
installed in the Cool Boss! Instead, remove the Media using the procedure in the Maintenance
section, then clean it as per the procedure outlined.
Cool Boss Evaporative Air Cooler 7 P/N 5900274 —Rev. A6—August 2024
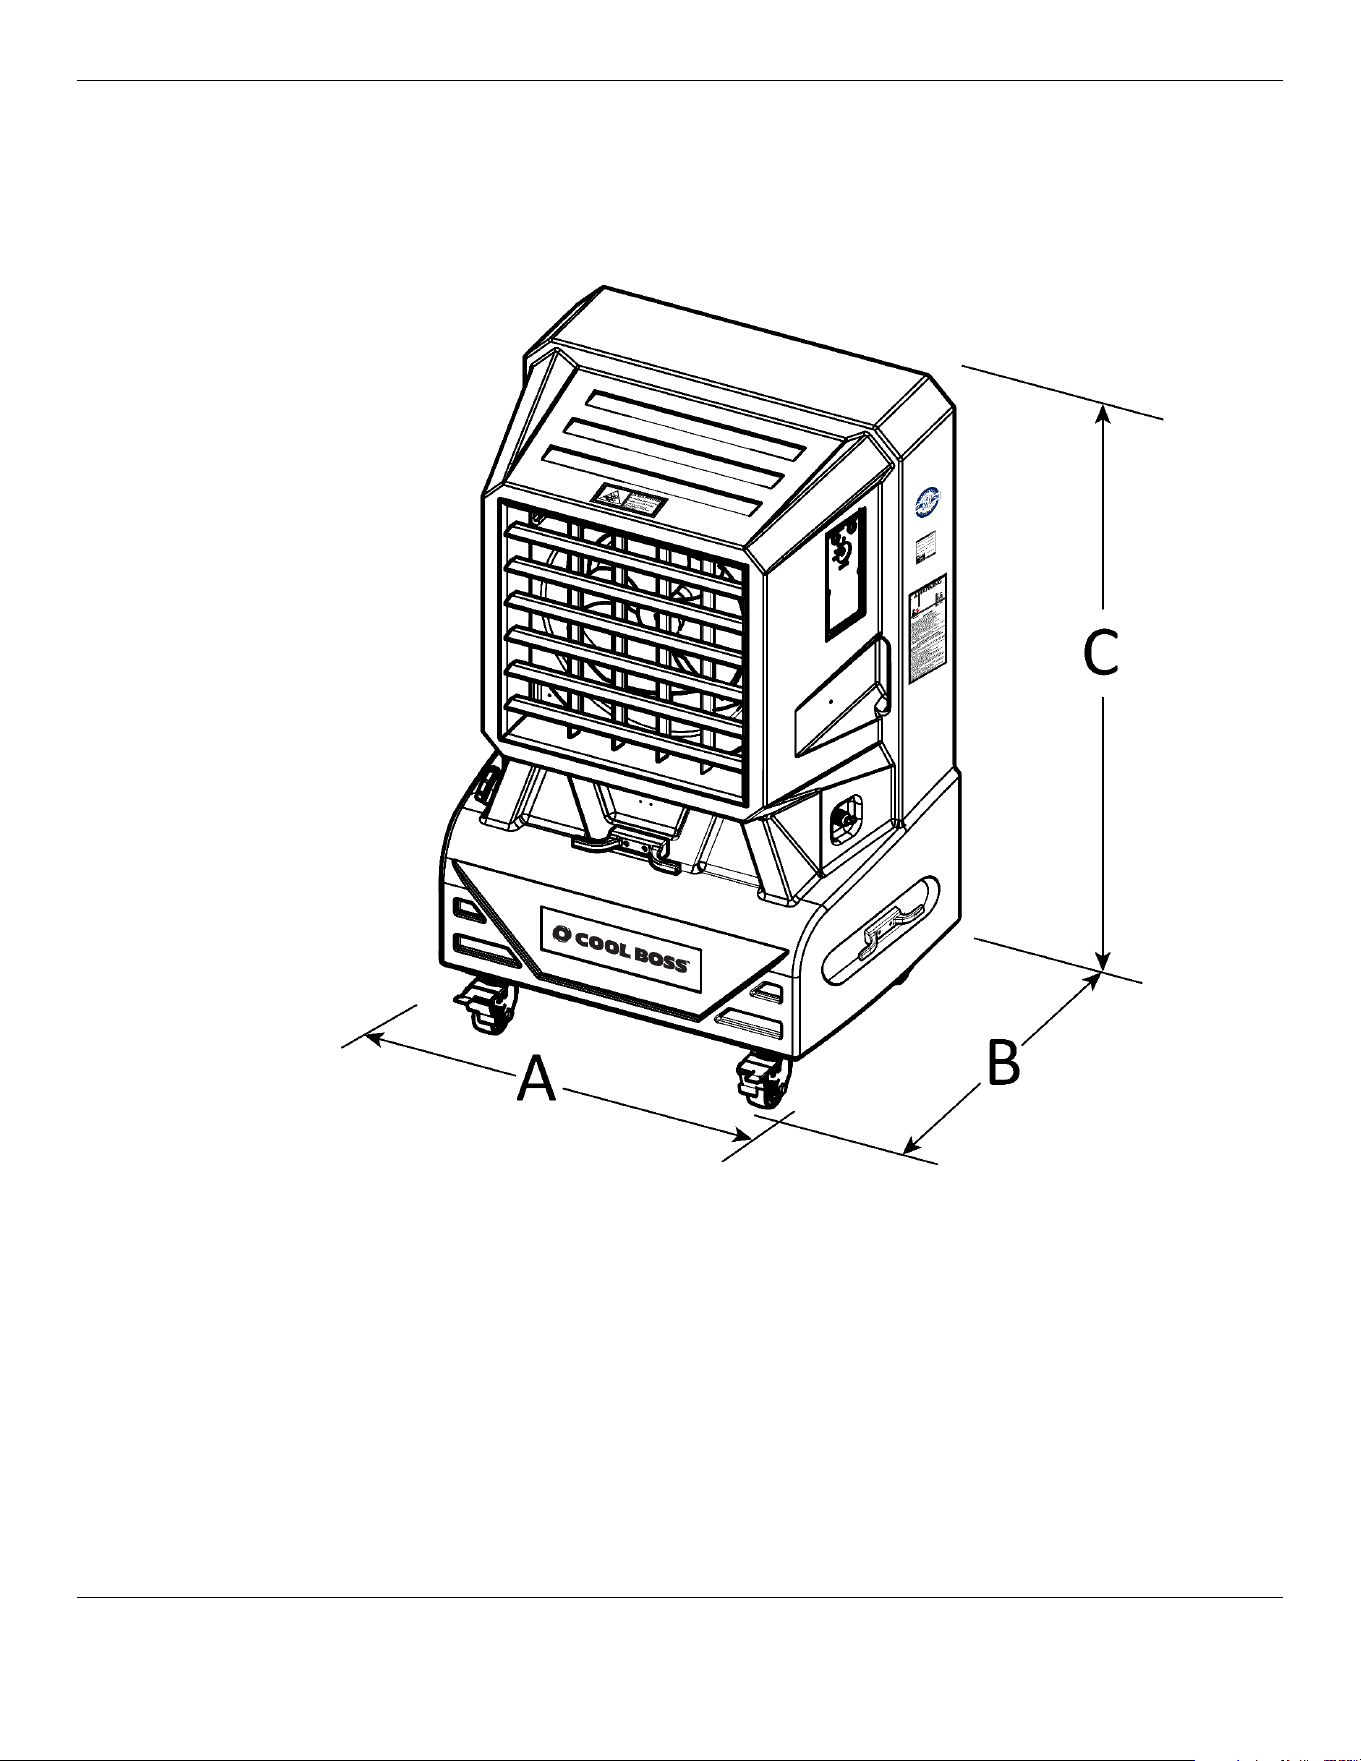
Specifications
Cool Boss Evaporative Air Cooler 8 P/N 5900274 —Rev. A6—August 2024
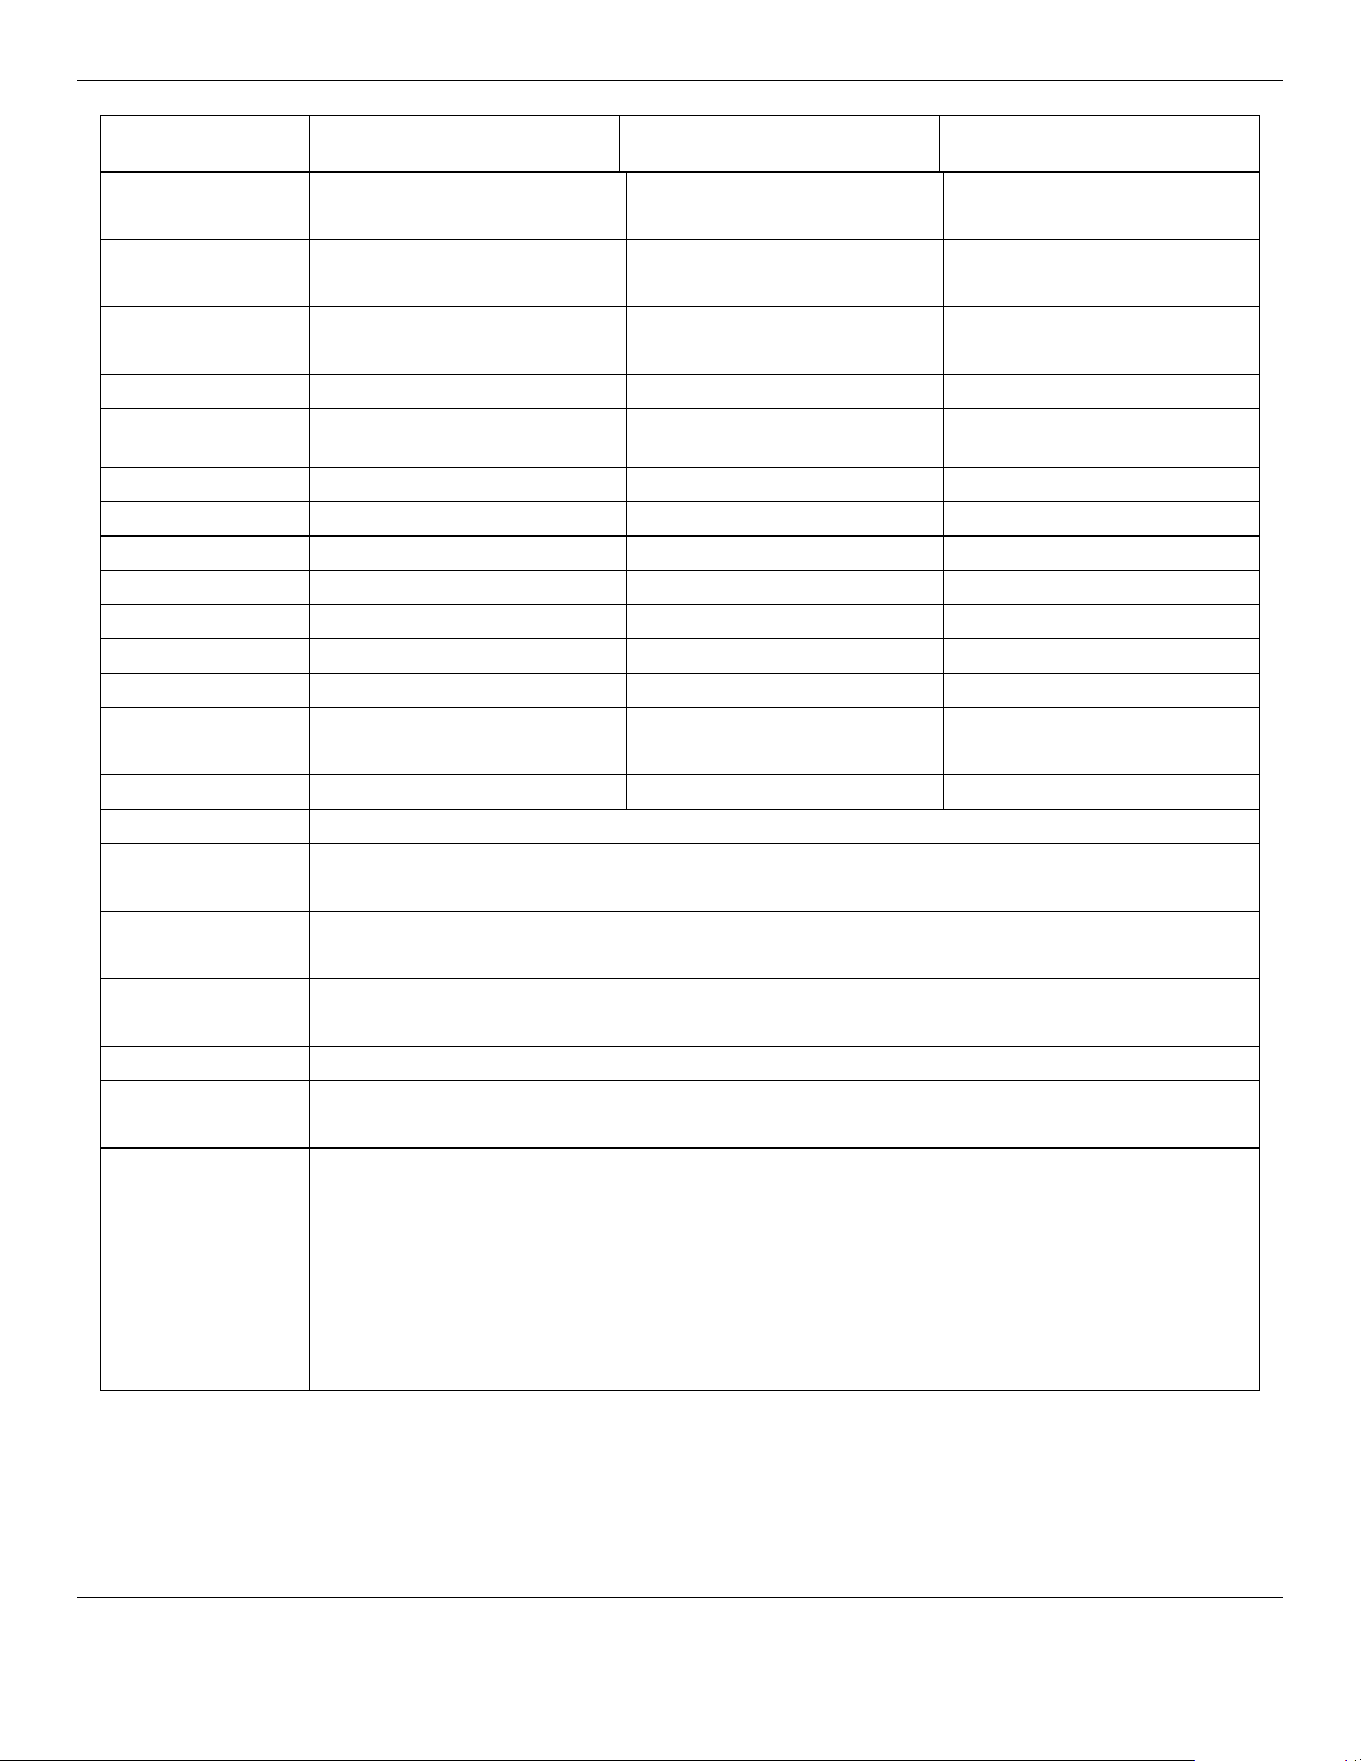
Model CB-12SL / SLH CB-14SL / SLH CB-26SL / SLH
Dimensions
(A x B x C)
27" x 22" x 45"
(686 x 559 x 1,143 mm)
30"x 22"x 47"
(762 x 559 x 1,193 mm)
43" x 27" x 66"
(1,092 x 686 x 1,651 mm)
Fan Diameter
12" (305 mm)
14" (356 mm)
26" (660 mm)
Media Dimension
(H x W x D)
22" x 8" x 4"
(563 x 210 x 98 mm)
25" x 9" x 4"
(630 x 232 x 98 mm )
39" x 14" x 6")
(990 x 350 x 150 mm)
Motor Standard
110V / 60 Hz / 1 Ph 3A
110V / 60 Hz / 1 Ph / 5A
110V / 60 Hz / 1 Ph / 6.7A
Motor Optional
208-230V / 50-60 Hz /1 Ph
1.5A
208-230V / 50-60 Hz /1 Ph
2.5A
208-230V / 50-60 Hz / 1Ph
4A
Weight Empty
73 lbs. (34 kg)
79 lbs. (36 kg)
209 lbs. (95 kg)
Weight Full
198 lbs. (89.8 kg)
208 lbs. (94.3 kg)
609 lbs. (276 kg)
Water capacity
15 gal. (57 liters)
15.6 gal. (59 liters)
50 gal. (185 liters)
Max. airflow
3,960 cfm
4,340 cfm
7,540 cfm
Sound level (avg.)
62 to 69 dB
59 to 65 dB
57 to 62 dB
UL
®
Certified
Yes
Yes
Yes
Fan speed
3-Speeds, Lo, Med, Hi
3-Speeds, Lo, Med, Hi
10-Speeds
Fan RPM
Min./Max.
1,100 / 1,650
1,035 / 1,550
970 / 1,450
Fan type
Axial
Axial
Axial
Max Water Press
≈28 to 99.5psi / (2 to 7 kg/cm
2
) Max.
Water Shutoff
The Cool Boss utilizes a Mechanical Float Valve to automatically shut off the Water
Source before exceeding maximum Fill.
Water Pump
Shutoff
The internal Water Pump incorporates an automatic low-level shutoff. Refill to maximum
capacity to reset the shutoff switch.
Inlet Water
Temp.
<113°F (45
°
C)
Housing Antibacterial
Power Cord
Length
15 feet / 4.5 m
Power
CB-12SL
: 110 VAC, 3A Max., 60 Hz, single phase.
CB-12SLH: 208 to 230 VAC, 1.5 Amp Max., 50-60 Hz, single phase.
CB-14SL: 110 VAC, 5A Max., 60 Hz, single phase.
CB-14SLH: 208 to 230 VAC, 2.5 Amp Max., 50-60 Hz, single phase.
CB-26SL: 110 VAC, 6.7 A Max., 60 Hz, single phase.
CB-26SLH: 208 to 230VAC / 4 A Max., 50-60 Hz / single phase
Must be connected to a grounded circuit protected by a circuit breaker or fuse.
Cool Boss Evaporative Air Cooler 9 P/N 5900274 —Rev. A6—August 2024
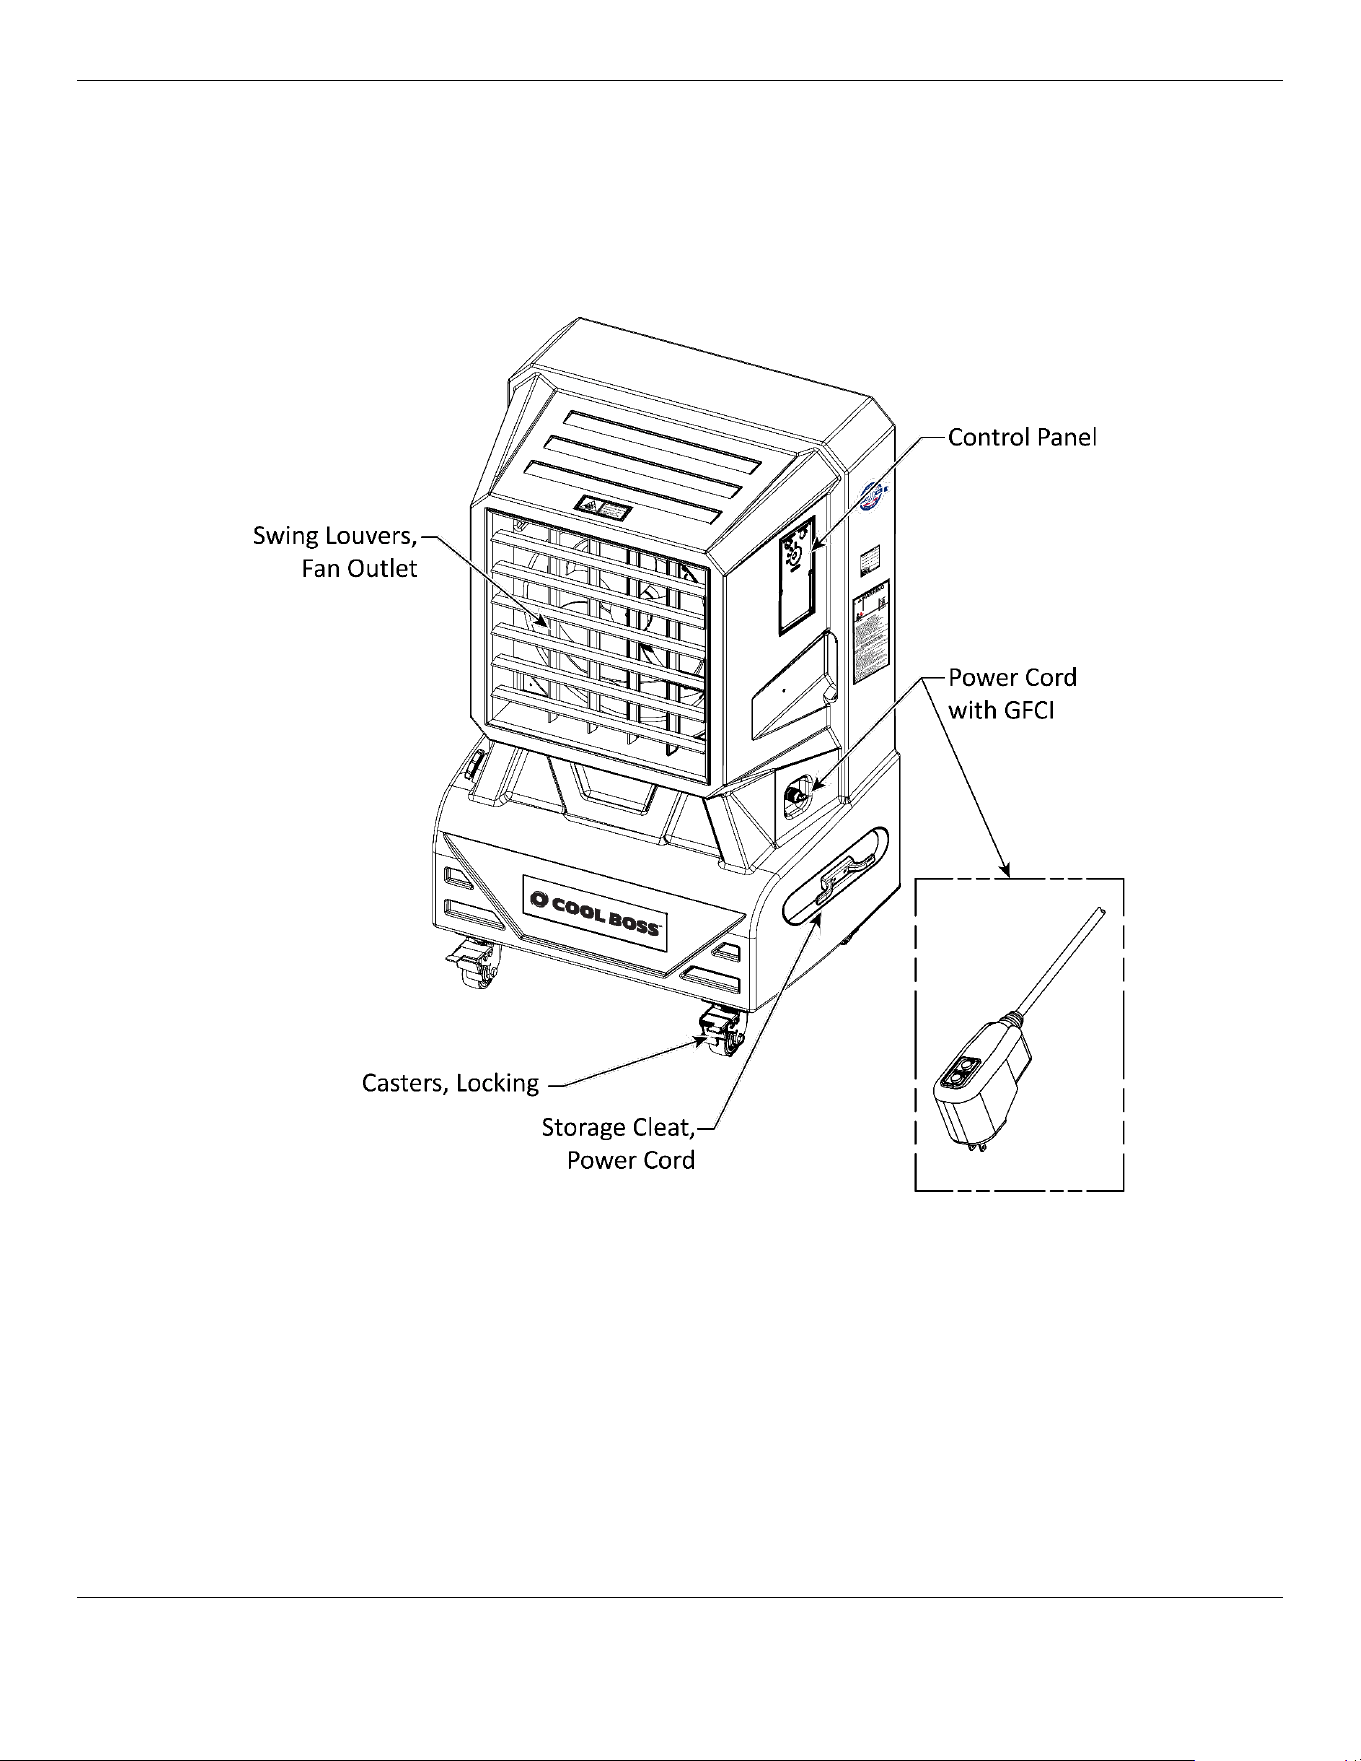
Components
The Cool Boss Unit
CB-14 pictured below
Continued on following page
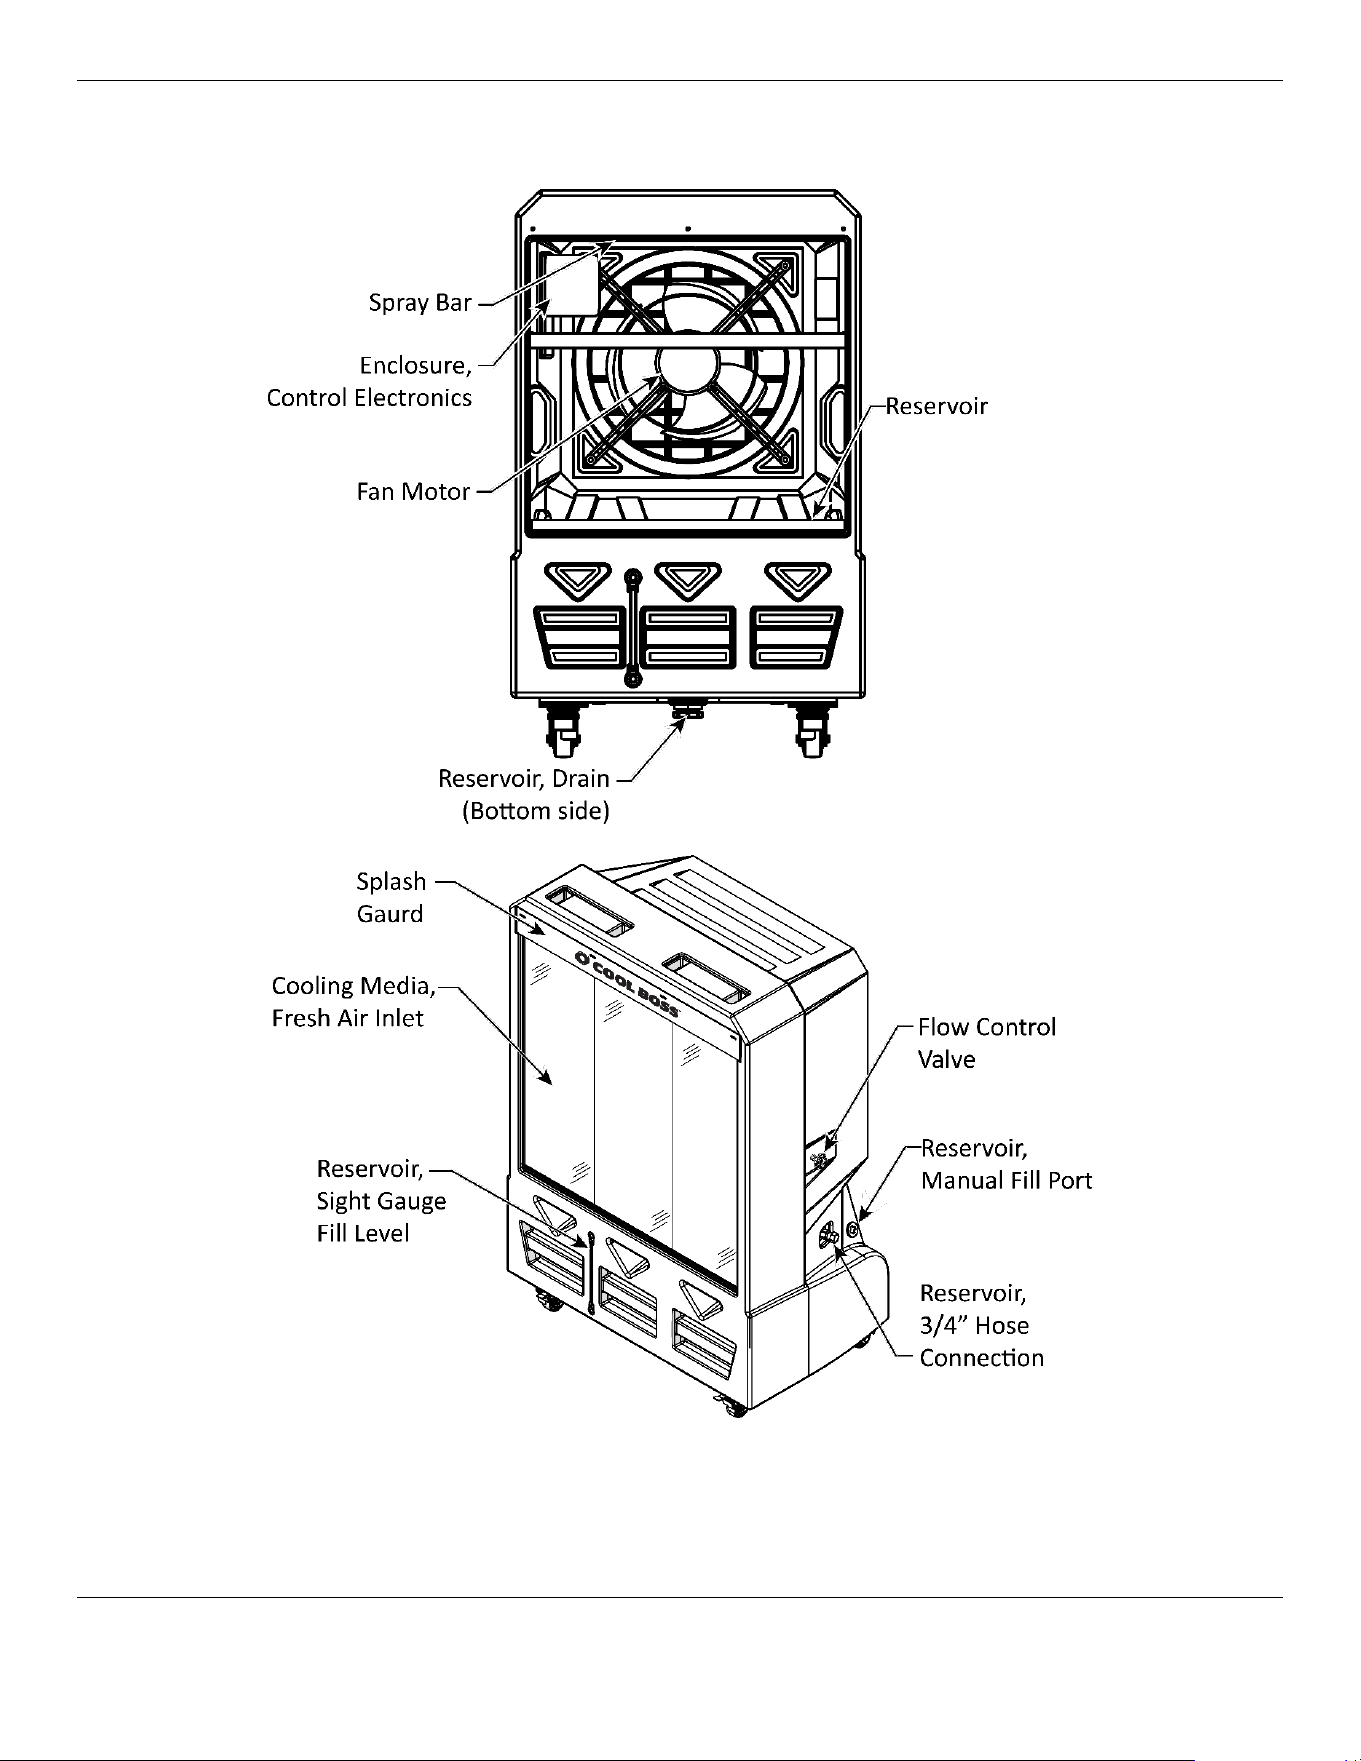
Cool Boss Evaporative Air Cooler 10 P/N 5900274 —Rev. A6—August 2024
Rear View CB-14
Cool Boss Evaporative Air Cooler 11 P/N 5900274 —Rev. A6—August 2024
Setup
There are six basic stages in the Cool Boss set-up:
1. Unbox
2. Install the Casters
3. Install the Media
4. Determine the Cool Boss location
5. Fill the reservoir or connect to water
6. Connect to power
Tools required for Assembly:
• Phillips Screwdrivers
• Open end metric wrenches
• Hammer
• Pry Bar
Unboxing the Cool Boss
The Cool Boss Cooler is carefully packaged to prevent damage. Exercise care in removing the Cooler
from its packaging. Be careful not to injure yourself on sharp edges or fasteners.
⚠ WARNING You must always wear the proper protective equipment during setup and assembly
of this Cooler: leather gloves, steel-toed boots, and back belts.
To unbox the Cooler:
Carefully remove the shipping container from around the Cool Boss using a hammer and pry
bar.
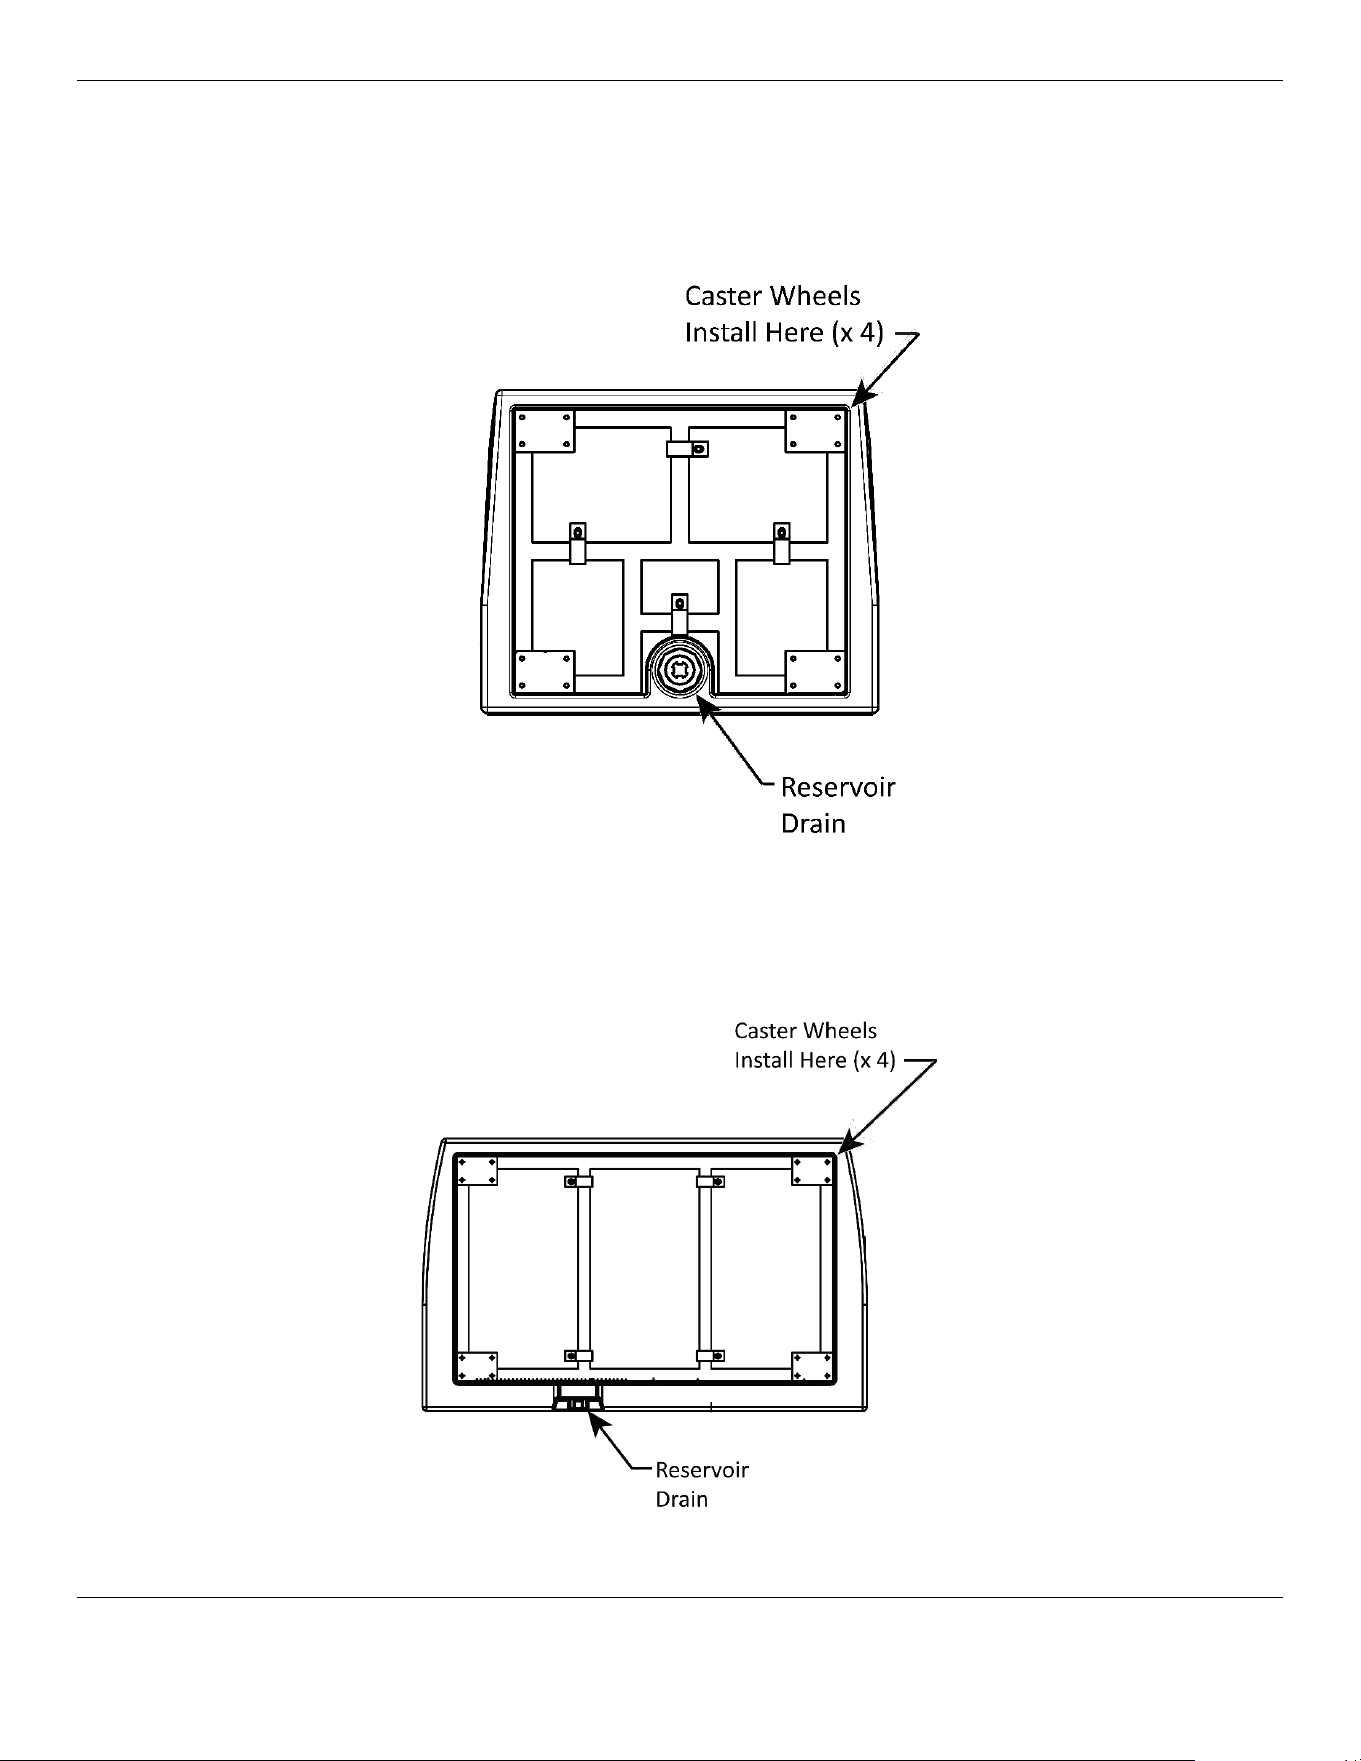
Position the Cooler with its Media side down to provide access to the bottom of the unit. The back
of the shipping container may be used to provide a clear, clean area to work on the Cooler.
See figure on next page.
Cool Boss Evaporative Air Cooler 12 P/N 5900274 —Rev. A6—August 2024
Bottom View-BEFORE Caster Wheels are Installed
CB-12 / CB-14
__________________________________________________________________________________________________
CB-26
Cool Boss Evaporative Air Cooler 13 P/N 5900274 —Rev. A6—August 2024
Installing the Casters
The Cool Boss is shipped with heavy-duty locking casters to both support and allow easy movement
of the Cooler around your facility.
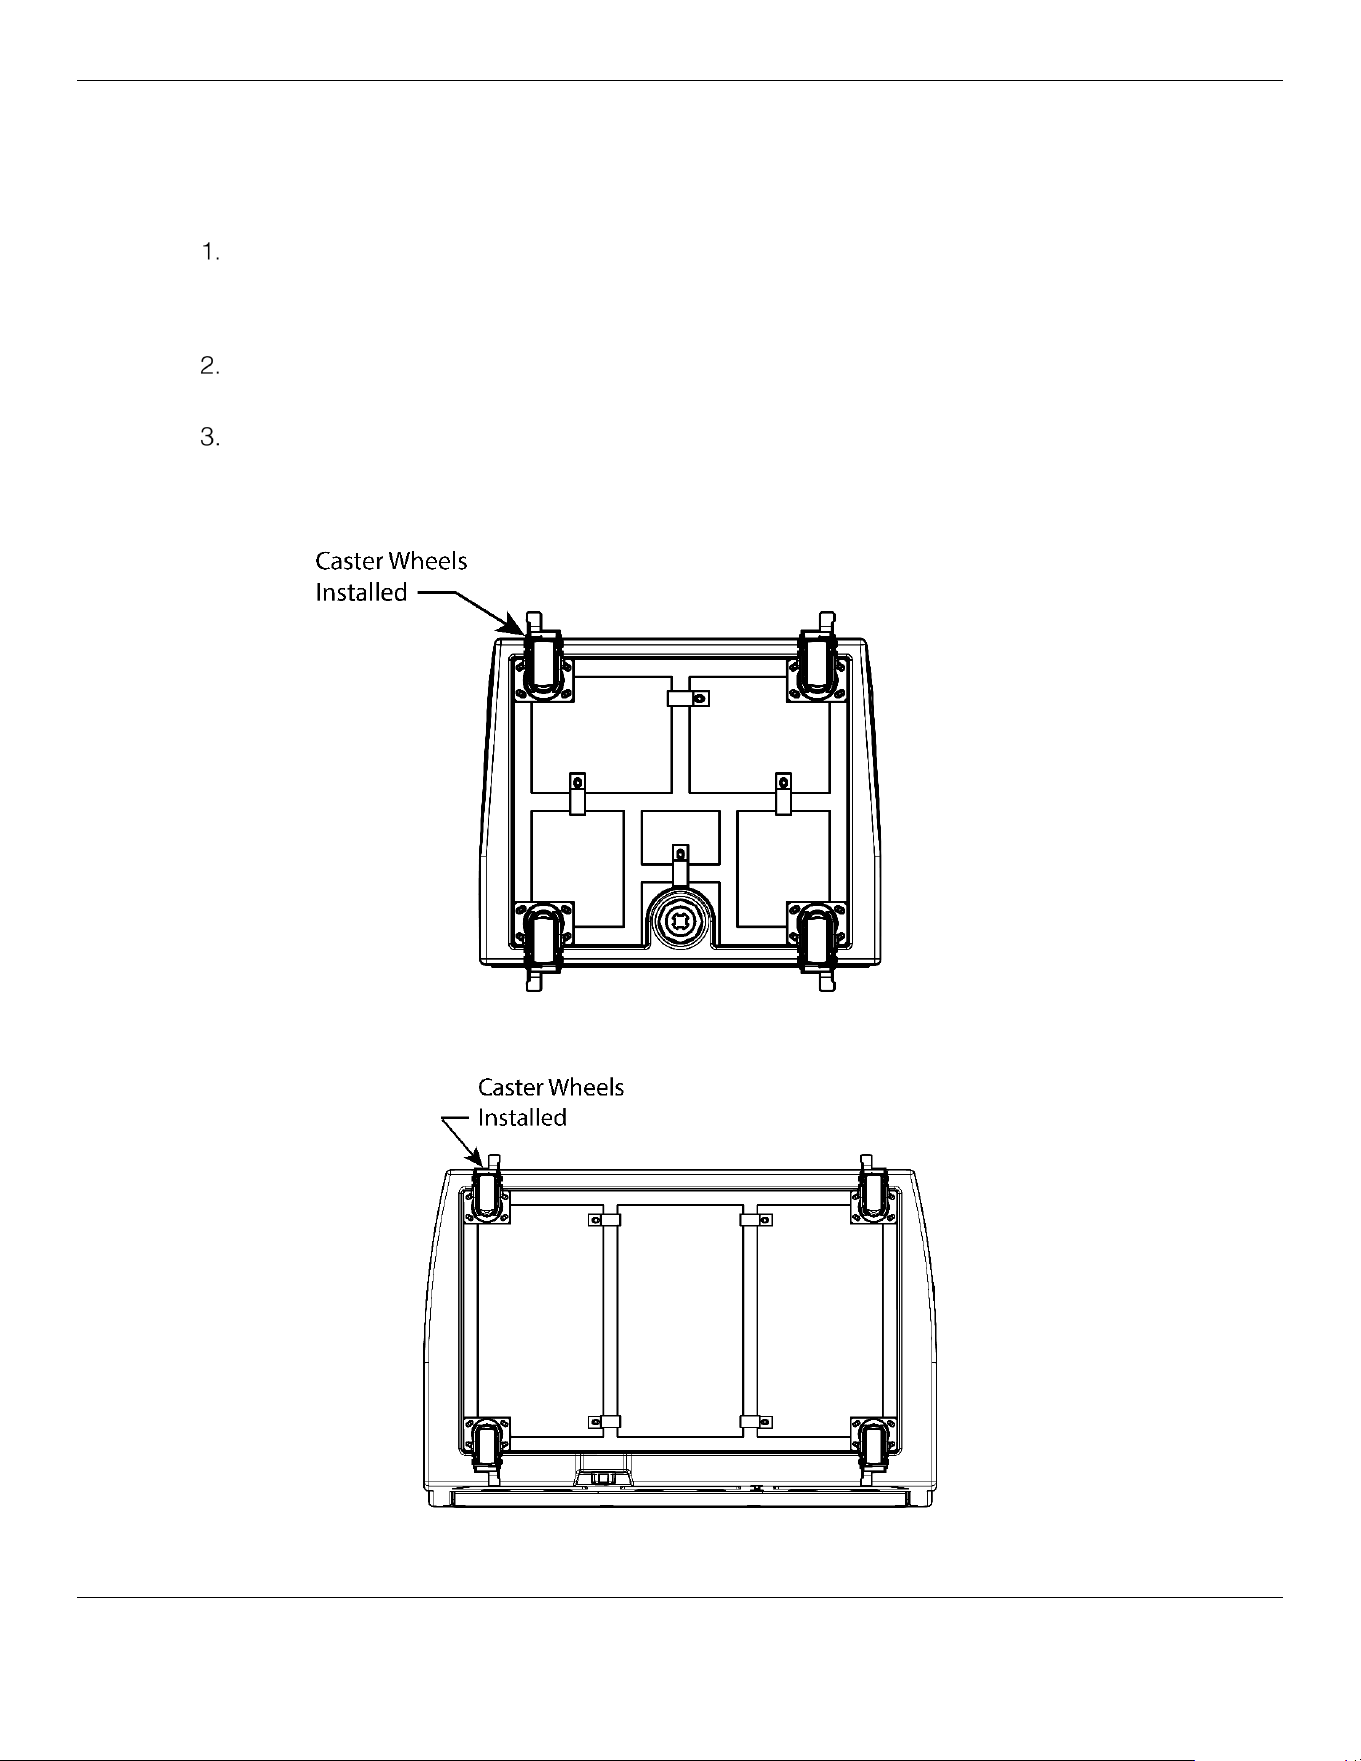
Locate and tightly install the four swivel Casters using the four bolts and flat washers provided for
each Caster. As detailed in the figure below.
-The Casters are shipped in a separate box.
Lock the two rear Casters by pushing down on the larger pedal. Pushing down on the small pedal
releases the lock.
Have an assistant help rotate the Cool Boss upright onto its Casters.
Bottom View, AFTER Caster Wheels are Installed
CB-12SL / CB-14SL
_____________________________________________________________________________
CB-26SL
Cool Boss Evaporative Air Cooler 14 P/N 5900274 —Rev. A6—August 2024
Installing the Media
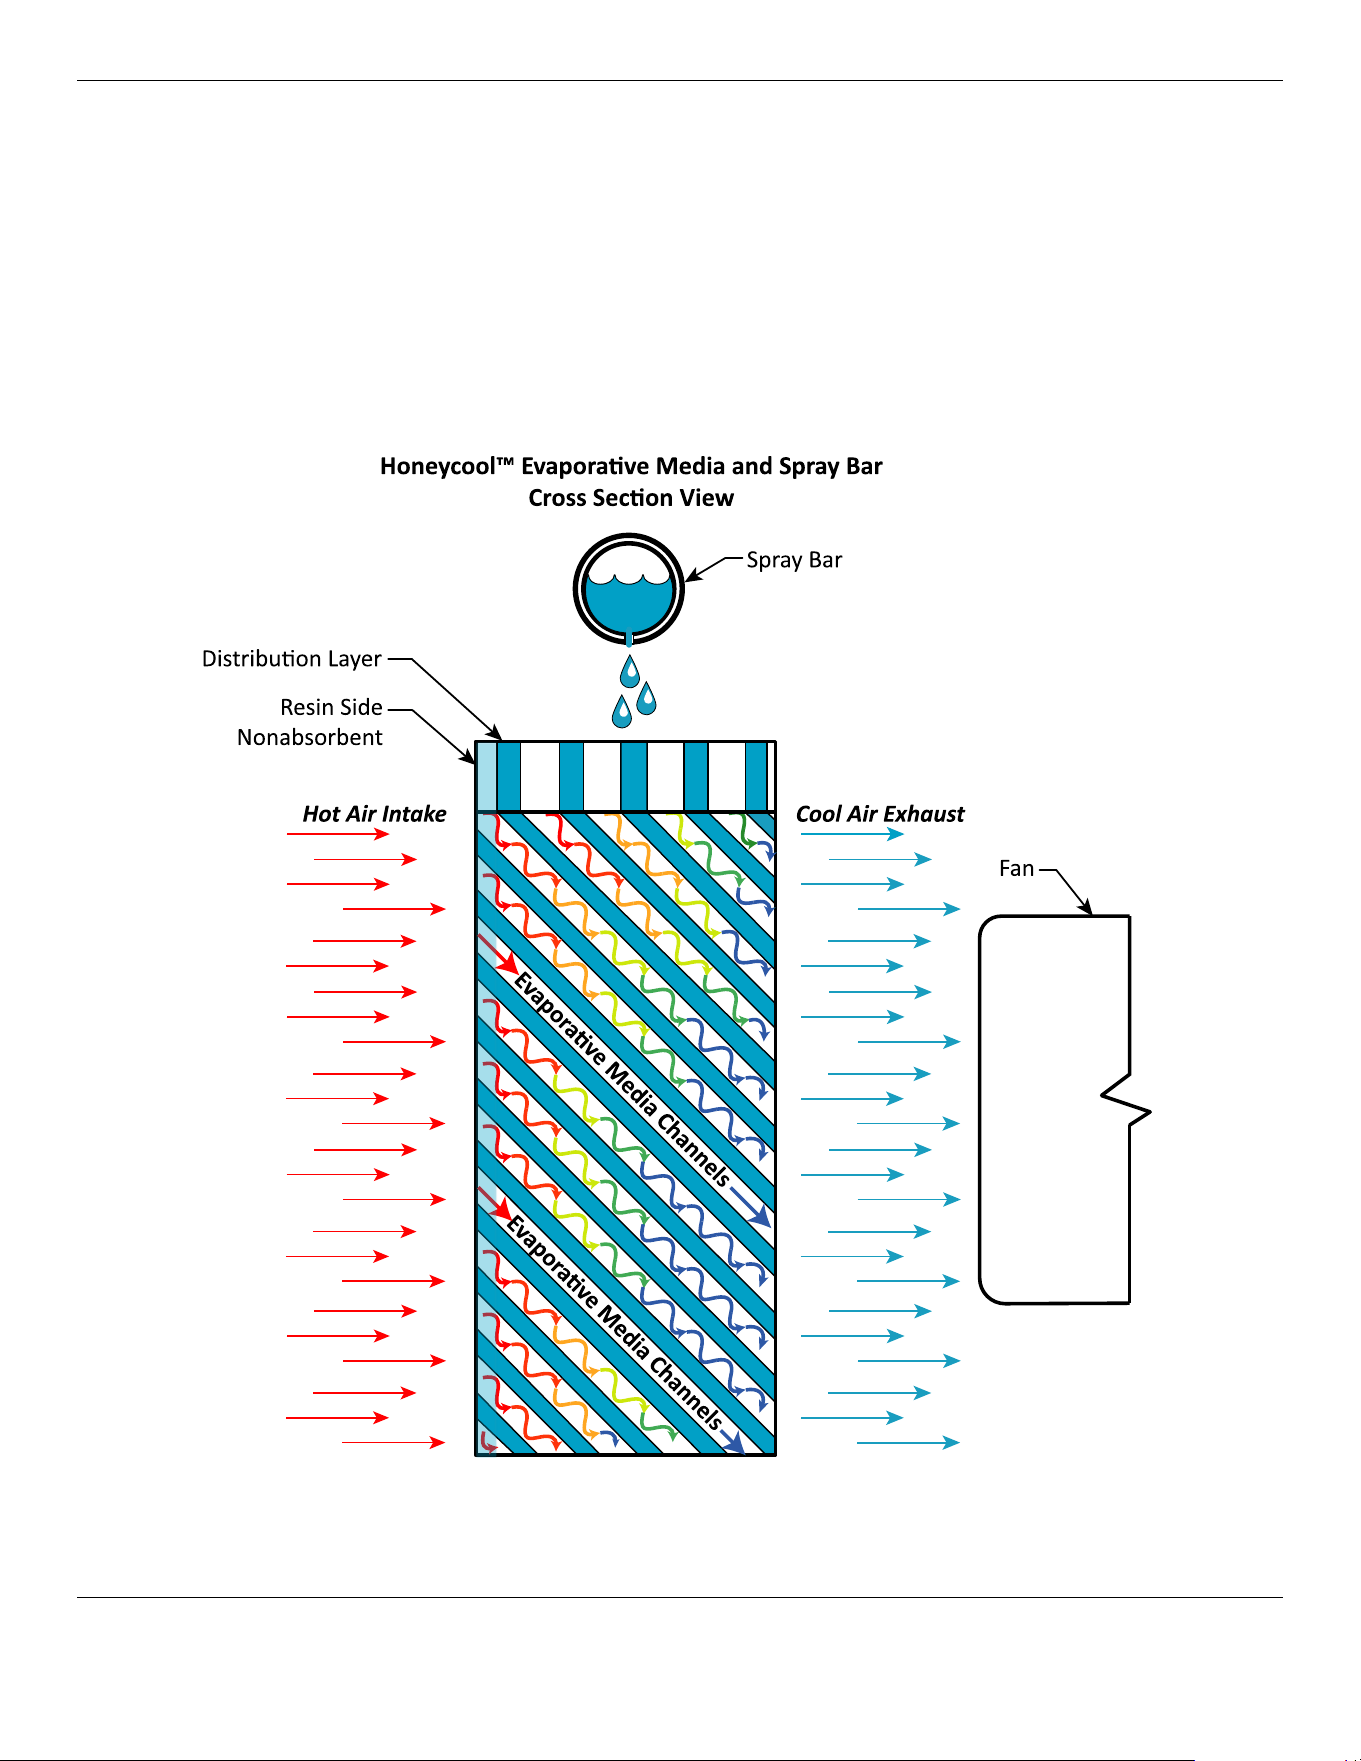
Properly installed Honeycool Evaporative Media are critical to the Cool Boss operation. The Spray Bar
saturates the Evaporative Media with water pumped from the reservoir as the Fan pulls warm air
through the Media. The Honeycool Media incorporates a Moisture Lock on the hot air side made of a
nonabsorbent resin which reduces evaporation and increases the Evaporative Media’s cooling
efficiency. The nonabsorbent resin side
must always be installed toward the warm air side and the
Distribution Layer must be orientated up to face the Spray Bar.
The internal channels within the
media will direct the water flow through and inward towards the fan.
Any excess water will be
directed back into the reservoir. Refer to the figure below.
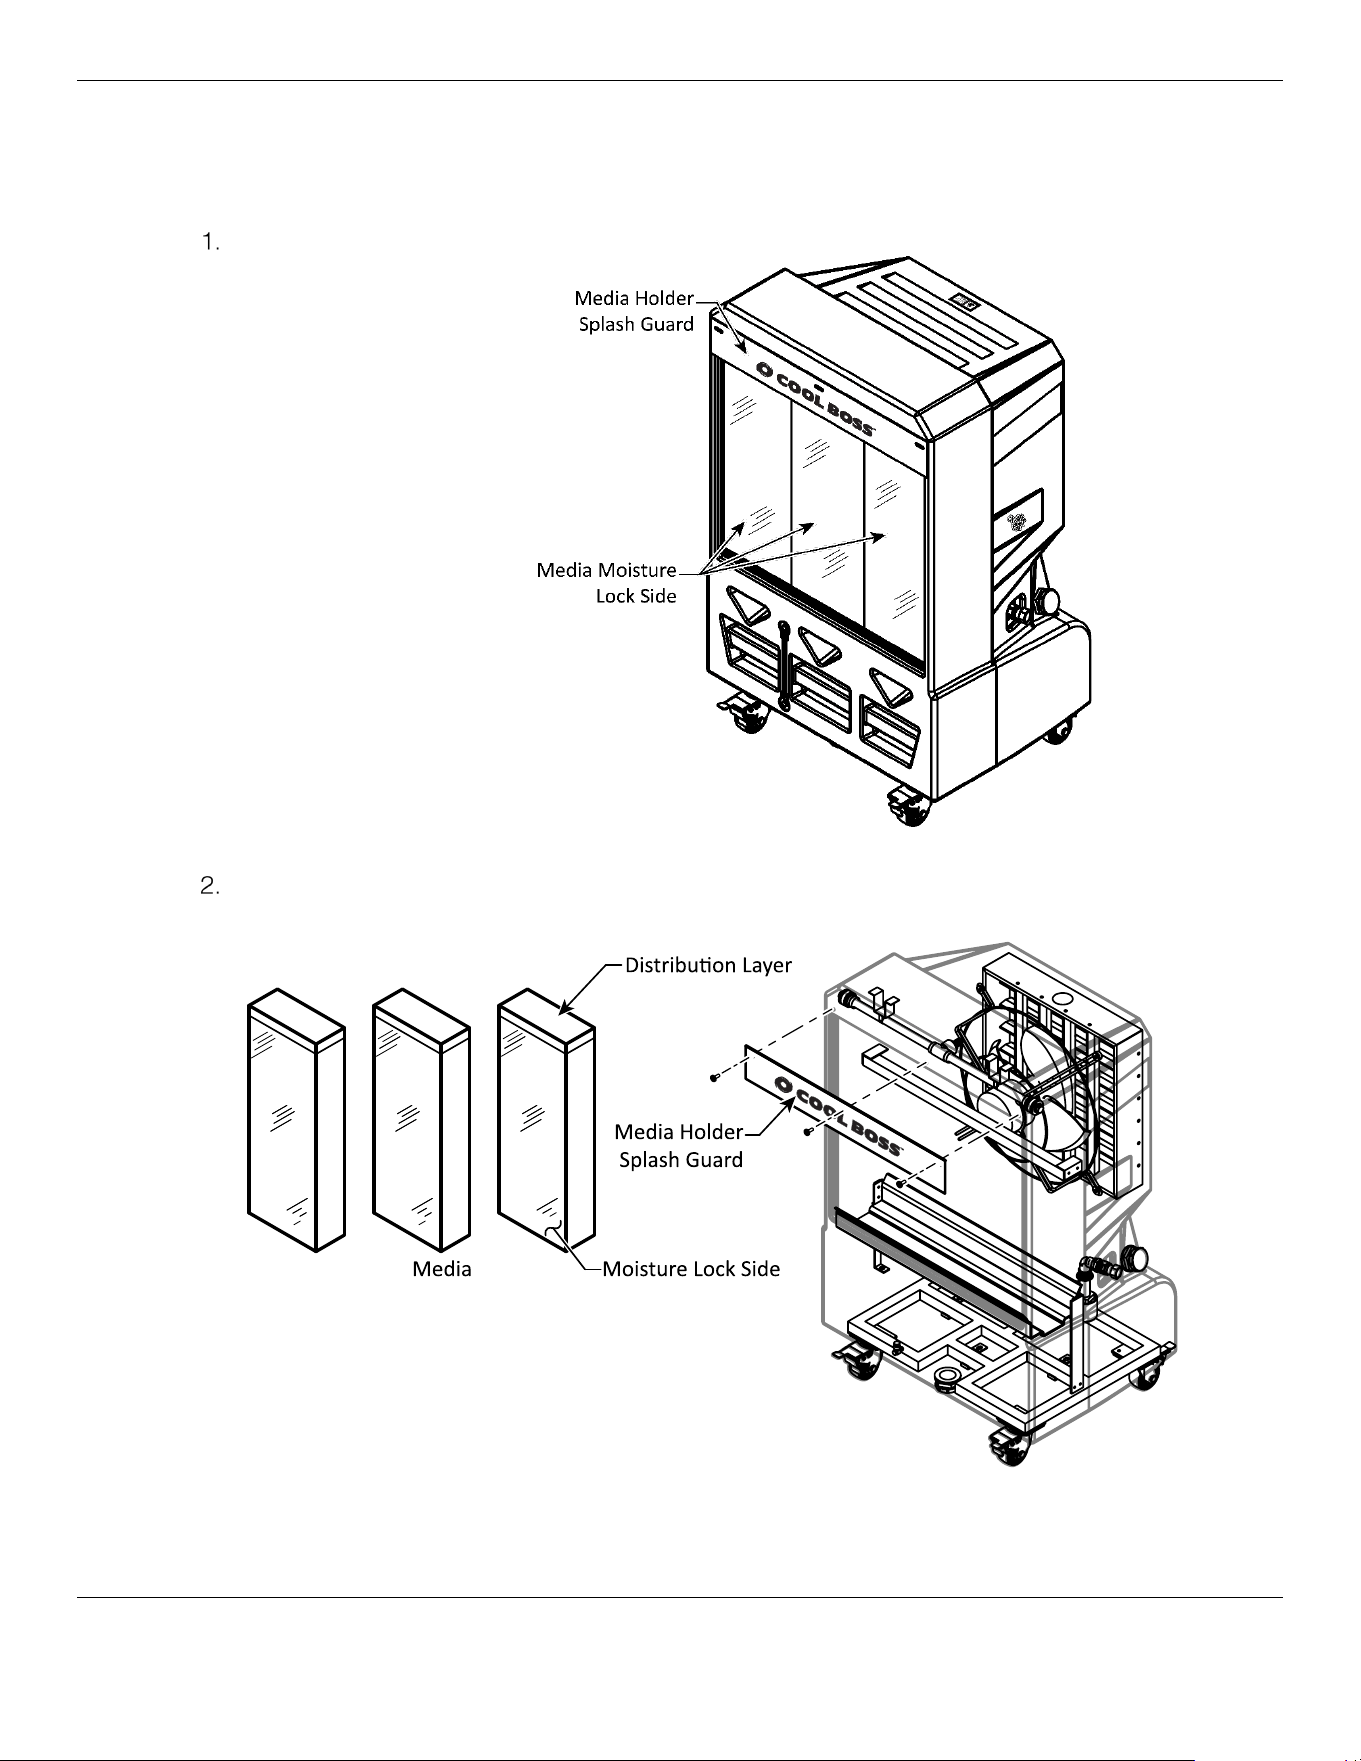
Cool Boss Evaporative Air Cooler 15 P/N 5900274 —Rev. A6—August 2024
To install the Media:
⚠ WARNING Unplug the unit from power before removing Media.
Retrieve the Media for your specific Cool Boss model.
Not to scale, components removed for clarity
Remove and retain the fasteners securing the Media Holder Splash Guard. Refer to the figure
below.
Not to scale, components removed for clarity.
Cool Boss Evaporative Air Cooler 16 P/N 5900274 —Rev. A6—August 2024
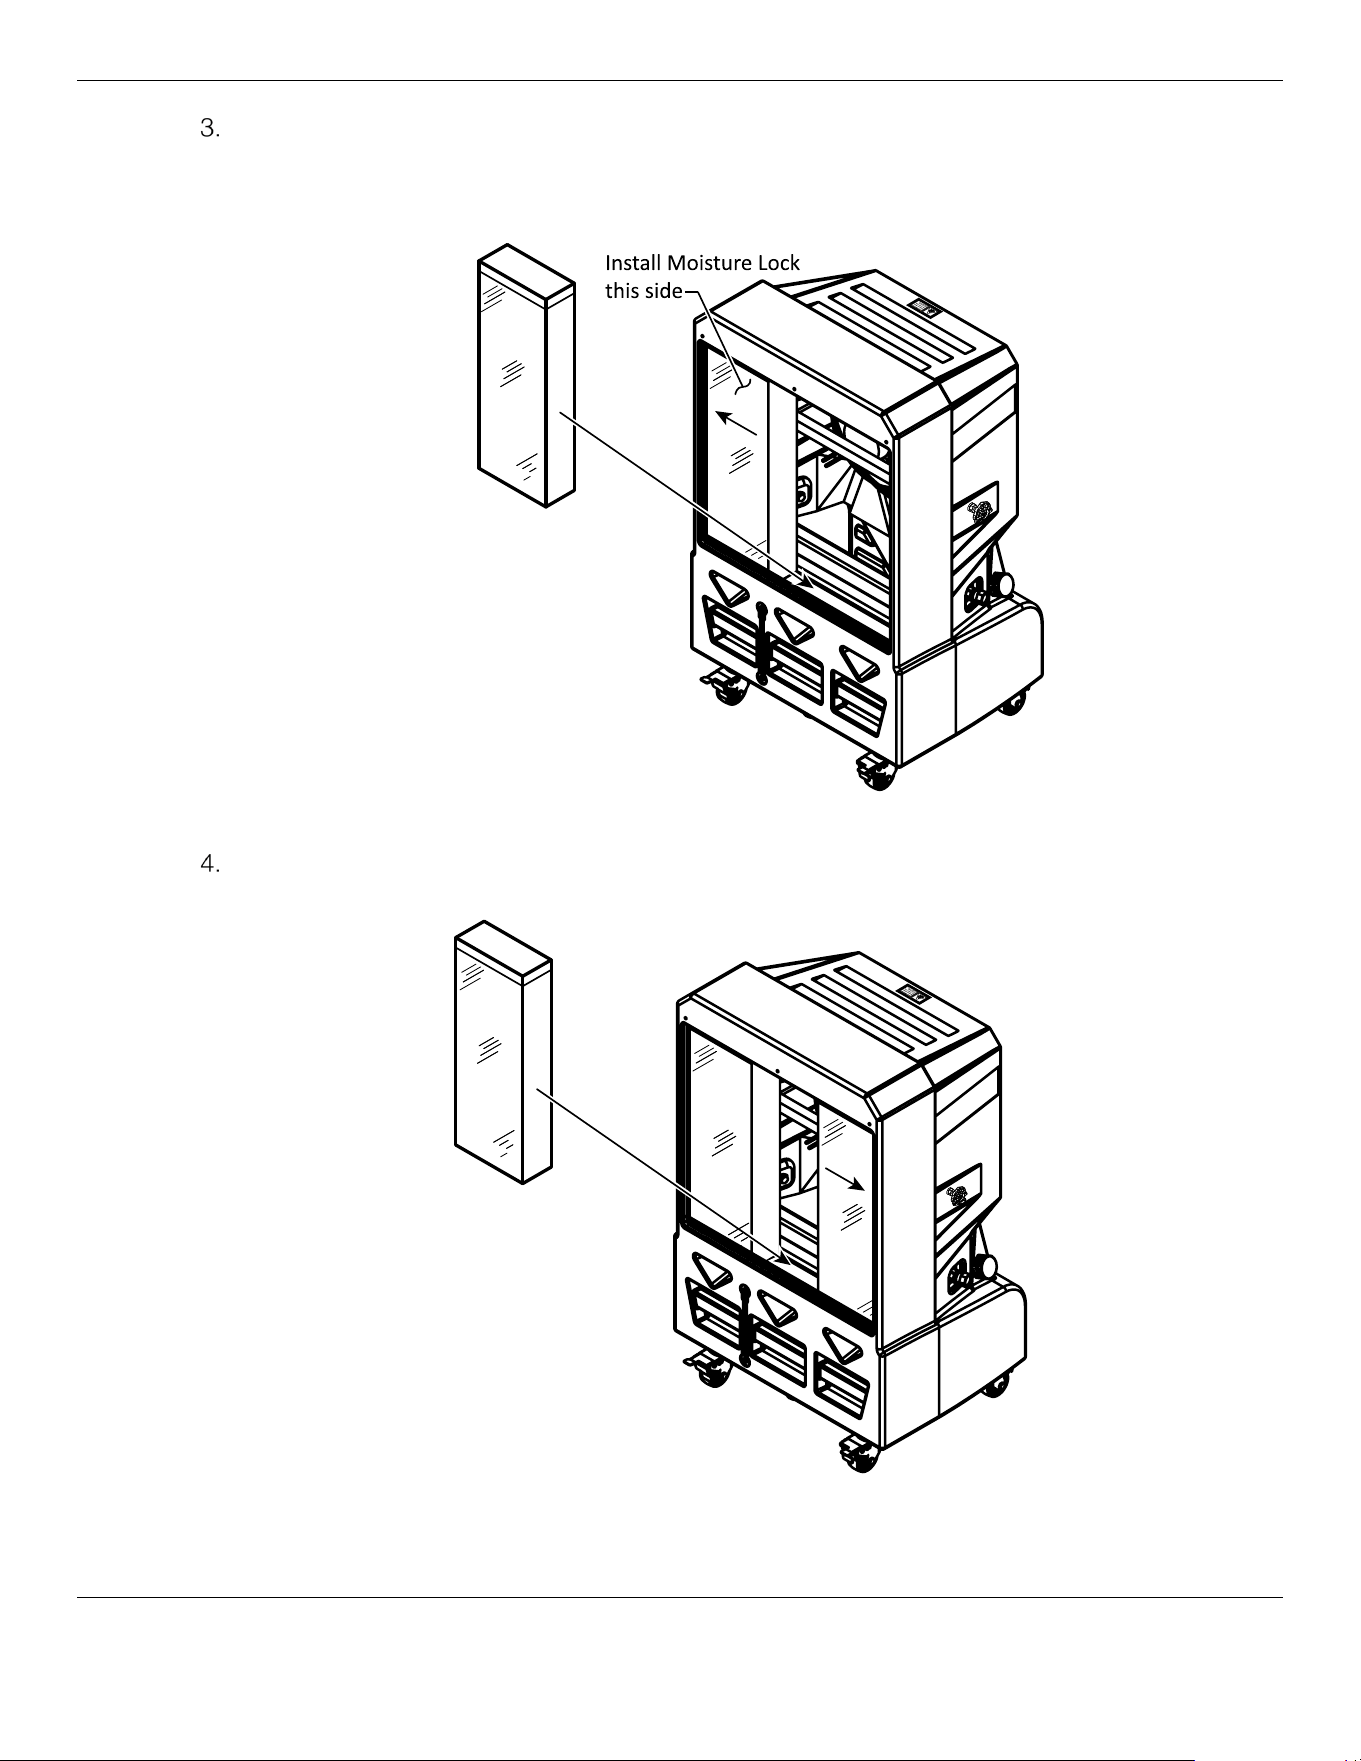
Insert one Media section into the Cool Boss. Verify the Moisture Lock Black Resin side of the
Media is oriented to the warm-air side. Channels in the Media are oriented to direct the water flow
downward and toward the Warm Air Intake side of the Cool Boss. Slide the first Media as
far left as possible. Refer to the figure below.
Not to scale, components removed for clarity.
Install another section of Media and slide the new section of Media as far right as possible. Orient
the Media channels as in the previous step.
Not to scale, components removed for clarity.
Cool Boss Evaporative Air Cooler 17 P/N 5900274 —Rev. A6—August 2024
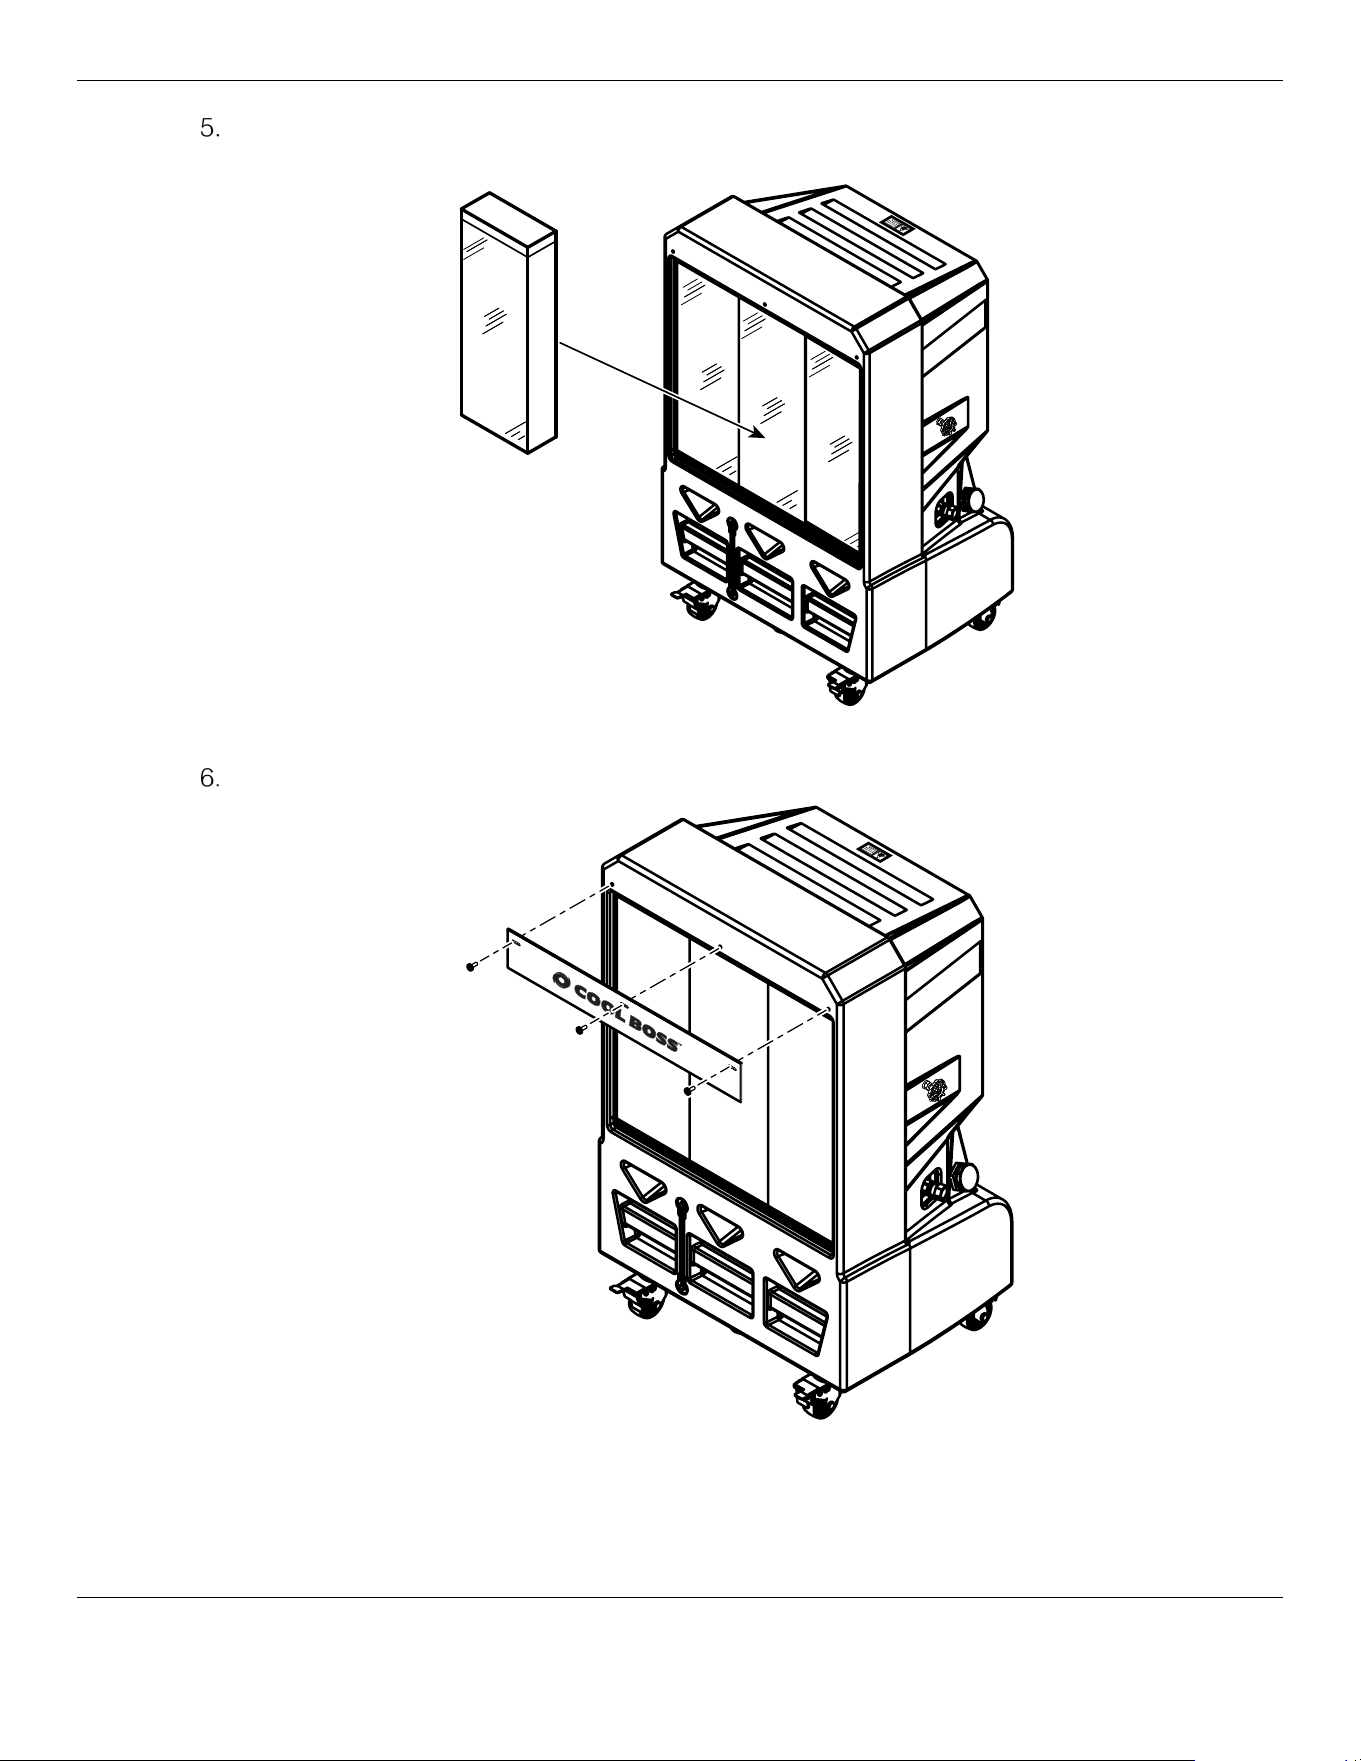
Install the last section of Media in the open middle section. Orient the Media channels as in the
previous step.
Not to scale, components removed for clarity.
Install the Media Splash Guard using the screws removed in step 1.
Not to scale, components removed for clarity.
Cool Boss Evaporative Air Cooler 18 P/N 5900274 —Rev. A6—August 2024
Find a location for your Cool Boss:
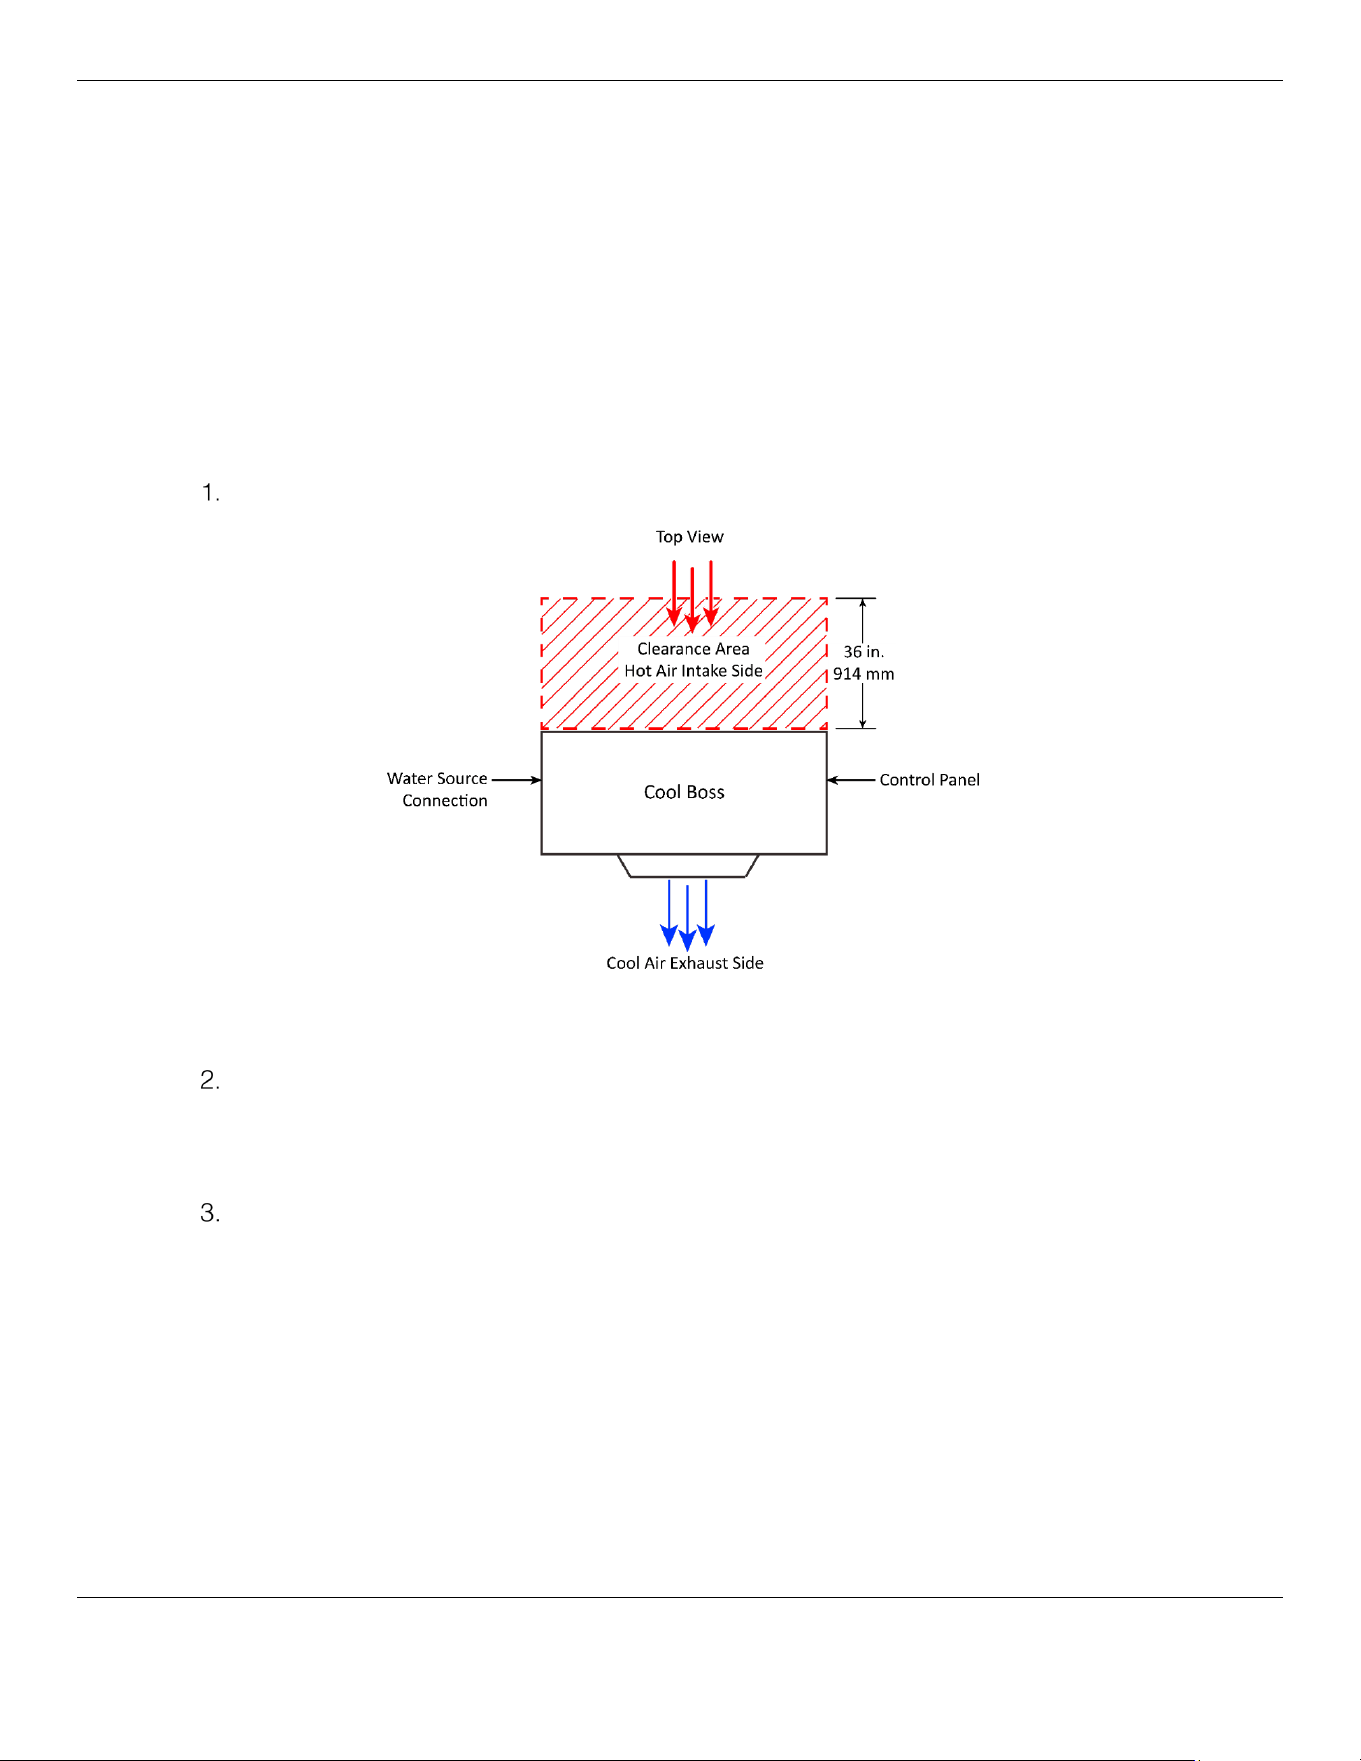
Find a suitable location for the Cool Boss (hot air to rear, cooling area to front). The Cool Boss should
be indoors, near an appropriate power and water source, and in a low-traffic and well-ventilated area.
⚠ WARNING This equipment has internal arcing or sparking parts that should not be exposed to
flammable vapors. The unit must not be located in a recessed area or below floor level.
⚠ WARNING Verify the floor will support the weight of the Cool Boss with a full reservoir. Also
verify the Floor is level, well-constructed and stable enough to prevent the Cooler
from tipping over
.
To choose a location for the Cool Boss Cooler:
Unlock the Casters to roll the Cool Boss. Direct the Fan outlet toward the area to be cooled.
⚠ CAUTION To ensure efficient operation, the Cool Boss requires adequate air flow for intake
and exhaust. Verify a window or door is open.
Keep 36 in. (914 mm) minimum free space behind the Cool Boss open for adequate air intake.
⚠ WARNING Verify the Power Cord and Water Supply Hose are routed to prevent a tripping
hazard and are not routed under carpets or across sharp edges.
Once you have found a location and moved the Cool Boss into position, lock a minimum of
two Casters
, by pressing down with your foot on the large pedal locking mechanism on each
Caster. To unlock the Casters, press down on the small pedal.
⚠ CAUTION Do not start the Cool Boss until you have locked a minimum of two Casters; this
ensures that unintended movement caused by the thrust of the Fan will not occur.
Water Reservoir
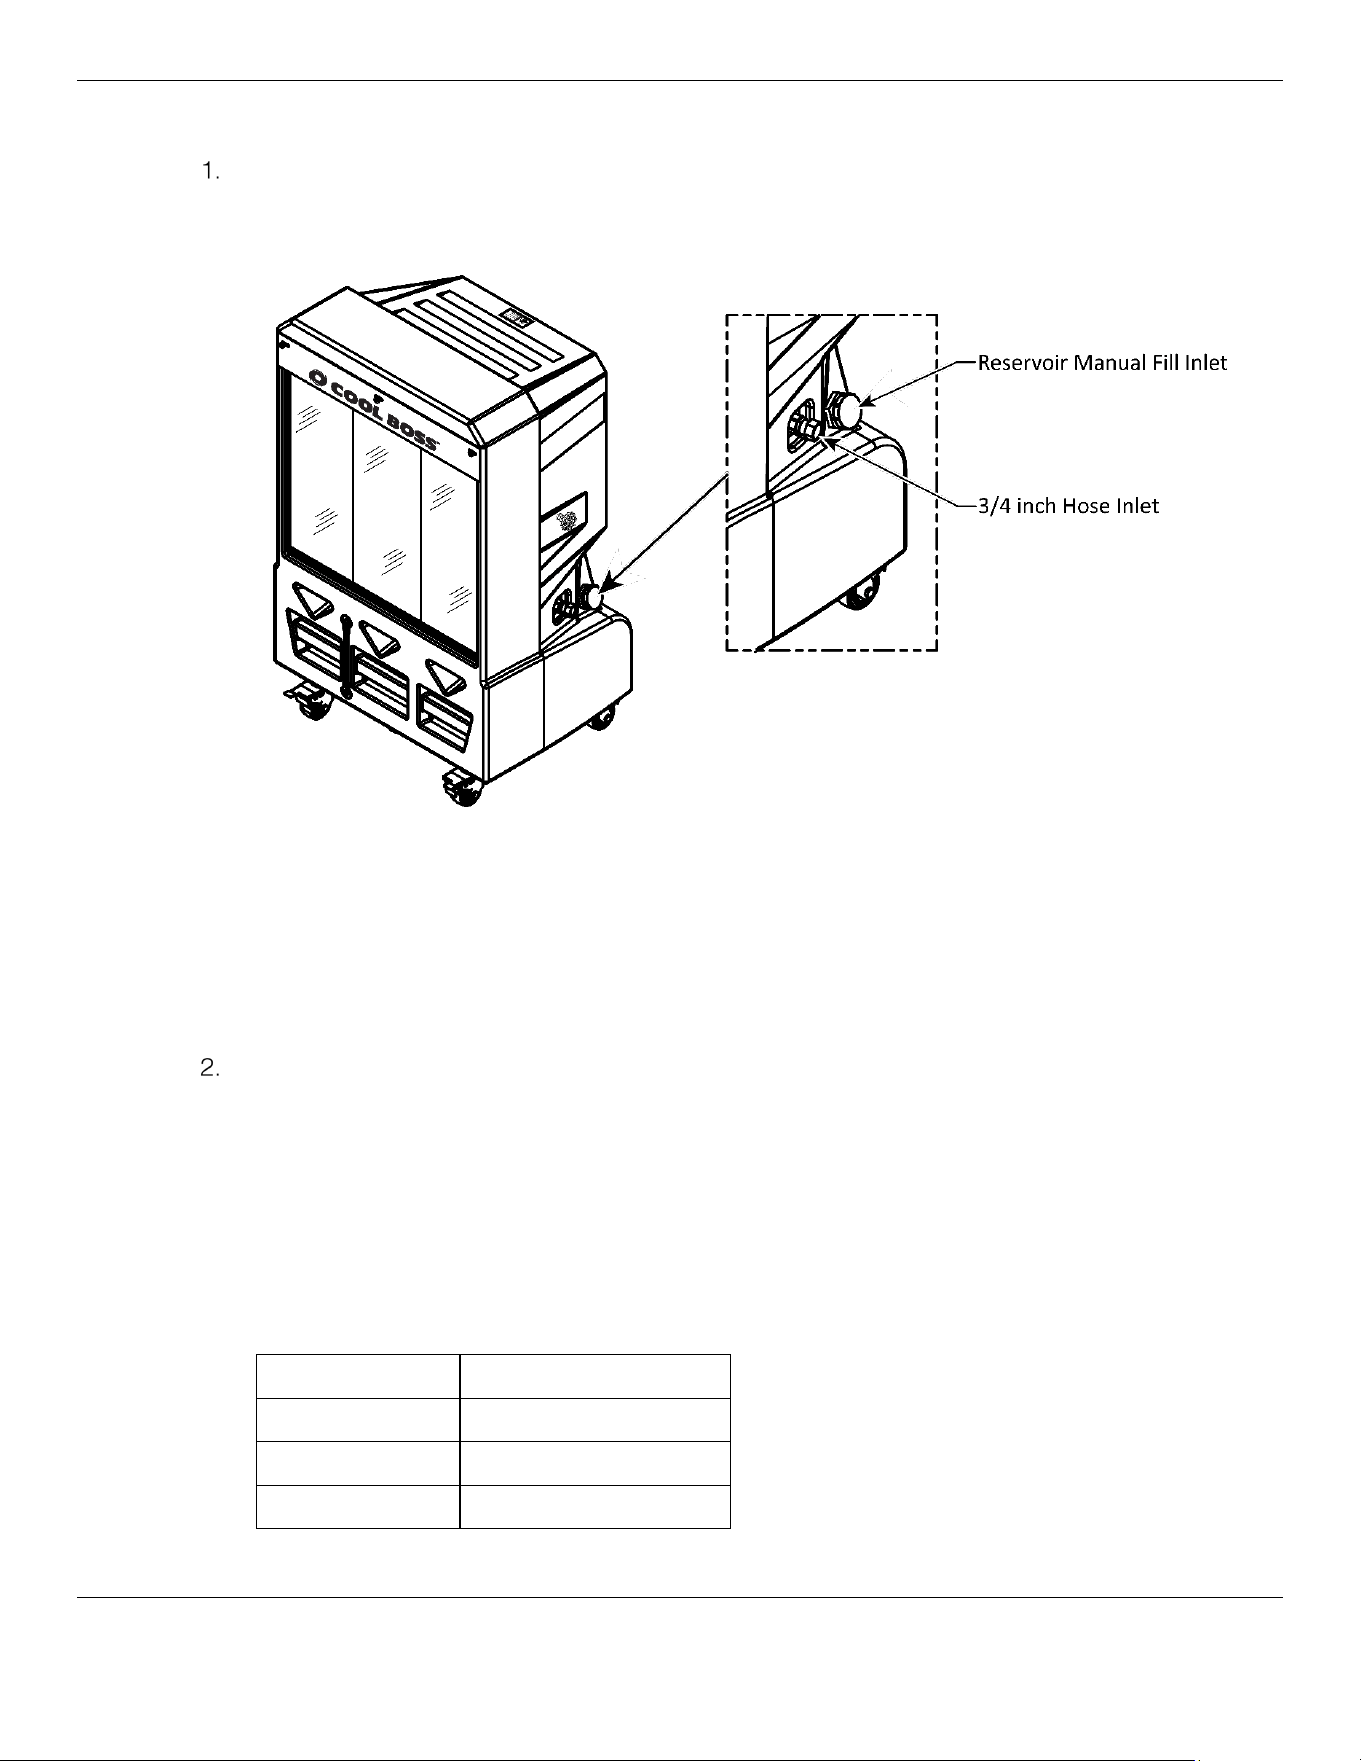
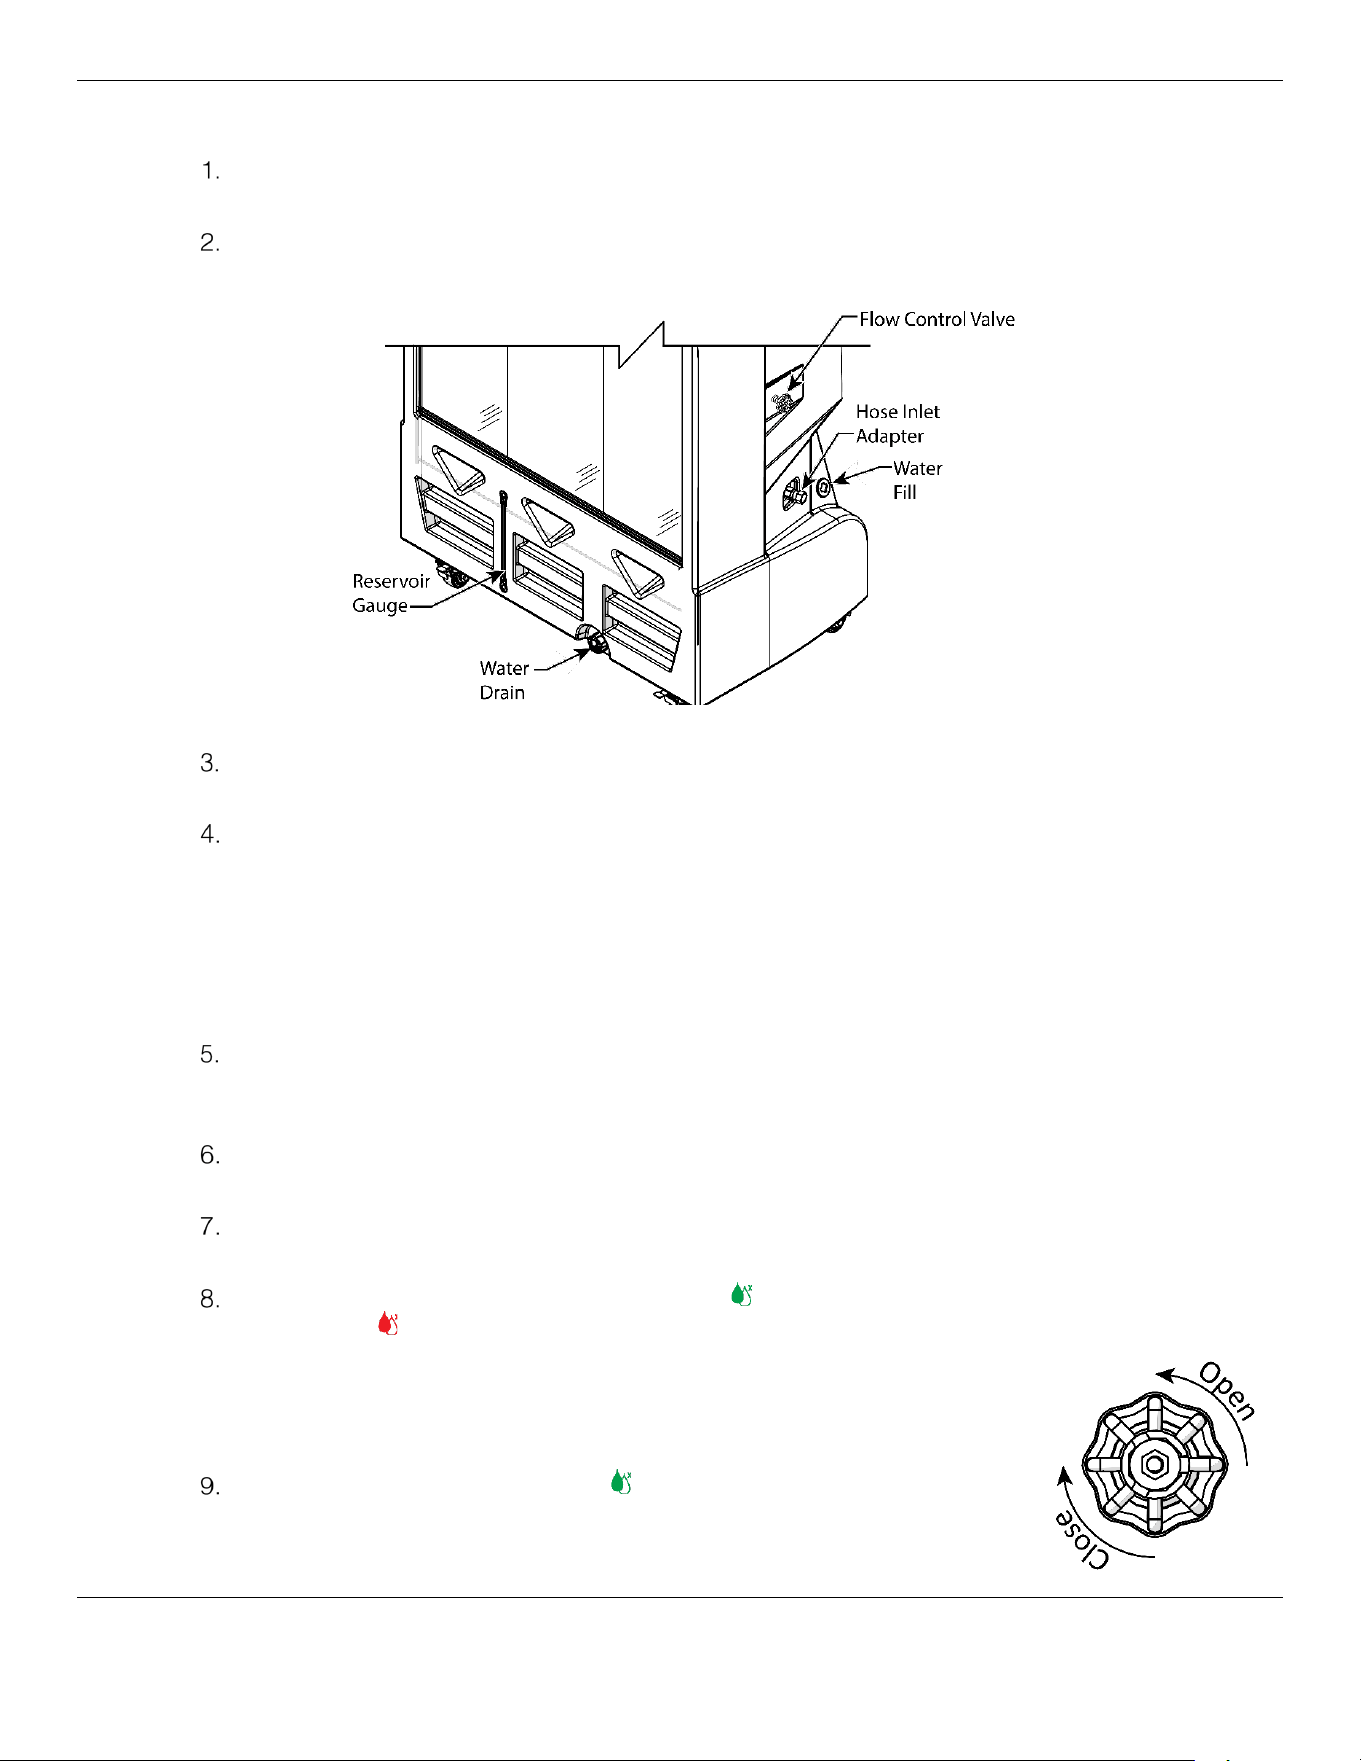
There are two options to fill the Reservoir, using a hose connected to the 3/4-inch Water Inlet
Connector with Float Valve, or manually fill the Reservoir through the Reservoir Fill Inlet.
Cool Boss Evaporative Air Cooler 19 P/N 5900274 —Rev. A6—August 2024
To fill the Reservoir:
You may connect to the Water Inlet Connector on the side of the unit using the standard 3/4-inch
hose fitting and a hose that is rated to ≈28 to 99.5psi (2 to 7 kg/cm
2
) maximum water pressure at
your location. Turn on the water and verify there are no leaks at the connection point. A hose is
not supplied with the Cool Boss. Refer to the figure below.
Not to scale
If you are utilizing the 3/4” Water Inlet Connector, the Reservoir Float Valve will shut off the water
before the maximum fill level is exceeded.
⚠ CAUTION Supplied Water Pressure must be between ≈28 to 99.5psi (2 to 7 kg/cm
2
).
Install a pressure regulator to reduce the inlet pressure, if required.
Alternatively, you may manually fill the Reservoir using the Water Reservoir Inlet found to the right of
the 3/4-inch hose connection.
Remove the cap and add clean water. Fill to the Max. level only, do not overfill. Water
temperature must be less than 113°F (45°C). Level may be viewed through the reservoir sight
gauge or the level gauge.
After filling, Replace the Cap, remove and dry any water spilled on the Cool Boss or floor around
the unit.
⚠ CAUTION Use only cold clean water. No detergents or additives of any kind.
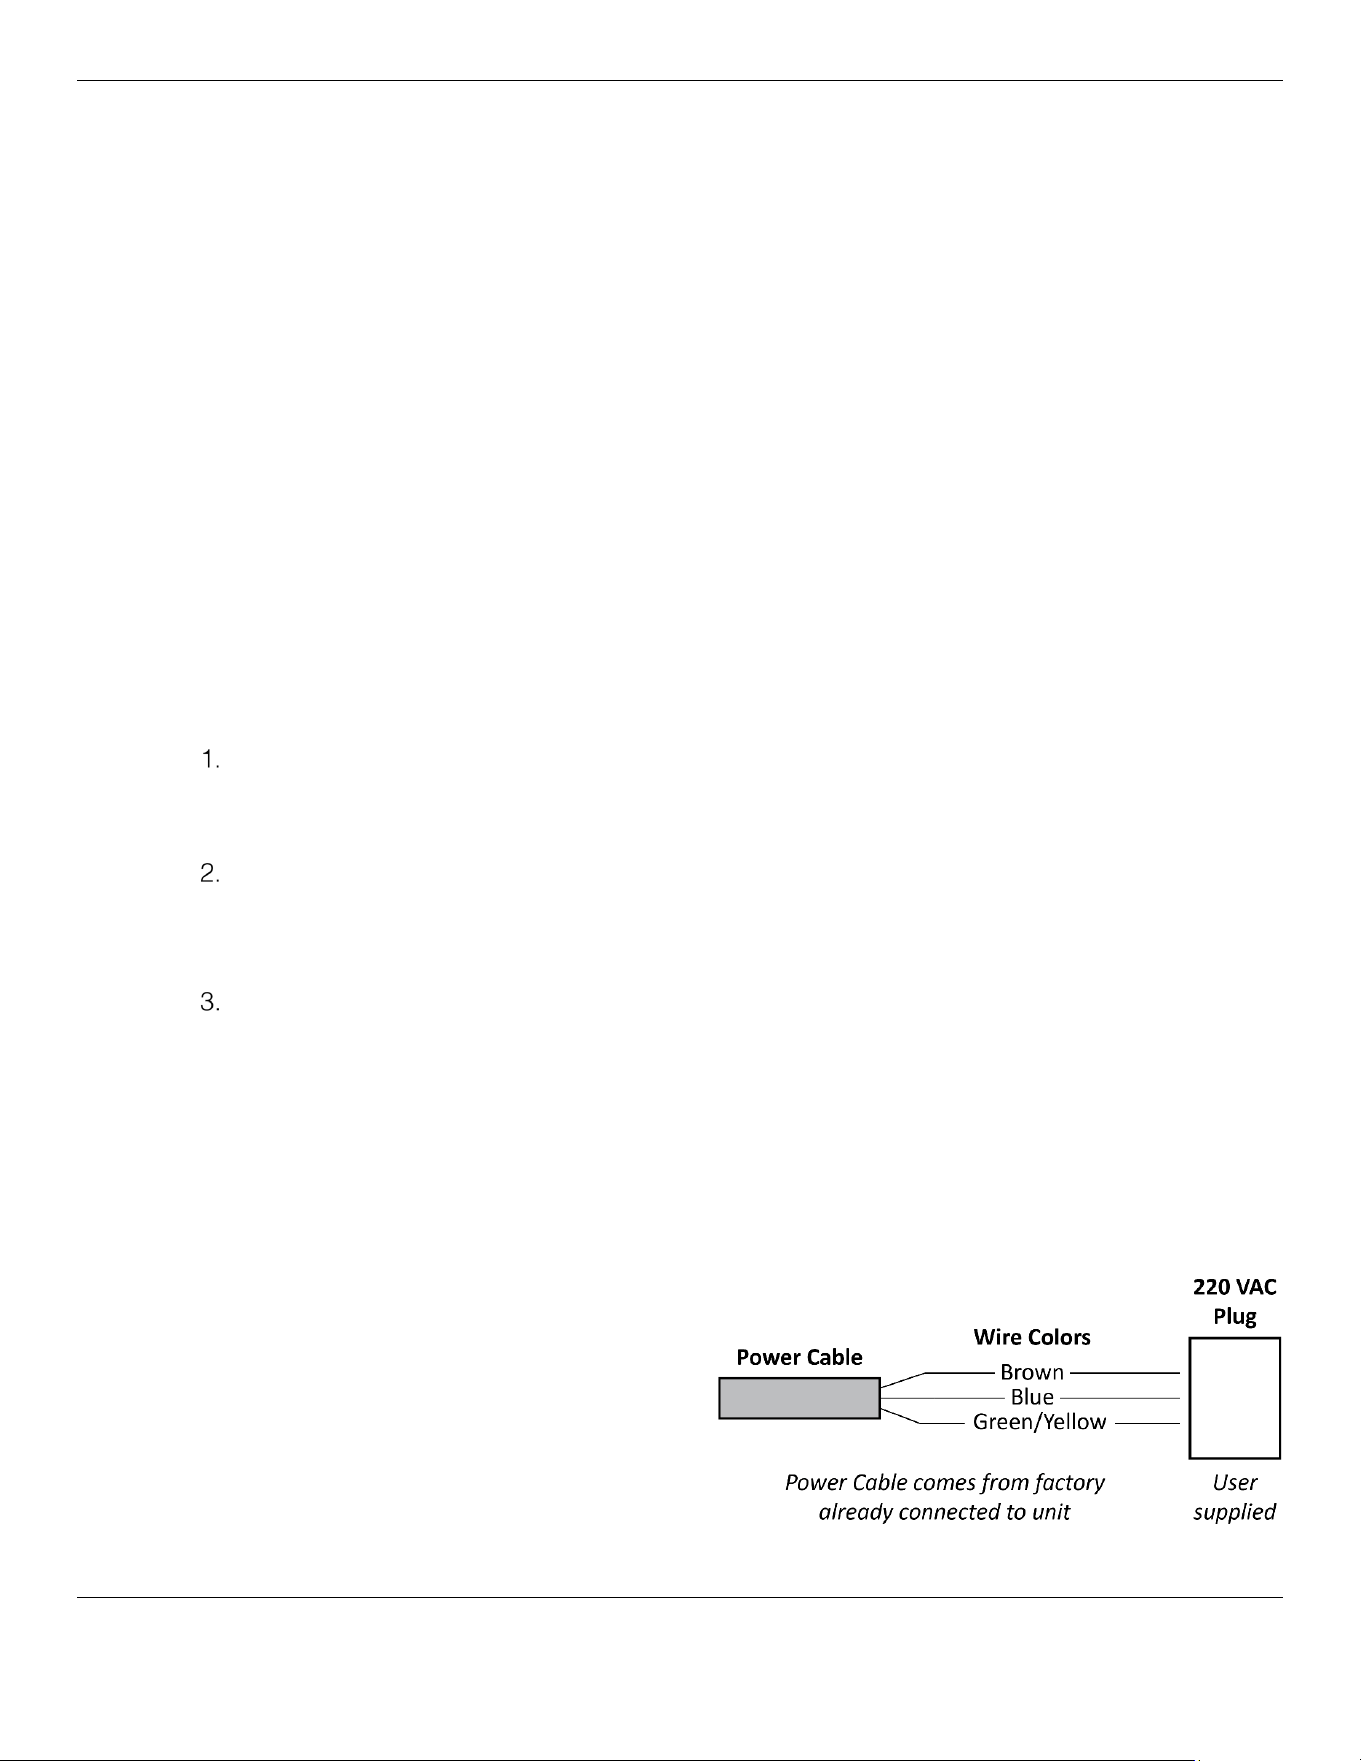
Model Water Capacity
CB-12SL / SLH ≈15 gal. (57 liters)
CB-14SL / SLH ≈15.6 gal. (60 liters)
CB-26SL / SLH ≈ 50 gal. (190 liters)
Cool Boss Evaporative Air Cooler 20 P/N 5900274 —Rev. A6—August 2024
Connecting to Power
Before connecting this unit to a power source, verify the required voltage by checking the model
nameplate affixed to your machine. Cool Boss models marked CB-12SL, CB-14 SL, and CB-26SL
indicates 110 VAC operation; model numbers with an H
suffix indicates 208 to 240 VAC operation
(e.g., CB-16 SLH for 220 VAC operation). It is recommended that a separate electrical
circuit servicing only the Cool Boss be provided.
If your Cool Boss is equipped with a plug not compatible with your current power source, you must
contact a licensed Electrician. The Electrician will install a separate 15 Amp circuit protected by a fuse
or circuit breaker with an appropriately grounded power receptacle in accordance with all national and
local electrical codes
. Use an outlet that cannot be turned off by a switch.
No Electrician is required to connect the Cool Boss with a 110 VAC power source as shipped from the
factory. Units operating at 110 VAC have the appropriate plug attached. Only units requiring 220 VAC
operation require an electrician to install the required 220 VAC plug.
⚠ DANGER All electrical work must be accomplished by a licensed Electrician, in
accordance with national and local electrical codes. If you do not use a licensed
Electrician, you void your warranty and put everyone who uses the cooler in danger
of injury or, in rare cases, death.
To connect an SLH model Cooler to a 220 VAC power source:
Verify the Cool Boss is disconnected from the power source.
If it is connected, disconnect it. Do not begin to install a 220 VAC plug until you are
sure that power has been disconnected from the unit.
Verify the Cooler is configured for 220 VAC operation. Locate the Model/Serial Number plate near
the Cooler Display. The operating voltage is indicated on this data plate and should indicate 208 –
230 VAC operation. If this data plate indicates 110 VAC, then the unit may not be operated on 220
VAC.
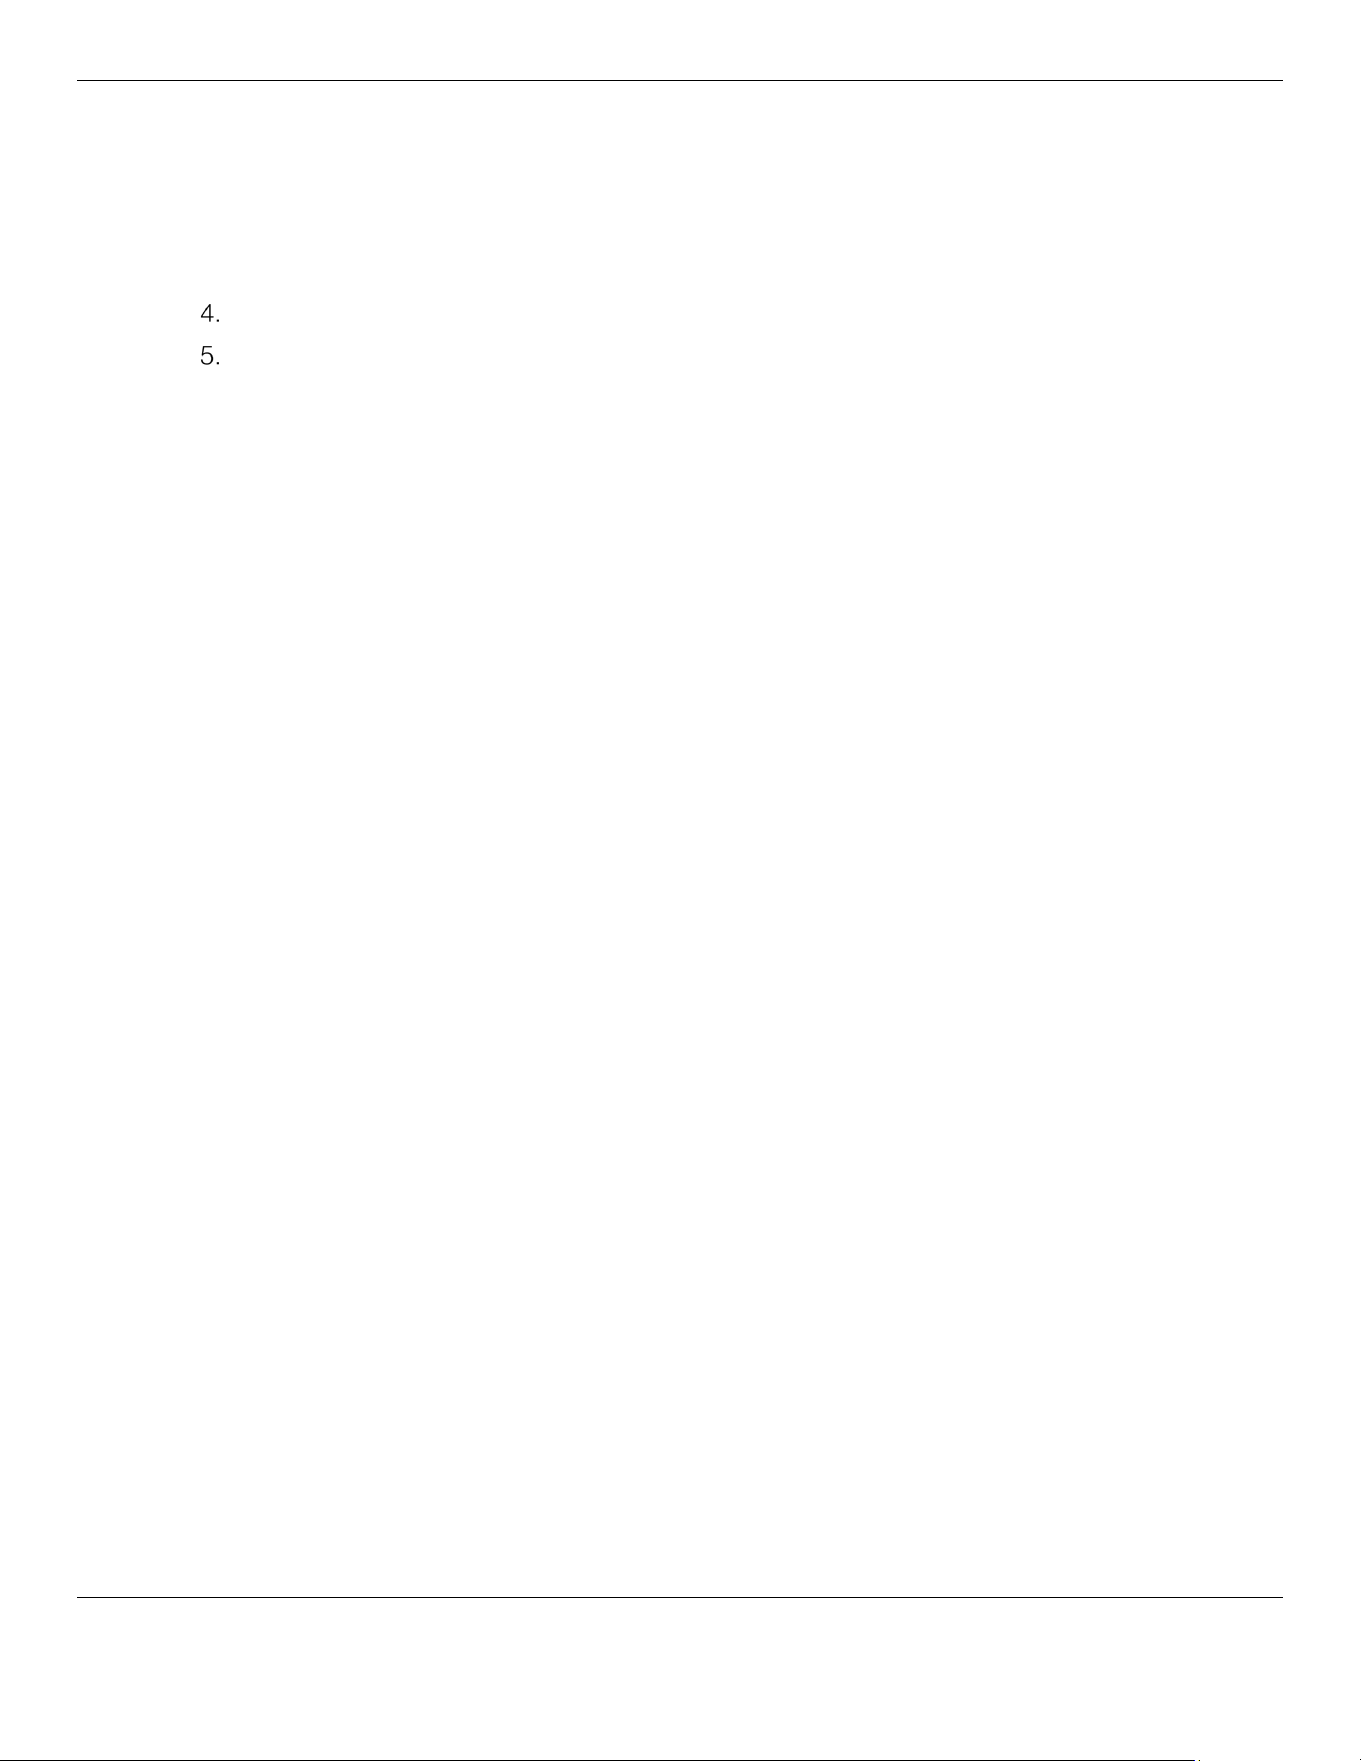
Have a licensed Electrician attach a 250 VAC, NEMA 30A, 2-Pole, 3-Wire plug. This Plug is
not shipped with the Cool Boss. You must have the Electrician supply the correct plug.
The colors of the three exposed wires from the power cord are Brown, Blue, and Green/Yellow,
the European color code.
Important: To connect the three exposed wires to an appropriate Plug or to hard wire them,
have your Electrician follow the electrical codes for the country and locality in which
you are using the unit.
For example, if you are using the unit for 220V in the United States, the color codes of the power
cord wiring on the Cooler correspond to:
Brown: Live
Blue: Live
Green/Yellow: Ground
If you are using the unit in a European
country, the color codes on the wiring that
comes with the Cooler correspond to:
Brown: Live
Cool Boss Evaporative Air Cooler 21 P/N 5900274 —Rev. A6—August 2024
Blue: Neutral
Green/Yellow: Ground
Information about color code conventions in other regions and countries is available online. Make
sure your Electrician installs the Plug in accordance with all applicable national and local electrical
codes.
Plug the Cool Boss power cord into a 220 VAC outlet protected by an appropriate circuit breaker.
Test the unit to verify the Cooler is working normally.
Additional electrical information:
Damage caused by improper electrical installation (such as not grounding the unit) voids the
warranty.
⚠ WARNING Disconnect power before performing any troubleshooting or maintenance.
Make sure the unit cannot be re-energized until you are done.
⚠ WARNING Plug into a properly grounded electrical receptacle only.
⚠ WARNING Never remove the Ground Prong from the plug end of the Power Cord.
Ground Fault Circuit Interrupter (GFCI)
The Cool Boss incorporates a Ground Fault Circuit Interrupter. The GFCI acts as a Circuit Breaker
in the event of a Ground Fault. A Ground Fault occurs when the power conductor comes into
direct contact with the equipment’s frame or Ground. To test the GFCI see the Maintenance
Section.
⚠ WARNING The Cool Boss must be connected to a properly grounded electrical outlet for
the GFCI to function. If the Outlet is not correctly grounded or Power Cord is
damaged preventing a Ground connection, the GFCI cannot protect from
electrical shock.
Cool Boss Evaporative Air Cooler 22 P/N 5900274 —Rev. A6—August 2024
Extension Cords
If an extension cord is required, use only cords with a polarized plug/receptacle no longer than 100
feet in length. Never use an extension cord that is not properly rated to handle the electrical load.
When making connections, ensure all local and national electrical codes are adhered to.
Minimum requirements for Extension Cords
25-50 Feet in length Minimum 14 AWG
Total to 100 Feet in length Minimum 12 AWG
⚠ WARNING For generator users and or areas with frequent brownout conditions. Motor
failure due to excessive high or low voltage is not covered under warranty. If you
plan to use the Cool Boss with a Generator or operate in an area with frequent
brownouts, verify that the power source can provide the required current and
voltage. While voltage variations are common (±5%) both high and low voltage
episodes in excess of 15% to 20% can cause Electrical Motor overheating and
premature Motor failure.
Low voltage will cause the Motor to draw more electrical current to deliver the same
amount of force to the Fan Blades. Excessive current overheats the Motor
Windings, eventually burning through the insulation and resulting in complete Motor
failure.
High voltage episodes can cause premature failure of electrical and electronic
components due to overheating.

Cool Boss Evaporative Air Cooler 23 P/N 5900274 —Rev. A6—August 2024
Operation
IMPORTANT NOTICE! Fill the water reservoir to maximum capacity before first use.
Failure to do so will prevent the low-water shutoff from engaging and the fan from
starting.
⚠ WARNING The Cool Boss should only be operated by authorized, trained personnel. This
includes reviewing and understanding the Operation Manual and Safety Labels on
Cool Boss. Do not allow children or impaired persons to operate the Cool Boss.
⚠ WARNING Never roll anything heavy or sharp over the power cord. Try to find a
location where people will not be constantly walking over the power cord,
presenting a tripping hazard. The product should only be operated by authorized,
trained personnel.
⚠ WARNING Never operate the Cool Boss unless the Ground Fault Circuit Interrupter (GFCI) is
functioning.
⚠ WARNING Never remove the Ground Prong from the plug end of the Power Cord. Do not
operate the unit if the power cord is damaged.
⚠ WARNING Do not run the Power Cord under a rug or other flammable material.
⚠ WARNING Use only in a well-ventilated open environment with a fresh air supply.
⚠ WARNING The Cool Boss area must be free from airborne pollutants, flammable gases and
contaminates.
⚠ WARNING Ambient operating temperature must remain between +65˚ to +113˚F (+18˚ to
+45˚C)
⚠ WARNING Never spray the Cooler with water as the Cooler is not sealed and moisture may
harm the motor or other electrical system components.
⚠ WARNING Do not operate near open containers of flammable liquids or gases.
⚠ WARNING Always maintain a minimum 50 feet (15 meters) from any open flame or sparks.
⚠ WARNING The Cool Boss is not designed to be used by children or persons with reduced
physical, sensory, or mental capabilities or lack of experience and knowledge
unless they have been given supervision or instruction concerning use by a person
responsible for their safety.
⚠ WARNING Never operate the Cool Boss unless all Media is securely in place.
⚠ WARNING Always dry the Media after use by turning off the Water Supply to the Media and
running the Fan without circulating water. This may take from 15 to 45 minutes
depending on temperature and humidity.
Cool Boss Evaporative Air Cooler 24 P/N 5900274 —Rev. A6—August 2024
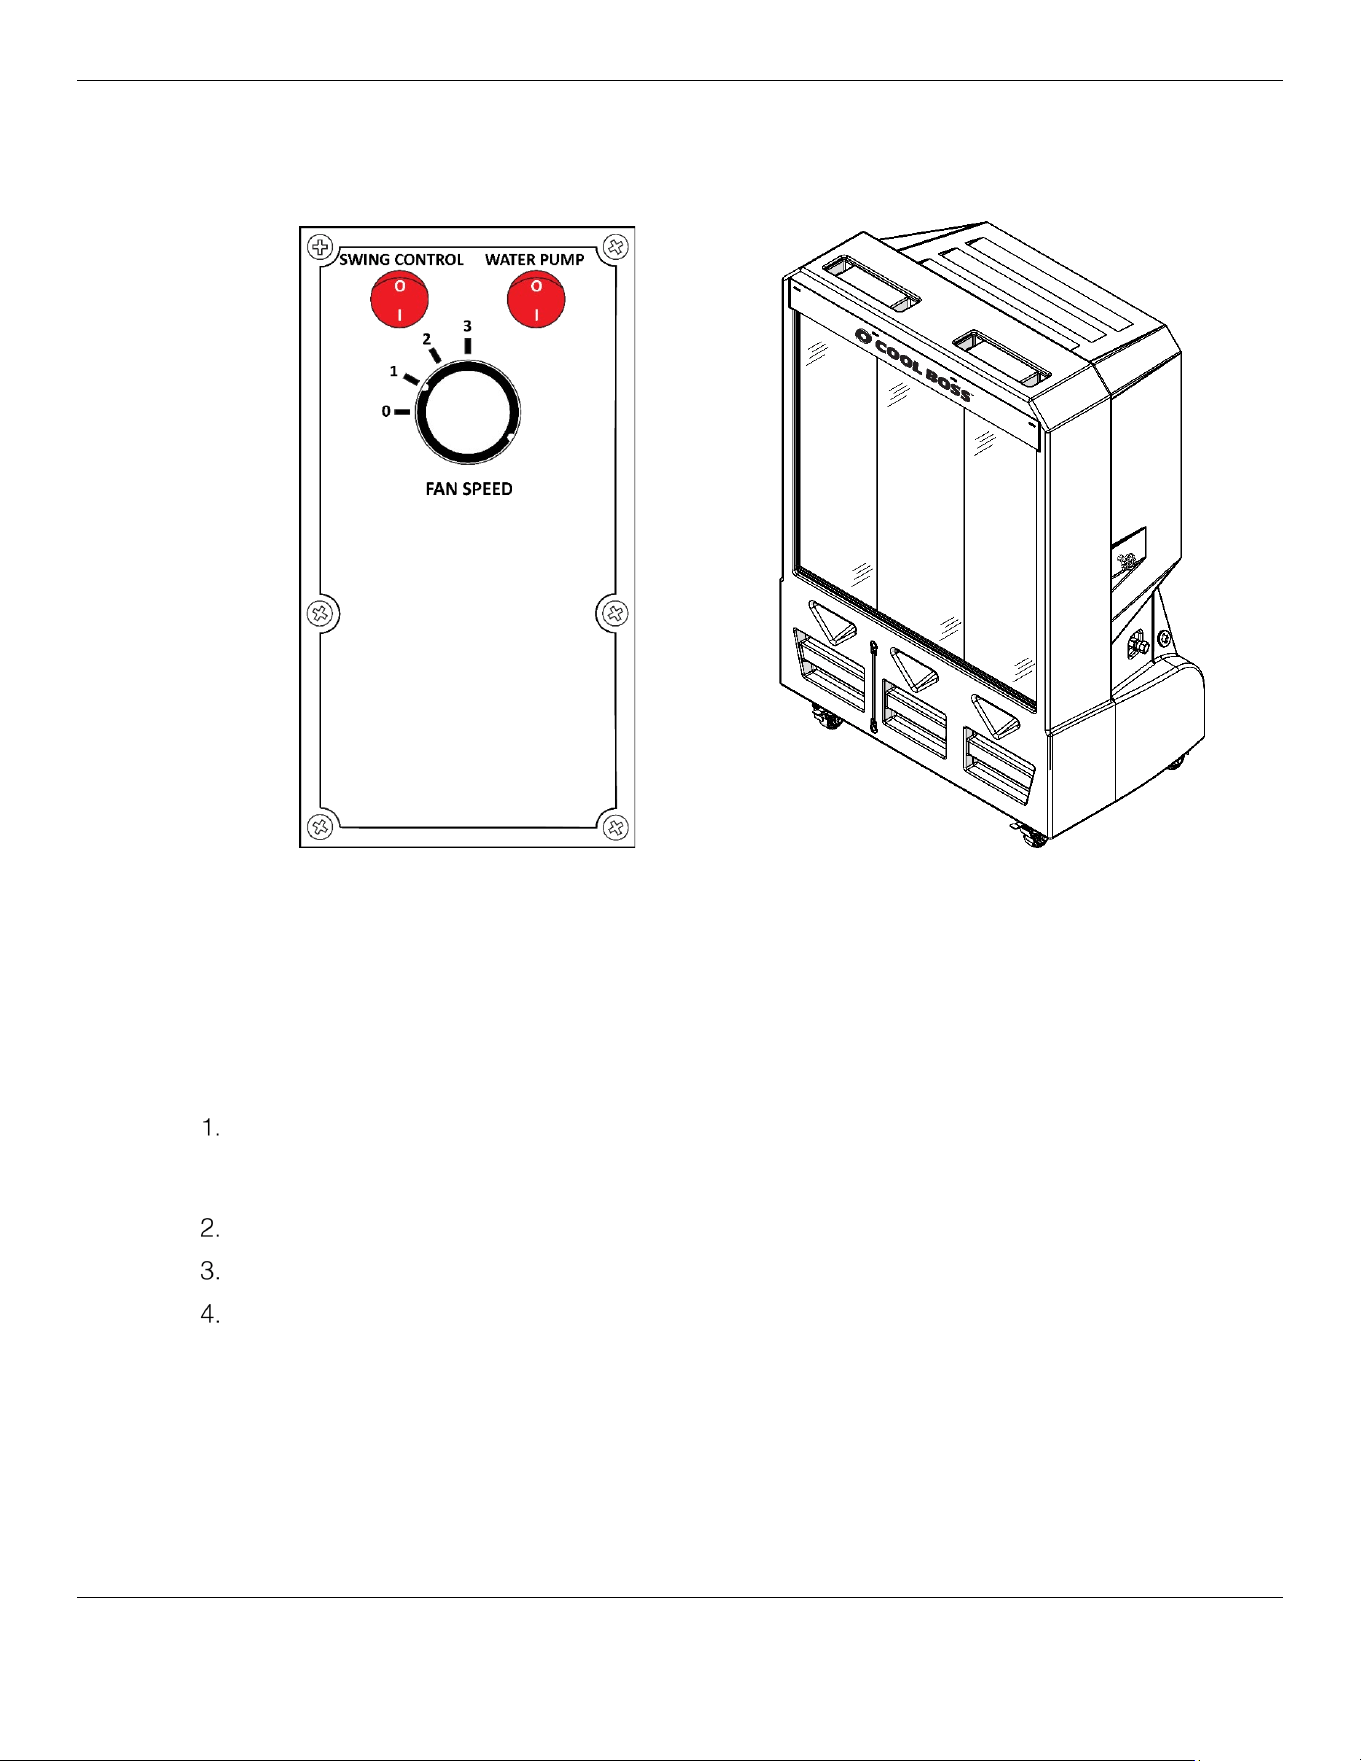
CB-12 and CB-14 Control Panel
•
Swing Control – Rocker Switch on-off. Initiates the Swing Louver left-right movement.
• Water Pump – Rocker Switch on-off. Applies power to the Water Pump providing water to
the Spray Bar, which then distributes it over the Cooling Media.
• Fan Speed – Rotary Switch on-off and three-speed settings.
To operate the Cool Boss for cooling CB-12 & CB-14:
Before operating the Cool Boss, verify that the Media and the Media Holder Splash Guard are
secured in place. This will reduce the chances of water splashing out of the Cool Boss and
creating a slipping hazard in front of the Media.
Verify controls are in the off position for the Swing Control, and Water Pump.
Verify the Fan Speed is set to 0.
Open a Door or Window, if using the Cool Boss indoors. Sufficient airflow for intake and
exhaust is critical.
⚠ CAUTION The Cool Boss Pump will be damaged if allowed to operate without
water. A Float Switch incorporated into the pump prevents activation when the
reservoir is empty or close to empty. This switch must be reset by filling
the reservoir to maximum capacity before use. See the Float Switch
Reset Procedure in Troubleshooting.
Cool Boss Evaporative Air Cooler 25 P/N 5900274 —Rev. A6—August 2024
Verify that the Cool Boss is connected to a Water Source through the 3/4-inch Hose
Inlet, or the Water Reservoir is full (Reservoir Gauge).
Verify the Casters are locked to prevent the Cool Boss from moving with the additional thrust from
the Fan.
Plug-in the Cool Boss electrical cord to an appropriate electrical outlet.
⚠ CAUTION Verify there is water in the Water Reservoir before activating cooling modes.
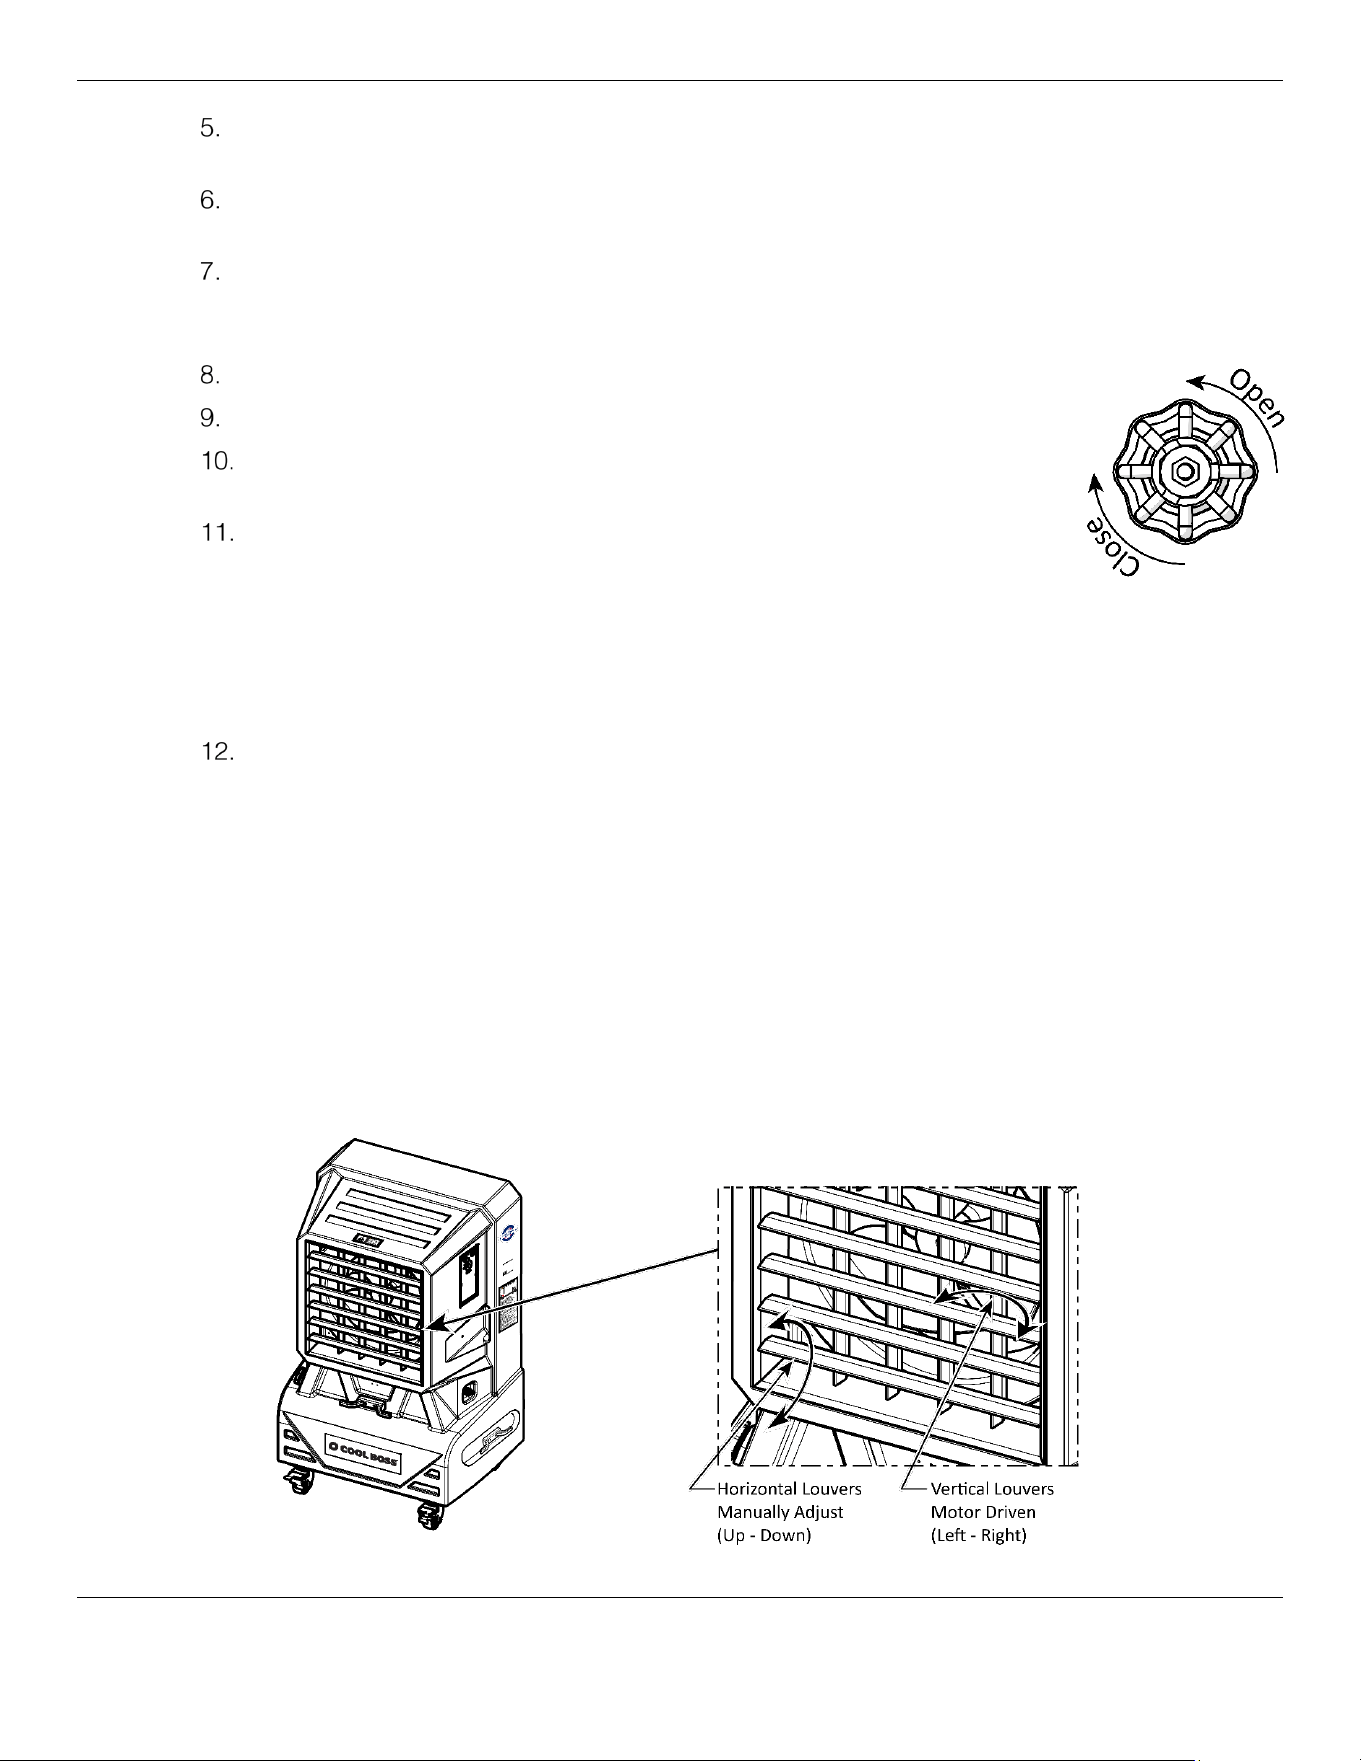
Ensure the red Flow Control Valve on the side is closed.
Rotate the Fan Speed Switch to 1 applying power to the Fan.
On the Control Panel (figure on the previous page) move the Water Pump
rocker switch to the ON position.
Slowly open the red Flow Control Valve on the side of the Cool Boss. Slowly
turn the valve counterclockwise. Verify water is making its way through and
beginning to saturate the Media.
⚠ WARNING If the Flow Control Valve is opened too quickly onto the dry media, water will splash
out of the cooler causing a possible slip hazard. Ensure the top of the media is
slowly being saturated before fully opening the Flow Control Valve.
Once the top 30% of the Media is saturated, Verify the fan is operating and cool air is beginning to
move through the Cooler exhaust. If the Fan is operating normally, select the desired fan setting to
cool the selected area. Open the Flow Control Valve to increase the cooling, as necessary.
⚠ WARNING Rotating Fan Blades! Keep hands, fingers, and loose clothing away from the Fan
when it is running.
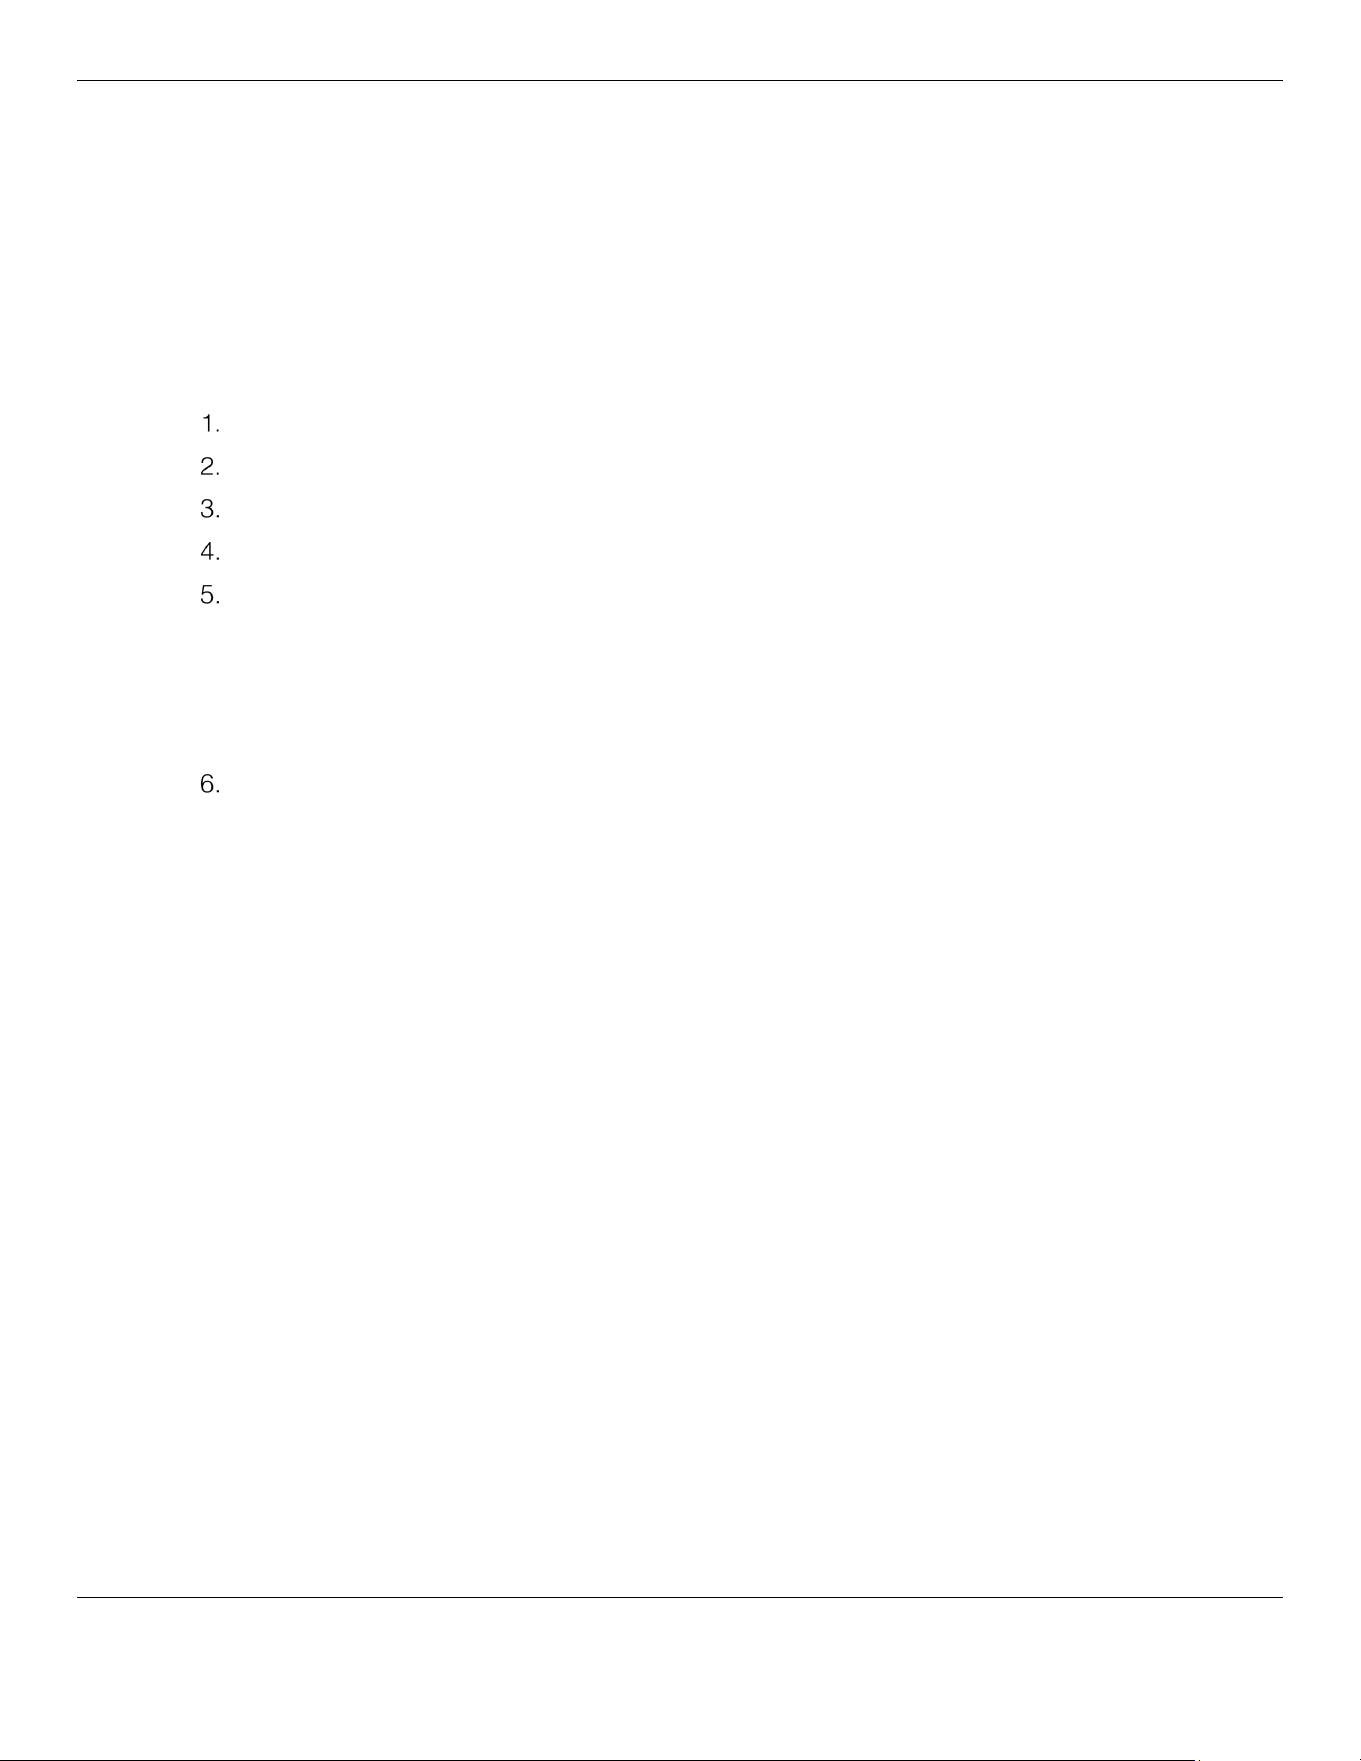
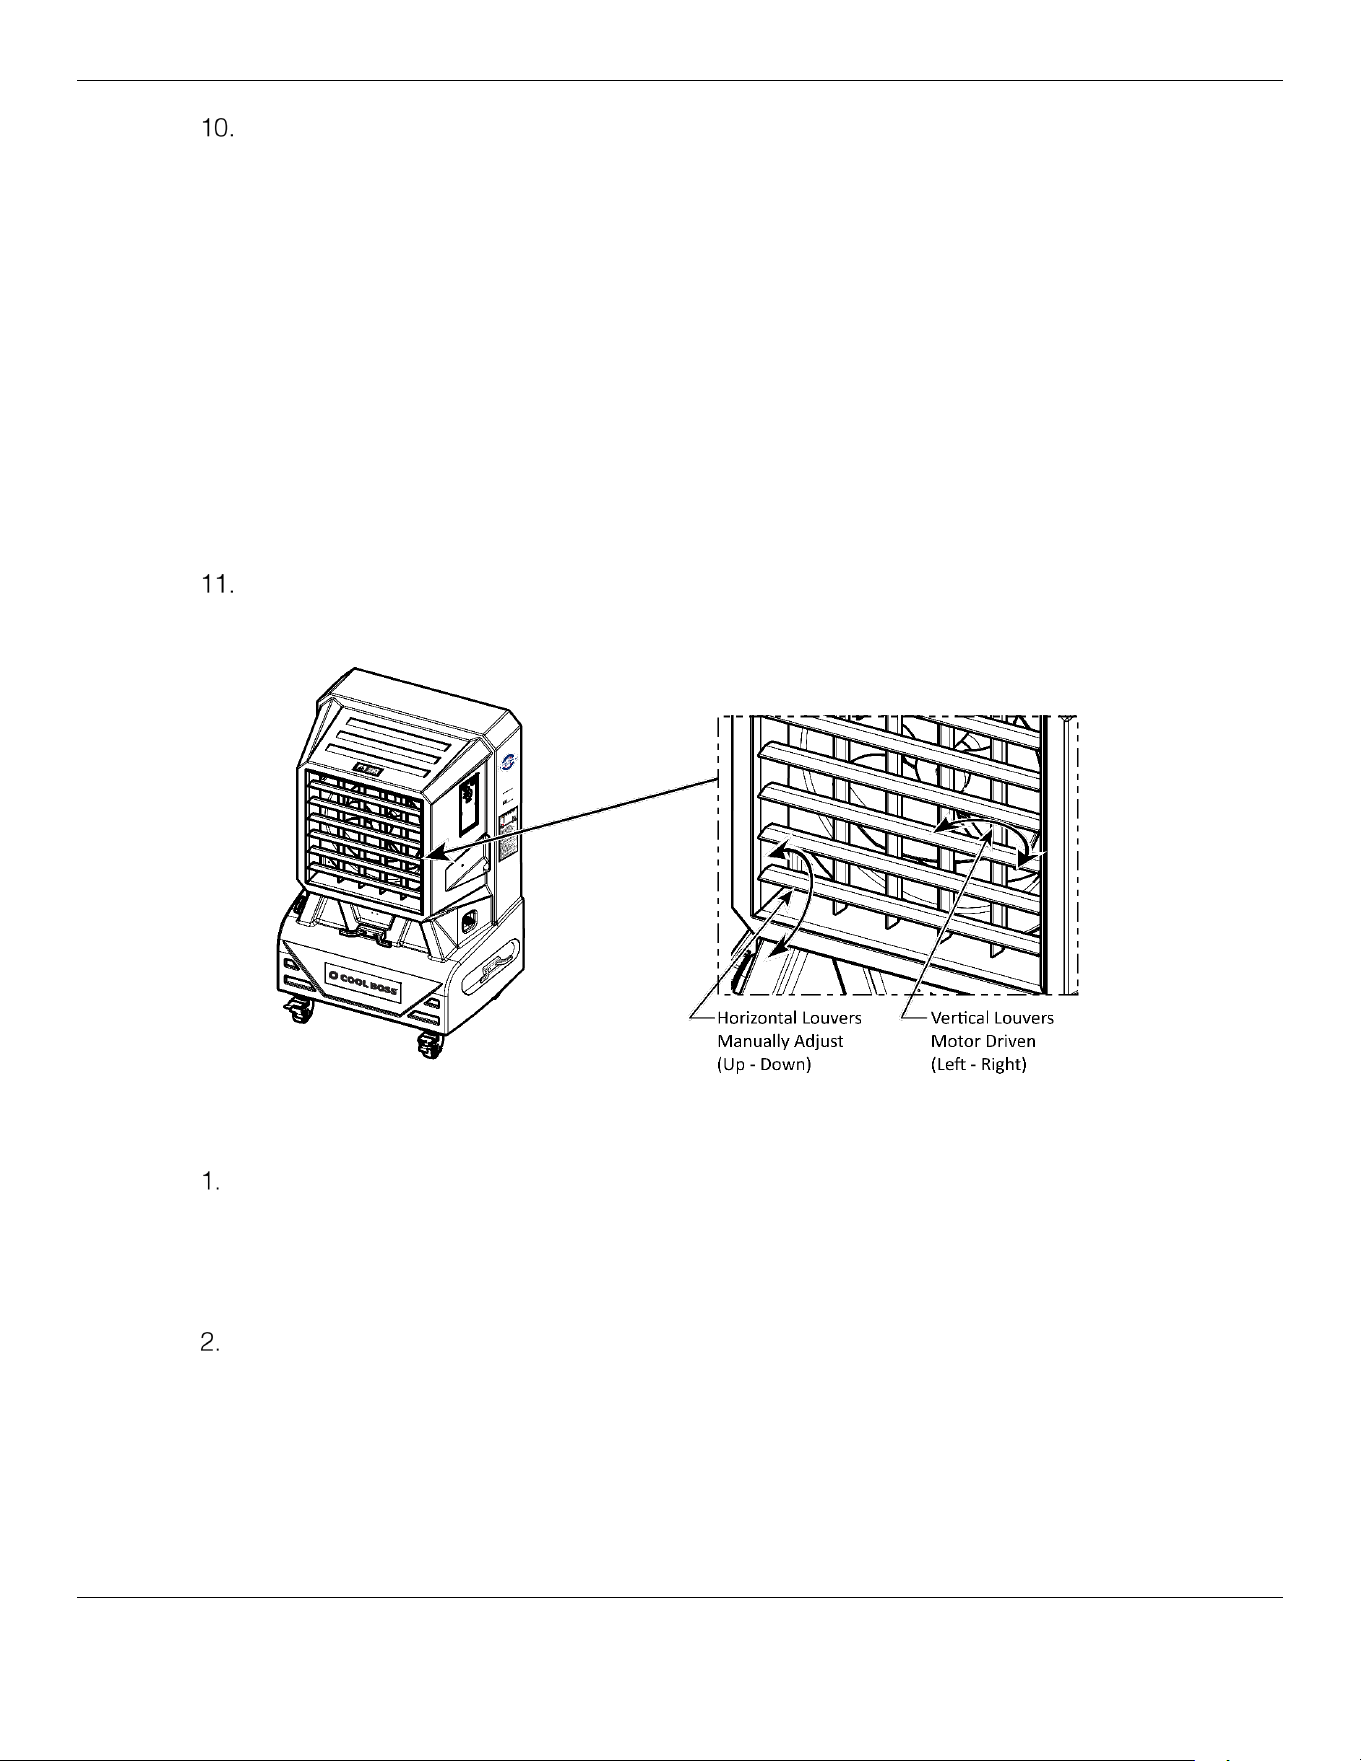
To use the Swing Louver function on CB-12, and CB-14
:
1. Manually adjust the horizontal Louvers to direct the cool air up or down. The Vertical Louvers are
mechanically driven and will swing to the left and right when the Swing Control Switch is in the on
position.
Cool Boss Evaporative Air Cooler 26 P/N 5900274 —Rev. A6—August 2024
⚠ CAUTION Before applying power to the Swing Louvers, verify that there is nothing that will
physically block or impede the motion of the Louvers.
⚠ CAUTION Attempting to adjust the Vertical Louvers by hand may cause the mechanism or
louvers to break and disengage from the drive motor.
2. Move the Swing Control Rocker Switch to the ON position. The Louvers will begin to swing left and
right.
To shut down the CB-12 and CB-14 Cool Boss models:
Move the Water Pump Rocker Switch to the Off position.
If using the 3/4-inch Water Source inlet, close the Valve supplying the water to the Cool Boss.
Continue to operate the fan.
Move the Swing Control Switch to the Off position, if required.
Dry the Media by operating the fan without running water through the Media.
⚠ WARNING To reduce the possibility of bacteria and mold growth, dry the Media at the end of
each day. Running the Fan without circulating water for 15 to 45 minutes should
dry the Media in most cases. Media drying times will vary based on temperature,
humidity, and fan speed.
After the Media is dry, turn the Fan Speed rotary switch to the 0 or off position. See the
Maintenance Section for guidance on storing the Cool Boss.
Cool Boss Evaporative Air Cooler 27 P/N 5900274 —Rev. A6—August 2024
Operating the CB-26
CB-26 operation shares some methods and procedures with the CB-12 and CB-14 units. However,
the following section outlines important CB-26 operating procedures.
Before Operating the Cool Boss, verify that the Media and the Media Holder Splash Guard are secured
in place. This will reduce the chance of water splashing out of the Cool Boss and creating a slipping
hazard in front of the Media.
IMPORTANT NOTICE! Fill the water reservoir to maximum capacity before first use.
Failure to do so will prevent the low-water shutoff from engaging and the fan from
starting.
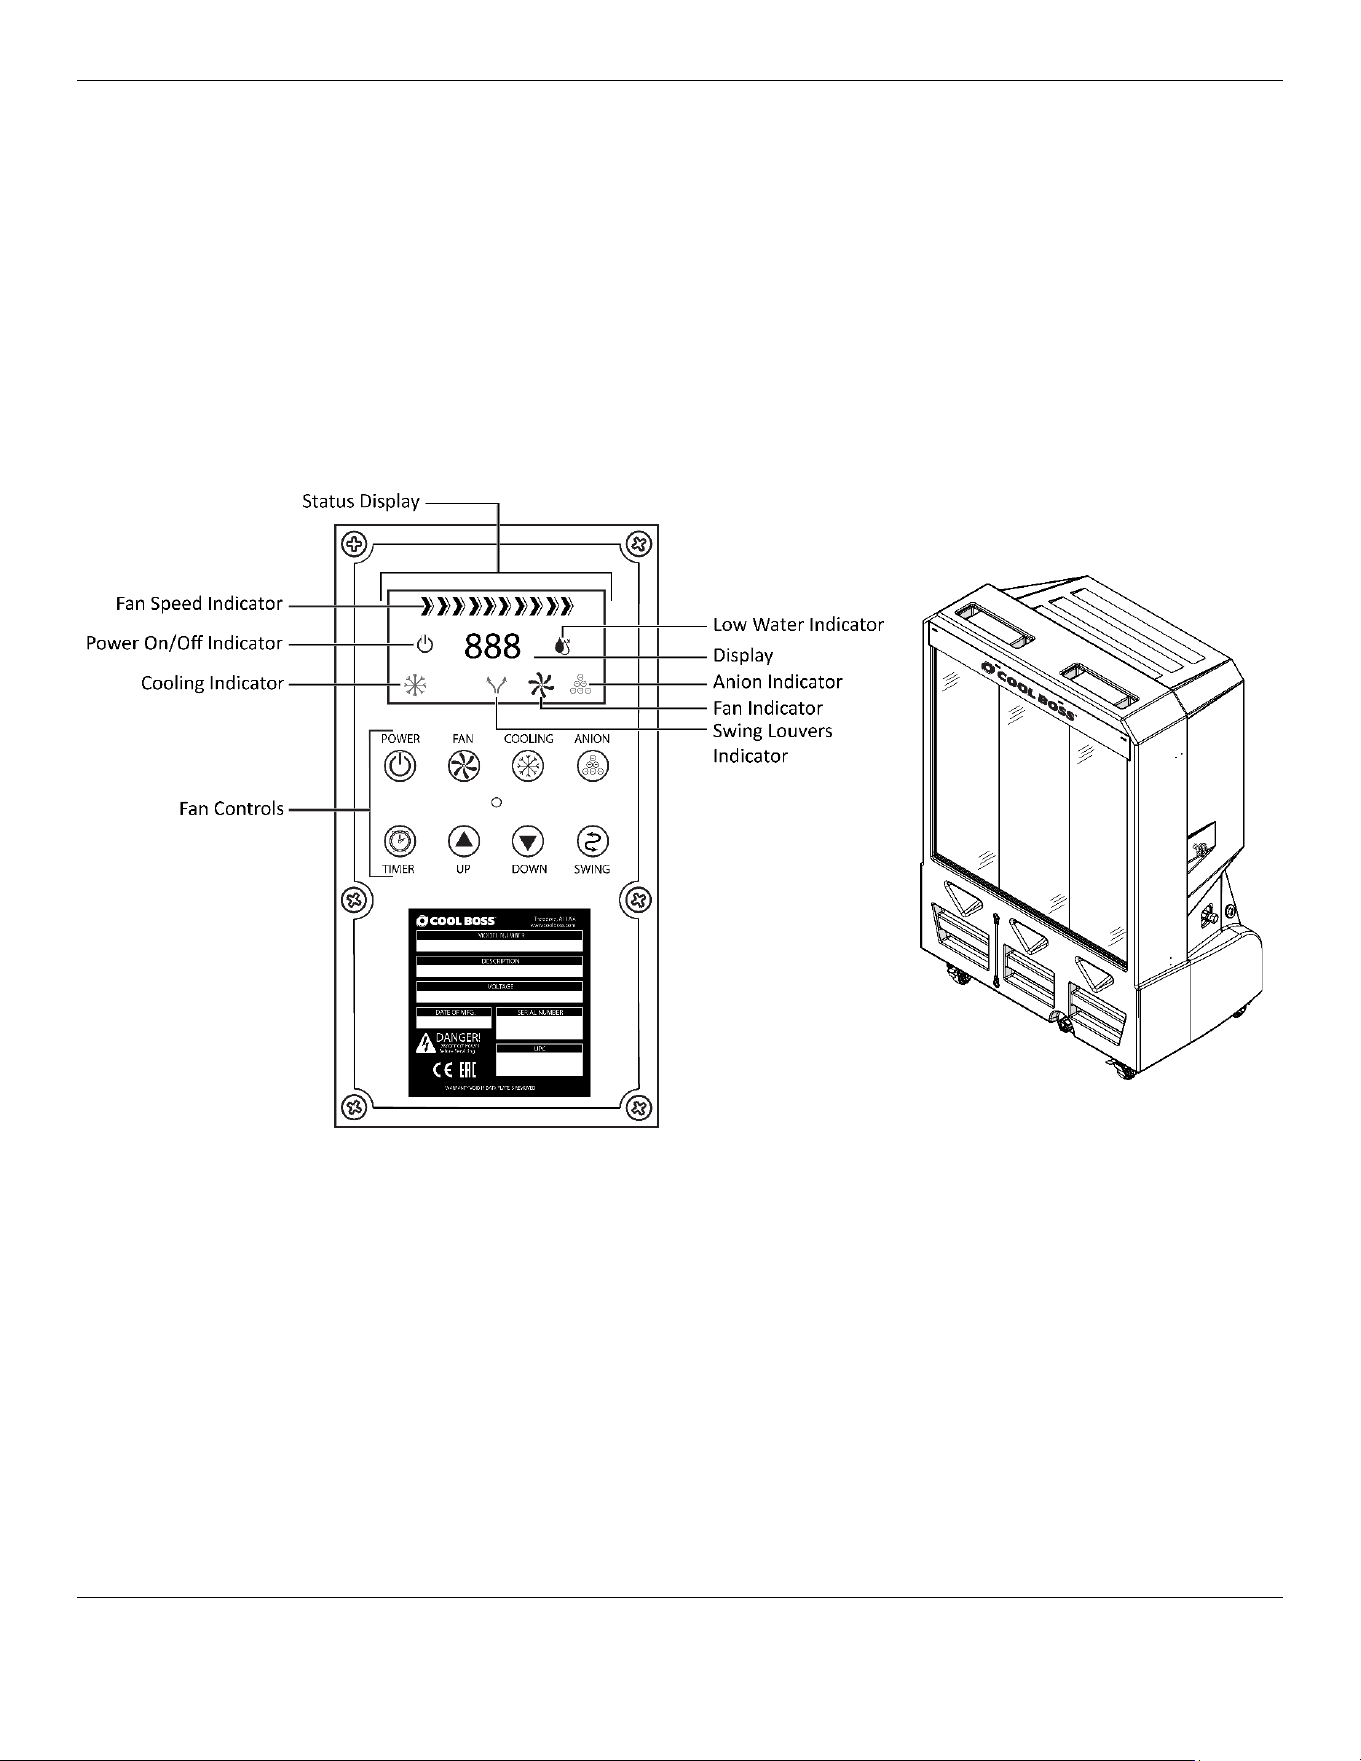
CB-26 Control Panel
CB-26 Fan Controls
• Power – Push on-off. Applies power to the Cool Boss CB-26.
• Fan – Push on-off. Applies power to the CB-26 Fan.
• Cooling – Push on-off. Applies power to the CB-26 Pump, which provides water to the Spray
Bar over the Media.
• Low-Water Indicator -Check water level.
• Timer – Push to scroll through preprogramed shutdown times. Allows the operator to select
an automatic shutdown time in 1-hour increments. Up to 12 Hours maximum.
• Up – Push to increase the Fan speed.
• Down – Push to decrease the Fan speed.
• Swing Louvers – Push on-off.
Cool Boss Evaporative Air Cooler 28 P/N 5900274 —Rev. A6—August 2024
To operate the CB-26 for cooling:
Open a Door or Window, if using the Cool Boss indoors. Sufficient airflow for intake and
exhaust is critical.
Verify that the Cool Boss is connected to a Water Source through the 3/4-inch Hose Inlet,
or the Water Reservoir is filled to capacity (Reservoir Gauge).
Verify at least two Casters are locked to prevent the Cool Boss from moving with additional thrust from
the Fan.
Plug-in the Cool Boss electrical cord to an appropriate electrical outlet.
⚠ CAUTION The Cool Boss Pump will be damaged if allowed to operate without
water. A Float Switch incorporated into the pump prevents activation when the
reservoir is empty or close to empty. This switch must be reset by filling the
reservoir to maximum capacity before use. See the Float Switch Reset
Procedure in Troubleshooting.
On the Control Panel note that the Status Display provides the on-off condition of the Cool
Boss functions, the fan power settings as a percentage, current temperature of the air in °F at the
Cool Boss Fan, the timer status, and a low-water warning.
Press Power on the CB-26 Fan Controls. Refer to the Status Display on the Control Panel to
determine current settings and air temperature at the fan.
Press the Fan button to supply power to the Fan. The Fan indicator will light on the Status Display.
Press Up
or Down to adjust the power setting to 25% or less.
Verify the Low Water Indicator displays Green on the Status Display. If the Low Water indicator
displays Red , verify the water source is connected and providing water under pressure. If filling
manually, turn off the Cool Boss, unplug it from power and fill the
Reservoir to its maximum capacity. The Pumps’ internal low-water switch
will keep the Pump in the off condition until the pump’s float switch is
reset. See the Float Switch Reset Procedure in Troubleshooting.
If the Low Water Indicator is Green , press the Cooling button once to
turn on the Pump. The Cooling indicator will light on the Status Display.
Cool Boss Evaporative Air Cooler 29 P/N 5900274 —Rev. A6—August 2024
Slowly open the Flow Control Valve. Leave the Flow Control Valve on low until the top ≈30% of
the Media becomes saturated (30 seconds minimum). Once the top 30% of the Media is saturated
the Flow Valve may be slowly opened to increase the flow of water.
⚠ CAUTION Fully opening the Flow Control Valve onto dry Media will flood the Media faster than
it is capable of absorbing the water. Water will then be forced out of the Media onto
the floor and surrounding area. Carefully adjust the Flow Control to evenly saturate
the Media before increasing the flow of water onto the Media and before applying
more power to the Fan.
⚠ CAUTION Make sure there is water in the Water Reservoir before pressing Cool; if not, the
Pumps’ internal low-water switch will keep the Pump in the off condition.
⚠ WARNING Rotating Fan Blades! Keep hands, fingers, and loose clothing away from the Fan
when it is running.
Increase the flow of water to increase cooling as the media becomes saturated.
To use the Swing Louver function on CB-26 models:
⚠ CAUTION Before applying power to the Swing Louvers, verify that there is nothing that will
physically block or impede the motion of the Louvers.
Manually adjust the horizontal Louvers to direct the cool air up or down. The Vertical Louvers are
mechanically driven and will swing to the left and right when the Swing Control Switch is pressed.
⚠ CAUTION Attempting to adjust the Vertical Louvers by hand may cause the mechanism or
louvers to break and disengage from the motor.
Press Swing. The Louvers will begin to swing left – right and the swing indicator on the control
panel will illuminate.
To shut down the Cool Boss CB-26:
1. Close the Flow Control Valve.
2. If using the ¾ inch Water Source inlet, close the Valve supplying inlet water to the Cool Boss.
3. Remove power from the Pump by pressing the Cooling button once.
Cool Boss Evaporative Air Cooler 30 P/N 5900274 —Rev. A6—August 2024
4. Run the Fan to dry the Media. 15 to 45 minutes depending on humidity and fan speed.
5. When the Media is dry press the Cool Boss Power button to shut down the Cool Boss.
⚠ WARNING Always dry the Media after use by turning off the Cooling and running the Fan
without circulating water. This may take from 15 to 45 minutes depending on
temperature and humidity.
To shut down the Cool Boss using the Timer
:
Close the Flow Control Valve and turn off the Pump by pressing the Cooling Button once.
If using the ¾-in. Water Source inlet, close the valve supplying water to the Cool Boss.
Press the Timer button until the desired number of hours before shut-down is displayed.
The Cooler will shut down based on the time entered.
Cool Boss Evaporative Air Cooler 31 P/N 5900274 —Rev. A6—August 2024
Maintenance
⚠ DANGER Disconnect the unit from its power source before performing any maintenance!
Verify the unit is locked out from power and cannot be energized while maintenance
is being performed. If your organization has Lockout/Tagout policies, make sure to
implement them before servicing the Cool Boss.
⚠ WARNING Rotating Fan Blades can cause severe injury! Keep hands and loose clothing clear!
⚠ WARNING Disconnect the Power Cord when cleaning the Cool Boss and exercise care to
avoid splashing water on the Motor or internal electronics.
To maintain the Cool Boss:
• Daily. Turn off the Cooling Pump and run the Fan to dry the Media and inhibit the growth of
bacteria, mold, and mildew. Typically, Media drying can take 15 to 60 minutes depending on
current temperature and humidity.
• Weekly.
Change the Cool Boss Reservoir water when it gets dirty. Dirt and other pollutants from
the environment will get into the water and reservoir. Cool Boss recommends draining and
cleaning the reservoir weekly or more often depending on the frequency of use and the cleanliness
of the environment.
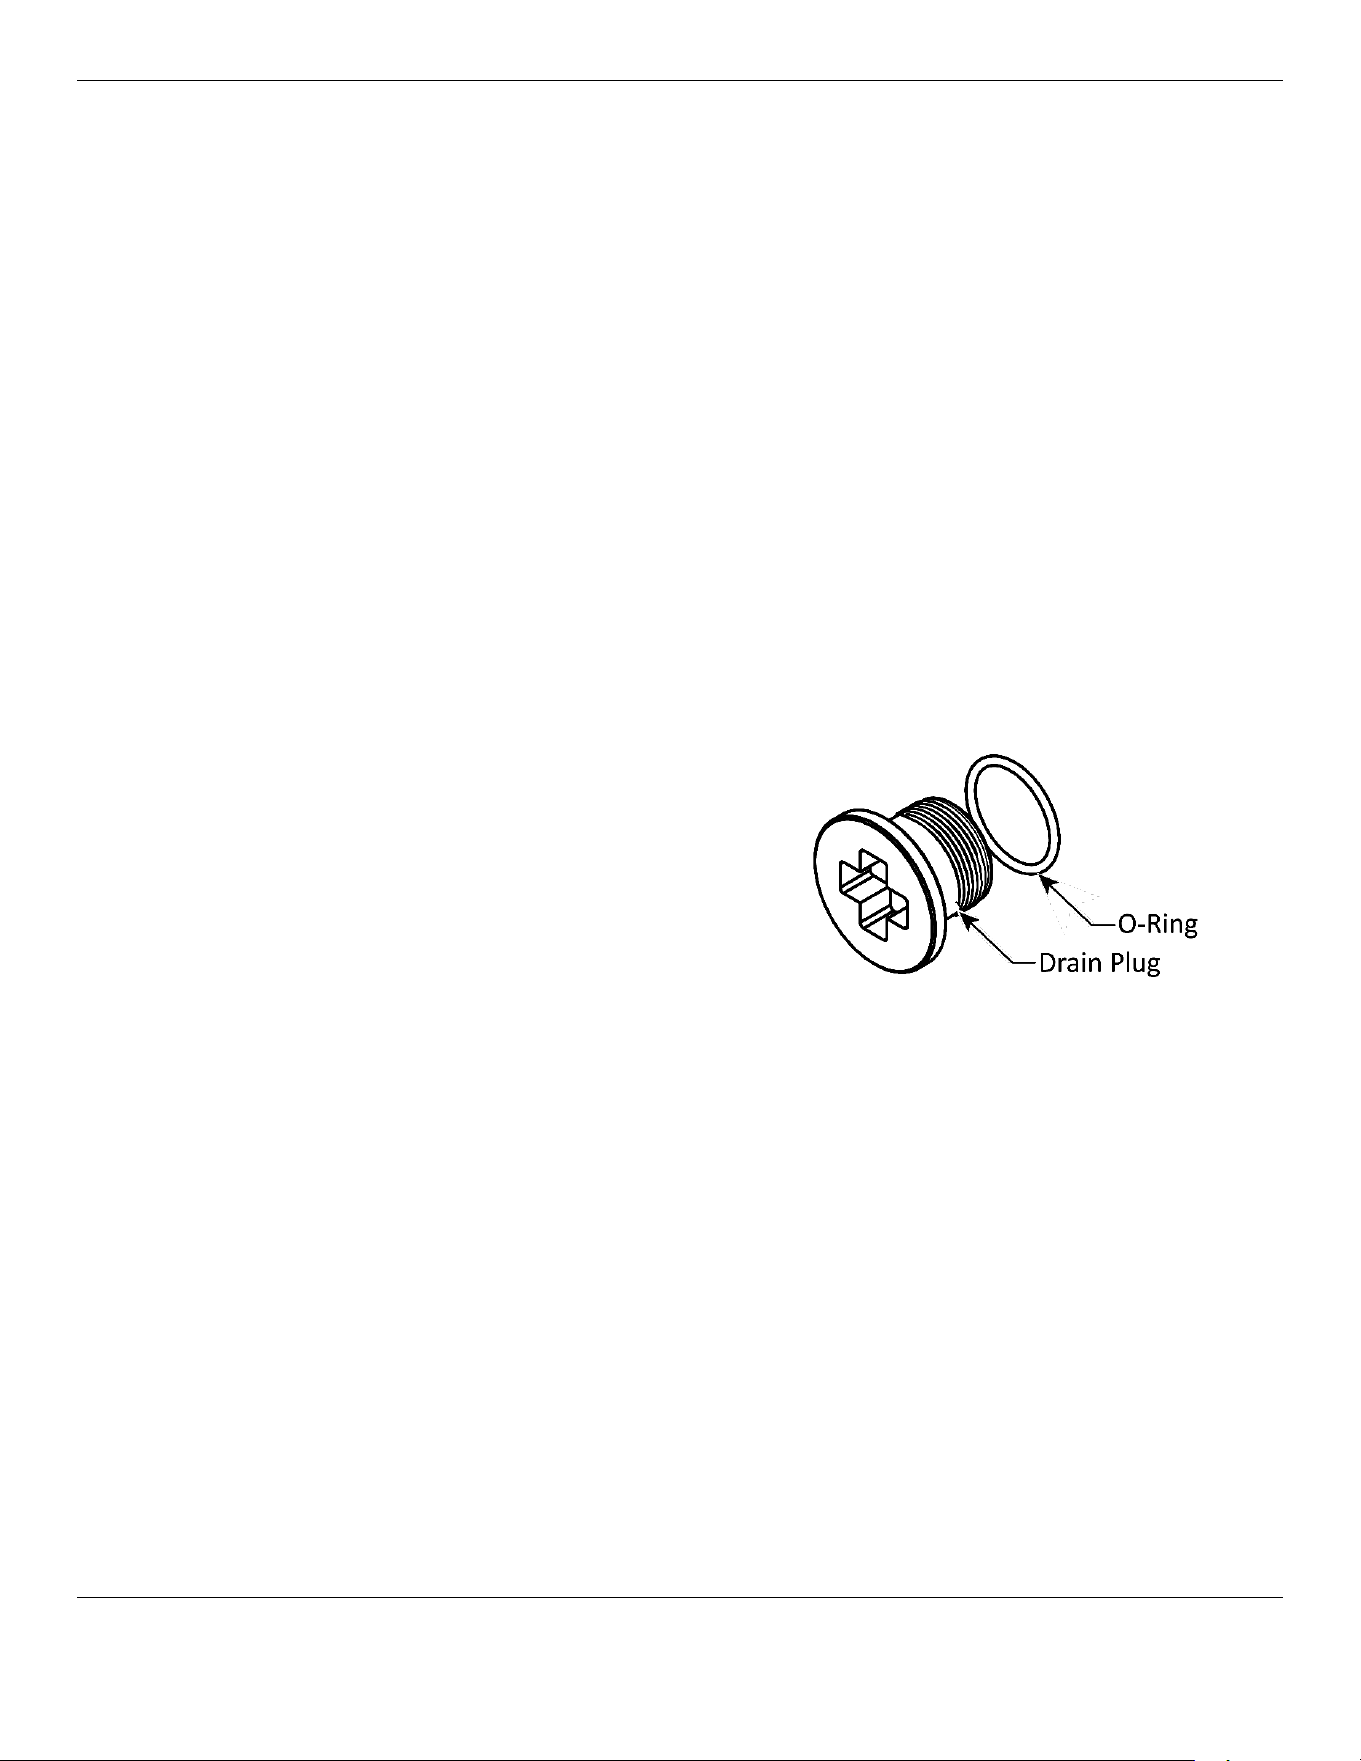
⚠ CAUTION O-Ring must remain on the Drain
Plug. Exercise care when removing
the Drain Plug on the bottom of the
Reservoir. The sealing O-Ring on this
plug may stick to the Housing and
later fall to the ground and possibly
become lost. See figure to the right.
• Weekly
. Drain and clean the Cool Boss Water Reservoir. Dirt and other pollutants from the
environment can settle in the Water Reservoir. Regular cleaning can remove these contaminants
and reduce the build-up of minerals.
• Monthly
. Check the GFCI function monthly. Test the GFCI on the Cool Boss Power Cord once a
month to ensure it is working and protecting you from electric shock.
• Monthly
. Clean the outside of the unit. Use no harsh chemicals. Unplug the Cool Boss and wipe
down the outside of the unit with a damp cloth. The frequency of use and the cleanliness of the
environment will affect the frequency of cleaning required.
⚠ WARNING Do not spray the Cool Boss with water. The electronics are not sealed. Water can
damage the motor and/or other parts of the electrical system.
• Monthly
. Empty the Reservoir and clean it.
• Monthly
. Remove the Media and clean as detailed below. Dirt and other pollutants from the
environment will become caught in the Media. Clean it regularly to keep the air fresh and clean.
⚠ WARNING Do not operate your Cooler if you find maintenance issues; instead, remove it from
service. Assistance with your Evaporative Cooler is available from your dealer, by calling
Cool Boss at (805) 933-9970, or by emailing
support@coolboss.com. You may
Cool Boss Evaporative Air Cooler 32 P/N 5900274 —Rev. A6—August 2024
also contact Cool Boss for parts replacement (please have the serial and model
numbers of your unit available).
To clean the Reservoir:
The Media must be dry before removing. If the Media is wet, run the Fan without running the
Cooling Pump until the media is dry.
Turn off and then unplug the Cool Boss.
⚠ WARNING Disconnect the unit from its power source before performing any maintenance!
Verify the unit is locked out from power and cannot be energized while maintenance
is being performed. If your organization has Lockout/Tagout policies, make sure to
implement them before servicing the Cool Boss.
Remove and retain the three Splash Guard Fasteners securing the Media Holder Splash Guard and
then remove the Splash Guard.
Remove the center Media first by pulling the top of the Media away from the Cool Boss. You may
need to apply a little pressure to get the Media out. Take care to not damage the Media.
Remove the remaining Media in the same manner.
Remove the plug at the bottom of the reservoir and drain water into a container.
⚠ CAUTION Take care to retain the O-Ring that provides a seal between the Plug and the
Reservoir.
Remove any residual water with rags or a Wet/Dry Vacuum.
Wipe with clean rags and remove any mineral deposits. Use no harsh chemicals.
Refill the reservoir with clean water and replace the Media. The Cool Boss is ready to use.
Tip Cool Boss recommends wearing gloves when handling the Media.
To clean the Media:
The Media must be dry before removing. If the Media is wet, run the Fan without running the
Cooling Pump until the media is dry.
Turn off and then unplug the Cool Boss.
⚠ WARNING Disconnect the unit from its power source before performing any maintenance!
Verify the unit is locked out from power and cannot be energized while maintenance
is being performed. If your organization has Lockout/Tagout policies, make sure to
implement them before servicing the Cool Boss.
Remove and retain the three Splash Guard Fasteners and the Splash Guard.
Remove the center Media first by pulling the top of the Media away from the Cool Boss. You may
need to apply a little pressure to get the Media out. Be careful not to damage the Media.
Remove the remaining Media in the same manner.
Rinse the Media under running water to clean and use a soft brush or rag to gently remove
accumulated dirt. Do not use highly pressurized water or air to clean the Media.
Cool Boss Evaporative Air Cooler 33 P/N 5900274 —Rev. A6—August 2024
Dry the Media before attempting to reinstall in the Cool Boss.
Put the Media back in place. Install the bottom first and then the top. Apply gentle pressure.
To store the Cool Boss:
1. Dry the Media or verify it is dry.
2. Drain the Reservoir and wipe clean and dry.
3. Unplug or disconnect from power and secure the electrical cord.
4. Cover the Cool Boss to prevent dust build-up and store in a dry, protected area.
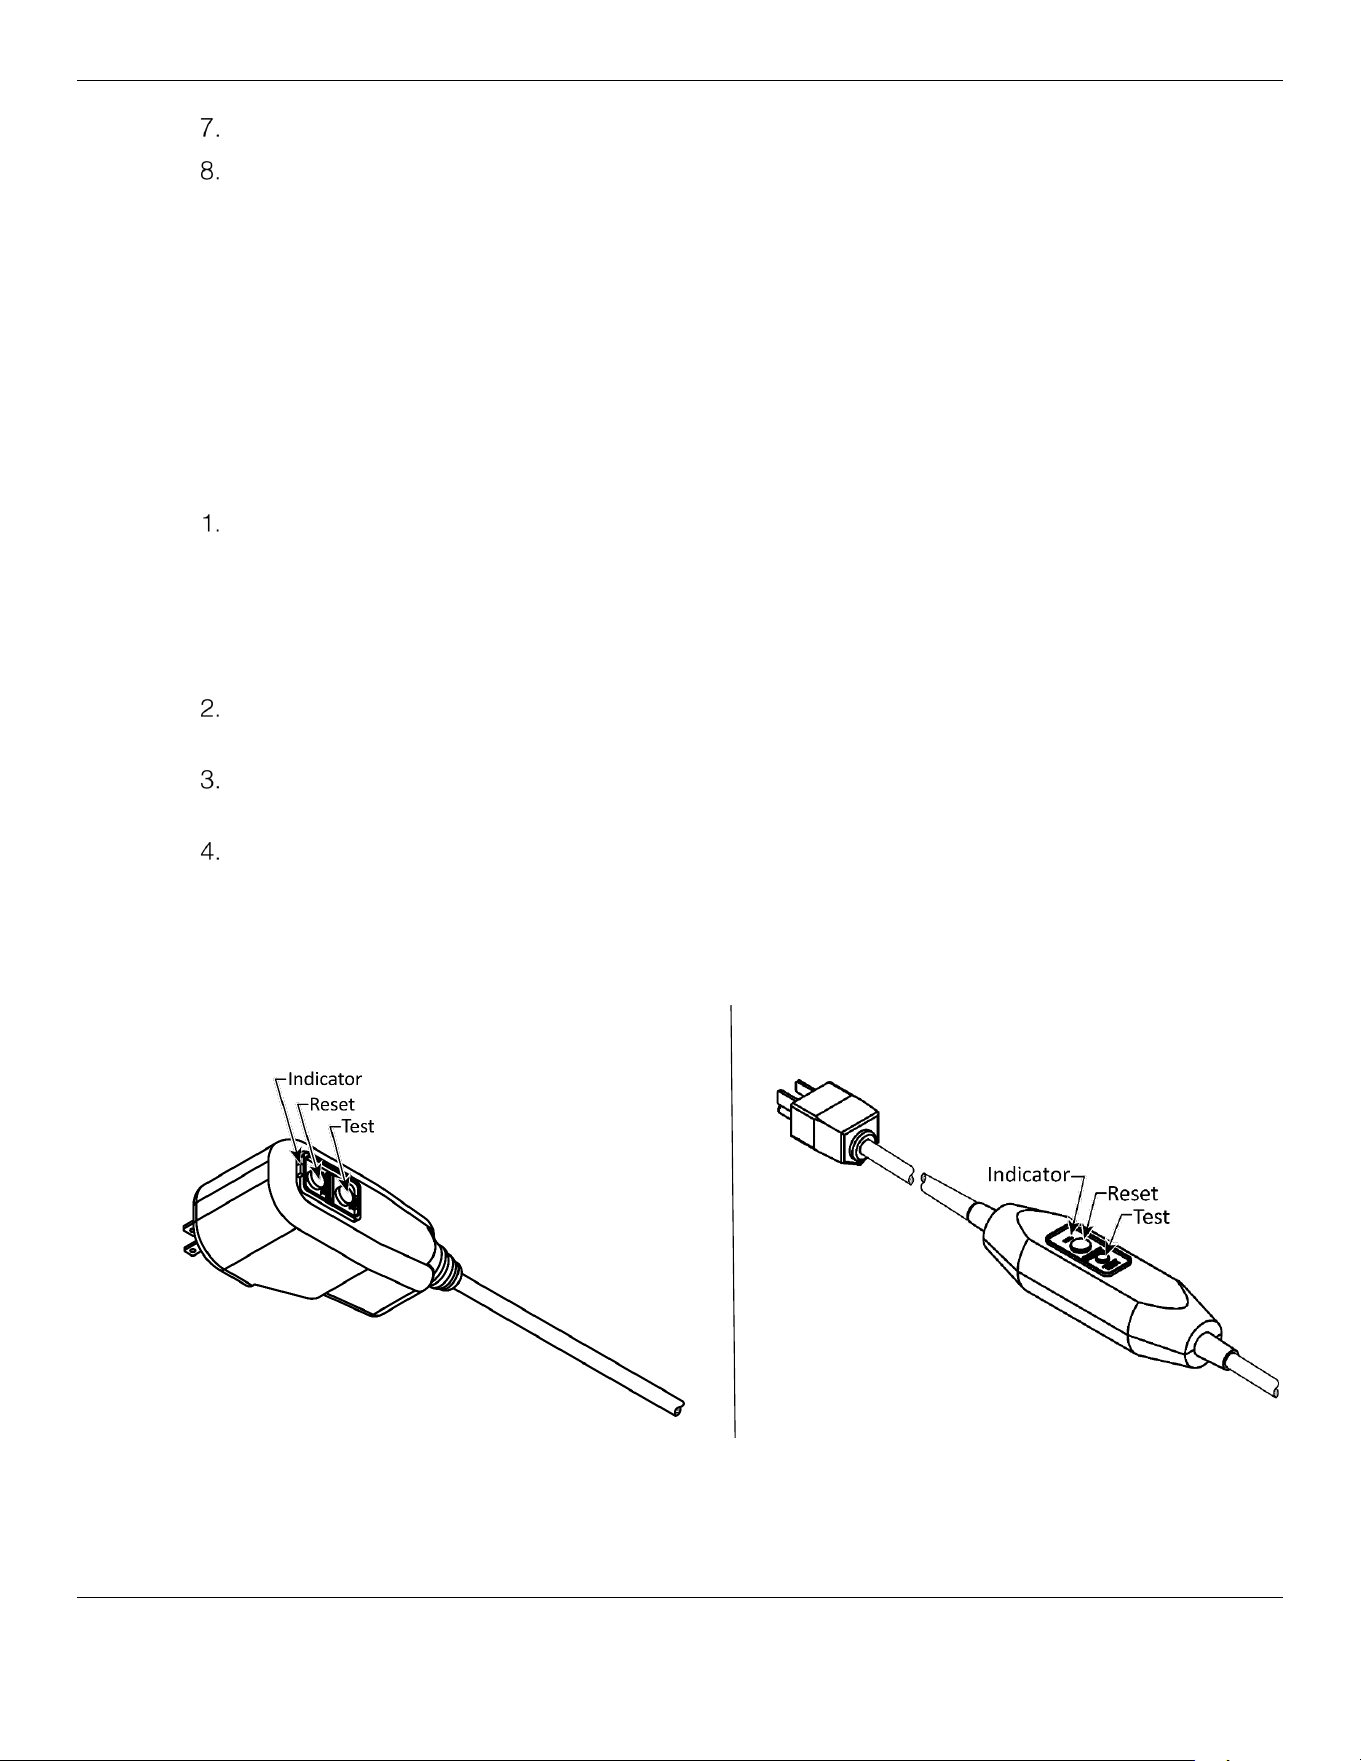
To test the GFCI incorporated into the Cool Boss Power Cord:
Plug the cord into a properly grounded wall outlet. The indicator should be illuminated. Refer to the
figure below.
a. If not, check the wall outlet for power.
b. If power is present at the outlet and not from the cord, the Power Cord or the GFCI is defective
and requires replacement.
Press the small Test button. The indicator should go out and no power should be available at the
Cool Boss.
Press the Reset Button and the Indicator should be illuminated again. The Cool Boss should now
be providing power and ready for use.
If the GFCI does not function, take the unit out of service, contact your dealer or Cool Boss
Support at
coolboss.com/support, via email at support@coolboss.com, or by phone at
(805) 933-9970.
⚠ WARNING Do not use the Cool Boss if the GFCI fails this test.
CB-12SL, CB-14SL (110V) Plug Type CB-26SL (110V) Inline Type
⚠ WARNING Do not operate your Cooler if you find maintenance issues; instead, remove it from
service, then assistance with your Evaporative Cooler is available from your dealer,
by calling Cool Boss at (805) 933-9970, or by emailing
support@coolboss.com.
Cool Boss Evaporative Air Cooler 34 P/N 5900274 —Rev. A6—August 2024
Troubleshooting
⚠ WARNING This Evaporative Cooler uses electrical energy; if your organization has
Lockout/Tagout policies, make sure to implement them before performing any
Troubleshooting.
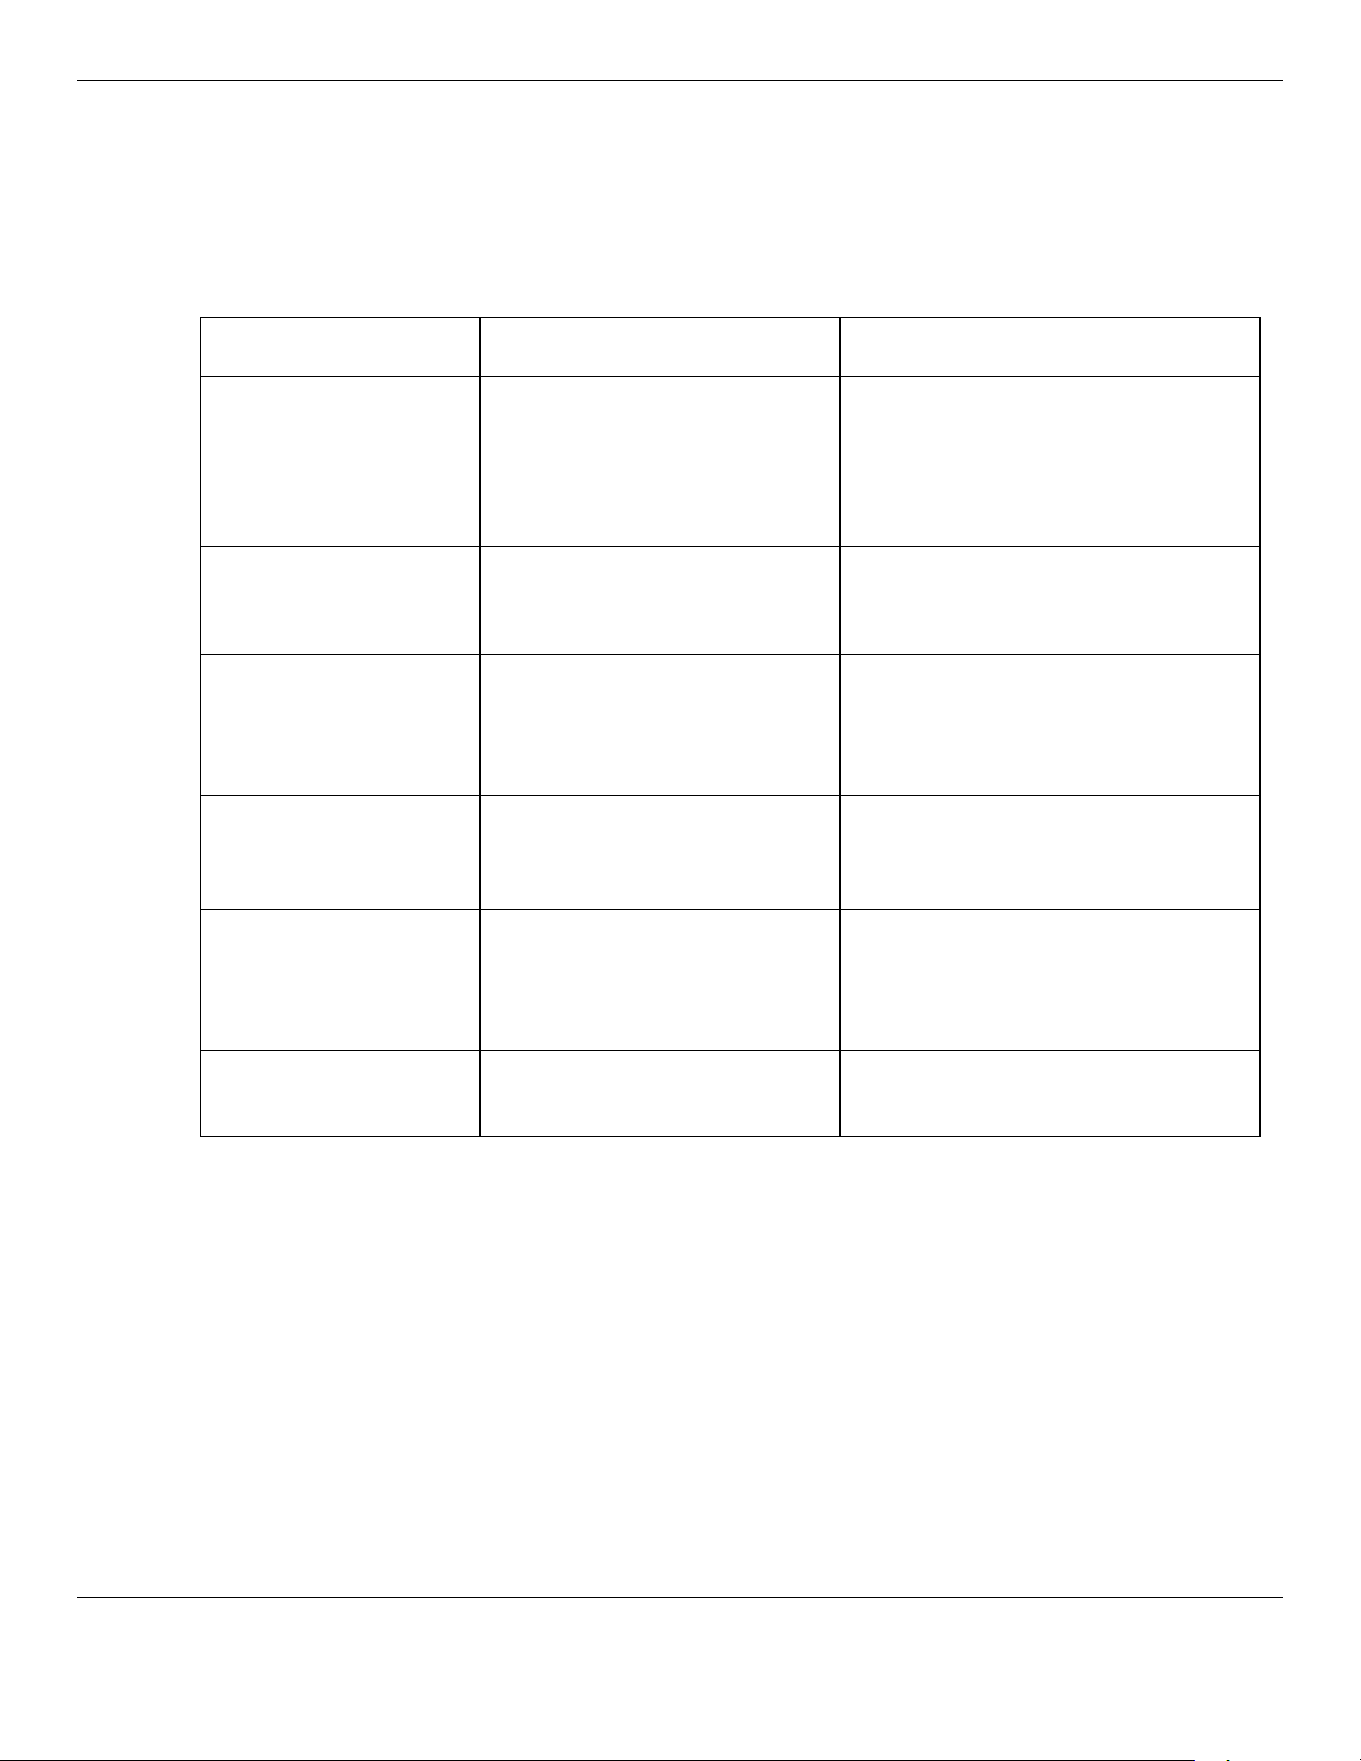
Issue Probable Cause Action to Take
Control Panel
inoperative.
No power.
Circuit Breaker open.
Control Panel component
failure.
– Check the power supply.
– Reset the circuit breaker.
– Replace the panel.
Unit not working. No power.
– Power cycle the unit on-off.
– Verify the power supply is
functional.
Fan not working or
moving slowly.
Fan is stuck.
Fan is broken.
Brownout or low voltage.
– Check for blockage and remove.
– Repair fan.
– Correct voltage supply issue.
Motor not working. Control Panel is not working.
Motor failure
– Replace Control Panel.
– Replace motor.
Drain leaks. Drain Plug is not tight
Drain Plug is cross-threaded.
O-Ring is missing
– Tighten Drain Plug.
– Replace Plug if thread is ruined.
– Replace O-Ring.
Fan dripping water.
Water plumbing is
disconnected or leaking.
– Check internal water connections
and tubing.
Assistance with your Cool Boss is available from your dealer, by calling Cool Boss at
(805) 933-9970, or by emailing support@coolboss.com. You may also contact Cool Boss for
parts replacement (please have the serial number and model number of your unit available).
Cool Boss Evaporative Air Cooler 35 P/N 5900274 —Rev. A6—August 2024
Float Switch Reset Procedure
The Cool Boss Pump will be damaged if allowed to operate without water. A Float Switch incorporated
into the pump prevents activation when the reservoir has emptied or is close to empty. This switch
must be reset through the procedure described below before operating the Cool Boss.
To Reset the Float Switch:
Verify the Cool Boss is disconnected from power.
Fill the reservoir with water to its maximum capacity. This will force the Float Switch to reset.
NOTE! Partially filling the reservoir will not reset the Float Switch.
• The reservoir may be filled through the water inlet connector using a standard 3/4” hose. A
Reservoir Float Valve will close before the maximum fill level is exceeded.
• Alternatively, the reservoir may be filled manually through the inlet found below the Reservoir Fill
Level Guage.
Remove and dry any spilled water around the Cool Boss.
Connect the Cool Boss Evaporative Cooler to power.
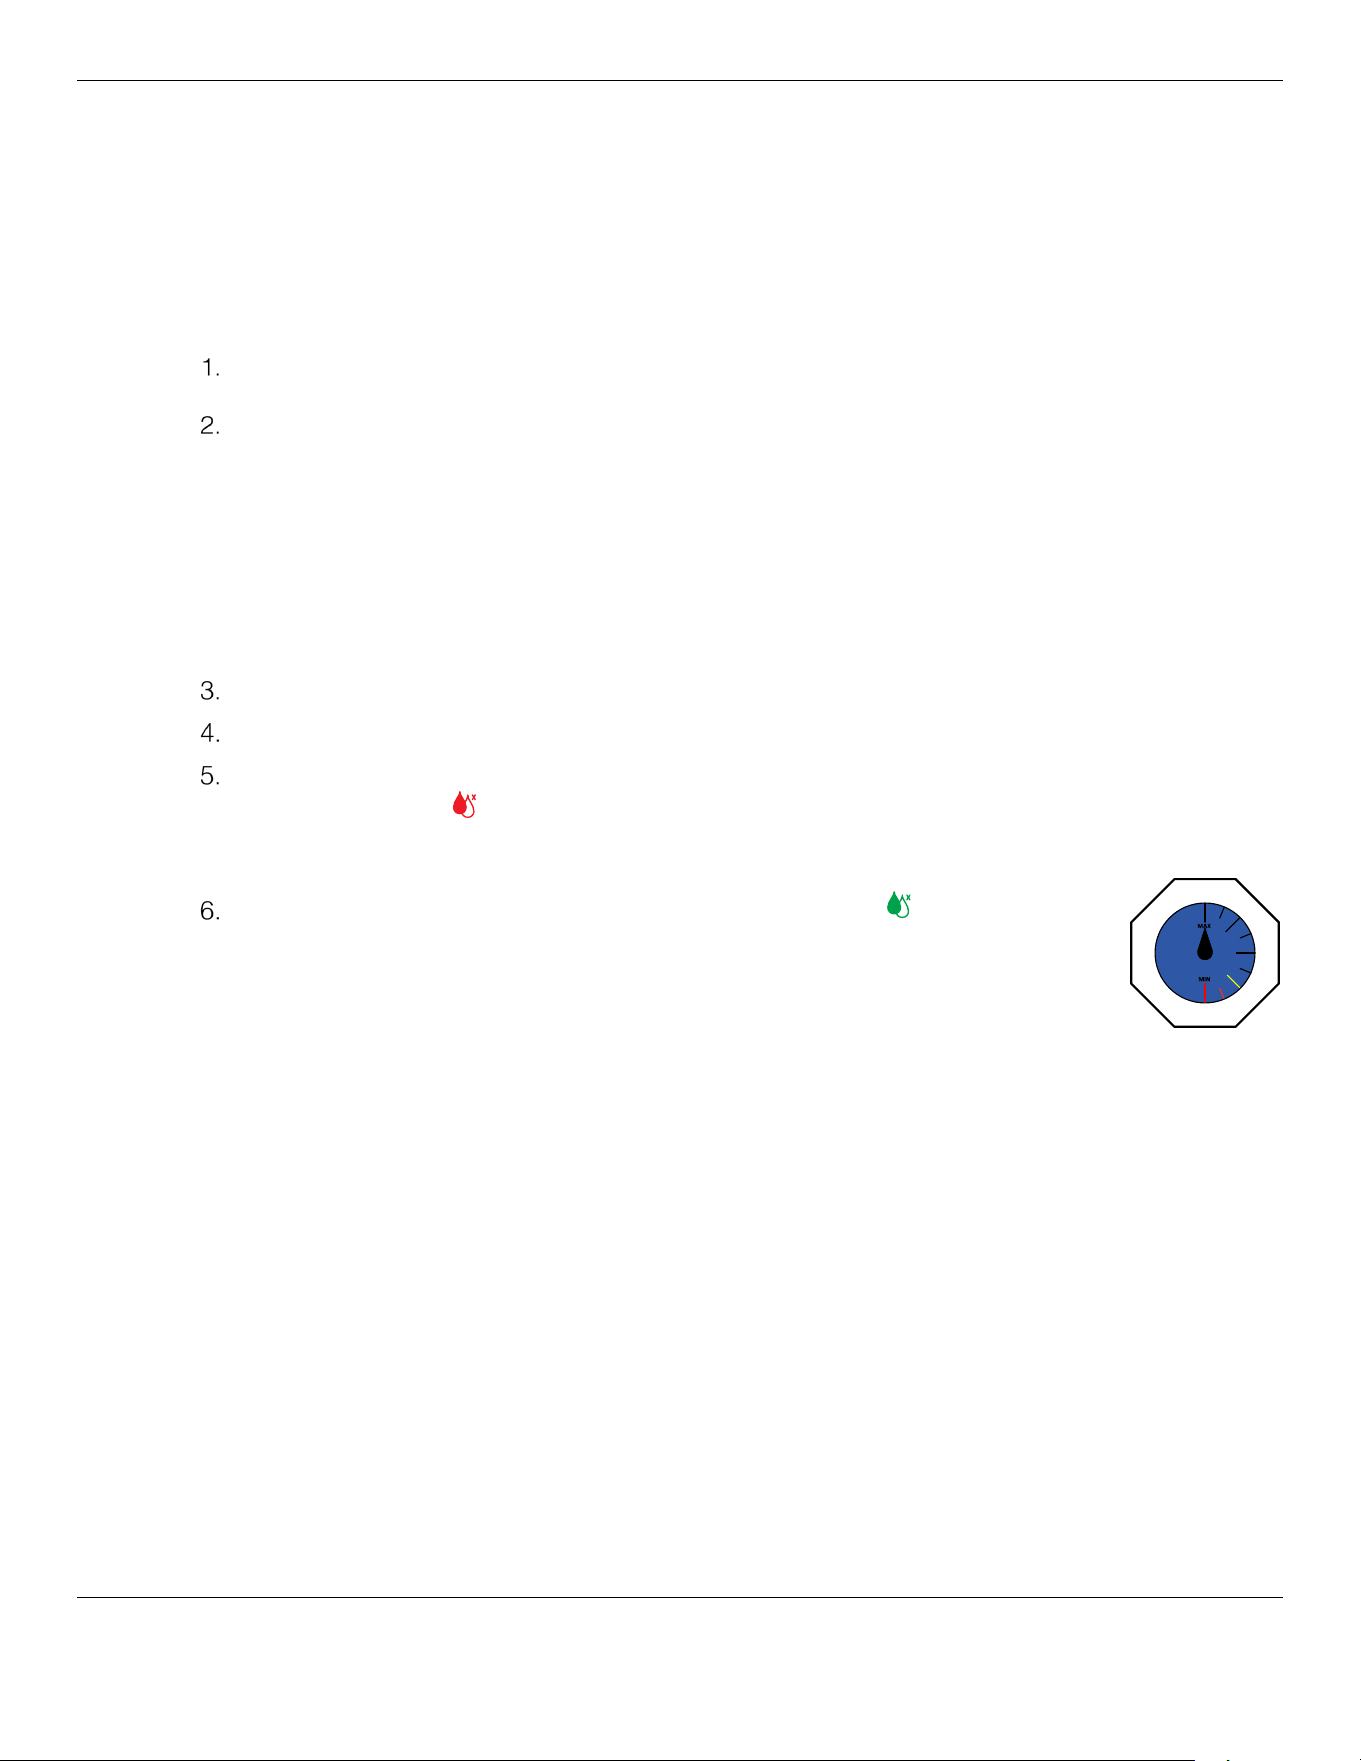
Press the Power Button. If the Control Panel indicates a low water condition with an illuminated red
water drop symbol and the Reservoir Fill Gauge indicates some level below Maximum, the
pump will not activate. Continue to add water.
The Float Switch is reset when the green water drop symbol is illuminated on
the Control Panel, the Reservoir Fill Level Gauge indicates MAX., and the Cooling
Pump will function when the Cooling Button is pressed.
IMPORTANT! The Float switch will NOT reset if the Reservoir is only partially
filled. The Reservoir must be filled to its maximum to reset the Float
Switch.
Assistance with your Cool Boss is available from your dealer, by calling Cool Boss at
(805) 933-9970, or by emailing support@coolboss.com. You may also contact Cool Boss for
parts replacement (please have the serial number and model number of your unit available).
Cool Boss Evaporative Air Cooler 36 P/N 5900274 —Rev. A6—August 2024
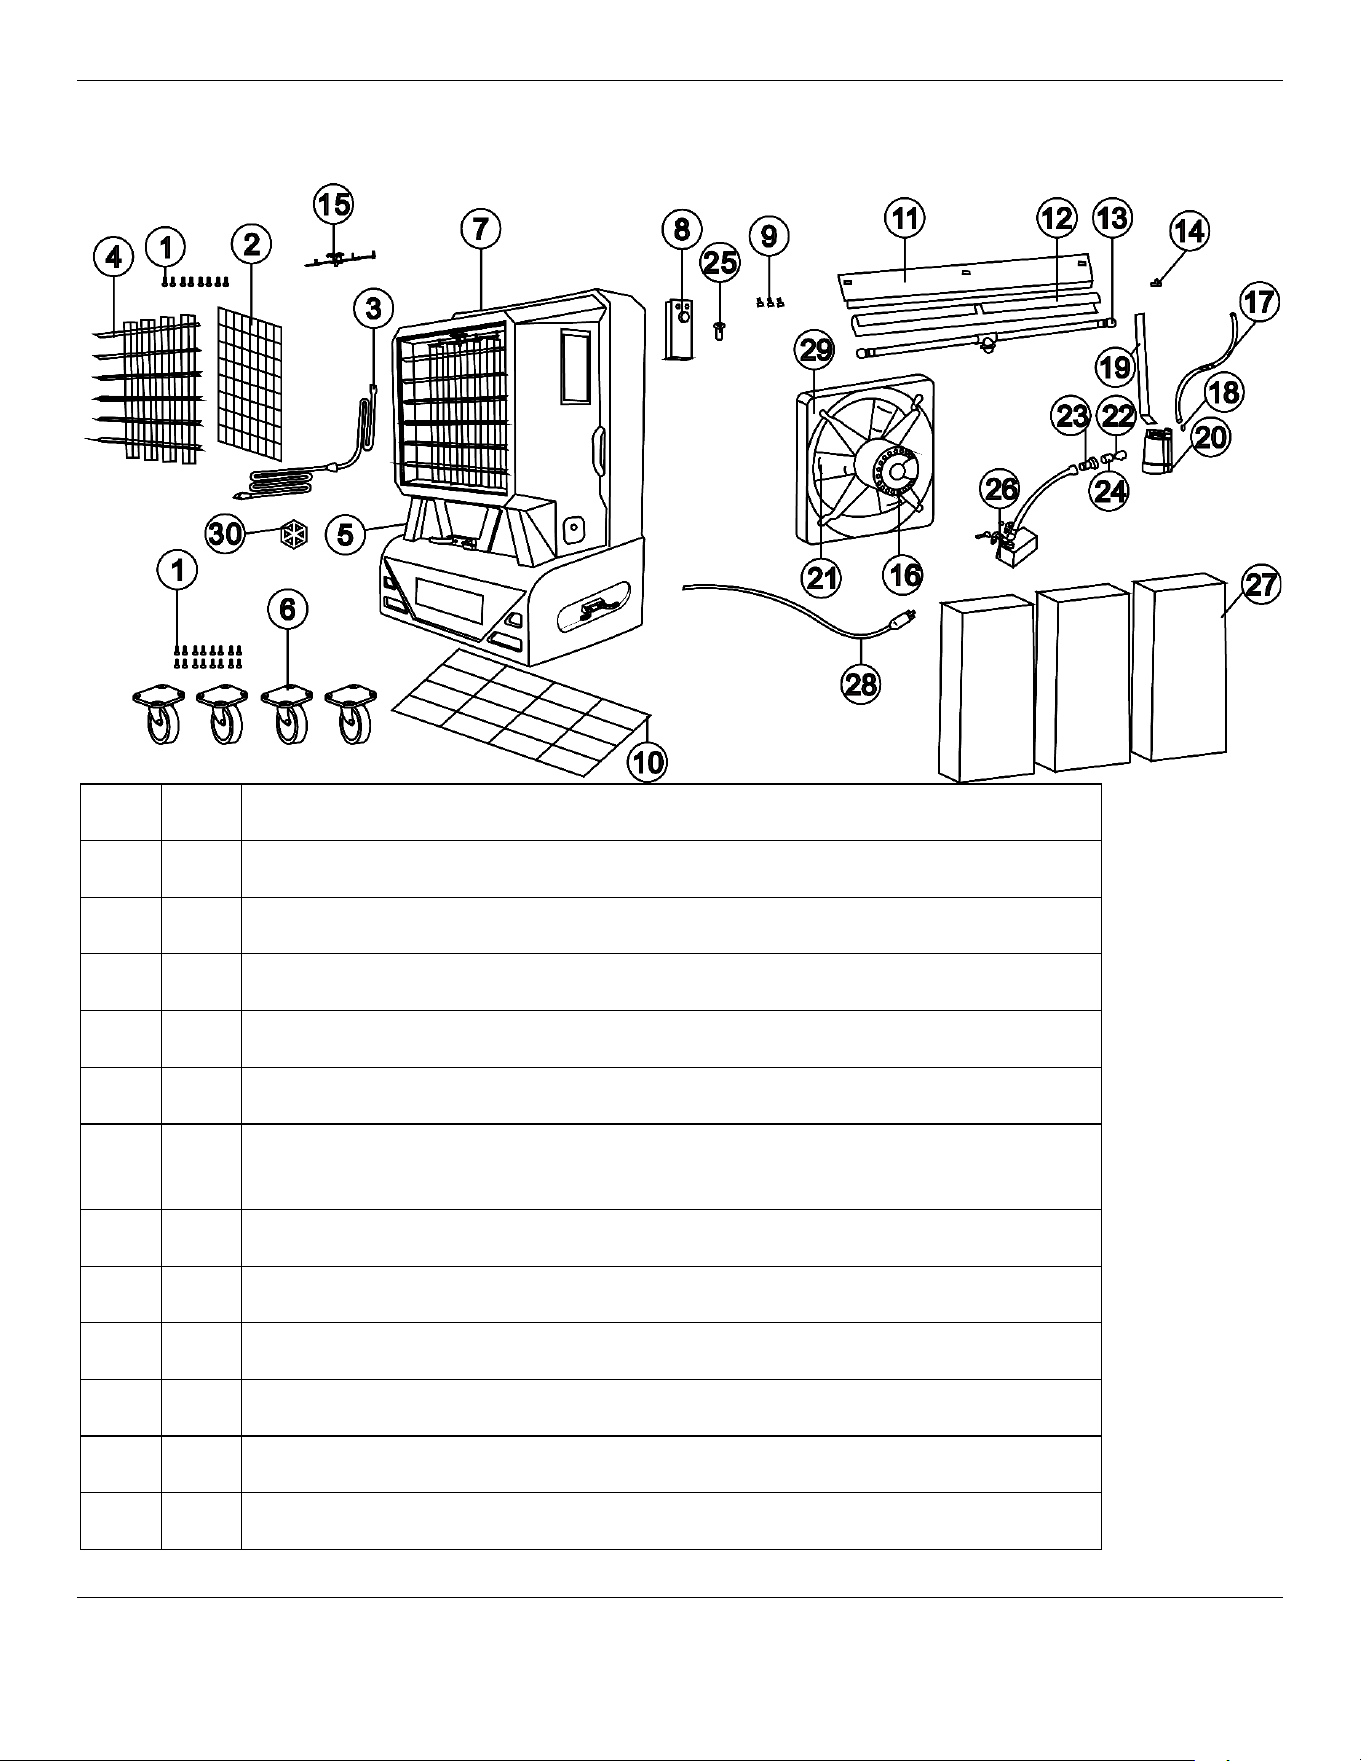
Parts Diagram
Item Qty. Description
1 32 Screw
2 1 Grill, Protective Fan Blade
3 1 Internal Electrical Cord: CB-12, CB-14, CB-26 (connects internal components).
4 1 Swing Louver Assembly
5 1 Fill Cap
6 1 set
Casters Set; CB-12SL/SLH, CB-14SL/SLH, CB-26SL/SLH (4-each / 4" size
specific)
7 1 Housing, Cooling Shell
8 1 Control Panel CB-12SL/SLH, CB-14SL/SLH,
8 1 Control Panel CB-26SL/SLH
9 3 Fasteners (Splash Guard)
10 1 Caster Support CB-12SL/SLH, CB-14SL/SLH, CB-26SL/SLH
11 1 Media Holder Splash Guard
Cool Boss Evaporative Air Cooler 37 P/N 5900274 —Rev. A6—August 2024
Parts (continued)
Item Qty. Description
12 1 Bonnet, Spray Bar
13 2 Spray Bar Endcap; CB-12, CB-14, CB-26 (all SL/H models) 2 per unit.
14 1 Tubing Joint
15 1 Control Assembly, Swing Louver
16 1 Motor, Variable Speed CB-12SL/SLH, CB-14SL/SLH, CB-26SL/SLH
17 1 Hose, Water Supply
18 1 Clamp, Wire Spring
19 1 Bracket, Submersible Pump Mount
20 1 Submersible Pump; CB-12SL (110V)
20 1 Submersible Pump; CB-14SL (110V)
20 1 Submersible Pump; CB-26SL (110V)
21 1 Blade, Fan CB-12SL/SLH, CB-14SL/SLH, CB-26SL/SLH
22 1 Bolt, Float
23 1 Regulator, Inlet Water
24 1 Adapter, Hose Inlet
25 1 Circuit Breaker
26 1 Water Inlet Shut-Off Valve (Float Valve)
27 3
Media Pads; With Black Resin Face, CB-12SL/SLH, CB-14SL/SLH,
CB-26SL/SLH
28 1
Electric Power Cord w/ GFCI; CB-12SL, CB-14SL, CB-26SL/ (voltage specific
with 110v plug attached)
29 1 Shroud, Fan CB-12SL/SLH, CB-14SL/SLH, CB-26SL
30 1 Valve, Flow Control
Cool Boss Evaporative Air Cooler 38 P/N 5900274 —Rev. A6—August 2024
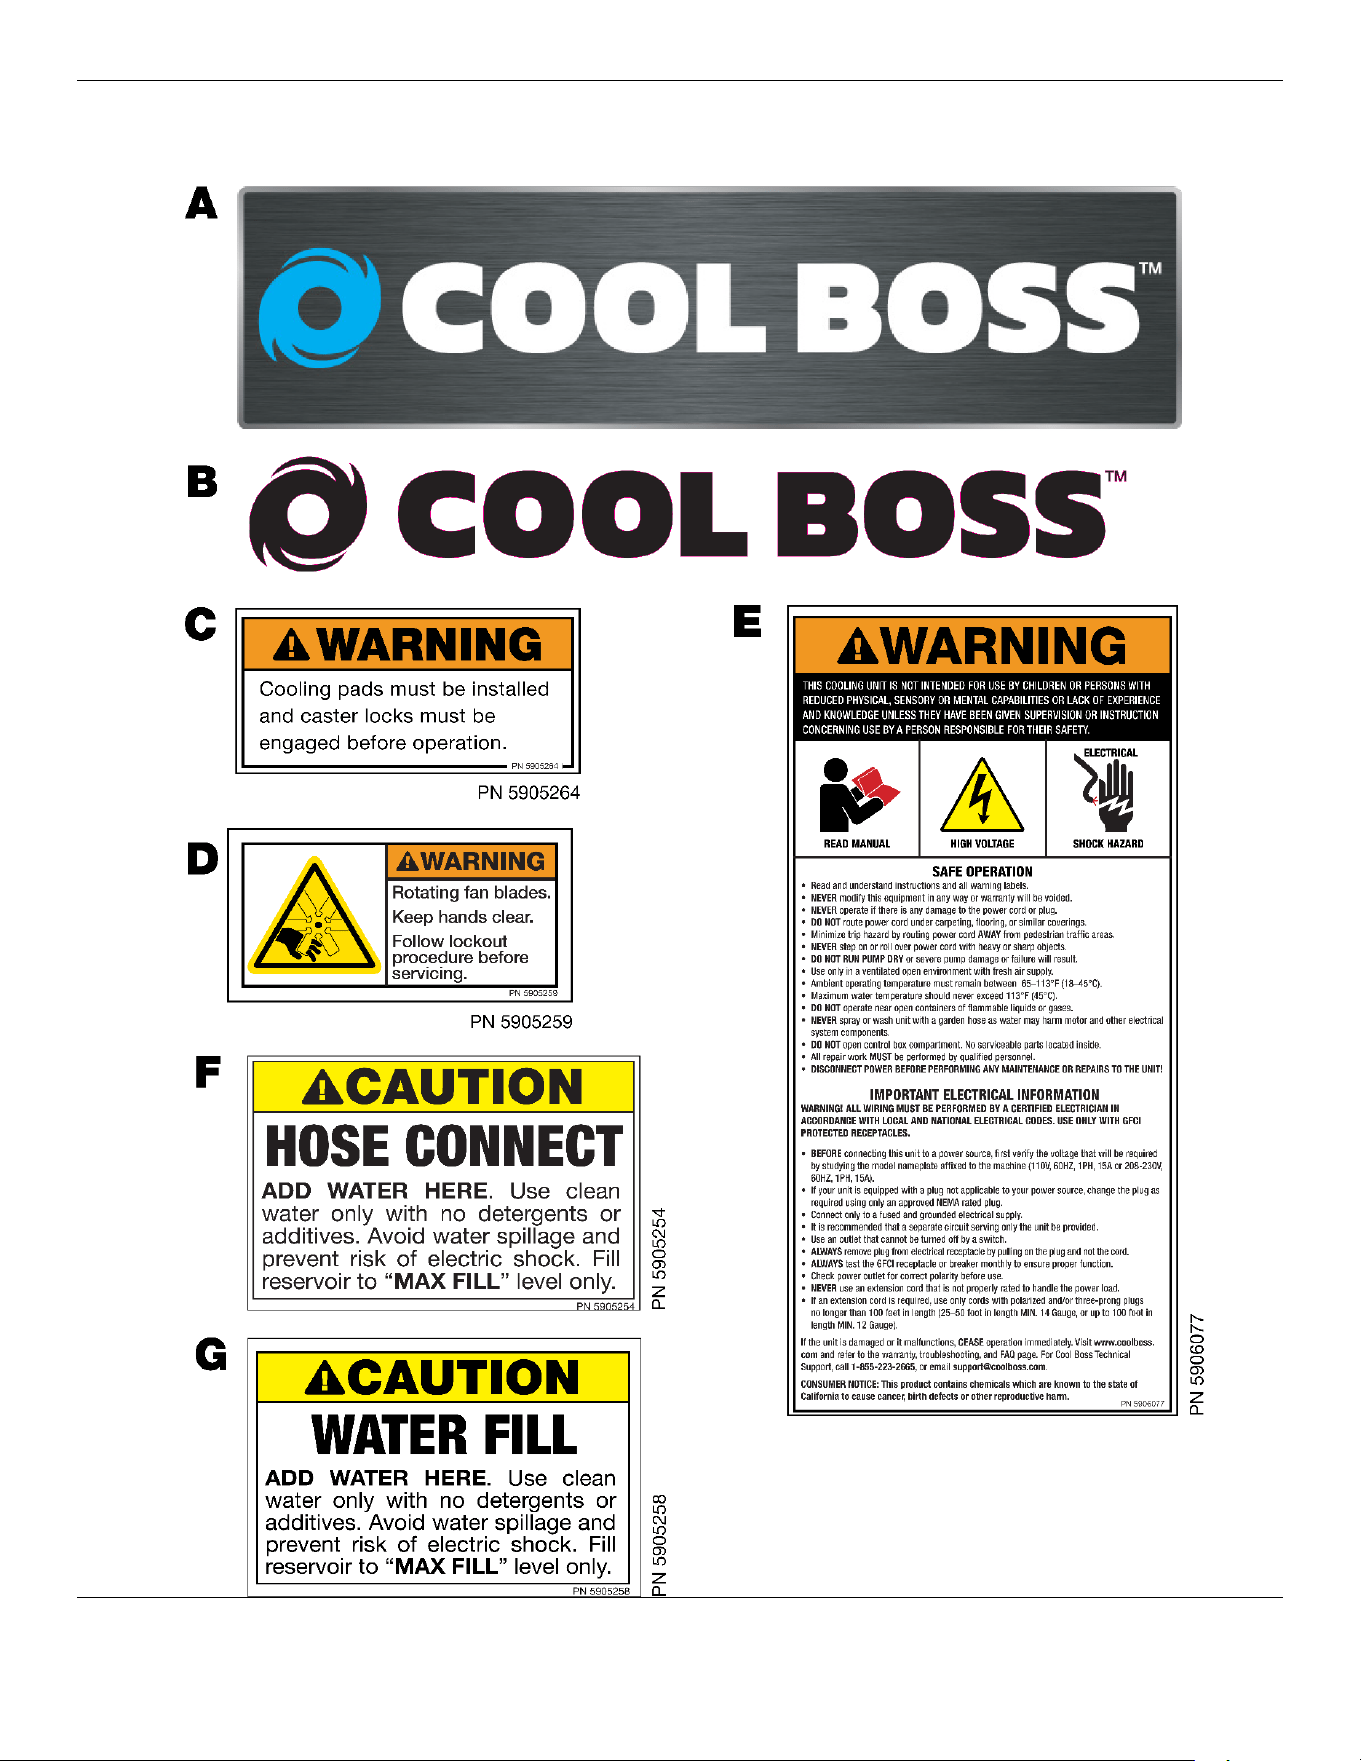
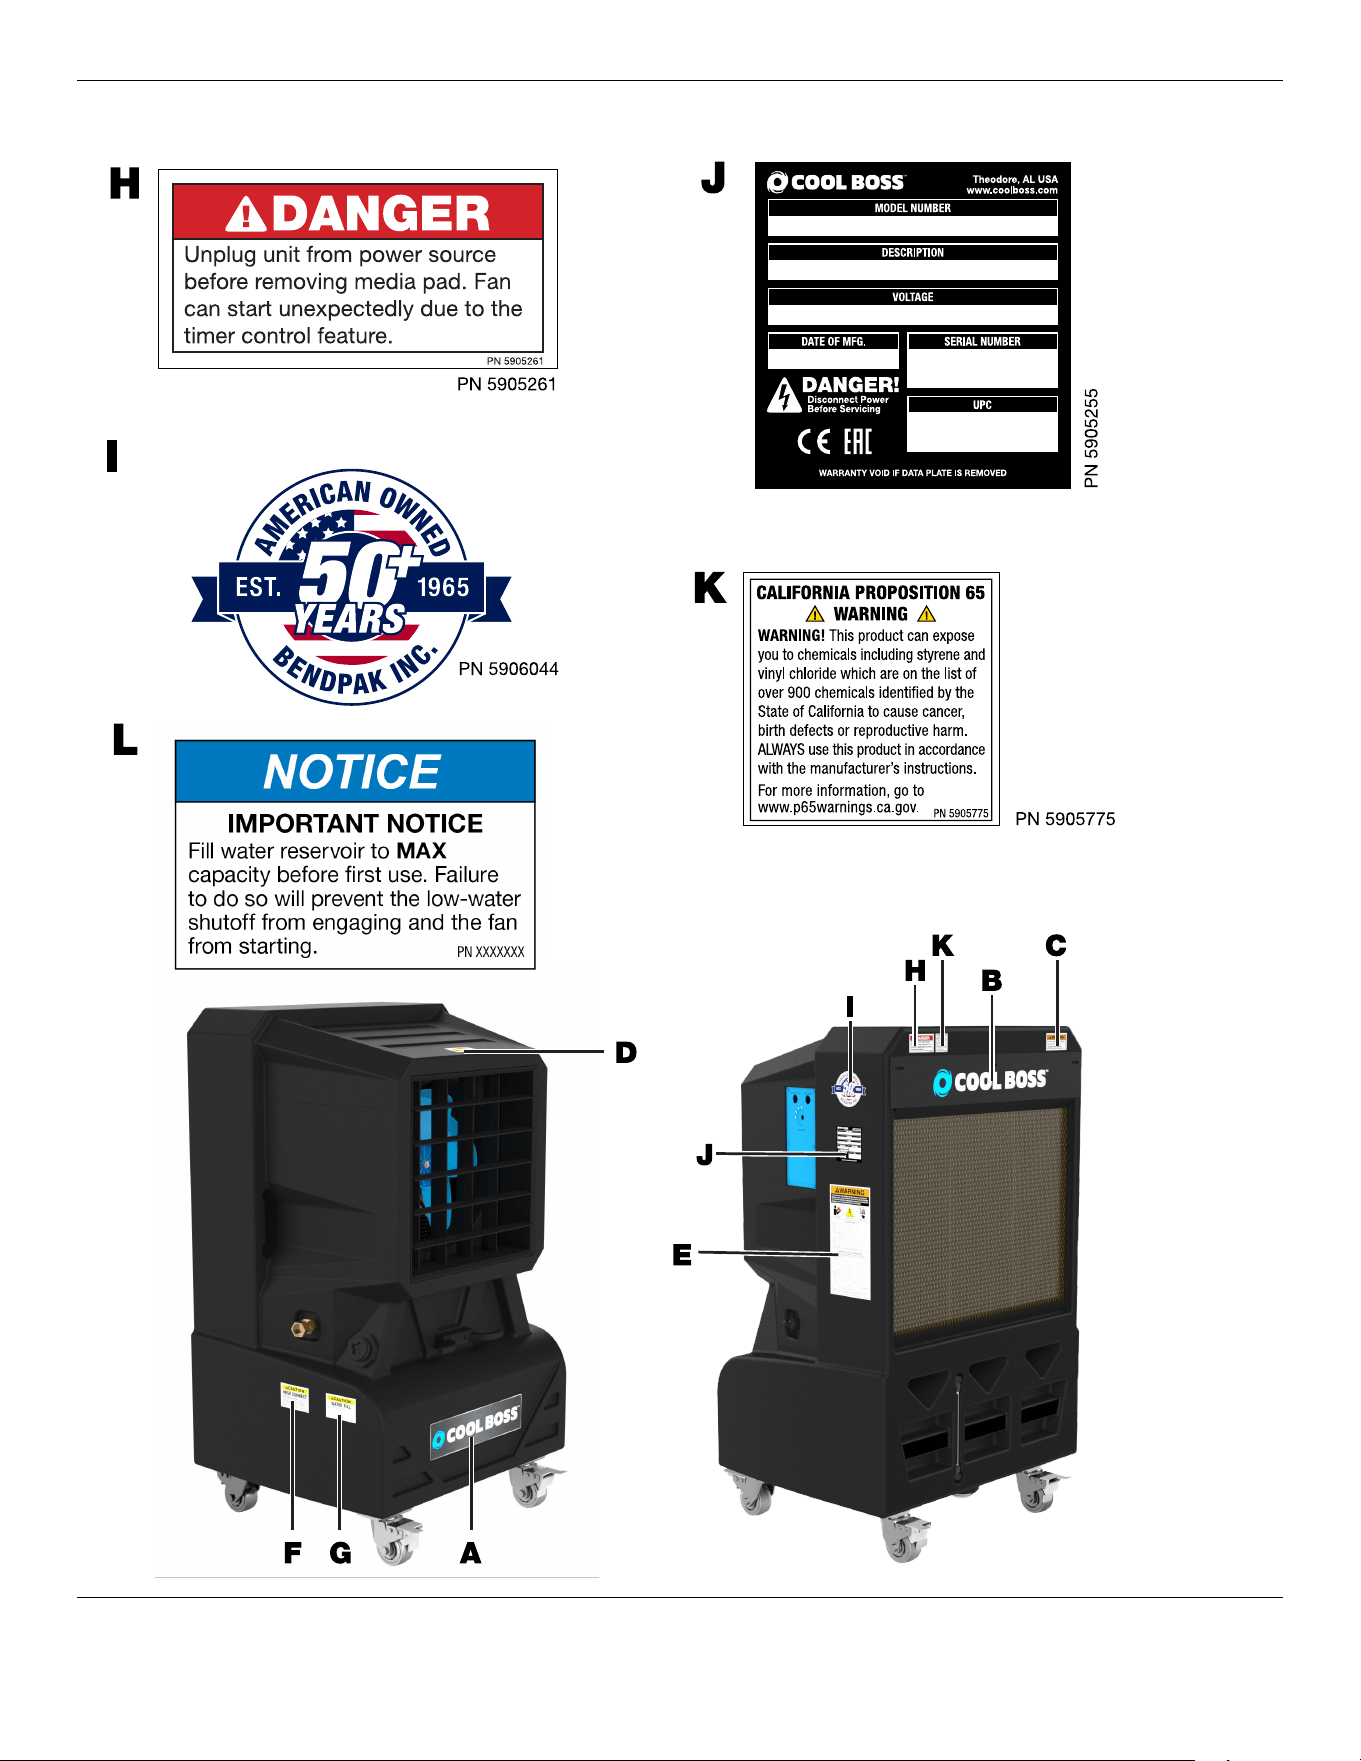
Labels
Cool Boss Evaporative Air Cooler 39 P/N 5900274 —Rev. A6—August 2024
Cool Boss Evaporative Air Cooler 40 P/N 5900274 —Rev. A6—August 2024
Maintenance Log
Cool Boss Evaporative Air Cooler 41 P/N 5900274 —Rev. A6—August 2024
Maintenance Log
Cool Boss Evaporative Air Cooler 42 P/N 5900274 —Rev. A6—August 2024
Maintenance Log
Cool Boss Evaporative Air Cooler 43 P/N 5900274 —Rev. A6—August 2024
Maintenance Log
5240 Willis Rd.
Theodore, AL 36582 USA
CoolBoss.com
2024 BendPak Inc. All rights reserved.