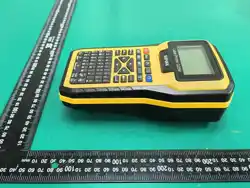
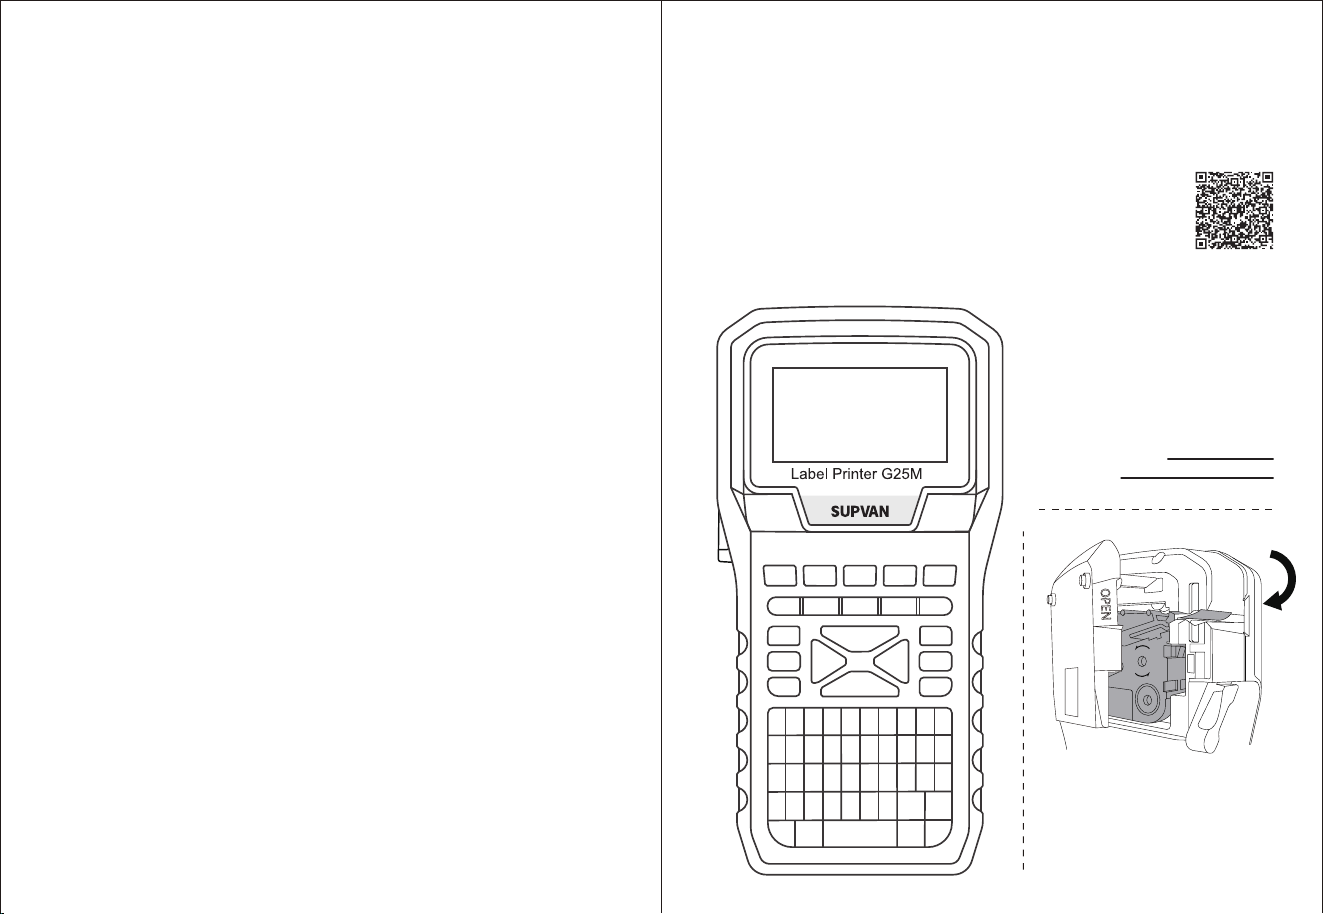
G25M
Label Printer User Manual
Etikettendrucker
Bedienungsanleitung
Scan the QR Code
to download the user manual
to your smartphone
Scannen Sie den QR-Code
um die Bedienungsanleitung auf
Ihr Smartphone herunterzuladen
Website & Customer Service:
us.supvan.com
Industry-leading
thermal transfer printing technology
If you have been using thermal transfer label printers, you
know that they all print labels with a blank tape feed prior to
the prints, wasting the tape and making the whole process
inconvenient.
However, this is not the case with the SUPVAN G-Series label
printer. Being one-of-a-kind in the field, this printer does not
leave any blank space when printing the label. The preci-
sion-printing technology makes sure the prints appear in the
center of the label. Saving tape paper while creating perfect
pieces of thermal labels.
Branchenführende
Thermotransferdruck-Technologie
Wenn Sie Thermotransfer-Etikettendrucker verwendet
haben, wissen Sie, dass alle Etiketten vor dem Drucken mit
einem leeren Bandeinzug gedruckt werden, wodurch das
Band verschwendet wird und der gesamte Vorgang unprak-
tisch wird.
Dies ist jedoch beim SUPVAN Etikettendrucker der G-Serie
nicht der Fall. Dieser Drucker ist einzigartig und druckt also
keine unnötigen leeren Etiketten. Die Präzisionsdrucktech-
nologie sorgt dafür, dass die gedruckten Inhalte in der Mitte
des Etiketts erscheinen. Somit sparen Sie das Etikettenband
und erstellen Sie perfekte Thermoetiketten.
Please find one label tape
stored inside the printer
Ein im Drucker eingesetztes
Etikettenband
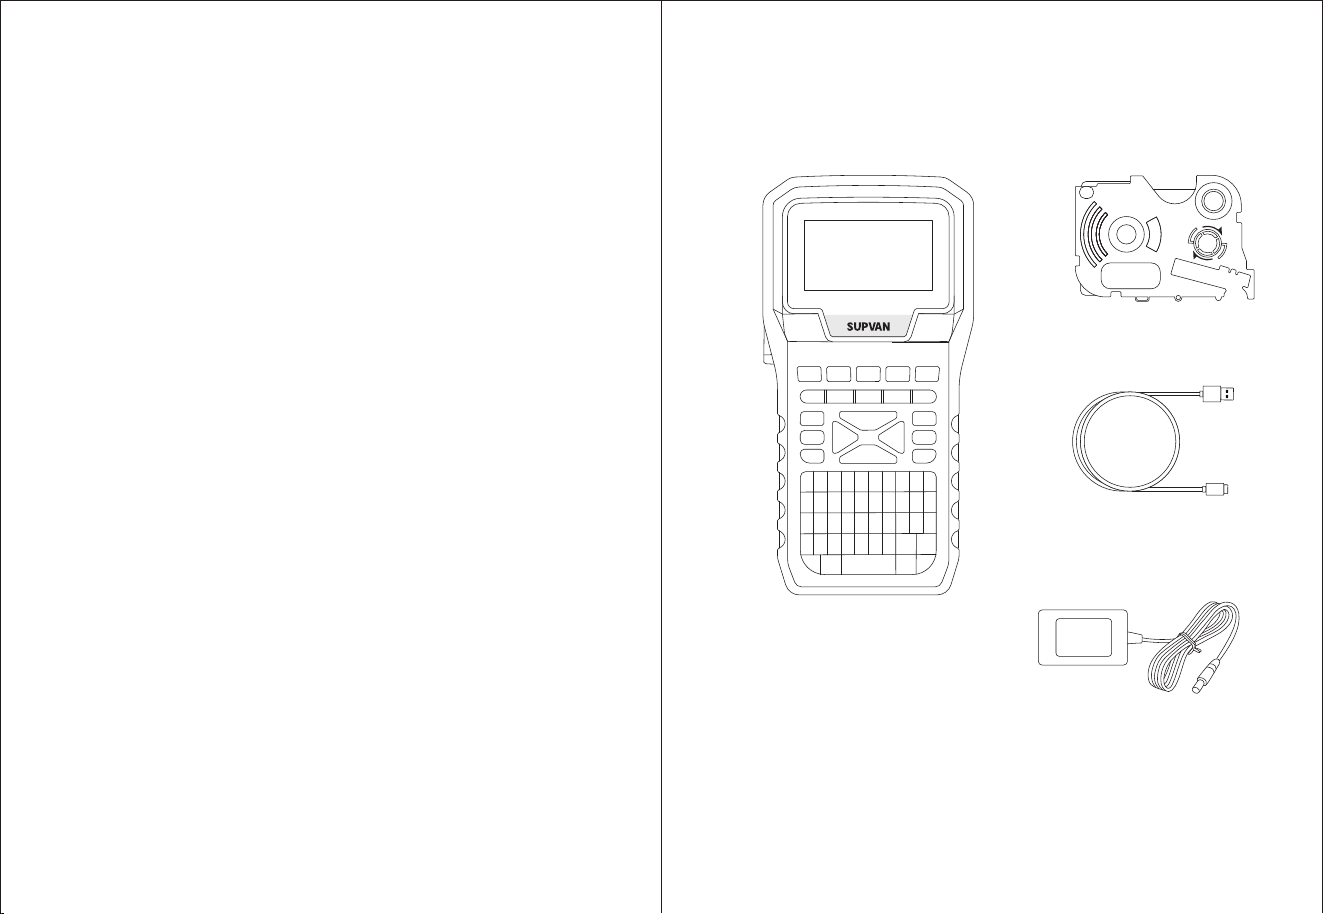
Checklist
Checkliste
1 Printer
1 Drucker
Contents
Inhalt
Checklist
Install the Label Tape
Display Information
Smartphone App & PC Software
Keys
Features
Troubleshooting
Maintenance
Safety Information, FCC & IC Warnings
Warranty / Disclaimer
Product Specifications
Checkliste
Installieren Sie das Etikettenband
Schnittstelleninformationen
Smartphone-App & PC-Software
Tasten
Besonderheiten
Fehlerbehebung
Wartung
Sicherheitsinformationen
Garantie / Haftungsausschluss
Produktspezifikation
English
Deutsch
2
3
4
5
6
9
10
10
11-16
17
18
2
19
20
21
22
25
26
26
27
29
30
2
1 USB-C Cabel*
1 USB-C Kabel*
Label Tape(s)
Etikettenbänder
* For charging and data transfer. See page 5 for computer software.
* Zum Laden und zur Datenübertragung. Informationen zur
Computersoftware finden Sie auf Seite 17.
1 AC Adapter
1 Netzteil
Display InformationInstall the Label Tape
3 4
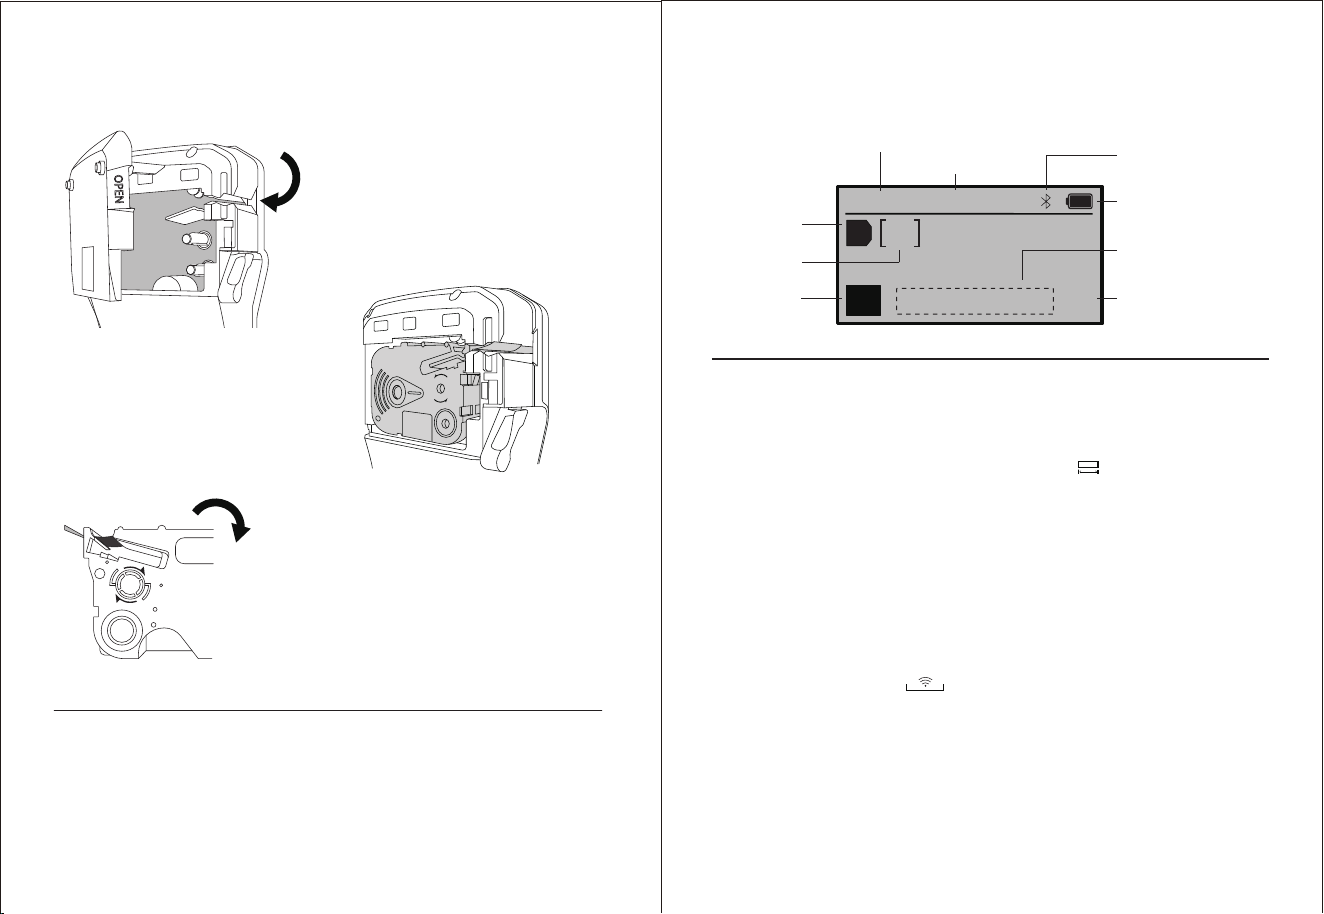
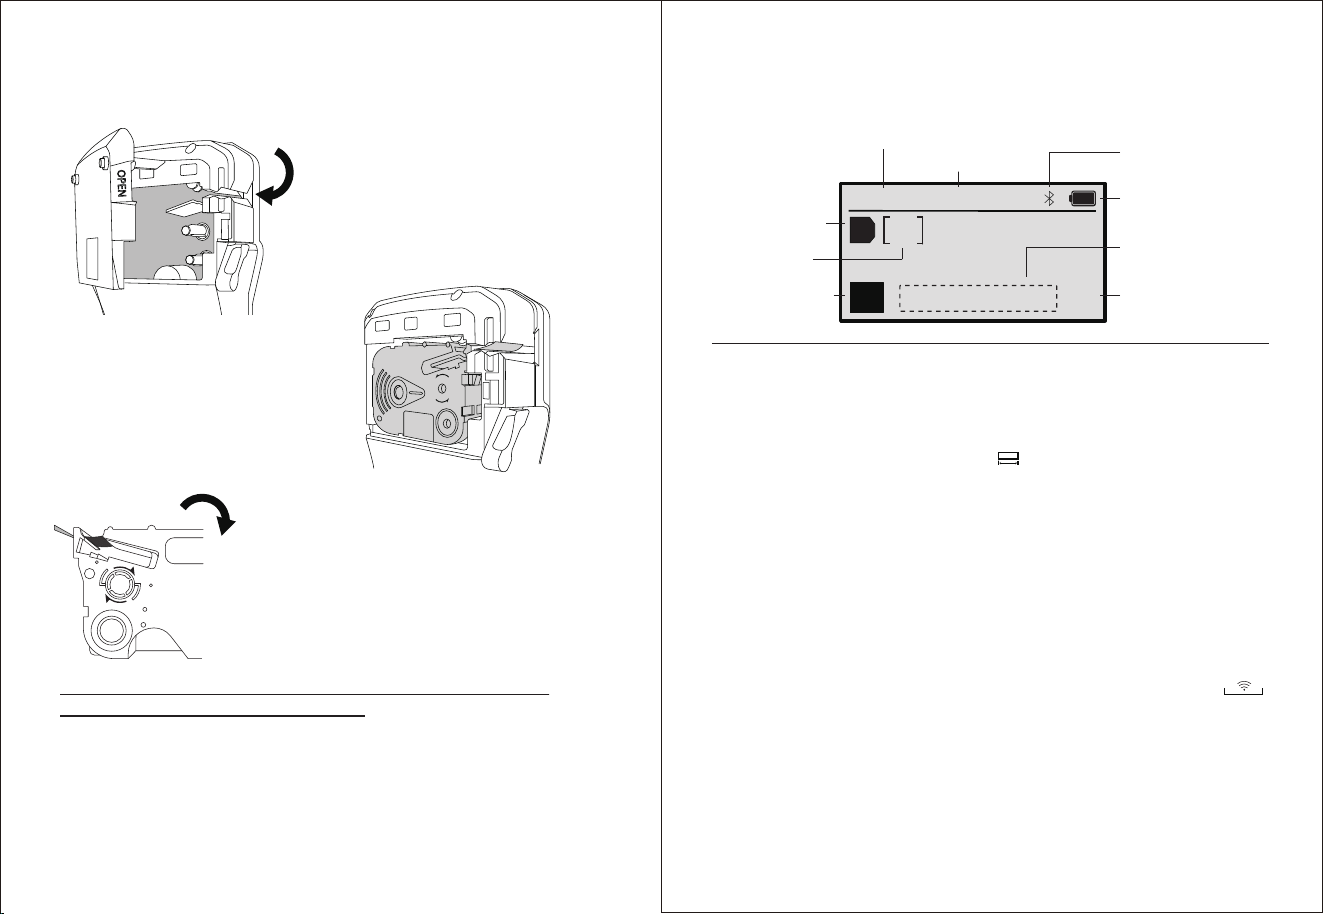
Pull to open the back cover,
and push the label tape
cassette all the way in.
Please fully close the back cover for the printer to properly work.
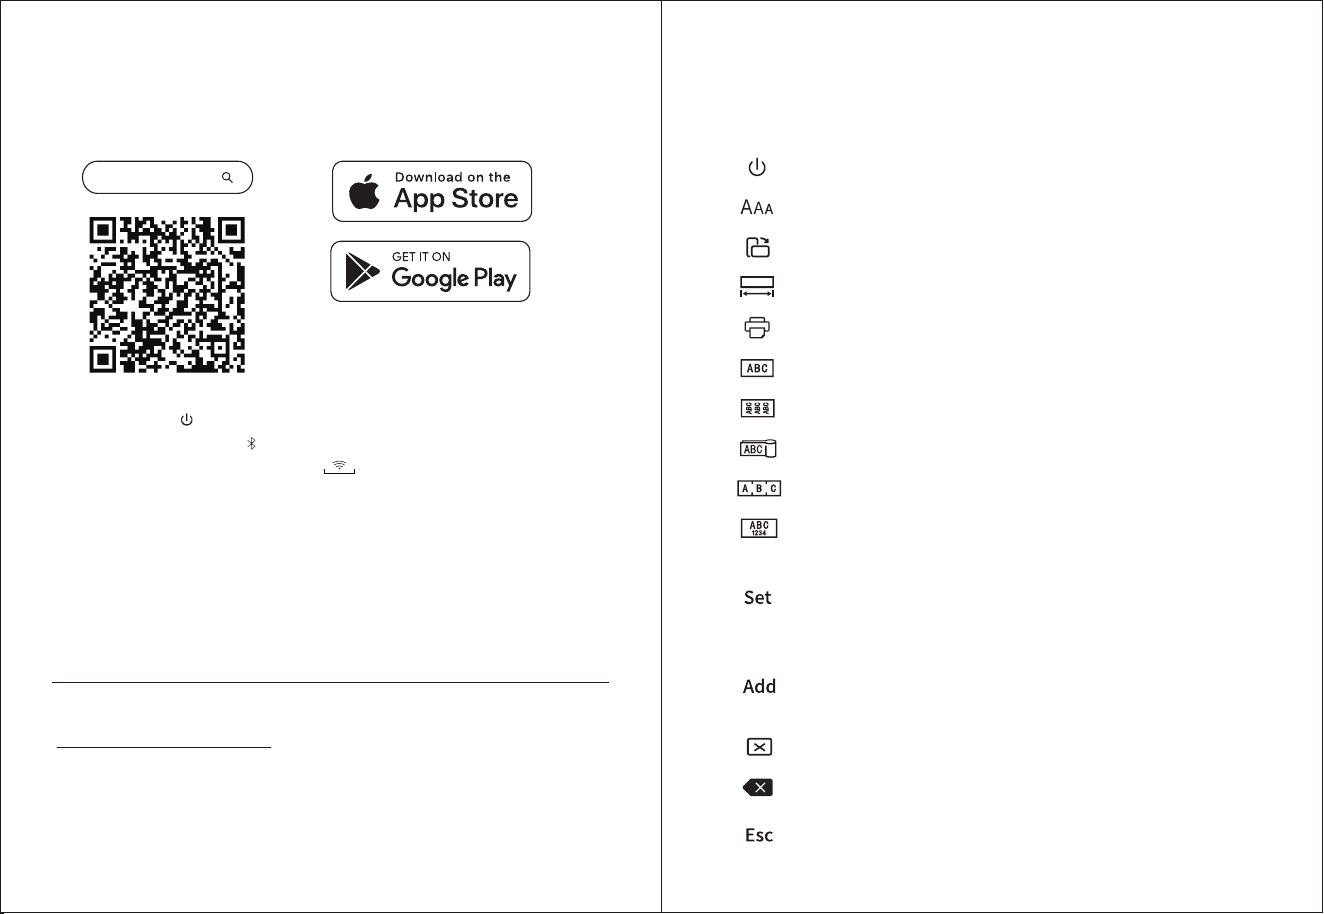
Label Size:
Width x Length (mm). If the length is shown as [L], the
current label tape is a continuous label tape, while the length of a
single label will be set automatically according to the content
inputted. To manually set the length, press .
Line Indicator: Indicates the line of text on the current label being
edited. Two lines of text can be entered on a single label.
Case Indicator:
Indicates capital letter or lower case letter input.
Press [A/a] to shift between upper and lower cases.
Bluetooth Indicator: Indicates Bluetooth is turned on, ready to
connect to your smartphone and use with the “SUPRINT” App.
Press [Fn], then press to enter Bluetooth setting.
Language Indicator:
Press [Fn] - [Lng] to change system language.
Editing Format Indicator: In wrap-around label, flag label, terminal
block label, and two size label editing mode, a diagram that
indicates the current editing format will appear at here. In general
label mode, no content will be displayed.
1/1 12*30
I
EN
Label Size
Battery Level /
Charging Status
Input Text
Language
Indicator
Line
Indicator
Bluetooth Indicator
1
Editing Format
Indicator
A
Case
Indicator
Current Label / Total Labels in Current File
When use, if label paper does
not automatically roll out when
print, please manually roll the
tape to feed paper onto the
print head. It will then roll
automatically.
To manually roll the label tape, turn
to the other side of the cassette,
rotate the green roller clockwise. The
label paper will start to feed into the
paper exit of the cassette. Push the
cassette in and try print again.
When not in use for a long time, please still keep the label tape
inside the printer. This is to prevent the rubber roller (on top left
from adhering onto the ceramic print head. If the rubber roller
got stuck onto the print head, please gently pry it loose, before
installing the label tape cassette back in.
Long press to turn the printer on / Press to turn off.
Set character size. Automatic / specified.
Switch between horizontal / vertical label editing.
Set the label length. Automatic / Specified.
Press to enter print setting, press again to print.
General label mode.
Wrap-around label mode.
Flag label mode.
Terminal block label mode.
Two size mode: edit two lines in different sizes.
Settings for length, character size, font, alighment,
style, frame, orientation, cutting mode, spacing,
density, margins, save files, backlit, underline,
factory reset, and Fn keys customization.
Add new label with the format of the last label.
Cannot add new label if the current input content is
empty.
Delete all.
Backspace / Long press to delete current line.
Cancel the current setting or content / Back to
previous menu.
Keys
Smartphone App & PC Software
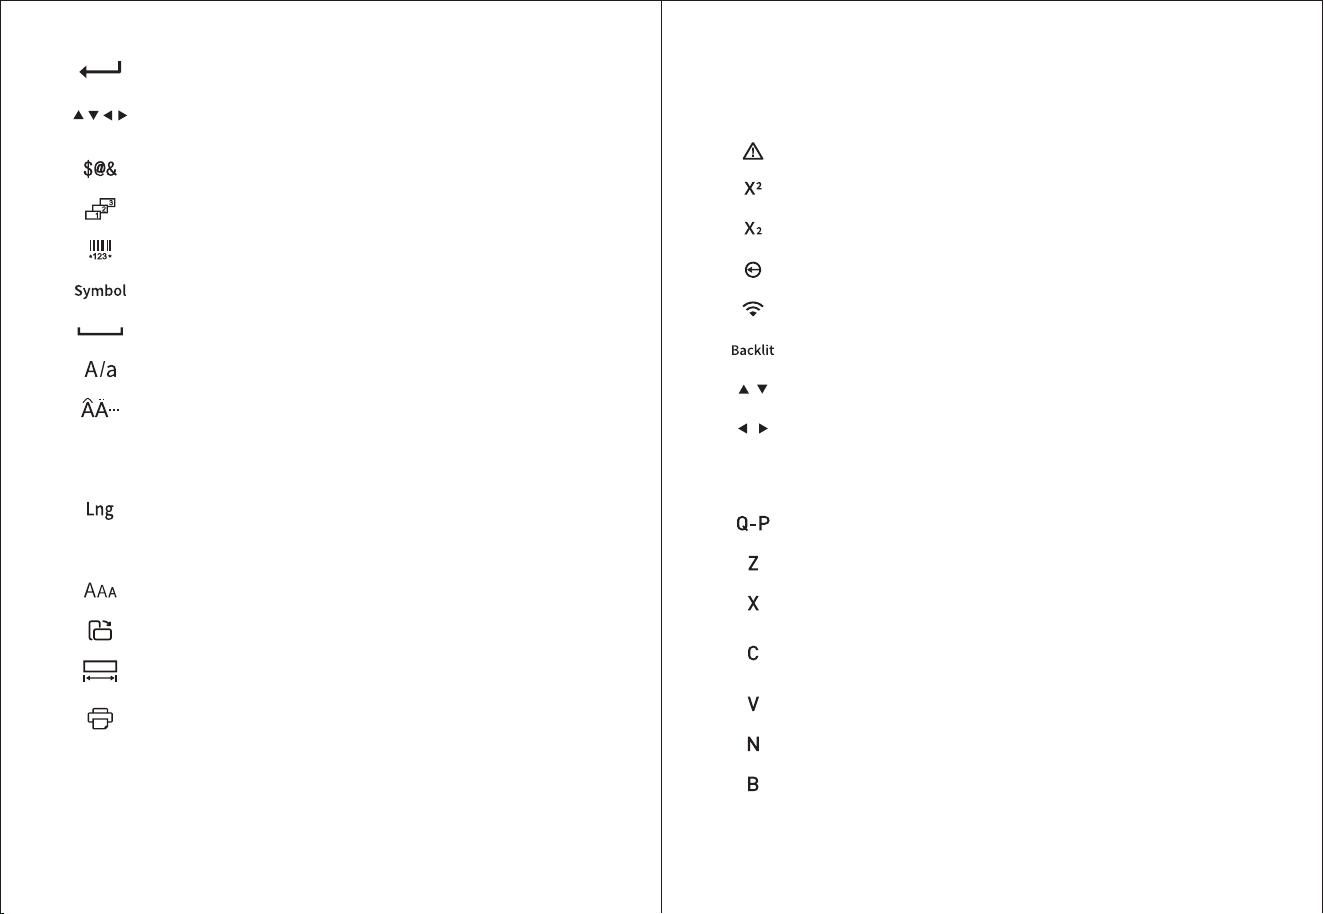
Search for the “SUPRINT” App,
or scan the QR Code on the left.
SUPRINT
1. Long press to turn on the label maker with Bluetooth on.
(The Bluetooth sign should appear on the top of the screen.
If not, please press [Fn] and to enter Bluetooth settings.)
2. Turn on the Bluetooth on your smartphone.
3. Download and open the App on your smartphone.
4. Click “Connect Printer” and search for G25M to connect.
(Android phones: If asked for location information permission,
please allow the App to access the location information of the
smartphone. This is only for the App to connect to the label
printer. Otherwise the Bluetooth connection may not function.)
Download the PC Editing Software at:
us.supvan.com/download (Windows & MacOS)
Use the USB-C Cable to connect the printer to your computer.
For batch printing, you may import excel file into the App or the
PC Software to print a set of labels in a single click.
5 6
Enter to confirm / Return to start next line.
Move the cursor Up / Down / Left / Right. Long
press Up / Down to switch between labels or sides.
Symbols.
Auto-add sequence numbers.
Add barcode & QR-code.
Graphical symbols.
Blank space.
Switch between upper and lower case input.
Press to add accent mark to the inputted letter
Change system language.
Enter the symbols shown on the keyboard.
Set the horizontal space between characters.
Switch between normal and bold font.
Choose frames.
Cursor printing: print current label only.
Range printing: set start and end labels.
Move to previous label.
Move to next label.
Set cutting mode.
Back to general label mode.
Set alignment.
Electrical signs.
Add superscript.
Add subscript.
Arrow symbols.
Bluetooth functions.
Turn backlight on/off.
Move to the beginning/end of the file.
Move to the beginning/end of the label.
Hold [Fn], and press these keys
In Set - Customize, customize shortcut functions.
Adjust LCD Display contrast.
Adjust LCD Display brightness.
Copy all characters in current line (Cannot copy
sequence number and barcode).
Paste the copied characters.
Display the usage information of current label tape.
Set Auto-shutdown.
7 8
Press [Fn], and press these keys
0-9, A-Z
Prev.
Next
Cut
Exit
Align
Features Troubleshooting
Thermal transfer printing technology
High clarity prints. Long term preservation.
Precise label positioning
Automatically detect the label paper position when printing
job starts. Precisely retract the paper to the standby position
and avoid wasting.
Auto-recognize label paper
The printer will auto-recognize the label paper specification
and enter the corresponding editing mode.
In-printer memory
After the last printing, the device will store the edited
information.You may repeat the last printing job, or start batch
printing, by simply press print button to quick print.
Multiple labels printing
Edit and print multiple labels in a single job.
Various types of label
Use with continuous label, die-cut label, tag, plate, wire label,
wrap-around label, heat-shrink tube, etc.
Prompt
Low battery
Label not
identified,
please re-install
Label error
Check label status
Printing failure /
Device check
overtime
Status
Prints blurred
Label installed, the
printer does not
identify it
Printer not running
No label comes out
Print from App, the
printer does not
respond
Fault
Low battery
Non-original
manufacturer
product /
Label not
installed properly
Out of labels
Label jam
App not
recognizing the
printer
Solution
Charge
Replace label /
Re-install label
Replace label tape
Re-install label
Restart the App
and the printer,
then reconnect
Print Head Maintenance
Turn off the printer, open the back cover and take out the label
tape. The print head is on the metal plate next to the paper exit.
Use a cloth or cotton swab with ethanol alcohol, wipe the print
head gently. Wait for it to completely dry before turn on.
If you see blank gaps on the prints, it may be stain on the print
head, please follow the instruction above to clean it.
Max. Print Length
It is advised to not print out more than 7m or a full cassette of
label in a single print job.
Battery
If not used for a long time, please charge the printer every 3
months to avoid the natural loss of lithium battery.
9 10
Please carefully read this manual
before use the product.
Please keep this product and its
accessories away from children,
to avoid potential danger.
Do not disassemble the printer if
you are not an authorized service
person; Do not open the cover
when the printer is printing;
Please use SUPVAN’s factory
original products and consum-
ables, otherwise may result in
bad printing quality or damage to
the printer.
Do not pull the label forcibly during the printing process, to
avoid damage to the printer;
This product is a precision product, please use on a plain
surface, avoid fall and other impacts.
The print head of this product is a precision part. Do not
scratch it to avoid affecting the printing function;
Do not throw the printer into fire or high temperature;
Please use a single power socket, instead of multiple sockets
with multiple devices plugged in, which may cause fire or
electric shock;
Please do not use an adapter that does not support DC 5V
output;
When charging, do not let printer / power supply / power
socket to be in contact with water, and do not plug or unplug
the power with wet hands, to prevent electric shock;
Please do not let metal or liquid enter the equipment, to
prevent fire or electric shock, or damage to the internal parts
and the printer;
Please use the printer in a clean environment. Do not use it on
rug or blanket, or dusts may cause short circuit.
Please keep the printer away from flammable solutions such
as alcohol or gasoline, and away from fire to avoid explosion
and fire hazards.
Please do not touch the print head with your hand. If you
touch it at the end of the printer, it may cause skin burns;
Please do not press the printer;
The printer and label paper supplies should be stored in a
room temperature, dry, ventilated place without direct
sunlight.
If peculiar smell or sound is detected when using the printer,
please turn it off immediately and contact the seller.
After long period of working, the lithium battery may generate
heat and diffuse on the bottom side of the printer. This is
normal. You may pause the printer and wait it to cool to
resume normal work.
Safety Information
11 12

Any Changes expressly or modifications not approved by the
party responsible for compliance could void the user's
authority to operate the equipment.
This device complies with part 15 of the FCC Rules. Operation
is subject to the following two conditions: (1) This device may
not cause harmful interference,and (2) this device must
accept any interference received, including interference that
may cause undesired operation.
Note: This equipment has been tested and found to comply
with the limits for a Class B digital device, pursuant to part 15
of the FCC Rules. These limits are designed to provide
reasonable protection against harmful interference in a
residential installation. This equipment generates, uses and
can radiate radio frequency energy and, if not installed and
used in accordance with the instructions, may cause harmful
interference to radio communications. However, there is no
guarantee that interference will not occur in a particular
installation.
If this equipment does cause harmful interference to radio or
television reception, which can be determined by turning the
equipment off and on, the user is encouraged to try to correct
the interference by one or more of the following measures:
—Reorient or relocate the receiving antenna.
—Increase the separation between the equipment and
receiver.
—Connect the equipment into an outlet on a circuit different
from that to which the receiver is connected.
—Consult the dealer or an experienced radio/TV technician
for help.
FCC Radiation Exposure Statement
This equipment complies with FCC radiation exposure limits
set forth for an uncontrolled environment .This transmitter
must not be co-located or operating in conjunction with any
other antenna or transmitter.
FCC Warning
13 14

ISEDC RSS warning
This device complies with Innovation, Science and Economic
Development Canada Compliance licence-exempt RSS
standard(s). Operation is subject to the following two
conditions: (1) this device may not cause interference, and (2)
this device must accept any interference, including interfer-
ence that may cause undesired operation of the device.
Le présent appareil est conforme aux CNR d'Innovation,
Sciences et Développement économique Canada applicables
aux appareils radio exempts de licence. L'exploitation est
autorisée aux deux conditions suivantes: (1) l'appareil ne doit
pas produire de brouillage, et (2) l'utilisateur de l'appareil
doit accepter tout brouillage radioélectrique subi, même si le
brouillage est susceptible d'en compromettre le fonctionne-
ment.
ISEDC Radiation Exposure Statement
This equipment complies with ISEDC RF radiation exposure
limits set forth for an uncontrolled environment. This
transmitter must not be co-located or operating in conjunc-
tion with any other antenna or transmitter.
IC exposition aux radiations
Cet équipement est conforme aux limites d’exposition aux
rayonnements RF de l’ISEDC établies pour un environnement
non contrôlé. Cet émetteur ne doit pas être co-localisés ou
fonctionner en conjonction avec une autre antenne ou
émetteur.
IC Warning
15 16
Print Head Maintenance
Turn off the printer, open the back cover and take out the label
tape. The print head is on the metal plate next to the paper exit.
Use a cloth or cotton swab with ethanol alcohol, wipe the print
head gently. Wait for it to completely dry before turn on.
If you see blank gaps on the prints, it may be stain on the print
head, please follow the instruction above to clean it.
Max. Print Length
It is advised to not print out more than 7m or a full cassette of
label in a single print job.
Battery
If not used for a long time, please charge the printer every 3
months to avoid the natural loss of lithium battery.
Warranty
Disclaimer
Specifications
Name:
Model:
Printing Method:
Resolution:
Label Width:
Max. Effective Printing Width:
Print Speed:
Battery Capacity:
Product Dimension:
Product Weight:
Data Transfer:
Power Supply:
Working Environment:
Storage Environment:
Working Humidity:
Storage Humidity:
Label Printer
G25M
Thermal transfer
300 dpi
6 mm ~ 27 mm
24 mm
30 mm/s (paper labels)
2000mAh
210 mm x 115 mm x 63 mm
600 g
Bluetooth 4.2 / USB 2.0
5V⎓2A(USB-C), 9V⎓2.5A(AC Adapter)
5℃ ~ 40℃
-10℃ ~ 55℃
20% ~ 90% No frost
20% ~ 90% No frost
Beginning from the date of purchase, 3 months warranty on
the print head or total print length of 30 km, whichever comes
first; 12 months warranty on the other parts.
The warranty of newly serviced parts is subject to the
warranty of the whole device.
No warranty on the label consumables. If there is a quality
problem, they can be replaced free of charge.
SUPVAN will not be responsible for any consequences caused
by:
- Failure to operate the device according to the
instructions and safety warnings listed in this manual.
- Use of non-SUPVAN factory’s consumables.
- Unauthorized disassemble, service, or customization
to the product.
- Malfunctions caused by abnormal voltage or improper
operating environment.
- Damage caused by fall, press, water, moisture, or any
human actions.
- Damage caused by force majeure such as flood, fire, or
lightning strike.
- Uses other than the designed uses of this printer.
SUPVAN reserves the right to change the contents of this
manual due to product upgrading.
The non-SUPVAN trademarks and symbols included in this
manual are owned by other companies.
17 18
SchnittstelleninformationenInstallieren Sie das Etikettenband
19 20
Etikettengröße: Breite x Länge (mm). Wenn die Länge als [L]
angezeigt wird, ist das aktuelle Etikettenband ein Endlosband,
während die Länge eines einzelnen Etiketts automatisch entsprech-
end dem eingegebenen Inhalt eingestellt wird. Um die Länge
manuell einzustellen, drücken Sie .
Zeilenanzeige: Zeigt die Textzeile auf dem aktuell bearbeiteten
Etikett an. Auf einem einzelnen Etikett kännen zwei Textzeilen
eingegeben werden.
Groß-/Kleinschreibung: Zeigt die Eingabe von Groß- oder Kleinbuch-
staben an. Drücken Sie [A/a], um zwischen Groß- und Kleinschrei-
bung zu wechseln.
Bluetooth-Anzeige: Zeigt an, dass Bluetooth eingeschaltet ist, bereit
ist, eine Verbindung zu Ihrem Smartphone herzustellen und mit der
„Katasymbol“-App zu verwenden. Drücken Sie [Fn] und dann ,
um die Bluetooth-Einstellung aufzurufen.
Sprache: Drücken Sie [Fn] – [Lng], um die Systemsprache zu ändern.
Formatbearbeitungsanzeige: Im Bearbeitungsmodus für Wickele-
tiketten, Fähnchenetiketten, Klemmenetiketten und Etiketten mit
zwei Größen wird hier ein Diagramm angezeigt, das das aktuelle
Bearbeitungsformat kennzeichnet. Im normalen Etikettenmodus
wird kein Inhalt angezeigt.
Ziehen Sie die Rückabdeckung
auf und schieben Sie die
Schriftbandkassette ganz hinein.
Bitte schließen Sie die Rückabdeckung vollständig, damit der
Drucker ordnungsgemäß funktioniert.
Bei der Verwendung, falls das
Etikettenband beim Drucken
nicht automatisch weiterläuft,
drehen Sie das Band bitte von
Hand, um es bis zum Druckkopf
zu führen. Anschließend läuft
es automatisch weiter.
Um das Etikettenband manuell weiter-
zudrehen, wenden Sie die Kassette auf die
andere Seite und drehen Sie die grüne
Walze im Uhrzeigersinn. Das Etikettenband
wird dann in die Bandausgabe der Kassette
eingezogen. Setzen Sie die Kassette wieder
ein und versuchen Sie erneut zu drucken.
Wenn das Gerät längere Zeit nicht benutzt wird, lassen Sie das
Etikettenband bitte trotzdem im Drucker eingelegt. Dies verhindert,
dass die Gummiwalze (oben links) am Keramik-Druckkopf haftet.
Falls die Gummiwalze am Druckkopf festklebt, lösen Sie sie
vorsichtig, bevor Sie die Schriftbandkassette wieder einsetzen.
1/1 12*30
I
EN
Etikettengröße
Batteriestand /
Ladestatus
Eingabetext
Sprachanzeige
Zeilenanzeige
Bluetooth-Anzeige
1
Formatbearbeitung-
sanzeige
A
Groß-/Kleinschrei-
bungsanzeige
Aktuelles Etikett / Alle bearbeitete Etiketten
Smartphone-App & PC-Software
1. Drücken Sie lange auf , um den Etikettendrucker bei eingeschalte-
tem Bluetooth einzuschalten.
(Das Bluetooth-Zeichen sollte oben auf dem Bildschirm angezeigt
werden. Wenn nicht, drücken Sie bitte [Fn] und , um die
Bluetooth-Einstellungen aufzurufen.)
2. Schalten Sie das Bluetooth auf Ihrem Smartphone ein.
3. Laden Sie die App herunter und öffnen Sie sie auf Ihrem Smartphone.
4. Klicken Sie auf „Drucker hinzufügen“ und suchen Sie nach G25M, um
die Verbindung herzustellen.
(Android-Smartphones: Wenn Sie zur Erteilung einer Standortfreigabe
aufgefordert werden, erlauben Sie der App bitte den Zugriff auf die
Standortinformationen des Smartphones. Dies dient ausschließlich der
Verbindung der App mit dem Etikettendrucker. Andernfalls funktioniert
die Bluetooth-Verbindung möglicherweise nicht.)
Laden Sie die PC-Bearbeitungssoftware unter:
us.supvan.com/download (Windows & MacOS)
Verwenden Sie das USB-C-Kabel, um den Drucker mit Ihrem Computer
zu verbinden.
Für den Seriendruck können Sie eine Excel-Datei in die App oder die
PC-Software importieren, um eine Reihe von Etiketten mit einem
einzigen Klick zu drucken.
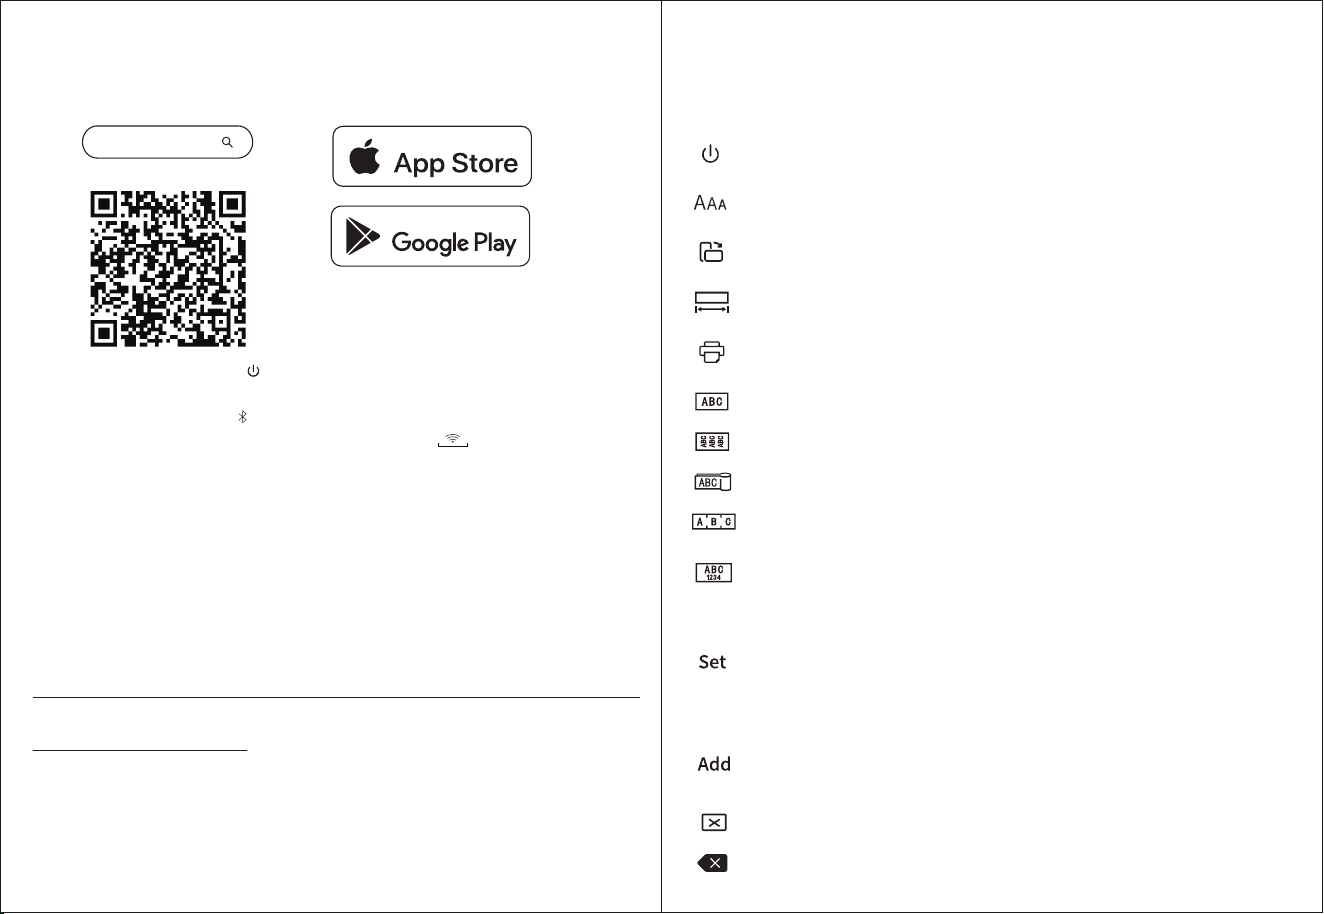
Suchen Sie nach der App „SUPRINT“
oder scannen Sie den QR-Code
auf der linken Seite.
SUPRINT
Laden im
JETZT BEI
Lange drücken, um den Drucker einzuschalten / Drücken, um
ihn auszuschalten.
Die Zeichengröße festlegen. Automatisch / Spezifiziert.
Wechseln Sie zwischen horizontaler / vertikaler Etikettenbear-
beitung.
Die Etikettenlänge festlegen. Automatisch / Spezifiziert.
Drücken Sie, um die Druckeinstellung aufzurufen, und drücken
erneut, um zu drucken.
Allgemeiner Etikettenmodus.
Wickeletikettenmodus.
Flaggenetikettenmodus.
Etikettenmodus für Kabelkennzeichnungen.
Zwei-Größen-Modus: Bearbeiten von zwei Zeilen in unter-
schiedlichen Größen.
Einstellungen für Länge, Zeichengröße, Schriftart, Ausrich-
tung, Stil, Rahmen, Ausrichtung/Orientierung, Schneidemodus,
Abstand, Dichte, Ränder, Dateispeicherung, Hintergrundbe-
leuchtung, Unterstreichung, Werkseinstellungen und Fn-Tas-
ten-Anpassung.
Fügen Sie ein neues Etikett mit dem Format des letzten
Etiketts hinzu. Es kann keine neue Beschriftung hinzugefügt
werden, wenn der aktuelle Eingabeinhalt leer ist.
Alles löschen.
Rücktaste / Lange drücken, um die aktuelle Zeile zu löschen.
Tasten
21 22
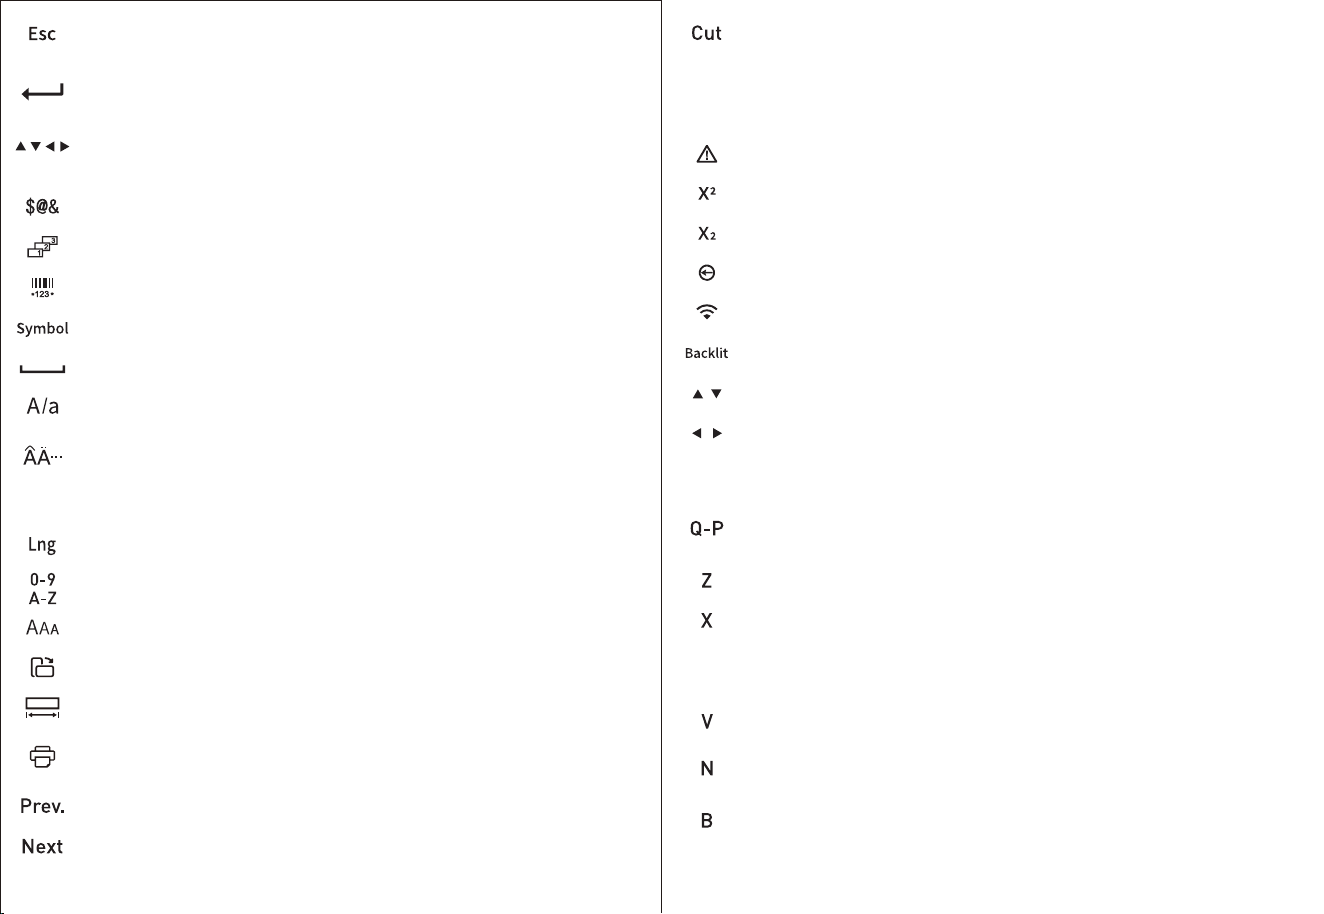
Abbrechen der aktuellen Einstellung oder Inhalt / Zurück zum
vorherigen Menü.
Enter zum Bestätigen / Return zum Starten der nächsten Zeile.
Bewegen Sie den Cursor nach oben / unten / links / rechts. Langes
Drücken nach oben / unten, um zwischen den Etiketten zu
wechseln.
Symbole.
Sequenznummern automatisch hinzufügen.
Den Barcode und QR-Code hinzufügen.
Grafische Symbole.
Leerzeichen.
Die Eingabe zwischen Groß- und Kleinbuchstaben umschalten.
Drücken Sie, um dem eingegebenen Buchstaben ein Akzentze-
ichen hinzuzufügen.
Systemsprache ändern
Geben Sie die auf der Tastatur angezeigten Symbole ein.
Legen Sie den horizontalen Abstand zwischen den Zeichen fest.
Wechseln Sie Zwischen normaler und fetter Schrift.
Wählen Sie Rahmen.
Cursordruck: Druckt nur das aktuelle Etikett.
Bereichsdruck: Legen Sie Start- und Endetiketten fest.
Zum vorherigen Etikett wechseln.
Zum nächsten Etikett wechseln.
Drücken Sie [Fn] und drücken Sie diese Tasten
23 24
Schneidemodus einstellen.
Zurück zum allgemeinen Etikettenmodus.
Ausrichtung einstellen.
Elektrische Zeichen.
Hochgestellt hinzufügen.
Index hinzufügen.
Pfeilsymbole.
Bluetooth-Funktionen.
Hintergrundbeleuchtung ein- / ausschalten.
Gehen Sie zum Anfang/Ende der Datei.
Gehen Sie zum Anfang / Ende des Etiketts.
Halten Sie [Fn] gedrückt und drücken Sie diese Tasten
Unter Festlegen - Anpassen passen Sie Verknüpfungsfunktionen
an.
Stellen Sie den Kontrast des LCD-Displays ein.
Stellen Sie die Helligkeit des LCD-Displays ein.
Kopiert alle Zeichen in der aktuellen Zeile (Die Sequenznummer
und der Barcode können nicht kopiert werden).
Fügen Sie die kopierten Zeichen ein.
Zeigt die Nutzungsinformationen des aktuellen Etikettenbands
an.
Automatische Abschaltung einstellen.
C
Exit
Align
Besonderheiten Fehlerbehebung
Thermotransferdrucktechnologie
Drucke mit hoher Klarheit. Langzeitkonservierung.
Präzise Etikettenpositionierung
Erkennt automatisch die Position des Etikettenpapiers, wenn
der Druckauftrag gestartet wird.
Ziehen Sie das Band präzise in die Standby-Position zurück
und vermeiden Sie Verschwendung.
Etikettenband automatisch erkennen
Der Drucker erkennt die Spezifikation des Etikettenbands
automatisch und wechselt in den entsprechenden Bearbeit-
ungsmodus.
Speicher im Drucker
Nach dem letzten Druck speichert das Gerät die bearbeiteten
Informationen. Sie können den letzten Druckauftrag wieder-
holen, oder starten Sie den Stapeldruck, indem Sie einfach die
Drucktaste drücken, um schnell zu drucken.
Drucken mehrerer Etiketten
Sie können mehr als ein Etikett in einem einzigen Auftrag
Bearbeiten und drucken.
Verschiedene Arten von Etiketten
Verwendbar mit Endlosetiketten, gestanzten Etiketten,
Anhängern, Schildern, Kabeletiketten, Wickeletiketten,
Schrumpfschläuchen usw.
Hinweise
Schwache
Batterie
Das Etikett nicht
identifiziert, bitte
neu installieren
Etikettenfehler
Den Etikettensta-
tus überprüfen
Druckfehler /
Überstunden bei
der Geräteprüfung
Status
Die gedruckte Zeichen
verschwommen
Das Etikett installiert,
der Drucker
identifiziert es nicht
Der Drucker läuft
nicht.
Es kommt kein Etikett
heraus.
Der App steuert den
Druck und der
Drucker reagiert
nicht.
Fehler
Schwache
Batterie
Nicht originales
Herstellerpro-
dukt / Das Etikett
nicht ordnungs-
gemß installiert
Kein Band mehr
Etikettenstau
Die App erkennt
den Drucker
nicht.
Lösung
Aufladen
Das Etikett
ersetzen / Das
Etikett neu
installieren
Etikettenband
ersetzen
Etikettband erneut
einlegen
Die App und den
Drucker neu
starten und die
Verbindung dann
erneut herstellen.
Wartung des Druckkopfs
Schalten Sie den Drucker aus, öffnen Sie die hintere Abdeck-
ung und nehmen Sie die Etikettenkassette heraus.
Wischen Sie den Druckkopf 1-2 Minuten lang vorsichtig mit
einem Tuch oder Wattestäbchen mit Ethanolalkohol ab.
Warten Sie, bis es vollständig getrocknet ist, bevor Sie den
Drucker einschalten.
Wenn Sie leere Lücken auf den Drucken sehen, kann es sich
um Flecken auf dem Druckkopf handeln. Befolgen Sie bitte die
obigen Anweisungen, um ihn zu reinigen.
Batterie
Wenn Sie den Drucker längere Zeit nicht benutzen, laden Sie
ihn bitte alle 3 Monate auf, um den natürlichen Verlust der
Lithiumbatterie zu vermeiden.
25 26
Bitte lesen Sie dieses Handbuch
sorgfältig durch, bevor Sie das
Produkt verwenden.
Bitte halten Sie dieses Produkt
und sein Zubehör von Kindern
fern, um potenzielle Gefahren zu
vermeiden.
Zerlegen Sie den Drucker nicht,
wenn Sie kein autorisierter
Servicetechniker sind. Öffnen Sie
die Abdeckung nicht, wenn der
Drucker druckt.
Bitte verwenden Sie die Originalprodukte und Verbrauchsma-
terialien von SUPVAN. Andernfalls kann dies zu einer
schlechten Druckqualität oder Beschädigung des Druckers
führen.
Ziehen Sie während des Druckvorgangs nicht gewaltsam am
Etikett, um Schäden am Drucker zu vermeiden.
Dieses Produkt ist ein Präzisionsprodukt, bitte auf einer
ebenen Fläche verwenden, Stürze und andere Stöße
vermeiden.
Der Druckkopf dieses Produkts ist ein Präzisionsteil.
Zerkratzen Sie den Druckkopf nicht, um die Druckfunktion
nicht zu beeinträchtigen.
Werfen Sie den Drucker nicht ins Feuer oder stellen Sie ihn
nicht in eine Umgebung mit hohen Temperaturen.
Bitte verwenden Sie eine einzelne Steckdose anstelle von
Mehrfachsteckdosen mit mehreren angeschlossenen
Geräten, da dies zu Bränden oder Stromschlägen führen
kann.
Bitte verwenden Sie keinen Adapter, der keinen 5V DC
Ausgang unterstützt.
Lassen Sie den Drucker / das Netzteil / die Steckdose
während des Ladevorgangs nicht mit Wasser in Berührung
kommen und stecken oder trennen Sie den Netzstecker nicht
mit nassen Händen, um einen Stromschlag zu vermeiden.
Bitte lassen Sie kein Metall oder Flüssigkeit in das Gerät
eindringen, um Feuer oder Stromschlag oder Schäden an den
Innenteilen und dem Drucker zu vermeiden.
Bitte verwenden Sie den Drucker in einer sauberen Umge-
bung. Verwenden Sie den Drucker nicht auf Teppichen oder
Decken, da sonst Staub einen Kurzschluss verursachen kann.
Bitte halten Sie den Drucker von brennbaren Lösungen wie
Alkohol oder Benzin und von Feuer fern, um Explosions- und
Brandgefahren zu vermeiden
Bitte berühren Sie den Druckkopf nicht mit der Hand. Wenn
Sie ihn am Ende des Druckers berühren, kann es zu Hautver-
brennungen kommen
Bitte drücken Sie nicht auf den Drucker.
Drucker und Zubehör (Etikettenbänder) sollten an einem
trockenen, belüfteten Ort mit Raumtemperatur und ohne
direkte Sonneneinstrahlung gelagert werden.
Wenn bei der Verwendung des Druckers ein eigenartiger
Geruch oder Geräusch festgestellt wird, schalten Sie ihn bitte
sofort aus und wenden Sie sich an den Verkäufer.
Nach längerer Arbeitszeit kann die Lithiumbatterie Wärme
erzeugen und auf der Unterseite des Druckers diffundieren.
Das ist normal. Sie können den Drucker anhalten und warten,
bis er abgekühlt ist, um die normale Arbeit fortzusetzen.
Sicherheitsinformationen
27 28
W
ARNUNG

Garantie
Haftungsausschluss
Produktspezifikation
Name:
Modell:
Druckverfahren:
Auflösung:
Etikettenbreite:
Max. Effektive Druckbreite:
Druckgeschwindigkeit:
Batteriekapazität:
Produktabmessung:
Produktgewicht:
Datenübertragung
Stromversorgung:
Arbeitsumgebung:
Speicherumgebung:
Arbeitsfeuchtigkeit:
Luftfeuchtigkeit bei Lagerung:
Etikettendrucker
G25M
Thermotransfer
300 dpi
6 mm ~ 27 mm
24 mm
30 mm/s (Papieretiketten)
2000mAh
190 mm x 99 mm x 53 mm
600 g
Bluetooth 4.2 / USB 2.0
5V⎓2A(USB-C), 9V⎓2.5A(AC-Adapter)
5℃ ~ 40℃
-10℃ ~ 55℃
20% ~ 90% kein Frost
20% ~ 90% kein Frost
Ab Kaufdatum 3 Monate Garantie auf den Druckkopf oder eine
Gesamtdrucklänge von 30 km, je nachdem, was zuerst eintritt;
12 Monate Garantie auf die anderen Teile.
Die Garantie für neu gewartete Teile unterliegt der Garantie
des gesamten Geräts.
Keine Garantie auf die Etikettenverbrauchsmaterialien. Wenn
es ein Qualitätsproblem gibt, können sie kostenlos ersetzt
werden.
SUPVAN haftet nicht für Folgen, die durch Folgendes verur-
sacht werden:
- Nichtbeachtung des Geräts gemäß den in diesem Handbuch
aufgeführten Anweisungen und Sicherheitshinweisen;
- Verwendung von Verbrauchsmaterialien, die nicht von
SUPVAN stammen;
- Nicht autorisierte Demontage, Wartung oder Anpassung
des products;
- Fehlfunktionen, die durch abnormale Spannung oder
unsachgemäße Betriebsumgebung verursacht werden;
- Schäden durch Sturz, Presse, Wasser, Feuchtigkeit oder
menschliche Handlungen;
- Schäden durch höhere Gewalt wie Überschwemmung,
Feuer oder Blitzschlag;
- alle anderen Verwendungen, die zu Designzwecken dieses
Druckers nicht passen.
SUPVAN behält sich das Recht vor, den Inhalt dieses Hand-
buchs aufgrund von Produktverbesserungen zu ändern.
Die in diesem Handbuch enthaltenen Nicht-SUPVAN-Marken
und -Symbole sind Eigentum anderer Unternehmen.
29 30
Max. Drucklänge
Es wird empfohlen, nicht mehr als 7 m oder eine volle Rolle
Etikettenband in einem einzigen Druckauftrag auszudrucken.